adobe illustrator how to guide
TRANSCRIPT
1
Adobe Illustrator How To Guide Creating a film poster
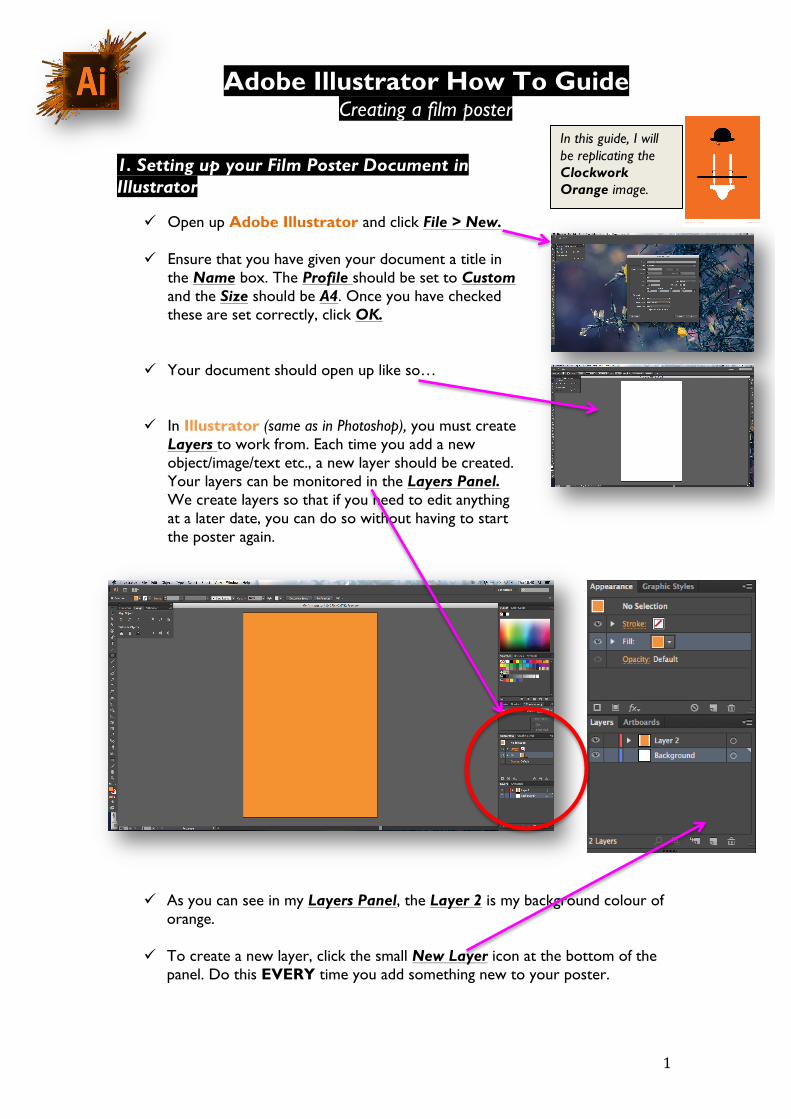
ü Open up Adobe Illustrator and click File > New.
ü Ensure that you have given your document a title in the Name box. The Profile should be set to Custom and the Size should be A4. Once you have checked these are set correctly, click OK.
ü Your document should open up like so…
ü In Illustrator (same as in Photoshop), you must create Layers to work from. Each time you add a new object/image/text etc., a new layer should be created. Your layers can be monitored in the Layers Panel. We create layers so that if you need to edit anything at a later date, you can do so without having to start the poster again.
ü As you can see in my Layers Panel, the Layer 2 is my background colour of orange.
ü To create a new layer, click the small New Layer icon at the bottom of the panel. Do this EVERY time you add something new to your poster.
In this guide, I will be replicating the Clockwork Orange image.
1. Setting up your Film Poster Document in Illustrator

2
Whether you are importing a new image or simply just changing the background colour, here are the steps to do so:
ü To import a new background image, simply click File > Place and then select the image from your folder. Once this has been imported you can position it accordingly on to your document.
ü To change the background colour, create a New Layer and then select the Rectangle Tool.
ü Select the background colour from the colour
picker at the bottom of the toolbar.
ü Now draw out the rectangle to cover the background. This will leave you with your colour choice.
ü Once you have drawn out the background, click back on to the Arrow Tool at the tope of the toolbar otherwise you will continue to draw rectangles!
2. Changing your background

3
ü After selecting a New Layer, I will now start to draw my objects; I
want to create the hat of the character from the poster so I will do this by combining shapes.
ü First, I will select the Ellipse Tool (hold down the shape button to select your shape choice) and will change this to black using the Colour Pallette.
ü As you can see below, I have used the Ellipse tool and the Rounded Rectangle Tool on top of one another to replicate the hat, however, these are two separate shapes, which we need to group/merge.
ü To merge the shapes, click on to the Arrow Tool at the top of the toolbar and select both shapes whilst holding down the Shift key.
ü Then, on the Pathfinder Panel, click the icon that says Unite. Your shapes will now be made in to one.
3. Creating shapes
4
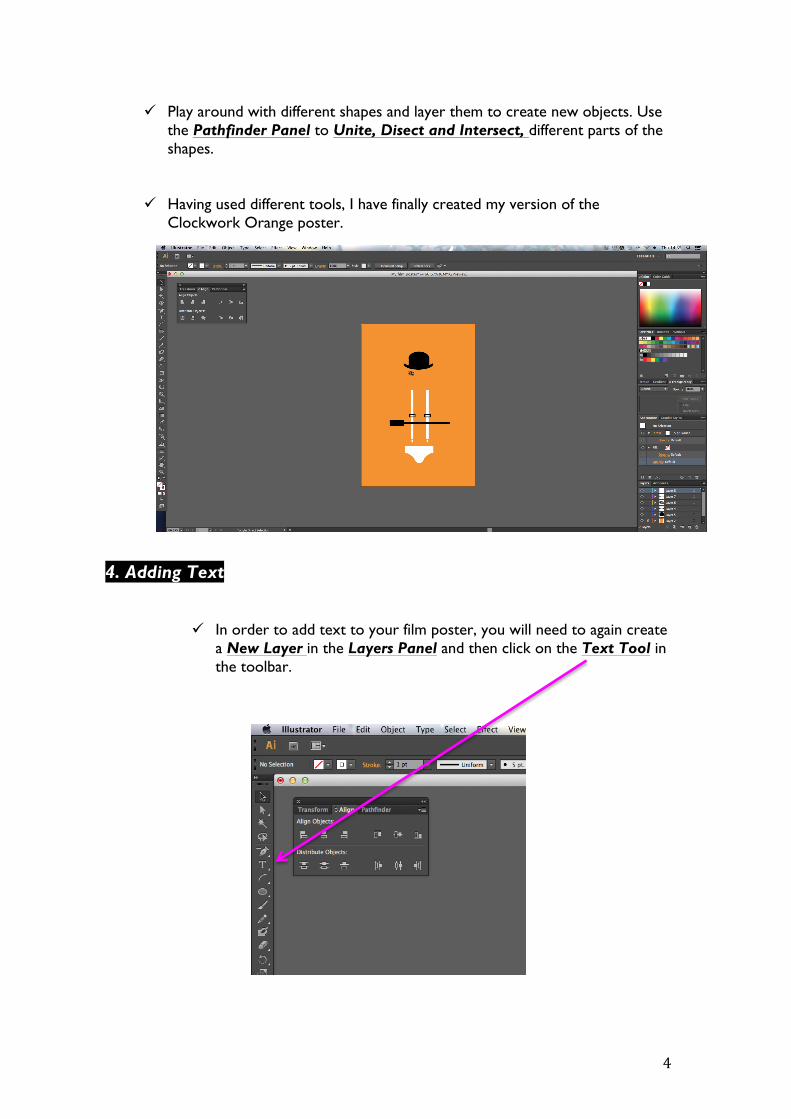
ü Play around with different shapes and layer them to create new objects. Use the Pathfinder Panel to Unite, Disect and Intersect, different parts of the shapes.
ü Having used different tools, I have finally created my version of the Clockwork Orange poster.
ü In order to add text to your film poster, you will need to again create a New Layer in the Layers Panel and then click on the Text Tool in the toolbar.
4. Adding Text

5
ü Draw a text box in the area that you would like your text and then
begin typing. You can change the sizing, colour and font of the text on the horizontal top toolbar.
ü To add an effect to the text, click back on to the Arrow Tool and
then click the text box, the go to Effect. There is a range of different effects to pick from so have a play around and see which one you like the look of. I went for the Drop Shadow effect so that my text now has a subtle shadow and helps it stand out.

6
If you have not yet finished your film poster and would like to edit it at a later date, then it is very important to follow these steps otherwise you may accidently create a file that cannot later be edited:
.
5. Saving your image
Saving a final version of your poster
Alternatively, if you have completely finished, and would like to save you image to be printed or emailed, then go to File > Export and then save it in the format PNG.
Saving the document to go back and edit at a later date Go to File > Save As Find the correct location you would like to save the document in. Give it a valid name and then where it says Format, you must save it as an Illustrator EPS file.