adobe marketing cloud best practices …® marketing cloud best practices implementing adobe target...
TRANSCRIPT
Adobe® Marketing Cloud
Best Practices Implementing Adobe Targetusing Dynamic Tag Management
Contents
Best Practices for Implementing Adobe Target using Dynamic Tag Management.3
Dynamic Tag Management Implementation..........................................................4
Adobe Target Tool....................................................................................................5
Add the Adobe Target Tool......................................................................................................5
Option 1: Implement Target Automatically via the Marketing Cloud (mbox.js only)....................................6
Option 2: Implement Target Automatically with Manual Entry of Your Target Client Code (mbox.js only)....6
Option 3: Implement Target Manually with the Target JavaScript Library Hosted by DTM (at.js and mbox.js).7
Option 4: Implement Target Manually with the Target JavaScript Library Hosted Outside of DTM (at.js and mbox.js).9
Configure the Adobe Target Tool...........................................................................................10
Mboxes.....................................................................................................................................................10
Data Elements..........................................................................................................................................22
Update the Adobe Target Tool...............................................................................................24
QA, Approval, and Deployment Steps..................................................................26
Installing the Debugging Tools...............................................................................................26
Performing QA Steps............................................................................................................27
Performing Approval and Publishing Steps...........................................................................29
Additional Resources............................................................................................31
Contact and Legal Information.............................................................................32
Best Practices Implementing Adobe Target usingDynamic Tag Management
Last updated 12/9/2016
Best Practices for Implementing Adobe Target usingDynamic Tag ManagementAdobe dynamic tag management (DTM) makes it quick and easy to implement Adobe Target on your websites.
Last Updated: November 17, 2016
There are many ways to implement Target depending on your industry and business requirements. Work with yourDTM or Target consultant to create your implementation strategy and then use this guide to realize it with DTM.
Prerequisites
Before following the instructions in this guide, we assume that you have met the following prerequisites:
For more information, see:Prerequisite:
Getting Started in the Dynamic Tag Management ProductDocumentation.
You have access to the DTM interface.
Web Properties in the Dynamic Tag Management ProductDocumentation.
You have configured the relevant DTM property.
Embed Code and Hosting Options in the Dynamic TagManagement Product Documentation.
You have added the DTM embed code to your website.
Dynamic Tag Management Product Documentation.You have a basic understanding of the DTM interface,how to configure rules, etc.
Users and Permissions in the Dynamic Tag ManagementProduct Documentation.
You have access to approve and publish DTM code.
Adobe Target Product Documentation.You have access to the Target interface.
Please check with Customer Care or refer to the Additional Resources section of this guide if you need assistancewith any of the above prerequisites.
3Best Practices for Implementing Adobe Targetusing Dynamic Tag Management
Dynamic Tag Management ImplementationInformation to help you properly manage the dynamic tag management embed code while implementing AdobeTarget.
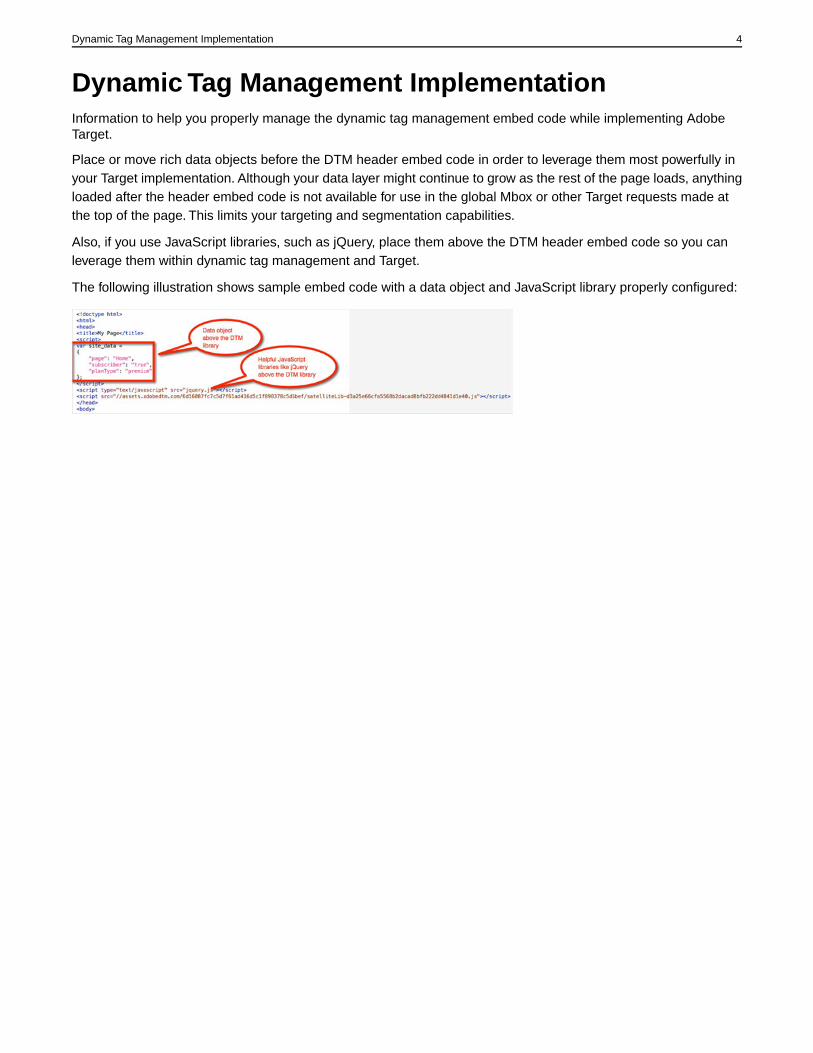
Place or move rich data objects before the DTM header embed code in order to leverage them most powerfully inyour Target implementation. Although your data layer might continue to grow as the rest of the page loads, anythingloaded after the header embed code is not available for use in the global Mbox or other Target requests made atthe top of the page. This limits your targeting and segmentation capabilities.
Also, if you use JavaScript libraries, such as jQuery, place them above the DTM header embed code so you canleverage them within dynamic tag management and Target.
The following illustration shows sample embed code with a data object and JavaScript library properly configured:
4Dynamic Tag Management Implementation
Adobe Target ToolInformation to help you implement Target using the Adobe Target Tool in dynamic tag management.
Note: In addition to the information contained in this section, additional information is included in Add AdobeTarget Tool in the Dynamic Tag Management Product Documentation.
The Adobe Target Tool is the recommended way to implement Target via DTM. The Adobe Target Tool supports:
• Target Standard or Target Premium implementations
• Target Classic implementations using a global mbox or regional mboxes
• Population of mbox and profile parameters in both global and regional mboxes
• Both at.js and mbox.js libraries
Add the Adobe Target Tool
Overview information to help you determine the best option to implement Adobe Target using the Adobe TargetTool in dynamic tag management.
Adding the Adobe Target Tool takes care of most implementation aspects needed for Adobe Target, including thefollowing:
• Implementation of the at.js or mbox.js library
• Implementation of the global mbox
• Inclusion of dynamic parameters in the global mbox
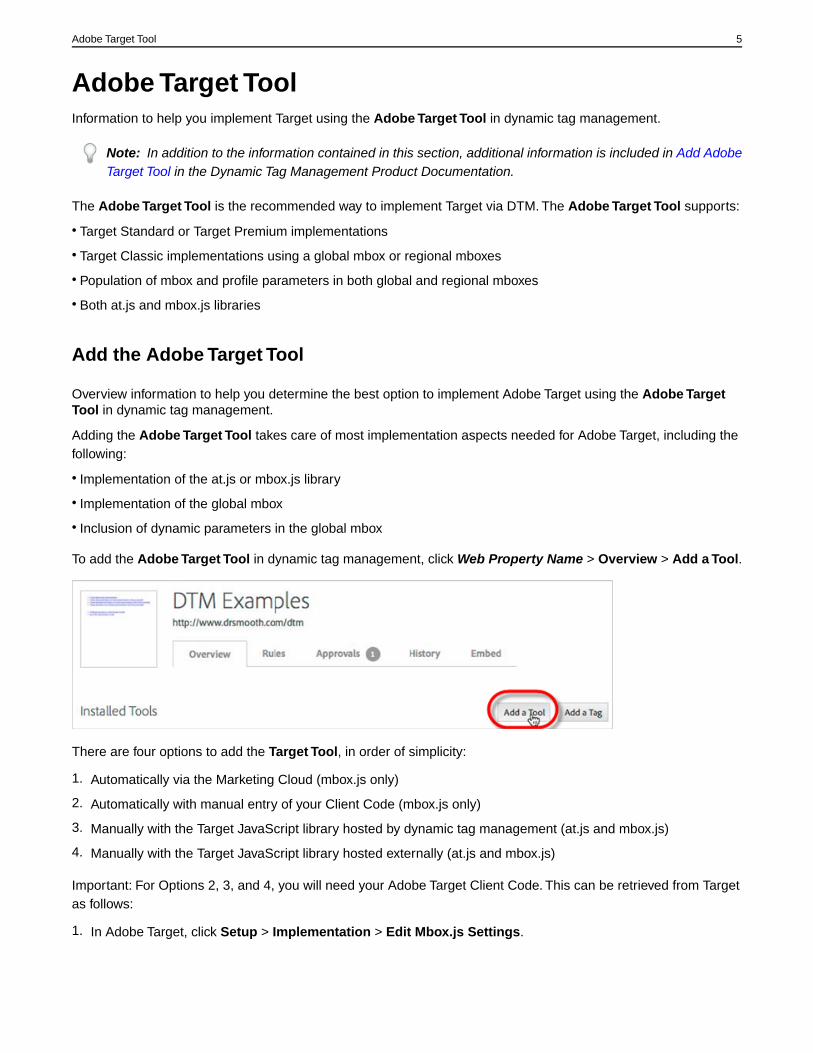
To add the Adobe Target Tool in dynamic tag management, click Web Property Name > Overview > Add a Tool.
There are four options to add the Target Tool, in order of simplicity:
1. Automatically via the Marketing Cloud (mbox.js only)
2. Automatically with manual entry of your Client Code (mbox.js only)
3. Manually with the Target JavaScript library hosted by dynamic tag management (at.js and mbox.js)
4. Manually with the Target JavaScript library hosted externally (at.js and mbox.js)
Important: For Options 2, 3, and 4, you will need your Adobe Target Client Code. This can be retrieved from Targetas follows:
1. In Adobe Target, click Setup > Implementation > Edit Mbox.js Settings.
5Adobe Target Tool
2. The Client Code is the first value on the screen, labeled Client Code.
Option 1: Implement Target Automatically via the Marketing Cloud (mbox.js only)
Information to help you implement Adobe Target in dynamic tag management automatically via the Adobe MarketingCloud.
If you have linked your dynamic tag management user account to your Marketing Cloud user account:
1. On a property's Overview page in dynamic tag management, click Add a Tool.
2. From the Tool Type drop-down list, select Adobe Target.
3. In the Tool Name box, type "Adobe Target."
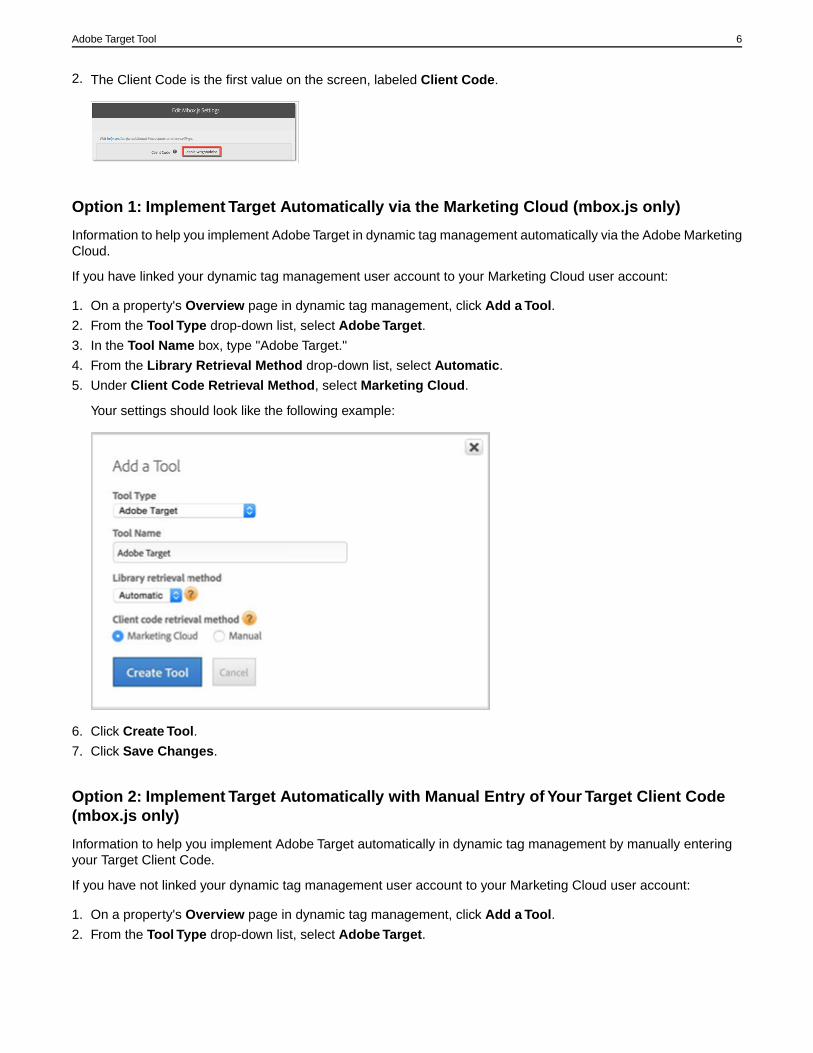
4. From the Library Retrieval Method drop-down list, select Automatic.
5. Under Client Code Retrieval Method, select Marketing Cloud.
Your settings should look like the following example:
6. Click Create Tool.
7. Click Save Changes.
Option 2: Implement Target Automatically with Manual Entry of Your Target Client Code(mbox.js only)
Information to help you implement Adobe Target automatically in dynamic tag management by manually enteringyour Target Client Code.
If you have not linked your dynamic tag management user account to your Marketing Cloud user account:
1. On a property's Overview page in dynamic tag management, click Add a Tool.
2. From the Tool Type drop-down list, select Adobe Target.
6Adobe Target Tool
3. In the Tool Name box, type "Adobe Target."
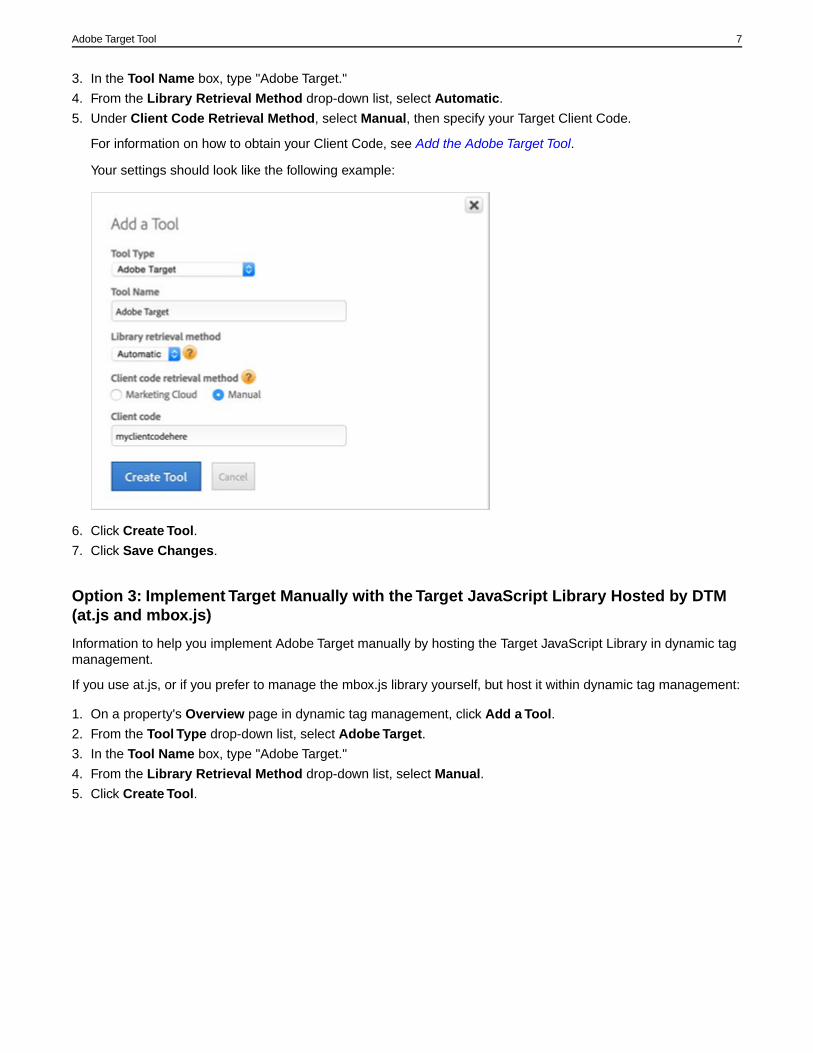
4. From the Library Retrieval Method drop-down list, select Automatic.
5. Under Client Code Retrieval Method, select Manual, then specify your Target Client Code.
For information on how to obtain your Client Code, see Add the Adobe Target Tool.
Your settings should look like the following example:
6. Click Create Tool.
7. Click Save Changes.
Option 3: Implement Target Manually with the Target JavaScript Library Hosted by DTM(at.js and mbox.js)
Information to help you implement Adobe Target manually by hosting the Target JavaScript Library in dynamic tagmanagement.
If you use at.js, or if you prefer to manage the mbox.js library yourself, but host it within dynamic tag management:
1. On a property's Overview page in dynamic tag management, click Add a Tool.
2. From the Tool Type drop-down list, select Adobe Target.
3. In the Tool Name box, type "Adobe Target."
4. From the Library Retrieval Method drop-down list, select Manual.
5. Click Create Tool.
7Adobe Target Tool
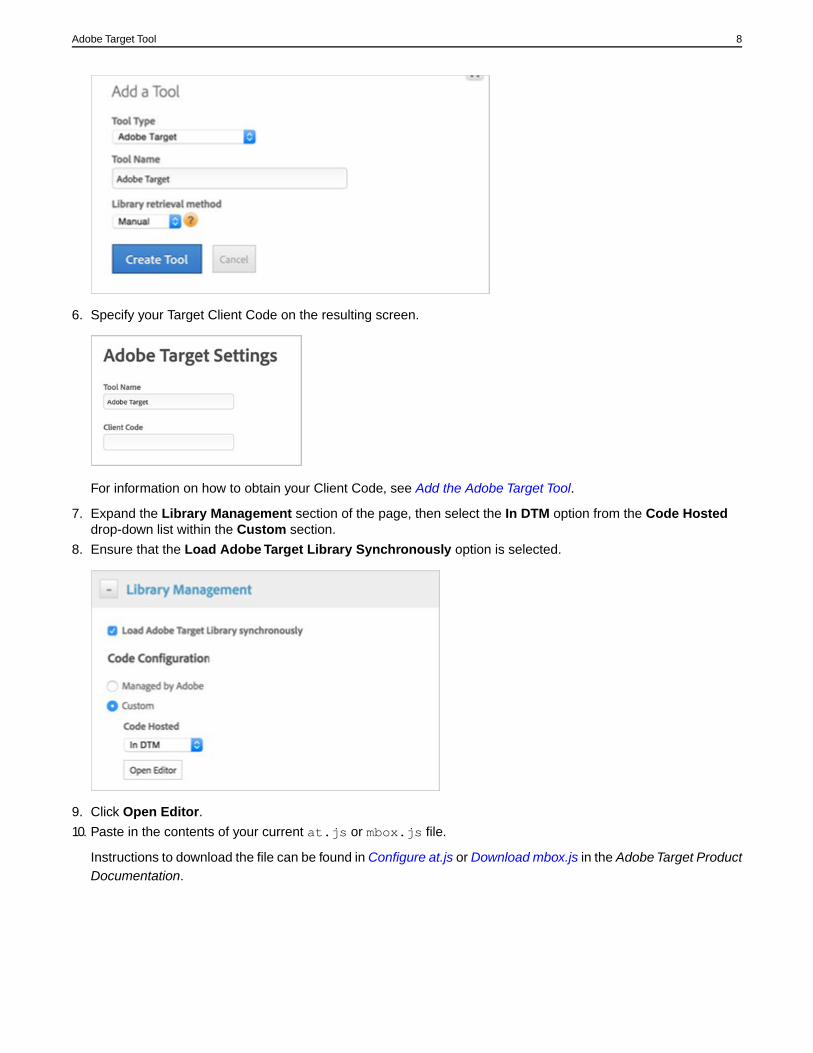
6. Specify your Target Client Code on the resulting screen.
For information on how to obtain your Client Code, see Add the Adobe Target Tool.
7. Expand the Library Management section of the page, then select the In DTM option from the Code Hosteddrop-down list within the Custom section.
8. Ensure that the Load Adobe Target Library Synchronously option is selected.
9. Click Open Editor.
10. Paste in the contents of your current at.js or mbox.js file.
Instructions to download the file can be found in Configure at.js or Download mbox.js in the Adobe Target ProductDocumentation.
8Adobe Target Tool
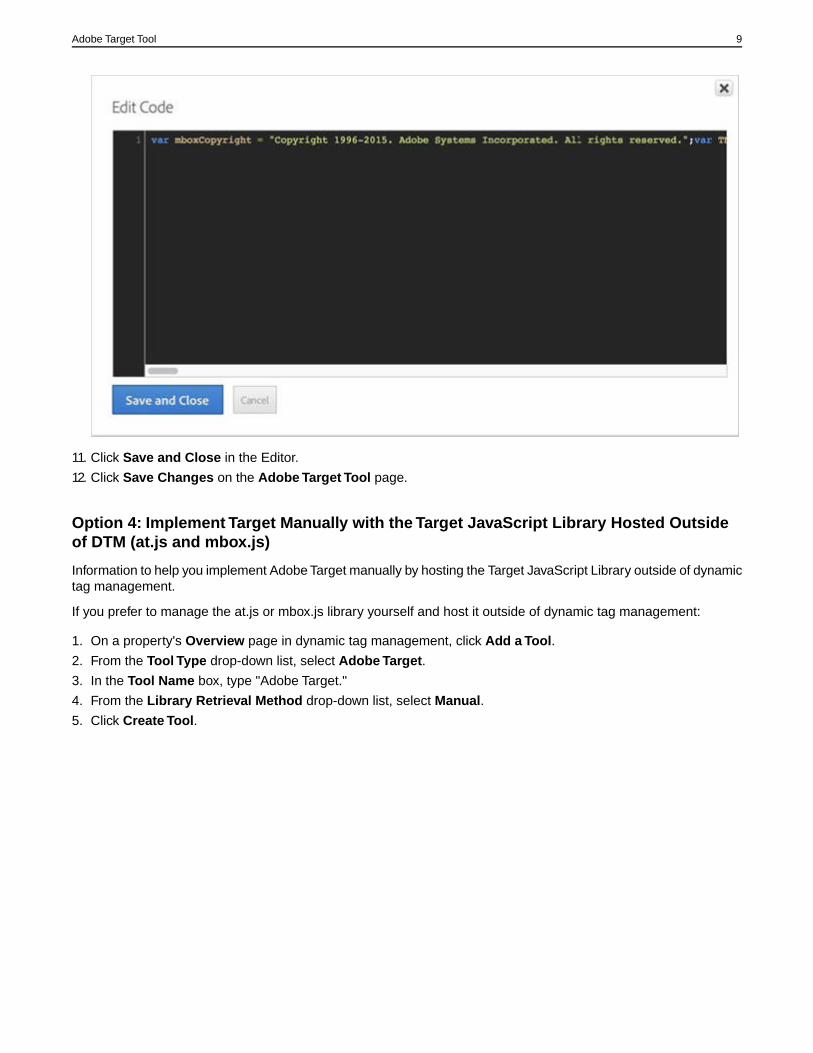
11. Click Save and Close in the Editor.
12. Click Save Changes on the Adobe Target Tool page.
Option 4: Implement Target Manually with the Target JavaScript Library Hosted Outsideof DTM (at.js and mbox.js)
Information to help you implement Adobe Target manually by hosting the Target JavaScript Library outside of dynamictag management.
If you prefer to manage the at.js or mbox.js library yourself and host it outside of dynamic tag management:
1. On a property's Overview page in dynamic tag management, click Add a Tool.
2. From the Tool Type drop-down list, select Adobe Target.
3. In the Tool Name box, type "Adobe Target."
4. From the Library Retrieval Method drop-down list, select Manual.
5. Click Create Tool.
9Adobe Target Tool
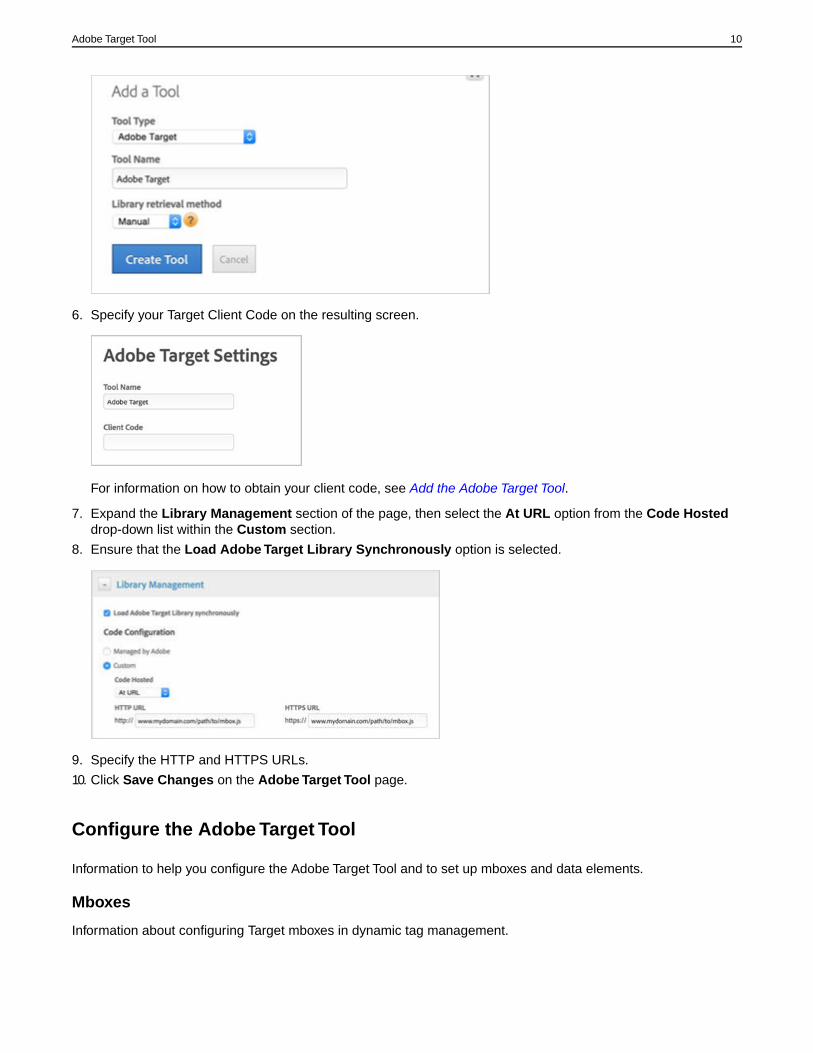
6. Specify your Target Client Code on the resulting screen.
For information on how to obtain your client code, see Add the Adobe Target Tool.
7. Expand the Library Management section of the page, then select the At URL option from the Code Hosteddrop-down list within the Custom section.
8. Ensure that the Load Adobe Target Library Synchronously option is selected.
9. Specify the HTTP and HTTPS URLs.
10. Click Save Changes on the Adobe Target Tool page.
Configure the Adobe Target Tool
Information to help you configure the Adobe Target Tool and to set up mboxes and data elements.
Mboxes
Information about configuring Target mboxes in dynamic tag management.
10Adobe Target Tool
Global Mbox
Information about creating a global mbox using dynamic tag management.
For most Target customers, your main mbox is automatically included in your at.js or mbox.js file. If you needan Order Confirmation mbox to track orders, see Order Confirmation Mbox.
Dynamic tag management is great for placing a top-of-page, empty mbox globally across every page of your site.This type of mbox can be used in both the Target Classic and the new Target user interfaces.
In the Target interface, on the Setup > Implementation > Edit at.js Settings or Edit mbox.js Settings page,ensure that the Auto Create Global Mbox option is enabled. When you import the library into DTM using one ofthe automatic options, or download the file from the Target interface, it will contain all of these settings.
Be sure to update the Adobe Target Tool in DTM after making any changes to these settings. For more information,see Update the Adobe Target Tool.
Wrapping Mboxes
If you aren’t able to use the global mbox for all of your activities , the Adobe Target Tool provides an easy methodto place wrapping mboxes with built-in flicker handling.
The Adobe Target Tool integration currently uses the mboxUpdate method to make mbox calls, so keep the followingin mind:
• For mbox.js only, the mboxUpdate call waits for the window onload event before the call is made. Test contenttakes longer to appear than when using mboxCreate.
• <style> blocks served through offers don’t work in Microsoft Internet Explorer 8 and below (use JavaScript to setthe styles).
• HTML is delivered first and JavaScript last, regardless of the order in the offer.
• All JavaScript in the offer is encapsulated, so additional steps must be taken if you want any variables or functionsto be usable elsewhere on the page.
• Extra SiteCatalyst calls will be made if using the legacy Test&Target > SiteCatalyst integration plugin. Considerswitching to the “Analytics for Target” back-end integration. See Adobe Analytics as the Reporting Source forAdobe Target in the Adobe Target help for more information.
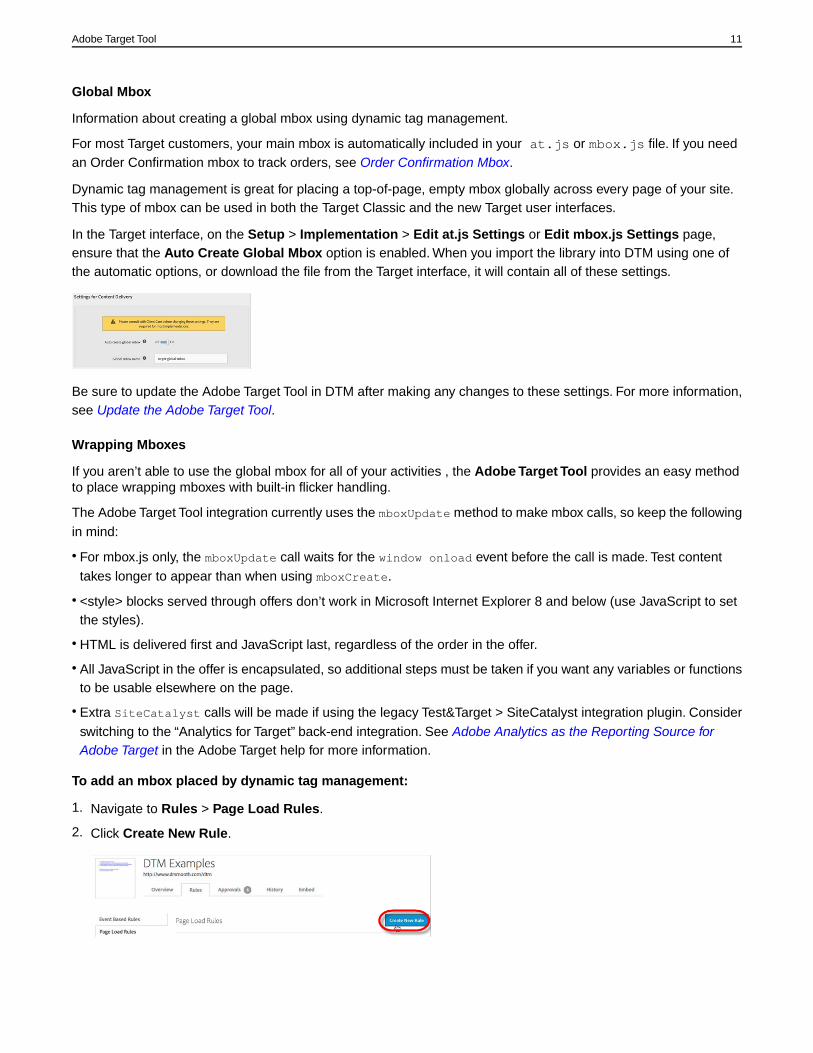
To add an mbox placed by dynamic tag management:
1. Navigate to Rules > Page Load Rules.
2. Click Create New Rule.
11Adobe Target Tool

3. Name the rule.
4. Add conditions.
a. Trigger the rule at Top of Page to ensure that the default content is hidden until the mbox response has beenreceived.
b. Use rule conditions to help you define the general location (e.g. page URL) and other conditions (e.g. “CookieX contains”) under which your mbox should fire. For experienced Target users, this is similar to definingtargeting conditions within the Target UI for your campaign; however, here you are placing targeting conditionsaround the firing of the mbox call. For global rule deployments across the DTM property, leave the selectionon “Choose….”
Note that you can even enter your own JavaScript code when you select the Custom option.
12Adobe Target Tool
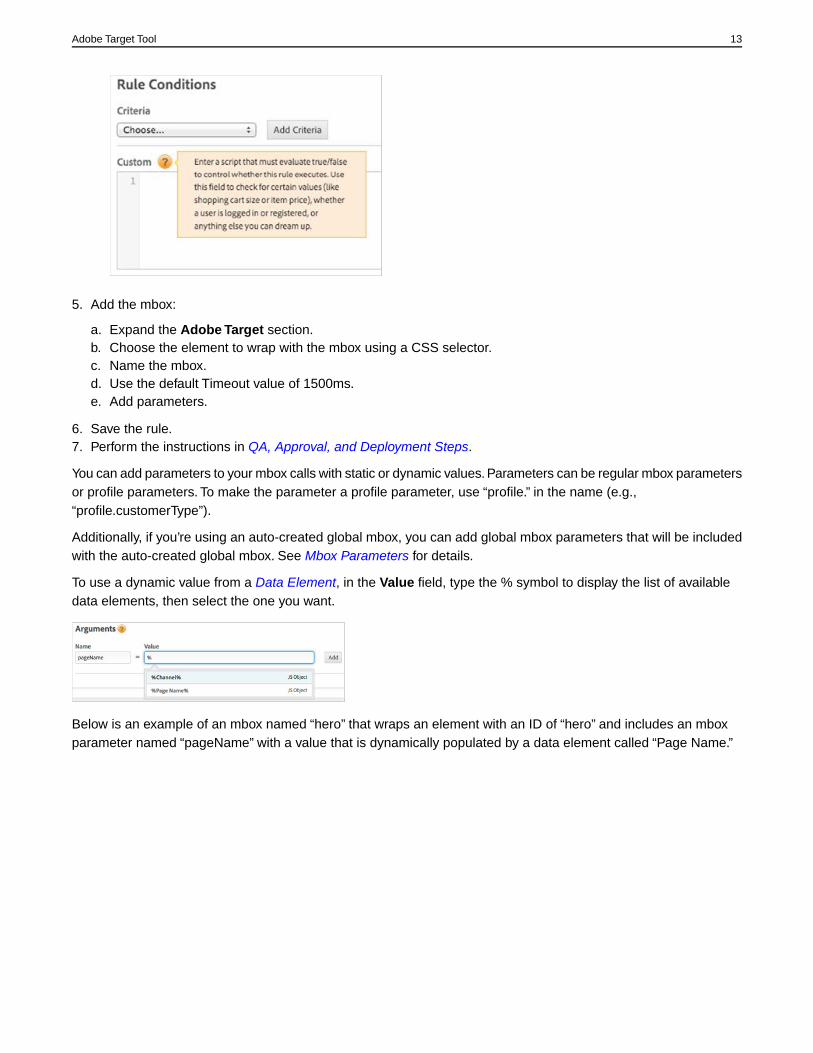
5. Add the mbox:
a. Expand the Adobe Target section.b. Choose the element to wrap with the mbox using a CSS selector.c. Name the mbox.d. Use the default Timeout value of 1500ms.e. Add parameters.
6. Save the rule.7. Perform the instructions in QA, Approval, and Deployment Steps.
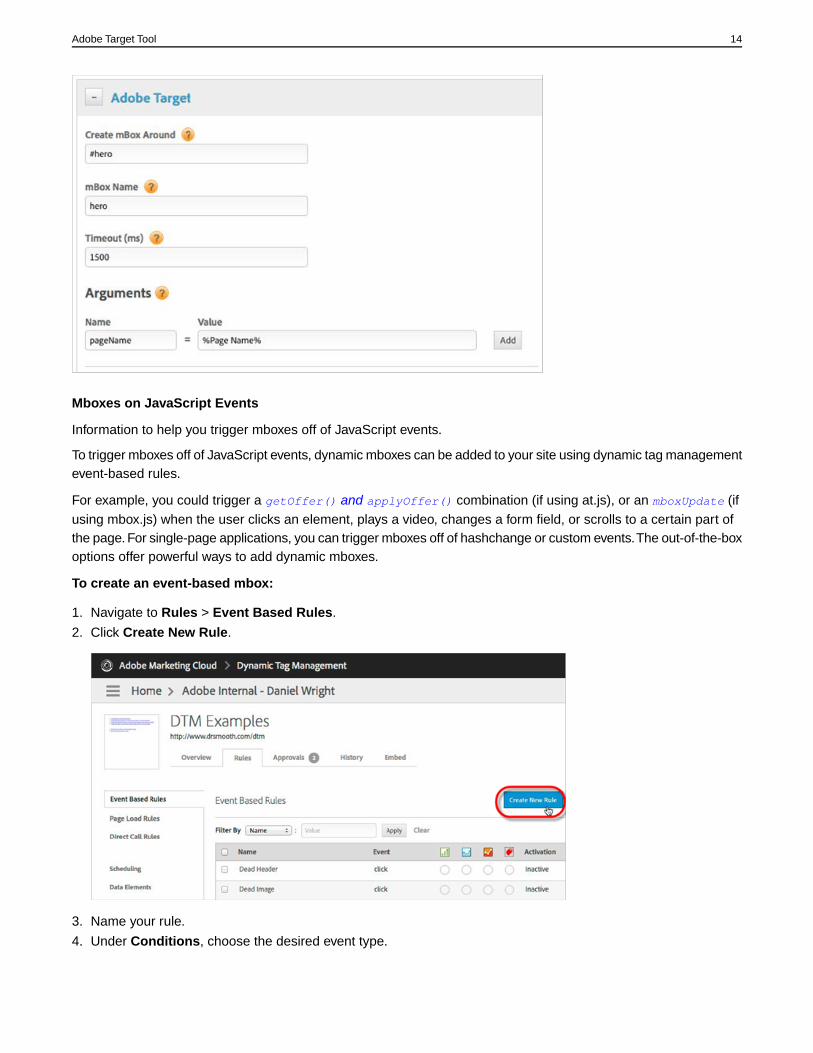
You can add parameters to your mbox calls with static or dynamic values. Parameters can be regular mbox parametersor profile parameters. To make the parameter a profile parameter, use “profile.” in the name (e.g.,“profile.customerType”).
Additionally, if you’re using an auto-created global mbox, you can add global mbox parameters that will be includedwith the auto-created global mbox. See Mbox Parameters for details.
To use a dynamic value from a Data Element, in the Value field, type the % symbol to display the list of availabledata elements, then select the one you want.
Below is an example of an mbox named “hero” that wraps an element with an ID of “hero” and includes an mboxparameter named “pageName” with a value that is dynamically populated by a data element called “Page Name.”
13Adobe Target Tool
Mboxes on JavaScript Events
Information to help you trigger mboxes off of JavaScript events.
To trigger mboxes off of JavaScript events, dynamic mboxes can be added to your site using dynamic tag managementevent-based rules.
For example, you could trigger a getOffer() and applyOffer() combination (if using at.js), or an mboxUpdate (ifusing mbox.js) when the user clicks an element, plays a video, changes a form field, or scrolls to a certain part ofthe page. For single-page applications, you can trigger mboxes off of hashchange or custom events.The out-of-the-boxoptions offer powerful ways to add dynamic mboxes.
To create an event-based mbox:
1. Navigate to Rules > Event Based Rules.
2. Click Create New Rule.
3. Name your rule.
4. Under Conditions, choose the desired event type.
14Adobe Target Tool
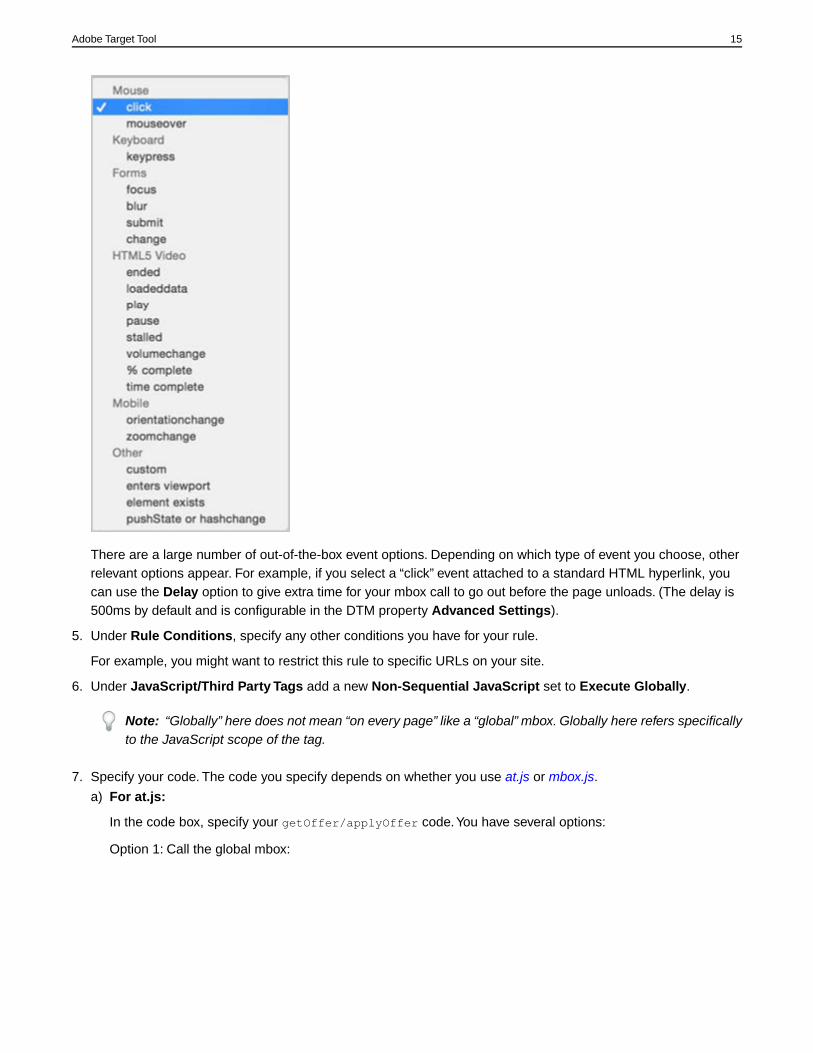
There are a large number of out-of-the-box event options. Depending on which type of event you choose, otherrelevant options appear. For example, if you select a “click” event attached to a standard HTML hyperlink, youcan use the Delay option to give extra time for your mbox call to go out before the page unloads. (The delay is500ms by default and is configurable in the DTM property Advanced Settings).
5. Under Rule Conditions, specify any other conditions you have for your rule.
For example, you might want to restrict this rule to specific URLs on your site.
6. Under JavaScript/Third Party Tags add a new Non-Sequential JavaScript set to Execute Globally.
Note: “Globally” here does not mean “on every page” like a “global” mbox. Globally here refers specificallyto the JavaScript scope of the tag.
7. Specify your code. The code you specify depends on whether you use at.js or mbox.js.
a) For at.js:
In the code box, specify your getOffer/applyOffer code.You have several options:
Option 1: Call the global mbox:
15Adobe Target Tool
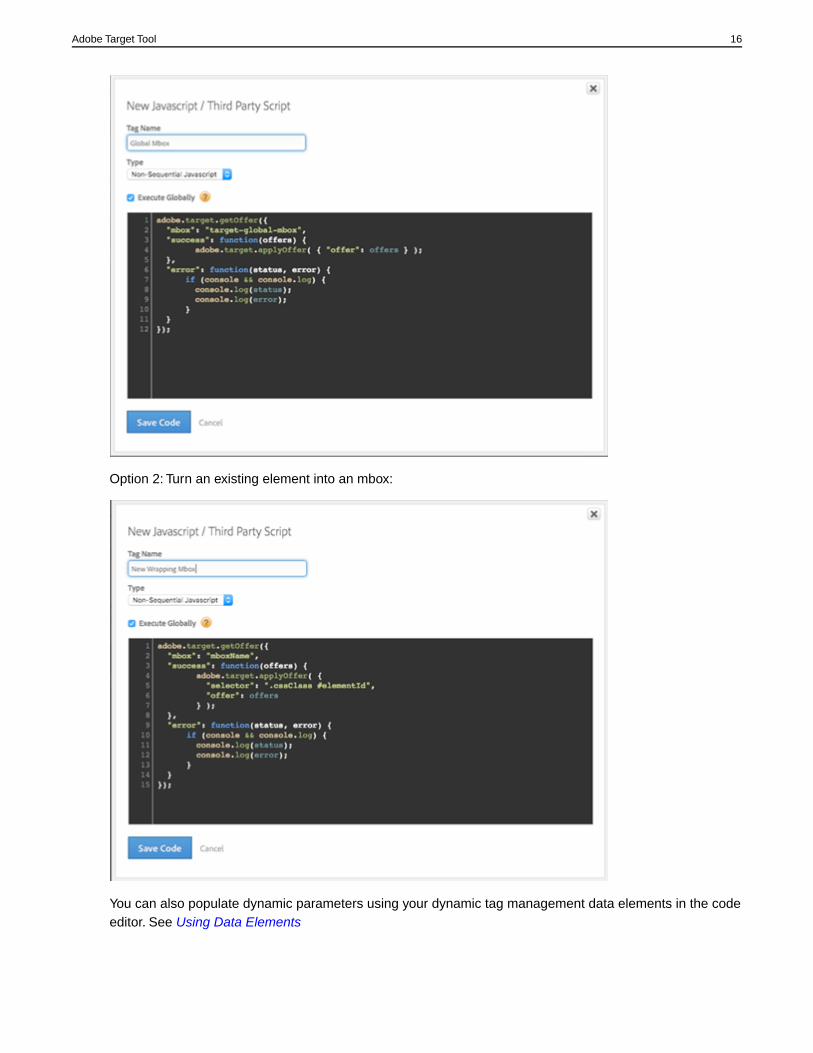
Option 2: Turn an existing element into an mbox:
You can also populate dynamic parameters using your dynamic tag management data elements in the codeeditor. See Using Data Elements
16Adobe Target Tool
Additionally, trackEvent() can be used when you only need to trigger a metric or report profile information—itcannot be used to serve content.
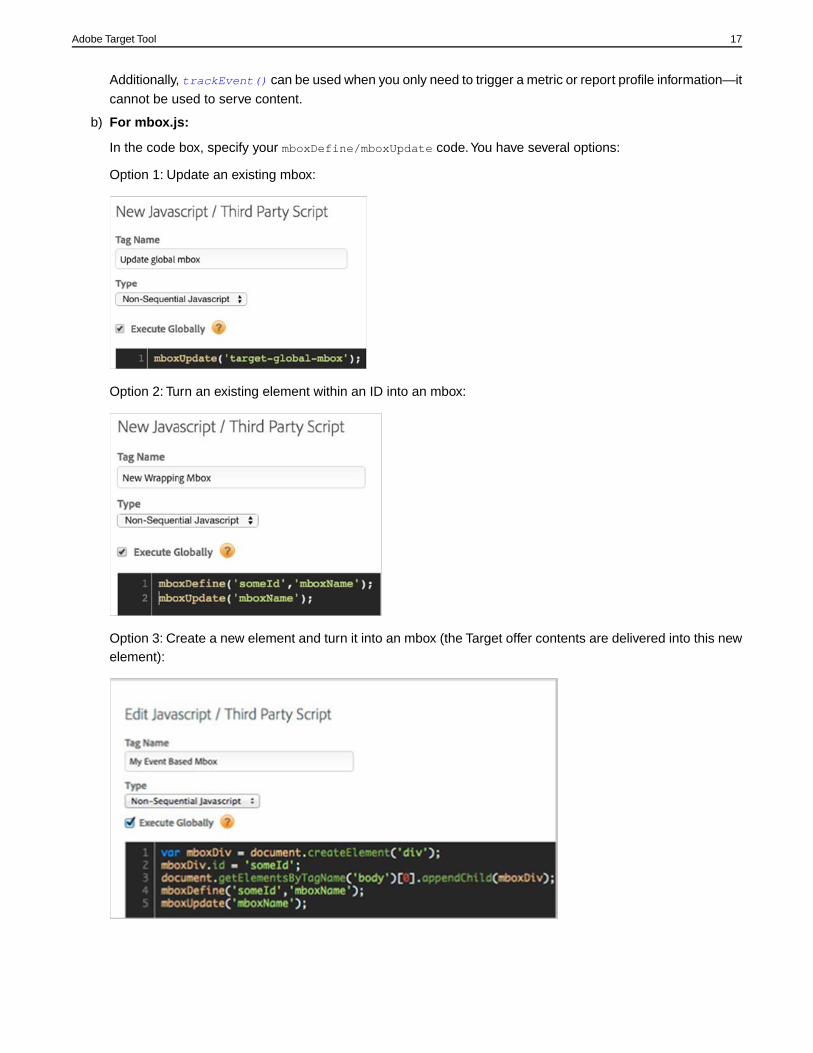
b) For mbox.js:
In the code box, specify your mboxDefine/mboxUpdate code.You have several options:
Option 1: Update an existing mbox:
Option 2: Turn an existing element within an ID into an mbox:
Option 3: Create a new element and turn it into an mbox (the Target offer contents are delivered into this newelement):
17Adobe Target Tool
You can also populate dynamic parameters using your dynamic tag management data elements in the codeeditor. See Using Data Elements
Additionally, the mboxTrack() plugin can be used in this context. Contact your Target consultant to add thisplugin to you mbox.js file. Use mboxTrack when you only need to use the call to trigger a metric or reportprofile information—it cannot be used to serve content.
Order Confirmation Mbox
Information to help you configure an order confirmation mbox to record details about purchases.
The order confirmation mbox records details about purchases, permitting reports revenue, orders, and derivedmetrics such as Revenue per Visitor and Average Order Value.
It is placed on the order confirmation page(s) of your site and needs to report three specific, dynamic parameters:
• orderId: Unique value to identify an order for conversion counting. The orderId must be unique. Duplicate ordersare ignored in reports.
• orderTotal: Monetary value of the purchase. Do not pass the currency symbol. Use a decimal point (not a comma)to indicate decimal values.
• productPurchasedId: Comma-separated list of product IDs purchased in the order. These product IDs display inthe audit report to support additional reporting analysis.
For more information, see Create an orderConfirmPage Mbox in the Adobe Target product documentation.
To create an order confirmation mbox perform the instructions in the following sections:
• Build Data Elements for Dynamic Order Parameters• Add a DTM Mbox to Pass Up Dynamic Order Parameters
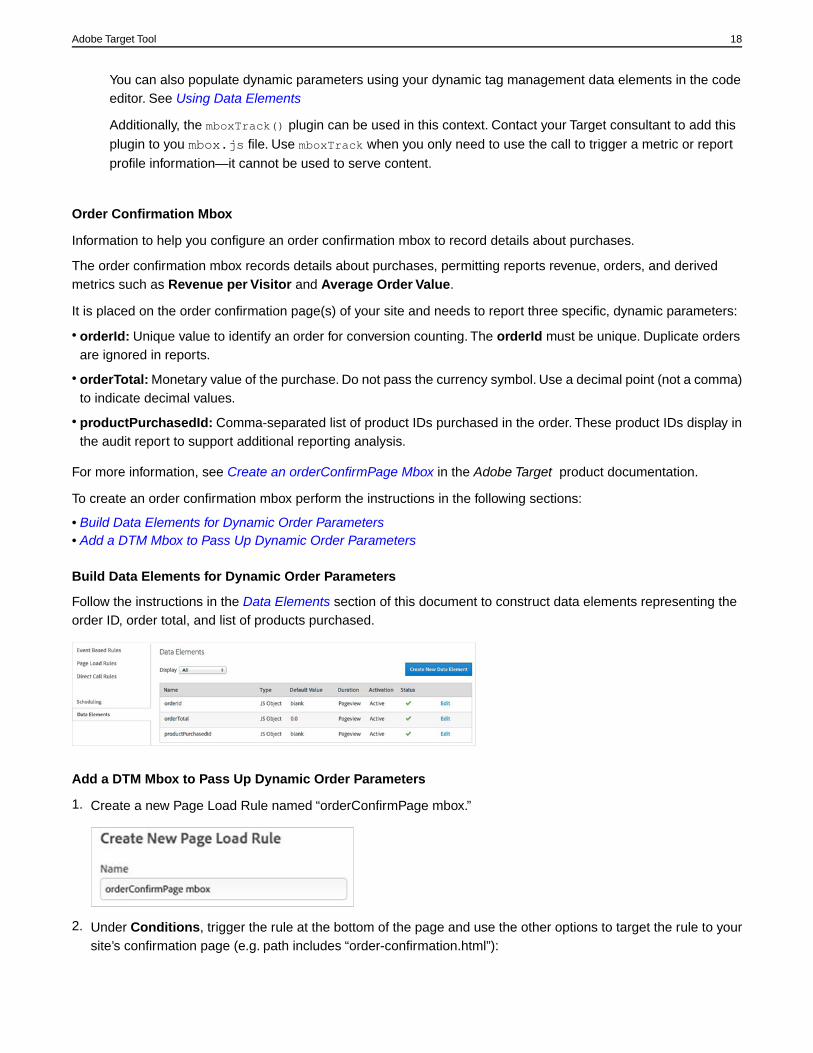
Build Data Elements for Dynamic Order Parameters
Follow the instructions in the Data Elements section of this document to construct data elements representing theorder ID, order total, and list of products purchased.
Add a DTM Mbox to Pass Up Dynamic Order Parameters
1. Create a new Page Load Rule named “orderConfirmPage mbox.”
2. Under Conditions, trigger the rule at the bottom of the page and use the other options to target the rule to yoursite’s confirmation page (e.g. path includes “order-confirmation.html”):
18Adobe Target Tool
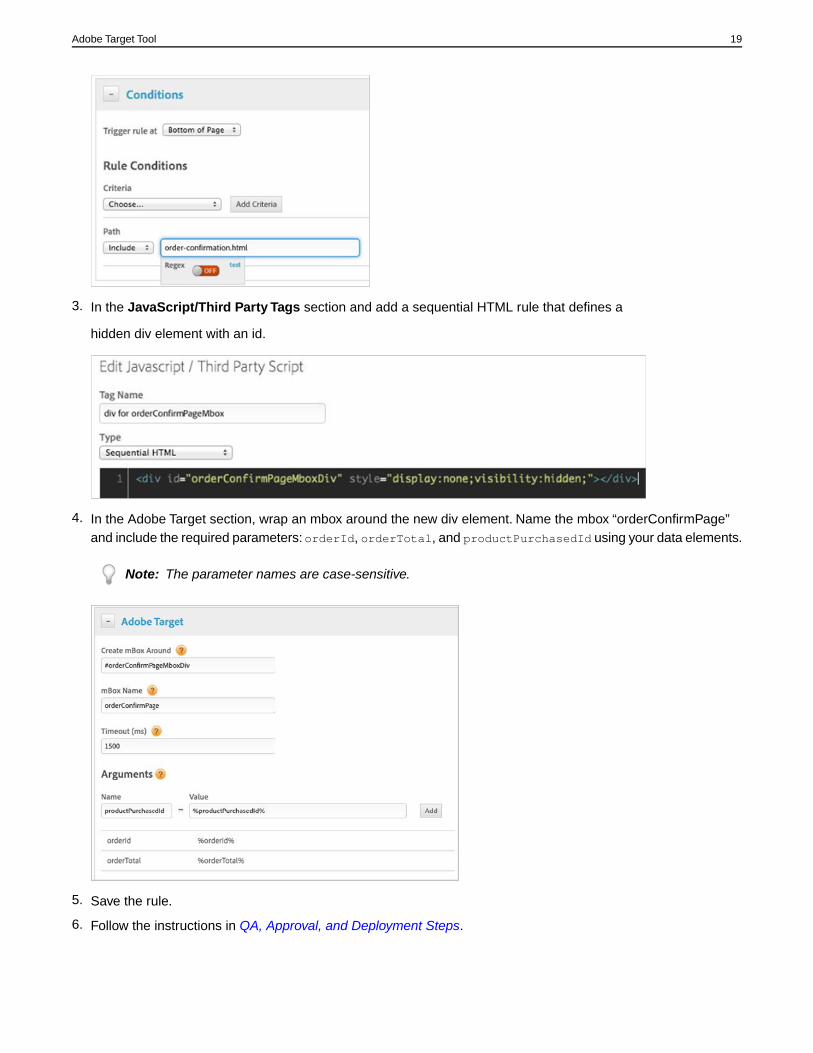
3. In the JavaScript/Third Party Tags section and add a sequential HTML rule that defines a
hidden div element with an id.
4. In the Adobe Target section, wrap an mbox around the new div element. Name the mbox “orderConfirmPage”and include the required parameters:orderId, orderTotal, and productPurchasedId using your data elements.
Note: The parameter names are case-sensitive.
5. Save the rule.
6. Follow the instructions in QA, Approval, and Deployment Steps.
19Adobe Target Tool
Mbox Parameters
Information to help you pass parameters with mbox calls to Adobe Target.
Parameters can be passed with mbox calls to provide rich data to your Target implementation for segmentation andtargeting. This section shows you how to enrich your implementation via DTM.
This section contains the following information:
• Adding Parameters to the Auto-Generated Global Mbox• Adding Parameters to the Auto-Generated Global Mbox on Specific Pages• Using the DTM Interface for DTM-Placed Wrapping Mboxes• Using the mboxParameters() Function for Every Mbox Call
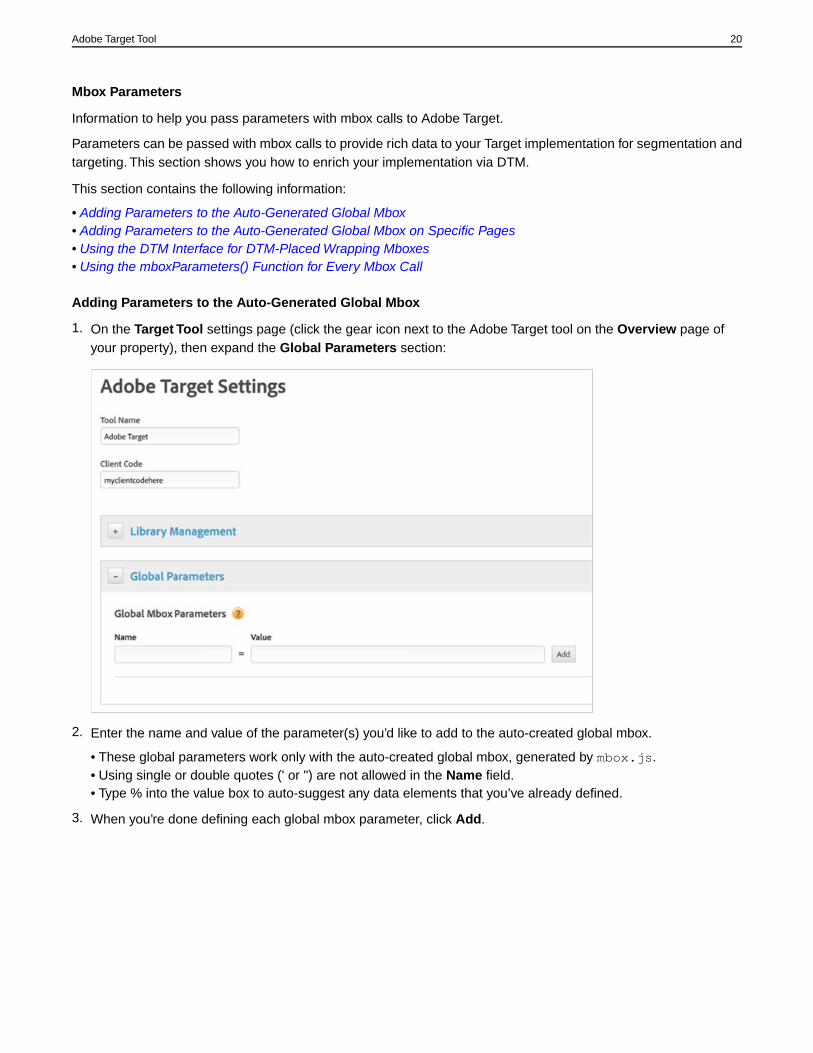
Adding Parameters to the Auto-Generated Global Mbox
1. On the Target Tool settings page (click the gear icon next to the Adobe Target tool on the Overview page ofyour property), then expand the Global Parameters section:
2. Enter the name and value of the parameter(s) you’d like to add to the auto-created global mbox.
• These global parameters work only with the auto-created global mbox, generated by mbox.js.• Using single or double quotes (' or ") are not allowed in the Name field.• Type % into the value box to auto-suggest any data elements that you’ve already defined.
3. When you’re done defining each global mbox parameter, click Add.
20Adobe Target Tool
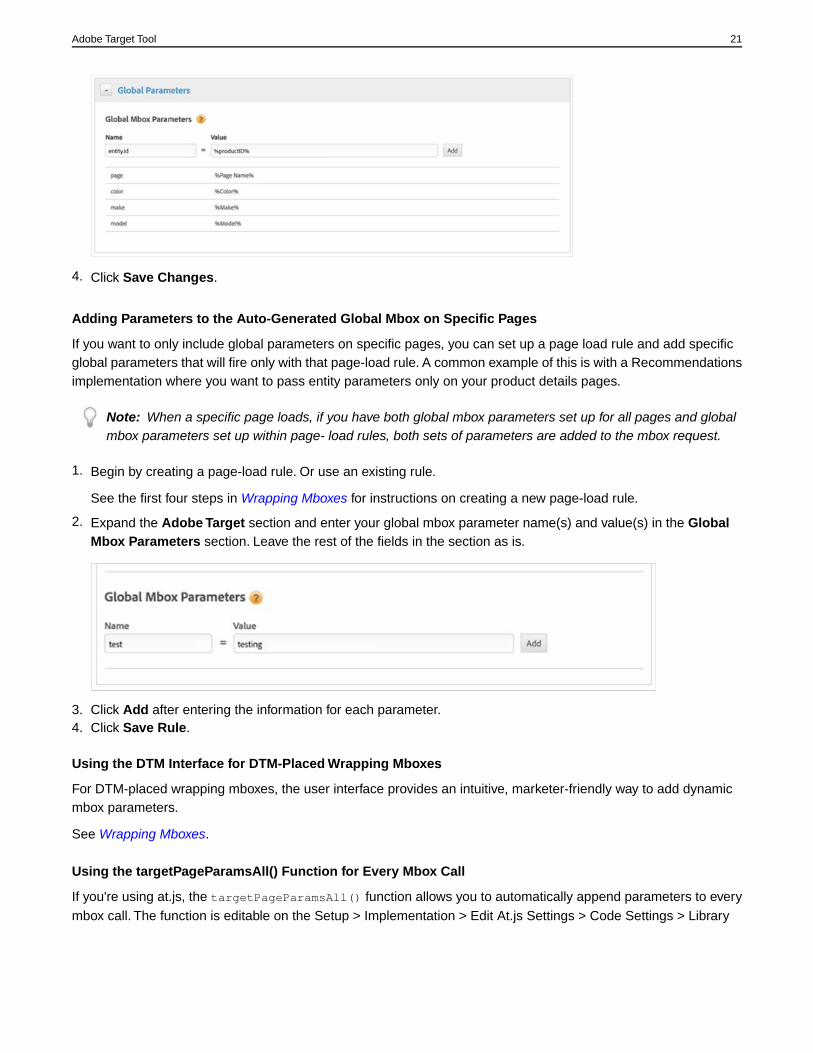
4. Click Save Changes.
Adding Parameters to the Auto-Generated Global Mbox on Specific Pages
If you want to only include global parameters on specific pages, you can set up a page load rule and add specificglobal parameters that will fire only with that page-load rule. A common example of this is with a Recommendationsimplementation where you want to pass entity parameters only on your product details pages.
Note: When a specific page loads, if you have both global mbox parameters set up for all pages and globalmbox parameters set up within page- load rules, both sets of parameters are added to the mbox request.
1. Begin by creating a page-load rule. Or use an existing rule.
See the first four steps in Wrapping Mboxes for instructions on creating a new page-load rule.
2. Expand the Adobe Target section and enter your global mbox parameter name(s) and value(s) in the GlobalMbox Parameters section. Leave the rest of the fields in the section as is.
3. Click Add after entering the information for each parameter.4. Click Save Rule.
Using the DTM Interface for DTM-Placed Wrapping Mboxes
For DTM-placed wrapping mboxes, the user interface provides an intuitive, marketer-friendly way to add dynamicmbox parameters.
See Wrapping Mboxes.
Using the targetPageParamsAll() Function for Every Mbox Call
If you're using at.js, the targetPageParamsAll() function allows you to automatically append parameters to everymbox call. The function is editable on the Setup > Implementation > Edit At.js Settings > Code Settings > Library
21Adobe Target Tool
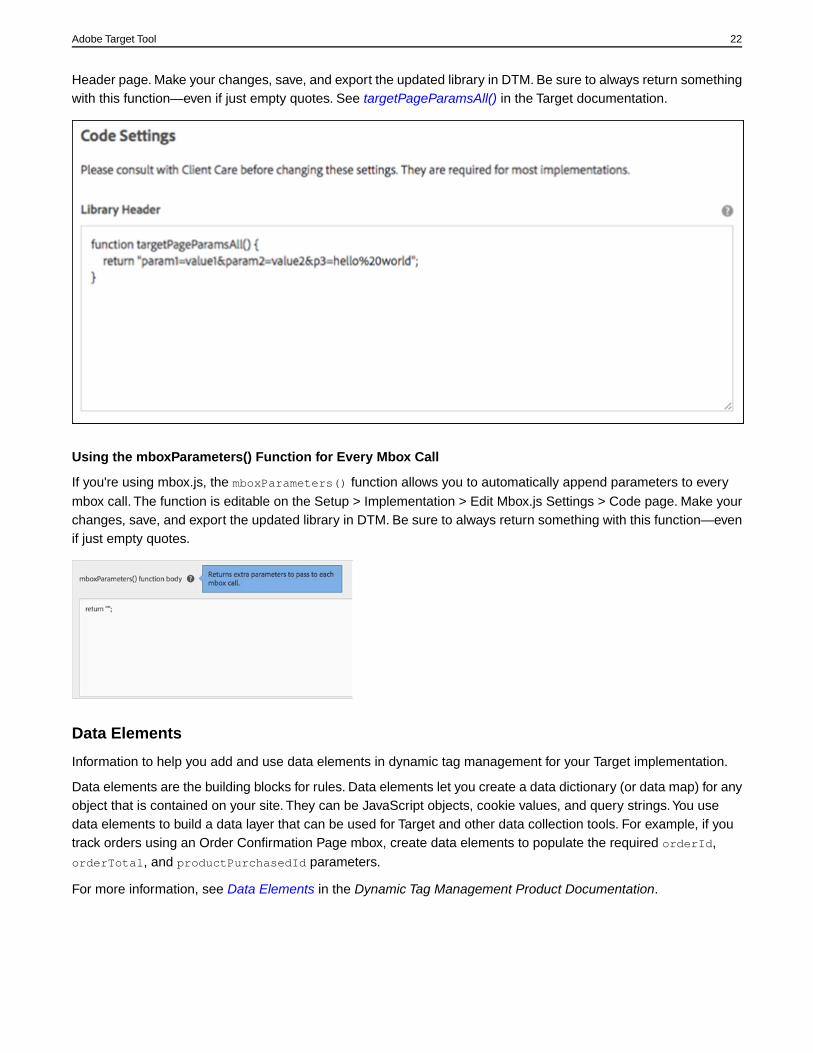
Header page. Make your changes, save, and export the updated library in DTM. Be sure to always return somethingwith this function—even if just empty quotes. See targetPageParamsAll() in the Target documentation.
Using the mboxParameters() Function for Every Mbox Call
If you're using mbox.js, the mboxParameters() function allows you to automatically append parameters to everymbox call. The function is editable on the Setup > Implementation > Edit Mbox.js Settings > Code page. Make yourchanges, save, and export the updated library in DTM. Be sure to always return something with this function—evenif just empty quotes.
Data Elements
Information to help you add and use data elements in dynamic tag management for your Target implementation.
Data elements are the building blocks for rules. Data elements let you create a data dictionary (or data map) for anyobject that is contained on your site. They can be JavaScript objects, cookie values, and query strings.You usedata elements to build a data layer that can be used for Target and other data collection tools. For example, if youtrack orders using an Order Confirmation Page mbox, create data elements to populate the required orderId,orderTotal, and productPurchasedId parameters.
For more information, see Data Elements in the Dynamic Tag Management Product Documentation.
22Adobe Target Tool
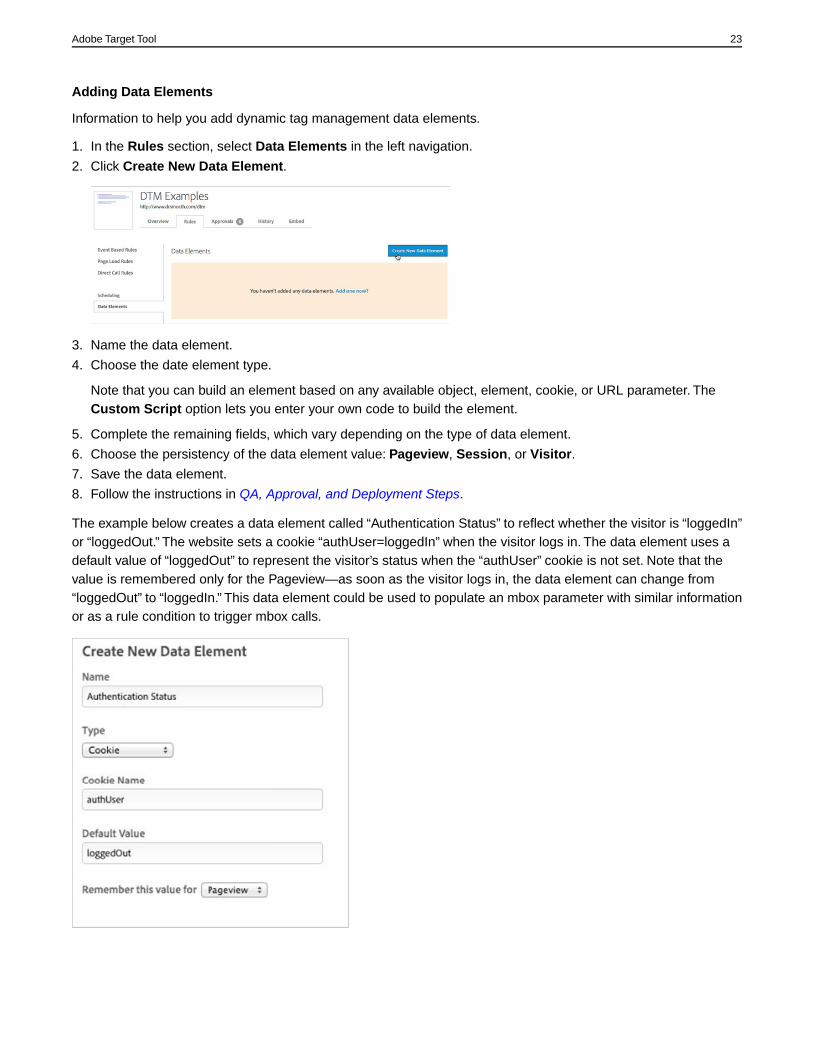
Adding Data Elements
Information to help you add dynamic tag management data elements.
1. In the Rules section, select Data Elements in the left navigation.
2. Click Create New Data Element.
3. Name the data element.
4. Choose the date element type.
Note that you can build an element based on any available object, element, cookie, or URL parameter. TheCustom Script option lets you enter your own code to build the element.
5. Complete the remaining fields, which vary depending on the type of data element.
6. Choose the persistency of the data element value: Pageview, Session, or Visitor.
7. Save the data element.
8. Follow the instructions in QA, Approval, and Deployment Steps.
The example below creates a data element called “Authentication Status” to reflect whether the visitor is “loggedIn”or “loggedOut.” The website sets a cookie “authUser=loggedIn” when the visitor logs in. The data element uses adefault value of “loggedOut” to represent the visitor’s status when the “authUser” cookie is not set. Note that thevalue is remembered only for the Pageview—as soon as the visitor logs in, the data element can change from“loggedOut” to “loggedIn.” This data element could be used to populate an mbox parameter with similar informationor as a rule condition to trigger mbox calls.
23Adobe Target Tool
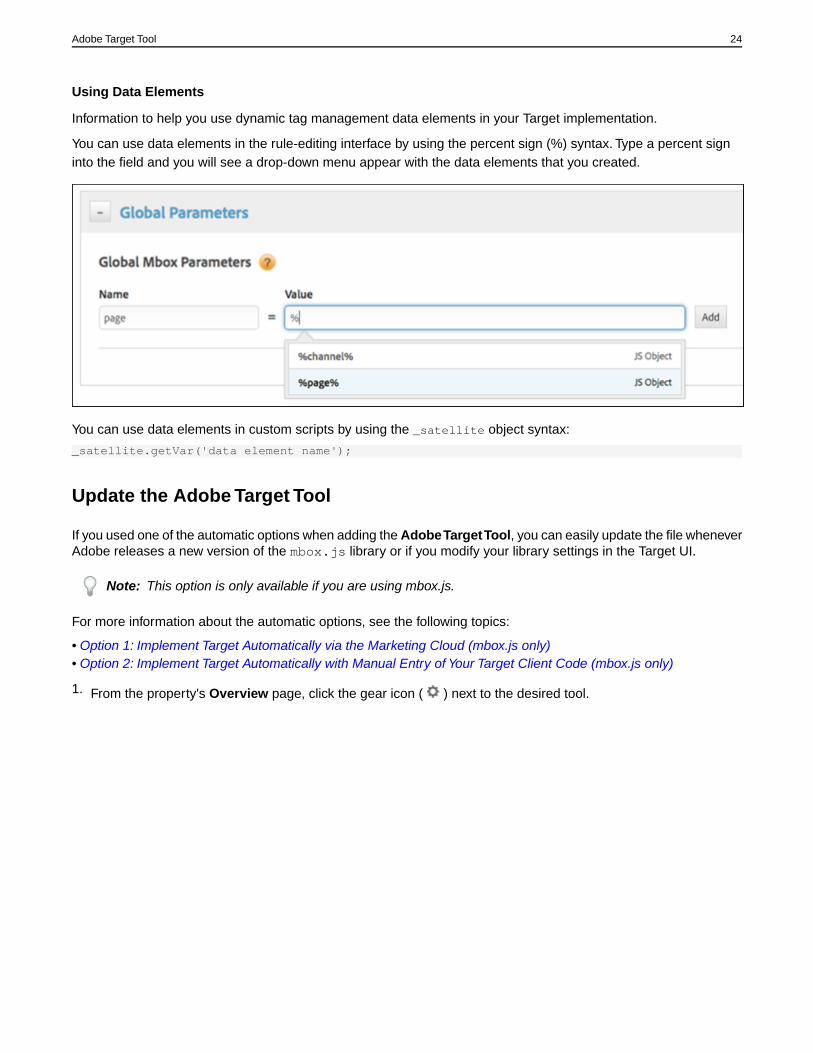
Using Data Elements
Information to help you use dynamic tag management data elements in your Target implementation.
You can use data elements in the rule-editing interface by using the percent sign (%) syntax. Type a percent signinto the field and you will see a drop-down menu appear with the data elements that you created.
You can use data elements in custom scripts by using the _satellite object syntax:
_satellite.getVar('data element name');
Update the Adobe Target Tool
If you used one of the automatic options when adding the Adobe Target Tool, you can easily update the file wheneverAdobe releases a new version of the mbox.js library or if you modify your library settings in the Target UI.
Note: This option is only available if you are using mbox.js.
For more information about the automatic options, see the following topics:
• Option 1: Implement Target Automatically via the Marketing Cloud (mbox.js only)• Option 2: Implement Target Automatically with Manual Entry of Your Target Client Code (mbox.js only)
1. From the property's Overview page, click the gear icon ( ) next to the desired tool.
24Adobe Target Tool
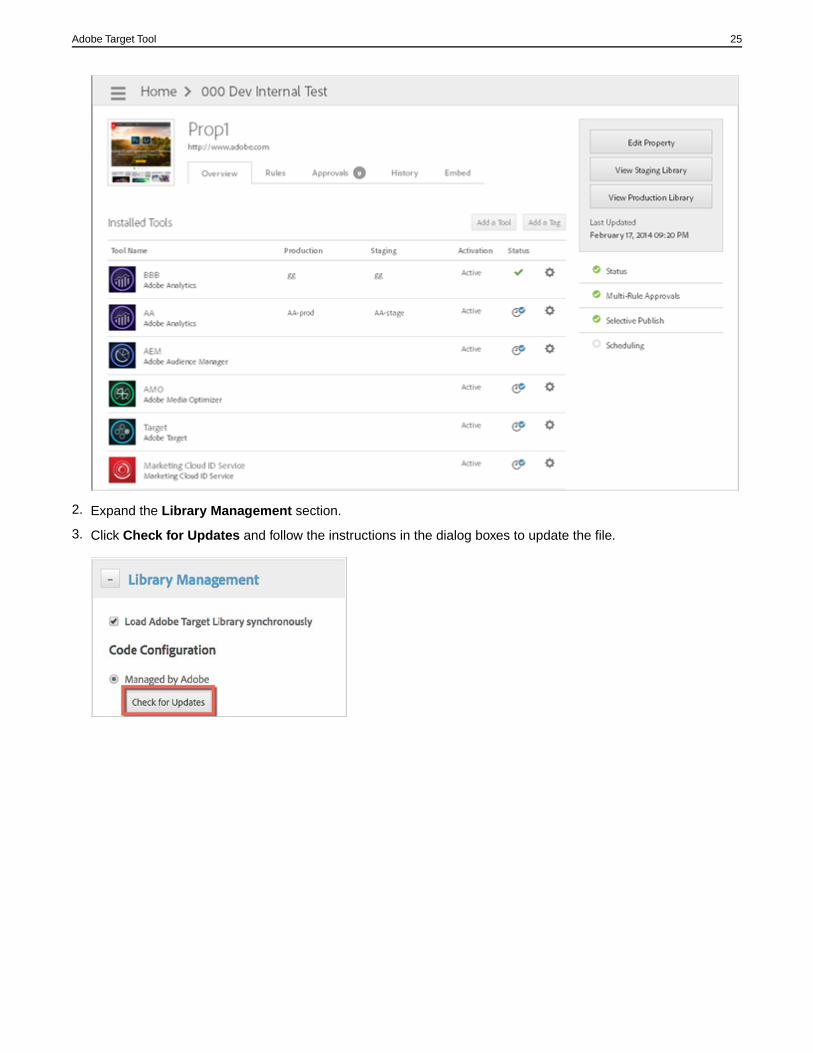
2. Expand the Library Management section.
3. Click Check for Updates and follow the instructions in the dialog boxes to update the file.
25Adobe Target Tool
QA, Approval, and Deployment StepsInformation about the steps necessary to effectively perform quality assurance testing, approve, and deploy yourTarget implementation.
Installing the Debugging Tools
In addition to your web browsers’ built-in developer tools, we recommend installing two additional Adobe tools tohelp QA and troubleshoot Target and dynamic tag management: the Adobe Marketing Cloud Debugger and theDTM Switch.
The following sections contain more information:
• Installing the Adobe Marketing Cloud Debugger• Installing the DTM Switch
Installing the Adobe Marketing Cloud Debugger
For general Marketing Cloud pixel debugging, install the Adobe Marketing Cloud Debugger bookmarklet.
Note: This debugger only works with mbox.js.
See Adobe Debugger.
Installing the DTM Switch
DTM Switch is a browser plugin for easy switching of debug mode and staging mode for DTM users. It is availablefor both Chrome and Firefox.You do not need to publish a new rule or tag in order to use this, though you do needto host DTM on Akamai.
For more information about the DTM Switch and to obtain the switches, see DTM Switch Plugins for Debugging(Chrome and Firefox) in the Dynamic Tag Management Product Documentation.
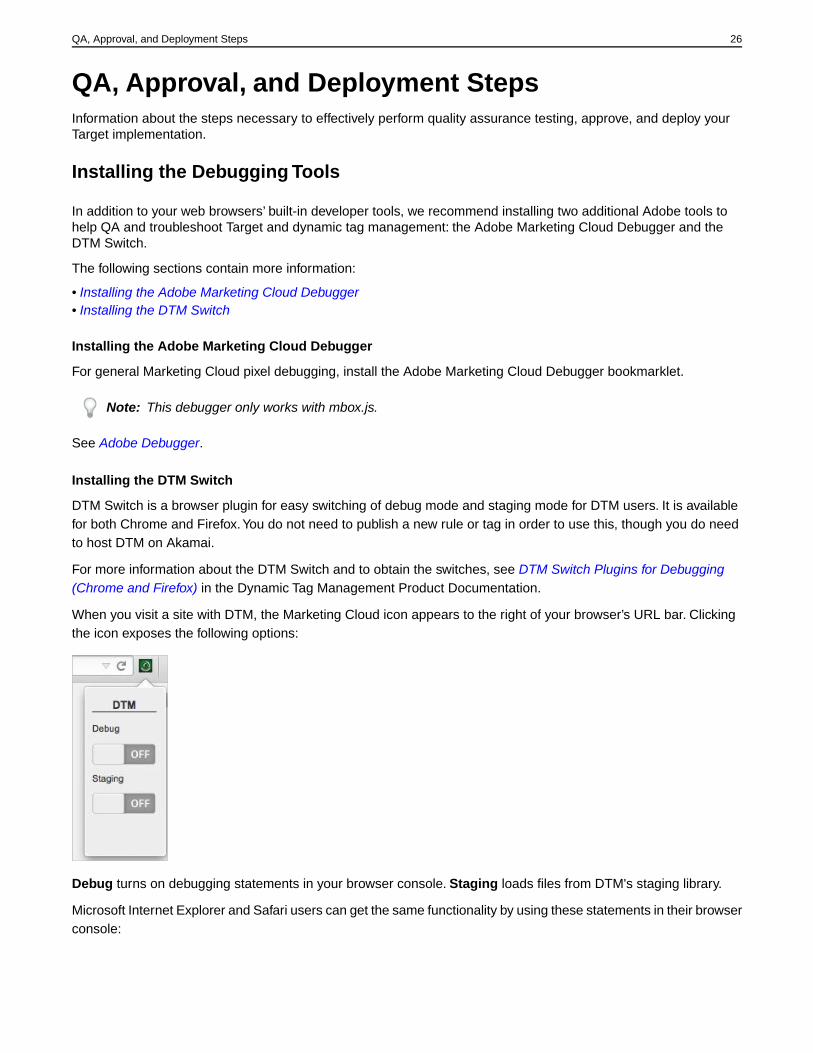
When you visit a site with DTM, the Marketing Cloud icon appears to the right of your browser’s URL bar. Clickingthe icon exposes the following options:
Debug turns on debugging statements in your browser console. Staging loads files from DTM's staging library.
Microsoft Internet Explorer and Safari users can get the same functionality by using these statements in their browserconsole:
26QA, Approval, and Deployment Steps
• For Debug Statements: _satellite.setDebug(true)
• To Load the Staging library: localStorage.setItem('sdsat_stagingLibrary',true)
Performing QA Steps
Steps to help you perform QA steps before approving and deploying your Target implementation.
The following sections contain more information:
• Previewing DTM Changes on Your Production Website• Ensuring that the Target Tool is Loading Properly• Ensuring that Target Mboxes are Firing Properly
Previewing DTM Changes on Your Production Website
Changes saved within DTM are immediately available in DTM’s staging library and should be QA’d before they arepublished. At most, they will take a minute or two to roll out across the Akamai network. To QA DTM changes onyour production website:
1. Load your production website in your browser.2. Use the DTM Switch tool or console commands to force DTM to load your staging library.3. Reload the page to preview the changes made in DTM.
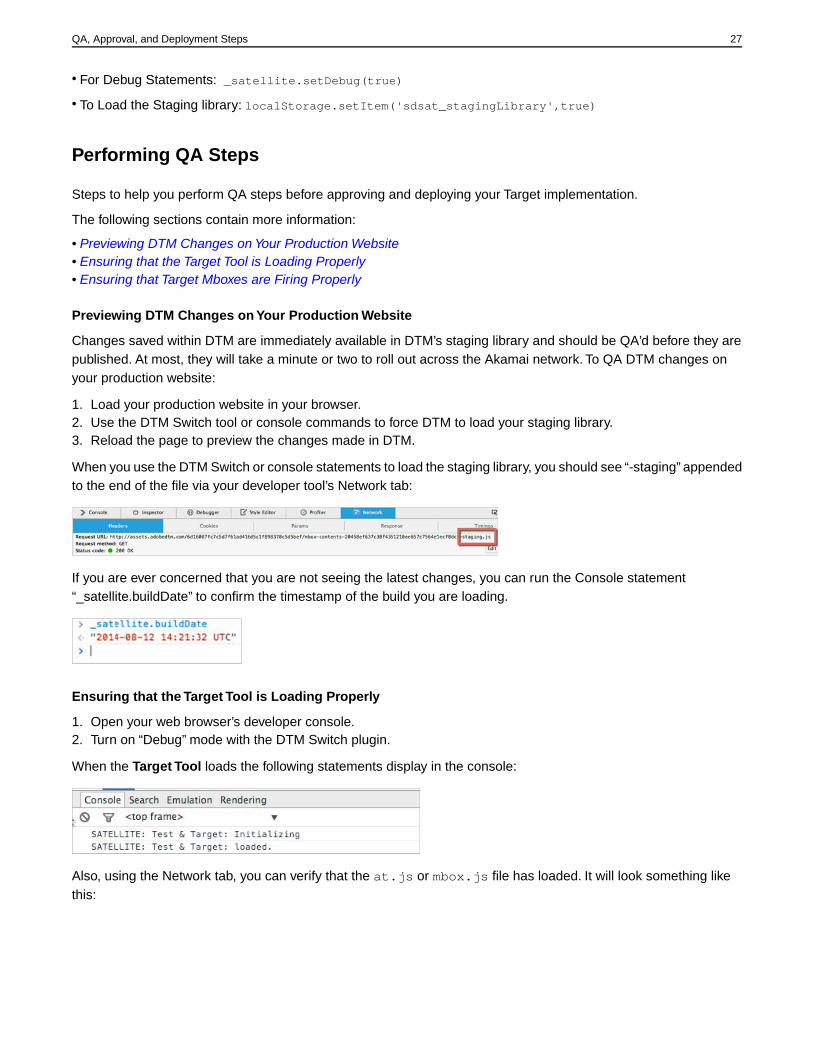
When you use the DTM Switch or console statements to load the staging library, you should see “-staging” appendedto the end of the file via your developer tool’s Network tab:
If you are ever concerned that you are not seeing the latest changes, you can run the Console statement“_satellite.buildDate” to confirm the timestamp of the build you are loading.
Ensuring that the Target Tool is Loading Properly
1. Open your web browser’s developer console.2. Turn on “Debug” mode with the DTM Switch plugin.
When the Target Tool loads the following statements display in the console:
Also, using the Network tab, you can verify that the at.js or mbox.js file has loaded. It will look something likethis:
27QA, Approval, and Deployment Steps
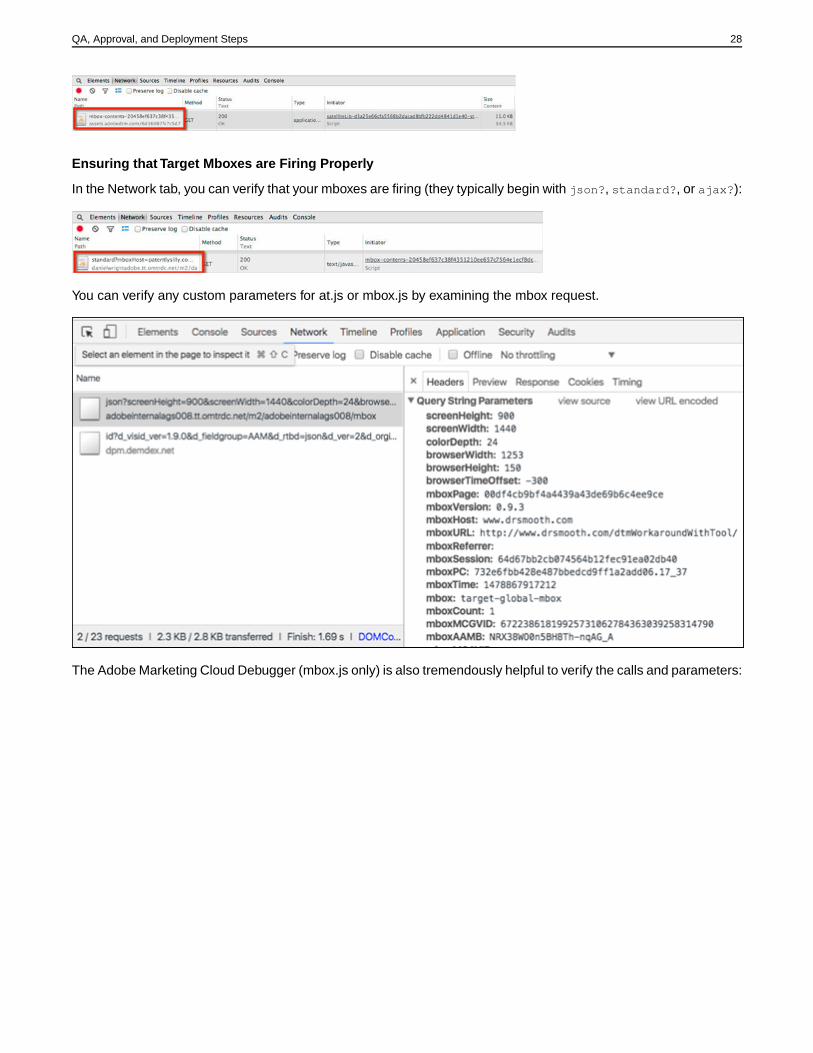
Ensuring that Target Mboxes are Firing Properly
In the Network tab, you can verify that your mboxes are firing (they typically begin with json?, standard?, or ajax?):
You can verify any custom parameters for at.js or mbox.js by examining the mbox request.
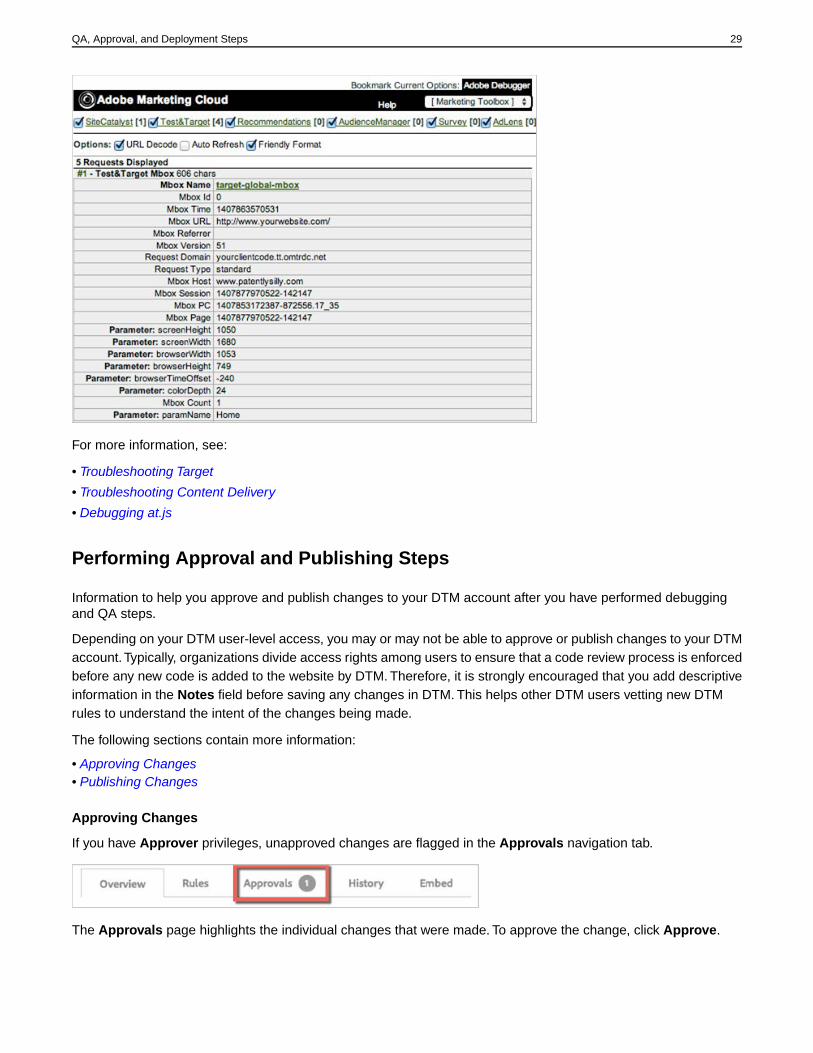
The Adobe Marketing Cloud Debugger (mbox.js only) is also tremendously helpful to verify the calls and parameters:
28QA, Approval, and Deployment Steps
For more information, see:
• Troubleshooting Target
• Troubleshooting Content Delivery
• Debugging at.js
Performing Approval and Publishing Steps
Information to help you approve and publish changes to your DTM account after you have performed debuggingand QA steps.
Depending on your DTM user-level access, you may or may not be able to approve or publish changes to your DTMaccount.Typically, organizations divide access rights among users to ensure that a code review process is enforcedbefore any new code is added to the website by DTM. Therefore, it is strongly encouraged that you add descriptiveinformation in the Notes field before saving any changes in DTM. This helps other DTM users vetting new DTMrules to understand the intent of the changes being made.
The following sections contain more information:
• Approving Changes• Publishing Changes
Approving Changes
If you have Approver privileges, unapproved changes are flagged in the Approvals navigation tab.
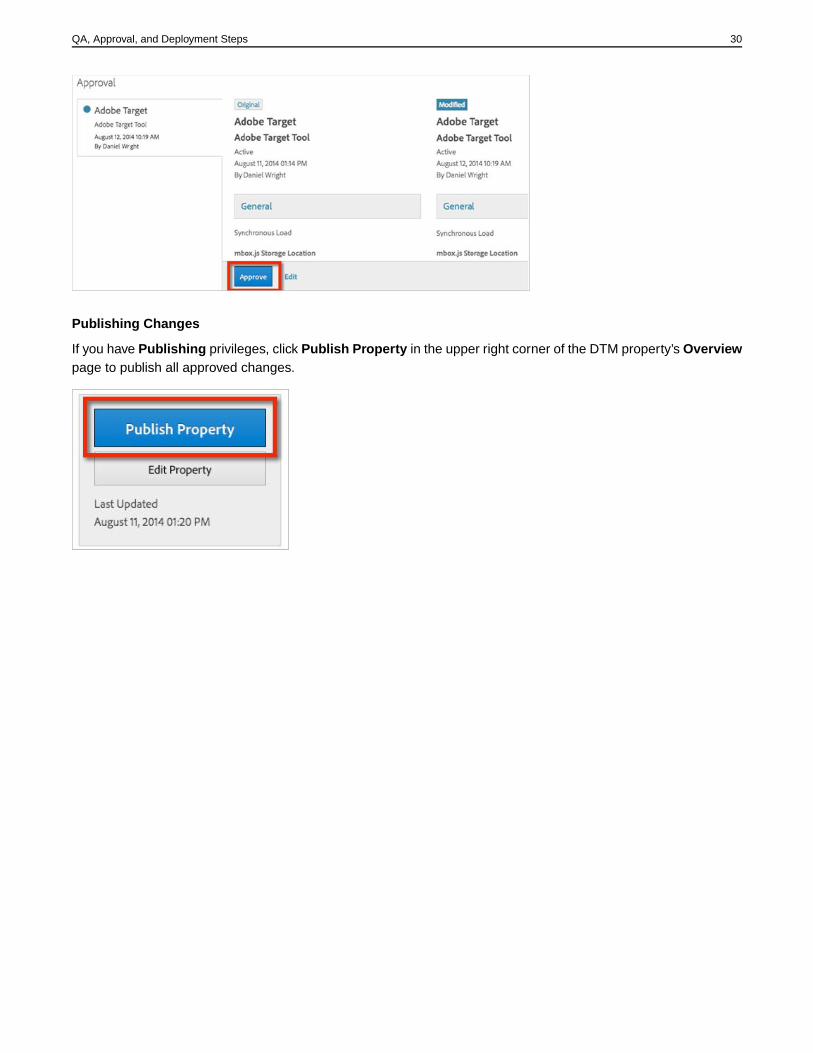
The Approvals page highlights the individual changes that were made. To approve the change, click Approve.
29QA, Approval, and Deployment Steps
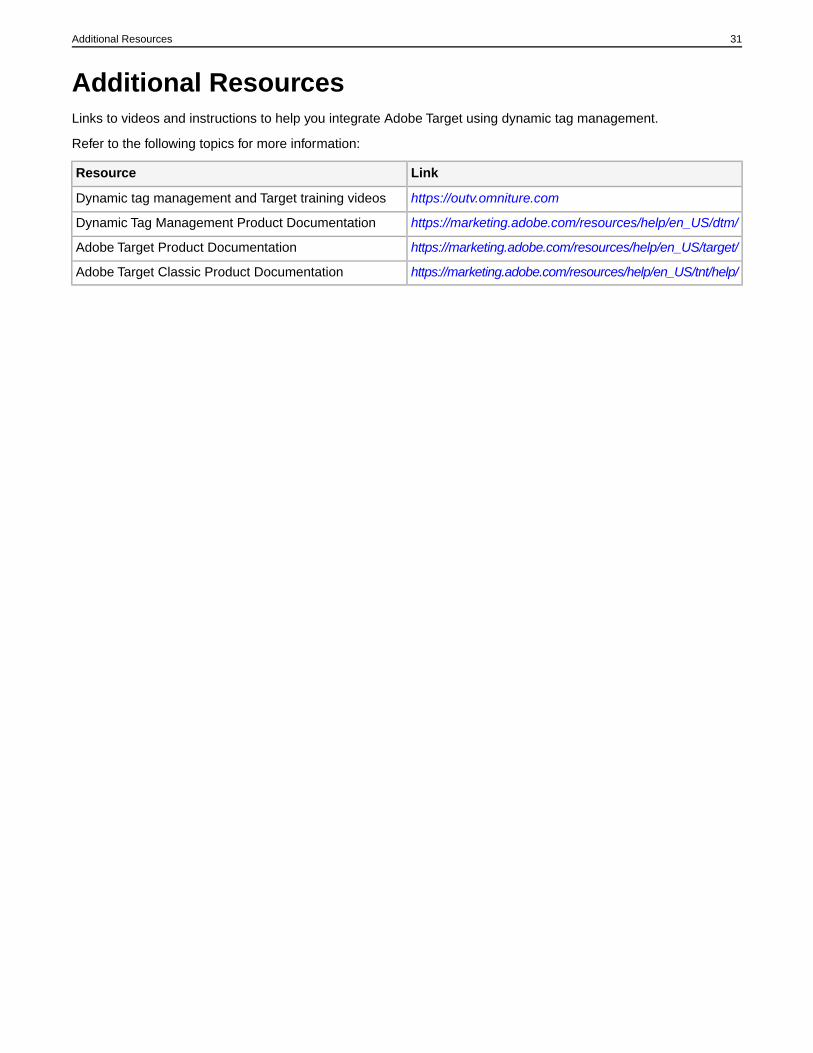
Publishing Changes
If you have Publishing privileges, click Publish Property in the upper right corner of the DTM property’s Overviewpage to publish all approved changes.
30QA, Approval, and Deployment Steps
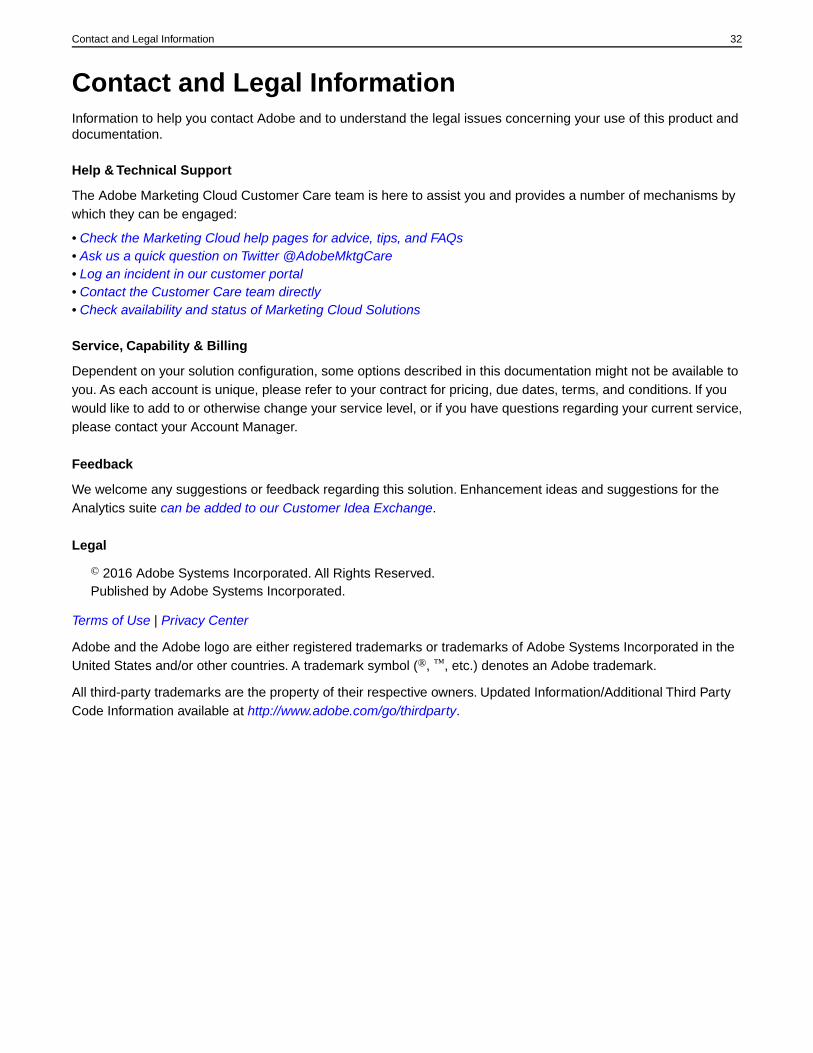
Additional ResourcesLinks to videos and instructions to help you integrate Adobe Target using dynamic tag management.
Refer to the following topics for more information:
LinkResource
https://outv.omniture.comDynamic tag management and Target training videos
https://marketing.adobe.com/resources/help/en_US/dtm/Dynamic Tag Management Product Documentation
https://marketing.adobe.com/resources/help/en_US/target/Adobe Target Product Documentation
https://marketing.adobe.com/resources/help/en_US/tnt/help/Adobe Target Classic Product Documentation
31Additional Resources
Contact and Legal InformationInformation to help you contact Adobe and to understand the legal issues concerning your use of this product anddocumentation.
Help & Technical Support
The Adobe Marketing Cloud Customer Care team is here to assist you and provides a number of mechanisms bywhich they can be engaged:
• Check the Marketing Cloud help pages for advice, tips, and FAQs• Ask us a quick question on Twitter @AdobeMktgCare• Log an incident in our customer portal• Contact the Customer Care team directly• Check availability and status of Marketing Cloud Solutions
Service, Capability & Billing
Dependent on your solution configuration, some options described in this documentation might not be available toyou. As each account is unique, please refer to your contract for pricing, due dates, terms, and conditions. If youwould like to add to or otherwise change your service level, or if you have questions regarding your current service,please contact your Account Manager.
Feedback
We welcome any suggestions or feedback regarding this solution. Enhancement ideas and suggestions for theAnalytics suite can be added to our Customer Idea Exchange.
Legal
© 2016 Adobe Systems Incorporated. All Rights Reserved.Published by Adobe Systems Incorporated.
Terms of Use | Privacy Center
Adobe and the Adobe logo are either registered trademarks or trademarks of Adobe Systems Incorporated in theUnited States and/or other countries. A trademark symbol (®, ™, etc.) denotes an Adobe trademark.
All third-party trademarks are the property of their respective owners. Updated Information/Additional Third PartyCode Information available at http://www.adobe.com/go/thirdparty.
32Contact and Legal Information