advanced authentication 6 - netiq€¦ · communicate to the advanced authentication server on...
TRANSCRIPT

Advanced Authentication 6.3Repo Agent Installation Guide
December 2019

Legal NoticesFor information about legal notices, trademarks, disclaimers, warranties, export and other use restrictions, U.S. Government rights, patent policy, and FIPS compliance, see http://www.microfocus.com/about/legal/.
© Copyright 2019 Micro Focus or one of its affiliates.
2
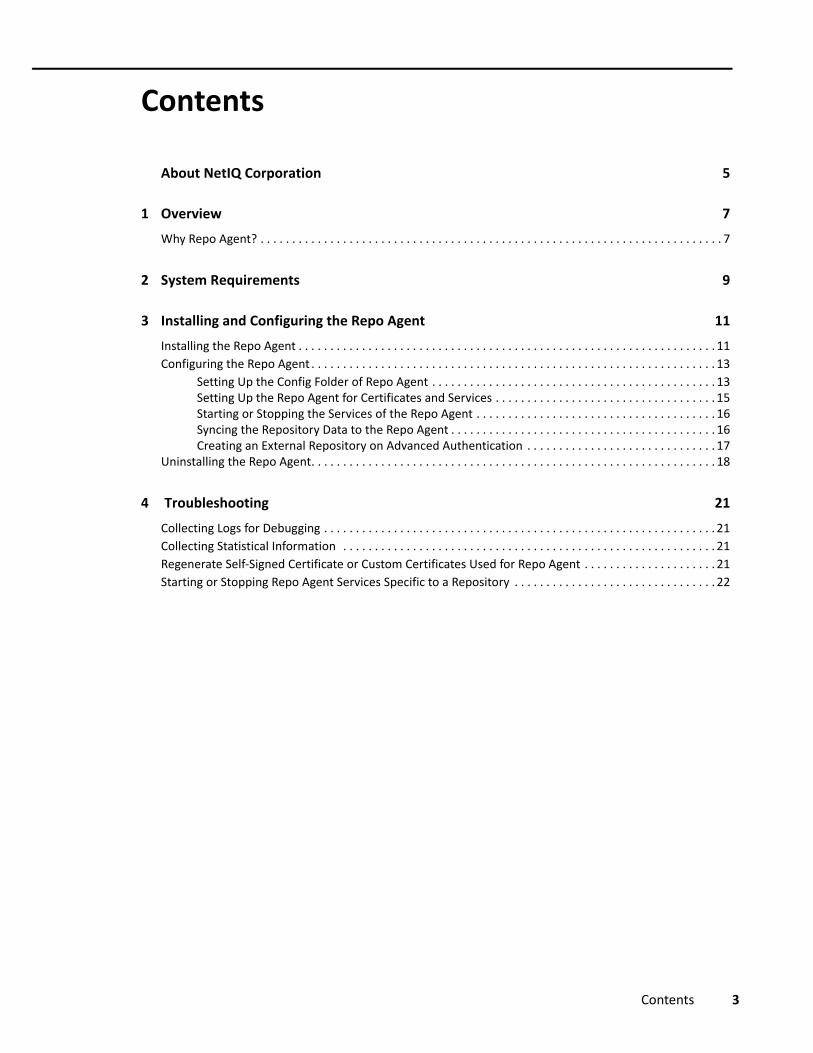
Contents
About NetIQ Corporation 5
1 Overview 7Why Repo Agent? . . . . . . . . . . . . . . . . . . . . . . . . . . . . . . . . . . . . . . . . . . . . . . . . . . . . . . . . . . . . . . . . . . . . . . . . . 7
2 System Requirements 9
3 Installing and Configuring the Repo Agent 11Installing the Repo Agent . . . . . . . . . . . . . . . . . . . . . . . . . . . . . . . . . . . . . . . . . . . . . . . . . . . . . . . . . . . . . . . . . . 11Configuring the Repo Agent . . . . . . . . . . . . . . . . . . . . . . . . . . . . . . . . . . . . . . . . . . . . . . . . . . . . . . . . . . . . . . . . 13
Setting Up the Config Folder of Repo Agent . . . . . . . . . . . . . . . . . . . . . . . . . . . . . . . . . . . . . . . . . . . . . 13Setting Up the Repo Agent for Certificates and Services . . . . . . . . . . . . . . . . . . . . . . . . . . . . . . . . . . . 15Starting or Stopping the Services of the Repo Agent . . . . . . . . . . . . . . . . . . . . . . . . . . . . . . . . . . . . . . 16Syncing the Repository Data to the Repo Agent . . . . . . . . . . . . . . . . . . . . . . . . . . . . . . . . . . . . . . . . . . 16Creating an External Repository on Advanced Authentication . . . . . . . . . . . . . . . . . . . . . . . . . . . . . . 17
Uninstalling the Repo Agent. . . . . . . . . . . . . . . . . . . . . . . . . . . . . . . . . . . . . . . . . . . . . . . . . . . . . . . . . . . . . . . . 18
4 Troubleshooting 21Collecting Logs for Debugging . . . . . . . . . . . . . . . . . . . . . . . . . . . . . . . . . . . . . . . . . . . . . . . . . . . . . . . . . . . . . . 21Collecting Statistical Information . . . . . . . . . . . . . . . . . . . . . . . . . . . . . . . . . . . . . . . . . . . . . . . . . . . . . . . . . . . 21Regenerate Self-Signed Certificate or Custom Certificates Used for Repo Agent . . . . . . . . . . . . . . . . . . . . . 21Starting or Stopping Repo Agent Services Specific to a Repository . . . . . . . . . . . . . . . . . . . . . . . . . . . . . . . . 22
Contents 3

4
About NetIQ Corporation
We are a global, enterprise software company, with a focus on the three persistent challenges in your environment: Change, complexity and risk—and how we can help you control them.
Our ViewpointAdapting to change and managing complexity and risk are nothing new
In fact, of all the challenges you face, these are perhaps the most prominent variables that deny you the control you need to securely measure, monitor, and manage your physical, virtual, and cloud computing environments.
Enabling critical business services, better and faster We believe that providing as much control as possible to IT organizations is the only way to enable timelier and cost effective delivery of services. Persistent pressures like change and complexity will only continue to increase as organizations continue to change and the technologies needed to manage them become inherently more complex.
Our PhilosophySelling intelligent solutions, not just software
In order to provide reliable control, we first make sure we understand the real-world scenarios in which IT organizations like yours operate—day in and day out. That's the only way we can develop practical, intelligent IT solutions that successfully yield proven, measurable results. And that's so much more rewarding than simply selling software.
Driving your success is our passion We place your success at the heart of how we do business. From product inception to deployment, we understand that you need IT solutions that work well and integrate seamlessly with your existing investments; you need ongoing support and training post-deployment; and you need someone that is truly easy to work with—for a change. Ultimately, when you succeed, we all succeed.
Our Solutions Identity & Access Governance Access Management Security Management Systems & Application Management Workload Management Service Management
About NetIQ Corporation 5

Contacting Sales SupportFor questions about products, pricing, and capabilities, contact your local partner. If you cannot contact your partner, contact our Sales Support team.
Contacting Technical SupportFor specific product issues, contact our Technical Support team.
Contacting Documentation SupportOur goal is to provide documentation that meets your needs. The documentation for this product is available on the NetIQ Web site in HTML and PDF formats on a page that does not require you to log in. If you have suggestions for documentation improvements, click Add Comment at the bottom of any page in the HTML version of the documentation posted at www.netiq.com/documentation. You can also email [email protected]. We value your input and look forward to hearing from you.
Contacting the Online User CommunityNetIQ Communities, the NetIQ online community, is a collaborative network connecting you to your peers and NetIQ experts. By providing more immediate information, useful links to helpful resources, and access to NetIQ experts, NetIQ Communities helps ensure you are mastering the knowledge you need to realize the full potential of IT investments upon which you rely. For more information, visit community.netiq.com.
Worldwide: www.netiq.com/about_netiq/officelocations.asp
United States and Canada: 1-888-323-6768
Email: [email protected]
Web Site: www.netiq.com
Worldwide: www.netiq.com/support/contactinfo.asp
North and South America: 1-713-418-5555
Europe, Middle East, and Africa: +353 (0) 91-782 677
Email: [email protected]
Web Site: www.netiq.com/support
6 About NetIQ Corporation

1 1Overview
The Repo Agent acts as a middle ware between the Advanced Authentication server and the organizational repositories. Repo Agent pulls the user data from the LDAP repository and makes this data available to Advanced Authentication based on periodic or on-demand requests. This eases the communication between the Advanced Authentication server and LDAP servers in a hybrid cloud-based environment, during the authentication of users.
Why Repo Agent?Previously, Advanced Authentication communicated directly with the LDAP servers to fetch the data of users and groups from the LDAP repository. However, during the authentication, this caused performance issues because of the delays that were caused every time Advanced Authentication interacted with the LDAP repository.
Also, if the Advanced Authentication server is to be hosted on cloud and if an organization may not want to expose their data to the cloud, then an agent is required that can run on-premise and communicate to the Advanced Authentication server on cloud.
To overcome these issues, Advanced Authentication provides the Repo Agent that acts as a middle ware between the LDAP repository and Advanced Authentication. The Repo Agent stores the data in an internal database and makes the data available to Advanced Authentication.
Figure 1-1 Illustrates working of Repo Agent
AdvancedAuthentication
Repo Agent LDAP Repository
Overview 7

8 Overview

2 2System Requirements
You must have the administrator privileges to install and configure the Repo Agent.
Linux host with docker and docker-compose. Minimum Requirement: docker-compose version 1.23.2 Minimum Requirement: docker version 18.09.1
CPU Minimum requirement: 2 Cores CPU
Memory Minimum requirement: 4 GB of RAM Recommended requirement: 8 GB of RAM
Hard disk space Minimum requirement: 40 GB Recommended requirement: 60 GB
IP PortsEnsure that the firewall uses the default port 9443
LDAP RepositoriesThe following LDAP repositories are supported: Microsoft Active Directory Services Microsoft Active Directory Lightweight Directory Services NetIQ eDirectory OpenLDAP OpenDJ
NOTE: Repo Agent does not support the SQL repositories.
System Requirements 9

10 System Requirements

3 3Installing and Configuring the Repo Agent
This chapter contains the following sections:
“Installing the Repo Agent” on page 11 “Configuring the Repo Agent” on page 13 “Uninstalling the Repo Agent” on page 18
Installing the Repo Agent1 Create a folder, for example, AuCoreRepoAgent in any valid directory:mkdir AuCoreRepoAgent
2 After you create the AuCoreRepoAgent, you must create the following script files to run the Repo Agent:2a Create a file dockompose with the following content:
#!/bin/bashpushd config >/dev/nulldocker-compose $*popd >/dev/null
NOTE: If you create the files on Windows, ensure that you remove the Windows line ending symbol (^M) in the end of each line.
2b Create a file, for example, aurepa_docker_stats.sh with the following content:
#!/bin/bash TMP=/tmp/docker-stats docker stats --no-stream --format "table {{.Name}}\t{{.CPUPerc}}\t{{.MemUsage}}" | grep aurepa | tail -n +2 >$TMP echo " SORT BY NAME" cat $TMP | sort -k 1 echo " SORT BY CPU" cat $TMP | sort -k 2 echo " SORT BY MEM" cat $TMP | sort -k 3 -h echo " if you want interactive montor, run 'docker stats'"
2c Create a file repo.sh with the following content:This file helps to start, stop, or restart the services (db, sync, and http) of the Repo Agent.
Installing and Configuring the Repo Agent 11
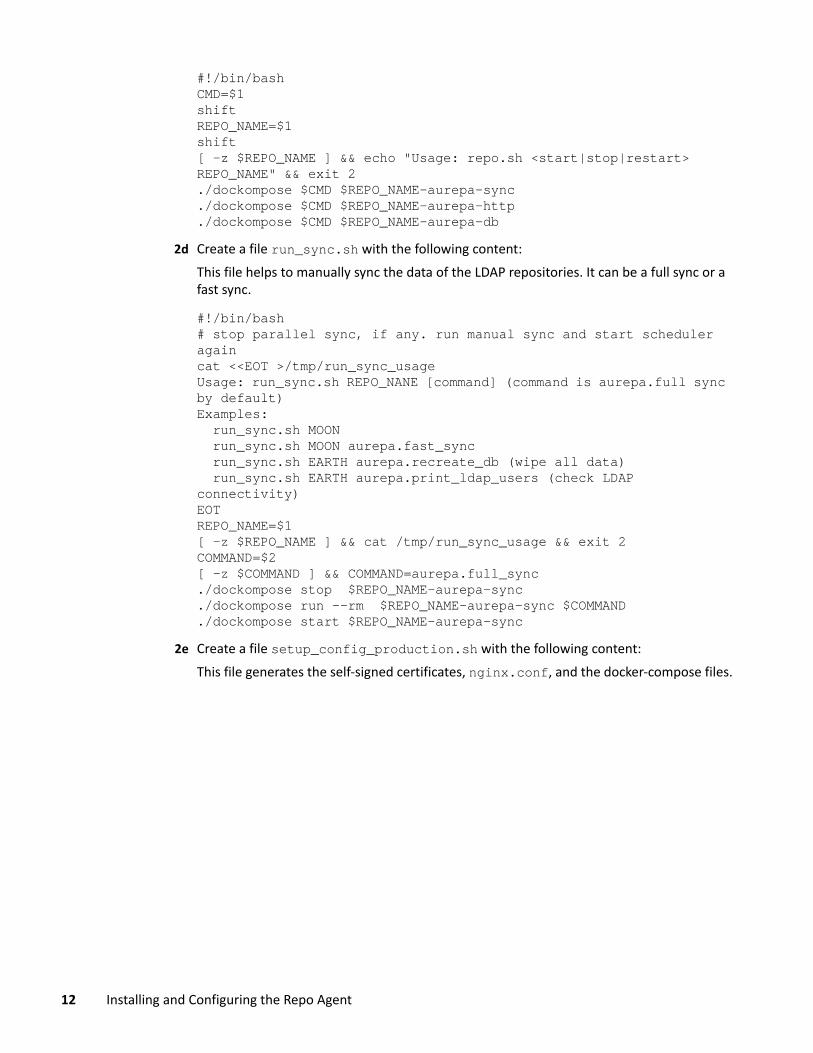
#!/bin/bashCMD=$1shiftREPO_NAME=$1shift[ -z $REPO_NAME ] && echo "Usage: repo.sh <start|stop|restart> REPO_NAME" && exit 2./dockompose $CMD $REPO_NAME-aurepa-sync./dockompose $CMD $REPO_NAME-aurepa-http./dockompose $CMD $REPO_NAME-aurepa-db
2d Create a file run_sync.sh with the following content:This file helps to manually sync the data of the LDAP repositories. It can be a full sync or a fast sync.
#!/bin/bash# stop parallel sync, if any. run manual sync and start scheduler againcat <<EOT >/tmp/run_sync_usageUsage: run_sync.sh REPO_NANE [command] (command is aurepa.full sync by default)Examples: run_sync.sh MOON run_sync.sh MOON aurepa.fast_sync run_sync.sh EARTH aurepa.recreate_db (wipe all data) run_sync.sh EARTH aurepa.print_ldap_users (check LDAP connectivity)EOTREPO_NAME=$1[ -z $REPO_NAME ] && cat /tmp/run_sync_usage && exit 2COMMAND=$2[ -z $COMMAND ] && COMMAND=aurepa.full_sync./dockompose stop $REPO_NAME-aurepa-sync./dockompose run --rm $REPO_NAME-aurepa-sync $COMMAND./dockompose start $REPO_NAME-aurepa-sync
2e Create a file setup_config_production.sh with the following content:This file generates the self-signed certificates, nginx.conf, and the docker-compose files.
12 Installing and Configuring the Repo Agent

#!/bin/bashexport AUREPA_IMG="mfsecurity/aaf-aurepa:6.2.0.0"export DOCKER_CONTENT_TRUST=1export SSL_HOSTNAME=$SSL_HOSTNAME# Generate docker-compose.yml, nginx and ini file. Generate SSL certificate, if not provided[ -z $SSL_HOSTNAME ] && [ ! -f config/etc.nginx/cert.pem ] && \ echo "Usage: SSL_HOSTNAME=your-server.com ./$(basename ${BASH_SOURCE[0]})" && \ exit 2MYDIR=`cd "$( dirname "${BASH_SOURCE[0]}" )" && pwd`CONF_DIR=$MYDIR/configdocker run --rm \ -e PYTHONUNBUFFERED=1 \ -e SSL_HOSTNAME=$SSL_HOSTNAME \ -e AUREPA_IMG=$AUREPA_IMG \ -v $CONF_DIR:/mnt/config/ $AUREPA_IMG \ python /opt/AuRepa/auconfig/setup_config.pyc $CONF_DIR
NOTE: Run the command sudo chmod 755 to set permissions for the above files.
2f Create the following folders in the AuCoreRepoAgent folder:mkdir -p config/etc.nginxmkdir -p config/EXAMPLE1.repo
Configuring the Repo AgentTo configure Repo Agent, perform the following:
“Setting Up the Config Folder of Repo Agent” on page 13 “Setting Up the Repo Agent for Certificates and Services” on page 15 “Starting or Stopping the Services of the Repo Agent” on page 16 “Syncing the Repository Data to the Repo Agent” on page 16 “Creating an External Repository on Advanced Authentication” on page 17
Setting Up the Config Folder of Repo AgentThe $AuCoreRepoAgent/config folder contains the following files:
EXAMPLE1.repo etc.nginx
You must rename EXAMPLE1.repo with the repo name of your repository.
For example, mv EXAMPLE1.repo/ FOCUS.repo
NOTE: Repo Name must be same as the NETBIOS name for the Active Directory.
Installing and Configuring the Repo Agent 13

Create the following three files in the FOCUS.repo:
cron.py: This file allows you to configure the LDAP synchronization.
For example, the file contains the following format:
import schedule, aurepa.scheduler as aurun = au.run################################ Schedule, please customizeschedule.every(10).minutes.do(run, command='aurepa.fast_sync')#schedule.every().saturday.at("00:15").do(run, command='aurepa.full_sync')# schedule.every(3).days.do(run, command='aurepa.full_sync')# Help: see https://schedule.readthedocs.io/en/stable/KILL_TIMEOUT_MINUTES = 60 * 4 # 4 hours, increase if your full sync may run longer# End schedule################################# Do not change rest of the fileau.kill_timeout_seconds = KILL_TIMEOUT_MINUTES * 60au.main_loop()print(f"This message must not appear. File {__name__} must run aurepa.scheduler.main_loop() forever")
repo.json: This file helps you configure the LDAP parameters.For example, the file contains the following format:
{ "user": "CN=Administrator,CN=Users,DC=focus,DC=com", "base_dn": "cn=users,dc=focus,dc=com", "password": "sample@12345", "ldap_type": 1, "ldap_type_help": "(1, 'AD'), (2, 'AD LDS'), (3, 'eDirectory'), (4, 'Other'). This field is ignored", "paged_enabled": true, "nested_enabled": true, "base_dn_one_level": false, "group_dn_one_level": false, "user_mail_attrs": ["mail", "otherMailbox"], "user_name_attrs": ["sAMAccountName", "userPrincipalName"], "group_name_attrs": ["sAMAccountName"], "user_lookup_attrs": ["sAMAccountName", "userPrincipalName"], "group_lookup_attrs": ["sAMAccountName"], "user_mobile_phone_attrs": ["mobile", "otherMobile"], "custom_attrs": ["info", "pager"], "servers": [ {"name": "1.1.1.1", "port":389,"use_ssl": false}, {"name": "1.1.1.4", "port":389,"use_ssl": false} ]}
NOTE: With custom_attrs, it is possible to return any LDAP attribute from Active Directory. These attributes provide additional information that can be displayed on RADIUS client if the corresponding RADIUS result specification rule exists in the Administration portal.
14 Installing and Configuring the Repo Agent
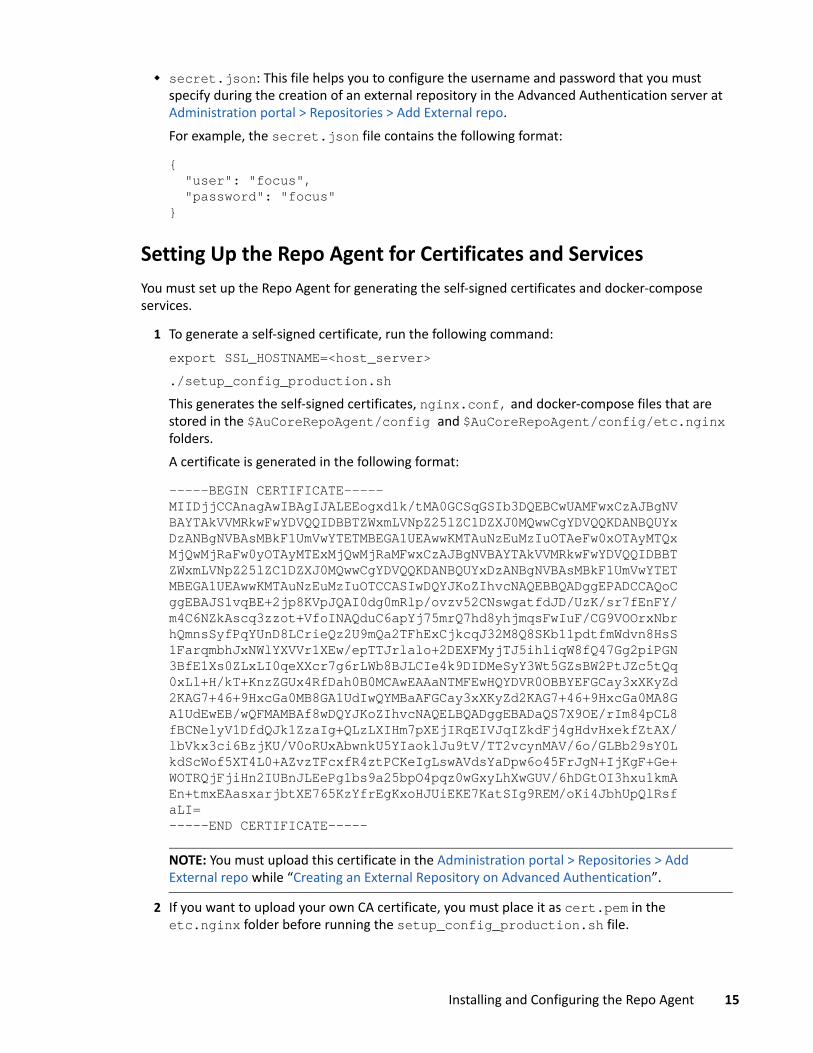
secret.json: This file helps you to configure the username and password that you must specify during the creation of an external repository in the Advanced Authentication server at Administration portal > Repositories > Add External repo.For example, the secret.json file contains the following format:
{ "user": "focus", "password": "focus"}
Setting Up the Repo Agent for Certificates and ServicesYou must set up the Repo Agent for generating the self-signed certificates and docker-compose services.
1 To generate a self-signed certificate, run the following command:export SSL_HOSTNAME=<host_server>./setup_config_production.shThis generates the self-signed certificates, nginx.conf, and docker-compose files that are stored in the $AuCoreRepoAgent/config and $AuCoreRepoAgent/config/etc.nginx folders.A certificate is generated in the following format:
-----BEGIN CERTIFICATE-----MIIDjjCCAnagAwIBAgIJALEEogxd1k/tMA0GCSqGSIb3DQEBCwUAMFwxCzAJBgNVBAYTAkVVMRkwFwYDVQQIDBBTZWxmLVNpZ25lZC1DZXJ0MQwwCgYDVQQKDANBQUYxDzANBgNVBAsMBkF1UmVwYTETMBEGA1UEAwwKMTAuNzEuMzIuOTAeFw0xOTAyMTQxMjQwMjRaFw0yOTAyMTExMjQwMjRaMFwxCzAJBgNVBAYTAkVVMRkwFwYDVQQIDBBTZWxmLVNpZ25lZC1DZXJ0MQwwCgYDVQQKDANBQUYxDzANBgNVBAsMBkF1UmVwYTETMBEGA1UEAwwKMTAuNzEuMzIuOTCCASIwDQYJKoZIhvcNAQEBBQADggEPADCCAQoCggEBAJS1vqBE+2jp8KVpJQAI0dg0mRlp/ovzv52CNswgatfdJD/UzK/sr7fEnFY/m4C6NZkAscq3zzot+VfoINAQduC6apYj75mrQ7hd8yhjmqsFwIuF/CG9VOOrxNbrhQmnsSyfPqYUnD8LCrieQz2U9mQa2TFhExCjkcqJ32M8Q8SKb11pdtfmWdvn8HsS1FarqmbhJxNWlYXVVr1XEw/epTTJrlalo+2DEXFMyjTJ5ihliqW8fQ47Gg2piPGN3BfE1Xs0ZLxLI0qeXXcr7g6rLWb8BJLCIe4k9DIDMeSyY3Wt5GZsBW2PtJZc5tQq0xLl+H/kT+KnzZGUx4RfDah0B0MCAwEAAaNTMFEwHQYDVR0OBBYEFGCay3xXKyZd2KAG7+46+9HxcGa0MB8GA1UdIwQYMBaAFGCay3xXKyZd2KAG7+46+9HxcGa0MA8GA1UdEwEB/wQFMAMBAf8wDQYJKoZIhvcNAQELBQADggEBADaQS7X9OE/rIm84pCL8fBCNelyV1DfdQJk1ZzaIg+QLzLXIHm7pXEjIRqEIVJqIZkdFj4gHdvHxekfZtAX/lbVkx3ci6BzjKU/V0oRUxAbwnkU5YIaoklJu9tV/TT2vcynMAV/6o/GLBb29sY0LkdScWof5XT4L0+AZvzTFcxfR4ztPCKeIgLswAVdsYaDpw6o45FrJgN+IjKgF+Ge+WOTRQjFjiHn2IUBnJLEePg1bs9a25bpO4pqz0wGxyLhXwGUV/6hDGtOI3hxu1kmAEn+tmxEAasxarjbtXE765KzYfrEgKxoHJUiEKE7KatSIg9REM/oKi4JbhUpQlRsfaLI=-----END CERTIFICATE-----
NOTE: You must upload this certificate in the Administration portal > Repositories > Add External repo while “Creating an External Repository on Advanced Authentication”.
2 If you want to upload your own CA certificate, you must place it as cert.pem in the etc.nginx folder before running the setup_config_production.sh file.
Installing and Configuring the Repo Agent 15

NOTE: When the SSL_HOSTNAME is not passed and setup_config_production.sh is executed, a script picks the custom certificates from etc-config file and consumes it for nginx. This also creates the two files: docker-compose.yml and aurepa.ini.
Starting or Stopping the Services of the Repo AgentRun the following command under the AuCoreRepoAgent directory to start the docker compose services of the Repo Agent:
./dockompose up -dBased on the number of repos that are configured, the services are started. Typically, for each repo, the Repo Agent starts three services: db, sync, and http.
The following services are created for FOCUS, which is a repository running in the Repo Agent and one single nginx service as a front web-server:
config_nginx_1 config_FOCUS-aurepa-db_1 config_FOCUS-aurepa-http_1 config_FOCUS-aurepa-sync_1
To stop and remove the services of the Repo Agent, run the following command:
./dockompose down $* --remove-orphansThis cleans or removes the Repo Agent docker services from the host machine.
Syncing the Repository Data to the Repo AgentTo manually sync the data from the LDAP repositories, run the following command:
$AuCoreRepoAgent/run_sync.sh <REPO_NAME> [aurepa.fast_sync | aurepa.full_sync]For example, to do a manual Fast sync for the FOCUS repository, run the following command:
$AuCoreRepoAgent/run_sync.sh FOCUS aurepa.fast_sync$AuCoreRepoAgent/run_sync.sh FOCUS performs a full sync of the Repo Agent.
NOTE: The Repo Agent fails to sync data with Advanced Authentication when the Repo Name contains spaces.
You can perform the following to validate the syncing of repositories:
“Checking the Repository LDAP Connectivity Before Syncing” on page 17 “Checking Repository Information is Synced to the Repo Agent Database” on page 17 “Cleaning the Repo Agent Database” on page 17
16 Installing and Configuring the Repo Agent

Checking the Repository LDAP Connectivity Before SyncingBefore syncing the repository data, to check the LDAP connectivity and print the users to be synced, run the following command:
$AuCoreRepoAgent/run_sync.sh <REPO_NAME> aurepa.print_ldap_usersFor example, $AuCoreRepoAgent/run_sync.sh FOCUS aurepa.print_ldap_users
Checking Repository Information is Synced to the Repo Agent DatabaseTo check all the users and groups information is synced to the Repo Agent database, run the following command:
NOTE: Replace the REPO_NAME with the repo name provided in the $AuCoreRepoAgent/config directory.
For users:
docker exec config_<REPO_NAME>-aurepa-db_1 psql -U postgres -d aurepa -P pager=off -c "select count(lookup_names) from repa_user"For groups:
docker exec config_<REPO_NAME>-aurepa-db_1 psql -U postgres -d aurepa -P pager=off -c "select count(lookup_names) from repa_group"
Cleaning the Repo Agent DatabaseTo delete an invalid user or group information in the Repo Agent database and clean the database without reconfiguring the Repo Agent, run the following command:
$AuCoreRepoAgent/run_sync.sh <REPO_NAME> aurepa.recreate_db
NOTE: After clean up, you must sync the data for the repositories.
Creating an External Repository on Advanced AuthenticationAfter you install and configure the Repo Agent, you must map the Repo Agent as the external repository on Advanced Authentication.
To add the external repository in Advanced Authentication:
1 Open the Advanced Authentication Administration portal.2 Click Repositories > Add External repo.3 Specify the following details:
Name: Name of the repository.Name of the repository must be the same as what is defined in the Repo Agent.
NOTE: Ensure that the repository name does not contain spaces.
Installing and Configuring the Repo Agent 17

Username: Name of the user using the repository. Password: Password of the repository.
NOTE: The Username and Password are defined in the secret.json file of the Repo Agent. For information about the secret.json file, see “Setting Up the Config Folder of Repo Agent”.
4 Add the external repository server configurations:4a Click Add Server.4b Specify the IP address of the Repo Agent in Address.4c Specify the port number of the external repository server in Port. For example, 9443.4d Save the server credentials.
5 Click Choose File to upload the CA certificate for the agent.This is the self-signed certificate cert.pem generated in the etc.nginx folder or your own CA certificate used during the configuration of the Repo Agent.
6 Click Save.
NOTE: You can perform the synchronization of an external repository only from a Global Master server.
Checking Repository is Synced to the Advanced Authentication DatabaseAfter creating the external repository in the Advanced Authentication Administration portal and syncing, to validate whether are all user and group information is synced, perform the following steps:
1 Log in to the Advanced Authentication terminal.2 Run the following commands:
To check users:docker exec aaf_audb_1 psql -U root -d aucore_prod -P pager=off -c "select * from external_user"
To check groups:docker exec aaf_audb_1 psql -U root -d aucore_prod -P pager=off -c "select * from external_group"
Uninstalling the Repo AgentTo uninstall the Repo Agent, run the following commands:
./dockompose down -v --remove-orphansdocker container prune -fdocker network prune -f
18 Installing and Configuring the Repo Agent

NOTE: The above commands removes the unused networks and containers.
Installing and Configuring the Repo Agent 19

20 Installing and Configuring the Repo Agent

4 4 Troubleshooting
This chapter contains the following topics:
“Collecting Logs for Debugging” on page 21 “Collecting Statistical Information” on page 21 “Regenerate Self-Signed Certificate or Custom Certificates Used for Repo Agent” on page 21 “Starting or Stopping Repo Agent Services Specific to a Repository” on page 22
Collecting Logs for DebuggingRun the following command to collect logs of all the Repo services that are configured in the $AuCoreRepoAgent/config directory:
$AuCoreRepoAgent/dockompose logs -f $*
Collecting Statistical Information To list the statistical information of Repo Agent docker container, for example, the CPU usage, memory, and so on, run the following command:
$AuCoreRepoAgent/aurepa_docker_stats.sh
Regenerate Self-Signed Certificate or Custom Certificates Used for Repo Agent
To regenerate a new self-signed certificate or use custom certificates for the nginx container, perform the following steps:
1 Delete the existing certificates and nginx configuration files:sudo rm $AuCoreRepoAgent/config/etc.nginx/*.*
2 Reconfigure the Repo Agent:SSL_HOSTNAME=<Repo_Agent_IP_Hostname> ./setup_config_production.sh
3 Restart the nginx container:$AuCoreRepoAgent/dockompose restart nginx
NOTE: You must name the custom certificate as cert.pem.
Troubleshooting 21

Starting or Stopping Repo Agent Services Specific to a Repository
To manage the services of a specific repository, run the following command:
$AuCoreRepoAgent/repo.sh <start|stop|restart> REPO_NAME
22 Troubleshooting