advanced maintenance and administration
TRANSCRIPT

1
1
AdvancedMaintenance andAdministration
Advanced RACAuckland - May 2008
juliandyke.com
Session 2
© 2008 Julian Dyke

2
2 © 2008 Julian Dyke juliandyke.com
Agenda
DBCA
Node Addition
Listener Configuration
Network Configuration
RCONFIG
Extended Clusters
3
3 © 2008 Julian Dyke juliandyke.com
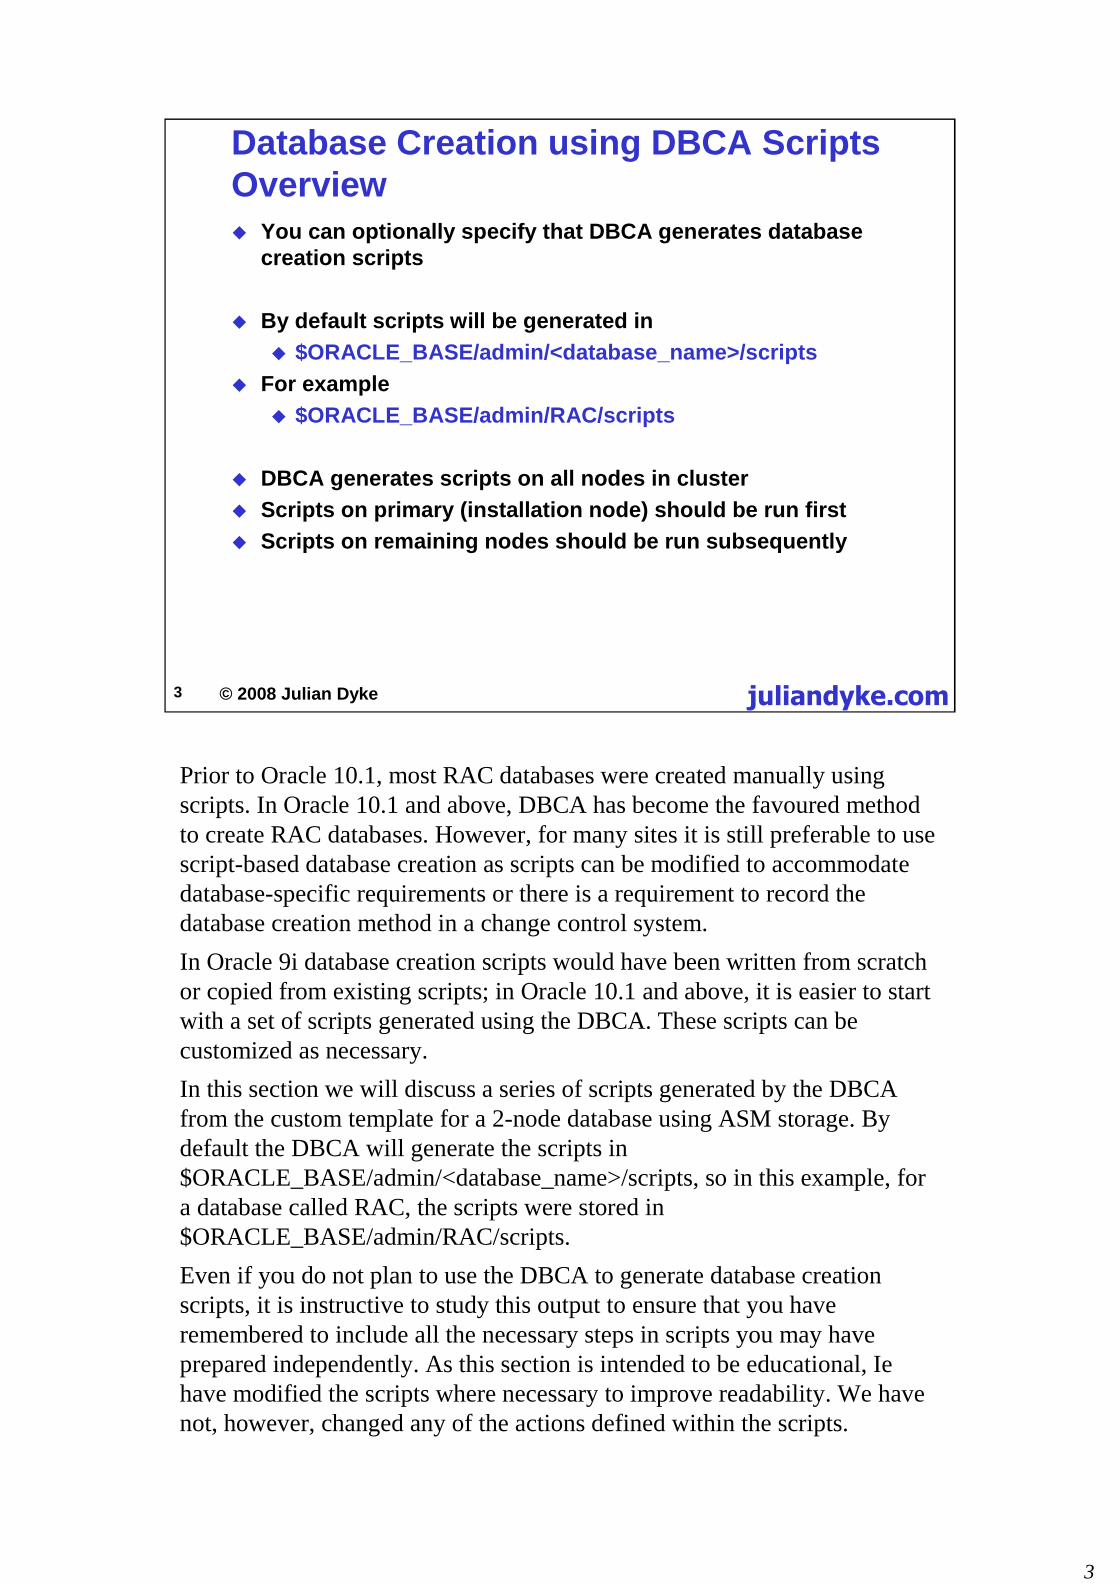
Database Creation using DBCA ScriptsOverview You can optionally specify that DBCA generates database
creation scripts
By default scripts will be generated in
$ORACLE_BASE/admin/<database_name>/scripts
For example
$ORACLE_BASE/admin/RAC/scripts
DBCA generates scripts on all nodes in cluster
Scripts on primary (installation node) should be run first
Scripts on remaining nodes should be run subsequently
Prior to Oracle 10.1, most RAC databases were created manually usingscripts. In Oracle 10.1 and above, DBCA has become the favoured methodto create RAC databases. However, for many sites it is still preferable to usescript-based database creation as scripts can be modified to accommodatedatabase-specific requirements or there is a requirement to record thedatabase creation method in a change control system.
In Oracle 9i database creation scripts would have been written from scratchor copied from existing scripts; in Oracle 10.1 and above, it is easier to startwith a set of scripts generated using the DBCA. These scripts can becustomized as necessary.
In this section we will discuss a series of scripts generated by the DBCAfrom the custom template for a 2-node database using ASM storage. Bydefault the DBCA will generate the scripts in$ORACLE_BASE/admin/<database_name>/scripts, so in this example, fora database called RAC, the scripts were stored in$ORACLE_BASE/admin/RAC/scripts.
Even if you do not plan to use the DBCA to generate database creationscripts, it is instructive to study this output to ensure that you haveremembered to include all the necessary steps in scripts you may haveprepared independently. As this section is intended to be educational, Iehave modified the scripts where necessary to improve readability. We havenot, however, changed any of the actions defined within the scripts.

4
4 © 2008 Julian Dyke juliandyke.com
Database Creation using DBCA ScriptsOverview The following files are generated on the primary node
RAC1.sh
RAC1.sql
init.ora
CreateDB.sql
CreateDBFiles.sql
CreateDBCatalog.sql
emRepository.sql
CreateClustDBViews.sql
postDBCreation.sql
The following files are generated on the second node
RAC2.sh
RAC2.sql
In order to save space I have omitted the following scripts which areoptionally included:
•JServer.sql
•xdb_protocol.sql
•ordinst.sql
• interMedia.sql
These scripts are not particularly instructive. However, you should be awareof them as your application might require some or all of them.
5
5 © 2008 Julian Dyke juliandyke.com
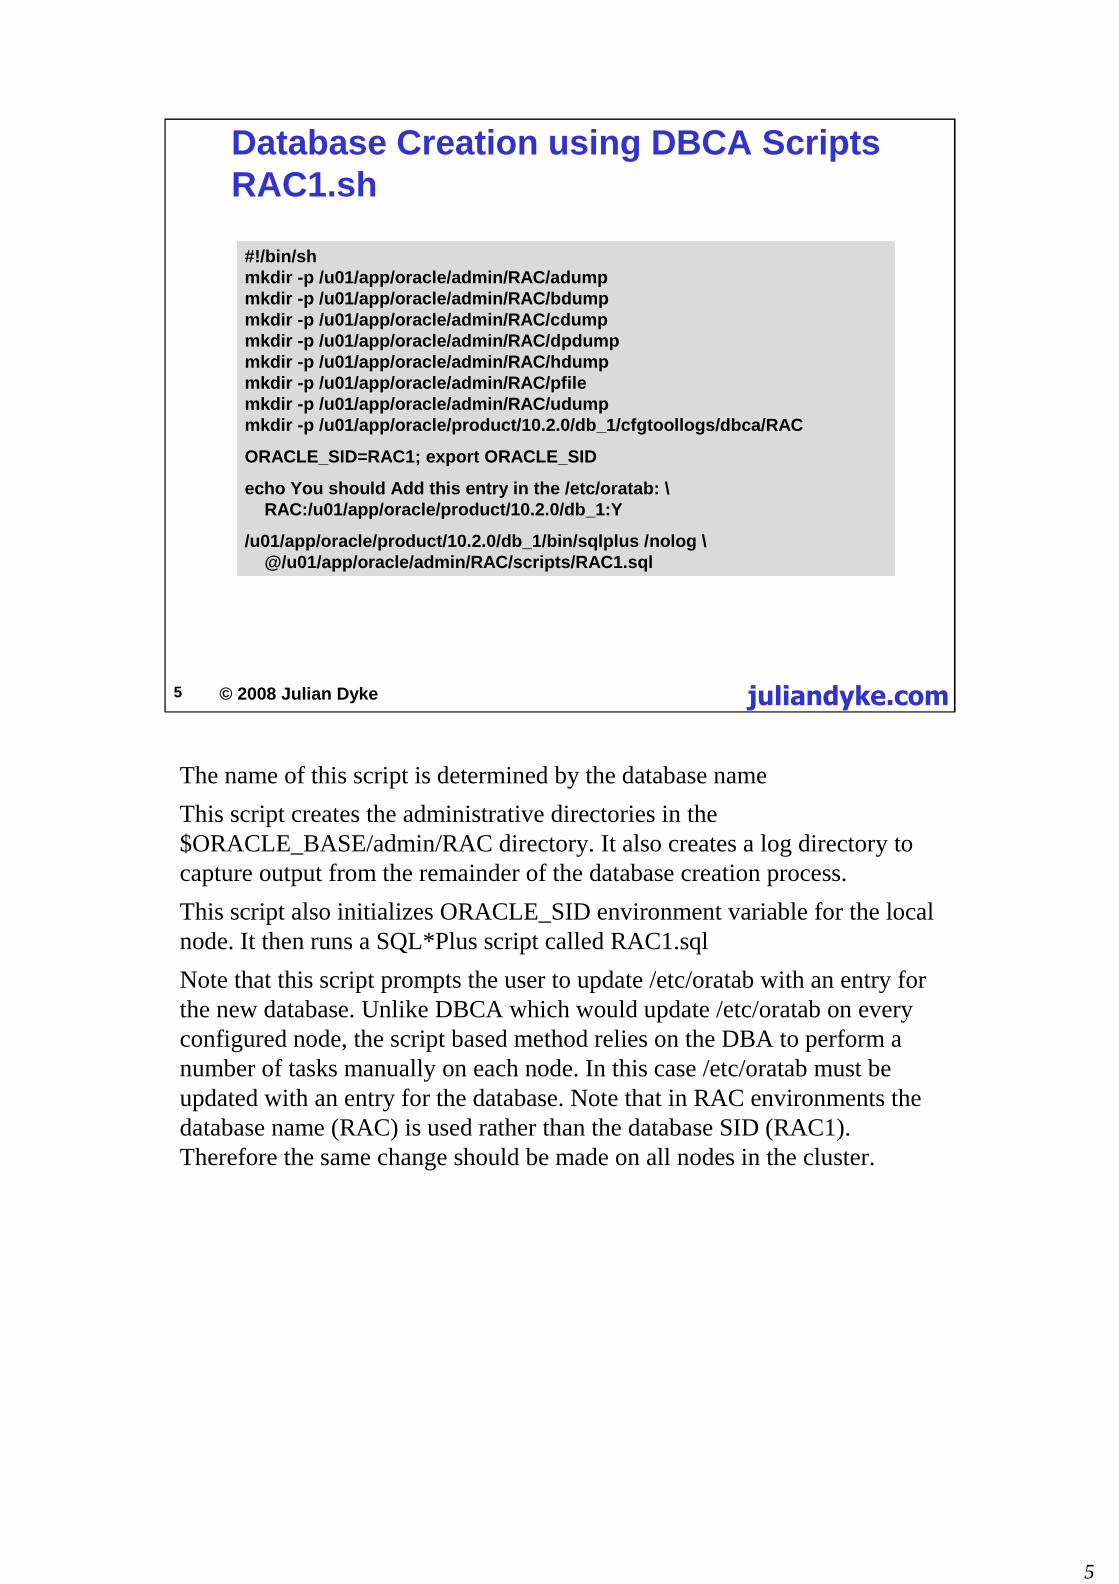
Database Creation using DBCA ScriptsRAC1.sh
#!/bin/shmkdir -p /u01/app/oracle/admin/RAC/adumpmkdir -p /u01/app/oracle/admin/RAC/bdumpmkdir -p /u01/app/oracle/admin/RAC/cdumpmkdir -p /u01/app/oracle/admin/RAC/dpdumpmkdir -p /u01/app/oracle/admin/RAC/hdumpmkdir -p /u01/app/oracle/admin/RAC/pfilemkdir -p /u01/app/oracle/admin/RAC/udumpmkdir -p /u01/app/oracle/product/10.2.0/db_1/cfgtoollogs/dbca/RAC
ORACLE_SID=RAC1; export ORACLE_SID
echo You should Add this entry in the /etc/oratab: \RAC:/u01/app/oracle/product/10.2.0/db_1:Y
/u01/app/oracle/product/10.2.0/db_1/bin/sqlplus /nolog \@/u01/app/oracle/admin/RAC/scripts/RAC1.sql
The name of this script is determined by the database name
This script creates the administrative directories in the$ORACLE_BASE/admin/RAC directory. It also creates a log directory tocapture output from the remainder of the database creation process.
This script also initializes ORACLE_SID environment variable for the localnode. It then runs a SQL*Plus script called RAC1.sql
Note that this script prompts the user to update /etc/oratab with an entry forthe new database. Unlike DBCA which would update /etc/oratab on everyconfigured node, the script based method relies on the DBA to perform anumber of tasks manually on each node. In this case /etc/oratab must beupdated with an entry for the database. Note that in RAC environments thedatabase name (RAC) is used rather than the database SID (RAC1).Therefore the same change should be made on all nodes in the cluster.

6
6 © 2008 Julian Dyke juliandyke.com
Database Creation using DBCA ScriptsRAC1.sql (1 of 2)
set verify off
PROMPT specify a password for sys as parameter 1;DEFINE sysPassword = &1
PROMPT specify a password for system as parameter 2;DEFINE systemPassword = &2
PROMPT specify a password for sysman as parameter 3;DEFINE sysmanPassword = &3
PROMPT specify a password for dbsnmp as parameter 4;DEFINE dbsnmpPassword = &4
PROMPT specify ASM SYS user password as parameter 6;DEFINE asmSysPassword= &6
host /u01/app/oracle/product/10.2.0/db_1/bin/orapwd \file=/u01/app/oracle/product/10.2.0/db_1/dbs/orapwRAC1 \password=&&sysPassword force=y
The name of this script is also determined by the database name. This SQLscript calls a number of other scripts which perform individual actionswithin the database creation procedure:
The script first prompts for passwords for the SYS, SYSTEM, SYSMAN,DBNSMP and, the ASM SYS users. Unlike DBCA it is not possible to setall passwords in a single command. Even if you entered the passwordsduring the DBCA session, they will not be stored in the scripts. This isnecessary to ensure that the integrity of the passwords is not compromisedby storing them in scripts.
The next step is to run the ORAPWD utility to create a password file in$ORACLE_HOME/dbs/orapwRAC1 using the SYS password entered in theprevious step.

7
7 © 2008 Julian Dyke juliandyke.com
Database Creation using DBCA ScriptsRAC1.sql (2 of 2)
@/u01/app/oracle/admin/RAC/scripts/CreateDB.sql@/u01/app/oracle/admin/RAC/scripts/CreateDBFiles.sql@/u01/app/oracle/admin/RAC/scripts/CreateDBCatalog.sql@/u01/app/oracle/admin/RAC/scripts/JServer.sql@/u01/app/oracle/admin/RAC/scripts/xdb_protocol.sql@/u01/app/oracle/admin/RAC/scripts/ordinst.sql@/u01/app/oracle/admin/RAC/scripts/interMedia.sql@/u01/app/oracle/admin/RAC/scripts/emRepository.sql@/u01/app/oracle/admin/RAC/scripts/CreateClustDBViews.sql
host echo "SPFILE='+DISKGROUP1/RAC/spfileRAC.ora'" >/u01/app/oracle/product/10.2.0/db_1/dbs/initRAC1.ora
@/u01/app/oracle/admin/RAC/scripts/postDBCreation.sql
The script then calls nine further SQL scripts to create the database, installthe catalog,, the Enterprise Manager repository and finally to run someRAC-specific catalog scripts. These scripts are discussed in more onsubsequent slides. This script also calls four scripts which configure JServer,XDB and intermedia. These scripts have been omitted from this material.
The next step is to create a PFILE called$ORACLE_HOME/dbs/initRAC1.ora which contains an SPFILE parameterdefining the location of the SPFILE in the ASM filesystem.
The final step is to run the post database creation SQL script. This scriptperforms a number of actions including the creation of redo log threads forthe second and subsequent instances, creation of an SPFILE, recompilationof invalid PL/SQL packages and optionally configuration of the EnterpriseManager database control.

8
8 © 2008 Julian Dyke juliandyke.com
Database Creation using DBCA Scriptsinit.ora (1 of 3)
# Cache and I/Odb_block_size=8192db_file_multiblock_read_count=16
# Cluster Database#cluster_database=truecluster_database_instances=2#remote_listener=LISTENERS_RAC
# Cursors and Library Cacheopen_cursors=300
# Database Identificationdb_domain=""db_name=RAC
# Diagnostics and Statisticsbackground_dump_dest=/u01/app/oracle/admin/RAC/bdumpcore_dump_dest=/u01/app/oracle/admin/RAC/cdumpuser_dump_dest=/u01/app/oracle/admin/RAC/udump
# File Configurationdb_create_file_dest=+DISKGROUP1
The database creation script include an initial set of parameters in an init.orafile. This file will subsequently be converted into an SPFILE. Note that theCONTROLFILES parameter is subsequently appended to this file by theCreateDB.sql. If you need to run the DBCA database creation scripts againfor any reason, you will need to restore the original version of this file.
Note that the values for the CLUSTER_DATABASES andREMOTE_LISTENER parameters are initially commented out. Thedatabase is initially created as an unclustered database and must besubsequently manually converted into a clustered database.

9
9 © 2008 Julian Dyke juliandyke.com
Database Creation using DBCA Scriptsinit.ora (2 of 3)
# Job Queuesjob_queue_processes=10
# Miscellaneouscompatible=10.2.0.1.0
# Processes and Sessionsprocesses=150
# SGA Memorysga_target=272629760
# Security and Auditingaudit_file_dest=/u01/app/oracle/admin/RAC/adumpremote_login_passwordfile=exclusive
# Shared Serverdispatchers="(PROTOCOL=TCP) (SERVICE=RACXDB)"
# Sort, Hash Joins, Bitmap Indexespga_aggregate_target=90177536
# System Managed Undo and Rollback Segmentsundo_management=AUTO
The DBCA will attempt to set reasonable default values for theSGA_TARGET and PGA_AGGREGATE_TARGET parameters. However,appropriate values for these parameters will be affected by the number ofinstances which you are intending to run on each node, so you may wish tomanually adjust these parameters

10
10 © 2008 Julian Dyke juliandyke.com
Database Creation using DBCA Scriptsinit.ora (3 of 3)
RAC1.instance_number=1RAC2.instance_number=2
RAC1.thread=1RAC2.thread=2
RAC1.undo_tablespace=UNDOTBS1RAC2.undo_tablespace=UNDOTBS2
The final entries in the init.ora file are instance specific and include theINSTANCE_NUMBER, THREAD and UNDO_TABLESPACE name.

11
11 © 2008 Julian Dyke juliandyke.com
Database Creation using DBCA ScriptsCreateDB.sql (1 of 2)
connect "SYS"/"&&sysPassword" as SYSDBAset echo onspool /u01/app/oracle/admin/RAC/scripts/CreateDB.log
startup nomount pfile="/u01/app/oracle/admin/RAC/scripts/init.ora";
CREATE DATABASE "RAC"MAXINSTANCES 32MAXLOGHISTORY 1MAXLOGFILES 192MAXLOGMEMBERS 3MAXDATAFILES 1024DATAFILE SIZE 300M
AUTOEXTEND ON NEXT 10240K MAXSIZE UNLIMITEDEXTENT MANAGEMENT LOCAL
SYSAUXDATAFILE SIZE 120MAUTOEXTEND ON NEXT 10240K MAXSIZE UNLIMITED
DEFAULT TEMPORARY TABLESPACE TEMPTEMPFILE SIZE 20MAUTOEXTEND ON NEXT 640K MAXSIZE UNLIMITED
.........
This script is called by RAC1.sql and is responsible for executing theCREATE DATABASE statement
The script performs some housekeeping and then starts an instance on thelocal node using the initialization parameters specified in the suppliedPFILE (init.ora)
The next step is to run the CREATE DATABASE statement which willcreate a database based on a combination of the specified parameters andthe contents of the $ORACLE_HOME/rdbms/admin/sql..bsq file. Note thatin Oracle 10.1 and above, the CREATE DATABASE statement includes amandatory clause for the SYSAUX tablespace. It also creates the SYSTEMtablespace, a default temporary tablespace and an UNDOTBS1 which is theundo tablespace for the initial instance.
The SYSAUX and TEMP tablespaces are explicitly created as SMALLFILEtablespaces. The SMALLFILE keyword was introduced in Oracle 10.1 andindicates that a tablespace can have multiple datafiles. The alternative is aBIGFILE tablespace which can only have a single datafile, but which canaddress a much larger number of blocks as all 32 bits in the address can beused for block numbers. As SMALLFILE tablespaces are still the default inOracle 10.2, I have deleted this keyword from the script to save space.

12
12 © 2008 Julian Dyke juliandyke.com
Database Creation using DBCA ScriptsCreateDB.sql (2 of 2)
..........UNDO TABLESPACE "UNDOTBS1"
DATAFILE SIZE 200MAUTOEXTEND ON NEXT 5120K MAXSIZE UNLIMITED
CHARACTER SET WE8ISO8859P1NATIONAL CHARACTER SET AL16UTF16LOGFILE GROUP 1 SIZE 51200K,GROUP 2 SIZE 51200KUSER SYS IDENTIFIED BY "&&sysPassword"USER SYSTEM IDENTIFIED BY "&&systemPassword";
set linesize 2048;
column ctl_files NEW_VALUE ctl_files;
select concat('control_files=''', concat(replace(value, ', ', ''','''), '''')) ctl_filesfrom v$parameter where name ='control_files';
host echo &ctl_files >>/u01/app/oracle/admin/RAC/scripts/init.ora;
spool off
The final step in this script updates the CONTROL_FILES parameter in theinit.ora file with the default values assigned by the CREATE DATABASEstatement.
As this is an ASM database, the filename of the control file cannot beknown when the scripts are generated. The controlfile is created by theCREATE DATABASE statement and can subsequently be selected from thenewly created instance and appended to the parameter file (init.ora).

13
13 © 2008 Julian Dyke juliandyke.com
Database Creation using DBCA ScriptsCreateDBFiles.sql (1 of 1)
connect "SYS"/"&&sysPassword" as SYSDBAset echo onspool /u01/app/oracle/admin/RAC/scripts/CreateDBFiles.log
CREATE SMALLFILE UNDO TABLESPACE "UNDOTBS2"DATAFILE SIZE 200MAUTOEXTEND ON NEXT 5120K MAXSIZE UNLIMITED;
CREATE SMALLFILE TABLESPACE "USERS" LOGGINGDATAFILE SIZE 5MAUTOEXTEND ON NEXT 1280K MAXSIZE UNLIMITEDEXTENT MANAGEMENT LOCALSEGMENT SPACE MANAGEMENT AUTO;
ALTER DATABASE DEFAULT TABLESPACE "USERS";
spool off
The CreateDBFiles.sql creates the remaining tablespaces.
The first step creates UNDOTBS2 which is the undo tablespace for thesecond instance. The second step creates a USERS tablespace which is thedefault tablespace for the database.
Note that there are a number of redundant clauses in the generated screens.By default all tablespaces are SMALLFILE tablespaces unless the BIGFILEkeyword is explicitly specified. In addition the default in Oracle 10.2 is forall tablespaces to be locally managed (EXTENT MANAGEMENTLOCAL) and also to use automatic segment space management(SEGMENT SPACE MANAGEMENT AUTO).
Note also that by default DBCA creates all tablespace with AUTOEXTENDenabled. If this is not in accord with your site standards, you may want toensure this clause is removed.
14
14 © 2008 Julian Dyke juliandyke.com
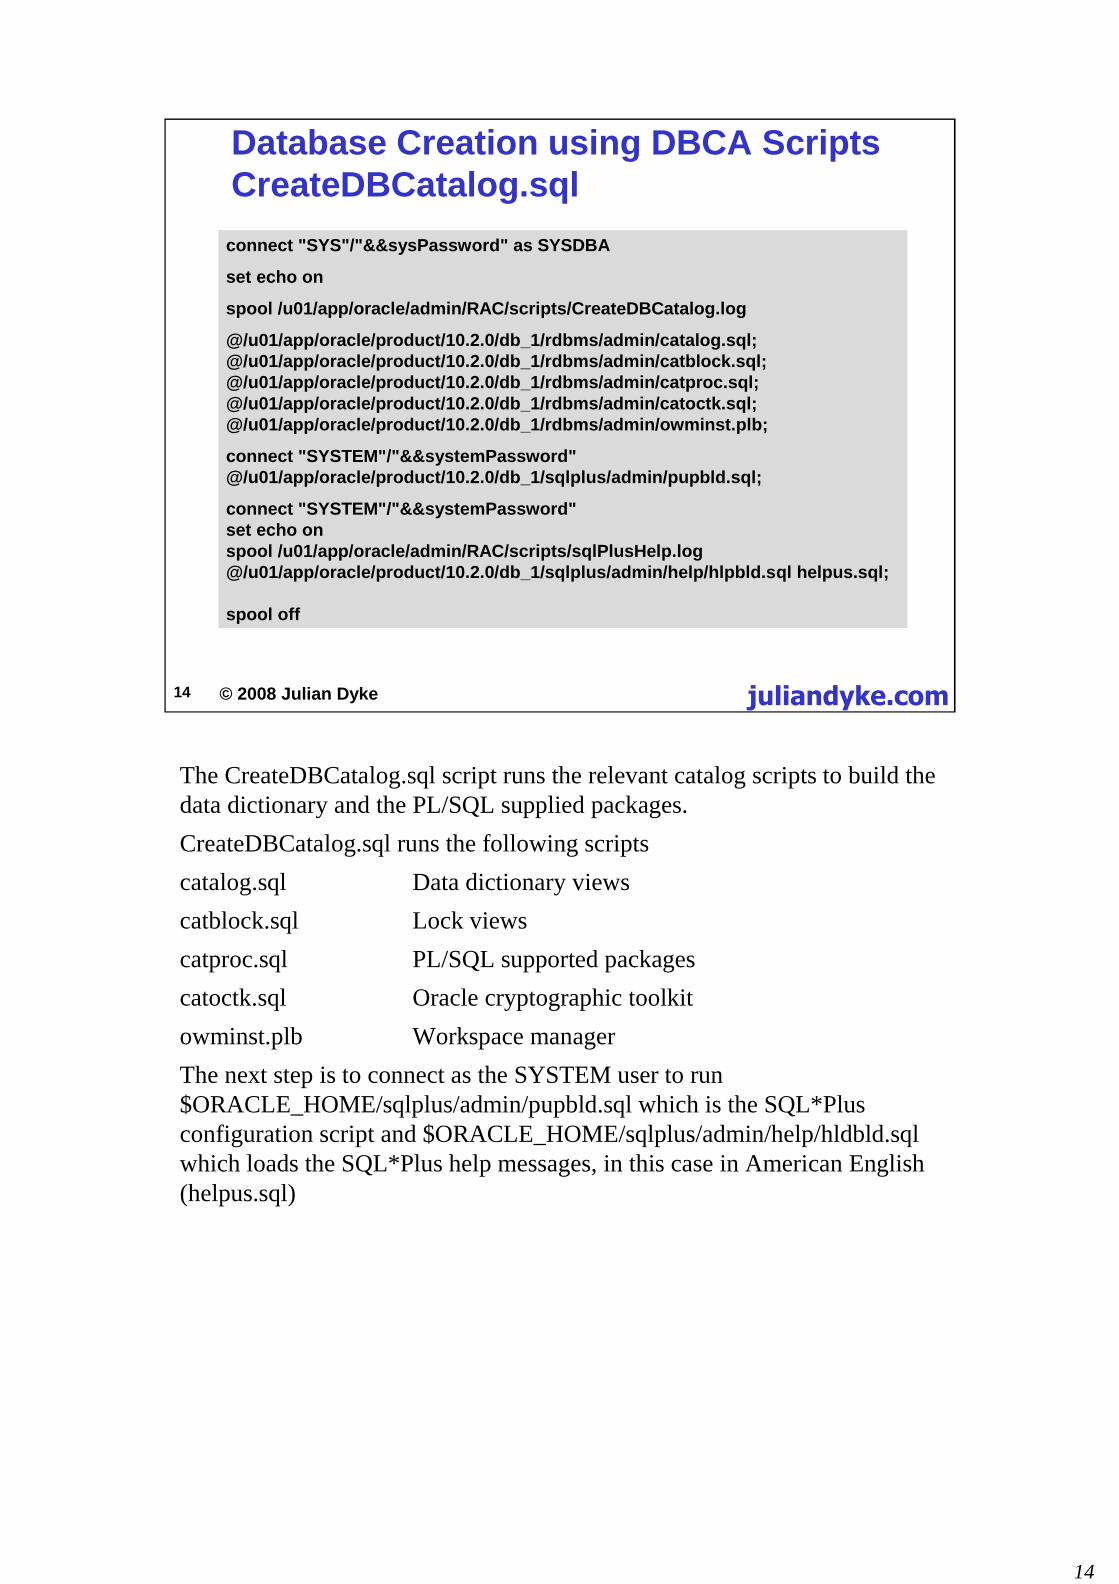
Database Creation using DBCA ScriptsCreateDBCatalog.sql
connect "SYS"/"&&sysPassword" as SYSDBA
set echo on
spool /u01/app/oracle/admin/RAC/scripts/CreateDBCatalog.log
@/u01/app/oracle/product/10.2.0/db_1/rdbms/admin/catalog.sql;@/u01/app/oracle/product/10.2.0/db_1/rdbms/admin/catblock.sql;@/u01/app/oracle/product/10.2.0/db_1/rdbms/admin/catproc.sql;@/u01/app/oracle/product/10.2.0/db_1/rdbms/admin/catoctk.sql;@/u01/app/oracle/product/10.2.0/db_1/rdbms/admin/owminst.plb;
connect "SYSTEM"/"&&systemPassword"@/u01/app/oracle/product/10.2.0/db_1/sqlplus/admin/pupbld.sql;
connect "SYSTEM"/"&&systemPassword"set echo onspool /u01/app/oracle/admin/RAC/scripts/sqlPlusHelp.log@/u01/app/oracle/product/10.2.0/db_1/sqlplus/admin/help/hlpbld.sql helpus.sql;
spool off
The CreateDBCatalog.sql script runs the relevant catalog scripts to build thedata dictionary and the PL/SQL supplied packages.
CreateDBCatalog.sql runs the following scripts
catalog.sql Data dictionary views
catblock.sql Lock views
catproc.sql PL/SQL supported packages
catoctk.sql Oracle cryptographic toolkit
owminst.plb Workspace manager
The next step is to connect as the SYSTEM user to run$ORACLE_HOME/sqlplus/admin/pupbld.sql which is the SQL*Plusconfiguration script and $ORACLE_HOME/sqlplus/admin/help/hldbld.sqlwhich loads the SQL*Plus help messages, in this case in American English(helpus.sql)

15
15 © 2008 Julian Dyke juliandyke.com
Database Creation using DBCA ScriptsemRepository.sql
connect "SYS"/"&&sysPassword" as SYSDBA
set echo off
spool /u01/app/oracle/admin/RAC/scripts/emRepository.log
@/u01/app/oracle/product/10.2.0/db_1/sysman/admin/emdrep/sql/emreposcre/u01/app/oracle/product/10.2.0/db_1 SYSMAN &&sysmanPassword TEMP ON;
WHENEVER SQLERROR CONTINUE;
spool off
The optional emRepository.sql script installs the Enterprise Managerrepository
The script runs$ORACLE_HOME/sysadm/admin/emdrep/sql/emreposcre.sql whichcreates the repository in the local tablespace under the SYSMAN schema.
It is only necessary to run this script if you intend to use the EnterpriseManager Database Control to manage database. If you are planning to useEnterprise Manager Grid Control then the repository should be located in aseparate database.

16
16 © 2008 Julian Dyke juliandyke.com
Database Creation using DBCA ScriptsCreateClustDBViews.sql
connect "SYS"/"&&sysPassword" as SYSDBAset echo onspool /u01/app/oracle/admin/RAC/scripts/CreateClustDBViews.log
@/u01/app/oracle/product/10.2.0/db_1/rdbms/admin/catclust.sql;
spool off
The CreateClustDBViews.sql script runs the RAC-specific catalog scripts.
In Oracle 10.2, this script runs $ORACLE_HOME/rdbms/admin/catalog.sqlwhich creates a number of synonyms for dynamic performance views wherethe name was changed from %DLM% to %GES% in Oracle 9.0.1

17
17 © 2008 Julian Dyke juliandyke.com
Database Creation using DBCA ScriptspostDBCreation.sql (1 of 2)
connect "SYS"/"&&sysPassword" as SYSDBAset echo onspool /u01/app/oracle/admin/RAC/scripts/postDBCreation.log
select group# from v$log where group# = 3;select group# from v$log where group# = 4;
ALTER DATABASE ADD LOGFILE THREAD 2GROUP 3 SIZE 51200K,GROUP 4 SIZE 51200K;
ALTER DATABASE ENABLE PUBLIC THREAD 2;
spool offconnect "SYS"/"&&sysPassword" as SYSDBAset echo on
CREATE SPFILE='+DISKGROUP1/RAC/spfileRAC.ora'FROM PFILE='/u01/app/oracle/admin/RAC/scripts/init.ora';
shutdown immediate;connect "SYS"/"&&sysPassword" as SYSDBAstartup ;
alter user SYSMAN identified by "&&sysmanPassword" account unlock;alter user DBSNMP identified by "&&dbsnmpPassword" account unlock;
The postDBCreation.sql script is the final database creation script.
The first step creates redo log files for the second instance and enables thesecond redo log thread.
The second step creates the SPFILE in the ASM filesystem, based on theupdated contents of the init.ora file.
The third step unlocks the passwords for the Enterprise Manager DBSNMPand SYSMAN users.

18
18 © 2008 Julian Dyke juliandyke.com
Database Creation using DBCA ScriptspostDBCreation.sql (2 of 2)select 'utl_recomp_begin: ' || to_char(sysdate, 'HH:MI:SS') from dual;execute utl_recomp.recomp_serial();select 'utl_recomp_end: ' || to_char(sysdate, 'HH:MI:SS') from dual;
host /u01/app/oracle/product/10.2.0/db_1/bin/emca -config dbcontrol db -silent-cluster -ASM_USER_ROLE SYSDBA-ASM_USER_NAME SYS-NODE_LIST london1,london2-CLUSTER_NAME crs-LOG_FILE /u01/app/oracle/admin/RAC/scripts/emConfig.log-DBSNMP_PWD &&dbsnmpPassword-SYS_PWD &&sysPassword -ASM_USER_PWD &&asmSysPassword-SID RAC -ASM_SID +ASM1-DB_UNIQUE_NAME RAC-EM_HOME /u01/app/oracle/product/10.2.0/db_1-SID_LIST RAC1,RAC2-SYSMAN_PWD &&sysmanPassword-SERVICE_NAME RAC-ASM_PORT 1521 -PORT 1521-LISTENER OH /u01/app/oracle/product/10.2.0/db_1-LISTENER LISTENER -ORACLE_HOME /u01/app/oracle/product/10.2.0/db_1-HOST server3-ASM_OH /u01/app/oracle/product/10.2.0/db_1;
spool /u01/app/oracle/admin/RAC/scripts/postDBCreation.logexit;
The postDBCreation.sql script is the final database creation script
The next step recompiles any invalid packages
The final step configures the Enterprise Manager Database Control usingthe Enterprise Manager Configuration Assistant($ORACLE_HOME/bin/emca). This step is only necessary if you intend tomanage the database using the Enterprise Manager Database Control. It canbe removed if you plan to manage the database using the EnterpriseManager Grid Control
Note that at the end of the script, there is a bug in which the spool file isoverwritten instead of being closed. I recommend that this line is amendedto
SPOOL OFF
so that the spool file can be inspected after the script has executed.

19
19 © 2008 Julian Dyke juliandyke.com
Database Creation using DBCA ScriptsRAC2.sh
#!/bin/sh
mkdir -p /u01/app/oracle/admin/RAC/adumpmkdir -p /u01/app/oracle/admin/RAC/bdumpmkdir -p /u01/app/oracle/admin/RAC/cdumpmkdir -p /u01/app/oracle/admin/RAC/dpdumpmkdir -p /u01/app/oracle/admin/RAC/hdumpmkdir -p /u01/app/oracle/admin/RAC/pfilemkdir -p /u01/app/oracle/admin/RAC/udumpmkdir -p /u01/app/oracle/product/10.2.0/db_1/cfgtoollogs/dbca/RAC
ORACLE_SID=RAC2; export ORACLE_SID
echo You should Add this entry in the /etc/oratab: \RAC:/u01/app/oracle/product/10.2.0/db_1:Y
/u01/app/oracle/product/10.2.0/db_1/bin/sqlplus /nolog \@/u01/app/oracle/admin/RAC/scripts/RAC2.sql
This script creates the password file on the second node. It also creates thePFILE on the second node.
Note that this script contains a number of other calls to SQL scripts whichare commented out. I have removed them to improve clarity.
Take care to enter the same passwords for all five users as you used on thefirst node when you run this script. Alternatively you can copy the passwordfile from the first node to the subsequent nodes ensuring that you change theinstance name component of the file name.

20
20 © 2008 Julian Dyke juliandyke.com
Database Creation using DBCA ScriptsRAC2.sql
set verify off
PROMPT specify a password for sys as parameter 1;DEFINE sysPassword = &1PROMPT specify a password for system as parameter 2;DEFINE systemPassword = &2PROMPT specify a password for sysman as parameter 3;DEFINE sysmanPassword = &3PROMPT specify a password for dbsnmp as parameter 4;DEFINE dbsnmpPassword = &4PROMPT specify ASM SYS user password as parameter 6;DEFINE asmSysPassword= &6
host /u01/app/oracle/product/10.2.0/db_1/bin/orapwd \file=/u01/app/oracle/product/10.2.0/db_1/dbs/orapwRAC2 \password=&&sysPassword force=y
host echo SPFILE='+DISKGROUP1/RAC/spfileRAC.ora' \> /u01/app/oracle/product/10.2.0/db_1/dbs/initRAC2.ora
host echo Run script "/u01/app/oracle/admin/RAC/scripts/RAC1.sh" \from node "london1" if you have not already run it.
The name of this script is also determined by the database name. This SQLscript calls a number of other scripts which perform individual actionswithin the database creation procedure:
The script first prompts for passwords for the SYS, SYSTEM, SYSMAN,DBNSMP and, the ASM SYS users. Unlike DBCA it is not possible to setall passwords in a single command. Even if you entered the passwordsduring the DBCA session, they will not be stored in the scripts. This isnecessary to ensure that the integrity of the passwords is not compromisedby storing them in scripts.
The next step is to run the ORAPWD utility to create a password file in$ORACLE_HOME/dbs/orapwRAC1 using the SYS password entered in theprevious step.

21
21 © 2008 Julian Dyke juliandyke.com
Database Creation using DBCA ScriptsRunning the Scripts After making any modifications, run the database creation
scripts
As the oracle user on the first node run RAC1.sh
$ cd $ORACLE_BASE/admin/RAC/scripts$ sh RAC1.sh
As the oracle user on the second node run RAC2.sh
$ cd $ORACLE_BASE/admin/RAC/scripts$ sh RAC2.sh
On each node update /etc/oratab with the entry described inthe scripts. For example:
RAC:/u01/app/oracle/product/10.2.0/db_1:Y
After making any necessary modifications to the scripts such as addingtablespaces, run the database creation scripts on each node.
In this example, the scripts are called RAC1.sh, RAC2.sh etc./
On the first node run RAC1.sh:
$ cd $ORACLE_BASE/admin/RAC/scripts$ sh RAC1.sh
On the second node, run RAC2.sh
$ cd $ORACLE_BASE/admin/RAC/scripts$ sh RAC2.sh
On the each node, update /etc/oratab with the entry described in the scripts.For example:
RAC:/u01/app/oracle/product/10.2.0/db_1:Y
Note that /etc/oratab is not used to start and stop the database in a RACenvironment as this action is performed by Oracle Clusterware. However/etc/oratab is still used for a number of other utilities and tools.

22
22 © 2008 Julian Dyke juliandyke.com
Database Creation using DBCA ScriptsRunning the Scripts Add the database to the Oracle Cluster Registry (OCR):
$ srvctl add database -d RAC \-o $ORACLE_HOME \-p +DISKGROUP1/RAC/spfileRAC.ora
where:
-d option specifies the database name
-o option specifies the Oracle home
-p option specifies the location of the SPFILE
The database must be added manually to the Oracle Cluster Registry(OCR):
For example:
$ srvctl add database -d RAC \-o $ORACLE_HOME \-p +DISKGROUP1/RAC/spfileRAC.ora
where
-d option specifies the database name-o option specifies the Oracle home-p option specifies the location of the SPFILE

23
23 © 2008 Julian Dyke juliandyke.com
Database Creation using DBCA ScriptsRunning the Scripts Add the instances to the Oracle Cluster Registry (OCR):
where:
-d option specifies the database name
-i option specifies the instance name
-n option specifies the node name
$ srvctl add instance -d RAC -i RAC1 -n london1$ srvctl add instance -d RAC -i RAC2 -n london2
The instances must also be added to the Oracle Cluster Registry (OCR).
For example:
$ srvctl add instance -d RAC -i RAC1 -n london1$ srvctl add instance -d RAC -i RAC2 -n london2
where
-d option specifies the database name-i option specifies the instance name-n option specifies the node name

24
24 © 2008 Julian Dyke juliandyke.com
Database Creation using DBCA ScriptsRunning the Scripts Set the CLUSTER_DATABASE parameter to true on the first
node
$ export ORACLE_SID=RAC1$ sqlplus / as sysdba
SQL> STARTUP MOUNTSQL> ALTER SYSTEM SET cluster_database = true SCOPE = SPFILE;SQL> SHUTDOWN IMMEDIATESQL> EXIT
Start the database:
$ srvctl start database -d RAC
Verify that all instances have started successfully using:
$ srvctl status database -d RACInstance RAC1 is running on node london1Instance RAC2 is running on node london2
By default the CLUSTER_DATABASE parameter will be set to FALSE.To complete the creation of the database, set the CLUSTER_DATABASEparameter to true as follows:
$ export ORACLE_SID=RAC1$ sqlplus / as sysdba
SQL> STARTUP MOUNTSQL> ALTER SYSTEM SET cluster_database = true SCOPE = SPFILE;SQL> SHUTDOWN IMMEDIATESQL> EXIT
Start the database using
$ srvctl start database -d RAC
Verify that all instances have started successfully using:
$ srvctl status database -d RACInstance RAC1 is running on node london1Instance RAC2 is running on node london2
This completes the database creation process.

25
25 © 2008 Julian Dyke juliandyke.com
DBCATemplates Templates are XML files stored in
$ORACLE_HOME/assistants/dbca/templates
Four default templates are supplied
General Purpose
Transaction Processing
Data Warehousing
Custom
Default templates have a dbc extension
User-defined templates can also be defined
In DBCA based on an existing template
Using a text editor
User defined templates have a dbt extension
Once created the template can be updated using either DBCA or using a texteditor. Using DBCA it is necessary to create a new template every time amodification is made, therefore it is probably simpler to work with a texteditor.
Note - you cannot base a user-defined template on the General Purposetemplate
Use underscores to replace spaces in template names. For exampleProof_Of_Concept.dbt will appear as "Proof of Concept" in DBCA.
In Oracle 10.2 the default templates have the following file names
•General_Purpose.dbc
•Transaction_Processing.dbc
•Data_Warehouse.dbc
•New Database.dbt (custom)
For test databases it is much quicker to use the General Purpose template asthis builds the database from an RMAN backup (clone). The Customtemplate builds the database using the traditional CREATE DATABASEstatement and catalog scripts. Using this method you have more control overthe contents of the database. In particular you can avoid installingunnecessary features which from a security perspective reduces the attacksurface and eliminates a lot of vulnerabilities.

26
26 © 2008 Julian Dyke juliandyke.com
DBCATemplates Databases can be created using templates using DBCA in
silent mode
For example:
dbca -silent -createDatabase \-templateName General_Purpose.dbc \-gdbName TEST \-sid TEST \-sysPassword oracle \-systemPassword oracle \-sysmanPassword oracle \-dbsnmpPassword oracle \-emConfiguration LOCAL \-storageType ASM \-diskGroupName DATA \-asmSysPassword oracle \-recoveryGroupName RECOVERY \-datafileJarLocation $ORACLE_HOME/assistants/dbca/templates \-nodeinfo server3,server4,server11,server12 \-characterset WE8ISO8859P1 \-obfuscatedPasswords false \-oratabLocation /etc/oratab
Databases can be created from templates either using DBCA in GUI modeor in silent mode.
The above command creates an Oracle 11.1 database silently based on theGeneral Purpose template with the following properties:
•Four instances on server3, server4, server11 and server12
•Global database name is TEST
•SID prefix is TEST
•Enterprise Manager Grid Control
•ASM storage
•Datafiles stored in DATA disk group
•Recovery files stored in RECOVERY disk group
If you do not specify the passwords, DBCA will prompt for them when it isexecuted e.g.:
Enter ASM SYS user password:
DBCA outputs progress in the form of percentage complete. Progressmessages are also written to
$ORACLE_BASE/cfgtoollogs/dbca/silent<n>.log where <n> is an integerwhich is incremented for every execution of dbca.
For this database additional logs are written to
$ORACLE_BASE/cfgtoollogs/dbca/TEST

27
27 © 2008 Julian Dyke juliandyke.com
DBCANetwork Configuration In Oracle 11.1 DBCA creates the following instance entry in
tnsnames.ora on each node
TEST1 =(DESCRIPTION =(ADDRESS = (PROTOCOL = TCP)(HOST = server3-vip)(PORT = 1521))(CONNECT_DATA =(SERVER = DEDICATED)(SERVICE_NAME = TEST)(INSTANCE_NAME = TEST2)
))
Note that one entry will be created for each instance on eachnode

28
28 © 2008 Julian Dyke juliandyke.com
DBCANetwork Configuration In Oracle 11.1 DBCA creates the following database entry in
tnsnames.ora on each node
TEST =(DESCRIPTION =(ADDRESS = (PROTOCOL = TCP)(HOST = server3-vip)(PORT = 1521))(ADDRESS = (PROTOCOL = TCP)(HOST = server4-vip)(PORT = 1521))(ADDRESS = (PROTOCOL = TCP)(HOST = server11-vip)(PORT = 1521))(ADDRESS = (PROTOCOL = TCP)(HOST = server12-vip)(PORT = 1521))(LOAD_BALANCE = yes)(CONNECT_DATA =(SERVER = DEDICATED)(SERVICE_NAME = TEST)
))
Note that client-side load balancing is enabled by default
29
29 © 2008 Julian Dyke juliandyke.com
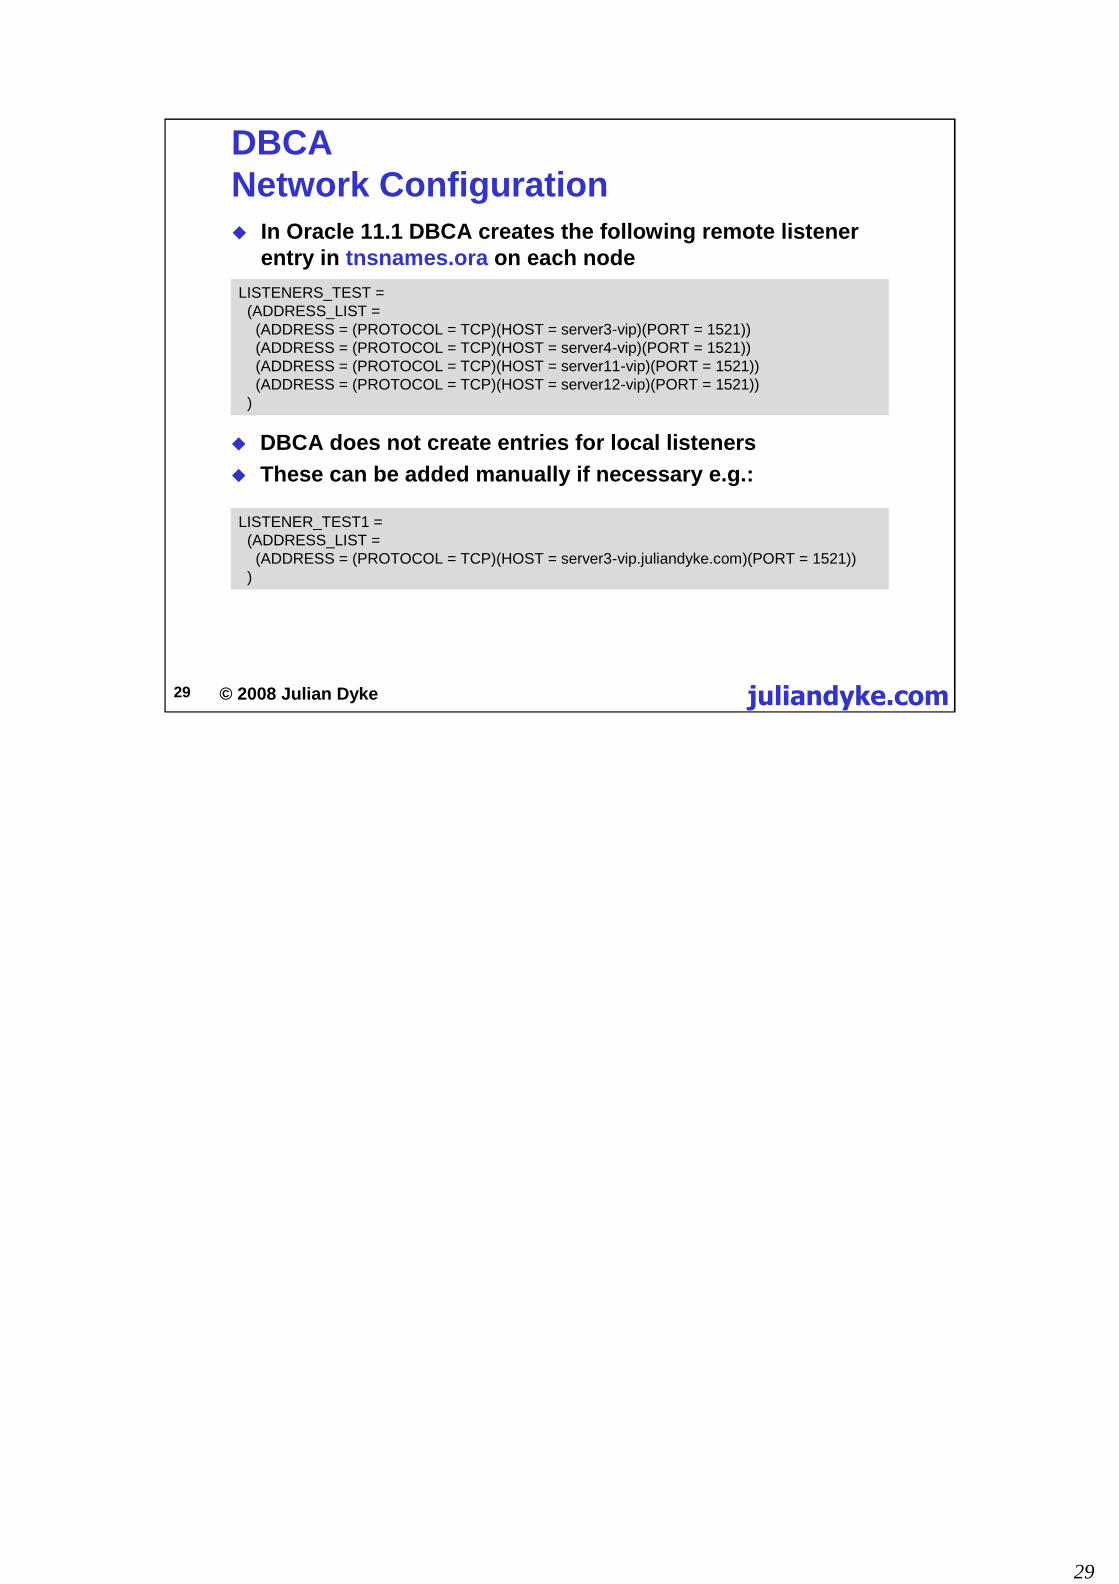
DBCANetwork Configuration In Oracle 11.1 DBCA creates the following remote listener
entry in tnsnames.ora on each node
LISTENERS_TEST =(ADDRESS_LIST =(ADDRESS = (PROTOCOL = TCP)(HOST = server3-vip)(PORT = 1521))(ADDRESS = (PROTOCOL = TCP)(HOST = server4-vip)(PORT = 1521))(ADDRESS = (PROTOCOL = TCP)(HOST = server11-vip)(PORT = 1521))(ADDRESS = (PROTOCOL = TCP)(HOST = server12-vip)(PORT = 1521))
)
DBCA does not create entries for local listeners
These can be added manually if necessary e.g.:
LISTENER_TEST1 =(ADDRESS_LIST =(ADDRESS = (PROTOCOL = TCP)(HOST = server3-vip.juliandyke.com)(PORT = 1521))
)

30
30 © 2008 Julian Dyke juliandyke.com
DBCANetwork Configuration In Oracle 11.1 DBCA creates a listener configuration similar to
the following in listener.ora on each node
LISTENER_SERVER3 =(DESCRIPTION_LIST =(DESCRIPTION =(ADDRESS = (PROTOCOL = TCP)(HOST = server3-vip)(PORT = 1521)(IP = FIRST))(ADDRESS = (PROTOCOL = TCP)(HOST = 192.168.2.104)(PORT = 1521)(IP = FIRST))
))

31
31 © 2008 Julian Dyke juliandyke.com
Node AdditionPreparation Install new hardware
Can be some variation with existing nodes
CPU speed (must be same architecture)
Memory
Local disks
Install operating system
Should be same as existing nodes
Version
Architecture
Packages
Patches
Kernel Parameters
Configure network
Interfaces must be identical to existing nodes

32
32 © 2008 Julian Dyke juliandyke.com
Node AdditionNetwork Configuration Assign IP addresses to the new nodes
Add to /etc/hosts on all nodes
# Public Network192.168.2.103 server3.juliandyke.com server3192.168.2.104 server4.juliandyke.com server4192.168.2.111 server11.juliandyke.com server11192.168.2.112 server12.juliandyke.com server12
# Public Virtual Network192.168.2.203 server3-vip.juliandyke.com server3-vip192.168.2.204 server4-vip.juliandyke.com server4-vip192.168.2.211 server11-vip.juliandyke.com server11-vip192.168.2.212 server12-vip.juliandyke.com server12-vip
# Private Interconnect192.168.3.103 server3-priv.juliandyke.com server3-priv192.168.3.104 server4-priv.juliandyke.com server4-priv192.168.3.111 server10-priv.juliandyke.com server11-priv192.168.3.112 server11-priv.juliandyke.com server12-priv
In this example, the original nodes were server3 and server4. The new nodesare server11 and server12.

33
33 © 2008 Julian Dyke juliandyke.com
Node AdditionUser Equivalence Operating system groups and users on the new nodes must
be identical to those on the original nodes e.g on Linux
[root@server3} # cat /etc/group....
dba:x:500:oracleoinstall:x:501:
[root@server11] # groupadd -g 500 dba[root@server11] # groupadd -g 501 oinstall
[root@server11} # mkdir -p /u01/app/oracle
[root@server3} # cat /etc/passwd....oracle:x:500:501:/u01/app/oracle:/bin/bash
[root@server11} # useradd -g oinstall -G dba -d /u01/app/oracle oracle
[root@server11} # passwd oracle
[root@server11} # id oracleuid=500(oracle) gid=501(oinstall) groups=501(oinstall),500 dba

34
34 © 2008 Julian Dyke juliandyke.com
Node AdditionSecurity Limits In Linux security limits must be increased on each new node:
In /etc/security/limits.conf add
oracle soft nproc 2047oracle hard nproc 16384oracle soft nofile 1024oracle hard nofile 65536
In /etc/pam.d/login add
session required pam_limits.so
In /etc/profile add
if [ $USER = "oracle" ]; thenif [ $SHELL = "/bin/ksh" ]; thenulimit -p 16384ulimit -n 65536
elseulimit -u 16384 -n 65536
fiumask 022
fi

35
35 © 2008 Julian Dyke juliandyke.com
Node AdditionConfigure Storage In using SAN / NFS LUNs should be presented to additional
nodes
Configure multipathing if necessary
Storage configuration should be symmetrical on all nodes
If using raw devices for Oracle Clusterware files
Create new raw devices on new nodes
Ensure that correct ownerships and permissions are setwhen nodes are rebooted
On Linux 2.6 consider using udev to create devices and setownerships

36
36 © 2008 Julian Dyke juliandyke.com
Node AdditionConfigure Storage All ASM disks must be presented to new nodes
If using ASM library (Linux only) ensure that on each newnode
Oracle ASM packages are installed
Oracle ASM is configured
/etc/init.d/oracleasm configure
/etc/init.d/oracleasm scandisk
/etc/init.d/oracleasm listdisks
Oracle ASM disks are discovered

37
37 © 2008 Julian Dyke juliandyke.com
Node AdditionEnvironment Variables Configure environment for root and oracle user
e.g .bash_profile or .ksh_profile
For root
export ORA_CRS_HOME=/u01/app/11.1.0/crsexport PATH=$ORA_CRS_HOME/bin:$PATHexport LD_LIBRARY_PATH=$ORA_CRS_HOME/lib:$LD_LIBRARY_PATH
For oracle
export ORACLE_BASE=/u01/app/oracleexport ORACLE_HOME=$ORACLE_BASE/product/11.1.0/db_1export PATH=$ORACLE_HOME/bin:$PATHexport LD_LIBRARY_PATH=$ORACLE_HOME/lib:$LD_LIBRARY_PATH
On Linux 2.6 kernels the hangcheck timer is configured in/etc/modprobe.conf

38
38 © 2008 Julian Dyke juliandyke.com
Node AdditionSecure Shell Extend Secure Shell configuration for oracle user to include
new nodes
Create .ssh subdirectory
On existing and new nodes add new keys to~/.ssh/authorized_keys
On existing and new nodes test ssh can connect withoutpasswords or warning messages
mkdir ~/.sshchmod 700 ~/.ssh
Generate new RSA and DSA keys on each new node
ssh-keygen -t rsassh-keygen -t dsa
ssh server3 datessh server4 datessh server11 datessh server12 date
On Linux 2.6 kernels the hangcheck timer is configured in/etc/modprobe.conf

39
39 © 2008 Julian Dyke juliandyke.com
Node AdditionMiscellaneous Configure hangcheck-timer (Linux 10.2.0.3 and below)
e.g. /etc/modprobe.conf (Linux 2.6 kernel)
options hangcheck-timer hangcheck_tick=30 hangcheck_margin=180
Configure NTP client
Use existing NTP server e.g.: /etc/ntp.conf
# --- OUR TIMESERVERS -----server server10
On Linux 2.6 kernels the hangcheck timer is configured in/etc/modprobe.conf

40
40 © 2008 Julian Dyke juliandyke.com
Node AdditionBackup Oracle Clusterware Files Ensure you have a recent backup of
Oracle Cluster Registry
Voting Disk
e.g. As the oracle user on each node
srvctl stop database -d TESTsrvctl stop asm -n server3srvctl stop asm -n server4srvctl stop nodeapps -n server3srvctl stop nodeapps -n server4
As the root user on each node stop Oracle Clusterware
crsctl stop crs
dd if=/dev/ocr of=/tmp/ocr bs=1M count=100dd if=/dev/voting of=/tmp/voting bs=1M count=100
As the root user on one node
As the root user on each node restart Oracle Clusterware
crsctl start crs
In my experience it is better to stop all CRS processes before performing thebackups.
If you are using Solaris or another operating system on which /tmp iscleared down following a reboot, then backup the OCR and voting disk toanother persistent location.
Following the backup you MUST restart Oracle Clusterware. However it isoptional whether you restart the ASM and database instances. Nodeapplications will be restarted when Oracle Clusterware is restarted; nodeapplications cannot be disabled using the SRVCTL utility.

41
41 © 2008 Julian Dyke juliandyke.com
Node AdditionCopy Oracle Clusterware Software On an existing node as the root user backup Oracle
Clusterware software
cd /u01/apptar cfvz crs.tgz ./11.1.0/crs
Copy the archive to the new nodes
cd /u01/appscp crs.tgz server11:/u01/appscp crs.tgz server12:/u01/app
On each new node as the root user extract the files from thearchive:
cd /u01/apptar xfvzp crs.tgz
42
42 © 2008 Julian Dyke juliandyke.com
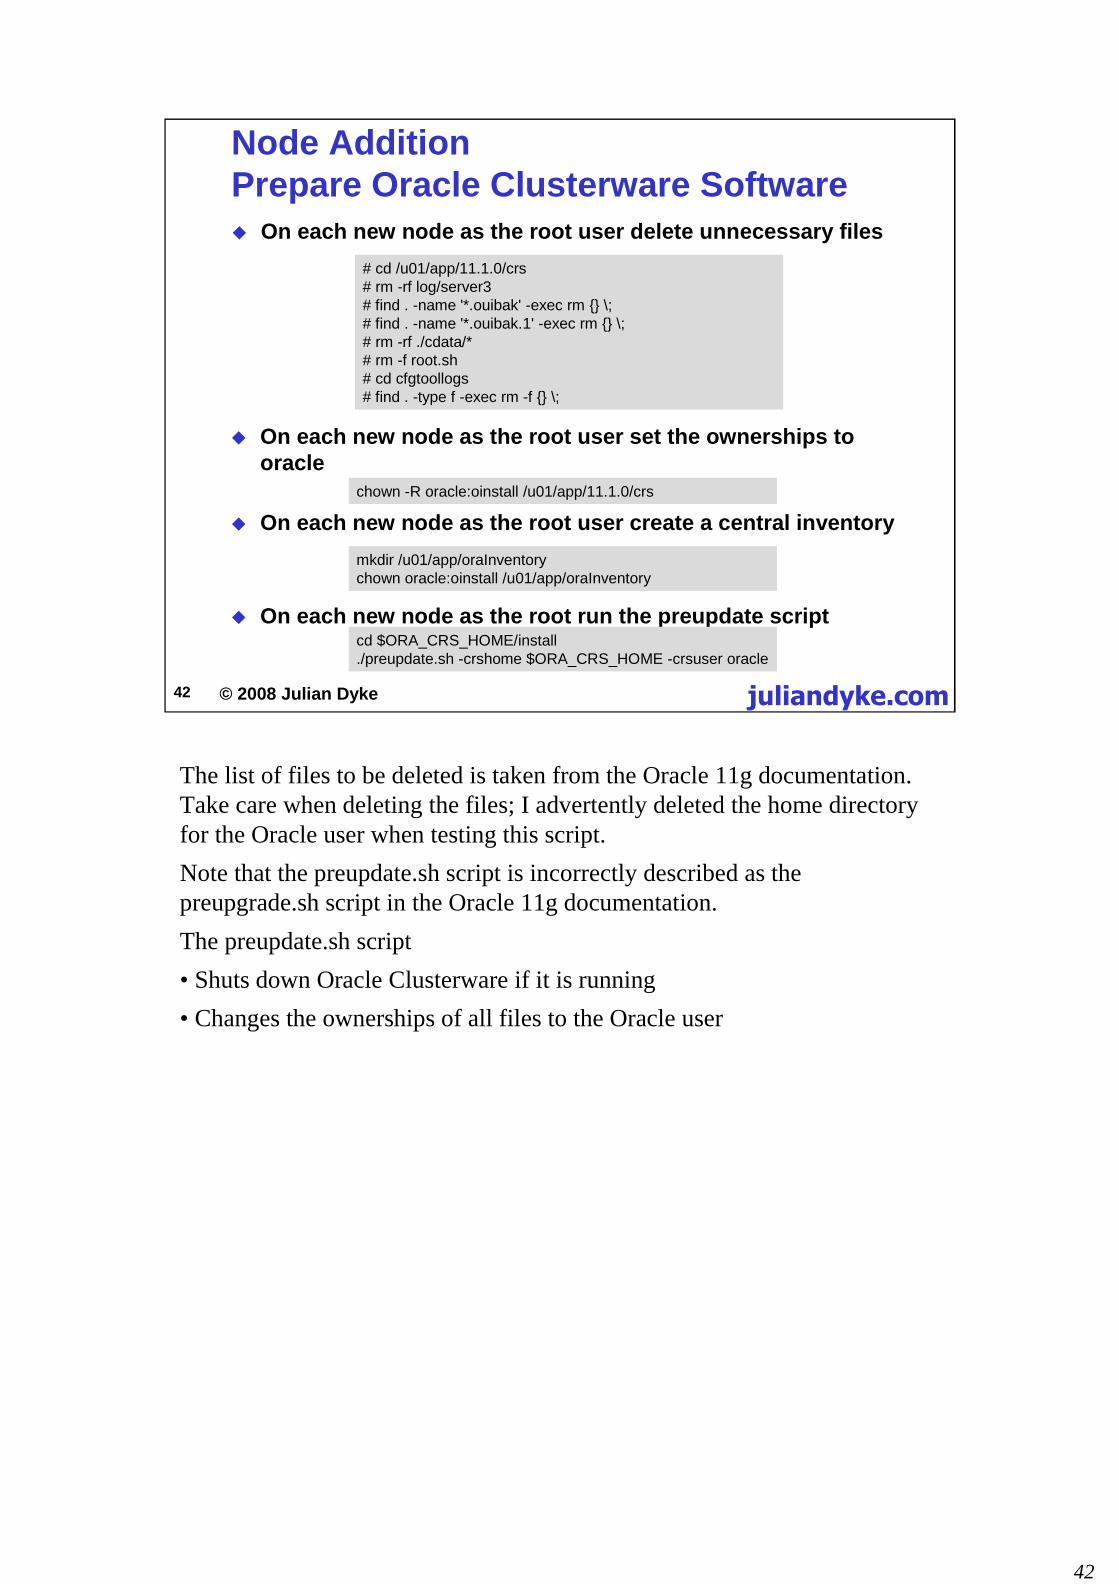
Node AdditionPrepare Oracle Clusterware Software On each new node as the root user delete unnecessary files
# cd /u01/app/11.1.0/crs# rm -rf log/server3# find . -name '*.ouibak' -exec rm {} \;# find . -name '*.ouibak.1' -exec rm {} \;# rm -rf ./cdata/*# rm -f root.sh# cd cfgtoollogs# find . -type f -exec rm -f {} \;
On each new node as the root user set the ownerships tooracle
chown -R oracle:oinstall /u01/app/11.1.0/crs
On each new node as the root user create a central inventory
mkdir /u01/app/oraInventorychown oracle:oinstall /u01/app/oraInventory
On each new node as the root run the preupdate scriptcd $ORA_CRS_HOME/install./preupdate.sh -crshome $ORA_CRS_HOME -crsuser oracle
The list of files to be deleted is taken from the Oracle 11g documentation.Take care when deleting the files; I advertently deleted the home directoryfor the Oracle user when testing this script.
Note that the preupdate.sh script is incorrectly described as thepreupgrade.sh script in the Oracle 11g documentation.
The preupdate.sh script
•Shuts down Oracle Clusterware if it is running
•Changes the ownerships of all files to the Oracle user

43
43 © 2008 Julian Dyke juliandyke.com
Node AdditionRun Clone Script On the new node as the oracle user
[oracle@server11]$ export ORACLE_HOME=$ORA_CRS_HOME[oracle@server11]$ export PATH=$ORACLE_HOME/bin:$PATH[oracle@server11]$ export LD_LIBRARY_PATH=$ORACLE_HOME/lib:$LD_LIBRARY_PATH
On the new node as the oracle user
[oracle@server11]$ cd $ORACLE_HOME/clone/bin
[oracle@server11]$ perl clone.pl \ORACLE_BASE=/u01/app/oracle \ORACLE_HOME=/u01/app/11.1.0/crs \ORACLE_HOME_NAME=OraCrs11g_home \"sl_tableList={server11:server11-priv:server11-vip}" \INVENTORY_LOCATION=/u01/app/oraInventory \-noConfig
On the new node as the oracle user
When executing clone.pl for the Oracle Clusterware software, theORACLE_BASE parameter is mandatory, but is, in fact, ignored
Results are written to the logs directory in the central inventory e.g.
/u01/app/oraInventory/logs/cloneActions2008-03-30_10-46-38AM.log
The clone.pl script is actually a wrapper for the runInstaller script. In theabove example, the installer was invoked as follows:
./runInstaller -clone -waitForCompletion -nowait"ORACLE_BASE=/u01/app/oracle""ORACLE_HOME=/u01/app/11.1.0/crs""ORACLE_HOME_NAME=OraCrs11g_home""sl_tableList={server11:server11-priv:server11-vip}""INVENTORY_LOCATION=/u01/app/oraInventory"-noConfig-silent-noConfig-nowait
Note you can optionally create a script containing parameters E01 to E04and C01 to C07 to avoid typos. See the 11g documentation for an examplecalled start.sh. In my opinion this is a wrapper script too far as it makeserror diagnosis very difficult by adding yet another layer of indirection.

44
44 © 2008 Julian Dyke juliandyke.com
Node AdditionAdd node to inventory On the new node as the root user create central inventory
[root@server11]# /u01/app/oraInventory/orainstRoot.sh
On an existing node as the oracle user add the new node tothe central inventory on all nodes in the cluster
[oracle@server3]$ export ORACLE_HOME=$ORA_CRS_HOME[oracle@server3]$ export PATH=$ORACLE_HOME/bin:$PATH[oracle@server3]$ export LD_LIBRARY_PATH=$ORACLE_HOME/lib:$LD_LIBRARY_PATH
[oracle@server3]$ cd $ORA_CRS_HOME/oui/bin./addNode.sh -silent \"CLUSTER_NEW_NODES={server11}" \"CLUSTER_NEW_PRIVATE_NODE_NAMES={server11-priv}" \"CLUSTER_NEW_VIRTUAL_HOSTNAMES={server11-vip}" \-noCopy
addNode.sh
adds new node to central inventory
generates rootaddnode.sh script
addNode.sh creates a rootaddnode.sh script on the local node (in this caseserver3) e.g.
$ORA_CRS_HOME/install/rootaddnode.sh

45
45 © 2008 Julian Dyke juliandyke.com
Node AdditionAdd node to inventory addNode.sh adds the new node name to the central inventory
e.g.:/u01/app/oracle/oraInventory/ContentsXML/inventory.xml
<HOME_LIST><HOME NAME="OraCrs11g_home" LOC="/u01/app/11.1.0/crs" TYPE="O" IDX="1" CRS="true">
<NODE_LIST><NODE NAME="server3"/><NODE NAME="server4"/><NODE NAME="server11"/>
</NODE_LIST></HOME><HOME NAME="OraDb11g_home1" LOC="/u01/app/oracle/product/11.1.0/db_1" TYPE="O" IDX="2">
<NODE_LIST><NODE NAME="server3"/><NODE NAME="server4"/>
</NODE_LIST></HOME></HOME_LIST>

46
46 © 2008 Julian Dyke juliandyke.com
Node AdditionAdd node to inventory addNode.sh also adds the new node name to the local
inventory e.g:/u01/app/11.1.0/crs/inventory/ContentsXML/oraclehomeproperties.xml
<ORACLEHOME_INFO><GUID>1432842332.#1221557768</GUID><HOME CRS="T"/><ARU_PLATFORM_INFO>
<ARU_ID>46</ARU_ID><ARU_ID_DESCRIPTION>Linux x86</ARU_ID_DESCRIPTION>
</ARU_PLATFORM_INFO><CLUSTER_INFO>
<LOCAL_NODE NAME="server3"/><NODE_LIST><NODE NAME="server3"/><NODE NAME="server4"/><NODE NAME="server11"/>
</NODE_LIST></CLUSTER_INFO>
</ORACLEHOME_INFO>
XML output reformatted to improve readability

47
47 © 2008 Julian Dyke juliandyke.com
Node AdditionRoot Scripts On existing node as root user run rootAddNode.sh script
[root@server3]# /u01/app/11.1.0/crs/install/rootaddnode.sh
[root@server11]# /u01/app/11.1.0/crs/root.sh...
Adding daemons to inittabExpecting the CRS daemons to be up within 600 seconds.Cluster Synchronization Services is active on these nodes.server3server4server11
Cluster Synchronization Services is active on all the nodes.Waiting for the Oracle CRSD and EVMD to startOracle CRS stack installed and running under init(1M)
On new node as root user run root.sh script
Run olsnodes to confirm success
[root@server11]# olsnodes -nserver3 1server4 2server11 3
The rootaddnode.sh script allocates ports to the CRS daemons on the newnode. It also configures the node applications for the new node in the OCR.
In Oracle 10.2 it is necessary to configure ONS explicitly.
In Oracle 11.1 the documentation recommends running onsconfig to specifythe report_port. However, this does not appear to be necessary if the defaultvalues are used.

48
48 © 2008 Julian Dyke juliandyke.com
Node AdditionClone ASM and RDBMS Software Shutdown the database and ASM instances:
[root@server3]$ srvctl stop database -d TEST[root@server3]$ srvctl stop asm -n server3[root@server3]$ srvctl stop asm -n server4
On an existing node as the root user:
[root@server3]$ cd /u01/app/oracle[root@server3] $ tar cfvz rdbms.tgz admin product
Copy the archive to the new nodes:
[root@server3]$ cd /u01/app/oracle[root@server3]$ scp rdbms.tgz server11:`pwd`[root@server3]$ scp rdbms.tgz server12:`pwd`
On each new node as the root user extract the files from thearchive:
[root@server3]$ cd /u01/app/oracle[root@server3]$ tar xfvzp rdbms.tgz
In this example ASM and RDBMS are running from the same Oracle home.This is not best practise but is pragmatic if memory is limited.
It is not immediately obvious whether the admin directory is necessary. Thismay be a legacy directory created by tools that have not fully been upgradedto Oracle 11.1. The product directory is definitely required.
49
49 © 2008 Julian Dyke juliandyke.com
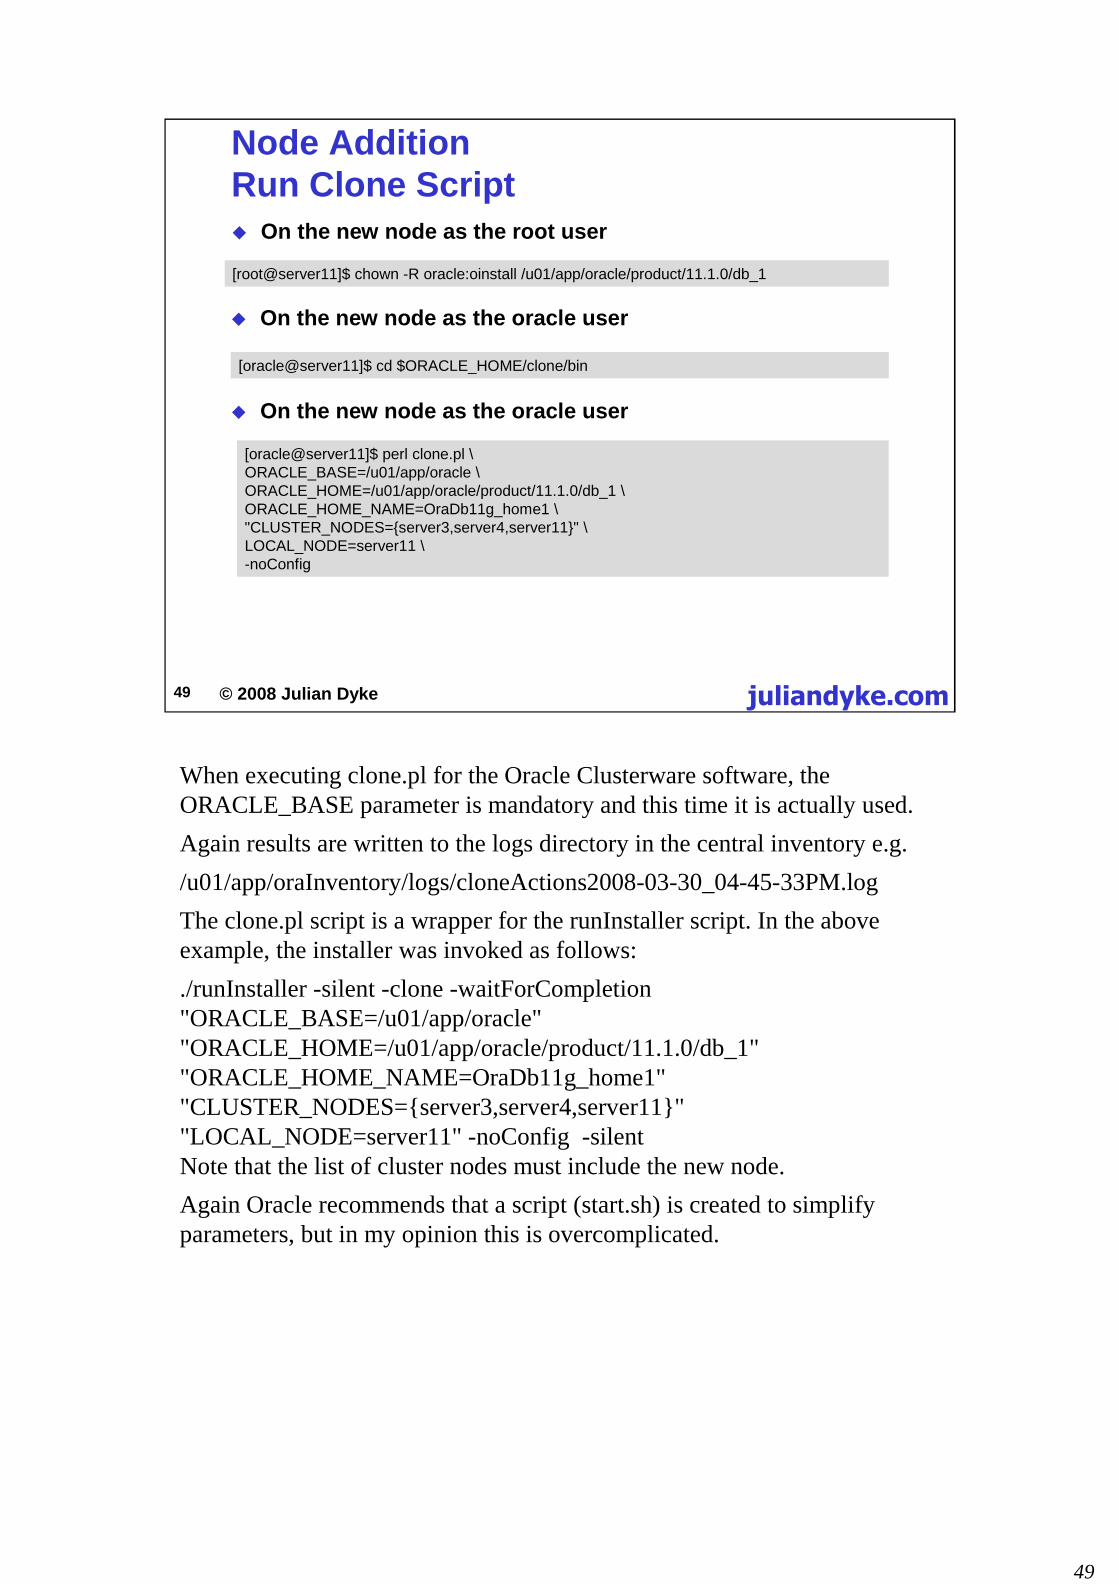
Node AdditionRun Clone Script On the new node as the root user
[root@server11]$ chown -R oracle:oinstall /u01/app/oracle/product/11.1.0/db_1
On the new node as the oracle user
[oracle@server11]$ cd $ORACLE_HOME/clone/bin
[oracle@server11]$ perl clone.pl \ORACLE_BASE=/u01/app/oracle \ORACLE_HOME=/u01/app/oracle/product/11.1.0/db_1 \ORACLE_HOME_NAME=OraDb11g_home1 \"CLUSTER_NODES={server3,server4,server11}" \LOCAL_NODE=server11 \-noConfig
On the new node as the oracle user
When executing clone.pl for the Oracle Clusterware software, theORACLE_BASE parameter is mandatory and this time it is actually used.
Again results are written to the logs directory in the central inventory e.g.
/u01/app/oraInventory/logs/cloneActions2008-03-30_04-45-33PM.log
The clone.pl script is a wrapper for the runInstaller script. In the aboveexample, the installer was invoked as follows:
./runInstaller -silent -clone -waitForCompletion"ORACLE_BASE=/u01/app/oracle""ORACLE_HOME=/u01/app/oracle/product/11.1.0/db_1""ORACLE_HOME_NAME=OraDb11g_home1""CLUSTER_NODES={server3,server4,server11}""LOCAL_NODE=server11" -noConfig -silentNote that the list of cluster nodes must include the new node.
Again Oracle recommends that a script (start.sh) is created to simplifyparameters, but in my opinion this is overcomplicated.

50
50 © 2008 Julian Dyke juliandyke.com
Node AdditionAdd Oracle home to inventory On an existing node as the oracle user add the new Oracle
home to the central inventory on all nodes in the cluster
[oracle@server3]$ cd $ORACLE_HOME/oui/bin./runInstaller -silent -updateNodeList \ORACLE_HOME=$ORACLE_HOME \"CLUSTER_NODES=server3,server4,server11"
On the new node as the root user run the root.sh script
[root@server11]# export LD_LIBRARY_PATH=$ORACLE_HOME/lib:$LD_LIBRARY_PATH/u01/app/oracle/product/11.1.0/db_1/root.sh
The updateNodeList option of runInstaller only affects the central and localrepositories. Details are shown on the next slide
The root.sh script run at this time is the normal root.sh script that isexecuted at the end of all ASM/RDBMS installs. It creates the localbinaries directory and also the environment variable setting scripts for thevarious shells.

51
51 © 2008 Julian Dyke juliandyke.com
Node AdditionAdd Oracle home to inventory The runInstaller updateNodeList operation updates the
database home in the central inventory. For example:
/u01/app/oraInventory/Contents.XML/inventory.xml
<HOME NAME="OraDb11g_home1" LOC="/u01/app/oracle/product/11.1.0/db_1" TYPE="O" IDX="2"><NODE_LIST>
<NODE NAME="server3"/><NODE NAME="server4"/><NODE NAME="server11"/>
</NODE_LIST></HOME>
It also updates the local inventory on each node. For example:
$ORACLE_HOME/inventory/ContentsXML/oraclehomeproperties.xml
<CLUSTER_INFO><LOCAL_NODE NAME="server3"/><NODE_LIST>
<NODE NAME="server3"/><NODE NAME="server4"/><NODE NAME="server11"/>
</NODE_LIST></CLUSTER_INFO>
It is useful to understand the effect of the updateNodeList operation on thevarious inventory files. In particular if installation fails it may be necessaryto manually remove entries from these inventories to get the cluster backinto a consistent state.

52
52 © 2008 Julian Dyke juliandyke.com
Node AdditionListener Configuration On the new node create a network listener using:
[oracle@server11]$ cd $ORACLE_HOME/bin./netca /silent \
/responseFile $ORACLE_HOME/network/install/netca_typ.rsp \/inscomp server \/nodeinfo server11
This command will create output similar to the following:
[oracle@server11]$ sh /tmp/netca1.shParsing command line arguments:
Parameter "silent" = trueParameter "responsefile" = /u01/app/oracle/product/11.1.0/db_1/network/install/netca_typ.rspParameter "inscomp" = serverParameter "nodeinfo" = server11
Done parsing command line arguments.Oracle Net Services Configuration:Profile configuration complete.Listener started at port:1521server11...Listener configuration complete.Oracle Net Services configuration successful. The exit code is 0
Listener processes are not automatically configured in Oracle Clusterware.In Oracle 11.1 they must be added manually before an ASM or RDBMSinstance can be created.
In Oracle 10.2 the listener process can be automatically created by DBCA ifdefault values are used for the protocol and port. This functionality appearsto have been removed in Oracle 11.1.
I strongly recommend using the NETCA GUI tool to create the networklistener, but as this requires six or seven slides for the screen shots I haveshown how the listener can be created silently. These scripts were tested onLinux.
In silent mode NETCA uses a response file to create a listener with defaultvalues; in other words TCP protocol listening on port 1521.It is onlynecessary to specify the node name.
NETCA will automatically add the listener definition to the list of nodeapplications in the OCR so that it can be managed by Oracle Clusterware.

53
53 © 2008 Julian Dyke juliandyke.com
Node AdditionASM Instance Creation On an EXISTING node as the oracle user create a new ASM
instance:
[oracle@server3]$ cd $ORACLE_HOME/bin./dbca -silent \-configureASM \-nodeinfo server3,server4,server11 \-asmSysPassword oracle
Node that all nodes must be included in the node list
Again, I strongly recommend using the DBCA GUI interface to add ASMinstances. When you select the Configure ASM option, DBCA will detectthat ASM instances have not been created on all nodes in the cluster andwill prompt to create them.
Alternatively you can create instances silently as shown in the exampleabove.
Note that this command MUST be run from an EXISTING node, not on thenew node.
Note that all nodes must be included in the node list, not just the new nodes.
No output is generated. However, a log file is written in$ORACLE_BASE/cfgtoollogs/dbca

54
54 © 2008 Julian Dyke juliandyke.com
Node AdditionDatabase Instance Creation On an EXISTING node as the oracle user create a new
database instance:
[orac'e@server3]$ cd $ORACLE_HOME/bin./dbca -silent -addInstance \-gdbName TEST \-nodelist server11 \-instanceName TEST3 \-sysDBAPassword oracle
Node that in this case it is only necessary to specify the newnodes in the node list
Once again I strongly recommend using the DBCA GUI interface to addnew database instances.
However, the slide shows how to add an instance using DBCAat thecommand line. Note that this command MUST be run from an EXISTINGnode, not on the new node.
Output will be similar to the following:
Adding instance1% complete2% complete6% complete13% complete20% complete26% complete33% complete40% complete46% complete53% complete66% completeCompleting instance management.70% complete73% complete76% complete86% complete90% complete100% completLook at the log file "/u01/app/oracle/cfgtoollogs/dbca/TEST/TEST.log" forfurther details.0

55
55 © 2008 Julian Dyke juliandyke.com
ListenerRelocating LISTENER.ORA To relocate files to a directory specified by the TNS_ADMIN
environment variable
Stop the listener:
[orac'e@server3]$ srvctl stop listener -n server3
[orac'e@server3]$ srvctl getenv nodeapps -n server3<no environment variables set initially>
[orac'e@server3]$ srvctl setenv nodeapps -n server3 \-t "TNS_ADMIN=/tmp/network/admin"
Check the current environment variable values:
Set TNS_ADMIN for the listener
[orac'e@server3]$ srvctl getenv nodeapps -n server3TNS_ADMIN=/tmp/network/admin
Move the Oracle Net files to the new location
Restart the listener[orac'e@server3]$ srvctl start listener -n server3
By default SRVCTL uses default location$ORACLE_HOME/network/admin or the location specified by the$TNS_ADMIN environment variable. To get SRVCTL to use non-defaultTNS_ADMIN location
On Linux, Oracle searches the following locations for Oracle Netconfiguration files
$TNS_ADMIN
$ORACLE_HOME/network/admin
/etc
Oracle looks for Oracle Net Configuration files in the /etc directory in atleast Oracle 10.2 and Oracle 11.1
See Metalink Note: 420977.1 - How to use listener.ora in non-defaultlocation for 10g RAC

56
56 © 2008 Julian Dyke juliandyke.com
ListenerRelocating LISTENER.ORA Set the environment variable
[oracle@server3]$ export TNS_ADMIN=/tmp/network/admin
Verify the listener status
[oracle@server3]$ lsnrctl status LISTENER_SERVER3
LSNRCTL for Linux: Version 11.1.0.6.0 - Production on 29-MAR-2008 18:13:59
Copyright (c) 1991, 2007, Oracle. All rights reserved.
Connecting to (DESCRIPTION=(ADDRESS=(PROTOCOL=TCP)(HOST=server3-vip)(PORT=1525)(IP=FIRST)))
STATUS of the LISTENER------------------------Alias LISTENER_SERVER3Version TNSLSNR for Linux: Version 11.1.0.6.0 - ProductionStart Date 29-MAR-2008 17:57:34Uptime 0 days 0 hr. 16 min. 26 secTrace Level offSecurity ON: Local OS AuthenticationSNMP OFFListener Parameter File /tmp/network/admin/listener.oraetc...

57
57 © 2008 Julian Dyke juliandyke.com
ListenerRelocating LISTENER.ORA To relocate the Oracle Net files from the location specified by
$TNS_ADMIN to the /etc directory
Stop the listener
[orac'e@server3]$ srvctl stop listener -n server3[orac'e@server3]$ srvctl stop listener -n server3
[orac'e@server3]$ srvctl getenv nodeapps -n server3TNS_ADMIN=/tmp/network/admin
[orac'e@server3]$ srvctl unsetenv nodeapps -n server3 -t "TNS_ADMIN"
Check the current environment variable values:
Unset the TNS_ADMIN environment variable:
Move the Oracle Net files to the new location
Restart the listener[orac'e@server3]$ srvctl start listener -n server3
Unset the TNS_ADMIN environment variable
unset TNS_ADMIN
If the Oracle Net configuration files are located in /etc it is not necessary tospecify a value for the TNS_ADMIN environment variable (Linux Oracle10.2. and 11.1)
58
58 © 2008 Julian Dyke juliandyke.com
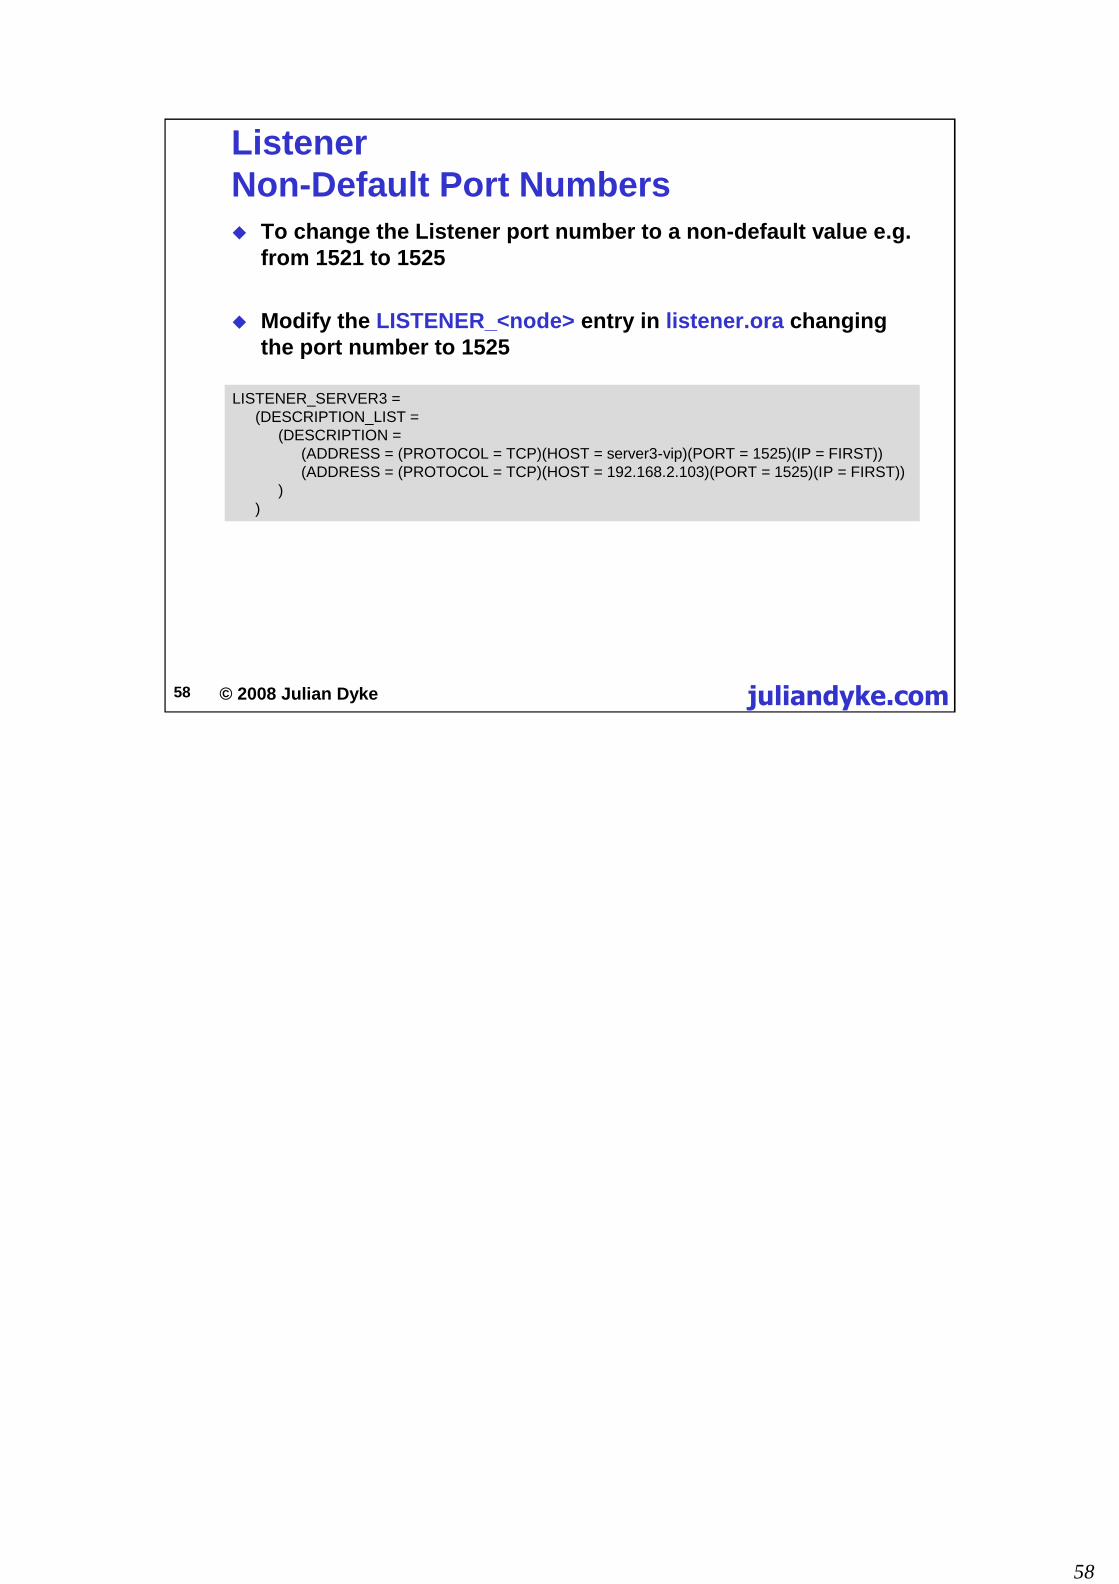
ListenerNon-Default Port Numbers To change the Listener port number to a non-default value e.g.
from 1521 to 1525
Modify the LISTENER_<node> entry in listener.ora changingthe port number to 1525
LISTENER_SERVER3 =(DESCRIPTION_LIST =
(DESCRIPTION =(ADDRESS = (PROTOCOL = TCP)(HOST = server3-vip)(PORT = 1525)(IP = FIRST))(ADDRESS = (PROTOCOL = TCP)(HOST = 192.168.2.103)(PORT = 1525)(IP = FIRST))
))

59
59 © 2008 Julian Dyke juliandyke.com
ListenerNon-Default Port Numbers Modify the LISTENER_<database> entry in tnsnames.ora
changing the port number to 1525
LISTENERS_TEST =(ADDRESS_LIST =
(ADDRESS = (PROTOCOL = TCP)(HOST = server3-vip)(PORT = 1525))(ADDRESS = (PROTOCOL = TCP)(HOST = server4-vip)(PORT = 1525))
)
Add new entries to tnsnames.ora for the local listeners
LISTENER_SERVER3 =(ADDRESS_LIST =
(ADDRESS = (PROTOCOL = TCP)(HOST = server3-vip)(PORT = 1525)))
LISTENER_SERVER4 =(ADDRESS_LIST =
(ADDRESS = (PROTOCOL = TCP)(HOST = server4-vip)(PORT = 1525)))
The client TNSNAMES.ora should contain entries similar to the following:
TEST1 =(DESCRIPTION =
(ADDRESS = (PROTOCOL=TCP)(HOST=server3-vip)(PORT=1525))(CONNECT_DATA =
(SERVER=DEDICATED)(SERVICE_NAME = TEST)
))
TEST2 =(DESCRIPTION =(ADDRESS = (PROTOCOL=TCP)(HOST=server4-vip)(PORT=1525))
(CONNECT_DATA =(SERVER=DEDICATED)(SERVICE_NAME = TEST)
))
TEST =(DESCRIPTION =
(ADDRESS = (PROTOCOL=TCP)(HOST=server3-vip)(PORT=1525))(ADDRESS = (PROTOCOL=TCP)(HOST=server4-vip)(PORT=1525))(LOAD_BALANCE = yes)(CONNECT_DATA =
(SERVER=DEDICATED)(SERVICE_NAME = TEST)
))

60
60 © 2008 Julian Dyke juliandyke.com
ListenerNon-Default Port Numbers Modify the LOCAL_LISTENERS parameter on each instance
ALTER SYSTEM SET local_listener = 'LISTENER_SERVER3' sid = 'TEST1';
ALTER SYSTEM SET local_listener = 'LISTENER_SERVER4' sid = 'TEST2';
Restart the listener process on each node
srvctl stop listener -n server3srvctl stop listener -n server4
srvctl start listener -n server3srvctl start listener -n server4
The REMOTE_LISTENER parameter should already be globallyconfigured as 'LISTENERS_TEST'.
Note that once a non-default port has been specified for the listener processit is necessary to specfity the listener name when using the LSNRCTLutility e.g.
lsnrctl status LISTENER_SERVER3
To unset the LOCAL_LISTENER parameter on each instance use theALTER SYSTEM RESET command e.g.:
ALTER SYSTEM RESET local_listener SID='TEST1';ALTER SYSTEM RESET local_listener SID='TEST2';

61
61 © 2008 Julian Dyke juliandyke.com
Private Network (Interconnect)Changing IP Address To change the IP address for the private network (interconnect)
On each node in the cluster
Stop database
Stop ASM instances
Stop CRS
[root@server3]# ifdown eth1
[root@server3]# ifup eth1
Start CRS
Update IP address in /etc/hosts
Update IP address in interface configuration filee.g. /etc/sysconfig/network-scripts/ifcfg-eth1
Restart interface e.g.
[root@server3]# crsctl stop crs
[root@server3]# crsctl ctart crs
It is occasionally necessary to change network addresses for a RAC cluster.For example when installing cluster nodes to a new data centre or when theIP address allocation scheme changes.
The procedure is slightly different for the private and public networks. Thelatter is complicated by the existence of VIP addresses in Oracle 10.1 andabove.
If you are changing the subnet then
•stop and disable the database
•stop and disable ASM instances
These resources need to be disabled to prevent them from being restartedwhen Oracle Clusterware is restarted.
See Metalink Note: 283684.1 How to Change Interconnect/Public InterfaceIP Subnet in a 10g Cluster

62
62 © 2008 Julian Dyke juliandyke.com
Private Network (Interconnect)Changing Subnet Follow procedure for changing IP address on previous slide
Check existing interface using OIFCFG e.g.:
[root@server3]# oifcfg getifeth0 192.168.1.0 global publiceth1 192.168.2.0 global cluster_interconnect
Delete the existing interface
[root@server3]# oifcfg delif -global eth1
Add the new interface
[root@server3]# oifcfg setif -global eth1/192.168.3.0:cluster_interconnect
Check that the interface has been added successfully
[root@server3]# oifcfg getifeth0 192.168.1.0 global publiceth1 192.168.3.0 global cluster_interconnect
In this example the private interface subnet is changing from 192.168.2.0 to192.168.3.0
You cannot modify the subnet for a network interface specified in OIFCFG.Therefore the interface must be deleted and then added again.
Oracle Clusterware should be running when this procedure is executed
All ASM instances and databases should be stopped and disabled.
After the new interface has been configured using OIFCFG SETIF the ASMinstances and database can be enabled and started.
Note that these instructions assume that the same interface is used for theprivate interconnect for all nodes in the cluster.
In Oracle 10.2 and above you can verify that the interconnect address hasbeen successfully changed on all nodes (instances) using:
SQL> select * from gv$cluster_interconnects;
INST_ID NAME IP_ADDRESS IS_ SOURCE
---------- --------------- ---------------- --- -------------------------
1 eth1 192.168.3.106 NO Oracle Cluster Repository
4 eth1 192.168.3.109 NO Oracle Cluster Repository
3 eth1 192.168.3.108 NO Oracle Cluster Repository
2 eth1 192.168.3.107 NO Oracle Cluster Repository

63
63 © 2008 Julian Dyke juliandyke.com
Private Network (Interconnect)Multiple Interconnects Multiple interconnects can be configured at database level
using CLUSTER_INTERCONNECTS parameter
Instance specific parameter
Specifies list of IP addresses
Useful when
Multiple instances sharing same cluster node
Single interconnect is insufficient
Parameter affects database instances
Does not affect Oracle Clusterware
Not necessary to update OCR
Not necessary to run OIFCFG

64
64 © 2008 Julian Dyke juliandyke.com
Private Network (Interconnect)Multiple Interconnects To set CLUSTER_INTERCONNECTS parameter on each node:
ALTER SYSTEM SET cluster_interconnects='192.168.3.103:192.168.4.103'SCOPE=SPFILE SID='TEST1';ALTER SYSTEM SET cluster_interconnects='192.168.3.104:192.168.4.104'SCOPE=SPFILE SID='TEST2';ALTER SYSTEM SET cluster_interconnects='192.168.3.111:192.168.4.111'SCOPE=SPFILE SID='TEST3';ALTER SYSTEM SET cluster_interconnects='192.168.3.112:192.168.4.112'SCOPE=SPFILE SID='TEST4';
ALTER SYSTEM SET cluster_interconnects='<IP address>[:<IP address>]';
For example:
Restart database after changing parameter
To reset CLUSTER_INTERCONNECTS parameter:
ALTER SYSTEM RESET cluster_interconnects SCOPE=SPFILE SID='TEST1';ALTER SYSTEM RESET cluster_interconnects SCOPE=SPFILE SID='TEST2';ALTER SYSTEM RESET cluster_interconnects SCOPE=SPFILE SID='TEST3';ALTER SYSTEM RESET cluster_interconnects SCOPE=SPFILE SID='TEST4';

65
65 © 2008 Julian Dyke juliandyke.com
Private Network (Interconnect)Multiple Interconnects Example continued
SQL> select * from v$cluster_interconnects;
NAME IP_ADDRESS IS_ SOURCE--------------- ---------------- --- -------------------------------eth1 192.168.3.103 NO cluster_interconnects parametereth2 192.168.4.103 NO cluster_interconnects parameter
SQL> select * from v$configured_interconnects;
NAME IP_ADDRESS IS_ SOURCE--------------- ---------------- --- -------------------------------eth1 192.168.3.103 NO cluster_interconnects parametereth2 192.168.4.103 NO cluster_interconnects parameter
[oracle@server3] $SQL> ORADEBUG SETMYPIDSQL> ORADEBUG IPC
SSKGXPT 0xb7fd6aec flags socket no 5 IP 192.168.3.103 UDP 12459SSKGXPT 0xb7fd6b08 flags socket no 8 IP 192.168.4.103 UDP 12464
Trace file includes the following lines:
66
66 © 2008 Julian Dyke juliandyke.com
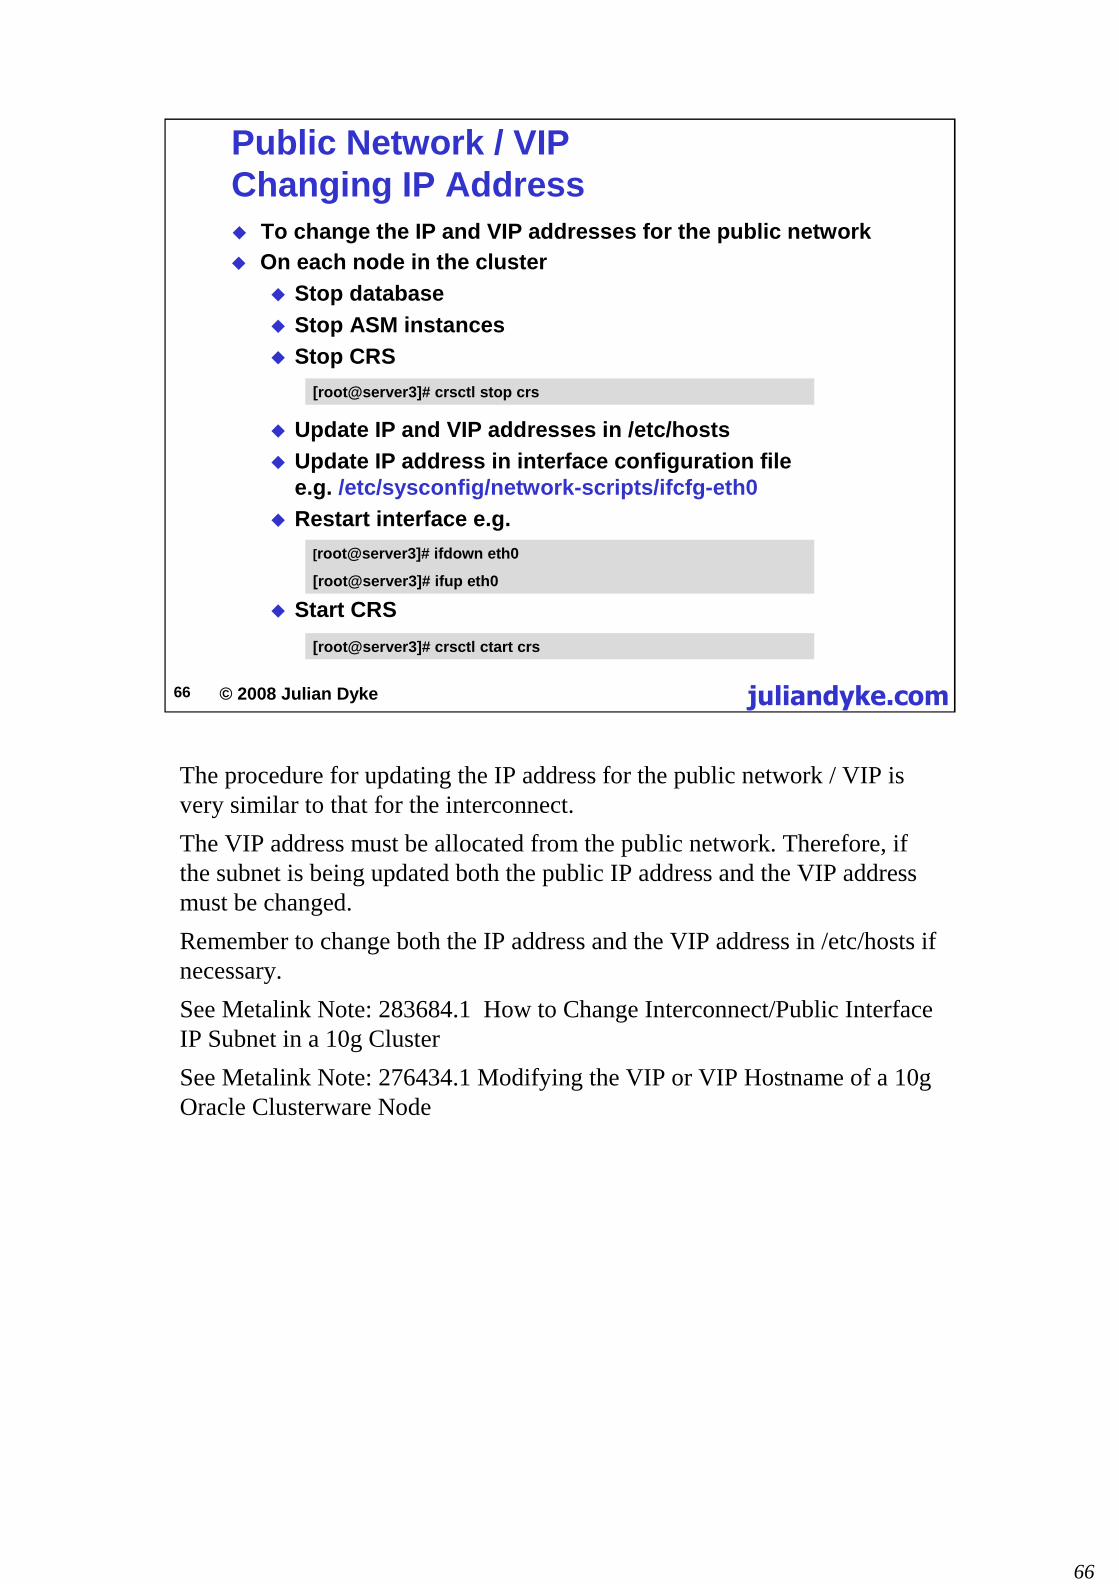
Public Network / VIPChanging IP Address To change the IP and VIP addresses for the public network
On each node in the cluster
Stop database
Stop ASM instances
Stop CRS
[root@server3]# ifdown eth0
[root@server3]# ifup eth0
Start CRS
Update IP and VIP addresses in /etc/hosts
Update IP address in interface configuration filee.g. /etc/sysconfig/network-scripts/ifcfg-eth0
Restart interface e.g.
[root@server3]# crsctl stop crs
[root@server3]# crsctl ctart crs
The procedure for updating the IP address for the public network / VIP isvery similar to that for the interconnect.
The VIP address must be allocated from the public network. Therefore, ifthe subnet is being updated both the public IP address and the VIP addressmust be changed.
Remember to change both the IP address and the VIP address in /etc/hosts ifnecessary.
See Metalink Note: 283684.1 How to Change Interconnect/Public InterfaceIP Subnet in a 10g Cluster
See Metalink Note: 276434.1 Modifying the VIP or VIP Hostname of a 10gOracle Clusterware Node

67
67 © 2008 Julian Dyke juliandyke.com
Public Network / VIPChanging Subnet Follow procedure for changing IP address on previous slide
Check existing interface using OIFCFG e.g.:
[root@server3]# oifcfg getifeth0 192.168.1.0 global publiceth1 192.168.3.0 global cluster_interconnect
Delete the existing interface
[root@server3]# oifcfg delif -global eth0
Add the new interface
[root@server3]# oifcfg setif -global eth0/192.168.2.0:public
Check that the interface has been added successfully
[root@server3]# oifcfg getifeth0 192.168.2.0 global publiceth1 192.168.3.0 global cluster_interconnect
Update Secure shell configuration for oracle user
In this example the public interface subnet is changing from 192.168.1.0 to192.168.2.0
If you are changing the subnet for the public network, you may wish tocheck whether it is necessary to update other configurations such as
•Gateway address
•NTP server (if a local server is used)
Note that it will be necessary to generate new keys for the Secure shellconfiguration for the oracle user.
It will also be necessary to replace the ~/.ssh/authorized_keys file on eachnode and to regenerate the ~./ssh/known_hosts file before using cross-nodetools such as OUI or DBCA.

68
68 © 2008 Julian Dyke juliandyke.com
Public Network / VIPUpdating Node Application When the IP address is changed, the configuration for the VIP
node application must be updated in the OCR
VIP must be changed for each node
Oracle Clusterware must be running to use SRVCTL
To check the existing value use:
[root@server3]# srvctl config nodeapps -n server3 -aVIP exists.: /server3-vip.juliandyke.com/192.168.1.203/255.255.255.0/eth0
To set the new value use:
[root@server3 ~]# srvctl modify nodeapps -n server3 \-A 192.168.2.203/255.255.255.0/eth0
[root@server3]# srvctl config nodeapps -n server3 -aVIP exists.: /server3-vip.juliandyke.com/192.168.2.203/255.255.255.0/eth0
Update IP address in LISTENER.ORA if necessary
In this example the public interface subnet is changing from 192.168.1.0 to 192.168.2.0
Note that SRVCTL must be executed by the root user in order to update the nodeapplications
Note that NETCA uses explicit IP addresses when generating entries in LISTENER.ORA.For example:
LISTENER_SERVER3 =(DESCRIPTION_LIST =
(DESCRIPTION =(ADDRESS = (PROTOCOL = TCP)(HOST = server3-vip)(PORT =
1521)(IP = FIRST))
(ADDRESS = (PROTOCOL = TCP)(HOST = 192.168.1.103)(PORT =1521)(IP = FIRST))
))
It will be necessary to update the IP address in LISTENER.ORA. Alternatively you couldreplace the explicit IP address with the node name e.g. server3.
69
69 © 2008 Julian Dyke juliandyke.com
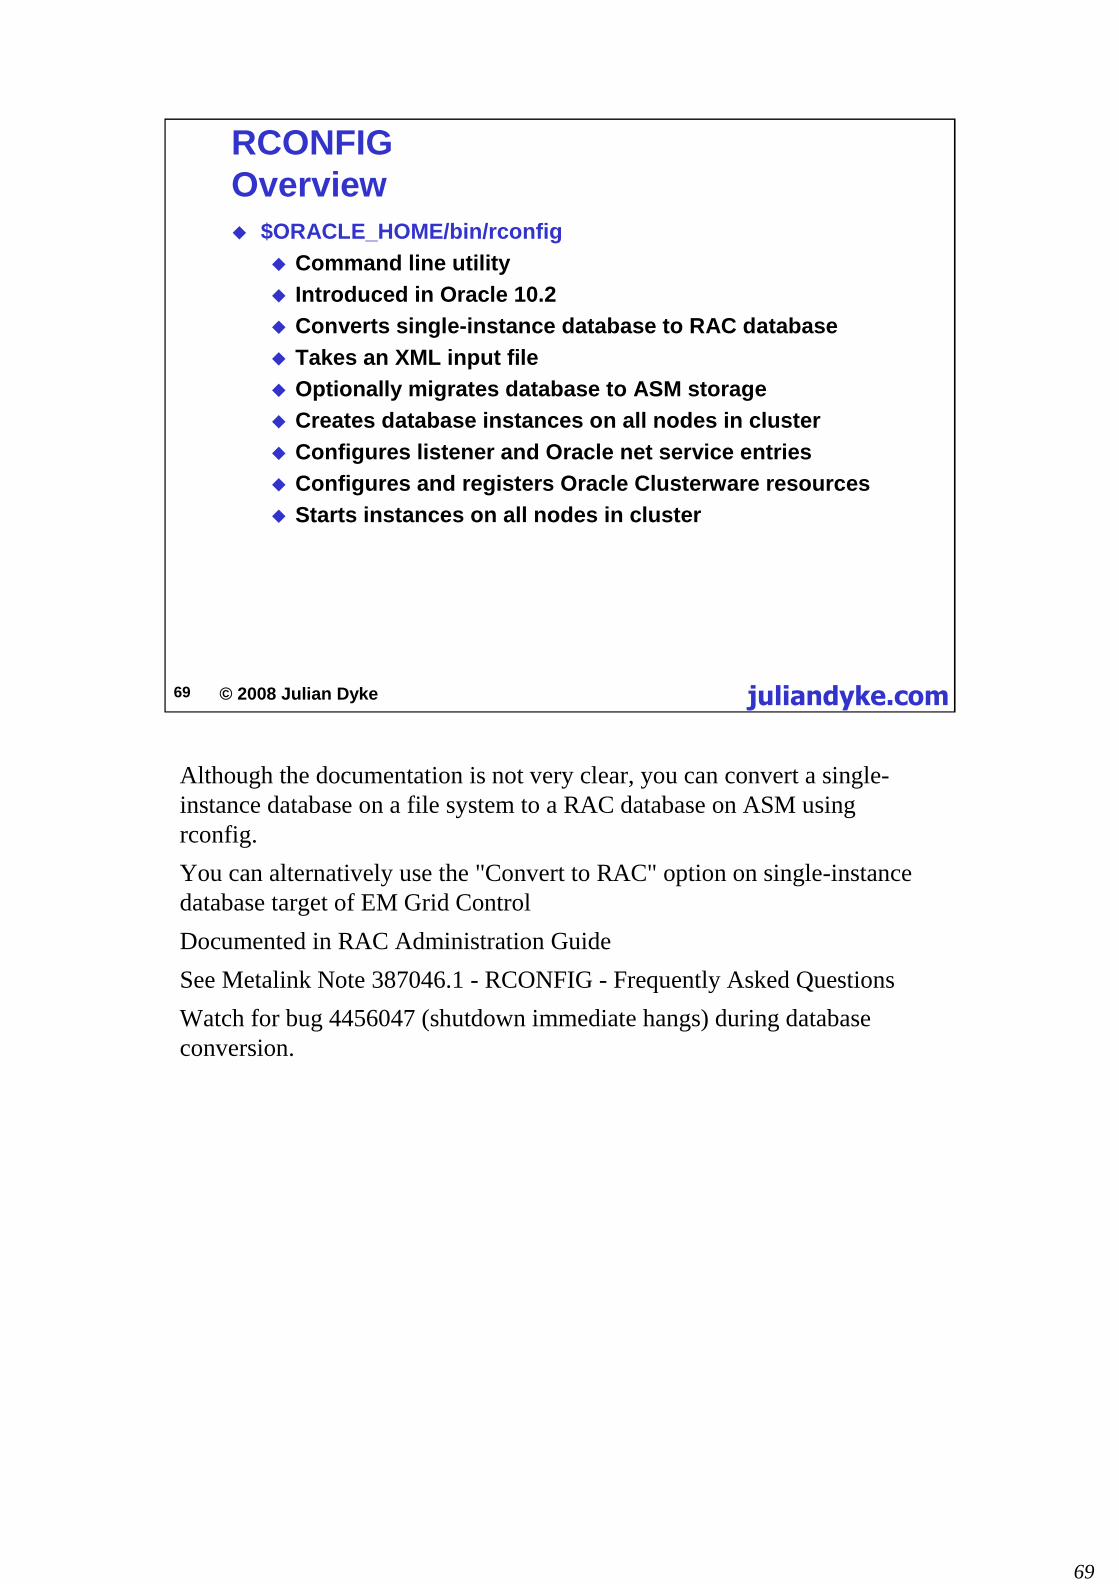
RCONFIGOverview $ORACLE_HOME/bin/rconfig
Command line utility
Introduced in Oracle 10.2
Converts single-instance database to RAC database
Takes an XML input file
Optionally migrates database to ASM storage
Creates database instances on all nodes in cluster
Configures listener and Oracle net service entries
Configures and registers Oracle Clusterware resources
Starts instances on all nodes in cluster
Although the documentation is not very clear, you can convert a single-instance database on a file system to a RAC database on ASM usingrconfig.
You can alternatively use the "Convert to RAC" option on single-instancedatabase target of EM Grid Control
Documented in RAC Administration Guide
See Metalink Note 387046.1 - RCONFIG - Frequently Asked Questions
Watch for bug 4456047 (shutdown immediate hangs) during databaseconversion.

70
70 © 2008 Julian Dyke juliandyke.com
RCONFIGPrerequisites On each node
Oracle Clusterware must be installed, configured andrunning
Oracle RAC software must be installed
Oracle RAC option must be linked in
Shared storage must be available and accessible from allnodes
Can be CFS or ASM
User equivalence must exist for all nodes
The source database must be on a file system or ASM.
Conversion of databases on raw devices not supported

71
71 © 2008 Julian Dyke juliandyke.com
RCONFIGSample XML Files $ORACLE_HOME/assistants/rconfig/sampleXMLs contains
ConvertToClusteredASM.xml
Converts single-instance ASM to multi-instance ASM
ConvertToRAC.xml
Converts single-instance database to RAC database
To convert a single-instance database to RAC
make a copy of ConvertToRAC.xml
modify the copy
Use Convert verify field to specify action
YES - perform prerequisite checks and conversion
NO - perform conversion only
ONLY - perform prerequisite checks only
Specify the "Convert verify = "ONLY" option
Values are:
•YES - rconfig performs checks to ensure that prerequisites have been metbefore conversion
•NO rconfig does not perform prerequisite checks
•ONLY rconfig only performs prerequisite checks and does not performconversion
A successful check returns an XML document similar to the following:
<?xml version="1.0" ?><RConfig version="1.1" ><ConvertToRAC>
<Convert><Response><Result code="0" >Operation Succeeded
</Result></Response><ReturnValue type="object">There is no return value for this step
</ReturnValue></Convert>
</ConvertToRAC></RConfig

72
72 © 2008 Julian Dyke juliandyke.com
RCONFIGExample<?xml version="1.0" encoding="UTF-8"?><n:RConfig xmlns:n=http://www.oracle.com/rconfig
xmlns:xsi=http://www.w3.org/2001/XMLSchema-instancexsi:schemaLocation="http://www.oracle.com/rconfig">
<n:ConvertToRAC><!-- Verify does a precheck to ensure all pre-requisites are met, beforethe conversion is attempted. Allowable values are: YES|NO|ONLY -->
<n:Convert verify="YES">
<!--Specify current OracleHome of non-rac database for SourceDBHome -->
<n:SourceDBHome>/u01/app/oracle/product/11.1.0/db_1</n:SourceDBHome>
<!--Specify OracleHome where the rac database should be configured. It canbe same as SourceDBHome -->
<n:TargetDBHome>/u01/app/oracle/product/11.1.0/db_1</n:TargetDBHome>
<!--Specify SID of non-rac database and credential. User with sysdba roleis required to perform conversion -->
<n:SourceDBInfo SID="PROD"><n:Credentials><n:User>sys</n:User><n:Password>oracle</n:Password><n:Role>sysdba</n:Role>
</n:Credentials></n:SourceDBInfo>
The Convert Verify field allows you to specify whether to perform aprerequisite check and/or a conversion. The check only takes a few minutesso it will invariably be worth performing.
The SourceDBName field specifies the Oracle home for the source (single-instance) database.
The TargetDBName field specifies the Oracle home for the target (RAC)database. As in this case the TargetDBName can be the same as theSourceDBName.
The SourceDBInfo field specifies the SID of the source database (PROD)and the credentials for a SYSDBA user.

73
73 © 2008 Julian Dyke juliandyke.com
RCONFIGExample<!--ASMInfo element is required only if the current non-rac database usesASM Storage -->
<n:ASMInfo SID="+ASM1"><n:Credentials><n:User>sys</n:User><n:Password>welcome</n:Password><n:Role>sysdba</n:Role>
</n:Credentials></n:ASMInfo>
<!--Specify the list of nodes that should have rac instances running.LocalNode should be the first node in this nodelist. -->
<n:NodeList><n:Node name="server3"/><n:Node name="server4"/><n:Node name="server11"/><n:Node name="server12"/>
</n:NodeList>
<!--Specify prefix for rac instances. It can be same as the instance namefor non-rac database or different. The instance number will be attached tothis prefix. -->
<n:InstancePrefix>PROD</n:InstancePrefix>
The ASMInfo section was theoretically not required for this section.However, the XML parsing failed when the section was removed. Thevalues are ignored.
The NodeList contains a list of all nodes for which database instancesshould be created. Note that the node on which the rconfig is run should bethe first node in the list.
The Instance Prefix can be the same as the instance (database) name for thesource database.

74
74 © 2008 Julian Dyke juliandyke.com
RCONFIGExample<!--Specify port for the listener to be configured for rac database.Ifport="", alistener existing on localhost will be used for rac database.Thelistener will be extended to all nodes in the nodelist -->
<n:Listener port="1525"/>
<!--Specify the type of storage to be used by rac database. Allowablevalues are CFS|ASM. The non-rac database should have same storage type.-->
<n:SharedStorage type="ASM">
<!--Specify Database Area Location to be configured for rac database.Ifthis field is left empty, current storage will be used for rac database.For CFS, this field will have directory path. -->
<n:TargetDatabaseArea>+DATA</n:TargetDatabaseArea>
<!--Specify Flash Recovery Area to be configured for rac database. If thisfield is left empty, current recovery area of non-rac database will beconfigured for rac database. If current database is not using recoveryArea, the resulting rac database will not have a recovery area. -->
<n:TargetFlashRecoveryArea>+RECOVERY</n:TargetFlashRecoveryArea>
</n:SharedStorage></n:Convert>
</n:ConvertToRAC></n:RConfig>
The Listener port specifies the port number for the target database. I had alot of problems with the default values for this of both 1521 and the emptystring "". Eventually I needed to use a new port number (in this case 1525)to ensure that the conversion completed successfully.
The SharedStorage type is ASM. The TargetDatabaseArea was +DATA andthe TargetFlashRecoveryArea was +RECOVERY.

75
75 © 2008 Julian Dyke juliandyke.com
RCONFIGOperation Execute rconfig using
$ORACLE_HOME/bin/rconfig <input_file>
Theoretically failed configurations can be restarted
Existing instances will be deleted
Target database will be dropped
In Oracle 11.1 log files are written to
$ORACLE_BASE/cfgtoollogs/rconfig
For example
rconfig_03_31_08_09_13_41.log
In practice when testing I found that rconfig can be run multiple timesallowing errors to be corrected iteratively.
However rconfig does update the source database and therefore it is notpossible to revert to the source database without restoring a backup.
76
76 © 2008 Julian Dyke juliandyke.com
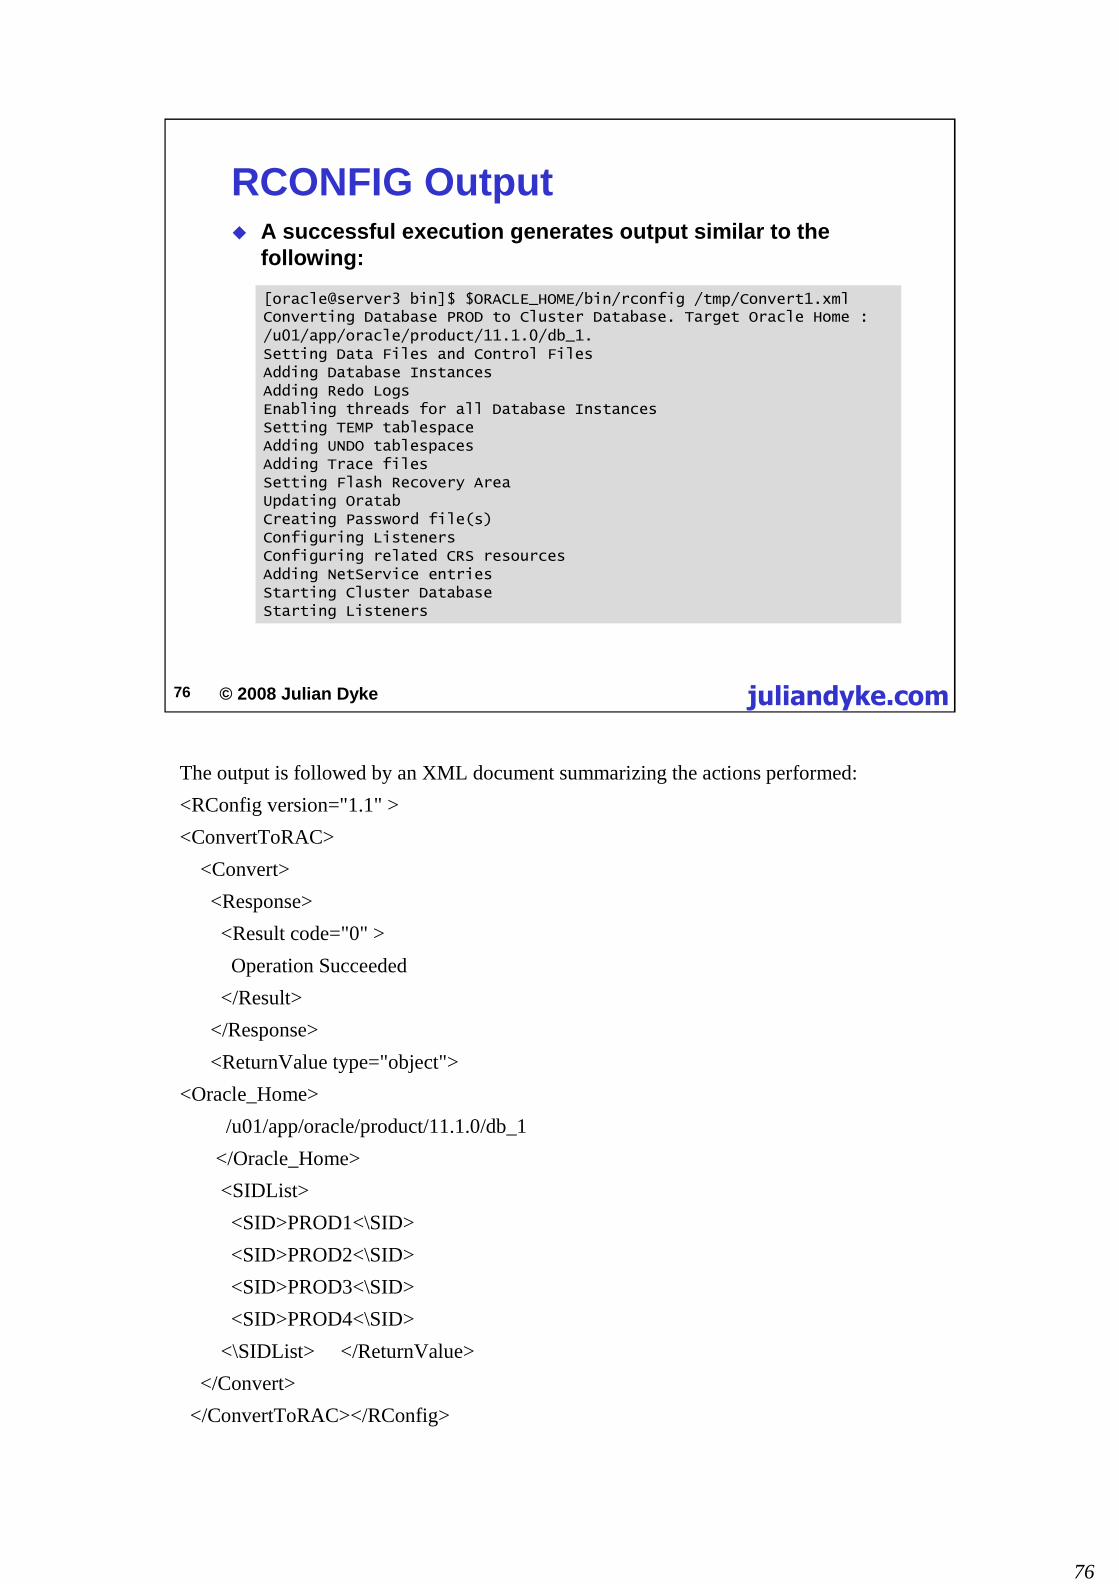
RCONFIG Output A successful execution generates output similar to the
following:
[oracle@server3 bin]$ $ORACLE_HOME/bin/rconfig /tmp/Convert1.xmlConverting Database PROD to Cluster Database. Target Oracle Home :/u01/app/oracle/product/11.1.0/db_1.Setting Data Files and Control FilesAdding Database InstancesAdding Redo LogsEnabling threads for all Database InstancesSetting TEMP tablespaceAdding UNDO tablespacesAdding Trace filesSetting Flash Recovery AreaUpdating OratabCreating Password file(s)Configuring ListenersConfiguring related CRS resourcesAdding NetService entriesStarting Cluster DatabaseStarting Listeners
The output is followed by an XML document summarizing the actions performed:
<RConfig version="1.1" >
<ConvertToRAC>
<Convert>
<Response>
<Result code="0" >
Operation Succeeded
</Result>
</Response>
<ReturnValue type="object">
<Oracle_Home>
/u01/app/oracle/product/11.1.0/db_1
</Oracle_Home>
<SIDList>
<SID>PROD1<\SID>
<SID>PROD2<\SID>
<SID>PROD3<\SID>
<SID>PROD4<\SID>
<\SIDList> </ReturnValue>
</Convert>
</ConvertToRAC></RConfig>

77
77 © 2008 Julian Dyke juliandyke.com
Extended ClustersOverview Currently the Holy Grail of high availability
RAC nodes located at physically separate sites
Implicit disaster recovery
Requires Enterprise Edition licences + RAC option
In the event of a site failure, database is still available
Storage is duplicated at each site
Can use ASM or vendor-supplied storage technology
Active / Active configuration
Users can access database via either site
Configuration and performance tuning are complex
Cache fusion traffic between sites

78
78 © 2008 Julian Dyke juliandyke.com
Extended ClustersOverview Protect against node, instance and site failure
Better utilization of Oracle licences than Data Guard
All nodes active during normal operations
Nodes at a maximum of two locations
All storage duplicated at both locations
Protects against site failure
Third independent site required for quorum disk
Can be server running NFS
Not essential to operation

79
79 © 2008 Julian Dyke juliandyke.com
Extended ClustersOverview
StorageNetwork
Public Network
Database
StorageNetwork
Site2Site1
Private Network
Quorum
Site3
Instance 1
Node 1
Instance 2
Node 2
Database

80
80 © 2008 Julian Dyke juliandyke.com
Extended ClustersInterconnect Public and private networks must span both sites
Must share same subnet
Interconnect must be
High bandwidth
Low latency

81
81 © 2008 Julian Dyke juliandyke.com
Extended ClustersStorage For ASM host-based clusters
Storage duplicated at both sites
Contents should be logically identical
Contents may differ physically
All writes must be performed at both sites
Ensures continued availability in the event of a site failure
In Oracle 10.2 and below reads will be equally distributedbetween sites
Reads from remote site will be slower than reads fromlocal site
In Oracle 11.1 and above preferred disk groups can bespecified
Potential performance improvement

82
82 © 2008 Julian Dyke juliandyke.com
Extended ClustersStorage Example of storage for ASM host-based mirroring
Site 1
+RECOVERY 1
+DATA 1
OCR 1
Voting Disk 1
Site 2
+RECOVERY 2
+DATA 2
OCR 2
Voting Disk 2
Site 3
Voting Disk 3

83
83 © 2008 Julian Dyke juliandyke.com
Extended ClustersQuorum Server For Linux clusters the quorum server must export a file
system for the voting disk
Can just use local file systems
No SAN / NAS connections required
No Oracle licences required
Quorum server must run the following services to supportNFS:
chkconfig --level 2345 portmap onservice portmap start
chkconfig --level 2345 nfs onservice nfs start
chkconfig --level 2345 nfslock onservice nfslock start
On Linux the quorum server must run thefollowing services to support NFS:
•portmap
•nfs
•nfslock
On Linux to configure the services to start automatically when the system isrestarted use the chkconfig command. For example
# chkconfig --level 2345 portmap on
# chkconfig --level 2345 nfs on
# chkconfig --level 2345 nfslock on
To start the services immediately use:
# service portmap start
# service nfs start
# service nfslock start

84
84 © 2008 Julian Dyke juliandyke.com
Extended ClustersQuorum Server To create and export a file system on Linux 2.6
Create a logical volume for the voting disk e.g:
lvcreate -L 1024 -n lvol08 vg00
Create a file system for the voting disk
mkfs.ext3 /dev/mapper/vg00-lvol08
Create a directory for the mount point
mkdir /votedisk
Add the voting disk partition to /etc/fstab
/dev/vg00/lvol08 /votedisk ext3 defaults 1 2
Mount the new file system
mount /votedisk

85
85 © 2008 Julian Dyke juliandyke.com
Extended ClustersQuorum Server To create and export a file system on Linux 2.6 (continued)
Change the ownership of the directory
chown oracle:oinstall /votedisk
Add the following entry to /etc/exports
/votedisk server3(rw,sync,all_squash,anonuid=500,anongid=500)server4(rw,sync,all_squash,anonuid=500,anongid=500)
Export the new file system
exportfs -a
Notes
the above should all be on a single line
anonuid = value of the oracle UID on cluster nodes
anongid = value of the oinstall GID on cluster nodes
To check that the file systems have been exported successfully use theexportfs command with no parameters. For example
exportfs
/votedisk server3
/votedisk server4
86
86 © 2008 Julian Dyke juliandyke.com
Extended ClustersNFS Clients Each cluster node must be configured as an NFS client
The netfs service must be enabled on each node
chkconfig --level 3 netfs onservice netfs start
Create a mount point e.g.
mkdir /app/oracle/votedisk
Add the NFS file system to /etc/fstab e.g.:
server42:/votedisk /app/oracle/votedisk nfsrw,bg,hard,intr,rsize=32768,wsize=32768,tcp,noac,vers=3,timeo=600 0 0
Notes
the above should all be on a single line
server42 = name of NFS server
Mount the NFS file system:
mount /app/oracle/votedisk

87
87 © 2008 Julian Dyke juliandyke.com
Extended ClustersAdding Voting Disks Create cluster with a single voting disk
Add second and third voting disks manually
Backup the existing OCR e.g.
[root@server3]# export ORA_CRS_HOME=/app/oracle/11.1.0/crs$ORA_CRS_HOME/bin/ocrconfig -export /tmp/ocrbackup -s online
[root@server3]# crsctl query css votedisk0. 0 /dev/raw/raw1
located 1 votedisk(s).
Verify the current voting disk configuration
On each node shutdown Oracle Clusterware:
[root@server3]# crsctl stop crs

88
88 © 2008 Julian Dyke juliandyke.com
Extended ClustersAdding Voting Disks On the first node add the new voting disks
[root@server3]# crsctl query css votedisk0. 0 /dev/raw/raw11. 0 /dev/raw/raw22. 0 /app/oracle/votedisk/votedisk_3
located 3 votedisk(s).
Verify the updated voting disk configuration
[root@server3]# crsctl start crs
On each node restart Oracle Clusterware
[root@server3]# crsctl add css votedisk /dev/raw/raw2 -force[root@server3]# crsctl add css votedisk /app/oracle/votedisk/votedisk_3 -force