advanced programming mode (apm) for manually … · advanced programming mode (apm) for manually...
TRANSCRIPT
Advanced Programming Mode (APM) for manually programmed systems
Application Note #247Revision D
February 2011
Technical Support 24/7—800.523.94661
OverviewRadioRA 2 dimmers, keypads, Visor Control Receivers, Hybrid keypads, and GRAFIK Eye® QS Wireless control units contain Advanced Programming Mode (APM) which allows the user to customize their devices according to their specific needs. APM is not available for switches or remote dimmers / switches. This document serves as a supplement to the installation instructions provided with the products and the system Setup Guide. If the devices in a system have been PC programmed, then the features mentioned below must be modified through the PC program and can not be modified through APM. PC programming a system will override all previously programmed APM settings.Before entering APM, it is important to have a good understanding of the features included. For a summary of these features please see Advanced Features Summary in each section.
Table of ContentsDimmerVisor Control ReceiverKeypadGRAFIK Eye QS Wireless Control UnitHybrid Keypad (Dimmer APM)Hybrid Keypad (Keypad APM)
2679
1112

Application Note #247
2www.lutron.com/radiora2
DimmerAdvanced Features Summary
Feature Description DefaultHigh End Trim Select the maximum available light limit. 90%Low End Trim Select the minimum available light limit. 5%LED Brightness Select the brightness of the LEDs when the dimmer is off. 100%Delayed Long Fade to Off Set the length of time to wait before entering a long fade to off. 30 secondsFade Off Rate Control the rate at which the dimmer fades from full intensity to
off when the tapswitch is pressed.2.5 seconds on to off
Fade On Time Set the amount of time the dimmer takes to fade from off to preset intensity when the tapswitch is pressed.
0.75 seconds off to preset
Protected Preset Set the intensity that the dimmer will always turn on to when the tapswitch is pressed once.
Disabled (off)
Load Type (Secondary APM)
Select the type of load that the dimmer will be controlling. This feature is only available on RRD-6NA.
Auto Load Detect
Blip Option (Secondary APM)
This feature is only available on RRD-6NE. Blip On
Dimmer / Switch Mode (Secondary APM)
Configure the dimmer to function as a dimmer or a switch. Dimmer
Enter APM1. Pull the FASSTM switch out.
2. Press and hold the tapswitch.
3. While continuing to hold the tapswitch, push the FASS switch in and continue to hold the tapswitch for 5 seconds until the bottom LED begins to normal flash (once per second).
Note: If the dimmer has already been PC programmed, the LEDs will normal flash for 10 seconds and return to normal operation instead of entering APM.
Continued on next page...

Application Note #247
3 Technical Support 24/7—800.523.9466
Main Menu1. Navigate the main menu.
a. Primary APM: i. Tap the raise / lower rocker to change the LED position to indicate which feature to modify.
b. Secondary APM:
i. Tap the raise rocker until the top LED is blinking.
ii. Press and hold the raise rocker for 3 seconds until LEDs 1 & 3 flash.
iii. Press the tapswitch to select Secondary APM.
iv. Tap the raise / lower rocker to change the LED position to indicate which feature to modify.
2. Press and release the tapswitch to select the feature for modification. Once the feature is selected the corresponding LED will flash.
Note: If the LED normal flashes (1x per second), the dimmer is currently in Primary APM; but if the LED rapid flashes (10x per second), the dimmer is currently in Secondary APM.
3. Tap the raise / lower rocker to select the desired setting.
a. High End Trim:
Adjust the load to the desired high end limit (top 3 LEDs only) between 95% and 67%. Load will show percentage.
High End TrimLow End TrimLED BrightnessDelayed Long Fade to OffFade Off RateFade On TimeProtected Preset
95% (Default) 84% 67%
Continued on next page...
fDimmer / Switch ModeBlip Option (RRD-6NE only)Load Type (RRD-6NA only)

Application Note #247
4www.lutron.com/radiora2
DimmersMain Menu (continued)
b. Low End Trim:
Adjust the load to the desired low end limit (bottom 3 LEDs only) between 1% and 34%. Load will show percentage.
c. LED Brightness:
Chose the desired LED brightness of 100% (top LED) or 30% (middle LED).
d. Delayed Long Fade to Off:
Select the LED that represents the desired waiting period before entering a long fade to off.
e. Fade Off Rate:
Select the LED that represents the desired fade rate from full intensity to off (bottom 5 LEDs only).
f. Fade On Time:
Select the LED that represents the desired fade time from off to preset intensity (bottom 5 LEDs only).
15 Seconds5 Seconds3 seconds2.5 Seconds0.75 Seconds (Default)
5 Seconds3 seconds2.5 Seconds0.75 Seconds0.75 Seconds
Single Tap Double Tap
34%17% 1% (Default)
100% (Default)
30%
70 Seconds60 Seconds50 Seconds40 Seconds30 Seconds (Default)20 Seconds10 Seconds
15 Seconds5 Seconds3 seconds2.5 Seconds (Default)0.75 Seconds
Continued on next page...

Application Note #247
5 Technical Support 24/7—800.523.9466
DimmersMain Menu (continued)g. Protected Preset:
Hold the lower rocker at the lowest light intensity for 3 seconds until the bottom 3 LEDs scroll to toggle the protected preset feature between disabled (default) or enabled. Use the raise / lower rocker to adjust the load to the desired preset level.
h. Load Type (Secondary APM):
Select the load type that the dimmer will be controlling. Only available on RRD-6NA.
i. Blip Option (Secondary APM):
Chose the desired blip option. Only available on RRD-6NE.
j. Dimmer / Switch Mode (Secondary APM):
Chose the LED that represents the desired operation mode.
4. Press and release the tapswitch to save the current setting and return to the previous menu.
5. Press and hold the tapswitch for 3 seconds until the LEDs stop flashing to exit APM.
Note: If there is no activity for 1 minute or the FASS switch is pulled out, the dimmer will automatically exit APM without saving the recent changes.
95%84%67%50%34%17%1%
3 LEDs scrolling: Disabled (Default)
OR
Reverse Phase Control (Incandescent, ELV, or LED)Forward Phase Control (MLV)Auto Load Detect (Default)
OffOn (Default)
SwitchDimmer (Default)
Application Note #247
6www.lutron.com/radiora2
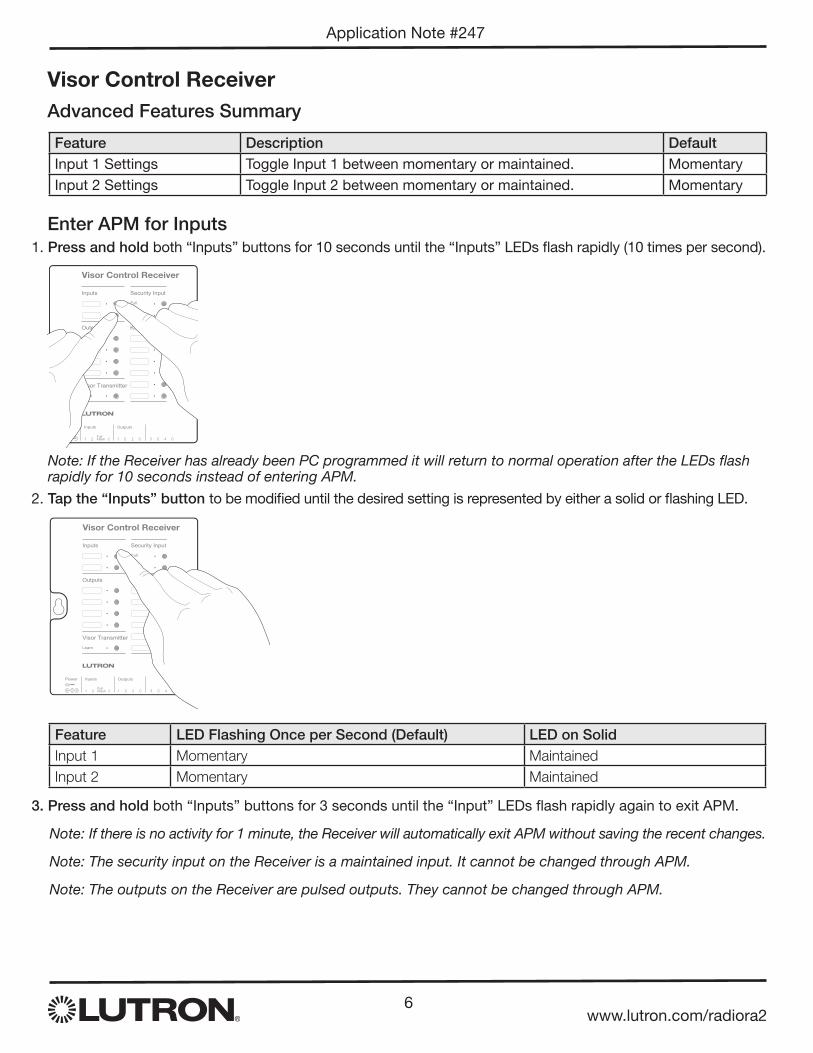
Visor Control ReceiverAdvanced Features Summary
Feature Description DefaultInput 1 Settings Toggle Input 1 between momentary or maintained. MomentaryInput 2 Settings Toggle Input 2 between momentary or maintained. Momentary
Enter APM for Inputs1. Press and hold both “Inputs” buttons for 10 seconds until the “Inputs” LEDs flash rapidly (10 times per second).
Note: If the Receiver has already been PC programmed it will return to normal operation after the LEDs flash rapidly for 10 seconds instead of entering APM.
2. Tap the “Inputs” button to be modified until the desired setting is represented by either a solid or flashing LED.
Visor Control Receiver
Learn
Visor Transmitter
KeypadOutputs
Flash
Full
Security InputInputs
1 2
Power9V
Inputs
CFull
1 C 2 C
Outputs
3 C 4 CFlash
Visor Control Receiver
Learn
Visor Transmitter
KeypadOutputs
Flash
Full
Security InputInputs
1 2
Power9V
Inputs
CFull
1 C 2 C
Outputs
3 C 4 CFlash
Feature LED Flashing Once per Second (Default) LED on SolidInput 1 Momentary MaintainedInput 2 Momentary Maintained
3. Press and hold both “Inputs” buttons for 3 seconds until the “Input” LEDs flash rapidly again to exit APM.
Note: If there is no activity for 1 minute, the Receiver will automatically exit APM without saving the recent changes.
Note: The security input on the Receiver is a maintained input. It cannot be changed through APM.
Note: The outputs on the Receiver are pulsed outputs. They cannot be changed through APM.

Application Note #247
7 Technical Support 24/7—800.523.9466
KeypadAdvanced Features Summary
Feature Description DefaultColumn Type Select the desired column type for each column on a keypad. ToggleRaise / Lower Type Choose the method that selects which assigned zones will be
affected by the raise / lower buttons. Last button pressed
Backlight Intensity Select the brightness of the backlights. 100%Scene Save Enable or disable the ability to save new light levels or
shade / drapery positions.Enabled
Wake-up Method1 Chose the method by which a tabletop keypad “wakes up” when battery powered.
Wake-up and activate
IR Functionality2 Enable or disable the Infrared (IR) receiver on a keypad. Enabled1 Tabletop keypads only.2 IR wall keypads only.
Enter APM1. Press and hold the top and bottom buttons of the top right column of the desired keypad for
10 seconds until the LEDs flash rapidly (10 times per second). Do not release the buttons when the top LED starts to flash after 3 seconds.
Note: If the keypad column has already been PC programmed it will return to normal operation after the LEDs flash rapidly instead of entering APM.
Continued on next page...

Application Note #247
8www.lutron.com/radiora2
KeypadEnter APM (continued)
2. Tap the button that corresponds to the feature to be modified until the desired setting is represented by either a solid or flashing LED.
Feature LED on Solid (Default) LED Flashing Once per SecondColumn Type1 Individual toggle buttons (for on/off and
scene status).Wireless shade / drapery column of buttons.
Raise / Lower Zones assigned to the last button pressed will be affected by a raise / lower.
Zones assigned to the last button double tapped will be affected by a raise / lower.
Backlight Intensity2 Tap to cycle through 4 backlight intensities. Backlights off.Scene Save2 Enabled (can save new levels / positions). Disabled (can not save new levels / positions).Wake-up Method2, 3 Wake-up and activate the button pressed. Wake-up and show the current status of
lights and shades / draperies.IR Functionality2, 4 Enabled. Disabled
1The column type can be modified for each column on a keypad. 2If a keypad column only has 2 or 3 buttons, then only the first 2 or 3 options are available.3Battery powered tabletop seeTouch® keypads only.4Wall seeTouch keypads only.
3. Press and hold the top and bottom buttons of the top right column on the selected keypad for 3 seconds until the LEDs stop flashing to exit APM.
Note: If there is no activity for 1 minute, the keypad will automatically exit APM without saving the recent changes.
Column Type1
Raise / Lower Type
Backlight Intensity2
Scene Save2
Wake-up Method2, 3 or IR Functionality2, 4

Application Note #247
9 Technical Support 24/7—800.523.9466
GRAFIK Eye® QS Wireless Control UnitAdvanced Features Summary
Feature Description DefaultColumn Type Select the desired column type for each column on a keypad. Toggle1
Raise / Lower Type Choose the method that selects which assigned zones will be affected by the raise / lower buttons.
Last button pressed
Backlight Intensity Select the brightness of the backlights. 100%Scene Save Enable or disable the ability to save new light levels or
shade / drapery positions.Enabled
Wake-up Method Chose the method by which a tabletop keypad “wakes up” when battery powered.
Wake-up and activate
IR Functionality Enable or disable the Infrared (IR) receiver on a keypad. Enabled1 On a GRAFIK Eye QS wireless panel, the right column defaults to a local scene column and the other columns default to shade columns.
Enter APM1. Press and hold the top and bottom buttons of the right column for 6 seconds until the LEDs begin to scroll
and the Main menu appears on the display.
2. Press the “OK” button to select the “RadioRA 2” menu on the display.
Note: If “RadioRa 2” does not appear in the Main menu then the control unit has not been added to a RadioRA 2 system. Assign the control unit to a Main Repeater according to the system Setup Guide.
OK
OK
Timeclock
RadioRa 2
Main menu
OK
Timeclock
RadioRa 2
Main menu
OK
Advanced Pro...
Button Config...
RadioRa 2
Continued on next page...

Application Note #247
10www.lutron.com/radiora2
GRAFIK Eye® QS Wireless Control UnitEnter APM (continued)
3. Use the Master Lower button to select “Advanced Programming”, then press the “OK” button to confirm the selection.
Note: If the control unit has already been PC programmed, the display will say “PC Programmed” and the control unit will return to normal operation instead of entering APM.
4. Tap the button that corresponds to the feature to be modified until the desired setting is represented by either a solid or flashing LED.
1The column type can be modified for each column. 2Shade columns only.
5. Press the “OK” button to save settings.
6. Press and hold the top and bottom buttons of the right column until the LEDs stop scrolling to exit APM.
Saved
OK
Advanced Pro...
Button Config...
RadioRa 2
OK
Advanced Pro...
Button Config...
RadioRa 2
OK
Advanced Pro...
Button Config...
RadioRa 2
Column Type1
Feature LED on Solid (Default) LED Flashing Once per SecondColumn Type1 Individual toggle buttons (for on / off and scene
status).Wireless shade / drapery (except for right column, which is a local scene column).
Raise / Lower2 Zones assigned to the last button pressed will be affected by a raise / lower.
Zones assigned to the last button double tapped will be affected by a raise / lower.
Column Type1
Raise / Lower Type2
OK
Press OK to s...
Edit LED with...
Advanced Prog...
OK
Press OK to s...
Edit LED with...
Advanced Prog...
OK
Advanced Pro...
Button Config...
RadioRa 2

Application Note #247
11 Technical Support 24/7—800.523.9466
Hybrid Keypad (Dimmer APM)Advanced Features Summary
Feature Description DefaultHigh End Trim Select the maximum available light limit. 90%Low End Trim Select the minimum available light limit. 5%
Enter Dimmer APM1. Pull the FASSTM switch out.
2. Press and hold the top button.
3. While continuing to hold the top button, push the FASS switch in and continue to hold the button for 5 seconds until the top LED begins to normal flash (once per second).
Note: If the Hybrid keypad has already been PC programmed, the LEDs will normal flash for 10 seconds and return to normal operation instead of entering APM.
Navigate the Main Menu1. Tap the button that corresponds to the feature to be modified.
2. Tap the raise / lower buttons to adjust the load to the desired setting.
a. High End Trim:
Adjust the load to the desired high end limit between 100% and 64%. Load will show percentage.
b. Low End Trim:
Adjust the load to the desired low end limit between 1% and 34%. Load will show percentage.
3. Press and hold the top button for 3 seconds until the LEDs stop flashing to exit APM.
Note: If there is no activity for 1 minute or the FASS switch is pulled out, the Hybrid keypad will automatically exit APM without saving the recent changes.
High End TrimLow End Trim

Application Note #247
Lutron Electronics Co., Inc.7200 Suter RoadCoopersburg, PA 18036-1299P/N 048-247 Rev. D 02/11
12
1 Column type can NOT be modified on a Hybrid keypad. The LED will display the setting but, if selected, the LED will flash rapidly to signify that the setting can not be changed.
3. Press and hold the top and bottom buttons for 3 seconds until the LEDs stop flashing to exit APM.
Note: If there is no activity for 1 minute or the FASS switch is pulled out, the Hybrid keypad will automatically exit APM without saving the recent changes.
Hybrid Keypad (Keypad APM)Advanced Features Summary
Feature Description DefaultColumn Type Select the desired column type for each column on a keypad. Toggle*Raise / Lower Type Choose the method that selects which assigned zones will be
affected by the raise / lower buttons. Last button pressed
Backlight Intensity Select the brightness of the backlights. 100%Scene Save Enable or disable the ability to save new light levels or
shade / drapery positions.Enabled
Enter Keypad APM1. Press and hold the top and bottom buttons for 10 seconds until the LEDs flash rapidly (10 times per
second). Do not release the buttons when the top LED starts to flash after 3 seconds.
Note: If the Hybrid keypad has already been PC programmed it will return to normal operation after the LEDs flash rapidly instead of entering APM.
2. Tap the button that corresponds to the feature to be modified until the desired setting is represented by either a solid or flashing LED.
Feature LED on Solid (Default) LED Flashing Once per SecondColumn Type Always solid. Column is programmed by
individual toggle buttons.Cannot be changed. Flashes rapidly if pressed.
Raise / Lower Zones assigned to the last button pressed will be affected by a raise / lower.
Zones assigned to the last button double tapped will be affected by a raise / lower.
Backlight Intensity Tap to cycle through 4 backlight intensities. Backlights off.Scene Save Enabled (can save new levels / positions). Disabled (can not save new levels / positions).
Column Type
Raise / Lower Type
Backlight Intensity
Scene Save