advanced web image viewer (awiv) user guide - … imaging system . advanced web image viewer (awiv)...
TRANSCRIPT

VistA Imaging System
Advanced Web Image Viewer (AWIV) User Guide
March 2013 – Revision 2.0
Department of Veterans Affairs Office of Enterprise Development
Health Provider Systems

ii VistA Imaging v 3.0 March 2013 Advanced Web Image Viewer (AWIV) User Guide – Rev. 2.0
Advanced Web Image Viewer (AWIV) User Guide VistA Imaging MAG*3.0*124 March 2013
Property of the US Government This is a controlled document. No changes to this document may be made without the express written consent of the VistA Imaging Office of Enterprise Development group.
While every effort has been made to assure the accuracy of the information provided, this document may include technical inaccuracies and/or typographical errors. Changes are periodically made to the information herein and incorporated into new editions of this document.
Product names mentioned in this document may be trademarks or registered trademarks of their respective companies, and are hereby acknowledged.
VistA Imaging Office of Enterprise Development Department of Veterans Affairs Internet: http://www.va.gov/imaging VA intranet: http://vaww.va.gov/imaging
Revision History
Date Rev Notes
Mar 2013 2.0 Added Web Application section and DoD abstract info. H.Suri. Updated for Patch 124. Added section on AWIV Web Application; added Print button and images of toolbars; copyedited. C. Huth
Oct 2010 1.0 Updated per WPR. H. Suri
Sept 2010 .9 Initial draft; WPR complete. H. Suri

March 2013 VistA Imaging v 3.0 iii Advanced Web Image Viewer (AWIV) User Guide – Rev. 2.0
Contents Preface ......................................................................................................v Terms of Use ............................................................................................. v Conventions ............................................................................................... v Related Information .................................................................................. vi Getting Help .............................................................................................. vi
AWIV Overview ........................................................................................ 1 How the AWIV Works ................................................................................ 1 Main AWIV Window ................................................................................... 2 How the AWIV Handles Images ................................................................ 3 AWIV Web Application .............................................................................. 3
Getting to the AWIV ................................................................................. 5 Launching the AWIV Using VistAWeb ....................................................... 5 Launching the AWIV Using the AWIV Web Application ............................ 6
Viewing Images Using Abstracts ........................................................... 7 Loading Images ......................................................................................... 7 Viewing a Study Report ............................................................................. 7 DoD Image Abstracts ................................................................................ 7 Working with Abstracts .............................................................................. 7
Resizing Abstracts............................................................................... 7 Changing Font Size ............................................................................. 8 Using the Abstracts Toolbar ................................................................ 9 Arranging the Abstracts Horizontally ................................................... 9
Using the Full Resolution Viewer ......................................................... 11 Changing Image Orientation .................................................................... 11 Changing Image Size .............................................................................. 11 Panning Images ....................................................................................... 13 Adjusting Brightness/ Contrast ................................................................ 13 Inverting an Image ................................................................................... 13 Printing an Image ..................................................................................... 13 Working with Multi-Page Images ............................................................. 13 Working with Multiple Images .................................................................. 14
To Change Layout ............................................................................. 14 Using Viewer Pages .......................................................................... 14 To apply actions to all images ........................................................... 14
Resetting an Image .................................................................................. 15 Refreshing an Image ............................................................................... 15 Removing Images .................................................................................... 15
Using the Radiology Viewer ................................................................. 17 Images Available in a Study ..................................................................... 17 Choosing a Series to View ....................................................................... 17 Changing Image Orientation .................................................................... 18 Changing Image Size .............................................................................. 18 Printing an Image ..................................................................................... 19 Getting Diagnostic Quality Images .......................................................... 19

iv VistA Imaging v 3.0 March 2013 Advanced Web Image Viewer (AWIV) User Guide – Rev. 2.0
Changing Window/Level .......................................................................... 19 Using the Protractor to Measure Angles .................................................. 20 Using the Ruler Tool ................................................................................ 21 Panning Images ....................................................................................... 22 Resetting an Image .................................................................................. 22 Inverting an Image ................................................................................... 22 Scrolling Through Images ........................................................................ 23 Using the Cine Viewer ............................................................................. 23
Using Other Viewers.............................................................................. 25 Viewing Documents ................................................................................. 25 Viewing Movie Files ................................................................................. 25
Closing the AWIV ................................................................................... 27
Troubleshooting .................................................................................... 29 About the AWIV ....................................................................................... 29 Message Log ........................................................................................... 30
Glossary ................................................................................................. 31
Appendix A - Supported File Extensions ............................................ 33
Appendix B – AWIV Toolbars ............................................................... 35 Full Resolution Viewer Toolbars .............................................................. 35 Radiology Viewer Toolbars ...................................................................... 37

March 2013 VistA Imaging v 3.0 v Advanced Web Image Viewer (AWIV) User Guide – Rev. 2.0
Preface
This manual describes the VistA Imaging Advanced Web Image Viewer (AWIV). It is intended for clinicians who use VistAWeb and need access to images. This manual assumes that a current version of the AWIV is installed and that users are familiar with the Microsoft Windows environment.
Terms of Use Use of the AWIV is subject to the following provisions:
Caution: Federal law restricts this device to use by or on the order of either a licensed practitioner or persons lawfully engaged in the manufacture or distribution of the product.
The AWIV is not intended for the primary interpretation of radiology exams. When the AWIV is installed on approved and properly maintained hardware, primary interpretation of other image types is permissible by licensed practitioners at their discretion.
The FDA classifies VistA Imaging, and the AWIV (as a component of VistA Imaging) as a medical device. Unauthorized modifications to VistA Imaging, including the AWIV, such as the installation of unapproved software, will adulterate the medical device. The use of an adulterated medical device violates US federal law (21CFR820).
Conventions This document uses the following conventions:
Controls, options, and button names are shown in Bold.
A vertical bar is used to separate menu choices. For example: “Click File | Open” means: “Click the File menu, then click the Open option.”
Keyboard key names are shown in bold and in brackets.
Sample output is shown in monospace.
When this document is used online, hyperlinks are indicated by blue text.
Useful or supplementary information is shown in a Tip.
Important or required information is shown in a NOTE.

Preface
vi VistA Imaging v 3.0 March 2013 Advanced Web Image Viewer (AWIV) User Guide – Rev. 2.0
Critical information is indicated by:
Related Information Additional information about VistA Imaging and VistAWeb can be found at:
• VistAWeb: http://www.va.gov/vdl/application.asp?appid=147
• VistA Imaging: http://www.va.gov/vdl/application.asp?appid=105
Getting Help If you encounter any problems using the AWIV, contact your local Imaging Coordinator or support staff. If the problem cannot be resolved locally, use Remedy to place a service request, or contact the National Help Desk at 1-888-596-4357.

March 2013 VistA Imaging v 3.0 1 Advanced Web Image Viewer (AWIV) User Guide – Rev. 2.0
AWIV Overview
How the AWIV Works The VistA Imaging Advanced Web Image Viewer (AWIV) adds image display capabilities to VistAWeb in much the same way that the Clinical Display application adds image display capabilities to the Computerized Patient Record System (CPRS). The AWIV is a Web-based application and hence provides a subset of the features of Clinical Display.
With the AWIV, a user can display images associated with progress notes or radiology reports within the VistAWeb application.
The VistA Imaging AWIV can be launched either from the VistAWeb in a VA-approved version of Microsoft Internet Explorer or from within the AWIV Web Application. VistAWeb (version 13 or later) displays an image icon to allow the user to launch the AWIV. Whereas, double-clicking any study from within the AWIV Web Application launches the AWIV.
The AWIV retrieves information and images from across the VA WAN. This may affect the performance of the AWIV in displaying images.
Note that certain Clinical Display features (such as filters) and image types (such as EKG images stored on MUSE servers) are not available in the AWIV.
NOTE: Turn off pop-up blockers on your computer to allow opening the AWIV component in a new browser window. The AWIV Web Application is hosted on the CVIX and enables use of the AWIV via Microsoft Internet Explorer, independent of VistAWeb. When the AWIV Web Application is used, workstations do not require access to VistAWeb or access to VistA Imaging Clinical Display. Images will be available in a Web-based interface, making it easier for users to access the images. Users can view images available in VistA Imaging and the Department of Defense (DoD), including Neurocognitive Assessment Tool (NCAT) reports, and radiology images and artifacts stored in Healthcare Artifact and Image Management Solution (HAIMS) using AWIV through Microsoft Internet Explorer 7, 8, or 9. For more information on using the AWIV Web Application, see the VistA Imaging AWIV Web Application User Guide.
NOTE: The NCAT system must be online and available in order for AWIV users to view NCAT reports.

AWIV Overview
2 VistA Imaging v 3.0 March 2013 Advanced Web Image Viewer (AWIV) User Guide – Rev. 2.0
Main AWIV Window The image below shows the main AWIV window and the various components of this window.
Main Image Display area
Abstracts Area
Patient Photo
Image Manipulation Toolbars
Status Bar

AWIV Overview
March 2013 VistA Imaging 3.0, MAG*3.0*124 3 Advanced Web Image Viewer (AWIV) User Guide – Rev. 2.0
How the AWIV Handles Images Most images handled by the AWIV are shown in one of two primary viewers, the Full Resolution style viewer, or the Radiology style viewer. These two viewers incorporate many of the controls available in the similarly named viewers in Clinical Display. In general, images associated with progress notes are shown in the Full Resolution Viewer, and images associated with radiology are shown in the Radiology Viewer. However, there are exceptions to this.
The AWIV uses outside viewers to handle certain types of images and non-image objects. For example, Word documents are opened in Microsoft Word if Word is available. For a detailed list of image types and the viewer associated with each type, see Appendix A - Supported File Extensions.
AWIV Web Application The VistA Imaging AWIV Web Application enables users to access patient images using VA approved versions of Internet Explorer independent of VistAWeb and VistA Imaging Clinical Display, similar to the way that VistAWeb currently does. The AWIV Web Application can be accessed using the URL: https://vhacvixclu2.r04.med.va.gov/Awiv/
The AWIV Web Application allows users to locate and display any patient images available to the VA from VistA Imaging, the DoD, including NCAT reports, and radiology images and artifacts stored in HAIMS.
NOTE: The NCAT system must be online and available in order for AWIV users to view NCAT reports.
For more information on AWIV Web Application, see the VistA Imaging AWIV Web Application User Guide.

AWIV Overview
4 VistA Imaging v 3.0 March 2013 Advanced Web Image Viewer (AWIV) User Guide – Rev. 2.0
This page is intentionally blank.

March 2013 VistA Imaging v 3.0 5 Advanced Web Image Viewer (AWIV) User Guide – Rev. 2.0
Getting to the AWIV
Launching the AWIV Using VistAWeb The AWIV can be launched from within VistAWeb. To launch the AWIV and display images, you will first need to select the patient and record that is associated with the remote images you want to view.
The following steps summarize how this is done when VistAWeb is launched in a standalone mode directly from a browser. NOTE: Turn off pop-up blockers on your computer to allow opening the AWIV component in a
new browser window.
1 Start VistAWeb.
2 In VistAWeb, select the site that you want to access.
3 Log in to the site when you are prompted to do so.
4 Select a patient.
5 Use the list on the left side of the page to view the progress notes or radiology reports for the selected patient.
6 Use the controls at the top of the page to query for the records you want to view. A list of records is displayed.
7 Records with associated images display an image icon in the AWIV column. Click the icon to launch the AWIV.

Getting to the AWIV
6 VistA Imaging v 3.0 March 2013 Advanced Web Image Viewer (AWIV) User Guide – Rev. 2.0
8 The AWIV window opens and images are presented as abstracts on the left side of the
window. To view images, click abstracts as described in the following section.
If you launch VistAWeb from the CPRS, the specific steps you use will vary.
For specific information on how to launch VistAWeb from CPRS, see the VistAWeb User Guide at http://www.va.gov/vdl/application.asp?appid=147.
Launching the AWIV Using the AWIV Web Application To display images using the AWIV Web Application,
1 Go to the URL https://vhacvixclu2.r04.med.va.gov/Awiv/ using a VA approved version of Internet Explorer.
2 Select a site (to which the user has credentials) to log into.
3 Select a patient.
4 Select one or more sites that the patient has been seen at in the site information bar, to display studies from that site(s).
5 Click on a study to open images in the AWIV.
6 Review and manipulate images as needed, using the AWIV.
For more details on how to use the VistA Imaging AWIV Web Application, refer to the AWIV Web Application User Guide.

March 2013 VistA Imaging v 3.0 7 Advanced Web Image Viewer (AWIV) User Guide – Rev. 2.0
Viewing Images Using Abstracts
Loading Images When the AWIV window opens, it displays abstract placeholders until the abstracts themselves are retrieved.
NOTE: You can click abstracts and work with them while they are being retrieved. The abstracts do not have to be fully loaded.
To display images associated with abstracts,
1 On the left side of the AWIV window, locate the abstract for the image you want to load.
2 Click the desired abstract. A progress icon with a yellow arrow indicates that the image is being retrieved.
3 Wait until the progress icon turns green . At this point the image is loaded in the main image display area.
Viewing a Study Report To view the associated progress note or study report, right-click an abstract and click Study Report. The report or progress note will display in the Study Report window.
DoD Image Abstracts When you select a DoD artifact, the AWIV window opens with all image abstracts automatically loaded in the abstracts area, and the selected abstract displayed in the main AWIV viewer or in an external viewer (depending on the image type).
NOTE: This only applies to DoD NCAT and non-radiology artifacts from HAIMS selected from within the AWIV Web Application.
Working with Abstracts You can use the functions described below to change how abstracts are displayed.
NOTE: Any changes made to the abstracts as described below apply only to the current session. They will not be saved for subsequent sessions.
Resizing Abstracts To resize abstracts,
1 Right-click any abstract.

Viewing Images Using Abstracts
8 VistA Imaging v 3.0 March 2013 Advanced Web Image Viewer (AWIV) User Guide – Rev. 2.0
2 Click Resize the abstracts… A message box displays.
NOTE: Do not click Finished until after you have completed resizing images. 3 Resize the abstract by dragging the highlighted edges or a corner of the abstract to desired
size, as shown in the image below.
4 Click Finished in the pop-up window when you have finished resizing the abstract. All
abstracts in the study selected will be resized.
Changing Font Size To change the size of the image title font displayed,
1 Right-click an abstract.

Viewing Images Using Abstracts
March 2013 VistA Imaging 3.0, MAG*3.0*124 9 Advanced Web Image Viewer (AWIV) User Guide – Rev. 2.0
2 Click Font Size.
3 Select one of the available font sizes. The font will be resized.
Using the Abstracts Toolbar To show the abstracts toolbar, right-click an abstract and click Toolbar.
Using the abstracts toolbar, you can:
• Navigate abstracts using Previous and Next .
• Resize abstracts using Zoom In and Zoom Out .
• Refresh abstracts using Refresh .
Arranging the Abstracts Horizontally In the AWIV window, abstracts are arranged vertically by default. To temporarily display abstracts horizontally, right-click an abstract, and click Scroll | Horizontal.

Viewing Images Using Abstracts
10 VistA Imaging v 3.0 March 2013 Advanced Web Image Viewer (AWIV) User Guide – Rev. 2.0
This page is intentionally blank.

March 2013 VistA Imaging v 3.0 11 Advanced Web Image Viewer (AWIV) User Guide – Rev. 2.0
Using the Full Resolution Viewer
The AWIV uses the Full Resolution Viewer for most non-DICOM images. The Full Resolution Viewer can be recognized by three image manipulation toolbars displayed at the top of the image area. (The Radiology Viewer has two toolbars at the top and one at the side).
The following sections explain how to work with images in the Full Resolution Viewer using the buttons in the image manipulation toolbars.
For information about the Radiology Viewer, see page 16.
Changing Image Orientation To change the orientation of an image,
• To flip the image vertically, click Flip Vertical .
• To flip the image horizontally, click Flip Horizontal .
• To rotate the image counter clockwise, click Rotate Counter Clockwise 90 .
• To rotate the image clockwise, click Rotate Clockwise 90 .
Changing Image Size Changing an image size in the Full Resolution Viewer includes resizing an image, zooming, using the mouse magnifier and resetting the image. Below are instructions on how to use each of these functions.
To resize an image
• To fit the image in the window, click Fit Image to Window .
• To fit the entire image width in the window, click Fit Image Width button .
To zoom in or out incrementally
• To zoom in on an image, click Zoom In .
• To zoom out from an image, click Zoom Out .

Using the Full Resolution Viewer
12 VistA Imaging v 3.0 March 2013 Advanced Web Image Viewer (AWIV) User Guide – Rev. 2.0
To zoom to a specified value
1 Click the arrow on the Zoom Out/Zoom Menu .
2 Choose one of the available settings.
To use the Zoom Slider
1 Click the Zoom Slider .
2 Drag the bar until desired zoom level is reached for the image.
3 Alternatively, click the arrows on the left and right of the slider bar.
To use the Zoom In on Selected Area Tool
1 Click Zoom In on Selected Area on the toolbar.
2 Drag the mouse to define a rectangular area that contains the image feature you want to magnify.
3 Release the left mouse button. The selected area will be enlarged to fit the available display area.
To use the Mouse Magnifier Tool
1 Click Mouse Magnifier .
2 Point to an area in the image and drag the mouse. A magnification area will display and will move as you drag the mouse.

Using the Full Resolution Viewer
March 2013 VistA Imaging 3.0, MAG*3.0*124 13 Advanced Web Image Viewer (AWIV) User Guide – Rev. 2.0
3 Release the left mouse button. The magnified area will disappear on its own.
Panning Images To pan an image that is larger than the display area, left-click in the image and drag to view the desired part.
Adjusting Brightness/ Contrast
1 To adjust the brightness of an image, click the brightness slider and drag to achieve desired brightness level.
2 To adjust the contrast of an image, click the contrast slider and drag to achieve desired contrast level.
Inverting an Image
To invert an image, click Invert Image on the toolbar.
Printing an Image
To print an image, click Print Image on the toolbar.
Working with Multi-Page Images When multiple pages are available in a single image, the scroll buttons in the middle image manipulation toolbar are enabled. To scroll through multiple pages, use the scroll buttons on the toolbar.
• Click to go to the next page.
• Click to go to the previous page.
• Click to go to the first page.
• Click to go to the last page.

Using the Full Resolution Viewer
14 VistA Imaging v 3.0 March 2013 Advanced Web Image Viewer (AWIV) User Guide – Rev. 2.0
Working with Multiple Images When multiple images are available, you can choose to display one or all of the available images in the main image display area by clicking the abstracts. There are several other AWIV functions multiple images, which are described below.
To Change Layout
1 To tile images currently displayed in the main image display area, click Tile Images on the toolbar.
2 To maximize an image, click the arrow on the Maximize Image (Layout utils.) on the toolbar, and click Maximize Image.
3 To control how many images are displayed at one time in the main image display area, click
the arrow on the Maximize Image (Layout utils.) and then choose one of the available layouts.
Using Viewer Pages If images are laid out across multiple pages, use the Previous Viewer Page and the Next Viewer Page options in the Maximize Image menu to switch between pages.
To apply actions to all images To apply selected actions to all images currently displayed in the main image display area,

Using the Full Resolution Viewer
March 2013 VistA Imaging 3.0, MAG*3.0*124 15 Advanced Web Image Viewer (AWIV) User Guide – Rev. 2.0
1 Click Apply Actions to all Images on the toolbar.
2 Select an action from one of the toolbar options, to apply that action to all images currently displayed in the main image display area.
Resetting an Image
To undo any changes made to an image, click Reset .
Refreshing an Image
To refresh/reload an image, click Refresh on the toolbar.
Removing Images To remove some or all images from the main image display area
1 To remove a single image, click in the upper right corner of the image.
2 To remove multiple images CTRL-Click the images to remove and then click Remove
Selected Images on the toolbar.
3 To remove all images, click Remove All Images on the toolbar.

Using the Full Resolution Viewer
16 VistA Imaging v 3.0 March 2013 Advanced Web Image Viewer (AWIV) User Guide – Rev. 2.0
This page intentionally left blank.

March 2013 VistA Imaging v 3.0 17 Advanced Web Image Viewer (AWIV) User Guide – Rev. 2.0
Using the Radiology Viewer
While the AWIV Web Application allows access to other types of images, the AWIV uses the Radiology Viewer to view and manipulate DICOM radiology images. The Radiology Viewer can be recognized by two toolbars at the top and side of the image display area. (The Full Resolution Viewer has three toolbars.)
The following sections explain how to work with images in the Radiology Viewer. For information about the Full Resolution Viewer, see page 11.
Images Available in a Study If there are multiple images, the information bar above the image displays, the number of images available in that study as shown in the image below.
Choosing a Series to View To view a particular series of images, use the dropdown menu in the information bar above the image to select the series.

Using the Radiology Viewer
18 VistA Imaging v 3.0 March 2013 Advanced Web Image Viewer (AWIV) User Guide – Rev. 2.0
Changing Image Orientation To change the orientation of an image, use toolbar buttons as follows,
• To flip the image vertically, click Flip Vertical .
• To flip the image horizontally, click Flip Horizontal .
• To rotate the image to the left, click Rotate Left .
• To rotate the image to the right, click on Rotate Right .
Changing Image Size You can resize an image, zoom, use the mouse magnifier, and reset images to their original viewing size, as follows,
To resize an image
• To fit the image in the window, click Fit Image to Window .
• To fit the entire image height in the window, click Fit Image Height .
• To fit the entire image width in the window, click Fit Image width .
• To view the image in its original size, click Actual Size .
To use the Zoom Slider
1 Click the Zoom slider .
2 Drag the bar until desired zoom level is reached for the image.
3 Alternatively, click the arrows on the left and right of the slider bar.
To use the Zoom In on Selected Area tool
1 Click Zoom In on Selected Area on the toolbar.
2 Drag the mouse to define a rectangular area that contains the image feature you want to magnify.

Using the Radiology Viewer
March 2013 VistA Imaging 3.0, MAG*3.0*124 19 Advanced Web Image Viewer (AWIV) User Guide – Rev. 2.0
3 Release the left mouse button. The selected area will be enlarged to fit the available display area.
To use the Mouse Magnifier tool
1 Click Mouse Magnifier on the toolbar.
2 Point to an area in the image and drag the mouse. A magnification area will display and will move as you drag the mouse.
3 Release the left mouse button. The magnified area will disappear on its own.
Printing an Image
To print an image, click Print Image on the toolbar.
Getting Diagnostic Quality Images If there are both reference and diagnostic quality versions of an image available, the AWIV will display the reference quality image by default. This is done to reduce the time needed for images to load across the VistA Imaging WAN.
When reference-quality images are displayed in the main image window, the yellow bar displayed near the bottom of the window indicates that this is a reference quality image with the phrase “Reduced size – Reference quality image.”
To retrieve the diagnostic quality image,
1 Right-click an abstract.
2 Select “Get Diagnostic Image.” A progress icon with a yellow arrow indicates that the image is being retrieved.
3 Wait for the diagnostic image to display.
Changing Window/Level You can change the window/level of an image using the mouse. You can also use the auto-window/level tool to base window/level values on a selected area in an image.
To change window/level with the mouse
1 Point to the image you want to adjust and drag using the right mouse button.
2 Drag up or down to change window (window width) values.

Using the Radiology Viewer
20 VistA Imaging v 3.0 March 2013 Advanced Web Image Viewer (AWIV) User Guide – Rev. 2.0
3 Drag left or right to change level (window center) values.
To use the Auto Window/ Level tool
1 Click Auto Window/Level in the toolbar near the top of the window.
2 In the image you want to adjust, drag the mouse to define a rectangular area that includes the tissue you want to base the window/level on.
3 When the drag is completed, the new window/level values will be applied to the entire image.
4 Continue using the Auto-Window/Level tool, or disable it by choosing another tool.
To change window/level using toolbar sliders
You can also click Win. / Lev. on the toolbar and change window/level by dragging with the left mouse button or by using the slider.
Using the Protractor to Measure Angles To measure an angle
1 To enable the option, click Protractor .
2 Once the option is selected, click the mouse on the image, to begin measuring the angle.
3 Drag mouse to stop point and click once again to draw the line.
4 Select desired area and draw an angled line to measure angle. The angle between the lines is displayed on the image, as shown below.

Using the Radiology Viewer
March 2013 VistA Imaging 3.0, MAG*3.0*124 21 Advanced Web Image Viewer (AWIV) User Guide – Rev. 2.0
To change the angle after making an angle selection
1 Click the Use Protractor Ruler Pointer .
2 Select the line to extend in the angle.
3 Drag the line to desired location.
4 Re-measure angle.
NOTE: You can delete an angle measurement by clicking the Reset Image button.
Using the Ruler Tool To measure a feature in an image,
1 Click Ruler on the toolbar.
2 Click on the image to start measuring.
3 Drag to desired area to get a measurement. The length is displayed on the image, as shown below.

Using the Radiology Viewer
22 VistA Imaging v 3.0 March 2013 Advanced Web Image Viewer (AWIV) User Guide – Rev. 2.0
NOTE: The ruler is available only if the applicable sizing information is available in the DICOM image header.
Panning Images To pan an image with the mouse
To pan an image that is larger than the display area, left click and drag to view desired part of the image.
To use the pan window
To pan an image using a pan window,
1 Click Pan Window in the tool bar above the image.
2 Click and drag the rectangular box that appears in the pan window to move to the desired area in the image.
Resetting an Image To undo any changes made to an image click Reset to restore the original image.
Inverting an Image To invert an image, click Invert Image on the toolbar.

Using the Radiology Viewer
March 2013 VistA Imaging 3.0, MAG*3.0*124 23 Advanced Web Image Viewer (AWIV) User Guide – Rev. 2.0
Scrolling Through Images If multiple images are available in the study, you can scroll through these images by using the scroll tools available to the left of the image.
• Click to go to next image.
• Click to go to previous image.
• Click to go to the first image in the study.
• Click to go to the last image in the study
• Click to play the images as a slide show.
• To change the speed of the slide show, drag the smaller slider at the bottom of the
scroll tools. Speed increases as you drag from top to bottom.
You can also scroll through images using the long vertical slider bar. Drag the slider from top to bottom to go to the next image.
Using the Cine Viewer When DICOM multi-frame images are loaded in the Radiology Viewer, a special toolbar displays automatically. You can use this to work with multi-frame images as described below.

Using the Radiology Viewer
24 VistA Imaging v 3.0 March 2013 Advanced Web Image Viewer (AWIV) User Guide – Rev. 2.0
• To play the study, click Cine.
• To stop playing the study, click Stop.
• To returns to the first page in the study, click Reset.
• To repeat play, select the Repeat option in the Play Mode area.
• To play once, select the Play once option in the Play Mode area.
• To change the play speed, click and drag the Cine Speed slider.
• To go to the previous page in the study, click PrevPg. Alternatively, use the page slider.
• To go to the next page in the study, click NextPg. Alternatively, use the page slider.
March 2013 VistA Imaging v 3.0 25 Advanced Web Image Viewer (AWIV) User Guide – Rev. 2.0
Using Other Viewers
Viewing Documents If a progress note or radiology report has a Word .doc file or .avi movie file associated with it, the AWIV launches the appropriate outside viewer when abstracts for these files are selected.
Clicking Word documents will open the document in a Microsoft Word window.
If you close the AWIV and select another patient in VistAWeb, the .doc file with information for the previous patient remains displayed.
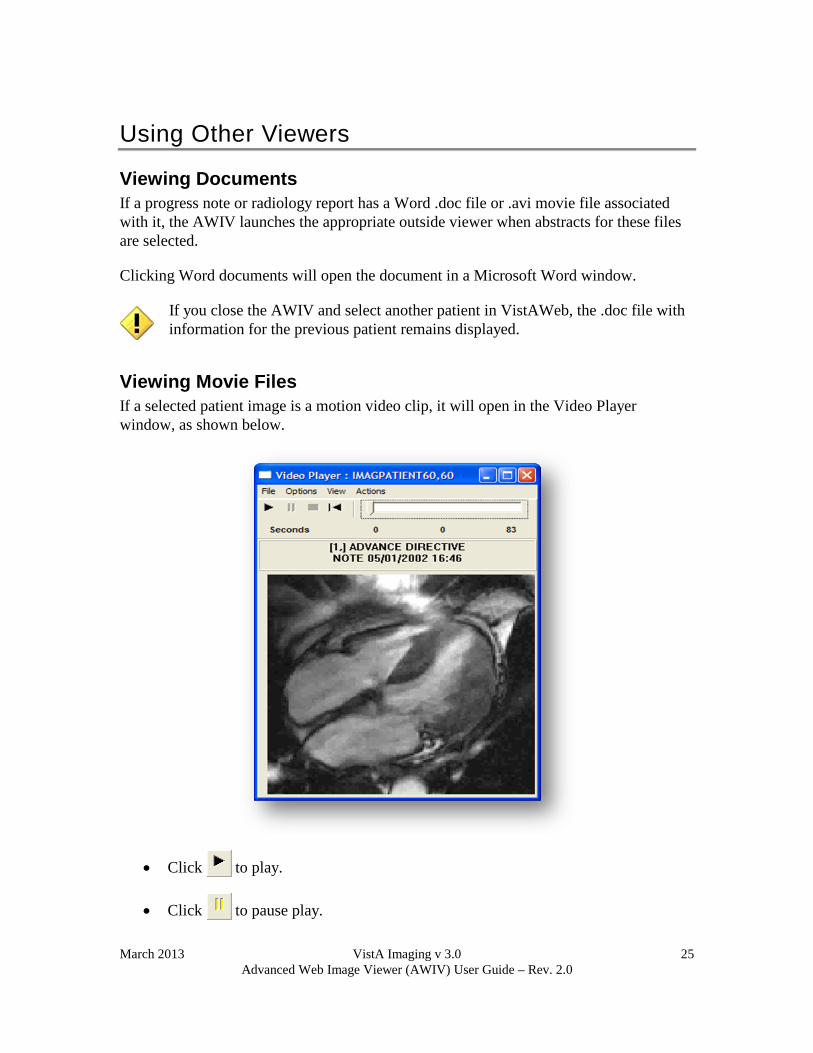
Viewing Movie Files If a selected patient image is a motion video clip, it will open in the Video Player window, as shown below.
• Click to play.
• Click to pause play.

Using Other Viewers
26 VistA Imaging v 3.0 March 2013 Advanced Web Image Viewer (AWIV) User Guide – Rev. 2.0
• Click to stop playing.
• Click to rewind.
• Click and drag the slider to browse the video clip, frame by frame.
• Click View | Set Start Point to set start point.
• Click View | Set End Point to set end point.
• Click Options | Video Loop to continuously play all or part of the file.
• You can choose to display or hide the progress bar in the video player, by clicking Options | Show Progress Bar.
With the progress bar,
Without the progress bar,

March 2013 VistA Imaging v 3.0 27 Advanced Web Image Viewer (AWIV) User Guide – Rev. 2.0
Closing the AWIV
To close the AWIV window, click in the upper right hand corner of the AWIV Window or click either of the Close buttons at the top and bottom of the AWIV window.
NOTE: The AWIV closes automatically when a different patient is selected in either VistAWeb or in the AWIV Web Application.

Closing the AWIV
28 VistA Imaging v 3.0 March 2013 Advanced Web Image Viewer (AWIV) User Guide – Rev. 2.0
This page is intentionally blank.

March 2013 VistA Imaging v 3.0 29 Advanced Web Image Viewer (AWIV) User Guide – Rev. 2.0
Troubleshooting
About the AWIV To display version and memory usage information about the AWIV, click the About button located in the lower left corner of the AWIV window.

Troubleshooting
30 VistA Imaging v 3.0 March 2013 Advanced Web Image Viewer (AWIV) User Guide – Rev. 2.0
Message Log The Message History window is used to view system messages for debugging purposes. To open this window, click Message History in the lower left corner of the AWIV window to view message history as shown in the image below.
To exit the message history window, click in the top right corner of the Message History window or click File | Exit.

March 2013 VistA Imaging v 3.0 31 Advanced Web Image Viewer (AWIV) User Guide – Rev. 2.0
Glossary
Acronym /Term Definition
AWIV Advanced Web Image Viewer
CPRS Computerized Patient Record System
DICOM Digital Imaging and Communications in Medicine
EKG Electrocardiogram
FAQ Frequently Asked Questions
FDA Food and Drug Administration
HIMS ROI Health Information Management Services Release of Information (department)
ID Identifier or Identification
Multi-frame A DICOM image that contains multiple two-dimensional pixel planes in a single file. When the file is displayed, each plane (frame) is presented as a separate image. This separation is automatically handled in the Radiology Viewer.
MUSE A third party cardiology information system used to store and manage ECG/EKG (electrocardiogram) images. If a VA facility stores their ECG images in MUSE, they will not be accessible to the AWIV.
TGA Targa (image type)
US United States
VA Veteran Affairs
VistA Veterans Health Information System and Technology Architecture
VistAWeb VistAWeb is an intranet web application used to review remote stored VistA and Health Data Repository (HDR) patient information; see http://vista.med.va.gov/vistaweb/index.htm for details about VistAWeb

Glossary
32 VistA Imaging v 3.0 March 2013 Advanced Web Image Viewer (AWIV) User Guide – Rev. 2.0
This page is intentionally left blank.

March 2013 VistA Imaging v 3.0 33 Advanced Web Image Viewer (AWIV) User Guide – Rev. 2.0
Appendix A - Supported File Extensions
Extension Description Associated Viewer
756 Historical 756 Radiology Viewer or Full Resolution Viewer depending on image type.
ABS Abstract file Abstract area
ASC ASCII text file Not Supported
AVI Motion video Video Player
BIG X-ray file 2000K Radiology Viewer
BMP Bitmap Full Resolution Viewer
BW Black and white Radiology Viewer or Full Resolution Viewer depending on image type.
DCM DICOM Radiology Viewer
DOC MS Word document Microsoft Word
DOCX MS Word document Microsoft Word
HTM Web HTM document Not Supported
HTML Web HTML document Not Supported
JPG JPEG full color Full Resolution Viewer
MHT MIME HTML web page archive Not Supported
MHTML MIME HTML web page archive Not Supported
MP3 Motion video MPEG-3 Not Supported
MP4 Motion video MPEG-4 Not Supported
MPEG Motion video MPG Not Supported
MPG Motion video MPG Not Supported
PAC X-ray PAC image Radiology Viewer
PDF Adobe PDF Full Resolution Viewer
RTF Rich text format MS Word
TGA TARGA image Radiology Viewer
TIF Tagged Image File Format Full Resolution Viewer
WAV Audio wave file Not Supported
This page intentionally left blank.

Appendix A - Supported File Extensions
34 VistA Imaging v 3.0 March 2013 Advanced Web Image Viewer (AWIV) User Guide – Rev. 2.0

March 2013 VistA Imaging v 3.0 35 Advanced Web Image Viewer (AWIV) User Guide – Rev. 2.0
Appendix B – AWIV Toolbars
Full Resolution Viewer Toolbars The Full Resolution Viewer has three toolbars. Each toolbar is shown below with a description of each button on the toolbar.
Apply Applies the actions to all images.
Fit Image to Window Resizes the image to fit in the viewing
window.
Width Fits the image to the width of the viewing
window.
Zoom In Incrementally magnifies the image.
Zoom Out Decreases image magnification with each
click.
Mouse Magnifier Allows the user to select a portion of the
image to magnify using a mouse click.
Zoom (Selected Area)
Allows the user to click an area to zoom in on the image. The image point selected zooms in or out with the movement of the mouse.
Pointer Changes the mouse back to a pointer.
Image Layout
Allows the user to specify the image size and layout. A drop down list appears when selected with options for the user to select.
Tile Images Tiles the images.
Rotate Image Counter Clockwise
Rotates the Image 90 degrees counterclockwise.
Rotate Image Clockwise Rotates the Image 90 degrees clockwise.
Refresh Images Refreshes current image.
Remove Selected Images Removes the selected image from the Full

Appendix B – AWIV Toolbars
36 VistA Imaging v 3.0 March 2013 Advanced Web Image Viewer (AWIV) User Guide – Rev. 2.0
Resolution Viewer pane.
Remove all images Removes all of the images from Full
Resolution Viewer pane.
Print Image Prints the image.
Flip Vertical Flips the image vertically.
Flip Horizontal Flips the image horizontally.
Invert Image Inverts the image.
Reset Image Adjusts the image to its original size.
Increases or decreases magnification.
Increases or decreases brightness.
Increases or decreases contrast.

Appendix B – AWIV Toolbars
March 2013 VistA Imaging 3.0, MAG*3.0*124 37 Advanced Web Image Viewer (AWIV) User Guide – Rev. 2.0
Radiology Viewer Toolbars The Radiology Viewer has two toolbars that can be used to manipulate images. Each toolbar is shown below with a description of each button on the toolbar.
Reset Images Resets the image to its original settings.
Fit Image to Window Resizes image to fit to the window.
Fit Image to height. Resizes image to fit to the height of the
window.
Fit Image to width. Resizes image to fit to the width of the
window.
Actual Size Resets the image to the actual size.
Flip Vertical Flips the image vertically.
Flip Horizontal Flips the image horizontally.
Rotate Left Rotates the image to the left.
Rotate right Rotates the image to the right.
Invert Image Inverts the image.
Pan Image with mouse. Pans image on mouse click.
Mouse Magnifier Magnifies image on mouse click.
Zoom Zooms in on the selected area.
Ruler Measures on mouse click.
Protractor Measures angle on mouse click.
Ruler/Protractor pointer Moves lines drawn.
Auto Window Level Window control.

Appendix B – AWIV Toolbars
38 VistA Imaging v 3.0 March 2013 Advanced Web Image Viewer (AWIV) User Guide – Rev. 2.0
Pan Window Opens the pan window.
Print Image Prints the image.
Changes Window/ Level values of the image.
Zooms in or out of the image.