advantage/mulia glass blocksadvantageglassblock.com/mulia3.pdf · advantage/mulia glass blocks. ......
TRANSCRIPT

Introduction
Glass blocks are a timeless building material, yet over the past 50
years they’ve gone in and out of fashion depending on the trends
of architectural design. Since the 1980s there has been a steady
increase in the use of glass block in commercial and residential
construction.
Invented in Europe in the early 1900s as thin blocks of glass sup-
ported by a grid, glass blocks fell out of favour for a while before
resurfacing in the 1950s as a decorative building material. But it
was a short-lived love affair as 1960s architecture began to stress
the minimalist look. Then two trends combined to bring glass
block back into demand. During the 1970s there was a move
away from the sparse look in architecture, and in the early 1980s
a trend for the feel of the 1950s began.
Glass blocks are not only decorative - they also have several
functional advantages that make them attractive. Lots of natural
light will filter through a glass block window, while at the same
time, the patterns on the glass blocks create varying degrees of
privacy. They have the insulating value of a 12” thick concrete
wall or an insulation R value of 2.0 (similar to a thermal pane
double-glazed window). Due to the large enclosed air space,
condensation problems normally experienced on conventional
windows are not seen on glass blocks (if installed correctly).
Glass blocks provide acoustical benefits by reducing outside
noise. They also provide a degree of security unavailable from an
ordinary flat-glass window, while eliminating the need for expen-
sive window coverings, which only reduce light transmission.
Page 1
Advantage/Mulia Glass Blocks

Until recently, glass blocks remained in the realm of architecture.
In the past, an architecturally designed home with a glass block
panel was a magnificent sight. But as installation techniques
become easier, more homeowners are looking to glass blocks for
their own home improvement projects.
Homeowners are discovering the benefits of glass block panels
for windows, walls, dividers and even furniture. In Europe, as
much as 40% of all glass blocks sold are used by the do-it-your-
selfer.
Designing with Glass Blocks
Mulia glass blocks are made from two sections of pressed glass,
which are then fused together to create a partial vacuum inside
the unit, with the pattern on the inside face.
If privacy is the main concern, the wall or window should be built
of blocks that will distort any images. The busier the pattern, the
greater the distortion.
There might be a trade-off between your need for privacy and
your desire for natural light, but keep in mind that even a clear
block in combination with the mortar grid will provide some dis-
tortion of image. To help keep the trade-off to a minimum, you
might want to design a glass block wall using a combination of
patterned and clear blocks. The clear blocks could be grouped in
areas where you want to retain the view or let in the most
amount of natural light.
In replacing an existing window with glass blocks, you are not
limited by the size of the opening. Combinations of different
block sizes can be used to retrofit openings where standard mul-
tiples of blocks will not work, or where a more interesting design
concept can be made while greatly reducing material costs.Two
examples are shown here to illustrate the possibilities. In new
construction, however, the size of the blocks can be considered in
the preliminary design stages, to allow you the broadest choice
of pattern and size. See sketches on next page:
Page 2

This example shows 2 panels, each 36” X 36” — one using a
combination of sizes and the other using all the same size of
block.These two panels are identical in size yet one contains 36
blocks while the other contains 25 blocks (in a symmetrical com-
bination). Cost per individual block is identical in this case yield-
ing an approximate 30% saving on material and labour with the
25-block option.
Why Architects Use Glass Block
Architects have always had a strong attraction to glass. It’s a
versatile material — hard while also being translucent or trans-
parent. Glass blocks offer the architect the excitement of glass,
while offering many of the advantages of masonry material.
Glass blocks are an important element in current design trends
and their qualities make them welcome in any renovation, new
home design or commercial application.
Few construction materials offer all the benefits associated with
glass blocks — natural light, openness, strength, attractiveness,
coupled with a high degree of privacy and security, and reduced
sound transmission.
With glass blocks, you can build an expanse of wall with only a
thin mortar line between the rows of blocks. No other visually
distracting construction material is necessary (within size limits).
Page 3

The maximum exterior panel area is 144 sq.ft. with the width no
longer that 25 ft. and a maximum height of 20 ft. Interior panels
can be a maximum of 250 sq.ft. These calculations are based on
the used of 3-7/8 thick blocks. If you use 3-1/8 thick blocks, the
maximum exterior area you can cover with a single panel is 85
sq.ft. The maximum interior area is 150 sq.ft., again with a height
of no more than 20 ft. If your opening is larger than these sizes,
a series of panels is necessary with each panel supported by a
structural frame and expansion joints.
Curved walls are one of the most beautiful applications of glass
blocks. A curved wall can round out to catch more light, dip back
to the wall line again, go straight for a bit, then curve out once
more. There is no end to the variety of design offered.
Whether they are clear for maximum visibility or textured to pro-
vide privacy, glass blocks will always create a feeling of open-
ness.
There are many interesting applications for glass blocks. For
example, if you would like an island in your kitchen, but a solid
island would appear too heavy, make the base from glass blocks
Page 4
Channel-type restraint 144 85
Panel anchors 144 85
Channels or panel anchors
w/intermediate stiffeners 250 150
Channel-type restraint 250 150
Panel anchors 250 150
interior
interior
thick series thin seriesPerimeter Support Method
Maximum Panel Dimensions
area (sq. ft.) area (sq. ft.)

to lighten the appearance. Or you may want a bar in a recreation
room but again a regular bar would appear too massive. The
base can be created from glass blocks while the bar top can be
supported by wood columns at either end. Shower installations
can surround the entire enclosure or be as simple as light panels
inserted anywhere in the drywall.
Glass blocks offer a degree of security that is not offered by an
ordinary glass window. Since the blocks are 3” to 4” inches
thick, they offer protection against forcible entry or breakage.
Basement windows are particularly attractive to intruders
because they are small, at ground level and are usually in a spot
that will prevent detection of the intruder.
Sidelights next to the front entrance are a favorite of intruders as
well, since it is simply a matter of breaking the glass and reach-
ing in to unlock a deadbolt to gain access.
Replace basement windows and sidelights with glass blocks and
you restrict access to your house without sacrificing any natural
light transmission.
Working with Glass Block
Glass blocks are not load-bearing and must be used in conjunc-
tion with a steel lintel (angle iron) or a wood header. This is no
different from typical construction details for a conventional win-
dow installation.
The panel must be independent of the main structure.There
must be a cushion between the panel and the surrounding con-
struction material. Yet the blocks are still tied to the surrounding
structure.
Glass blocks are treated somewhat like bricks with the panel
being built from the bottom up, block by block.
It is true that a glass block project is only as good as the crafts-
manship employed, but there are no great secrets to masonry
work.
Page 5

With the use of spacers, you can keep the mortar joints even and
prevent bulges in the rows of blocks. So the only remaining trick
to the masonry work is preparing and handling the mortar.
Mortar is the adhesive that will hold your glass blocks together
and give your project its strength. The quality and durability of
your glass block panel will depend on the quality of the mortar
you prepare. A mortar that is too runny or too dry won’t work.
You should mix to a consistency of peanut butter in order to
achieve a durable bond with optimal holding power. One bag of
our pre-mixed glass block mortar (20 kg) will lay approximately
25-3” blocks or 20-4” blocks. Our pre-mix mortar incorporates
latex acrylic polymers to increase water resistance.
Using Installation Accessories: Spacers, Anchors, Expansion, Reinforcing
Kreuz plastic spacers — called a laying cross — were originally
invented in Austria.The crosses at each end of the spacer sit on
either side of the glass block providing horizontal rigidity while
the bridge sits down in the vertical mortar bed.
The tabs at the outside of the
spacers keep the wall plumb
as it goes up. These tabs
snap off when twisted to
allow easy striking of the
mortar joint.The main body
of the spacer remains embed-
ded in the mortar, providing
uniform quarter-inch horizon-
tal and vertical joint spacing.
The support provided by
these spacers allows con-
struction of large spans with-
in a single day with no need
to wait for mortar to harden.
Page 6
Glass Block Spacer
(specify thickness 3” or 4”)

These versatile plastic spacers are a key “enabling technology”
which ensures that consistent mortar lines are within the reach
of anyone who wants to produce a glass block project.
A glass block panel cannot support any structural weight other
than its own. That means you can not tear down a load-bearing
wall inside your house and replace it with a glass block wall —
unless you provide an integrated supporting structure.
This also means that no lintels or structural pieces of any kind
that support weight can rest on top of the glass block panel.
Lintels must be supported by other structural members. An
expansion joint is placed between the glass block and lintel, act-
ing as a cushion in the case of any lintel deflection.
As mentioned earlier, panels must be independent of the main
structure. This means the panel cannot be mortared directly to
the building for fear of cracking during the differential expansion
and contraction of the surrounding materials. The panel is there-
fore surrounded by an expansion joint at both jambs and at the
head position.
There are three methods of providing panel support: chase con-
struction, channel construction and panel anchors. In chase con-
struction, the edges of the glass block panel are built so that
they fit into a wide groove or channel formed directly into con-
crete jambs.
The second method of securing a glass block panel is channel
construction. In this system, the glass block panel sits in a metal
channel that is fastened to the jambs and head of the opening.
With the panel anchoring method, two-foot-long, hot-dipped, gal-
vanized steel panel anchors are secured into the mortar joint
above the first course and then at 16”-24” intervals thereafter,
with the last anchor placed directly below the top block. A 16”
length of anchor is buried in the mortar, the other 8” is bent and
fastened directly to the jambs and/or head (depending on appli-
cation).This method allows for full view of the glass blocks
around the edges of the panel since the block edges are not
buried in a channel support.
Page 7

Page 8
Below: Chase and Channel Construction
Photo above: Panel Anchor

Page 9
It may appear contradictory when to say that a panel must be
independent from the main structure, and then explain how to
secure a panel. However, in each of these anchoring cases, the
panel is separated from the main structure by means of an
expansion strip that is usually a compressed polyfoam material.
The panel anchor must not come into contact with the glass
block (because of the different expansion rates), so make sure the
anchor is buried in the middle of the mortar bed.
To install four-foot hot-dipped galvanized steel ladder reinforcing,
place the lower half of the mortar bed, press the reinforcing into
place, then cover the reinforcing with the top half of the mortar
bed and trowel smooth. Keep the metal ladder in the middle of
the mortar bed to avoid contact with the glass blocks. Overlap
the steel ladder reinforcing by a minimun of 6” to maintain con-
tinuous reinforcing without bridging the expansion material.

Page 10
Three Spacers in One
Each glass block installation will generally require the use of all
the three possible spacer variations: “Regular”, “T” and “L” spac-
ers.To create “T” and “L” spacers, simply cut off the indicated
parts of a “regular” spacer.
Regular
L
T
Use wherever 4 blocks meet. Do not
remove end caps until installation is
completed.
Remove end cap and two legs (shown
dotted) from each end of a regular
spacer to form an “L” spacer. Use for
corners against sill, jamb and header.
Remove one half of end cap and upper
extension of vertical leg from each end
of spacer (shown dotted). Use for blocks
placed against jamb, sill and header.
Page 11
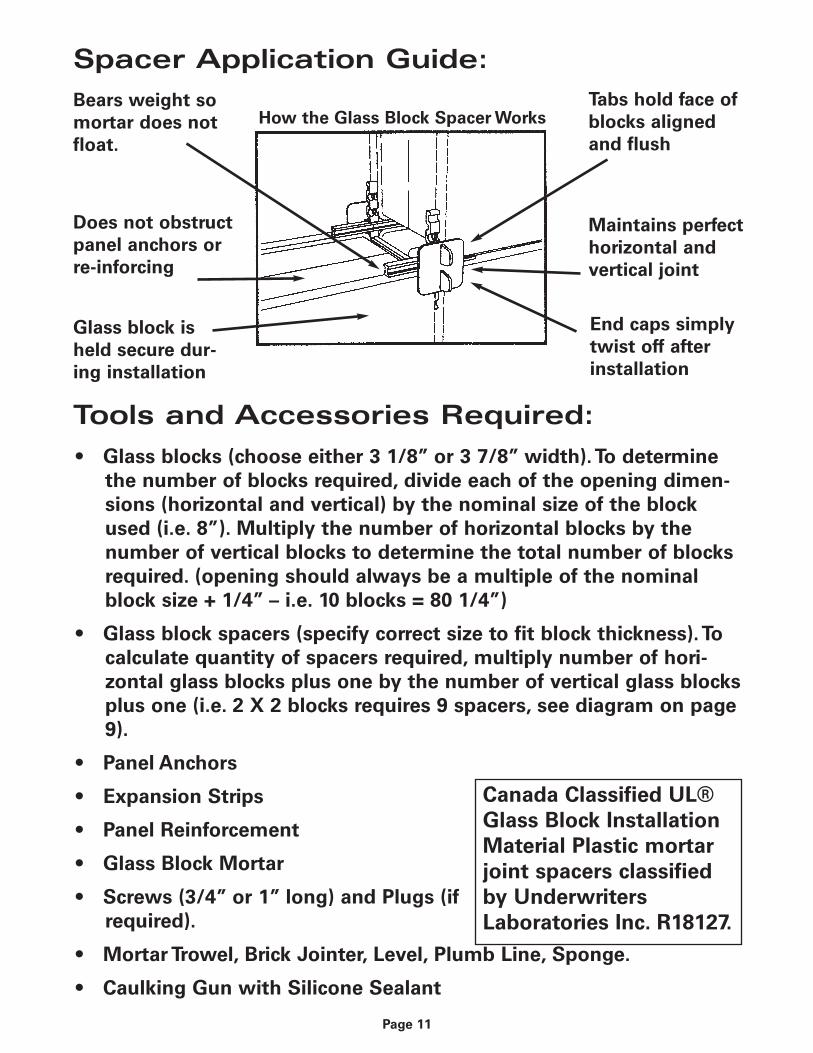
Spacer Application Guide:
Tools and Accessories Required:
• Glass blocks (choose either 3 1/8” or 3 7/8” width).To determine
the number of blocks required, divide each of the opening dimen-
sions (horizontal and vertical) by the nominal size of the block
used (i.e. 8”). Multiply the number of horizontal blocks by the
number of vertical blocks to determine the total number of blocks
required. (opening should always be a multiple of the nominal
block size + 1/4” – i.e. 10 blocks = 80 1/4”)
• Glass block spacers (specify correct size to fit block thickness).To
calculate quantity of spacers required, multiply number of hori-
zontal glass blocks plus one by the number of vertical glass blocks
plus one (i.e. 2 X 2 blocks requires 9 spacers, see diagram on page
9).
• Panel Anchors
• Expansion Strips
• Panel Reinforcement
• Glass Block Mortar
• Screws (3/4” or 1” long) and Plugs (if
required).
• Mortar Trowel, Brick Jointer, Level, Plumb Line, Sponge.
• Caulking Gun with Silicone Sealant
Tabs hold face of
blocks aligned
and flush
Bears weight so
mortar does not
float.
How the Glass Block Spacer Works
Does not obstruct
panel anchors or
re-inforcing
Glass block is
held secure dur-
ing installation
Maintains perfect
horizontal and
vertical joint
End caps simply
twist off after
installation
Canada Classified UL®
Glass Block Installation
Material Plastic mortar
joint spacers classified
by Underwriters
Laboratories Inc. R18127.

Preparation
• After preparing the work site, first install panel anchors to tie
the panel into the jambs of the opening. Anchors will be
embedded in mortar during installation of block. Bend the
anchor into a “L” shape with an 8” vertical leg and a 16” hori-
zontal leg. Attach vertical leg to the jamb with appropriate
fasteners. Additional panel anchors must be placed after every
third 6” block or after every second 8” or 12” block.
• Install expansion strips, trim strips to proper width and attach
to head and jambs.
• Prepare “T” and “L” spacers by removing legs from regular
spacers.
Installation Note:
Don’t place mortar between glass blocks and expansion strips.
Laying the First Course
• Apply mortar to the prepared sill.
• Place an “L” spacer in the corner, seating it squarely against
the jamb and the sill.
• Seat the first block into the corner, resting it on the mortar.
Add a “T” spacer under the corner of the block that is not
already supported by the “L” spacer. Place the spacer under
the block against the sill and seat the block into position.
• Place a regular spacer on the free upper corner of the block.
• Apply mortar to the vertical side of a second block and put
that block into position, using spacers to maintain joint spac-
ing. Seat block horizontally and vertically.
• Repeat process to end of first course of blocks
• Inspect work periodically to check accuracy, level and plumb.
Make any necessary corrections before proceeding.
Page 12

Continue the Installation
• Clear mortar from the legs of the spacers to ensure an accu-
rate mortar joint.
• Install block as
described for begin-
ning course.
• At courses requiring
panel anchors, embed
anchor into centre of
mortar bed.
• Panels over 25 square
feet require panel re-
inforcing to be used,
with panel anchors.
Embed re-inforcing
strips in mortar as
each course is finished. Overlap re-inforcing strips by 6” when
joining pieces.
• At head (top course), place spacers before inserting block. No
mortar is used between the header and the block. Use expan-
sion material between block and head.
Finishing and Clean-Up
• After mortar has begun to set (thumbprint-hard), twist off
spacer end caps and discard. Strike joint with brick jointer to a
concave smooth finish.
• Before mortar has dried, remove excess with a damp sponge
or cloth. Rinse cloth often with clean clear water. Film and
residue on the block faces can be removed later with a dry
cloth.
• Use silicone caulk/sealant around the perimeter of your instal-
lation.
Page 13

Expansion Joints
A straight exterior panel that is larger than 144 sq.ft. (13.4
sq.metres) must be built from a series of smaller panels. These
smaller panels are fastened together by a series of supports and
expansion joints.
Although there are various ways of creating expansion joints,
each joint contains compressed polyfoam to absorb movement in
the panels. To join the two panels, visible or hidden attachments
may be used. As shown in Diagram A, a stiffener is used that is
visible on one side. The stiffener provides the necessary rigidity
to support the large panels being joined. The expansion material
is located between the stiffener and the block wall to provide a
cushion for movement.
For a continuous wall of glass blocks without any visible sup-
ports on either side, the steel plate shown in Diagram B is the
answer. The steel plate acts as a double jamb and serves to
separate the panels into two individual framed panels.
Page 14
If constructed properly (that is, by using adequate steel reinforc-
ment) glass blocks have a fire rating of 45 minutes, which allows
them to be used in areas where ordinary flat-glass windows can-
not. Maximum allowable size in a masonry opening is 120 square
feet. Maximum allowable opening in drywall is 94 square feet.
Neither dimension should exceed 10 feet.
Glass blocks are rated by ULC for a 45-minute fire rating which
will actually allow a 1-hour fire separation if the materials sur-
rounding the glass block are 1-hour fire rated.
Fire-rated glass blocks must be installed according to the follow-
ing diagram in order to qualify for ULC approval.This requires
anchors and steel reinforcing above the first horizontal course,
and at every second course thereafter, and with the last anchor
and reinforcing placed directly below the top block. Panel
anchors must also be used from the head down at 16” intervals.
ULC Fire Ratings
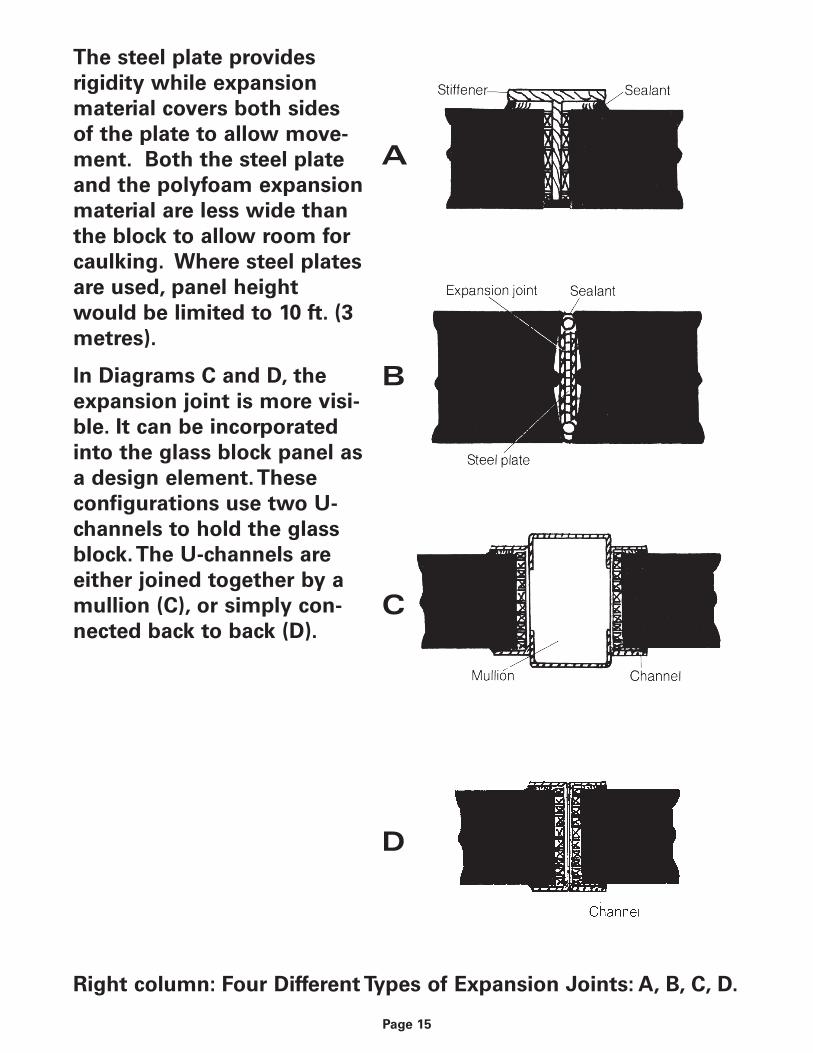
The steel plate provides
rigidity while expansion
material covers both sides
of the plate to allow move-
ment. Both the steel plate
and the polyfoam expansion
material are less wide than
the block to allow room for
caulking. Where steel plates
are used, panel height
would be limited to 10 ft. (3
metres).
In Diagrams C and D, the
expansion joint is more visi-
ble. It can be incorporated
into the glass block panel as
a design element.These
configurations use two U-
channels to hold the glass
block.The U-channels are
either joined together by a
mullion (C), or simply con-
nected back to back (D).
Page 15
A
B
C
D
Right column: Four Different Types of Expansion Joints: A, B, C, D.

Page 16
Fire-Rated Panel Anchor Construction:
Wall framing shown
here for illustrative
purposes only. Wall
framing can be
concrete, masonry,
wood, steel, fire-rated
drywall or any other
structural surround.
Lintel or Header
Expansion Strip
Panel Anchor
Panel Re-inforcing
Glass Block
Asphalt Emulsion
Mortar
Fire-Rated
Caulking
Expansion
Strip
Panel Anchors
Two Bolts
or Screws
per Anchor

Curved Walls
Curved walls have their own special requirements for expansion joints.
Regardless of size, an intermediate expansion joint must be placed in the
wall every time a curve changes direction or where a curved section meets
a straight wall. The radius of the curve is also restricted. See the follow-
ing table for radius
options available with
different sizes of glass
blocks. Special
tapered spacers
accommodate these
radius options. These
spacers can also be
opened up slightly to
accommodate minor
adjustments to the
radius options listed.
3 1/8” 5/8” 1/8” 1/4” 19 1/2” 29 5/8” 39 7/8” – 8 11.25˚ ABK-RO1
5/8” 1/4” 1/4” 25 1/8” 37 7/8” 50 1/2” – 10 9.0˚ ABK RO2
3/8” 1/8” 1/4” 39 3/8” 59 3/4” 80 1/8” – 16 5.625˚ ABK-RO3
3/8” 1/4” 1/4” 76 1/8” 114 3/8” 152 1/2” – 30 3.0˚ ABK-RO4
3 7/8” 5/8” 1/8” 1/4” 24 1/2” 37 1/4” 49 7/8” 75 1/4” 10 9.0˚ ABK RO5
5/8” 1/4” 1/4” 30 1/4” 45 1/2” 60 3/4” 91 1/4” 12 7.5˚ ABK-RO6
3/8” 1/8” 1/4” 49 3/8” 74 3/4” 100 1/4” 151 1/8” 20 4.5˚ ABK-RO7
3/8” 1/4” 1/4” 101 5/8” 152 1/2” 203 3/8” 305 1/4” 40 2.25˚ ABK-RO8
3 7/8” 3/8” 3/16” 1/4” 4 22.5˚ ABK-ALBAllbend®
Blo
ck w
idth
Outs
ide Ver
tica
l
Inside
Vertica
l
Horiz
ontal
4 in
ch b
lock
6 in
ch b
lock
8 in
ch b
lock
12 in
ch b
lock
No. o
f blo
cks
in 9
0˚ a
rc
Angle
in d
egre
es
Product
Code
B:Mortar Joint
Thickness
Nominal Block Size
& Actual Inside Radius
(in inches)A
B C D
E
Page 17

Page 18

90 Degree Corner Options
Here are four methods to get you around corners: Diagram A
shows two glass block panels formed into a 90∫ angle by the use
of a wood post or steel tubing. The post or tube is covered from
floor to ceiling with a steel or aluminum angle. The flanges of
the angle must be long enough to overlap the glass block panels
on both sides by 1 inch. Expansion joint material is placed
between the glass block and the post or tubing. The inside cor-
ner is covered with a steel or aluminum “T”. Two of the ”T”
flanges cover the corner while the third flange fits into one of the
expansion joints. Again, the inside corner flanges must cover the
glass block face on each side by
1 inch. Expansion material is
stuffed into the edge of each
flange, then a bead of caulking
is run between the flange and
the glass block to seal each
joint.
Diagram B shows a variation of
the above corner-making
method. In this version, the
steel tubing or wood post is left
visible without any aluminum
angle attached. The posts act as
jambs. An expansion strip is
placed between the glass block
panel with panel anchors to tie
the glass block panel to the
post.Then a bead of caulking is
run between the post and panel
to seal the joint.
Page 19
Diagram B
Diagram A
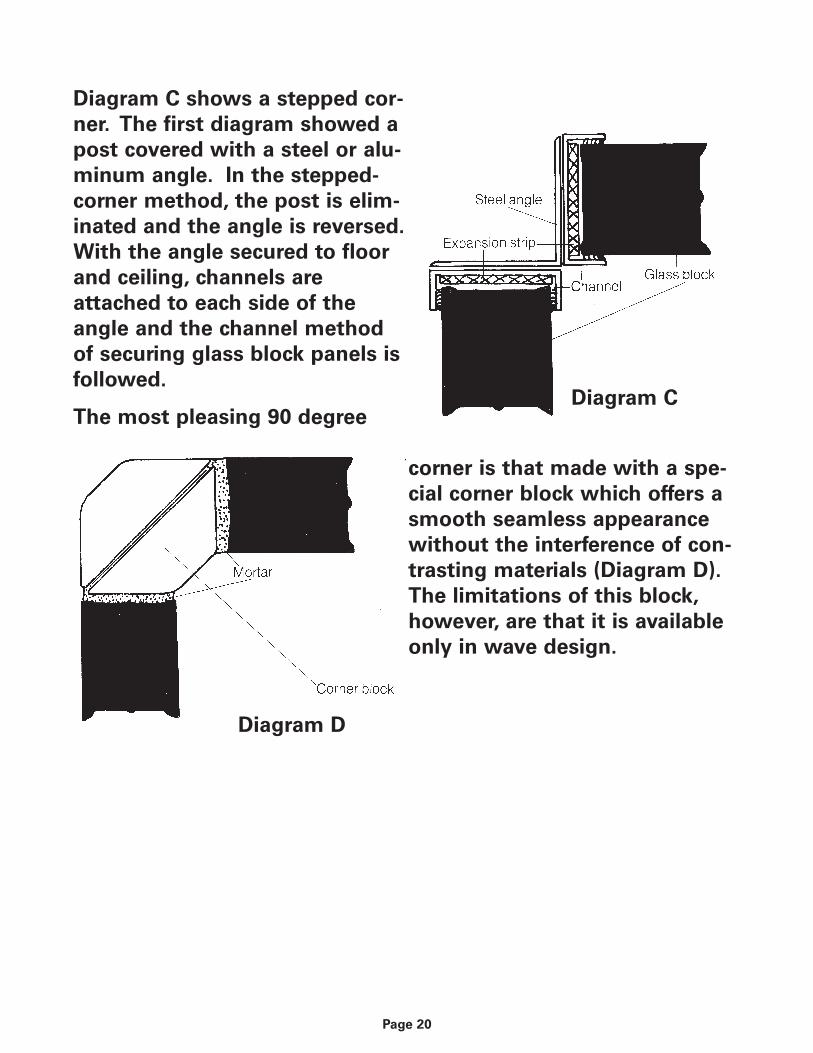
Diagram C shows a stepped cor-
ner. The first diagram showed a
post covered with a steel or alu-
minum angle. In the stepped-
corner method, the post is elim-
inated and the angle is reversed.
With the angle secured to floor
and ceiling, channels are
attached to each side of the
angle and the channel method
of securing glass block panels is
followed.
The most pleasing 90 degree
corner is that made with a spe-
cial corner block which offers a
smooth seamless appearance
without the interference of con-
trasting materials (Diagram D).
The limitations of this block,
however, are that it is available
only in wave design.
Page 20
Diagram D
Diagram C

Specialty Blocks
End blocks in both 8 X 8 X 3 1/8” and 8 X 8 X 3 7/8” are now
available with rounded finished ends.This allows construction of
walls with exposed vertical or horizontal edges, with a totally fin-
ished appearance (wave pattern only).
As mentioned above, there is also a 90 degree corner block in
wave pattern, intended to help create a seamless corner. It will
accomodate either the thick or thin block series.
Pre-Cast Panel System
Entire glass blocks panels can be pre-assembled in our factory,
based on the number of modules needed to complete a project.
We can work with you if you require design assistance or prepare
panels from your plans or drawings.
Our panels are normally manageable by one or two people who
will then do the final erection at the work site. Even curved or
serpentine walls can be pre-constructed. Replacement or infill
panels for any size window or wall opening can also be pre-fabri-
cated. Just call or fax us with the measurements and we will
create drawings showing the different possible combinations of
blocks required to fill the opening. The drawings will show the
correct positions for wall panel anchors, horizontal joint reinforc-
ing, spacers and expansion material. The locations are important
due to the need to tie the blocks to the surrounding structure,
yet still allow for expansion and contraction.
The finest materials go into our special mortar mix such as latex
and acrylic bonding agents for superior thermal shock and water
resistance. The final installation time is reduced dramatically
over laying loose block, yielding great savings on labour costs
while providing a superior quality finished appearance.
Smaller panels of up to 15 sq.ft. can be produced using a clear
construction-strength silicone which allows a seamless appear-
ance.
Page 21
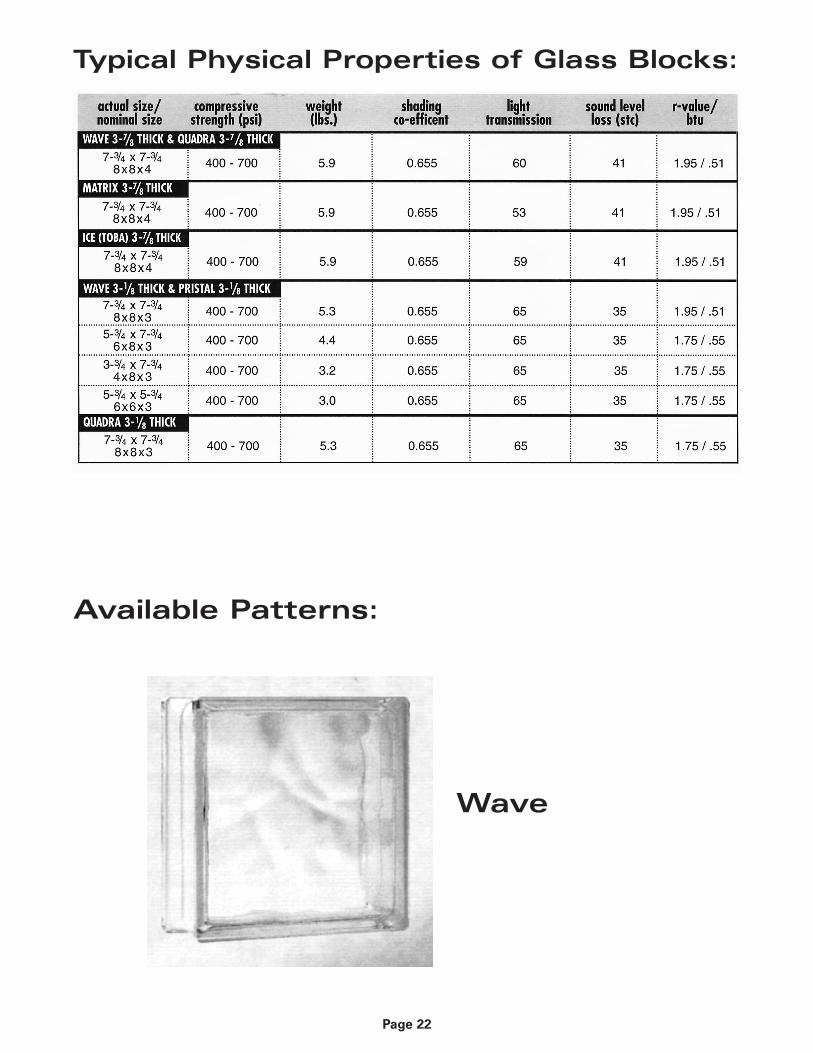
Typical Physical Properties of Glass Blocks:
Available Patterns:
Page 22
Wave

Page 23
Ocean View
Quadra
Diamond

Page 24
Bromo
Ice
Wave Finishing End(8X8X4) and (8X8X3)

Page 25
View (Clear)
Pristal
Matrix

UPC Ctn UPC Each SKU# Style Size Ctn Qty Skid Qty
619284288020 619284088026 7902 Wave 8X8X3 10 300
619284268121 619284068127 7912 Wave 6X8X3 10 400
619284266226 619284066222 7922 Wave 6X6X3 10 480
619284248321 619284048327 7932 Wave 4X8X3 10 600
619284288822 619284088828 7902-EB Wave End Thin 8X8X3 10 300
619284288426 619284088422 9802 Wave 8X8X4 8 240
619284288938 619284088934 9802-AB Wave 90 angle 8X8X4 4 240
619284288945 619284088941 9802-EB Wave End Thick 8X8X4 8 240
619284279035 619284079031 7903 Pristal 8X8X3 10 300
619284279134 619284079130 7913 Pristal 6X8X3 10 400
619284279233 619284079239 7923 Pristal 6X6X3 10 480
619284279332 619284079338 7933 Pristal 4X8X3 10 600
619284298036 619284098032 9803 Pristal 8X8X4 8 240
619284298012 619284098018 9801 Quadra 8X8X4 8 240
619284298524 619284098520 9852 Ice 8X8X4 8 240
619284279004 619284079000 7900 View (Clear) 8X8X3 10 300
619284279103 619284079109 7910 View (Clear) 6X8X3 10 400
619284298005 619284098001 9800 View (Clear) 8X8X4 8 240
619284279042 619284079048 7904 Bubbles 8X8X3 10 300
619284279059 619284079055 7905 Ocean View 8X8X3 10 300
619284279219 619284079215 7921 Diamond 8X8X3 10 300
619284279530 619284079536 7953 Bromo 8X8X3 10 300
619284298081 619284098087 9808 Matrix 8X8X4 8 240
Page 26
Product Order Index

Page 27
Accessories:
Item Description
Panel Anchors
UPC Code #
107 02550 10001 4
40
20 Bundles
50
50
16
26
ABK-PA1
ABK-PR3
4Pallets 70 3,080 lb GBM-20
16 50 3 ABK-EX2
25
25
20
20
8
8
ABK-SO1
ABK-SO2
Panel Anchors 1 3/4”W X 24”LHot-Dipped Galvanized Steel
Hot-Dipped Galvanized SteelLadder 1 5/8”W X 48”L
1/4’ Spacer for Glass BlockThinline 3 1/8”
1/4’ Spacer for Glass BlockStandard 3 7/8”
Glass Block Latex ModifiedMortar Mix
(20 kg. per bag)
Expansion StripsWhite Closed-cell Polyfoam2 1/4”W X 24”L X 3/8” Thick
Steel Ladder
UPC Code #
1 07 02550 10009 0
1/4” Spacers
Thinline 3 1/8”UPC Code #
1 07 02550 31221 9
Standard 3 7/8”UPC Code #
1 07 02550 71221 7
Mortar Mix
UPC Code #
7-73727-0714-7
Expansion Strips
UPC Code #
107 02550 10103 5
DrawingNumber
of_____?
Units perWeightper car-ton (lb.)
SKU #

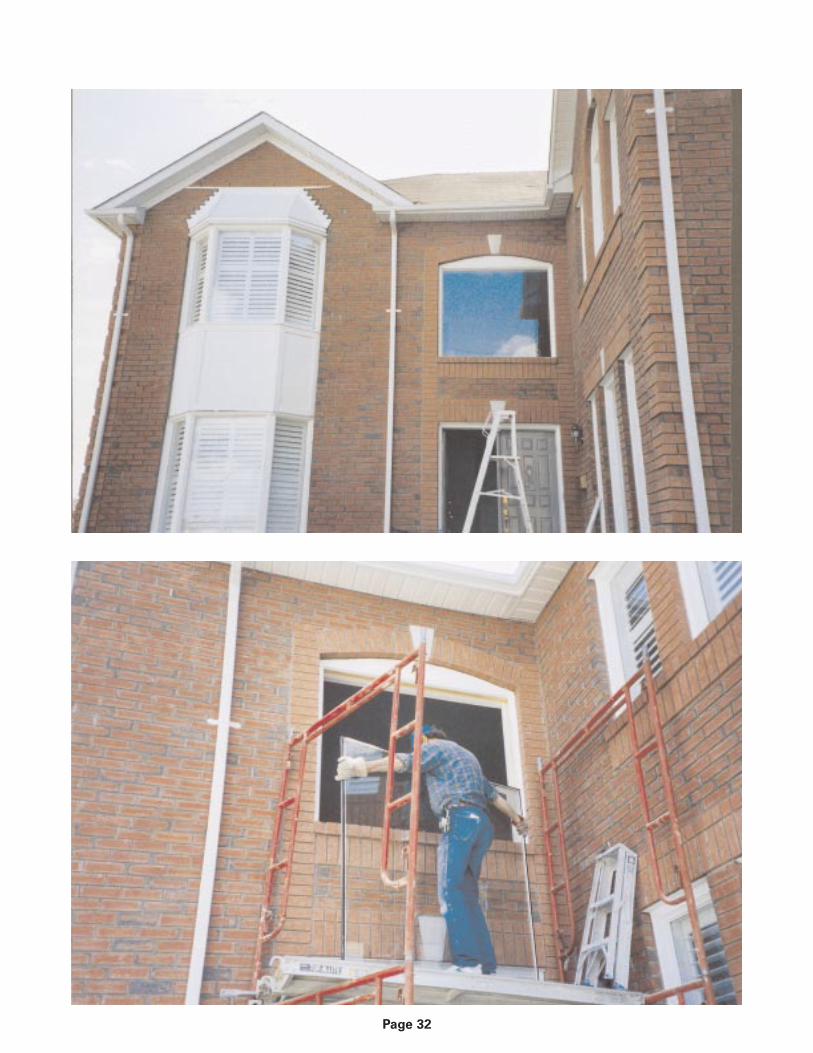
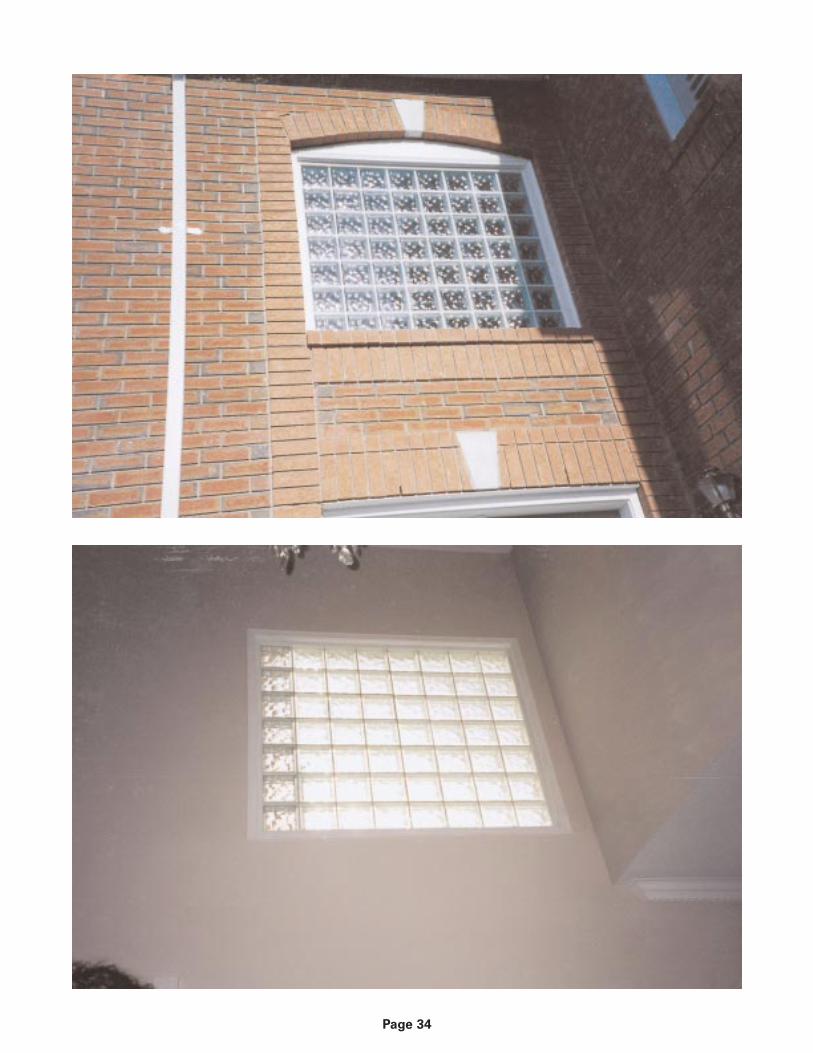
Glass Block Installation Gallery:
Page 28

Page 29

Page 30

Page 31
Page 32

Page 33
Page 34