adventures in pompom land squirrel
DESCRIPTION
Make a charming squirrel using handmade pompoms with the instructions from Adventures in Pompom Land by Mylo Diann Bocek, courtesy of Lark Crafts and Serendipity Handmade blog!TRANSCRIPT

1. Following steps 2–6 for Making Pompoms by Hand on
pages 19–21, make a 2 1⁄2-inch (6.4 cm) fat, egg-shaped pompom
from gray yarn for the head. I used approximately 1⁄3 skein of
Patons medium-weight Classic Wool, which is approximately
69 yards (63 m).
2. On the narrow end of the egg shape, locate where you want the
nose to be. Make a small part into the pile of the yarn, place a small
drop of glue in the part, and insert the pink seed bead. Gently pinch
the fibers around the glue and the bead to secure it. Let dry.
3. Using the inverted triangle layout (see Positioning the Nose and
Eyes on page 22), decide where you want the eyes to be. Make a
part in the yarn, carefully squeeze in a pea-size drop of glue for
each eye, and gently insert the wire end of each glass eye into the
pompom. Let the glue dry.
4. Using the template on page 121, cut two ears out of the wool
felt, rub the inside of each ear with a bit of pink chalk, and blend it
in with your finger. Squeeze a dollop of glue onto the bottom flat
part of each ear shape and pinch the lower edge together, with pink
inside, to give it dimension. Repeat this for the second ear. Use
clothespins or hemostats to hold the ear bases together as they dry.
5. After the ears have dried, make a small part on top of the head
over each eye, squeeze a bit of glue into the pile, and insert the
ears. Pinch the fibers around the ears to secure them and let dry.
6. Make another slightly larger pompom from gray yarn and trim it
into a pear-shaped pompom for the body, about 4 inches (10.2 cm)
tall. I used approximately 1⁄2 skein of medium-weight Patons Classic
Wool, which is approximately 105 yards (96 m). The narrow top will
be the Squirrel’s neck, and the heavier, rounded end will be the
bottom of the Squirrel sitting upright. To create the illusion of the
Squirrel’s haunches and tummy, trim out a V shape from the front
center bottom of the belly area.
7. Glue the pipe cleaner into the top half of the pompom body.
Simply make a horizontal part deep into the wool at the top,
squeeze in a dime-size dollop of glue, and place the pipe cleaner
snugly down into it; pinch the fibers of the wool yarn around the
pipe cleaner to secure it. This will become the frame for the arms of
the Squirrel, which you will needle felt. (See Creating Appendages
on page 24.) Let the glue dry.
SquirrelSquirrels pair curiosity and cuteness to perfection: this chap’s bushy tail and inquisitive look complete his lively expression. Give him a pal or two to keep him company up in the trees by making the Bluebird or Raccoon. Basic Pompom Toolbox
(page 12)
100% wool yarn: gray
100% wool felt: gray
100% wool roving: gray
100% wool roving yarn: gray
Pink seed bead
2 black glass eyes, 10 or 12 mm
Template: ears (page 121)
Pink chalk
6-inch (15.2 cm) gray pipe cleaner
Needle felting supplies (page 16)
Ribbons
Piece of a tree branch, limb, or trunk, 3 inches (7.6 cm) in diameter, for the base
FINISHED MEASUREMENTS
5 1⁄2 inches (14 cm) tall (without the wooden base)
YOU WILL NEED
81
Squirrel
80
8. Glue the finished head onto the body. To create a cute,
inquisitive expression, tilt the head to one side. Squeeze a
nickel-size dollop of glue at the top of the body pompom and
position the head as desired. You will need to let the glue set up
and dry, which can take a few hours. To keep the head from falling
off before the glue sets up, use a long floral pin to hold it in place.
Remove the pin after the glue has set up.
9. After the glue has fully dried, bend the pipe cleaner into the
desired position and trim each arm to approximately 2 1⁄2 inches
(6.4 cm). Bend down and crimp the sharp ends of the pipe
cleaners because they will poke through the needle-felted paws.
10. Needle felt the Squirrel’s feet by rolling a golf ball–size bit
of wool roving into a cigarlike shape and needle felting to compact
it down. Once it is a tight, dense 3-inch (7.6 cm) cigar shape, cut it
evenly in half to make the two little feet.
11. At the bottom of the pear shape make two separate parts into
the wool “fur” and glue and insert the feet into the body. Let it dry
standing upright.
12. After the pipe cleaner and glue have set up, wrap a thick
bacon-size strip of roving tightly around the pipe cleaner
armatures from top to bottom. Use more roving near the upper
arm and shoulder area and taper it toward the end to form a tiny
paw. Needle felt the roving tightly to compact it around the pipe
cleaner so it will not unravel. Bend down at the wrist to create the
illusion of paws.
13. For the tail, make another pompom from wool roving yarn. I
used approximately 1⁄3 skein of Patons bulky-weight Classic Wool
Roving yarn, which is approximately 40 yards (36 m). The
Squirrel’s tail looks like a rounded arc with longer, fluffier roving
yarn at the end, and shorter, denser roving yarn at the base. The
knotted waxed twine will be located in the center of the tail’s
curved arc. Begin shaping the pompom by trimming the fibers on
one side of the waxed twine shorter than the other side, as the
shorter, denser part of the tail will be attached to the Squirrel’s
body. On the other side of the twine, trim the roving yarn fibers so
they’re slightly longer and fluffier. The longer fibers will naturally
tend to droop a bit, which will create the curve of the tail. Comb
the fibers with your fingers as you gradually sculpt the curved tail
to approximately 6 to 7 inches (15.2 to 17.8 cm) long.
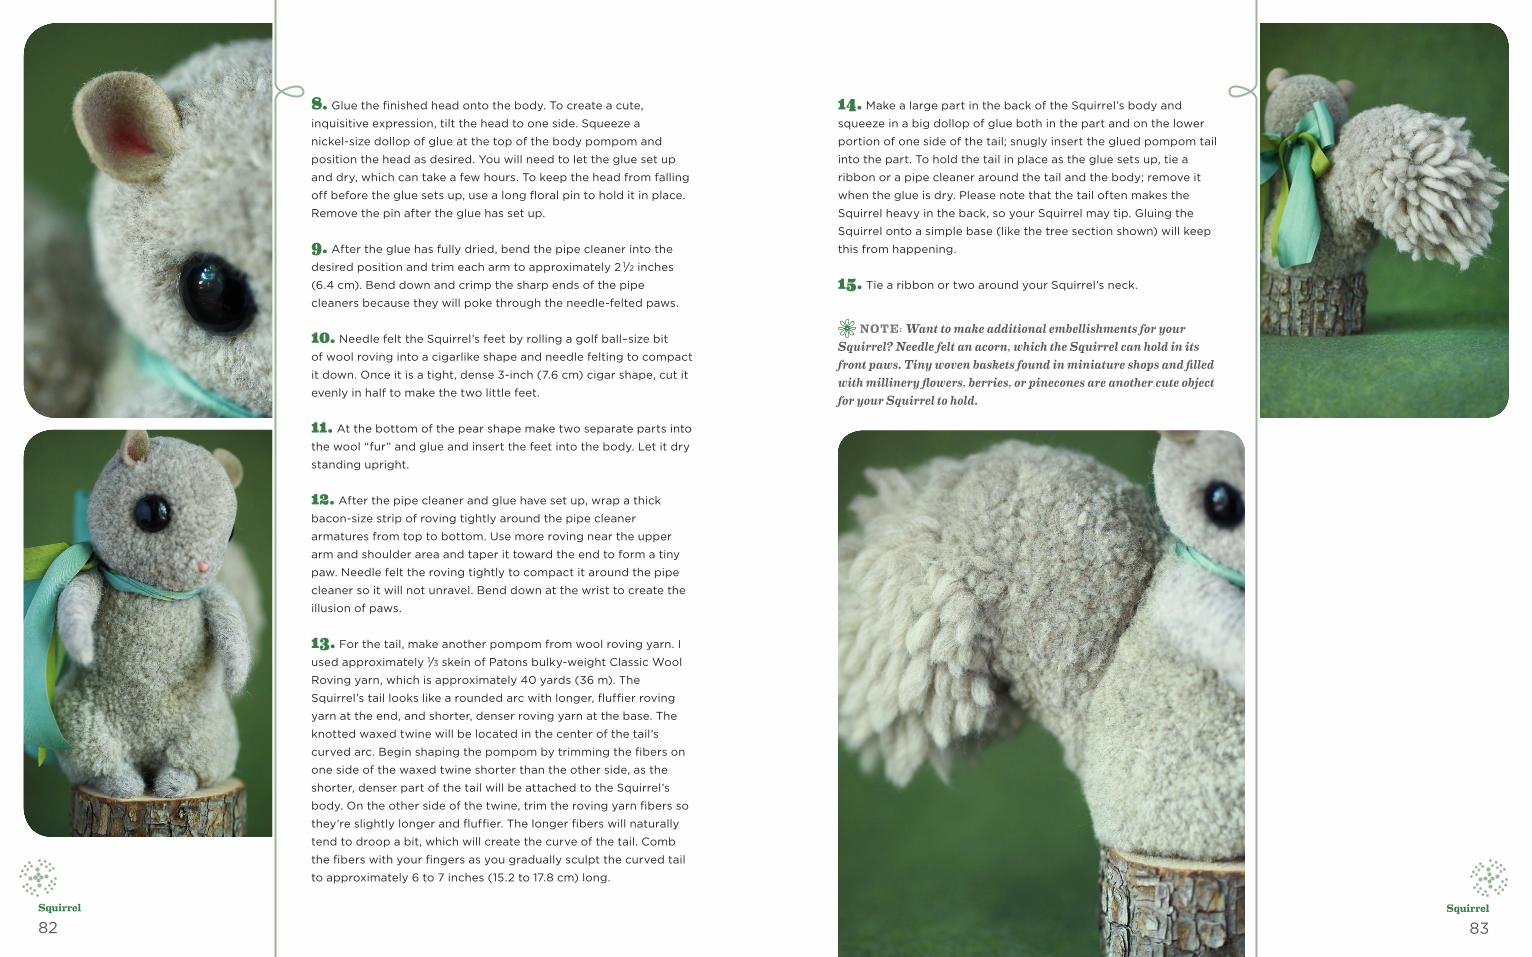
14. Make a large part in the back of the Squirrel’s body and
squeeze in a big dollop of glue both in the part and on the lower
portion of one side of the tail; snugly insert the glued pompom tail
into the part. To hold the tail in place as the glue sets up, tie a
ribbon or a pipe cleaner around the tail and the body; remove it
when the glue is dry. Please note that the tail often makes the
Squirrel heavy in the back, so your Squirrel may tip. Gluing the
Squirrel onto a simple base (like the tree section shown) will keep
this from happening.
15. Tie a ribbon or two around your Squirrel’s neck.
NOTE: Want to make additional embellishments for your Squirrel? Needle felt an acorn, which the Squirrel can hold in its front paws. Tiny woven baskets found in miniature shops and filled with millinery flowers, berries, or pinecones are another cute object for your Squirrel to hold.
82
Squirrel
83
Squirrel