afaria
DESCRIPTION
Afaria thatnksTRANSCRIPT
Afaria® Reference ManualComponents
V e r s i o n 6 . 5

Afaria Reference Manual | Components Version 6.5Document version 6.50.00Copyright © 2009 Sybase, Inc. All rights reserved.Afaria is a trademark of Sybase, Inc. or its subsidiaries. Java and JDBC are trademarks of Sun Microsystems, Inc. All other trademarks are properties of their respective owners. ® indicates registration in the United States of America.
Contents
Preface 10
Afaria support services ........................................................................................................................10
Chapter 1: Backup Manager 11
Create or edit a Backup Manager channel ...................................................................................................12General options ......................................................................................................................................13Backup options .......................................................................................................................................14
Backup options data elements ...............................................................................................................15Restore options ......................................................................................................................................17
Restore options data elements ...............................................................................................................18
Chapter 2: Configuration Manager 20
About Configuration Manager ...................................................................................................................21Features for configuration ...................................................................................................................21Features for configuration and enforcement ............................................................................................22
Create or edit a Configuration Manager channel .........................................................................................23About Configuration Manager channel editor ...............................................................................................24Configuring BlackBerry clients .................................................................................................................25
Synchronization property page ..............................................................................................................26Security property page ........................................................................................................................27Messaging property page .....................................................................................................................27Application property page .....................................................................................................................28
Configuring Palm clients ..........................................................................................................................29Buttons property page .........................................................................................................................30Connection property page ...................................................................................................................30Formats property page ........................................................................................................................31General property page .........................................................................................................................32HotSync property page ........................................................................................................................32Network property page ........................................................................................................................34Owner Info property page ....................................................................................................................35
iii
Afaria Reference Manual | Components 6.5 Contents
Shortcuts property page ......................................................................................................................35Security property page ........................................................................................................................36
Configuring Symbian clients .....................................................................................................................38Favorites property page ......................................................................................................................38Access points properties .......................................................................................................................39Mail for Exchange properties ................................................................................................................47
Configuring Windows Mobile clients ...........................................................................................................50About configuration property types ........................................................................................................51Connection property page .....................................................................................................................52Device property page ..........................................................................................................................55Formats property page ........................................................................................................................56Network property page ........................................................................................................................57Owner property page ...........................................................................................................................57Sound property page ...........................................................................................................................58User Access page ................................................................................................................................58Port Control page ................................................................................................................................59Windows Mobile Update page ................................................................................................................63Provisioning .......................................................................................................................................64
Configuration Manager alerts ...................................................................................................................78Configuration Manager logs .......................................................................................................................78
Chapter 3: Data Security Manager for Handheld Clients 79
About Data Security Manager ..................................................................................................................80Variations by client type and by individual client .........................................................................................83Create a Data Security Manager install channel ...........................................................................................84Create a Data Security Manager uninstall channel ......................................................................................85Edit a Data Security Manager channel .......................................................................................................86Password options ....................................................................................................................................88
Defining password formats ....................................................................................................................92Custom UI options ..............................................................................................................................94
Encryption options ..................................................................................................................................96Windows Mobile encryption options ........................................................................................................97Symbian encryption options.................................................................................................................100Palm encryption options......................................................................................................................102Policy timers .....................................................................................................................................105Windows Mobile 2003 Professional clients, timer example ......................................................................107Defining non-PIM data items for encryption ..........................................................................................110
Configuration options ...........................................................................................................................112Lock down options ................................................................................................................................115
Defining data to delete for lock down ...................................................................................................119Hard reset lock down differentiators .....................................................................................................121Path and file name data items .............................................................................................................122
Recovery options .................................................................................................................................125Managing device-based recovery questions ...........................................................................................127
iv
Afaria Reference Manual | Components 6.5 Contents
Alerts .................................................................................................................................................129Reports ...............................................................................................................................................130Decrypting card files without the client ....................................................................................................131Data Security Manager at the client ........................................................................................................133
Installing Data Security Manager .........................................................................................................133Notes about installation for all client types ............................................................................................134Starting Data Security Manager ...........................................................................................................136Uninstalling Data Security Manager ......................................................................................................138Using passwords ...............................................................................................................................139Encryption and decryption at the client ................................................................................................143Locking the client...............................................................................................................................148Synchronizing after a lock down delete action .......................................................................................150Viewing software version information ...................................................................................................150Using OEM backup/restore utilities ......................................................................................................150
Chapter 4: Data Security Manager for Windows Clients 152
About Data Security Manager .................................................................................................................153Data Security Manager and Security Manager .......................................................................................153Features ..........................................................................................................................................153About Windows clients .......................................................................................................................155
About Data Security Manager deployment ................................................................................................156About the Data Security Manager client ...................................................................................................157
Protecting fixed disks .........................................................................................................................157Protecting removable media ...............................................................................................................158Afaria Security Manager Management Tool ............................................................................................158
Create or edit a Data Security Manager channel .......................................................................................160Channel wizard: Mode ...........................................................................................................................161
Wizard: Mode data elements ...............................................................................................................162Channel wizard: Installation actions ........................................................................................................164
Wizard: Installation actions data elements.............................................................................................165Channel wizard: Password settings ..........................................................................................................167
Wizard: Password data elements ..........................................................................................................168Channel editor: Password .......................................................................................................................169
Editor: Password data elements ...........................................................................................................170Channel editor: Fixed disk ......................................................................................................................171
Editor: Fixed disk data elements .........................................................................................................171Channel editor: Media ...........................................................................................................................173
Editor: Media data elements ...............................................................................................................173Channel editor: Install actions ................................................................................................................175
Editor: Install actions data elements.....................................................................................................176Channel editor: Unattended ...................................................................................................................179
Editor: Unattended data elements ........................................................................................................180Maintenance mode at the client............................................................................................................181
Prepare for token deployment .................................................................................................................183Data Security Manager token utility .....................................................................................................183
Prepare for removable media ..................................................................................................................185Password protecting media .................................................................................................................185Using MediaViewer ............................................................................................................................185
v
Afaria Reference Manual | Components 6.5 Contents
Prepare the clients and end users ...........................................................................................................187Deliver and install at the client ...............................................................................................................189
Password advisory! ............................................................................................................................192Provide challenge-response recovery support ...........................................................................................193Uninstall Data Security Manager from the client .......................................................................................194Data Security Manager alerts .................................................................................................................195Data Security Manager logging ...............................................................................................................196Data Security Manager reports ...............................................................................................................197
Chapter 5: Document Manager 198
Plan a Document Manager channel ..........................................................................................................199Document Manager for Palm OS clients ................................................................................................200
Create or edit a Document Manager channel ............................................................................................201About the Document Manager channel editor ............................................................................................202
Using the Document Manager toolbar ...................................................................................................203Documents options ...............................................................................................................................204
Add directory data elements ................................................................................................................205Add files data elements.......................................................................................................................206Add dependent files data elements .......................................................................................................207
Properties options .................................................................................................................................208Properties data elements.....................................................................................................................209
Channel view options ............................................................................................................................212Channel view data elements ................................................................................................................213
Chapter 6: Inventory Manager 214
About Inventory Manager .......................................................................................................................215Features ..........................................................................................................................................215
The inventory collection process .............................................................................................................217Collecting phone and network data on handhelds ......................................................................................219
Inventory Manager reports and data views ...........................................................................................219Serial number property ......................................................................................................................220Phone class data ...............................................................................................................................221WiFi class data ..................................................................................................................................221Bluetooth class data ..........................................................................................................................222IrDA class data .................................................................................................................................222
Create or edit an Inventory Manager channel ............................................................................................223Storage options ....................................................................................................................................224
Storage data elements........................................................................................................................225Scan options ........................................................................................................................................226
Scan data elements............................................................................................................................227Scan time and schedule options ..............................................................................................................228
Scan time and schedule data elements..................................................................................................229Stop Inventory Manager services ............................................................................................................230Manager for SMS and Inventory Manager ................................................................................................231
Queries for SMS clients and Afaria Clients .............................................................................................231Assign SMS client type collections to Afaria Client groups .......................................................................232
vi
Afaria Reference Manual | Components 6.5 Contents
Route scan results to SMS database ....................................................................................................232View client inventory .........................................................................................................................234Delete client inventory data from SMS database ....................................................................................234
Inventory Manager alerts .......................................................................................................................235Inventory Manager reports .....................................................................................................................236
Chapter 7: Patch Manager 237
About Patch Manager ...........................................................................................................................238Patch Manager and Microsoft Windows Update ......................................................................................238About Windows clients .......................................................................................................................238
Patch Manager prerequisite activity ..........................................................................................................238Using Patch Manager Canned Channel .....................................................................................................240Create or edit a Patch Manager channel ..................................................................................................241About the Patch Manager channel editor ..................................................................................................242
Using the Patch Manager toolbar ..........................................................................................................243Install options ......................................................................................................................................244
Reboot mode ...................................................................................................................................244Impersonation .................................................................................................................................244
Delivery options ...................................................................................................................................245Segment delivery .............................................................................................................................245Bandwidth throttle ...........................................................................................................................245
Impersonation on a Patch Manager channel .............................................................................................246Impersonation requirements for client users ........................................................................................246
Chapter 8: Server Listing 248
Create or edit a Server Listing channel ....................................................................................................249About Server Listing Channel Editor ........................................................................................................250
Chapter 9: Session Manager 251
About Windows clients ...........................................................................................................................252Create or edit a Session Manager channel ................................................................................................253About Session Manager Channel Editor ....................................................................................................254
Assignments view - default view .........................................................................................................254Channels view ...................................................................................................................................255Events view.......................................................................................................................................256
Create a new worklist or sendlist for a channel .........................................................................................257Assign a worklist or sendlist to your channel .............................................................................................258
Unassign objects from your channel ....................................................................................................259Add events to a worklist or sendlist .........................................................................................................260
Using visual cues on events ................................................................................................................261Define event properties .........................................................................................................................262
Using directory and file names in events .............................................................................................263Using variables in events ....................................................................................................................263Using wildcards in events ...................................................................................................................264
vii
Afaria Reference Manual | Components 6.5 Contents
Event file comparison and transfer properties ........................................................................................265Event options properties .....................................................................................................................267
Import/export events ............................................................................................................................268Optimize channel sessions .....................................................................................................................269
Pre-processing tasks .........................................................................................................................269Streamline remaining tasks ................................................................................................................269Create worklist efficiencies .................................................................................................................270
Chapter 10: Software Manager 271
Organize the properties of a software channel ..........................................................................................272About Windows clients .......................................................................................................................272Organize channel creation and deployment............................................................................................273Questions to answer in the Software Manager Channel Wizard .................................................................274Plan further channel definition through the Software Manager Channel Editor.............................................276
Create a Software Manager channel ........................................................................................................279Edit a Software Manager channel ............................................................................................................280General options ....................................................................................................................................282
General options for handheld clients ...................................................................................................282General options for Windows clients ....................................................................................................283
Files options .........................................................................................................................................284File options for handheld clients .........................................................................................................284File options for Windows clients ...........................................................................................................290Include variables in the destination path ..............................................................................................306
Install options ......................................................................................................................................308Define installation at a Windows Mobile client .......................................................................................309Define installation for a Windows client, Setup based channel ...............................................................311Define installation in a Windows client, Non-Setup based channel ............................................................314
Timeframes options ...............................................................................................................................318Delivery and installation times for Windows client channels .................................................................318
Criteria options .....................................................................................................................................320Add delivery and installation requirements to Windows and Windows Mobile client channels .....................320
Segmentation options ...........................................................................................................................327Define segmented delivery options for Windows client channels ............................................................327
User options .........................................................................................................................................331Deliver channels to Windows clients via a Web page ............................................................................331
Uninstall options ...................................................................................................................................335Uninstall channels at the Windows client .............................................................................................335
Advanced options .................................................................................................................................338Include advanced features in channels .................................................................................................338
Install success options ...........................................................................................................................350Track Setup based installation success at the Windows client ...............................................................350
How the Windows client user cleans up installation files .............................................................................353
Appendix A: Session Manager events and variables 355
About events ........................................................................................................................................356File/Disk Operations events ................................................................................................................356
viii
Afaria Reference Manual | Components 6.5 Contents
Variable events .................................................................................................................................357Session Control events ......................................................................................................................358Miscellaneous events .........................................................................................................................359About Windows clients .......................................................................................................................359
Event list .............................................................................................................................................360Event summary – Support for Afaria channel events ..................................................................................418About Variables ....................................................................................................................................438
Predefined session variables ...............................................................................................................438User-defined session variables ............................................................................................................447Environment variables .......................................................................................................................447Variable modifiers .............................................................................................................................448
Troubleshoot worklist or sendlist execution ...............................................................................................449
Index 452
ix
10
PrefaceThis guide is intended for the person responsible for installing and maintaining the Afaria Server. You must have a working knowledge of the Windows operating system and its conventions, your database server, Microsoft Internet Information Server (IIS), and your directory manager such as LDAP or NT. You also need a working knowledge of the client types you plan to support.
Afaria support servicesProduct technical support: www.sybase.com/support
Americas and Asia-Pacific call support:
(678) 585-7320 Atlanta, Georgia (800) 669-1211 toll-free
EMEA call support:
+44 (0) 1628 50 5321 United Kingdom0825 800372 toll-free
1
Backup ManagerBackup Manager channels enable you to back up and restore business critical data for your Afaria Clients.
Backups are added to a managed folder structure, which you can access via Afaria Administrator
after clients run the channel. Feature support, which is subject to client type, includes byte-level
differencing to reduce data transfer time.
Client types supported are:
• Windows Mobile Professional (including Windows CE)
• Windows Mobile Standard
• Symbian
• Palm
• Windows
11
Afaria Reference Manual | Components 6.5 Backup ManagerCreate or edit a Backup Manager channel
Create or edit a Backup Manager channelCreate or edit Backup Manager channels to back up or restore business critical data at the client.
• To create a channel, launch the channel wizard for a Backup Manager channel. The wizard guides you through the channel creation process and then opens the channel editor.
• To edit an existing channel, open the channel editor using one of the following methods:
• Click the Edit icon on the channel administration toolbar.
• Click the Edit channel contents… link on the channel’s Properties page.
• Right click the channel and select Edit… from the channel’s shortcut menu.
From the channel editor, select a property page and make any changes to the channel you need. The editor provides the following property pages, subject to the channel mode selected when creating the channel:
• “General options” on page 13
• “Backup options” on page 14
• “Restore options” on page 17
• To deploy a channel to clients, you must both publish it and assign it to a work profile.
• For complete information about creating and editing channels, refer to Afaria Reference Manual | Platform > Administration > “Channel Administration”.
12
Afaria Reference Manual | Components 6.5 Backup ManagerGeneral options
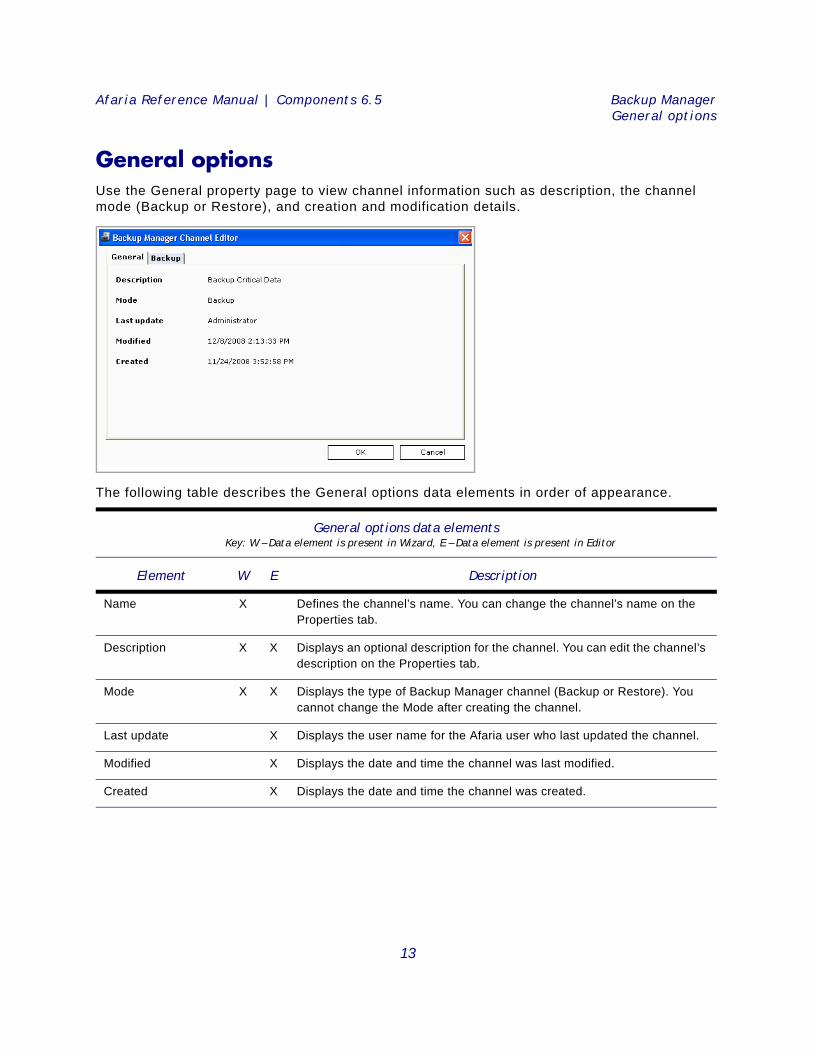
General optionsUse the General property page to view channel information such as description, the channel mode (Backup or Restore), and creation and modification details.
The following table describes the General options data elements in order of appearance.
General options data elements Key: W – Data element is present in Wizard, E – Data element is present in Editor
Element W E Description
Name X Defines the channel’s name. You can change the channel’s name on the Properties tab.
Description X X Displays an optional description for the channel. You can edit the channel’s description on the Properties tab.
Mode X X Displays the type of Backup Manager channel (Backup or Restore). You cannot change the Mode after creating the channel.
Last update X Displays the user name for the Afaria user who last updated the channel.
Modified X Displays the date and time the channel was last modified.
Created X Displays the date and time the channel was created.
13
Afaria Reference Manual | Components 6.5 Backup ManagerBackup options
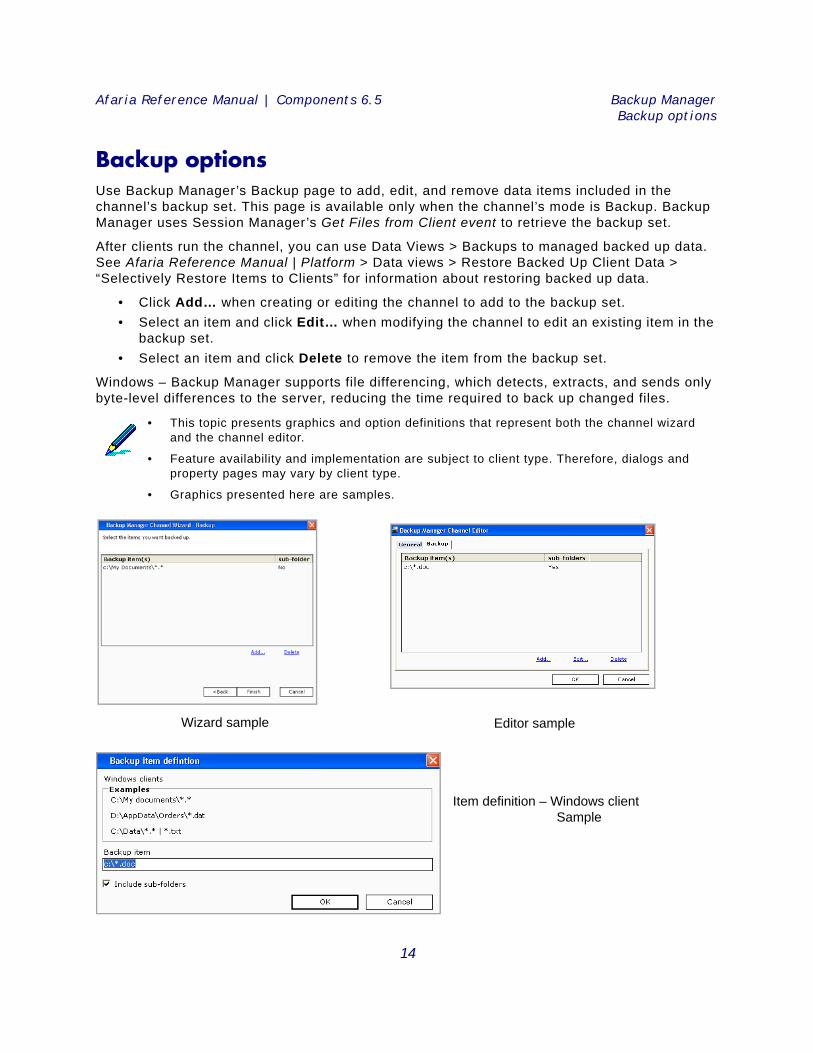
Backup optionsUse Backup Manager’s Backup page to add, edit, and remove data items included in the channel’s backup set. This page is available only when the channel’s mode is Backup. Backup Manager uses Session Manager’s Get Files from Client event to retrieve the backup set.
After clients run the channel, you can use Data Views > Backups to managed backed up data. See Afaria Reference Manual | Platform > Data views > Restore Backed Up Client Data > “Selectively Restore Items to Clients” for information about restoring backed up data.
• Click Add… when creating or editing the channel to add to the backup set.• Select an item and click Edit… when modifying the channel to edit an existing item in the
backup set.• Select an item and click Delete to remove the item from the backup set.
Windows – Backup Manager supports file differencing, which detects, extracts, and sends only byte-level differences to the server, reducing the time required to back up changed files.
• This topic presents graphics and option definitions that represent both the channel wizard and the channel editor.
• Feature availability and implementation are subject to client type. Therefore, dialogs and property pages may vary by client type.
• Graphics presented here are samples.
Wizard sample Editor sample
Item definition – Windows clientSample
14
Afaria Reference Manual | Components 6.5 Backup ManagerBackup options
Backup options data elementsThe following table describes the Backup options data elements in order of appearance.
Backup options data elements Key: W – Data element is present in Wizard, E – Data element is present in Editor
Element W E Description
Backup Item X X Defines the full path for a backup item included in the channel’s backup set, including any file name or wildcard characters. Use the device’s file system convention for specifying a backup item.
When using wildcard characters, note the following:
• Any wildcard forms that are supported by Session Manager’s Get Files from Client event can be used for including files.
• You can also use wildcard forms in a limited sense to exclude files, for example, in c:\sample\*.*|*.xxx a vertical line (|) followed by a file specification indicates the files to exclude.
A full backup followed by a Full restore may produce unpredictable results because system files that have been backed up may not be restored properly. It’s recommended that backup channels be used to save critical data files.
Windows Mobile Professional, Symbian – Client ID is 36 characters, which limits the characters used in the backup location as well as the total length of the backup file path on the client. If you change the client ID you may see multiple backup sets for the same client, but you can resolve these sets in Data views > Backup.
Windows – The maximum path length supported for the backup location, client ID, drive, folder, and file is 260 characters.
If you plan to change the default location for Backup Manager's backed up data you should change it before publishing Backup Manager channels. Once backed up data has been stored in the default location, changing the backup location orphans all previously backed up content. This content is then unavailable for restoration, as well as for administrative purposes. For details on changing backup locations, see Afaria Reference Manual | Platform > Server configuration > Properties > “Backup Manager”.
Symbian – Due to the code and data caging rules of the Symbian OS security model, only application data files may be backed up and restored.
15
Afaria Reference Manual | Components 6.5 Backup ManagerBackup options
File attributes for backed up dataWindows Mobile Professional, Symbian, Palm – Backup Manager removes the attributes from backed up files. Running a restore (Selective or Full) channel at the client returns these files without the defined attributes. Performing a hard reset on the device after running the restore channel reapplies file attributes.
Windows – Backup Manager removes the Read, System, and Hidden attributes from the backed up files. Running a restore (Selective or Full) channel at the client returns these files without the defined attributes. You can set the attributes using Session Manager's Set File Attributes event, or client users can reset the attributes using the file's Properties > General property page.
Restoring backed up dataWindows Mobile Professional, Symbian, Palm – You can restore backed up data through the device’s synchronization utility on its companion PC. Device data stored in Data views > Backup can be used to restore Companion PCs that have failed.
Include sub-folders X X Supported client types – Windows Mobile Professional, Windows Mobile Standard, Symbian, Windows
Includes in the backup item all subfolders residing with in the backup item specified.
Backup options data elements (Continued)Key: W – Data element is present in Wizard, E – Data element is present in Editor
Element W E Description
16
Afaria Reference Manual | Components 6.5 Backup ManagerRestore options
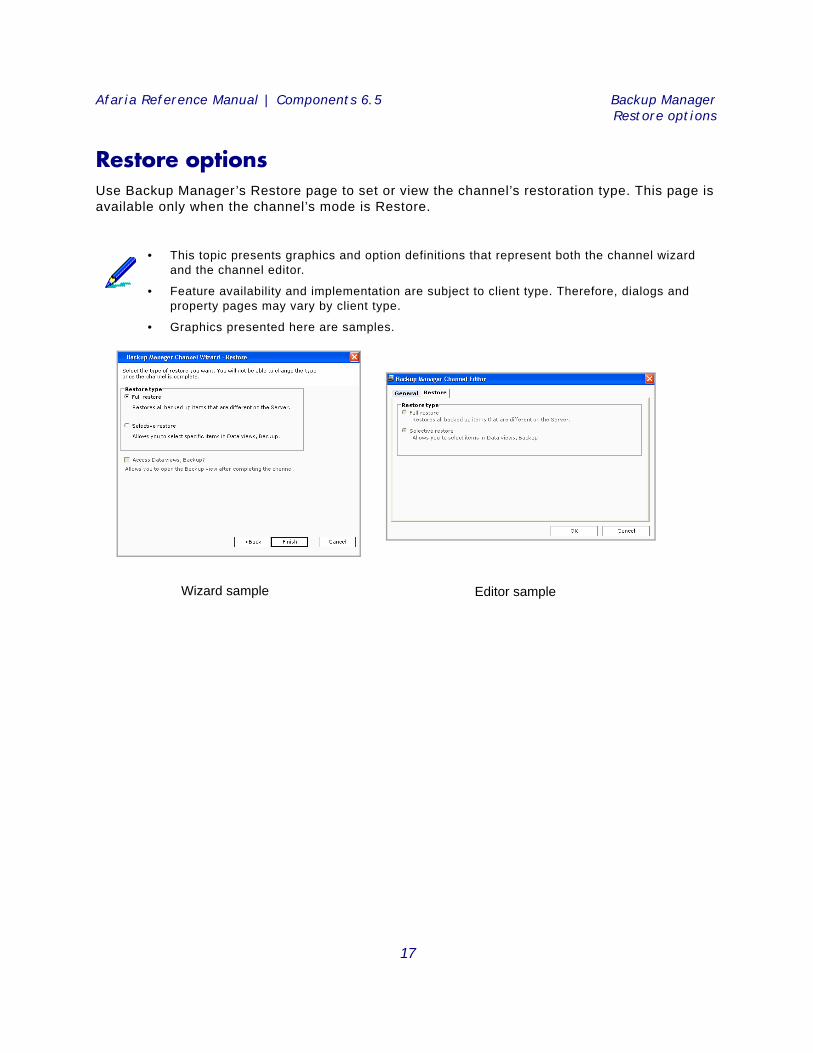
Restore optionsUse Backup Manager’s Restore page to set or view the channel’s restoration type. This page is available only when the channel’s mode is Restore.
• This topic presents graphics and option definitions that represent both the channel wizard and the channel editor.
• Feature availability and implementation are subject to client type. Therefore, dialogs and property pages may vary by client type.
• Graphics presented here are samples.
Wizard sample Editor sample
17
Afaria Reference Manual | Components 6.5 Backup ManagerRestore options
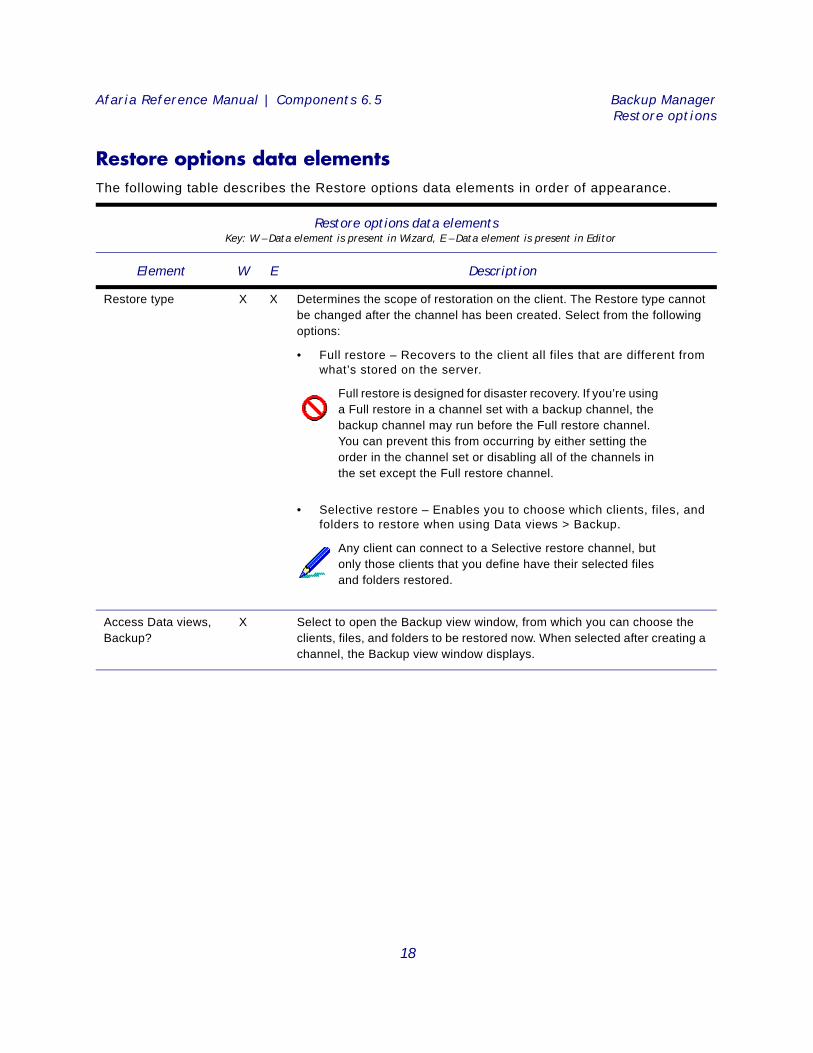
Restore options data elementsThe following table describes the Restore options data elements in order of appearance.
Restore options data elements Key: W – Data element is present in Wizard, E – Data element is present in Editor
Element W E Description
Restore type X X Determines the scope of restoration on the client. The Restore type cannot be changed after the channel has been created. Select from the following options:
• Full restore – Recovers to the client all files that are different from what’s stored on the server.
• Selective restore – Enables you to choose which clients, files, and folders to restore when using Data views > Backup.
Access Data views, Backup?
X Select to open the Backup view window, from which you can choose the clients, files, and folders to be restored now. When selected after creating a channel, the Backup view window displays.
Full restore is designed for disaster recovery. If you’re using a Full restore in a channel set with a backup channel, the backup channel may run before the Full restore channel. You can prevent this from occurring by either setting the order in the channel set or disabling all of the channels in the set except the Full restore channel.
Any client can connect to a Selective restore channel, but only those clients that you define have their selected files and folders restored.
18
Afaria Reference Manual | Components 6.5 Backup ManagerRestore options
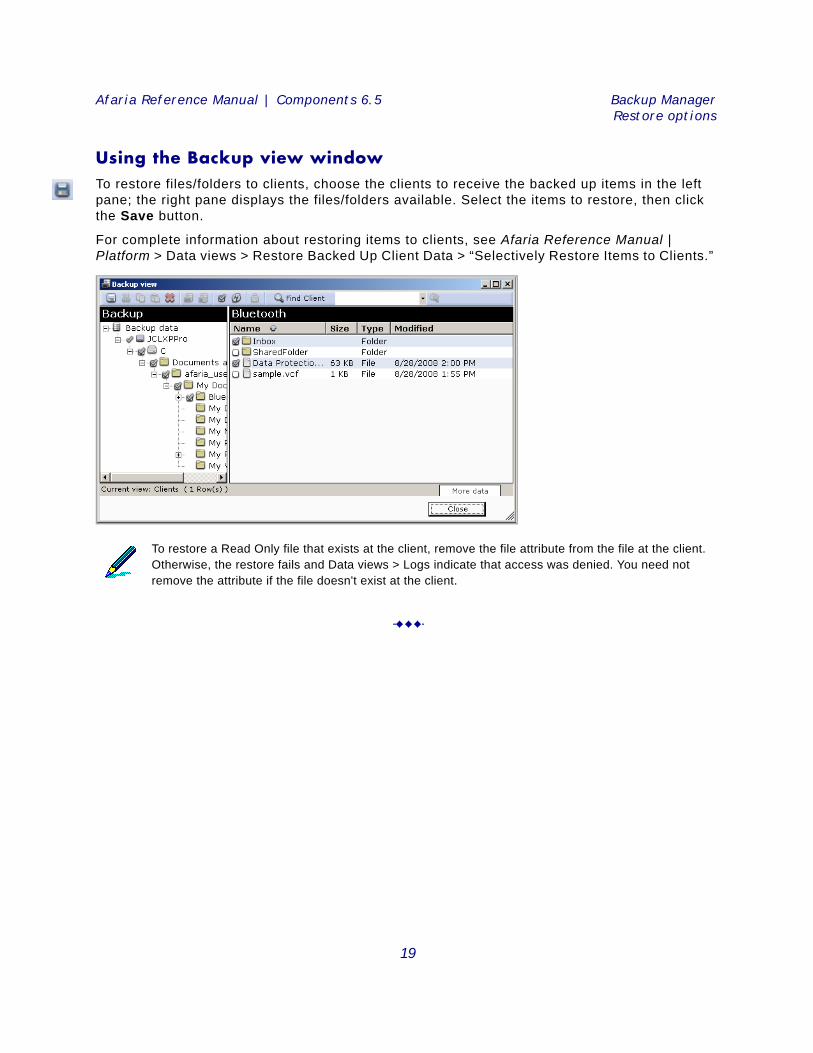
Using the Backup view windowTo restore files/folders to clients, choose the clients to receive the backed up items in the left pane; the right pane displays the files/folders available. Select the items to restore, then click the Save button.
For complete information about restoring items to clients, see Afaria Reference Manual | Platform > Data views > Restore Backed Up Client Data > “Selectively Restore Items to Clients.”
To restore a Read Only file that exists at the client, remove the file attribute from the file at the client. Otherwise, the restore fails and Data views > Logs indicate that access was denied. You need not remove the attribute if the file doesn't exist at the client.
19
2
Configuration ManagerConfiguration Manager channels enable you to configure and maintain device settings for your mobile
Afaria Clients. Feature support, which is subject to client type, includes connectivity settings,
synchronization activity, application and feature controls, and email settings. Use Configuration Manager
to let your client users spend less time managing their devices and more time meeting their goals.
Client types supported are:
• Windows Mobile Professional (including Windows CE)
• Windows Mobile Standard
• Symbian
• Palm
• BlackBerry
20
Afaria Reference Manual | Components 6.5 Configuration ManagerAbout Configuration Manager
About Configuration Manager Use Configuration Manager to remotely configure and maintain devices that are deployed to your mobile workforce. For example, you can create a channel that sets up all of the general buttons, connections, synchronization and network settings. When the associated clients connect to the server, the devices are automatically configured with your settings.
Configuration Manager offers features that are:
• Subject to client type.
• Either for configuration or configuration and enforcement.
• Configuration – Establishes device settings when the channel runs on the device. Subsequent to the channel completing device configuration, the device holder may be able to change settings established by the channel.
• Configuration and enforcement – Establishes device settings when the channel runs on the device, and also prevents the device holder from changing the settings. Enforced settings govern the device at all times.
Features for configuration Supported client types – Symbian, Windows Mobile Professional (including Windows CE), Windows Mobile Standard, Palm, BlackBerry
The following configuration features are provided, subject to client type:
• Connectivity – Configure a variety of connectivity settings for WiFi, Bluetooth, VPN, proxy, WAP proxy, dial up, APN, access points, and service provider.
• Device security – Establish and enforce your device security policy using security settings that include password controls, security timeouts, login scripts, and encryption options.
• Synchronization activity – Define the behaviors for synchronization using settings that define synchronization profiles; identify email, PIM and non-PIM application synchronization behavior; and resolve synchronization conflicts.
• Custom XML provisioning – Configuration Manager includes a custom provisioning page for Windows Mobile Professional and Windows Mobile Standard clients. The custom page allows you to use the Open Mobile Alliance (OMA) Client Provisioning standards to compose provisioning XML scripts that you can deliver to your devices. Use the custom feature to configure settings that are not available in the channel editor. This custom provisioning feature provides a method for you to configure even the newest devices as they hit the market.
• Email controls – Define settings that route email traffic to defined email servers, provide passwords, and create restrictions for message and attachment sizes.
• Device application and feature controls – Control the applications and features that your devices support using application settings related to application downloads, application data storage, email service use, device to device messaging, SMS messaging, browser controls, and phone use.
21
Afaria Reference Manual | Components 6.5 Configuration ManagerAbout Configuration Manager
Features for configuration and enforcementSupported client types – Windows Mobile Professional 5 and later, Windows Mobile Standard
The following configuration and enforcement features are provided:
• Port Control – Enable, limit, or disable the usage of hardware ports on devices. By regulating the use of hardware ports, you can enforce the availability of key device features, such as Bluetooth connectivity, data transfer methods, and the use of external data cards.
• Windows Mobile Update – Control how software and security updates issued by Microsoft are applied to the device.
22
Afaria Reference Manual | Components 6.5 Configuration ManagerCreate or edit a Configuration Manager channel
Create or edit a Configuration Manager channel Create or edit Configuration Manager channels to configure settings for handheld devices.
• To create a channel, launch the channel wizard for a Configuration Manager channel. The wizard guides you through the channel creation process and then opens the channel editor.
• To edit an existing channel, open the channel editor using one of the following methods:
• Click the Edit icon on the channel administration toolbar.
• Click the Edit channel contents… link on the channel’s Properties page.
• Right click the channel and select Edit… from the channel’s shortcut menu.
From the channel editor, select a property page and make any changes to the channel you need. The editor provides property pages corresponding to the client type selected when creating the channel. Refer to the following topics for more information:
• “Configuring BlackBerry clients” on page 25
• “Configuring Palm clients” on page 29
• “Configuring Symbian clients” on page 38
• “Configuring Windows Mobile clients” on page 50
• To deploy a channel to clients, you must both publish it and assign it to a work profile.
• See “About Configuration Manager channel editor” on page 24 to learn more about using the Configuration Manager channel editor.
• For complete information about creating and editing channels, refer to Afaria Reference Manual | Platform > Administration > “Channel Administration”.
23
Afaria Reference Manual | Components 6.5 Configuration ManagerAbout Configuration Manager channel editor
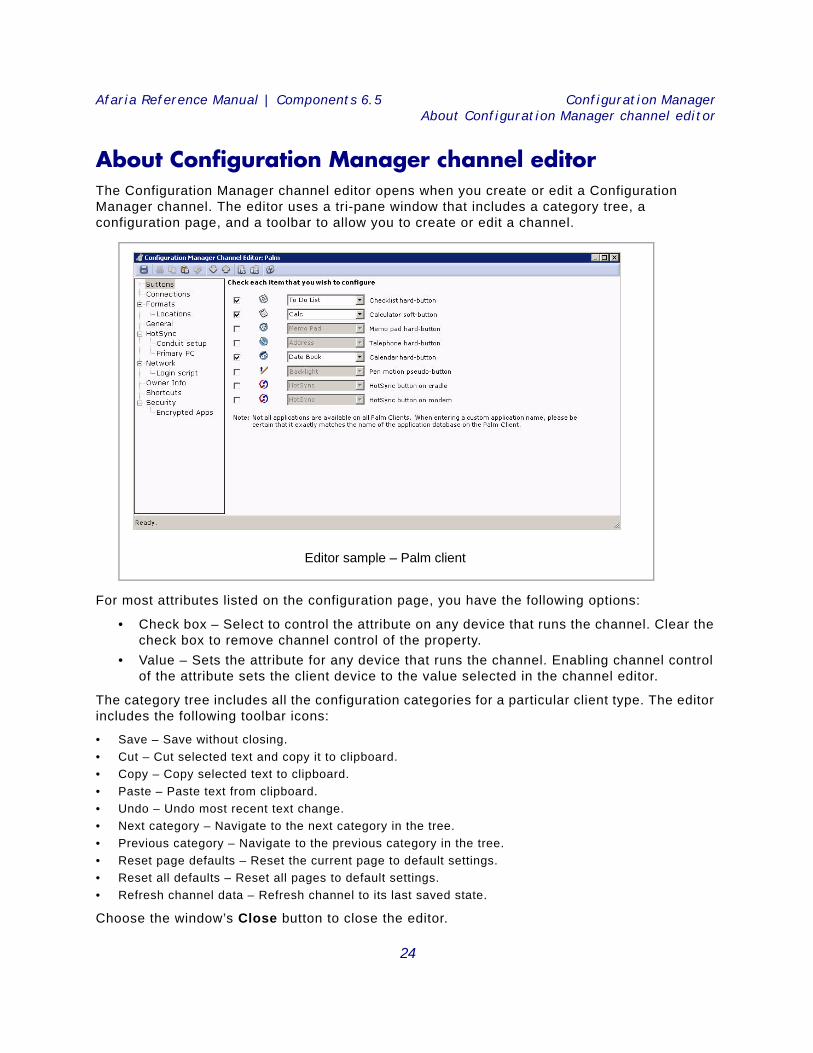
About Configuration Manager channel editor The Configuration Manager channel editor opens when you create or edit a Configuration Manager channel. The editor uses a tri-pane window that includes a category tree, a configuration page, and a toolbar to allow you to create or edit a channel.
For most attributes listed on the configuration page, you have the following options:
• Check box – Select to control the attribute on any device that runs the channel. Clear the check box to remove channel control of the property.
• Value – Sets the attribute for any device that runs the channel. Enabling channel control of the attribute sets the client device to the value selected in the channel editor.
The category tree includes all the configuration categories for a particular client type. The editor includes the following toolbar icons:
• Save – Save without closing. • Cut – Cut selected text and copy it to clipboard. • Copy – Copy selected text to clipboard. • Paste – Paste text from clipboard. • Undo – Undo most recent text change. • Next category – Navigate to the next category in the tree. • Previous category – Navigate to the previous category in the tree. • Reset page defaults – Reset the current page to default settings. • Reset all defaults – Reset all pages to default settings. • Refresh channel data – Refresh channel to its last saved state.
Choose the window’s Close button to close the editor.
Editor sample – Palm client
24
Afaria Reference Manual | Components 6.5 Configuration ManagerConfiguring BlackBerry clients
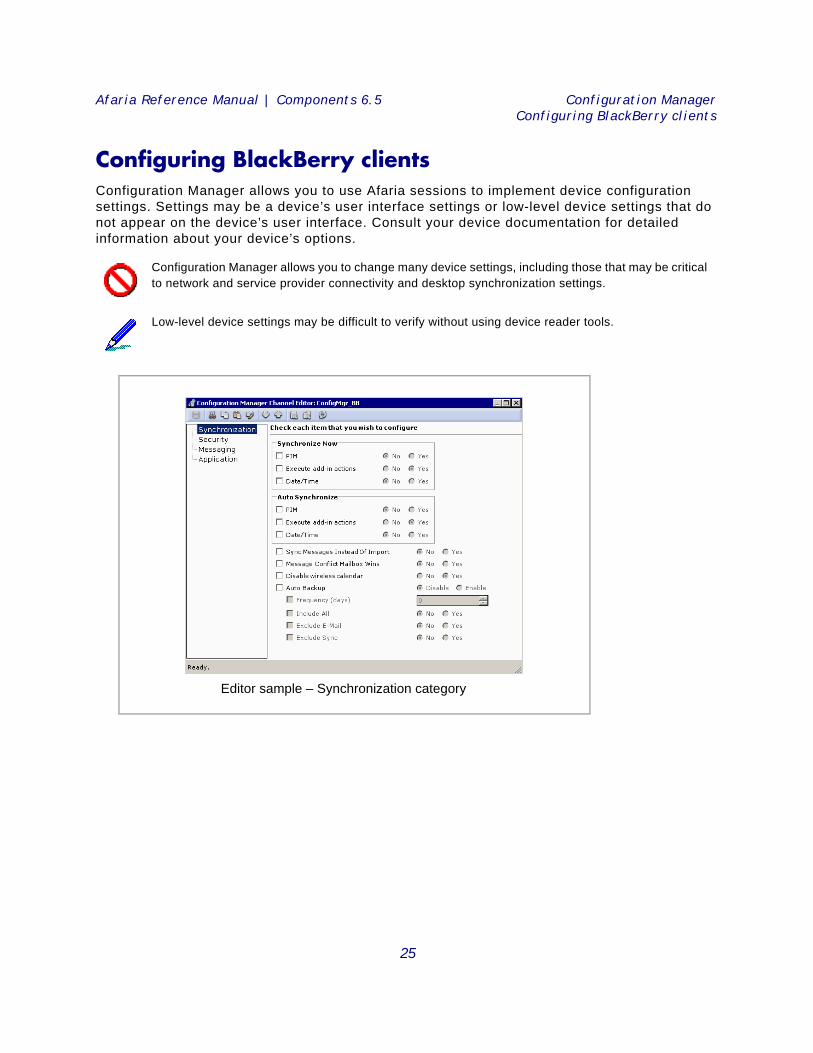
Configuring BlackBerry clients Configuration Manager allows you to use Afaria sessions to implement device configuration settings. Settings may be a device’s user interface settings or low-level device settings that do not appear on the device’s user interface. Consult your device documentation for detailed information about your device’s options.
Configuration Manager allows you to change many device settings, including those that may be critical to network and service provider connectivity and desktop synchronization settings.
Low-level device settings may be difficult to verify without using device reader tools.
Editor sample – Synchronization category
25
Afaria Reference Manual | Components 6.5 Configuration ManagerConfiguring BlackBerry clients
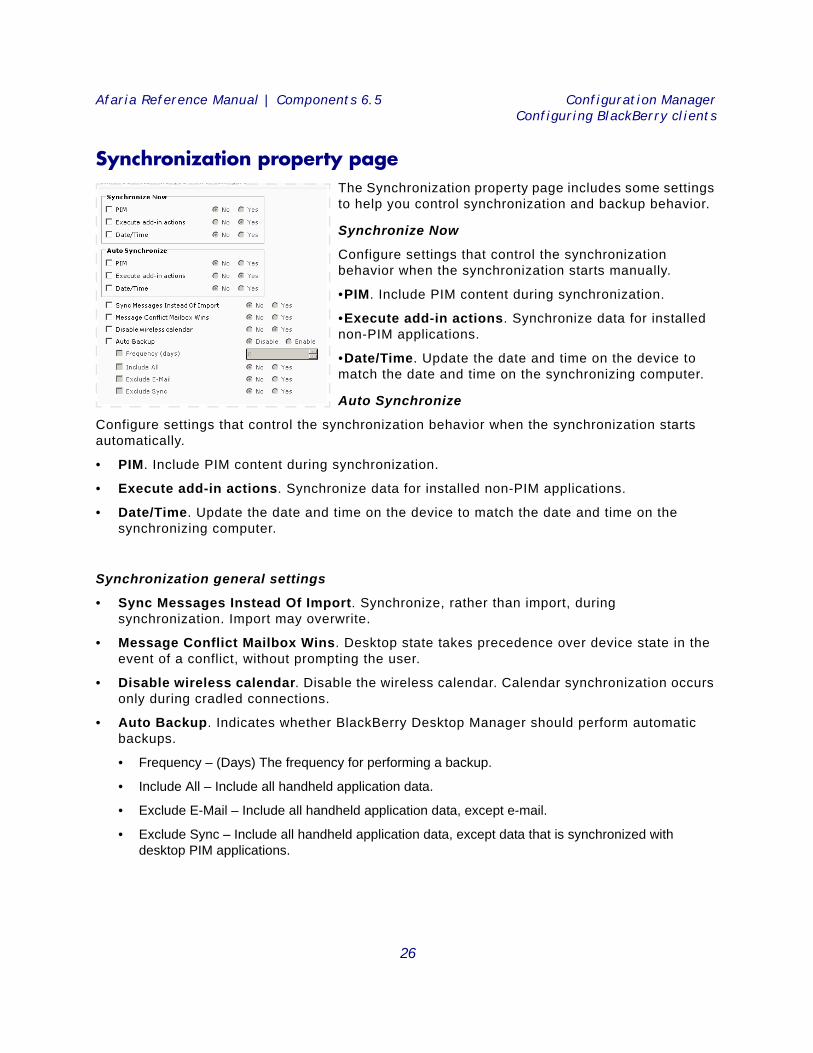
Synchronization property pageThe Synchronization property page includes some settings to help you control synchronization and backup behavior.
Synchronize Now
Configure settings that control the synchronization behavior when the synchronization starts manually.
•PIM. Include PIM content during synchronization.
•Execute add-in actions. Synchronize data for installed non-PIM applications.
•Date/Time. Update the date and time on the device to match the date and time on the synchronizing computer.
Auto Synchronize
Configure settings that control the synchronization behavior when the synchronization starts automatically.
• PIM. Include PIM content during synchronization.
• Execute add-in actions. Synchronize data for installed non-PIM applications.
• Date/Time. Update the date and time on the device to match the date and time on the synchronizing computer.
Synchronization general settings
• Sync Messages Instead Of Import. Synchronize, rather than import, during synchronization. Import may overwrite.
• Message Conflict Mailbox Wins. Desktop state takes precedence over device state in the event of a conflict, without prompting the user.
• Disable wireless calendar. Disable the wireless calendar. Calendar synchronization occurs only during cradled connections.
• Auto Backup. Indicates whether BlackBerry Desktop Manager should perform automatic backups.
• Frequency – (Days) The frequency for performing a backup.
• Include All – Include all handheld application data.
• Exclude E-Mail – Include all handheld application data, except e-mail.
• Exclude Sync – Include all handheld application data, except data that is synchronized with desktop PIM applications.
26
Afaria Reference Manual | Components 6.5 Configuration ManagerConfiguring BlackBerry clients
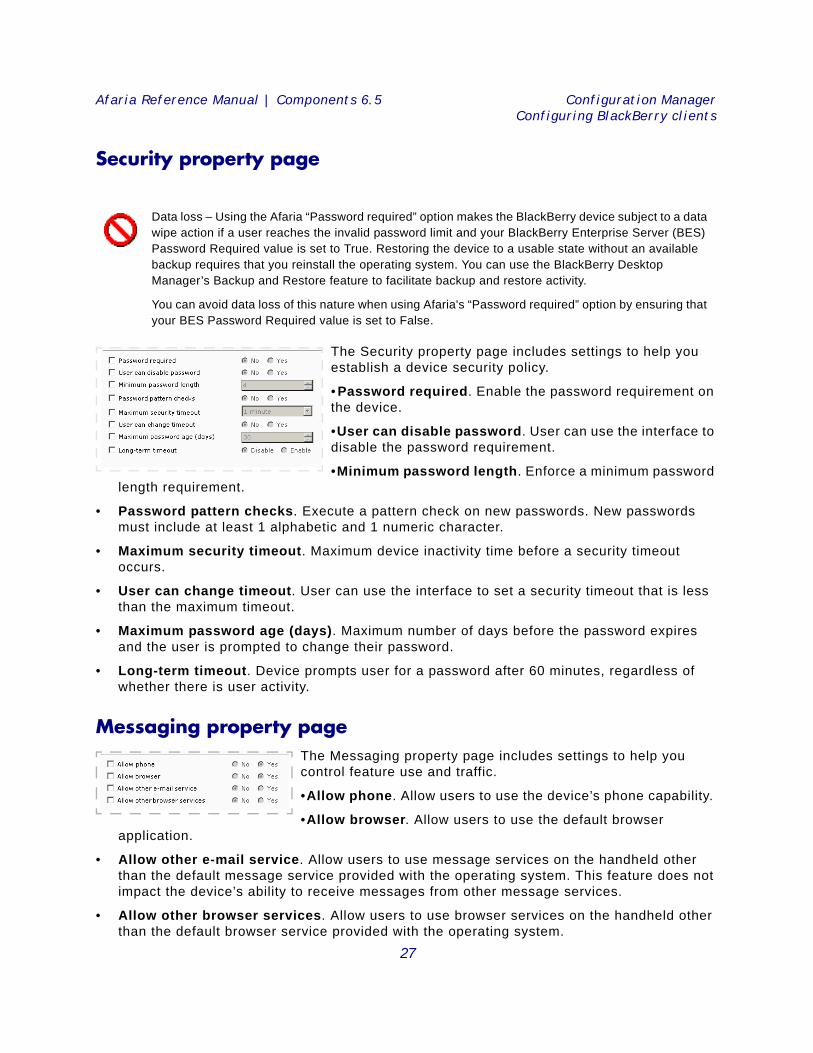
Security property page
The Security property page includes settings to help you establish a device security policy.
• Password required. Enable the password requirement on the device.
•User can disable password. User can use the interface to disable the password requirement.
•Minimum password length. Enforce a minimum password length requirement.
• Password pattern checks. Execute a pattern check on new passwords. New passwords must include at least 1 alphabetic and 1 numeric character.
• Maximum security timeout. Maximum device inactivity time before a security timeout occurs.
• User can change timeout. User can use the interface to set a security timeout that is less than the maximum timeout.
• Maximum password age (days). Maximum number of days before the password expires and the user is prompted to change their password.
• Long-term timeout. Device prompts user for a password after 60 minutes, regardless of whether there is user activity.
Messaging property page The Messaging property page includes settings to help you control feature use and traffic.
•Allow phone. Allow users to use the device’s phone capability.
•Allow browser. Allow users to use the default browser application.
• Allow other e-mail service. Allow users to use message services on the handheld other than the default message service provided with the operating system. This feature does not impact the device’s ability to receive messages from other message services.
• Allow other browser services. Allow users to use browser services on the handheld other than the default browser service provided with the operating system.
Data loss – Using the Afaria “Password required” option makes the BlackBerry device subject to a data wipe action if a user reaches the invalid password limit and your BlackBerry Enterprise Server (BES) Password Required value is set to True. Restoring the device to a usable state without an available backup requires that you reinstall the operating system. You can use the BlackBerry Desktop Manager’s Backup and Restore feature to facilitate backup and restore activity.
You can avoid data loss of this nature when using Afaria's “Password required” option by ensuring that your BES Password Required value is set to False.
27
Afaria Reference Manual | Components 6.5 Configuration ManagerConfiguring BlackBerry clients
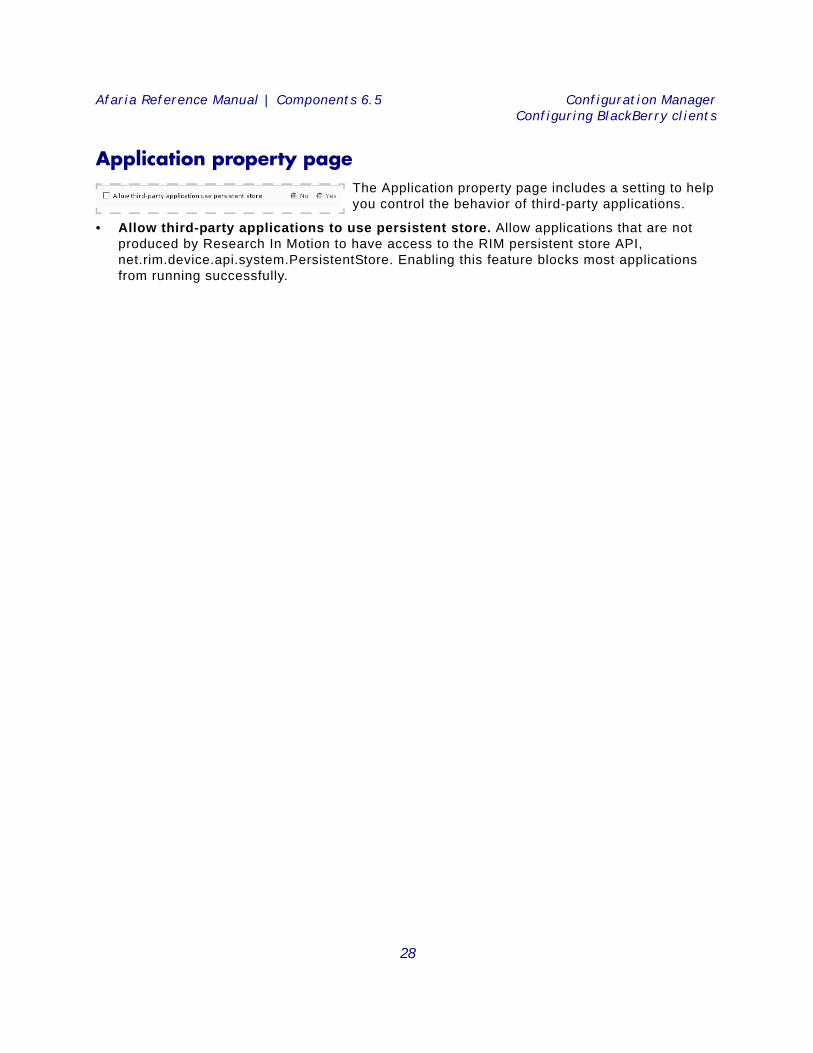
Application property page The Application property page includes a setting to help you control the behavior of third-party applications.
• Allow third-party applications to use persistent store. Allow applications that are not produced by Research In Motion to have access to the RIM persistent store API, net.rim.device.api.system.PersistentStore. Enabling this feature blocks most applications from running successfully.
28
Afaria Reference Manual | Components 6.5 Configuration ManagerConfiguring Palm clients
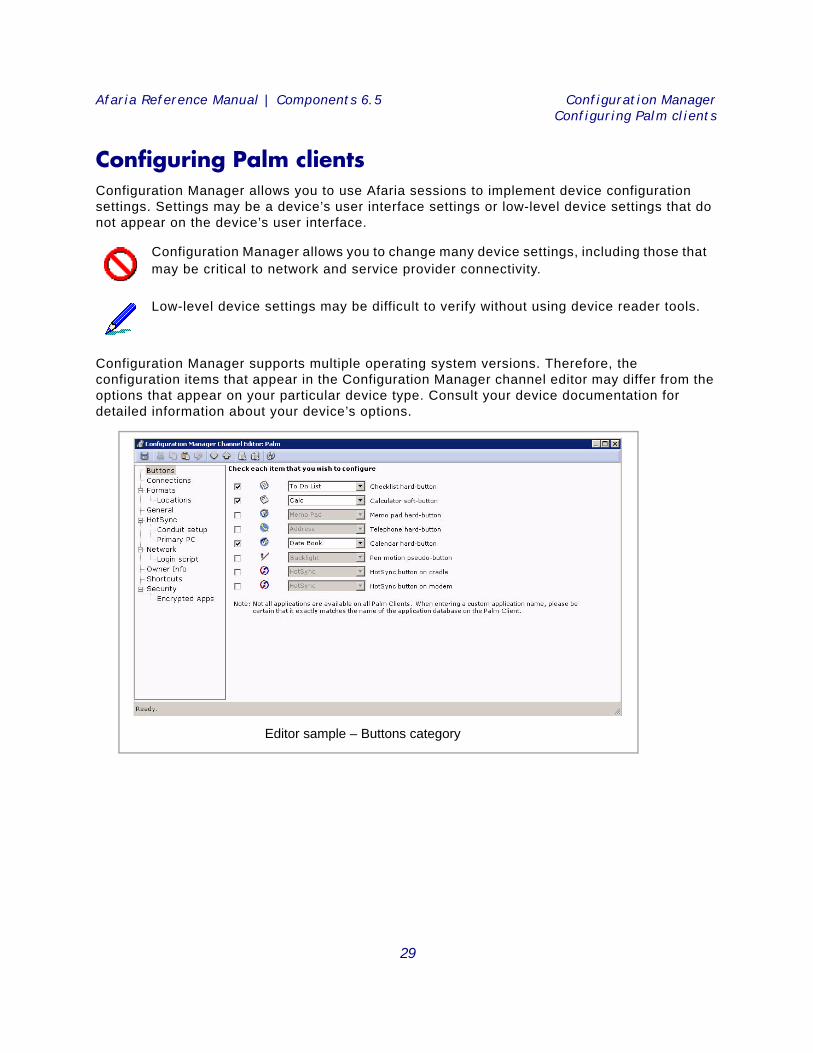
Configuring Palm clients Configuration Manager allows you to use Afaria sessions to implement device configuration settings. Settings may be a device’s user interface settings or low-level device settings that do not appear on the device’s user interface.
Configuration Manager supports multiple operating system versions. Therefore, the configuration items that appear in the Configuration Manager channel editor may differ from the options that appear on your particular device type. Consult your device documentation for detailed information about your device’s options.
Configuration Manager allows you to change many device settings, including those that may be critical to network and service provider connectivity.
Low-level device settings may be difficult to verify without using device reader tools.
Editor sample – Buttons category
29
Afaria Reference Manual | Components 6.5 Configuration ManagerConfiguring Palm clients
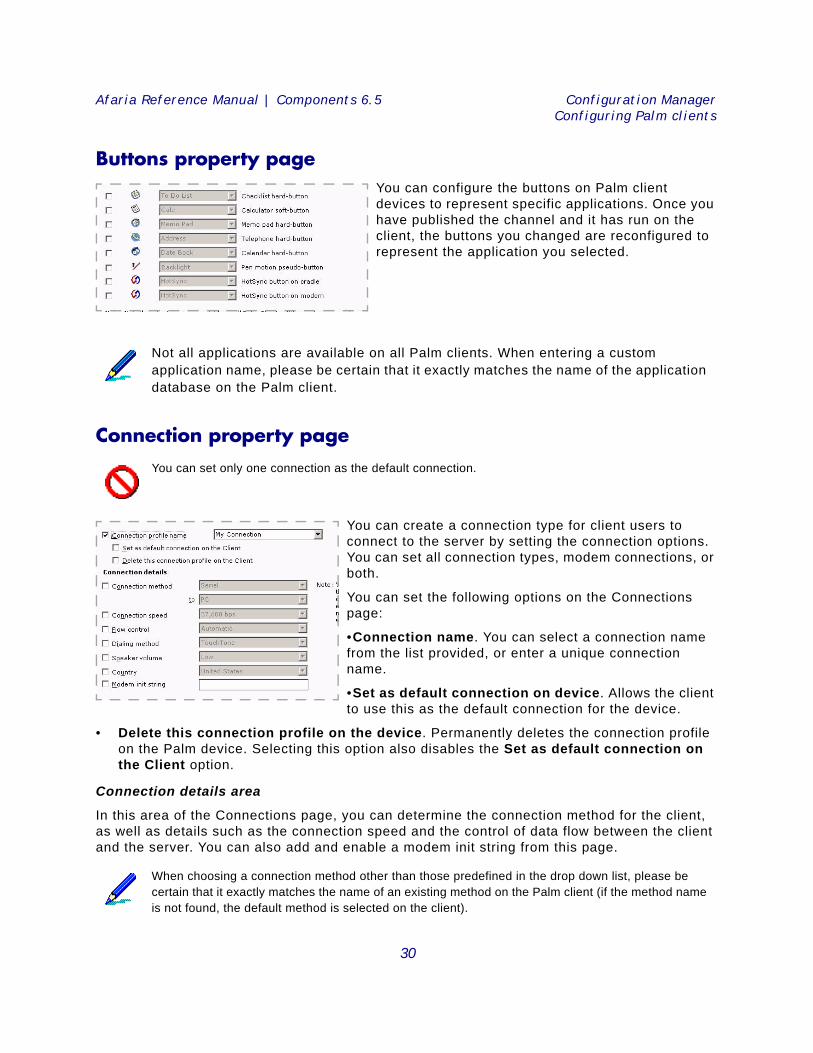
Buttons property pageYou can configure the buttons on Palm client devices to represent specific applications. Once you have published the channel and it has run on the client, the buttons you changed are reconfigured to represent the application you selected.
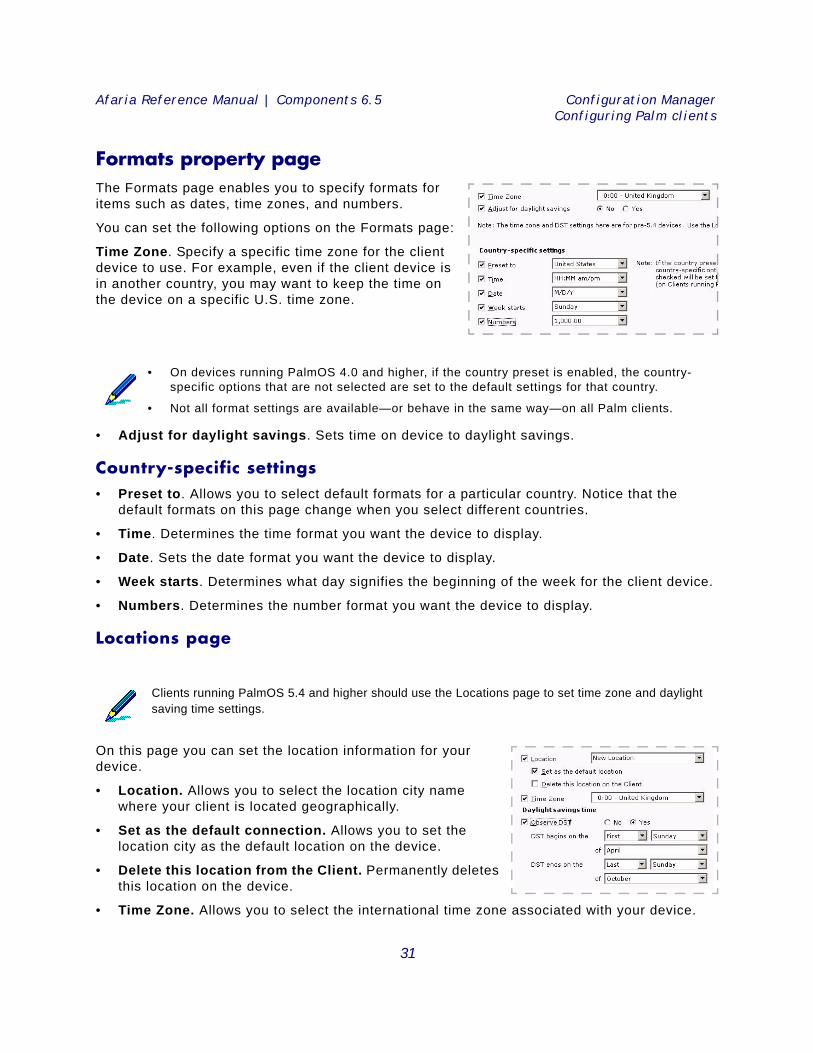
Connection property page
You can create a connection type for client users to connect to the server by setting the connection options. You can set all connection types, modem connections, or both.
You can set the following options on the Connections page:
•Connection name. You can select a connection name from the list provided, or enter a unique connection name.
•Set as default connection on device. Allows the client to use this as the default connection for the device.
• Delete this connection profile on the device. Permanently deletes the connection profile on the Palm device. Selecting this option also disables the Set as default connection on the Client option.
Connection details area
In this area of the Connections page, you can determine the connection method for the client, as well as details such as the connection speed and the control of data flow between the client and the server. You can also add and enable a modem init string from this page.
Not all applications are available on all Palm clients. When entering a custom application name, please be certain that it exactly matches the name of the application database on the Palm client.
You can set only one connection as the default connection.
When choosing a connection method other than those predefined in the drop down list, please be certain that it exactly matches the name of an existing method on the Palm client (if the method name is not found, the default method is selected on the client).
30
Afaria Reference Manual | Components 6.5 Configuration ManagerConfiguring Palm clients
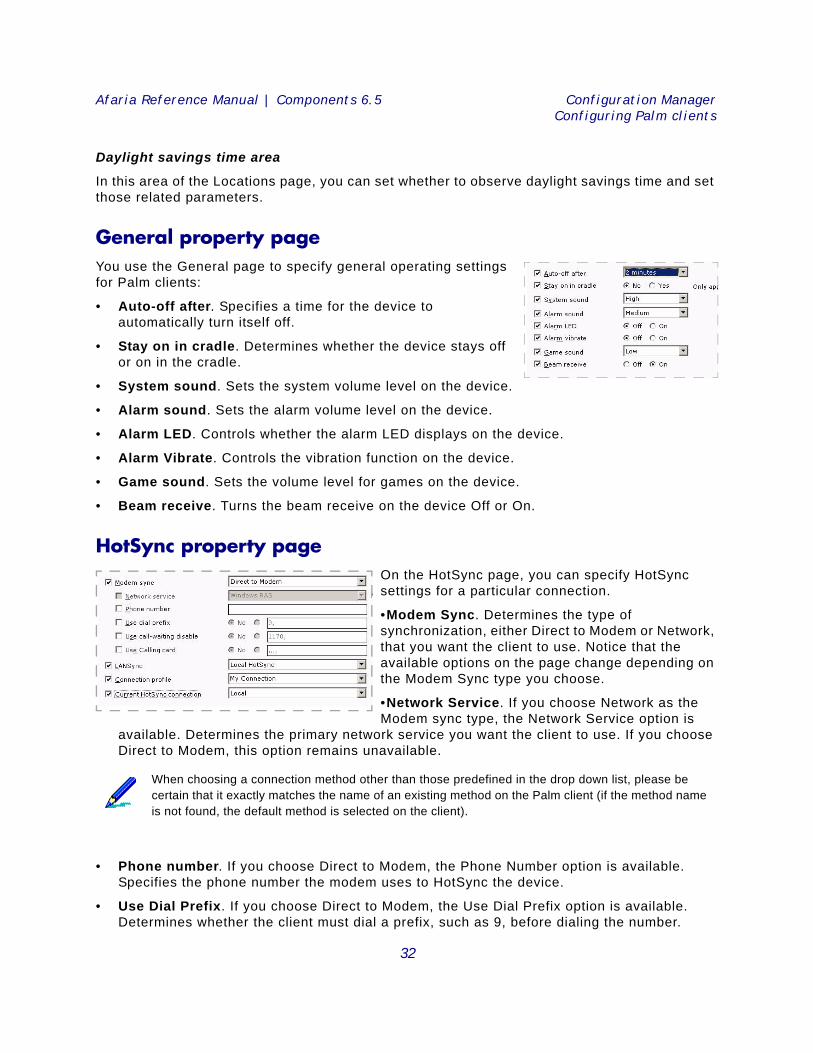
Formats property pageThe Formats page enables you to specify formats for items such as dates, time zones, and numbers.
You can set the following options on the Formats page:
Time Zone. Specify a specific time zone for the client device to use. For example, even if the client device is in another country, you may want to keep the time on the device on a specific U.S. time zone.
• Adjust for daylight savings. Sets time on device to daylight savings.
Country-specific settings• Preset to. Allows you to select default formats for a particular country. Notice that the
default formats on this page change when you select different countries.
• Time. Determines the time format you want the device to display.
• Date. Sets the date format you want the device to display.
• Week starts. Determines what day signifies the beginning of the week for the client device.
• Numbers. Determines the number format you want the device to display.
Locations page
On this page you can set the location information for your device.
• Location. Allows you to select the location city name where your client is located geographically.
• Set as the default connection. Allows you to set the location city as the default location on the device.
• Delete this location from the Client. Permanently deletes this location on the device.
• Time Zone. Allows you to select the international time zone associated with your device.
• On devices running PalmOS 4.0 and higher, if the country preset is enabled, the country-specific options that are not selected are set to the default settings for that country.
• Not all format settings are available—or behave in the same way—on all Palm clients.
Clients running PalmOS 5.4 and higher should use the Locations page to set time zone and daylight saving time settings.
31
Afaria Reference Manual | Components 6.5 Configuration ManagerConfiguring Palm clients
Daylight savings time area
In this area of the Locations page, you can set whether to observe daylight savings time and set those related parameters.
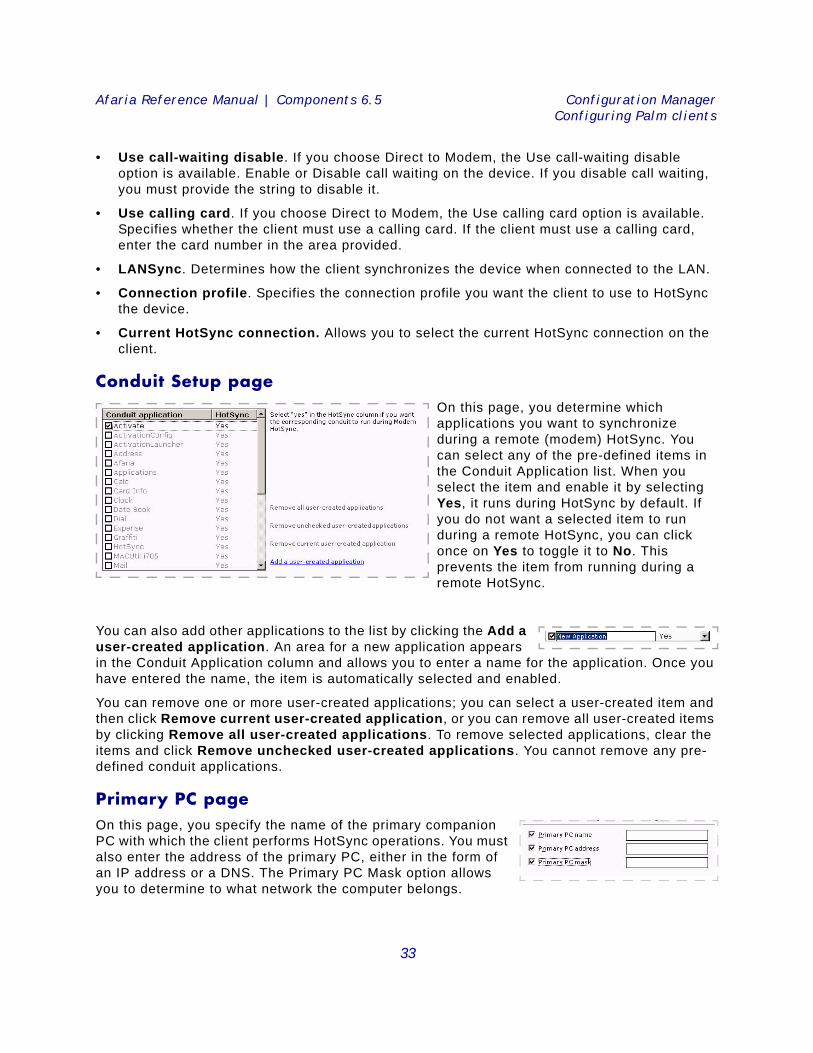
General property pageYou use the General page to specify general operating settings for Palm clients:
• Auto-off after. Specifies a time for the device to automatically turn itself off.
• Stay on in cradle. Determines whether the device stays off or on in the cradle.
• System sound. Sets the system volume level on the device.
• Alarm sound. Sets the alarm volume level on the device.
• Alarm LED. Controls whether the alarm LED displays on the device.
• Alarm Vibrate. Controls the vibration function on the device.
• Game sound. Sets the volume level for games on the device.
• Beam receive. Turns the beam receive on the device Off or On.
HotSync property pageOn the HotSync page, you can specify HotSync settings for a particular connection.
•Modem Sync. Determines the type of synchronization, either Direct to Modem or Network, that you want the client to use. Notice that the available options on the page change depending on the Modem Sync type you choose.
•Network Service. If you choose Network as the Modem sync type, the Network Service option is
available. Determines the primary network service you want the client to use. If you choose Direct to Modem, this option remains unavailable.
• Phone number. If you choose Direct to Modem, the Phone Number option is available. Specifies the phone number the modem uses to HotSync the device.
• Use Dial Prefix. If you choose Direct to Modem, the Use Dial Prefix option is available. Determines whether the client must dial a prefix, such as 9, before dialing the number.
When choosing a connection method other than those predefined in the drop down list, please be certain that it exactly matches the name of an existing method on the Palm client (if the method name is not found, the default method is selected on the client).
32
Afaria Reference Manual | Components 6.5 Configuration ManagerConfiguring Palm clients
• Use call-waiting disable. If you choose Direct to Modem, the Use call-waiting disable option is available. Enable or Disable call waiting on the device. If you disable call waiting, you must provide the string to disable it.
• Use calling card. If you choose Direct to Modem, the Use calling card option is available. Specifies whether the client must use a calling card. If the client must use a calling card, enter the card number in the area provided.
• LANSync. Determines how the client synchronizes the device when connected to the LAN.
• Connection profile. Specifies the connection profile you want the client to use to HotSync the device.
• Current HotSync connection. Allows you to select the current HotSync connection on the client.
Conduit Setup pageOn this page, you determine which applications you want to synchronize during a remote (modem) HotSync. You can select any of the pre-defined items in the Conduit Application list. When you select the item and enable it by selecting Yes, it runs during HotSync by default. If you do not want a selected item to run during a remote HotSync, you can click once on Yes to toggle it to No. This prevents the item from running during a remote HotSync.
You can also add other applications to the list by clicking the Add a user-created application. An area for a new application appears in the Conduit Application column and allows you to enter a name for the application. Once you have entered the name, the item is automatically selected and enabled.
You can remove one or more user-created applications; you can select a user-created item and then click Remove current user-created application, or you can remove all user-created items by clicking Remove all user-created applications. To remove selected applications, clear the items and click Remove unchecked user-created applications. You cannot remove any pre-defined conduit applications.
Primary PC pageOn this page, you specify the name of the primary companion PC with which the client performs HotSync operations. You must also enter the address of the primary PC, either in the form of an IP address or a DNS. The Primary PC Mask option allows you to determine to what network the computer belongs.
33
Afaria Reference Manual | Components 6.5 Configuration ManagerConfiguring Palm clients
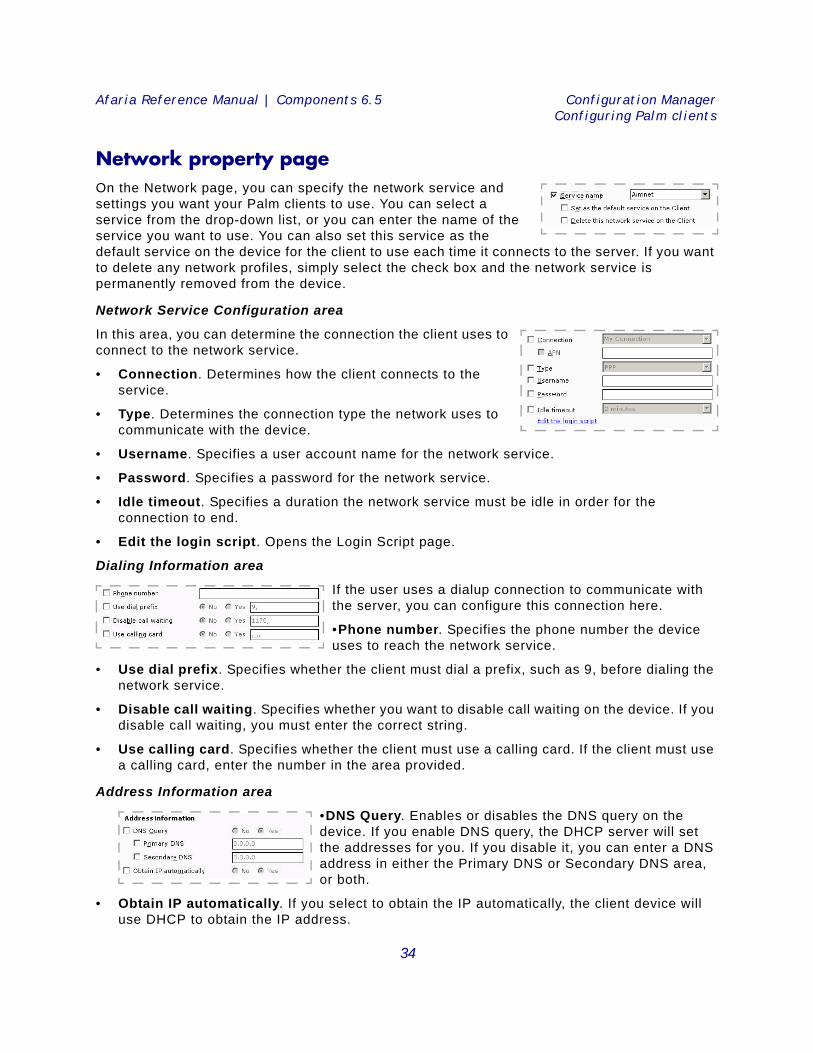
Network property pageOn the Network page, you can specify the network service and settings you want your Palm clients to use. You can select a service from the drop-down list, or you can enter the name of the service you want to use. You can also set this service as the default service on the device for the client to use each time it connects to the server. If you want to delete any network profiles, simply select the check box and the network service is permanently removed from the device.
Network Service Configuration area
In this area, you can determine the connection the client uses to connect to the network service.
• Connection. Determines how the client connects to the service.
• Type. Determines the connection type the network uses to communicate with the device.
• Username. Specifies a user account name for the network service.
• Password. Specifies a password for the network service.
• Idle timeout. Specifies a duration the network service must be idle in order for the connection to end.
• Edit the login script. Opens the Login Script page.
Dialing Information area
If the user uses a dialup connection to communicate with the server, you can configure this connection here.
•Phone number. Specifies the phone number the device uses to reach the network service.
• Use dial prefix. Specifies whether the client must dial a prefix, such as 9, before dialing the network service.
• Disable call waiting. Specifies whether you want to disable call waiting on the device. If you disable call waiting, you must enter the correct string.
• Use calling card. Specifies whether the client must use a calling card. If the client must use a calling card, enter the number in the area provided.
Address Information area
•DNS Query. Enables or disables the DNS query on the device. If you enable DNS query, the DHCP server will set the addresses for you. If you disable it, you can enter a DNS address in either the Primary DNS or Secondary DNS area, or both.
• Obtain IP automatically. If you select to obtain the IP automatically, the client device will use DHCP to obtain the IP address.
34
Afaria Reference Manual | Components 6.5 Configuration ManagerConfiguring Palm clients
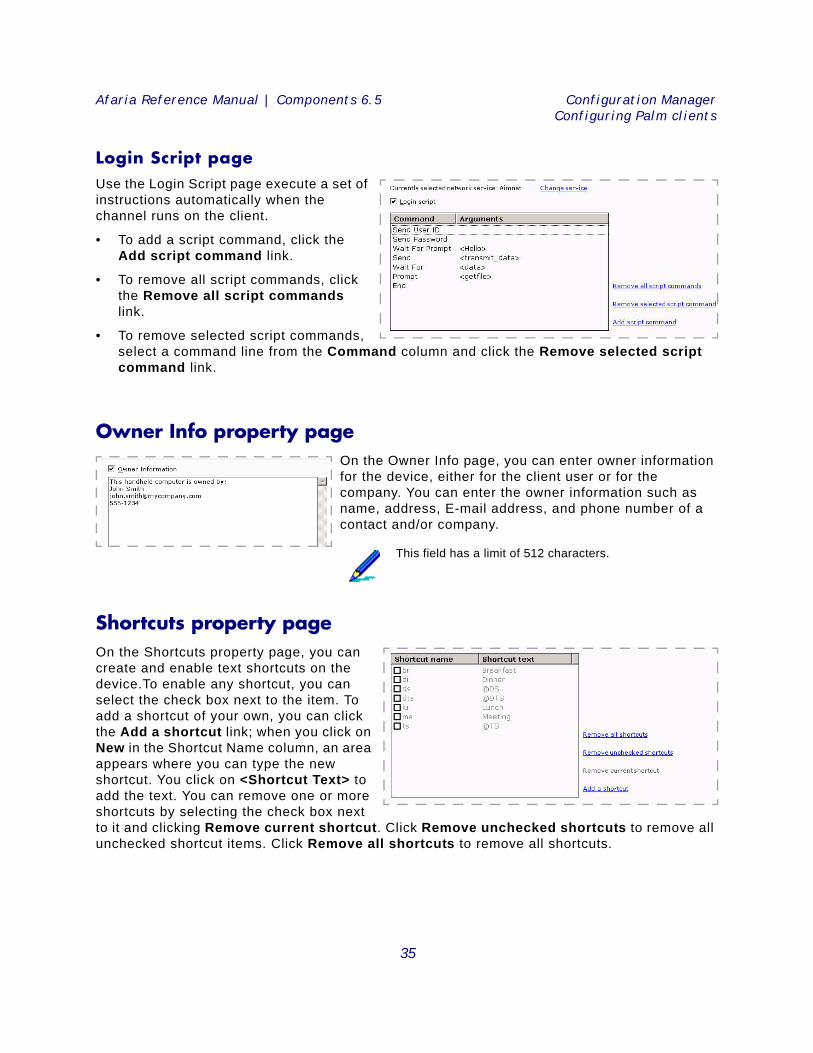
Login Script pageUse the Login Script page execute a set of instructions automatically when the channel runs on the client.
• To add a script command, click the Add script command link.
• To remove all script commands, click the Remove all script commands link.
• To remove selected script commands, select a command line from the Command column and click the Remove selected script command link.
Owner Info property pageOn the Owner Info page, you can enter owner information for the device, either for the client user or for the company. You can enter the owner information such as name, address, E-mail address, and phone number of a contact and/or company.
Shortcuts property pageOn the Shortcuts property page, you can create and enable text shortcuts on the device.To enable any shortcut, you can select the check box next to the item. To add a shortcut of your own, you can click the Add a shortcut link; when you click on New in the Shortcut Name column, an area appears where you can type the new shortcut. You click on <Shortcut Text> to add the text. You can remove one or more shortcuts by selecting the check box next to it and clicking Remove current shortcut. Click Remove unchecked shortcuts to remove all unchecked shortcut items. Click Remove all shortcuts to remove all shortcuts.
This field has a limit of 512 characters.
35
Afaria Reference Manual | Components 6.5 Configuration ManagerConfiguring Palm clients
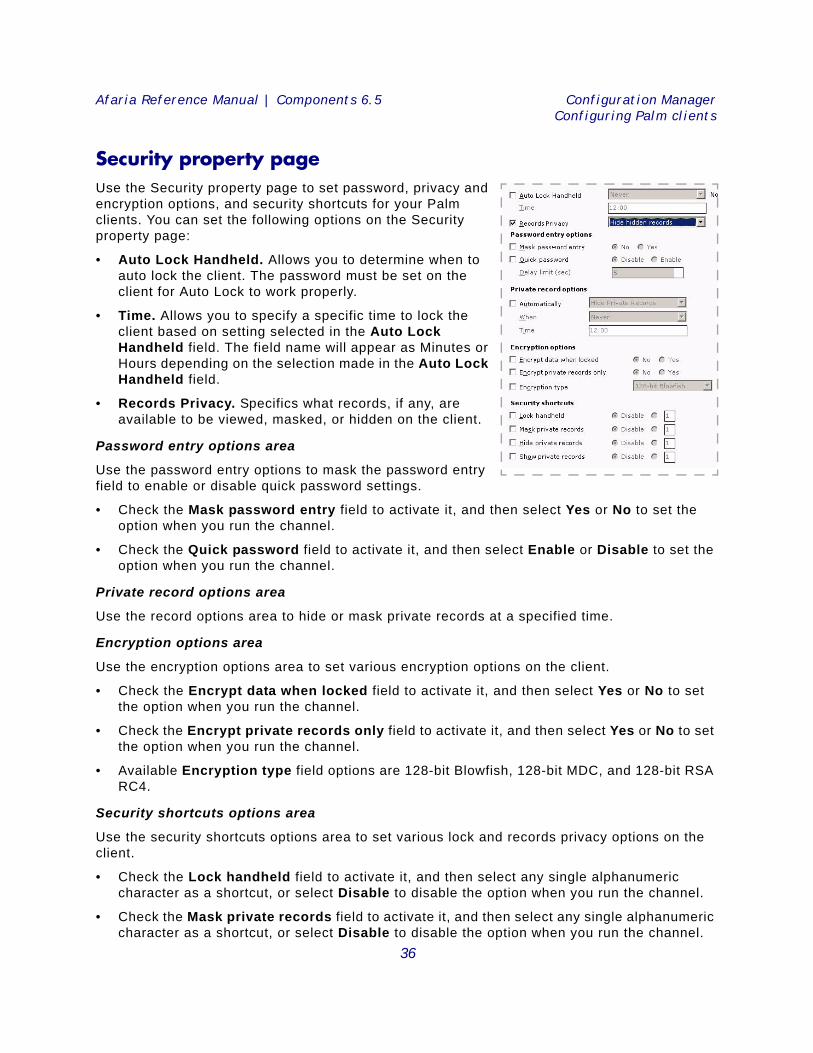
Security property pageUse the Security property page to set password, privacy and encryption options, and security shortcuts for your Palm clients. You can set the following options on the Security property page:
• Auto Lock Handheld. Allows you to determine when to auto lock the client. The password must be set on the client for Auto Lock to work properly.
• Time. Allows you to specify a specific time to lock the client based on setting selected in the Auto Lock Handheld field. The field name will appear as Minutes or Hours depending on the selection made in the Auto Lock Handheld field.
• Records Privacy. Specifics what records, if any, are available to be viewed, masked, or hidden on the client.
Password entry options area
Use the password entry options to mask the password entry field to enable or disable quick password settings.
• Check the Mask password entry field to activate it, and then select Yes or No to set the option when you run the channel.
• Check the Quick password field to activate it, and then select Enable or Disable to set the option when you run the channel.
Private record options area
Use the record options area to hide or mask private records at a specified time.
Encryption options area
Use the encryption options area to set various encryption options on the client.
• Check the Encrypt data when locked field to activate it, and then select Yes or No to set the option when you run the channel.
• Check the Encrypt private records only field to activate it, and then select Yes or No to set the option when you run the channel.
• Available Encryption type field options are 128-bit Blowfish, 128-bit MDC, and 128-bit RSA RC4.
Security shortcuts options area
Use the security shortcuts options area to set various lock and records privacy options on the client.
• Check the Lock handheld field to activate it, and then select any single alphanumeric character as a shortcut, or select Disable to disable the option when you run the channel.
• Check the Mask private records field to activate it, and then select any single alphanumeric character as a shortcut, or select Disable to disable the option when you run the channel.
36
Afaria Reference Manual | Components 6.5 Configuration ManagerConfiguring Palm clients
• Check the Hide private records field to activate it, and then select any single alphanumeric character as a shortcut, or select Disable to disable the option when you run the channel.
• Check the Show private records field to activate it, and then select any single alphanumeric character as a shortcut, or select Disable to disable the option when you run the channel.
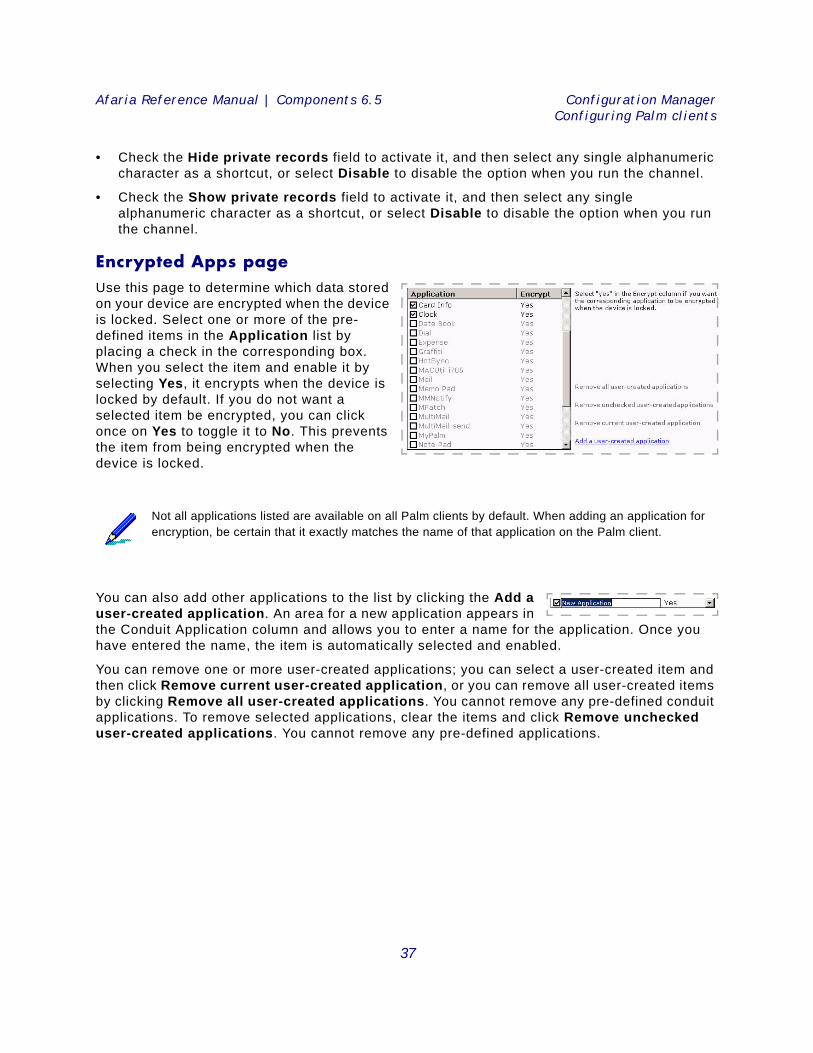
Encrypted Apps pageUse this page to determine which data stored on your device are encrypted when the device is locked. Select one or more of the pre-defined items in the Application list by placing a check in the corresponding box. When you select the item and enable it by selecting Yes, it encrypts when the device is locked by default. If you do not want a selected item be encrypted, you can click once on Yes to toggle it to No. This prevents the item from being encrypted when the device is locked.
You can also add other applications to the list by clicking the Add a user-created application. An area for a new application appears in the Conduit Application column and allows you to enter a name for the application. Once you have entered the name, the item is automatically selected and enabled.
You can remove one or more user-created applications; you can select a user-created item and then click Remove current user-created application, or you can remove all user-created items by clicking Remove all user-created applications. You cannot remove any pre-defined conduit applications. To remove selected applications, clear the items and click Remove unchecked user-created applications. You cannot remove any pre-defined applications.
Not all applications listed are available on all Palm clients by default. When adding an application for encryption, be certain that it exactly matches the name of that application on the Palm client.
37
Afaria Reference Manual | Components 6.5 Configuration ManagerConfiguring Symbian clients
Configuring Symbian clientsConfiguration Manager allows you to use Afaria sessions to implement device configuration settings. Consult your device documentation for detailed information about your device’s options.
Favorites property page
To add a favorite to the Client device:
Click Add a favorite to enter a Favorite Name and a URL. The favorite is added to the device when the client runs the channel.
To remove a favorite from the Client device:
Clear the URL field value to remove a previously defined favorite. The favorite is removed from the device when the client runs the channel.
Configuration Manager allows you to change many device settings, including those that may be critical to network and service provider connectivity.
Editor sample – Favorites category
38
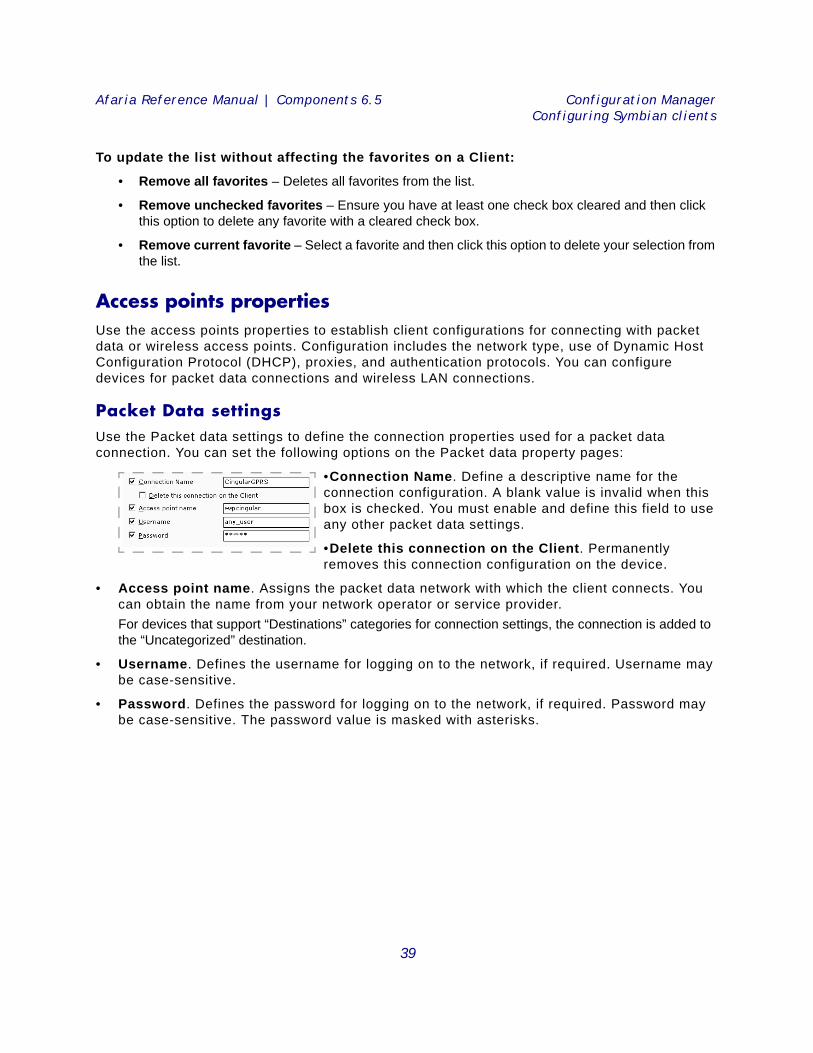
Afaria Reference Manual | Components 6.5 Configuration ManagerConfiguring Symbian clients
To update the list without affecting the favorites on a Client:
• Remove all favorites – Deletes all favorites from the list.
• Remove unchecked favorites – Ensure you have at least one check box cleared and then click this option to delete any favorite with a cleared check box.
• Remove current favorite – Select a favorite and then click this option to delete your selection from the list.
Access points propertiesUse the access points properties to establish client configurations for connecting with packet data or wireless access points. Configuration includes the network type, use of Dynamic Host Configuration Protocol (DHCP), proxies, and authentication protocols. You can configure devices for packet data connections and wireless LAN connections.
Packet Data settingsUse the Packet data settings to define the connection properties used for a packet data connection. You can set the following options on the Packet data property pages:
•Connection Name. Define a descriptive name for the connection configuration. A blank value is invalid when this box is checked. You must enable and define this field to use any other packet data settings.
•Delete this connection on the Client. Permanently removes this connection configuration on the device.
• Access point name. Assigns the packet data network with which the client connects. You can obtain the name from your network operator or service provider.For devices that support “Destinations” categories for connection settings, the connection is added to the “Uncategorized” destination.
• Username. Defines the username for logging on to the network, if required. Username may be case-sensitive.
• Password. Defines the password for logging on to the network, if required. Password may be case-sensitive. The password value is masked with asterisks.
39
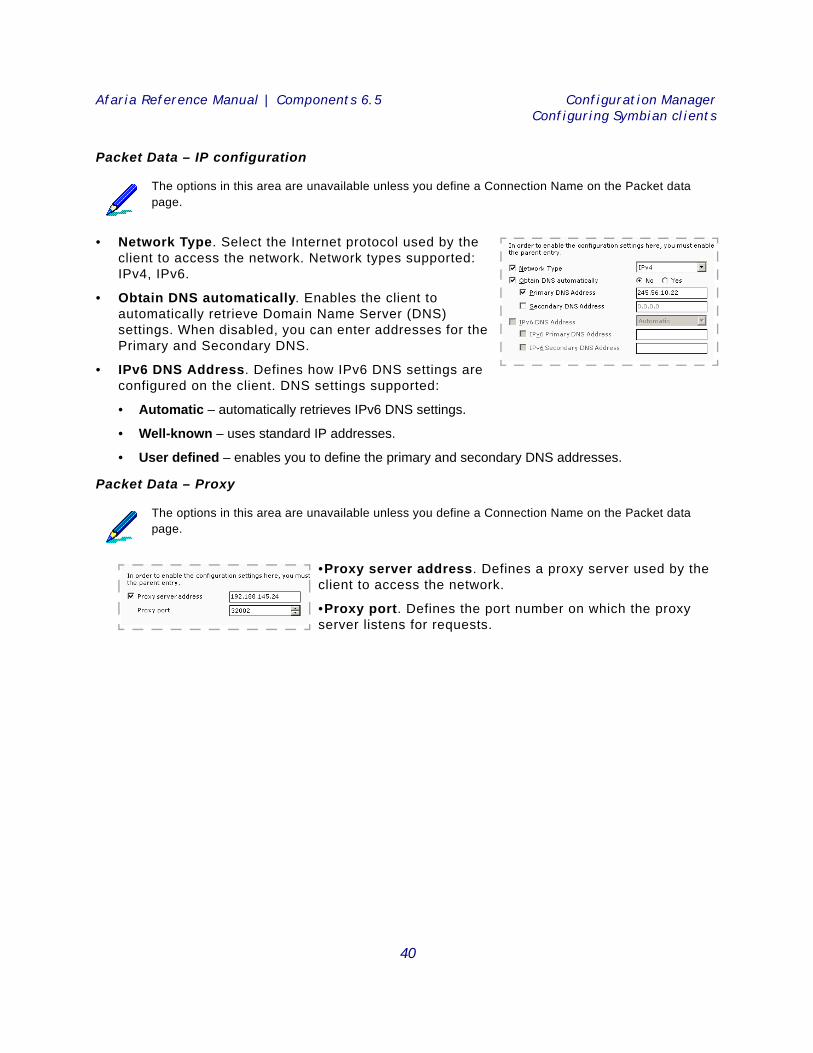
Afaria Reference Manual | Components 6.5 Configuration ManagerConfiguring Symbian clients
Packet Data – IP configuration
• Network Type. Select the Internet protocol used by the client to access the network. Network types supported: IPv4, IPv6.
• Obtain DNS automatically. Enables the client to automatically retrieve Domain Name Server (DNS) settings. When disabled, you can enter addresses for the Primary and Secondary DNS.
• IPv6 DNS Address. Defines how IPv6 DNS settings are configured on the client. DNS settings supported:
• Automatic – automatically retrieves IPv6 DNS settings.
• Well-known – uses standard IP addresses.
• User defined – enables you to define the primary and secondary DNS addresses.
Packet Data – Proxy
•Proxy server address. Defines a proxy server used by the client to access the network.
•Proxy port. Defines the port number on which the proxy server listens for requests.
The options in this area are unavailable unless you define a Connection Name on the Packet data page.
The options in this area are unavailable unless you define a Connection Name on the Packet data page.
40
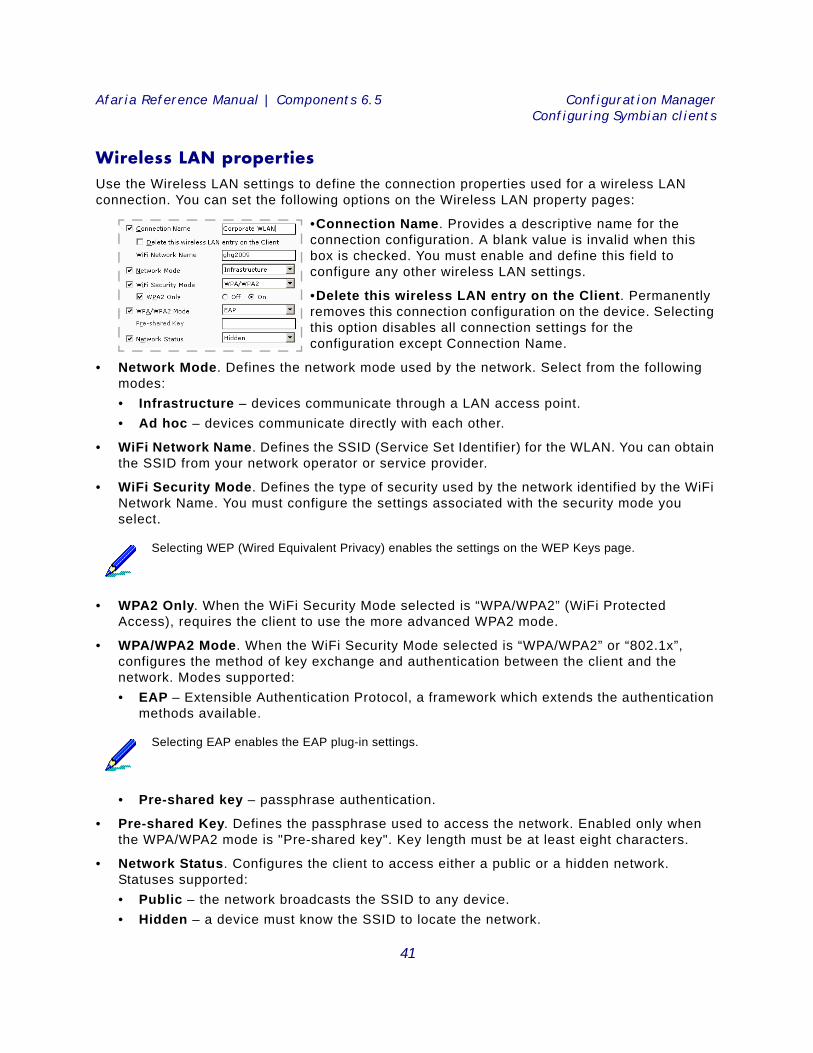
Afaria Reference Manual | Components 6.5 Configuration ManagerConfiguring Symbian clients
Wireless LAN propertiesUse the Wireless LAN settings to define the connection properties used for a wireless LAN connection. You can set the following options on the Wireless LAN property pages:
•Connection Name. Provides a descriptive name for the connection configuration. A blank value is invalid when this box is checked. You must enable and define this field to configure any other wireless LAN settings.
•Delete this wireless LAN entry on the Client. Permanently removes this connection configuration on the device. Selecting this option disables all connection settings for the configuration except Connection Name.
• Network Mode. Defines the network mode used by the network. Select from the following modes:• Infrastructure – devices communicate through a LAN access point.• Ad hoc – devices communicate directly with each other.
• WiFi Network Name. Defines the SSID (Service Set Identifier) for the WLAN. You can obtain the SSID from your network operator or service provider.
• WiFi Security Mode. Defines the type of security used by the network identified by the WiFi Network Name. You must configure the settings associated with the security mode you select.
• WPA2 Only. When the WiFi Security Mode selected is “WPA/WPA2” (WiFi Protected Access), requires the client to use the more advanced WPA2 mode.
• WPA/WPA2 Mode. When the WiFi Security Mode selected is “WPA/WPA2” or “802.1x”, configures the method of key exchange and authentication between the client and the network. Modes supported: • EAP – Extensible Authentication Protocol, a framework which extends the authentication
methods available.
• Pre-shared key – passphrase authentication.
• Pre-shared Key. Defines the passphrase used to access the network. Enabled only when the WPA/WPA2 mode is "Pre-shared key". Key length must be at least eight characters.
• Network Status. Configures the client to access either a public or a hidden network. Statuses supported:• Public – the network broadcasts the SSID to any device.• Hidden – a device must know the SSID to locate the network.
Selecting WEP (Wired Equivalent Privacy) enables the settings on the WEP Keys page.
Selecting EAP enables the EAP plug-in settings.
41
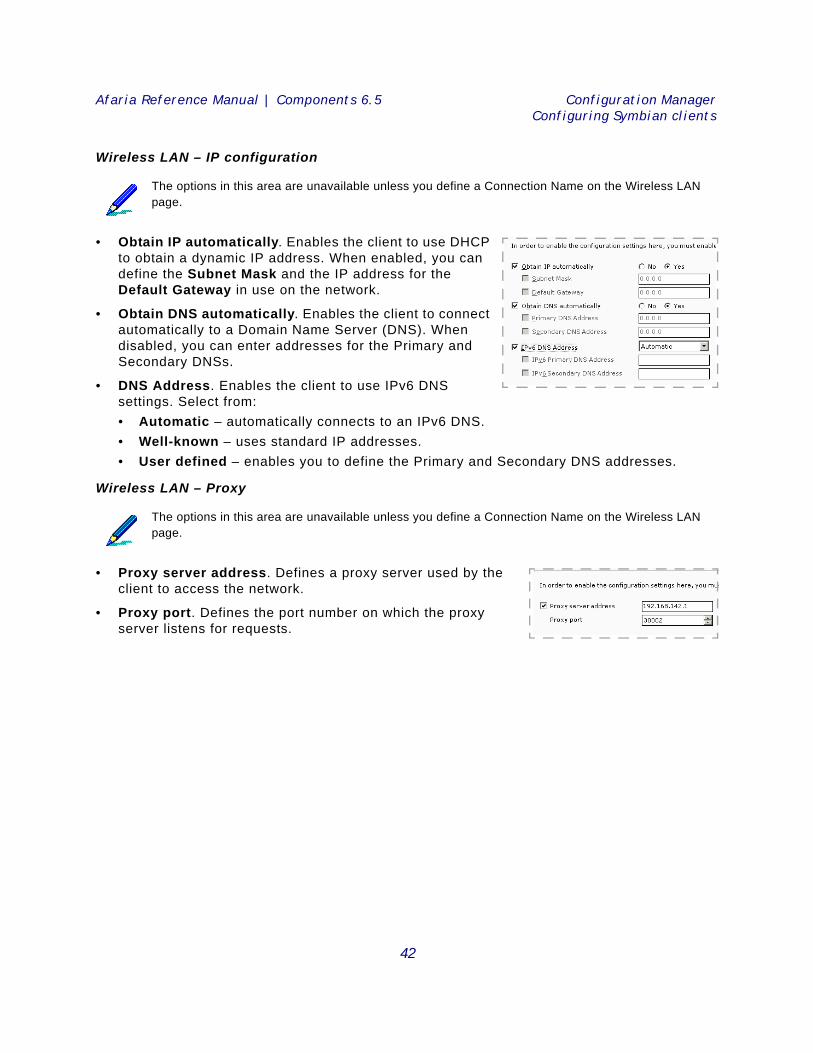
Afaria Reference Manual | Components 6.5 Configuration ManagerConfiguring Symbian clients
Wireless LAN – IP configuration
• Obtain IP automatically. Enables the client to use DHCP to obtain a dynamic IP address. When enabled, you can define the Subnet Mask and the IP address for the Default Gateway in use on the network.
• Obtain DNS automatically. Enables the client to connect automatically to a Domain Name Server (DNS). When disabled, you can enter addresses for the Primary and Secondary DNSs.
• DNS Address. Enables the client to use IPv6 DNS settings. Select from:• Automatic – automatically connects to an IPv6 DNS.• Well-known – uses standard IP addresses.• User defined – enables you to define the Primary and Secondary DNS addresses.
Wireless LAN – Proxy
• Proxy server address. Defines a proxy server used by the client to access the network.
• Proxy port. Defines the port number on which the proxy server listens for requests.
The options in this area are unavailable unless you define a Connection Name on the Wireless LAN page.
The options in this area are unavailable unless you define a Connection Name on the Wireless LAN page.
42
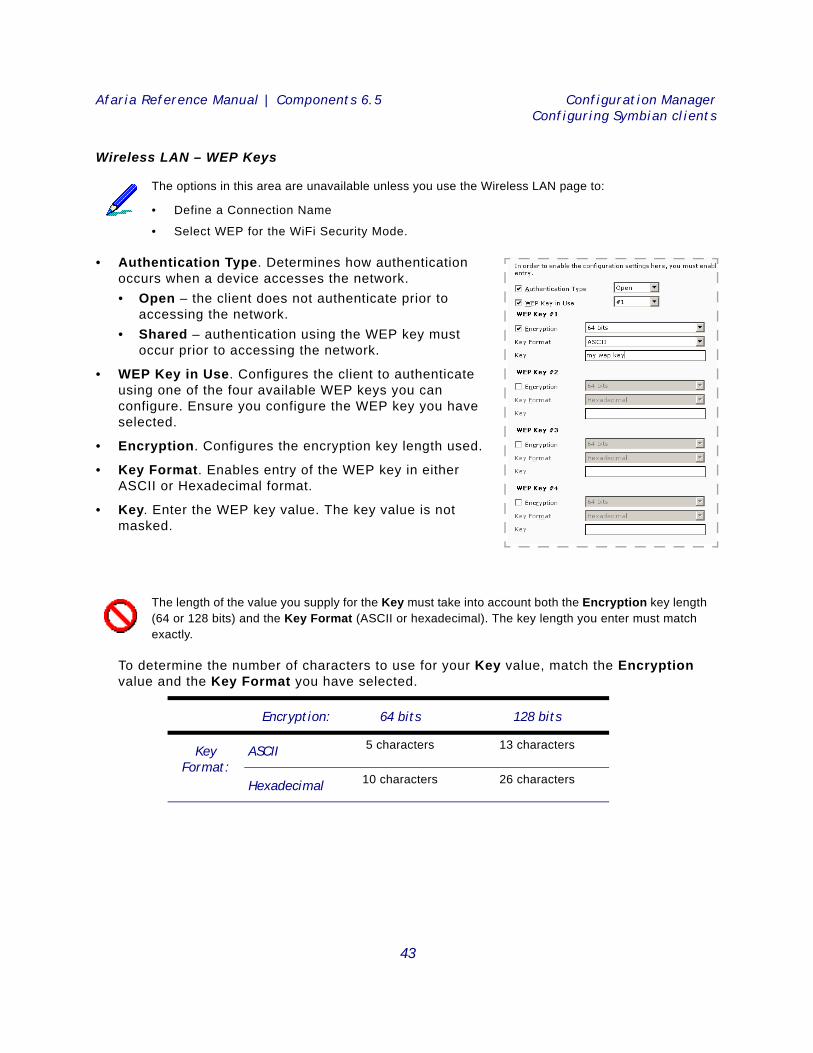
Afaria Reference Manual | Components 6.5 Configuration ManagerConfiguring Symbian clients
Wireless LAN – WEP Keys
• Authentication Type. Determines how authentication occurs when a device accesses the network.• Open – the client does not authenticate prior to
accessing the network.• Shared – authentication using the WEP key must
occur prior to accessing the network.
• WEP Key in Use. Configures the client to authenticate using one of the four available WEP keys you can configure. Ensure you configure the WEP key you have selected.
• Encryption. Configures the encryption key length used.
• Key Format. Enables entry of the WEP key in either ASCII or Hexadecimal format.
• Key. Enter the WEP key value. The key value is not masked.
To determine the number of characters to use for your Key value, match the Encryption value and the Key Format you have selected.
The options in this area are unavailable unless you use the Wireless LAN page to:
• Define a Connection Name
• Select WEP for the WiFi Security Mode.
The length of the value you supply for the Key must take into account both the Encryption key length (64 or 128 bits) and the Key Format (ASCII or hexadecimal). The key length you enter must match exactly.
Encryption: 64 bits 128 bits
Key Format:
ASCII 5 characters 13 characters
Hexadecimal 10 characters 26 characters
43
Afaria Reference Manual | Components 6.5 Configuration ManagerConfiguring Symbian clients
Wireless LAN – EAP plug-ins
EAP protects the security of wireless networks by extending the authentication methods available via the WPA/WPA2 security mode. EAP enables authentication methods such as SIM (Subscriber Identify Module) cards and digital certificates.
Select one or more authentication methods for the configuration. For complete information about the EAP plug-ins supported on your device or required by your environment, refer to your related documentation.
Authentication methods supported are:
• EAP-SIM. Relies on the mobile SIM card and the GSM network for device authentication.
• EAP-AKA (Authentication and Key Agreement). Relies on the USIM (Universal SIM) card and the UMTS (Universal Mobile Telecommunications System) for device authentication.
• EAP-TLS (Transport Layer Security). Relies on a secure channel and certificates for mutual authentication and key exchange between two endpoints.
• EAP-PEAP (Protected EAP). Proprietary implementations provided by both Microsoft and Cisco and based on EAP-TTLS. EAP-PEAP encapsulates additional EAP authentication methods.
• EAP-TTLS (Tunneled Transport Layer Security). Establishes secure communication via a tunnel and relies on a secure channel, certificates for mutual authentication, and key exchange between two endpoints. EAP-TTLS encapsulates additional EAP authentication methods.
• EAP-LEAP (Lightweight EAP). Proprietary implementation provided by Cisco and based on MS-CHAP (Microsoft Challenge-Handshake Authentication Protocol).
The options in this area are unavailable unless you use the Wireless LAN page to:
• Define a Connection Name
• Select WPA/WPA2 or 802.1x for the WiFi Security Mode
• Select EAP for the WPA/WPA2 Mode
44
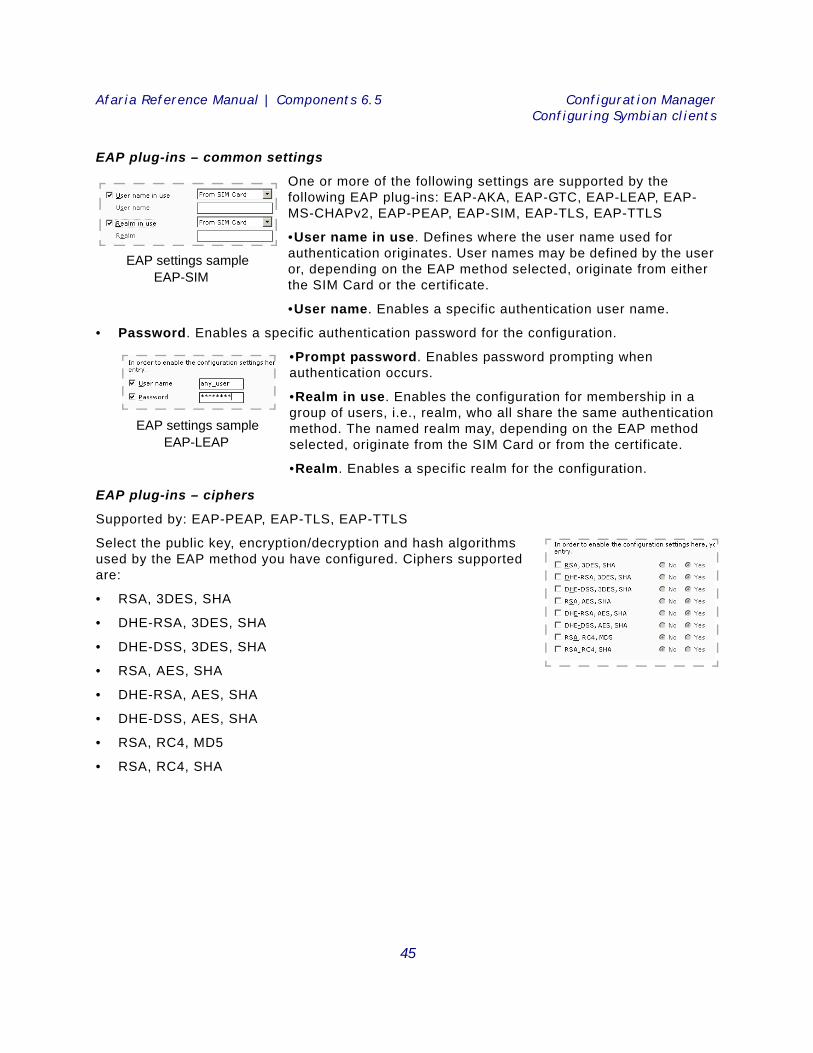
Afaria Reference Manual | Components 6.5 Configuration ManagerConfiguring Symbian clients
EAP plug-ins – common settings
One or more of the following settings are supported by the following EAP plug-ins: EAP-AKA, EAP-GTC, EAP-LEAP, EAP-MS-CHAPv2, EAP-PEAP, EAP-SIM, EAP-TLS, EAP-TTLS
•User name in use. Defines where the user name used for authentication originates. User names may be defined by the user or, depending on the EAP method selected, originate from either the SIM Card or the certificate.
•User name. Enables a specific authentication user name.
• Password. Enables a specific authentication password for the configuration.
•Prompt password. Enables password prompting when authentication occurs.
•Realm in use. Enables the configuration for membership in a group of users, i.e., realm, who all share the same authentication method. The named realm may, depending on the EAP method selected, originate from the SIM Card or from the certificate.
•Realm. Enables a specific realm for the configuration.
EAP plug-ins – ciphers
Supported by: EAP-PEAP, EAP-TLS, EAP-TTLS
Select the public key, encryption/decryption and hash algorithms used by the EAP method you have configured. Ciphers supported are:
• RSA, 3DES, SHA
• DHE-RSA, 3DES, SHA
• DHE-DSS, 3DES, SHA
• RSA, AES, SHA
• DHE-RSA, AES, SHA
• DHE-DSS, AES, SHA
• RSA, RC4, MD5
• RSA, RC4, SHA
EAP settings sampleEAP-SIM
EAP settings sampleEAP-LEAP
45
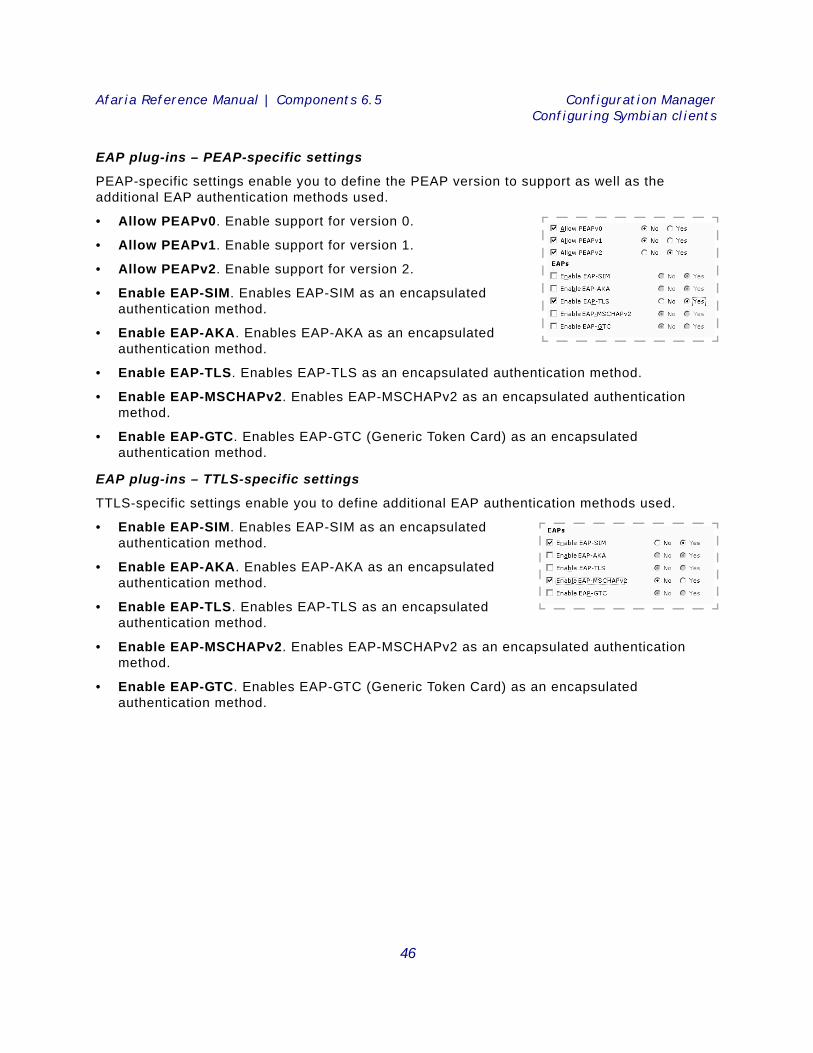
Afaria Reference Manual | Components 6.5 Configuration ManagerConfiguring Symbian clients
EAP plug-ins – PEAP-specific settings
PEAP-specific settings enable you to define the PEAP version to support as well as the additional EAP authentication methods used.
• Allow PEAPv0. Enable support for version 0.
• Allow PEAPv1. Enable support for version 1.
• Allow PEAPv2. Enable support for version 2.
• Enable EAP-SIM. Enables EAP-SIM as an encapsulated authentication method.
• Enable EAP-AKA. Enables EAP-AKA as an encapsulated authentication method.
• Enable EAP-TLS. Enables EAP-TLS as an encapsulated authentication method.
• Enable EAP-MSCHAPv2. Enables EAP-MSCHAPv2 as an encapsulated authentication method.
• Enable EAP-GTC. Enables EAP-GTC (Generic Token Card) as an encapsulated authentication method.
EAP plug-ins – TTLS-specific settings
TTLS-specific settings enable you to define additional EAP authentication methods used.
• Enable EAP-SIM. Enables EAP-SIM as an encapsulated authentication method.
• Enable EAP-AKA. Enables EAP-AKA as an encapsulated authentication method.
• Enable EAP-TLS. Enables EAP-TLS as an encapsulated authentication method.
• Enable EAP-MSCHAPv2. Enables EAP-MSCHAPv2 as an encapsulated authentication method.
• Enable EAP-GTC. Enables EAP-GTC (Generic Token Card) as an encapsulated authentication method.
46
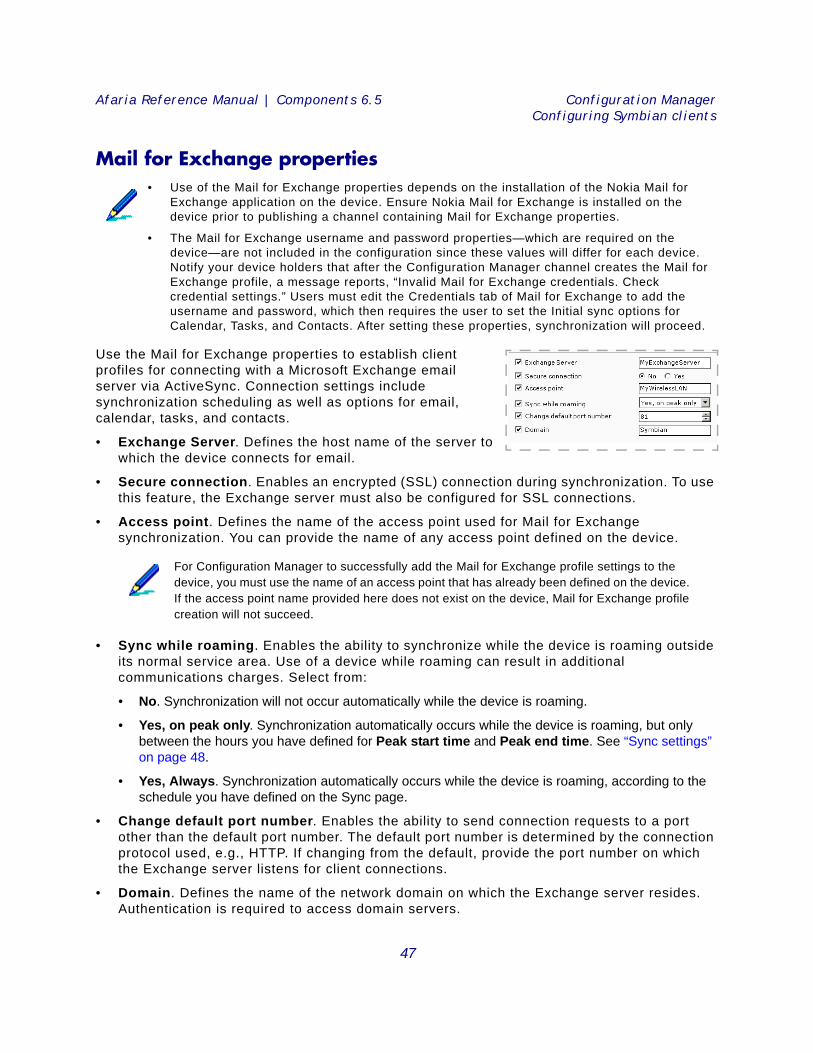
Afaria Reference Manual | Components 6.5 Configuration ManagerConfiguring Symbian clients
Mail for Exchange properties
Use the Mail for Exchange properties to establish client profiles for connecting with a Microsoft Exchange email server via ActiveSync. Connection settings include synchronization scheduling as well as options for email, calendar, tasks, and contacts.
• Exchange Server. Defines the host name of the server to which the device connects for email.
• Secure connection. Enables an encrypted (SSL) connection during synchronization. To use this feature, the Exchange server must also be configured for SSL connections.
• Access point. Defines the name of the access point used for Mail for Exchange synchronization. You can provide the name of any access point defined on the device.
• Sync while roaming. Enables the ability to synchronize while the device is roaming outside its normal service area. Use of a device while roaming can result in additional communications charges. Select from:
• No. Synchronization will not occur automatically while the device is roaming.
• Yes, on peak only. Synchronization automatically occurs while the device is roaming, but only between the hours you have defined for Peak start time and Peak end time. See “Sync settings” on page 48.
• Yes, Always. Synchronization automatically occurs while the device is roaming, according to the schedule you have defined on the Sync page.
• Change default port number. Enables the ability to send connection requests to a port other than the default port number. The default port number is determined by the connection protocol used, e.g., HTTP. If changing from the default, provide the port number on which the Exchange server listens for client connections.
• Domain. Defines the name of the network domain on which the Exchange server resides. Authentication is required to access domain servers.
• Use of the Mail for Exchange properties depends on the installation of the Nokia Mail for Exchange application on the device. Ensure Nokia Mail for Exchange is installed on the device prior to publishing a channel containing Mail for Exchange properties.
• The Mail for Exchange username and password properties—which are required on the device—are not included in the configuration since these values will differ for each device. Notify your device holders that after the Configuration Manager channel creates the Mail for Exchange profile, a message reports, “Invalid Mail for Exchange credentials. Check credential settings.” Users must edit the Credentials tab of Mail for Exchange to add the username and password, which then requires the user to set the Initial sync options for Calendar, Tasks, and Contacts. After setting these properties, synchronization will proceed.
For Configuration Manager to successfully add the Mail for Exchange profile settings to the device, you must use the name of an access point that has already been defined on the device. If the access point name provided here does not exist on the device, Mail for Exchange profile creation will not succeed.
47
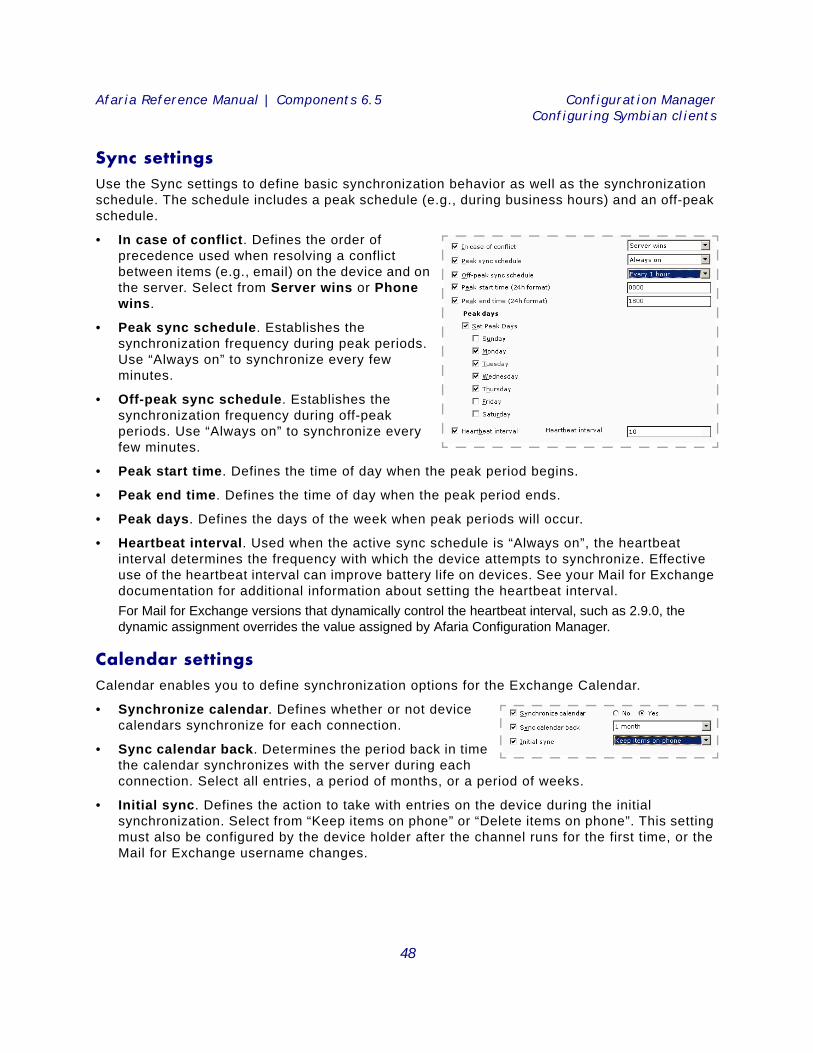
Afaria Reference Manual | Components 6.5 Configuration ManagerConfiguring Symbian clients
Sync settingsUse the Sync settings to define basic synchronization behavior as well as the synchronization schedule. The schedule includes a peak schedule (e.g., during business hours) and an off-peak schedule.
• In case of conflict. Defines the order of precedence used when resolving a conflict between items (e.g., email) on the device and on the server. Select from Server wins or Phone wins.
• Peak sync schedule. Establishes the synchronization frequency during peak periods. Use “Always on” to synchronize every few minutes.
• Off-peak sync schedule. Establishes the synchronization frequency during off-peak periods. Use “Always on” to synchronize every few minutes.
• Peak start time. Defines the time of day when the peak period begins.
• Peak end time. Defines the time of day when the peak period ends.
• Peak days. Defines the days of the week when peak periods will occur.
• Heartbeat interval. Used when the active sync schedule is “Always on”, the heartbeat interval determines the frequency with which the device attempts to synchronize. Effective use of the heartbeat interval can improve battery life on devices. See your Mail for Exchange documentation for additional information about setting the heartbeat interval.For Mail for Exchange versions that dynamically control the heartbeat interval, such as 2.9.0, the dynamic assignment overrides the value assigned by Afaria Configuration Manager.
Calendar settingsCalendar enables you to define synchronization options for the Exchange Calendar.
• Synchronize calendar. Defines whether or not device calendars synchronize for each connection.
• Sync calendar back. Determines the period back in time the calendar synchronizes with the server during each connection. Select all entries, a period of months, or a period of weeks.
• Initial sync. Defines the action to take with entries on the device during the initial synchronization. Select from “Keep items on phone” or “Delete items on phone”. This setting must also be configured by the device holder after the channel runs for the first time, or the Mail for Exchange username changes.
48
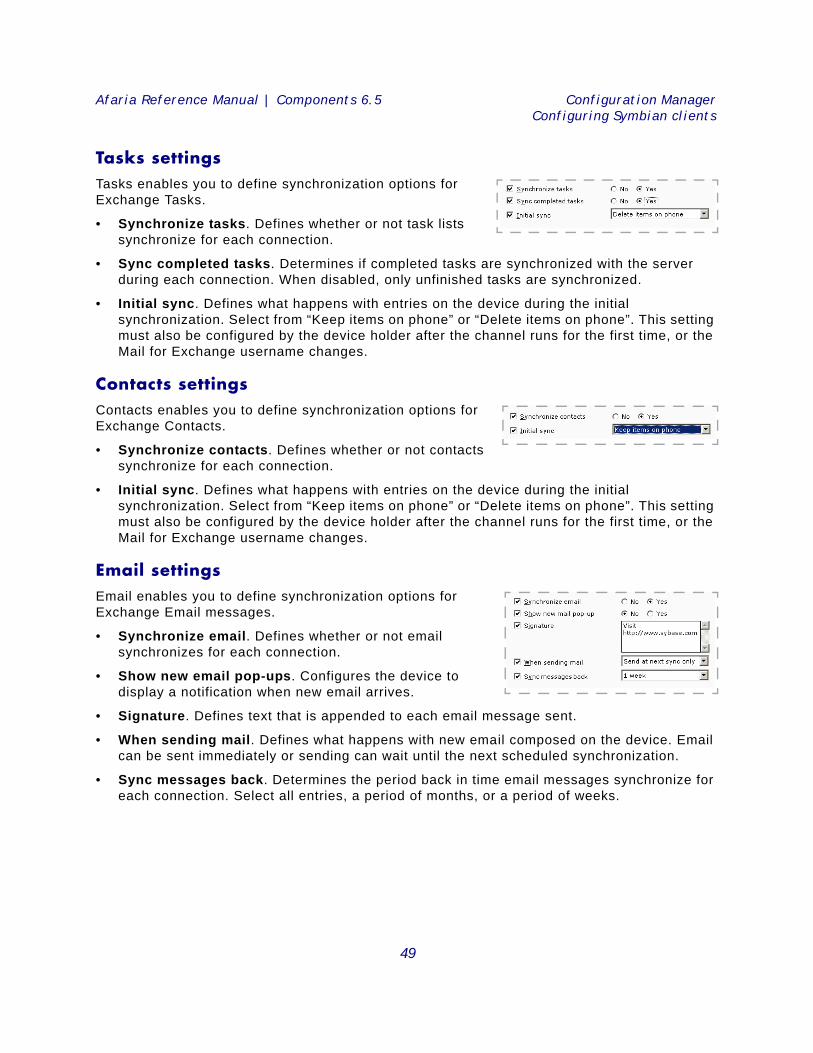
Afaria Reference Manual | Components 6.5 Configuration ManagerConfiguring Symbian clients
Tasks settingsTasks enables you to define synchronization options for Exchange Tasks.
• Synchronize tasks. Defines whether or not task lists synchronize for each connection.
• Sync completed tasks. Determines if completed tasks are synchronized with the server during each connection. When disabled, only unfinished tasks are synchronized.
• Initial sync. Defines what happens with entries on the device during the initial synchronization. Select from “Keep items on phone” or “Delete items on phone”. This setting must also be configured by the device holder after the channel runs for the first time, or the Mail for Exchange username changes.
Contacts settingsContacts enables you to define synchronization options for Exchange Contacts.
• Synchronize contacts. Defines whether or not contacts synchronize for each connection.
• Initial sync. Defines what happens with entries on the device during the initial synchronization. Select from “Keep items on phone” or “Delete items on phone”. This setting must also be configured by the device holder after the channel runs for the first time, or the Mail for Exchange username changes.
Email settings Email enables you to define synchronization options for Exchange Email messages.
• Synchronize email. Defines whether or not email synchronizes for each connection.
• Show new email pop-ups. Configures the device to display a notification when new email arrives.
• Signature. Defines text that is appended to each email message sent.
• When sending mail. Defines what happens with new email composed on the device. Email can be sent immediately or sending can wait until the next scheduled synchronization.
• Sync messages back. Determines the period back in time email messages synchronize for each connection. Select all entries, a period of months, or a period of weeks.
49
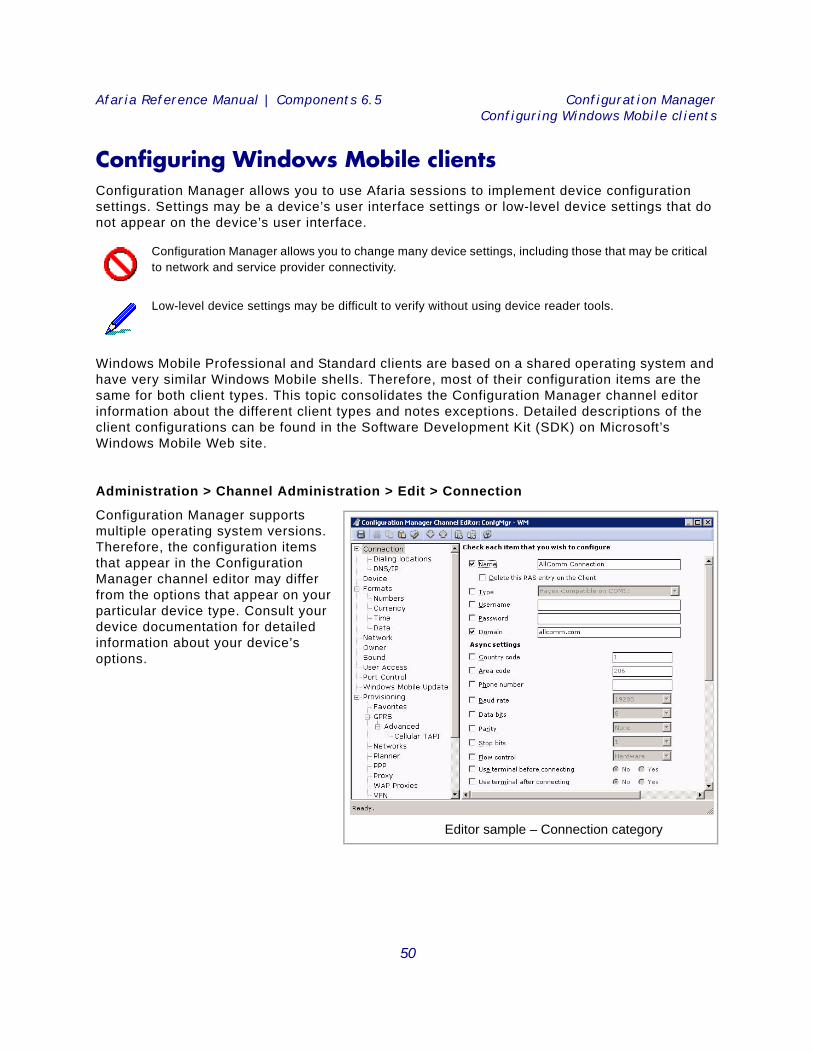
Afaria Reference Manual | Components 6.5 Configuration ManagerConfiguring Windows Mobile clients
Configuring Windows Mobile clientsConfiguration Manager allows you to use Afaria sessions to implement device configuration settings. Settings may be a device’s user interface settings or low-level device settings that do not appear on the device’s user interface.
Windows Mobile Professional and Standard clients are based on a shared operating system and have very similar Windows Mobile shells. Therefore, most of their configuration items are the same for both client types. This topic consolidates the Configuration Manager channel editor information about the different client types and notes exceptions. Detailed descriptions of the client configurations can be found in the Software Development Kit (SDK) on Microsoft’s Windows Mobile Web site.
Administration > Channel Administration > Edit > Connection
Configuration Manager supports multiple operating system versions. Therefore, the configuration items that appear in the Configuration Manager channel editor may differ from the options that appear on your particular device type. Consult your device documentation for detailed information about your device’s options.
Configuration Manager allows you to change many device settings, including those that may be critical to network and service provider connectivity.
Low-level device settings may be difficult to verify without using device reader tools.
Editor sample – Connection category
50
Afaria Reference Manual | Components 6.5 Configuration ManagerConfiguring Windows Mobile clients
About configuration property typesDevice properties fall into the following categories:
• Configuration – Sets device options when the device runs the Configuration Manager channel. Subsequent to the channel completing device configuration, the device holder may be able to change settings established by the channel.
• Configuration and enforcement – Sets device options when the device runs the Configuration Manager channel, and additionally prevents the device holder from changing the settings. Enforced settings enable, limit, or disable key device features at all times.Enforced settings apply only to a subset of configuration properties. Support of enforced settings also depends on the version of Windows Mobile used. Refer to the following topics to learn more about enforced settings:
• “Port Control page” on page 59
• “Windows Mobile Update page” on page 63
51
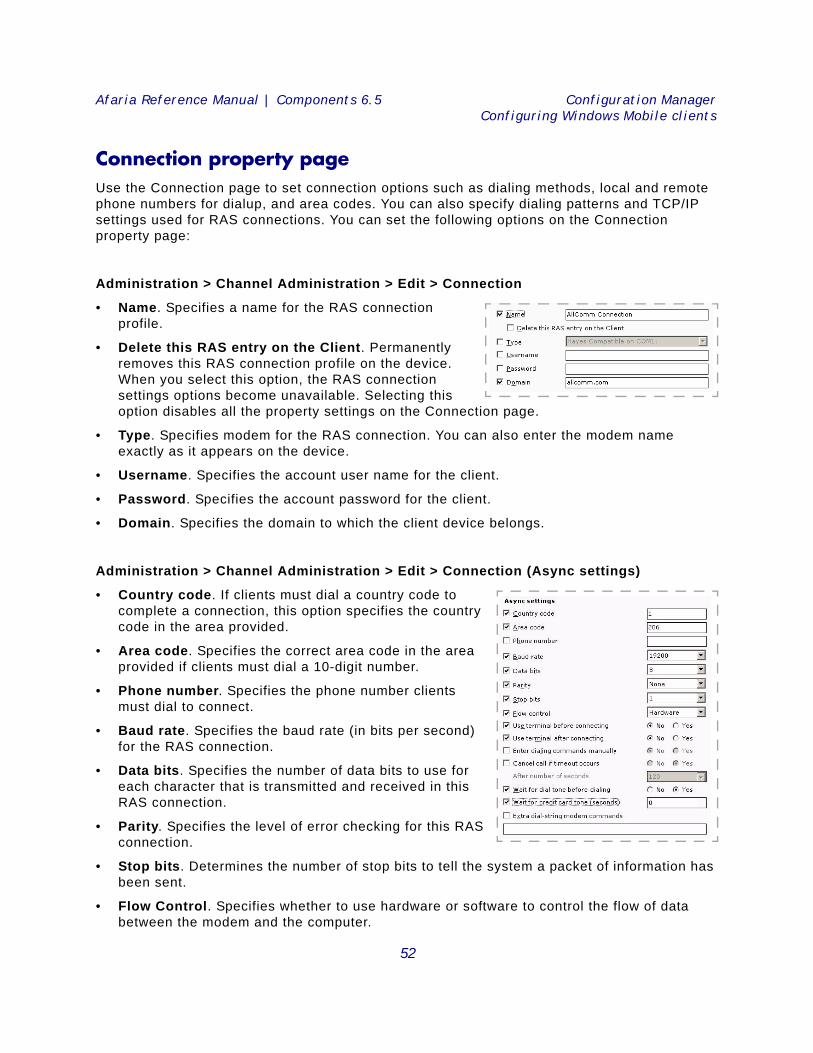
Afaria Reference Manual | Components 6.5 Configuration ManagerConfiguring Windows Mobile clients
Connection property page Use the Connection page to set connection options such as dialing methods, local and remote phone numbers for dialup, and area codes. You can also specify dialing patterns and TCP/IP settings used for RAS connections. You can set the following options on the Connection property page:
Administration > Channel Administration > Edit > Connection
• Name. Specifies a name for the RAS connection profile.
• Delete this RAS entry on the Client. Permanently removes this RAS connection profile on the device. When you select this option, the RAS connection settings options become unavailable. Selecting this option disables all the property settings on the Connection page.
• Type. Specifies modem for the RAS connection. You can also enter the modem name exactly as it appears on the device.
• Username. Specifies the account user name for the client.
• Password. Specifies the account password for the client.
• Domain. Specifies the domain to which the client device belongs.
Administration > Channel Administration > Edit > Connection (Async settings)
• Country code. If clients must dial a country code to complete a connection, this option specifies the country code in the area provided.
• Area code. Specifies the correct area code in the area provided if clients must dial a 10-digit number.
• Phone number. Specifies the phone number clients must dial to connect.
• Baud rate. Specifies the baud rate (in bits per second) for the RAS connection.
• Data bits. Specifies the number of data bits to use for each character that is transmitted and received in this RAS connection.
• Parity. Specifies the level of error checking for this RAS connection.
• Stop bits. Determines the number of stop bits to tell the system a packet of information has been sent.
• Flow Control. Specifies whether to use hardware or software to control the flow of data between the modem and the computer.
52
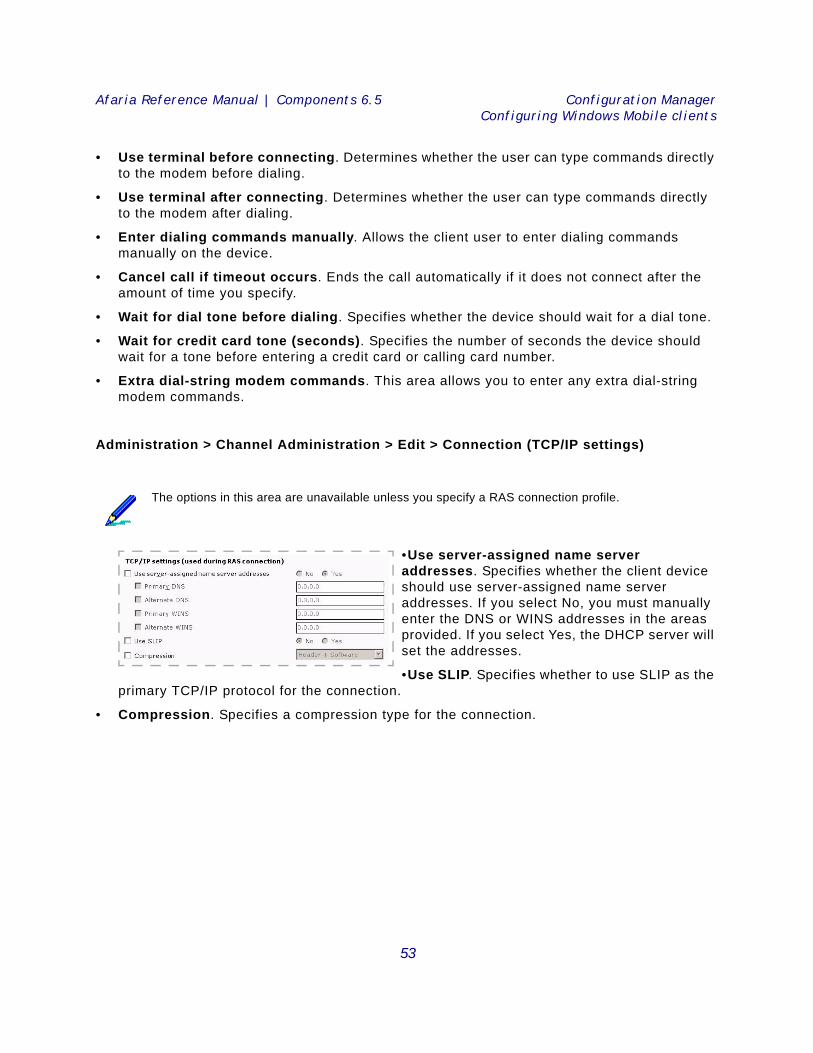
Afaria Reference Manual | Components 6.5 Configuration ManagerConfiguring Windows Mobile clients
• Use terminal before connecting. Determines whether the user can type commands directly to the modem before dialing.
• Use terminal after connecting. Determines whether the user can type commands directly to the modem after dialing.
• Enter dialing commands manually. Allows the client user to enter dialing commands manually on the device.
• Cancel call if timeout occurs. Ends the call automatically if it does not connect after the amount of time you specify.
• Wait for dial tone before dialing. Specifies whether the device should wait for a dial tone.
• Wait for credit card tone (seconds). Specifies the number of seconds the device should wait for a tone before entering a credit card or calling card number.
• Extra dial-string modem commands. This area allows you to enter any extra dial-string modem commands.
Administration > Channel Administration > Edit > Connection (TCP/IP settings)
•Use server-assigned name server addresses. Specifies whether the client device should use server-assigned name server addresses. If you select No, you must manually enter the DNS or WINS addresses in the areas provided. If you select Yes, the DHCP server will set the addresses.
•Use SLIP. Specifies whether to use SLIP as the primary TCP/IP protocol for the connection.
• Compression. Specifies a compression type for the connection.
The options in this area are unavailable unless you specify a RAS connection profile.
53

Afaria Reference Manual | Components 6.5 Configuration ManagerConfiguring Windows Mobile clients
Dialing locations page
Administration > Channel Administration > Edit > Connection > Dialing locations
You can set the following options on the Dialing locations page:
• When dialing from. Enables you to create a profile for a specific location. You can choose a location from the list, or create your own locations, such as “Local” or “Remote.” When you select this option, all the remaining options become available.
• Set as default dialing location. Sets the location you specify as the default on the device.
• Delete this dialing location on the Client. Permanently removes the dialing location profile from the device. When you delete a dialing location profile, the remaining options become unavailable.
• Local area code. Specifies the correct area code in the area provided, if clients must dial a 10-digit number.
• Local country code. Specifies the country code in the area provided if clients must dial a country code to complete a connection.
• Dialing method. Specifies the correct dialing mode, Tone or Pulse.
• Disable call waiting. You can disable call waiting on the device. If you disable call waiting, select or enter the string that disables this feature on the device.
• Local dial pattern. Specifies a dialing pattern for local calls. For instance, if clients must dial 9 and then a 10-digit number, the local dial pattern would be 9,FG.
• Long distance dial pattern. Specifies a dialing pattern for long-distance calls. For instance, if clients can dial a long distance number directly, the pattern would be 1FG.
• International dial pattern. Specifies a dialing pattern for international calls. For instance, if clients must dial 9 and then the number, the pattern would be 9,011, EFG.
DNS/IP page
Administration > Channel Administration > Edit > Connection > DNS/IP
You can use the DNS/IP page to configure network adapter, DNS, IP, or WINS settings. The IP addresses used on this page are for the network interface on the client. For dial-up settings, use the Connection page.
• Network Adapter. Select the network adapter for your device from the list or type in a custom
54

Afaria Reference Manual | Components 6.5 Configuration ManagerConfiguring Windows Mobile clients
adapter name. The custom name must match either that adapter type’s display name or the exact adapter name in the registry.
• Obtain IP information. If you select to obtain IP information automatically, the client device will use DHCP to obtain the IP address. If you select to obtain IP information manually, the Subnet Mask and Gateway options become available. You can select either or both of these options to help the TCP/IP layer make a decision about when to forward requests to computers outside the local network.
• Primary/Secondary DNS. Use this option to resolve any host names into IP addresses within the network.
• Primary/Secondary WINS. Use this option to resolve NetBIOS names to IP addresses within the network.
Device property page
Administration > Channel Administration > Edit > Device
On the Device page, you can set device options such as the device description, desktop connection settings, and device power settings. You can enter a unique description for the client device, which may help you differentiate between devices and/or users.
•Allow connection to desktop PC when attached enables the client device to connect through a companion PC. You can select a
connection method from the Connect to desktop PC using drop-down list, or enter the connection name exactly as it is listed on the device.
• On battery power, suspend after idle for. Specifies the number of minutes a device can remain idle before suspending battery power.
• Suspend while on external power. If you enable this option, you can determine the number of minutes after which the device should suspend external power.
If you provide a custom network adapter name, it must match either that adapter type's display name (example: Socket LP-E Driver) or the exact adapter name in the registry (example: SOCKETLPE1).
Setting a manual IP does not set the specific IP address on a device. Set up separate channels for each device needing a manual IP address assigned.
If the IP information is obtained automatically, the primary and secondary DNS and WINS settings are applied as alternate DNS/INS addresses after those obtained through DHCP.
55
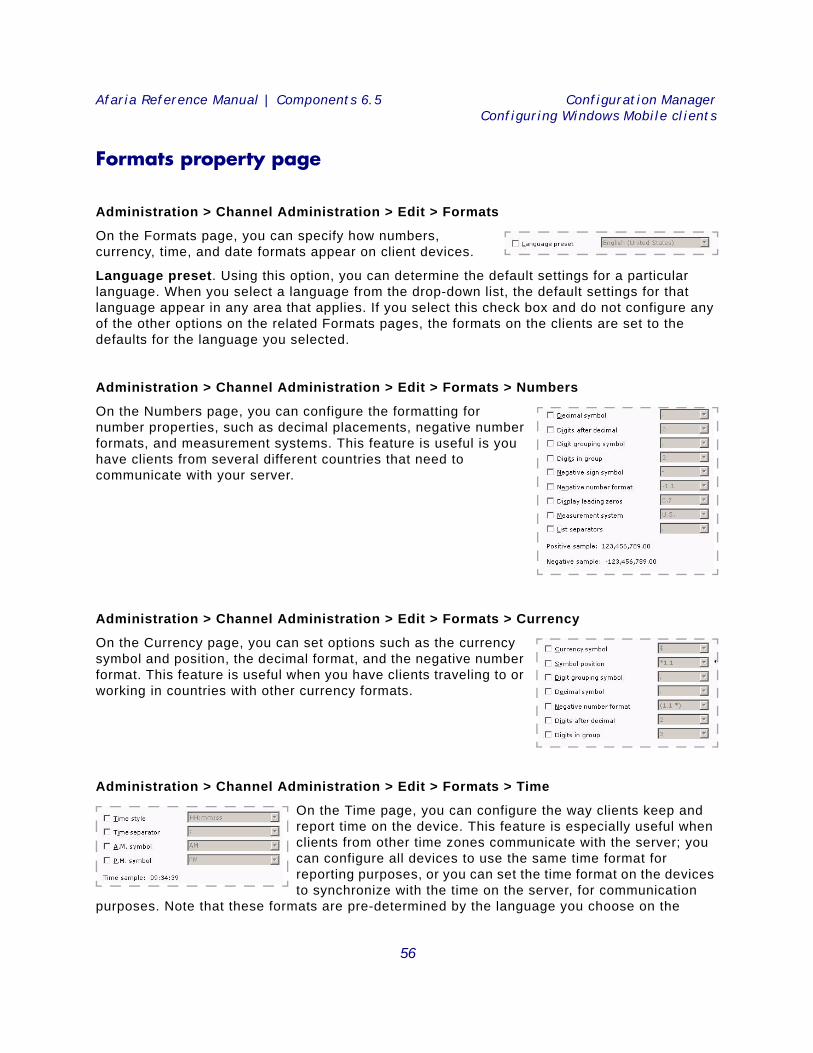
Afaria Reference Manual | Components 6.5 Configuration ManagerConfiguring Windows Mobile clients
Formats property page
Administration > Channel Administration > Edit > Formats
On the Formats page, you can specify how numbers, currency, time, and date formats appear on client devices.
Language preset. Using this option, you can determine the default settings for a particular language. When you select a language from the drop-down list, the default settings for that language appear in any area that applies. If you select this check box and do not configure any of the other options on the related Formats pages, the formats on the clients are set to the defaults for the language you selected.
Administration > Channel Administration > Edit > Formats > Numbers
On the Numbers page, you can configure the formatting for number properties, such as decimal placements, negative number formats, and measurement systems. This feature is useful is you have clients from several different countries that need to communicate with your server.
Administration > Channel Administration > Edit > Formats > Currency
On the Currency page, you can set options such as the currency symbol and position, the decimal format, and the negative number format. This feature is useful when you have clients traveling to or working in countries with other currency formats.
Administration > Channel Administration > Edit > Formats > Time
On the Time page, you can configure the way clients keep and report time on the device. This feature is especially useful when clients from other time zones communicate with the server; you can configure all devices to use the same time format for reporting purposes, or you can set the time format on the devices to synchronize with the time on the server, for communication
purposes. Note that these formats are pre-determined by the language you choose on the
56
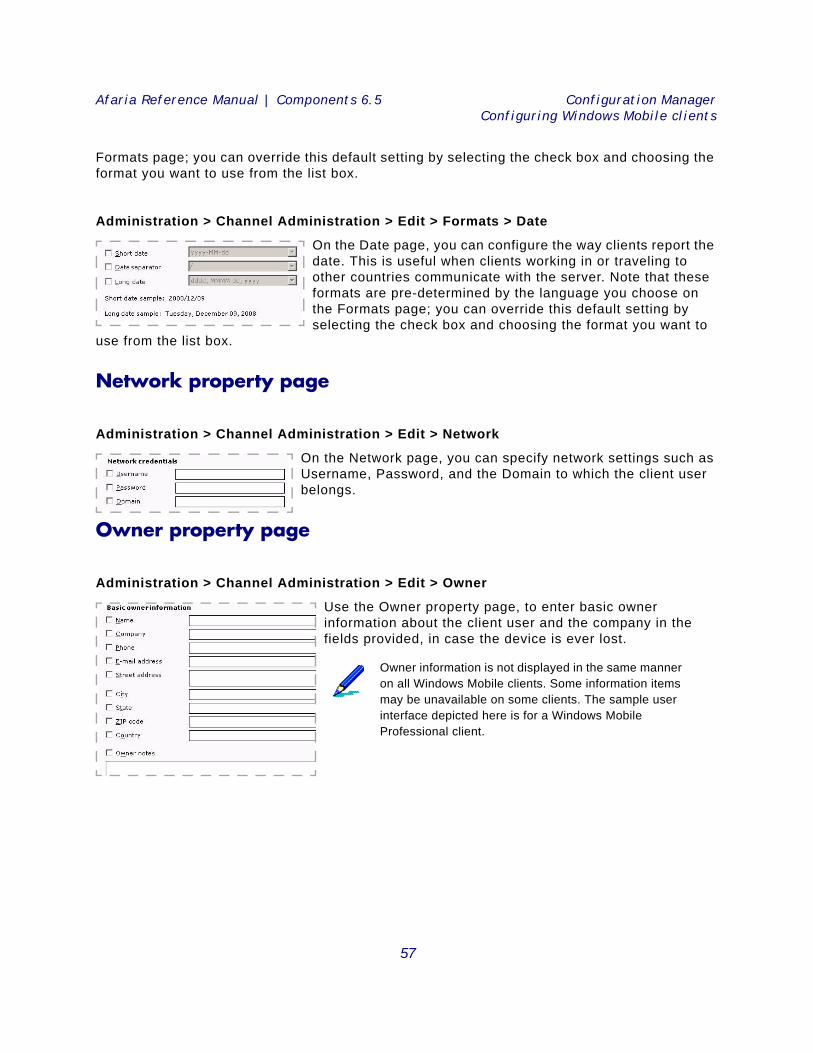
Afaria Reference Manual | Components 6.5 Configuration ManagerConfiguring Windows Mobile clients
Formats page; you can override this default setting by selecting the check box and choosing the format you want to use from the list box.
Administration > Channel Administration > Edit > Formats > Date
On the Date page, you can configure the way clients report the date. This is useful when clients working in or traveling to other countries communicate with the server. Note that these formats are pre-determined by the language you choose on the Formats page; you can override this default setting by selecting the check box and choosing the format you want to
use from the list box.
Network property page
Administration > Channel Administration > Edit > Network
On the Network page, you can specify network settings such as Username, Password, and the Domain to which the client user belongs.
Owner property page
Administration > Channel Administration > Edit > Owner
Use the Owner property page, to enter basic owner information about the client user and the company in the fields provided, in case the device is ever lost.
Owner information is not displayed in the same manner on all Windows Mobile clients. Some information items may be unavailable on some clients. The sample user interface depicted here is for a Windows Mobile Professional client.
57
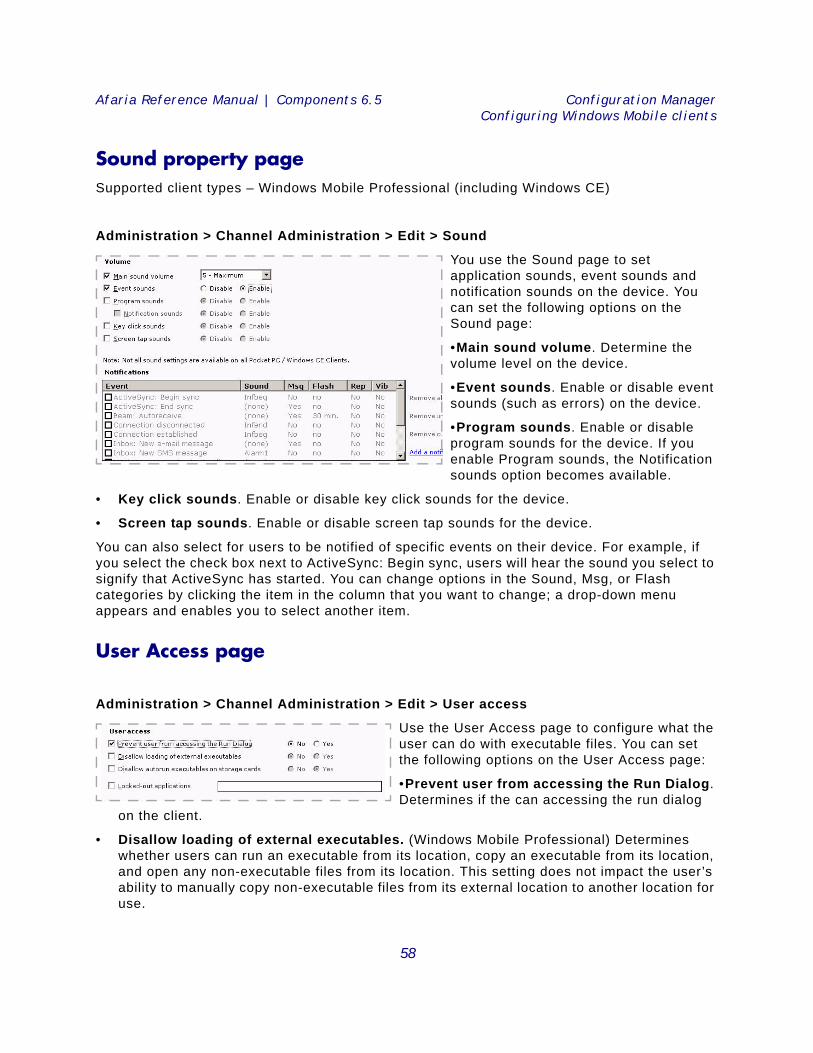
Afaria Reference Manual | Components 6.5 Configuration ManagerConfiguring Windows Mobile clients
Sound property pageSupported client types – Windows Mobile Professional (including Windows CE)
Administration > Channel Administration > Edit > Sound
You use the Sound page to set application sounds, event sounds and notification sounds on the device. You can set the following options on the Sound page:
•Main sound volume. Determine the volume level on the device.
•Event sounds. Enable or disable event sounds (such as errors) on the device.
•Program sounds. Enable or disable program sounds for the device. If you enable Program sounds, the Notification sounds option becomes available.
• Key click sounds. Enable or disable key click sounds for the device.
• Screen tap sounds. Enable or disable screen tap sounds for the device.
You can also select for users to be notified of specific events on their device. For example, if you select the check box next to ActiveSync: Begin sync, users will hear the sound you select to signify that ActiveSync has started. You can change options in the Sound, Msg, or Flash categories by clicking the item in the column that you want to change; a drop-down menu appears and enables you to select another item.
User Access page
Administration > Channel Administration > Edit > User access
Use the User Access page to configure what the user can do with executable files. You can set the following options on the User Access page:
•Prevent user from accessing the Run Dialog. Determines if the can accessing the run dialog
on the client.
• Disallow loading of external executables. (Windows Mobile Professional) Determines whether users can run an executable from its location, copy an executable from its location, and open any non-executable files from its location. This setting does not impact the user’s ability to manually copy non-executable files from its external location to another location for use.
58

Afaria Reference Manual | Components 6.5 Configuration ManagerConfiguring Windows Mobile clients
• Disallow autorun executables on storage cards. If an “autorun.exe” file is on the storage card, this setting determines whether it runs when the card is inserted. This setting does not impact the user’s ability to manually run executables or open non-executable files on the card.
• Locked-out applications. Select the Locked-out applications check box and type the names of the applications (ex: game1.exe) that you want to prevent from running on the client. Use a semicolon (;) to delimit multiple application names. This value overwrites the existing Locked-out Applications value on the client, rather than creating a cumulative list.
• Locked-out applications. Select the Locked-out applications check box and type the names of the applications (ex: game1.exe) that you want to prevent from running on the client. Use a semicolon (;) to delimit multiple application names. This value overwrites the existing Locked-out Applications value on the client, rather than creating a cumulative list.
Port Control pageSupported clients – Windows Mobile Professional 5.0 and later, Windows Mobile Standard
Port control provides the ability to enable, limit, or disable hardware port usage on devices. By regulating the use of hardware ports, you can enforce the availability of key device features, such as Bluetooth connectivity, data transfer methods, and the use of external data cards.
Attempting to use a disabled feature on a device results in a notification message informing the device holder that the system administrator has disabled the feature. However, attempting to use a disabled camera or infrared (IR) port does not generate a notification message.
Administration > Channel Administration > Edit > Port Control
Use the following settings to determine port control behavior:
• Enable Port/Device Control. Enables the configuration and enforcement of port control options.
• Show disabled device list. Provides the device holder with a list of device features you have disabled. The disabled list displays during a Configuration Manager channel update and at device startup. The list includes only the disabled features that are installed on a
• A single application may have different ways of being invoked. For example, you may be able to launch a calendar application by pressing a specific button on a handheld device or by navigating to the program file on the device's file system and running the file. If these different user launch points launch different processes or applications, then define each launching application or process in your policy to effectively prevent an application from running.
• You can use a bogus value to effectively remove the current Locked-out Applications list from the client, without causing an adverse effect. Clearing the value or clearing the check box does not send a value to the client and therefore, does not have the effect of removing the current Locked-out applications list from the client.
“Enforce” means the device holder is not able to change the settings you establish.
59
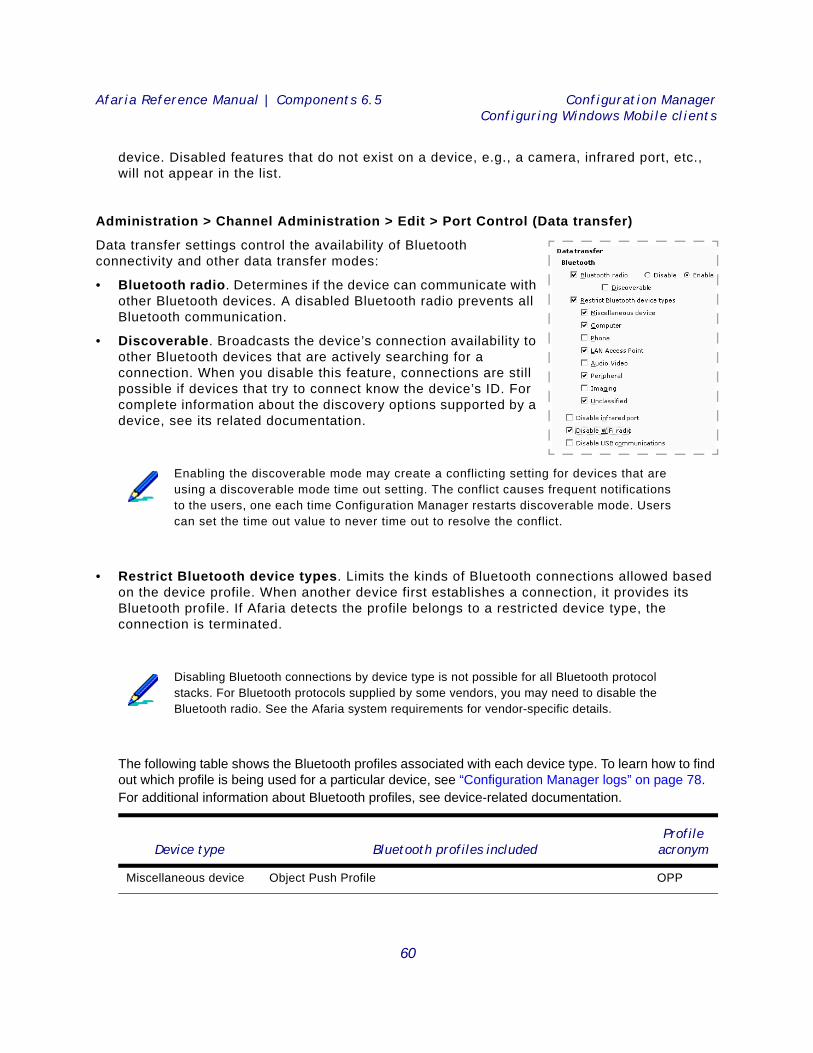
Afaria Reference Manual | Components 6.5 Configuration ManagerConfiguring Windows Mobile clients
device. Disabled features that do not exist on a device, e.g., a camera, infrared port, etc., will not appear in the list.
Administration > Channel Administration > Edit > Port Control (Data transfer)
Data transfer settings control the availability of Bluetooth connectivity and other data transfer modes:
• Bluetooth radio. Determines if the device can communicate with other Bluetooth devices. A disabled Bluetooth radio prevents all Bluetooth communication.
• Discoverable. Broadcasts the device’s connection availability to other Bluetooth devices that are actively searching for a connection. When you disable this feature, connections are still possible if devices that try to connect know the device’s ID. For complete information about the discovery options supported by a device, see its related documentation.
• Restrict Bluetooth device types. Limits the kinds of Bluetooth connections allowed based on the device profile. When another device first establishes a connection, it provides its Bluetooth profile. If Afaria detects the profile belongs to a restricted device type, the connection is terminated.
The following table shows the Bluetooth profiles associated with each device type. To learn how to find out which profile is being used for a particular device, see “Configuration Manager logs” on page 78. For additional information about Bluetooth profiles, see device-related documentation.
Enabling the discoverable mode may create a conflicting setting for devices that are using a discoverable mode time out setting. The conflict causes frequent notifications to the users, one each time Configuration Manager restarts discoverable mode. Users can set the time out value to never time out to resolve the conflict.
Disabling Bluetooth connections by device type is not possible for all Bluetooth protocol stacks. For Bluetooth protocols supplied by some vendors, you may need to disable the Bluetooth radio. See the Afaria system requirements for vendor-specific details.
Device type Bluetooth profiles includedProfile
acronym
Miscellaneous device Object Push Profile OPP
60
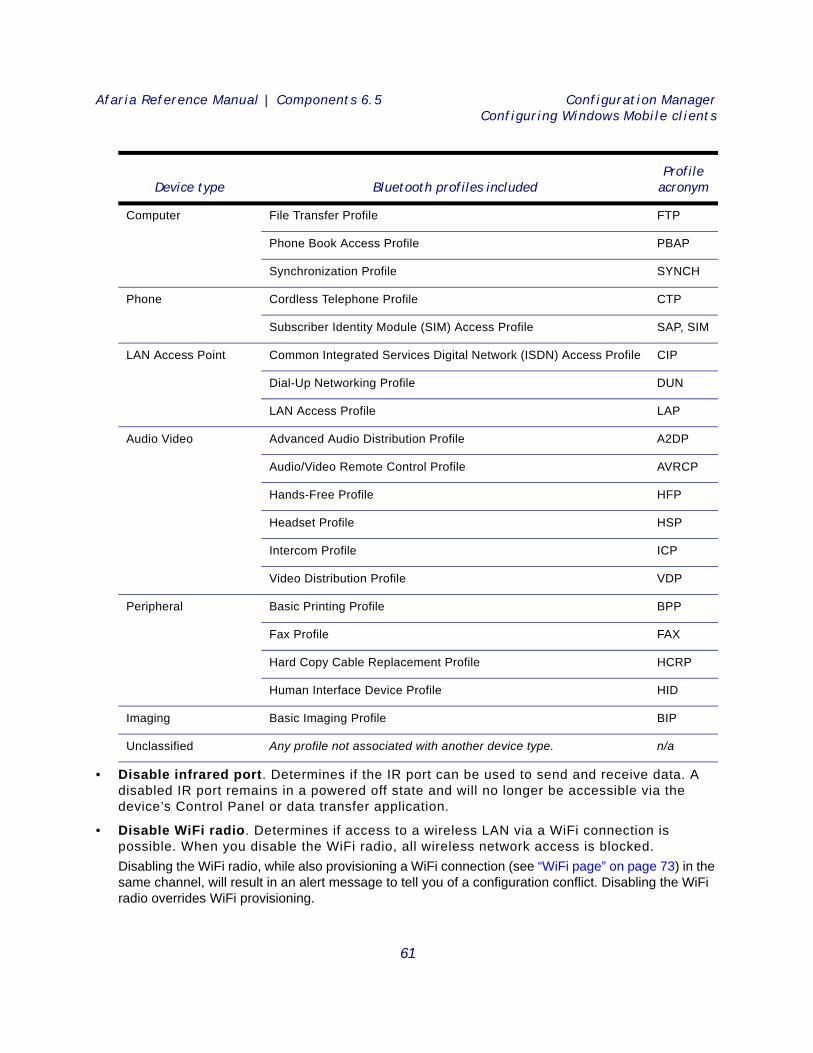
Afaria Reference Manual | Components 6.5 Configuration ManagerConfiguring Windows Mobile clients
• Disable infrared port. Determines if the IR port can be used to send and receive data. A disabled IR port remains in a powered off state and will no longer be accessible via the device’s Control Panel or data transfer application.
• Disable WiFi radio. Determines if access to a wireless LAN via a WiFi connection is possible. When you disable the WiFi radio, all wireless network access is blocked.Disabling the WiFi radio, while also provisioning a WiFi connection (see “WiFi page” on page 73) in the same channel, will result in an alert message to tell you of a configuration conflict. Disabling the WiFi radio overrides WiFi provisioning.
Computer File Transfer Profile FTP
Phone Book Access Profile PBAP
Synchronization Profile SYNCH
Phone Cordless Telephone Profile CTP
Subscriber Identity Module (SIM) Access Profile SAP, SIM
LAN Access Point Common Integrated Services Digital Network (ISDN) Access Profile CIP
Dial-Up Networking Profile DUN
LAN Access Profile LAP
Audio Video Advanced Audio Distribution Profile A2DP
Audio/Video Remote Control Profile AVRCP
Hands-Free Profile HFP
Headset Profile HSP
Intercom Profile ICP
Video Distribution Profile VDP
Peripheral Basic Printing Profile BPP
Fax Profile FAX
Hard Copy Cable Replacement Profile HCRP
Human Interface Device Profile HID
Imaging Basic Imaging Profile BIP
Unclassified Any profile not associated with another device type. n/a
Device type Bluetooth profiles includedProfile
acronym
61
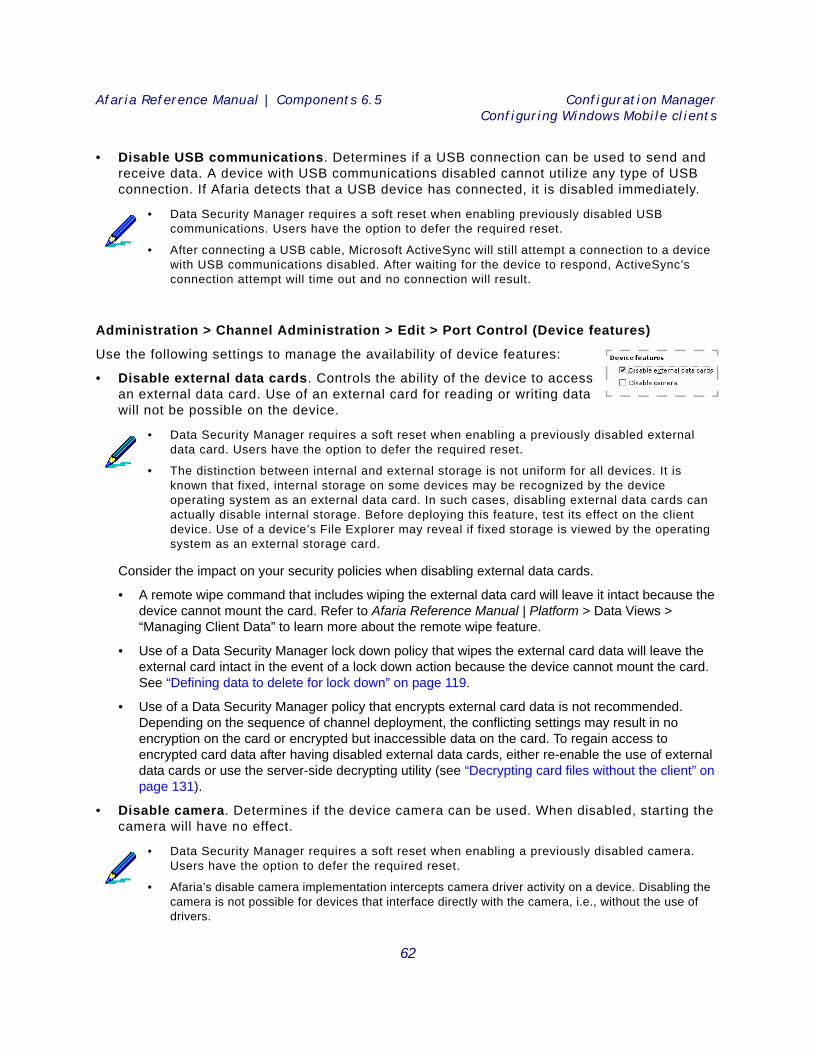
Afaria Reference Manual | Components 6.5 Configuration ManagerConfiguring Windows Mobile clients
• Disable USB communications. Determines if a USB connection can be used to send and receive data. A device with USB communications disabled cannot utilize any type of USB connection. If Afaria detects that a USB device has connected, it is disabled immediately.
Administration > Channel Administration > Edit > Port Control (Device features)
Use the following settings to manage the availability of device features:
• Disable external data cards. Controls the ability of the device to access an external data card. Use of an external card for reading or writing data will not be possible on the device.
Consider the impact on your security policies when disabling external data cards.
• A remote wipe command that includes wiping the external data card will leave it intact because the device cannot mount the card. Refer to Afaria Reference Manual | Platform > Data Views > “Managing Client Data” to learn more about the remote wipe feature.
• Use of a Data Security Manager lock down policy that wipes the external card data will leave the external card intact in the event of a lock down action because the device cannot mount the card. See “Defining data to delete for lock down” on page 119.
• Use of a Data Security Manager policy that encrypts external card data is not recommended. Depending on the sequence of channel deployment, the conflicting settings may result in no encryption on the card or encrypted but inaccessible data on the card. To regain access to encrypted card data after having disabled external data cards, either re-enable the use of external data cards or use the server-side decrypting utility (see “Decrypting card files without the client” on page 131).
• Disable camera. Determines if the device camera can be used. When disabled, starting the camera will have no effect.
• Data Security Manager requires a soft reset when enabling previously disabled USB communications. Users have the option to defer the required reset.
• After connecting a USB cable, Microsoft ActiveSync will still attempt a connection to a device with USB communications disabled. After waiting for the device to respond, ActiveSync’s connection attempt will time out and no connection will result.
• Data Security Manager requires a soft reset when enabling a previously disabled external data card. Users have the option to defer the required reset.
• The distinction between internal and external storage is not uniform for all devices. It is known that fixed, internal storage on some devices may be recognized by the device operating system as an external data card. In such cases, disabling external data cards can actually disable internal storage. Before deploying this feature, test its effect on the client device. Use of a device’s File Explorer may reveal if fixed storage is viewed by the operating system as an external storage card.
• Data Security Manager requires a soft reset when enabling a previously disabled camera. Users have the option to defer the required reset.
• Afaria’s disable camera implementation intercepts camera driver activity on a device. Disabling the camera is not possible for devices that interface directly with the camera, i.e., without the use of drivers.
62
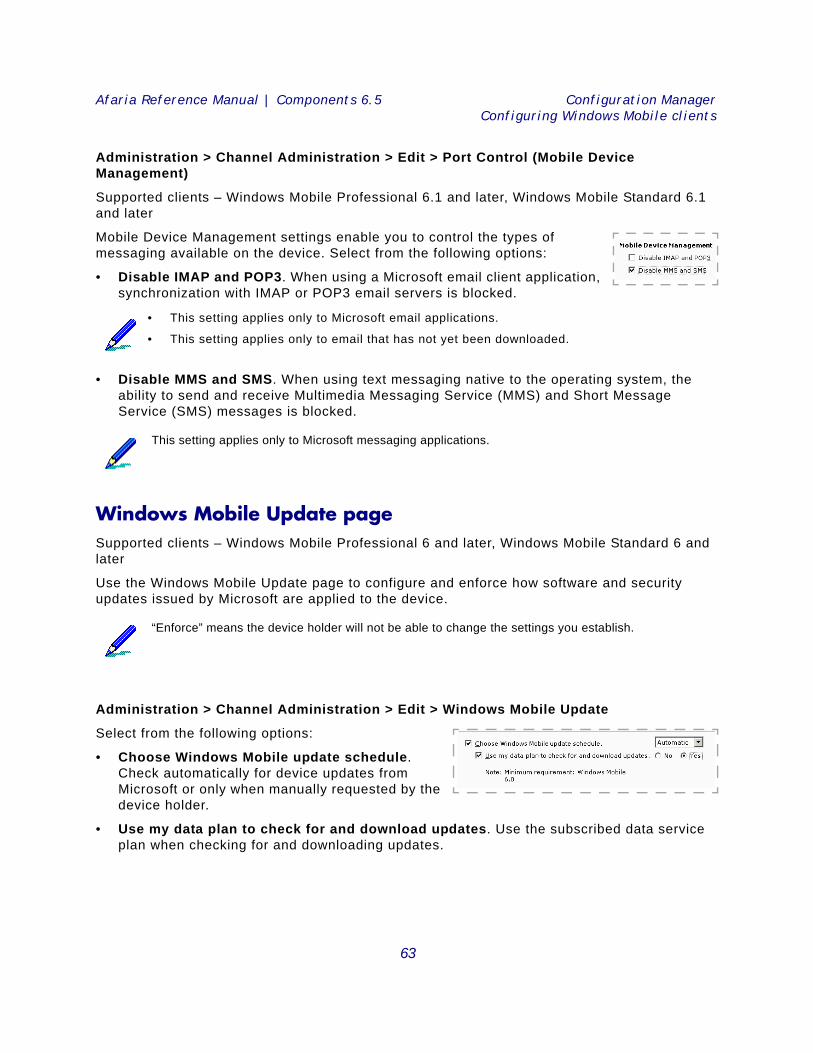
Afaria Reference Manual | Components 6.5 Configuration ManagerConfiguring Windows Mobile clients
Administration > Channel Administration > Edit > Port Control (Mobile Device Management)
Supported clients – Windows Mobile Professional 6.1 and later, Windows Mobile Standard 6.1 and later
Mobile Device Management settings enable you to control the types of messaging available on the device. Select from the following options:
• Disable IMAP and POP3. When using a Microsoft email client application, synchronization with IMAP or POP3 email servers is blocked.
• Disable MMS and SMS. When using text messaging native to the operating system, the ability to send and receive Multimedia Messaging Service (MMS) and Short Message Service (SMS) messages is blocked.
Windows Mobile Update pageSupported clients – Windows Mobile Professional 6 and later, Windows Mobile Standard 6 and later
Use the Windows Mobile Update page to configure and enforce how software and security updates issued by Microsoft are applied to the device.
Administration > Channel Administration > Edit > Windows Mobile Update
Select from the following options:
• Choose Windows Mobile update schedule. Check automatically for device updates from Microsoft or only when manually requested by the device holder.
• Use my data plan to check for and download updates. Use the subscribed data service plan when checking for and downloading updates.
• This setting applies only to Microsoft email applications.
• This setting applies only to email that has not yet been downloaded.
This setting applies only to Microsoft messaging applications.
“Enforce” means the device holder will not be able to change the settings you establish.
63
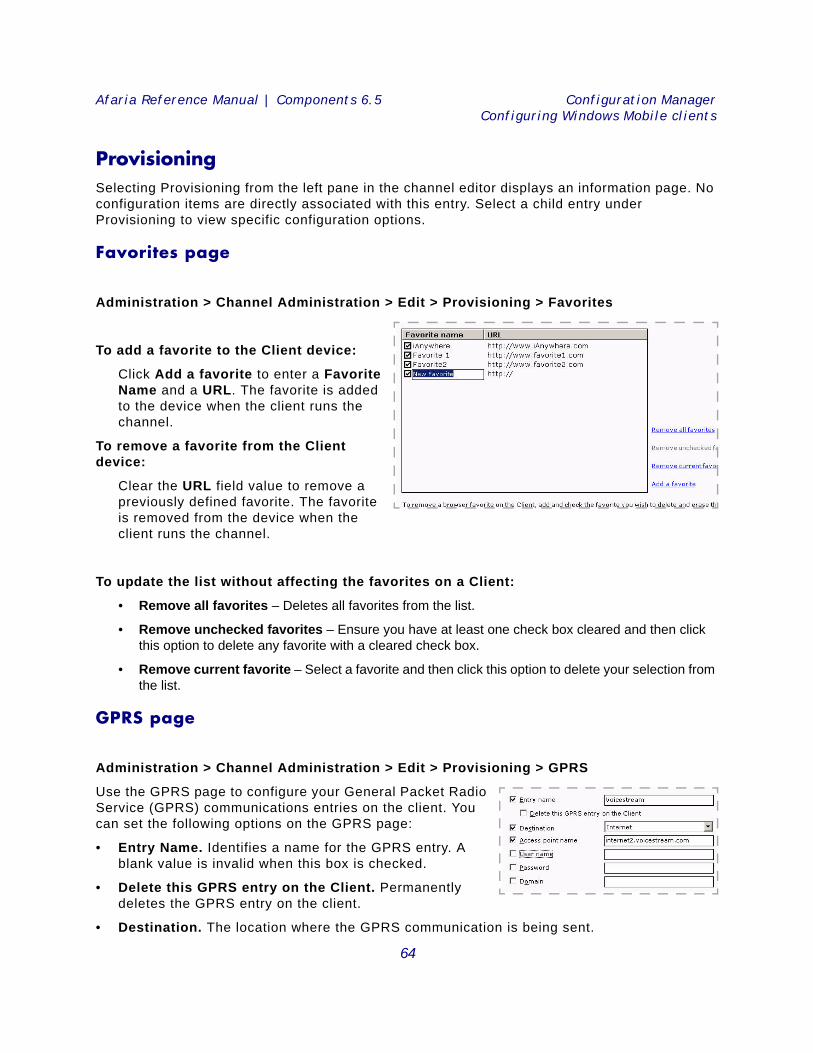
Afaria Reference Manual | Components 6.5 Configuration ManagerConfiguring Windows Mobile clients
ProvisioningSelecting Provisioning from the left pane in the channel editor displays an information page. No configuration items are directly associated with this entry. Select a child entry under Provisioning to view specific configuration options.
Favorites page
Administration > Channel Administration > Edit > Provisioning > Favorites
To add a favorite to the Client device:
Click Add a favorite to enter a Favorite Name and a URL. The favorite is added to the device when the client runs the channel.
To remove a favorite from the Client device:
Clear the URL field value to remove a previously defined favorite. The favorite is removed from the device when the client runs the channel.
To update the list without affecting the favorites on a Client:
• Remove all favorites – Deletes all favorites from the list.
• Remove unchecked favorites – Ensure you have at least one check box cleared and then click this option to delete any favorite with a cleared check box.
• Remove current favorite – Select a favorite and then click this option to delete your selection from the list.
GPRS page
Administration > Channel Administration > Edit > Provisioning > GPRS
Use the GPRS page to configure your General Packet Radio Service (GPRS) communications entries on the client. You can set the following options on the GPRS page:
• Entry Name. Identifies a name for the GPRS entry. A blank value is invalid when this box is checked.
• Delete this GPRS entry on the Client. Permanently deletes the GPRS entry on the client.
• Destination. The location where the GPRS communication is being sent.
64
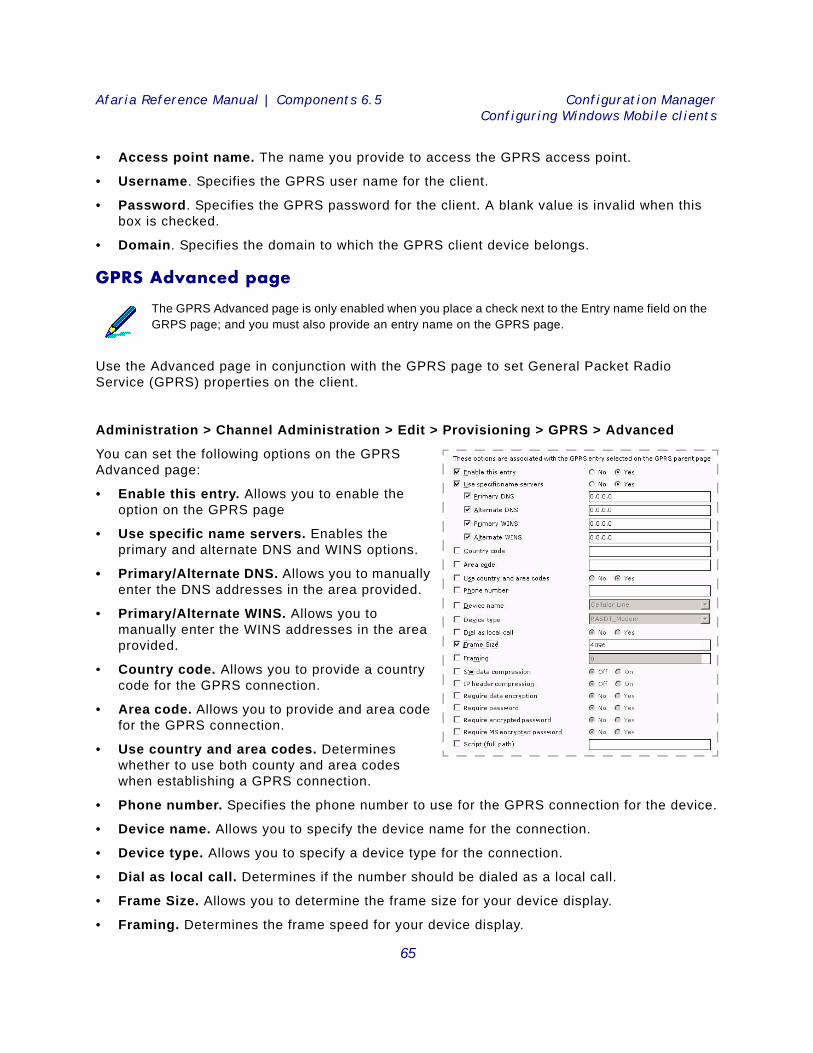
Afaria Reference Manual | Components 6.5 Configuration ManagerConfiguring Windows Mobile clients
• Access point name. The name you provide to access the GPRS access point.
• Username. Specifies the GPRS user name for the client.
• Password. Specifies the GPRS password for the client. A blank value is invalid when this box is checked.
• Domain. Specifies the domain to which the GPRS client device belongs.
GPRS Advanced page
Use the Advanced page in conjunction with the GPRS page to set General Packet Radio Service (GPRS) properties on the client.
Administration > Channel Administration > Edit > Provisioning > GPRS > Advanced
You can set the following options on the GPRS Advanced page:
• Enable this entry. Allows you to enable the option on the GPRS page
• Use specific name servers. Enables the primary and alternate DNS and WINS options.
• Primary/Alternate DNS. Allows you to manually enter the DNS addresses in the area provided.
• Primary/Alternate WINS. Allows you to manually enter the WINS addresses in the area provided.
• Country code. Allows you to provide a country code for the GPRS connection.
• Area code. Allows you to provide and area code for the GPRS connection.
• Use country and area codes. Determines whether to use both county and area codes when establishing a GPRS connection.
• Phone number. Specifies the phone number to use for the GPRS connection for the device.
• Device name. Allows you to specify the device name for the connection.
• Device type. Allows you to specify a device type for the connection.
• Dial as local call. Determines if the number should be dialed as a local call.
• Frame Size. Allows you to determine the frame size for your device display.
• Framing. Determines the frame speed for your device display.
The GPRS Advanced page is only enabled when you place a check next to the Entry name field on the GRPS page; and you must also provide an entry name on the GPRS page.
65
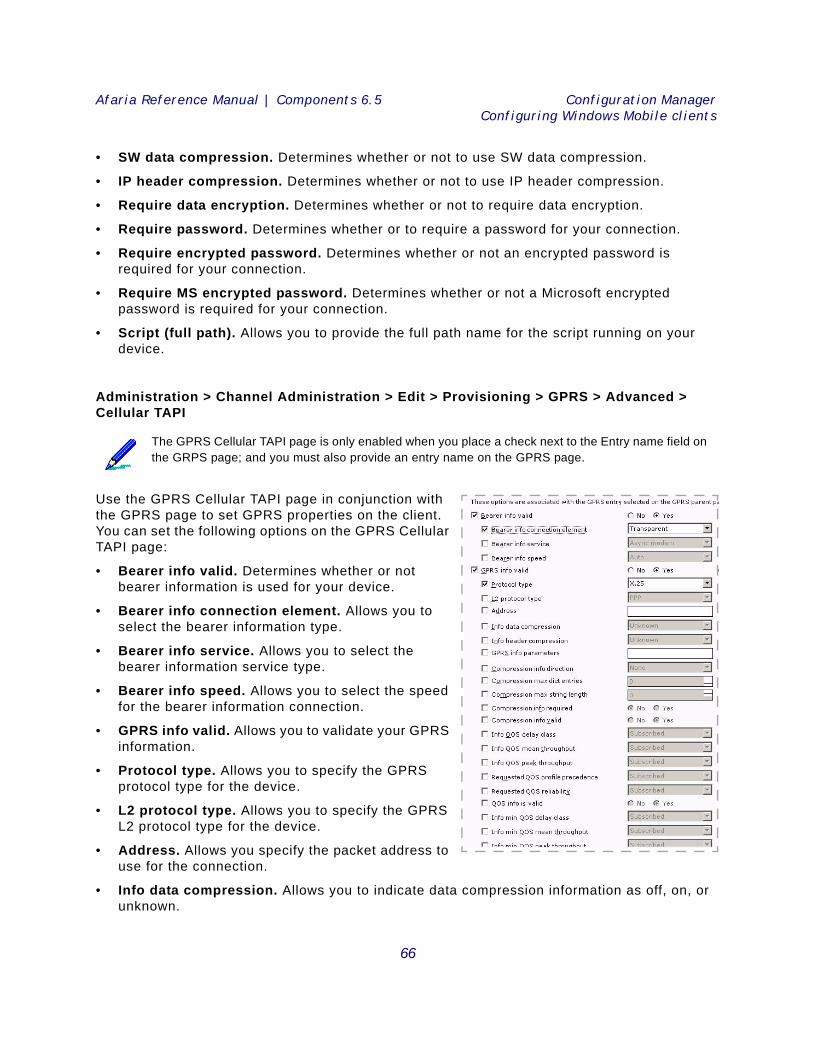
Afaria Reference Manual | Components 6.5 Configuration ManagerConfiguring Windows Mobile clients
• SW data compression. Determines whether or not to use SW data compression.
• IP header compression. Determines whether or not to use IP header compression.
• Require data encryption. Determines whether or not to require data encryption.
• Require password. Determines whether or to require a password for your connection.
• Require encrypted password. Determines whether or not an encrypted password is required for your connection.
• Require MS encrypted password. Determines whether or not a Microsoft encrypted password is required for your connection.
• Script (full path). Allows you to provide the full path name for the script running on your device.
Administration > Channel Administration > Edit > Provisioning > GPRS > Advanced > Cellular TAPI
Use the GPRS Cellular TAPI page in conjunction with the GPRS page to set GPRS properties on the client. You can set the following options on the GPRS Cellular TAPI page:
• Bearer info valid. Determines whether or not bearer information is used for your device.
• Bearer info connection element. Allows you to select the bearer information type.
• Bearer info service. Allows you to select the bearer information service type.
• Bearer info speed. Allows you to select the speed for the bearer information connection.
• GPRS info valid. Allows you to validate your GPRS information.
• Protocol type. Allows you to specify the GPRS protocol type for the device.
• L2 protocol type. Allows you to specify the GPRS L2 protocol type for the device.
• Address. Allows you specify the packet address to use for the connection.
• Info data compression. Allows you to indicate data compression information as off, on, or unknown.
The GPRS Cellular TAPI page is only enabled when you place a check next to the Entry name field on the GRPS page; and you must also provide an entry name on the GPRS page.
66
Afaria Reference Manual | Components 6.5 Configuration ManagerConfiguring Windows Mobile clients
• GPRS info parameters. Allows you to specify protocol-specific values when defining a GPRS context.
• Compression info direction. Allows you to specify the transmit or receive direction for the connection.
• Compression max dict entries. Allows you to control the maximum number of dictionary entries for data compression.
• Compression max string length. Allows you to control the maximum string length for data compression.
• Compression info required. Determines whether compression information is required.
• Compression info valid. Determines whether compression information is valid.
• Info QOS delay class. Allows you to specify the Quality of Service (QOS) delay profile value.
• Info QOS mean throughput. Allows you to specify the Quality of Service (QOS) mean throughput value.
• Info QOS peak throughput. Allows you to specify the Quality of Service (QOS) peak throughput value.
• Requested QOS profile precedence. Allows you to specify the Quality of Service (QOS) profile precedence value.
• Requested QOS reliability. Allows you to specify the Quality of Service (QOS) profile reliability value.
• QOS info is valid. Determines whether the Quality of Service (QOS) information is valid.
• Info min QOS delay class. Allows you to specify the minimum Quality of Service (QOS) delay profile value.
• Info min QOS mean throughput. Allows you to specify the minimum Quality of Service (QOS) mean throughput value.
• Info min QOS peak throughput. Allows you to specify the minimum Quality of Service (QOS) peak throughput value.
• Requested min QOS profile precedence. Allows you to specify the requested minimum Quality of Service (QOS) profile precedence value.
• Requested min QOS reliability. Allows you to specify the requested minimum Quality of Service (QOS) profile reliability value.
• Min QOS info is valid. Determines whether the minimum Quality of Service (QOS) information is valid.
67
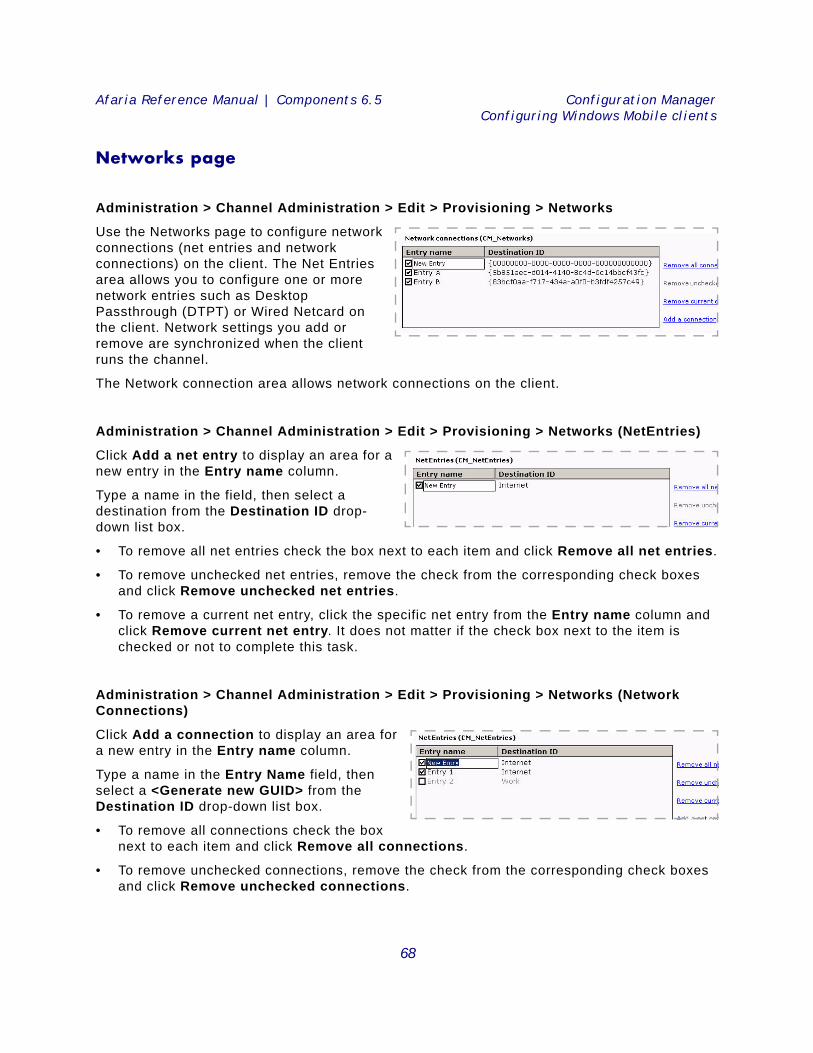
Afaria Reference Manual | Components 6.5 Configuration ManagerConfiguring Windows Mobile clients
Networks page
Administration > Channel Administration > Edit > Provisioning > Networks
Use the Networks page to configure network connections (net entries and network connections) on the client. The Net Entries area allows you to configure one or more network entries such as Desktop Passthrough (DTPT) or Wired Netcard on the client. Network settings you add or remove are synchronized when the client runs the channel.
The Network connection area allows network connections on the client.
Administration > Channel Administration > Edit > Provisioning > Networks (NetEntries)
Click Add a net entry to display an area for a new entry in the Entry name column.
Type a name in the field, then select a destination from the Destination ID drop-down list box.
• To remove all net entries check the box next to each item and click Remove all net entries.
• To remove unchecked net entries, remove the check from the corresponding check boxes and click Remove unchecked net entries.
• To remove a current net entry, click the specific net entry from the Entry name column and click Remove current net entry. It does not matter if the check box next to the item is checked or not to complete this task.
Administration > Channel Administration > Edit > Provisioning > Networks (Network Connections)
Click Add a connection to display an area for a new entry in the Entry name column.
Type a name in the Entry Name field, then select a <Generate new GUID> from the Destination ID drop-down list box.
• To remove all connections check the box next to each item and click Remove all connections.
• To remove unchecked connections, remove the check from the corresponding check boxes and click Remove unchecked connections.
68
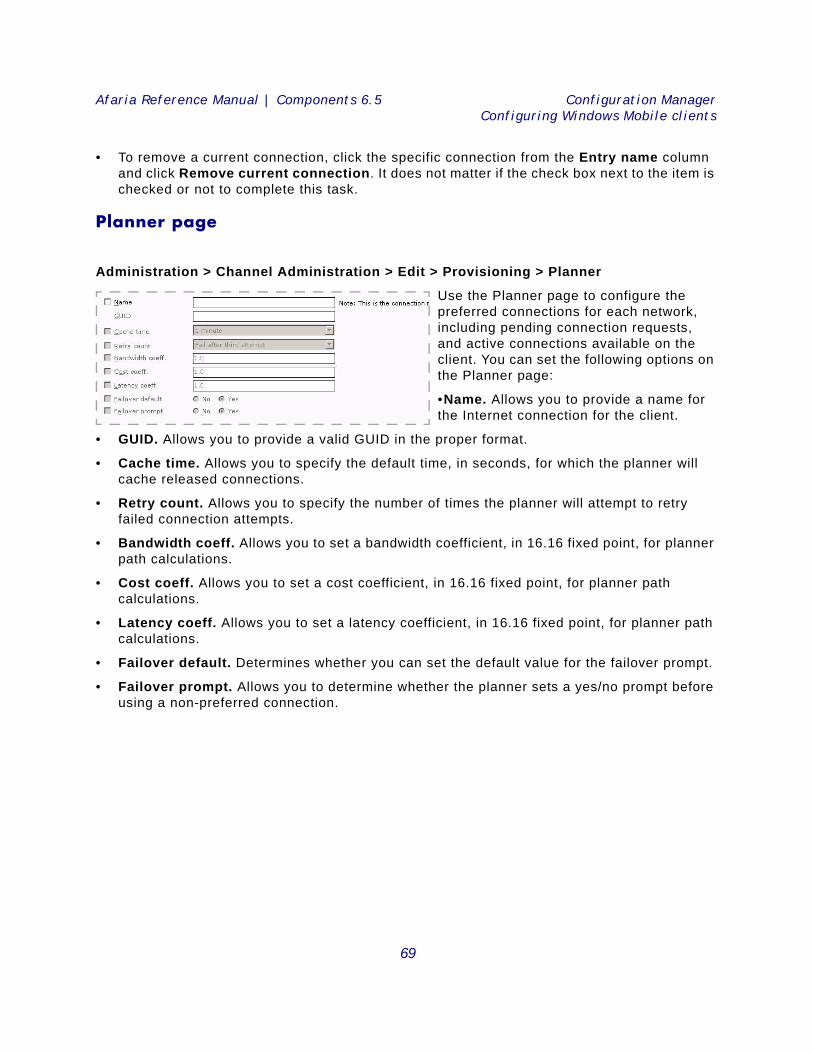
Afaria Reference Manual | Components 6.5 Configuration ManagerConfiguring Windows Mobile clients
• To remove a current connection, click the specific connection from the Entry name column and click Remove current connection. It does not matter if the check box next to the item is checked or not to complete this task.
Planner page
Administration > Channel Administration > Edit > Provisioning > Planner
Use the Planner page to configure the preferred connections for each network, including pending connection requests, and active connections available on the client. You can set the following options on the Planner page:
•Name. Allows you to provide a name for the Internet connection for the client.
• GUID. Allows you to provide a valid GUID in the proper format.
• Cache time. Allows you to specify the default time, in seconds, for which the planner will cache released connections.
• Retry count. Allows you to specify the number of times the planner will attempt to retry failed connection attempts.
• Bandwidth coeff. Allows you to set a bandwidth coefficient, in 16.16 fixed point, for planner path calculations.
• Cost coeff. Allows you to set a cost coefficient, in 16.16 fixed point, for planner path calculations.
• Latency coeff. Allows you to set a latency coefficient, in 16.16 fixed point, for planner path calculations.
• Failover default. Determines whether you can set the default value for the failover prompt.
• Failover prompt. Allows you to determine whether the planner sets a yes/no prompt before using a non-preferred connection.
69
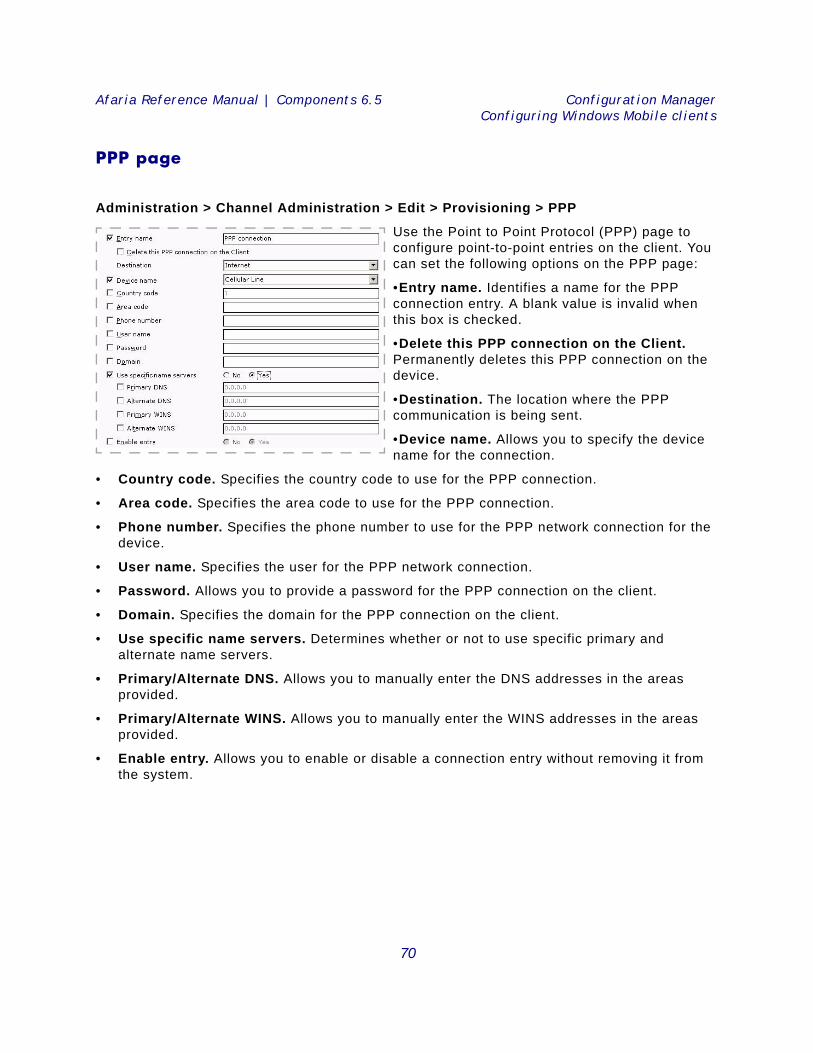
Afaria Reference Manual | Components 6.5 Configuration ManagerConfiguring Windows Mobile clients
PPP page
Administration > Channel Administration > Edit > Provisioning > PPP
Use the Point to Point Protocol (PPP) page to configure point-to-point entries on the client. You can set the following options on the PPP page:
•Entry name. Identifies a name for the PPP connection entry. A blank value is invalid when this box is checked.
•Delete this PPP connection on the Client. Permanently deletes this PPP connection on the device.
•Destination. The location where the PPP communication is being sent.
•Device name. Allows you to specify the device name for the connection.
• Country code. Specifies the country code to use for the PPP connection.
• Area code. Specifies the area code to use for the PPP connection.
• Phone number. Specifies the phone number to use for the PPP network connection for the device.
• User name. Specifies the user for the PPP network connection.
• Password. Allows you to provide a password for the PPP connection on the client.
• Domain. Specifies the domain for the PPP connection on the client.
• Use specific name servers. Determines whether or not to use specific primary and alternate name servers.
• Primary/Alternate DNS. Allows you to manually enter the DNS addresses in the areas provided.
• Primary/Alternate WINS. Allows you to manually enter the WINS addresses in the areas provided.
• Enable entry. Allows you to enable or disable a connection entry without removing it from the system.
70
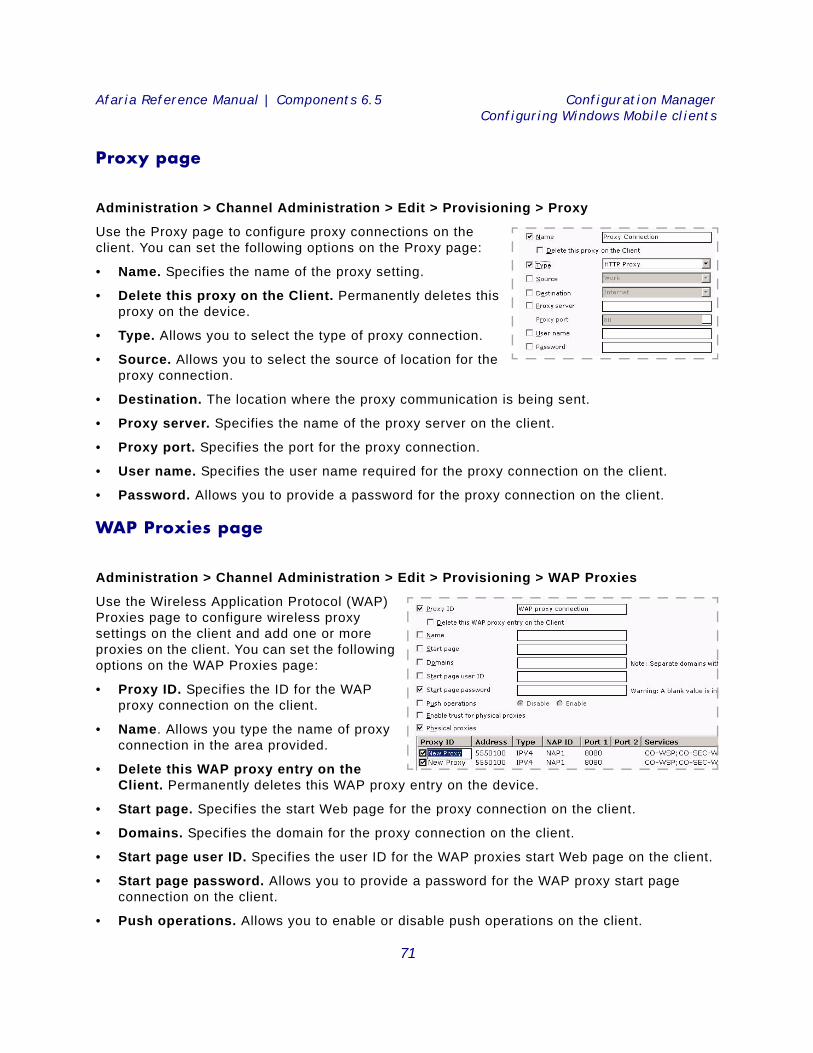
Afaria Reference Manual | Components 6.5 Configuration ManagerConfiguring Windows Mobile clients
Proxy page
Administration > Channel Administration > Edit > Provisioning > Proxy
Use the Proxy page to configure proxy connections on the client. You can set the following options on the Proxy page:
• Name. Specifies the name of the proxy setting.
• Delete this proxy on the Client. Permanently deletes this proxy on the device.
• Type. Allows you to select the type of proxy connection.
• Source. Allows you to select the source of location for the proxy connection.
• Destination. The location where the proxy communication is being sent.
• Proxy server. Specifies the name of the proxy server on the client.
• Proxy port. Specifies the port for the proxy connection.
• User name. Specifies the user name required for the proxy connection on the client.
• Password. Allows you to provide a password for the proxy connection on the client.
WAP Proxies page
Administration > Channel Administration > Edit > Provisioning > WAP Proxies
Use the Wireless Application Protocol (WAP) Proxies page to configure wireless proxy settings on the client and add one or more proxies on the client. You can set the following options on the WAP Proxies page:
• Proxy ID. Specifies the ID for the WAP proxy connection on the client.
• Name. Allows you type the name of proxy connection in the area provided.
• Delete this WAP proxy entry on the Client. Permanently deletes this WAP proxy entry on the device.
• Start page. Specifies the start Web page for the proxy connection on the client.
• Domains. Specifies the domain for the proxy connection on the client.
• Start page user ID. Specifies the user ID for the WAP proxies start Web page on the client.
• Start page password. Allows you to provide a password for the WAP proxy start page connection on the client.
• Push operations. Allows you to enable or disable push operations on the client.
71
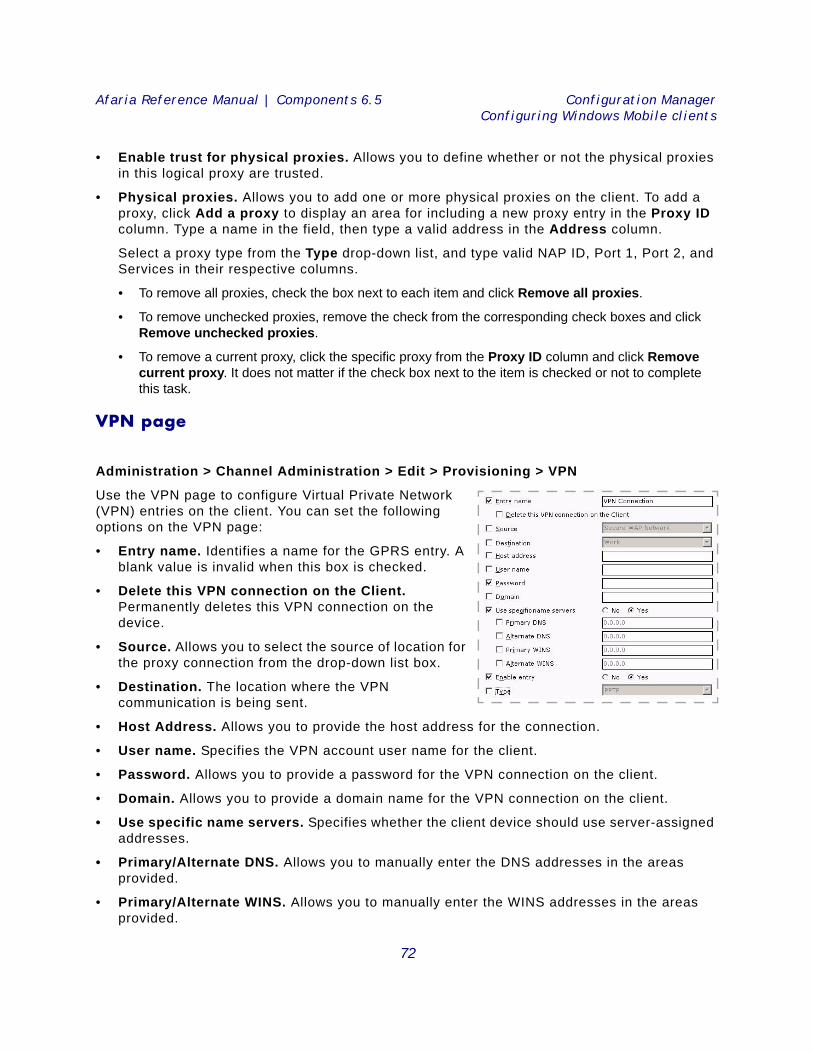
Afaria Reference Manual | Components 6.5 Configuration ManagerConfiguring Windows Mobile clients
• Enable trust for physical proxies. Allows you to define whether or not the physical proxies in this logical proxy are trusted.
• Physical proxies. Allows you to add one or more physical proxies on the client. To add a proxy, click Add a proxy to display an area for including a new proxy entry in the Proxy ID column. Type a name in the field, then type a valid address in the Address column.
Select a proxy type from the Type drop-down list, and type valid NAP ID, Port 1, Port 2, and Services in their respective columns.
• To remove all proxies, check the box next to each item and click Remove all proxies.
• To remove unchecked proxies, remove the check from the corresponding check boxes and click Remove unchecked proxies.
• To remove a current proxy, click the specific proxy from the Proxy ID column and click Remove current proxy. It does not matter if the check box next to the item is checked or not to complete this task.
VPN page
Administration > Channel Administration > Edit > Provisioning > VPN
Use the VPN page to configure Virtual Private Network (VPN) entries on the client. You can set the following options on the VPN page:
• Entry name. Identifies a name for the GPRS entry. A blank value is invalid when this box is checked.
• Delete this VPN connection on the Client. Permanently deletes this VPN connection on the device.
• Source. Allows you to select the source of location for the proxy connection from the drop-down list box.
• Destination. The location where the VPN communication is being sent.
• Host Address. Allows you to provide the host address for the connection.
• User name. Specifies the VPN account user name for the client.
• Password. Allows you to provide a password for the VPN connection on the client.
• Domain. Allows you to provide a domain name for the VPN connection on the client.
• Use specific name servers. Specifies whether the client device should use server-assigned addresses.
• Primary/Alternate DNS. Allows you to manually enter the DNS addresses in the areas provided.
• Primary/Alternate WINS. Allows you to manually enter the WINS addresses in the areas provided.
72
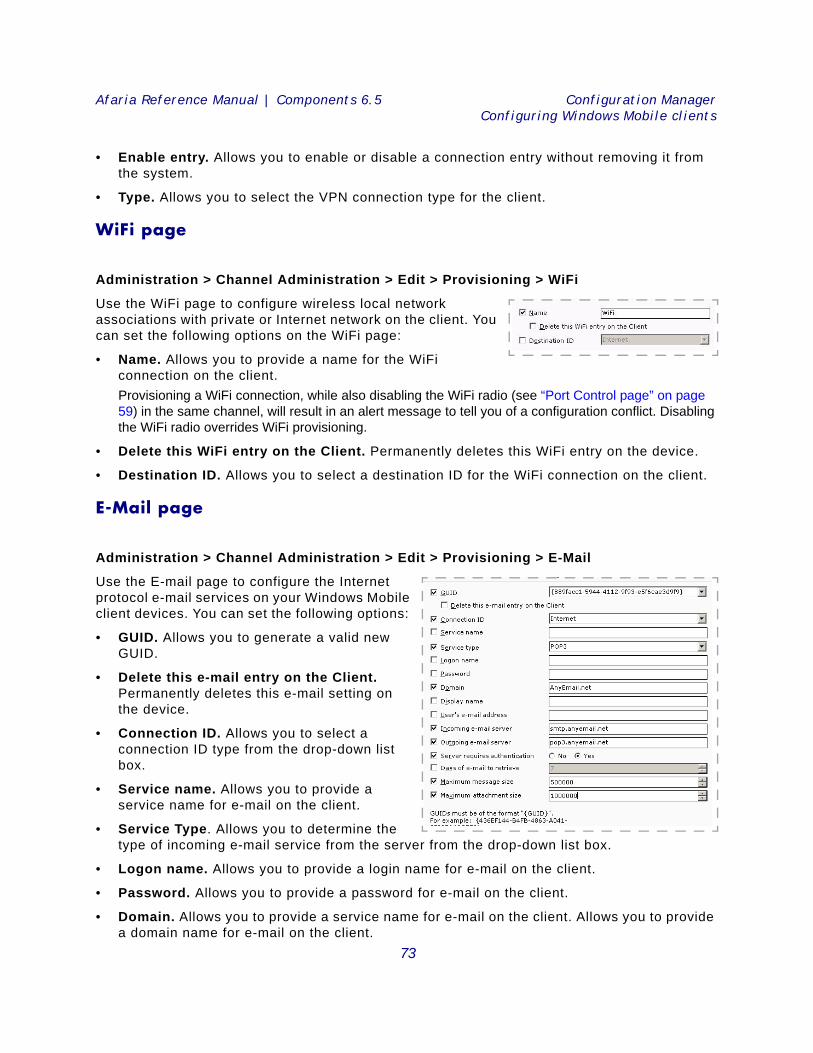
Afaria Reference Manual | Components 6.5 Configuration ManagerConfiguring Windows Mobile clients
• Enable entry. Allows you to enable or disable a connection entry without removing it from the system.
• Type. Allows you to select the VPN connection type for the client.
WiFi page
Administration > Channel Administration > Edit > Provisioning > WiFi
Use the WiFi page to configure wireless local network associations with private or Internet network on the client. You can set the following options on the WiFi page:
• Name. Allows you to provide a name for the WiFi connection on the client.Provisioning a WiFi connection, while also disabling the WiFi radio (see “Port Control page” on page 59) in the same channel, will result in an alert message to tell you of a configuration conflict. Disabling the WiFi radio overrides WiFi provisioning.
• Delete this WiFi entry on the Client. Permanently deletes this WiFi entry on the device.
• Destination ID. Allows you to select a destination ID for the WiFi connection on the client.
E-Mail page
Administration > Channel Administration > Edit > Provisioning > E-Mail
Use the E-mail page to configure the Internet protocol e-mail services on your Windows Mobile client devices. You can set the following options:
• GUID. Allows you to generate a valid new GUID.
• Delete this e-mail entry on the Client. Permanently deletes this e-mail setting on the device.
• Connection ID. Allows you to select a connection ID type from the drop-down list box.
• Service name. Allows you to provide a service name for e-mail on the client.
• Service Type. Allows you to determine the type of incoming e-mail service from the server from the drop-down list box.
• Logon name. Allows you to provide a login name for e-mail on the client.
• Password. Allows you to provide a password for e-mail on the client.
• Domain. Allows you to provide a service name for e-mail on the client. Allows you to provide a domain name for e-mail on the client.
73
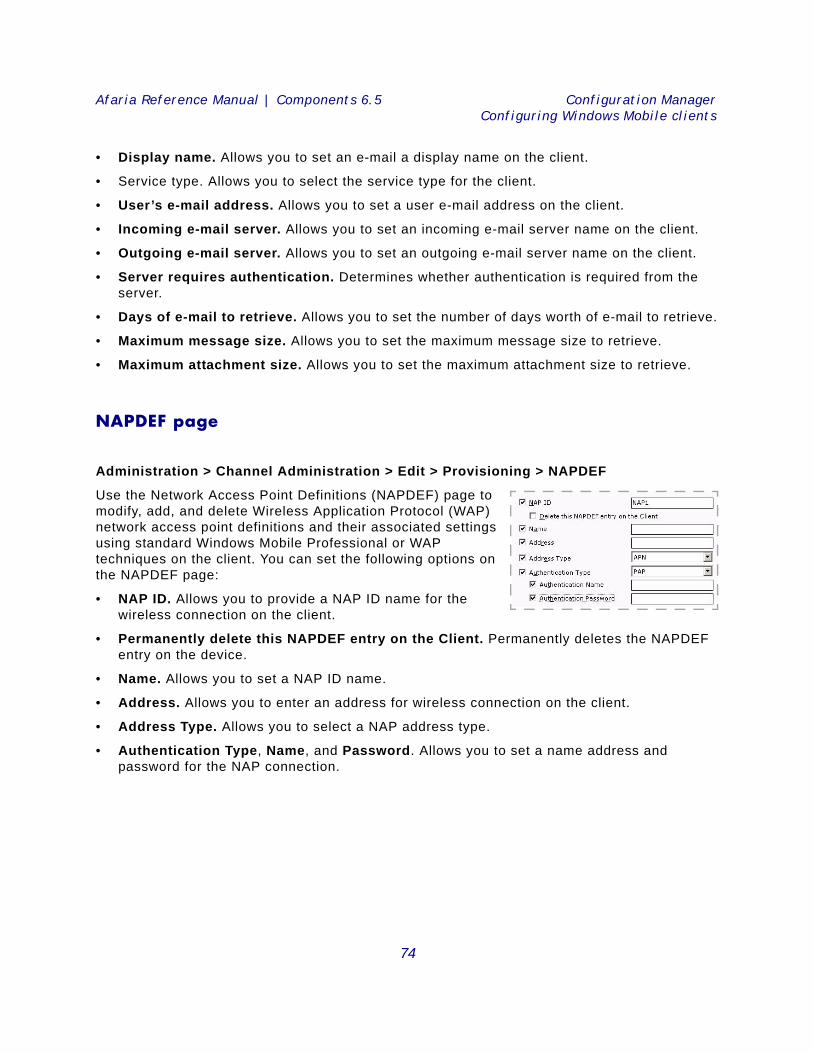
Afaria Reference Manual | Components 6.5 Configuration ManagerConfiguring Windows Mobile clients
• Display name. Allows you to set an e-mail a display name on the client.
• Service type. Allows you to select the service type for the client.
• User’s e-mail address. Allows you to set a user e-mail address on the client.
• Incoming e-mail server. Allows you to set an incoming e-mail server name on the client.
• Outgoing e-mail server. Allows you to set an outgoing e-mail server name on the client.
• Server requires authentication. Determines whether authentication is required from the server.
• Days of e-mail to retrieve. Allows you to set the number of days worth of e-mail to retrieve.
• Maximum message size. Allows you to set the maximum message size to retrieve.
• Maximum attachment size. Allows you to set the maximum attachment size to retrieve.
NAPDEF page
Administration > Channel Administration > Edit > Provisioning > NAPDEF
Use the Network Access Point Definitions (NAPDEF) page to modify, add, and delete Wireless Application Protocol (WAP) network access point definitions and their associated settings using standard Windows Mobile Professional or WAP techniques on the client. You can set the following options on the NAPDEF page:
• NAP ID. Allows you to provide a NAP ID name for the wireless connection on the client.
• Permanently delete this NAPDEF entry on the Client. Permanently deletes the NAPDEF entry on the device.
• Name. Allows you to set a NAP ID name.
• Address. Allows you to enter an address for wireless connection on the client.
• Address Type. Allows you to select a NAP address type.
• Authentication Type, Name, and Password. Allows you to set a name address and password for the NAP connection.
74
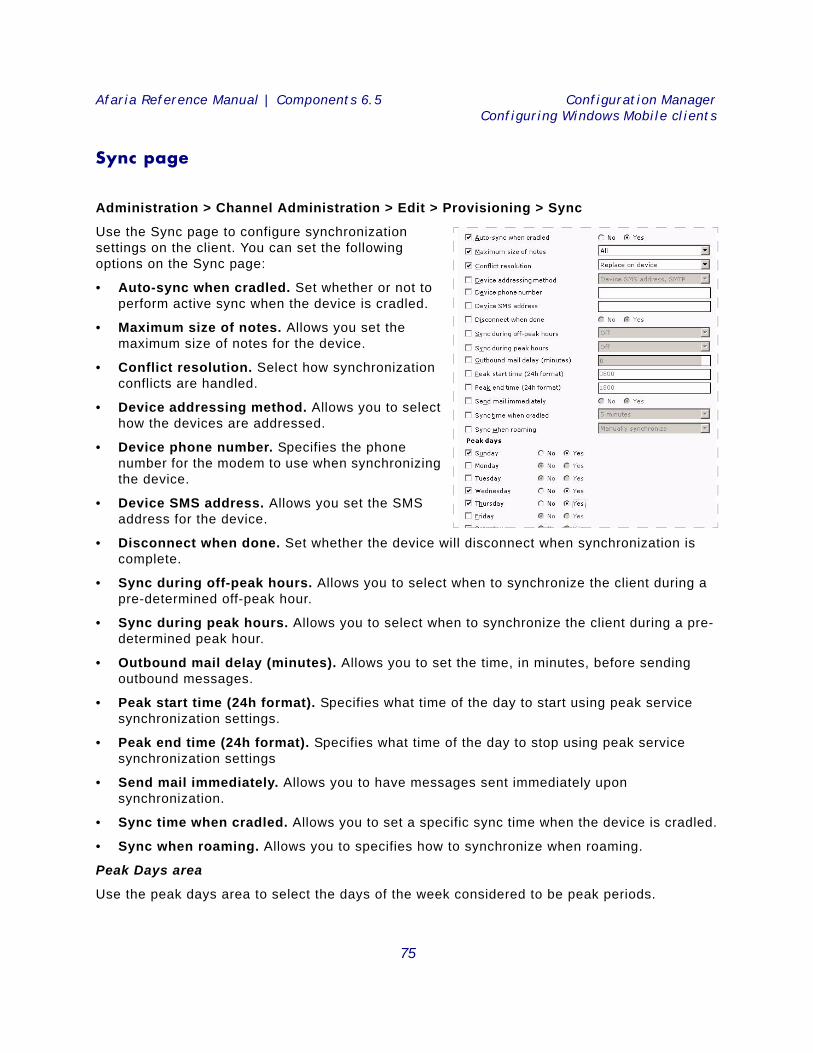
Afaria Reference Manual | Components 6.5 Configuration ManagerConfiguring Windows Mobile clients
Sync page
Administration > Channel Administration > Edit > Provisioning > Sync
Use the Sync page to configure synchronization settings on the client. You can set the following options on the Sync page:
• Auto-sync when cradled. Set whether or not to perform active sync when the device is cradled.
• Maximum size of notes. Allows you set the maximum size of notes for the device.
• Conflict resolution. Select how synchronization conflicts are handled.
• Device addressing method. Allows you to select how the devices are addressed.
• Device phone number. Specifies the phone number for the modem to use when synchronizing the device.
• Device SMS address. Allows you set the SMS address for the device.
• Disconnect when done. Set whether the device will disconnect when synchronization is complete.
• Sync during off-peak hours. Allows you to select when to synchronize the client during a pre-determined off-peak hour.
• Sync during peak hours. Allows you to select when to synchronize the client during a pre-determined peak hour.
• Outbound mail delay (minutes). Allows you to set the time, in minutes, before sending outbound messages.
• Peak start time (24h format). Specifies what time of the day to start using peak service synchronization settings.
• Peak end time (24h format). Specifies what time of the day to stop using peak service synchronization settings
• Send mail immediately. Allows you to have messages sent immediately upon synchronization.
• Sync time when cradled. Allows you to set a specific sync time when the device is cradled.
• Sync when roaming. Allows you to specifies how to synchronize when roaming.
Peak Days area
Use the peak days area to select the days of the week considered to be peak periods.
75
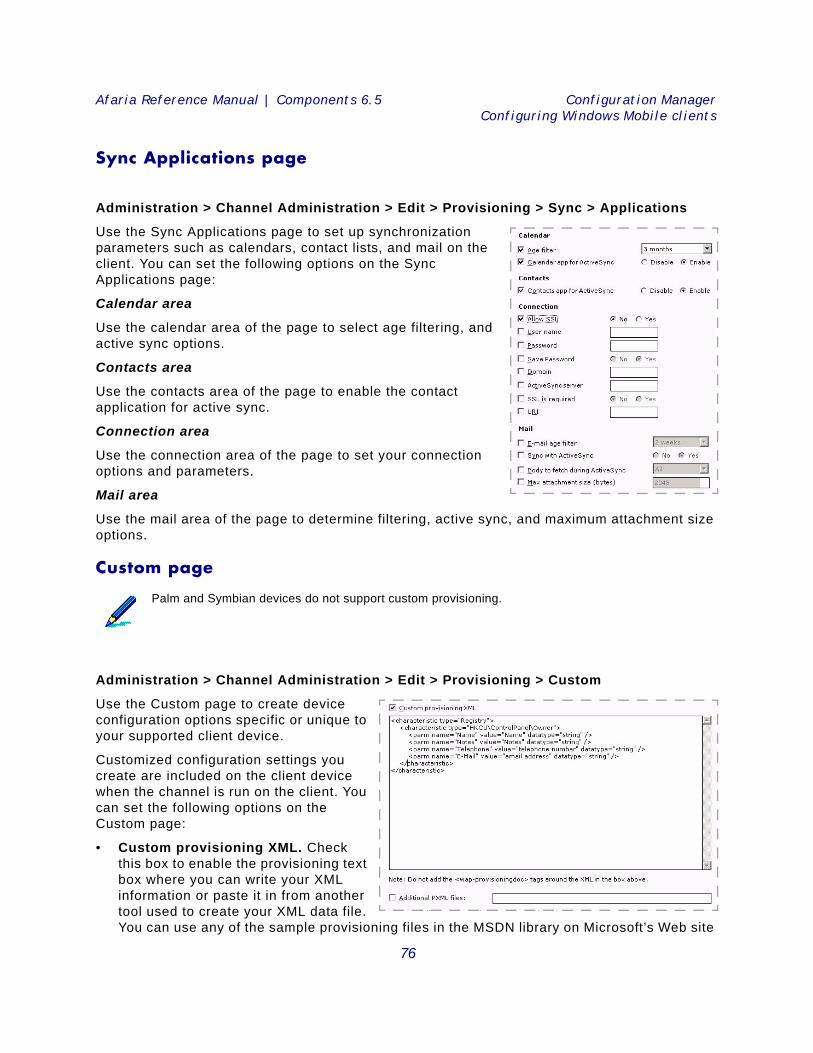
Afaria Reference Manual | Components 6.5 Configuration ManagerConfiguring Windows Mobile clients
Sync Applications page
Administration > Channel Administration > Edit > Provisioning > Sync > Applications
Use the Sync Applications page to set up synchronization parameters such as calendars, contact lists, and mail on the client. You can set the following options on the Sync Applications page:
Calendar area
Use the calendar area of the page to select age filtering, and active sync options.
Contacts area
Use the contacts area of the page to enable the contact application for active sync.
Connection area
Use the connection area of the page to set your connection options and parameters.
Mail area
Use the mail area of the page to determine filtering, active sync, and maximum attachment size options.
Custom page
Administration > Channel Administration > Edit > Provisioning > Custom
Use the Custom page to create device configuration options specific or unique to your supported client device.
Customized configuration settings you create are included on the client device when the channel is run on the client. You can set the following options on the Custom page:
• Custom provisioning XML. Check this box to enable the provisioning text box where you can write your XML information or paste it in from another tool used to create your XML data file. You can use any of the sample provisioning files in the MSDN library on Microsoft’s Web site
Palm and Symbian devices do not support custom provisioning.
76
Afaria Reference Manual | Components 6.5 Configuration ManagerConfiguring Windows Mobile clients
to help build your files, or you can follow the example owner.xml file below:owner.xml
<wap-provisioningdoc>
<characteristic type="Registry">
<characteristic type="HKCU\ControlPanel\Owner">
<parm name="Name" value="Name" datatype="string" />
<parm name="Notes" value="Notes" datatype="string" />
<parm name="Telephone" value="telephone number" datatype="string" />
<parm name="E-Mail" value="email address" datatype="string" />
</characteristic>
</characteristic>
</wap-provisioningdoc>
• Additional PXML files. Check this box to include one or more XML provisioning files created using another tool used to create your XML data. Use full path names and separate each file name with semicolons (example: C:\XML\file1.xml;C:\XML\file2.xml).
Do not add the <wap-provisioningdoc> tags around the XML in the provisioning text box.
You must create separate XML files for each configuration task you want to accomplish on the device. For example, if you want to set owner information on the device and also set browser favorites for the device, you must have a separate XML file for each task; for instance, owner.xml and addfavorite.xml.
77
Afaria Reference Manual | Components 6.5 Configuration ManagerConfiguration Manager alerts
Configuration Manager alerts You can use the Server configuration, Alert definition feature to create alerts to notify you when an Configuration Manager event has occurred. The following events are associated with the Configuration Manager component:
See Afaria Reference Manual | Platform > Server Configuration > “Alert Definitions” and Afaria Reference Manual | Platform > Data Views > “Working with Logged Actions.”
Configuration Manager logsSupported client types – Windows Mobile Professional 5 or later and Windows Mobile Standard
The Afaria Client collects Bluetooth connection activity (see “Port Control page” on page 59) and delivers it to the Afaria Server during Afaria sessions. You can view the log data using Data Views > Logs > Handheld Security.
Event Message
Content exported The user exports the data, properties and settings necessary to recreate the channel, channel set or folder on the target server.
Content imported The user Imports the data, properties and settings necessary to recreate the channel, channel set or folder on the target server.
78
3
Data Security Manager for HandheldClientsData Security Manager for handheld Clients (Data Security Manager) enables you to establish security
policies for your Afaria clients. Security policies can include password protection, a variety of lock down
actions, flexible data encryption, and custom user interface elements.
Client types supported are:
• Windows Mobile Professional (excluding Windows CE)
• Windows Mobile Standard
• Symbian
• Palm
79
Afaria Reference Manual | Components 6.5 Data Security Manager for Handheld ClientsAbout Data Security Manager
About Data Security Manager Data Security Manager enables you to establish security policies for your Afaria clients. Security policies for handheld Clients can include a policy for protecting against unauthorized user access, for security action against excessive password retry attempts, and for encrypting sensitive data, and for security action against absentee devices. You also have access to reports and events to monitor and analyze the state of your client security.
Data Security Manager offers the following features, subject to client type:
• Device support – Supports a diverse set of Windows Mobile Professional, Windows Mobile Standard, Symbian, and Palm devices. Data Security Manager’s implementation accommodates many different screen resolutions, orientations, and sizes.
• Password options – Establishes a password policy for locking the device to restrict user access. The password is required to use the device, thereby protecting device data and all device applications from unauthorized access. The password is also used to verify authorization for device state changes such as the insertion of a data card or an attempt to use desktop synchronization tools. Data Security Manager implements the following password features:
• Power-on password – Enforces password use at the client. Data Security Manager offers flexible password criteria so that you can define a device password that meets your enterprise’s password strength requirements.
• Administrator password – Implements an administrator password on the client. You can use the administrator password to access the user interface at any time, including when the device enters a lock down state with the user password disabled.
• Remote-based recovery – Issues a temporary recovery password for a client user that has control of the device but has forgotten the password. You can use the recovery password to access the user interface any time that the device is locked. Remote-based recovery requires Afaria administrator assistance.
• Device-based recovery – Provides password recovery on the device without the need for Afaria administrator assistance. Client users configure secret questions and answers, which must be answered correctly on the device prior to resetting a forgotten device password. Enabling this recovery method is optional.
• Manual lock – Allows a device user to force the device into a locked state without waiting for an automatic lock to engage. Users must supply a valid user, administrator, or temporary recovery password to unlock the device. This locked state provides protection against unauthorized users attempting to gain access to a device’s applications and data.
• Automatic lock – Data Security Manager locks the device after a defined period of inactivity.
• Data encryption – Allows you to establish an encryption policy for encrypting sensitive data located on the device or on any of the device’s external data storage cards. You use a channel editor to select personal information management (PIM) and other data to encrypt. You may also allow Windows Mobile Professional and Palm users to select data for encryption on their devices. You may choose your preferred encryption algorithms for Afaria to use for encrypting data, including Federal Information Processing Standards-certified (FIPS) Advanced Encryption Standard (AES) encryption algorithms. Data encryption is protection against intruders who use advanced techniques to bypass the user interface and
80
Afaria Reference Manual | Components 6.5 Data Security Manager for Handheld ClientsAbout Data Security Manager
access the data directly, or who gain control of removable media that contains sensitive data.
• Password lock down policy – Allows you to establish a password lock down policy for security action against excessive password retry attempts. You define an action to take when locking the device in response to a defined number of user password failures. Lock down action options include disabling a user password, deleting data, and hard resetting the device to its default state. This lock down state is protection against unintended users attempting to guess the user password to gain access to a device’s applications and data.
• Connection lock down policy – Allows you to establish a connection policy for security action against absentee devices. You define an action to take when locking the device in response to a client device failing to establish a connection within a defined period of time. Lock down action options include disabling a user password, deleting data, and hard resetting the device to its default state. This lock down state is protection against the possibility that a device that does not connect in a timely manner has an unknown status. The device may be in the hands of unintended users attempting to gain access to device applications and data, or have obsolete data that may put business-critical operations at risk of error.
• SIM lock down policy – Allows you to establish a policy for security action against a device with a SIM card that is changed or missing. You can define an action to take when locking the device in response to a SIM card that is changed or missing. Lock down action options include disabling a user password, deleting data, and hard resetting the device to its default state. This lock down state is protection against the possibility that a device that does not have a proper SIM card. The device may be in the hands of unintended users attempting to gain access to device applications and data.
• Emergency call support – Users can make emergency phone calls while the device is in a locked state. You can define the security policy for the locked state to allow other outgoing phone calls as well.
• Custom user interface – Allows you to customize several elements of the user interface that your users encounter when they use Data Security Manager, including the password prompt text and the password screen graphic.
• Email and personal information management (PIM) application compatibility – Integration with your iAnywhere Mobile Office client, Microsoft Exchange push email client, or similar solutions, enables your users to receive ongoing email and PIM update notifications, including notifications received while the device is in a locked state. Afaria supports receiving Short Message Service (SMS) and Hypertext Transfer Protocol (HTTP) notifications.
• Global Positioning System (GPS) service application compatibility – Afaria includes a policy setting for organizations that run GPS applications on their handheld devices. Enabling the feature keeps the user interface on and the device unlocked while the GPS radio is active. Users have access to the GPS application without the device automatically locking. Users may engage the manual lock at any time.
• Data Security Manager client uninstall channel – Allows you to uninstall Data Security Manager from your Afaria client. The uninstall process decrypts any associated data on the device or on an inserted external data card.
• Server-side decryption utility – Allows you run the File Decryption Utility program on the Afaria Server to decrypt external card files encrypted by Afaria Data Security Manager
81
Afaria Reference Manual | Components 6.5 Data Security Manager for Handheld ClientsAbout Data Security Manager
clients. This is particularly useful if encrypted files become orphaned due to the device experiencing a hard reset, uninstalling the client, or some other circumstance which prevents the original client from decrypting the files.
• Log entries and registered events – Afaria records Data Security Manager events during event logging. You can examine occurrences of Data Security Manager events in the Messages log. You can also define alerts that monitor specific Data Security Manager events.
• Data Security Manager reports – Data Security Manager includes the following predefined reports that you can view and print:
• Client Lock Down Detail – Identifies any clients that have entered a lock down state.
• Administrator Password Detail – Identifies any clients that have been unlocked using the administrator password.
• Client Password Changed – Identifies any clients that have had their passwords changed.
• Client Password Unchanged – Identifies any clients that have not had their passwords changed.
82
Afaria Reference Manual | Components 6.5 Data Security Manager for Handheld ClientsVariations by client type and by individual client
Variations by client type and by individual client Afaria Data Security Manager feature implementation is tightly integrated with an Afaria client’s client type features, device-specific application programming interfaces (APIs), operating system-specific (OS) APIs, device state, and security policy. While Data Security Manager implementation and performance is largely consistent between different client devices, differences do exist.
The most notable differences in Data Security Manager implementation and behavior exist between different supported client types: Windows Mobile Professional, Windows Mobile Standard, Symbian, and Palm. As the administrator, you can observe differences in feature availability in the channel wizard and channel editor that result in differences in client behavior. For example, the Data Security Manager channel editor for Windows Mobile Professional client types allows you to customize the text for the recovery password message at the client, while the editor for Palm client types does not.
Additional and more subtle differences in Data Security Manager implementation and behavior may exist within client types but between different device models, different device OS levels, or some other differentiator. For example, Windows Mobile Professional 2003 devices handle the hard reset lock down action on external data cards in one manner, while Windows Mobile Professional 5 devices may handle the external data card action in a slightly different manner, although you delivered the same security policy to both clients. Therefore, Data Security Manager client users may experience some differences in Data Security Manager behavior.
Look for documentation conventions that identify Data Security Manager variations by client type and by individual client.
Variations by client type
This documentation identifies Data Security Manager features that differ by client type with a supported client types list or with notes for specific client types. The following examples show the convention used for client types:
Supported client types – Windows Mobile Professional, Palm
Supported client types – Windows Mobile Standard
Supported client types – Symbian
Variations by individual client
This documentation identifies Data Security Manager features that differ by client differentiators other than client type with notes or other indicators. The following are examples of this convention:
Custom UI – (Windows Mobile Professional, Windows Mobile Standard) Use the Custom UI property page…
Windows Mobile Professional, Windows Mobile Standard – Clients have access to their device’s…
Supported clients – Windows Mobile 6 Professional
Supported clients – Windows Mobile 5 or later
Supported clients – Symbian E Series 60 3rd Edition or later
83

Afaria Reference Manual | Components 6.5 Data Security Manager for Handheld ClientsCreate a Data Security Manager install channel
Create a Data Security Manager install channel Create Data Security Manager install channels to establish new security policies for your client devices. An install channel can run on an earlier version of a Data Security Manager client to upgrade it to the current version, or the channel can run on the same version of a Data Security Manager client to apply an updated security policy.
To create an install channel, launch the channel wizard for the Data Security Manager channel. The wizard guides you through the channel creation process. Ensure that you:
• Select a handheld client type.
• Select Install for the channel mode. The channel wizard provides policy options by client type for Password (see page 88) and Encryption (see page 96).
You can use the Data Security Manager channel editor to access additional Data Security Manager settings after you create the channel. The editor includes additional settings for passwords, encryption, custom user interface settings and lock down policies.
• A channel may support only a subset of Data Security Manager features. This is a reflection of the highly device-specific nature of native device APIs that Data Security Manager uses to support its feature set.
• Some channel features are available only in the editor, and not in the channel wizard.
• See “Installing Data Security Manager” on page 133 to learn about Afaria client device user steps for running an install channel.
• Creating Data Security Manager channels for Windows clients is addressed in “Data Security Manager for Windows Clients” on page 152.
• To deploy a channel to clients, you must both publish it and assign it to a work profile.
• An Afaria client honors only one security policy at a time. You can publish a new policy to override an existing policy.
• To establish proper expectations and deliver relevant information about passwords, password composition, and device lock down, be sure to inform your device holders about any changes to security policies.
• Windows Mobile 6.1 and Symbian – Afaria Data Security Manager cannot install on devices that have device encryption turned on. You must disable device encryption.
• For complete information about creating and editing channels, refer to Afaria Reference Manual | Platform > Administration > “Channel Administration”.
84
Afaria Reference Manual | Components 6.5 Data Security Manager for Handheld ClientsCreate a Data Security Manager uninstall channel
Create a Data Security Manager uninstall channel Create Data Security Manager uninstall channels to remove existing security policies from your client devices. An uninstall channel can run only on the same version of a Data Security Manager Client software. The Afaria Client must be present on a client to run sessions for the Data Security Manager uninstall channel.
To create an uninstall channel, launch the channel wizard for the Data Security Manager channel. The wizard guides you through the channel creation process. Ensure that you:
• Select a handheld client type.
• Select Uninstall for the channel mode.
Control client access to uninstall channels by unpublishing them after use. Keeping an uninstall channel in a published state for all clients using a work profile is not recommended.
• To deploy a channel to clients, you must both publish it and assign it to a work profile.
• Refer to “Uninstalling Data Security Manager” on page 138 for information about Afaria client device user steps for running an unistall channel.
• For complete information about creating and editing channels, refer to Afaria Reference Manual | Platform > Administration > “Channel Administration”.
85
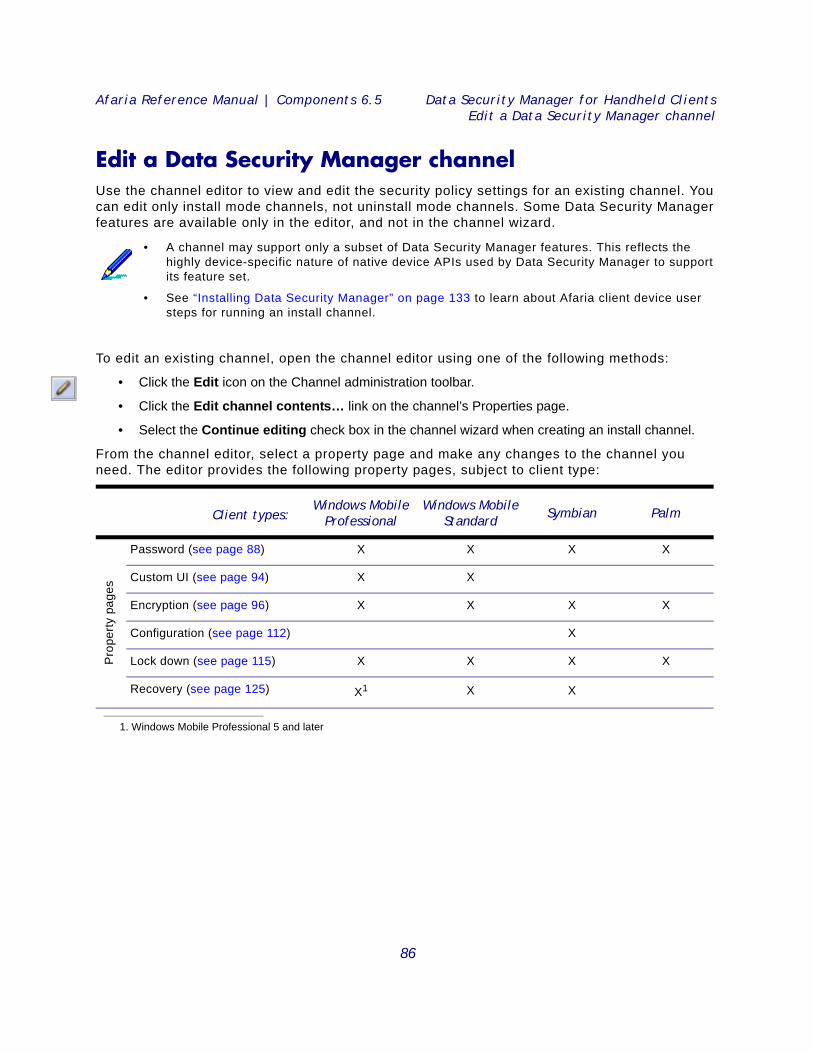
Afaria Reference Manual | Components 6.5 Data Security Manager for Handheld ClientsEdit a Data Security Manager channel
Edit a Data Security Manager channel Use the channel editor to view and edit the security policy settings for an existing channel. You can edit only install mode channels, not uninstall mode channels. Some Data Security Manager features are available only in the editor, and not in the channel wizard.
To edit an existing channel, open the channel editor using one of the following methods:
• Click the Edit icon on the Channel administration toolbar.
• Click the Edit channel contents… link on the channel’s Properties page.
• Select the Continue editing check box in the channel wizard when creating an install channel.
From the channel editor, select a property page and make any changes to the channel you need. The editor provides the following property pages, subject to client type:
• A channel may support only a subset of Data Security Manager features. This reflects the highly device-specific nature of native device APIs used by Data Security Manager to support its feature set.
• See “Installing Data Security Manager” on page 133 to learn about Afaria client device user steps for running an install channel.
Client types: Windows Mobile
ProfessionalWindows Mobile
StandardSymbian Palm
Pro
perty
pag
es
Password (see page 88) X X X X
Custom UI (see page 94) X X
Encryption (see page 96) X X X X
Configuration (see page 112) X
Lock down (see page 115) X X X X
Recovery (see page 125) X1
1. Windows Mobile Professional 5 and later
X X
86
Afaria Reference Manual | Components 6.5 Data Security Manager for Handheld ClientsEdit a Data Security Manager channel
• To deploy a channel to clients, you must both publish it and assign it to a work profile.
• An Afaria client honors only one security policy at a time. You can publish a new policy to override an existing policy.
• To establish proper expectations and deliver relevant information about passwords, password composition, and device lock down, be sure to inform your device holders about any changes to security policies.
• Windows Mobile 6.1 and Symbian – Afaria Data Security Manager cannot install on devices that have device encryption turned on. You must disable device encryption.
• For complete information about creating and editing channels, refer to Afaria Reference Manual | Platform > Administration > “Channel Administration”.
87

Afaria Reference Manual | Components 6.5 Data Security Manager for Handheld ClientsPassword options
Password options
Graphics shown here are for Windows Mobile Standard
Feature availability and implementation is subject to client type. Therefore, dialog boxes and property pages may vary by client type.
Wizard sample
Editor sample
88
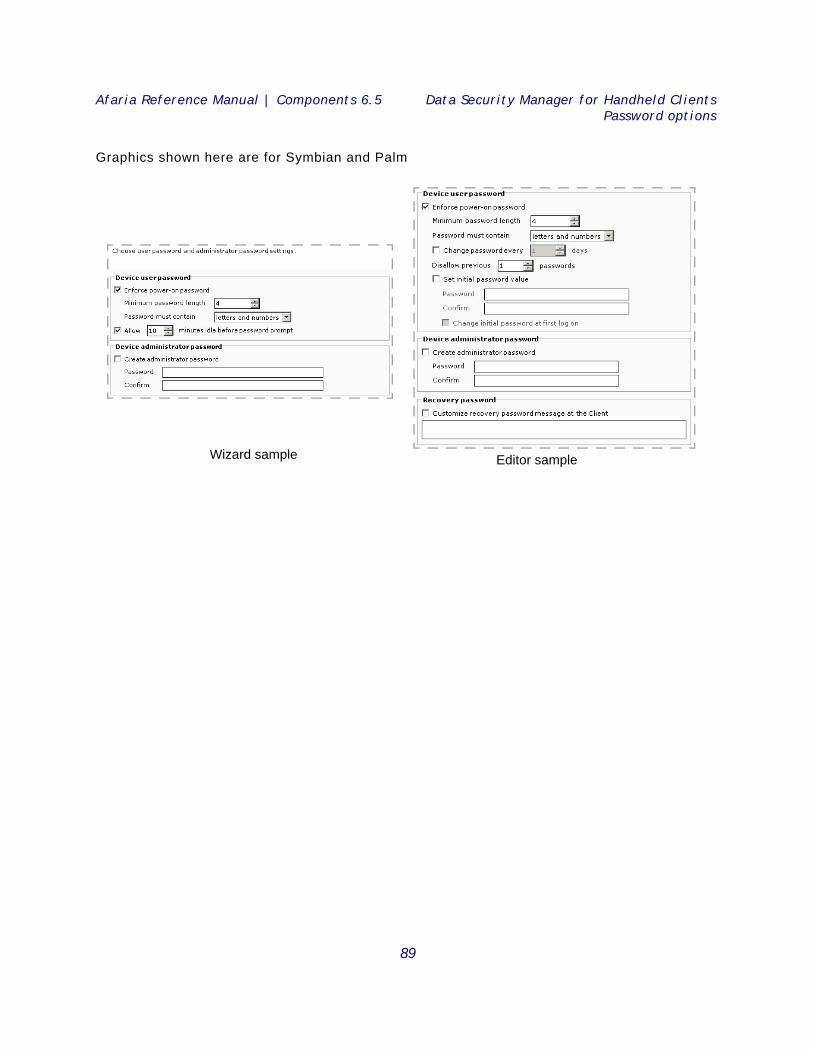
Afaria Reference Manual | Components 6.5 Data Security Manager for Handheld ClientsPassword options
Graphics shown here are for Symbian and Palm
Wizard sample Editor sample
89
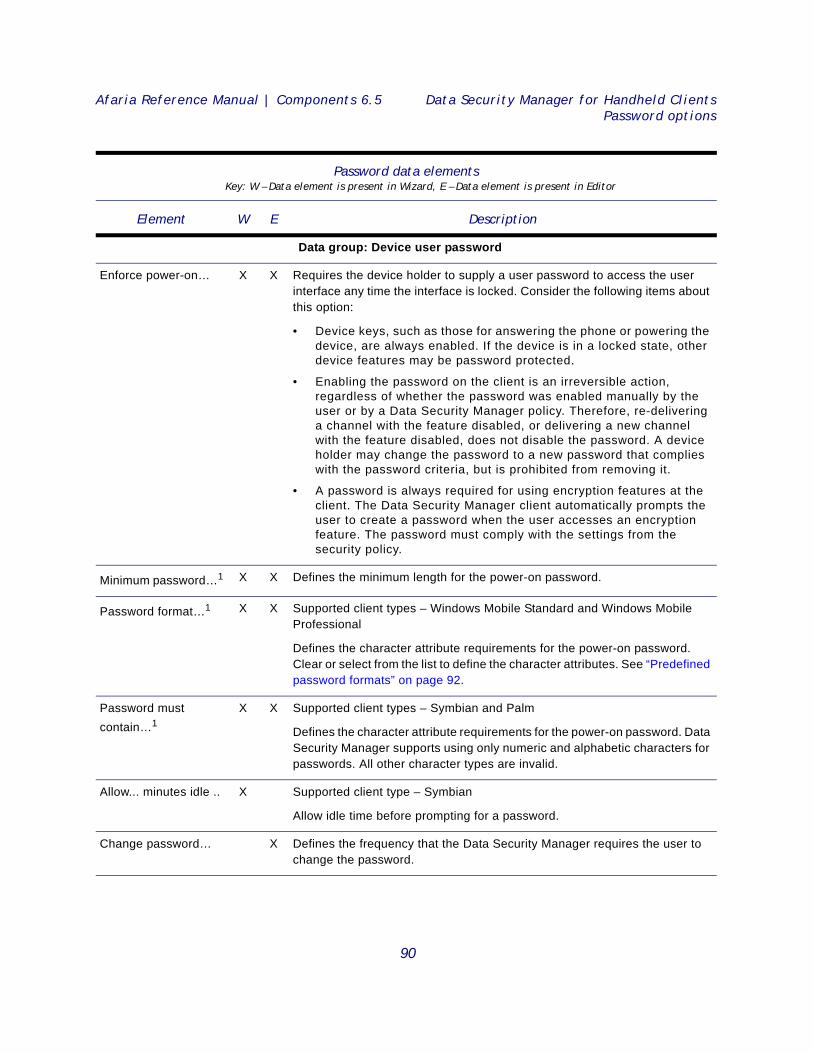
Afaria Reference Manual | Components 6.5 Data Security Manager for Handheld ClientsPassword options
Password data elements Key: W – Data element is present in Wizard, E – Data element is present in Editor
Element W E Description
Data group: Device user password
Enforce power-on… X X Requires the device holder to supply a user password to access the user interface any time the interface is locked. Consider the following items about this option:
• Device keys, such as those for answering the phone or powering the device, are always enabled. If the device is in a locked state, other device features may be password protected.
• Enabling the password on the client is an irreversible action, regardless of whether the password was enabled manually by the user or by a Data Security Manager policy. Therefore, re-delivering a channel with the feature disabled, or delivering a new channel with the feature disabled, does not disable the password. A device holder may change the password to a new password that complies with the password criteria, but is prohibited from removing it.
• A password is always required for using encryption features at the client. The Data Security Manager client automatically prompts the user to create a password when the user accesses an encryption feature. The password must comply with the settings from the security policy.
Minimum password…1 X X Defines the minimum length for the power-on password.
Password format…1 X X Supported client types – Windows Mobile Standard and Windows Mobile Professional
Defines the character attribute requirements for the power-on password. Clear or select from the list to define the character attributes. See “Predefined password formats” on page 92.
Password must contain…1
X X Supported client types – Symbian and Palm
Defines the character attribute requirements for the power-on password. Data Security Manager supports using only numeric and alphabetic characters for passwords. All other character types are invalid.
Allow... minutes idle .. X Supported client type – Symbian
Allow idle time before prompting for a password.
Change password… X Defines the frequency that the Data Security Manager requires the user to change the password.
90
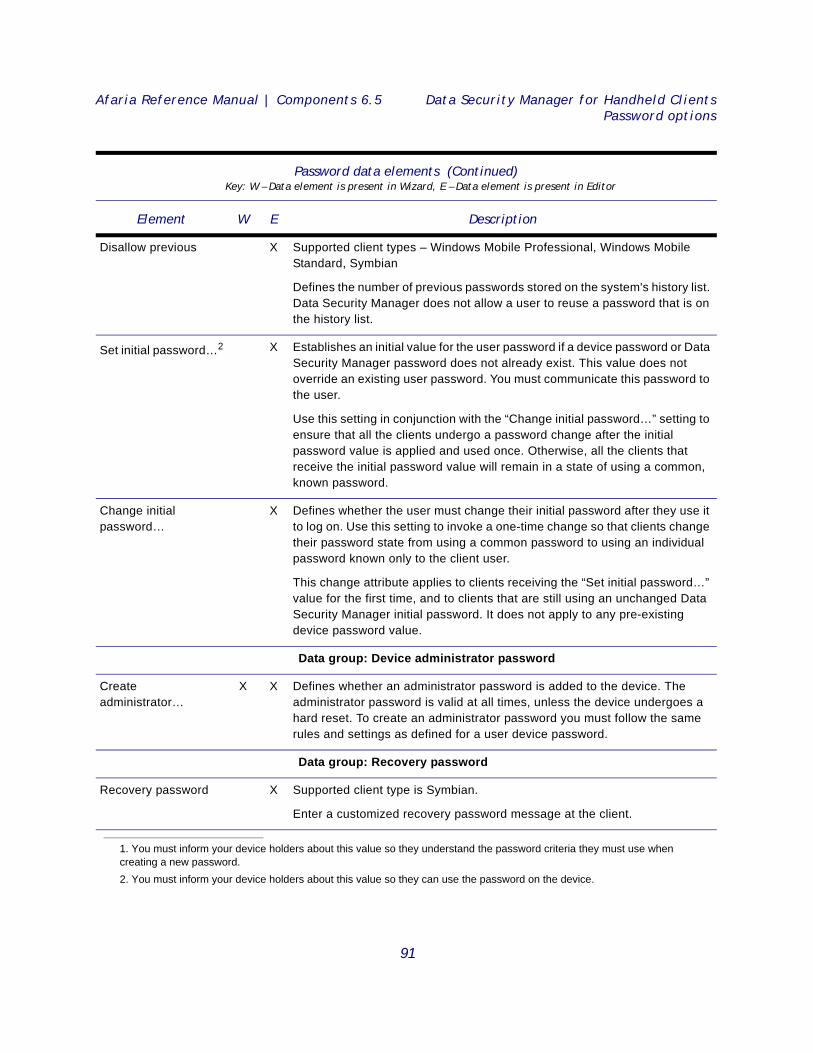
Afaria Reference Manual | Components 6.5 Data Security Manager for Handheld ClientsPassword options
Disallow previous X Supported client types – Windows Mobile Professional, Windows Mobile Standard, Symbian
Defines the number of previous passwords stored on the system's history list. Data Security Manager does not allow a user to reuse a password that is on the history list.
Set initial password…2 X Establishes an initial value for the user password if a device password or Data Security Manager password does not already exist. This value does not override an existing user password. You must communicate this password to the user.
Use this setting in conjunction with the “Change initial password…” setting to ensure that all the clients undergo a password change after the initial password value is applied and used once. Otherwise, all the clients that receive the initial password value will remain in a state of using a common, known password.
Change initial password…
X Defines whether the user must change their initial password after they use it to log on. Use this setting to invoke a one-time change so that clients change their password state from using a common password to using an individual password known only to the client user.
This change attribute applies to clients receiving the “Set initial password…” value for the first time, and to clients that are still using an unchanged Data Security Manager initial password. It does not apply to any pre-existing device password value.
Data group: Device administrator password
Create administrator…
X X Defines whether an administrator password is added to the device. The administrator password is valid at all times, unless the device undergoes a hard reset. To create an administrator password you must follow the same rules and settings as defined for a user device password.
Data group: Recovery password
Recovery password X Supported client type is Symbian.
Enter a customized recovery password message at the client.
1. You must inform your device holders about this value so they understand the password criteria they must use when creating a new password. 2. You must inform your device holders about this value so they can use the password on the device.
Password data elements (Continued)Key: W – Data element is present in Wizard, E – Data element is present in Editor
Element W E Description
91
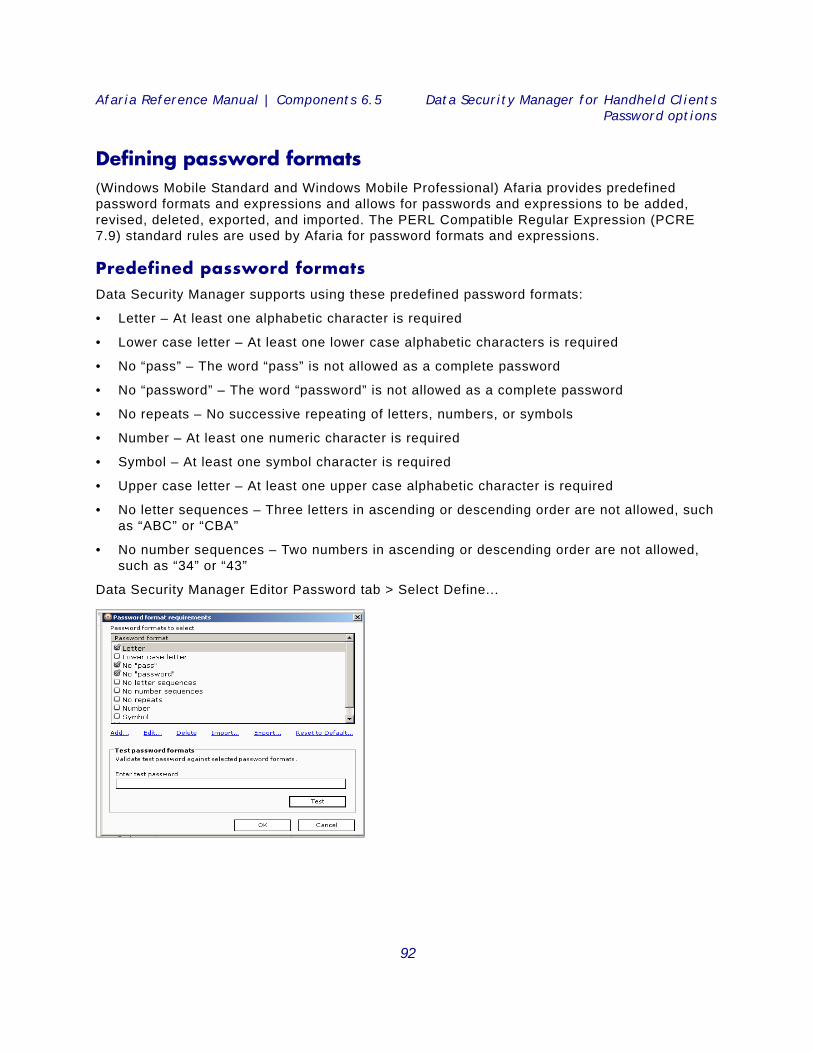
Afaria Reference Manual | Components 6.5 Data Security Manager for Handheld ClientsPassword options
Defining password formats(Windows Mobile Standard and Windows Mobile Professional) Afaria provides predefined password formats and expressions and allows for passwords and expressions to be added, revised, deleted, exported, and imported. The PERL Compatible Regular Expression (PCRE 7.9) standard rules are used by Afaria for password formats and expressions.
Predefined password formatsData Security Manager supports using these predefined password formats:
• Letter – At least one alphabetic character is required
• Lower case letter – At least one lower case alphabetic characters is required
• No “pass” – The word “pass” is not allowed as a complete password
• No “password” – The word “password” is not allowed as a complete password
• No repeats – No successive repeating of letters, numbers, or symbols
• Number – At least one numeric character is required
• Symbol – At least one symbol character is required
• Upper case letter – At least one upper case alphabetic character is required
• No letter sequences – Three letters in ascending or descending order are not allowed, such as “ABC” or “CBA”
• No number sequences – Two numbers in ascending or descending order are not allowed, such as “34” or “43”
Data Security Manager Editor Password tab > Select Define...
92
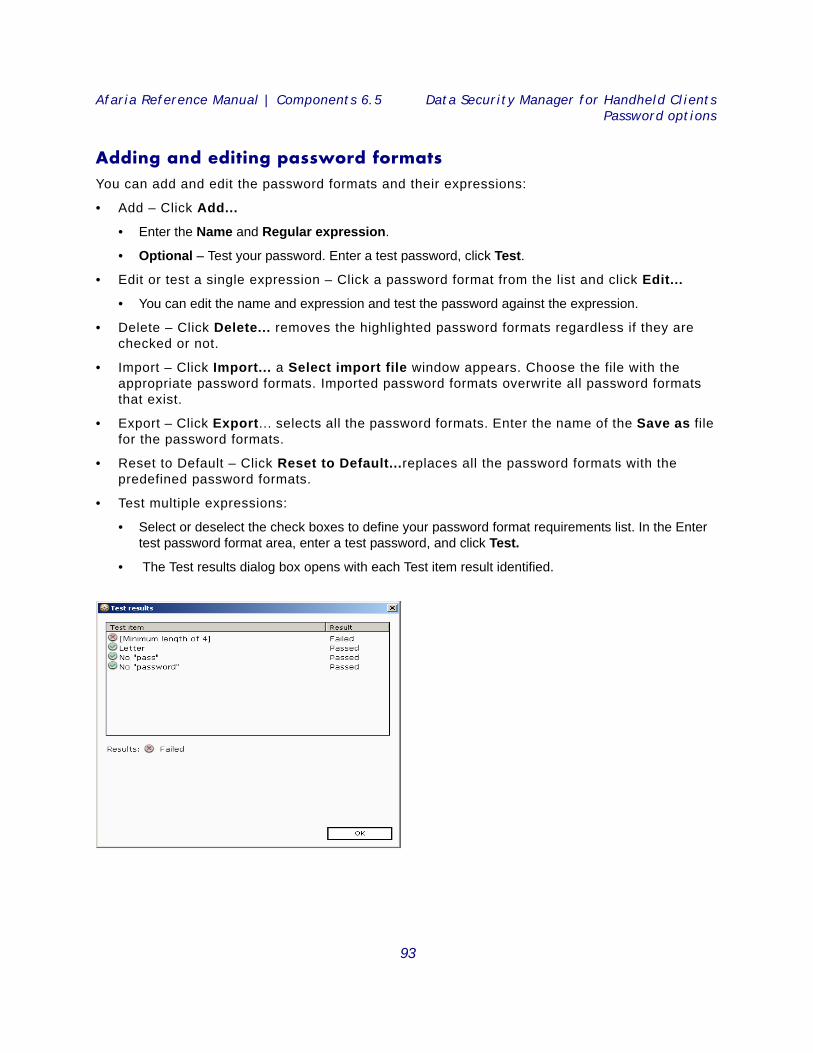
Afaria Reference Manual | Components 6.5 Data Security Manager for Handheld ClientsPassword options
Adding and editing password formatsYou can add and edit the password formats and their expressions:
• Add – Click Add...
• Enter the Name and Regular expression.
• Optional – Test your password. Enter a test password, click Test.
• Edit or test a single expression – Click a password format from the list and click Edit...
• You can edit the name and expression and test the password against the expression.
• Delete – Click Delete... removes the highlighted password formats regardless if they are checked or not.
• Import – Click Import... a Select import file window appears. Choose the file with the appropriate password formats. Imported password formats overwrite all password formats that exist.
• Export – Click Export... selects all the password formats. Enter the name of the Save as file for the password formats.
• Reset to Default – Click Reset to Default...replaces all the password formats with the predefined password formats.
• Test multiple expressions:
• Select or deselect the check boxes to define your password format requirements list. In the Enter test password format area, enter a test password, and click Test.
• The Test results dialog box opens with each Test item result identified.
93
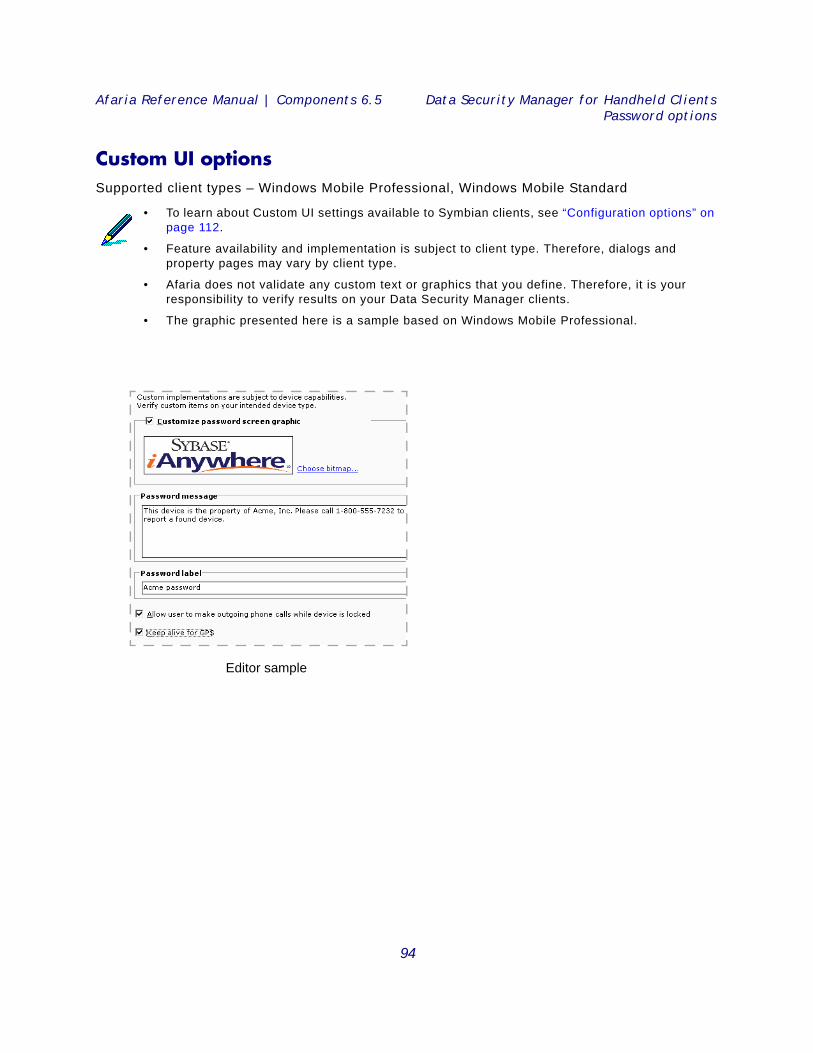
Afaria Reference Manual | Components 6.5 Data Security Manager for Handheld ClientsPassword options
Custom UI optionsSupported client types – Windows Mobile Professional, Windows Mobile Standard
• To learn about Custom UI settings available to Symbian clients, see “Configuration options” on page 112.
• Feature availability and implementation is subject to client type. Therefore, dialogs and property pages may vary by client type.
• Afaria does not validate any custom text or graphics that you define. Therefore, it is your responsibility to verify results on your Data Security Manager clients.
• The graphic presented here is a sample based on Windows Mobile Professional.
Editor sample
94
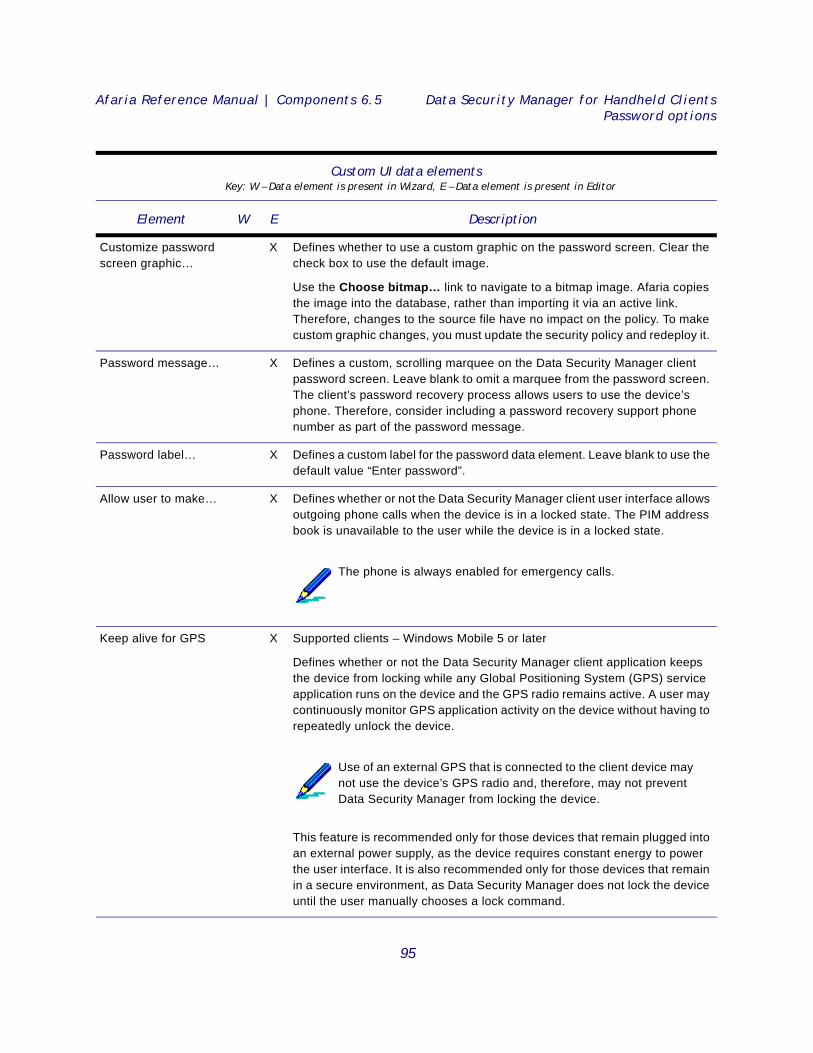
Afaria Reference Manual | Components 6.5 Data Security Manager for Handheld ClientsPassword options
Custom UI data elements Key: W – Data element is present in Wizard, E – Data element is present in Editor
Element W E Description
Customize password screen graphic…
X Defines whether to use a custom graphic on the password screen. Clear the check box to use the default image.
Use the Choose bitmap… link to navigate to a bitmap image. Afaria copies the image into the database, rather than importing it via an active link. Therefore, changes to the source file have no impact on the policy. To make custom graphic changes, you must update the security policy and redeploy it.
Password message… X Defines a custom, scrolling marquee on the Data Security Manager client password screen. Leave blank to omit a marquee from the password screen. The client’s password recovery process allows users to use the device’s phone. Therefore, consider including a password recovery support phone number as part of the password message.
Password label… X Defines a custom label for the password data element. Leave blank to use the default value “Enter password”.
Allow user to make… X Defines whether or not the Data Security Manager client user interface allows outgoing phone calls when the device is in a locked state. The PIM address book is unavailable to the user while the device is in a locked state.
Keep alive for GPS X Supported clients – Windows Mobile 5 or later
Defines whether or not the Data Security Manager client application keeps the device from locking while any Global Positioning System (GPS) service application runs on the device and the GPS radio remains active. A user may continuously monitor GPS application activity on the device without having to repeatedly unlock the device.
This feature is recommended only for those devices that remain plugged into an external power supply, as the device requires constant energy to power the user interface. It is also recommended only for those devices that remain in a secure environment, as Data Security Manager does not lock the device until the user manually chooses a lock command.
The phone is always enabled for emergency calls.
Use of an external GPS that is connected to the client device may not use the device’s GPS radio and, therefore, may not prevent Data Security Manager from locking the device.
95

Afaria Reference Manual | Components 6.5 Data Security Manager for Handheld ClientsEncryption options
Encryption options
Refer to the following topics to learn about encryption options provided by client type:
• “Windows Mobile encryption options” on page 97
• “Symbian encryption options” on page 100
• “Palm encryption options” on page 102
• Feature availability and implementation is subject to client type. Therefore, dialog boxes and property pages may vary by client type.
• Write-protected external data cards are not subject to encryption. However due to limited operating system messages at the client, attempts to encrypt protected data cards are logged in the Messages log as failed encryption attempts.
96
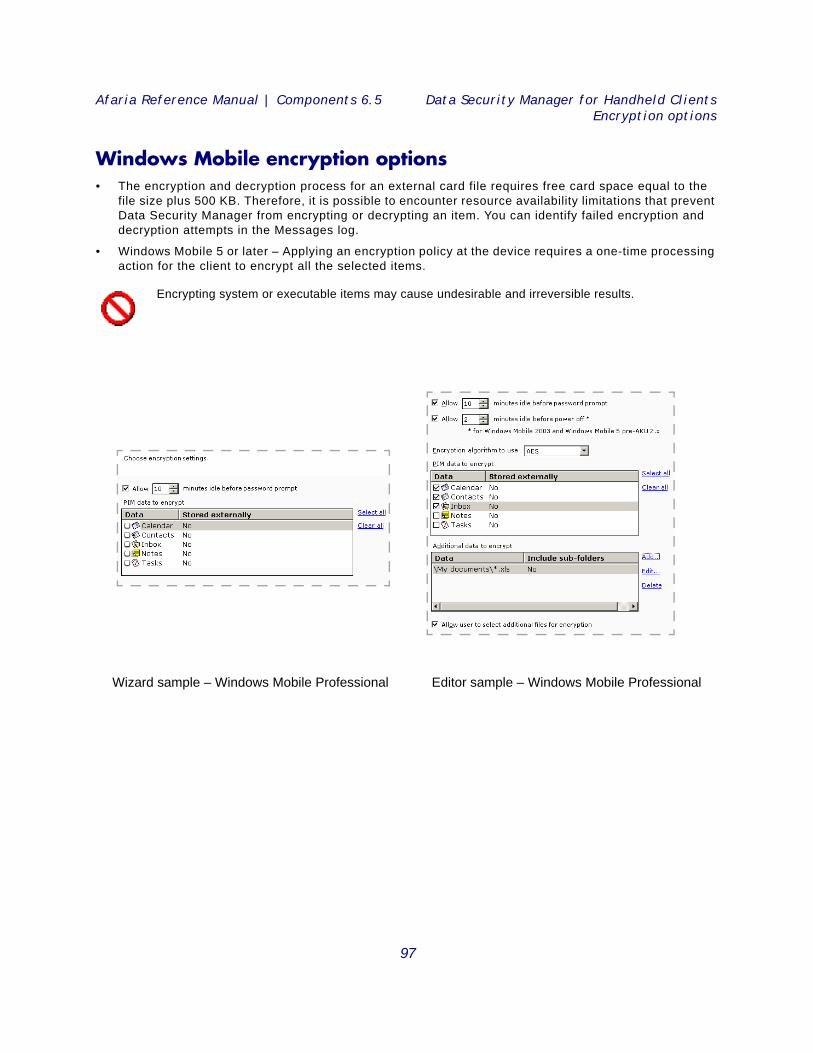
Afaria Reference Manual | Components 6.5 Data Security Manager for Handheld ClientsEncryption options
Windows Mobile encryption options• The encryption and decryption process for an external card file requires free card space equal to the
file size plus 500 KB. Therefore, it is possible to encounter resource availability limitations that prevent Data Security Manager from encrypting or decrypting an item. You can identify failed encryption and decryption attempts in the Messages log.
• Windows Mobile 5 or later – Applying an encryption policy at the device requires a one-time processing action for the client to encrypt all the selected items.
Encrypting system or executable items may cause undesirable and irreversible results.
Wizard sample – Windows Mobile Professional Editor sample – Windows Mobile Professional
97
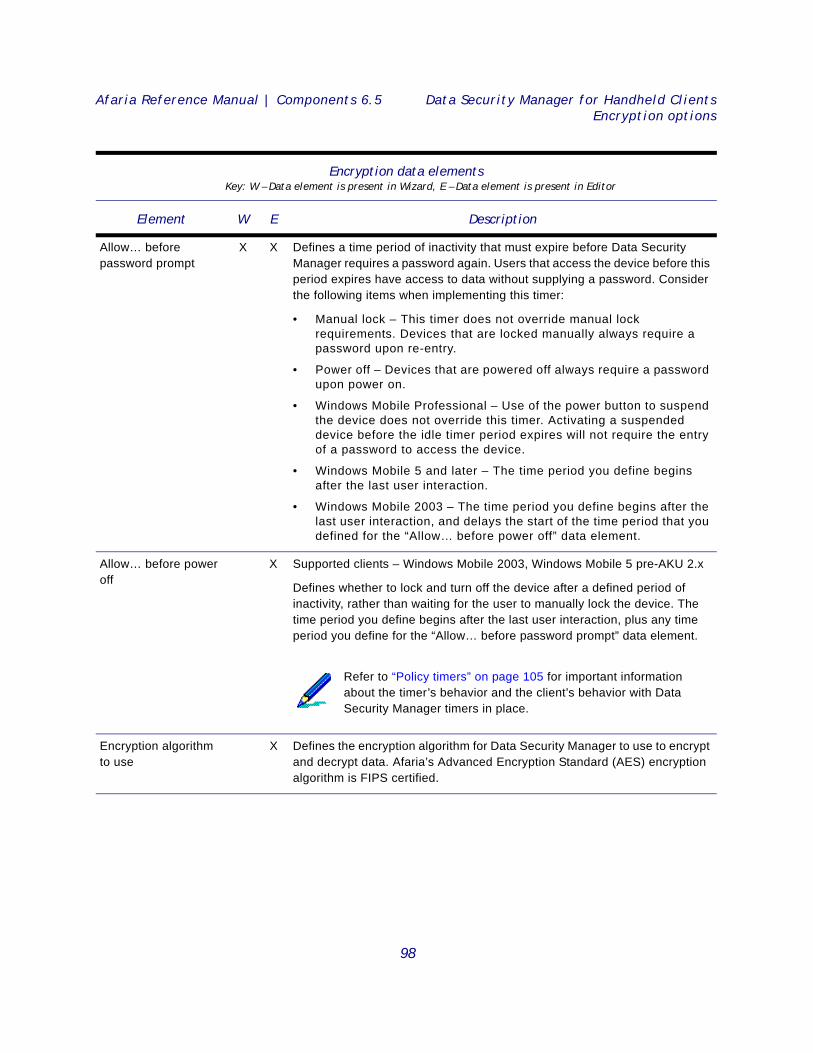
Afaria Reference Manual | Components 6.5 Data Security Manager for Handheld ClientsEncryption options
Encryption data elements Key: W – Data element is present in Wizard, E – Data element is present in Editor
Element W E Description
Allow… before password prompt
X X Defines a time period of inactivity that must expire before Data Security Manager requires a password again. Users that access the device before this period expires have access to data without supplying a password. Consider the following items when implementing this timer:
• Manual lock – This timer does not override manual lock requirements. Devices that are locked manually always require a password upon re-entry.
• Power off – Devices that are powered off always require a password upon power on.
• Windows Mobile Professional – Use of the power button to suspend the device does not override this timer. Activating a suspended device before the idle timer period expires will not require the entry of a password to access the device.
• Windows Mobile 5 and later – The time period you define begins after the last user interaction.
• Windows Mobile 2003 – The time period you define begins after the last user interaction, and delays the start of the time period that you defined for the “Allow… before power off” data element.
Allow… before power off
X Supported clients – Windows Mobile 2003, Windows Mobile 5 pre-AKU 2.x
Defines whether to lock and turn off the device after a defined period of inactivity, rather than waiting for the user to manually lock the device. The time period you define begins after the last user interaction, plus any time period you define for the “Allow… before password prompt” data element.
Encryption algorithm to use
X Defines the encryption algorithm for Data Security Manager to use to encrypt and decrypt data. Afaria’s Advanced Encryption Standard (AES) encryption algorithm is FIPS certified.
Refer to “Policy timers” on page 105 for important information about the timer’s behavior and the client’s behavior with Data Security Manager timers in place.
98

Afaria Reference Manual | Components 6.5 Data Security Manager for Handheld ClientsEncryption options
PIM data to encrypt X X Defines the PIM data items to encrypt.
Additional data to encrypt
X Identifies the additional data items you selected for encryption. See “Defining non-PIM data items for encryption” on page 110.
Allow user to select… X Supported client types – Windows Mobile Professional
Defines whether the user is allowed to use the Data Security Manager interface to select additional device data items for encryption.
Encryption data elements (Continued)Key: W – Data element is present in Wizard, E – Data element is present in Editor
Element W E Description
• Selecting the Notes PIM impacts only the note item (file type.PWI) and its embedded .WAV files. WAV files that are not embedded in a note entry are not impacted.
• Windows Mobile 5 or later clients manage Contacts, Tasks, and Calendar as a single PIM entity. Therefore, choosing any one of these items for encryption results in the policy encrypting all.
99
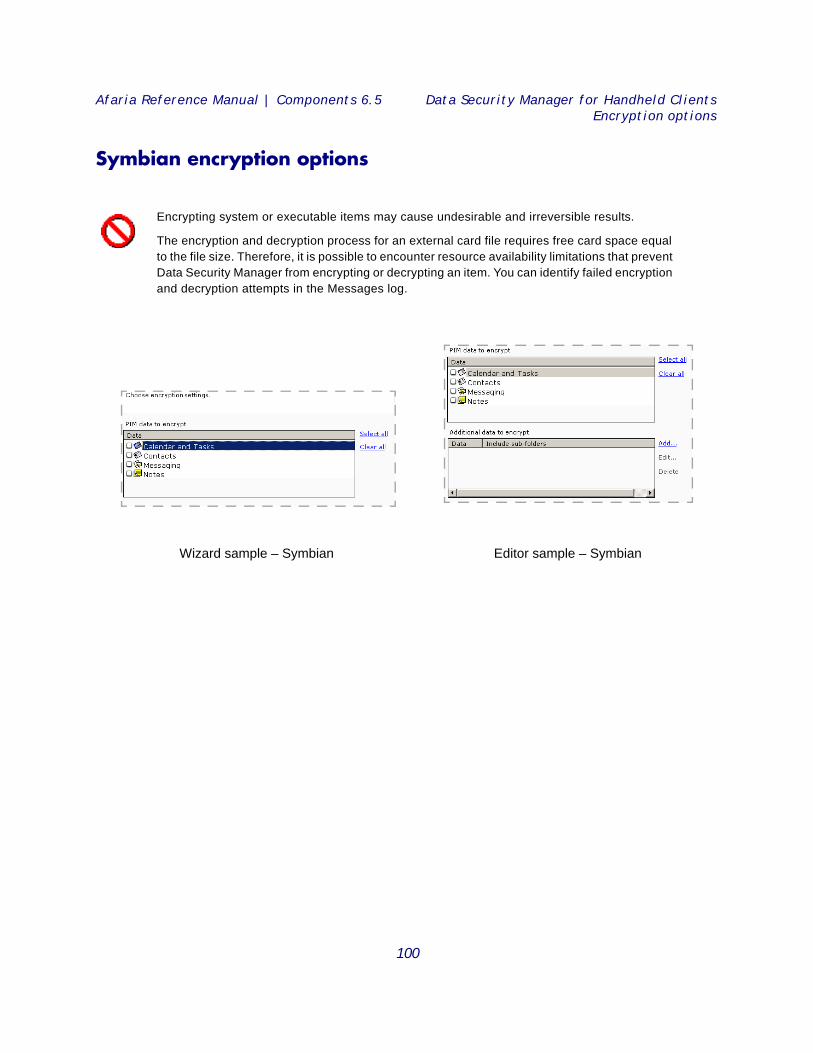
Afaria Reference Manual | Components 6.5 Data Security Manager for Handheld ClientsEncryption options
Symbian encryption options
Encrypting system or executable items may cause undesirable and irreversible results.
The encryption and decryption process for an external card file requires free card space equal to the file size. Therefore, it is possible to encounter resource availability limitations that prevent Data Security Manager from encrypting or decrypting an item. You can identify failed encryption and decryption attempts in the Messages log.
Wizard sample – Symbian Editor sample – Symbian
100
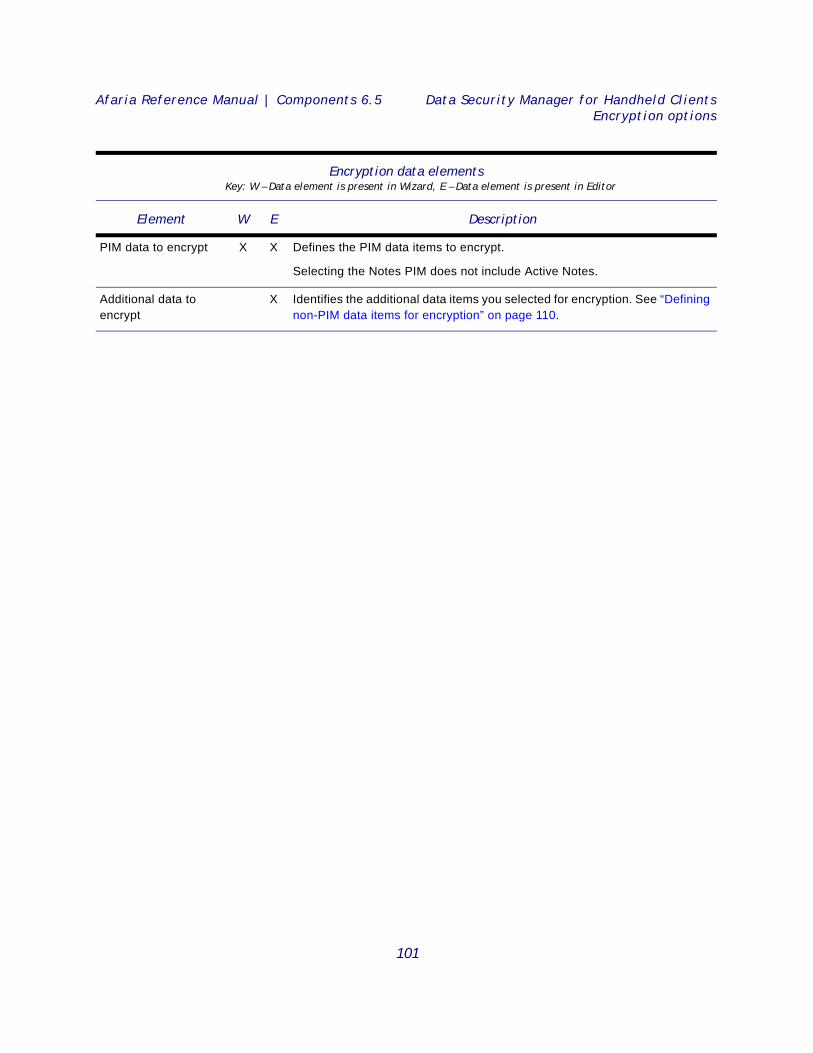
Afaria Reference Manual | Components 6.5 Data Security Manager for Handheld ClientsEncryption options
Encryption data elements Key: W – Data element is present in Wizard, E – Data element is present in Editor
Element W E Description
PIM data to encrypt X X Defines the PIM data items to encrypt.
Selecting the Notes PIM does not include Active Notes.
Additional data to encrypt
X Identifies the additional data items you selected for encryption. See “Defining non-PIM data items for encryption” on page 110.
101
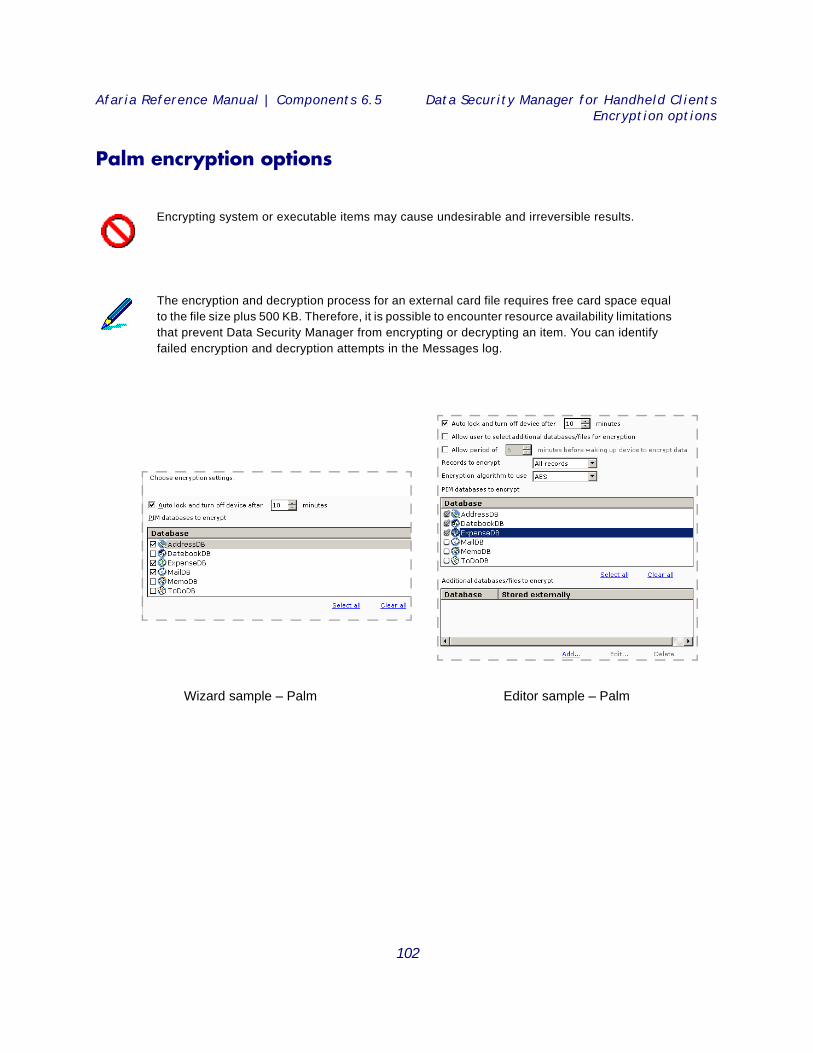
Afaria Reference Manual | Components 6.5 Data Security Manager for Handheld ClientsEncryption options
Palm encryption options
Encrypting system or executable items may cause undesirable and irreversible results.
The encryption and decryption process for an external card file requires free card space equal to the file size plus 500 KB. Therefore, it is possible to encounter resource availability limitations that prevent Data Security Manager from encrypting or decrypting an item. You can identify failed encryption and decryption attempts in the Messages log.
Wizard sample – Palm Editor sample – Palm
102
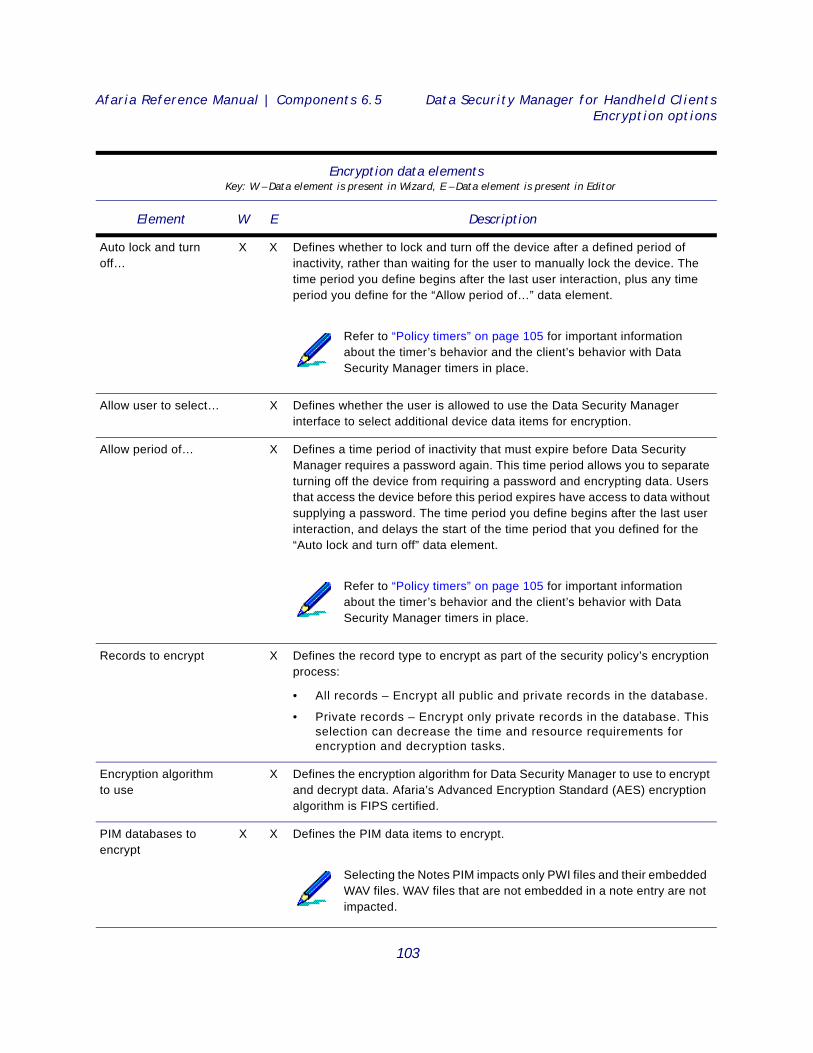
Afaria Reference Manual | Components 6.5 Data Security Manager for Handheld ClientsEncryption options
Encryption data elements Key: W – Data element is present in Wizard, E – Data element is present in Editor
Element W E Description
Auto lock and turn off…
X X Defines whether to lock and turn off the device after a defined period of inactivity, rather than waiting for the user to manually lock the device. The time period you define begins after the last user interaction, plus any time period you define for the “Allow period of…” data element.
Allow user to select… X Defines whether the user is allowed to use the Data Security Manager interface to select additional device data items for encryption.
Allow period of… X Defines a time period of inactivity that must expire before Data Security Manager requires a password again. This time period allows you to separate turning off the device from requiring a password and encrypting data. Users that access the device before this period expires have access to data without supplying a password. The time period you define begins after the last user interaction, and delays the start of the time period that you defined for the “Auto lock and turn off” data element.
Records to encrypt X Defines the record type to encrypt as part of the security policy’s encryption process:
• All records – Encrypt all public and private records in the database.
• Private records – Encrypt only private records in the database. This selection can decrease the time and resource requirements for encryption and decryption tasks.
Encryption algorithm to use
X Defines the encryption algorithm for Data Security Manager to use to encrypt and decrypt data. Afaria’s Advanced Encryption Standard (AES) encryption algorithm is FIPS certified.
PIM databases to encrypt
X X Defines the PIM data items to encrypt.
Refer to “Policy timers” on page 105 for important information about the timer’s behavior and the client’s behavior with Data Security Manager timers in place.
Refer to “Policy timers” on page 105 for important information about the timer’s behavior and the client’s behavior with Data Security Manager timers in place.
Selecting the Notes PIM impacts only PWI files and their embedded WAV files. WAV files that are not embedded in a note entry are not impacted.
103
Afaria Reference Manual | Components 6.5 Data Security Manager for Handheld ClientsEncryption options
Additional databases to…
X Defines the additional data items you selected for encryption. See “Defining non-PIM data items for encryption” on page 110.
Encryption data elements (Continued)Key: W – Data element is present in Wizard, E – Data element is present in Editor
Element W E Description
104
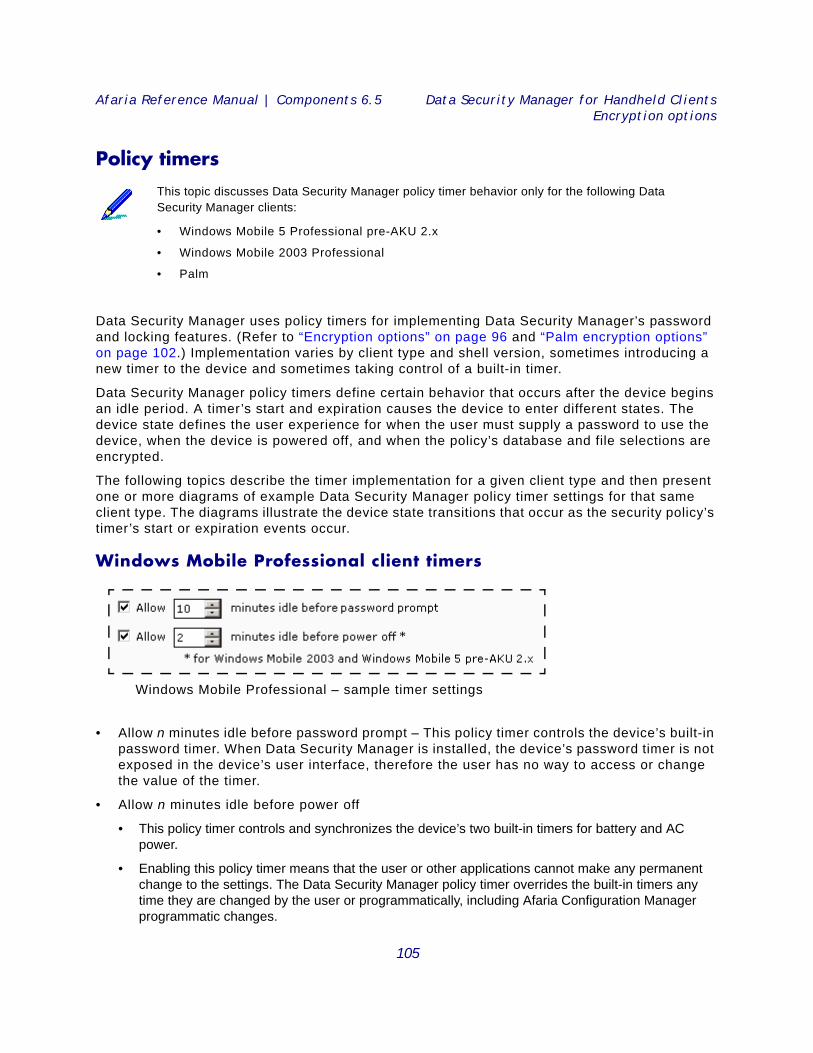
Afaria Reference Manual | Components 6.5 Data Security Manager for Handheld ClientsEncryption options
Policy timers
Data Security Manager uses policy timers for implementing Data Security Manager’s password and locking features. (Refer to “Encryption options” on page 96 and “Palm encryption options” on page 102.) Implementation varies by client type and shell version, sometimes introducing a new timer to the device and sometimes taking control of a built-in timer.
Data Security Manager policy timers define certain behavior that occurs after the device begins an idle period. A timer’s start and expiration causes the device to enter different states. The device state defines the user experience for when the user must supply a password to use the device, when the device is powered off, and when the policy’s database and file selections are encrypted.
The following topics describe the timer implementation for a given client type and then present one or more diagrams of example Data Security Manager policy timer settings for that same client type. The diagrams illustrate the device state transitions that occur as the security policy’s timer’s start or expiration events occur.
Windows Mobile Professional client timers
• Allow n minutes idle before password prompt – This policy timer controls the device’s built-in password timer. When Data Security Manager is installed, the device’s password timer is not exposed in the device’s user interface, therefore the user has no way to access or change the value of the timer.
• Allow n minutes idle before power off
• This policy timer controls and synchronizes the device’s two built-in timers for battery and AC power.
• Enabling this policy timer means that the user or other applications cannot make any permanent change to the settings. The Data Security Manager policy timer overrides the built-in timers any time they are changed by the user or programmatically, including Afaria Configuration Manager programmatic changes.
This topic discusses Data Security Manager policy timer behavior only for the following Data Security Manager clients:
• Windows Mobile 5 Professional pre-AKU 2.x
• Windows Mobile 2003 Professional
• Palm
Windows Mobile Professional – sample timer settings
105
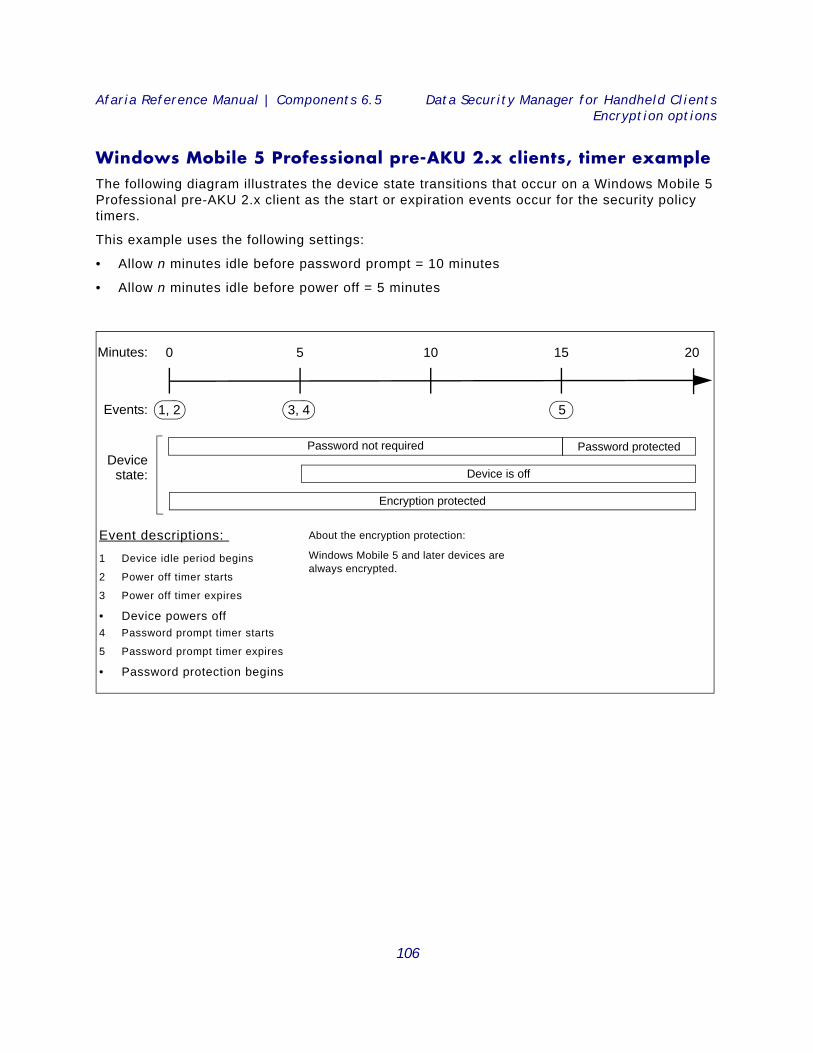
Afaria Reference Manual | Components 6.5 Data Security Manager for Handheld ClientsEncryption options
Windows Mobile 5 Professional pre-AKU 2.x clients, timer example The following diagram illustrates the device state transitions that occur on a Windows Mobile 5 Professional pre-AKU 2.x client as the start or expiration events occur for the security policy timers.
This example uses the following settings:
• Allow n minutes idle before password prompt = 10 minutes
• Allow n minutes idle before power off = 5 minutes
51, 2 3, 4
Minutes:
Events:
0 5 10 15 20
Encryption protected
Password protectedPassword not required
Device is off
Event descriptions:
1 Device idle period begins
2 Power off timer starts
3 Power off timer expires
• Device powers off 4 Password prompt timer starts
5 Password prompt timer expires
• Password protection begins
Devicestate:
About the encryption protection:
Windows Mobile 5 and later devices are always encrypted.
106
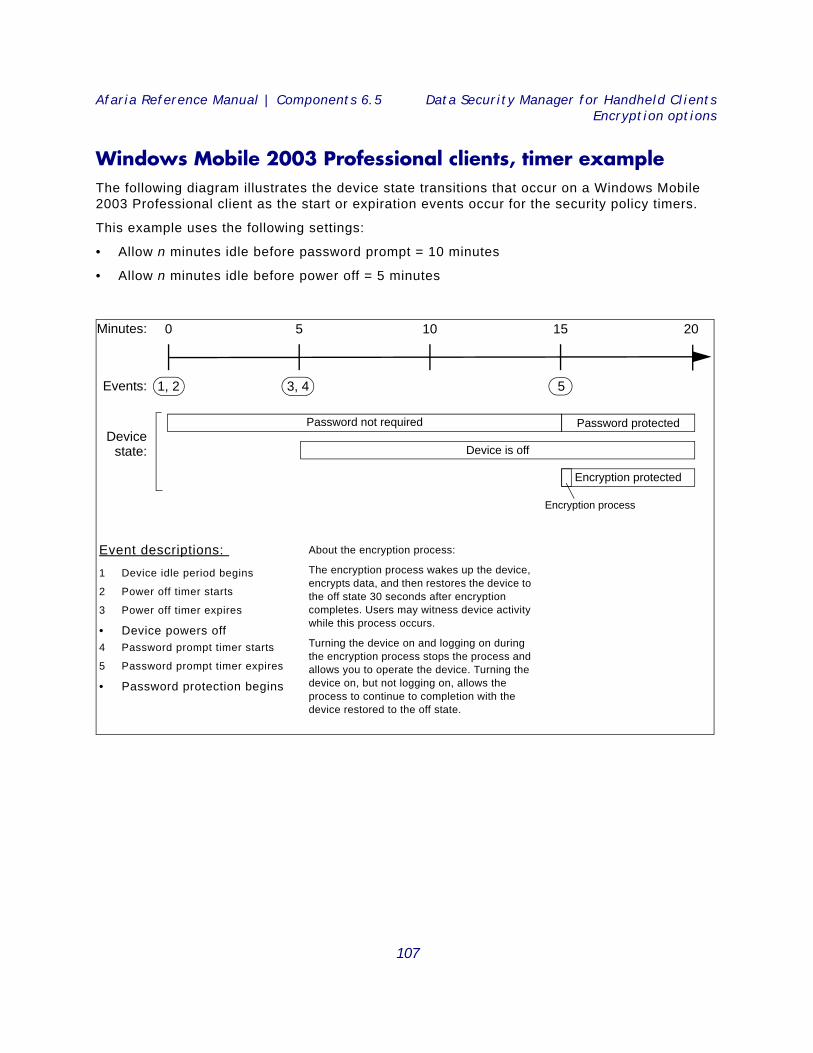
Afaria Reference Manual | Components 6.5 Data Security Manager for Handheld ClientsEncryption options
Windows Mobile 2003 Professional clients, timer example The following diagram illustrates the device state transitions that occur on a Windows Mobile 2003 Professional client as the start or expiration events occur for the security policy timers.
This example uses the following settings:
• Allow n minutes idle before password prompt = 10 minutes
• Allow n minutes idle before power off = 5 minutes
51, 2 3, 4
Minutes:
Events:
0 5 10 15 20
Encryption protected
Password protectedPassword not required
Device is off
Event descriptions:
1 Device idle period begins
2 Power off timer starts
3 Power off timer expires
• Device powers off 4 Password prompt timer starts
5 Password prompt timer expires
• Password protection begins
Devicestate:
Encryption process
About the encryption process:
The encryption process wakes up the device, encrypts data, and then restores the device to the off state 30 seconds after encryption completes. Users may witness device activity while this process occurs.
Turning the device on and logging on during the encryption process stops the process and allows you to operate the device. Turning the device on, but not logging on, allows the process to continue to completion with the device restored to the off state.
107
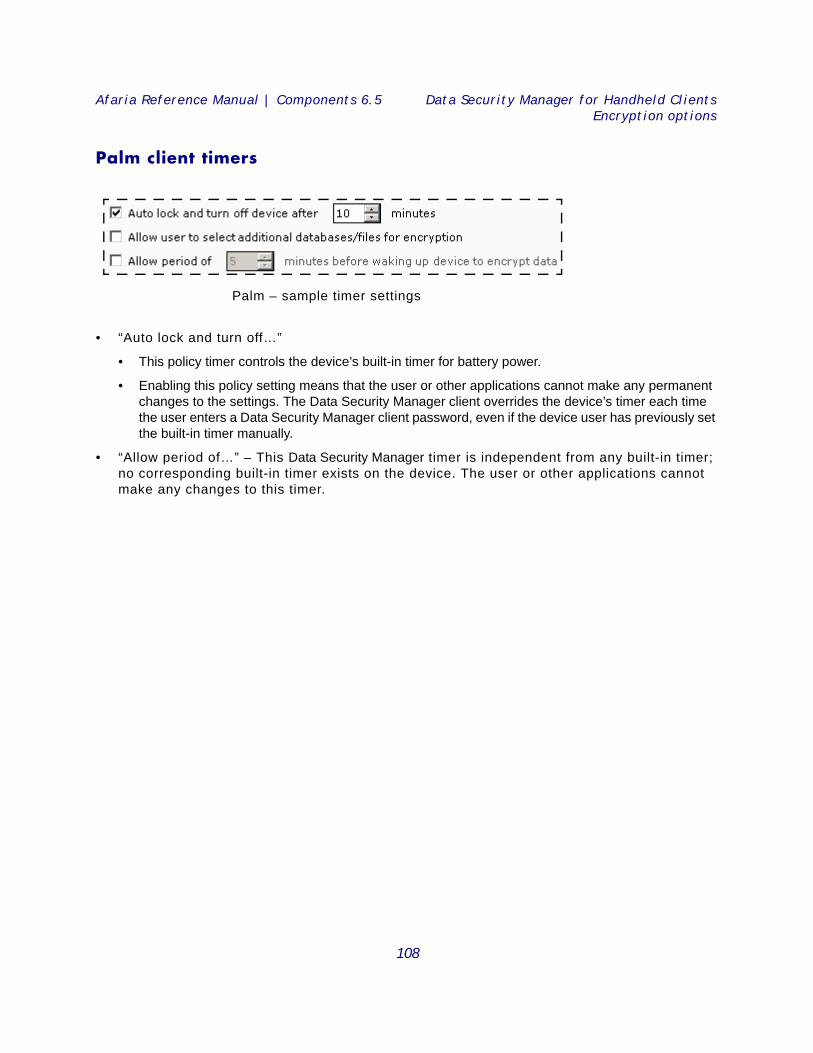
Afaria Reference Manual | Components 6.5 Data Security Manager for Handheld ClientsEncryption options
Palm client timers
• “Auto lock and turn off…”
• This policy timer controls the device’s built-in timer for battery power.
• Enabling this policy setting means that the user or other applications cannot make any permanent changes to the settings. The Data Security Manager client overrides the device’s timer each time the user enters a Data Security Manager client password, even if the device user has previously set the built-in timer manually.
• “Allow period of…” – This Data Security Manager timer is independent from any built-in timer; no corresponding built-in timer exists on the device. The user or other applications cannot make any changes to this timer.
Palm – sample timer settings
108
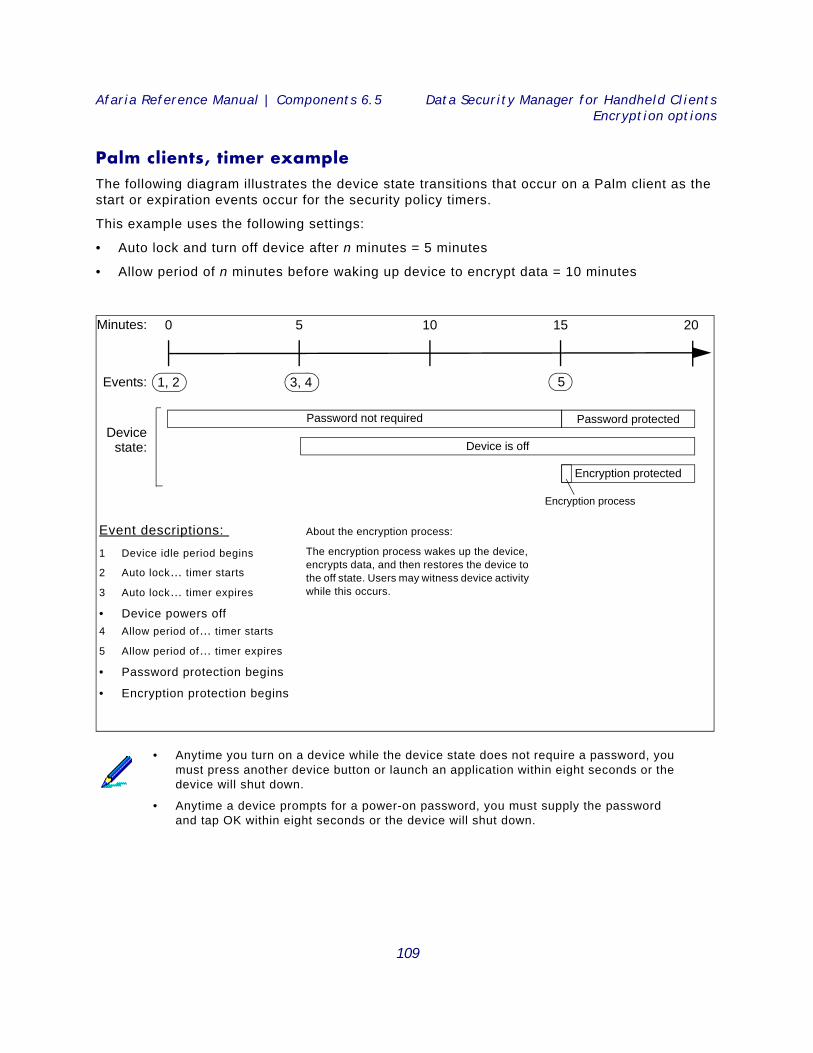
Afaria Reference Manual | Components 6.5 Data Security Manager for Handheld ClientsEncryption options
Palm clients, timer example The following diagram illustrates the device state transitions that occur on a Palm client as the start or expiration events occur for the security policy timers.
This example uses the following settings:
• Auto lock and turn off device after n minutes = 5 minutes
• Allow period of n minutes before waking up device to encrypt data = 10 minutes
• Anytime you turn on a device while the device state does not require a password, you must press another device button or launch an application within eight seconds or the device will shut down.
• Anytime a device prompts for a power-on password, you must supply the password and tap OK within eight seconds or the device will shut down.
51, 2 3, 4
Minutes:
Events:
0 5 10 15 20
Encryption protected
Password protectedPassword not required
Device is off
Event descriptions:
1 Device idle period begins
2 Auto lock… timer starts
3 Auto lock… timer expires
• Device powers off 4 Allow period of… timer starts
5 Allow period of… timer expires
• Password protection begins
• Encryption protection begins
Devicestate:
Encryption process
About the encryption process:
The encryption process wakes up the device, encrypts data, and then restores the device to the off state. Users may witness device activity while this occurs.
109
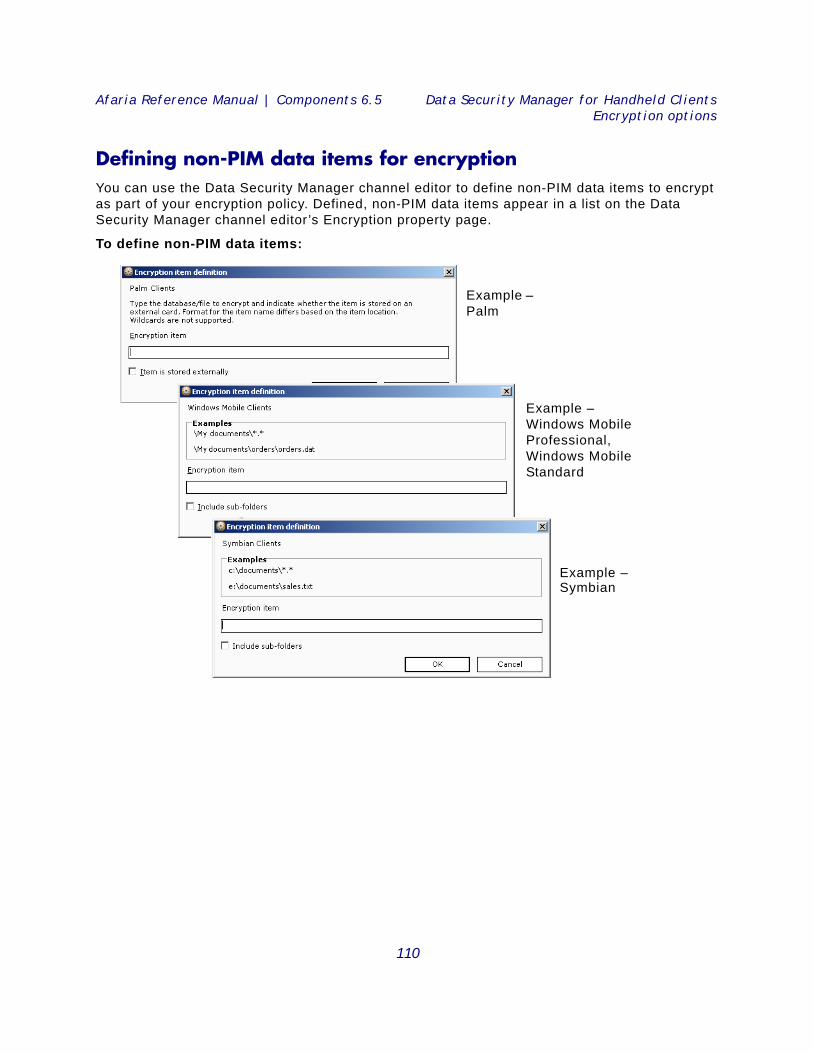
Afaria Reference Manual | Components 6.5 Data Security Manager for Handheld ClientsEncryption options
Defining non-PIM data items for encryption You can use the Data Security Manager channel editor to define non-PIM data items to encrypt as part of your encryption policy. Defined, non-PIM data items appear in a list on the Data Security Manager channel editor’s Encryption property page.
To define non-PIM data items:
Example – Palm
Example – Windows Mobile Professional, Windows MobileStandard
Example – Symbian
110
Afaria Reference Manual | Components 6.5 Data Security Manager for Handheld ClientsEncryption options
111
1 Define the item in the Encryption item data box, according to the examples provided in the dialog. Definition formats may vary for local and external data items.
• Windows Mobile – Refer to “Path and file name data items” on page 122 for more information about defining items and using wildcard characters.
• Symbian, Windows Mobile 5 and later – Select the Include sub-folders check box to include nested folders in the item definition.
• Symbian – Refer to “Path and file name data items” on page 122 for more information about defining items and using wildcard characters.
• Palm – Use the Item is stored externally check box to indicate whether the item is local or external.
2 Click OK to save the definition and return to the property page.
To change an item definition, select an item from the encryption item list and select Edit….
To delete an item definition, select an item from the encryption list and select Delete.
Windows Mobile Professional and Windows Mobile Standard item definitions must include a path to an external card in order to define data items that reside on the card.
• Windows Mobile Professional 5 and later, Windows Mobile Standard – Use of a Data Security Manager policy that encrypts external card data is not recommended if you also use Configuration Manager to disable the use of external cards. Depending on the sequence of channel deployment, the conflicting settings may result in no encryption on the card or encrypted but inaccessible data on the card. See “Port Control page” on page 59 for more about disabling external data cards on a device.
• Symbian – Use of Data Security Manager to encrypt data is not recommended if you also use device encryption.
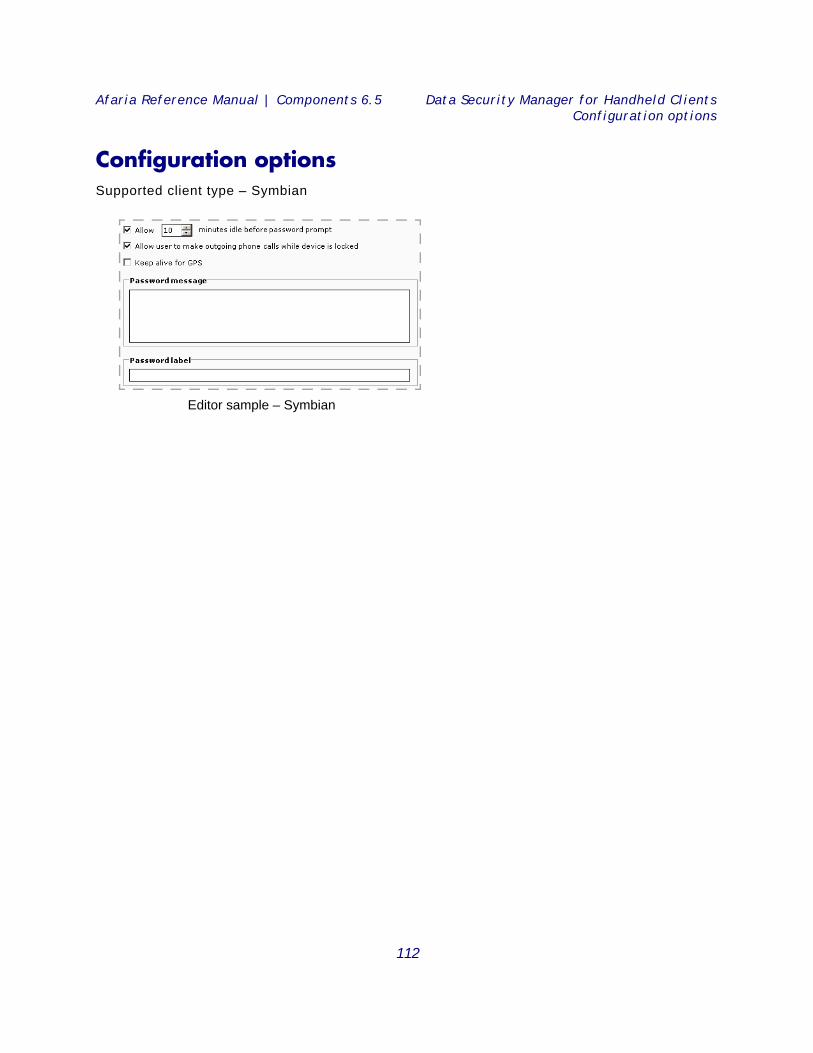
Afaria Reference Manual | Components 6.5 Data Security Manager for Handheld ClientsConfiguration options
Configuration options Supported client type – Symbian
Editor sample – Symbian
112
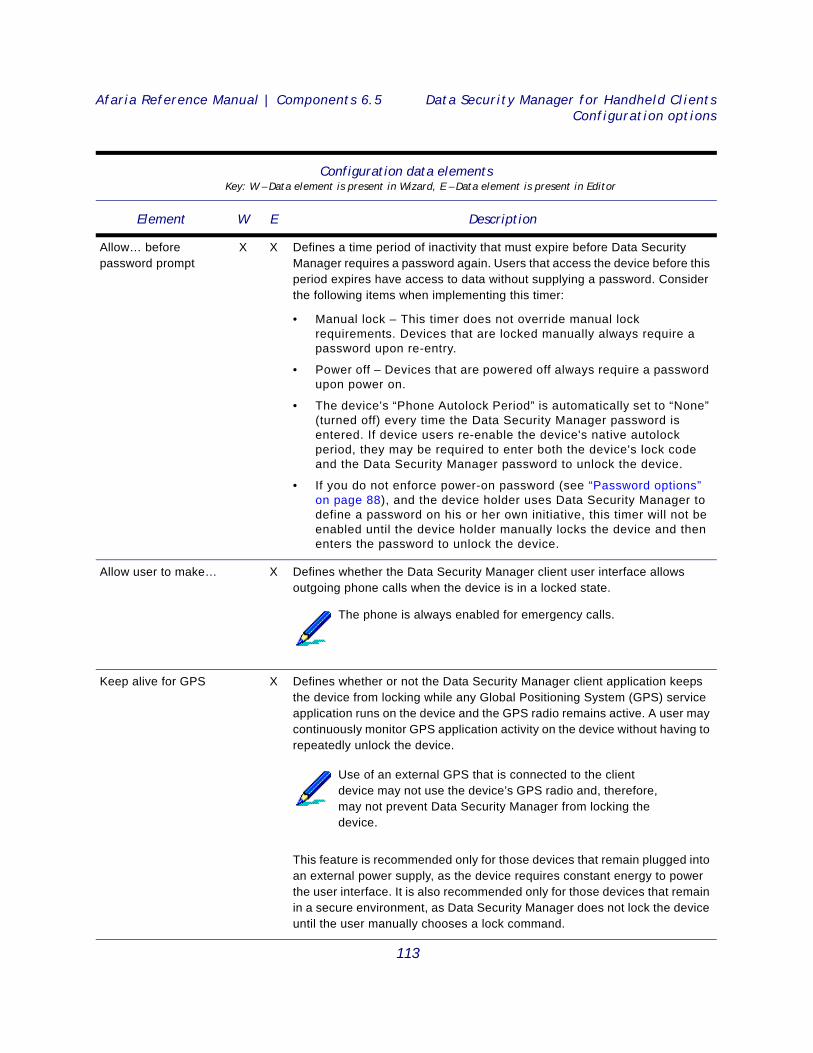
Afaria Reference Manual | Components 6.5 Data Security Manager for Handheld ClientsConfiguration options
Configuration data elements Key: W – Data element is present in Wizard, E – Data element is present in Editor
Element W E Description
Allow… before password prompt
X X Defines a time period of inactivity that must expire before Data Security Manager requires a password again. Users that access the device before this period expires have access to data without supplying a password. Consider the following items when implementing this timer:
• Manual lock – This timer does not override manual lock requirements. Devices that are locked manually always require a password upon re-entry.
• Power off – Devices that are powered off always require a password upon power on.
• The device's “Phone Autolock Period” is automatically set to “None” (turned off) every time the Data Security Manager password is entered. If device users re-enable the device's native autolock period, they may be required to enter both the device's lock code and the Data Security Manager password to unlock the device.
• If you do not enforce power-on password (see “Password options” on page 88), and the device holder uses Data Security Manager to define a password on his or her own initiative, this timer will not be enabled until the device holder manually locks the device and then enters the password to unlock the device.
Allow user to make… X Defines whether the Data Security Manager client user interface allows outgoing phone calls when the device is in a locked state.
Keep alive for GPS X Defines whether or not the Data Security Manager client application keeps the device from locking while any Global Positioning System (GPS) service application runs on the device and the GPS radio remains active. A user may continuously monitor GPS application activity on the device without having to repeatedly unlock the device.
This feature is recommended only for those devices that remain plugged into an external power supply, as the device requires constant energy to power the user interface. It is also recommended only for those devices that remain in a secure environment, as Data Security Manager does not lock the device until the user manually chooses a lock command.
The phone is always enabled for emergency calls.
Use of an external GPS that is connected to the client device may not use the device’s GPS radio and, therefore, may not prevent Data Security Manager from locking the device.
113
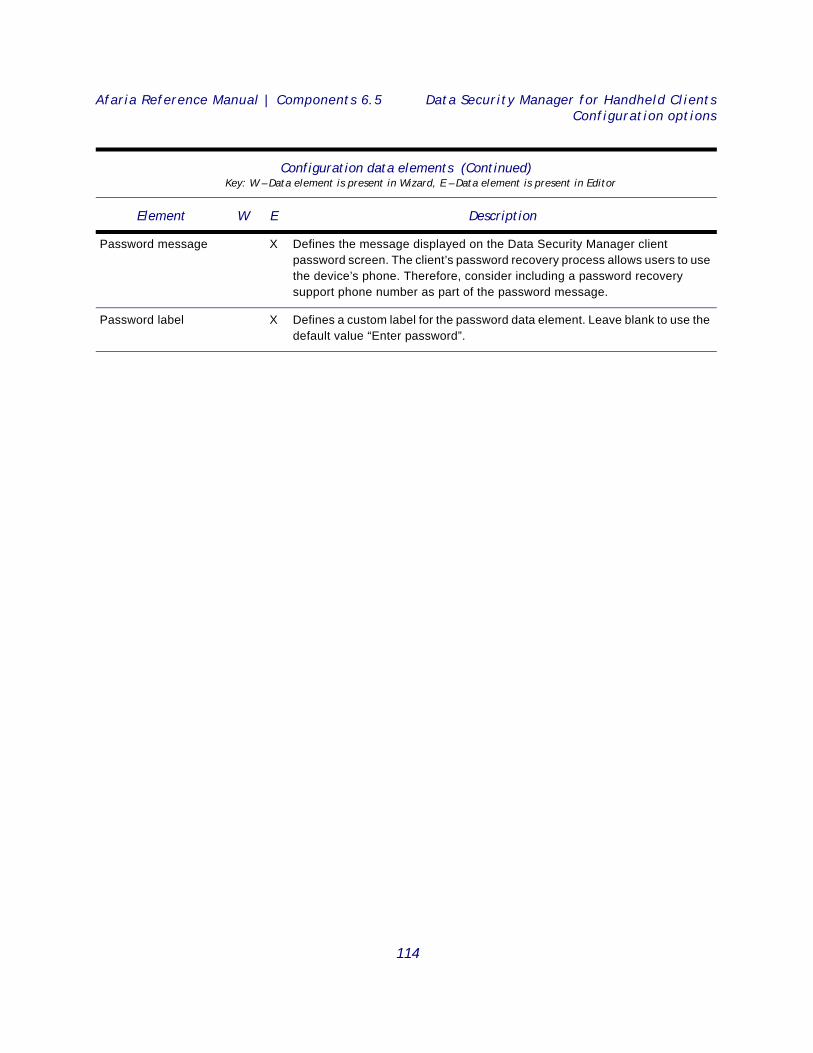
Afaria Reference Manual | Components 6.5 Data Security Manager for Handheld ClientsConfiguration options
Password message X Defines the message displayed on the Data Security Manager client password screen. The client’s password recovery process allows users to use the device’s phone. Therefore, consider including a password recovery support phone number as part of the password message.
Password label X Defines a custom label for the password data element. Leave blank to use the default value “Enter password”.
Configuration data elements (Continued)Key: W – Data element is present in Wizard, E – Data element is present in Editor
Element W E Description
114
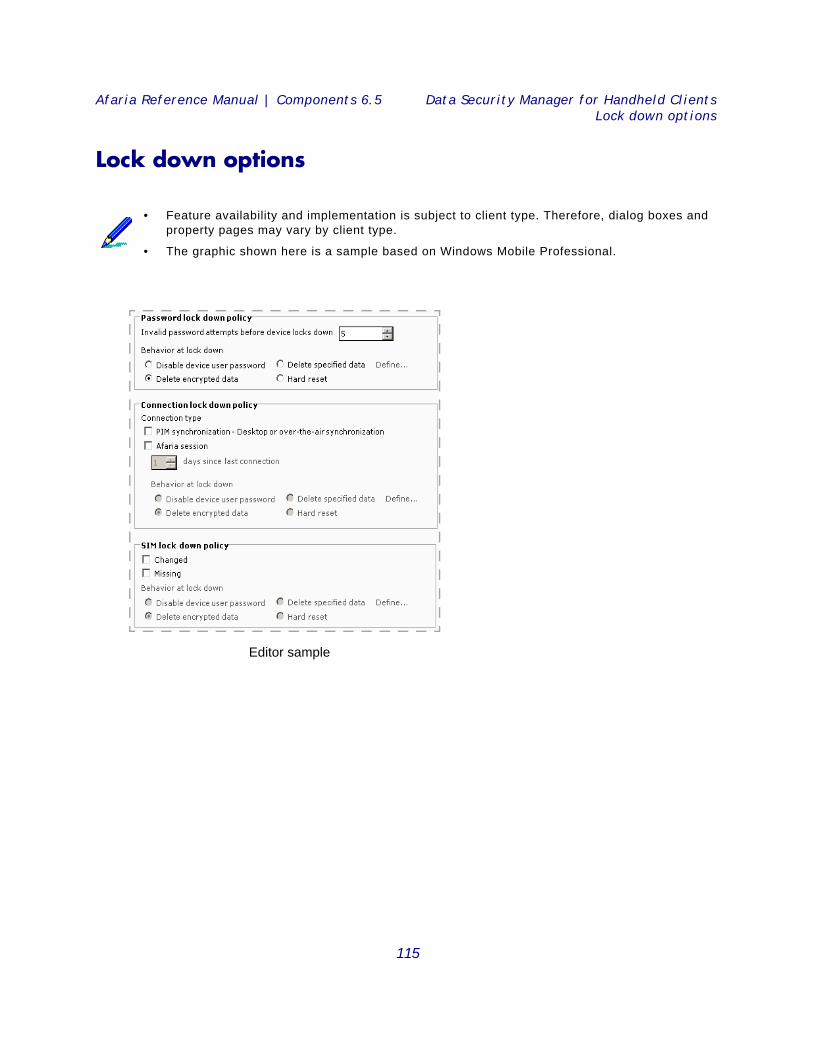
Afaria Reference Manual | Components 6.5 Data Security Manager for Handheld ClientsLock down options
Lock down options
• Feature availability and implementation is subject to client type. Therefore, dialog boxes and property pages may vary by client type.
• The graphic shown here is a sample based on Windows Mobile Professional.
Editor sample
115
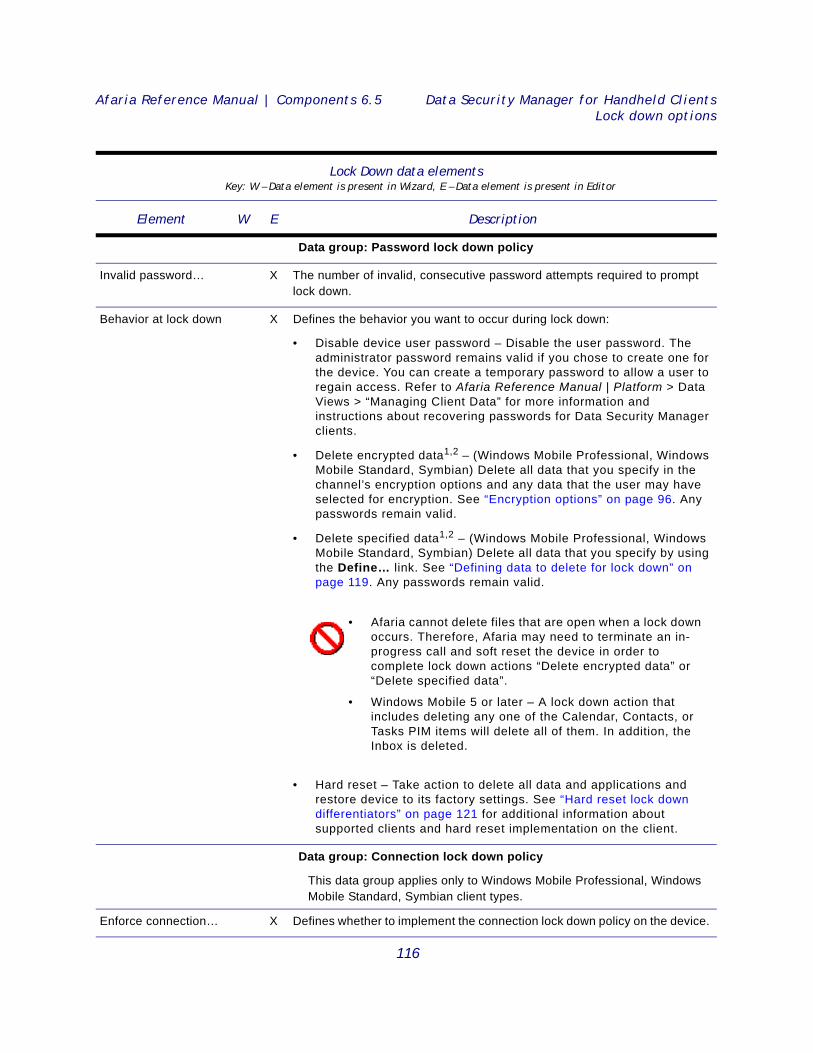
Afaria Reference Manual | Components 6.5 Data Security Manager for Handheld ClientsLock down options
Lock Down data elements Key: W – Data element is present in Wizard, E – Data element is present in Editor
Element W E Description
Data group: Password lock down policy
Invalid password… X The number of invalid, consecutive password attempts required to prompt lock down.
Behavior at lock down X Defines the behavior you want to occur during lock down:
• Disable device user password – Disable the user password. The administrator password remains valid if you chose to create one for the device. You can create a temporary password to allow a user to regain access. Refer to Afaria Reference Manual | Platform > Data Views > “Managing Client Data” for more information and instructions about recovering passwords for Data Security Manager clients.
• Delete encrypted data1,2 – (Windows Mobile Professional, Windows Mobile Standard, Symbian) Delete all data that you specify in the channel’s encryption options and any data that the user may have selected for encryption. See “Encryption options” on page 96. Any passwords remain valid.
• Delete specified data1,2 – (Windows Mobile Professional, Windows Mobile Standard, Symbian) Delete all data that you specify by using the Define… link. See “Defining data to delete for lock down” on page 119. Any passwords remain valid.
• Hard reset – Take action to delete all data and applications and restore device to its factory settings. See “Hard reset lock down differentiators” on page 121 for additional information about supported clients and hard reset implementation on the client.
Data group: Connection lock down policy
This data group applies only to Windows Mobile Professional, Windows Mobile Standard, Symbian client types.
Enforce connection… X Defines whether to implement the connection lock down policy on the device.
• Afaria cannot delete files that are open when a lock down occurs. Therefore, Afaria may need to terminate an in-progress call and soft reset the device in order to complete lock down actions “Delete encrypted data” or “Delete specified data”.
• Windows Mobile 5 or later – A lock down action that includes deleting any one of the Calendar, Contacts, or Tasks PIM items will delete all of them. In addition, the Inbox is deleted.
116
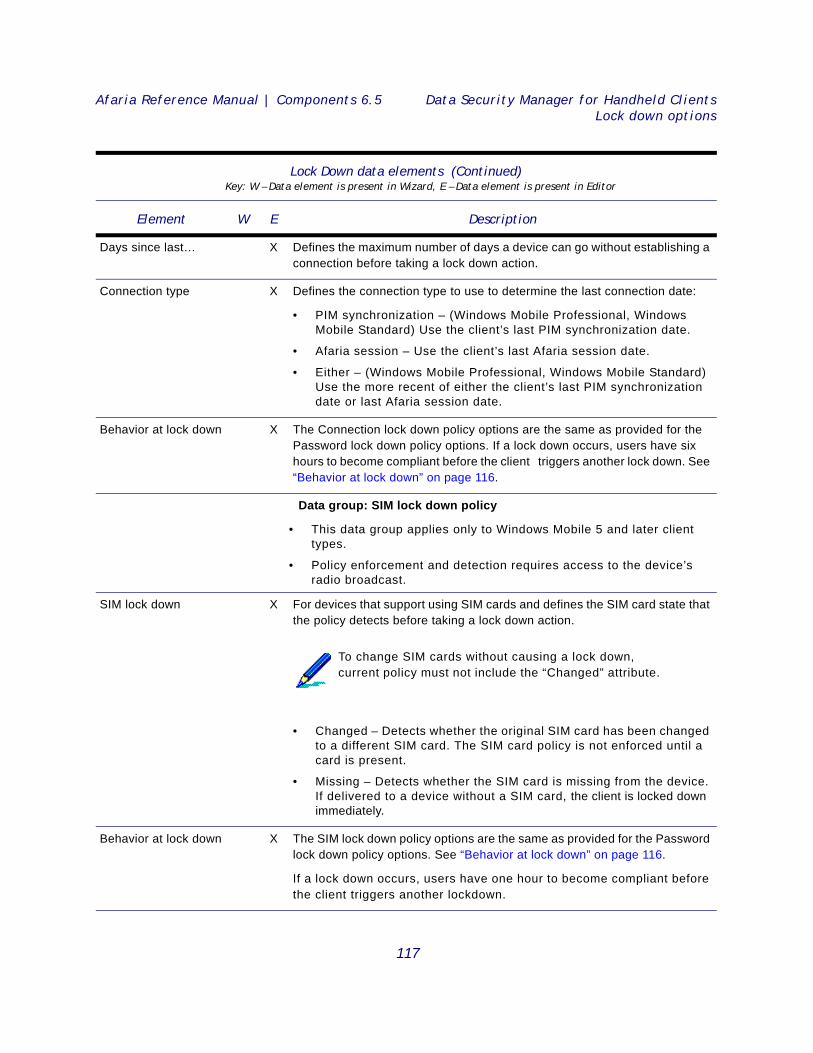
Afaria Reference Manual | Components 6.5 Data Security Manager for Handheld ClientsLock down options
Days since last… X Defines the maximum number of days a device can go without establishing a connection before taking a lock down action.
Connection type X Defines the connection type to use to determine the last connection date:
• PIM synchronization – (Windows Mobile Professional, Windows Mobile Standard) Use the client’s last PIM synchronization date.
• Afaria session – Use the client’s last Afaria session date.
• Either – (Windows Mobile Professional, Windows Mobile Standard) Use the more recent of either the client’s last PIM synchronization date or last Afaria session date.
Behavior at lock down X The Connection lock down policy options are the same as provided for the Password lock down policy options. If a lock down occurs, users have six hours to become compliant before the client triggers another lock down. See “Behavior at lock down” on page 116.
Data group: SIM lock down policy
• This data group applies only to Windows Mobile 5 and later client types.
• Policy enforcement and detection requires access to the device’s radio broadcast.
SIM lock down X For devices that support using SIM cards and defines the SIM card state that the policy detects before taking a lock down action.
• Changed – Detects whether the original SIM card has been changed to a different SIM card. The SIM card policy is not enforced until a card is present.
• Missing – Detects whether the SIM card is missing from the device. If delivered to a device without a SIM card, the client is locked down immediately.
Behavior at lock down X The SIM lock down policy options are the same as provided for the Password lock down policy options. See “Behavior at lock down” on page 116.
If a lock down occurs, users have one hour to become compliant before the client triggers another lockdown.
Lock Down data elements (Continued)Key: W – Data element is present in Wizard, E – Data element is present in Editor
Element W E Description
To change SIM cards without causing a lock down, current policy must not include the “Changed” attribute.
117
Afaria Reference Manual | Components 6.5 Data Security Manager for Handheld ClientsLock down options
1. (Windows Mobile Standard and Widows Mobile Professional) Devices that have policies that include either “Delete en-crypted data” or “Delete specified data” and experience a lock down have lost the data that was indicated in the policy. Afariadeletes the client-desktop synchronization partnership, which includes any mail synchronization profile, in order to preventhaving your desktop synchronization software interpret the delete data action as the most current transaction. This avoidshaving your desktop data synchronized to match the device’s delete actions. This prevents having data loss both on thedevice and on the desktop, which may be unintended. You can resume synchronization activity with your companion PC after first establishing a new partnership between yourdevice and the synchronization source..2. (Symbian) Devices that have policies that include either “Delete encrypted data” or “Delete specified data” and experiencea lock down have lost the data that was indicated in the policy. Afaria deletes the Mail for Exchange or Microsoft Office mailsynchronization profiles, in order to prevent having your synchronized processes interpret the delete data action as the mostcurrent transaction. This avoids having data loss both on the device and on the synchronization source.You can resume synchronization activity after first establishing a new profile between your device and the synchronizationsource. Using PC Suite with a Data Security Manager client as your synchronization source is unsupported and may cause unde-sirable and irreversible results.
118
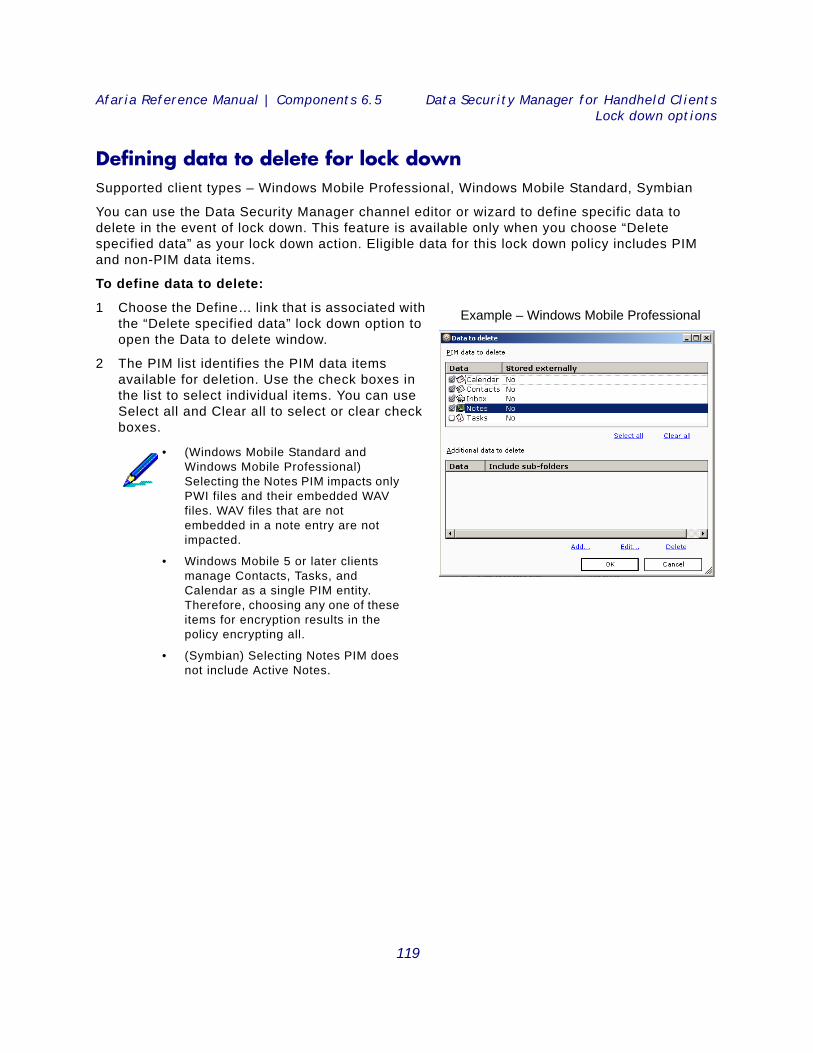
Afaria Reference Manual | Components 6.5 Data Security Manager for Handheld ClientsLock down options
Defining data to delete for lock down Supported client types – Windows Mobile Professional, Windows Mobile Standard, Symbian
You can use the Data Security Manager channel editor or wizard to define specific data to delete in the event of lock down. This feature is available only when you choose “Delete specified data” as your lock down action. Eligible data for this lock down policy includes PIM and non-PIM data items.
To define data to delete:
1 Choose the Define… link that is associated with the “Delete specified data” lock down option to open the Data to delete window.
2 The PIM list identifies the PIM data items available for deletion. Use the check boxes in the list to select individual items. You can use Select all and Clear all to select or clear check boxes.
• (Windows Mobile Standard and Windows Mobile Professional) Selecting the Notes PIM impacts only PWI files and their embedded WAV files. WAV files that are not embedded in a note entry are not impacted.
• Windows Mobile 5 or later clients manage Contacts, Tasks, and Calendar as a single PIM entity. Therefore, choosing any one of these items for encryption results in the policy encrypting all.
• (Symbian) Selecting Notes PIM does not include Active Notes.
Example – Windows Mobile Professional
119
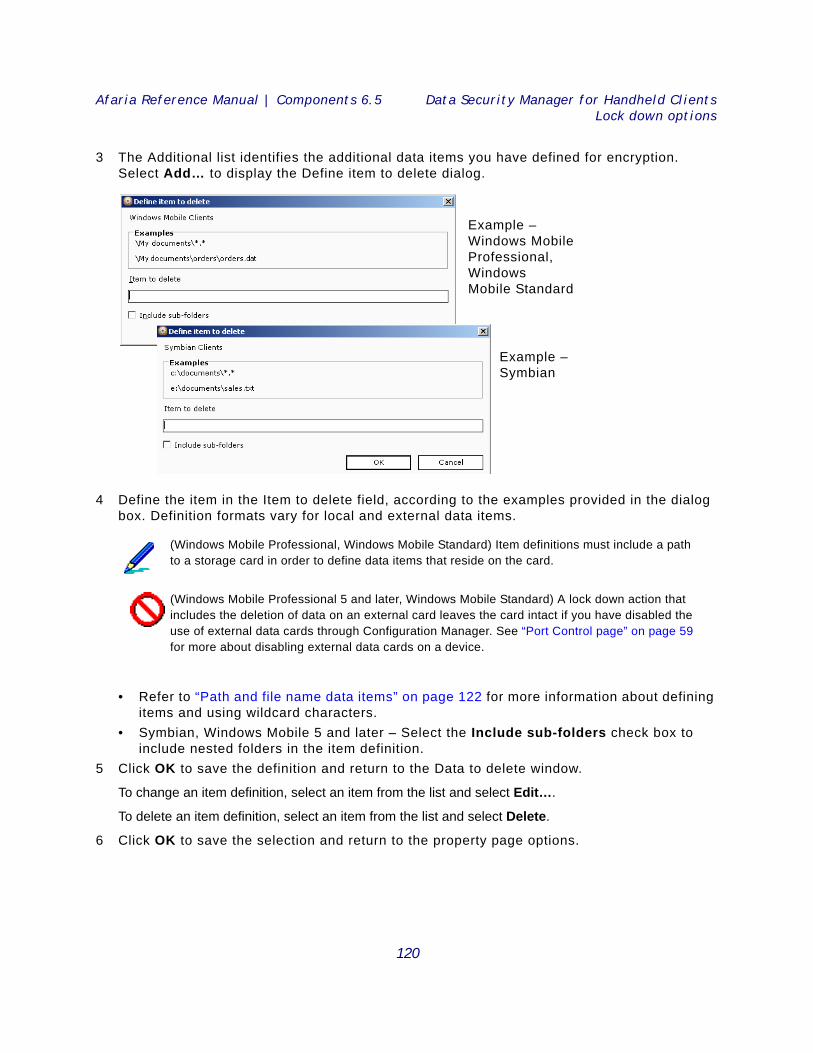
Afaria Reference Manual | Components 6.5 Data Security Manager for Handheld ClientsLock down options
3 The Additional list identifies the additional data items you have defined for encryption. Select Add… to display the Define item to delete dialog.
4 Define the item in the Item to delete field, according to the examples provided in the dialog box. Definition formats vary for local and external data items.
• Refer to “Path and file name data items” on page 122 for more information about defining items and using wildcard characters.
• Symbian, Windows Mobile 5 and later – Select the Include sub-folders check box to include nested folders in the item definition.
5 Click OK to save the definition and return to the Data to delete window.
To change an item definition, select an item from the list and select Edit….
To delete an item definition, select an item from the list and select Delete.
6 Click OK to save the selection and return to the property page options.
(Windows Mobile Professional, Windows Mobile Standard) Item definitions must include a path to a storage card in order to define data items that reside on the card.
(Windows Mobile Professional 5 and later, Windows Mobile Standard) A lock down action that includes the deletion of data on an external card leaves the card intact if you have disabled the use of external data cards through Configuration Manager. See “Port Control page” on page 59 for more about disabling external data cards on a device.
Example – Windows Mobile Professional, WindowsMobile Standard
Example – Symbian
120
Afaria Reference Manual | Components 6.5 Data Security Manager for Handheld ClientsLock down options
Hard reset lock down differentiators
The hard reset lock down behavior is subject to the following differentiators:
• Windows Mobile 5 Professional or later clients with Adaptation Kit Update 2 (AKU2) – Delete all data and applications and restore device to its factory settings. External card data that is selected for encryption is deleted.
• Windows Mobile 5 Professional clients, pre-AKU2 – Lock the user interface, allowing the user only to 1) make emergency calls, if the device is phone enabled, and 2) look up Afaria Data Security Manager client information from the Help menu. The device must undergo a hard reset to restore usability.
• Windows Mobile 2003 Professional clients – Delete all data and applications and restore device to its factory settings. No action is taken on external data cards. No data recovery on device is possible.
• Windows Mobile Standard clients with AKU2 – Delete all data and applications and restore device to its factory settings. External card data that is selected for encryption is deleted.
• Symbian clients – Hard reset (includes wiping external card).
• Some device types do not support hard reset with external card wipe. Therefore, the data on the external card may not be deleted before a hard reset. Test your device’s behavior.
• Some device types may briefly open a user-facing message before hard resetting. The hard reset occurs without requiring interaction from the user.
• Palm clients – Delete all data and applications and restore device to its factory settings. No action is taken on external data cards. No data recovery on device is possible.
Windows Mobile Professional, Windows Mobile Standard – Hard reset lock down action is supported for password lock down policies and connection lock down policies.
Symbian, Palm – Hard reset lock down action is supported for password lock down policies.
121
Afaria Reference Manual | Components 6.5 Data Security Manager for Handheld ClientsLock down options
Path and file name data items Supported client types – Symbian, Windows Mobile Professional, Windows Mobile Standard
The Data Security Manager channel editor interface includes interfaces for you to define path and file name data items. For Windows Mobile Professional devices, this is also true for the device holder’s definitions. This topic presents data item samples and their interpretations so that you and the device holders can successfully create the definitions to meet your needs in the following instances:
• Data Security Manager channel editor, encryption – You can use the Data Security Manager channel editor to define non-PIM data items to encrypt as part of your encryption policy. Defined non-PIM data items appear in a list on the Data Security Manager channel editor’s Encryption property page. “Defining non-PIM data items for encryption” on page 110.
• Data Security Manager channel editor, lock down – You can use the Data Security Manager channel editor to define specific data to delete in the event of lock down. This feature is available only when you choose “Delete specified data” as your lock down action. “Defining data to delete for lock down” on page 119.
• (Windows Mobile Professional) Data Security Manager client, selecting files and folders for encryption – Your security policy determines whether this encryption feature is enabled on the device. Device holders create a list of files and folders they want encrypted. “Selecting files and folders for encryption at the client” on page 146.
Windows Mobile data item specificationsThe Data Security Manager policy interprets path and file name data items that you or the device holder specify according to the standard Windows specifications.
The following table interprets path and file name examples. When you choose to include sub-folders with the item definition (Windows Mobile 5 or later), each sub-folder is interpreted in the same way as the parent folder.
Data item Description
\My Documents File “My Documents”.
\My Documents\ All files in this folder.
\My Documents\* All files in this folder.
\My Documents\*. All files without an extension in this folder.
\My Documents\*.* All files in this folder.
\My Documents\*.txt All files with a “.txt” extension in this folder.
\My Documents\f*.txt All files starting with “f” and also having a “.txt” extension in the file name in this folder.
\My Documents\f?o.* All files with any one character between “f” and “o” in the name in this folder.
122
Afaria Reference Manual | Components 6.5 Data Security Manager for Handheld ClientsLock down options
Symbian data item specificationsThe Data Security Manager policy interprets path and file name data items that you specify according to the Symbian specifications.
Defining additional data items requires a format that includes a drive letter, a colon and a backslash. For example; C:\ or E:\. Consider the following items for memory cards:
• A device that has only an external memory card assigns the E drive designation to the card. A device that has both internal and external memory cards assigns E to the internal card and F to the external card.
• For devices that have E and F drives, policies that include data item specifications for only the E drive are applied to both the E and F drives. If you want to manage the drives separately, define data item specifications for both the E and F drives.
The following table interprets path and file name examples. When you choose to include sub-folders with the item definition, each sub-folder is interpreted in the same way as the parent folder.
Symbian file encryption exclusion list
The Data Security Manager channel editor validates specifications for compliance with definition rules:
• Full encryption of the system drive is invalid however, full encryption of the external card is valid.
• Double backslash anywhere in the file specification is invalid.
\My Documents\f*o.* All files with any one or more characters between “f” and “o” in the name in this folder.
\My Documents\foo.txt Any “foo.txt” file in this folder.
Data item Description
C:\Documents\* All files in this folder.
C:\Documents\*. All files without an extension in this folder.
C:\Documents\*.* All files in this folder.
C:\Documents\*.txt All files with a “.txt” extension in this folder.
C:\Documents\f*.txt All files starting with “f” and also having a “.txt” extension in the file name in this folder.
C:\Documents\f?o.* All files with any one character between “f” and “o” in the name in this folder.
C:\Documents\f*o.* All files with any one or more characters between “f” and “o” in the name in this folder.
C:\Documents\foo.txt Any “foo.txt” file in this folder.
123
Afaria Reference Manual | Components 6.5 Data Security Manager for Handheld ClientsLock down options
• The following characters are invalid: “/”, “:”, “*”, “?”, “““, “<“, ”>”, “|”.
• For root directory items, wildcard “*” as an extension is invalid.
Additionally, the Data Security Manager client filters out known data item specifications for items that, if encrypted, may render the device unusable. For example:
\sys\*
\system\temp\*
\logs\*
124

Afaria Reference Manual | Components 6.5 Data Security Manager for Handheld ClientsRecovery options
Recovery options
• Supported client types – Windows Mobile Professional 5 and later, Windows Mobile Standard
• The graphic shown here is a sample based on Windows Mobile Professional.
Editor sample
125
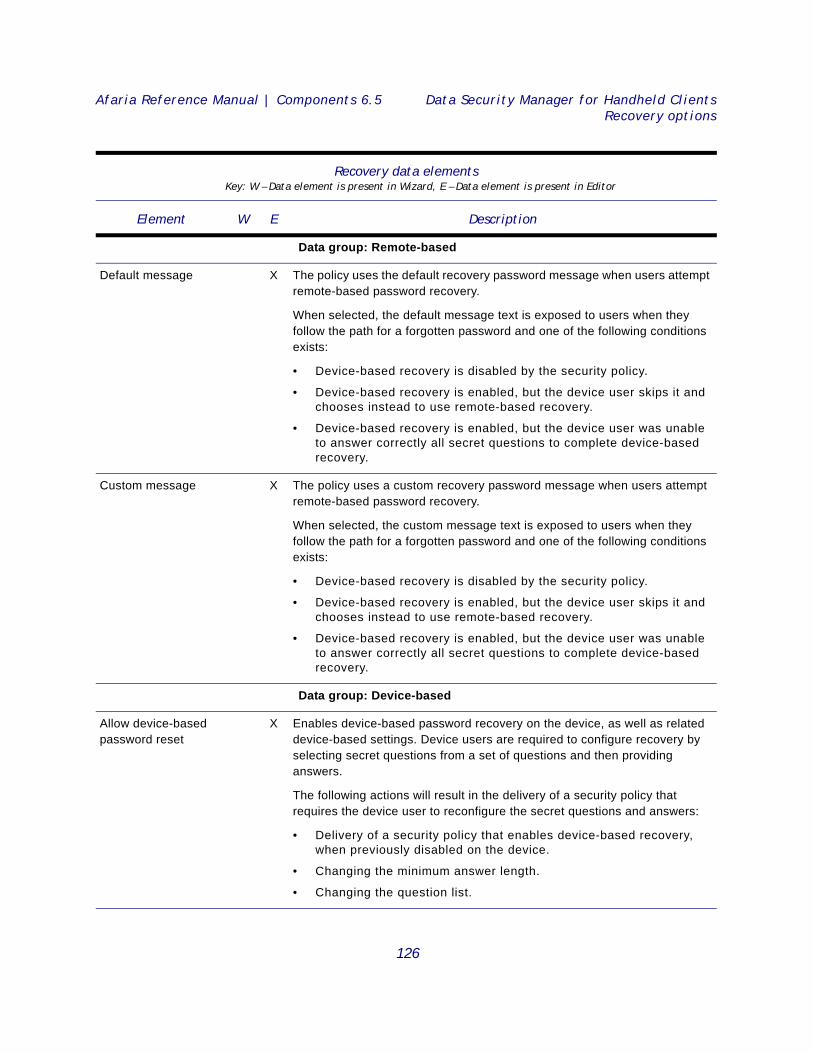
Afaria Reference Manual | Components 6.5 Data Security Manager for Handheld ClientsRecovery options
Recovery data elements Key: W – Data element is present in Wizard, E – Data element is present in Editor
Element W E Description
Data group: Remote-based
Default message X The policy uses the default recovery password message when users attempt remote-based password recovery.
When selected, the default message text is exposed to users when they follow the path for a forgotten password and one of the following conditions exists:
• Device-based recovery is disabled by the security policy.
• Device-based recovery is enabled, but the device user skips it and chooses instead to use remote-based recovery.
• Device-based recovery is enabled, but the device user was unable to answer correctly all secret questions to complete device-based recovery.
Custom message X The policy uses a custom recovery password message when users attempt remote-based password recovery.
When selected, the custom message text is exposed to users when they follow the path for a forgotten password and one of the following conditions exists:
• Device-based recovery is disabled by the security policy.
• Device-based recovery is enabled, but the device user skips it and chooses instead to use remote-based recovery.
• Device-based recovery is enabled, but the device user was unable to answer correctly all secret questions to complete device-based recovery.
Data group: Device-based
Allow device-based password reset
X Enables device-based password recovery on the device, as well as related device-based settings. Device users are required to configure recovery by selecting secret questions from a set of questions and then providing answers.
The following actions will result in the delivery of a security policy that requires the device user to reconfigure the secret questions and answers:
• Delivery of a security policy that enables device-based recovery, when previously disabled on the device.
• Changing the minimum answer length.
• Changing the question list.
126
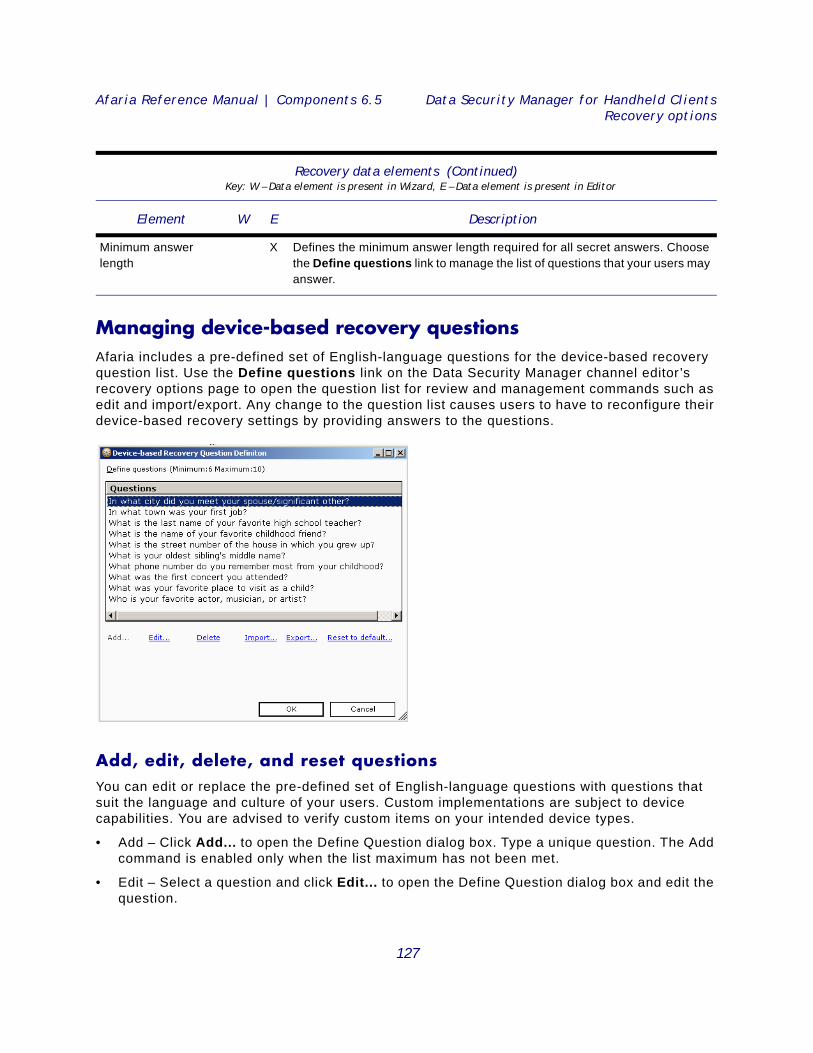
Afaria Reference Manual | Components 6.5 Data Security Manager for Handheld ClientsRecovery options
Managing device-based recovery questions Afaria includes a pre-defined set of English-language questions for the device-based recovery question list. Use the Define questions link on the Data Security Manager channel editor’s recovery options page to open the question list for review and management commands such as edit and import/export. Any change to the question list causes users to have to reconfigure their device-based recovery settings by providing answers to the questions.
Add, edit, delete, and reset questionsYou can edit or replace the pre-defined set of English-language questions with questions that suit the language and culture of your users. Custom implementations are subject to device capabilities. You are advised to verify custom items on your intended device types.
• Add – Click Add... to open the Define Question dialog box. Type a unique question. The Add command is enabled only when the list maximum has not been met.
• Edit – Select a question and click Edit... to open the Define Question dialog box and edit the question.
Minimum answer length
X Defines the minimum answer length required for all secret answers. Choose the Define questions link to manage the list of questions that your users may answer.
Recovery data elements (Continued)Key: W – Data element is present in Wizard, E – Data element is present in Editor
Element W E Description
127
Afaria Reference Manual | Components 6.5 Data Security Manager for Handheld ClientsRecovery options
• Delete – Select a question click Delete. The minimum number of questions is stated on the UI and verified when you click OK.
• Reset to default – Select Reset to default... at any time to restore the original set of English-language questions. This action deletes any modifications you have made to the list. You are advised to export questions before using the reset command if you want to retain any revisions.
Import questions Use the import process to transfer a question list from an export location into server. The import process overwrites the current question list.
1 Select Import... to open the Select Import File dialog box.
2 Select a question list file to import. The file extension for question lists is XML.
3 Review the import results.
Export questionsUse the export process to transfer the question list from an Afaria Server to an export location.
1 Select Export... to open the export Save As dialog box.
2 Select a file destination for the export. The file extension for question lists is XML. You can use the dialog box to create a folder or file if it does not exist. The process prompts for confirmation before overwriting a file.
128

Afaria Reference Manual | Components 6.5 Data Security Manager for Handheld ClientsAlerts
Alerts You can use the Afaria alert definition feature to create alerts to notify you when Data Security Manager events have occurred on an Afaria client. The following events are associated with the Data Security Manager for the handheld clients component:
The Data Security Manager client logs the events as they occur on the device. The next time the Data Security Manager channel runs at the client, the Afaria Server retrieves the data and then deletes the messages from the client.
See Afaria Reference Manual | Platform > Server Configuration > “Alert Definitions” and Afaria Reference Manual | Platform > Data Views > “Working with Logged Actions.”
Event Message
Admin Login Successful administrator login.
Data Fading Freeze1
1. Supported client types – Windows Mobile Professional, Windows Mobile Standard, Symbian
Data fading occurred in freeze mode; user password disabled.
Data Fading Wipe1 Data fading occurred in datawipe mode; all encrypted data was deleted.
Data Fading Wipe Specified Data1 Data fading occurred in datawipe mode; all specified data was deleted.
Decryption Failed Decryption failed due to insufficient available memory.
Destroy Failed2
2. Supported client types – Windows Mobile Professional, Windows Mobile Standard
Unsuccessful deleting lock down specified file.
Encryption Failed Encryption failed due to insufficient available memory.
EOF Encode Failed2 Encoding failed while setting the location for end-of-file (EOF) marker.
Lockdown Freeze Lock down occurred in freeze mode; user password was disabled.
Lockdown Wipe Lock down occurred in datawipe mode; all encrypted data was deleted.
Lockdown Wipe Specified Data Lock down occurred in datawipe mode; all specified data was deleted.
SIM Lockdown Freeze2 SIM lock down occurred in freeze mode; user password disabled.
SIM Lockdown Wipe2 SIM lock down occurred in datawipe mode; all encrypted data was deleted.
SIM Lockdown Wipe Specified Data2 SIM lock down occurred in datawipe mode; all specified data was deleted.
Upgrade failed2 The client must run version 5.50 or later to upgrade.
129
Afaria Reference Manual | Components 6.5 Data Security Manager for Handheld ClientsReports
ReportsData Security Manager for handheld clients includes the following predefined reports that you can view and print:
• Administrator Password Detail
• Client Lock Down Detail
• Client Password Changed
• Client Password Unchanged
See Afaria Reference Manual | Platform > Home > “Reports.”
Reports are sorted by date. The Date range reflects the date the client connected to the server so that the action could be reported, not when the action happened.
130
Afaria Reference Manual | Components 6.5 Data Security Manager for Handheld ClientsDecrypting card files without the client
Decrypting card files without the client Data Security Manager Decryption Utility is installed during your Afaria installation and is part of the Data Security Manager solution. Use the utility to decrypt external card files from an Afaria Data Security Manager client that is not available. A client may become unavailable for several reasons, including the following scenarios:
• Data Security Manager is humanistically from the device while the external card was not present.
• The device experiences a hard reset, which removes the Data Security Manager client from the device without first decrypting external card files.
• The device is lost or broken, but you have external cards that still have encrypted files.
Open the utility from the following location:
<ServerInstallDir>\bin\XSSMDecryptUtility.exe
An Afaria Server can decrypt files for only those clients that already have client/server relationship with the server.
131

Afaria Reference Manual | Components 6.5 Data Security Manager for Handheld ClientsDecrypting card files without the client
To decrypt a file:
1 Open Data Security Manager File Decryption Utility.
2 Complete the following fields:
• Encrypted file – Path and file name of the encrypted file. You can choose Open… to navigate to the file.
• Decrypted file – Path and file name for the planned decrypted file. You can choose Save as… to navigate to a file that you want to overwrite.
3 Choose Decrypt now to start the decrypt process. The utility attempts to locate key information based on the client that encrypted the file, decrypt the file, and then create the decrypted file.
Default state
Populated state
132

Afaria Reference Manual | Components 6.5 Data Security Manager for Handheld ClientsData Security Manager at the client
Data Security Manager at the client Data Security Manager applies a security policy to your client device. Use this section to understand how Data Security Manager functions on the client as well as how users complete tasks. This section may serve as a useful reference when providing support to your client users.
Installing Data Security Manager
This procedure provides user instructions for installing Data Security Manager onto a client device. You can copy the instructions from this document into another format for distribution to your users. You may want to modify the instructions based on your own policy implementation.
Install Data Security Manager:
Begin with the Afaria Client application installed on the device.
1 If you have an external data card, unlock it and insert it into the device.
2 Use Afaria to connect to the Afaria Server to ensure that all files are up to date. The device will execute a soft reset as the last step of the install process.
(Symbian) A soft reset may be part of the installation process based on encryption settings.
(Palm) Soft reset the device if it does not reset automatically.
3 The client may require that you enter your password1 or personal identification number (PIN), or it may require that you create or change to a new password. Some devices2 may execute a soft reset after entering an all-numeric PIN. New password criteria are established by your Afaria administrator.
4 Review the connection log to verify that the Data Security Manager channel ran. Repeat the connection if the log indicates that the channel did not run. Contact your Afaria administrator if the channel continues to fail.
Palm – Policies that include encryption for internal and external non-PIM data items encrypt only those data items that are present at the time the policy is applied. Users must lock and unlock their device to apply the policy again in order to encrypt additional non-PIM data items that meet the encryption criteria, but are added after applying the policy.
1. Data Security Manager attempts to open the keyboard for users that need to enter an alphanu-meric password. However, some users must tap on the keyboard icon to open the keyboard be-cause not all devices execute the request. 2. A soft reset may occur during the password sequence for Windows Mobile Professional deviceusers that are using a simple PIN (all-numeric) password prior to installing Data Security Manager.Refer to “Data Security Manager replaces native application” on page 134.
133
Afaria Reference Manual | Components 6.5 Data Security Manager for Handheld ClientsData Security Manager at the client
Notes about installation for all client typesConsider the following items about installing Data Security Manager:
• Inserting the external data card is not a requirement for all devices or all policies. However, stating the step as a requirement in all cases simplifies the instruction set and establishes a process that addresses all scenarios.
• On the initial reset during a Data Security Manager installation, some devices may not display the Data Security Manager title in the title bar during the first prompt for a user password.
• (Windows Mobile only) ActiveSync users may need to reconnect to refresh the ActiveSync connection after the device resets.
• (Symbian only) For devices that do not support a left soft key, and if the user is using a home screen that supports shortcuts at installation time, the Data Security Manager installation process adds a home screen shortcut for locking the device. However, if the user is using a home screen that does not support short cuts at installation time but later changes to one that does, the shortcut is not installed automatically. The user may install the shortcut manually.
• See “Using passwords” on page 139 for information about entering, changing, or creating passwords for the Data Security Manager application.
• After installing Data Security Manager, you may continue to use your device’s features and software applications as you normally do.
Native device password management
Data Security Manager replaces native application
Supported client types – Windows Mobile Professional, Windows Mobile Standard
After installation, Data Security Manager replaces your device’s native password management application. Attempting to launch the native password application will instead launch Data Security Manager.
Data Security Manager co-exists with native application
Supported client types – Symbian, Palm
After installation, Data Security Manager will co-exist with your device’s native password management application. This means that the user interface for launching the device’s password application before you installed Data Security Manager will continue to do so. Device users can continue to access and make changes in the native password application.
There are constraints associated with a device’s simple PIN mode that require additional Data Security Manager processing in order for Data Security Manager to take ownership of the device password. Therefore, device users that are using a simple PIN (all-numeric) before installing Data Security Manager must wait for Data Security Manager to execute an additional device soft reset before receiving a change password dialog and replacing the native password management application.
134
Afaria Reference Manual | Components 6.5 Data Security Manager for Handheld ClientsData Security Manager at the client
Symbian – Use of the native password application will cause it to temporarily co-exist with Data Security Manager’s password management. Data Security Manager will turn off the device’s native password application upon installation and with each entry of the Data Security Manager password.
Palm – Use of the native password application temporarily overrides Data Security Manager’s password management. Data Security Manager regains control over password management as soon as the client engages Data Security Manager in any way. The client engages Data Security Manager in many ways including opening Data Security Manager, performing a soft reset and locking the device.
135
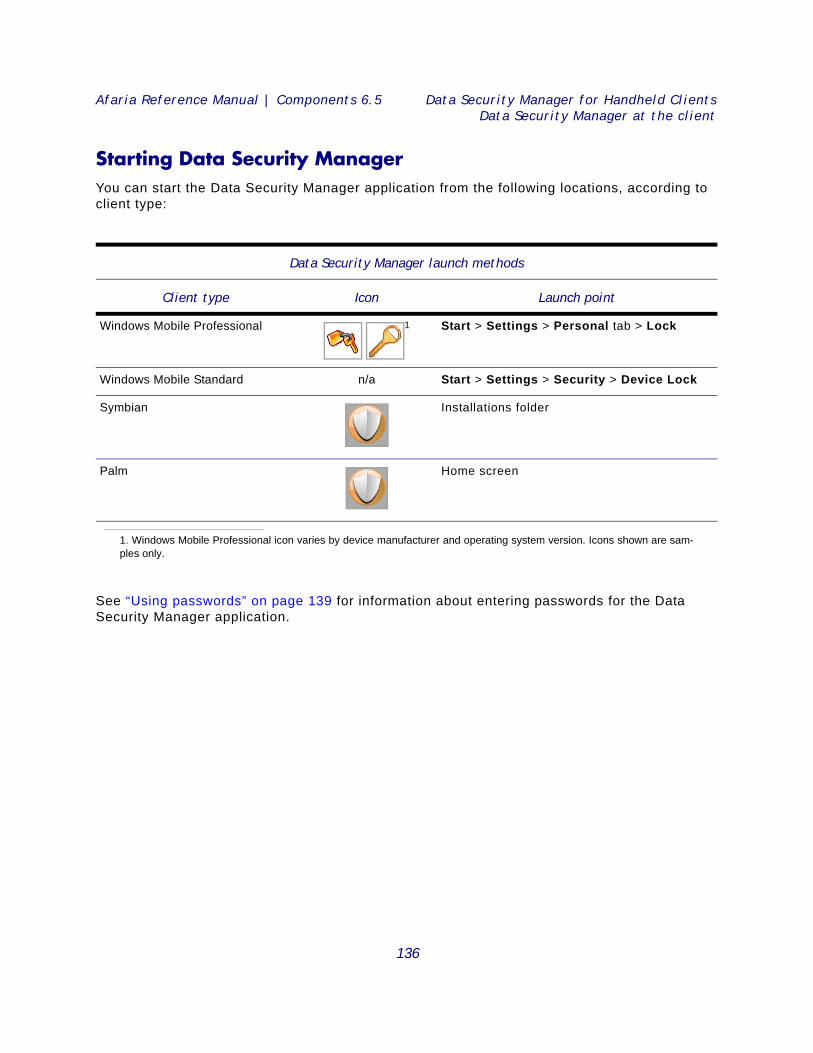
Afaria Reference Manual | Components 6.5 Data Security Manager for Handheld ClientsData Security Manager at the client
Starting Data Security Manager You can start the Data Security Manager application from the following locations, according to client type:
See “Using passwords” on page 139 for information about entering passwords for the Data Security Manager application.
Data Security Manager launch methods
Client type Icon Launch point
Windows Mobile Professional 1
1. Windows Mobile Professional icon varies by device manufacturer and operating system version. Icons shown are sam-ples only.
Start > Settings > Personal tab > Lock
Windows Mobile Standard n/a Start > Settings > Security > Device Lock
Symbian Installations folder
Palm Home screen
136
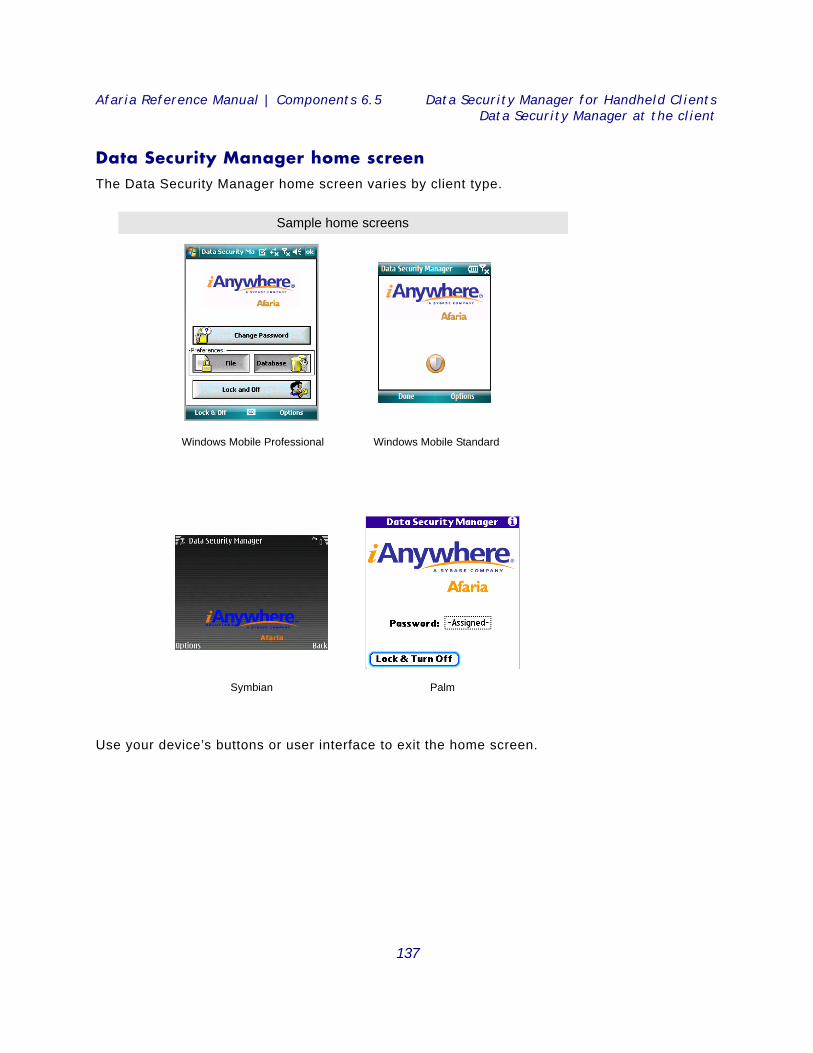
Afaria Reference Manual | Components 6.5 Data Security Manager for Handheld ClientsData Security Manager at the client
Data Security Manager home screenThe Data Security Manager home screen varies by client type.
Use your device’s buttons or user interface to exit the home screen.
Sample home screens
Windows Mobile Professional Windows Mobile Standard
PalmSymbian
137

Afaria Reference Manual | Components 6.5 Data Security Manager for Handheld ClientsData Security Manager at the client
Uninstalling Data Security Manager This procedure provides user instructions for uninstalling Data Security Manager from the Afaria Client device, thereby removing the channel’s security policy. The unionist process includes decrypting any encrypted data, as defined by the security policy or selected by the device user, that resides on the device and on any external data cards that are installed. Refer to “Decrypting card files without the client” on page 131 for decrypting data on additional cards.
You can copy the instructions from this document into another format for distribution to your users. You may need to modify the instructions based on your own policy implementation.
Uninstall Data Security Manager:
1 If you have an external data card, unlock it and insert it into the device.
2 Use Afaria to connect to the Afaria Server to allow the Data Security Manager unionist channel to run. You may witness device activity while tasks execute. The device will execute a soft reset as the last step of the uninstall process.
3 Review the connection log to verify that the Data Security Manager channel ran. Repeat the connection if the log indicates that the channel did not run. Contact your Afaria administrator if the channel continues to fail.
Notes about uninstallation Consider the following items about uninstalling Data Security Manager:
• Inserting the external data card is not a requirement for all devices or all policies. However, stating the step as a requirement in all cases simplifies the instruction set and establishes a process that addresses all scenarios.
• Ongoing device password control is returned from Data Security Manager to the device.
138
Afaria Reference Manual | Components 6.5 Data Security Manager for Handheld ClientsData Security Manager at the client
Using passwords The Data Security Manager application may prompt for a password for the following user interaction scenarios, user-driven device state changes, and device-driven device state changes:
• User creates or changes a device password
• User unlocks the device
• User establishes a PIM synchronization connection
• User physically inserts an external data card
• Device logically remounts an external data card when emerging from a low battery state
The Data Security Manager application password prompts help to secure your device in accordance with your defined security policy.
Successive failed password attempts may cause your device to lock down.
A device’s design can result in multiple state changes occurring in a short period of time (for example, during device startup). Depending on the device design and hardware configuration, the state changes may result in the Data Security Manager application prompting for a password multiple times.
139
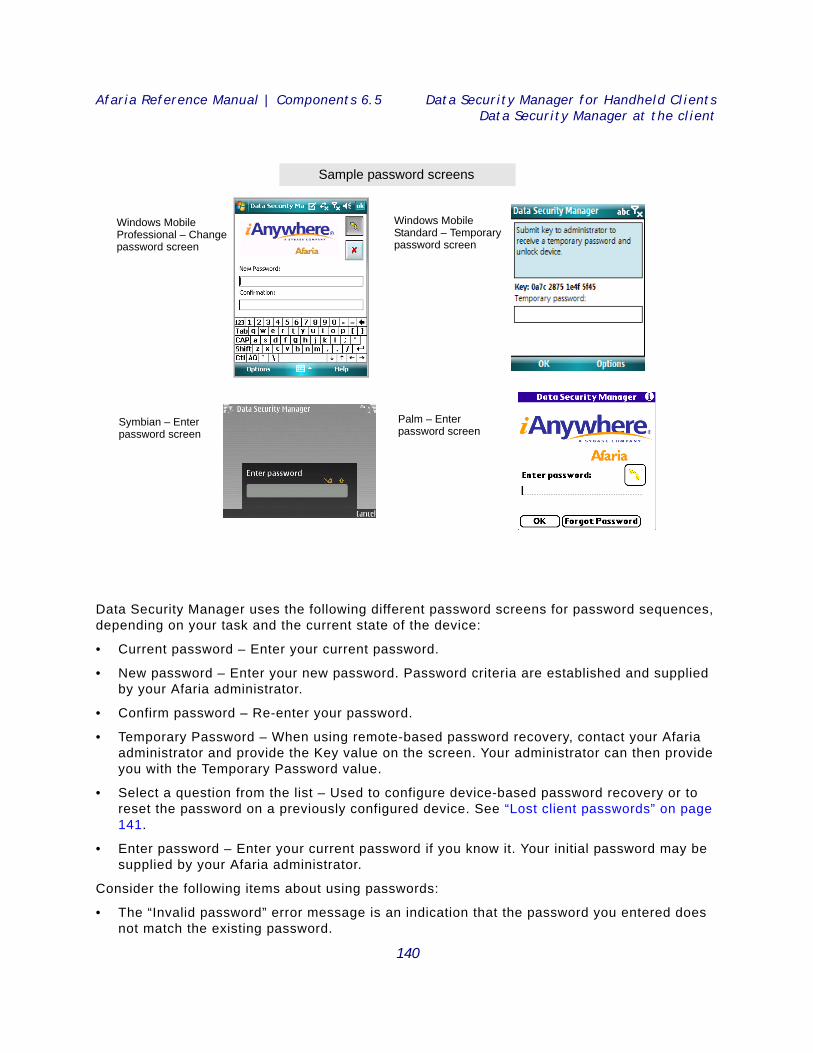
Afaria Reference Manual | Components 6.5 Data Security Manager for Handheld ClientsData Security Manager at the client
Data Security Manager uses the following different password screens for password sequences, depending on your task and the current state of the device:
• Current password – Enter your current password.
• New password – Enter your new password. Password criteria are established and supplied by your Afaria administrator.
• Confirm password – Re-enter your password.
• Temporary Password – When using remote-based password recovery, contact your Afaria administrator and provide the Key value on the screen. Your administrator can then provide you with the Temporary Password value.
• Select a question from the list – Used to configure device-based password recovery or to reset the password on a previously configured device. See “Lost client passwords” on page 141.
• Enter password – Enter your current password if you know it. Your initial password may be supplied by your Afaria administrator.
Consider the following items about using passwords:
• The “Invalid password” error message is an indication that the password you entered does not match the existing password.
Sample password screens
Windows MobileProfessional – Changepassword screen
Windows MobileStandard – Temporarypassword screen
Symbian – Enter password screen
Palm – Enterpassword screen
140
Afaria Reference Manual | Components 6.5 Data Security Manager for Handheld ClientsData Security Manager at the client
• The “Password format” error message is an indication that the password you entered does not match the password composition criteria defined in the security policy.
• You must acknowledge device and application message prompts before you can use a password screen.
• The center OK function used for navigation on your device may be disabled by the operating system until after you complete password verification. Use your device’s alternative OK button or the Data Security Manager user interface for the OK command.
• Changing your device state by cradling your device may cause the client to prompt for a password. Your device’s buttons and applications may remain available to you while the password screen is open.
• Windows Mobile Professional – Some devices support using an all-numeric keyboard for all-numeric password entry. The all-numeric keyboard contains a keyboard icon that you can choose to toggle to an alpha-numeric keyboard.
• Palm – Anytime a device prompts for a password, you must supply the password and tap OK within eight seconds or the device will shut down.
Lost client passwords Data Security Manager provides features for the recovery of a lost password when a client user has control of a device but has forgotten the password.
Use the following actions if you have forgotten your password:
• Windows Mobile Professional, Windows Mobile Standard – Tap! or Options > I Forgot • Symbian – Select Options > Recover password• Palm – Tap Forgot password
Refer to Afaria Reference Manual | Platform > Data Views > “Managing Client Data” for more information and instructions about recovering passwords for Data Security Manager clients.
Device-based password recovery
Supported clients – Windows Mobile Professional 5 and later, Windows Mobile Standard
If enabled on the device by your Afaria administrator, use device-based password recovery to reset the password without the assistance of your Afaria administrator.
141
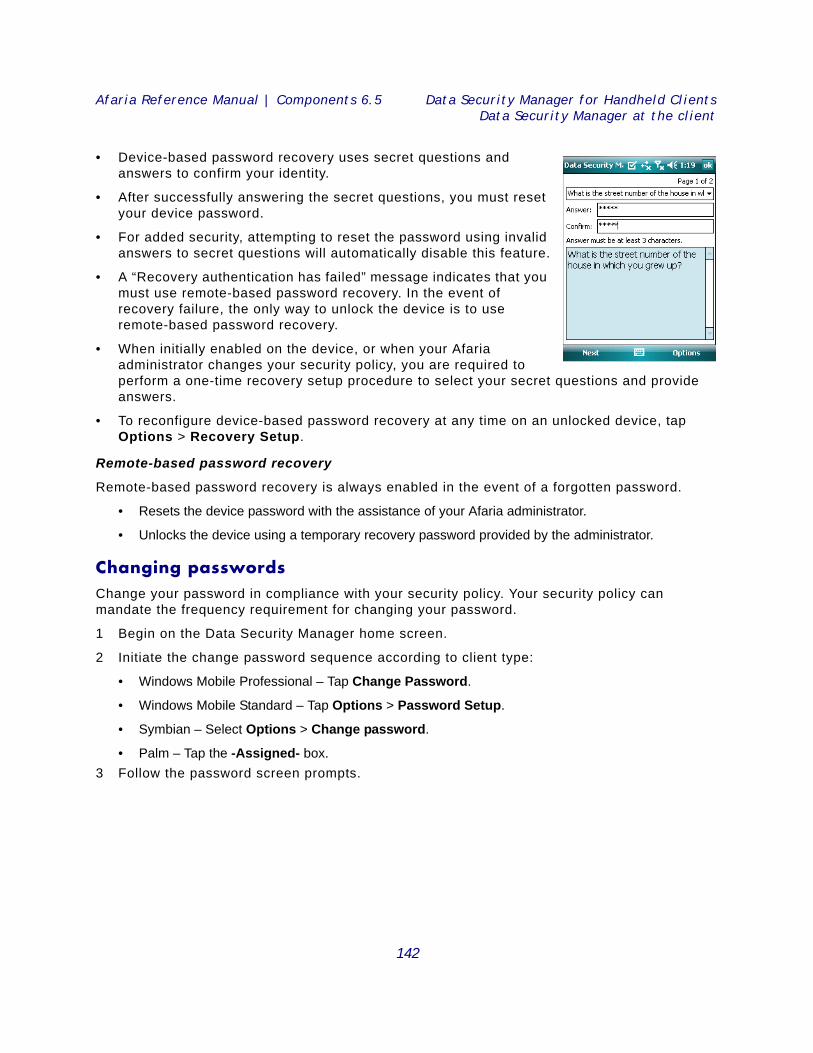
Afaria Reference Manual | Components 6.5 Data Security Manager for Handheld ClientsData Security Manager at the client
• Device-based password recovery uses secret questions and answers to confirm your identity.
• After successfully answering the secret questions, you must reset your device password.
• For added security, attempting to reset the password using invalid answers to secret questions will automatically disable this feature.
• A “Recovery authentication has failed” message indicates that you must use remote-based password recovery. In the event of recovery failure, the only way to unlock the device is to use remote-based password recovery.
• When initially enabled on the device, or when your Afaria administrator changes your security policy, you are required to perform a one-time recovery setup procedure to select your secret questions and provide answers.
• To reconfigure device-based password recovery at any time on an unlocked device, tap Options > Recovery Setup.
Remote-based password recovery
Remote-based password recovery is always enabled in the event of a forgotten password.
• Resets the device password with the assistance of your Afaria administrator.
• Unlocks the device using a temporary recovery password provided by the administrator.
Changing passwords Change your password in compliance with your security policy. Your security policy can mandate the frequency requirement for changing your password.
1 Begin on the Data Security Manager home screen.
2 Initiate the change password sequence according to client type:
• Windows Mobile Professional – Tap Change Password.
• Windows Mobile Standard – Tap Options > Password Setup.
• Symbian – Select Options > Change password.
• Palm – Tap the -Assigned- box. 3 Follow the password screen prompts.
142
Afaria Reference Manual | Components 6.5 Data Security Manager for Handheld ClientsData Security Manager at the client
Encryption and decryption at the client
The Data Security Manager application’s encryption and decryption process interacts with device-specific APIs, OS-specific APIs, device state, and security policy settings. Therefore, the process, timing, and user experience for encryption and decryption may vary according to these factors.
Client behavior with encryption policies Your security policy impacts device behavior. In some cases, your security policy may also control your device’s power settings for turning off the device or its screen. Device state transitions can occur at the same or different times, based on the device and the security policy. Consider the following items about device states and their associated transitions:
• Windows Mobile 5 or later – The application prompts for a password when the device is locked. Device data is always encrypted, regardless of the device’s locked or unlocked state. The device power state is controlled by the device’s native settings.
• Symbian – The application prompts for a password when the device is locked. Device data is always encrypted, regardless of the device’s locked or unlocked state.
• Windows Mobile 2003, Palm – The application prompts for a password when the device is locked. Device data is encrypted if your device is locked. The device may power off before the application encrypts its data or at the same time the device encrypts its data.
Your security policy determines whether encryption features are enabled for your device.
Data Security Manager can successfully preserve data in most cases of interrupted encryption or decryption processes. However, in some cases an interruption can have unpredictable and undesirable consequences. Removing the external data card, powering off the device, or soft resetting the device are actions that will interrupt the encryption or decryption process.
Windows Mobile 2003, Palm – External card data that is encrypted by a security policy is available for viewing only after a password is established on a device.
About the Palm encryption process:
The Data Security Manager data encryption process wakes up the device, encrypts data, and then restores the device to the off state. Users may witness device activity while this occurs.
About the Windows Mobile 2003 encryption process:
The encryption process wakes up the device, encrypts data, and then restores the device to the off state 30 seconds after encryption completes. Users may witness device activity while this process occurs.
Turning the device on and logging on during encryption stops the process and enables you to operate the device. Turning the device on, but not logging on, allows the process to continue to completion and restore the device to the off state.
143
Afaria Reference Manual | Components 6.5 Data Security Manager for Handheld ClientsData Security Manager at the client
Windows Mobile 2003 usersThe following topics identify some encryption behaviors that are unique to Data Security Manager Windows Mobile 2003 clients.
Windows Mobile Today display
Devices that encrypt PIM data may require a period of time to fully populate the Windows Mobile Today display. All PIM data must be decrypted, and the Today display refreshed, in order for the display to fully populate. Whether your device refreshes automatically or requires a manual refresh depends upon your device manufacturer’s operating system implementation.
ActiveSync users
Data Security Manager must decrypt all encrypted data before allowing control to pass to the Microsoft Activations desktop application. Activations can begin performing desktop-to-device tasks after the client device becomes available. It is possible for an Afaria Client device to have a large enough volume of data to decrypt that Activations times out before Data Security Manager completes the decryption process. Activations fails to acknowledge the device if it times out and, as a result, does not begin any desktop-to-device tasks. The user has the following options for managing this condition:
• Prevention – Ensure that decryption is complete on the client before connecting the device to the desktop.
• Correction – Reconnect the device after decryption is complete.
Selecting PIM data for encryption at the client Supported client types – Windows Mobile Professional, Palm
Your security policy determines whether this encryption feature is enabled on your device.
1 Begin on the Data Security Manager home screen.
2 Open the PIM data screen according to client type:
• Windows Mobile Professional – Tap Database. This action may require the device’s user password.
• Palm – Tap Options > Database preferences. The Options menu is available when you tap on the title bar of the Data Security Manager Password home screen.
3 Select items to encrypt from the list, and then tap OK.
144
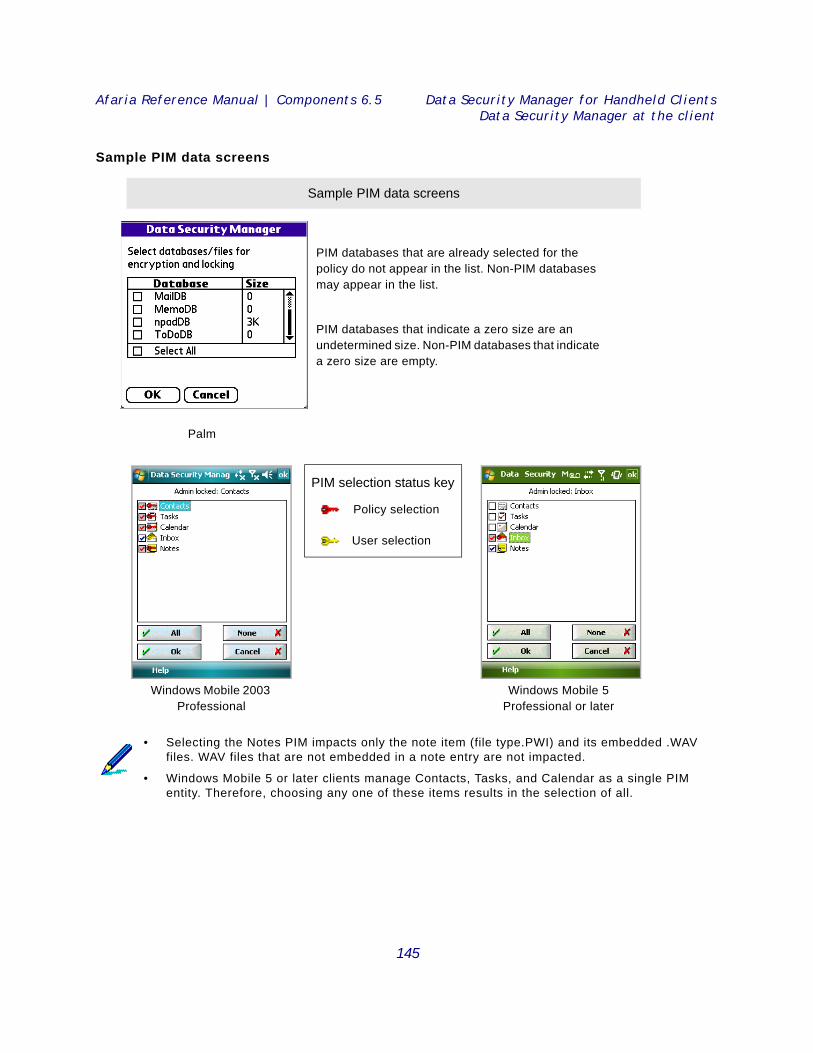
Afaria Reference Manual | Components 6.5 Data Security Manager for Handheld ClientsData Security Manager at the client
Sample PIM data screens
• Selecting the Notes PIM impacts only the note item (file type.PWI) and its embedded .WAV files. WAV files that are not embedded in a note entry are not impacted.
• Windows Mobile 5 or later clients manage Contacts, Tasks, and Calendar as a single PIM entity. Therefore, choosing any one of these items results in the selection of all.
Sample PIM data screens
User selection
Palm
Windows Mobile 2003 Professional
Policy selection
PIM databases that are already selected for the policy do not appear in the list. Non-PIM databases may appear in the list.
PIM databases that indicate a zero size are an undetermined size. Non-PIM databases that indicate a zero size are empty.
Windows Mobile 5Professional or later
PIM selection status key
145
Afaria Reference Manual | Components 6.5 Data Security Manager for Handheld ClientsData Security Manager at the client
Selecting files and folders for encryption at the client Supported client types – Windows Mobile Professional
Your security policy determines whether this encryption feature is enabled on your device.
Selecting files for Windows Mobile 5 or later:
1 Begin on the Data Security Manager home screen.
2 Tap File. This action requires the device user password.
3 Specify files for encryption. Changes are saved to your security policy only after you tap OK.
• Add item – Add an item by tapping Add… to open a view of the device’s file tree, staying at the root or navigating to select the folder or file of interest, and tapping OK to return to the list. You may edit the item manually after it is added to the list. Using the root selection allows you to start typing a new item.
• Remove item – Select an item and tap Remove.
• Include sub-folders – Select an item’s folder check box to select all eligible files from all of that item’s sub-folders.
Consider the following items for your Windows Mobile 5 or later encryption list:
• The root symbol and wildcard characters “*” and “?” are invalid when used to define root items. For example, list entries “\”, “\*”, and “\*.*” are invalid. The application deletes them from the list after you tap OK.
• Wildcard characters “*” and “?” are valid when used to define non-root items. For example, “\My Documents\Sales\*.*” is a valid wildcard item. Refer to “Path and file name data items” on page 122 for more information about defining items and using wildcard characters.
• An item is not required to be present on the device when you add it to the list. The application will encrypt it if it ever becomes present on the device.
• You can add an item that your Afaria administrator has already added to your policy. Should the administrator ever remove it from the policy, the application continues to encrypt the item based on your selection.
• The application sorts the list alphabetically after you tap OK.
Selecting files for Windows Mobile 2003:
1 Begin on the Data Security Manager home screen.
2 Tap File. This action requires the device user password. Files that are already selected on the policy are protected from user action. You cannot change policy selections at the device.
3 Select items to encrypt from the list, and then choose OK.
Encrypting system or executable items may cause undesirable and irreversible results, such as rendering an executable file as unusable to another calling program.
146
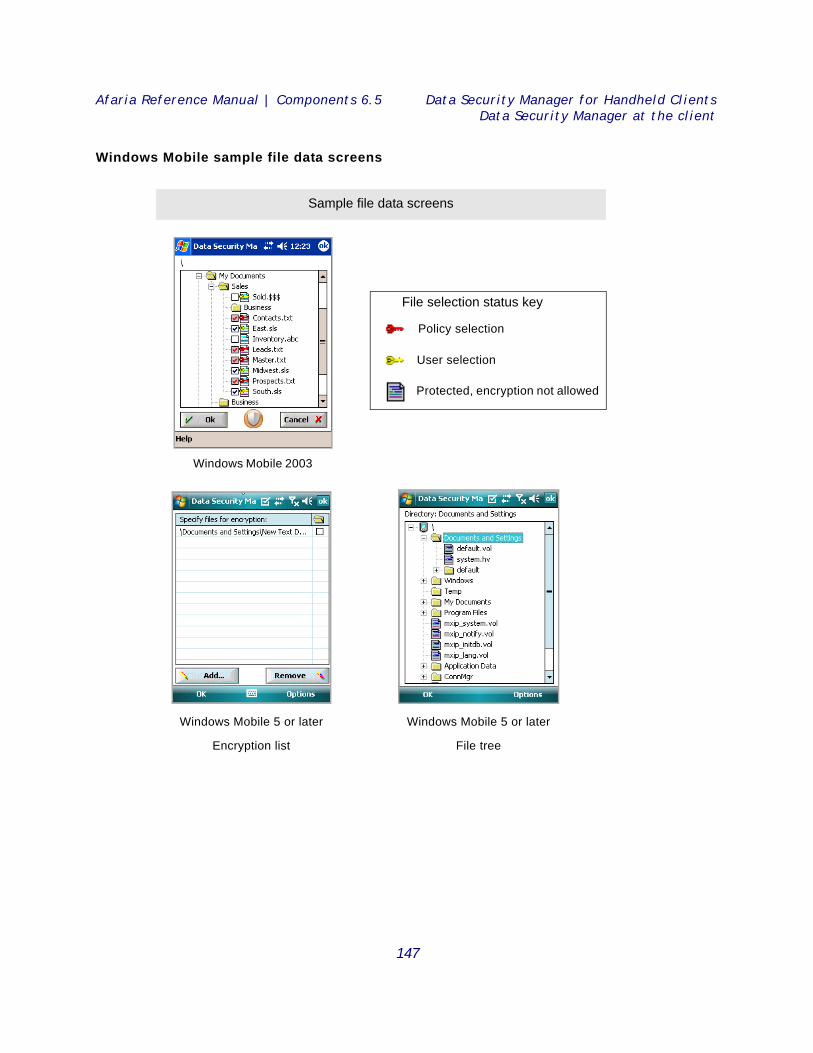
Afaria Reference Manual | Components 6.5 Data Security Manager for Handheld ClientsData Security Manager at the client
Windows Mobile sample file data screens
Windows Mobile 2003
Sample file data screens
User selection
Policy selection
File selection status key
Protected, encryption not allowed
Windows Mobile 5 or later
Encryption list
Windows Mobile 5 or later
File tree
147
Afaria Reference Manual | Components 6.5 Data Security Manager for Handheld ClientsData Security Manager at the client
Locking the clientTo use the locking feature, you must have a password. Once a device is locked, enter a valid password to unlock it. The feature’s implementation varies according to client type.
Locking Windows Mobile Professional clients The “Lock & Turn Off” command powers off the device and sets the device state to require a password upon power on. The power off action for Windows Mobile 5 and later devices may power off the screen or the device, depending on the device.
To lock the client, use either method:
• Data Security Manager home screen > Lock & Turn Off
• Start menu3 > Lock & Turn Off > Lock and Turn Off For Windows Mobile 2003 devices, the Lock & Turn Off command also encrypts any data that is flagged for encryption, while Windows Mobile 5 and later devices are always encrypted.
Locking Windows Mobile Standard clients The “Lock Device” command powers off the user interface without powering off the device and sets the device state to require a password upon re-entry.
The “Lock & Turn Off” command powers off the device and sets the device state to require a password upon re-entry.
To lock the client, use any of the following methods:
• Data Security Manager home screen > Options > Lock Device
• Data Security Manager home screen > Options > Lock & Turn Off
• Start menu3 > Lock Device
• Start menu3 > Lock & Turn Off Devices are always encrypted.
Locking Symbian clients The Symbian “Lock” command powers off the user interface without powering off the device and sets the device state to require a password upon re-entry. Powering off a device also locks it.
To lock the client, use any of the following methods, as availability may differ on different devices:
Your device’s security policy may include an automatic lock action that engages after a defined period of inactivity.
3. Devices differ on how they implement the Start menu regarding which icons appear on the menuand when icons appear on the menu. Therefore, this option may not appear on the Start menu forall devices at all times.
148
Afaria Reference Manual | Components 6.5 Data Security Manager for Handheld ClientsData Security Manager at the client
• Device home screen > Left soft key > Lock
• Device home screen > Options > Lock
• Device home screen > Lock shortcut
• Application folder > Lock
• Power off the device
Palm clients The Palm “Lock & Turn Off” action encrypts any data that is flagged for encryption and then powers off the device. The action also sets the device state to require a password upon power on. However, your Afaria administrator may create a security policy that defines a grace period during which time you can power the device on without having to supply a password.
To lock the client, use the following method:
Data Security Manager home screen – Tap Lock & Turn Off
Making phone calls on a locked device You can always use your phone to make an emergency call, regardless of its locked or unlocked state. Data Security Manager provides access to non-emergency calls during the locked state according to client type:
• Windows Mobile Professional, Windows Mobile Standard – You may make non-emergency calls only if your Afaria administrator defined your policy to allow calls. If a locked device is displaying a screen with a Cancel button, choose Cancel, then dial.
• Symbian – You may make non-emergency calls only if your Afaria administrator defined your policy to allow calls. If a locked device is displaying a password screen with a Cancel button, choose Cancel > Options > Call, then dial. While the device is locked, the device uses non-standard Dual Tone Multi Frequency (DTFM) audible tones when you press buttons.
• Palm – You may make non-emergency calls. If a locked device is displaying a screen with a Cancel button, choose Cancel, then dial.
149
Afaria Reference Manual | Components 6.5 Data Security Manager for Handheld ClientsData Security Manager at the client
Synchronizing after a lock down delete action • (Windows Mobile Standard and Windows Mobile Professional) Devices that have policies
that include either “Delete encrypted data” or “Delete specified data” and experience a lock down have lost the data that was indicated in the policy. Afaria deletes the client-desktop synchronization partnership, which includes any mail synchronization profile, in order to prevent having your desktop synchronization software interpret the delete data action as the most current transaction. This avoids having your desktop data synchronized to match the device’s delete actions. This prevents having data loss both on the device and on the desktop, which may be unintended.
You can resume synchronization activity with your companion PC after first establishing a new partnership between your device and the synchronization source.
• (Symbian) Devices that have policies that include either “Delete encrypted data” or “Delete specified data” and experience a lock down have lost the data that was indicated in the policy. Afaria deletes the Mail for Exchange or Mobile Office mail synchronization profiles, in order to prevent having your synchronized processes interpret the delete data action as the most current transaction. This avoids having data loss both on the device and on the synchronization source.
You can resume synchronization activity with your companion PC after first establishing a new partnership between your device and the synchronization source.
Viewing software version informationDevice holders can view software version and copyright information for the Data Security Manager application.
Windows Mobile Professional > Help > About…
Windows Mobile Standard > Options > About
Symbian – Select Options > About
Palm – Tap Options > About
Using OEM backup/restore utilitiesAfaria Data Security Manager client attempts to disable Original Equipment Manufacturer (OEM) device backup/restoration utilities to prevent unintended conflicts between the restoration data and the data that is altered by the security policy. The Afaria Data Security Manager client may not always be successful at disabling the utility. Restoring data from a
The Palm Options menu is available when you tap on the title bar of the Data Security Manager’s home screen.
150

Afaria Reference Manual | Components 6.5 Data Security Manager for Handheld ClientsData Security Manager at the client
device state that does not include a security policy, onto a device state that does include a security policy, has the effect of restoring data in its pre-policy form.
151
4
Data Security Manager for WindowsClientsData Security Manager for Windows clients (Data Security Manager) enables you to establish security
policies for your Afaria Windows clients. Security policies can include user authentication as well as
encryption for fixed disks and removable media.
Client types supported are:
Windows
152
Afaria Reference Manual | Components 6.5 Data Security Manager for Windows ClientsAbout Data Security Manager
About Data Security ManagerAfaria Data Security Manager is an encryption solution that lets you define and implement a security policy for Afaria Windows clients. It provides two layers of security: boot-time authentication for multiple users and encryption for fixed disks and removable media. Anyone making direct access to the disk or media, without using the authentication process, encounters encrypted data that is unintelligible without the encryption key.
Data Security Manager and Security ManagerWith the release of Afaria 6.0, Security Manager has been renamed to Data Security Manager to more closely reflect its role among in the Afaria product suite.
References to Security Manager have been changed to Data Security Manager in the following content areas:
• All user interface elements accessed by Afaria administrators
• All product documentation provided for Afaria administrators
• All marketing collateral
Due to integration with third-party components, all user-facing references to Security Manager in Windows client components have been retained for the current release:
• User interface elements displayed on Windows clients
• Install Afaria Security Manager for Windows help file(Security_Manager_Windows_Installation.chm)
• Security Manager online help(Security_Manager_Windows_UserGuide.chm)
FeaturesData Security Manager offers the following features:
• Encryption for fixed disk and removable media – Data Security Manager encryption uses the AES 128-bit key encryption algorithm to transparently encrypt a computer's fixed disk and its removable media. Each client’s fixed disk encryption key is unique and generated using a high degree of entropy. Data is available for user sessions as required, without interrupting normal application operations.
• Unattended reboot feature allows you to use an Afaria channel to establish a maintenance mode for the Data Security Manager client. This mode allows the client reboot without user interaction. The reboot process securely bypasses the boot-time authentication and starts the operating system in a state that doesn’t allow additional users to log on. Maintenance mode is useful for running maintenance tasks such as installing software or software patches that may require the client computer to reboot one or more times.
• Boot-time authentication by password or token – Boot-time authentication for fixed disk encryption clients prompts for and authenticates user credentials before the operating system loads and when returning from hibernation. Afaria supports authenticating users by
153
Afaria Reference Manual | Components 6.5 Data Security Manager for Windows ClientsAbout Data Security Manager
popular token brands and their compatible rebranded models with a PIN or by user name and password.
• Single sign on – Option to synchronize a user’s Data Security Manager with their Windows password, using the Windows password policy as the enforced policy. Option may be implemented as an automatic action or one that users can opt for based on their preference.
• Challenge-response recovery – Challenge-response recovery process is a secure mechanism that allows for an authorized user to regain control of a computer from a state of denied access after having accidentally entered the wrong password too many times.
• MediaViewer – Removable media encryption solution includes a portable media viewer application for Data Security Manager client users to distribute to allow controlled access to encrypted media content on a computer that is not a Data Security Manager client.
• Removable media sharing – Removable media is encrypted with a user-selected key, based on the type of media sharing they want to do:
• Computer work groups – A key can be shared with a group of client computers for media sharing between all of their users.
• Single computer – A key can be reserved for one specific client computer for media sharing between all of its users.
• User work groups – A key can be shared with a group of users on the same or different client computers.
• Single user – A user can reserve a key for their exclusive use.
• Multiple client users – Single Data Security Manager client supports multiple users. Each user has their own user name or token identity and is responsible for managing their own password/PIN changes and encryption keys.
• Client administrators – Clients can support multiple Data Security Manager administrators. Administrators have the rights to add and remove users, change policy settings, manage removable media encryption keys, and decommission clients. Each client has at least one client administrator account, which gets created at installation time. A client administrator must also be a Windows administrator.
• Client management tool – Clients include a user interface for administrator and non-administrator users. Administrators and users launch the Afaria Data Security Manager Management Tool program from the padlock icon in the system tray. The management program includes the interface for executing user tasks. Features are enabled or disabled based on administrator or non-administrator status.
• Decommission client – Client administrative features include an action to decommission a client, wiping it of all its current data. This action assists with safely removing a computer from an active environment or for assigning it to a new use or user.
• Controlled installation process – Users experience controlled reboots during the installation process. Reboots are announced with a countdown timer that leaves a user enough time to save data and stop activity before a reboot occurs.
• Controlled removal process – Use the Data Security Manager client Control Panel's Add and Remove Programs tool to uninstall the Data Security Manager client. Uninstall is a two-pass
154
Afaria Reference Manual | Components 6.5 Data Security Manager for Windows ClientsAbout Data Security Manager
process; i.e. the first pass with Add and Remove Programs starts decrypting the hard disk and the second pass programmatically removes the client.
• Afaria Administrator client views – Afaria Administrator Web console includes defined data views for Data Security Manager clients. The view includes a client’s recovery identifier for streamlined support tasks. An administrator must have Afaria access policy “Create” rights to generate recovery passwords or update sensitive client administrator information. You can include the new data when you create a new custom view.
• Client security event logging – Data Security Manager client event data is delivered to the Afaria Server during Afaria sessions. Logging for external media activity is included if it is enabled in the security policy.
• Reports – Summary, detail, and exception reporting for Data Security Manager client computers to report encryption status.
About Windows clients Afaria Windows clients are supported for many of Afaria’s platform and component features. As is the nature of device management in general, and Afaria components in particular, successful operations depend in part on your understanding of how the Windows client is designed to operate in the Afaria environment.
Refer to Afaria Reference Manual | Platform > Creating Clients > Creating Afaria Clients > “About Your Afaria Windows Client” to learn more about managing your Afaria Windows clients.
155

Afaria Reference Manual | Components 6.5 Data Security Manager for Windows ClientsAbout Data Security Manager deployment
About Data Security Manager deploymentThis overview allows you to become familiar with the general process for installing and deploying Data Security Manager to your Afaria Clients, before you begin to impact your clients.
1 Review release notes and system requirements – Visit the Afaria technical support site to review release notes for the latest information about Data Security Manager. The release notes include information about known issues and system requirements.
2 Create channel – Create a Data Security Manager channel to define your security policy concerning password requirements and recovery scenarios. The channel delivers the Data Security Manager application and associated end user documentation to your Afaria Windows clients.
3 Prepare the client and end users – Ensure that you scan, repair, and back up all fixed and removable media before delivering and installing Data Security Manager on your Afaria Windows clients. The installation may expose existing system problems such as a failing hard drive.
4 Deliver and install the product on the client – Deliver the Data Security Manager channel that you created to your Afaria Windows clients. The channel contains logic to deliver the files, launch the installation process, and monitor the installation process through completion.
5 Support client operations
• Prepare for recovery support – Become familiar with, and prepare to use, the Data Security Manager feature on the Data Security Manager client and the Afaria Server for issuing a response code to a client user that has caused their Afaria Client to enter a state of denied access. The state of denied access presents the user with a challenge code to which they must reply with a valid response code in order to regain access to the Data Security Manager client.
• Unattended reboot, maintenance mode – Use unattended reboot functionality as needed to put your Data Security Manager clients into maintenance mode, such as for when you are installing software or software patches.
• Monitor clients – Use data views and reports to monitor information about your Data Security Manager clients.
156
Afaria Reference Manual | Components 6.5 Data Security Manager for Windows ClientsAbout the Data Security Manager client
About the Data Security Manager client
The Data Security Manager client must host at least one Data Security Manager administrator user but can host more. A Data Security Manager administrator must also be a Windows administrator. The client can also host multiple non-administrator users. Password-based installations that use a user name and password to identify users can host a maximum of 26 user accounts per client. Token-based installations that use a token and PIN (password) to identify users can host an unlimited number of user accounts per client.
Each Data Security Manager client is defined to protect either the client’s fixed disk, its removable media, or both. “Protect” refers to protecting data from unauthorized users by encrypting the data. “Removable media” is the general reference to mass storage devices that you can use with the client for reading and writing data that are also subject to removal and transport to another computer.
Client configurations are described in the following ways:
• Fixed disk installation – The client is defined to protect the client’s fixed disk, but not its removable media. Encryption occurs on the full disk, including the boot sector. A user can use unprotected media if they choose.
• Fixed disk with removable media – The client is defined to protect both the client’s fixed disk and its removable media. The removable media protection implementation can occur in the following ways:
• Removable media permitted – The user is prompted to decide whether they want to protect media each time they attempt to read from or write to unprotected media. A user can use unprotected media if they choose.
• Removable media required – The user is forced to decide between protecting media or not using the media each time they attempt to read from or write to unprotected media.
• Removable media only – The client is defined to protect the client’s removable media. However, the removable media protection default implementation is “Removable media required”. The fixed disk is not encrypted.
Protecting fixed disks Data Security Manager uses an encryption algorithm and a unique disk encryption key to encrypt data on fixed disks. Data Security Manager has built-in processes to invoke the algorithm, however it requires a key for each client computer. The user that installs the client
This release includes an online help resource “Afaria Security Manager User Guide”. The help includes content for Data Security Manager client administrators and users. The help is not attached to the client’s user interface. Client administrators and users can find it on the client on the following path:
<SecurityManagerClientInstall>\Disk Protect\Security_Manager_Windows_UserGuide.chm
Inform your administrators and users about this important resource.
It is helpful for you to review the online help to understand client-side concepts and tasks. You can locate the help in this release’s documentation download.
157
Afaria Reference Manual | Components 6.5 Data Security Manager for Windows ClientsAbout the Data Security Manager client
creates the disk encryption key by executing a key-generating exercise. The exercise uses a high degree of entropy to create a unique key.
Once the key is created, Data Security Manager takes care of the rest and client users do not need to concern themselves with anything about the key or the fixed disk protection. Users that are added to the client can log on and log off, read from and write to the fixed disk; all without thinking about encryption or keys. Data Security Manager takes action to securely transfer a copy of the key to the Afaria Server. The Afaria Server provides secure key escrow and client recovery services.
Protecting removable media Data Security Manager uses an encryption algorithm and an encryption key to encrypt data on removable media. Data Security Manager has built-in processes to invoke the algorithm, but there can be many keys stored on a single Data Security Manager client. Therefore, the client always prompts a user to select an encryption key to use when they attempt to use unprotected media.
Data Security Manager keys are stored as data files. As such, they can be shared between users and client computers in the same way you would share any important, sensitive file; e.g. transport on removable media, store on a network share, email, etc.
• Computer work groups – A key can be shared with a group of client computers. Therefore, any user on any of those clients can protect and share removable media with any other user in that computer work group.
• Single computer – A key can be reserved for one specific client computer. Therefore all the users on that client can protect and share removable media with each other.
• User work groups – A key can be shared with a group of users on the same or different client computers. Therefore, all users in the group can protect and share removable media with any of the other users in that user work group.
• Single user – A user can reserve a key for their exclusive use. Therefore, the user can protect their removable media with a key that is not part of a group environment.
All Data Security Manager keys are identical in form; its only their function within the Data Security Manager application that makes them different. Keys for computers are called transport keys and are administered by Data Security Manager client administrators. Keys for users are called media keys and are administered by client users. Administrators and users create new keys using Data Security Manager tools. You can export a key if you need to share it or store it for safe keeping, import it if someone is sharing it with you, or delete it if it is no longer of use.
Afaria Security Manager Management Tool Afaria Security Manager Management Tool is a program that runs on the Data Security Manager client. It includes tasks for managing keys, single sign on, tokens, passwords, and the local security policy.
Administrators and users launch the Afaria Security Manager Management Tool program from the padlock icon in the system tray. The program opens in the locked state when the current
158

Afaria Reference Manual | Components 6.5 Data Security Manager for Windows ClientsAbout the Data Security Manager client
user is not a Data Security Manager client administrator. This state allows a user to access user-appropriate tasks and keeps administrator tasks protected. The management tool opens in the unlocked state when the current user is a Data Security Manager client administrator. This state allows the administrator to access all tasks. An administrator can unlock the program temporarily while a user is logged by supplying their administrator credentials.
159

Afaria Reference Manual | Components 6.5 Data Security Manager for Windows ClientsCreate or edit a Data Security Manager channel
Create or edit a Data Security Manager channel Create or edit Data Security Manager channels to configure security policies for your Windows clients.
To create a channel, launch the channel wizard for a Data Security Manager channel. The wizard guides you through the channel creation process. Ensure that you select Windows for your client type1. The channel wizard displays the following policy options in sequence. Refer to the indicated topics for additional information.
1 “Channel wizard: Mode” on page 161
2 “Channel wizard: Installation actions” on page 164
3 “Channel wizard: Password settings” on page 167
To edit an existing channel, open the channel editor using one of the following methods:
• Click the Edit icon on the Channel administration toolbar.
• Click the Edit channel contents… link on the channel’s Properties page.
• Select the Continue editing check box in the channel wizard when creating a channel. Change settings for the policy properties you want to change. The editor provides the following policy property pages:
• “Channel editor: Password” on page 169
• “Channel editor: Fixed disk” on page 171
• “Channel editor: Media” on page 173
• “Channel editor: Install actions” on page 175
• “Channel editor: Unattended” on page 179
Some channel features are available only in the editor, and not in the channel wizard.
1. Vista appears in the new channel wizard's Channel Types dialog box in the list of Windows client sub-types. However, the Data Security Manager component does not support Vista in this release.
• To deploy a channel to clients, you must both publish it and assign it to a work profile.
• An Afaria Client honors only one security policy at a time. You can publish a new policy to override an existing policy.
• To establish proper expectations and deliver relevant information about passwords, password composition, and device lock down, be sure to inform your device holders about any changes to security policies.
• For complete information about creating and editing channels, refer to Afaria Reference Manual | Platform > Administration > “Channel Administration”.
160
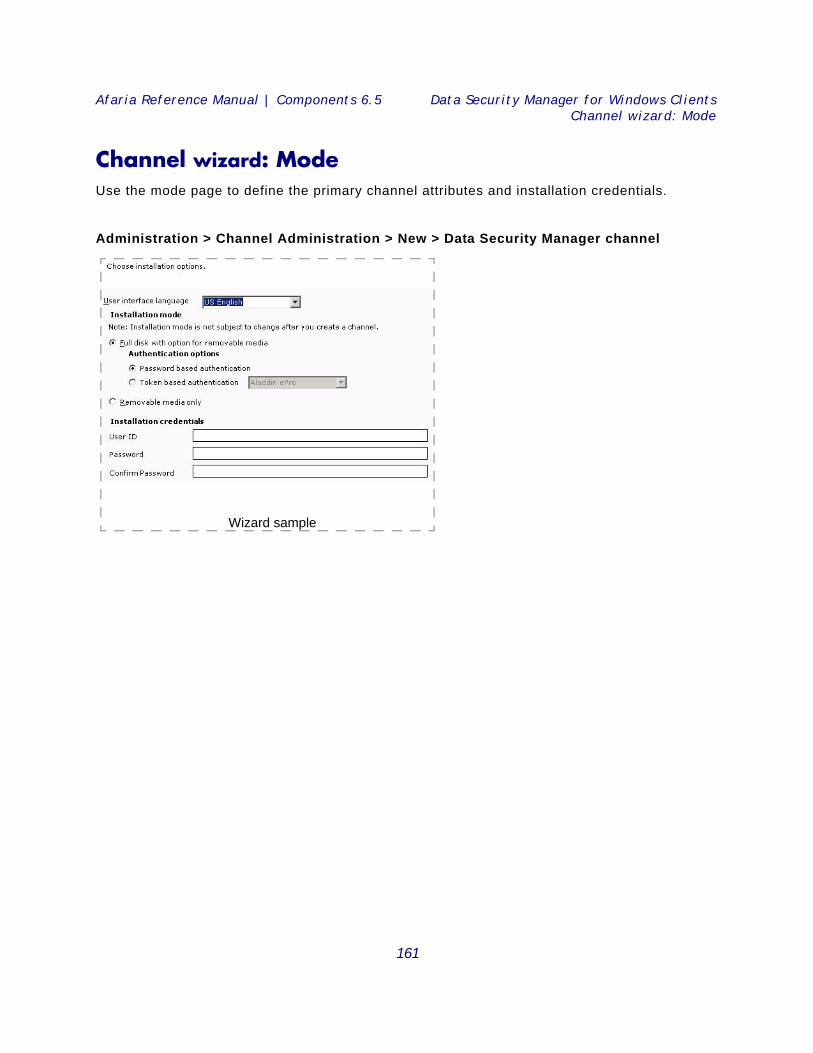
Afaria Reference Manual | Components 6.5 Data Security Manager for Windows ClientsChannel wizard: Mode
Channel wizard: ModeUse the mode page to define the primary channel attributes and installation credentials.
Administration > Channel Administration > New > Data Security Manager channel
Wizard sample
161
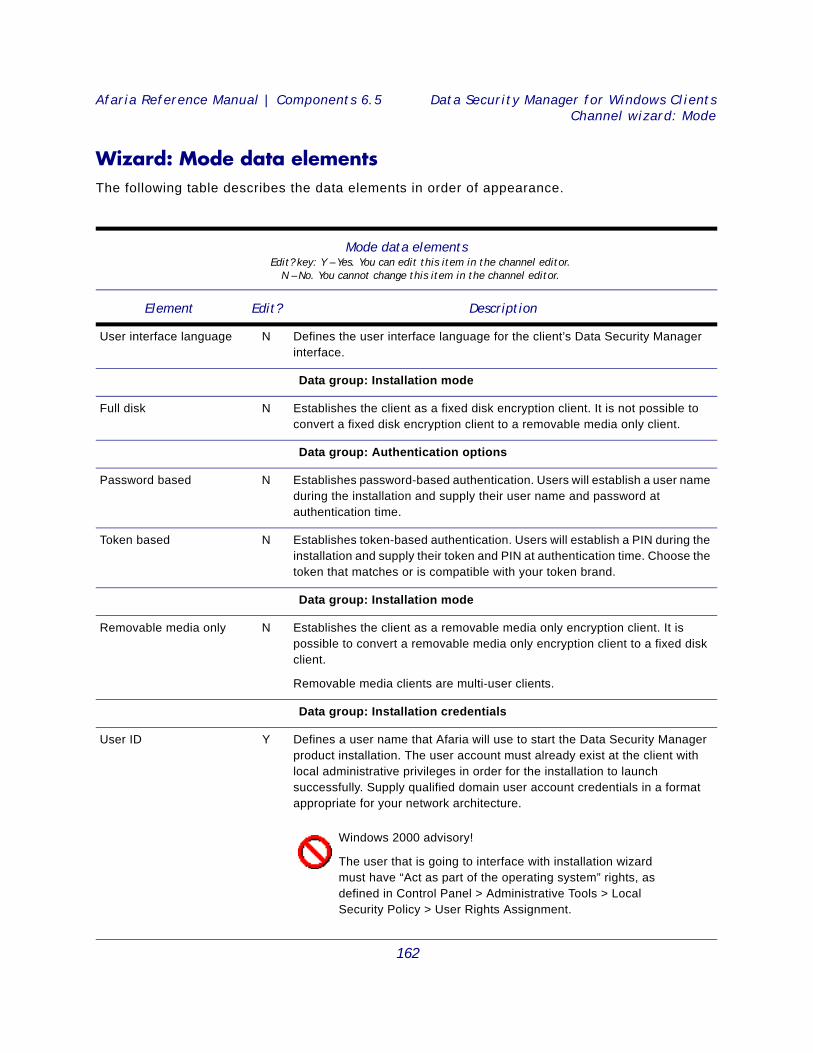
Afaria Reference Manual | Components 6.5 Data Security Manager for Windows ClientsChannel wizard: Mode
Wizard: Mode data elements The following table describes the data elements in order of appearance.
Mode data elements Edit? key: Y – Yes. You can edit this item in the channel editor.
N – No. You cannot change this item in the channel editor.
Element Edit? Description
User interface language N Defines the user interface language for the client’s Data Security Manager interface.
Data group: Installation mode
Full disk N Establishes the client as a fixed disk encryption client. It is not possible to convert a fixed disk encryption client to a removable media only client.
Data group: Authentication options
Password based N Establishes password-based authentication. Users will establish a user name during the installation and supply their user name and password at authentication time.
Token based N Establishes token-based authentication. Users will establish a PIN during the installation and supply their token and PIN at authentication time. Choose the token that matches or is compatible with your token brand.
Data group: Installation mode
Removable media only N Establishes the client as a removable media only encryption client. It is possible to convert a removable media only encryption client to a fixed disk client.
Removable media clients are multi-user clients.
Data group: Installation credentials
User ID Y Defines a user name that Afaria will use to start the Data Security Manager product installation. The user account must already exist at the client with local administrative privileges in order for the installation to launch successfully. Supply qualified domain user account credentials in a format appropriate for your network architecture.
Windows 2000 advisory!
The user that is going to interface with installation wizard must have “Act as part of the operating system” rights, as defined in Control Panel > Administrative Tools > Local Security Policy > User Rights Assignment.
162
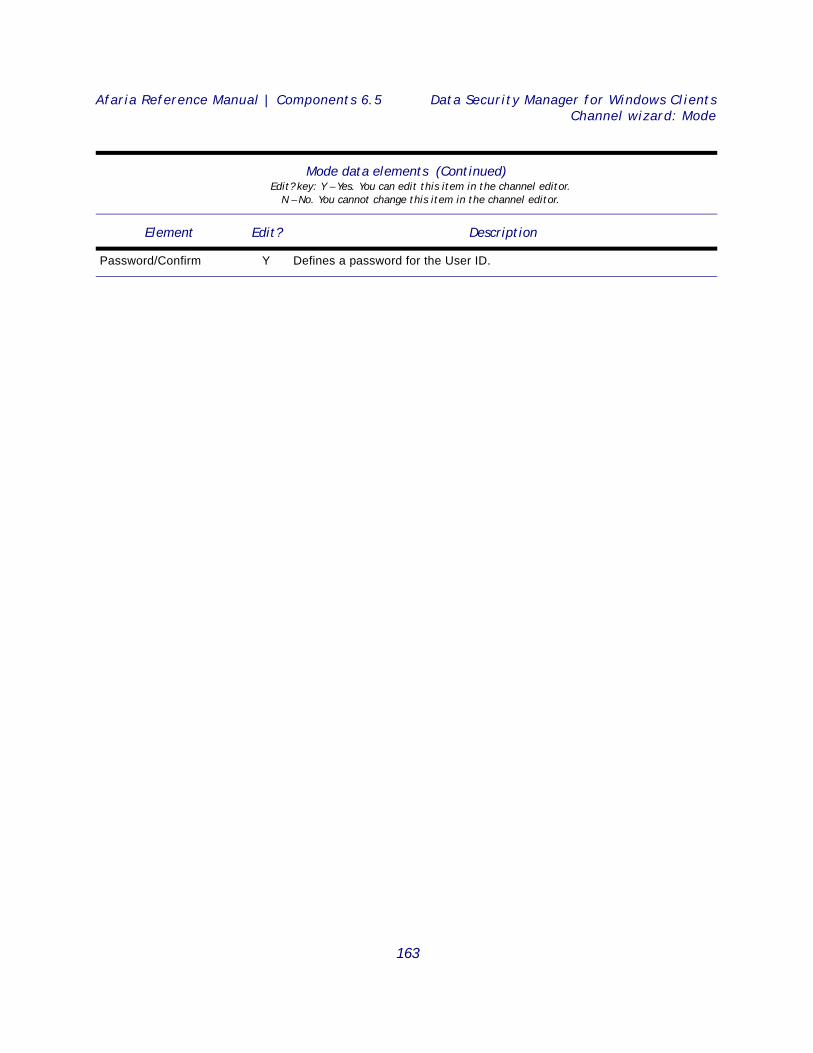
Afaria Reference Manual | Components 6.5 Data Security Manager for Windows ClientsChannel wizard: Mode
Password/Confirm Y Defines a password for the User ID.
Mode data elements (Continued)Edit? key: Y – Yes. You can edit this item in the channel editor.
N – No. You cannot change this item in the channel editor.
Element Edit? Description
163
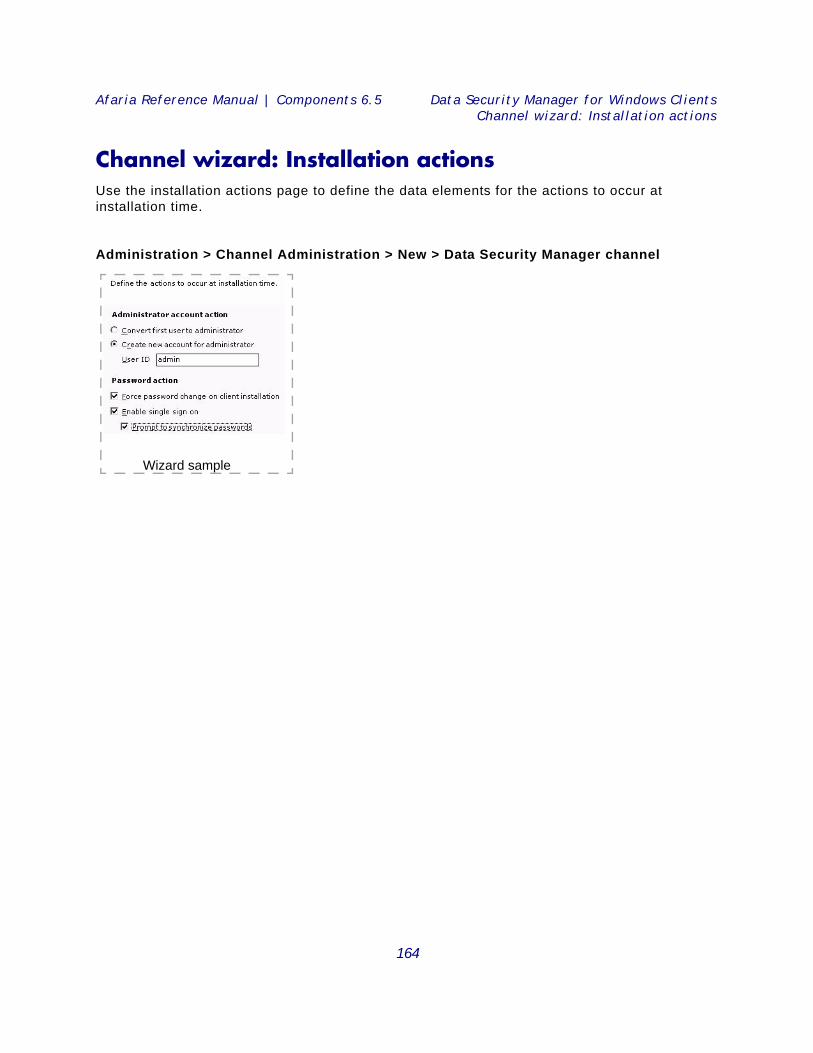
Afaria Reference Manual | Components 6.5 Data Security Manager for Windows ClientsChannel wizard: Installation actions
Channel wizard: Installation actionsUse the installation actions page to define the data elements for the actions to occur at installation time.
Administration > Channel Administration > New > Data Security Manager channel
Wizard sample
164
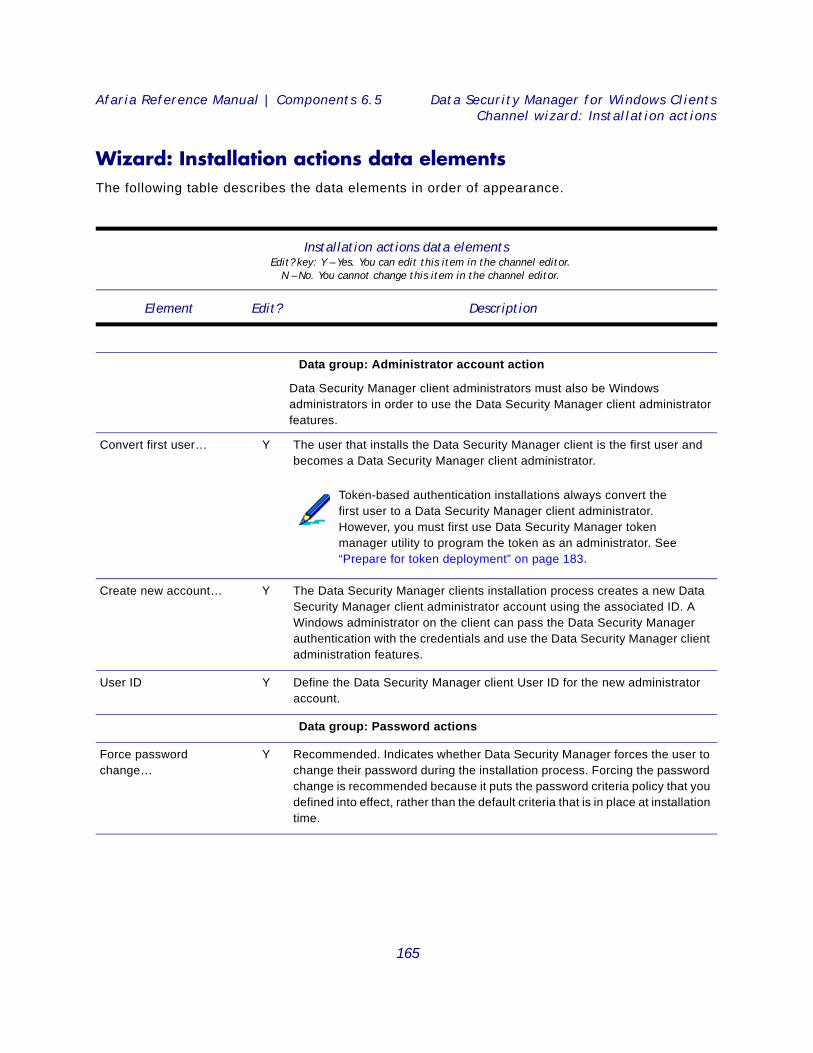
Afaria Reference Manual | Components 6.5 Data Security Manager for Windows ClientsChannel wizard: Installation actions
Wizard: Installation actions data elements The following table describes the data elements in order of appearance.
Installation actions data elements Edit? key: Y – Yes. You can edit this item in the channel editor.
N – No. You cannot change this item in the channel editor.
Element Edit? Description
Data group: Administrator account action
Data Security Manager client administrators must also be Windows administrators in order to use the Data Security Manager client administrator features.
Convert first user… Y The user that installs the Data Security Manager client is the first user and becomes a Data Security Manager client administrator.
Create new account… Y The Data Security Manager clients installation process creates a new Data Security Manager client administrator account using the associated ID. A Windows administrator on the client can pass the Data Security Manager authentication with the credentials and use the Data Security Manager client administration features.
User ID Y Define the Data Security Manager client User ID for the new administrator account.
Data group: Password actions
Force password change…
Y Recommended. Indicates whether Data Security Manager forces the user to change their password during the installation process. Forcing the password change is recommended because it puts the password criteria policy that you defined into effect, rather than the default criteria that is in place at installation time.
Token-based authentication installations always convert the first user to a Data Security Manager client administrator. However, you must first use Data Security Manager token manager utility to program the token as an administrator. See “Prepare for token deployment” on page 183.
165
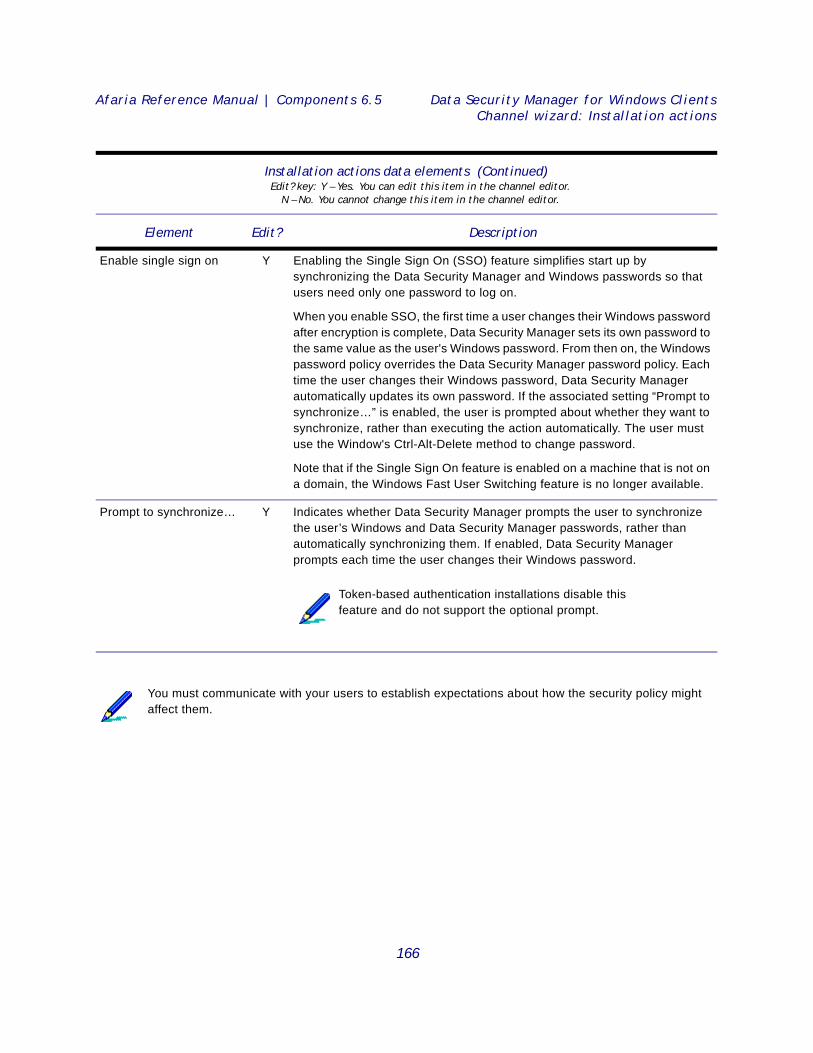
Afaria Reference Manual | Components 6.5 Data Security Manager for Windows ClientsChannel wizard: Installation actions
Enable single sign on Y Enabling the Single Sign On (SSO) feature simplifies start up by synchronizing the Data Security Manager and Windows passwords so that users need only one password to log on.
When you enable SSO, the first time a user changes their Windows password after encryption is complete, Data Security Manager sets its own password to the same value as the user's Windows password. From then on, the Windows password policy overrides the Data Security Manager password policy. Each time the user changes their Windows password, Data Security Manager automatically updates its own password. If the associated setting “Prompt to synchronize…” is enabled, the user is prompted about whether they want to synchronize, rather than executing the action automatically. The user must use the Window's Ctrl-Alt-Delete method to change password.
Note that if the Single Sign On feature is enabled on a machine that is not on a domain, the Windows Fast User Switching feature is no longer available.
Prompt to synchronize… Y Indicates whether Data Security Manager prompts the user to synchronize the user’s Windows and Data Security Manager passwords, rather than automatically synchronizing them. If enabled, Data Security Manager prompts each time the user changes their Windows password.
You must communicate with your users to establish expectations about how the security policy might affect them.
Installation actions data elements (Continued)Edit? key: Y – Yes. You can edit this item in the channel editor.
N – No. You cannot change this item in the channel editor.
Element Edit? Description
Token-based authentication installations disable this feature and do not support the optional prompt.
166
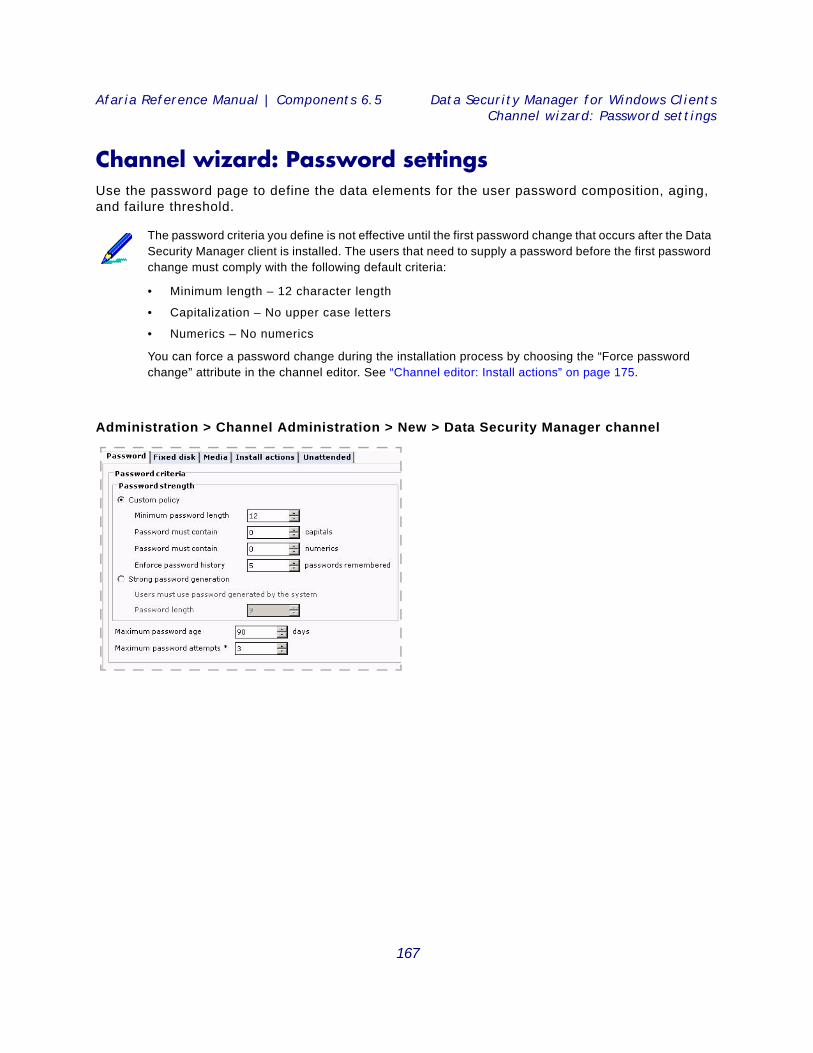
Afaria Reference Manual | Components 6.5 Data Security Manager for Windows ClientsChannel wizard: Password settings
Channel wizard: Password settingsUse the password page to define the data elements for the user password composition, aging, and failure threshold.
Administration > Channel Administration > New > Data Security Manager channel
The password criteria you define is not effective until the first password change that occurs after the Data Security Manager client is installed. The users that need to supply a password before the first password change must comply with the following default criteria:
• Minimum length – 12 character length
• Capitalization – No upper case letters
• Numerics – No numerics
You can force a password change during the installation process by choosing the “Force password change” attribute in the channel editor. See “Channel editor: Install actions” on page 175.
Wizard sample
167
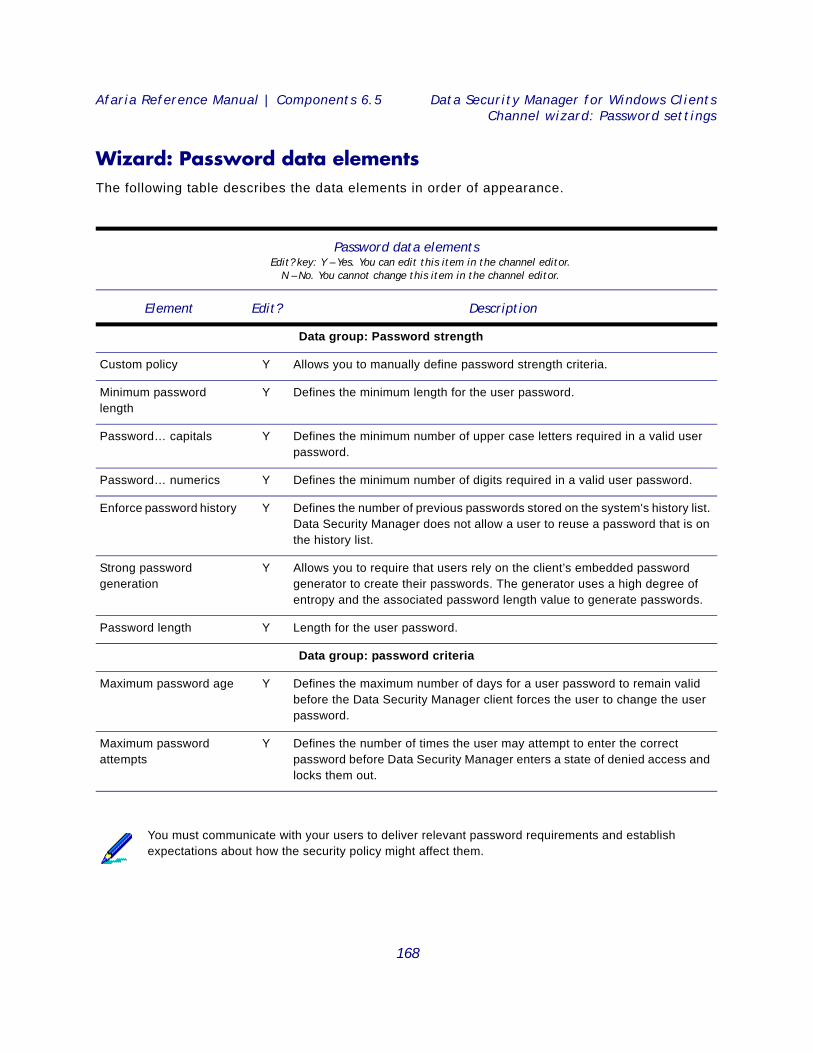
Afaria Reference Manual | Components 6.5 Data Security Manager for Windows ClientsChannel wizard: Password settings
Wizard: Password data elements The following table describes the data elements in order of appearance.
Password data elements Edit? key: Y – Yes. You can edit this item in the channel editor.
N – No. You cannot change this item in the channel editor.
Element Edit? Description
Data group: Password strength
Custom policy Y Allows you to manually define password strength criteria.
Minimum password length
Y Defines the minimum length for the user password.
Password… capitals Y Defines the minimum number of upper case letters required in a valid user password.
Password… numerics Y Defines the minimum number of digits required in a valid user password.
Enforce password history Y Defines the number of previous passwords stored on the system's history list. Data Security Manager does not allow a user to reuse a password that is on the history list.
Strong password generation
Y Allows you to require that users rely on the client’s embedded password generator to create their passwords. The generator uses a high degree of entropy and the associated password length value to generate passwords.
Password length Y Length for the user password.
Data group: password criteria
Maximum password age Y Defines the maximum number of days for a user password to remain valid before the Data Security Manager client forces the user to change the user password.
Maximum password attempts
Y Defines the number of times the user may attempt to enter the correct password before Data Security Manager enters a state of denied access and locks them out.
You must communicate with your users to deliver relevant password requirements and establish expectations about how the security policy might affect them.
168
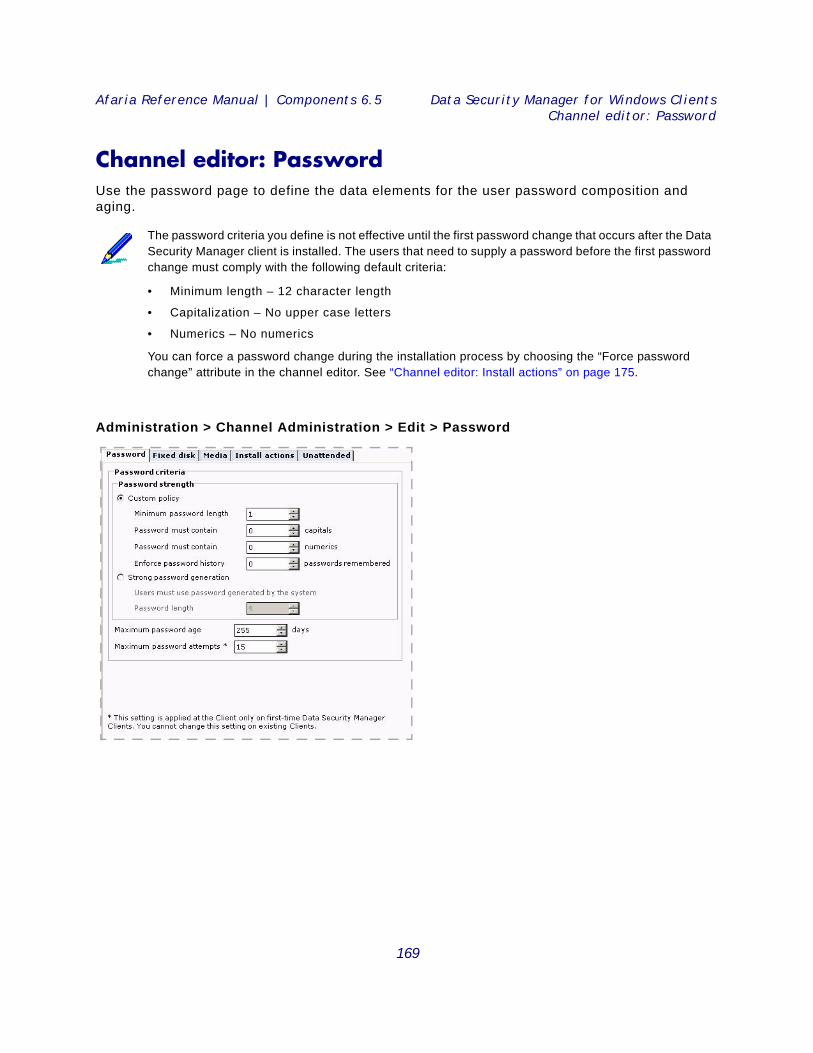
Afaria Reference Manual | Components 6.5 Data Security Manager for Windows ClientsChannel editor: Password
Channel editor: PasswordUse the password page to define the data elements for the user password composition and aging.
Administration > Channel Administration > Edit > Password
The password criteria you define is not effective until the first password change that occurs after the Data Security Manager client is installed. The users that need to supply a password before the first password change must comply with the following default criteria:
• Minimum length – 12 character length
• Capitalization – No upper case letters
• Numerics – No numerics
You can force a password change during the installation process by choosing the “Force password change” attribute in the channel editor. See “Channel editor: Install actions” on page 175.
Editor sample
169
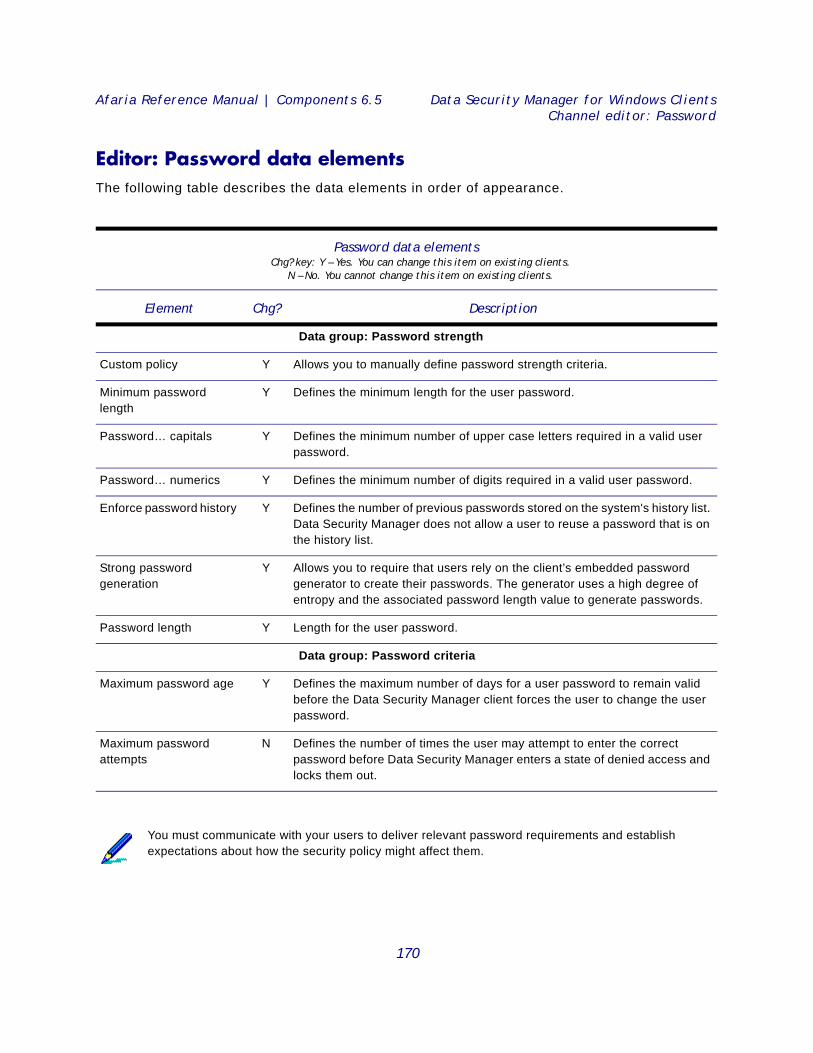
Afaria Reference Manual | Components 6.5 Data Security Manager for Windows ClientsChannel editor: Password
Editor: Password data elements The following table describes the data elements in order of appearance.
Password data elements Chg? key: Y – Yes. You can change this item on existing clients.
N – No. You cannot change this item on existing clients.
Element Chg? Description
Data group: Password strength
Custom policy Y Allows you to manually define password strength criteria.
Minimum password length
Y Defines the minimum length for the user password.
Password… capitals Y Defines the minimum number of upper case letters required in a valid user password.
Password… numerics Y Defines the minimum number of digits required in a valid user password.
Enforce password history Y Defines the number of previous passwords stored on the system's history list. Data Security Manager does not allow a user to reuse a password that is on the history list.
Strong password generation
Y Allows you to require that users rely on the client’s embedded password generator to create their passwords. The generator uses a high degree of entropy and the associated password length value to generate passwords.
Password length Y Length for the user password.
Data group: Password criteria
Maximum password age Y Defines the maximum number of days for a user password to remain valid before the Data Security Manager client forces the user to change the user password.
Maximum password attempts
N Defines the number of times the user may attempt to enter the correct password before Data Security Manager enters a state of denied access and locks them out.
You must communicate with your users to deliver relevant password requirements and establish expectations about how the security policy might affect them.
170
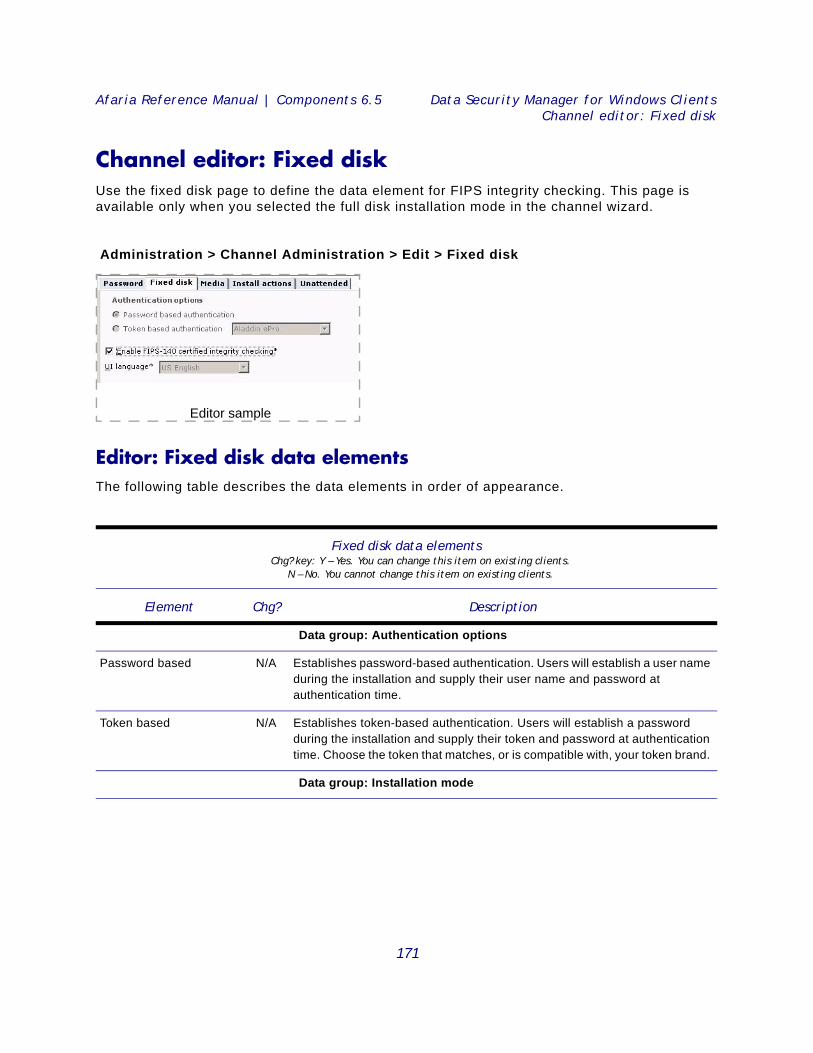
Afaria Reference Manual | Components 6.5 Data Security Manager for Windows ClientsChannel editor: Fixed disk
Channel editor: Fixed diskUse the fixed disk page to define the data element for FIPS integrity checking. This page is available only when you selected the full disk installation mode in the channel wizard.
Administration > Channel Administration > Edit > Fixed disk
Editor: Fixed disk data elements The following table describes the data elements in order of appearance.
Fixed disk data elements Chg? key: Y – Yes. You can change this item on existing clients.
N – No. You cannot change this item on existing clients.
Element Chg? Description
Data group: Authentication options
Password based N/A Establishes password-based authentication. Users will establish a user name during the installation and supply their user name and password at authentication time.
Token based N/A Establishes token-based authentication. Users will establish a password during the installation and supply their token and password at authentication time. Choose the token that matches, or is compatible with, your token brand.
Data group: Installation mode
Editor sample
171

Afaria Reference Manual | Components 6.5 Data Security Manager for Windows ClientsChannel editor: Fixed disk
Enable FIPS… checking N Enables FIPS integrity checking. A FIPS-certified encryption algorithm is always used for Data Security Manager encryption regardless of this setting. Enabling this setting causes a specific set of hardware and software checks to occur that attempts to validate that no FIPS-related mishandling has occurred with the client.
UI language N/A Defines the user interface language for the client’s Data Security Manager interface.
Fixed disk data elements (Continued)Chg? key: Y – Yes. You can change this item on existing clients.
N – No. You cannot change this item on existing clients.
Element Chg? Description
Integrity checking advisory!
Clients that fail FIPS integrity checking enter a specialized locked state. You must wipe a client to regain use and normal operations.
172
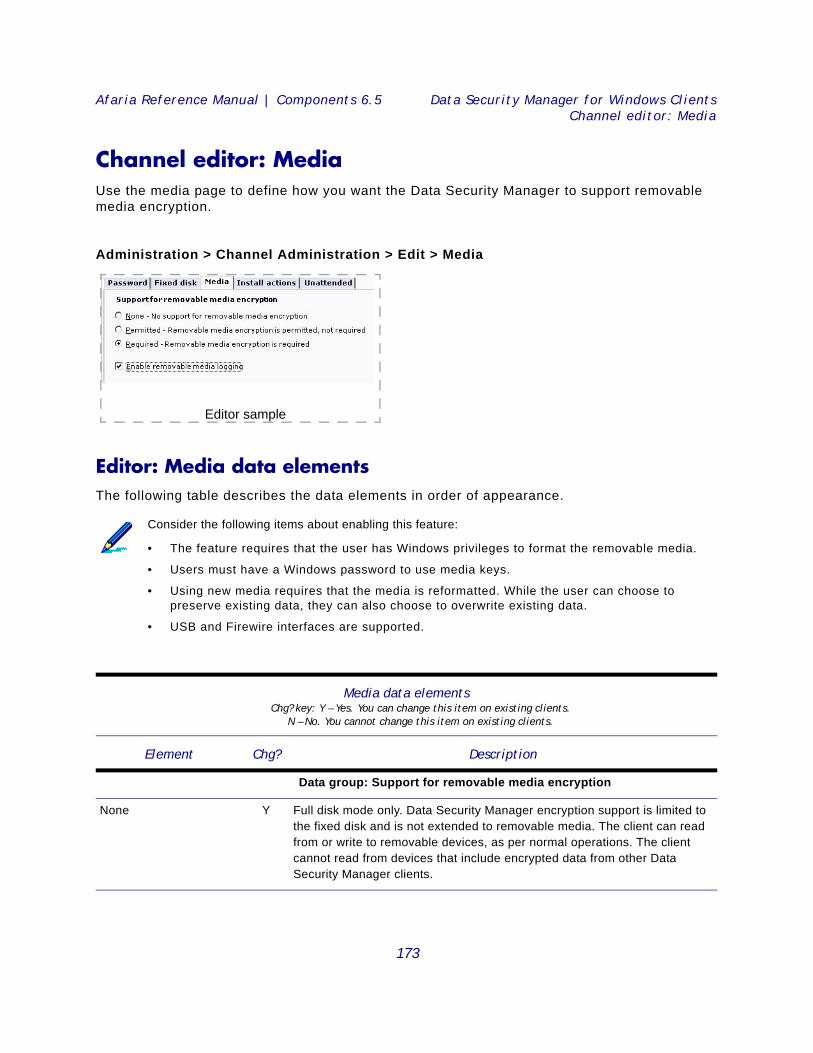
Afaria Reference Manual | Components 6.5 Data Security Manager for Windows ClientsChannel editor: Media
Channel editor: MediaUse the media page to define how you want the Data Security Manager to support removable media encryption.
Administration > Channel Administration > Edit > Media
Editor: Media data elements The following table describes the data elements in order of appearance.
Consider the following items about enabling this feature:
• The feature requires that the user has Windows privileges to format the removable media.
• Users must have a Windows password to use media keys.
• Using new media requires that the media is reformatted. While the user can choose to preserve existing data, they can also choose to overwrite existing data.
• USB and Firewire interfaces are supported.
Media data elements Chg? key: Y – Yes. You can change this item on existing clients.
N – No. You cannot change this item on existing clients.
Element Chg? Description
Data group: Support for removable media encryption
None Y Full disk mode only. Data Security Manager encryption support is limited to the fixed disk and is not extended to removable media. The client can read from or write to removable devices, as per normal operations. The client cannot read from devices that include encrypted data from other Data Security Manager clients.
Editor sample
173
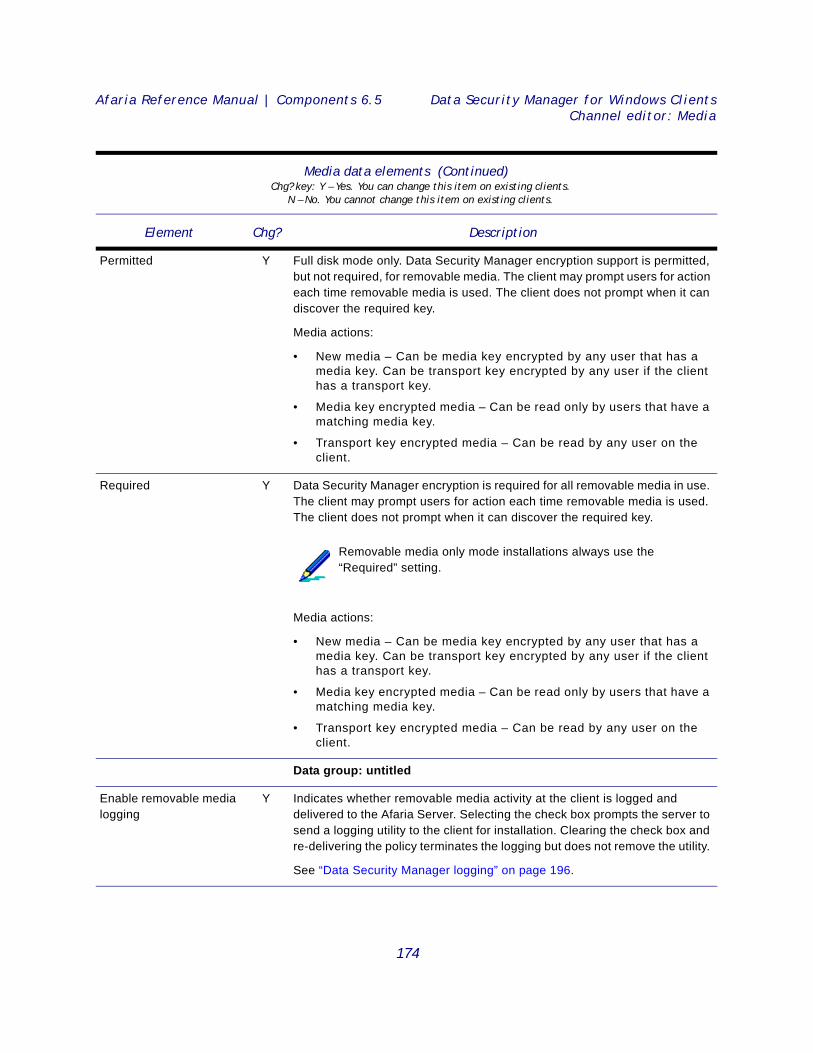
Afaria Reference Manual | Components 6.5 Data Security Manager for Windows ClientsChannel editor: Media
Permitted Y Full disk mode only. Data Security Manager encryption support is permitted, but not required, for removable media. The client may prompt users for action each time removable media is used. The client does not prompt when it can discover the required key.
Media actions:
• New media – Can be media key encrypted by any user that has a media key. Can be transport key encrypted by any user if the client has a transport key.
• Media key encrypted media – Can be read only by users that have a matching media key.
• Transport key encrypted media – Can be read by any user on the client.
Required Y Data Security Manager encryption is required for all removable media in use. The client may prompt users for action each time removable media is used. The client does not prompt when it can discover the required key.
Media actions:
• New media – Can be media key encrypted by any user that has a media key. Can be transport key encrypted by any user if the client has a transport key.
• Media key encrypted media – Can be read only by users that have a matching media key.
• Transport key encrypted media – Can be read by any user on the client.
Data group: untitled
Enable removable media logging
Y Indicates whether removable media activity at the client is logged and delivered to the Afaria Server. Selecting the check box prompts the server to send a logging utility to the client for installation. Clearing the check box and re-delivering the policy terminates the logging but does not remove the utility.
See “Data Security Manager logging” on page 196.
Media data elements (Continued)Chg? key: Y – Yes. You can change this item on existing clients.
N – No. You cannot change this item on existing clients.
Element Chg? Description
Removable media only mode installations always use the “Required” setting.
174
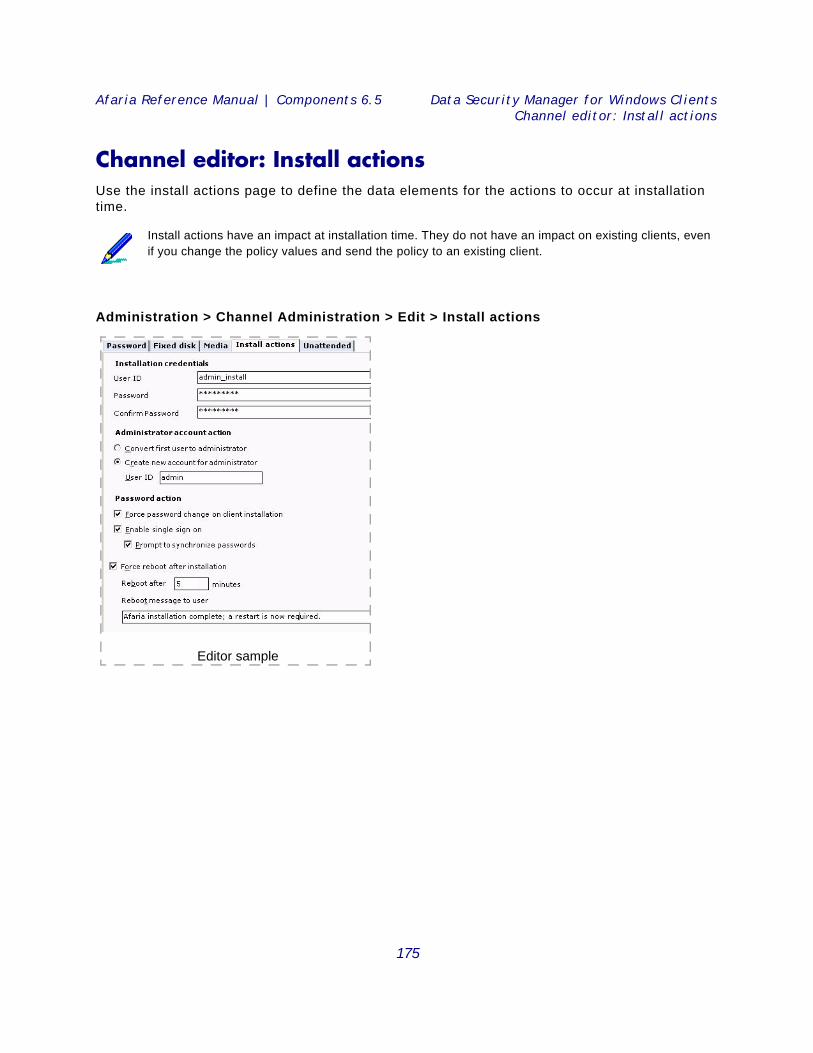
Afaria Reference Manual | Components 6.5 Data Security Manager for Windows ClientsChannel editor: Install actions
Channel editor: Install actions Use the install actions page to define the data elements for the actions to occur at installation time.
Administration > Channel Administration > Edit > Install actions
Install actions have an impact at installation time. They do not have an impact on existing clients, even if you change the policy values and send the policy to an existing client.
Editor sample
175
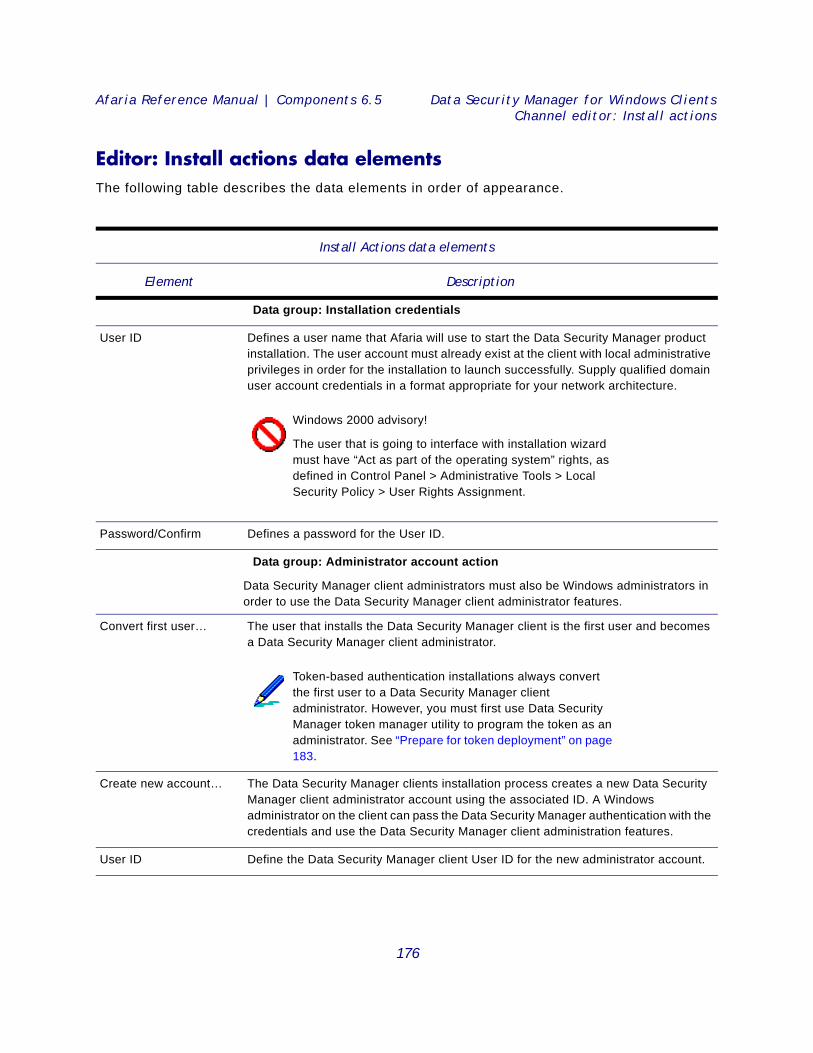
Afaria Reference Manual | Components 6.5 Data Security Manager for Windows ClientsChannel editor: Install actions
Editor: Install actions data elements The following table describes the data elements in order of appearance.
Install Actions data elements
Element Description
Data group: Installation credentials
User ID Defines a user name that Afaria will use to start the Data Security Manager product installation. The user account must already exist at the client with local administrative privileges in order for the installation to launch successfully. Supply qualified domain user account credentials in a format appropriate for your network architecture.
Password/Confirm Defines a password for the User ID.
Data group: Administrator account action
Data Security Manager client administrators must also be Windows administrators in order to use the Data Security Manager client administrator features.
Convert first user… The user that installs the Data Security Manager client is the first user and becomes a Data Security Manager client administrator.
Create new account… The Data Security Manager clients installation process creates a new Data Security Manager client administrator account using the associated ID. A Windows administrator on the client can pass the Data Security Manager authentication with the credentials and use the Data Security Manager client administration features.
User ID Define the Data Security Manager client User ID for the new administrator account.
Windows 2000 advisory!
The user that is going to interface with installation wizard must have “Act as part of the operating system” rights, as defined in Control Panel > Administrative Tools > Local Security Policy > User Rights Assignment.
Token-based authentication installations always convert the first user to a Data Security Manager client administrator. However, you must first use Data Security Manager token manager utility to program the token as an administrator. See “Prepare for token deployment” on page 183.
176
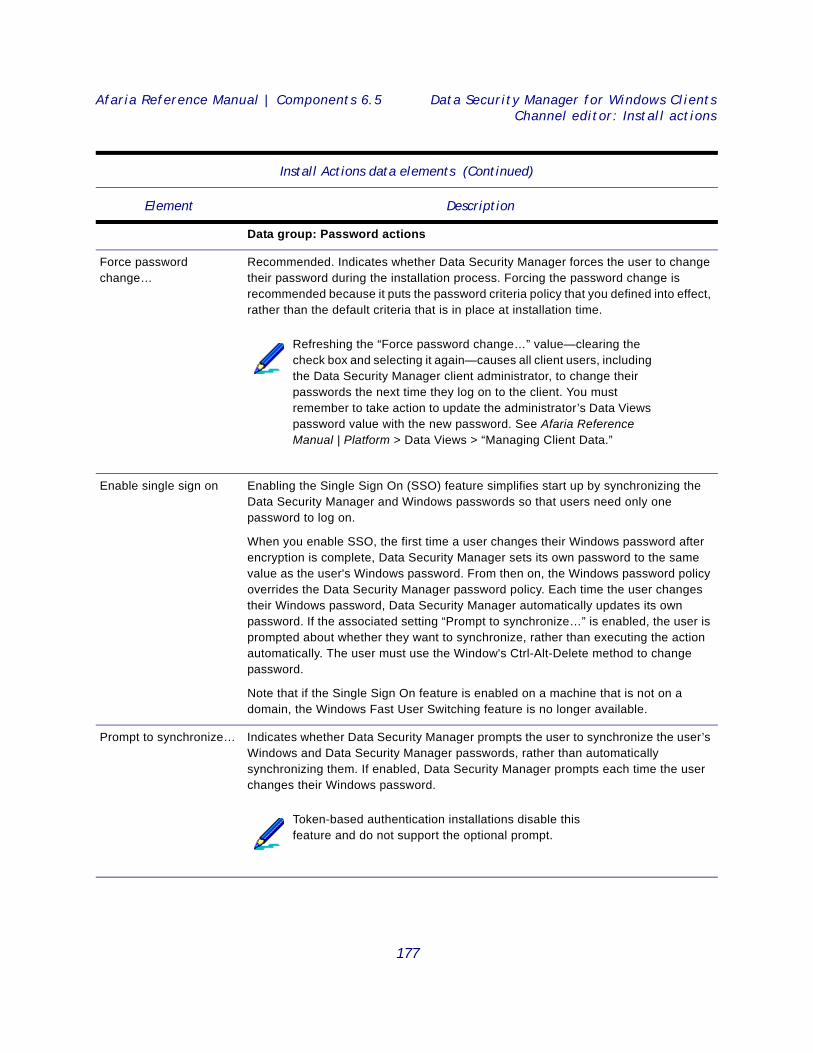
Afaria Reference Manual | Components 6.5 Data Security Manager for Windows ClientsChannel editor: Install actions
Data group: Password actions
Force password change…
Recommended. Indicates whether Data Security Manager forces the user to change their password during the installation process. Forcing the password change is recommended because it puts the password criteria policy that you defined into effect, rather than the default criteria that is in place at installation time.
Enable single sign on Enabling the Single Sign On (SSO) feature simplifies start up by synchronizing the Data Security Manager and Windows passwords so that users need only one password to log on.
When you enable SSO, the first time a user changes their Windows password after encryption is complete, Data Security Manager sets its own password to the same value as the user's Windows password. From then on, the Windows password policy overrides the Data Security Manager password policy. Each time the user changes their Windows password, Data Security Manager automatically updates its own password. If the associated setting “Prompt to synchronize…” is enabled, the user is prompted about whether they want to synchronize, rather than executing the action automatically. The user must use the Window's Ctrl-Alt-Delete method to change password.
Note that if the Single Sign On feature is enabled on a machine that is not on a domain, the Windows Fast User Switching feature is no longer available.
Prompt to synchronize… Indicates whether Data Security Manager prompts the user to synchronize the user’s Windows and Data Security Manager passwords, rather than automatically synchronizing them. If enabled, Data Security Manager prompts each time the user changes their Windows password.
Install Actions data elements (Continued)
Element Description
Refreshing the “Force password change…” value—clearing the check box and selecting it again—causes all client users, including the Data Security Manager client administrator, to change their passwords the next time they log on to the client. You must remember to take action to update the administrator’s Data Views password value with the new password. See Afaria Reference Manual | Platform > Data Views > “Managing Client Data.”
Token-based authentication installations disable this feature and do not support the optional prompt.
177
Afaria Reference Manual | Components 6.5 Data Security Manager for Windows ClientsChannel editor: Install actions
Data group: untitled
Force reboot after… Indicates whether the installation process forces a reboot at the client. The reboot causes the client to begin the next phase of the installation.
Reboot after… minutes Establish the number of minutes until the forced reboot occurs, starting from the time the reboot notification message box displays.
Reboot message to user Define optional text to include on reboot notification message box. The box already includes an indication that a reboot must occur and a countdown timer.
Install Actions data elements (Continued)
Element Description
178
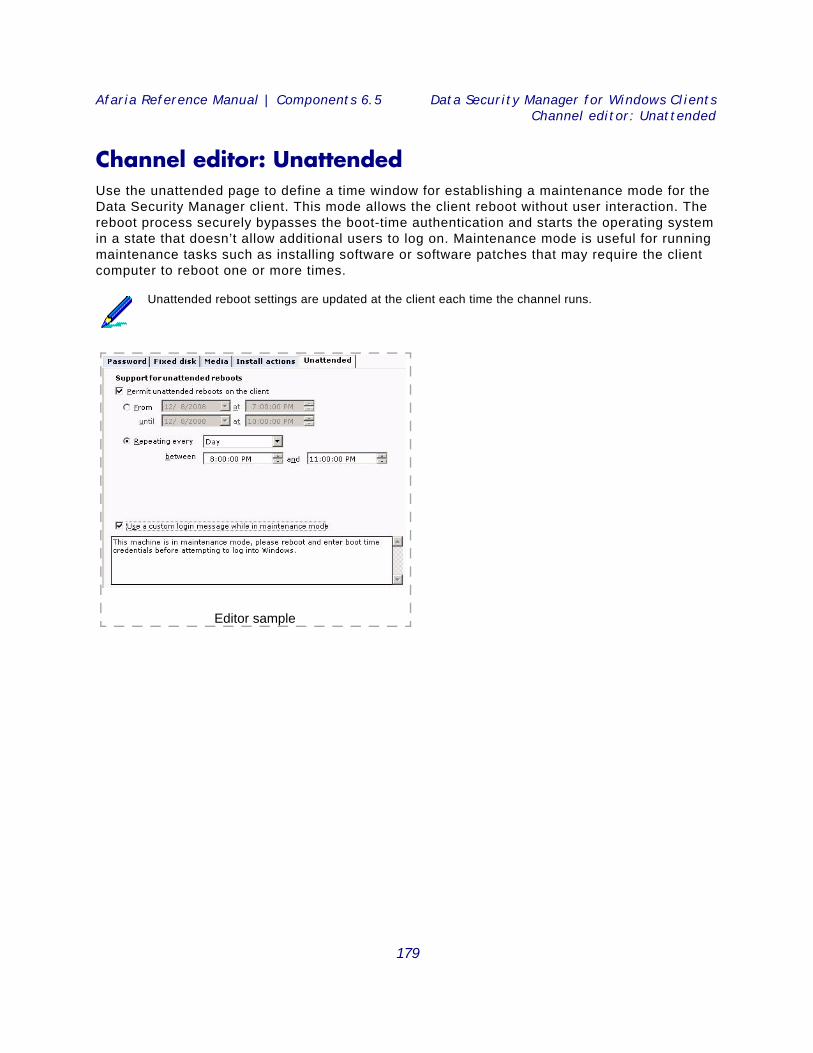
Afaria Reference Manual | Components 6.5 Data Security Manager for Windows ClientsChannel editor: Unattended
Channel editor: Unattended Use the unattended page to define a time window for establishing a maintenance mode for the Data Security Manager client. This mode allows the client reboot without user interaction. The reboot process securely bypasses the boot-time authentication and starts the operating system in a state that doesn’t allow additional users to log on. Maintenance mode is useful for running maintenance tasks such as installing software or software patches that may require the client computer to reboot one or more times.
Unattended reboot settings are updated at the client each time the channel runs.
Editor sample
179
Afaria Reference Manual | Components 6.5 Data Security Manager for Windows ClientsChannel editor: Unattended
Editor: Unattended data elements The following table describes the data elements in order of appearance.
Unattended data elements
Element Description
Data group: Support for unattended reboots
Permit unattended reboots…
Indicates whether the Data Security Manager policy includes an unattended reboot window definition for the client. Delivering the policy with a definition adds a single instance of a definition to execute at the client, defined according to the “From/Until” or “Repeating every” values you set. Delivering the policy without a definition cancels any definition already queued or executing at the client.
Unattended reboot window times are executed according to the client operating system’s time.
From/until Defines the unattended reboot window using absolute calendar date and time reference points that are subject to expiration. Using this method creates a single instance of an unattended reboot window. Running the channel with a defined from/until window that has already expired does not add a window definition to the client.
Repeating every Defines the unattended reboot window using relative calendar and time reference points that are not subject to expiration. Using this method creates a single instance of an unattended reboot window; however, a new definition is created each time the client runs the channel.
All repeating values are calculated from the beginning of the calendar year, rather than the date the policy is created or saved.
Use a custom login message…
Defines the message that the client displays after it reboots at the start of the unattended reboot window and after every reboot during the window. See “Maintenance mode at the client” on page 181 for a sample of the dialog. A user can choose OK to close the window but cannot use the log on dialog to log on to Windows without restarting the client computer.
Afaria does not filter or verify the characters you type. The characters are subject to the run time environment both at the Afaria Server and at any client that runs the channel. You are advised to avoid using special characters such as “!@#$%^&*()” and to test your message on the relevant operating systems.
Running the channel again while the client is within a defined window’s time frame does not create a new “Repeating every” window definition instance at the client.
180
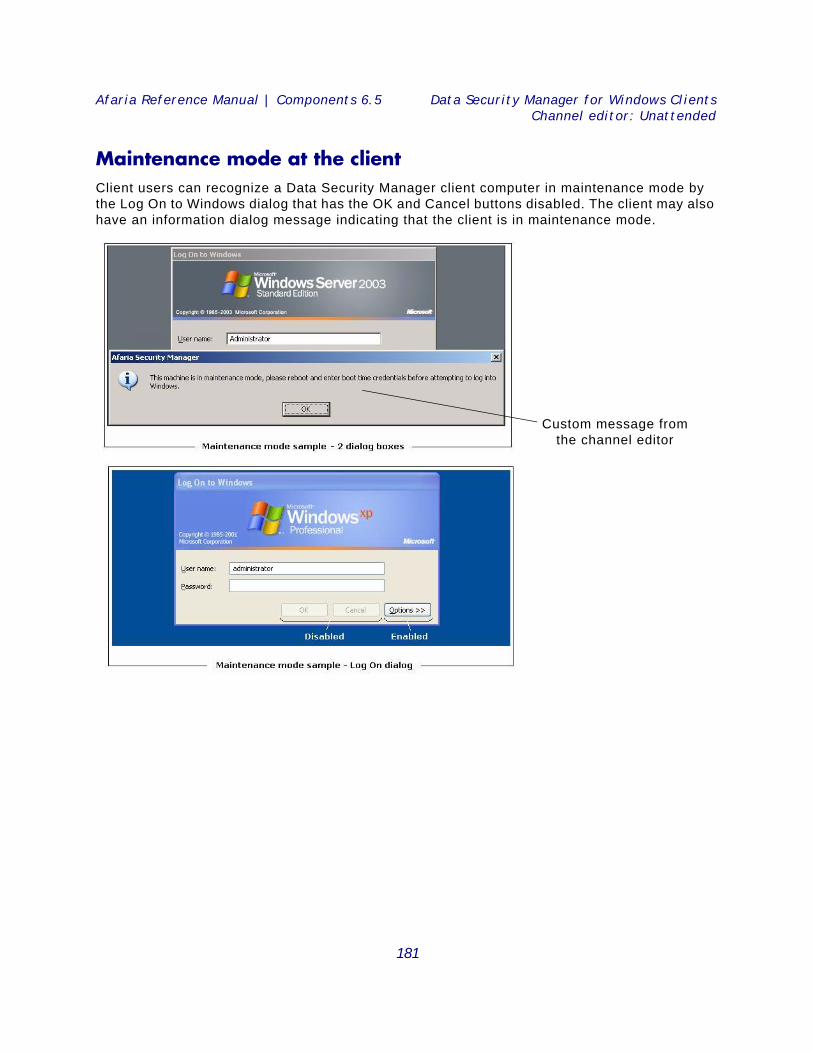
Afaria Reference Manual | Components 6.5 Data Security Manager for Windows ClientsChannel editor: Unattended
Maintenance mode at the client Client users can recognize a Data Security Manager client computer in maintenance mode by the Log On to Windows dialog that has the OK and Cancel buttons disabled. The client may also have an information dialog message indicating that the client is in maintenance mode.
Custom message from the channel editor
181
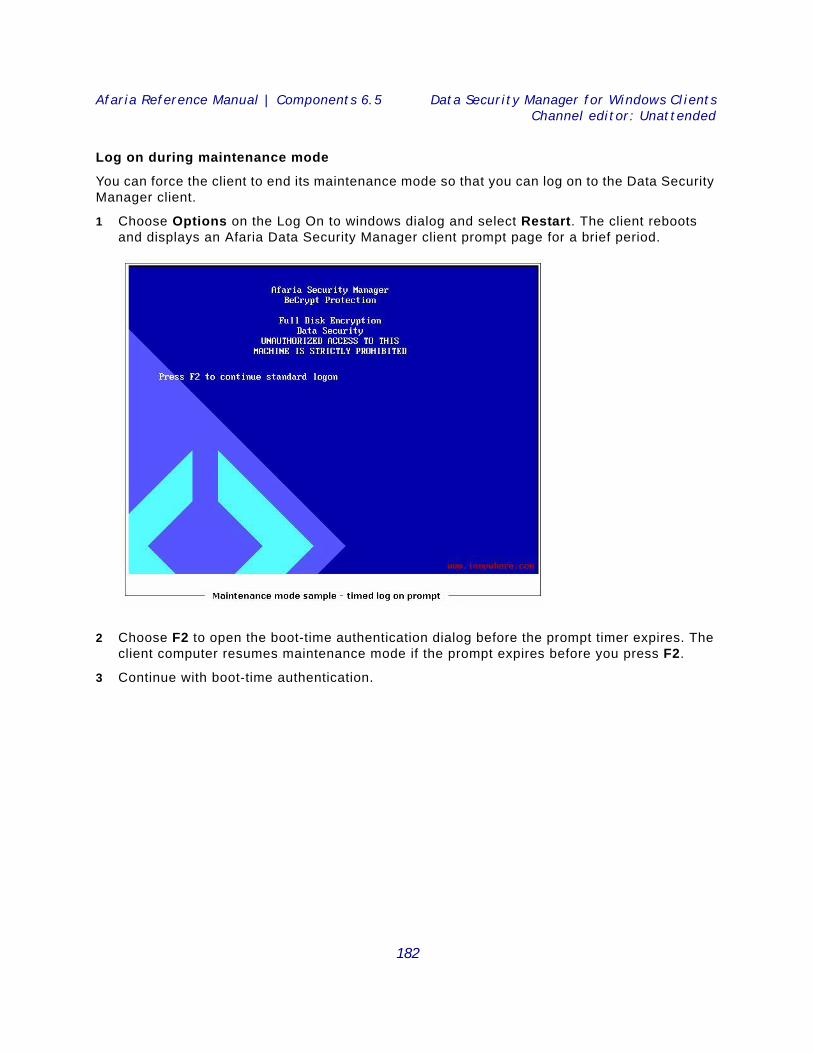
Afaria Reference Manual | Components 6.5 Data Security Manager for Windows ClientsChannel editor: Unattended
Log on during maintenance mode
You can force the client to end its maintenance mode so that you can log on to the Data Security Manager client.
1 Choose Options on the Log On to windows dialog and select Restart. The client reboots and displays an Afaria Data Security Manager client prompt page for a brief period.
2 Choose F2 to open the boot-time authentication dialog before the prompt timer expires. The client computer resumes maintenance mode if the prompt expires before you press F2.
3 Continue with boot-time authentication.
182
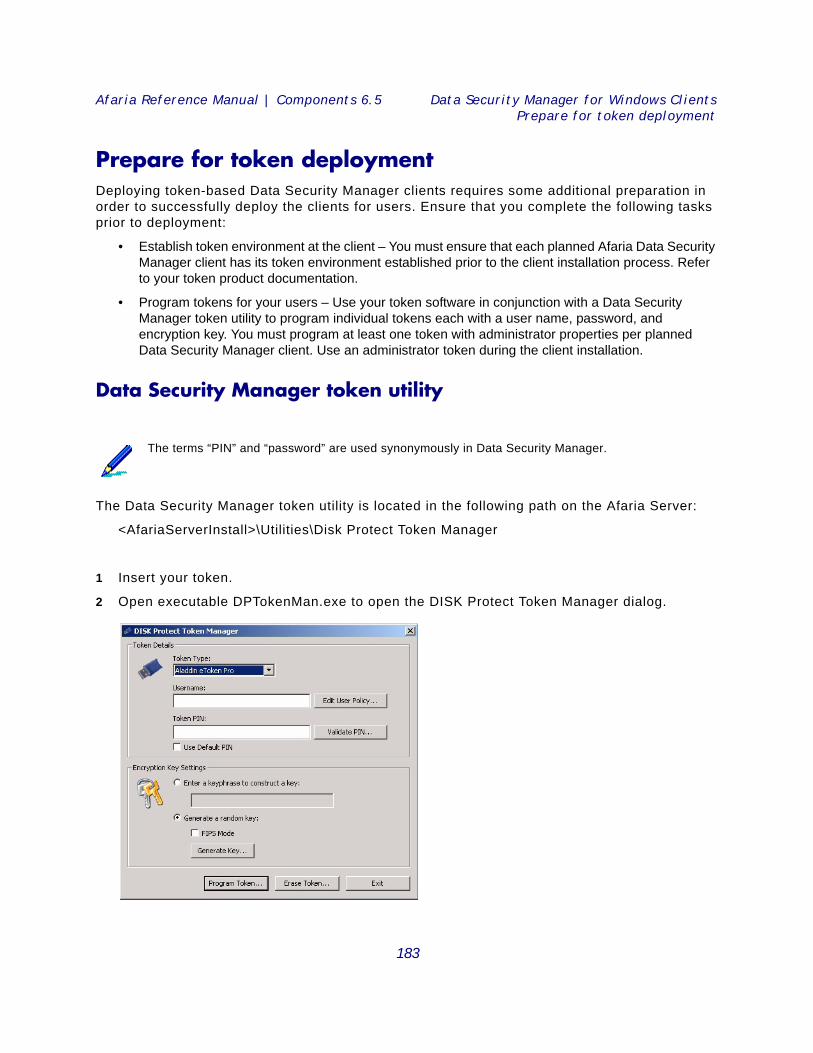
Afaria Reference Manual | Components 6.5 Data Security Manager for Windows ClientsPrepare for token deployment
Prepare for token deployment Deploying token-based Data Security Manager clients requires some additional preparation in order to successfully deploy the clients for users. Ensure that you complete the following tasks prior to deployment:
• Establish token environment at the client – You must ensure that each planned Afaria Data Security Manager client has its token environment established prior to the client installation process. Refer to your token product documentation.
• Program tokens for your users – Use your token software in conjunction with a Data Security Manager token utility to program individual tokens each with a user name, password, and encryption key. You must program at least one token with administrator properties per planned Data Security Manager client. Use an administrator token during the client installation.
Data Security Manager token utility
The Data Security Manager token utility is located in the following path on the Afaria Server:
<AfariaServerInstall>\Utilities\Disk Protect Token Manager
1 Insert your token.
2 Open executable DPTokenMan.exe to open the DISK Protect Token Manager dialog.
The terms “PIN” and “password” are used synonymously in Data Security Manager.
183
Afaria Reference Manual | Components 6.5 Data Security Manager for Windows ClientsPrepare for token deployment
3 Select your token brand or its compatible brand from the token type list.
4 Type the token’s current password in the Token PIN box and choose Validate PIN. You must be able to successfully validate the token before you can make a change to the token’s data.
5 Use the following program settings program your token for deployment:
• Token type – Select your token from the list.
• Username – User name for the token, in accordance with your organization’s token policy.
Choose Edit User Policy… to access settings for assigning administrator and single sign on properties. Each client requires an administrator token to perform a successful installation.
• Token PIN – Supply a non-default password for programming a token.
• Use Default PIN – You are discouraged from using the token’s default PIN value. 6 Choose Generate and perform the keyboard exercise to generate random data until the
status bar is full. You can choose the keyphrase option to construct a key if you prefer.
7 Choose Program Token to update the token with the new properties and key.
The utility can also erase Data Security Manager data from a token, while preserving token data for other applications.
184
Afaria Reference Manual | Components 6.5 Data Security Manager for Windows ClientsPrepare for removable media
Prepare for removable media Enabling or disabling removable media features at the Data Security Manager client is a security policy decision that you make when you create a channel. However, be advised that the Data Security Manager client administrator has access to the following settings on the client that can redefine the removable media policy:
• Enable or disable removable media.
• Allow or disallow users to use removable media that is not protected.
• Allow or disallow users to assign passwords to protected media. See “Password protecting media”.
Changes made at the client are not reported back to the Afaria Server.
Consider reviewing these features with your Data Security Manager client administrators to establish and communicate a policy about using these features in a manner that is appropriate for your organization.
Password protecting media Removable media users can apply a password to protected media. Applying password protection to media allows users to share removable media in the following ways:
• Data Security Manager client users – Users can share password-protected media with Data Security Manager client users, regardless of whether the receiving user has a matching encryption key. This type of sharing simplifies key management for Data Security Manager users.
• Non-client users – Users can share password-protected media with users that do not have access to a Data Security Manager client. This type of sharing requires that the receiving user has MediaViewer installed on the viewing computer.
Using MediaViewer Data Security Manager includes a MediaViewer utility that provides a way to share removable media with users that are not using a Data Security Manager client computer; e.g. employee using a computer at home or employee visiting a customer site. Non-client users can use the media provided that they have the following items:
• Password-protected media from a Data Security Manager user
• MediaViewer utility
• Knowledge of the Data Security Manager media password
The Data Security Manager MediaViewer utility is located in the following path on the Afaria Server:
<AfariaServerInstall>\Utilities\USB Media Viewer
185

Afaria Reference Manual | Components 6.5 Data Security Manager for Windows ClientsPrepare for removable media
You must ensure that you make this utility available to your users if you choose to allow media sharing of this nature. It is not installed on the Data Security Manager client. You may want to make it available by delivering it to your Data Security Manager client administrators and allowing them to control distribution, or you may want make it directly available to all client users.
186
Afaria Reference Manual | Components 6.5 Data Security Manager for Windows ClientsPrepare the clients and end users
Prepare the clients and end usersPreparing your Afaria Windows clients and your end users for Data Security Manager installation helps to ensure a smooth implementation.
The Afaria administrator must perform the following steps to prepare the Afaria Windows client and the end users:
1 Scan and repair disks
2 Verify installation path
3 Turn off hibernation and standby features
4 Back up Afaria Windows client media
5 Distribute guide and information to users
Scan and repair disks Run your operating system utility to scan the hard disks for errors. Have the utility repair any errors it finds.
Verify installation path
Ensure that your Afaria Windows client is installed in a folder that does not conflict with the planned path for the Data Security Manager client's installation folder, C:\Program Files\Afaria. The two installations must remain separate.
Turn off hibernation and standby features Turn off any hibernation or standby features that you have enabled on the Afaria Windows client. This action allows the client to complete the encryption process as quickly as possible.
Back up Afaria Windows client media Ensure that all data on permanent and removable media is backed up for any Afaria Windows client that you plan for Data Security Manager installation. Data Security Manager may expose existing system problems, such as a failing hard drive. Recovery tools are available for use, under the guidance of a technical support representative, to help recover data in this situation.
• You are advised to carefully plan your deployment and practice it on a small set of clients before initiating any large deployment.
• Once Data Security Manager is deployed to a client, you may not change the keyboard language. Changing the keyboard language renders the client unsupported.
This verification step is critical for preserving your opportunity to successfully uninstall the Data Security Manager client and the Afaria Client programs at a later time.
187
Afaria Reference Manual | Components 6.5 Data Security Manager for Windows ClientsPrepare the clients and end users
Distribute guide and information to users
The end user's process is covered in detail in Afaria Security Manager Installation Guide (Security_Manager_Windows_Installation.chm). You can find the guide with this release in the documentation download.
1 Distribute installation guide – Prior to deploying Data Security Manager to your Afaria Windows clients, distribute Afaria Security Manager Installation Guide (Security_Manager_Windows_Installation.chm) to the end user that will interact with the installation. The guide helps to establish expectations and provides two sets of detailed instructions for installing the product: “Installation for interface users” and “Installation for service users”.
2 Tell users which instruction set to use – Ensure that your users know which set of installation instructions to use in the guide. Interface users are those that run Afaria sessions using Afaria Channel Viewer or a Web browser. Service users have Afaria running as a service on their computer and may not even be aware that the product is on their computer.
3 Designate proxy users – User interaction is a requirement in the installation process. Designate proxy users for those Afaria Windows clients that run as a service on computers that are normally unattended.
4 Communicate security password policy – Ensure that your users are informed about the password policy you are establishing with Data Security Manager. This helps them to avoid frustration when they create new passwords.
5 Communicate security media policy – Ensure that your users are informed about the removable media policy you are establishing with Data Security Manager. Users that are subject to a policy that supports removable media encryption need to understand how to manage their media keys, their removable media, and how to make use of the Media Viewer.
6 Inform users about support resources – Provide your users with contact information for getting support in the following scenarios:
• They fail Data Security Manager authentication enough times that the client enters a state of denied access
• They need help changing their password
• They encounter a Data Security Manager error message
• They require general assistance
Visit topic “Password advisory!” on page 192 for critical information about creating successful passwords on different Windows keyboards. It includes important information that you must share with your users.
188
Afaria Reference Manual | Components 6.5 Data Security Manager for Windows ClientsDeliver and install at the client
Deliver and install at the clientDelivering Data Security Manager to the Afaria Windows client and installing it is a multi-step task. It requires running multiple Afaria sessions with your Data Security Manager channel, and it requires user interaction. User interaction is required even when you have installed the Afaria Windows client to run as a service without a user interface.
This topic focuses on the Afaria administrator's participation and perspective of the installation. The end user's process is covered in detail in Security Manager Installation Guide (Security_Manager_Windows_Installation.chm). You can find the guide with this release in the documentation download.
The Afaria administrator must perform the following steps to facilitate installing Data Security Manager:
1 Assign clients to the Data Security Manager channel
2 Install Data Security Manager at the client
Assign clients to your Data Security Manager channelAssign the Afaria Windows clients that you want to receive Data Security Manager to a Data Security Manager channel. The channel's purpose at the beginning of the worklist is to deliver the Data Security Manager installation file (.msi), the security policy files (.dat, .txt), the public key (.mod), and the user guide (.chm); and launch the installation process. The channel's purpose later in the worklist, after product installation at the client is complete, is to send a recovery key file back to Afaria Server for escrow.
Refer to event logs to trace the worklist events.
You are advised to carefully plan your deployment and practice it on a small set of clients before initiating any large deployment.
The installation process requires user interaction. The channel's worklist contains logic to run as many times as necessary until it has the user actions it needs to complete.
189
Afaria Reference Manual | Components 6.5 Data Security Manager for Windows ClientsDeliver and install at the client
Install Data Security Manager at the client Install Data Security Manager at the Afaria Windows client by running your Data Security Manager channel.
Refer to Security Manager Installation Guide for detailed end user steps. The guide describes the following general steps, annotated here only to increase your understanding of the process:
1 Run the Data Security Manager channel. Part of the channel's worklist executes to deliver files and stages a reboot (reboot #1). Users receive a reboot notification and countdown message. The countdown cannot be paused or canceled. A user can preempt the countdown by executing a reboot on their own before the countdown expires.
2 The channel’s worklist prompts users to generate a random key and create a user name and password. User interaction is required. Refer to “Password advisory!” on page 192 for important information about creating passwords. This process creates an encrypted key file (.brf). The client creates the key file name dynamically, based on the client GUID. End user cancellation and unplanned reboots do not terminate the worklist, only delay its processing.
3 Run the Data Security Manager channel again. The worklist sends the encrypted key file to the Afaria Server, and the server adds it to the Afaria database. The worklist then stages a reboot (reboot #2). Users receive a reboot notification and countdown message. The countdown cannot be paused or canceled. A user can preempt the countdown by executing a reboot on their own before the countdown expires.
It is your responsibility to schedule and implement a process to ensure that this step is accomplished for all of your Data Security Manager clients. Communicate with users to establish expectations.
4 At this point, the user is informed that encryption has started. Consider the following items about the encryption process:
• The process may take several hours.
• The process for fixed media captures and uses a relatively constant and modest percentage of processor resources. Normal computer operation may occur while encryption occurs.
• The process for removable media is resource intensive. Normal computer operation is nearly halted while encryption occurs.
• These instructions include steps to run the Data Security Manager channel. You can use the Afaria Channel Viewer, an HTML parameter file (.xec), or a server-initiated connection to run the Afaria session and channel. Use the implementation that is most suitable for your organization and client.
• The Data Security Manager client installation file is approximately 10 MB. You may want to consider using LAN-based Afaria connections for implementing the Data Security Manager installation.
The Data Security Manager client administrator’s user name for removable media only installations is always “admin”.
190
Afaria Reference Manual | Components 6.5 Data Security Manager for Windows ClientsDeliver and install at the client
• Data Security Manager cannot complete a password change during the initial encryption phase. Therefore, users that forget their password and use the recovery process are then unable to change their password by following the interface dialogs. Users attempting to change their password receive an error for an incorrect password. Users in this state must use the challenge-recovery process to gain access while the encryption process is incomplete.
• The encryption process resumes from a checkpoint if the computer is rebooted before encryption is 100% complete.
About adding additional users Adding additional Data Security Manager users is a process that occurs at the client and requires a Data Security Manager client administrator. The administrator must also have Windows administration rights in order to use Data Security Manager administration features.
The Data Security Manager administrator can open the Data Security Manager’s context menu from the system tray > Security Manager Management Tool > User Management page or Token Management page to add users.
Completing the encryption process represents the end of the installation process from the end user's perspective. However, it is not until the next reboot that occurs after the end of the encryption process that the product is fully installed and is eligible for uninstallation.
191
Afaria Reference Manual | Components 6.5 Data Security Manager for Windows ClientsDeliver and install at the client
Password advisory!
Data Security Manager's ability to create, store, and verify passwords successfully requires that users create valid passwords that do not include restricted key presses or characters. The following items are restricted for user passwords.
• All keyboards – Dead keys and dead key combination characters • French Canadian keyboards – ° (degree symbol) • German keyboards – | (vertical bar)
The information contained herein is critical for instructing your users on creating successful boot-time authentication and Single Sign On passwords.
192
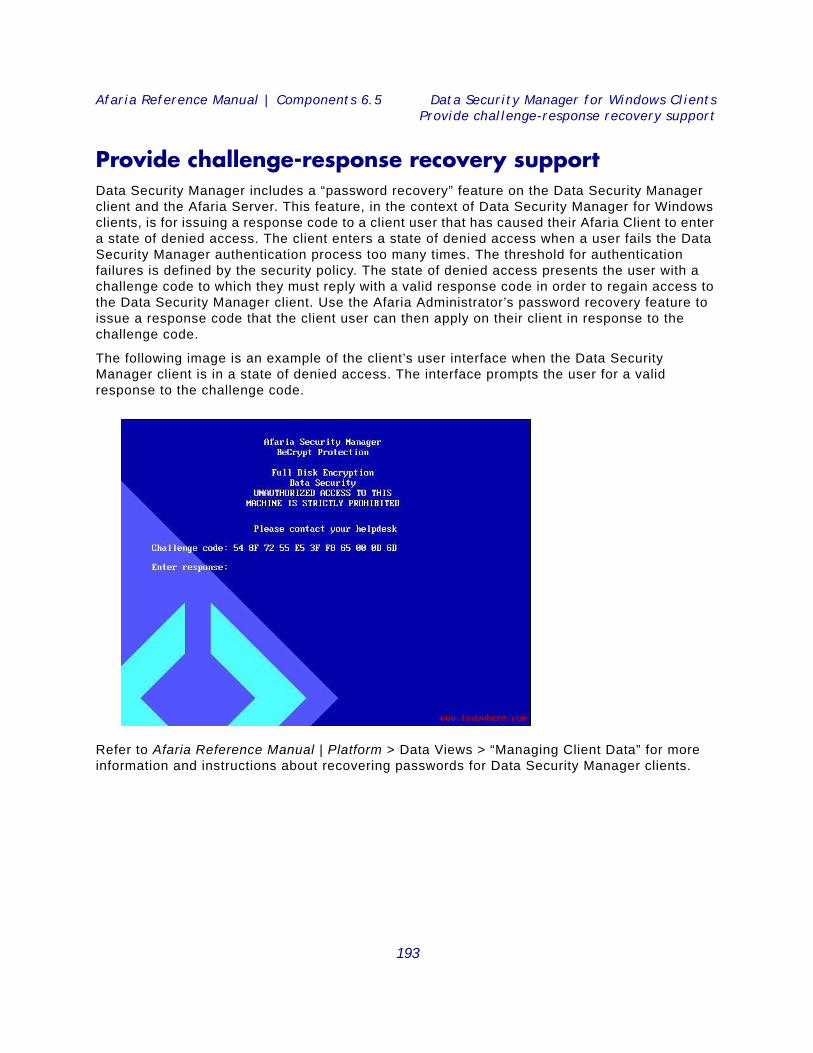
Afaria Reference Manual | Components 6.5 Data Security Manager for Windows ClientsProvide challenge-response recovery support
Provide challenge-response recovery support Data Security Manager includes a “password recovery” feature on the Data Security Manager client and the Afaria Server. This feature, in the context of Data Security Manager for Windows clients, is for issuing a response code to a client user that has caused their Afaria Client to enter a state of denied access. The client enters a state of denied access when a user fails the Data Security Manager authentication process too many times. The threshold for authentication failures is defined by the security policy. The state of denied access presents the user with a challenge code to which they must reply with a valid response code in order to regain access to the Data Security Manager client. Use the Afaria Administrator’s password recovery feature to issue a response code that the client user can then apply on their client in response to the challenge code.
The following image is an example of the client’s user interface when the Data Security Manager client is in a state of denied access. The interface prompts the user for a valid response to the challenge code.
Refer to Afaria Reference Manual | Platform > Data Views > “Managing Client Data” for more information and instructions about recovering passwords for Data Security Manager clients.
193
Afaria Reference Manual | Components 6.5 Data Security Manager for Windows ClientsUninstall Data Security Manager from the client
Uninstall Data Security Manager from the client Data Security Manager is eligible for uninstallation from the client after the multi-step installation at the client is complete. Refer to “Install Data Security Manager at the client” on page 190 to determine if your Data Security Manager installation is complete.
To uninstall the Data Security Manager client:
1 Select Afaria Security Manager on the Control Panel’s Add or Remove Programs list and choose Remove. This action begins the decryption process on the client that is necessary before you remove the client program.
2 Use the client’s system tray menu > Open Afaria Security Manager Management Tool… > Encryption Status and verify that the client is in a completely decrypted state. Do not proceed until decryption is complete.
3 Select Afaria Security Manager on the Control Panel’s Add or Remove Programs list and choose Remove. This action programmatically removes the Security Manager client from the operating system.
Always uninstall your Data Security Manager client before uninstalling your Afaria Client. Failing to do so may leave your computer in an encrypted or unstable state without a method for recovery.
It is recommended that you uninstall Data Security Manager only after the encryption has reached 100%.
194
Afaria Reference Manual | Components 6.5 Data Security Manager for Windows ClientsData Security Manager alerts
Data Security Manager alerts You can use the Server configuration, Alert definition feature to create alerts to notify you when Data Security Manager events have occurred on an Afaria Client. The following events are associated with the Data Security Manager for Windows component:
The Data Security Manager client logs the events as they occur on the device. The next time the Data Security Manager channel runs at the client, the Afaria Server retrieves the data and then deletes the messages from the client.
See Afaria Reference Manual | Platform > Server Configuration > “Alert Definitions” and Afaria Reference Manual | Platform > Data Views > “Working with Logged Actions.”
Event Message
Admin Login
Install Failed - Execute Failed to execute installation MSI.
Install Failed - Get Failed to get Becrypt recovery file.
Install Failed - Send Failed sending install files to client.
Mismatch for admin name Win32 - Attempt to change administrator name not permitted.
Mismatch for FIPS check Win32 - Attempt to change FIPS integrity check not permitted.
Mismatch for max attempts Win32 - Attempt to change Maximum password attempts not permitted.
Mismatch for Windows encryption Not currently used by Data Security Manager.
195
Afaria Reference Manual | Components 6.5 Data Security Manager for Windows ClientsData Security Manager logging
Data Security Manager loggingThe Data Security Manager client collects security event data and delivers it to the Afaria Server during Afaria sessions. You can view the log data using Data Views > Logs > Security > Windows clients.
Log events for Data Security Manager client are captured error and information events that are originally logged to the Windows Event Viewer’s Application page. Log events for removable media describe service start and stop, USB device connections, and user file actions. Removable media logging captures the logged on user for each event.
The Data Security Manager log cleanup process is controlled by the clean up settings on the server Configuration > Properties > Log Cleanup page.
Refer to Afaria Reference Manual | Platform > Data Views > “Working with Logged Actions” for more information about viewing events in the Security logs.
196
Afaria Reference Manual | Components 6.5 Data Security Manager for Windows ClientsData Security Manager reports
Data Security Manager reports Data Security Manager for Windows includes the following predefined reports that you can view and print:
Encryption Exception Status – Reports the encryption status of all Data Security Manager clients that do not have a disk status of 100% encryption complete.
Encryption Status – Reports the encryption status of all Data Security Manager clients.
See Afaria Reference Manual | Platform > Home > “Reports.”
Reports are sorted by date. The Date range reflects the date the client connected to the server so that the action could be reported, not when the action happened.
197
5
Document ManagerDocument Manager channels enable you to manage content on your Afaria Clients. You can push content
to clients to provide users with the most up-to-date information, or you can let users subscribe to content
they want to receive. Document Manager ensures your users always have the exact information they
need, when they need it.
Client types supported are:
• Windows Mobile Professional (including Windows CE)
• Palm
• Windows
198
Afaria Reference Manual | Components 6.5 Document ManagerPlan a Document Manager channel
Plan a Document Manager channelBefore you create Document Manager channels, you should carefully plan what you want to accomplish. Organize your channels and files in a logical manner. Use channel names and file names that are intuitive and accurately reflect their content. Be sure your users have access to the most up-to-date versions of the files. Consider the following issues related to creating, organizing, distributing, and maintaining Document Manager channels. Your answers to these questions will help you ensure your channels operate efficiently and effectively.
What default settings do you want to apply to all the channels you create?
You can specify certain default settings that apply to all Document Manager channels you create. For example, if you are going to create a number of different channels that all use the same external media as the file source, you can specify new channels use client media by default. You specify whether the media is a CD-ROM or floppy disk, and assign a label for the media. Until you change these default settings, every new Document Manager channel you create is configured this way.
All of these channel options are contained on the Document Manager property page in Server configuration, Properties. To navigate to this page, click Server configuration on the global navigation bar and select Properties on the drop-down list. When the Properties page appears, select Document Manager in the left pane.
How should you name your channels and each of their files?
The name you assign channels and the individual files is extremely important. The channel’s name should accurately reflect the types of documents it contains. For example, you may want to use a descriptive name for the channel, such as “Product Marketing Documents.”
The same concept applies to the file names in the channel. You may want to change the file names to something descriptive, such as “Press Release of 071509.doc” before beginning to add the files to the channel.
If you have no control over the file names, remember Document Manager allows you to enter a description of the document. This description displays next to the file name in Channel Viewer by default; however, you can choose to hide the file name and display only the description. See “Properties options” on page 208 for more information.
How will you organize your channels and files?
When you create channels and add documents to them, keep in mind how the channels will appear to your Channel Viewer users. Document Manager channels are most useful when they are well organized. You should limit the number of files in each channel and ensure all of the documents in a channel are related.
For example, you may want to group the files into different categories, marketing press releases, and clip art. Next, you may want to create a different channel for each category of documents.
Grouping your documents into categories will simplify the channel creation process. Because Document Manager allows you to add an entire folder to a channel, you can organize your files
For detailed information about the available options on this page, see Afaria Reference Manual | Platform > Server Configuration > “Document Manager.”
199
Afaria Reference Manual | Components 6.5 Document ManagerPlan a Document Manager channel
into a hierarchical folder structure similar to the one in Windows Explorer. Then, you can add the folder to the channel and Document Manager automatically adds all the individual files in that folder to the channel. For more information, see “Documents options” on page 204.
You can also control how the list of documents are sorted when initially displayed in Channel Viewer. The sort method you choose depends on the types of files in the channel. For example, if the channel contains a series of press releases for the past year, sorting them by date may be most effective. If the files are biographical profiles of all managers, sorting by name may be best. For more information, see “Channel view options” on page 212.
Will you make any files dependent on other files or hide any files from the user?
Document Manager allows you to make selected files dependent on other files. For example, your channel may include an HTML document that is dependent upon a JPEG graphic file in order to display correctly. Obviously, you need to send the JPEG file to the user along with the main HTML file. By associating the JPEG file (the dependent file) with the HTML file (the main file) you ensure that both files are included in the channel and sent to the client. See “Add dependent files data elements” on page 207.
To increase the channel’s usability, you could go one step further and hide the dependent file from the Channel Viewer users. Although the dependent file must be sent to the client, the user has no need to access the individual JPEG file. In this instance, you may choose to hide the file so that it does not appear in the Channel Viewer. For more information, see “Add files data elements” on page 206.
How will you update channel files?
Many of the documents in your Document Manager channels are created and updated by other people who may be in other departments or locations. Therefore, you want to make sure updating those files on a regular basis is as simple as possible. If the documents’ owners do not have access to the server to update the source files, you will need to be sure you use a UNC path when adding files to the channel. This way, the owners can update the files as many times as they want, as long as you have used a UNC path. For more information, see “Add files data elements” on page 206.
The channel’s contents are also updated automatically each time you execute a Channel Refresh. For more information, see “Using the Document Manager toolbar” on page 203.Server-side upgrade
Document Manager for Palm OS clients Consider the following items as you prepare for Afaria Document Manager operations for Palm OS clients:
• Server-side operations – You must implement a document conversion method that places device-ready documents into the Document Manager document storage path, as defined by your Afaria Server properties configuration.
• Client-side operations – The Document Manager client is able to launch a document’s associated application only if it can locate an application that is associated with the document’s type and “Creator ID”. You are responsible for ensuring that each device has applications installed that can open and view converted documents. Afaria does not supply device-side tools for using the documents.
200
Afaria Reference Manual | Components 6.5 Document ManagerCreate or edit a Document Manager channel
Create or edit a Document Manager channel Create Document Manager channels to deliver content to client users.
• To create a channel, launch the channel wizard for a Document Manager channel. The wizard guides you through the channel creation process and then opens the channel editor.
• To edit an existing channel, open the channel editor using one of the following methods:
• Click the Edit icon on the channel administration toolbar.
• Click the Edit channel contents… link on the channel’s Properties page.
• Right click the channel and select Edit… from the channel’s shortcut menu.
From the channel editor, select a tab and make any changes to the channel you need. The editor provides the following tabs, subject to client type:
• “Documents options” on page 204
• “Properties options” on page 208
• “Channel view options” on page 212
• To deploy a channel to clients, you must both publish it and assign it to a work profile.
• See “About the Document Manager channel editor” on page 202 to learn more about using the Document Manager channel editor.
• For complete information about creating and editing channels, refer to Afaria Reference Manual | Platform > Administration > “Channel Administration.”
201
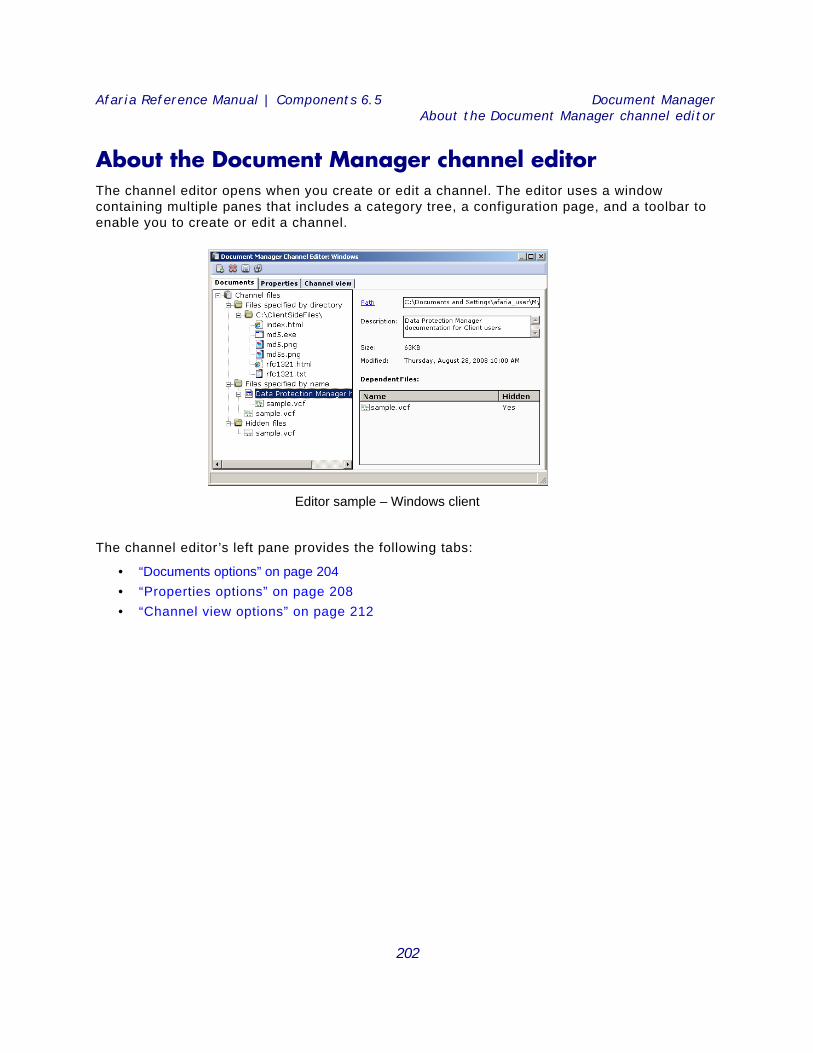
Afaria Reference Manual | Components 6.5 Document ManagerAbout the Document Manager channel editor
About the Document Manager channel editorThe channel editor opens when you create or edit a channel. The editor uses a window containing multiple panes that includes a category tree, a configuration page, and a toolbar to enable you to create or edit a channel.
The channel editor’s left pane provides the following tabs:
• “Documents options” on page 204• “Properties options” on page 208• “Channel view options” on page 212
Editor sample – Windows client
202
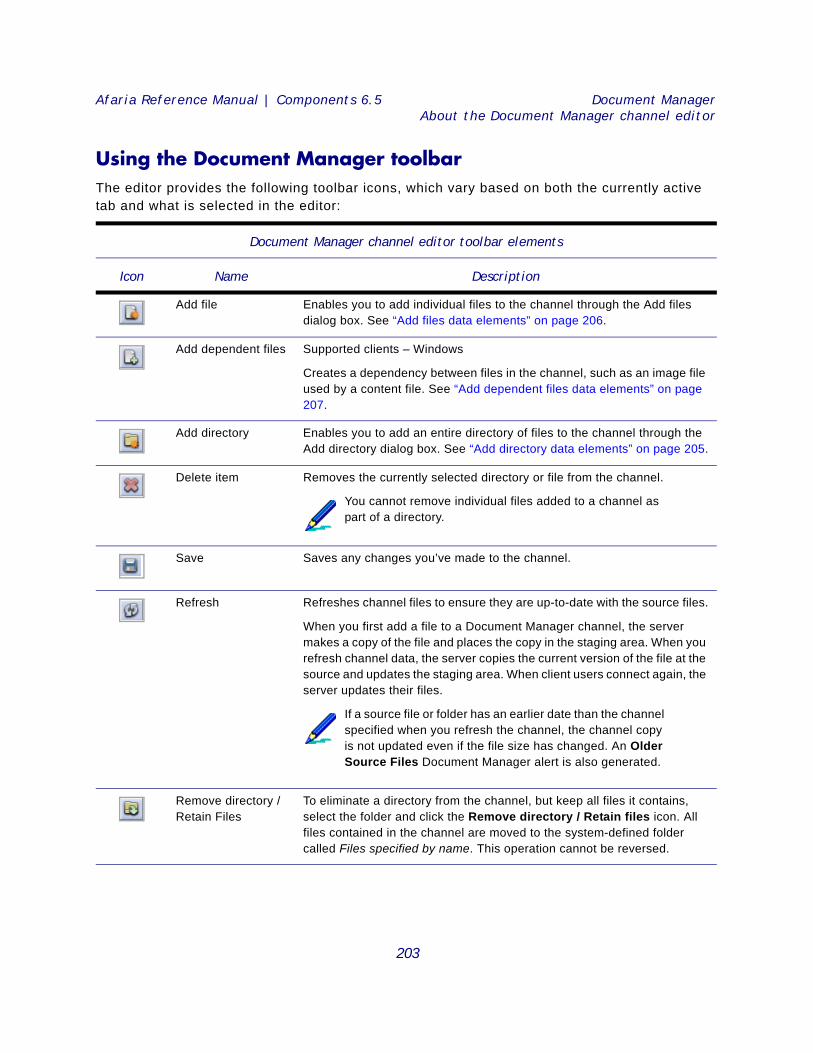
Afaria Reference Manual | Components 6.5 Document ManagerAbout the Document Manager channel editor
Using the Document Manager toolbarThe editor provides the following toolbar icons, which vary based on both the currently active tab and what is selected in the editor:
Document Manager channel editor toolbar elements
Icon Name Description
Add file Enables you to add individual files to the channel through the Add files dialog box. See “Add files data elements” on page 206.
Add dependent files Supported clients – Windows
Creates a dependency between files in the channel, such as an image file used by a content file. See “Add dependent files data elements” on page 207.
Add directory Enables you to add an entire directory of files to the channel through the Add directory dialog box. See “Add directory data elements” on page 205.
Delete item Removes the currently selected directory or file from the channel.
Save Saves any changes you’ve made to the channel.
Refresh Refreshes channel files to ensure they are up-to-date with the source files.
When you first add a file to a Document Manager channel, the server makes a copy of the file and places the copy in the staging area. When you refresh channel data, the server copies the current version of the file at the source and updates the staging area. When client users connect again, the server updates their files.
Remove directory / Retain Files
To eliminate a directory from the channel, but keep all files it contains, select the folder and click the Remove directory / Retain files icon. All files contained in the channel are moved to the system-defined folder called Files specified by name. This operation cannot be reversed.
You cannot remove individual files added to a channel as part of a directory.
If a source file or folder has an earlier date than the channel specified when you refresh the channel, the channel copy is not updated even if the file size has changed. An Older Source Files Document Manager alert is also generated.
203
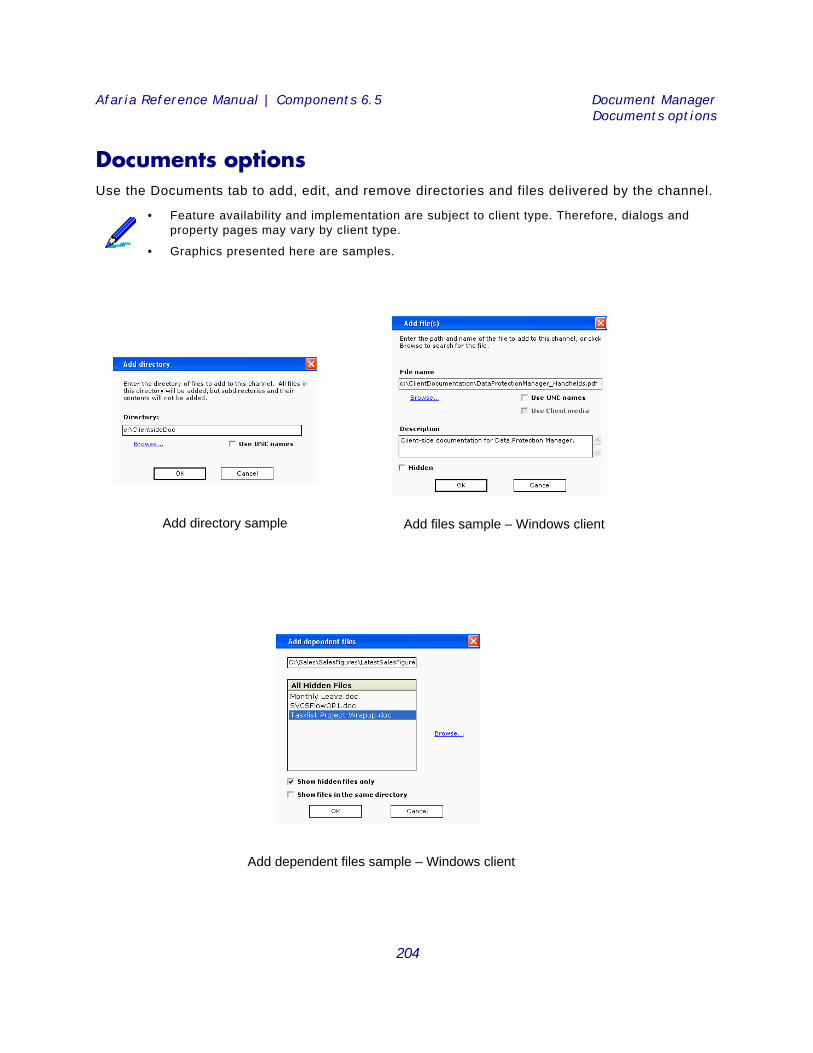
Afaria Reference Manual | Components 6.5 Document ManagerDocuments options
Documents optionsUse the Documents tab to add, edit, and remove directories and files delivered by the channel.
• Feature availability and implementation are subject to client type. Therefore, dialogs and property pages may vary by client type.
• Graphics presented here are samples.
Add directory sample Add files sample – Windows client
Add dependent files sample – Windows client
204
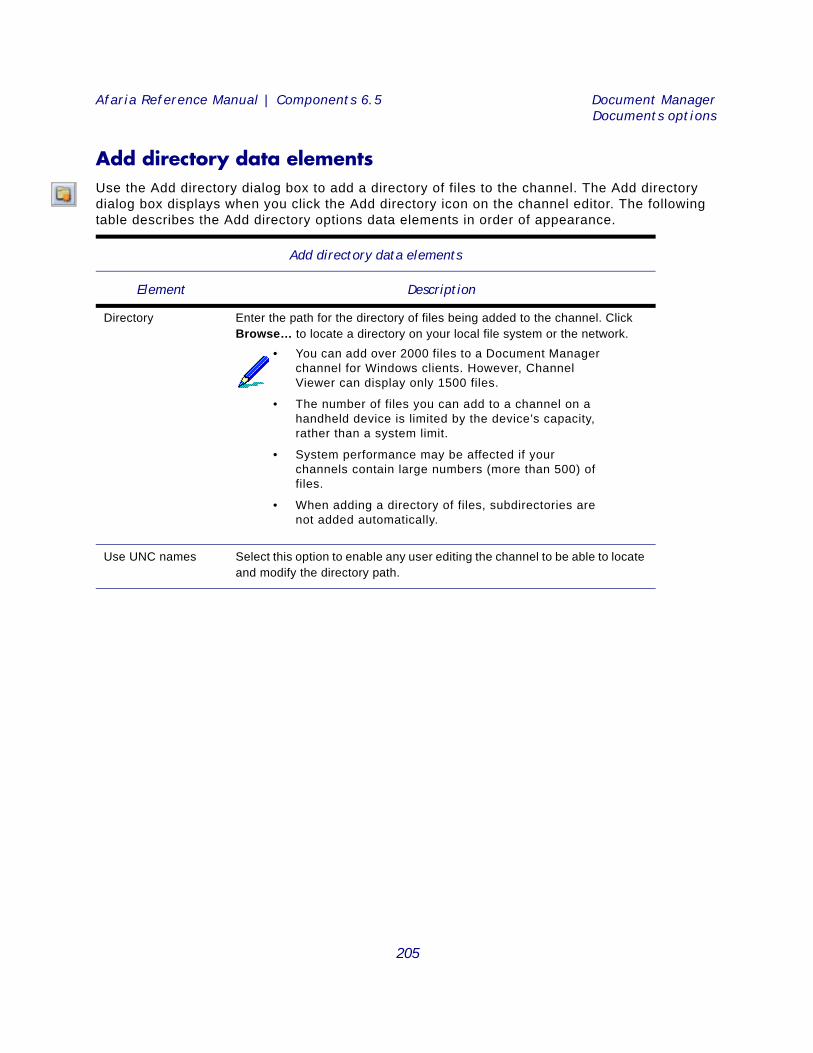
Afaria Reference Manual | Components 6.5 Document ManagerDocuments options
Add directory data elementsUse the Add directory dialog box to add a directory of files to the channel. The Add directory dialog box displays when you click the Add directory icon on the channel editor. The following table describes the Add directory options data elements in order of appearance.
Add directory data elements
Element Description
Directory Enter the path for the directory of files being added to the channel. Click Browse… to locate a directory on your local file system or the network.
Use UNC names Select this option to enable any user editing the channel to be able to locate and modify the directory path.
• You can add over 2000 files to a Document Manager channel for Windows clients. However, Channel Viewer can display only 1500 files.
• The number of files you can add to a channel on a handheld device is limited by the device’s capacity, rather than a system limit.
• System performance may be affected if your channels contain large numbers (more than 500) of files.
• When adding a directory of files, subdirectories are not added automatically.
205
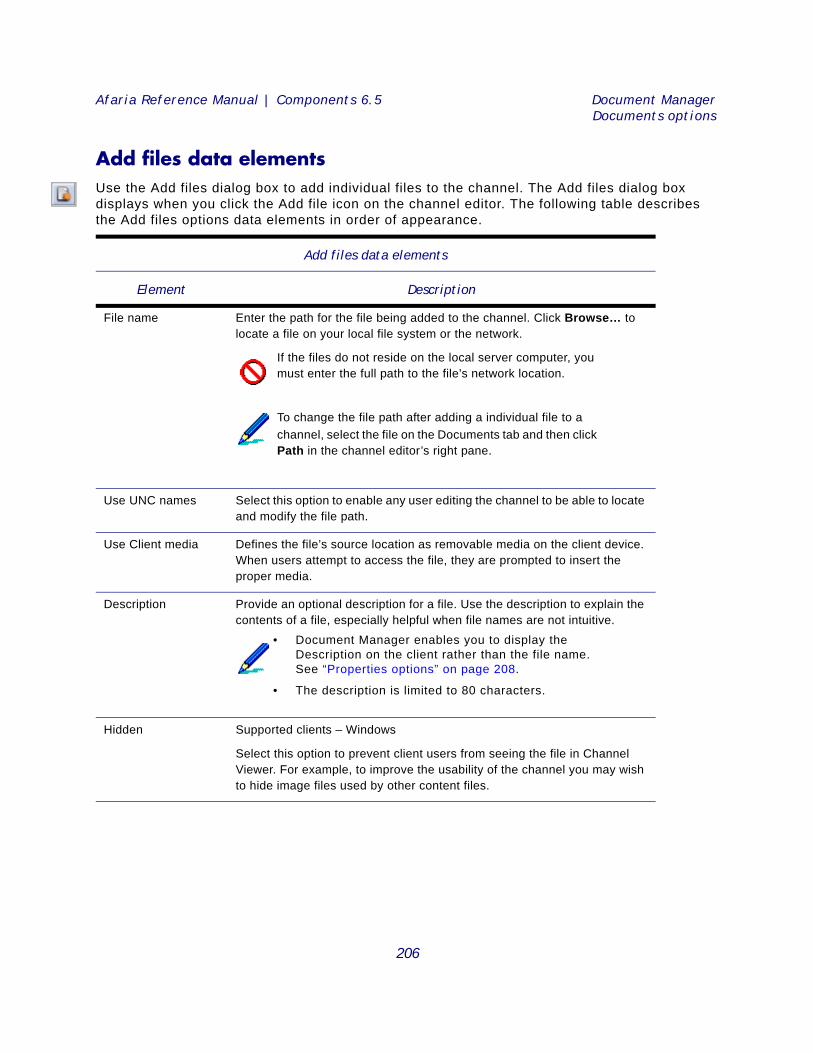
Afaria Reference Manual | Components 6.5 Document ManagerDocuments options
Add files data elementsUse the Add files dialog box to add individual files to the channel. The Add files dialog box displays when you click the Add file icon on the channel editor. The following table describes the Add files options data elements in order of appearance.
Add files data elements
Element Description
File name Enter the path for the file being added to the channel. Click Browse… to locate a file on your local file system or the network.
Use UNC names Select this option to enable any user editing the channel to be able to locate and modify the file path.
Use Client media Defines the file’s source location as removable media on the client device. When users attempt to access the file, they are prompted to insert the proper media.
Description Provide an optional description for a file. Use the description to explain the contents of a file, especially helpful when file names are not intuitive.
Hidden Supported clients – Windows
Select this option to prevent client users from seeing the file in Channel Viewer. For example, to improve the usability of the channel you may wish to hide image files used by other content files.
If the files do not reside on the local server computer, you must enter the full path to the file’s network location.
To change the file path after adding a individual file to a channel, select the file on the Documents tab and then click Path in the channel editor’s right pane.
• Document Manager enables you to display the Description on the client rather than the file name. See “Properties options” on page 208.
• The description is limited to 80 characters.
206
Afaria Reference Manual | Components 6.5 Document ManagerDocuments options
Add dependent files data elementsSupported clients – Windows
Use the Add dependent files dialog box to establish a dependency between files. The Add dependent files dialog box displays when you click the Add dependent files icon on the channel editor. For example, your channel may include an HTML document that needs a JPEG image to display correctly. By creating a dependency between the JPEG file (the dependent file) and the HTML file (the main file) you ensure that the channel sends both files to the client.
The following table describes the Add files options data elements in order of appearance.
Add dependent files data elements
Element Description
File list Lists all files that are eligible for dependency.
• Use the Show hidden files only and the Show files in the same directory check boxes to control the list’s contents.
• To select a file not in the list, click Browse… and make the selection.
• To create a dependency, select a file in the list and then click OK.
Show files in the same directory
Provided only when creating a dependency for a file specified by directory, select to toggle the list to display only the files eligible for dependency that reside in the same directory as the main file.
Show hidden files only
Select to toggle the list to display only the files eligible for dependency that are already in the channel and that are hidden from on the client.
To increase a channel’s usability, consider hiding dependent files from Channel Viewer users. Users may not need to see the dependent file in the Channel Viewer. See “Add files data elements” on page 206 to learn more.
207
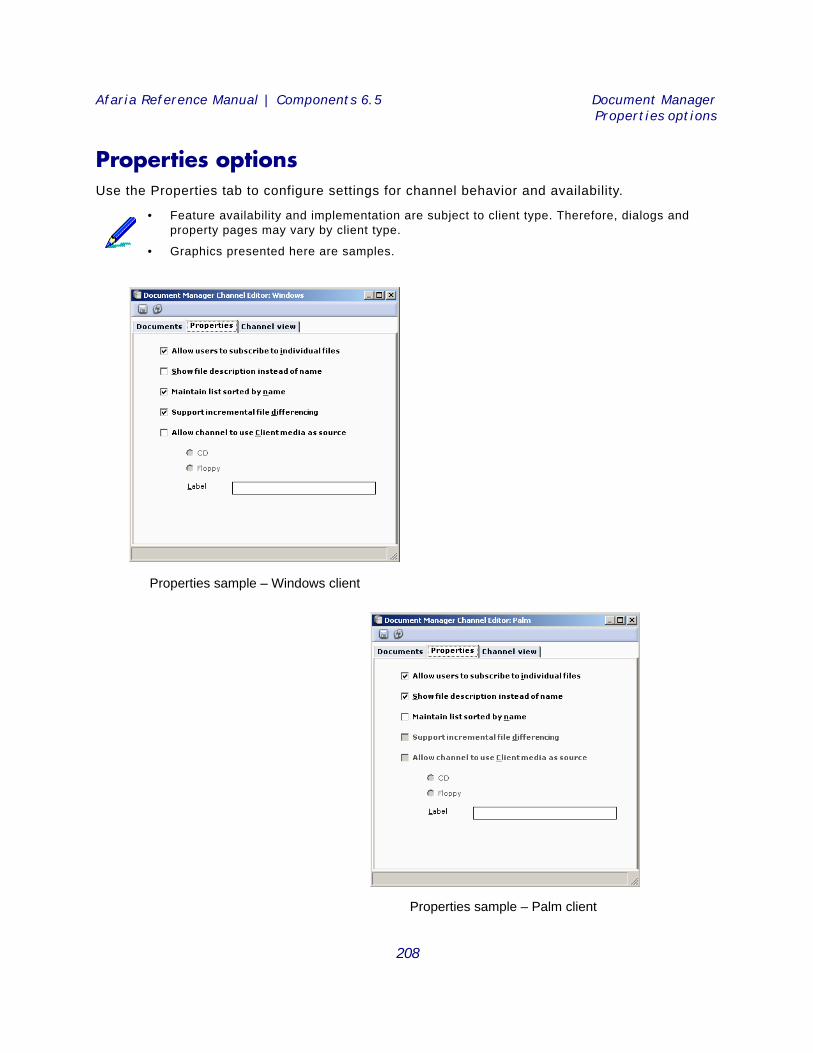
Afaria Reference Manual | Components 6.5 Document ManagerProperties options
Properties optionsUse the Properties tab to configure settings for channel behavior and availability.
• Feature availability and implementation are subject to client type. Therefore, dialogs and property pages may vary by client type.
• Graphics presented here are samples.
Properties sample – Windows client
Properties sample – Palm client
208
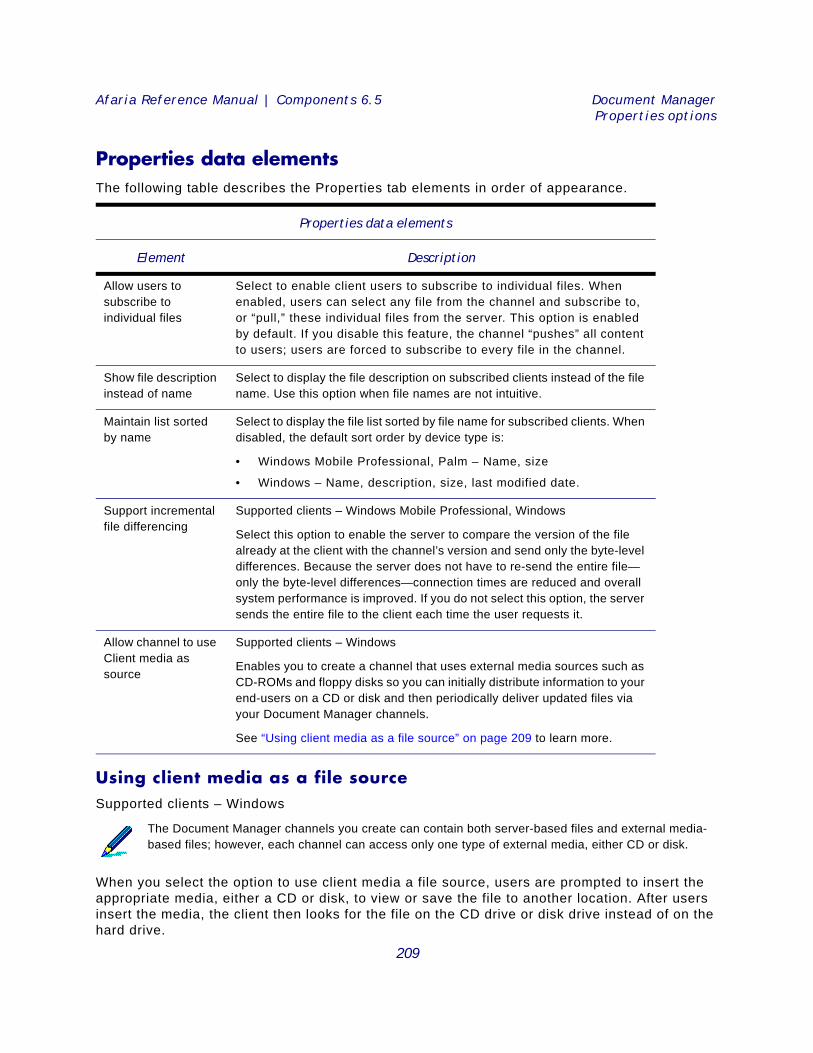
Afaria Reference Manual | Components 6.5 Document ManagerProperties options
Properties data elementsThe following table describes the Properties tab elements in order of appearance.
Using client media as a file sourceSupported clients – Windows
When you select the option to use client media a file source, users are prompted to insert the appropriate media, either a CD or disk, to view or save the file to another location. After users insert the media, the client then looks for the file on the CD drive or disk drive instead of on the hard drive.
Properties data elements
Element Description
Allow users to subscribe to individual files
Select to enable client users to subscribe to individual files. When enabled, users can select any file from the channel and subscribe to, or “pull,” these individual files from the server. This option is enabled by default. If you disable this feature, the channel “pushes” all content to users; users are forced to subscribe to every file in the channel.
Show file description instead of name
Select to display the file description on subscribed clients instead of the file name. Use this option when file names are not intuitive.
Maintain list sorted by name
Select to display the file list sorted by file name for subscribed clients. When disabled, the default sort order by device type is:
• Windows Mobile Professional, Palm – Name, size
• Windows – Name, description, size, last modified date.
Support incremental file differencing
Supported clients – Windows Mobile Professional, Windows
Select this option to enable the server to compare the version of the file already at the client with the channel’s version and send only the byte-level differences. Because the server does not have to re-send the entire file—only the byte-level differences—connection times are reduced and overall system performance is improved. If you do not select this option, the server sends the entire file to the client each time the user requests it.
Allow channel to use Client media as source
Supported clients – Windows
Enables you to create a channel that uses external media sources such as CD-ROMs and floppy disks so you can initially distribute information to your end-users on a CD or disk and then periodically deliver updated files via your Document Manager channels.
See “Using client media as a file source” on page 209 to learn more.
The Document Manager channels you create can contain both server-based files and external media-based files; however, each channel can access only one type of external media, either CD or disk.
209
Afaria Reference Manual | Components 6.5 Document ManagerProperties options
For example, your organization may distribute a CD that contains an electronic version of a comprehensive parts catalog. The catalog CD contains hundreds of individual files. To make it easier for your users to find the specific files on the CD, you can create Document Manager channels that use the CD as the source for the files. Users can simply view the list of available files in Channel Viewer and request the media-based files they want. Channel Viewer prompts them to insert the CD and locates the file for them.
When you need to update a file on the CD, you can send the updated file to Channel Viewer users via a “normal” Document Manager channel. When users access the updated file, Channel Viewer sends them the new version located at the server instead of using the outdated version on the CD.
Additional steps when using client mediaTake the following steps when using client media as a file source:
1 Configure channel to accept default media. If you plan to add channels from a variety of sources, you may want to set this option when you add individual files or directories to your Document Manager channels.
However, if you plan to use external media on a regular basis, you can set this option as the default through Document Manager options in server configuration.
2 Replicate the media’s directory structure. Ensure the directory structure you use to add files to the channel is consistent with the media distributed to your users.
When Channel Viewer searches for a file on external media, it looks in the path you specified when you added the files to the channel. If the path you used to add files does not match the path on the CD or disk, Channel Viewer cannot locate the files.For example, suppose you are distributing a CD named Timetracks that contains three directories. You want to create a Document Manager channel that automatically updates the files in those directories. You can access the CD on your LAN at the path \\INTCDS\Products\Timetracks.
3 Add files for use with external media. When you add a file, you can select the Use client media option. If the file you are adding is not located at the root of the media, you should add the subdirectories to the path after the <ClientMedia> variable. You may also want to set the default path for client media, which you can set in Server Configuration Properties for Document Manager.
4 Update files initially distributed via Client Media. You may need to distribute newer versions of files that you initially distributed on external media. When you need to send your users an updated version of a file on the CD, you can send the updated file to the Channel Viewer user via a "normal" Document Manager channel. When the user accesses the
For detailed information about the available options on this page, see Afaria Reference Manual | Platform > Server Configuration > “Document Manager.”
For detailed information about the available options on this page, see Afaria Reference Manual | Platform > Server Configuration > “Document Manager.”
210
Afaria Reference Manual | Components 6.5 Document ManagerProperties options
updated file, Channel Viewer will send them the new version located at the server instead of using the outdated version on the CD.
To update the file, select it in the left pane and click the Path link in the right pane on the Documents property page. The Change file source dialog box appears. You can enter the new path for the file, or click Browse to navigate to the new location. Document Manager will remove the <ClientMedia> variable from the original file’s path and inserts the path to the new file.
The next time the user requests this channel, the new server-based file appears in Channel Viewer as a "normal" Document Manager channel. The user can subscribe to the file, which has the same name and description as the original file.
To ensure your users no longer access the original file on the Client Media, do not change the file name. Change only the path to the file. When you change the file name, both the original media-based file and the new server-based file are available to the Channel Viewer user.
211
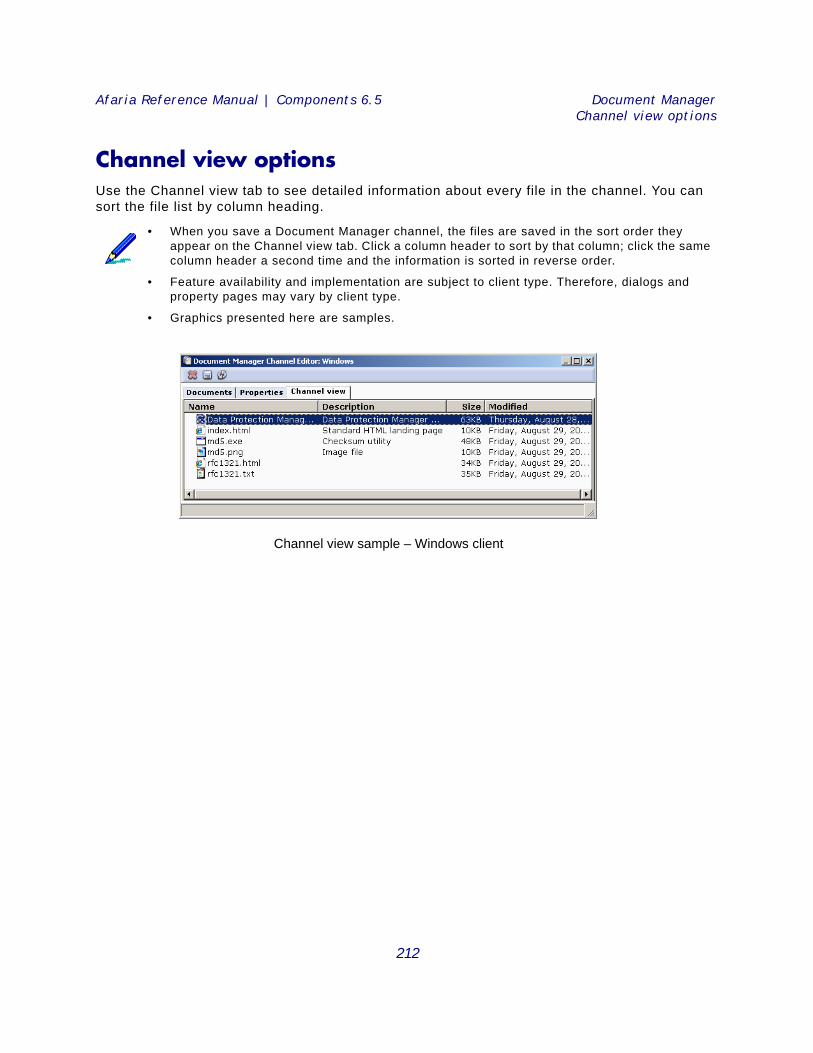
Afaria Reference Manual | Components 6.5 Document ManagerChannel view options
Channel view optionsUse the Channel view tab to see detailed information about every file in the channel. You can sort the file list by column heading.
• When you save a Document Manager channel, the files are saved in the sort order they appear on the Channel view tab. Click a column header to sort by that column; click the same column header a second time and the information is sorted in reverse order.
• Feature availability and implementation are subject to client type. Therefore, dialogs and property pages may vary by client type.
• Graphics presented here are samples.
Channel view sample – Windows client
212
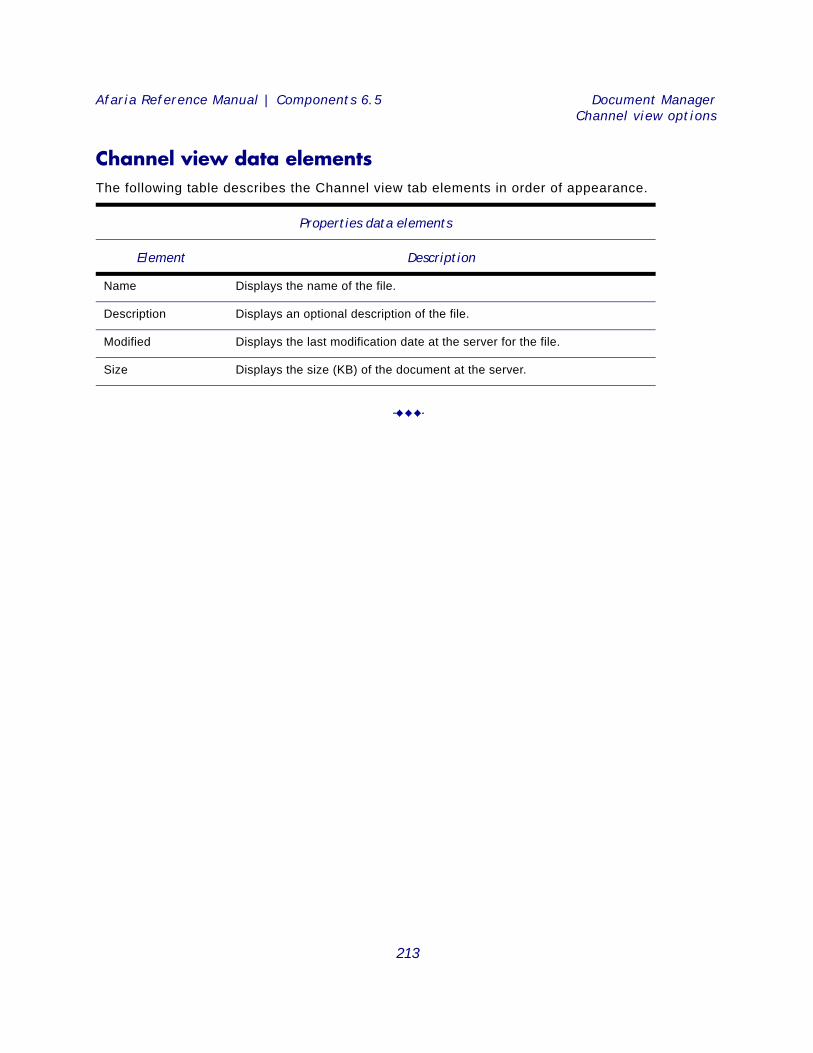
Afaria Reference Manual | Components 6.5 Document ManagerChannel view options
Channel view data elementsThe following table describes the Channel view tab elements in order of appearance.
Properties data elements
Element Description
Name Displays the name of the file.
Description Displays an optional description of the file.
Modified Displays the last modification date at the server for the file.
Size Displays the size (KB) of the document at the server.
213
6
Inventory ManagerInventory Manager channels enable you to scan your Afaria Clients to retrieve detailed hardware and
software inventory data, as well as detect changes to hardware and software profiles. Feature support,
which is subject to client type, includes automatic scanning and reporting, offline scanning, and client
change detection. You can manage inventory results and change detection in Data views > Inventory.
Client types supported are:
• Windows Mobile Professional (including Windows CE)
• Windows Mobile Standard
• Symbian
• Palm
• BlackBerry
• Windows
214
Afaria Reference Manual | Components 6.5 Inventory ManagerAbout Inventory Manager
About Inventory Manager Inventory Manager channels automatically and silently scan and retrieve detailed inventory data from your Afaria Clients. Depending upon the client type, Inventory Manager can gather information such as software applications, hardware, scan processing time, configuration data related to Infrared (IR) connections, WiFi and Bluetooth connectivity and enhanced phone data. Enhanced phone data collection includes, carrier network, the mobile operator and operator network, phone number, device status, and network access point information. Scan results are stored in a file on the client and then retrieved by the server during an Afaria session.
You can view and organize the inventory information in Afaria Administrator’s Inventory and Data Views Clients pages. Refer to Afaria Reference Manual | Platform > Data Views, topics “Working with Client Inventory Data” and “Opening Client Mini-Views”.
Features Inventory Manager offers the following features, subject to client type:
• Automatic scanning and reporting – Inventory Manager automatically scans and retrieves detailed hardware and software inventory data from remote computing devices. Data retrieved is dependent upon the client type, but includes commercial software usage, battery amount remaining, processor type, amount of memory, operating system installed, language that displays on the device, and more. You’ll find this information beneficial prior to performing hardware and software updates, troubleshooting, or other administrative tasks.
• Efficient inventory scanning and collection – Inventory Manager is specifically designed to work efficiently in the remote and mobile environment where connections are intermittent and unreliable. File compression ensures inventory collection sessions are efficient and quick. Built-in error checking ensures that data is always complete. Checkpoint restart is used to resume failed transfers at the point of failure, rather than from the beginning.
• Support for DMI standards – Inventory Manager supports Desktop Management Interface (DMI) 2.0, which is the Distributed Management Task Force (DMTF) industry standard specifications supported by major hardware and software manufacturers. During client inventory scans, Inventory Manager collects and reports DMI-compliant hardware or software inventory located on the system.
• Inventory scheduling options for Windows clients – You can schedule inventory scanning to take place offline, lowering communications time and cost. Scans can run at the client during
Afaria’s ability to retrieve inventory data may differ from client to client due to differences in carriers, networks, hardware, and operating systems.
The DMI Agent—provided by the computer manufacturer—is a system-specific executable file that scans inventory information. If a DMI Agent is enabled at the client, Inventory Manager can collect more detailed client information, such as additional data about the BIOS, Keyboard, Motherboard, Network Adapters, OS Drivers and Services, System, or Video.
215
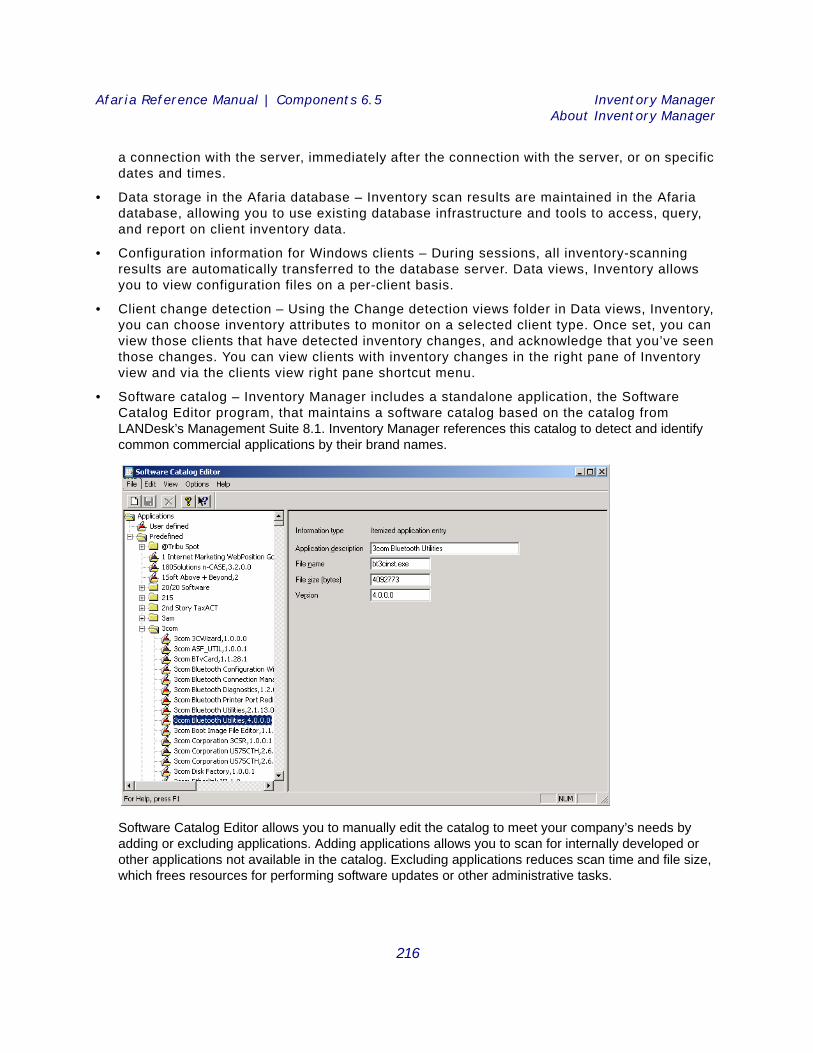
Afaria Reference Manual | Components 6.5 Inventory ManagerAbout Inventory Manager
a connection with the server, immediately after the connection with the server, or on specific dates and times.
• Data storage in the Afaria database – Inventory scan results are maintained in the Afaria database, allowing you to use existing database infrastructure and tools to access, query, and report on client inventory data.
• Configuration information for Windows clients – During sessions, all inventory-scanning results are automatically transferred to the database server. Data views, Inventory allows you to view configuration files on a per-client basis.
• Client change detection – Using the Change detection views folder in Data views, Inventory, you can choose inventory attributes to monitor on a selected client type. Once set, you can view those clients that have detected inventory changes, and acknowledge that you’ve seen those changes. You can view clients with inventory changes in the right pane of Inventory view and via the clients view right pane shortcut menu.
• Software catalog – Inventory Manager includes a standalone application, the Software Catalog Editor program, that maintains a software catalog based on the catalog from LANDesk’s Management Suite 8.1. Inventory Manager references this catalog to detect and identify common commercial applications by their brand names.
Software Catalog Editor allows you to manually edit the catalog to meet your company’s needs by adding or excluding applications. Adding applications allows you to scan for internally developed or other applications not available in the catalog. Excluding applications reduces scan time and file size, which frees resources for performing software updates or other administrative tasks.
216

Afaria Reference Manual | Components 6.5 Inventory ManagerThe inventory collection process
The inventory collection processThe process of collecting inventory data from a client includes several steps. You may find the following diagram helpful in understanding the process.
1 Create and publish an Inventory Manager channel.
2 As a client connects to the server, the channel ensures that any new or updated Inventory Manager files are installed on the client. The scan then runs with the options that you defined in the channel.
Scan results for Windows clients are in one or more files (.scn, .scx, .dscn, .dfsd). Scan results for handheld clients are in .xml files.
3 For Windows clients, after an initial full scan file is created, subsequent scan files reflect only the differences between the current data and the last scan. This differenced scan data is stored in a .dscn file for hardware and software scan data; and in a .dsfd file for directory scan data. The differenced scan files are significantly smaller than the full scan file, saving time during transmission to the server and during processing by the server.
4 The channel retrieves the scan files from the client during the same connection or on the next connection, depending on the options selected in the channel. After the scan files have been successfully transmitted to the server, some or all of the scan files on the client are deleted or renamed for later use in differencing.
5 Afaria processes each scan file, adding or updating client data in the Afaria database. Differenced scan files produce the same net result as full scan files:
The differenced scan files created during this process are not the same as the general purpose file differencing feature of Afaria.
217

Afaria Reference Manual | Components 6.5 Inventory ManagerThe inventory collection process
• any data changes from change detection are detected
• the data stored in the Afaria database is still a complete picture of the client machine
218
Afaria Reference Manual | Components 6.5 Inventory ManagerCollecting phone and network data on handhelds
Collecting phone and network data on handheldsNew phone devices with complex feature sets are quickly emerging on the market place. Devices increasingly offer a selection of independent features that relate to networking and communications. Afaria’s Inventory Manager retrieves data about these features. We will refer to this inventory data collectively as “phone and network data”. Phone and network data, in this context, is data included with the following data properties and data classes:
• Serial number
• Phone
• WiFi
• Bluetooth
• IrDA
The following device and environmental elements can all impact Afaria Inventory Manager’s ability to collect phone and network data from your Afaria Client:
• Device type
• Device manufacturer and model
• Mobile/cellular service provider
• Carrier network type
• Operating system implementation
The following subtopics are designed to help you establish proper expectations about Afaria Inventory Manager’s ability to collect phone data from supported Afaria handheld clients.
Inventory Manager reports and data views Afaria does not create client inventory records for class data groups that are not supported on a client. This has the following implications for Inventory Manager reporting and inventory data views:
• Data views, Inventory
• Pre-defined views – The data view tree always includes all of a client type’s inventory data classes. However, individual client results for specific data classes appear only when there are corresponding client inventory records for the associated data class. For example, the inventory tree for a Windows Mobile Professional device always includes the WiFi data class, but a specific Windows Mobile Professional client that does not support WiFi features will not populate the results pane for the WiFi data class and will not include the WiFi data class in its inventory dialog.
• Custom views – Consider the fact that Inventory Manager does not create client inventory records for the Phone, WiFi, Bluetooth, and IrDA classes if the feature is unsupported on a client when you
Afaria may retrieve more phone data properties as new devices offer more features or expose more properties.
219
Afaria Reference Manual | Components 6.5 Inventory ManagerCollecting phone and network data on handhelds
build custom views. You must plan your queries to account for the possible absence of a record type, rather than the record type containing a null value.
• Inventory Manager reports – Inventory Manager reports suppress reporting for any Phone, WiFi, Bluetooth, and IrDA class data groups that do not have corresponding client inventory records. For example, a client’s Inventory Manager report does not include the WiFi class data group if the associated device does not have WiFi inventory records, due to not supporting WiFi features.
Serial number property Consider the following general observations and informational items about serial numbers:
• PocketPC client, GSM, without phone
• Some clients return a manufacturer-specific serial number that may not match the number that is visible on the outside of the device.
• Some clients return the Universal Unique Identifier (UUID) value, as referenced in the device’s system information, in place of a serial number.
• iPAQ devices return a serial number that matches the number that is visible on the outside of the device.
• PocketPC client, GSM, with phone
• Some clients return a serial number that is extracted from the client’s IMEI number. Afaria Client code must be signed to retrieve this value. The serial number most often does not match the number that is visible on the outside of the device.
• Some clients return the UUID value in place of a serial number.
• iPAQ devices return a serial number that matches the number that is visible on the outside of the device.
• PocketPC client, CDMA, with phone— Most clients return the UUID value in place of the serial number.
• Windows Mobile Standard client, GSM – Serial number is extracted from the client’s IMEI number. Afaria Client code must be signed to retrieve this value. The serial number most often does not match the number that is visible on the outside of the device.
• Windows Mobile Standard client, CDMA – Most clients do not return a serial number or UUID value.
• Symbian client – Serial number is extracted from its IMEI number and most often does not match, or matches only a portion of, the number that is visible on the outside of the device.
• Palm client – Serial number matches the number that is visible on the outside of the device.
• BlackBerry client – Clients return their PIN value in place of the serial number.
220
Afaria Reference Manual | Components 6.5 Inventory ManagerCollecting phone and network data on handhelds
Phone class data Consider the following general observations and informational items about phone class data:
• Phone number
• Phone number is not exposed on most GSM SIM cards and therefore, is not known to the device or to Inventory Manager.
• CDMA phone clients may not expose their phone number.
• Symbian clients do not expose their phone number.
• Current mobile operator, Current network
• Most GSM phones successfully return values for operator and network.
• Carriers did not always choose to expose operator and network properties for earlier CDMA phone clients models.
• Carriers are exposing operator and network properties more frequently on newer CDMA SIM-enabled phone client models.
• International Mobile Equipment Identification (IMEI) and International Mobile Subscriber Identity (IMSI)
• Windows Mobile Professional and Windows Mobile Standard phone clients must have active phone service with the phone turned on in order for Afaria to be able to collect the data property.
• IMEI is relevant only to GSM phone clients. Afaria Client code must be signed to retrieve a value.
• IMSI is relevant to only to GSM and CDMA SIM-enabled phone clients.
• Phone supported (Yes, No) – Non-phone devices do not return a value.
• Phone status (On, Off)
• Non-phone devices do not return a value.
• Symbian phone devices do not always report an On value when the phone status is on. For example, if you have the phone on and the device is in flight mode, then the client returns an Off value for phone status.
WiFi class data Consider the following general observations and informational items about WiFi class data:
• WiFi features were introduced to Windows Mobile Standard devices with Windows Mobile 5 and to Windows Mobile Professional devices with Windows CE 4.2.
• WiFi supported (Yes, No)
• Non-WiFi devices do not return a value. Inventory Manager does not create WiFi class inventory records for the client.
• A device may support WiFi without your carrier offering WiFi features as part of its service agreement.
• WiFi status (On, Off) – Non-WiFi devices do not return a value.
221
Afaria Reference Manual | Components 6.5 Inventory ManagerCollecting phone and network data on handhelds
• MAC address for wireless – Most Windows Mobile Standard devices do not expose their MAC address.
Bluetooth class data Consider the following general observations and informational items about Bluetooth class data:
• Bluetooth features were introduced to Windows Mobile Standard and Windows Mobile Professional devices with Windows CE 4.2.
• Bluetooth supported (Yes, No)
• Non-Bluetooth devices do not return a value. Inventory Manager does not create Bluetooth class inventory records for the client.
• A device may support Bluetooth without your carrier offering Bluetooth features as part of its service agreement.
• Bluetooth status (On, Off) – Non-Bluetooth devices return a null value.
• Some device manufacturers protect their Bluetooth data with driver licensing.
IrDA class data Consider the following informational item about IrDA class data:
• IrDA supported (Yes, No) – Non-IrDA devices do not return a value. Inventory Manager does not create IrDA class inventory records for the client.
222

Afaria Reference Manual | Components 6.5 Inventory ManagerCreate or edit an Inventory Manager channel
Create or edit an Inventory Manager channelCreate or edit Inventory Manager channels to retrieve inventory data from your client devices.
To create a channel, launch the channel wizard for an Inventory Manager channel. The wizard guides you through the channel creation process.
To edit an existing channel, open the channel editor using one of the following methods:
• Click the Edit icon on the Channel administration toolbar.• Click the Edit channel contents… link on the channel’s Properties page. • Select the Continue editing check box in the channel wizard when creating a channel.
The channel wizard and the channel editor provide the following channel options, subject to client type:
• “Storage options” on page 224
• “Scan options” on page 226
• “Scan time and schedule options” on page 228
• A channel may support only a subset of Inventory Manager features. This is a reflection of the highly device-specific nature of native device APIs that Inventory Manager uses to support its feature set.
• Some channel features are available only in the editor, and not in the channel wizard.
• To deploy a channel to clients, you must both publish it and assign it to a work profile.
• For complete information about creating and editing channels, refer to Afaria Reference Manual | Platform > Administration > “Channel Administration”.
223

Afaria Reference Manual | Components 6.5 Inventory ManagerStorage options
Storage optionsUse the Storage Options settings to define where you want to store client inventory data after the Afaria Server retrieves it from the client.
This topic presents graphics and option definitions that represent both the Inventory Manager Channel Wizard and Inventory Manager Channel Editor.
Feature availability and implementation is subject to client type. Therefore, dialogs and property pages may vary by client type.
Graphics presented here are samples.
Wizard sample Editor sample
224
Afaria Reference Manual | Components 6.5 Inventory ManagerStorage options
Storage data elementsThe following table describes the storage options data elements in order of appearance.
Storage data elements Key: W – Data element is present in Wizard, E – Data element is present in Editor
Element W E Description
Storage X X Indicates the storage location for client inventory data after the Afaria Server retrieves it from the client.
• Server – Store data in the Afaria database.
• SMS1 – Store data in your Microsoft Systems Management Server (SMS) database. The data is first written to the SMS Client Access Point (CAP) and then stored by SMS in the SMS database.
• Both1 – Store data in both the Afaria and your SMS databases.
1. This option is valid only with Manager for SMS licensing.
SMS CAP1 X X Defines the UNC path to the Client Access Point (CAP). The Microsoft Systems Management Server (SMS) periodically polls the CAP location and transfers the data it finds to the SMS server, which then stores it in the Afaria database. Refer to “Manager for SMS and Inventory Manager” on page 231 for details about using SMS with Inventory Manager.
Storing inventory data on the Afaria Server:
Each inventory scan must open, process and then close a database connection. If the database doesn't have enough space available to perform all three tasks, then the connection will remain open and all inventory scans that follow are unable to open an already open connection. There are no alerts or log information that indicate that the database connection is open. To close the connection, allocate enough database storage, stop the Inventory Manager service and then restart the service so that scans process successfully.
225
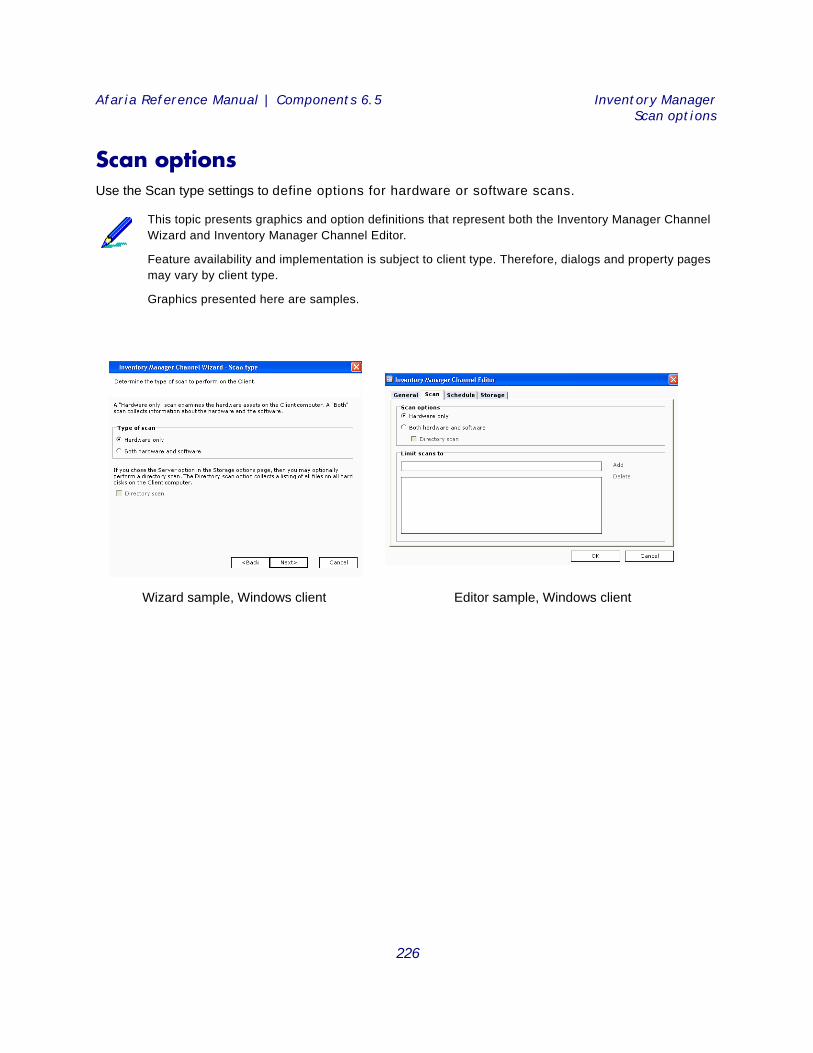
Afaria Reference Manual | Components 6.5 Inventory ManagerScan options
Scan optionsUse the Scan type settings to define options for hardware or software scans.
This topic presents graphics and option definitions that represent both the Inventory Manager Channel Wizard and Inventory Manager Channel Editor.
Feature availability and implementation is subject to client type. Therefore, dialogs and property pages may vary by client type.
Graphics presented here are samples.
Wizard sample, Windows client Editor sample, Windows client
226
Afaria Reference Manual | Components 6.5 Inventory ManagerScan options
Scan data elements The following table describes the scan type data elements in order of appearance.
Scan data elements Key: W – Data element is present in Wizard, E – Data element is present in Editor
Element W E Description
Scan options X X Indicates the type of inventory scan to run on the client.
• Hardware only – Run only a hardware scan. A hardware scan collects data relating to the client’s physical components; such as processors, memory chips, and device drivers.
• Both hardware and software – Run a hardware scan and a software scan. The software scan collects data relating to installed software applications that it can identify, based on the current state of the Software Catalog Editor’s catalog.
• Directory scan – (Windows clients) Run a hardware, software scan, and directory scan. The directory scan collects information on the directory and file structure of all local hard drives. This option is available only for channels using the Afaria Server database as their data storage location.
Limit scans to X (Windows clients) Specify one or more paths to include in a directory scan; all other directories are excluded. You must type the full directory path without any wildcard characters.
Use the Directory scan option with caution. It increases scan processing time on the client and creates larger data files to retrieve, thereby increasing both communication time and inventory database size requirements.
Software inventory for Symbian clients – Inventory results consist only of applications that were installed using Software Installer, either as installed by the device manufacturer or by the device user. An application that resides on the phone but is not installed will not be reported.
227

Afaria Reference Manual | Components 6.5 Inventory ManagerScan time and schedule options
Scan time and schedule optionsUse the scan time settings to define when you want to run the scan. Use the scan schedule settings if you selected a scheduled scan time.
This topic presents graphics and option definitions that represent both the Inventory Manager Channel Wizard and Inventory Manager Channel Editor.
Feature availability and implementation is subject to client type. Therefore, dialogs and property pages may vary by client type.
Graphics presented here are samples.
Wizard samples, Windows client Editor sample, Windows client
228
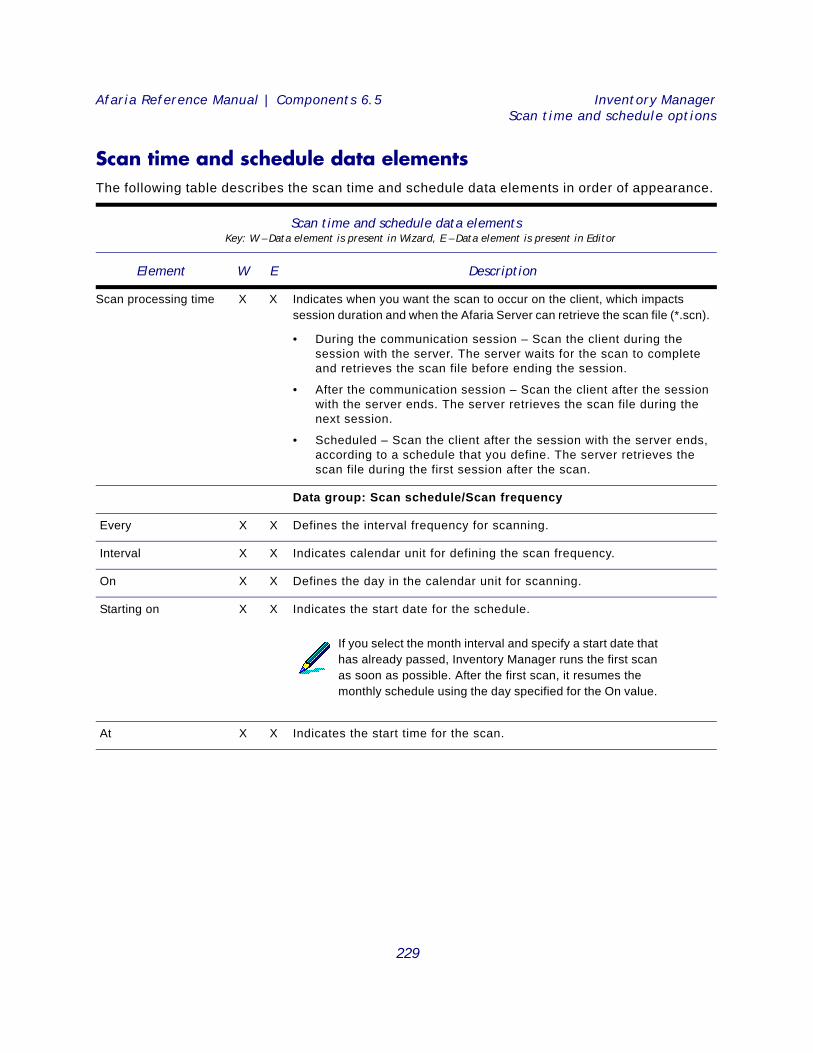
Afaria Reference Manual | Components 6.5 Inventory ManagerScan time and schedule options
Scan time and schedule data elementsThe following table describes the scan time and schedule data elements in order of appearance.
Scan time and schedule data elements Key: W – Data element is present in Wizard, E – Data element is present in Editor
Element W E Description
Scan processing time X X Indicates when you want the scan to occur on the client, which impacts session duration and when the Afaria Server can retrieve the scan file (*.scn).
• During the communication session – Scan the client during the session with the server. The server waits for the scan to complete and retrieves the scan file before ending the session.
• After the communication session – Scan the client after the session with the server ends. The server retrieves the scan file during the next session.
• Scheduled – Scan the client after the session with the server ends, according to a schedule that you define. The server retrieves the scan file during the first session after the scan.
Data group: Scan schedule/Scan frequency
Every X X Defines the interval frequency for scanning.
Interval X X Indicates calendar unit for defining the scan frequency.
On X X Defines the day in the calendar unit for scanning.
Starting on X X Indicates the start date for the schedule.
At X X Indicates the start time for the scan.
If you select the month interval and specify a start date that has already passed, Inventory Manager runs the first scan as soon as possible. After the first scan, it resumes the monthly schedule using the day specified for the On value.
229
Afaria Reference Manual | Components 6.5 Inventory ManagerStop Inventory Manager services
Stop Inventory Manager servicesOccasionally, you may want to stop the Inventory Manager services, for example to temporarily stop processing data into the inventory database. The two services to stop are:
• Afaria Inventory Manager Server
• Afaria Inventory Manager DB Server
To stop the Inventory Manager Services:
1 Open Control Panel and double-click Services.
2 In the Services dialog box, select the Afaria Inventory Manager Server service. Click Stop.
3 Next, select the Afaria Inventory Manager DB Server service, and click Stop.
4 Click Close.
No new data is processed until you restart these two services in Control Panel.
230
Afaria Reference Manual | Components 6.5 Inventory ManagerManager for SMS and Inventory Manager
Manager for SMS and Inventory Manager
Microsoft Systems Management Server (SMS) is a comprehensive solution for centrally managing personal computers on a network of any size. Using SMS, you can detect every computer on the network, collect inventory on software and hardware configurations, troubleshoot and control remote systems, and retrieve information from an SQL Server database. SMS is designed to operate over a high-speed LAN server with a minimum of 128 KB bandwidth.
The Afaria Manager for SMS feature combines Afaria Inventory Manager’s capabilities with the inventory capabilities of SMS to reach beyond high-speed LAN based users to users of all client types receiving inventory channels via a corporate intranet or the Internet. Afaria’s communication efficiencies, session automation, and systems management utilities are the basis for this combined solution. The results are shorter connection times, simplified user interaction, and more efficient control and administration.
For asset tracking and management purposes, you need to look at inventory data from both remote/mobile and LAN-attached computers. Inventory Manager routes Afaria Client inventory data to the SQL database used by the Microsoft SMS server. You can elect to store data in both the SMS and Afaria databases or in the SMS database only.
By default, Inventory Manager retrieves scan results files from clients and stores them in the Afaria database used by the Afaria Server. You can choose to store these data files in an SQL database used by a Microsoft SMS server in addition to, or in lieu of, the Afaria database. This provides a means for integrating client inventory data with information in your SMS database.
The following topics are included in this section:
• “Queries for SMS clients and Afaria Clients”
• “Assign SMS client type collections to Afaria Client groups” on page 232
• “Route scan results to SMS database” on page 232
• “View client inventory” on page 234
• “Delete client inventory data from SMS database” on page 234
Queries for SMS clients and Afaria ClientsSMS uses different names than Inventory Manager for some inventory attributes. For example, the name of the operating system might be represented as “Operating System ->OS-Name(Afaria)” on one platform and as “Operating System -> Name” on another. The reason for
This component requires licensing for both Inventory Manager and Manager for SMS.
Before a computer can be inventoried by SMS it must be discovered, which sometimes causes SMS to automatically install its software on clients when they connect to the network. To properly integrate Afaria inventory with SMS inventory, avoid automatic SMS client installation on Afaria Clients. Afaria Clients cannot also be direct SMS clients. The Microsoft Knowledge Base article #Q207729 (“SMS: Excluding Computers from Windows NT Remote Client Installation”) explains the registry change procedure required to prevent automatic SMS client installation.
231
Afaria Reference Manual | Components 6.5 Inventory ManagerManager for SMS and Inventory Manager
using different names is because two separate scan utilities retrieve client inventory, and there isn’t a one-to-one correspondence between all inventory attributes reported for SMS clients and Afaria Clients. Also, SMS scans may retrieve inventory from its clients that Inventory Manager does not gather from Afaria Clients, and vice-versa.
For assistance in viewing Afaria-specific attributes, many include “(Afaria)” in their listings, such as “Operating System ->OS-Name(Afaria)”. When you build queries in the SMS database, add Afaria-specific attributes with the logical operator OR to include Afaria Clients in the query results. For example, the query statement that follows would return the Operating System for both SMS clients and Afaria Clients:
Operating System -> Name
OR
Operating System –> OS-Name(Afaria)
Assign SMS client type collections to Afaria Client groupsAfaria allows you to automatically create a client group from an SMS collection of clients with inventory scan data, then view that data on an SMS server. To do this, create an Inventory Manager channel for a specific client type, using “SMS” or “Both” as the storage location for scan data. Next, run the channel. The scan data is routed to the Client Access Point (CAP) and then transferred to the SMS server. Next, create an SMS collection based on the client type for which you gathered inventory scan data and assign that collection to an SMS software package. Choose to monitor the SMS collections manually or instruct Afaria to monitor all collections, then elect to automatically import the channels. The import process creates a client group based on the collection of clients. The name of the group follows the <SMS Server><collection name> format. It also creates an equivalent Software Manager channel that you can deploy to your clients.
Route scan results to SMS databaseYou specify the routing of client inventory data to the SMS database on a channel-by-channel basis. In the Inventory Manager Channel Wizard, Storage options dialog box, you choose to store inventory scan results in the inventory database (server), SMS database, or both.
For details on selecting storage locations, see “Storage options” on page 224.
For details about importing and assigning SMS collections, see Afaria Reference Manual | Platform > Server Configuration > “Manager for SMS.”
For details on working with client groups, see Afaria Reference Manual | Platform > Administration > “Client Groups.”
For details on working with an existing Software Manager channel, see “Edit a Software Manager channel” on page 280.
For information about choosing storage options, see “Storage options” on page 224.
232
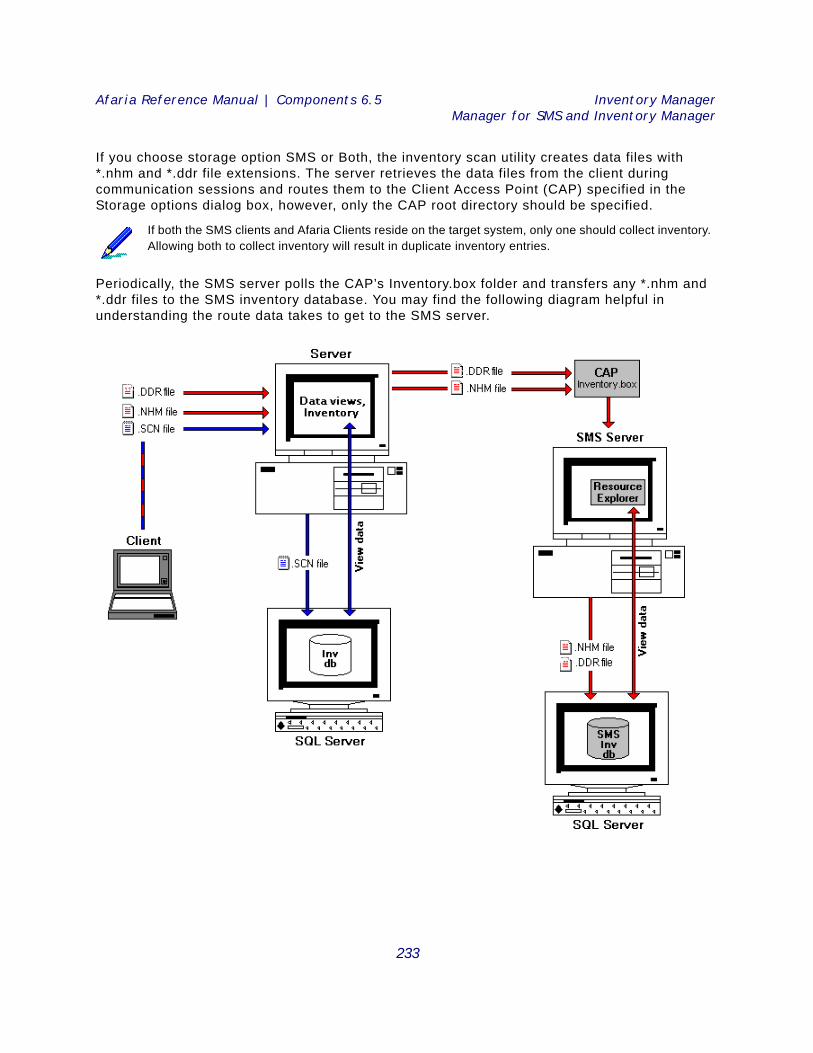
Afaria Reference Manual | Components 6.5 Inventory ManagerManager for SMS and Inventory Manager
If you choose storage option SMS or Both, the inventory scan utility creates data files with *.nhm and *.ddr file extensions. The server retrieves the data files from the client during communication sessions and routes them to the Client Access Point (CAP) specified in the Storage options dialog box, however, only the CAP root directory should be specified.
Periodically, the SMS server polls the CAP’s Inventory.box folder and transfers any *.nhm and *.ddr files to the SMS inventory database. You may find the following diagram helpful in understanding the route data takes to get to the SMS server.
If both the SMS clients and Afaria Clients reside on the target system, only one should collect inventory. Allowing both to collect inventory will result in duplicate inventory entries.
233
Afaria Reference Manual | Components 6.5 Inventory ManagerManager for SMS and Inventory Manager
View client inventoryClient software assets
When the SMS server processes software information from SMS clients it stores the information in the Software view. When it processes Inventory Manager scan results from Afaria Clients, it stores information about software applications in the “Software” category under the Hardware view, rather than directly in the Software view. This difference in storage locations is a result of client inventory being processed by two separate scan utilities.
Client inventory in SMS database
Using Resource Explorer on the SMS server, you can view Afaria Client inventory alongside inventory for SMS clients. The SMS Console displays Afaria Clients in the ‘Afaria Client’ collection. In addition, you can build database queries that display both Afaria and SMS clients and delete Afaria Client data, as necessary. Refer to your SMS documentation.
Delete client inventory data from SMS databaseAfter Inventory Manager runs an initial scan on a client, subsequent scans report only the inventory that changed since the previous scan. (This is true only for the data file created for SMS (*.nhm). Afaria scan files (*.scn) include full results.) If you want to retrieve a full client configuration instead of a partial configuration, you can delete the .mif files associated with a client’s inventory data from the SMS database. (Deleting the .mif files prevents SMS from processing the .nhm files and therefore runs a complete inventory scan at the client.)
The following four .mif files must be manually deleted from the client system before you can collect new inventory data:
Ldiscanold.mif (located in the Bin directory of the client install directory)
Ldiscanswold.mif (located in the Bin directory of the client install directory)
Ldiscan.mif (located in C:\DMI\DOS\MIFS)
discnsw.mif (located in C:\DMI\DOS\MIFS)
When Inventory Manager scans a client for the first time, the resulting data typically appears in the Resource Explorer in approximately one hour. The delay is due to the way in which Microsoft SMS server processes the scan data. To force the SMS server to parse the client data immediately, start and stop the Inventory Data Loader service on the SMS server.
SMS information that resides in an inventory scan file may still be delivered to the Afaria Server after the channel has been deleted because scan delivery can occur during or after a communications session. If the SMS server is no longer valid or accessible when the scan is processed on the Afaria Server, error messages will appear.
For more information about deleting client inventory from the SMS database, refer to your SMS documentation.
234
Afaria Reference Manual | Components 6.5 Inventory ManagerInventory Manager alerts
Inventory Manager alertsYou can use the Server configuration, Alert definition feature to create alerts to notify you when an Inventory Manager event has occurred. The following event is associated with the Inventory Manager component:
See Afaria Reference Manual | Platform > Server Configuration > “Alert Definitions” and Afaria Reference Manual | Platform > Data Views > “Working with Logged Actions.”
Event Message
Change detection A Configuration Change has been Detected.
235
Afaria Reference Manual | Components 6.5 Inventory ManagerInventory Manager reports
Inventory Manager reportsInventory Manager includes the following predefined reports that you can view and print:
• BlackBerry Hardware
• Change Detection
• Desktop to Handheld Sync, by Client
• Desktop to Handheld Sync, by Handheld Type
• Palm Hardware
• Pocket PC - Windows CE Hardware
• Smartphone Hardware
• Symbian Hardware
• Windows Directory Scans
• Windows Hardware - Capacities
• Windows Hardware - Identities
• Windows Hardware - Summary
• Windows Hardware by Application
• Windows Software by Client
See Afaria Reference Manual | Platform > Home > “Reports.”
236
7
Patch ManagerPatch Manager channels enable you to deploy Microsoft updates to your Afaria Windows clients. Microsoft
updates include critical updates, security updates, patches, and service packs. Patch Manager ensures
your Afaria Windows clients always have the most up-to-date Microsoft components.
Client types supported are:
Windows
237
Afaria Reference Manual | Components 6.5 Patch ManagerAbout Patch Manager
About Patch Manager Afaria’s Patch Manager enables you to deploy Microsoft security patches, security rollups and critical updates for your Afaria Windows clients, thereby minimizing security risks and reducing the costs of keeping remote and mobile machines up-to-date with the latest security patches. You can download, configure installation for, and deploy Microsoft patches via bandwidth-optimized Afaria channels, allowing you to retain administrative control.
Your Patch Manager installation includes an unpublished channel named “Patch Manager Canned Channel”. You can use this channel to start collecting relevant patch information from your clients, even before you are ready to deploy any patches. The Afaria Server retrieves the patch information during a subsequent session for the client patches view to display.
Use the client patches view to conduct queries and take action to support using Patch Manager channels. See Afaria Reference Manual | Platform > Data Views > “Viewing Client Patch Information.”
Patch Manager and Microsoft Windows Update Afaria Patch Manager uses the Microsoft Windows Update offline scan file to list available patches or updates. Only the items in the Microsoft scan file are available in Patch Manager. Any patch or update not contained in the scan file will not be available for deployment via Patch Manager.
Microsoft periodically updates their scan file and may remove previously listed patches or updates. The scan file may include:
• Critical updates
• Security updates
• Patch/update rollups
• Service packs
About Windows clients Afaria Windows clients are supported for many of Afaria’s platform and component features. As is the nature of device management in general, and Afaria components in particular, successful operations depend in part on your understanding of how the Windows client is designed to operate in the Afaria environment.
Refer to Afaria Reference Manual | Platform > Creating Clients > Creating Afaria Clients > “About Your Afaria Windows Client.”
Patch Manager prerequisite activityThe following activities are prerequisites to using Patch Manager channels:
• Specify server configuration properties for Patch Manager – Refer to Afaria Reference Manual | Platform > Server Configuration > Properties > “Patch Manager.”
238

Afaria Reference Manual | Components 6.5 Patch ManagerPatch Manager prerequisite activity
• Prepare the Patch console’s patch list for first-time use – Refer to Afaria Reference Manual | Platform > Server Configuration > “Patch Console.”
239
Afaria Reference Manual | Components 6.5 Patch ManagerUsing Patch Manager Canned Channel
Using Patch Manager Canned ChannelPatch Manager includes an unpublished channel named “Patch Manager Canned Channel”, which is void of any patches. You can use this channel to deploy the required client-side Microsoft Baseline Security Analyzer (MBSA) files and the Windows Update Agent (WUA) file to the clients that you plan to associate with Patch Manager channels. Deploying the required client-side items occurs whenever a client that doesn't have the items runs any Patch Manager channel. However, this Patch Manager channel allows you to deploy the client-side items and start collecting information for Data views > Client patches, even before you are ready to deploy any patches.
240
Afaria Reference Manual | Components 6.5 Patch ManagerCreate or edit a Patch Manager channel
Create or edit a Patch Manager channel Create or edit Patch Manager channels to determine which patches you want to apply to a client or client group as well as to configure how to install the patches at the client.
• To create a channel, launch the channel wizard for a Patch Manager channel. The wizard guides you through the channel creation process, including the following options:
• Add all pre-selected patches to this channel – Adds to the channel all patches selected in server configuration. Use this option to deliver all patches selected in Server configuration > Patch console.
• View and edit pre-selected patches using the Channel Editor – Opens the channel editor to enable you to edit the list of pre-selected patches. For example, you may be creating a channel for a client group that does not require Windows Media Player patches, although they have been pre-selected in server configuration. Use this option to select which patches the channel delivers.
• To edit an existing channel, open the channel editor using one of the following methods:
• Click the Edit icon on the channel administration toolbar.
• Click the Edit channel contents… link on the channel’s Properties page.
• Right click the channel and select Edit… from the channel’s shortcut menu.
From the channel editor, select an item in the tree view and make any changes you need. For each patch, the editor enables you to set the following properties:
• “Install options” on page 244
• “Delivery options” on page 245
• To deploy a channel to clients, you must both publish it and assign it to a work profile.
• See “About the Patch Manager channel editor” on page 242 to learn more about using the Patch Manager channel editor.
• For complete information about creating and editing channels, refer to Afaria Reference Manual | Platform > Administration > “Channel Administration”.
241
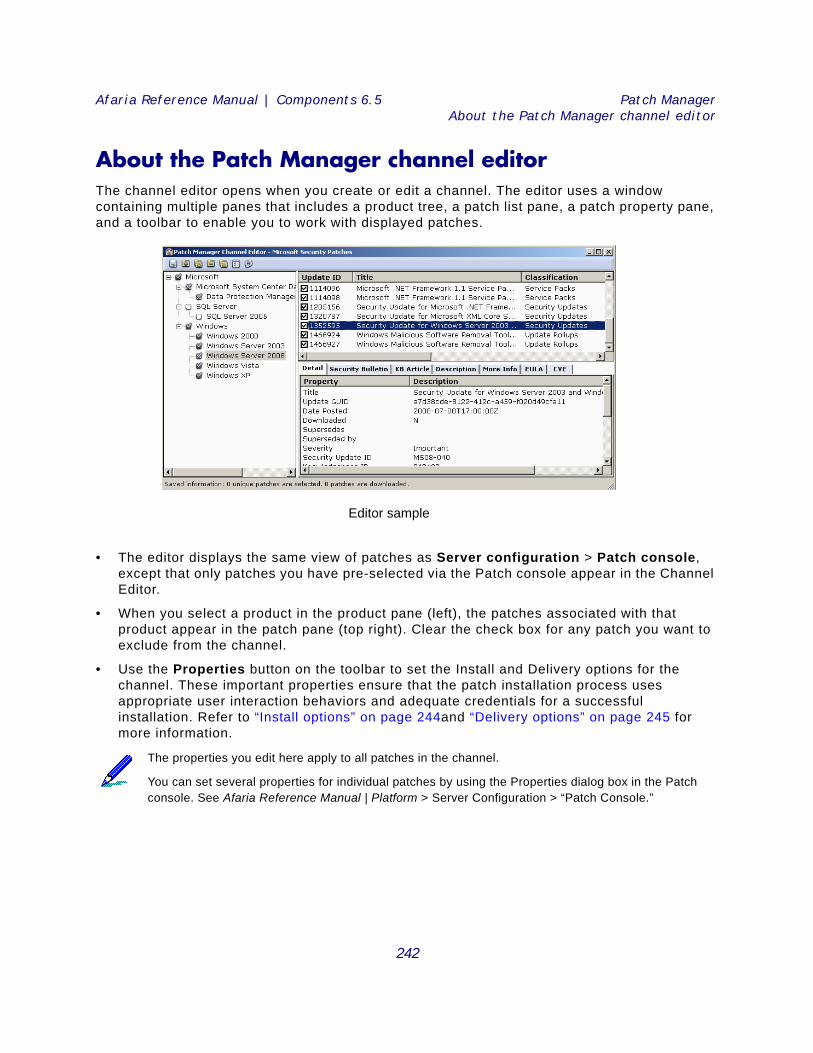
Afaria Reference Manual | Components 6.5 Patch ManagerAbout the Patch Manager channel editor
About the Patch Manager channel editorThe channel editor opens when you create or edit a channel. The editor uses a window containing multiple panes that includes a product tree, a patch list pane, a patch property pane, and a toolbar to enable you to work with displayed patches.
• The editor displays the same view of patches as Server configuration > Patch console, except that only patches you have pre-selected via the Patch console appear in the Channel Editor.
• When you select a product in the product pane (left), the patches associated with that product appear in the patch pane (top right). Clear the check box for any patch you want to exclude from the channel.
• Use the Properties button on the toolbar to set the Install and Delivery options for the channel. These important properties ensure that the patch installation process uses appropriate user interaction behaviors and adequate credentials for a successful installation. Refer to “Install options” on page 244and “Delivery options” on page 245 for more information.
The properties you edit here apply to all patches in the channel.
You can set several properties for individual patches by using the Properties dialog box in the Patch console. See Afaria Reference Manual | Platform > Server Configuration > “Patch Console.”
Editor sample
242
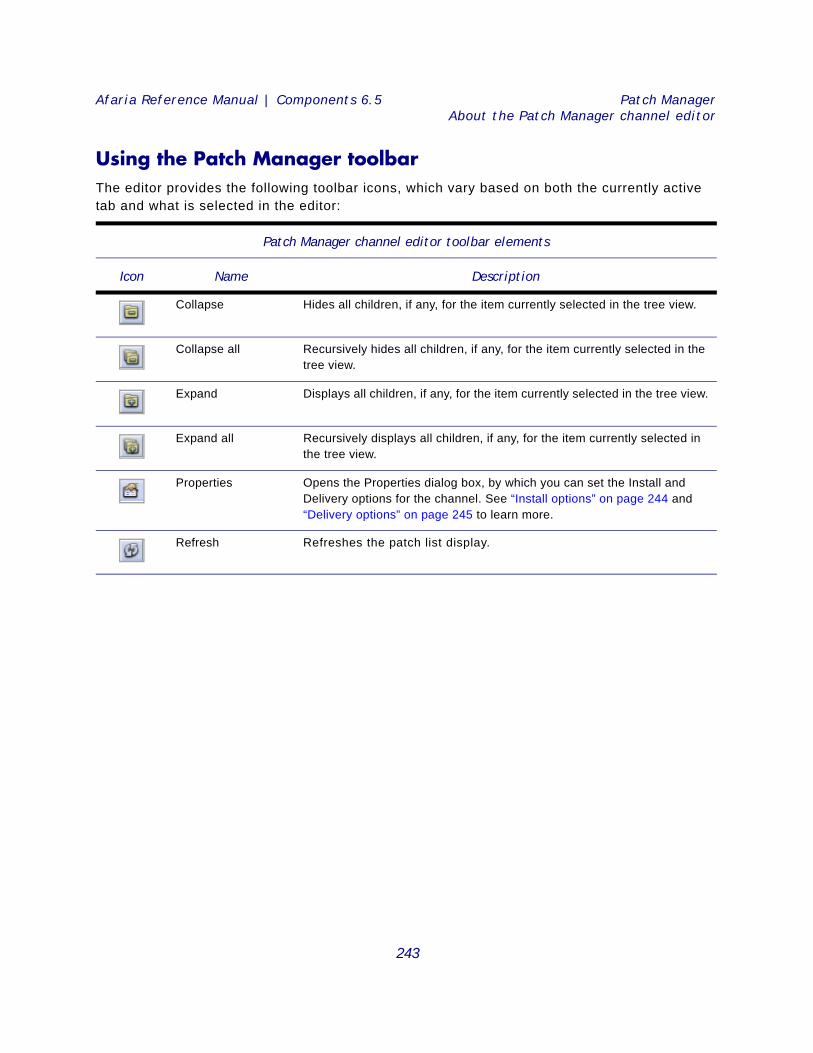
Afaria Reference Manual | Components 6.5 Patch ManagerAbout the Patch Manager channel editor
Using the Patch Manager toolbarThe editor provides the following toolbar icons, which vary based on both the currently active tab and what is selected in the editor:
Patch Manager channel editor toolbar elements
Icon Name Description
Collapse Hides all children, if any, for the item currently selected in the tree view.
Collapse all Recursively hides all children, if any, for the item currently selected in the tree view.
Expand Displays all children, if any, for the item currently selected in the tree view.
Expand all Recursively displays all children, if any, for the item currently selected in the tree view.
Properties Opens the Properties dialog box, by which you can set the Install and Delivery options for the channel. See “Install options” on page 244 and “Delivery options” on page 245 to learn more.
Refresh Refreshes the patch list display.
243
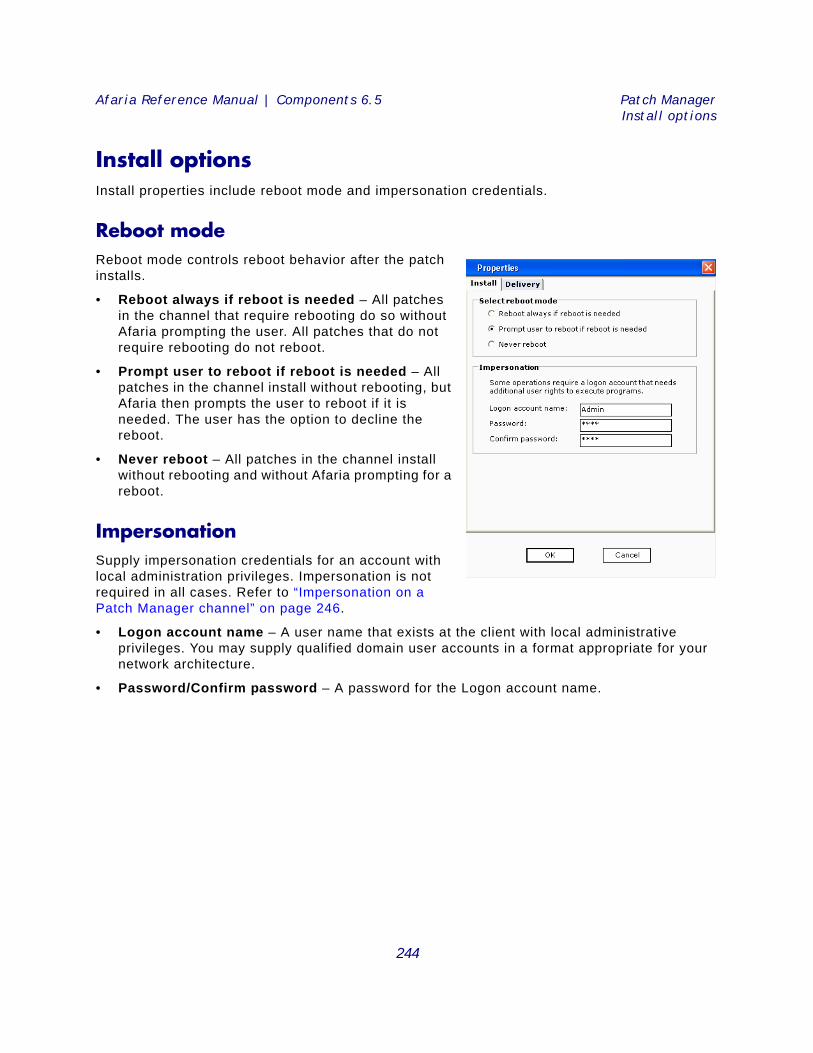
Afaria Reference Manual | Components 6.5 Patch ManagerInstall options
Install optionsInstall properties include reboot mode and impersonation credentials.
Reboot mode
Reboot mode controls reboot behavior after the patch installs.
• Reboot always if reboot is needed – All patches in the channel that require rebooting do so without Afaria prompting the user. All patches that do not require rebooting do not reboot.
• Prompt user to reboot if reboot is needed – All patches in the channel install without rebooting, but Afaria then prompts the user to reboot if it is needed. The user has the option to decline the reboot.
• Never reboot – All patches in the channel install without rebooting and without Afaria prompting for a reboot.
Impersonation Supply impersonation credentials for an account with local administration privileges. Impersonation is not required in all cases. Refer to “Impersonation on a Patch Manager channel” on page 246.
• Logon account name – A user name that exists at the client with local administrative privileges. You may supply qualified domain user accounts in a format appropriate for your network architecture.
• Password/Confirm password – A password for the Logon account name.
244
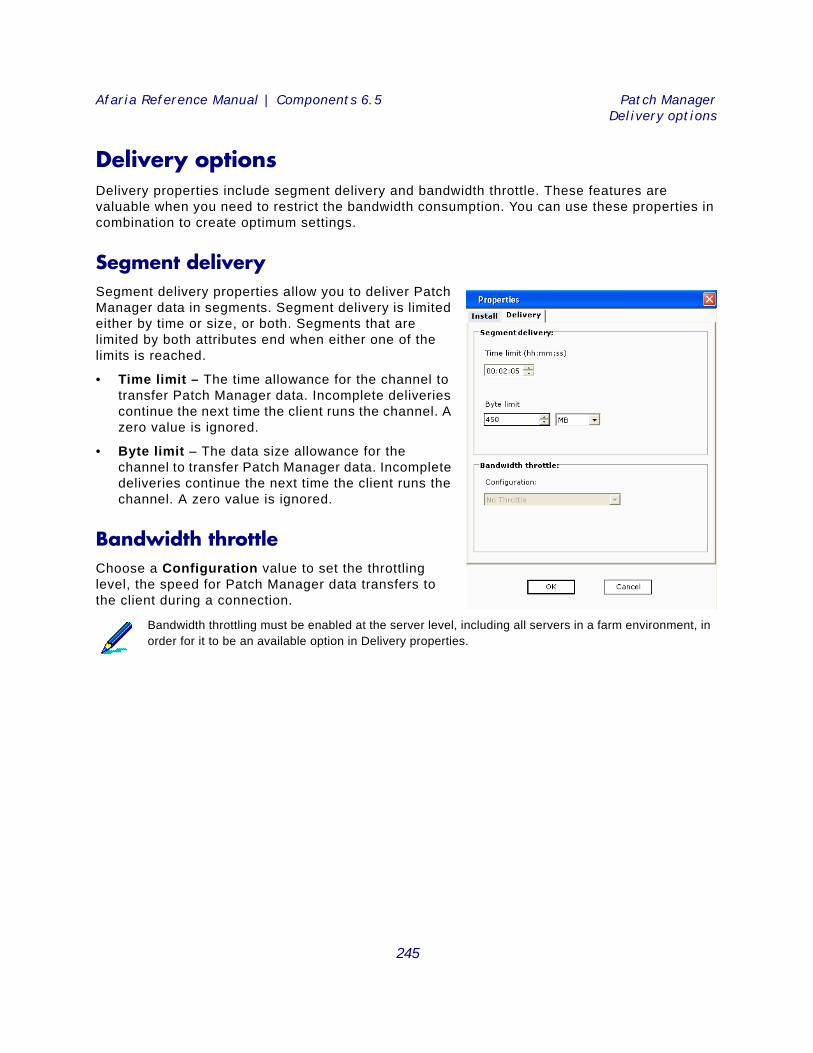
Afaria Reference Manual | Components 6.5 Patch ManagerDelivery options
Delivery optionsDelivery properties include segment delivery and bandwidth throttle. These features are valuable when you need to restrict the bandwidth consumption. You can use these properties in combination to create optimum settings.
Segment delivery Segment delivery properties allow you to deliver Patch Manager data in segments. Segment delivery is limited either by time or size, or both. Segments that are limited by both attributes end when either one of the limits is reached.
• Time limit – The time allowance for the channel to transfer Patch Manager data. Incomplete deliveries continue the next time the client runs the channel. A zero value is ignored.
• Byte limit – The data size allowance for the channel to transfer Patch Manager data. Incomplete deliveries continue the next time the client runs the channel. A zero value is ignored.
Bandwidth throttle Choose a Configuration value to set the throttling level, the speed for Patch Manager data transfers to the client during a connection.
Bandwidth throttling must be enabled at the server level, including all servers in a farm environment, in order for it to be an available option in Delivery properties.
245
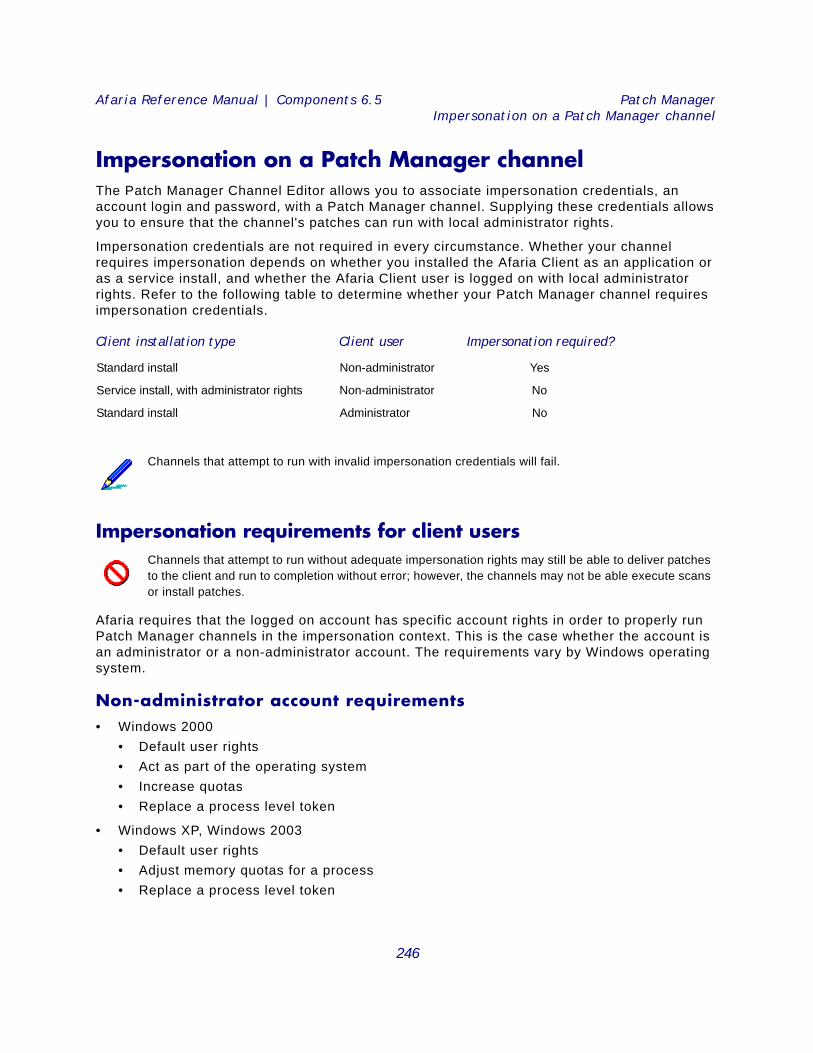
Afaria Reference Manual | Components 6.5 Patch ManagerImpersonation on a Patch Manager channel
Impersonation on a Patch Manager channel The Patch Manager Channel Editor allows you to associate impersonation credentials, an account login and password, with a Patch Manager channel. Supplying these credentials allows you to ensure that the channel's patches can run with local administrator rights.
Impersonation credentials are not required in every circumstance. Whether your channel requires impersonation depends on whether you installed the Afaria Client as an application or as a service install, and whether the Afaria Client user is logged on with local administrator rights. Refer to the following table to determine whether your Patch Manager channel requires impersonation credentials.
Impersonation requirements for client users
Afaria requires that the logged on account has specific account rights in order to properly run Patch Manager channels in the impersonation context. This is the case whether the account is an administrator or a non-administrator account. The requirements vary by Windows operating system.
Non-administrator account requirements • Windows 2000
• Default user rights • Act as part of the operating system • Increase quotas • Replace a process level token
• Windows XP, Windows 2003• Default user rights • Adjust memory quotas for a process • Replace a process level token
Client installation type Client user Impersonation required?
Standard install Non-administrator Yes
Service install, with administrator rights Non-administrator No
Standard install Administrator No
Channels that attempt to run with invalid impersonation credentials will fail.
Channels that attempt to run without adequate impersonation rights may still be able to deliver patches to the client and run to completion without error; however, the channels may not be able execute scans or install patches.
246
Afaria Reference Manual | Components 6.5 Patch ManagerImpersonation on a Patch Manager channel
Administrator account requirements • Windows 2000 – no changes to administrator account required
• Windows XP, Windows 2003 • Default administrator user rights • Replace a process level token
247
8
Server ListingServer Listing channels enable you to publish the addresses of Afaria Servers for Channel Viewer users.
Channel Viewer users can add any of the published servers to their personal server list. Use Server Listing
channels to make additional servers available to Channel Viewer users without requiring them to add
addresses individually.
Client types supported are:
Windows
248
Afaria Reference Manual | Components 6.5 Server ListingCreate or edit a Server Listing channel
Create or edit a Server Listing channelWith Server Listing channels, you define the name, address, and description of each server in the channel list for Channel Viewer users. When a client user connects to your server, the Server Listing channel content is automatically sent to the client. The user does not have to subscribe to the server Listing channel in order to receive its content.
• To create a channel, launch the channel wizard for a Server Listing channel. The wizard guides you through the channel creation process, and then opens the channel editor.
• To edit an existing channel, open the channel editor using one of the following methods:
• Click the Edit icon on the channel administration toolbar.
• Click the Edit channel contents… link on the channel’s Properties page.
• Right click the channel and select Edit… from the channel’s shortcut menu.
From the channel editor, select an entry and make any changes to the channel you need.
• To deploy a channel to clients, you must both publish it and assign it to a work profile.
• See “About Server Listing Channel Editor” on page 250 to learn more about using the Server Listing channel editor.
• For complete information about creating and editing channels, refer to Afaria Reference Manual | Platform > Administration > “Channel Administration”.
249
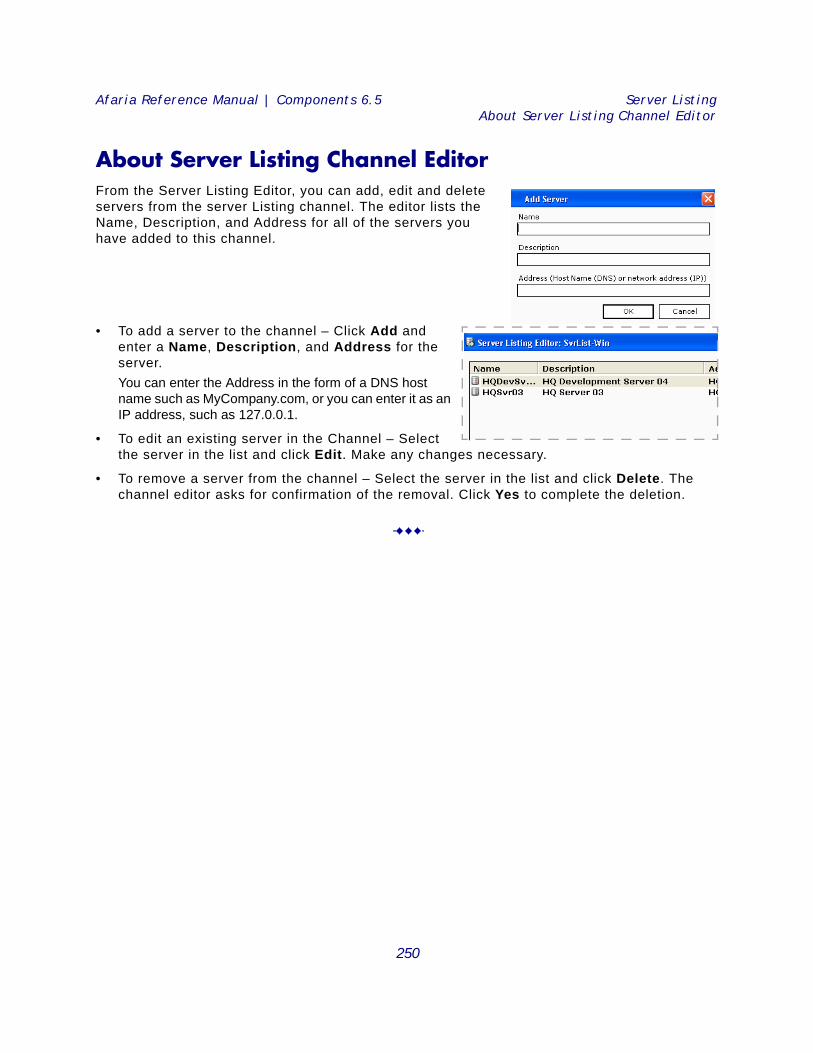
Afaria Reference Manual | Components 6.5 Server ListingAbout Server Listing Channel Editor
About Server Listing Channel EditorFrom the Server Listing Editor, you can add, edit and delete servers from the server Listing channel. The editor lists the Name, Description, and Address for all of the servers you have added to this channel.
• To add a server to the channel – Click Add and enter a Name, Description, and Address for the server. You can enter the Address in the form of a DNS host name such as MyCompany.com, or you can enter it as an IP address, such as 127.0.0.1.
• To edit an existing server in the Channel – Select the server in the list and click Edit. Make any changes necessary.
• To remove a server from the channel – Select the server in the list and click Delete. The channel editor asks for confirmation of the removal. Click Yes to complete the deletion.
250
9
Session ManagerSession Manager channels enable you to perform a variety of scripted tasks on your Afaria Clients. In
addition to sending and retrieving files, you can perform system tasks such as disk maintenance, registry
updates, and script execution. You can also utilize control flow logic to condition task execution. All task
scripting is accomplished via an intuitive user interface. Session Manager is the core technology in the
Afaria suite.
Client types supported are:
• Windows Mobile Professional (including Windows CE)
• Windows Mobile Standard
• Symbian
• Palm
• Java
• BlackBerry
• Windows
251
Afaria Reference Manual | Components 6.5 Session ManagerAbout Windows clients
About Windows clients Afaria Windows clients are supported for many of Afaria’s platform and component features. As is the nature of device management in general, and Afaria components in particular, successful operations depend in part on your understanding of how the Windows client is designed to operate in the Afaria environment.
Refer to Afaria Reference Manual | Platform > Creating Clients > Creating Afaria Clients > “About Your Afaria Windows Client.”
252

Afaria Reference Manual | Components 6.5 Session ManagerCreate or edit a Session Manager channel
Create or edit a Session Manager channelCreate or edit Session Manager channels to provide custom, systems-management channels that send and receive data, execute programs, and more, during a session between the client and a server.
• To create a channel, launch the channel wizard for a Session Manager channel. The wizard guides you through the channel creation process, and then opens the channel editor.
• To edit an existing channel, open the channel editor using one of the following methods:
• Click the Edit icon on the channel administration toolbar.
• Click the Edit channel contents… link on the channel’s Properties page.
• Right click the channel and select Edit… from the channel’s shortcut menu.
From the channel editor you can perform a variety of tasks. Refer to the following topics, categorized by activity, to learn more:
• Worklists and sendlists: “Create a new worklist or sendlist for a channel” on page 257 “Assign a worklist or sendlist to your channel” on page 258
• Events “Add events to a worklist or sendlist” on page 260 “Define event properties” on page 262 “Import/export events” on page 268 “Optimize channel sessions” on page 269
• To deploy a channel to clients, you must both publish it and assign it to a work profile.
• See “About Session Manager Channel Editor” on page 254 to learn more about using the Session Manager channel editor.
• For complete information about creating and editing channels, refer to Afaria Reference Manual | Platform > Administration > “Channel Administration”.
253
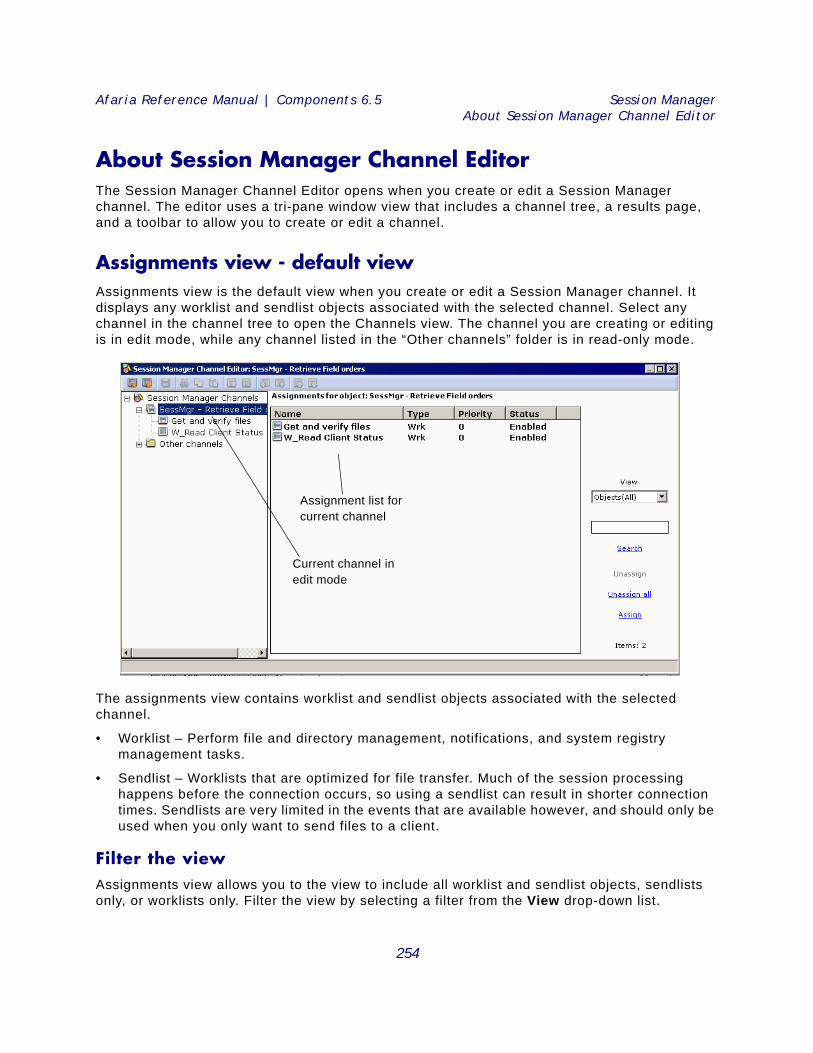
Afaria Reference Manual | Components 6.5 Session ManagerAbout Session Manager Channel Editor
About Session Manager Channel EditorThe Session Manager Channel Editor opens when you create or edit a Session Manager channel. The editor uses a tri-pane window view that includes a channel tree, a results page, and a toolbar to allow you to create or edit a channel.
Assignments view - default viewAssignments view is the default view when you create or edit a Session Manager channel. It displays any worklist and sendlist objects associated with the selected channel. Select any channel in the channel tree to open the Channels view. The channel you are creating or editing is in edit mode, while any channel listed in the “Other channels” folder is in read-only mode.
The assignments view contains worklist and sendlist objects associated with the selected channel.
• Worklist – Perform file and directory management, notifications, and system registry management tasks.
• Sendlist – Worklists that are optimized for file transfer. Much of the session processing happens before the connection occurs, so using a sendlist can result in shorter connection times. Sendlists are very limited in the events that are available however, and should only be used when you only want to send files to a client.
Filter the viewAssignments view allows you to the view to include all worklist and sendlist objects, sendlists only, or worklists only. Filter the view by selecting a filter from the View drop-down list.
Assignment list for current channel
Current channel in edit mode
254
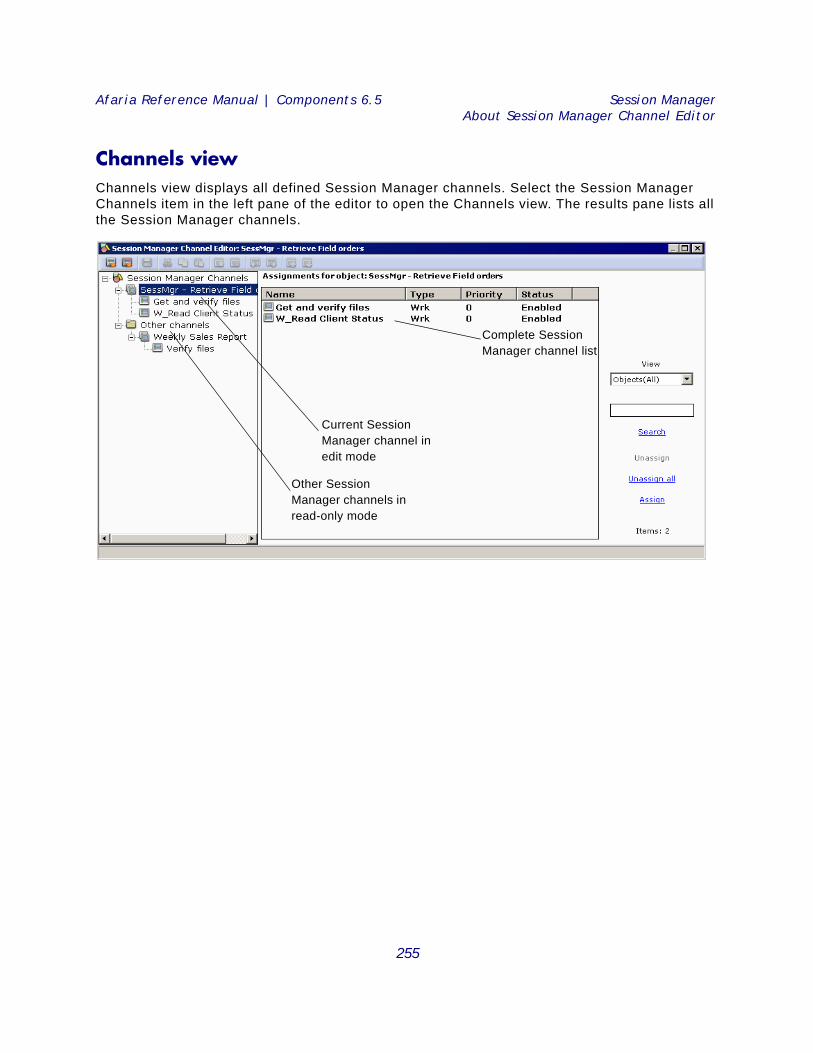
Afaria Reference Manual | Components 6.5 Session ManagerAbout Session Manager Channel Editor
Channels viewChannels view displays all defined Session Manager channels. Select the Session Manager Channels item in the left pane of the editor to open the Channels view. The results pane lists all the Session Manager channels.
Current Session Manager channel in edit mode
Other Session Manager channels in read-only mode
Complete Session Manager channel list
255
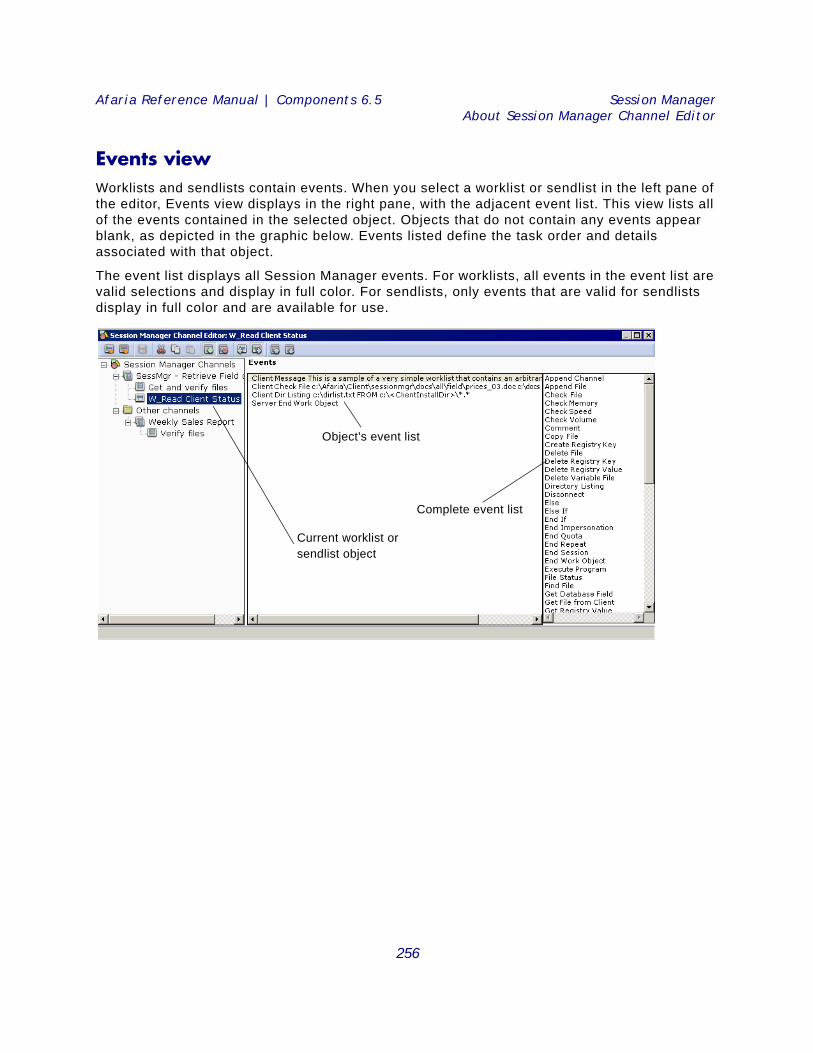
Afaria Reference Manual | Components 6.5 Session ManagerAbout Session Manager Channel Editor
Events viewWorklists and sendlists contain events. When you select a worklist or sendlist in the left pane of the editor, Events view displays in the right pane, with the adjacent event list. This view lists all of the events contained in the selected object. Objects that do not contain any events appear blank, as depicted in the graphic below. Events listed define the task order and details associated with that object.
The event list displays all Session Manager events. For worklists, all events in the event list are valid selections and display in full color. For sendlists, only events that are valid for sendlists display in full color and are available for use.
Current worklist or sendlist object
Object’s event list
Complete event list
256
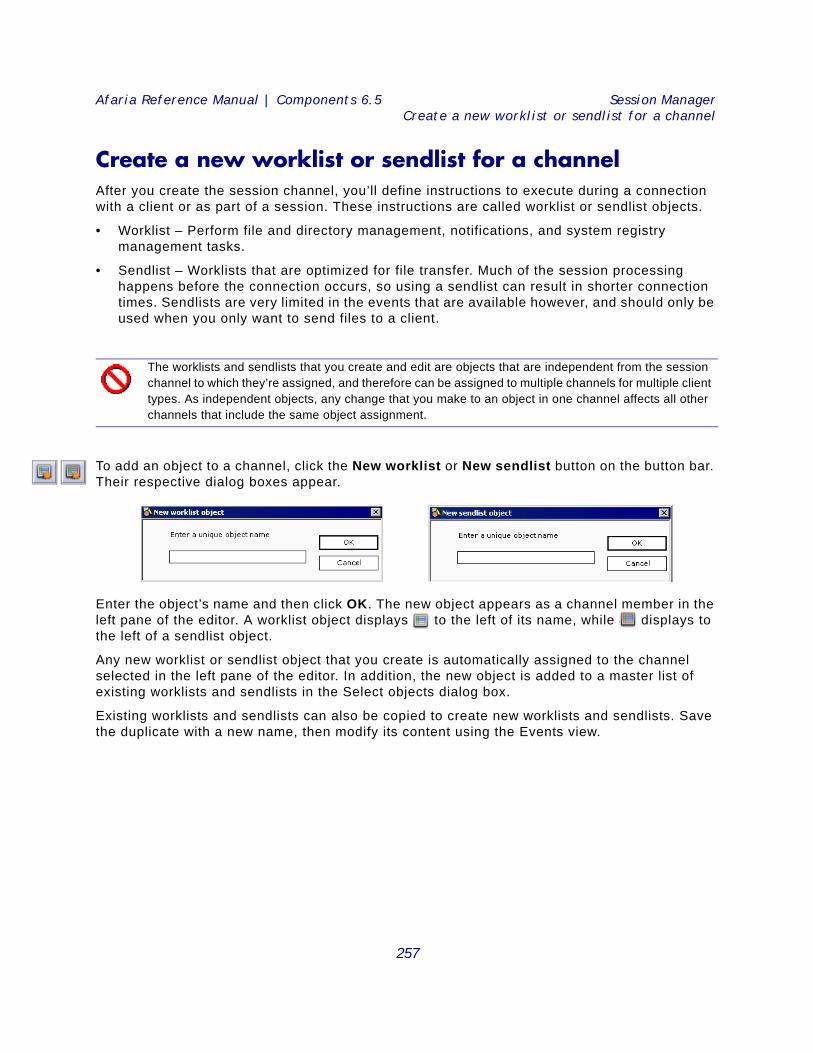
Afaria Reference Manual | Components 6.5 Session ManagerCreate a new worklist or sendlist for a channel
Create a new worklist or sendlist for a channelAfter you create the session channel, you’ll define instructions to execute during a connection with a client or as part of a session. These instructions are called worklist or sendlist objects.
• Worklist – Perform file and directory management, notifications, and system registry management tasks.
• Sendlist – Worklists that are optimized for file transfer. Much of the session processing happens before the connection occurs, so using a sendlist can result in shorter connection times. Sendlists are very limited in the events that are available however, and should only be used when you only want to send files to a client.
To add an object to a channel, click the New worklist or New sendlist button on the button bar. Their respective dialog boxes appear.
Enter the object’s name and then click OK. The new object appears as a channel member in the left pane of the editor. A worklist object displays to the left of its name, while displays to the left of a sendlist object.
Any new worklist or sendlist object that you create is automatically assigned to the channel selected in the left pane of the editor. In addition, the new object is added to a master list of existing worklists and sendlists in the Select objects dialog box.
Existing worklists and sendlists can also be copied to create new worklists and sendlists. Save the duplicate with a new name, then modify its content using the Events view.
The worklists and sendlists that you create and edit are objects that are independent from the session channel to which they’re assigned, and therefore can be assigned to multiple channels for multiple client types. As independent objects, any change that you make to an object in one channel affects all other channels that include the same object assignment.
257
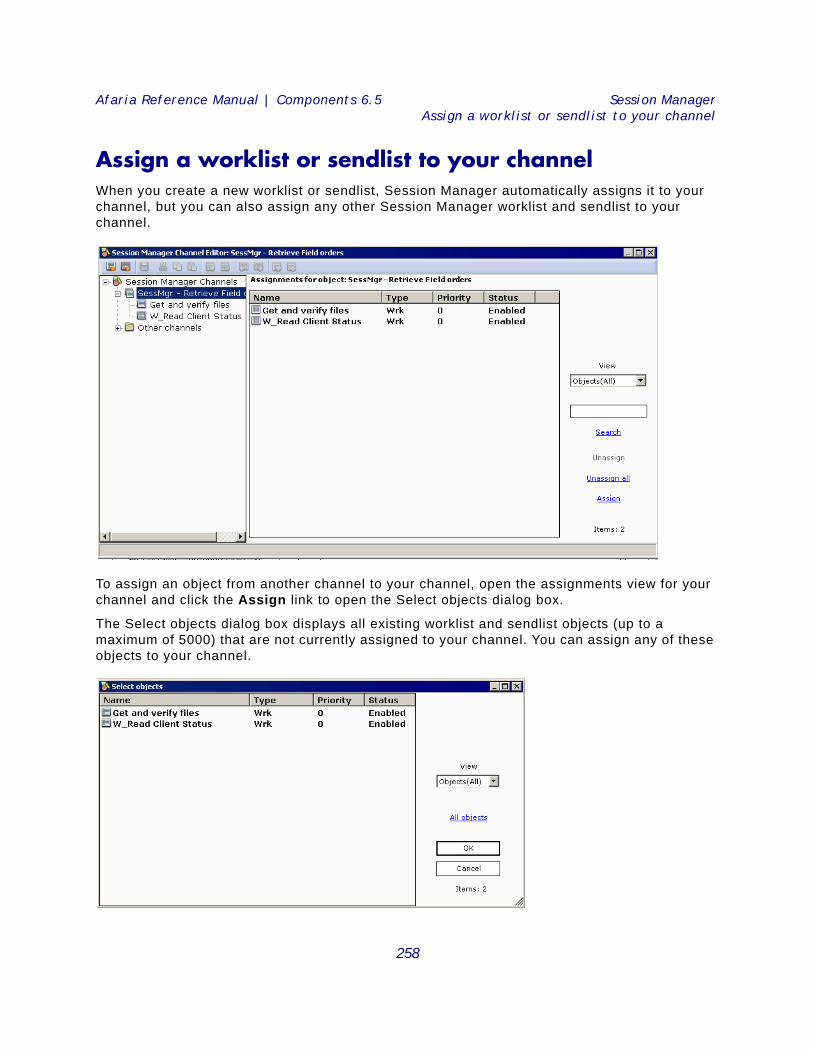
Afaria Reference Manual | Components 6.5 Session ManagerAssign a worklist or sendlist to your channel
Assign a worklist or sendlist to your channelWhen you create a new worklist or sendlist, Session Manager automatically assigns it to your channel, but you can also assign any other Session Manager worklist and sendlist to your channel.
To assign an object from another channel to your channel, open the assignments view for your channel and click the Assign link to open the Select objects dialog box.
The Select objects dialog box displays all existing worklist and sendlist objects (up to a maximum of 5000) that are not currently assigned to your channel. You can assign any of these objects to your channel.
258
Afaria Reference Manual | Components 6.5 Session ManagerAssign a worklist or sendlist to your channel
The View drop-down allows you to control the objects that display in the list. Display items from which you can choose include all worklist and sendlist objects, sendlists only, or worklists only.
To include a worklist or sendlist object in a channel, click the object name and then click OK, or double-click the object. To assign all objects at once, click the All objects link and then click OK. To assign multiple objects simultaneously, click the first object, press and hold [Ctrl] or [Shift] and then select the additional objects. The Select objects dialog box closes and the objects are added to Assignments for object view.
To clear a selected object, click anywhere on the dialog box.
Unassign objects from your channel To unassign an object from your channel, select it in the assignments view and then click the Unassign link. Session Manager removes it from the view and returns it to the Select objects dialog box where it remains available for future assignments.
259
Afaria Reference Manual | Components 6.5 Session ManagerAdd events to a worklist or sendlist
Add events to a worklist or sendlist
Worklist and sendlist objects use events to perform actions during communication between the server and client. Afaria executes valid events and creates corresponding log entries. Invalid events are ignored and not captured in resulting logs.
There are several types of events. Some are valid for worklist objects only, while others are valid for both worklist and sendlist objects.
All events are categorized by the following function types:
• File/disk operations – events perform file-level data exchange, administration, and information gathering on the server and client.
• Variable – events manipulate placeholders whose contents you control and perform system registry tasks. You can use the predefined Session Manager variables or create your own user-defined variables. User-defined variables can be used in all worklists and sendlists contained within an individual channel.
• Session control – events govern how Session Manager structures and progresses through an object’s list of events. These events include conditional statements and events that stop the worklist or sendlist, session, and connection.
• Miscellaneous – events display save file and message dialog boxes, execute programs, send commands to other computers, and run events in an external file.
To add an event to a worklist or sendlist, select the object in the left pane of the editor. Any event associated with that object displays in Events view. In the right pane, locate and then double-click the event to add and open the details dialog box for you to specify instructions for the event. The fields and options in the dialog box vary depending upon the event selected. You can also use Copy and Paste commands to copy events from one object to another.
The worklists and sendlists that you create and edit are objects that are independent from the channel to which they’re assigned, and therefore can be assigned to multiple channels for multiple client types. As independent objects, any change that you make to an object in one channel affects all other channels that include the same object assignment.
Afaria does not validate events that you add to an object by using a Paste command. Adding invalid events to a sendlist object may have unpredictable results.
Use Insert before or Insert after on the button bar to toggle whether the editor adds events before or after your cursor placement in the object.
260

Afaria Reference Manual | Components 6.5 Session ManagerAdd events to a worklist or sendlist
When the event is completely defined, click OK to close the Event details dialog box. The new event appears in the specified location in Events view.
Using visual cues on events Session Manager Channel Editor includes visual cues that you can use to flag or color events.
Display/hide event flagsFlags are used to indicate that a special behavior is associated with an event. You can choose to display or hide event flags in Events view.
To display or hide event flags, open the event’s context menu and choose Show flags. The event shifts to the right and any flag appears to the left of the event.
Set event colorsSession Manager allows you to define custom colors for different event types so that you can quickly determine the types of events in a worklist or sendlist.
To set event colors, open the event’s context menu and choose Set colors. The Set colors dialog box appears. Click the Category drop-down arrow and select the type of category to which you want to assign a color; choices include: Client events, Comments, Control events, Get File from Client, Send File to Client, and server events. Click New color to access the standard Windows Color palette through which you select a predefined color or define a custom color to assign to the selected event type. When you click OK your color selection displays in the Sample box. Click OK to return to Events view. All events of the specified type display in the selected color.
For information on working with the Event details dialog box, see “Define event properties” on page 262.
For detailed information about worklist and sendlist events, see “About events” on page 356 in Appendix, Session Manager events and variables.
261
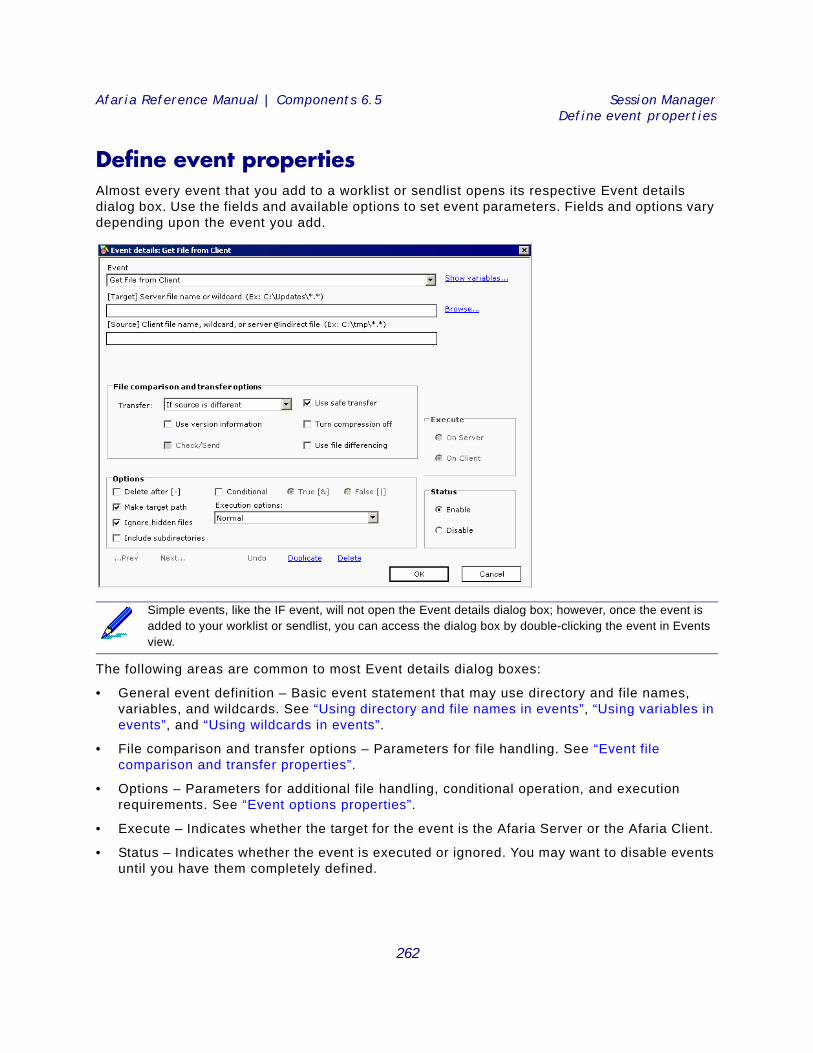
Afaria Reference Manual | Components 6.5 Session ManagerDefine event properties
Define event propertiesAlmost every event that you add to a worklist or sendlist opens its respective Event details dialog box. Use the fields and available options to set event parameters. Fields and options vary depending upon the event you add.
The following areas are common to most Event details dialog boxes:
• General event definition – Basic event statement that may use directory and file names, variables, and wildcards. See “Using directory and file names in events”, “Using variables in events”, and “Using wildcards in events”.
• File comparison and transfer options – Parameters for file handling. See “Event file comparison and transfer properties”.
• Options – Parameters for additional file handling, conditional operation, and execution requirements. See “Event options properties”.
• Execute – Indicates whether the target for the event is the Afaria Server or the Afaria Client.
• Status – Indicates whether the event is executed or ignored. You may want to disable events until you have them completely defined.
Simple events, like the IF event, will not open the Event details dialog box; however, once the event is added to your worklist or sendlist, you can access the dialog box by double-clicking the event in Events view.
262
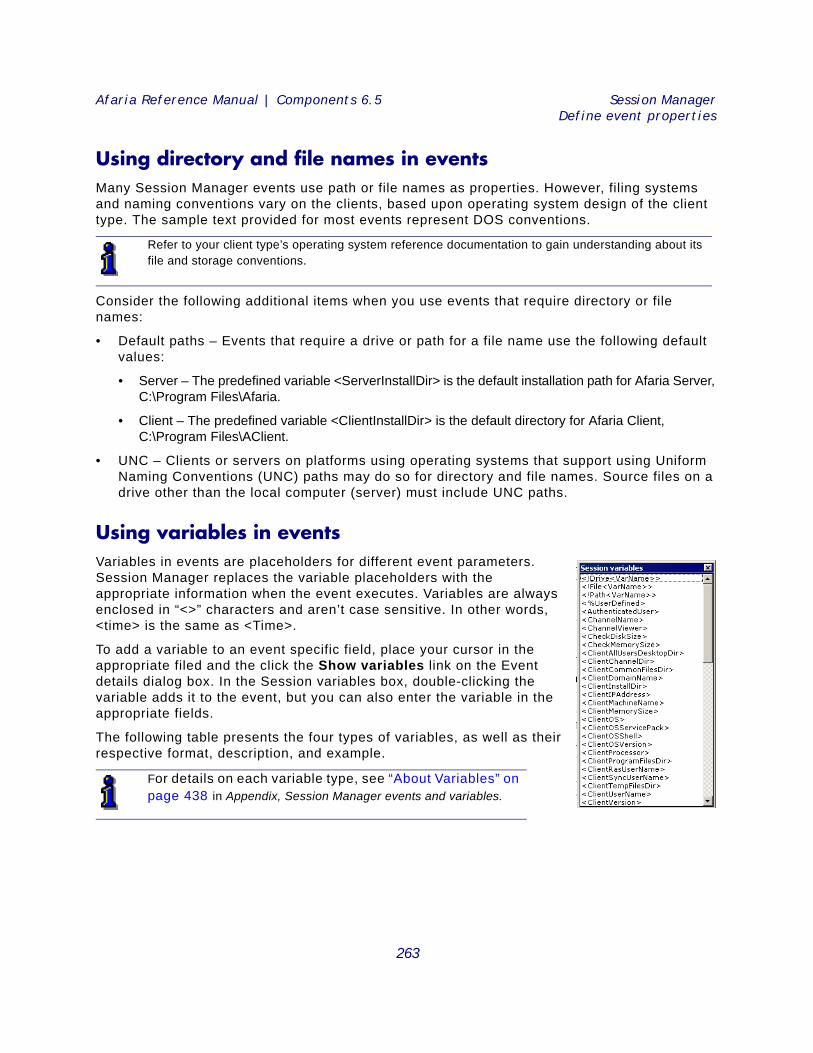
Afaria Reference Manual | Components 6.5 Session ManagerDefine event properties
Using directory and file names in events Many Session Manager events use path or file names as properties. However, filing systems and naming conventions vary on the clients, based upon operating system design of the client type. The sample text provided for most events represent DOS conventions.
Consider the following additional items when you use events that require directory or file names:
• Default paths – Events that require a drive or path for a file name use the following default values:
• Server – The predefined variable <ServerInstallDir> is the default installation path for Afaria Server, C:\Program Files\Afaria.
• Client – The predefined variable <ClientInstallDir> is the default directory for Afaria Client, C:\Program Files\AClient.
• UNC – Clients or servers on platforms using operating systems that support using Uniform Naming Conventions (UNC) paths may do so for directory and file names. Source files on a drive other than the local computer (server) must include UNC paths.
Using variables in eventsVariables in events are placeholders for different event parameters. Session Manager replaces the variable placeholders with the appropriate information when the event executes. Variables are always enclosed in “<>” characters and aren’t case sensitive. In other words, <time> is the same as <Time>.
To add a variable to an event specific field, place your cursor in the appropriate filed and the click the Show variables link on the Event details dialog box. In the Session variables box, double-clicking the variable adds it to the event, but you can also enter the variable in the appropriate fields.
The following table presents the four types of variables, as well as their respective format, description, and example.
Refer to your client type’s operating system reference documentation to gain understanding about its file and storage conventions.
For details on each variable type, see “About Variables” on page 438 in Appendix, Session Manager events and variables.
263
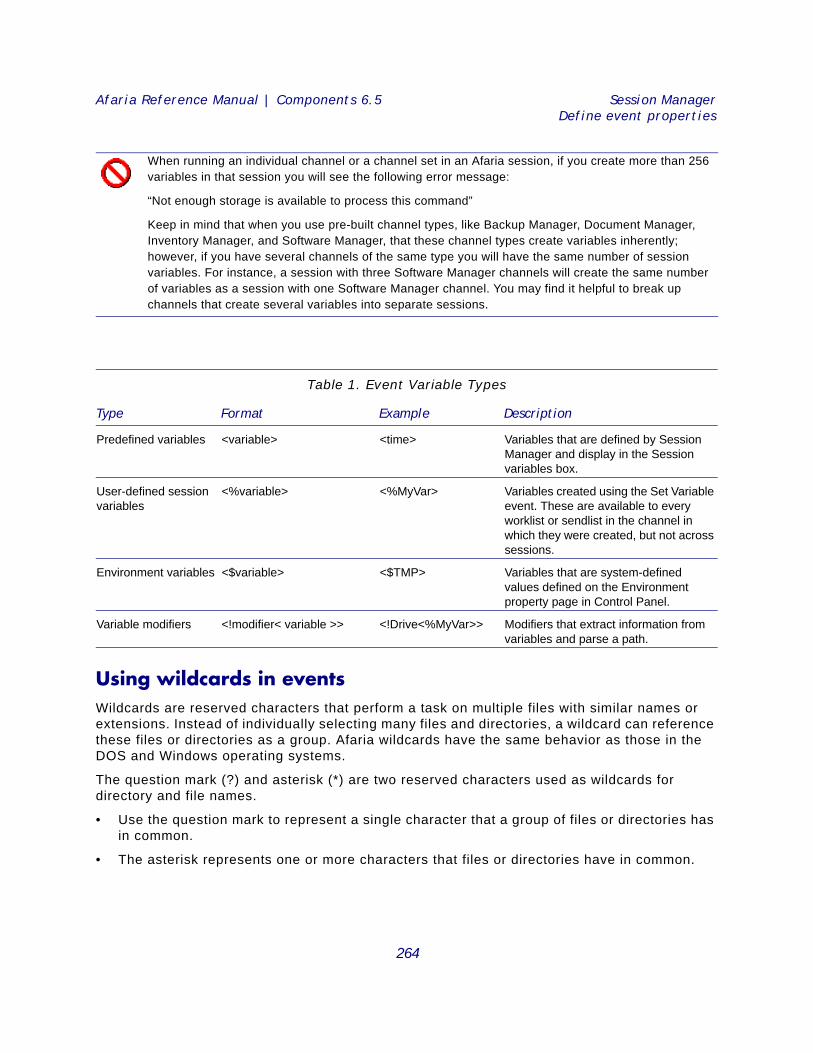
Afaria Reference Manual | Components 6.5 Session ManagerDefine event properties
Using wildcards in events Wildcards are reserved characters that perform a task on multiple files with similar names or extensions. Instead of individually selecting many files and directories, a wildcard can reference these files or directories as a group. Afaria wildcards have the same behavior as those in the DOS and Windows operating systems.
The question mark (?) and asterisk (*) are two reserved characters used as wildcards for directory and file names.
• Use the question mark to represent a single character that a group of files or directories has in common.
• The asterisk represents one or more characters that files or directories have in common.
When running an individual channel or a channel set in an Afaria session, if you create more than 256 variables in that session you will see the following error message:
“Not enough storage is available to process this command”
Keep in mind that when you use pre-built channel types, like Backup Manager, Document Manager, Inventory Manager, and Software Manager, that these channel types create variables inherently; however, if you have several channels of the same type you will have the same number of session variables. For instance, a session with three Software Manager channels will create the same number of variables as a session with one Software Manager channel. You may find it helpful to break up channels that create several variables into separate sessions.
Table 1. Event Variable Types
Type Format Example Description
Predefined variables <variable> <time> Variables that are defined by Session Manager and display in the Session variables box.
User-defined session variables
<%variable> <%MyVar> Variables created using the Set Variable event. These are available to every worklist or sendlist in the channel in which they were created, but not across sessions.
Environment variables <$variable> <$TMP> Variables that are system-defined values defined on the Environment property page in Control Panel.
Variable modifiers <!modifier< variable >> <!Drive<%MyVar>> Modifiers that extract information from variables and parse a path.
264
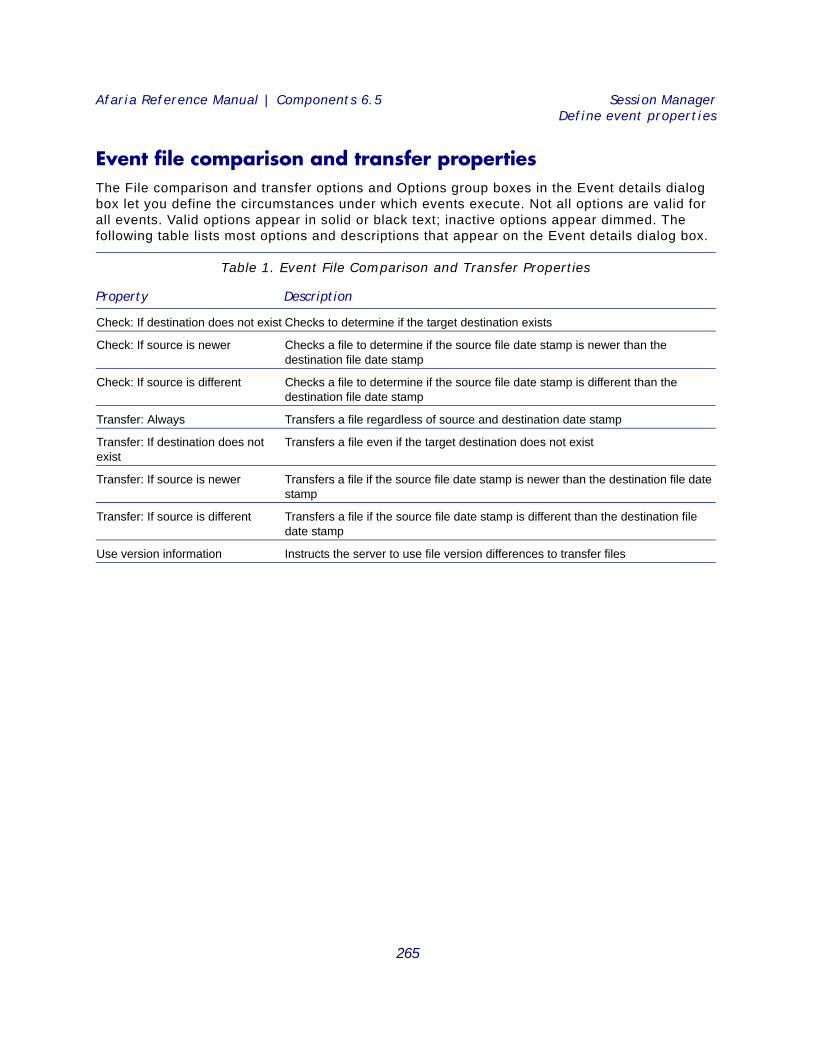
Afaria Reference Manual | Components 6.5 Session ManagerDefine event properties
Event file comparison and transfer properties The File comparison and transfer options and Options group boxes in the Event details dialog box let you define the circumstances under which events execute. Not all options are valid for all events. Valid options appear in solid or black text; inactive options appear dimmed. The following table lists most options and descriptions that appear on the Event details dialog box.
Table 1. Event File Comparison and Transfer Properties
Property Description
Check: If destination does not exist Checks to determine if the target destination exists
Check: If source is newer Checks a file to determine if the source file date stamp is newer than the destination file date stamp
Check: If source is different Checks a file to determine if the source file date stamp is different than the destination file date stamp
Transfer: Always Transfers a file regardless of source and destination date stamp
Transfer: If destination does not exist
Transfers a file even if the target destination does not exist
Transfer: If source is newer Transfers a file if the source file date stamp is newer than the destination file date stamp
Transfer: If source is different Transfers a file if the source file date stamp is different than the destination file date stamp
Use version information Instructs the server to use file version differences to transfer files
265
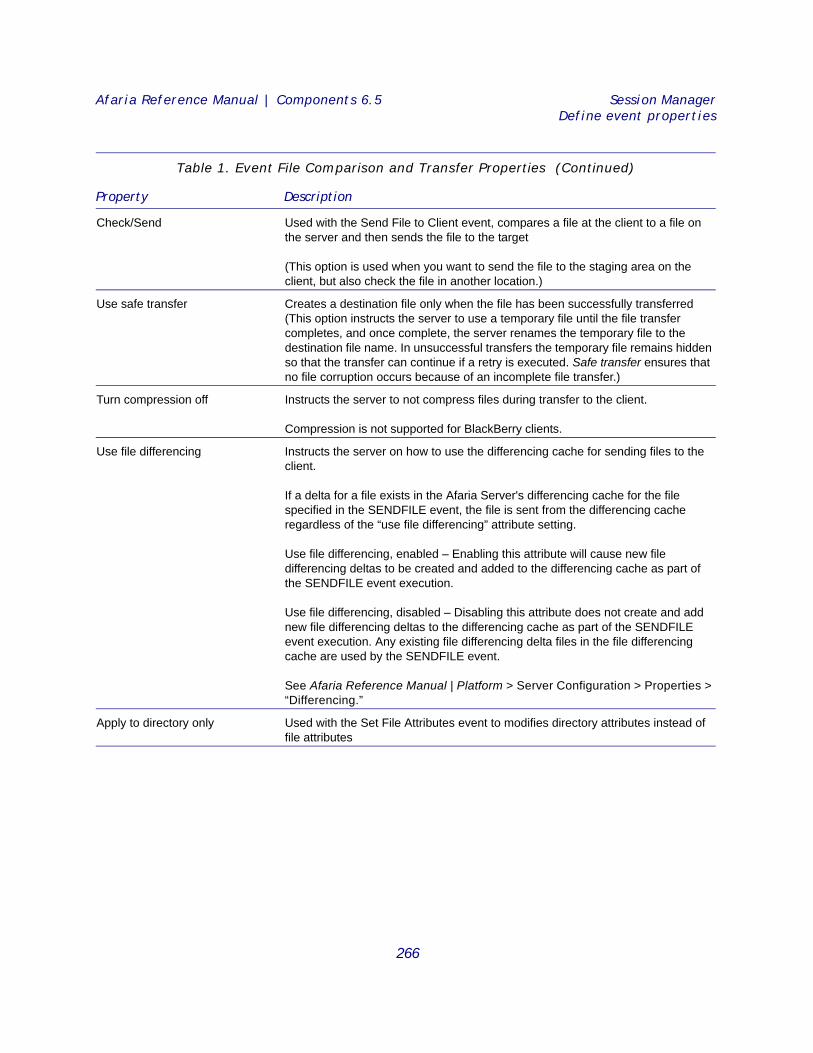
Afaria Reference Manual | Components 6.5 Session ManagerDefine event properties
Check/Send Used with the Send File to Client event, compares a file at the client to a file on the server and then sends the file to the target
(This option is used when you want to send the file to the staging area on the client, but also check the file in another location.)
Use safe transfer Creates a destination file only when the file has been successfully transferred(This option instructs the server to use a temporary file until the file transfer completes, and once complete, the server renames the temporary file to the destination file name. In unsuccessful transfers the temporary file remains hidden so that the transfer can continue if a retry is executed. Safe transfer ensures that no file corruption occurs because of an incomplete file transfer.)
Turn compression off Instructs the server to not compress files during transfer to the client.
Compression is not supported for BlackBerry clients.
Use file differencing Instructs the server on how to use the differencing cache for sending files to the client.
If a delta for a file exists in the Afaria Server's differencing cache for the file specified in the SENDFILE event, the file is sent from the differencing cache regardless of the “use file differencing” attribute setting.
Use file differencing, enabled – Enabling this attribute will cause new file differencing deltas to be created and added to the differencing cache as part of the SENDFILE event execution.
Use file differencing, disabled – Disabling this attribute does not create and add new file differencing deltas to the differencing cache as part of the SENDFILE event execution. Any existing file differencing delta files in the file differencing cache are used by the SENDFILE event.
See Afaria Reference Manual | Platform > Server Configuration > Properties > “Differencing.”
Apply to directory only Used with the Set File Attributes event to modifies directory attributes instead of file attributes
Table 1. Event File Comparison and Transfer Properties (Continued)
Property Description
266
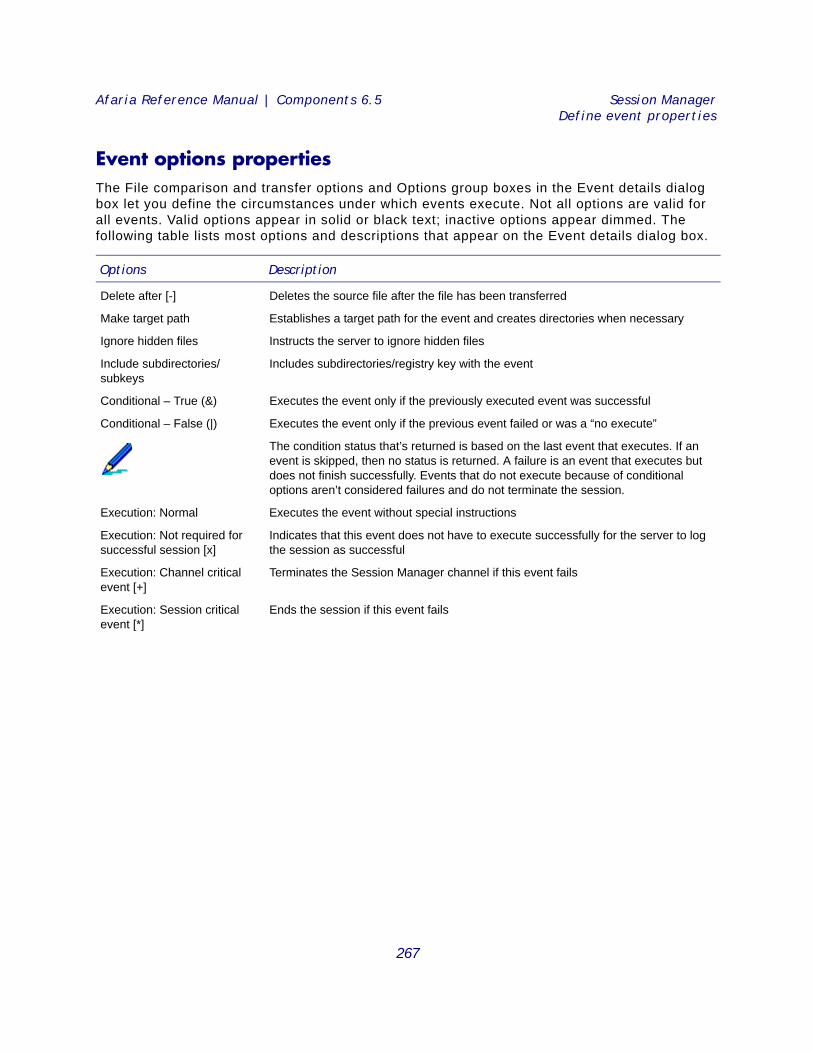
Afaria Reference Manual | Components 6.5 Session ManagerDefine event properties
Event options propertiesThe File comparison and transfer options and Options group boxes in the Event details dialog box let you define the circumstances under which events execute. Not all options are valid for all events. Valid options appear in solid or black text; inactive options appear dimmed. The following table lists most options and descriptions that appear on the Event details dialog box.
Options Description
Delete after [-] Deletes the source file after the file has been transferred
Make target path Establishes a target path for the event and creates directories when necessary
Ignore hidden files Instructs the server to ignore hidden files
Include subdirectories/subkeys
Includes subdirectories/registry key with the event
Conditional – True (&) Executes the event only if the previously executed event was successful
Conditional – False (|) Executes the event only if the previous event failed or was a “no execute”
The condition status that’s returned is based on the last event that executes. If an event is skipped, then no status is returned. A failure is an event that executes but does not finish successfully. Events that do not execute because of conditional options aren’t considered failures and do not terminate the session.
Execution: Normal Executes the event without special instructions
Execution: Not required for successful session [x]
Indicates that this event does not have to execute successfully for the server to log the session as successful
Execution: Channel critical event [+]
Terminates the Session Manager channel if this event fails
Execution: Session critical event [*]
Ends the session if this event fails
267
Afaria Reference Manual | Components 6.5 Session ManagerImport/export events
Import/export eventsSession Manager allows you to import events that have been saved to a file into an existing worklist or sendlist, as well as export an event from a worklist of sendlist to a file in another location.
Import an eventSelect the object into which you want to import an event, then click Import events on the button bar. The Open dialog box appears. (You can also right-click the event and choose Import events on the shortcut menu.) Navigate to the directory that contains the file that you want to import; the file will have an .evf extension. Select the file and then click Open. Session Manager adds the events from the imported file to the list of events in Events view.
Export an eventTo export an event from a worklist or sendlist to a file in another location, select the object that contains the event you want to export to file. In Events view, select the event to export then click Export events. The Save As dialog box appears. (You can also right-click the event and choose Export events on the shortcut menu.) Navigate to the directory in which you want to export the selected event. In the File Name field, enter the name for the file and then click Save. Session Manager exports the file to the specified directory. You can choose to import this file to the same worklist or sendlist or another worklist or sendlist at a future time.
Afaria does not validate events that you import into an object. Adding invalid events to a sendlist object may have unpredictable results.
268
Afaria Reference Manual | Components 6.5 Session ManagerOptimize channel sessions
Optimize channel sessionsAlthough your channels sessions may be functional, you may want to fine-tune them to increase resource efficiency and decrease session completion time. You may find that the following methods optimize your channel’s worklist and sendlist performance, and reduce connection time between the server and client.
Use the following strategies to optimize your channels:
• Use pre-processing tasks when possible
• Streamline remaining tasks
• Create worklist efficiencies
Pre-processing tasksThe single most important step that you can take to ensure that Session Manager processes events quickly and efficiently is to preprocess as much data as possible. Preprocessing means that any task that can be performed on the client by the client should be completed before a session begins. Preprocessing should be used any time an event can be eliminated in this manner.
Depending upon the type of connection you have, each session event can take about one second to send the low level commands. Modem connections may take longer than one second, while LAN connections are much faster, for example, several events per second.
Streamline remaining tasks The second class of session optimization is through optimization of the events that cannot be preprocessed.
• Use sendlists when possible. The best way to optimize events is to use sendlists whenever possible. The client checks an entire sendlist at one time. A worklist that includes a Send File to Client event typically has other events before or after the event, which forces Session Manager to perform multiple checks.
• Wildcards increase efficiency. Another way to ensure that processing occurs once, instead of many times, is through the use of wildcards. While an event with wildcards is expanded into several events at runtime, it’s still faster than explicitly naming each file. With a wildcard, file status of the affected files can be checked at once in a manner similar to that for sendlists.
• File Status. Don’t use the File Status event to check a file that’s being transferred. Instead, use File Status to check for the existence of a flagged file.
• Conditional checks. Use the Set Variable event to avoid multiple File Status events and other conditional checks at the client. The first time a condition is checked, create a variable using the Set Variable event and reference that variable in subsequent worklists and sendlists. The Set Variable event does not send a command to the client and it can be used throughout the entire session.
269
Afaria Reference Manual | Components 6.5 Session ManagerOptimize channel sessions
Create worklist efficienciesAn efficient worklist has as few events as possible. In general, a worklist that has fewer events runs faster than a worklist that has more. Smaller worklists also use less memory and disk space.
• Comments. Each Comment event can include up to 251 characters, which may be several lines of text. Instead of creating five one-line Comment events, it’s much more efficient to create one Comment event that contains five lines of text.
• Conditional attributes with event. Worklist events provide a Conditional True (&) and Conditional False ( | ) attribute. When enabled, the event executes based on the result of the last event, for example, an If true statement (containing a single event) can be replaced by the use of the Conditional true attribute, reducing the number of events required to complete the tasks.
• Delete after (-). Worklist events also provide a Delete after (-) attribute, which deletes the source file on the server or client after the file has been processed, for example, instead of using two events to get and delete a file at the client, you can accomplish the same task by using the Delete after (-) attribute.
270
10
Software ManagerSoftware Manager channels enable you to automate the delivery of files and applications to your Afaria
Clients. Feature support includes file compression to ensure quick data transfer, checkpoint restart to
resume failed transfers at the point of failure, and incremental updating to deliver only new or updated files.
Software Manager ensures efficient and cost-effective software distribution.
Client types supported are:
• Windows Mobile Professional (including Windows CE)
• Windows Mobile Standard
• Symbian
• Palm
• Windows
271
Afaria Reference Manual | Components 6.5 Software ManagerOrganize the properties of a software channel
Organize the properties of a software channelThe Software Manager Channel Wizard walks you through creating fully functional channels that deliver and install software on your Windows, Windows Mobile, Palm, and Symbian clients. Once created, you can further enhance these channels in the Software Manager Channel Editor.
Before you create a software channel you should plan its properties. Knowing how to construct and then test the channel will ensure its successful deployment to your client users. In addition, knowing the answers to the questions posed during channel creation, as well as future channel enhancements will make it easier to correctly define the channel.
The following topics are included in this section:
• “Organize channel creation and deployment” on page 273
• “Questions to answer in the Software Manager Channel Wizard” on page 274
• “Plan further channel definition through the Software Manager Channel Editor” on page 276
About Windows clients Afaria Windows clients are supported for many of Afaria’s platform and component features. As is the nature of device management in general, and Afaria components in particular, successful operations depend in part on your understanding of how the Windows client is designed to operate in the Afaria environment.
Refer to Afaria Reference Manual | Platform > Creating Clients > Creating Afaria Clients > “About Your Afaria Windows Client.”
272
Afaria Reference Manual | Components 6.5 Software ManagerOrganize the properties of a software channel
Organize channel creation and deploymentBefore you begin creating a software channel, ensure that all of the necessary channel components are in order.
To ensure successful channel creation and deployment:
1 Determine the disk space needed on the server to hold the installation files.
2 Copy the selected files to clearly defined locations on the server, such as “C:\apps\Windows_NonSetup” and “C:\apps\Palm”.
3 Secure any permission rights.
The server must be able to access channel files. You may find it helpful to share the files across a network. If you do, ensure that the COMMS Service Account you’re using has been granted share rights to the locations of the selected files before you create the channel.
4 Determine the platforms on which your clients are running.
5 Build the channel.
6 Set a temporary password for the channel on the Administration > Channel Administration > Security property page.
7 Replicate a low-end client environment, then publish and test the channel. Testing will help you determine memory and disk requirements for the clients.
8 Unpublish the channel and then modify the criteria accordingly.
9 Disclose the temporary password to a limited client test group and then re-publish the channel. The test group should install and test the channel.
10 Make any necessary channel modifications and then remove the password.
For LAN based installations for your Windows clients, define your locations using a network/LAN path.
If your selected files are currently on diskettes, copy them to \AppA\Disk1..\Disk 2..\Disk 3, and so on. If the selected files are on a CD-ROM, you do not have to copy them to your server or designated LAN location, but you’re encouraged to do so to avoid having to keep the source files in the CD-ROM drive.
If the channel is Setup based (Windows clients), identify any additional non-installation files to include, such as templates and documents.
273
Afaria Reference Manual | Components 6.5 Software ManagerOrganize the properties of a software channel
Questions to answer in the Software Manager Channel WizardUse the following questions to help you plan the creation of your software channel. If you change your mind about the questions you answer in the wizard, you can change your answers in the Software Manager Channel Editor. The only decisions that you cannot change are: Windows installation type, Setup or Non-Setup based; deployment mode, local or LAN based; and client type.
What is the name and description of the channel?Choose your labels carefully as they display to the client user.
What is the Client type for this installation?Channel installation is based upon the client type that you select. For example, a Windows client channel includes two types of installations:
• Setup-based installations are used for applications that provide their own installation program to perform file copy and system update operations. A setup program is often provided with shrink-wrapped software or from programming departments that write their own setup program.
• Nonsetup-based installations are used for applications that either:
• Have no installation program and are distributed as a custom application or as a collection of files, or,
• Are Microsoft Windows Installer (MSI) or Microsoft Windows Installer Transform (MST) files, possibly created, for example, using the Software Manager Tuner utility, or by some other means. For these channels, Software Manager provides installation services to the client. For example, you can define postdelivery options to execute commands after the installation.
What is the method of deployment?In addition to choosing the installation type for Windows client channels, you must specify a deployment method:
• Deliver package files to the Client, or “local based” installations, are used for remote users or users wishing to install offline. This option sends the channel files to the client computer; installation runs from the client’s temporary staging area.
• Run installation from a LAN location, or “LAN based” installations, are used for networked users. This option runs the installation using channel contents that reside on a LAN location.
For information on creating software channels, “Create a Software Manager channel” on page 279
274
Afaria Reference Manual | Components 6.5 Software ManagerOrganize the properties of a software channel
What files or directories should be included?Know the location of files that you want installed at the client. If possible, try to organize the files in a location on the server where they’re always available to the channel. Organized file locations prevent service outages in the event that a directory or file is unavailable on a network. For Windows channels, Setup based installations, know which file performs the installation.
Where should channel files be installed on the Client?Using the target directory option forces the delivery of software and the installation of additional files to a specific directory on the client. The software installation program controls the location of the installed program files.
For information on organizing channel files, “Organize channel creation and deployment” on page 273
Software Manager also provides a licensable option for importing Microsoft Systems Management Server (SMS) packages for distribution by Software Manager. For details on importing SMS channels, see the Server Configuration, Properties
275
Afaria Reference Manual | Components 6.5 Software ManagerOrganize the properties of a software channel
Plan further channel definition through the Software Manager Channel EditorAfter you create your software channels you can use the Software Manager Channel Editor to edit and view channel contents.
• For your Windows clients you can define the installation program, specify delivery and installation timeframes, and require specific operating system criteria. You can also add and delete files and folders, define channel segmentation restrictions, enable browser based delivery, define uninstall options, verify the success of a Setup based channel, as well as include advanced features, such as pre/post delivery and installation options.
• For your Windows Mobile clients you can add files and folders to channels, define a target folder at the client, define the installation program, require specific operating system criteria, create user-defined string fields, and include Session Manager channels in a software channel.
• For your Palm and Symbian clients you can add files and folders to channels, create user-defined string fields, include Session Manager channels in a software channel, and check for minimum RAM at the device. For Symbian clients you can also define a target folder at the client.
The following questions will prepare you for enhancements you can make through the editor.
For Windows channels, Setup based installations, does the installation program support an answer response file?The answer response file is often used when no client user interaction is desired. For example, if you want all of your users to install custom template files, provide an answer response file that installs those specific files.
For Windows channels, Setup based installations, should the Client user receive a guidance file?A guidance file contains any instructions the client user may need to run the installation. Ensure that it can be displayed at the client using a standard Windows application, such as Notepad or WordPad.
For Windows channels, Non-Setup based installations, which files should be kept up to date and which should be checked only when the channel has been updated at the Server?You can define your software channels to always check channel files at the client, or only check the files if the files at the server have been updated. You can also specify whether to send files to the client that are newer on the server, or send them if they’re different on the server, such as older.
For Windows and Windows Mobile channels, should Software Manager perform a byte-level inspection on all files in the channel, specific files, or no files?You can instruct Software Manager to detect, extract, and send only byte-level file differences when delivering software channels.
For information on editing software channels, “Edit a Software Manager channel” on page 280
276
Afaria Reference Manual | Components 6.5 Software ManagerOrganize the properties of a software channel
For Windows Mobile channels, if a registry key is present on the Client, which files should be kept up to date?You can define your software channels to only check channel files at the client when a registry key is not present. When any channel files at the server has been updated (either through your modifications to the channel or through an automatic refresh in Channel Administration), Software Manager will check the corresponding files at the client. And with the exception of .cab files, you can instruct Software Manager to always check any file every time the client connects to the server if there are files that must always be kept current with the server versions. The option takes more time to execute, but it can replace files that are unintentionally deleted or modified at the client. Files that are missing or have changed at the client can be sent if the server files are newer or different.
For Windows and Windows Mobile channels, should installation proceed automatically on the Client?Selecting this option instructs Software Manager to automatically start the installation after the software channel has been successfully transferred to the client, requiring no action from the client user. If criteria checking is enabled, installation starts immediately after the client has passed the criteria check.
When you must change a file's destination, how will the “destination switch” affect the channel's installation?When you delete a file from the list of installed files and then add it back with a different destination, Software Manager recognizes that the file has “changed destination” and sends it to the new location. Software Manager considers each directory destination that you specify, a different destination.
For Windows channels, Non-Setup based installations, should the channel create menu commands or add icons to the Client desktop?Any executable file, such as .exe and .bat, and many non-executable files, may be selectively added to the client’s desktop, the root of the Start menu, and/or a folder within the Programs folder in the Start menu.
For Windows channels, should there be specific delivery and installation timeframes for the channel?You can specify a daily time period during which channel delivery is valid. You can also define a date range and time period during which the channel can be installed.
For Windows and Windows Mobile channels, are there minimum hardware requirements for the Software Manager channel?After you determine how much hard disk or memory is necessary to install and run a channel, you can enforce those requirements at the client.
Are there minimum RAM requirements for the Software Manager channel?After you determine how much memory is necessary to install and run a channel, you can enforce those requirements at the client.
For Windows and Windows Mobile channels, are there any files or registry keys that should or should not exist at the Client?Specify file/registry key criteria on the client by requiring the existence or absence of that information prior to delivery and installation. This is very useful for preventing the installation of conflicting or similar programs. It can also be used to locate a file used in staged installations, or to require a file as a prerequisite before further installations.
277
Afaria Reference Manual | Components 6.5 Software ManagerOrganize the properties of a software channel
For Windows and Windows Mobile channels, is there a required operating system and service pack for the Client?Send the software channel to clients that possess the correct operating system. Avoid delivering an installation designed for another operating system or one that can render the software or the computer inoperable.
For Windows channels, local based installations, should the multiple parts of a segmented channel be delivered based on time or byte size?Software Manager allows you to determine whether to have delivery of a segmented channel stop when it reaches a certain time limit or byte size. You can also specify a date on which to discontinue channel segmentation requirements.
For Windows channels, should the channel be available through a Web page?Using the Browser property page in conjunction with channel sets, you can define a software channel that your client users can install, clean up, and uninstall from a Web page, if you incorporate the channel’s automatically generated HTML code onto your Web page.
For Windows channels, should you define the channel to include an uninstall button at the Client?Software Manager allows you to determine whether an installed channel at the client can be uninstalled, and if so, whether the client user performs the uninstall or if it’s forced.
For Windows channels, how much status information should appear at the Client during installation?Software Manager allows you to select the installation status dialog box size that displays at the client, as it relates to the software channel. However, you cannot specify how much of the application’s setup program is visible at the client.
For Windows channels, should a message appear before or after installation?For Non-Setup based installations, you can display a message prior to, or after an installation. Setup based installations can only display a message prior to installation.
For Windows channels, Setup based installations, should you specify a file or registry key to learn the success of an installed channel?Using the Install Success property page you can specify installation criteria at the client to learn whether a channel was successfully installed.
For Windows channels, Setup based installations, should you include uninstall commands to aid in successful uninstallation of channels that Software Manager delivers?You can include a registry key or an answer response file and/or command line argument to Setup based channels to aid Software Manager in the successful uninstallation of a channel.
278
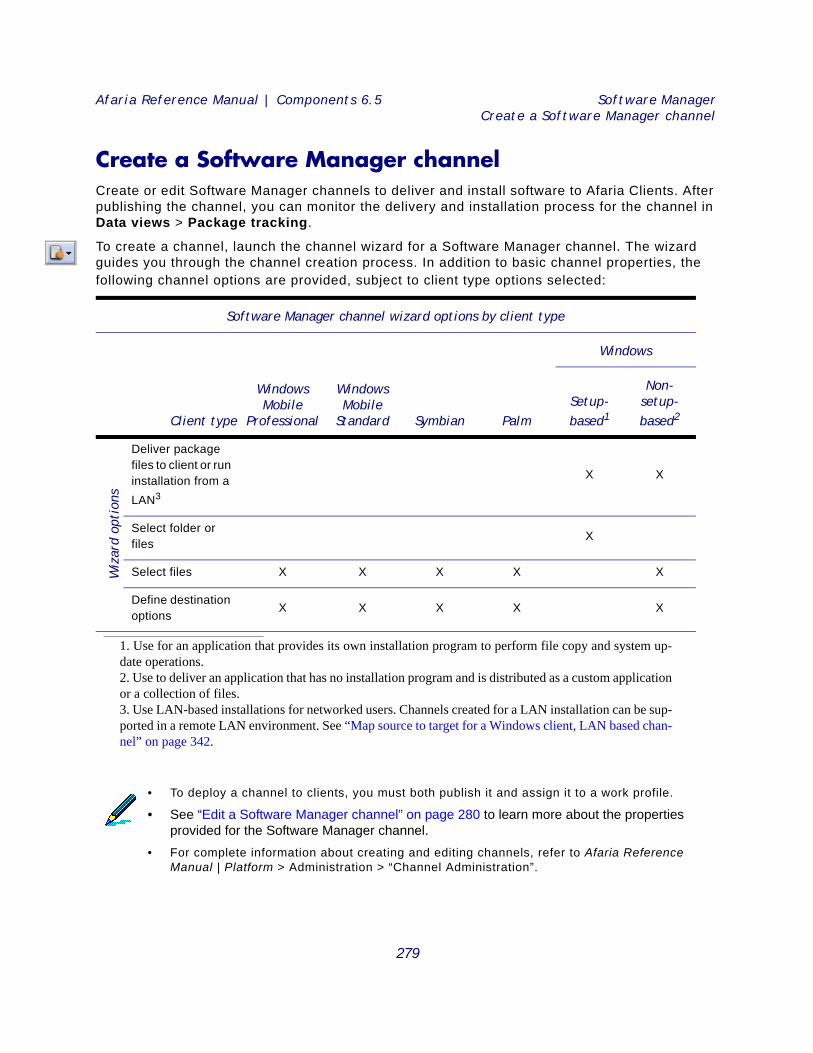
Afaria Reference Manual | Components 6.5 Software ManagerCreate a Software Manager channel
Create a Software Manager channelCreate or edit Software Manager channels to deliver and install software to Afaria Clients. After publishing the channel, you can monitor the delivery and installation process for the channel in Data views > Package tracking.
To create a channel, launch the channel wizard for a Software Manager channel. The wizard guides you through the channel creation process. In addition to basic channel properties, the following channel options are provided, subject to client type options selected:
Software Manager channel wizard options by client type
Client type
Windows Mobile
Professional
Windows Mobile
Standard Symbian Palm
Windows
Setup-based1
1. Use for an application that provides its own installation program to perform file copy and system up-date operations.
Non-setup-based2
2. Use to deliver an application that has no installation program and is distributed as a custom applicationor a collection of files.
Wiz
ard
opti
ons
Deliver package files to client or run installation from a LAN3
3. Use LAN-based installations for networked users. Channels created for a LAN installation can be sup-ported in a remote LAN environment. See “Map source to target for a Windows client, LAN based chan-nel” on page 342.
X X
Select folder or files
X
Select files X X X X X
Define destination options
X X X X X
• To deploy a channel to clients, you must both publish it and assign it to a work profile.
• See “Edit a Software Manager channel” on page 280 to learn more about the properties provided for the Software Manager channel.
• For complete information about creating and editing channels, refer to Afaria Reference Manual | Platform > Administration > “Channel Administration”.
279
Afaria Reference Manual | Components 6.5 Software ManagerEdit a Software Manager channel
Edit a Software Manager channelTo edit an existing channel, open the channel editor using one of the following methods:
• Click the Edit icon on the channel administration toolbar.
• Click the Edit channel contents… link on the channel’s Properties page.
• Right click the channel and select Edit… from the channel’s shortcut menu.
280
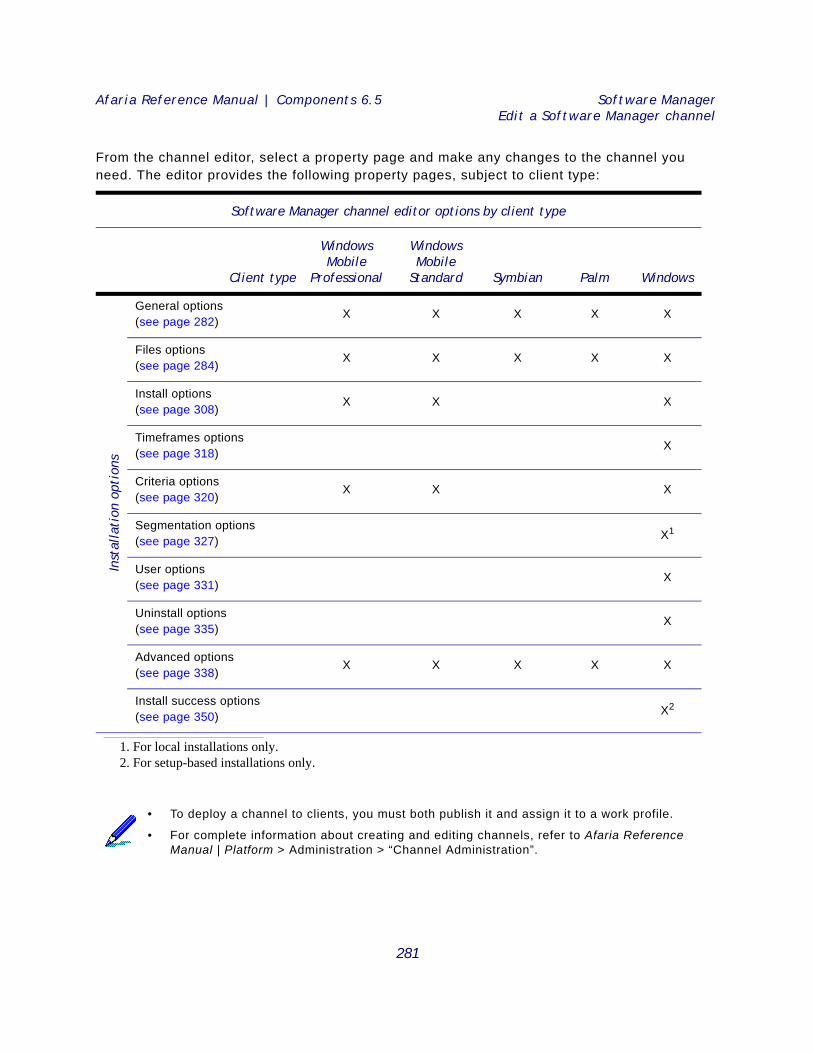
Afaria Reference Manual | Components 6.5 Software ManagerEdit a Software Manager channel
From the channel editor, select a property page and make any changes to the channel you need. The editor provides the following property pages, subject to client type:
Software Manager channel editor options by client type
Client type
Windows Mobile
Professional
Windows Mobile
Standard Symbian Palm Windows
Inst
alla
tion
opt
ions
General options(see page 282)
X X X X X
Files options(see page 284)
X X X X X
Install options(see page 308)
X X X
Timeframes options(see page 318)
X
Criteria options(see page 320)
X X X
Segmentation options(see page 327) X1
1. For local installations only.
User options(see page 331)
X
Uninstall options(see page 335)
X
Advanced options(see page 338)
X X X X X
Install success options(see page 350) X2
2. For setup-based installations only.
• To deploy a channel to clients, you must both publish it and assign it to a work profile.
• For complete information about creating and editing channels, refer to Afaria Reference Manual | Platform > Administration > “Channel Administration”.
281
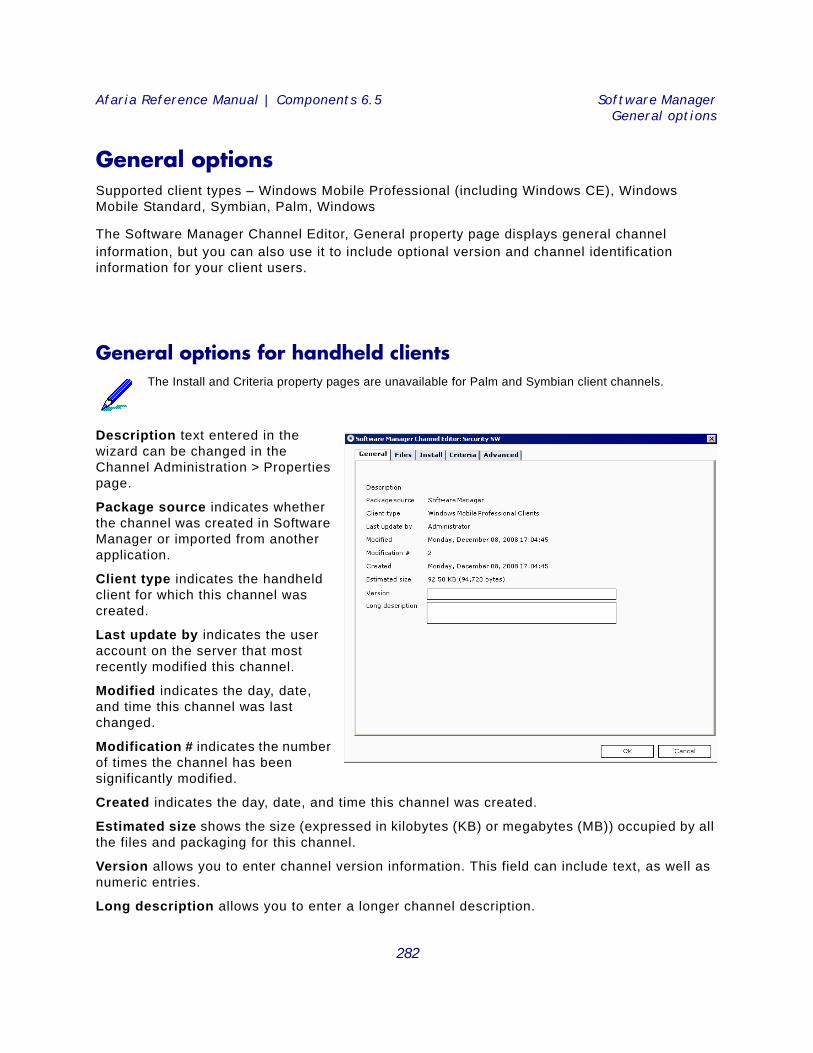
Afaria Reference Manual | Components 6.5 Software ManagerGeneral options
General optionsSupported client types – Windows Mobile Professional (including Windows CE), Windows Mobile Standard, Symbian, Palm, Windows
The Software Manager Channel Editor, General property page displays general channel information, but you can also use it to include optional version and channel identification information for your client users.
General options for handheld clients
Description text entered in the wizard can be changed in the Channel Administration > Properties page.
Package source indicates whether the channel was created in Software Manager or imported from another application.
Client type indicates the handheld client for which this channel was created.
Last update by indicates the user account on the server that most recently modified this channel.
Modified indicates the day, date, and time this channel was last changed.
Modification # indicates the number of times the channel has been significantly modified.
Created indicates the day, date, and time this channel was created.
Estimated size shows the size (expressed in kilobytes (KB) or megabytes (MB)) occupied by all the files and packaging for this channel.
Version allows you to enter channel version information. This field can include text, as well as numeric entries.
Long description allows you to enter a longer channel description.
The Install and Criteria property pages are unavailable for Palm and Symbian client channels.
282

Afaria Reference Manual | Components 6.5 Software ManagerGeneral options
General options for Windows clients
Type indicates whether channel installation is a Setup or Non-Setup based.
Description text entered in the wizard can be changed in the Channel Administration > Properties page.
Delivery model indicates whether this is a local or LAN based channel.
Package source indicates whether the channel was created in Software Manager or imported from another application.
Last update by indicates the user account on the server that most recently modified this channel.
Modified indicates the day, date, and time this channel was last changed.
Modification # indicates the number of significant changes to the channel.
Created indicates the day, date, and time this channel was created.
Estimated size shows the size (expressed in kilobytes (KB) or megabytes (MB)) occupied by all the files and packaging for this channel.
Version allows you to enter text and/or numeric version information.
Long description allows you to enter a longer channel description.
The Segmentation property page appears for local based installations only. The Install success (to the right of Advanced) property page appears for Setup based installations only.
The information that you enter on this page displays in the Channel Viewer UI at the client in the “Detailed description” section on the Summary property page.
283
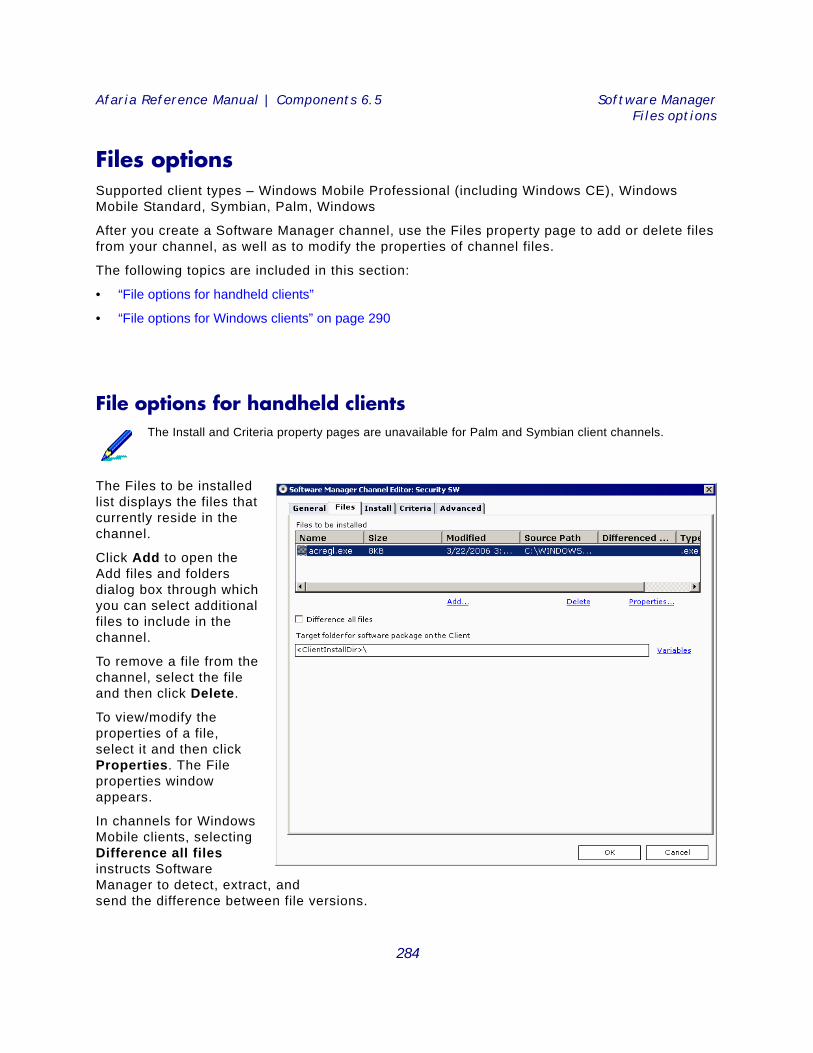
Afaria Reference Manual | Components 6.5 Software ManagerFiles options
Files optionsSupported client types – Windows Mobile Professional (including Windows CE), Windows Mobile Standard, Symbian, Palm, Windows
After you create a Software Manager channel, use the Files property page to add or delete files from your channel, as well as to modify the properties of channel files.
The following topics are included in this section:
• “File options for handheld clients”
• “File options for Windows clients” on page 290
File options for handheld clients
The Files to be installed list displays the files that currently reside in the channel.
Click Add to open the Add files and folders dialog box through which you can select additional files to include in the channel.
To remove a file from the channel, select the file and then click Delete.
To view/modify the properties of a file, select it and then click Properties. The File properties window appears.
In channels for Windows Mobile clients, selecting Difference all files instructs Software Manager to detect, extract, and send the difference between file versions.
The Install and Criteria property pages are unavailable for Palm and Symbian client channels.
284

Afaria Reference Manual | Components 6.5 Software ManagerFiles options
Specify a target folderIn channels for Symbian and Windows Mobile clients you can specify or change an existing target folder for the program at the client.
Add a file to channels for handheld clientsClicking Add on the Files property page opens the Add files and folders dialog box. Use it to add additional files to the channel, as well as define destination and delivery options for those files.
When the dialog box opens it displays local drives only. If your files reside on a LAN location, enter as much of the path as you can in the File name or UNC path field, then press Enter on your keyboard to expand the tree.
If you alter the existing target folder of a previously published channel, clients that have already received channel files in the previous target folder will receive them again in the new target folder.
In channels for Palm clients several fields in the Add files and folders dialog box are inappropriate and therefore are unavailable.
285
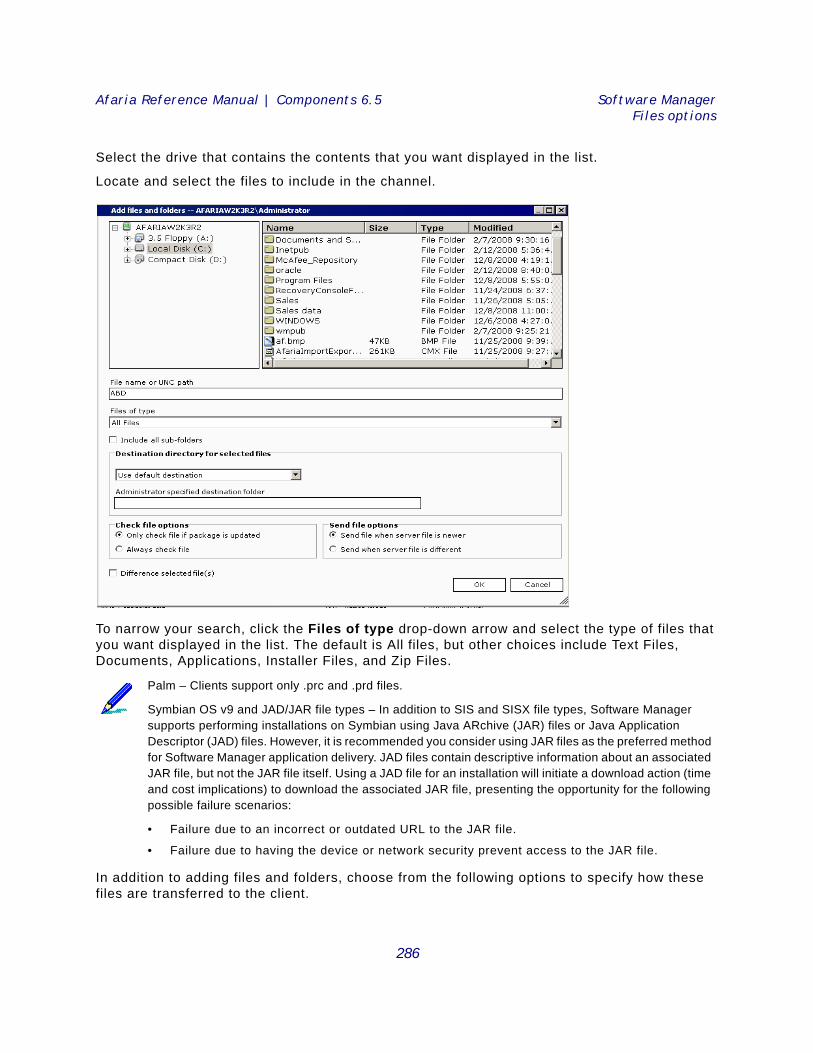
Afaria Reference Manual | Components 6.5 Software ManagerFiles options
Select the drive that contains the contents that you want displayed in the list.
Locate and select the files to include in the channel.
To narrow your search, click the Files of type drop-down arrow and select the type of files that you want displayed in the list. The default is All files, but other choices include Text Files, Documents, Applications, Installer Files, and Zip Files.
In addition to adding files and folders, choose from the following options to specify how these files are transferred to the client.
Palm – Clients support only .prc and .prd files.
Symbian OS v9 and JAD/JAR file types – In addition to SIS and SISX file types, Software Manager supports performing installations on Symbian using Java ARchive (JAR) files or Java Application Descriptor (JAD) files. However, it is recommended you consider using JAR files as the preferred method for Software Manager application delivery. JAD files contain descriptive information about an associated JAR file, but not the JAR file itself. Using a JAD file for an installation will initiate a download action (time and cost implications) to download the associated JAR file, presenting the opportunity for the following possible failure scenarios:
• Failure due to an incorrect or outdated URL to the JAR file.
• Failure due to having the device or network security prevent access to the JAR file.
286

Afaria Reference Manual | Components 6.5 Software ManagerFiles options
Include all sub-folders adds all of the selected folder’s files from all of the sub-folders to the target folder location on the client; the editor ignores this option when you add a specific file.
Destination directory for selected files specifies the destination folder at the client and includes the following options:
• Use default destination (default) uses a single target location as the destination for the entire channel. This selection is useful when you want all files to go to one main directory.
• Let administrator specify destination enables the Administrator specified destination folder field so that you can specify a different installation destination for each set of files that you add. This selection is useful for files that should go to different locations, for example you may want a database file to go to a destination other than the target folder.
Administrator specified destination folder field is available when you select Let administrator specify destination from the drop-down list. Enter the location for the installation directory on the client.
To include variables in your Windows Mobile path, click Variables and then make your selection from the drop-down list.
Check file options specify when to check a file on the client. The result of the selected Check file option will determine how Software Manager will execute the Send file options.
• Only check file when package is updated (default) checks corresponding files at the client when any channel files at the server has been updated (either through your modifications to the channel or through an automatic refresh in Channel Administration), and then executes the selected Send file option.
• Always check file checks any file with this option selected every time the client connects to the server. Use this option when there are files that must always be kept current with the server versions. This option takes more time to execute but it can replace files that are unintentionally deleted or modified at the client. Files that are missing or have changed at the client are sent according to the Send file option specified.
Send file options specify when to send the file to the client.
• Send file when server file is newer (default) sends the files to the client if the server copy is more recent than the client copy. This option compares time and date stamps.
This option is unavailable for Palm client channels.
This is the only option available for Palm client channels.
For details on working with variables, see “Include variables in the destination path” on page 306.
Check file options are unavailable for Palm client channels.
These options do not perform on .cab files in channels for Windows Mobile clients.
287
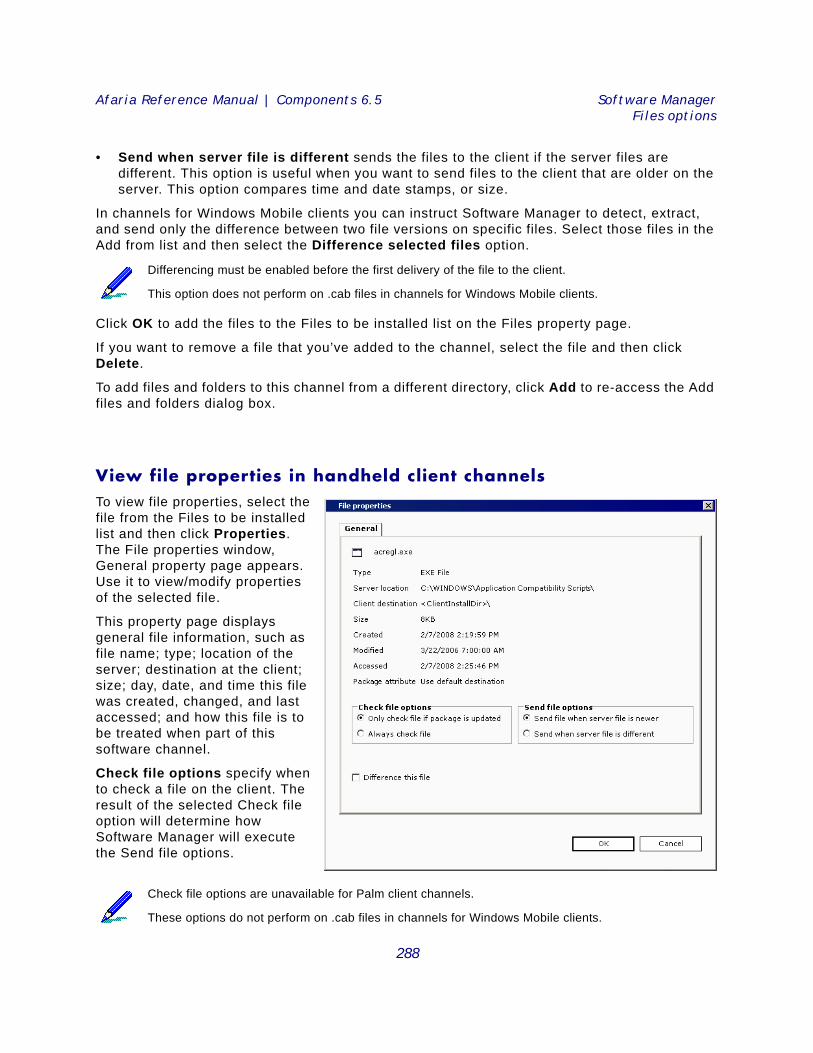
Afaria Reference Manual | Components 6.5 Software ManagerFiles options
• Send when server file is different sends the files to the client if the server files are different. This option is useful when you want to send files to the client that are older on the server. This option compares time and date stamps, or size.
In channels for Windows Mobile clients you can instruct Software Manager to detect, extract, and send only the difference between two file versions on specific files. Select those files in the Add from list and then select the Difference selected files option.
Click OK to add the files to the Files to be installed list on the Files property page.
If you want to remove a file that you’ve added to the channel, select the file and then click Delete.
To add files and folders to this channel from a different directory, click Add to re-access the Add files and folders dialog box.
View file properties in handheld client channelsTo view file properties, select the file from the Files to be installed list and then click Properties. The File properties window, General property page appears. Use it to view/modify properties of the selected file.
This property page displays general file information, such as file name; type; location of the server; destination at the client; size; day, date, and time this file was created, changed, and last accessed; and how this file is to be treated when part of this software channel.
Check file options specify when to check a file on the client. The result of the selected Check file option will determine how Software Manager will execute the Send file options.
Differencing must be enabled before the first delivery of the file to the client.
This option does not perform on .cab files in channels for Windows Mobile clients.
Check file options are unavailable for Palm client channels.
These options do not perform on .cab files in channels for Windows Mobile clients.
288
Afaria Reference Manual | Components 6.5 Software ManagerFiles options
• Only check file when package is updated (default) checks corresponding files at the client when any channel files at the server has been updated (either through your modifications to the channel or through an automatic refresh in Channel Administration), and then executes the selected Send file option.
• Always check file checks any file with this option selected every time the client connects to the server. Use this option when there are files that must always be kept current with the server versions. This option takes more time to execute but it can replace files that are unintentionally deleted or modified at the client. Files that are missing or have changed at the client are sent according to the Send file option specified.
Send file options specify when to send the file to the client.
• Send file when server file is newer (default) sends the files to the client if the server copy is more recent than the client copy. This option compares time and date stamps.
• Send when server file is different sends the files to the client if the server files are different. This option is useful when you want to send files to the client that are older on the server. This option compares time and date stamps, or size.
In channels for Windows Mobile clients you can instruct Software Manager to detect, extract, and send only the difference between two file versions on a specific file by selecting the Difference this file option.
Click OK to save changes and return to the Files property page.
Differencing must be enabled before the first delivery of the file to the client. This option does not perform on .cab files in channels for Windows Mobile clients.
289
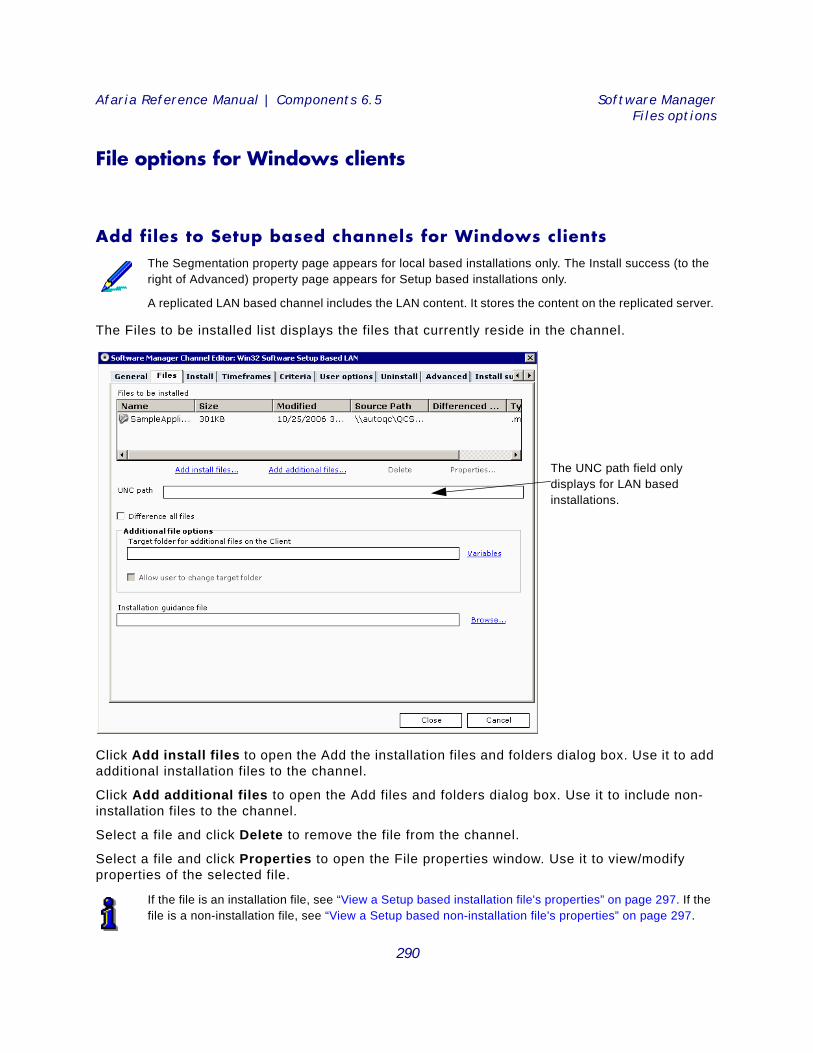
Afaria Reference Manual | Components 6.5 Software ManagerFiles options
File options for Windows clients
Add files to Setup based channels for Windows clients
The Files to be installed list displays the files that currently reside in the channel.
Click Add install files to open the Add the installation files and folders dialog box. Use it to add additional installation files to the channel.
Click Add additional files to open the Add files and folders dialog box. Use it to include non-installation files to the channel.
Select a file and click Delete to remove the file from the channel.
Select a file and click Properties to open the File properties window. Use it to view/modify properties of the selected file.
The Segmentation property page appears for local based installations only. The Install success (to the right of Advanced) property page appears for Setup based installations only.
A replicated LAN based channel includes the LAN content. It stores the content on the replicated server.
If the file is an installation file, see “View a Setup based installation file's properties” on page 297. If the file is a non-installation file, see “View a Setup based non-installation file's properties” on page 297.
The UNC path field only displays for LAN based installations.
290
Afaria Reference Manual | Components 6.5 Software ManagerFiles options
Difference channel files
Select the Difference all files check box to instruct Software Manager to detect, extract, and send the difference between file versions.
Specify a target folder for the Setup based installation
If you add additional files to the channel (Add additional files link) you must specify a target folder at the client for those files. Enter the path in the Target folder for additional files on the Client field. Select the Allow the user to change target folder check box to let the client user specify another drive or folder.
To include variables in your path, click Variables and then make your selection from the drop-down list. To install files at the origination of the drive, enter the drive letter, a colon ( : ), followed by a backslash ( \ ). For example: C:\
Include an installation guidance file
Guidance files typically answer specific questions from the installation program. These files are sent with the installation program, which saves you time by eliminating the need to send lengthy messages to your client users.
To add a guidance file to the channel that provides assistance to the client user during the installation process, enter the drive, path, and name of the guidance file in the Installation guidance file field. Installation guidance files for LAN based channels can reside locally or on a LAN location, which require a UNC path to which the Service Account and client computer have access. You can also click Browse to access the Add an installation guidance file dialog box in
When you alter the target folder, new clients receive files in the new location, but clients having already received the files continue receiving them in the previous location, even after performing a cleanup or uninstall.
For details on working with variables, see “Include variables in the destination path” on page 306.
291
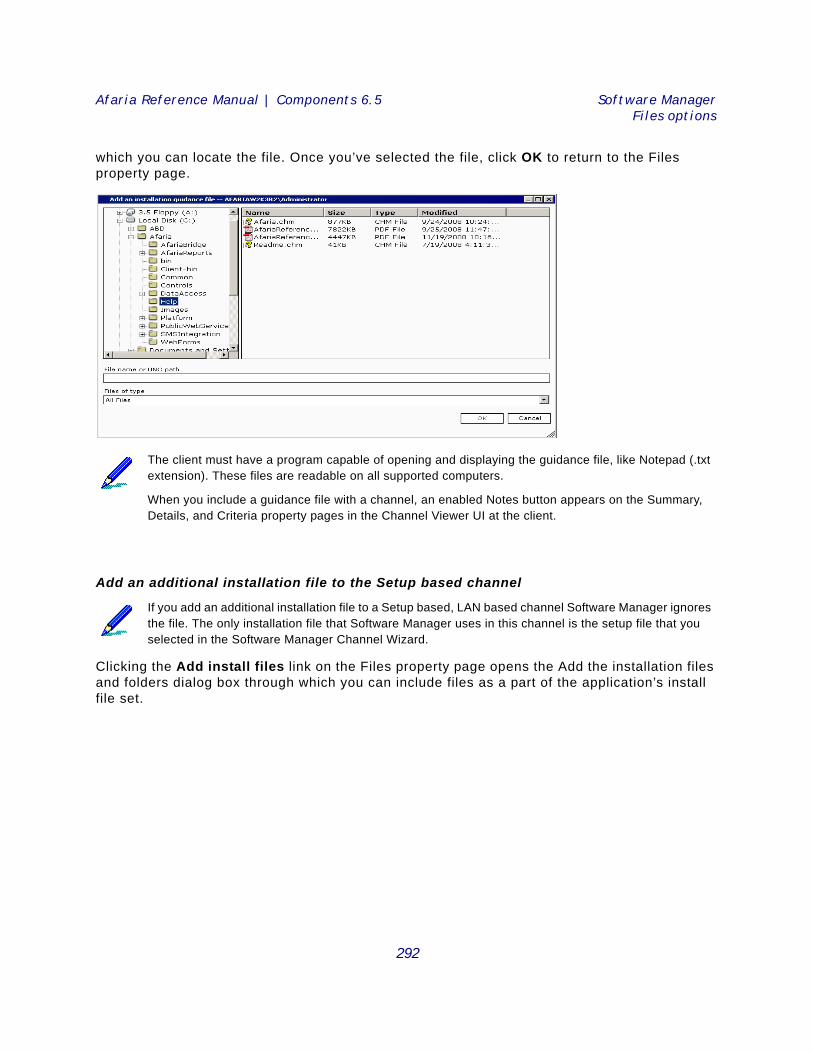
Afaria Reference Manual | Components 6.5 Software ManagerFiles options
which you can locate the file. Once you’ve selected the file, click OK to return to the Files property page.
Add an additional installation file to the Setup based channel
Clicking the Add install files link on the Files property page opens the Add the installation files and folders dialog box through which you can include files as a part of the application’s install file set.
The client must have a program capable of opening and displaying the guidance file, like Notepad (.txt extension). These files are readable on all supported computers.
When you include a guidance file with a channel, an enabled Notes button appears on the Summary, Details, and Criteria property pages in the Channel Viewer UI at the client.
If you add an additional installation file to a Setup based, LAN based channel Software Manager ignores the file. The only installation file that Software Manager uses in this channel is the setup file that you selected in the Software Manager Channel Wizard.
292
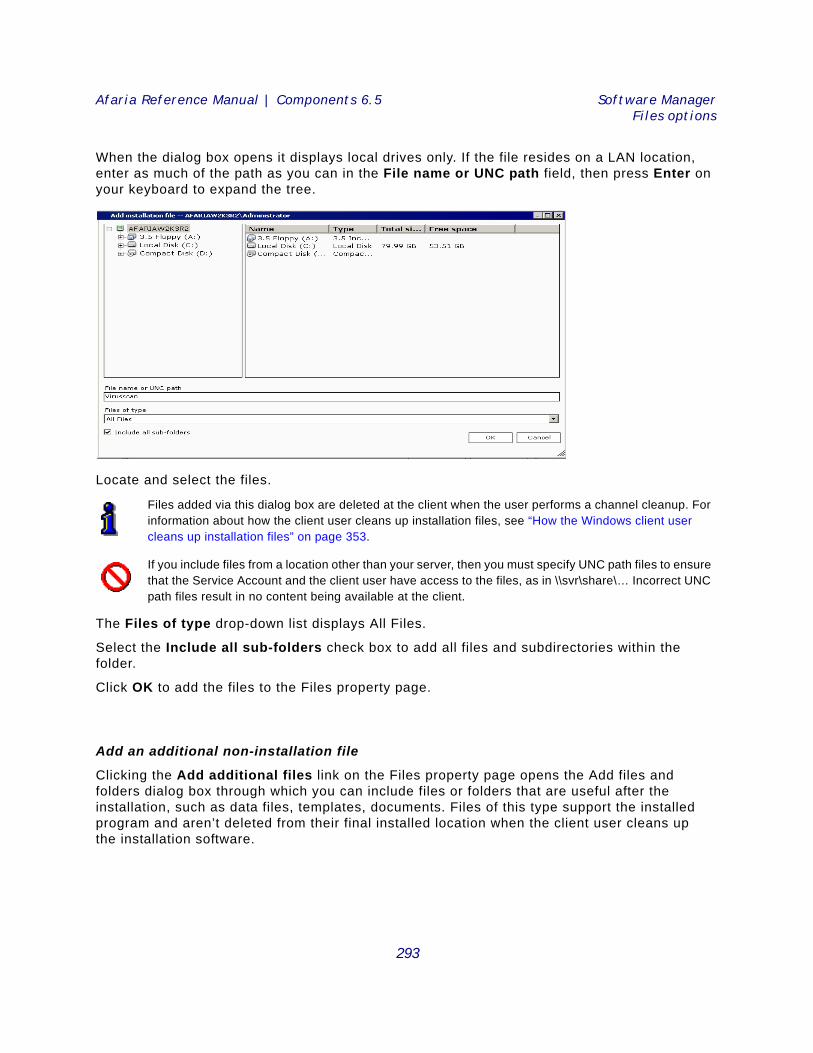
Afaria Reference Manual | Components 6.5 Software ManagerFiles options
When the dialog box opens it displays local drives only. If the file resides on a LAN location, enter as much of the path as you can in the File name or UNC path field, then press Enter on your keyboard to expand the tree.
Locate and select the files.
The Files of type drop-down list displays All Files.
Select the Include all sub-folders check box to add all files and subdirectories within the folder.
Click OK to add the files to the Files property page.
Add an additional non-installation file
Clicking the Add additional files link on the Files property page opens the Add files and folders dialog box through which you can include files or folders that are useful after the installation, such as data files, templates, documents. Files of this type support the installed program and aren’t deleted from their final installed location when the client user cleans up the installation software.
Files added via this dialog box are deleted at the client when the user performs a channel cleanup. For information about how the client user cleans up installation files, see “How the Windows client user cleans up installation files” on page 353.
If you include files from a location other than your server, then you must specify UNC path files to ensure that the Service Account and the client user have access to the files, as in \\svr\share\… Incorrect UNC path files result in no content being available at the client.
293
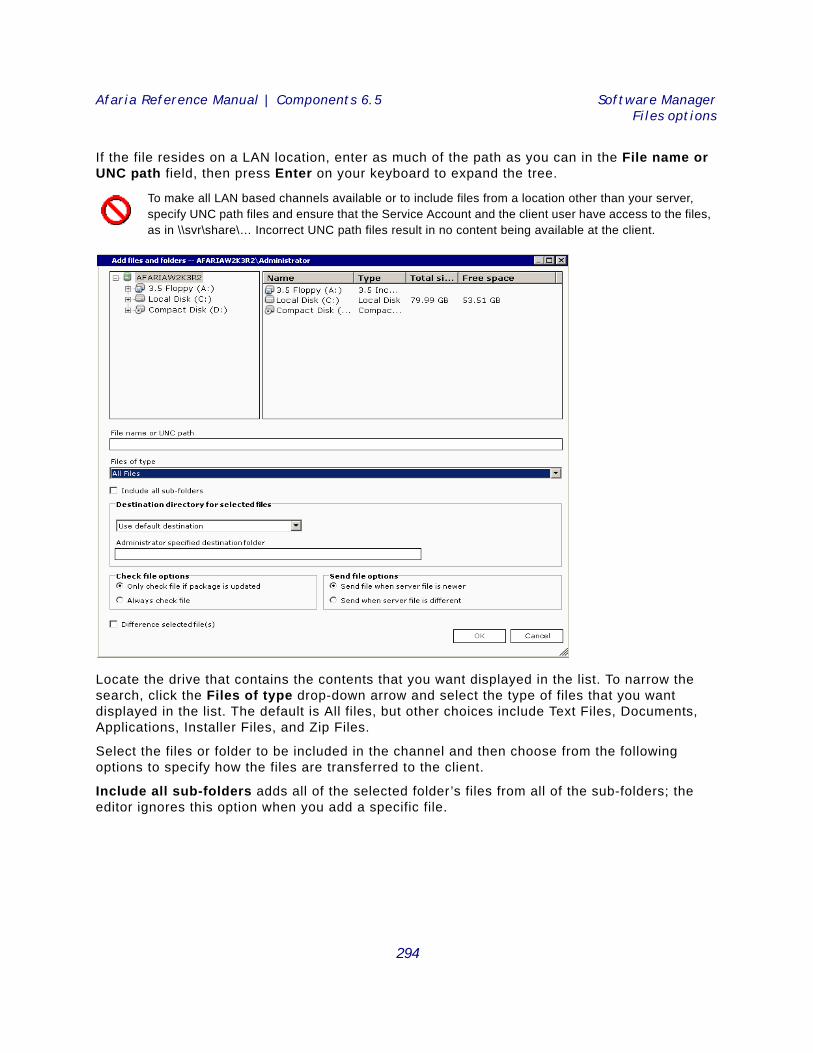
Afaria Reference Manual | Components 6.5 Software ManagerFiles options
If the file resides on a LAN location, enter as much of the path as you can in the File name or UNC path field, then press Enter on your keyboard to expand the tree.
Locate the drive that contains the contents that you want displayed in the list. To narrow the search, click the Files of type drop-down arrow and select the type of files that you want displayed in the list. The default is All files, but other choices include Text Files, Documents, Applications, Installer Files, and Zip Files.
Select the files or folder to be included in the channel and then choose from the following options to specify how the files are transferred to the client.
Include all sub-folders adds all of the selected folder’s files from all of the sub-folders; the editor ignores this option when you add a specific file.
To make all LAN based channels available or to include files from a location other than your server, specify UNC path files and ensure that the Service Account and the client user have access to the files, as in \\svr\share\… Incorrect UNC path files result in no content being available at the client.
294
Afaria Reference Manual | Components 6.5 Software ManagerFiles options
Specify destination options
Destination folder for selected files specifies the destination folder at the client and includes six options:
• Use target folder (default) uses a single target folder as the destination for the entire channel. This selection is useful when you want all files to go to one main directory. It can accept environment variables, which must be defined at the client, and session variables <ClientInstall> and <Date>. It also accepts the <Program Files>, <Registry key>, and <Environment variable> variables. If you let the client user alter the destination on the first installation, Software Manager will remember that destination for subsequent updates.
• Create folders under target creates folders under the target folder much the same way as “Use target folder” except that Software Manager creates the server’s directory structure underneath the target folder. When you select a directory including all of its files and folders and then indicate the target folder, the selected directory with all of its structure is created underneath the target folder. The directory level at which you select the folder determines the folders that are created under the target.
• Let user specify destination prompts the client user to specify the installation destination before the installation begins.
• Let administrator specify destination enables the Administrator specified destination directory field so that you can specify a different installation destination for each set of files that you add. This selection is useful for files that should go to different locations, for example, you may want a database file to go to a destination other than the channel’s target folder.
• Windows folder uses the client’s Windows directory.
• Windows\System folder uses the Windows\System or Windows\System32 folder, as appropriate for the client platform.
Administrator specified destination directory field is available when you select Let administrator specify destination from the drop-down list. Enter the path and folder name for the installation directory on the client. Ensure that the directory you specify exists on the client or Software Manager will not be able to copy the files.
To include variables in your path, click Variables and then make your selection from the drop-down list.
Define Check/Send options for a Setup based channel
Check file options specify when to check a file on the client. You can define these options for sets of channel files, as well as for a single file. The result of the selected Check file option will determine how Software Manager will execute the Send file options.
• Only check file when package is updated (default) checks corresponding files at the client when any channel files at the server has been updated (either through your modifications to
For details on working with variables, see “Include variables in the destination path” on page 306.
295
Afaria Reference Manual | Components 6.5 Software ManagerFiles options
the channel or through an automatic refresh in Channel Administration), and then executes the selected Send file option.
• Always check file checks any file with this option selected every time the client connects to the server. Use this option when there are files that must always be kept current with the server versions. This option takes more time to execute but it can replace files that are unintentionally deleted or modified at the client. Files that are missing or have changed at the client are sent according to the Send file option specified.
Send file options specify when to send the file to the client based on the result of the Check file options.
• Send file when server file is newer (default) sends the files to the client if the server copy is more recent than the client copy. This option compares time and date stamps.
• Send when server file is different sends the files to the client if the server files are different. This option is useful when you want to send files to the client that are older on the server. This option compares time and date stamps, or size.
Difference selected file
Difference selected files detects, extracts, and sends only byte-level file differences, which significantly reduces the time required to update files and software. Software Manager adds differenced files to the cache when the channel is published.
Click OK to add the files to the Files property page.
To add files and folders to this channel from a different directory, click Add additional files to re-access the Add files and folders dialog box.
Differencing must be enabled before the first delivery of the file to the client.
296
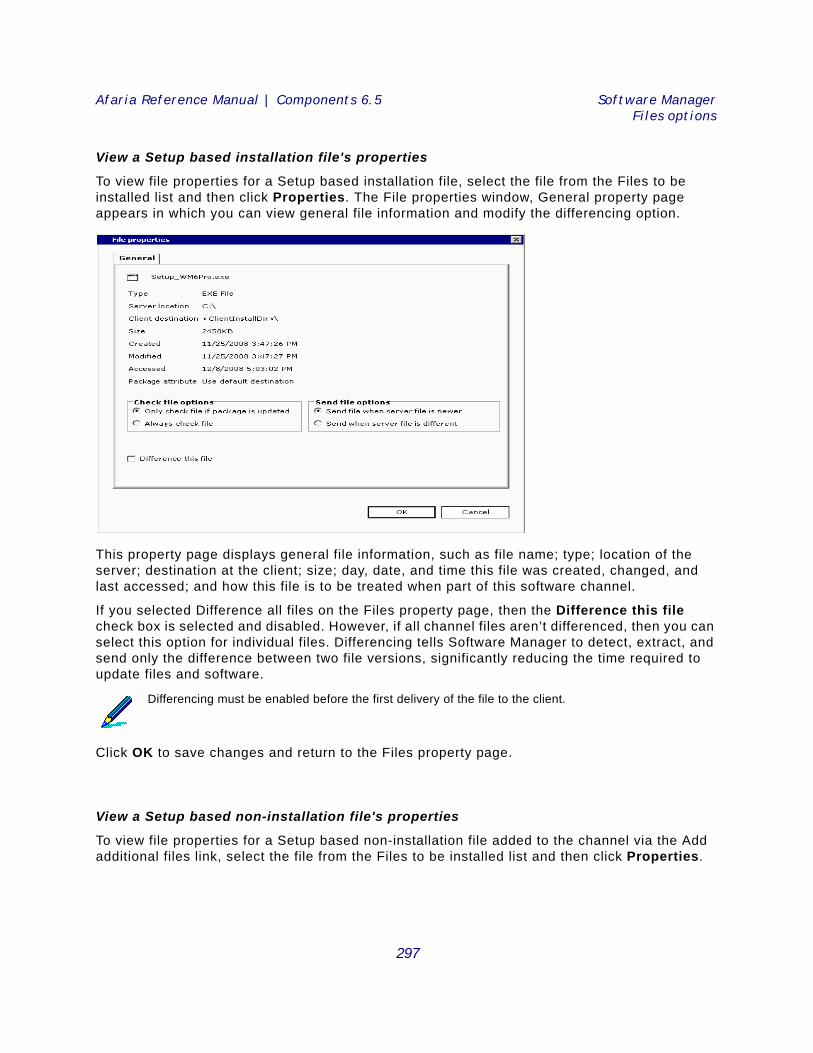
Afaria Reference Manual | Components 6.5 Software ManagerFiles options
View a Setup based installation file's properties
To view file properties for a Setup based installation file, select the file from the Files to be installed list and then click Properties. The File properties window, General property page appears in which you can view general file information and modify the differencing option.
This property page displays general file information, such as file name; type; location of the server; destination at the client; size; day, date, and time this file was created, changed, and last accessed; and how this file is to be treated when part of this software channel.
If you selected Difference all files on the Files property page, then the Difference this file check box is selected and disabled. However, if all channel files aren’t differenced, then you can select this option for individual files. Differencing tells Software Manager to detect, extract, and send only the difference between two file versions, significantly reducing the time required to update files and software.
Click OK to save changes and return to the Files property page.
View a Setup based non-installation file's properties
To view file properties for a Setup based non-installation file added to the channel via the Add additional files link, select the file from the Files to be installed list and then click Properties.
Differencing must be enabled before the first delivery of the file to the client.
297
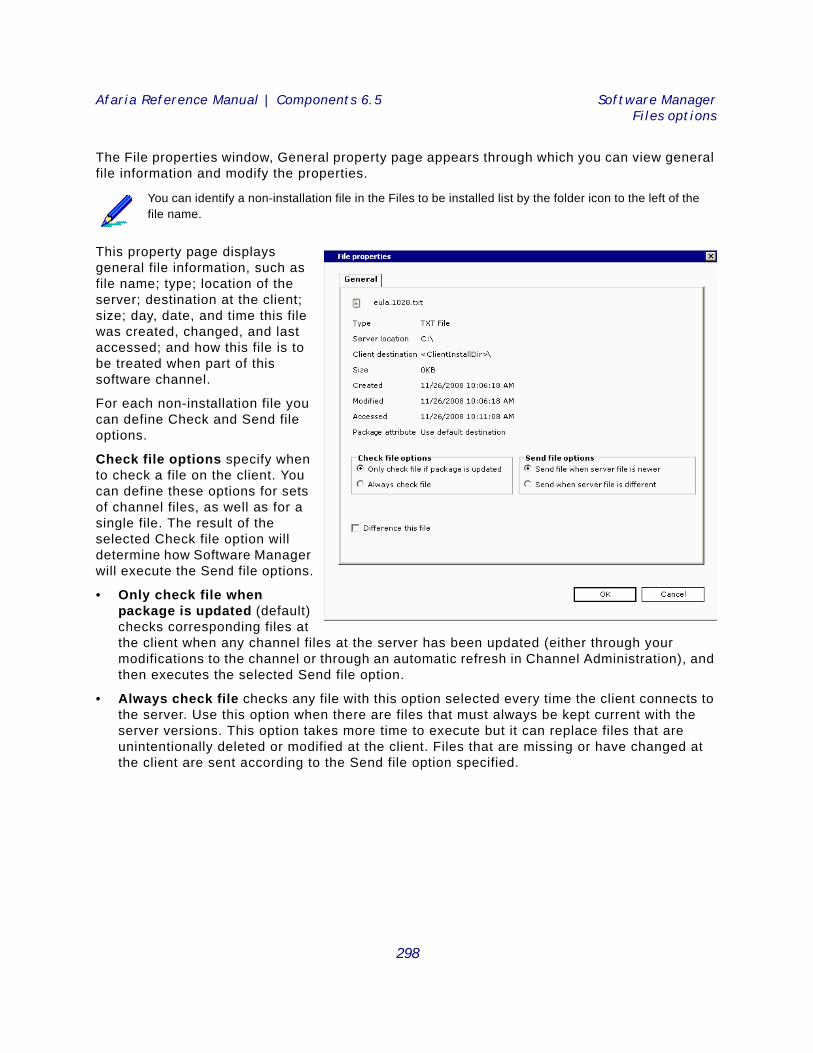
Afaria Reference Manual | Components 6.5 Software ManagerFiles options
The File properties window, General property page appears through which you can view general file information and modify the properties.
This property page displays general file information, such as file name; type; location of the server; destination at the client; size; day, date, and time this file was created, changed, and last accessed; and how this file is to be treated when part of this software channel.
For each non-installation file you can define Check and Send file options.
Check file options specify when to check a file on the client. You can define these options for sets of channel files, as well as for a single file. The result of the selected Check file option will determine how Software Manager will execute the Send file options.
• Only check file when package is updated (default) checks corresponding files at the client when any channel files at the server has been updated (either through your modifications to the channel or through an automatic refresh in Channel Administration), and then executes the selected Send file option.
• Always check file checks any file with this option selected every time the client connects to the server. Use this option when there are files that must always be kept current with the server versions. This option takes more time to execute but it can replace files that are unintentionally deleted or modified at the client. Files that are missing or have changed at the client are sent according to the Send file option specified.
You can identify a non-installation file in the Files to be installed list by the folder icon to the left of the file name.
298
Afaria Reference Manual | Components 6.5 Software ManagerFiles options
Send file options specify when to send the file to the client based on the result of the Check file options.
• Send file when server file is newer (default) sends the files to the client if the server copy is more recent than the client copy. This option compares time and date stamps.
• Send when server file is different sends the files to the client if the server files are different. This option is useful when you want to send files to the client that are older on the server. This option compares time and date stamps, or size.
For non-installation files you can specify that it be shared and/or non-removable in the event that you define the channel to be uninstalled at the client. Software Manager allows you to prevent the uninstall process from removing files that are shared by other applications and those that you designate as non-removable.
Shared files are those that your system uses for multiple applications. Each time that a shared file is installed, the usage count in the registry increments by 1 (one). When Software Manager uninstalls a channel that contains a shared file, it decrements the registry by 1 (one). If uninstalling a channel leaves the usage count at 0 (zero), then Software Manager will remove the shared file unless you protect it by selecting the Shared file check box.
Non-removable files are those files that for whatever reason you want saved at the client computer, such as data files to ensure file availability in the future.
Difference this file. If you selected Difference all files on the Files property page, then the Difference this file check box is selected and disabled. If channel files aren’t differenced, then you can select this option for individual files. Differencing tells Software Manager to detect, extract, and send only the difference between two file versions, significantly reducing the time required to update files and software.
If the additional file is a component (.dll and .ocx) or registry (.reg) file Software Manager automatically registers it in the client computer’s registry. You can prevent a file from being registered by clearing the Register this component or Import file into Client registry check box. The file is delivered to the client but registration information isn’t added to the client registry during channel installation.
Click OK to save changes and return to the Files property page.
Differencing must be enabled before the first delivery of the file to the client.
For information about adding a component or registry file to the client registry, see “Add a component or registry file to the Client registry” on page 305.
299
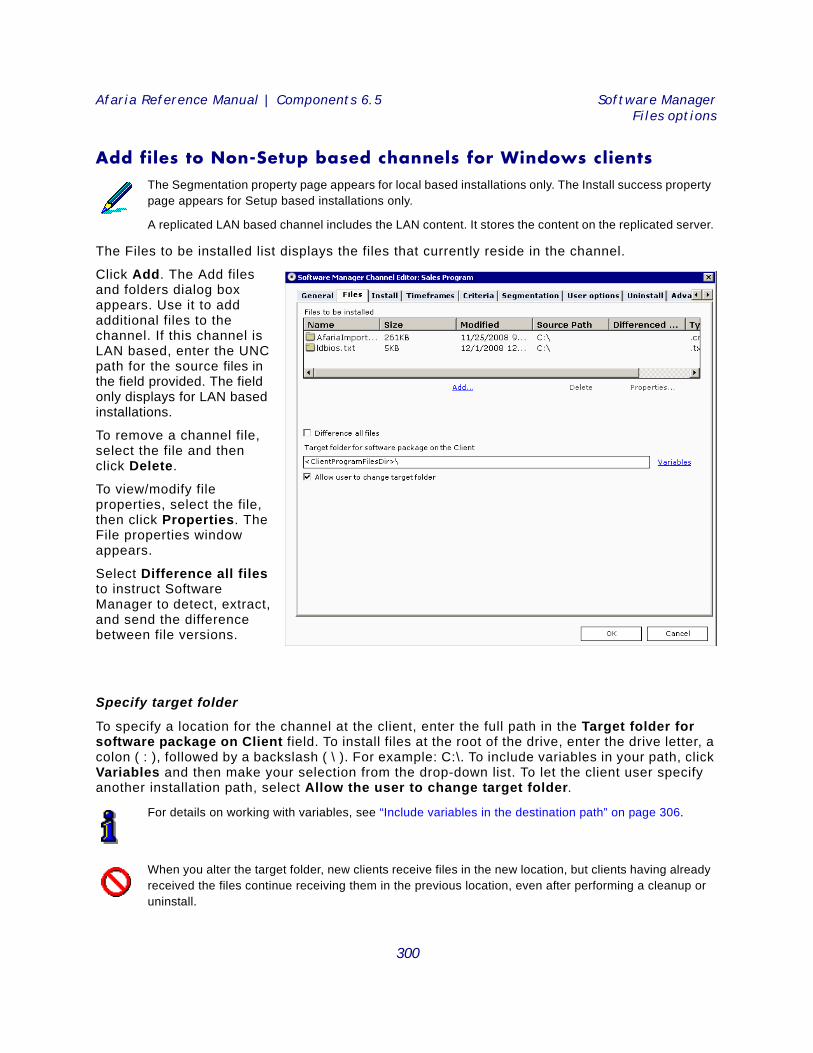
Afaria Reference Manual | Components 6.5 Software ManagerFiles options
Add files to Non-Setup based channels for Windows clients
The Files to be installed list displays the files that currently reside in the channel.
Click Add. The Add files and folders dialog box appears. Use it to add additional files to the channel. If this channel is LAN based, enter the UNC path for the source files in the field provided. The field only displays for LAN based installations.
To remove a channel file, select the file and then click Delete.
To view/modify file properties, select the file, then click Properties. The File properties window appears.
Select Difference all files to instruct Software Manager to detect, extract, and send the difference between file versions.
Specify target folder
To specify a location for the channel at the client, enter the full path in the Target folder for software package on Client field. To install files at the root of the drive, enter the drive letter, a colon ( : ), followed by a backslash ( \ ). For example: C:\. To include variables in your path, click Variables and then make your selection from the drop-down list. To let the client user specify another installation path, select Allow the user to change target folder.
The Segmentation property page appears for local based installations only. The Install success property page appears for Setup based installations only.
A replicated LAN based channel includes the LAN content. It stores the content on the replicated server.
For details on working with variables, see “Include variables in the destination path” on page 306.
When you alter the target folder, new clients receive files in the new location, but clients having already received the files continue receiving them in the previous location, even after performing a cleanup or uninstall.
300
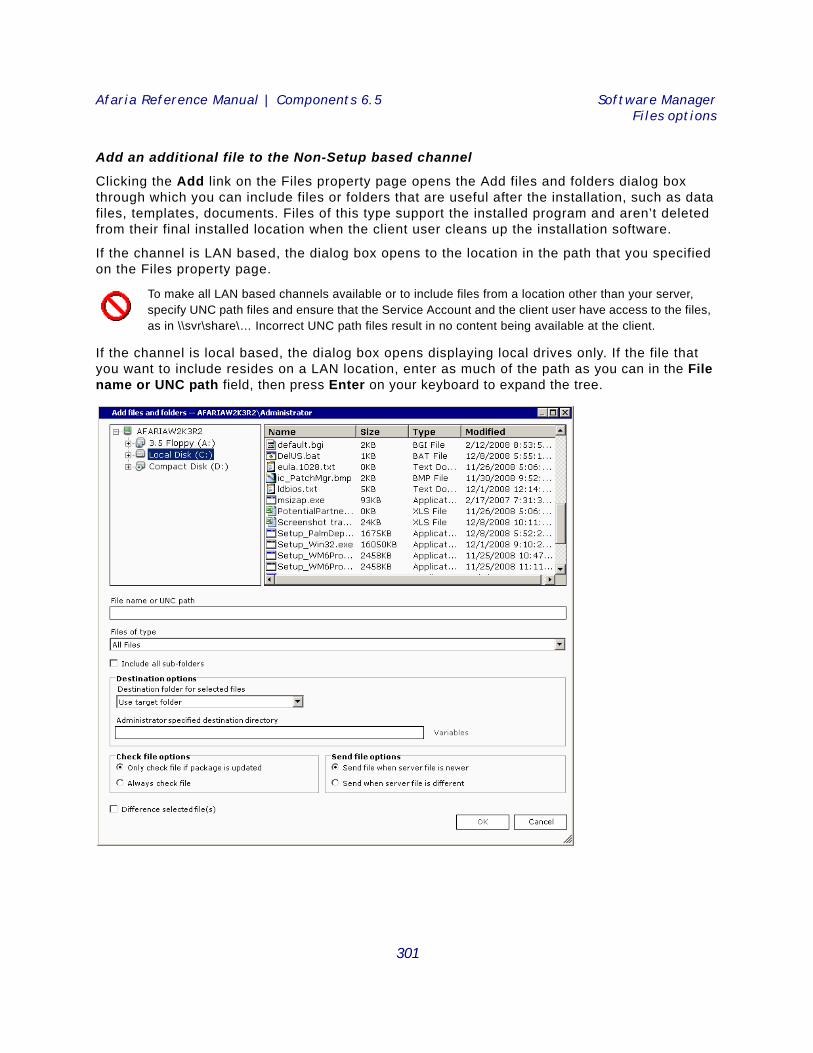
Afaria Reference Manual | Components 6.5 Software ManagerFiles options
Add an additional file to the Non-Setup based channel
Clicking the Add link on the Files property page opens the Add files and folders dialog box through which you can include files or folders that are useful after the installation, such as data files, templates, documents. Files of this type support the installed program and aren’t deleted from their final installed location when the client user cleans up the installation software.
If the channel is LAN based, the dialog box opens to the location in the path that you specified on the Files property page.
If the channel is local based, the dialog box opens displaying local drives only. If the file that you want to include resides on a LAN location, enter as much of the path as you can in the File name or UNC path field, then press Enter on your keyboard to expand the tree.
To make all LAN based channels available or to include files from a location other than your server, specify UNC path files and ensure that the Service Account and the client user have access to the files, as in \\svr\share\… Incorrect UNC path files result in no content being available at the client.
301
Afaria Reference Manual | Components 6.5 Software ManagerFiles options
Locate the drive that contains the contents that you want displayed in the list. To narrow the search, click the Files of type drop-down arrow and select the type of files that you want displayed in the list. The default is All files, but other choices include Text Files, Documents, Applications, Installer Files, and Zip Files.
Select the files or folder to be included in the channel and then choose from the following options to specify how the files are transferred to the client.
Include all sub-folders adds all of the selected folder’s files from all of the sub-folders; the editor ignores this option when you add a specific file.
Specify destination options for the Non-Setup based channel
Destination folder for selected files specifies the destination folder at the client and includes six options:
• Use target folder (default) uses a single target folder as the destination for the entire channel. This selection is useful when you want all files to go to one main directory. It can accept environment variables, which must be defined at the client, and session variables <ClientInstall> and <Date>. It also accepts the <Program Files>, <Registry key>, and <Environment variable> variables. If you let the client user alter the destination on the first installation, Software Manager will remember that destination for subsequent updates.
• Create folders under target creates folders under the target folder much the same way as “Use target folder” except that Software Manager creates the server’s directory structure underneath the target folder. When you select a directory including all of its files and folders and then indicate the target folder, the selected directory with all of its structure is created underneath the target folder. The directory level at which you select the folder determines the folders that are created under the target.
• Let user specify destination prompts the client user to specify the installation destination before the installation begins.
• Let administrator specify destination enables the Administrator specified destination directory field so that you can specify a different installation destination for each set of files that you add. This selection is useful for files that should go to different locations, for example, you may want a database file to go to a destination other than the channel’s target folder.
• Windows folder uses the client’s Windows directory.
• Windows\System folder uses the Windows\System or Windows\System32 folder, as appropriate for the client platform.
Administrator specified destination directory field is available when you select Let administrator specify destination from the drop-down list. Enter the path and folder name for the installation directory on the client. Ensure that the directory you specify exists on the client or Software Manager will not be able to copy the files.
302
Afaria Reference Manual | Components 6.5 Software ManagerFiles options
To include variables in your path, click Variables and then make your selection from the drop-down list.
Define Check/Send options for the Non-Setup based channel
Check file options specify when to check a file on the client. You can define these options for sets of channel files, as well as for a single file. The result of the selected Check file option will determine how Software Manager will execute the Send file options.
• Only check file when package is updated (default) checks corresponding files at the client when any channel files at the server has been updated (either through your modifications to the channel or through an automatic refresh in Channel Administration), and then executes the selected Send file option.
• Always check file checks any file with this option selected every time the client connects to the server. Use this option when there are files that must always be kept current with the server versions. This option takes more time to execute but it can replace files that are unintentionally deleted or modified at the client. Files that are missing or have changed at the client are sent according to the Send file option specified.
Send file options specify when to send the file to the client based on the result of the Check file options.
• Send file when server file is newer (default) sends the files to the client if the server copy is more recent than the client copy. This option compares time and date stamps.
• Send when server file is different sends the files to the client if the server files are different. This option is useful when you want to send files to the client that are older on the server. This option compares time and date stamps, or size.
Difference selected files
Difference selected files detects, extracts, and sends only byte-level file differences, which significantly reduces the time required to update files and software. Software Manager adds differenced files to the cache when the channel is published.
Click OK to add the files to the Files property page.
To add files and folders to this channel from a different directory, click Add to re-access the Add files and folders dialog box.
For details on working with variables, see “Include variables in the destination path” on page 306.
Differencing must be enabled before the first delivery of the file to the client.
303

Afaria Reference Manual | Components 6.5 Software ManagerFiles options
View a Non-Setup based file's properties
To view file properties for a Non-Setup based file, select the file from the Files to be installed list, then click Properties. The File properties window, General property page appears through which you can view general file information and modify the properties.
This property page displays general file information, such as file name; type; location of the server; destination at the client; size; day, date, and time this file was created, changed, and last accessed; and how this file is to be treated when part of this software channel.
For each non-installation file you can define Check and Send file options.
Check file options specify when to check a file on the client. You can define these options for sets of channel files, as well as for a single file. The result of the selected Check file option will determine how Software Manager will execute the Send file options.
• Only check file when package is updated (default) checks corresponding files at the client when any channel files at the server has been updated (either through your modifications to the channel or through an automatic refresh in Channel Administration), and then executes the selected Send file option.
• Always check file checks any file with this option selected every time the client connects to the server. Use this option when there are files that must always be kept current with the server versions. This option takes more time to execute but it can replace files that are unintentionally deleted or modified at the client. Files that are missing or have changed at the client are sent according to the Send file option specified.
Send file options specify when to send the file to the client based on the result of the Check file options.
• Send file when server file is newer (default) sends the files to the client if the server copy is more recent than the client copy. This option compares time and date stamps.
You can identify a non-installation file in the Files to be installed list by the folder icon to the left of the file name.
304
Afaria Reference Manual | Components 6.5 Software ManagerFiles options
• Send when server file is different sends the files to the client if the server files are different. This option is useful when you want to send files to the client that are older on the server. This option compares time and date stamps, or size.
For non-installation files you can specify that it be shared and/or non-removable in the event that you define the channel to be uninstalled at the client. Software Manager allows you to prevent the uninstall process from removing files that are shared by other applications and those that you designate as non-removable.
Shared files are those that your system uses for multiple applications. Each time that a shared file is installed, the usage count in the registry increments by 1 (one). When Software Manager uninstalls a channel that contains a shared file, it decrements the registry by 1 (one). If uninstalling a channel leaves the usage count at 0 (zero), then Software Manager will remove the shared file unless you protect it by selecting the Shared file check box.
Non-removable files are those files that for whatever reason you want saved at the client computer, such as data files to ensure file availability in the future.
Difference this file. If you selected Difference all files on the Files property page, then the Difference this file check box is selected and disabled. If channel files aren’t differenced, then you can select this option for individual files. Differencing tells Software Manager to detect, extract, and send only the difference between two file versions, significantly reducing the time required to update files and software.
If the additional file is a component (.dll and .ocx) or registry (.reg) file Software Manager automatically registers it in the client computer’s registry. You can prevent a file from being registered by clearing the Register this component or Import file into Client registry check box. The file is delivered to the client but registration information isn’t added to the client registry during channel installation.
Click OK to save changes and return to the Files property page.
Add a component or registry file to the Client registry
To add a .dll or .ocx component file to the Client registry…
Access the Software Manager Channel Editor and then click the Files tab to display that property page.
Differencing must be enabled before the first delivery of the file to the client.
For information about adding a component or registry file to the client registry, see “Add a component or registry file to the Client registry” on page 305.
Software Manager automatically selects the Register this component and Import file into Client registry check boxes for all components and registry files, respectively. Clearing the check boxes prevents registration information from being added to the client registry during channel installation. You may find this helpful if there is a problem registering a 16-bit component.
305
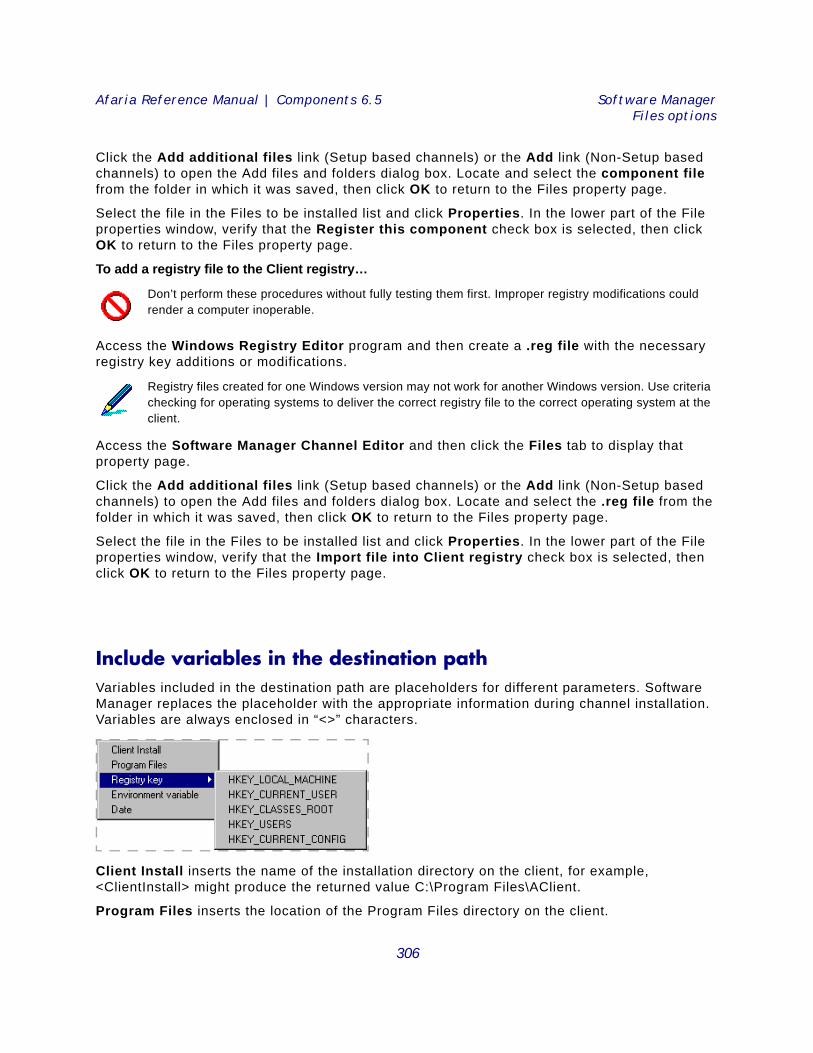
Afaria Reference Manual | Components 6.5 Software ManagerFiles options
Click the Add additional files link (Setup based channels) or the Add link (Non-Setup based channels) to open the Add files and folders dialog box. Locate and select the component file from the folder in which it was saved, then click OK to return to the Files property page.
Select the file in the Files to be installed list and click Properties. In the lower part of the File properties window, verify that the Register this component check box is selected, then click OK to return to the Files property page.
To add a registry file to the Client registry…
Access the Windows Registry Editor program and then create a .reg file with the necessary registry key additions or modifications.
Access the Software Manager Channel Editor and then click the Files tab to display that property page.
Click the Add additional files link (Setup based channels) or the Add link (Non-Setup based channels) to open the Add files and folders dialog box. Locate and select the .reg file from the folder in which it was saved, then click OK to return to the Files property page.
Select the file in the Files to be installed list and click Properties. In the lower part of the File properties window, verify that the Import file into Client registry check box is selected, then click OK to return to the Files property page.
Include variables in the destination pathVariables included in the destination path are placeholders for different parameters. Software Manager replaces the placeholder with the appropriate information during channel installation. Variables are always enclosed in “<>” characters.
Client Install inserts the name of the installation directory on the client, for example, <ClientInstall> might produce the returned value C:\Program Files\AClient.
Program Files inserts the location of the Program Files directory on the client.
Don’t perform these procedures without fully testing them first. Improper registry modifications could render a computer inoperable.
Registry files created for one Windows version may not work for another Windows version. Use criteria checking for operating systems to deliver the correct registry file to the correct operating system at the client.
306
Afaria Reference Manual | Components 6.5 Software ManagerFiles options
Registry key points to the location on the client (determined by the installed application) where you want to install the channel files, for example, <Reg:HKEY_LOCAL_MACHINE\Software\Sample:InstallDirectory> might produce the returned value C:\Sample.
Environment variable inserts a placeholder for a system-defined value that must be recognized at the client, for example, <%ENVVAR%> might produce the returned value APPDIR\sample.
Date inserts a placeholder for the date.
307
Afaria Reference Manual | Components 6.5 Software ManagerInstall options
Install optionsSupported client types – Windows Mobile Professional, Windows Mobile Standard, Windows
After you create a software channel, use the Install property page to specify how it installs at the client.
The following topics are included in this section:
• “Define installation at a Windows Mobile client” on page 309
• “Define installation for a Windows client, Setup based channel” on page 311
• “Define installation in a Windows client, Non-Setup based channel” on page 314
308
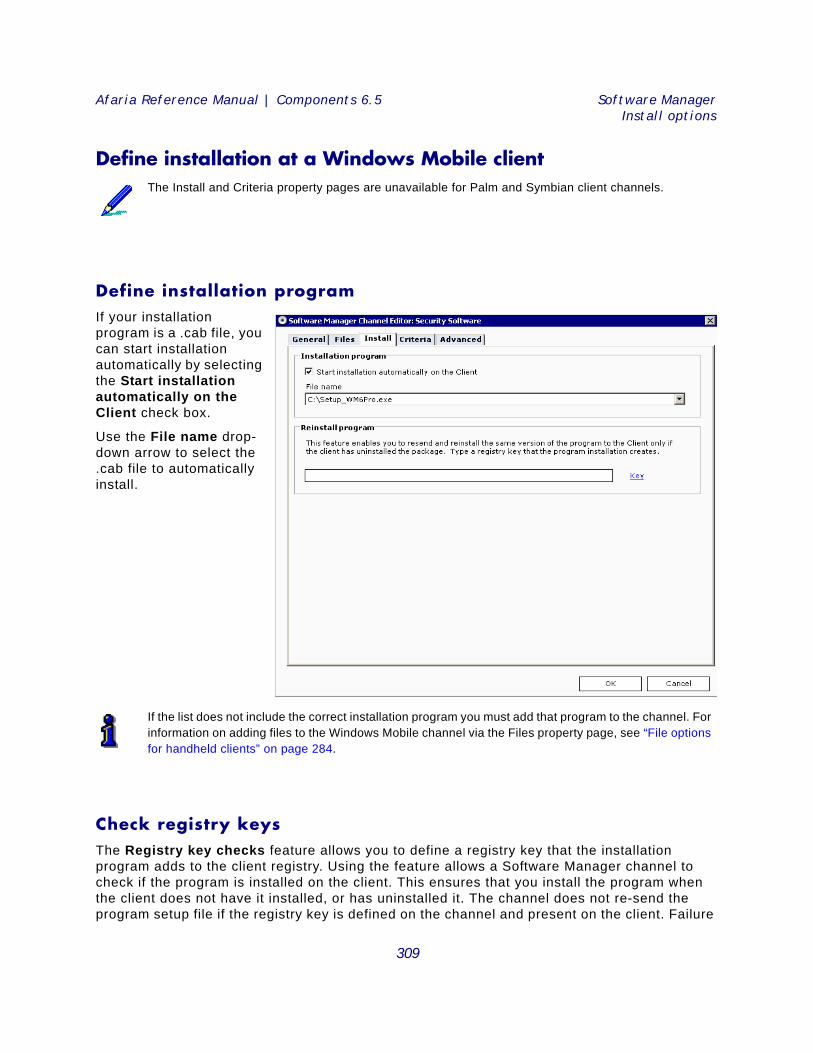
Afaria Reference Manual | Components 6.5 Software ManagerInstall options
Define installation at a Windows Mobile client
Define installation program If your installation program is a .cab file, you can start installation automatically by selecting the Start installation automatically on the Client check box.
Use the File name drop-down arrow to select the .cab file to automatically install.
Check registry keysThe Registry key checks feature allows you to define a registry key that the installation program adds to the client registry. Using the feature allows a Software Manager channel to check if the program is installed on the client. This ensures that you install the program when the client does not have it installed, or has uninstalled it. The channel does not re-send the program setup file if the registry key is defined on the channel and present on the client. Failure
The Install and Criteria property pages are unavailable for Palm and Symbian client channels.
If the list does not include the correct installation program you must add that program to the channel. For information on adding files to the Windows Mobile channel via the Files property page, see “File options for handheld clients” on page 284.
309
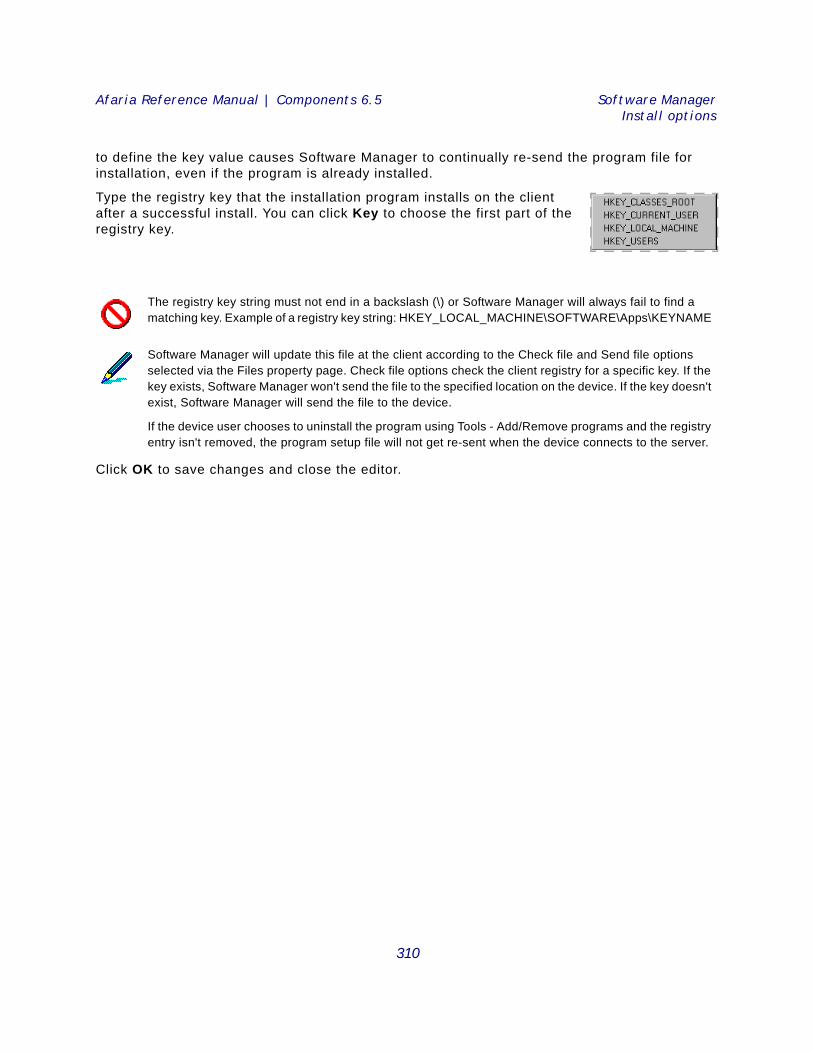
Afaria Reference Manual | Components 6.5 Software ManagerInstall options
to define the key value causes Software Manager to continually re-send the program file for installation, even if the program is already installed.
Type the registry key that the installation program installs on the client after a successful install. You can click Key to choose the first part of the registry key.
Click OK to save changes and close the editor.
The registry key string must not end in a backslash (\) or Software Manager will always fail to find a matching key. Example of a registry key string: HKEY_LOCAL_MACHINE\SOFTWARE\Apps\KEYNAME
Software Manager will update this file at the client according to the Check file and Send file options selected via the Files property page. Check file options check the client registry for a specific key. If the key exists, Software Manager won't send the file to the specified location on the device. If the key doesn't exist, Software Manager will send the file to the device.
If the device user chooses to uninstall the program using Tools - Add/Remove programs and the registry entry isn't removed, the program setup file will not get re-sent when the device connects to the server.
310
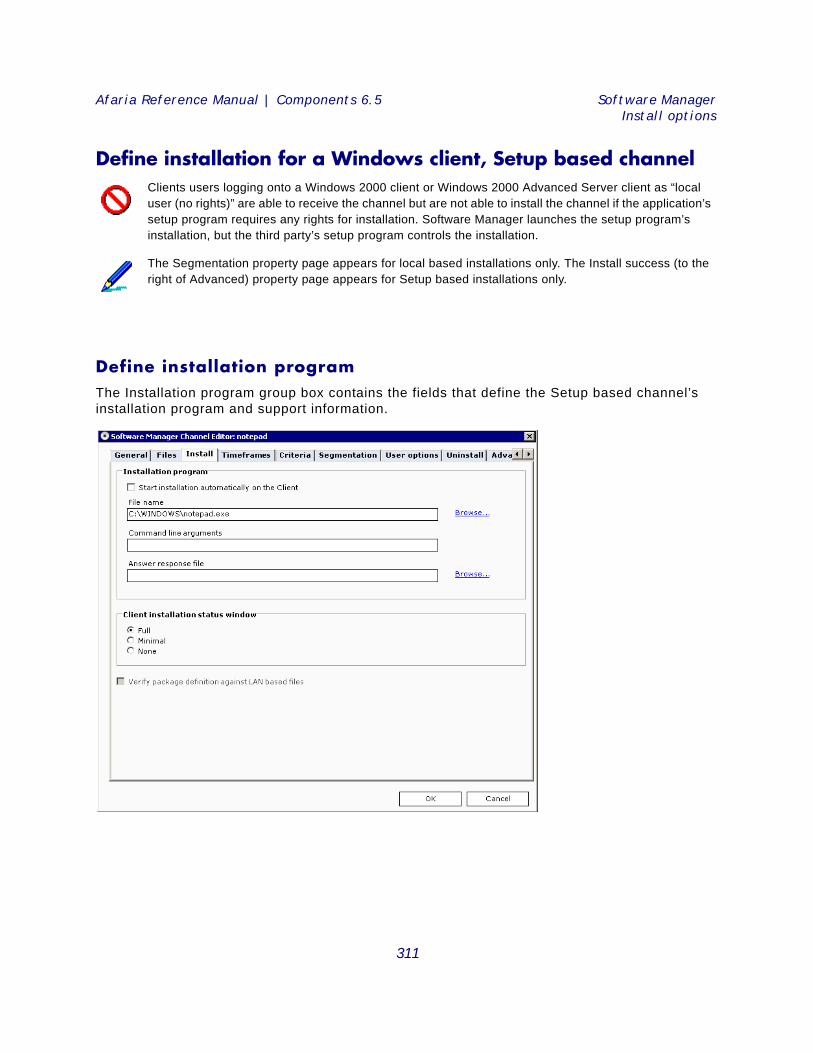
Afaria Reference Manual | Components 6.5 Software ManagerInstall options
Define installation for a Windows client, Setup based channel
Define installation programThe Installation program group box contains the fields that define the Setup based channel’s installation program and support information.
Clients users logging onto a Windows 2000 client or Windows 2000 Advanced Server client as “local user (no rights)” are able to receive the channel but are not able to install the channel if the application’s setup program requires any rights for installation. Software Manager launches the setup program’s installation, but the third party’s setup program controls the installation.
The Segmentation property page appears for local based installations only. The Install success (to the right of Advanced) property page appears for Setup based installations only.
311
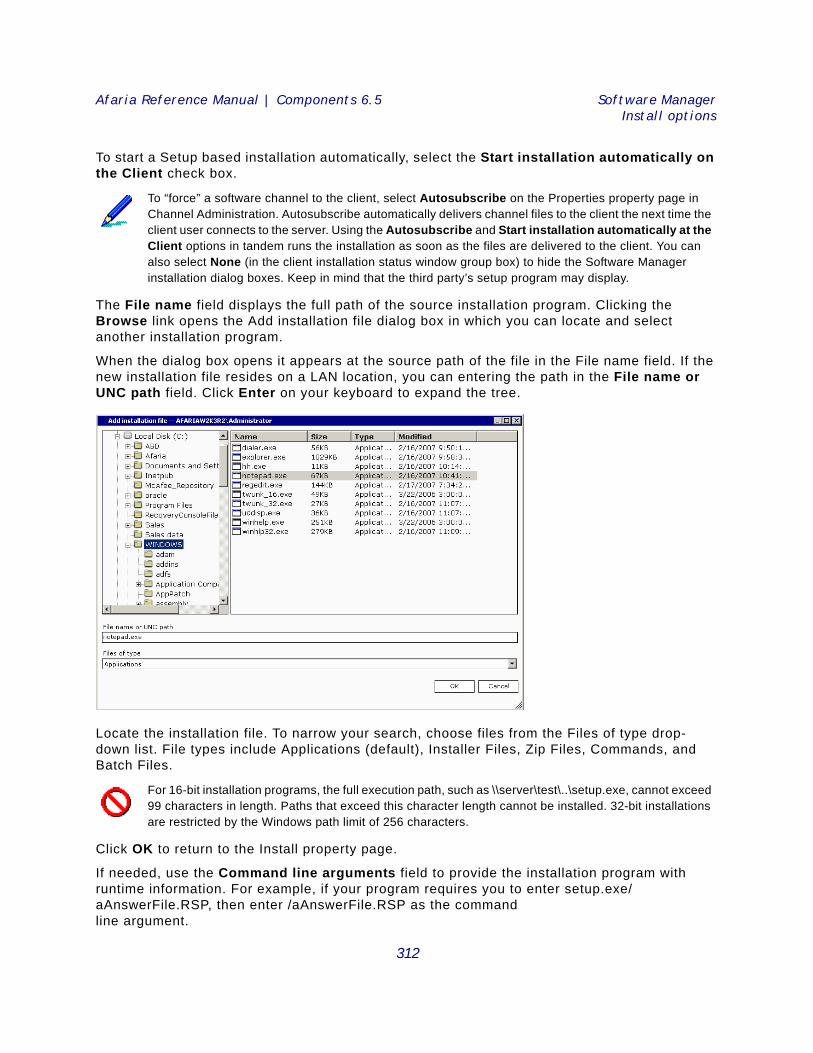
Afaria Reference Manual | Components 6.5 Software ManagerInstall options
To start a Setup based installation automatically, select the Start installation automatically on the Client check box.
The File name field displays the full path of the source installation program. Clicking the Browse link opens the Add installation file dialog box in which you can locate and select another installation program.
When the dialog box opens it appears at the source path of the file in the File name field. If the new installation file resides on a LAN location, you can entering the path in the File name or UNC path field. Click Enter on your keyboard to expand the tree.
Locate the installation file. To narrow your search, choose files from the Files of type drop-down list. File types include Applications (default), Installer Files, Zip Files, Commands, and Batch Files.
Click OK to return to the Install property page.
If needed, use the Command line arguments field to provide the installation program with runtime information. For example, if your program requires you to enter setup.exe/aAnswerFile.RSP, then enter /aAnswerFile.RSP as the command line argument.
To “force” a software channel to the client, select Autosubscribe on the Properties property page in Channel Administration. Autosubscribe automatically delivers channel files to the client the next time the client user connects to the server. Using the Autosubscribe and Start installation automatically at the Client options in tandem runs the installation as soon as the files are delivered to the client. You can also select None (in the client installation status window group box) to hide the Software Manager installation dialog boxes. Keep in mind that the third party’s setup program may display.
For 16-bit installation programs, the full execution path, such as \\server\test\..\setup.exe, cannot exceed 99 characters in length. Paths that exceed this character length cannot be installed. 32-bit installations are restricted by the Windows path limit of 256 characters.
312
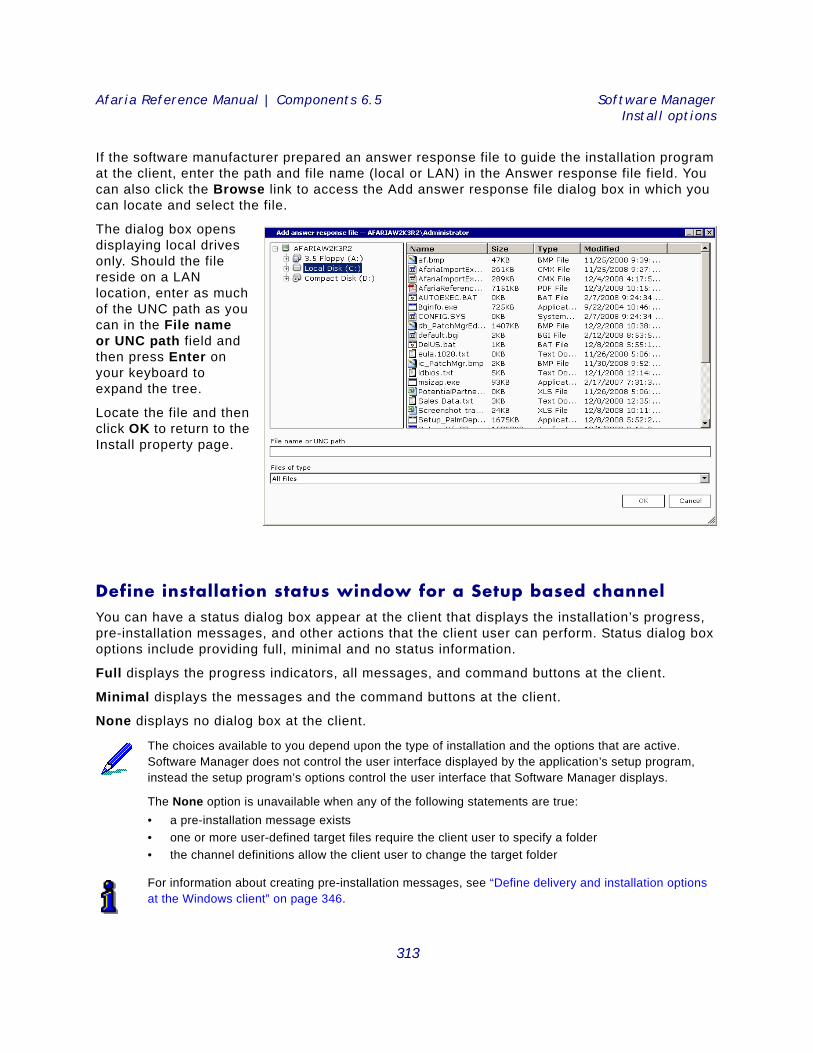
Afaria Reference Manual | Components 6.5 Software ManagerInstall options
If the software manufacturer prepared an answer response file to guide the installation program at the client, enter the path and file name (local or LAN) in the Answer response file field. You can also click the Browse link to access the Add answer response file dialog box in which you can locate and select the file.
The dialog box opens displaying local drives only. Should the file reside on a LAN location, enter as much of the UNC path as you can in the File name or UNC path field and then press Enter on your keyboard to expand the tree.
Locate the file and then click OK to return to the Install property page.
Define installation status window for a Setup based channelYou can have a status dialog box appear at the client that displays the installation’s progress, pre-installation messages, and other actions that the client user can perform. Status dialog box options include providing full, minimal and no status information.
Full displays the progress indicators, all messages, and command buttons at the client.
Minimal displays the messages and the command buttons at the client.
None displays no dialog box at the client.
The choices available to you depend upon the type of installation and the options that are active. Software Manager does not control the user interface displayed by the application’s setup program, instead the setup program’s options control the user interface that Software Manager displays.
The None option is unavailable when any of the following statements are true:• a pre-installation message exists• one or more user-defined target files require the client user to specify a folder• the channel definitions allow the client user to change the target folder
For information about creating pre-installation messages, see “Define delivery and installation options at the Windows client” on page 346.
313
Afaria Reference Manual | Components 6.5 Software ManagerInstall options
Prevent outdated LAN based Setup based channelsFor your LAN based channels, you can prevent the client from receiving an outdated channel from a remote server by selecting the Verify channel definition against LAN based files check box. You’ll find this option most useful in the remote LAN environment.
Click OK to save changes and close the editor.
Define installation in a Windows client, Non-Setup based channel
For information about the remote LAN environment, see “Map source to target for a Windows client, LAN based channel” on page 342.
The Segmentation property page appears for local based installations only. The Install success property page appears for Setup based installations only.
314
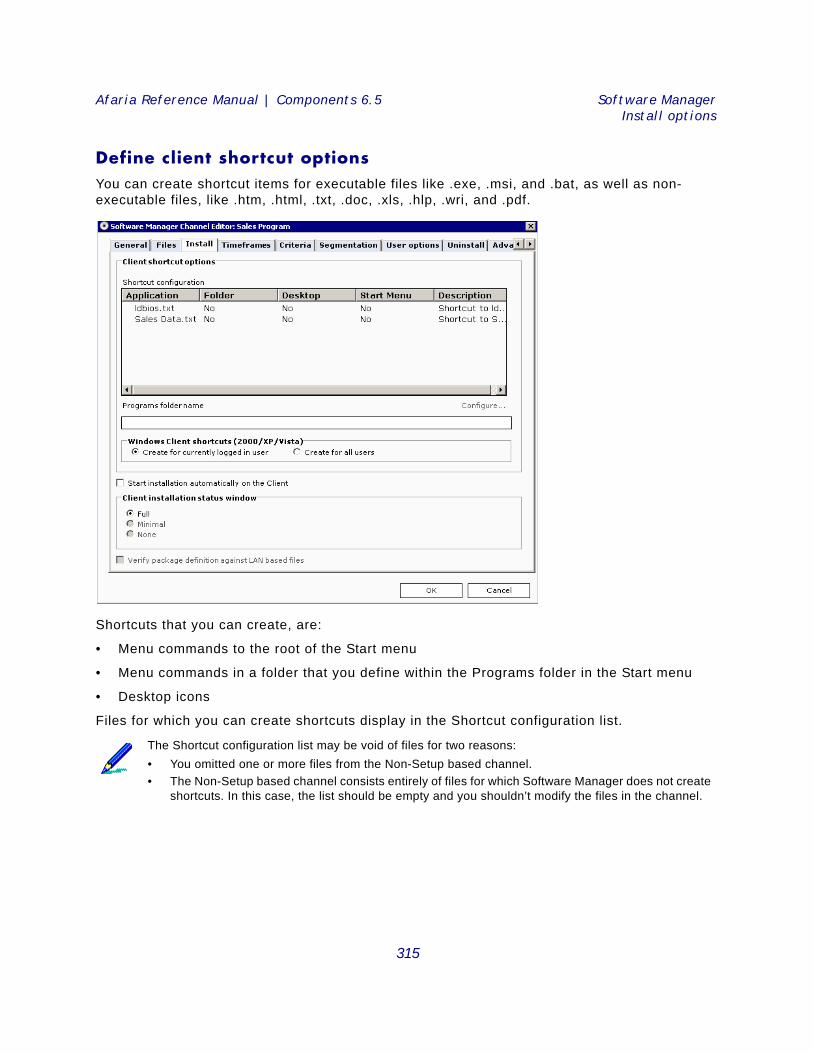
Afaria Reference Manual | Components 6.5 Software ManagerInstall options
Define client shortcut optionsYou can create shortcut items for executable files like .exe, .msi, and .bat, as well as non-executable files, like .htm, .html, .txt, .doc, .xls, .hlp, .wri, and .pdf.
Shortcuts that you can create, are:
• Menu commands to the root of the Start menu
• Menu commands in a folder that you define within the Programs folder in the Start menu
• Desktop icons
Files for which you can create shortcuts display in the Shortcut configuration list.
The Shortcut configuration list may be void of files for two reasons:• You omitted one or more files from the Non-Setup based channel.• The Non-Setup based channel consists entirely of files for which Software Manager does not create
shortcuts. In this case, the list should be empty and you shouldn’t modify the files in the channel.
315
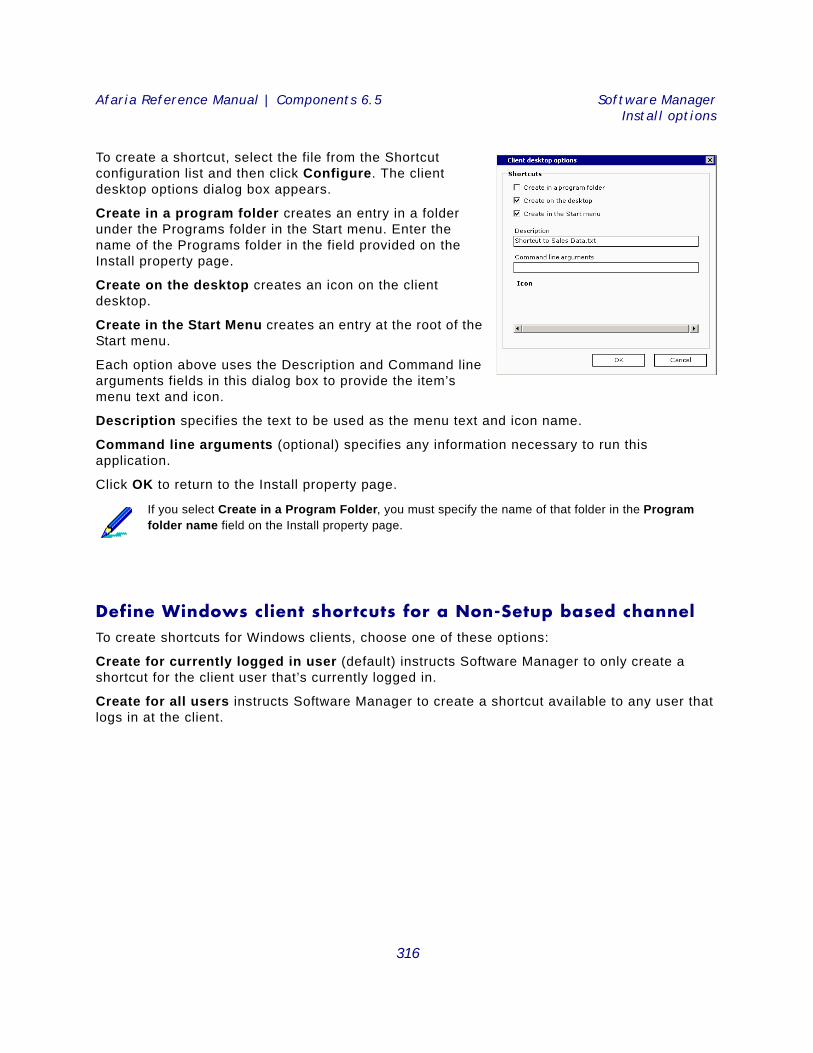
Afaria Reference Manual | Components 6.5 Software ManagerInstall options
To create a shortcut, select the file from the Shortcut configuration list and then click Configure. The client desktop options dialog box appears.
Create in a program folder creates an entry in a folder under the Programs folder in the Start menu. Enter the name of the Programs folder in the field provided on the Install property page.
Create on the desktop creates an icon on the client desktop.
Create in the Start Menu creates an entry at the root of the Start menu.
Each option above uses the Description and Command line arguments fields in this dialog box to provide the item’s menu text and icon.
Description specifies the text to be used as the menu text and icon name.
Command line arguments (optional) specifies any information necessary to run this application.
Click OK to return to the Install property page.
Define Windows client shortcuts for a Non-Setup based channelTo create shortcuts for Windows clients, choose one of these options:
Create for currently logged in user (default) instructs Software Manager to only create a shortcut for the client user that’s currently logged in.
Create for all users instructs Software Manager to create a shortcut available to any user that logs in at the client.
If you select Create in a Program Folder, you must specify the name of that folder in the Program folder name field on the Install property page.
316
Afaria Reference Manual | Components 6.5 Software ManagerInstall options
Start the installation automaticallyTo start a Non-Setup based installation automatically, select the Start installation automatically on the Client check box.
Define installation status window for a Non-Setup based channelYou can have a status dialog box appear at the client that displays the installation’s progress, pre-installation messages, and other actions that the client user can perform. Status dialog box options include providing full, minimal and no status information.
Full displays the progress indicators, all messages, and command buttons at the client.
Minimal displays the messages and the command buttons at the client.
None displays no dialog box at the client.
Prevent outdated LAN based channelsFor your LAN based channels, you can prevent the client from receiving an outdated channel from a remote server by selecting the Verify channel definition against LAN based files check box. You’ll find this option most useful in the remote LAN environment.
Click OK to save changes and close the editor.
To “force” a software channel to the client, select Autosubscribe on the Properties property page in Channel Administration. Autosubscribe automatically delivers channel files to the client the next time the client user connects to the server. Using the Autosubscribe and Start installation automatically at the Client options in tandem runs the installation as soon as the files are delivered to the client. You can also select None (in the client installation status window group box) to hide the Software Manager installation dialog boxes. Keep in mind that the third party’s setup program may display.
The None option is unavailable when any of the following statements are true:• a pre-installation message exists• one or more user-defined target files require the client user to specify a folder• the channel definitions allow the client user to change the target folder
For information about creating pre-installation messages, see “Define delivery and installation options at the Windows client” on page 346.
For information about the remote LAN environment, see “Map source to target for a Windows client, LAN based channel” on page 342.
317
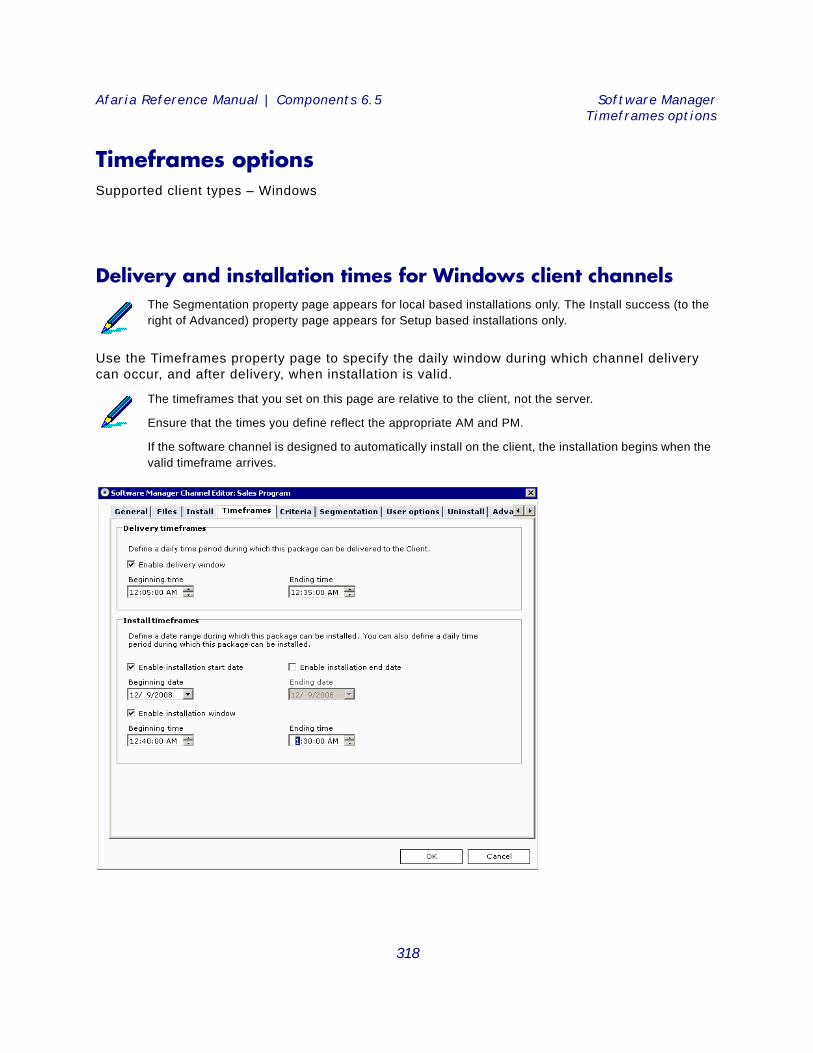
Afaria Reference Manual | Components 6.5 Software ManagerTimeframes options
Timeframes optionsSupported client types – Windows
Delivery and installation times for Windows client channels
Use the Timeframes property page to specify the daily window during which channel delivery can occur, and after delivery, when installation is valid.
The Segmentation property page appears for local based installations only. The Install success (to the right of Advanced) property page appears for Setup based installations only.
The timeframes that you set on this page are relative to the client, not the server.
Ensure that the times you define reflect the appropriate AM and PM.
If the software channel is designed to automatically install on the client, the installation begins when the valid timeframe arrives.
318
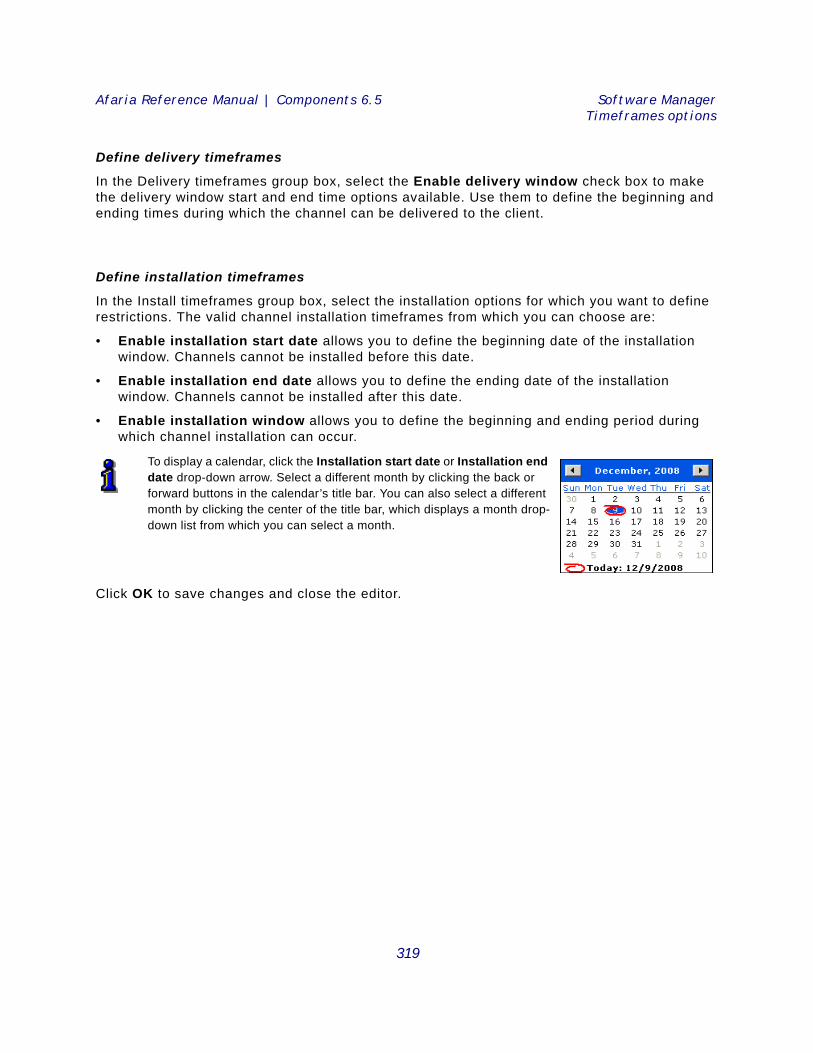
Afaria Reference Manual | Components 6.5 Software ManagerTimeframes options
Define delivery timeframes
In the Delivery timeframes group box, select the Enable delivery window check box to make the delivery window start and end time options available. Use them to define the beginning and ending times during which the channel can be delivered to the client.
Define installation timeframes
In the Install timeframes group box, select the installation options for which you want to define restrictions. The valid channel installation timeframes from which you can choose are:
• Enable installation start date allows you to define the beginning date of the installation window. Channels cannot be installed before this date.
• Enable installation end date allows you to define the ending date of the installation window. Channels cannot be installed after this date.
• Enable installation window allows you to define the beginning and ending period during which channel installation can occur.
Click OK to save changes and close the editor.
To display a calendar, click the Installation start date or Installation end date drop-down arrow. Select a different month by clicking the back or forward buttons in the calendar’s title bar. You can also select a different month by clicking the center of the title bar, which displays a month drop-down list from which you can select a month.
319

Afaria Reference Manual | Components 6.5 Software ManagerCriteria options
Criteria optionsSupported client types – Windows Mobile Professional (including Windows CE), Windows Mobile Standard, Windows
Add delivery and installation requirements to Windows and Windows Mobile client channels After you create and test channel delivery and installation, use the Criteria property page to specify unique hardware and software requirements that a client must meet, or to accept the system defaults.
Criteria at the client are checked at two points:
• Before software delivery so that the channel is sent only to clients that meet or exceed the criteria. This checkpoint prevents misspending connection time and consuming client hard disk space just to transfer and store an installation that’s inappropriate for the computer.
• Prior to installation to cover situations in which software is received but not immediately installed, after which the criteria are no longer met.
The following topics are included in this section:
• “Specify criteria at a Windows Mobile client”
• “Specify criteria at a Windows client” on page 324
Specify criteria at a Windows Mobile client
Define hardware requirements
Before you can accept system defaults or specify channel criteria, select the Enable criteria checking on Client check box. Once selected, criteria options are enabled and required system defaults display in the Hardware requirements group box.
Software Manager automatically calculates each channel’s delivery disk space requirement at the client. You can define a channel’s specific criteria options, or accept these defaults. System defaults are a calculated combination of file set size, number of files, potential cluster size, size of the largest file, and an additional percentage to be cautious.
The Install and Criteria property pages are unavailable for Palm and Symbian client channels.
320
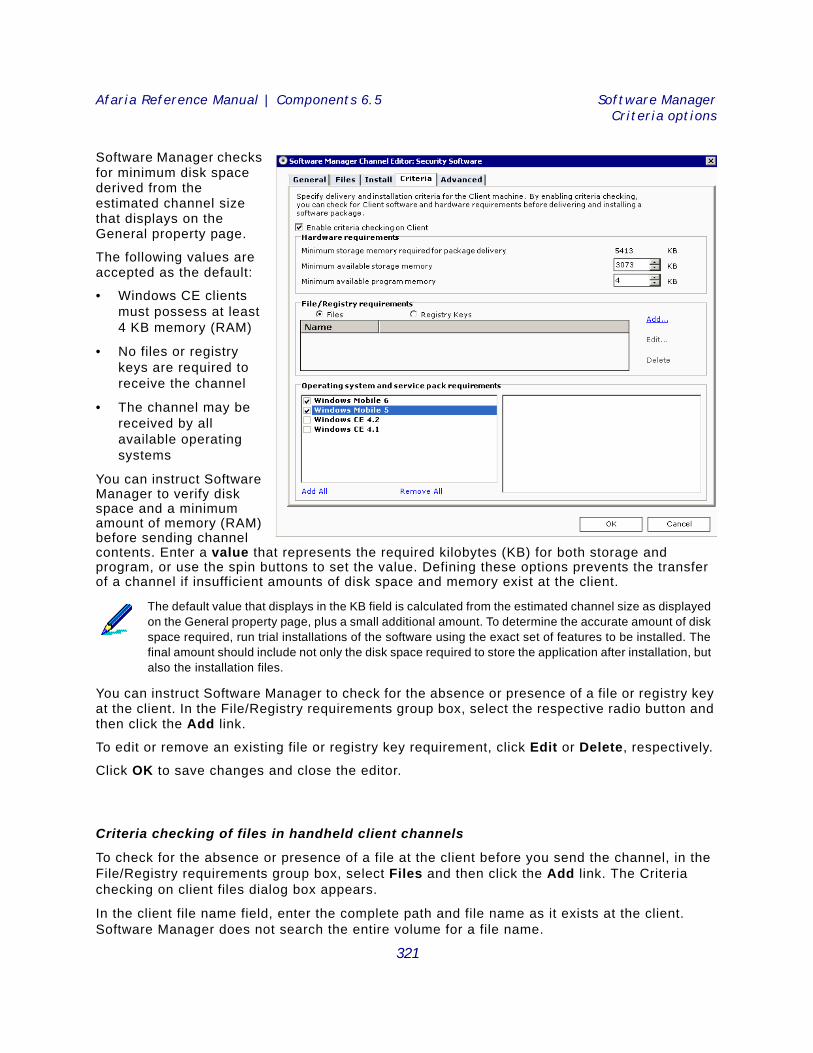
Afaria Reference Manual | Components 6.5 Software ManagerCriteria options
Software Manager checks for minimum disk space derived from the estimated channel size that displays on the General property page.
The following values are accepted as the default:
• Windows CE clients must possess at least 4 KB memory (RAM)
• No files or registry keys are required to receive the channel
• The channel may be received by all available operating systems
You can instruct Software Manager to verify disk space and a minimum amount of memory (RAM) before sending channel contents. Enter a value that represents the required kilobytes (KB) for both storage and program, or use the spin buttons to set the value. Defining these options prevents the transfer of a channel if insufficient amounts of disk space and memory exist at the client.
You can instruct Software Manager to check for the absence or presence of a file or registry key at the client. In the File/Registry requirements group box, select the respective radio button and then click the Add link.
To edit or remove an existing file or registry key requirement, click Edit or Delete, respectively.
Click OK to save changes and close the editor.
Criteria checking of files in handheld client channels
To check for the absence or presence of a file at the client before you send the channel, in the File/Registry requirements group box, select Files and then click the Add link. The Criteria checking on client files dialog box appears.
In the client file name field, enter the complete path and file name as it exists at the client. Software Manager does not search the entire volume for a file name.
The default value that displays in the KB field is calculated from the estimated channel size as displayed on the General property page, plus a small additional amount. To determine the accurate amount of disk space required, run trial installations of the software using the exact set of features to be installed. The final amount should include not only the disk space required to store the application after installation, but also the installation files.
321
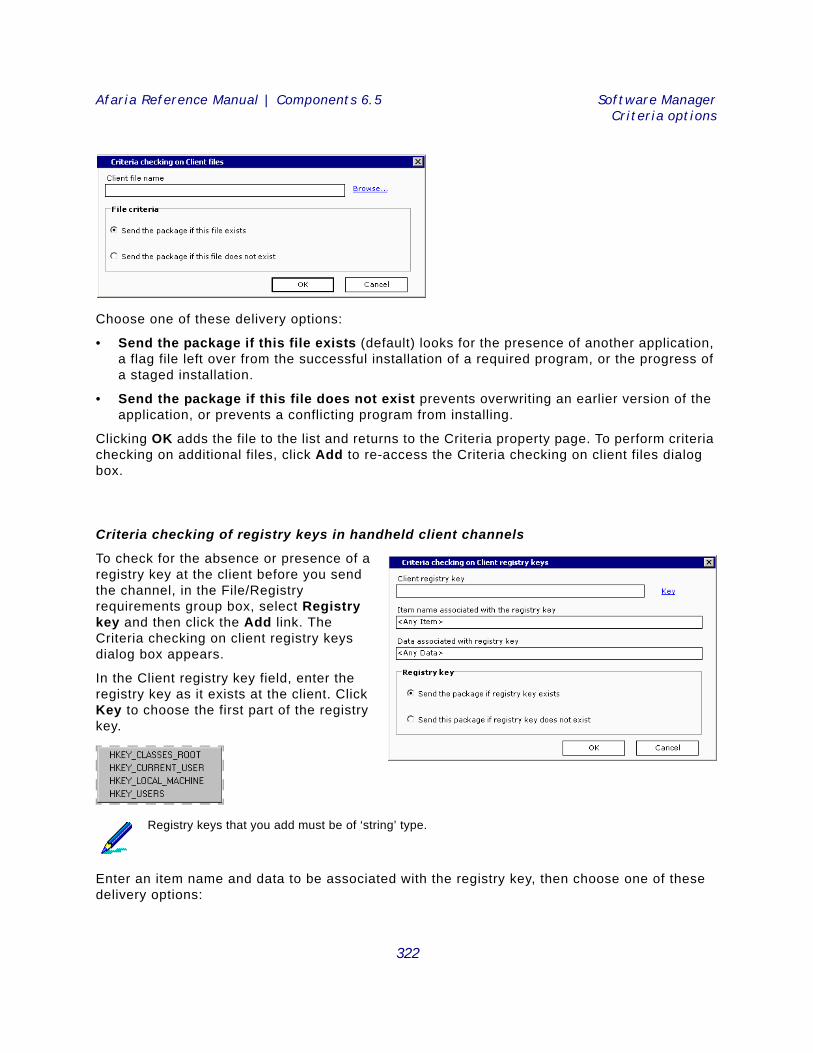
Afaria Reference Manual | Components 6.5 Software ManagerCriteria options
Choose one of these delivery options:
• Send the package if this file exists (default) looks for the presence of another application, a flag file left over from the successful installation of a required program, or the progress of a staged installation.
• Send the package if this file does not exist prevents overwriting an earlier version of the application, or prevents a conflicting program from installing.
Clicking OK adds the file to the list and returns to the Criteria property page. To perform criteria checking on additional files, click Add to re-access the Criteria checking on client files dialog box.
Criteria checking of registry keys in handheld client channels
To check for the absence or presence of a registry key at the client before you send the channel, in the File/Registry requirements group box, select Registry key and then click the Add link. The Criteria checking on client registry keys dialog box appears.
In the Client registry key field, enter the registry key as it exists at the client. Click Key to choose the first part of the registry key.
Enter an item name and data to be associated with the registry key, then choose one of these delivery options:
Registry keys that you add must be of ‘string’ type.
322
Afaria Reference Manual | Components 6.5 Software ManagerCriteria options
• Send the package if registry key exists (default) looks for the presence of a particular registry key in the client’s registry.
• Send the package if registry key does not exist prevents overwriting an earlier version of the application, or prevents a conflicting program from installing.
Clicking OK adds the registry key to the list and returns to the Criteria property page. To perform criteria checking on additional registry keys, click Add to re-access the Criteria checking on Client registry keys dialog box.
Require an operating system
You can require the client to use a specific operating system prior to receiving the channel contents. All Windows CE device operating systems are included by default, but you can exclude any by clearing the respective check box.
Click OK to save changes and close the editor.
While all of the operating systems are selected by default, no service packs are selected.
323
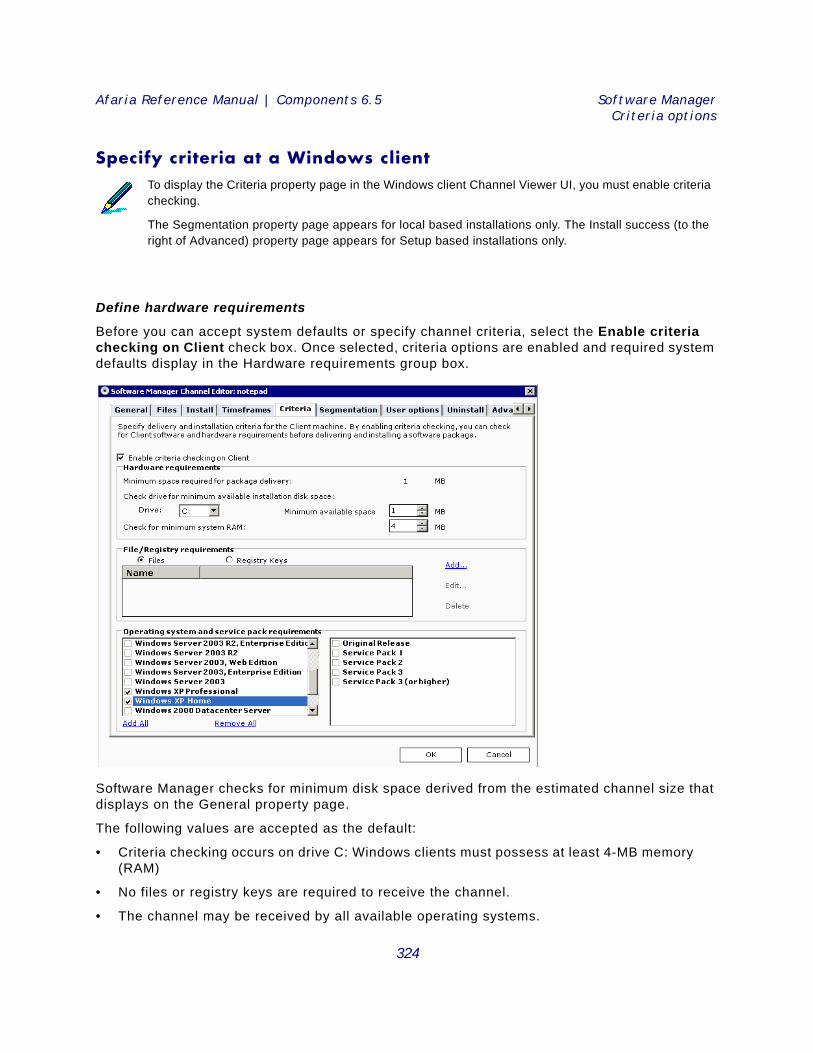
Afaria Reference Manual | Components 6.5 Software ManagerCriteria options
Specify criteria at a Windows client
Define hardware requirements
Before you can accept system defaults or specify channel criteria, select the Enable criteria checking on Client check box. Once selected, criteria options are enabled and required system defaults display in the Hardware requirements group box.
Software Manager checks for minimum disk space derived from the estimated channel size that displays on the General property page.
The following values are accepted as the default:
• Criteria checking occurs on drive C: Windows clients must possess at least 4-MB memory (RAM)
• No files or registry keys are required to receive the channel.
• The channel may be received by all available operating systems.
To display the Criteria property page in the Windows client Channel Viewer UI, you must enable criteria checking.
The Segmentation property page appears for local based installations only. The Install success (to the right of Advanced) property page appears for Setup based installations only.
324
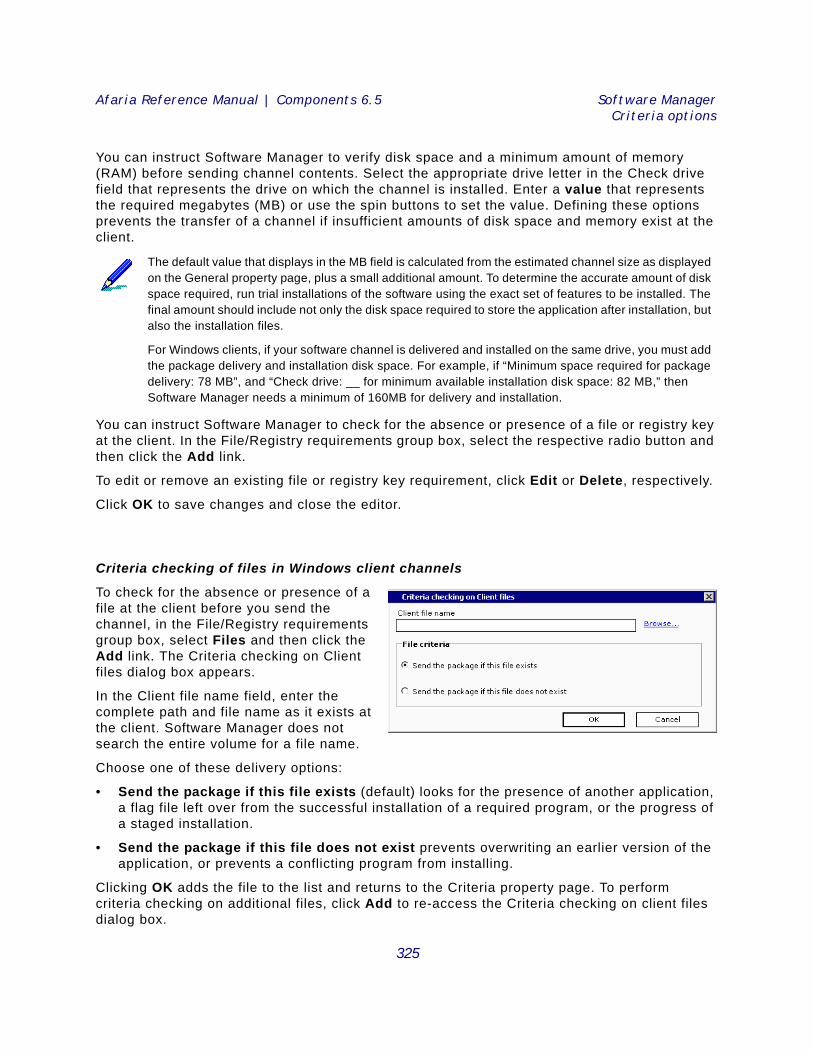
Afaria Reference Manual | Components 6.5 Software ManagerCriteria options
You can instruct Software Manager to verify disk space and a minimum amount of memory (RAM) before sending channel contents. Select the appropriate drive letter in the Check drive field that represents the drive on which the channel is installed. Enter a value that represents the required megabytes (MB) or use the spin buttons to set the value. Defining these options prevents the transfer of a channel if insufficient amounts of disk space and memory exist at the client.
You can instruct Software Manager to check for the absence or presence of a file or registry key at the client. In the File/Registry requirements group box, select the respective radio button and then click the Add link.
To edit or remove an existing file or registry key requirement, click Edit or Delete, respectively.
Click OK to save changes and close the editor.
Criteria checking of files in Windows client channels
To check for the absence or presence of a file at the client before you send the channel, in the File/Registry requirements group box, select Files and then click the Add link. The Criteria checking on Client files dialog box appears.
In the Client file name field, enter the complete path and file name as it exists at the client. Software Manager does not search the entire volume for a file name.
Choose one of these delivery options:
• Send the package if this file exists (default) looks for the presence of another application, a flag file left over from the successful installation of a required program, or the progress of a staged installation.
• Send the package if this file does not exist prevents overwriting an earlier version of the application, or prevents a conflicting program from installing.
Clicking OK adds the file to the list and returns to the Criteria property page. To perform criteria checking on additional files, click Add to re-access the Criteria checking on client files dialog box.
The default value that displays in the MB field is calculated from the estimated channel size as displayed on the General property page, plus a small additional amount. To determine the accurate amount of disk space required, run trial installations of the software using the exact set of features to be installed. The final amount should include not only the disk space required to store the application after installation, but also the installation files.
For Windows clients, if your software channel is delivered and installed on the same drive, you must add the package delivery and installation disk space. For example, if “Minimum space required for package delivery: 78 MB”, and “Check drive: __ for minimum available installation disk space: 82 MB,” then Software Manager needs a minimum of 160MB for delivery and installation.
325
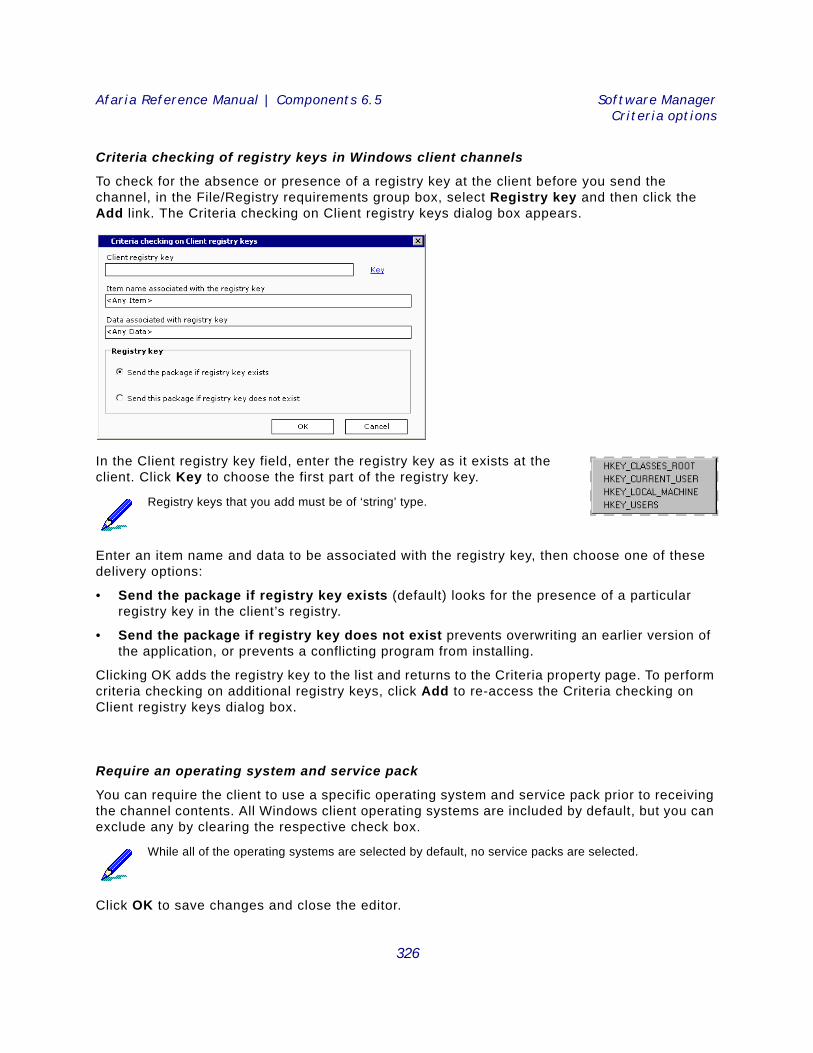
Afaria Reference Manual | Components 6.5 Software ManagerCriteria options
Criteria checking of registry keys in Windows client channels
To check for the absence or presence of a registry key at the client before you send the channel, in the File/Registry requirements group box, select Registry key and then click the Add link. The Criteria checking on Client registry keys dialog box appears.
In the Client registry key field, enter the registry key as it exists at the client. Click Key to choose the first part of the registry key.
Enter an item name and data to be associated with the registry key, then choose one of these delivery options:
• Send the package if registry key exists (default) looks for the presence of a particular registry key in the client’s registry.
• Send the package if registry key does not exist prevents overwriting an earlier version of the application, or prevents a conflicting program from installing.
Clicking OK adds the registry key to the list and returns to the Criteria property page. To perform criteria checking on additional registry keys, click Add to re-access the Criteria checking on Client registry keys dialog box.
Require an operating system and service pack
You can require the client to use a specific operating system and service pack prior to receiving the channel contents. All Windows client operating systems are included by default, but you can exclude any by clearing the respective check box.
Click OK to save changes and close the editor.
Registry keys that you add must be of ‘string’ type.
While all of the operating systems are selected by default, no service packs are selected.
326
Afaria Reference Manual | Components 6.5 Software ManagerSegmentation options
Segmentation options
Define segmented delivery options for Windows client channels
Define segmented limitsYou can control the length of a communication session between a client and server by breaking a large software channel into smaller sections. The separate segments are then sent to your clients in portions based on time or size during subsequent connections, even if the connections
• Supported client types – Windows
• The Segmentation property page only appears for channels delivered to the client computer (local based). The Install success (to the right of Advanced) property page appears for Setup based installations only.
The Segmentation property page only appears for channels delivered to the client computer (local based). The Install success (to the right of Advanced) property page appears for Setup based installations only.
327
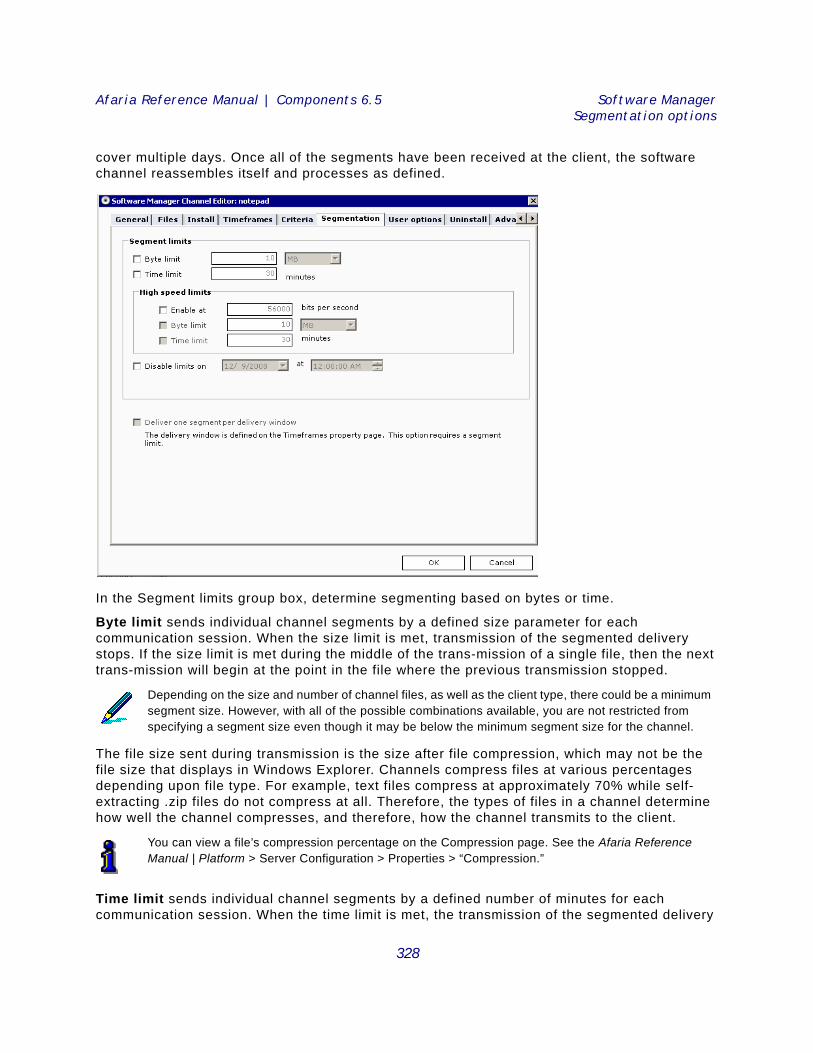
Afaria Reference Manual | Components 6.5 Software ManagerSegmentation options
cover multiple days. Once all of the segments have been received at the client, the software channel reassembles itself and processes as defined.
In the Segment limits group box, determine segmenting based on bytes or time.
Byte limit sends individual channel segments by a defined size parameter for each communication session. When the size limit is met, transmission of the segmented delivery stops. If the size limit is met during the middle of the trans-mission of a single file, then the next trans-mission will begin at the point in the file where the previous transmission stopped.
The file size sent during transmission is the size after file compression, which may not be the file size that displays in Windows Explorer. Channels compress files at various percentages depending upon file type. For example, text files compress at approximately 70% while self-extracting .zip files do not compress at all. Therefore, the types of files in a channel determine how well the channel compresses, and therefore, how the channel transmits to the client.
Time limit sends individual channel segments by a defined number of minutes for each communication session. When the time limit is met, the transmission of the segmented delivery
Depending on the size and number of channel files, as well as the client type, there could be a minimum segment size. However, with all of the possible combinations available, you are not restricted from specifying a segment size even though it may be below the minimum segment size for the channel.
You can view a file’s compression percentage on the Compression page. See the Afaria Reference Manual | Platform > Server Configuration > Properties > “Compression.”
328
Afaria Reference Manual | Components 6.5 Software ManagerSegmentation options
stops. If the time limit is met during the transmission of a file, the next transmission will begin at the point in the file where the previous transmission stopped.
Define high speed limits at the Windows clientUse the High speed limits group to specify unique segment limits for high-speed connections.
Enable at allows you to define the Bits per second. You can choose Byte limit, Time limit, or both limits.
Disable limits on allows you to set a date and time at which a channel’s segmented delivery restrictions no longer apply. This option is useful when a channel must be completely downloaded and installed at the client by a certain date. Any clients that haven’t received all of the channel segments by this date and time will receive the remaining segments all at once during the next communication session with the server, regardless of the originally defined time or byte limits.
Deliver one segment per delivery window sends only one channel segment to a client during each delivery window, as defined on the Timeframes property page. When a client connects to the server for the first time during that delivery window, it receives the next segment to be received (1st, 2nd, and so on). If the client connects an additional time during that same delivery window, it will not receive any additional segments.
If both time and byte limits are defined, then the segmented delivery ends when the first limit is met. For example, if the time limit is set to 1 minute and the byte limit is set to 1 MB, and the time limit is met first, then the delivery ends after 1 minute.
When you specify the number of minutes for this option on a Non-Setup based channel that includes a large number of files, be sure to include extra time so that Software Manager can check through the files to be sent. This checking step precedes the transmission of the segmented delivery.
The server sends a “round-trip test packet” to the client to determine whether a client is connected via a “high-speed” device, like a LAN, or over a slower device, like a RAS connection, and then uses the limit settings that apply. The default high speed cut off is 56000 bits per second, but you can change it.
The date and time that you specify in this field is relative to the server, not the client.
If delivery windows have been defined for the channel (on the Timeframes property page), the date and time limits that you set in this field must be earlier than the defined delivery windows. For details on setting channel delivery windows, see “Delivery and installation times for Windows client channels” on page 318.
The Deliver one segment per delivery window check box is available only if a delivery period has been defined on the Timeframes property page.
329
Afaria Reference Manual | Components 6.5 Software ManagerSegmentation options
Click OK to save changes and close the editor.
If a file from a segmented channel becomes deleted or corrupted at the client and you have selected the Check file option, Always check file, then Software Manager sends the file’s replacement during the current session without size and time limit restrictions. If Always check file isn’t selected and the client user performs a Full Cleanup, the entire channel will be re-delivered. There are a number of places where Check file options are explained, but most places are in the adding files to Windows channels section; see “File options for Windows clients” on page 290. For information about how the client user cleans up installation files, “How the Windows client user cleans up installation files” on page 353
330

Afaria Reference Manual | Components 6.5 Software ManagerUser options
User optionsSupported client types – Windows
Deliver channels to Windows clients via a Web page
Software Manager provides two methods for enabling browser functionality for a software channel: User options property page in the Software Manager Channel Editor and the HTML property page in Channel Administration.
• Using the User options property page in conjunction with channel sets, you can define software channels that your client users can receive via a browser interface using Netscape 4.0 or IE 4.0 and higher. The first time that the client user accesses the Web page, each channel’s content is automatically delivered to the client so that it can be installed, cleaned up, and/or uninstalled at any time just by clicking pre-defined links on the Web page.
• Browser functionality using the HTML property page creates desktop icons at the client computer. Client users can install, cleanup, and uninstall (if uninstall settings have been defined on the Uninstall property page) channels by double-clicking the appropriate desktop icon.
The Segmentation property page appears for local based installations only. The Install success (to the right of Advanced) property page appears for Setup based installations only.
331

Afaria Reference Manual | Components 6.5 Software ManagerUser options
Define HTML settingsSelecting the Enable HTML parameter file generation check box makes the HTML settings group box available.
In the Operation being generated group box, select the radio button for the operation to generate: Install (default), Cleanup, Uninstall. Software Manager creates the appropriate .swm file for the operation.
Using the Type drop-down list, choose how you want the operation’s link to display on the Web page: Text, Button, or Image.
Save the parameter file to the location of your Web page (wwwroot), or click Browse to access the Parameter files dialog box in which you can search for the location. The default location for saving the parameter file is “drive”:\Afaria\Data\Channel\HTML\… You must change this to the location of your Web page.
Read the information in the HTML snippets box and enter any necessary information. Highlight the text, then click the Copy to clipboard link. Access the Web file, then paste the text into the appropriate location in the file. Save the file.
If you select the Uninstall option on a Setup based channel, you must provide the name of the application’s registry key that you want to uninstall in the Enter key name found in field on the Uninstall property page. For details on uninstalling software channels, see “Uninstall channels at the Windows client” on page 335.
If you select Button or Text, enter the text that you want to display on the link. If you select Image, enter the image file for the link, or click Browse to access the Open dialog box in which you can search for the image file.
For details on saving .xec and .swm files for replicated software channels, see Afaria Reference Manual | Platform > Administration > Channel Replication > “Setting Replication Options.”
332
Afaria Reference Manual | Components 6.5 Software ManagerUser options
Place shortcuts at the Windows clientYou can control the placement of the Install, Cleanup, and Uninstall shortcuts at the Windows client running software channels via a browser. You can place the shortcuts on the desktop and/or in the Start menu and/or in a program folder. Whatever shortcuts you define are included in replicated channels.
Click OK to save changes and return to Channel Administration.
Specify settings on the HTML property pageCreate a channel set to contain this software channel, or add this channel to an existing channel set.
Click the HTML tab to display that property page and then select the Generate HTML parameter file check box.
Select Control type: Connect On Load.
In the Parameter file field, click Browse to locate the directory in which you store your HTML parameter files. Place the channel set’s hyperlink on a Web page by clicking Copy to clipboard.
In a text editor, like Notepad, open your Web page and paste the text where you want to insert the channel set’s hyperlink, then save the file to the same location as your HTML Web page.
If you select an icon placement option for clients running in “stealth” mode (silently), you must also enable the Autosubscribe option on the Properties property page in Channel Administration.
Ensure that the shortcut selections you define work properly with the selected installation and uninstallation options. For instance, if you define a channel to install automatically at the client, you do not need to define an Install shortcut. However, if the channel will not automatically install at the client, then you must create an Install shortcut or the channel will be delivered but never installed. For details on setting installation options, see “Install options” on page 308. For details on uninstalling software channels, see “Uninstall options” on page 335.
Icon placement/availability depends upon the method of channel delivery. If the client user receives this channel via the Channel Viewer UI, then no icons will be created. If the channel is delivered to the client via a server schedule, then icons will be created if and where you specify. If the client user receives this channel via a browser, then icon options defined on the User options property page (.swm) will not create icons at the client while icon options defined on the HTML property page (.xec) will create icons if and where you specify.
You can only have one Connect On Load Control type on any one HTML page.
You must enable browser functionality for the channel set using the HTML property page with Control type: Connect On Load, even though each channel in the channel set may contain browser functionality using the Browser property page. Failure to enable the HTML property page using “Connect On Load” will prevent the channel set’s content from being delivered to the client.
333

Afaria Reference Manual | Components 6.5 Software ManagerUser options
The text editor file and the parameter file must reside in the same directory location in order for the Web server to locate the Web page.
334
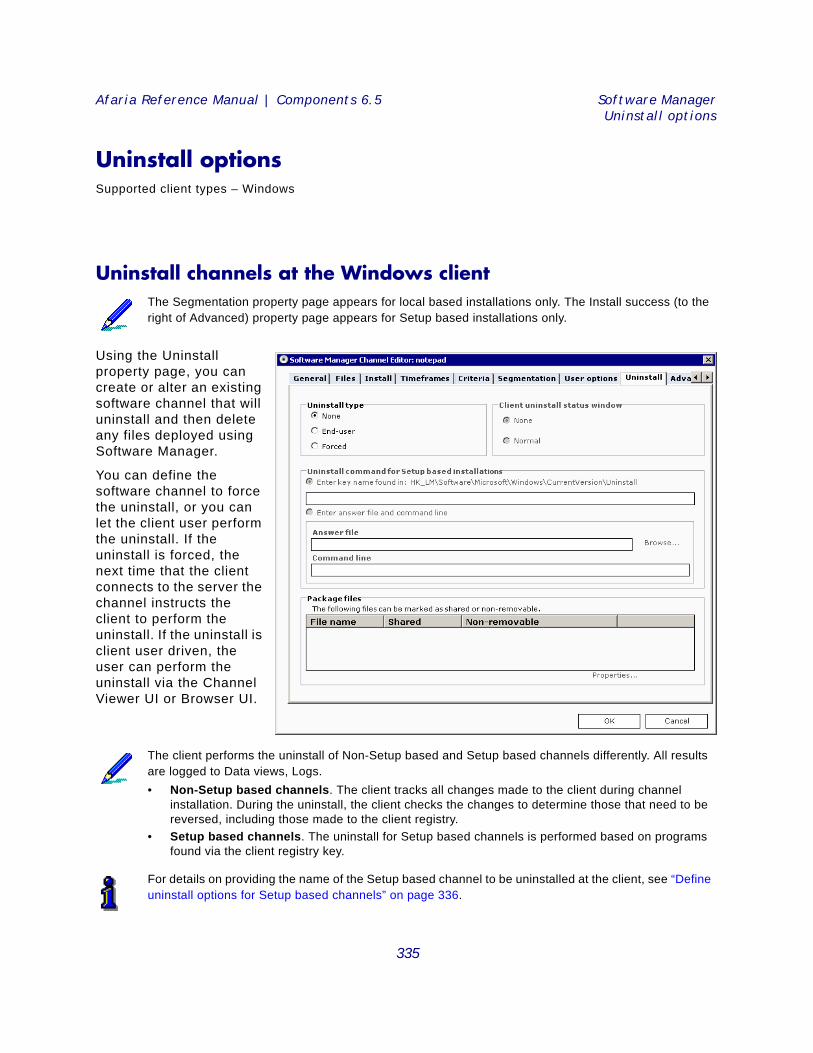
Afaria Reference Manual | Components 6.5 Software ManagerUninstall options
Uninstall optionsSupported client types – Windows
Uninstall channels at the Windows client
Using the Uninstall property page, you can create or alter an existing software channel that will uninstall and then delete any files deployed using Software Manager.
You can define the software channel to force the uninstall, or you can let the client user perform the uninstall. If the uninstall is forced, the next time that the client connects to the server the channel instructs the client to perform the uninstall. If the uninstall is client user driven, the user can perform the uninstall via the Channel Viewer UI or Browser UI.
The Segmentation property page appears for local based installations only. The Install success (to the right of Advanced) property page appears for Setup based installations only.
The client performs the uninstall of Non-Setup based and Setup based channels differently. All results are logged to Data views, Logs. • Non-Setup based channels. The client tracks all changes made to the client during channel
installation. During the uninstall, the client checks the changes to determine those that need to be reversed, including those made to the client registry.
• Setup based channels. The uninstall for Setup based channels is performed based on programs found via the client registry key.
For details on providing the name of the Setup based channel to be uninstalled at the client, see “Define uninstall options for Setup based channels” on page 336.
335

Afaria Reference Manual | Components 6.5 Software ManagerUninstall options
Define uninstall type at the Windows clientIn the Uninstall type group box, select an uninstall option:
None performs no uninstall services at the client.
End-user sends the appropriate executable files and .dlls to the client so that the client user can perform the uninstall services via the Channel Viewer UI or the Browser UI.
Forced:
• Channel Viewer UI uninstalls all channel related files from the client during the next connection to the server without sending any additional files to perform the uninstall services.
• Browser UI sends the appropriate executable files and .dlls during the next connection with the server so that it can automatically perform the uninstall services.
Specify the uninstall status windowIn the client uninstall status window group box, you can choose to present a normal uninstall status window or not to present a status window at all.
Define uninstall options for Setup based channels
Software Manager allows you to uninstall Setup based channels at the client either through a registry key or an answer file.
To uninstall a Setup based channel via a registry key, accept the default Enter key name found in, then enter the key that will perform the operation in the field.
You can locate the key to uninstall a channel by accessing the Registry Editor, then following the “HKEY_LOCAL_MACHINE\SOFTWARE\Microsoft\Windows\CurrentVersion\Uninstall” path.
To instruct Software Manager to silently uninstall a channel at the client, select the Enter answer file and command line radio button. Enter the path and file name of the Answer file in
If a client user subscribes to and receives a channel with the forced uninstall option enabled, the client will not receive new files and the uninstall will not be performed. For example, a client user wants to install the McAfee channel on their client computer but the existing channel has been altered to perform a forced uninstall. Subscribing to and receiving the channel will not deliver the installation files, nor will it uninstall files that have never been installed.
The Uninstall command for Setup based installations group box is disabled on Non-Setup based channels.
The Setup based application that you want to uninstall must have provided an UninstallString value in order for Software Manager to uninstall the channel.
336
Afaria Reference Manual | Components 6.5 Software ManagerUninstall options
the field provided. In the Command line field, enter the parameters that will invoke the uninstall executable, as well as the name of the answer file that assists the executable in the silent uninstall.
Protect shared and non-removable filesSoftware Manager allows you to prevent the uninstall process from removing files that are shared by other applications and those that you designate as non-removable. Channel files that are marked as shared and/or non-removable display in the Package files list. Files of this type include additional files added to Setup based channels and any files included in a Non-Setup based channel. These files display on the Files property page in the Files to be installed list.
Shared files are those that your system uses for multiple applications. Each time that a shared file is installed, the usage count in the registry increments by 1 (one). When Software Manager uninstalls a channel that contains a shared file, it decrements the registry by 1 (one). If uninstalling a channel leaves the usage count at 0 (zero), then Software Manager will remove the shared file unless you protect it from the uninstall process.
Non-removable files are those files that for whatever reason you want saved at the client computer, such as data files.
To instruct Software Manager to remove a file marked as shared or non-removable, access the Properties window, General property page by clicking the Properties link. Clear the Shared file and/or Non-removable file check boxes on the lower part of the page. Click OK to return to the Uninstall property page.
Click OK to save changes and close the editor.
During the uninstall process at the client, if Software Manager detects the presence of Microsoft Installer (MSI), the usage count will never drop below 1 (one). Software Manager will leave the shared file intact rather than delete it and potentially render the client computer inoperable.
For information about adding files to channels, see “Files options” on page 284.
337
Afaria Reference Manual | Components 6.5 Software ManagerAdvanced options
Advanced optionsSupported client types – Windows Mobile Professional (including Windows CE), Windows Mobile Standard, Symbian, Palm, Windows
Include advanced features in channelsUse the Advanced property page to create user defined fields, execute published Session Manager channels at the client, and depending upon whether the channel is for handheld or Windows clients, check for minimum device RAM, map source share points to target share points for a LAN based channel, and define user rights on a Windows client.
The following topics are included in this section:
• “Create user defined fields”
• “Execute channels before or after delivery at the handheld client” on page 339
• “Set RAM requirements at the Palm and Symbian client” on page 341
• “Create channel shortcuts on Windows Mobile clients” on page 342
• “Map source to target for a Windows client, LAN based channel” on page 342
• “Define delivery and installation options at the Windows client” on page 346
• “Define user rights on a Windows client” on page 348
Create user defined fields
The user defined string fields that you create store and display information about a software channel, but do not affect channel installation. An example of user defined string fields may be:
Vendor MicrosoftPurchase_Date 08_01_03Copies 100Warranty NoTech_Support 1_800_MICROSOFTTech_Supt_1 Bill_SmithTech_Supt_2 Susan_Jones
You use the same procedure for creating user defined fields in both Windows and handheld client channels.
338
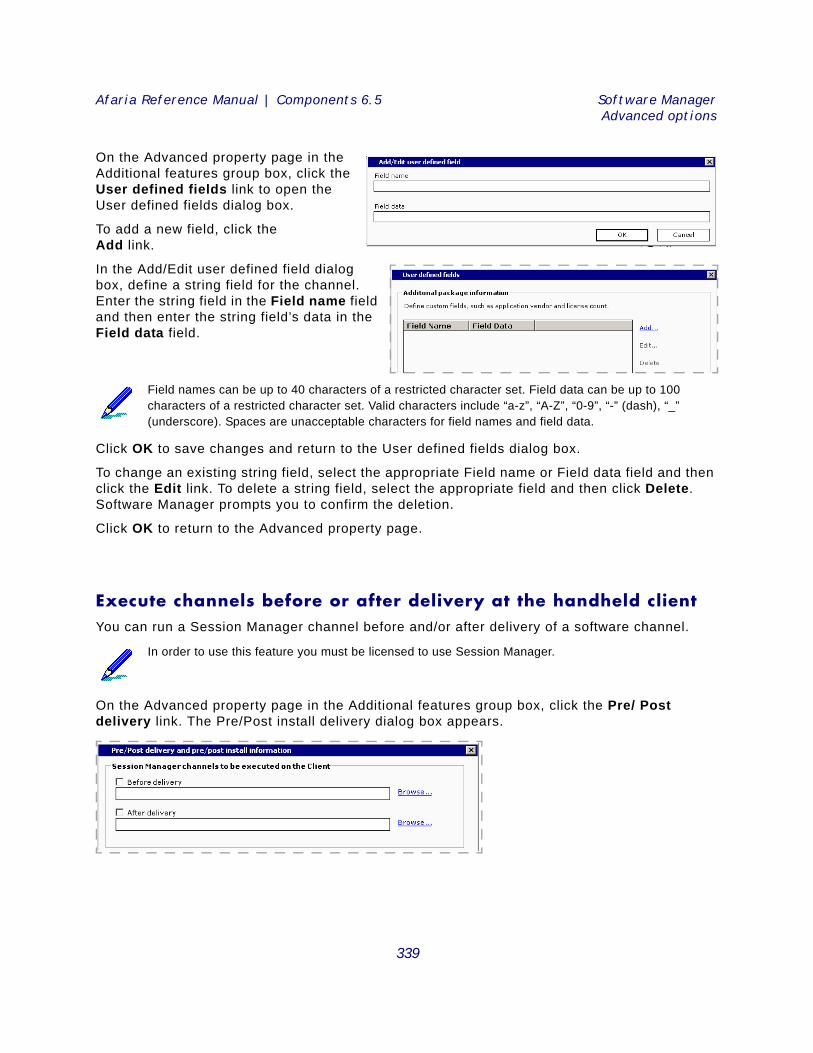
Afaria Reference Manual | Components 6.5 Software ManagerAdvanced options
On the Advanced property page in the Additional features group box, click the User defined fields link to open the User defined fields dialog box.
To add a new field, click the Add link.
In the Add/Edit user defined field dialog box, define a string field for the channel. Enter the string field in the Field name field and then enter the string field’s data in the Field data field.
Click OK to save changes and return to the User defined fields dialog box.
To change an existing string field, select the appropriate Field name or Field data field and then click the Edit link. To delete a string field, select the appropriate field and then click Delete. Software Manager prompts you to confirm the deletion.
Click OK to return to the Advanced property page.
Execute channels before or after delivery at the handheld client You can run a Session Manager channel before and/or after delivery of a software channel.
On the Advanced property page in the Additional features group box, click the Pre/ Post delivery link. The Pre/Post install delivery dialog box appears.
Field names can be up to 40 characters of a restricted character set. Field data can be up to 100 characters of a restricted character set. Valid characters include “a-z”, “A-Z”, “0-9”, “-” (dash), “_” (underscore). Spaces are unacceptable characters for field names and field data.
In order to use this feature you must be licensed to use Session Manager.
339
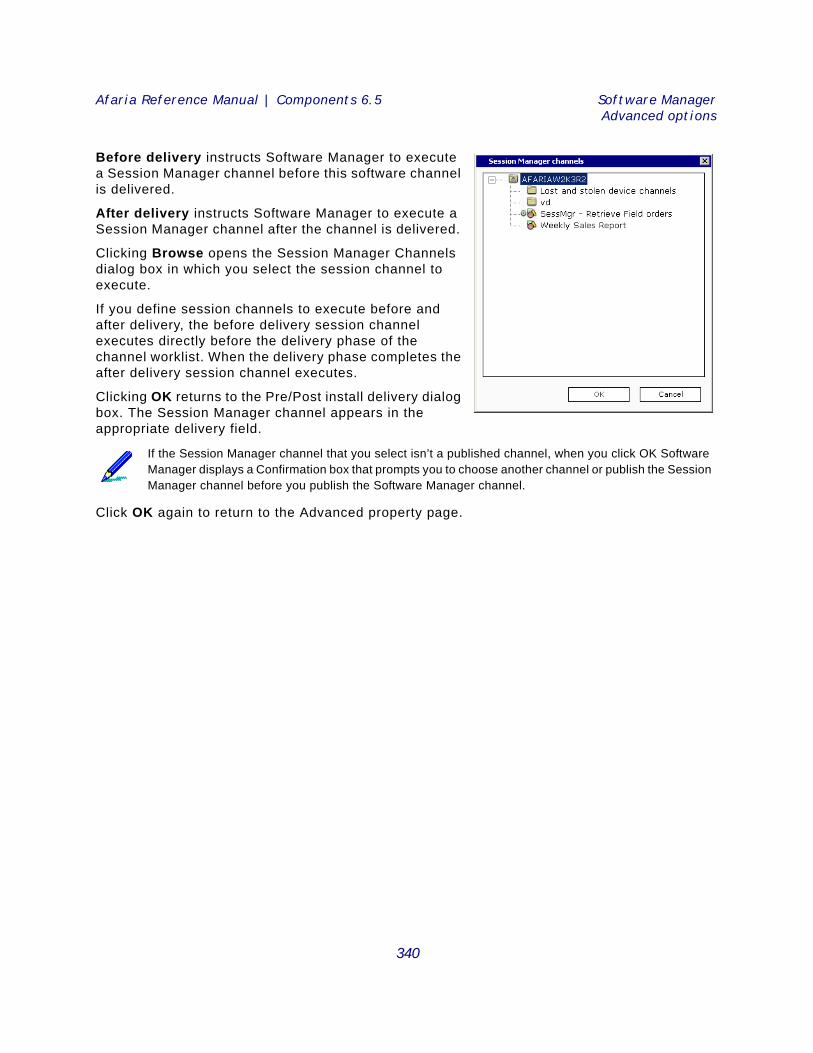
Afaria Reference Manual | Components 6.5 Software ManagerAdvanced options
Before delivery instructs Software Manager to execute a Session Manager channel before this software channel is delivered.
After delivery instructs Software Manager to execute a Session Manager channel after the channel is delivered.
Clicking Browse opens the Session Manager Channels dialog box in which you select the session channel to execute.
If you define session channels to execute before and after delivery, the before delivery session channel executes directly before the delivery phase of the channel worklist. When the delivery phase completes the after delivery session channel executes.
Clicking OK returns to the Pre/Post install delivery dialog box. The Session Manager channel appears in the appropriate delivery field.
Click OK again to return to the Advanced property page.
If the Session Manager channel that you select isn’t a published channel, when you click OK Software Manager displays a Confirmation box that prompts you to choose another channel or publish the Session Manager channel before you publish the Software Manager channel.
340
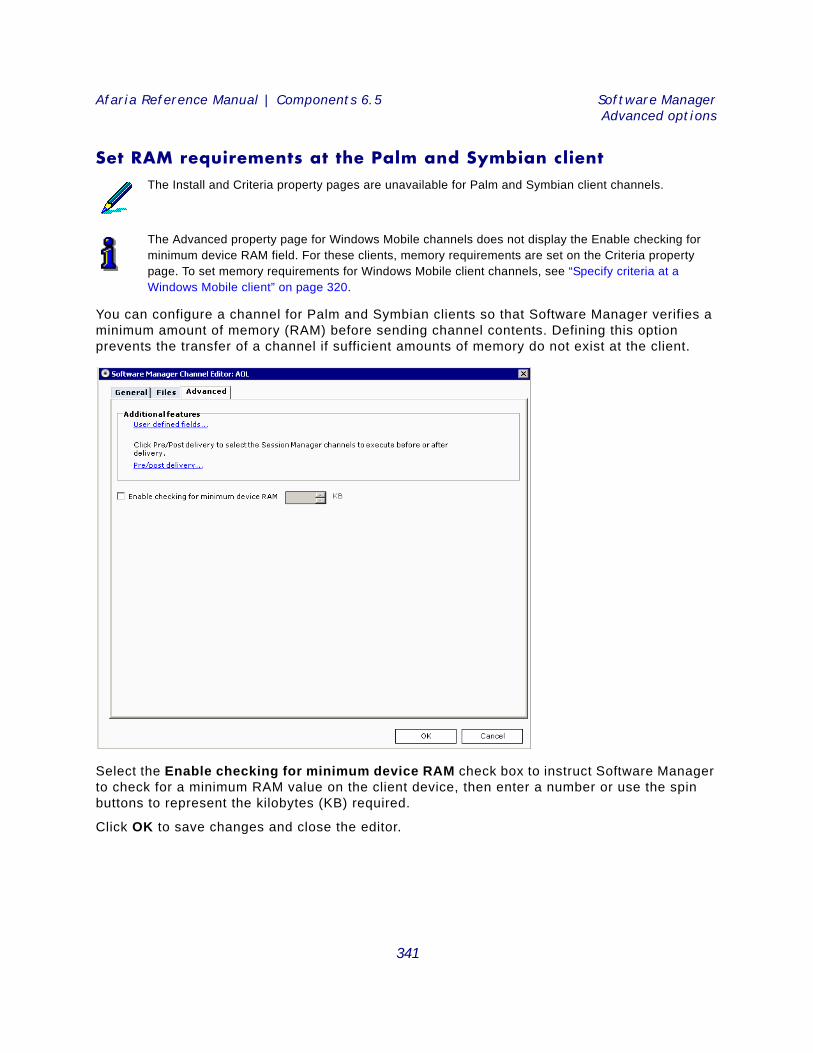
Afaria Reference Manual | Components 6.5 Software ManagerAdvanced options
Set RAM requirements at the Palm and Symbian client
You can configure a channel for Palm and Symbian clients so that Software Manager verifies a minimum amount of memory (RAM) before sending channel contents. Defining this option prevents the transfer of a channel if sufficient amounts of memory do not exist at the client.
Select the Enable checking for minimum device RAM check box to instruct Software Manager to check for a minimum RAM value on the client device, then enter a number or use the spin buttons to represent the kilobytes (KB) required.
Click OK to save changes and close the editor.
The Install and Criteria property pages are unavailable for Palm and Symbian client channels.
The Advanced property page for Windows Mobile channels does not display the Enable checking for minimum device RAM field. For these clients, memory requirements are set on the Criteria property page. To set memory requirements for Windows Mobile client channels, see “Specify criteria at a Windows Mobile client” on page 320.
341
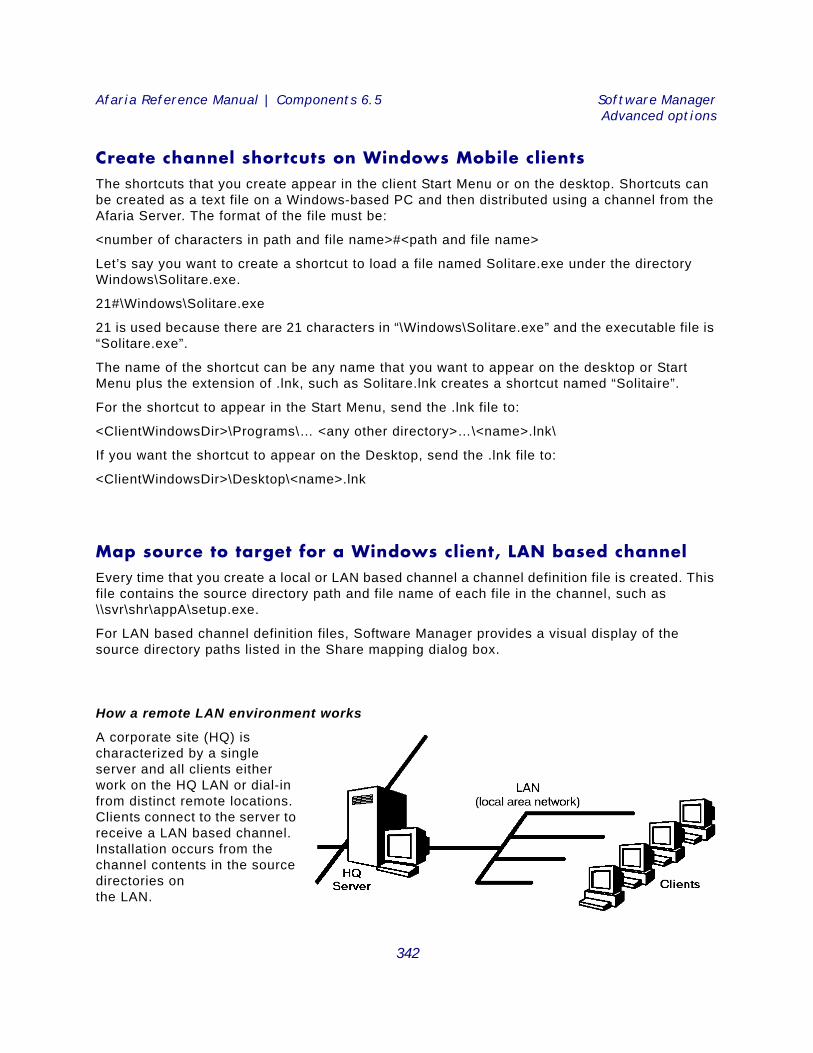
Afaria Reference Manual | Components 6.5 Software ManagerAdvanced options
Create channel shortcuts on Windows Mobile clientsThe shortcuts that you create appear in the client Start Menu or on the desktop. Shortcuts can be created as a text file on a Windows-based PC and then distributed using a channel from the Afaria Server. The format of the file must be:
<number of characters in path and file name>#<path and file name>
Let’s say you want to create a shortcut to load a file named Solitare.exe under the directory Windows\Solitare.exe.
21#\Windows\Solitare.exe
21 is used because there are 21 characters in “\Windows\Solitare.exe” and the executable file is “Solitare.exe”.
The name of the shortcut can be any name that you want to appear on the desktop or Start Menu plus the extension of .lnk, such as Solitare.lnk creates a shortcut named “Solitaire”.
For the shortcut to appear in the Start Menu, send the .lnk file to:
<ClientWindowsDir>\Programs\… <any other directory>…\<name>.lnk\
If you want the shortcut to appear on the Desktop, send the .lnk file to:
<ClientWindowsDir>\Desktop\<name>.lnk
Map source to target for a Windows client, LAN based channel Every time that you create a local or LAN based channel a channel definition file is created. This file contains the source directory path and file name of each file in the channel, such as \\svr\shr\appA\setup.exe.
For LAN based channel definition files, Software Manager provides a visual display of the source directory paths listed in the Share mapping dialog box.
How a remote LAN environment works
A corporate site (HQ) is characterized by a single server and all clients either work on the HQ LAN or dial-in from distinct remote locations. Clients connect to the server to receive a LAN based channel. Installation occurs from the channel contents in the source directories on the LAN.
342
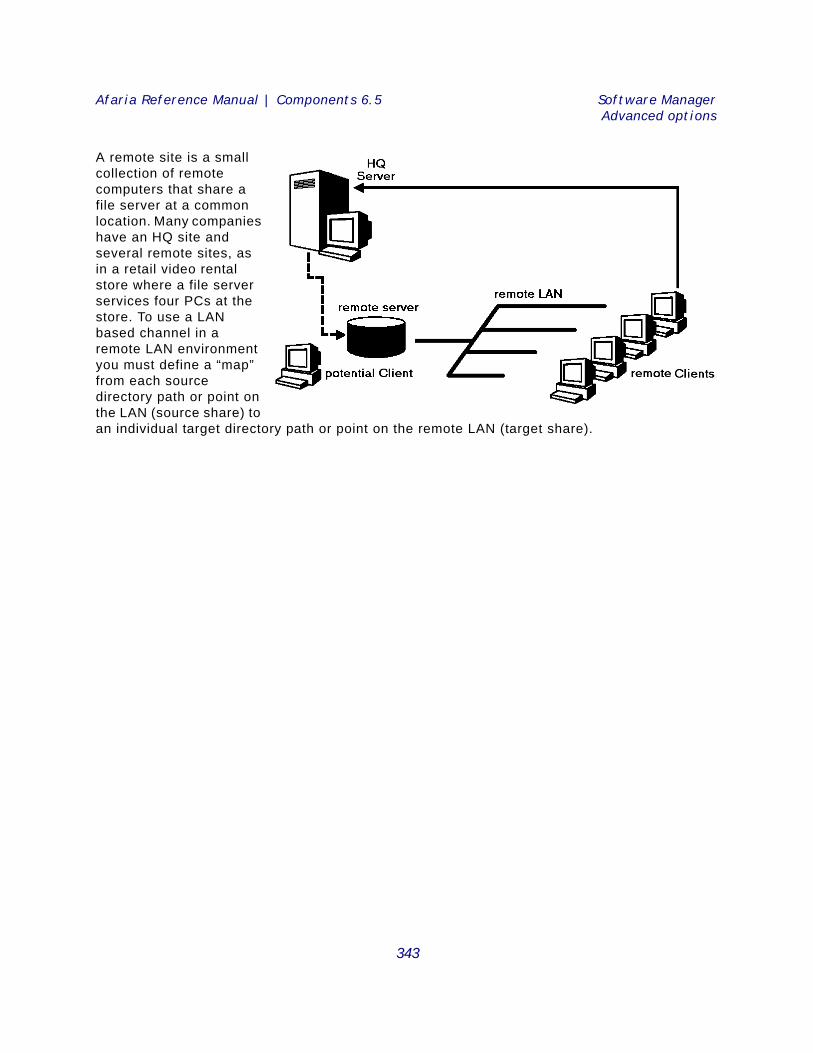
Afaria Reference Manual | Components 6.5 Software ManagerAdvanced options
A remote site is a small collection of remote computers that share a file server at a common location. Many companies have an HQ site and several remote sites, as in a retail video rental store where a file server services four PCs at the store. To use a LAN based channel in a remote LAN environment you must define a “map” from each source directory path or point on the LAN (source share) to an individual target directory path or point on the remote LAN (target share).
343

Afaria Reference Manual | Components 6.5 Software ManagerAdvanced options
To support a remote site you send the LAN based channel files to the remote site server. The LAN based channel is then copied from the mapped target directories on the remote LAN. To receive a LAN based channel the remote client connects to the server and then during installation the server looks at the mapped share points (in the Share mapping dialog box) to locate channel contents on the remote servers. Channel installation occurs across the remote LAN. The server delivers the channel one time instead of four, reducing connection time and cost.
Map shares
To view source directory paths in the Share mapping dialog box, click the Share Mapping link in the Additional features group box on the Advanced property page.
In the remote LAN environment, LAN based channels are installed from defined share points on the remote network. Therefore, it’s especially important that the “source” LAN based channel be copied to the defined “target” share points so that the share maps are correct. As an example, suppose that a remote site server is named \\RemSvr and that you’ve created a Non-Setup, LAN based installation channel consisting of the following files:
\\HQSvr\NSBApps\AppOne\One.exe\\HQSvr\NSBApps\AppOne\One.dll\\HQSvr\NSBApps\AppOne\One.db
Select the Use share maps check box to enable the Share mapping dialog box. The list displays every source share point initially used in the channel definition file.
Click Add. The Add/Edit share mapping dialog box appears.
The Share mapping link is available only if the channel is LAN based. Validation occurs to ensure that if you select the Use share maps check box every source share has a map defined, even if it’s back to itself.
344
Afaria Reference Manual | Components 6.5 Software ManagerAdvanced options
Continuing the example noted on the previous page, map a share from \\HQSvr\NSBApps to \\RemSvr\NSBApps. In this case, \\HQSvr\ = \\RemSvr\
This share map indicates to the remote client that the files defined as residing on \\HQSvr\NSBApps on the HQ LAN reside on \\RemSvr\NSBApps on the remote LAN. The directory structure must be the same on the HQSvr and the RemSvr servers.
Click OK to save the map in the Share mapping dialog box. The Target mapping field displays the mapped share points on the remote LAN.
To change an existing share map, select the appropriate Source mapping field and then click the Edit link. To delete a share map click Remove. Software Manager prompts you to confirm the deletion.
Click OK again to return to the Advanced property page. Click OK a third time to save changes and close the editor.
Copy files to the remote LAN
After you’ve mapped your share points you must copy the contents of the LAN based channel at the source, to the specified share points at the remote LAN. There are several ways that you can “copy” the LAN based channel at the Afaria Server to the remote server’s network. You can:
• Set up the remote file server as a Afaria Client and use Software Manager to deliver the channel
• Use any copy mechanism, such as XCopy
• “Overnight” to the remote location a CD-ROM containing the channel
Maximize the support of the remote LAN environment
Suppose that you support two remote site servers, which support several clients each. You can define one channel with mapped share points to serve both sites by including environment variables to “act” as the HQ server’s name when you define the remote target share points. Variable examples that you might use include: %SvrName% or %SN%. Each client then defines the SvrName or SN environment variable to be their server’s name.
Mapping source to target shares translates where the channel is on the source LAN, to where it is on the target LAN. Installations are run from the correctly mapped location on the remote LAN.
Always keep the LAN based channel at the remote site up to date with the channel at the server. The remote site channel date and time stamps must match those at the server because file comparisons are made against the remote site channel during the client’s connection with the server. Use extreme care when moving files from the HQ server to the remote site server.
For information about preventing an outdated remote LAN based channel from being installed at the Windows client, see “Install options” on page 308.
345
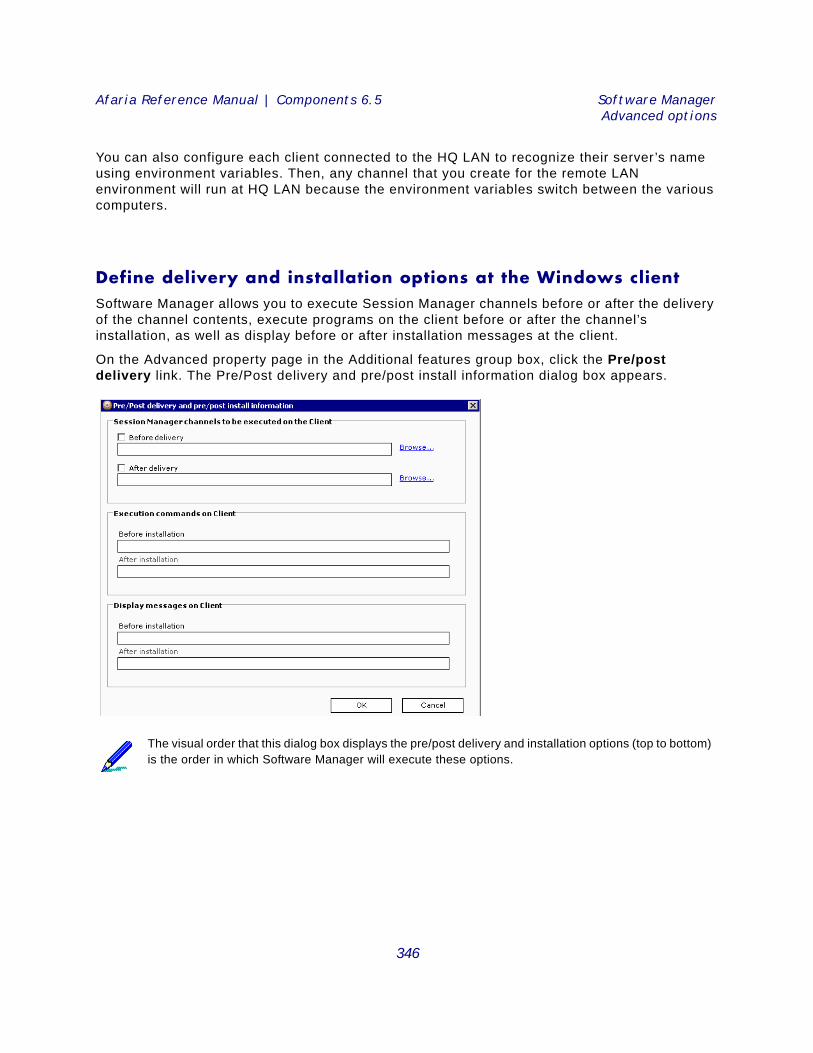
Afaria Reference Manual | Components 6.5 Software ManagerAdvanced options
You can also configure each client connected to the HQ LAN to recognize their server’s name using environment variables. Then, any channel that you create for the remote LAN environment will run at HQ LAN because the environment variables switch between the various computers.
Define delivery and installation options at the Windows clientSoftware Manager allows you to execute Session Manager channels before or after the delivery of the channel contents, execute programs on the client before or after the channel’s installation, as well as display before or after installation messages at the client.
On the Advanced property page in the Additional features group box, click the Pre/post delivery link. The Pre/Post delivery and pre/post install information dialog box appears.
The visual order that this dialog box displays the pre/post delivery and installation options (top to bottom) is the order in which Software Manager will execute these options.
346
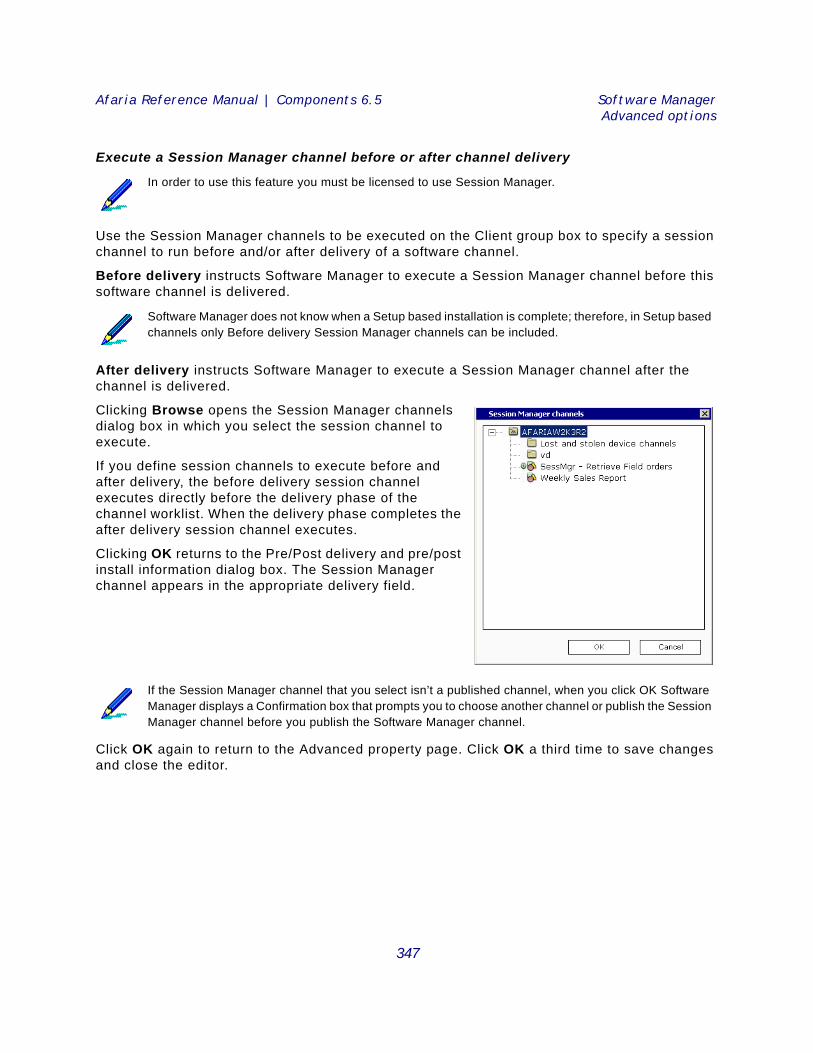
Afaria Reference Manual | Components 6.5 Software ManagerAdvanced options
Execute a Session Manager channel before or after channel delivery
Use the Session Manager channels to be executed on the Client group box to specify a session channel to run before and/or after delivery of a software channel.
Before delivery instructs Software Manager to execute a Session Manager channel before this software channel is delivered.
After delivery instructs Software Manager to execute a Session Manager channel after the channel is delivered.
Clicking Browse opens the Session Manager channels dialog box in which you select the session channel to execute.
If you define session channels to execute before and after delivery, the before delivery session channel executes directly before the delivery phase of the channel worklist. When the delivery phase completes the after delivery session channel executes.
Clicking OK returns to the Pre/Post delivery and pre/post install information dialog box. The Session Manager channel appears in the appropriate delivery field.
Click OK again to return to the Advanced property page. Click OK a third time to save changes and close the editor.
In order to use this feature you must be licensed to use Session Manager.
Software Manager does not know when a Setup based installation is complete; therefore, in Setup based channels only Before delivery Session Manager channels can be included.
If the Session Manager channel that you select isn’t a published channel, when you click OK Software Manager displays a Confirmation box that prompts you to choose another channel or publish the Session Manager channel before you publish the Software Manager channel.
347
Afaria Reference Manual | Components 6.5 Software ManagerAdvanced options
Execute programs at the Windows client
Use the Execution commands on Client group box to enter the absolute path and file name (at the client) of the program that you want to execute.
Before installation execution command occurs immediately before Software Manager begins channel installation.
After installation commands occur as soon as installation is complete.
Click OK to return to the Advanced property page. Click OK again to save changes and close the editor.
Display a message at the Windows client before or after installation
Use the Display messages on Client group box to enter a message before and/or after installation.
Before installation messages appear in the status dialog box prior to installation.
After installation messages appear in the status dialog box after installation has completed.
Click OK again to return to the Advanced property page. Click OK again to save changes and close the editor.
Define user rights on a Windows client
Some installations at a Windows client require the use of special privileges (or user rights) to complete a task. Windows uses an “impersonation” technique that allows Software Manager to temporarily possess the rights of another user account that can both copy and delete files or
Software Manager does not know when a Setup based installation is complete; therefore, in Setup based channels only Before installation execution commands can be included. In Non-Setup based channels, however, you can specify both before and after execution commands because Software Manager performs all of the installation services.
Software Manager will wait for any Before installation execution commands to complete before continuing with the installation.
Software Manager does not know when a Setup based installation is complete; therefore, in Setup based channels only Before installation execution commands can be included.
If you’ve selected None in the client installation status window group box on the Install property page, the Before installation and After installation fields will be unavailable. For details on setting installation options for a Windows client, see “Install options” on page 308.
The Segmentation property page appears for local based installations only. The Install success (to the right of Advanced) property page appears for Setup based installations only.
348
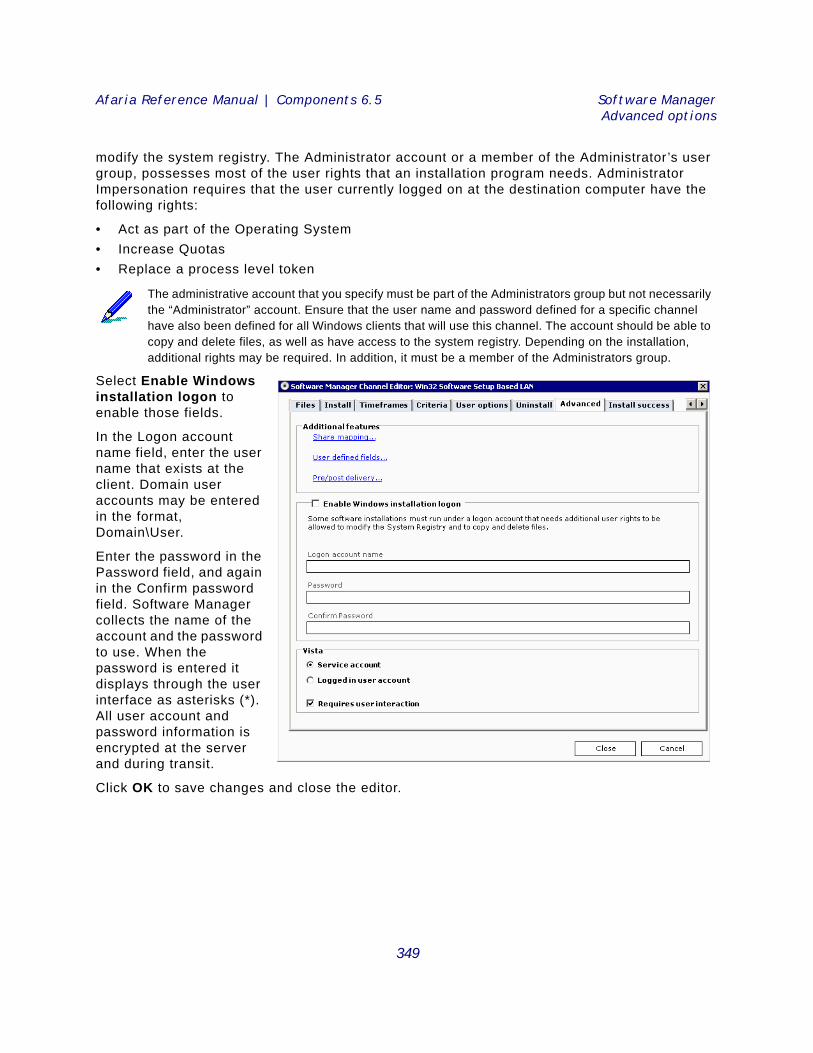
Afaria Reference Manual | Components 6.5 Software ManagerAdvanced options
modify the system registry. The Administrator account or a member of the Administrator’s user group, possesses most of the user rights that an installation program needs. Administrator Impersonation requires that the user currently logged on at the destination computer have the following rights:
• Act as part of the Operating System• Increase Quotas• Replace a process level token
Select Enable Windows installation logon to enable those fields.
In the Logon account name field, enter the user name that exists at the client. Domain user accounts may be entered in the format, Domain\User.
Enter the password in the Password field, and again in the Confirm password field. Software Manager collects the name of the account and the password to use. When the password is entered it displays through the user interface as asterisks (*). All user account and password information is encrypted at the server and during transit.
Click OK to save changes and close the editor.
The administrative account that you specify must be part of the Administrators group but not necessarily the “Administrator” account. Ensure that the user name and password defined for a specific channel have also been defined for all Windows clients that will use this channel. The account should be able to copy and delete files, as well as have access to the system registry. Depending on the installation, additional rights may be required. In addition, it must be a member of the Administrators group.
349
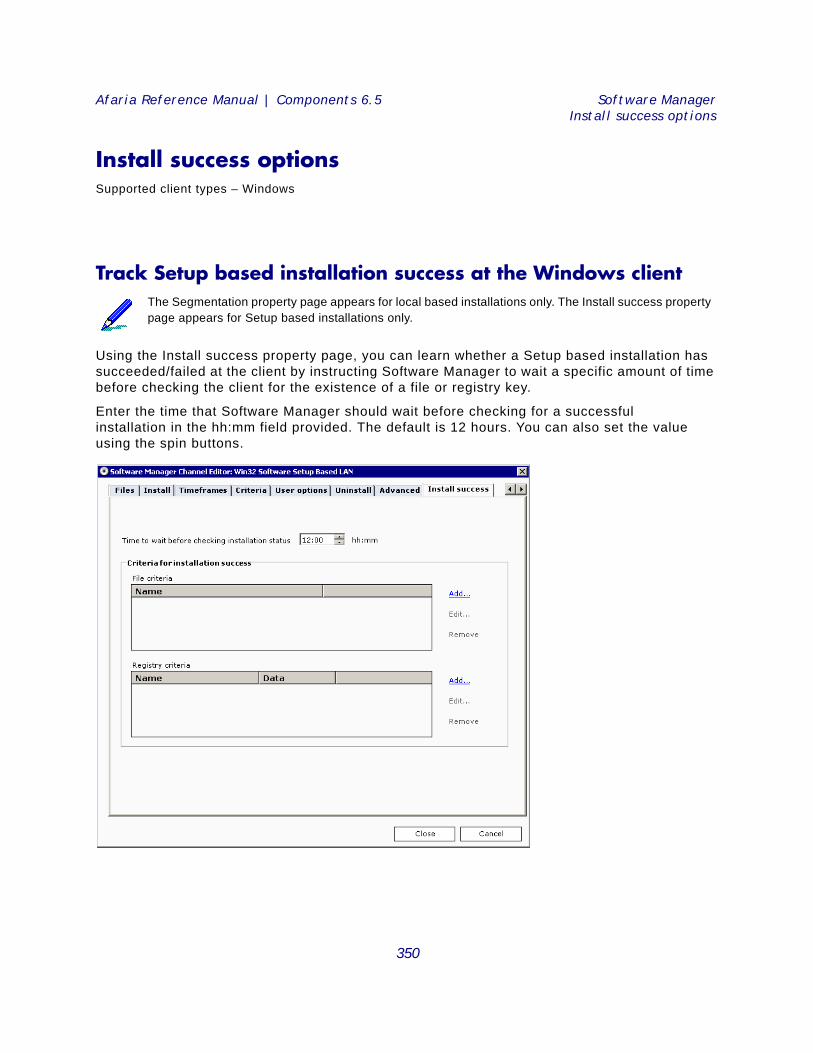
Afaria Reference Manual | Components 6.5 Software ManagerInstall success options
Install success optionsSupported client types – Windows
Track Setup based installation success at the Windows client
Using the Install success property page, you can learn whether a Setup based installation has succeeded/failed at the client by instructing Software Manager to wait a specific amount of time before checking the client for the existence of a file or registry key.
Enter the time that Software Manager should wait before checking for a successful installation in the hh:mm field provided. The default is 12 hours. You can also set the value using the spin buttons.
The Segmentation property page appears for local based installations only. The Install success property page appears for Setup based installations only.
350
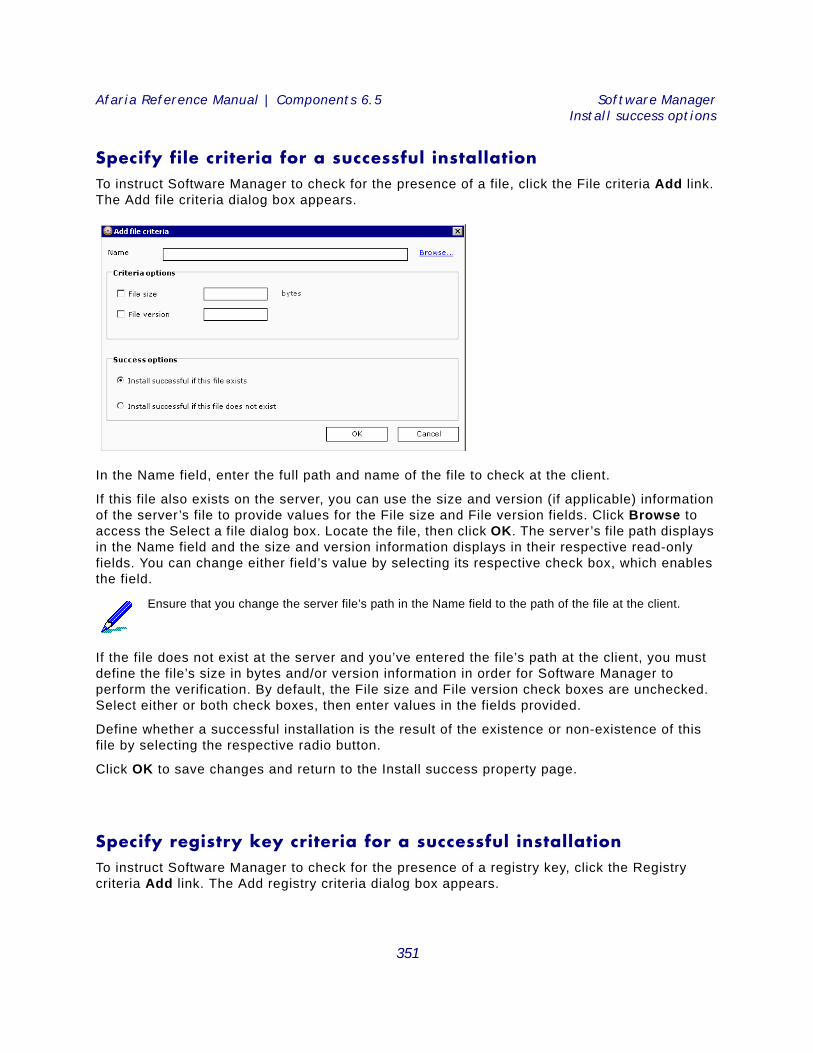
Afaria Reference Manual | Components 6.5 Software ManagerInstall success options
Specify file criteria for a successful installationTo instruct Software Manager to check for the presence of a file, click the File criteria Add link. The Add file criteria dialog box appears.
In the Name field, enter the full path and name of the file to check at the client.
If this file also exists on the server, you can use the size and version (if applicable) information of the server’s file to provide values for the File size and File version fields. Click Browse to access the Select a file dialog box. Locate the file, then click OK. The server’s file path displays in the Name field and the size and version information displays in their respective read-only fields. You can change either field’s value by selecting its respective check box, which enables the field.
If the file does not exist at the server and you’ve entered the file’s path at the client, you must define the file’s size in bytes and/or version information in order for Software Manager to perform the verification. By default, the File size and File version check boxes are unchecked. Select either or both check boxes, then enter values in the fields provided.
Define whether a successful installation is the result of the existence or non-existence of this file by selecting the respective radio button.
Click OK to save changes and return to the Install success property page.
Specify registry key criteria for a successful installationTo instruct Software Manager to check for the presence of a registry key, click the Registry criteria Add link. The Add registry criteria dialog box appears.
Ensure that you change the server file’s path in the Name field to the path of the file at the client.
351
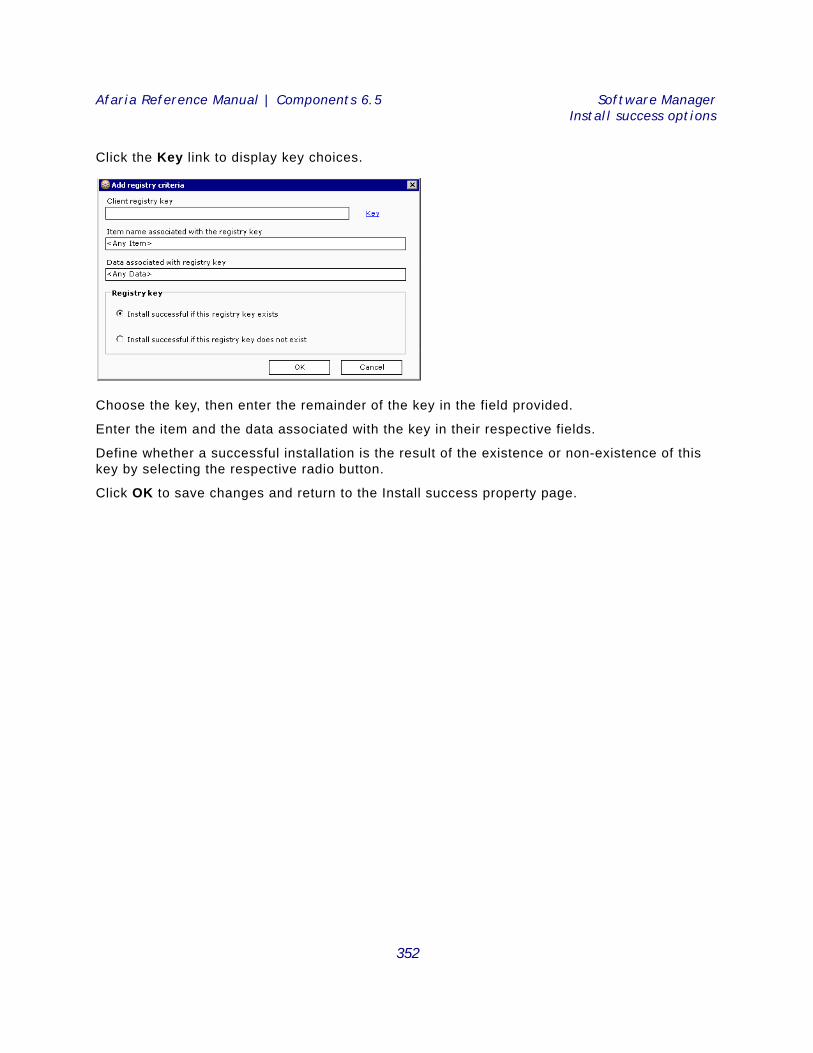
Afaria Reference Manual | Components 6.5 Software ManagerInstall success options
Click the Key link to display key choices.
Choose the key, then enter the remainder of the key in the field provided.
Enter the item and the data associated with the key in their respective fields.
Define whether a successful installation is the result of the existence or non-existence of this key by selecting the respective radio button.
Click OK to save changes and return to the Install success property page.
352
Afaria Reference Manual | Components 6.5 Software ManagerHow the Windows client user cleans up installation files
How the Windows client user cleans up installation filesClient users can perform two types of “cleanup” operations on Setup and Non-Setup, local based installations to remove unwanted or unnecessary installation files from their computers: Full and Normal.
Full cleanup removes all of the selected channel’s “control” files from the client computer, it does not remove an installed application. Control files are used to prevent Software Manager from re-sending the channel to the client. The two instances in which a client user would perform a Full cleanup are after the user:
• Downloads, but does not install the channel and then decides against performing the installation.
• Downloads and installs the channel, but the channel does not perform correctly so the user wants to re-receive and then re-install all of the channel files.
To perform a Full cleanup the client user must select an installed Software Manager channel in the left pane of Afaria Channel Viewer UI and in the right pane click the Cleanup button. In the Cleanup Choices dialog box that appears the client user must select Full – Remove all channel files. After clicking OK Software Manager deletes all files associated with the selected channel.
After the client user performs a Full cleanup, the Details property page (Channel Viewer UI) Status section displays the following data:
• Install disabled: Full Cleanup has been performed.
• Cleanup disabled: Full Cleanup has been performed.
If you include a notes file in a Setup, local based installation, performing a cleanup removes the file.
The Cleanup button is disabled for all LAN based installations.
Before performing a Full cleanup, the client user must first cancel the channel subscription to avoid re-receiving it during the next connection to the server.
The Cleanup button will be unavailable at the client if any of the following statements are true:• the client user has already performed a Full Cleanup on the selected channel• the channel is LAN based• there are no channel files in the staging area• channel file delivery is incomplete or in progress• an installation or cleanup is in progress
353
Afaria Reference Manual | Components 6.5 Software ManagerHow the Windows client user cleans up installation files
Normal cleanup removes channel data from the client computer but leaves control over channel delivery to Software Manager. When the client user receives a local based channel from the server, its contents are placed in a temporary staging area until it’s installed. After installation, and after the client user is sure that the application runs properly, Normal cleanup removes the temporary files from the staging area and frees up disk space. Non-Setup based installations automatically perform this type cleanup after the channel is successfully installed.
To perform a Normal cleanup the client user must select an installed Software Manager channel in the left pane of Afaria Channel Viewer UI and in the right pane click the Cleanup button. In the Cleanup Choices dialog box that appears the client user must select Normal – Remove temporary channel files. After clicking OK Software Manager deletes all temporary files associated with the selected channel.
After the client user performs a Normal cleanup, the Details property page (Channel Viewer UI) Status section displays the following data:
• Install disabled: No package files are present.
• This package is available for cleanup.
If the channel is still subscribed and the client user performs a Normal cleanup, they’ll re-receive only updates to channel files the next time they connect to the server.
If the client user has performed a Full cleanup for a selected channel, then the Cleanup button is disabled for that channel.
The Cleanup button remains available after performing a Normal cleanup.
354
A
Session Manager events and variablesSession Manager events and variables enable you to build worklists and sendlists for managing your
Afaria Clients. Use this appendix as a reference when working with Session Manager channels.
See “Session Manager” on page 251 for general Session Manager information.
355
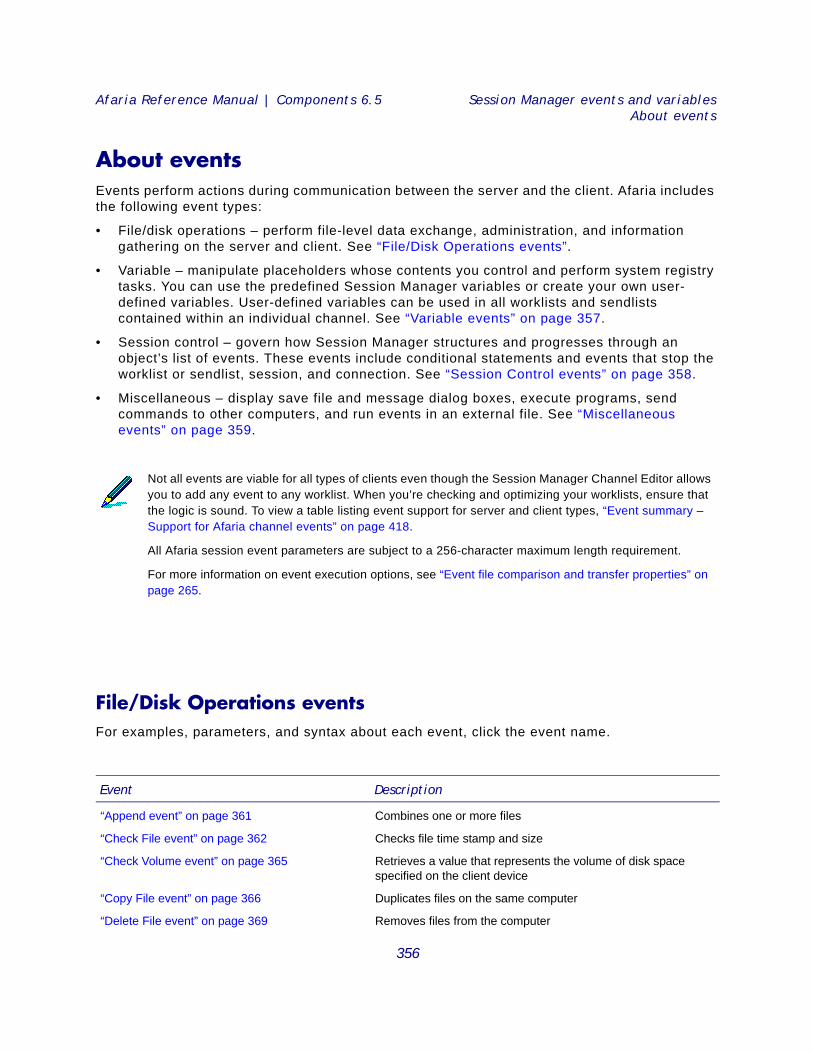
Afaria Reference Manual | Components 6.5 Session Manager events and variablesAbout events
About eventsEvents perform actions during communication between the server and the client. Afaria includes the following event types:
• File/disk operations – perform file-level data exchange, administration, and information gathering on the server and client. See “File/Disk Operations events”.
• Variable – manipulate placeholders whose contents you control and perform system registry tasks. You can use the predefined Session Manager variables or create your own user-defined variables. User-defined variables can be used in all worklists and sendlists contained within an individual channel. See “Variable events” on page 357.
• Session control – govern how Session Manager structures and progresses through an object’s list of events. These events include conditional statements and events that stop the worklist or sendlist, session, and connection. See “Session Control events” on page 358.
• Miscellaneous – display save file and message dialog boxes, execute programs, send commands to other computers, and run events in an external file. See “Miscellaneous events” on page 359.
File/Disk Operations eventsFor examples, parameters, and syntax about each event, click the event name.
Not all events are viable for all types of clients even though the Session Manager Channel Editor allows you to add any event to any worklist. When you’re checking and optimizing your worklists, ensure that the logic is sound. To view a table listing event support for server and client types, “Event summary – Support for Afaria channel events” on page 418.
All Afaria session event parameters are subject to a 256-character maximum length requirement.
For more information on event execution options, see “Event file comparison and transfer properties” on page 265.
Event Description
“Append event” on page 361 Combines one or more files
“Check File event” on page 362 Checks file time stamp and size
“Check Volume event” on page 365 Retrieves a value that represents the volume of disk space specified on the client device
“Copy File event” on page 366 Duplicates files on the same computer
“Delete File event” on page 369 Removes files from the computer
356
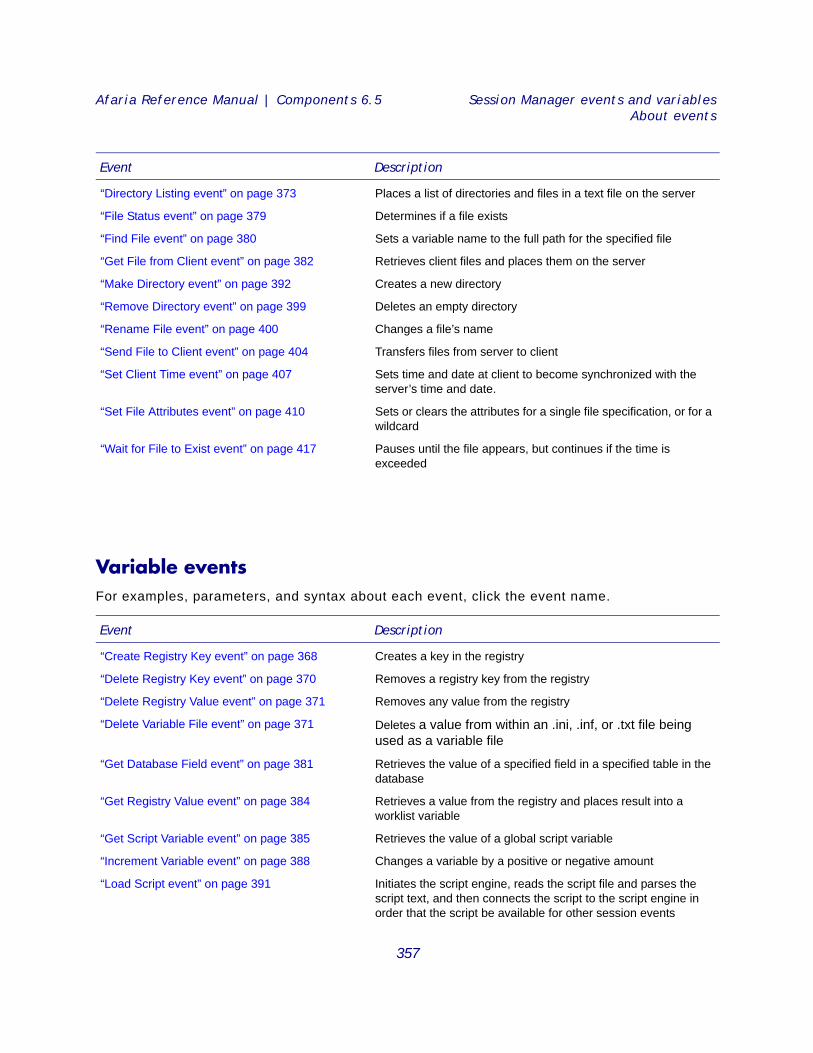
Afaria Reference Manual | Components 6.5 Session Manager events and variablesAbout events
Variable eventsFor examples, parameters, and syntax about each event, click the event name.
“Directory Listing event” on page 373 Places a list of directories and files in a text file on the server
“File Status event” on page 379 Determines if a file exists
“Find File event” on page 380 Sets a variable name to the full path for the specified file
“Get File from Client event” on page 382 Retrieves client files and places them on the server
“Make Directory event” on page 392 Creates a new directory
“Remove Directory event” on page 399 Deletes an empty directory
“Rename File event” on page 400 Changes a file’s name
“Send File to Client event” on page 404 Transfers files from server to client
“Set Client Time event” on page 407 Sets time and date at client to become synchronized with the server’s time and date.
“Set File Attributes event” on page 410 Sets or clears the attributes for a single file specification, or for a wildcard
“Wait for File to Exist event” on page 417 Pauses until the file appears, but continues if the time is exceeded
Event Description
Event Description
“Create Registry Key event” on page 368 Creates a key in the registry
“Delete Registry Key event” on page 370 Removes a registry key from the registry
“Delete Registry Value event” on page 371 Removes any value from the registry
“Delete Variable File event” on page 371 Deletes a value from within an .ini, .inf, or .txt file being used as a variable file
“Get Database Field event” on page 381 Retrieves the value of a specified field in a specified table in the database
“Get Registry Value event” on page 384 Retrieves a value from the registry and places result into a worklist variable
“Get Script Variable event” on page 385 Retrieves the value of a global script variable
“Increment Variable event” on page 388 Changes a variable by a positive or negative amount
“Load Script event” on page 391 Initiates the script engine, reads the script file and parses the script text, and then connects the script to the script engine in order that the script be available for other session events
357
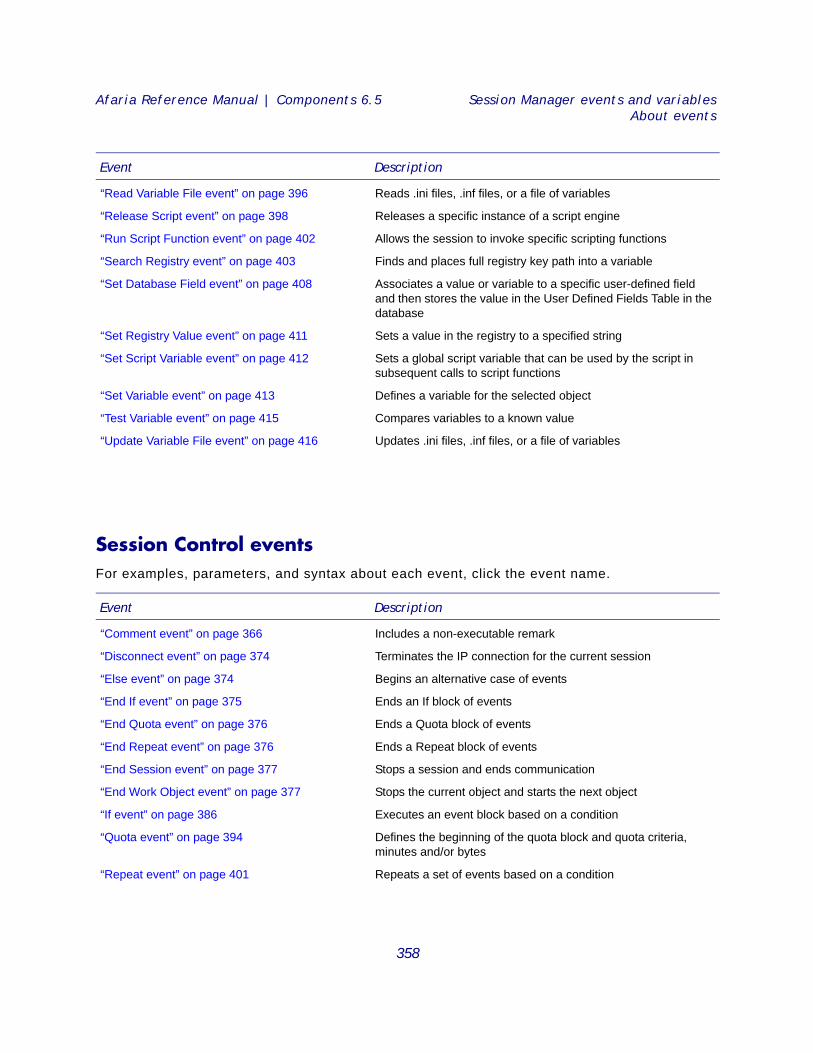
Afaria Reference Manual | Components 6.5 Session Manager events and variablesAbout events
Session Control eventsFor examples, parameters, and syntax about each event, click the event name.
“Read Variable File event” on page 396 Reads .ini files, .inf files, or a file of variables
“Release Script event” on page 398 Releases a specific instance of a script engine
“Run Script Function event” on page 402 Allows the session to invoke specific scripting functions
“Search Registry event” on page 403 Finds and places full registry key path into a variable
“Set Database Field event” on page 408 Associates a value or variable to a specific user-defined field and then stores the value in the User Defined Fields Table in the database
“Set Registry Value event” on page 411 Sets a value in the registry to a specified string
“Set Script Variable event” on page 412 Sets a global script variable that can be used by the script in subsequent calls to script functions
“Set Variable event” on page 413 Defines a variable for the selected object
“Test Variable event” on page 415 Compares variables to a known value
“Update Variable File event” on page 416 Updates .ini files, .inf files, or a file of variables
Event Description
Event Description
“Comment event” on page 366 Includes a non-executable remark
“Disconnect event” on page 374 Terminates the IP connection for the current session
“Else event” on page 374 Begins an alternative case of events
“End If event” on page 375 Ends an If block of events
“End Quota event” on page 376 Ends a Quota block of events
“End Repeat event” on page 376 Ends a Repeat block of events
“End Session event” on page 377 Stops a session and ends communication
“End Work Object event” on page 377 Stops the current object and starts the next object
“If event” on page 386 Executes an event block based on a condition
“Quota event” on page 394 Defines the beginning of the quota block and quota criteria, minutes and/or bytes
“Repeat event” on page 401 Repeats a set of events based on a condition
358
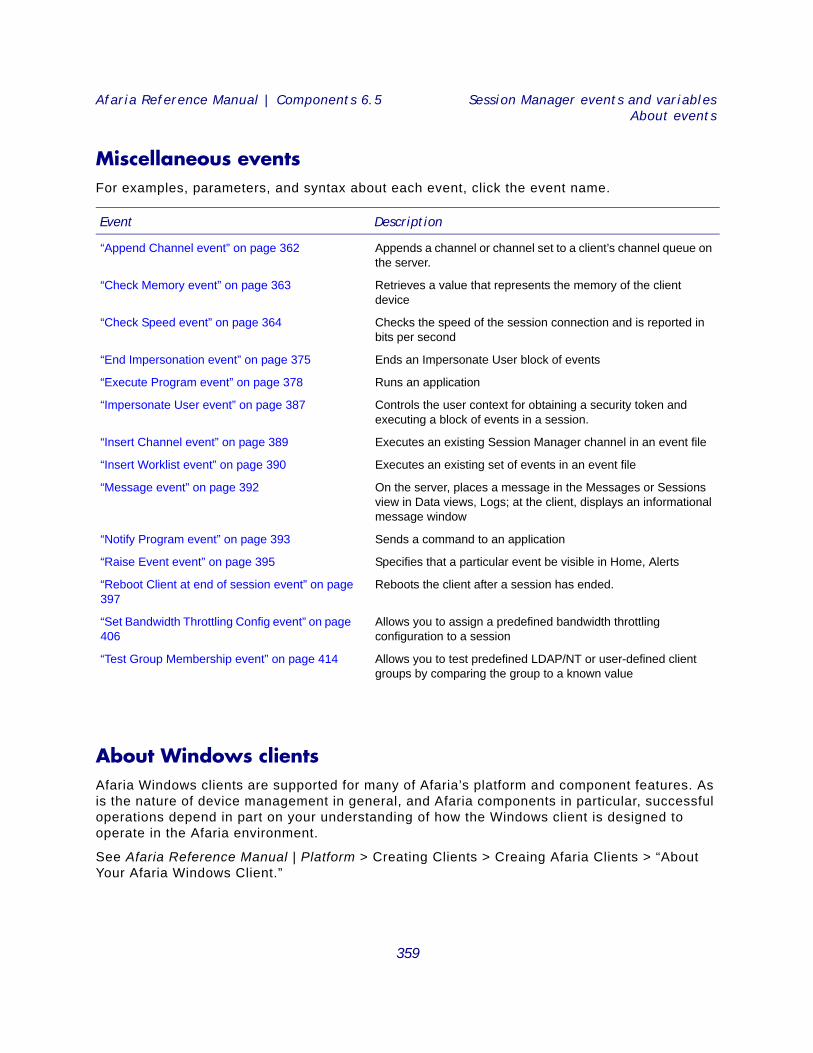
Afaria Reference Manual | Components 6.5 Session Manager events and variablesAbout events
Miscellaneous eventsFor examples, parameters, and syntax about each event, click the event name.
About Windows clients Afaria Windows clients are supported for many of Afaria’s platform and component features. As is the nature of device management in general, and Afaria components in particular, successful operations depend in part on your understanding of how the Windows client is designed to operate in the Afaria environment.
See Afaria Reference Manual | Platform > Creating Clients > Creaing Afaria Clients > “About Your Afaria Windows Client.”
Event Description
“Append Channel event” on page 362 Appends a channel or channel set to a client’s channel queue on the server.
“Check Memory event” on page 363 Retrieves a value that represents the memory of the client device
“Check Speed event” on page 364 Checks the speed of the session connection and is reported in bits per second
“End Impersonation event” on page 375 Ends an Impersonate User block of events
“Execute Program event” on page 378 Runs an application
“Impersonate User event” on page 387 Controls the user context for obtaining a security token and executing a block of events in a session.
“Insert Channel event” on page 389 Executes an existing Session Manager channel in an event file
“Insert Worklist event” on page 390 Executes an existing set of events in an event file
“Message event” on page 392 On the server, places a message in the Messages or Sessions view in Data views, Logs; at the client, displays an informational message window
“Notify Program event” on page 393 Sends a command to an application
“Raise Event event” on page 395 Specifies that a particular event be visible in Home, Alerts
“Reboot Client at end of session event” on page 397
Reboots the client after a session has ended.
“Set Bandwidth Throttling Config event” on page 406
Allows you to assign a predefined bandwidth throttling configuration to a session
“Test Group Membership event” on page 414 Allows you to test predefined LDAP/NT or user-defined client groups by comparing the group to a known value
359
Afaria Reference Manual | Components 6.5 Session Manager events and variablesEvent list
Event list The following topics describe all Afaria events including their syntax and supported options.
• See “Define event properties” on page 262 for more information about event properties. • See “Event summary – Support for Afaria channel events” on page 418 for a summarized table of
events that indicates event support for the Afaria Server and each Afaria client type.
360

Afaria Reference Manual | Components 6.5 Session Manager events and variablesEvent list
Append event
Item Description
Description Use the Append event to add the contents of one or more files to the end of another file. To add this event to a worklist, double-click Append File in the Events list.
Event Specific Fields Source file name or wildcard. The path name, file name, or wildcard parameter for one or more files to be appended to the destination file. Click the Browse link to choose a server file, or enter the path name and file name in this field.Target file name. Specifies the name of the file to which the source file is being added. Click the Browse link to choose a file, or enter the path and file name in this field.
Syntax [Param 1] Source file name. Example: C:\Docs\*.*[Param 2] Target file name. Example: C:\DailyDocs\Daily.txt
Options Delete after (-)Make target pathInclude subdirectoriesConditional (True/False)Execution: NormalExecution: Not required for successful session [x]Execution: Channel critical event [+]Execution: Session critical event [*]
Server/client availability “Append File” on page 418
Remarks The Append event requires two parameters, source and destination file names. The event copies the entire contents of the source file to the end of the destination file. The destination file may or may not exist. The event fails if the source and destination are the same.For Windows clients and the server, the Append event allows both:- Append test.txt TO *.*- Append *.* TO test.txt Supports the “Make target path” option, which establishes a target path for the event and creates directories when necessary.
The Append event adds disk I/O time, which is needed to process the command at the client. You may be able to save several minutes per session by letting the application do most of the heavy work and having all the data at the client ready before the session runs.
When using wildcards, the “include subdirectories” option is used for the first parameter. Many source files in multiple subdirectories can be appended to a single destination file, but, a source file that is appended to a wildcard destination will not include subdirectories.
Returned Value N/A
361
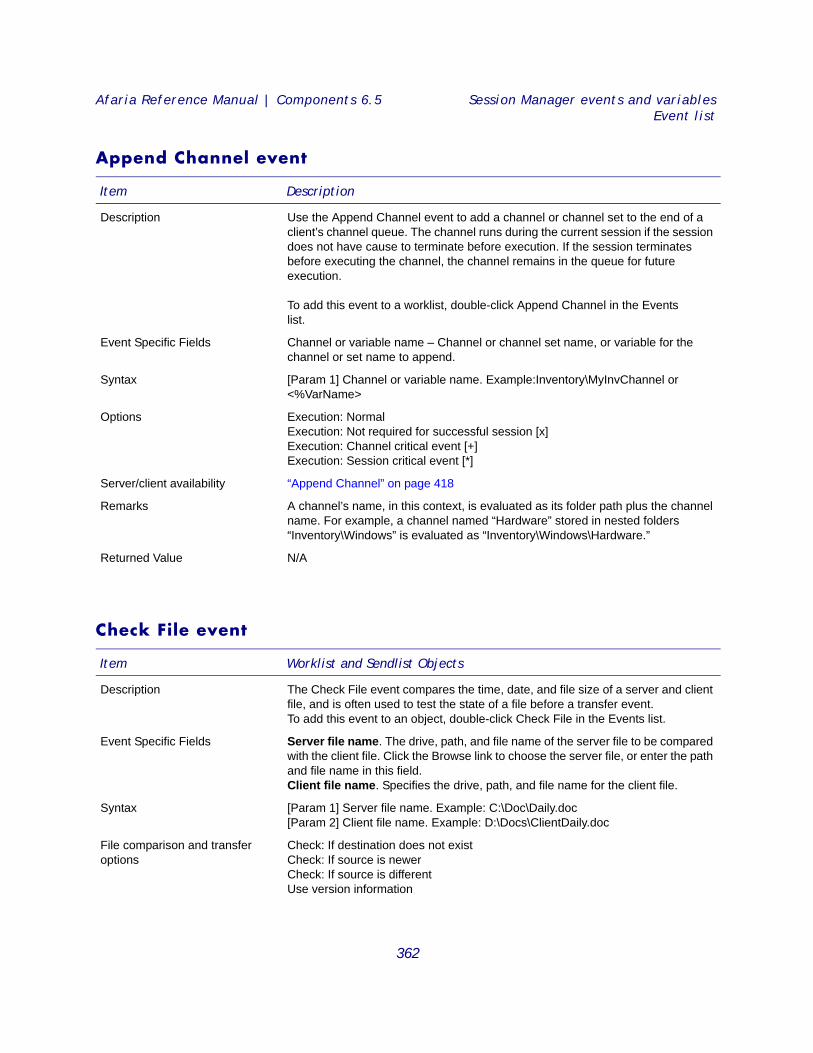
Afaria Reference Manual | Components 6.5 Session Manager events and variablesEvent list
Append Channel event
Check File event
Item Description
Description Use the Append Channel event to add a channel or channel set to the end of a client’s channel queue. The channel runs during the current session if the session does not have cause to terminate before execution. If the session terminates before executing the channel, the channel remains in the queue for future execution.
To add this event to a worklist, double-click Append Channel in the Events list.
Event Specific Fields Channel or variable name – Channel or channel set name, or variable for the channel or set name to append.
Syntax [Param 1] Channel or variable name. Example:Inventory\MyInvChannel or <%VarName>
Options Execution: NormalExecution: Not required for successful session [x]Execution: Channel critical event [+]Execution: Session critical event [*]
Server/client availability “Append Channel” on page 418
Remarks A channel’s name, in this context, is evaluated as its folder path plus the channel name. For example, a channel named “Hardware” stored in nested folders “Inventory\Windows” is evaluated as “Inventory\Windows\Hardware.”
Returned Value N/A
Item Worklist and Sendlist Objects
Description The Check File event compares the time, date, and file size of a server and client file, and is often used to test the state of a file before a transfer event. To add this event to an object, double-click Check File in the Events list.
Event Specific Fields Server file name. The drive, path, and file name of the server file to be compared with the client file. Click the Browse link to choose the server file, or enter the path and file name in this field.Client file name. Specifies the drive, path, and file name for the client file.
Syntax [Param 1] Server file name. Example: C:\Doc\Daily.doc [Param 2] Client file name. Example: D:\Docs\ClientDaily.doc
File comparison and transfer options
Check: If destination does not existCheck: If source is newerCheck: If source is differentUse version information
362
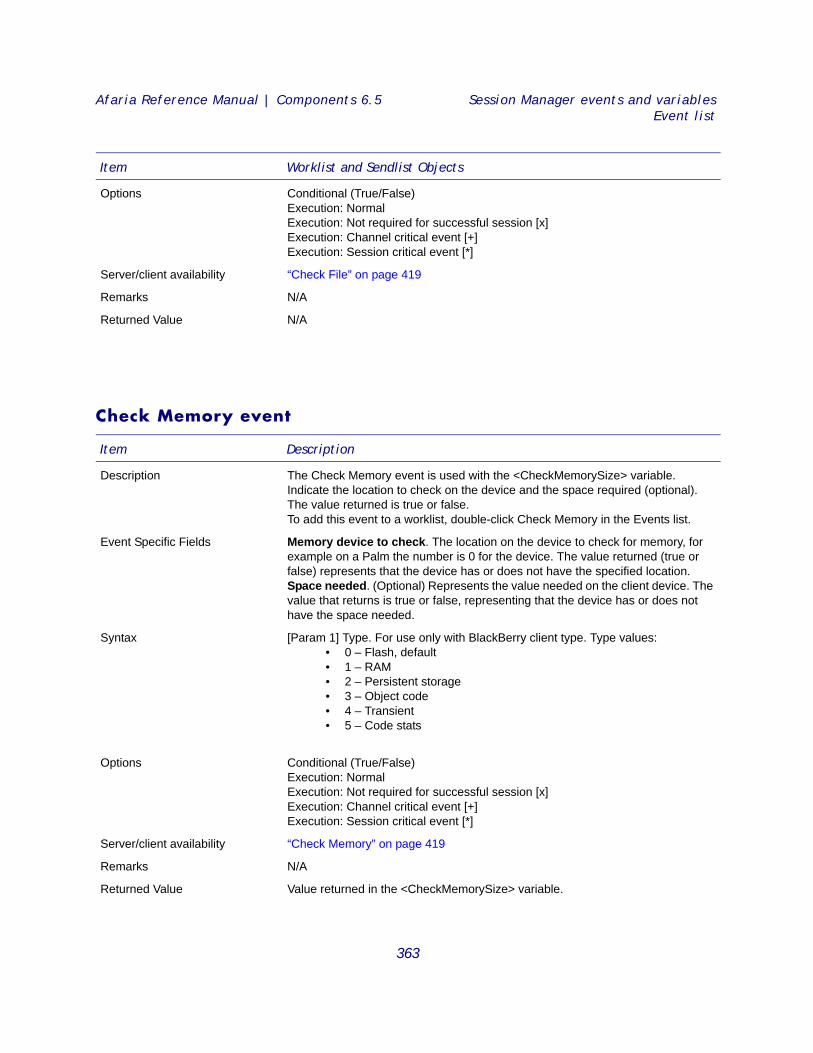
Afaria Reference Manual | Components 6.5 Session Manager events and variablesEvent list
Check Memory event
Options Conditional (True/False)Execution: NormalExecution: Not required for successful session [x]Execution: Channel critical event [+]Execution: Session critical event [*]
Server/client availability “Check File” on page 419
Remarks N/A
Returned Value N/A
Item Worklist and Sendlist Objects
Item Description
Description The Check Memory event is used with the <CheckMemorySize> variable. Indicate the location to check on the device and the space required (optional). The value returned is true or false. To add this event to a worklist, double-click Check Memory in the Events list.
Event Specific Fields Memory device to check. The location on the device to check for memory, for example on a Palm the number is 0 for the device. The value returned (true or false) represents that the device has or does not have the specified location.Space needed. (Optional) Represents the value needed on the client device. The value that returns is true or false, representing that the device has or does not have the space needed.
Syntax [Param 1] Type. For use only with BlackBerry client type. Type values: • 0 – Flash, default • 1 – RAM• 2 – Persistent storage • 3 – Object code • 4 – Transient • 5 – Code stats
Options Conditional (True/False)Execution: NormalExecution: Not required for successful session [x]Execution: Channel critical event [+]Execution: Session critical event [*]
Server/client availability “Check Memory” on page 419
Remarks N/A
Returned Value Value returned in the <CheckMemorySize> variable.
363
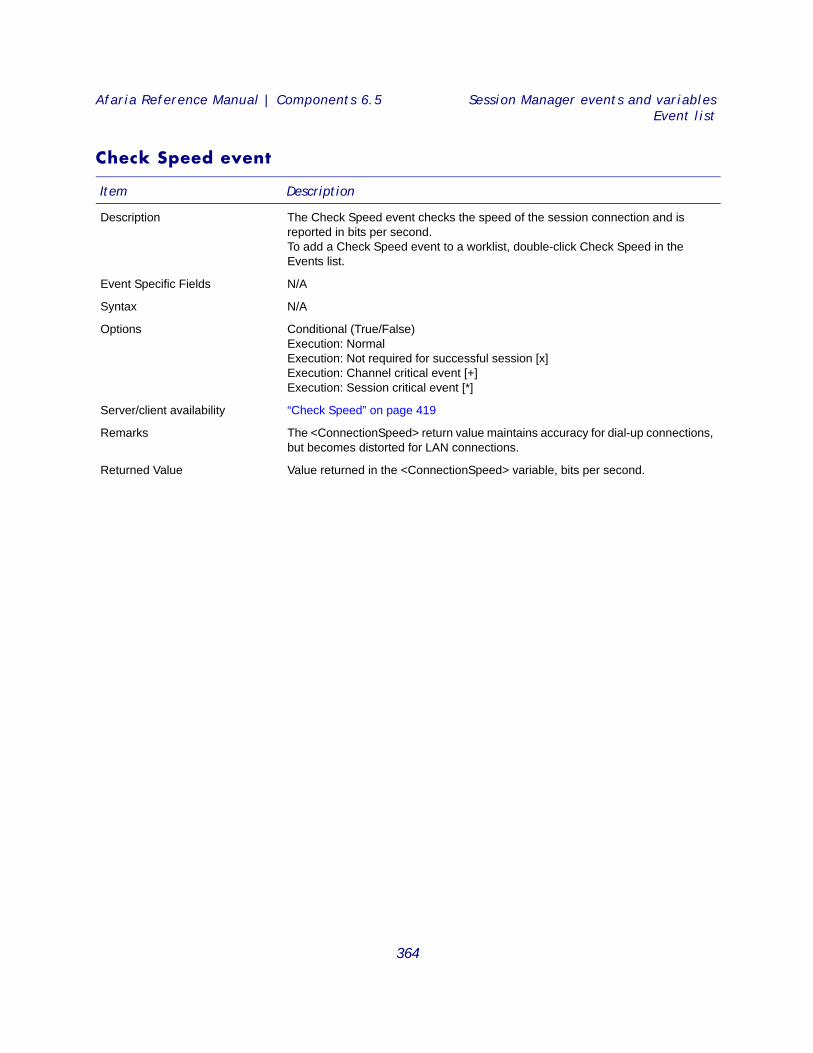
Afaria Reference Manual | Components 6.5 Session Manager events and variablesEvent list
Check Speed event
Item Description
Description The Check Speed event checks the speed of the session connection and is reported in bits per second. To add a Check Speed event to a worklist, double-click Check Speed in the Events list.
Event Specific Fields N/A
Syntax N/A
Options Conditional (True/False)Execution: NormalExecution: Not required for successful session [x]Execution: Channel critical event [+]Execution: Session critical event [*]
Server/client availability “Check Speed” on page 419
Remarks The <ConnectionSpeed> return value maintains accuracy for dial-up connections, but becomes distorted for LAN connections.
Returned Value Value returned in the <ConnectionSpeed> variable, bits per second.
364
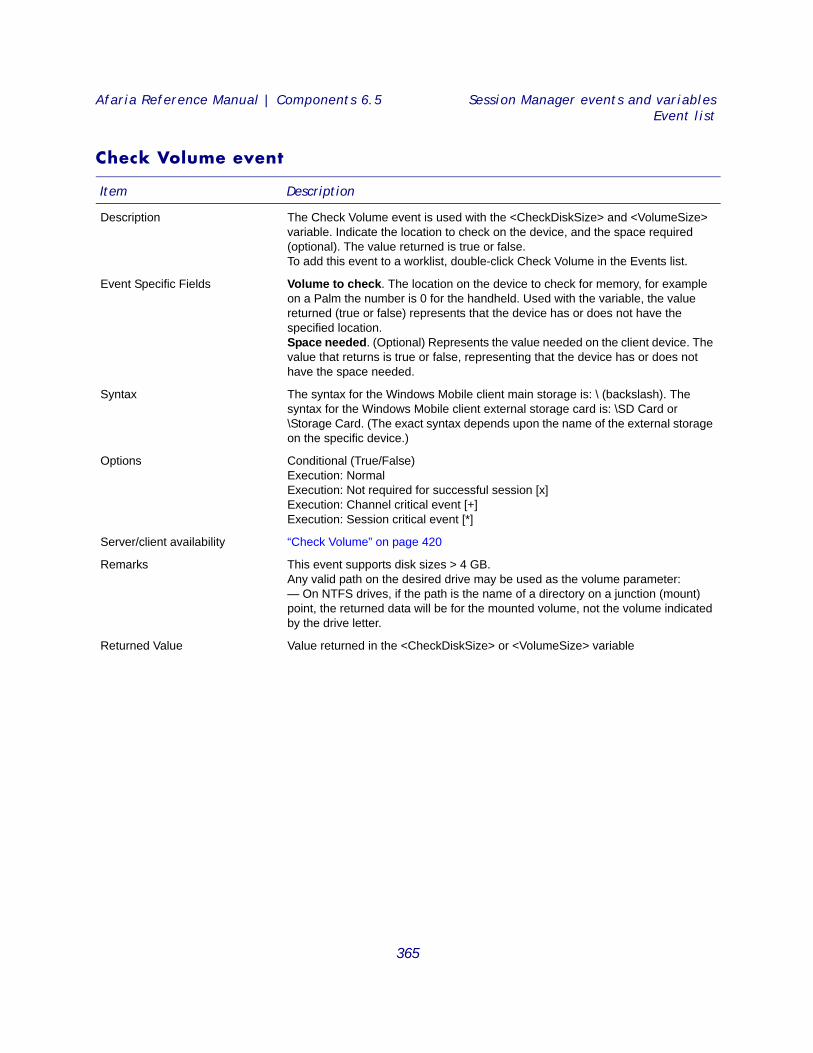
Afaria Reference Manual | Components 6.5 Session Manager events and variablesEvent list
Check Volume event
Item Description
Description The Check Volume event is used with the <CheckDiskSize> and <VolumeSize> variable. Indicate the location to check on the device, and the space required (optional). The value returned is true or false. To add this event to a worklist, double-click Check Volume in the Events list.
Event Specific Fields Volume to check. The location on the device to check for memory, for example on a Palm the number is 0 for the handheld. Used with the variable, the value returned (true or false) represents that the device has or does not have the specified location.Space needed. (Optional) Represents the value needed on the client device. The value that returns is true or false, representing that the device has or does not have the space needed.
Syntax The syntax for the Windows Mobile client main storage is: \ (backslash). The syntax for the Windows Mobile client external storage card is: \SD Card or \Storage Card. (The exact syntax depends upon the name of the external storage on the specific device.)
Options Conditional (True/False)Execution: NormalExecution: Not required for successful session [x]Execution: Channel critical event [+]Execution: Session critical event [*]
Server/client availability “Check Volume” on page 420
Remarks This event supports disk sizes > 4 GB. Any valid path on the desired drive may be used as the volume parameter:— On NTFS drives, if the path is the name of a directory on a junction (mount) point, the returned data will be for the mounted volume, not the volume indicated by the drive letter.
Returned Value Value returned in the <CheckDiskSize> or <VolumeSize> variable
365
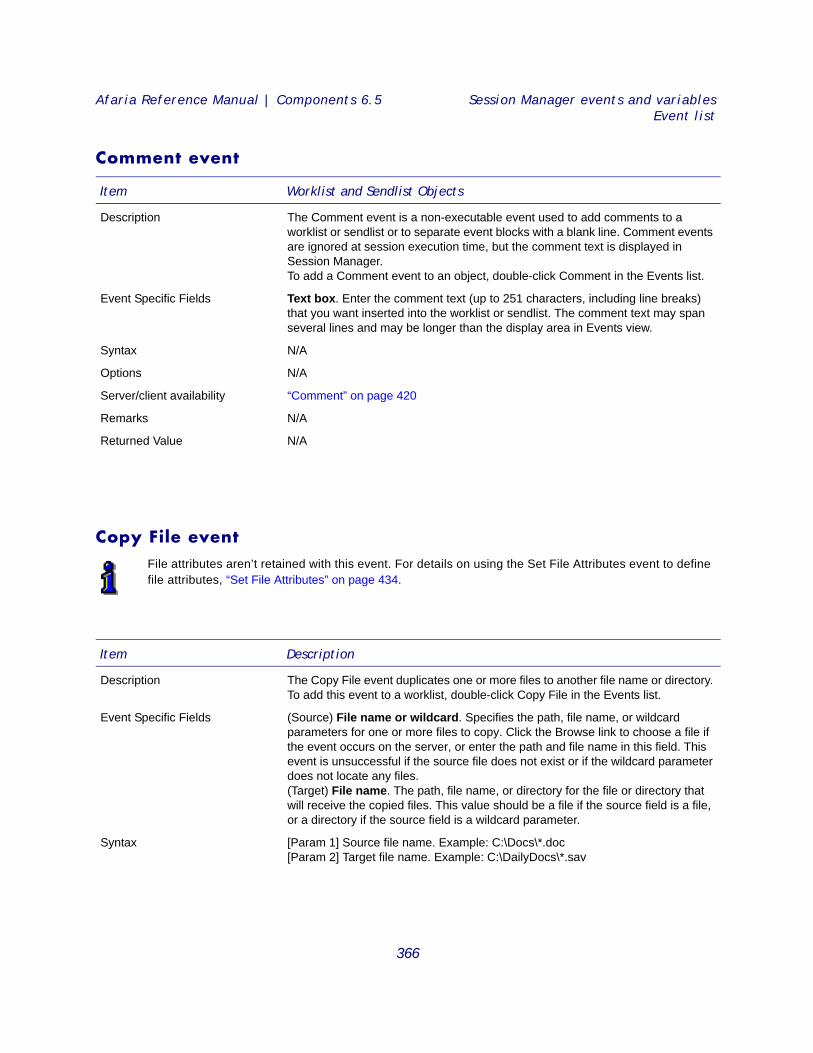
Afaria Reference Manual | Components 6.5 Session Manager events and variablesEvent list
Comment event
Copy File event
Item Worklist and Sendlist Objects
Description The Comment event is a non-executable event used to add comments to a worklist or sendlist or to separate event blocks with a blank line. Comment events are ignored at session execution time, but the comment text is displayed in Session Manager. To add a Comment event to an object, double-click Comment in the Events list.
Event Specific Fields Text box. Enter the comment text (up to 251 characters, including line breaks) that you want inserted into the worklist or sendlist. The comment text may span several lines and may be longer than the display area in Events view.
Syntax N/A
Options N/A
Server/client availability “Comment” on page 420
Remarks N/A
Returned Value N/A
File attributes aren’t retained with this event. For details on using the Set File Attributes event to define file attributes, “Set File Attributes” on page 434.
Item Description
Description The Copy File event duplicates one or more files to another file name or directory. To add this event to a worklist, double-click Copy File in the Events list.
Event Specific Fields (Source) File name or wildcard. Specifies the path, file name, or wildcard parameters for one or more files to copy. Click the Browse link to choose a file if the event occurs on the server, or enter the path and file name in this field. This event is unsuccessful if the source file does not exist or if the wildcard parameter does not locate any files. (Target) File name. The path, file name, or directory for the file or directory that will receive the copied files. This value should be a file if the source field is a file, or a directory if the source field is a wildcard parameter.
Syntax [Param 1] Source file name. Example: C:\Docs\*.doc[Param 2] Target file name. Example: C:\DailyDocs\*.sav
366
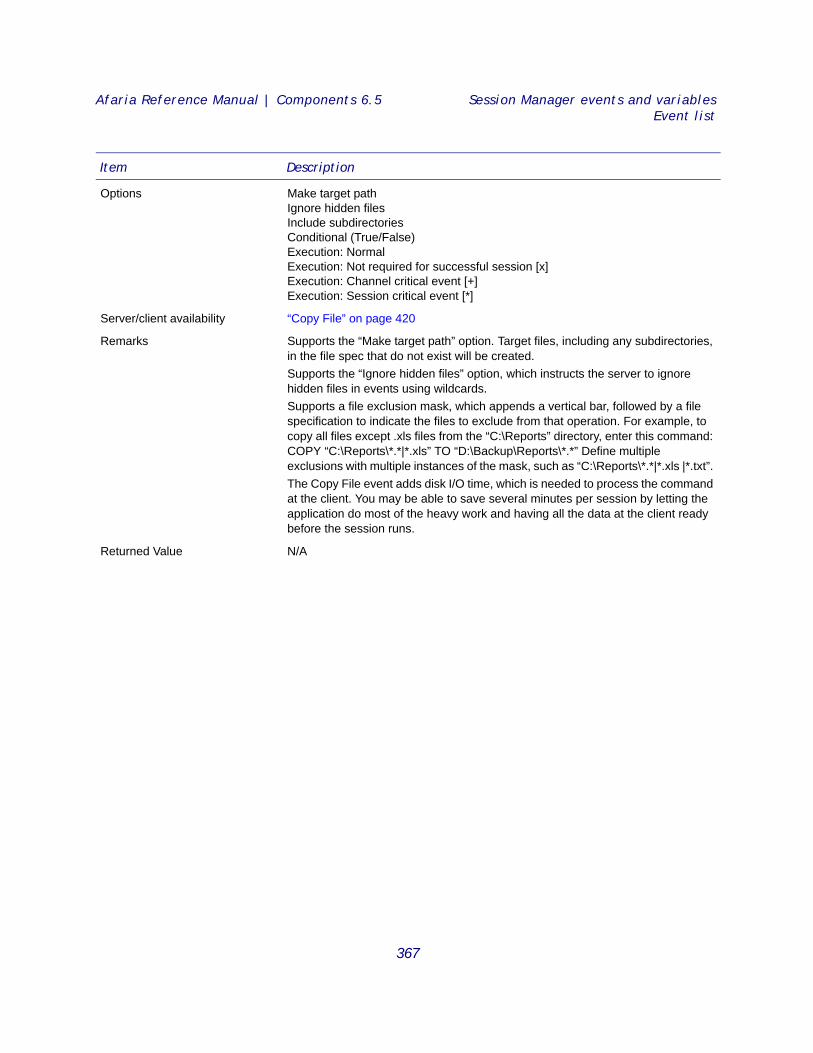
Afaria Reference Manual | Components 6.5 Session Manager events and variablesEvent list
Options Make target pathIgnore hidden filesInclude subdirectoriesConditional (True/False)Execution: NormalExecution: Not required for successful session [x]Execution: Channel critical event [+]Execution: Session critical event [*]
Server/client availability “Copy File” on page 420
Remarks Supports the “Make target path” option. Target files, including any subdirectories, in the file spec that do not exist will be created.Supports the “Ignore hidden files” option, which instructs the server to ignore hidden files in events using wildcards.Supports a file exclusion mask, which appends a vertical bar, followed by a file specification to indicate the files to exclude from that operation. For example, to copy all files except .xls files from the “C:\Reports” directory, enter this command: COPY “C:\Reports\*.*|*.xls” TO “D:\Backup\Reports\*.*” Define multiple exclusions with multiple instances of the mask, such as “C:\Reports\*.*|*.xls |*.txt”. The Copy File event adds disk I/O time, which is needed to process the command at the client. You may be able to save several minutes per session by letting the application do most of the heavy work and having all the data at the client ready before the session runs.
Returned Value N/A
Item Description
367

Afaria Reference Manual | Components 6.5 Session Manager events and variablesEvent list
Create Registry Key event
Item Description
Description The Create Registry Key event creates a new key in the registry. To add this event to a worklist, double-click Create Registry Key in the Events list.
Event Specific Fields Root key\key1\keyN. The complete path and name of the key to be added.
Syntax [Param 1] Registry path and key name. Example: HKLM\Software\Key
Options Make target pathConditional (True/False)Execution: NormalExecution: Not required for successful session [x]Execution: Channel critical event [+]Execution: Session critical event [*]
Server/client availability “Create Registry Key” on page 421
Remarks Supports the “Make target path” option. Target files, including any subdirectories, in the file spec that do not exist will be created.This event will fail if the parameter isn’t a valid registry path or if the specified key already exists.Windows CE does not ship with a registry editor but third party applications are available.
Returned Value N/A
368
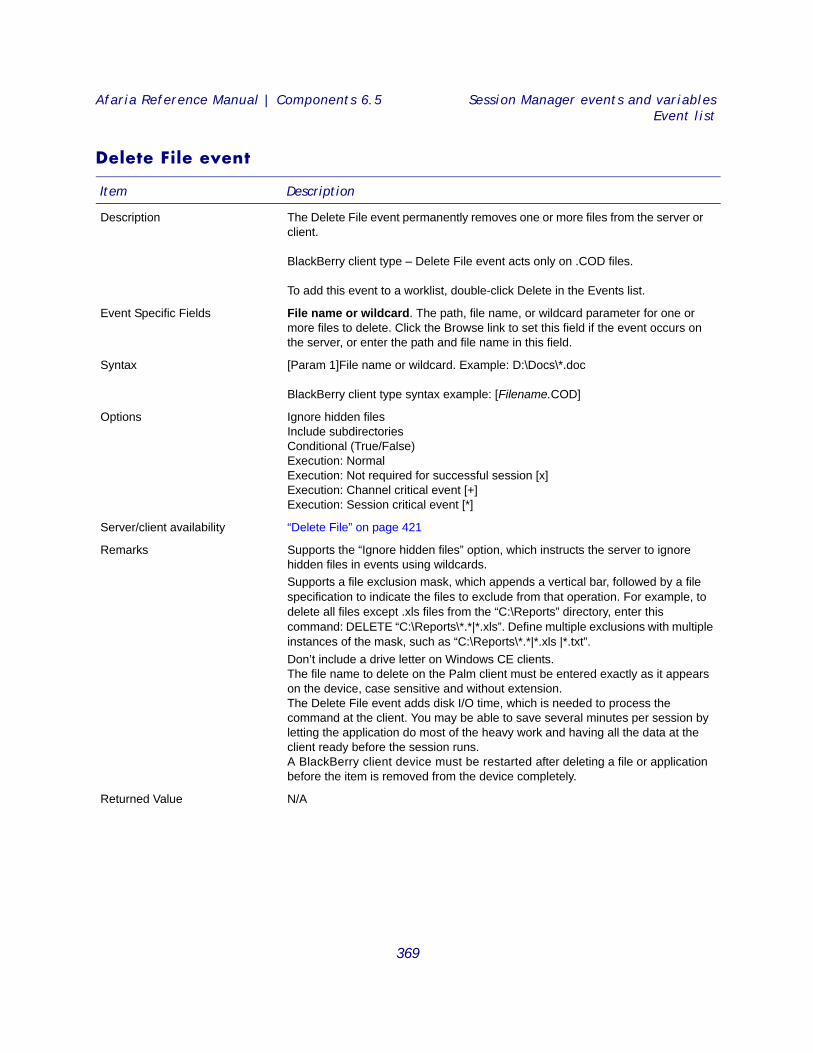
Afaria Reference Manual | Components 6.5 Session Manager events and variablesEvent list
Delete File event
Item Description
Description The Delete File event permanently removes one or more files from the server or client.
BlackBerry client type – Delete File event acts only on .COD files.
To add this event to a worklist, double-click Delete in the Events list.
Event Specific Fields File name or wildcard. The path, file name, or wildcard parameter for one or more files to delete. Click the Browse link to set this field if the event occurs on the server, or enter the path and file name in this field.
Syntax [Param 1]File name or wildcard. Example: D:\Docs\*.doc
BlackBerry client type syntax example: [Filename.COD]
Options Ignore hidden filesInclude subdirectoriesConditional (True/False)Execution: NormalExecution: Not required for successful session [x]Execution: Channel critical event [+]Execution: Session critical event [*]
Server/client availability “Delete File” on page 421
Remarks Supports the “Ignore hidden files” option, which instructs the server to ignore hidden files in events using wildcards.Supports a file exclusion mask, which appends a vertical bar, followed by a file specification to indicate the files to exclude from that operation. For example, to delete all files except .xls files from the “C:\Reports” directory, enter this command: DELETE “C:\Reports\*.*|*.xls”. Define multiple exclusions with multiple instances of the mask, such as “C:\Reports\*.*|*.xls |*.txt”. Don’t include a drive letter on Windows CE clients.The file name to delete on the Palm client must be entered exactly as it appears on the device, case sensitive and without extension.The Delete File event adds disk I/O time, which is needed to process the command at the client. You may be able to save several minutes per session by letting the application do most of the heavy work and having all the data at the client ready before the session runs. A BlackBerry client device must be restarted after deleting a file or application before the item is removed from the device completely.
Returned Value N/A
369
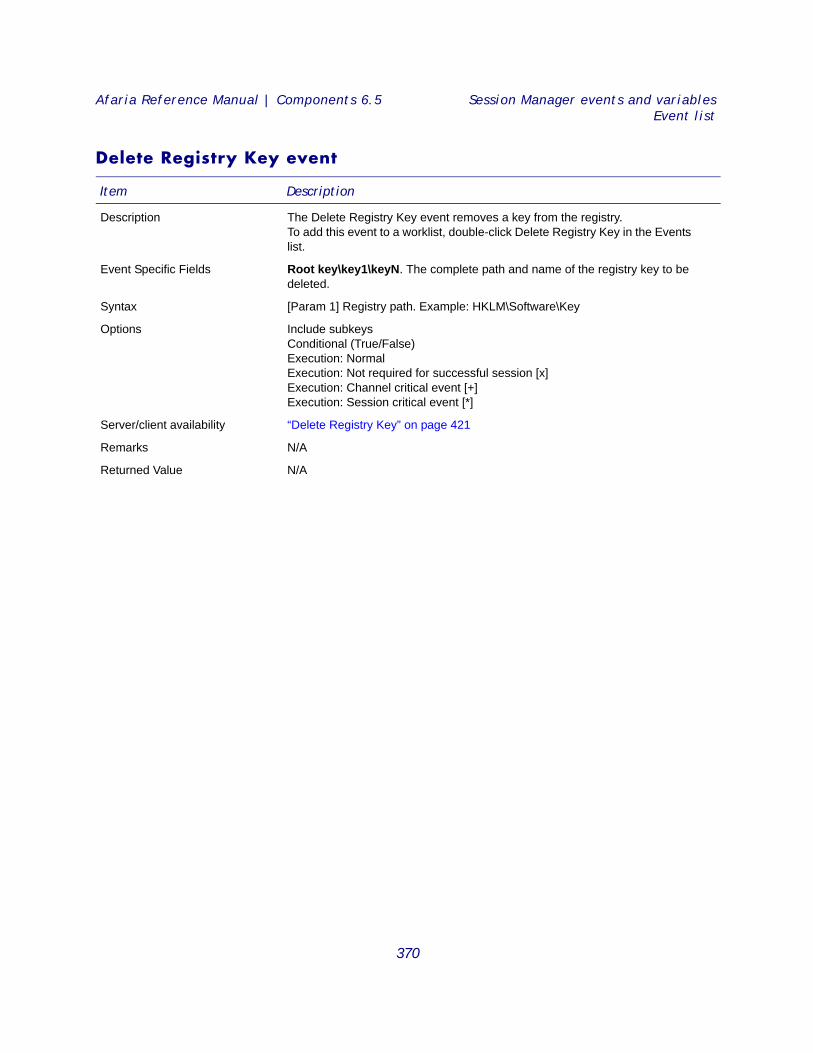
Afaria Reference Manual | Components 6.5 Session Manager events and variablesEvent list
Delete Registry Key event
Item Description
Description The Delete Registry Key event removes a key from the registry. To add this event to a worklist, double-click Delete Registry Key in the Events list.
Event Specific Fields Root key\key1\keyN. The complete path and name of the registry key to be deleted.
Syntax [Param 1] Registry path. Example: HKLM\Software\Key
Options Include subkeysConditional (True/False)Execution: NormalExecution: Not required for successful session [x]Execution: Channel critical event [+]Execution: Session critical event [*]
Server/client availability “Delete Registry Key” on page 421
Remarks N/A
Returned Value N/A
370
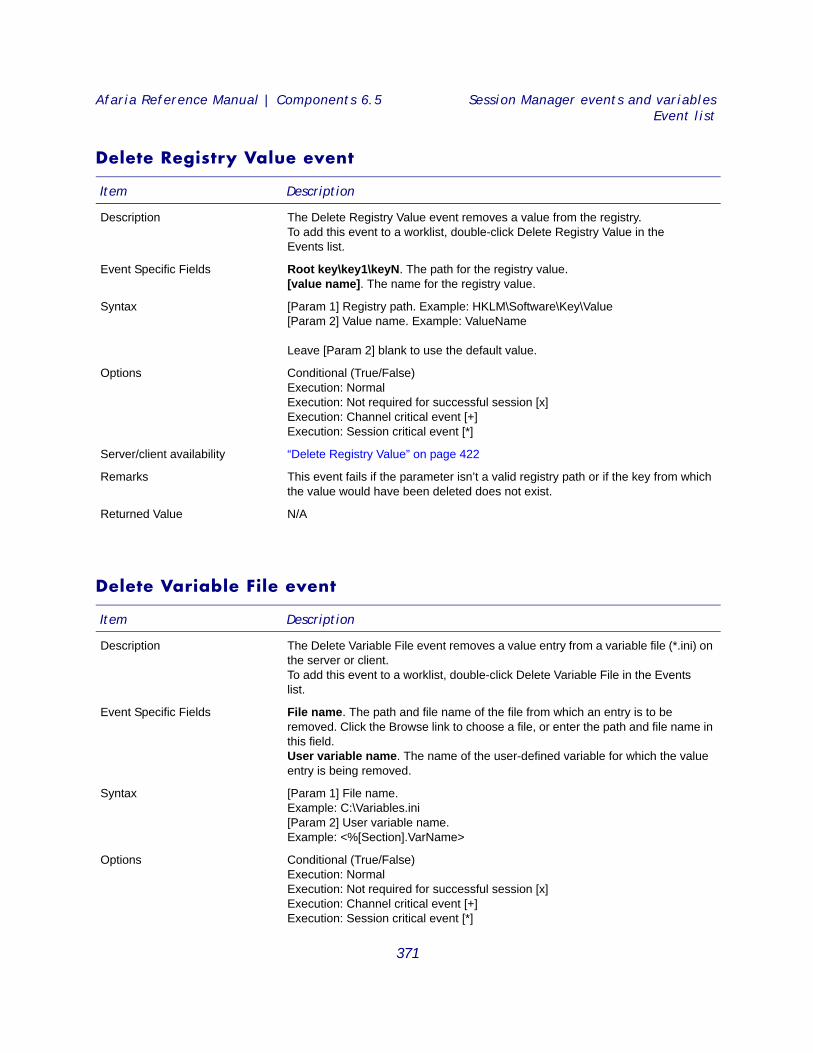
Afaria Reference Manual | Components 6.5 Session Manager events and variablesEvent list
Delete Registry Value event
Delete Variable File event
Item Description
Description The Delete Registry Value event removes a value from the registry. To add this event to a worklist, double-click Delete Registry Value in the Events list.
Event Specific Fields Root key\key1\keyN. The path for the registry value. [value name]. The name for the registry value.
Syntax [Param 1] Registry path. Example: HKLM\Software\Key\Value [Param 2] Value name. Example: ValueName
Leave [Param 2] blank to use the default value.
Options Conditional (True/False)Execution: NormalExecution: Not required for successful session [x]Execution: Channel critical event [+]Execution: Session critical event [*]
Server/client availability “Delete Registry Value” on page 422
Remarks This event fails if the parameter isn’t a valid registry path or if the key from which the value would have been deleted does not exist.
Returned Value N/A
Item Description
Description The Delete Variable File event removes a value entry from a variable file (*.ini) on the server or client. To add this event to a worklist, double-click Delete Variable File in the Events list.
Event Specific Fields File name. The path and file name of the file from which an entry is to be removed. Click the Browse link to choose a file, or enter the path and file name in this field. User variable name. The name of the user-defined variable for which the value entry is being removed.
Syntax [Param 1] File name. Example: C:\Variables.ini[Param 2] User variable name. Example: <%[Section].VarName>
Options Conditional (True/False)Execution: NormalExecution: Not required for successful session [x]Execution: Channel critical event [+]Execution: Session critical event [*]
371
Afaria Reference Manual | Components 6.5 Session Manager events and variablesEvent list
Server/client availability “Delete Variable File” on page 422
Remarks N/A
Returned Value N/A
Item Description
372
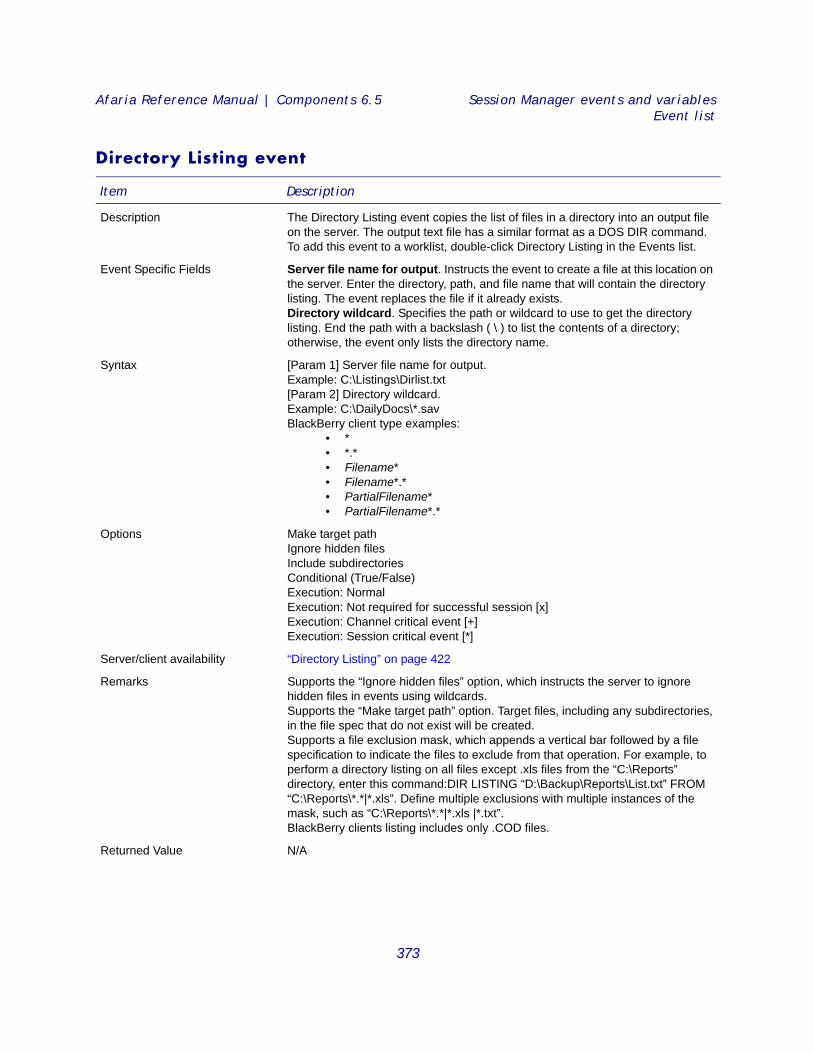
Afaria Reference Manual | Components 6.5 Session Manager events and variablesEvent list
Directory Listing event
Item Description
Description The Directory Listing event copies the list of files in a directory into an output file on the server. The output text file has a similar format as a DOS DIR command. To add this event to a worklist, double-click Directory Listing in the Events list.
Event Specific Fields Server file name for output. Instructs the event to create a file at this location on the server. Enter the directory, path, and file name that will contain the directory listing. The event replaces the file if it already exists.Directory wildcard. Specifies the path or wildcard to use to get the directory listing. End the path with a backslash ( \ ) to list the contents of a directory; otherwise, the event only lists the directory name.
Syntax [Param 1] Server file name for output.Example: C:\Listings\Dirlist.txt[Param 2] Directory wildcard.Example: C:\DailyDocs\*.sav BlackBerry client type examples:
• * • *.* • Filename* • Filename*.* • PartialFilename* • PartialFilename*.*
Options Make target pathIgnore hidden filesInclude subdirectoriesConditional (True/False)Execution: NormalExecution: Not required for successful session [x]Execution: Channel critical event [+]Execution: Session critical event [*]
Server/client availability “Directory Listing” on page 422
Remarks Supports the “Ignore hidden files” option, which instructs the server to ignore hidden files in events using wildcards.Supports the “Make target path” option. Target files, including any subdirectories, in the file spec that do not exist will be created.Supports a file exclusion mask, which appends a vertical bar followed by a file specification to indicate the files to exclude from that operation. For example, to perform a directory listing on all files except .xls files from the “C:\Reports” directory, enter this command:DIR LISTING “D:\Backup\Reports\List.txt” FROM “C:\Reports\*.*|*.xls”. Define multiple exclusions with multiple instances of the mask, such as “C:\Reports\*.*|*.xls |*.txt”. BlackBerry clients listing includes only .COD files.
Returned Value N/A
373
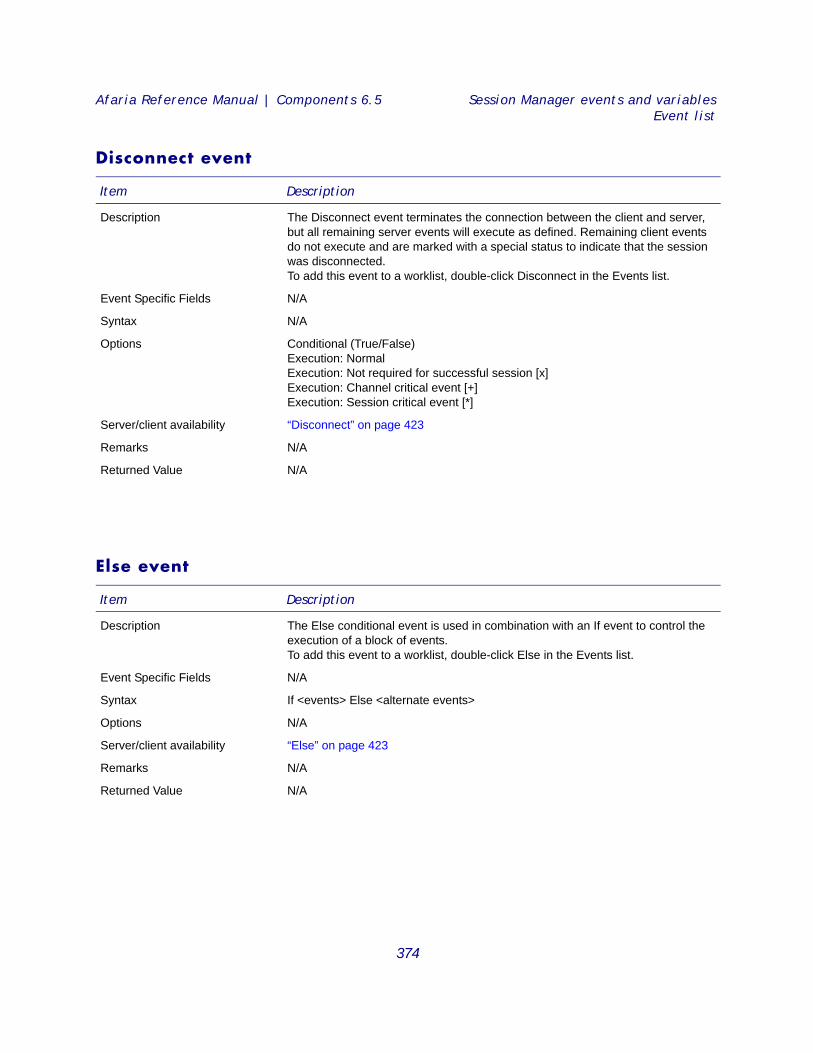
Afaria Reference Manual | Components 6.5 Session Manager events and variablesEvent list
Disconnect event
Else event
Item Description
Description The Disconnect event terminates the connection between the client and server, but all remaining server events will execute as defined. Remaining client events do not execute and are marked with a special status to indicate that the session was disconnected. To add this event to a worklist, double-click Disconnect in the Events list.
Event Specific Fields N/A
Syntax N/A
Options Conditional (True/False)Execution: NormalExecution: Not required for successful session [x]Execution: Channel critical event [+]Execution: Session critical event [*]
Server/client availability “Disconnect” on page 423
Remarks N/A
Returned Value N/A
Item Description
Description The Else conditional event is used in combination with an If event to control the execution of a block of events. To add this event to a worklist, double-click Else in the Events list.
Event Specific Fields N/A
Syntax If <events> Else <alternate events>
Options N/A
Server/client availability “Else” on page 423
Remarks N/A
Returned Value N/A
374
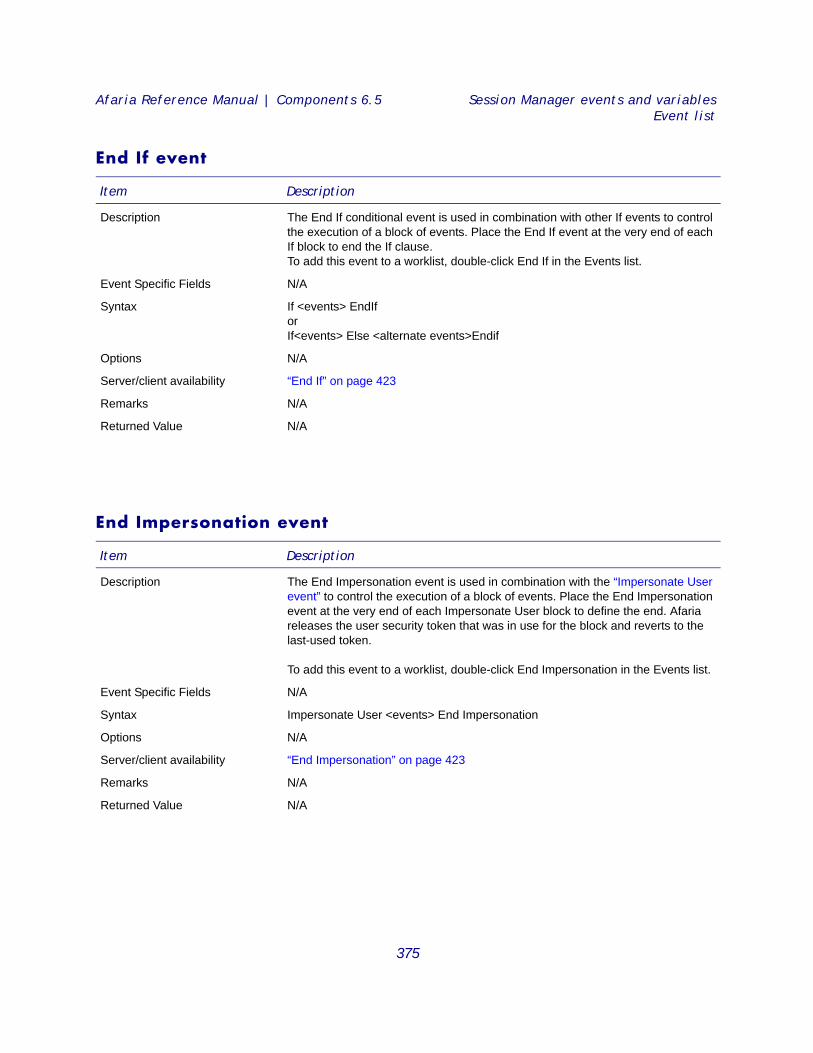
Afaria Reference Manual | Components 6.5 Session Manager events and variablesEvent list
End If event
End Impersonation event
Item Description
Description The End If conditional event is used in combination with other If events to control the execution of a block of events. Place the End If event at the very end of each If block to end the If clause. To add this event to a worklist, double-click End If in the Events list.
Event Specific Fields N/A
Syntax If <events> EndIf orIf<events> Else <alternate events>Endif
Options N/A
Server/client availability “End If” on page 423
Remarks N/A
Returned Value N/A
Item Description
Description The End Impersonation event is used in combination with the “Impersonate User event” to control the execution of a block of events. Place the End Impersonation event at the very end of each Impersonate User block to define the end. Afaria releases the user security token that was in use for the block and reverts to the last-used token.
To add this event to a worklist, double-click End Impersonation in the Events list.
Event Specific Fields N/A
Syntax Impersonate User <events> End Impersonation
Options N/A
Server/client availability “End Impersonation” on page 423
Remarks N/A
Returned Value N/A
375

Afaria Reference Manual | Components 6.5 Session Manager events and variablesEvent list
End Quota event
End Repeat event
Item Description
Description One of two Quota events that wrap a block of file transfer events together by a specified time or byte limit in an individual session. Using the Quota events, the server counts the time or bytes spent on the events that are wrapped by the Quota event, then stops processing the events when the defined time or byte limit is met, even if the limit is met during the middle of an individual file transmission. The next time that the client connects to the server, the server continues processing the wrapped events starting at the exact place in the events, or file, where it stopped in the previous session.To add this event to a worklist, double-click End Quota in the Events list.
Server/client availability “End Quota” on page 423
Event Specific Fields N/A
Syntax Quota <send events> End Quota
Options N/A
Remarks Worklist execution below the End Quota event resumes on two conditions:• The nested SEND events have completed. The flag file specified in the
Quota event is created.• The quota is met or exceeded. Execution is passed to subsequent events
once the last block is transferred. All necessary parameters for resuming uncompleted SEND events are set at this time.
Returned Value N/A
Item Description
Description The End Repeat conditional event is used with the Repeat event to mark the end of a Repeat block of events. Place End Repeat events at the end of each Repeat event. To add this event to a worklist, double-click End Repeat in the Events list.
Event Specific Fields N/A
Syntax Repeat <events> End Repeat
Options N/A
Server/client availability “End Repeat” on page 423
Remarks N/A
Returned Value N/A
376
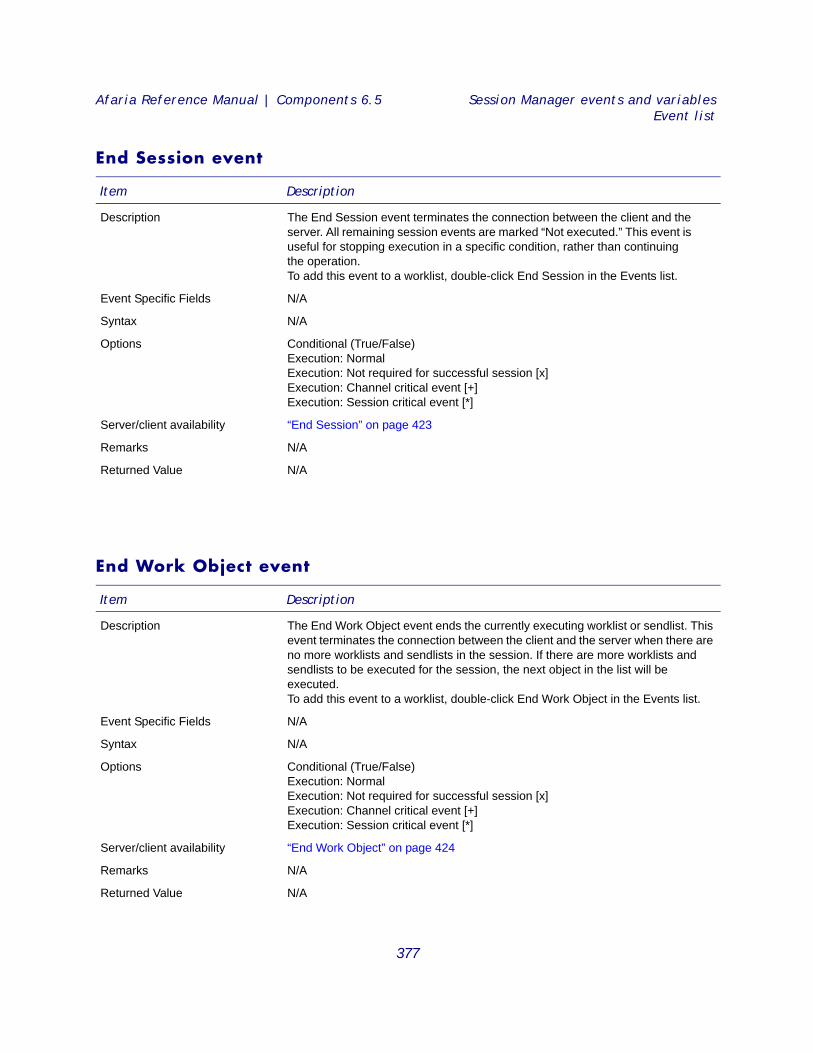
Afaria Reference Manual | Components 6.5 Session Manager events and variablesEvent list
End Session event
End Work Object event
Item Description
Description The End Session event terminates the connection between the client and the server. All remaining session events are marked “Not executed.” This event is useful for stopping execution in a specific condition, rather than continuing the operation. To add this event to a worklist, double-click End Session in the Events list.
Event Specific Fields N/A
Syntax N/A
Options Conditional (True/False)Execution: NormalExecution: Not required for successful session [x]Execution: Channel critical event [+]Execution: Session critical event [*]
Server/client availability “End Session” on page 423
Remarks N/A
Returned Value N/A
Item Description
Description The End Work Object event ends the currently executing worklist or sendlist. This event terminates the connection between the client and the server when there are no more worklists and sendlists in the session. If there are more worklists and sendlists to be executed for the session, the next object in the list will be executed.To add this event to a worklist, double-click End Work Object in the Events list.
Event Specific Fields N/A
Syntax N/A
Options Conditional (True/False)Execution: NormalExecution: Not required for successful session [x]Execution: Channel critical event [+]Execution: Session critical event [*]
Server/client availability “End Work Object” on page 424
Remarks N/A
Returned Value N/A
377
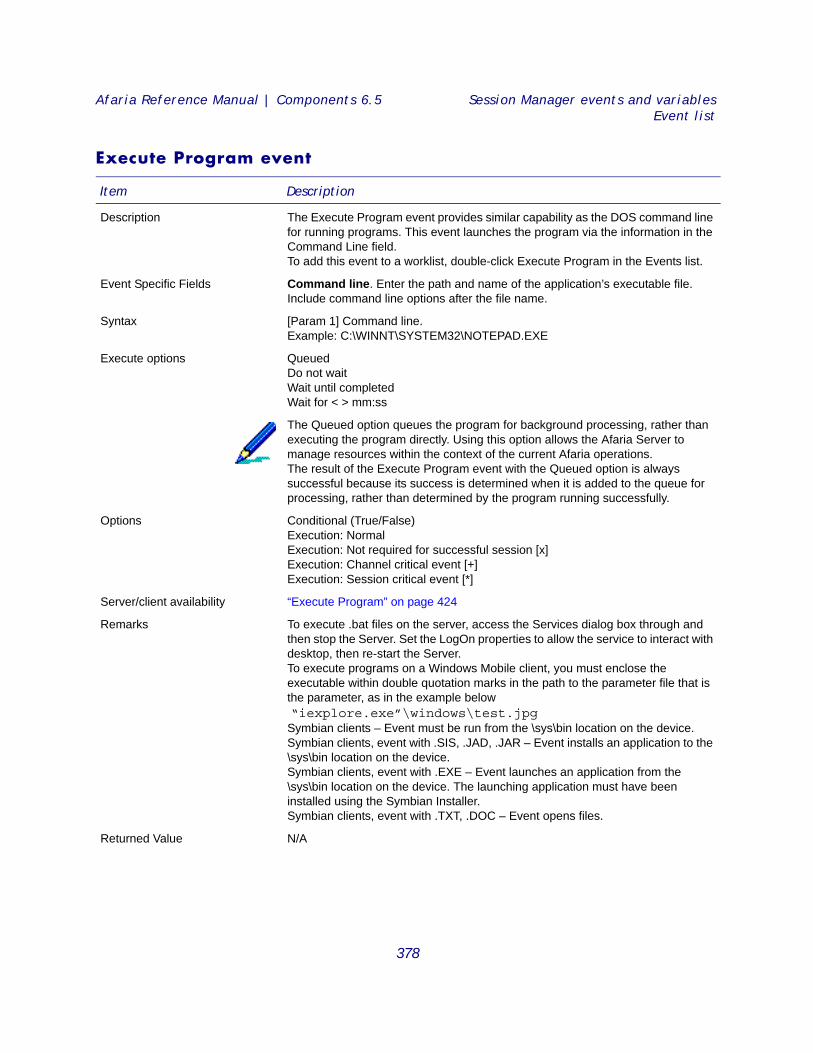
Afaria Reference Manual | Components 6.5 Session Manager events and variablesEvent list
Execute Program event
Item Description
Description The Execute Program event provides similar capability as the DOS command line for running programs. This event launches the program via the information in the Command Line field. To add this event to a worklist, double-click Execute Program in the Events list.
Event Specific Fields Command line. Enter the path and name of the application’s executable file. Include command line options after the file name.
Syntax [Param 1] Command line. Example: C:\WINNT\SYSTEM32\NOTEPAD.EXE
Execute options QueuedDo not waitWait until completedWait for < > mm:ss
The Queued option queues the program for background processing, rather than executing the program directly. Using this option allows the Afaria Server to manage resources within the context of the current Afaria operations. The result of the Execute Program event with the Queued option is always successful because its success is determined when it is added to the queue for processing, rather than determined by the program running successfully.
Options Conditional (True/False)Execution: NormalExecution: Not required for successful session [x]Execution: Channel critical event [+]Execution: Session critical event [*]
Server/client availability “Execute Program” on page 424
Remarks To execute .bat files on the server, access the Services dialog box through and then stop the Server. Set the LogOn properties to allow the service to interact with desktop, then re-start the Server.To execute programs on a Windows Mobile client, you must enclose the executable within double quotation marks in the path to the parameter file that is the parameter, as in the example below “iexplore.exe”\windows\test.jpg Symbian clients – Event must be run from the \sys\bin location on the device. Symbian clients, event with .SIS, .JAD, .JAR – Event installs an application to the \sys\bin location on the device. Symbian clients, event with .EXE – Event launches an application from the \sys\bin location on the device. The launching application must have been installed using the Symbian Installer. Symbian clients, event with .TXT, .DOC – Event opens files.
Returned Value N/A
378
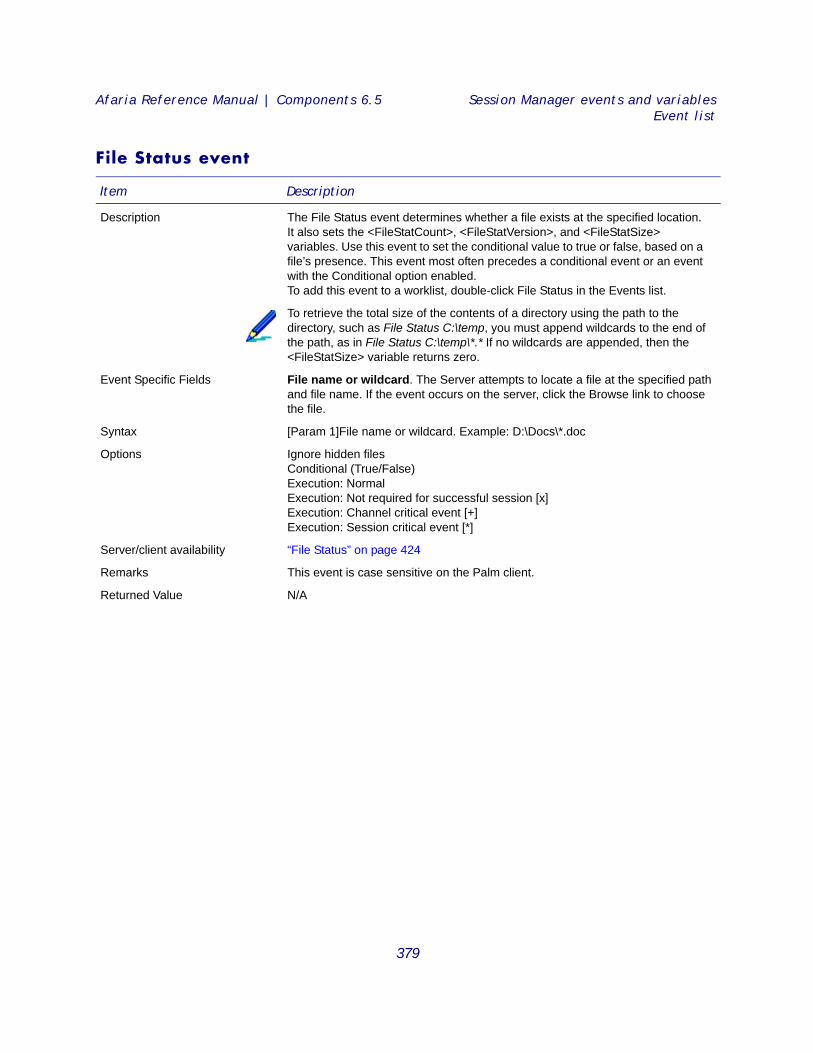
Afaria Reference Manual | Components 6.5 Session Manager events and variablesEvent list
File Status event
Item Description
Description The File Status event determines whether a file exists at the specified location. It also sets the <FileStatCount>, <FileStatVersion>, and <FileStatSize> variables. Use this event to set the conditional value to true or false, based on a file’s presence. This event most often precedes a conditional event or an event with the Conditional option enabled. To add this event to a worklist, double-click File Status in the Events list.
To retrieve the total size of the contents of a directory using the path to the directory, such as File Status C:\temp, you must append wildcards to the end of the path, as in File Status C:\temp\*.* If no wildcards are appended, then the <FileStatSize> variable returns zero.
Event Specific Fields File name or wildcard. The Server attempts to locate a file at the specified path and file name. If the event occurs on the server, click the Browse link to choose the file.
Syntax [Param 1]File name or wildcard. Example: D:\Docs\*.doc
Options Ignore hidden filesConditional (True/False)Execution: NormalExecution: Not required for successful session [x]Execution: Channel critical event [+]Execution: Session critical event [*]
Server/client availability “File Status” on page 424
Remarks This event is case sensitive on the Palm client.
Returned Value N/A
379
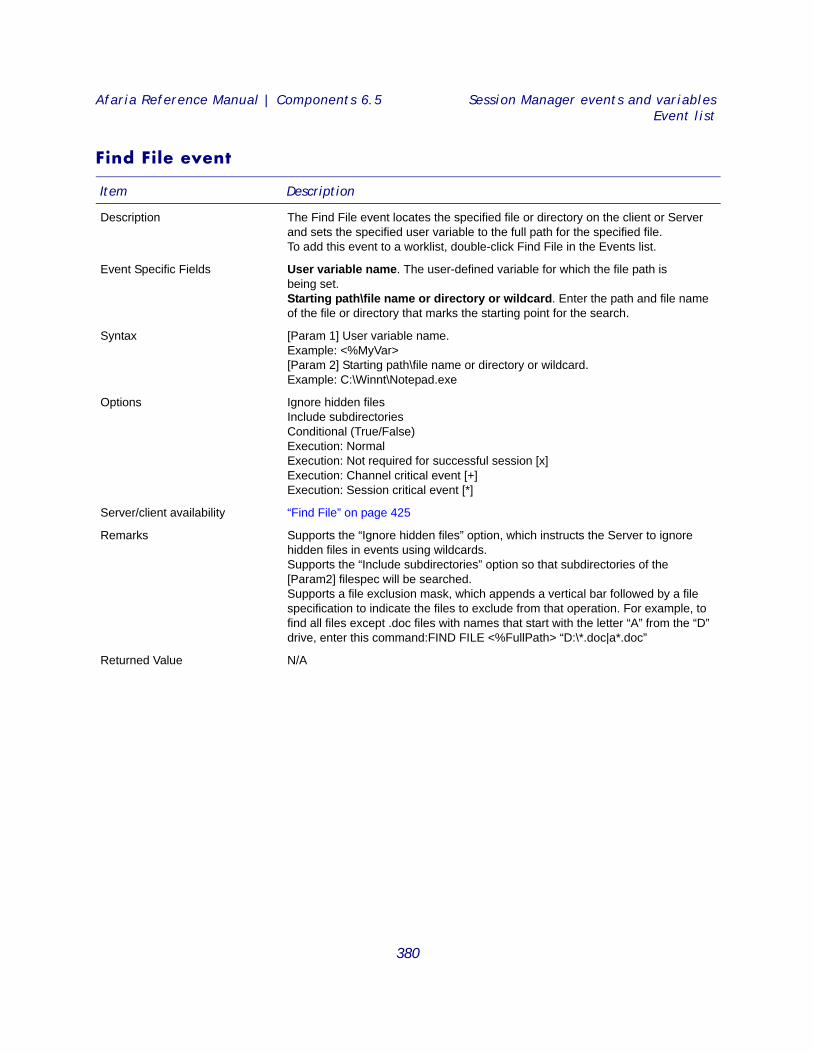
Afaria Reference Manual | Components 6.5 Session Manager events and variablesEvent list
Find File event
Item Description
Description The Find File event locates the specified file or directory on the client or Server and sets the specified user variable to the full path for the specified file. To add this event to a worklist, double-click Find File in the Events list.
Event Specific Fields User variable name. The user-defined variable for which the file path is being set.Starting path\file name or directory or wildcard. Enter the path and file name of the file or directory that marks the starting point for the search.
Syntax [Param 1] User variable name. Example: <%MyVar>[Param 2] Starting path\file name or directory or wildcard.Example: C:\Winnt\Notepad.exe
Options Ignore hidden filesInclude subdirectoriesConditional (True/False)Execution: NormalExecution: Not required for successful session [x]Execution: Channel critical event [+]Execution: Session critical event [*]
Server/client availability “Find File” on page 425
Remarks Supports the “Ignore hidden files” option, which instructs the Server to ignore hidden files in events using wildcards.Supports the “Include subdirectories” option so that subdirectories of the [Param2] filespec will be searched.Supports a file exclusion mask, which appends a vertical bar followed by a file specification to indicate the files to exclude from that operation. For example, to find all files except .doc files with names that start with the letter “A” from the “D” drive, enter this command:FIND FILE <%FullPath> “D:\*.doc|a*.doc”
Returned Value N/A
380
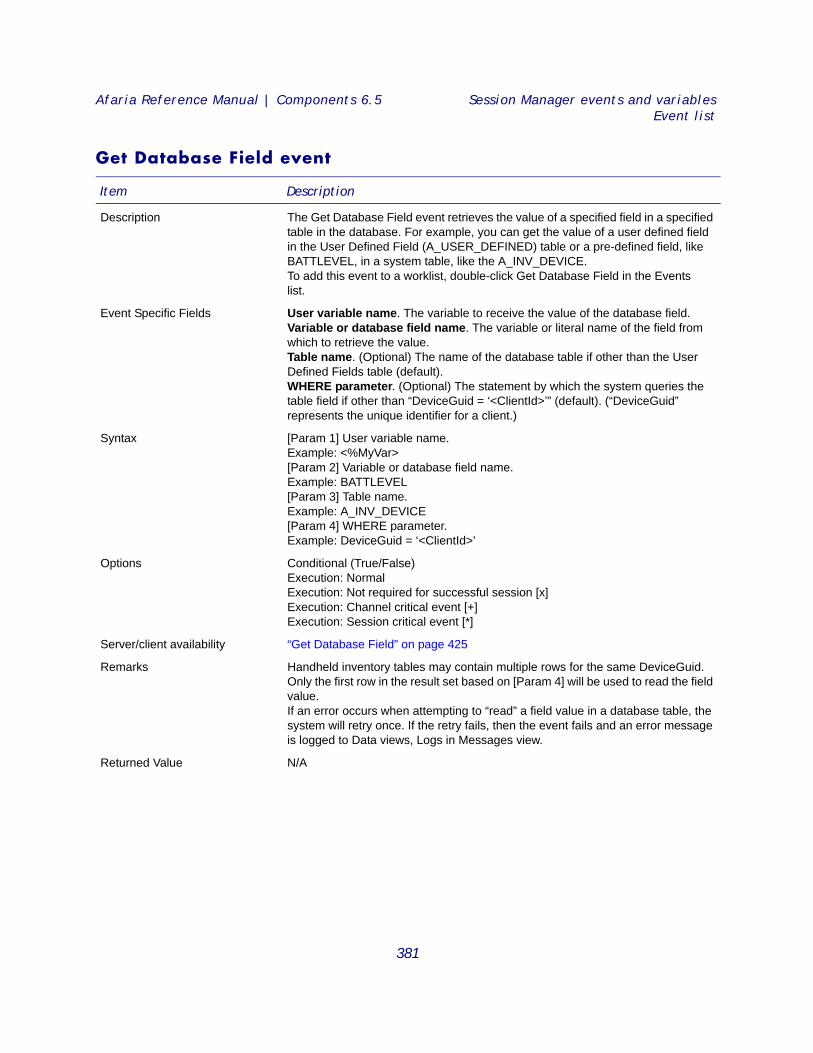
Afaria Reference Manual | Components 6.5 Session Manager events and variablesEvent list
Get Database Field event
Item Description
Description The Get Database Field event retrieves the value of a specified field in a specified table in the database. For example, you can get the value of a user defined field in the User Defined Field (A_USER_DEFINED) table or a pre-defined field, like BATTLEVEL, in a system table, like the A_INV_DEVICE. To add this event to a worklist, double-click Get Database Field in the Events list.
Event Specific Fields User variable name. The variable to receive the value of the database field.Variable or database field name. The variable or literal name of the field from which to retrieve the value.Table name. (Optional) The name of the database table if other than the User Defined Fields table (default).WHERE parameter. (Optional) The statement by which the system queries the table field if other than “DeviceGuid = ‘<ClientId>’” (default). (“DeviceGuid” represents the unique identifier for a client.)
Syntax [Param 1] User variable name.Example: <%MyVar>[Param 2] Variable or database field name.Example: BATTLEVEL[Param 3] Table name.Example: A_INV_DEVICE[Param 4] WHERE parameter.Example: DeviceGuid = ‘<ClientId>’
Options Conditional (True/False)Execution: NormalExecution: Not required for successful session [x]Execution: Channel critical event [+]Execution: Session critical event [*]
Server/client availability “Get Database Field” on page 425
Remarks Handheld inventory tables may contain multiple rows for the same DeviceGuid. Only the first row in the result set based on [Param 4] will be used to read the field value.If an error occurs when attempting to “read” a field value in a database table, the system will retry once. If the retry fails, then the event fails and an error message is logged to Data views, Logs in Messages view.
Returned Value N/A
381
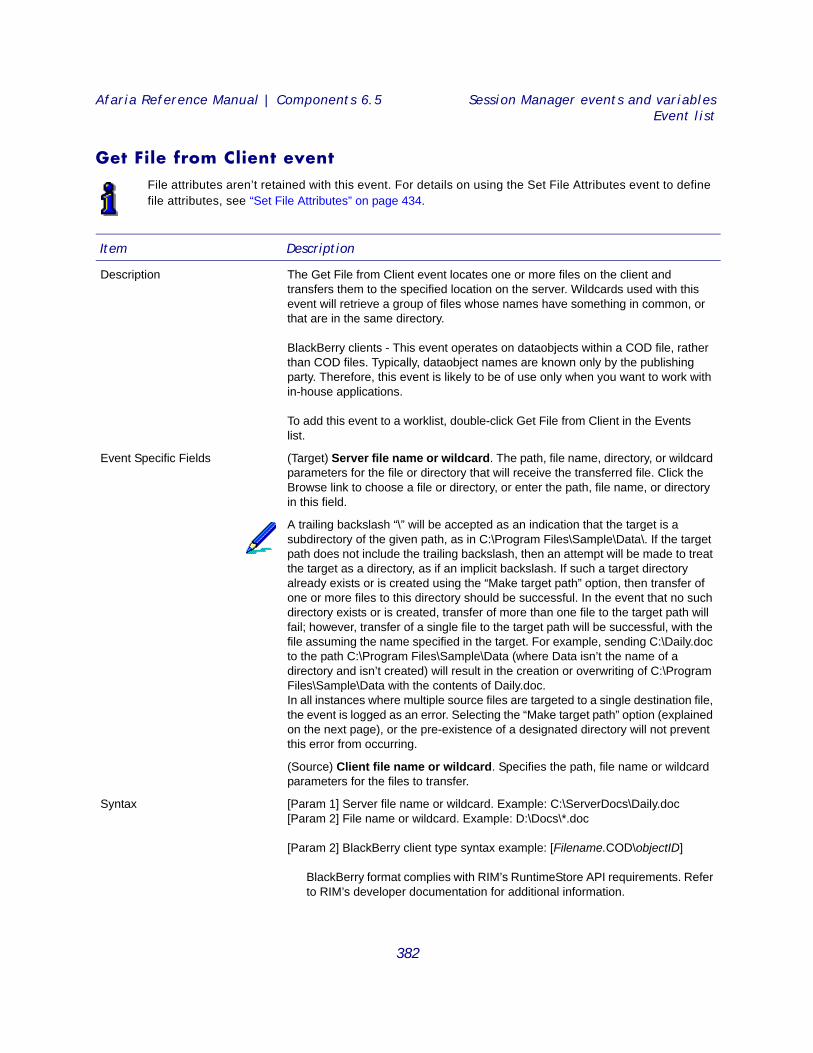
Afaria Reference Manual | Components 6.5 Session Manager events and variablesEvent list
Get File from Client event File attributes aren’t retained with this event. For details on using the Set File Attributes event to define file attributes, see “Set File Attributes” on page 434.
Item Description
Description The Get File from Client event locates one or more files on the client and transfers them to the specified location on the server. Wildcards used with this event will retrieve a group of files whose names have something in common, or that are in the same directory.
BlackBerry clients - This event operates on dataobjects within a COD file, rather than COD files. Typically, dataobject names are known only by the publishing party. Therefore, this event is likely to be of use only when you want to work with in-house applications.
To add this event to a worklist, double-click Get File from Client in the Events list.
Event Specific Fields (Target) Server file name or wildcard. The path, file name, directory, or wildcard parameters for the file or directory that will receive the transferred file. Click the Browse link to choose a file or directory, or enter the path, file name, or directory in this field.
A trailing backslash “\” will be accepted as an indication that the target is a subdirectory of the given path, as in C:\Program Files\Sample\Data\. If the target path does not include the trailing backslash, then an attempt will be made to treat the target as a directory, as if an implicit backslash. If such a target directory already exists or is created using the “Make target path” option, then transfer of one or more files to this directory should be successful. In the event that no such directory exists or is created, transfer of more than one file to the target path will fail; however, transfer of a single file to the target path will be successful, with the file assuming the name specified in the target. For example, sending C:\Daily.doc to the path C:\Program Files\Sample\Data (where Data isn’t the name of a directory and isn’t created) will result in the creation or overwriting of C:\Program Files\Sample\Data with the contents of Daily.doc.In all instances where multiple source files are targeted to a single destination file, the event is logged as an error. Selecting the “Make target path” option (explained on the next page), or the pre-existence of a designated directory will not prevent this error from occurring.
(Source) Client file name or wildcard. Specifies the path, file name or wildcard parameters for the files to transfer.
Syntax [Param 1] Server file name or wildcard. Example: C:\ServerDocs\Daily.doc[Param 2] File name or wildcard. Example: D:\Docs\*.doc
[Param 2] BlackBerry client type syntax example: [Filename.COD\objectID]
BlackBerry format complies with RIM’s RuntimeStore API requirements. Refer to RIM’s developer documentation for additional information.
382
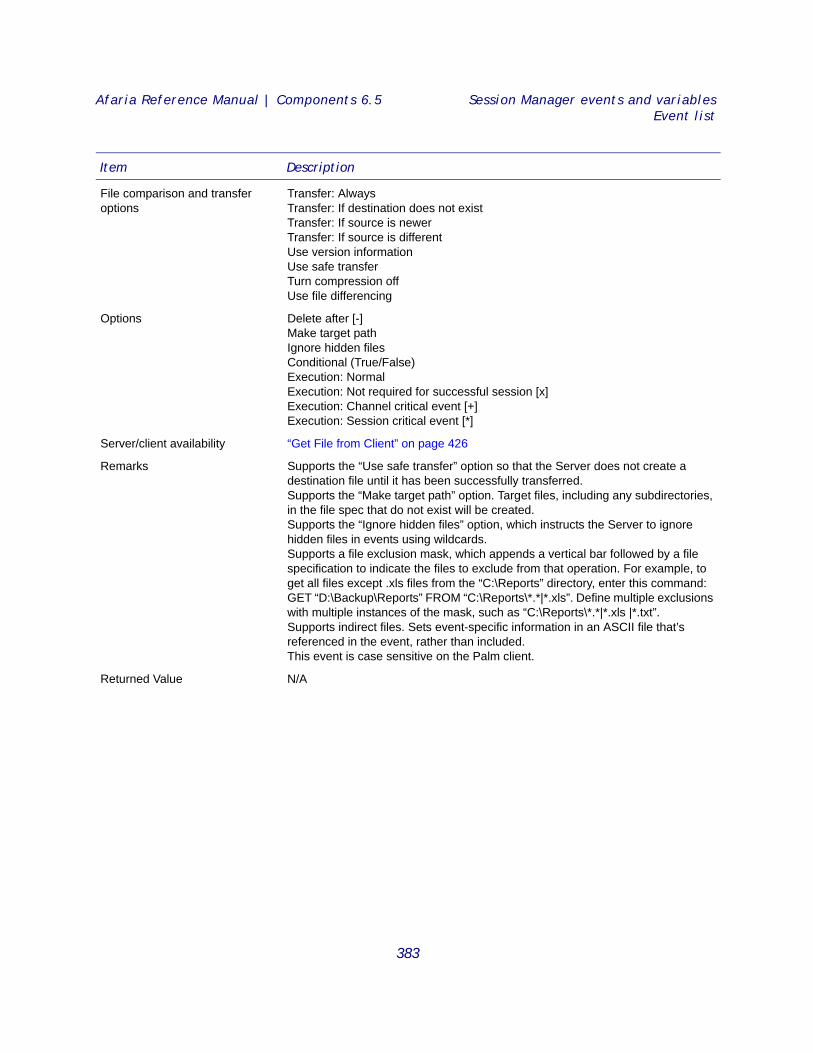
Afaria Reference Manual | Components 6.5 Session Manager events and variablesEvent list
File comparison and transfer options
Transfer: AlwaysTransfer: If destination does not existTransfer: If source is newerTransfer: If source is differentUse version informationUse safe transferTurn compression offUse file differencing
Options Delete after [-]Make target pathIgnore hidden filesConditional (True/False)Execution: NormalExecution: Not required for successful session [x]Execution: Channel critical event [+]Execution: Session critical event [*]
Server/client availability “Get File from Client” on page 426
Remarks Supports the “Use safe transfer” option so that the Server does not create a destination file until it has been successfully transferred.Supports the “Make target path” option. Target files, including any subdirectories, in the file spec that do not exist will be created.Supports the “Ignore hidden files” option, which instructs the Server to ignore hidden files in events using wildcards.Supports a file exclusion mask, which appends a vertical bar followed by a file specification to indicate the files to exclude from that operation. For example, to get all files except .xls files from the “C:\Reports” directory, enter this command: GET “D:\Backup\Reports” FROM “C:\Reports\*.*|*.xls”. Define multiple exclusions with multiple instances of the mask, such as “C:\Reports\*.*|*.xls |*.txt”. Supports indirect files. Sets event-specific information in an ASCII file that’s referenced in the event, rather than included. This event is case sensitive on the Palm client.
Returned Value N/A
Item Description
383
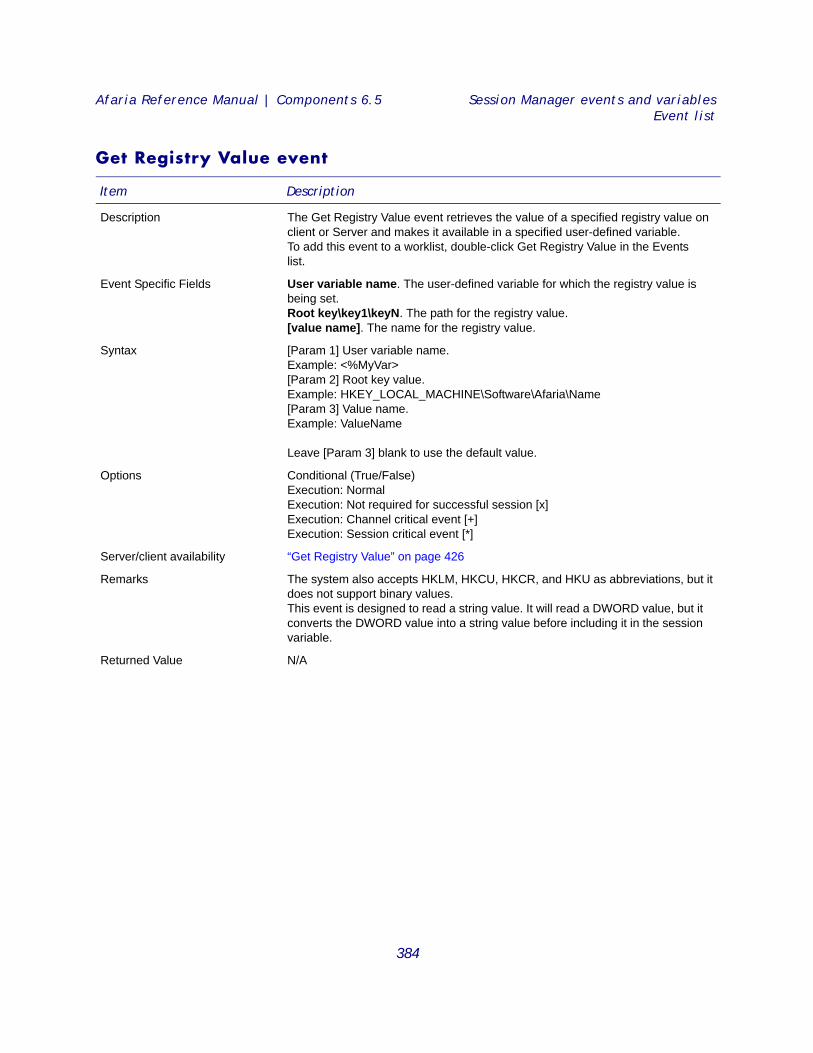
Afaria Reference Manual | Components 6.5 Session Manager events and variablesEvent list
Get Registry Value event
Item Description
Description The Get Registry Value event retrieves the value of a specified registry value on client or Server and makes it available in a specified user-defined variable. To add this event to a worklist, double-click Get Registry Value in the Events list.
Event Specific Fields User variable name. The user-defined variable for which the registry value is being set.Root key\key1\keyN. The path for the registry value. [value name]. The name for the registry value.
Syntax [Param 1] User variable name.Example: <%MyVar>[Param 2] Root key value. Example: HKEY_LOCAL_MACHINE\Software\Afaria\Name [Param 3] Value name. Example: ValueName
Leave [Param 3] blank to use the default value.
Options Conditional (True/False)Execution: NormalExecution: Not required for successful session [x]Execution: Channel critical event [+]Execution: Session critical event [*]
Server/client availability “Get Registry Value” on page 426
Remarks The system also accepts HKLM, HKCU, HKCR, and HKU as abbreviations, but it does not support binary values.This event is designed to read a string value. It will read a DWORD value, but it converts the DWORD value into a string value before including it in the session variable.
Returned Value N/A
384
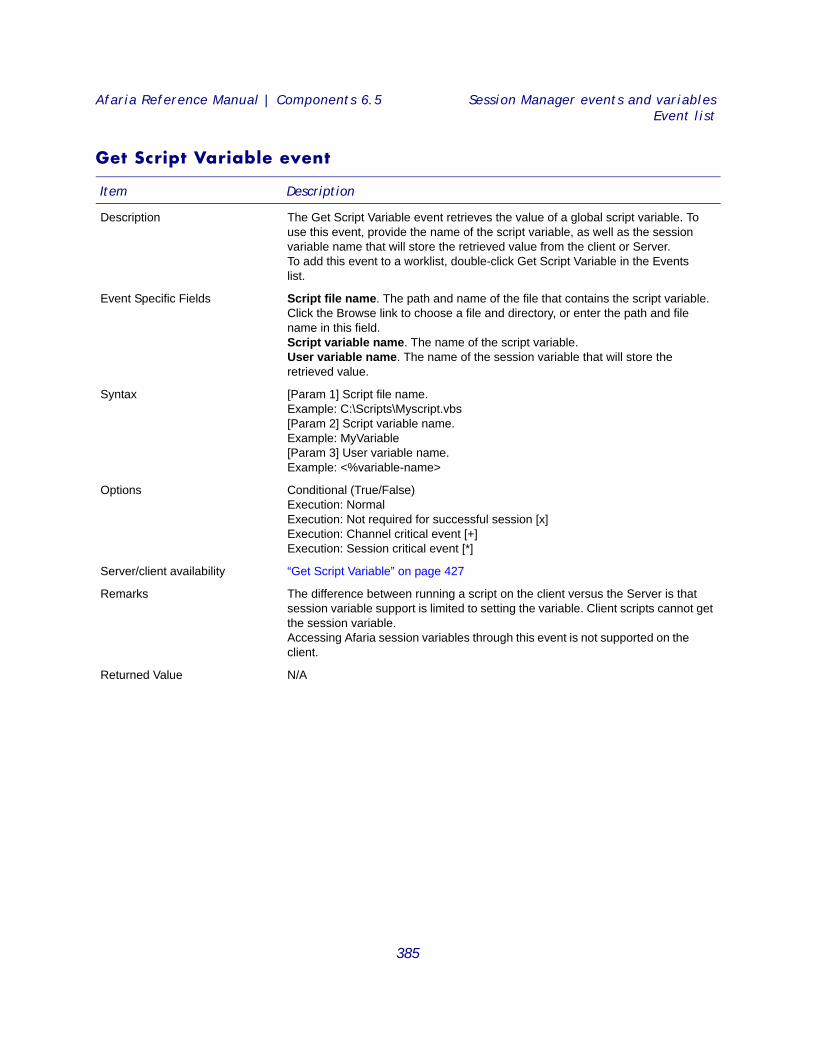
Afaria Reference Manual | Components 6.5 Session Manager events and variablesEvent list
Get Script Variable event
Item Description
Description The Get Script Variable event retrieves the value of a global script variable. To use this event, provide the name of the script variable, as well as the session variable name that will store the retrieved value from the client or Server. To add this event to a worklist, double-click Get Script Variable in the Events list.
Event Specific Fields Script file name. The path and name of the file that contains the script variable. Click the Browse link to choose a file and directory, or enter the path and file name in this field.Script variable name. The name of the script variable.User variable name. The name of the session variable that will store the retrieved value.
Syntax [Param 1] Script file name.Example: C:\Scripts\Myscript.vbs[Param 2] Script variable name.Example: MyVariable[Param 3] User variable name.Example: <%variable-name>
Options Conditional (True/False)Execution: NormalExecution: Not required for successful session [x]Execution: Channel critical event [+]Execution: Session critical event [*]
Server/client availability “Get Script Variable” on page 427
Remarks The difference between running a script on the client versus the Server is that session variable support is limited to setting the variable. Client scripts cannot get the session variable.Accessing Afaria session variables through this event is not supported on the client.
Returned Value N/A
385
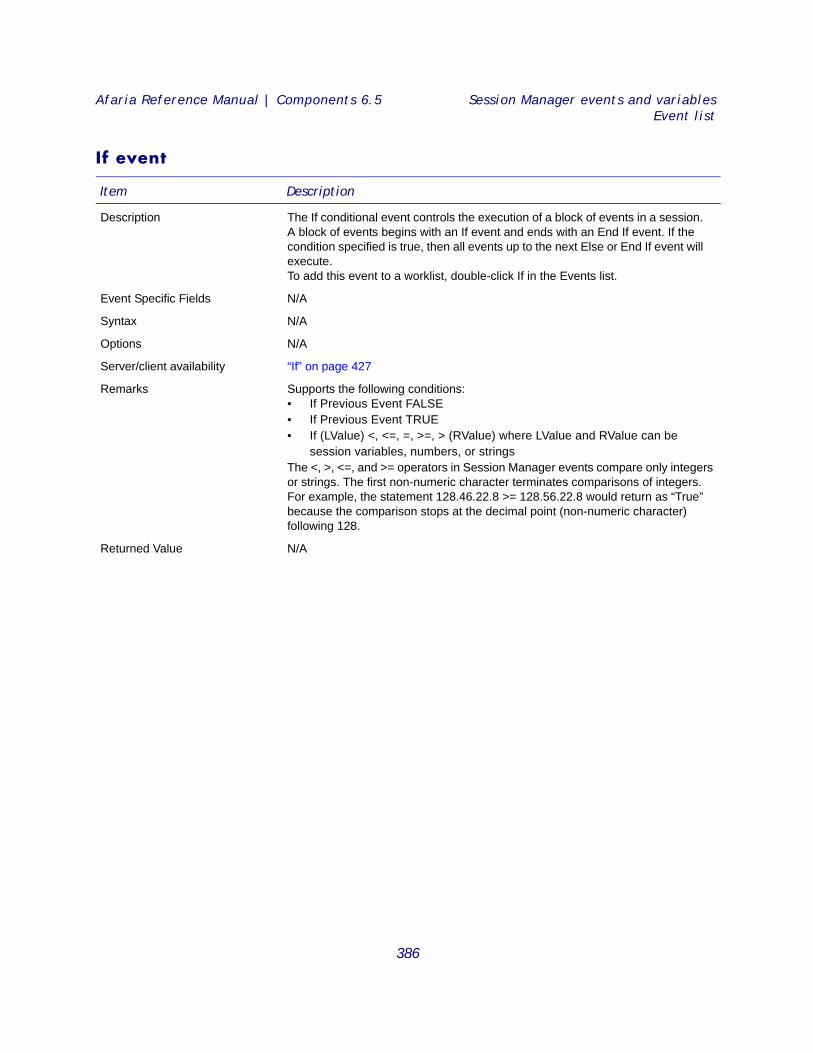
Afaria Reference Manual | Components 6.5 Session Manager events and variablesEvent list
If event
Item Description
Description The If conditional event controls the execution of a block of events in a session. A block of events begins with an If event and ends with an End If event. If the condition specified is true, then all events up to the next Else or End If event will execute. To add this event to a worklist, double-click If in the Events list.
Event Specific Fields N/A
Syntax N/A
Options N/A
Server/client availability “If” on page 427
Remarks Supports the following conditions:• If Previous Event FALSE• If Previous Event TRUE• If (LValue) <, <=, =, >=, > (RValue) where LValue and RValue can be
session variables, numbers, or stringsThe <, >, <=, and >= operators in Session Manager events compare only integers or strings. The first non-numeric character terminates comparisons of integers. For example, the statement 128.46.22.8 >= 128.56.22.8 would return as “True” because the comparison stops at the decimal point (non-numeric character) following 128.
Returned Value N/A
386
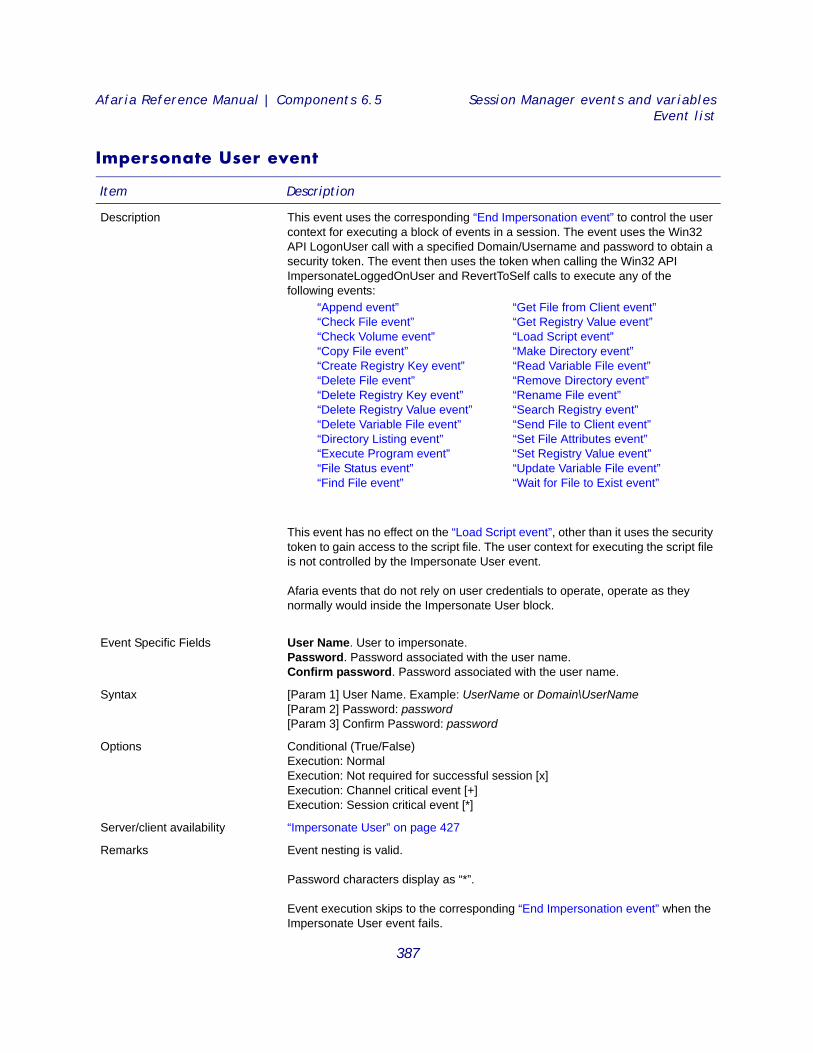
Afaria Reference Manual | Components 6.5 Session Manager events and variablesEvent list
Impersonate User event
Item Description
Description This event uses the corresponding “End Impersonation event” to control the user context for executing a block of events in a session. The event uses the Win32 API LogonUser call with a specified Domain/Username and password to obtain a security token. The event then uses the token when calling the Win32 API ImpersonateLoggedOnUser and RevertToSelf calls to execute any of the following events:
This event has no effect on the “Load Script event”, other than it uses the security token to gain access to the script file. The user context for executing the script file is not controlled by the Impersonate User event.
Afaria events that do not rely on user credentials to operate, operate as they normally would inside the Impersonate User block.
Event Specific Fields User Name. User to impersonate. Password. Password associated with the user name. Confirm password. Password associated with the user name.
Syntax [Param 1] User Name. Example: UserName or Domain\UserName [Param 2] Password: password [Param 3] Confirm Password: password
Options Conditional (True/False)Execution: NormalExecution: Not required for successful session [x]Execution: Channel critical event [+]Execution: Session critical event [*]
Server/client availability “Impersonate User” on page 427
Remarks Event nesting is valid.
Password characters display as “*”.
Event execution skips to the corresponding “End Impersonation event” when the Impersonate User event fails.
“Append event”“Check File event”“Check Volume event” “Copy File event”“Create Registry Key event”“Delete File event”“Delete Registry Key event”“Delete Registry Value event” “Delete Variable File event”“Directory Listing event” “Execute Program event”“File Status event” “Find File event”
“Get File from Client event”“Get Registry Value event”“Load Script event”“Make Directory event”“Read Variable File event”“Remove Directory event”“Rename File event”“Search Registry event”“Send File to Client event”“Set File Attributes event”“Set Registry Value event”“Update Variable File event” “Wait for File to Exist event”
387
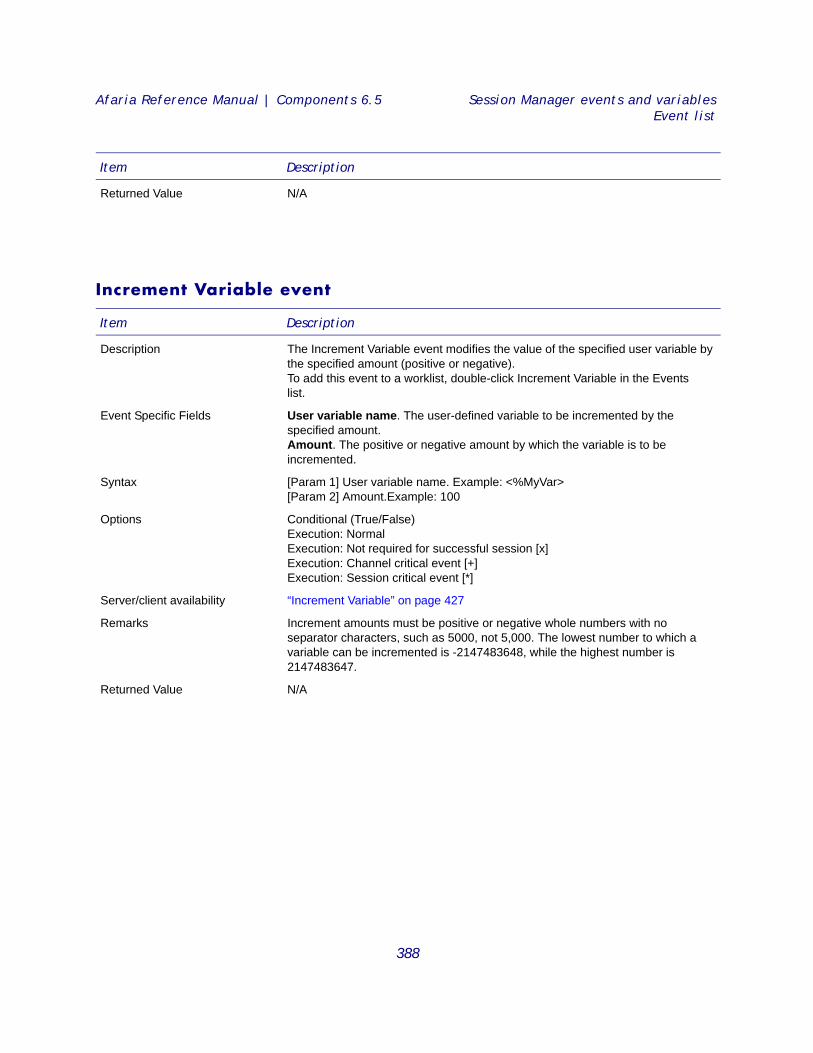
Afaria Reference Manual | Components 6.5 Session Manager events and variablesEvent list
Increment Variable event
Returned Value N/A
Item Description
Item Description
Description The Increment Variable event modifies the value of the specified user variable by the specified amount (positive or negative). To add this event to a worklist, double-click Increment Variable in the Events list.
Event Specific Fields User variable name. The user-defined variable to be incremented by the specified amount.Amount. The positive or negative amount by which the variable is to be incremented.
Syntax [Param 1] User variable name. Example: <%MyVar>[Param 2] Amount.Example: 100
Options Conditional (True/False)Execution: NormalExecution: Not required for successful session [x]Execution: Channel critical event [+]Execution: Session critical event [*]
Server/client availability “Increment Variable” on page 427
Remarks Increment amounts must be positive or negative whole numbers with no separator characters, such as 5000, not 5,000. The lowest number to which a variable can be incremented is -2147483648, while the highest number is 2147483647.
Returned Value N/A
388
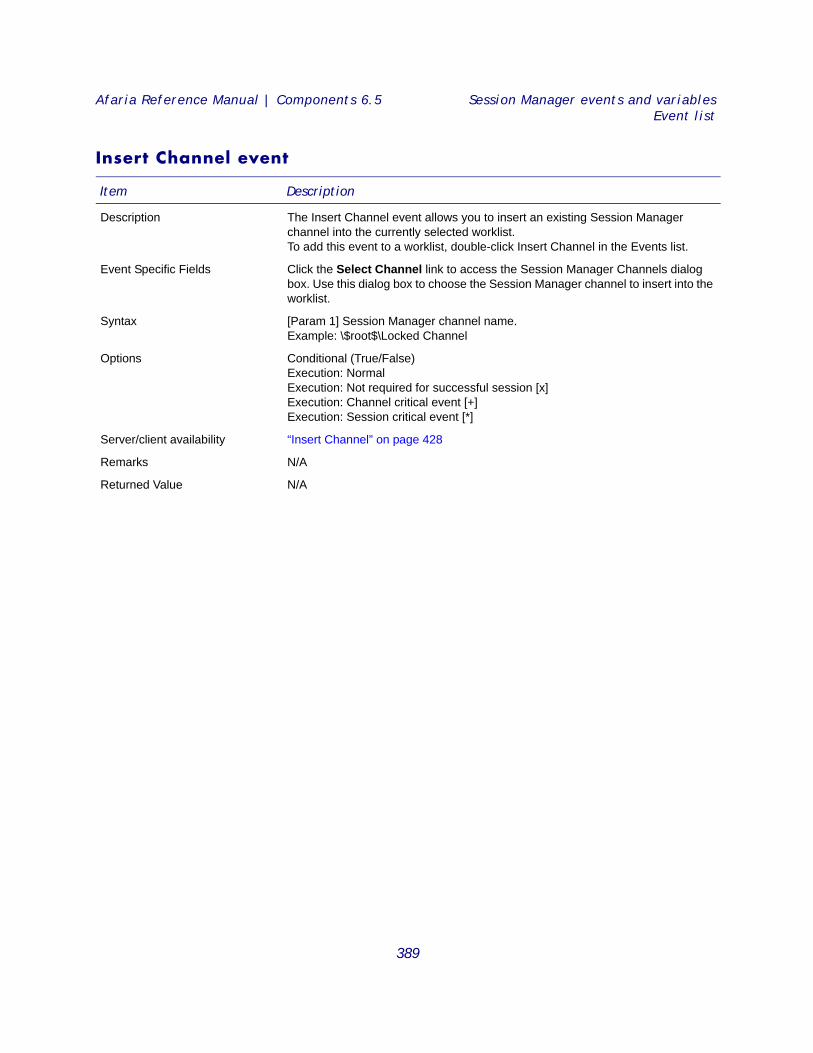
Afaria Reference Manual | Components 6.5 Session Manager events and variablesEvent list
Insert Channel event
Item Description
Description The Insert Channel event allows you to insert an existing Session Manager channel into the currently selected worklist. To add this event to a worklist, double-click Insert Channel in the Events list.
Event Specific Fields Click the Select Channel link to access the Session Manager Channels dialog box. Use this dialog box to choose the Session Manager channel to insert into the worklist.
Syntax [Param 1] Session Manager channel name.Example: \$root$\Locked Channel
Options Conditional (True/False)Execution: NormalExecution: Not required for successful session [x]Execution: Channel critical event [+]Execution: Session critical event [*]
Server/client availability “Insert Channel” on page 428
Remarks N/A
Returned Value N/A
389
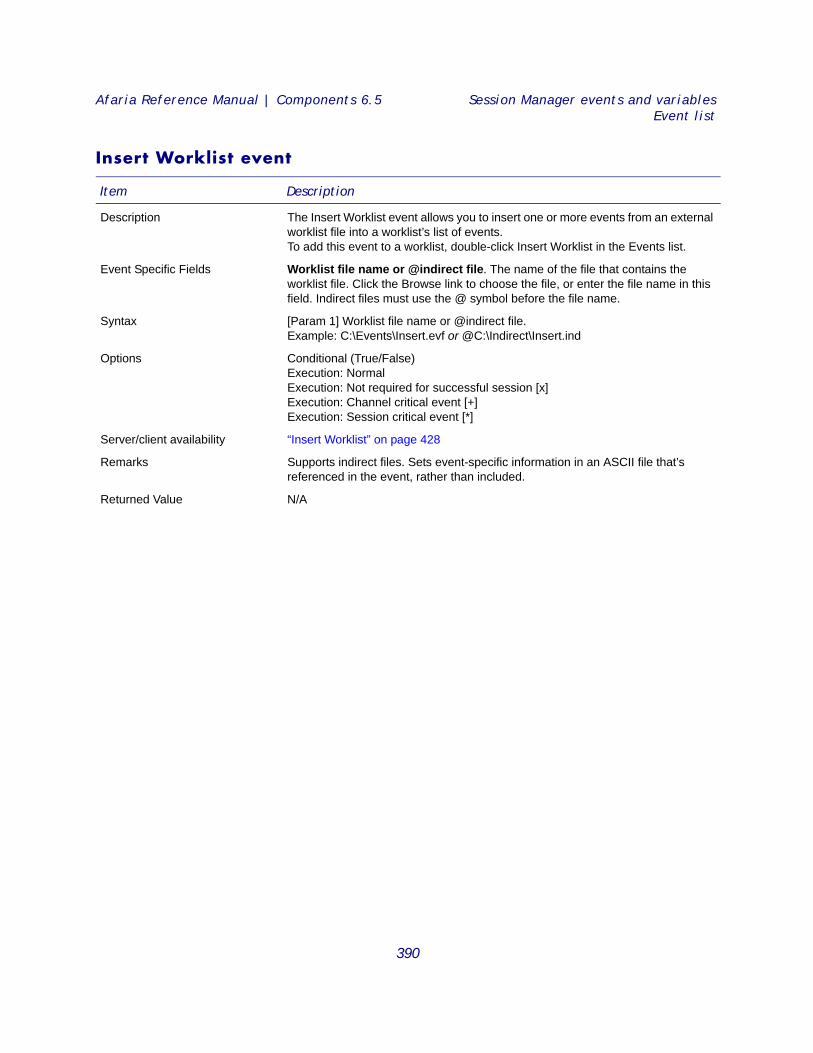
Afaria Reference Manual | Components 6.5 Session Manager events and variablesEvent list
Insert Worklist event
Item Description
Description The Insert Worklist event allows you to insert one or more events from an external worklist file into a worklist’s list of events. To add this event to a worklist, double-click Insert Worklist in the Events list.
Event Specific Fields Worklist file name or @indirect file. The name of the file that contains the worklist file. Click the Browse link to choose the file, or enter the file name in this field. Indirect files must use the @ symbol before the file name.
Syntax [Param 1] Worklist file name or @indirect file.Example: C:\Events\Insert.evf or @C:\Indirect\Insert.ind
Options Conditional (True/False)Execution: NormalExecution: Not required for successful session [x]Execution: Channel critical event [+]Execution: Session critical event [*]
Server/client availability “Insert Worklist” on page 428
Remarks Supports indirect files. Sets event-specific information in an ASCII file that’s referenced in the event, rather than included.
Returned Value N/A
390
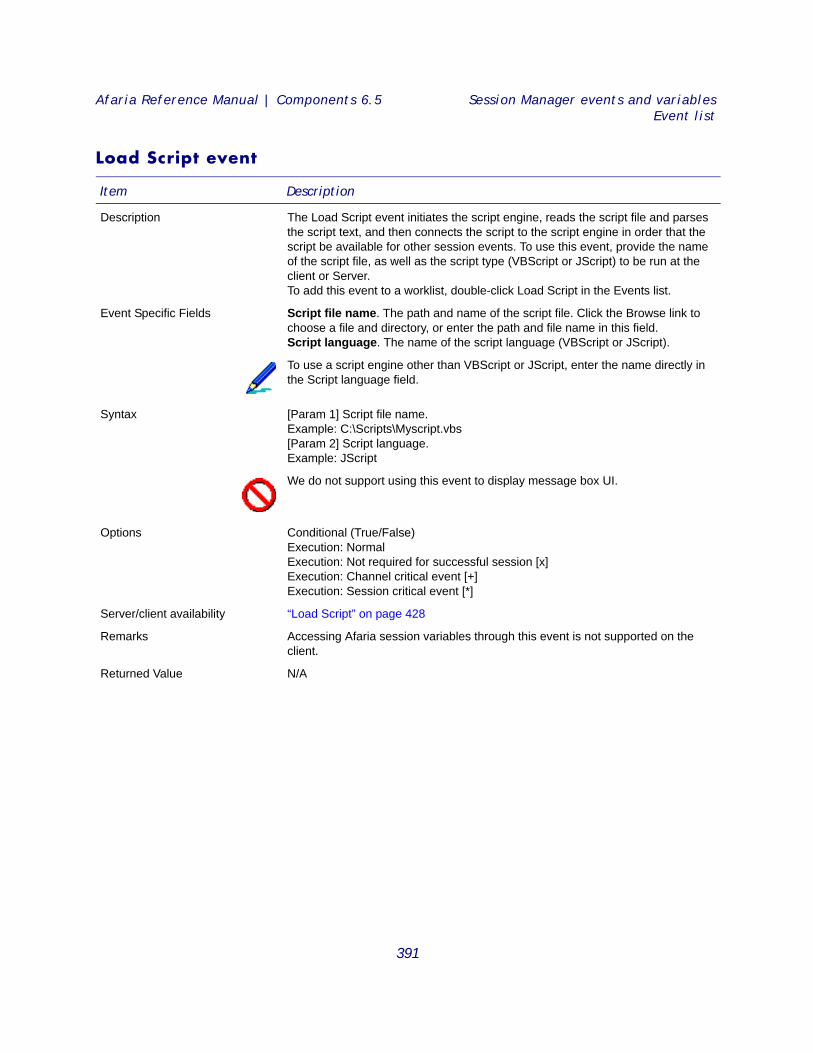
Afaria Reference Manual | Components 6.5 Session Manager events and variablesEvent list
Load Script event
Item Description
Description The Load Script event initiates the script engine, reads the script file and parses the script text, and then connects the script to the script engine in order that the script be available for other session events. To use this event, provide the name of the script file, as well as the script type (VBScript or JScript) to be run at the client or Server. To add this event to a worklist, double-click Load Script in the Events list.
Event Specific Fields Script file name. The path and name of the script file. Click the Browse link to choose a file and directory, or enter the path and file name in this field.Script language. The name of the script language (VBScript or JScript).
To use a script engine other than VBScript or JScript, enter the name directly in the Script language field.
Syntax [Param 1] Script file name.Example: C:\Scripts\Myscript.vbs[Param 2] Script language.Example: JScript
We do not support using this event to display message box UI.
Options Conditional (True/False)Execution: NormalExecution: Not required for successful session [x]Execution: Channel critical event [+]Execution: Session critical event [*]
Server/client availability “Load Script” on page 428
Remarks Accessing Afaria session variables through this event is not supported on the client.
Returned Value N/A
391
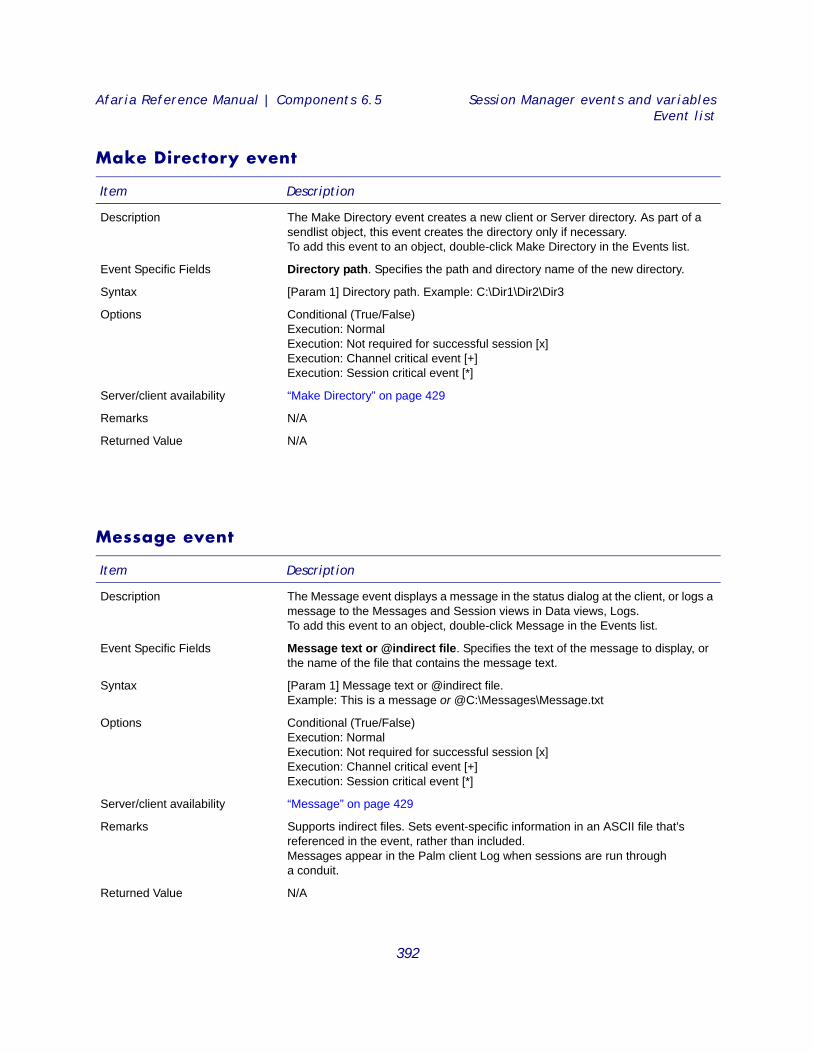
Afaria Reference Manual | Components 6.5 Session Manager events and variablesEvent list
Make Directory event
Message event
Item Description
Description The Make Directory event creates a new client or Server directory. As part of a sendlist object, this event creates the directory only if necessary. To add this event to an object, double-click Make Directory in the Events list.
Event Specific Fields Directory path. Specifies the path and directory name of the new directory.
Syntax [Param 1] Directory path. Example: C:\Dir1\Dir2\Dir3
Options Conditional (True/False)Execution: NormalExecution: Not required for successful session [x]Execution: Channel critical event [+]Execution: Session critical event [*]
Server/client availability “Make Directory” on page 429
Remarks N/A
Returned Value N/A
Item Description
Description The Message event displays a message in the status dialog at the client, or logs a message to the Messages and Session views in Data views, Logs. To add this event to an object, double-click Message in the Events list.
Event Specific Fields Message text or @indirect file. Specifies the text of the message to display, or the name of the file that contains the message text.
Syntax [Param 1] Message text or @indirect file.Example: This is a message or @C:\Messages\Message.txt
Options Conditional (True/False)Execution: NormalExecution: Not required for successful session [x]Execution: Channel critical event [+]Execution: Session critical event [*]
Server/client availability “Message” on page 429
Remarks Supports indirect files. Sets event-specific information in an ASCII file that’s referenced in the event, rather than included. Messages appear in the Palm client Log when sessions are run through a conduit.
Returned Value N/A
392
Afaria Reference Manual | Components 6.5 Session Manager events and variablesEvent list
Notify Program event
Item Description
Description The Notify Program event sends a message to the specified named pipe or mailslot on the server. To add this event to an object, double-click Notify Program in the Events list.
Event Specific Fields Server named pipe or mail slot. Specifies the pipe name or mailslot to be notified on the server.Notify text or @indirect file. Specifies the text of the message to send, or the name of the file that contains the message text.
Syntax [Param 1] Server named pipe or mail slot.Example: pipe\name or mailslot\name[Param 2] Notify text or @indirect fileExample: This is a notification or @C:\Notify\Notify.txt
Options Conditional (True/False)Execution: NormalExecution: Not required for successful session [x]Execution: Channel critical event [+]Execution: Session critical event [*]
Server/client availability “Notify Program” on page 429
Remarks Supports indirect files. Sets event-specific information in an ASCII file that’s referenced in the event, rather than included. The requirements for a named pipe server that can work with the Notify event are as follows:• The named pipe must be created as bi-directional.• XComms.exe will open the pipe, write message data (not byte data), and
will close it for each Notify event.• XComms.exe is expecting a Win32 return code (DWORD) to come back as
a response. If everything was successful, this value will be “0”.• Pseudo-code for this event using the Win32 API function names is
CreateNamedPipe.• Loop the following as long as you want the pipe to accept information:
•ConnectNamedPipe•ReadFile (message)•WriteFile (return code)•DisconnectNamedPipe
Returned Value N/A
393
Afaria Reference Manual | Components 6.5 Session Manager events and variablesEvent list
Quota event
Item Description
Description One of two Quota events that wrap a block of file transfer events together by a specified time or byte limit in an individual session. Using the Quota events, the Server counts the time or bytes spent on the events that are wrapped by the Quota event, then stops processing the events when the defined time or byte limit is met, even if the limit is met during the middle of an individual file transmission. The next time that the client connects to the server, the Server continues processing the wrapped events starting at the exact place in the events, or file, where it stopped in the previous session.To add this event to a worklist, double-click Quota in the Events list
This Quota event defines the beginning of the quota block and quota criteria, minutes and/or bytes. At least one criteria type must be specified. If both criteria are specified, the limit that is met or exceeded first will trigger the end of the block of file transfers. For example, assume that the Quota block is set for 30 seconds or 1MB. If the events within the Quota event and the End Quota event do not send 1MB in 30 seconds, then the next connection will send the rest of the file or have a connection for 30 seconds, whichever comes first. To define the termination of the quota block, see “End Quota event” on page 376. To view a table listing this event, its execution options, and availability for client types, see “Quota” on page 430.
Event Specific Fields Byte limit. Specifies the size limit (for example, 1024000 or 1000k or 1m) at which you want to stop the transmission of this quota block.Time limit. Specifies the limit in minutes at which you want to stop the transmission of this quota block. Click the Enter limit link to set a limit in the Enter time limit dialog box.
Syntax Quota <send events> End Quota
Options N/A
Server/client availability “Quota” on page 430
Remarks The Quota event is based on the actual amount of data being transferred, not the true file size. File compression shrinks file size depending upon file type.
Returned Value N/A
394

Afaria Reference Manual | Components 6.5 Session Manager events and variablesEvent list
Raise Event event
Item Description
Description The Raise Event event specifies that a particular event be visible in Home, Alerts. To add this event to a worklist, double-click Raise Event in the Events list.
Event Specific Fields Event name. Specifies the event to display in the Home, Alerts.Error message. Specifies the message to appear when the event defined as the “raised event” displays in Home, Alerts.
Syntax N/A
Options Conditional (True/False)Execution: NormalExecution: Not required for successful session [x]Execution: Channel critical event [+]Execution: Session critical event [*]
Server/client availability “Raise Event” on page 430
Remarks N/A
Returned Value N/A
395
Afaria Reference Manual | Components 6.5 Session Manager events and variablesEvent list
Read Variable File event
Item Description
Description The Read Variable File event sets variables by reading values from an .ini file. To add this event to a worklist, double-click Read Variable File in the Events list.
Event Specific Fields File name. Specifies the .ini file whose values are to be set as a user variable.User variable name. The user-defined variable whose value is to be determined by the specified .ini file.
Syntax [Param 1] File name.Example: C:\Variables.ini[Param 2] User variable name. Examples:One variable in one section: <%[MySectionName].MySectionVar> to read MySectionVar entry in MySectionName section of the .ini file.All variables in one section: <%[MySectionName].*> to read all entries in the MySectionName section of the .ini file. The variable name format is <%[MySectionName].EntryName> where EntryName is the name on the left side of the equal sign.All variables in all sections: <%*> to read all entries in all sections of the .ini file. The variable name format is <%[MySectionName].EntryName> where SectionName is the name of the .ini file section and EntryName is the name on the left of the equal sign.
Options Conditional (True/False)Execution: NormalExecution: Not required for successful session [x]Execution: Channel critical event [+]Execution: Session critical event [*]
Server/client availability “Read Variable File” on page 430
Remarks The format for the .ini file must be: [section]
variable=valuefor example,
[386Enh]woafont=dosapp.fonega80woa.fon=ega80woa.fonega40woa.fon=ega40woa.fon
Returned Value N/A
396
Afaria Reference Manual | Components 6.5 Session Manager events and variablesEvent list
Reboot Client at end of session event
Item Description
Description Reboots the client after a session has ended. To add this event to a worklist, double-click Reboot Client at end of Session in the Events list.
Event Specific Fields N/A
Syntax N/A
Options Conditional (True/False)Execution: NormalExecution: Not required for successful session [x]Execution: Channel critical event [+]Execution: Session critical event [*]
Server/client availability “Reboot Client” on page 430
Remarks The reboot occurs after the session is complete. Therefore, it is not known to the server if the reboot executes. The event is logged as successful when the task is queued with the operating system. The reboot’s successful execution is subject to the device manufacturer’s implementation of the reboot API. There are some circumstances in which an interactive user may be given the opportunity to cancel the reboot. For all client types and user contexts, you are advised to test the event to observe results.
Returned Value N/A
397
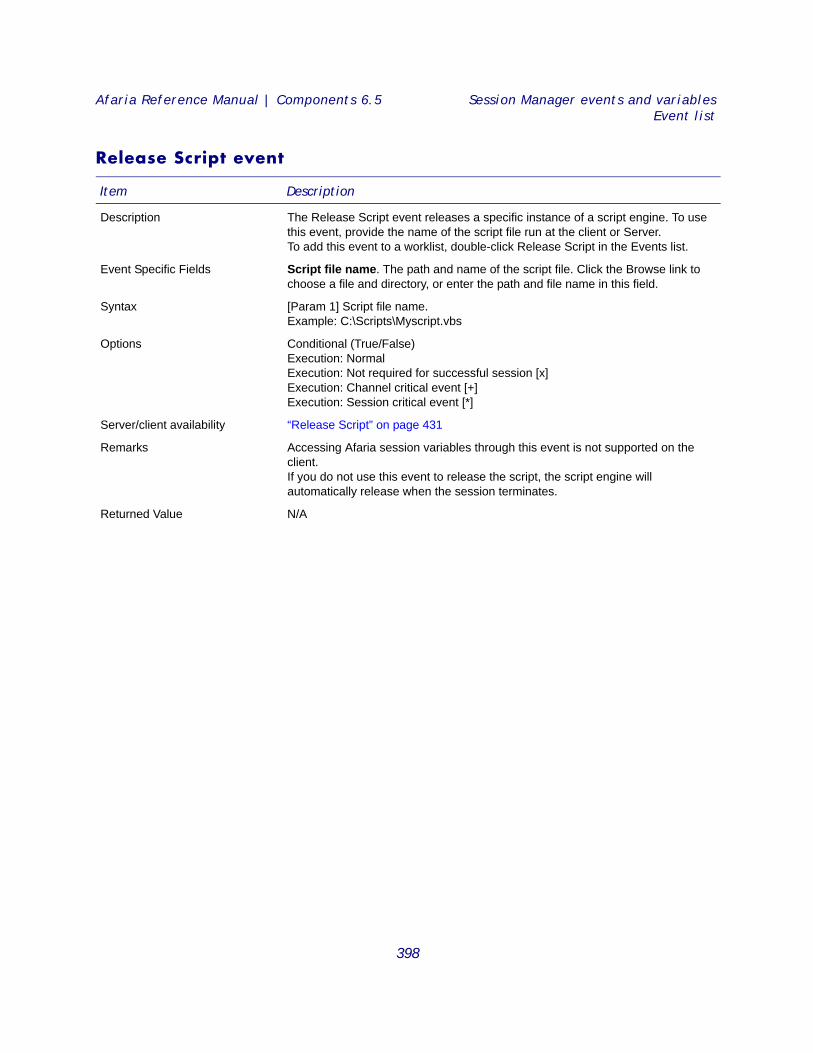
Afaria Reference Manual | Components 6.5 Session Manager events and variablesEvent list
Release Script event
Item Description
Description The Release Script event releases a specific instance of a script engine. To use this event, provide the name of the script file run at the client or Server. To add this event to a worklist, double-click Release Script in the Events list.
Event Specific Fields Script file name. The path and name of the script file. Click the Browse link to choose a file and directory, or enter the path and file name in this field.
Syntax [Param 1] Script file name.Example: C:\Scripts\Myscript.vbs
Options Conditional (True/False)Execution: NormalExecution: Not required for successful session [x]Execution: Channel critical event [+]Execution: Session critical event [*]
Server/client availability “Release Script” on page 431
Remarks Accessing Afaria session variables through this event is not supported on the client.If you do not use this event to release the script, the script engine will automatically release when the session terminates.
Returned Value N/A
398
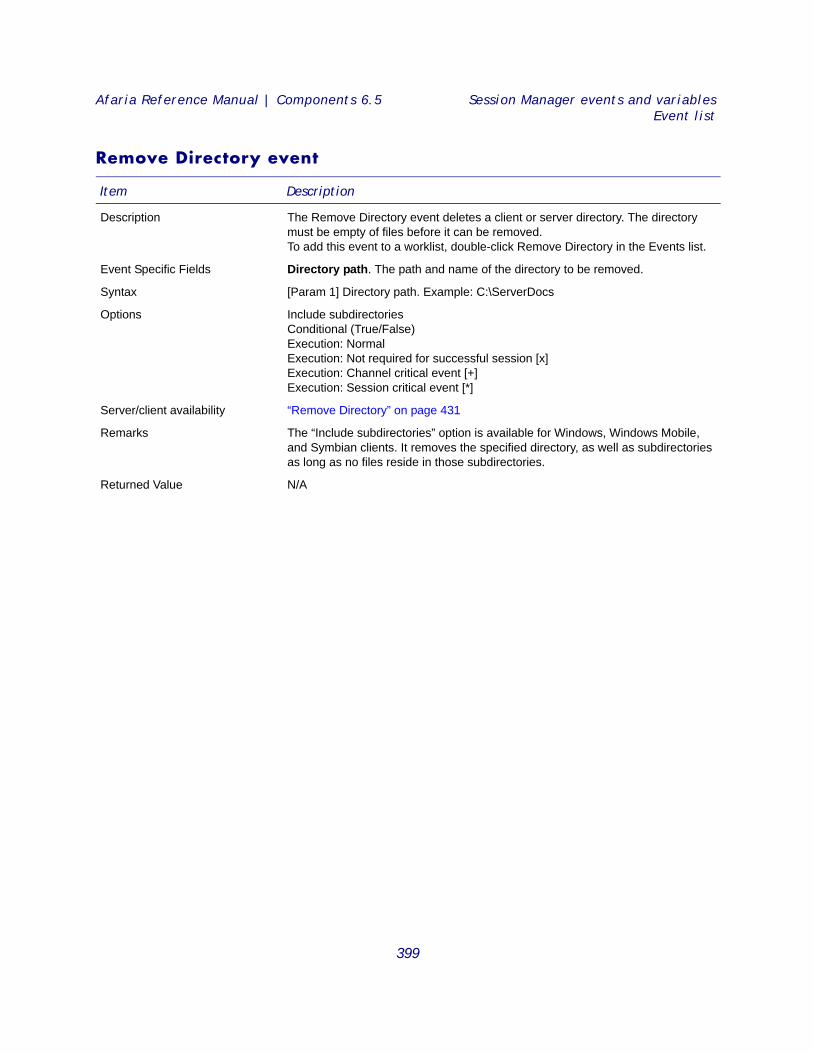
Afaria Reference Manual | Components 6.5 Session Manager events and variablesEvent list
Remove Directory event
Item Description
Description The Remove Directory event deletes a client or server directory. The directory must be empty of files before it can be removed. To add this event to a worklist, double-click Remove Directory in the Events list.
Event Specific Fields Directory path. The path and name of the directory to be removed.
Syntax [Param 1] Directory path. Example: C:\ServerDocs
Options Include subdirectoriesConditional (True/False)Execution: NormalExecution: Not required for successful session [x]Execution: Channel critical event [+]Execution: Session critical event [*]
Server/client availability “Remove Directory” on page 431
Remarks The “Include subdirectories” option is available for Windows, Windows Mobile, and Symbian clients. It removes the specified directory, as well as subdirectories as long as no files reside in those subdirectories.
Returned Value N/A
399
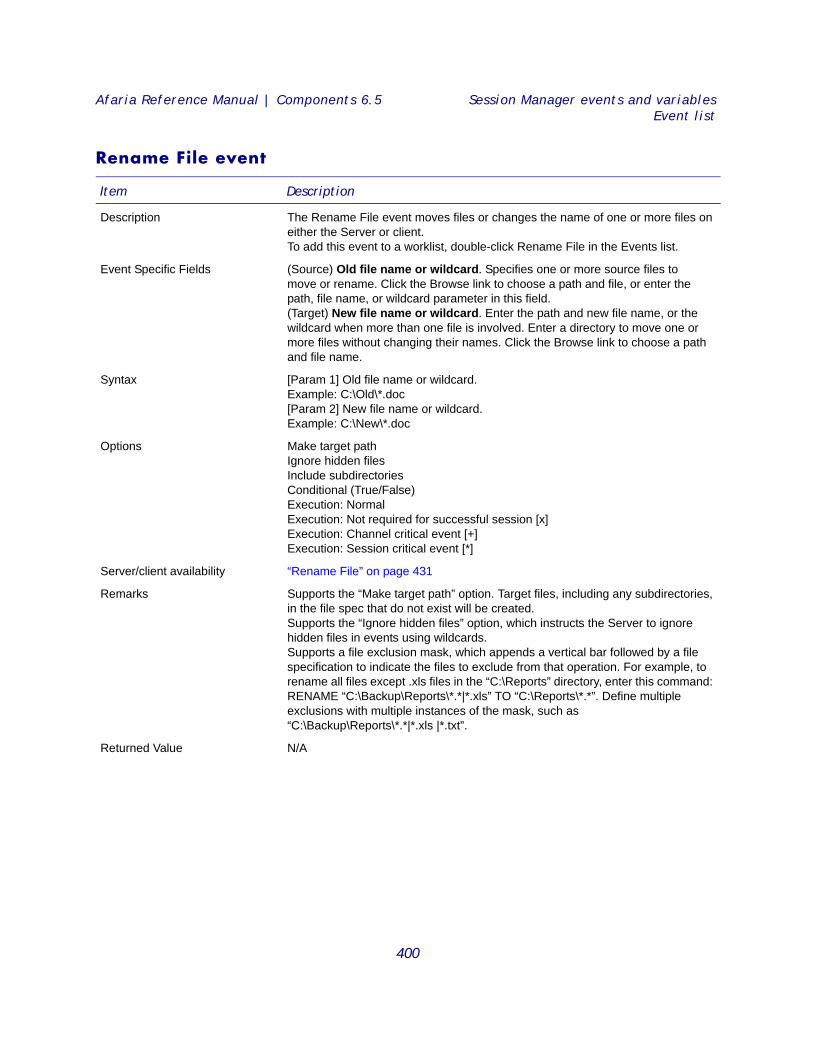
Afaria Reference Manual | Components 6.5 Session Manager events and variablesEvent list
Rename File event
Item Description
Description The Rename File event moves files or changes the name of one or more files on either the Server or client. To add this event to a worklist, double-click Rename File in the Events list.
Event Specific Fields (Source) Old file name or wildcard. Specifies one or more source files to move or rename. Click the Browse link to choose a path and file, or enter the path, file name, or wildcard parameter in this field.(Target) New file name or wildcard. Enter the path and new file name, or the wildcard when more than one file is involved. Enter a directory to move one or more files without changing their names. Click the Browse link to choose a path and file name.
Syntax [Param 1] Old file name or wildcard.Example: C:\Old\*.doc[Param 2] New file name or wildcard.Example: C:\New\*.doc
Options Make target pathIgnore hidden filesInclude subdirectoriesConditional (True/False)Execution: NormalExecution: Not required for successful session [x]Execution: Channel critical event [+]Execution: Session critical event [*]
Server/client availability “Rename File” on page 431
Remarks Supports the “Make target path” option. Target files, including any subdirectories, in the file spec that do not exist will be created.Supports the “Ignore hidden files” option, which instructs the Server to ignore hidden files in events using wildcards.Supports a file exclusion mask, which appends a vertical bar followed by a file specification to indicate the files to exclude from that operation. For example, to rename all files except .xls files in the “C:\Reports” directory, enter this command: RENAME “C:\Backup\Reports\*.*|*.xls” TO “C:\Reports\*.*”. Define multiple exclusions with multiple instances of the mask, such as “C:\Backup\Reports\*.*|*.xls |*.txt”.
Returned Value N/A
400
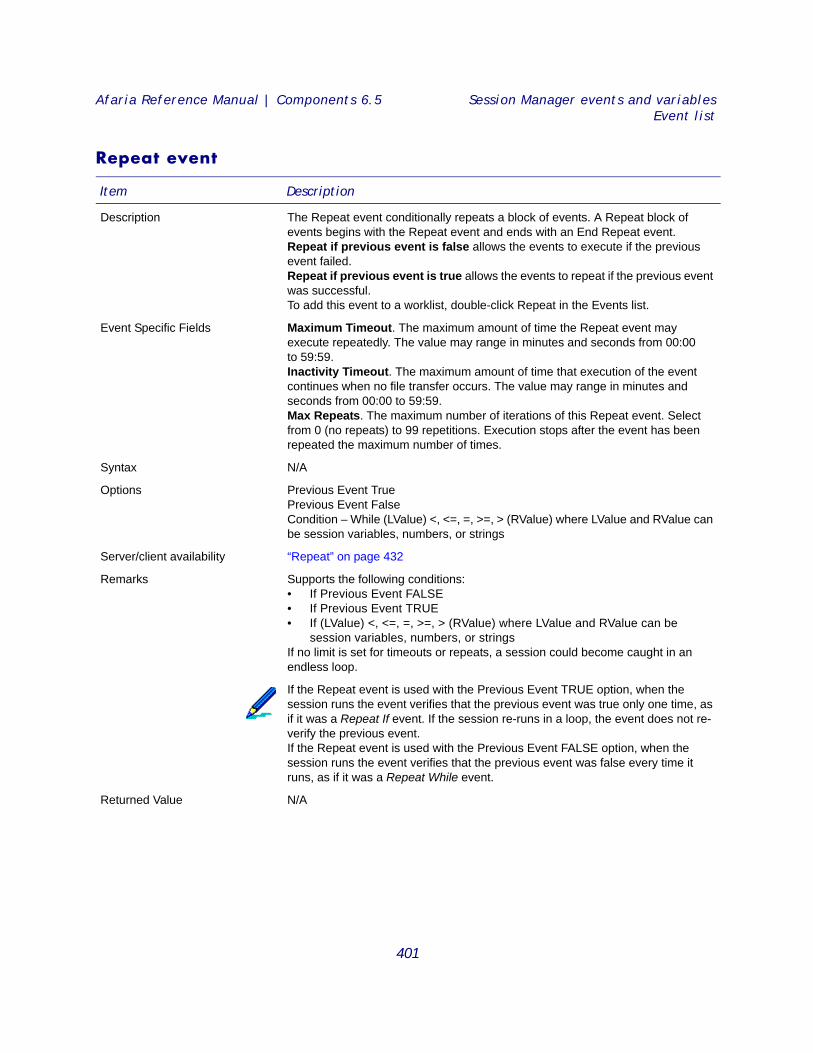
Afaria Reference Manual | Components 6.5 Session Manager events and variablesEvent list
Repeat event
Item Description
Description The Repeat event conditionally repeats a block of events. A Repeat block of events begins with the Repeat event and ends with an End Repeat event. Repeat if previous event is false allows the events to execute if the previous event failed. Repeat if previous event is true allows the events to repeat if the previous event was successful. To add this event to a worklist, double-click Repeat in the Events list.
Event Specific Fields Maximum Timeout. The maximum amount of time the Repeat event may execute repeatedly. The value may range in minutes and seconds from 00:00 to 59:59.Inactivity Timeout. The maximum amount of time that execution of the event continues when no file transfer occurs. The value may range in minutes and seconds from 00:00 to 59:59.Max Repeats. The maximum number of iterations of this Repeat event. Select from 0 (no repeats) to 99 repetitions. Execution stops after the event has been repeated the maximum number of times.
Syntax N/A
Options Previous Event TruePrevious Event FalseCondition – While (LValue) <, <=, =, >=, > (RValue) where LValue and RValue can be session variables, numbers, or strings
Server/client availability “Repeat” on page 432
Remarks Supports the following conditions:• If Previous Event FALSE• If Previous Event TRUE• If (LValue) <, <=, =, >=, > (RValue) where LValue and RValue can be
session variables, numbers, or stringsIf no limit is set for timeouts or repeats, a session could become caught in an endless loop.
If the Repeat event is used with the Previous Event TRUE option, when the session runs the event verifies that the previous event was true only one time, as if it was a Repeat If event. If the session re-runs in a loop, the event does not re-verify the previous event. If the Repeat event is used with the Previous Event FALSE option, when the session runs the event verifies that the previous event was false every time it runs, as if it was a Repeat While event.
Returned Value N/A
401
Afaria Reference Manual | Components 6.5 Session Manager events and variablesEvent list
Run Script Function event
Item Description
Description The Run Script Function event invokes specific scripting functions at the client or Server. To use this event, provide the name of the script function, as well as any parameters that need to be passed in to the function. To add this event to a worklist, double-click Run Script Function in the Events list.
Event Specific Fields Script file name. The path and name of the file that contains the script variable. Click the Browse link to choose a file and directory, or enter the path and file name in this field.Function name. The name of the script function.User variable name. The name of the session variable that will store the retrieved value.Return user variable name. If the script function returns a value, the name of the user defined session variable on the server that will store the value.
Syntax [Param 1] Script file name.Example: C:\Scripts\Myscript.vbs[Param 2] Function name.Example: MyFunction[Param 3] Input variables.Example: <%value1>, <%value2> or 100,200[Param 4] Return user variable name.Example: <%MyVariable>
We do not support using this event to display message box (popup) UI.
Options Conditional (True/False)Execution: NormalExecution: Not required for successful session [x]Execution: Channel critical event [+]Execution: Session critical event [*]
Server/client availability “Run Script Function” on page 432
Remarks The parameter list is a comma separated list that contains either text values or session variables. Accessing Afaria session variables through this event is not supported on the client.
Returned Value N/A
402
Afaria Reference Manual | Components 6.5 Session Manager events and variablesEvent list
Search Registry event
Item Description
Description The Search Registry event searches the registry on the client or Server for the specified key or value and places the value found into the specified user-defined variable. To add this event to a worklist, double-click Search Registry in the Events list.
Event Specific Fields User variable name. The user-defined variable for the registry search. Root key\key1\keyN. The path for the registry value. [value name]. The name for the registry value.
Syntax [Param 1] User variable name.Example: <%MyVar>[Param 2] Root key value. Example: HKEY_LOCAL_MACHINE\Software\Afaria\Name [Param 3] Value name. Example: ValueName
Leave [Param 3] blank to use the default value.
Options Include subkeysConditional (True/False)Execution: NormalExecution: Not required for successful session [x]Execution: Channel critical event [+]Execution: Session critical event [*]
Server/client availability “Search Registry” on page 432
Remarks Supports “Include subkeys” so that the registry is searched for any keys matching the Source filespec.
Returned Value N/A
403
Afaria Reference Manual | Components 6.5 Session Manager events and variablesEvent list
Send File to Client event File attributes aren’t retained with this event. For details on using the Set File Attributes event to define file attributes, see “Set File Attributes” on page 434.
Item Worklist and Sendlist Objects
Description The Send File to Client event transfers one or more Server files to a file or directory on the client. Using wildcards with this event transfers a group of Server files whose names have something in common, or that are in the same directory.
BlackBerry clients – This event operates on dataobjects within a COD file, rather than COD files. Typically, dataobject names are known only by the publishing party. Therefore, this event is likely to be of use only when you want to work with in-house applications.
To add this event to an object, double-click Send File to Client in the Events list.
Event Specific Fields (Source) Server file name or wildcard. Indicates which directory or files to send to the client. Enter the file name, path name, or directory on the server. Click the Browse link to choose a file, or use wildcards to send files of the same enter or that exist in one directory.
(Target) Client file name or wildcard. Places one or more Server files in this location at the client. Specify the file name, wildcard parameter, or directory for the client files.
A trailing backslash “\” will be accepted as an indication that the target is a subdirectory of the given path, as in C:\Program Files\Sample\Data\. If the target path does not include the trailing backslash, then an attempt will be made to treat the target as a directory, as if an implicit backslash. If such a target directory already exists or is created using the “Make target path” option, then transfer of one or more files to this directory should be successful. In the event that no such directory exists or is created, transfer of more than one file to the target path will fail. However transfer of a single file to the target path will be successful, with the file assuming the name specified in the target. For example, sending C:\Daily.doc to the path C:\Program Files\Sample\Data (where Data isn’t the name of a directory and isn’t created) will result in the creation or overwriting of C:\Program Files\Sample\Data with the contents of Daily.doc.
In all instances where multiple source files are targeted to a single destination file, the event is logged as an error. Selecting the “Make target path” option (explained on the next page), or the pre-existence of a designated directory will not prevent this error from occurring.
Syntax [Param 1] Server file name or wildcard. Example: C:\ServerDocs\Daily.doc [Param 2] File name or wildcard. Example: D:\Docs\*.doc
[Param 2] BlackBerry client type syntax example: [Filename.COD\objectID]
BlackBerry format complies with RIM’s RuntimeStore API requirements. Refer to RIM’s developer documentation for additional information.
404
Afaria Reference Manual | Components 6.5 Session Manager events and variablesEvent list
File comparison and transfer options
Transfer: AlwaysTransfer: If destination does not existTransfer: If source is newerTransfer: If source is differentUse version informationCheck/SendUse safe transferTurn compression offUse file differencing
Options Delete after [-]Make target pathIgnore hidden filesInclude subdirectoriesConditional (True/False)Execution: NormalExecution: Not required for successful session [x]Execution: Channel critical event [+]Execution: Session critical event [*]
Server/client availability “Send File to Client” on page 432
Remarks Maximum file size – 4 GB; to send a file send a file over 4 GB, you must divide the file into segments, each 4 GB or less in size. Supports the “Use safe transfer” option so that the Server does not create a destination file until it has been successfully transferred.Supports the “Make target path” option. Target files, including any subdirectories, in the file spec that do not exist will be created.Supports the “Ignore hidden files” option, which instructs the Server to ignore hidden files in events using wildcards.Supports a file exclusion mask, which appends a vertical bar followed by a file specification to indicate the files to exclude from that operation. For example, to get all files except .xls files from the “C:\Reports” directory, enter this command: SEND “D:\Backup\Reports” FROM “C:\Reports\*.*|*.xls”. Define multiple exclusions with multiple instances of the mask, such as “C:\Reports\*.*|*.xls |*.txt”. Supports indirect files. Sets event-specific information in an ASCII file that’s referenced in the event, rather than included. The only valid files for Palm clients are *.prc and *.pdb. file names are case sensitive, and the extension is removed at the device. A BlackBerry client device must be restarted before a .COD file can be successfully referenced by another Afaria Session Manager event.
Returned Value N/A
Item Worklist and Sendlist Objects
405

Afaria Reference Manual | Components 6.5 Session Manager events and variablesEvent list
Set Bandwidth Throttling Config event
Item Description
Description The Set Bandwidth Throttling Config event allows you to assign a predefined bandwidth throttling configuration to a session.To add this event to a worklist, double-click Set Bandwidth Throttling Config in the Events list.
Event Specific Fields Configuration name. The name of the predefined bandwidth throttling configuration set on the Bandwidth throttling view in Server configuration, Properties, or a variable created using the Set Variable event. If the configuration name that you enter in this field does not exist, the software uses the Current Default Configuration defined on the Bandwidth throttling view.
Syntax N/A
Options Conditional (True/False)Execution: NormalExecution: Not required for successful session [x]Execution: Channel critical event [+]Execution: Session critical event [*]
Server/client availability “Set Bandwidth Throttling Config” on page 433
Remarks N/A
Returned Value N/A
406
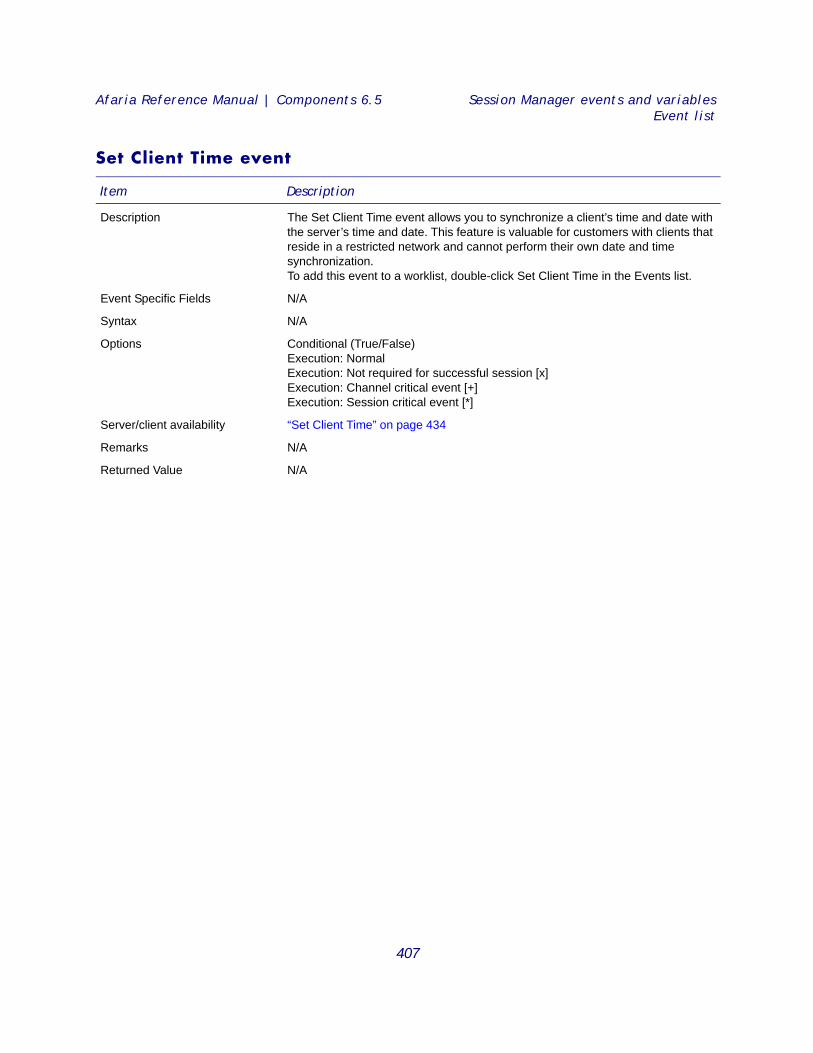
Afaria Reference Manual | Components 6.5 Session Manager events and variablesEvent list
Set Client Time event
Item Description
Description The Set Client Time event allows you to synchronize a client’s time and date with the server’s time and date. This feature is valuable for customers with clients that reside in a restricted network and cannot perform their own date and time synchronization. To add this event to a worklist, double-click Set Client Time in the Events list.
Event Specific Fields N/A
Syntax N/A
Options Conditional (True/False)Execution: NormalExecution: Not required for successful session [x]Execution: Channel critical event [+]Execution: Session critical event [*]
Server/client availability “Set Client Time” on page 434
Remarks N/A
Returned Value N/A
407
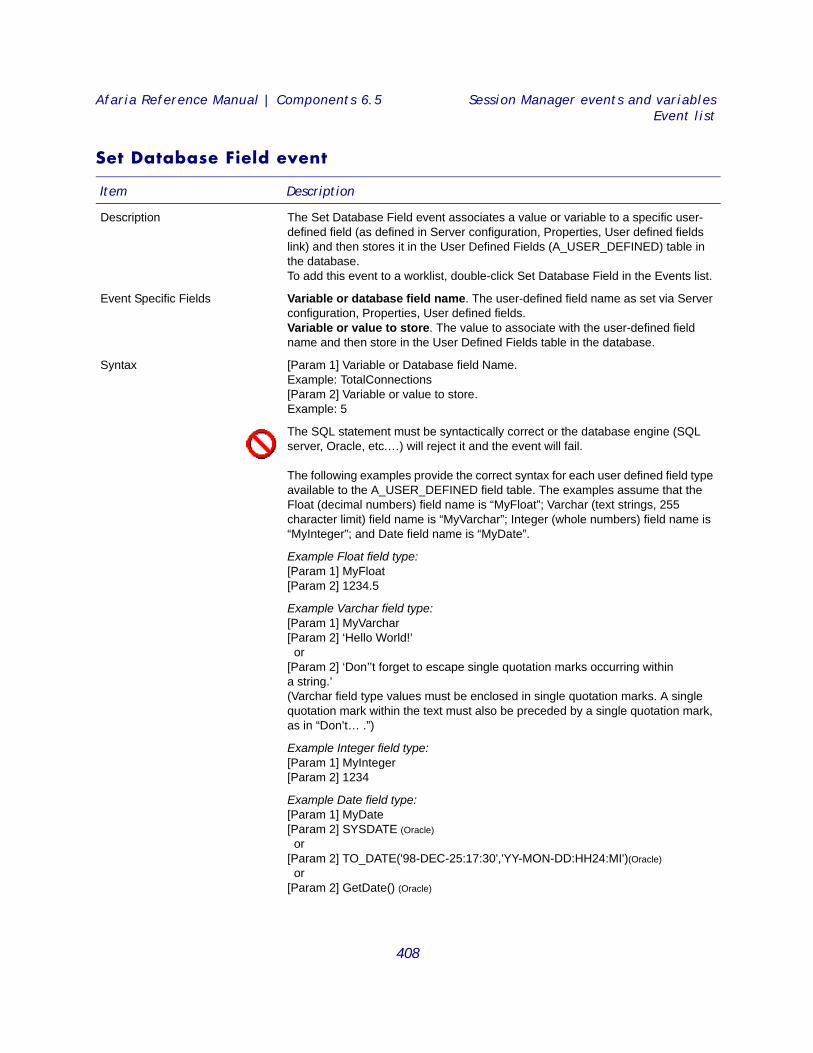
Afaria Reference Manual | Components 6.5 Session Manager events and variablesEvent list
Set Database Field event
Item Description
Description The Set Database Field event associates a value or variable to a specific user-defined field (as defined in Server configuration, Properties, User defined fields link) and then stores it in the User Defined Fields (A_USER_DEFINED) table in the database. To add this event to a worklist, double-click Set Database Field in the Events list.
Event Specific Fields Variable or database field name. The user-defined field name as set via Server configuration, Properties, User defined fields.Variable or value to store. The value to associate with the user-defined field name and then store in the User Defined Fields table in the database.
Syntax [Param 1] Variable or Database field Name.Example: TotalConnections[Param 2] Variable or value to store.Example: 5
The SQL statement must be syntactically correct or the database engine (SQL server, Oracle, etc.…) will reject it and the event will fail.
The following examples provide the correct syntax for each user defined field type available to the A_USER_DEFINED field table. The examples assume that the Float (decimal numbers) field name is “MyFloat”; Varchar (text strings, 255 character limit) field name is “MyVarchar”; Integer (whole numbers) field name is “MyInteger”; and Date field name is “MyDate”.
Example Float field type:[Param 1] MyFloat[Param 2] 1234.5
Example Varchar field type:[Param 1] MyVarchar[Param 2] ‘Hello World!’ or[Param 2] ‘Don’’t forget to escape single quotation marks occurring within a string.’(Varchar field type values must be enclosed in single quotation marks. A single quotation mark within the text must also be preceded by a single quotation mark, as in “Don’t… .”)
Example Integer field type:[Param 1] MyInteger[Param 2] 1234
Example Date field type:[Param 1] MyDate[Param 2] SYSDATE (Oracle) or[Param 2] TO_DATE('98-DEC-25:17:30','YY-MON-DD:HH24:MI')(Oracle) or[Param 2] GetDate() (Oracle)
408
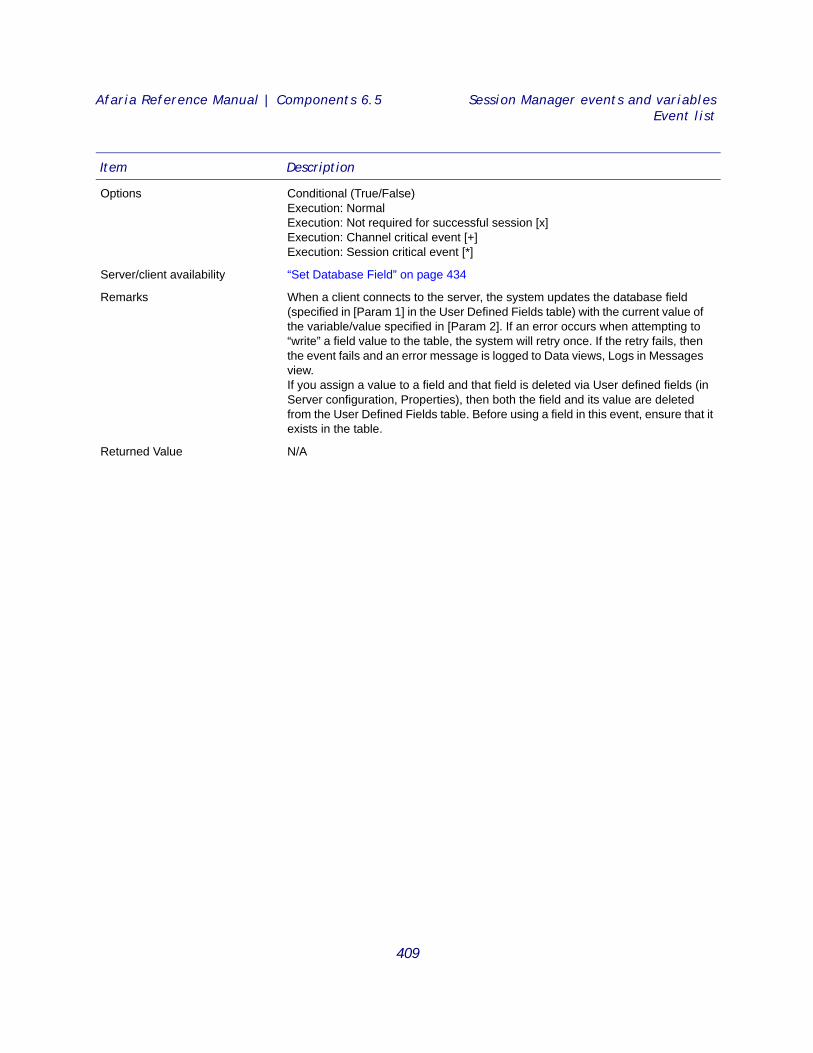
Afaria Reference Manual | Components 6.5 Session Manager events and variablesEvent list
Options Conditional (True/False)Execution: NormalExecution: Not required for successful session [x]Execution: Channel critical event [+]Execution: Session critical event [*]
Server/client availability “Set Database Field” on page 434
Remarks When a client connects to the server, the system updates the database field (specified in [Param 1] in the User Defined Fields table) with the current value of the variable/value specified in [Param 2]. If an error occurs when attempting to “write” a field value to the table, the system will retry once. If the retry fails, then the event fails and an error message is logged to Data views, Logs in Messages view.If you assign a value to a field and that field is deleted via User defined fields (in Server configuration, Properties), then both the field and its value are deleted from the User Defined Fields table. Before using a field in this event, ensure that it exists in the table.
Returned Value N/A
Item Description
409
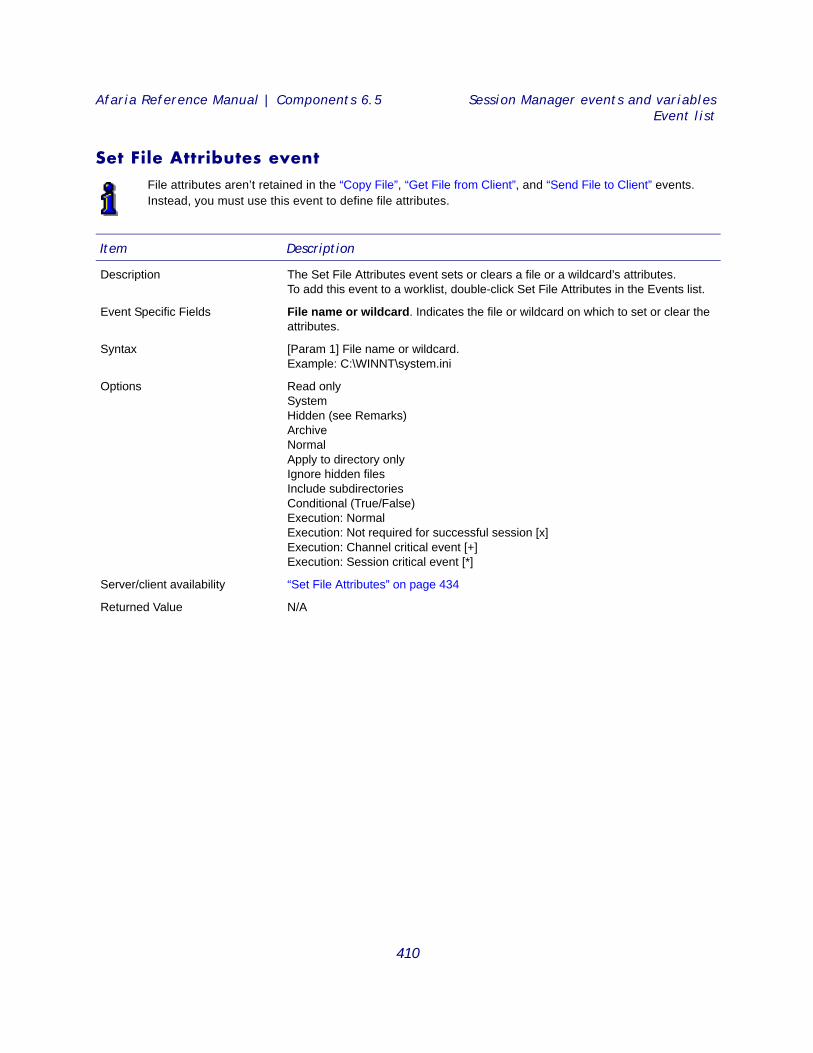
Afaria Reference Manual | Components 6.5 Session Manager events and variablesEvent list
Set File Attributes event File attributes aren’t retained in the “Copy File”, “Get File from Client”, and “Send File to Client” events. Instead, you must use this event to define file attributes.
Item Description
Description The Set File Attributes event sets or clears a file or a wildcard’s attributes. To add this event to a worklist, double-click Set File Attributes in the Events list.
Event Specific Fields File name or wildcard. Indicates the file or wildcard on which to set or clear the attributes.
Syntax [Param 1] File name or wildcard.Example: C:\WINNT\system.ini
Options Read onlySystemHidden (see Remarks) ArchiveNormalApply to directory onlyIgnore hidden filesInclude subdirectoriesConditional (True/False)Execution: NormalExecution: Not required for successful session [x]Execution: Channel critical event [+]Execution: Session critical event [*]
Server/client availability “Set File Attributes” on page 434
Returned Value N/A
410
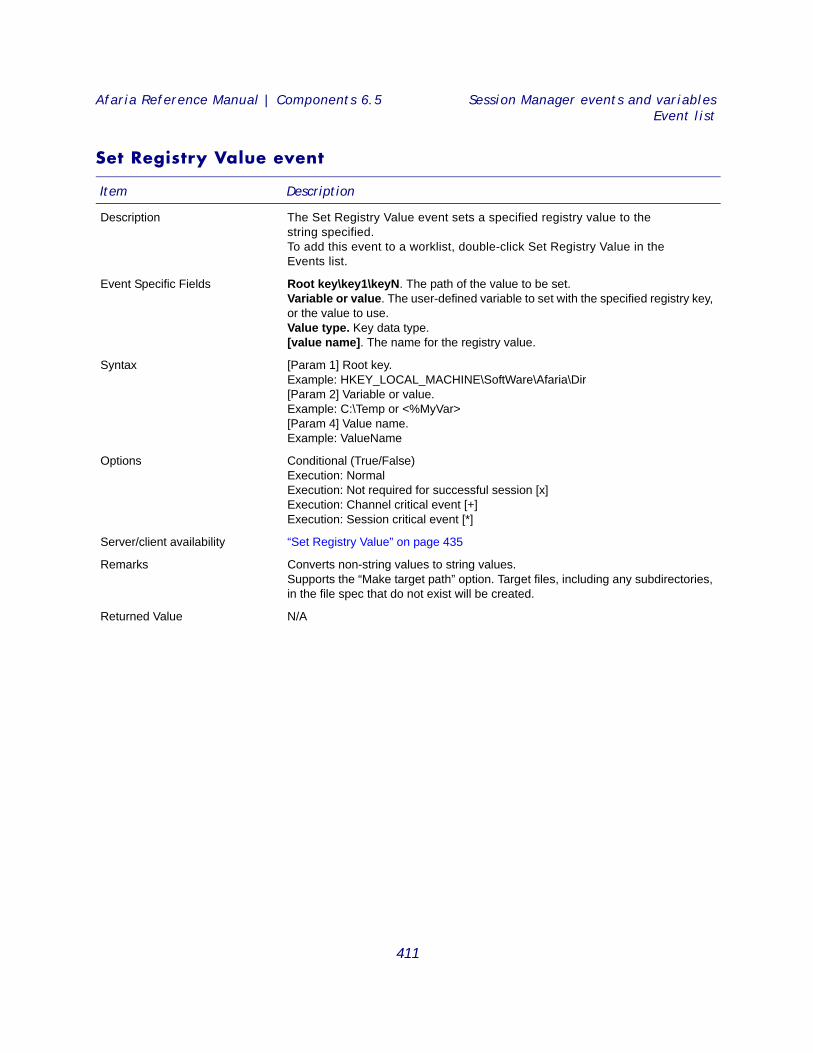
Afaria Reference Manual | Components 6.5 Session Manager events and variablesEvent list
Set Registry Value event
Item Description
Description The Set Registry Value event sets a specified registry value to the string specified. To add this event to a worklist, double-click Set Registry Value in the Events list.
Event Specific Fields Root key\key1\keyN. The path of the value to be set. Variable or value. The user-defined variable to set with the specified registry key, or the value to use. Value type. Key data type. [value name]. The name for the registry value.
Syntax [Param 1] Root key.Example: HKEY_LOCAL_MACHINE\SoftWare\Afaria\Dir[Param 2] Variable or value.Example: C:\Temp or <%MyVar> [Param 4] Value name. Example: ValueName
Options Conditional (True/False)Execution: NormalExecution: Not required for successful session [x]Execution: Channel critical event [+]Execution: Session critical event [*]
Server/client availability “Set Registry Value” on page 435
Remarks Converts non-string values to string values.Supports the “Make target path” option. Target files, including any subdirectories, in the file spec that do not exist will be created.
Returned Value N/A
411
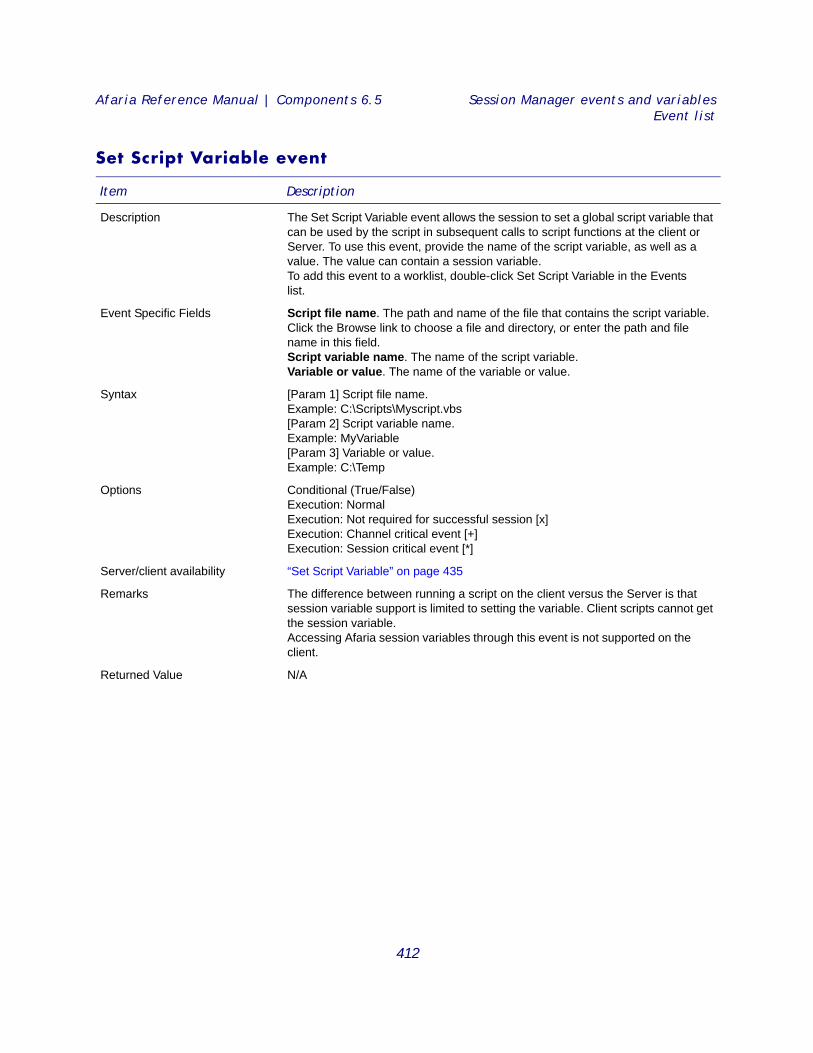
Afaria Reference Manual | Components 6.5 Session Manager events and variablesEvent list
Set Script Variable event
Item Description
Description The Set Script Variable event allows the session to set a global script variable that can be used by the script in subsequent calls to script functions at the client or Server. To use this event, provide the name of the script variable, as well as a value. The value can contain a session variable. To add this event to a worklist, double-click Set Script Variable in the Events list.
Event Specific Fields Script file name. The path and name of the file that contains the script variable. Click the Browse link to choose a file and directory, or enter the path and file name in this field.Script variable name. The name of the script variable.Variable or value. The name of the variable or value.
Syntax [Param 1] Script file name.Example: C:\Scripts\Myscript.vbs[Param 2] Script variable name.Example: MyVariable[Param 3] Variable or value.Example: C:\Temp
Options Conditional (True/False)Execution: NormalExecution: Not required for successful session [x]Execution: Channel critical event [+]Execution: Session critical event [*]
Server/client availability “Set Script Variable” on page 435
Remarks The difference between running a script on the client versus the Server is that session variable support is limited to setting the variable. Client scripts cannot get the session variable.Accessing Afaria session variables through this event is not supported on the client.
Returned Value N/A
412
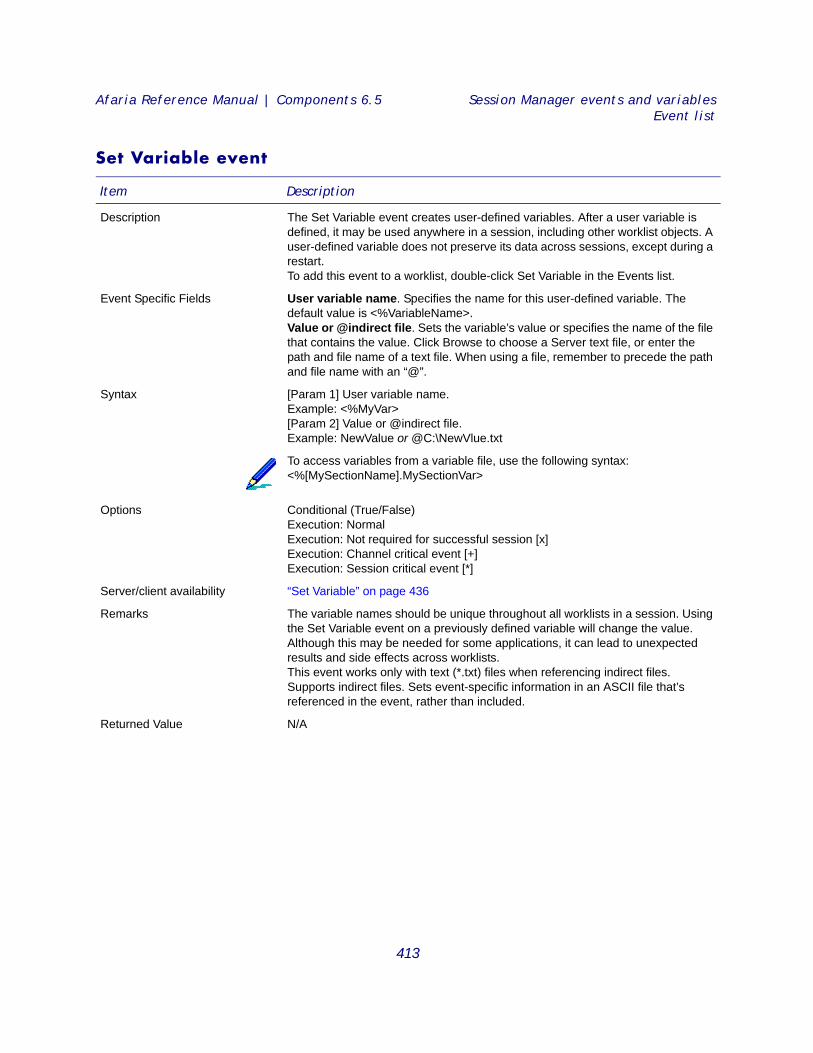
Afaria Reference Manual | Components 6.5 Session Manager events and variablesEvent list
Set Variable event
Item Description
Description The Set Variable event creates user-defined variables. After a user variable is defined, it may be used anywhere in a session, including other worklist objects. A user-defined variable does not preserve its data across sessions, except during a restart. To add this event to a worklist, double-click Set Variable in the Events list.
Event Specific Fields User variable name. Specifies the name for this user-defined variable. The default value is <%VariableName>. Value or @indirect file. Sets the variable’s value or specifies the name of the file that contains the value. Click Browse to choose a Server text file, or enter the path and file name of a text file. When using a file, remember to precede the path and file name with an “@”.
Syntax [Param 1] User variable name.Example: <%MyVar>[Param 2] Value or @indirect file.Example: NewValue or @C:\NewVlue.txt
To access variables from a variable file, use the following syntax:<%[MySectionName].MySectionVar>
Options Conditional (True/False)Execution: NormalExecution: Not required for successful session [x]Execution: Channel critical event [+]Execution: Session critical event [*]
Server/client availability “Set Variable” on page 436
Remarks The variable names should be unique throughout all worklists in a session. Using the Set Variable event on a previously defined variable will change the value. Although this may be needed for some applications, it can lead to unexpected results and side effects across worklists.This event works only with text (*.txt) files when referencing indirect files.Supports indirect files. Sets event-specific information in an ASCII file that’s referenced in the event, rather than included.
Returned Value N/A
413
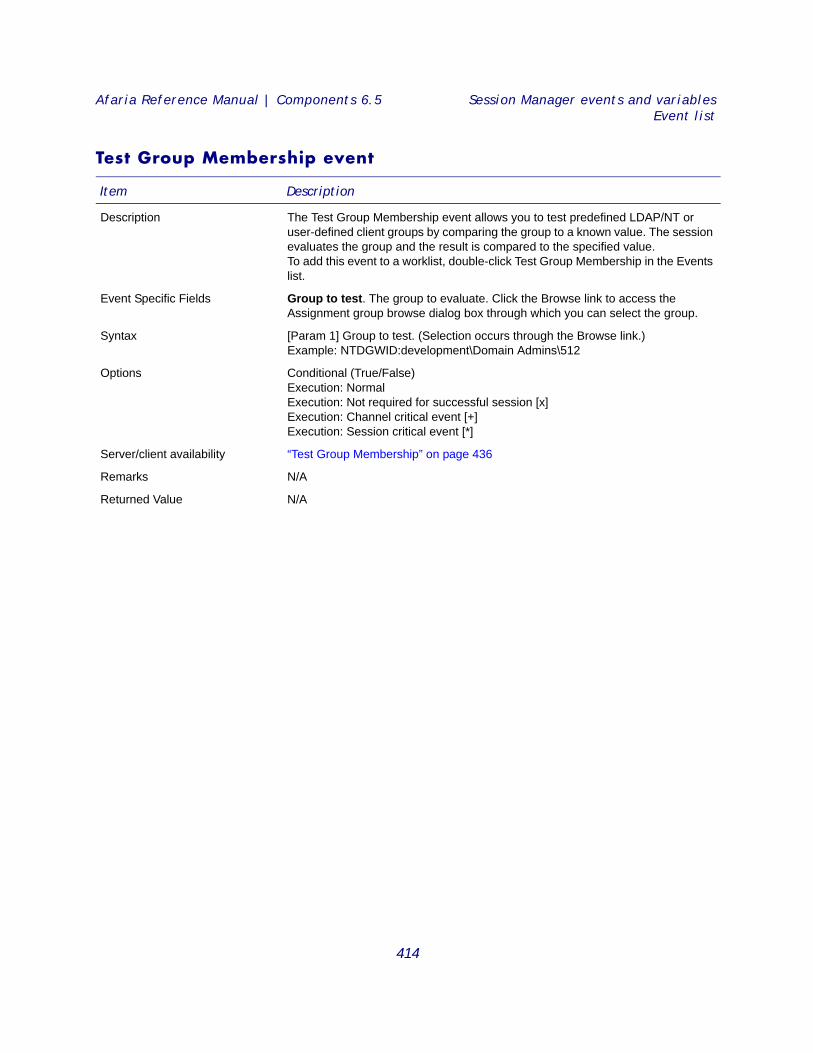
Afaria Reference Manual | Components 6.5 Session Manager events and variablesEvent list
Test Group Membership event
Item Description
Description The Test Group Membership event allows you to test predefined LDAP/NT or user-defined client groups by comparing the group to a known value. The session evaluates the group and the result is compared to the specified value. To add this event to a worklist, double-click Test Group Membership in the Events list.
Event Specific Fields Group to test. The group to evaluate. Click the Browse link to access the Assignment group browse dialog box through which you can select the group.
Syntax [Param 1] Group to test. (Selection occurs through the Browse link.)Example: NTDGWID:development\Domain Admins\512
Options Conditional (True/False)Execution: NormalExecution: Not required for successful session [x]Execution: Channel critical event [+]Execution: Session critical event [*]
Server/client availability “Test Group Membership” on page 436
Remarks N/A
Returned Value N/A
414
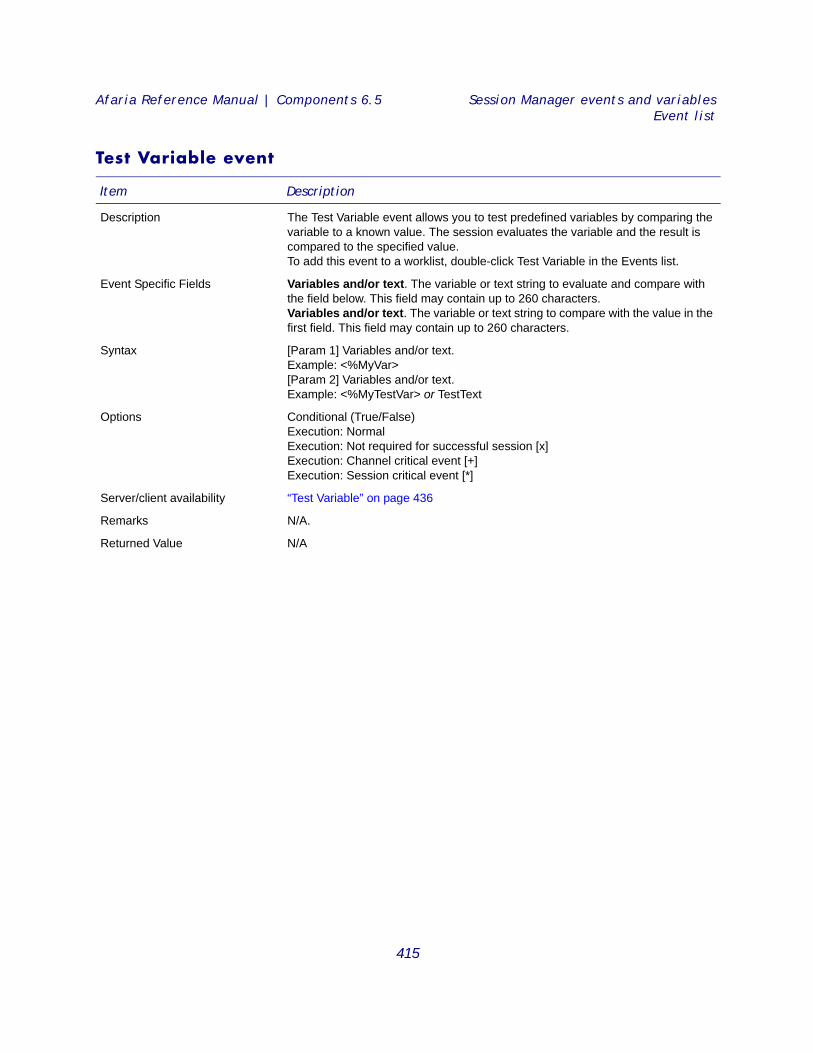
Afaria Reference Manual | Components 6.5 Session Manager events and variablesEvent list
Test Variable event
Item Description
Description The Test Variable event allows you to test predefined variables by comparing the variable to a known value. The session evaluates the variable and the result is compared to the specified value. To add this event to a worklist, double-click Test Variable in the Events list.
Event Specific Fields Variables and/or text. The variable or text string to evaluate and compare with the field below. This field may contain up to 260 characters.Variables and/or text. The variable or text string to compare with the value in the first field. This field may contain up to 260 characters.
Syntax [Param 1] Variables and/or text.Example: <%MyVar>[Param 2] Variables and/or text.Example: <%MyTestVar> or TestText
Options Conditional (True/False)Execution: NormalExecution: Not required for successful session [x]Execution: Channel critical event [+]Execution: Session critical event [*]
Server/client availability “Test Variable” on page 436
Remarks N/A.
Returned Value N/A
415
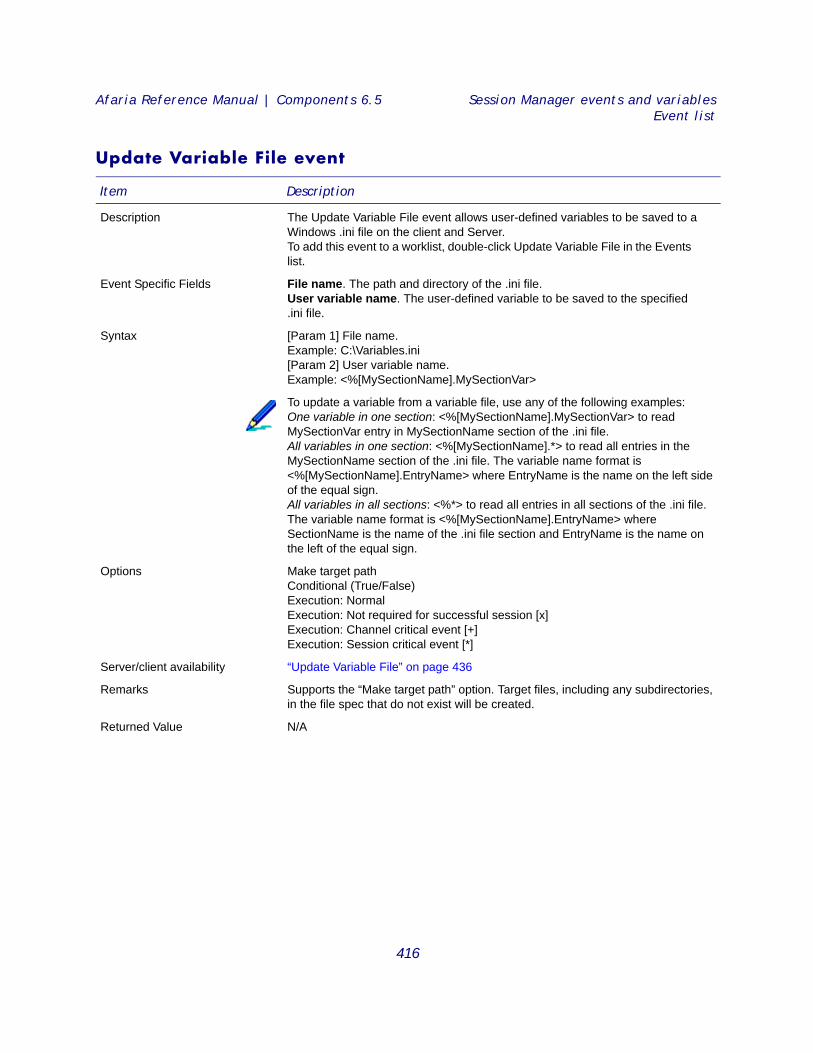
Afaria Reference Manual | Components 6.5 Session Manager events and variablesEvent list
Update Variable File event
Item Description
Description The Update Variable File event allows user-defined variables to be saved to a Windows .ini file on the client and Server. To add this event to a worklist, double-click Update Variable File in the Events list.
Event Specific Fields File name. The path and directory of the .ini file.User variable name. The user-defined variable to be saved to the specified .ini file.
Syntax [Param 1] File name.Example: C:\Variables.ini[Param 2] User variable name.Example: <%[MySectionName].MySectionVar>
To update a variable from a variable file, use any of the following examples:One variable in one section: <%[MySectionName].MySectionVar> to read MySectionVar entry in MySectionName section of the .ini file.All variables in one section: <%[MySectionName].*> to read all entries in the MySectionName section of the .ini file. The variable name format is <%[MySectionName].EntryName> where EntryName is the name on the left side of the equal sign.All variables in all sections: <%*> to read all entries in all sections of the .ini file. The variable name format is <%[MySectionName].EntryName> where SectionName is the name of the .ini file section and EntryName is the name on the left of the equal sign.
Options Make target pathConditional (True/False)Execution: NormalExecution: Not required for successful session [x]Execution: Channel critical event [+]Execution: Session critical event [*]
Server/client availability “Update Variable File” on page 436
Remarks Supports the “Make target path” option. Target files, including any subdirectories, in the file spec that do not exist will be created.
Returned Value N/A
416
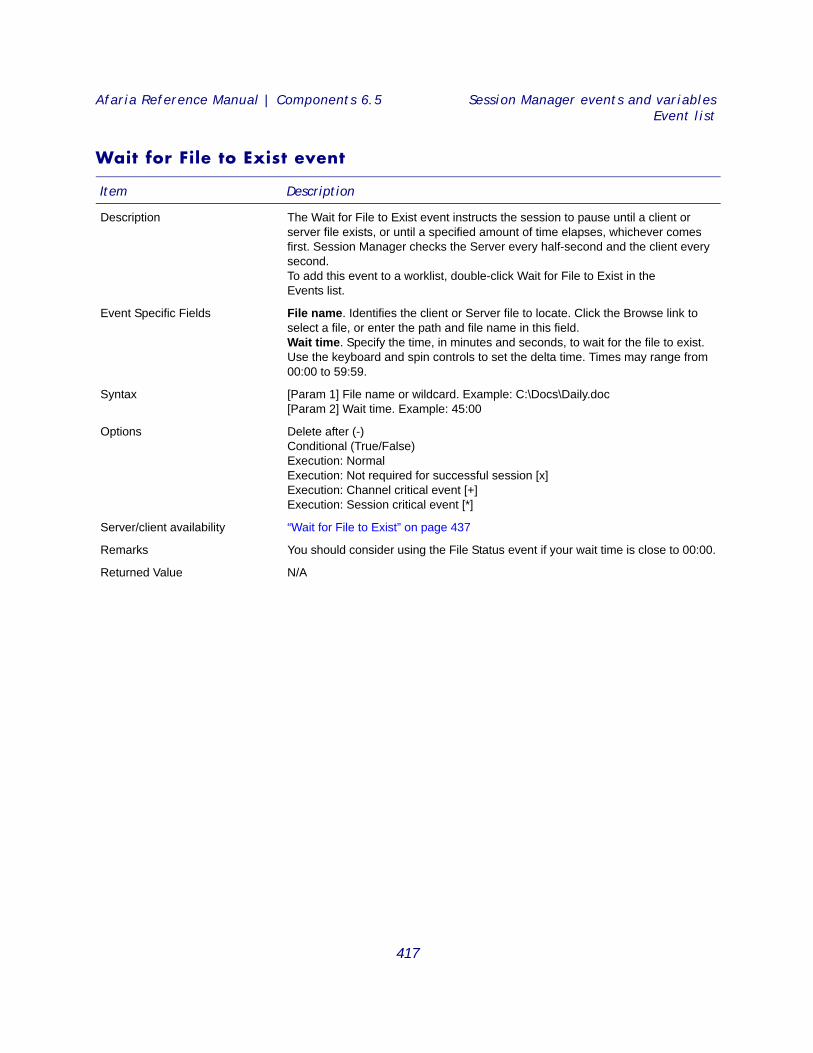
Afaria Reference Manual | Components 6.5 Session Manager events and variablesEvent list
Wait for File to Exist event
Item Description
Description The Wait for File to Exist event instructs the session to pause until a client or server file exists, or until a specified amount of time elapses, whichever comes first. Session Manager checks the Server every half-second and the client every second.To add this event to a worklist, double-click Wait for File to Exist in the Events list.
Event Specific Fields File name. Identifies the client or Server file to locate. Click the Browse link to select a file, or enter the path and file name in this field.Wait time. Specify the time, in minutes and seconds, to wait for the file to exist. Use the keyboard and spin controls to set the delta time. Times may range from 00:00 to 59:59.
Syntax [Param 1] File name or wildcard. Example: C:\Docs\Daily.doc [Param 2] Wait time. Example: 45:00
Options Delete after (-)Conditional (True/False)Execution: NormalExecution: Not required for successful session [x]Execution: Channel critical event [+]Execution: Session critical event [*]
Server/client availability “Wait for File to Exist” on page 437
Remarks You should consider using the File Status event if your wait time is close to 00:00.
Returned Value N/A
417
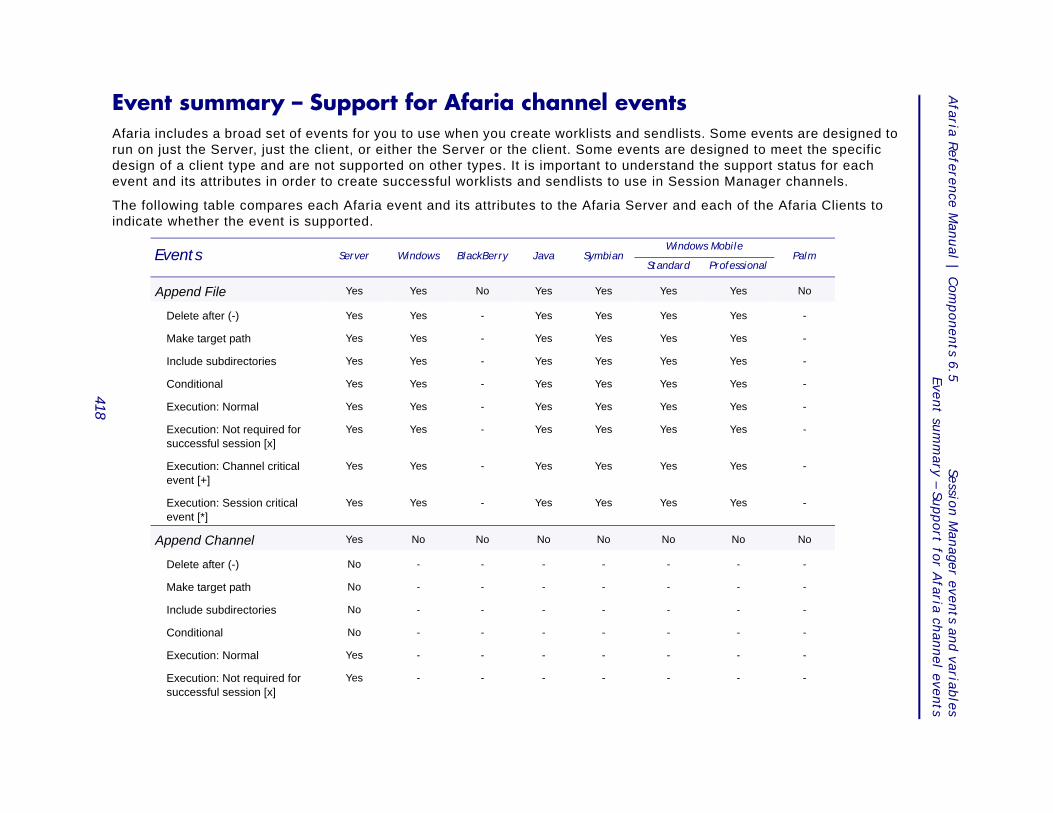
Afaria R
eference Manu
al | Com
ponents 6.5
Session Manager events and
variables
Event sum
mary – Su
pp
ort for Afaria ch
annel eventsEvent summary – Support for Afaria channel events Afaria includes a broad set of events for you to use when you create worklists and sendlists. Some events are designed to
ed to meet the specific upport status for each anager channels.
of the Afaria Clients to
ilePalm
ssional
es No
es -
es -
es -
es -
es -
es -
es -
es -
No No
- -
- -
- -
- -
- -
- -
418
run on just the Server, just the client, or either the Server or the client. Some events are designdesign of a client type and are not supported on other types. It is important to understand the sevent and its attributes in order to create successful worklists and sendlists to use in Session M
The following table compares each Afaria event and its attributes to the Afaria Server and eachindicate whether the event is supported.
Events Server Windows BlackBerry Java SymbianWindows Mob
Standard Profe
Append File Yes Yes No Yes Yes Yes Y
Delete after (-) Yes Yes - Yes Yes Yes Y
Make target path Yes Yes - Yes Yes Yes Y
Include subdirectories Yes Yes - Yes Yes Yes Y
Conditional Yes Yes - Yes Yes Yes Y
Execution: Normal Yes Yes - Yes Yes Yes Y
Execution: Not required for successful session [x]
Yes Yes - Yes Yes Yes Y
Execution: Channel critical event [+]
Yes Yes - Yes Yes Yes Y
Execution: Session critical event [*]
Yes Yes - Yes Yes Yes Y
Append Channel Yes No No No No No
Delete after (-) No - - - - -
Make target path No - - - - -
Include subdirectories No - - - - -
Conditional No - - - - -
Execution: Normal Yes - - - - -
Execution: Not required for successful session [x]
Yes - - - - -
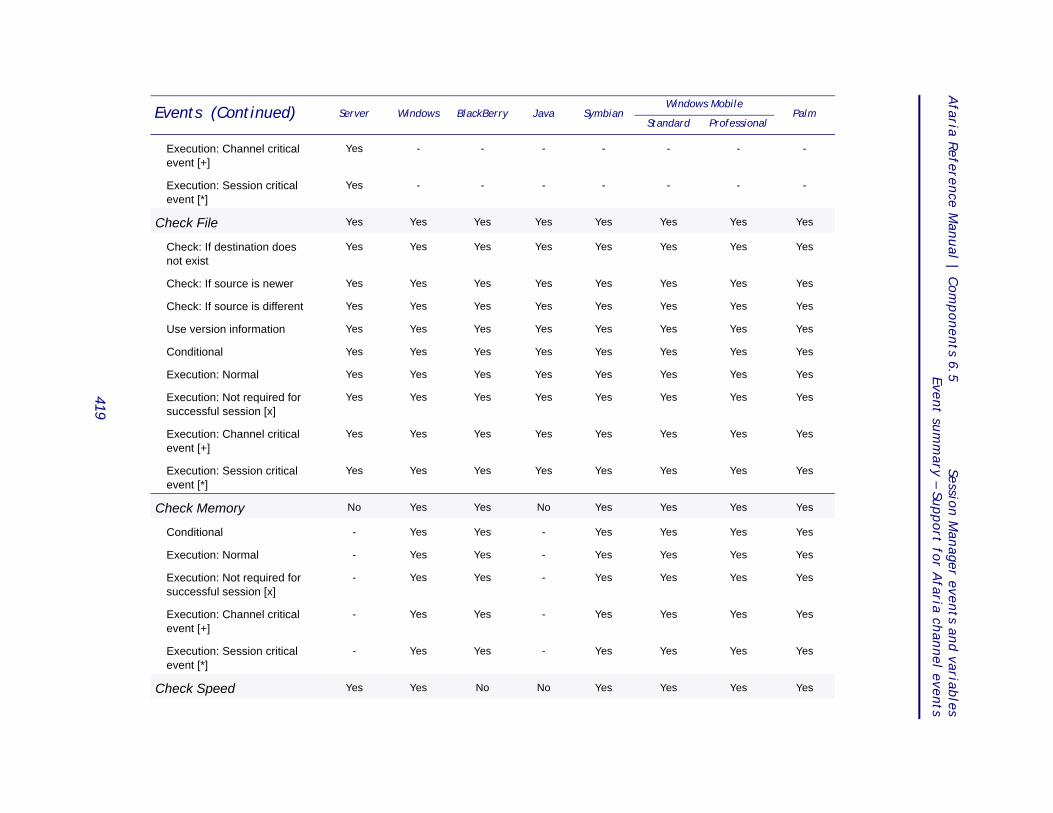
Afaria R
eference Manu
al | Com
ponents 6.5
Session Manager events and
variables
Event sum
mary – Su
pp
ort for Afaria ch
annel events
- -
- -
es Yes
es Yes
es Yes
es Yes
es Yes
es Yes
es Yes
es Yes
es Yes
es Yes
es Yes
es Yes
es Yes
es Yes
es Yes
es Yes
es Yes
Events (Continued) Server Windows BlackBerry Java SymbianWindows Mobile
PalmStandard Professional
419
Execution: Channel critical event [+]
Yes - - - - -
Execution: Session critical event [*]
Yes - - - - -
Check File Yes Yes Yes Yes Yes Yes Y
Check: If destination does not exist
Yes Yes Yes Yes Yes Yes Y
Check: If source is newer Yes Yes Yes Yes Yes Yes Y
Check: If source is different Yes Yes Yes Yes Yes Yes Y
Use version information Yes Yes Yes Yes Yes Yes Y
Conditional Yes Yes Yes Yes Yes Yes Y
Execution: Normal Yes Yes Yes Yes Yes Yes Y
Execution: Not required for successful session [x]
Yes Yes Yes Yes Yes Yes Y
Execution: Channel critical event [+]
Yes Yes Yes Yes Yes Yes Y
Execution: Session critical event [*]
Yes Yes Yes Yes Yes Yes Y
Check Memory No Yes Yes No Yes Yes Y
Conditional - Yes Yes - Yes Yes Y
Execution: Normal - Yes Yes - Yes Yes Y
Execution: Not required for successful session [x]
- Yes Yes - Yes Yes Y
Execution: Channel critical event [+]
- Yes Yes - Yes Yes Y
Execution: Session critical event [*]
- Yes Yes - Yes Yes Y
Check Speed Yes Yes No No Yes Yes Y
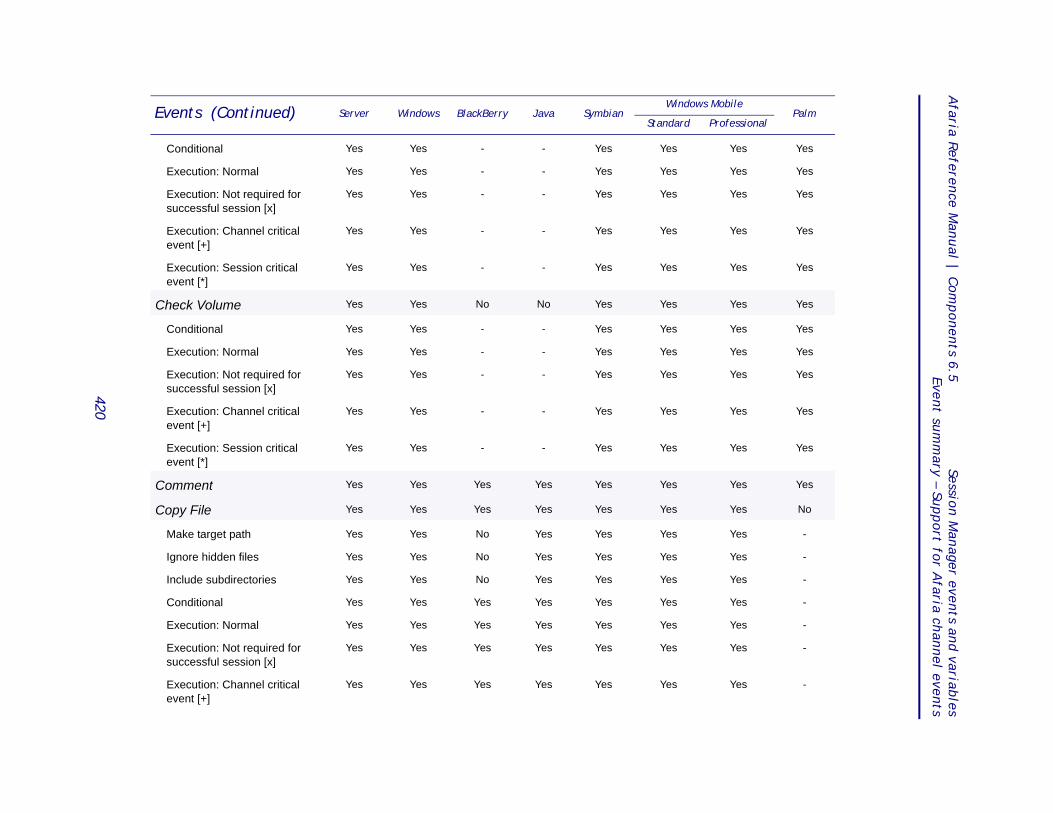
Afaria R
eference Manu
al | Com
ponents 6.5
Session Manager events and
variables
Event sum
mary – Su
pp
ort for Afaria ch
annel events
es Yes
es Yes
es Yes
es Yes
es Yes
es Yes
es Yes
es Yes
es Yes
es Yes
es Yes
es Yes
es No
es -
es -
es -
es -
es -
es -
es -
Events (Continued) Server Windows BlackBerry Java SymbianWindows Mobile
PalmStandard Professional
420
Conditional Yes Yes - - Yes Yes Y
Execution: Normal Yes Yes - - Yes Yes Y
Execution: Not required for successful session [x]
Yes Yes - - Yes Yes Y
Execution: Channel critical event [+]
Yes Yes - - Yes Yes Y
Execution: Session critical event [*]
Yes Yes - - Yes Yes Y
Check Volume Yes Yes No No Yes Yes Y
Conditional Yes Yes - - Yes Yes Y
Execution: Normal Yes Yes - - Yes Yes Y
Execution: Not required for successful session [x]
Yes Yes - - Yes Yes Y
Execution: Channel critical event [+]
Yes Yes - - Yes Yes Y
Execution: Session critical event [*]
Yes Yes - - Yes Yes Y
Comment Yes Yes Yes Yes Yes Yes Y
Copy File Yes Yes Yes Yes Yes Yes Y
Make target path Yes Yes No Yes Yes Yes Y
Ignore hidden files Yes Yes No Yes Yes Yes Y
Include subdirectories Yes Yes No Yes Yes Yes Y
Conditional Yes Yes Yes Yes Yes Yes Y
Execution: Normal Yes Yes Yes Yes Yes Yes Y
Execution: Not required for successful session [x]
Yes Yes Yes Yes Yes Yes Y
Execution: Channel critical event [+]
Yes Yes Yes Yes Yes Yes Y
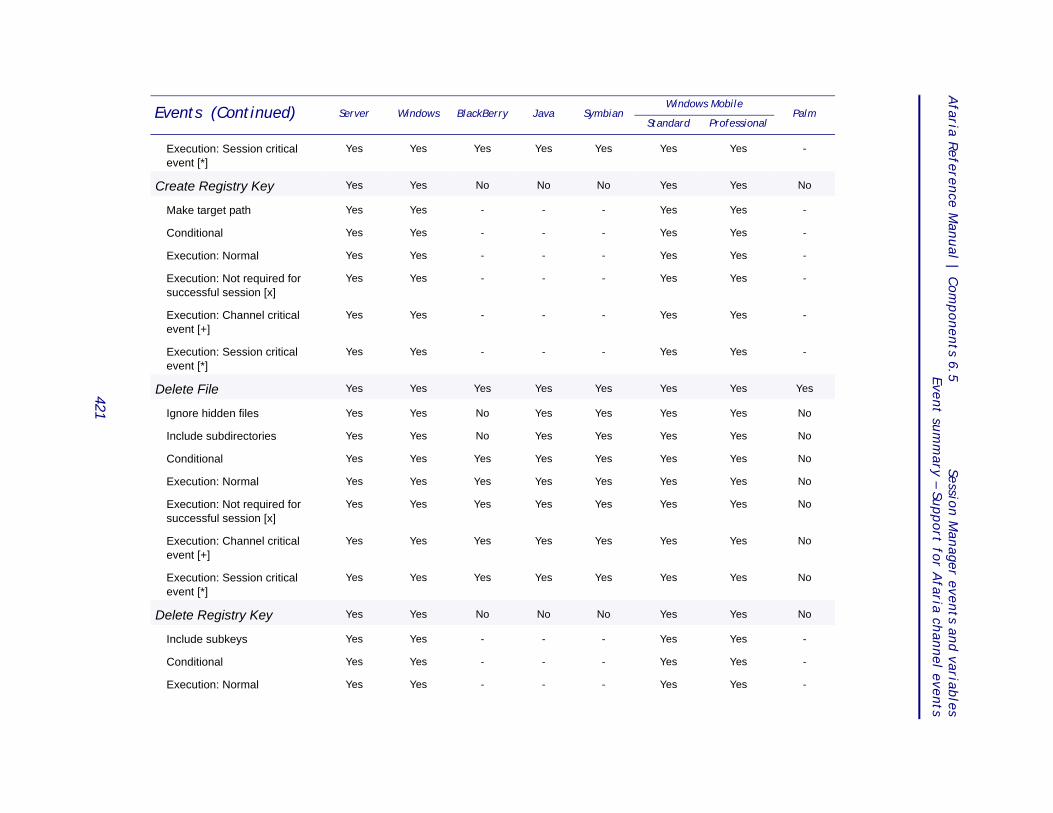
Afaria R
eference Manu
al | Com
ponents 6.5
Session Manager events and
variables
Event sum
mary – Su
pp
ort for Afaria ch
annel events
es -
es No
es -
es -
es -
es -
es -
es -
es Yes
es No
es No
es No
es No
es No
es No
es No
es No
es -
es -
es -
Events (Continued) Server Windows BlackBerry Java SymbianWindows Mobile
PalmStandard Professional
421
Execution: Session critical event [*]
Yes Yes Yes Yes Yes Yes Y
Create Registry Key Yes Yes No No No Yes Y
Make target path Yes Yes - - - Yes Y
Conditional Yes Yes - - - Yes Y
Execution: Normal Yes Yes - - - Yes Y
Execution: Not required for successful session [x]
Yes Yes - - - Yes Y
Execution: Channel critical event [+]
Yes Yes - - - Yes Y
Execution: Session critical event [*]
Yes Yes - - - Yes Y
Delete File Yes Yes Yes Yes Yes Yes Y
Ignore hidden files Yes Yes No Yes Yes Yes Y
Include subdirectories Yes Yes No Yes Yes Yes Y
Conditional Yes Yes Yes Yes Yes Yes Y
Execution: Normal Yes Yes Yes Yes Yes Yes Y
Execution: Not required for successful session [x]
Yes Yes Yes Yes Yes Yes Y
Execution: Channel critical event [+]
Yes Yes Yes Yes Yes Yes Y
Execution: Session critical event [*]
Yes Yes Yes Yes Yes Yes Y
Delete Registry Key Yes Yes No No No Yes Y
Include subkeys Yes Yes - - - Yes Y
Conditional Yes Yes - - - Yes Y
Execution: Normal Yes Yes - - - Yes Y
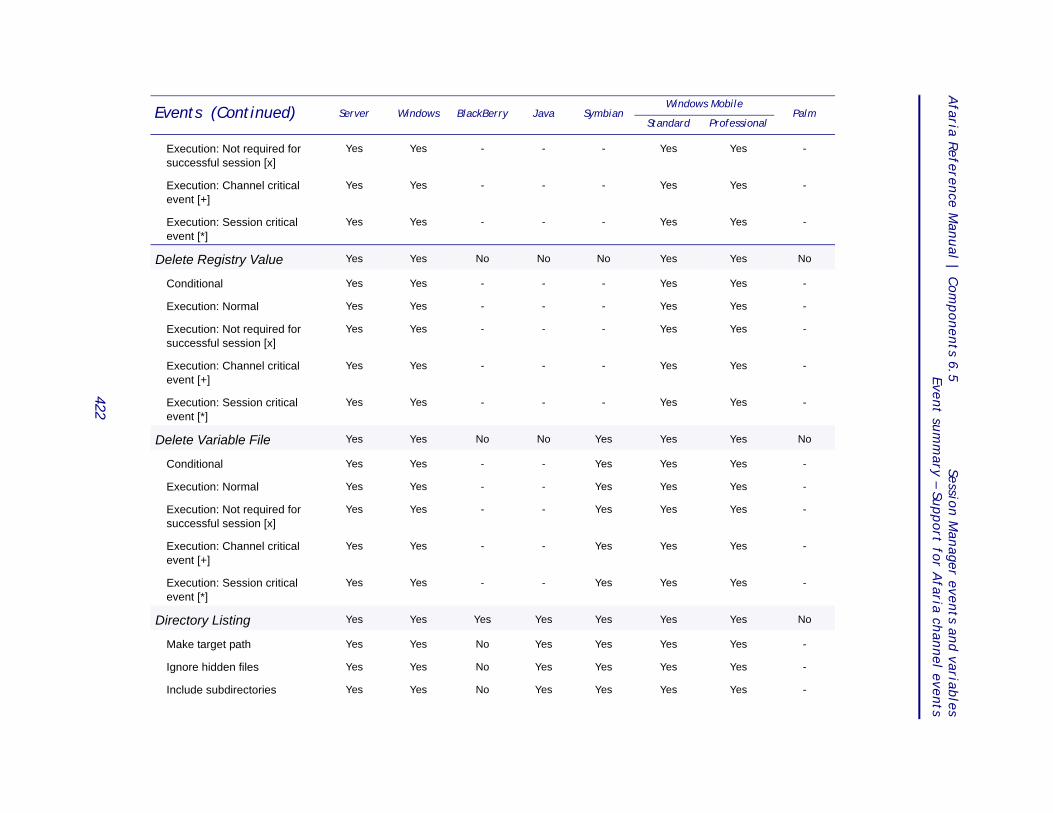
Afaria R
eference Manu
al | Com
ponents 6.5
Session Manager events and
variables
Event sum
mary – Su
pp
ort for Afaria ch
annel events
es -
es -
es -
es No
es -
es -
es -
es -
es -
es No
es -
es -
es -
es -
es -
es No
es -
es -
es -
Events (Continued) Server Windows BlackBerry Java SymbianWindows Mobile
PalmStandard Professional
422
Execution: Not required for successful session [x]
Yes Yes - - - Yes Y
Execution: Channel critical event [+]
Yes Yes - - - Yes Y
Execution: Session critical event [*]
Yes Yes - - - Yes Y
Delete Registry Value Yes Yes No No No Yes Y
Conditional Yes Yes - - - Yes Y
Execution: Normal Yes Yes - - - Yes Y
Execution: Not required for successful session [x]
Yes Yes - - - Yes Y
Execution: Channel critical event [+]
Yes Yes - - - Yes Y
Execution: Session critical event [*]
Yes Yes - - - Yes Y
Delete Variable File Yes Yes No No Yes Yes Y
Conditional Yes Yes - - Yes Yes Y
Execution: Normal Yes Yes - - Yes Yes Y
Execution: Not required for successful session [x]
Yes Yes - - Yes Yes Y
Execution: Channel critical event [+]
Yes Yes - - Yes Yes Y
Execution: Session critical event [*]
Yes Yes - - Yes Yes Y
Directory Listing Yes Yes Yes Yes Yes Yes Y
Make target path Yes Yes No Yes Yes Yes Y
Ignore hidden files Yes Yes No Yes Yes Yes Y
Include subdirectories Yes Yes No Yes Yes Yes Y
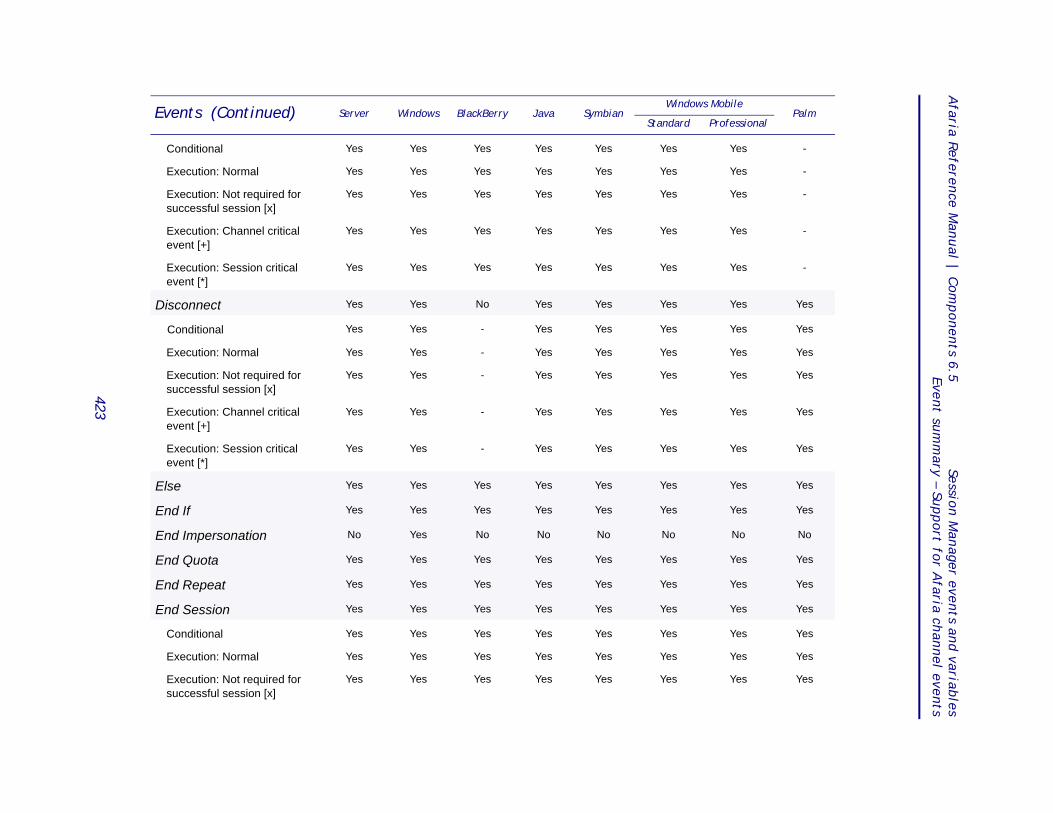
Afaria R
eference Manu
al | Com
ponents 6.5
Session Manager events and
variables
Event sum
mary – Su
pp
ort for Afaria ch
annel events
es -
es -
es -
es -
es -
es Yes
es Yes
es Yes
es Yes
es Yes
es Yes
es Yes
es Yes
No No
es Yes
es Yes
es Yes
es Yes
es Yes
es Yes
Events (Continued) Server Windows BlackBerry Java SymbianWindows Mobile
PalmStandard Professional
423
Conditional Yes Yes Yes Yes Yes Yes Y
Execution: Normal Yes Yes Yes Yes Yes Yes Y
Execution: Not required for successful session [x]
Yes Yes Yes Yes Yes Yes Y
Execution: Channel critical event [+]
Yes Yes Yes Yes Yes Yes Y
Execution: Session critical event [*]
Yes Yes Yes Yes Yes Yes Y
Disconnect Yes Yes No Yes Yes Yes Y
Conditional Yes Yes - Yes Yes Yes Y
Execution: Normal Yes Yes - Yes Yes Yes Y
Execution: Not required for successful session [x]
Yes Yes - Yes Yes Yes Y
Execution: Channel critical event [+]
Yes Yes - Yes Yes Yes Y
Execution: Session critical event [*]
Yes Yes - Yes Yes Yes Y
Else Yes Yes Yes Yes Yes Yes Y
End If Yes Yes Yes Yes Yes Yes Y
End Impersonation No Yes No No No No
End Quota Yes Yes Yes Yes Yes Yes Y
End Repeat Yes Yes Yes Yes Yes Yes Y
End Session Yes Yes Yes Yes Yes Yes Y
Conditional Yes Yes Yes Yes Yes Yes Y
Execution: Normal Yes Yes Yes Yes Yes Yes Y
Execution: Not required for successful session [x]
Yes Yes Yes Yes Yes Yes Y
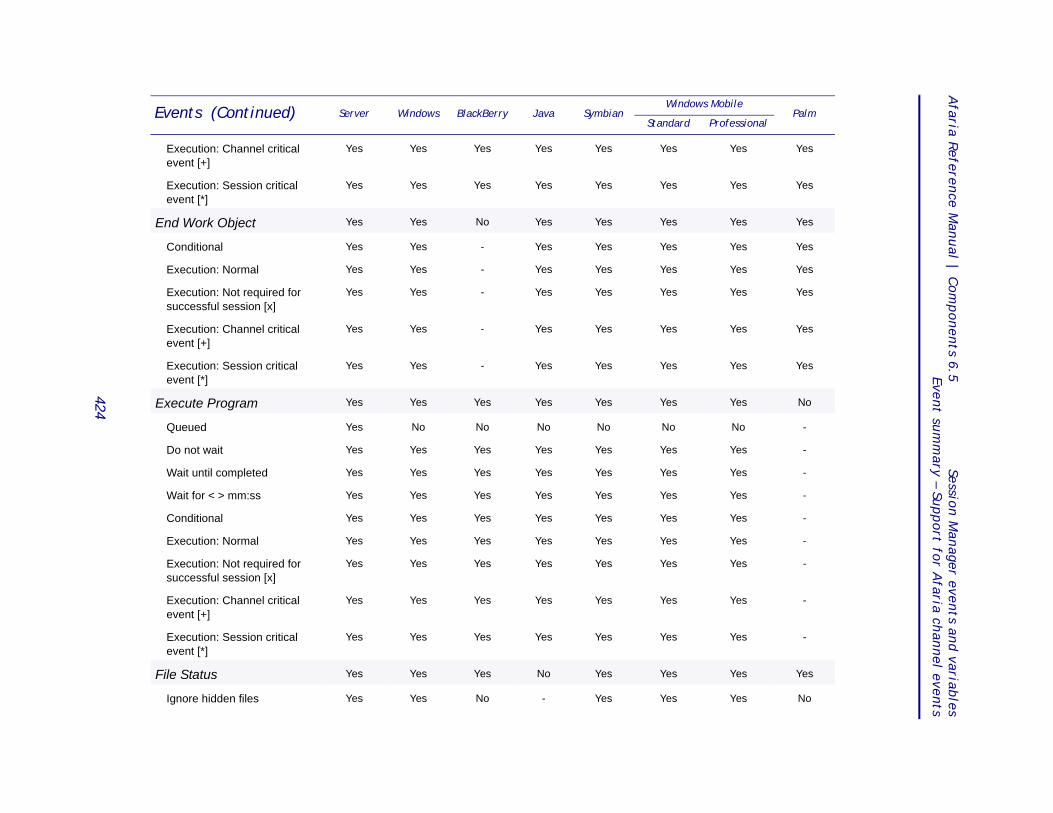
Afaria R
eference Manu
al | Com
ponents 6.5
Session Manager events and
variables
Event sum
mary – Su
pp
ort for Afaria ch
annel events
es Yes
es Yes
es Yes
es Yes
es Yes
es Yes
es Yes
es Yes
es No
No -
es -
es -
es -
es -
es -
es -
es -
es -
es Yes
es No
Events (Continued) Server Windows BlackBerry Java SymbianWindows Mobile
PalmStandard Professional
424
Execution: Channel critical event [+]
Yes Yes Yes Yes Yes Yes Y
Execution: Session critical event [*]
Yes Yes Yes Yes Yes Yes Y
End Work Object Yes Yes No Yes Yes Yes Y
Conditional Yes Yes - Yes Yes Yes Y
Execution: Normal Yes Yes - Yes Yes Yes Y
Execution: Not required for successful session [x]
Yes Yes - Yes Yes Yes Y
Execution: Channel critical event [+]
Yes Yes - Yes Yes Yes Y
Execution: Session critical event [*]
Yes Yes - Yes Yes Yes Y
Execute Program Yes Yes Yes Yes Yes Yes Y
Queued Yes No No No No No
Do not wait Yes Yes Yes Yes Yes Yes Y
Wait until completed Yes Yes Yes Yes Yes Yes Y
Wait for < > mm:ss Yes Yes Yes Yes Yes Yes Y
Conditional Yes Yes Yes Yes Yes Yes Y
Execution: Normal Yes Yes Yes Yes Yes Yes Y
Execution: Not required for successful session [x]
Yes Yes Yes Yes Yes Yes Y
Execution: Channel critical event [+]
Yes Yes Yes Yes Yes Yes Y
Execution: Session critical event [*]
Yes Yes Yes Yes Yes Yes Y
File Status Yes Yes Yes No Yes Yes Y
Ignore hidden files Yes Yes No - Yes Yes Y
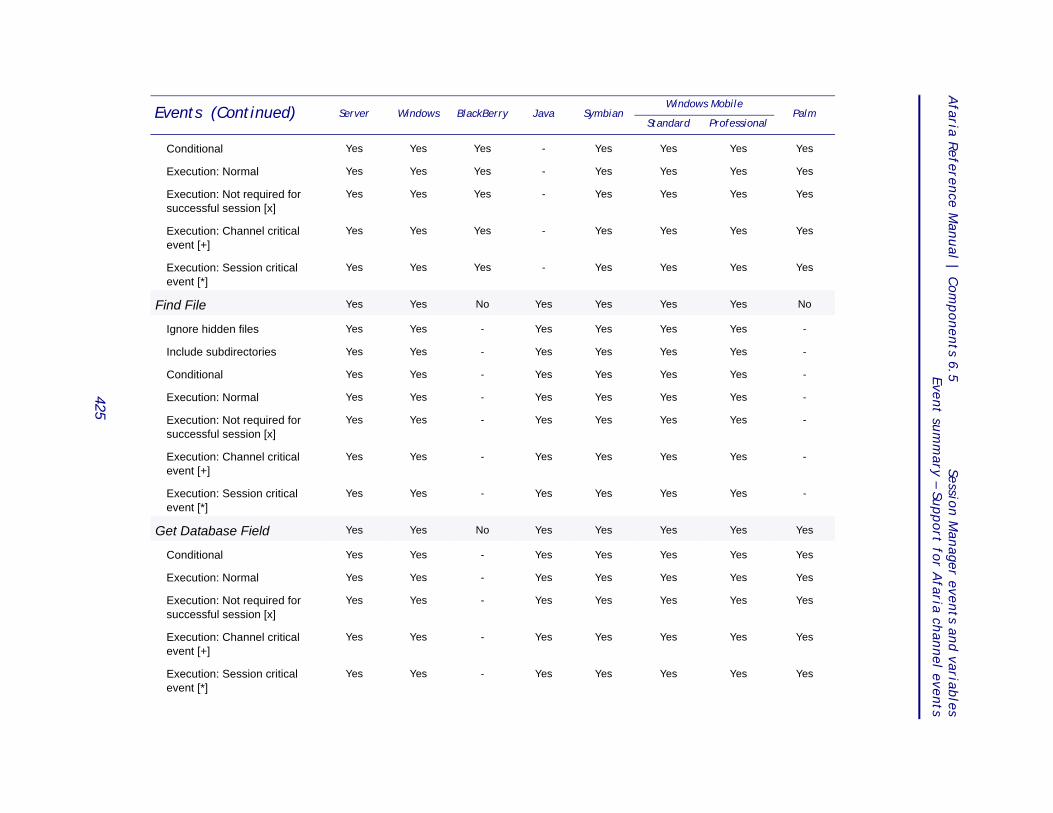
Afaria R
eference Manu
al | Com
ponents 6.5
Session Manager events and
variables
Event sum
mary – Su
pp
ort for Afaria ch
annel events
es Yes
es Yes
es Yes
es Yes
es Yes
es No
es -
es -
es -
es -
es -
es -
es -
es Yes
es Yes
es Yes
es Yes
es Yes
es Yes
Events (Continued) Server Windows BlackBerry Java SymbianWindows Mobile
PalmStandard Professional
425
Conditional Yes Yes Yes - Yes Yes Y
Execution: Normal Yes Yes Yes - Yes Yes Y
Execution: Not required for successful session [x]
Yes Yes Yes - Yes Yes Y
Execution: Channel critical event [+]
Yes Yes Yes - Yes Yes Y
Execution: Session critical event [*]
Yes Yes Yes - Yes Yes Y
Find File Yes Yes No Yes Yes Yes Y
Ignore hidden files Yes Yes - Yes Yes Yes Y
Include subdirectories Yes Yes - Yes Yes Yes Y
Conditional Yes Yes - Yes Yes Yes Y
Execution: Normal Yes Yes - Yes Yes Yes Y
Execution: Not required for successful session [x]
Yes Yes - Yes Yes Yes Y
Execution: Channel critical event [+]
Yes Yes - Yes Yes Yes Y
Execution: Session critical event [*]
Yes Yes - Yes Yes Yes Y
Get Database Field Yes Yes No Yes Yes Yes Y
Conditional Yes Yes - Yes Yes Yes Y
Execution: Normal Yes Yes - Yes Yes Yes Y
Execution: Not required for successful session [x]
Yes Yes - Yes Yes Yes Y
Execution: Channel critical event [+]
Yes Yes - Yes Yes Yes Y
Execution: Session critical event [*]
Yes Yes - Yes Yes Yes Y
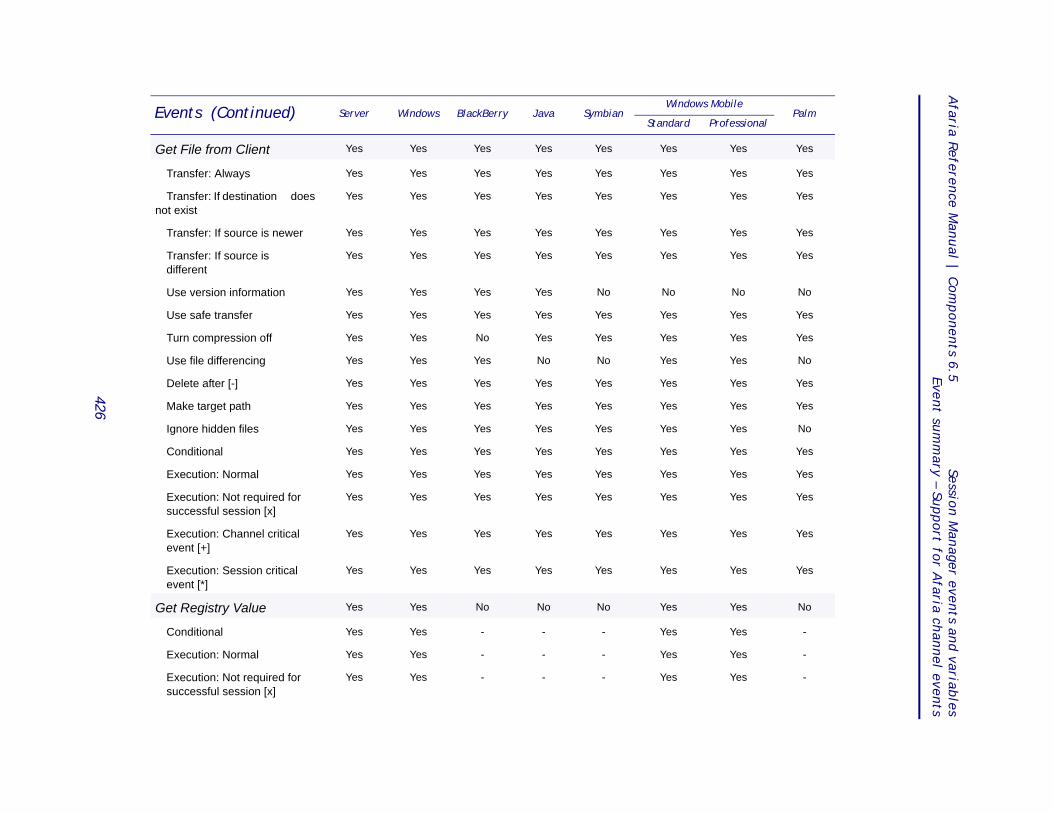
Afaria R
eference Manu
al | Com
ponents 6.5
Session Manager events and
variables
Event sum
mary – Su
pp
ort for Afaria ch
annel events
es Yes
es Yes
es Yes
es Yes
es Yes
No No
es Yes
es Yes
es No
es Yes
es Yes
es No
es Yes
es Yes
es Yes
es Yes
es Yes
es No
es -
es -
es -
Events (Continued) Server Windows BlackBerry Java SymbianWindows Mobile
PalmStandard Professional
426
Get File from Client Yes Yes Yes Yes Yes Yes Y
Transfer: Always Yes Yes Yes Yes Yes Yes Y
Transfer: If destination does not exist
Yes Yes Yes Yes Yes Yes Y
Transfer: If source is newer Yes Yes Yes Yes Yes Yes Y
Transfer: If source is different
Yes Yes Yes Yes Yes Yes Y
Use version information Yes Yes Yes Yes No No
Use safe transfer Yes Yes Yes Yes Yes Yes Y
Turn compression off Yes Yes No Yes Yes Yes Y
Use file differencing Yes Yes Yes No No Yes Y
Delete after [-] Yes Yes Yes Yes Yes Yes Y
Make target path Yes Yes Yes Yes Yes Yes Y
Ignore hidden files Yes Yes Yes Yes Yes Yes Y
Conditional Yes Yes Yes Yes Yes Yes Y
Execution: Normal Yes Yes Yes Yes Yes Yes Y
Execution: Not required for successful session [x]
Yes Yes Yes Yes Yes Yes Y
Execution: Channel critical event [+]
Yes Yes Yes Yes Yes Yes Y
Execution: Session critical event [*]
Yes Yes Yes Yes Yes Yes Y
Get Registry Value Yes Yes No No No Yes Y
Conditional Yes Yes - - - Yes Y
Execution: Normal Yes Yes - - - Yes Y
Execution: Not required for successful session [x]
Yes Yes - - - Yes Y
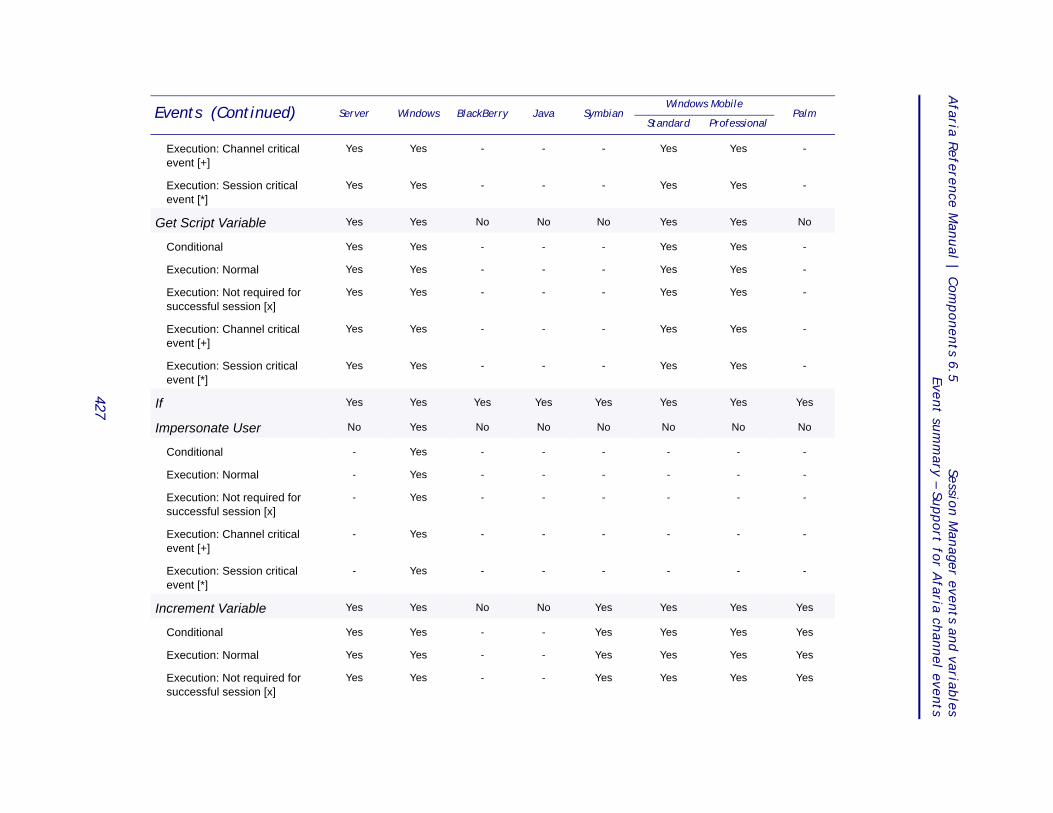
Afaria R
eference Manu
al | Com
ponents 6.5
Session Manager events and
variables
Event sum
mary – Su
pp
ort for Afaria ch
annel events
es -
es -
es No
es -
es -
es -
es -
es -
es Yes
No No
- -
- -
- -
- -
- -
es Yes
es Yes
es Yes
es Yes
Events (Continued) Server Windows BlackBerry Java SymbianWindows Mobile
PalmStandard Professional
427
Execution: Channel critical event [+]
Yes Yes - - - Yes Y
Execution: Session critical event [*]
Yes Yes - - - Yes Y
Get Script Variable Yes Yes No No No Yes Y
Conditional Yes Yes - - - Yes Y
Execution: Normal Yes Yes - - - Yes Y
Execution: Not required for successful session [x]
Yes Yes - - - Yes Y
Execution: Channel critical event [+]
Yes Yes - - - Yes Y
Execution: Session critical event [*]
Yes Yes - - - Yes Y
If Yes Yes Yes Yes Yes Yes Y
Impersonate User No Yes No No No No
Conditional - Yes - - - -
Execution: Normal - Yes - - - -
Execution: Not required for successful session [x]
- Yes - - - -
Execution: Channel critical event [+]
- Yes - - - -
Execution: Session critical event [*]
- Yes - - - -
Increment Variable Yes Yes No No Yes Yes Y
Conditional Yes Yes - - Yes Yes Y
Execution: Normal Yes Yes - - Yes Yes Y
Execution: Not required for successful session [x]
Yes Yes - - Yes Yes Y
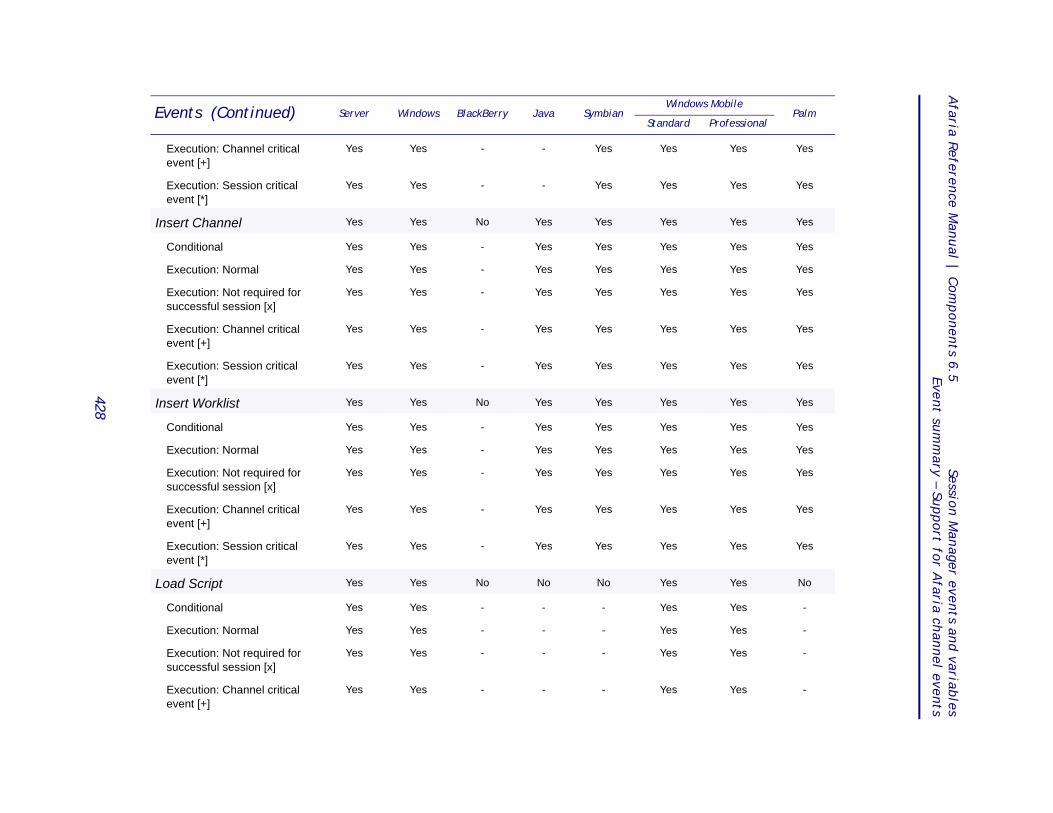
Afaria R
eference Manu
al | Com
ponents 6.5
Session Manager events and
variables
Event sum
mary – Su
pp
ort for Afaria ch
annel events
es Yes
es Yes
es Yes
es Yes
es Yes
es Yes
es Yes
es Yes
es Yes
es Yes
es Yes
es Yes
es Yes
es Yes
es No
es -
es -
es -
es -
Events (Continued) Server Windows BlackBerry Java SymbianWindows Mobile
PalmStandard Professional
428
Execution: Channel critical event [+]
Yes Yes - - Yes Yes Y
Execution: Session critical event [*]
Yes Yes - - Yes Yes Y
Insert Channel Yes Yes No Yes Yes Yes Y
Conditional Yes Yes - Yes Yes Yes Y
Execution: Normal Yes Yes - Yes Yes Yes Y
Execution: Not required for successful session [x]
Yes Yes - Yes Yes Yes Y
Execution: Channel critical event [+]
Yes Yes - Yes Yes Yes Y
Execution: Session critical event [*]
Yes Yes - Yes Yes Yes Y
Insert Worklist Yes Yes No Yes Yes Yes Y
Conditional Yes Yes - Yes Yes Yes Y
Execution: Normal Yes Yes - Yes Yes Yes Y
Execution: Not required for successful session [x]
Yes Yes - Yes Yes Yes Y
Execution: Channel critical event [+]
Yes Yes - Yes Yes Yes Y
Execution: Session critical event [*]
Yes Yes - Yes Yes Yes Y
Load Script Yes Yes No No No Yes Y
Conditional Yes Yes - - - Yes Y
Execution: Normal Yes Yes - - - Yes Y
Execution: Not required for successful session [x]
Yes Yes - - - Yes Y
Execution: Channel critical event [+]
Yes Yes - - - Yes Y
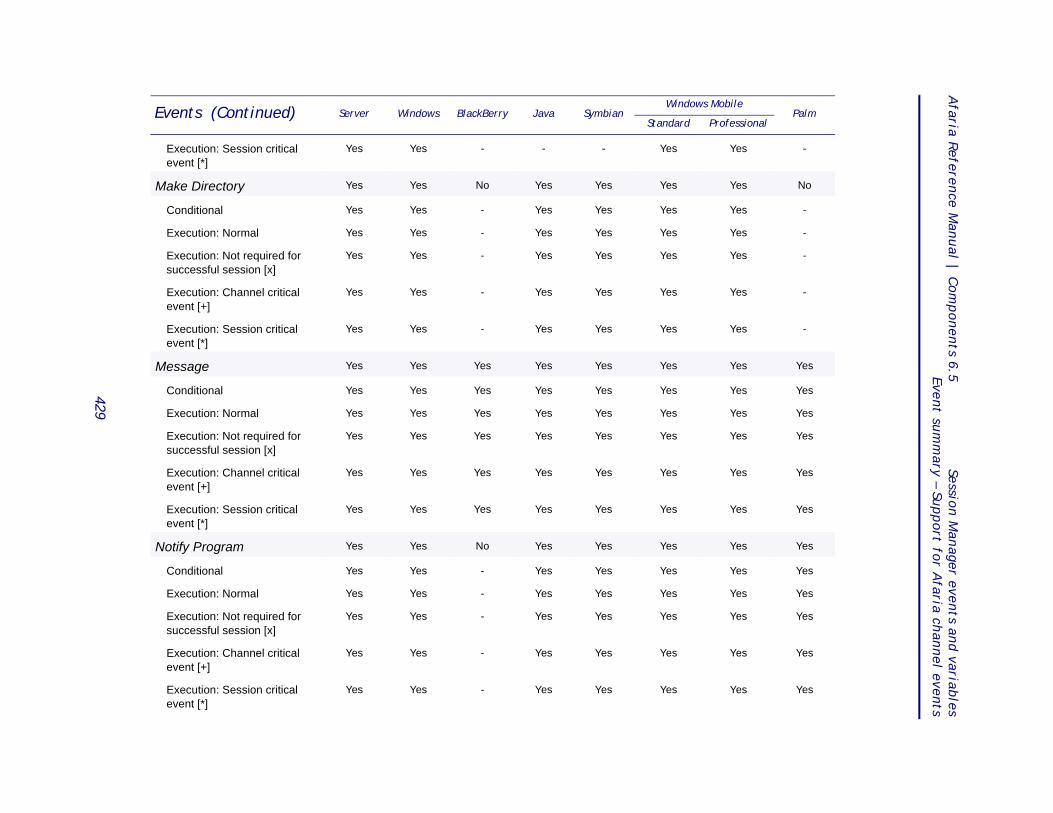
Afaria R
eference Manu
al | Com
ponents 6.5
Session Manager events and
variables
Event sum
mary – Su
pp
ort for Afaria ch
annel events
es -
es No
es -
es -
es -
es -
es -
es Yes
es Yes
es Yes
es Yes
es Yes
es Yes
es Yes
es Yes
es Yes
es Yes
es Yes
es Yes
Events (Continued) Server Windows BlackBerry Java SymbianWindows Mobile
PalmStandard Professional
429
Execution: Session critical event [*]
Yes Yes - - - Yes Y
Make Directory Yes Yes No Yes Yes Yes Y
Conditional Yes Yes - Yes Yes Yes Y
Execution: Normal Yes Yes - Yes Yes Yes Y
Execution: Not required for successful session [x]
Yes Yes - Yes Yes Yes Y
Execution: Channel critical event [+]
Yes Yes - Yes Yes Yes Y
Execution: Session critical event [*]
Yes Yes - Yes Yes Yes Y
Message Yes Yes Yes Yes Yes Yes Y
Conditional Yes Yes Yes Yes Yes Yes Y
Execution: Normal Yes Yes Yes Yes Yes Yes Y
Execution: Not required for successful session [x]
Yes Yes Yes Yes Yes Yes Y
Execution: Channel critical event [+]
Yes Yes Yes Yes Yes Yes Y
Execution: Session critical event [*]
Yes Yes Yes Yes Yes Yes Y
Notify Program Yes Yes No Yes Yes Yes Y
Conditional Yes Yes - Yes Yes Yes Y
Execution: Normal Yes Yes - Yes Yes Yes Y
Execution: Not required for successful session [x]
Yes Yes - Yes Yes Yes Y
Execution: Channel critical event [+]
Yes Yes - Yes Yes Yes Y
Execution: Session critical event [*]
Yes Yes - Yes Yes Yes Y
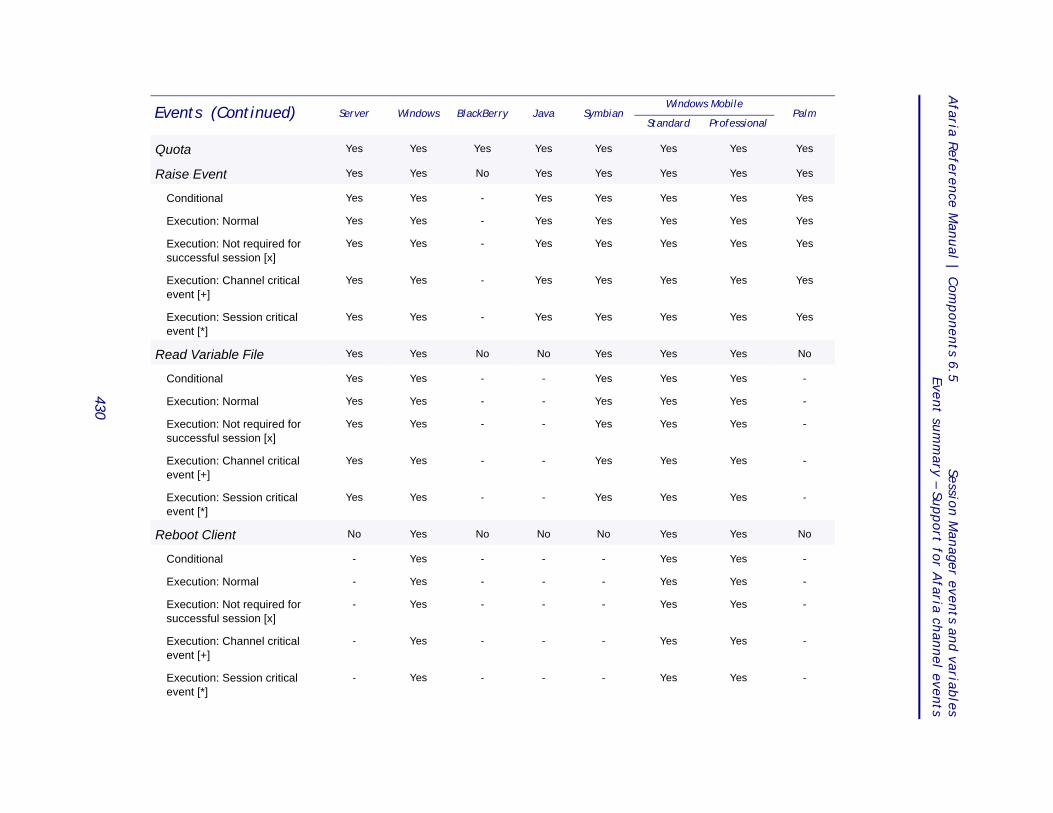
Afaria R
eference Manu
al | Com
ponents 6.5
Session Manager events and
variables
Event sum
mary – Su
pp
ort for Afaria ch
annel events
es Yes
es Yes
es Yes
es Yes
es Yes
es Yes
es Yes
es No
es -
es -
es -
es -
es -
es No
es -
es -
es -
es -
es -
Events (Continued) Server Windows BlackBerry Java SymbianWindows Mobile
PalmStandard Professional
430
Quota Yes Yes Yes Yes Yes Yes Y
Raise Event Yes Yes No Yes Yes Yes Y
Conditional Yes Yes - Yes Yes Yes Y
Execution: Normal Yes Yes - Yes Yes Yes Y
Execution: Not required for successful session [x]
Yes Yes - Yes Yes Yes Y
Execution: Channel critical event [+]
Yes Yes - Yes Yes Yes Y
Execution: Session critical event [*]
Yes Yes - Yes Yes Yes Y
Read Variable File Yes Yes No No Yes Yes Y
Conditional Yes Yes - - Yes Yes Y
Execution: Normal Yes Yes - - Yes Yes Y
Execution: Not required for successful session [x]
Yes Yes - - Yes Yes Y
Execution: Channel critical event [+]
Yes Yes - - Yes Yes Y
Execution: Session critical event [*]
Yes Yes - - Yes Yes Y
Reboot Client No Yes No No No Yes Y
Conditional - Yes - - - Yes Y
Execution: Normal - Yes - - - Yes Y
Execution: Not required for successful session [x]
- Yes - - - Yes Y
Execution: Channel critical event [+]
- Yes - - - Yes Y
Execution: Session critical event [*]
- Yes - - - Yes Y
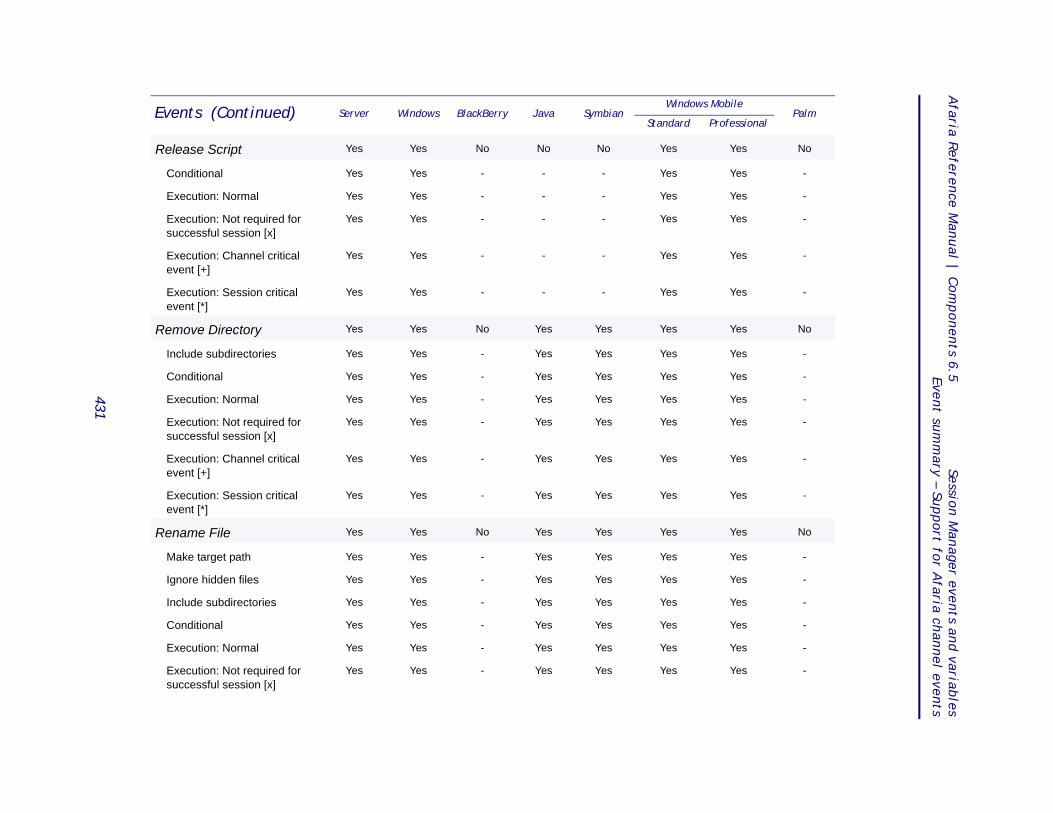
Afaria R
eference Manu
al | Com
ponents 6.5
Session Manager events and
variables
Event sum
mary – Su
pp
ort for Afaria ch
annel events
es No
es -
es -
es -
es -
es -
es No
es -
es -
es -
es -
es -
es -
es No
es -
es -
es -
es -
es -
es -
Events (Continued) Server Windows BlackBerry Java SymbianWindows Mobile
PalmStandard Professional
431
Release Script Yes Yes No No No Yes Y
Conditional Yes Yes - - - Yes Y
Execution: Normal Yes Yes - - - Yes Y
Execution: Not required for successful session [x]
Yes Yes - - - Yes Y
Execution: Channel critical event [+]
Yes Yes - - - Yes Y
Execution: Session critical event [*]
Yes Yes - - - Yes Y
Remove Directory Yes Yes No Yes Yes Yes Y
Include subdirectories Yes Yes - Yes Yes Yes Y
Conditional Yes Yes - Yes Yes Yes Y
Execution: Normal Yes Yes - Yes Yes Yes Y
Execution: Not required for successful session [x]
Yes Yes - Yes Yes Yes Y
Execution: Channel critical event [+]
Yes Yes - Yes Yes Yes Y
Execution: Session critical event [*]
Yes Yes - Yes Yes Yes Y
Rename File Yes Yes No Yes Yes Yes Y
Make target path Yes Yes - Yes Yes Yes Y
Ignore hidden files Yes Yes - Yes Yes Yes Y
Include subdirectories Yes Yes - Yes Yes Yes Y
Conditional Yes Yes - Yes Yes Yes Y
Execution: Normal Yes Yes - Yes Yes Yes Y
Execution: Not required for successful session [x]
Yes Yes - Yes Yes Yes Y
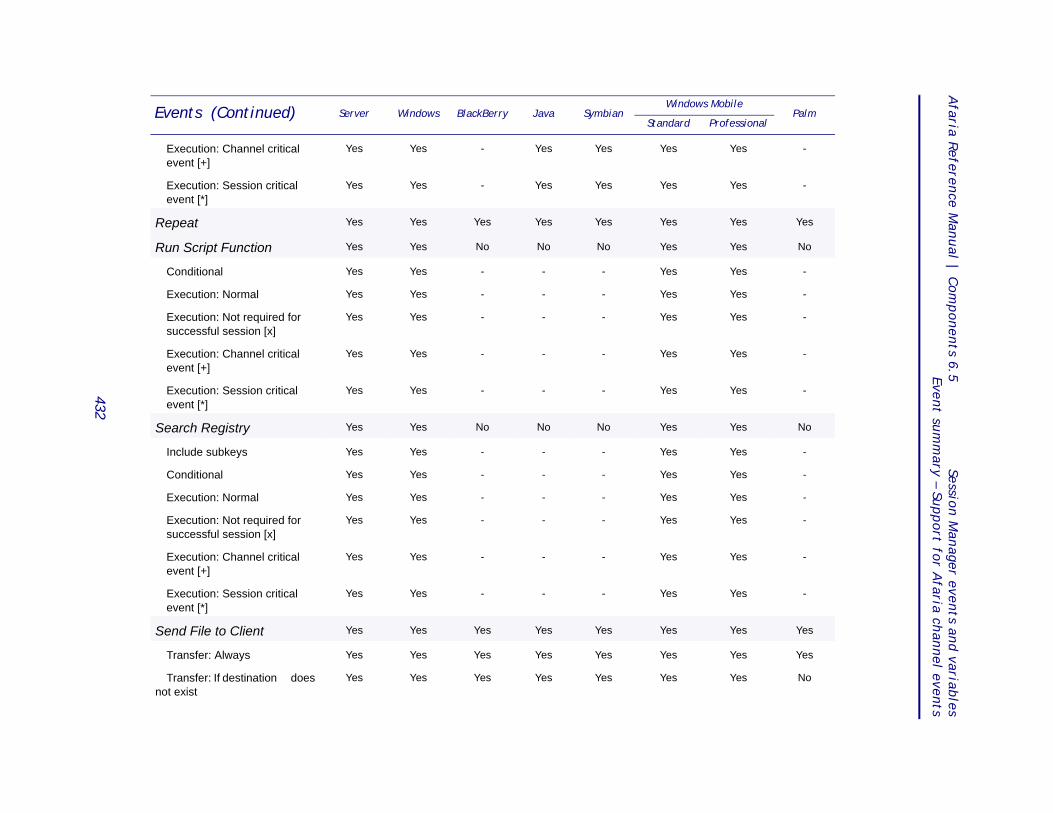
Afaria R
eference Manu
al | Com
ponents 6.5
Session Manager events and
variables
Event sum
mary – Su
pp
ort for Afaria ch
annel events
es -
es -
es Yes
es No
es -
es -
es -
es -
es -
es No
es -
es -
es -
es -
es -
es -
es Yes
es Yes
es No
Events (Continued) Server Windows BlackBerry Java SymbianWindows Mobile
PalmStandard Professional
432
Execution: Channel critical event [+]
Yes Yes - Yes Yes Yes Y
Execution: Session critical event [*]
Yes Yes - Yes Yes Yes Y
Repeat Yes Yes Yes Yes Yes Yes Y
Run Script Function Yes Yes No No No Yes Y
Conditional Yes Yes - - - Yes Y
Execution: Normal Yes Yes - - - Yes Y
Execution: Not required for successful session [x]
Yes Yes - - - Yes Y
Execution: Channel critical event [+]
Yes Yes - - - Yes Y
Execution: Session critical event [*]
Yes Yes - - - Yes Y
Search Registry Yes Yes No No No Yes Y
Include subkeys Yes Yes - - - Yes Y
Conditional Yes Yes - - - Yes Y
Execution: Normal Yes Yes - - - Yes Y
Execution: Not required for successful session [x]
Yes Yes - - - Yes Y
Execution: Channel critical event [+]
Yes Yes - - - Yes Y
Execution: Session critical event [*]
Yes Yes - - - Yes Y
Send File to Client Yes Yes Yes Yes Yes Yes Y
Transfer: Always Yes Yes Yes Yes Yes Yes Y
Transfer: If destination does not exist
Yes Yes Yes Yes Yes Yes Y
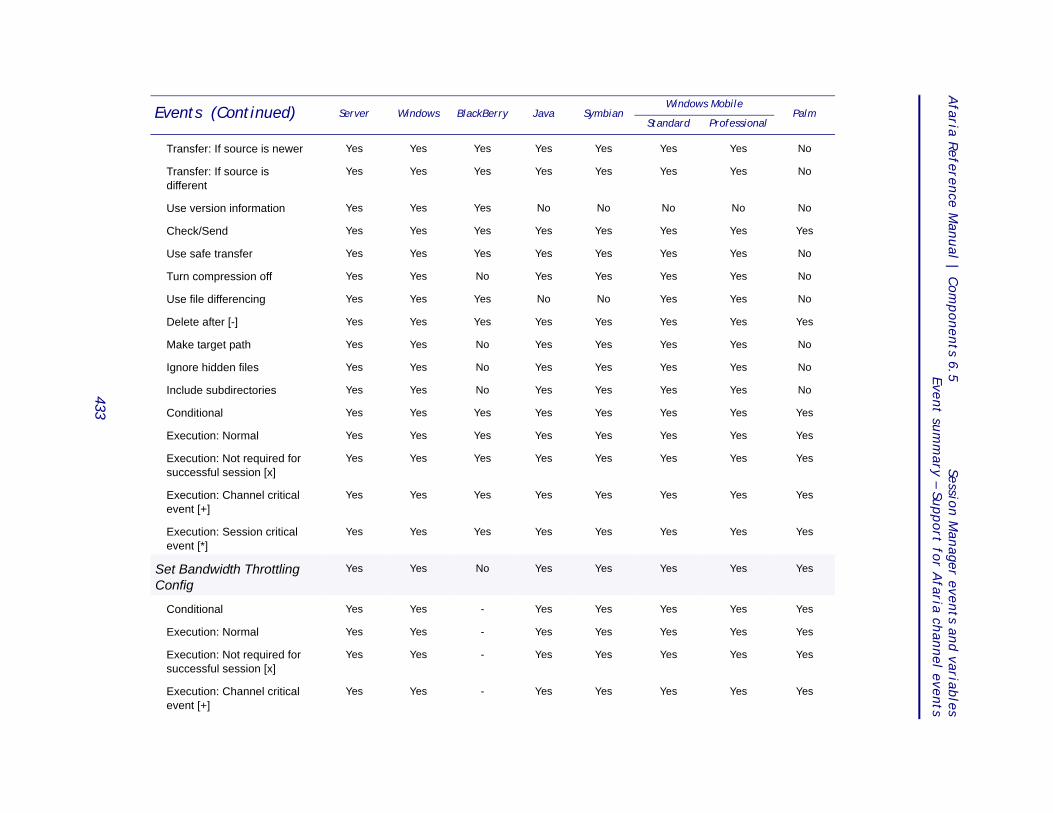
Afaria R
eference Manu
al | Com
ponents 6.5
Session Manager events and
variables
Event sum
mary – Su
pp
ort for Afaria ch
annel events
es No
es No
No No
es Yes
es No
es No
es No
es Yes
es No
es No
es No
es Yes
es Yes
es Yes
es Yes
es Yes
es Yes
es Yes
es Yes
es Yes
es Yes
Events (Continued) Server Windows BlackBerry Java SymbianWindows Mobile
PalmStandard Professional
433
Transfer: If source is newer Yes Yes Yes Yes Yes Yes Y
Transfer: If source is different
Yes Yes Yes Yes Yes Yes Y
Use version information Yes Yes Yes No No No
Check/Send Yes Yes Yes Yes Yes Yes Y
Use safe transfer Yes Yes Yes Yes Yes Yes Y
Turn compression off Yes Yes No Yes Yes Yes Y
Use file differencing Yes Yes Yes No No Yes Y
Delete after [-] Yes Yes Yes Yes Yes Yes Y
Make target path Yes Yes No Yes Yes Yes Y
Ignore hidden files Yes Yes No Yes Yes Yes Y
Include subdirectories Yes Yes No Yes Yes Yes Y
Conditional Yes Yes Yes Yes Yes Yes Y
Execution: Normal Yes Yes Yes Yes Yes Yes Y
Execution: Not required for successful session [x]
Yes Yes Yes Yes Yes Yes Y
Execution: Channel critical event [+]
Yes Yes Yes Yes Yes Yes Y
Execution: Session critical event [*]
Yes Yes Yes Yes Yes Yes Y
Set Bandwidth Throttling Config
Yes Yes No Yes Yes Yes Y
Conditional Yes Yes - Yes Yes Yes Y
Execution: Normal Yes Yes - Yes Yes Yes Y
Execution: Not required for successful session [x]
Yes Yes - Yes Yes Yes Y
Execution: Channel critical event [+]
Yes Yes - Yes Yes Yes Y
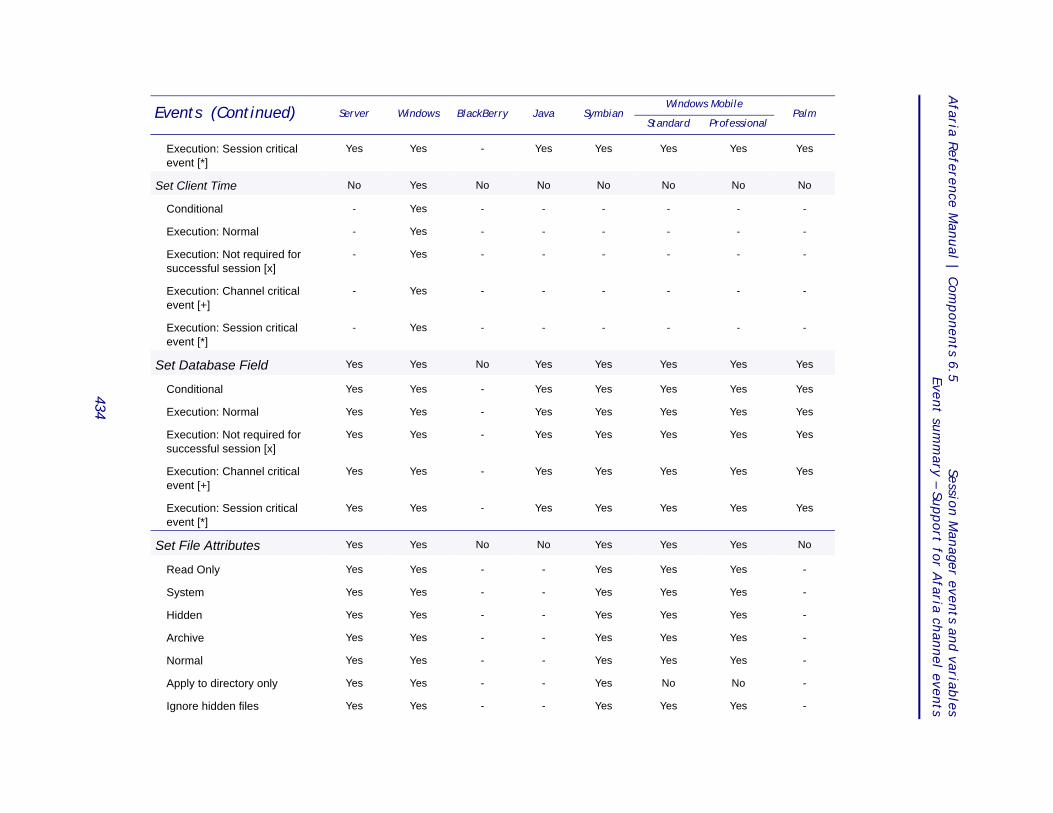
Afaria R
eference Manu
al | Com
ponents 6.5
Session Manager events and
variables
Event sum
mary – Su
pp
ort for Afaria ch
annel events
es Yes
No No
- -
- -
- -
- -
- -
es Yes
es Yes
es Yes
es Yes
es Yes
es Yes
es No
es -
es -
es -
es -
es -
No -
es -
Events (Continued) Server Windows BlackBerry Java SymbianWindows Mobile
PalmStandard Professional
434
Execution: Session critical event [*]
Yes Yes - Yes Yes Yes Y
Set Client Time No Yes No No No No
Conditional - Yes - - - -
Execution: Normal - Yes - - - -
Execution: Not required for successful session [x]
- Yes - - - -
Execution: Channel critical event [+]
- Yes - - - -
Execution: Session critical event [*]
- Yes - - - -
Set Database Field Yes Yes No Yes Yes Yes Y
Conditional Yes Yes - Yes Yes Yes Y
Execution: Normal Yes Yes - Yes Yes Yes Y
Execution: Not required for successful session [x]
Yes Yes - Yes Yes Yes Y
Execution: Channel critical event [+]
Yes Yes - Yes Yes Yes Y
Execution: Session critical event [*]
Yes Yes - Yes Yes Yes Y
Set File Attributes Yes Yes No No Yes Yes Y
Read Only Yes Yes - - Yes Yes Y
System Yes Yes - - Yes Yes Y
Hidden Yes Yes - - Yes Yes Y
Archive Yes Yes - - Yes Yes Y
Normal Yes Yes - - Yes Yes Y
Apply to directory only Yes Yes - - Yes No
Ignore hidden files Yes Yes - - Yes Yes Y
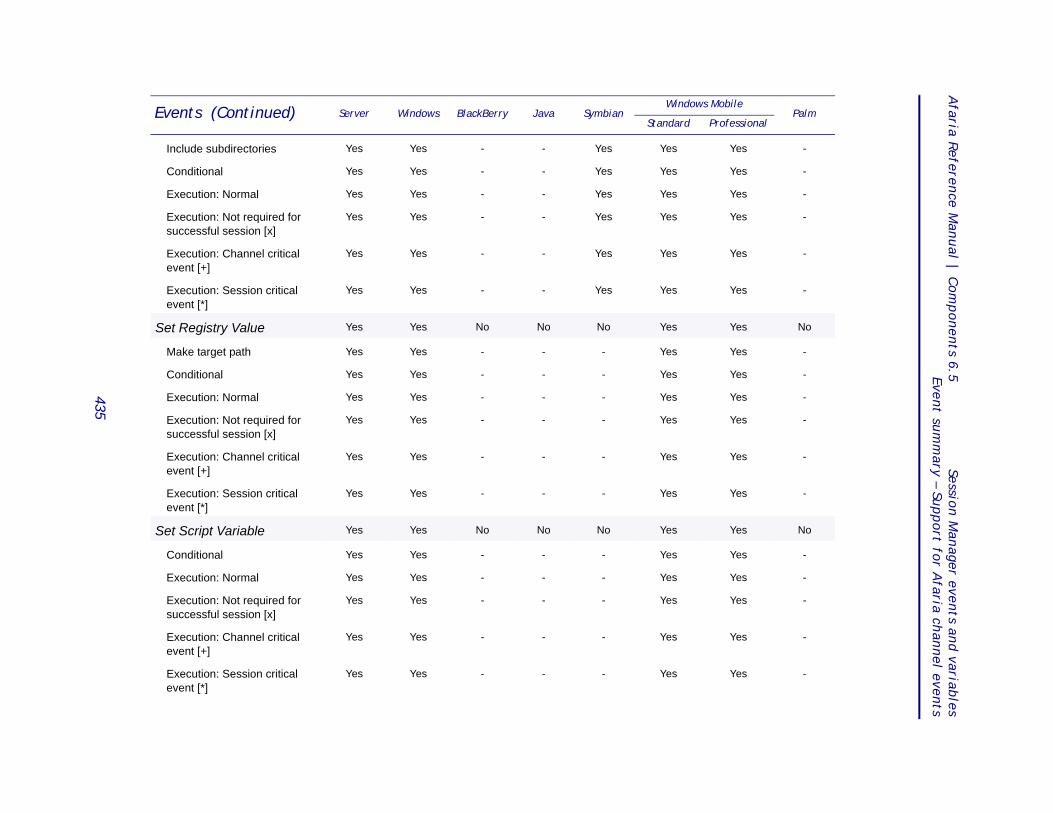
Afaria R
eference Manu
al | Com
ponents 6.5
Session Manager events and
variables
Event sum
mary – Su
pp
ort for Afaria ch
annel events
es -
es -
es -
es -
es -
es -
es No
es -
es -
es -
es -
es -
es -
es No
es -
es -
es -
es -
es -
Events (Continued) Server Windows BlackBerry Java SymbianWindows Mobile
PalmStandard Professional
435
Include subdirectories Yes Yes - - Yes Yes Y
Conditional Yes Yes - - Yes Yes Y
Execution: Normal Yes Yes - - Yes Yes Y
Execution: Not required for successful session [x]
Yes Yes - - Yes Yes Y
Execution: Channel critical event [+]
Yes Yes - - Yes Yes Y
Execution: Session critical event [*]
Yes Yes - - Yes Yes Y
Set Registry Value Yes Yes No No No Yes Y
Make target path Yes Yes - - - Yes Y
Conditional Yes Yes - - - Yes Y
Execution: Normal Yes Yes - - - Yes Y
Execution: Not required for successful session [x]
Yes Yes - - - Yes Y
Execution: Channel critical event [+]
Yes Yes - - - Yes Y
Execution: Session critical event [*]
Yes Yes - - - Yes Y
Set Script Variable Yes Yes No No No Yes Y
Conditional Yes Yes - - - Yes Y
Execution: Normal Yes Yes - - - Yes Y
Execution: Not required for successful session [x]
Yes Yes - - - Yes Y
Execution: Channel critical event [+]
Yes Yes - - - Yes Y
Execution: Session critical event [*]
Yes Yes - - - Yes Y
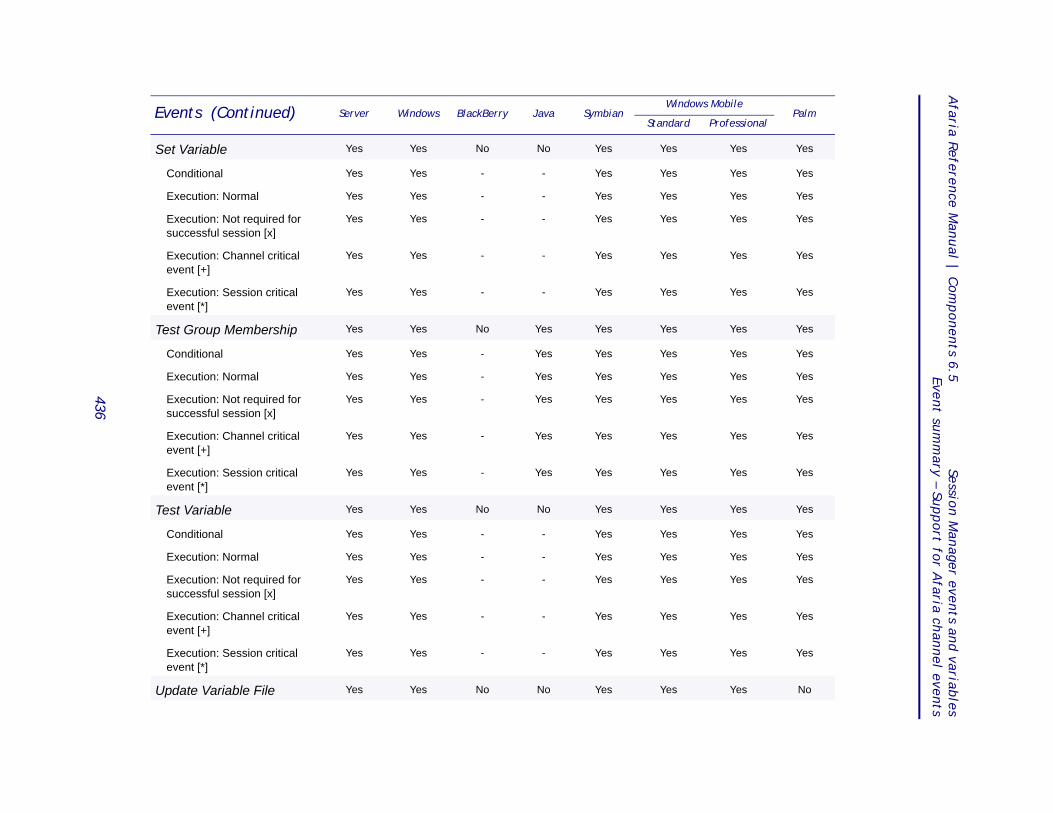
Afaria R
eference Manu
al | Com
ponents 6.5
Session Manager events and
variables
Event sum
mary – Su
pp
ort for Afaria ch
annel events
es Yes
es Yes
es Yes
es Yes
es Yes
es Yes
es Yes
es Yes
es Yes
es Yes
es Yes
es Yes
es Yes
es Yes
es Yes
es Yes
es Yes
es Yes
es No
Events (Continued) Server Windows BlackBerry Java SymbianWindows Mobile
PalmStandard Professional
436
Set Variable Yes Yes No No Yes Yes Y
Conditional Yes Yes - - Yes Yes Y
Execution: Normal Yes Yes - - Yes Yes Y
Execution: Not required for successful session [x]
Yes Yes - - Yes Yes Y
Execution: Channel critical event [+]
Yes Yes - - Yes Yes Y
Execution: Session critical event [*]
Yes Yes - - Yes Yes Y
Test Group Membership Yes Yes No Yes Yes Yes Y
Conditional Yes Yes - Yes Yes Yes Y
Execution: Normal Yes Yes - Yes Yes Yes Y
Execution: Not required for successful session [x]
Yes Yes - Yes Yes Yes Y
Execution: Channel critical event [+]
Yes Yes - Yes Yes Yes Y
Execution: Session critical event [*]
Yes Yes - Yes Yes Yes Y
Test Variable Yes Yes No No Yes Yes Y
Conditional Yes Yes - - Yes Yes Y
Execution: Normal Yes Yes - - Yes Yes Y
Execution: Not required for successful session [x]
Yes Yes - - Yes Yes Y
Execution: Channel critical event [+]
Yes Yes - - Yes Yes Y
Execution: Session critical event [*]
Yes Yes - - Yes Yes Y
Update Variable File Yes Yes No No Yes Yes Y
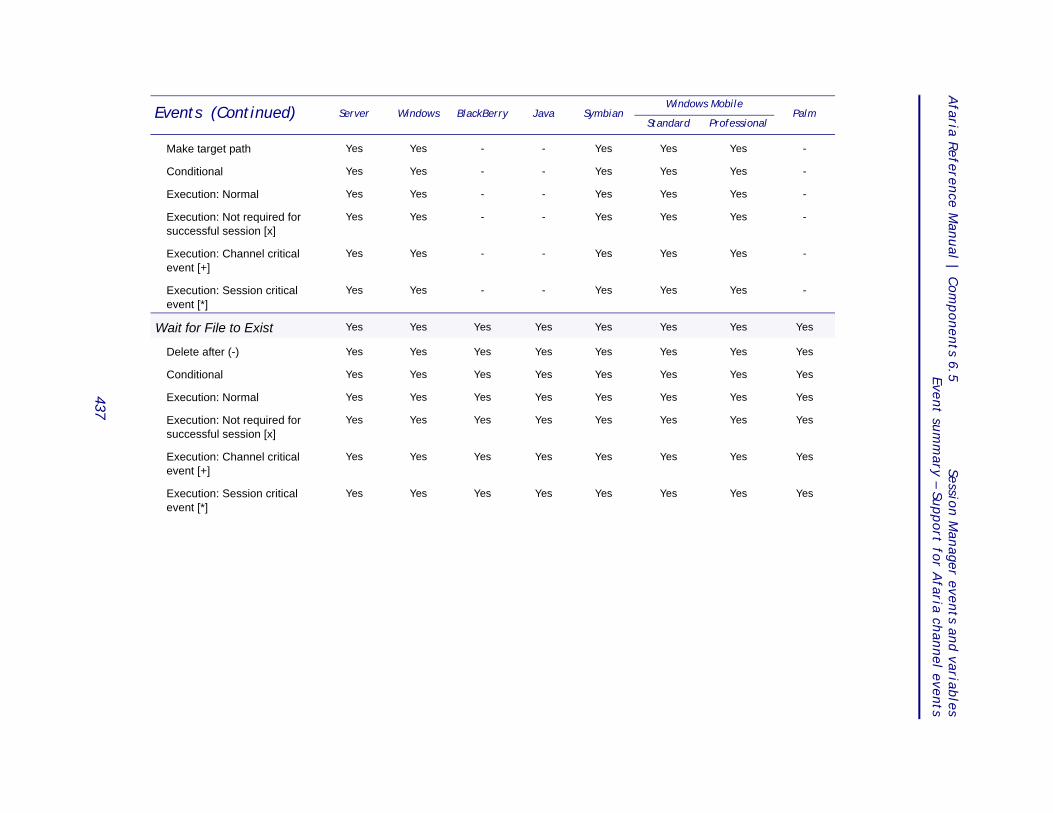
Afaria R
eference Manu
al | Com
ponents 6.5
Session Manager events and
variables
Event sum
mary – Su
pp
ort for Afaria ch
annel events
es -
es -
es -
es -
es -
es -
es Yes
es Yes
es Yes
es Yes
es Yes
es Yes
es Yes
Events (Continued) Server Windows BlackBerry Java SymbianWindows Mobile
PalmStandard Professional
437
Make target path Yes Yes - - Yes Yes Y
Conditional Yes Yes - - Yes Yes Y
Execution: Normal Yes Yes - - Yes Yes Y
Execution: Not required for successful session [x]
Yes Yes - - Yes Yes Y
Execution: Channel critical event [+]
Yes Yes - - Yes Yes Y
Execution: Session critical event [*]
Yes Yes - - Yes Yes Y
Wait for File to Exist Yes Yes Yes Yes Yes Yes Y
Delete after (-) Yes Yes Yes Yes Yes Yes Y
Conditional Yes Yes Yes Yes Yes Yes Y
Execution: Normal Yes Yes Yes Yes Yes Yes Y
Execution: Not required for successful session [x]
Yes Yes Yes Yes Yes Yes Y
Execution: Channel critical event [+]
Yes Yes Yes Yes Yes Yes Y
Execution: Session critical event [*]
Yes Yes Yes Yes Yes Yes Y
Afaria Reference Manual | Components 6.5 Session Manager events and variablesAbout Variables
About VariablesWhen an event executes, Session Manager replaces variable placeholders with the appropriate information. Variables are always enclosed in “<>” characters and aren’t case sensitive.
To add a variable to an event specific field, click the Show variables link on the Event details dialog box. In the Session Variables box, double-clicking the variable adds it to the event. You can also enter the variable in the appropriate fields.
Session Manager supports the following variable types:
• “Predefined session variables”
• “User-defined session variables” on page 447
• “Environment variables” on page 447
• “Variable modifiers” on page 448
Predefined session variablesSession Manager includes a set of predefined session variables that you can use to insert the current time or date, client information, or Server information in an event list. The following table lists each predefined variable, describes its function, and provides an example of its usage and a value of the variable.
When running an individual channel or a channel set in an Afaria connection, if you create more than 256 variables in that session you will see the following error message:
“Not enough storage is available to process this command”
Keep in mind that when you use pre-built channel types, like Backup Manager, Document Manager, Inventory Manager, and Software Manager, that these channel types create variables inherently; however, if you have several channels of the same type you will have the same number of session variables. For instance, a session with three Software Manager channels will create the same number of variables as a session with one Software Manager channel. You may find it helpful to break up channels that create several variables into separate sessions.
All Afaria session variables are subject to a 256-character maximum length requirement.
Not all variables are supported for all types of clients, for instance <ClientWindowsDir> isn’t an appropriate variable to use on a Palm client; however, the Session Manager Channel Editor allows you to add any variable to any worklist. When you’re checking and optimizing your worklists, ensure that the logic is sound.
The use of Session Manager variables is reserved for Session Manager channels. Except where noted otherwise, Afaria does not support using variables as values for other components’ dialog boxes and input parameters.
438

Afaria Reference Manual | Components 6.5 Session Manager events and variablesAbout Variables
Variable Description Sample use or sample value
<%UserDefined> Contains or holds the value of the specified user-defined variable
Value of Variable: Value (varies)
<AuthenticatedUser> Indicates whether or not Authentication is turned on, returning either “0” or “1” where “1” indicates Authentication is turned on
Value of Variable: 1
<ChannelName> Indicates the name of the channel Set Variable:<%CurrentChannel><ChannelName>
Value of Variable: Channel name
<ChannelViewer> Indicates whether the Channel Viewer UI initiated the session, returning either “1” or “0” where “1” indicates that Channel Viewer initiated the session
If <ChannelViewer> = 1
Value of Variable: 1
<CheckDiskSize> The disk free space available valu, in bytes, as determined by running the Check Volume event, handled as unsigned 64-bit integers
If <CheckDiskSize> <= 1000000
Value of Variable: 900900
<CheckMemorySize> Used with the Check Memory event, returns a value, in bytes, that represents the available amount of memory on the handheld client; handled as unsigned 64-bit integers
If <ClientMemorySize> <= 1200000
Value of Variable: 10017792
<ClientAllUsersDesktopDir> Returns the desktop folder for “all users” in operating systems that use the convention
Client File Status:<ClientAllUsersDesktopDir>
Value of Variable: C:\Documents and Settings\All Users Desktop
<ClientChannelDir> The directory of the client computer where channel files are located
Client File Status:<ClientChannelDir>
Value of Variable: C:\Program Files\AClient\data\VB\49\
<ClientCommonFilesDir> The Windows Common Files directory on the client computer
Client File Status:<ClientCommonFilesDir>
Value of Variable: C:\Program Files\Common Files
439
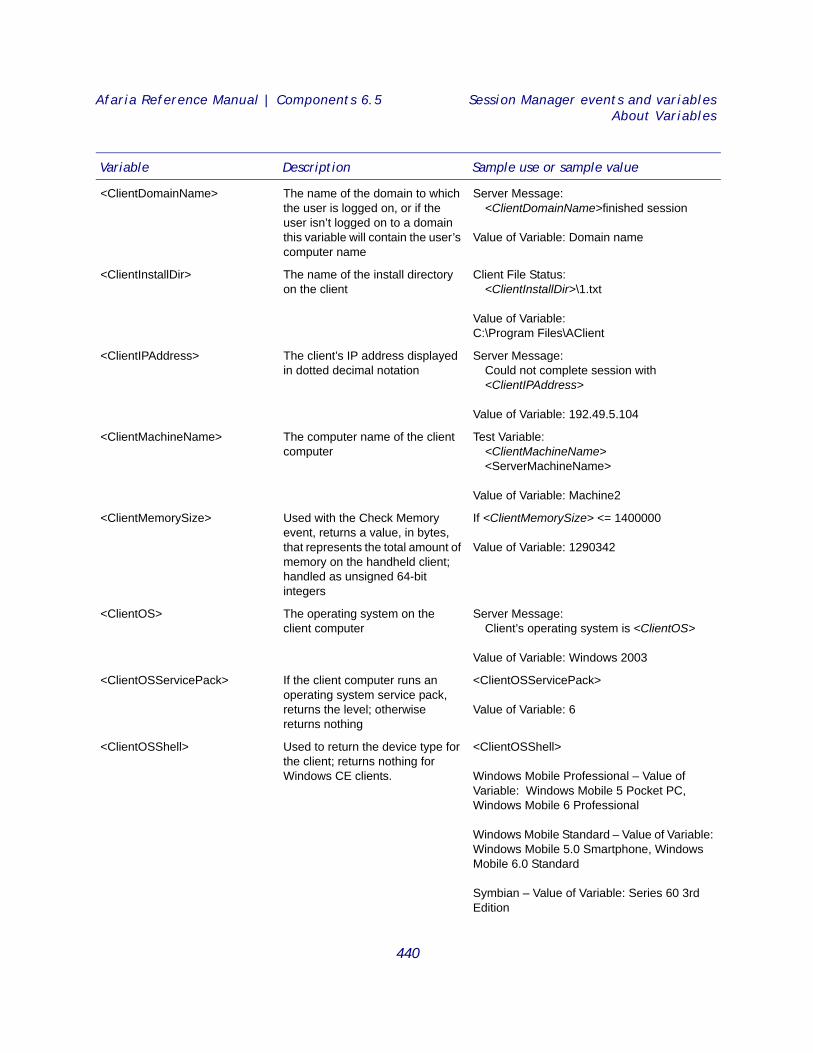
Afaria Reference Manual | Components 6.5 Session Manager events and variablesAbout Variables
<ClientDomainName> The name of the domain to which the user is logged on, or if the user isn’t logged on to a domain this variable will contain the user’s computer name
Server Message:<ClientDomainName>finished session
Value of Variable: Domain name
<ClientInstallDir> The name of the install directory on the client
Client File Status:<ClientInstallDir>\1.txt
Value of Variable: C:\Program Files\AClient
<ClientIPAddress> The client’s IP address displayed in dotted decimal notation
Server Message:Could not complete session with <ClientIPAddress>
Value of Variable: 192.49.5.104
<ClientMachineName> The computer name of the client computer
Test Variable:<ClientMachineName> <ServerMachineName>
Value of Variable: Machine2
<ClientMemorySize> Used with the Check Memory event, returns a value, in bytes, that represents the total amount of memory on the handheld client; handled as unsigned 64-bit integers
If <ClientMemorySize> <= 1400000
Value of Variable: 1290342
<ClientOS> The operating system on the client computer
Server Message:Client’s operating system is <ClientOS>
Value of Variable: Windows 2003
<ClientOSServicePack> If the client computer runs an operating system service pack, returns the level; otherwise returns nothing
<ClientOSServicePack>
Value of Variable: 6
<ClientOSShell> Used to return the device type for the client; returns nothing for Windows CE clients.
<ClientOSShell>
Windows Mobile Professional – Value of Variable: Windows Mobile 5 Pocket PC, Windows Mobile 6 Professional
Windows Mobile Standard – Value of Variable: Windows Mobile 5.0 Smartphone, Windows Mobile 6.0 Standard
Symbian – Value of Variable: Series 60 3rd Edition
Variable Description Sample use or sample value
440
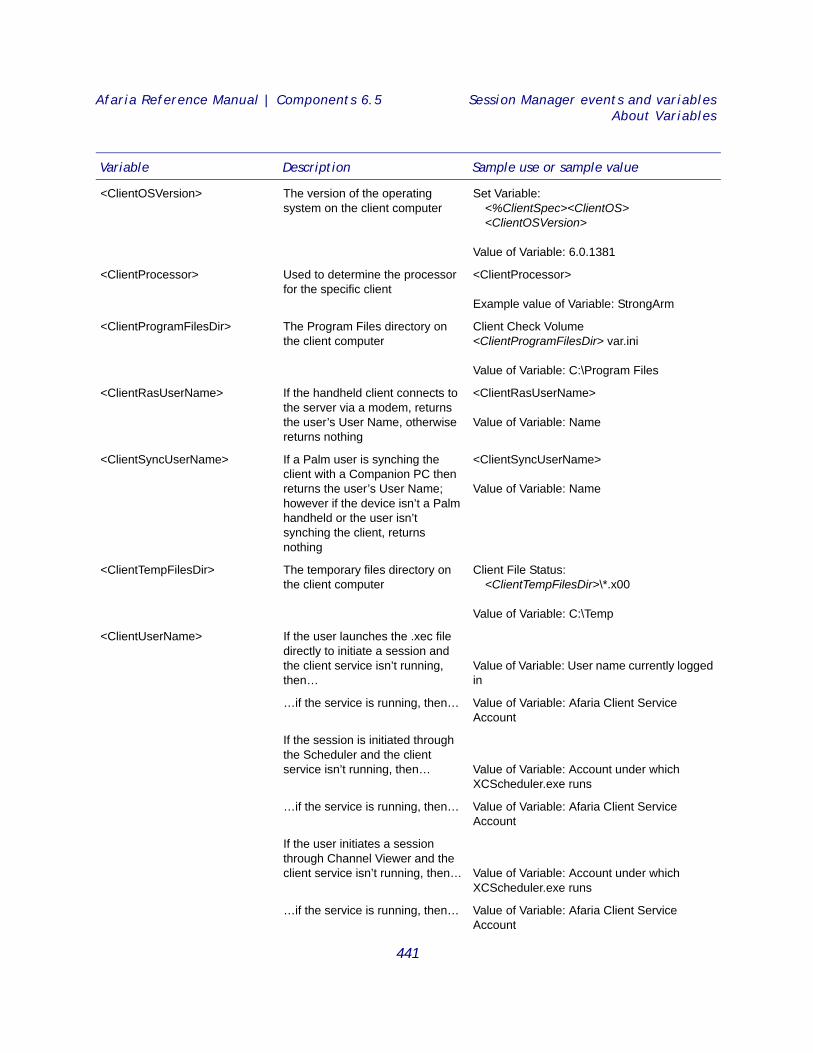
Afaria Reference Manual | Components 6.5 Session Manager events and variablesAbout Variables
<ClientOSVersion> The version of the operating system on the client computer
Set Variable:<%ClientSpec><ClientOS> <ClientOSVersion>
Value of Variable: 6.0.1381
<ClientProcessor> Used to determine the processor for the specific client
<ClientProcessor>
Example value of Variable: StrongArm
<ClientProgramFilesDir> The Program Files directory on the client computer
Client Check Volume <ClientProgramFilesDir> var.ini
Value of Variable: C:\Program Files
<ClientRasUserName> If the handheld client connects to the server via a modem, returns the user’s User Name, otherwise returns nothing
<ClientRasUserName>
Value of Variable: Name
<ClientSyncUserName> If a Palm user is synching the client with a Companion PC then returns the user’s User Name; however if the device isn’t a Palm handheld or the user isn’t synching the client, returns nothing
<ClientSyncUserName>
Value of Variable: Name
<ClientTempFilesDir> The temporary files directory on the client computer
Client File Status:<ClientTempFilesDir>\*.x00
Value of Variable: C:\Temp
<ClientUserName> If the user launches the .xec file directly to initiate a session and the client service isn’t running, then…
Value of Variable: User name currently logged in
…if the service is running, then… Value of Variable: Afaria Client Service Account
If the session is initiated through the Scheduler and the client service isn’t running, then… Value of Variable: Account under which
XCScheduler.exe runs
…if the service is running, then… Value of Variable: Afaria Client Service Account
If the user initiates a session through Channel Viewer and the client service isn’t running, then… Value of Variable: Account under which
XCScheduler.exe runs
…if the service is running, then… Value of Variable: Afaria Client Service Account
Variable Description Sample use or sample value
441
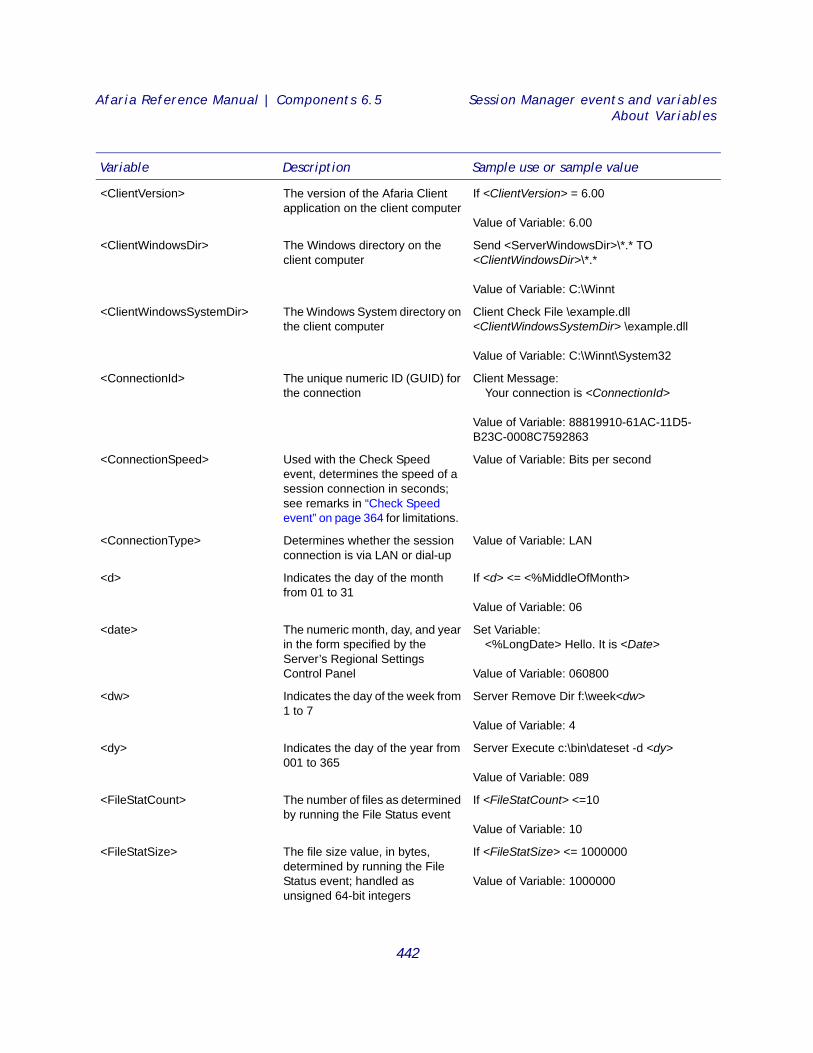
Afaria Reference Manual | Components 6.5 Session Manager events and variablesAbout Variables
<ClientVersion> The version of the Afaria Client application on the client computer
If <ClientVersion> = 6.00
Value of Variable: 6.00
<ClientWindowsDir> The Windows directory on the client computer
Send <ServerWindowsDir>\*.* TO <ClientWindowsDir>\*.*
Value of Variable: C:\Winnt
<ClientWindowsSystemDir> The Windows System directory on the client computer
Client Check File \example.dll <ClientWindowsSystemDir> \example.dll
Value of Variable: C:\Winnt\System32
<ConnectionId> The unique numeric ID (GUID) for the connection
Client Message:Your connection is <ConnectionId>
Value of Variable: 88819910-61AC-11D5-B23C-0008C7592863
<ConnectionSpeed> Used with the Check Speed event, determines the speed of a session connection in seconds; see remarks in “Check Speed event” on page 364 for limitations.
Value of Variable: Bits per second
<ConnectionType> Determines whether the session connection is via LAN or dial-up
Value of Variable: LAN
<d> Indicates the day of the month from 01 to 31
If <d> <= <%MiddleOfMonth>
Value of Variable: 06
<date> The numeric month, day, and year in the form specified by the Server’s Regional Settings Control Panel
Set Variable:<%LongDate> Hello. It is <Date>
Value of Variable: 060800
<dw> Indicates the day of the week from 1 to 7
Server Remove Dir f:\week<dw>
Value of Variable: 4
<dy> Indicates the day of the year from 001 to 365
Server Execute c:\bin\dateset -d <dy>
Value of Variable: 089
<FileStatCount> The number of files as determined by running the File Status event
If <FileStatCount> <=10
Value of Variable: 10
<FileStatSize> The file size value, in bytes, determined by running the File Status event; handled as unsigned 64-bit integers
If <FileStatSize> <= 1000000
Value of Variable: 1000000
Variable Description Sample use or sample value
442
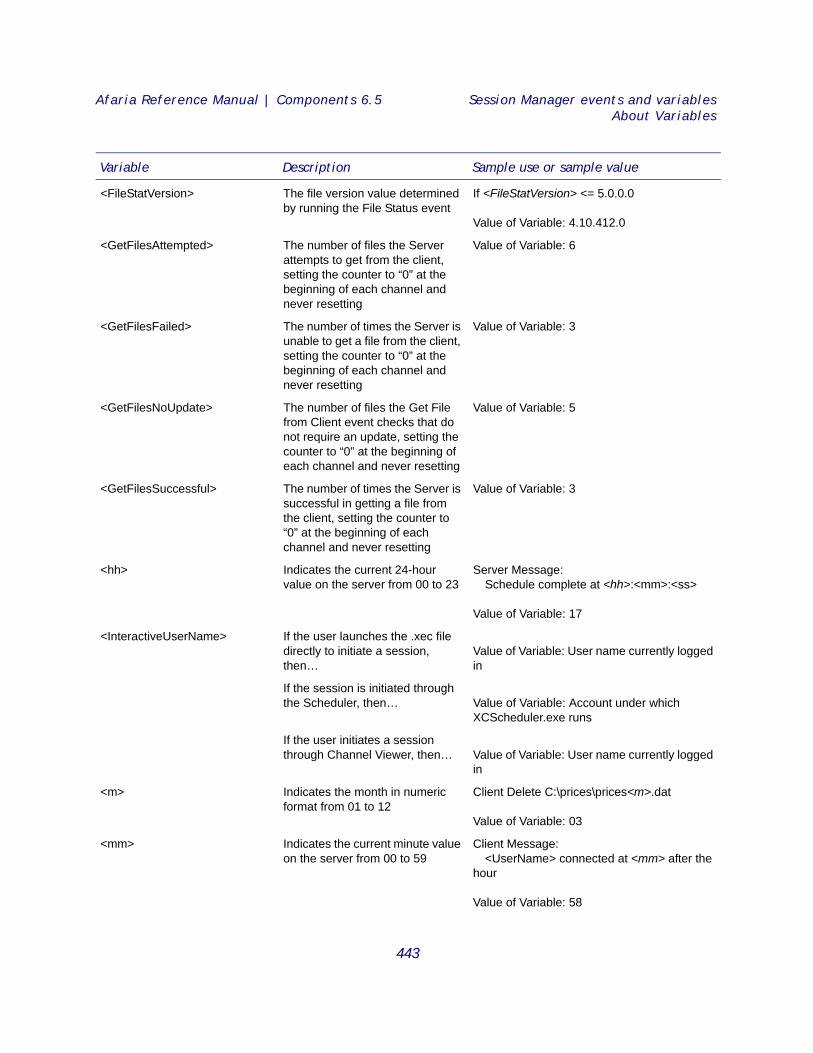
Afaria Reference Manual | Components 6.5 Session Manager events and variablesAbout Variables
<FileStatVersion> The file version value determined by running the File Status event
If <FileStatVersion> <= 5.0.0.0
Value of Variable: 4.10.412.0
<GetFilesAttempted> The number of files the Server attempts to get from the client, setting the counter to “0” at the beginning of each channel and never resetting
Value of Variable: 6
<GetFilesFailed> The number of times the Server is unable to get a file from the client, setting the counter to “0” at the beginning of each channel and never resetting
Value of Variable: 3
<GetFilesNoUpdate> The number of files the Get File from Client event checks that do not require an update, setting the counter to “0” at the beginning of each channel and never resetting
Value of Variable: 5
<GetFilesSuccessful> The number of times the Server is successful in getting a file from the client, setting the counter to “0” at the beginning of each channel and never resetting
Value of Variable: 3
<hh> Indicates the current 24-hour value on the server from 00 to 23
Server Message:Schedule complete at <hh>:<mm>:<ss>
Value of Variable: 17
<InteractiveUserName> If the user launches the .xec file directly to initiate a session, then…
Value of Variable: User name currently logged in
If the session is initiated through the Scheduler, then… Value of Variable: Account under which
XCScheduler.exe runs
If the user initiates a session through Channel Viewer, then… Value of Variable: User name currently logged
in
<m> Indicates the month in numeric format from 01 to 12
Client Delete C:\prices\prices<m>.dat
Value of Variable: 03
<mm> Indicates the current minute value on the server from 00 to 59
Client Message:<UserName> connected at <mm> after the
hour
Value of Variable: 58
Variable Description Sample use or sample value
443
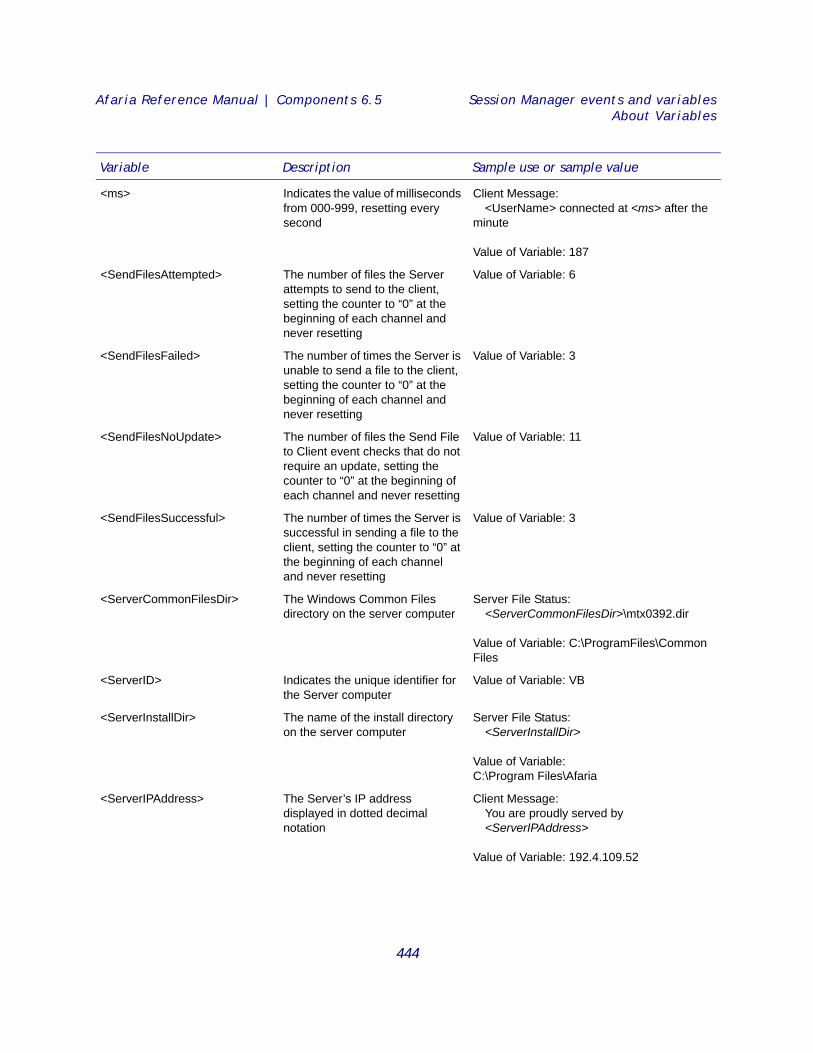
Afaria Reference Manual | Components 6.5 Session Manager events and variablesAbout Variables
<ms> Indicates the value of milliseconds from 000-999, resetting every second
Client Message:<UserName> connected at <ms> after the
minute
Value of Variable: 187
<SendFilesAttempted> The number of files the Server attempts to send to the client, setting the counter to “0” at the beginning of each channel and never resetting
Value of Variable: 6
<SendFilesFailed> The number of times the Server is unable to send a file to the client, setting the counter to “0” at the beginning of each channel and never resetting
Value of Variable: 3
<SendFilesNoUpdate> The number of files the Send File to Client event checks that do not require an update, setting the counter to “0” at the beginning of each channel and never resetting
Value of Variable: 11
<SendFilesSuccessful> The number of times the Server is successful in sending a file to the client, setting the counter to “0” at the beginning of each channel and never resetting
Value of Variable: 3
<ServerCommonFilesDir> The Windows Common Files directory on the server computer
Server File Status:<ServerCommonFilesDir>\mtx0392.dir
Value of Variable: C:\ProgramFiles\Common Files
<ServerID> Indicates the unique identifier for the Server computer
Value of Variable: VB
<ServerInstallDir> The name of the install directory on the server computer
Server File Status:<ServerInstallDir>
Value of Variable:C:\Program Files\Afaria
<ServerIPAddress> The Server’s IP address displayed in dotted decimal notation
Client Message:You are proudly served by <ServerIPAddress>
Value of Variable: 192.4.109.52
Variable Description Sample use or sample value
444
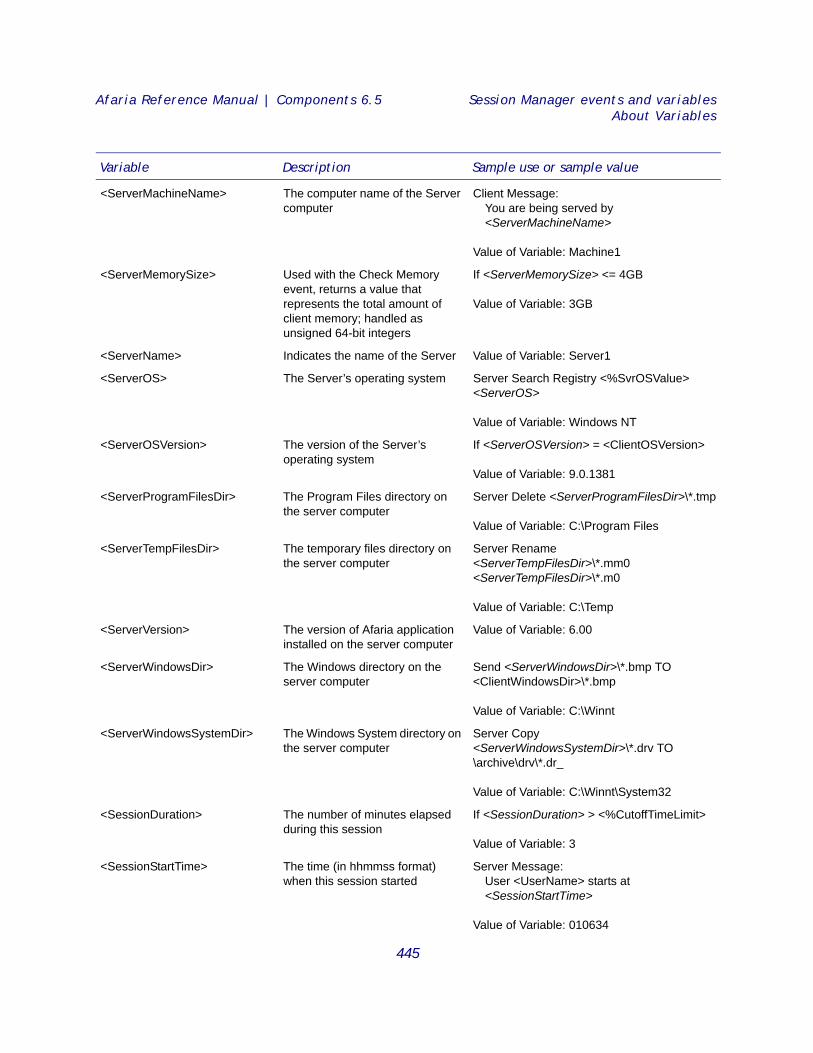
Afaria Reference Manual | Components 6.5 Session Manager events and variablesAbout Variables
<ServerMachineName> The computer name of the Server computer
Client Message:You are being served by <ServerMachineName>
Value of Variable: Machine1
<ServerMemorySize> Used with the Check Memory event, returns a value that represents the total amount of client memory; handled as unsigned 64-bit integers
If <ServerMemorySize> <= 4GB
Value of Variable: 3GB
<ServerName> Indicates the name of the Server Value of Variable: Server1
<ServerOS> The Server’s operating system Server Search Registry <%SvrOSValue> <ServerOS>
Value of Variable: Windows NT
<ServerOSVersion> The version of the Server’s operating system
If <ServerOSVersion> = <ClientOSVersion>
Value of Variable: 9.0.1381
<ServerProgramFilesDir> The Program Files directory on the server computer
Server Delete <ServerProgramFilesDir>\*.tmp
Value of Variable: C:\Program Files
<ServerTempFilesDir> The temporary files directory on the server computer
Server Rename <ServerTempFilesDir>\*.mm0 <ServerTempFilesDir>\*.m0
Value of Variable: C:\Temp
<ServerVersion> The version of Afaria application installed on the server computer
Value of Variable: 6.00
<ServerWindowsDir> The Windows directory on the server computer
Send <ServerWindowsDir>\*.bmp TO <ClientWindowsDir>\*.bmp
Value of Variable: C:\Winnt
<ServerWindowsSystemDir> The Windows System directory on the server computer
Server Copy <ServerWindowsSystemDir>\*.drv TO \archive\drv\*.dr_
Value of Variable: C:\Winnt\System32
<SessionDuration> The number of minutes elapsed during this session
If <SessionDuration> > <%CutoffTimeLimit>
Value of Variable: 3
<SessionStartTime> The time (in hhmmss format) when this session started
Server Message:User <UserName> starts at <SessionStartTime>
Value of Variable: 010634
Variable Description Sample use or sample value
445
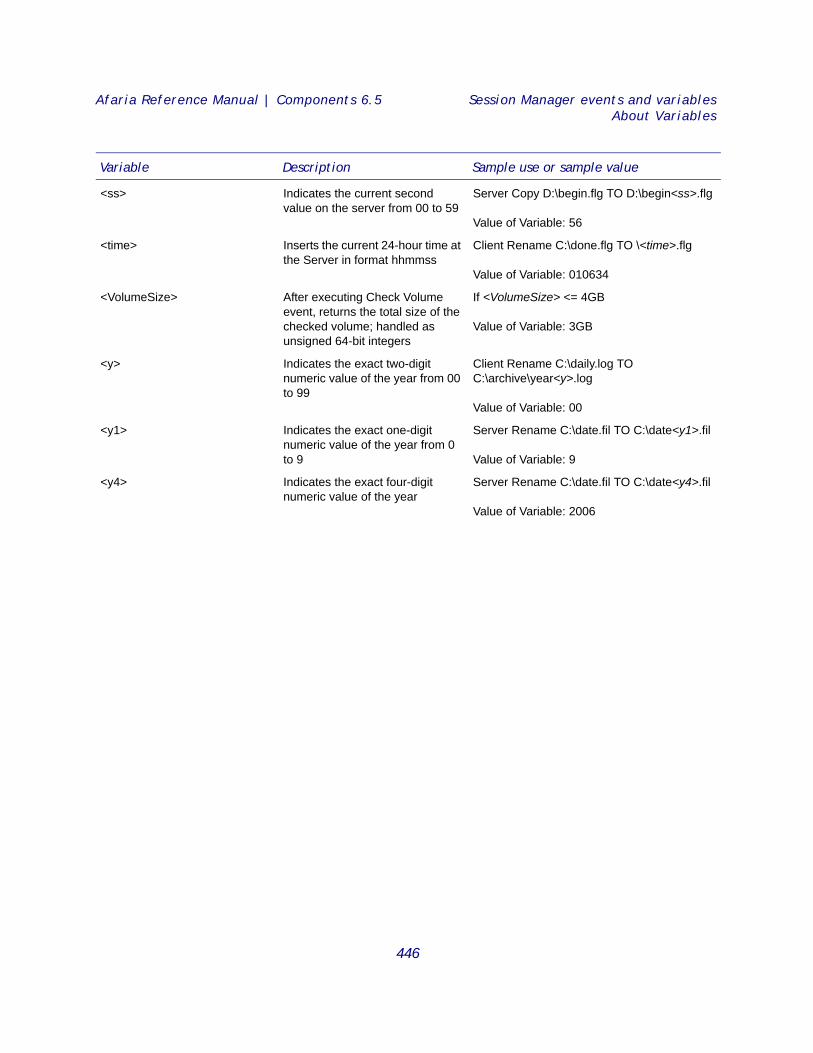
Afaria Reference Manual | Components 6.5 Session Manager events and variablesAbout Variables
<ss> Indicates the current second value on the server from 00 to 59
Server Copy D:\begin.flg TO D:\begin<ss>.flg
Value of Variable: 56
<time> Inserts the current 24-hour time at the Server in format hhmmss
Client Rename C:\done.flg TO \<time>.flg
Value of Variable: 010634
<VolumeSize> After executing Check Volume event, returns the total size of the checked volume; handled as unsigned 64-bit integers
If <VolumeSize> <= 4GB
Value of Variable: 3GB
<y> Indicates the exact two-digit numeric value of the year from 00 to 99
Client Rename C:\daily.log TO C:\archive\year<y>.log
Value of Variable: 00
<y1> Indicates the exact one-digit numeric value of the year from 0 to 9
Server Rename C:\date.fil TO C:\date<y1>.fil
Value of Variable: 9
<y4> Indicates the exact four-digit numeric value of the year
Server Rename C:\date.fil TO C:\date<y4>.fil
Value of Variable: 2006
Variable Description Sample use or sample value
446

Afaria Reference Manual | Components 6.5 Session Manager events and variablesAbout Variables
User-defined session variablesUser-defined session variables use the Set Variable event to create custom placeholders for any event that can use a variable. Every worklist or sendlist in the session channel will have access to the new variable after it’s defined. As a result, user-defined variables can be used as parameters in another worklist in the same Session Manager channel, but not across channels.
Worklists can reference another worklist's user-defined session variable as long as the variable has already been defined in the session. Sendlists execute before worklists in a session. This order of execution prevents sendlists from being able to use a worklist's variable. Exceptions may occur if you manipulate priorities in a channel or are running queued outbound notification channels.
User-defined session variables use the % (percent) symbol preceding the variable name, such as <%myvariable>=value. Examples of user-defined variables include:
<%current>=<m>/<d>/<y> (Includes a combination of literal text and system variable.)
<%report>=@\report.txt (Includes an indirect reference “@” to the contents of a file.)
<%path>=\\server1\data (Includes a combination of literal text and system variable)
Environment variablesUse environment variables as placeholders in event text for system defined values. To be recognized by the Server, these environment variables must be defined on the Environment property page of the System Properties window, which you can access from Control Panel.
If variables have been changed or new variables have been defined, these values will not be recognized unless the service is stopped and restarted.
Environment variables in event text must take the form <$variablename>. For example, if a line in the System Environment Variables box defines the variable…HTMLHome=Z:\SessionManagerChannelEditor\HTML\ActiveX\ then the event to copy a file to this directory would be… COPY C:\Temp\File1.htm TO <$HTMLHome>\File1.htm
447
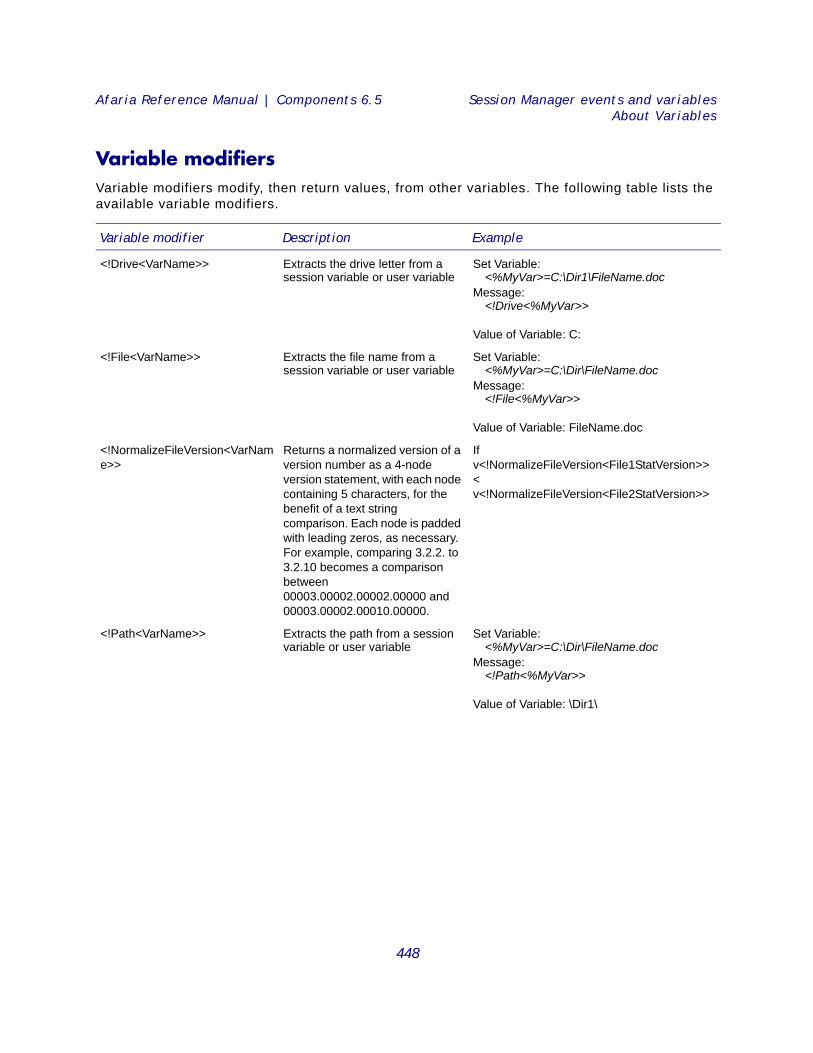
Afaria Reference Manual | Components 6.5 Session Manager events and variablesAbout Variables
Variable modifiersVariable modifiers modify, then return values, from other variables. The following table lists the available variable modifiers.
Variable modifier Description Example
<!Drive<VarName>> Extracts the drive letter from a session variable or user variable
Set Variable:<%MyVar>=C:\Dir1\FileName.doc
Message:<!Drive<%MyVar>>
Value of Variable: C:
<!File<VarName>> Extracts the file name from a session variable or user variable
Set Variable:<%MyVar>=C:\Dir\FileName.doc
Message:<!File<%MyVar>>
Value of Variable: FileName.doc
<!NormalizeFileVersion<VarName>>
Returns a normalized version of a version number as a 4-node version statement, with each node containing 5 characters, for the benefit of a text string comparison. Each node is padded with leading zeros, as necessary. For example, comparing 3.2.2. to 3.2.10 becomes a comparison between 00003.00002.00002.00000 and 00003.00002.00010.00000.
If v<!NormalizeFileVersion<File1StatVersion>> < v<!NormalizeFileVersion<File2StatVersion>>
<!Path<VarName>> Extracts the path from a session variable or user variable
Set Variable:<%MyVar>=C:\Dir\FileName.doc
Message:<!Path<%MyVar>>
Value of Variable: \Dir1\
448
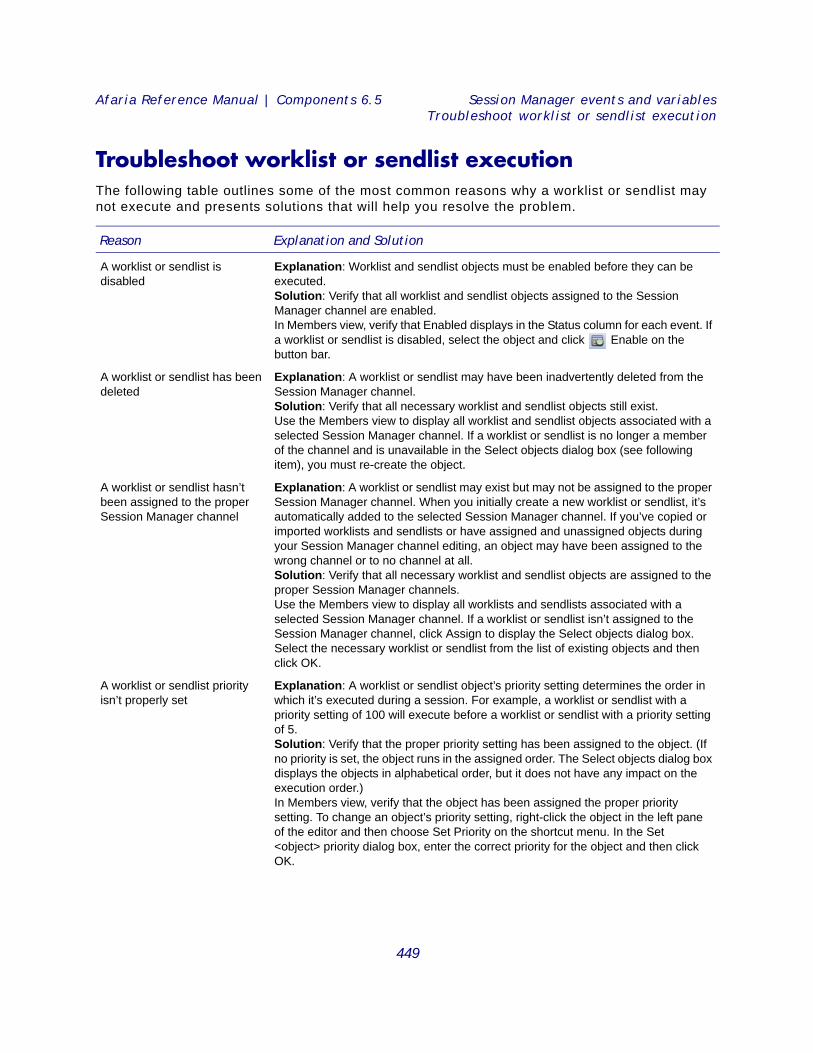
Afaria Reference Manual | Components 6.5 Session Manager events and variablesTroubleshoot worklist or sendlist execution
Troubleshoot worklist or sendlist executionThe following table outlines some of the most common reasons why a worklist or sendlist may not execute and presents solutions that will help you resolve the problem.
Reason Explanation and Solution
A worklist or sendlist is disabled
Explanation: Worklist and sendlist objects must be enabled before they can be executed.Solution: Verify that all worklist and sendlist objects assigned to the Session Manager channel are enabled.In Members view, verify that Enabled displays in the Status column for each event. If a worklist or sendlist is disabled, select the object and click Enable on the button bar.
A worklist or sendlist has been deleted
Explanation: A worklist or sendlist may have been inadvertently deleted from the Session Manager channel.Solution: Verify that all necessary worklist and sendlist objects still exist. Use the Members view to display all worklist and sendlist objects associated with a selected Session Manager channel. If a worklist or sendlist is no longer a member of the channel and is unavailable in the Select objects dialog box (see following item), you must re-create the object.
A worklist or sendlist hasn’t been assigned to the proper Session Manager channel
Explanation: A worklist or sendlist may exist but may not be assigned to the proper Session Manager channel. When you initially create a new worklist or sendlist, it’s automatically added to the selected Session Manager channel. If you’ve copied or imported worklists and sendlists or have assigned and unassigned objects during your Session Manager channel editing, an object may have been assigned to the wrong channel or to no channel at all.Solution: Verify that all necessary worklist and sendlist objects are assigned to the proper Session Manager channels.Use the Members view to display all worklists and sendlists associated with a selected Session Manager channel. If a worklist or sendlist isn’t assigned to the Session Manager channel, click Assign to display the Select objects dialog box. Select the necessary worklist or sendlist from the list of existing objects and then click OK.
A worklist or sendlist priority isn’t properly set
Explanation: A worklist or sendlist object’s priority setting determines the order in which it’s executed during a session. For example, a worklist or sendlist with a priority setting of 100 will execute before a worklist or sendlist with a priority setting of 5.Solution: Verify that the proper priority setting has been assigned to the object. (If no priority is set, the object runs in the assigned order. The Select objects dialog box displays the objects in alphabetical order, but it does not have any impact on the execution order.)In Members view, verify that the object has been assigned the proper priority setting. To change an object’s priority setting, right-click the object in the left pane of the editor and then choose Set Priority on the shortcut menu. In the Set <object> priority dialog box, enter the correct priority for the object and then click OK.
449
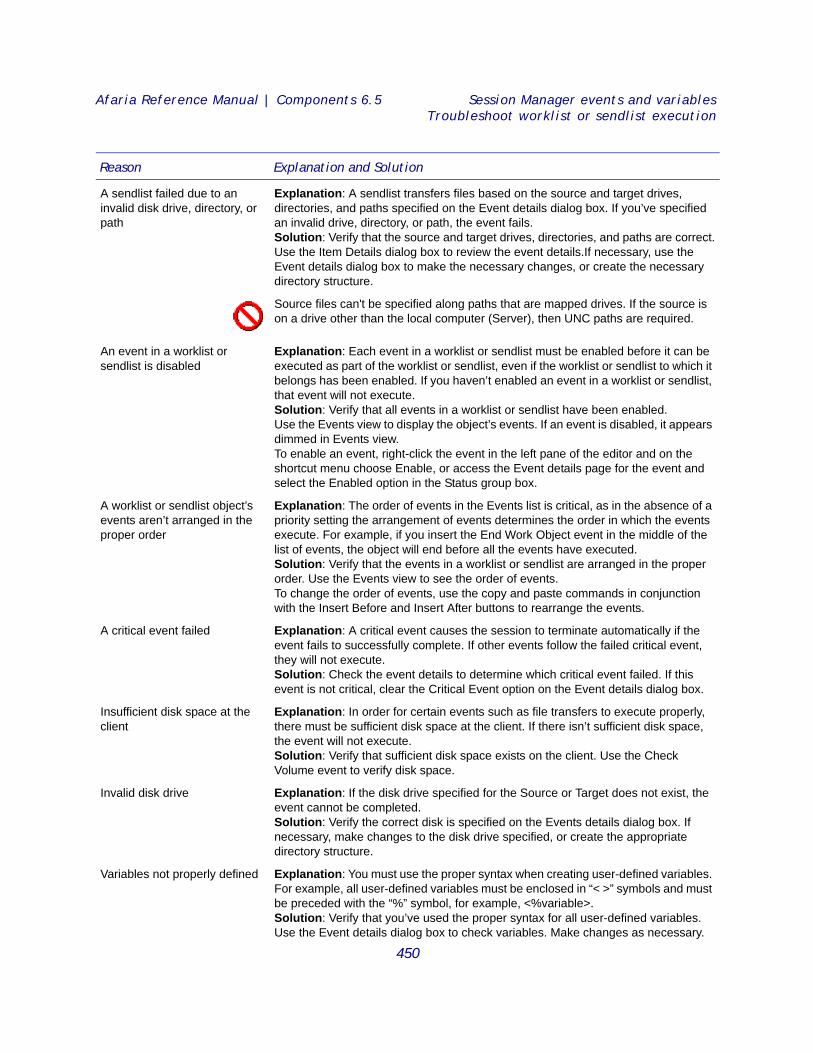
Afaria Reference Manual | Components 6.5 Session Manager events and variablesTroubleshoot worklist or sendlist execution
A sendlist failed due to an invalid disk drive, directory, or path
Explanation: A sendlist transfers files based on the source and target drives, directories, and paths specified on the Event details dialog box. If you’ve specified an invalid drive, directory, or path, the event fails.Solution: Verify that the source and target drives, directories, and paths are correct.Use the Item Details dialog box to review the event details.If necessary, use the Event details dialog box to make the necessary changes, or create the necessary directory structure.
Source files can't be specified along paths that are mapped drives. If the source is on a drive other than the local computer (Server), then UNC paths are required.
An event in a worklist or sendlist is disabled
Explanation: Each event in a worklist or sendlist must be enabled before it can be executed as part of the worklist or sendlist, even if the worklist or sendlist to which it belongs has been enabled. If you haven’t enabled an event in a worklist or sendlist, that event will not execute.Solution: Verify that all events in a worklist or sendlist have been enabled.Use the Events view to display the object’s events. If an event is disabled, it appears dimmed in Events view.To enable an event, right-click the event in the left pane of the editor and on the shortcut menu choose Enable, or access the Event details page for the event and select the Enabled option in the Status group box.
A worklist or sendlist object’s events aren’t arranged in the proper order
Explanation: The order of events in the Events list is critical, as in the absence of a priority setting the arrangement of events determines the order in which the events execute. For example, if you insert the End Work Object event in the middle of the list of events, the object will end before all the events have executed.Solution: Verify that the events in a worklist or sendlist are arranged in the proper order. Use the Events view to see the order of events.To change the order of events, use the copy and paste commands in conjunction with the Insert Before and Insert After buttons to rearrange the events.
A critical event failed Explanation: A critical event causes the session to terminate automatically if the event fails to successfully complete. If other events follow the failed critical event, they will not execute.Solution: Check the event details to determine which critical event failed. If this event is not critical, clear the Critical Event option on the Event details dialog box.
Insufficient disk space at the client
Explanation: In order for certain events such as file transfers to execute properly, there must be sufficient disk space at the client. If there isn’t sufficient disk space, the event will not execute.Solution: Verify that sufficient disk space exists on the client. Use the Check Volume event to verify disk space.
Invalid disk drive Explanation: If the disk drive specified for the Source or Target does not exist, the event cannot be completed.Solution: Verify the correct disk is specified on the Events details dialog box. If necessary, make changes to the disk drive specified, or create the appropriate directory structure.
Variables not properly defined Explanation: You must use the proper syntax when creating user-defined variables. For example, all user-defined variables must be enclosed in “< >” symbols and must be preceded with the “%” symbol, for example, <%variable>.Solution: Verify that you’ve used the proper syntax for all user-defined variables. Use the Event details dialog box to check variables. Make changes as necessary.
Reason Explanation and Solution
450
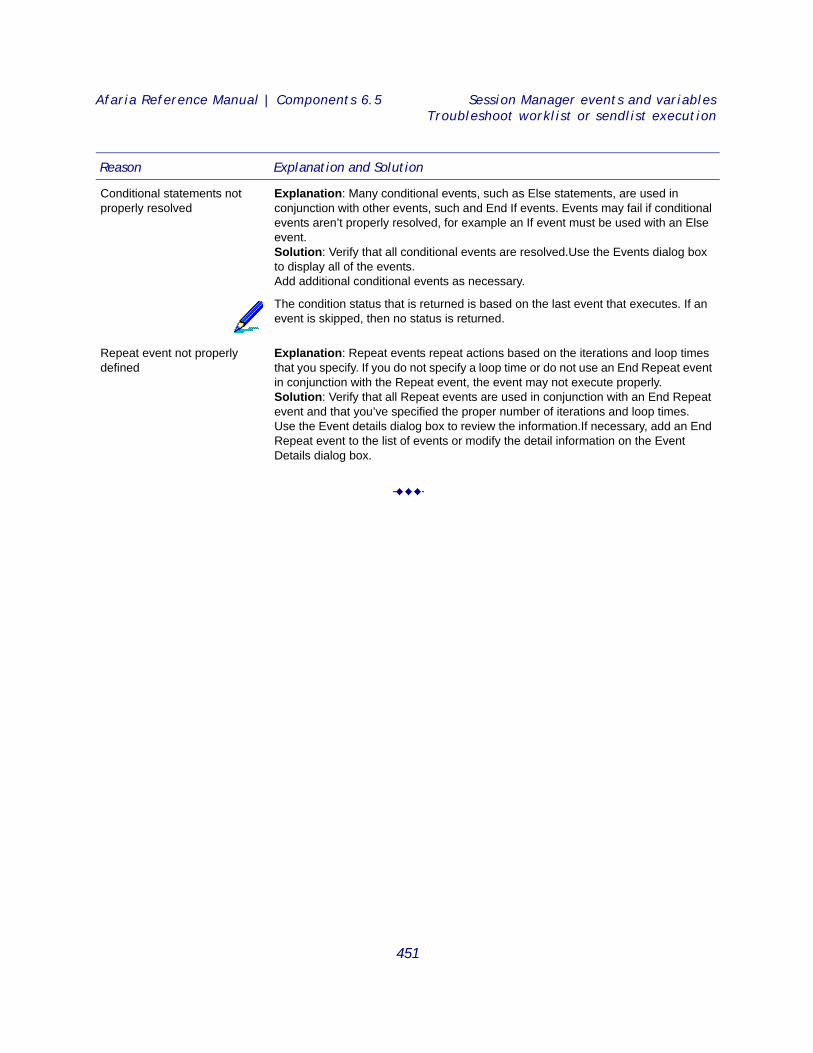
Afaria Reference Manual | Components 6.5 Session Manager events and variablesTroubleshoot worklist or sendlist execution
Conditional statements not properly resolved
Explanation: Many conditional events, such as Else statements, are used in conjunction with other events, such and End If events. Events may fail if conditional events aren’t properly resolved, for example an If event must be used with an Else event.Solution: Verify that all conditional events are resolved.Use the Events dialog box to display all of the events.Add additional conditional events as necessary.
The condition status that is returned is based on the last event that executes. If an event is skipped, then no status is returned.
Repeat event not properly defined
Explanation: Repeat events repeat actions based on the iterations and loop times that you specify. If you do not specify a loop time or do not use an End Repeat event in conjunction with the Repeat event, the event may not execute properly.Solution: Verify that all Repeat events are used in conjunction with an End Repeat event and that you’ve specified the proper number of iterations and loop times.Use the Event details dialog box to review the information.If necessary, add an End Repeat event to the list of events or modify the detail information on the Event Details dialog box.
Reason Explanation and Solution
451
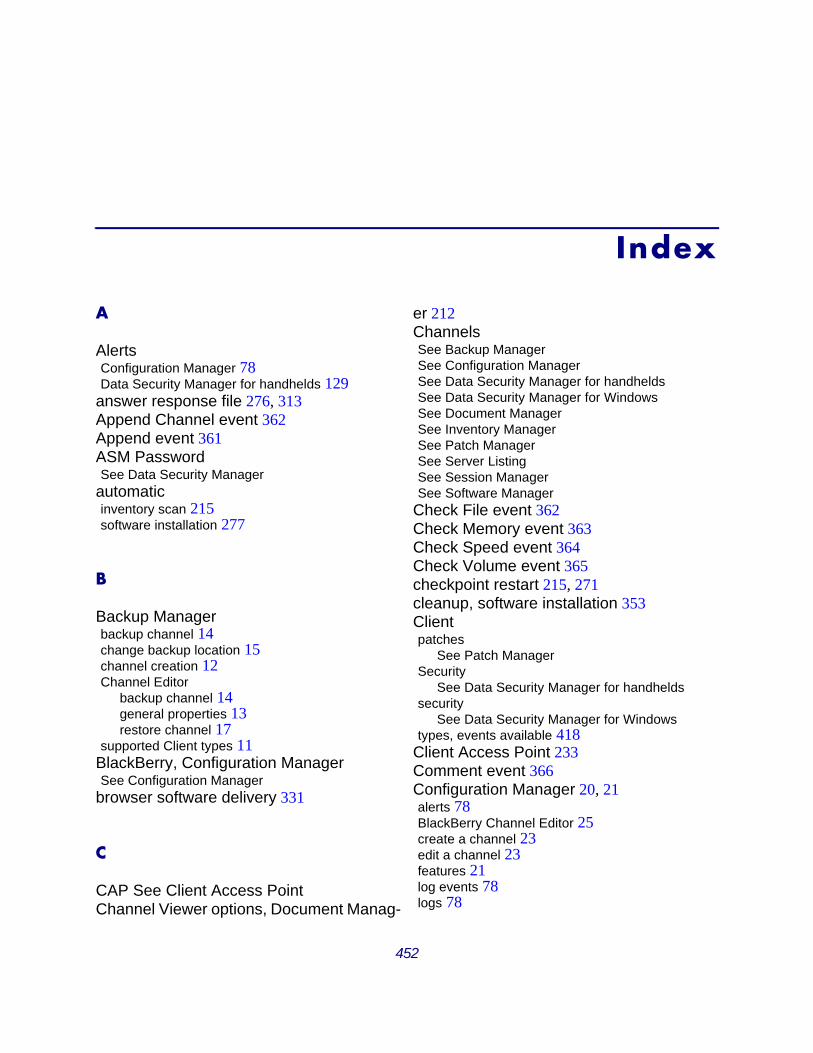
Index
A
AlertsConfiguration Manager 78Data Security Manager for handhelds 129
answer response file 276, 313Append Channel event 362Append event 361ASM PasswordSee Data Security Manager
automaticinventory scan 215software installation 277
B
Backup Managerbackup channel 14change backup location 15channel creation 12Channel Editor
backup channel 14general properties 13restore channel 17
supported Client types 11BlackBerry, Configuration ManagerSee Configuration Manager
browser software delivery 331
C
CAP See Client Access PointChannel Viewer options, Document Manag-
er 212ChannelsSee Backup ManagerSee Configuration ManagerSee Data Security Manager for handheldsSee Data Security Manager for WindowsSee Document ManagerSee Inventory ManagerSee Patch ManagerSee Server ListingSee Session ManagerSee Software Manager
Check File event 362Check Memory event 363Check Speed event 364Check Volume event 365checkpoint restart 215, 271cleanup, software installation 353Clientpatches
See Patch ManagerSecurity
See Data Security Manager for handheldssecurity
See Data Security Manager for Windowstypes, events available 418
Client Access Point 233Comment event 366Configuration Manager 20, 21alerts 78BlackBerry Channel Editor 25create a channel 23edit a channel 23features 21log events 78logs 78
452
Afaria Reference Manual | Components Index - DVersion 6.5
Palm Channel Editor 29supported Client types 20Symbian Channel Editor 38Windows Mobile Channel Editor 50
Copy File event 366Create Registry Key event 368criteria requirements, delivery⁄installation 320, 324
D
Datarestoration types 12
databackup location change 15inventory
automatic scan 215collection process 217
storage options 216, 224data cards, disabling 62Data Security Manager for handheldsat the Client 133create install channel 84create uninstall channel 85custom UI, channel options 81, 94edit install channel 86encryption, channel options 80, 96encryption, device behavior 143encryption, device options 144, 146encryption, non-PIM data 110external data cards 80, 111, 120, 133, 138features, list of 80File Decryption Utility 81, 131hard reset lock down 116, 121installing on the Client 84, 133lock device, auto 80, 103, 148lock device, manual 80, 148lock down, channel options 81, 115log events and alerts 82, 129logo, adding custom 95making phone calls 81, 95, 113, 149overview 79passwords, changing on Client 142passwords, channel options 80, 88passwords, lost 80, 125, 140, 141
passwords, using on Client 139recovery, channel options 125reports 82, 130supported Client types 79, 83synch after lock down 150uninstalling from the Client 81, 84, 138variations by Client 83with 3rd-party applications 81, 150
Data Security Manager for Windowscreate channel 160features, list of 153installing at the Client 189log events and alerts 195logs 196non-English keyboards 192overview 152passwords, advisory 192passwords, changing 168, 170preparing Client and users 187recovery support, providing 156, 193reports 197supported Client types 152uninstalling from the Client 194
Decryption, Data Security Manager 131Delete File event 369Delete Registry Key event 370Delete Registry Value event 371Delete Variable File event 371Desktop Management Interface See DMI supportDifferencing 14, 276Directory Listing event 373Disabling external data cards 62Disconnect event 374Document Managerabout 199channel creation 201Channel Editor
byte-level differencing 209Channel Viewer channels 212Client media 209directory specification 203documents options 204, 208, 212files
appearance 209dependent 207
453
Afaria Reference Manual | Components Index - EVersion 6.5
descriptions 206directories 203hidden 207individual 203paths 206
user subscriptions 209default settings 199dependent files 200file naming 199hidden files 200organization 199supported Client types 198updates 200
E
Else event 374Encryptionsee Data Security Manager for Windows
End If event 375End Impersonation event 375End Quota event 376End Repeat event 376End Session event 377End Work Object event 377eventsSession Manager
Append 361Append Channel 362available, Client type 418Check File 362Check Memory 363Check Speed 364Check Volume 365Comment 366Copy File 366Create Registry Key 368Delete File 369Delete Registry Key 370Delete Registry Value 371Delete Variable File 371details 262Directory Listing 373Disconnect 374Else 374
End If 375End Impersonation 375End Quota 376End Repeat 376End Session 377End Work Object 377Execute Program 378execution options 265, 267export 268File Status 379file⁄disk operations 356Find File 380Get Database Field 381Get File from Client 15, 382Get Registry Value 384Get Script Variable 385If 386Impersonate User 387import 268Increment Variable 388Insert Channel 389Insert Worklist 390Load Script 391Make Directory 392Message 392miscellaneous 359Notify Program 393optimization 269Quota 394Raise Event 395Read Variable File 396reference, directories and file names 263Release Script 398Remove Directory 399Rename File 400Repeat 401Run Script Function 402Search Directory 403Send File to Client 404session control 358Set Bandwidth Throttling Config 406Set Client Time 397, 407Set Database Field 408Set File Attributes 16, 410Set Registry Value 411Set Script Variable 412Set Variable 413Test Variable 414, 415
454
Afaria Reference Manual | Components Index - FVersion 6.5
troubleshoot object execution 449types 260, 356Update Variable File 416variable
events 357modifiers 448types 263
variablesenvironment 447session, predefined 438session, user defined 447
Wait for File to Exist 417wildcards 264
Exchange, Mail forSee Mail for Exchange
Execute Program event 378export events 268External data cards, disabling 62
F
FavoritesConfiguration Manager 38, 64
File Decryption Utility, Data Security Man-ager 131File differencing 14File Status event 379file⁄disk operation events 356Find File event 380
G
Get Database Field event 381Get File from Client event 15, 382Get Registry Value event 384Get Script Variable event 385guidance file 276, 291
I
identification, software channelHandheld Client 282handheld Client 282Windows Client 283
If event 386Impersonate User event 387import, events 268Increment Variable event 388Insert Channel event 389Insert Worklist event 390installationoptions, software channel
handheld Client 309Windows Client 311, 314
source, software channelhandheld Client 284Windows Client 290, 300
Inventory Managerautomatic scan 215channel creation 223data
collection process 217storage options 224
log events 235Manager for SMS
Client inventory 234database queries 231overview 231route scan results 232
scantime and schedule 228type
Windows Clients 226services, stop 230supported Client types 214
Inventory Manager for handheldsreports 236
L
LAN, remote environment 342Load Script event 391
455
Afaria Reference Manual | Components Index - MVersion 6.5
Lock down ClientSee Data Security Manager for Windows
LogsConfiguration Manager 78Data Security Manager for Windows 196
M
Mail for ExchangeConfiguration Manager for Symbian 47–49
Make Directory event 392Manager for SMSClient inventory 234database queries 231Inventory Manager 231route scan results 232
Message event 392Microsoft patchesSee Patch Manager
miscellaneous events 359
N
non-removable files, software channel 299, 305Notify Program event 393
P
Palm, Configuration ManagerSee Configuration Manager
Patch Manager"canned" predefined channel 240channel properties, impersonation 246create channel 241edit channel 241features 238overview 237patch properties, bandwidth throttle 245patch properties, impersonation 244patch properties, reboot 244
patch properties, segment delivery 245supported Client types 237
Provisioning devicesSee Configuration Manager
Q
Quota event 394
R
Raise Event event 395Read Variable File event 396Release Script event 398remote LAN environment 342Remote wipedisabling external data cards 62
Remove Directory event 399Rename File event 400Repeat event 401ReportsData Security Manager for handhelds 130Data Security Manager for Windows 197Inventory Manager for handhelds 236
Restoration, data 12Run Script Function event 402
S
scan inventory, automatically 215Search Directory event 403Security Manager for handheldsSee Data Security Manager for handhelds
Security Manager for Windowsdocumentation 188, 190See also Data Security Manager for Windows
Security patchesSee Patch Manager
segmented software delivery 327
456
Afaria Reference Manual | Components Index - SVersion 6.5
Send File to Client event 404sendlists 257Server Listingchannel creation 249Editor 250supported Client types 248
services, stop inventory 230session control events 358Session ManagerAppend Channel event 362Append event 361channel
executed via Software Manager 339, 347Channel Editor 254
assign objects 258control object display 254events list 256objects list 254unassign objects 259
Check File event 362Check Memory event 363Check Speed event 364Check Volume event 365Comment event 366Copy File event 366create a channel 253Create Registry Key event 368Delete File event 369Delete Registry Key event 370Delete Registry Value event 371Delete Variable File event 371Directory Listing event 373Disconnect event 374Else event 374End If event 375End Impersonation event 375End Quota event 376End Repeat event 376End Session event 377End Work Object event 377event
details 262execution options 265, 267export 268import 268optimization 269reference, directories and file names 263
types 260, 356wildcards 264
eventsavailable, Client type 418file⁄disk operation 356miscellaneous 359session control 358variable 357
Execute Program event 378File Status event 379Find File event 380Get Database Field event 381Get File from Client 15Get File from Client event 382Get Registry Value event 384Get Script Variable event 385If event 386Impersonate User event 387Increment Variable event 388Insert Channel event 389Insert Worklist event 390Load Script event 391Make Directory event 392Message event 392Notify Program event 393Quota event 394Raise Event event 395Read Variable File event 396Release Script event 398Remove Directory event 399Rename File event 400Repeat event 401Run Script Function event 402Search Directory event 403Send File to Client event 404sendlists 257Set Bandwidth Throttling Config event 406Set Client Time event 397, 407Set Database Field event 408Set File Attributes 16Set File Attributes event 410Set Registry Value event 411Set Script Variable event 412Set Variable event 413supported Client types 251Test Variable event 414, 415troubleshoot object execution 449Update Variable File event 416
457
Afaria Reference Manual | Components Index - SVersion 6.5
variableevents 357modifiers 448types 263
variablesenvironment 447session
predefined 438user defined 447
Wait for File to Exist event 417worklists 257
Set Bandwidth Throttling Config event 406Set Client Time event 397, 407Set Database Field event 408Set File Attributes event 16, 410Set Registry Value event 411Set Script Variable event 412Set Variable event 413shared files, software channel 299, 305shortcuts, software 315, 342SMS, See Manager for SMSSoftware Manageranswer response file 276automatic software installation 277channel
organize properties 272, 274, 276plan deployment 273
Channel Editoradvanced editing 338criteria requirements, delivery⁄installation 320files⁄folders 284General options 282Handheld Client
identification 282handheld Clients
criteria requirements, delivery⁄installation 320
execute Session Manager channels 339files⁄folders 284identification 282installation options 309RAM requirement 341
installation options 308timeframe requirement, delivery⁄installation 318user defined fields 338Windows Client
browser delivery 331criteria requirements, delivery⁄installation 324
delivery⁄installation options 346execute Session Manager channels 347files⁄folders 290, 300identification 283installation options 311, 314map LAN based channels 342, 344message display 348program execution 348segmented delivery 327successful Setup based installation 350uninstall software 335user rights 348
Client user installation cleanup 353criteria
checkingfiles 321, 325registry keys 322, 326
requirements, delivery⁄installation 320differencing 276guidance file 276handheld Clients
criteria requirements, delivery⁄installation 320default destination 285differencing 288file
properties 288requirements 321
files⁄folders 284hardware requirements 320installation
options 309program 309source 285
operating system requirements 323RAM requirement 321registry key
checks 309requirements 322
shortcuts, software 342supported Client types 271variables
environment 307source path 306
Windows Clientbrowser 331
458
Afaria Reference Manual | Components Index - TVersion 6.5
component file 305criteria requirements, delivery⁄installation 324file requirements 325hardware requirements 324high speed segment limits 329HTML delivery options 332non-removable files 299, 305, 337Non-Setup based
automatic installation 317differencing 300file, installation 301files⁄folders 300installation options 314outdated LAN channel 317properties, file 304shortcuts 315status window, installation 317target folder 300
operating system requirements 326RAM requirement 324registry
file 306key requirements 326
segment limits 327segmented delivery 327Setup based
answer response file 313differencing 291executable source 292file, installation 293files⁄folders 290guidance file 291installation options 311outdated LAN channel 314program, installation 311properties, file 297status window, installation 313successful installation options 350target folder 291
shared files 299, 305, 337shortcut options 333timeframe requirement, delivery⁄installation 318timeframes
delivery 319installation 319
uninstall software 335software, track installation success 350
stop inventory services 230storage, data 216, 224Symbian, Configuration ManagerSee Configuration Manager
Systems Management Server, see Manag-er for SMS
T
Test Variable event 414, 415timeframe requirement, delivery⁄installation 318
U
uninstall, software channel 335Update Variable File event 416userdefined fields 338rights, Windows Client 348
V
variableevents 357modifiers 448types, events 263
variablesenvironment 307, 447session
predefined 438user defined 447
source path, software channel 306
W
Wait for File to Exist event 417wildcard 15, 264
459

Afaria Reference Manual | Components Index - WVersion 6.5
Windows Client, user rights 348Windows Mobile, Configuration ManagerSee Configuration Manager
worklists 257
460