agent install guide - new boundary
TRANSCRIPT

Agent Install GuideNew Boundary Prism Patch Manager 7.0 SP1

New Boundary Prism Patch Manager 7.0 SP1
- 2 -

- 3 -
NoticesVersion InformationNew Boundary Prism Patch Manager Agent Install Guide - New Boundary Prism Patch Manager Version 7.0 SP1 -Released: April 2010Document Number: 02_017_7.0 SP1_101201400
Copyright Information
New Boundary Technologies, Inc. 1300 Godward Street NE, Suite 3100 Minneapolis, MN 55413 Telephone:612-379-3805 Toll free: 800-747-4487 Fax: 612-378-3818 E-mail: [email protected]
Copyright© 1997-2010 New Boundary Technologies, Inc.: ALL RIGHTS RESERVED. This manual, as wellas the software described in it, is furnished under license. No part of this manual may be reproduced, stored in aretrieval system, or transmitted in any form - electronic, mechanical, recording, or otherwise - except as permitted bysuch license.
LIMIT OF LIABILITY/DISCLAIMER OF WARRANTY: NEW BOUNDARY TECHNOLOGIES, INC.MAKES NO REPRESENTATIONS OR WARRANTIES IN REGARDS TO THE ACCURACY ORCOMPLETENESS OF THE INFORMATION PROVIDED IN THIS MANUAL. NEW BOUNDARYTECHNOLOGIES, INC. RESERVES THE RIGHT TO MAKE CHANGES TO THE INFORMATIONDESCRIBED IN THIS MANUAL AT ANY TIME WITHOUT NOTICE AND WITHOUT OBLIGATION TONOTIFY ANY PERSON OF SUCH CHANGES. THE INFORMATION PROVIDED IN THE MANUAL IS NOTGUARANTEED OR WARRANTED TO PRODUCE ANY PARTICULAR RESULT, AND THE ADVICE ANDSTRATEGIES CONTAINED MAY NOT BE SUITABLE FOR EVERY ORGANIZATION. NO WARRANTYMAY BE CREATED OR EXTENDED WITH RESPECT TO THIS MANUAL BY SALES REPRESENTATIVESOR WRITTEN SALES MATERIALS. NEW BOUNDARY TECHNOLOGIES, INC. SHALL NOT BE LIABLEFOR ANY LOSS OF PROFIT OR ANY OTHER DAMAGES ARISING FROM THE USE OF THIS MANUAL,INCLUDING BUT NOT LIMITED TO SPECIAL, INCIDENTAL, CONSEQUENTIAL, OR OTHER DAMAGES.
Trademark Information
New Boundary Technologies®, Prism Patch Manager®, Lumension® Security, Lumension®, Lumension®
Patch and Remediation, Lumension® Enterprise Reporting™, Lumension® Security Management Console,Lumension® Content Wizard, Lumension® Scan, Lumension® NAC Integrator, Lumension® Security ConfigurationManagement, Lumension® Application Control™, Lumension® Device Control™, Lumension® EndpointSecurity™, Lumension® Endpoint Management and Security Suite, PatchLink™, PatchLink Update™, Sanctuary®,SecureWave®, their associated logos, and all other trademarks and trade names used here are the property of NewBoundary Technologies, Inc. and Lumension Security, Inc.
RSA Secured® is a registered trademark of RSA Security Inc.
Apache is a trademark of the Apache Software Foundation. In addition, any other companies' names and productsmentioned in this document may be either registered trademarks or trademarks of their respective owners.
Feedback
Your feedback lets us know if we are meeting your documentation needs. E-mail New Boundary [email protected] to tell us what you like best, what you like least, and to report any inaccuracies.

New Boundary Prism Patch Manager 7.0 SP1
- 4 -

Table of Contents
- 5 -
Table of Contents
Preface: About This Document.................................................................................................................................. 7
Typographical Conventions..........................................................................................................................................................7
Contacting New Boundary...........................................................................................................................................................8
Chapter 1: Preparing for Agent Installation............................................................................................................9
Installation Methods..................................................................................................................................................................... 9
Supported Agent Operating Systems.........................................................................................................................................10
Supported Languages................................................................................................................................................................. 12
Requirements.............................................................................................................................................................................. 13
Agent for Windows..............................................................................................................................................................13
Agent for Linux, UNIX, and Mac...................................................................................................................................... 14
Chapter 2: Installing Agents.................................................................................................................................... 17
Installing Agents on Endpoints..................................................................................................................................................17
Downloading the Installer....................................................................................................................................................17
Installing the Single Agent for Windows 2000.................................................................................................................. 19
Installing the Single Agent for Windows XP and Later.....................................................................................................25
Installing the Single Agent for Mac....................................................................................................................................30
Installing the Command Line Agent for Linux, UNIX, and Mac...................................................................................... 36
Installing Agents by Agent Management Job..................................................................................................................... 37
Upgrading Agents.......................................................................................................................................................................49
Upgrading Agents Locally...................................................................................................................................................50
Uninstalling Agents.................................................................................................................................................................... 51
Uninstalling Agents by Agent Management Job................................................................................................................ 51
Uninstalling the Agent for Windows 2000 Locally............................................................................................................63
Uninstalling the Agent for XP or Later Locally.................................................................................................................63
Uninstalling the Agent for Linux Locally...........................................................................................................................64
Uninstalling the Agent for Solaris Locally......................................................................................................................... 64
Uninstalling the Agent for AIX Locally............................................................................................................................. 65
Uninstalling the Agent for HP-UX Locally........................................................................................................................ 65
Uninstalling the Command Line Agent for Mac Locally...................................................................................................65
Chapter 3: Automating the Agent Installation.......................................................................................................67
Automating the Windows MSI Installer....................................................................................................................................67

New Boundary Prism Patch Manager 7.0 SP1
- 6 -
Creating a Network Share................................................................................................................................................... 68
Modifying the PatchAgent.msi File.................................................................................................................................... 71
Modifying the LMAgent.msi Installer.................................................................................................................................75
Creating an Organizational Unit..........................................................................................................................................80
Performing a Silent Install on Windows................................................................................................................................... 84
Command Line Descriptions for Windows 2000............................................................................................................... 85
Command Line Descriptions for Windows XP or Later.................................................................................................... 85
Performing a Silent Install on Linux/UNIX/Mac......................................................................................................................86
Command Line Descriptions............................................................................................................................................... 86
Configuring the Server and Endpoints for Agent Management Jobs..................................................................89
Configuring the Scanning System............................................................................................................................................. 89
Configuring Pre-Windows Vista Endpoint for Discovery........................................................................................................ 89
Configuring Endpoints for Agent Management Jobs (Pre-Windows Vista).............................................................................92
Configuring Post-Windows Vista Endpoints for Discovery..................................................................................................... 97
Configuring Endpoints for Agent Management Jobs (Post-Windows Vista)......................................................................... 101
Resolving Endpoint UAC Issues....................................................................................................................................... 105
Troubleshooting Agent Management Jobs.............................................................................................................................. 105
Disabling Password Changes.............................................................................................................................................106

- 7 -
Preface
About This Document
This Agent Install Guide is a resource written for all users of Prism Patch Manager 7.0 SP1. This documentdefines the concepts and procedures for installing, configuring, implementing, and using Prism Patch Manager7.0 SP1.
Tip: New Boundary documentation is updated on a regular basis. To acquire the latest version of this document,please refer to the New Boundary Support Documentation Website (http://www.newboundary.com/support).
Typographical Conventions
The following conventions are used throughout this documentation to help you identify various informationtypes.
Convention Usage
bold Buttons, menu items, window and screen objects.
bold italics Wizard names, window names, and page names.
italics New terms, options, and variables.
UPPERCASE SQL Commands and keyboard keys.
monospace File names, path names, programs, executables, command syntax, andproperty names.

New Boundary Prism Patch Manager 7.0 SP1
- 8 -
Contacting New Boundary
Corporate Headquarters
New Boundary Technologies, Inc.
1300 Godward Street NE, Suite 3100
Minneapolis, MN 55413
Telephone: 612-379-3805
Tollfree: 800-747-4487
Fax: 612-378-3818
Email: [email protected]
USA and Canada Sales
Telephone: 800-747-4487
Email: [email protected]
Technical Support
Telephone: 612-379-1851
E-mail: [email protected]
United Kingdom - International
29 Harley Street
London W1G 9QR
Telephone: +44 870 0119403

- 9 -
Chapter
1Preparing for Agent Installation
In this chapter:
• Installation Methods
• Supported Agent Operating Systems
• Supported Languages
• Requirements
Having successfully installed your New Boundary Prism PatchManager server, you can now proceed to the installation of youragents. Following installation the agent is monitored and maintainedby the New Boundary Prism Patch Manager server requiring noadditional maintenance.
Installation Methods
Agents can be deployed using any one (or combination) of the following methods:
Table 1: Installation Options
Installation Type Agent Type Descriptions
Single agent installer forWindows 2000
Patch 6.4 Agent Allows you to run the installer, entering theinformation as prompted. You can also modifythe Microsoft Software Installer (MSI) file, usingan MSI editor, to include your organization’sconfiguration. The .msi file can be delivered byusing a login script, Active Directory Group PolicyObject (GPO), or other remote software installationmethod.
Single agent installer forWindows XP and later
Patch Manager 7.0Agent
Allows you to run the Patch Manager (EndpointManagement and Security Suite) agent installer,entering the information as prompted. The PatchManager agent then automatically installs the patchcomponent. You can also modify the MicrosoftSoftware Installer (MSI) file, using an MSI editor,to include your organization’s configuration. The.msi file can be delivered by using a login script,Active Directory Group Policy Object (GPO), orother remote software installation method.

New Boundary Prism Patch Manager 7.0 SP1
- 10 -
Installation Type Agent Type Descriptions
Single agent installer for Mac Patch Manager 7.0Agent
Allows you to run the installer, enteringinformation as prompted.
Single agent installer for Linux/Unix/Mac
Patch Manager 7.0Agent
Allows you to run the installer, entering theinformation as prompted. You can also perform asilent installation using rsh or SSH.
Supported Agent Operating SystemsThere are multiple versions of the New Boundary Prism Patch Manager (Patch Manager) agent to accommodatemultiple platforms. In some cases, more than one agent version can be installed on a particular operating system.
The following table lists the supported platforms on which the agent is supported.
Table 2: Supported Operating Systems
OperatingSystem
Version Edition DataWidth
Proc.Family
SoftwarePrerequisites
AgentVersion
MicrosoftWindows 2000SP4
5.0 All(1) 32 bit Intel MicrosoftWindowsInstaller 2.0+
Patch 6.4Agent
MicrosoftWindows XPSP2+
5.1 Professional(2) 32/64 bit Intel MicrosoftWindowsInstaller 2.0+
Patch Manager7.0 Agent
MicrosoftWindows 2003SP1+
5.2 Web
Standard
Enterprise
R2
32/64 bit Intel MicrosoftWindowsInstaller 2.0+
Patch Manager7.0 Agent
MicrosoftWindows Vista
6.0 Business
Enterprise
Ultimate
32/64 bit Intel Microsoft .NETFramework 3.0+
Patch Manager7.0 Agent
MicrosoftWindows Server2008
6.0 Web(3)
Standard
Enterprise
32/64 bit Intel Microsoft .NETFramework 3.0+
Patch Manager7.0 Agent

Preparing for Agent Installation
- 11 -
OperatingSystem
Version Edition DataWidth
Proc.Family
SoftwarePrerequisites
AgentVersion
MicrosoftWindows 7
7.0 Professional
Enterprise
Ultimate
32/64 bit Intel Microsoft .NETFramework 3.0+
Patch Manager7.0 Agent
MicrosoftWindows Server2008 R2
7.0 Standard
Enterprise
Web
64 bit Intel Microsoft .NETFramework 3.0+
Patch Manager7.0 Agent
Apple Mac OS X 10.3
10.4
10.5
10.6
All 32/64 bit Intel /PowerPC
Sun Java JRE1.5.0+
Patch 7.0Agent
HP-UX 11.11
11.23
11.31
All 64 bit PA-RISC Sun Java JRE1.5.0+
Patch 7.0Agent
IBM AIX 5.2
5.3
6.1
All 32/64 bit Power /PowerPC
Sun Java JRE1.5.0+
Patch 7.0Agent
Novell SUSELinux
9
10
11
Enterprise 32/64 bit Intel Sun Java JRE1.5.0+
Patch 7.0Agent
Red Hat Linux 3.0
4.0
5.0
Enterprise
AS
ES
WS
32/64 bit Intel Sun Java JRE1.5.0+
Patch 7.0Agent
Sun Solaris 8
9
10
All 32/64 bit SPARC /Intel
Sun Java JRE1.5.0+
Patch 7.0Agent

New Boundary Prism Patch Manager 7.0 SP1
- 12 -
OperatingSystem
Version Edition DataWidth
Proc.Family
SoftwarePrerequisites
AgentVersion
Oracle Linux 4
5
All 32/64 bit Intel Sun Java JRE1.5.0+
Patch 7.0Agent
CentOS Linux 4
5
All 32/64 bit Intel Sun Java JRE1.5.0+
Patch 7.0Agent
(1) The Datacenter editions of this OS family are not supported.
(2) Home, Media Center, and Tablet PC editions are not supported.
(3) The Datacenter and Core Editions of this OS family are not supported.
Supported Languages
The agent is supported in the following languages:
• en-AU: English (Australia)• en-BZ: English (Belize)• en-CA: English (Canada)• en-JM: English (Jamaica)• en-NZ: English (New Zealand)• en-ZA: English (South Africa)• en-GB: English (United Kingdom)• en-US: English (United States)• es-ES: Spanish (Spain)• fi-FI: Finnish (Finland)• fr-FR: French (France)• de-DE: German (Germany)• it-IT: Italian (Italy)• ja-JP: Japanese (Japan)• ko-KR: Korean (Korea)• nl-NL: Dutch (Netherlands)• pt-BE: Portuguese (Brazil)• zh-CN: Chinese (Simplified)• zh-CHS: Chinese (Simplified)• zh-TW: Chinese (Traditional)• zh-CHT: Chinese (Traditional)

Preparing for Agent Installation
- 13 -
Requirements
The following section lists the hardware and software requirements for the agent.
Note: You must disable any virus-scanning software prior to the installation of the New Boundary Agent forWindows. Failure to do so may result in an unsuccessful agent installation.
Agent for WindowsThe following minimum requirements must be met in order to install the agent on endpoints running theMicrosoft Windows operating system.
The install (and uninstall) must be done by an Administrator or Administrator equivalent.
• 500 MHz processor or higher.• 256 MB RAM.• 20 MB of free disk space for agent installation.• 25 MB of free disk space once the agent is installed• A single 10 Mbps network connection (with access to the New Boundary Prism Patch Manager server).• Sufficient free disk space to download and install patches (varies dependent upon size of patch).• Windows Installer 2.0 or higher.• Microsoft Internet Explorer 5.01 or higher (Internet Explorer 5.5 or higher if using SSL).• Network connectivity to your New Boundary Prism Patch Manager server (6.5 or higher).
Note: Windows 2000 computers require Service Pack 1.
The following table lists the supported platforms on which the agent is supported.
Table 3: Supported Operating Systems
OperatingSystem
Version Edition DataWidth
Proc.Family
SoftwarePrerequisites
AgentVersion
MicrosoftWindows 2000SP4
5.0 All(1) 32 bit Intel MicrosoftWindowsInstaller 2.0+
Patch 6.4Agent
MicrosoftWindows XPSP2+
5.1 Professional(2) 32/64 bit Intel MicrosoftWindowsInstaller 2.0+
Patch Manager7.0 Agent
MicrosoftWindows 2003SP1+
5.2 Web
Standard
Enterprise
R2
32/64 bit Intel MicrosoftWindowsInstaller 2.0+
Patch Manager7.0 Agent
New Boundary Prism Patch Manager 7.0 SP1
- 14 -
OperatingSystem
Version Edition DataWidth
Proc.Family
SoftwarePrerequisites
AgentVersion
MicrosoftWindows Vista
6.0 Business
Enterprise
Ultimate
32/64 bit Intel Microsoft .NETFramework 3.0+
Patch Manager7.0 Agent
MicrosoftWindows Server2008
6.0 Web(3)
Standard
Enterprise
32/64 bit Intel Microsoft .NETFramework 3.0+
Patch Manager7.0 Agent
MicrosoftWindows 7
7 Professional
Enterprise
Ultimate
32/64 bit Intel Microsoft .NETFramework 3.0+
Patch Manager7.0 Agent
MicrosoftWindows 2008R2
7 Standard
Enterprise
Web
64 bit Intel Microsoft .NETFramework 3.0+
Patch Manager7.0 Agent
(1) The Datacenter editions of this OS family are not supported.
(2) Home, Media Center, and Tablet PC editions are not supported.
(3) The Datacenter and Core Editions of this OS family are not supported.
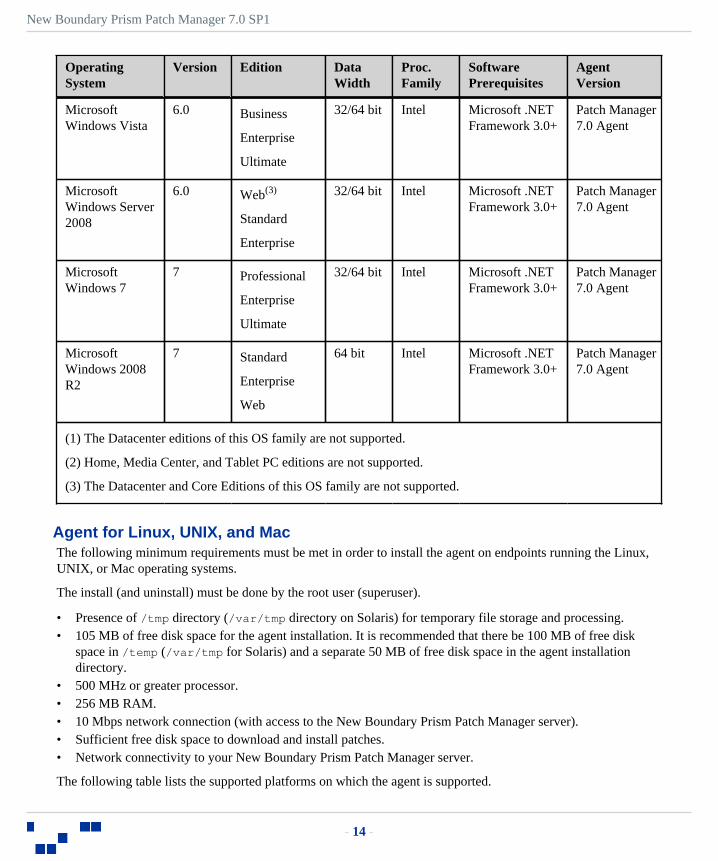
Agent for Linux, UNIX, and MacThe following minimum requirements must be met in order to install the agent on endpoints running the Linux,UNIX, or Mac operating systems.
The install (and uninstall) must be done by the root user (superuser).
• Presence of /tmp directory (/var/tmp directory on Solaris) for temporary file storage and processing.• 105 MB of free disk space for the agent installation. It is recommended that there be 100 MB of free disk
space in /temp (/var/tmp for Solaris) and a separate 50 MB of free disk space in the agent installationdirectory.
• 500 MHz or greater processor.• 256 MB RAM.• 10 Mbps network connection (with access to the New Boundary Prism Patch Manager server).• Sufficient free disk space to download and install patches.• Network connectivity to your New Boundary Prism Patch Manager server.
The following table lists the supported platforms on which the agent is supported.

Preparing for Agent Installation
- 15 -
Table 4: Supported Operating Systems
OperatingSystem
Version Edition DataWidth
Proc.Family
SoftwarePrerequisites
AgentVersion
Apple Mac OS X 10.3
10.4
10.5
10.6
All 32/64 bit Intel /PowerPC
Sun Java JRE1.5.0+
Patch Manager7.0 Agent
HP-UX 11.11
11.23
11.31
All 64 bit PA-RISC Sun Java JRE1.5.0+
Patch 7.0Agent
IBM AIX 5.2
5.3
6.1
All 32/64 bit Power /PowerPC
Sun Java JRE1.5.0+
Patch 7.0Agent
Novell SUSELinux
9
10
Enterprise 32/64 bit Intel Sun Java JRE1.5.0+
Patch 7.0Agent
Red Hat Linux 3.0
4.0
5.0
Enterprise
AS
ES
WS
32/64 bit Intel Sun Java JRE1.5.0+
Patch 7.0Agent
Sun Solaris 8
9
10
All 32/64 bit SPARC /Intel
Sun Java JRE1.5.0+
Patch 7.0Agent
Oracle Linux 4
5
All 32/64 bit Intel Sun Java JRE1.5.0+
Patch 7.0Agent
CentOS Linux 4
5
All 32/64 bit Intel Sun Java JRE1.5.0+
Patch 7.0Agent

New Boundary Prism Patch Manager 7.0 SP1
- 16 -

- 17 -
Chapter
2Installing Agents
In this chapter:
• Installing Agents on Endpoints
• Upgrading Agents
• Uninstalling Agents
Installing agents on your endpoints allows you to manage the endpointusing New Boundary Prism Patch Manager.
The following section includes instructions for installing the agent.Installation instructions are specific to operating system type andversion.
Installing Agents on EndpointsRunning the agent installer on an endpoint connects the endpoint to the New Boundary Prism Patch Managerserver.
You can install an agent on an endpoint in either of the following ways:
• Download the appropriate installer to the endpoint that you want to manage, then run the installer locally onthe endpoint.
• Create an agent management job to install the agent that targets the endpoint (Windows operating systemsonly). When the job executes, an agent is installed on the endpoint.
Note: You should not perform the procedures listed in this section on the New Boundary Prism Patch Managerserver. The agent on the New Boundary Prism Patch Manager server is installed and configured during the serverinstallation process.
Downloading the InstallerThe standard agent install requires logging in to the New Boundary Prism Patch Manager administration consolefrom the target computer then downloading the installer to that computer.
For some operating systems, you have the option of downloading and installing the command line version of theagent installer or the graphical user interface version of the agent installer. The command line agent is installedand accessed after installation using the command line. The graphical user interface version of the agent isinstalled using an installation wizard and accessed after installation via the Control Panel (Windows) or SystemPreferences (Mac).
1. Log in to the target computer as the local administrator (or a member of the Local Administrators group).
2. Launch your Web browser.

New Boundary Prism Patch Manager 7.0 SP1
- 18 -
3. Log in to your New Boundary Prism Patch Manager.
Step Result: The New Boundary Prism Patch Manager Home page opens.
4. Select Tools > Download Agent Installer.
Step Result: The Download Agent Installers dialog opens.
Figure 1: Download Agent Installers Dialog
Note: You can click Cancel at any time to close this page and cancel the downloadprocedure.
5. Select the endpoint's operating system from the Operating System drop-down list.
6. Select the version of the agent that you want to install from the Agent Version drop-down list.
7. Click Download to download the installer to the endpoint.
Step Result: The installer downloads to the location you specify on your computer.
Tip: This dialog stays open during the installer download so that you can copy the serverURL and the serial number for use during the agent installation.
8. In the Download Agent Installers page, click Close.
Step Result: The Download Agent Installers page closes.

Installing Agents
- 19 -
Installing the Single Agent for Windows 2000
Prerequisites:
Verify that your computer meets the minimum requirements for agent installation. See Agent for Windows onpage 13 for more information.
Download the appropriate installer for your operating system. See Downloading the Installer on page 17 formore information.
Caution: The following steps apply to the New Boundary Windows 2000 Patch Agent installer. To install theagent for Windows XP or later, refer to Installing the Single Agent for Windows XP and Later on page 25.
1. From the downloaded location, open the PatchAgent.msi installer file to extract the New Boundary PatchAgent for Windows InstallShield Wizard.
Step Result: The Welcome dialog opens.
Figure 2: Welcome Dialog

New Boundary Prism Patch Manager 7.0 SP1
- 20 -
2. Click Next.
Step Result: The License Agreement dialog opens.
Figure 3: License Agreement Dialog
3. If you agree to the license terms select the I accept the terms in the license agreement option and clickNext.
Step Result: The Destination Folder dialog opens.
Figure 4: Destination Folder Dialog

Installing Agents
- 21 -
4. To change the location of the agent:
a) Click Change.
Step Result: The Change Current Destination Folder dialog opens.
Figure 5: Change Current Destination Folder Dialog
b) Change the installation to the location you want.c) Click OK.
Step Result: The Change Current Destination Folder dialog closes and the Destination Folder dialogreflects the new location.

New Boundary Prism Patch Manager 7.0 SP1
- 22 -
5. Click Next.
Step Result: The Agent Registration dialog opens.
Figure 6: Agent Registration Dialog
6. Type the appropriate IP address or URL in the New Boundary Patch Manager Server Address fieldincluding the protocol (http://serverAddress or https://ServerAddress for a secure server).
7. Type your serial number in the field. Use the same serial number that was used for the installation of yourNew Boundary Prism Patch Manager server, otherwise the agent will be unable to communicate with theserver.
Tip: The New Boundary Prism Patch Manager serial number is available on the New Boundary Prism PatchManager Home page.

Installing Agents
- 23 -
8. If your LAN uses a proxy server:
a) Select Use a Proxy Server.
Step Result: The Proxy Information dialog opens.
Figure 7: Proxy Information Dialog
b) In the Proxy URL field, enter the URL of your proxy server.c) In the Proxy Port field, type the proxy port number (if required).d) If you are using an authenticated proxy:
1. Select the My proxy server requires authorization option.2. In the Username field, type the user name.3. In the Password field, type a new password for the proxy.4. In the Confirm Password field, type the proxy password again.
Note: In many LAN environments, although a proxy is used for Internet access, a proxy bypass is usedto for all access within the corporate network. Therefore, only enter proxy information if your agents willbe required to use a proxy to access your New Boundary Prism Patch Manager server.
New Boundary Prism Patch Manager 7.0 SP1
- 24 -
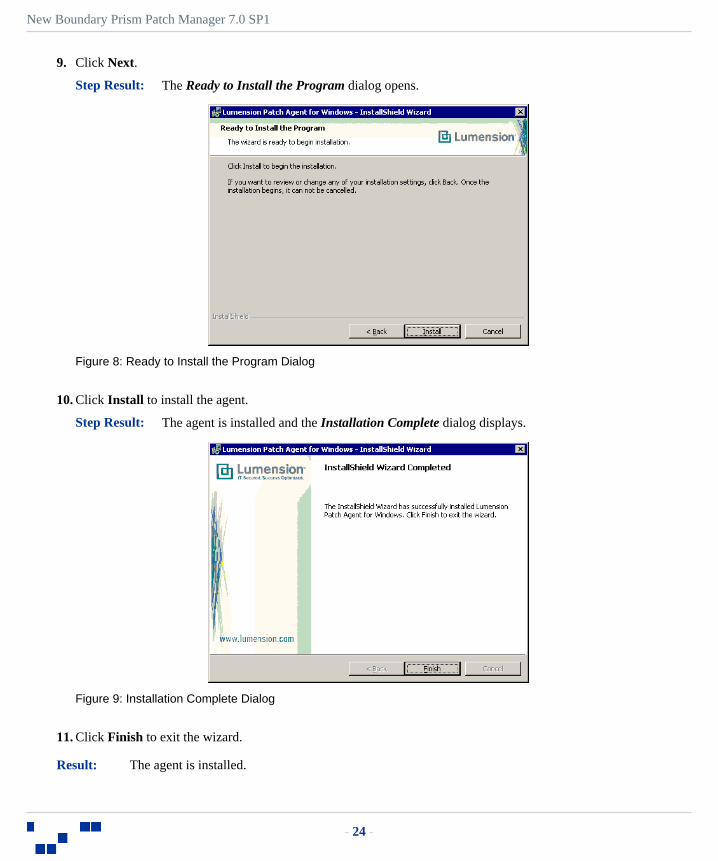
9. Click Next.
Step Result: The Ready to Install the Program dialog opens.
Figure 8: Ready to Install the Program Dialog
10. Click Install to install the agent.
Step Result: The agent is installed and the Installation Complete dialog displays.
Figure 9: Installation Complete Dialog
11. Click Finish to exit the wizard.
Result: The agent is installed.

Installing Agents
- 25 -
Installing the Single Agent for Windows XP and Later
Prerequisites:
Verify that your computer meets the minimum requirements for agent installation. See Agent for Windows onpage 13 for more information.
Download the appropriate installer for your operating system. See Downloading the Installer on page 17 formore information.
The following steps apply to both the single agent for Windows MSI Installer and the single agent for Windowsx64 MSI Installer.
Note: If you downloaded the 64-bit installer, x64 will be appended to the file name for the installer.
1. From the downloaded location, open the LMAgent.msi installer file to extract the agent for WindowsInstallation Wizard.
Step Result: The Welcome dialog opens.
Figure 10: Welcome Dialog

New Boundary Prism Patch Manager 7.0 SP1
- 26 -
2. Click Next.
Step Result: The License Agreement dialog opens.
Figure 11: License Agreement Dialog
3. If you agree to the license terms select the I accept the terms in the license agreement option and clickNext.
Step Result: The Destination Folder dialog opens.
Figure 12: Destination Folder Dialog

Installing Agents
- 27 -
4. To change the location of the agent:
a) Click Change.
Step Result: The Change Current Destination Folder dialog opens.
Figure 13: Change Current Destination Folder Dialog
b) Change the installation to the location you want.c) Click OK.
Step Result: The Change Current Destination Folder dialog closes and the Destination Folder dialogreflects the new location.

New Boundary Prism Patch Manager 7.0 SP1
- 28 -
5. Click Next.
Step Result: The New Boundary Prism Patch Manager Server Information dialog opens.
Figure 14: New Boundary Prism Patch Manager Server Information Dialog
6. Type the appropriate IP address or URL in the Server identity field including the protocol (http://serverAddress or https://ServerAddress for a secure server).
7. If your LAN uses a proxy server:
a) Select Use a Proxy Server.
Step Result: The Proxy Information dialog opens.
Figure 15: Proxy Information Dialog
b) In the Proxy URL field, type the proxy URL.

Installing Agents
- 29 -
c) In the Port number field, type the proxy port number (if required).d) If you are using an authenticated proxy:
1. Select the Authentication is required check box.2. In the Username field, type the user name.3. In the Password field, type a new password for the proxy.4. In the Confirm Password field, type the proxy password again.
Note: In many LAN environments, although a proxy is used for Internet access, a proxy bypass is usedto for all access within the corporate network. Therefore, only enter proxy information if your agents willbe required to use a proxy to access your New Boundary Prism Patch Manager server.
8. Click Next.
Step Result: The Installation Ready dialog opens.
Figure 16: Installation Ready Dialog

New Boundary Prism Patch Manager 7.0 SP1
- 30 -
9. Click Install to install the agent.
Step Result: The agent is installed and the Installation Complete dialog displays.
Figure 17: Installation Complete Dialog
10. Click Finish to exit the wizard.
Result: The agent is installed. The agent's patch component is downloaded automatically to the agent.
Installing the Single Agent for MacComplete the following procedure to install an agent on the Mac.
Prerequisites:
Verify that your computer meets the minimum requirements for agent installation. See Agent for Linux, UNIX,and Mac on page 14 for more information.
Download the appropriate installer for your operating system. See Downloading the Installer on page 17 formore information.
1. Verify that your computer meets the minimum requirements for agent installation.
2. From the downloaded location, select the updateagentformac.dmg to extract the Patch Agent for MacInstaller.
3. Open the installer.

Installing Agents
- 31 -
4. Enter your system password.
Step Result: The Introduction dialog displays.
Figure 18: Introduction Dialog
5. Click Next.
Step Result: The License Agreement dialog displays.
Figure 19: License Agreement Dialog

New Boundary Prism Patch Manager 7.0 SP1
- 32 -
6. If you agree to the license terms select the I Accept the terms of the License Agreement option and clickNext.
Step Result: The Verify Sudo Password dialog opens.
Figure 20: Verify Sudo Password Dialog
7. Enter your system password in the Please Enter the Password field. This is the same password that youentered in step previously.
8. Click Next.
Step Result: The Choose Install Folder dialog displays.
Figure 21: Choose Install Folder Dialog

Installing Agents
- 33 -
9. To change the location of the agent:
a) Click Choose.
Step Result: The Finder window opens.
Figure 22: Finder window
b) Change the installation to the location you need.c) Select Open.d) Optionally, you can click Restore Default Folder to restore the default installation location.
10. Select Next.
Step Result: The Server Information dialog displays.
Figure 23: The Server Information Dialog
11. Type the appropriate URL in the URL field including the protocol (http://serverAddress or https://serverAddress for a secure server).

New Boundary Prism Patch Manager 7.0 SP1
- 34 -
12. Type your serial number in the Serial Number field. Use the same serial number that was used for theinstallation of your New Boundary Prism Patch Manager otherwise the agent will be unable to communicatewith the server.
Tip: The New Boundary Prism Patch Manager serial number is available on the New Boundary Prism PatchManager Home page.
13. If your LAN uses a proxy server:
a) Select the Use a Proxy Server check box.b) Click Next.
Step Result: The Proxy Configuration dialog displays.
Figure 24: Proxy Configuration Dialog
c) In the Proxy URL field, type the proxy URL.d) In the Proxy Port field, type the proxy port (if required).e) If you are using an authenticated proxy:
1. Enter the proxy server user name in the Proxy User (if authenticated) field.2. Enter the proxy server password in the Proxy Password (if authenticated) field.3. Enter the proxy server password a second time in the Confirm Password field.
Note: In many LAN environments, although a proxy is used for Internet access, a proxy bypass is usedfor all access within the corporate network. Therefore, only enter proxy information if your agents will berequired to use a proxy to access your New Boundary Prism Patch Manager.

Installing Agents
- 35 -
14. Click Next.
Step Result: The Additional Options dialog displays.
Figure 25: Additional Options Dialog
15. To optionally add the agent to specific device groups, enter these names of the groups in the Groups field.Values should be separated by a (|) symbol.
16. To optionally set the operating system's prioritization value for the agent, enter a value in the Agent NiceValue field. A value of -20 in this field gives the agent the highest priority and 20 is the lowest priority
17. To optionally configure the agent so that it's detectable but cannot have packages deployed to it, select theDetect Only check box.
18. Click Next.
Step Result: The Pre-Installation Summary dialog box displays.
19. Verify the agent pre-installation summary information is accurate.

New Boundary Prism Patch Manager 7.0 SP1
- 36 -
20. Click Next to begin the installation.
Step Result: The Install Complete Success dialog displays when the installation process is finished.
Figure 26: Install Complete Success Dialog
21. Click Done to complete the installation and close the installer.
Installing the Command Line Agent for Linux, UNIX, and Mac
Prerequisites:
Ensure that the currently installed Java version meets the requirements defined under Supported Agent OperatingSystems on page 10.
Verify that your computer meets the minimum requirements for agent installation. See Agent for Linux, UNIX,and Mac on page 14 for more information.
Download the appropriate installer for your operating system. See Downloading the Installer on page 17 formore information.
After ensuring the endpoint meets the minimum system requirements, complete the following steps to install thecommand line agent.1. In the /root directory, create an UnixPatchAgent directory.
2. From the downloaded location select the UnixUpdateAgent.tar file, and extract the file’s contents to: /root/UnixPatchAgent.
3. Open a Terminal window.
4. Navigate to the /root/UnixPatchAgent/ directory.
5. Type ./install to start the installation process.
6. At the Enter the Directory where the Agent should be installed [/usr/local]: prompt,type the desired installation path or press ENTER to accept the default path of /usr/local.
7. At the Enter your New Boundary Prism Patch Manager address prompt, type the URL or IP ofthe New Boundary Prism Patch Manager, to which the agent will be communicating, in the format of http://ServerAddress or https://ServerAddress.

Installing Agents
- 37 -
8. At the Enter the product serial number that appears as xxxxxxxx-xxxxxxxx: prompt, typeyour serial number.
Tip: You must enter your serial number in the xxxxxxxx-xxxxxxxx format. You can copy the serial numberfrom the New Boundary Prism Patch Manager Home page or the Download Agent Installers page.
9. At the Do you have a Proxy [Y/N]: prompt; type y to configure a proxy, or press ENTER to continuewithout configuring a proxy server.
10. At the Do you wish to add this agent to existing groups on New Boundary Prism PatchManager? [Y/N]: prompt, type y to add the agent to a group or n to continue.
Result: The installation completes and the terminal link can be disconnected.
Note: Some issues when installing the Agent for Linux/Unix/Mac may include:
• An incorrect New Boundary Prism Patch Manager address (if using SSL, the URL starts withhttps://).
• An incorrect serial number.• Networking problems.• An incorrect proxy address or port.
Installing Agents by Agent Management JobYou can install agents upon network endpoints remotely by using agent management jobs. Installing agentsremotely substantially eases an administrator's workload, since they do not have to install agents locally.
Prerequisites:
• Agent management jobs can only manage Windows-based endpoints. Unix-based endpoints are not agentmanagement job-compatible.
• When configuring the job, you must enter credentials that authenticate with target endpoints for a successfuljob outcome.
• Windows Vista, Windows Server 2008, and Windows 7 targets must have Network discovery and Filesharing enabled to be discovered by the agent management job. For additional information refer toConfiguring Post-Windows Vista Endpoints for Discovery on page 97.
• Your server must be configured to allow agent management. For additional information, refer to Configuringthe Scanning System on page 89.
• Targets must be configured to allow agent management. For additional information, refer to ConfiguringEndpoints for Agent Management Jobs (Pre-Windows Vista) on page 92 or Configuring Endpoints forAgent Management Jobs (Post-Windows Vista) on page 101.
Verify that your computer meets the minimum requirements for agent installation. See Agent for Linux, UNIX,and Mac on page 14 for more information.

New Boundary Prism Patch Manager 7.0 SP1
- 38 -
Configuration of agent management jobs is similar to configuration of an ad hoc discovery scan job.Configuration occurs in the Schedule Agent Management Job - Install Wizard.
Note: Agent management jobs can only manage Windows-based endpoints. Unix-based endpoints are not agentmanagement job-compatible.
1. Select Discover > Assets and Manage Agents > Install Agents.
Step Result: The Schedule Agent Management Job - Install wizard opens to the Job Name andScheduling page.
Figure 27: Job Name and Scheduling Page
2. If desired, type a new name in the Scan job name field.
Note: By default, new agent management jobs for installation are named New Agent InstallManagement Job, followed by the server's date and time, which is formatted according to your browser'slocale setting.
3. Schedule the job.
Use one of the following methods.
Method Steps
To schedule an immediate job: Select the Immediate option.

Installing Agents
- 39 -
Method Steps
To schedule a one-time job: 1. Ensure the Once option is selected.2. Define a start date. Complete one of the following sub step sets.
To define a start date manually:
You can also select the start date by clicking the Calender icon.
a. Type the start date in the Start date field using a mm/dd/yyyyformat.
To define a start date using the UI:
a. Click the Menu icon.b. Select a date from the calender. If necessary, use the arrow icons
to open change months.3. Define a start time. Complete one of the following sub step sets.
To define a start time manually:
a. Type the start time in the Start time field using a hh:mm formatfollowed by AM or PM. The Start time field supports both 12-and 24-hour time.
To define a start time using the UI:
a. Click the Clock icon.b. Select a time from the menu.
Note: Scheduling a one-time job for a past date and time willlaunch the job immediately.

New Boundary Prism Patch Manager 7.0 SP1
- 40 -
Method Steps
To schedule a recurring weeklyjob:
1. Select the Weekly option.2. Define a start date. Complete one of the following sub step sets.
To define a start date manually:
You can also select the start date by clicking the Calender icon.
a. Type the start date in the Start date field using a mm/dd/yyyyformat.
To define a start date using the UI:
a. Click the Menu icon.b. Select a date from the calender. If necessary, use the arrow icons
to open change months.3. Define a start time. Complete one of the following sub step sets.
To define a start time manually:
a. Type the start time in the Start time field using a hh:mm formatfollowed by AM or PM. The Start time field supports both 12-and 24-hour time.
To define a start time using the UI:
a. Click the Clock icon.b. Select a time from the menu.

Installing Agents
- 41 -
Method Steps
To schedule a recurringmonthly job:
1. Select the Monthly option.2. Define a start date. Complete one of the following sub step sets.
To define a start date manually:
You can also select the start date by clicking the Calender icon.
a. Type the start date in the Start date field using a mm/dd/yyyyformat.
To define a start date using the UI:
a. Click the Menu icon.b. Select a date from the calender. If necessary, use the arrow icons
to open change months.3. Define a start time. Complete one of the following sub step sets.
To define a start time manually:
a. Type the start time in the Start time field using a hh:mm formatfollowed by AM or PM. The Start time field supports both 12-and 24-hour time.
To define a start time using the UI:
a. Click the Clock icon.b. Select a time from the menu.
Note: One-time and recurring jobs scheduled for the last day of a 31-day month are automaticallyrescheduled for the last day of shorter months.

New Boundary Prism Patch Manager 7.0 SP1
- 42 -
4. Click Next.
Step Result: The Targets page opens.
Figure 28: Targets Page
5. Define targets (endpoints) for the job to locate.
Use one or more of the following discovery methods.
Method Steps
To define targets using a singleIP address:
1. From the Scan for list, select Single IP Address.2. Type an IP address in the empty field. Wildcards are supported.
For additional information refer to Defining Targets Within anImported File in the New Boundary Prism Patch Manager UserGuide (http://www.newboundary.com/support/) .
3. If necessary, edit the Timeout list. The Timeout list definesthe number of seconds before a scan fails due to inactivity for aparticular target. Under most network conditions, the Timeout fielddoes not require editing.
4. If necessary, edit the Number of retries list. The Number ofretries list defines the number of times a scan retries on that targetif the scan times out.

Installing Agents
- 43 -
Method Steps
To define targets using an IPrange:
1. From the Scan for list, select IP Range.2. In the first empty field, type the beginning of IP range. Wildcards
are supported. For additional information refer to Defining TargetsWithin an Imported File in the New Boundary Prism PatchManager User Guide (http://www.newboundary.com/support/) .
3. In the second empty field, type the ending of the IP range.4. If necessary, edit the Timeout list. The Timeout list defines the
number of seconds before a scan fails due to inactivity for thatparticular target. Under most network conditions, the Timeout fielddoes not require editing.
5. If necessary, edit the Number of retries list. The Number ofretries list defines the number of times a scan retries on that targetif the scan times out.
To define targets using acomputer name:
1. From the Scan for list, select Computer name.2. In the empty field, type an endpoint name in one of the following
formats: endpointname or domain\endpointname.
To define targets usingnetwork neighborhood:
1. From the Scan for list, select Network Neighborhood.2. From the second list, select the desired network neighborhood.
To define targets using activedirectory:
1. From the Scan for list, select Active Directory.2. In the Fully-qualified domain name field, type the DNS
domain name of the domain controller you want to scan.For example, if your domain controller's DNS name wasbox.domain.company.local, you would type domain.company.localin this field.
3. In the Organizational Unit field, type the active directory'sorganizational unit string from specific to broad (optional). Theomission of this field returns job results containing the full contentsof all the active directory's organizational units.
4. In the Domain controller field, type the domain controller's IPaddress.
5. In the Username field, type the user name that will authenticatewith the domain controller. Type the user name in one of thefollowing format: domainname\username or username.
6. In the Password field, type the password associated with the username.

New Boundary Prism Patch Manager 7.0 SP1
- 44 -
Method Steps
To define targets using animported file:
1. From the Scan for list, select Import file.2. Click Browse.3. Browse to the file you want to use for target discovery. The
following file types are supported: .txt and .csv.4. Click Open.
6. Add targets to the wizard list. This list indicates whether defined targets are included in or excluded from thejob.
Use one of the following methods.
Method Steps
To include defined targets inthe job:
Click Add to Scan.
To exclude defined targetsfrom the job:
Click Exclude from Scan.
Note: You must include at least one target for Next to become available. You can also delete targets fromthe list by selecting the applicable check boxes and clicking Remove.
7. If desired, define additional targets and add them to the list. For more information, see Editing Targets in the New Boundary Prism Patch Manager User Guide (http://www.newboundary.com/support/) .
8. Click Next.
Step Result: The Options page opens.
Figure 29: Options Page

Installing Agents
- 45 -
9. Select or clear the desired Scan Options.
The following table defines each Scan Option.
Option Description
Verify With Ping Jobs using this option send ping requests to all network endpointstargeted for discovery. Endpoints that respond to the request areflagged for scanning; unresponsive endpoints are skipped. Endpointsunresponsive to Verify With Ping are not scanned by other selecteddiscovery options.
Note: Anti-virus software and host firewalls may block Verify WithPing. If necessary, adjust anti-virus and firewall configurations topermit ping requests.
ICMP Discovery Jobs using this option request a series of echoes, information, andaddress masks from endpoints. Endpoint responses are then comparedto a list of known ICMP fingerprints to identify endpoint operatingsystems.
Note: ICMP Discovery is ineffective on endpoints configured toignore ICMP requests. For best results identifying Windows operatingsystems, use this option in conjunction with Windows VersionDiscovery.
Port Scan Discovery Jobs using this option perform a limited scan on endpoint FTP, Telnet,SSH, SMTP, and HTTP ports. Based on the application banners foundin these ports, endpoint operating systems are generically identified.
Note: For best results in identifying Windows operating systems, usethis option in conjunction with Windows Version Discovery.
SNMP Discovery Jobs using this option request system properties for SNMP devices(routers, printers, and so on) from the management information base.Following credential authentication, SNMP devices are identified.
Note: Without authenticated credentials, SNMP devices ignoreSNMP Discovery requests. In this event, one of two outcomes occur:the SNMP device is misidentified as a UNIX endpoint or the SNMPdevice is not detected. Jobs with no SNMP credentials use the publiccredential by default.

New Boundary Prism Patch Manager 7.0 SP1
- 46 -
Option Description
Windows Version Discovery Jobs using this option identify an endpoint's specific version ofWindows following generic operating system identification duringICMP or Port Scan Discovery.
Note: Correct operating system identification is contingent uponauthenticated credentials. This option must be used in conjunction witheither ICMP or Port Scan Discovery.
Resolve DNS Names Jobs using this option acquire the endpoint DNS name through a localDNS server query. These names are displayed in job results for easyendpoint identification.
Resolve MAC Addresses Jobs using this option acquire endpoint MAC addresses throughendpoint queries. These addresses are displayed in job results for easyendpoint identification.
Note: Monitor network inventory reports to prevent MAC addressspoofing that may alter the Resolve MAC Addresses results.
Resolve NetBIOS Names Jobs using this option acquire endpoint NetBIOS names through WINSNetBIOS mapping. These names are displayed in job results for easyendpoint identification.
Note: Security-hardened networks running Windows 2000, Windows2003, or Windows XP may require enablement of NetBIOS overTCP/IP for Resolve NetBIOS Names to acquire NetBIOS names.Additionally, firewalls protecting endpoints using Windows XPProfessional SP2 may require adjustment to permit NetBIOScommunication.
10. Select the desired Agent Options.
These options control which version of the agent are installed on Windows endpoints.
a) For endpoints running Windows XP or a newer Windows operating system, select an agent version fromthe Windows XP and newer agent versions list.
b) For endpoints running Windows 2000, select an agent version from the Windows 2000 agent version list.
Note: The availability of different agents in these lists is determined by the New Boundary Prism PatchManager server settings. For more information, see Agent Versions in the New Boundary Prism PatchManager User Guide (http://www.newboundary.com/support/) .
c) If desired, select the Overwrite existing agents check box.
This option controls whether the agent management job re-installs the agent on targets that already haveagents installed. If the a Windows XP or later endpoint has a version 6.3 or 6.4 agent on it, the agentwill be overwritten with a version 7.0 agent. If the endpoint has a version 6.2 agent on it, it will not beoverwritten and the agent management job will show as Incomplete.

Installing Agents
- 47 -
11. Click Next.
Step Result: The Credentials page opens.
Figure 30: Credentials Page
12. Define Windows credentials for the target.
Type the applicable information in the following fields.
Note: When configuring an agent management job, you must define valid Windows credentials.
Field Description
Username A user name that authenticates with Windows-based endpoints.Type the user name in a local format (username) or a domain format(domain/username).
Password The password associated with the Username.
Confirm password The Password retyped.

New Boundary Prism Patch Manager 7.0 SP1
- 48 -
13. Click Next.
Step Result: The Agent Settings page opens.
Figure 31: Agent Settings Page
14. Define the Distribution drop-down lists.
The following table describes each list their available values.
List Description
Timeout Defines the number of minutes before the agent management jobterminates due to a non-responsive agent installation or removal (0-30).
Number of retries Defines the number of attempts an agent installation or removal willretry if the initial attempt fails (1-10).
Number of simultaneousinstalls
Defines the maximum number of agents that can installed or removedsimultaneously during the job (1-25). A value of 1 indicates that serialinstalls or removals should occur.
15. Define how the endpoints that are having agents installed will name the New Boundary Prism Patch Managerserver within their registries by selecting a Server identity option.
The following table describes each option.
Method Steps
To have agents list the NewBoundary Prism PatchManager server by its defaultname:
Do not edit the Server identity field. The server will be identified onthe agent according to the value set in the Agent Installation section ofthe Agents tab located on the Options page. For more information, seeAgent Installation in the New Boundary Prism Patch Manager UserGuide (http://www.newboundary.com/support/) .

Installing Agents
- 49 -
Method Steps
To have agent list the NewBoundary Prism PatchManager server by a user-defined name:
Type address information for your Patch Manager server in the Serveridentity field. Information must be entered in one of the followingformats:
• endpointname.domainname.com• computername• 10.10.10.10
16. If using a proxy during agent management, and that proxy requires authentication, select the Authenticationrequired check box and define the following fields.
Field Description
Username A user name that authenticates with the proxy.
Password The password associated with the Username.
Confirm password The Password retyped.
17. Click Finish.
Result: The Schedule Agent Management Job - Install wizard closes. Depending on how you configuredthe job, it moves to either the Scheduled tab or Active tab on the Job Results page. The job will runat the applicable time, installing agents on the defined targets, and move to Completed tab whenfinished.
Upgrading AgentsEndpoints running Windows XP or later operating systems are upgraded regularly when they connect to theNew Boundary Prism Patch Manager server due to the presence of the Patch Manager Agent. Endpoints runningWindows 2000 or a version of the Linux, Unix, or Mac operating systems must be upgraded manually. In allcases, you should verify that your agents are being upgraded on your endpoints regularly.

New Boundary Prism Patch Manager 7.0 SP1
- 50 -
Upgrading Agents LocallyUpgrading the agent replaces the version of the agent running on the endpoint with the most recent version of theagent.
1. Click Tools > Download Agent Installer.
Step Result: The Download Agent Installers page opens.
Figure 32: Download Agent Installers
Note: You can click Cancel at any time to close this page and cancel the downloadprocedure.
Tip: Click the copy icon to copy the version, URL, or serial number information to theclipboard.
2. Select the endpoint's operating system from the Operating System drop-down list.
3. Select the version of the agent that you want to install from the Agent Version drop-down list.
4. Click Download to download the installer to the endpoint.
Step Result: The installer downloads to the location you specify on your computer.
5. In the Download Agent Installers page, click Close.
Result: The Download Agent Installers page closes.

Installing Agents
- 51 -
Uninstalling AgentsUninstalling an agent from an endpoint removes the agent from the endpoint. The endpoint can still be detectedby the New Boundary Prism Patch Manager server, but will no longer receive security content from the NewBoundary Prism Patch Manager server.
You can uninstall an agent on an endpoint in either of the following ways:
• Uninstall the agent locally on the endpoint.• Create an agent management job to uninstall the agent that targets the endpoint. When the job executes, an
agent is uninstalled on the endpoint.
Uninstalling Agents by Agent Management JobYou can remotely uninstall agents from endpoints in your network using an agent management job. These jobsprevent administrators from having to uninstall agents locally.
Prerequisites:
• Agent management jobs can only manage Windows-based endpoints. Unix-based endpoints are not agentmanagement job-compatible.
• When configuring the job, you must enter credentials that authenticate with target endpoints for a successfuljob outcome.
• Windows Vista, Windows Server 2008, and Windows 7 targets must have Network discovery and Filesharing enabled to be discovered by the agent management job. For additional information refer toConfiguring Post-Windows Vista Endpoints for Discovery on page 97.
• Your server must be configured to allow agent management. For additional information, refer to Configuringthe Scanning System on page 89.
• Targets must be configured to allow agent management. For additional information, refer to ConfiguringEndpoints for Agent Management Jobs (Pre-Windows Vista) on page 92 or Configuring Endpoints forAgent Management Jobs (Post-Windows Vista) on page 101.
Configuration of agent management is similar to an ad hoc discovery scan. Configuration occurs in the ScheduleAgent Management Job - Uninstall wizard.
Note: Agent management jobs can only manage Windows-based endpoints. Unix-based endpoints are not agentmanagement job-compatible.
New Boundary Prism Patch Manager 7.0 SP1
- 52 -
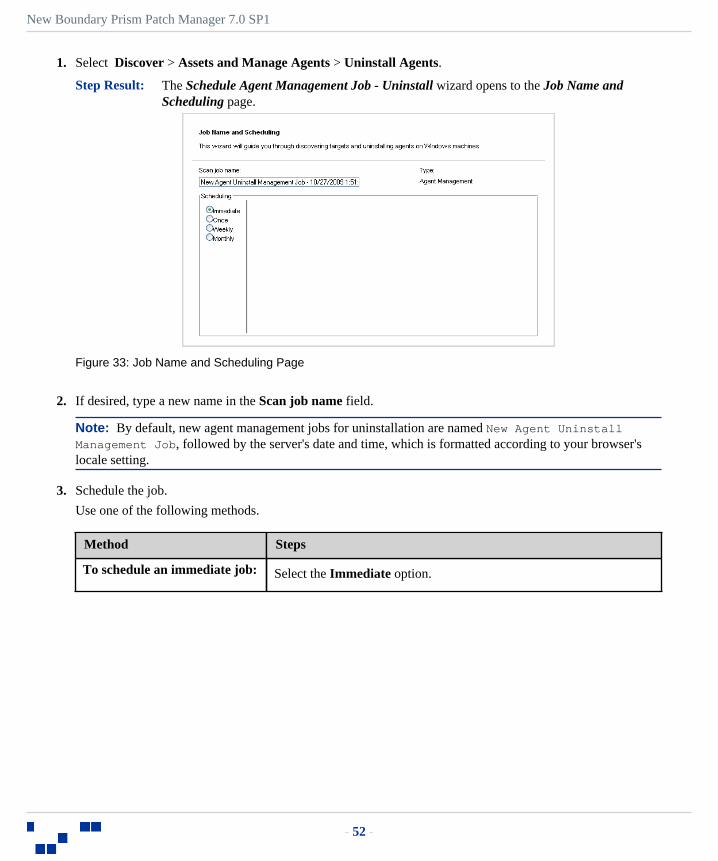
1. Select Discover > Assets and Manage Agents > Uninstall Agents.
Step Result: The Schedule Agent Management Job - Uninstall wizard opens to the Job Name andScheduling page.
Figure 33: Job Name and Scheduling Page
2. If desired, type a new name in the Scan job name field.
Note: By default, new agent management jobs for uninstallation are named New Agent UninstallManagement Job, followed by the server's date and time, which is formatted according to your browser'slocale setting.
3. Schedule the job.
Use one of the following methods.
Method Steps
To schedule an immediate job: Select the Immediate option.
Installing Agents
- 53 -
Method Steps
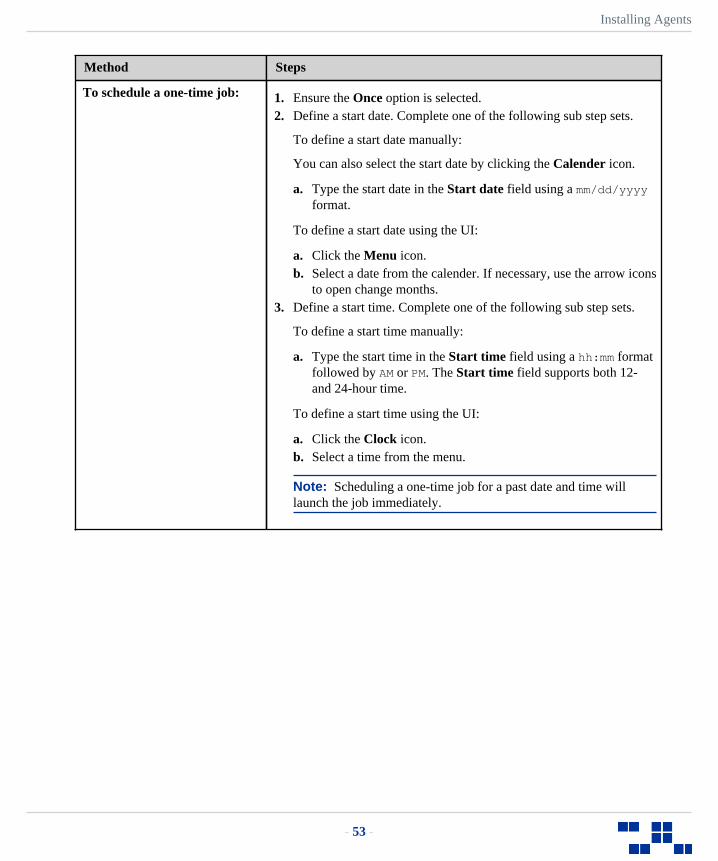
To schedule a one-time job: 1. Ensure the Once option is selected.2. Define a start date. Complete one of the following sub step sets.
To define a start date manually:
You can also select the start date by clicking the Calender icon.
a. Type the start date in the Start date field using a mm/dd/yyyyformat.
To define a start date using the UI:
a. Click the Menu icon.b. Select a date from the calender. If necessary, use the arrow icons
to open change months.3. Define a start time. Complete one of the following sub step sets.
To define a start time manually:
a. Type the start time in the Start time field using a hh:mm formatfollowed by AM or PM. The Start time field supports both 12-and 24-hour time.
To define a start time using the UI:
a. Click the Clock icon.b. Select a time from the menu.
Note: Scheduling a one-time job for a past date and time willlaunch the job immediately.

New Boundary Prism Patch Manager 7.0 SP1
- 54 -
Method Steps
To schedule a recurring weeklyjob:
1. Select the Weekly option.2. Define a start date. Complete one of the following sub step sets.
To define a start date manually:
You can also select the start date by clicking the Calender icon.
a. Type the start date in the Start date field using a mm/dd/yyyyformat.
To define a start date using the UI:
a. Click the Menu icon.b. Select a date from the calender. If necessary, use the arrow icons
to open change months.3. Define a start time. Complete one of the following sub step sets.
To define a start time manually:
a. Type the start time in the Start time field using a hh:mm formatfollowed by AM or PM. The Start time field supports both 12-and 24-hour time.
To define a start time using the UI:
a. Click the Clock icon.b. Select a time from the menu.

Installing Agents
- 55 -
Method Steps
To schedule a recurringmonthly job:
1. Select the Monthly option.2. Define a start date. Complete one of the following sub step sets.
To define a start date manually:
You can also select the start date by clicking the Calender icon.
a. Type the start date in the Start date field using a mm/dd/yyyyformat.
To define a start date using the UI:
a. Click the Menu icon.b. Select a date from the calender. If necessary, use the arrow icons
to open change months.3. Define a start time. Complete one of the following sub step sets.
To define a start time manually:
a. Type the start time in the Start time field using a hh:mm formatfollowed by AM or PM. The Start time field supports both 12-and 24-hour time.
To define a start time using the UI:
a. Click the Clock icon.b. Select a time from the menu.
Note: One-time and recurring jobs scheduled for the last day of a 31-day month are automaticallyrescheduled for the last day of shorter months.

New Boundary Prism Patch Manager 7.0 SP1
- 56 -
4. Click Next.
Step Result: The Targets page opens.
Figure 34: Targets Page
5. Define targets (endpoints) for the job to locate.
Use one or more of the following discovery methods.
Method Steps
To define targets using a singleIP address:
1. From the Scan for list, select Single IP Address.2. Type an IP address in the empty field. Wildcards are supported.
For additional information refer to Defining Targets Within anImported File in the New Boundary Prism Patch Manager UserGuide (http://www.newboundary.com/support/) .
3. If necessary, edit the Timeout list. The Timeout list definesthe number of seconds before a scan fails due to inactivity for aparticular target. Under most network conditions, the Timeout fielddoes not require editing.
4. If necessary, edit the Number of retries list. The Number ofretries list defines the number of times a scan retries on that targetif the scan times out.

Installing Agents
- 57 -
Method Steps
To define targets using an IPrange:
1. From the Scan for list, select IP Range.2. In the first empty field, type the beginning of IP range. Wildcards
are supported. For additional information refer to Defining TargetsWithin an Imported File in the New Boundary Prism PatchManager User Guide (http://www.newboundary.com/support/) .
3. In the second empty field, type the ending of the IP range.4. If necessary, edit the Timeout list. The Timeout list defines the
number of seconds before a scan fails due to inactivity for thatparticular target. Under most network conditions, the Timeout fielddoes not require editing.
5. If necessary, edit the Number of retries list. The Number ofretries list defines the number of times a scan retries on that targetif the scan times out.
To define targets using acomputer name:
1. From the Scan for list, select Computer name.2. In the empty field, type an endpoint name in one of the following
formats: endpointname or domain\endpointname.
To define targets usingnetwork neighborhood:
1. From the Scan for list, select Network Neighborhood.2. From the second list, select the desired network neighborhood.
To define targets using activedirectory:
1. From the Scan for list, select Active Directory.2. In the Fully-qualified domain name field, type the DNS
domain name of the domain controller you want to scan.For example, if your domain controller's DNS name wasbox.domain.company.local, you would type domain.company.localin this field.
3. In the Organizational Unit field, type the active directory'sorganizational unit string from specific to broad (optional). Theomission of this field returns job results containing the full contentsof all the active directory's organizational units.
4. In the Domain controller field, type the domain controller's IPaddress.
5. In the Username field, type the user name that will authenticatewith the domain controller. Type the user name in one of thefollowing format: domainname\username or username.
6. In the Password field, type the password associated with the username.

New Boundary Prism Patch Manager 7.0 SP1
- 58 -
Method Steps
To define targets using animported file:
1. From the Scan for list, select Import file.2. Click Browse.3. Browse to the file you want to use for target discovery. The
following file types are supported: .txt and .csv.4. Click Open.
6. Add targets to the wizard list. This list indicates whether defined targets are included in or excluded from thejob.
Use one of the following methods.
Method Steps
To include defined targets inthe job:
Click Add to Scan.
To exclude defined targetsfrom the job:
Click Exclude from Scan.
Note: You must include at least one target for Next to become available. You can also delete targets fromthe list by selecting the applicable check boxes and clicking Remove.
7. If desired, define additional targets and add them to the list. For more information, see Editing Targets in the New Boundary Prism Patch Manager User Guide (http://www.newboundary.com/support/) .
8. Click Next.
Step Result: The Options page opens.
Figure 35: Options Page

Installing Agents
- 59 -
9. Select or clear the desired Scan Options.
The following table defines each Scan Option.
Option Description
Verify With Ping Jobs using this option send ping requests to all network endpointstargeted for discovery. Endpoints that respond to the request areflagged for scanning; unresponsive endpoints are skipped. Endpointsunresponsive to Verify With Ping are not scanned by other selecteddiscovery options.
Note: Anti-virus software and host firewalls may block Verify WithPing. If necessary, adjust anti-virus and firewall configurations topermit ping requests.
ICMP Discovery Jobs using this option request a series of echoes, information, andaddress masks from endpoints. Endpoint responses are then comparedto a list of known ICMP fingerprints to identify endpoint operatingsystems.
Note: ICMP Discovery is ineffective on endpoints configured toignore ICMP requests. For best results identifying Windows operatingsystems, use this option in conjunction with Windows VersionDiscovery.
Port Scan Discovery Jobs using this option perform a limited scan on endpoint FTP, Telnet,SSH, SMTP, and HTTP ports. Based on the application banners foundin these ports, endpoint operating systems are generically identified.
Note: For best results in identifying Windows operating systems, usethis option in conjunction with Windows Version Discovery.
SNMP Discovery Jobs using this option request system properties for SNMP devices(routers, printers, and so on) from the management information base.Following credential authentication, SNMP devices are identified.
Note: Without authenticated credentials, SNMP devices ignoreSNMP Discovery requests. In this event, one of two outcomes occur:the SNMP device is misidentified as a UNIX endpoint or the SNMPdevice is not detected. Jobs with no SNMP credentials use the publiccredential by default.

New Boundary Prism Patch Manager 7.0 SP1
- 60 -
Option Description
Windows Version Discovery Jobs using this option identify an endpoint's specific version ofWindows following generic operating system identification duringICMP or Port Scan Discovery.
Note: Correct operating system identification is contingent uponauthenticated credentials. This option must be used in conjunction witheither ICMP or Port Scan Discovery.
Resolve DNS Names Jobs using this option acquire the endpoint DNS name through a localDNS server query. These names are displayed in job results for easyendpoint identification.
Resolve MAC Addresses Jobs using this option acquire endpoint MAC addresses throughendpoint queries. These addresses are displayed in job results for easyendpoint identification.
Note: Monitor network inventory reports to prevent MAC addressspoofing that may alter the Resolve MAC Addresses results.
Resolve NetBIOS Names Jobs using this option acquire endpoint NetBIOS names through WINSNetBIOS mapping. These names are displayed in job results for easyendpoint identification.
Note: Security-hardened networks running Windows 2000, Windows2003, or Windows XP may require enablement of NetBIOS overTCP/IP for Resolve NetBIOS Names to acquire NetBIOS names.Additionally, firewalls protecting endpoints using Windows XPProfessional SP2 may require adjustment to permit NetBIOScommunication.

Installing Agents
- 61 -
10. Click Next.
Step Result: The Credentials page opens.
Figure 36: Credentials Page
11. Define Windows credentials.
Type the applicable information in the following fields.
Note: When configuring an agent management job, you must define valid Windows credentials.
Field Description
Username A user name that authenticates with Windows endpoints. Type theuser name in a local format (username) or a domain format (domain/username).
Password The password associated with the Username.
Confirm password The Password retyped.

New Boundary Prism Patch Manager 7.0 SP1
- 62 -
12. Click Next.
Step Result: The Agent Settings page opens.
Figure 37: Agent Settings Page
13. Define the Distribution drop-down lists.The following table describes each list their available values.
List Description
Timeout Defines the number of minutes before the agent management jobterminates due to a non-responsive agent installation or removal (0-30).
Number of retries Defines the number of attempts an agent installation or removal willretry if the initial attempt fails (1-10).
Number of simultaneousinstalls
Defines the maximum number of agents that can installed or removedsimultaneously during the job (1-25). A value of 1 indicates that serialinstalls or removals should occur.
14. Define the Reboot option.Select one of the following options:
• Suppress the reboot• Force a reboot (does not prompt the user)
Note: If the agent being uninstalled resides on the New Boundary Prism Patch Manager server, thereboot is automatically suppressed regardless of this setting.
15. Click Finish.
Result: The Schedule Agent Management Job - Uninstall wizard closes. Depending on how youconfigured the job, it moves to either the Scheduled tab or Active tab on the Job Results page.
Installing Agents
- 63 -
The job will run at the applicable time, uninstalling agents on the defined targets, and move to theCompleted tab when finished.
Uninstalling the Agent for Windows 2000 LocallyYou can uninstall agents locally on managed endpoints running the pre-Windows Vista operating system.
Prerequisites:
In order to uninstall an agent from an endpoint, you must provide the uninstall password. See New BoundaryPrism Patch Manager User Guide (http://www.newboundary.com/support/) for more information.
1. Select Start > Control Panel from the Windows menu bar.
2. Double-click Add/Remove Programs.
3. Select Patch Agent from the list of installed programs.
4. Click Change.
Step Result: The Patch Agent installer displays.
5. Click Next.
6. Enter the uninstall password for the endpoint in the Global or uninstall password field.
The uninstall password is set in the Global Agent Policy Set. For more information on agent policy sets, seeThe Policies View in the New Boundary Prism Patch Manager User Guide (http://www.newboundary.com/support/) .
7. Click Next.
8. Click Remove.
9. Click Finish.
Result: The agent is uninstalled.
Uninstalling the Agent for XP or Later LocallyYou can uninstall Patch Agents locally on managed endpoints running the Windows XP (or later) operatingsystem.
Prerequisites:
In order to uninstall an agent from an endpoint, you must provide the uninstall password. See New BoundaryPrism Patch Manager User Guide (http://www.newboundary.com/support/) for more information.
1. Select Start > Control Panel from the Windows menu bar.
2. Double-click Programs and Features.
3. Select LM Agent from the list of installed programs.
4. Click Change.
Step Result: The Patch Agent installer displays.
5. Click Next.

New Boundary Prism Patch Manager 7.0 SP1
- 64 -
6. Enter the uninstall password for the endpoint in the Global or uninstall password field.The uninstall password is set in the Global Agent Policy Set. For more information on agent policy sets, seeThe Policies View in the New Boundary Prism Patch Manager User Guide (http://www.newboundary.com/support/) .
7. Click Next.
8. Click Remove.
9. Click Finish.
Result: The agent is uninstalled.
Uninstalling the Agent for Linux Locally
Perform the following procedure to uninstall the Linux agent locally.
1. Navigate to the agent installation directory. By default, this is /usr/local/patchagent.
2. Type ./uninstall at the command prompt.
3. Press ENTER.
Step Result: The Linux agent is uninstalled.
4. Type cd /usr/local to navigate to the parent directory of the installation directory. If you installed theagent to a directory other than the default directory, navigate to the parent directory of the agent installationdirectory.
5. Press ENTER.
6. Type rm –rf patchagent.
7. Press ENTER.
Result: The Linux agent installation directory is deleted.
Uninstalling the Agent for Solaris Locally
Perform the following procedure to uninstall the Solaris agent locally.
1. Navigate to the agent installation directory. By default, this is /export/home/patchagent.
2. Type ./uninstall at the command prompt.
3. Press ENTER.
Step Result: The Solaris agent is uninstalled.
4. Type cd /export/home to navigate to the parent directory of the installation directory. If you installed theagent to a directory other than the default directory, navigate to the parent directory of the agent installationdirectory.
5. Press ENTER.
6. Type rm –rf patchagent.
7. Press ENTER.
Result: The Solaris agent installation directory is deleted.

Installing Agents
- 65 -
Uninstalling the Agent for AIX Locally
Perform the following procedure to uninstall the AIX agent locally.
1. Navigate to the agent installation directory. By default, this is /usr/local/patchagent.
2. Type ./uninstall at the command prompt.
3. Press ENTER.
Step Result: The AIX agent is uninstalled.
4. Type cd /usr/local to navigate to the parent directory of the installation directory. If you installed theagent to a directory other than the default directory, navigate to the parent directory of the agent installationdirectory.
5. Press ENTER.
6. Type rm –rf patchagent.
7. Press ENTER.
Result: The AIX agent installation directory is deleted.
Uninstalling the Agent for HP-UX Locally
Perform the following procedure to uninstall the HP-UX agent locally.
1. Navigate to the agent installation directory. By default, this is /usr/local/patchagent.
2. Type ./uninstall at the command prompt.
3. Press ENTER.
Step Result: The HP-UX agent is uninstalled.
4. Type cd /usr/local to navigate to the parent directory of the installation directory. If you installed theagent to a directory other than the default directory, navigate to the parent directory of the agent installationdirectory.
5. Press ENTER.
6. Type rm –rf patchagent.
7. Press ENTER.
Result: The HP-UX agent installation directory is deleted.
Uninstalling the Command Line Agent for Mac Locally
Perform the following procedure to uninstall the Mac command line agent locally.
1. Navigate to the agent installation directory. By default, this is /private/var/patchagent.
2. Type ./uninstall at the command prompt.
3. Press ENTER.
Step Result: The Mac agent is uninstalled.

New Boundary Prism Patch Manager 7.0 SP1
- 66 -
4. Type cd /private/var to navigate to the parent directory of the installation directory. If you installed theagent to a directory other than the default directory, navigate to the parent directory of the agent installationdirectory.
5. Press ENTER.
6. Type rm –rf patchagent.
7. Press ENTER.
Result: The Mac command line agent installation directory is deleted.

- 67 -
Chapter
3Automating the Agent Installation
In this chapter:
• Automating the Windows MSIInstaller
• Performing a Silent Install onWindows
• Performing a Silent Install on Linux/UNIX/Mac
The following section includes instructions for automating theinstallation of the agent to a device. Instructions include the following:
• Automation of the PatchAgent.msi installer. This is the agentinstaller for the Windows 2000 operation system.
• Automation of the LMAgent.msi installer. This is the agentinstaller for the Windows XP, Windows Vista, Windows 7,Windows 2008, and Windows 2008 R2 operating systems.
• Command line options for installing the Windows 2000 agentautomatically.
• Command line options for installing the Windows XP or lateragent automatically.
• Command line options for installing the Linux/Unix/Mac agentautomatically.
Automating the Windows MSI Installer
The New Boundary Patch Agent (Patch Agent) and the New Boundary Prism Patch Manager (LEMSS) Agentfor Windows MSI Installers can be used to perform a single installation on the current computer or, throughthe use of the Windows MSI Installer, Group Policy Objects (GPOs), and the Orca package editor, on multiplecomputers. Using these tools you can install the agent on all windows computers within your domain.1. Create a network share as defined in Creating a Network Share on page 68.
2. Modify the New Boundary Patch Agent or LEMSS Agent for Windows MSI Installer (.msi) file as definedin Modifying the PatchAgent.msi File on page 71.
3. Create an organizational unit as defined in Creating an Organizational Unit on page 80.
Note: Microsoft Group Policy Object (GPO) allows for mandatory software distribution to computers undercontrol of a particular organizational unit (OU) and can be used to distribute the agent. However, the GPOinstallation does not check for an existing installation of the agent on the target computer and will reinstallthe agent on any computers in the OU. In order to avoid potential problems caused by reinstalling the agentensure that computers with existing agents are NOT members of the OU which contains the New Boundarysoftware GPO.

New Boundary Prism Patch Manager 7.0 SP1
- 68 -
Creating a Network Share
Create a network share (with read-only access) from which all users can access and install the agent using theWindows MSI installer.
1. Create the Agent MSI folder on a network computer.
2. Right-click the Agent MSI folder and select Properties.
3. Select the Sharing tab.
4. Select the Share this folder option. If needed, change the Share name.
Figure 38: Sharing Tab

Automating the Agent Installation
- 69 -
5. Click Permissions.
Step Result: The Permissions for Agent MSI dialog opens.
Figure 39: Permissions Dialog
6. Click Add.
Step Result: The Select Users, Computers, or Groups dialog opens.
Figure 40: Select Users, Computers, or Groups Dialog

New Boundary Prism Patch Manager 7.0 SP1
- 70 -
7. In the Domain Users and Domain Admins groups, select the Domain Users group. If you cannot locate thegroups, type the names in the Enter the object names to select field and click Check Names.
Figure 41: Group Search Dialog
8. Click OK.
Step Result: The Select Users, Computers, or Groups dialog closes and displays the Permissions forAgent MSI dialog.
Figure 42: Permissions for Agent MSI Dialog
9. Select the Everyone group and choose Deny Change and Allow Read access.
10. Select the Domain Admins group, and choose Allow Full Control access.
11. Click OK.
Step Result: The Permissions dialog closes and displays the Properties window.
12. Select the Security tab.

Automating the Agent Installation
- 71 -
13. Add the Domain Users, Domain Admins, and Everyone groups (refer to steps 6 through 8) applying AllowRead and Deny Execute permissions to the Everyone and Domain Users groups.
14. Add the Allow Full Control to the Domain Admins group.
15. Click OK to close the Agent MSI Properties dialog.
16. Download the agent installer that you want to share on your network. For more information, seeDownloading the Installer.
17. Copy the installer that you downloaded to the Agent MSI folder you created.
Modifying the PatchAgent.msi File
To fully automate the agent installation you must modify the PatchAgent.msi file to include your host nameand serial number. Microsoft Orca allows you to make changes to the application so your users will not haveto manually enter their name and serial number for their installs. This also allows the application to be installedremotely.
The user-customized installer properties are defined in the following table:Table 5: Description of PatchAgent.msi Installation Properties
Property Description
HOST The URL (or IP) of your New Boundary Prism Patch Manager.
SERIAL The serial number of your New Boundary Prism Patch Manager.
USEPROXY Whether or not a proxy is used. 0=No, 1=Yes.
PROXYURL The URL (or IP) of your proxy.
PROXYUSER Login user for an authenticated proxy.
PROXYPASS Login password for an authenticated proxy.
GROUPLIST Automatically add the agent to the defined group(s). Either the groupname or distinguished name can be used. If the group name is used, theagent will be added to all of the groups with that name.
Note: Modifying the digitally signed MSI file will invalidate the digital signature assigned by New Boundary.Depending upon your security settings, this may introduce security warnings and restrictions during agentinstallation.
To Modify the PatchAgent.msi File Using Microsoft OrcaThis procedure explains how to modify the MSI file using Microsoft Orca.
Prerequisites:
You must download Microsoft Orca before you can complete this procedure. Orca is installed from the MicrosoftWindows Installer SDK which can be downloaded from http://msdn.microsoft.com/library/default.asp?url=/library/en-us/msi/setup/orca_exe.asp.
Complete this procedure to modify the MSI file using Microsoft Orca.1. Install Microsoft Orca (or a similar MSI editor tool) to your management workstation.

New Boundary Prism Patch Manager 7.0 SP1
- 72 -
2. Select Start > Programs > Orca to open Microsoft Orca.
3. Open the PatchAgent.msi file that you copied to the network share you created.
Step Result: Orca displays the PatchAgent.msi file.
Figure 43: Orca Initial Display
4. Scroll through the Tables list and select the Property table.
Step Result: The Rows field populates with the rows associated with the Property table.
5. Locate the Host row, and click the Value field.
Step Result: The Value field is activated and can be edited.
6. Type the New Boundary Prism Patch Manager URL in the format: http://ServerName (or https://ServerName for a secure server) in the Value field.
7. Locate the Serial row, and click the Value field.
Step Result: The Value field is activated and can be edited.

Automating the Agent Installation
- 73 -
8. Type your New Boundary Prism Patch Manager serial number in the Value field.
Figure 44: Enter Serial Number
9. If you are using a Proxy Server, add the necessary proxy entries as follows:
a) Right-click in the right window pane and select Add Row.
Step Result: The Add Row dialog box opens.
Figure 45: The Add Row dialog box

New Boundary Prism Patch Manager 7.0 SP1
- 74 -
b) Enter USEPROXY as the Property Column field.
Figure 46: Add Row Property
c) Select Value and type 1 to indicate that proxy is enabled.
Figure 47: Add Row Value
d) Click OK.
Step Result: The USEPROXY row is added to the Property table.
e) Add additional rows as needed for the following proxy entries:
Table 6: Proxy specific entries
Property Value
USEPROXY 1
PROXYURL http://yourproxyserver:port
PROXYUSER (optional) Authenticated proxy login user.

Automating the Agent Installation
- 75 -
Property Value
PROXYPASS (optional) Authenticated proxy login user’s password.
10. To automatically add the agent to an existing group, add the following entry:a) Right-click in the right window pane and select Add Row.
Step Result: The Add Row dialog box opens.
b) Enter GROUPLIST as the Property Column field.c) Select Value and enter the Group Names in the format: “GroupName1|GroupName2|GroupNameN”
Step Result: The GROUPLIST row is added to the Property table.
11. Click Save.
Step Result: Orca saves the changes to the PatchAgent.msi file.
12. Close Microsoft Orca.
Result: You can now use the PatchAgent.msi file to manually install the agent by browsing, from thetarget computer, to the network share you created and manually opening the PatchAgent.msifile.
Modifying the LMAgent.msi Installer
To fully automate the agent installation you must modify the file to include your server IP address (or fullyqualified domain name), group information, and the agent global uninstall password. Microsoft Orca allowsyou to make changes to the application so your users will not have to manually enter this information for theirinstalls. This also allows the application to be installed remotely.
The user-customized installer properties are defined in the following table:
Table 7: Description of LMAgent.msi Installation Properties
Property Description
SERVERIPADDRESS The URL (or IP) of your New Boundary Prism Patch Manager server.You can also use your server's fully qualified domain name as the valuefor this property.
SERVERPORT The HTTP port used by the agent. The default value for this property is80.
SECUREPORT The HTTPS port used by the agent. The default value for this property is443.
STANDDOWNPASSWORD The global uninstall password. This is required if you want to uninstall theagent.
PROXYADDRESS The URL (or IP) of your proxy.
PROXYPORT The port used by the proxy.
PROXYUSERNAME Login user for an authenticated proxy.

New Boundary Prism Patch Manager 7.0 SP1
- 76 -
Property Description
PROXYPASSWORD Login password for an authenticated proxy.
GROUPLIST Automatically add the agent to the defined group(s). Either the groupname or distinguished name can be used. If the group name is used, theagent will be added to all of the groups with that name.
Note: Modifying the digitally signed MSI file will invalidate the digital signature assigned by New Boundary.Depending upon your security settings, this may introduce security warnings and restrictions during agentinstallation.
To Modify the LMAgent.msi File Using Microsoft Orca
Prerequisites:
You must download Microsoft Orca before you can complete this procedure. Orca is installed from the MicrosoftWindows Installer SDK which can be downloaded from http://msdn.microsoft.com/library/default.asp?url=/library/en-us/msi/setup/orca_exe.asp.
Complete this procedure to modify the MSI file using Microsoft Orca.
1. Install Microsoft Orca (or a similar MSI editor tool) to your management workstation.
2. Select Start > Programs > Orca to open Microsoft Orca.
3. Open the LMAgent.msi file that you copied to the network share you created.
Step Result: Orca displays the LMAgent.msi file.
Figure 48: Orca Initial Display
4. Scroll through the Tables list and select the Property table.
Step Result: The Rows field populates with the rows associated with the Property table.

Automating the Agent Installation
- 77 -
5. Right-click in the right window pane and select Add Row.
Step Result: The Add Row dialog box opens.
Figure 49: The Add Row dialog box
6. Enter SERVERIPADDRESS as the Property Column field.
7. Select Value and type your server IP address or the server's fully qualified domain name.
8. Click OK.
Step Result: The SERVERIPADDRESS row is added to the Property table.
9. To change the default a value for the SERVERPORT property (80) to another value, perform the followingsteps:a) Double click in the Value column of the SERVERPORT property in the Property table.
Step Result: The Value column for the SERVERPORT property becomes editable.
b) Enter the value that you want to use for the SERVERPORT property.c) Press Enter.
Step Result: The value for the SERVERPORT property is changed in the Property table.
10. To change the default value for the SECUREPORT property (443) to another value, perform the followingsteps:a) Double click in the Value column of the SECUREPORT property in the Property table.
Step Result: The Value column for the SECUREPORT property becomes editable.
b) Enter the value that you want to use for the SECUREPORT property.c) Press Enter.
Step Result: The value for the SECUREPORT property is changed in the Property table.
11. Right-click in the right window pane and select Add Row.
Step Result: The Add Row dialog box opens.
12. Enter STANDDOWNPASSWORD as the Property Column field.

New Boundary Prism Patch Manager 7.0 SP1
- 78 -
13. Select Value and type the global agent uninstall password.
14. Click OK.
Step Result: The STANDDOWNPASSWORD row is added to the Property table.
15. If you are using a Proxy Server, add the necessary proxy entries as follows:
a) Right-click in the right window pane and select Add Row.
Step Result: The Add Row dialog box opens.
Figure 50: The Add Row dialog box
b) Enter PROXYADDRESS as the Property Column field.
Figure 51: Add Row Property

Automating the Agent Installation
- 79 -
c) Select Value and type the URL or IP address of your proxy.
Figure 52: Add Row Value
d) Click OK.
Step Result: The PROXYADDRESS row is added to the Property table.
e) Add additional rows as needed for the following proxy entries:Table 8: Proxy specific entries
Property Value
PROXYPORT The port used by the proxy.
PROXYUSERNAME(optional)
Authenticated proxy login user.
PROXYPASSWORD(optional)
Authenticated proxy login user’s password.
16. To automatically add the agent to an existing group, add the following entry:a) Right-click in the right window pane and select Add Row.
Step Result: The Add Row dialog box opens.
b) Enter GROUPLIST as the Property Column field.c) Select Value and enter the Group Names in the format: “GroupName1|GroupName2|GroupNameN”.
Step Result: The GROUPLIST row is added to the Property table.
17. Click Save.
Step Result: Orca saves the changes to the LMAgent.msi file.
18. Close Microsoft Orca.Result: You can now use the LMAgent.msi file to manually install the agent by browsing, from the target
computer, to the network share you created and manually opening the LMAgent.msi file.

New Boundary Prism Patch Manager 7.0 SP1
- 80 -
Creating an Organizational UnitThis procedure explains how to create an organizational unit.
Complete the following procedure to use organizational units classify and differentiate between installer files.
1. Click Start > Administrative Tools > Active Directory Users and Computers.
Step Result: The Active Directory Users and Computers management console opens.
2. Right-click the domain tree (mydomain.com) and select New > Organizational Unit.
Figure 53: Create New OU
3. Assign a name (New BoundaryMSI) to your Organizational Unit (OU) and click OK.
4. Right-click the new OU and select Properties.

Automating the Agent Installation
- 81 -
5. In the Group Policy tab, click New and assign a name (Install Windows Agent) to the new GroupPolicy.
Figure 54: OU Group Policy tab
6. Select your new Group Policy and click Edit.
Step Result: The Group Policy Editor opens.
7. Expand the Software Settings sub-branch of the Computer Configuration branch.

New Boundary Prism Patch Manager 7.0 SP1
- 82 -
8. Right-click Software Installation and select Properties opening the Software Installation Propertieswindow.
Figure 55: General tab
9. In the General tab, select the Assign radio button.
10. Select the Uninstall the applications when they fall out of the scope of management check box in theGeneral tab (in the Advanced tab in Windows 2003).
11. Click OK.
12. Right-click Software Installation and select New > Package.

Automating the Agent Installation
- 83 -
13. Browse to the shared folder you created and select the modified PatchAgent.msi or LMAgent.msipackage.
Figure 56: Group Policy
14. Close the Group Policy editor and click Close.
15. In the Active Directory Users and Computers management console, select the Computers branch of yourdomain tree (mydomain.com).

New Boundary Prism Patch Manager 7.0 SP1
- 84 -
16. Select the computers to be added to the new OU.
Figure 57: Add Computers to the OU
17. Right-click and select Move to add them to the OU.
18. Select your OU (New BoundaryMSI) from the Move window.
19. Close the Active Directory Users and Computers management console.
Performing a Silent Install on Windows
In addition to the New Boundary Prism Patch Manager Server URL (or IP) and Serial Number, you can define aProxy and Auto-Assign groups when performing a silent install using the Single Agent Windows MSI Installer:
1. Open a command prompt.
2. Define the host/server location and other settings using the following syntax:
To perform an install on a Windows 2000 endpoint with a proxy:
msiexec /i “C:\PatchAgent.msi” /qn HOST=”http://myServer” SERIAL="88888888-88888888" USEPROXY=”1” PROXYURL=”http://xxx.xxx.xxx” PROXYPORT="xxxx" PROXYUSER=”ProxyUser” PROXYPASS=”ProxyPassword” GROUPLIST=”GroupName1 | GroupName2 | GroupNameN”

Automating the Agent Installation
- 85 -
To perform an install on a Windows 2000 endpoint without a proxy:
msiexec /i “C:\PatchAgent.msi” /qn HOST=”http://myServer” SERIAL="88888888-88888888" USEPROXY=”0” GROUPLIST=”GroupName1 | GroupName2 | GroupNameN”
Note: When performing a silent install on a Windows 2000 endpoint, the Patch Agent is installed.
To perform an install on a Windows XP or later endpoint with a proxy:
msiexec /i “C:\LMAgent.msi” /qn SERVERIPADDRESS=”xxx.xxx.xxx.xxx” SERVERPORT=”xxxx” SECUREPORT="xxxx" PROXYADDRESS=”xxx.xxx.xxx” PROXYPORT="xxxx" PROXYUSERNAME=”ProxyUser” PROXYPASSWORD=”ProxyPassword” GROUPLIST=”GroupName1 | GroupName2 | GroupNameN”
To perform an install on a Windows XP or later endpoint without a proxy:
msiexec /i “C:\LMAgent.msi” /qn SERVERIPADDRESS=”xxx.xxx.xxx.xxx” SERVERPORT=”xxxx” SECUREPORT="xxxx GROUPLIST=”GroupName1 | GroupName2 | GroupNameN”
Note: When performing a silent install on a Windows XP or later endpoint, the New Boundary Agent isinstalled.
Command Line Descriptions for Windows 2000The following commands can be used to perform a silent installation on endpoints running Windows 2000.
The user customized installer properties are defined in the following table:
Table 9: Description of Installation Properties
Property Description
HOST The URL (or IP address) of your New Boundary Prism Patch Manager.
SERIAL The serial number for your New Boundary Prism Patch Manager.
USEPROXY Indicates whether or not a proxy is used. 0=No, 1=Yes.
PROXYURL The URL (or IP address) for your proxy.
PROXYPORT The port your proxy server is using.
PROXYUSER Login user for an authenticated proxy.
PROXYPASS Login password for an authenticated proxy.
GROUPLIST Automatically add the Agent to the defined group(s). Either the groupname or distinguished name can be used. If the group name is used, theagent will be added to all of the groups with that name.
Command Line Descriptions for Windows XP or LaterThe following commands can be used to perform a silent installation on endpoints running Windows XP or later.
The user customized installer properties are defined in the following table:

New Boundary Prism Patch Manager 7.0 SP1
- 86 -
Table 10: Description of Installation Properties
Property Description
SERVERIPADDRESS The IP address of your New Boundary Prism Patch Manager.
SERVERPORT The HTTP port for your New Boundary Prism Patch Manager. If no valueis specified, the default value (80) is used.
SECUREPORT The SSL port for your New Boundary Prism Patch Manager. If no value isspecified, the default value (443) is used.
PROXYADDRESS The IP address for your proxy server.
PROXYPORT The port your proxy server is using.
PROXYUSERNAME Login user for an authenticated proxy.
PROXYPASSWORD Login password for an authenticated proxy.
GROUPLIST Automatically add the Agent to the defined group(s). Either the groupname or distinguished name can be used. If the group name is used, theagent will be added to all of the groups with that name.
Performing a Silent Install on Linux/UNIX/Mac
In addition to the New Boundary Prism Patch Manager URL (or IP) and Serial Number, you can define a Proxyand Auto-Assign groups when performing a silent install using the Single Agent Installer for Linux/UNIX/Mac:
1. Open a command prompt.
2. Define the host location, serial number, and other optional settings using the following syntax:
To perform a silent install with a proxy:
./install -silent -d “/user/local” -p “http://myServer” -sno “88888888-88888888” -proxy “http://myProxy” -port ## -g “GroupName1|GroupName2|GroupNameN”
To perform a silent install without a proxy:
./install -silent -d “/user/local” -p “http://myServer” -sno “88888888-88888888” -g “GroupName1|GroupName2|GroupNameN”
Command Line Descriptions
The user customized installer properties are defined in the following table:
Table 11: Command Line Descriptions
Command Description
-silent Performs installation silently.
-d The install directory.

Automating the Agent Installation
- 87 -
Command Description
-p The URL (or IP) of your New Boundary Prism Patch Manager.
-sno The serial number of your New Boundary Prism Patch Manager.
-proxy The URL (or IP) of your proxy.
-port The proxy port.
-g Automatically add the Agent to the defined group(s). Either the groupname or distinguished name can be used. If the group name is used, theagent will be added to all of the groups with that name.

New Boundary Prism Patch Manager 7.0 SP1
- 88 -

- 89 -
Configuring the Server and Endpoints for AgentManagement Jobs
After installing New Boundary Prism Patch Manager on a server, you must perform additional configuration onthe endpoints that you want to manage so that agent management jobs will complete successfully.
Configuring the Scanning SystemThe New Boundary Prism Patch Manager server must be configured in the following manner so that you can runagent management jobs on your managed endpoints.
1. Click Start > Run.
2. Enter regedit in the Open field.
3. Click OK.
Step Result: The registry editor displays.
4. In the registry editor, navigate to HKEY_LOCAL_MACHINE\SYSTEM\Currentcontrolset\Control\Lsa.
5. Verify that the value for the lmcompatibilitylevel registry key is set to 3.
Note: Under most network conditions, a setting of 3 is sufficient. However, in some networks, this key mayrequire a different value. To determine which value to use, refer to http://support.microsoft.com/kb/239869.
Configuring Pre-Windows Vista Endpoint for DiscoveryFor pre-Windows Vista endpoints behind local firewalls, certain ports must be opened in order for them to bediscovered. Pre-Windows Vista endpoints that do not have local firewalls in place will be discovered withoutperforming this procedure.
Perform this task from the pre-Windows Vista endpoint your are configuring for discovery.
1. Select Start > Control Panel.
Step Result: Control Panel opens.

New Boundary Prism Patch Manager 7.0 SP1
- 90 -
2. Double-click Windows Firewall.
Step Result: The Windows Firewall dialog opens.
Figure 58: Windows Firewall Dialog

Configuring the Server and Endpoints for Agent Management Jobs
- 91 -
3. Select the Exceptions tab.
Step Result:
Figure 59: Exceptions Tab
4. Ensure the File and Printer Sharing check box is selected.
A File and Printer Sharing exception opens the following ports, which are essential for discovery and agentmanagement.
• 445/TCP• 139/TCP• 135/UDP• 137/UDP
5. Click OK.
Result: The endpoint can now be discovered during discovery scan jobs and agent management jobs.

New Boundary Prism Patch Manager 7.0 SP1
- 92 -
Configuring Endpoints for Agent Management Jobs (Pre-WindowsVista)
In order to successfully perform network-based assessments, you must complete the following configurationprocedure on your managed endpoints after you install the New Boundary Agent.
Configure your networked devices running pre-Windows Vista operating systems (Windows 2003, Windows XP,and so on) according the following procedure.
1. Select Start > Run.
2. Enter cmd in the Open field.
3. Click OK.
Step Result: The command prompt displays.
4. Type net share and press ENTER.
5. Verify that C$ and ADMIN$ are enabled and appear in the Share name column.
If they are not, type the following commands to enable these shares.
• NET SHARE C$=C
• NET SHARE ADMIN$
These commands enable the shares until the system reboots.
6. Select Start > Control Panel.
Step Result: Control Panel opens.

Configuring the Server and Endpoints for Agent Management Jobs
- 93 -
7. Double-click Administrative Tools.
Step Result: The Administrative Tools dialog opens.
Figure 60: Administrative Tools Dialog
8. Double-click Services.
Step Result: The Services dialog opens.
Figure 61: Services Dialog

New Boundary Prism Patch Manager 7.0 SP1
- 94 -
9. Verify that the following services are running:
• DCOM Server Process Launcher• Remote Procedure Call (RPC)• Remote Registry• Server• Windows Firewall/Internet Connection Sharing• Windows Management Instrumentation
If any of these services is not running, start it by completing the following substeps.
a) Double-click the applicable service.b) Ensure the General tab is selected.c) From the Startup type list, select Automatic.d) Click Start.e) Click OK.
10. Select Start > Run.
11. Enter gpedit.msc in the Open field.
12. Click OK.
Step Result: The Group Policy dialog opens.
Figure 62: Services Dialog
13. Expand the directory tree structure to Computer Configuration > Administrative Templates > Network >Network Connections > Windows Firewall > Domain Profile/Standard Profiles.
The standard profile is enforced for workgroup members, and the domain profile is enforced for domainmembers. Edit both lists for consistency.

Configuring the Server and Endpoints for Agent Management Jobs
- 95 -
14. Edit the following settings according to the following table.
Value Setting
Enable • Windows Firewall: Allow file and printer sharing exception• Windows Firewall: Allow remote administration exception
Disable • Windows Firewall: Do not allow exceptions
To edit these settings, perform the following substeps.
a) Right-click the applicable setting.b) Select Properties.c) Select the applicable option (Enable or Disable).d) If desired, define an IP range in the Allow unsolicited incoming messages from field.
Note: This substep is only applicable to the Windows Firewall: Allow file and printer sharingexception and Windows Firewall: Allow remote administration exception settings. To define a range,you may use the following syntax: * (any IP address), 10.3.2.0/24 (specific Class C subnet), andlocalsubnet (for local subnetwork access only).
This input is not validated. By default, you should leave the box blank to allow any IP address.
e) Click OK.
15. Select Start > Run.
16. Enter regedit in the Open field.
17. Click OK.
Step Result: The Registry Editor opens.
Figure 63: Services Dialog
18. From the directory tree structure, expand to HKEY_LOCAL_MACHINE\SYSTEM\CurrentControlSet\Control\Lsa.
New Boundary Prism Patch Manager 7.0 SP1
- 96 -
19. Verify that the value for the lmcompatibilitylevel registry key is set to 3 or 5.
If the key is not set to one of the following values, complete the following substeps.
Note: Under most network conditions, a setting of 3 or 5 is sufficient. However, in some networks, thiskey may require a different value. To determine which value to use, refer to http://support.microsoft.com/kb/239869.
a) Double-click lmcompatibilitylevel.
Step Result: The Edit DWORD Value dialog opens.
b) In the Value data field, type 3 or 5 (unless another value is required).c) Click OK.
20. Select Start > Run.
21. Enter cmd in the Open field.
22. Click OK.
Step Result: A command prompt displays.
23. Type gpupdate /force and press ENTER.
24. Select Start > Control Panel.
Step Result: Control Panel opens.
25. Double-click Network Connections.
Step Result: The Network Connections dialog opens.
26. Right-click your local area connection.

Configuring the Server and Endpoints for Agent Management Jobs
- 97 -
27. Select Properties.
Step Result: The Local Area Connection Properties dialog opens.
Figure 64: Local Area Connection Properties Dialog
28. Ensure the File and Printer Sharing for Microsoft Networks check box is selected.
29. Click OK.
Configuring Post-Windows Vista Endpoints for DiscoveryFor New Boundary Prism Patch Manager to discover Windows Vista, Windows Server 2008, and Windows 7endpoints during discovery scan jobs and agent management jobs, they must have both network discovery andfile sharing enabled. Target endpoints without these features enabled will not be discovered.
Perform these steps on the applicable post-Windows Vista endpoint.
1. Select Start > Control Panel.
Step Result: Control Panel opens.

New Boundary Prism Patch Manager 7.0 SP1
- 98 -
2. Open Network and Sharing Center.
Step Result: The Network and Sharing Center opens.
Figure 65: Network and Sharing Center
3. Ensure Network discovery is enabled.
4. Select Start > Control Panel.
Step Result: Control Panel opens.
5. Double-click Windows Firewall.
Step Result: The Windows Firewall dialog opens.

Configuring the Server and Endpoints for Agent Management Jobs
- 99 -
6. Click the Change Settings link.
Step Result: The Windows Firewall Settings dialog opens.
Figure 66: Windows Firewall Settings Dialog

New Boundary Prism Patch Manager 7.0 SP1
- 100 -
7. Select the Exceptions tab.
Step Result:
Figure 67: Exceptions Tab
8. Ensure the File and Printer Sharing check box is selected.
A File and Printer Sharing exception opens the following ports, which are essential for discovery and agentmanagement.
• 445/TCP• 139/TCP• 135/UDP• 137/UDP
9. Click OK.
Result: Network discovery and File sharing are enabled, and the ports are opened. The endpoint can nowbe discovered during discovery scan jobs and agent management jobs.

Configuring the Server and Endpoints for Agent Management Jobs
- 101 -
Configuring Endpoints for Agent Management Jobs (Post-WindowsVista)
In order to successfully perform network-based assessments, you must complete the following configurationprocedure on your managed endpoints before you install the agent.
Prerequisites:
Complete Configuring Post-Windows Vista Endpoints for Discovery on page 97.
Configure your networked endpoints running Windows Vista, Windows Server 2008, or Windows 7 accordingthe following procedure.
Note: While executing some of the following steps, a User Account Control dialog may appear, to verifypermission to continue with the requested action. Click Continue and proceed to the next step.
1. Select Start > Run.
2. Enter cmd in the Open field.
3. Click OK.
Step Result: The command prompt displays.
4. Type net share and press ENTER.
5. Verify that C$ and ADMIN$ are enabled and appear in the Share name column.
If they are not, type the following commands to enable these shares.
• NET SHARE C$=C
• NET SHARE ADMIN$
These commands enable the shares until the system reboots.
6. Select Start > Control Panel.
Step Result: Control Panel opens.

New Boundary Prism Patch Manager 7.0 SP1
- 102 -
7. Double-click Administrative Tools.
Step Result: The Administrative Tools dialog opens.
Figure 68: Administrative Tools Dialog
8. Double-click Services.
Step Result: The Services dialog opens.
Figure 69: Services Dialog

Configuring the Server and Endpoints for Agent Management Jobs
- 103 -
9. Verify that the following services are running:
• DCOM Server Process Launcher• Remote Procedure Call (RPC)• Remote Registry• Server• Windows Firewall/Internet Connection Sharing• Windows Management Instrumentation
If any of these services is not running, start it by completing the following substeps.
a) Double-click the applicable service.b) Ensure the General tab is selected.c) From the Startup type list, select Automatic.d) Click Start.e) Click OK.
10. Select Start > Run.
11. Enter gpedit.msc in the Open field.
12. Click OK.
Step Result: The Group Policy Object Editor opens.
Figure 70: Group Policy Object Editor
13. Expand the directory tree structure to Computer Configuration > Administrative Templates > Network >Network Connections > Windows Firewall > Domain Profile/Standard Profiles.
The standard profile is enforced for workgroup members, and the domain profile is enforced for domainmembers. Edit both lists for consistency.

New Boundary Prism Patch Manager 7.0 SP1
- 104 -
14. Edit the following settings according to the following table.
Value Setting
Enable • Windows Firewall: Allow file and printer sharing exception• Windows Firewall: Allow remote administration exception• Windows Firewall: Allow ICMP exceptions
Disable • Windows Firewall: Do not allow exceptions
To edit these settings, perform the following substeps.
a) Right-click the applicable setting.b) Select Properties.c) Select the applicable option (Enable or Disable).
Note: After enabling the Windows Firewall: Allow ICMP exceptions setting, select the Allowinbound echo request check box. Ensure all other check boxes are clear.
d) If desired, define an IP range in the Allow unsolicited incoming messages from field.
Note: This substep is only applicable to the Windows Firewall: Allow file and printer sharingexception and Windows Firewall: Allow remote administration exception settings. To define a range,you may use the following syntax: * (any IP address), 10.3.2.0/24 (specific Class C subnet), andlocalsubnet (for local subnetwork access only).
This input is not validated. By default, you should leave the box blank to allow any IP address.
e) Click OK.
15. Select Start > Run.
16. Enter regedit in the Open field.
17. Click OK.
Step Result: The Registry Editor displays.
18. From the directory tree structure, expand to HKEY_LOCAL_MACHINE\SYSTEM\CurrentControlSet\Control\Lsa.
19. Verify that the value for the lmcompatibilitylevel registry key is set to 3 or 5.
If the key is not set to one of the following values, complete the following substeps.
Note: Under most network conditions, a setting of 3 or 5 is sufficient. However, in some networks, thiskey may require a different value. To determine which value to use, refer to http://support.microsoft.com/kb/239869.
a) Double-click lmcompatibilitylevel.
Step Result: The Edit DWORD Value dialog opens.

Configuring the Server and Endpoints for Agent Management Jobs
- 105 -
b) In the Value data field, type 3 or 5 (unless another value is required).c) Click OK.
20. Select Start > Run.
21. Enter cmd in the Open field.
22. Click OK.
Step Result: A command prompt displays.
23. Type gpupdate /force and press ENTER.
Resolving Endpoint UAC IssuesOn endpoints running Windows Vista or later operating systems, UAC security features are set to highlyrestrictive levels by default. These settings must be configured properly to ensure agent management job success.
When a post-Windows Vista endpoint is in this default UAC configuration, agent management jobs fail with anaccess denied error.
Use one of two methods to resolve this issue:
Add a domain account Adding a domain account to the applicable endpoint's local administrator'sgroup will typically resolve the issue. To use this method, add the endpointto a domain (provided it isn't already added), and then add a domain userto the endpoint's local administrator group. Running an agent managementjob configured to use this domain account's credentials will allow the job tocomplete successfully.
Note: The domain account added to the local administrator's group mustbe an individual domain account; you cannot add a domain group.
Set a Registry Value If the user of a local administrative account is desired or required, you canset a registry value to resolve this issue.
Create a DWORD registry value named LocalAccountTokenFilterPolicy in theHKLM\SOFTWARE\Microsoft\Windows\CurrentVersion\Policies
\System\ registry hive. Set its value to 1.
No reboot is required. This method allows a local administrative account tosuccessfully run agent management jobs.
Note: For additional information about this method, refer to http://support.microsoft.com/kb/942817.
Troubleshooting Agent Management JobsIf agent managements are not completing successfully, additional configuration may be required.
If the New Boundary Prism Patch Manager server or an applicable network endpoint has lost its trust relationshipwith the domain, agent management jobs will fail with an error of access denied.
New Boundary Prism Patch Manager 7.0 SP1
- 106 -
To verify if this issue is causing agent management job failure, ensure that the Patch Manager server canconnect to the applicable endpoints C$, and that the applicable endpoints can connect to the server's C$.To verify these connections, type the following command from the applicable endpoint or server prompt: \\EndpointIPAddress\C$.
If the following system output results from the command, your endpoint or server has lost its trust relationshipwith the domain: The trust relationship between this workstation and the primary domainfailed.
To resolve this issue, remove the applicable server or endpoint from the domain, and then add it back. Thisprocess forces the domain to refresh the endpoint password. The endpoint password prompts users for resetting atscheduled intervals according to its security settings.
To disable password changes, complete Disabling Password Changes on page 106.
Disabling Password ChangesDo disable password changes, create a registry key for the applicable endpoint.
Perform this task from the applicable endpoint.
1. Select Start > Run.
Step Result: The Run dialog opens.
2. Type regedit in the Open field.
3. Click OK.
Step Result: The Registry Editor opens.
4. Expand the directory tree structure to My Computer\HKEY_LOCAL_MACHINE\SYSTEM\CurrentControlSet\Services\Netlogon\Parameters.
5. Right-click DisablePasswordChange.
6. Select Modify.
Step Result: The Edit DWORD Value dialog opens.
7. In the Value data field, type 1.
8. Click OK.
Result: The key value is updated. User profile passwords can no longer be edited on the applicableendpoint.