agentry device client branding - sap · agentry device client branding 5 section 2: agentry client...
TRANSCRIPT

Agentry Device Client Branding
Provided by SAP Mobile – Agentry Product Development Team
Applicable Releases:
Agentry 6.X, SMP 2.3
Version 1.0
www.sap.com
TABLE OF CONTENTS
SECTION 1: AGENTRY DEVICE CLIENT BRANDING SDK .......................................................................... 3 Branding Agentry Installers ........................................................................................................................... 3 Prerequisites .................................................................................................................................................... 3 Task ................................................................................................................................................................... 3
SECTION 2: AGENTRY CLIENT FOR IOS BRANDING OVERVIEW ............................................................. 5 iOS Developer Program .................................................................................................................................. 5 iOS Developer Enterprise Program ................................................................................................................ 6 Obtaining Apple Certificates and Resources for Branding ......................................................................... 6 Task ................................................................................................................................................................... 7
SECTION 3: AGENTRY CLIENT FOR ANDROID BRANDING OVERVIEW .................................................. 9 Command Line Arguments for aapt Explained ............................................................................................ 9 Agentry Client for Android Branding Image Specifications ...................................................................... 11 Branding Agentry Clients for Android ......................................................................................................... 11 Task ................................................................................................................................................................. 12
Agentry Device Client Branding
3
SECTION 1: AGENTRY DEVICE CLIENT BRANDING SDK
Branding Agentry Installers
Prerequisites
NSIS (Nullsoft Scriptable Install System) is a professional open source system that is used to create
Windows installers. This is the software used to create the branded installers for the Agentry Clients.
In order to brand the Client installers, you will need to have Microsoft’s Cabwiz.exe
installed on your system.
Task
The following main steps walk you through the basics of creating branded installers for the Agentry
Client.
1. Download and install Nullsoft NSIS.
a) Open a browser and go to http://nsis.sourceforge.net.
You are brought to the Nullsoft Scriptable Install System Main Page.
b) Click the [Download] link under “Latest NSIS release.”
An NSIS setup file is downloaded to your computer.
c) Run the nsis-[version]-setup.exe.
Make sure to note the location where you install the NSIS files because you will need this
information later in the branding process.
After you run the NSIS setup program, a full set of NSIS files is installed on your computer. Typically, you
will put the NSIS folder inside your Program Files folder. Be sure to note the location because you will
need the full path information when you build the branded installer.
2. Create the branding source. The same Agentry installers that are used to install the products
are used to create the branding installer sources for the Client.
a) To create the branding Client installer source, run ClientWinCE_Branding_sdk.exe.
Use the switch “/Branding=[folder name]” to put the branding Client installer into a
folder of your choice.
b) When creating a Client installer source, you must also build CAB files for each supported
device and for each supported scanner. To do this in a single step, run the command script cabs/BuildCabs.cmd.
Note: In order to run the Cabs script, you must have Microsoft’s Cabwiz.exe. These steps create all the files necessary to complete the customization of the Client installer.
3. Customize the installers. Once you have the branding source files, you are ready to use those
files to modify items such as the company name, product name, and installer names. You must
customize the installers for the Client .nsi files, as necessary.
a) Optionally, make a copy of the AgentryClientWinCE.nsi file. You can optionally make a
copy of the files so that you always have the original in case your modified file ever gets
overwritten. If you do not make a copy, and need the original files, you can re-install them.
b) Open the .nsi files in a text editor, one at a time, and follow the instructions in the file to modify
the common items. These items include things like product name, company name, installer
name, company URL, and the uninstaller executable name.
Your modified .nsi files should now contain all custom branding details for your Client installer.
Agentry Device Client Branding
4
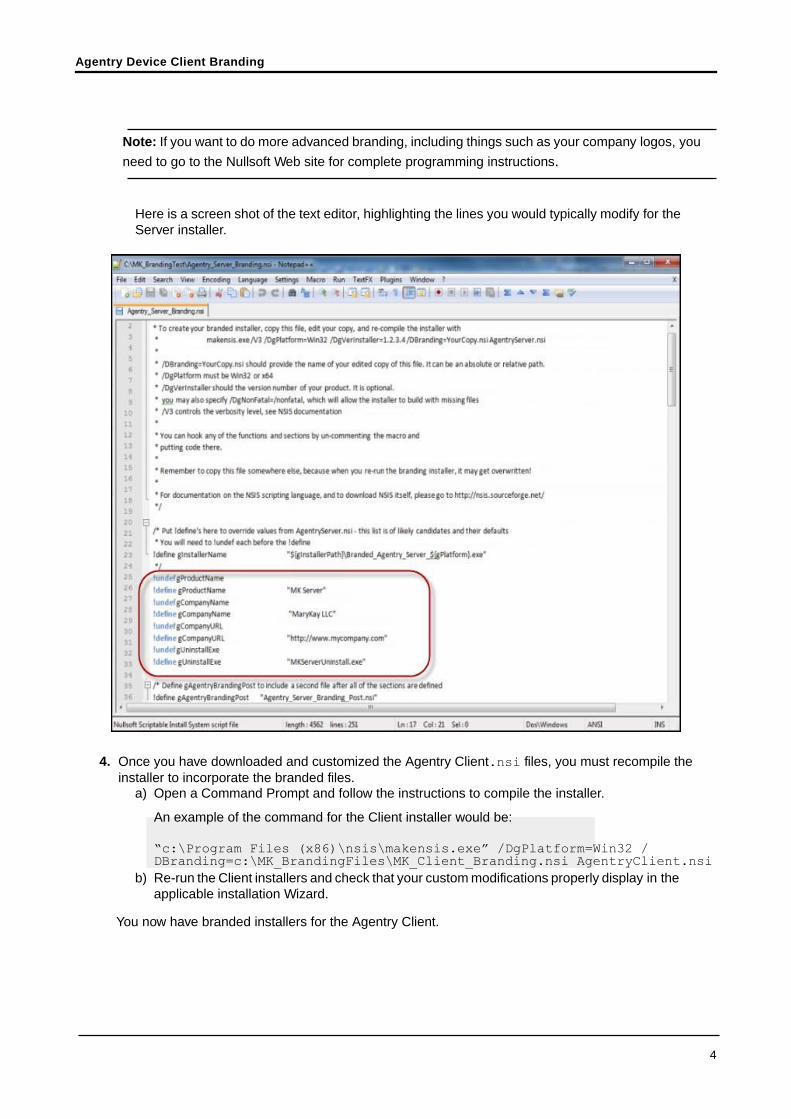
Note: If you want to do more advanced branding, including things such as your company logos, you
need to go to the Nullsoft Web site for complete programming instructions.
Here is a screen shot of the text editor, highlighting the lines you would typically modify for the
Server installer.
4. Once you have downloaded and customized the Agentry Client.nsi files, you must recompile the
installer to incorporate the branded files. a) Open a Command Prompt and follow the instructions to compile the installer.
An example of the command for the Client installer would be:
“c:\Program Files (x86)\nsis\makensis.exe” /DgPlatform=Win32 / DBranding=c:\MK_BrandingFiles\MK_Client_Branding.nsi AgentryClient.nsi
b) Re-run the Client installers and check that your custom modifications properly display in the
applicable installation Wizard.
You now have branded installers for the Agentry Client.
Agentry Device Client Branding
5
SECTION 2: AGENTRY CLIENT FOR IOS BRANDING OVERVIEW
The Agentry Client for iOS is available on the Apple App Store for iPhone, iPod Touch, and iPad
mobile devices. The client available is branded by SAP as a generic Agentry Client and can be
downloaded and installed as such. For partners and customers wishing to re-brand the Agentry Client
and to deploy the client using an enterprise server, SAP provides a channel to have such a client
made available.
For those familiar with the branding process for the Agentry Client for Windows, it is important to note
that this process is separate and not related in any way. When deploying a branded application that
utilizes both the Agentry Client for Windows and iOS platforms, it is necessary to brand both using the
process specific to that platform. The most notable difference in these processes is the requirement of
sending the branding resources to SAP, via a customer message through SAP Service Marketplace,
which in turn results in SAP building the branded iOS Agentry Client and returning the resulting build
to you when completed.
The branding of an iOS Agentry Client involves multiple steps, including obtaining certificates from
Apple, as well as generating items such as images and other resources. These items must then be
provided to SAP in conjunction with a request to generate a branded iOS Agentry Client. SAP will then
build the branded Agentry Client and provide it to the requesting party. Such requests should be made
through a customer message submitted through SAP Service Marketplace.
This technical bulletin provides details and instructions on each of the resources needed by SAP to
create the branded iOS Agentry Client. In general, the following types of items are needed:
• Various certificates and other possible items, as provided by Apple
• Image files in the Portable Network Graphics (.png) format containing the branded images to
be used within the application.
• The name of the application as it should be displayed on the Agentry Client.
• If necessary, the specific type of iOS device upon which the application should be limited,
e.g. only iPad, no iPhone or iPod Touch. (This is optional and is typically not necessary for most
deployments.)
Once these items have been obtained, they should be provided to SAP with the request to generate
the branded iOS Agentry Client. The SAP support department will respond to such requests with
information regarding duration to generate the branded Agentry Client, as well as any additional
information that may be needed.
Additional Information on Obtaining Apple Certificates
Apple’s requirements regarding application distribution for both enterprise (i.e. “internal”) deployment
and iTunes Store dictate the specific needs of obtaining the certificates and other resources discussed
in this technical bulletin.
Important: In order to obtain the certificates and other resources from Apple, it is required that your
firm has a membership in either the iOS Developer Program or the iOS Developer Enterprise
Program. Details on these programs and enrollment in them are available at the links provided below.
Information provided in this technical bulletin covering these specific needs is intended as guidance
only. For official information on these resources, see Apple’s web pages covering these topics,
including required developer licenses:
iOS Developer Program
Agentry Device Client Branding
6
https://developer.apple.com/programs/ios/
iOS Developer Enterprise Program
https://developer.apple.com/programs/ios/enterprise/
In general, if the application is to be distributed via iTunes, the needed Apple resources must be
obtained using the iOS Developer Program. For applications that are to be distributed internally, i.e.
via an Enterprise Server, the needed resources must be obtained via the iOS Developer Enterprise
Program. Details on each program are provided at the above links, and these requirements are
specified by Apple, not SAP.
Procedure Overview
The following provides a list of the tasks to be accomplished in order to obtain a branded iOS Agentry
Client. The details of these main tasks are provided in subsequent sections of this technical bulletin:
1. Obtain the appropriate certificates and identifiers from Apple, including the distribution certificate
and private key, provisioning profile built using the distribution certificate, and possible the APNS
Certificate and private key password if push functionality is to be supported.
2. Generate the images according to provided specifications to be used to brand the Agentry Client.
All images must be in the Portable Network Graphics (.png) format and must adhere to the
image sizes provided in the information in this technical bulletin.
3. Provide the above resources, along with the specific name by which the application will be labeled,
with a request to SAP Service Marketplace via a customer message. SAP will use these items to
build a branded iOS Agentry Client. You will receive information in response to your request
indicating when the branded iOS Agentry Client will be made available.
4. Once the branded iOS Agentry Client is returned Submit the application to Apple for placement
on iTunes, or place the application on the Enterprise Server at the implementation site,
according to Apple’s standard procedures.
Obtaining Apple Certificates and Resources for Branding
Prerequisites
The following items must be addressed prior to performing this procedure:
• The organization to whom the mobile application belongs must have the appropriate membership
in the Apple developer program that pertains to the distribution method by which the branded iOS
Agentry Client will be made available.
• iTunes Distribution: Apple Developer Program
• Internal/Enterprise Server Distribution: Apple Enterprise Developer Program
• The person performing this procedure should have information about the membership,
including:
• Apple Developer ID (typically an email address) and password
• Values for the Bundle Seed ID (see Apple site for details; e.g. com.company.ios.myeapp) -
Note this value must be unique, should be in lowercase, and if push functionality is to be
implemented cannot contain wild cards.
Agentry Device Client Branding
7
Task
This procedure provides guidance on obtaining the required certificates and other resources needed
by SAP to build and return to the requesting organization a branded iOS Agentry Client. While every
attempt is made to make this information as accurate as is possible, note that the procedures explained
here are executed using web resources provided by Apple. If any discrepancies are found between this
information and the information provided on Apple’s web site, information provided on that site should
be considered the authoritative source.
The items resulting from this procedure are those needed by SAP to build a branded iOS Agentry
Client.
1. Navigate in a web browser to Apple’s Developer web site:
https://developer.apple.com
2. Click the iOS Developer link and then log in using your Apple developer ID and password.
3. On the page now displayed, under the iOS Developer Program, select the item iOS
Provisioning Portal item.
4. Create a distribution certificate if you do not already have one. Download a copy of this file.
5. Install the certificate locally to your Keychain (Double click the certificate to begin this process.)
6. From Keychain, export the private key out to a file. Note the location of this file. This is one of the
items you will need to provide to SAP with the request for a branded client.
7. On the iOS Provisioning page, select the App ID item on the left navigation bar.
8. In the page displayed, click the New App ID button in the upper right corner.
9. On the form now displayed, follow the instructions provided here for each field, as well as adhering
to any information provided for these fields on the form.
a) Description: Enter a unique, meaningful description for the App ID.
b) Bundle Seed ID: Select the option Use the Team ID
c) Bundle Identifier: This value must be unique. It is case sensitive in some areas and not in
others. For this reason it is strongly recommended this value be entered in all lower case
characters. Wild card values (*) are supported; however a wild card cannot be used if the
application is to support push functionality. In almost all cases, wild cards should not be used, as
this prevents push functionality from ever being implemented while the branded iOS Agentry
Client provided is in use.
10. Once the fields are entered, click the Submit button and then wait a few moments. Refresh the page
and you should now see your newly created App ID in the list displayed. The Apple Push
Notification Service column should show “Configurable for Development” and “Configurable for
Production”.
11. If push functionality is to be implemented, either with the initial implementation or in subsequent
updates to the mobile application, the application must be enabled for Apple Push Notification
Service:
a) Select the Configure item in the action column.
b) Check the box Enable for Apple Push Notification Service.
c) Select the Configure button in the Production Push SSL Certificate section.
d) Follow the instructions provided in the form to generate a signing request. It is strongly
recommended the name be the same or similar to the Bundle Identifier.
e) Once this process is completed, download the certificate and install it to your Keychain.
f) Select the certificate and its private key and export them to a file. Note the location for later use
when providing this to SAP with the branding request.
Agentry Device Client Branding
8
12. The final task to accomplish on the Apple Developers site is to create a Distribution Provision
Profile. This is accomplished in part using the distribution certificate and the App ID created
previously. The following steps provide the details on this process:
a) On the Apple site, select the Provisioning item in the menu on the left side. In the page
displayed, select the Distribution tab. Click the New Profile button in the upper right.
b) In the form displayed, enter the information in the fields per the following information.
• Distribution Method: Select In House
• Profile Name: Enter a meaningful name for the provisioning profile being created.
• Distribution Certificate: Select the one created earlier in this procedure, which should
now be listed here.
• App ID: Select the App ID created previously in this procedure.
c) Click the Submit button in the lower right corner.
13. A status of Pending should now be displayed for the distribution provisioning profile. The request is
being routed to be approved by the iOS developer program administrator of your organization. If you
are the administrator, refresh the page and the status should change from pending to active.
Tip: If you are unsure as to who may be the iOS Developer Program administrator at your firm, the
people section of the Member Center can provide this information:
https://developer.apple.com/membercenter/index.action#allpeople
14. Once the status is changed to active, select the Download button to save the distribution
provisioning profile.
15. Create the icon images you wish displayed in the client at runtime as a part of the
rebranding.
16. At this point gather the exported certificate files, and all other items downloaded during this
process, as well as the image icons to replace the SAP provided icons, and place them in a single
location in preparation for making them available to SAP.
17. Once you have gathered all of these resources, navigate to the SAP Service Marketplace and
create a customer message requesting a branded Agentry Client for iOS. Use the URL
http://service.sap.com/message and reference the component MOB_SDK_ABK. You
will be contacted regarding your request and will need to provide the resources generated during
this procedure.
With the completion of this procedure, the resources needed by SAP to create a branded iOS Agentry
Client have been created. This should include the following:
• The distribution certificate and corresponding private key
• The provisioning profile
• The APNS Certificate and password for its private key (only if supporting push
functionality)
• The icon images to be used client at run time.
• A customer message requesting a rebranded Agentry Client for iOS be built for you.
Agentry Device Client Branding
9
SECTION 3: AGENTRY CLIENT FOR ANDROID BRANDING OVERVIEW
The Agentry Client for Android can be branded to replace the default, SAP provided logos and
application strings. This process includes the use of the Agentry Client for Android Branding SDK,
which is a ZIP archive containing the necessary resources to support the branding process.
In addition to this SDK, it is necessary to install the following tools provided by third parties:
• Java SDK (JDK) 1.6, not 1.7 as this version is not supported by Android.
• The Android SDK provided by Google.
• The Cygwin UNIX/Linux environment toolset for use on Windows systems.
• The Ant scripting utility.
In addition to these tools, it may be necessary to register your mobile application to obtain a Product
ID and Simple API Key from Google for use with the Google Cloud Messaging (GCM) service. This is
needed when it is desired to send notifications to client devices in the event of missed push data. If
push is not to be a part of the implementation, or if notifications for missed pushes are not required,
this is not needed.
It is also likely you will want to replace the default logos displayed for the application, including it’s
shortcut and task bar icons, as well as the logo displayed in the application’s logon screen. These icon
images should be created before of beginning the branding process as they are included in the build of
the branded client.
It may also be necessary to obtain the services of a translator to localize the Agentry Client for Android.
While most values are localized through a different means, and after the application has been
developed and tested, there are a small number of displayed strings contained in the resources found
within the Agentry Client Branding SDK for Android. These strings are typically displayed when the
Agentry Client is started and before the initial transmit.
Overall the following are the main tasks in the branding process:
1. Perform the environment setup, including: installation of the JDK, Android SDK, Ant scripting
utility, and Cygwin; making environment variable changes; and extraction of the Agentry Client
Branding SDK for Android.
2. Optionally, translating strings contained within the contents of the Agentry Client Branding
SDK for Android.
3. Optionally, obtaining a Simple API Key from Google in support of missed push
notifications using GCM.
4. Repackaging the Agentry Client for Android using tools from both the JDK and Ant scripts.
5. Testing the branded Agentry Client prior to deploying it.
Command Line Arguments for aapt Explained
The information provided in this section is intended to aid you in entering the proper arguments to the
command line utility aapt, which is a part of the Android SDK. This information is not an exhaustive
discussion on the utility itself, but rather is intended the specific needs of branding the Agentry Client
for Android. This information is provided in support of the procedure “Branding Agentry Clients for
Android.”
Some of the values for the command line arguments come from files found in the Agentry Client
Branding SDK for Android. The files buildinfo and projects.properties, which can be found in the root
directory of the extracted files of this SDK, should be opened in a text editor to obtain these values, as
described in the following list.
Arguments List for appt
• <version_code>: This value is found in the buildinfo file for the setting version_code. In
this setting, version_code= “--version-code 12345”, the proper value is the numeric

Agentry Device Client Branding
10
portion of this setting (“12345” from this example).
• <version_name>: This value is found in the buildinfo file, in the setting version_name. In
this setting, version_name= “--version-name 1.2.3.45”, the proper value is the numeric
portion of this setting (“1.2.3.45” from this example).
• <target>: This value is found in the projects.properties file for the setting target. In this
setting, target=anroid-15, the proper value is the full value for this setting (android-15
from this example).
• <pkg_name>: This value is set by you to change the package name of the client from the default
value of com.syclo.agentry.client.android. Package names for Android applications
follow the same conventions as Java packages. The package name must be unique for all
Android applications installed on the system. It is therefore recommended that the reverse of your
company’s domain be used to begin the package name, as in com.mycompany.myapp.
• <res_include>: This value is based on the folders found within the folder otherres. Here you
will find a list of folders with numeric values for names, such as 01 or 08.01, etc. Within each of
these folders are the subfolders res and bin\res. Each of these paths must be referenced with a
–S argument to aapt. There will be multiple instances of the switch –S followed by a relative path.
There will always be a -S bin\res followed by a -S res. After these there will be two additional
instances each for each res and bin\res folder within one of the numeric folders. See the section
“Example Resource Includes (<res_include>) Arguments” below for more details.
Example Resource (<res_includes>) Includes Arguments
The command line parameters and arguments related to the -S option would appear as follows (other
arguments omitted for this example):
$aapt <other arguments>
-S bin/res -S res
-S otherres/01/bin/res -S otherres/01/res
-S otherres/01.01/bin/res -S otherres/01.01/res
-S otherres/02/bin/res -S otherres/02/res
-S otherres/03/bin/res -S otherres/03/res
-S otherres/04/bin/res -S otherres/04/res
-S otherres/05/bin/res -S otherres/05/res
-S otherres/06/bin/res -S otherres/06/res
-S otherres/07/bin/res -S otherres/07/res
-S otherres/08/bin/res -S otherres/08/res
-S otherres/08.01/bin/res -S otherres/08.01/res
The paths for each of the arguments to the -S parameter are relative to the location in which the

Agentry Device Client Branding
11
resources of the branding SDK for Android have been extracted. Note that there may be additional
folders within the otherres folder which are numerically named as those above are and should also
have corresponding arguments following the pattern above.
Agentry Client for Android Branding Image Specifications
When branding the Agentry Client for Android it is possible to replace the icon images provided with
the client and also found in the Agentry Client Branding SDK for Android. These images are a part of
the SDK archive. All images are in the Portable Network Graphics (PNG) format.
The images are organized within the folders created when the Agentry Client Branding SDK for
Android ZIP archive is extracted. Each individual image is found in two locations within these folders.
Following is list of these images and their sizes, organized according to the directories in which they
can be found and where replacements should be placed:
• res\drawable-ldpi; bin\res\drawable-ldpi
• icon.png - 36 x 36
• res\drawable-mdpi; bin\res\drawable-mdpi
• icon.png - 48 x 48
• logo.png - 203 x 46
• res\drawable-hdpi; bin\res\drawable-hdpi
• icon.png - 72x72
• login_logo.png - 435 x 111
During packaging the tools process images found in the bin\res directories over those found in the
res directories. Therefore, it is up to you whether or not the files in both, or just in bin\res are replaced.
Branding Agentry Clients for Android
Prerequisites
The following items must be addressed prior to performing this procedure:
• Review the information provided related to this procedure and the Agentry Client branding SDK
for Android clients; especially the information found in the sections “Android Client Branding
Image Specifications” and “Command Line Arguments for aapt Explained.”
• It is recommended that the icons to be used as replacement for those provided by default already
exist and ready for inclusion in the packaging specified in this procedure.
• The default package name for the Agentry Client is set to com.syclo.agentry.client.android. This
package name is changed during this process to a package name you will enter. This name
should be determined ahead of time.
• The following determinations should be made prior to beginning:
• Whether or not push functionality is to be implemented and, if so, whether or not it is desired to
use Google Cloud Messaging to support notifications for missed pushes. If this is to be a part
of the implementation, follow the instructions provided at the following URL to register your
application to obtain both a Product ID and a Simple API Key this should be performed before
performing the branding procedure.
http://developer.android.com/google/gcm/gs.html
• Whether or not localization/translation is a part of the implementation.
Agentry Device Client Branding
12
Task
This procedure describes the steps necessary to change the default SAP and Agentry branding of the
Agentry Client for Android devices. To perform this procedure you must have downloaded the ZIP
archive Agentry_6.1.x.x_Client- Android_Branding.zip containing the branding
resources from the SAP Service Marketplace.
The steps in this procedure include environment setup, file and resource modification, and other
similar tasks. The result of this procedure is an Agentry Client for Android (.apk file) with all branded
components replaced with the desired name and icons which can then be installed to Android devices.
As options to this process, the client application may be registered with Google Cloud Message to
support missed push notifications on the device, and also translated default display strings.
1. Install the Java SDK (“JDK”) version 1.6, latest patch release. Note the installation location’s full path. DO NOT install version 1.7 of this SDK, as it is not supported by the Android SDK.
2. Create an Environment Variable for Windows named JAVA_HOME and set the path to the installation folder of the JDK from the previous step.
3. Download and install API level 15 of the Android SDK. To download the SDK, click click here; or
enter the following URL in a web browser: http://
developer.android.com/sdk/index.html. Note the installation location’s full path.
Alternately, if this SDK is already installed, but is not the latest version, update it to the latest version of the Android SDK.
4. Within the Windows Environment Variables the installation location of the Android SDK must be set in two different variables:
a) Edit the existing Path variable by adding the full path of the Android SDK installation location. b) Create a new Environment Variable named ANDROID_SDK_ROOT and set its value to the
installation location of the Android SDK 5. Install the Ant build utility. For instructions on installing this utility, click here; or, enter the following
URL into your web browser: http://dita-ot.sourceforge.net/ doc/ot-userguide13/xhtml/installing/ windows_installingant.html
6. Install the Cygwin tool, which provides Linux commands to the Windows environment.
This tool is needed to use the Android Branding SDK in Windows. It can be downloaded and installed by clicking here; or by entering the following URL into your web browser:
http://www.cygwin.com. During the installation process, verify the packages bash, ls, grep, awk,
and sed are included. Typically these are selected by default in the installer.
7. Create a folder named C:\ag-android-branding, or similar, and extract the contents of the
Agentry_6.1.x.x_Client-Android_Branding.zip archive (where x.x represents the latest
service pack or patch release) provided with the SAP Mobile SDK to this location. 8. CONDITIONAL: If it is desired to use Google Cloud Messaging (GCM) for missed push notifications,
and if you have obtained both a Product ID and Simple API Key from GCM: If you are not using this service for missed push notifications, or if push functionality is not part of your implementation, skip to the next step in the procedure.
a) Open the file found at C:\ag-android-
branding\assets\AgentryClient.properties in a text editor. Here, set the value of the
setting gcm_product_id to your GCM Product ID. Save and close the file when complete.
b) Either now or at some point during the remaining implementation tasks for your environment, the API Key must be configured within the Agentry Server, in the Configuration section of properties accessible in the SAP Control Center, in the setting gcmServerAuthenticationKey.
If you do not have a GCM Product ID and Simple API Key, see the URL provided in the prerequisites to this procedure.
Agentry Device Client Branding
13
9. CONDITIONAL: By default the Agentry Client’s screen orientation will rotate with orientation of the device, as is standard behavior. If it is a requirement for your implementation to lock the screen
orientation, open the file found at C:\ag-android-
branding\assets\AgentryClient.properties. Within this file add one or more of the
following settings and values, based on your implementation requirements. If the standard screen orientation behavior is required, skip to the next step in this procedure.
•screen_orientation_phone=LANDSCAPE | REVERSE_LANDSCAPE | PORTRAIT |
REVERSE_PORTRAIT
•screen_orientation_tablet=LANDSCAPE | REVERSE_LANDSCAPE
| PORTRAIT | REVERSE_PORTRAIT
For these options, screen_orientation_phone specifies the setting for Android phones and
screen_orientation_tablet specifies the setting for Android tablets. The available settings are:
• LANDSCAPE - Lock the orientation in landscape
• REVERSE_LANDSCAPE - Lock the orientation in reverse landscape.
•PORTRAIT - Lock the orientation in portrait.
• REVERSE_PORTRAIT - Lock the orientation in reverse portrait.
10. Replace the images branding found in the following folders and leave others as is:
Refer to the information provided in the section “Android Client Branding Image Specifications” for details on the properties of the images found in these locations.
• C:\ag-android-branding\bin\res\drawable-hdpi
• C:\ag-android-branding\bin\res\drawable-ldpi
• C:\ag-android-branding\bin\res\drawable-mdpi
11. To modify the strings displayed in the client at run time to match your branding requirements, open
the XML file located at C:\ag-android-branding\res\values\strings.xml. Search for and
replace the text value Agentry with the desired name for the mobile client. Save and close the file when finished.
12. To modify the application full and short names, open the XML file located at C:\ag- android-
branding\res\values\manifest_strings.xml. Here modify the contents of the two
elements, which contain the text “Agentry Client” and “Agentry”for the application name and application short name, to match your branding requirements. Save and close the file when complete.
13. CONDITIONAL: For localization or translation requirements, manifest_strings.xml files found
in each of the language-specific folders of the languages to be supported must be edited. The
folders at res\value-xx, where xx is the language code for the desired language, contains the file
to be modified. Additionally, the strings.xml file must be modified to If supporting only English, these additional files need not be modified. Skip to the next step in this procedure.
14. Within the Cygwin tool, change directories to the location where the Agentry Android Branding SDK was extracted, e.g., C:\ag-android-branding. All commands run from this point on in this procedure must be run from this location.
15. Execute the following command to begin packaging the Agentry Client for Android, substituting the
<tokens> below with the values required for your environment (See section “Command Line
Arguments for aapt Explained” for details):
$ANDROID_SDK_ROOT/platform-tools/aapt package --no-crunch -f -- auto-add-
overlay
--version-code <version_code>
Agentry Device Client Branding
14
--version-name <version_name>
--rename-manifest-package <pkg_name>
-M AndroidManifest.xml
-S bin/res
-S res <res_includes>
-A assets
-I $ANDROID_SDK_ROOT/platforms/<target>/android.jar
-F bin/AgentryAndroidClient.ap_ --generate-dependencies
The above is a single command line string. It is displayed on multiple lines here for clearer presentation. It should be entered on a single line when actually executed in your environment.
16. Next run the package.xml Ant script using the following command:
$ANT_HOME/bin/ant -f package.xml
17. Copy and rename the unsigned Agentry Client for Android form the bin directory to the current base
directory of the branding SDK with the following command:
cp bin/AgentryAndroidClient-release-unsigned.apk ./
AgentryAndroidClient.apk
18. Create a keystore and password using the keytool Java utility by running the following command. Replace the <myAlias> token with a value unique value, which should be noted as it will be needed in the next step of this procedure:
$JAVA_HOME/bin/keytool -genkey -keystore gen.keystore
-alias <myAlias> keyalg RSA -keysize 2048 -validity 10000
The above is a single command line string. It is displayed on multiple lines here for clearer presentation. It should be entered on a single line when actually executed in your environment.
After running the above command you will be prompted for passwords for the keystore and key, as well as other information. Note the values you enter as they will be used in the next step.
19. Now sign the Agentry Client .apk file using the Java tool jarsigner by entering the following
command. The <myAlias>, <store_password>, and
<key_pasword> tokens should be replaced with the values entered in the
previous step:
Agentry Device Client Branding
15
$JAVA_HOME/bin/jarsigner -keystore gen.keystore
-storepass <store_password>
-keypass <key_password>
AgentryAndroidClient.apk
<myAlias>
The above is a single command line string. It is displayed on multiple lines here for clearer presentation. It should be entered on a single line when actually executed in your environment.
20. Align the Agentry Client .apk file using the following command. Note that the output of this
command is the branded, signed, and aligned Agentry Client .apk file, named according to the
<client_file> token in the following command, which can be installed to the Android client
devices in your implementation environment.
$ANDROID_SDK_ROOT/tools/zipalign AgentryAndroidClient.apk
<client_file>.apk
With the completion of this task you should now have an .apk file that is the Agentry Client for
Android branded for your needs. This file can be installed to and run on an Android device.
Next
The newly branded client should be installed to an Android device (or devices) for testing. The device or devices should be representative of the devices to be used in the runtime environment of your implementation.
www.sap.com
© 2013 SAP AG. All rights reserved.
SAP, R/3, SAP NetWeaver, Duet, PartnerEdge, ByDesign, SAP
BusinessObjects Explorer, StreamWork, SAP HANA, and other SAP
products and services mentioned herein as well as their respective
logos are trademarks or registered trademarks of SAP AG in Germany
and other countries.
Business Objects and the Business Objects logo, BusinessObjects,
Crystal Reports, Crystal Decisions, Web Intelligence, Xcelsius, and
other Business Objects products and services mentioned herein as
well as their respective logos are trademarks or registered trademarks
of Business Objects Software Ltd. Business Objects is an SAP
company.
Sybase and Adaptive Server, iAnywhere, Sybase 365, SQL
Anywhere, and other Sybase products and services mentioned herein
as well as their respective logos are trademarks or registered
trademarks of Sybase Inc. Sybase is an SAP company.
Crossgate, m@gic EDDY, B2B 360°, and B2B 360° Services are
registered trademarks of Crossgate AG in Germany and other
countries. Crossgate is an SAP company.
All other product and service names mentioned are the trademarks of
their respective companies. Data contained in this document serves
informational purposes only. National product specifications may vary.
These materials are subject to change without notice. These materials
are provided by SAP AG and its affiliated companies ("SAP Group")
for informational purposes only, without representation or warranty of
any kind, and SAP Group shall not be liable for errors or omissions
with respect to the materials. The only warranties for SAP Group
products and services are those that are set forth in the express
warranty statements accompanying such products and services, if
any. Nothing herein should be construed as constituting an additional
warranty. .