aii33026 fog lightstechinfo.honda.com/rjanisis/pubs/ai/aii33026.pdffront side of the bumper around...
TRANSCRIPT
© 2006 American Honda Motor Co., Inc. - All Rights Reserved. AII 33026 (0607) 1 of 1908V31-SHJ-1000-91
INSTALLATIONINSTRUCTIONS
Accessory Application Publications No.
Issue Date
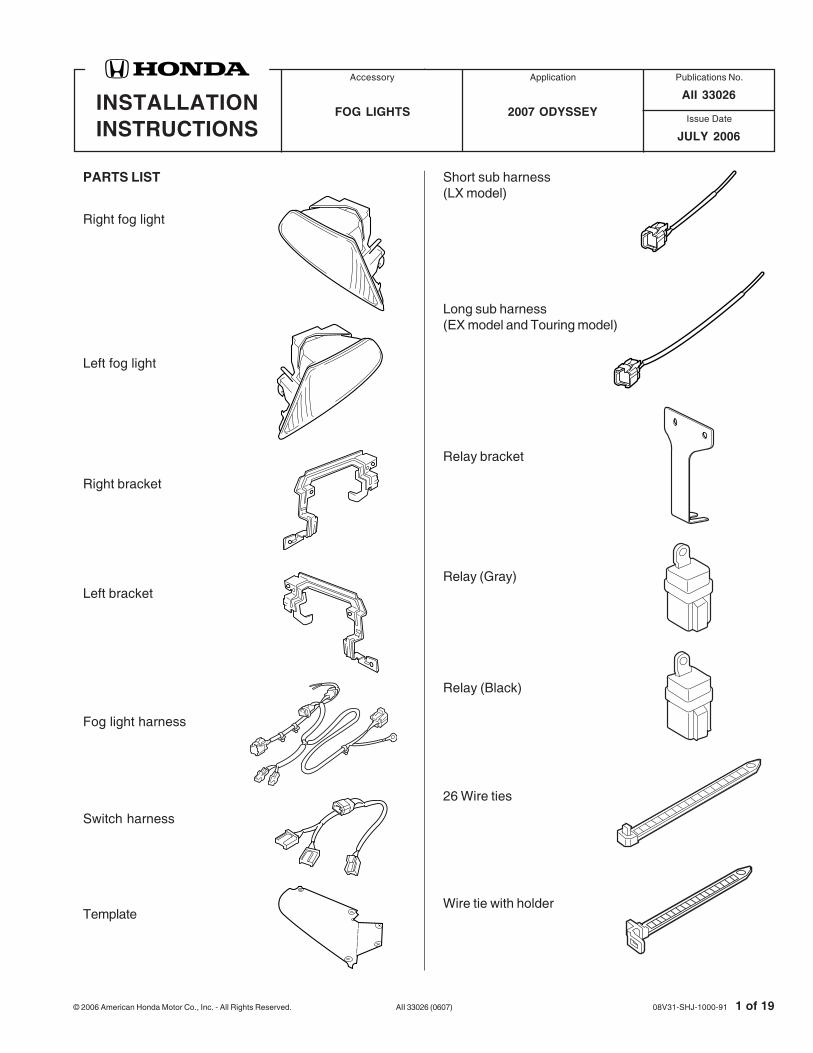
PARTS LIST
Left bracket
Right bracket
Fog light harness
Switch harness
Short sub harness(LX model)
Long sub harness(EX model and Touring model)
Relay bracket
Relay (Gray)
Relay (Black)
26 Wire ties
Wire tie with holder
JULY 2006
2007 ODYSSEYFOG LIGHTS
Right fog light
Left fog light
Template
AII 33026

2 of 19 AII 33026 (0607) © 2006 American Honda Motor Co., Inc. - All Rights Reserved.
TOOL AND SUPPLIES REQUIREDPhillips screwdriverStubby #2 Phillips screwdriver10 mm SocketRatchetDiagonal cutters10 mm Combination wrenchDrill3 mm, 6 mm, 7 mm, 10 mm, Drill bitEye protection (face shield, safety goggles, etc.)Hacksaw bladeFileMasking tapeFlat-tip screwdriverFelt-tip penPushpinBlanketIsopropyl alcoholShop towelScissors
3 Wire ties with clip
4 Small wire ties
Switch
2 Washer-bolts, 6 x 16 mm
2 Washer-bolts, 5 x 16 mm
6 Self-tapping screws
Ground bolt
4 Cushion tapes
Fuse label(LX model only)
10A Fuse
INSTALLATION
Customer Information: The information in thisinstallation instruction is intended for use only byskilled technicians who have the proper tools,equipment, and training to correctly and safely addequipment to your vehicle. These proceduresshould not be attempted by “do-it-yourselfers.”
NOTE:
• Be careful not to damage the body finish.
• Take care not to damage the clips and tabs.
1. Make sure you have the anti-theft code for theradio, then write down the radio station presets.
2. Disconnect the negative cable from the battery.

© 2006 American Honda Motor Co., Inc. - All Rights Reserved. AII 33026 (0607) 3 of 19
3. Remove the radiator cover (ten clips). Cutting the Front Bumper
5. To protect the bumper, apply masking tape to thefront side of the bumper around the right and leftfog light opening.
4. Remove the front bumper.
• On each side, pull the inner fender back, andremove the two self-tapping screws.
• Remove the eight clips.
• Remove the two bolts, and remove the frontbumper.
• Place the front bumper on a blanket.
6. On the inside of the bumper, align the templatewith the left fog light mounting position. Using apushpin, mark the bumper at each of the sixlocations on the template. Ignore the pre-scribedline.
4121010Y
CLIPS (10)
RADIATORCOVER
4121021Y
CLIPS (8)
SELF-TAPPINGSCREWS (2)
FRONTBUMPER
BOLTS (2)
MASKING TAPE
4306010Y
FRONTBUMPER
FOG LIGHTOPENING
4306020Y
PUSHPININSIDE THEFRONT BUMPER
TEMPLATE
INSIDE THEFRONT BUMPERPUSHPIN
TEMPLATE

4 of 19 AII 33026 (0607) © 2006 American Honda Motor Co., Inc. - All Rights Reserved.
11. On the inside of the front bumper, cut out the foglight opening from the front bumper using ahacksaw blade. Remove any burrs, and removethe masking tape.
10. On the outside of the front bumper, use ahacksaw blade to cut the bumper at the fog lightopening along the three sides.
7. Using a felt-tip pen, mark the bumper in the areashown.
NOTE: If there are pre-scribed lines on thebumper, ignore the pre-scribed lines, and use thetemplate as the guide.
9. While wearing eye protection, drill one 7 mm holeand four 10 mm holes at the marked locations.Start with a 3 mm drill bit, and finish with a 7 mmor a 10 mm drill bit.
8. Turn the template over, and mark the other side ofthe bumper the same way.
4306052Y
FOG LIGHTOPENING
INSIDE THEFRONT BUMPER
PUSHPINMARK
CUT LINE
4306042Y�
FRONT BUMPER
FOG LIGHTOPENING
HACKSAWBLADE
4306031Y
DRILL(Drill with 3 mmdrill bit, finish witha 10 mm drill bit.)
DRILL(Drill with 3 mmdrill bit, finish witha 10 mm drill bit.)
7 mm HOLE
INSIDE THEFRONT BUMPER
10 mmHOLES (4)
4519040Y
FELT-TIP PEN
MARK
TEMPLATE
FRONT BUMPER

© 2006 American Honda Motor Co., Inc. - All Rights Reserved. AII 33026 (0607) 5 of 19
Installing the Fog Lights
12. Install the left bracket to the front bumper usingthree self-tapping screws.
13. Insert the fog light through the opening in the frontbumper and into the bracket.
14. Install the fog light to the bracket using one5 x 16 mm washer bolt.
15. Repeat steps 9 through 14 to cut the bumper, andinstall the right fog light.
Routing the Fog Light Harness
16. Open the hood. Remove the FI-ECU cover (twoclips).
17. Remove the two under-hood fuse/relay box bolts,and slide the fuse/relay box to the side.
18. Remove the under-hood fuse/relay box cover (fourretaining tabs).
4306061Y
LEFTBRACKET
SELF-TAPPINGSCREW
FRONTBUMPER
4306071Y
LEFT FOG LIGHT
LEFT BRACKET
5 x 16 mmWASHER BOLT
4306080Y
FI-ECUCOVER
Insert
FI-ECU
CLIP
4306090Y
RETAININGTABS (4)
BOLT
BOLT
UNDER-HOODFUSE/RELAYBOX COVER
UNDER-HOODFUSE/RELAYBOX

6 of 19 AII 33026 (0607) © 2006 American Honda Motor Co., Inc. - All Rights Reserved.
22. Remove the subfuse box from the vehicle bracket.
If the vehicle you are working on is an LX model,go to step 28; otherwise, continue with step 20.
20. Locate the subfuse box near the under-hood fuserelay box. Remove the subfuse box cover (twotabs).
21. Remove the screw, and disconnect the vehicleharness.
4308010YUNDER-HOODFUSE RELAY BOX
SCREW
VEHICLEHARNESS
SUBFUSE BOX
TABSUBFUSEBOX COVER
19. Remove the under-hood fuse/relay box lowercover from the under-hood fuse/relay box (sixretaining tabs).
23. Remove the subfuse box from the case (one tab).
24. Get the long subharness. Plug the 1-pin terminalon the long subharness into the rear of thesubfuse box at the location shown.
4308020YUNDER-HOODFUSE RELAY BOX VEHICLE BRACKET
SUBFUSEBOX
SUBFUSEBOX
CASE
TAB
4308032Y�
LONG SUBHARNESS
SUBFUSEBOX
(Rear view) SUBFUSE BOX
4519050Y
UNDER-HOODFUSE RELAYBOX LOWERCOVER
UNDER-HOODFUSE/RELAY BOX
RETAININGTABS (6)
RELEASE CLIPTo remove fuserelay box.

© 2006 American Honda Motor Co., Inc. - All Rights Reserved. AII 33026 (0607) 7 of 19
25. Secure the long subharness to the subfuse boxharness with one small wire tie.
29. Get the short subharness. Plug the 1-pin terminalfrom the short subharness into the back of thevehicle 20-pin connector.
4308070Y
BOTTOM OFTHE UNDER-HOOD FUSE/RELAY BOX
VEHICLE20-PINCONNECTOR
4308041YUNDER-HOODFUSE/RELAY BOX
SUBFUSEBOX
VEHICLEHARNESS
SMALLWIRE TIE
WIRE TIE
LONG SUBHARNESS
VEHICLEHARNESS
26. Secure the long subharness to the vehicleharness with one wire tie.
27. Reinstall the subfuse box.
If the vehicle you are working on is an EX orTouring model, go to step 31; otherwise, continuewith step 28.
28. Disconnect the vehicle 20-pin connector from thebottom of the under-hood fuse relay box.
30. Reconnect the vehicle 20-pin connector into theunder-hood fuse/relay box.
31. Disconnect the vehicle 18-pin connector from theback of the under-hood fuse/relay box.
4308050Y
BACK OF THEUNDER-HOODFUSE/RELAY BOX
VEHICLE18-PINCONNECTOR
4308062Y
SHORT SUBHARNESS 1-PINCONNECTOR LOCATION
VEHICLE20-PIN CONNECTOR
VEHICLE20-PINCONNECTOR
SUBHARNESS
(View from theharness side)
UNDER-HOOD FUSERELAY BOX
SHORTSUBHARNESS1-PINTERMINAL
Release locktabs to insertpin.

8 of 19 AII 33026 (0607) © 2006 American Honda Motor Co., Inc. - All Rights Reserved.
36. Below the under-hood fuse relay box, secure thefog light harness connector to the vehicleharness using the wire tie with holder, and trim thewire tie.
39. Secure the fog light harness connector to thevehicle harness using one wire tie.
32. Get the fog light harness. Plug the 1-pin white/green and the 1-pin red/green terminals into theback of the 18-pin connector in the locationsshown.
35. Reinstall the under-hood fuse relay box lowercover in the original position.
33. Reconnect the vehicle 18-pin connector into theunder-hood fuse relay box.
34. Plug the connector on the long/short subharnessinto the fog light harness connector. Secure thefog light harness and the subharness to thevehicle harness with one small wire tie, then trimthe wire tie.
4308091Y
LONG SUBHARNESS(EX/Touringmodel)
FOG LIGHT HARNESSCONNECTOR
SMALLWIRE TIE
FOG LIGHTHARNESS
VEHICLEHARNESS
SHORT SUBHARNESS(LX model)
37. Using isopropyl alcohol, thoroughly clean theareas where the cushion tape will attach. Usingscissors, cut one cushion tape in half, and attachone half to the FI-ECU in the area shown.
38. Locate the vehicle 2-pin connector blue taped tothe vehicle harness, and remove the blue tape tofree the connector. Plug the fog light harness 2-pinconnector into the vehicle harness 2-pinconnector.
4309011Y�
CONNECTOR
VEHICLEHARNESS
FOG LIGHTHARNESS
WIRE TIEWITHHOLDER
4308081Y
FOG LIGHTHARNESS
VEHICLE18-PINCONNECTOR
View from theharness side
Red/GreenWhite/Green
VEHICLE18-PINCONNECTOR
White/Green
Red/Green
UNDER-HOODFUSE/RELAYBOX
Releaselock tabsto installpins
Removethe tape.
HARNESS2-PINCONNECTOR
WIRE TIE
FI-ECU
1/2 CUSHION TAPE
BOLT
FRONT
CUSHIONTAPE (half)
VEHICLE 2-PINCONNECTOR
FI-ECU

© 2006 American Honda Motor Co., Inc. - All Rights Reserved. AII 33026 (0607) 9 of 19
40. Route the fog light harness forward along thevehicle harness. Loosely secure it to the vehicleharness with two wire ties.
41. Route the right fog light harness 2-pin connectoralong the vehicle harness and into the bumperarea.
42. Attach the two wire ties with clips on the fog lightharness into the holes in the vehicle body.
4309030Y
WASHERTANK
FOG LIGHTHARNESS
LOOSELYSECUREWITHWIRE TIE
RIGHTHEADLIGHT
VEHICLEHARNESS
4309040Y
HORN
FOG LIGHTHARNESS
VEHICLEHARNESS
43. Using isopropyl alcohol, thoroughly clean theareas where the cushion tape will attach. Securethe fog light harness to the vehicle’s frame withthe cushion tape.
44. Adjust the fog light harness until the green tape onthe fog light harness is close to the wire tie withclip on the vehicle harness. Secure the fog lightharness to the vehicle harness with two wire ties.
4309061Y�
WIRETIE
FOG LIGHTHARNESS
VEHICLEHARNESS
GREENTAPE WIRE
TIE
FOG LIGHTHARNESS
VEHICLE WIRETIE WITH CLIP
4309051Y�VEHICLE FRAME
WIRE TIEWITH CLIP (2)
CUSHION TAPE
FOG LIGHTHARNESS

10 of 19 AII 33026 (0607) © 2006 American Honda Motor Co., Inc. - All Rights Reserved.
48. Route the fog light harness along the vehicleharness. Attach the fog light harness to thevehicle harness with two wire ties.
49. Route the fog light harness along the vehicleharness on the bulkhead, and loosely attach thefog light harness to the vehicle harness with fourwire ties.
4309080Y
WIRE TIE
FRONT
VEHICLEHARNESS
FOG LIGHTHARNESS
WIRE TIE
45. Tighten the two wire ties installed in step 40.
4309070Y
POWERSTEERINGRESERVOIRVEHICLE
BRACKET
4309030Y
WIRETIE
VEHICLEHARNESS
FOG LIGHTHARNESS
46. Reinstall the under-hood fuse/relay box.
47. Remove the power steering reservoir from thevehicle bracket.
4309090Y
WIRE TIE(Attach loosely.)
FRONT
VEHICLEHARNESS
FOG LIGHTHARNESS
BULKHEAD

© 2006 American Honda Motor Co., Inc. - All Rights Reserved. AII 33026 (0607) 11 of 19
50. Route the fog light harness behind the battery, andloosely secure it to the vehicle harness with threeadditional wire ties.
51. Locate the wire tie with clip near the end of the foglight harness. Wrap a cushion tape around the foglight harness at the measurement shown.
52. Attach the wire tie with clip on the fog lightharness into the hole in the body panel.
4310010Y
WIRE TIEWITH CLIP
WIRETIEWITHCLIP
120 mm
CUSHION TAPE
BODYPANEL
FOG LIGHTHARNESS
53. Route the fog light harness as shown.
55. EX model with AUTO air: Remove the bolt fromthe vehicle bracket. Secure the ground terminalfrom the fog light harness to the vehicle bracketusing the ground bolt supplied.
54. EX model with AUTO air: Secure the fog lightharness to the sensor harness with three wire ties.
4310031YFOG LIGHT HARNESSGROUND TERMINALGROUND
BOLT
BOLT(Discard)
FOG LIGHTHARNESS
WIRETIE
SENSORHARNESS
VEHICLEBRACKET
4309100Y
WIRE TIE(Attach loosely.)
VEHICLEHARNESS FRONT
FOG LIGHTHARNESS
BATTERY
FOG LIGHTHARNESS

12 of 19 AII 33026 (0607) © 2006 American Honda Motor Co., Inc. - All Rights Reserved.
61. Plug the blue fog light harness 4-pin connectorinto the gray relay. Plug the brown fog lightharness 4-pin connector into the black relay.
59. Tighten the seven wire ties installed in steps 49and 50.
60. Get the relay bracket and the two relays. Attachthe relays to the relay bracket with two 6 x 16 mmwasher bolts.
56. LX Model: Route the fog light harness as shownand secure it with three wire ties with clips to thevehicle frame.
58. Using isopropyl alcohol, thoroughly clean the areawhere the cushion tape will attach. Secure the foglight harness to the vehicle frame with onecushion tape.
57. LX Model: Use the ground bolt to secure theground terminal on the fog light harness to thevehicle frame.
4310022Y
FOG LIGHTGROUNDTERMINAL
GROUNDBOLT
VEHICLEFRAME
WIRE TIEWITHCLIP
GREENTAPE
WIRE TIE WITH CLIPS
FOG LIGHTHARNESS
4310050Y
6 x 16 mmWASHER-BOLT
RELAYBRACKET
RELAY(BLACK)
RELAY(GRAY)
4310041Y
FOG LIGHTHARNESS
VEHICLE FRAME
FOG LIGHT HARNESSCUSHION TAPE
4310060Y
RELAY(GRAY)
FOG LIGHT HARNESS4-PIN CONNECTOR(BLUE)
RELAY(BLACK)
FOG LIGHTHARNESS4-PINCONNECTOR(BROWN)

© 2006 American Honda Motor Co., Inc. - All Rights Reserved. AII 33026 (0607) 13 of 19
62. Loosen the bolt that secures the existing relaybox, and slide the tab from the fog light relaybracket under the bolt. Retighten the relaybracket bolt.
63. Secure the fog light harness to the vehicleharness with three wire ties.
64. With the help of an assistant, plug the fog lightharness 2-pin connectors into the fog lightconnectors, and reinstall the front bumper in itsoriginal position. Be careful that the fog lightharness does not get caught between the bumperand the splash shield.
Installing the Fog Light Switch
65. Remove the instrument side panel (six clips, threeretaining tabs).
4310070Y
RELAY
FRONT
BOLT
VEHICLEFRAME
EXISTINGRELAY BOX
4311010Y
VEHICLEHARNESS
FOG LIGHTHARNESS
FRONT
WIRE TIE
4301202B
CLIPS (6)
RETAININGTAB
INSTRUMENTSIDE PANEL
INSTRUMENTSIDE PANEL
FLAT-TIPSCREWDRIVER
SHOPTOWEL
4121020Y
FOG LIGHTHARNESS2-PINCONNECTOR
FOG LIGHTHARNESS2-PINCONNECTOR
FOG LIGHT
FOG LIGHT
FRONTBUMPER

14 of 19 AII 33026 (0607) © 2006 American Honda Motor Co., Inc. - All Rights Reserved.
67. Remove the switch lid (two retaining tabs).
72. Route the 6-pin switch harness connector throughthe switch hole and plug it into the VSA switch.Plug the vehicle 6-pin VSA connector into theswitch harness.
66. Reaching through the opening in the dashboard,release the four clips and pull out on the switchpanel. If equipped, disconnect the vehicleconnectors from the switch panel, and remove theswitch panel.
68. Remove the VSA switch. (two retaining tabs).
70. Route the switch harness 5-pin connector throughthe switch hole and plug it into the fog light switch.
71. Install the fog light switch into the hole where youremoved the switch lid.
69. Unplug the vehicle 6-pin connector from the VSAswitch.
4310090Y
SWITCH PANEL
VEHICLECONNECTOR
CLIPS (4)
EX Model Shown
4310101Y
SWITCH LID
RETAININGTABS
4310122Y
VEHICLE 6-PINCONNECTOR(VSA) SWITCH HARNESS
5-PIN CONNECTOR
FOGLIGHTSWITCH
VSA SWITCH
SWITCH HARNESS6-PIN CONNECTOR
EX Model Shown
SWITCHHARNESS6-PINCONNECTOR
4707020YVEHICLE 6-PINCONNECTOR
VSASWITCH
EX Model Shown

© 2006 American Honda Motor Co., Inc. - All Rights Reserved. AII 33026 (0607) 15 of 19
74. Locate the 2-pin connector at the front of the fusebox that is black-taped to the vehicle harness nearthe front bulkhead. Remove the black tape to freethe connector. Plug the 2-pin connector from theswitch harness into the vehicle harness 2-pinconnector you just freed.
73. Route and fold the switch harness back along thevehicle harness, and secure the switch harness tothe vehicle harness with two wire ties.
76. Install the 10A fog light fuse.
EX/Touring Model: Install the 10A fuse into thesubfuse box in the location shown.
75. At the fuse box, secure the switch harness to thevehicle harness with three wire ties.
4310131Y
WIRE TIE
VEHICLEHARNESS
SWITCHHARNESS
4311030Y
VEHICLEHARNESS
WIRE TIE
SWITCHHARNESS
4520020Y
TOP VIEW
FUSELOCATION
10A FUSE
SUB FUSE BOX
4311020Y
SWITCH HARNESS2-PIN CONNECTOR
BLACKTAPE
VEHICLE2-PINCONNECTOR

16 of 19 AII 33026 (0607) © 2006 American Honda Motor Co., Inc. - All Rights Reserved.
78. Check that all wire harnesses are routed properly,and all connectors are plugged in.
79. Reinstall all removed parts.
80. Reconnect the negative cable to the battery.
81. Enter the customer’s radio anti-theft code, andreset the station presets.
82. Reset the clock.
NOTE: Whenever the battery is disconnected, the driver’s AUTO window function is disabled.
83. Start the engine. Push down on the driver’swindow switch until the window is fully open, thenhold the switch for 2 seconds or more.
84. Pull up on the driver’s window switch to close thewindow completely, then hold the switch for 2seconds or more.
85. Test the AUTO window function.
77. LX Model Only: Attach the 10A fuse label to theinside of the under-hood fuse relay box.
LX Model: Install the 10A fuse into the under-hood fuse/relay box in the location shown.
4520010Y
10A FUSE
UNDER-HOODFUSE RELAY BOX
TOP VIEW
FUSE LOCATION
UNDER-HOODFUSE RELAY BOX
4311050Y
FUSE LABEL

© 2006 American Honda Motor Co., Inc. - All Rights Reserved. AII 33026 (0607) 17 of 19
87. Adjust the fog lights.
• Adjust the aiming according to local laws andregulations.
• To adjust, turn the adjustment screw in or outuntil the correct aiming is obtained.
Fog Light Aiming Adjustment
86. Remove the bolt and clip, and pull down the innerfender.
USE AND CARE
How to Operate Fog Lights
• Turn the light switch to the “on” position (headlights on low beam ).
• Press the fog light switch (indicator is on).
• If the fog lights don’t come on, check the fuse andall the connectors, including the ground cable andthe fusible link.
NOTE: The fog light lenses can cloud when theoutside temperature is cold; this is normal and shouldgo away in warm weather.
Replacing the Bulb
NOTE:
• Use only a Honda Genuine Halogen Light Bulb ofspecified wattage.BULB, FOG LIGHT (H8)P/N 33165-S5A-J010-M1
• Do not touch the bulb. Oily or greasy substanceson the bulb can shorten its service life due to theheat produced when the bulb is turned on. If thebulb is accidentally touched, wipe it clean with aclean, soft cloth that has been dampened withdenatured alcohol or a mild detergent solution.
4311080Y
ADJUSTINGSCREW
TO LOWERTO RAISE
4311070Y
Pull down.CLIP BOLT
INNER FENDER

18 of 19 AII 33026 (0607) © 2006 American Honda Motor Co., Inc. - All Rights Reserved.
4. Unplug the connector from the bulb, and removethe bulb from the fog light.
1. Remove the bolt and clip, and pull down the innerfender.
2. Unplug the connector from the fog light.
3. Remove the screw that fastens the fog light, andpull the light out toward you.
6. Reinstall the removed parts in the reverse order ofremoval:
• Check that the wire harnesses are notpinched.
• Be sure to tighten the self-tapping screw andbolts securely.
7. Check the operation of the fog light; adjust theaiming if necessary.
4312010Y
FOG LIGHT
BULBCONNECTOR
4311110Y
FOG LIGHT
BULBCONNECTOR
4311100Y
FOG LIGHT
SCREW CONNECTOR
4311070Y
Pull down.CLIP BOLT
INNER FENDER5. Install the new bulb into the fog light. Align the tab
on the fog light with the cutout in the bulb socketwhen installing the new bulb. If not aligned, thereis possibility that the fog light may annoyoncoming drivers.

© 2006 American Honda Motor Co., Inc. - All Rights Reserved. AII 33026 (0607) 19 of 19
LIGHT SWITCH
OFFLow Hi
OFF
ON ON
FOG
LIG
HT
SW
ITC
H
- - -
- - - -
BLK BRN BROWNBLACK
YEL ORN ORANGEYELLOW
BLU PUR PURPLEBLUE
GRN NAT NATURALGREEN
RED PNK PINKRED
WHT GRY GRAYWHITE
LT BLU LT GRN LIGHT GREENLIGHT BLUE
4707031Y
Front�Fog�Light
BLK
BLU/YEL
BLK
BLK BLK
GRNRED
RED/BLK
BLU/RED
RED/GRN
WHT/GRN
Under-hood�Relay Box
FR FOG LIGHT
Relay
Relay
BLU
BLK
12
HOT WITH�HEADLIGHT�SWITCH IN�PARK OR HEAD
HOT WITH HEADLIGHT�SWITCH IN HAED,AND�DIMMER SWITCH IN HIGHT
HOT WITH HEADLIGHT�SWITCH IN HAED��
HOT AT ALL�TIMES
Fog Light�Fuse�10A
Switch�1=Indicato�2=Switch� Illumination
Illumination�Control�
�
LX Model
Fog Light�Fuse�10A
Sub Fuse Box
HOT AT ALL�TIMES
EX Model/�Touring
CIRCUIT DIAGRAM
INDICATOR
HOT WITH HEADLIGHT SWITCH
IN HEAD AND DIMMER SWITCH IN
HIGHBEAM POSITION
HOT WITH HEADLIGHT
SWITCH IN HEAD