air conditioning control system remote monitoring interface … · 2016-04-10 · air conditioning...
TRANSCRIPT

Air Conditioning Control SystemRemote Monitoring Interface CMS-RMD-JInstallation and Instructions Manual
Safety notes are marked with WARNING or CAUTION, depending on the severity of possible
consequences that may result when the instructions are not followed exactly as stated.Proper installation is important for your safety and proper functioning of the units.Thoroughly read the following safety precautions prior to installation.
To ensure safety and proper operation of the unit, the unit should only be installed by qualified personnel.After reading this manual, pass the manual on to the end user to retain for future reference.The users should keep this manual for future reference and refer to it as necessary. This manual should be made available to those who repair or relocate the units. Make sure that the manual is passed on to any future air conditioning system users.
1. Introduction ..........................................................................................71-1. Parts names ............................................................................................ 71-2. Monitoring and operation of the air conditioners ..................................... 91-3. “Group” Definitions .................................................................................. 9
2. Package contents ..............................................................................103. Specifications ....................................................................................12
3-1. Product specifications ........................................................................... 123-2. External dimensions ............................................................................. 13
4. System configuration .........................................................................144-1. Number of connectable units ................................................................ 154-2. Setting M-NET address for various devices.......................................... 164-3. Units whose operation data can be acquired by the RMI ..................... 184-4. M-NET system setting example ............................................................ 22
5. Installation .........................................................................................245-1. Field-supplied items .............................................................................. 245-2. M-NET transmission cable length ......................................................... 265-3. Installation ............................................................................................. 28
6. Wiring connections ............................................................................326-1. Removing the cover to access the wiring ............................................. 326-2. Connecting protective ground wire ....................................................... 336-3. Connecting M-NET transmission cables and DC power
cables (24 VDC) ................................................................................... 346-4. Reinstalling the cover ........................................................................... 386-5. Connecting LAN cable .......................................................................... 39
7. Initial settings .....................................................................................407-1. Quick IP address setting ....................................................................... 427-2. Network settings on the Web browser .................................................. 43
8. Test run ..............................................................................................448-1. Confirmation of monitoring operation data ............................................ 448-2. Service LEDs ........................................................................................ 45
9. Product features ................................................................................4710. RS-232C ............................................................................................5011. Error code list ....................................................................................51

2
Safety precautions ● Thoroughly read the following safety precautions prior to installation. ● Observe these precautions carefully to ensure safety.
WARNING Indicates a risk of death or serious injury.
CAUTION Indicates a risk of injury or structural damage.
● Nomenclature
(Prohibited actions) (Do not touch) (No water) (No wet hands) (Fire hazards) (Electric shock hazards) (Injury hazards) (Important actions) (Grounding required) ● After reading this manual, pass the manual on to the end user to retain for future reference. ● The users should keep this manual for future reference and refer to it as necessary. This manual should be made available to those who repair or relocate the units. Make sure that the manual is passed on to any future air conditioning system users.
General precautions
This appliance is not intended for use by persons (including children) with reduced physical, sensory or mental capabilities, or lack of experience and knowledge, unless they have been given supervision or instruction concerning use of the appliance by a person responsible for their safety.Children should be supervised to ensure that they do not play with the appliance.
Do not install the interface in a place where large amounts of oil, steam, organic solvents, or corrosive gases, such as sulfuric gas, are present or where acidic/alkaline solutions or sprays are used frequently. These substances can compromise the performance of the interface or cause certain components of the interface to corrode, which can result in electric shock, malfunctions, smoke, or fire.
All electric work must be performed by qualified personnel.
WARNING
3
Precautions during installation
CAUTION
WARNING
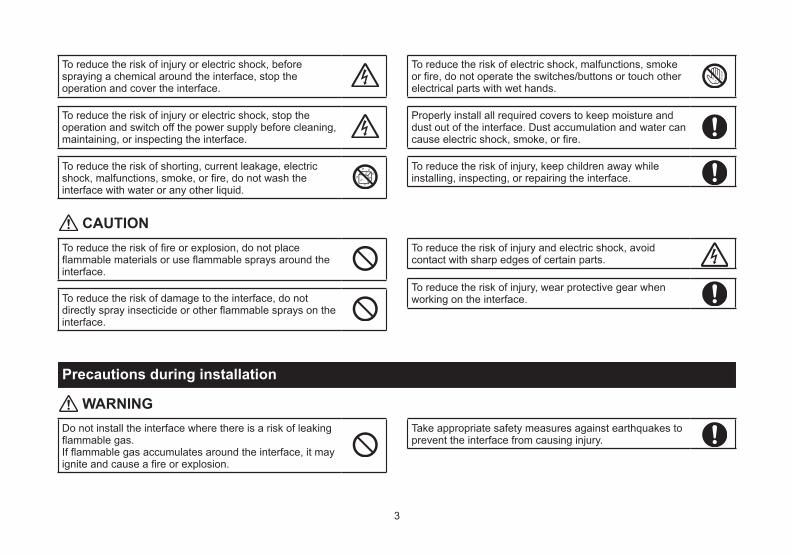
To reduce the risk of injury or electric shock, before spraying a chemical around the interface, stop the operation and cover the interface.
To reduce the risk of electric shock, malfunctions, smoke or fire, do not operate the switches/buttons or touch other electrical parts with wet hands.
To reduce the risk of injury or electric shock, stop the operation and switch off the power supply before cleaning, maintaining, or inspecting the interface.
To reduce the risk of shorting, current leakage, electric shock, malfunctions, smoke, or fire, do not wash the interface with water or any other liquid.
Properly install all required covers to keep moisture and dust out of the interface. Dust accumulation and water can cause electric shock, smoke, or fire.
To reduce the risk of injury, keep children away while installing, inspecting, or repairing the interface.
To reduce the risk of fire or explosion, do not place flammable materials or use flammable sprays around the interface.
To reduce the risk of damage to the interface, do not directly spray insecticide or other flammable sprays on the interface.
To reduce the risk of injury and electric shock, avoid contact with sharp edges of certain parts.
To reduce the risk of injury, wear protective gear when working on the interface.
Do not install the interface where there is a risk of leaking flammable gas.If flammable gas accumulates around the interface, it may ignite and cause a fire or explosion.
Take appropriate safety measures against earthquakes to prevent the interface from causing injury.

4
Precautions during wiring
CAUTION
WARNING
Properly dispose of the packing materials. Plastic bags pose suffocation hazard to children.
To prevent injury, install the interface on a flat surface strong enough to support its weight.
To reduce the risk of shorting, current leakage, electric shock, malfunctions, smoke, or fire, do not install the interface in a place exposed to water or in a condensing environment.
Interface must be installed by qualified personnel according to the instructions detailed in this manual.Improper installation may result in electric shock or fire.
To reduce the risk of damage to the interface, malfunctions, smoke, or fire, do not connect the power cable to the signal terminal block.
To reduce the risk of electric shock, install a breaker and a residual current circuit breaker on the power supply.To reduce the risk of electric shock, smoke, or fire, install a breaker for each interface.
Properly secure the cables in place and provide adequate slack in the cables so as not to stress the terminals. Improperly connected cables may break, overheat, and cause smoke or fire.
To reduce the risk of injury or electric shock, switch off the main power before performing electrical work.
All electric work must be performed by a qualified electrician according to the local regulations, standards, and the instructions detailed in this manual. Capacity shortage to the power supply circuit or improper installation may result in malfunction, electric shock, smoke, or fire.
Use properly rated breakers and fuses (breaker, local switch <switch + fuse>, no-fuse breaker). The use of a breaker with a breaking capacity greater than the specified capacity may cause electric shock, malfunctions, smoke, or fire.
To reduce the risk of current leakage, overheating, smoke, or fire, use properly rated cables with adequate current carrying capacity.

5
Precautions for moving or repairing the interface
CAUTION
WARNING
Proper grounding must be provided by a licensed electrician.Do not connect the protective ground wire to a gas pipe, water pipe, lightning rod, or telephone wire. Improper grounding may result in electric shock, smoke, fire, or malfunction due to electrical noise interference.
To reduce the risk of electric shock, shorting, or malfunctions, keep wire pieces and sheath shavings out of the terminal block.
To reduce the risk of electric shock, malfunctions, or fire, seal the gap between the cable access holes with putty.
To reduce the risk of shorting, current leakage, electric shock, or malfunctions, keep the cables out of contact with interface edges.
The interface should be repaired or moved only by qualified personnel. Do not disassemble or modify the interface.Improper installation or repair may cause injury, electric shock, or fire.
To reduce the risk of shorting, electric shock, fire, or malfunction, do not touch the circuit board with tools or with your hands, and do not allow dust to accumulate on the circuit board.
CAUTION

6
Additional precautions
To avoid damage to the interface, use appropriate tools to install, inspect, or repair the interface.
To avoid damage to the interface, do not overtighten the screws.
This interface is designed for exclusive use with the Building Management System by Mitsubishi Electric. The use of this interface for with other systems or for other purposes may cause malfunctions.
Take appropriate measures against electrical noise interference when installing the air conditioners in hospitals or facilities with radio communication capabilities.Inverter, high-frequency medical, or wireless communication equipment as well as power generators may cause the air conditioning system to malfunction. Air conditioning system may also adversely affect the operation of these types of equipment by creating electrical noise.
To avoid malfunctions, do not bundle power cables and signal cables together, or place them in the same metallic conduit.
To reduce the risk of electric shock, install and wire the unit with the power to the PAC-SC51KUA power supply unit turned off.
To avoid causing damage or fire, do not apply an AC voltage or a voltage higher than 32 VDC to the M-NET or the power supply (24 VDC) terminal blocks on the interface.
To avoid damage to the interface, do not make holes on the interface cover.
Do not use solderless terminals to connect cables to the terminal block. Solderless terminals may come in contact with the circuit board and cause malfunctions.
To avoid deformation and malfunction, do not install the interface in direct sunlight or where the ambient temperature may exceed 55°C (131°F) or drop below -10°C (14°F).
Do not install the interface on the panel door of the metal control box. Vibrations or shocks to the interface may damage the interface or cause the interface to fall.
To prevent unauthorized access, always use a security device such as a VPN router when connecting to the Internet.

7
1. IntroductionCMS-RMD-J is a remote monitoring interface that can be operated over a Local Area Network (LAN).Any connected air conditioning systems can be operated or monitored on the Web browser.Refer to the Web browser instruction books (separate volume) for how to use the Web functions.Hereinafter, CMS-RMD-J, unless otherwise specified, will be called “RMI.”
1-1. Parts names
M-NET LEDRed: ErrorGreen: Power and M-NET
* Refer to section 8-2 for details.
SD card LEDOrange: ErrorGreen: Access

8
CN5Unused
LANConnects to other units of equipment over the LAN via a HUB.
CN4 (RS-232C)Connects to a modem.
Ground (M4)Connects to protective ground wire.
TB2 (V+, V-) (M3.5)DC power supply terminal blockConnects to DC power cables (24 VDC) from power supply unit (PAC-SC51KUA). (V+: 24 VDC, V-: 0 V)
TB3 (A, B, S) (M3.5)M-NET transmission terminal blockConnects to M-NET transmission cables from power supply unit (PAC-SC51KUA).(A, B: Non-polarized, S: Shield)

9
1-2. Monitoring and operation of the air conditionersTo monitor and operate the air conditioners, the RMI and a PC are required.
1-3. “Group” DefinitionsThe term “Group” used in this manual is defined as follows.
Group is a group of air conditioning units and controllers and is the smallest unit that the RMI can control. The maximum number of units that each group can contain is 16.

10
2. Package contentsThe following items are included in the package.
Package contents Qty.(1) Remote monitoring interface (RMI)
* A specified microSD card is already installed.1
(2) L-fitting 2(3) M3 (8 mm (5/16 in)) roundhead screw (for fixing L-fitting)* 4(4) DIN rail attachment 2(5) M3 (6 mm (1/4 in)) roundhead screw (for fixing DIN rail attachment)* 8(6) Installation and Instructions Manual (this manual) 1
* M4 screws for fixing the RMI inside the metal control box using the L-fittings are not included.* Be sure to use the supplied screws (3) and (5). Other screws may damage the control board depending on the screw length.* ISO metric screw thread
11
Notes on the microSD card installed on the RMI ● The microSD card installed on the RMI has been set up at the factory. Do not use other SD cards as proper function cannot be guaranteed.
● The microSD card installed on the RMI differs from the ones sold on the market. ● The RMI will not start up if the microSD card does not function properly or is not installed. ● Only the microSD card that has been formatted on RMI can be used. ● Do not use the microSD card installed on the RMI for any other equipment.
Precautions for the replacement of microSD card ● Because of the characteristics of the microSD card, the read/write performance may degrade over time. It is recommended to replace the microSD card with our microSD card (available as service parts) every 10 years, even if it is not damaged.
● Only a qualified technician should insert or remove the microSD card. ● Before inserting or removing the microSD card, turn off the power to the RMI. ● If the microSD card becomes damaged, consult your dealer for a replacement.

12
3. Specifications3-1. Product specifications
Item SpecificationsPower supply Interface drive 24 VDC ± 5% * Requires a power supply unit
PAC-SC51KUA (sold separately)
Interface
M-NET transmission terminal 17–32 VDCExternal input/output 12 or 24 VDC (requires an external power supply)LAN Ethernet 100BASE-TX/10BASE-TRS-232C D-sub 9-pin Male
Ambient conditions
Temperature
Operating temperature range -10°C – +55°C [+14°F – +131°F]
Storage temperature range -20°C – +60°C [-4°F – +140°F]
Humidity 30%–90% RH (Non-condensing)
Dimensions (W × H × D) 165 × 120 × 46 mm [6-1/2 × 4-3/4 × 1-13/16 in]
Weight 0.7 kg [2 lbs]
Installation conditions Inside the metal control box* To be used in a business office or similar environment

13
3-2. External dimensions
20 (1
3/16
)
120
(4-3
/4)60
(2-3
/8)
50 (1
-31/
32)
36 (1
-7/1
6)
20 (1
3/16
)
4.5 (3
/16)
4.5 (3
/16)
10 (13/32)
20 (13/16)
30 (1-3/16)
46 (1-13/16)
225 (8-7/8)
205 (8-3/32)
165 (6-1/2)
Main body (when L-fittings are installed)
L-fitting
Unit: mm (in)
Fig. 3-1

14
4. System configurationThe figure below only shows the transmission cable connections. Power cables are omitted.
TB7 TB3
TB7 TB3
MA MA
ME
MA
M-NET
LOSSNAY
[051]
[056] [057]
[000]
[004] [005] [001] [002] [003]
[11] [12]
[006] [007] [008] [009] [010]
[106]
MA
[248]
M-NET
M-NET
Power supply unit PAC-SC51KUA
Power (24 VDC)Centralized controller
EB-50LAN
Outdoor unit (Y)
Outdoor unit (R2) BC controller
Group 2 Group 1
Group 3
Group 4 Group 5
M-NET adapter
Mr. Slim/M- and P-Seriesoutdoor unit
Indoor unit
Local remote controller
M-NET transmission cable
MA remote controller cable
Numbers in the parentheses indicate address numbers.
Mr. Slim/M- and P-Seriesoutdoor unit
Fig. 4-1
Remote monitoring interface RMI
Power supply unit PAC-SC51KUA (sold separately)
Power (24 VDC)
15
Note ● Provide a single ground point by grounding the shield wire of the M-NET centralized controller transmission cable at the power supply unit. Provide a ground point for the indoor-outdoor transmission cable for each outdoor unit. (Provide the appropriate grounding according to the local standard.)
● Set the centralized control switch (SW2-1) on the outdoor unit connected to the M-NET transmission cable to ON. ● To prevent unauthorized access, always use a security device such as a VPN router when connecting the RMI to the Internet.
● When newly connecting the RMI to the M-NET system in which a Main system controller exists, the group settings and interlocked LOSSNAY settings for the RMI must be the same as those for the Main system controller. (Likewise, when newly connecting a Main system controller to the M-NET system in which the RMI exists, the settings for the Main system controller must be the same as those for the RMI.) When registering system controllers to a group on the Web Browser for Initial Settings, make sure to register each other’s M-NET address.
4-1. Number of connectable unitsThe table below summarizes the number of connectable units.
Unit type Number of connectable unitsIndoor units, independent OA processing units, LOSSNAY units, DIDO controllers (PAC-YG66DCA), Air To Water (PWFY) units, Advanced HVAC CONTROLLERs in a system
Up to 50 units (including the interlocked LOSSNAY units)*1
Indoor units, independent OA processing units, and LOSSNAY units in a group
1–16 units(Indoor units, independent OA processing units, and LOSSNAY units cannot be combined in one group.)
Remote controllers in a group 1–2 units
System controllers in a group 0–4 units (Up to four remote and system controllers combined can be assigned to each group.)
LOSSNAY unit that can be interlocked with each indoor unit 1 unitIndoor units that can be interlocked with each LOSSNAY unit 1–16 units
*1 The maximum number of controllable units varies, depending on the number of channels used for DIDO controller.

16
4-2. Setting M-NET address for various devicesDesignate the address for each M-NET device. The addresses cannot be overlapped within the same M-NET system.
Address setting method M-NET address
Indoor unitAssign the lowest address to the main indoor unit in the group, and assign sequential addresses to the rest of the indoor units in the same group.
1–50
Outdoor unit Assign an address that equals the lowest indoor unit address in the same refrigerant system plus 50. 51–100
Auxiliary outdoor unit(BC controller etc.)
Assign an address that equals the address of the outdoor unit in the same refrigerant system plus 1. 52–100
OA processing unit/LOSSNAY unit
Assign an arbitrary but unused address to each of these units after assigning an address to all indoor units. 1–50
Air To Water (PWFY) unitAssign the lowest address to the main Air To Water (PWFY) unit in the group, and assign sequential addresses to the rest of the Air To Water (PWFY) units in the same group.
1–50
Mr. Slim/M- and P-Series outdoor unit
Make the settings in the same way as with the indoor units.Requires PAC-SF81MA-E (sold separately). 1–50
Room air conditioner Make the settings in the same way as with the indoor units.Requires MAC-333IF-E/MAC-399IF-E (sold separately). 1–50
M-NET remote controllerAssign an address that equals the address of the main indoor unit with the lowest address in the group plus 100. Add 150 in stead of 100 to set the address for a sub remote controller.
101–200
MA remote controllerAddress setting is not required.Connection of two remote controllers requires the Main/Sub setting for each controller to be made.
–

17
Address setting method M-NET address
Sub system controller Assign an address that equals the group number of the smallest controlled group plus 200. 201–250
Advanced HVAC CONTROLLER
Assign an address that equals the address of the main indoor unit with the lowest address in the group plus 200. If the address overlaps with the Sub system controller's address, assign an arbitrary but unused address between 201 and 250 to the Advanced HVAC CONTROLLER.
201–250
DIDO controller(PAC-YG66DCA)
Assign an arbitrary but unused address to the controller after completing the address setting for the units with an address between 1 and 50. The number of controllable units varies with the number of channels used.
1–50
PI controller(PAC-YG60MCA)
Assign an arbitrary but unused address to the controller after completing the address setting for the units with an address between 1 and 50.
1–50
AI controller(PAC-YG63MCA)
Assign an arbitrary but unused address to the controller after completing the address setting for the units with an address between 1 and 50.
1–50
Remote monitoring interface (CMS-RMD-J) Recommended to leave the default address 248 as it is. 0, 201–250
* Some models of the units listed in the table above cannot be controlled from RMI.

18
4-3. Units whose operation data can be acquired by the RMIThe table below summarizes the unit types whose operation data can be acquired by the RMI.
Unit type Details
Indoor unit Operation data can be acquired only from the units that have responded to a maintenance command from the RMI.
Outdoor unit Same as above.Auxiliary outdoor unit Same as above.P-Series outdoor unit Same as above.

19
[Main and Sub system controllers, and remote monitoring interface (M-NET)]Each group can be controlled by a Main system controller, Sub system controller, or remote monitoring interface.RMI is a remote monitoring interface and cannot be used as a Main or Sub system controller.
Main system controllerMain system controller refers to a system controller that controls all other system controllers including the units they control. If a given system has only one system controller, that controller becomes a Main system controller.
Sub system controllerSub system controller refers to a system controller that is controlled by a Main system controller.
Remote monitoring interfaceRemote monitoring interface is an equipment that collects operation data of units.When connecting the RMI to the M-NET system in which a Main system controller exists, the group settings, and interlocked LOSSNAY settings for the RMI must be the same as those for the Main system controller. When registering system controllers to a group on the Web Browser for Initial Settings, make sure to register each other's M-NET address.
Main system controller's (AG-150A's) control range
Sub system controller's control range
Group Group Group
Remote monitoring interface's (RMI's) control range

20
The system cannot be configured as shown in the examples below.
● Groups that are not under the control of a Main system controller cannot be controlled from a Sub system controller.
Group Group Group
Main system controller
Sub system controller
● Each group cannot be placed under the control of two or more Main system controllers.
Group Group Group
Main system controller 1
Main system controller 2
● Sub system controllers cannot be placed under the control of two or more Main system controllers.
Group Group Group Group
Main system controller 1
Main system controller 2
Sub system controller

21
● Groups that are not under the control of a Main system controller cannot be monitored from a remote monitoring interface.
Group Group Group
Main system controller
Remote monitoring interface
* If a Main system controller exists in the system, the group settings for the RMI must be the same as those for the Main system controller.
● Remote monitoring interface cannot be placed under the control of two or more Main system controllers.
Group Group Group Group
Main system controller 1
Main system controller 2
Remote monitoring interface
● Remote monitoring interface cannot be used as a Main system controller.
Group Group Group
Remote monitoring interface
Sub system controller's control range

22
4-4. M-NET system setting example(1) Setting example for connecting multiple M-NET system controllers
(Main system controller such as AG-150A)
[000]
[248]
[201]
M-NET
ON/OFF remote controller(Sub system controller)
PC
HUB
LAN 50 indoor unitsLAN
RMI(Remote monitoring interface)
● Make the initial settings such as group settings and interlock settings on the Web browser. Refer to the Instruction Book (Web Browser for Initial Settings) for details.
● The group settings and interlocked LOSSNAY settings for the RMI must be the same as those for the existing Main system controller. The M-NET address of the Main system controller needs to be registered to a group on the group settings screen on the RMI’s Web Browser for Initial Settings. Also, the M-NET address of the RMI needs to be registered to a group as a system controller on the group settings screen on the Main system controller’s Web Browser for Initial Settings. Be sure to register each other’s M-NET address.
● Designate a system controller within the system as the only controller from which operation prohibit setting can be made.

23
(2) Setting example for controlling Mr. Slim units (A-control models)
[000]
[248]
PCLAN
HUB
20 indoor unitsGroups 1–20
Mr. Slim outdoor unitsGroups 21 and 22
2 M-NET adapters(adapter address 21 and 22)
LAN(Main system controller
such as AG-150A)
RMI(Remote monitoring interface)
● An M-NET adapter (sold separately) is required to connect the Mr. Slim model of units to the M-NET.

24
5. Installation5-1. Field-supplied items
The following items are required to install the RMI.Field-supplied items Specifications
Unit fixing screw (required when using L-fittings) M4 x 4 pcs.
DIN rail and fixing screw (required when using DIN rails)
DIN rail width: 35 mm (1-13/32 in)Applicable type (IEC 60715/DIN 60715): TH35-7.5Fe, TH35-7.5Al
Protective ground wire
Type: Sheathed vinyl wire (should not be lighter than ordinary PVC sheathed flexible cord IEC 60227.) (designation 60227 IEC 53)
Size: Min. 0.75 mm² (Min. AWG 18)Color: green/yellow* Use a wire with an appropriate diameter so that the wire can be fixed with the cable
strap below the terminal block. A diameter of 10 mm is recommended.
Sleeved ring terminal M3.5 ring terminal (for power cables (+V, -V) and M-NET transmission cables (A, B, S))M4 ring terminal (for protective ground wire)
Transmission cable
Type: Sheathed vinyl cable● CPEVS ø1.2 mm● CVVS Min. 1.25 mm² (Min. AWG 16)
* CPEVS: PE*1 insulated PVC*1 jacketed shielded communication cable* CVVS: PVC*1 insulated PVC*1 jacketed shielded control cable
* Use cables with an appropriate diameter so that the cables can be fixed with the cable strap below the terminal block. A diameter of 10 mm is recommended.

25
Field-supplied items Specifications
DC power cable
Must comply with the local standards and the power requirement of RMI.Recommended type: Min. 0.75 mm² (Min. AWG 18), 2-conductor power cableLength: Max. 50 m (164 ft)* Use cables with an appropriate diameter so that the cables can be fixed with the cable
strap below the terminal block. A diameter of 10 mm is recommended.LAN cable Category 5 or above straight cable (Max. 100 m (328 ft))Switching HUB The communication speed of 100 Mbps or faster is recommended.
*1 PE: Polyethylene, PVC: Polyvinyl chloride

26
5-2. M-NET transmission cable lengthObserve the maximum total length of M-NET transmission cables to ensure proper signal transmission to and from the connected equipment over the M-NET transmission cables. If the maximum total length is exceeded, the M-NET signals will be attenuated, resulting in communication error and control failure.
● Maximum total length of M-NET transmission cables: 500 m (1640 ft)● Maximum total length of power feed: 200 m (656 ft)
<Example>
a
c
b d e
f
g
Remote monitoring interface
RMI
Power supply unit for transmission
cables (PAC-SC51KUA)
Outdoor unit
Outdoor unit
Centralized control transmission cables Indoor-outdoor transmission cables
Indoor unit Indoor unit
Indoor unit
Indoor unit Indoor unit
M-NET remote controller
10 m (32 ft)

27
(1) Maximum total length of M-NET transmission cablesa + b + d + e (f) ≤ 500 m (1640 ft)a + b + c + g ≤ 500 m (1640 ft)e (f) + d + c + g ≤ 500 m (1640 ft)
(2) Maximum total length of power feed for the indoor-outdoor transmission cablesg ≤ 200 m (656 ft)d + e (f) ≤ 200 m (656 ft)
(3) Maximum total length of power feed for the centralized control transmission cablesa + b ≤ 200 m (656 ft)a + b + c ≤ 200 m (656 ft)
Note ● The M-NET remote controller cable length should be 10 m (32 ft) or shorter. The length that exceeds 10 m (32 ft) needs to be included in the maximum total length of M-NET transmission cables (500 m (1640 ft)) and in the maximum total length of power feed (200 m (656 ft)).
● If the M-NET remote controller cable is shorter than 10 m (32 ft), the length does not need to be included in the maximum total length.

28
5-3. InstallationThe RMI must be installed inside the metal control box.Either the supplied L-fittings or DIN rail attachments can be used for the installation.
To prevent injury, install the interface on a flat surface strong enough to support its weight.
To reduce the risk of shorting, current leakage, electric shock, malfunctions, smoke, or fire, do not install the interface in a place exposed to water or in a condensing environment.
To reduce the risk of electric shock, malfunctions, or fire, seal the gap between the cable access holes with putty.
Do not install the interface on the panel door of the metal control box. Vibrations or shocks to the interface may damage the interface or cause the interface to fall.
<Installation space>Leave a space around the RMI as shown in the figure below.
UP
UP
UP
UP
UP
UP
UP
UP
20 (13/16) 20 (13/16)(165 (6-1/2)) (165 (6-1/2))
40 (1-19/32)
50 (1
-31/
32)
(120
(4-3
/4))
(120
(4-3
/4))
20 (1
3/16
)
70 (2
-25/
32)
20 (13/16) 20 (13/16)(165 (6-1/2)) (165 (6-1/2))
40 (1-19/32)
50 (1
-31/
32)
(120
(4-3
/4))
(120
(4-3
/4))
20 (1
3/16
)
70 (2
-25/
32)
RMI RMI
RMI RMI
RMI RMI
RMI RMI
Unit: mm (in)
Fig. 5-1 When using L-fittings Fig. 5-2 When using DIN rail

29
Method 1: Installation using L-fittings1. Have a metal control box ready. (Minimum steel thickness: 1 mm (3/64 in))2. Attach the supplied two L-fittings to the RMI with the supplied M3 screws. (Fig. 5-3)3. Properly install the RMI with the M4 screws (field-supplied) horizontally inside the metal control box (Fig. 5-3), taking into
consideration the installation space (Fig. 5-1).
M3(8 mm (5/16 in))
M3(8 mm (5/16 in))
M4
M4
Fig. 5-3
Note ● Each L-fitting must be attached to the RMI with two M3 screws. ● The RMI to which the L-fittings are attached must be fixed to the metal control box with total of four M4 screws to prevent it from falling.
● The surface on which the RMI will be installed needs to be strong enough to support its weight (1.0 kg (3 lbs) each).

30
Method 2: Installation using DIN rail1. Have a metal control box ready. (Minimum steel thickness: 1 mm (3/64 in))2. Attach the supplied two DIN rail attachments to the RMI with the supplied M3 screws. (Fig. 5-4)3. Properly mount the RMI on the DIN rail vertically (Fig. 5-5 and Fig. 5-6), taking into consideration the installation space (Fig.
5-2).
Fig. 5-4 Fig. 5-5
M3 (6 mm (1/4 in))
DIN rail attachments
Note ● Each DIN rail attachment must be fixed to the RMI with four M3 screws. ● To secure the strength, the screw pitch must be 200 mm (7-7/8 in) or less when DIN rail is mounted to the metal control box.
● The surface on which the RMI will be installed needs to be strong enough to support its weight (1.0 kg (3 lbs) each). ● Do not install the RMI where it may receive vibration. Use studs to fix the RMI as necessary.

31
[Mounting/removing the RMI on/from the DIN rail]
DIN rail attachment
DIN rail
MountingRemoving
Fig. 5-6
(1) Mounting1. Hook the upper side of the attachments to the DIN rail. 2. Push the lower part of the RMI until it snaps into place.
Note ● Ensure that the DIN rail attachments are fixed securely in place to the DIN rail.
(2) Removing1. Push the RMI downwards.2. Pull it up toward you.

32
6. Wiring connectionsAll electric work must be performed by a qualified electrician according to the local regulations, standards, and the instructions detailed in this manual. Capacity shortage to the power supply circuit or improper installation may result in malfunction, electric shock, smoke, or fire.
To reduce the risk of injury or electric shock, switch off the main power before performing electrical work.
To reduce the risk of damage to the interface, malfunctions, smoke, or fire, do not connect the power cable to the signal terminal block.
IMPORTANT ● To avoid damage to the interface, do not connect an AC power cable to the terminal block. ● Be careful not to injure your hands with sharp edges of the interface cover.
6-1. Removing the cover to access the wiringUnscrew the three screws on the cover to remove it as shown in the figure below.
Fig. 6-1

33
6-2. Connecting protective ground wireConnect an M4 ring terminal to the protective ground wire, and connect it to the ground terminal as shown in Fig. 6-2.
Protective ground wire
* Clamp the protective ground wire and DC power cables (24 VDC).
Wire color: yellow/green
Fig. 6-2

34
6-3. Connecting M-NET transmission cables and DC power cables (24 VDC)(1) Connecting the RMI to the M-NET system in which no Main system controllers exist
Connect the M-NET transmission cables and DC power cables (24 VDC) as shown in Fig. 6-3.(M-NET transmission cables A and B: Non-polarized; S: Shield)Be sure to use PAC-SC51KUA as a power supply unit.
* Use M3.5 ring terminals to connect the cables to the terminal blocks.
A B S V+ V- FG
M-NET Output
CN1 CN2
TB2 TB3
24VDC
A B S
TB7
TB2TB3
+V -V24VDCM-NET
Remote monitoring interface RMI
Power supply unit (PAC-SC51KUA)
Outdoor unit
RMI Power supply unit
To outdoor unit
Max. 50 m (164 ft)
DC power cables (Polarized)DC power cables
(Polarized)
M-NET transmission cables A and B (Non-polarized)
M-NET transmission cable S (Shield)
DC power cables (24 VDC) (Polarized)
Cable clamp
M-NET transmission cables for centralized control
Fig. 6-3
Cable clamp

35
Note ● Connect the M-NET transmission cables to the centralized controller system side, and supply power to the M-NET from PAC-SC51KUA. (Leave the power jumpers on all the outdoor units as they are (connected to CN41 at factory shipment).)

36
(2) Connecting the RMI to the M-NET system in which a Main system controller existsConnect the M-NET transmission cables and DC power cables (24 VDC) as shown in Fig. 6-4. Do not connect the M-NET transmission cables to the M-NET transmission terminal blocks on PAC-SC51KUA that is newly installed along with the RMI.
* Use M3.5 ring terminals to connect the cables to the terminal blocks.
A B S V+ V- FG
M-NET Output
CN1 CN2
TB2 TB3
24VDC
A B S
TB7
TB2TB3
+V -V24VDCM-NET
Remote monitoring interface RMI
Power supply unit (PAC-SC51KUA)
Outdoor unit
RMI Power supply unit
To outdoor unit
Max. 50 m (164 ft)
DC power cables (Polarized)DC power cables
(Polarized)
M-NET transmission cables A and B (Non-polarized)
M-NET transmission cable S (Shield)
DC power cables (24 VDC) (Polarized)
Cable clamp
M-NET transmission cables for centralized control
Fig. 6-4
Cable clamp

37
Note ● Connect the M-NET transmission cables to the centralized controller system side. Do not connect M-NET transmission cables to TB2 on PAC-SC51KUA that supplies power to the RMI. (Leave TB2 open.)

38
6-4. Reinstalling the coverReinstall the cover using the three screws that were unscrewed.
Fig. 6-4

39
6-5. Connecting LAN cableConnect the LAN cable to the LAN port on the RMI.
● The LAN cable is field supplied. Use a category 5 or above straight LAN cable. ● Use a switching HUB. ● The maximum distance between the switching HUB and RMI is 100 m (328 ft).
Fig. 6-5
LAN port
Note ● LAN must be installed before the unit installation. Route the LAN cable to the RMI in the same way as the M-NET transmission cables.
● Leave enough space around the LAN port on the RMI to allow for the connection of the cables. Refer to section 5-3 "Installation."
● When connecting the RMI to an existing LAN, consult the system administrator to decide the IP address. Change the IP address setting before connecting the LAN cable to the LAN port.
● To prevent unauthorized access, always use a security device such as a VPN router when connecting the RMI to the Internet.

40
7. Initial settingsInitial settings need to be made for each RMI on the Web browser. Details about the initial settings and other settings are covered in the Instruction Books (Web Browser for Initial Settings, Web Browser for Remote Monitoring User).
The format in which the web page address for each RMI is expressed on the Web browser is shown below.http://[IP address of the RMI]/init/administrator.htmlFor example, if the IP address of the RMI is [192.168.1.51], the web page address is [http://192.168.1.51/init/administrator.html].
The web page can only be displayed in English.
Enter the following default maintenance user name and password in the log in screen.Default user name Default password
initial init
41
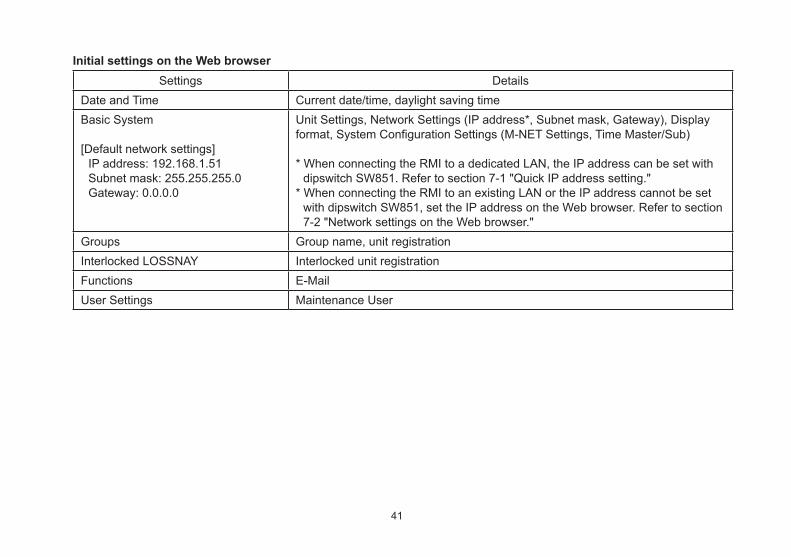
Initial settings on the Web browserSettings Details
Date and Time Current date/time, daylight saving timeBasic System
[Default network settings]IP address: 192.168.1.51Subnet mask: 255.255.255.0Gateway: 0.0.0.0
Unit Settings, Network Settings (IP address*, Subnet mask, Gateway), Display format, System Configuration Settings (M-NET Settings, Time Master/Sub)
* When connecting the RMI to a dedicated LAN, the IP address can be set with dipswitch SW851. Refer to section 7-1 "Quick IP address setting."
* When connecting the RMI to an existing LAN or the IP address cannot be set with dipswitch SW851, set the IP address on the Web browser. Refer to section 7-2 "Network settings on the Web browser."
Groups Group name, unit registrationInterlocked LOSSNAY Interlocked unit registrationFunctions E-MailUser Settings Maintenance User

42
7-1. Quick IP address settingIP address can be easily set to an address between 192.168.1.1 and 192.168.1.15 with dipswitch SW851. Set SW851 before turning on the power.
No.SW851
[0: OFF, 1: ON] IP address Subnet mask Gateway1 2 3 4
0 0 0 0 0 Default192.168.1.51
Default 255.255.255.0
Default 0.0.0.0
1 0 0 0 1 192.168.1.1
255.255.255.0 0.0.0.0
2 0 0 1 0 192.168.1.23 0 0 1 1 192.168.1.34 0 1 0 0 192.168.1.45 0 1 0 1 192.168.1.56 0 1 1 0 192.168.1.67 0 1 1 1 192.168.1.78 1 0 0 0 192.168.1.89 1 0 0 1 192.168.1.910 1 0 1 0 192.168.1.1011 1 0 1 1 192.168.1.1112 1 1 0 0 192.168.1.1213 1 1 0 1 192.168.1.1314 1 1 1 0 192.168.1.1415 1 1 1 1 192.168.1.15
Note ● If you forget the RMI IP address, you can start RMI by changing the SW851 setting and temporarily using an arbitrary IP address. (It is recommended to paste a label with the IP address on the RMI, so that the IP address is available at all times.)

43
Fig. 7-1
1234 O
NO
FF
SW851
SW851
7-2. Network settings on the Web browserIP, subnet mask, and gateway addresses can be set on the Web browser. All the switches of SW851 must be set to OFF to make these settings.When connecting the RMI to an existing LAN, consult the system administrator to decide the IP, subnet mask, and gateway addresses. Refer to the Instruction Book (Web Browser for Initial Settings) for how to make these settings.

44
8. Test runConfirm that the group settings and interlock settings are complete before performing a test run.
8-1. Confirmation of monitoring operation dataTest run procedure1. Turn on the power to the RMI and all units.2. Access the Web browser URL address and log in with the remote monitoring user name and password.
(Refer to the Instruction Book (Web Browser for Remote Monitoring User) for details.)3. Monitor the operation data of all the units that are registered to the RMI. Check for proper operation of monitoring.
(Refer to the Instruction Book (Web Browser for Remote Monitoring User) for details.)

45
8-2. Service LEDs
M-NET/Error
SD
LED858
LED857
SD
Fig. 8-2
LED Item Color Status
M-NET M-NET GreenLit PoweredUnlit Not poweredBlink M-NET transmission in progress
Error Error status RedBlink One or more air conditioning units*1 are in error.Unlit Normal
SDSD card error status Orange
Blink The SD card may be damaged.Unlit Normal
SD card access GreenBlink Write-out/read-in process in progressUnlit No access
LED857 Start-up YellowLit Starting-upUnlit Start-up completed
LED858 ON/OFF status*2 YellowLit One or more air conditioning units are ON.Unlit All air conditioning units are OFF.
*1 Includes all the connected equipments.*2 The ON/OFF status of the DIDO controller cannot be indicated.* All the LEDs will light up for approximately one minute after startup.

46
Note ● When the LED for SD card error status is blinking, the microSD card installed on the RMI may be damaged. If the microSD card is damaged, consult your dealer for a replacement.
● Only a qualified technician should insert or remove the microSD card.

47
9. Product featuresAny connected air conditioning systems can be operated or monitored on the RMI Web browser.The table below summarizes the available functions and settings on RMI. Refer to the Web browser instruction books (separate volume) for details.
Function Description
Use
r's o
pera
tion
func
tions
Operation*1
ON/OFF The ON/OFF operation can be performed collectively or for each group.
Operation mode The operation mode can be switched collectively or for each group. (The available operation modes depend on the unit model.)
Set temperature The set temperature can be set collectively or for each group. (The available set temperatures depend on the unit model.)
Air direction The air direction can be changed collectively or for each group. (The available air directions depend on the unit model.)
Fan speedThe fan speed can be changed collectively or for each group. (The number of available fan speeds depend on the unit model.) Auto mode is available only on the models that support Auto mode.
Interlocked ventilator (LOSSNAY) ON/OFF
Interlocked LOSSNAY units (if any) can be operated or stopped collectively or for each group.
Prohibition of local remote controller operation
Some operations or settings from the local remote controllers can be prohibited collectively or for each group.
Filter sign reset Filter sign can be reset collectively or for each group.Malfunction reset Displayed error can be reset.Clear malfunction log Displayed unit errors and communication errors can be cleared.

48
Function DescriptionU
ser's
ope
ratio
n fu
nctio
ns
Monitor*1
Condition List Displays the operation status of each group.
Prohibition of local remote controller operation
Displays the icon to indicate that the operation is prohibited by the RMI or other system controllers.
Malfunction List Displays the address of the unit in error and error code.
Filter sign Indicates that the filter on the unit in a given group is due for cleaning.
Malfunction Log Displays unit errors and communication errors.
Initi
al s
ettin
gs
Operation*1
Date and Time Sets the current date/time and daylight savings time.
Basic System Sets unit name, unit ID, IP address, subnet mask, gateway, display format, M-NET address, range of prohibited controllers, and Time Master/Sub setting.
Groups Registers air conditioning units, Air To Water (PWFY) units, LOSSNAY units, general equipments, remote controllers, and sub system controllers to a group.
Interlocked LOSSNAY Interlocks the operation of indoor units and LOSSNAY units.
Func
tion
setti
ngs
Functions E-Mail The e-mail server information, RMI e-mail information, and e-mail settings for the error notification e-mail function and e-mail communication function can be set.

49
Function DescriptionU
ser s
ettin
gs
User settings
Maintenance user User name and password for maintenance users can be set.
Remote monitoring user User name, password for remote monitoring users can be set.
Mis
cella
neou
s
Data back-up
Connection/Interlock information
Group setting information and interlock setting information are retained, even if power is turned off.
Malfunction log Malfunction log is retained, even if power is turned off.
Current time Current time is retained by the built-in capacitor for a week, even if power is turned off.
Operation data Operation data are saved every hour on the hour, and they are retained even if power is turned off.
Pre-error data Pre-error data are retained, even if power is turned off.
Data displayOperation data Displays unit addresses, operation data, and date and time of acquisition of
operation data.Pre-error data Displays data for the two hours before the occurrence of each unit error.
Device maintenance
Time synchronization
Clocks on the RMI, controllers, and the units that are under the control of the main system controller are synchronized once a day (applicable only to the ones that support this function).
*1 The item and range that can be operated or monitored depend on the unit model.

50
10. RS-232CRS-232C connector is used to connect to a modem. Refer to the manual that came with the modem for how to connect the modem.
RS-232C connector (CN4)
Fig. 10-1

51
11. Error code listError codes and their definitions are shown below. If an error occurs, note the error code and consult your dealer.(A) indicates A-control units.
0100 Equipment abnormality01*0 Equipment abnormality (PAC-YG66DCA) in system *01** Equipment abnormality in system **0403 Serial transmission trouble0404 Indoor unit EEPROM error (A)0701 Combustion circuit abnormality (A)0702 Combustion heat exchange overheating protection (A)0703 Accidental fire (A)0704 Heater abnormality (A)0705 Seismoscope malfunction (A)0706 Flame current sensor abnormality (A)0707 Ignition abnormality (A)0708 Blower motor rotation abnormality (A)0709 Oil pump circuit abnormality (A)0900 Test run1000 Refrigerant cycle abnormality10*0 Refrigerant cycle abnormality in line *1102 Discharge temperature abnormality (TH4) (A)1108 Inner thermo (49C) operation (A)11** Refrigerant cycle temperature abnormality - Common operand: **
1300 Low-pressure abnormality (63L operation) (A)13** Refrigerant cycle pressure abnormality - Common operand: **

52
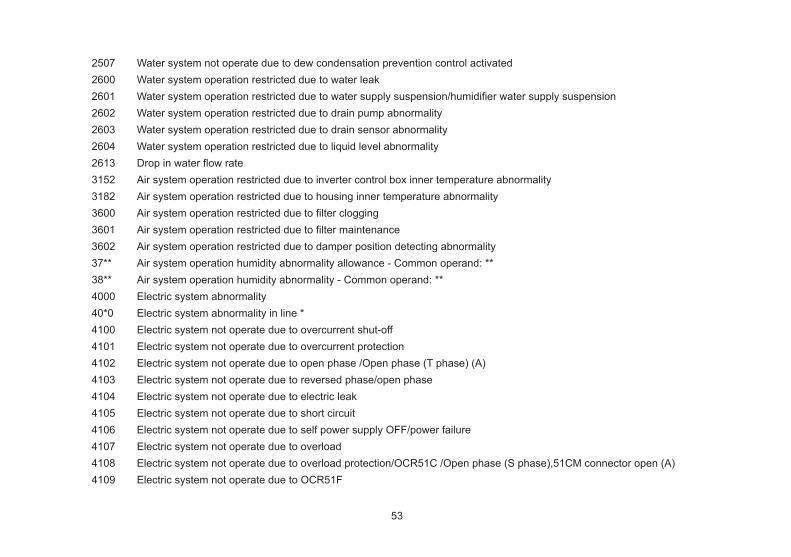
1500 Refrigerant cycle not operate due to overcharge1501 Refrigerant cycle not operate due to undercharge (/compressor shell temperature abnormality)1502 Refrigerant cycle not operate due to liquid back /Low-discharge super heat abnormality (A)1503 Refrigerant cycle not operate due to coil frost1504 Refrigerant cycle not operate due to overheat protection1505 Refrigerant cycle not operate due to compressor vacuum operation protection/refrigerant low temperature abnormality1506 Refrigerant cycle not operate due to refrigerant pump abnormality1507 Refrigerant cycle not operate due to composition detection abnormality1508 Refrigerant cycle not operate due to control valve fault1509 Refrigerant cycle not operate due to high pressure abnormality (ball valve closed)1510 Refrigerant cycle - Gas leakage1511 Refrigerant cycle not operate due to oil slick abnormality1512 Refrigerant cycle not operate due to a stop of freezing protection function1513 Refrigerant cycle - Brine freezing1559 Oil balance circuit abnormality2000 Water system abnormality (Pump interlock abnormality)20*0 Water system abnormality in line *21** Water system temperature abnormality - Common operand: **23** Water system pressure abnormality - Common operand: **2500 Water system not operate due to water leak2501 Water system not operate due to water supply suspension2502 Water system not operate due to drain pump abnormality2503 Water system not operate due to drain sensor abnormality/float switch function2504 Water system not operate due to liquid level abnormality2505 Water system not operate due to cool water valve abnormality2506 Water system not operate due to warm water valve abnormality
53
2507 Water system not operate due to dew condensation prevention control activated2600 Water system operation restricted due to water leak2601 Water system operation restricted due to water supply suspension/humidifier water supply suspension2602 Water system operation restricted due to drain pump abnormality2603 Water system operation restricted due to drain sensor abnormality2604 Water system operation restricted due to liquid level abnormality2613 Drop in water flow rate3152 Air system operation restricted due to inverter control box inner temperature abnormality3182 Air system operation restricted due to housing inner temperature abnormality3600 Air system operation restricted due to filter clogging3601 Air system operation restricted due to filter maintenance3602 Air system operation restricted due to damper position detecting abnormality37** Air system operation humidity abnormality allowance - Common operand: **38** Air system operation humidity abnormality - Common operand: **4000 Electric system abnormality40*0 Electric system abnormality in line *4100 Electric system not operate due to overcurrent shut-off4101 Electric system not operate due to overcurrent protection4102 Electric system not operate due to open phase /Open phase (T phase) (A)4103 Electric system not operate due to reversed phase/open phase4104 Electric system not operate due to electric leak4105 Electric system not operate due to short circuit4106 Electric system not operate due to self power supply OFF/power failure4107 Electric system not operate due to overload4108 Electric system not operate due to overload protection/OCR51C /Open phase (S phase),51CM connector open (A)4109 Electric system not operate due to OCR51F

54
4110 Electric system not operate due to high voltage part4111 Electric system not operate due to bus current4112 Electric system not operate due to coil overheat 49°C4113 Electric system not operate due to heater overheat4114 Electric system not operate due to fan controller abnormality4115 Electric system not operate due to power supply synchronism abnormality /Input circuit (board) failure4116 Electric system not operate due to motor abnormality/speed abnormality4117 Compressor self-protection function operation (A)4118 Opposite phase detection circuit (board) failure (A)4119 Open of 2 or more connectors (A)4121 Electric system not operate due to trouble in equipment to which a measure against higher harmonics is taken4123 Electric system not operate due to Inverter output error4124 Electric system not operate due to damper abnormality4125 Electric system - Rush-proof circuit abnormality4200 Inverter abnormality420* Inverter abnormality - Inverter No.: *4210 Inverter overcurrent shut-off421* Inverter overcurrent shut-off - Inverter No.: *4220 Inverter bus voltage insufficiency / Voltage abnormality (A)422* Inverter bus voltage insufficiency - Inverter No.: *4230 Inverter radiating thermostat abnormality423* Inverter radiating thermostat abnormality - Inverter No.: *4240 Inverter overcurrent (overload) protection424* Inverter overcurrent protection - Inverter No.: *4250 Inverter IPM/bus voltage abnormality /Power module abnormality (A)425* Inverter IPM abnormality *

55
4260 Inverter cooling fan trouble426* Inverter cooling fan trouble - Inverter No.: *5000 Sensor trouble50*0 Sensor trouble in system *51** Temperature sensor trouble - Sensor No.: **5202 Connector (63L) open (A)52** Pressure sensor trouble - Sensor No.: **5300 Current sensor abnormality (A)53** Current sensor trouble - Sensor No.: **54** Humidity sensor trouble - Sensor No.: **55** Gas sensor trouble - Sensor No.: **56** Air speed sensor trouble - Sensor No.: **57** Limit switch trouble - Switch No.: **58** Sensor trouble - Sensor No.: **59** Other sensors trouble - Sensor No.: **6000 System abnormality6101 System not operate due to abnormality - With response frame6102 No answer back6200 Controller H/W abnormality6201 E2PROM abnormality6202 RTC abnormality6204 External memory read/write error6205 External memory cannot be written to any more.6500 Communication error6600 Communication error - Address duplicate6601 Communication error - Polarity unsettled

56
6602 Communication error - Transmission processor hardware error6603 Communication error - Transmission line busy6604 Communication error - No ACK (06H) (communication circuit error)6605 Communication error - No response frame6606 Communication error - Transmission processor communication error6607 Communication error - No ACK return6608 Communication error - No return of response frame6609 Communication error6610 Communication error6700 Communication error - K-transmission abnormality6701 Communication error - K-transmission error6702 Communication error - K-address duplicate6750 Communication error - K abnormality code PO6751 K abnormality - Room temperature thermistor abnormality6752 K abnormality - Indoor coil thermistor abnormality, Condensation temperature sensor abnormality6753 K abnormality - Transmit/receive error6754 K abnormality - Drain sensor abnormality, Float switch function6755 K abnormality - Drain pump abnormality6756 K abnormality - Coil frost/overheat protection6757 K abnormality - System error6758 K abnormality - Outdoor unit trouble, Indoor/outdoor communication error6761 K abnormality - Room temperature thermistor abnormality6762 K abnormality - Indoor coil thermistor abnormality, Condensation temperature sensor abnormality6763 K abnormality - Transmit/receive error6764 K abnormality - Drain sensor abnormality6765 K abnormality - Drain pump abnormality

57
6766 K abnormality - Coil frost/overheat protection6767 K abnormality - Outdoor unit trouble - Indoor/outdoor communication error6771 K abnormality - High pressure abnormality, Low pressure abnormality
6772 K abnormality - Inner thermostat function, Discharge temperature abnormality, Shell thermostat function, Overcurrent protection
6773 K abnormality - Radiator plate thermostat function6774 K abnormality - Outdoor thermistor abnormality6775 K abnormality - Pressure sensor abnormality, Indoor/outdoor communication error6776 K abnormality - Overcurrent shut-off6777 K abnormality - System error6778 K abnormality - Normal6779 K abnormality - Refrigerant overcharge, Abnormal voltage, Abnormal CT sensor6800 Communication error - Other communication errors6801 Communication error - V-control communication error6810 Communication error - UR communication error6811 Communication error - UR communication synchronism not recover6812 Communication error - UR communication hardware error6813 Communication error - UR communication status bit detection error6820 Other communication errors6821 Other communication errors - Transmission line busy6822 Other communication errors - No communication ACK6823 Other communication errors - No response command6824 Other communication errors - Receive data error6830 Communication error - MA communication refrigerant address double setting error6831 Communication error - No MA communication reception error6832 Communication error - MA communication synchronism not recover

58
6833 Communication error - MA communication transmission/reception hardware trouble6834 Communication error - MA communication start bit detection error6840 Communication error - A control no indoor/outdoor communication/reception abnormality6841 Communication error - A control indoor/outdoor communication synchronization recovery abnormal
6844 Communication error - A control indoor/outdoor communication incorrect indoor/outdoor wiring connection, excessive number of indoor units (more than five units)
6845 Communication error - A control indoor/outdoor communication incorrect indoor/outdoor wiring connection (telecommunication, disconnection)
6846 Communication error - A control indoor/outdoor communication startup time exceeded7000 System abnormality7100 System abnormality - Total capacity error7101 System abnormality - Capacity code error7102 System abnormality - Connecting unit number excess7103 System abnormality - Piping length setting error7104 System abnormality - Floor height setting error7105 System abnormality - Address setting over 2547106 System abnormality - Attribute setting error7107 System abnormality - Distributor setting error7108 System abnormality - Refrigerant system setting error7109 System abnormality - Connection setting error7110 System abnormality - Refrigerant system connection/connection data unsettled7111 System abnormality - I/O connection equipment not connected/remote controller sensor abnormality7112 System abnormality - I/O type setting error7113 System abnormality - Equipment unsettled7116 System abnormality - Replace non-wash setting error7117 System abnormality - Model identification setting error7130 System abnormality - Different unit model error

59
7131 System abnormality - Mixed cooling only H/P connection error (Facility PAC)7132 System abnormality - Multiple entries of operation performance (Facility PAC)7200 System abnormality - Numeric values unsettled7201 System abnormality - Numeric values unsettled73** System abnormality - LON system equipment abnormality

60

61

62

63
microSD and microSDHC Logos are trademarks of SD-3C, LLC.
Java is a registered trademark of Oracle and/or its affiliates.
This equipment has been tested and found to comply with the limits for a Class B digital device, pursuant to Part 15 of the FCC Rules. These limits are designed to provide reasonable protection against harmful interference in a residential installation. This equipment generates, uses and can radiate radio frequency energy and, if not installed and used in accordance with the instructions, may cause harmful interference to radio communications.However, there is no guarantee that interference will not occur in a particular installation.If this equipment does cause harmful interference to radio or television reception, which can be determined by turning the equipment off and on, the user is encouraged to try to correct the interference by one or more of the following measures:
- Reorient or relocate the receiving antenna.- Increase the separation between the equipment and receiver.- Connect the equipment into an outlet on a circuit different from that to which the receiver is connected.- Consult the dealer or an experienced radio/TV technician for help.

Please be sure to put the contact address/telephone number on this manual before handing it to the customer.
HEAD OFFICE: TOKYO BLDG., 2-7-3, MARUNOUCHI, CHIYODA-KU, TOKYO 100-8310, JAPAN
WT06708X01
The product at hand is based on the following EU regulations:• Electromagnetic Compatibility Directive 2004/108/EC• Restriction of Hazardous Substances 2011/65/EU
This product is designed and intended for use in the residential, commercial and light-industrial environment.