air purifier uv light system - hetch
TRANSCRIPT
Air Purifier UV Light SystemModel No. : APF-1804-HC
Quick Guide
Parts Identifications
Intended Use
English
The air purifier is only intended for air cleaning of privately used rooms (e.g. living rooms, bedrooms, storage rooms or cellars). The user must comply with the specified operating parameters of these instructions.
The machine may only be used for its intended purpose. Any further use beyond this is not intended. The user/operator and not the manufacturer shall be liable for any damage or injury of any kind resulting there from.
Air cleaners are only conditionally suitable for use in kitchens, as oils and fats in the air as well as increased soot pollution can very quickly clog the filters.
Attention : Before using, remove all packaging materials from the filters and install them as explained in the section “Filter replacement”.
A B C D
A. Operation PanelB. Fan-wheelC. Honeycomb HEPA 5 Layers FilterD. Rear Panel
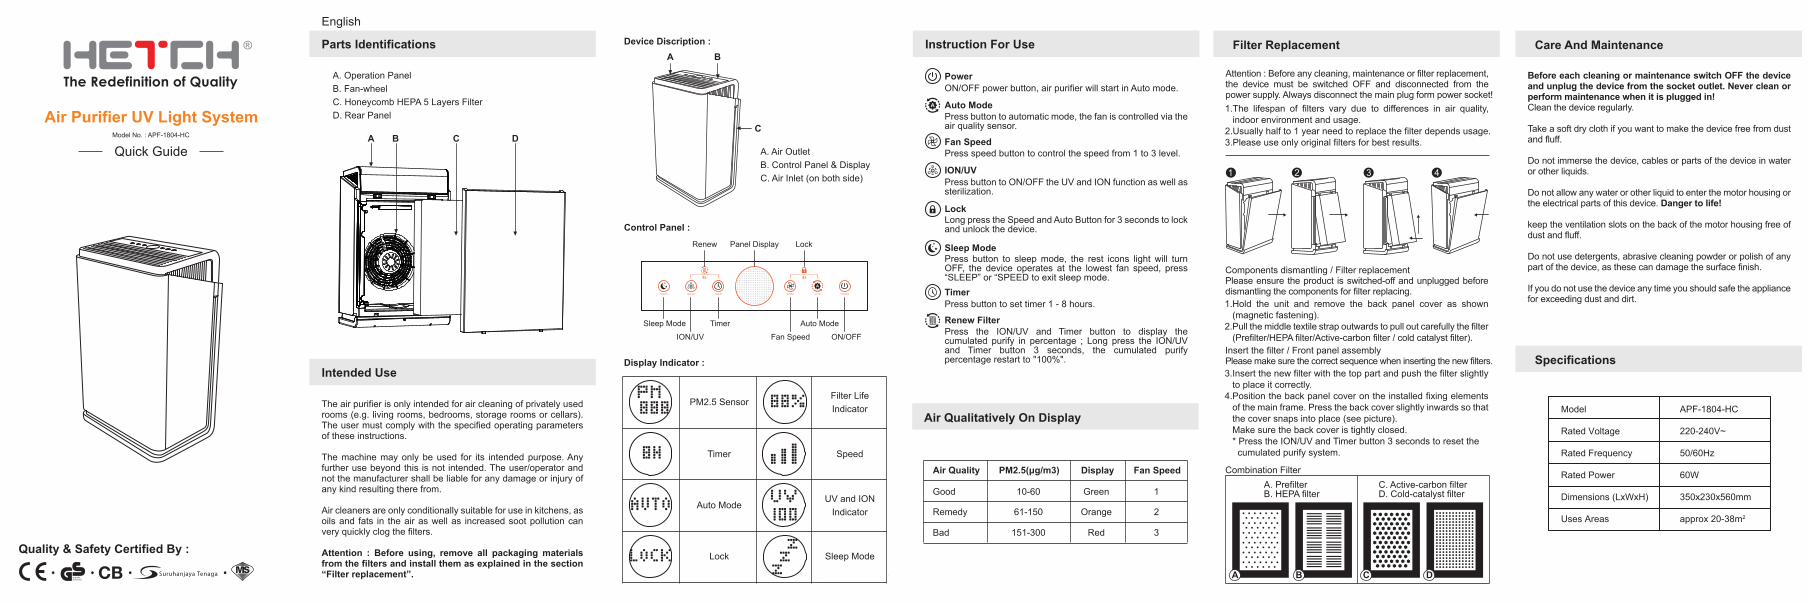
A B
C
A. Air OutletB. Control Panel & DisplayC. Air Inlet (on both side)
Device Discription :
Control Panel :
Display Indicator :
Sleep ModeION/UV
TimerFan Speed
Auto ModeON/OFF
Renew Panel Display Lock
PM2.5 Sensor Filter LifeIndicator
Speed
UV and IONIndicator
Sleep Mode
Timer
Auto Mode
Lock
Instruction For Use
ON/OFF power button, air purifier will start in Auto mode.
Press button to automatic mode, the fan is controlled via the air quality sensor.
Press speed button to control the speed from 1 to 3 level.
Press button to ON/OFF the UV and ION function as well as sterilization.
Long press the Speed and Auto Button for 3 seconds to lock and unlock the device.
Press button to set timer 1 - 8 hours.
Press button to sleep mode, the rest icons light will turn OFF, the device operates at the lowest fan speed, press “SLEEP” or “SPEED to exit sleep mode.
Press the ION/UV and Timer button to display the cumulated purify in percentage ; Long press the ION/UV and Timer button 3 seconds, the cumulated purify percentage restart to "100%".
Power
Auto Mode
Fan Speed
ION/UV
Lock
Sleep Mode
Timer
Renew Filter
Air Qualitatively On Display
Air Quality PM2.5(μg/m3) Display Fan Speed
Good 10-60 Green 1
Remedy 61-150 Orange 2
Bad 151-300 Red 3
Filter Replacement
1 2 3 4
Components dismantling / Filter replacementPlease ensure the product is switched-off and unplugged before dismantling the components for filter replacing.
Insert the filter / Front panel assemblyPlease make sure the correct sequence when inserting the new filters.
Hold the unit and remove the back panel cover as shown (magnetic fastening).Pull the middle textile strap outwards to pull out carefully the filter (Prefilter/HEPA filter/Active-carbon filter / cold catalyst filter).
1.
2.
Insert the new filter with the top part and push the filter slightly to place it correctly.Position the back panel cover on the installed fixing elements of the main frame. Press the back cover slightly inwards so that the cover snaps into place (see picture).Make sure the back cover is tightly closed.* Press the ION/UV and Timer button 3 seconds to reset the cumulated purify system.
3.
4.
Attention : Before any cleaning, maintenance or filter replacement, the device must be switched OFF and disconnected from the power supply. Always disconnect the main plug form power socket!
The lifespan of filters vary due to differences in air quality, indoor environment and usage.Usually half to 1 year need to replace the filter depends usage.Please use only original filters for best results.
1.
2.3.
Combination FilterA. PrefilterB. HEPA filter
C. Active-carbon filterD. Cold-catalyst filter
A B C D
Specifications
Model
Rated Voltage
Rated Frequency
Rated Power
Dimensions (LxWxH)
Uses Areas
APF-1804-HC
220-240V~
50/60Hz
60W
350x230x560mm
approx 20-38m2
Care And Maintenance
Before each cleaning or maintenance switch OFF the device and unplug the device from the socket outlet. Never clean or perform maintenance when it is plugged in!Clean the device regularly.
Take a soft dry cloth if you want to make the device free from dust and fluff.
Do not immerse the device, cables or parts of the device in water or other liquids.
Do not allow any water or other liquid to enter the motor housing or the electrical parts of this device. Danger to life!
keep the ventilation slots on the back of the motor housing free of dust and fluff.
Do not use detergents, abrasive cleaning powder or polish of any part of the device, as these can damage the surface finish.
If you do not use the device any time you should safe the appliance for exceeding dust and dirt.

Pengenalpastian Bahagian
Tujuan Penggunaan
Bahasa Malaysia
Penulen udara ini hanya bertujuan untuk membersihkan udara bilik yang digunakan secara peribadi (cth. ruang tamu, bilik tidur, bilik penyimpanan atau bilik bawah tanah). Pengguna perlu mematuhi parameter pengendalian yang ditetapkan dalam arahan ini.
Mesin ini hanya boleh digunakan untuk tujuan yang dimaksudkan. Ia tidak dimaksudkan untuk sebarang penggunaan selain daripada ini. Pengguna/Pengendali dan bukan pengeluar akan bertanggungjawab ke atas sebarang kerosakan atau kecederaan apa jua jenis akibat daripadanya.
Pembersih udara hanya sesuai untuk digunakan dengan syarat di dapur kerana minyak dan lemak dalam udara serta peningkatan pencemaran jelaga boleh menyumbat penuras dengan sangat cepat.
Perhatian : Sebelum guna, tanggalkan bahan pembungkusan dari penuras dan pasangnya seperti yang dijelaskan di bahagian “Penggantian penuras”.
A B C D
A. Panel PengendalianB. Roda KipasC. Penuras 5 Lapis HEPA Sarang LebahD. Panel Belakang
A B
C
A. Saluran Keluar UdaraB. Panel & Paparan KawalanC. Saluran Masuk Udara (pada kedua-dua sisi)
Penerangan Peranti :
Paparan :
Penunjuk Paparan :
Mod TidurION/UV
PemasaKelajuan
Mod AutoKuasa
PerbaharuiPenuras
PenunjukPaparan Kunci
Sensor PM2.5 Penunjuk JangkaHayat Penuras
Kelajuan
Penunjuk UVdan ION
Mod Tidur
Pemasa
Mod Auto
Kunci
Arahan Untuk Penggunaan
Butang kuasa ON/OFF (HIDUPKAN / MATIKAN), penulen udara akan mula dalam mod Auto.
Tekan butang untuk mod automatik, kipas dikawal melalui sensor kualiti udara.
Tekan butang kelajuan untuk mengawal kelajuan kipas dari tahap 1 hingga 3.
Tekan butang untuk ON/OFF (HIDUPKAN / MATIKAN) fungsi UV dan ION serta pensterilan.
Tekan lama Butang Kelajuan dan Auto selama 3 saat untuk mengunci dan membuka kunci peranti.
Tekan butang untuk menetapkan pemasa 1 - 8 jam.
Tekan butang mod tidur, lampu ikon lain akan OFF (DIMATIKAN), peranti akan beroperasi dalam kelajuan kipas terendah, tekan “SLEEP” (TIDUR) atau “SPEED” (KELAJUAN) untuk keluar dari mod tidur.
Tekan butang ION/UV dan Pemasa untuk memaparkan jumlah penulenan terkumpul dalam peratusan ; Tekan lama butang ION/UV dan Pemasa selama 3 saat, peratusan jumlah terkumpul penulenan dimulakan semula menjadi "100%".
KUASA
MOD AUTO
KELAJUAN KIPAS
ION/UV
Kunci
Mod Tidur
Pemasa
PERBAHARUI PENURAS
Udara Secara Kualitatif Pada Paparan
Kualiti Udara PM2.5(μg/m3) Paparan KelajuanKipas
Baik 10-60 Hijau 1
Pulih 61-150 Oren 2
Teruk 151-300 Merah 3
Spesifikasi
Model
Voltan Terkadar
Kekerapan Terkadar
Kuasa Terkadar
Dimensi (LxWxH)
Sesuai Julat
APF-1804-HC
220-240V~
50/60Hz
60W
350x230x560mm
anggaran 20-38m2
Penggantian Penuras
1 2 3 4
Membuka komponen / Penggantian penurasSila pastikan produk dimatikan dan palamnya dicabut sebelum membuka komponen untuk menggantikan penuras.
Masukkan penuras / Himpunkan panel hadapanSila pastikan urutan yang betul semasa memasukkan penuras baru.
Pegang unit dan tanggalkan penutup panel belakang seperti yang ditunjukkan (pengancing magnetik).Tarik tali tekstil tengah untuk menarik keluar penuras dengan berhati-hati (Pra-penuras/penuras HEPA /Penuras karbon aktif/penuras pemangkin sejuk).
1.
2.
Masukkan penuras baru dengan bahagian atas dan tolak penuras sedikit untuk meletakkannya dengan betul.Letakkan penutup panel belakang pada elemen pemasangan terpasang pada bingkai utama. Tekan penutup belakang sedikit ke dalam supaya penutupnya masuk ke tempatnya.Pastikan penutup belakang ditutup dengan rapat.* Tekan lama butang ION/UV dan Pemasa selama 3 saat untuk menetap semula sistem penulen jumlah terkumpul.
3.
4.
Perhatian : Sebelum melakukan sebarang pembersihan, penyelenggaraan atau penggantian penuras, peranti mesti dimatikan (OFF) suis dan diputuskan dari bekalan.
Jangka hayat penuras berbeza-beza kerana perbezaan dalam kualiti udara, persekitaran dalaman dan penggunaan.Biasanya setengah hingga setahun penuras perlu ditukar bergantung kepada penggunaan.Sila gunakan hanya penuras asli untuk hasil yang terbaik.
1.
2.
3.
Penuras GabunganA. Pra-penurasB. Penuras HEPA
C. Penuras Karbon AktifD. Penuras pemangkin sejuk
A B C D
Penjagaan Dan Penyelenggaraan
Sebelum setiap pembersihan atau penyelenggaraan, MATIKAN suis peranti dan cabut palamnya dari soket saluran keluar. Jangan membersih atau melakukan penyelenggaraan semasa peranti masih dipasang! Bersihkan peranti dengan kerap.
Ambil kain kering yang lembut jika anda inginkan peranti bebas dari habuk dan bulu.
Jangan tenggelamkan peranti, kabel atau bahagiannya dalam air atau cecair lain.
Jangan biarkan air atau cecair lain memasuki perumah motor atau bahagian elektrik peranti ini. Membahayakan nyawa!
Pastikan slot pengudaraan di belakang perumah motor bebas habuk dan bulu.
Jangan guna detergen, serbuk pembersih atau pengilat yang melelas pada mana-mana bahagian peranti kerana ini akan merosakkan kemasan permukaan.
Jika anda tidak menggunakan peranti pada bila-bila masa, anda perlu lindunginya daripada habuk dan kotoran yang berlebihan.
www.hetch2u.com
Marketed by :IN & EX HOLDINGS SDN. BHD. ( 496703-U )
No. 48-3, Jalan PJU 5/10,Dataran Sunway, Kota Damansara,47810 Petaling Jaya,Selangor D. E. , Malaysia.
Facebook : hetch
Tel : (603) 6141 6802E-mail: [email protected]
For full version usage and safety instruction manual,please visit www.hetch2u.com
Online Warranty Registrationhttp://www.hetch2u.com/e-warranty
E-WARRANTY