aix 7 with technology level 2: release...
TRANSCRIPT

AIX 7 with Technology Level 2
Release Notes
IBM


AIX 7 with Technology Level 2
Release Notes
IBM

NoteBefore using this information and the product it supports, read the information in “Notices” on page 35.
Fifth edition (October 2016)
This edition applies to IBM AIX 7 with Technology Level 2 and to all subsequent release and modifications untilotherwise indicated in new editions.
© Copyright IBM Corporation 2012, 2016.US Government Users Restricted Rights – Use, duplication or disclosure restricted by GSA ADP Schedule Contractwith IBM Corp.

Contents
About this document . . . . . . . . . vHighlighting . . . . . . . . . . . . . . vCase sensitivity in AIX . . . . . . . . . . . vISO 9000. . . . . . . . . . . . . . . . v
What's new . . . . . . . . . . . . . 1HyperSwap for PowerHA SystemMirror . . . . . 1Role-based access control . . . . . . . . . . 1Enterprise Storage Management . . . . . . . . 2Firmware assisted system dump . . . . . . . . 2
Read before installing AIX 7 with7100-02 . . . . . . . . . . . . . . . 3Installation tips . . . . . . . . . . . . . 3Software License Agreements . . . . . . . . . 3Software Maintenance Agreement . . . . . . . 3Service . . . . . . . . . . . . . . . . 3
Fixes and problem-solving databases . . . . . 3Security advisories . . . . . . . . . . . . 3
System requirements . . . . . . . . . 5Required hardware . . . . . . . . . . . . 5Firmware . . . . . . . . . . . . . . . 5
Some AIX systems might not boot from CD-ROM 5Firmware upgrade required to support analternate boot device. . . . . . . . . . . 5I/O devices IPL limitation . . . . . . . . . 6
Memory requirements . . . . . . . . . . . 7Host Ethernet Adapter memory requirements . . 7IBM Tivoli Directory Server memory requirements 7
Paging space requirements. . . . . . . . . . 8Disk requirements . . . . . . . . . . . . 8Disk capacity . . . . . . . . . . . . . . 8
Installation, migration, upgrade, andconfiguration information. . . . . . . 11Installation . . . . . . . . . . . . . . 11
Installing AIX 7 with 7100-02 . . . . . . . 11IBM Systems Director Common Agent . . . . 12Disk format requirement . . . . . . . . . 13Creating a bootable CD or DVD . . . . . . 13Base Operating System installation options . . . 14Installing AIX using the media device to install apartition with an HMC . . . . . . . . . 14Secure by Default installation . . . . . . . 16Network Installation Management . . . . . . 17IBM SDK for AIX, Java Technology Edition . . . 17IBM Tivoli Directory Server . . . . . . . . 17Other installation information . . . . . . . 18Troubleshooting problems with installation frommksysb backup . . . . . . . . . . . . 18
Migration . . . . . . . . . . . . . . . 18Maximum size of boot image increased . . . . 19
Replacements for the vmtune and schedtunecommands. . . . . . . . . . . . . . 19DSM. . . . . . . . . . . . . . . . 19xlC runtime software . . . . . . . . . . 19KDE desktop . . . . . . . . . . . . . 19Thin Servers . . . . . . . . . . . . . 19pmtoolkit file set . . . . . . . . . . . 20Kerberos . . . . . . . . . . . . . . 20Multipath I/O (MPIO). . . . . . . . . . 20IBM Subsystem Device Driver . . . . . . . 21
Limitations and restrictions. . . . . . 23EMC PowerPath support for traditional andfirmware assisted dump . . . . . . . . . . 23console special file limitation . . . . . . . . 23clogin command limitation . . . . . . . . . 23Workload Partitions not supported on thin servers 23System software cannot be directly managed in anonshared /usr Workload Partition . . . . . . 23SNMPv3 . . . . . . . . . . . . . . . 23AIO has been removed from the ODM . . . . . 23Using a USB optical device with VIOS . . . . . 24Performing an internal or external snapshot of aJFS2 filesystem . . . . . . . . . . . . . 24InfiniBand EEH limitation . . . . . . . . . 24
WPAR storage devices . . . . . . . . 25Supported storage devices . . . . . . . . . 25Allocating a device . . . . . . . . . . . . 25Deallocating a device . . . . . . . . . . . 26Configuring a device in a WPAR . . . . . . . 26Managing file systems for a device . . . . . . 26Limitations . . . . . . . . . . . . . . 27
WPAR parameters must be in ASCII text . . . 27Installing applications in a WPAR environment 27
Additional information . . . . . . . . 29AIX 7.1 Information Center . . . . . . . . . 29USB Blu-ray drive read-only support . . . . . . 29Cluster Aware AIX . . . . . . . . . . . . 30
Migration support . . . . . . . . . . . 30Removal of solidDB . . . . . . . . . . 30clusterconf command . . . . . . . . . . 30Vendor disk support . . . . . . . . . . 30
Cluster Data Aggregation Tool . . . . . . . . 30DB2 migration . . . . . . . . . . . . . 31Lightweight Infrastructure . . . . . . . . . 31Server side support for new Unicode locales . . . 31PCIe2 10 GbE RoCE Adapter support. . . . . . 31
Network Interface Card . . . . . . . . . 32Remote Direct Memory Access . . . . . . . 33
Notices . . . . . . . . . . . . . . 35Trademarks . . . . . . . . . . . . . . 37
© Copyright IBM Corp. 2012, 2016 iii
|||

iv AIX 7 with Technology Level 2: Release Notes

About this document
The Release Notes topics include late technical information that is not included in other topics andhighlights new functions for the IBM® AIX® 7 with Technology Level 2 licensed program.
HighlightingThe following highlighting conventions are used in this document:
Bold Identifies commands, subroutines, keywords, files, structures, directories, and other items whose names arepredefined by the system. Bold highlighting also identifies graphical objects, such as buttons, labels, andicons that the you select.
Italics Identifies parameters for actual names or values that you supply.
Monospace Identifies examples of specific data values, examples of text similar to what you might see displayed,examples of portions of program code similar to what you might write as a programmer, messages fromthe system, or text that you must type.
Case sensitivity in AIXEverything in the AIX operating system is case sensitive, which means that it distinguishes betweenuppercase and lowercase letters. For example, you can use the ls command to list files. If you type LS, thesystem responds that the command is not found. Likewise, FILEA, FiLea, and filea are three distinct filenames, even if they reside in the same directory. To avoid causing undesirable actions to be performed,always ensure that you use the correct case.
ISO 9000ISO 9000 registered quality systems were used in the development and manufacturing of this product.
© Copyright IBM Corp. 2012, 2016 v

vi AIX 7 with Technology Level 2: Release Notes

What's new
HyperSwap for PowerHA SystemMirrorThe HyperSwap® function in PowerHA® SystemMirror 7.1.2 Enterprise Edition for AIX provides forcontinuous availability against storage errors. With the HyperSwap function, you can manage DS8800Synchronous Peer-to-Peer Remote Copy (PPRC) storage systems.
To correctly implement and use the HyperSwap function in your environment, review the followinginformation:v The DS8800 storage systems must be managed by the AIX Path Control Module (PCM). To configure
the AIX PCM to manage the DS8000® family of storage systems, run the manage_disk_drivers -d2107DS8K -o AIX_AAPCM command. After you run the manage_disk_drivers command, you mustreboot your system.
Note: The manage_disk_drivers command supports the NO_OVERRIDE option (the default option)and the AIX_AAPCM option, which are required to use the HyperSwap function. By using theNO_OVERRIDE option, you can use vendor software, such as Subsystem Device Driver Path ControlModule (SDDPCM), to manage the DS8000 family of storage systems. To allow vendor software tomanage the DS8000 family of storage systems, run the manage_disk_drivers -d 2107DS8K -oNO_OVERRIDE command. For more information about the manage_disk_drivers command, see themanage_disk_drivers command topic in the AIX 7.1 Information Center.
v The ODM unique type field for the DS8000 family of storage systems managed by AIX PCM changedfrom disk/fcp/mpioosdisk to disk/fcp/aixmpiods8k. This change does not affect other software such asSDDPCM.
v The DS8800 storage subsystem and microcode levels must allow SCSI commands to manage the PPRCstorage systems.
v Only synchronous PPRC storage systems, such as Metro Mirror, are supported.v You must have PowerHA SystemMirror 7.1.2 Enterprise Edition for AIX installed.v You can use the lspprc command to query the states of those storage systems that are using the
HyperSwap function. For more information about the lspprc command, see the lspprc command topicin the AIX 7.1 Information Center.
v Support for the Network Interface Card configuration mode of the PCIe2 10 GbE RoCE Adapter.
Role-based access controlRole-based access control (RBAC) is designed to improve security and manageability by allowingadministrators to delegate system administrative duties to non-root users. RBAC in AIX has beenenhanced to provide very fine granular authorizations that identify the privileged operation that theycontrol. These authorizations can be used to create the required roles necessary and assign those roles tothe users required to manage the system.
The rbacqry command is used as a monitor utility to enable RBAC for applications. The rbacqrycommand reports authorizations and privileges used by a program after the program is run. For moreinformation about the rbacqry command, see the rbacqry command topic in the AIX 7.1 InformationCenter.
© Copyright IBM Corp. 2012, 2016 1

Enterprise Storage ManagementAIX 7 with 7100-02 includes new improvements to Enterprise Storage Management. These enhancementsinclude:v NFS Support for Workload Partitions
When mounting NFS file systems from within a system, WPAR performs the same as a regular NFSmount (Versions 2, 3, and 4 supported). Statistics (nfsstat) and tunables (nfso) commands from within aWPAR are specific to that WPAR. NFS mounts from within a mobile WPAR are relocated with theWPAR.
v JFS2 Integrated Snapshots
In AIX 7 with 7100-02, snapshots are created in the same storage device as the file system. This newfeature allows:– Ease of management by removing management of separate logical volumes for snapshots. The
snapshot resides in the same host storage object as the primary file system. These snapshots arereferred to as internal snapshots to contrast with the snapshots in separate logical volumes, whichare now referred to as external snapshots.
– The number of snapshot generations per file system has been increased to 64. This increase providesbetter support for real world environments where snapshots are taken at weekly, daily and hourlyintervals compared to the external snapshot limit of 15.
– The new integrated snapshot facility provides superior ease of use. Since the snapshot is in theprimary file system, earlier versions of files can be accessed by non-privileged users withoutrequiring a separate mount of the snapshot. This new facility also allows NFS client access tosnapshot data for exported file systems.
v Thread support enhancements add support for thread local storage, thread I/O Prioritization, uniquethread identifiers to enable the next generation of database technology.
v PowerHA SystemMirror asynchronous global disk mirroring is supported, a key requirement fordisaster recovery and data protection.
Firmware assisted system dumpThe firmware assisted system dump function is supported on EMC PowerPath. You can use EMCPowerPath to configure and save the system dump to a logical volume on the EMC PowerPath disk.
2 AIX 7 with Technology Level 2: Release Notes

Read before installing AIX 7 with 7100-02
This software might contain errors that can result in a critical business impact. You must install the latestavailable fixes before using this software. Fixes can be obtained from the Fix Central website(http://www.ibm.com/support/fixcentral).
The AIX 7 with 7100-02 Release Notes include information that helps you install the AIX operatingsystem. To view the most current version, see AIX Release Notes in the AIX 7.1 Information Center(http://pic.dhe.ibm.com/infocenter/aix/v7r1/topic/com.ibm.aix.ntl/releasenotes_kickoff.htm).
Installation tipsThe latest installation hints and tips are available at the IBM Subscription Service website(http://www14.software.ibm.com/webapp/set2/subscriptions/pqvcmjd).
Software License AgreementsThere are instances where the Software Licence Agreements (SLA) might not be displayed correctly. Inthis event, the License Agreements can be viewed for all languages at the Software license agreementswebsite (http://www.ibm.com/software/sla/sladb.nsf).
Software Maintenance AgreementIn AIX 7 with 7100-02, a separate Software Maintenance Agreement (SWMA) acceptance window displaysduring installation immediately after the license acceptance window. The response to the SWMAacceptance (accept or decline) is stored on the system, and either response allows the installation toproceed, unlike license acceptance which requires an accept to proceed.
The SWMA acceptance window is displayed during a New Overwrite or Preservation installation frombase CD media.
For base CD media New Overwrite or Preservation installations, if a non-prompted installation is desired,the ACCEPT_SWMA field in the control_flow stanza of the bosinst.data file should be set to yes (toaccept the SMWA terms) or no (to decline the SWMA terms). The ACCEPT_SWMA field is set to blankby default.
For NIM installations, if licenses have been accepted either from the choices made when initializing theinstallation, or using the ACCEPT_LICENSES field in a customized bosinst.data file, then this willconstitute SWMA acceptance.
Service
Fixes and problem-solving databasesYou can download AIX fixes and search technical databases (including "APARS" and "Tips for AIXadministrators"), at the Fix Central website (http://www.ibm.com/support/fixcentral).
Security advisoriesSecurity subscription services are available at My notifications website (https://www.ibm.com/systems/support/myview/subscription/css.wss/folders?methodName=listMyFolders).
© Copyright IBM Corp. 2012, 2016 3

After you subscribe to the AIX security advisories, you will receive the advisories by email as soon asthey are published. You can also view AIX security advisories at the IBM Subscription Service website(http://www14.software.ibm.com/webapp/set2/subscriptions/pqvcmjd).
4 AIX 7 with Technology Level 2: Release Notes

System requirements
Review the following information to determine the minimum and recommended system requirementsneeded to run AIX 7 with 7100-02.
Required hardwareOnly 64-bit Common Hardware Reference Platform (CHRP) machines running selected PowerPC® 970,POWER4, POWER5, POWER6®, and POWER7® processors that implement the Power Architecture®
Platform Requirements (PAPR) are supported.
To see if you have a supported machine, log into the machine as the root user, and run the followingcommand:prtconf | grep ’Processor Type’
Note: RS64, POWER3, and 604 processors, 32-bit kernel, 32-bit kernel extensions, and 32-bit devicedrivers are no longer supported.
Firmware
Some AIX systems might not boot from CD-ROMSome AIX systems might not boot from CD-ROM because of firmware issues. To determine if yoursystem will be affected by this problem, perform the following steps before you migrate or install arunning AIX 4.3, AIX 5.1, or AIX 5.2 system:1. At the command prompt, type the following:
lscfg -vl cd*
2. Examine the data that is returned.If Part Number is 04N2964 and ROS Level and ID is less than or equal to 1_04 (for example, 1_02, 1_01,or 1_00), contact your local service representative. Tell your service representative that your systemrequires the CD-ROM firmware upgrade that is described in RETAIN TIP H1332.If the data returned does not match the data described in the preceding paragraph, your system is notaffected by this problem.
Firmware upgrade required to support an alternate boot deviceThe requirement of upgrading firmware when installing or booting AIX 7 with 7100-02 in the scenariosdescribed in this section applies only to the systems listed in the table included at the end of this section.
InstallationSome systems might encounter installation problems when you are installing AIX 7 with 7100-02 on asystem that is currently installed with a earlier version of AIX or when you are installing an earlierversion of AIX on a system currently installed with AIX 7 with 7100-02.
A firmware upgrade is required to support the following installation scenarios:1. When an installation device is specified using the SMS menus or the Open Firmware command-line
and the specified device is not the first available device in the AIX bootlist.
Note: SMS menus differ, depending on the system. On some systems, the installation device isspecified under the Multiboot menus. On other systems, the installation device is specified under theSelect Boot Options menus.
© Copyright IBM Corp. 2012, 2016 5

2. When the F5 key is selected during boot, which is the fast path to install from the CD device, and theCD device is not the first available device in the AIX bootlist.
No firmware upgrade is required if no installation device is specified in the SMS menus or the OpenFirmware prompt or if the specified installation device is the first available device in the AIX bootlist.
I/O devices IPL limitationBecause of a firmware memory size limitation, only I/O devices in the first 144 I/O slots assigned to alogical partition or single system image partition can be used as an IPL (boot) source.
You can use the HMC to identify which devices are in the first 144 I/O slots by doing the following:1. Select Partition Properties > Hardware > I/O.2. Click the Bus column to sort the I/O devices in ascending order.
The first 144 I/O devices in the sorted list are in the bootable adapter slots.
If you are using a partition or single-system image partition with more than 144 assigned I/O slots, thefollowing scenarios and their results and resolutions are possible.
Table 1. Scenarios for partitions with more than 144 assigned I/O slots
Scenario Result Resolution
Attempting to boot from a device beyondthe first 144 I/O slots for installation ordiagnostic purposes.
The device is not selectable as a bootsource from the SMS menus.
Use a device in the first 144 I/O slots.
Booting from a device in the first 144 I/Oslots, and then attempt to select a targetinstallation device in a slot beyond thefirst 144 I/O slots.
The boot will succeed to the installationmenus, but devices beyond the first 144I/O slots will not be listed as bootableinstallation targets in the AIX menus.
Select a device that is available andmarked as bootable.
Using an MPIO configuration where oneadapter is in the first 144 I/O slots andanother adapter is in a slot beyond thefirst 144 I/O slots. Both adapters arepresent at boot time.
The boot will succeed to the installationmenus, and the device will be listed asbootable in AIX installation menus. Theinstallation will proceed, but it will failwith the bootlist command failure "unableto set bootpath for all paths."
Use a device in the first 144 I/O slots forall paths.
Using DLPAR to add an adapter in a slotbeyond the first 144 I/O slots, and thenattempting to run the alt_disk_installcommand for the newly added device.
The device will not be listed as bootable. Use a device in the first 144 I/O slots.
Using DLPAR to add an adapter in a slotbeyond the first 144 I/O slots, and usingthe bootlist command to add the deviceas a bootable device (for example, bydynamically adding a redundant path to acurrent boot device or setting up for anetwork boot). Then removing theoriginal adapter and rebooting.
The bootlist command succeeds, but theboot fails from the specified device, andAIX will not receive control.
Use a device in the first 144 I/O slots.
Using DLPAR to add an adapter whoseprobe order will make it displace acurrent bootable device, and thenrebooting.
The boot fails, and AIX will not receivecontrol.
Move the boot device to one of the first144 I/O slots or remove the previouslyadded device.
Selecting a device in a slot beyond thefirst 144 I/O slots as a dump device for afirmware-assisted dump.
The sysdumpdev command does notallow devices in slots beyond the first 144I/O slots to be selected asfirmware-assisted dump storage devices.An error occurs during thefirmware-assisted dump configuration,and a traditional AIX dump automaticallybecomes available.
Use a device in the first 144 I/O slots forfirmware-assisted dumps.
6 AIX 7 with Technology Level 2: Release Notes

Table 1. Scenarios for partitions with more than 144 assigned I/O slots (continued)
Scenario Result Resolution
Using DLPAR to add an adapter whoseprobe order will make it displace acurrently valid firmware-assisted dumptarget device, and then rebooting after thedump.
The firmware-assisted dump process failsduring the boot process and displays anerror message. The traditional AIX dumpstill runs to retrieve the dump image.
Avoid displacing the selectedfirmware-assisted dump target device orreconfiguring the sysdumpdev commandfor the firmware-assisted dump targetdevice selection, and specify a devicewithin the first 144 I/O slots.
Using DLPAR to add an adapter whoseprobe order will make it displace acurrently valid firmware-assisted dumptarget device, and then rebooting.
The sysdumpdev command does notallow devices in slots beyond the first 144I/O slots to be selected asfirmware-assisted dump storage devices.An error occurs during thefirmware-assisted dump configuration,and a traditional AIX dump automaticallybecomes available.
Use a device in the first 144 I/O slots forfirmware-assisted dumps.
Memory requirementsAIX 7 with 7100-02 minimum current memory requirements vary, based on the configuration.
A general rule for a minimum current memory requirement for AIX 7 with 7100-02 is 512 MB. A smallerminimum current memory might support a configuration with a small number of devices or a smallmaximum memory configuration. To install the AIX 7 with 7100-02 operating system with only 512 MB,you can overwrite only the existing operating system, and you cannot install any bundles or devices. Ifyou update the AIX operating system with the install_all_updates command, your system must havemore than 512 MB.
AIX 7 with 7100-02 requires the minimum current memory requirement to increase as the maximummemory configuration or the number of devices scales upward, or both. Larger maximum memoryconfigurations or additional devices scale up the minimum current memory requirement. If the minimummemory requirement is not increased along with the maximum memory configuration, the partitionhangs during the initial program load (IPL).
Host Ethernet Adapter memory requirementsConfigurations containing a Host Ethernet Adapter (HEA) require more memory than the 512 MBminimum. Each logical HEA port that is configured requires an additional 102 MB of memory. Theminimum memory requirement for configurations with one or more HEA ports configured, where n isthe number of HEA ports, is 512MB + n*102MB.
IBM Tivoli Directory Server memory requirementsIBM Tivoli® Directory Server Version 6.1 requires a minimum of 256 MB RAM for the client and aminimum of 512 MB of RAM (1 GB or more is recommended) for the server. IBM Tivoli Directory Server(including the client and the server) requires about 160 MB of disk space.
IBM Tivoli Directory Server includes the DB2 Universal Database™ for AIX Version 9.1 RestrictedEnterprise Server Edition. No previous versions of DB2® databases are supported. If you already haveDB2 database installed, you need approximately 45 MB of disk space to create the empty database andstart the server. DB2 database requires between 300 MB and 500 MB of disk space. Disk space requiredfor data storage is dependent upon the number and size of database entries.
Your machine must be running on 64-bit hardware.
Your machine must be running a 64-bit kernel.
System requirements 7
Paging space requirementsAIX 7 with 7100-02 creates a 512 MB paging space (in the /dev/hd6 directory) for all new and completeoverwrite installations.
Disk requirementsAIX 7 with 7100-02 requires a minimum of 5 GB of physical disk space for a default installation thatincludes all devices, the Graphics bundle, and the System Management Client bundle.
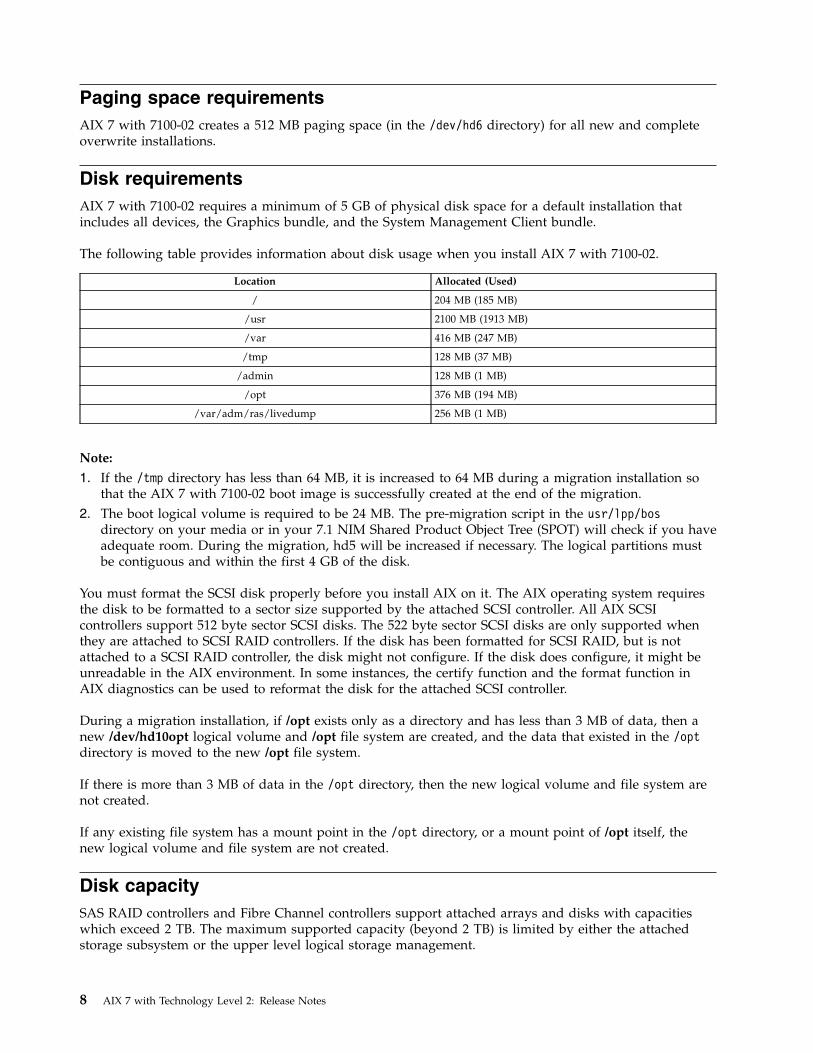
The following table provides information about disk usage when you install AIX 7 with 7100-02.
Location Allocated (Used)
/ 204 MB (185 MB)
/usr 2100 MB (1913 MB)
/var 416 MB (247 MB)
/tmp 128 MB (37 MB)
/admin 128 MB (1 MB)
/opt 376 MB (194 MB)
/var/adm/ras/livedump 256 MB (1 MB)
Note:
1. If the /tmp directory has less than 64 MB, it is increased to 64 MB during a migration installation sothat the AIX 7 with 7100-02 boot image is successfully created at the end of the migration.
2. The boot logical volume is required to be 24 MB. The pre-migration script in the usr/lpp/bosdirectory on your media or in your 7.1 NIM Shared Product Object Tree (SPOT) will check if you haveadequate room. During the migration, hd5 will be increased if necessary. The logical partitions mustbe contiguous and within the first 4 GB of the disk.
You must format the SCSI disk properly before you install AIX on it. The AIX operating system requiresthe disk to be formatted to a sector size supported by the attached SCSI controller. All AIX SCSIcontrollers support 512 byte sector SCSI disks. The 522 byte sector SCSI disks are only supported whenthey are attached to SCSI RAID controllers. If the disk has been formatted for SCSI RAID, but is notattached to a SCSI RAID controller, the disk might not configure. If the disk does configure, it might beunreadable in the AIX environment. In some instances, the certify function and the format function inAIX diagnostics can be used to reformat the disk for the attached SCSI controller.
During a migration installation, if /opt exists only as a directory and has less than 3 MB of data, then anew /dev/hd10opt logical volume and /opt file system are created, and the data that existed in the /optdirectory is moved to the new /opt file system.
If there is more than 3 MB of data in the /opt directory, then the new logical volume and file system arenot created.
If any existing file system has a mount point in the /opt directory, or a mount point of /opt itself, thenew logical volume and file system are not created.
Disk capacitySAS RAID controllers and Fibre Channel controllers support attached arrays and disks with capacitieswhich exceed 2 TB. The maximum supported capacity (beyond 2 TB) is limited by either the attachedstorage subsystem or the upper level logical storage management.
8 AIX 7 with Technology Level 2: Release Notes

For additional information about SAS RAID controllers, see the SAS RAID controller for AIX topic in theIBM Power Systems™ Hardware Information Center.
For information about AIX capacity limitations for logical storage, see the Limitations for logical storagemanagement topic in the AIX 7.1 Information Center.
System requirements 9

10 AIX 7 with Technology Level 2: Release Notes

Installation, migration, upgrade, and configuration information
InstallationThis section contains information about installing AIX 7.1 that supplements the information contained inthe Installation and Migration topic in the AIX 7.1 Information Center.
To order these installation guides, contact your point of sale, or in the U.S., call IBM CustomerPublication Support at 1-800-879-2755. Give the order number of the book you want to order.
To obtain AIX 7.1installation hints and tips, go to the IBM Subscription Service website(http://www14.software.ibm.com/webapp/set2/subscriptions/pqvcmjd).
Installing AIX 7 with 7100-02The following methods can be used to install AIX 7 with 7100-02:v Complete overwrite installationv Preservation installationv Migration installation
The cp_bos_update command is automatically run during a complete overwrite installation, apreservation installation, or a migration installation to enable WPARs to move from one global system toanother global system. For more information about the cp_bos_update command, see the/usr/lpp/bos/README.cp_bos_updates file.
Note: After you install or migrate a system to AIX 7 with 7100-02, you can install a lower level of AIX byrestoring a system backup or by performing a new and complete overwrite with base media. Preservationinstallations from AIX 7 with 7100-02 to a lower level of AIX are not supported.
If an existing version of the AIX 7.1 operating system is installed on your system, you can use the updatemedia or the base media to update the operating system to AIX 7 with 7100-02. To verify the level, runthe oslevel -r command. To perform the update, run the smitty update_all command.
Note: Using the update media is recommended for updates. If you use the base media to update, someODM settings (such as SRC subsystems settings) might be lost.
Since only the base installation images are on the media, you cannot reject the software and return to theprevious level if you use the product media to update to AIX 7 with 7100-02.
The minimum size of the boot logical volume is 24 MB. If your current boot logical volume is 16 MB orless, the installation process tries to increase it. However, partitions in a boot logical volume must becontiguous, and within the first 4 GB on the disk. If your system does not have free space that meetsthese requirements, a message will indicate that there is not enough space to expand hd5 (the boot logicalvolume).
To install AIX 7 with 7100-02, boot your system from the product media, and follow the instructions inthe Installing the base operating system topic in the AIX 7.1 Information Center.
NIM installations with updated LPP_SOURCENIM installations using an LPP_SOURCE directory that contains base images from a prior release andthat contains updates to the current release require that you use an image_data resource during operatingsystem installations.
© Copyright IBM Corp. 2012, 2016 11

When you use an LPP_SOURCE directory that contains base images from a prior release and updates tothe current release, create an image_data resource to use for any operating system installations. The SPOTmust be updated with the updates added to the LPP_SOURCE directory, or a new SPOT must be created.In that SPOT, copy the image.template file found at <SPOT_LOCATION>/lpp/bosinst/image.template to anew location outside of the SPOT. Create a new NIM image_data resource that points to that location.Use that NIM image_data resource for all operating system installations.
Certain file systems have grown in size, and the default image.data file used during an operating systeminstallation comes from the bos image in your LPP_SOURCE directory, which is the prior releaseimage.data file.
IBM Systems Director Common AgentAIX 7 with 7100-02 includes the IBM Systems Director Common Agent 6.3. It is installed as part of theSystem Management Client Software bundle, which is part of the default installation options.
Note: If you are updating or migrating the AIX operating system and have IBM Systems Director ServerVersion 6.2, or earlier, installed, you must update to IBM Systems Director Server Version 6.3, or later,after the update or migration.
When the AIX system is rebooted, the Director agent and the prerequisite processes for it, like thePegasus CIM server, are automatically enabled. If you do not want to install or enable the Director agent,see the following information for the steps needed to stop, disable, and uninstall the Director agent.
To stop the Director agent, run the following commands:stopsrc -s cas_agent
stopsrc -s platform_agent
stopsrc -s cimsys
To start the Director agent, run the following commands:startsrc -s platform_agent
Note: The startsrc -s platform_agent command implicitly starts the cimsys subsystem.startsrc -s cas_agent
To permanently disable the Director agent, comment out the following lines in /etc/inittab file by addinga # symbol in front of each of them:cas_agent:2:once:/usr/bin/startsrc -s cas_agent >/dev/null 2>&1
platform_agent:2:once:/usr/bin/startsrc -s platform_agent >/dev/null 2>&1
Note: Comment out the following line only if you do not need the cimserver command to run otherapplications.cimservices:2:once:/usr/bin/startsrc -s cimsys >/dev/null 2>&1
To permanently uninstall the Director agent components and leave the file sets that might be used byother applications, run the following command:/opt/ibm/director/bin/diruninstall
To uninstall the file sets that remain after you run the diruninstall command (if they are not required forother applications), do the following:v Run the following command:
installp -u cas.agent
Note: The artex.base.agent file set has an installation prerequisite on the cas.agent fileset. Thecas.agent file set can only be removed if the artex.base.agent fileset is removed.
12 AIX 7 with Technology Level 2: Release Notes
|
||
|
|
||
|

v To uninstall Tivoli Guid, run the following command:installp -u tivoli.tivguid
v To uninstall SMIS CIM providers, run the following command:installp -u sysmgt.cim.smisproviders*
v To uninstall the remaining CIM providers, run the following command:installp -u sysmgt.cim.providers*
v To uninstall the Pegasus CIM server, run the following command:installp -u sysmgt.cimserver.pegasus
For more information about IBM Systems Director 6.3, see the IBM Systems Director V6.3 InformationCenter (http://pic.dhe.ibm.com/infocenter/director/pubs/index.jsp).
Disk format requirementYou cannot install AIX on an improperly formatted SCSI disk. AIX requires the disk to be formatted to asector size supported by the attached SCSI controller. All AIX SCSI controllers support 512 byte sectorSCSI disks. The 522 byte sector SCSI disks are only supported when they are attached to SCSI RAIDcontrollers. If the disk has been formatted for SCSI RAID, but is not attached to a SCSI RAID controller,the disk might not configure. If the disk does configure, it might be unreadable in the AIX environment.In some instances, the certify function and the format function in AIX diagnostics can be used to reformatthe disk for the attached SCSI controller.
Creating a bootable CD or DVDYou might want to create a CD or DVD that can be used to boot and perform maintenance on yoursystem that matches your current level of AIX.
To create a bootable CD or DVD, run the following commands (where cdx is an attached CD or DVDwriter). The bosinst.data file must be set for a prompted installation (PROMPT = yes).
Perform the following steps to create a boot-only disc:1. Create a file /etc/exclude.rootvg using an editor. For example, vi editor. Add the following line in it.
^./
2. Run the following command.# mkcd -e -d /dev/cdx # Where cdx is an attached cdwriter
OR# mkcd -e -S # Creates a CD image that can be
# transferred to a system with a cdwriter
Notes:
v The final mkcd command in the previous example makes an image that can be transferred to anothersystem (AIX or other than AIX) for burning.
v When a bootable disc is created, the boot image reflects the kernel that is currently running. If thecurrent kernel is the 64-bit kernel, the disc's boot image is also 64-bit, and boots only 64-bit systems. Ifthe current kernel is a 32-bit kernel, the disc's boot image is 32-bit, and it can boot both 32-bit and64-bit systems.
Using the current kernelThe 32-bit systems cannot boot using a 64-bit kernel. Additionally, some configurations require the systemto boot from the 64-bit kernel in order to install the operating system. To ensure that the backup workson the system it came from, the boot image is created to contain the kernel that was running when thebackup was created.
Installation, migration, upgrade, and configuration information 13

Base Operating System installation optionsIn the Base Operating System installation menus, if there are more than 50 disks on the system, the disksare ordinarily grouped by adapter. However, for some types of disks, the grouping is slightly different:
SCSI disksDisks may be grouped by adapter or SCSI bus
IBM TotalStorage DS4000®
Disks are grouped by disk array controller (DAC)
In each case, the user can select the adapter, SCSI bus, or DAC by name and see the associated disks. Thephysical location of the adapter, SCSI bus, or DAC is also displayed.
Installing AIX using the media device to install a partition with an HMCThe instructions for installing AIX using the media device to install a partition with an HMC have beenchanged to:1. Activate the partition, as follows:
a. Insert the AIX Volume 1 CD or DVD into the media device of the managed system.b. Select the checkbox that corresponds to the partition you want installed.c. In the Operations menu in the lower window pane, select Activate.d. In the Activate window, click Advanced.e. For the Boot mode, select SMS.f. Click OK. Ensure that the appropriate partition profile is highlighted.g. Select the Open a terminal window or console session checkbox, and then click OK.
2. In the SMS menu on the vterm, do the following:a. Press Enter to select 5. Select Boot Options.
PowerPC FirmwareVersion SF220_001SMS 1.5 (c) Copyright IBM Corp. 2000, 2003 All rights reserved.-------------------------------------------------------------------------------Main Menu
1. Select Language2. Setup Remote IPL (Initial Program Load)3. Change SCSI Settings4. Select Console5. Select Boot Options
-------------------------------------------------------------------------------Navigation Keys:
X = eXit System Management Services-------------------------------------------------------------------------------Type the number of the menu item and press Enter or select Navigation Key: 5
b. Press Enter to select 2. Select Boot Devices.c. Press Enter to select 1. Select 1st Boot Device.d. Press Enter to select 3. CD/DVD.e. Select the media type that corresponds to the media device and press Enter.f. Select the device number that corresponds to the media device and press Enter. The media device
is now the first device in the Current Boot Sequence list.g. Press the ESC key until you return to the Configure Boot Device Order menu.h. Press the x key to exit the SMS menu. Confirm that you want to exit SMS.
3. Boot from the AIX Volume 1 CD or DVD, as follows:a. Select console and press Enter.
14 AIX 7 with Technology Level 2: Release Notes

b. Select language for BOS Installation menus, and press Enter to open the Welcome to BaseOperating System Installation and Maintenance menu.
c. Type 2 to select Change/Show Installation Settings and Install in the Choice field and pressEnter.
Welcome to Base Operating SystemInstallation and Maintenance
Type the number of your choice and press Enter. Choice is indicated by >>>.
1 Start Install Now with Default Settings
2 Change/Show Installation Settings and Install
3 Start Maintenance Mode for System Recovery
88 Help ?99 Previous Menu
>>> Choice [1]: 2
4. Verify or Change BOS Installation Settings, as follows:a. Type 1 in the Choice field to select the System Settings option.b. Type 1 for New and Complete Overwrite in the Choice field and press Enter.
Note: The installation methods available depend on whether your disk has a previous version ofAIX installed.
c. When the Change Disk(s) screen displays, you can change the destination disk for the installation.If the default shown is correct, type 0 in the Choice field and press Enter. To change thedestination disk, do the following:1) Type the number for each disk you choose in the Choice field and press Enter. Do not press
Enter a final time until you have finished selecting all disks. If you must deselect a disk, typeits number a second time and press Enter.
2) When you have finished selecting the disks, type 0 in the Choice field and press Enter. TheInstallation and Settings screen displays with the selected disks listed under System Settings.
d. If needed, change the primary language environment. Use the following steps to change theprimary language used by this installation to select the language and cultural convention youwant to use.
Note: Changes to the primary language environment do not take effect until after the BOSinstallation has completed and your system is rebooted.1) Type 2 in the Choice field on the Installation and Settings screen to select the Primary
Language Environment Settings option.2) Select the appropriate set of cultural convention, language, and keyboard options. Most of the
options are a predefined combination, however, you can define your own combination ofoptions.v To choose a predefined Primary Language Environment, type that number in the Choice
field and press Enter.v To configure your own primary language environment, do the following:
a) Select MORE CHOICES.b) Select Create Your Own Combination.c) When the Set Primary Cultural Convention screen displays, type the number in the
Choice field that corresponds to the cultural convention of your choice and press Enter.d) When the Set Primary Language screen displays, type the number in the Choice field
that corresponds to your choice for the primary language and press Enter.e) When the Set Keyboard screen displays, type the number in the Choice field that
corresponds to the keyboard attached to the system and press Enter.
Installation, migration, upgrade, and configuration information 15

e. After you have made all of your selections, verify that the selections are correct. Press Enter toconfirm your selections and to begin the BOS installation. The system automatically reboots afterinstallation is complete.
5. Complete the BOS Installation, as follows:a. Type vt100 as the terminal type.
Set Terminal TypeThe terminal is not properly initialized. Please enter a terminal typeand press Enter. Some terminal types are not supported innon-English languages.
ibm3101 tvi912 vt330ibm3151 tvi920 vt340ibm3161 tvi925 wyse30ibm3162 tvi950 wyse50ibm3163 vs100 wyse60ibm3164 vt100 wyse100ibmpc vt320 wyse350lft sun
+-----------------------Messages------------------------| If the next screen is unreadable, press Break (Ctrl-c)
88 Help ? | to return to this screen.99 Exit |
|>>> Choice []: vt100
b. In the License Agreement menu, select Accept License Agreements.c. Select yes to ACCEPT Installed License Agreements.d. Press F10 (or Esc+0) to exit the License Agreement menu.e. In the Installation Assistant main menu, select Set Date and Time.
Installation Assistant
Move cursor to desired item and press Enter.
Set Date and TimeSet root PasswordConfigure Network CommunicationsInstall Software ApplicationsUsing SMIT (information only)
F1=Help F2=Refresh F3=Cancel F8=ImageF9=Shell F10=Exit Enter=Do
f. Set the correct date, time, and time zone. Press the F3 (or Esc+3) key to return to the InstallationAssistant main menu.
g. Select Set root Password. Set a root password for the partition.h. Select Configure Network Communications.i. Select TCP/IP Startup.j. Select from the Available Network Interfaces and press Enter.k. Enter the appropriate network information in the Minimum Configuration and Startup menu and
press Enter. Use the F3 (or Esc+3) key to return to the Installation Assistant main menu.l. Exit the Installation Assistant by pressing F10 (or Esc+0).m. The vterm window displays a login prompt.
Secure by Default installationA DVD installation of AIX 7.1 with the Secure by Default (SbD) option prompts for the Expansion PackCDs after the base operating system is installed. This step is necessary to install SSH and SSL packagesfor secure remote system accessibility. If this step is skipped, the system will not be network accessiblebecause SbD erases binaries that use clear text passwords (for example, telnet, and ftp-similar binaries). If
16 AIX 7 with Technology Level 2: Release Notes

the SbD installation option is selected through NIM, the system administrator should ensure that theNIM lpp_source has the openssh and openssl images in place.
Network Installation ManagementNetwork Installation Management (NIM) includes a readme file that is installed with the NIM Masterbos.sysmgt.nim.master file set. The path name of the file is /usr/lpp/bos.sysmgt/nim/README. Thereadme file contains additional information about the AIX 7 with 7100-02 NIM product and includes thefollowing topics:v Web-based System Manager NIM May Have Problems Installing SW on Client Machinesv Restrictions on Customize Operation for RPM Packagesv Steps Necessary For Adding GNOME -or- KDE Desktop Support
When Live Partition Mobility (LPM) is used to migrate a machine (that is, move a machine from onephysical server to another) and the machine is defined as a NIM client, the NIM administrator mustupdate the cupid attribute for the NIM client to reflect the new hardware value after the LPM migrationcompletes. To update the cupid attribute, do the following:1. On the NIM client, acquire the new cupid ID by running the following command:
uname -a
2. On the NIM master, run the following command:nim -o change -a cupid+<cupid> <client>
Note: The OS_install network installer no longer supports the installation of Linux due to the removal ofCluster Systems Management (CSM) support in the AIX operating system.
Installing with an updated LPP_SOURCENIM installations using an LPP_SOURCE directory that contains base images from a prior release andthat contains updates to the current release require that you use an image_data resource during operatingsystem installations.
When you use an LPP_SOURCE directory that contains base images from a prior release and updates tothe current release, create an image_data resource to use for any operating system installations. The SPOTmust be updated with the updates added to the LPP_SOURCE directory, or a new SPOT must be created.In that SPOT, copy the image.template file found at <SPOT_LOCATION>/lpp/bosinst/image.template to anew location outside of the SPOT. Create a new NIM image_data resource that points to that location.Use that NIM image_data resource for all operating system installations.
Certain file systems have grown in size, and the default image.data file used during an operating systeminstallation comes from the bos image in your LPP_SOURCE directory, which is the prior releaseimage.data file.
IBM SDK for AIX, Java Technology EditionIBM software development kit (SDK) for AIX, Java™ Technology Edition is released in JavaV.x file sets,where V represents the version of Java, such as Java6, and x is the individual file set, such as Java5.sdk.To obtain the latest update, complete the following steps:1. Go to the developerWorks® website (http://www.ibm.com/developerworks/java/jdk/aix/).2. Click Downloads, User Guides, and Service information.3. Click Fix Info from the respective Java version column.
IBM Tivoli Directory ServerYou must purchase a full-use license through Passport Advantage® for any other use of the IBM TivoliDirectory Server other than authentication and AIX user registry.
Installation, migration, upgrade, and configuration information 17

The Passport Advantage package includes a White Pages application. The Passport Advantage licenseentitles you to use and to receive support for the IBM Tivoli Directory Server Proxy server and the WhitePages application. You can install and use IBM Tivoli Directory Server only in association with yourlicensed use of AIX operating system functions.
Other installation information
Installation packaging formatsAIX 7 with 7100-02 supports the following installation-packaging formats:v installp, AIX system installation command and packaging formatv RPM, a Linux installation command and packaging formatv ISMP, InstallShield Multi-Platform packaging format
With the geninstall command, you can list and install packages from media that contains installationimages packaged in any of the listed formats. The geninstall and gencopy commands recognize thenon-installp installation formats and either call the appropriate installers or copy the images, respectively.
The AIX 7 with 7100-02 product media contains installp packages and RPM packages that are installedduring a BOS installation. The installp packages are located in the following path, where mount_point isthe mount point:/mount_point/installp/ppc
The RPM packages are located in the following path, where mount_point is the mount point:/mount_point/RPMS/ppc
The ISMP packages are located in the following path, where mount_point is the mount point:/mount_point/ismp/ppc
The installp, bffcreate, geninstall, gencopy and nim commands recognize this media structure.
For more information about software packaging, see the Software product packaging topic in the AIX 7.1Information Center.
Troubleshooting problems with installation from mksysb backupCheck that you have sufficient free blocks in the file systems to write temporary files. Check that each filesystem has at least 500 blocks free when the mksysb backup image is made. The system needs workspace in each file system when installing from a mksysb backup image.
Note: Depending on the type of data or files in the file system, you might need additional blocks free.For example, if the file system has a lot of small files, an extra 4 KB is automatically allocated to allow formetadata expansion.
MigrationYou can do an operating system migration to AIX 7.1 from any level of the AIX operating system, on asystem that supports AIX 7.1 boot. Installing any new level of AIX requires more disk space thanprevious levels. Verify that you have enough free space in the file systems, or that you have freepartitions in the rootvg. Migrating will require slightly more free space than a basic installation.
When you migrate from AIX 5.3 or 6.1 to AIX 7.1, you can avoid the risk of down-leveling fixespreviously installed on your AIX 5.3 or AIX 6.1 system by migrating to the latest available TechnologyLevel of AIX 7.1. If you are using a NIM lpp_source created with a prior level base media and laterlevels of updates added, you should initially create the lpp_source with the base media at the same
18 AIX 7 with Technology Level 2: Release Notes

release date or later than the level of AIX 5.3 or AIX 6.1 that you are migrating from. The last 4 digits ofthe output of the oslevel -s command represent the year and week of the service pack currently installed(YYWW).
Maximum size of boot image increasedFor AIX Version 7.1, the maximum size of the boot image has changed from the previous value used forAIX 5.2 (and earlier releases) value of 11,984 KB (12 MB minus 16 KB) to 31,984 KB (32 MB minus 16 KB).The size of the boot logical volume has increased from 16 MB to 20 MB.
Replacements for the vmtune and schedtune commandsWhen you migrate a new version of the AIX operating system from a previous version of AIX operatingsystem, your system is to automatically set to run in compatibility mode (pre520tune mode).Compatibility scripts that replace the vmtune and schedtune commands are included with AIX 5.2,which means that the previous behavior of the tuning commands is preserved to a large extent after amigration.
DSMThe dsm.core ships a /etc/ibm/sysmgt/dsm/overrides/dsm.properties file which allows user to overridesSSH configuration. If this file was modified, the file will need to be backed up manually before an updateor a migration, as it will be overwritten.
xlC runtime softwareWhen you migrate from an AIX 5L™ operating system to an AIX 7.1 operating system, the xlC.aix50.rtefile set is replaced by the xlC.aix61.rte file set. If you upgraded the xlC.aix50.rte file set after you installedyour system, the migration may replace your upgraded version with a downlevel version. Before youmigrate to an AIX 7.1 operating system, save the level of your xlC.aix50.rte file set. After the migration iscomplete, compare your saved level of the xlC.aix50.rte file set with the xlC.aix61.rte file set. If thechanges that you made to your level of the xlC.aix50.rte file set are not in the xlC.aix61.rte file set,upgrade the xlC.aix61.rte file set.
KDE desktopIf the CDE and KDE desktops are both installed on a system migrated from AIX 5.x to AIX 7 with7100-02, the KDE desktop might not start from the CDE login. To fix this problem, remove the followingCDE startup information from the /etc/inittab file:dt:2:wait:/etc/rc.dt
Note: You must have root user authority to remove this CDE startup information.
Do not delete the following KDE entry from the /etc/inittab file:kdm:2:once:/opt/freeware/kde/bin/kdm
Thin ServersIf you migrate any previous version of the AIX Common Operating System Image (COSI) and associatedAIX Thin Servers to the AIX Version 7.1, it is recommended that you delete any dump device associatedwith the migrated Thin Servers and re-create the Thin Servers.
Additionally, you must install the devices.tmiscsw.rte fileset on the NIM master for the AIX Version 7.1Thin Server to create a dump device. The devices.tmiscsw.rte fileset is available in the AIX ExpansionPack.
Installation, migration, upgrade, and configuration information 19

pmtoolkit file setThe Performance Monitoring API is contained in the bos.pmapi file set. A beta version of the same codewas made available to selected customers, and also through alphaWorks®, under the name pmtoolkit.
When you are migrating from AIX with the beta file set installed, you must uninstall the pmtoolkit fileset and reboot the machine before you install the bos.pmapi file set. If you do not, the machine will failto boot when you attempt to load the pmtoolkit file set's kernel extension.
Verify that the pmtoolkit file set is installed by typing the following at the command line:lslpp -l pmtoolkit
v If you get the following output:lslpp: 0504-132 fileset pmtoolkit not installed
you can safely install the bos.pmapi file set.v If you get the following output:
Fileset Level State Description----------------------------------------------------------------------------
Path: /usr/lib/objrepospmtoolkit 1.3.1.6 COMMITTED Performance Monitor Toolkit
1.3.1
complete the following steps:1. Run the following command:
installp -u pmtoolkit
2. Reboot the machine. After the machine reboots, you can safely install the bos.pmapi file set.
KerberosAll of the secure remote commands use the Kerberos Version 5 library and the GSSAPI library providedby IBM Network Authentication Service Version 1.4 that is located on the AIX Version 7.1 Expansion PackDVD. However, you must install the krb5.client.rte file set that is located on the AIX 7 with 7100-02Expansion Pack DVD.
If you are migrating to AIX 7.1 with DVD media, and have Kerberos Version 5 installed, the installationscripts will prompt you to install the krb5.client.rte file set from the Expansion Pack. If you are migratingyour operating system using NIM resources, add krb5 to your lpp_source. The secure remote commandssupport Kerberos clients and servers from both Native Kerberos 5 and DCE.
For more information about the secure remote commands, see the Authentication and the secure rcmdstopic in the AIX 7.1 Information Center.
Multipath I/O (MPIO)In AIX 7 with 7100-02, the DS4K products are configured as Multipath I/O (MPIO) devices by default.
A DS4K product using the FCPARRAY driver may be migrated to the MPIO driver by using thefollowing instructions, or all DS4K devices may be migrated by uninstalling the devices.fcp.disk.array.rtepackage and then running the cfgmgr command or rebooting.
The DS3K products are always configured as MPIO devices. There is no FCPARRAY support for thesedevices. The MPIO support for these devices removes the limitation of connecting only one adapter toeach DS3/4K controller port.
IBM BladeCenter issuesTo ensure that the storage devices are properly configured on the IBM BladeCenter server, change theinit_link setting on the Fibre Channel adapter from arbitrated loop to point to point.
20 AIX 7 with Technology Level 2: Release Notes

Enter the following commands to change the init_link setting on the Fibre Channel adapter:chdev -l fcsX -ainit_link=pt2pt –Pbosboot -aDcfgmgr
IBM Subsystem Device DriverAIX Version 7.1 does not support the IBM Subsystem Device Driver (SDD) for IBM TotalStorageEnterprise Storage Server®, the IBM TotalStorage DS family, and the IBM System Storage® SAN VolumeController. If you are using SDD, you must transition to Subsystem Device Driver Path Control Module(SDDPCM) or AIX Path Control Module (PCM) for the multipath support on AIX for IBM SAN storage.SDD to SDDPCM migration scripts are available to help you with the transition.
Contact IBM storage technical support to request access to the migration scripts.
For additional information related to the available multipath I/O solutions and supported AIX versionsfor IBM SAN storage products, see the IBM System Storage Interoperation Center (SSIC) website(www.ibm.com/systems/support/storage/ssic/interoperability.wss).
Installation, migration, upgrade, and configuration information 21

22 AIX 7 with Technology Level 2: Release Notes

Limitations and restrictions
This section lists restrictions and limitations applying to AIX 7 with 7100-02.
EMC PowerPath support for traditional and firmware assisted dumpTo complete a traditional assisted dump or a firmware assisted dump, you must have installed EMCPowerPath Version 5.5.0.2, or earlier.
console special file limitationThe EIO errors are restricted in some cases when the connection to the console is lost. The EIO errors thatresult from the console write function are restricted because the streams file is marked when a tty that isconnected to a modem is disconnected. All of the writes to the console are redirected to where theconsole points, and any writes to the file descriptor are returned with EIO errors. These EIO errorscontinue until a process reopens the console.
clogin command limitationWhen you run the clogin command, some programs will not function properly, especially those programsthat are in multibyte locales. Use the clogin command only for emergency system maintenance.
Workload Partitions not supported on thin serversWorkload partitions (WPARs) are not supported on thin servers (diskless and dataless systems that arenot capable of booting and running without the assistance of servers on a network).
System software cannot be directly managed in a nonshared /usrWorkload PartitionIf a WPAR is configured to have writable, non-shared /usr and /opt filesystems, the AIX system softwarewithin that WPAR cannot be directly managed from within the WPAR. Operations that are prevented onsystem software include apply, commit, deinstall, and reject. If it is necessary to modify system softwarewithin a non-shared WPAR, use the /usr/sbin/swvpdmgr -w <fileset_names> command to allow thosefile sets to be directly managed within the workload partition.
SNMPv3Due to the security concern, the public community name configured in snmpdv3 agent configuration file/etc/snmpdv3.conf will be disabled from AIX 6100-07 and AIX 7100-01 release. The AIX snmpdv3 agentwill not respond to any request on behalf of the public community name.
AIO has been removed from the ODMFor each Asynchronous I/O (AIO) function there is a Legacy and a POSIX definition. In AIX 7 with7100-02, both POSIX and Legacy extensions are loaded at boot time. Do not run the mkdev -l [aio0 |posix_aio0] command to load the extension because it will fail on AIX 7 with 7100-02. AIO attributeshave been removed from the Object Data Manager (ODM) and can no longer be queried with the lsattrcommand or changed with the chdev command. All of the tunable have been removed from the ODMand are managed by the ioo command.
© Copyright IBM Corp. 2012, 2016 23
|
||

Using a USB optical device with VIOSWhen you switch USB optical devices away from a Virtual I/O Server platform, then switch them back,the client partitions cannot use the optical devices until you delete the virtual optical devices, as well asthe real optical devices. Run the cfgmgr command to make the optical devices available.
Performing an internal or external snapshot of a JFS2 filesystemThe snapshot command fails in the following instances:v The snapshot command fails with a Not owner error if you are trying to create an internal snapshot
and the filesystem already has an external snapshot and vice versa. In this instance, the fscntl systemcall returns -1 and the errno parameter has the EPERM value.
v The snapshot command fails with a Not owner error if trying to create an internal or an externalsnapshot and the filesystem is HSM enabled. In this instance, the fscntl system call returns -1 and theerrno parameter has a EPERM value.
v The chfs command fails with a A system call received a parameter that is not valid error if tryingto enable HSM for a filesystem that has an internal or an external snapshot. In this instance, the finfosystem call returns -1 and the errno parameter has a EINVAL value.
v The snapshot command fails with a No space left on device error when trying to create an internalsnapshot and the snapshot limit is exceeded. In this instance, the fscntl system call returns -1 and theerrno parameter has a ENOSPC value.
InfiniBand EEH limitationThe 4X IB Dual Port DDR Exp CD, CFF/PCIE adapter (feature 8258) and aix_ib stack type of 2 port10GbE RoCE adapter (feature EC27,EC28,EC29,EC30) do not support full EEH recovery. If you get a buserror (MXIB_EEH_TEMP_ERR in the error log), you might have to manually perform the recovery steps.These steps might include manually reconfiguring the adapter or replacing the adapter. To manuallyreconfigure the adapter, complete the following steps:1. Stop any applications using IB or roce devices.2. Unconfigure the adapter by using the rmdev command (for example, rmdev -l iba0 or rmdev -l
roce0).3. Configure the adapter by using the mkdev command (for example, mkdev -l iba0 or mkdev -l
roce0).
Notes:
1. If the adapter instance is busy (a program or kernel extension has called open on the adapter), youmight not be able to unconfigure the adapter. If you cannot unconfigure the adapter, you must rebootthe system.
2. If the bus error (MXIB_EEH_HARDWARE_ERROR) is present after a successful manual recovery, youmust replace the adapter.
24 AIX 7 with Technology Level 2: Release Notes

WPAR storage devices
System WPARs can import one or more storage devices. Non-rootvg volume groups, logical volumes, andfile systems can be created and managed on imported storage devices within the WPAR.
A storage device is deployed to a WPAR in the following phases:1. Use the mkwpar or chwpar command to allocate a device to a WPAR.2. The device is automatically exported to the WPAR when the WPAR starts.3. The device is automatically imported when the WPAR is booted with the cfgmgr command.
Note: The man page for the syncwpar command has information about the -C flag, but the flag is notsupported.
After the device is exported to a WPAR, the device state is listed as Defined and it is not available in theGlobal environment until it is unexported by using either the chwpar command or the stopwparcommand.
Supported storage devicesThe disk drives that are supported in a WPAR include any FibreChannel disk drive that is supported byAIX Version 7.1 and uses the scsidisk device driver with the AIX MPIO (default PCM) multipathsoftware. These include the follwing:v IBM System Storage DS3400v IBM System Storage DS4200v IBM TotalStorage DS4300 (FAStT600)v IBM TotalStorage DS4500 (FAStT900)v IBM System Storage DS4700v IBM System Storage DS4800v IBM System Storage DS5100v IBM System Storage DS5300v IBM XIV® Storage System
The tape drives that are supported in a WPAR are any FibreChannel tape drives that are supported byAIX Version 7.1 and use the sctape device driver.
Note: The atape device driver is not supported.
Allocating a deviceA device can be allocated to a WPAR when the WPAR is created or it can be added to WPAR in a lateroperation. For a device to be allocated to a WPAR, it must be in the available state or defined state in theGlobal environment.
To query the device state, run the following command:lsdev -l <device>
To create a system WPAR and allocate the hdisk3 storage device, run the following command:mkwpar -D devname=hdisk3 -n mywpar1
© Copyright IBM Corp. 2012, 2016 25

To allocate a storage device to an existing WPAR, run the following command:chwpar -D devname=hdisk4 mywpar1
When you allocate a storage device to an active WPAR, the device is exported to the WPAR unless it waspreviously exported. To import the newly allocated device into the WPAR, invoke the cfgmgr commandwithin the WPAR.
The -D flag for the mkwpar and chwpar commands supports a new attribute, devid. The devid attributecan be used if the unique device identifier for the storage device is known. The devid and devnameattributes cannot be specified together. The devtype attribute has been updated to accept three additionaldevice types: disk, tape and cdrom.
A storage device can be allocated to more than one WPAR. However, the device can be exported to onlyone WPAR at a time. The device is exported to the WPAR that starts first. After a device has beenexported to a WPAR, the extended state of the device is listed as Exported. To see the extended state of adevice, run the following lsdev command with the new -x flag:lsdev -x -l hdisk1
A message similar to the following is displayed:hdisk1 Exported 01-08-02 MPIO Other DS4K Array Disk
Deallocating a deviceTo deallocate a storage device from an existing WPAR, enter the following command.chwpar -K -D devname=hdisk3 mywpar1
When a storage device is deallocated from an inactive WPAR, the device is removed from theconfiguration file. When a storage device is deallocated from an active WPAR, the chwpar commandattempts to unconfigure the device. If the device is being used, the unconfiguration operation fails andthe command to remove the device from the WPAR also fails. When the command is successful, thedevice in the WPAR changes from the available state to the defined state.
Configuring a device in a WPAREach storage device that is configured in the WPAR has an ODM entry in the WPAR. Each storage devicealso has a virtualized parent device. Configuration of the parent devices and management of the paths tothe actual devices are not allowed in the WPAR. The following commands are used to configure andmanage the Global environment and the devices in the WPAR:v mkdevv chdevv rmdevv lsdevv cfgmgrv lsattrv lspath
Managing file systems for a deviceWhen a device is configured in the WPAR, commands that are used to create and manage volumegroups, logical volumes, and file systems operate in the same way as they do in the Global environment.To create and modify volume groups, use the following commands:v mkvgv importvg
26 AIX 7 with Technology Level 2: Release Notes

v extendvg
To create and modify logical volumes, use the following commands:v mklvv chlv
To create and modify file systems, use the following commands:v mkfsv chfs
LimitationsThe following limitations apply to WPAR storage devices.v A storage device can be exported to only one active WPAR.v The JFS2 file system must be used for disk storage devices.v To use the WPAR storage device feature, the wio.common and wio.fcp packages must be installed.v You must be a root user to use the startwpar command and the stopwpar command on a rootvg
WPAR.
WPAR parameters must be in ASCII textWPAR input parameters must consist of upper or lower case ASCII letters, numbers, and underscores (_).This includes the following WPAR variables:v WPAR namev WPAR passwordv WPAR pathsv WPAR applicationv WPAR hostname
Installing applications in a WPAR environmentThe WPAR documentation describes how to install applications in a WPAR environment using variousapplications such as Apache, DB2 and WAS. These examples are not intended to imply that they are thesupported versions or configurations of these applications.
WPAR storage devices 27

28 AIX 7 with Technology Level 2: Release Notes

Additional information
AIX 7.1 Information CenterTo view the most current version of the information center, see the AIX 7.1 Information Center website(http://pic.dhe.ibm.com/infocenter/aix/v7r1/index.jsp). The AIX Information Center can be installedfrom or be viewed directly from the DVD on any AIX or Microsoft Windows systems that are capable ofreading a DVD.
If you require a translated version of the documentation and cannot access the Web site or use a DVD,then you might be able to download a copy of the DVD contents from the "Entitled Software Service" siteunder the terms of your AIX Software Maintenance Agreement if electronic download is offered in yourcountry.
For information about using the electronic software delivery, see the My entitled software website(https://www.ibm.com/servers/eserver/ess/ProtectedServlet.wss) and click Help. The electronic installimage is provided in a tar.gz format. After downloading the compressed tar image, decompress, unpack,and run install_aix to start the installation wizard.
Note: It is recommended that you restart your system after the AIX Information Center is installed. OnAIX systems, exit the installation wizard after the installation of the documentation for each language. OnAIX systems, to set the default browser, type the following command:chwebconfig -b <browser location>
USB Blu-ray drive read-only supportAIX Version 7.1 recognizes and configures USB attached Blu-ray drives. This feature is included in thefollowing device package:devices.usbif.08025002
The capability of the AIX operating system to read Blu-ray media is validated against a sample ofindustry standard OEM USB Blu-ray drives.
USB Blu-ray drives are configured with logical names, such as cd0 and cd1. The drives present both rawand block special files. For example, the raw special file for cd0 is /dev/rcd0, and the block special file is/dev/cd0.
The read-only capability is provided for the ISO file system (read-only ISO9660), the Universal DiskFormat (UDF) file system (version 2.01, or earlier) and standard optical media access commands, such asdd and tar.
AIX does not support the write operation to CD, DVD, or Blu-ray media present in the USB Blu-raydrive. Although the write operation is not prevented (if the drive is write capable), IBM does not providesupport for any issues encountered during the write operation.
AIX does not support plug-and-play for USB Blu-ray drives. To make a USB Blu-ray drive available toAIX users, a root user must connect the drive to a system's USB port and run the following command:cfgmgr -l usb0
After the drive is removed, the drive remains in the available state in the Object Data Manager (ODM)database until the root user runs the following command:rmdev -l cd<n>
© Copyright IBM Corp. 2012, 2016 29

When a drive is in the available state, you can reconnect it to the system, and it can be remounted orreopened. If a drive is disconnected from a system USB port while it is still open to a user, you cannotuse that drive until you close and reopen it.
Cluster Aware AIXThe Cluster Aware function is part of the AIX operating system. Using Cluster Aware AIX (CAA) you cancreate a cluster of AIX nodes and build a highly available solution for a data center.
Migration supportMigration is not supported for AIX 6 with 6100-07 or for AIX 7 with 7100-01. To upgrade from AIX 6.1with 6100-06 of Cluster Aware AIX (CAA) or from AIX 7 with 7100-00 of CAA to AIX 6 with 6100-07 orto AIX 7 with 7100-01, first remove the cluster, and then install AIX 6 with 6100-07 or install AIX 7 with7100-01 on all nodes that will be included in the new cluster.
Removal of solidDBCAA no longer uses an embedded IBM solidDB® database. The bos.cluster.solid fileset still exists, but it isnow obsolete. The solid and solidhac daemons are no longer used by CAA.
clusterconf commandCAA commands no longer support forced cleanup options.
The following is a list of options, by command, that are not supported in AIX 6 with 6100-07 or in AIX 7with 7100-01.chcluster -f
clusterconf -f, -s, -u
rmcluster -f
The clctrl command can be used for tuning the cluster subsystem. Only tune the cluster subsystem at thedirection of IBM customer support.
Vendor disk supportThe CAA infrastructure now provides limited support for some disks that are managed by vender diskdrivers. No disk events are available for these disks, but they can be configured into a cluster as arepository or as shared disks. See the documentation for the clustering product that you are using, suchas IBM PowerHA SystemMirror® for AIX, for a complete list of vendor disk devices that are supportedfor your environment.
Cluster Data Aggregation ToolAIX Version 7.1 introduces a new reliability, availability, and serviceability (RAS) tool called Cluster DataAggregation Tool.
The Cluster Data Aggregation Tool provides a single instance to launch RAS debug and monitoringactions, and to collect problem determination data for multiple nodes. The Cluster Data Aggregation Toolenvironment is made of a central master node and remote nodes. The Cluster Data Aggregation Tool isinstalled on and executed from the central master node. The central master node hosts the data collectionrepository, which is a new file system that contains all the collection data from multiple remote nodes.The remote nodes are the nodes where Cluster Data Aggregation Tool data are collected, which are theAIX logical partition (LPAR), VIOS, PowerHA pureScale®, and HMC data.
The Cluster Data Aggregation Tool has the following features:v Captures problem determination data across multiple nodes.
30 AIX 7 with Technology Level 2: Release Notes

v Supports sending the data gathering tool to remote nodes.v Provides an extensible plug-in feature that supports new data collection types for a user.v Integrates with RBAC to enable a nonroot user to collect Cluster Data Aggregation Tool data.v Relies on Secure Shell (SSH) for secure connectivity between nodes.v Is controlled by the CLI (command-line interface) and SMIT panel.
The Cluster Data Aggregation Tool is managed by the cdat command that is divided into severalsubcommands. The subcommands are access, archive, check, collect, delete, discover_nodes, init,list_nodes, list_types, and show.
For more information about the Cluster data Aggregation Tool, see the Cluster Data Aggregation Tooltopic in the AIX 7.1 Information Center.
DB2 migrationYou can upgrade your DB2 environment with DB2 Version 9.5, DB2 Version 9.1, or DB2 UDB Version 8copies to DB2 Version 9.7. For more information about upgrading to DB2 Version 9.7, see the Upgrade toDB2 Version 9.7 topic in the DB2 Information Center.
Note: The DB2 High Availability feature is not included in the DB2 version 9.7 FP2. The DB2 HA featureis available in the DB2 Version 9.7 from FP3.
Lightweight InfrastructureThe following AIX components rely on and incorporate Lightweight Infrastructure (LWI) v7.1:v Electronic Service Agent™ (eSA)v IBM Systems Director Console for AIXv Common Agent Services (CAS) Agent
For information about licensing LWI v7.1, see the Program-unique Terms section of the AIX licenseinformation documentation.
Server side support for new Unicode localesFor information about server side support for new unicode locales, see the Supported languages andlocales topic in the AIX 7.1 Information Center.
PCIe2 10 GbE RoCE Adapter supportThe PCIe2 10 GbE RDMA Over Converged Ethernet (RoCE) Adapter was supported only on previousversions of the AIX operating system to use the Remote Direct Memory Access (RDMA) configurationmode. AIX 7 with 7100-02 or later supports the adapter that is configured in either the RDMA or thenetwork interface card (NIC) configuration. The host bus adapter (HBA), which was not available inearlier versions of the AIX operating systems, manages which mode is enabled.
Any firmware updates can be downloaded from IBM Fix Central (www.ibm.com/support/fixcentral/).
The adapter is still configured by default to support the RDMA mode. Complete the steps in NetworkInterface Card to change it to the NIC mode.
Additional information 31

Network Interface CardAs of AIX 7 with 7100-02, the PCIe2 10 GbE RoCE Adapter can be configured to run in the NICconfiguration. If you do not have the network-intensive applications that benefit from RDMA, then youcan run the adapter in the NIC configuration.
To use the PCIe2 10 GbE RoCE Adapter in the NIC configuration, you must update and install certainfilesets that support the NIC configuration. The following filesets are required and are available on theAIX 7 with 7100-02 base operating system CD.
devices.ethernet.mlxConverged Ethernet Adapter main device driver (mlxentdd)
devices.pciex.b315506b3157265Packaging support for the NGP ITE Converge Ethernet Adapter ASIC2
devices.pciex.b3155067b3157365Packaging support for the NGP ITE Converge Ethernet Adapter ASIC1
devices.pciex.b315506714101604Packaging for Mellanox 2 Ports 10 GbE Converge Ethernet Adapter with the small form factorpluggable (SFP+) transceivers
devices.pciex.b315506714106104Packaging for Mellanox 2 Ports 10 GbE Converge Ethernet Adapter that supports any SFP+transceivers
devices.common.IBM.ibICM device driver that is required to use the RDMA configuration
devices.pciex.b3154a63Mellanox 10 GbE Converge Ethernet Adapter device driver that is required to use the RDMAconfiguration
After the existing RDMA filesets are updated with the new filesets, both the roce and the ent devicesmight appear to be configured. If both devices appear to be configured when you run the lsdevcommand on the adapters, complete the following steps:1. Delete the roceX instances that are related to the PCIe2 10 GbE RoCE Adapter by entering the
following command:# rmdev -dl roce0[, roce1][, roce2,...]
2. Delete the entX instances that are related to the PCIe2 10 GbE RoCE Adapter by entering thefollowing command:# rmdev -dl ent1[,ent2][, ent3...]
3. If there are one or more converged host bus adapters (hbaX) that are related to the PCIe2 10 GbERoCE Adapter, delete them by entering the following command:# rmdev -dl hba0[, hba1][,hba2...]
4. Run the configuration manager to incorporate the changes by entering the following command:# cfgmgr
Complete the following steps to switch over to the NIC configuration from the RDMA configuration:1. Stop all RDMA applications that are running on the PCIe2 10 GbE RoCE Adapter.2. Delete or redefine the roceX instances by entering one of the following commands:v # rmdev -d -l roce0v # rmdev -l roce0
The rmdev -l roce0 command retains the definition of the roce0 configuration so you can use it thenext time to create instances.
32 AIX 7 with Technology Level 2: Release Notes
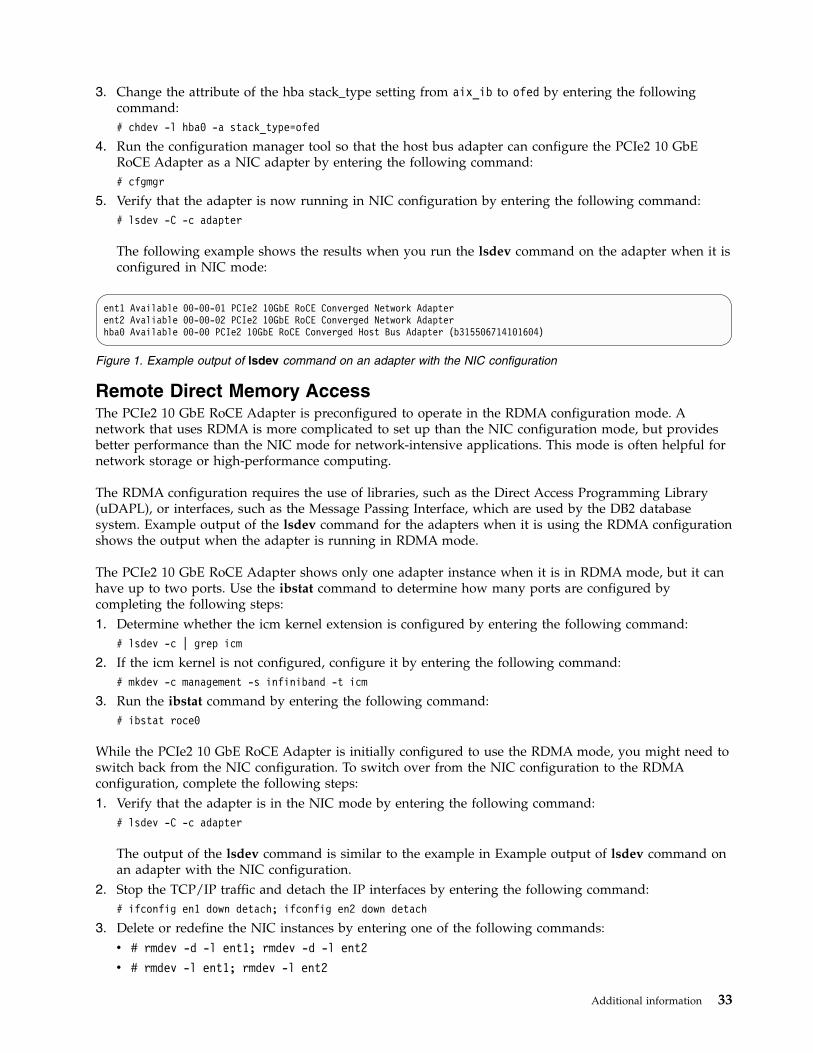
3. Change the attribute of the hba stack_type setting from aix_ib to ofed by entering the followingcommand:# chdev -l hba0 -a stack_type=ofed
4. Run the configuration manager tool so that the host bus adapter can configure the PCIe2 10 GbERoCE Adapter as a NIC adapter by entering the following command:# cfgmgr
5. Verify that the adapter is now running in NIC configuration by entering the following command:# lsdev -C -c adapter
The following example shows the results when you run the lsdev command on the adapter when it isconfigured in NIC mode:
Remote Direct Memory AccessThe PCIe2 10 GbE RoCE Adapter is preconfigured to operate in the RDMA configuration mode. Anetwork that uses RDMA is more complicated to set up than the NIC configuration mode, but providesbetter performance than the NIC mode for network-intensive applications. This mode is often helpful fornetwork storage or high-performance computing.
The RDMA configuration requires the use of libraries, such as the Direct Access Programming Library(uDAPL), or interfaces, such as the Message Passing Interface, which are used by the DB2 databasesystem. Example output of the lsdev command for the adapters when it is using the RDMA configurationshows the output when the adapter is running in RDMA mode.
The PCIe2 10 GbE RoCE Adapter shows only one adapter instance when it is in RDMA mode, but it canhave up to two ports. Use the ibstat command to determine how many ports are configured bycompleting the following steps:1. Determine whether the icm kernel extension is configured by entering the following command:
# lsdev -c | grep icm
2. If the icm kernel is not configured, configure it by entering the following command:# mkdev -c management -s infiniband -t icm
3. Run the ibstat command by entering the following command:# ibstat roce0
While the PCIe2 10 GbE RoCE Adapter is initially configured to use the RDMA mode, you might need toswitch back from the NIC configuration. To switch over from the NIC configuration to the RDMAconfiguration, complete the following steps:1. Verify that the adapter is in the NIC mode by entering the following command:
# lsdev -C -c adapter
The output of the lsdev command is similar to the example in Example output of lsdev command onan adapter with the NIC configuration.
2. Stop the TCP/IP traffic and detach the IP interfaces by entering the following command:# ifconfig en1 down detach; ifconfig en2 down detach
3. Delete or redefine the NIC instances by entering one of the following commands:v # rmdev -d -l ent1; rmdev -d -l ent2v # rmdev -l ent1; rmdev -l ent2
ent1 Available 00-00-01 PCIe2 10GbE RoCE Converged Network Adapterent2 Avaliable 00-00-02 PCIe2 10GbE RoCE Converged Network Adapterhba0 Available 00-00 PCIe2 10GbE RoCE Converged Host Bus Adapter (b315506714101604)
Figure 1. Example output of lsdev command on an adapter with the NIC configuration
Additional information 33

The rmdev -l ent1; rmdev -l ent2 command retains the definition of the Ethernet devices so thatyou can use it the next time that you create instances.
4. Change the attribute of the hba stack_type from ofed to aix_ib by entering the following command:# chdev -l hba0 -a stack_type=aix_ib
5. Run the configuration manager tool so that the host bus adapter can configure the PCIe2 10 GbERoCE Adapter as an RDMA adapter by entering the following command:# cfgmgr
6. Verify that the adapter is now running in the RDMA configuration by entering the followingcommand:# lsdev -C -c adapter
The following example shows the results when you run the lsdev command for adapters, and theadapter is configured in the RDMA mode.
roce0 Avaliable 00-00-00 PCIe2 10GbE RoCE Converged Network Adapterhba0 Available 00-00-00 PCIe2 10GbE RoCE Converged Host Bus Adapter (b315506714101604)
Figure 2. Example output of the lsdev command for the adapters when it is using the RDMA configuration
34 AIX 7 with Technology Level 2: Release Notes

Notices
This information was developed for products and services offered in the U.S.A.
IBM may not offer the products, services, or features discussed in this document in other countries.Consult your local IBM representative for information on the products and services currently available inyour area. Any reference to an IBM product, program, or service is not intended to state or imply thatonly that IBM product, program, or service may be used. Any functionally equivalent product, program,or service that does not infringe any IBM intellectual property right may be used instead. However, it isthe user's responsibility to evaluate and verify the operation of any non-IBM product, program, orservice.
IBM may have patents or pending patent applications covering subject matter described in thisdocument. The furnishing of this document does not give you any license to these patents. You can sendlicense inquiries, in writing, to:
IBM Director of LicensingIBM CorporationNorth Castle DriveArmonk, NY 10504-1785U.S.A.
For license inquiries regarding double-byte character set (DBCS) information, contact the IBM IntellectualProperty Department in your country or send inquiries, in writing, to:
Intellectual Property LicensingLegal and Intellectual Property LawIBM Japan, Ltd.19-21, Nihonbashi-Hakozakicho, Chuo-kuTokyo 103-8510, Japan
The following paragraph does not apply to the United Kingdom or any other country where suchprovisions are inconsistent with local law: INTERNATIONAL BUSINESS MACHINES CORPORATIONPROVIDES THIS PUBLICATION "AS IS" WITHOUT WARRANTY OF ANY KIND, EITHER EXPRESS ORIMPLIED, INCLUDING, BUT NOT LIMITED TO, THE IMPLIED WARRANTIES OFNON-INFRINGEMENT, MERCHANTABILITY OR FITNESS FOR A PARTICULAR PURPOSE. Somestates do not allow disclaimer of express or implied warranties in certain transactions, therefore, thisstatement may not apply to you.
This information could include technical inaccuracies or typographical errors. Changes are periodicallymade to the information herein; these changes will be incorporated in new editions of the publication.IBM may make improvements and/or changes in the product(s) and/or the program(s) described in thispublication at any time without notice.
Any references in this information to non-IBM websites are provided for convenience only and do not inany manner serve as an endorsement of those websites. The materials at those websites are not part ofthe materials for this IBM product and use of those websites is at your own risk.
IBM may use or distribute any of the information you supply in any way it believes appropriate withoutincurring any obligation to you.
Licensees of this program who wish to have information about it for the purpose of enabling: (i) theexchange of information between independently created programs and other programs (including this
© Copyright IBM Corp. 2012, 2016 35

one) and (ii) the mutual use of the information which has been exchanged, should contact:
IBM CorporationDept. LRAS/Bldg. 90311501 Burnet RoadAustin, TX 78758-3400U.S.A.
Such information may be available, subject to appropriate terms and conditions, including in some cases,payment of a fee.
The licensed program described in this document and all licensed material available for it are providedby IBM under terms of the IBM Customer Agreement, IBM International Program License Agreement orany equivalent agreement between us.
Any performance data contained herein was determined in a controlled environment. Therefore, theresults obtained in other operating environments may vary significantly. Some measurements may havebeen made on development-level systems and there is no guarantee that these measurements will be thesame on generally available systems. Furthermore, some measurements may have been estimated throughextrapolation. Actual results may vary. Users of this document should verify the applicable data for theirspecific environment.
Information concerning non-IBM products was obtained from the suppliers of those products, theirpublished announcements or other publicly available sources. IBM has not tested those products andcannot confirm the accuracy of performance, compatibility or any other claims related to non-IBMproducts. Questions on the capabilities of non-IBM products should be addressed to the suppliers ofthose products.
All statements regarding IBM's future direction or intent are subject to change or withdrawal withoutnotice, and represent goals and objectives only.
All IBM prices shown are IBM's suggested retail prices, are current and are subject to change withoutnotice. Dealer prices may vary.
This information is for planning purposes only. The information herein is subject to change before theproducts described become available.
This information contains examples of data and reports used in daily business operations. To illustratethem as completely as possible, the examples include the names of individuals, companies, brands, andproducts. All of these names are fictitious and any similarity to the names and addresses used by anactual business enterprise is entirely coincidental.
COPYRIGHT LICENSE:
This information contains sample application programs in source language, which illustrate programmingtechniques on various operating platforms. You may copy, modify, and distribute these sample programsin any form without payment to IBM, for the purposes of developing, using, marketing or distributingapplication programs conforming to the application programming interface for the operating platform forwhich the sample programs are written. These examples have not been thoroughly tested under allconditions. IBM, therefore, cannot guarantee or imply reliability, serviceability, or function of theseprograms. The sample programs are provided "AS IS", without warranty of any kind. IBM shall not beliable for any damages arising out of your use of the sample programs.
Each copy or any portion of these sample programs or any derivative work, must include a copyrightnotice as follows:
36 AIX 7 with Technology Level 2: Release Notes

© (your company name) (year). Portions of this code are derived from IBM Corp. Sample Programs. ©Copyright IBM Corp. _enter the year or years_.
If you are viewing this information softcopy, the photographs and color illustrations may not appear.
TrademarksIBM, the IBM logo, and ibm.com are trademarks or registered trademarks of International BusinessMachines Corp., registered in many jurisdictions worldwide. Other product and service names might betrademarks of IBM or other companies. A current list of IBM trademarks is available on the web atCopyright and trademark information at www.ibm.com/legal/copytrade.shtml.
INFINIBAND, InfiniBand Trade Association, and the INFINIBAND design marks are trademarks and/orservice marks of the INFINIBAND Trade Association.
Linux is a registered trademark of Linus Torvalds in the United States, other countries, or both.
Microsoft and Windows are trademarks of Microsoft Corporation in the United States, other countries, orboth.
Java and all Java-based trademarks and logos are trademarks or registered trademarks of Oracle and/orits affiliates.
Notices 37

38 AIX 7 with Technology Level 2: Release Notes


IBM®
Printed in USA