aix network dataadministration facilitypublic.dhe.ibm.com/systems/power/docs/aix/61/ndaf_pdf.pdf ·...
TRANSCRIPT

AIX Version 6.1
AIX Network Data AdministrationFacility
���


AIX Version 6.1
AIX Network Data AdministrationFacility
���

NoteBefore using this information and the product it supports, read the information in “Notices” on page 57.
This edition applies to AIX Version 6.1 and to all subsequent releases and modifications until otherwise indicated innew editions.
© Copyright IBM Corporation 2006, 2014.US Government Users Restricted Rights – Use, duplication or disclosure restricted by GSA ADP Schedule Contractwith IBM Corp.

Contents
About this document . . . . . . . . . vHighlighting . . . . . . . . . . . . . . vCase-sensitivity in AIX . . . . . . . . . . . vISO 9000. . . . . . . . . . . . . . . . v
AIX network data administration facility 1What's new in AIX network data administrationfacility . . . . . . . . . . . . . . . . 1NDAF concepts . . . . . . . . . . . . . 1
Physical filesystem . . . . . . . . . . . 1NDAF domain. . . . . . . . . . . . . 1Data set . . . . . . . . . . . . . . . 2Cell . . . . . . . . . . . . . . . . 2Replicas . . . . . . . . . . . . . . . 2Administration client . . . . . . . . . . 4Administration server . . . . . . . . . . 4Data server . . . . . . . . . . . . . . 4Principal. . . . . . . . . . . . . . . 4Graphical representation of an NDAF domain . . 5
NDAF commands . . . . . . . . . . . . 5dmf . . . . . . . . . . . . . . . . 5dmadm . . . . . . . . . . . . . . . 6dms . . . . . . . . . . . . . . . . 6dms_enable_fs . . . . . . . . . . . . . 6
NDAF deployment models . . . . . . . . . 6Data centers . . . . . . . . . . . . . 6Wide area networks . . . . . . . . . . . 6
NDAF security . . . . . . . . . . . . . 7Security for NFS file access . . . . . . . . 7Exporting with Kerberos . . . . . . . . . 7Roles . . . . . . . . . . . . . . . . 8NDAF role-based access control support . . . . 9
NDAF installation and configuration . . . . . . 9Installing NDAF . . . . . . . . . . . . 9Upgrading NDAF . . . . . . . . . . . 10
Configuring NFS version 4 . . . . . . . . 10Configuring Kerberos 5 . . . . . . . . . 10RPC port requirements . . . . . . . . . 11Configuring an NDAF data server . . . . . . 12Configuring the NDAF administration server . . 13Configuring an NDAF administration client . . 13
Managing NDAF . . . . . . . . . . . . 13Creating and managing administration serversfor NDAF . . . . . . . . . . . . . . 13Creating and managing data servers . . . . . 15Creating and managing cells. . . . . . . . 18Creating and managing roles . . . . . . . 22Creating and managing data sets . . . . . . 25Creating and managing replicas . . . . . . 32Populating data sets . . . . . . . . . . 41Constructing a cell namespace from data sets . . 41Federating NFS servers without NDAF into anNDAF environment . . . . . . . . . . 42NDAF logs files analysis . . . . . . . . . 43
NDAF use cases and installation examples . . . . 44Configuring a Kerberos-enabled NDAF domain 44NDAF case studies . . . . . . . . . . . 47
Troubleshooting NDAF . . . . . . . . . . 52NDAF checker . . . . . . . . . . . . 53NDAF data backup. . . . . . . . . . . 54NDAF data recovery . . . . . . . . . . 54
Additional NDAF command processes . . . . . 55NDAF SMIT fastpaths . . . . . . . . . . . 55
Notices . . . . . . . . . . . . . . 57Privacy policy considerations . . . . . . . . 59Trademarks . . . . . . . . . . . . . . 59
Index . . . . . . . . . . . . . . . 61
© Copyright IBM Corp. 2006, 2014 iii

iv AIX Version 6.1: AIX Network Data Administration Facility

About this document
This document provides system administrators with conceptual and procedural information about how toset up, administer, and manage the AIX Network Data Administration Facility (NDAF) subsystem.Information about projects, policies, and data aggregation is included.
HighlightingThe following highlighting conventions are used in this book:
Bold Identifies commands, subroutines, keywords, files, structures, directories, and other items whose names arepredefined by the system. Also identifies graphical objects such as buttons, labels, and icons that the userselects.
Italics Identifies parameters whose actual names or values are to be supplied by the user.
Monospace Identifies examples of specific data values, examples of text similar to what you might see displayed,examples of portions of program code similar to what you might write as a programmer, messages fromthe system, or information you should actually type.
Case-sensitivity in AIXEverything in the AIX® operating system is case-sensitive, which means that it distinguishes betweenuppercase and lowercase letters. For example, you can use the ls command to list files. If you type LS, thesystem responds that the command is not found. Likewise, FILEA, FiLea, and filea are three distinct filenames, even if they reside in the same directory. To avoid causing undesirable actions to be performed,always ensure that you use the correct case.
ISO 9000ISO 9000 registered quality systems were used in the development and manufacturing of this product.
© Copyright IBM Corp. 2006, 2014 v

vi AIX Version 6.1: AIX Network Data Administration Facility

AIX network data administration facility
This section provides system administrators with complete information about how to perform such tasksas configuring and managing the AIX Network Data Administration Facility (NDAF). It includesinformation about the structure, installation, security, and troubleshooting. This publication is alsoavailable on the documentation CD that is shipped with the operating system.
What's new in AIX network data administration facilityRead about new or significantly changed information for the AIX network data administration facilitytopic collection.
November 2012
The following information is a summary of the updates made to this topic collection:v Added the support information for role-based access control (RBAC). See NDAF role-based access
control support for complete information.
How to see what's new or changed
In this PDF file, you might see revision bars (|) in the left margin that identifies new and changedinformation.
NDAF conceptsThe AIX Network Data Administration Facility (NDAF) is an AIX solution for centralized creation,placement, replication, ongoing management, and namespace federation of file system data across anetwork of machines.
Its primary purpose is to facilitate the provisioning of data on NFS version 4 (NFSv4) servers and thecreation of a single NFSv4 exported file namespace that spans multiple server systems.
NDAF consists of several components. They include a domain where the network servers reside, acentralized server that controls the collection of data servers, and a directory tree of file system objects formanagement purposes.
Physical filesystemA physical filesystem (PFS) is a filesystem that can access attached disk storage on a system and can beexported by an NFS server.
NDAF domainAn NDAF domain consists of one or more administration clients (that is, systems from which anadministrator can control the NDAF environment through the dmf command), one or more AIXNDAF-enabled NFS servers, and potentially, one or more non-NDAF enabled NFS servers groupedaround an NDAF administration server.
All systems in the NDAF domain share the same user and group definitions. For example, if NDAF isdeployed using Kerberos security, all systems in the domain are members of the same Kerberos realm.The NDAF domain and the NFSv4 domain must be the same domain.
© Copyright IBM Corp. 2006, 2014 1

In an NDAF domain, the NDAF administration server receives its process information from commandsrun by one or more system administrators over a command-line interface (CLI). The NDAFadministration server initiates all NDAF actions at the NFS data server systems that are part of thedomain.
Data setThe basic unit of NDAF management is a data set. A data set is a directory tree. NDAF creates data setsand manages their attributes, mounting, and contained data.
Data sets, also called dsets, are manageable units of data that can be shared across a network. Theyprovide basic management for replicating network data and inserting it into a namespace. They arelinked together using data set references to form the file namespace. NDAF supports thousands of datasets or replicas across all managed servers. Read-only replicas of a data set can be created, distributed,and maintained across multiple data servers. When the master source for a collection of replicas ismodified, the dmf update replica command is used to propagate the changes to all replica locations.
Data that is copied into data set directories is NFS-exported, but the data is not visible in the cell (seefollowing section) in the NFS domain until the data set is mounted with the dmf mount dset command.File system objects in a data set include files, directories, access control lists (ACLs), links, and more.
Unless specified when they are created, data sets are created in the directory specified when the dmsdaemon is started by the -ndaf_dataset_default parameter or, if unspecified, the -ndaf_dir parameter.
A data set can only be created on a directory that belongs to a file system enabled (for dataset creation)by dms_enable_fs.
CellData sets can be grouped with other data sets and organized into a single file namespace. This groupingis called a cell.
A cell is a unit of management and namespace that is hosted by an administration server. After a cell isdefined on an administration server, more data sets can be created on that server using that cell. Each cellin an administration server is independent of all other cells hosted by that administration server. A cellcontains its own namespace, consisting of data sets, and its own role-based security objects. Roles areprivileges attached to a set of users that manage the resources within a cell. As many as eight distinctroles can be defined for each cell.
After a cell is created using the dmf create cell name command, and is automatically placed on theadministration server. You cannot use the dmf place cell name command to place a cell on theadministration server. Placing a cell results in the copy of the cell’s root directory information, whichconsists of mounted dsets and replicas referrals from the administration server to the targeted data server.A cell can be placed on any server defined on the administration server on which the cell is hosted.NFSv4 clients mount the root directory of the cell to access the cell’s full namespace.
All NFSv4 clients can view the objects mounted with dmf mount within a cell by mounting, with NFS,the root path of the cell from any NDAF server on which the cell has been placed.
NDAF supports up to 64 cells for every deployed NDAF instance (domain) that has cells residing on oneor more data servers. When a cell is destroyed, all its data sets and replicas are also destroyed.
ReplicasRead-only copies of data sets can be created, distributed, and maintained safely across multiple dataservers.
2 AIX Version 6.1: AIX Network Data Administration Facility

These read-only data sets are called replicas. A replica is placed in the global namespace in the same wayas a data set. Multiple clones of a replica of the same data set can be placed on different servers so that ifthe primary server of a replica becomes unavailable to the client, the client can automatically access thesame files from a different server. Replicas will not reflect updates that are made to the data set unlessthe replica is updated using the dmf update replica command.
Unless specified when they are created, replicas are created in the directory specified when the dmsdaemon is started by the -ndaf_replica_default parameter or, if unspecified, the -ndaf_dir parameter.
Replicas can only be created on a filesystem enabled for dset creation by the dms_enable_fs command.
Master replica locationThe master replication location is the place where the replica was first created, and it is the first locationupdated on any update action request. The other replica locations are updated afterwardsasynchronously.
You can change the master location to another replica location using the master action request.
A master replica can never be unplaced before another master replica location is defined as a replacementfor the first location.
Replica clonesFor replicas, the dmf place replica command creates a clone of the replica at a specified location on theserver.
If the replica is mounted in the cell, this clone location is added to the NFS replica list that is returned tothe NFS clients that are accessing the replica. For more information, see NFS replication and globalnamespace. The order of the referrals in this list depends on the network configuration. Every clonelocation of a replica is updated asynchronously upon dmf update commands. The dmf place replicacommand takes as parameters the server and, optionally, the local path on the server.
A clone location of a replica can be removed from a server, as in the following example:dmf unplace replica my_server local_path -a my_admin -c my_cell -o my_replica
In this example, my_server is the name of the server on which the clone resides and my_replica is thename of the replica. The clone location is unexported, and its content is destroyed. This location is alsoremoved from the file systems locations data list returned by NFSv4 for this replica in the cell. The otherlocations of the replica remain the same. The dmf update replica command updates clones along withtheir original replicas to be refreshed with the content of the original source data set.
Replication updatesThe master replica is a read-only copy of the source data set, and the clones are copies of the masterreplica. If the source data set is updated, the replicas are not updated until explicitly done so using thedmf update replica command.
There are two methods of data transfer:
copy methodperforms data transfer using full file tree copy. The copy method implements the data transfermethod plugin interface and performs a data transfer operation by doing a complete walk of thedirectory tree for the data set and transmitting all objects and data to the target.
rsync methodperforms data transfer using rsync-like algorithm. The rsync method performs a data transferoperation by doing a complete walk of the directory tree for the data set and transmitting onlydeltas for directories and data to the target. It is beneficial when updating replicas because it onlysends changed blocks of information, so it reduces network bandwidth considerably.
AIX network data administration facility 3

Administration clientAn administration client is any system in the network that has the ndaf.base.client fileset installed on itfrom which the dmf command can be run.
The NDAF administration server receives its process information from commands run by systemadministrators over a command-line interface. The program name for this administration client is the dmfcommand.Related concepts:“dmf” on page 5In NDAF command strings, dmf is the prefix for all command-line interface commands.
Administration serverThe NDAF administration server is a data server that runs both the dmadm and dms daemon processesand acts as the central point of control for the collection of NDAF data servers.
It receives commands from the system administrators who use the administration client (the dmfcommand). The NDAF administration server maintains a master database of configuration informationand sends commands to the data servers. When a loss of communication occurs between theadministration server and the data servers, the NDAF-managed data already present on the data servercan still be accessed. After network connectivity is restored, the transactions between the systems areeventually completed.
The administration server is configured before all other NDAF components. This server requires 64-bitsystems running the AIX 64-bit kernel.
Administration server databases are created in an admin subdirectory in the directory specified by the-ndaf_dir parameter when the dmadm daemon is started.
The ndaf.base.admin fileset is installed on the administration server systems.
Data serverA data server is the server that runs the dms daemon process controlling an NFS file server and itsassociated physical file system (PFS). The data provisioned with NDAF resides at the data server.
The dms process runs at each data server and carries out actions in underlying file systems. It setsdefault directories, timeout values, level of logging, security method used, Kerberos keytab path,Kerberos principal, and communication ports on each data server. Only data servers within the NDAFdomain can be replicated.
Data server databases are created in a server subdirectory in the directory specified by the -ndaf_dirparameter when the dms daemon is started. These servers require 64-bit systems running the AIX 64-bitkernel. The administration server also serves as a data server.
As they run the dms daemon processes, administration servers also are data servers.
The ndaf.base.server fileset is installed on the data server systems.
PrincipalA principal is an authorized NDAF user that Kerberos and other security methods screen for duringsecurity checks.
Principals control how objects can be manipulated and by which operations.
4 AIX Version 6.1: AIX Network Data Administration Facility

Only the first user to run the dmf create admin command, called the DmPrincipal, can create cells,servers, and roles. Additional NDAF principals can be added to manage an object with the dmf add_toobject DmPrincipal=login command. All members of the DmPrincipal list are considered to be ownersof the object and can control it.
NDAF principals can also be removed using the dmf remove_from action.
Graphical representation of an NDAF domainThe basic concepts of the functioning objects of an NDAF domain can be depicted graphically.
The following figure shows the organization of various objects within NDAF:
NDAF commandsThe four primary commands that NDAF uses to perform its operations are the dmf command, dmscommand, dmadm command, and the dms_enable_fs command.
For more information about other NDAF commands, refer to “Additional NDAF command processes” onpage 55, and the dmf command.
dmfIn NDAF command strings, dmf is the prefix for all command-line interface commands.
These command strings follow a consistent structure: the actual name of the executable (dmf), an actionrequest called a verb (such as create or delete), the object to which the action is being applied (such as aserver or a cell), and any subsequent parameters (such as names). These parameters areposition-dependent.
The dmf command can be run on 32-bit or 64-bit systems.Related information:
NDAF Domain
Cell
Administration server(dmadm)
NFSv4 data servers(dms)
NFSv4 clients
NFSv4 clientsNFSv4 clients
NFSv4 data servers(dms)
ndaf1
Administration(dmf)
NFSv4 data servers(dms)
Figure 1. The NDAF domain
AIX network data administration facility 5

dmf CommandProvides complete information on the dmf command.
dmadmThe dmadm command operates NDAF on the administration server.
Both the dmadm and dms commands are required services on the administration server's Kerberoskeytab. The dms processes must be launched along with the dmadm daemons for the administrationmachine to function correctly.Related information:dmadm CommandProvides complete information on the dmadm command.
dmsThe dms command operates NDAF on a data server.
On a data server within an NDAF domain, the dms command sets default directories, timeout values,level of logging, security method used, Kerberos keytab path, Kerberos principal, and communicationports.Related information:dms CommandProvides complete information on the dms command.
dms_enable_fsThe dms_enable_fs command enables, disables, or queries the capability to create cells, data sets, andreplicas on a filesystem.Related information:dms_enable_fs CommandProvides complete information on the dms_enable_fs command.
NDAF deployment modelsNDAF is designed to be deployed in either a data center environment or a wide area network (WAN)environment where servers are separated by distance or less reliable networks.
Deployments combining the two aspects are also possible. Each has unique considerations.
Data centersFast reliable networks are typical of data center environments. Data center configurations usually ensurea high degree of trust between the systems and the data flowing between them.
With fast reliable networks, replication of larger data sets with more maintained copies is possible.Networks in data center environments can handle replication of data that changes more frequently orchanges more extensively.
Depending on the security of a data center environment, NDAF can be deployed without Kerberos-basedauthentication or the use of the Kerberos-based data protection features.
Wide area networksIn a wide area network (WAN) environment, network bandwidth or reliability constraints can limit thesize of data that can be reasonably replicated across systems. The frequency and amount of change todata becomes an important consideration when deciding whether or not to replicate it, how many copies
6 AIX Version 6.1: AIX Network Data Administration Facility
to maintain, and how often to schedule replica updates. These considerations must be balanced againstthe benefit of placing the data at remote locations to get it closer to the point of consumption for betterperformance and increased availability.
NDAF is designed so that the loss of communication between the administration and data servers doesnot prevent access to NDAF-managed data already present on the data server. It is also designed toeventually complete transactions between systems after network connectivity is restored.
For this deployment model, the use of Kerberos-based security is preferable for providing trustedauthentication or protection of data on the network.
NDAF securityNDAF systems, including the point of administration, can use strong security based on Kerberos andopen network computing (ONC) remote procedure call (RPC) with RPCSEC-GSS for authentication whencommunicating with each other.
RPCSEC_GSS is a security method that can optionally be applied to ONC RPC. RPCSEC-GSS is aprotocol that applies Generic Security Services (GSS) to RPC.
Security for NFS file accessTo manage access to NFS clients, the NFSv4 access control list (ACL) method can be used for directoriescontaining data sets, at filesystem level, and on the mounting point (nfsroot) of each server.
Filesystem objects are typically associated with an ACL that (for NFSv4 ACLs as opposed to AIX ACLs)consists of a series of access control entries (ACEs). Each ACE defines an identity and its related accessrights.
Access control consists of protected information resources that specify who can be granted access to thoseresources. The operating system offers a choice of need-to-know or discretionary security. The owner ofan information resource can grant other users read- or write-access rights for the resource. A user who isgranted access rights to a resource can transfer those rights to other users. This security permitsuser-controlled information flow in the system; the owner of an information resource defines the accesspermissions to that resource.
Users have user-based access only to the objects that they own. Typically, users receive either the grouppermissions or the default permissions for a resource. The major task in administering access control is todefine the group memberships of users, because these memberships determine the users' access rights tothe files that they do not own.
The NFSv4 ACL type provides fine-grained control over access rights and also provides for features suchas inheritance. NFSv4 ACLs consist of an array of ACEs. Each ACE defines access rights for an identity.
In AIX, use the aclget, acledit, aclput and aclconvert commands to manage NFSv4 ACLs. Additionalinformation on AIX support of NFSv4 ACLs can be found in the Access Control List section of Security.
Exporting with KerberosBy default, the data servers only export filesystems for NFSv4 access with all security types allowed.
You might want to change the default export options to restrict the auth_sys security mechanism or topermit NFS version 3 mounts.
To do this, run chndaf command with the following arguments:chndaf -nfs_args=<new nfs args>
AIX network data administration facility 7

Format the new nfs args exactly as they would be for the exportfs command.
For example, to restrict exports to krb5p only, run chndaf -nfs_args=sec=krb5p.
If you specify the vers= stanza, you must include 4 (see below); NDAF will not work correctly otherwise.If you do not specify the vers= stanza, the filesystems will be exported for NFSv4 only.
To export for versions 3 and 4, run chndaf -nfs_args=vers=3:4.
For more information about Kerberos and RPCSEC-GSS security, see Setting up a network forRPCSEC-GSS.
RolesRoles are privileges attached to a set of NDAF principals for managing the resources within a cell. NDAFroles are a distinct function separate from AIX administrative roles.
NDAF principals match Kerberos principals when using the Kerberos authentication, and they matchuser names when using system-based authentication (such as the auth_sys security mechanism).
At first, only the DmPrincipal attribute (signifying the first user to run the dmf create admin command)can create cells, servers, and roles. Additional NDAF principals can be used to manage an object with thedmf add_to object DmPrincipal=login command. All members of the DmPrincipal list are considered tobe owners of the object and can control it.
NDAF principals can also be removed using the dmf remove_from action.
Creating a role and assigning it to a user on the DmMember list defines a set of command capabilitiesthat are granted to the users of that role. The following capabilities are included:
Note: Each of these capabilities can be set to either 0 or 1. The default for each of these capabilities is 1.
DmCreateDsIf nonzero, specifies that this role permits data set creation on the servers listed in the DmServerlist of the role. An asterisk (*) signifies that data set creation is permitted on every server that ispart of the list. This applies in the same line to replicas, except that with replicas, the user alsomust be permitted to duplicate the source data set. This can be done if the user is a DmPrincipalof the source data set, or if the user is a DmMember of a role that is part of the DmOwningRoleof the source data set and the role has its DmDuplicateDs field set to 1.
DmDestroyDsIf nonzero, specifies that this role permits data set destruction if this role is listed in theDmOwningRole of the data set. It applies in the same line to replicas.
DmModifyDsIf nonzero, specifies that this role permits data set or replica modification for the data sets andreplicas that have this role in their DmOwningRole list. Modification involves using thefollowing commands:v dmf set command for the data set or replicav dmf add_to command and dmf remove_from command for the data set or replicav dmf place command and dmf unplace command for the replica if it is placed on (or unplaced
from) a server that is listed in the DmServer list of that rolev dmf mount command and dmf unmount command for the data set or replica if it is directly
mounted in the cell, or if it is mounted within another data set and this data set has a role inits DmOwningRole list with this user as a DmMember, and the DmModifyDs is set to 1
8 AIX Version 6.1: AIX Network Data Administration Facility

DmDuplicateDsIf nonzero, specifies that this role permits data set replication of the data sets that have this rolein their DmOwningRole list.
DmCreateRoleIf nonzero, specifies that this role permits role creation.
DmDestroyRoleIf nonzero, specifies that this role permits role destruction for the roles that have this role in theirDmOwningRole list.
DmModifyRoleIf nonzero, specifies that this role permits role modification (dmf set, dmf add_to, and dmfremove_from) for the roles that have this role in their DmOwningRole list.
Roles can also be defined using the System Management Interface Tool (SMIT). For more information oncreating roles, refer to “Creating and managing roles” on page 22.
After they are created using the dmf create role command, roles apply to every server by default(specified by an asterisk [*] in the DmServer list). They can then be applied on selected servers so thatdata sets or replicas can be created and placed using the dmf add_to role DmServer=name command,and afterwards using a dmf remove_from role Dmserver=* command. A role can also be applied to asingle data set or replica using the dmf add_to DmOwningRole command on this data set or replica.
NDAF role-based access control supportNDAF provides support for role-based access control (RBAC). The NDAF client and server commandsare enabled for RBAC. The nonroot user can run the NDAF commands when the administrator assignsthe RBAC role of the command to that user.
NDAF installation and configurationYou can install and configure NDAF.
Installing NDAFUse SMIT (fastpath: smitty install_all) or the installp command to install the ndaf.base fileset. If therecommended Kerberos 5 security is required, install the krb5.client fileset.
To install NDAF, the system must have IBM® AIX 5L™ Version 5.3 with the 5300-05 Technology Level orgreater installed. The system must be using the 64-bit kernel.
A given system can assume one of three roles in an NDAF domain. Different pieces of the ndaf.basefileset must be installed depending on the roles. The roles are:
Administration serverFor this system, ndaf.base.admin and ndaf.base.server must be installed. There is only oneadministration server for a federation of servers.
Data serversFor these systems, ndaf.base.server must be installed.
Administration clientsFor these systems, only ndaf.base.client must be installed.
For information about the command and flags, see the installp command in AIX Version 6.1 CommandsReference.
AIX network data administration facility 9

Note: By default, the NDAF daemons are not started after installing the package. They are also notconfigured to be started automatically on the next boot. For instructions on starting the daemons, see“Configuring an NDAF data server” on page 12 or “Configuring the NDAF administration server” onpage 13.
Upgrading NDAFUpgrading a part of the NDAF framework to a new NDAF version will generally have no effect on theglobal system.
In spite of the upgrade's lack of effect on the global system, NDAF is designed to detect when there arecompatibility issues between two elements in the framework (between dmf and dmadm, dmadm anddms, or between two different dms elements). For example, if you are upgrading a server, and if thecommunication protocol changed compared to the other data servers belonging to the NDAF domain, theadmin will restrict data transfers between those servers until they are upgraded to the correct versions.
In this example, you will get error messages and requests to upgrade either the dmf, dmadm, or dmssystems.
You may also be requested to upgrade the admin when upgrading a data server. In the same line,upgrading the admin may lead to a recommendation to upgrade the dmf clients.
During a system upgrade that includes data server protocol change, data will remain accessible, but datatransfers between incompatible servers will be forbidden. Replica creation, placement, update, cellplacement, and mount-unmount operations will therefore be rejected between those data servers.
Configuring NFS version 4NDAF servers must be configured as NFSv4 servers.
To configure an NDAF server as an NFSv4 server:1. Set the NFSv4 domain name with the chnfsdom command.2. Start the nfsrgyd daemon with the following command:
startsrc -s nfsrgyd
3. Ensure that nfsd and rpc.mountd are automatically started on system boot. The simplest way to dothis is to use the touch command to touch the /etc/exports file.
4. To enable aliasing, create or choose a directory on the server and set the NFSv4 root location with thechnfs –r command. For example, enter the command chnfs -r /ndaf (where /ndaf is a directory onthe server). NDAF uses the exname exportfs option to create the global namespace using aliasing.Alias and non-alias exports cannot be mixed, so if the NDAF server is already an NFS server withoutan NFS root, the administrator is not able to set the root, and NDAF will not function properly. Allcurrent exports must be unexported before the root can be set, and all future exports must be aliasedto appear under the NFS root. For more information, refer to /etc/exports in AIX Version 6.1 FilesReference.
5. Enable NFSv4 server replicas, aliasing, and referrals with the chnfs -R on command.
Result: NFSv4 is configured.
Configuring Kerberos 5The NDAF administration server and all NDAF data servers and administration clients must beconfigured as Kerberos clients.
10 AIX Version 6.1: AIX Network Data Administration Facility

Note: A full discussion of Kerberos 5 configuration is beyond the scope of this topic. This topic is meantto describe the Kerberos principals needed by the NDAF product. For detailed instructions on setting upKerberos, refer to the IBM Network Authentication Service Version 1.4 Administrator's and User's Guide,which is installed in the following directories:
HTML/usr/lpp/krb5/doc/html/language/ADMINGD
PDF /usr/lpp/krb5/doc/pdf/language/ADMINGD
In order to access these files, krb5.doc must be installed.
You can configure the NDAF administration server and all NDAF data servers and administration clientsas Kerberos clients with either the config.krb5 command or the mkkrb5clnt command. (The appropriatecommand depends on how Kerberos will be used on this system.) If you want an integrated login, youcan use the mkkrb5clnt command to manage the integrated login configuration.
The Kerberos administrator must establish Kerberos service principals for every data server and for theadministration server. The following principals are required:
Administration clientsEvery administration client must have a service principal in the form of dmf/fully-qualifieddomain name.
Data serversEvery data server (including the administration server) must have a service principal in the formof dms/fully-qualified domain name.
Administration serverThe administration server must have a service principal in both of the following forms:v dmadm/fully-qualified domain name
v dms/fully-qualified domain name
Any NFS or data server that exports for KerberosAny NFS or data server that exports for Kerberos must have a service principal in the form ofnfs/fully-qualified domain name.
The administrator can create these Kerberos service principals with the add_principal command underthe Kerberos administration (kadmin) command (/usr/sbin/krb5/kadmin). The administrator must thenadd the server's service principals to the server's keytab file. You can do this with the ktutil command.For example:ktutil: addent -password -p dms/test.austin.ibm.com -k 1 -e desktutil: wkt /etc/krb5/krb5.keytab
where the key version number (kvno) (-k) and encryption types are set as appropriate. All NDAFadministrators must be known as Kerberos 5 users if Kerberos 5 security is used.
RPC port requirementsIn order to communicate correctly, each server must be aware of the ports the other servers are listeningon and emitting to.
The sending and receiving ports between communicating servers must have identical values. Forexample:v The data server connects to another data server's SSP port, and the other data server listens to SSP
(28003 is the default port).v The data server connects to the administration server ACP, and the administration server listens to
ACP (28002 is the default port).
AIX network data administration facility 11

v The administration server connects to a data server SP port, and the data server listens to SP (28001 isthe default port).
v A client connects to the administration server AP, and the administration server listens to AP (28000 isthe default port).
Note: When you start a server with non-default ports, make sure that the other servers are started withthe same values for the specified non-default ports.
Configuring an NDAF data serverThe primary configuration for an NDAF data server involves starting the dms daemon.
This can be accomplished using the System Management Interface Tool (SMIT) menus (fastpathndafdatastart) or directly using the mkndaf and chndaf commands. Both methods will update the/etc/rc.ndaf startup file for simple (and if needed, automatic) restart on reboot. Due to the aliasing usedto create the global namespace, the view from an NFS client is different than the local view from anNDAF data server. The view from an NFSv4 client mounting an NDAF data server’s root is:/mount_point/cell_name/dset_mount_name
The actual path to the data-set data on the data server (if not specified when the data set is created) is:/ndaf_dataset_default/dset/ndaf_assigned_dir_name
Or, if the ndaf_dataset_default was not specified at daemons start time:/ndaf_dir/dset/ndaf_assigned_dir_name
Similarly, the path to replica data on the data server (if not specified when the data set is created) is:/ndaf_replica_default/ndaf_assigned_dir_name
Or, if the ndaf_replica_default was not specified at daemons start time:/ndaf_dir/replica/ndaf_assigned_dir_name
There are three key considerations when starting NDAF on a data server:
Where data sets and replicas should reside by default:Unless specified when a data set or replica is created, the data set or replica is created in thedirectory specified by the ndaf_default_dset_dir, ndaf_default_replica_dir, or ndaf_dir parameterswhen the dms daemon starts. These directories must reside in a filesystem that has been enabledfor data sets using the dms_enable_fs command, and should be large enough for the expectedsize of the data sets and replicas. It is recommended that this filesystem be a separate, dedicatedfilesystem created specifically for storing data sets and replicas.
Note: The /, /tmp, and /proc filesystems cannot be enabled for data sets.
Where NDAF log and state data should reside:The directory specified will have “log” and “server” subdirectories that contain data crucial to theoperation of the NDAF data server. These subdirectories do not need to reside in a file systemenabled for data sets. The data in the “server” subdirectory must be backed up along with thedata-set data for data recovery purposes.
The type of security that will be used:The auth_sys security type provides a level of security appropriate only within a trusted datacenter, whereas Kerberos can be used where stronger security is required.
There are three levels of Kerberos security:
krb5 Performs authentication, verifying that the message was sent by who it claims sent it.
12 AIX Version 6.1: AIX Network Data Administration Facility

krb5i Performs checksum operations to verify the integrity of the data. Integrity promises thatthe message has not been modified (and provides authentication).
krb5p Encrypts the data. Privacy prevents the message from being read by anyone but theintended recipient (and provides authentication and integrity).
For example, a data server could be configured with the following steps. (This example assumes NFS hasbeen configured as described in “Configuring NFS version 4” on page 10).# Enable the filesystem where data sets and replicas will go
dms_enable_fs –s /ndafpool
# Configure default dirs and security
chndaf -I –ndaf_dir=/var/dmf –ndaf_dataset_default=/ndafpool/dsets \–ndaf_replica_default=/ndafpool/replicas –security=auth_sys
# Start the dms daemon (and add to inittab so will start on reboot)
mkndaf
Configuring the NDAF administration serverWhen configuring NDAF, you must first configure the administration server. There is one NDAFadministration server for a given federation of NDAF data servers.
The NDAF administration server is the central point of control and all NDAF administration requestsfrom NDAF clients are handled on this server. The administration server is also a data server, so theconfiguration procedure in “Configuring an NDAF data server” on page 12 also applies to theadministration server. To configure the administration server, you must also configure the system as adata server. In addition to “log” and “server” subdirectories, there will also be an “admin” subdirectory.The only additional configuration step is to use the chndaf command to start the dmadm daemon as wellas the dms daemon:chndaf –admin_serv=yes
Configuring an NDAF administration clientAn NDAF administration client is any system that is used to run data-management commands that arehandled by the NDAF administration server.
There is no configuration necessary on the administration client beyond installing the ndaf.base.clientfileset. The dmf command or NDAF Management SMIT menus are used for NDAF administration.
Managing NDAFYou must add the NDAF administration server and the data servers before you can perform other NDAFmanagement tasks. You can then create and manage cells, roles, data sets, and replicas; populate datasets; construct cell namespaces; and, federate servers without the NDAF into an NDAF environment.
Creating and managing administration servers for NDAFYou must create the NDAF administration server and all of the data servers to the system before you canperform any other NDAF management tasks.
You can use the dmf command to create the NDAF administration server:dmf create admin name [-r] [-a admin_server]
where:
AIX network data administration facility 13

-a admin_serverSpecifies the Domain Name System (DNS) name or IP address of the administration server. Theport can be added using a colon separator.
name Specifies the name for the administration server to be created.
-r Prints the universally unique identifier (uuid) assigned to the request.
Note: Entering dmf create admin my_admin also creates the my_admin server object.
To add the NDAF administration server using SMIT, perform the following steps:1. From the NDAF menu, select NDAF Management > Administration Server Management > Create
Admin Server.
Note: You can also use the ndafadmincreate fastpath.2. Specify the DNS name or IP address of the administration server in the Admin Server DNS name
field and press Enter.3. Specify a name for the new administration server in the Admin Server name field and press Enter.
Showing and changing administration server attributesYou can show the attributes of a specific administration server. You can modify some of these attributes ifyou have the necessary authorization.
You can use the dmf command to show the attributes for an administration server, as follows:dmf show admin [-r] [-a admin_server]
where:
-a admin_serverSpecifies the DNS name or IP address of the administration server. The port can be added using acolon separator.
-r Prints the uuid assigned to the request.
You can use the dmf command to change the attributes for an administration server, as follows:dmf add_to admin key=value [-r] [-a admin_server]
dmf remove_from admin key=value [-r] [-a admin_server]
where:
-a admin_serverSpecifies the DNS name or IP address of the administration server. The port can be added using acolon separator.
key=valueSpecifies an attribute and the value to assign to it. Valid key is DmPrincipal.
-r Prints the uuid assigned to the request.
Perform the following steps to show or change the attributes for an administration server using SMIT:1. From the NDAF menu, select NDAF Management > Administration Server Management >
Change/Show Admin Server Attributes. Note that you can also use the ndafadminshow_adminfastpath.
2. Specify the DNS name or IP address of the administration server in the Admin Server DNS namefield and press Enter. The following attributes are displayed:
14 AIX Version 6.1: AIX Network Data Administration Facility

Admin server DNS name (or IP address)Specifies the DNS name or IP address of the administration server that manages the NDAFdomain
Admin server UUIDSpecifies the uuid for the administration server
Admin server nameSpecifies the name of the administration server
Admin server framework versionSpecifies the version of the application running on this server
Server to admin portSpecifies the number of the port for RPC callbacks from data servers to the administrationserver
Security methodSpecifies the security method that is used for data transfers
NDAF principalsEnter the list of users, separated by commas, directly in the input field; users from this list areowners of this cell and can manipulate it
Removing an administration serverYou can remove an administration server object and clean the databases of all the objects that have beendefined within the administration server.
You can use the dmf command to remove an NDAF administration server, as follows:dmf destroy admin [-f] [-r] [-a admin_server]
where:
-a admin serverSpecifies the DNS name or IP address of the administration server. The port can be added using acolon separator.
-f Forces the action without confirmation
-r Prints the universally unique identifier (uuid) assigned to the request
To remove a NDAF administration server using SMIT, follow these steps:1. From the NDAF menu, select NDAF Management > Administration Server Management > Remove
Admin Server.
Note: You can also use the ndafadminremove fastpath.2. Specify the DNS name or IP address of the administration server in the Admin Server DNS name
field and press Enter. A confirmation dialog opens.
Creating and managing data serversYou can create NDAF data servers which represent systems that will manage data in the NDAFnamespaces.
You can use the dmf command to create a NDAF data server:dmf create server <name> <dns_target> [-e] [-r] [-a <admin_server>]
where:
AIX network data administration facility 15

-a admin_serverSpecifies the Domain Name System (DNS) name or IP address of the administration server. Theport can be added using a colon separator.
name Specifies the name for the data server to be created.
dns_targetSpecifies the DNS name or IP address of the server. The port can be added using a colonseparator.
-e Specifies that the object is external to NDAF. For more information about this flag, see “Case 2 :Add an existing server with NFS exported data to an NDAF cell namespace without installingNDAF on it” on page 51.
-r Prints the uuid assigned to the request.
To add the NDAF administration server using SMIT, perform the following steps:1. From the NDAF menu, select NDAF Management > Data Server Management > Create Data Server.
Note: You can also use the ndafdscreate fastpath.2. Specify the DNS name or IP address of the administration server in the Admin Server DNS name
field.3. Specify a name for the new data server in the Data Server name field and press Enter.4. Specify the DNS name or IP address of the new data server in the Data Server DNS name field and
press Enter.
Showing and changing data server attributesYou can show the attributes of a specified data server. If you have the required authorization, you canmodify some of these attributes.
You can use the dmf command to show the attributes for a data server, as follows:dmf show server [-r] [-a admin_server] [-c container]
where:
-a admin_serverSpecifies the Domain Name Service (DNS) name or IP address of the administration server. Theport can be added using a colon separator.
-c Specifies the data server name.
-r Prints the universally unique identifier uuid assigned to the request.
You can use the dmf command to change the attributes for a data server, as follows:dmf add_to server key=value [-r] [-a admin_server] [-c container]
dmf remove_from server key=value [-r] [-a admin_server] [-c container]
where:
-a admin_serverSpecifies the DNS name or IP address of the administration server. The port can be added using acolon separator.
-c Specifies the data server name.
key=valueSpecifies an attribute and the value to assign to it. Valid keys are DmPrincipal, DmTransferTable,and DmClientDnsName.
-r Prints the uuid assigned to the request.
16 AIX Version 6.1: AIX Network Data Administration Facility

Perform the following steps to show or change the attributes for a data server using SMIT:1. From the NDAF menu, select NDAF Management > Data Server Management > Change/Show Data
Server Attributes. Note that you can also use the ndafdsshow_admin fastpath.2. Specify the DNS name or IP address of administration server in the Admin Server DNS name field
and press Enter. The following attributes are displayed:
Admin server DNS name (or IP address)Specifies the DNS name or IP address of the administration server that manages the NDAFdomain.
Data server nameSpecifies the name of the data server.
Data server DNS name (or IP address)Specifies the DNS name or IP address of the data server.
Data server UUIDSpecifies the uuid for the administration server.
Admin server framework versionSpecifies the version of the application running on this server.
Server to server portSpecifies the number of the port for RPC calls between data transfer agents.
External serverSpecifies if this server is an external server (not running an NDAF daemon).
Log levelSpecifies the amount of information written in the log file.
Minimum RPC port numberSpecifies the minimum RPC port number to be used for data transfer between servers.
Maximum RPC port numberSpecifies the maximum RPC port number to be used for data transfer between servers.
Default dset pathSpecifies the local path where new datasets should be created in if no path is specified in thecreate dset command.
Default replica pathSpecifies the local path where new replicas should be created in if no path is specified in thecreate replica command.
NDAF principalsEnter the list of users, separated by commas, directly in the input field. Users from this list areowners of this administration server and can manipulate it
Transfer methodSpecifies the names of the methods allowed for data transfer.
Removing a data serverYou can remove a data server object and clean the databases of all the objects that have been definedwithin the data server.
You can use the dmf command to remove an NDAF data server, as follows:dmf destroy server [-f] [-r] [-a admin_server] [-c container]
where:
AIX network data administration facility 17

-a admin_serverSpecifies the DNS name or IP address of the administration server. The port can be added using acolon separator.
-c containerSpecifies the server name.
-f Forces the action without confirmation.
-r Prints the uuid assigned to the request.
To remove an NDAF data server using SMIT, follow these steps:1. From the NDAF menu, select NDAF Management > Administration Server Management > Remove
Data Server.2. Specify the DNS name or IP address of the administration server in the Admin Server DNS name
field and press Enter.3. Enter the name of the data server in the Data Server name field and press Enter. A confirmation
dialog is then displayed.
Listing data serversYou can list the data servers that have been defined for a specified administration server.
You can use the dmf command to list data servers, as follows:dmf enumerate admin server [pattern] [-r] [-a admin_server]
where:
patternOptional matching text pattern. Valid values include ? and *.
-a admin_serverSpecifies the DNS name or IP address of the administration server. The port can be added using acolon separator.
-r Prints the uuid assigned to the request.
Perform the following steps to list data servers using SMIT:v From the NDAF menu, select NDAF Management > Data server Management > List Data Servers.v Specify the name of the administration server that manages the NDAF domain in the Admin name
field and press Enter.
Creating and managing cellsA cell is a collection of data sets organized into a single file namespace for use with NFSv4 servers.NFSv4 clients are expected to mount the root directory of the cell to access the cell’s full namespace.
Creating a cellYou can create a cell for use with NFSv4 servers.
You must create an NDAF administration server before you can create a cell.
You can use the dmf command to create a cell:dmf create cell name [-w timeout] [-r] [-a admin_server]
where:
-a admin_serverSpecifies the DNS name or IP address of the administration server. The port can be added using acolon separator
18 AIX Version 6.1: AIX Network Data Administration Facility

name Specifies the name for the cell to be created.
-r Prints the uuid assigned to the request.
-w timeoutSpecifies how long the command can wait before completing.
Perform the following steps to create a cell using SMIT:1. From the NDAF menu, select NDAF Management > Namespace (cell) Management > Create cell
namespace.
Note: You can also use the ndafcellcreate fastpath.2. Specify the DNS name or IP address of the administration server that manages the NDAF domain in
the Admin name field.3. Enter a name for the new cell in the Cell name field and press Enter.
To create a cell named cell1 in the NDAF domain that is managed by the NDAFServer1 administrationserver, perform the following steps:1. From the NDAF menu, select NDAF Management > Namespace (cell) Management > Create cell
namespace.2. Enter NDAFServer1 in the Admin name field.3. Enter cell1 in the Cell name field and press Enter.
Listing cell namespacesYou can list the cells that have been defined for a specified administration server.
You can use the dmf command to list cells:dmf enumerate admin cell [pattern] [-r] [-a admin_server]
where:
-a admin_serverSpecifies the DNS name or IP address of the administration server. The port can be added using acolon separator.
pattern Optional matching text pattern. Valid values include ? and *.
-r Prints the uuid assigned to the request.
Perform the following steps to lists cells using SMIT:1. Select NDAF > NDAF Management > Namespace (cell) Management > List Cell Namespaces.2. Specify the name of the administration server that manages the NDAF domain in the Admin name
field and press Enter.
Showing and changing cell attributesYou can show the attributes of a specified cell. You can modify some of these attributes if you have thenecessary authorization.
You must have the required authorization to modify the attributes for a cell.
You can use the dmf command to show the attributes for a cell:dmf show cell [-r] [-a admin_server] [-c container]
where:
AIX network data administration facility 19

-a admin_serverSpecifies the DNS name or IP address of the administration server. The port can be added using acolon separator.
-c containerSpecifies the cell name this command is addressed to.
-r Prints the uuid assigned to the request.
You can use the dmf command to change the attributes for a cell:dmf set cell key=value [-r] [-a admin_server] [-c container]
where:
-a admin_serverSpecifies the DNS name or IP address of the administration server. The port can be added using acolon separator.
-c containerSpecifies the cell name this command is addressed to.
key=valueSpecifies an attribute and the value to assign to it. Valid keys are DmLogLevel and DmLocsMax.
-r Prints the uuid assigned to the request.
Perform the following steps to show and change the attributes for a specific cell using SMIT:1. Select NDAF > NDAF Management > Namespace (cell) Management > Change/show cell attributes
.2. Specify the name of the administration server that manages the NDAF domain in the Admin name
field.3. Enter the name of the cell in the Cell name field (or choose one from the list by pressing F4). The
following attributes are displayed:
Admin server DNS name (or IP address)Specifies the DNS name or IP address of the administration server that manages the NDAFdomain
Admin server nameSpecifies the name of the administration server that manages the NDAF domain
Cell nameSpecifies the name of the cell
Cell UUIDSpecifies the uuid for the cell
Maximum number of reported locationsSpecifies the maximum number of NFS location referrals that can be returned to an NFS clientfor an object
NDAF principalsEnter the list of users, separated by commas, directly in the input field. Users from this list areowners of this cell and can manipulate the cell
Removing a cell namespaceYou can remove a cell object and clean the databases of all the objects that have been defined within thecell.
You can use the dmf command to remove a cell namespace:dmf destroy cell [-r] [-f] [-a admin_server] [-c container]
20 AIX Version 6.1: AIX Network Data Administration Facility
where:
-a admin_serverSpecifies the DNS name or IP address of the administration server. The port can be added using acolon separator.
-c containerSpecifies the container (that is, the cell name).
-f Forces the action without confirmation.
-r Prints the uuid assigned to the request.
Perform the following steps to remove a cell namespace using SMIT:1. From the NDAF menu, select NDAF Management > Namespace (cell) Management > Remove cell
namespace.2. Specify the name of the administration server that manages the NDAF domain in the Admin name
field and press Enter.3. Enter the name of the cell to be removed in the Cell name field and press Enter. A standard SMIT
dialog box displays to confirm the destruction of the cell.
Adding a server to a cell namespaceA cell can use a data server to host the cell's data set referrals, and therefore authorize users to access thecell's namespace, by mounting the cell root path from this server with NFS.
You can use the dmf command to enable a cell to use a data server to host the cell's data set, as follows:dmf place cell server_name [-r] [-a admin_server] [-c container]
where:
server_nameSpecifies the server on which the cell should be made available for mounting by NFS.
-r Prints the uuid assigned to the request.
-a admin_serverSpecifies the DNS name or IP address of the administration server. The port can be added using acolon separator.
-c containerSpecifies the cell name.
Perform the following steps to enable a cell to use a data server to host the cell's data set using SMIT:1. From the NDAF menu, select NDAF Management > Namespace (cell) Management > Add Server to
a Cell Namespace.2. Specify the name of the administration server that manages the NDAF domain in the Admin name
field and press Enter.3. Enter the name of the cell in the Cell Name field (or choose one from the list by pressing F4) and
press Enter.4. Enter the name of the data server in the Data server name field (or choose one from the list by
pressing F4) and press Enter.
Removing a server from a cell namespaceYou can prevent a cell from using a data server to host the cell's data sets.
You can use the dmf command to prevent a cell from using a data server to host the cell's data sets:dmf unplace cell server_name [-r] [-f] [-a admin_server] [-c container]
AIX network data administration facility 21

where:
server_nameSpecifies the server on which the cell should become unavailable for mounting by NFS.
-r Prints the uuid assigned to the request.
-f Forces the action without confirmation.
-a admin_serverSpecifies the DNS name or IP address of the administration server. The port can be added using acolon separator.
-c containerSpecifies the cell name.
Perform the following steps to prevent a cell from using a data server to host the cell's data sets usingSMIT:1. From the NDAF menu, select NDAF Management > Namespace (cell) Management > Remove
Server from a Cell Namespace.2. Specify the name of the administration server that manages the NDAF domain in the Admin name
field and press Enter.3. Enter the name of the cell in the Cell Name field (or choose one from the list by pressing F4) and
press Enter.4. Enter the name of the data server in the Data server name field (or choose one from the list by
pressing F4) and press Enter.
Creating and managing rolesA role is a set of privileges associated with a set of users. Roles are used to manage resources within acell. Administrators can create, list, remove, validate and change the options of roles.
Creating a roleYou can create a role. A role is a set of privileges associated with a set of users. Roles are created for cellsand are used to manage resources within a cell.
You must create a cell before you can create a role.
You can use the dmf command to create a role:dmf create role name [-r] [-a admin_server] [-c container]
where:
-a admin_serverSpecifies the DNS name or IP address of the administration server. The port can be added using acolon separator.
-c containerSpecifies the cell name.
name Specifies the name of the role to be created.
-r Prints the uuid assigned to the request.
Perform the following steps to create a role using SMIT:1. From the NDAF menu, select NDAF Management > Delegation of administration rights > Create a
role.2. Enter the DNS name or the IP address of the administration server that manages the NDAF domain
in the Admin name field and press Enter.
22 AIX Version 6.1: AIX Network Data Administration Facility

3. Enter the name of the cell in the Cell name field (or choose one from the list by pressing F4).4. Enter the name of the role to be created in the Role name field and press Enter.
Showing and changing role attributesYou can show the attributes for a specific role. If you have the required privileges, you can modify somerole attributes.
You can use the dmf command to show the attributes for a role:dmf show role [-r] [-a admin_server] [-c container] [-o object]
where:
-a admin_serverSpecifies the DNS name or IP address of the administration server. The port can be added using acolon separator.
-c containerSpecifies the cell name.
-o objectSpecifies the name of the object this command is addressed to.
-r Prints the uuid assigned to the request.
You can use the dmf command to change the attributes for a role:dmf set role key=value [-r] [-a admin_server] [-c container] [-o object]
where:
-a admin_serverSpecifies the DNS name or IP address of the administration server. The port can be added using acolon separator.
-c containerSpecifies the cell name.
key=valueSpecifies an attribute and the value to assign to it. Valid keys are DmCreateDs, DmDestroyDs,DmModifyDs, DmDuplicateDs, DmCreateRole, DmDestroyRole, and DmModifyRole.
-o objectSpecifies the name of the object this command is addressed to.
-r Prints the uuid assigned to the request.
Perform the following steps to show and change the attributes for a role using SMIT:1. From the NDAF menu, select NDAF Management > Delegation of administration rights > Change /
show role options.2. In the dialog panel, enter the DNS name or IP address of the administration server that manages the
NDAF domain in the Admin name field and press Enter.3. Enter the name of the cell in the Cell name field (or choose one from the list by pressing F4) and
press Enter.4. In the dialog panel, enter the name of the role to be shown or modified in the Role name field (or
choose one from the list by pressing F4) and press Enter. The following attributes are displayed:
Admin server DNS name (or IP address)Specifies the DNS name or the IP address of the administration server.
Cell nameSpecifies the name of the cell.
AIX network data administration facility 23

Role nameSpecifies the name of the role.
Role UUIDSpecifies the universal unique identifier of the role.
NDAF principalsSpecifies the list of users (separated by commas) directly in the input field. These users areowners of this administration server and can manipulate the server.
Owning rolesSpecifies the roles that can apply to an object.
MembersSpecifies the principals that are members of this role (that is, the members for which this rolepermits administrative actions).
ServersSpecifies the servers for which this roles permits activity.
Dset creation rightSpecifies whether the role has data set creation rights. The options are yes or no.
Dset destruction rightSpecifies whether the role has data set destruction rights. The options are yes or no.
Dset modification rightSpecifies whether the role has data set modification rights. The options are yes or no.
Dset duplication (replication) rightGrants the right to duplicate (replicate) a dset. The options are yes or no.
Role creation rightSpecifies role creation rights. The options are yes or no.
Role destruction rightSpecifies role destruction rights. The options are yes or no.
Role modification rightSpecifies role modification rights. The options are yes or no.
Removing a roleYou can remove a role.
You can use the dmf command to remove a role:dmf destroy role [-r] [-f] [-a admin_server] [-c container] [-o object]
where:
-a admin_serverSpecifies the DNS name or IP address of the administration server. The port can be added using acolon separator.
-c containerSpecifies the cell name.
-f Forces the action without confirmation.
-o objectSpecifies the name of the object this command is addressed to.
-r Prints the uuid assigned to the request.
Perform the following steps to remove a role using SMIT:
24 AIX Version 6.1: AIX Network Data Administration Facility

1. From the NDAF menu, select NDAF Management > Delegation of administration rights > Removerole.
2. Enter the DNS name or IP address of the administration server that manages the NDAF domain inthe Admin name field and press Enter.
3. Enter the name of the cell in the Cell name field (or choose one from the list by pressing F4) andpress Enter.
4. Enter the name of the role to be removed in the Role name field and press Enter. A confirmationdialog displays.
Listing rolesYou can list all of the roles for a cell.
You can use the dmf command to list all of the roles for a specified cell:dmf enumerate cell role [pattern] [-r] [-a admin_server] [-c container]
where:
pattern Optional matching text pattern. Valid values include a question mark (?) and an asterisk (*).
-r Prints the uuid assigned to the request.
-a admin_serverSpecifies the DNS name or IP address of the administration server. The port can be added using acolon separator.
-c containerSpecifies the cell name.
Perform the following steps to list all of the roles for a specified cell using SMIT:1. From the NDAF menu, select NDAF Management > Delegation of administration rights > List
roles.2. Enter the DNS name or IP address of the administration server that manages the NDAF domain in
the Admin name field and press Enter.3. Enter the name of the cell name in the Cell name field and press Enter.
Creating and managing data setsA data set (dset) is a directory tree of filesystem objects (files, directories, ACLs, links, and so on).
You can create, remove, validate, list, mount, and unmount data sets and change their options.
Creating data setsWhen you create a data set, you must specify an administration server, a namespace, and a data server.
You can use the dmf command to create a data set:dmf create dset name server [path] [-r] [-a admin_server] [-c container]
where:
-a admin_serverSpecifies the DNS name or IP address of the administration server. The port can be added using acolon separator.
-c containerSpecifies the cell name.
name Specifies the name for the data set to be created.
AIX network data administration facility 25

path Specifies the local path on the server. If the path parameter is omitted, the server puts the dataset in its default pool.
-r Prints the uuid assigned to the request.
server Specifies the server name.
Perform the following steps to create a data set using SMIT:1. From the NDAF menu, select NDAF Management > Data management > Dataset management >
Create Dataset.2. Specify the DNS name or IP address of the administration server that manages the NDAF domain in
the Admin name field and press Enter.3. Enter the cell name in the Cell name field (or choose one from the list by pressing F4).4. Enter the data set name in the Dset name field.5. Enter the data server name in the data server name field. Press Enter or define a local path in the
following step.6. Specify where on the server the data set will be created in the Local path on the server field and
press Enter. If you do not specify a path, the new data set will be created on the default data set pathdefined for the server. The default data set path is the path specified when the dms daemon is startedby the -ndaf_dataset_default parameter. If this parameter is not specified, the default path is$ndaf_dir/server/dsets, where $ndaf_dir is the path specified by the -ndaf_dir parameter. You canedit this path using the dmf set DmDefaultDsetPath command in the NDAF CLI.
Listing data setsYou can list all data sets for a specified cell or data server.
You can use the dmf command to list all data sets for a specified cell:dmf enumerate cell dset [pattern] [-r] [-a admin_server] [-c container]
where:
-a admin_serverSpecifies the DNS name or IP address of the administration server. The port can be added using acolon separator.
-c containerSpecifies the cell name.
pattern Optional matching text pattern. Valid values include a question mark (?) and an asterisk (*).
-r Prints the uuid assigned to the request.
You can use the dmf command to list all data sets for a specified server:dmf enumerate server dset [pattern] [-r] [-a admin_server] [-c container]
where:
-a admin_serverSpecifies the DNS name or IP address of the administration server. The port can be added using acolon separator.
-c containerSpecifies the server name.
pattern Optional matching text pattern. Valid values include a question mark (?) and an asterisk (*).
-r Prints the uuid assigned to the request.
26 AIX Version 6.1: AIX Network Data Administration Facility
Perform the following steps to display the list of all data sets for a specified cell or administration serverusing SMIT:1. From the NDAF menu, select Data management > Dataset management > List data sets.2. Specify the DNS name or IP address of the administration server that manages the NDAF domain in
the Admin name field and press Enter.3. Select whether to list all data sets for a cell or for a server by choosing the appropriate option using
F4 and then press Enter.4. Enter the cell name or server name in the Cell name or Data server Name field and press Enter (use
F4 to select a cell or a server from a list). Leave this field blank and press Enter to display all the datasets for all cells or all data servers.
Validating data setsYou can check the consistency of a data set between the hosting server and the administration serverdatabases.
You can use the dmf command to validate a data set:dmf validate dset [-r] [-a admin_server] [-c container] [-o object]
where:
-a admin_serverSpecifies the DNS name or IP address of the administration server. The port can be added using acolon separator.
-c containerSpecifies the cell name.
-oobjectSpecifies the name of the object to which this command is addressed.
Perform the following steps to check for the existence of a data set in a specified namespace using SMIT:1. From the NDAF menu, select NDAF Management > Data management > Dataset management >
Check Dataset.2. Specify the DNS name or IP address of the administration server that manages the NDAF domain in
the Admin name field and press Enter.3. Enter the name of the cell in the Cell name field and press Enter.4. Enter the name of the data set in the Dset name field (or choose one from the list by pressing F4) and
press Enter.
Showing and changing data set attributesYou can show the attributes for a data set. If you have the required authorization, you can modify theattributes for a data set.
You can use the dmf command to show the attributes for a specified data set:dmf show dset [-r] [-a admin_server] [-c container] [-o object]
where:
-a admin_serverSpecifies the DNS name or IP address of the administration server. The port can be added using acolon separator.
-c containerSpecifies the cell name.
-o objectSpecifies the name of the object this command is addressed to.
AIX network data administration facility 27

-r Prints the uuid assigned to the request.
You can use the dmf command to change the attributes for a specified data set:dmf set dset key=value [-r] [-a admin_server] [-c container] [-o object]
where:
-a admin_serverSpecifies the DNS name or IP address of the administration server. The port can be added using acolon separator.
-c containerSpecifies the cell name.
key=valueSpecifies an attribute and the value to assign to it. Valid keys are DmOwner, DmGroup,DmMode, and DmLocsMax.
-o objectSpecifies the name of the object this command is addressed to.
-r Prints the uuid assigned to the request.
You can use the dmf command to adds a key/value item to a list-based attribute for a data set:dmf add_to dset key=value [-r] [-a admin_server] [-c container] [-o object]
where:
-a admin_serverSpecifies the DNS name or IP address of the administration server. The port can be added using acolon separator.
-c containerSpecifies the cell name.
key=valueSpecifies an attribute and the value to assign to it. Valid keys are DmPrincipal, DmOwningRole,and DmTransferTable.
-o objectSpecifies the name of the object this command is addressed to.
-r Prints the uuid assigned to the request.
You can use the dmf command to remove a key/value item from a list-based attribute for a data set:dmf remove_from dset key=value [-r] [-a admin_server] [-c container] [-o object]
where:
-a admin_serverSpecifies the DNS name or IP address of the administration server. The port can be added using acolon separator.
-c containerSpecifies the cell name.
key=valueSpecifies an attribute and the value to assign to it. Valid keys are DmPrincipal, DmOwningRole,and DmTransferTable.
-o objectSpecifies the name of the object this command is addressed to.
28 AIX Version 6.1: AIX Network Data Administration Facility

-r Prints the uuid assigned to the request.
Perform the following steps to show or change the attributes for a specified data set using SMIT:1. From the NDAF menu, select NDAF Management > Data management > Dataset management >
Change / show Dataset attributes.2. Specify the DNS name or IP address of the administration server that manages the NDAF domain in
the Admin server name field.3. Enter the name of the cell in the Cell name field (or choose one from the list by pressing F4).4. Enter the name of the data set in the Dset name field. The following attributes are displayed:
Admin server DNS name (or IP address)Specifies the DNS name or IP address of the administration server.
Cell nameSpecifies the name of the cell.
Dset nameSpecifies the data set name.
Dset UUIDSpecifies the universal unique identifier for this data set.
VersionSpecifies the version of the replica data set.
OwnerSpecifies the owner that should be set in the filesystem for this data set.
Group Specifies the group that should be set in the filesystem for this data set.
Mode Specifies the mode that should be set in the filesystem for this data set. Permissible values are000 through 777 octal (in other words, the value is a normal UNIX file permission setting).
Maximum number of reported locationsSpecifies the maximum number of NFS locations referrals that can be returned to an NFSclient for an object.
NDAF principalsSpecify a list of users (separated by commas) directly in the input field. Users from this listwill own this data set and can manipulate the data set.
Owning rolesSpecifies the roles that can manage this data set.
Transfer methodsSpecifies the method this data server will use for data transfer (or choose one from the list bypressing F4). This field accepts multiple, comma-separated values. Possible values are copy,rsync, copy + rsync. The default value is copy.
Showing data set locationsYou can display the physical locations of a data set.
You can use the dmf command to display the physical locations of a specified data set:dmf show dset [-r] [-a admin_server] [-c container] [-o object]
where:
-a admin_serverSpecifies the DNS name or IP address of the administration server. The port can be added using acolon separator.
AIX network data administration facility 29

-c containerSpecifies the cell name.
-o objectSpecifies the name of the object this command is addressed to.
-r Prints the uuid assigned to the request.
Perform the following steps to display the physical locations of a specified data set using SMIT:1. From the NDAF menu, select NDAF Management > Data management > Dataset management >
Show Dataset locations.2. Specify the DNS name or IP address of the administration server that manages the NDAF domain in
the Admin server name field.3. Enter the name of the cell in the Cell name field.4. Enter the name of the data set in the Dset name field (or choose one from the list by pressing F4) and
press Enter. The data set attributes and data set locations are displayed.
Removing data setsYou can remove a data set.
You can use the dmf command to remove a data set:dmf destroy dset [-r] [-f] [-a admin_server] [-c container] [-o object]
where:
-a admin_serverSpecifies the DNS name or IP address of the administration server. The port can be added using acolon separator.
-c containerSpecifies the cell name.
-f Forces the action without confirmation.
-o objectSpecifies the name of the object this command is addressed to.
-r Prints the uuid assigned to the request.
Perform the following steps to remove a data set using SMIT:1. From the NDAF menu, select NDAF Management > Data management > Dataset management >
Remove dataset.2. Specify the DNS name or IP address of the administration server that manages the NDAF domain in
the Admin name field and press Enter.3. Enter the name of the cell in the Cell name field and press Enter.4. Enter the name of the data set in the Dset name field (or choose one from the list by pressing F4) and
press Enter. A confirmation dialog displays.
Mounting data setsYou can mount a data set in the cell namespace to make it visible in this cell from NFS clients.
You can use the dmf command to mount a data set:dmf mount dset mount_path [-r] [-a admin_server] [-c container] [-o object]
where:
30 AIX Version 6.1: AIX Network Data Administration Facility

-a admin_serverSpecifies the DNS name or IP address of the administration server. The port can be added using acolon separator.
-c containerSpecifies the cell name.
mount_pathSpecifies the mount path in the namespace.
-o objectSpecifies the name of the object this command is addressed to.
-r Prints the uuid assigned to the request.
Perform the following steps to mount a data set using SMIT:1. From the NDAF menu, select NDAF Management > Data management > Data set management >
Mount Data set.2. Specify the DNS name or IP address of the administration server that manages the NDAF domain in
the Admin name field and press Enter.3. Enter the name of the cell in the Cell name field and press Enter.4. Enter the name of the data set in the Dset name field and press Enter.5. Specify the location where the data set will be mounted on this server in the Mount path field. The
data set cannot be already mounted and the path cannot already exist.
Unmounting data setsYou can unmount a data set that was previously mounted. After a data set is unmounted, it is no longervisible in the cell namespace. For data set mounts that exist within replicated data sets, the unmount doesnot take effect until the associated replicas are updated.
You can use the dmf command to unmount a data set:dmf unmount dset mount_path [-r] [-a admin_server] [-c container] [-o object]
where:
-a admin_serverSpecifies the DNS name or IP address of the administration server. The port can be added using acolon separator.
-c containerSpecifies the cell name.
mount_pathSpecifies the mount path in the namespace.
-o objectSpecifies name of the object to which this command is addressed.
-r Prints the uuid assigned to the request.
Perform the following steps to unmount a data set using SMIT:1. From the NDAF menu, select NDAF Management > Data management > Dataset management >
Unmount Dataset.2. Specify the DNS name or IP address of the administration server that manages the NDAF domain in
the Admin name field and press Enter.3. Enter the name of the cell in the Cell name field and press Enter.4. Enter the name of the data set in the Dset name field and press Enter.5. Specify the location where the data set is currently mounted in the Mount path field and press Enter.
AIX network data administration facility 31

Creating and managing replicasA replica is a read-only copy of a data set. You can distribute a replica across multiple data servers. Youcan create, remove, validate, update, list, mount, unmount, place, and unplace replicas and change theiroptions.
Creating a replica of a data setYou can create a replica of a data set in a specified location on a server.
You must run dmf update in order to have the data synchronized between the replica and the sourcedata set, in case the content of the source data set changes.
You can use the dmf command to create a replica, as follows:dmf create replica name server [path] [-d | -w timeout] [-r] [-a admin_server] [-c container][-o object]
where:
-a admin_serverSpecifies the DNS name or IP address of the administration server. The port can be added using acolon separator
-c containerSpecifies the container (the cell name, for example).
-d Specifies that the command must be run asynchronously.
name Specifies the name for the replica to be created.
-o objectSpecifies the name of the data set that will be the source of this replica.
path Specifies the local path on the server. If the path parameter is omitted, the server puts the replicain its default pool for replicas.
-r Prints the uuid assigned to the request.
server Specifies the name of the server where the replica will be created.
-w timeoutSpecifies how long the command can wait before completing.
You can use the dmf command to add a key/value item to a list-based attribute for a replica:dmf add_to replica key=value [-r] [-a admin_server] [-c container] [-o object]
where:
-a admin_serverSpecifies the DNS name or IP address of the administration server. The port can be added using acolon separator.
-c containerSpecifies the cell name.
key=valueSpecifies an attribute and the value to assign to it. Valid keys are DmPrincipal, DmOwningRole,and DmTransferTable.
-o objectSpecifies the name of the object this command is addressed to.
-r Prints the uuid assigned to the request.
32 AIX Version 6.1: AIX Network Data Administration Facility

You can use the dmf command to remove a key/value item from a list-based attribute for a replica:dmf remove_from replica key=value [-r] [-a admin_server] [-c container] [-o object]
where:
-a admin_serverSpecifies the DNS name or IP address of the administration server. The port can be added using acolon separator.
-c containerSpecifies the cell name.
key=valueSpecifies an attribute and the value to assign to it. Valid keys are DmPrincipal, DmOwningRole,and DmTransferTable.
-o objectSpecifies the name of the object this command is addressed to.
-r Prints the uuid assigned to the request.
Perform the following steps to create a replica using SMIT:1. From the NDAF menu, select NDAF Management > Data management > Replica management >
Create replica of a dataset.2. Enter the DNS name or IP address of the administration server that manages the NDAF domain in
the Admin name field and press Enter.3. Enter a cell name in the Cell name field (or choose one from the list by pressing F4).4. Specify the source data set to be replicated in the Dset name field.5. Enter a name for the replica in the Replica name field.6. Specify the server on which the replica will be created in the Server field.7. Specify the replica location in the Root directory field. If you do not specify a location, the replica will
be located in the default replica path defined for the server. The default replica path is the pathspecified when the dms daemon is started by the -ndaf_replica_default parameter. If this parameteris not specified, the default path is $ndaf_dir/server/replicas, where $ndaf_dir is the path specifiedby the -ndaf_dir parameter. You can edit this path using the dmf set DmDefaultRepPath commandin the NDAF CLI.
Showing and changing replica attributesYou can display the attributes of a replica. If you have the required authorization, you can modify theattributes of a replica.
You can use the dmf command to display the attributes for a replica:dmf show replica [-r] [-a admin_server] [-c container] [-o object]
where:
-a admin_serverSpecifies the DNS name or IP address of the administration server. The port can be added using acolon separator.
-c containerSpecifies the cell name.
-o objectSpecifies the name of the object this command is addressed to.
-r Prints the uuid assigned to the request.
AIX network data administration facility 33

You can use the dmf command to change the attributes for a replica:dmf set replica key=value [-r] [-a admin_server] [-c container] [-o object]
where:
-a admin_serverSpecifies the DNS name or IP address of the administration server. The port can be added using acolon separator.
-c containerSpecifies the cell name.
key=valueSpecifies an attribute and the value to assign to it. Valid keys are DmOwner, DmGroup,DmMode, and DmLocsMax.
-o objectSpecifies the name of the object this command is addressed to.
-r Prints the uuid assigned to the request.
Perform the following steps to display and change the attributes for a replica using SMIT:1. From the NDAF menu, select NDAF Management > Data management > Replica management >
Change/show replica attributes.2. Enter the DNS name or IP address of the administration server that manages the NDAF domain in
the Admin name field.3. Enter the name of the cell in the Cell name field.4. Enter the name of data set in the Dset name field. The following attributes display:
Admin server DNS name (or IP address)Specifies the DNS name or IP address of the server.
Cell nameSpecifies the name of the cell.
Dset nameSpecifies the name of the data set.
Dset UUIDSpecifies the universal unique identifier for the data set.
VersionSpecifies the version number of the replica.
OwnerSpecifies the owner of the data set root directory.
Group Specifies the group of the data set root directory.
Mode Specifies the mode that should be set for the data set root directory. The default mode is 755.
Maximum number of reported locationsSpecifies the maximum number of NFS locations referrals that can be returned to an NFSclient for an object.
NDAF principalsSpecifies a list of users (separated by commas). These users own this data set and canmanipulate the data set.
Owning rolesSpecifies the roles that can manage the replica.
34 AIX Version 6.1: AIX Network Data Administration Facility

Transfer methodsSpecifies the methods you want this data server to use for data transfer (or choose one fromthe list by pressing F4). You can specify multiple, comma-separated methods. Possiblemethods are copy, rsync, and copy + rsync. The default method is copy.
Placing a replicaYou can create a copy of the master replica location at a specified location on the server and export thereplica on this server under the cell.
You can use the dmf command to place a replica:dmf place replica server_name [path] [-d | -w timeout] [-r] [-a admin_server] [-c container] [-o object]
where:
-a admin_serverSpecifies the DNS name or IP address of the administration server. The port can be added using acolon separator.
-c containerSpecifies the cell name.
-d Specifies that the command must be run asynchronously.
-o objectSpecifies the name of the object to which this command is addressed.
path Specifies the path of the replica data on that server.
-r Prints the uuid assigned to the request.
server_nameSpecifies the server name where the replica data should be placed.
-w timeoutSpecifies how long the command can wait before completing.
Perform the following steps to place a replica using SMIT:1. From the NDAF menu, select NDAF Management > Data management > Replica management >
Place replica.2. Enter the DNS name or IP address of the administration server that manages the NDAF domain in
the Admin name field and press Enter.3. Enter the name of the cell in the Cell name field (or choose one from the list by pressing F4) and
press Enter.4. Enter the name of the replica to place in the Replica name field (or choose one from the list by
pressing F4).5. Enter the name of the server where the replica will be placed in the Server name field.6. Specify the location where the replica will be copied in the Local path on server field. If you do not
specify a location, the replica is copied in the default replica path defined for the server (defined inthe DmDefaultRepPath attribute of the server).
Mounting a replicaYou can mount a replica so that it is available at a specified location on a cell namespace.
You can use the dmf command to mount a replica:dmf mount replica mount_path [-r] [-a admin_server] [-c container] [-o object]
where:
AIX network data administration facility 35

-a admin_serverSpecifies the DNS name or IP address of the administration server. The port can be added using acolon separator.
-c containerSpecifies the cell name.
mount_pathSpecifies the mount path in the namespace.
-o objectSpecifies the name of the object this command is addressed to.
-r Prints the uuid assigned to the request.
Perform the following steps to mount a replica using SMIT:1. From the NDAF menu, select NDAF Management > Data management > Replica management >
Mount replica..2. Enter the DNS name or IP address of the administration server that manages the NDAF domain in
the Admin name field and press Enter.3. Enter the name of the cell in the Cell name field and press Enter.4. Enter the name of the replica to be mounted in the Replica name field.5. Specify the location in the cell namespace where the replica will be made available in the Mount path
field.
Updating a replicaA replica is a read-only copy of a data set, but you can update a replica so that the replica's contents aresynchronized with the source data set.
You can use the dmf command to refresh a replica from its original source data set:dmf update replica [-d | -w timeout] [-r] [-a admin_server] [-c container] [-o object]
where:
-a admin_serverSpecifies the DNS name or IP address of the administration server. The port can be added using acolon separator.
-c containerSpecifies the cell name.
-d Specifies that the command must be run asynchronously.
-o objectSpecifies the name of the object this command is addressed to.
-r Prints the uuid assigned to the request.
-w timeoutSpecifies how long the command can wait before completing.
Perform the following steps to refresh a replica from its original source data set using SMIT:1. From the NDAF menu, select NDAF Management > Data management > Replica management >
Update replica.2. Enter the DNS name or IP address of the administration server that manages the NDAF domain in
the Admin name field and press Enter.3. Enter the name of the cell in which the replica is located in the Cell name field and press Enter.4. Enter the name of the replica to update in the Replica name field and press Enter.
36 AIX Version 6.1: AIX Network Data Administration Facility

Validating a replicaReplica validation checks the consistency of the replica between the hosting server and the administrationserver databases.
You can use the dmf command to validate a replica:dmf validate replica [-r] [-a admin_server] [-c container] [-o object]
where:
-a admin_serverSpecifies the DNS name or IP address of the administration server. The port can be added using acolon separator.
-c containerSpecifies the cell name.
-o objectSpecifies the name of the object this command is addressed to.
-r Prints the uuid assigned to the request.
Perform the following steps to validate a replica using SMIT:1. From the NDAF menu, select NDAF Management > Data management > Replica management >
Check replica.2. Enter the DNS name or IP address of the administration server that manages the NDAF domain in
the Admin name field and press Enter.3. Enter the name of the cell in the Cell name field and press Enter.4. Enter the name of the replica to be checked in the Replica name field (or choose one from the list by
pressing F4) and press Enter.
Unmounting a replicaYou can unmount a previously mounted replica so that the replica is no longer available for use.
You can use the dmf command to unmount a replica:dmf unmount replica mount_path [-r] [-a admin_server] [-c container] [-o object]
where:
-a admin_serverSpecifies the DNS name or IP address of the administration server. The port can be added using acolon separator.
-c containerSpecifies the cell name.
mount_pathSpecifies the mount path in the namespace.
-o objectSpecifies the name of the object this command is addressed to.
-r Prints the uuid assigned to the request.
Perform the following steps to unmount a replica using SMIT:1. From the NDAF menu, select NDAF Management > Data management > Replica management >
Unmount replica.2. Enter the DNS name or IP address of the administration server that manages the NDAF domain in
the Admin name field and press Enter.
AIX network data administration facility 37
3. Enter the name of the cell in the Cell name field and press Enter.4. Enter the name of the replica to unmount in the Replica name field.5. Specify the location where the replica is currently mounted in the cell namespace in the Mount path
field and press Enter.
Unplacing a replicaUnplacing a replica removes a replica placed on a data server at a specified location. After confirmationof removal of a replica, the data on the location specified by the path is destroyed and the path isunexported.
You can use the dmf command to unplace a replica:dmf unplace replica server_name [path] [-r] [-f] [-a admin_server] [-c container] [-o object]
where:
-a admin_serverSpecifies the DNS name or IP address of the administration server. The port can be added using acolon separator.
-c containerSpecifies the cell name.
-f Forces the action without confirmation.
-o objectSpecifies the name of the object this command is addressed to.
path Specifies the path of the replica data on that server.
-r Prints the uuid assigned to the request.
server_nameSpecifies the server name where the replica data should be unplaced.
Perform the following steps to unplace a replica using SMIT:1. From the NDAF menu, select NDAF Management > Data management > Replica management >
Unplace replica.2. Enter the DNS name or IP address of the administration server that manages the NDAF domain in
the Admin name field and press Enter.3. Enter the name of the cell in the Cell name field (or choose one from the list by pressing F4) and
press Enter.4. Enter the name of the replica to be unplaced in the Replica name field (or choose one from the list by
pressing F4).5. Enter the name of the server from which the replica will be removed in the Server name field.6. Specify the location where the replica is currently copied on the server in the Local path on server
field.
Removing a replicaDestroying a replica removes every location of the replica including its master location.
You can use the dmf command to remove a replica:dmf destroy replica [-r] [-f] [-a admin_server] [-c container] [-o object]
where:
-a admin_serverSpecifies the DNS name or IP address of the administration server. The port can be added using acolon separator.
38 AIX Version 6.1: AIX Network Data Administration Facility

-c containerSpecifies the cell name.
-f Forces the action without confirmation.
-o objectSpecifies the name of the object this command is addressed to.
-r Prints the uuid assigned to the request.
Perform the following steps to remove a replica using SMIT:1. From the NDAF menu, select NDAF Management > Data management > Replica management >
Remove replica.2. Enter the DNS name or IP address of the administration server that manages the NDAF domain in
the Admin name field and press Enter.3. Enter the name of the cell in the Cell name field and press Enter.4. Enter the name of the replica to be removed in the Replica name field and press Enter. A
confirmation dialog displays.
Listing replicasYou can display a list of all replicas for a specified administration server or namespace.
You can use the dmf command to display a list of replicas for a selected cell, as follows:dmf enumerate cell replica [pattern] [-r] [-a admin_server] [-c container]
where:
-a admin_serverSpecifies the DNS name or IP address of the administration server. The port can be added using acolon separator.
-c containerSpecifies the cell name.
pattern Optional matching text pattern. Valid values include ? and *.
-r Prints the uuid assigned to the request.
You can use the dmf command to display a list of replicas for a selected server, as follows:dmf enumerate server replica [pattern] [-r] [-a admin_server] [-c container]
where:
-a admin_serverSpecifies the DNS name or IP address of the administration server. The port can be added using acolon separator.
-c containerSpecifies the server name.
pattern Optional matching text pattern. Valid values include ? and *.
-r Prints the uuid assigned to the request.
Perform the following steps to display a list of replicas using SMIT:1. From the NDAF menu, select NDAF Management > Data management > Replica management >
List replicas.2. Specify the DNS name or IP address of the administration server that manages the NDAF domain in
the Admin name field and press Enter.
AIX network data administration facility 39

3. Select whether to list all replicas for a cell or for a server by choosing the appropriate option (bypressing F4) and press Enter.
4. Enter the cell name or server name in the Cell name or Data server Name field (you can press F4 toselect a cell or a server from a list) and press Enter. If you do not specify a cell name or server name,all of the replicas for all cells or all data servers are displayed.
Changing the master replicaYou can specify a replica location to become the master location.
You can use the dmf command to change the master replica:dmf master replica server [path] [-r] [-a admin_server] [-c container] [-o object]
where:
-a admin_serverSpecifies the DNS name or IP address of the administration server. The port can be added using acolon separator.
-c containerSpecifies the cell name.
-o objectSpecifies the name of the object this command is addressed to.
path Specifies the local path on the server.
-r Prints the uuid assigned to the request.
server Specifies the server name.
Perform the following steps to change the master replica using SMIT:1. From the NDAF menu, select NDAF Management > Data management > Replica management >
Change master replica.2. Enter the DNS name or IP address of the administration server that manages the NDAF domain in
the Admin name field and press Enter.3. Enter the name of the cell in the Cell name field (or choose one from the list by pressing F4) and
press Enter.4. Enter the name of the replica that will become the master replica in the Replica name field (or choose
one from the list by pressing F4).5. Enter the name of the server where the replica will be placed in the Server name field.6. Specify the location where the replica will be copied in the Local path on server field. If you do not
specify a location, the replica is copied in the default replica path defined for the server (theDmDefaultRepPath attribute of the server).
Changing the source of a replicaYou can change the source data set for a replica.
The content of the replica locations is not automatically updated with the content of the new source dataset. You must explicitly do a replica update operation.
You can use the dmf command to change the source data set of a replica:dmf source replica new_source [-r] [-a admin_server] [-c container] [-o object]
where:
-a admin_serverSpecifies the DNS name or IP address of the administration server. The port can be added using acolon separator.
40 AIX Version 6.1: AIX Network Data Administration Facility

-c containerSpecifies the cell name.
-o objectSpecifies the name of the object this command is addressed to.
new_sourceSpecifies the name of the new source data set.
-r Prints the uuid assigned to the request.
Perform the following steps to change the source data set of a replica using SMIT:1. From the NDAF menu, select NDAF Management > Data management > Replica management >
Change the source of a replica.2. Enter the DNS name or IP address of the administration server that manages the NDAF domain in
the Admin name field and press Enter.3. Enter the name of the cell in the Cell name field (or choose one from the list by pressing F4) and
press Enter.4. Enter the name of the replica for which to change the source data set in the Replica name field (or
choose one from the list by pressing F4).5. Enter the name of the new source data set in the New source dset name (or choose one from the list
by pressing F4) and press Enter.
Populating data setsThere are two basic approaches to populating newly created data sets with data: by local filesystemaccess on the server, or remotely by NFSv4. With the exception of replicas under NDAF control and thecreation of data set references for data set mounts, the creation and manipulation of data insidefilesystems with data sets uses normal filesystem access mechanism such as libc calls and NFS. Theprimary form of access to NDAF-managed filesystems is expected to be through NFS.
You can use local filesystem access to populate a new data set. If the path of the data set was specifiedwhen the data set was created, you can go to the specified directory on the server and create, restore, orcopy the necessary data to the directory. When the data set is created in the default data set pool, thedata set is created in the directory specified by the -ndaf_dataset_default parameter when the dmsdaemon is started on the server, or under server/dsets in the directory specified by the -ndaf_dirparameter if -ndaf_dataset_default is not specified. The directory name for the data set is generated byNDAF and is not obvious. You can locate the proper directory by running dmf show dset and inspectingthe DmPath field. For example:# dmf show dset -a admin_hostname -c my_cell -o my_dset | grep DmPathDmPath: /ndafpool/dset/db2c3176-e5ed-11da-802d-0004ace4aa38
You can also use remote filesystem access to populate a new data set. After you have used the dmfmount command to place the data set in to the namespace, you can access the directory through an NFSclient that mounts the root directory of any server on which the cell has been placed. You can go to thedirectory in the namespace where the data set was placed and create, restore, or remotely copy the datainto the data set. You might need to run the dmf set dset DmMode to enable write access by the client.For example:# dmf create dset my_dset1 my_server2 -a admin_hostname -c my_cell# dmf place cell my_server2 -a admin_hostname -c my_cell# dmf mount dset /mount_my_dset1 -a admin_hostname -c my_cell -o my_dset1# dmf set dset DmMode=777 -a admin_hostname -c my_cell -o my_dset1# mount -o vers=4 server_hostname:/ /mnt# cd /mnt/my_cell/mount_my_dset1
Constructing a cell namespace from data setsYou can construct a cell namespace from data sets.
AIX network data administration facility 41
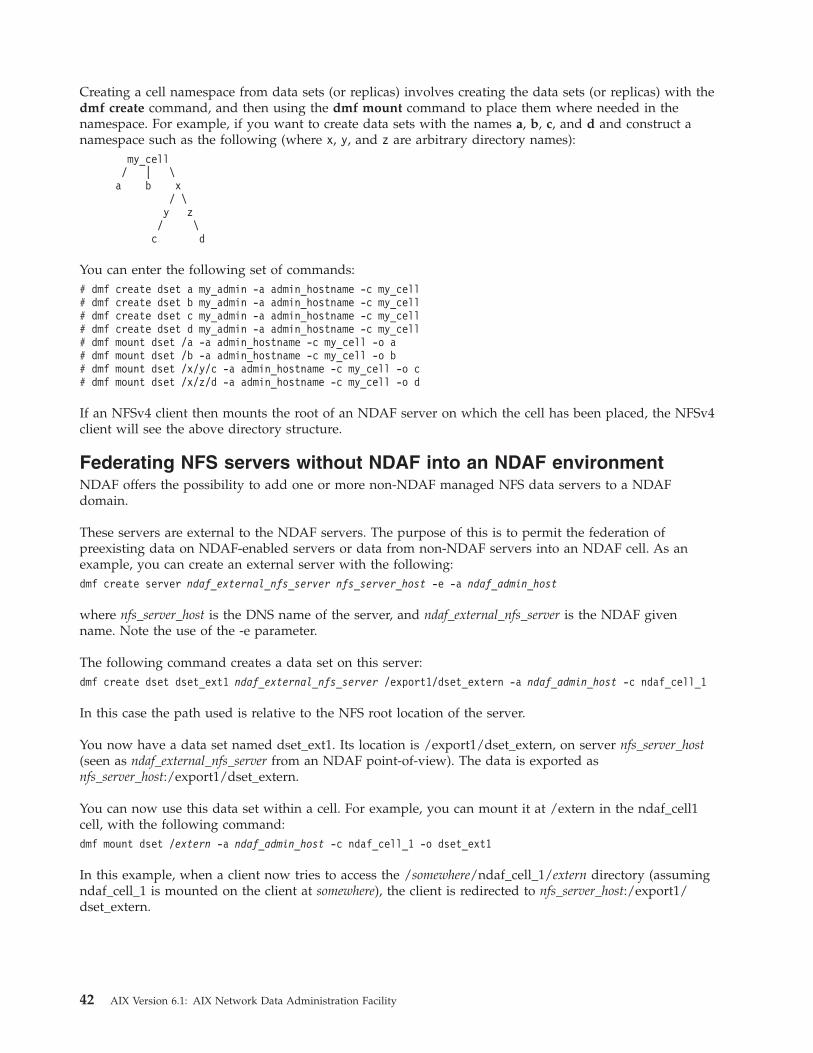
Creating a cell namespace from data sets (or replicas) involves creating the data sets (or replicas) with thedmf create command, and then using the dmf mount command to place them where needed in thenamespace. For example, if you want to create data sets with the names a, b, c, and d and construct anamespace such as the following (where x, y, and z are arbitrary directory names):
my_cell/ | \a b x
/ \y z/ \c d
You can enter the following set of commands:# dmf create dset a my_admin -a admin_hostname -c my_cell# dmf create dset b my_admin -a admin_hostname -c my_cell# dmf create dset c my_admin -a admin_hostname -c my_cell# dmf create dset d my_admin -a admin_hostname -c my_cell# dmf mount dset /a -a admin_hostname -c my_cell -o a# dmf mount dset /b -a admin_hostname -c my_cell -o b# dmf mount dset /x/y/c -a admin_hostname -c my_cell -o c# dmf mount dset /x/z/d -a admin_hostname -c my_cell -o d
If an NFSv4 client then mounts the root of an NDAF server on which the cell has been placed, the NFSv4client will see the above directory structure.
Federating NFS servers without NDAF into an NDAF environmentNDAF offers the possibility to add one or more non-NDAF managed NFS data servers to a NDAFdomain.
These servers are external to the NDAF servers. The purpose of this is to permit the federation ofpreexisting data on NDAF-enabled servers or data from non-NDAF servers into an NDAF cell. As anexample, you can create an external server with the following:dmf create server ndaf_external_nfs_server nfs_server_host -e -a ndaf_admin_host
where nfs_server_host is the DNS name of the server, and ndaf_external_nfs_server is the NDAF givenname. Note the use of the -e parameter.
The following command creates a data set on this server:dmf create dset dset_ext1 ndaf_external_nfs_server /export1/dset_extern -a ndaf_admin_host -c ndaf_cell_1
In this case the path used is relative to the NFS root location of the server.
You now have a data set named dset_ext1. Its location is /export1/dset_extern, on server nfs_server_host(seen as ndaf_external_nfs_server from an NDAF point-of-view). The data is exported asnfs_server_host:/export1/dset_extern.
You can now use this data set within a cell. For example, you can mount it at /extern in the ndaf_cell1cell, with the following command:dmf mount dset /extern -a ndaf_admin_host -c ndaf_cell_1 -o dset_ext1
In this example, when a client now tries to access the /somewhere/ndaf_cell_1/extern directory (assumingndaf_cell_1 is mounted on the client at somewhere), the client is redirected to nfs_server_host:/export1/dset_extern.
42 AIX Version 6.1: AIX Network Data Administration Facility

NDAF logs files analysisHow the log messages in NDAF are classified and what they represent. It does not cover the syslogintegration.
Log messages pathThere are two kinds of log messages files: those from the dmadm daemons and those from the dmsdaemons.
As there are several processes running for each daemon, the dms logs are gathered into a single file thatlogs messages by identifying their process with its PID and type (such as SS for source session, and RM forrequest manager). The log messages are stored in the directory configured with the ndaf_log_dirparameter of the dms and dmadm daemons. If ndaf_log_dir is not used, then the log subdirectory in thedefault ndaf_dir directory is used. The data server log messages are stored on the systems running dmsin the following format:$log_dir/dms-<ddmmyyyy.hhmmss>.log
The administration log messages are stored on the systems running dmadm in the following format:$log_dir/dmadm-<ddmmyyyy.hhmmss>.log
Log detail levelsWhen starting the dms and dmadm daemons, you can select the type of messages that are placed in thelog files. Select the level to be used by adjusting the log_level parameter before starting the daemons.
The log level can be changed with the following dmf commands:v dmf set server DmLogLevel=new_level – Changes the log level for the dms running on this server.v dmf set cell DmLogLevel=new_level – Changes the log level for the dms running on the servers where
this cell is placed
The possible levels that can be configured with the log_level parameter are described in the followingtable:
Log level DocumentedInternallevel value Description
critical Yes 0 Logs messages about problems that could prevent NDAF from working
error Yes 1 Logs critical messages and description of the problems that caused a NDAFrequest to fail
warning Yes 2 Log error messages and description of the problems that occurred during arequest, but do not prevent it from succeeding
notice Yes 3 Logs warning messages and description of the beginning request and summary ofresults
info Yes 4 Logs notice messages and description of queued events, files treated, and RPCevents
Log messages formatA description of the different log levels and their format.
Every line in the log files uses the following format:v The line contains:
– the date in universal time zone– the time in universal time zone– the process type– the process identifier– the thread identifier
AIX network data administration facility 43

– the logged message
Example:2006/10/15 15:54:58.512101 RM393368 1: Received RPC update request from the admin2006/10/15 15:54:59.509711 SM389348 1: Started source session process 394567 to send data to
replica location
Process types in log filesA complete list of process types that can appear in the log files.
Type Stands for Relates to Description
AD Admin watchdog process dmadm log Starts the other dmadm resident processes and restarts them ifthey fail.
NH Notification Handler dmadm log Receive RPC request from the notify agent of the dmsprocesses to identify which requests completed.
LH Log Handler dmadm log Centralized log handler. Gathers log outputs from everydistant log files – not used in the current implementation.
QH Queue Handler dmadm log For asynchronous requests (replications), the requests arequeued to the queue handler using queues on disk. Thisprocess then runs the request after the previous one hasfinished.
CH Commands Handler dmadm log Receive RPC request from the dmf CLI commands.
DS Data Server watchdog process dms log Starts the other dms resident processes and restarts them ifthey fail.
RM Request Manager dms log Listen to RPC requests from the dmadm. In case of replicationrequest, ask for a source session creation to the sessionmanager.
SM Session Manager dms log Read disk queues related to SS and TS creation requests. Thenforce either a source session or a target session process.
NA Notify Agent dms log Send RPC to the dmadm to inform it when a request hascompleted.
LC Lookup Control dms log Receives locations lookups from the NFS server and forces thelookup agent process to handle them.
LA Lookup Agent dms log Manage locations lookups from the NFS server.
TA Target Agent dms log Receives RPC requests to create a target session process fromthe source session processes. Then forwards the request to thesession manager using disk queues.
SS Source Session dms log Transfer replication data to a target session process.
TS Target Session dms log Receive replication data from a source session process.
NDAF use cases and installation examplesExamples of a Kerberos-enabled NDAF domain and case studies of NDAF installation.
Configuring a Kerberos-enabled NDAF domainHow to set up a very simple Kerberos-enabled NDAF domain.
Your NDAF domain should consist of one NDAF administration system (called ndaf_admin), more thantwo NDAF servers (ndaf_server_1, ndaf_server_2, and so on), and at least one client (ndaf_dmf). You alsoneed a Kerberos server (krb_server) that is the key distribution center (KDC). For example, our domainname is ndaf.domain.com, the associated Kerberos realm is NDAF.DOMAIN.COM, and the NDAFadministrators are dmfadmin, dmfadmin2, and so on.
The correct NDAF fileset must be installed on every NDAF machine in the domain (ndaf.base.admin andndaf.base.server on the administration system, ndaf.base.server on the servers and ndaf.base.client on
44 AIX Version 6.1: AIX Network Data Administration Facility
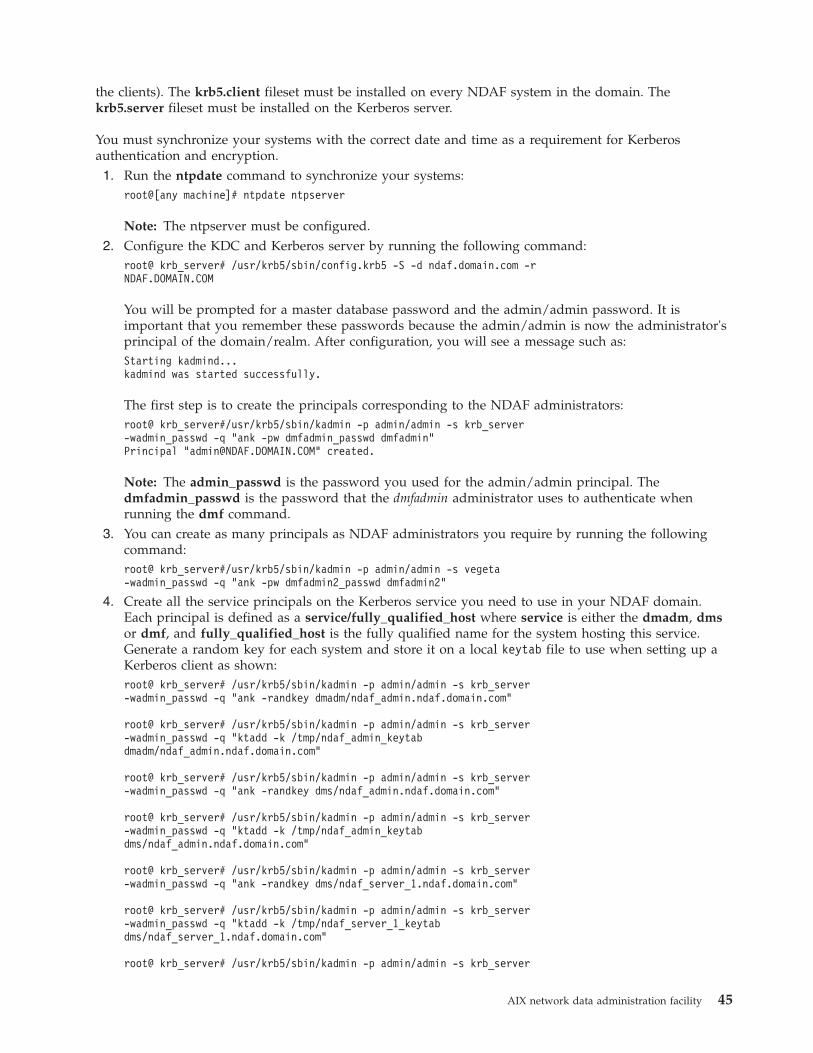
the clients). The krb5.client fileset must be installed on every NDAF system in the domain. Thekrb5.server fileset must be installed on the Kerberos server.
You must synchronize your systems with the correct date and time as a requirement for Kerberosauthentication and encryption.1. Run the ntpdate command to synchronize your systems:
root@[any machine]# ntpdate ntpserver
Note: The ntpserver must be configured.2. Configure the KDC and Kerberos server by running the following command:
root@ krb_server# /usr/krb5/sbin/config.krb5 -S -d ndaf.domain.com -rNDAF.DOMAIN.COM
You will be prompted for a master database password and the admin/admin password. It isimportant that you remember these passwords because the admin/admin is now the administrator'sprincipal of the domain/realm. After configuration, you will see a message such as:Starting kadmind...kadmind was started successfully.
The first step is to create the principals corresponding to the NDAF administrators:root@ krb_server#/usr/krb5/sbin/kadmin -p admin/admin -s krb_server-wadmin_passwd -q "ank -pw dmfadmin_passwd dmfadmin"Principal "[email protected]" created.
Note: The admin_passwd is the password you used for the admin/admin principal. Thedmfadmin_passwd is the password that the dmfadmin administrator uses to authenticate whenrunning the dmf command.
3. You can create as many principals as NDAF administrators you require by running the followingcommand:root@ krb_server#/usr/krb5/sbin/kadmin -p admin/admin -s vegeta-wadmin_passwd -q "ank -pw dmfadmin2_passwd dmfadmin2"
4. Create all the service principals on the Kerberos service you need to use in your NDAF domain.Each principal is defined as a service/fully_qualified_host where service is either the dmadm, dmsor dmf, and fully_qualified_host is the fully qualified name for the system hosting this service.Generate a random key for each system and store it on a local keytab file to use when setting up aKerberos client as shown:root@ krb_server# /usr/krb5/sbin/kadmin -p admin/admin -s krb_server-wadmin_passwd -q "ank -randkey dmadm/ndaf_admin.ndaf.domain.com"
root@ krb_server# /usr/krb5/sbin/kadmin -p admin/admin -s krb_server-wadmin_passwd -q "ktadd -k /tmp/ndaf_admin_keytabdmadm/ndaf_admin.ndaf.domain.com"
root@ krb_server# /usr/krb5/sbin/kadmin -p admin/admin -s krb_server-wadmin_passwd -q "ank -randkey dms/ndaf_admin.ndaf.domain.com"
root@ krb_server# /usr/krb5/sbin/kadmin -p admin/admin -s krb_server-wadmin_passwd -q "ktadd -k /tmp/ndaf_admin_keytabdms/ndaf_admin.ndaf.domain.com"
root@ krb_server# /usr/krb5/sbin/kadmin -p admin/admin -s krb_server-wadmin_passwd -q "ank -randkey dms/ndaf_server_1.ndaf.domain.com"
root@ krb_server# /usr/krb5/sbin/kadmin -p admin/admin -s krb_server-wadmin_passwd -q "ktadd -k /tmp/ndaf_server_1_keytabdms/ndaf_server_1.ndaf.domain.com"
root@ krb_server# /usr/krb5/sbin/kadmin -p admin/admin -s krb_server
AIX network data administration facility 45

-wadmin_passwd -q "ank -randkey dms/ndaf_server_2.ndaf.domain.com"
root@ krb_server# /usr/krb5/sbin/kadmin -p admin/admin -s krb_server-wadmin_passwd -q "ktadd -k /tmp/ndaf_server_2_keytabdms/ndaf_server_2.ndaf.domain.com"
root@ krb_server# /usr/krb5/sbin/kadmin -p admin/admin -s krb_server-wadmin_passwd -q "ank -randkey dmf/ndaf_dmf.ndaf.domain.com"
root@ krb_server# /usr/krb5/sbin/kadmin -p admin/admin -s krb_server-wadmin_passwd -q "ktadd -k /tmp/ndaf_dmf_keytabdms/ndaf_dmf.ndaf.domain.com"
5. To add the NFS service principals, run the following commands:root@ krb_server# /usr/krb5/sbin/kadmin -p admin/admin -s krb_server-wadmin_passwd -q "ank -randkey nfs/ndaf_admin.ndaf.domain.com"
root@ krb_server# /usr/krb5/sbin/kadmin -p admin/admin -s krb_server-wadmin_passwd -q "ktadd -k /tmp/ndaf_admin_keytabnfs/ndaf_admin.ndaf.domain.com"
root@ krb_server# /usr/krb5/sbin/kadmin -p admin/admin -s krb_server-wadmin_passwd -q "ank -randkey nfs/ndaf_server_1.ndaf.domain.com"
root@ krb_server# /usr/krb5/sbin/kadmin -p admin/admin -s krb_server-wadmin_passwd -q "ktadd -k /tmp/ndaf_server_1_keytabnfs/ndaf_server_1.ndaf.domain.com"
root@ krb_server# /usr/krb5/sbin/kadmin -p admin/admin -s krb_server-wadmin_passwd -q "ank -randkey nfs/ndaf_server_2.ndaf.domain.com"
root@ krb_server# /usr/krb5/sbin/kadmin -p admin/admin -s krb_server-wadmin_passwd -q "ktadd -k /tmp/ndaf_server_2_keytabnfs/ndaf_server_2.ndaf.domain.com"
6. Configure every Kerberos client for which you set a service principal. You can automate this processwith the keytab files that you previously created. Copy the keytab file to the corresponding Kerberosclient (for example, using ssh) as shown:root@ krb_server# cat /tmp/ndaf_admin_keytab | ( ssh root@ndaf_admin’cat > /etc/krb5/ndaf.keytab’)
root@ krb_server# cat /tmp/ndaf_server_1_keytab | ( sshroot@ndaf_server_1 ’cat > /etc/krb5/ndaf.keytab’)
...
7. Configure the clients with the following command:root@ ndaf_admin# mkkrb5clnt -a admin/admin -ckrb_server.ndaf.domain.com -r NDAF.DOMAIN.COM -skrb_server.ndaf.domain.com -d austin.ibm.com
where:
-c KDC
-s Kerberos server
-a admin principal
-d domain
-r Kerberos realmroot@ ndaf_server_1# mkkrb5clnt -a admin/admin -ckrb_server.ndaf.domain.com -r NDAF.DOMAIN.COM -skrb_server.ndaf.domain.com -d austin.ibm.com
...
46 AIX Version 6.1: AIX Network Data Administration Facility
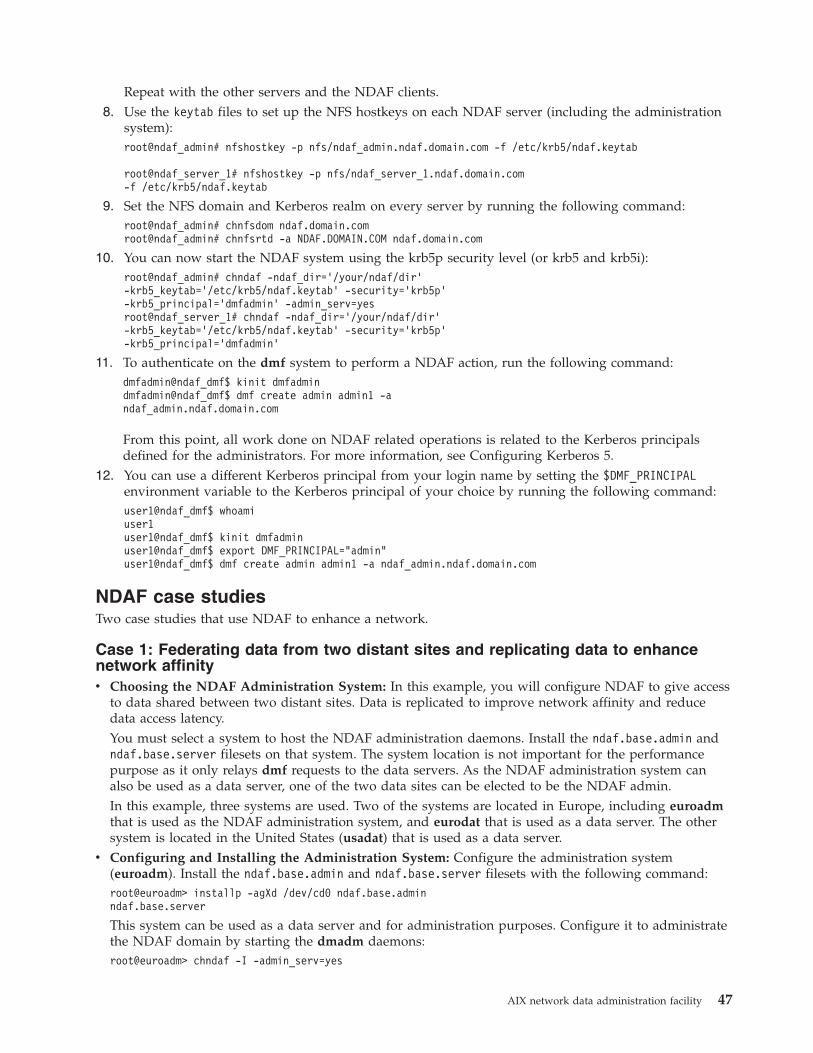
Repeat with the other servers and the NDAF clients.8. Use the keytab files to set up the NFS hostkeys on each NDAF server (including the administration
system):root@ndaf_admin# nfshostkey -p nfs/ndaf_admin.ndaf.domain.com -f /etc/krb5/ndaf.keytab
root@ndaf_server_1# nfshostkey -p nfs/ndaf_server_1.ndaf.domain.com-f /etc/krb5/ndaf.keytab
9. Set the NFS domain and Kerberos realm on every server by running the following command:root@ndaf_admin# chnfsdom ndaf.domain.comroot@ndaf_admin# chnfsrtd -a NDAF.DOMAIN.COM ndaf.domain.com
10. You can now start the NDAF system using the krb5p security level (or krb5 and krb5i):root@ndaf_admin# chndaf -ndaf_dir=’/your/ndaf/dir’-krb5_keytab=’/etc/krb5/ndaf.keytab’ -security=’krb5p’-krb5_principal=’dmfadmin’ -admin_serv=yesroot@ndaf_server_1# chndaf -ndaf_dir=’/your/ndaf/dir’-krb5_keytab=’/etc/krb5/ndaf.keytab’ -security=’krb5p’-krb5_principal=’dmfadmin’
11. To authenticate on the dmf system to perform a NDAF action, run the following command:dmfadmin@ndaf_dmf$ kinit dmfadmindmfadmin@ndaf_dmf$ dmf create admin admin1 -andaf_admin.ndaf.domain.com
From this point, all work done on NDAF related operations is related to the Kerberos principalsdefined for the administrators. For more information, see Configuring Kerberos 5.
12. You can use a different Kerberos principal from your login name by setting the $DMF_PRINCIPALenvironment variable to the Kerberos principal of your choice by running the following command:user1@ndaf_dmf$ whoamiuser1user1@ndaf_dmf$ kinit dmfadminuser1@ndaf_dmf$ export DMF_PRINCIPAL="admin"user1@ndaf_dmf$ dmf create admin admin1 -a ndaf_admin.ndaf.domain.com
NDAF case studiesTwo case studies that use NDAF to enhance a network.
Case 1: Federating data from two distant sites and replicating data to enhancenetwork affinityv Choosing the NDAF Administration System: In this example, you will configure NDAF to give access
to data shared between two distant sites. Data is replicated to improve network affinity and reducedata access latency.You must select a system to host the NDAF administration daemons. Install the ndaf.base.admin andndaf.base.server filesets on that system. The system location is not important for the performancepurpose as it only relays dmf requests to the data servers. As the NDAF administration system canalso be used as a data server, one of the two data sites can be elected to be the NDAF admin.In this example, three systems are used. Two of the systems are located in Europe, including euroadmthat is used as the NDAF administration system, and eurodat that is used as a data server. The othersystem is located in the United States (usadat) that is used as a data server.
v Configuring and Installing the Administration System: Configure the administration system(euroadm). Install the ndaf.base.admin and ndaf.base.server filesets with the following command:root@euroadm> installp -agXd /dev/cd0 ndaf.base.adminndaf.base.server
This system can be used as a data server and for administration purposes. Configure it to administratethe NDAF domain by starting the dmadm daemons:root@euroadm> chndaf -I -admin_serv=yes
AIX network data administration facility 47

The chndaf command modifies the rc.ndaf file so that when the NDAF services are started, they runwith the appropriate options. Before starting the dmadm and dms daemons, you must specify theremaining options to be used. For instance, the ndaf_dir parameter sets the path that is used to storeNDAF metadata. It is recommended that a separate file system with sufficient free space (300 MB) beused. The /ndaf_admin file system is used to store NDAF metadata by running the followingcommand:root@euroadm> chndaf -I -ndaf_dir=/ndaf_admin
The admin uses RPC connections over TCP to communicate with the dmf command line interface. Italso communicates with the data servers running the dms daemons. If a firewall is used, it must allowaccess to the two dmadm communications ports. These ports are 28000 (receive dmf requests) and28002 (receive requests callbacks from dms) by default. As the administration server also runs a dataserver, the data server ports used by the dms daemons must also be opened for TCP connections.These are port 28001 (receive dmadm requests) and 28003 (receive other dms replication requests). Arange of ports is also used for data replications that are stored as NDAF server properties in theDmMinRpcPort and DmMaxRpcPort fields that span from 1024 to 65535 by default. In this example,the [42000-42003] ports are opened for requests connections and the [42004-43000] ports are opened fordata transfers. These changes are reflected in the NDAF configuration before starting the daemons:root@euroadm> chndaf -I -admin_port=42000 -serv_port=42001-admin_cb_port=42002 -serv_serv_port=42003
Kerberos is used for both NDAF and NFS security by setting up Kerberos as described in Configuringa Kerberos-enabled NDAF domain. When finished, configure NDAF to use Kerberos security byrunning the following command:root@euroadm> chndaf -I -security=krb5 -krb5_keytab=/etc/krb5/ndaf.keytab
Change the NFS export options that are used by NDAF by running the following command:root@euroadm> chndaf -I -nfs_args=sec=krb5
Request the dmadm and dms daemons to start immediately and schedule to restart at boot time byrunning the following command:root@euroadm> mkndaf -B
The four dmadm daemon processes and the eight dms daemon processes are now running. If not, seeTroubleshooting NDAF.
v Installing the dmf Command Line Interface: Install the ndaf.base.client on one of the systems to sendrequests to the NDAF administration system. The eurocli system is used in this example:root@eurocli> installp -agXd /dev/cd0 ndaf.base.client
v Creating the NDAF Administration Object: Before the dmf command is run, initialize the Kerberosprincipal:root@eurocli> /usr/krb5/bin/kinit root
The administration system in NDAF is defined by creating an "admin" object with the dmf commandwith the following command:root@eurocli> dmf create admin ndaf_global_admin -a euroadm:42000
The port used by the dmadm daemons to listen for the RPC request from the dmf command was used.As the standard port is not used in this example, it must be specified. The administration object is nowcreated. Run the dmf show admin command to verify that the administration object exists:root@eurocli> dmf show admin -a euroadm:42000
v Configuring and Installing the Data Servers Systems: To set up both the eurodat and usadat dataserver systems in this case study, install the ndaf.base.server fileset on these systems:root@eurodat> installp -agXd /dev/cd0 ndaf.base.serverroot@usadat> installp -agXd /dev/cd0 ndaf.base.server
Update the Kerberos key server configuration to allow the two data servers to use the dms service. Formore information, see Configuring a Kerberos-enabled NDAF domain. When finished, configure NDAFto use Kerberos security by running the following command:
48 AIX Version 6.1: AIX Network Data Administration Facility

root@eurodat> chndaf -I -security=krb5 -krb5_keytab=/etc/krb5/ndaf.keytabroot@usadat> chndaf -I -security=krb5 -krb5_keytab=/etc/krb5/ndaf.keytab
Change the NFS export options that are used by NDAF with the following command:root@eurodat> chndaf -I -nfs_args=sec=krb5root@usadat> chndaf -I -nfs_args=sec=krb5
Configure the previously defined ports with the following command:root@eurodat> chndaf -I -serv_port=42001 -admin_cb_port=42002-serv_serv_port=42003root@usadat> chndaf -I -serv_port=42001 -admin_cb_port=42002-serv_serv_port=42003
The /ndaf_server file system is specified to store local NDAF metadata on these servers by runningthe following command:root@eurodat> chndaf -I -ndaf_dir=/ndaf_serverroot@usadat> chndaf -I -ndaf_dir=/ndaf_server
The dms daemons are started immediately and scheduled to restart at boot time by running thefollowing command:root@euroadm> mkndaf -B
The eight dms daemon processes should now be running. If not, see Troubleshooting NDAF.v Creating the NDAF Server Objects: The data server systems in NDAF are defined by creating "server"
objects with the dmf command:root@eurocli> dmf create server devel_server eurodat:42001 -aeuroadm:42000root@eurocli> dmf create server production_server usadat:42001 -aeuroadm:42000
The port used by the dms daemons to listen for a RPC request is configured with the dmadm daemon.In this example, configuring the port is not mandatory because it is the same as the -serv_portspecified in the dmadm parameters. It must be specified when all the data servers are not listening onthe same port. The server object is now created. Verify that it exists by running the dmf show servercommand:root@eurocli> dmf show server -a euroadm:42000 -c devel_serverroot@eurocli> dmf show server -a euroadm:42000 -c production_server
The current system configuration is:– NDAF admin:
name : ndaf_global_adminhost : euroadmdmf port : 42000dms callback port : 42002
– NDAF server:name : ndaf_global_adminhost : euroadmdmadm port : 42001dms port : 42003replication ports : [1024-65535]
– NDAF server:name : devel_serverhost : eurodatdmadm port : 42001dms port : 42003replication ports : [1024-65535]
– NDAF server:
AIX network data administration facility 49

name : production_serverhost : usadatdmadm port : 42001dms port : 42003replication ports : [1024-65535]
Because ports [42004-43000] are needed for data transfers, the properties of the data servers are set asshown:root@eurocli> dmf set server DmMinRpcPort=42004 -a euroadm:42000 -cdevel_serverroot@eurocli> dmf set server DmMaxRpcPort=43000 -a euroadm:42000 -cdevel_serverroot@eurocli> dmf set server DmMinRpcPort=42004 -a euroadm:42000 -cproduction_serverroot@eurocli> dmf set server DmMaxRpcPort=43000 -a euroadm:42000 -cproduction_serverroot@eurocli> dmf set server DmMinRpcPort=42004 -a euroadm:42000 -cndaf_global_adminroot@eurocli> dmf set server DmMaxRpcPort=43000 -a euroadm:42000 -cndaf_global_admin
The administration system data server /ndaf_global_admin/ ports are also set because they are used inthe following NDAF commands: create cell, place cell, mount dset, and mount replica.
v Enabling File Systems for Cells: The file system where the cell is stored must be enabled with thedms_enable_fs command. The cell, data set, or replica creation fails if it is not enabled. To enable thecell, run the following command:root@euroadm> dms_enable_fs -s /ndaf_admin
As the file system is now enabled, you can create a cell that will be the namespace used to access datasets and replicas with NFSv4 with the following command:root@eurocli> dmf create cell global_root -a euroadm:42000
By default, the cell is created on the admin and is only accessible from that system with NFS. Any NFSclient with the correct Kerberos rights can now access the empty namespace from the admin:user@anywhere> mount -o vers=4 euroadm:/global_root/mnt/ndaf_namespace
v Placing the Cell on the Data Servers: The goal is for users to be able to directly access data from thedata servers and not the administration system by creating clones of the cell, so that it is accessiblefrom all of the data servers. This is accomplished by running the dmf place cell command. Along withthe administration server, the other data servers must be enabled to have the right to place the cell onthese servers by running the following command:root@eurodat> dms_enable_fs -s /ndaf_serverroot@usadat> dms_enable_fs -s /ndaf_server
Now that the file system that holds the clones of the cell is enabled, you can use the dmf command toplace the cell on these data servers:root@eurocli> dmf place cell devel_server -a euroadm:42000 -cglobal_rootroot@eurocli> dmf place cell production_server -a euroadm:42000 -cglobal_root
NFS users can now access the cell from every server in the NDAF domain with the followingcommand:user@anywhere> mount -o vers=4 usadat:/global_root/mnt/ndaf_namespace
v Creating a dset NDAF Data Set: After the cell namespace is created, you can create the data sets (dsetobjects) to store data on the data server and that will be made available to NFS accesses. In thisexample, a separate file system is used to store the data itself so that it differs from the file systemstoring the NDAF metadata. Therefore, the /ndaf_data file system will be used. To create dset andreplica objects on this file system, you must enable it with dms_enable_fs command:root@eurodat> dms_enable_fs -s /ndaf_data
Create this dataset on the eurodat data server by running the following command:
50 AIX Version 6.1: AIX Network Data Administration Facility

root@eurocli> dmf create dset design_data devel_server/ndaf_data/design -a euroadm:42000 -c global_root
You have specified the name of the dset (design_data), the NDAF server that hosts the data(devel_server on the eurodat host), the path where the data resides (/ndaf_data/design), and the cellthat integrates this dset in its namespace (global_root). It is important to note that the datarepresented by the new dset object was exported to NFS at creation time using the export rule that waspassed as a parameter to the NDAF daemons. Yet this dataset will not appear in the cell upon a dmfmount operation. Put the data required into the new dataset by running the following command:root@eurodat> cp -r /data_fs/design_data_to_export /ndaf_data/design
v Creating a Replica: In this example, a replica of this dataset is created. Clones of this replica will beprovided on both the eurodat and usadat data servers. This is done to allow network affinity for dataaccesses and also to provide data accesses failover to the other locations in case one of the servers goesdown. As a replica does not change upon using the dmf update replica command, its data will be thesame on its various locations.The replica is created by using the same /ndaf_data file system used for the dataset. Enabling the filesystem for NDAF is not required. Create the replica of the dset by running the following command:root@eurocli> dmf create replica design_rep devel_server/ndaf_data/design_rep -a euroadm:42000 -c global_root -o design_data
The replica now contains the same data stored in the dset. As the content of the dataset evolves, thereplica might become different from the data stored in the dset.
v Giving Access to the Replica within the Cell: Run the dmf mount replica command to access thereplica in the cell namespace as shown:root@eurocli> dmf mount replica /design -a euroadm:42000 -cglobal_root -o design_rep
After mounting the cell from any of the servers, the user will see a "design" directory that is only aNFSv4 referral to the replica data exported on eurodat when created.
v Placing a Replica: The problem is that the data resides in Europe (eurodat host). Access to this datafrom the United States results in poor network performance. With NDAF, you can define severallocations for a replica. After updating, all locations are updated with the same data. When accessing areplica referral mounted with NFSv4, a list of its locations are returned to the NFS client based on thenetwork affinity of the IP address. To take advantage of both network performance and failover, youcan create an additional location for the replica in the usadat host with the dmf place replicacommand. Enable the file system containing the replicas on that host with the following command:root@usadat> dms_enable_fs -s /ndaf_data
Place this replica on the usadat data server with the following command:root@eurocli> dmf place replica production_server/ndaf_data/design_rep -a euroadm:42000 -c global_root -o design_rep
The location residing in the production_server was updated with the content of the first replicalocation hosted on eurodat.
Case 2 : Add an existing server with NFS exported data to an NDAF cellnamespace without installing NDAF on it
In this case study, you will integrate a data server with already exported NFS data to the NDAF domainpreviously defined. Data replication is not needed in this example. Therefore, the data server can beintegrated to our NDAF domain as an external server and will only gain visibility through the cellpreviously defined. The host usaext server is used in this example.v Creating an External Server Object
Create the external server object that will be handled by NDAF with the following command:root@eurocli> dmf create server external_server usaext -e -aeuroadm:42000
Note: The -e flag is used to specify this is an external server.
AIX network data administration facility 51

v Creating dset Objects to Represent Exported Data
For each exported path on usaext that integrates to the NDAF domain, you must create acorresponding dset as shown:root@eurocli> dmf create dset dset1 external_server/the/NFS/exported/path1 -a euroadm:42000 -c global_rootroot@eurocli> dmf create dset dset2 external_server/the/NFS/exported/path2 -a euroadm:42000 -c global_root
v Mounting dsets as Standard dsets with dmf
The created data set can now be made accessible in the cell with the dmf mount dset command:root@eurocli> dmf mount dset /mount_dset1 -a euroadm:42000 -cglobal_root -o dset1root@eurocli> dmf mount dset /mount_dset2 -a euroadm:42000 -cglobal_root -o dset2
Troubleshooting NDAFYou can troubleshoot NDAF.
Table 1. Troubleshooting
Problem Action
The dms or dmadm daemons won't start. Must specify either ndaf_dir or both ndaf_dataset_default andndaf_replica default when starting dms. Must specify ndaf_dirwhen starting dmadm. The specified directory for data sets andreplicas must belong to a data-set enabled filesystem. Usedms_enable_fs to enable the filesystem. If using Kerberos, checkthe Kerberos keytab file.
Can read files, but can't create or modify data set files from NFSclient.
The DmMode for the data set might not permit writes. To fixthis, use
dmf set dset DmMode=<required mode>
Cannot navigate to the cell or data set directory or access dataset data from NFS client.
All the following must be running on the NDAF data server:nfsd, nfsrgyd, and dms.
The dmf command fails with Cannot contact remote hostmessage.
Make sure the hostname of the administration server is specifiedcorrectly in the dmf command and that the dmadm daemon isrunning on the administration server.
Cannot specify directory when creating a data set. The specified directory must belong to a filesystem that hasbeen enabled for data sets on the server with the dms_enable_fscommand. The specified directory must not exist.Note: The directory will be created by the dmf command.
Source data set is down and a replica exists, but the client willnot fail over to the replica.
This feature is not supported. Clients will fail over from onereplica to another, but not from the source data set to a replica.
Failover from one replica to another takes too long or is tooquick.
The timeout by default is approximately the timeo valuemultiplied by the retrans value (from the mount command ornfs4cl command). This can be overridden with thenfs_v4_fail_over_timeout option of the nfso command.
Cell or data set is not NFS-exported. Make sure nfsroot is set. The command to set it is:
chnfs -r <root_dir>
To make the exports happen after setting the root, you mustrestart dms.
Cannot create a cell or data set. Filesystem where the data set will be created must be enabledfor data sets with the dms_enable_fs command.
Cannot see data in a the data set when mounted with NFSv4.Might be able to see the data when mounted from some servers,but not from others.
NFSv4 must be configured with replicas enabled on all NDAFservers. The command to enable NDAF servers is:
chnfs -R on
52 AIX Version 6.1: AIX Network Data Administration Facility

NDAF checkerTo help diagnose problems, NDAF provides commands to check the consistency of the databases used tomanage the NDAF objects on administration and data servers.
You can use the following dmf command code to check the validity and consistency of the administrationserver database:dmf check_adm admin [-r] [-a admin_server]
where:
-r Prints the uuid assigned to the request.
-a admin_serverSpecifies the DNS name or IP address of the admin server. The port can be added using a colonseparator.
You can use the following dmf command to check the validity and consistency of the data serverdatabase on the specified data server or on every managed data server if none is specified:dmf check_serv server [-r] [-a admin_server] [-c container]
where:
-r Prints the uuid assigned to the request.
-a admin_serverSpecifies the DNS name or IP address of the admin server. The port can be added using a colonseparator.
-c containerSpecifies the name of the server to check.
You can use the following dmf command to check the consistency of the database on the administrationserver with the database on the specified data server or with the databases on every managed data serverif none is specified:dmf check_adm_serv {admin|server} [-r] [-a admin_server] [-c container]
where:
-r Prints the uuid assigned to the request.
-a admin_serverSpecifies the DNS name or IP address of the admin server. The port can be added using a colonseparator.
-c containerSpecifies the name of the server to check.
If the data from this command indicates inconsistencies between the databases, it might be necessary torecover from a backup to restore correct behavior. See “NDAF data backup” on page 54 and “NDAF datarecovery” on page 54 for more information.
The following is sample output from running the following dmf command:# dmf check_adm admin -a ndaf10
---------- STARTING REPORT FROM SERVER my_admin ----------1 ERROR(S)------------------------------ DATABASE CHECK ----------
ERROR: 1
AIX network data administration facility 53

DATABASE: gldb:///admin/dmf.ldbDESCRIPTION:Error DmGroup root doesn’t exist for DmUuid 8c9d4200-e973-11da-b214-de83e0005002 with path \/var/dmf/server/dsets/8c9d416a-e973-11da-b214-de83e0005002
---------- END OF REPORT FROM SERVER my_admin ----------
The sample output shows that an NDAF object has a DmGroup parameter that is not valid. In thissituation, use the dmf show command to find the corresponding data set, which is identified by theDmUuid parameter. In this case, the group specified for the data set is not valid because it does not existin the /etc/group file. The solution might be to use the dmf set dset command to change this data setparameter.
NDAF data backupAn important consideration when backing up NDAF data is that the NDAF state data needs to be backedup along with the data set data.
While normal means can be used to back up the data set data (either locally on the server or remotelyusing NFS), it is recommended that the NDAF state data be backed up using a file system snapshot toget a consistent backup of the NDAF state data. This must be done locally on each data server and theadministration server for that server's local state data. The directory to back up is the ndaf_dir specifiedwhen the dms or dmadm daemons were started. If this state data is lost, all data sets, replicas, and globalnamespace information will have to be recreated.
A data set replica could serve as a backup of dataset data in that the most recently updated replica couldbe copied back to the source data set location if necessary.
NDAF data recoveryAssuming the NDAF data set data and state data are backed-up as described above, recovery depends onwhat is lost.
If the file system itself is fine, missing or corrupted data set data could be recovered by simply restoringfrom a backup. Nevertheless it is a good idea to run the dmf repair -V (verify) command for the restoredserver, and then dmf repair -R (repair) if some inconsistencies are reported.
If more is required, you might want to first unexport the corrupted location, either by hand on the serverby using the exportfs -u command, or automatically using the dmf repair -U (unmount) command forthe corrupted server.
After the unexport is done, you can destroy, recreate, and recover the file system from a backup.
Finally, use the dmf repair server with the -R option to recover the server and reexport the data setswithin the file system.
If you must recover the NDAF state data from a backup, use the dmf repair server command with the -Roption after you recover the data from a snapshot.
The dmf repair server command can be run with no options or with the -V (verify) option to produce areport of inconsistencies.
For more information about the -R (repair) option, see the dmf command.
54 AIX Version 6.1: AIX Network Data Administration Facility
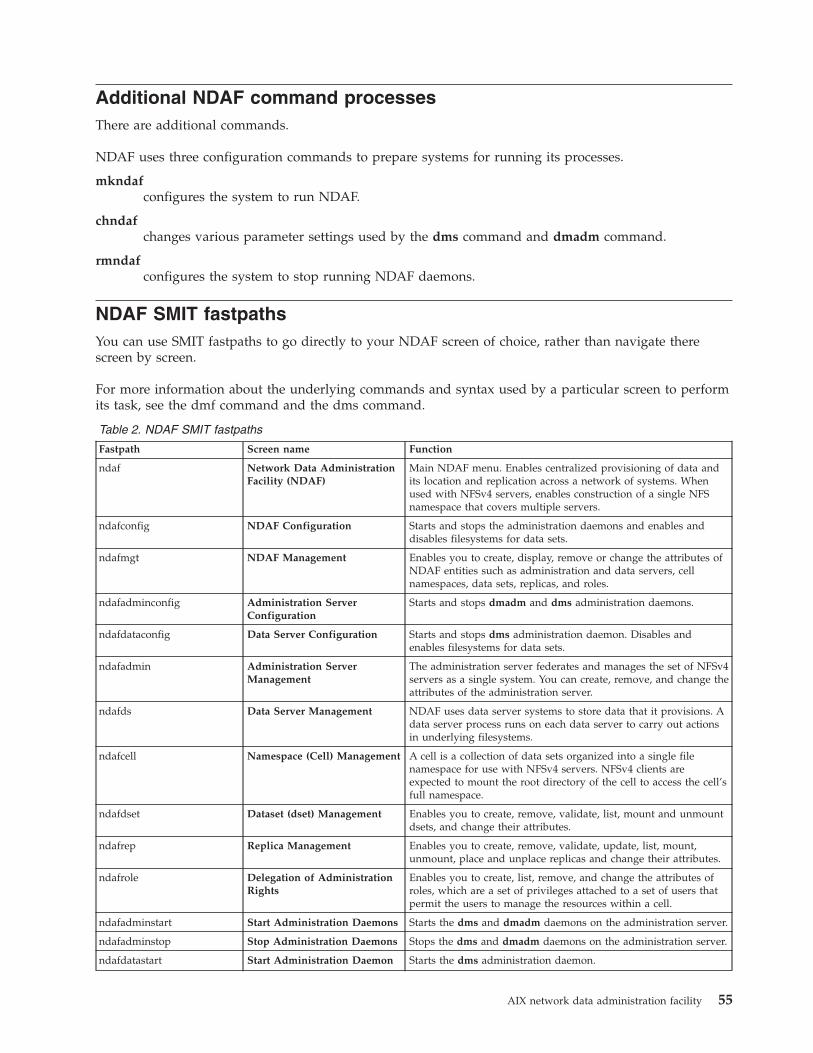
Additional NDAF command processesThere are additional commands.
NDAF uses three configuration commands to prepare systems for running its processes.
mkndafconfigures the system to run NDAF.
chndafchanges various parameter settings used by the dms command and dmadm command.
rmndafconfigures the system to stop running NDAF daemons.
NDAF SMIT fastpathsYou can use SMIT fastpaths to go directly to your NDAF screen of choice, rather than navigate therescreen by screen.
For more information about the underlying commands and syntax used by a particular screen to performits task, see the dmf command and the dms command.
Table 2. NDAF SMIT fastpaths
Fastpath Screen name Function
ndaf Network Data AdministrationFacility (NDAF)
Main NDAF menu. Enables centralized provisioning of data andits location and replication across a network of systems. Whenused with NFSv4 servers, enables construction of a single NFSnamespace that covers multiple servers.
ndafconfig NDAF Configuration Starts and stops the administration daemons and enables anddisables filesystems for data sets.
ndafmgt NDAF Management Enables you to create, display, remove or change the attributes ofNDAF entities such as administration and data servers, cellnamespaces, data sets, replicas, and roles.
ndafadminconfig Administration ServerConfiguration
Starts and stops dmadm and dms administration daemons.
ndafdataconfig Data Server Configuration Starts and stops dms administration daemon. Disables andenables filesystems for data sets.
ndafadmin Administration ServerManagement
The administration server federates and manages the set of NFSv4servers as a single system. You can create, remove, and change theattributes of the administration server.
ndafds Data Server Management NDAF uses data server systems to store data that it provisions. Adata server process runs on each data server to carry out actionsin underlying filesystems.
ndafcell Namespace (Cell) Management A cell is a collection of data sets organized into a single filenamespace for use with NFSv4 servers. NFSv4 clients areexpected to mount the root directory of the cell to access the cell’sfull namespace.
ndafdset Dataset (dset) Management Enables you to create, remove, validate, list, mount and unmountdsets, and change their attributes.
ndafrep Replica Management Enables you to create, remove, validate, update, list, mount,unmount, place and unplace replicas and change their attributes.
ndafrole Delegation of AdministrationRights
Enables you to create, list, remove, and change the attributes ofroles, which are a set of privileges attached to a set of users thatpermit the users to manage the resources within a cell.
ndafadminstart Start Administration Daemons Starts the dms and dmadm daemons on the administration server.
ndafadminstop Stop Administration Daemons Stops the dms and dmadm daemons on the administration server.
ndafdatastart Start Administration Daemon Starts the dms administration daemon.
AIX network data administration facility 55

Table 2. NDAF SMIT fastpaths (continued)
Fastpath Screen name Function
ndafdatastop Stop Administration Daemon Stops the dms administration daemon.
ndafenablefs Enable Filesystem for Datasets Configures a filesystem so that it can be defined as a data set.
ndafdisablefs Disable Filesystem forDatasets
Configures a filesystem so that it can no longer be used as a dataset.
ndafadmincreate Create Admin Server Creates the master administration server of the NDAF domainthat will be running the administration server daemon.
ndafadminremove Remove Admin Server Removes the administration server and cleans the server'sdatabases of all the objects that have been defined within it.
ndafadminstatus Show Admin Server Status Displays the contents of the log of the administration server.
ndafadminclearstatus Clear Admin Server Status Clears the contents of the log of the administration server.
ndafdscreate Create Data Server Creates a data server within an administration server.
ndafcellcreate Create Cell Namespace Creates a cell namespace.
56 AIX Version 6.1: AIX Network Data Administration Facility

Notices
This information was developed for products and services offered in the U.S.A.
IBM may not offer the products, services, or features discussed in this document in other countries.Consult your local IBM representative for information on the products and services currently available inyour area. Any reference to an IBM product, program, or service is not intended to state or imply thatonly that IBM product, program, or service may be used. Any functionally equivalent product, program,or service that does not infringe any IBM intellectual property right may be used instead. However, it isthe user's responsibility to evaluate and verify the operation of any non-IBM product, program, orservice.
IBM may have patents or pending patent applications covering subject matter described in thisdocument. The furnishing of this document does not give you any license to these patents. You can sendlicense inquiries, in writing, to:
IBM Director of LicensingIBM CorporationNorth Castle DriveArmonk, NY 10504-1785U.S.A.
For license inquiries regarding double-byte character set (DBCS) information, contact the IBM IntellectualProperty Department in your country or send inquiries, in writing, to:
Intellectual Property LicensingLegal and Intellectual Property LawIBM Japan, Ltd.19-21, Nihonbashi-Hakozakicho, Chuo-kuTokyo 103-8510, Japan
The following paragraph does not apply to the United Kingdom or any other country where suchprovisions are inconsistent with local law: INTERNATIONAL BUSINESS MACHINES CORPORATIONPROVIDES THIS PUBLICATION "AS IS" WITHOUT WARRANTY OF ANY KIND, EITHER EXPRESS ORIMPLIED, INCLUDING, BUT NOT LIMITED TO, THE IMPLIED WARRANTIES OFNON-INFRINGEMENT, MERCHANTABILITY OR FITNESS FOR A PARTICULAR PURPOSE. Somestates do not allow disclaimer of express or implied warranties in certain transactions, therefore, thisstatement may not apply to you.
This information could include technical inaccuracies or typographical errors. Changes are periodicallymade to the information herein; these changes will be incorporated in new editions of the publication.IBM may make improvements and/or changes in the product(s) and/or the program(s) described in thispublication at any time without notice.
Any references in this information to non-IBM websites are provided for convenience only and do not inany manner serve as an endorsement of those websites. The materials at those websites are not part ofthe materials for this IBM product and use of those websites is at your own risk.
IBM may use or distribute any of the information you supply in any way it believes appropriate withoutincurring any obligation to you.
Licensees of this program who wish to have information about it for the purpose of enabling: (i) theexchange of information between independently created programs and other programs (including this
© Copyright IBM Corp. 2006, 2014 57

one) and (ii) the mutual use of the information which has been exchanged, should contact:
IBM CorporationDept. LRAS/Bldg. 90311501 Burnet RoadAustin, TX 78758-3400U.S.A.
Such information may be available, subject to appropriate terms and conditions, including in some cases,payment of a fee.
The licensed program described in this document and all licensed material available for it are providedby IBM under terms of the IBM Customer Agreement, IBM International Program License Agreement orany equivalent agreement between us.
Any performance data contained herein was determined in a controlled environment. Therefore, theresults obtained in other operating environments may vary significantly. Some measurements may havebeen made on development-level systems and there is no guarantee that these measurements will be thesame on generally available systems. Furthermore, some measurements may have been estimated throughextrapolation. Actual results may vary. Users of this document should verify the applicable data for theirspecific environment.
Information concerning non-IBM products was obtained from the suppliers of those products, theirpublished announcements or other publicly available sources. IBM has not tested those products andcannot confirm the accuracy of performance, compatibility or any other claims related to non-IBMproducts. Questions on the capabilities of non-IBM products should be addressed to the suppliers ofthose products.
All statements regarding IBM's future direction or intent are subject to change or withdrawal withoutnotice, and represent goals and objectives only.
All IBM prices shown are IBM's suggested retail prices, are current and are subject to change withoutnotice. Dealer prices may vary.
This information is for planning purposes only. The information herein is subject to change before theproducts described become available.
This information contains examples of data and reports used in daily business operations. To illustratethem as completely as possible, the examples include the names of individuals, companies, brands, andproducts. All of these names are fictitious and any similarity to the names and addresses used by anactual business enterprise is entirely coincidental.
COPYRIGHT LICENSE:
This information contains sample application programs in source language, which illustrate programmingtechniques on various operating platforms. You may copy, modify, and distribute these sample programsin any form without payment to IBM, for the purposes of developing, using, marketing or distributingapplication programs conforming to the application programming interface for the operating platform forwhich the sample programs are written. These examples have not been thoroughly tested under allconditions. IBM, therefore, cannot guarantee or imply reliability, serviceability, or function of theseprograms. The sample programs are provided "AS IS", without warranty of any kind. IBM shall not beliable for any damages arising out of your use of the sample programs.
Each copy or any portion of these sample programs or any derivative work, must include a copyrightnotice as follows:
58 AIX Version 6.1: AIX Network Data Administration Facility
© (your company name) (year). Portions of this code are derived from IBM Corp. Sample Programs. ©Copyright IBM Corp. _enter the year or years_.
If you are viewing this information softcopy, the photographs and color illustrations may not appear.
Privacy policy considerationsIBM Software products, including software as a service solutions, (“Software Offerings”) may use cookiesor other technologies to collect product usage information, to help improve the end user experience, totailor interactions with the end user or for other purposes. In many cases no personally identifiableinformation is collected by the Software Offerings. Some of our Software Offerings can help enable you tocollect personally identifiable information. If this Software Offering uses cookies to collect personallyidentifiable information, specific information about this offering’s use of cookies is set forth below.
This Software Offering does not use cookies or other technologies to collect personally identifiableinformation.
If the configurations deployed for this Software Offering provide you as the customer the ability to collectpersonally identifiable information from end users via cookies and other technologies, you should seekyour own legal advice about any laws applicable to such data collection, including any requirements fornotice and consent.
For more information about the use of various technologies, including cookies, for these purposes, seeIBM’s Privacy Policy at http://www.ibm.com/privacy and IBM’s Online Privacy Statement athttp://www.ibm.com/privacy/details the section entitled “Cookies, Web Beacons and OtherTechnologies” and the “IBM Software Products and Software-as-a-Service Privacy Statement” athttp://www.ibm.com/software/info/product-privacy.
TrademarksIBM, the IBM logo, and ibm.com are trademarks or registered trademarks of International BusinessMachines Corp., registered in many jurisdictions worldwide. Other product and service names might betrademarks of IBM or other companies. A current list of IBM trademarks is available on the web atCopyright and trademark information at www.ibm.com/legal/copytrade.shtml.
UNIX is a registered trademark of The Open Group in the United States and other countries.
Notices 59

60 AIX Version 6.1: AIX Network Data Administration Facility

Index
AACE configuration 7adding servers for NDAF 13administration client 4administration server 4
adding 13configuring 13
attributesshowing and change role 23showing and changing data set 27showing and changing replica 33
Bbacking up data 54
Ccase studies 47cell 2
adding a server 21changing attributes 14, 16, 19creating 18listing 19managing 18removing 20removing server from 21showing attributes 14, 16, 19
cell namespaceconstructing from data sets 42
changingcell attributes 14, 16, 19data set attributes 27master replica 40replica attributes 33role attributes 23source of a replica 40
clientsadministration 4
clones 3commands 5
dmadm 6dmf 5dms 4, 6dms_enable_fs 6
configuringan NDAF administration client 13Kerberos 5 11NDAF data servers 12the NDAF administration server 13
constructing cell namespace from data sets 42creating
a replica of a data set 32cells 18data sets 25replicas 32roles 22
Ddata backup 54data centers 6data recovery 54data repair 54data server 4
adding 13data sets 2, 25
checking 27constructing cell namespace from 42creating 25creating a replica of 32grouping 2listing 26managing 25mounting 30populating 41removing 30showing and changing attributes 27showing locations 29unmounting 31
database validity and consistencychecking 53
deployment 6destroying
replica 38dmadm command 6dmf check_adm 53
sample output 53dmf command 5dms command 4, 6dms_enable_fs command 6domain 1, 5dsets 2
Eexporting filesystems 7
Kerberos 7
Ffastpaths 55
Iinstalling 9
NDAF 9NDAF when Kerberos 5 is required 9ndaf.base fileset 9
KKerberos
required services 6security levels 12
Kerberos 5configuring 11
© Copyright IBM Corp. 2006, 2014 61
Llisting
cell namespaces 19replicas 39roles 25
locationmaster replica 3
locations, showing data set 29log detail levels 43log messages format 43log messages path 43logs files analysis 43
Mmanaging
cells 18data sets 25NDAF 13replicas 32roles 22
master replicachanging 40removing/destroying 38
master replica location 3mounting
data sets 30replicas 35
Nnamespaces
listing cell 19NDAF administration client
configuring 13NDAF administration server
configuring 13NDAF case studies 47NDAF data server
configuring 12NDAF overview 1, 44NDAF RBAC support 9NDAF servers
configuring for NFSv4 10ndaf.base fileset 9NFS security 7NFSv4
configuring 10
PPFS 1physical filesystem (PFS) 1placing 2
replicas 35populating data sets 41port requirements 11principals 4, 8
service 11process types in log files 44
Rrecovery, data 54
removingcell namespace 20data set 30replica 38role 24server from a cell namespace 21
repair, data 54replica 3
changing the source of 40creating 32listing 39managing 32master 3mounting 35placing 3, 35removing/destroying 38showing and changing attributes 33unmounting 37unplacing 38updates 3updating 3, 36validating 37
role 8, 22creating 22listing 25managing 22removing 24showing and changing attributes 23
RPC port requirements 11
Sserver
adding for NDAF 13adding to a cell 21administration 4data 4removing from cell 21
service principals 11setting up
NDAF administration clients 13NDAF data servers 12the NDAF administration server 13
showingcell attributes 14, 16, 19data set attributes 27data set locations 29replica attributes 33role attributes 23
SMIT fastpaths 55source
changing a replica's 40
Ttroubleshooting 52
Uunmounting
a replica 37data sets 31
unplacing a replica 38updating
replicas 3, 36use cases and installation examples 44
62 AIX Version 6.1: AIX Network Data Administration Facility

Vvalidating a replica 37
WWANs 7wide-area networks 7
Index 63

64 AIX Version 6.1: AIX Network Data Administration Facility


����
Printed in USA