aix version 6 - ps-2.kev009.comps-2.kev009.com/basil.holloway/all pdf/sc23660300.pdfsecurity aix®...
TRANSCRIPT

AIX Version 6.1
Security
SC23-6603-00
���


AIX Version 6.1
Security
SC23-6603-00
���

Note
Before using this information and the product it supports, read the information in “Notices” on page 493.
First Edition (November 2007)
This edition applies to AIX Version 6.1 and to all subsequent releases of this product until otherwise indicated in new
editions.
A reader’s comment form is provided at the back of this publication. If the form has been removed, address
comments to Information Development, Department 04XA-905-6C006, 11501 Burnet Road, Austin, Texas
78758-3493. To send comments electronically, use this commercial Internet address: [email protected]. Any
information that you supply may be used without incurring any obligation to you.
Copyright (c) 1993, 1994 Hewlett-Packard CompanyCopyright (c) 1993, 1994 International Business Machines Corp.Copyright (c) 1993, 1994 Sun Microsystems, Inc.Copyright (c) 1993, 1994 Novell, Inc.All rights reserved. This product and related documentation are protected by copyright and distributed under licenses
restricting its use, copying, distribution, and decompilation. No part of this product or related documentation may be
reproduced in any form by any means without prior written authorization.RESTRICTED RIGHTS LEGEND: Use, duplication, or disclosure by the United States Government is subject to the
restrictions set forth in DFARS 252.227-7013 (c)(1)(ii) and FAR 52.227-19.THIS PUBLICATION IS PROVIDED "AS IS" WITHOUT WARRANTY OF ANY KIND, EITHER EXPRESS OR
IMPLIED, INCLUDING, BUT NOT LIMITED TO, THE IMPLIED WARRANTIES OF MERCHANTABILITY, FITNESS
FOR A PARTICULAR PURPOSE, OR NON-INFRINGEMENT.THIS PUBLICATION COULD INCLUDE TECHNICAL INACCURACIES OR TYPOGRAPHICAL ERRORS. CHANGES
ARE PERIODICALLY ADDED TO THE INFORMATION HEREIN; THESE CHANGES WILL BE INCORPORATED IN
NEW EDITIONS OF THE PUBLICATION. HEWLETT-PACKARD COMPANY, INTERNATIONAL BUSINESS
MACHINES CORP., SUN MICROSYSTEMS, INC., AND UNIX SYSTEMS LABORATORIES, INC., MAY MAKE
IMPROVEMENTS AND/OR CHANGES IN THE PRODUCT(S) AND/OR THE PROGRAM(S) DESCRIBED IN THIS
PUBLICATION AT ANY TIME.
© Copyright International Business Machines Corporation 2002, 2007. All rights reserved.
US Government Users Restricted Rights – Use, duplication or disclosure restricted by GSA ADP Schedule Contract
with IBM Corp.

Contents
About this book . . . . . . . . . . . . . . . . . . . . . . . . . . . . . . . . . v
Highlighting . . . . . . . . . . . . . . . . . . . . . . . . . . . . . . . . . . . v
Case-sensitivity in AIX . . . . . . . . . . . . . . . . . . . . . . . . . . . . . . . v
ISO 9000 . . . . . . . . . . . . . . . . . . . . . . . . . . . . . . . . . . . . v
Related publications . . . . . . . . . . . . . . . . . . . . . . . . . . . . . . . . v
Security . . . . . . . . . . . . . . . . . . . . . . . . . . . . . . . . . . . . 1
Securing the Base Operating System . . . . . . . . . . . . . . . . . . . . . . . . . 1
Securing the network . . . . . . . . . . . . . . . . . . . . . . . . . . . . . . . 199
AIX Security Expert . . . . . . . . . . . . . . . . . . . . . . . . . . . . . . . 337
Security checklist . . . . . . . . . . . . . . . . . . . . . . . . . . . . . . . . 380
Security resources . . . . . . . . . . . . . . . . . . . . . . . . . . . . . . . 381
Summary of common AIX system services . . . . . . . . . . . . . . . . . . . . . . . 382
Summary of network service options . . . . . . . . . . . . . . . . . . . . . . . . . 393
Trusted AIX . . . . . . . . . . . . . . . . . . . . . . . . . . . . . . . . . . 395
Notices . . . . . . . . . . . . . . . . . . . . . . . . . . . . . . . . . . . 493
Trademarks . . . . . . . . . . . . . . . . . . . . . . . . . . . . . . . . . . 494
Index . . . . . . . . . . . . . . . . . . . . . . . . . . . . . . . . . . . . 495
© Copyright IBM Corp. 2002, 2007 iii

iv AIX Version 6.1 Security

About this book
This topic provides system administrators with complete information on file, system, and network security.
This topic contains information about how to perform such tasks as hardening a system, changing
permissions, setting up authentication methods, and configuring the Common Criteria Security Evaluation
features. This topic is also available on the documentation CD that is shipped with the operating system.
Highlighting
The following highlighting conventions are used in this book:
Bold Identifies commands, subroutines, keywords, files, structures, directories, and other items
whose names are predefined by the system. Also identifies graphical objects such as buttons,
labels, and icons that the user selects.
Italics Identifies parameters whose actual names or values are to be supplied by the user.
Monospace Identifies examples of specific data values, examples of text similar to what you might see
displayed, examples of portions of program code similar to what you might write as a
programmer, messages from the system, or information you should actually type.
Case-sensitivity in AIX
Everything in the AIX operating system is case-sensitive, which means that it distinguishes between
uppercase and lowercase letters. For example, you can use the ls command to list files. If you type LS, the
system responds that the command is not found. Likewise, FILEA, FiLea, and filea are three distinct file
names, even if they reside in the same directory. To avoid causing undesirable actions to be performed,
always ensure that you use the correct case.
ISO 9000
ISO 9000 registered quality systems were used in the development and manufacturing of this product.
Related publications
The following publications contain related information:
v Operating system and device management
v Networks and communication management
v Installation and migration
v AIX Version 6.1 Commands Reference
v AIX Version 6.1 Files Reference
v AIX Version 6.1 General Programming Concepts: Writing and Debugging Programs
v AIX Version 6.1 Network Information Services (NIS and NIS+) Guide
v Printers and printing
© Copyright IBM Corp. 2002, 2007 v

vi AIX Version 6.1 Security
Security
AIX® allows you to perform tasks such as hardening a system, changing permissions, setting up
authentication methods, and configuring the Common Criteria Security Evaluation features. This topic is
also available on the documentation CD that is shipped with the operating system.
To view or download the PDF version of this topic, select Security.
Securing the Base Operating System
Securing the Base Operating System provides information about how to protect the system regardless of
network connectivity.
These sections describe how to install your system with security options turned on, and how to secure AIX
against nonprivileged users gaining access to the system.
Secure system installation and configuration
Several factors are involved in the secure installation and configuration of AIX.
Trusted Computing Base
The system administrator must determine how much trust can be given to a particular program. This
determination includes considering the value of the information resources on the system in deciding how
much trust is required for a program to be installed with privilege.
The Trusted Computing Base (TCB) is the part of the system that is responsible for enforcing system-wide
information security policies. By installing and using the TCB, you can define user access to the trusted
communication path, which permits secure communication between users and the TCB. TCB features can
only be enabled when the operating system is installed. To install TCB on an already installed machine,
you will have to perform a Preservation installation. Enabling TCB permits you to access the trusted shell,
trusted processes, and the Secure Attention Key (SAK).
Installing a system with the TCB:
The TCB is the part of the system that is responsible for enforcing the information security policies of the
system. All of the computer’s hardware is included in the TCB, but a person administering the system
should be concerned primarily with the software components of the TCB.
If you install a system with the Trusted Computing Base option, you enable the trusted path, trusted shell,
and system-integrity checking (tcbck command). These features can only be enabled during a base
operating system (BOS) installation. If the TCB option is not selected during the initial installation, the
tcbck command is disabled. You can use this command only by reinstalling the system with the TCB
option enabled.
To set the TCB option during a BOS installation, select More Options from the Installation and Settings
screen. In the Installation Options screen, the default for the Install Trusted Computing Base selection is
no. To enable the TCB, type 2 and press Enter.
Because every device is part of the TCB, every file in the /dev directory is monitored by the TCB. In
addition, the TCB automatically monitors over 600 additional files, storing critical information about these
files in the /etc/security/sysck.cfg file. If you are installing the TCB, immediately after installing, back up
this file to removable media, such as tape, CD, or disk, and store the media in a secure place.
Checking the TCB:
© Copyright IBM Corp. 2002, 2007 1

The security of the operating system is jeopardized when the Trusted Computing Base (TCB) files are not
correctly protected or when configuration files have unsafe values.
The tcbck command audits the security state of the Trusted Computing Base. The tcbck command audits
this information by reading the /etc/security/sysck.cfg file. This file includes a description of all TCB files,
configuration files, and trusted commands.
The /etc/security/sysck.cfg file is not offline and, could therefore be altered by a hacker. Make sure you
create an offline read-only copy after each TCB update. Also, copy this file from the archival media to disk
before doing any checks.
Installing the TCB and using the tcbck command do not guarantee that a system is operating in a
Controlled Access Protection Profile (CAPP) and Evaluation Assurance Level 4+ (EAL4+) compliant mode.
For information on the CAPP/EAL4+ option, see “Controlled Access Protection Profile and Evaluation
Assurance Level 4+ and Labeled Security Protection Profile and Evaluation Assurance Level 4+” on page
12.
Structure of the sysck.cfg file:
The tcbck command reads the /etc/security/sysck.cfg file to determine which files to check. Each trusted
program on the system is described by a stanza in the /etc/security/sysck.cfg file.
Each stanza has the following attributes:
acl Text string representing the access control list for the file. It must be of the same
format as the output of the aclget command. If this does not match the actual file ACL
(access control list), the sysck command applies this value using the aclput
command.
Note: The SUID, SGID, and SVTX attributes must match those specified for the mode,
if present.
class Name of a group of files. This attribute permits several files with the same class name
to be checked by specifying a single argument to the tcbck command. More than one
class can be specified, with each class being separated by a comma.
group Group ID or name of the file group. If this does not match the file group, the tcbck
command sets the group ID of the file to this value.
links Comma-separated list of path names linked to this file. If any path name in this list is
not linked to the file, the tcbck command creates the link. If used without the tree
parameter, the tcbckcommand prints a message that there are extra links but does not
determine their names. If used with the tree parameter, the tcbck command also prints
any additional path names linked to this file.
mode Comma-separated list of values. The permissible values are SUID, SGID, SVTX, and
TCB. The file permissions must be the last value and can be specified either as an
octal value or as a 9-character string. For example, either 755 or rwxr-xr-x are valid file
permissions. If this does not match the actual file mode, the tcbck command applies
the correct value.
owner User ID or name of the file owner. If this does not match the file owner, the tcbck
command sets the owner ID of the file to this value.
program Comma-separated list of values. The first value is the path name of a checking
program. Additional values are passed as arguments to the program when the program
is run.
Note: The first argument is always one of -y, -n, -p, or -t, depending on which flag the
tcbck command was used with.
source Name of a file this source file is to be copied from prior to checking. If the value is
blank, and this is either a regular file, directory, or a named pipe, a new empty version
of this file is created if it does not already exist. For device files, a new special file is
created for the same type device.
2 AIX Version 6.1 Security

symlinks Comma-separated list of path names symbolically linked to this file. If any path name in
this list is not a symbolic link to the file, the tcbck command creates the symbolic link.
If used with the tree argument, the tcbck command also prints any additional path
names that are symbolic links to this file.
If a stanza in the /etc/security/sysck.cfg file does not specify an attribute, the corresponding check is not
performed.
Using the tcbck command:
The tcbck command is used to ensure the proper installation of security-relevant file; to ensure the file
system tree contains no files that clearly violate system security; and to update, add, or delete trusted files.
The tcbck command is normally used for the following tasks:
v Ensure the proper installation of security-relevant files
v Ensure that the file system tree contains no files that clearly violate system security
v Update, add, or delete trusted files
The tcbck command can be used in the following ways:
v Normal use
– Noninteractive at system initialization
– With the cron command
v Interactive use
– Check out individual files and classes of files
v Paranoid use
– Store the sysck.cfg file offline and restore it periodically to check out the machine
Although not cryptographically secure, the TCB uses the sum command for checksums. The TCB
database can be set up manually with a different checksum command, for example, the md5sum
command that is shipped in the textutils RPM Package Manager package with AIX Toolbox for Linux
Applications CD.
Checking trusted files:
Use the tcbck command to check and fix all the files in the tcbck database, and fix and produce a log of
all errors.
To check all the files in the tcbck database, and fix and report all errors, type:
tcbck -y ALL
This causes the tcbck command to check the installation of each file in the tcbck database described by
the /etc/security/sysck.cfg file.
To perform this automatically during system initialization, and produce a log of what was in error, add the
previous command string to the /etc/rc command.
Checking the file system tree:
Whenever you suspect the integrity of the system might have been compromised, run the tcbck command
to check the file system tree.
To check the file system tree, type:
tcbck -t tree
Security 3

When the tcbck command is used with the tree value, all files on the system are checked for correct
installation (this could take a long time). If the tcbck command discovers any files that are potential threats
to system security, you can alter the suspected file to remove the offending attributes. In addition, the
following checks are performed on all other files in the file system:
v If the file owner is root and the file has the SetUID bit set, the SetUID bit is cleared.
v If the file group is an administrative group, the file is executable, and the file has the SetGID bit set, the
SetGID bit is cleared.
v If the file has the tcb attribute set, this attribute is cleared.
v If the file is a device (character or block special file), it is removed.
v If the file is an additional link to a path name described in /etc/security/sysck.cfg file, the link is
removed.
v If the file is an additional symbolic link to a path name described in /etc/security/sysck.cfg file, the
symbolic link is removed.
Note: All device entries must have been added to the /etc/security/sysck.cfg file prior to execution
of the tcbck command or the system is rendered unusable. To add trusted devices to the
/etc/security/sysck.cfg file, use the -l flag.
Attention: Do not run the tcbck -y tree command option. This option deletes and disables devices that
are not properly listed in the TCB, and might disable your system.
Adding a trusted program:
Use the tcbck command to add a specific program to the /etc/security/sysck.cfg file.
To add a specific program to the /etc/security/sysck.cfg file, type:
tcbck -a PathName [Attribute=Value]
Only attributes whose values are not deduced from the current state of the file need be specified on the
command line. All attribute names are contained in the /etc/security/sysck.cfg file.
For example, the following command registers a new SetUID root program named /usr/bin/setgroups,
which has a link named /usr/bin/getgroups:
tcbck -a /usr/bin/setgroups links=/usr/bin/getgroups
To add jfh and jsl as administrative users and to add developers as an administrative group to be
verified during a security audit of the /usr/bin/abc file, type:
tcbck -a /usr/bin/abc setuids=jfh,jsl setgids=developers
After installing a program, you might not know which new files are registered in the /etc/security/sysck.cfg file. These files can be found and added with the following command:
tcbck -t tree
This command string displays the name of any file that is to be registered in the /etc/security/sysck.cfg
file.
Deleting a trusted program:
If you remove a file from the system that is described in the /etc/security/sysck.cfg file, you must also
remove the description of this file from the /etc/security/sysck.cfg file.
For example, if you have deleted the /etc/cvid program, the following command string produces an error
message:
tcbck -t ALL
4 AIX Version 6.1 Security

The resulting error message is as follows:
3001-020 The file /etc/cvid was not found.
The description for this program remains in the /etc/security/sysck.cfg file. To remove the description of
this program, type the following command:
tcbck -d /etc/cvid
Configuring additional trusted options:
You can configure additional options for the Trusted Computing Base (TCB).
Restricting access to a terminal:
You can configure the operating system to restrict terminal access.
The getty and shell commands change the owner and mode of a terminal to prevent untrusted programs
from accessing the terminal. The operating system provides a way to configure exclusive terminal access.
Using the Secure Attention Key:
A trusted communication path is established by pressing the Secure Attention Key (SAK) reserved key
sequence (Ctrl-X, and then Ctrl-R).
Note: Use caution when using SAK because it stops all processes that attempt to access the terminal and
any links to it (for example, /dev/console can be linked to /dev/tty0).
A trusted communication path is established under the following conditions:
v When logging in to the system
After you press the SAK:
– If a new login screen displays, you have a secure path.
– If the trusted shell prompt displays, the initial login screen was an unauthorized program that might
have been trying to steal your password. Determine who is currently using this terminal by using the
who command and then log off.
v When you want the command you enter to result in a trusted program running. Some examples of this
include:
– Running as root user. Run as root user only after establishing a trusted communication path. This
ensures that no untrusted programs are run with root-user authority.
– Running the su, passwd, and newgrp commands. Run these commands only after establishing a
trusted communication path.
Configuring the Secure Attention Key:
Configure the Secure Attention Key to create a trusted communication path.
Each terminal can be independently configured so that pressing the Secure Attention Key (SAK) at that
terminal creates a trusted communication path. This is specified by the sak_enabled attribute in
/etc/security/login.cfg file. If the value of this attribute is True, the SAK is enabled.
If a port is to be used for communications, (for example, by the uucp command), the specific port used
has the following line in its stanza of the /etc/security/login.cfg file:
sak_enabled = false
This line (or no entry in that stanza) disables the SAK for that terminal.
Security 5

To enable the SAK on a terminal, add the following line to the stanza for that terminal:
sak_enabled = true
Trusted Execution
Trusted Execution (TE) refers to a collection of features that are used to verify the integrity of the system
and implement advance security policies, which together can be used to enhance the trust level of the
complete system.
The usual way for a malicious user to harm the system is to get access to the system and then install
Trojans, rootkits or tamper some security critical files, resulting in the system becoming vulnerable and
exploitable. The central idea behind the set of features under Trusted Execution is prevention of such
activities or in worst case be able to identify if any such incident happens to the system. Using the
functionality provided by Trusted Execution, the system administrator can decide upon the actual set of
executables that are allowed to execute or the set of kernel extensions that are allowed to be loaded. It
can also be used to audit the security state of the system and identify files that have changed, thereby
increasing the trusted level of the system and making it more difficult for the malicious user to do harm to
the system. The set of features under TE can be grouped into the following:
v Managing Trusted Signature Database
v Auditing integrity of the Trusted Signature Database
v Configuring Security Policies
v Trusted Execution Path and Trusted Library Path
Note: A TCB functionality already exists in AIX. TE is a more powerful and enhanced mechanism that
overlaps some of the TCB functionality and provides advance security policies to better control the
integrity of the system. While the Trusted Computing Base is still available, Trusted Execution
introduces a new and more advanced concept of verifying and guarding the system integrity.
Trusted Signature Database Management:
Similar to that of Trusted Computing Base (TCB) there exists a database which is used to store critical
security parameters of trusted files present on the system. This database, called Trusted Signature
Database (TSD), resides in the /etc/security/tsd/tsd.dat.
A trusted file is a file that is critical from the security perspective of the system, and if compromised, can
jeopardize the security of the entire system. Typically the files that match this description are the following:
v Kernel (operating system)
v All setuid root programs
v All setgid root programs
v Any program that is exclusively run by the root user or by a member of the system group
v Any program that must be run by the administrator while on the trusted communication path (for
example, the ls command)
v The configuration files that control system operation
v Any program that is run with the privilege or access rights to alter the kernel or the system configuration
files
Every trusted file should ideally have an associated stanza or a file definition stored in the Trusted
Signature Database (TSD). A file can be marked as trusted by adding its definition in the TSD using the
trustchk command. The trustchk command can be used to add, delete, or list entries from the TSD.
Trusted Signature Database:
The Trusted Signature Database is a database that is used to store critical security parameters of trusted
files present on the system. This database resides in the /etc/security/tsd/tsd.dat directory.
6 AIX Version 6.1 Security

Every trusted file should ideally have an associated stanza or a file definition stored in the Trusted
Signature Database (TSD). Every trusted file is associated with a unique cryptographic hash and a digital
signature. The cryptographic hash of the default set of trusted files is generated using the SHA-256
algorithm and the digital signature is generated using RSA by the AIX build environment and packaged as
part of AIX installation filesets. These hash values and the signatures are shipped as part of respective
AIX installation images and stored in the Trusted Software Database (/etc/security/tsd/tsd.dat) on the
destination machine, in the sample stanza format that follows:
/usr/bin/ps:
owner = bin
group = system
mode = 555
type = FILE
hardlinks = /usr/sbin/ps
symlinks =
size = 1024
cert_tag = bbe21b795c550ab243
signature =
f7167eb9ba3b63478793c635fc991c7e9663365b2c238411d24c2a8a
hash_value = c550ab2436792256b4846a8d0dc448fc45
minslabel = SLSL
maxslabel = SLSL
intlabel = SHTL
accessauths = aix.mls.pdir, aix.mls.config
innateprivs = PV_LEF
proxyprivs = PV_DAC
authprivs =
aix.security.cmds:PV_DAC,aix.ras.audit:PV_AU_ADMIN
secflags = FSF_EPS
t_accessauths =
t_innateprivs =
t_proxyprivs =
t_authprivs =
t_secflags =
owner Owner of the file. This value is computed by the trustchk command when the file is being added
to TSD.
group Group of the file. This value is computed by the trustchk command.
mode Comma separated list of values. The permissible values are SUID (SUID set bit), SGID (SGID set
bit), SVTX (SVTX set bit), and TCB (Trusted Computing Base). The file permissions must be the
last value and can be specified as an octal value. For example, for a file that is set uid and has
permission bits as rwxr-xr-x, the value for mode is SUID,755. The value is computed by the
trustchk command.
type Type of the file. This value is computed by the trustchk command. The possible values are FILE,
DIRECTORY, MPX_DEV, CHAR_DEV, BLK_DEV, and FIFO.
hardlinks
List of hardlinks to the file. This value cannot be computed by the trustchk command. It must be
supplied by the user when adding a file to the database.
symlinks
List of symbolic links to the file. This value cannot be computed by the trustchk command. It must
be supplied by the user when adding a file to the database.
size Defines size of the file. The VOLATILE value means the file gets changed frequently.
cert_tag
This field maps the digital signature of the file with the associated certificate that can be used to
verify the file’s signatures. This field stores the certificate id and is computed by the trustchk
command at the time of addition of the file to the TSD. The certificates are stored in
/etc/security/certificates directory.
Security 7
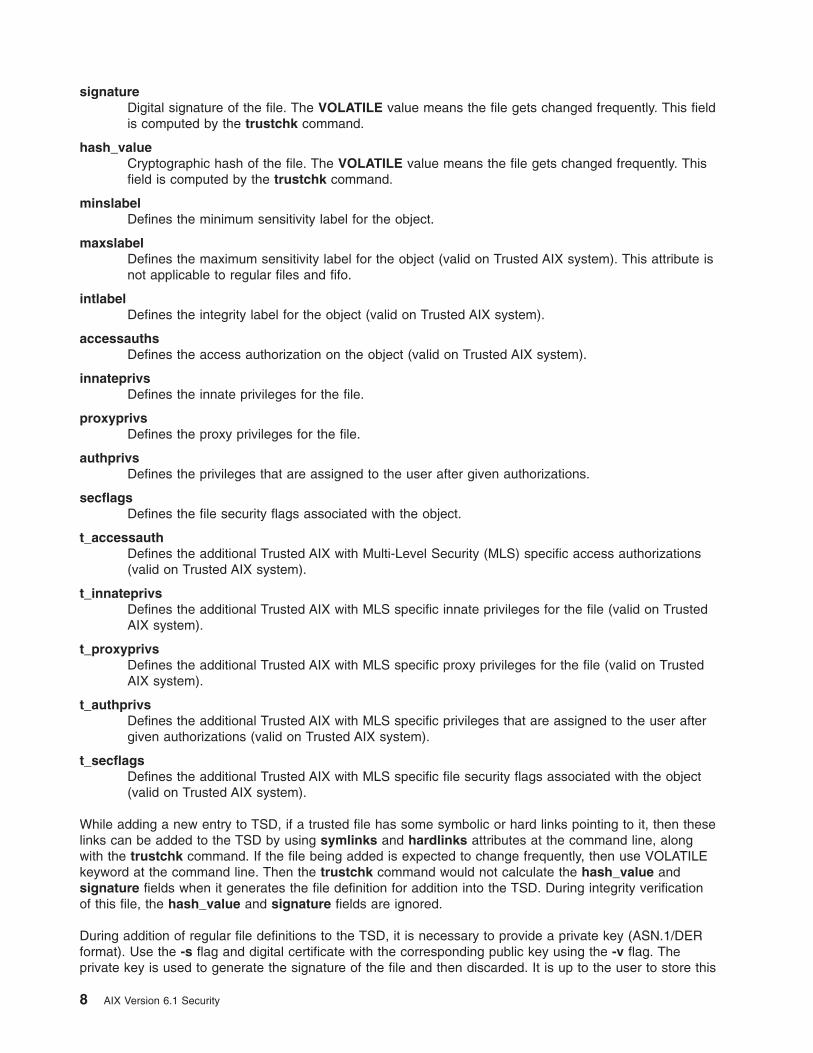
signature
Digital signature of the file. The VOLATILE value means the file gets changed frequently. This field
is computed by the trustchk command.
hash_value
Cryptographic hash of the file. The VOLATILE value means the file gets changed frequently. This
field is computed by the trustchk command.
minslabel
Defines the minimum sensitivity label for the object.
maxslabel
Defines the maximum sensitivity label for the object (valid on Trusted AIX system). This attribute is
not applicable to regular files and fifo.
intlabel
Defines the integrity label for the object (valid on Trusted AIX system).
accessauths
Defines the access authorization on the object (valid on Trusted AIX system).
innateprivs
Defines the innate privileges for the file.
proxyprivs
Defines the proxy privileges for the file.
authprivs
Defines the privileges that are assigned to the user after given authorizations.
secflags
Defines the file security flags associated with the object.
t_accessauth
Defines the additional Trusted AIX with Multi-Level Security (MLS) specific access authorizations
(valid on Trusted AIX system).
t_innateprivs
Defines the additional Trusted AIX with MLS specific innate privileges for the file (valid on Trusted
AIX system).
t_proxyprivs
Defines the additional Trusted AIX with MLS specific proxy privileges for the file (valid on Trusted
AIX system).
t_authprivs
Defines the additional Trusted AIX with MLS specific privileges that are assigned to the user after
given authorizations (valid on Trusted AIX system).
t_secflags
Defines the additional Trusted AIX with MLS specific file security flags associated with the object
(valid on Trusted AIX system).
While adding a new entry to TSD, if a trusted file has some symbolic or hard links pointing to it, then these
links can be added to the TSD by using symlinks and hardlinks attributes at the command line, along
with the trustchk command. If the file being added is expected to change frequently, then use VOLATILE
keyword at the command line. Then the trustchk command would not calculate the hash_value and
signature fields when it generates the file definition for addition into the TSD. During integrity verification
of this file, the hash_value and signature fields are ignored.
During addition of regular file definitions to the TSD, it is necessary to provide a private key (ASN.1/DER
format). Use the -s flag and digital certificate with the corresponding public key using the -v flag. The
private key is used to generate the signature of the file and then discarded. It is up to the user to store this
8 AIX Version 6.1 Security

key securely. The certificate is stored into a certificate store in the/etc/security/certificates file for the
signatures to be verified whenever you request integrity verification. Since signature calculation is not
possible for non-regular files like directory and device files, it is not mandatory to supply the private key
and certificate while adding such files to TSD.
You can also supply the pre-computed file definition through a file using the -f option to be added to the
TSD. In this case the trustchk does not compute any of the values and stores the definitions into TSD
without any verification. The user is responsible for sanity of the file definitions in this case.
Auditing the integrity of Trusted Signature Database:
The trustchk command can be used to audit the integrity state of the file definitions in the Trusted
Signature Database (TSD) against the actual files.
If the trustchk command identifies an anomaly, then it can be made to automatically correct it or prompt
the user before attempting correction. If anomalies like size, signature, cert_tag or hash_value mismatch,
the correction is not possible. In such cases, the trustchk command would make the file inaccessible,
thereby rendering it useless and containing any damage.
Following corrective actions shall be taken for different mismatching attributes:
owner Owner of the file shall be reset to the value in TSD.
group Group of the file shall be reset to the value in TSD.
mode Mode bits of the file be reset to the value in TSD.
hardlinks
If the link points to some other file, it is modified to point to this file. If the link does not exist, a
new link is created to point to this file.
symlinks
Same as hardlinks.
type File is made inaccessible.
size File is made inaccessible, except in case of VOLATILE file.
cert_tag
File is made inaccessible.
signature
File is made inaccessible, except in case of VOLATILE file.
hash_value
File is made inaccessible, except in case of VOLATILE file.
minslabel
On a Trusted AIX system, the minimum sensitivity label is reset to the value in the TSD.
maxslabel
On a Trusted AIX system, the maximum sensitivity label is reset to the value in the TSD.
intlabel
On a Trusted AIX system, the integrity label is reset to the value in the TSD.
accessauths
The access authorizations are reset to the value in TSD. On Trusted AIX, the t_accessauths
values are considered part of the accessauths attribute.
innateprivs
The innate privileges are reset to the value in TSD. On Trusted AIX, the t_innateprivs values are
considered part of the innateprivs attribute.
Security 9

inheritprivs
The inheritable privileges are reset to the value in TSD. On Trusted AIX, the t_inheritprivs values
are considered part of the inherit attribute.
authprivs
The authorized privileges are reset to the value in TSD. On Trusted AIX, the t_authprivs values
are considered part of the authprivs attribute.
aecflags
The security flags are reset to the value in TSD. On Trusted AIX, the t_secglags values are
considered as part of the secflags attribute.
You can also validate file definitions against an alternate database using the -F option. The system
administrator should avoid storing the TSD on the same system and backup the database to some
alternate location. This file integrity can be made to match against this backed up version of TSD using the
-F option.
Security policies configuration:
The Trusted Execution (TE) feature provides you with a run-time file integrity verification mechanism.
Using this mechanism, the system can be configured to check the integrity of the trusted files before every
request to access those file, effectively allowing only the trusted files that pass the integrity check to be
accessed on the system.
When a file is marked as trusted (by adding its definition to Trusted Signature Database), the TE feature
can be made to monitor its integrity on every access. TE can continuously monitor the system and is
capable of detecting tampering of any trusted file (by a malicious user or application) present on the
system at run-time (for example, at load time). If the file is found to be tampered, TE can take corrective
actions based on pre-configured policies, such as disallow execution, access to the file, or logging error. If
a file being opened or executed, and has an entry in the Trusted Signature Database (TSD), the TE
performs as follows:
v Before loading the binary, the component responsible for loading the file (system loader) invokes the
Trusted Execution subsystem, and calculates the hash value using the SHA-256 algorithm
(configurable).
v This run-time calculated hash value is matched with the one stored in the TSD.
v If the values match, the file opening or execution is permitted.
v If the values do not match, either the binary is tampered, or somehow compromised. It is up to the user
to decide the action to be taken. The TE mechanism provides options for users to configure their own
policies for the actions to be taken if the hash values do not match.
v Based on these configured policies, a relevant action is taken.
The following policies can be configured:
CHKEXEC
Check hash value of only the trusted executables before loading them in memory for execution.
CHKSHLIBS
Check the hash value of only the trusted shared libraries before loading them in memory for
execution.
CHKSCRIPTS
Check the hash value of only the trusted shell scripts before loading them in memory.
CHKKERNEXT
Check the hash value of only the kernel extension before loading it in memory.
STOP_UNTRUSTD
Stop loading of files that are not trusted. Only files belonging to TSD are loaded. This policy only
10 AIX Version 6.1 Security

works in combination with any of the CHK* policies mentioned above. For example, if
CHKEXEC=ON and STOP_UNTRUSTD=ON, then any executable binary that does not belong to
TSD is blocked from execution.
STOP_ON_CHKFAIL
Stop loading of trusted files that fail hash value check. This policy also works in combination with
CHK* policies. For example, if CHKSHLIBS=ON and STOP_ON_CHKFAIL=ON, then any shared
library not belonging to the TSD is blocked from being loaded into memory for use.
TSD_LOCK
Lock TSD so it is not available for editing.
TSD_FILES_LOCK
Lock trusted files. This does not allow opening of trusted files in write mode.
TE Enable/Disable Trusted Execution functionality. Only when this is enabled, the above mentioned
policies are in effect.
The following table gives the interaction between different CHK* policies and STOP* policies when
enabled:
Policy STOP_UNTRUSTD STOP_ON_CHKFAIL
CHKEXEC Stop loading of executables that do
not belong to TSD.
Stop loading of executables whose hash
values do not match the TSD values.
CHKSHLIBS Stop loading of shared libraries that
do not belong to TSD.
Stop loading of shared libraries whose hash
values do not match the TSD values.
CHKSCRIPTS Stop loading of shell scripts that do
not belong to TSD.
Stop loading of shell scripts whose hash
values do not match the TSD values.
CHKKERNEXT Stop loading of kernel extensions that
do not belong to TSD.
Stop loading of kernel extensions whose hash
values do not match the TSD values.
Note: A policy can be enabled or disabled at any time until the TE is turned on to bring the policies into
effect. Once a policy is in effect, disabling that policy becomes effective only on next boot cycle. All
the information messages are logged into syslog.
Trusted Execution Path and Trusted Library Path:
Trusted Execution Path (TEP) defines a list of directories that contain the trusted executables. Once TEP
verification is enabled, the system loader allows only binaries in the specified paths to execute. Trusted
Library Path (TLP) has the same functionality, except that it is used to define the directories that contain
trusted libraries of the system.
Once TLP is enabled, the system loader allows only the libraries from this path to be linked to the binaries.
The trustchk command can be used to enable or disable the TEP or TLP, as well as set the colon
separated path list for both, using TEP and TLP command line attributes of the trustchk command.
Trusted Shell and Secure Attention Key:
Trusted Shell and Secure Attention Key (SAK) perform similarly to the Trusted Computing Base (TCB),
except that if Trusted Execution is enabled on the system instead of TCB, the Trusted Shell executes files
belonging only to the Trusted Signature Database.
For more information about TCB and SAK, see Trusted Computing Base, Using the Secure Attention Key,
and Configuring the Secure Attention Key.
Security 11

Controlled Access Protection Profile and Evaluation Assurance Level 4+ and
Labeled Security Protection Profile and Evaluation Assurance Level 4+
System administrators can install a system with the Controlled Access Protection Profile (CAPP) and
Evaluation Assurance Level 4+ (EAL4+) option or Labeled Security Protection Profile (LSPP) and
Evaluation Assurance Level 4+ (EAL4+) during a base operating system (BOS) installation. A system with
these options has restrictions on the software that is installed during BOS installation, plus network access
is restricted.
Note: Evaluations are currently ongoing for AIX Version 6.1. Please refer to the AIX Version 6.1 release
notes for the latest information.
CAPP/EAL4+ compliant system overview:
A CAPP system is a system that has been designed and configured to meet the Controlled Access
Protection Profile (CAPP) for security evaluation according to the Common Criteria. The CAPP specifies
the functional requirements for the system, similar to the earlier TCSEC C2 standard (also known as the
Orange Book).
A Common Criteria (CC) Evaluated System is a system that has been evaluated according to the Common
Criteria, an ISO standard (ISO 15408) for the assurance evaluation of IT products. The system
configuration that meets these requirements is referred to as a CAPP/EAL4+ system in this guide.
If a system is evaluated according to the CC, the CC evaluation is valid only for a specific system
configuration (hardware and software). Changing the relevant security configuration results in a
nonevaluated system. This does not necessarily mean that the security of the system will be reduced, but
only indicates that the system is no longer in a certified configuration. Neither the CAPP nor the CC cover
all possible security configuration options of AIX 6.1. Some features, such as IPsec or custom-password
checking modules, are not included, but can be used to enhance the security of the system.
The AIX 6.1 CAPP/EAL4+ system includes the base operating system on 64-bit POWER5™, POWER5™,
and POWER6™ processors with the following:
v Logical Volume Manager (LVM) and the enhanced journaled file system (JFS2)
v The X-Windows system with the CDE interface
v Basic Internet Protocol version 4 (IPv4) network functions (Telnet, FTP, rlogin, rsh/rcp)
v Network File System (NFS)
A CAPP/EAL4+ system is considered to be in a secured state if the following conditions apply:
v If auditing is configured and the system is in multi-user mode, then auditing must be operational.
v The system accepts user logins and services network requests.
v For a distributed system, the administrative databases are NFS-mounted from the master server.
The following administrative interfaces to the security functionality are provided:
v Identification and authentication measures (configuration of users, password settings, login
configuration, and so on.)
v Audit measures (configuring bin mode audition, selecting audited events, processing audit trails, and so
on.)
v Discretionary access control (permission bits and ACLs for file system objects, IPC mechanisms and
TCP ports)
v Setting the system time
v Running the diag diagnostic subsystem
v Running the su command to become a privileged administrator (root)
12 AIX Version 6.1 Security
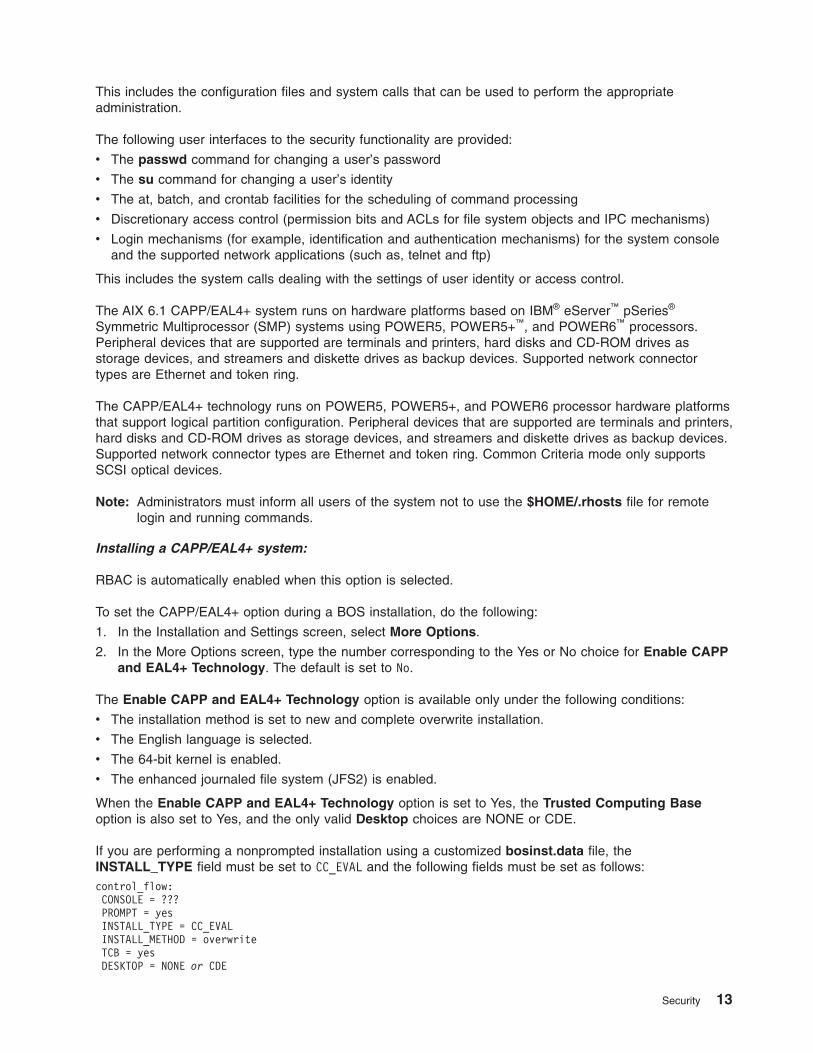
This includes the configuration files and system calls that can be used to perform the appropriate
administration.
The following user interfaces to the security functionality are provided:
v The passwd command for changing a user’s password
v The su command for changing a user’s identity
v The at, batch, and crontab facilities for the scheduling of command processing
v Discretionary access control (permission bits and ACLs for file system objects and IPC mechanisms)
v Login mechanisms (for example, identification and authentication mechanisms) for the system console
and the supported network applications (such as, telnet and ftp)
This includes the system calls dealing with the settings of user identity or access control.
The AIX 6.1 CAPP/EAL4+ system runs on hardware platforms based on IBM® eServer™ pSeries®
Symmetric Multiprocessor (SMP) systems using POWER5, POWER5+™, and POWER6™ processors.
Peripheral devices that are supported are terminals and printers, hard disks and CD-ROM drives as
storage devices, and streamers and diskette drives as backup devices. Supported network connector
types are Ethernet and token ring.
The CAPP/EAL4+ technology runs on POWER5, POWER5+, and POWER6 processor hardware platforms
that support logical partition configuration. Peripheral devices that are supported are terminals and printers,
hard disks and CD-ROM drives as storage devices, and streamers and diskette drives as backup devices.
Supported network connector types are Ethernet and token ring. Common Criteria mode only supports
SCSI optical devices.
Note: Administrators must inform all users of the system not to use the $HOME/.rhosts file for remote
login and running commands.
Installing a CAPP/EAL4+ system:
RBAC is automatically enabled when this option is selected.
To set the CAPP/EAL4+ option during a BOS installation, do the following:
1. In the Installation and Settings screen, select More Options.
2. In the More Options screen, type the number corresponding to the Yes or No choice for Enable CAPP
and EAL4+ Technology. The default is set to No.
The Enable CAPP and EAL4+ Technology option is available only under the following conditions:
v The installation method is set to new and complete overwrite installation.
v The English language is selected.
v The 64-bit kernel is enabled.
v The enhanced journaled file system (JFS2) is enabled.
When the Enable CAPP and EAL4+ Technology option is set to Yes, the Trusted Computing Base
option is also set to Yes, and the only valid Desktop choices are NONE or CDE.
If you are performing a nonprompted installation using a customized bosinst.data file, the
INSTALL_TYPE field must be set to CC_EVAL and the following fields must be set as follows:
control_flow:
CONSOLE = ???
PROMPT = yes
INSTALL_TYPE = CC_EVAL
INSTALL_METHOD = overwrite
TCB = yes
DESKTOP = NONE or CDE
Security 13

ENABLE_64BIT_KERNEL = yes
CREATE_JFS2_FS = yes
ALL_DEVICES_KERNELS = no
FIREFOX_BUNDLE = no
HTTP_SERVER_BUNDLE = no
KERBEROS_5_BUNDLE = no
SERVER_BUNDLE = no
ALT_DISK_INSTALL_BUNDLE = no
locale:
CULTURAL_CONVENTION = en_US or C
MESSAGES = en_US or C
For more information about RBAC, see Role Based Access Control (RBAC).
CAPP/EAL4+ and the Network Installation Management environment:
Installation of CAPP/EAL4+ technology clients can be performed using the Network Installation
Management (NIM) environment.
The NIM master is configured to provide the resources needed to install the appropriate CAPP/EAL4+
level of AIX 6.1. NIM clients may then be installed using the resources located on the NIM master. You can
perform a nonprompted NIM installation of the client by setting the following fields in the bosinst_data
resource:
control_flow:
CONSOLE = ???
PROMPT = no
INSTALL_TYPE = CC_EVAL
INSTALL_METHOD = overwrite
TCB = yes
DESKTOP = NONE or CDE
ENABLE_64BIT_KERNEL = yes
CREATE_JFS2_FS = yes
ALL_DEVICES_KERNELS = no
FIREFOX_BUNDLE = no
HTTP_SERVER_BUNDLE = no
KERBEROS_5_BUNDLE = no
SERVER_BUNDLE = no
ALT_DISK_INSTALL_BUNDLE = no
locale:
CULTURAL_CONVENTION = en_US or C
MESSAGES = en_US or C
The NIM master cannot be configured as a CAPP/EAL4+ system and cannot be connected to the same
network with other CAPP/EAL4+ systems. When initiating the installation from the NIM master, the
Remain NIM client after install SMIT menu option must be set to No. After a NIM client is installed as a
CAPP/EAL4+ system, the NIM client must be removed from the NIM master’s network, and additional
software installations and updates cannot be performed using the NIM master.
An example situation is to have two network environments; the first network consists of the NIM master
and the non-CAPP/EAL4+ systems; the second network consists only of CAPP/EAL4+ systems. Perform
the NIM installation on the NIM client. After the installation has completed, disconnect the newly installed
CAPP/EAL4+ system from the NIM master’s network and connect the system to the evaluated network.
A second example consists of one network. The NIM master is not connected to the network when other
systems are operating in the evaluated configuration, and CAPP/EAL4+ systems are not connected to the
network during NIM installation.
CAPP/EAL4+ software bundle:
14 AIX Version 6.1 Security

When the CAPP/EAL4+ option is selected, the contents of the /usr/sys/inst.data/sys_bundles/CC_EVAL.BOS.autoi installation bundle are installed.
You can optionally select to install the graphics software bundle and the documentation services software
bundle with the CAPP/EAL4+ option selected. If you select the Graphics Software option with the
CAPP/EAL4+ option, the contents of the /usr/sys/inst.data/sys_bundles/CC_EVAL.Graphics.bnd
software bundle are installed. If you select the Documentation Services Software option with the
CAPP/EAL4+ option, the contents of the /usr/sys/inst.data/sys_bundles/CC_EVAL.DocServices.bnd
software bundle are installed.
After the Licensed Program Products (LPPs) have been installed, the system changes the default
configuration to comply with the CAPP/EAL4+ requirements. The following changes are made to the
default configuration:
v Remove /dev/echo from the /etc/pse.conf file.
v Instantiate streams devices.
v Allow only root to access removable media.
v Remove non-CC entries from the inetd.conf file.
v Change various file permissions.
v Register symbolic links in the sysck.cfg file.
v Register devices in the sysck.cfg file.
v Set default user and port attributes.
v Configure the doc_search application for browser use.
v Remove httpdlite from the inittab file.
v Remove writesrv from the inittab file.
v Remove mkatmpvc from the inittab file.
v Remove atmsvcd from the inittab file.
v Disable snmpd in the /etc/rc.tcpip file.
v Disable hostmibd in the /etc/rc.tcpip file.
v Disable snmpmibd in the /etc/rc.tcpip file.
v Disable aixmibd in the /etc/rc.tcpip file.
v Disable muxatmd in the /etc/rc.tcpip file.
v NFS port (2049) is a privileged port.
v Add missing events to the /etc/security/audit/events file.
v Ensure that the loopback interface is running.
v Create synonyms for /dev/console.
v Enforce default X-server connection permissions.
v Change the /var/docsearch directory so that all files are world-readable.
v Add Object Data Manager (ODM) stanzas to set the console permissions.
v Set permissions on BSD-style ptys to 000.
v Disable .netrc files.
v Add patch directory processing.
Graphical user interface:
The CAPP/EAL4+ compliant system includes the X Windows System as a graphical user interface.
Security 15

X Windows provides a mechanism for displaying graphical clients, such as clocks, calculators, and other
graphical applications, as well as multiple terminal sessions using the aixterm command. The X Windows
System is started with the xinit command from the initial command line after a user has logged in at the
host’s console.
To start an X Windows session, type:
xinit
This command starts the X Windows server with local access mechanisms enabled for the invoker only. X
Windows clients that are set-UID to root will be able to access the X Windows server via the UNIX®
domain socket using the root override on the access restrictions. X Windows clients that are set-UID to
other users or that are started by other users will not be able to access the X Windows server. This
restriction prevents other users of a host from gaining unauthorized access to the X Windows server.
Installing a LSPP/EAL4+ system:
RBAC is automatically enabled when this option is selected.
To set the LSPP/EAL4+ option during a BOS installation, do the following:
The installation options are available by typing 3 to change the Security Model and typing 4 to view the
More Options field in the Installation and Settings window. These options vary based on installation type
(overwrite, preservation, or migration) and security options. For LSPP, the installation method is new or
complete overwrite. Choose LSPP/EAL4+ configuration install.
For more information about RBAC, see Role Based Access Control (RBAC).
LSPP/EAL4+ configuration installation (only available with Trusted AIX:
The LSPP/EAL4+ configuration install option installs Trusted AIX in LSPP/EAL4+ configured mode.
LSPP/EAL4+ configured mode provides for further restrictive security as compared to the Trusted AIX
installation.
If you are performing a nonprompted installation using a customized bosinst.data file, the
INSTALL_TYPE field must be blank and the TRUSTED_AIX field should be set to yes and the following
fields must be set as follows:
control_flow:
CONSOLE = ???
PROMPT = yes
INSTALL_TYPE =
TRUSTED_AIX = yes
INSTALL_METHOD = overwrite
TCB = yes
DESKTOP = NONE
ENABLE_64BIT_KERNEL = yes
CREATE_JFS2_FS = yes
ALL_DEVICES_KERNELS = no
FIREFOX_BUNDLE = no
HTTP_SERVER_BUNDLE = no
KERBEROS_5_BUNDLE = no
SERVER_BUNDLE = no
ALT_DISK_INSTALL_BUNDLE = no
locale:
CULTURAL_CONVENTION = en_US or C
MESSAGES = en_US or C
For more information about Trusted AIX, see Trusted AIX.
16 AIX Version 6.1 Security

LSPP/EAL4+ and the Network Installation Management environment:
Installation of LSPP/EAL4+ technology clients can be performed using the Network Installation
Management (NIM) environment.
The NIM master is configured to provide the resources needed to install the appropriate LSPP/EAL4+ level
of AIX 6.1. NIM clients may then be installed using the resources located on the NIM master. You can
perform a nonprompted NIM installation of the client by setting the following fields in the bosinst_data
resource:
control_flow:
CONSOLE = ???
PROMPT = no
INSTALL_TYPE =
TRUSTED_AIX = yes
INSTALL_METHOD = overwrite
TCB = yes
DESKTOP = NONE
ENABLE_64BIT_KERNEL = yes
CREATE_JFS2_FS = yes
ALL_DEVICES_KERNELS = no
FIREFOX_BUNDLE = no
HTTP_SERVER_BUNDLE = no
KERBEROS_5_BUNDLE = no
SERVER_BUNDLE = no
ALT_DISK_INSTALL_BUNDLE = no
locale:
CULTURAL_CONVENTION = en_US or C
MESSAGES = en_US or C
The NIM master cannot be configured as a LSPP/EAL4+ system and cannot be connected to the same
network with other LSPP/EAL4+ systems. When initiating the installation from the NIM master, the Remain
NIM client after install SMIT menu option must be set to No. After a NIM client is installed as a
LSPP/EAL4+ system, the NIM client must be removed from the NIM master’s network, and additional
software installations and updates cannot be performed using the NIM master.
An example situation is to have two network environments; the first network consists of the NIM master
and the non-LSPP/EAL4+ systems; the second network consists only of LSPP/EAL4+ systems. Perform
the NIM installation on the NIM client. After the installation has completed, disconnect the newly installed
LSPP/EAL4+ system from the NIM master’s network and connect the system to the evaluated network.
A second example consists of one network. The NIM master is not connected to the network when other
systems are operating in the evaluated configuration, and LSPP/EAL4+ systems are not connected to the
network during NIM installation.
CAPP/EAL4+ and LSPP/EAL4+ systems physical environment:
The CAPP/EAL4+ and LSPP/EAL4+ systems have specific requirements for the environment in which they
are run.
The requirements are as follows:
v Physical access to the systems must be restricted so that only authorized administrators can use the
system consoles.
v The Service Processor is not connected to a modem.
v Physical access to the terminals is restricted to authorized users.
v The physical network is secure against eavesdropping and spoofing programs (also called Trojan horse
programs). When communicating over insecure lines, additional security measures, such as encryption,
are needed.
Security 17

v Communication with other systems that are not AIX 6.1 CAPP/EAL4+ or LSPP/EAL4+ systems, or are
not under the same management control, is not permitted.
v Only IPv4 is to be used when communicating with other CAPP/EAL4+ and LSPP/EAL4+ systems. IPv6
is included in the evaluated configuration, but only the functional capabilities of IPv6 that are also
supported by IPv4 are included.
v Users must not be allowed to change the system time.
v Systems in an LPAR environment cannot share PHBs.
CAPP/EAL4+ and LSPP/EAL4+ systems organizational environment:
Certain procedural and organizational requirements must be met for a CAPP/EAL4+ and LSPP/EAL4+
systems.
The following requirements must be met:
v Administrators must be trustworthy and well trained.
v Only users authorized to work with the information on the systems are granted user IDs on the system.
v Users must use high-quality passwords (as random as possible and not affiliated with the user or the
organization). For information about setting up password rules, see “Passwords” on page 58.
v Users must not disclose their passwords to others.
v Administrators must have sufficient knowledge to manage security critical systems.
v Administrators must work in accordance with the guidance provided by the system documentation.
v Administrators must log in with their personal ID and use the su command to switch to superuser mode
for administration.
v Passwords generated for system users by administrators must be transmitted securely to the users.
v Those who are responsible for the system must establish and implement the necessary procedures for
the secure operation of the systems.
v Administrators must ensure that the access to security-critical system resources is protected by
appropriate settings of permission bits and ACLs.
v The physical network must be approved by the organization to carry the most sensitive data held by the
systems.
v Maintenance procedures must include regular diagnostics of the systems.
v Administrators must have procedures in place that ensure a secure operation and recovery after a
system failure.
v The LIBPATH environment variable should not be changed, because this might result in a trusted
process loading an untrusted library.
v Wiretapping and trace software (tcpdump, trace) must not be used on an operational system.
v Anonymous protocols such as HTTP may only be used for public information (for example, the online
documentation).
v Only TCP-based NFS can be used.
v Access to removable media is not to be given to users. The device files are to be protected by
appropriate permission bits or ACLs.
v Only root authority is used when administering AIX. None of the role-based and group-based
administration-delegation features, nor the privilege mechanism of AIX, are included in the CAPP/EAL4+
compliance.
v Administrators must not use dynamic partitioning to allocate and deallocate resources. Partition
configuration may only be performed while no partitions at all are running.
CAPP/EAL4+ system operational environment:
Certain operational requirements and procedures must be met for a CAPP/EAL4+ system.
18 AIX Version 6.1 Security
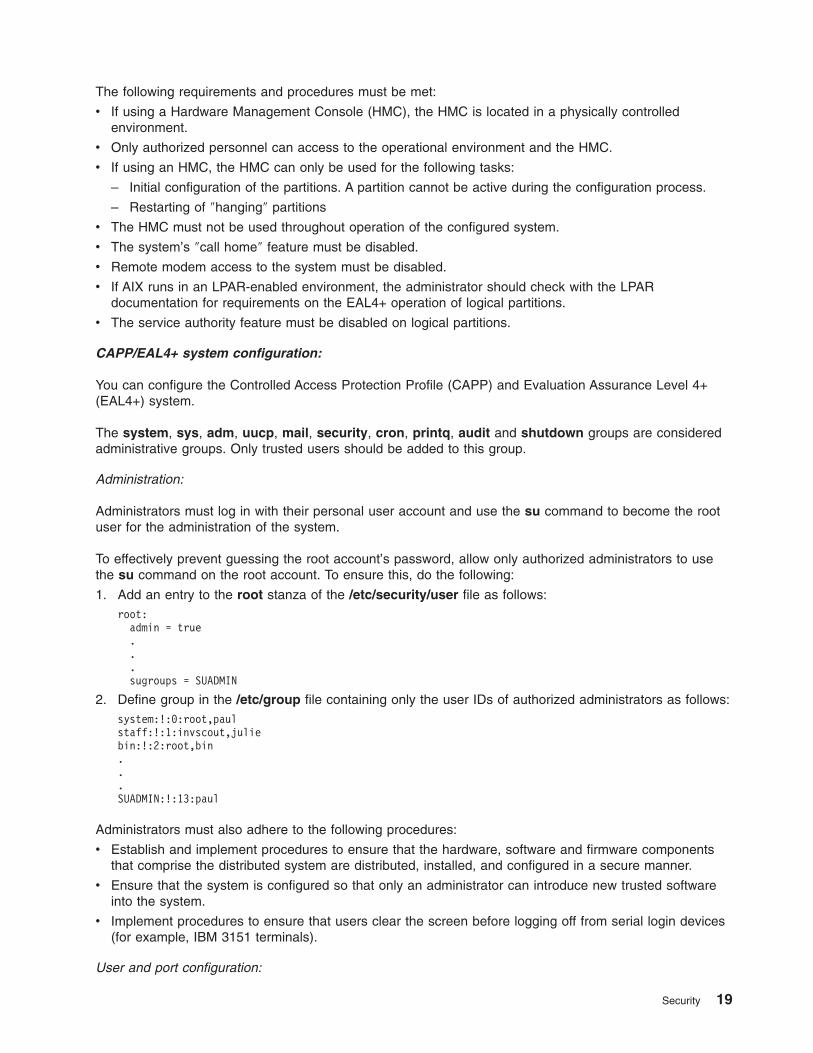
The following requirements and procedures must be met:
v If using a Hardware Management Console (HMC), the HMC is located in a physically controlled
environment.
v Only authorized personnel can access to the operational environment and the HMC.
v If using an HMC, the HMC can only be used for the following tasks:
– Initial configuration of the partitions. A partition cannot be active during the configuration process.
– Restarting of ″hanging″ partitions
v The HMC must not be used throughout operation of the configured system.
v The system’s ″call home″ feature must be disabled.
v Remote modem access to the system must be disabled.
v If AIX runs in an LPAR-enabled environment, the administrator should check with the LPAR
documentation for requirements on the EAL4+ operation of logical partitions.
v The service authority feature must be disabled on logical partitions.
CAPP/EAL4+ system configuration:
You can configure the Controlled Access Protection Profile (CAPP) and Evaluation Assurance Level 4+
(EAL4+) system.
The system, sys, adm, uucp, mail, security, cron, printq, audit and shutdown groups are considered
administrative groups. Only trusted users should be added to this group.
Administration:
Administrators must log in with their personal user account and use the su command to become the root
user for the administration of the system.
To effectively prevent guessing the root account’s password, allow only authorized administrators to use
the su command on the root account. To ensure this, do the following:
1. Add an entry to the root stanza of the /etc/security/user file as follows:
root:
admin = true
.
.
.
sugroups = SUADMIN
2. Define group in the /etc/group file containing only the user IDs of authorized administrators as follows:
system:!:0:root,paul
staff:!:1:invscout,julie
bin:!:2:root,bin
.
.
.
SUADMIN:!:13:paul
Administrators must also adhere to the following procedures:
v Establish and implement procedures to ensure that the hardware, software and firmware components
that comprise the distributed system are distributed, installed, and configured in a secure manner.
v Ensure that the system is configured so that only an administrator can introduce new trusted software
into the system.
v Implement procedures to ensure that users clear the screen before logging off from serial login devices
(for example, IBM 3151 terminals).
User and port configuration:
Security 19

AIX configuration options for users and ports must be set to satisfy the requirements of the evaluation. The
actual requirement is that the probability of correctly guessing a password should be at least 1 in
1,000,000, and the probability of correctly guessing a password with repeated attempts in one minute
should be at least 1 in 100,000.
The /etc/security/user file shown in the following example uses the /usr/share/dict/words dictionary list.
The /usr/share/dict/words file is contained in the bos.data fileset. You must install the bos.data fileset
prior to configuring the /etc/security/user file. The recommended values for the /etc/security/user file are
the following:
default:
admin = false
login = true
su = true
daemon = true
rlogin = true
sugroups = ALL
admgroups =
ttys = ALL
auth1 = SYSTEM
auth2 = NONE
tpath = nosak
umask = 077
expires = 0
SYSTEM = "compat"
logintimes =
pwdwarntime = 5
account_locked = false
loginretries = 3
histexpire = 52
histsize = 20
minage = 0
maxage = 8
maxexpired = 1
minalpha = 2
minother = 2
minlen = 8
mindiff = 4
maxrepeats = 2
dictionlist = /usr/share/dict/words
pwdchecks =
dce_export = false
root:
rlogin = false
login = false
The default settings in the /etc/security/user file should not be overwritten by specific settings for single
users.
Note: Setting login = false in the root stanza prevents direct root login. Only user accounts that have su
privileges for the root account will be able to log in as the root account. If a Denial of Service attack
is launched against the system that sends incorrect passwords to the user accounts, it could lock
all the user accounts. This attack might prevent any user (including administrative users) from
logging into the system. Once a user’s account is locked, the user will not be able to log in until the
system administrator resets the user’s unsuccessful_login_count attribute in the
/etc/security/lastlog file to be less than the value of the loginretries user attribute. If all the
administrative accounts become locked, you might need to reboot the system into maintenance
mode and run the chsec command. For more information about using the chsec command, see
“User account control” on page 50.
The suggested values for the /etc/security/login.cfg file are the following:
20 AIX Version 6.1 Security
default:
sak_enabled = false
logintimes =
logindisable = 4
logininterval = 60
loginreenable = 30
logindelay = 5
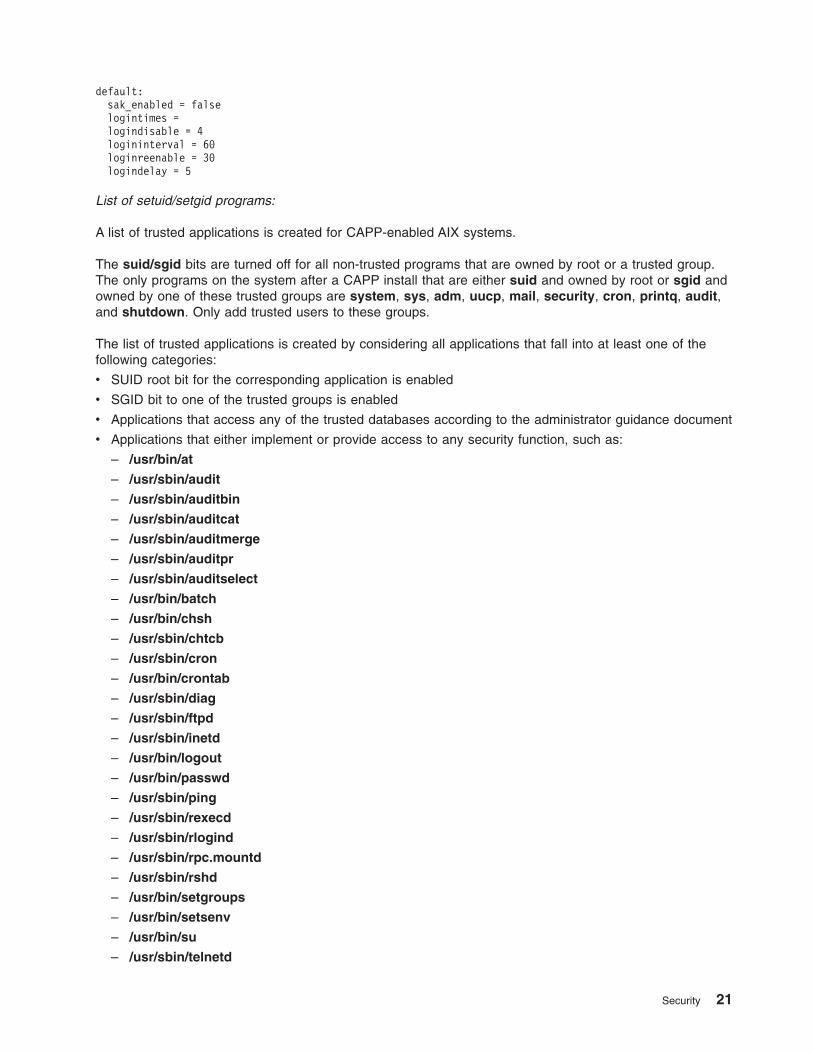
List of setuid/setgid programs:
A list of trusted applications is created for CAPP-enabled AIX systems.
The suid/sgid bits are turned off for all non-trusted programs that are owned by root or a trusted group.
The only programs on the system after a CAPP install that are either suid and owned by root or sgid and
owned by one of these trusted groups are system, sys, adm, uucp, mail, security, cron, printq, audit,
and shutdown. Only add trusted users to these groups.
The list of trusted applications is created by considering all applications that fall into at least one of the
following categories:
v SUID root bit for the corresponding application is enabled
v SGID bit to one of the trusted groups is enabled
v Applications that access any of the trusted databases according to the administrator guidance document
v Applications that either implement or provide access to any security function, such as:
– /usr/bin/at
– /usr/sbin/audit
– /usr/sbin/auditbin
– /usr/sbin/auditcat
– /usr/sbin/auditmerge
– /usr/sbin/auditpr
– /usr/sbin/auditselect
– /usr/bin/batch
– /usr/bin/chsh
– /usr/sbin/chtcb
– /usr/sbin/cron
– /usr/bin/crontab
– /usr/sbin/diag
– /usr/sbin/ftpd
– /usr/sbin/inetd
– /usr/bin/logout
– /usr/bin/passwd
– /usr/sbin/ping
– /usr/sbin/rexecd
– /usr/sbin/rlogind
– /usr/sbin/rpc.mountd
– /usr/sbin/rshd
– /usr/bin/setgroups
– /usr/bin/setsenv
– /usr/bin/su
– /usr/sbin/telnetd
Security 21

– /usr/sbin/tsm
– /usr/lpp/X11/bin/xlock
– /usr/lpp/diagnostics/bin/uformat
Note: The setuid bit for the ipcs command should be removed by the system administrator. The system
administrator should run the chmod u-s /usr/bin/ipcs and chmod u-s /usr/bin/ipcs64 commands.
Hard disk erasure:
AIX allows hdisks to be erased using the Format media service aid in the AIX diagnostic package. The
diagnostic package is fully documented in the Diagnostic Information for Multiple Bus Systems book, as
well as your hardware user’s guide.
To erase a hard disk, run the following command:
diag -T "format"
This command will start the Format media service aid in a menu driven interface. If prompted, select your
terminal.
You will then be presented with a resource selection list. Select the hdisk devices you want to erase from
this list and commit your changes according to the instructions on the screen.
After committing your selections, select Erase Disk from the menu. You are then asked to confirm your
selection. Choose Yes.
You are then asked if you want to Read data from drive or Write patterns to drive. Select Write
patterns to drive.
You then have the opportunity to modify the disk erasure options. After you specify the options you prefer,
select Commit Your Changes . The disk is erased.
Note: It can take a long time for this process to complete.
Resource limits:
When setting resource limits in the /etc/security/limits file, make sure that the limits correspond to the
needs of the processes on the system.
In particular, the stack and rss sizes should never be set to unlimited. An unlimited stack might overwrite
other segments of the running process, and an unlimited rss size allows a process to use all real memory,
therefore creating resource problems for other processes. The stack_hard and rss_hard sizes should also
be limited.
Audit subsystem:
There are several procedures to help protect the audit subsystem.
v Configure the audit subsystem to record all the relevant security activities of the users. To ensure that
the file space needed for auditing is available and is not impaired by other consumers of file system
space, set up a dedicated file system for audit data.
v Protect audit records (such as audit trails, bin files, and all other data stored in /audit) from non-root
users.
v For the CAPP/EAL4+ system, bin mode auditing must be set up when the audit subsystem is used. For
information about how to set up the audit subsystem, refer to “Setting up auditing” on page 126.
v At least 20 percent of the available disk space in a system should be dedicated to the audit trail.
22 AIX Version 6.1 Security

v If auditing is enabled, the binmode parameter in the start stanza in the /etc/security/audit/config file
should be set to panic. The freespace parameter in the bin stanza should be configured at minimum to
a value that equals 25 percent of the disk space dedicated to the storage of the audit trails. The
bytethreshold and binsize parameters should each be set to 65 536 bytes.
v Copy audit records from the system to permanent storage for archival.
System services:
The following table is a list of standard system services on a Controlled Access Protection Profile (CAPP)
and Evaluation Assurance Level 4+ (EAL4+) system.
This table shows the standard system services running on a CAPP/EAL4+ system (if there is no graphics
card).
Table 1. Standard System Services
UID Command Description
root /etc/init Init process
root /usr/sbin/syncd 60 File system sync daemon
root /usr/sbin/srcmstr SRC master daemon
root /usr/sbin/cron CRON facility with AT support
root /usr/ccs/bin/shlap64 Shared Library Support Daemon
root /usr/sbin/syslogd Syslog daemon
root /usr/lib/errdemon AIX error log daemon
root /usr/sbin/getty /dev/console getty / TSM
root /usr/sbin/portmap Portmapper for NFS and CDE
root /usr/sbin/biod 6 NFS Client
root /usr/sbin/rpc.lockd NFS lock daemon
daemon /usr/sbin/rpc.statd NFS stat daemon
root /usr/sbin/rpc.mountd NFS mount daemon
root /usr/sbin/nfsd NFS server daemon
root /usr/sbin/inetd Inetd master daemon
root /usr/sbin/uprintfd Kernel print daemon
root /usr/sbin/qdaemon Queuing daemon
root /usr/lpp/diagnostics/bin/diagd Diagnostics
root /usr/sbin/secldapcintd AIX LDAP authentication daemon
root /usr/sbin/gssd Services kernel requests for GSS operation
root /usr/sbin/nfsrgyd Name translation service for NFS v4 servers/clients
Running a CAPP/EAL4+ distributed system:
To run a distributed system that is CAPP/EAL4+ compliant, all users must have identical user IDs on all
systems. Although this can be achieved with NIS, the result is not secure enough for a CAPP/EAL4+
system.
This section describes a distributed setup that ensures that the user IDs are identical on all systems that
are CAPP/EAL4+ compliant.
Security 23
The master system stores the identification and authentication data (user and group configuration) for the
whole distributed system.
Authentication data can be changed by any administrator by using tools, such as SMIT, on any system.
Authentication data is physically changed on the master.
All shared identification and authentication data comes from the /etc/data.shared directory. The regular
identification and authentication files are replaced by symbolic links into the /etc/data.shared directory.
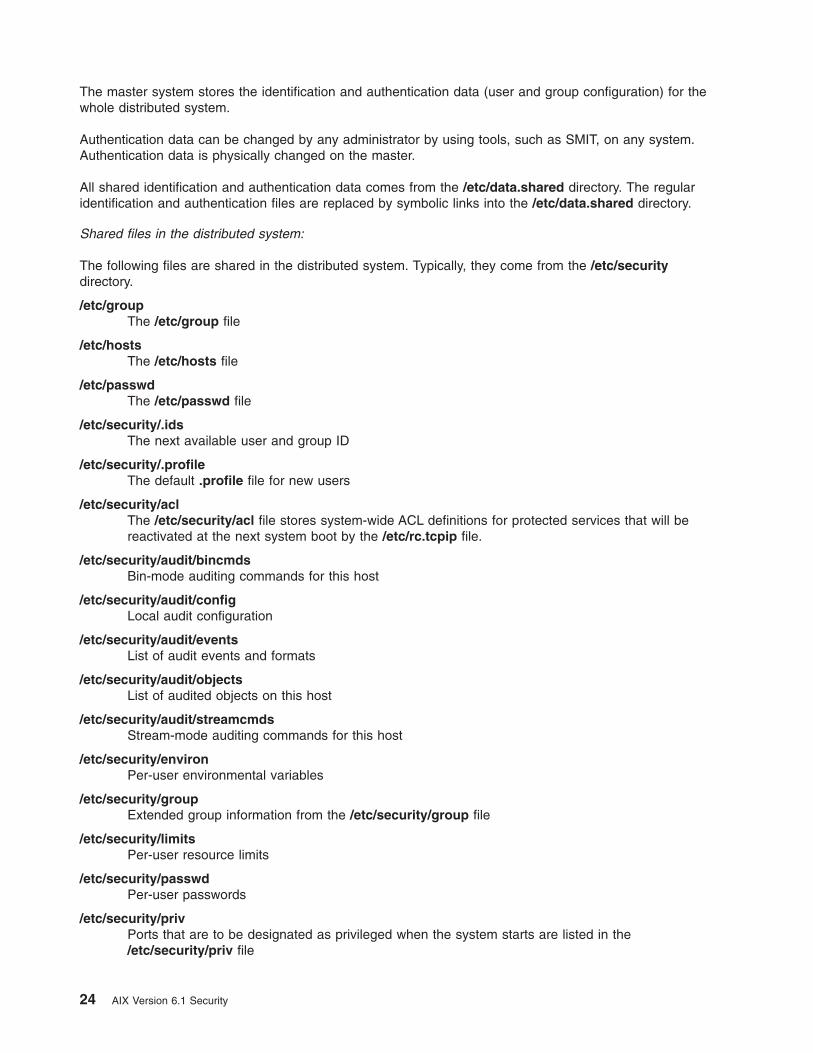
Shared files in the distributed system:
The following files are shared in the distributed system. Typically, they come from the /etc/security
directory.
/etc/group
The /etc/group file
/etc/hosts
The /etc/hosts file
/etc/passwd
The /etc/passwd file
/etc/security/.ids
The next available user and group ID
/etc/security/.profile
The default .profile file for new users
/etc/security/acl
The /etc/security/acl file stores system-wide ACL definitions for protected services that will be
reactivated at the next system boot by the /etc/rc.tcpip file.
/etc/security/audit/bincmds
Bin-mode auditing commands for this host
/etc/security/audit/config
Local audit configuration
/etc/security/audit/events
List of audit events and formats
/etc/security/audit/objects
List of audited objects on this host
/etc/security/audit/streamcmds
Stream-mode auditing commands for this host
/etc/security/environ
Per-user environmental variables
/etc/security/group
Extended group information from the /etc/security/group file
/etc/security/limits
Per-user resource limits
/etc/security/passwd
Per-user passwords
/etc/security/priv
Ports that are to be designated as privileged when the system starts are listed in the
/etc/security/priv file
24 AIX Version 6.1 Security
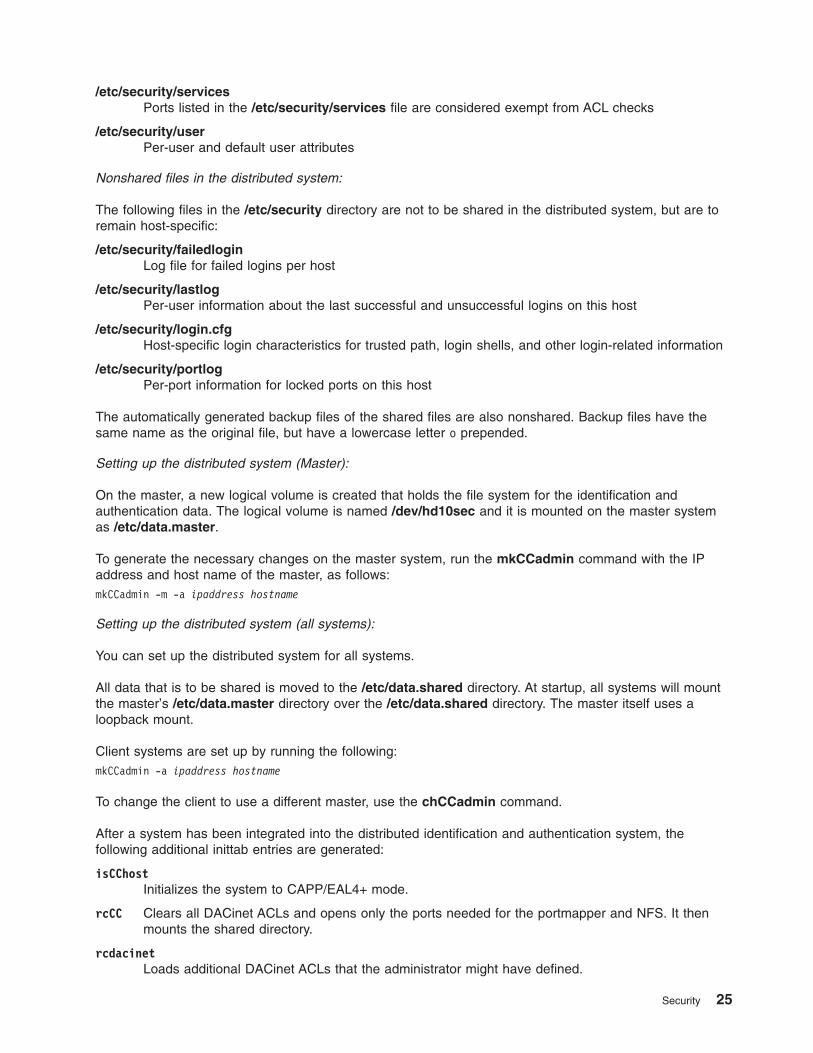
/etc/security/services
Ports listed in the /etc/security/services file are considered exempt from ACL checks
/etc/security/user
Per-user and default user attributes
Nonshared files in the distributed system:
The following files in the /etc/security directory are not to be shared in the distributed system, but are to
remain host-specific:
/etc/security/failedlogin
Log file for failed logins per host
/etc/security/lastlog
Per-user information about the last successful and unsuccessful logins on this host
/etc/security/login.cfg
Host-specific login characteristics for trusted path, login shells, and other login-related information
/etc/security/portlog
Per-port information for locked ports on this host
The automatically generated backup files of the shared files are also nonshared. Backup files have the
same name as the original file, but have a lowercase letter o prepended.
Setting up the distributed system (Master):
On the master, a new logical volume is created that holds the file system for the identification and
authentication data. The logical volume is named /dev/hd10sec and it is mounted on the master system
as /etc/data.master.
To generate the necessary changes on the master system, run the mkCCadmin command with the IP
address and host name of the master, as follows:
mkCCadmin -m -a ipaddress hostname
Setting up the distributed system (all systems):
You can set up the distributed system for all systems.
All data that is to be shared is moved to the /etc/data.shared directory. At startup, all systems will mount
the master’s /etc/data.master directory over the /etc/data.shared directory. The master itself uses a
loopback mount.
Client systems are set up by running the following:
mkCCadmin -a ipaddress hostname
To change the client to use a different master, use the chCCadmin command.
After a system has been integrated into the distributed identification and authentication system, the
following additional inittab entries are generated:
isCChost
Initializes the system to CAPP/EAL4+ mode.
rcCC Clears all DACinet ACLs and opens only the ports needed for the portmapper and NFS. It then
mounts the shared directory.
rcdacinet
Loads additional DACinet ACLs that the administrator might have defined.
Security 25

When running the distributed system, consider the following:
v Administrators must make sure that the shared data is mounted before changing shared configuration
files to ensure that the shared data is seen on all systems.
v Changing the root password is the only administrative action that is permitted while the shared directory
is not mounted.
Using the DACinet feature for user-based and port-based network access control:
The DACinet feature can be used to restrict the access of users to TCP ports.
For more information about DACinet, see “User based TCP port access control with discretionary access
control for internet ports” on page 206. For example, when using DACinet to restrict access to port TCP/25
inbound to root only with the DACinet feature, only root users from CAPP/EAL4+ compliant hosts can
access this port. This situation limits the possibility of regular users spoofing e-mail by using telnet to
connect to port TCP/25 on the victim.
To activate the ACLs for TCP connections at boot time, the /etc/rc.dacinet script is run from /etc/inittab. It
will read the definitions in the /etc/security/acl file and load ACLs into the kernel. Ports which should not
be protected by ACLs should be listed in the /etc/security/services file, which uses the same format as
the /etc/services file.
Assuming a subnet of 10.1.1.0/24 for all the connected systems, the ACL entries to restrict access to the
root user only for X (TCP/6000) in the /etc/security/acl file would be as follows:
6000 10.1.1.0/24 u:root
Installing additional software on a CAPP/EAL4+ compliant system:
The administrator can install additional software on the CAPP/EAL4+ compliant system. If the software is
not run by the root user or with root-user privileges, this will not invalidate the CAPP/EAL4+ compliance.
Typical examples include office applications that are run only by regular users and have no SUID
components.
Additionally, installed software that runs with root-user privileges invalidates the CAPP/EAL4+ compliance.
This means, for example, drivers for the older JFS should not be installed, as they are running in kernel
mode. Additional daemons that are run as root (for example, an SNMP daemon) also invalidates the
CAPP/EAL4+ compliance. A CAPP/EAL4+ enabled system cannot be upgraded (normally).
A CAPP/EAL4+ compliant system is rarely used in the evaluated configuration, especially in a commercial
environment. Typically, additional services are needed, so that the production system is based on an
evaluated system, but does not comply with the exact specification of the evaluated system.
NSF v4 Access Control Lists and contents policy:
An NFS v4 Access Control List (ACL) contains the Type, Mask, and Flags fields.
The following is a description of these fields:
v The Type field contains one of the following values:
– ALLOW – Grants the subject, specified in the Who field, the permission(s) specified in the Mask field.
– DENY – Denies the subject, specified in the Who field, the permission(s) specified in the Mask field.
v The Mask field contains one or more of the following fine grained permission values:
– READ_DATA / LIST_DIRECTORY – Read the data from a non-directory object or list the objects in a
directory.
– WRITE_DATA / ADD_FILE – Write data into a non-directory object or add a non-directory object to a
directory.
26 AIX Version 6.1 Security
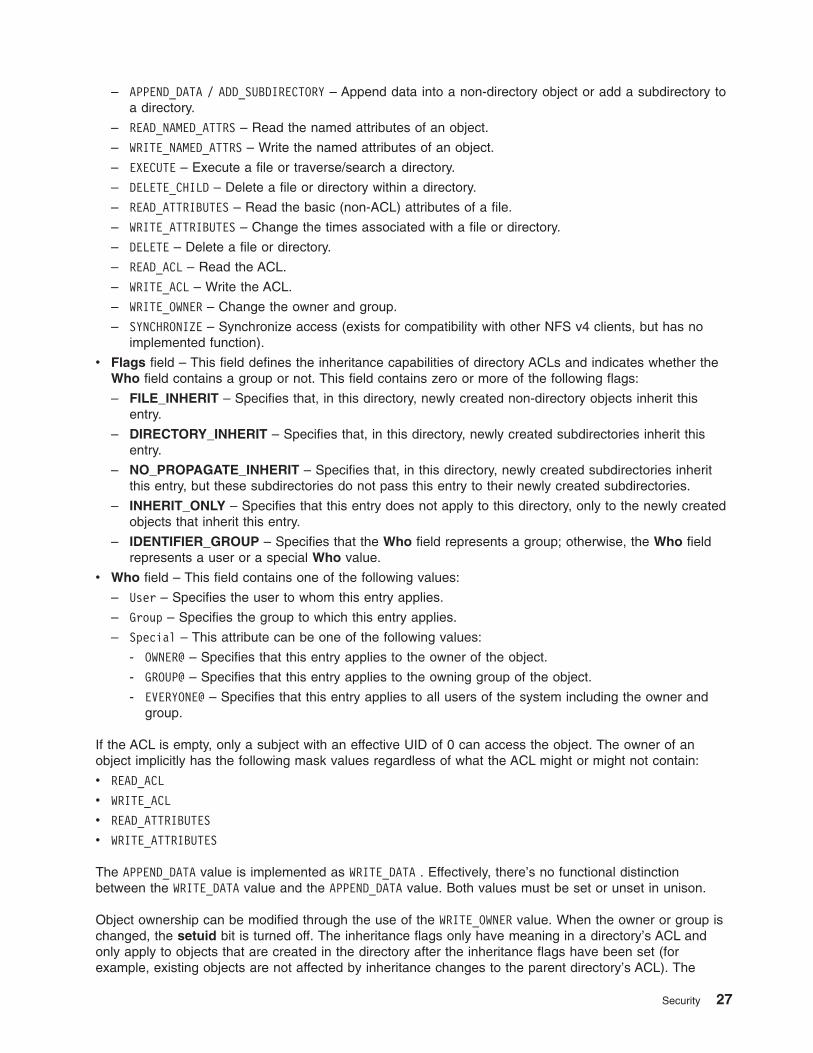
– APPEND_DATA / ADD_SUBDIRECTORY – Append data into a non-directory object or add a subdirectory to
a directory.
– READ_NAMED_ATTRS – Read the named attributes of an object.
– WRITE_NAMED_ATTRS – Write the named attributes of an object.
– EXECUTE – Execute a file or traverse/search a directory.
– DELETE_CHILD – Delete a file or directory within a directory.
– READ_ATTRIBUTES – Read the basic (non-ACL) attributes of a file.
– WRITE_ATTRIBUTES – Change the times associated with a file or directory.
– DELETE – Delete a file or directory.
– READ_ACL – Read the ACL.
– WRITE_ACL – Write the ACL.
– WRITE_OWNER – Change the owner and group.
– SYNCHRONIZE – Synchronize access (exists for compatibility with other NFS v4 clients, but has no
implemented function).
v Flags field – This field defines the inheritance capabilities of directory ACLs and indicates whether the
Who field contains a group or not. This field contains zero or more of the following flags:
– FILE_INHERIT – Specifies that, in this directory, newly created non-directory objects inherit this
entry.
– DIRECTORY_INHERIT – Specifies that, in this directory, newly created subdirectories inherit this
entry.
– NO_PROPAGATE_INHERIT – Specifies that, in this directory, newly created subdirectories inherit
this entry, but these subdirectories do not pass this entry to their newly created subdirectories.
– INHERIT_ONLY – Specifies that this entry does not apply to this directory, only to the newly created
objects that inherit this entry.
– IDENTIFIER_GROUP – Specifies that the Who field represents a group; otherwise, the Who field
represents a user or a special Who value.
v Who field – This field contains one of the following values:
– User – Specifies the user to whom this entry applies.
– Group – Specifies the group to which this entry applies.
– Special – This attribute can be one of the following values:
- OWNER@ – Specifies that this entry applies to the owner of the object.
- GROUP@ – Specifies that this entry applies to the owning group of the object.
- EVERYONE@ – Specifies that this entry applies to all users of the system including the owner and
group.
If the ACL is empty, only a subject with an effective UID of 0 can access the object. The owner of an
object implicitly has the following mask values regardless of what the ACL might or might not contain:
v READ_ACL
v WRITE_ACL
v READ_ATTRIBUTES
v WRITE_ATTRIBUTES
The APPEND_DATA value is implemented as WRITE_DATA . Effectively, there’s no functional distinction
between the WRITE_DATA value and the APPEND_DATA value. Both values must be set or unset in unison.
Object ownership can be modified through the use of the WRITE_OWNER value. When the owner or group is
changed, the setuid bit is turned off. The inheritance flags only have meaning in a directory’s ACL and
only apply to objects that are created in the directory after the inheritance flags have been set (for
example, existing objects are not affected by inheritance changes to the parent directory’s ACL). The
Security 27
entries in an NFS v4 ACL are order dependent. To determine if the requested access is allowed, each
entry is processed in order. Only entries that have the following values are considered:
v A Who field that matches the effective UID
v A user that is specified in the entry or effective GID
v A group that is specified in the entry of the subject
Each entry is processed until all of the bits of the requester’s access have been ALLOWED. After an
access type has been ALLOWED by an entry, it is no longer considered in the processing of later entries.
If a DENY entry is encountered where the requester’s access for that mask value is necessary and
undetermined, the request is denied. If the evaluation reaches the end of the ACL, the request is denied.
The maximum supported ACL size is 64 KB. Each entry in an ACL is of variable length and 64 KB is the
only limit on an entry.
The WRITE OWNER value:
The NFS v4 policy provides control over who can read and write the attributes of an object.
A subject with an effective UID 0 can always override the NFS v4 policy. The object owner can allow
others to read and write the attributes of an object using the READ_ATTRIBUTES, WRITE_ATTRIBUTES ,
READ_NAMED_ATTRS, and WRITE_NAME_ATTRS attributes of the ACL mask. The owner can control who can read
and write the ACL using the READ_ACL and WRITE_ACL values of the ACL mask. The object owner always
has READ_ATTRIBUTES, WRITE_ATTRIBUTES, READ_ACL, and WRITE_ACL access. The object owner can also
allow others to change the owner and group of the object using the WRITE_OWNER attribute. An object owner
cannot change the owner or group of the object by default, but the object owner can add a WRITE_OWNER
entry to the ACL specifying themselves, or the object can inherit an ACL entry that specifies a WRITE_OWNER
entry with a Who value of OWNER@. When the owner or group is changed, the setuid bit is turned off.
The following are some exceptions to the rules:
v If the object is owned by UID 0, only UID 0 can change the owner, but the group can still be changed
by a subject with the WRITE_OWNER attribute.
v Assuming the object has the WRITE_OWNER attribute for the subject, in versions of AIX 5.3 prior to
Technology Level 5300-05, if the object has a non-UID 0 owner, the owner can only be changed to
another non-UID 0 user. In AIX with 5300-05 and later, if the object has a non-UID 0 owner, the owner
can only be changed to the EUID of the subject attempting to change the owner.
v The group can be changed to any group in the subject’s concurrent group set with the exception that it
can never be changed to GID 0 or GID 7 (system or security), even if these two groups are in the
concurrent group set of the subject.
LDAP-based and file-based administrative database supported:
The evaluation does not support NFS administrative database. Authentication methods such as DCE and
NIS are not supported.
The evaluation supports only the following:
v File-based authentication (default)
v UNIX-style LDAP-based authentication (use LDAP server ITDSv 6.0)
For more information about file-based authentication, see the User Authentication.
LDAP authentication:
LDAP-based I&A is configured in the ″UNIX-type″ authentication mode. In this mode, the administrative
data (including user names, IDs, and passwords) are stored in LDAP where access to the data is limited
to the LDAP administrator.
28 AIX Version 6.1 Security

When a user logs into the system, the system binds to the LDAP server using the LDAP administrator
account over an SSL connection, retrieves the necessary data for the user (including the password) from
LDAP, and then performs authentication using the data retrieved from LDAP. The system maintains an
administrative database on an LDAP server. The remaining hosts import the administrative data from the
same LDAP server through the same mechanism previously described. The system maintains a consistent
administrative database by making all administrative changes on the designated LDAP server. A user ID
on any computer refers to the same individual on all other computers. In addition, the password
configuration, name-to-UID mappings, and other data are identical on all hosts in the distributed system.
For more information on LDAP authentication setup, see Light Directory Access Protocol. For more
information in setting up SSL on LDAP, see Setting up SSL on the LDAP server and Setting up SSL on the
LDAP client.
LDAP server:
The mksecldap -s command sets up an AIX system as an LDAP server for security authentication and
data management.
Perform the following tasks:
v Use the RFC2307AIX schema with the -S option.
v Set the server to use SSL by using the -k option. This requires installing the GSKit fileset and the
ldap.max_crypto_server fileset. Use the gsk7ikm utility to generate the key pairs for the directory
server.
The LDAP user options must be set to satisfy the requirements of the evaluation. The RFC2370AIX
schema defines the user attributes. Use the same values as described in CAPP/EAL4+ system
configuration. The ITDS administrators are not forced to periodically change their passwords (for example,
there’s no MaxAge value for administrative passwords). Because of this, the LDAP administrative
password must be changed as often as an AIX user (MaxAge = 8 (in weeks)).
In ITDS 5.2, the authentication failure handling does not apply to Directory Administrator or to the
members of the administrative group. Password composition rules also do not apply to administrative
accounts. These need to be enforced if ITDS 5.2 is used.
If the administrator does not use a common LDAP database backend for user management, the
administrator must somehow ensure that the database that contains users credentials (listed below) is
maintained consistently among the different TOE systems part of one network:
v /etc/group
v /etc/passwd
v /etc/security/.ids
v /etc/security/.profile
v /etc/security/environ
v /etc/security/group
v /etc/security/limits
v /etc/security/passwd
v /etc/security/user
LDAP client:
The mksecldap -c command sets up an AIX system as an LDAP client for security authentication and
data management.
Perform the following tasks:
Security 29

v Using the mksecldap -c command, specify unix_auth for the authType with the -A option.
v Set the client to use SSL by using the -k option in the mksecldap -c command. Specifying the client
SSL key requires installing the GSKit fileset and ldap.max_crypto_client fileset. Use the gsk7ikm
utility to generate the key pairs for the directory server.
For more information about LDAP, see the following documentation:
v Redbook: Integrating AIX into Heterogenous LDAP Environments.
v Whitepaper: Configuring an IBM Directory Server for User Authentication and Management in AIX.
v Whitepaper: Configuring an AIX Client System for User Authentication and Management Through LDAP.
NFS v4 Client/Server and Kerberos:
The NFS v4 Client/Server environment includes LDAP for maintaining authentication data and Kerberos for
establishing trusted channel between NFS v4 clients and servers. The evaluated configuration supports
NAS v1.4 for Kerberos and ITDS v6.0 (LDAP server) for the user database.
NAS v1.4 (Kerberos Version 5 Server) must be configured to use LDAP for its database. Kerberos tickets
previously granted by the Kerberos server are valid until they expire.
When you are using Kerberos authentication, the credential used in remote procedure calls initiated by a
user are associated with the current Kerberos ticket held by the user and is not influenced by the real or
effective UID of the process. When you are accessing an NFS remote file system using Kerberos
authentication while running a setuid program, the UID seen at the server is based on the Kerberos
identity, not the UID that owns the setuid program being run.
The evaluated configuration involves setting up NFS to use RPCSEC-GSS security. For more information,
see Network File System, Configuring an NFS server, and Configuring an NFS client. When setting up the
server, choose Kerberos authentication and enable enhanced security on the server. You can enable this
through SMIT using the chnfs command. The chnfs command has the option to enable RPCSEC_GSS
security. When you are setting up the client, follow the instructions to use Kerberos in Configuring an NFS
client. See Setting up a network for RPCSEC-GSS for the instructions to set up the Kerberos data server
with DES3 encryption for security. The evaluated configuration supports only des3 encryption.
Password rules:
The evaluated configuration should have these values for password rules when you are using the
Kerberos server with LDAP as the database.
For more information about password rules, see ″Chapter 9. Managing Network Authentication Service
passwords″ in the IBM Network Authentication Service Version 1.4 for AIX, Linux and Solaris
Administrator’s and User’s Guide.
mindiff = 4
maxrepeats = 2
minalpha = 2
minother = 2
minlen = 8
minage = 0
histsize = 10
To have the AIX NFS v4 client and AIX NFS v4 server securely communicate explicitly using only DES3
enctypes, create the ″nfs/hostname″ server principal with DES3 enctype (such as des3-cbc-sha1), along
30 AIX Version 6.1 Security
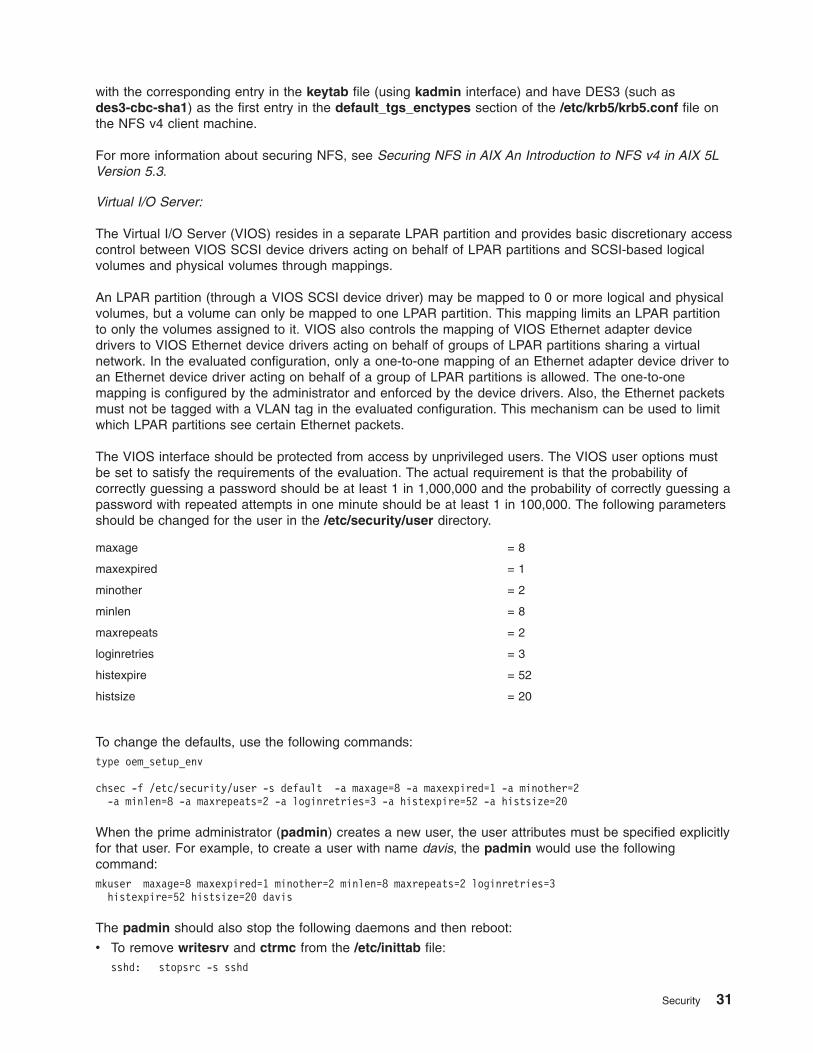
with the corresponding entry in the keytab file (using kadmin interface) and have DES3 (such as
des3-cbc-sha1) as the first entry in the default_tgs_enctypes section of the /etc/krb5/krb5.conf file on
the NFS v4 client machine.
For more information about securing NFS, see Securing NFS in AIX An Introduction to NFS v4 in AIX 5L
Version 5.3.
Virtual I/O Server:
The Virtual I/O Server (VIOS) resides in a separate LPAR partition and provides basic discretionary access
control between VIOS SCSI device drivers acting on behalf of LPAR partitions and SCSI-based logical
volumes and physical volumes through mappings.
An LPAR partition (through a VIOS SCSI device driver) may be mapped to 0 or more logical and physical
volumes, but a volume can only be mapped to one LPAR partition. This mapping limits an LPAR partition
to only the volumes assigned to it. VIOS also controls the mapping of VIOS Ethernet adapter device
drivers to VIOS Ethernet device drivers acting on behalf of groups of LPAR partitions sharing a virtual
network. In the evaluated configuration, only a one-to-one mapping of an Ethernet adapter device driver to
an Ethernet device driver acting on behalf of a group of LPAR partitions is allowed. The one-to-one
mapping is configured by the administrator and enforced by the device drivers. Also, the Ethernet packets
must not be tagged with a VLAN tag in the evaluated configuration. This mechanism can be used to limit
which LPAR partitions see certain Ethernet packets.
The VIOS interface should be protected from access by unprivileged users. The VIOS user options must
be set to satisfy the requirements of the evaluation. The actual requirement is that the probability of
correctly guessing a password should be at least 1 in 1,000,000 and the probability of correctly guessing a
password with repeated attempts in one minute should be at least 1 in 100,000. The following parameters
should be changed for the user in the /etc/security/user directory.
maxage = 8
maxexpired = 1
minother = 2
minlen = 8
maxrepeats = 2
loginretries = 3
histexpire = 52
histsize = 20
To change the defaults, use the following commands:
type oem_setup_env
chsec -f /etc/security/user -s default -a maxage=8 -a maxexpired=1 -a minother=2
-a minlen=8 -a maxrepeats=2 -a loginretries=3 -a histexpire=52 -a histsize=20
When the prime administrator (padmin) creates a new user, the user attributes must be specified explicitly
for that user. For example, to create a user with name davis, the padmin would use the following
command:
mkuser maxage=8 maxexpired=1 minother=2 minlen=8 maxrepeats=2 loginretries=3
histexpire=52 histsize=20 davis
The padmin should also stop the following daemons and then reboot:
v To remove writesrv and ctrmc from the /etc/inittab file:
sshd: stopsrc -s sshd
Security 31

v To prevent the daemon from starting at boot time, remove the /etc/rc.d/rc2.d/Ksshd and
/etc/rc.d/rc2.d/Ssshd files. After reboot stop the RSCT daemons:
stopsrc -g rsct_rm stopsrc -g rsct
All users, regardless of their roles, are to be considered as administrative users.
The system administrator can run all of the commands except those in the following list that are limited to
prime admin (padmin):
v chdate
v chuser
v cleargcl
v de_access
v diagmenu
v invscout
v loginmsg
v lsfailedlogin
v lsgcl
v mirrorios
v mkuser
v motd
v oem_platform_level
v oem_setup_env
v redefvg
v rmuser
v shutdown
v unmirrorios
X Server:
X Server should not be allowed to bind to port 6000.
To prevent the X Server from binding (listening) on port 6000, edit the xserverrc file in the
/usr/lpp/X11/defaults directory, and modify the EXTENSIONS variable to EXTENSIONS="$EXTENSIONS -x
abx -x dbe -x GLX -secIP".
Login control
You can change the login screen defaults for security reasons after a system installation.
Potential hackers can get valuable information from the default AIX login screen, such as the host name
and the version of the operating system. This information would allow them to determine which exploitation
methods to attempt. For security reasons, you may want to change the login screen defaults as soon as
possible after a system installation.
The KDE and GNOME desktops share some of the same security issues. For more information about KDE
and GNOME, refer to the Installation and migration.
For information about users, groups, and passwords, see “Users, groups, and passwords” on page 45.
Setting up login controls:
You can set up login controls in the /etc/security/login.cfg file.
32 AIX Version 6.1 Security

To make it harder to attack a system with password guessing, set up login controls in the
/etc/security/login.cfg file as follows:
Table 2. Attributes and Recommended Values for Login Control.
Attribute Applies to PtYs
(Network)
Applies to TTYs Recommended
Value
Comments
sak_enabled Y Y false The Secure Attention key is rarely needed.
See “Using the Secure Attention Key” on
page 5.
logintimes N Y Specify allowed login times here.
logindisable N Y 4 Disable login on this terminal after 4
consecutive failed attempts.
logininterval N Y 60 Terminal will be disabled when the
specified invalid attempts have been made
within 60 seconds.
loginreenable N Y 30 Re-enable the terminal after it was
automatically disabled after 30 minutes.
logindelay Y Y 5 The time in seconds between login
prompts. This will be multiplied with the
number of failed attempts; for example,
5,10,15,20 seconds when 5 is the initial
value.
These port restrictions work mostly on attached serial terminals, not on pseudo-terminals used by network
logins. You can specify explicit terminals in this file, for example:
/dev/tty0:
logintimes = 0600-2200
logindisable = 5
logininterval = 80
loginreenable = 20
Changing the welcome message on the login screen:
To prevent displaying certain information on login screens, edit the herald parameter in the
/etc/security/login.cfg file.
The default herald contains the welcome message that displays with your login prompt. To change this
parameter, you can either use the chsec command or edit the file directly.
The following example uses the chsec command to change the default herald parameter:
# chsec -f /etc/security/login.cfg -a default -herald
"Unauthorized use of this system is prohibited.\n\nlogin: "
For more information about the chsec command, see the AIX Version 6.1 Commands Reference, Volume
1.
To edit the file directly, open the /etc/security/login.cfg file and update the herald parameter as follows:
default:
herald ="Unauthorized use of this system is prohibited\n\nlogin:"
sak_enable = false
logintimes =
logindisable = 0
logininterval = 0
loginreenable = 0
logindelay = 0
Security 33

Note: To make the system more secure, set the logindisable and logindelay variables to a number greater
than 0 (# > 0).
Changing the login screen for the common desktop environment:
This security issue also affects the Common Desktop Environment (CDE) users. The CDE login screen
also displays, by default, the host name and the operating system version. To prevent this information from
being displayed, edit the /usr/dt/config/$LANG/Xresources file, where $LANG refers to the local
language installed on your machine.
In our example, assuming that $LANG is set to C, copy this file into the /etc/dt/config/C/Xresources
directory. Next, open the /usr/dt/config/C/Xresources file and edit it to remove welcome messages that
include the host name and operating system version.
For more information about CDE security issues, see “Managing X11 and CDE concerns” on page 38.
Disabling the display of the user name and changing the password prompt:
In a secure environment, it might be necessary to hide the display of the login user name or to provide a
custom password prompt that differs from the default.
The default message behavior for the login and password prompt is shown below:
login: foo
foo’s Password:
To disable the display of the user name from prompts and system error messages, edit the usernameecho
parameter in the /etc/security/login.cfg file. The default value for usernameecho is true which results in
the user name being displayed. To change this parameter, you can either use the chsec command or edit
the file directly.
The following example uses the chsec command to change the default usernameecho parameter to false:
# chsec -f /etc/security/login.cfg -s default -a usernameecho=false
For more information about the chsec command, see the AIX Version 6.1 Commands Reference, Volume
1.
To edit the file directly, open the /etc/security/login.cfg file and add or modify the usernameecho
parameter as follows:
default:
usernamecho = false
Setting the usernameecho parameter to false will result in the user name not being displayed at the login
prompt. Instead, the user name is masked out with ’*’ characters for system prompts and error messages
as show below:
login:
***’s Password:
The password prompt may be separately modified to be a custom string by setting the pwdprompt
parameter in the /etc/security/login.cfg file. The default value is a string ″user’s Password: ″ where user
is replaced with the authenticating user name.
To change this parameter, you can either use the chsec command or edit the file directly.
The following example uses the chsec command to change the default pwdprompt parameter to
″Password: ″:
# chsec -f /etc/security/login.cfg -s default -a pwdprompt="Password: "
34 AIX Version 6.1 Security

To edit the file directly, open the /etc/security/login.cfg file and add or modify the pwdprompt parameter
as follows:
default:
pwdprompt = "Password: "
Setting the pwdprompt parameter to ″Password: ″ will result in the specified prompt being displayed by
login as well as by other applications that use the system password prompt. The prompt behavior for the
login when the a custom prompt has been configured is as follows:
login: foo
Password:
Setting up system default login parameters:
Edit the /etc/security/login.cfg file to set up system default login parameters.
To set up base defaults for many login parameters, such as those you might set up for a new user
(number of login retries, login re-enable, and login internal), edit the /etc/security/login.cfg file.
Securing unattended terminals:
Use the lock and xlock commands to secure your terminal.
All systems are vulnerable if terminals are left logged in and unattended. The most serious problem occurs
when a system manager leaves a terminal unattended that has been enabled with root authority. In
general, users should log out any time they leave their terminals. Leaving system terminals unsecure
poses a potential security hazard. To lock your terminal, use the lock command. If your interface is
AIXwindows, use the xlock command.
Enforcing automatic logoff:
Enable automatic logoff to prevent an intruder from compromising the security of the system.
Another valid security concern results from users leaving their accounts unattended for a lengthy period of
time. This situation allows an intruder to take control of the user’s terminal, potentially compromising the
security of the system.
To prevent this type of potential security hazard, you can enable automatic logoff on the system. To do
this, edit the /etc/security/.profile file to include an automatic logoff value for all users, as in the following
example:
TMOUT=600 ; TIMEOUT=600 ; export readonly TMOUT TIMEOUT
The number 600, in this example, is in seconds, which is equal to 10 minutes. However, this method will
only work from the shell.
While the previous action allows you to enforce an automatic logoff policy for all users, system users can
bypass some restrictions by editing their individual .profile files. To completely implement an automatic
logoff policy, take authoritative action by providing users with appropriate .profile files, preventing
write-access rights to these files.
Stack Execution Disable protection
Keeping computer systems secure forms an important aspect of an On Demand business. In today’s world
of highly networked environments, it has become an extreme challenge to ward off attacks from a variety
of sources.
There is increasing likelihood of computer systems falling prey to sophisticated attacks, resulting in
disruption to the daily operations of businesses and government agencies. While no security measure can
Security 35

provide foolproof protection against attacks, you should deploy multiple security mechanisms to thwart
security attacks. This section covers a security mechanism that is used with AIX to thwart attacks due to
buffer overflow based execution.
Security breaches occur in many forms, but one of the most common methods is to monitor the
system-provided administrative tools, look for, and exploit buffer overflows. Buffer overflow attacks occur
when an internal program buffer is overwritten because data was not properly validated (such as
command line, environmental variable, disk or terminal I/O). Attack code is inserted into a running process
through the buffer overflow, changing the execution path of the running process. The return address is
overwritten and redirected to the inserted-code location. Common causes of breaches include improper or
nonexistent bounds checking, or incorrect assumptions about the validity of data sources. For example, a
buffer overflow can occur when a data object is large enough to hold 1 KB of data, but the program does
not check the bounds of the input and hence can be made to copy more than 1 KB into that data object.
The intruder’s goal is to attack a command and/or tool that provides root privileges to a regular user.
Control of the program is gained with all the privileges enabled, permitting overflow of the buffers. Attacks
are typically focused on a root owned UID set or programs leading to the execution of a shell, thereby
gaining root-based shell access to the system.
You can prevent these attacks by blocking execution of attack code entering through the buffer overflow.
Disable execution on the memory areas of a process where execution commonly does not take place
(stack and heap memory areas).
SED buffer overflow protection mechanism:
AIX has enabled the stack execution disable (SED) mechanism to disable the execution of code on a
stack and select data areas of a process.
By disabling the execution and then terminating, an infringing program, the attacker is prevented from
gaining root user privileges through a buffer overflow attack. While this feature does not stop buffer
overflows, it provides protection by disabling the execution of attacks on buffers that have been
overflowed.
Beginning with the POWER4 family of processors, you can use a page-level execution enable and/or
disable feature for the memory. The AIX SED mechanism uses this underlying hardware support for
implementing a no-execution feature on select memory areas. Once this feature is enabled, the operating
system checks and flags various files during the executable programs. It then alerts the operating system
memory manager and the process managers that the SED is enabled for the process being created. The
select memory areas are marked for no-execution. If any execution occurs on these marked areas, the
hardware raises an exception flag and the operating system stops the corresponding process. The
exception and application termination details are captured through the AIX error log events.
SED is implemented mainly through the sedmgr command. The sedmgr command permits control of the
systemwide SED mode of operation as well as setting the executable file based SED flags.
SED modes and monitoring:
The stack execution disable (SED) mechanism in AIX is implemented through systemwide mode flags, as
well as individual executable file-based header flags.
While systemwide flags control the systemwide operation of the SED, file level flags indicate how files
should be treated in SED. The buffer overflow protection (BOP) mechanism provides for four systemwide
modes of operation:
off The SED mechanism is turned off and no process is marked for SED protection.
select Only a select set of files are enabled and monitored for SED protection. The select set of files are
36 AIX Version 6.1 Security

chosen by reviewing the SED related flags in the executable program binary headers. The
executable program header enables SED related flags to request to be included in the select
mode.
setidfiles
Permits you to enable SED, not only for the files requesting such a mechanism, but all the
important setuid and setgid system files. In this mode, the operating system not only provides
SED for the files with the request SED flag set, but also enables SED for the executable files with
the following characteristics (except the files marked for exempt in their file headers):
v SETUID files owned by root
v SETGID files with primary group as system or security
all All executable programs loaded on the system are SED protected except for the files requesting
an exemption from SED mode. Exemption related flags are part of the executable program
headers.
The SED feature on AIX also provides the ability to monitor instead of stopping the process when an
exception happens. This systemwide control permits a system administrator to check for breakdowns and
issues in the system environment by monitoring it before the SED is deployed in the production systems.
The sedmgr command provides an option that permits you to enable SED to monitor files instead of
stopping the processes when exceptions occur. The system administrator can evaluate whether an
executable program is doing any legitimate stack execution. This setting works in conjunction with the
systemwide mode set using the -c option. When the monitor mode is turned on, the system permits the
process to continue operating even if an SED-related exception occurs. Instead of stopping the process,
the operating system logs the exception in the AIX error log. If SED monitoring is off, the operating system
stops any process that violates and raises an exception per SED facility.
Any changes to the SED mode systemwide flags requires that you restart the system for the changes to
take effect. All of these types of events are audited.
SED flags for executables:
In AIX, you can use the sedmgr command to flag executables from the SE mechanism.
Linker has been enhanced to support two new SED related flags to enable select and exempt options in
the executable’s headers. The select flag permits an executable to request and be part of SED protection
during the select mode of systemwide SED operation, whereas the exempt flag permits an executable to
request for an exemption from the SED mechanism. These executables are not enabled for execution
disable on any of the process memory areas.
The exemption flag permits a system administrator to monitor the SED mechanism, and evaluate the
situation. The system administrator can enable execution on stack and data areas as necessary for the
application, with the associated risks understood.
The following table shows how the systemwide settings and file settings affect the SED mode of operation:
Table 3. Systemwide settings and file settings affecting the SED mode
Executable file SED flags
System SED mode request exempt system
Setuid-root or setgid-system/security files
off – – – –
select enabled – – –
setgidfiles enabled – – enabled
all enabled – enabled enabled
Security 37

SED issues and considerations:
By default, AIX SED is shipped in select mode. A number of setuid and setgid programs are
select-enabled for SED and operate in protected mode by default.
SED enablement might cause older binary files to break if they are not capable of handling the
no-execution feature on the stack heap areas. These applications must run on stack data areas. The
system administrator can evaluate the situation and flag the file for an exemption using the bopmgr
command. AIX Java™ 1.3.1 and AIX Java 1.4.2 have Just-In-Time (JIT) compilers that dynamically
generate and run native object code while running Java applications (the Java Virtual Machine decides
which code to compile based on the execution profile of the application). This object code is stored in data
buffers allocated by the JIT. Consequently, if AIX is configured to run in the SED ALL mode, the system
administrator must set the Java binary file’s exemption flag.
When SED-related flags in an executable file are changed, they apply only to a future load and execution
of the file. This change does not apply to currently operating processes based on this file. The SED facility
controls and monitors both 32- and 64-bit executable programs for the systemwide and file-level settings.
The SED facility is available only when the AIX operating system is used with the 64-bit kernel.
Related information
sedmgr command
AIX Error-Logging Facility
Managing X11 and CDE concerns
There are potential security vulnerabilities involved with the X11 X server and the Common Desktop
Environment (CDE).
Removing the /etc/rc.dt file:
Remove the /etc/rc.dt file on systems that require a high level of security.
Although running the CDE interface is convenient for users, security issues are associated with it. For this
reason, do not run CDE on servers that require a high level of security. The best solution is to avoid
installing CDE (dt) file sets. If you have installed these file sets on your system, consider uninstalling them,
especially the /etc/rc.dt script, which starts CDE.
For more information about CDE, see the Operating system and device management.
Preventing unauthorized monitoring of remote X server:
An important security issue associated with the X11 server is unauthorized silent monitoring of a remote
server.
The xwd and xwud commands can be used to monitor X server activity because they have the ability to
capture keystrokes, which can expose passwords and other sensitive data. To solve this problem, remove
these executable files unless they are necessary under your configuration, or, as an alternative, change
access to these commands to be root only.
The xwd and xwud commands are located in the X11.apps.clients fileset.
38 AIX Version 6.1 Security

If you do need to retain the xwd and xwud commands, consider using OpenSSH or MIT Magic Cookies.
These third-party applications help prevent the risks that are created by running the xwd and xwud
commands.
For more information about OpenSSH and MIT Magic Cookies, refer to each application’s respective
documentation.
Enabling and disabling access control:
The X server permits remote hosts to use the xhost + command to connect to your system.
Ensure that you specify a host name with the xhost + command, because it disables access control for
the X server. This permits you to grant access to specific hosts, which eases monitoring for potential
attacks to the X server. To grant access to a specific host, run the xhost command as follows:
# xhost + hostname
If you do not specify a host name, access will be granted to all hosts.
For more information about the xhost command, see the AIX Version 6.1 Commands Reference
Disabling user permissions to run the xhost command:
You can prevent the unauthorized execution of the xhost command by using the chmod command.
Another way to ensure that the xhost command is being used appropriately is to restrict execution of this
command to root-user authority only. To do this, use the chmod command to change the permissions of
/usr/bin/X11/xhost to 744, as follows:
chmod 744/usr/bin/X11/xhost
List of setuid/setgid programs
There are various setuid/setgid programs on an AIX system. You can remove these privileges on
commands that do nto need to be available to regular users.
The following programs are included in a normal AIX install. In a CC-configured AIX system, this list is
pruned and includes fewer programs.
v /opt/IBMinvscout/bin/invscoutClient_VPD_Survey
v /opt/IBMinvscout/bin/invscoutClient_PartitionID
v /usr/lpp/diagnostics/bin/diagsetrto
v /usr/lpp/diagnostics/bin/Dctrl
v /usr/lpp/diagnostics/bin/diagTasksWebSM
v /usr/lpp/diagnostics/bin/diagela
v /usr/lpp/diagnostics/bin/diagela_exec
v /usr/lpp/diagnostics/bin/diagrpt
v /usr/lpp/diagnostics/bin/diagrto
v /usr/lpp/diagnostics/bin/diaggetrto
v /usr/lpp/diagnostics/bin/update_manage_flash
v /usr/lpp/diagnostics/bin/utape
v /usr/lpp/diagnostics/bin/uspchrp
v /usr/lpp/diagnostics/bin/update_flash
v /usr/lpp/diagnostics/bin/uesensor
v /usr/lpp/diagnostics/bin/usysident
v /usr/lpp/diagnostics/bin/usysfault
Security 39
v /usr/lpp/X11/bin/xlock
v /usr/lpp/X11/bin/aixterm
v /usr/lpp/X11/bin/xterm
v /usr/lpp/X11/bin/msmitpasswd
v /usr/lib/boot/tftp
v /usr/lib/lpd/digest
v /usr/lib/lpd/rembak
v /usr/lib/lpd/pio/etc/piodmgrsu
v /usr/lib/lpd/pio/etc/piomkpq
v /usr/lib/lpd/pio/etc/pioout
v /usr/lib/mh/slocal
v /usr/lib/perf/libperfstat_updt_dictionary
v /usr/lib/sa/sadc
v /usr/lib/semutil
v /usr/lib/trcload
v /usr/sbin/allocp
v /usr/sbin/audit
v /usr/sbin/auditbin
v /usr/sbin/auditcat
v /usr/sbin/auditconv
v /usr/sbin/auditmerge
v /usr/sbin/auditpr
v /usr/sbin/auditselect
v /usr/sbin/auditstream
v /usr/sbin/backbyinode
v /usr/sbin/cfgmgr
v /usr/sbin/chcod
v /usr/sbin/chcons
v /usr/sbin/chdev
v /usr/sbin/chpath
v /usr/sbin/chtcb
v /usr/sbin/cron
v /usr/sbin/acct/accton
v /usr/sbin/arp64
v /usr/sbin/arp
v /usr/sbin/devinstall
v /usr/sbin/diag_exec
v /usr/sbin/entstat
v /usr/sbin/entstat.ethchan
v /usr/sbin/entstat.scent
v /usr/sbin/diskusg
v /usr/sbin/exec_shutdown
v /usr/sbin/fdformat
v /usr/sbin/format
v /usr/sbin/fuser
40 AIX Version 6.1 Security

v /usr/sbin/fuser64
v /usr/sbin/getlvcb
v /usr/sbin/getlvname
v /usr/sbin/getvgname
v /usr/sbin/grpck
v /usr/sbin/getty
v /usr/sbin/extendvg
v /usr/sbin/fastboot
v /usr/sbin/frcactrl64
v /usr/sbin/frcactrl
v /usr/sbin/inetd
v /usr/sbin/invscout
v /usr/sbin/invscoutd
v /usr/sbin/ipl_varyon
v /usr/sbin/keyenvoy
v /usr/sbin/krlogind
v /usr/sbin/krshd
v /usr/sbin/lchangelv
v /usr/sbin/lchangepv
v /usr/sbin/lchangevg
v /usr/sbin/lchlvcopy
v /usr/sbin/lcreatelv
v /usr/sbin/ldeletelv
v /usr/sbin/ldeletepv
v /usr/sbin/lextendlv
v /usr/sbin/lmigratelv
v /usr/sbin/lmigratepp
v /usr/sbin/lparsetres
v /usr/sbin/lpd
v /usr/sbin/lquerylv
v /usr/sbin/lquerypv
v /usr/sbin/lqueryvg
v /usr/sbin/lqueryvgs
v /usr/sbin/lreducelv
v /usr/sbin/lresynclp
v /usr/sbin/lresynclv
v /usr/sbin/lsaudit
v /usr/sbin/lscfg
v /usr/sbin/lscons
v /usr/sbin/lslv
v /usr/sbin/lspath
v /usr/sbin/lspv
v /usr/sbin/lsresource
v /usr/sbin/lsrset
v /usr/sbin/lsslot
Security 41

v /usr/sbin/lsuser
v /usr/sbin/lsvg
v /usr/sbin/lsvgfs
v /usr/sbin/login
v /usr/sbin/lvaryoffvg
v /usr/sbin/lvaryonvg
v /usr/sbin/lvgenmajor
v /usr/sbin/lvgenminor
v /usr/sbin/lvrelmajor
v /usr/sbin/lvrelminor
v /usr/sbin/lsmcode
v /usr/sbin/mailq
v /usr/sbin/mkdev
v /usr/sbin/mklvcopy
v /usr/sbin/mknod
v /usr/sbin/mkpasswd
v /usr/sbin/mkpath
v /usr/sbin/mkvg
v /usr/sbin/mount
v /usr/sbin/netstat64
v /usr/sbin/mtrace
v /usr/sbin/ndp
v /usr/sbin/newaliases
v /usr/sbin/named9
v /usr/sbin/named8
v /usr/sbin/netstat
v /usr/sbin/nfsstat
v /usr/sbin/pdelay
v /usr/sbin/pdisable
v /usr/sbin/penable
v /usr/sbin/perf/diag_tool/getschedparms
v /usr/sbin/perf/diag_tool/getvmparms
v /usr/sbin/phold
v /usr/sbin/portmir
v /usr/sbin/pshare
v /usr/sbin/pstart
v /usr/sbin/putlvcb
v /usr/sbin/putlvodm
v /usr/sbin/qdaemon
v /usr/sbin/quota
v /usr/sbin/reboot
v /usr/sbin/redefinevg
v /usr/sbin/repquota
v /usr/sbin/restbyinode
v /usr/sbin/rmdev
42 AIX Version 6.1 Security

v /usr/sbin/ping
v /usr/sbin/rmgroup
v /usr/sbin/rmpath
v /usr/sbin/rmrole
v /usr/sbin/rmuser
v /usr/sbin/rsct/bin/ctstrtcasd
v /usr/sbin/srcd
v /usr/sbin/srcmstr
v /usr/sbin/rmsock64
v /usr/sbin/sendmail_ssl
v /usr/sbin/sendmail_nonssl
v /usr/sbin/rmsock
v /usr/sbin/sliplogin
v /usr/sbin/sendmail
v /usr/sbin/rwhod
v /usr/sbin/route
v /usr/sbin/snappd
v /usr/sbin/swap
v /usr/sbin/swapoff
v /usr/sbin/swapon
v /usr/sbin/swcons
v /usr/sbin/switch.prt
v /usr/sbin/synclvodm
v /usr/sbin/tsm
v /usr/sbin/umount
v /usr/sbin/umountall
v /usr/sbin/unmount
v /usr/sbin/varyonvg
v /usr/sbin/watch
v /usr/sbin/talkd
v /usr/sbin/timedc
v /usr/sbin/uucpd
v /usr/bin/bellmail
v /usr/bin/at
v /usr/bin/capture
v /usr/bin/chcore
v /usr/bin/acctras
v /usr/bin/acctctl
v /usr/bin/chgroup
v /usr/bin/chkey
v /usr/bin/chque
v /usr/bin/chquedev
v /usr/bin/chrole
v /usr/bin/chsec
v /usr/bin/chuser
Security 43

v /usr/bin/confsrc
v /usr/bin/crontab
v /usr/bin/enq
v /usr/bin/filemon
v /usr/bin/errpt
v /usr/bin/fileplace
v /usr/bin/fileplacej2
v /usr/bin/fileplacej2_64
v /usr/bin/ftp
v /usr/bin/getconf
v /usr/bin/ipcs
v /usr/bin/ipcs64
v /usr/bin/iostat
v /usr/bin/logout
v /usr/bin/lscore
v /usr/bin/lssec
v /usr/bin/mesg
v /usr/bin/mkgroup
v /usr/bin/mkque
v /usr/bin/mkquedev
v /usr/bin/mkrole
v /usr/bin/mkuser
v /usr/bin/netpmon
v /usr/bin/newgrp
v /usr/bin/pagdel
v /usr/bin/paginit
v /usr/bin/paglist
v /usr/bin/passwd
v /usr/bin/pwck
v /usr/bin/pwdadm
v /usr/bin/pwdck
v /usr/bin/rm_mlcache_file
v /usr/bin/rdist
v /usr/bin/remsh
v /usr/bin/rlogin
v /usr/bin/rexec
v /usr/bin/rcp
v /usr/bin/rmque
v /usr/bin/rmquedev
v /usr/bin/rsh
v /usr/bin/ruptime
v /usr/bin/rwho
v /usr/bin/script
v /usr/bin/setgroups
v /usr/bin/setsenv
44 AIX Version 6.1 Security

v /usr/bin/shell
v /usr/bin/su
v /usr/bin/sysck
v /usr/bin/tcbck
v /usr/bin/sysck_r
v /usr/bin/telnet
v /usr/bin/tftp
v /usr/bin/traceroute
v /usr/bin/tn
v /usr/bin/tn3270
v /usr/bin/usrck
v /usr/bin/utftp
v /usr/bin/vmstat
v /usr/bin/vmstat64
v /usr/bin/yppasswd
v /sbin/helpers/jfs2/backbyinode
v /sbin/helpers/jfs2/diskusg
v /sbin/helpers/jfs2/restbyinode
Users, groups, and passwords
You can manage AIX users and groups.
Account ID
Each user account has a numeric ID which uniquely identifies the account. AIX grants authorization
according to Account ID.
It is important to understand that accounts with the same ID are virtually the same account. When creating
users and groups, the AIX mkuser and mkgroup commands always check for the target registry to make
sure that the account to be created has no ID collision with existing accounts.
The system can also be configured to check all user (group) registries during account creation using the
dist_uniqid system attribute. The dist_uniqid attribute of the usw stanza in the /etc/security/login.cfg
file can be managed using the chsec command. To configure the system to always check for id collision
against all registries, run:
# chsec -f /etc/security/login.cfg -s usw -a dist_uniqid=always
There are three valid values for the dist_uniqid attribute:
never This value does not check for ID collision against the non-target registries (default).
always
This value checks for ID collision against all other registries. If collision detected between the
target registry and any other registry, the mkuser (mkgroup) command picks a unique ID which is
not used by any registry. It only fails if the ID value is specified from the command line (for
example, mkuser id=234 foo, and ID 234 is already taken by a user in any of the registries).
uniqbyname
This value checks for ID collision against all other registries. Collision between registries is
permitted only if the account to be created has the same name as the existing account for a
mkuser id=123 foo type of command. If the ID is not specified from the command line, the new
account might not have the same ID value as an existing account with the same name in another
registry. For example, acct1 with ID 234 is a local account. When creating an LDAP account acct1,
Security 45

mkuser -R LDAP acct1 might pick a unique ID of 235 for the LDAP account. The result is acct1
with ID 234 on local, and acct1 with 235 on LDAP.
Note: ID collision detection in the target registry is always enforced regardless of the dist_uniqid
attribute.
The uniqbyname value works well against two registries. With more than two registries, and when ID
collision already exists between two registries, the behavior of mkuser (mkgroup) is unspecified when
creating a new account in a third registry using the colliding ID values. The new account creation might
succeed or fail depending the order the registries are checked.
For example: Suppose a system is configured with three registries: local, LDAP and DCE. An acct1
account exists in LDAP and an acct2 account in DCE, both with ID 234. When the system administrator
runs the mkuser -R files id=234 acct1 (mkgroup -R files id=234 acct1) command to create the local
account with the uniqbyname value, the mkuser (mkgroup) command checks against the LDAP registry
first, and finds that ID 234 is taken by LDAP account acct1. Since the account to be created has the same
account name, the mkuser (mkgroup) command successfully creates the local account acct1 with ID 234.
If the DCE registry is checked first, the mkuser (mkgroup) command finds that ID 234 is taken by DCE
account acct2, and creation of local account acct1 fails. The check for ID collision enforces ID uniqueness
between the local registry and remote registries or between remote registries. There is no guarantee of ID
uniqueness between the newly created account on the remote registry and existing local users on other
systems which use the same remote registry. The mkuser (mkgroup) command bypasses the remote
registry if it is not reachable at the time the command is run.
Root account
The root account has virtually unlimited access to all programs, files, and resources on a system.
The root account is the special user in the /etc/passwd file with the user ID (UID) of 0 and is commonly
given the user name, root. It is not the user name that makes the root account so special, but the UID
value of 0. This means that any user that has a UID of 0 also has the same privileges as the root user.
Also, the root account is always authenticated by means of the local security files.
The root account should always have a password, which should never be shared. The root account should
be given a password immediately after the system is installed. Only the system administrator should know
the root password. System administrators should only operate as the root user to perform system
administration functions that require root privileges. For all other operations, they should return to their
normal user account.
Attention: Routinely operating as the root user can result in damage to the system because the root
account overrides many safeguards in the system.
Disabling direct root login:
A common attack method of potential hackers is to obtain the root password.
To avoid this type of attack, you can disable direct access to your root ID and then require your system
administrators to obtain root privileges by using the su - command. In addition to permitting you to remove
the root user as a point of attack, restricting direct root access permits you to monitor which users gained
root access, as well as the time of their action. You can do this by viewing the /var/adm/sulog file.
Another alternative is to enable system auditing, which will report this type of activity.
To disable remote login access for your root user, edit the /etc/security/user file. Specify False as the
rlogin value on the entry for root.
Before you disable the remote root login, examine and plan for situations that would prevent a system
administrator from logging in under a non-root user ID. For example, if a user’s home file system is full,
46 AIX Version 6.1 Security

the user would not be able to log in. If the remote root login were disabled and the user who could use the
su - command to change to root had a full home file system, root could never take control of the system.
This issue can be bypassed by system administrators creating home file systems for themselves that are
larger than the average user’s file system.
For more information about controlling root login, see “CAPP/EAL4+ system configuration” on page 19.
User accounts
There are several security administrative tasks for user accounts.
Recommended user attributes:
User administration consists of creating users and groups and defining their attributes.
A major attribute of users is how they are authenticated. Users are the primary agents on the system.
Their attributes control their access rights, environment, how they are authenticated, as well as how, when,
and where their accounts can be accessed.
Groups are collections of users who can share the same access permissions for protected resources. A
group has an ID and is composed of members and administrators. The creator of the group is usually the
first administrator.
Many attributes can be set for each user account, including password and login attributes. For a list of
configurable attributes, refer to “Disk quota system overview” on page 70. The following attributes are
recommended:
v Each user should have a user ID that is not shared with any other user. All of the security safeguards
and accountability tools work only if each user has a unique ID.
v Give user names that are meaningful to the users on the system. Actual names are best, because most
electronic mail systems use the user ID to label incoming mail.
v Add, change, and delete users using the Web-based System Manager or SMIT interface. Although you
can perform all of these tasks from the command line, these interfaces help reduce small errors.
v Do not give an initial password to a user account until the user is ready to log in to the system. If the
password field is defined as an * (asterisk) in the /etc/passwd file, account information is kept, but no
one can log in to that account.
v Do not change the system-defined user IDs that are needed by the system to function correctly. The
system-defined user IDs are listed in the /etc/passwd file.
v In general, do not set the admin parameter to true for any user IDs. Only the root user can change
attributes for users with admin=true set in the /etc/security/user file.
The operating system supports the standard user attributes usually found in the /etc/passwd and
/etc/system/group files, such as:
Authentication Information Specifies the password
Credentials Specifies the user identifier, principal group, and the
supplementary group ID
Environment Specifies the home or shell environment.
User and group name length limit:
You can configure and retrieve the user and group name length limit.
Security 47

The user and group name length limit parameter default value is 9 characters. For AIX 5.3 and later, you
can increase the user and group name length limit from 9 characters to 256 characters. Because the user
and group name length limit parameter includes the terminating NULL character, the actual valid name
lengths are from 8 characters to 255 characters.
The user and group name length limit is specified with the v_max_logname system configuration
parameter for the sys0 device. You can change or retrieve the v_max_logname parameter value from the
kernel or ODM database. The parameter value in the kernel is the value the system uses while running.
The parameter value in the ODM database is the value the system uses after the next restart.
Note: Unexpected behavior might occur if you decrease the user and group name length limit after
increasing it. User and group names that you created with the larger limitation might still exist on
the system.
Retrieving the user and group name length limit from the ODM database:
You can use commands or subroutines to retrieve the v_max_logname parameter.
You can use the lsattr command to retrieve the v_max_logname parameter in the ODM database. The
lsattr command displays the v_max_logname parameter as the max_logname attribute.
For more information, see the lsattr command in AIX Version 6.1 Commands Reference, Volume 3.
The following example shows how to use the lsattr command to retrieve the max_logname attribute:
$ lsattr -El sys0
SW_dist_intr false Enable SW distribution of interrupts True
autorestart true Automatically REBOOT system after a crash True
boottype disk N/A False
capacity_inc 1.00 Processor capacity increment False
capped true Partition is capped False
conslogin enable System Console Login False
cpuguard enable CPU Guard True
dedicated true Partition is dedicated False
ent_capacity 4.00 Entitled processor capacity False
frequency 93750000 System Bus Frequency False
fullcore false Enable full CORE dump True
fwversion IBM,SPH01316 Firmware version and revision levels False
iostat false Continuously maintain DISK I/O history True
keylock normal State of system keylock at boot time False
max_capacity 4.00 Maximum potential processor capacity False
max_logname 20 Maximum login name length at boot time True
maxbuf 20 Maximum number of pages in block I/O BUFFER CACHE True
maxmbuf 0 Maximum Kbytes of real memory allowed for MBUFS True
maxpout 0 HIGH water mark for pending write I/Os per file True
maxuproc 128 Maximum number of PROCESSES allowed per user True
min_capacity 1.00 Minimum potential processor capacity False
minpout 0 LOW water mark for pending write I/Os per file True
modelname IBM,7044-270 Machine name False
ncargs 6 ARG/ENV list size in 4K byte blocks True
pre430core false Use pre-430 style CORE dump True
pre520tune disable Pre-520 tuning compatibility mode True
realmem 3145728 Amount of usable physical memory in Kbytes False
rtasversion 1 Open Firmware RTAS version False
sec_flags 0 Security Flags True
sed_config select Stack Execution Disable (SED) Mode True
systemid IBM,0110B5F5F Hardware system identifier False
variable_weight 0 Variable processor capacity weight False
$
Retrieving the user and group name length limit from the kernel:
48 AIX Version 6.1 Security
You can use commands and subroutines to retrieve the v_max_logname parameter from the kernel.
Using the getconf command
You can use the getconf command with the LOGIN_NAME_MAX parameter to retrieve the user and
group name length limit in the kernel. The getconf command output includes the terminating NULL
character.
The following example shows how to use getconf command to retrieve the current user and group name
limit from the kernel:
$ getconf LOGIN_NAME_MAX
20
$
Using the sysconf subroutine
You can use the sysconf subroutine with the _SC_LOGIN_NAME_MAX parameter to retrieve the user and
group name length limit in the kernel.
The following example shows how to use the sysconf subroutine to retrieve the user and group name
length limit from the kernel:
#include <unistd.h>
main()
{
long len;
len = sysconf(_SC_LOGIN_NAME_MAX);
printf("The name length limit is %d\n", len);
}
Using the sys_parm subroutine
You can use the sys_parm subroutine with the SYSP_V_MAX_LOGNAME parameter to retrieve the
current user name length limit in the kernel.
The following example shows how to use the sys_parm subroutine to retrieve the user name length limit
from the kernel:
#include <sys/types.h>
#include <sys/var.h>
#include <errno.h>
main()
{
int rc;
struct vario myvar;
rc = sys_parm (SYSP_GET, SYSP_V_MAX_LOGNAME, &myvar);
if (!rc)
printf("Max_login_name = %d\n", myvar.v.v_max_logname.value);
else
printf("sys_parm() failed rc = %d, errno = %d\n", rc, errno);
}
Changing the user group and name length limit in the ODM database:
You can configure the user and group name length limit value in the kernel only during the system boot
phase. You can change the value in the ODM database using the chdev command. The change takes
effect after the next system restart.
Security 49

The following example shows how to use the chdev command to change the v_max_logname parameter
in the ODM database:
$ chdev -l sys0 -a max_logname=30
sys0 changed
$
User account control:
User accounts have attributes that can be altered.
Each user account has a set of associated attributes. These attributes are created from default values
when a user is created by using the mkuser command. The attributes can be altered by using the chuser
command. The following are the user attributes that control login and are not related to password quality:
account_locked If an account must be explicitly locked, this attribute can be set to True; the default is False.
admin If set to True, this user can not change the password. Only the administrator can change it.
admgroups Lists groups for which this user has administrative rights. For those groups, the user can add
or delete members.
auth1 The authentication method that is used to grant the user access. Typically, it is set to SYSTEM,
which will then use newer methods.
Note: The auth1 attribute is deprecated and should not be used.
auth2 Method that runs after the user has been authenticated by whatever was specified in auth1. It
cannot block access to the system. Typically, it is set to NONE.
Note: The auth2 attribute is deprecated and should not be used.
daemon This boolean parameter specifies whether the user is allowed to start daemons or subsystems
with the startsrc command. It also restricts the use of the cron and at facilities.
login Specifies whether this user is allowed to log in. A successful login resets the
unsuccessful_login_count attribute to a value of 0 (from the loginsuccess subroutine).
logintimes Restricts when a user can log in. For example, a user might be restricted to accessing the
system only during normal business hours.
registry Specifies the user registry. It can be used to tell the system about alternate registries for user
information, such as NIS, LDAP, or Kerberos.
rlogin Specifies whether this user is allowed to log in by using rlogin or telnet.
su Specifies whether other users can switch to this ID with the su command.
sugroups Specifies which groups are allowed to switch to this user ID.
ttys Limits certain accounts to physically secure areas.
expires Manages student or guest accounts; also can be used to turn off accounts temporarily.
loginretries Specifies the maximum number of consecutive failed login attempts before the user ID is
locked by the system. The failed attempts are recorded in the /etc/security/lastlog file.
umask Specifies the initial umask for the user.
rcmds Specifies whether the user account can be accessed with the rsh or exec commands. A value
of allow indicates that the account may be accessed by rsh and rexec. A value of deny
indicates no account access by rsh and rexec commands. A value of hostlogincontrol
indicates that the account access is controlled by hostallowedlogin and hostsdeniedlogin
attributes.
hostallowedlogin Specifies the hosts which permit the user to login. This attribute is intended to be used in a
networked environment where user attributes are shared by multiple hosts.
hostsdeniedlogin Specifies the hosts which do not permit the user to login. This attribute is intended to be used
in a networked environment where user attributes are shared by multiple hosts.
maxulogs Specifies the maximum number of logins per user. If the user has reached the maximum
number of allowed logins, login will be denied.
The complete set of user attributes is defined in the /etc/security/user, /etc/security/limits,
/etc/security/audit/config and /etc/security/lastlog files. The default for user creation with the mkuser
command is specified in the /usr/lib/security/mkuser.default file. Only options that override the general
defaults in the default stanzas of the /etc/security/user and /etc/security/limits files, as well as audit
50 AIX Version 6.1 Security

classes, must be specified in the mkuser.default file. Several of these attributes control how a user can
log in, and they can be configured to lock the user account (prevent further logins) automatically under
specified conditions.
After the user account has been locked by the system due to the number of unsuccessful login attempts,
the user is not able to log in until the system administrator resets the user unsuccessful_login_count
attribute in the /etc/security/lastlog file to be less than the value of login retries. This can be done using
the following chsec command, as follows:
chsec -f /etc/security/lastlog -s username -a
unsuccessful_login_count=0
The defaults can be changed by using the chsec command to edit the default stanza in the appropriate
security file, such as the /etc/security/user or /etc/security/limits files. Many of the defaults are defined
to be the standard behavior. To explicitly specify attributes that are set every time that a new user is
created, change the user entry in /usr/lib/security/mkuser.default.
For information on extended user password attributes, refer to “Passwords” on page 58.
Login-related commands affected by user attributes
The following table lists the attributes that control login and the affected commands.
Note: The attributes only affect the ssh and scp commands if the UseLogin attribute is set to yes in the
ssh daemon configuration file on the server.
User attribute Commands
account_locked rexec, rsh, rcp, ssh, scp, rlogin, telnet, ftp, login
login Only affects login from a console. The value of the login
attribute does not affect remote login commands, remote
shell commands, or remote copy commands rexec, rsh, rcp,
ssh, scp, rlogin, telnet, and ftp).
logintimes rexec, rsh, rcp, ssh, scp, rlogin, telnet, ftp, login
rlogin Only affects remote login commands, certain remote shell
commands, and certain remote copy commands (ssh, scp,
rlogin, and telnet).
loginretries rexec, rsh, rcp, ssh, scp, rlogin, telnet, ftp, login
/etc/nologin rexec, rsh, rcp, ssh, scp, rlogin, telnet, ftp, login
rcmds=deny rexec, rsh, rcp, ssh, scp
rcmds=hostlogincontrol and
hostsdeniedlogin=<target_hosts>
rexec, rsh, rcp, ssh, scp, rlogin, telnet, ftp, login
ttys = !REXEC, !RSH rexec, rsh, rcp, ssh, scp, rlogin, telnet, ftp, login
ttys = !REXEC, !RSH, /dev/pts rexec, rsh
ttys = !REXEC, !RSH, ALL rexec, rsh
expires rexec, rsh, rcp, ssh, scp, rlogin, telnet, ftp, login
Note: rsh only disallows execution of remote commands. Remote logins are still permitted.
Login user IDs:
The operating system identifies users by their login user ID.
Security 51

The login user ID allows the system to trace all user actions to their source. After a user logs in to the
system but before running the initial user program, the system sets the login ID of the process to the user
ID found in the user database. All subsequent processes during the login session are tagged with this ID.
These tags provide a trail of all activities performed by the login user ID. The user can reset the effective
user ID, real user ID, effective group ID, real group ID, and supplementary group ID during the session,
but cannot change the login user ID.
Strengthening user security with Access Control Lists:
To achieve an appropriate level of security in your system, develop a consistent security policy to manage
user accounts. The most commonly used security mechanism is the access control list (ACL).
For information about ACLs and developing a security policy, see “Access Control Lists” on page 106.
PATH environment variable:
The PATH environment variable is an important security control. It specifies the directories to be searched
to find a command.
The default systemwide PATH value is specified in the /etc/profile file, and each user normally has a
PATH value in the user’s $HOME/.profile file. The PATH value in the .profile file either overrides the
systemwide PATH value or adds extra directories to it.
Unauthorized changes to the PATH environment variable can enable a user on the system to ″spoof″
other users (including root users). Spoofing programs (also called Trojan horse programs) replace system
commands and then capture information meant for that command, such as user passwords.
For example, suppose a user changes the PATH value so that the system searches the /tmp directory first
when a command is run. Then the user places in the /tmp directory a program called su that asks for the
root password just like the su command. Then the /tmp/su program mails the root password to the user
and calls the real su command before exiting. In this scenario, any root user who used the su command
would reveal the root password and not even be aware of it.
To prevent any problems with the PATH environment variable for system administrators and users, do the
following:
v When in doubt, specify full path names. If a full path name is specified, the PATH environment variable
is ignored.
v Never put the current directory (specified by . (period)) in the PATH value specified for the root user.
Never allow the current directory to be specified in /etc/profile.
v The root user should have its own PATH specification in his private .profile file. Typically, the
specification in /etc/profile lists the minimal standard for all users, whereas the root user might need
more or fewer directories than the default.
v Warn other users not to change their .profile files without consulting the system administrator.
Otherwise, an unsuspecting user could make changes that allow unintended access. A user .profile file
should have permissions set to 740.
v System administrators should not use the su command to gain root privilege from a user session,
because the user’s PATH value specified in the .profile file is in effect. Users can set their own .profile
files. System administrators should log in to the user’s machine as root user or preferably, using their
own ID and then use the following command:
/usr/bin/su - root
This ensures that the root environment is used during the session. If a system administrator does
operate as root in another user session, the system administrator should specify full path names
throughout the session.
52 AIX Version 6.1 Security

v Protect the input field separator (IFS) environment variable from being changed in the /etc/profile file.
The IFS environment variable in the .profile file can be used to alter the PATH value.
Anonymous FTP with a secure user account setup
You can set up anonymous FTP with a secure user account.
Things to Consider
The information in this how-to scenario was tested using specific versions of AIX. The results you obtain might vary
significantly depending on your version and level of AIX.
This scenario sets up an anonymous FTP with a secure user account, using the command line interface
and a script.
Note: This scenario cannot be used on a system with the Controlled Access Protection Profile (CAPP)
with Evaluation Assurance Level 4+ (EAL4+) feature.
1. Verify that the bos.net.tcp.client fileset is installed on your system, by typing the following command:
lslpp -L | grep bos.net.tcp.client
If you receive no output, the fileset is not installed. For instructions on how to install it, see the
Installation and migration.
2. Verify that you have at least 8 MB of free space available in the system’s /home directory, by typing
the following command:
df -k /home
The script in step 4 requires at least 8 MB free space in the /home directory to install the required
files and directories. If you need to increase the amount of available space, see the Operating system
and device management.
3. With root authority, change to the /usr/samples/tcpip directory. For example:
cd /usr/samples/tcpip
4. To set up the account, run the following script:
./anon.ftp
5. When prompted with Are you sure you want to modify /home/ftp?, type yes. Output similar to the
following displays:
Added user anonymous.
Made /home/ftp/bin directory.
Made /home/ftp/etc directory.
Made /home/ftp/pub directory.
Made /home/ftp/lib directory.
Made /home/ftp/dev/null entry.
Made /home/ftp/usr/lpp/msg/en_US directory.
6. Change to the /home/ftp directory. For example:
cd /home/ftp
7. Create a home subdirectory, by typing:
mkdir home
8. Change the permissions of the /home/ftp/home directory to drwxr-xr-x, by typing:
chmod 755 home
9. Change to the /home/ftp/etc directory, by typing:
cd /home/ftp/etc
10. Create the objrepos subdirectory, by typing:
mkdir objrepos
11. Change the permissions of the /home/ftp/etc/objrepos directory to drwxrwxr-x, by typing:
Security 53

chmod 775 objrepos
12. Change the owner and group of the /home/ftp/etc/objrepos directory to the root user and the system
group, by typing:
chown root:system objrepos
13. Create a security subdirectory, by typing
mkdir security
14. Change the permissions of the /home/ftp/etc/security directory to drwxr-x---, by typing:
chmod 750 security
15. Change the owner and group of the /home/ftp/etc/security directory to the root user and the security
group, by typing:
chown root:security security
16. Change to the /home/ftp/etc/security directory, by typing:
cd security
17. Add a user by typing the following SMIT fast path:
smit mkuser
In this scenario, we are adding a user named test.
18. In the SMIT fields, enter the following values:
User NAME [test]
ADMINISTRATIVE USER? true
Primary GROUP [staff]
Group SET [staff]
Another user can SU TO USER? true
HOME directory [/home/test]
After you enter your changes, press Enter to create the user. After the SMIT process completes, exit
SMIT.
19. Create a password for this user with the following command:
passwd test
When prompted, enter the desired password. You must enter the new password a second time for
confirmation.
20. Change to the /home/ftp/etc directory, by typing
cd /home/ftp/etc
21. Copy the /etc/passwd file to the /home/ftp/etc/passwd file, using the following command:
cp /etc/passwd /home/ftp/etc/passwd
22. Using your favorite editor, edit the /home/ftp/etc/passwd file. For example:
vi passwd
23. Remove all lines from the copied content except those for the root, ftp, and test users. After your edit,
the content should look similar to the following:
root:!:0:0::/:/bin/ksh
ftp:*:226:1::/home/ftp:/usr/bin/ksh
test:!:228:1::/home/test:/usr/bin/ksh
24. Save your changes and exit the editor.
25. Change the permissions of the /home/ftp/etc/passwd file to -rw-r--r--, by typing:
chmod 644 passwd
26. Change the owner and group of the /home/ftp/etc/passwd file to the root user and the security
group, by typing:
chown root:security passwd
27. Copy the contents of the /etc/security/passwd file to the /home/ftp/etc/security/passwd file, using
the following command:
54 AIX Version 6.1 Security

cp /etc/security/passwd /home/ftp/etc/security/passwd
28. Using your favorite editor, edit the /home/ftp/etc/security/passwd file. For example:
vi ./security/passwd
29. Remove all stanzas from the copied content except the stanza for the test user.
30. Remove the flags = ADMCHG line from the test user stanza. After your edits, the content should look
similar to the following:
test:
password = 2HaAYgpDZX3Tw
lastupdate = 990633278
31. Save your changes and exit the editor.
32. Change the permissions of the /home/ftp/etc/security/passwd file to -rw-------, by typing:
chmod 600 ./security/passwd
33. Change the owner and group of the /home/ftp/etc/security/passwd file to the root user and the
security group, by typing:
chown root:security ./security/passwd
34. Using your favorite editor, edit the /home/ftp/etc/group file. For example:
vi group
35. Add the following lines to the file:
system:*:0:
staff:*:1:test
36. Save your changes and exit the editor.
37. Change the permissions of the /home/ftp/etc/group file to -rw-r--r-–, by typing:
chmod 644 group
38. Change the owner and group of the /home/ftp/etc/group file to the root user and the security group,
by typing:
chown root:security group
39. Using your favorite editor, edit the /home/ftp/etc/security/group file. For example:
vi ./security/group
40. Add the following lines to the file:
system:
admin = true
staff
admin = false
41. Save your changes and exit the editor.
42. Change the permissions of the /home/ftp/etc/security/group file to -rw-r-----, by typing:
chmod 640 ./security/group
43. Change the owner and group of the /home/ftp/etc/security/group file to the root user and the security,
by typing:
chown root:security ./security/group
44. Use the following commands to copy the appropriate content into the /home/ftp/etc/objrepos
directory:
cp /etc/objrepos/CuAt ./objrepos
cp /etc/objrepos/CuAt.vc ./objrepos
cp /etc/objrepos/CuDep ./objrepos
cp /etc/objrepos/CuDv ./objrepos
cp /etc/objrepos/CuDvDr ./objrepos
cp /etc/objrepos/CuVPD ./objrepos
cp /etc/objrepos/Pd* ./objrepos
45. Change to the /home/ftp/home directory, by typing:
cd ../home
46. Make a new home directory for your user, by typing:
Security 55

mkdir test
This will be the home directory for the new ftp user.
47. Change the owner and group of the /home/ftp/home/test directory to the test user and the staff
group, by typing:
chown test:staff test
48. Change the permissions of the /home/ftp/home/test file to -rwx------, by typing:
chmod 700 test
At this point, you have ftp sublogin set up on your machine. You can test this with the following procedure:
1. Using ftp, connect to the host on which you created the test user. For example:
ftp MyHost
2. Log in as anonymous. When prompted for a password, press Enter.
3. Switch to the newly created test user, by using the following command:
user test
When prompted for a password, use the password you created in step 19 on page 54
4. Use the pwd command to verify the user’s home directory exists. For example:
ftp> pwd
/home/test
The output shows /home/test as an ftp subdirectory. The full path name on the host is actually
/home/ftp/home/test.
For more information:
v ″TCP/IP Security″ in Security
v ″ftp Command″ in AIX Version 6.1 Commands Reference
System special user accounts
AIX provides a default set of system special user accounts that prevents the root and system accounts
from owning all operating system files and file systems.
Attention: Use caution when removing a system special user account. You can disable a specific
account by inserting an asterisk (*) at the beginning of its corresponding line of the /etc/security/passwd
file. However, be careful not to disable the root user account. If you remove system special user accounts
or disable the root account, the operating system will not function.
The following accounts are predefined in the operating system:
adm The adm user account owns the following basic system functions:
v Diagnostics, the tools for which are stored in the /usr/sbin/perf/diag_tool directory.
v Accounting, the tools for which are stored in the following directories:
– /usr/sbin/acct
– /usr/lib/acct
– /var/adm
– /var/adm/acct/fiscal
– /var/adm/acct/nite
– /var/adm/acct/sum
bin The bin user account typically owns the executable files for most user commands. This account’s
primary purpose is to help distribute the ownership of important system directories and files so that
everything is not owned solely by the root and sys user accounts.
56 AIX Version 6.1 Security

daemon
The daemon user account exists only to own and run system server processes and their
associated files. This account guarantees that such processes run with the appropriate file access
permissions.
nobody
The nobody user account is used by the Network File System (NFS) to enable remote printing.
This account exists so that a program can permit temporary root access to root users. For
example, before enabling Secure RPC or Secure NFS, check the /etc/public key on the master
NIS server to find a user who has not been assigned a public key and a secret key. As root user,
you can create an entry in the database for each unassigned user by entering:
newkey -u username
Or, you can create an entry in the database for the nobody user account, and then any user can
run the chkey program to create their own entries in the database without logging in as root.
root The root user account, UID 0, through which you can perform system maintenance tasks and
troubleshoot system problems.
sys The sys user owns the default mounting point for the Distributed File Service (DFS™) cache, which
must exist before you can install or configure DFS on a client. The /usr/sys directory can also
store installation images.
system
System group is a system-defined group for system administrators. Users of the system group
have the privilege to perform some system maintenance tasks without requiring root authority.
Removing unnecessary default user accounts:
During installation of the operating system, a number of default user and group IDs are created.
Depending on the applications you are running on your system and where your system is located in the
network, some of these user and group IDs can become security weaknesses, vulnerable to exploitation. If
these users and group IDs are not needed, you can remove them to minimize security risks associated
with them.
The following table lists the most common default user IDs that you might be able to remove:
Table 4. Common default user IDs that you might be able to remove.
User ID Description
uucp, nuucp Owner of hidden files used by uucp protocol. The uucp user account is
used for the UNIX-to-UNIX Copy Program, which is a group of
commands, programs, and files, present on most AIX systems, that
allows the user to communicate with another AIX system over a
dedicated line or a telephone line.
lpd Owner of files used by printing subsystem
guest Allows access to users who do not have access to accounts
The following table lists common group IDs that might not be needed:
Table 5. Common group IDs that might not be needed.
Group ID Description
uucp Group to which uucp and nuucp users belong
printq Group to which lpd user belongs
Security 57

Analyze your system to determine which IDs are indeed not needed. There might also be additional user
and group IDs that you might not need. Before your system goes into production, perform a thorough
evaluation of available IDs.
Accounts created by security components:
When security components such as LDAP and OpenSSH are installed or configured, user and group
accounts are created.
The user and group accounts created include:
v Internet Protocol (IP) Security: IP Security adds the user ipsec and the group ipsec during its
installation. These IDs are used by the key management service. Note that the group ID in
/usr/lpp/group.id.keymgt cannot be customized before the installation.
v Kerberos and Public Key Infrastructure (PKI): These components do not create any new user or
group accounts.
v LDAP: When the LDAP client or server is installed, the ldap user account is created. The user ID of
ldap is not fixed. When the LDAP server is installed, it automatically installs DB2®. The DB2 installation
creates the group account dbsysadm. The default group ID of dbsysadm is 400. During the
configuration of the LDAP server, the mksecldap command creates the ldapdb2 user account.
v OpenSSH: During the installation of OpenSSH, the user sshd and group sshd are added to the system.
The corresponding user and group IDs must not be changed. The privilege separation feature in SSH
requires IDs.
Passwords
Guessing passwords is one of the most common attack methods that a system experiences. Therefore,
controlling and monitoring your password-restriction policy is essential.
AIX provides mechanisms to help you enforce a stronger password policy, such as establishing values for
the following:
v Minimum and maximum number of weeks that can elapse before and after a password can be changed
v Minimum length of a password
v Minimum number of alphabetic characters that can be used when selecting a password
Establishing good passwords:
Good passwords are effective first lines of defense against unauthorized entry into a system.
Passwords are effective if they are:
v A mixture of both uppercase and lowercase letters
v A combination of alphabetic, numeric, or punctuation characters. Also, they may have special characters
such as ~!@#$%^&*()-_=+[]{}|\;:’",.<>?/<space>
v Are not written down anywhere
v Are at least 7 to a maximum of PW_PASSLEN characters in length, if using the /etc/security/passwd
file (authentication implementations that use registries, such as LDAP, can have passwords that exceed
this maximum length)
v Are not real words that can be found in any dictionary
v Are not patterns of letters on the keyboard, like qwerty
v Are not real words or known patterns spelled backwards
v Do not contain any personal information about yourself, family, or friends
v Do not follow the same pattern as a previous password
v Can be typed relatively quickly so someone nearby cannot determine your password
58 AIX Version 6.1 Security

In addition to these mechanisms, you can further enforce stricter rules by restricting passwords so that
they cannot include standard UNIX words, which can be guessed. This feature uses the dictionlist, which
requires that you first have the bos.data and bos.txt file sets installed.
To implement the previously defined dictionlist, edit the following line in the /etc/security/users file:
dictionlist = /usr/share/dict/words
The /usr/share/dict/words file uses the dictionlist to prevent standard UNIX words from being used as
passwords.
Using the /etc/passwd file:
Traditionally, the /etc/passwd file is used to keep track of every registered user that has access to a
system.
The /etc/passwd file is a colon-separated file that contains the following information:
v User name
v Encrypted password
v User ID number (UID)
v User’s group ID number (GID)
v Full name of the user (GECOS)
v User home directory
v Login shell
The following is an example of an /etc/passwd file:
root:!:0:0::/:/usr/bin/ksh
daemon:!:1:1::/etc:
bin:!:2:2::/bin:
sys:!:3:3::/usr/sys:
adm:!:4:4::/var/adm:
uucp:!:5:5::/usr/lib/uucp:
guest:!:100:100::/home/guest:
nobody:!:4294967294:4294967294::/:
lpd:!:9:4294967294::/:
lp:*:11:11::/var/spool/lp:/bin/false
invscout:*:200:1::/var/adm/invscout:/usr/bin/ksh
nuucp:*:6:5:uucp login user:/var/spool/uucppublic:/usr/sbin/uucp/uucico
paul:!:201:1::/home/paul:/usr/bin/ksh
jdoe:*:202:1:John Doe:/home/jdoe:/usr/bin/ksh
AIX does not store encrypted passwords in the /etc/password file in the way that UNIX systems do, but in
the
1 file by default, which is only readable by the root user. The password filed in /etc/passwd is used by
AIX to signify if there is a password or whether the account is blocked.
The /etc/passwd file is owned by the root user and must be readable by all the users, but only the root
user has writable permissions, which is shown as -rw-r--r--. If a user ID has a password, then the
password field will have an ! (exclamation point). If the user ID does not have a password, then the
password field will have an * (asterisk). The encrypted passwords are stored in the /etc/security/passwd
file. The following example contains the last four entries in the /etc/security/passwd file based on the
entries from the /etc/passwd file shown previously.
guest:
password = *
nobody:
password = *
1. /etc/security/password
Security 59

lpd:
password = *
paul:
password = eacVScDKri4s6
lastupdate = 1026394230
flags = ADMCHG
The user ID jdoe does not have an entry in the /etc/security/passwd file because it does not have a
password set in the /etc/passwd file.
The consistency of the /etc/passwd file can be checked using the pwdck command. The pwdck
command verifies the correctness of the password information in the user database files by checking the
definitions for all of the users or for specified users.
Using the /etc/passwd file and network environments:
In a traditional networked environment, a user must have had an account on each system to gain access
to that system.
That typically meant that the user would have an entry in each of the /etc/passwd files on each system.
However, in a distributed environment, there is no easy way to ensure that every system had the same
/etc/passwd file. To solve this problem, several methods make the information in the /etc/passwd file
available over the network, including Network Information System (NIS) and NIS+.
For more information about NIS and NIS+, see “Network Information Services and NIS+ security” on page
272.
Hiding user names and passwords:
To achieve a higher level of security, ensure that user IDs and passwords are not visible within the system.
The .netrc files contain user IDs and passwords. This file is not protected by encryption or encoding, thus
its contents are clearly shown as plain text. To find these files, run the following command:
# find `awk -F: ’{print $6}’ /etc/passwd` -name .netrc -ls
After you locate these files, delete them. A more effective way to save passwords is by setting up
Kerberos. For more information about Kerberos, see “Kerberos” on page 291.
Setting recommended password options:
Proper password management can only be accomplished through user education. To provide some
additional security, the operating system provides configurable password restrictions. These allow the
administrator to constrain the passwords chosen by users and to force passwords to be changed regularly.
Password options and extended user attributes are located in the /etc/security/user file, an ASCII file that
contains attribute stanzas for users. These restrictions are enforced whenever a new password is defined
for a user. All password restrictions are defined per user. By keeping restrictions in the default stanza of
the /etc/security/user file, the same restrictions are enforced on all users. To maintain password security,
all passwords must be similarly protected.
Administrators can also extend the password restrictions. Using the pwdchecks attribute of the
/etc/security/user file, an administrator can add new subroutines (known as methods) to the password
restrictions code. Thus, local site policies can be added to and enforced by the operating system. For
more information, see “Extending password restrictions” on page 65.
60 AIX Version 6.1 Security

Apply password restrictions sensibly. Attempts to be too restrictive, such as limiting the password space,
which makes guessing the password easier, or forcing the user to select passwords that are difficult to
remember, which might then be written down, can jeopardize password security. Ultimately, password
security rests with the user. Simple password restrictions, coupled with sensible guidelines and an
occasional audit to verify that current passwords are unique, are the best policy.
The following table lists recommended values for some security attributes related to user passwords in the
/etc/security/user file.
Table 6. Recommended security attribute values for user passwords.
Attribute Description Recommended Value Default Value Maximum Value
dictionlist Verifies passwords
do not include
standard UNIX
words.
/usr/share/dict/words Not applicable Not applicable
histexpire Number of weeks
before password
can be reused.
26 0 260*
histsize Number of
password iterations
allowed.
20 0 50
maxage Maximum number
of weeks before
password must be
changed.
8 0 52
maxexpired Maximum number
of weeks beyond
maxage that an
expired password
can be changed by
the user. (Root is
exempt.)
2 -1 52
maxrepeats Maximum number
of characters that
can be repeated in
passwords.
2 8 8
minage Minimum number of
weeks before a
password can be
changed. This
should not be set to
a nonzero value
unless
administrators are
always easy to
reach to reset an
accidentally
compromised
password that was
recently changed.
0 0 52
minalpha Minimum number of
alphabetic
characters required
on passwords.
2 0 PW_PASSLEN**
Security 61
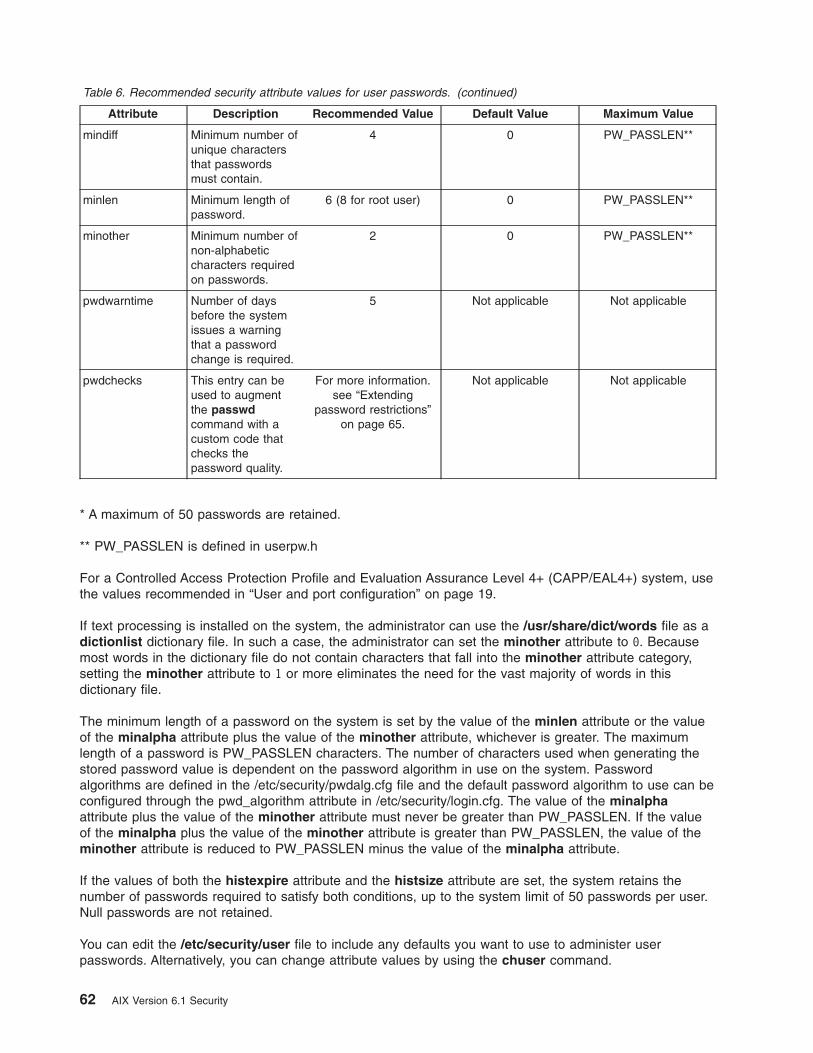
Table 6. Recommended security attribute values for user passwords. (continued)
Attribute Description Recommended Value Default Value Maximum Value
mindiff Minimum number of
unique characters
that passwords
must contain.
4 0 PW_PASSLEN**
minlen Minimum length of
password.
6 (8 for root user) 0 PW_PASSLEN**
minother Minimum number of
non-alphabetic
characters required
on passwords.
2 0 PW_PASSLEN**
pwdwarntime Number of days
before the system
issues a warning
that a password
change is required.
5 Not applicable Not applicable
pwdchecks This entry can be
used to augment
the passwd
command with a
custom code that
checks the
password quality.
For more information.
see “Extending
password restrictions”
on page 65.
Not applicable Not applicable
* A maximum of 50 passwords are retained.
** PW_PASSLEN is defined in userpw.h
For a Controlled Access Protection Profile and Evaluation Assurance Level 4+ (CAPP/EAL4+) system, use
the values recommended in “User and port configuration” on page 19.
If text processing is installed on the system, the administrator can use the /usr/share/dict/words file as a
dictionlist dictionary file. In such a case, the administrator can set the minother attribute to 0. Because
most words in the dictionary file do not contain characters that fall into the minother attribute category,
setting the minother attribute to 1 or more eliminates the need for the vast majority of words in this
dictionary file.
The minimum length of a password on the system is set by the value of the minlen attribute or the value
of the minalpha attribute plus the value of the minother attribute, whichever is greater. The maximum
length of a password is PW_PASSLEN characters. The number of characters used when generating the
stored password value is dependent on the password algorithm in use on the system. Password
algorithms are defined in the /etc/security/pwdalg.cfg file and the default password algorithm to use can be
configured through the pwd_algorithm attribute in /etc/security/login.cfg. The value of the minalpha
attribute plus the value of the minother attribute must never be greater than PW_PASSLEN. If the value
of the minalpha plus the value of the minother attribute is greater than PW_PASSLEN, the value of the
minother attribute is reduced to PW_PASSLEN minus the value of the minalpha attribute.
If the values of both the histexpire attribute and the histsize attribute are set, the system retains the
number of passwords required to satisfy both conditions, up to the system limit of 50 passwords per user.
Null passwords are not retained.
You can edit the /etc/security/user file to include any defaults you want to use to administer user
passwords. Alternatively, you can change attribute values by using the chuser command.
62 AIX Version 6.1 Security
Other commands that can be used with this file are the mkuser, lsuser, and rmuser commands. The
mkuser command creates an entry for each new user in the /etc/security/user file and initializes its
attributes with the attributes defined in the /usr/lib/security/mkuser.default file. To display the attributes
and their values, use the lsuser command. To remove a user, use the rmuser command.
Support for passwords with more than 8 characters and Loadable Password Algorithm:
Recent advancements in computer hardware makes tradition UNIX password encryption vulnerable to
brute-force password guessing attacks. A cryptographically weak algorithm can lead to recovery of even
strong passwords. AIX 5L introduced Loadable Password Algorithm (LPA) that supports secure password
hash mechanisms. It also removes the eight-character password limitation.
Traditional password crypt function:
The standard AIX authentication mechanism uses a one-way hash function called crypt to authenticate
users. The crypt function is a modified DES algorithm. It performs a one-way encryption of a fixed data
array with the supplied password and a Salt.
The crypt function uses only the first eight characters from the password string; the user’s password is
truncated to eight characters. If the password contains less than eight characters, it is padded with zero
bits on the right. The 56-bit DES key is derived by using the 7 bits from each character.
Salt is a two-character string (the 12 bits of the Salt is used to perturb the DES algorithm) chosen from the
character set ″A-Z″, ″a-z″,″0-9″,″.″(period) and ″/″. Salt is used to vary the hashing algorithm, so that the
same clear text password can produce 4,096 possible password encryptions. A modification to the DES
algorithm, swapping bits i and i+24 in the DES E-Box output when bit i is set in the Salt, achieves this
while also making DES encryption hardware useless for password guessing.
The 64-bit all-bits-zero block is encrypted 25 times with the DES key. The final output is the 12-bit salt
concatenated with the encrypted 64-bit value. The resulting 76-bit value is recoded into 13 printable ASCII
characters in the form of base64.
Password hashing algorithms:
Hashing algorithms such as MD5 are harder to break than the crypt function. This provides a strong
mechanism against brute-force password guessing attacks. Since the whole password is used for
generating the hash, there is no password length limitation when password hashing algorithms are used to
encrypt the password.
Loadable Password Algorithm (LPA):
AIX 5L implemented a Loadable Password Algorithm (LPA) mechanism that can easily deploy new
password encryption algorithms.
Each supported password encryption algorithm is implemented as a LPA load module that is loaded at
runtime when the algorithm is needed. The supported LPAs and their attributes are defined in the
/etc/security/pwdalg.cfg system configuration file.
An administrator can set up a system-wide password encryption mechanism that uses a specific LPA to
encrypt the passwords. After the system-wide password mechanism is changed, AIX 5L still supports
passwords that are encrypted by the previous selected password encryption mechanisms, such as the
crypt function.
Support for passwords longer than eight characters:
Security 63

All of the LPAs implemented for AIX 5L support passwords longer than eight characters. The password
length limitations vary for different LPAs. The maximum password length supported by AIX 5L is 255
characters.
LPA configuration file:
The LPA configuration file is /etc/security/pwdalg.cfg. It is a stanza file that defines the attributes of the
supported LPAs.
The following LPA attributes are defined in the config file:
v The path to the LPA module
v The optional flags that is passed to the LPA module at runtime
The LPA attributes defined in the configuration file can be accessed with the getconfattr and setconfattr
interfaces.
The following example stanza in /etc/security/pwdalg.cfg defines a LPA named ssha256:
ssha256:
lpa_module = /usr/lib/security/ssha
lpa_options = algorithm=sha256
System password algorithm:
A system administrator can set a system-wide password algorithm by selecting an LPA as the password
hashing algorithm. There can only be one active system password algorithm at a time. The system
password algorithm is defined by the pwd_algorithm system attribute in the usw stanza in the
/etc/security/login.cfg file.
The valid values for the pwd_algorithm attribute in the /etc/security/login.cfg file are LPA stanza names
that are defined in the /etc/security/pwdalg.cfg file. Another valid value for the pwd_algorithm attribute is
crypt, which refers to traditional crypt encryption. If the pwd_algorithm attribute is omitted from the
config file, crypt is used as the default value.
The following example of the /etc/security/login.cfg file uses ssha256 LPA as the system-wide password
encryption algorithm.
... ...
usw:
shells = /bin/sh,/bin/bsh,/bin/csh,/bin/ksh,/bin/tsh,/bin/ksh93
maxlogins = 32767
logintimeout = 60
maxroles = 8
auth_type = STD_AUTH
pwd_algorithm = ssha256
... ...
The system password algorithm takes effect only for newly created passwords and changed passwords.
After the migration, all subsequent new passwords or password changes use the system password
algorithm. The passwords that existed before the system password algorithm is chosen, either generated
by the standard crypt function or by other supported LPA modules, still work on the system. Therefore,
mixed passwords that were generated by different LPAs can coexist on the system.
Setting up the system password algorithm:
A system administrator can use the chsec command to set up the system password algorithm or use an
editor such as vi to manually modify the pwd_algorithm attribute in the /etc/security/login.cfg file.
64 AIX Version 6.1 Security
It is recommended that you use the chsec command to set the system password algorithm, as the chsec
command automatically checks the definition of the specified LPA.
Using the chsec command
Run the following command to set the smd5 LPA as the system-wide password encryption module:
chsec -f /etc/security/login.cfg -s usw -a pwd_algorithm=smd5
When you use the chsec command to modify the pwd_algorithm attribute, the chsec command checks
the /etc/security/pwdalg.cfg file to verify the specified LPA. The chsec command fails if this check fails.
Using an editor
If you use an editor to manually change the pwd_algorithm attribute value in the /etc/security/login.cfg
file, ensure that the specified value is the name of a stanza that is defined in the /etc/security/pwdalg.cfg
file.
Extending password restrictions:
The rules used by the password program to accept or reject passwords (the password composition
restrictions) can be extended by system administrators to provide site-specific restrictions.
Restrictions are extended by adding methods, which are called during a password change. The
pwdchecks attribute in the /etc/security/user file specifies the methods called.
The AIX Version 6.1 Technical Reference contains a description of the pwdrestrict_method, the
subroutine interface to which specified password restriction methods must conform. To correctly extend the
password composition restrictions, the system administrator must program this interface when writing a
password-restriction method. Use caution in extending the password-composition restrictions. These
extensions directly affect the login command, the passwd command, the su command, and other
programs. The security of the system could easily be subverted by malicious or defective code.
User authentication
Identification and authentication are used to establish a user’s identity.
Each user is required to log in to the system. The user supplies the user name of an account and a
password if the account has one (in a secure system, all accounts must either have passwords or be
invalidated). If the password is correct, the user is logged in to that account; the user acquires the access
rights and privileges of the account. The /etc/passwd and /etc/security/passwd files maintain user
passwords.
By default users are defined in the Files registry. This means that user account and group information is
stored in the flat-ASCII files. With the introduction of plug-in load modules, users can be defined in other
registries too. For example, when the LDAP plug-in module is used for user administration, then the user
definitions are stored in the LDAP repository. In this case there will be no entry for users in the
/etc/security/user file (there is an exception to this for the user attributes SYSTEM and registry). When a
compound load module (i.e. load modules with an authentication and database part) is used for user
administration, the database half determines how AIX user account information is administrated, and the
authentication half describes the authentication and password related administration. The authentication
half may also describe authentication-specific user account administration attributes by implementing
certain load module interfaces (newuser, getentry, putentry etc).
Alternative methods of authentication are integrated into the system by means of the SYSTEM attribute
that appears in /etc/security/user file. The SYSTEM attribute allows the system administrator to specify to
a fine granularity to which method (or methods) a user must successfully authenticate in order to gain
access to the system. For instance, the Distributed Computing Environment (DCE) requires password
Security 65

authentication but validates these passwords in a different manner than the encryption model used in the
/etc/passwd command and the /etc/security/passwd command.
The value of the SYSTEM attribute is defined through a grammar. By using this grammar, the system
administrators can combine one or more methods to authenticate a particular user to the system. The well
known method tokens are compat, DCE, files and NONE.
The system default is compat. The default SYSTEM=compat tells the system to use the local database for
authentication and, if no resolution is found, the Network Information Services (NIS) database is tried. The
files token specifies that only local files are to be used during authentication, whereas SYSTEM=DCE results
in a DCE authentication flow.
The NONE token turns off method authentication. To turn off all authentication, the NONE token must appear
in the SYSTEM and auth1 lines of the user’s stanza.
You can specify two or more methods and combine them with the logical constructors AND and OR. For
instance SYSTEM=DCE OR compat indicates that the user is allowed to login if either DCE or local
authentication (crypt()) succeeds in this given order.
In a similar fashion a system administrator can use authentication load module names for the SYSTEM
attribute. For instance when SYSTEM attribute is set to SYSTEM=KRB5files OR compat, the AIX host will
first try a Kerberos flow for authentication and if it fails, then it will try standard AIX authentication.
SYSTEM and registry attributes are always stored on the local file system in the /etc/security/user file. If
an AIX user is defined in LDAP and the SYSTEM and registry attributes are set accordingly, then the user
will have an entry in the /etc/security/user file.
The SYSTEM and registry attributes of a user can be changed using the chuser command.
Acceptable tokens for the SYSTEM attribute can be defined in the /usr/lib/security/methods.cfg file.
Note: The root user is always authenticated by means of the local system security file. The SYSTEM
attribute entry for the root user is specifically set to SYSTEM=compat in the/etc/security/user file.
Alternative methods of authentication are integrated into the system by means of the SYSTEM attribute
that appears in /etc/security/user. For instance, the Distributed Computing Environment (DCE) requires
password authentication but validates these passwords in a manner different from the encryption model
used in etc/passwd and /etc/security/passwd. Users who authenticate by means of DCE can have their
stanza in /etc/security/user set to SYSTEM=DCE.
Other SYSTEM attribute values are compat, files, and NONE. The compat token is used when name
resolution (and subsequent authentication) follows the local database, and if no resolution is found, the
Network Information Services (NIS) database is tried. The files token specifies that only local files are to
be used during authentication. Finally, the NONE token turns off method authentication. To turn off all
authentication, the NONE token must appear in the SYSTEM and auth1 lines of the user’s stanza.
Other acceptable tokens for the SYSTEM attribute can be defined in /usr/lib/security/methods.cfg.
Note: The root user is always authenticated by means of the local system security file. The SYSTEM
attribute entry for the root user is specifically set to SYSTEM = "compat" in /etc/security/user.
See Operating system and device management for more information on protecting passwords.
66 AIX Version 6.1 Security
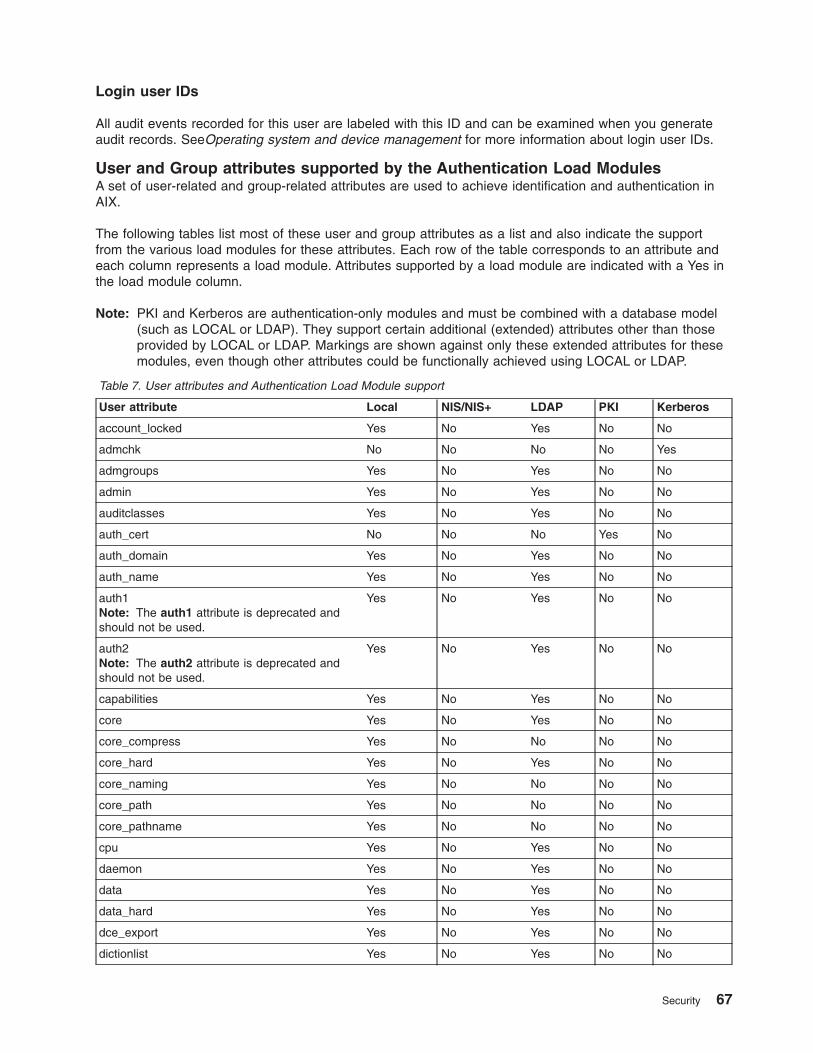
Login user IDs
All audit events recorded for this user are labeled with this ID and can be examined when you generate
audit records. SeeOperating system and device management for more information about login user IDs.
User and Group attributes supported by the Authentication Load Modules
A set of user-related and group-related attributes are used to achieve identification and authentication in
AIX.
The following tables list most of these user and group attributes as a list and also indicate the support
from the various load modules for these attributes. Each row of the table corresponds to an attribute and
each column represents a load module. Attributes supported by a load module are indicated with a Yes in
the load module column.
Note: PKI and Kerberos are authentication-only modules and must be combined with a database model
(such as LOCAL or LDAP). They support certain additional (extended) attributes other than those
provided by LOCAL or LDAP. Markings are shown against only these extended attributes for these
modules, even though other attributes could be functionally achieved using LOCAL or LDAP.
Table 7. User attributes and Authentication Load Module support
User attribute Local NIS/NIS+ LDAP PKI Kerberos
account_locked Yes No Yes No No
admchk No No No No Yes
admgroups Yes No Yes No No
admin Yes No Yes No No
auditclasses Yes No Yes No No
auth_cert No No No Yes No
auth_domain Yes No Yes No No
auth_name Yes No Yes No No
auth1
Note: The auth1 attribute is deprecated and
should not be used.
Yes No Yes No No
auth2
Note: The auth2 attribute is deprecated and
should not be used.
Yes No Yes No No
capabilities Yes No Yes No No
core Yes No Yes No No
core_compress Yes No No No No
core_hard Yes No Yes No No
core_naming Yes No No No No
core_path Yes No No No No
core_pathname Yes No No No No
cpu Yes No Yes No No
daemon Yes No Yes No No
data Yes No Yes No No
data_hard Yes No Yes No No
dce_export Yes No Yes No No
dictionlist Yes No Yes No No
Security 67

Table 7. User attributes and Authentication Load Module support (continued)
User attribute Local NIS/NIS+ LDAP PKI Kerberos
expires Yes No Yes No Yes
flags Yes No Yes No No
fsize Yes No Yes No No
fsize_hard Yes No Yes No No
funcmode Yes No Yes No No
gecos Yes Yes Yes No No
groups Yes Yes Yes No No
groupsids Yes Yes Yes No No
histexpire Yes No Yes No No
home Yes Yes Yes No No
host_last_login Yes No Yes No No
host_last_unsuccessful_login Yes Yes Yes No No
hostsallowedlogin Yes No Yes No No
hostsdeniedlogin Yes No Yes No No
id Yes Yes Yes No No
krb5_attributes No No No No Yes
krb5_kvno No No No No Yes
krb5_last_pwd_change No No No No Yes
krb5_max_renewable_life No No No No Yes
krb5_mknvo No No No No Yes
krb5_mod_date No No No No Yes
krb5_mod_name No No No No Yes
krb5_names No No No No Yes
krb5_principal No No No No Yes
krb5_principal_name No No No No Yes
krb5_realm No No No No Yes
lastupdate Yes Yes Yes No No
login Yes No Yes No No
loginretries Yes No Yes No No
logintimes Yes No Yes No No
maxage Yes Yes Yes No Yes
maxexpired Yes Yes Yes No No
maxrepeats Yes No Yes No No
maxulogs Yes No Yes No No
minage Yes Yes Yes No No
minalpha Yes No Yes No No
mindiff Yes No Yes No No
minlen Yes No Yes No No
minother Yes No Yes No No
nofiles Yes No Yes No No
68 AIX Version 6.1 Security
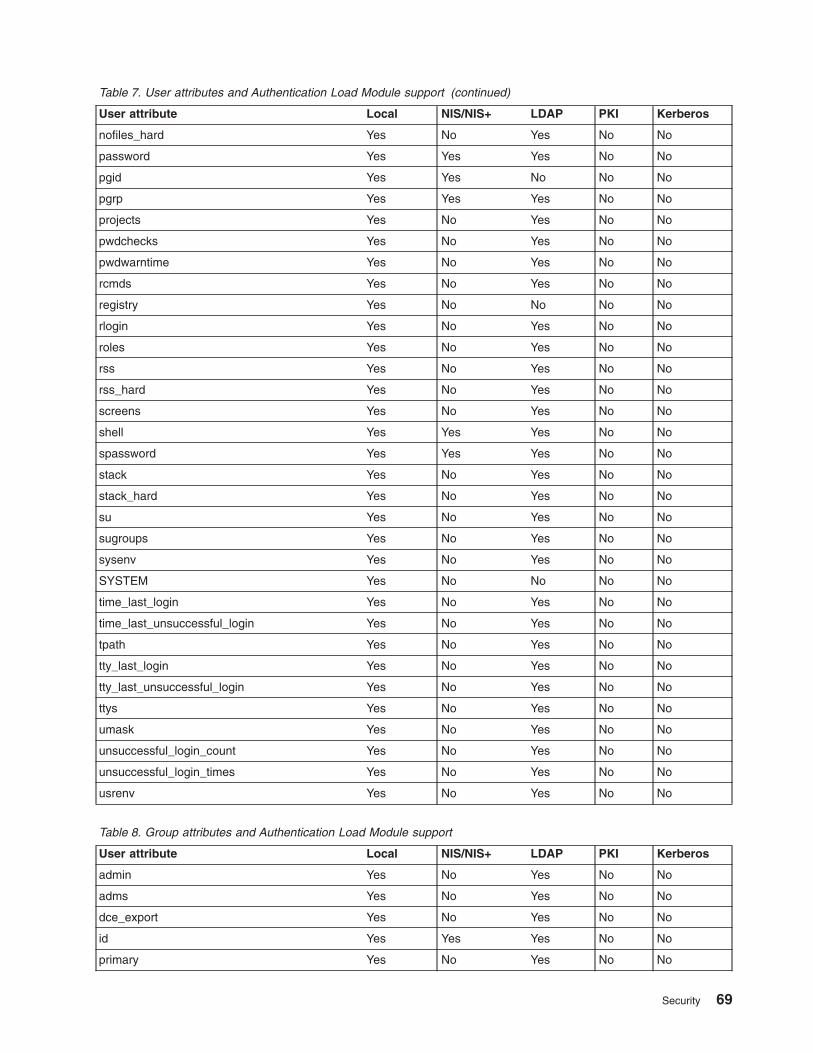
Table 7. User attributes and Authentication Load Module support (continued)
User attribute Local NIS/NIS+ LDAP PKI Kerberos
nofiles_hard Yes No Yes No No
password Yes Yes Yes No No
pgid Yes Yes No No No
pgrp Yes Yes Yes No No
projects Yes No Yes No No
pwdchecks Yes No Yes No No
pwdwarntime Yes No Yes No No
rcmds Yes No Yes No No
registry Yes No No No No
rlogin Yes No Yes No No
roles Yes No Yes No No
rss Yes No Yes No No
rss_hard Yes No Yes No No
screens Yes No Yes No No
shell Yes Yes Yes No No
spassword Yes Yes Yes No No
stack Yes No Yes No No
stack_hard Yes No Yes No No
su Yes No Yes No No
sugroups Yes No Yes No No
sysenv Yes No Yes No No
SYSTEM Yes No No No No
time_last_login Yes No Yes No No
time_last_unsuccessful_login Yes No Yes No No
tpath Yes No Yes No No
tty_last_login Yes No Yes No No
tty_last_unsuccessful_login Yes No Yes No No
ttys Yes No Yes No No
umask Yes No Yes No No
unsuccessful_login_count Yes No Yes No No
unsuccessful_login_times Yes No Yes No No
usrenv Yes No Yes No No
Table 8. Group attributes and Authentication Load Module support
User attribute Local NIS/NIS+ LDAP PKI Kerberos
admin Yes No Yes No No
adms Yes No Yes No No
dce_export Yes No Yes No No
id Yes Yes Yes No No
primary Yes No Yes No No
Security 69

Table 8. Group attributes and Authentication Load Module support (continued)
User attribute Local NIS/NIS+ LDAP PKI Kerberos
projects Yes No Yes No No
screens Yes No Yes No No
users Yes Yes Yes No No
Disk quota system overview
The disk quota system allows system administrators to control the number of files and data blocks that can
be allocated to users or groups.
Disk quota system concept:
The disk quota system, based on the Berkeley Disk Quota System, provides an effective way to control
the use of disk space. The quota system can be defined for individual users or groups, and is maintained
for each journaled file system (JFS and JFS2).
The disk quota system establishes limits based on the following parameters that can be changed with the
edquota command for JFS file systems and the j2edlimit command for JFS2 file systems:
v User’s or group’s soft limits
v User’s or group’s hard limits
v Quota grace period
The soft limit defines the number of 1 KB disk blocks or files the user or group will be allowed to use
during normal operations. The hard limit defines the maximum amount of disk blocks or files the user can
accumulate under the established disk quotas. The quota grace period allows the user to exceed the soft
limit for a short period of time (the default value is one week). If the user fails to reduce usage below the
soft limit during the specified time, the system will interpret the soft limit as the maximum allocation
allowed, and no further storage is allocated to the user. The user can reset this condition by removing
enough files to reduce usage below the soft limit.
The disk quota system tracks user and group quotas in the quota.user and quota.group files that reside
in the root directories of file systems enabled with quotas. These files are created with the quotacheck
and edquota commands and are readable with the quota commands.
Recovering from over-quota conditions:
You can recover from over-quota conditions by reducing file system usage.
To reduce file system usage when you have exceeded quota limits, you can use the following methods:
v Stop the current process that caused the file system to reach its limit, remove surplus files to bring the
limit below quota, and retry the failed program.
v If you are running an editor such as vi, use the shell escape sequence to check your file space, remove
surplus files, and return without losing your edited file. Alternatively, if you are using the C or Korn
shells, you can suspend the editor with the Ctrl-Z key sequence, issue the file system commands, and
then return with the fg (foreground) command.
v Temporarily write the file to a file system where quota limits have not been exceeded, delete surplus
files, and then return the file to the correct file system.
Setting up the disk quota system:
Typically, only those file systems that contain user home directories and files require disk quotas.
70 AIX Version 6.1 Security

Consider implementing the disk quota system under the following conditions:
v Your system has limited disk space.
v You require more file-system security.
v Your disk-usage levels are large, such as at many universities.
If these conditions do not apply to your environment, you might not want to create disk-usage limits by
implementing the disk quota system.
The disk quota system can be used only with the journaled file system.
Note: Do not establish disk quotas for the /tmp file system.
To set up the disk quota system, use the following procedure:
1. Log in with root authority.
2. Determine which file systems require quotas.
Note: Because many editors and system utilities create temporary files in the /tmp file system, it
must be free of quotas.
3. Use the chfs command to include the userquota and groupquota quota configuration attributes in the
/etc/filesystems file. The following example uses the chfs command to enable user quotas on the
/home file system:
chfs -a "quota = userquota" /home
To enable both user and group quotas on the /home file system, type:
chfs -a "quota = userquota,groupquota" /home
The corresponding entry in the /etc/filesystems file is displayed as follows:
/home:
dev = /dev/hd1
vfs = jfs
log = /dev/hd8
mount = true
check = true
quota = userquota,groupquota
options = rw
4. Optionally, specify alternate disk quota file names. The quota.user and quota.group file names are
the default names located at the root directories of the file systems enabled with quotas. You can
specify alternate names or directories for these quota files with the userquota and groupquota
attributes in the /etc/filesystems file.
The following example uses the chfs command to establish user and group quotas for the /home file
system, and names the myquota.user and myquota.group quota files:
chfs -a "userquota = /home/myquota.user" -a "groupquota = /home
/myquota.group" /home
The corresponding entry in the /etc/filesystems file is displayed as follows:
/home:
dev = /dev/hd1
vfs = jfs
log = /dev/hd8
mount = true
check = true
quota = userquota,groupquota
userquota = /home/myquota.user
groupquota = /home/myquota.group
options = rw
5. If they are not previously mounted, mount the specified file systems.
Security 71

6. Set the desired quota limits for each user or group. Use the edquota command to create each user or
group’s soft and hard limits for allowable disk space and maximum number of files.
The following example entry shows quota limits for the davec user:
Quotas for user davec:
/home: blocks in use: 30, limits (soft = 100, hard = 150)
inodes in use: 73, limits (soft = 200, hard = 250)
This user has used 30 KB of the maximum 100 KB of disk space. Of the maximum 200 files, davec
has created 73. This user has buffers of 50 KB of disk space and 50 files that can be allocated to
temporary storage.
When establishing disk quotas for multiple users, use the -p flag with the edquota command to
duplicate a user’s quotas for another user.
To duplicate the quotas established for user davec for user nanc, type:
edquota -p davec nanc
7. Enable the quota system with the quotaon command. The quotaon command enables quotas for a
specified file system, or for all file systems with quotas (as indicated in the /etc/filesystems file) when
used with the -a flag.
8. Use the quotacheck command to check the consistency of the quota files against actual disk usage.
Note: Do this each time you first enable quotas on a file system and after you reboot the system. The
quotacheck command takes longer to run on a JFS filesystem than on a JFS2 filesystem of the
same size. If quotas are enabled all the time prior to reboot, it is not necessary to run the
quotacheck command on the filesystem during reboot.
To enable this check and to turn on quotas during system startup, add the following lines at the end of
the /etc/rc file:
echo " Enabling filesystem quotas "
/usr/sbin/quotacheck -a
/usr/sbin/quotaon -a
Role Based Access Control (RBAC)
System administration is an important aspect of daily operations, and security is an inherent part of most
system administration functions. Also, in addition to securing the operating environment, it is necessary to
closely monitor daily system activities.
Most environments require that different users manage different system administration duties. It is
necessary to maintain separation of these duties so that no single system management user can
accidentally or maliciously bypass system security. While traditional UNIX system administration cannot
achieve these goals, Role Based Access Control (RBAC) can.
Traditional UNIX administration limitations
RBAC resolves some traditional UNIX system administration issues. These issues include the following:
root administrative account
Traditionally, AIX and other UNIX operating systems have defined a single system administrator account
named root (normally designated with a UID of 0) that can perform all privileged system administration
tasks on the system. Reliance on a single user for all system administration tasks is a problem in regard to
the separation of duties. While a single administrative account is acceptable in certain environments, many
environments require multiple administrators, with each administrator responsible for different system
administration tasks.
In order to share the administration responsibilities with multiple users of the system, the historical practice
was to either share the password of the root user or create another user with the same UID as the root
user. This method of sharing system administration duties presents security issues, since each
72 AIX Version 6.1 Security

administrator has complete system control and there is no method to limit the operations that an
administrator can perform. Since the root user is the most privileged user, root users can perform
unauthorized operations and can also erase any audits of these activities, making it impossible to track
these administrative actions.
Privilege escalation through SUID
Access control in UNIX operating systems has historically been performed by using the UID associated
with the process to determine access. However, the root UID of 0 has traditionally been allowed to bypass
permission checks. Therefore, a process that is running as the root user can pass any access checks and
perform any operation. This is a security issue for the UNIX concept of setuid applications.
The setuid concept allows a command to run under a different identity then the user who invoked the
command. This is necessary when a normal user needs to accomplish a privileged task. An example of
this is the AIX passwd command. Since a normal user does not have access to the file that stores user
passwords, an additional privilege is needed to change the user’s password, so the passwd command is
setuid to the root user. When a normal user runs the passwd command, it appears to the operating
system that the root user is accessing the file and the access is granted.
While this concept does provide the desired functionality, it carries with it an inherent risk. Since the setuid
program is effectively running in the root context, if an attacker successfully takes over the program before
it exits, then the attacker has all of the powers of root and can then bypass all operating system access
checks and perform all operations. A better solution is to only assign a subset of the root user privileges to
the program so that the “Least privilege principal” on page 74 is followed and the threat is mitigated.
Elements of RBAC
RBAC allows the creation of roles for system administration and the delegation of administrative tasks
across a set of trusted system users. In AIX, RBAC provides a mechanism through which the
administrative functions typically reserved for the root user can be assigned to regular system users.
RBAC accomplishes this by defining job functions (roles) within an organization and assigning those roles
to specific users. RBAC is essentially a framework that allows for system administration through the use of
roles. Roles are typically defined with the scope of managing one or more administrative aspects of the
environment. Assigning a role to a user effectively confers a set of permissions or privileges and powers to
the user. For example, one management role might be to manage the filesystems, while another role might
be to enable the creation of user accounts.
RBAC administration has the following advantages as compared to traditional UNIX administration:
v System administration can be performed by multiple users without sharing account access.
v Security isolation through granular administration since each administrator does not need to be granted
more power than is required.
v Allows for enforcing a least-privilege security model. Users and applications are only granted necessary
privileges when required, thereby reducing the impact a system attacker can have.
v Allows for implementing and enforcing company-wide security policies consistently in regard to system
management and access control.
v A role definition can be created once and then assigned to users or removed as needed when users
change job functions.
The RBAC framework is centered on the following three core concepts:
v Authorizations
v Roles
v Privileges
Together, these concepts allow an RBAC system to enforce the least-privilege principle.
Security 73

Authorizations:
An authorization is a text string associated with security-related functions or commands. Authorizations
provide a mechanism to grant rights to users to perform privileged actions and to provide different levels of
functionality to different classes of users.
When a command governed by an authorization is run, access is granted only if the invoking user has the
required authorization. An authorization can be thought of as a key that is able to unlock access to one or
more commands. Authorizations are not directly assigned to users. Users are assigned roles, which are a
collection of authorizations.
Roles:
Roles allow a set of management functions in the system to be grouped together. Using the analogy that
an authorization is a key, a role can be thought of as a key ring that can hold multiple authorizations.
Authorizations may be directly assigned to a role or indirectly assigned through a sub-role. A sub-role is
simply another role that a given role inherits the authorizations from.
A role by itself does not grant the user any additional powers, but instead serves as a collection
mechanism for authorizations and a facility for assigning authorizations to a user. Defining a role and
assigning the role to a user determines the system administration tasks that can be performed by the user.
After a role has been defined, the role administrator can assign the role to one or more users to manage
the privileged operations that are represented by the role. Additionally, a user can be assigned multiple
roles. Once a role has been assigned to a user, the user can use the authorizations assigned to the role to
unlock access to administrative commands on the system.
Organizational policies and procedures determine how to allocate roles to users. Do not assign too many
authorizations to a role or assign a role to too many users. Most roles should only be assigned to
members of the administrative staff. Just as the powers of root have historically only been given to trusted
users, roles should only be assigned to trusted users. Grant roles only to users with legitimate needs and
only for the duration of the need. This practice reduces the chances that an unauthorized user can acquire
or abuse authorizations.
Privileges:
A privilege is a process attribute that allows the process to bypass specific system restrictions and
limitations.
The privilege mechanism provides trusted applications with capabilities that are not permitted to untrusted
applications. For example, privileges can be used to override security constraints, to permit the expanded
use of certain system resources such as memory and disk space, and to adjust the performance and
priority of a process. A privilege can be thought of as an ability that allows a process to overcome a
specific security constraint in the system.
Authorizations and roles are user-level tools that configure a user’s ability to access privileged operations.
On the other hand, privileges are the restriction mechanism used in the kernel to determine if a process is
allowed to perform a particular action.
Privileges are associated with a process and are typically acquired through the invocation of a privileged
command. Because of these associated privileges, the process is eligible to perform the related privileged
operation. For example, if a user uses a role that has an authorization to run a command, a set of
privileges is assigned to the process when the command is run.
Least privilege principal:
74 AIX Version 6.1 Security

In an operating system, some operations are privileged and permission to perform these operations is
restricted to authorized users. These privileged operations usually include tasks such as rebooting the
system, adding and modifying filesystems, adding and deleting users, and modifying the system date and
time.
In traditional UNIX systems, a process or user can be in normal mode or privileged mode (also called
superuser or root). A process running as root can execute any command and perform any system
operation, while a normal user cannot perform privileged operations. A traditional UNIX system has a very
coarse all-or-nothing concept of privilege and faces the security threat of the overprivileged administrator.
The traditional UNIX approach where a single privileged mode grants all access to the system is too
coarse to meet the requirements of highly secured systems. A system designed to be secure requires that
each process be granted the most restrictive set of privileges needed to perform a task. Privileges provide
the advantage that only processes that require certain privileges need to be granted these privileges. This
restriction of privileges is known as the principle of least privilege and is useful in limiting damage to the
system due to careless or malicious administrators and operators.
For example, changing a password requires certain privileges in order to access files that are not typically
accessible by a normal user. If users always had these privileges, they could also perform other actions
that are undesirable from a security standpoint. Therefore, the required privileges are granted only to the
passwd command and not to all users.
In an RBAC environment, users themselves do not have any inherent privileges. Users are simply allowed
to run certain commands which are then granted privileges. If a user was instead directly granted
privileges, they could use the privileges at any time and in any manner wanted. Limiting privileges to
individual commands allows the context in which the privileges are applied to be constrained. This leads to
enhanced security because if a trusted application is exploited by an attacker, the attacker will have a
limited set of privileges instead of the whole powers of root with all privileges.
Trusted applications should be carefully inspected before they are granted privileges. In addition, privileges
should only be granted when and where necessary for the application. Trusted applications are just like
any other program, the only difference being that trusted applications are allowed to perform actions that
are denied to untrusted applications.
AIX RBAC
AIX has provided a limited RBAC implementation since AIX 4.2.1.
Beginning with AIX 6.1, a new implementation of RBAC provides for a very fine granular mechanism to
segment system administration tasks. Since these two RBAC implementations differ greatly in functionality,
the following terms are used:
Legacy RBAC Mode
The historic behavior of AIX roles that was introduced in AIX 4.2.1
Enhanced RBAC Mode
The new implementation introduced with AIX 6.1
Both modes of operation are supported. However, Enhanced RBAC Mode is the default on a newly
installed AIX 6.1 system. The following sections provide a brief discussion of the two modes and their
differences, and information on configuring the system to operate in the desired RBAC mode.
Legacy RBAC Mode:
AIX 4.2.1 provided limited RBAC functionality that allowed non-root users to perform certain system
administration tasks.
Security 75

In this RBAC implementation, when a given administrative command is invoked by a non-root user, the
code in the command determines if the user is assigned a role with the required authorization. If a match
is found, the command execution continues. If not, the command fails with an error. It is often required that
the command being controlled by an authorization be setuid to the root user for an authorized invoker to
have the necessary privilege to accomplish the operation.
This RBAC implementation also introduced a predefined but user-expandable set of authorizations that
can be used to determine access to administrative commands. Additionally, a framework of administrative
commands and interfaces to create roles, assign authorizations to roles, and assign roles to users is also
provided.
While this implementation provides the ability to partially segment system administration responsibilities, it
functions with the following constraints:
1. The framework requires changes to commands and applications to be RBAC-enabled.
2. Predefined authorizations are not granular and the mechanisms to create authorizations are not robust.
3. Membership in a certain group is often required as well as having a role with a given authorization in
order to run a command.
4. Separation of duties is difficult to implement. If a user is assigned multiple roles, there is no way to act
under a single role. The user always has all of the authorizations for all of their roles.
5. The least privilege principle is not adopted in the operating system. Commands must typically be SUID
to the root user.
Legacy RBAC Mode is supported for compatibility, but Enhanced RBAC Mode is the default RBAC mode.
Enhanced RBAC Mode is preferred on AIX.
Enhanced RBAC Mode:
A more powerful implementation of RBAC is provided with AIX 6.1. Applications that require administrative
privileges for certain operations have new integration options with the enhanced AIX RBAC infrastructure.
These integration options center on the use of granular privileges and authorizations and the ability to
configure any command on the system as a privileged command. Features of the enhanced RBAC mode
will be installed and enabled by default on all installations of AIX beginning with AIX 6.1.
The enhanced RBAC mode provides a configurable set of authorizations, roles, privileged commands,
devices and files through the following RBAC databases listed below. With enhanced RBAC, the
databases can reside either in the local filesystem or can be managed remotely through LDAP.
v Authorization database
v Role database
v Privileged command database
v Privileged device database
v Privileged file database
Enhanced RBAC mode introduces a new naming convention for authorizations that allows a hierarchy of
authorizations to be created. AIX provides a granular set of system-defined authorizations and an
administrator is free to create additional user-defined authorizations as necessary.
The behavior of roles has been enhanced to provide separation of duty functionality. Enhanced RBAC
introduces the concept of role sessions. A role session is a process with one or more associated roles. A
user can create a role session for any roles that they have been assigned, thus activating a single role or
several selected roles at a time. By default, a new system process does not have any associated roles.
Roles have further been enhanced to support the requirement that the user must authenticate before
activating the role to protect against an attacker taking over a user session since the attacker would then
need to authenticate to activate the user’s roles.
76 AIX Version 6.1 Security

The introduction of the privileged command database implements the least privilege principle. The
granularity of system privileges has been increased, and explicit privileges can be granted to a command
and the execution of the command can be governed by an authorization. This provides the functionality to
enforce authorization checks for command execution without requiring a code change to the command
itself. Use of the privileged command database eliminates the requirement of SUID and SGID applications
since the capability of only assigning required privileges is possible.
The privileged device database allows access to devices to be governed by privileges, while the privileged
file database allows unprivileged users access to restricted files based on authorizations. These databases
increase the granularity of system administrative tasks that can be assigned to users who are otherwise
unprivileged.
The information in the RBAC databases is gathered and verified and then sent to an area of the kernel
designated as the Kernel Security Tables (KST). It is important to note that the state of the data in the KST
determines the security policy for the system. Entries that are modified in the user-level RBAC databases
are not used for security decisions until this information has been sent to the KST with the setkst
command.
Configuring the RBAC mode:
The RBAC mode is controlled by a system-wide configuration variable in the kernel. This variable specifies
whether Enhanced RBAC Mode is enabled or disabled.
Enhanced RBAC mode is enabled by default on AIX 6.1. You can run the chdev command on the sys0
device and specify a value of false for the enhanced_RBAC attribute to disable enhanced RBAC mode
and revert to legacy RBAC mode. You must reboot the system for the change to the enhanced_RBAC
attribute to take affect. To enable the enhanced RBAC mode, the enhanced_RBAC attribute should be set
to true. Programmatically, the mode can also be set or queried through the sys_parm() system call.
Run the following command on the system to retrieve the current RBAC mode:
lsattr -E -l sys0 -a enhanced_RBAC
You can disable the enhanced RBAC mode by running the following command and then rebooting the
system:
chdev -l sys0 -a enhanced_RBAC=false
In a WPAR environment, the RBAC mode can only be configured from the global system and will uniformly
affect the global as well as all of the WPARs on the system.
Legacy RBAC mode and enhanced RBAC mode comparison:
Existing and new interfaces have been modified to check the system configuration and run the new code
or follow the old behavior.
In legacy RBAC mode, only authorizations that are checked within the code of the command itself are
enforced. The Kernel Security Tables (KST) do not have any affect on command execution or authorization
checks. Determination of whether a user has an authorization follows the legacy RBAC mode behavior of
retrieving all the user’s authorizations and checking for a match. New features such as the swrole
command and the default_roles and auth_mode attributes are not available in legacy RBAC mode.
However, the new privileges, authorizations, and management commands for authorizations are supported
in legacy RBAC mode.
Security 77

The following table lists some of the differences between the legacy and enhanced RBAC modes.
Table 9.
Feature Legacy RBAC Enhanced RBAC
Role activation All of a user’s roles are always active By default, roles are not active until
assumed explicitly via the swrole
command
default_roles attribute Not available Supported
swrole command Not available Supported
Role management commands Supported Supported
Authorization management
commands
Supported Supported
Authorization hierarchy Each authorization is independent. No
hierarchy functionality.
Supports concept of authorization
hierarchy where authorizations can be
parents of other authorizations
Authorization checks Only enforced if command itself
checks for authorization
Enforced through Privileged
Command Database and/or by the
command itself
Granular Privileges Supported Supported
pvi command Not available Supported
Kernel Security Tables Not available Supported
RBAC Database Location Local files Local files or LDAP
Using Enhanced RBAC
System administrators should be knowledgeable in the following areas in order to effectively use
Enhanced RBAC.
RBAC Authorizations:
Authorizations are an important part of Role Based Access Control (RBAC). The operating system uses
authorization strings to determine eligibility before performing a privileged operation. Related checks can
be performed from within the code explicitly or can be done by the loader when running protected
privileged executables.
The naming of authorization strings indicates the privileged operation that they represent and control. The
AIX naming convention for authorizations supports a hierarchical structure that is denoted by the
authorization’s textual name. AIX authorization strings use a dotted notation format to describe the
authorization hierarchy. For example, the authorization to create new file systems is aix.fs.manage.create.
If this authorization is included in a role, then a user who is assigned this role can create AIX filesystems.
If the parent authorization aix.fs.manage is included in a role, then a user who is assigned this role can
perform other file system management tasks as well as create filesystems.
AIX RBAC differentiates between system-provided authorizations (system-defined authorizations) and
authorizations that are created after installation (user-defined authorizations).
System-defined authorizations:
AIX provides a predefined and non-modifiable set of authorizations. These are known as System-Defined
Authorizations. These authorizations are associated with various privileged AIX operations; the association
is specified in the Privileged Command Database.
78 AIX Version 6.1 Security

At the top of the system-defined authorization hierarchy is the aix authorization. This authorization is the
parent of all other system-defined authorizations. Granting this authorization to a role grants every
system-defined authorization to the role. To display the complete set of AIX system-defined authorizations
and a brief description of each authorization, run the following command:
lsauth –f –a description ALL_SYS
The output of the above command shows that the list of system-defined authorizations is a multi-level
hierarchy. For example, the aix authorization has several immediate children. Each of those children is
then a parent of another hierarchy. The aix.fs authorization includes multiple child authorizations, including
aix.fs.manage, which in turn includes multiple authorizations such as aix.fs.manage.change, and
aix.fs.manage.create.
User-defined authorizations:
In addition to system-defined authorizations, AIX RBAC allows system administrators to define their own
custom authorizations in the authorization database (/etc/security/authorizations). These are known as
user-defined authorizations.
A system administrator can add, modify, or delete user-defined authorizations. For example, a system
administrator can allow some users to run a privileged command by creating a user-defined authorization
and then associating this authorization with the command and granting the authorization to a role that is
assigned to these users.
User-defined authorizations support the same hierarchy concept as system-defined authorizations.
However, there are restrictions placed on the naming of AIX user-defined authorizations.
v User-defined authorizations must be defined beneath a new top-level parent. In other words,
user-defined authorizations cannot be children of system-defined authorizations (aix).
v An authorization name can contain a maximum of 63 printable characters.
v An authorization’s parent hierarchy can contain a maximum of eight levels.
v An authorization can have any number of immediate children, but can only have one immediate parent.
Two independent authorizations cannot have the same immediate child.
Since the hierarchy does not allow an element to have multiple direct parents, you cannot create a
user-defined authorization that is a parent of an existing system-defined authorization. Therefore, an
attempt to create an authorization named aix.custom will fail and the creation of an authorization named
custom.aix will result in a brand new authorization and does not function as the parent of the aix
system-defined authorization.
The following syntax is suggested when creating user-defined authorizations to avoid conflicts between
authorization names across multiple software components:
vendor_name.product_name.function.function1.function2...
vendor_name
Identifies the name of the vendor of the software module.
product_name
High-level product name of the product that is managed with RBAC.
function, function1, function2 ...
These strings represent the functions that are being managed with RBAC. These strings also
provide a hierarchical representation of how these functions are organized.
For example, ibm.db2.manage could potentially represent the management aspects of the IBM DB2
database suite. As mentioned previously, the vendor_name string aix is reserved for AIX use and is not
allowed for user-defined authorizations.
Security 79
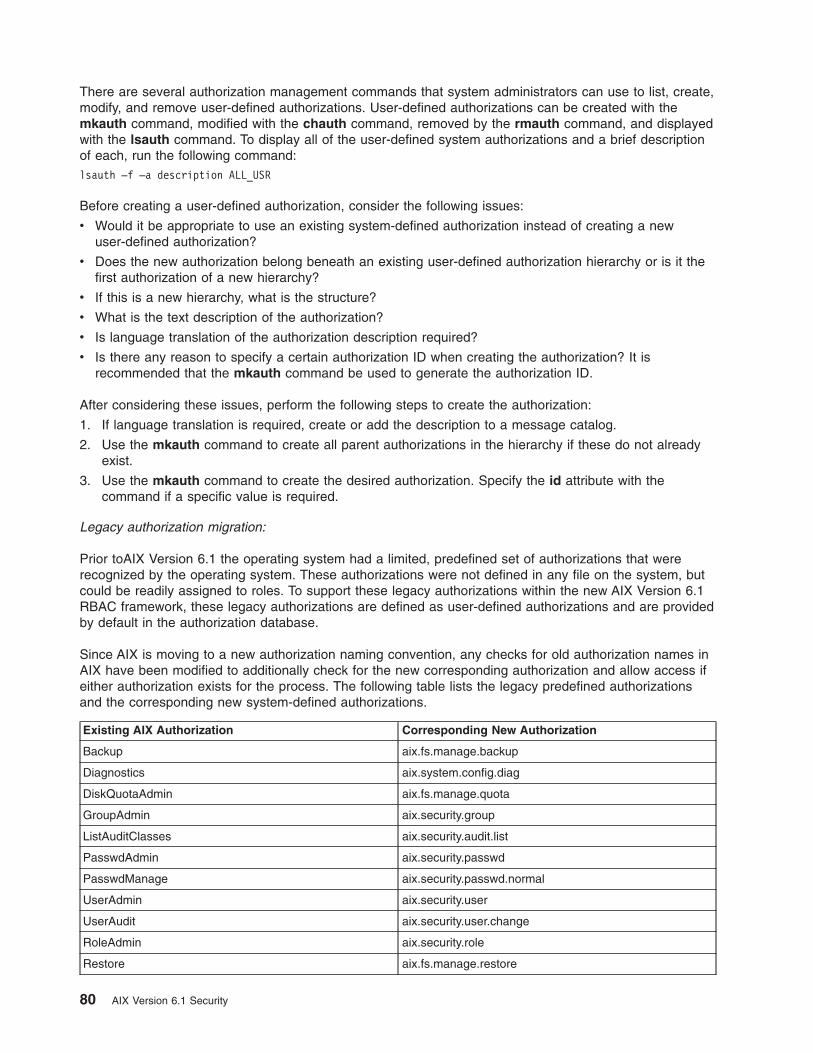
There are several authorization management commands that system administrators can use to list, create,
modify, and remove user-defined authorizations. User-defined authorizations can be created with the
mkauth command, modified with the chauth command, removed by the rmauth command, and displayed
with the lsauth command. To display all of the user-defined system authorizations and a brief description
of each, run the following command:
lsauth –f –a description ALL_USR
Before creating a user-defined authorization, consider the following issues:
v Would it be appropriate to use an existing system-defined authorization instead of creating a new
user-defined authorization?
v Does the new authorization belong beneath an existing user-defined authorization hierarchy or is it the
first authorization of a new hierarchy?
v If this is a new hierarchy, what is the structure?
v What is the text description of the authorization?
v Is language translation of the authorization description required?
v Is there any reason to specify a certain authorization ID when creating the authorization? It is
recommended that the mkauth command be used to generate the authorization ID.
After considering these issues, perform the following steps to create the authorization:
1. If language translation is required, create or add the description to a message catalog.
2. Use the mkauth command to create all parent authorizations in the hierarchy if these do not already
exist.
3. Use the mkauth command to create the desired authorization. Specify the id attribute with the
command if a specific value is required.
Legacy authorization migration:
Prior toAIX Version 6.1 the operating system had a limited, predefined set of authorizations that were
recognized by the operating system. These authorizations were not defined in any file on the system, but
could be readily assigned to roles. To support these legacy authorizations within the new AIX Version 6.1
RBAC framework, these legacy authorizations are defined as user-defined authorizations and are provided
by default in the authorization database.
Since AIX is moving to a new authorization naming convention, any checks for old authorization names in
AIX have been modified to additionally check for the new corresponding authorization and allow access if
either authorization exists for the process. The following table lists the legacy predefined authorizations
and the corresponding new system-defined authorizations.
Existing AIX Authorization Corresponding New Authorization
Backup aix.fs.manage.backup
Diagnostics aix.system.config.diag
DiskQuotaAdmin aix.fs.manage.quota
GroupAdmin aix.security.group
ListAuditClasses aix.security.audit.list
PasswdAdmin aix.security.passwd
PasswdManage aix.security.passwd.normal
UserAdmin aix.security.user
UserAudit aix.security.user.change
RoleAdmin aix.security.role
Restore aix.fs.manage.restore
80 AIX Version 6.1 Security
RBAC roles:
Roles are the mechanism used to assign authorizations to a user and to group a set of system
administration tasks together. An AIX role is primarily a container for a collection of authorizations.
AIX supports the direct assignment of authorizations to a role or the indirect assignment of authorizations
through a sub-role. A sub-role can be specified for a role in the rolelist attribute of a role. Configuring a
role to have a designated sub-role effectively assigns all of the authorizations in the sub-role to the role.
Assigning a role to a user allows the user to access the role and use the authorizations that are contained
in the role. A system administrator can assign a role to multiple users and can assign multiple roles to a
user. A user who has been assigned multiple roles can activate more than one role (up to a maximum of
eight roles) simultaneously if necessary to perform system management functions.
AIX provides a set of predefined roles for system management. However it is expected that customers will
need to create their own custom roles or modify the existing predefined roles. Several role-management
commands are available to list, create, modify, and remove AIX roles. Roles can be created with the
mkrole command, modified with the chrole command, removed with the rmrole command, and displayed
with the lsrole command.
When creating a new AIX role, consider the following issues:
v What will be the name of the role?
v The role name is a text string, but should provide some insight into the role’s capabilities. Role names
can contain a maximum of 63 printable characters.
v What authorizations are required for the role? Consider whether authorizations should be directly
assigned to the role or indirectly assigned to the role through a sub-role.
v Should the user be required to authenticate when activating the role?
Activating a role:
By default in AIX Version 6.1 with enhanced RBAC, when a user authenticates to the system, the user’s
session does not have any associated roles or authorizations. In order to associate roles to the session,
the user must invoke a separate authentication command (the swrole command) to switch to the role or
roles.
The user can only activate roles that have previously been assigned to the user. By default, a user is
required to authenticate as themselves when entering a role session or when adding a role to their
session. Roles can optionally be designated to not require authentication with the auth_mode role
attribute.
Switching to a new role session creates a new shell (session) without inheriting roles from the prior
session. This is accomplished by creating a new process shell for the role and assigning the new role ID
(RID) to the process. Creation of the new session is similar to using the su command except in this case
only the role ID of the process is changed and not characteristics such as the UID or GID. The swrole
command allows the user to create a role session composed of a single role or multiple roles. There is no
restriction to prevent a user from switching to a new role session from the current role session. Since the
new session is a new process, the new session will not inherit any roles from the prior session. In order to
restore the previous session, the user must exit the current role session. The roles assumed in a session
(the active role set) can be listed by running the rolelist command in the session. An administrator can
also use the rolelist command to list the active role set for a given system process.
A user can optionally be assigned a default set of roles with the new default_roles user attribute. This
attribute is intended for situations where processes that are created on behalf of a user always need to be
Security 81

associated with a given set of roles, for example, the cron command. The cron facility runs in the
background and runs commands as the defined user. It is possible that some of the commands that are
run may require authorizations. This requires the ability to designate that a set of roles always be active
for a user ID since there is no mechanism for the cron command to later acquire these roles. The
default_roles attribute can be set to include up to eight role names or the special value of ALL. Setting
default_roles=ALL assigns all of the user’s roles to the session. If the user has been assigned more then
eight roles, then only the first eight roles will be enabled for the session.
Maximum number of roles per session:
In enhanced RBAC, a system administrator can configure on a system-wide basis the maximum number of
roles that a user can activate in a given role session. By default, a user can activate up to eight roles in a
session.
Certain environments may require a greater separation of duties in which a user can only activate a single
role at a time. In these environments, the maxroles attribute of the usw stanza in the
/etc/security/login.cfg file can be modified to restrict the maximum allowed number of roles per session.
The maxroles attribute can be set to a value in the range of 1 to 8 to specify the maximum allowable
number of roles per session.
To display the current value of the restriction on the number of roles per session, run the following
command:
lssec –f /etc/security/login.cfg –s usw –a maxroles
To modify the system to allow a user to only activate a single role at a time, run the following command:
chsec –f /etc/security/login.cfg –s usw –a maxroles=1
Modification of the maxroles attribute value is effective immediately for any new role sessions that are
created and does not require a system reboot. Role sessions that existed prior to the modification of the
value are not affected by the change. The enforcement of the maximum number of roles per session is
performed at session initiation.
Predefined roles:
A predefined set of roles is defined in the local role database (/etc/security/roles) on a new AIX Version
6.1 installation. This set of roles is intended to group typical administrative responsibilities.
This set of roles serves as a suggested means of dividing administrative duties. Role administrators can
modify or remove these roles or create new roles as needed for their environment. The following lists the
provided roles and a brief description of each role’s abilities.
Role name Role description
isso Information System Security Officer. An ISSO is
responsible for creating and assigning roles and is
therefore the most powerful role on the system. Some
ISSO responsibilities include:
v Establishing and maintaining security policy
v Setting passwords for users
v Network configuration
v Device administration
82 AIX Version 6.1 Security

Role name Role description
sa System Administrator. The SA role provides functionality
for daily administration and is responsible for:
v User administration (except password setting)
v File system administration
v Software installation update
v Network daemon management
v Device allocation
so System Operator. The SO role provides functionality for
day to day operations and is responsible for:
v System shutdown and reboot
v File system backup, restore and quotas
v System error logging, trace and statistics
v Workload administration
Role migration:
If an AIX system prior to AIX Version 6.1 is being updated to an AIX enhanced RBAC level via a migration
install, migration of the /etc/security/roles file attempts to update the file for the new functionality while
maintaining the current role abilities.
Role definitions in the file are preserved and are simply modified to include a unique role ID to allow the
role to function properly in the new framework. Any authorizations in the /etc/security/roles file that are
not known predefined authorizations are considered user-defined authorizations. During migration, these
authorization names are added as entries in the local /etc/security/authorizations authorization database.
In addition to migration of the old role definitions, the new predefined roles are appended to the file. After
migration, the system administrator must verify that the authorizations and roles are defined as needed for
the environment.
RBAC privileges:
The enhanced RBAC framework relies heavily on system privileges to allow non-privileged users to
perform privileged tasks. A privilege is a mechanism used to grant a process augmented functionality in
system calls.
The concept of privileges is primarily a kernel-level construct since the definition and most of the checking
occurs in the kernel. However, user-level interfaces are provided to handle the assignment of privileges to
commands, devices, and processes.
It is important to note the difference between privileges and authorizations. Both privileges and
authorizations are used to control certain allowable exceptions to system security policy. The defining
difference between privileges and authorizations is that privileges are associated with specific processes,
while authorizations are associated with users through roles. Authorizations reside with a role and the user
who has the role, and do not depend on the program that is being run. Privileges reside with the program
and provide the mechanism to fine tune the system security policy. Because of these associated
privileges, the process is eligible to perform the related privileged operation.
Privileges are defined in the AIX kernel as individual bits of a bit-mask which enforce access control over
privileged operations. Over 100 privileges are provided with AIX, providing for a very fine granular control
of privileged operations. When determining access in a system call, the kernel determines if the process
has the required associated privilege bit and then grants or denies the request.
Security 83

Privileges are assigned to command invocations through the privileged command database and privileges
are used to control access to devices through the privileged device database.
Privilege naming and hierarchy:
AIX privileges cannot be created, modified or deleted by a system administrator.
The list of available privileges and a brief description of the privilege can be displayed on a system by
running the following command:
lspriv -v
The privileges provided on AIX are listed in AIX privileges. All AIX privileges have a textual representation
of the privilege bit that begins with PV_. The naming convention used after the PV_ prefix denotes the
hierarchical relationship between privileges. For example, the auditing privilege PV_AU_ is the parent of
privileges PV_AU_ADD, PV_AU_ADMIN, PV_AU_READ, PV_AU_WRITE and PV_AU_PROC. When
checking for privilege, the system first determines if the process has the lowest privilege needed and then
proceeds up the hierarchy, checking for the presence of a more powerful privilege. The PV_ROOT
privilege is a special privilege that represents the parent of all privileges except PV_SU_. A process that is
assigned the PV_ROOT privilege behaves as if it has been assigned every privilege on the system except
PV_SU_.
Process privilege sets:
Multiple sets of privileges are defined in the kernel to provide varied controls for privileged operations.
Multiple privilege sets allow the operating system to enforce dynamic privilege controls and allow
applications to manage least-privilege principles.
Privileges are associated with a process through the following privilege sets:
Limiting Privilege Set (LPS)
Defines the hard limit on privileges for a given process. No privilege escalation in the system can
raise process privileges beyond this value. This means that a process cannot acquire any more
privileges than this value using any of the defined system interfaces. In other words, the process is
restricted to these privileges at any point in time. This also means that the rest of the privilege sets
will always be subsets of LPS. Even though LPS cannot be expanded, every process will have the
right to reduce the LPS. However, once the LPS is reduced, it cannot be expanded back to its
original value. The lowering of the LPS allows a process to restrict the boundaries in regard to
associated privileges. For example, a process might reduce the LPS just before running a custom
user-provided program. By default, all of the privileges available on the system are set in the LPS
for a process.
Maximum Privilege Set (MPS)
The full set of privileges that the process is authorized to use. The MPS can include any privilege
in the LPS, but cannot exceed the LPS. The MPS can change during the lifetime of a process for
many reasons. The following are some of the reasons:
v When the current process executes another privileged command and then gains related
additional privileges
v If the process has the right privilege, then it can expand the MPS programmatically in a
dynamic manner
Effective Privilege Set (EPS)
The list of privileges which are currently active for the process. The EPS is always a subset of the
process’ MPS and is used by the kernel to perform access checks in regard to privileged
operations. The EPS can be manipulated by the process and can equal the MPS, but cannot
exceed the MPS. Dynamic manipulation of the EPS can be performed by the process to enforce
least-privilege principles. For example, user-space code can potentially raise the audit privilege bit
84 AIX Version 6.1 Security

in the EPS using the priv_raise API before making an audit-related system call or kernel call. The
privilege can then be lowered with the priv_lower API when the audit call returns.
Inheritable Privilege Set (IPS)
Privileges which are passed from a parent process to its child processes’ MPS and EPS. The IPS
can include any privilege in the LPS, but cannot exceed the LPS. The IPS can be set in a process
in the following ways:
v If the process has the proper privilege, it can expand the IPS programmatically through the
setppriv system call
v When a privileged command is run, the privileges specified in the inheritprivs attribute that is
associated with the command are assigned into the IPS.
Used Privilege Set (UPS)
Denotes the privileges that have been used for access checks during the life of the process. The
UPS can be used to determine the privileges required by the process. When the kernel checks if a
process has a given privilege, it stores a successful check in the UPS for the privilege.
Workload Partition Privilege Set (WPS)
A system WPAR can be restricted to not allow all of the privileged operations that are allowed in a
global WPAR. The privileged operations allowed in a system WPAR can be controlled through the
WPS. The global root can assign a limited set of privileges to a WPAR using WPS. The WPS can
be specified in the /etc/wpar/secattrs configuration file or during the start of a WPAR using the
/usr/sbin/startwpar command. All processes running in a WPAR have their LPS equal to their
WPS.
A system administrator can use administrative commands to list and modify the various privilege sets of a
process. The lssecattr command can be used to list the LPS, MPS, EPS, IPS, and UPS. The setsecattr
command can be used to modify the LPS, MPS, EPS, and IPS. The UPS cannot be modified with the
setsecattr command since the UPS is a read-only attribute.
Privileged command database:
Authorizations, roles, and privileges allow granular security controls to be implemented. However, the
exploitation of RBAC by various system operations allows an RBAC security policy to be enforced.
While historically some AIX commands directly checked for authorizations, it required that the executable
code itself be modified to perform these checks. The enhanced RBAC mode provides a framework to
enforce authorization checks and grant associated privileges through the privileged command database
without requiring changes to system executables.
The privileged command database grants access and powers to users for commands they would not
otherwise be able to run or for which they would not have the proper privilege to perform the task. The
database saves the authorization information for a particular command as well as the privileges that are
granted to the process if authorization checks succeed. When the database is stored locally, it exists in the
/etc/security/privcmds file and contains stanzas of information in the form of command-versus-security
attributes. The following are a few of the key attributes in this database (for a full description of all of the
attributes, see the /etc/security/privcmds file).
accessauths
List of access authorizations that protect the execution of the command. A user with any one of
the listed authorizations is allowed to run the command and perform some or all of the privileged
operations that are contained in the command.
innateprivs
Innate privileges are privileges assigned to the process if the invoker succeeds the access
authorization checks.
authprivs
Authorized privileges are additional privileges assigned to the process if the user has the
Security 85

associated authorization. This attribute allows more granular control of the command to allow a
restricted set of users to perform additional privileged operations.
inheritprivs
Inheritable privileges are privileges that the process passes on to child processes.
secflags
List of security flags. FSF_EPS is a flag which causes the maximum privilege set (MPS) to be
loaded into the effective privilege set (EPS) when the command is run.
When a user on an enhanced RBAC mode system attempts to run a command, the command is first
checked in the privileged command database. If the command exists in the database, a check is
performed against the authorizations associated with the user’s session and the value of the accessauths
attribute for the command. If the session has one of the authorizations listed, the user can run the
command regardless of whether the user passes the DAC execution checks for the command. Upon
invocation, the command process has the privileges listed in the innateprivs attribute assigned into its
maximum privilege set (MPS). Additional authorization checks are performed with the
authorization-privilege pairs listed in the authprivs attribute. If the session has one of the listed
authorizations, the associated privilege(s) are also added to the MPS of the command process. A
command entry in the privileged command database that has the FSF_EPS value set in the secflags
attribute assigns all of the privileges in the MPS to the effective privilege set (EPS) upon when the
command is invoked.
A command is known as a privileged command when it is included in the privileged command database.
While setuid programs that are not listed in the database are still technically privileged commands, they
are not referred to as privileged commands when describing RBAC behavior. If a command does not have
an entry in the privileged commands database, then it is not a privileged command and access to it is
enforced by DAC and the command itself. Additionally, if a command is listed in the privileged command
database, but the user’s session does not have an authorization that allows invocation of the command,
the system reverts to checking DAC access and allows the command to be run if these checks succeed.
Several management commands have been created to manipulate and query the privileged command
database. Entries in the privileged command database can be created or modified with the setsecattr
command, displayed with the lssecattr command, and removed with the rmsecattr command.
Determining required privileges for a command:
Many system administrative applications require privileges to run properly. While a set of predefined
commands is provided in the privileged command database, a system administrator may need to add
entries that are specific to their environment. The privileged command database allows entries to be added
to the database and privileges to be associated with the invocation of the command.
Prior to adding a command to the privileged command database, the minimum set of required privileges
must be determined to ensure that command execution is as secure as possible. Any privileges granted
beyond those necessary for proper execution violate the least-privilege principle. Therefore, an important
step in adding a privileged command to the system is determining the minimum required privileges.
The following is the basic strategy to determine the minimum required privileges for a command:
1. Assign the PV_ROOT privilege to the invoking shell
2. Run the command
3. Record the privilege set used for the process
4. Store the necessary privileges in the innateprivs attribute of the command in the privileged command
database
These steps should be performed in a controlled environment since the PV_ROOT privilege is assigned to
a shell and the PV_ROOT privilege is extremely powerful. In addition, running the command may have
86 AIX Version 6.1 Security

some system impact that can affect other users. In practice, this is likely to be a trial-and-error procedure.
In order to obtain the full set of privileges, the command will likely need to be run repeatedly with different
flags and options, and possibly for a long period of time for long-running applications. The required
privilege set of the process can be easily gathered using one of the following procedures, which can be
performed by an administrator with proper authority:
tracepriv
Takes an argument that is the command to execute. The tracepriv command runs the command
and records the privileges used during the lifetime of the process. When the command finishes,
the tracepriv command displays the privileges that were used on stdout.
lssecattr
If the command is a long-running process, the lssecattr command can be used to display the
privileges used by the process. To display the used privilege set for a process, run the command
as follows, substituting the PID of the process that is being monitored:
lssecattr –p –a uprivs PID
After the minimum required privileges have been determined, perform the steps in “Adding a command to
the privileged command database” to add the command to the privileged command database. The
command should then be run by an authorized user to verify that it runs properly.
Privilege escalation:
When a new process is created by the fork system call, fork grants the process the same privileges as
the parent process (the process that called the fork system call). When a process does an exec system
call on an executable file, exec recalculates the privileges for the executable file based on the privileges
that exec currently possesses and the privileges possessed by the executable file.
Escalated privileges are calculated as follows:
1. First, the union (bitwise-OR operation) of inheritable privileges possessed by the old (parent) process
and the set of innate privileges possessed by the executable file is calculated.
2. If the user is appropriately authorized, the union (bitwise-OR) of the result from the previous step and
the authorized privileges is calculated.
3. If the limiting privileges exist, then the intersection of the result from the previous step and the limiting
privileges is calculated. Limiting privileges, if any, are inherited across an exec system call.
4. The set of privileges resulting from that union become the set of maximum privileges for the new
process.
5. If the inherited privileges exist in the executable file, they are assigned to inheritable privileges set in
the new process. Otherwise, the set of inheritable privileges possessed by the old (parent) process is
carried forward in the new process’s inheritable privilege set.
If the executable file has its FSF_EPS file security flag set, the set of effective privileges for the new
process is the same as its set of maximum privileges. Otherwise, the effective privileges for the new
process are same as the inheritable privileges possessed by the old (parent) process.
Adding a command to the privileged command database:
You should consider carefully before adding a command to the privileged command database to ensure
that the proper authorizations and privileges are assigned.
See the /etc/security/privcmds file for a full description of the attributes that are valid for a command.
The following questions can be used as a guide to determine the entry required for a command:
1. Should an authorization control access to run the command?
YES If the authorization does not exist, create it with the mkauth command. Specify the
authorization in the accessauths attribute.
Security 87

NO If all users should be allowed to run the command, specify the ALLOW_ALL authorization in
the accessauths attribute.
2. Should the owner or group of the command be allowed to run the command even if they do not have
the proper authorization?
YES Add the ALLOW_OWNER or ALLOW_GROUP authorization to the list of authorizations in the
accessauths attribute.
3. When the command is executed, does it require an explicit set of privileges?
YES Run the command with various options as the root user with the tracepriv command to
determine the required privileges for the innateprivs attribute.
4. Should users with a specific authorization be granted additional privileges?
YES Specify the additional authorization-privilege pairs in the authprivs attribute.
5. Does the command need to behave like a SUID or SGID program?
YES Specify the EUID or EGID as appropriate.
6. Do privileges assigned to the command need to be passed on to child processes?
YES Specify the privileges in the inheritprivs attribute.
7. Should the effective privilege set of the command be equal to the maximum privilege set at the time
the command is invoked?
YES Specify the FSF_EPS flag for the secflags attribute.
NO Do not specify the secflags attribute. The command code is expected to raise and lower its
privileges as required when the FSF_EPS flag is not specified.
After answering these questions, run the setsecattr command with the appropriate parameters to add the
command to the database. If the command is an existing command and is an SUID or SGID command,
then consideration should be given to remove the SUID and SGID bits from the file so that the
least-privilege model is enforced.
Privileged device database:
The privileged device database stores the list of privileges that are allowed to read from or write to a
device. This database provides a mechanism for an administrator to further control access to a device
than can be managed through traditional device access controls.
When this database is stored locally, it is contained in the /etc/security/privdevs file. The database stores
the privileges required to access a given device for read or write operations in the following attributes:
readprivs
Lists privileges which are allowed to read from the device
writeprivs
Lists privileges which are allowed to write to the device
When a privileged device is requested to be opened in read mode, the open is only allowed if one of the
privileges specified in the readprivs attribute exists in the effective privilege set (EPS) for the process.
Similarly, if the device is opened for write mode, a privilege in the writeprivs attribute must exist in the
EPS.
The process of adding a device to the privileged device database is normally not a common operation.
The lssecattr and setsecattr commands can be used to list and manipulate the database, but adding or
modifying entries in the database requires considerable investigation. Since the read and write permission
for a device is controlled through privileges, a thorough investigation of the commands and applications
that need to access the device must be performed to ensure that the proper privileges are specified.
88 AIX Version 6.1 Security
Privileged file database:
Many system configuration files in traditional UNIX systems are owned by the root user and are not
directly modifiable by other users. RBAC allows a user to modify these system configuration files by
activating a role and running a command to gain the privileges needed to modify the file.
There are some AIX configuration files that do not have command interfaces to allow modification of the
file. In these cases, it is necessary to have a tool that allows an administrator with the appropriate
authorization to directly edit and save a file to which they otherwise would not have access.
The privileged file database provides a method to use authorizations to determine access to system
configuration files. When the database is stored locally, it is contained in the /etc/security/privfiles file.
This database maps configuration files to the authorizations required to view or modify these files. Access
to a configuration file is controlled in this database with the following attributes:
readauths
List of authorizations allowed to read from the file
writeauths
List of authorizations allowed to write to the file (read authorization is implied in this case)
Entries in the privileged file database can be listed with the lssecattr command and can be created or
modified with the setsecattr command. Files defined in the privileged file database can be accessed by
authorized users with the /usr/bin/pvi command. The pvi command is a privileged and restricted version
of the vi editor based on the /usr/bin/tvi command. The pvi command imposes all of the same security
precautions as the tvi command (for example, no –r or -t flags, no shell escapes, no user defined macros)
and also enforces the following restrictions:
v The system must be in Enhanced RBAC Mode.
v Only files defined in the privileged file database can be opened.
v Only one file can be opened at a time.
v Writing to a different filename then the one specified on the command line is disabled.
v The /etc/security/privfiles file cannot be edited with the pvi command.
v Attempts to open links will fail. Only regular files can be edited.
The authorization checks are performed prior to opening the file. If the authorization matches, the privilege
set of the process is raised to include PV_DAC_R or PV_DAC_W (depending on whether the file is being
opened for reading or writing). If the authorization does not match, an error message is displayed and the
user is denied access to the file with the pvi command.
Kernel security tables:
The information contained in the authorization, role, privileged command, and privileged device databases
is not used for security considerations until the data has been loaded into an area of the kernel designated
as the kernel security tables (KST). In the enhanced RBAC mode, authorization and privilege checks are
performed in the kernel, so the databases must be sent to the kernel before they can be used.
The KST is composed of the following sub-tables:
v Kernel Authorization Table (KAT)
v Kernel Role Table (KRT)
v Kernel Command Table (KCT)
v Kernel Device Table (KDT)
All of the tables or select tables can be sent to the kernel from the user space with the setkst command.
The KRT and KCT are dependent on the KAT, so if the KAT is selected to be updated, the KRT and KCT
are also updated to verify that the tables are in sync. The preferred method for adding updates to the KST
Security 89

is to create or modify all of the necessary databases at the user level (with commands such as mkauth,
chauth, mkrole, and setsecattr) and then use the setkst command to send the tables to the kernel.
Once the tables have been loaded in the kernel, the lskst command can be used to display the
information contained in each table.
A given table in the KST is always sent as a complete table. In other words, the KST does not allow for
individual entry modifications; the entire table must be replaced. Prior to sending the tables to the kernel,
the setkst command validates the tables and the relationships between them. The setkst command is
also placed in the inittab file to ensure that the databases are sent to the KST early in the boot process.
If for some reason the tables cannot be created or cannot be loaded into the kernel and no tables have
previously been loaded, the system operates as if there are no authorizations or roles. Commands, APIs,
and system calls for authorization and role checking return failure in this scenario since no match is found.
System operation in this state is very similar to the legacy RBAC mode, except that no user can access
sections of code in commands that enforce authorizations.
Disabling the root user:
In enhanced RBAC mode, it is possible to configure the system so that the root user has no associated
special powers and is treated by the system as a normal user.
Historically, the root user’s ID value of 0 has been treated as a privileged ID by the operating system and
is allowed to bypass enforced security checks. Disabling the root user effectively removes the checks in
the operating system which allow the user ID of 0 to bypass security checks and instead requires the
process to have privileges to pass the security checks. Disabling the root user minimizes the damage an
attacker can cause since there is no longer a single all-powerful user identity on the system. After
disabling the root user, system administration must be performed by users who have been assigned
privileged roles.
The root powers can be disabled with the /usr/sbin/setsecconf command. Run the following command
and then reboot the system to disable the powers of the root user:
setsecconf –o root=disable
After running this command the root user account cannot be accessed through remote or local login or
through the su command. However, since the root user account remains the owner of files on the file
system, if the account is acquired, the user would have access to privileged files.
On a system where root has been disabled, processes owned by root are no longer assigned any special
powers or privileges. This should be considered if the system has setuid applications owned by root that
have not been added to the privileged command database. These setuid applications will probably fail in a
root-disabled environment since the process cannot perform privileged operations. In a root-disabled
system, any command that needs to perform privileged operations should be added to the privileged
command database and assigned the appropriate privileges. Therefore, a careful analysis of the system
and the applications used on the system should be performed before disabling the powers of the root user.
Remote RBAC database support:
In an enterprise environment, it is desirable to be able to implement and enforce a common security policy
across all systems in the environment. If the databases that control the policy are stored independently on
each system, management of the security policy becomes a burden for the designated system
administrator. AIX enhanced RBAC mode allows the RBAC databases to be stored in LDAP so that the
security policy for all systems in the environment can be centrally managed.
Support has been added in AIX for all of the RBAC-relevant databases to be stored in LDAP. The following
are the relevant RBAC databases:
v Authorization database
90 AIX Version 6.1 Security

v Role database
v Privileged command database
v Privileged device database
v Privileged file database
Note: The authorization database stored in LDAP contains only the user-defined authorizations.
System-defined authorizations cannot be stored in LDAP and remain local to each client system.
AIX provides utilities to easily export local RBAC data to LDAP, to configure the client to use RBAC data in
LDAP, to control the lookup of RBAC data, and to manage the LDAP data from a client system. The
following sections provide more information on the LDAP features that are provided in enhanced RBAC.
Exporting RBAC data to LDAP:
Initial preparation for using LDAP as an RBAC database repository requires populating the LDAP server
with the RBAC data.
The LDAP server must have the RBAC schema for LDAP installed on it before LDAP clients can use the
server for RBAC data. The RBAC schema for LDAP is available on an AIX system in the
/etc/security/ldap/sec.ldif file. The schema of the LDAP server should be updated with this file by using
the ldapmodify command.
The /usr/sbin/rbactoldif file can be used to read the data in the local RBAC databases and output them
in a format suitable for LDAP. The output generated by the rbactoldif command can be saved to a file and
then used to populate the LDAP server with the data with the ldapadd command. The following databases
on the local system are used by the rbactoldif command to generate the RBAC data for LDAP:
v /etc/security/authorizations
v /etc/security/privcmds
v /etc/security/privdevs
v /etc/security/privfiles
v /etc/security/roles
The LDAP storage location for the RBAC data should be given some consideration. It is recommended
that the RBAC data in LDAP be placed under the same parent DN as the user and group data. The ACLs
on the data should then be adjusted as needed for the chosen security policy.
LDAP client configuration for RBAC:
A system must be configured as an LDAP client to use RBAC data stored in LDAP.
You can use the AIX /usr/sbin/mksecldap command to configure a system as an LDAP client. The
mksecldap command dynamically searches the specified LDAP server to determine the location of the
authorization, role, privileged command, device, and file data, and saves the results to the
/etc/security/ldap/ldap.cfg file.
After successfully configuring the system as an LDAP client with the mksecldap command, the system
must be further configured to enable LDAP as a lookup domain for RBAC data. The /etc/nscontrol.conf
file must be modified to include LDAP in the secorder attribute for databases that are stored in LDAP.
Once the system has been configured as both an LDAP client and as a lookup domain for RBAC data, the
/usr/sbin/secldapclntd client daemon periodically retrieves the RBAC data from LDAP and sends the
data to the Kernel Security Tables (KST) with the setkst command. You can configure the time period
used by the daemon to retrieve the RBAC data from LDAP with the rbacinterval attribute in the
Security 91

/etc/security/ldap/ldap.cfg file. The default value of this attribute is 3600, which specifies to retrieve the
RBAC data from LDAP and update the KST once every hour. The KST can also be manually updated
when an administrator runs the setkst command.
Name service control file:
The RBAC data can reside strictly in local files, strictly in LDAP, or can be merged in local files and LDAP
by configuring a given database in the /etc/nscontrol.conf name service control file.
The search order for the authorization, role, privileged command, device, and file databases is specified
individually in the /etc/nscontrol.conf file. The search order for a database is specified in the file with the
secorder attribute, which is a comma-separated list of domains. The following is an example of a
configuration for the authorization database:
authorizations:
secorder = LDAP,files
This example specifies that queries on authorizations should search in LDAP first and then in the local
files if the authorization is not found in LDAP. The collection of authorizations available to the system is the
merge of the authorizations provided by LDAP and those provided in the local files. The merge is not a
simple combination of the values from the two domains, but rather a union of the values. For the
configuration above, all LDAP authorizations are included and then only unique authorizations from local
files are added to the result.
Modifications and deletions are attempted on the first domain listed and are only attempted on subsequent
domains if the entity is not found in the first domain. In this case, LDAP is attempted first and local files
are only attempted if the authorization is not found in LDAP. New entries are always created in the first
domain listed in the secorder attribute. In the example above, a creation of a new authorization occurs in
the LDAP database.
If there is no entry for a database in the /etc/nscontrol.conf file or if the file does not exist, queries and
modifications on the database are only performed in the local files database. The configuration for a
database in the file can be set with the chsec command and listed through the lssec command. To
configure authorization data to be retrieved from LDAP first and then from the local files, run the following
command:
chsec –f /etc/nscontrol.conf –s authorizations –a secorder=LDAP,files
The configuration in the /etc/nscontrol.conf file controls both the library and command line interfaces.
Applications can retrieve the current value of the secorder attribute for a database with the getsecorder
interface. The value of the secorder attribute can be overridden for the process with the setsecorder
interface.
RBAC command enablement for LDAP:
All of the RBAC database management commands are enabled to use the configuration in the
/etc/nscontrol.conf file and to query, modify, create, or remove the entity in the domain or domains
defined for a given database.
By default, the domains are processed as defined in the secorder attribute for a database, but this can be
overridden by using the –R option on the command line. Specifying the –R option for a command forces
the operation to occur on the specified domain and overrides the configuration in the /etc/nscontrol.conf
file. The following RBAC database management commands are enabled for remote domain support:
v mkauth, chauth, lsauth, and rmauth
v mkrole, chrole, lsrole, and rmrole
v setsecattr, lssecattr, and rmsecattr
92 AIX Version 6.1 Security

In addition, the setkst command is enabled to use the configuration contained in the /etc/nscontrol.conf
file. The setkst command retrieves a merged copy of the entries for a given database as defined in the file
and then loads the resulting data into the Kernel Security Tables.
Cross-domain assignment:
When designing an environment where RBAC data is provided by two domains such as local files and
LDAP, consideration must be given to the issue of cross-domain assignment of entities. Examples of
cross-domain assignment include assigning an LDAP-defined role to a local user or assigning a
local-defined role to an LDAP user.
The assignment of a remote entity (LDAP role) to a local entity (local user) is not much of a concern since
it has no impact on other systems in the environment. However, assigning a local entity (local role) to a
remote entity (LDAP user) should only be done with great care. Since the remote entity (LDAP user) is
visible on multiple clients, there is no guarantee that the local entity (local role) assigned to it is defined or
has the same definition on each client system. For example, a role may be defined locally on each client
but have different associated authorizations. A remote user that is assigned this local role would therefore
have different authorizations on each of these clients and this can have undesirable security
consequences.
To prevent possible security issues with assigning a local entity to LDAP entity, it is recommended that the
LDAP server implement access control to the RBAC databases to prevent each client from modifying
entries. Only clients connecting to the LDAP server through a privileged account should be allowed to
modify LDAP RBAC entities. Other clients should only have read access to the LDAP RBAC databases.
Size limits in enhanced RBAC:
The following table lists the various limits for the RBAC-related elements:
Table 10.
Description Maximum size
Role name 63 printable characters
Maximum roles per session 8
Maximum authorization name size 63 printable characters
Maximum number of levels in authorization hierarchy 9
Maximum number of access authorizations per command 8
Maximum authorized privileged sets per command 8
Administering enhanced RBAC:
This section describes common command line usage scenarios for administering RBAC. These examples
illustrate major aspects of the functionality. SMIT interfaces are also provided for RBAC administration. The
fastpath to RBAC SMIT menus is smit rbac.
Creating a user-defined authorization:
You can create user-defined authorizations that can be used to control execution of commands.
You can use the mkauth command to create user-defined authorizations. Changes to the authorization
database are effective after the changes are downloaded to the kernel with the setkst command.
v Run the following command to create a user-defined authorization:
mkauth auth_name
Security 93
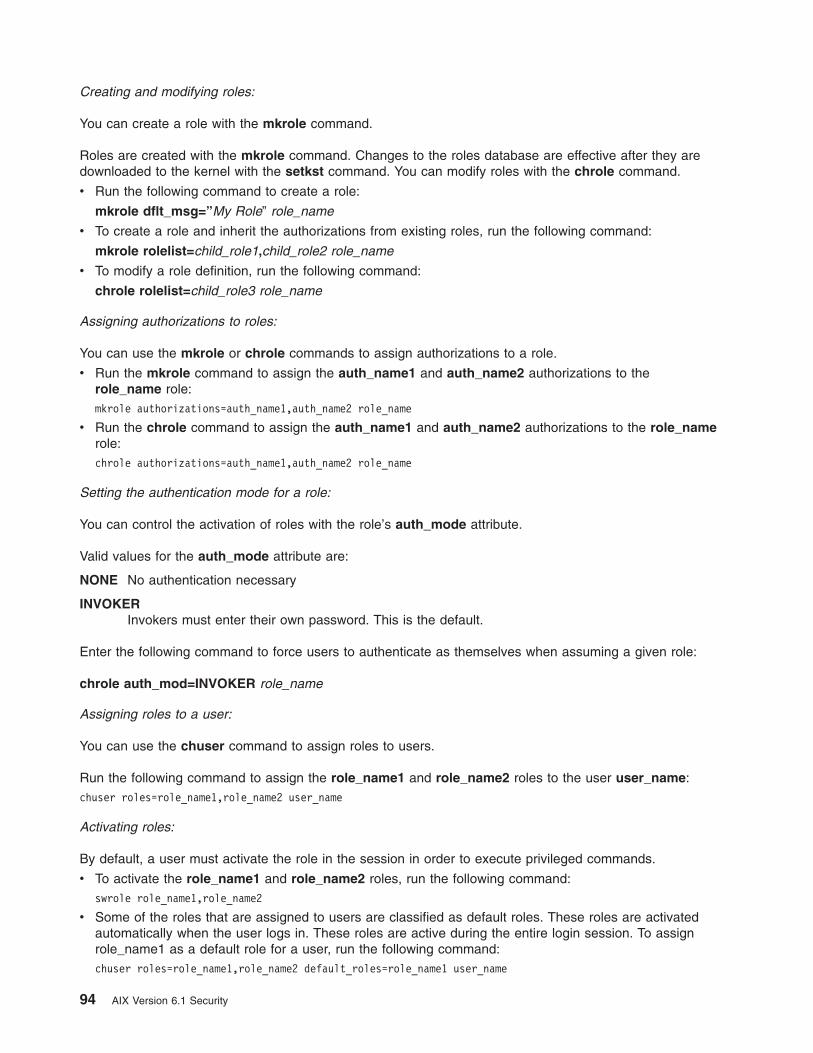
Creating and modifying roles:
You can create a role with the mkrole command.
Roles are created with the mkrole command. Changes to the roles database are effective after they are
downloaded to the kernel with the setkst command. You can modify roles with the chrole command.
v Run the following command to create a role:
mkrole dflt_msg=”My Role” role_name
v To create a role and inherit the authorizations from existing roles, run the following command:
mkrole rolelist=child_role1,child_role2 role_name
v To modify a role definition, run the following command:
chrole rolelist=child_role3 role_name
Assigning authorizations to roles:
You can use the mkrole or chrole commands to assign authorizations to a role.
v Run the mkrole command to assign the auth_name1 and auth_name2 authorizations to the
role_name role:
mkrole authorizations=auth_name1,auth_name2 role_name
v Run the chrole command to assign the auth_name1 and auth_name2 authorizations to the role_name
role:
chrole authorizations=auth_name1,auth_name2 role_name
Setting the authentication mode for a role:
You can control the activation of roles with the role’s auth_mode attribute.
Valid values for the auth_mode attribute are:
NONE No authentication necessary
INVOKER
Invokers must enter their own password. This is the default.
Enter the following command to force users to authenticate as themselves when assuming a given role:
chrole auth_mod=INVOKER role_name
Assigning roles to a user:
You can use the chuser command to assign roles to users.
Run the following command to assign the role_name1 and role_name2 roles to the user user_name:
chuser roles=role_name1,role_name2 user_name
Activating roles:
By default, a user must activate the role in the session in order to execute privileged commands.
v To activate the role_name1 and role_name2 roles, run the following command:
swrole role_name1,role_name2
v Some of the roles that are assigned to users are classified as default roles. These roles are activated
automatically when the user logs in. These roles are active during the entire login session. To assign
role_name1 as a default role for a user, run the following command:
chuser roles=role_name1,role_name2 default_roles=role_name1 user_name
94 AIX Version 6.1 Security

Listing the active role set:
You can use the rolelist command with the -e option to display information about the effective active role
set for a session.
v To display the effective active role set for a session, run the following command:
rolelist -e
Listing the roles for a user:
The rolelist command provides role and authorization information about a user’s current roles or the roles
that have been assigned to them.
By default, the rolelist command displays the list of roles that have been assigned to the user. This is
basically the same information displayed by the lsuser -a roles user1 command except that it also
includes the text description of the role if one has been provided.
v To list your assigned roles and associated authorizations, run the following command:
rolelist -a
Auditing session roles:
The roles that are active in a login session are audited along with other attributes such as UID and GID.
You can list these roles with the auditpr command.
To display the roles from the audit trail, run the following command:
auditpr -h eli -i /audit/trail
Assigning privileges to a running process:
You can use the setsecattr command to modify the privileges of a running process.
v To update the effective privilege set associated with a process, run the following command:
setsecattr –p eprivs=privileges pid
v Before adding any privilege to the effective privilege set of a process, you should ensure that the
privilege already exists in the maximum privilege set. To modify maximum privilege set, run the following
command:
setsecattr –p mprivs=privileges pid
Administering WPAR privileges:
Each WPAR is associated with a set of privileges that determine its powers. This is referred to as WPAR
privilege set (WPS).
Processes running within a given WPAR can use only those privileges that are available in the WPS.
v To modify the WPS from the global WPAR, run the following command:
chwpar –S privs+=privileges wpar_name
Determining the privileges required for a command:
Some commands require special privileges to perform privileged operations. Privileges are used in the
kernel to bypass security restrictions.
You can use the tracepriv command to profile a command to determine the privileges that are required for
the command to run successfully. The tracepriv command records the privileges that are used by another
Security 95
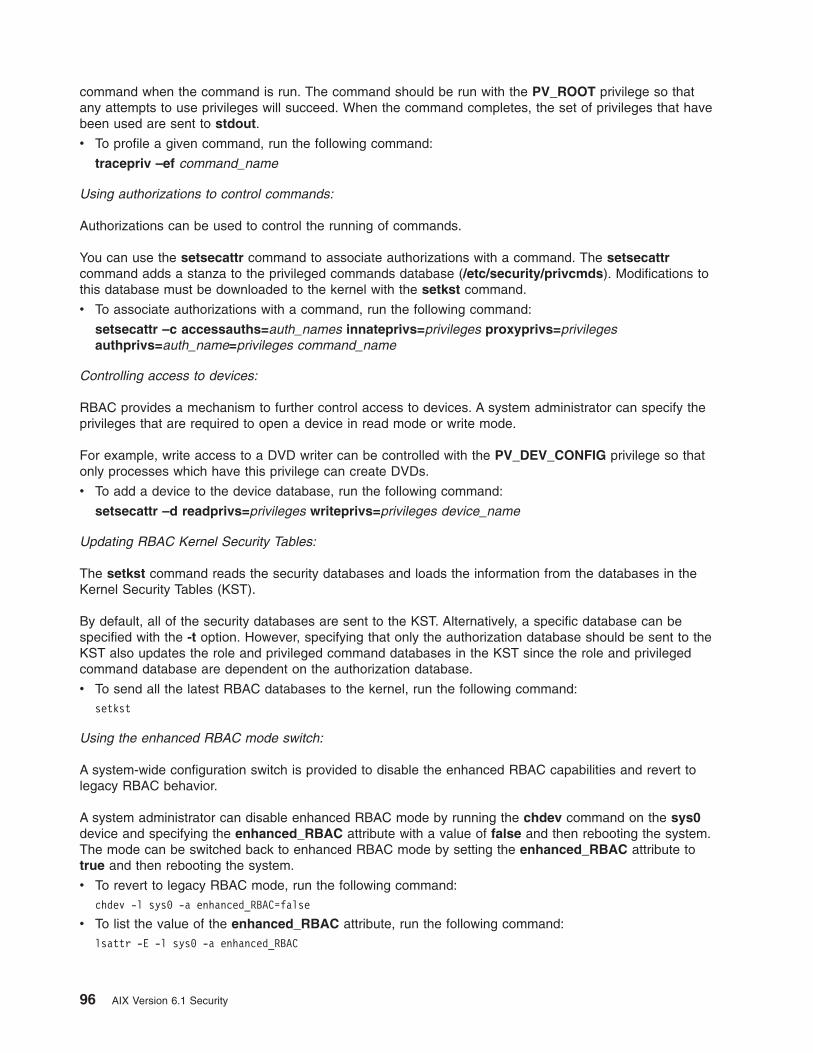
command when the command is run. The command should be run with the PV_ROOT privilege so that
any attempts to use privileges will succeed. When the command completes, the set of privileges that have
been used are sent to stdout.
v To profile a given command, run the following command:
tracepriv –ef command_name
Using authorizations to control commands:
Authorizations can be used to control the running of commands.
You can use the setsecattr command to associate authorizations with a command. The setsecattr
command adds a stanza to the privileged commands database (/etc/security/privcmds). Modifications to
this database must be downloaded to the kernel with the setkst command.
v To associate authorizations with a command, run the following command:
setsecattr –c accessauths=auth_names innateprivs=privileges proxyprivs=privileges
authprivs=auth_name=privileges command_name
Controlling access to devices:
RBAC provides a mechanism to further control access to devices. A system administrator can specify the
privileges that are required to open a device in read mode or write mode.
For example, write access to a DVD writer can be controlled with the PV_DEV_CONFIG privilege so that
only processes which have this privilege can create DVDs.
v To add a device to the device database, run the following command:
setsecattr –d readprivs=privileges writeprivs=privileges device_name
Updating RBAC Kernel Security Tables:
The setkst command reads the security databases and loads the information from the databases in the
Kernel Security Tables (KST).
By default, all of the security databases are sent to the KST. Alternatively, a specific database can be
specified with the -t option. However, specifying that only the authorization database should be sent to the
KST also updates the role and privileged command databases in the KST since the role and privileged
command database are dependent on the authorization database.
v To send all the latest RBAC databases to the kernel, run the following command:
setkst
Using the enhanced RBAC mode switch:
A system-wide configuration switch is provided to disable the enhanced RBAC capabilities and revert to
legacy RBAC behavior.
A system administrator can disable enhanced RBAC mode by running the chdev command on the sys0
device and specifying the enhanced_RBAC attribute with a value of false and then rebooting the system.
The mode can be switched back to enhanced RBAC mode by setting the enhanced_RBAC attribute to
true and then rebooting the system.
v To revert to legacy RBAC mode, run the following command:
chdev -l sys0 -a enhanced_RBAC=false
v To list the value of the enhanced_RBAC attribute, run the following command:
lsattr -E -l sys0 -a enhanced_RBAC
96 AIX Version 6.1 Security

In a WPAR environment, the RBAC mode can only be configured from the global system and affects the
global as well as all WPARs.
Note: Disabling the enhanced RBAC mode may lower the security threshold of your system, especially in
a WPAR.
RBAC-related commands
The following table lists the RBAC-related commands that are provided in AIX to manage and use the
RBAC framework.
Command Description
ckauth Check the current process for an authorization
chauth Modify user-defined authorization attributes
lsauth Display user- and system-defined authorization attributes
mkauth Create a new user-defined authorization
rmauth Remove user-defined authorizations
chrole Modify role attributes
lsrole Display role attributes
mkrole Create a new role
rmrole Remove a role
rolelist Display role information for a user or process
swrole Create a new role session
lssecattr Display security attributes of a command, device,
process, or file
rmsecattr Remove the definition of security attributes for a
command, device, or file
setsecattr Set the security attributes of a command, device,
process, or file
lskst List the entries in the Kernel Security Tables
setkst Send the entries in the RBAC user-level databases to the
Kernel Security Tables
lspriv Display the privileges available on the system
tracepriv Trace the privileges needed by a command to
successfully run
pvi Privileged file editor
rbactoldif Output RBAC user-level databases in LDAP-compatible
format
setsecconf Modify kernel security flags
RBAC-related files
The following table lists the RBAC-related files provided in AIX to configure and store database
information.
File Description
/etc/nscontrol.conf Name service control file for certain security databases
/etc/security/authorizations User-defined authorization database
/etc/security/privcmds Privileged command database
Security 97

File Description
/etc/security/privfiles Privileged file database
/etc/security/privdevs Privileged device database
/etc/security/roles Role database
Using enhanced RBAC in applications
Many applications do not require any modifications to run successfully in the enhanced RBAC
environment. Simply defining the application’s access authorizations and associated privileges and then
assigning the application to the privileged command database may be sufficient.
However, an application can use enhanced RBAC by calling RBAC interfaces to control the application’s
execution at a granular level and thereby result in a more secure application. Applications that might
benefit from integration with enhanced RBAC include the following:
v Applications that restrict use to either the root user or members of a specific group. These applications
typically check for effective user identity or group membership and can be modified to check for an
authorization instead.
v Applications that utilize setuid or setgid mode bits to allow unprivileged users to gain privileges during
the command invocation. These applications would usually be more secure by using privilege bracketing
so that less privilege is used to accomplish their task.
Authorization checking:
Applications that currently use the user ID or group ID of the invoking user to determine the ability to
perform privileged operations should be modified to check for an authorization instead.
For example, consider an application which performs filesystem configuration tasks and currently allows
the root user (UID = 0) to perform some privileged operations:
if (getuid() == 0) {
/* allow privileged operation to continue */
}
To enable this application to instead allow users with a specific authorization (aix.fs.config) to perform the
privileged operation, the code can be modified to use the checkauths API to perform the authorization
check:
if (checkauths(“aix.fs.config", CHECK_ALL)) {
/* allow privileged operation to continue */
}
The checkauths API is enabled for both the legacy and enhanced RBAC modes and will return a 0
success code if the invoking process has the specified authorization. The checkauths API also determines
if the root user powers are enabled or disabled and then allows or disallows the root user to bypass
authorization checks as appropriate. Prior to AIX Version 6.1, the MatchAllAuths, MatchAnyAuths,
MatchAllAuthsList, and MatchAnyAuthsList APIs were normally used to perform authorization checks.
Applications provided on AIX Version 6.1 and later should use the checkauths API instead due to its
support for legacy and enhanced RBAC modes and root disablement.
As in the example above, applications that call getuid, getgid, or a similar function to only allow certain
users to perform specific tasks can be modified to use the checkauths API to perform an authorization
check instead. If the user ID or group ID being checked is not that of the root user, the sys_parm system
call can be used first to query whether enhanced RBAC is enabled or not. If enhanced RBAC is not
enabled, the code can perform the checks that are already in place. Otherwise, if enhanced RBAC is
enabled, the code can check for the relevant system or user-defined authorizations.
Privilege bracketing:
98 AIX Version 6.1 Security

Once applications have been modified to check for authorizations, they can be further modified to utilize
fine-grained privilege bracketing during operation.
Applications can use the priv_raise API to raise the privileges required to perform an operation and lower
the privilege with the priv_lower API. Raising privileges immediately before a privileged operation is
attempted and lowering privileges after the operation has completed is known as privileged bracketing and
is the preferred method for applications to use privileges. To raise a privilege, the privilege needs to be
available in the maximum privilege set of the application in the privileged commands database. Raising a
privilege causes the privilege to be placed in the effective privilege set (EPS) of the process. Lowering a
privilege removes the privilege from the EPS. The following code sample shows privilege bracketing
around the auditproc API.
priv_raise(PV_AU_ADMIN, -1); /* raise privilege when needed */
auditproc(); /* call auditing system call */
priv_lower(PV_AU_ADMIN, -1); /* lower privilege */
RBAC-aware applications:
Traditionally, in AIX and on root-enabled enhanced RBAC systems, a root or root-owned setuid program
(with UID=0) that does not appear in the privileged command database is always granted all privileges in
the kernel. Privilege checks in the kernel will therefore always return success even when a requested
privilege is not present in the process effective privilege set (EPS).
This behavior is still needed to support existing setuid applications, but this can be a security risk because
a setuid program will have all of the powers of root.
To allow proper privilege bracketing in a process on a root-enabled enhanced RBAC system, a new bit in
the process structure has been introduced. If this bit is set, then the process becomes an RBAC-aware
process and an effective UID of 0 does not provide any extra privileges. This bit can be set in a program
with the proc_rbac_op system call. Any setuid programs which are not listed in the privileged command
database can use this functionality to reduce security vulnerability by lowering the available privileges.
Note that programs that are defined in the privileged command database are automatically marked as
RBAC-aware processes and are only assigned the privileges listed in the database.
The following code demonstrates how an application can mark itself as RBAC-aware and then perform
proper privilege bracketing:
#include <userpriv.h
#include <sys/priv.h>
privg_t effpriv;
int rbac_flags = SEC_RBACAWARE;
/* Mark the process as RBAC-aware. */
proc_rbac_op(-1, PROC_RBAC_SET, &rbac_flags);
/* Set the effective privilege set as empty. */
priv_clrall(effpriv);
setppriv(-1, &effpriv, NULL, NULL, NULL);
/* Raise privilege when required. */
priv_raise(PV_AU_ADMIN, -1);
auditproc();
/* Lower privilege when no longer needed. */
priv_lower(PV_AU_ADMIN, -1);
RBAC APIs:
Security 99

The RBAC-related APIs available on the system are listed in the following table. Please see the specific
APIs for more information.
API Description
checkauths Compares the passed in list of authorizations to the
authorizations associated with the current process.
GetUserAuths Retrieves the set of authorizations assigned to the current
process.
MatchAllAuths, MatchAllAuthsList, MatchAnyAuths,
MatchAnyAuthsList
Compares authorizations. The checkauths API is
preferred to these APIs.
getauthattr, putauthattr Queries or modifies authorizations defined in the
authorization database.
getauthattrs Retrieves multiple authorization attributes from the
authorization database.
putauthattrs Updates multiple authorization attributes in the
authorization database.
getcmdattr, putcmdattr Queries or modifies the command security information in
the privileged command database.
getcmdattrs Retrieves multiple command attributes from the privileged
command database.
putcmdattrs Updates multiple command attributes in the privileged
command database.
getdevattr, putdevattr Queries or modifies the device security information in the
privileged device database.
getdevattrs Retrieves multiple device attributes from the privileged
device database.
putdevattrs Updates multiple device attributes in the privileged device
database.
getpfileattr, putpfileattr Queries or modifies the file security information in the
privileged file database
getpfileattrs Retrieves multiple file attributes from the privileged file
database.
putpfileattrs Updates multiple file attributes in the privileged file
database.
getroleattr, putroleattr Queries or modifies roles defined in the role database.
getroleattrs Retrieves multiple role attributes from the role database.
putroleattrs Updates multiple role attributes in the role database.
getsecorder Retrieves the ordering of domains for certain security
databases.
setsecorder Sets the ordering of domains for certain security
databases.
AIX privileges
The privileges that are available in AIX are listed in the following table. A description of each privilege and
its related system calls is provided. Some privileges form a hierarchy where one privilege can grant all of
the rights that are associated with another privilege.
When checking for privileges, the system first determines if the process has the lowest privilege needed,
and then proceeds up the hierarchy checking for the presence of a more powerful privilege. For example,
a process with the PV_AU_ privilege automatically has the PV_AU_ADMIN, PV_AU_ADD,
100 AIX Version 6.1 Security
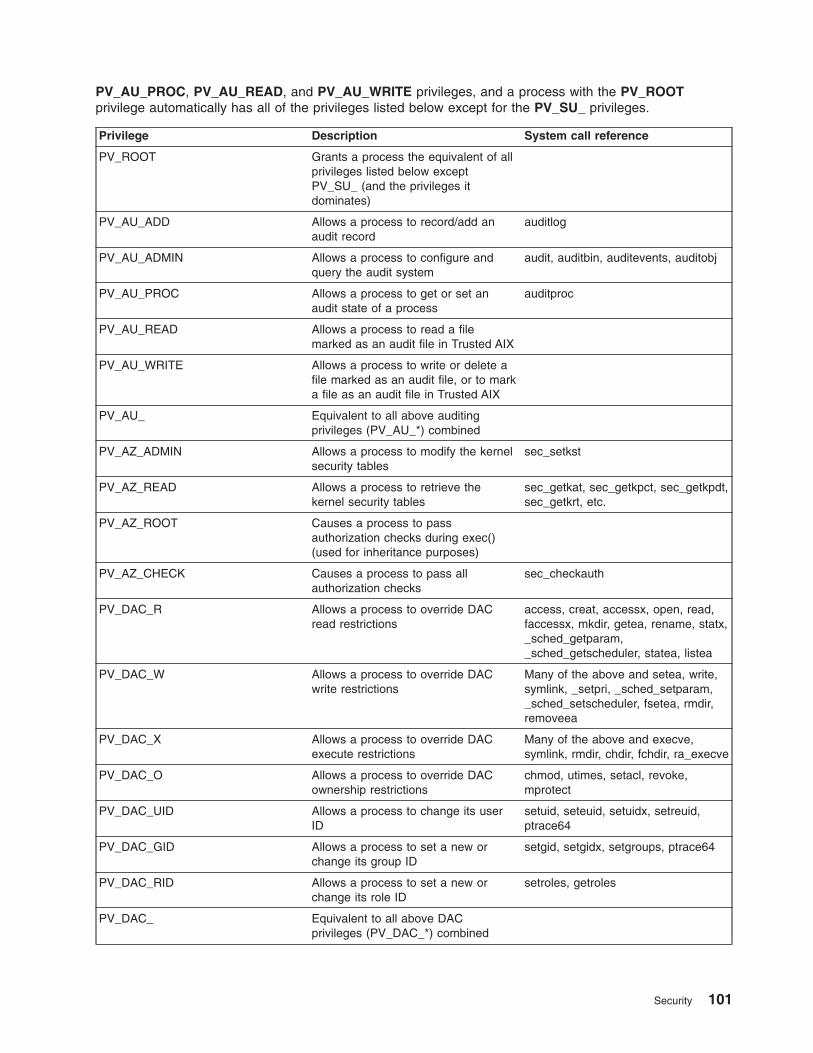
PV_AU_PROC, PV_AU_READ, and PV_AU_WRITE privileges, and a process with the PV_ROOT
privilege automatically has all of the privileges listed below except for the PV_SU_ privileges.
Privilege Description System call reference
PV_ROOT Grants a process the equivalent of all
privileges listed below except
PV_SU_ (and the privileges it
dominates)
PV_AU_ADD Allows a process to record/add an
audit record
auditlog
PV_AU_ADMIN Allows a process to configure and
query the audit system
audit, auditbin, auditevents, auditobj
PV_AU_PROC Allows a process to get or set an
audit state of a process
auditproc
PV_AU_READ Allows a process to read a file
marked as an audit file in Trusted AIX
PV_AU_WRITE Allows a process to write or delete a
file marked as an audit file, or to mark
a file as an audit file in Trusted AIX
PV_AU_ Equivalent to all above auditing
privileges (PV_AU_*) combined
PV_AZ_ADMIN Allows a process to modify the kernel
security tables
sec_setkst
PV_AZ_READ Allows a process to retrieve the
kernel security tables
sec_getkat, sec_getkpct, sec_getkpdt,
sec_getkrt, etc.
PV_AZ_ROOT Causes a process to pass
authorization checks during exec()
(used for inheritance purposes)
PV_AZ_CHECK Causes a process to pass all
authorization checks
sec_checkauth
PV_DAC_R Allows a process to override DAC
read restrictions
access, creat, accessx, open, read,
faccessx, mkdir, getea, rename, statx,
_sched_getparam,
_sched_getscheduler, statea, listea
PV_DAC_W Allows a process to override DAC
write restrictions
Many of the above and setea, write,
symlink, _setpri, _sched_setparam,
_sched_setscheduler, fsetea, rmdir,
removeea
PV_DAC_X Allows a process to override DAC
execute restrictions
Many of the above and execve,
symlink, rmdir, chdir, fchdir, ra_execve
PV_DAC_O Allows a process to override DAC
ownership restrictions
chmod, utimes, setacl, revoke,
mprotect
PV_DAC_UID Allows a process to change its user
ID
setuid, seteuid, setuidx, setreuid,
ptrace64
PV_DAC_GID Allows a process to set a new or
change its group ID
setgid, setgidx, setgroups, ptrace64
PV_DAC_RID Allows a process to set a new or
change its role ID
setroles, getroles
PV_DAC_ Equivalent to all above DAC
privileges (PV_DAC_*) combined
Security 101

Privilege Description System call reference
PV_FS_MOUNT Allows a process to mount and
unmount a filesystem
vmount, umount
PV_FS_MKNOD Allows a process to create a file of
any type or to perform the mknod
system call
mknod
PV_FS_CHOWN Allows a process to change the
ownership of a file
chown, chownx, fchownx, lchown
PV_FS_QUOTA Allows a process to manage disk
quotas related operations
quotactl
PV_FS_LINKDIR Allows a process to make a hard link
to a directory
link, unlink, remove
PV_FS_CNTL Allows a process to perform various
control operations except extend and
shrink on a filesystem
fscntl
PV_FS_RESIZE Allows a process to perform extend
and shrink type of operations on a
filesystem
fscntl
PV_FS_CHROOT Allows a process to change its root
directory
chroot
PV_FS_PDMODE Allows a process to make or set
partitioned type directory
pdmkdir
PV_FS_ Equivalent to all above filesystem
privileges (PV_FS_*) combined
PV_PROC_PRIV Allows a process to modify or view
privilege sets associated with a
process
setppriv, getppriv
PV_PROC_PRIO Allows a process/thread to change
priority, policy and other scheduling
parameters
_prio_requeue, _setpri, _setpriority,
_getpri, _sched_setparam,
_sched_setscheduler,
_thread_setsched,
thread_boostceiling,
thread_setmystate, thread_setstate
PV_PROC_CORE Allows a process to dump core gencore
PV_PROC_RAC Allows a process create more
processes than the per-user limit
appsetrlimit, setrlimit64, mlock,
mlockall, munlock, munlockall, plock,
upfget, upfput, restart, brk, sbrk
PV_PROC_RSET Allow to attach resource set (rset) to
a process or thread
bindprocessor, ra_attachrset,
ra_detachrset, rs_registername,
rs_setnameattr, rs_discardname,
rs_setpartition, rs_getassociativity,
kra_mmapv
PV_PROC_ENV Allows a process to set user
information in the user structure
ue_proc_register, ue_proc_unregister,
usrinfo
PV_PROC_CKPT Allows a process to checkpoint or
restart another process
setcrid, restart
PV_PROC_CRED Allows a process to set credential
attributes
__pag_setvalue, __pag_setvalue64,
__pag_genpagvalue
PV_PROC_SIG Allows a process to send signal to an
unrelated process
_sigqueue, kill, signohup, gencore,
thread_post, thread_post_many
102 AIX Version 6.1 Security
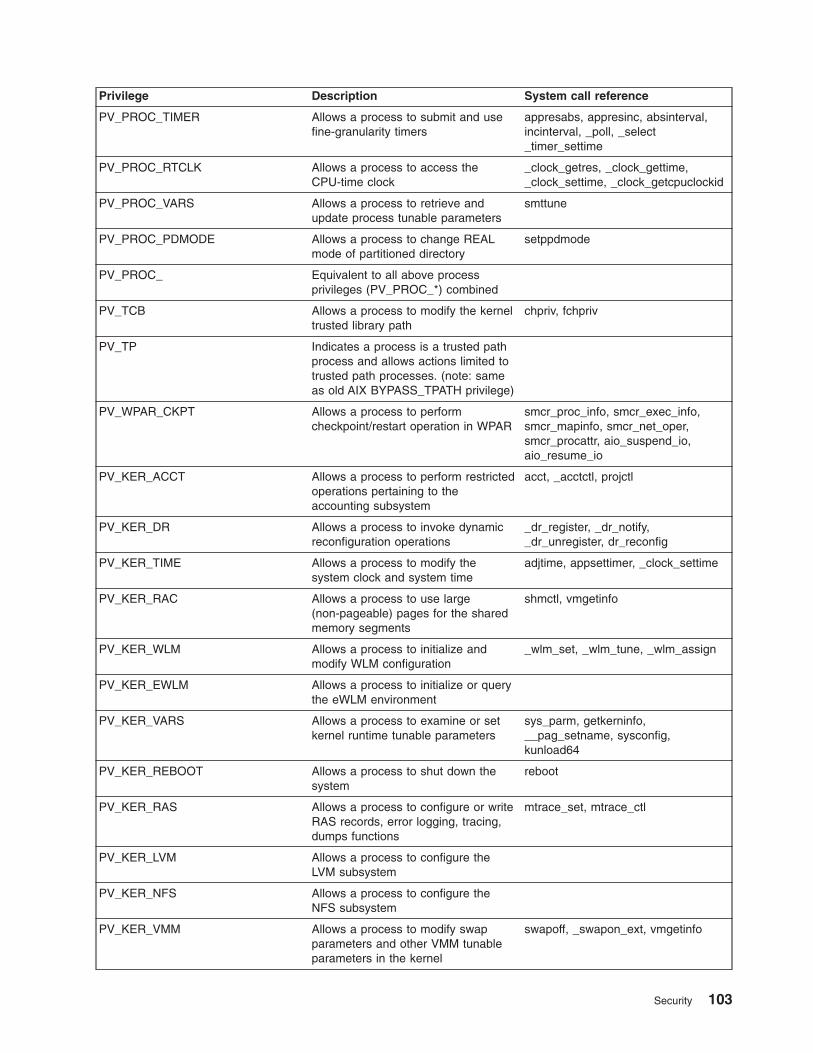
Privilege Description System call reference
PV_PROC_TIMER Allows a process to submit and use
fine-granularity timers
appresabs, appresinc, absinterval,
incinterval, _poll, _select
_timer_settime
PV_PROC_RTCLK Allows a process to access the
CPU-time clock
_clock_getres, _clock_gettime,
_clock_settime, _clock_getcpuclockid
PV_PROC_VARS Allows a process to retrieve and
update process tunable parameters
smttune
PV_PROC_PDMODE Allows a process to change REAL
mode of partitioned directory
setppdmode
PV_PROC_ Equivalent to all above process
privileges (PV_PROC_*) combined
PV_TCB Allows a process to modify the kernel
trusted library path
chpriv, fchpriv
PV_TP Indicates a process is a trusted path
process and allows actions limited to
trusted path processes. (note: same
as old AIX BYPASS_TPATH privilege)
PV_WPAR_CKPT Allows a process to perform
checkpoint/restart operation in WPAR
smcr_proc_info, smcr_exec_info,
smcr_mapinfo, smcr_net_oper,
smcr_procattr, aio_suspend_io,
aio_resume_io
PV_KER_ACCT Allows a process to perform restricted
operations pertaining to the
accounting subsystem
acct, _acctctl, projctl
PV_KER_DR Allows a process to invoke dynamic
reconfiguration operations
_dr_register, _dr_notify,
_dr_unregister, dr_reconfig
PV_KER_TIME Allows a process to modify the
system clock and system time
adjtime, appsettimer, _clock_settime
PV_KER_RAC Allows a process to use large
(non-pageable) pages for the shared
memory segments
shmctl, vmgetinfo
PV_KER_WLM Allows a process to initialize and
modify WLM configuration
_wlm_set, _wlm_tune, _wlm_assign
PV_KER_EWLM Allows a process to initialize or query
the eWLM environment
PV_KER_VARS Allows a process to examine or set
kernel runtime tunable parameters
sys_parm, getkerninfo,
__pag_setname, sysconfig,
kunload64
PV_KER_REBOOT Allows a process to shut down the
system
reboot
PV_KER_RAS Allows a process to configure or write
RAS records, error logging, tracing,
dumps functions
mtrace_set, mtrace_ctl
PV_KER_LVM Allows a process to configure the
LVM subsystem
PV_KER_NFS Allows a process to configure the
NFS subsystem
PV_KER_VMM Allows a process to modify swap
parameters and other VMM tunable
parameters in the kernel
swapoff, _swapon_ext, vmgetinfo
Security 103

Privilege Description System call reference
PV_KER_WPAR Allows a process to configure a
workload partition
brand, corral_config, corral_delete,
corral_modify, wpar_mkdevexport,
wpar_rmdevexport, wpar_lsdevexport
PV_KER_CONF Allows a process to perform various
system-configuration operations
sethostname, sethostid, unameu,
setdomainname
PV_KER_EXTCONF Allows a process to perform various
configuration tasks in kernel
extensions (for kernel extension
services)
PV_KER_IPC Allows a process to raise the value of
IPC message queue buffer and allow
shmget with ranges to attach
msgctl, shm_open, shmget,
ra_shmget, ra_shmgetv, shmctl
PV_KER_IPC_R Allows a process to read a IPC
message queue, semaphore set, or
shared memory segment
msgctl, __msgrcv, _mq_open, semctl,
shmat, shm_open, __semop, shmctl,
__semtimedop, sem_post,
_sem_wait, __msgrcv, __msgxrcv
PV_KER_IPC_W Allows a process to write a IPC
message queue, semaphore set, or
shared memory segment
_mq_open, shmat, _sem_open,
semctl, shm_open, shmctl, mq_unlink,
sem_unlink, shm_unlink, msgctl,
__msgsnd
PV_KER_IPC_O Allows a process to override DAC
ownership on all IPC objects
msgctl, semctl, shmctl, fchmod,
fchown
PV_KER_SECCONFIG Allows a process to set kernel
security flags
sec_setsecconf, sec_setrunmode,
sec_setsyslab, sec_getsyslab
PV_KER_PATCH Allows a process to patch kernel
extensions
PV_KER_ Equivalent to all above kernel
privileges (PV_KER_*) combined
PV_DEV_CONFIG Allows a process to configure kernel
extensions and devices in the system
sysconfig
PV_DEV_LOAD Allows a process to load and unload
kernel extensions and devices in the
system
sysconfig
PV_DEV_QUERY Allows a process to query kernel
modules
sysconfig
PV_SU_ROOT Grants the process all privileges
associated with the standard AIX
superuser
PV_SU_EMUL Grants the process all privileges
associated with the standard AIX
super user if the UID is 0
PV_SU_UID Causes the getuid system call to
return 0
getuidx
PV_SU_ Equivalent to all of the above
superuser privileges (PV_SU_*)
combined
PV_NET_CNTL Allows a process to modify network
tables
socket, bind, listen, _naccept,
econnect, ioctl, rmsock, setsockopt
PV_NET_PORT Allows a process to bind to privileged
ports
bind
104 AIX Version 6.1 Security
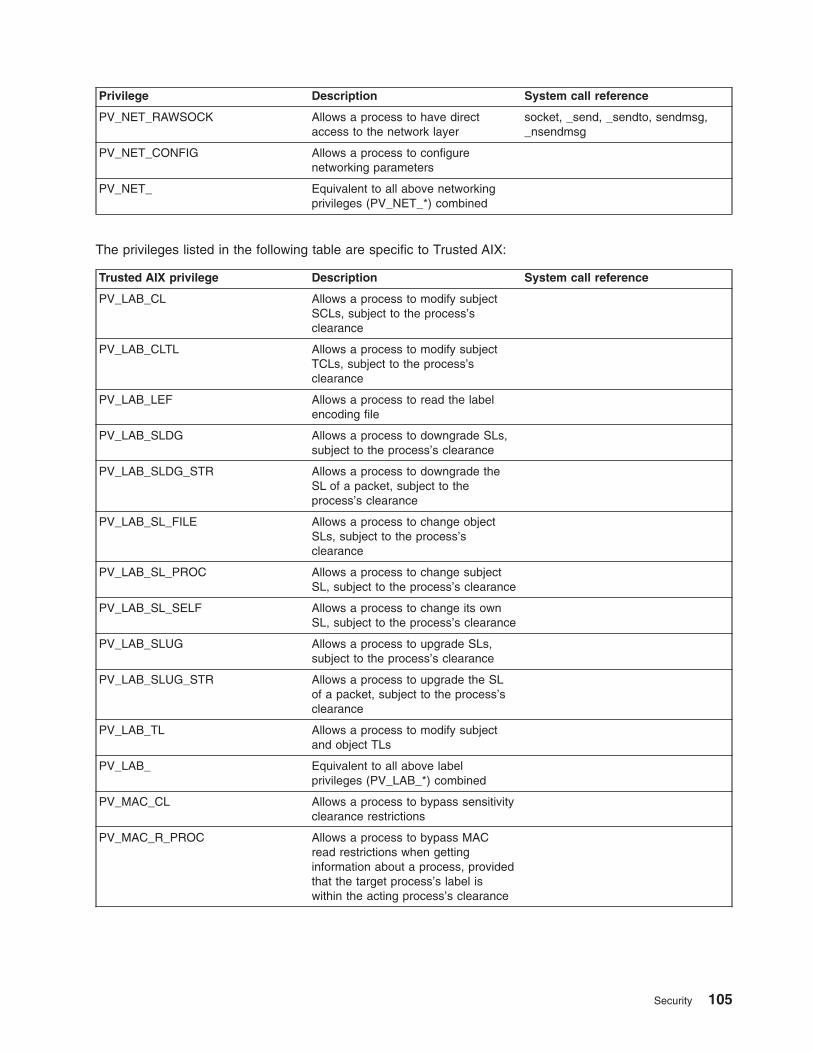
Privilege Description System call reference
PV_NET_RAWSOCK Allows a process to have direct
access to the network layer
socket, _send, _sendto, sendmsg,
_nsendmsg
PV_NET_CONFIG Allows a process to configure
networking parameters
PV_NET_ Equivalent to all above networking
privileges (PV_NET_*) combined
The privileges listed in the following table are specific to Trusted AIX:
Trusted AIX privilege Description System call reference
PV_LAB_CL Allows a process to modify subject
SCLs, subject to the process’s
clearance
PV_LAB_CLTL Allows a process to modify subject
TCLs, subject to the process’s
clearance
PV_LAB_LEF Allows a process to read the label
encoding file
PV_LAB_SLDG Allows a process to downgrade SLs,
subject to the process’s clearance
PV_LAB_SLDG_STR Allows a process to downgrade the
SL of a packet, subject to the
process’s clearance
PV_LAB_SL_FILE Allows a process to change object
SLs, subject to the process’s
clearance
PV_LAB_SL_PROC Allows a process to change subject
SL, subject to the process’s clearance
PV_LAB_SL_SELF Allows a process to change its own
SL, subject to the process’s clearance
PV_LAB_SLUG Allows a process to upgrade SLs,
subject to the process’s clearance
PV_LAB_SLUG_STR Allows a process to upgrade the SL
of a packet, subject to the process’s
clearance
PV_LAB_TL Allows a process to modify subject
and object TLs
PV_LAB_ Equivalent to all above label
privileges (PV_LAB_*) combined
PV_MAC_CL Allows a process to bypass sensitivity
clearance restrictions
PV_MAC_R_PROC Allows a process to bypass MAC
read restrictions when getting
information about a process, provided
that the target process’s label is
within the acting process’s clearance
Security 105
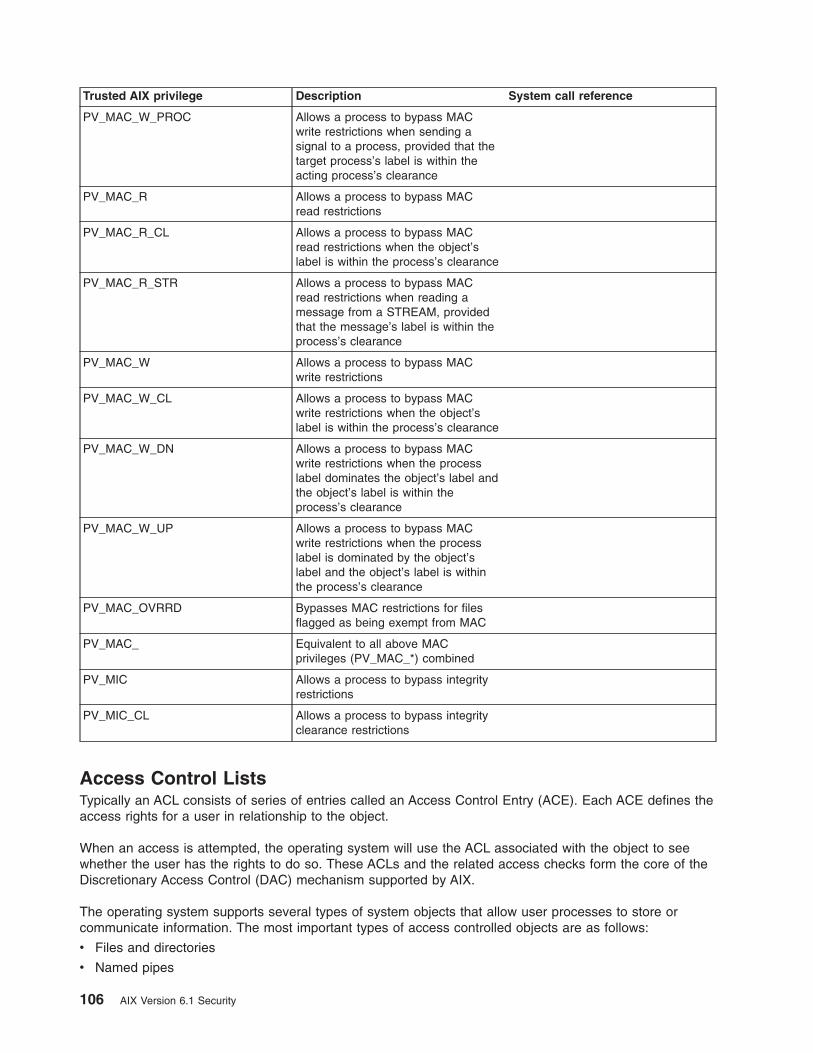
Trusted AIX privilege Description System call reference
PV_MAC_W_PROC Allows a process to bypass MAC
write restrictions when sending a
signal to a process, provided that the
target process’s label is within the
acting process’s clearance
PV_MAC_R Allows a process to bypass MAC
read restrictions
PV_MAC_R_CL Allows a process to bypass MAC
read restrictions when the object’s
label is within the process’s clearance
PV_MAC_R_STR Allows a process to bypass MAC
read restrictions when reading a
message from a STREAM, provided
that the message’s label is within the
process’s clearance
PV_MAC_W Allows a process to bypass MAC
write restrictions
PV_MAC_W_CL Allows a process to bypass MAC
write restrictions when the object’s
label is within the process’s clearance
PV_MAC_W_DN Allows a process to bypass MAC
write restrictions when the process
label dominates the object’s label and
the object’s label is within the
process’s clearance
PV_MAC_W_UP Allows a process to bypass MAC
write restrictions when the process
label is dominated by the object’s
label and the object’s label is within
the process’s clearance
PV_MAC_OVRRD Bypasses MAC restrictions for files
flagged as being exempt from MAC
PV_MAC_ Equivalent to all above MAC
privileges (PV_MAC_*) combined
PV_MIC Allows a process to bypass integrity
restrictions
PV_MIC_CL Allows a process to bypass integrity
clearance restrictions
Access Control Lists
Typically an ACL consists of series of entries called an Access Control Entry (ACE). Each ACE defines the
access rights for a user in relationship to the object.
When an access is attempted, the operating system will use the ACL associated with the object to see
whether the user has the rights to do so. These ACLs and the related access checks form the core of the
Discretionary Access Control (DAC) mechanism supported by AIX.
The operating system supports several types of system objects that allow user processes to store or
communicate information. The most important types of access controlled objects are as follows:
v Files and directories
v Named pipes
106 AIX Version 6.1 Security

v IPC objects such as message queues, shared memory segments, and semaphores
All access permission checks for these objects are made at the system call level when the object is first
accessed. Because System V Interprocess Communication (SVIPC) objects are accessed statelessly,
checks are made for every access. For objects with file system names, it is necessary to be able to
resolve the name of the actual object. Names are resolved either relatively (to the process’ working
directory) or absolutely (to the process’ root directory). All name resolution begins by searching one of
these directories.
The discretionary access control mechanism allows for effective access control of information resources
and provides for separate protection of the confidentiality and integrity of the information. Owner-controlled
access control mechanisms are only as effective as users make them. All users must understand how
access permissions are granted and denied, and how these are set.
For example, an ACL associated with a file system object (file or directory) could enforce the access rights
for various users in regards to access of the object. It is possible that such an ACL could enforce different
levels of access rights, such as read or write, for different users.
Typically, each object will have a defined owner and, in some cases, be associated to a primary group .
The owner of a specific object controls its discretionary access attributes. The owner’s attributes are set to
the creating process’s effective user ID.
The following table lists direct access control attributes for the different types of objects:
Owner
For System V Interprocess Communication (SVIPC) objects, the creator or owner can change the
object’s ownership. SVIPC objects have an associated creator that has all the rights of the owner
(including access authorization). The creator cannot be changed, even with root authority.
SVIPC objects are initialized to the effective group ID of the creating process. For file system
objects, the direct access control attributes are initialized to either the effective group ID of the
creating process or the group ID of the parent directory (this is determined by the group
inheritance flag of the parent directory).
Group The owner of an object can change the group. The new group must be either, the effective group
ID of the creating process, or the group ID of the parent directory. (As above, SVIPC objects have
an associated creating group that cannot be changed, and share the access authorization of the
object group.)
Mode The chmod command (in numeric mode with octal notations) can set base permissions and
attributes. The chmod subroutine that is called by the command, disables extended permissions.
The extended permissions are disabled if you use the numeric mode of the chmod command on a
file that has an ACL. The symbolic mode of the chmod command disables extended ACLs for
NSF4 ACL type but does not disable extended permissions for AIXC type ACLs. For information
about numeric and symbolic mode, see chmod.
Many objects in the operating system, such as sockets and file system objects, have ACLs associated for
different subjects. Details of ACLs for these object types could vary from one to another.
Traditionally, AIX has supported mode bits for controlling access to the file system objects. It has also
supported a unique form of ACL around mode bits. This ACL consisted of base mode bits and also
allowed for the definition of multiple ACE entries; each ACE entry defining access rights for a user or
group around the mode bits. This classic type of ACL behavior existed prior to AIX 5.3 and will continue to
be supported. This ACL type has been named as AIXC ACL type.
Note that support of an ACL on file system objects depends on the underlying physical file system (PFS).
The PFS must understand the ACL data and be able to store, retrieve, and enforce the accesses for
various users. It is possible that some of the physical file systems do not support any ACLs at all (may just
Security 107

support the base mode bits) as compared to a physical file system that supported multiple types of ACLs.
Beginning with AIX 5.3, few of the file systems under AIX have been enhanced to support multiple ACL
types. JFS2 and GPFS™ will have the capability to support NFS version 4 protocol based ACL type too.
This ACL has been named NFS4 ACL type on AIX. This ACL type adheres to most of the ACL definition in
the NFS version 4 protocol specifications. It also supports more granular access controls as compared to
the AIXC ACL type and provides for capabilities such as inheritance.
Multiple Access Control List type framework support
Beginning with version 5.3.0, AIX supports an infrastructure for different Access Control List (ACL) types to
exist for different file system objects within the operating system.
This infrastructure allows for uniform methods to manage ACLs irrespective of the ACL type associated
with the object. The framework includes the following components:
ACL administration commands
These are commands, such as aclget, aclput, acledit, aclconvert, aclgetttypes. These
commands call library interfaces that invoke ACL-type-specific modules.
ACL library interfaces
ACL Library interfaces act as front-ends to the applications that need to access ACLs.
ACL-type-specific dynamically loadable ACL modules
AIX provides a set of ACL-type-specific modules for AIX Classic ACLs (AIXC) and NFS4 ACLs
(nfs4).
Binary compatibility:
There are no compatibility issues for applications that run on the existing JFS2 file systems, with or without
the existing AIX ACLs.
However, note that applications might find that access to files might fail if they encounter file system
objects with much stricter ACLs (such as NFS4) associated. Simple checks to see whether the file exists
will require level of read permission in NFS4 ACL.
Access Control List types supported on AIX
AIX currently supports AIXC and NFS4 ACL types.
As mentioned, it also supports an infrastructure for the addition of any other ACL type supported by the
underlying physical file system. Note that the JFS2 PFS supports NFS4 ACL natively if the file system
instance is created with Extended Attributes Version 2 capability.
AIXC Access Control List:
The AIXC Access Control List type represents the behavior of the ACL type supported on AIX releases
prior to 5.3.0. AIXC ACLs include base permissions and extended permissions.
The AIXC Access Control List (ACL) type represents the behavior of the ACL type supported on AIX
releases prior to 5.3.0. AIXC ACLs include base permissions and extended permissions. The JFS2 file
system allows a maximum size of 4 KB for AIXC ACLs.
Setting base permissions for AIXC ACL
Base permissions are the traditional file-access modes assigned to the file owner, file group, and other
users. The access modes are: read (r), write (w), and execute/search (x).
In an ACL, base permissions are in the following format, with the Mode parameter expressed as rwx (with
a hyphen (-) replacing each unspecified permission):
108 AIX Version 6.1 Security

base permissions:
owner(name): Mode
group(group): Mode
others: Mode
Setting attributes for AIXC ACL
The following attributes can be added to an AIXC ACL:
setuid (SUID)
Set-user-ID mode bit. This attribute sets the effective and saved user IDs of the process to the
owner ID of the file at run time.
setgid (SGID)
Set-group-ID mode bit. This attribute sets the effective and saved group IDs of the process to the
group ID of the file at run time.
savetext (SVTX)
For directories, indicates that only file owners can link or unlink files in the specified directory.
These attributes are added in the following format:
attributes: SUID, SGID, SVTX
Setting extended permissions for AIXC Access ACL
Extended permissions allow the owner of a file to more precisely define access to that file. Extended
permissions modify the base file permissions (owner, group, others) by permitting, denying, or specifying
access modes for specific individuals, groups, or user and group combinations. Permissions are modified
through the use of keywords.
The permit, deny, and specify keywords are defined as follows:
permit Grants the user or group the specified access to the file
deny Restricts the user or group from using the specified access to the file
specify Precisely defines the file access for the user or group
If a user is denied a particular access by either a deny or a specify keyword, no other entry can override
that access denial.
The enabled keyword must be specified in the ACL for the extended permissions to take effect. The
default value is the disabled keyword.
In an ACL, extended permissions are in the following format:
extended permissions:
enabled | disabled
permit Mode UserInfo...
deny Mode UserInfo...
specify Mode UserInfo...
Use a separate line for each permit, deny, or specify entry. The Mode parameter is expressed as rwx
(with a hyphen (-) replacing each unspecified permission). The UserInfo parameter is expressed as
u:UserName, or g:GroupName, or a comma-separated combination of u:UserName and g:GroupName.
Note: Because a process has only one user ID, if more than one user name is specified in an entry, that
entry cannot be used in an access control decision.
Security 109
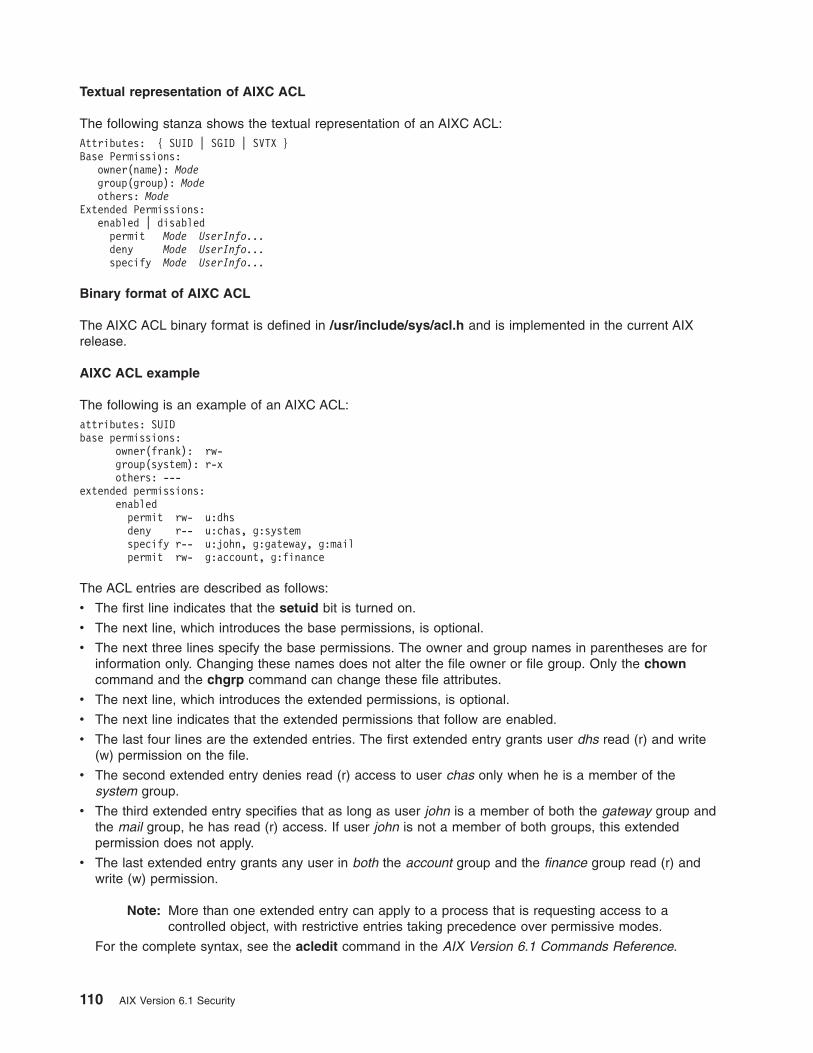
Textual representation of AIXC ACL
The following stanza shows the textual representation of an AIXC ACL:
Attributes: { SUID | SGID | SVTX }
Base Permissions:
owner(name): Mode
group(group): Mode
others: Mode
Extended Permissions:
enabled | disabled
permit Mode UserInfo...
deny Mode UserInfo...
specify Mode UserInfo...
Binary format of AIXC ACL
The AIXC ACL binary format is defined in /usr/include/sys/acl.h and is implemented in the current AIX
release.
AIXC ACL example
The following is an example of an AIXC ACL:
attributes: SUID
base permissions:
owner(frank): rw-
group(system): r-x
others: ---
extended permissions:
enabled
permit rw- u:dhs
deny r-- u:chas, g:system
specify r-- u:john, g:gateway, g:mail
permit rw- g:account, g:finance
The ACL entries are described as follows:
v The first line indicates that the setuid bit is turned on.
v The next line, which introduces the base permissions, is optional.
v The next three lines specify the base permissions. The owner and group names in parentheses are for
information only. Changing these names does not alter the file owner or file group. Only the chown
command and the chgrp command can change these file attributes.
v The next line, which introduces the extended permissions, is optional.
v The next line indicates that the extended permissions that follow are enabled.
v The last four lines are the extended entries. The first extended entry grants user dhs read (r) and write
(w) permission on the file.
v The second extended entry denies read (r) access to user chas only when he is a member of the
system group.
v The third extended entry specifies that as long as user john is a member of both the gateway group and
the mail group, he has read (r) access. If user john is not a member of both groups, this extended
permission does not apply.
v The last extended entry grants any user in both the account group and the finance group read (r) and
write (w) permission.
Note: More than one extended entry can apply to a process that is requesting access to a
controlled object, with restrictive entries taking precedence over permissive modes.
For the complete syntax, see the acledit command in the AIX Version 6.1 Commands Reference.
110 AIX Version 6.1 Security

NFS4 Access Control List:
AIX also supports the NFS4 Access Control List (ACL) type.
The NFS4 ACL type implements access control as specified in the Network File System (NFS) version 4
Protocol RFC 3530. The JFS2 file system allows a maximum size of 64KB for NFS4 ACLs.
Textual representation of NFS4 ACL
A textual NFS V4 ACL is a list of ACEs (Access Control Entries) each ACE per line. An ACE has four
elements in the following format.
IDENTITY ACE_TYPE ACE_MASK ACE_FLAGS
where:
IDENTITY => Has format of ’IDENTITY_type:(IDENTITY_name or IDENTITY_ID or IDENTITY_who):’
where:
IDENTITY_type => One of the following Identity type:
u : user
g : group
s : special who string (IDENTITY_who must be a special who)
IDENTITY_name => user/group name
IDENTITY_ID => user/group ID
IDENTITY_who => special who string (e.g. OWNER@, GROUP@, EVERYONE@)
ACE_TYPE => One of the following ACE Type:
a : allow
d : deny
l : alarm
u : audit
ACE MASK => One or more of the following Mask value Key without separator:
r : READ_DATA or LIST_DIRECTORY
w : WRITE_DATA or ADD_FILE
p : APPEND_DATA or ADD_SUBDIRECTORY
R : READ_NAMED_ATTRS
W : WRITE_NAMED_ATTRS
x : EXECUTE or SEARCH_DIRECTORY
D : DELETE_CHILD
a : READ_ATTRIBUTES
A : WRITE_ATTRIBUTES
d : DELETE
c : READ_ACL
C : WRITE_ACL
o : WRITE_OWNER
s : SYNCHRONIZE
ACE_FLAGS (Optional) => One or more of the following Attribute Key without separater:
fi : FILE_INHERIT
di : DIRECTORY_INHERIT
oi : INHERIT_ONLY
ni : NO_PROPAGATE_INHERIT
sf : SUCCESSFUL_ACCESS_ACE_FLAG
ff : FAILED_ACCESS_ACE_FLAG
Note: Concerning the SYNCHRONIZE Ace_Mask value key, s, AIX does not take any action concerning
this value key. AIX stores and preserves the s value key but this value key does not have any
meaning to AIX.
When the WRITE_OWNER Ace_Mask is set to Ace_Type allow, users can change ownership of
the file to themselves only.
Deleting a file depends on two ACEs, the DELETE entry of the object to be deleted and the
DELETE_CHILD entry of its parent directory. AIX provides the user with two modes of behavior. In
the secure mode, DELETE behaves similar to AIXC ACLs. In the compatibility mode, DELETE
behaves like other major implementations of NFS4 ACLs. To turn on the compatibility mode, use
the chdev command as follows:
chdev -l sys0 -a nfs4_acl_compat=’true’
Security 111
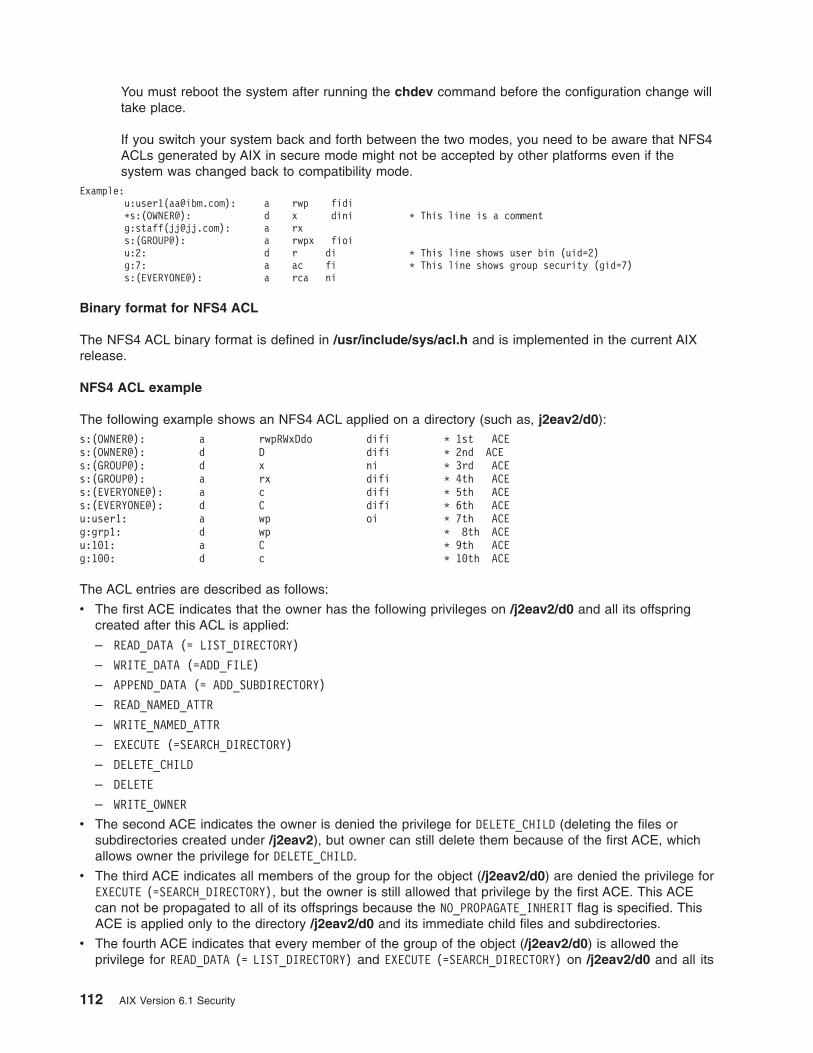
You must reboot the system after running the chdev command before the configuration change will
take place.
If you switch your system back and forth between the two modes, you need to be aware that NFS4
ACLs generated by AIX in secure mode might not be accepted by other platforms even if the
system was changed back to compatibility mode.
Example:
u:user1([email protected]): a rwp fidi
*s:(OWNER@): d x dini * This line is a comment
g:staff([email protected]): a rx
s:(GROUP@): a rwpx fioi
u:2: d r di * This line shows user bin (uid=2)
g:7: a ac fi * This line shows group security (gid=7)
s:(EVERYONE@): a rca ni
Binary format for NFS4 ACL
The NFS4 ACL binary format is defined in /usr/include/sys/acl.h and is implemented in the current AIX
release.
NFS4 ACL example
The following example shows an NFS4 ACL applied on a directory (such as, j2eav2/d0):
s:(OWNER@): a rwpRWxDdo difi * 1st ACE
s:(OWNER@): d D difi * 2nd ACE
s:(GROUP@): d x ni * 3rd ACE
s:(GROUP@): a rx difi * 4th ACE
s:(EVERYONE@): a c difi * 5th ACE
s:(EVERYONE@): d C difi * 6th ACE
u:user1: a wp oi * 7th ACE
g:grp1: d wp * 8th ACE
u:101: a C * 9th ACE
g:100: d c * 10th ACE
The ACL entries are described as follows:
v The first ACE indicates that the owner has the following privileges on /j2eav2/d0 and all its offspring
created after this ACL is applied:
– READ_DATA (= LIST_DIRECTORY)
– WRITE_DATA (=ADD_FILE)
– APPEND_DATA (= ADD_SUBDIRECTORY)
– READ_NAMED_ATTR
– WRITE_NAMED_ATTR
– EXECUTE (=SEARCH_DIRECTORY)
– DELETE_CHILD
– DELETE
– WRITE_OWNER
v The second ACE indicates the owner is denied the privilege for DELETE_CHILD (deleting the files or
subdirectories created under /j2eav2), but owner can still delete them because of the first ACE, which
allows owner the privilege for DELETE_CHILD.
v The third ACE indicates all members of the group for the object (/j2eav2/d0) are denied the privilege for
EXECUTE (=SEARCH_DIRECTORY), but the owner is still allowed that privilege by the first ACE. This ACE
can not be propagated to all of its offsprings because the NO_PROPAGATE_INHERIT flag is specified. This
ACE is applied only to the directory /j2eav2/d0 and its immediate child files and subdirectories.
v The fourth ACE indicates that every member of the group of the object (/j2eav2/d0) is allowed the
privilege for READ_DATA (= LIST_DIRECTORY) and EXECUTE (=SEARCH_DIRECTORY) on /j2eav2/d0 and all its
112 AIX Version 6.1 Security

offsprings. However, because of third ACE group members (except the owner) are not allowed the
privilege for EXECUTE (=SEARCH_DIRECTORY) on the /j2eav2/d0 directory and its immediate child files and
subdirectories.
v The fifth ACE indicates that everyone is allowed the privilege for READ_ACL on the /j2eav2/d0 directory
and any offspring that are created after this ACL is applied.
v The sixth ACE indicates that everyone is denied the privilege for WRITE_ACL on the /j2eav2/d0 directory
and any offspring. The owner always has the privilege for WRITE_ACL on files and directories with NFS4
ACLs.
v The seventh ACE indicates that user1 has the privilege for WRITE_DATA (=ADD_FILE) and APPEND_DATA
(= ADD_SUBDIRECTORY) on all the offspring of the /j2eav2/d0 directory but not on the /j2eav2/d0 directory
itself.
v The eighth ACE indicates that all the members of grp1 are denied the privilege for WRITE_DATA
(=ADD_FILE) and APPEND_DATA (= ADD_SUBDIRECTORY). This ACE does not apply to the owner even it
belongs to grp1 because of the first ACE.
v The ninth ACE indicates that the user with UID 101 has the privilege for WRITE_ACL, but no one, except
the owner has the privilege for WRITE_ACL because of the sixth ACE.
v The tenth ACE indicates that all the members of the group with GID 100 are denied for READ_ACL, but
they will have this privilege because of the fifth ACE.
Access Control List Management
There are several methods of managing ACLs. AIX users can use the Web-based System Manager to
view and set ACLs, or they can use the commands.
Applications programmers and other subsystem developers can use the ACL library interfaces and ACL
conversion routines described in this section.
ACL administration commands
You can use the following commands to work with ACLs for a file system object:
aclget Writes to standard output the ACL of the file object named FileObject, presented in readable
format or writes the same to the output file named outAclFile.
aclput Sets the ACL of FileObject on the file system using the input specified through standard input or
inAclFile.
acledit
Opens an editor for editing the ACL of the specified FileObject.
aclconvert
Converts an ACL from one type to another type. This command fails if the conversion is not
supported.
aclgettypes
Gets ACL types supported by a file system path.
ACL library interfaces
ACL Library interfaces act as front-ends to the applications that need to access ACLs. The applications
(including the generic ACL administration commands given above) do not directly invoke the
undocumented ACL syscalls; instead, they access the generic syscalls and the type-specific loadable
modules via the library interfaces. This will shield the customer application programmers from the
complexity of using loadable modules, and reduces the backward binary compatibility issues for future AIX
releases.
The following library interfaces call syscalls.
Security 113

aclx_fget and aclx_get
The aclx_get and aclx_fget functions retrieve the access control information for a file system
object, and put it into the memory region specified by acl. The size and type information for the
acl are stored in *acl_sz and *acl_type.
aclx_fput and aclx_put
The aclx_put and aclx_fput functions store the access control information specified in acl for the
input file object. These functions do not do ACL type conversions; for doing ACL type conversion,
the caller has to explicitly call the aclx_convert function.
aclx_gettypes
The aclx_gettypes function gets the list of ACL types supported on the particular file system. A file
system type can support more than one ACL type simultaneously. Each file system object is
associated with an unique ACL type belonging to the list of ACL types supported by the file
system.
aclx_gettypeinfo
The aclx_gettypeinfo function gets the characteristics and capabilities of an ACL type on the file
system specified by path. Note that the ACL characteristics will normally be of a data structure
type, which is specific for each particular ACL type. The data structures used for AIXC and NFS4
ACLs will be described in a separate document.
aclx_print and aclx_printStr
These two functions convert the ACL given in binary format into textual representation. These
functions are called by the aclget and acledit commands.
aclx_scan and aclx_scanStr
These two functions convert the given textual representation of the ACL into binary format.
aclx_convert
Converts an ACL from one type to another. This function is used for implicit conversion by
commands, such as cp, mv, or tar.
ACL conversion
ACL conversion allows you to convert one ACL type to another. Support of multiple ACL types is
dependent upon what ACL types are support on a specific physical file system. All file systems do not
support all ACL types. For example, file system one might support only AIXC ACL types, and file system
two might support AIXC and NFS4 ACL types. You can copy AIXC ACLs between the two file systems, but
you must use ACL conversion to copy the NFS ACLs from file system two to file system one. ACL
conversion preserves the access control information as much as possible.
Note: The conversion process is approximate and could result in loss of access control information. You
should consider this when planning your ACL conversions.
ACL conversion in AIX is supported with the following infrastructure:
Library routines
These routines and user level ACL framework enable ACL conversion from one ACL type to
another.
aclconvert command
This command converts ACLs.
aclput and acledit commands
These commands are used to modify ACL types.
cp and mv commands
These commands have been enabled to handle multiple ACL types and perform any internal ACL
conversion, as necessary.
114 AIX Version 6.1 Security

backup command
This command converts the ACL information to a known type and form (AIXC ACL type), if
requested to backup in the legacy format. To retrieve the ACL in its native format, specifiy the -U
option. See backup for more information.
Each ACL type is unique, and refinement of access control masks varies widely from one ACL type to
another. The conversion algorithms are approximate and are not equivalent to manually converting an
ACL. In some cases, the conversion will not be exact. For example, NFS4 ACLs cannot truly be converted
to AIXC ACLs because NFS4 ACLs provides up to 16 access masks and has inheritance features that are
not supported in the AIXC ACL type). You should not use the ACL conversion facilities and interfaces if you
are concerned about the loss of access control information.
Note: The ACL conversion algorithms are proprietary in nature and are subject to change.
S bits and Access Control Lists
You can use setuid and setgid programs and applying S bits to ACLs.
Using setuid and setgid programs
The permission bits mechanism allows effective access control for resources in most situations. But for
more precise access control, the operating system provides the setuid and setgid programs.
AIX defines identity only in terms of uids and gids. ACL types that do not define identity with uids and gids
are mapped to the AIX identity model. For example, the NFS4 ACL type defines user identity as strings of
the form user@domain, and this string is mapped to numeric UIDs and GIDs.
Most programs run with the user and group access rights of the user who invoked them. Program owners
can associate the access rights of the user who invoked them by making the program a setuid or setgid
program; that is, a program with the setuid or setgid bit set in its permissions field. When that program is
run by a process, the process acquires the access rights of the owner of the program. A setuid program
runs with the access rights of its owner, while a setgid program has the access rights of its group, and
both bits can be set according to the permission mechanism.
Although the process is assigned the additional access rights, these rights are controlled by the program
bearing the rights. Thus, the setuid and setgid programs allow for user-programmed access controls in
which access rights are granted indirectly. The program acts as a trusted subsystem, guarding the user’s
access rights.
Although these programs can be used with great effectiveness, there is a security risk if they are not
designed carefully. In particular, the program must never return control to the user while it still has the
access rights of its owner, because this would allow a user to make unrestricted use of the owner’s rights.
Note: For security reasons, the operating system does not support setuid or setgid program calls within
a shell script.
Applying S bits to ACLs
ACLs such as NFS4 do not directly deal with the S bits. NFS4 ACL does not specify how these bits could
be accommodated as part of the ACL. AIX has approached the problem such that S bits will be used while
performing access checks and will compliment any NFS4 ACL related access checks. AIX’s chmod
command can be used set or reset S bits on file system objects with ACLs such as NFS4.
Administrative access rights
The operating system provides privileged access rights for system administration.
Security 115

System privilege is based on user and group IDs. Users with effective user or group IDs of 0 are
recognized as privileged.
Processes with effective user IDs of 0 are known as root-user processes and can:
v Read or write any object
v Call any system function
v Perform certain subsystem control operations by executing setuid-root programs.
You can manage the system using two types of privilege: the su command privilege and setuid-root
program privilege. The su command allows all programs you invoke to function as root-user processes.
The su command is a flexible way to manage the system, but it is not very secure.
Making a program into a setuid-root program means the program is a root-user-owned program with the
setuid bit set. A setuid-root program provides administrative functions that ordinary users can perform
without compromising security; the privilege is encapsulated in the program rather than granted directly to
the user. It can be difficult to encapsulate all necessary administrative functions in setuid-root programs,
but it provides more security to system managers.
Access authorization
When a user logs in to an account (using the login or su commands), the user IDs and group IDs
assigned to that account are associated with the user’s processes. These IDs determine the access rights
of the process.
A process with a user ID of 0 is known as a root user process. These processes are generally allowed all
access permissions. But if a root user process requests execute permission for a program, access is
granted only if execute permission is granted to at least one user.
Access Authorization for AIXC ACLs
The owner of the information resource is responsible for managing access rights. Resources are protected
by permission bits, which are included in the mode of the object. The permission bits define the access
permissions granted to the owner of the object, the group of the object, and for the others default class.
The operating system supports three different modes of access (read, write, and execute) that can be
granted separately.
For files, directories, named pipes, and devices (special files), access is authorized as follows:
v For each access control entry (ACE) in the ACL, the identifier list is compared to the identifiers of the
process. If there is a match, the process receives the permissions and restrictions defined for that entry.
The logical unions for both permissions and restrictions are computed for each matching entry in the
ACL. If the requesting process does not match any of the entries in the ACL, it receives the permissions
and restrictions of the default entry.
v If the requested access mode is permitted (included in the union of the permissions) and is not
restricted (included in the union of the restrictions), access is granted. Otherwise, access is denied.
The identifier list of an ACL matches a process if all identifiers in the list match the corresponding type of
effective identifier for the requesting process. A USER-type identifier matches if it is equal to the effective
user ID of the process, and a GROUP-type identifier matches if it is equal to the effective group ID of the
process or to one of the supplementary group IDs. For instance, an ACE with an identifier list such as the
following:
USER:fred, GROUP:philosophers, GROUP:software_programmer
would match a process with an effective user ID of fred and a group set of:
philosophers, philanthropists, software_programmer, doc_design
116 AIX Version 6.1 Security
but would not match for a process with an effective user ID of fred and a group set of:
philosophers, iconoclasts, hardware_developer, graphic_design
Note that an ACE with an identifier list of the following would match for both processes:
USER:fred, GROUP:philosophers
In other words, the identifier list in the ACE functions is a set of conditions that must hold for the specified
access to be granted.
All access permission checks for these objects are made at the system call level when the object is first
accessed. Because System V Interprocess Communication (SVIPC) objects are accessed statelessly,
checks are made for every access. For objects with file system names, it is necessary to be able to
resolve the name of the actual object. Names are resolved either relatively (to the process’ working
directory) or absolutely (to the process’ root directory). All name resolution begins by searching one of
these directories.
The discretionary access control mechanism allows for effective access control of information resources
and provides for separate protection of the confidentiality and integrity of the information. Owner-controlled
access control mechanisms are only as effective as users make them. All users must understand how
access permissions are granted and denied, and how these are set.
Access Authorization for NFS4 ACLs
Any user who has the privilege for WRITE_ACL can control the access rights. The owner of the information
resource is always has the privilege for WRITE_ACL. For files and directories with NFS4 ACLs, access is
authorized as follows:
v The list of ACEs is processed in order and only those ACEs which have a ″who″ (i.e. Identity ) that
matches the requester are considered for processing. The credentials of the requester is not checked
while processing the ACE with special who EVERYONE@.
v Each ACE is processed until all of the bits of requester’s access have been allowed. Once a bit is has
been allowed, it is no longer considered in the processing of later ACEs.
v If any bit corresponding to the requester’s access is denied, access is denied and the remaining ACEs
are not processed.
v If all of the bits of requester’s access have not been allowed, and there is no ACE left for processing,
access is denied.
If the access requested is denied by the ACEs and the requesting user is superuser or root, access is
generally allowed. Note that the object owner is always permitted for READ_ACL, WRITE_ACL,
READ_ATTRIBUTES, and WRITE_ATTRIBUTES. For more information on the algorithm for access authorization,
see “NFS4 Access Control List” on page 111.
Access Control List Troubleshooting
The following information can be used for troubleshooting the Access Control List (ACL).
NFS4 Access Control List on an object failed application
You can use the return code or the trace facility to troubleshoot problems with setting an NFS4 ACL on an
object, such as a file or directory. Both methods use command the aclput command and the acledit
command to find the cause of the problem.
Using the Return Code for troubleshooting
To display the return code, use the echo $? command after you run the aclput command. The following
lists shows the return codes and their explanations:
Security 117

22 (EINVAL, defined in /usr/include/sys/errno.h)
The following are possible causes for this code:
v Invalid textual format in any field of the 4 fields.
v The size of the input NFS4 ACL is more than 64 KB.
v The ACL is applied on a file that already has at least one ACE with ACE mask set to w
(WRITE_DATA) but not p (APPEND_DATA) or p (APPEND_DATA) but not w (WRITE_DATA).
v The ACL is applied on a directory that already has at least one ACE with ACE mask set to w
(WRITE_DATA) but not p (APPEND_DATA) or p (APPEND_DATA) but not w (WRITE_DATA), and the ACE
flag fi (FILE_INHERIT ).
v There is at least one ACE with OWNER@ set as a special who (Identity) and one or more of
the ACE masks c (READ_ACL), C (WRITE_ACL), a (READ_ATTRIBUTE) and A (WRITE_ATTRIBUTE) are
being denied by ACE type d.
124 (ENOTSUP, defined in /usr/include/sys/errno.h)
The following are possible causes for this code:
v The special who might not be any one of the three values (OWNER@, GROUP@, or EVERYONE@) in one
of the ACEs.
v There is at least one ACE with ACE type u (AUDIT) or l (ALARM).
13 (EACCES, defined in /usr/include/sys/errno.h)
The following are possible causes for this code:
v You are not allowed to read the input file containing NFS4 ACEs.
v You are not allowed to search the parent directory of the target object because you do not have
x (EXECUTE) permission on the parent directory of the target object.
v You might not be allowed to write or change the ACL. If the object is already associated with an
NFS4 ACL ensure that you are have the privilege for the ACE mask C (WRITE_ACL).
Using the Trace facility for troubleshooting
You can also generate a trace report to find the cause of the problem. The following scenario shows how
to use trace to find the cause of the problem applying an NFS4 ACL. If you have a file, /j2v2/file1 with the
following NFS4 ACL:
s:(EVERYONE@): a acC
And, the following ACL is contained in the input_acl_file input file:
s:(EVERYONE@): a rwxacC
Complete the following steps to troubleshoot with the trace facility:
1. Run the trace, aclput and trcrpt using the following commands:
$ trace -j 478 -o trc.raw
$->!aclput -i input_acl_file -t NFS4 /j2v2/file1
$ ->quit
$ trcrpt trc.raw > trc.rpt
2. Analyze the trace report. When the ACL is applied on a file or directory, it checks for the access to
write or change the ACL, and then applies the ACL. The file contains lines similar to the following:
478 xxx xxx ACL ENGINE: chk_access entry: type=NFS4 obj_mode=33587200 size=68 ops=16384 uid=100
478 xxx xxx ACL ENGINE: chk_access exit: type=NFS4 rc=0 ops=16384 priv=0 against=0
478 xxx xxx ACL ENGINE: set_acl entry: type=NFS4 ctl_flg=2 obj_mode=33587200 mode=0 size=48
478 xxx xxx ACL ENGINE: validate_acl: type=NFS4 rc=22 ace_cnt=1 acl_len=48 size=12
478 xxx xxx ACL ENGINE: set_acl exit: type=NFS4 rc=22 obj_mode=33587200 size=68 cmd=536878912
The second line containing, chk_access exit, indicates access is allowed (rc = 0) to write the ACL.
The fourth line, containing validate_acl, and the fifth line, containing set_acl exit, indicate that the
118 AIX Version 6.1 Security

ACL is not applied successfully (rc=22 indicates EINVAL). The fourth line, containing validate_acl,
indicates there is problem in the first line of the ACE (ace_cnt=1). If you refer to the first ACE,
s:(EVERYONE@): a rwxacC), there is no p as the access mask. The p is needed in addition to the w
when applying the ACL.
Troubleshooting access denies
A filesystem operation (for example, read or write) might fail on an object associated with an NFS4 ACL.
Usually, an error message is displayed, but that message might not contain enough information to
determine the access problem. You can use the trace facility to find the access problem. For example, if
you have a file, /j2v2/file2 with the following NFS4 ACL:
s:(EVERYONE@): a rwpx
The following command reports a ″Permission denied″ error:
ls -l /j2v2/file2
Complete the following steps to troubleshoot this problem:
1. Run the trace, ls -l /j2v2/file2 and trcrpt using the following commands:
$ trace -j 478 -o trc.raw
$->!ls -l /j2v2/file2
$ ->quit
$ trcrpt trc.raw > trc.rpt
2. Analyze the trace report. The file contains lines similar to the following:
478 xxx xxx ACL ENGINE: chk_access entry: type=NFS4 obj_mode=33587711 size=68 ops=1024 uid=100
478 xxx xxx ACL ENGINE: nfs4_chk_access_self: type=NFS4 aceN=1 aceCnt=1 req=128 deny=0
478 xxx xxx ACL ENGINE: nfs4_mask_privcheck: type=NFS4 deny=128 priv=128
478 xxx xxx ACL ENGINE: chk_access exit: type=NFS4 rc=13 ops=1024 priv=0 against=0
The third line indicates the access is denied for access mask = 128 (0x80) which is only
READ_ATTRIBUTES (see the /usr/include/sys/acl.h file).
Auditing overview
The auditing subsystem enables the system administrator to record security-relevant information, which
can be analyzed to detect potential and actual violations of the system security policy.
Auditing subsystem
The auditing subsystem has detection, collection, and processing functions.
v “Auditing event detection”
v “Event information collection” on page 120
v “Audit trail information processing” on page 120
The system administrator can configure each of these functions.
Auditing event detection
Event detection is distributed throughout the Trusted Computing Base (TCB), both in the kernel (supervisor
state code) and the trusted programs (user state code). An auditable event is any security-relevant
occurrence in the system. A security-relevant occurrence is any change to the security state of the system,
any attempted or actual violation of the system access control or accountability security policies, or both.
The programs and kernel modules that detect auditable events are responsible for reporting these events
to the system audit logger, that runs as part of the kernel and can be accessed either with a subroutine
(for trusted program auditing) or within a kernel procedure call (for supervisor state auditing). The
information reported includes the name of the auditable event, the success or failure of the event, and any
additional event-specific information that is relevant to security auditing.
Security 119
Event detection configuration consists of turning event detection on or off, and specifiying which events are
to be audited for which users. To activate event detection use the audit command to enable or disable the
audit subsystem. The /etc/security/audit/config file contains the events and users that are processed by
the audit subsystem.
Event information collection
Information collection encompasses logging the selected auditable events. This function is performed by
the kernel audit logger, which provides both a system call and an intra-kernel procedure call interface that
records auditable events.
The audit logger is responsible for constructing the complete audit record, consisting of the audit header,
that contains information common to all events (such as the name of the event, the user responsible, the
time and return status of the event), and the audit trail, which contains event-specific information. The
audit logger appends each successive record to the kernel audit trail, which can be written in either (or
both) of two modes:
BIN mode
The trail is written into alternating files, providing for safety and long-term storage.
STREAM mode
The trail is written to a circular buffer that is read synchronously through an audit pseudo-device.
STREAM mode offers immediate response.
Information collection can be configured at both the front end (event recording) and at the back end (trail
processing). Event recording is selectable on a per-user basis. Each user has a defined set of audit events
that are logged in the audit trail when they occur. At the back end, the modes are individually configurable,
so that the administrator can employ the back-end processing best suited for a particular environment. In
addition, BIN mode auditing can be configured to generate an alert in case the file system space available
for the trail is getting too low.
Audit trail information processing
The operating system provides several options for processing the kernel audit trail. The BIN mode trail can
be compressed, filtered, or formatted for output, or any reasonable combination of these before archival
storage of the audit trail, if any. Compression is done through Huffman encoding. Filtering is done with
standard query language (SQL)-like audit record selection (using the auditselect command), which
provides for both selective viewing and selective retention of the audit trail. Formatting of audit trail records
can be used to examine the audit trail, to generate periodic security reports, and to print a paper audit trail.
The STREAM mode audit trail can be monitored in real time, to provide immediate threat-monitoring
capability. Configuration of these options is handled by separate programs that can be invoked as daemon
processes to filter either BIN or STREAM mode trails, although some of the filter programs are more
naturally suited to one mode or the other.
Auditing subsystem configuration
The auditing subsystem has a global state variable that indicates whether the auditing subsystem is on. In
addition, each process has a local state variable that indicates whether the auditing subsystem should
record information about this process.
Both of these variables determine whether events are detected by the Trusted Computing Base (TCB)
modules and programs. Turning TCB auditing off for a specific process allows that process to do its own
auditing and not to bypass the system accountability policy. Permitting a trusted program to audit itself
allows for more efficient and effective collection of information.
120 AIX Version 6.1 Security

Auditing subsystem information collection
Information collection addresses event selection and kernel audit trail modes. It is done by a kernel routine
that provides interfaces to log information, used by the TCB components that detect auditable events, and
configuration interfaces, used by the auditing subsystem to control the audit logging routine.
Audit logging
Auditable events are logged by the following interfaces: the user state and supervisor state. The user state
portion of the TCB uses the auditlog or auditwrite subroutine, while the supervisor state portion of the
TCB uses a set of kernel procedure calls.
For each record, the audit event logger prefixes an audit header to the event-specific information. This
header identifies the user and process for which this event is being audited, as well as the time of the
event. The code that detects the event supplies the event type and return code or status and optionally,
additional event-specific information (the event tail). Event-specific information consists of object names
(for example, files that are refused access or tty used in failed login attempts), subroutine parameters, and
other modified information.
Events are defined symbolically, rather than numerically. This lessens the chances of name collisions,
without using an event registration scheme. Because subroutines are auditable and the extendable kernel
definition has no fixed switched virtual circuit (SVC) numbers, it is difficult to record events by number. The
number mapping would have to be revised and logged every time that the kernel interface was extended
or redefined.
Audit record format
The audit records consist of a common header, followed by audit trails specific to the audit event of the
record. The structures for the headers are defined in the /usr/include/sys/audit.h file. The format of the
information in the audit trails is specific to each base event and is shown in the /etc/security/audit/events
file.
The information in the audit header is generally collected by the logging routine to ensure its accuracy,
while the information in the audit trails is supplied by the code that detects the event. The audit logger has
no knowledge of the structure or semantics of the audit trails. For example, when the login command
detects a failed login, it records the specific event with the terminal on which it occurred and writes the
record into the audit trail using the auditlog subroutine. The audit logger kernel component records the
subject-specific information (user IDs, process IDs, time) in a header and appends this to the other
information. The caller supplies only the event name and result fields in the header.
Audit logger configuration
The audit logger is responsible for constructing the complete audit record. You must select the audit
events that you want to be logged.
Audit events selection
Audit event selection has the following types:
Per-Process Auditing
To select process events efficiently, the system administrator can define audit classes. An audit
class is a subset of the base auditing events in the system. Auditing classes provide for
convenient logical groupings of the base auditing events.
For each user on the system, the system administrator defines a set of audit classes that
determine the base events that could be recorded for that user. Each process run by the user is
tagged with its audit classes.
Security 121

Per-Object Auditing
The operating system provides for the auditing of object accesses by name; that is, the auditing of
specific objects (normally files). By-name object auditing prevents having to cover all object
accesses to audit the few pertinent objects. In addition, the auditing mode can be specified, so
that only accesses of the specified mode (read/write/execute) are recorded.
Kernel audit trail modes
Kernel logging can be set to BIN or STREAM modes to define where the kernel audit trail is to be written.
If the BIN mode is used, the kernel audit logger must be given (before audit startup) at least one file
descriptor to which records are to be appended.
BIN mode consists of writing the audit records into alternating files. At auditing startup, the kernel is
passed two file descriptors and an advisory maximum bin size. It suspends the calling process and starts
writing audit records into the first file descriptor. When the size of the first bin reaches the maximum bin
size, and if the second file descriptor is valid, it switches to the second bin and reactivates the calling
process. The kernel continues writing into the second bin until it is called again with another valid file
descriptor. If at that point the second bin is full, it switches back to the first bin, and the calling process
returns immediately. Otherwise, the calling process is suspended, and the kernel continues writing records
into the second bin until it is full. Processing continues this way until auditing is turned off. See the
following figure for an illustration of audit BIN mode:
122 AIX Version 6.1 Security
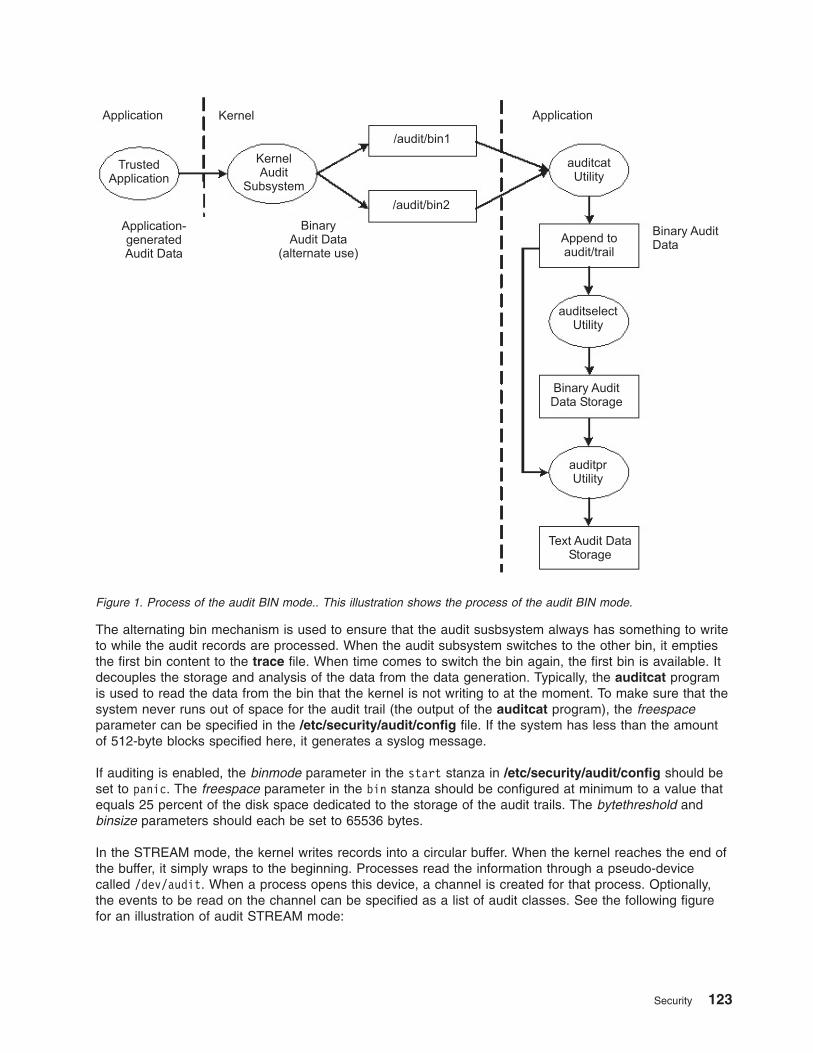
The alternating bin mechanism is used to ensure that the audit susbsystem always has something to write
to while the audit records are processed. When the audit subsystem switches to the other bin, it empties
the first bin content to the trace file. When time comes to switch the bin again, the first bin is available. It
decouples the storage and analysis of the data from the data generation. Typically, the auditcat program
is used to read the data from the bin that the kernel is not writing to at the moment. To make sure that the
system never runs out of space for the audit trail (the output of the auditcat program), the freespace
parameter can be specified in the /etc/security/audit/config file. If the system has less than the amount
of 512-byte blocks specified here, it generates a syslog message.
If auditing is enabled, the binmode parameter in the start stanza in /etc/security/audit/config should be
set to panic. The freespace parameter in the bin stanza should be configured at minimum to a value that
equals 25 percent of the disk space dedicated to the storage of the audit trails. The bytethreshold and
binsize parameters should each be set to 65536 bytes.
In the STREAM mode, the kernel writes records into a circular buffer. When the kernel reaches the end of
the buffer, it simply wraps to the beginning. Processes read the information through a pseudo-device
called /dev/audit. When a process opens this device, a channel is created for that process. Optionally,
the events to be read on the channel can be specified as a list of audit classes. See the following figure
for an illustration of audit STREAM mode:
Figure 1. Process of the audit BIN mode.. This illustration shows the process of the audit BIN mode.
Security 123

The main purpose of the STREAM mode is to allow for timely reading of the audit trail, which is desirable
for real-time threat monitoring. Another use is to create a trail that is written immediately, preventing any
possible tampering with the audit trail, as is possible if the trail is stored on some writable media.
Yet another method to use the STREAM mode is to write the audit stream into a program that stores the
audit information on a remote system, which allows central near-time processing, while at the same time
protecting the audit information from tampering at the originating host.
Audit records processing
The auditselect, auditpr, and auditmerge commands are available to process BIN or STREAM mode
audit records. Both utilities operate as filters so that they can be easily used on pipes, which is especially
handy for STREAM mode auditing.
auditselect
Can be used to select only specific audit records with SQL-like statements. For example, to select
only exec() events that were generated by user afx, type the following:
auditselect -e "login==afx && event==PROC_Execute"
Figure 2. Process of the audit STREAM mode. This illustration shows the process of the audit STREAM mode.
124 AIX Version 6.1 Security
auditpr
Used to convert the binary audit records into a human-readable form. The amount of information
displayed depends on the flags specified on the command line. To get all the available information,
run the auditpr command as follows:
auditpr -v -hhelrtRpPTc
When the -v flag is specified, the audit tail which is an event specific string (see the
/etc/security/audit/events file) is displayed in addition to the standard audit information that the
kernel delivers for every event.
auditmerge
Used to merge binary audit trails. This is especially useful if there are audit trails from several
systems that need to be combined. The auditmerge command takes the names of the trails on
the command line and sends the merged binary trail to standard output, so you still need to use
the auditpr command to make it readable. For example, the auditmerge and auditptr commands
could be run as follows:
auditmerge trail.system1 trail.system2 | auditpr -v -hhelrRtpc
Using the audit subsystem for a quick security check:
To monitor a single suspicious program without setting up the audit subsystem, the watch command can
be used. It will record either the requested or all events that are generated by the specified program.
For example, to see all FILE_Open events when running vi /etc/hosts, type the following:
watch -eFILE_Open -o /tmp/vi.watch vi /etc/hosts
The /tmp/vi.watch file displays all FILE_Open events for the editor session.
Event selection
Event selection must maintain a balance between insufficient to too much detail.
The set of auditable events on the system defines which occurrences can actually be audited and the
granularity of the auditing provided. The auditable events must cover the security-relevant events on the
system, as defined previously. The level of detail you use for auditable event definition must maintain a
balance between insufficient detail, which makes it difficult for the administrator to understand the selected
information, and too much detail, which leads to excessive information collection. The definition of events
takes advantage of similarities in detected events. For the purpose of this discussion, a detected event is
any single instance of an auditable event; for instance, a given event might be detected in various places.
The underlying principle is that detected events with similar security properties are selected as the same
auditable event. The following list shows a classification of security policy events:
v Subject Events
– Process creation
– Process deletion
– Setting subject security attributes: user IDs, group IDs
– Process group, control terminal
v Object Events
– Object creation
– Object deletion
– Object open (including processes as objects)
– Object close (including processes as objects)
– Setting object security attributes: owner, group, ACL
v Import/Export Events
– Importing or exporting an object
Security 125

v Accountability Events
– Adding a user, changing user attributes in the password database
– Adding a group, changing group attributes in the group database
– User login
– User logoff
– Changing user authentication information
– Trusted path terminal configuration
– Authentication configuration
– Auditing administration: selecting events and audit trails, switching on or off, defining user auditing
classes
v General System Administration Events
– Use of privilege
– File system configuration
– Device definition and configuration
– System configuration parameter definition
– Normal system IPL and shutdown
– RAS configuration
– Other system configuration
– Starting the audit subsystem
– Stopping the audit subsystem
– Querying the audit subsystem
– Resetting the audit subsystem
v Security Violations (potential)
– Access permission refusals
– Privilege failures
– Diagnostically detected faults and system errors
– Attempted alteration of the TCB
Setting up auditing
This procedure shows you how to set up an auditing subsystem. For more specific information, refer to the
configuration files noted in these steps.
1. Select system activities (events) to audit from the list in the /etc/security/audit/events file. If you have
added new audit events to applications or kernel extensions, you must edit the file to add the new
events.
v You add an event to this file if you have included code to log that event in an application program
(using the auditwrite or auditlog subroutine) or in a kernel extension (using the audit_svcstart,
audit_svcbcopy, and audit_svcfinis kernel services).
v Ensure that formatting instructions for any new audit events are included in the
/etc/security/audit/events file. These specifications enable the auditpr command to write an audit
trail when it formats audit records.
2. Group your selected audit events into sets of similar items called audit classes. Define these audit
classes in the classes stanza of the /etc/security/audit/config file.
3. Assign the audit classes to the individual users and assign audit events to the files (objects) that you
want to audit, as follows:
v To assign audit classes to an individual user, add a line to the users stanza of the
/etc/security/audit/config file. To assign audit classes to a user, you can use the chuser command.
v To assign audit events to an object (data or executable file), add a stanza for that file to the
/etc/security/audit/objects file.
126 AIX Version 6.1 Security

v You can also specify default audit classes for new users by editing the /usr/lib/security/mkuser.default file. This file holds user attributes that will be used when generating new user IDs.
For example, use the general audit class for all new user IDs, as follows:
user:
auditclasses = general
pgrp = staff
groups = staff
shell = /usr/bin/ksh
home = /home/$USER
To get all audit events, specify the ALL class. When doing so on even a moderately busy system, a
huge amount of data will be generated. It is typically more practical to limit the number of events
that are recorded.
4. In the /etc/security/audit/config file, configure the type of data collection that you want using BIN
collection, STREAM collection, or both methods. Make sure that audit data does not compete with
other data about file space by using a separate file system for audit data. This ensures that there is
enough space for the audit data. Configure the type of data collection as follows:
v To configure BIN collection:
a. Enable the BIN mode collection by setting binmode = on in the start stanza.
b. Edit the binmode stanza to configure the bins and trail, and specify the path of the file containing
the BIN mode back-end processing commands. The default file for back-end commands is the
/etc/security/audit/bincmds file.
c. Make sure that the audit bins are large enough for your needs and set the freespace parameter
accordingly to get an alert if the file system is filling up.
d. Include the shell commands that process the audit bins in an audit pipe in the
/etc/security/audit/bincmds file.
v To configure STREAM collection:
a. Enable the STREAM mode collection by setting streammode = on in the start stanza.
b. Edit the streammode stanza to specify the path to the file containing the streammode processing
commands. The default file containing this information is the /etc/security/audit/streamcmds
file.
c. Include the shell commands that process the stream records in an audit pipe in the
/etc/security/audit/streamcmds file.
5. When you have finished making any necessary changes to the configuration files, you are ready to use
the audit start command to enable the audit subsystem. This will generate the AUD_It event with a
value of 1.
6. Use the audit query command to see which events and objects are audited. This will generate the
AUD_It event with a value of 2.
7. Use the audit shutdown command to deactivate the audit subsystem again. This will generate the
AUD_It event with a value of 0.
Generating a generic audit log:
The following are examples of generating a generic audit log.
In this example, assume that a system administrator wants to use the audit subsystem to monitor a large
multi-user server system. No direct integration into an IDS is performed, all audit records will be inspected
manually for irregularities. Only a few essential audit events are recorded, to keep the amount of
generated data to a manageable size.
The audit events that are considered for event detection are the following:
FILE_Write We want to know about file writes to configuration files, so this event will be
used with all files in the /etc tree.
Security 127

PROC_SetUserIDs All changes of user IDs
AUD_Bin_Def Audit bin configuration
USER_SU The su command
PASSWORD_Change passwd command
AUD_Lost_Rec Notification in case there where lost records
CRON_JobAdd new cron jobs
AT_JobAdd new at jobs
USER_Login All logins
PORT_Locked All locks on terminals because of too many invalid attempts
The following is an example of how to generate a generic audit log:
1. Set up a list of critical files to be monitored for changes, such as, all files in /etc and configure them for
FILE_Write events in the objects file as follows:
find /etc -type f | awk ’{printf("%s:\n\tw = FILE_Write\n\n",$1)}’ >> /etc/security/audit/objects
2. Use the auditcat command to set up BIN mode auditing. The /etc/security/audit/bincmds file is
similar to the following:
/usr/sbin/auditcat -p -o $trail $bin
3. Edit the /etc/security/audit/config file and add a class for the events we have interest. List all existing
users and specify the custom class for them.
start:
binmode = on
streammode = off
bin:
cmds = /etc/security/audit/bincmds
trail = /audit/trail
bin1 = /audit/bin1
bin2 = /audit/bin2
binsize = 100000
freespace = 100000
classes:
custom = FILE_Write,PROC_SetUser,AUD_Bin_Def,AUD_Lost_Rec,USER_SU, \
PASSWORD_Change,CRON_JobAdd,AT_JobAdd,USER_Login,PORT_Locked
users:
root = custom
afx = custom
...
4. Add the custom audit class to the /usr/lib/security/mkuser.default file, so that new IDs will
automatically have the correct audit call associated:
user:
auditclasses = custom
pgrp = staff
groups = staff
shell = /usr/bin/ksh
home = /home/$USER
5. Create a new file system named /audit by using SMIT or the crfs command. The file system should
be large enough to hold the two bins and a large audit trail.
6. Run the audit start command option and examine the /audit file. You should see the two bin files and
an empty trail file initially. After you have used the system for a while, you should have audit records in
the trail file that can be read with:
auditpr -hhelpPRtTc -v | more
This example uses only a few events. To see all events, you could specify the classname ALL for all users.
This action will generate large amounts of data. You might want to add all events related to user changes
and privilege changes to your custom class.
128 AIX Version 6.1 Security

Monitoring file access to critical files in real time:
These steps can be used to monitor file access to critical files in real time.
Perform these steps:
1. Set up a list of critical files to be monitored for changes, for example all files in /etc and configure them
for FILE_Write events in the objects file:
find /etc -type f | awk ’{printf("%s:\n\tw = FILE_Write\n\n",$1)}’ >> /etc/security/audit/objects
2. Set up stream auditing to list all file writes. (This example lists all file writes to the console, but in a
production environment you might want to have a backend that sends the events into an Intrusion
Detection System.) The /etc/security/audit/streamcmds file is similar to the following:
/usr/sbin/auditstream | /usr/sbin/auditselect -e "event == FILE_Write" |
auditpr -hhelpPRtTc -v > /dev/console &
3. Set up STREAM mode auditing in /etc/security/audit/config, add a class for the file write events and
configure all users that should be audited with that class:
start:
binmode = off
streammode = on
stream:
cmds = /etc/security/audit/streamcmds
classes:
filemon = FILE_write
users:
root = filemon
afx = filemon
...
4. Now run audit start. All FILE_Write events are displayed on the console.
Audit events selection:
The purpose of an audit is to detect activities that might compromise the security of your system.
When performed by an unauthorized user, the following activities violate system security and are
candidates for an audit:
v Engaging in activities in the Trusted Computing Base
v Authenticating users
v Accessing the system
v Changing the configuration of the system
v Circumventing the auditing system
v Initializing the system
v Installing programs
v Modifying accounts
v Transferring information into or out of the system
The audit system does not have a default set of events to be audited. You must select events or event
classes according to your needs.
To audit an activity, you must identify the command or process that initiates the audit event and ensure
that the event is listed in the /etc/security/audit/events file for your system. Then you must add the event
either to an appropriate class in the /etc/security/audit/config file, or to an object stanza in the
Security 129

/etc/security/audit/objects file. See the /etc/security/audit/events file on your system for the list of audit
events and trail formatting instructions. For a description of how audit event formats are written and used,
see the auditpr command.
After you have selected the events to audit, you must combine similar events into audit classes. Audit
classes are then assigned to users.
Audit classes selection
You can facilitate the assignment of audit events to users by combining similar events into audit classes.
These audit classes are defined in the classes stanza of the /etc/security/audit/config file.
Some typical audit classes might be as follows:
general Events that alter the state of the system and change user authentication. Audit attempts to circumvent
system access controls.
objects Write access to security configuration files.
kernel Events in the kernel class are generated by the process management functions of the kernel.
An example of a stanza in the /etc/security/audit/config file is as follows:
classes:
general = USER_SU,PASSWORD_Change,FILE_Unlink,FILE_Link,FILE_Rename
system = USER_Change,GROUP_Change,USER_Create,GROUP_Create
init = USER_Login,USER_Logout
Audit data-collection method selection
Your selection of a data-collection method depends on how you intend to use the audit data. If you need
long-term storage of a large amount of data, select BIN collection. If you want to process the data as it is
collected, select STREAM collection. If you need both long-term storage and immediate processing, select
both methods.
Bin collection Allows storage of a large audit trail for a long time. Audit records are written to a file
that serves as a temporary bin. After the file is filled, the data is processed by the
auditbin daemon while the audit subsystem writes to the other bin file, and records
are written to an audit trail file for storage.
Stream collection Allows processing of audit data as it is collected. Audit records are written into a
circular buffer within the kernel, and are retrieved by reading /dev/audit. The audit
records can be displayed, printed to provide a paper audit trail, or converted into
bin records by the auditcat command.
Light Directory Access Protocol
The Light Directory Access Protocol (LDAP) defines a standard method for accessing and updating
information in a directory (a database) either locally or remotely in a client-server model.
The protocol is optimized for reading, browsing, and searching directories, and was originally developed as
a lightweight front-end to the X.500 Directory Access Protocol. The LDAP method is used by a cluster of
hosts to allow centralized security authentication as well as access to user and group information. This
functionality is intended to be used in a clustering environment to keep authentication, user, and group
information common across the cluster.
Objects in LDAP are stored in a hierarchical structure known as a Directory Information Tree (DIT). A good
directory starts with the structural design of the DIT. The DIT should be designed carefully before
implementing LDAP as a means of authentication.
130 AIX Version 6.1 Security

LDAP authentication load module
The LDAP exploitation of the security subsystem is implemented as the LDAP authentication load module.
It is conceptually similar to the other load modules such as NIS, DCE, and KRB5. Load modules are
defined in the /usr/lib/security/methods.cfg file.
The LDAP loadmodule provides user authentication and centralized user and group management
functionality through the LDAP protocol. A user defined on a LDAP server can be configured to log in to an
LDAP client even if that user is not defined locally.
The AIX LDAP load module is fully integrated within the AIX operating system. After the LDAP
authentication load module is enabled to serve user and group information, high-level APIs, commands,
and system-management tools work in their usual manner. An -R flag is introduced for most high-level
commands to work through different load modules. For example, to create an LDAP user named joe from
a client machine, use the following command:
mkuser -R LDAP joe
Note: Even though the LDAP infrastructure can support an unlimited number of users in a group, up to 25
000 users have been created in a single group and various operations tested against that group.
Some of the historical POSIX interfaces might not return the complete information for the group.
Refer to the individual API’s documentation for such limitations.
LDAP based authentication:
There are limits on the various entities as part of LDAP based authentication on AIX.
Note that LDAP infrastructure itself does not specify any limits on the database contents. However, this
section documents the results based on test configurations as to limits. The following limits have been
tested with respect to the LDAP based authentication on AIX:
Total number of users: Up to 500 000 users have been created on a single system and simultaneous
authentication has been tested for hundreds of users.
Total number of groups: Up to 500 groups have been created on a single system and tested.
Maximum number of users per group: Up to 25 000 users have been created in a single group and
various operations tested against that group.
Some of the historical POSIX interfaces might not return the complete information for the group. Refer to
the individual API’s documentation for such limitations. Also, the above values are based on the testing
done. They do not preclude the possibility that one can configure systems with much larger users and
groups provided necessary resources exist.
Setting up an ITDS security information server:
To set up a system as an LDAP security information server that serves authentication, user, and group
information through LDAP, the LDAP server and client packages must be installed.
If the Secure Socket Layer (SSL) is required, the GSKit package must be installed. The system
administrator must create a key using the ikeyman command. For more information about configuring the
server to use SSL, see Secure Communication with SSL.
To simplify server configuration, AIX created the mksecldap command. The mksecldap command can be
used to set up an LDAP security information server. It sets up a database named ldapdb2, populates the
database with the user and group information from the local host, and sets the LDAP server administrator
DN (distinguished name) and password. Optionally, it can set up SSL for client/server communication. The
mksecldap command adds an entry into the /etc/inittab file to start the LDAP server at every reboot. The
Security 131

entire LDAP server setup is done through the mksecldap command, which updates the ibmslapd.conf
file (IBM Tivoli® Directory Server Version 5.1 and later) or slapd.conf file (SecureWay® Directory Version
3.2 and 4.1) or slapd32.conf file (SecureWay Directory Version 3.2).
Unless the -u NONE command option for mksecldap is used, all users and groups from the local system
are exported to the LDAP server during setup. Select one of the following LDAP schemas for this step:
AIX schema
Includes aixAccount and aixAccessGroup object class. This schema offers a full set of attributes
for AIX users and groups.
RFC 2307 schema
Includes posixAccount, shadowAccount, and posixGroup object class and is used by several
vendors’ directory products. The RFC 2307 schema defines only a small subset of attributes that
AIX uses.
RFC2307AIX schema
Includes posixAccount, shadowAccount, and posixGroup object classes plus the aixAuxAccount and
aixAuxGroup object classes. The aixAuxAccount and aixAuxGroup object classes provide the
attributes which are used by AIX but not defined by the RFC 2307 schema.
Using the RFC2307AIX schema type for users and groups is highly recommended. The RFC2037AIX
schema type is fully compliant to RFC 2307 with extra attributes to support additional AIX user
management functionality. An ITDS server with RFC2307AIX schema configuration not only supports AIX
LDAP clients, but also other RFC 2307 compliant UNIX and Linux® LDAP clients.
AIX 5.1 and earlier requires AIX schema type. Use of AIX schema type is not encouraged unless such a
server is required to support systems with AIX 5.1 and earlier. Non-AIX systems might not work with ITDS
with AIX schema for user and group management.
All the user and group information is stored under a common AIX tree (suffix). The default suffix is
″cn=aixdata″. The mksecldap command accepts a user-supplied suffix through the -d flag. The name for
the subtrees to be created for the user, group, ID, and so on is controlled by the sectoldif.cfg
configuration file. Refer to the sectoldif.cfg file for more information.
The created AIX tree is ACL (Access Control List) protected. The default ACL grants administrative
privilege only to the entity specified as the administrator with the -a command option. Additional privilege
can be granted to a proxy identity if the -x and -X command options are used. Use of these options
creates the proxy identity and configure access privilege as defined in the /etc/security/ldap/proxy.ldif.template file. Creation of a proxy identity allows LDAP clients to bind to the server without the
use of the administrator identity, thereby restricting client administrator privileges on the LDAP server.
The mksecldap command works even if an LDAP server has been set up for other purposes; for
example, for user ID lookup information. In this case, mksecldap adds the AIX tree and populates it with
the AIX security information to the existing database. This tree is ACL-protected independently from other
trees. In this case, the LDAP server works as usual, in addition to serving as an AIX LDAP Security
Server.
Note: Back up the existing database before running the mksecldap command to set up the security
server to share the same database is recommended.
After the LDAP security information server is successfully set up, the same host can also be set up as a
client so that LDAP user and group management can be completed and LDAP users can log in to this
server.
If the LDAP security information server setup is not successful, you can undo the setup by running the
mksecldap command with the -U flag. This restores the ibmslapd.conf (or slapd.conf or slapd32.conf)
132 AIX Version 6.1 Security

file to its pre-setup state. Run the mksecldap command with the -U flag after any unsuccessful setup
attempt before trying to run the mksecldap command again. Otherwise, residual setup information might
remain in the configuration file and cause a subsequent setup to fail. As a safety precaution, the undo
option does not do anything to the database or to its data, because the database could have existed
before the mksecldap command was run. Remove any database manually if it was created by the
mksecldap command. If the mksecldap command has added data to a pre-existing database, decide
what steps to take to recover from a failed setup attempt.
For more information on setting up an LDAP security information server, see the mksecldap command.
Setting up an LDAP client:
To set up a client to use LDAP for authentication and user/group information, make sure that each client
has the LDAP client package installed. If the SSL is required, the GSKit must be installed, a key must be
created, and the LDAP server SSL key certificate must be added to this key.
Similar to LDAP server setup, client setup can be done using the mksecldap command. To have this
client contact the LDAP security information server, the server name must be supplied during setup. The
server’s bind DN and password are also needed for client access to the AIX tree on the server. The
mksecldap command saves the server bind DN, password, server name, AIX tree DN on the server, the
SSL key path and password, and other configuration attributes to the /etc/security/ldap/ldap.cfg file.
The mksecldap command saves the bind password and SSL key password (if configuring SSL) to the
/etc/security/ldap/ldap.cfg file in encrypted format. The encrypted passwords are system specific, and
can only be used by the secldapclntd daemon on the system where they are generated. The
secldapcIntd daemon can make use of clear text or encrypted password from the /etc/security/ldap/ldap.cfg file.
Multiple servers can be supplied to the mksecldap command during client setup. In this case, the client
contacts the servers in the supplied order and establishes connection to the first server that the client can
successfully bind to. If a connection error occurs between the client and the server, a reconnection request
is tried using the same logic. The Security LDAP exploitation model does not support referral. It is
important that the replicate servers are kept synchronized.
The client communicates to the LDAP security information server through a client side daemon
(secldapclntd). If the LDAP load module is enabled on the client, high-level commands are routed to the
daemon through the library APIs for users defined in LDAP. The daemon maintains a cache of requested
LDAP entries. If a request is not satisfied from the cache, the daemon queries the server, updates the
cache, and returns the information back to the caller.
Other fine-tuning options can be supplied to the mksecldap command during client setup, such as
settings for the number of threads used by the daemon, the cache entry size, and the cache expiration
timeout. These options are for experienced users only. For most environments, the default values are
sufficient.
In the final steps of the client setup, the mksecldap command starts the client-side daemon and adds an
entry in the /etc/inittab file so the daemon starts at every reboot. You can check whether the setup is
successful by checking the secldapclntd daemon process through the ls-secldapclntd command.
Provided that the LDAP security information server is setup and running, this daemon will be running if the
setup was successful.
The server must be set up before the client. Client setup depends on the migrated data being on the
server. Follow these steps to set up the client:
1. Install ldap.client fileset on the AIX 5.3 system.
2. To configure the LDAP client, run the following command:
Security 133
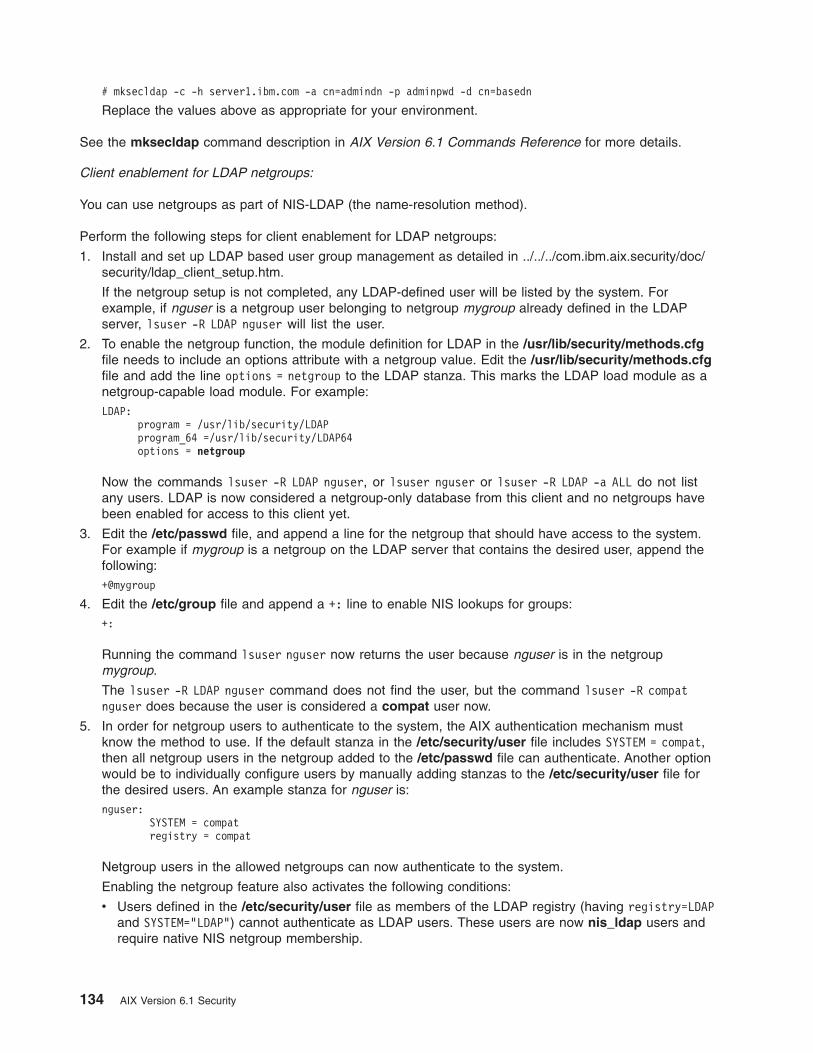
# mksecldap -c -h server1.ibm.com -a cn=admindn -p adminpwd -d cn=basedn
Replace the values above as appropriate for your environment.
See the mksecldap command description in AIX Version 6.1 Commands Reference for more details.
Client enablement for LDAP netgroups:
You can use netgroups as part of NIS-LDAP (the name-resolution method).
Perform the following steps for client enablement for LDAP netgroups:
1. Install and set up LDAP based user group management as detailed in ../../../com.ibm.aix.security/doc/security/ldap_client_setup.htm.
If the netgroup setup is not completed, any LDAP-defined user will be listed by the system. For
example, if nguser is a netgroup user belonging to netgroup mygroup already defined in the LDAP
server, lsuser -R LDAP nguser will list the user.
2. To enable the netgroup function, the module definition for LDAP in the /usr/lib/security/methods.cfg
file needs to include an options attribute with a netgroup value. Edit the /usr/lib/security/methods.cfg
file and add the line options = netgroup to the LDAP stanza. This marks the LDAP load module as a
netgroup-capable load module. For example:
LDAP:
program = /usr/lib/security/LDAP
program_64 =/usr/lib/security/LDAP64
options = netgroup
Now the commands lsuser -R LDAP nguser, or lsuser nguser or lsuser -R LDAP -a ALL do not list
any users. LDAP is now considered a netgroup-only database from this client and no netgroups have
been enabled for access to this client yet.
3. Edit the /etc/passwd file, and append a line for the netgroup that should have access to the system.
For example if mygroup is a netgroup on the LDAP server that contains the desired user, append the
following:
+@mygroup
4. Edit the /etc/group file and append a +: line to enable NIS lookups for groups:
+:
Running the command lsuser nguser now returns the user because nguser is in the netgroup
mygroup.
The lsuser -R LDAP nguser command does not find the user, but the command lsuser -R compat
nguser does because the user is considered a compat user now.
5. In order for netgroup users to authenticate to the system, the AIX authentication mechanism must
know the method to use. If the default stanza in the /etc/security/user file includes SYSTEM = compat,
then all netgroup users in the netgroup added to the /etc/passwd file can authenticate. Another option
would be to individually configure users by manually adding stanzas to the /etc/security/user file for
the desired users. An example stanza for nguser is:
nguser:
SYSTEM = compat
registry = compat
Netgroup users in the allowed netgroups can now authenticate to the system.
Enabling the netgroup feature also activates the following conditions:
v Users defined in the /etc/security/user file as members of the LDAP registry (having registry=LDAP
and SYSTEM="LDAP") cannot authenticate as LDAP users. These users are now nis_ldap users and
require native NIS netgroup membership.
134 AIX Version 6.1 Security

v The meaning of registry compat is expanded to include modules that use netgroup. For example, if
LDAP module is netgroup enabled, compat includes the files, NIS, and LDAP registries. Users
retrieved from those modules have a registry value of compat.
Related information
v The exports File for NFS document
v The .rhosts File Format for TCP/IP document
v The hosts.equiv File Format for TCP/IP document
Supported LDAP servers:
AIX LDAP-based user and group management supports IBM Tivoli Directory Servers, non IBM servers
with RFC 2307 compliant schema, and Microsoft® active directory servers.
IBM Tivoli Directory Server
It is highly recommended that AIX user/group management be configured using IBM Tivoli Directory
Servers (ITDS) servers. For more information about setting up an ITDS server for user and group
management, see Setting up an ITDS security information server.
Non IBM Directory Servers
AIX supports a variety of directory servers whose users and groups are defined using the RFC 2307
schema. When configured as an LDAP client to such servers, AIX uses the severs the same way as an
ITDS server with RFC 2037 schema. These servers must support LDAP Version 3 protocol.
Because the RFC 2307 schema only defines a subset of user and group attributes that AIX can use, some
AIX user and group management functionality could not be done if AIX is configured to use such an LDAP
server (for example, user password reset enforcement, password history, per user resource limit, login
control to certain systems through the AIX hostsallowedlogin and hostsdeniedlogin attributes, capability,
and so on).
AIX does not support non-RFC 2307 compliant directory servers. However, AIX may be made to work with
such servers that are not RFC 2307 compliant, but whose users and groups are defined with all the
required UNIX attributes. The minimal set of user and group attributes required by AIX is the set defined in
RFC 2307. Support for such directory servers requires manual configuration. AIX provides a schema
mapping mechanism for this purpose. For more information on schema file format and schema file usage,
see LDAP Attribute Mapping File Format.
Microsoft Active Directory
AIX supports Microsoft Active Directory (AD) as an LDAP server for user and group management. The AD
server must have the UNIX supporting schema installed. The UNIX support schema of AD comes from the
Microsoft Service For UNIX (SFU) package. Each SFU version has slightly different user and group
schema definitions from its predecessors. AIX supports AD running on Windows® 2000 and 2003 with SFU
schema Version 3.0 and 3.5, and AD running on Windows 2003 R2 with its built in UNIX schema.
Due to the difference in user and group management between UNIX systems and Windows systems, not
all AIX commands may work on LDAP users if the server is AD. Commands that do not work include
mkuser and mkgroup. Most user and group management commands do work, depending on the access
rights given to the identity with which AIX binds to AD. These commands include lsuser, chuser, rmuser,
lsgroup, chgroup, rmgroup, id, groups, passwd, and chpasswd.
AIX supports two user authentication mechanisms against Windows servers: LDAP authentication and
Kerberos authentication. With either mechanism, AIX supports user identification through LDAP protocol
Security 135

against AD, with no requirement for a corresponding user account on AIX.
Configuring AIX to work with Active Directory through LDAP:
AIX supports Microsoft Active Directory (AD) as an LDAP server for user and group management. It is
required that the AD server has the UNIX supporting schema installed.
An administrator can use the mksecldap command to configure AIX on the AD server in the same manner
as an ITDS server. The mksecldap command hides all the details of configuration to simplify the process.
Before running the mksecldap command to configure AIX on the AD server:
1. The AD server must have the UNIX support schema installed.
2. The AD server must contain users which are UNIX enabled.
For more information about installing UNIX schema to AD and enabling AD users with UNIX support, see
the related Microsoft documentation.
The AD schema often has multiple attribute definitions for the same UNIX attribute (for example, there are
multiple user password and group member definitions). Although AIX supports most of them, consideration
and planning should be done carefully when selecting the definitions to use. It is recommended that AIX
systems and other non-AIX systems sharing the same AD use the same definition to avoid conflicts.
Active Directory password attribute selection:
AIX supports two authentication mechanisms, unix_auth and ldap_auth.
With unix_auth, the password in Microsoft Active Directory (AD) is required to be in encrypted format.
During authentication, the encrypted password is retrieved from AD and compared to the encrypted format
of the user-entered password. Authentication is successful if they match. In ldap_auth mode, AIX
authenticates a user by an LDAP bind operation to the server with the user’s identity and the supplied
password. The user is authenticated if the bind operation is successful. AD supports multiple user
password attributes. A different AIX authentication mode requires a different AD user password attribute.
unix_auth mode
The following AD password attributes can be used for unix_auth mode:
v userPassword
v unixUserPassword
v msSFU30Password
Password management on AIX can be difficult due to AD’s multiple password attributes. Knowing which
password management attributes should be used by the UNIX clients can be confusing. AIX LDAP
attribute mapping capability enables you to customize the password management according to your needs.
By default, AIX uses the msSFU30Password attribute for AD running on Windows 2000 and 2003, and
the userPassword attribute on Windows 2003 R2. If a different password is used, you need to modify the
/etc/security/ldap/sfu30user.map file (or the /etc/security/ldap/sfur2user.map file if AD is running on
Windows 2003 R2). Find the line that starts with the word spassword and change the third field of the line
to the desired AD password attribute name. For more information, see LDAP Attribute Mapping File
Format. Run the mksecldap command to configure the AIX LDAP client after the change. If the AIX LDAP
client is already configured, run the restart-secldapclntd command to restart the secldapclntd daemon to
absorb the change.
In unix_auth mode, the password might be out of sync between Windows and UNIX, resulting in a
different password for each system. This occurs when you change a password from AIX to Windows,
because Windows uses the uncodepwd password attribute. The AIX passwd command can reset the
136 AIX Version 6.1 Security

UNIX password to be the same as a Windows password, but AIX does not support automatically changing
the Window’s password when you change your UNIX password from AIX.
ldap_auth mode
Active Directory also has the unicodepwd password attribute. This password attribute is used by Windows
systems to authenticate Windows users. In a bind operation to AD, the unicodePwd password must be
used. None of the passwords mentioned under unix_auth mode works for a bind operation. If the
ldap_auth option is specified from the command line, the mksecldap command maps the password
attribute to AD’s unicodePwd attribute at client configuration with no manual step required.
By mapping AIX passwords with the unicodePwd attribute, users defined in AD can login to Windows and
AIX systems using the same password. A password reset from either a AIX or Windows system is in effect
for both AIX and Windows systems.
Active Directory group member attribute selection:
Microsoft’s Service for UNIX defines the memberUid, msSFU30MemberUid, and
msSFU30PosixMember group member attributes.
The memberUid and msSFU30MemeberUid attributes accept user account names, while the
msSFU30PosixMember accepts only full DN. For example, for a user account foo (with last name bar)
defined in AD:
v memberUid: foo
v msSFU30MemberUid: foo
v msSFU30PosixMember: CN=foo bar,CN=Users,DC=austin,DC=ibm,DC=com
AIX supports all of these attributes. Consult with your AD administrator to determine which attribute to use.
By default, the mksecldap command configures AIX to use the msSFU30PosixMember attribute against
AD running on Windows 2000 and 2003, and the uidMember attribute against AD running on Windows
2003 R2. Such selection is due to the AD behavior as AD selects that attribute when adding a user to a
group from Windows. Your business strategy might require the use of a non-default group member
attribute for supporting multiple platforms.
If a different group member attribute is needed, you can change the mapping by editing the group
mapping file. The group mapping file for AD is /etc/security/ldap/sfu30group.map running on Windows
2000 and 2003, and /etc/security/ldap/sfur2group.map for Windows 2003 R2. Find the line that starts
with the word users, and replace the third field with the desired attribute name for group members. For
more information, see LDAP Attribute Mapping File Format. Run the mksecldap command to configure
AIX LDAP client after the change, or if the AIX is already configured, run the restart-secldapclntd
command to restart the secldapclntd daemon to absorb the change.
Multiple organizational units:
Your AD server might have multiple organizational units defined, with each containing a set of users.
Most Windows AD users are defined in the cn=users,... subtree, but some may be defined elsewhere.
The AIX multiple base DN feature can be used for such an AD server. For more information, see Multiple
base DN support.
Kerberos authentication for Windows servers:
In addition to the LDAP authentication mechanisms, AIX also supports user authentication through the
Kerberos protocol for Windows servers.
Security 137

AIX supports Kerberos authentication for Windows KDC and LDAP identification for Windows Active
Directory by creating a KRB5ALDAP compound loadmodule. Because user identification information is
pulled from Microsoft Active Directory, you do not need to create the corresponding user accounts on AIX.
LDAP user management:
You can manage users and groups on an LDAP security information server from any LDAP client by using
high-level commands.
An -R flag added to most of the high-level commands can manage users and groups using LDAP as well
as other authentication load modules such as DCE, NIS, and KRB5. For more information concerning the
use of the -R flag, refer to each of the user or group management commands.
To enable a user to authenticate through LDAP, run the chuser command to change the user’s SYSTEM
attribute value to LDAP. By setting the SYSTEM attribute value according to the defined syntax, a user can
be authenticated through more than one load module (for example, compat and LDAP). For more
information on setting users’ authentication methods, see “User authentication” on page 65 and the
SYSTEM attribute syntax defined in the /etc/security/user file.
A user can become an LDAP user at client setup time by running the mksecldap command with the -u
flag in either of the following forms:
1. Run the command:
mksecldap -c -u user1,user2,...
where user1,user2,... is a list of users. The users in this list can be either locally defined or remote
LDAP-defined users. The SYSTEM attribute is set to LDAP in each of the above users’ stanzas in the
/etc/security/user file. Such users are only authenticated through LDAP. The users in this list must
exist on the LDAP security information server; otherwise, they can not log in from this host. Run the
chuser command to modify the SYSTEM attribute and allow authentication through multiple methods
(for example, both local and LDAP).
2. Run
mksecldap -c -u ALL
This command sets the SYSTEM attribute to LDAP in each user’s stanza in the /etc/security/user file
for all locally defined users. All such users only authenticate through LDAP. The locally defined users
must exist on the LDAP security information server; otherwise they can not log in from this host. A user
that is defined on the LDAP server but not defined locally cannot log in from this host. To allow a
remote LDAP-defined user to log in from this host, run the chuser command to set the SYSTEM
attribute to LDAP for that user.
Alternatively, you can enable all LDAP users, whether they are defined locally or not, to authenticate
through LDAP on a local host by modifying the ″default″ stanza of the /etc/security/user file to use
″LDAP″ as its value. All users that do not have a value defined for their SYSTEM attribute must follow
what is defined in the default stanza. For example, if the default stanza has "SYSTEM = "compat"" ,
changing it to "SYSTEM = "compat OR LDAP"" allows authentication of these users either through AIX or
LDAP. Changing the default stanza to "SYSTEM = "LDAP"" enables these users to authenticate exclusively
through LDAP. Those users who have a SYSTEM attribute value defined are not affected by the default
stanza.
Multiple base DN support:
Previous to AIX 5L Version 5.3 with the 5300-05 Technology Level, AIX supports only one base DN for an
LDAP entity. For example, you can only specify a single user base DN in the /etc/security/ldap/ldap.cfg
file.
138 AIX Version 6.1 Security
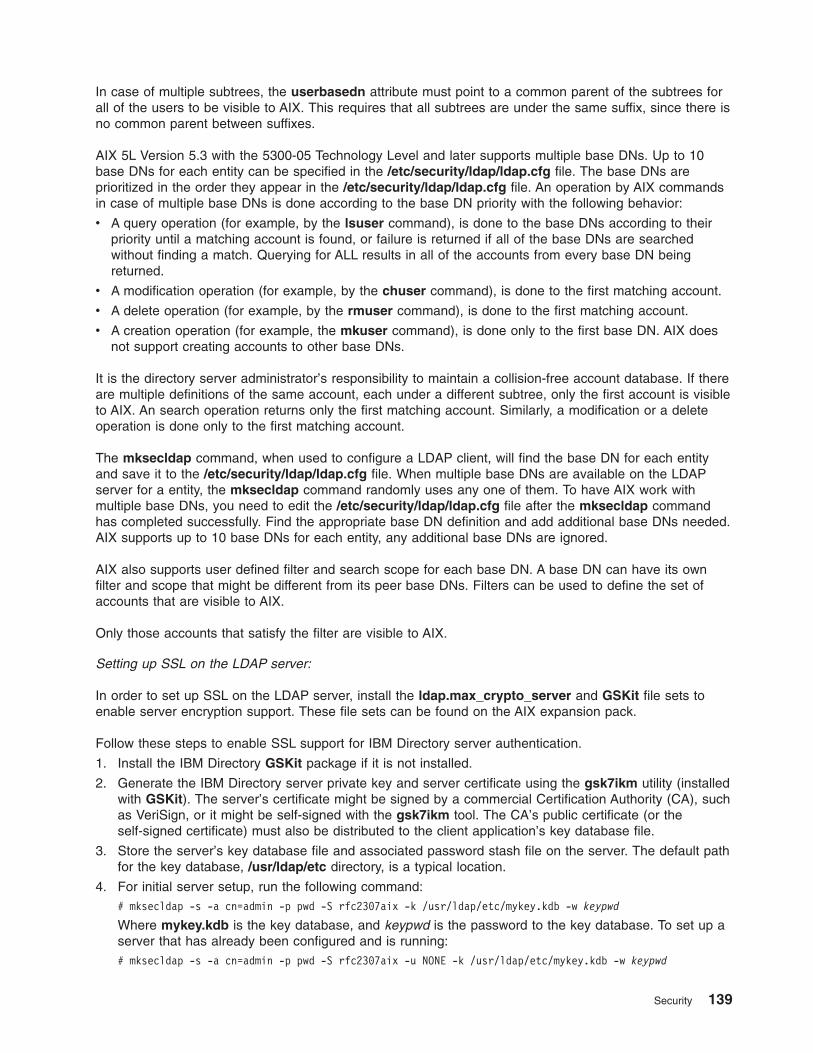
In case of multiple subtrees, the userbasedn attribute must point to a common parent of the subtrees for
all of the users to be visible to AIX. This requires that all subtrees are under the same suffix, since there is
no common parent between suffixes.
AIX 5L Version 5.3 with the 5300-05 Technology Level and later supports multiple base DNs. Up to 10
base DNs for each entity can be specified in the /etc/security/ldap/ldap.cfg file. The base DNs are
prioritized in the order they appear in the /etc/security/ldap/ldap.cfg file. An operation by AIX commands
in case of multiple base DNs is done according to the base DN priority with the following behavior:
v A query operation (for example, by the lsuser command), is done to the base DNs according to their
priority until a matching account is found, or failure is returned if all of the base DNs are searched
without finding a match. Querying for ALL results in all of the accounts from every base DN being
returned.
v A modification operation (for example, by the chuser command), is done to the first matching account.
v A delete operation (for example, by the rmuser command), is done to the first matching account.
v A creation operation (for example, the mkuser command), is done only to the first base DN. AIX does
not support creating accounts to other base DNs.
It is the directory server administrator’s responsibility to maintain a collision-free account database. If there
are multiple definitions of the same account, each under a different subtree, only the first account is visible
to AIX. An search operation returns only the first matching account. Similarly, a modification or a delete
operation is done only to the first matching account.
The mksecldap command, when used to configure a LDAP client, will find the base DN for each entity
and save it to the /etc/security/ldap/ldap.cfg file. When multiple base DNs are available on the LDAP
server for a entity, the mksecldap command randomly uses any one of them. To have AIX work with
multiple base DNs, you need to edit the /etc/security/ldap/ldap.cfg file after the mksecldap command
has completed successfully. Find the appropriate base DN definition and add additional base DNs needed.
AIX supports up to 10 base DNs for each entity, any additional base DNs are ignored.
AIX also supports user defined filter and search scope for each base DN. A base DN can have its own
filter and scope that might be different from its peer base DNs. Filters can be used to define the set of
accounts that are visible to AIX.
Only those accounts that satisfy the filter are visible to AIX.
Setting up SSL on the LDAP server:
In order to set up SSL on the LDAP server, install the ldap.max_crypto_server and GSKit file sets to
enable server encryption support. These file sets can be found on the AIX expansion pack.
Follow these steps to enable SSL support for IBM Directory server authentication.
1. Install the IBM Directory GSKit package if it is not installed.
2. Generate the IBM Directory server private key and server certificate using the gsk7ikm utility (installed
with GSKit). The server’s certificate might be signed by a commercial Certification Authority (CA), such
as VeriSign, or it might be self-signed with the gsk7ikm tool. The CA’s public certificate (or the
self-signed certificate) must also be distributed to the client application’s key database file.
3. Store the server’s key database file and associated password stash file on the server. The default path
for the key database, /usr/ldap/etc directory, is a typical location.
4. For initial server setup, run the following command:
# mksecldap -s -a cn=admin -p pwd -S rfc2307aix -k /usr/ldap/etc/mykey.kdb -w keypwd
Where mykey.kdb is the key database, and keypwd is the password to the key database. To set up a
server that has already been configured and is running:
# mksecldap -s -a cn=admin -p pwd -S rfc2307aix -u NONE -k /usr/ldap/etc/mykey.kdb -w keypwd
Security 139

Setting up SSL on the LDAP client:
To use SSL on an LDAP client, install the ldap.max_crypto_client and GSKit filesets off of the AIX
expansion pack.
Follow these steps to enable SSL support for LDAP after the server has been enabled for SSL.
1. Run gsk7ikm to generate the key database on each client.
2. Copy the server certificate to each of the clients. If the server SSL uses a self-signed certificate, the
certificate must be exported first.
3. On each client system, run gsk7ikm to import the server certificate to the key database.
4. Enable SSL for each client:
# mksecldap -c -h servername -a adminDN -p pwd -k /usr/ldap/etc/mykey.kdb -p keypwd
Where /usr/ldap/etc/mykey.kdb is the full path to the key database and keypwd is the password to
the key. If the key password is not entered from the command line, a stashed password file from the
same directory is used. The stashed file needs to have the same name as the key database with an
extension of .sth (for example, mykey.sth).
LDAP host access control:
AIX provides user-level host access (login) control for a system. Administrators can configure LDAP users
to log in to an AIX system by setting their SYSTEM attribute to LDAP.
The SYSTEM attribute is in the /etc/security/user file. The chuser command can be used to set its value,
similar to the following:
# chuser -R LDAP SYSTEM=LDAP registry=LDAP foo
Note: With this type of control, do not set the default SYSTEM attribute to LDAP, which allows all LDAP
users to login to the system.
This sets the LDAP attribute to allow user foo to log in to this system. It also sets the registry to LDAP,
which allows the login process to log foo’s login attempts to LDAP, and also allows any user management
tasks done on LDAP.
The administrator needs to run such setup on each of the client systems to enable login by certain users.
Starting with AIX 5.2, AIX has implemented a feature to limit a LDAP user only to log in to certain LDAP
client systems. This feature allows centralized host access control management. Administrators can
specify two host access control lists for a user account: an allow list and a deny list. These two user
attributes are stored in the LDAP server with the user account. A user is allowed access to systems or
networks that are specified in the allow list, while he is denied access to systems or networks in the deny
list. If a system is specified in both the allow list and the deny list, the user is denied access to the system.
There are two ways to specify the access lists for a user: with the mkuser command when the user is
created or with the chuser command for a existing user. For backward compatibility, if both the allow list
and deny list do not exist for a user, the user is allowed to login to any LDAP client systems by default.
Beginning in AIX 5.2, this host access control feature is available.
Examples of setting allow and deny permission lists for users are the following:
# mkuser -R LDAP hostsallowedlogin=host1,host2 foo
This creates a user foo, and user foo is only allowed to log in to host1 and host2.
# mkuser -R LDAP hostsdeniedlogin=host2 foo
This create user foo, and user foo can log in to any LDAP client systems except host2.
140 AIX Version 6.1 Security

# chuser -R LDAP hostsallowedlogin=192.9.200.1 foo
This sets user foo with permission to log in to the client system at address 192.9.200.1.
# chuser -R LDAP hostsallowedlogin=192.9.200/24 hostsdeniedlogin=192.9.200.1 foo
This sets user foo with permission to log in to any client system within the 192.9.200/24 subnet , except
the client system at address 192.9.200.1.
For more information, see the chuser command.
Secure communication with SSL:
Depending on the authentication type being used between the LDAP client and server, passwords are sent
in either crypted format (unix_auth) or in clear text (ldap_auth). Use Secure Socket Layer (SSL) to protect
against security exposure when you send even encrypted passwords over the network, or, in some cases,
the Internet. AIX provides packages for SSL that can provide secure communication between directory
servers and clients.
For more information, see:
v “Setting up SSL on the LDAP server” on page 139
v “Setting up SSL on the LDAP client” on page 140
Kerberos bind:
In addition to a simple bind using a bind DN and a bind password, the secldapclntd daemon also
supports a bind using Kerberos V credentials.
The keys of the bind principal are stored in a keytab file and need to be made available to the
secldapclntd daemon in order to use Kerberos bind. With Kerberos bind enabled, the secldapclntd
daemon does Kerberos authentication to the LDAP server using the principal name and keytab specified in
the /etc/security/ldap/ldap.cfg client configuration file. Using Kerberos bind makes the secldapclntd
daemon ignore the bind DN and the bind password specified in /etc/security/ldap/ldap.cfg file.
When Kerberos authentication is successful, the secldapclntd daemon saves the bind credentials to the
/etc/security/ldap/krb5cc_secldapclntd directory. The saved credentials are used for a later rebind. If
credentials are more than one hour old at the time that the secldapclntd daemon tries to rebind to a
LDAP server, the secldapclntd daemon will reinitialize to renew credentials.
To configure the LDAP client system to use Kerberos bind, you must configure the client using the
mksecldap command using a bind DN and a bind password. If the configuration is successful, edit the
/etc/security/ldap/ldap.cfg file with the correct values for Kerberos related attributes. The secldapclntd
daemon uses the Kerberos bind at restart. After successful configuration, the bind DN and the bind
password are not used any more. They can be safely removed or commented out of the
/etc/security/ldap/ldap.cfg file.
Creating a Kerberos principal:
You need to create at least two principals on the Key Distribution Center (KDC) for use by the IDS server
and client in order to support Kerberos bind. The first principal is the LDAP server principal and the
second one is the principal used by client systems to bind to the server.
Each of the principal keys need to be placed in a keytab file so that they can be used to start the server
process or the client daemon process.
The following example is based on the IBM Network Authentication Service. If you install Kerberos
software from other sources, the actual commands may be different than what is shown here.
Security 141

v Start the kadmin tool on the KDC server as the root user.
#/usr/krb5/sbin/kadmin.local
kadmin.local:
v Create the ldap/serverhostname principal for the LDAP server. The serverhostname is the fully qualified
DNS host that will run the LDAP server.
kadmin.local: addprinc ldap/plankton.austin.ibm.com
WARNING: no policy specified for "ldap/[email protected]":
Re-enter password for principal "ldap/[email protected]":
Principal "ldap/[email protected]" created.
kadmin.local:
v Create a keytab for the created server principal. This key will be used by the LDAP server during server
startup. To create a keytab called slapd_krb5.keytab:
kadmin.local: ktadd -k /etc/security/slapd_krb5.keytab ldap/plankton.austin.ibm.com
Entry for principal ldap/plankton.austin.ibm.com with kvno 2,
encryption type Triple DES cbc mode with HMAC/sha1 added to keytab
WRFILE:/etc/security/slapd_krb5.keytab.
Entry for principal ldap/plankton.austin.ibm.com with kvno 2,
encryption type ArcFour with HMAC/md5 added to keytab WRFILE:/etc/security/slapd_krb5.keytab.
Entry for principal ldap/plankton.austin.ibm.com with kvno 2,
encryption type AES-256 CTS mode with 96-bit SHA-1 HMAC added to keytab
WRFILE:/etc/security/slapd_krb5.keytab.
Entry for principal ldap/plankton.austin.ibm.com with kvno 2,
encryption type DES cbc mode with RSA-MD5 added to keytab WRFILE:/etc/security/slapd_krb5.keytab.
kadmin.local:
v Create a principal named ldapadmin for the IDS administrator.
kadmin.local: addprinc ldapadmin
WARNING: no policy specified for [email protected]; defaulting to no policy.
Note that policy may be overridden by ACL restrictions.
Enter password for principal "[email protected]":
Re-enter password for principal "[email protected]":
Principal "[email protected]" created.
kadmin.local:
v Create a keytab for the bind principal kdapadmin.keytab. This key can be used by the secldapclntd
client daemon.
kadmin.local: ktadd -k /etc/security/ldapadmin.keytab ldapadmin
Entry for principal ldapadmin with kvno 2, encryption type
Triple DES cbc mode with HMCA/sha1 added to keytab WRFILE:/etc/security/ldapadmin.keytab.
Entry for principal ldapadmin with kvno 2, encryption type
ArcFour with HMAC/md5 added to keytab WRFILE:/etc/security/ldapadmin.keytab.
Entry for principal ldapadmin with kvno 2, encryption type
AES-256 CTS mode with 96-bit SHA-1 HMAC added to keytab WRFILE:/etc/security/ldapadmin.keytab.
Entry for principal ldapadmin with kvno 2, encryption type
DES cbc mode with RSA-MD5 added to keytab WRFILE:/etc/security/ldapadmin.keytab.
kadmin.local
v Create a principal named ldapproxy for clients to bind to the LDAP server.
kadmin.local: addprinc ldapproxy
WARNING: no policy specified for ldapproxy @ud3a.austin.ibm.com; defaulting to no policy.
Note that policy may be overridden by ACL restriction
Enter password for principal "[email protected]":
Re-enter password for principal "[email protected]":
Principal "[email protected]" created.
kadmin.local:
v Create a keytab called ldapproxy.keytab for the bind principal ldapproxy. This key can be used by the
secldapclntd client daemon.
kadmin.local: ktadd -k /etc/security/ldapproxy.keytab ldapproxy
Entry for principal ldapproxy with kvno 2, encryption type
Triple DES cbc mode with HMAC/sh1 added to keytab WRFILE:/etc/security/ldapproxy.keytab.
Entry for principal ldapproxy with kvno 2, encryption type
ArcFour with HMAC/md5 added to keytab WRFILE:/etc/security/ldapproxy.keytab
Entry for principal ldapproxy with kvno 2, encryption type
142 AIX Version 6.1 Security
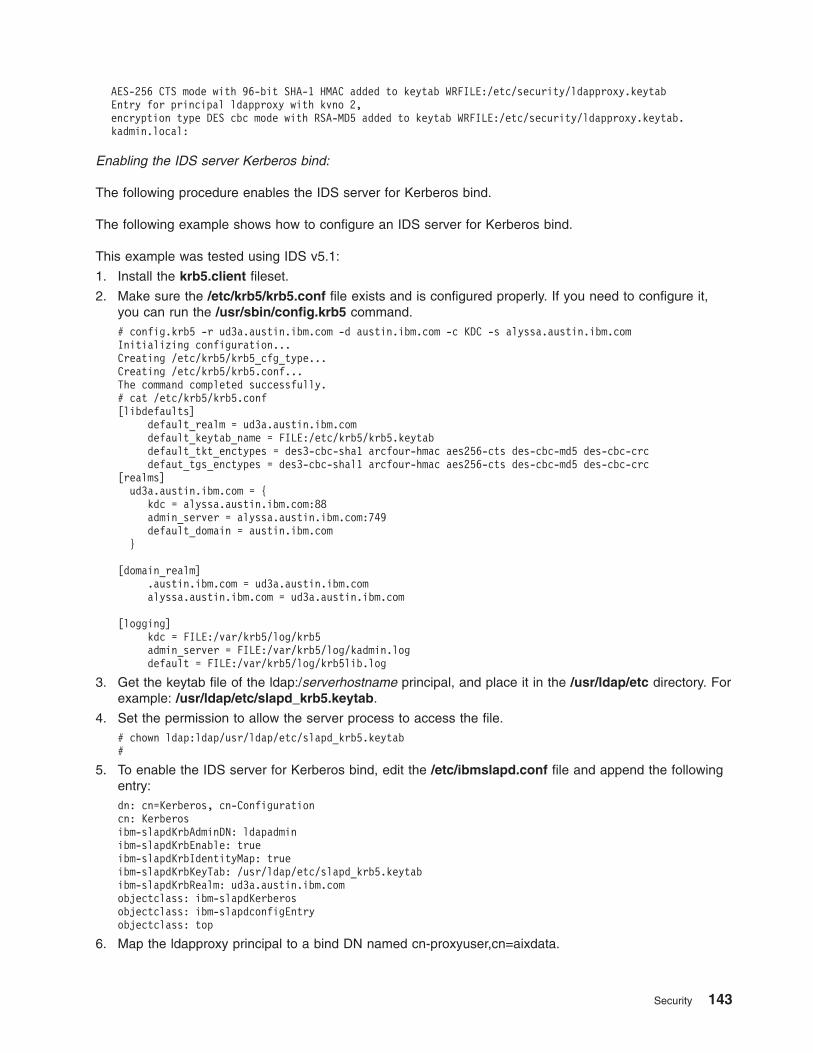
AES-256 CTS mode with 96-bit SHA-1 HMAC added to keytab WRFILE:/etc/security/ldapproxy.keytab
Entry for principal ldapproxy with kvno 2,
encryption type DES cbc mode with RSA-MD5 added to keytab WRFILE:/etc/security/ldapproxy.keytab.
kadmin.local:
Enabling the IDS server Kerberos bind:
The following procedure enables the IDS server for Kerberos bind.
The following example shows how to configure an IDS server for Kerberos bind.
This example was tested using IDS v5.1:
1. Install the krb5.client fileset.
2. Make sure the /etc/krb5/krb5.conf file exists and is configured properly. If you need to configure it,
you can run the /usr/sbin/config.krb5 command.
# config.krb5 -r ud3a.austin.ibm.com -d austin.ibm.com -c KDC -s alyssa.austin.ibm.com
Initializing configuration...
Creating /etc/krb5/krb5_cfg_type...
Creating /etc/krb5/krb5.conf...
The command completed successfully.
# cat /etc/krb5/krb5.conf
[libdefaults]
default_realm = ud3a.austin.ibm.com
default_keytab_name = FILE:/etc/krb5/krb5.keytab
default_tkt_enctypes = des3-cbc-sha1 arcfour-hmac aes256-cts des-cbc-md5 des-cbc-crc
defaut_tgs_enctypes = des3-cbc-shal1 arcfour-hmac aes256-cts des-cbc-md5 des-cbc-crc
[realms]
ud3a.austin.ibm.com = {
kdc = alyssa.austin.ibm.com:88
admin_server = alyssa.austin.ibm.com:749
default_domain = austin.ibm.com
}
[domain_realm]
.austin.ibm.com = ud3a.austin.ibm.com
alyssa.austin.ibm.com = ud3a.austin.ibm.com
[logging]
kdc = FILE:/var/krb5/log/krb5
admin_server = FILE:/var/krb5/log/kadmin.log
default = FILE:/var/krb5/log/krb5lib.log
3. Get the keytab file of the ldap:/serverhostname principal, and place it in the /usr/ldap/etc directory. For
example: /usr/ldap/etc/slapd_krb5.keytab.
4. Set the permission to allow the server process to access the file.
# chown ldap:ldap/usr/ldap/etc/slapd_krb5.keytab
#
5. To enable the IDS server for Kerberos bind, edit the /etc/ibmslapd.conf file and append the following
entry:
dn: cn=Kerberos, cn-Configuration
cn: Kerberos
ibm-slapdKrbAdminDN: ldapadmin
ibm-slapdKrbEnable: true
ibm-slapdKrbIdentityMap: true
ibm-slapdKrbKeyTab: /usr/ldap/etc/slapd_krb5.keytab
ibm-slapdKrbRealm: ud3a.austin.ibm.com
objectclass: ibm-slapdKerberos
objectclass: ibm-slapdconfigEntry
objectclass: top
6. Map the ldapproxy principal to a bind DN named cn-proxyuser,cn=aixdata.
Security 143

a. If the bind DN entry exists in the IDS server, create a file named ldapproxy.ldif with the following
content:
dn: cn=proxyuser,cn=aixdata
changetype: modify
add: objectclass
objectclass: ibm-securityidentities
-
add:altsecurityidentities
alsecurityidentities: Kerberos:[email protected]
OR
b. If the bind DN entry is not yet added to the server, create a file named proxyuser.ldif with the
following content:
Note: You will need to replace proxyuserpwd with your password.dn: cn=proxyuser,cn=mytest
cn: proxyuser
sn: proxyuser
userpassword: proxyuserpwd
objectclass: person
objectclass: top
objectclass: ibm-securityidentities
altsecurityidentities: Kerberos:[email protected]
Add the bind DN entry that is created to the IDS server using the ldapmodify command.
# ldapmodify -D cn-admin -w adminPwd -f /tmp/proxyuser.ldif modifying entry cn=proxyuser,cn=mytest
#
7. Restart the IDS server.
Enabling the AIX LDAP client Kerberos bind:
You can configure an AIX LDAP client system to use Kerberos in its initial bind to an LDAP server.
The IDS server must be configured in this manner for the server host to be a client to itself.
This example was tested using IDS v 5.1:
1. Install the krb5.client fileset.
2. Make sure the /etc/krb.conf file exists and is configured properly. If it is not properly configured, you
can run the /usr/sbin/config.krb5 command to configure it.
3. Get the keytab file of the bind principal, and place it in the /etc/security/ldap directory.
4. Set the permission to 600.
5. Configure the client using the mksecldap command using the bind DN and the bind password. Make
sure that AIX commands work on LDAP users.
6. Edit the /etc/security/ldap/ldap.cfg file to set the Kerberos related attributes. In the following example,
the bind principal is ldapproxy and the keytab file is ldapproxy.keytab. If you want IDS server
administrator privileges, replace the ldapproxy with ldapadmin and replace the ldapproxy.keytab with
ldapadmin.keytab.
useKRB5:yes
krbprincipal:ldapproxy
krbkeypath:/etc/security/ldap/ldapproxy.keytab
krbcmddir:/usr/krb5/bin/
Now the bind DN and bind password can be removed or commented out of the ldap.cfg file because
the secldapclntd daemon now uses Kerberos bind.
7. Restart the secldapclntd daemon.
8. The /etc/security/ldap/ldap.cfg file can now be propagated to other client systems.
144 AIX Version 6.1 Security

LDAP security information server auditing:
SecureWay Directory version 3.2 (and later) provides a default server audit logging function. Once
enabled, this default audit plugin logs LDAP server activities to a log file. See the LDAP documentation in
Packaging Guide for LPP Installation for more information on this default audit plugin.
An LDAP security information server auditing function has been implemented in AIX 5.1 and later, called
the LDAP security audit plugin. It is independent of the SecureWay Directory default auditing service, so
that either one or both of these auditing subsystems can be enabled. The AIX audit plugin records only
those events that update or query the AIX security information on an LDAP server. It works within the
framework of AIX system auditing.
To accommodate LDAP, the following audit events are contained in the /etc/security/audit/event file:
v LDAP_Bind
v LDAP_Unbind
v LDAP_Add
v LDAP_Delete
v LDAP_Modify
v LDAP_Modifydn
v LDAP_Search
An ldapserver audit class definition is also created in the /etc/security/audit/config file that contains all of
the above events.
To audit the LDAP security information server, add the following line to each user’s stanza in the
/etc/security/audit/config file:
ldap = ldapserver
Because the LDAP security information server audit plug-in is implemented within the frame of the AIX
system auditing, it is part of the AIX system auditing subsystem. Enable or disable the LDAP security
information server audit using system audit commands, such as audit start or audit shutdown. All audit
records are added to the system audit trails, which can be reviewed with the auditpr command. For more
information, see “Auditing overview” on page 119.
LDAP commands:
There are several LDAP commands.
lsldap command
The lsldap command can be used to display naming service entities from the configured LDAP server.
These entities are aliases, automount, bootparams, ethers, groups, hosts, netgroups, networks, passwd,
protocols, rpc and services.
mksecldap command
The mksecldap command can be used to set up IBM SecureWay Directory servers and clients for
security authentication and data management. This command must be run on the server and all clients.
secldapclntd daemon
The secldapclntd daemon accepts requests from the LDAP load module, forwards the request to the
LDAP Security Information Server, and passes the result from the server back to the LDAP load module.
Security 145

For more information on the LDAP attribute mapping file format, see LDAP attribute mapping file format
in the AIX Version 6.1 Files Reference.
Related information
The mksecldap, start-secldapclntd, stop-secldapclntd, restart-secldapclntd, ls-secldapclntd,
sectoldif, and flush-secldapclntd commands.
The secldapclntd daemon.
The /etc/security/ldap/ldap.cfg file.
The LDAP attribute mapping file format.
Migration to LDAP from NIS, including the netgroup setting can be found in the Network Information
Services (NIS and NIS+) Guide: Appendix B. Migrating from NIS and NIS+ to RFC 2307-compliant LDAP
services.
LDAP management commands:
Several commands are used for LDAP management.
start-secldapclntd command
The start-secldapclntd command starts the secldapclntd daemon if it is not running.
stop-secldapclntd command
The stop-secldapclntd command terminates the running secldapclntd daemon process.
restart-secldapclntd command
The restart-secldapclntd script stops the secldapclntd daemon if it is running, and then restarts it. If the
secldapclntd daemon is not running, it simply starts it.
ls-secldapclntd command
The ls-secldapclntd command lists the secldapclntd daemon status.
flush-secldapclntd command
The flush-secldapclntd command clears the cache for the secldapclntd daemon process.
sectoldif command
The sectoldif command reads users and groups defined locally, and prints the result to standard output in
ldif format.
ldap.cfg file format:
The /etc/security/ldap/ldap.cfg file contains information for the secldapclntd daemon to start and
function properly as well as information for fine tuning the daemon’s performance.
Before AIX 5L Version 5.3 with the 5300-05 Technology Level, AIX supports only one base DN for each
entity. For example, only one userbasedn can be specified for the user entity. For AIX 5L Version 5.3 with
146 AIX Version 6.1 Security
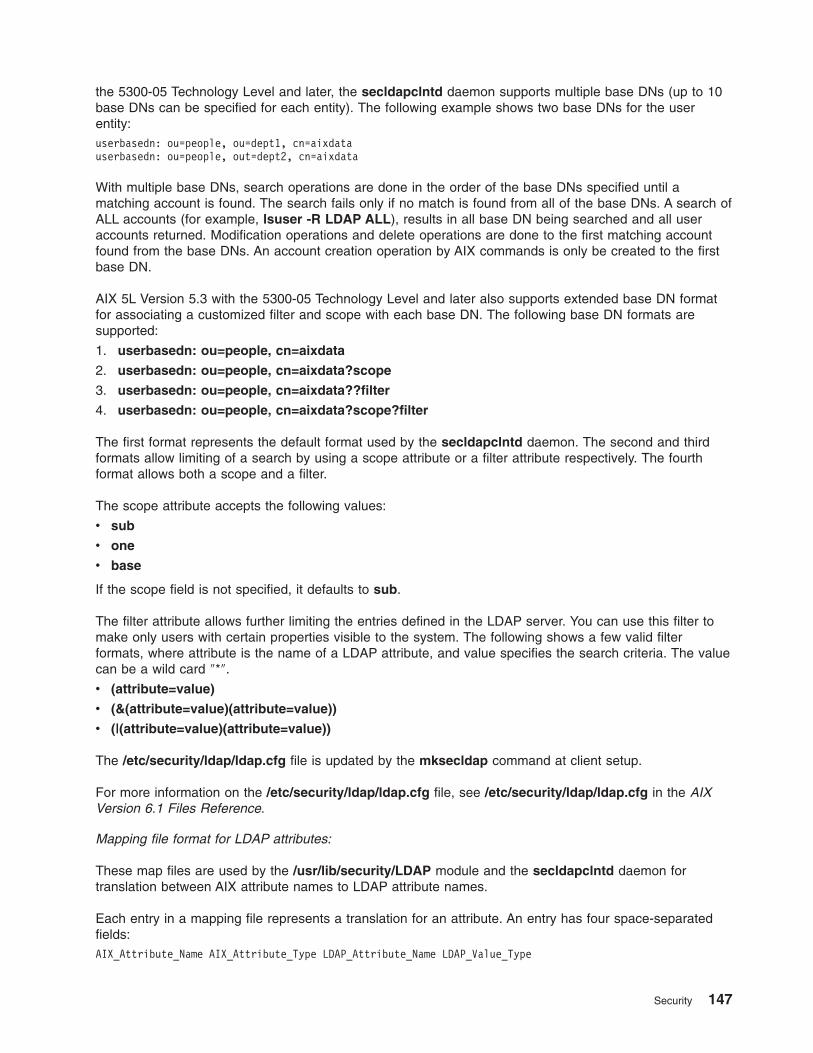
the 5300-05 Technology Level and later, the secldapclntd daemon supports multiple base DNs (up to 10
base DNs can be specified for each entity). The following example shows two base DNs for the user
entity:
userbasedn: ou=people, ou=dept1, cn=aixdata
userbasedn: ou=people, out=dept2, cn=aixdata
With multiple base DNs, search operations are done in the order of the base DNs specified until a
matching account is found. The search fails only if no match is found from all of the base DNs. A search of
ALL accounts (for example, lsuser -R LDAP ALL), results in all base DN being searched and all user
accounts returned. Modification operations and delete operations are done to the first matching account
found from the base DNs. An account creation operation by AIX commands is only be created to the first
base DN.
AIX 5L Version 5.3 with the 5300-05 Technology Level and later also supports extended base DN format
for associating a customized filter and scope with each base DN. The following base DN formats are
supported:
1. userbasedn: ou=people, cn=aixdata
2. userbasedn: ou=people, cn=aixdata?scope
3. userbasedn: ou=people, cn=aixdata??filter
4. userbasedn: ou=people, cn=aixdata?scope?filter
The first format represents the default format used by the secldapclntd daemon. The second and third
formats allow limiting of a search by using a scope attribute or a filter attribute respectively. The fourth
format allows both a scope and a filter.
The scope attribute accepts the following values:
v sub
v one
v base
If the scope field is not specified, it defaults to sub.
The filter attribute allows further limiting the entries defined in the LDAP server. You can use this filter to
make only users with certain properties visible to the system. The following shows a few valid filter
formats, where attribute is the name of a LDAP attribute, and value specifies the search criteria. The value
can be a wild card ″*″.
v (attribute=value)
v (&(attribute=value)(attribute=value))
v (|(attribute=value)(attribute=value))
The /etc/security/ldap/ldap.cfg file is updated by the mksecldap command at client setup.
For more information on the /etc/security/ldap/ldap.cfg file, see /etc/security/ldap/ldap.cfg in the AIX
Version 6.1 Files Reference.
Mapping file format for LDAP attributes:
These map files are used by the /usr/lib/security/LDAP module and the secldapclntd daemon for
translation between AIX attribute names to LDAP attribute names.
Each entry in a mapping file represents a translation for an attribute. An entry has four space-separated
fields:
AIX_Attribute_Name AIX_Attribute_Type LDAP_Attribute_Name LDAP_Value_Type
Security 147

AIX_Attribute_Name Specifies the AIX attribute name.
AIX_Attribute_Type Specifies the AIX attribute type. Values are SEC_CHAR, SEC_INT, SEC_LIST, and
SEC_BOOL.
LDAP_Attribute_Name Specifies the LDAP attribute name.
LDAP_Value_Type Specifies the LDAP value type. Values are s for single value and m for multi-value.
EFS Encrypted File System
The Encrypted Files System enables individual users on the system to encrypt their data on J2 file system
through their individual key stores.
A key is associated to each user. These keys are stored in cryptographically protected key store and upon
successful login, the user’s keys are loaded into the kernel and associated with the processes credentials.
Later on, when the process needs to open an EFS-protected file, these credentials are tested and if a key
matching the file protection is found, the process is able to decrypt the file key and therefore the file
content. Group based key management are supported too.
Note: EFS is part of an overall security strategy. It is designed to work in conjunction with sound
computer security practices and controls.
Encrypted File System usability
Encrypted File System (EFS) key management, file encryption, and file decryption are transparent to users
in normal operations.
EFS is part of base AIX OS. To enable EFS, root (or any user with the RBAC aix.security.efs
authorization, see EFS actors for more information) must use the efsenable command to activate EFS
and create the EFS environment. This is a one time system enablement. After EFS is enabled, when the
user logs in, its key and keystore are silently created and protected or encrypted with the user login
password. The users keys are then used sliently by the J2 file system when encrypting or decrypting EFS
files. Every EFS file is protected with its own unique file key, and this file key is in turn protected or
encrypted with the file owner or group key depending on the file permissions.
By default, a J2 File System is not EFS-enabled. When it is EFS-enabled, the J2 File System transparently
manages encryption and decryption in the kernel for read and write requests. Users and groups
administration commands (such as mkgroup, chuser, and chgroup) transparently manage the users’ and
groups’ keystores.
The following EFS commands are provided to allow users to manage their keys and file encryption:
efskeymgr
Manages and administers the keys
efsmgr
Manages the encryption of files/directories/file system
Encrypted File System actors
There are three types of users who can manage and use EFS keys:
Full or restricted access as root:
The root access to the keys can be unlimited or limited. In either mode, it is not possible for root to simply
su to a user and gain access to the user’s encrypted file or keystore.
In one mode, root can reset the user’s keystore password, and might gain access to the user’s keys within
this keystore. This mode provides greater system administration flexibility.
148 AIX Version 6.1 Security
In the other mode, root can reset the user’s logon password, cannot reset the user’s keystore password. It
is not possible for root to substitute user (with the su command) and inherit an open keystore. While root
can create and delete users and groups. along with their associated keystores, cannot gain access to the
keys within these keystores. This mode provides a greater degree of protection against an attack from
malicious root.
There are two modes for managing and using keystores, Root Admin and Root Guard. An EFS
administration key is also provided.
The EFS administration key enables access to rest the password to all keystores in Root Admin mode.
This key is located in the efs_admin special keystore. Access to the efs_admin special keystore is
granted only to authorized users (root user and security group at installation, or the RBAC aix.security.efs
authorization).
When a keystore is in Root Guard mode, the keys contained in this keystore cannot be retrieved without
the correct keystore password. This provides strong security against a malicious root, but can also cause
problems if a user forgets their password, as there is no way to regenerate the password without loosing
the keys in the keystore, and the user can no longer access their data as a result. In this keystore mode,
some operations cannot be treated immediately and are scheduled as pending operations. These pending
operations are generated in cases such adding or suppressing a group access key in a user keystore or
regenerating a private key. These are managed by the keystore owner.
efs_admin administration key:
The efs_admin keystore contains a special key which can open any user or group keystore in root admin
mode (the default mode).
The password to open this special keystore is stored in root user and security group keystores when EFS
is activated. This password can be given to other groups and users or removed with the efskeymgr
command. This key, in conjunction with the RBAC aix.security.efsauthorization, allows an user to
administrate EFS (that is,, access keystores in root admin mode).
efs_admin RBAC considerations
On systems with Role Based Access Control enabled, the efs_admin command is protected with the
aix.security.efs authorization.
User keystore:
The user keystore is managed automatically for most common operations. The efskeymgr command is
used for maintenance tasks and advanced EFS use. Users can create encrypted files and directories with
the efsmgr command. Key store management is integrated into most user admin commands. If a user is
added to a group, then the user will automatically have access to the group keystore.
A file owner with EFS access to the file use the efsmgr command to grant EFS access to other users and
groups (similar to the control that file owners have with ACLs in UNIX). Users can change their passwords
without effecting separate processes running under the same UID with an open keystore.
Encrypted File System keystore
Keystores are protected with a password. Users can choose an alternate keystore password other than
their login password. In this case, the keystore is not opened and available during the user’s standard
login. Instead, the user must manually load the keystore by using the efskey command to provide the
keystore password.
The keystore format is PKCS # 12. The keystores are stored in the following files:
Security 149

user keystore
/var/efs/users//keystore
group keystore
/var/efs/groups//keystore
efsadmin keystore
/var/efs/efs_admin/keystore
If a user sets their logon password and their keystore password to the same password, their keystore is
opened and enabled when they log in.
A user can use the EFS efskeymgr command to select the type of encryption algorithm and the key
length.
Access to the keystore is inherited by any child process.
Group- based key management is also supported. Only group members can add or remove group keys to
member’s keystores if the group keystore is in guard mode. A user keystore contains the user’s private
key and also the password to open the user’s groups keystores, which contain the group’s private keys.
Note: The EFS keystore is opened automatically as part of the standard AIX login only when the user’s
keystore password matches their login password. This is set up by default during the initial creation
of the user’s keystore. Login methods other than the standard AIX login, such as loadable
authentication modules and pluggable authentication modules may not automatically open the
keystore.
Encryption and inheritance
EFS is a feature of J2. The filesystem’s efs option must be set to yes (see the mkfs and chfs
commands).
J2 EFS automatically encrypts and decrypts user data. However, if a user has read access to an
EFS-activated file but does not have the right key, then the user cannot read the file in the normal manner;
if the user does not have a valid key, it is impossible to decrypt the data.
All cryptographic functions come from the CLiC kernel services and CLiC user libraries.
By default, a J2 File System is not EFS-enabled. A J2 File System must be EFS-enabled before File
System EFS inheritance can be activated or any EFS encryption of user data can take place. A file is
created as an encrypted file either explicitly with the efsmgr command or implicitly via EFS inheritance.
EFS inheritance can be activated either at the File System level, at a Directory level, or both.
The ls command lists entries of an encrypted file with a preceeding e.
The cp and mv commands can handle metadata and encrypted data seamlessly across EFS-to-EFS and
EFS-to-non-EFS scenarios.
The backup, restore, and tar commands and related commands can back up and restore encrypted data,
including EFS meta-data used for encryption and decryption.
Backup and restore
It is important to properly manage the archiving or backup of the keystores associated with the archived
EFS files. You must also manage and maintain the keystore passwords associated with the archived or
backup keystores. Failure to do either of these tasks may result in data loss.
When backing up EFS encrypted files, it is possible to use the –Z option with the backup command to
back up the encrypted form of the file, along with the file’s cryptographic meta-data. Both the file data and
150 AIX Version 6.1 Security
meta-data are protected with strong encryption. This has the security advantage of protecting the
backed-up file through strong encryption. It is necessary to back up the keystore of the file owner and
group associated with the file that is being backed up. These key stores are located in the following files:
users keystores
/var/efs/users/user_login/*
group keystore
/var/efs/groups//keystore
efsadmin keystore
/var/efs/efs_admin/keystore
To restore an EFS backup (made with the backup –Z), the restore command’s –Z option must be used to
restore the data. The restore command’s –Z option ensures that the file’s necessary crypto-meta data is
also restored. During the restore process, it is not necessary to restore the backed-up keystores if the user
has not changed the keys in their individual keystore. When a user changes their password to open their
keystore, it does not change their keystore’s internal key. The keystore’s internal keys are changed with
the efskeymgr command.
If the user’s internal, keystore key remains the same, the user an immediately open and decrypt the
restored file using their current keystore. However, if the key internal to the user’s keystore has changed,
the user must open the keystore that was backed up in association with the backed-up file. This keystore
can be opened with the efskeymgr –o command. The efskeymgr command prompts the user for a
password to open the keystore. This password is the one used in association with the keystore at time of
the backup.
For example, assume that the user Bob’s keystore was protected with the password foo (the password
‘foo’ is not a secure password and only used in this example for simplicities sake) and a backup of Bob’s
encrypted files was performed in January along with Bob’s keystore. In this example, Bob also uses foo
for his AIX login password. In February, Bob changed his password to bar, which also had the effect of
changing his keystore access password to bar. If, in March, Bob’s EFS files were restored, then Bob
would be able to open and view these files with his current key store and password, because he did not
change the keystore’s internal key.
If however, it was necessary to change Bob’s keystore’s internal key (with the efskeymgr command), then
by default the old keystore internal key is deprecated and left in Bob’s keystore. When the user accesses
the file, EFS will automatically recognize that the restored file used the old internal key, and EFS will then
use the deprecated key to decrypt it. During this same access instance, EFS will convert the file over to
using the new internal key. There is not a significant performance impact in the process, because it is all
handled via the key store and file’s crypto meta-data, and does not require that the file data is
re-encrypted.
If the deprecated internal key is removed through efskeymgr, then the old keystore containing the old
internal key must be restored and used in conjunction with the files encrypted with this internal key.
This raises the question of how to securely maintain and archive old passwords. There are methods and
tools to archive passwords. Generally, these methods involve having a file which contains a list of all old
passwords, and then encrypting this file and protecting it with the current keystore, which in turn is
protected by the current passwords. However, IT environments and security policies vary from organization
to organization, and consideration and thought should be given to the specific security needs of your
organization to develop security policy and practices that are best suited to your environment.
J2 EFS internal mechanism
Each J2 EFS-activated file is associated with a special extended attribute which contains EFS meta-data
used to validate crypto authority and information used to encrypt and decrypt files (keys, crypto algorithm,
etc).
Security 151

The EA content is opaque for J2. Both user credentials and EFS meta-data are required to determine a
crypto authority (access control) for any given EFS-activated file.
Note: Special attention should be given to situations where a file or data may be lost (for example,
removal of the file’s EA).
EFS Protection Inheritance
After a directory is EFS-activated, any newly created immediate children are automatically EFS-activated if
not manually overridden.
The scope of a directory’s inheritance is exactly one level. Any newly created child also inherits its parent’s
EFS attributes if its parent’s directory is EFS-activated. Existing children maintain their current encrypted or
non-encrypted state. The logical inheritance chain is broken if the parent changes its EFS attributes.
These changes do not propagate down to the directory’s existing children. Enabling encryption for a
directory is a non-recursive operation (that is, it does not effect it’s grandchildren). The parent directory’s
EFS attributes takes precedence over the filesystem’s EFS attributes.
Workload Partition considerations
Before enabling or using Encrypted File System within a Workload Partition, EFS must first be enabled on
the global system with the efsenable command. This enablement only needs to be performed once.
Additionally, all filesystems, including EFS-enabled filesystems, must be created from the global system.
Setting up the Encrypted File System
You need to do this first.
The stage needs to be set just so.
1. Install the clic.rte fileset. This fileset contains the cryptographic libraries and kernel extension required
by EFS. The clic.rte fileset can be found on the AIX Expansion Pack.
2. Enable EFS on the system with the efsenable command (for example >efsenable –a). When prompted
for a password, it is reasonable to use the root password. Users keystores are created automatically,
then the user logs in, or re-logs in, after the efsenable command has been run. Once efsenable –a
has been run on a system, then the system is EFS-enabled and the efsenable command does not
need to be run again.
3. Create an EFS-enabled filesystem with the –a efs=yes option. For example, crfs -v jfs2 -m /foo –A
yes -a efs=yes -g rootvg -a size=20000
4. After mounting the filesystem, turn on the cryptographic inheritance on the EFS-enabled filesystem.
This can be done with the efsmgr command. To continue the previous example where the filesystem
/foo was created, run the following command: efsmgr –s –E /foo. This allows every file created and
used in this filesystem to be an encrypted file.
From this point forward, when a user or process with an open keystore creates a file on this filesystem,
the file will be encrypted. When the user or file reads the file, the file is automatically decrypted for users
who are authorized to access the file.
See the following for more information:
v chfs, chgroup, chuser, cp, efsenable, efskeymgr, efsmgr, lsuser, ls, mkgroup, mkuser, and mv
commands
v /etc/security/group and /etc/security/user files
Public Key Cryptography Standards #11
The Public Key Cryptography Standards #11 (PKCS #11) subsystem provides applications with a method
for accessing hardware devices (tokens) regardless of the type of device.
152 AIX Version 6.1 Security

The content in this section conforms to Version 2.01 of the PKCS #11 standard.
The PKCS #11 subsystem has been implemented using the following components:
v A slot manager daemon (pkcsslotd), which provides the subsystem with information regarding the state
of available hardware devices. This daemon is started automatically during installation and when the
system is rebooted.
v An API shared object (/usr/lib/pkcs11/pkcs11_API.so) is provided as a generic interface to the
adapters for which PKCS #11 support has been implemented.
v An adapter-specific library, which provides the PKCS #11 support for the adapter. This tiered design
allows the user to use new PKCS #11 devices when they come available without recompiling existing
applications.
IBM 4758 Model 2 Cryptographic Coprocessor
The IBM 4758 Model 2 Cryptographic Coprocessor provides a secure computing environment.
Before attempting to configure the PKCS #11 subsystem, verify that the adapter has been properly
configured with a supported microcode.
IBM 4960 Cryptographic Accelerator
The IBM 4960 Cryptographic Accelerator provides a means of offloading cryptographic transactions.
Before attempting to configure the PKCS #11 subsystem, verify that the adapter has been properly
configured.
Verifying the IBM 4758 Model 2 Cryptographic Coprocessor for use with the Public Key
Cryptography Standards #11 subsystem:
The PKCS #11 subsystem is designed to automatically detect adapters capable of supporting PKCS #11
calls during installation and at reboot. For this reason, any IBM 4758 Model 2 Cryptographic Coprocessor
that is not properly configured will not be accessible from the PKCS #11 interface and calls sent to the
adapter will fail.
To verify that your adapter is set up correctly, complete the following:
1. Ensure that the software for the adapter is properly installed by typing the following command:
lsdev -Cc adapter | grep crypt
If the IBM 4758 Model 2 Cryptographic Coprocessor is not included in the resulting list, check that the
card is seated properly and that the supporting software is correctly installed.
2. Determine that the proper firmware has been loaded onto the card by typing the following:
csufclu /tmp/l ST device_number_minor
Verify that the Segment 3 Image has the PKCS #11 application loaded. If it is not loaded refer to the
adapter specific documentation to obtain the latest microcode and installation instructions.
Note: If this utility is not available, then the supporting software has not been installed.
Verifying the IBM 4960 Model 2 Cryptographic Accelerator for use with the Public Key
Cryptography Standards #11 subsystem:
The PKCS #11 subsystem is designed to automatically detect adapters capable of supporting PKCS #11
calls during installation and at reboot. For this reason, any IBM 4960 Cryptographic Accelerator that is not
properly configured will not be accessible from the PKCS #11 interface and calls sent to the adapter will
fail.
To ensure that the software for the adapter is properly installed, type the following command:
Security 153

lsdev -Cc adapter | grep ica
If the IBM 4960 Cryptographic Accelerator is not included in the resulting list, check that the card is seated
properly and that the supporting device driver is correctly installed.
Public Key Cryptography Standards #11 subsystem configuration
The PKCS #11 subsystem automatically detects devices supporting PKCS #11. However, in order for
some applications to use these devices, some initial set up is necessary.
These tasks can be performed through the API (by writing a PKCS #11 application) or by using the SMIT
interface. The PKCS #11 SMIT options are accessed either through Manage the PKCS11 subsystem
from the main SMIT menu, or by using the smit pkcs11 fast path.
Initializing the token:
Each adapter or PKCS #11 token must be initialized before it can be used successfully.
This initialization procedure involves setting a unique label to the token. This label allows applications to
uniquely identify the token. Therefore, the labels should not be repeated. However; the API does not verify
that labels are not re-used. This initialization can be done through a PKCS #11 application or by the
system administrator using SMIT. If your token has a Security Officer PIN, the default value is set to
87654321. To ensure the security of the PKCS #11 subsystem, this value should be changed after
initialization.
To initialize the token:
1. Enter the token management screen by typing smit pkcs11.
2. Select Initialize a Token.
3. Select a PKCS #11 adapter from the list of supported adapters.
4. Confirm your selection by pressing Enter.
Note: This will erase all information on the token.
5. Enter the Security Officer PIN (SO PIN) and a unique token label.
If the correct PIN is entered, the adapter will be initialized or reinitialized after the command has finished
running.
Setting the security officer PIN:
Follow these steps to change an SO PIN from its default value.
To change the PIN from its default value:
1. Type smit pkcs11.
2. Select Set the Security Officer PIN.
3. Select the initialized adapter for which you want to set the PIN.
4. Enter the current PIN and a new PIN.
5. Verify the new PIN.
Initializing the user PIN:
After the token has been initialized, it might be necessary to set the user PIN to allow applications to
access token objects.
Refer to your device specific documentation to determine if the device requires a user to log in before
accessing objects.
154 AIX Version 6.1 Security

To initialize the user PIN:
1. Enter the token management screen typing smit pkcs11.
2. Select Initialize the User PIN.
3. Select a PKCS #11 adapter from the list of supported adapters.
4. Enter the SO PIN and the User PIN.
5. Verify the User PIN.
6. Upon verification, the User PIN must be changed.
Resetting the user PIN:
To reset the user PIN, you can either reinitialize the PIN using the SO PIN or set the user PIN by using
the existing user PIN.
To reset the PIN:
1. Enter the token management screen by typing smit pkcs11.
2. Select Set the User PIN.
3. Select the initialized adapter for which you want to set the user PIN.
4. Enter the current user PIN and a new PIN.
5. Verify the new user PIN.
Public Key Cryptography Standards #11 usage
For an application to use the PKCS #11 subsystem, the subsystem’s slot manager daemon must be
running and the application must load in the API’s shared object.
The slot manager is normally started at boot time by inittab calling the /etc/rc.pkcs11 script. This script
verifies the adapters in the system before starting the slot manager daemon. As a result, the slot manager
daemon is not available before the user logs on to the system. After the daemon starts, the subsystem
incorporates any changes to the number and types of supported adapters without intervention from the
systems administrator.
The API can be loaded either by linking in the object at runtime or by using deferred symbol resolution.
For example, an application can get the PKCS #11 function list in the following manner:
d CK_RV (*pf_init)();
void *d;
CK_FUNCTION_LIST *functs;
d = dlopen(e, RTLD_NOW);
if ( d == NULL ) {
return FALSE;
}
pfoo = (CK_RV (*)())dlsym(d, “C_GetFunctionList”);
if (pfoo == NULL) {
return FALSE;
}
rc = pf_init(&functs);
X.509 Certificate Authentication Service and Public Key Infrastructure
Certificate Authentication Service provides the AIX operating system with the ability to authenticate users
using X.509 Public Key Infrastructure (PKI) certificates and to associate certificates with processes as
proof of a user’s identity. It provides this capability through the Loadable Authentication Module Framework
(LAMF), the same extensible AIX mechanism used to provide DCE, Kerberos, and other authentication
mechanisms.
Security 155

Overview of Certificate Authentication Service
Every user account participating in PKI authentication has a unique PKI certificate. The certificate in
conjunction with a password is used to authenticate the user during login.
PKI certificates are based on public key/private key technology. This technology uses two asymmetric keys
to encrypt and decrypt data. Data encrypted using one key can only be decrypted using the other key. A
user keeps one key private, called the private key, storing it in a private keystore while publishing the other
key, called the public key, in the form of a certificate. Certificates are commonly maintained on a
Lightweight Directory Access Protocol (LDAP) server, either within an organization for intra-company usage
or on the Internet for world-wide usage.
For a user named John to send a user named Kathy data that only she can decrypt, John would obtain
the public key from Kathy’s published certificate, encrypt the data using Kathy’s public key, and send the
data to her. Kathy would decrypt the data from John using her private key located in her private keystore.
This technology is also used for digital signatures. If Kathy wants to send data to John that is digitally
signed by her, Kathy would use her private key to digitally sign the data and send the data and digital
signature to John. John would obtain the public key from Kathy’s published certificate and use the public
key to verify the digital signature before using the data.
In both cases, Kathy’s private key is maintained in a private keystore. The many types of private keystores
include smart cards and files, but all keystore types protect private keys through the use of passwords or
Personal Identification Numbers (PINs). They typically provide storage for multiple private keys along with
certificates and other PKI objects. Users typically have their own keystores.
Certificate authentication service uses digital-signature technology to authenticate a user during login.
Certificate authentication service locates the user’s certificate and keystore based off the user’s account
name, obtains the certificate’s matching private key from the user’s keystore using the user’s password,
signs a data item with the user’s private key, and checks the signature using the user’s public key from the
certificate. After the user authenticates, the system stores the user’s certificate in protected memory,
associating the certificate with every process created by the user. This in-memory association enables
quick access to the user’s certificate for any process owned by the user, as well as by the operating
system’s kernel.
Certificates:
Understanding certificate authentication service requires a basic understanding of certificates, certificate
formats, and certificate lifecycle management.
Certificates are standardized objects that follow the X.509 standard, of which version 3 (X.509v3) is the
latest version. Certificates are created, signed, and issued by a Certificate Authority (CA) which is most
commonly a software application that accepts and processes certificate requests. Certificates are
comprised of several certificate attributes. Some of the attributes are required, but many are optional.
Certificate attributes commonly used and discussed in this document are:
v Certificate Version - The X.509 version number (that is, 1, 2, or 3).
v Serial Number - A certificate serial number that uniquely distinguishes the certificate from all other
certificates issued by the same CA.
v Issuer Name - A name specifying the certificate’s issuing CA.
v Validity Period - The activation and expiration date of the certificate.
v Public Key - The public key.
v Subject Distinguished Name - A name specifying the certificate’s owner.
v Subject Alternate Name Email - The owner’s email address.
v Subject Alternate Name URI - The owner’s Web site URI/URL.
156 AIX Version 6.1 Security

Each certificate has a unique version number that indicates with which version of the X.509 standard it
conforms. Each certificate has a serial number which uniquely distinguishes it from all other certificates
issued by the same CA. The serial number is unique only to the issuing CA. The certificate’s issuer name
identifies the issuing CA.
Certificates are valid only between two specified dates: the ″Not Before″ date and the ″Not After″ date.
Therefore, certificates may be created prior to their validity date and expire at some date in the future. It is
common for certificates to have a life span of 3 months to 5 years.
The subject distinguished name specifies the certificate owner by using a specialized naming format
known as a Distinguished Name (DN). A DN allows for the specification of the country, organization, city,
state, owner name, and other attributes associated with the requesting entity (usually a person, but not
limited to a person). The subject alternate name email allows for the specification of the owner’s email
address and the subject alternate name URI allows for the specification of the owner’s Web site URI/URL.
Certificate authorities and certificates
Certificate Authorities (CA) issue, store, and typically publish certificates. A common place to publish
certificates is on an LDAP server, because LDAP allows for easy access to community oriented data.
Certificate Authorities also handle the revocation of certificates and the management of certificate
revocation lists (CRLs). Revoking a certificate is the act of publishing the fact that a specific certificate is
no longer valid due to reasons other than the expiration of the certificate’s validity period. Because copies
of certificates can be maintained and used outside the control of the issuing CA, CAs publish a list of
revoked certificates in a CRL so that outside entities may query the list. This places the responsibility on
entities using a copied certificate to compare the copied certificate against the issuing CA’s CRL. A CA
may only revoke certificates that it creates or issues. It cannot revoke certificates issued by other CAs.
Administrative reasons for revoking a certificate include:
v Compromise of the certificate’s private key.
v Certificate owner left the company.
v Compromise of the CA.
CAs also have their own identifying certificate. This allows CAs to identify each other in peer-to-peer
communications among other uses (for example, chains of trust).
Many CAs support the Certificate Management Protocol (CMP) for requesting and revoking certificates.
The protocol supports multiple methods to establish a secure connection between a client (also known as
an End Entity) and the CA, though not all clients and CAs support all methods. One common method
requires each certificate creation and revocation request to use a reference number and password
recognized by the CA. Other data such as a special certificate recognized by the CA may also be required.
Revocation requests may require the matching private key of the certificate being revoked.
Although CMP provides for certificate creation and revocation requests, it does not support CRL query
requests. In fact, CRLs are often accessed through out-of-band methods. Since CRLs are often published
on LDAP servers, software applications can obtain the CRL from an LDAP server and manually scan the
CRL. Another emerging method is the Online Certification Status Protocol (OCSP), but not all CAs support
OCSP.
CAs are typically owned and operated by government organizations or trusted private organizations that
attempt to provide assurance that certificates issued by them correspond to the person who requested the
issuance of the certificate. The phrase issuing a certificate means to create a certificate and is not the
same as requesting a copy of a published certificate.
Security 157

Certificate storage format
The most common format for storing individual certificates is in Abstract Syntax Notation version 1 (ASN.1)
format using the Distinguished Encoding Rules (DER). This format is referred to as DER format.
Keystores:
A keystore (sometimes called a keyset) contains a user’s private keys matching the public keys of their
certificates.
A unique key label is assigned to every private key, usually by the user, for easy identification. Keystores
are password-protected requiring a user to enter a password prior to accessing the keys or adding new
keys. And typically, users have their own keystores. Keystores come in many different forms, for example:
smart cards, LDAP-based, file-based, and so on. Not only do the forms vary, but so do the methods used
to access them and the formats used to store the private key data. Certificate authentication service only
supports file-based keystores.
Certificate Authentication Service implementation
The server side of certificate authentication service publishes certificates and certificate revocation lists
(CRLs) that it creates to an LDAP server. The client side of certificate authentication service implements
the user authentication, user administration, and user certificate management functions of certificate
authentication service.
Certificate authentication service functions as a client/server model. The server side contains a Certificate
Authority (CA) for creating and maintaining X.509 version 3 certificates and CRLs. (Typically, an
organization uses one CA for the entire organization.) The client side contains the software (commands,
libraries, load modules, and configuration files) required by every system participating in PKI
authentication. The installation package for the server is cas.server and the installation package for the
client is cas.client.
Creating PKI user accounts:
To create a PKI user account, use the AIX mkuser command.
After it is created, each account has a certificate and a private keystore. (Existing accounts can be
converted to PKI accounts too, but other steps are required.) The administrator supplies the keystore
passwords to the new users, and new users can then log in to the system and change their keystore
password.
User authentication data flow:
Users can have multiple certificates associated with their accounts. Each certificate has a unique, user
defined tag value associated with it for easy identification, but only one certificate can be specified as the
authentication certificate. Certificate authentication service uses a per-user attribute named auth_cert to
specify which of the user’s certificates is the user’s authentication certificate. The value of the auth_cert
attribute is the certificate’s tag value.
The certificates, tags, matching keystore locations, matching key labels, and other related data are
maintained under LDAP on a per-user basis. The combination of the user name and tag allows certificate
authentication service to locate the certificate under the LDAP server. For more information on the PKI
LDAP layer, see “PKI LDAP Layer (certificate storage)” on page 161.
At login, users supply a user name and password. Using the user name, the system retrieves the user’s
authentication certificate tag from the user’s auth_cert attribute. Combining the user name and tag, the
system retrieves the user’s certificate, keystore location, and matching key label from LDAP. It checks the
validity period values found in the certificate to determine if the certificate has expired or has not reached
158 AIX Version 6.1 Security

its activation date. The system then retrieves the user’s private key by using the keystore location, key
label, and supplied password. After the private key is retrieved, the system verifies that the private key and
certificate match using an internal signing process. If the two match, the user passes the PKI
authentication step of the login procedure. (This does not imply that the user is logged in. Several other
account checks are performed by the AIX system on a user account before allowing the user access to the
system.)
For a certificate to be used as an authentication certificate, the certificate must be signed using a trusted
signing key. The signature is stored under LDAP with the certificate for later reference. The implementation
requires that a certificate have a signature before the tag can be assigned to auth_cert.
The authentication process does not compare a certificate against a CRL. This is due to performance
reasons (CRLs take time to acquire and scan and may be temporarily unavailable), but also due to
publishing delays of CRLs (CAs may delay an hour or more before publishing a revoked certificate through
a CRL, making certificate revocation a poor substitute for disabling a user’s account).
It is also worth noting that authentication does not require a CA. The majority of the work is performed
locally by certificate authentication service, with the exception of retrieving data stored under LDAP.
Server implementation:
The server side of certificate authentication service implements a CA written in Java and contains a
Registration Authority (RA) along with self-auditing features. It publishes certificates and CRLs that it
creates to an LDAP server.
The CA is configurable through a set of configuration files (Java property files). It contains an
administrative application called runpki that provides sub-commands to start and stop the server among
other functions and supports CMP for creating and revoking certificates. The CA requires Java 1.3.1, the
IBM DB2 7.1 database, and the IBM Directory 4.1. Due to DB2 requirements, the CA must run under a
user account other than the root user.
The server contains the following commands to help install and manage the cas.server component:
mksecpki
This command is used during installation to configure the AIX PKI server components. As part of
its tasks, the command creates a certificate authority user account for the certificate authority.
runpki
This command allows the system administrator to start the server. If the JavaPKI daemons are
running, they must first be stopped. The runpki command starts the daemon in the background by
using the lb flags combination. If the daemons need to be started in interactive mode, the
administrator can edit the runpki command and use the l flag instead of the lb flags.
The runpki command must be run after performing an su - operation to the user account under
which the certificate authority is running. The command is located in the javapki directory under
the certificate authority user account’s home directory. (The mksecpki command creates the
certificate authority user account.)
For example, if the certificate authority user account is pkiinst, then with root authority, type the
following:
1. su - pkiinst
2. cd javapki
3. runpki
Client implementation:
Security 159

The client side of certificate authentication service implements the user authentication, user administration,
and user certificate management functions of certificate authentication service.
After it is installed and configured on a system, certificate authentication service integrates into the existing
user authentication and administration functions (such as the mkuser, chuser, passwd, and login
commands) through the use of the AIX Loadable Authentication Module Framework (LAMF). It also adds
several commands, libraries, and configuration files to help manage user certificates and keystores.
Certificate authentication service can be used in conjunction with either the AIX LDAP database
mechanism or the file-based database mechanism for storing standard AIX attributes. Certificate
authentication service always uses LDAP to maintain user certificates, even when the file-based database
mechanism is used. For limitations when using the file-based database, see “Certificate Authentication
Service planning” on page 168.
The client side of certificate authentication service contains the most user oriented software of the two
parts. For this reason, the following sections describe how certificate authentication service maintains and
uses the data required for PKI authentication.
General client features:
The certificate authentication service provides several features and commands for managing and using
certificates.
Some of the general features of certificate authentication service include the following:
v Provides user authentication via PKI certificates
v Provides commands to manage user certificates and keystores
v Supports multiple certificates per user
v Supports multiple CA’s simultaneously
v Integrates into existing AIX administration commands and authentication (for example, login, passwd,
mkuser)
v Generate certificates at user creation time or add certificates after user creation
v Works with either an LDAP user database or the standard AIX file-based user database
v Configurable key sizes and algorithms
v Associates certificates with Process Authentication Groups (PAGs).
General client architecture:
The client architecture of the Certificate Authentication Service takes a layered approach.
Java daemon:
At the foundation of the client side is a Java-based daemon using the JCE security package.
The Java daemon manages user keystores, creates key pairs, performs CMP communications, and
provides all hashing and encryption functions. Because APIs of PKI service provider packages are not
standardized for C applications, a wrapper layer API called the Service Management Layer (SML) provides
a normalized API to application programs and daemons.
Service Management Layer:
Service Management Layer creates certificates and keystores, and manages keystores, but it doesn’t
manage certificate storage.
160 AIX Version 6.1 Security

The SML service for the Java daemon is named /usr/lib/security/pki/JSML.sml. Certificate storage is
managed by the PKI LDAP Layer.
Private Key Storage Through SML
The Java daemon uses PKCS#12 formatted keystore files for storing user keys. The keystores are
protected by a single password used to encrypt all the keys in the keystore. The location of a keystore is
specified as a URI. By default, certificate authentication service maintains keystore files in the
/var/pki/security/keys directory.
Keystores are typically limited in size, including file keystores. The SML Layer provides the API for
managing keystores.
Certificate authentication service supports only file keystores. It does not support smart card or LDAP
keystores. You can support roaming users by placing the file keystores on a shared file system under the
same mount point on all systems.
PKI LDAP Layer (certificate storage):
Certificate authentication service stores certificates and other certificate related information on a per-user
basis in LDAP through the PKI LDAP Layer.
A user account can have multiple certificates associated with it. Each association has a unique,
user-specified tag for easy identification and lookup. Certificate authentication service uses the
combination of the user’s name and the tag to locate a user’s certificate association in LDAP.
For performance versus disk space trade-offs, certificate authentication service can save either the entire
certificate under LDAP or just a URI reference to the certificate. If a URI reference is used instead of a
certificate, certificate authentication service queries the reference to obtain the actual certificate.
References are most commonly used in conjunction with a CA which publishes its certificates on an LDAP
sever. The types of URI references currently supported by certificate authentication service are LDAP
references. Certificate authentication service stores certificates in DER format and expects URI references
to refer to DER formatted certificates.
Certificate authentication service also stores the type and location of each certificate’s matching keystore
and key label in the same record as the certificate association on the LDAP server. This allows users to
have more than one keystore and allows certificate authentication service to quickly find a certificate’s
matching private key. To support roaming users, a user’s keystore must reside in the same location on all
systems.
Certificate authentication service maintains the auth_cert attribute in LDAP on a per-user basis. This
attribute specifies the tag of the certificate used for authentication.
All LDAP information is readable by ordinary users, except for the auth_cert attribute which is restricted to
the LDAP ldappkiadmin account. Since the root user has access to the LDAP ldappkiadmin password
through the acct.cfg file, applications running with the effective UID of root can access the auth_cert
attribute. (This applies to the accessibility of the URI reference value, not to the data referenced by the
URI reference value. Typically, the data referenced by the URI reference value is public.) The API for
managing the certificate storage is contained in the libpki.a library.
libpki.a library:
In addition to serving as the home of the SML APIs and the PKI LDAP Layer APIs, the libpki.a library
houses several subroutines.
The library includes APIs that do the following:
Security 161

v Manage the new configuration files
v Access certificate specific attributes
v Combine multiple lower layer functions into higher level functions
v Are expected to be common among SML services
Note: The APIs are not published.
Loadable Authentication Module Framework Layer:
On top of the SML API and PKI LDAP API resides the Loadable Authentication Module Framework (LAMF)
layer. LAMF supplies AIX authentication and user administration applications with common authentication
and user administration APIs regardless of the underlying mechanism (for example, Kerberos, LDAP, DCE,
files).
LAMF uses the SML API and the PKI LDAP API as building blocks in implementing PKI authentication. It
does this through the use of load modules that map LAMF’s API to different authentication/database
technologies. Commands like login, telnet, passwd, mkuser, and others use the LAMF API to implement
their functions; hence, these commands automatically support new authentication and database
technologies when new load modules for these technologies are added to the system.
Certificate authentication service adds a new LAMF load module to the system named
/usr/lib/security/PKI. The module must be added by the system administrator to the /usr/lib/security/methods.cfg file before using PKI for authentication. The module must also be paired with a database
type (for example, LDAP) in the methods.cfg file before it can be used for authentication. An example of
the methods.cfg file containing the LAMF module and database definition can be found in “methods.cfg
file” on page 181.
Once the definitions are added to methods.cfg, the administrator can set the registry and SYSTEM user
attributes (defined in the /etc/security/user file) to the new stanza value or values for PKI authentication.
Client commands:
Above all the API layers (LAMF, PKI LDAP, and SML) reside the commands.
Besides the standard AIX authentication and user administration commands supporting certificate
authentication service (through LAMF), several certificate authentication service specific commands exist.
These commands help the user manage certificates and keystores. Below is a list of the commands along
with a brief description.
certadd
Adds a certificate to the user’s account in LDAP and checks if the certificate is revoked.
certcreate
Creates a certificate.
certdelete
Deletes a certificate from the user’s account (i.e., from LDAP).
certget
Retrieves a certificate from the user’s account (i.e., from LDAP).
certlink
Adds a link to a certificate that exists in a remote repository to the user’s account in LDAP and
checks if the certificate is revoked.
certlist
Lists the certificates associated with the user’s account contained in LDAP.
162 AIX Version 6.1 Security
certrevoke
Revokes a certificate.
certverify
Verifies the private key matches the certificate and performs trusted signing.
keyadd
Adds a keystore object to a keystore.
keydelete
Deletes a keystore object from a keystore.
keylist
Lists the objects in a keystore.
keypasswd
Changes the password on a keystore.
For more information about these commands. see the AIX Version 6.1 Commands Reference.
Process Authentication Group commands:
The Process Authentication Group (PAG) commands are new to AIX. PAGs are data items that associate
user-authentication data with processes.
For certificate authentication service, if the PAG mechanism is enabled, the user’s authentication certificate
is associated with the user’s login shell. As the shell creates child processes, the PAG propagates to each
child.
The PAG mechanism requires the /usr/sbin/certdaemon daemon to be enabled in order to provide this
functionality. By default, the mechanism is not enabled. Certificate authentication service does not require
the PAG mechanism to be enabled, but works with the mechanism if it is enabled.
To enable the certdaemon daemon, add the following line to the /etc/inittab file:
certdaemon:2:wait:/usr/sbin/certdaemon
A list of PAG commands along with brief descriptions follows:
paginit
Authenticates a user and creates a PAG association.
pagdel
Lists authentication information associated with the current process.
paglist
Removes existing PAG associations within the current process’ credentials.
For more information about these commands, see the AIX Version 6.1 Commands Reference.
User administration commands:
Similar to user-authentication, certificate authentication service integrates with the AIX user-administration
functions through the AIX LAMF. Commands like chuser, lsuser, mkuser, and passwd use the LAMF API
to implement their functions. Therefore, these commands automatically support new authentication and
database technologies when new load modules for these technologies are added to the system.
The subsections below provide a more in-depth look at how PKI authentication affects the user
administration commands.
The following commands are affected by the PKI authentication process:
Security 163
chuser
This command allows the administrator to modify the auth_cert user attribute. This attribute
specifies the tag value of the certificate used for authentication. The certificate must be signed by
the trusted signing key in order to be used as the authentication certificate. (Certificate attributes,
certificate storage attributes, and keystore attributes are not available through this command.)
lsuser This command lists the value of the user’s auth_cert attribute, as well as, the certificate attributes
listed below. The auth_cert attribute specifies the tag value of the certificate used for
authentication. (Other certificate attributes, certificate storage attributes, and keystore attributes are
not available through this command.)
The certificate attributes listed by the lsuser command are as follows:
subject-DN
The user’s subject distinguished name.
subject-alt-name
The user’s subject alternate name email.
valid-after
The date the user’s certificate becomes valid.
valid-until
The date the user’s certificate becomes invalid.
issuer The distinguished name of the issuer.
mkuser
This command provides an administrator the option of generating a certificate at user creation
time. An administrator can use the mkuser command to generate a certificate during user creation
for users who don’t already have an authentication certificate. Optionally, if a user already has an
authentication certificate, but no user account, the administrator can create the account without
generating a certificate and add the certificate (and keystore) later. The default value for this option
is specified in the /usr/lib/security/pki/policy.cfg file in the newuser stanza by the cert attribute.
Many default values are required when automatically generating an authentication certificate for a
user using the mkuser command. Many of these values are specified in the newuser stanza of
the /usr/lib/security/pki/policy.cfg file. The newuser stanza provides administrative control over
these default values. Some of the default values are as follows:
v CA
v Value for the auth_cert attribute
v Location for the keystore
v Password for the keystore
v Private key label
v Domain name for the subject alternate name e-mail field
A behavioral difference between creating a PKI user account and a non-PKI user account is that
creating a PKI user account requires a password to encrypt the private key if the mkuser
command generates an authentication certificate for the account. Since the mkuser command is a
non-interactive command, the command obtains the password from the policy.cfg file and sets the
keystore password (the private key password) to this value; therefore, the account is immediately
accessible after creation. When creating a non-PKI user account, the mkuser command sets the
password to an invalid value, preventing accessibility.
passwd
This command modifies the user’s keystore password when used on a PKI user account. It
enforces the password restriction rules found in the /etc/security/user file, it enforces the flags
attribute found in the /etc/security/passwd file, and it enforces any rules required by the PKI
service provider.
164 AIX Version 6.1 Security

Because file-based keystores encrypt their private keys using the user’s password, the root user
cannot reset a file-based keystore password without knowing the keystore’s current password. If a
user forgets their keystore password, the root user will not be able to reset the password unless
root knows the keystore’s password. If the password is unknown, a new keystore and new
certificates may have to be issued to the user.
Configuration files:
Certificate authentication service uses configuration files for configuring the client-side: acct.cfg, ca.cfg,
and policy.cfg.
The SMIT interface provides support for these configuration files. The following sections provide
information about the configuration files.
acct.cfg file
The acct.cfg file consists of CA stanzas and LDAP stanzas. The CA stanzas contain private CA
information not suitable for the publicly readable ca.cfg file, such as CMP reference numbers and
passwords. The LDAP stanzas contain private LDAP information not suitable for public access, such as
PKI LDAP administrative names and passwords.
For every CA stanza in the ca.cfg file, the acct.cfg file should contain an equivalently named CA stanza,
and all CA stanzas must be uniquely named. The LDAP stanzas are all named ldap, and for this reason, a
CA stanza cannot be named ldap. Also, no stanza can be named default. An LDAP stanza must exist,
and at least one CA stanza, named local, must also exist.
CA stanzas contain the following attributes:
capasswd
Specifies the CA’s CMP password. The length of the password is specified by the CA.
carefnum
Specifies the CA’s CMP reference number.
keylabel
Specifies the label of the private key in the trusted keystore used to sign certificate requests.
keypasswd
Specifies the password for the trusted keystore.
rvpasswd
Specifies the revocation password used for CMP. The length of the password is specified by the
CA.
rvrefnum
Specifies the revocation reference number used for CMP.
The LDAP stanza contains the following attributes:
ldappkiadmin
Specifies the account name of the LDAP server listed in ldapservers.
ldappkiadmpwd
Specifies the password for the LDAP server’s account.
ldapservers
Specifies the LDAP server name.
ldapsuffix
Specifies the DN attributes added to a user’s certificate DN by the mkuser command.
Security 165

The following is an example acct.cfg file:
local:
carefnum = 12345678
capasswd = password1234
rvrefnum = 9478371
rvpasswd = password4321
keylabel = "Trusted Key"
keypasswd = joshua
ldap:
ldappkiadmin = "cn=admin"
ldappkiadmpwd = secret
ldapservers = "LDAP server.austin.ibm.com"
ldapsuffix = "ou=aix,cn=us"
For more information, see the AIX Version 6.1 Files Reference.
ca.cfg file
The ca.cfg file consists of CA stanzas. The CA stanzas contain public CA information used by certificate
authentication service for generating certificate requests and certificate revocation requests.
For every CA stanza in the ca.cfg file, the acct.cfg file should contain an equivalently named CA stanza.
Each CA stanza name in the ca.cfg file must be unique. At least one stanza named local must exist. No
stanzas should be named ldap or default.
CA stanzas contain the following attributes:
algorithm
Specifies the public key algorithm (for example, RSA).
crl Specifies the CA’s CRL URI.
dn Specifies the base DN used when creating certificates.
keysize
Specifies the minimum key size in bits.
program
Specifies the PKI service module file name.
retries
Specifies the number of retry attempts when contacting the CA.
server Specifies the CA’s URI.
signinghash
Specifies the hash algorithm used to sign certificates (for example, MD5).
trustedkey
Specifies the trusted keystore containing the trusted signing key used for signing authentication
certificates.
url Specifies the default value for the subject alternate name URI.
The default CA stanza is named local. The following is an example ca.cfg file:
local:
program = /usr/lib/security/pki/JSML.sml
trustedkey = file:/usr/lib/security/pki/trusted.p15
server = "cmp://9.53.230.186:1077"
crl = "ldap://dracula.austin.ibm.com/o=aix,c=us"
dn = "o=aix,c=us"
url = "http://www.ibm.com/"
166 AIX Version 6.1 Security

algorithm = RSA
keysize = 512
retries = 5
signinghash = MD5
For more information, see the AIX Version 6.1 Files Reference.
policy.cfg file
The policy.cfg file consists of four stanzas: newuser, storage, crl, and comm. These stanzas modify the
behavior of some system administration commands.
The mkuser command uses the newuser stanza. The certlink command uses the storage stanza. The
certadd and certlink commands use the comm and crl stanzas.
The newuser stanza contains the following attributes:
ca Specifies the CA used by the mkuser command when generating a certificate.
cert Specifies whether the mkuser command generates a certificate (new) or not (get) by default.
domain
Specifies the domain part of the certificate’s subject alternate name e-mail value used by the
mkuser command when generating a certificate.
keysize
Specifies the minimum encryption key size in bits used by the mkuser command when generating
a certificate.
keystore
Specifies the keystore URI used by the mkuser command when generating a certificate.
keyusage
Specifies the certificate’s key usage value used by the mkuser command when generating a
certificate.
label Specifies the private key label used by the mkuser command when generating a certificate.
passwd
Specifies the keystore’s password used by the mkuser command when generating a certificate.
subalturi
Specifies the certificate’s subject alternate name URI value used by the mkuser command when
generating a certificate.
tag Specifies the auth_cert tag value used by the mkuser command when creating a user when cert =
new.
validity
Specifies the certificate’s validity period value used by the mkuser command when generating a
certificate.
version
Specifies the version number of the certificate to be created. The value 3 is the only supported
value.
The storage stanza contains the following attributes:
replicate
Specifies whether the certlink command saves a copy of the certificate (yes) or just the link (no).
The crl stanza contains the check attribute, which specifies whether the certadd and certlink commands
should check the CRL (yes) or not (no).
Security 167
The comm stanza contains the timeout attribute which specifies the timeout period in seconds used by
certadd and certlink when requesting certificate information using HTTP (for example, retrieving CRLs).
The following is an example of the policy.cfg file:
newuser:
cert = new
ca = local
passwd = pki
version = "3"
keysize = 512
keystore = "file:/var/pki/security/keys"
validity = 86400
storage:
replicate = no
crl:
check = yes
comm:
timeout = 10
For more information, see the AIX Version 6.1 Files Reference.
Audit-log events:
The Certificate Authentication Service (CAS) client generates several audit-log events.
v CERT_Create
v CERT_Add
v CERT_Link
v CERT_Delete
v CERT_Get
v CERT_List
v CERT_Revoke
v CERT_Verify
v KEY_Password
v KEY_List
v KEY_Add
v KEY_Delete
Trace events:
The Certificate Authentication Service (CAS) client generates trace events.
The CAS client generates several new trace events in the 3B7 and 3B8 range.
Certificate Authentication Service planning
Certificate Authentication Service (CAS) is available beginning with AIX 5.2. The minimum software
requirements for CAS are a DB2 server, an IBM Directory server, and a certificate authentication service
server. All can be installed on one system or on a combination of systems. Each enterprise must
determine the best choice for their environment.
This section provides information on planning for certificate authentication service, as follows:
Certificate considerations:
168 AIX Version 6.1 Security
Certificate authentication service supports X.509 version 3 certificates. It also supports several version 3
certificate attributes, but not all certificate attributes.
For a list of supported certificate attributes, see the certcreate command and the ca.cfg file. Certificate
authentication service contains limited support of the Teletex character set. Specifically, only 7-bit (ASCII
subset of) Teletex is supported by certificate authentication service.
Keystore considerations:
Certificate authentication service supports keystore files. Smart cards, LDAP keystores, and other types of
keystores are not supported.
By default, user keystores are kept in the local file system under the /var/pki/security/keys directory.
Because the keystores are local to the system, they cannot be accessed by other systems; thus, user
authentication will be restricted to the system containing the user’s keystore. To allow for roaming users,
either copy the user’s keystore to the identical location with the same keystore name on other systems or
place the keystores on a distributed file system.
Note: Care must be taken to ensure that access permission to the user’s keystore remains unchanged.
(In AIX, every certificate in LDAP contains the path name to the private keystore containing the
certificate’s private key. The keystore must exist at the path name specified in LDAP in order to be
used for authentication.)
User registry considerations:
Certificate authentication service supports an LDAP user-registry. LDAP is also the recommended user
registry type to use with certificate authentication service.
Certificate authentication service also supports a file-based user registry. Certain restrictions must be
enforced by the administrator for file-based PKI to work correctly. Specifically, identically named user
accounts on different systems participating in PKI authentication must refer to the same account.
For example, user Bob on system A and user Bob on system B must refer to the same user Bob. This is
because certificate authentication service uses LDAP to store certificate information on a per user basis.
The user name is used as the indexing key to access this information. Because file-based registries are
local to each system and LDAP is global to all systems, the user names on all systems participating in PKI
authentication must map to unique user names in the LDAP namespace. If user Bob on system A is
different from user Bob on system B, either only one of the Bob’s can participate in PKI authentication or
each Bob account must use a different LDAP namespace/server.
Configuration considerations:
For configuration simplicity, consider maintaining the three configuration files (acct.cfg, ca.cfg, and
policy.cfg ) on a distributed file system using symbolic links to avoid having to modify configuration files
on every system.
Maintain proper access-control settings on these files. This situation may increase your security
vulnerability because the information in these files will be transferred across your network.
Security considerations:
The acct.cfg and ca.cfg files contain sensitive reference numbers, passwords, and certificate information.
Security 169

acct.cfg file
The acct.cfg file contains sensitive CA reference numbers and passwords (see the carefnum, capasswd,
rvrefnum, and rvpasswd attribute descriptions for acct.cfg). These values are used solely for CMP
communications with the CA when creating a certificate and revoking a certificate, respectively. If
compromised, the compromiser may be able to create certificates at will, and revoke anyone’s certificate at
will.
To limit the exposure, consider restricting certificate creation or revocation to a small number of systems.
The carefnum and capasswd attribute values are required only on systems where certificates are created
(either through the certcreate or mkuser commands). This may imply limiting user account creation to the
same set of systems.
Note: The mkuser command can be configured to automatically create a certificate during user creation
or it can create an account without a certificate, whereby the administrator must create and add the
certificate at a later time.Similarly, the rvrefnum and rvpasswd attribute values are required only on systems where certificates are
to be revoked (through the certrevoke command).
The acct.cfg file also contains sensitive trusted signing key information (see the keylabel and keypasswd
attribute descriptions for the acct.cfg file). These values are used solely for special certificate verification
operations. If compromised, the compromiser may be able to forge verified certificates.
To limit the exposure, consider restricting certificate verification to a small number of systems. The
keylabel and keypasswd attribute values of the acct.cfg file and the trustedkey attribute value of the
ca.cfg file are required only on systems where certificate verification is required. Specifically, on systems
where the mkuser (with automatic certificate creation enabled) and certverify commands are required.
Active new accounts
When creating a PKI user account, if the cert attribute of the newuser stanza in the policy.cfg file is set to
new, the mkuser command creates an active PKI account complete with a working certificate and
password. The password on the account is specified by the passwd attribute in the newuser stanza.
Because keystores require a password in order to store private keys. This differs from other types of user
account creations where the administrator must first create the account, then set the password before the
account is activated.
The root user and keystore passwords
Unlike other account types where the root user can change an account’s password without knowing the
account’s password, PKI accounts do not allow this. This is because account passwords are used to
encrypt keystores and keystores cannot be decrypted without knowing the password. When users forget
their passwords, new certificates must be issued and new keystores created.
Other Certificate Authentication Service considerations:
There are several factors to consider when planning for the Certificate Authentication Service (CAS).
v Certificate authentication service contains its own certificate authority (CA). Other CA implementations
are not supported by certificate authentication service.
v The larger the key size, the more time required to generate key pairs and to encrypt data. Hardware
based encryption is not supported.
v Certificate authentication service uses the IBM Directory for LDAP. Other LDAP implementations are not
supported by certificate authentication service.
v Certificate authentication service uses DB2 for database support. Other database implementations are
not supported by certificate authentication service.
170 AIX Version 6.1 Security
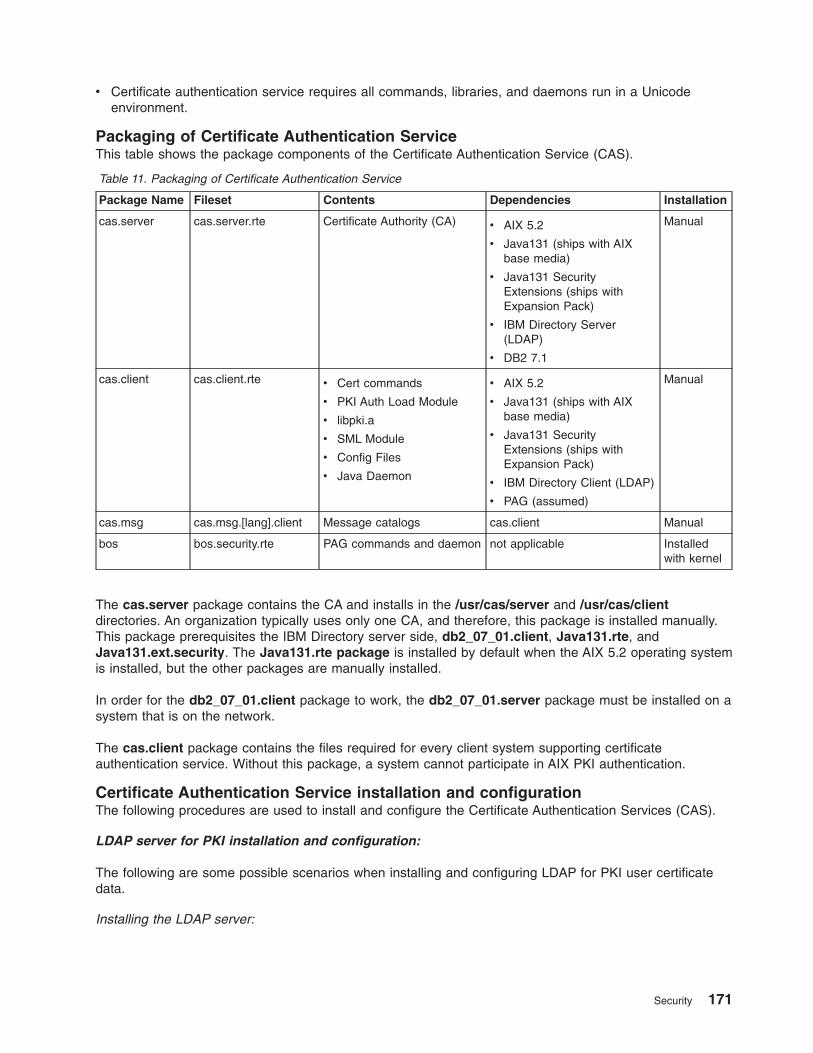
v Certificate authentication service requires all commands, libraries, and daemons run in a Unicode
environment.
Packaging of Certificate Authentication Service
This table shows the package components of the Certificate Authentication Service (CAS).
Table 11. Packaging of Certificate Authentication Service
Package Name Fileset Contents Dependencies Installation
cas.server cas.server.rte Certificate Authority (CA) v AIX 5.2
v Java131 (ships with AIX
base media)
v Java131 Security
Extensions (ships with
Expansion Pack)
v IBM Directory Server
(LDAP)
v DB2 7.1
Manual
cas.client cas.client.rte v Cert commands
v PKI Auth Load Module
v libpki.a
v SML Module
v Config Files
v Java Daemon
v AIX 5.2
v Java131 (ships with AIX
base media)
v Java131 Security
Extensions (ships with
Expansion Pack)
v IBM Directory Client (LDAP)
v PAG (assumed)
Manual
cas.msg cas.msg.[lang].client Message catalogs cas.client Manual
bos bos.security.rte PAG commands and daemon not applicable Installed
with kernel
The cas.server package contains the CA and installs in the /usr/cas/server and /usr/cas/client
directories. An organization typically uses only one CA, and therefore, this package is installed manually.
This package prerequisites the IBM Directory server side, db2_07_01.client, Java131.rte, and
Java131.ext.security. The Java131.rte package is installed by default when the AIX 5.2 operating system
is installed, but the other packages are manually installed.
In order for the db2_07_01.client package to work, the db2_07_01.server package must be installed on a
system that is on the network.
The cas.client package contains the files required for every client system supporting certificate
authentication service. Without this package, a system cannot participate in AIX PKI authentication.
Certificate Authentication Service installation and configuration
The following procedures are used to install and configure the Certificate Authentication Services (CAS).
LDAP server for PKI installation and configuration:
The following are some possible scenarios when installing and configuring LDAP for PKI user certificate
data.
Installing the LDAP server:
Security 171
Detailed instructions for installing the IBM Directory Server software can be found in the product
documentation contained in the ldap.html.en_US.config fileset. After installing the
ldap.html.en_US.config fileset, the documentation can be viewed using a Web browser at the following
URL: file:/usr/ldap/web/C/getting_started.htm.
Perform the following steps to install the LDAP server:
1. Login as the root user.
2. Place volume 1 of the AIX Base Operating System CDs in the CD-ROM drive.
3. Type smitty install_latest at the command line and press Enter.
4. Select Install Software.
5. Select the input device or software directory containing the IBM Directory Server software and press
Enter.
6. Use the F4 key to list the install packages in the Software to Install field.
7. Select the LDAP server package and press Enter.
8. Verify that the AUTOMATICALLY install requisite software option is set to YES, and press Enter.
This will install the LDAP server and client filesets and the DB2 backend database filesets.
The filesets installed include the following:
v LDAP client .adt (Directory Client SDK)
v LDAP client .dmt (Directory Client DMT)
v LDAP client .java (Directory Client Java)
v LDAP client .rte (Directory Client Run-time Environment)
v LDAP server .rte (Directory Server Run-time Environment)
v LDAP server .admin (Directory Server)
v LDAP server .cfg (Directory Server Config)
v LDAP server .com (Directory Server Framework)
v db2_07_01.* (DB2 Run-time Environment and associated filesets)
9. Install the DB2 package, db2_07_01.jdbc. The DB2 package, db2_07_01.jdbc, is located on the
Expansion Pack CD. Use the installation procedure listed above to install the db2_07_01.jdbc
package.
Configuring the LDAP server:
After the LDAP and DB2 filesets have been installed, the LDAP server must be configured.
Even though the configuration can be done through the command line and file editing, for ease of
administration and configuration, the LDAP web administrator is used. This tool requires a web server.
The Apache web server application is located on the AIX Toolbox for LINUX Applications CD. Use either
the SMIT interface or the geninstall command to install the Apache web server. Other web servers can
also be used, see the LDAP documentation for details.
You can find detailed instructions for configuring LDAP in the product HTML documentation. To configure
the LDAP, perform the following steps:
1. Use ldapcfg to set the admin DN and password for the LDAP database. The administrator is the root
user of the LDAP database. To configure an administrator DN of cn=admin with a password of secret,
type the following:
# ldapcfg -u cn=admin -p secret
The DN and password will be required later when configuring each client. Specifically, the DN and
password will be used as the ldappkiadmin and ldappkiadmpwd attributes of an ldap stanza in the
acct.cfg file.
172 AIX Version 6.1 Security

2. Configure the web administrator tool using the location of the web server configuration file, as follows:
# ldapcfg -s apache -f /etc/apache/httpd.conf
3. Restart the web server. For the Apache server, use the command:
# /usr/local/bin/apachectl restart
4. Access the web administrator using the URL http:// hostname/ldap. Then login using the LDAP
administrator DN and password configured in step 2.
5. Using the web administrator tool, follow the directions to configure the DB2 database backend and
restart the LDAP server.
Configuring the LDAP Server for PKI:
Certificate authentication service requires two separate LDAP directory information trees. One tree is used
by the CA for publishing certificates and CRLs. The other tree is used by each client for storing and
retrieving per-user PKI data.
The following steps configure the LDAP directory information tree used for storing and retrieving per-user
PKI data.
1. Add the LDAP Configuration Suffix Entry. The default suffix for the PKI data is cn=aixdata. This
places the PKI certificate data below the default suffix for all AIX data. The default data root for the PKI
data is ou=pkidata,cn=aixdata. All PKI data is placed under this location.
PKI Data Suffix
cn=aixdata
Common suffix for all AIX data. May already exist if LDAP server is being used for other AIX
data.
The suffix configuration entry can be added through the web administrator tool, or by directly editing
the LDAP server configuration file.
To add the suffix configuration entry using the Web administrator, do the following:
a. Select Settings from the left side menu.
b. Select Suffixes.
c. Enter the necessary suffix for the PKI data, and then click the Update button.
d. Restart the LDAP server, after the suffix is successfully added.
To add the suffix configuration entry by editing the LDAP server configuration file, do the following:
a. In the /usr/ldap/etc/slapd32.conf file, locate the line containing
ibm-slapdSuffix: cn=localhost
This is the default system suffix.
b. Add the necessary ibm-slapdSuffix entry for the PKI data. For example, you can add a suffix
entry similar to the following:
ibm-slapdSuffix: cn=aixdata
c. Save the configuration file changes.
d. Restart the LDAP server.
2. Add the PKI Data Suffix, Root, and ACL Database Entries. The Data Root is the point in the LDAP
directory structure under which all the PKI data resides. The ACL is the Access Control List for the
Data Root that sets the access rules for all the PKI data. The pkiconfig.ldif file is supplied to add the
suffix, root, and ACL entries to the database.
a. First, add the suffix and root database entries and the PKI data administrator password. The first
part of the file adds the default suffix entries to the database and sets the password as follows:
Security 173

dn: cn=aixdata
objectclass: top
objectclass: container
cn: aixdata
dn: ou=pkidata,cn=aixdata
objectclass: organizationalUnit
ou: cert
userPassword: <<password>>
b. Edit the pkiconfig.ldif file and replace the <<password>> character string after the
userPassword attribute with your password for the PKI data administrator.
The DN and userPassword values will be required later when configuring each client. Specifically,
the DN (ou=pkidata,cn=aixdata) and value for password will be used as the ldappkiadmin and
ldappkiadmpwd attributes of an ldap stanza in the acct.cfg file.
The second part of the file changes the ownership and adds the ACL for the PKI data as follows:
dn: ou=pkidata,cn=aixdata
changetype: modify
add: entryOwner
entryOwner: access-id:ou=pkidata,cn=aixdata
ownerPropagate: true
dn: ou=pkidata,cn=aixdata
changetype: modify
add: aclEntry
aclEntry: group:cn=anybody:normal:grant:rsc:normal:deny:w
aclEntry: group:cn=anybody:sensitive:grant:rsc:sensitive:deny:w
aclEntry: group:cn=anybody:critical:grant:rsc:critical:deny:w
aclEntry: group:cn=anybody:object:deny:ad aclPropagate: true
Note: To avoid jeopardizing the integrity of your PKI implementation, do not make any changes to
the ACL settings.The pkiconfig.ldif file can be edited to use a suffix other than the default, however this is
recommended only for experienced LDAP administrators. The ldif file can then be applied to the
database using the ldapadd command below.
c. Replace the values for the -D and -w options with your local LDAP administrator DN and password,
as follows:
# ldapadd -c -D cn=admin -w secret -f pkiconfig.ldif
3. Restart the LDAP Server. Restart the LDAP server using the web administrator tool, or by stopping
and restarting the slapd process.
Installing and configuring the Certificate Authentication Service:
The following steps are used to install and configure the certificate authentication service.
To install and configure the certificate authentication service, do the following:
1. Install the Java security filesets (Java131.ext.security.*) from the Expansion Pack CD. The required
packages are as follows:
v Java131.ext.security.cmp-us (Java Certificate Management)
v Java131.ext.security.jce-us (Java Cryptography Extension)
v Java131.ext.security.jsse-us (Java Secure Socket Extension)
v Java131.ext.security.pkcs-us (Java Public Key Cryptography)
2. Move the ibmjcaprovider.jar file from /usr/java131/jre/lib/ext to another directory. This file conflicts
with the Java security filesets and must be moved for correct functioning of the certificate
authentication service.
3. Install the certificate authentication service server fileset (cas.server.rte) from the Expansion Pack CD.
174 AIX Version 6.1 Security

Configuring the Certificate Authentication Service server to work with LDAP:
If the Certificate Authentication Service (CAS) is to be used with LDAP, CAS must be configured to work
with LDAP.
To configure the CAS server to work with LDAP, perform the following steps:
1. If not already installed, then install the IBM Directory client package on the system supporting the
cas.server package.
2. If not already configured, then configure the IBM Directory client, as follows:
# ldapcfg -l /home/ldapdb2 -u "cn=admin" -p secret -s apache \
-f /usr/local/apache/conf/httpd.conf
It is assumed that the Web Server is the Apache Web Server in the above configuration command.
3. Add the following suffix to the slapd.conf file, as follows:
ibm-slapdSuffix: o=aix,c=us
You can specify a different distinguished name instead of o=aix,c=us.
4. Run the slapd command, as follows:
# /usr/bin/slapd -f /etc/slapd32.conf
5. Add the object classes, as follows:
# ldapmodify -D cn=admin -w secret -f setup.ldif
where setup.ldif contains the following:
dn: cn=schema
changetype: modify
add: objectClasses
objectClasses: ( 2.5.6.21 NAME ’pkiuser’ DESC ’auxiliary class for non-CA certificate owners’
SUP top AUXILIARY MAY userCertificate )
dn: cn=schema
changetype: modify
add: objectClasses
objectClasses: ( 2.5.6.22 NAME ’pkiCA’ DESC ’class for Cartification Authorities’ SUP top
AUXILIARY MAY ( authorityRevocationList $ caCertificate $ certificateRevocationList $
crossCertificatePair ) )
dn:cn=schema
changetype: modify
replace: attributetypes
attributetypes: ( 2.5.4.39 NAME ( ’certificateRevocationList’
’certificateRevocationList;binary’ ) DESC ’ ’ SYNTAX 1.3.6.1.4.1.1466.115.121.1.5
SINGLE-VALUE )
replace:ibmattributetypes
ibmattributetypes:( 2.5.4.39 DBNAME ( ’certRevocationLst’ ’certRevocationLst’ )
ACCESS-CLASS NORMAL)
6. Add the entries:
# ldapadd -D cn=admin -w secret -f addentries.ldif
where addentries.ldif contains the following:
dn: o=aix,c=us
changetype: add
objectclass: organization
objectclass: top
objectclass: pkiCA
o: aix
Note: Sample addentries.ldif and setup.ldif files are provided in the cas.server package.
7. Stop and start the slapd daemon.
Security 175

Creating the Certificate Authority:
The following steps are used to create the certificate authority.
1. Create a reference file. The reference file contains one or more certificate creation reference number
and password pairs. A pair represents the authentication information accepted by the certificate
authentication service server when a certificate authentication service client attempts to authenticate to
the server during the creation of a certificate (typically using the CMP protocol). The format of the file
is a reference number followed by a password, both on separate lines. For example:
12345678
password1234
87654321
password4321
where 12345678 and 87654321 are reference numbers, and password1234 and password4321 are their
respective passwords. Blank lines are not allowed. Space characters should not precede or follow
reference numbers or passwords. At least one reference number and password must exist in the file.
An example file can be found in /usr/cas/server/iafile. You will need to reference these values each
time you set up a client.
2. Configure the CA using the mksecpki command as follows:
# mksecpki -u pkiuser -f /usr/cas/server/iafile -p 1077 -H ldap.cert.mydomain.com \
-D cn=admin -w secret -i o=aix,c=us
Information on the mksecpki flags follows:
-u Specifies a user account name where the certificate authentication service server will be
installed.
-f Specifies the reference file created in the previous step.
-p Specifies a port number for the LDAP server.
-H Specifies the LDAP server host name or IP address.
-D Specifies the LDAP administrator’s common name.
-w Specifies the LDAP administration password.
-i Specifies the LDAP branch where the user certificate data will reside.
The mksecpki command automatically generates the trusted signing key with a key label of
TrustedKey, the password of the CA user account, and places it in the /usr/lib/security/pki/trusted.pkcs12 keystore file. It’s not necessary to perform the steps in “Creating the trusted signing
key” unless you need to generate multiple keys or want a trusted signing key with a different key label
and/or password.
Creating the trusted signing key:
The mksecpki command automatically generates a trusted signing key with a key label of TrustedKey, the
password of the CA user account, and places it in the /usr/lib/security/pki/trusted.pkcs12 keystore file. If
you need to generate a new trusted signing key or multiple trusted signing keys, then this section provides
the steps needed to generate a trusted signing key.
All certificate authentication service clients where certificate creation and revocation are allowed require a
trusted signing key for signing the user’s authentication certificate. The key is saved in a separate keystore
and is made available to all systems where certificates can be created. A single key can be used by all
systems or, for a more secure approach, multiple keys can be created and distributed.
To create a trusted key, use the /usr/java131/bin/keytool command. Use a file name of a non-existing file.
The keytool command prompts for a keystore password and key password. Both the keystore password
and key password must be identical for certificate authentication service to access the key in the keystore.
Run the keytool command as follows:
176 AIX Version 6.1 Security
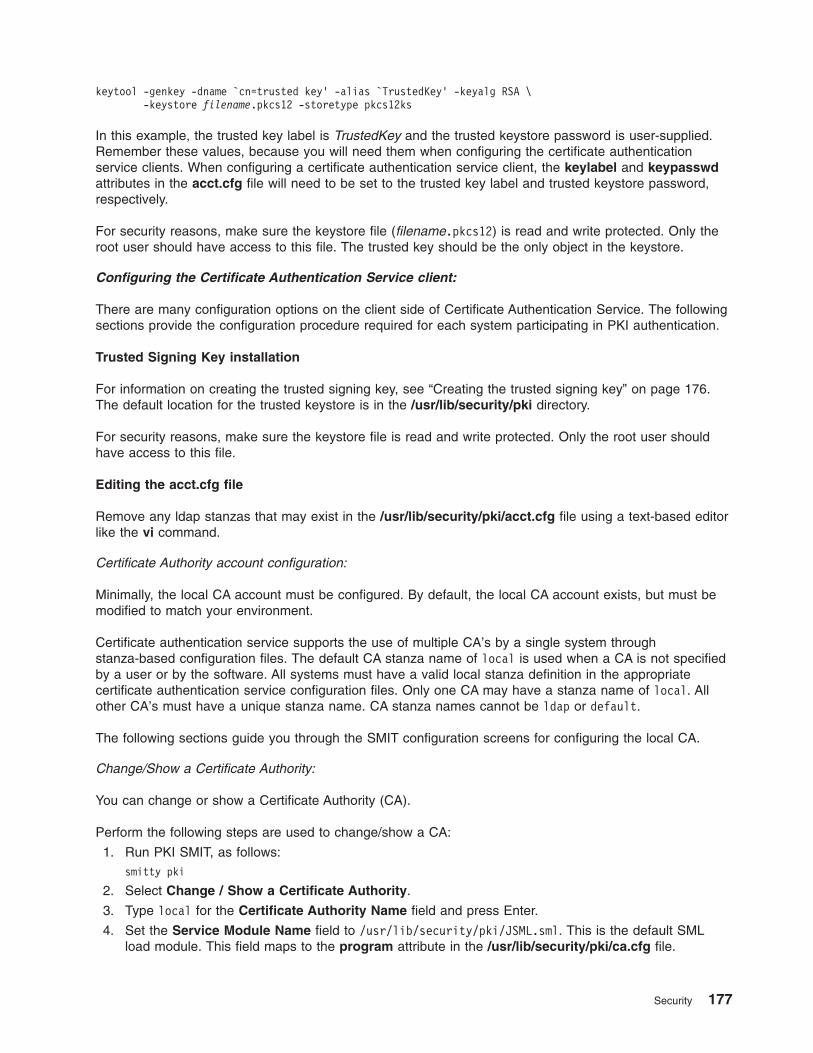
keytool -genkey -dname `cn=trusted key’ -alias `TrustedKey’ -keyalg RSA \
-keystore filename.pkcs12 -storetype pkcs12ks
In this example, the trusted key label is TrustedKey and the trusted keystore password is user-supplied.
Remember these values, because you will need them when configuring the certificate authentication
service clients. When configuring a certificate authentication service client, the keylabel and keypasswd
attributes in the acct.cfg file will need to be set to the trusted key label and trusted keystore password,
respectively.
For security reasons, make sure the keystore file (filename.pkcs12) is read and write protected. Only the
root user should have access to this file. The trusted key should be the only object in the keystore.
Configuring the Certificate Authentication Service client:
There are many configuration options on the client side of Certificate Authentication Service. The following
sections provide the configuration procedure required for each system participating in PKI authentication.
Trusted Signing Key installation
For information on creating the trusted signing key, see “Creating the trusted signing key” on page 176.
The default location for the trusted keystore is in the /usr/lib/security/pki directory.
For security reasons, make sure the keystore file is read and write protected. Only the root user should
have access to this file.
Editing the acct.cfg file
Remove any ldap stanzas that may exist in the /usr/lib/security/pki/acct.cfg file using a text-based editor
like the vi command.
Certificate Authority account configuration:
Minimally, the local CA account must be configured. By default, the local CA account exists, but must be
modified to match your environment.
Certificate authentication service supports the use of multiple CA’s by a single system through
stanza-based configuration files. The default CA stanza name of local is used when a CA is not specified
by a user or by the software. All systems must have a valid local stanza definition in the appropriate
certificate authentication service configuration files. Only one CA may have a stanza name of local. All
other CA’s must have a unique stanza name. CA stanza names cannot be ldap or default.
The following sections guide you through the SMIT configuration screens for configuring the local CA.
Change/Show a Certificate Authority:
You can change or show a Certificate Authority (CA).
Perform the following steps are used to change/show a CA:
1. Run PKI SMIT, as follows:
smitty pki
2. Select Change / Show a Certificate Authority.
3. Type local for the Certificate Authority Name field and press Enter.
4. Set the Service Module Name field to /usr/lib/security/pki/JSML.sml. This is the default SML
load module. This field maps to the program attribute in the /usr/lib/security/pki/ca.cfg file.
Security 177

5. Ignore the Pathname of CA’s Certificate field. This field maps to the certfile attribute in the
/usr/lib/security/pki/ca.cfg file.
6. Set the Pathname of CA’s Trusted Key field to a URI that is the location of the trusted keystore on
the local system. Only file-based keystores are supported. The typical location for the trusted keystore
is in the /usr/lib/security/pki directory. (See “Configuring the Certificate Authentication Service client”
on page 177.) This field maps to the trustedkey attribute in the /usr/lib/security/pki/ca.cfg file.
7. Set the URI of the Certificate Authority Server field to a URI that is the location of the CA
(cmp://myserver:1077). This field maps to the server attribute in the /usr/lib/security/pki/ca.cfg file.
8. Ignore the Certificate Distribution Point field. This field maps to the cdp attribute in the
/usr/lib/security/pki/ca.cfg file.
9. Set the Certificate Revocation List (CRL) URI field. This field specifies the URI that should be set to
the location of the certificate revocation list for this CA. This is typically an LDAP URI, for example:
ldap://crlserver/o=XYZ,c=us
This field maps to the crl attribute in the /usr/lib/security/pki/ca.cfg file.
10. The Default Certificate Distinguished Name field specifies the baseline DN used when creating
certificates (for example, o=XYZ,c=us). This field is not required. This field maps to the dn attribute in
the /usr/lib/security/pki/ca.cfg file.
11. The Default Certificate Subject Alternate Name URI field specifies the default subject alternate
name URI used when creating certificates if a subject alternate name URI is not provided at creation
time. This field is not required. This field maps to the url attribute in the /usr/lib/security/pki/ca.cfg
file.
12. The Public Key Algorithm field specifies the public key algorithm used when creating a certificate.
The choices are RSA and DSA. If neither are specified, the system defaults to RSA. This field maps to
the algorithm attribute in the /usr/lib/security/pki/ca.cfg file.
13. The Public Key Size (in bits) field specifies the bit size of the public key algorithm. This field is in
bits, not bytes, and this value may be rounded up by the underlying public key mechanism to support
the next feasible byte size. (Typically, rounding occurs when the number of bits is not a even multiple
of 8). Example values are 512, 1024, and 2048. If this field is not specified, the system defaults to 1024
bits. This field maps to the keysize attribute in the /usr/lib/security/pki/ca.cfg file.
14. The MAX. Communications Retries field specifies the number of times the system attempts to
contact the CA (when creating or revoking a certificate) before giving up. The system defaults to 5
attempts. This field maps to the retries attribute in the /usr/lib/security/pki/ca.cfg file.
15. The Signing Hash Algorithm field specifies the hash algorithm used when signing an authentication
certificate. The choices are MD2, MD5, and SHA1. The system defaults to MD5. This field maps to the
signinghash attribute in the /usr/lib/security/pki/ca.cfg file.
16. Press Enter to commit the changes.
Change/Show Certificate Authority accounts:
Perform the following steps to change/show the Certificate Authority (CA) accounts.
1. Run PKI SMIT, as follows:
smitty pki
2. Select Change/Show CA Accounts.
3. Type local for the Certificate Authority Name field and press Enter.
4. The Certificate Creation Reference Number field specifies the CA’s reference number used in
creating a certificate. The creation reference number must be composed of all digits and be at least 7
digits in length. The reference number is defined by the CA. (See “Creating the Certificate Authority”
on page 176.) This field maps to the carefnum attribute in the /usr/lib/security/pki/acct.cfg file.
5. The Certificate Creation Password field specifies the CA’s reference password used when creating
a certificate. The creation password must be composed of 7-bit ASCII alpha-numerics and be at least
12 characters in length. The creation password is defined at the CA and must be the matching
178 AIX Version 6.1 Security
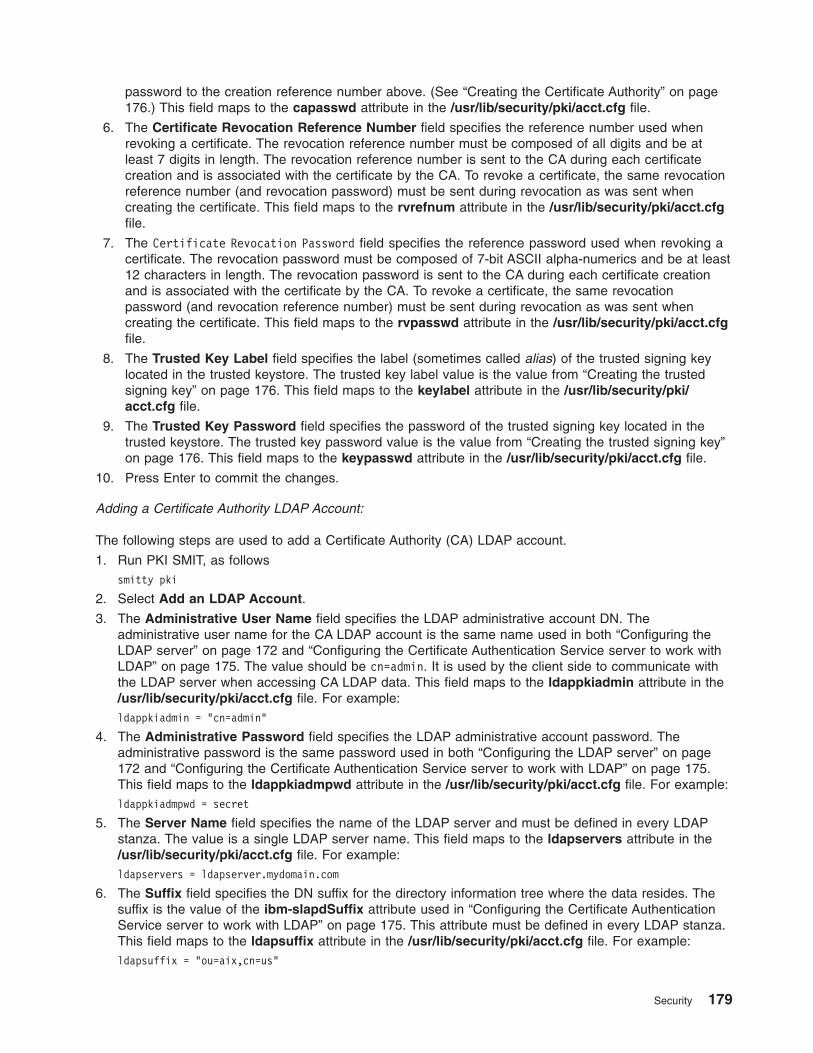
password to the creation reference number above. (See “Creating the Certificate Authority” on page
176.) This field maps to the capasswd attribute in the /usr/lib/security/pki/acct.cfg file.
6. The Certificate Revocation Reference Number field specifies the reference number used when
revoking a certificate. The revocation reference number must be composed of all digits and be at
least 7 digits in length. The revocation reference number is sent to the CA during each certificate
creation and is associated with the certificate by the CA. To revoke a certificate, the same revocation
reference number (and revocation password) must be sent during revocation as was sent when
creating the certificate. This field maps to the rvrefnum attribute in the /usr/lib/security/pki/acct.cfg
file.
7. The Certificate Revocation Password field specifies the reference password used when revoking a
certificate. The revocation password must be composed of 7-bit ASCII alpha-numerics and be at least
12 characters in length. The revocation password is sent to the CA during each certificate creation
and is associated with the certificate by the CA. To revoke a certificate, the same revocation
password (and revocation reference number) must be sent during revocation as was sent when
creating the certificate. This field maps to the rvpasswd attribute in the /usr/lib/security/pki/acct.cfg
file.
8. The Trusted Key Label field specifies the label (sometimes called alias) of the trusted signing key
located in the trusted keystore. The trusted key label value is the value from “Creating the trusted
signing key” on page 176. This field maps to the keylabel attribute in the /usr/lib/security/pki/acct.cfg file.
9. The Trusted Key Password field specifies the password of the trusted signing key located in the
trusted keystore. The trusted key password value is the value from “Creating the trusted signing key”
on page 176. This field maps to the keypasswd attribute in the /usr/lib/security/pki/acct.cfg file.
10. Press Enter to commit the changes.
Adding a Certificate Authority LDAP Account:
The following steps are used to add a Certificate Authority (CA) LDAP account.
1. Run PKI SMIT, as follows
smitty pki
2. Select Add an LDAP Account.
3. The Administrative User Name field specifies the LDAP administrative account DN. The
administrative user name for the CA LDAP account is the same name used in both “Configuring the
LDAP server” on page 172 and “Configuring the Certificate Authentication Service server to work with
LDAP” on page 175. The value should be cn=admin. It is used by the client side to communicate with
the LDAP server when accessing CA LDAP data. This field maps to the ldappkiadmin attribute in the
/usr/lib/security/pki/acct.cfg file. For example:
ldappkiadmin = "cn=admin"
4. The Administrative Password field specifies the LDAP administrative account password. The
administrative password is the same password used in both “Configuring the LDAP server” on page
172 and “Configuring the Certificate Authentication Service server to work with LDAP” on page 175.
This field maps to the ldappkiadmpwd attribute in the /usr/lib/security/pki/acct.cfg file. For example:
ldappkiadmpwd = secret
5. The Server Name field specifies the name of the LDAP server and must be defined in every LDAP
stanza. The value is a single LDAP server name. This field maps to the ldapservers attribute in the
/usr/lib/security/pki/acct.cfg file. For example:
ldapservers = ldapserver.mydomain.com
6. The Suffix field specifies the DN suffix for the directory information tree where the data resides. The
suffix is the value of the ibm-slapdSuffix attribute used in “Configuring the Certificate Authentication
Service server to work with LDAP” on page 175. This attribute must be defined in every LDAP stanza.
This field maps to the ldapsuffix attribute in the /usr/lib/security/pki/acct.cfg file. For example:
ldapsuffix = "ou=aix,cn=us"
Security 179

7. Press Enter to commit the changes.
Add a PKI Per-User LDAP account:
Use this procedure to add a PKI Per-User LDAP account.
Perform the same steps as in “Adding a Certificate Authority LDAP Account” on page 179, except use the
values used in the Adding the PKI Suffix and ACL Database Entries step in “Configuring the LDAP
Server for PKI” on page 173. Use the following values:
v Administrative User Name (ou=pkidata,cn=aixdata),
v Administrative Password (password),
v Server Name (site specific),
v Suffix (ou=pkidata,cn=aixdata).
Press Enter to commit the changes.
Change/Show the Policy:
The following steps are used to change/show the policy.
1. Run PKI SMIT, as follows:
smitty pki
2. Select Change / Show the Policy.
v The Create Certificates for New Users field specifies whether the mkuser command generates a
certificate and keystore for the new user (new), or if the administrator provides a certificate and keystore
after the user is created (get). This field maps to the cert attribute of the newuser stanza in the
/usr/lib/security/pki/policy.cfg file.
v The Certificate Authority Name field specifies the CA used by the mkuser command when generating
a certificate. The field value must be a stanza name found in the ca.cfg file; for example, local. This
field maps to the ca attribute of the newuser stanza in the /usr/lib/security/pki/policy.cfg file.
v The Initial User Password field specifies the password used by the mkuser command when creating a
user’s keystore. This field maps to the passwd attribute of the newuser stanza in the
/usr/lib/security/pki/policy.cfg file.
v The Certificate Version field specifies the certificate version used by the mkuser command when
generating a certificate. Currently, the only supported value is 3, which represents X.509v3. This field
maps to the version attribute of the newuser stanza in the /usr/lib/security/pki/policy.cfg file.
v The Public Key Size field specifies the size (in bits) of the public key used by the mkuser command
when generating a certificate. This field maps to the keysize attribute of the newuser stanza in the
/usr/lib/security/pki/policy.cfg file.
v The Keystore Location field specifies the keystore directory in URI format used by the mkuser
command when creating a keystore. This field maps to the keystore attribute of the newuser stanza in
the /usr/lib/security/pki/policy.cfg file.
v The Validity Period field specifies the certificate’s requested validity period used by the mkuser
command when generating a certificate. The requested validity period may or may not be honored by
the CA when creating the certificate. The period can be specified in seconds, days, or years. If just a
number is provided, it is assumed to be in seconds. If the letter d immediately follows the number, it is
interpreted as days. If the letter y immediate follows the number, it is interpreted as years. Example
values are:
– 1y (for 1 year)
– 30d (for 30 days)
– 2592000 (for 30 days represented in seconds)
This field maps to the validity attribute of the newuser stanza in the /usr/lib/security/pki/policy.cfg file.
180 AIX Version 6.1 Security

v The Replicate Non-Local Certificates field specifies whether the certlink command saves a copy of a
certificate (Yes) or just the link to the certificate (No). This field maps to the replicate attribute of the
storage stanza in the /usr/lib/security/pki/policy.cfg file.
v The Check Certificate Revocation Lists field specifies whether the certadd and certlink commands
check the CRL before performing their tasks (Yes) or not (No). This field maps to the check attribute of
the crl stanza in the /usr/lib/security/pki/policy.cfg file.
v The Default Communications Timeout field specifies the timeout period in seconds used by the
certadd and certlink commands when requesting certificate information using HTTP (for example,
retrieving CRLs). This field maps to the timeout attribute of the comm stanza in the
/usr/lib/security/pki/policy.cfg file.
methods.cfg file:
The methods.cfg file specifies the definitions of the authentication grammar used by the registry and
SYSTEM attributes. Specifically, this is where the authentication grammar for PKILDAP (for PKI using
LDAP) and FPKI (files PKI) must be defined and added by the system administrator.
Below is a typical methods.cfg definition. The stanza names PKI, LDAP, and PKILDAP are arbitrary
names and can be changed by the administrator. This section uses these stanza names throughout for
consistency.
PKI:
program = /usr/lib/security/PKI
options = authonly
LDAP:
program = /usr/lib/security/LDAP
PKILDAP:
options = auth=PKI,db=LDAP
To support roaming users, use the same methods.cfg file stanza names and attribute values across all
systems that support roaming users.
Administration configuration examples:
The following examples show typical administration configuration tasks.
Creating a new PKI user account
To create a new PKI user account, use the mkuser command and the appropriate /usr/lib/security/methods.cfg stanza name (PKILDAP). Depending on the attribute settings in the /usr/lib/security/pki/policy.cfg file, the mkuser command can automatically create a certificate for the user. Below is a
mkuser command example that creates the user account bob:
mkuser -R PKILDAP SYSTEM="PKILDAP" registry=PKILDAP bob
Converting a non-PKI user account to a PKI user account
There are two different approaches for converting a non-PKI user account into a PKI user account. The
first approach allows the system administrator access to the user’s private keystore initially, which might be
acceptable in a given environment, but is the quickest way to convert a user. The second way requires
interaction between the user and system administrator, which might take more time to setup.
Both examples use the following assumptions:
v cas.server and cas.client are already installed, configured, and working.
v PKILDAP is defined in methods.cfg as shown in “methods.cfg file.”
Security 181
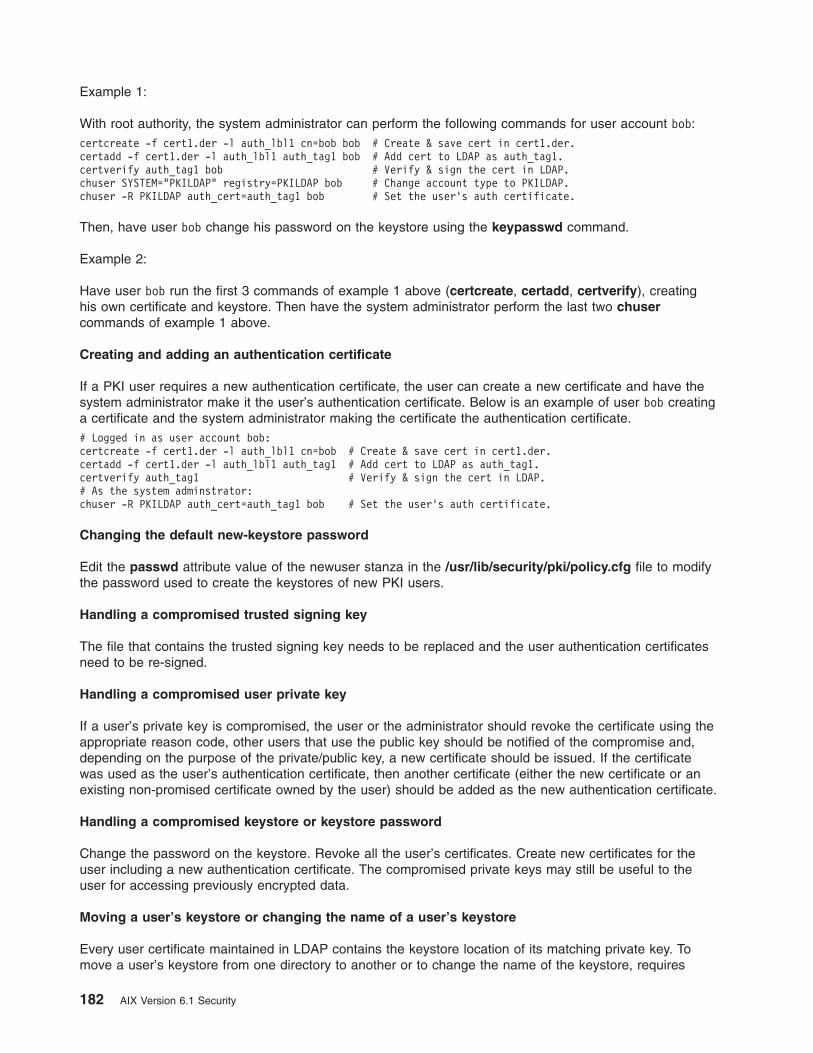
Example 1:
With root authority, the system administrator can perform the following commands for user account bob:
certcreate -f cert1.der -l auth_lbl1 cn=bob bob # Create & save cert in cert1.der.
certadd -f cert1.der -l auth_lbl1 auth_tag1 bob # Add cert to LDAP as auth_tag1.
certverify auth_tag1 bob # Verify & sign the cert in LDAP.
chuser SYSTEM="PKILDAP" registry=PKILDAP bob # Change account type to PKILDAP.
chuser -R PKILDAP auth_cert=auth_tag1 bob # Set the user’s auth certificate.
Then, have user bob change his password on the keystore using the keypasswd command.
Example 2:
Have user bob run the first 3 commands of example 1 above (certcreate, certadd, certverify), creating
his own certificate and keystore. Then have the system administrator perform the last two chuser
commands of example 1 above.
Creating and adding an authentication certificate
If a PKI user requires a new authentication certificate, the user can create a new certificate and have the
system administrator make it the user’s authentication certificate. Below is an example of user bob creating
a certificate and the system administrator making the certificate the authentication certificate.
# Logged in as user account bob:
certcreate -f cert1.der -l auth_lbl1 cn=bob # Create & save cert in cert1.der.
certadd -f cert1.der -l auth_lbl1 auth_tag1 # Add cert to LDAP as auth_tag1.
certverify auth_tag1 # Verify & sign the cert in LDAP.
# As the system adminstrator:
chuser -R PKILDAP auth_cert=auth_tag1 bob # Set the user’s auth certificate.
Changing the default new-keystore password
Edit the passwd attribute value of the newuser stanza in the /usr/lib/security/pki/policy.cfg file to modify
the password used to create the keystores of new PKI users.
Handling a compromised trusted signing key
The file that contains the trusted signing key needs to be replaced and the user authentication certificates
need to be re-signed.
Handling a compromised user private key
If a user’s private key is compromised, the user or the administrator should revoke the certificate using the
appropriate reason code, other users that use the public key should be notified of the compromise and,
depending on the purpose of the private/public key, a new certificate should be issued. If the certificate
was used as the user’s authentication certificate, then another certificate (either the new certificate or an
existing non-promised certificate owned by the user) should be added as the new authentication certificate.
Handling a compromised keystore or keystore password
Change the password on the keystore. Revoke all the user’s certificates. Create new certificates for the
user including a new authentication certificate. The compromised private keys may still be useful to the
user for accessing previously encrypted data.
Moving a user’s keystore or changing the name of a user’s keystore
Every user certificate maintained in LDAP contains the keystore location of its matching private key. To
move a user’s keystore from one directory to another or to change the name of the keystore, requires
182 AIX Version 6.1 Security

changing the LDAP keystore location and name associated with the user’s certificates. If the user uses
multiple keystores, then extra care must be taken to change only the LDAP information of the certificates
affected by the keystore change.
To move a keystore from /var/pki/security/keys/user1.p12 to /var/pki/security1/keys/user1.p12:
# As root...
cp /var/pki/security/keys/user1.p12 /var/pki/security1/keys/user1.p12
# Retrieve a list of all the certificates associated with the user.
certlist ALL user1
# For each certificate associated with the keystore, do the following:
# A) Retrieve the certificate’s private key label and its "verified" status.
# B) Retrieve the certificate from LDAP.
# C) Replace the certificate in LDAP using the same private key label,
# but the new keystore path name.
# D) If the certificate was previously verified, it must verified again.
# (Step D requires the password to the keystore.)
# Example modifying one certificate.
# Assume:
# username: user1
# cert tag: tag1
# key label: label1
# Retrieve the certificate’s private key label.
certlist -a label tag1 user1
# Retrieve the certificate from LDAP and place it in file cert.der.
certget -f cert.der tag1 user1
# Replace the certificate in LDAP.
certadd -r -f cert.der -p /var/pki/security1/keys/user1.p12 -l label1 tag1 user1
# Re-verify the certificate if it was previously verified.
# (Need to know the keystore password.)
certverify tag1 user1
Adding a certificate issued by a non-AIX Certificate Authority:
You must have possession of the certificate and private key before adding this certificate into AIX for login
purposes. Certificate Authentication Services filesets must be installed and configured.
The certificate must be a DER-encoded x509 v3 certificate and the keystore must be a pkcs12 type
keystore. In the following example, the name of the certificate file is aixtest.cer, the name of the private
key file is aixtest.p12, and the name of the AIX user is aixuser. The user aixuser must already exist on
the system. The key label is aixtest and keystore password is secret.
The size of the key in the keystore might not be supported by the underlying crypto provider. In that case
you might need to get the proper Java security policy files to remove the restrictions.
Perform these steps to use a certificate issued by another Certificate Authority (CA) for login:
1. Verify that the keystore is compatible by listing the keystore using the /usr/bin/keylist command.
# keylist -v -p aixtest.p12
Enter password for the keystore :
Private Key : aixtest
Certificate : aixtest
#
Security 183
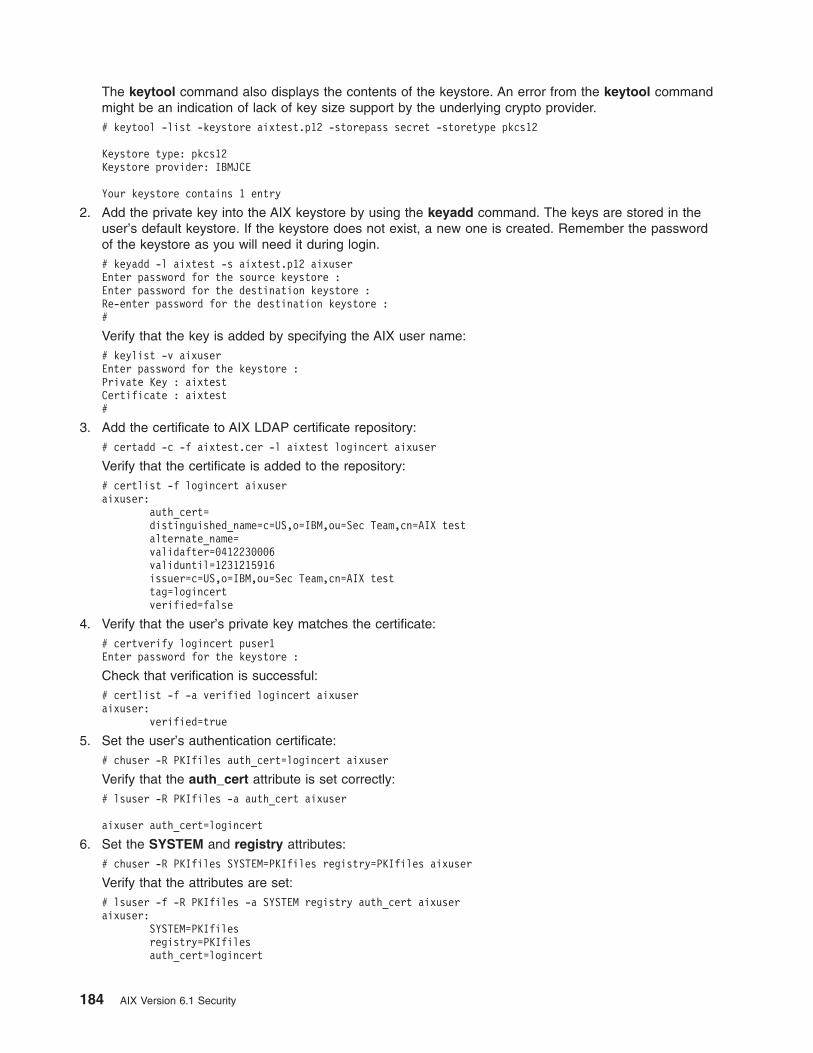
The keytool command also displays the contents of the keystore. An error from the keytool command
might be an indication of lack of key size support by the underlying crypto provider.
# keytool -list -keystore aixtest.p12 -storepass secret -storetype pkcs12
Keystore type: pkcs12
Keystore provider: IBMJCE
Your keystore contains 1 entry
2. Add the private key into the AIX keystore by using the keyadd command. The keys are stored in the
user’s default keystore. If the keystore does not exist, a new one is created. Remember the password
of the keystore as you will need it during login.
# keyadd -l aixtest -s aixtest.p12 aixuser
Enter password for the source keystore :
Enter password for the destination keystore :
Re-enter password for the destination keystore :
#
Verify that the key is added by specifying the AIX user name:
# keylist -v aixuser
Enter password for the keystore :
Private Key : aixtest
Certificate : aixtest
#
3. Add the certificate to AIX LDAP certificate repository:
# certadd -c -f aixtest.cer -l aixtest logincert aixuser
Verify that the certificate is added to the repository:
# certlist -f logincert aixuser
aixuser:
auth_cert=
distinguished_name=c=US,o=IBM,ou=Sec Team,cn=AIX test
alternate_name=
validafter=0412230006
validuntil=1231215916
issuer=c=US,o=IBM,ou=Sec Team,cn=AIX test
tag=logincert
verified=false
4. Verify that the user’s private key matches the certificate:
# certverify logincert puser1
Enter password for the keystore :
Check that verification is successful:
# certlist -f -a verified logincert aixuser
aixuser:
verified=true
5. Set the user’s authentication certificate:
# chuser -R PKIfiles auth_cert=logincert aixuser
Verify that the auth_cert attribute is set correctly:
# lsuser -R PKIfiles -a auth_cert aixuser
aixuser auth_cert=logincert
6. Set the SYSTEM and registry attributes:
# chuser -R PKIfiles SYSTEM=PKIfiles registry=PKIfiles aixuser
Verify that the attributes are set:
# lsuser -f -R PKIfiles -a SYSTEM registry auth_cert aixuser
aixuser:
SYSTEM=PKIfiles
registry=PKIfiles
auth_cert=logincert
184 AIX Version 6.1 Security
7. Add an entry into the ca.cfg file corresponding to the non-AIX CA. Specify the certificate issuer’s
distinguished name in the dn field and the program name in the program field. Use the certlist
command to get the distinguished name of the CA that issued the certificate.
# certlist -f -a issuer logincert aixuser
aixuser:
issuer=c=US,o=IBM,ou=Sec Team,cn=AIX test
#
Specify the program name as /usr/lib/security/pki/JSML.sml.
Edit the /usr/lib/security/pki/ca.cfg file to add the above information:
remoteCA:
program = /usr/lib/security/pki/JSML.sml
dn = "c=US,o=IBM,ou=Sec Team,cn=AIX test"
# telnet testsystem.ibm.com
AIX Version 5
(C) Copyrights by IBM and by others 1982, 2006.
login: aixuser
aixuser’s Password:
8. Verify that aixuser can login to the system using this certificate:
# telnet testsystem.ibm.com
AIX Version 5
(C) Copyrights by IBM and by others 1982, 2006.
login: aixuser
aixuser’s Password:
......
Last login: Fri Apr 14 10:46:29 CDT 2006 on /dev/pts/3 from localhost
$ echo $AUTHSTATE
PKIfiles
$
Pluggable Authentication Modules
The pluggable authentication module (PAM) framework provides system administrators with the ability to
incorporate multiple authentication mechanisms into an existing system through the use of pluggable
modules.
Applications enabled to make use of PAM can be plugged-in to new technologies without modifying the
existing applications. This flexibility allows administrators to do the following:
v Select any authentication service on the system for an application
v Use multiple authentication mechanisms for a given service
v Add new authentication service modules without modifying existing applications
v Use a previously entered password for authentication with multiple modules
The PAM framework consists of a library, pluggable modules, and a configuration file. The PAM library
implements the PAM application programming interface (API) and serves to manage PAM transactions and
invoke the PAM service programming interface (SPI) defined in the pluggable modules. Pluggable modules
are dynamically loaded by the library based on the invoking service and its entry in the configuration file.
Success is determined not only by the pluggable module but also by the behavior defined for the service.
Through the concept of stacking, a service can be configured to authenticate through multiple
authentication methods. If supported, modules can also be configured to use a previously submitted
password rather than prompting for additional input.
The system administrator can configure an AIX system to use PAM through modification of the auth_type
attribute in the usw stanza of the/etc/security/login.cfg file. Setting auth_type = PAM_AUTH configures
Security 185

PAM-enabled commands to invoke the PAM API directly for authentication rather than use the historic AIX
authentication routines. This configuration is a run-time decision and does not require a reboot of the
system to take affect. For further information about the auth_type attribute, see the /etc/security/login.cfg file reference. The following native AIX commands and applications have been modified to
recognize the auth_type attribute and enabled for PAM authentication:
v login
v passwd
v su
v ftp
v telnet
v rlogin
v rexec
v rsh
v snappd
v imapd
v dtaction
v dtlogin
v dtsession
The following illustration shows the interaction between PAM-enabled applications, PAM library,
configuration file, and PAM modules on a system that has been configured to use PAM. PAM enabled
applications invoke the PAM API in the PAM library. The library determines the appropriate module to load
based on the application entry in the configuration file and calls the PAM SPI in the module.
Communication occurs between the PAM module and the application through the use of a conversation
function implemented in the application. Success or failure from the module and the behavior defined in
the configuration file then determine if another module needs to be loaded. If so, the process continues;
otherwise, the result is passed back to the application.
PAM library
The PAM library,/usr/lib/libpam.a, contains the PAM API that serves as a common interface to all PAM
applications and also controls module loading.
Modules are loaded by the PAM library based on the stacking behavior defined in the /etc/pam.conf file.
Figure 3. PAM Framework and Entities. This illustration shows how PAM enabled commands use the PAM library to
access the appropriate PAM module.
186 AIX Version 6.1 Security
The following PAM API functions invoke the corresponding PAM SPI provided by a PAM module. For
example, the pam_authenticate API invokes the pam_sm_authenticate SPI in a PAM module.
v pam_authenticate
v pam_setcred
v pam_acct_mgmt
v pam_open_session
v pam_close_session
v pam_chauthtok
The PAM library also includes several framework APIs that enable an application to invoke PAM modules
and pass information to PAM modules. The following table shows the PAM framework APIs that are
implemented in AIX and their functions:
pam_start Establish a PAM session
pam_end Terminate a PAM session
pam_get_data Retrieve module-specific data
pam_set_data Set module-specific data
pam_getenv Retrieve the value of a defined PAM environment variable
pam_getenvlist Retrieve a list of all of the defined PAM environment
variables and their values
pam_putenv Set a PAM environment variable
pam_get_item Retrieve common PAM information
pam_set_item Set common PAM information
pam_get_user Retrieve user name
pam_strerror Get PAM standard error message
PAM modules
PAM modules allow multiple authentication mechanisms to be used collectively or independently on a
system.
A given PAM module must implement at least one of four module types. The module types are described
as follows, along with the corresponding PAM SPIs that are required to conform to the module type.
Authentication Modules
Authenticate users and set, refresh, or destroy credentials. These modules identify user based on
their authentication and credentials.
Authentication module functions:
v pam_sm_authenticate
v pam_sm_setcred
Account Management Modules
Determine validity of the user account and subsequent access after identification from
authentication module. Checks performed by these modules typically include account expiration
and password restrictions.
Account management module function:
v pam_sm_acct_mgmt
Session Management Modules
Initiate and terminate user sessions. Additionally, support for session auditing may be provided.
Session management module functions:
v pam_sm_open_session
v pam_sm_close_session
Security 187

Password Management Modules
Perform password modification and related attribute management.
Password management module functions:
v pam_sm_chauthtok
PAM configuration file
The /etc/pam.conf configuration file consists of service entries for each PAM module type and serves to
route services through a defined module path.
Entries in the file are composed of the following whitespace-delimited fields:
service_name module_type control_flag module_path module_options
Where:
service_name Specifies the name of the service. The keyword OTHER is used to define the
default module to use for applications not specified in an entry.
module_type Specifies the module type for the service. Valid module types are auth, account,
session, or password. A given module will provide support for one or more
module types.
control_flag Specifies the stacking behavior for the module. Supported control flags are
required, requisite, sufficient, or optional.
module_path Specifies the module to load for the service. Valid values for module_path may be
specified as either the full path to the module or just the module name. If the full
path to the module is not specified, then the PAM library will prepend to the module
name either /usr/lib/security for 32-bit services or /usr/lib/security/64 for
64-bit services.
module_options Specifies a space-delimited list of options that can be passed to the service
modules. Values for this field are dependent on the options supported by the
module defined in the module_path field. This field is optional.
Malformed entries or entries with incorrect values for the module_type or control_flag fields are ignored
by the PAM library. Entries beginning with a number sign (#) character at the beginning of the line are also
ignored because this denotes a comment.
PAM supports a concept typically referred to as ″stacking″, allowing multiple mechanisms to be used for
each service. Stacking is implemented in the configuration file by creating multiple entries for a service
with the same module_type field. The modules are invoked in the order in which they are listed in the file
for a given service, with the final result determined by the control_flag field specified for each entry. Valid
values for the control_flag field and the corresponding behavior in the stack are as follows:
required All required modules in a stack must pass for a successful result. If one or more of
the required modules fail, all of the required modules in the stack will be
attempted, but the error from the first failed required module is returned.
requisite Similar to required except that if a requisite module fails, no further modules in the
stack are processed and it immediately returns the first failure code from a
required or requisite module.
sufficient If a module flagged as sufficient succeeds and no previous required or sufficient
modules have failed, all remaining modules in the stack are ignored and success
is returned.
optional If none of the modules in the stack are required and no sufficient modules have
succeeded, then at least one optional module for the service must succeed. If
another module in the stack is successful, a failure in an optional module is
ignored.
The following /etc/pam.conf subset is an example of stacking in the auth module type for the login
service.
188 AIX Version 6.1 Security
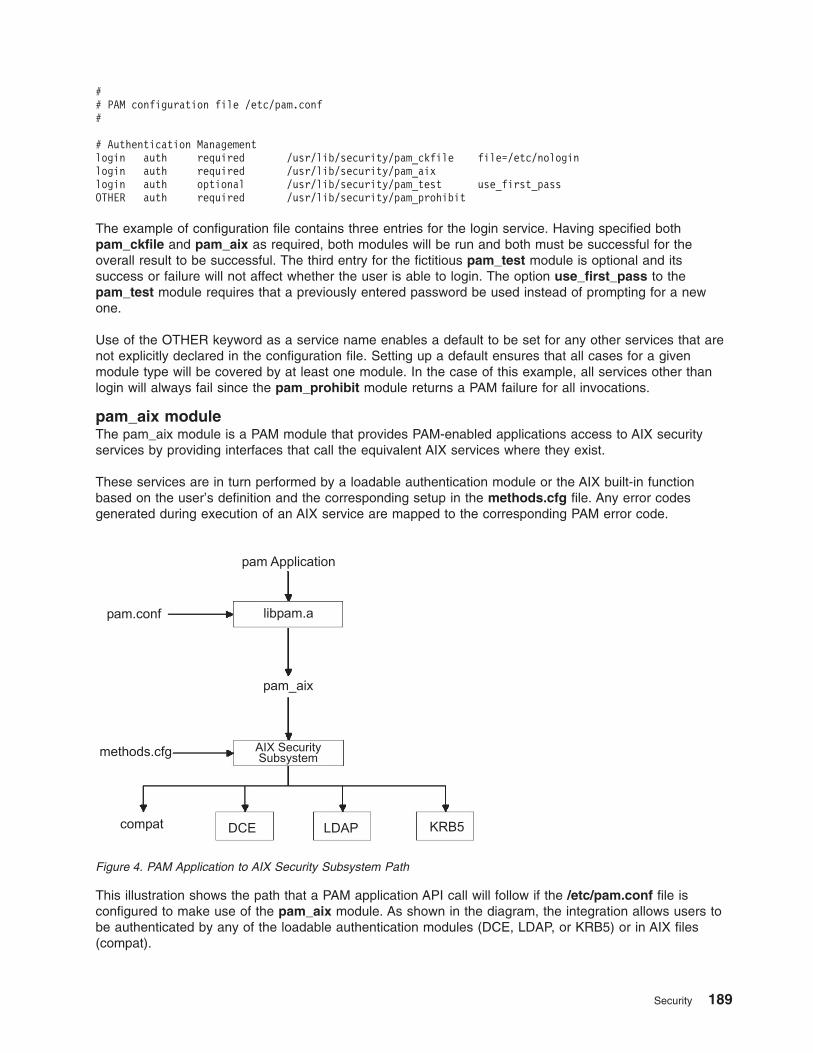
#
# PAM configuration file /etc/pam.conf
#
# Authentication Management
login auth required /usr/lib/security/pam_ckfile file=/etc/nologin
login auth required /usr/lib/security/pam_aix
login auth optional /usr/lib/security/pam_test use_first_pass
OTHER auth required /usr/lib/security/pam_prohibit
The example of configuration file contains three entries for the login service. Having specified both
pam_ckfile and pam_aix as required, both modules will be run and both must be successful for the
overall result to be successful. The third entry for the fictitious pam_test module is optional and its
success or failure will not affect whether the user is able to login. The option use_first_pass to the
pam_test module requires that a previously entered password be used instead of prompting for a new
one.
Use of the OTHER keyword as a service name enables a default to be set for any other services that are
not explicitly declared in the configuration file. Setting up a default ensures that all cases for a given
module type will be covered by at least one module. In the case of this example, all services other than
login will always fail since the pam_prohibit module returns a PAM failure for all invocations.
pam_aix module
The pam_aix module is a PAM module that provides PAM-enabled applications access to AIX security
services by providing interfaces that call the equivalent AIX services where they exist.
These services are in turn performed by a loadable authentication module or the AIX built-in function
based on the user’s definition and the corresponding setup in the methods.cfg file. Any error codes
generated during execution of an AIX service are mapped to the corresponding PAM error code.
This illustration shows the path that a PAM application API call will follow if the /etc/pam.conf file is
configured to make use of the pam_aix module. As shown in the diagram, the integration allows users to
be authenticated by any of the loadable authentication modules (DCE, LDAP, or KRB5) or in AIX files
(compat).
Figure 4. PAM Application to AIX Security Subsystem Path
Security 189

The pam_aix module is installed in the /usr/lib/security directory. Integration of the pam_aix module
requires that the /etc/pam.conf file be configured to make use of the module. Stacking is still available but
is not shown in the following example of the /etc/pam.conf file:
#
# Authentication management
#
OTHER auth required /usr/lib/security/pam_aix
#
# Account management
#
OTHER account required /usr/lib/security/pam_aix
#
# Session management
#
OTHER session required /usr/lib/security/pam_aix
#
# Password management
#
OTHER password required /usr/lib/security/pam_aix
The pam_aix module has implementations for the pam_sm_authenticate, pam_sm_chauthok and
pam_sm_acct_mgmt SPI functions. The pam_sm_setcred, pam_sm_open_session, and
pam_sm_close_session SPI are also implemented in the pam_aix module, but these SPI functions return
PAM_SUCCESS invocations.
The following is an approximate mapping of PAM SPI calls to the AIX security subsystem:
PAM SPI AIX
========= =====
pam_sm_authenticate --> authenticate
pam_sm_chauthtok --> passwdexpired, chpass
Note: passwdexpired is only checked if the
PAM_CHANGE_EXPIRED_AUTHTOK flag is passed in.
pam_sm_acct_mgmt --> loginrestrictions, passwdexpired
pam_sm_setcred --> No comparable mapping exists, PAM_SUCCESS returned
pam_sm_open_session --> No comparable mapping exists, PAM_SUCCESS returned
pam_sm_close_session --> No comparable mapping exists, PAM_SUCCESS returned
Data intended to be passed to the AIX security subsystem can be set using either the pam_set_item
function prior to module use, or the pam_aix module for data if it does not already exist.
PAM loadable authentication module
AIX security services can be configured to call PAM modules through the use of the existing AIX loadable
authentication module framework.
Note: Prior to AIX 5.3 a loadable authentication module PAM was used to provide PAM authentication to
native AIX applications. Due to differences in behavior between this solution and a true PAM
solution, the PAM loadable authentication module is no longer the recommended means to provide
PAM authentication to native AIX applications. Instead, the auth_type attribute in the usw stanza of
/etc/security/login.cfg should be set to PAM_AUTH to enable PAM authentication in AIX. For more
information on the auth_type attribute, see /etc/security/login.cfg. Use of the PAM loadable
authentication module is still supported, but it is deprecated. You should use the auth_type attribute
to enable PAM authentication.
When the /usr/lib/security/methods.cfg file is set up correctly, the PAM load module routes AIX security
services (passwd, login, and so on) to the PAM library. The PAM library checks the /etc/pam.conf file to
determine which PAM module to use and then makes the corresponding PAM SPI call. Return values from
190 AIX Version 6.1 Security

PAM are mapped to AIX error codes and returned to the calling program.
This illustration shows the path that an AIX security service call takes when PAM is configured correctly.
The PAM modules shown (pam_krb, pam_ldap, and pam_dce) are listed as examples of third-party
solutions.
The PAM load module is installed in the /usr/lib/security directory and is an authentication-only module.
The PAM module must be combined with a database to form a compound load module. The following
example shows the stanzas that could be added to the methods.cfg file to form a compound PAM module
with a database called files. The BUILTIN keyword for the db attribute designates the database as UNIX
files.
PAM:
program = /usr/lib/security/PAM
PAMfiles:
options = auth=PAM,db=BUILTIN
Creating and modifying users is then performed by using the -R option with the administration commands
and by setting the SYSTEM attribute when a user is created. For example:
mkuser -R PAMfiles SYSTEM=PAMfiles registry=PAMfiles pamuser
This action informs further calls to AIX security services (login, passwd, and so on) to use the PAM load
module for authentication. While the files database was used for the compound module in this example,
other databases, such as LDAP, can also be used if they are installed. Creating users as previously
described will result in the following mapping of AIX security to PAM API calls:
AIX PAM API
===== =========
authenticate --> pam_authenticate
chpass --> pam_chauthtok
passwdexpired --> pam_acct_mgmt
passwdrestrictions --> No comparable mapping exists, success returned
Customizing the /etc/pam.conf file allows the PAM API calls to be directed to the desired PAM module for
authentication. To further refine the authentication mechanism, stacking can be implemented.
Figure 5. AIX Security Service to PAM Module Path
Security 191

Data prompted for by an AIX security service is passed to PAM through the pam_set_item function
because it is not possible to accommodate user dialog from PAM. PAM modules written for integration with
the PAM module should retrieve all data with pam_get_item calls and should not attempt to prompt the
user to input data because this is handled by the security service.
Loop detection is provided to catch possible configuration errors in which an AIX security service is routed
to PAM and then a PAM module in turn attempts to call the AIX security service to perform the operation.
Detection of this loop event will result in an immediate failure of the intended operation.
Note: The /etc/pam.conf file should not be written to make use of the pam_aix module when using PAM
integration from an AIX security service to a PAM module because this will result in a loop
condition.
Adding a PAM module
You can add a PAM module to enable multiple authentication mechanisms.
1. Place the 32-bit version of the module in the /usr/lib/security directory and the 64-bit version of the
module in /usr/lib/security/64 directory.
2. Set file ownership to root and permissions to 555. The PAM library does not load any module not
owned by the root user.
3. Update the /etc/pam.conf configuration file to include the module in entries for the desired service
names.
4. Test the affected services to ensure their functionality. Do not log off the system until a login test has
been performed.
Changing the /etc/pam.conf file
There are a few thing you should consider before changing the /etc/pam.conf file.
When changing the /etc/pam.conf configuration file, consider the following requirements:
v The file should always be owned by the root user and group security. Permission on the file needs to be
644 to allow everyone read access but only allow root to modify.
v For greater security, consider explicitly configuring each PAM-enabled service and then using the
pam_prohibit module for the OTHER service keyword.
v Read any documentation supplied for a chosen module, and determine which control flags and options
are supported and what their impact will be.
v Select the ordering of modules and control flags carefully, keeping in mind the behavior of required,
requisite, sufficient, and optional control flags in stacked modules.
Note: Incorrect configuration of the PAM configuration file can result in a system that cannot be logged in
to since the configuration applies to all users including root. After making changes to the file, always
test the affected applications before logging out of the system. A system that cannot be logged in to
can be recovered by booting the system in maintenance mode and correcting the /etc/pam.conf
configuration file.
Enabling PAM debug
The PAM library can provide debug information during execution. After enabling the system to collect
debug output, the information gathered can be used to track PAM-API invocations and determine failure
points in the current PAM setup.
To enable PAM debug output, perform these steps:
1. Create an empty file at /etc/pam_debug. The PAM library checks for existence of the
/etc/pam_debug file and if found, enables syslog output.
2. Edit the /etc/syslog.conf file to contain the appropriate entries for the desired levels of messages.
3. Restart the syslogd daemon so that configuration changes are recognized.
192 AIX Version 6.1 Security

4. When the PAM application is restarted, debug messages will be collected in the output file defined in
the /etc/syslog.conf configuration file.
OpenSSH software tools
OpenSSH software tools support the SSH1 and SSH2 protocols. The tools provide shell functions where
network traffic is encrypted and authenticated.
OpenSSH is based on client and server architecture. OpenSSH runs the sshd daemon process on the AIX
host and waits for the connection from clients. It supports public-key and private-key pairs for
authentication and encryption of channels to ensure secure network connections and host-based
authentication. For more information about OpenSSH, including the man pages, see the following Web
sites:
http://www.openssh.org
http://www-128.ibm.com/developerworks/eserver/articles/openssh_updated.html
To download the latest installp format packages for AIX go to the following Web site:
http://sourceforge.net/projects/openssh-aix.
This section explains how to install and configure OpenSSH on AIX.
The OpenSSH software is shipped on the AIX 5.3 Expansion Pack. This version of OpenSSH is compiled
and packaged as installp packages using the openssh-3.8.p1 level of source code. The installp packages
include the man pages and the translated message filesets. The OpenSSH program contained in the
Expansion Pack CD-ROM media is licensed under the terms and conditions of the IBM International
Program License Agreement (IPLA) for Non-Warranted Programs.
Before installing the OpenSSH installp format packages, you must install the Open Secure Sockets Layer
(OpenSSL) software that contains the encrypted library. OpenSSL is available in RPM packages on the
AIX Toolbox for Linux Applications CD, or you can also download the packages from the following AIX
Toolbox for Linux Applications Web site:
http://www-1.ibm.com/servers/aix/products/aixos/linux/download.html
Because the OpenSSL package contains cryptographic content, you must register on the Web site to
download the packages. You can download the packages by completing the following steps:
1. Click the AIX Toolbox Cryptographic Content link on the right side of the AIX Toolbox for Linux
Applications Web site.
2. Click I have not registered before.
3. Fill in the required fields in the form.
4. Read the license and then click Accept License. The browser automatically redirects to the download
page.
5. Scroll down the list of cryptographic content packages until you see openssl-0.9.6m-1.aix4.3.ppc.rpm
under OpenSSL — SSL Cryptographic Libraries.
6. Click the Download Now! button for the openssl-0.9.6m-1.aix4.3.ppc.rpm.
After you download the OpenSSL package, you can install OpenSSL and OpenSSH.
1. Install the OpenSSL RPM package using the geninstall command:
# geninstall -d/dev/cd0 R:openssl-0.9.6m
Output similar to the following displays:
SUCCESSES
---------
openssl-0.9.6m-3
2. Install the OpenSSH installp packages using the geninstall command:
Security 193

# geninstall -I"Y" -d/dev/cd0 I:openssh.base
Use the Y flag to accept the OpenSSH license agreement after you have reviewed the license
agreement.
Output similar to the following displays:
Installation Summary
--------------------
Name Level Part Event Result
-------------------------------------------------------------------------------
openssh.base.client 3.8.0.5200 USR APPLY SUCCESS
openssh.base.server 3.8.0.5200 USR APPLY SUCCESS
openssh.base.client 3.8.0.5200 ROOT APPLY SUCCESS
openssh.base.server 3.8.0.5200 ROOT APPLY SUCCESS
You can also use the SMIT install_software fast path to install OpenSSL and OpenSSH.
The following OpenSSH binary files are installed as a result of the preceding procedure:
scp File copy program similar to rcp
sftp Program similar to FTP that works over SSH1 and SSH2 protocol
sftp-server
SFTP server subsystem (started automatically by sshd daemon)
ssh Similar to the rlogin and rsh client programs
ssh-add
Tool that adds keys to ssh-agent
ssh-agent
An agent that can store private keys
ssh-keygen
Key generation tool
ssh-keyscan
Utility for gathering public host keys from a number of hosts
ssh-keysign
Utility for host-based authentication
ssh-rand-helper
A program used by OpenSSH to gather random numbers. It is used only on AIX 5.1 installations.
sshd Daemon that permits you to log in
The following general information covers OpenSSH:
v The /etc/ssh directory contains the sshd daemon and the configuration files for the ssh client
command.
v The /usr/openssh directory contains the readme file and the original OpenSSH open-source license
text file. This directory also contains the ssh protocol and Kerberos license text.
v The sshd daemon is under AIX SRC control. You can start, stop, and view the status of the daemon by
issuing the following commands:
startsrc -s sshd OR startsrc -g ssh (group)
stopsrc -s sshd OR stopsrc -g ssh
lssrc -s sshd OR lssrc -s ssh
You can also start and stop the daemon by issuing the following commands:
/etc/rc.d/rc2.d/Ksshd start
OR
194 AIX Version 6.1 Security

/etc/rc.d/rc2.d/Ssshd start
/etc/rc.d/rc2.d/Ksshd stop
OR
/etc/rc.d/rc2.d/Ssshd stop
v When the OpenSSH server fileset is installed, an entry is added to the /etc/rc.d/rc2.d directory. An
entry is in inittab to start run-level 2 processes (l2:2:wait:/etc/rc.d/rc 2), so the sshd daemon will
start automatically at boot time. To prevent the daemon from starting at boot time, remove the
/etc/rc.d/rc2.d/Ksshd and /etc/rc.d/rc2.d/Ssshd files.
v OpenSSH software logs information to SYSLOG.
v The IBM Redbooks® publication, Managing AIX Server Farms, provides information about configuring
OpenSSH in AIX and is available at the following Web site:
http://www.redbooks.ibm.com
v OpenSSH supports long user names (256 bytes), the same as the AIX base operating system. For
more information on long user names, see the mkuser command.
v Some keywords, such as AllowUsers, DenyUsers, AllowGroups, and DenyGroups are not available by
default in the ssh_config file or the sshd_config file. You must add these keywords to the
configuration files in order to use them.
OpenSSH images
Use the following steps to install the OpenSSH images:
1. Download the images from http://sourceforge.net/projects/openssh-aix
2. Decompress the image package using the uncompress packagename command. For example:
uncompress openssh361p2_52_nologin.tar.Z
3. Untar the package with the tar -xvf packagename command. For example:
tar -xvf openssh361p2_52_nologin.tar
4. Run inutoc.
5. Run smitty install.
6. Select Install and Update Software.
7. Select Update Installed Software to Latest Level (Update All).
8. Type a dot (.) in the field for INPUT device / directory for software and press Enter.
9. Scroll down to ACCEPT new license agreements and press the Tab key to change the field to Yes.
10. Press the Enter key twice to start the installation.
The OpenSSH images are base level images, not Program Temporary Fixes (PTFs). Upon installation, all
of the previous version’s code is overwritten with the new version’s images.
Configuration of OpenSSH compilation
The following information discusses how the OpenSSH code is compiled for AIX.
When configuring OpenSSH for AIX 5.1, the output is similar to the following:
OpenSSH has been configured with the following options:
User binaries: /usr/bin
System binaries: /usr/sbin
Configuration files: /etc/ssh
Askpass program: /usr/sbin/ssh-askpass
Manual pages: /usr/man
PID file: /etc/ssh
Privilege separation chroot path: /var/empty
sshd default user PATH: /usr/bin:/bin:/usr/sbin:/sbin:/usr/local/bin
Manpage format: man
PAM support: no
KerberosIV support: no
Security 195

KerberosV support: yes
Smartcard support: no
AFS support: no
S/KEY support: no
TCP Wrappers support: no
MD5 password support: no
IP address in $DISPLAY hack: no
Use IPv4 by default hack: no
Translate v4 in v6 hack: no
BSD Auth support: no
Random number source: ssh-rand-helper
ssh-rand-helper collects from: Command hashing (timeout 200)
Host: powerpc-ibm-aix5.1.0.0
Compiler: cc
Compiler flags: -O -D__STR31__
Preprocessor flags: -I. -I$(srcdir) -I/home/BUILD/test2debug/zlib-1.1.3/ -I/o
pt/freeware/src/packages/SOURCES/openssl-0.9.6m/include -I/usr/include -I/usr/in
clude/gssapi -I/usr/include/ibm_svc -I/usr/local/include $(PATHS) -DHAVE_CONFIG_
H
Linker flags: -L. -Lopenbsd-compat/ -L/opt/freeware/lib/ -L/usr/local/lib
-L/usr/krb5/lib -blibpath:/opt/freeware/lib:/usr/lib:/lib:/usr/local/lib:/usr/kr
b5/lib
Libraries: -lz -lcrypto -lkrb5 -lk5crypto -lcom_err
WARNING: you are using the builtin random number collection
service. Please read WARNING.RNG and request that your OS
vendor includes kernel-based random number collection in
future versions of your OS.
When configuring OpenSSH for AIX 5.2 the output is similar to the following:
OpenSSH has been configured with the following options:
User binaries: /usr/bin
System binaries: /usr/sbin
Configuration files: /etc/ssh
Askpass program: /usr/sbin/ssh-askpass
Manual pages: /usr/man
PID file: /etc/ssh
Privilege separation chroot path: /var/empty
sshd default user PATH: /usr/bin:/bin:/usr/sbin:/sbin:/usr/local/bin
Manpage format: man
PAM support: no
KerberosIV support: no
KerberosV support: yes
Smartcard support: no
AFS support: no
S/KEY support: no
TCP Wrappers support: no
MD5 password support: no
IP address in $DISPLAY hack: no
Use IPv4 by default hack: no
Translate v4 in v6 hack: no
BSD Auth support: no
Random number source: OpenSSL internal ONLY
Host: powerpc-ibm-aix5.2.0.0
Compiler: cc
Compiler flags: -O -D__STR31__
Preprocessor flags: -I/opt/freeware/src/packages/BUILD/openssl-0.9.6m/includ
e -I/usr/local/include -I/usr/local/include
Linker flags: -L/opt/freeware/src/packages/BUILD/openssl-0.9.6m -L/usr/lo
cal/lib -L/usr/local/lib -blibpath:/usr/lib:/lib:/usr/local/lib:/usr/local/lib
Libraries: -lz -lcrypto -lkrb5 -lk5crypto -lcom_err
When configuring OpenSSH for AIX 5.3 the output is similar to the following:
OpenSSH has been configured with the following options:
User binaries: /usr/bin
System binaries: /usr/sbin
Configuration files: /etc/ssh
196 AIX Version 6.1 Security

Askpass program: /usr/sbin/ssh-askpass
Manual pages: /usr/man
PID file: /etc/ssh
Privilege separation chroot path: /var/empty
sshd default user PATH: /usr/bin:/bin:/usr/sbin:/sbin:/usr/
local/bin
Manpage format: man PAM support: no
KerberosIV support: no
KerberosV support: yes
Smartcard support: no
AFS support: no
S/KEY support: no
TCP Wrappers support: no
MD5 password support: no
IP address in $DISPLAY hack: no
Use IPv4 by default hack: no
Translate v4 in v6 hack: no
BSD Auth support: no
Random number source: OpenSSL internal ONLY
Host: powerpc-ibm-aix5.3.0.0
Compiler: cc
Compiler flags: -O -D__STR31__
Preprocessor flags: -I/opt/freeware/src/packages/BUILD/openssl-0.9.6m/
include -I/usr/local/include -I/usr/local/include
Linker flags: -L/opt/freeware/src/packages/BUILD/openssl-0.9.6m
-L/usr/local/lib -L/usr/local/lib -blibpath:/usr/lib:/lib:/usr/local/
lib:/usr/local/lib
Libraries: -lz -lcrypto -lkrb5 -lk5crypto -lcom_err
OpenSSH and Kerberos Version 5 support
Kerberos is an authentication mechanism that provides a secure means of authentication for network
users. It prevents transmission of clear text passwords over the network by encrypting authentication
messages between clients and servers. In addition, Kerberos provides a system for authorization in the
form of administering tokens, or credentials.
To authenticate a user using Kerberos, the user runs the kinit command to gain initial credentials from a
central Kerberos server known as the KDC (Key Distribution Center). The KDC verifies the user and
passes back to the user his initial credentials, known as a TGT (Ticket-Granting Ticket). The user can then
start a remote login session using a service such as a Kerberized Telnet or OpenSSH, and Kerberos
authenticates the user by gaining user credentials from the KDC. Kerberos performs this authentication
without any need for user interaction, therefore users do not need to enter passwords to login. IBM’s
version of Kerberos is known as Network Authentication Service (NAS). NAS can be installed from the AIX
Expansion Pack CDs. It is available in the krb5.client.rte and krb5.server.rte packages. Beginning in the
July 2003 release of OpenSSH 3.6, OpenSSH supports Kerberos 5 authentication and authorization
through NAS version 1.3.
OpenSSH version 3.8 and later supports Kerberos 5 authentication and authorization through NAS Version
1.4. Any migration from previous versions of NAS (Kerberos) needs to happen before updating OpenSSH.
OpenSSH version 3.8.x will only work with NAS version 1.4 or later.
AIX has created OpenSSH with Kerberos authentication as an optional method. If the Kerberos libraries
are not installed on the system, when OpenSSH runs Kerberos authentication is skipped and OpenSSH
tries the next configured authentication method (such as AIX authentication).
After you install Kerberos, it is recommended that you read the Kerberos documentation before configuring
the Kerberos servers. For more information about how to install and administer Kerberos, refer to the IBM
Network Authentication Service Version 1.3 for AIX : Administrator’s and User’s Guide located in the
/usr/lpp/krb5/doc/html/lang/ADMINGD.htm path.
Using OpenSSH with Kerberos:
Security 197

Some initial setup is required to use OpenSSH with Kerberos.
The following steps provide information on the initial setup that is required in order to use OpenSSH with
Kerberos:
1. On your OpenSSH clients and servers, the /etc/krb5.conf file must exist. This file tells Kerberos which
KDC to use, how long of a lifetime to give each ticket, and so on. The following is an example
krb5.conf file:
[libdefaults]
ticket_lifetime = 600
default_realm = OPENSSH.AUSTIN.XYZ.COM
default_tkt_enctypes = des3-hmac-sha1 des-cbc-crc
default_tgs_enctypes = des3-hmac-sha1 des-cbc-crc
[realms]
OPENSSH.AUSTIN.xyz.COM = {
kdc = kerberos.austin.xyz.com:88
kdc = kerberos-1.austin.xyz.com:88
kdc = kerberos-2.austin.xyz.com:88
admin_server = kerberos.austin.xyz.com:749
default_domain = austin.xyz.com
}
[domain_realm]
.austin.xyz.com = OPENSSH.AUSTIN.XYZ.COM
kdc.austin.xyz.com = OPENSSH.AUSTIN.XYZ.COM
2. Also, you must add the following Kerberos services to each client machine’s /etc/services file:
kerberos 88/udp kdc # Kerberos V5 KDC
kerberos 88/tcp kdc # Kerberos V5 KDC
kerberos-adm 749/tcp # Kerberos 5 admin/changepw
kerberos-adm 749/udp # Kerberos 5 admin/changepw
krb5_prop 754/tcp # Kerberos slave
# propagation
3. If your KDC is using LDAP as the registry to store user information, read “LDAP authentication load
module” on page 131, and the Kerberos publications. Furthermore, make sure the following actions are
performed:
v KDC is running the LDAP client. You can start the LDAP client daemon with the secldapclntd
command.
v LDAP server is running the slapd LDAP server daemon.
4. On the OpenSSH server, edit the /etc/ssh/sshd_config file to contain the lines:
KerberosAuthentication yes
KerberosTicketCleanup yes
GSSAPIAuthentication yes
GSSAPICleanupCredentials yes
UseDNS yes
If UseDNS is set to Yes, the ssh server does a reverse host lookup to find the name of the connecting
client. This is necessary when host-based authentication is used or when you want last login
information to display host names rather than IP addresses.
Note: Some ssh sessions stall when performing reverse name lookups because the DNS servers are
unreachable. If this happens, you can skip the DNS lookups by setting UseDNS to no. If
UseDNS is not explicitly set in the /etc/ssh/sshd_config file, the default value is UseDNS yes.
5. On the SSH server, run the startsrc -g ssh command to start the ssh server daemon.
6. On the SSH client machine, run the kinit command to gain initial credentials (a TGT). You can verify
that you received a TGT by running the klist command. This shows all credentials belonging to you.
7. Connect to the server by running the ssh username@servername command.
198 AIX Version 6.1 Security

8. If Kerberos is properly configured to authenticate the user, a prompt for a password will not display,
and the user will be automatically logged into the SSH server.
Securing the network
The following sections describe how to install and configure IP Security; how to identify necessary and
unnecessary network services; and auditing and monitoring network security.
TCP/IP security
If you installed the Transmission Control Protocol/Internet Protocol (TCP/IP) and Network File System
(NFS) software, you can configure your system to communicate over a network.
This guide does not describe the basic concepts of TCP/IP, but rather describes security-related concerns
of TCP/IP. For information on installing and the initial configuration of TCP/IP, refer to the Transmission
Control Protocol/Internet Protocol section in Networks and communication management.
For any number of reasons, the person who administers your system might have to meet a certain level of
security. For instance, the security level might be a matter of corporate policy. Or a system might need
access to government systems and thus be required to communicate at a certain security level. These
security standards might be applied to the network, the operating system, application software, even
programs written by the person who administers your system.
This section describes the security features provided with TCP/IP, both in standard mode and as a secure
system, and discusses some security considerations that are appropriate in a network environment.
After you install TCP/IP and NFS software, use the Web-based System Manager or the System
Management Interface Tool (SMIT) tcpip fast path, to configure your system.
For more information on the dacinet command, refer to the AIX Version 6.1 Commands Reference.
Operating system-specific security
Many of the security features, such as network access control and network auditing, available for TCP/IP
are based on those available through the operating system.
The following sections outline TCP/IP security.
Network access control:
The security policy for networking is an extension of the security policy for the operating system and
consists of user authentication, connection authentication, and data security.
It consists of the following major components:
v User authentication is provided at the remote host by a user name and password in the same way as
when a user logs in to the local system. Trusted TCP/IP commands, such as ftp, rexec, and telnet,
have the same requirements and undergo the same verification process as trusted commands in the
operating system.
v Connection authentication is provided to ensure that the remote host has the expected Internet Protocol
(IP) address and name. This prevents a remote host from masquerading as another remote host.
v Data import and export security permits data at a specified security level to flow to and from network
interface adapters at the same security and authority levels. For example, top-secret data can flow only
between adapters that are set to the top-secret security level.
Network auditing:
Security 199

Network auditing is provided by TCP/IP, using the audit subsystem to audit both kernel network routines
and application programs.
The purpose of auditing is to record those actions that affect the security of the system and the user
responsible for those actions.
The following types of events are audited:
Kernel events
v Change configuration
v Change host ID
v Change route
v Connection
v Create socket
v Export object
v Import object
Application events
v Access the network
v Change configuration
v Change host ID
v Change static route
v Configure mail
v Connection
v Export data
v Import data
v Write mail to a file
Creation and deletion of objects are audited by the operating system. Application audit records suspend
and resume auditing to avoid redundant auditing by the kernel.
Trusted path, trusted shell, and Secure Attention Key:
The operating system provides the trusted path to prevent unauthorized programs from reading data from
a user terminal. This path is used when a secure communication path with the system is required, such as
when you are changing passwords or logging in to the system.
The operating system also provides the trusted shell (tsh), which runs only trusted programs that have
been tested and verified as secure. TCP/IP supports both of these features, along with the secure
attention key (SAK), which establishes the environment necessary for secure communication between you
and the system. The local SAK is available whenever you are using TCP/IP. A remote SAK is available
through the telnet command.
The local SAK has the same function in telnet that it has in other operating system application programs:
it ends the telnet process and all other processes associated with the terminal in which telnet was
running. Inside the telnet program, however, you can send a request for a trusted path to the remote
system using the telnet send sak command (while in telnet command mode). You can also define a
single key to initiate the SAK request using the telnet set sak command.
For more information about the Trusted Computing Base, see “Trusted Computing Base” on page 1.
200 AIX Version 6.1 Security

TCP/IP command security
Some commands in TCP/IP provide a secure environment during operation. These commands are ftp,
rexec, and telnet.
The ftp function provides security during file transfer. The rexec command provides a secure environment
for running commands on a foreign host. The telnet function provides security for login to a foreign host.
The ftp, rexec, and telnet commands provide security during their operation only. That is, they do not set
up a secure environment for use with other commands. For securing your system for other operations, use
the securetcpip command. This command gives you the ability to secure your system by disabling the
nontrusted daemons and applications, and by giving you the option of securing your IP layer network
protocol as well.
The ftp, rexec, securetcpip, and telnet commands provide the following forms of system and data
security:
ftp The ftp command provides a secure environment for transferring files.
When a user invokes the ftp command to a foreign host, the user is
prompted for a login ID. A default login ID is shown: the user’s current login
ID on the local host. The user is prompted for a password for the remote
host.
The automatic login process searches the local user’s $HOME/.netrc file for
the user’s ID and password to use at the foreign host. For security, the
permissions on the $HOME/.netrc file must be set to 600 (read and write
by owner only). Otherwise, automatic login fails.
Note: Because use of the .netrc file requires storage of passwords in
a nonencrypted file, the automatic login feature of the ftp command is
not available when your system has been configured with the
securetcpip command. This feature can be reenabled by removing
the ftp command from the tcpip stanza in the /etc/security/config
file.
To use the file transfer function, the ftp command requires two TCP/IP
connections, one for the File Transfer Protocol (FTP) and one for data
transfer. The protocol connection is primary and is secure because it is
established on reliable communicating ports. The secondary connection is
needed for the actual transfer of data, and both the local and remote host
verify that the other end of this connection is established with the same
host as the primary connection. If the primary and secondary connections
are not established with the same host, the ftp command first displays an
error message stating that the data connection was not authenticated, and
then it exits. This verification of the secondary connection prevents a third
host from intercepting data intended for another host.
rexec The rexec command provides a secure environment for executing
commands on a foreign host. The user is prompted for both a login ID and
a password.
An automatic login feature causes the rexec command to search the local
user’s $HOME/.netrc file for the user’s ID and password on a foreign host.
For security, the permissions on the $HOME/.netrc file must be set to 600
(read and write by owner only). Otherwise, automatic login fails.
Note: Because use of the .netrc file requires storage of passwords in
a nonencrypted file, the automatic login feature of rexec command is
not available when your system is operating in secure. This feature
can be reenabled by removing the entry from the tcpip stanza in the
/etc/security/config file.
Security 201

securetcpip The securetcpip command enables TCP/IP security features. Access to
commands that are not trusted is removed from the system when this
command is issued. Each of the following commands is removed by
running the securetcpip command:
v rlogin and rlogind
v rcp, rsh, and rshd
v tftp and tftpd
v trpt
The securetcpip command is used to convert a system from the standard
level of security to a higher security level. After your system has been
converted, you need not issue the securetcpip command again unless you
reinstall TCP/IP.
telnet or tn The telnet (TELNET) command provides a secure environment for login to
a foreign host. The user is prompted for both a login ID and a password.
The user’s terminal is treated just like a terminal connected directly to the
host. That is, access to the terminal is controlled by permission bits. Other
users (group and other) do not have read access to the terminal, but they
can write messages to it if the owner gives them write permission. The
telnet command also provides access to a trusted shell on the remote
system through the SAK. This key sequence differs from the sequence that
invokes the local trusted path and can be defined within the telnet
command.
Remote command execution access:
Users on the hosts listed in the /etc/hosts.equiv file can run certain commands on your system without
supplying a password.
The following table provides information about how to list, add, and remove remote hosts using
Web-based System Manager, SMIT, or command line.
Table 12. Remote command execution access tasks
Task SMIT fast path Command or file Web-based System Manager Management Environment
List
Remote
Hosts That
Have
Command
Execution
Access
smit
lshostsequiv
view
/etc/hosts.equiv file
Software → Network → TCPIP (IPv4 and IPv6) → TCPIP
Protocol Configuration → TCP/IP → Configure TCP/IP →
Advanced Methods → Hosts File → Contents of /etc/hosts file
.
Add a
Remote
Host for
Command
Execution
Access
smit
mkhostsequiv
edit /etc/hosts.equiv
filenote
Software → Network → TCPIP (IPv4 and IPv6) → TCPIP
Protocol Configuration → TCP/IP → Configure TCP/IP →
Advanced Methods → Hosts File . In Add/Change host entry,
complete the following fields: IP Address, Host name,
Alias(es), and Comment. Click Add/Change Entry, and click
OK.
Remove a
Remote
Host from
Command
Execution
Access
smit
rmhostsequiv
edit /etc/hosts.equiv
filenote
Software → Network → TCPIP (IPv4 and IPv6) → TCPIP
Protocol Configuration → TCP/IP → Configure TCP/IP →
Advanced Methods → Hosts File. Select a host in Contents of
/etc/host file. Click Delete Entry → OK.
202 AIX Version 6.1 Security

Note: For more information about these file procedures, see the ″hosts.equiv File Format for TCP/IP″ in
the AIX Version 6.1 Files Reference.
Restricted file transfer program users:
Users listed in the /etc/ftpusers file are protected from remote FTP access. For example, suppose that
user A is logged into a remote system, and he knows the password of user B on your system. If user B is
listed in the /etc/ftpusers file, user A cannot FTP files to or from user B’s account, even though user A
knows user B’s password.
The following table provides information about how to list, add, and remove restricted users using
Web-based System Manager, SMIT, or command line.
Remote FTP user tasks
Task SMIT fast path Command or file
Web-based System Manager Management
Environment
List Restricted
FTP Users
smit lsftpusers view
/etc/ftpusers file
Software → Users → All Users.
Add a Restricted
User
smit mkftpusers edit /etc/ftpusers
fileNote
Software → Users → All Users → Selected → Add this
User to Group. Select a group, and click OK.
Remove a
Restricted User
smit rmftpusers edit /etc/ftpusers
fileNote
Software → Users → All Users → Selected → Delete.
Note: For more information about these file procedures, see the ″ftpusers File Format for TCP/IP″ in the
AIX Version 6.1 Files Reference.
Trusted processes
A trusted program, or trusted process, is a shell script, a daemon, or a program that meets a particular
standard of security. These security standards are set and maintained by the U.S. Department of Defense,
which also certifies some trusted programs.
Trusted programs are trusted at different levels. Security levels include A1, B1, B2, B3, C1, C2, and D,
with level A1 providing the highest security level. Each security level must meet certain requirements. For
example, the C2 level of security incorporates the following standards:
program integrity Ensures that the process performs exactly as intended.
modularity Process source code is separated into modules that cannot
be directly affected or accessed by other modules.
principle of least privilege States that at all times a user is operating at the lowest level
of privilege authorized. That is, if a user has access only to
view a certain file, then the user does not inadvertently also
have access to alter that file.
limitation of object reuse Keeps a user from, for example, accidentally finding a section
of memory that has been flagged for overwriting but not yet
cleared, and which might contain sensitive material.
TCP/IP contains several trusted daemons and many nontrusted daemons.
Examples of trusted daemons are as follows:
v ftpd
v rexecd
v telnetd
Examples of nontrusted daemons are as follows:
Security 203

v rshd
v rlogind
v tftpd
For a system to be trusted, it must operate with a trusted computing base; that is, for a single host, the
machine must be secure. For a network, all file servers, gateways, and other hosts must be secure.
Network Trusted Computing Base
The Network Trusted Computing Base (NTCB) consists of hardware and software for ensuring network
security. This section defines the components of the NTCB as they relate to TCP/IP.
The hardware security features for the network are provided by the network adapters used with TCP/IP.
These adapters control incoming data by receiving only data destined for the local system and broadcast
data receivable by all systems.
The software component of the NTCB consists of only those programs that are considered as trusted. The
programs and associated files that are part of a secure system are listed in the following tables on a
directory-by-directory basis.
/etc directory
Name Owner Group Mode Permissions
gated.conf root system 0664 rw-rw-r—
gateways root system 0664 rw-rw-r—
hosts root system 0664 rw-rw-r—
hosts.equiv root system 0664 rw-rw-r—
inetd.conf root system 0644 rw-r—r—
named.conf root system 0644 rw-r—r—
named.data root system 0664 rw-rw-r—
networks root system 0664 rw-rw-r—
protocols root system 0644 rw-r—r—
rc.tcpip root system 0774 rwxrwxr—
resolv.conf root system 0644 rw-rw-r—
services root system 0644 rw-r—r—
3270.keys root system 0664 rw-rw-r—
3270keys.rt root system 0664 rw-rw-r—
/usr/bin directory
Name Owner Group Mode Permissions
host root system 4555 r-sr-xr-x
hostid bin bin 0555 r-xr-xr-x
hostname bin bin 0555 r-xr-xr-x
finger root system 0755 rwxr-xr-x
ftp root system 4555 r-sr-xr-x
netstat root bin 4555 r-sr-xr-x
rexec root bin 4555 r-sr-xr-x
ruptime root system 4555 r-sr-xr-x
rwho root system 4555 r-sr-xr-x
204 AIX Version 6.1 Security

/usr/bin directory
Name Owner Group Mode Permissions
talk bin bin 0555 r-xr-xr-x
telnet root system 4555 r-sr-xr-x
/usr/sbin directory
Name Owner Group Mode Permissions
arp root system 4555 r-sr-xr-x
fingerd root system 0554 r-xr-xr—
ftpd root system 4554 r-sr-xr—
gated root system 4554 r-sr-xr—
ifconfig bin bin 0555 r-xr-xr-x
inetd root system 4554 r-sr-xr—
named root system 4554 r-sr-x—
ping root system 4555 r-sr-xr-x
rexecd root system 4554 r-sr-xr—
route root system 4554 r-sr-xr—
routed root system 0554 r-xr-x—-
rwhod root system 4554 r-sr-xr—
securetcpip root system 0554 r-xr-xr—
setclock root system 4555 r-sr-xr-x
syslogd root system 0554 r-xr-xr—
talkd root system 4554 r-sr-xr—
telnetd root system 4554 r-sr-xr—
/usr/ucb directory
Name Owner Group Mode Permissions
tn root system 4555 r-sr-xr-x
/var/spool/rwho directory
Name Owner Group Mode Permissions
rwho (directory) root system 0755 drwxr-xr-x
Data security and information protection
The security feature for TCP/IP does not encrypt user data transmitted through the network.
Identify any risk in communication that could result in the disclosure of passwords and other sensitive
information, and based on that risk, apply appropriate countermeasures.
Using the TCP/IP security feature in a Department of Defense (DOD) environment might require
adherence to DOD 5200.5 and NCSD-11 for communications security.
Security 205

User based TCP port access control with discretionary access control for internet
ports
Discretionary Access Control for Internet Ports (DACinet) features user-based access control for TCP ports
for communication between AIX 5.2 hosts.
AIX 5.2 can use an additional TCP header to transport user and group information between systems. The
DACinet feature allows the administrator on the destination system to control access based on the
destination port, the originating user id and host.
Note: The DACinet facility is available only in CAPP/EAL4+ configured AIX systems.
In addition, the DACinet feature allows the administrator to restrict local ports for root only usage. UNIX
systems like AIX treat ports below 1024 as privileged ports which can only be opened by root. AIX 5.2
allows you to specify additional ports above 1024 which can be opened only by root, therefore preventing
users from running servers on well known ports.
Depending on the settings a non-DACinet system may or may not be able to connect to a DACinet
system. Access is denied in the initial state of the DACinet feature. Once DACinet has been enabled, there
is no way to disable DACinet.
The dacinet command accepts addresses which are specified as hostnames, dotted decimal host
addresses, or network addresses followed by the length of the network prefix.
The following example specifies a single host which is known by the fully qualified host name
host.domain.org:
host.domain.org
The following example specifies a single host which is known by the IP address 10.0.0.1:
10.0.0.1
The following example specifies the entire network which has the first 24 bits (the length of the network
prefix) with a value of 10.0.0.0:
10.0.0.0/24
This network includes all IP addresses between 10.0.0.1 and 10.0.0.254.
Access control for TCP based services:
DACinet uses the /etc/rc.dacinet startup file, and the configuration files it uses are /etc/security/priv,
/etc/security/services, and /etc/security/acl.
Ports listed in /etc/security/services are considered exempt from the ACL checks. The file has the same
format as /etc/services. The easiest way to initialize it is to copy the file from /etc to /etc/security and
then delete all the ports for which ACLs should be applied. The ACLs are stored in two places. The
currently active ACLs are stored in the kernel and can be read by running dacinet aclls. ACLs that will be
reactivated at the next system boot by /etc/rc.tcpip are stored in /etc/security/acl. The following format is
used:
service host/prefix-length [user|group]
Where the service can be specified either numerically or as listed in /etc/services, the host can be given
either as a host name or a network address with a subnet mask specification and the user or group is
specified with the u: or g: prefix. When no user or group is specified, then the ACL takes only the sending
host into account. Prefixing the service with a - will disable access explicitly. ACLs are evaluated according
to the first match. So you could specify access for a group of users, but explicitly deny it for a user in the
group by placing the rule for this user in front of the group rule.
206 AIX Version 6.1 Security
The /etc/services file includes two entries with port number values which are not supported in AIX 5.2.
The system administrator must remove both lines from that file prior to executing the mkCCadmin
command. Remove the following lines from the /etc/services file:
sco_printer 70000/tcp sco_spooler # For System V print IPC
sco_s5_port 70001/tcp lpNet_s5_port # For future use
DACinet usage examples:
For example, when using DACinet to restrict access to port TCP/25 inbound to root only with the DACinet
feature, then only root users from other AIX 5.2 hosts can access this port, therefore limiting the
possibilities of regular users to spoof e-mail by just telneting to port TCP/25 on the victim.
The following example shows how to configure the X protocol (X11) for root only access. Make sure that
the X11 entry in /etc/security/services is removed, so that the ACLs will apply for this service.
Assuming a subnet of 10.1.1.0/24 for all the connected systems, the ACL entries to restrict access to the
root user only for X (TCP/6000) in /etc/security/acl would be as follows:
6000 10.1.1.0/24 u:root
When limiting Telnet service to users in the group friends, no matter from which system they are coming
from, use the following ACL entry after having removed the telnet entry from /etc/security/services:
telnet 0.0.0.0/0 g:friends
Disallow user fred access to the web server, but allow everyone else access:
-80 0.0.0.0/0 u:fred
80 0.0.0.0/0
Privileged ports for running local services:
To prevent regular users from running servers at specific ports, these ports can be designated as
privileged.
Normally any user can open any port above 1024. For example, a user could place a server at port 8080,
which is quite often used to run Web proxies or at 1080 where one typically finds a SOCKS server. The
dacinet setpriv command can be used to add privileged ports to the running system. Ports that are to be
designated as privileged when the system starts have to be listed in /etc/security/priv.
Ports can be listed in this file either with their symbolic name as defined in /etc/services or by specifying
the port number. The following entries would disallow non-root users to run SOCKS servers or Lotus
Notes® servers on their usual ports:
1080
lotusnote
Note: This feature does not prevent the user from running the programs. It will only prevent the user from
running the services at the well known ports where those services are typically expected.
Network services
Information about identifying and securing network services with open communication ports is shown.
Ports usage
The following table describes known port usage on AIX.
Note: This list has been established by reviewing multiple AIX systems with different configurations of
software installed.
Security 207
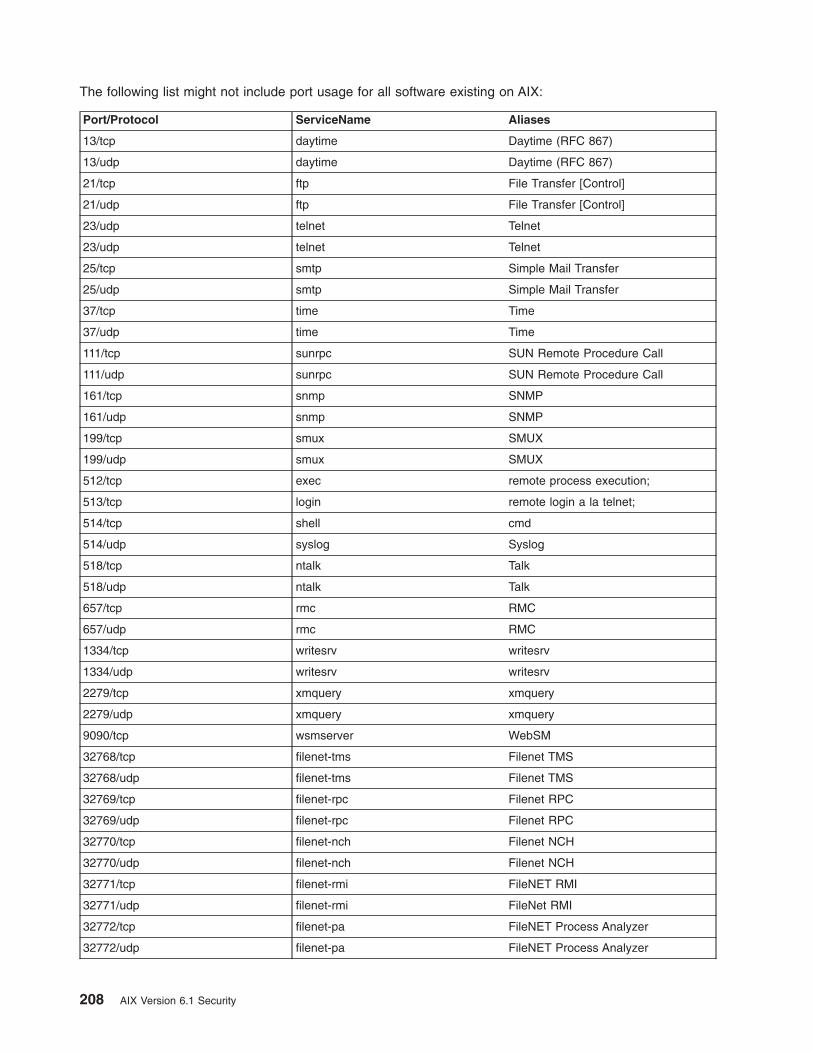
The following list might not include port usage for all software existing on AIX:
Port/Protocol ServiceName Aliases
13/tcp daytime Daytime (RFC 867)
13/udp daytime Daytime (RFC 867)
21/tcp ftp File Transfer [Control]
21/udp ftp File Transfer [Control]
23/udp telnet Telnet
23/udp telnet Telnet
25/tcp smtp Simple Mail Transfer
25/udp smtp Simple Mail Transfer
37/tcp time Time
37/udp time Time
111/tcp sunrpc SUN Remote Procedure Call
111/udp sunrpc SUN Remote Procedure Call
161/tcp snmp SNMP
161/udp snmp SNMP
199/tcp smux SMUX
199/udp smux SMUX
512/tcp exec remote process execution;
513/tcp login remote login a la telnet;
514/tcp shell cmd
514/udp syslog Syslog
518/tcp ntalk Talk
518/udp ntalk Talk
657/tcp rmc RMC
657/udp rmc RMC
1334/tcp writesrv writesrv
1334/udp writesrv writesrv
2279/tcp xmquery xmquery
2279/udp xmquery xmquery
9090/tcp wsmserver WebSM
32768/tcp filenet-tms Filenet TMS
32768/udp filenet-tms Filenet TMS
32769/tcp filenet-rpc Filenet RPC
32769/udp filenet-rpc Filenet RPC
32770/tcp filenet-nch Filenet NCH
32770/udp filenet-nch Filenet NCH
32771/tcp filenet-rmi FileNET RMI
32771/udp filenet-rmi FileNet RMI
32772/tcp filenet-pa FileNET Process Analyzer
32772/udp filenet-pa FileNET Process Analyzer
208 AIX Version 6.1 Security

Port/Protocol ServiceName Aliases
32773/tcp filenet-cm FileNET Component Manager
32773/udp filenet-cm FileNET Component Manager
32774/tcp filenet-re FileNET Rules Engine
32774/udp filenet-re FileNET Rules Engine FileNET Rules Engine
Identifying network services with open communication ports
Client-server applications open communication ports on the server, allowing the applications to listen to
incoming client requests.
Because open ports are vulnerable to potential security attacks, identify which applications have open
ports and close those ports that are open unnecessarily. This practice is useful because it allows you to
understand what systems are being made available to anyone who has access to the Internet.
To determine which ports are open, follow these steps:
1. Identify the services by using the netstat command as follows:
# netstat -af inet
The following is an example of this command output. The last column of the netstat command output
indicates the state of each service. Services that are waiting for incoming connections are in the
LISTEN state.
Active Internet connection (including servers)
Proto Recv-Q Send-Q Local Address Foreign Address (state)
tcp4 0 0 *.echo *.* LISTEN
tcp4 0 0 *.discard *.* LISTEN
tcp4 0 0 *.daytime *.* LISTEN
tcp 0 0 *.chargen *.* LISTEN
tcp 0 0 *.ftp *.* LISTEN
tcp4 0 0 *.telnet *.* LISTEN
tcp4 0 0 *.smtp *.* LISTEN
tcp4 0 0 *.time *.* LISTEN
tcp4 0 0 *.www *.* LISTEN
tcp4 0 0 *.sunrpc *.* LISTEN
tcp 0 0 *.smux *.* LISTEN
tcp 0 0 *.exec *.* LISTEN
tcp 0 0 *.login *.* LISTEN
tcp4 0 0 *.shell *.* LISTEN
tcp4 0 0 *.klogin *.* LISTEN
udp4 0 0 *.kshell *.* LISTEN
udp4 0 0 *.echo *.*
udp4 0 0 *.discard *.*
Security 209

Active Internet connection (including servers)
Proto Recv-Q Send-Q Local Address Foreign Address (state)
udp4 0 0 *.daytime *.*
udp4 0 0 *.chargen *.*
udp4 0 0 *.time *.*
udp4 0 0 *.bootpc *.*
udp4 0 0 *.sunrpc *.*
udp4 0 0 255.255.255.255.ntp *.*
udp4 0 0 1.23.123.234.ntp *.*
udp4 0 0 localhost.domain.ntp *.*
udp4 0 0 name.domain..ntp *.*
....................................
2. Open the /etc/services file and check the Internet Assigned Numbers Authority (IANA) services to
map the service to port numbers within the operating system.
The following is a sample fragment of the /etc/services file:
tcpmux 1/tcp # TCP Port Service Multiplexer
tcpmux 1/tcp # TCP Port Service Multiplexer
Compressnet 2/tcp # Management Utility
Compressnet 2/udp # Management Utility
Compressnet 3/tcp # Compression Process
Compressnet 3/udp Compression Process
Echo 7/tcp
Echo 7/udp
discard 9/tcp sink null
discard 9/udp sink null
..............
rfe 5002/tcp # Radio Free Ethernet
rfe 5002/udp # Radio Free Ethernet
rmonitor_secure 5145/tcp
rmonitor_secure 5145/udp
pad12sim 5236/tcp
pad12sim 5236/udp
sub-process 6111/tcp # HP SoftBench Sub-Process Cntl.
sub-process 6111/udp # HP SoftBench Sub-Process Cntl.
xdsxdm 6558/ucp
210 AIX Version 6.1 Security
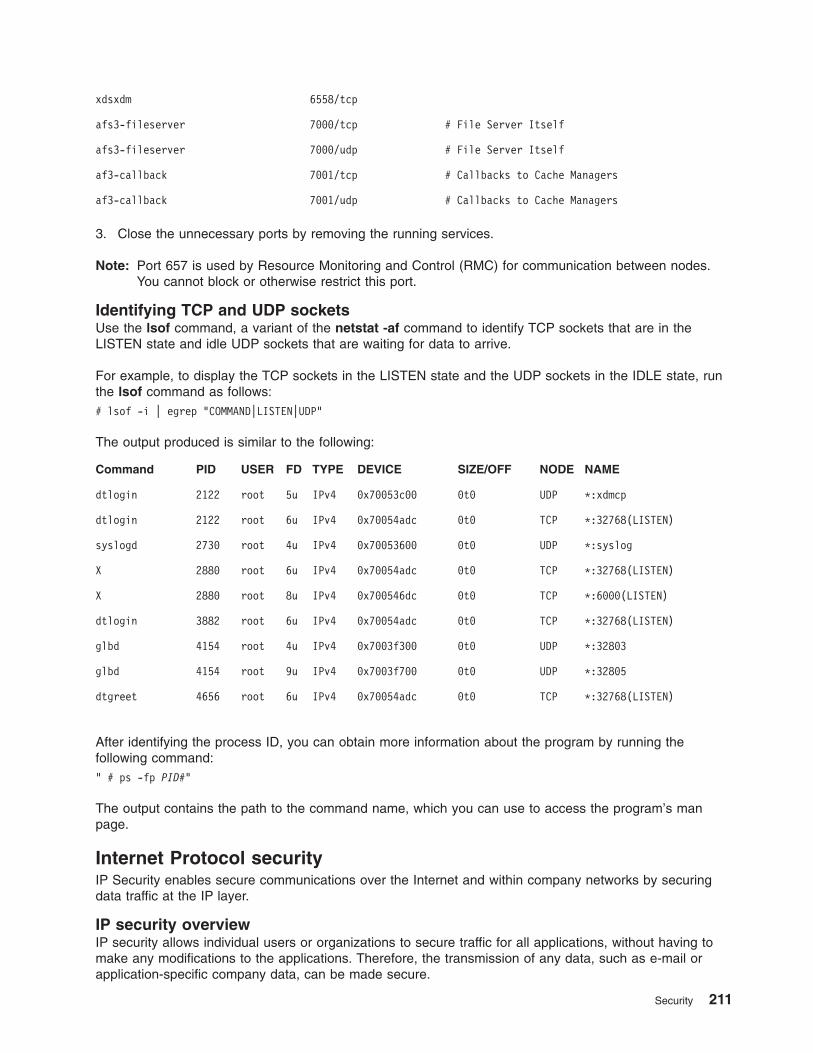
xdsxdm 6558/tcp
afs3-fileserver 7000/tcp # File Server Itself
afs3-fileserver 7000/udp # File Server Itself
af3-callback 7001/tcp # Callbacks to Cache Managers
af3-callback 7001/udp # Callbacks to Cache Managers
3. Close the unnecessary ports by removing the running services.
Note: Port 657 is used by Resource Monitoring and Control (RMC) for communication between nodes.
You cannot block or otherwise restrict this port.
Identifying TCP and UDP sockets
Use the lsof command, a variant of the netstat -af command to identify TCP sockets that are in the
LISTEN state and idle UDP sockets that are waiting for data to arrive.
For example, to display the TCP sockets in the LISTEN state and the UDP sockets in the IDLE state, run
the lsof command as follows:
# lsof -i | egrep "COMMAND|LISTEN|UDP"
The output produced is similar to the following:
Command PID USER FD TYPE DEVICE SIZE/OFF NODE NAME
dtlogin 2122 root 5u IPv4 0x70053c00 0t0 UDP *:xdmcp
dtlogin 2122 root 6u IPv4 0x70054adc 0t0 TCP *:32768(LISTEN)
syslogd 2730 root 4u IPv4 0x70053600 0t0 UDP *:syslog
X 2880 root 6u IPv4 0x70054adc 0t0 TCP *:32768(LISTEN)
X 2880 root 8u IPv4 0x700546dc 0t0 TCP *:6000(LISTEN)
dtlogin 3882 root 6u IPv4 0x70054adc 0t0 TCP *:32768(LISTEN)
glbd 4154 root 4u IPv4 0x7003f300 0t0 UDP *:32803
glbd 4154 root 9u IPv4 0x7003f700 0t0 UDP *:32805
dtgreet 4656 root 6u IPv4 0x70054adc 0t0 TCP *:32768(LISTEN)
After identifying the process ID, you can obtain more information about the program by running the
following command:
" # ps -fp PID#"
The output contains the path to the command name, which you can use to access the program’s man
page.
Internet Protocol security
IP Security enables secure communications over the Internet and within company networks by securing
data traffic at the IP layer.
IP security overview
IP security allows individual users or organizations to secure traffic for all applications, without having to
make any modifications to the applications. Therefore, the transmission of any data, such as e-mail or
application-specific company data, can be made secure.
Security 211

IP security and the operating system:
The operating system uses IP Security (IPsec), which is an open, standard security technology developed
by the Internet Engineering Task Force (IETF).
IPsec provides cryptography-based protection of all data at the IP layer of the communications stack. No
changes are needed for existing applications. IPsec is the industry-standard network-security framework
chosen by the IETF for both the IP Version 4 and 6 environments.
IPsec protects your data traffic using the following cryptographic techniques:
Authentication
Process by which the identity of a host or end point is verified
Integrity Checking
Process of ensuring that no modifications were made to the data while in transit across the
network
Encryption
Process of ensuring privacy by ″hiding″ data and private IP addresses while in transit across the
network
Authentication algorithms prove the identity of the sender and data integrity by using a cryptographic hash
function to process a packet of data (with the fixed IP header fields included) using a secret key to
produce a unique digest. On the receiver side, the data is processed using the same function and key. If
either the data has been altered or the sender key is not valid, the datagram is discarded.
Encryption uses a cryptographic algorithm to modify and randomize the data using a certain algorithm and
key to produce encrypted data known as cyphertext. Encryption makes the data unreadable while in
transit. After it is received, the data is recovered using the same algorithm and key (with symmetric
encryption algorithms). Encryption must occur with authentication to verify the data integrity of the
encrypted data.
These basic services are implemented in IPsec by the use of the Encapsulating Security Payload (ESP)
and the Authentication Header (AH). ESP provides confidentiality by encrypting the original IP packet,
building an ESP header, and putting the cyphertext in the ESP payload.
The AH can be used alone for authentication and integrity-checking if confidentiality is not an issue. With
AH, the static fields of the IP header and the data have a hash algorithm applied to compute a keyed
digest. The receiver uses its key to compute and compare the digest to make sure the packet is unaltered
and the sender’s identity is authenticated.
IP security features:
The following are features of IP Security.
v Supports AES 128-, 192-, and 256-bit algorithms.
v Hardware acceleration with the 10/100 Mbps Ethernet PCI Adapter II.
v AH support using RFC 2402, and ESP support using RFC 2406.
v Manual tunnels can be configured to provide interoperability with other systems that do not support the
automatic IKE key refreshment method, and for use of IP Version 6 tunnels.
v Tunnel mode and transport mode of encapsulation for host or gateway tunnels.
v Authentication algorithms of HMAC (Hashed Message Authentication Code) MD5 (Message Digest 5)
and HMAC SHA (Secure Hash Algorithm).
v Encryption algorithms include 56-bit Data Encryption Standard (DES) Cipher Block Chaining (CBC) with
64-bit initial vector (IV), Triple DES, DES CBC 4 (32 bit IV), and AES CBC.
v Dual IP Stack Support (IP version 4 and IP version 6).
212 AIX Version 6.1 Security

v Both IP Version 4 and IP Version 6 traffic can be encapsulated and filtered. Because the IP stacks are
separate, the IP Security function for each stack can be configured independently.
v Filtering of secure and nonsecure traffic by a variety of IP characteristics such as source and
destination IP addresses, interface, protocol, port numbers, and more.
v Automatic filter-rule creation and deletion with most tunnel types.
v Use of host names for the destination address when defining tunnels and filter rules. The host names
are converted to IP addresses automatically (as long as DNS is available).
v Logging of IP Security events to syslog.
v Use of system traces and statistics for problem determination.
v User-defined default action allows the user to specify whether traffic that does not match defined
tunnels should be allowed.
Internet Key Exchange features:
The following features are available with Internet Key Exchange for AIX 4.3.3 or later.
v ESP encryption support for Data Encryption Standard (DES), Triple DES, AES, Null encryption; ESP
authentication support with HMAC MD5 and HMAC SHA1.
v Support incoming PKCS #7 certificate chains (AIX 5.1 and later).
v Certificate Revocation List support with retrieval using HTTP or LDAP servers.
v Automatic key refreshment with tunnels using IETF Internet Key Exchange (IKE) protocol.
v X.509 Digital Certificate and preshared key support in IKE protocol during key negotiation.
v IKE tunnels can be created using Linux configuration files (AIX 5.1 and later).
v Authentication with preshared keys and X.509 digital signatures.
v Use of main mode (identity protect mode) and aggressive mode.
v Support for Diffie Hellman groups 1, 2, and 5.
v AH support for HMAC MD5 and HMAC SHA1.
v IP Version 4 and Version 6 support.
Security associations:
The building block on which secure communications is built is a concept known as a security association.
Security associations relate a specific set of security parameters to a type of traffic.
With data protected by IP Security, a separate security association exists for each direction and for each
header type, AH or ESP. The information contained in the security association includes the IP addresses of
the communicating parties, a unique identifier known as the Security Parameters Index (SPI), the
algorithms selected for authentication or encryption, the authentication and encryption keys, and the key
lifetimes. The following figure shows the security associations between Host A and Host B.
Security 213

This illustration shows a virtual tunnel running between Host A and Host B. Security association A is an
arrow directed from Host A to Host B. Security association B is an arrow directed from Host B to Host A. A
Security association consists of the Destination Address, SPI, Key, Crypto Algorithm and Format,
Authentication Algorithm, and Key Lifetime.
The goal of key management is to negotiate and compute the security associations that protect IP traffic.
Tunnels and key management:
Use a tunnel to negotiate and manage the security associations that are required to set up secure
communication between two hosts.
The following types of tunnels are supported, each using a different key management technique:
v IKE tunnels (dynamically changing keys, IETF standard)
v Manual tunnels (static, persistent keys, IETF standard)
Internet Key Exchange tunnel support:
IKE Tunnels are based on the Internet Security Association and Key Management Protocol
(ISAKMP)/Oakley standards developed by the IETF. With this protocol, security parameters are negotiated
and refreshed, and keys are exchanged securely.
The following types of authentication are supported: preshared key and X.509v3 digital certificate
signatures.
The negotiation uses a two-phase approach. The first phase authenticates the communicating parties, and
specifies the algorithms to be used for securely communicating in phase 2. During phase 2, IP Security
parameters to be used during data transfer are negotiated, security associations and keys are created and
exchanged.
The following table shows the authentication algorithms that can be used with the AH and ESP security
protocols for IKE tunnel support.
Algorithm AH IP Version 4 & 6 ESP IP Version 4 & 6
HMAC MD5 X X
HMAC SHA1 X X
DES CBC 8 X
Figure 6. Establishment of a Secure Tunnel Between Hosts A and B
214 AIX Version 6.1 Security

Algorithm AH IP Version 4 & 6 ESP IP Version 4 & 6
Triple DES CBC X
AES CBC (128, 192, 256) X
ESP Null X
Manual tunnel support:
Manual tunnels provide backward compatibility, and they interoperate with machines that do not support
IKE key management protocols. The disadvantage of manual tunnels is that the key values are static. The
encryption and authentication keys are the same for the life of the tunnel and must be manually updated.
The following table shows the authentication algorithms that can be used with the AH and ESP security
protocols for manual tunnel support.
Algorithm AH IP Version 4 AH IP Version 6 ESP IP Version 4 ESP IP Version 6
HMAC MD5 X X X X
HMAC SHA1 X X X X
AES CBC (128,
192, 256)
X X
Triple DES CBC X X
DES CBC 8 X X
DES CBC 4 X X
Because IKE tunnels offer more effective security, IKE is the preferred key management method.
Native filtering capability:
Filtering is a basic function in which incoming and outgoing packets can be accepted or denied based on a
variety of characteristics. This allows a user or system administrator to configure the host to control the
traffic between this host and other hosts.
Filtering is done on a variety of packet properties, such as source and destination addresses, IP version (4
or 6), subnet masks, protocol, port, routing characteristics, fragmentation, interface, and tunnel definition.
Rules, known as filter rules, are used to associate certain kinds of traffic with a particular tunnel. In a basic
configuration for manual tunnels, when a user defines a host-to-host tunnel, filter rules are autogenerated
to direct all traffic from that host through the secure tunnel. If more specific types of traffic are desired (for
instance, subnet to subnet), the filter rules can be edited or replaced to allow precise control of the traffic
using a particular tunnel.
For IKE tunnels, the filter rules are also automatically generated and inserted in the filter table once the
tunnel is activated.
Similarly, when the tunnel is modified or deleted, the filter rules for that tunnel are automatically deleted,
which simplifies IP Security configuration and helps reduce human error. Tunnel definitions can be
propagated and shared among machines and firewalls using import and export utilities, which is helpful in
the administration of a large number of machines.
Filter rules associate particular types of traffic with a tunnel, but data being filtered does not necessarily
need to travel in a tunnel. This aspect of filter rules lets the operating system provide basic firewall
Security 215
functionality to those who want to restrict traffic to or from their machine in an intranet or in a network that
does not have the protection of a true firewall. In this scenario, filter rules provide a second barrier of
protection around a group of machines.
After the filter rules are generated, they are stored in a table and loaded into the kernel. When packets are
ready to be sent or received from the network, the filter rules are checked in the list from top to bottom to
determine whether the packet should be permitted, denied, or sent through a tunnel. The criteria of the
rule is compared to the packet characteristics until a match is found or the default rule is reached.
The IP Security function also implements filtering of non-secure packets based on very granular,
user-defined criteria, which allows the control of IP traffic between networks and machines that do not
require the authentication or encryption properties of IP Security.
Digital certificate support:
IP Security supports the use of X.509 Version 3 digital certificates.
The Key Manager tool manages certificate requests, maintains the key database, and performs other
administrative functions.
Digital certificates are described in Digital Certificate Configuration. The Key Manager and its functions are
described in Using the IBM Key Manager Tool
Virtual private networks and IP security:
A virtual private network (VPN) securely extends a private intranet across a public network such as the
Internet.
VPNs convey information across what is essentially a private tunnel through the Internet to and from
remote users, branch offices, and business partners/suppliers. Companies can opt for Internet access
through Internet service providers (ISPs) using direct lines or local telephone numbers and eliminate more
expensive leased lines, long-distance calls, and toll-free telephone numbers. A VPN solution can use the
IPsec security standard because IPsec is the IETF-chosen industry standard network security framework
for both the IP Version 4 and 6 environments, and no changes are needed for existing applications.
A recommended resource for planning the implementation of a VPN in AIX is Chapter 9 of A
Comprehensive Guide to Virtual Private Networks, Volume III: Cross-Platform Key and Policy
Management, ISBN SG24-5309-00. This guide is also available on the Internet World Wide Web at
http://www.redbooks.ibm.com/redbooks/SG245309.html.
Installing the IP security feature
The IP Security feature in AIX is separately installable and loadable.
The file sets that need to be installed are as follows:
v bos.net.ipsec.rte (The run-time environment for the kernel IP Security environment and commands)
v bos.msg.LANG.net.ipsec (where LANG is the desired language, such as en_US)
v bos.net.ipsec.keymgt
v bos.net.ipsec.websm
v bos.crypto-priv (The file set for DES, triple DES and AES encryption)
The bos.crypto-priv file set is located on the Expansion Pack. For IKE digital signature support, you must
also install the gskit.rte fileset (AIX Version 4) or gskkm.rte (AIX 5.1) from the Expansion Pack.
For IP Security support in Web-based System Manager, you must install the Java131.ext.xml4j fileset at
level 1.3.1.1 or later.
216 AIX Version 6.1 Security

After it is installed, IP Security can be separately loaded for IP Version 4 and IP Version 6, either by using
the recommended procedure provided in “Loading IP security” or by using the mkdev command.
Loading IP security:
Use SMIT or Web-based System Manager to automatically load the IP security modules when IP Security
is started. Also, SMIT and Web-based System Manager ensure that the kernel extensions and IKE
daemons are loaded in the correct order.
Note: Loading IP Security enables the filtering function. Before loading, it is important to ensure the
correct filter rules are created. Otherwise, all outside communication might be blocked.
If the loading completes successfully, the lsdev command shows the IP Security devices as Available.
lsdev -C -c ipsec
ipsec_v4 Available IP Version 4 Security Extension
ipsec_v6 Available IP Version 6 Security Extension
After the IP Security kernel extension has been loaded, tunnels and filters are ready to be configured.
Planning IP security configuration
To configure IP Security, plan to configure the tunnels and filters first.
When a simple tunnel is defined for all traffic to use, the filter rules can be automatically generated. If
more complex filtering is desired, filter rules can be configured separately.
You can configure IP Security using the Web-based System Manager Network plug-in, Virtual Private
Network plug-in, or the System Management Interface Tool (SMIT). If using SMIT, the following fast paths
are available:
smit ips4_basic
Basic configuration for IP version 4
smit ips6_basic
Basic configuration for IP version 6
Before configuring IP Security for your site, you must decide what method you intend to use; for example,
whether you prefer to use tunnels or filters (or both), which type of tunnel best suits your needs, and so
on. The following sections provide information you must understand before making these decisions:
Hardware acceleration:
The 10/100 Mbps Ethernet PCI Adapter II (Feature code 4962) offers standards-based IP Security and is
designed to offload IP Security functions from the AIX operating system.
When the 10/100 Mbps Ethernet PCI Adapter II is present in the AIX system, the IP Security stack uses
the following capabilities of the adapter:
v Encryption and decryption using DES or Triple DES algorithms
v Authentication using the MD5 or SHA-1 algorithms
v Storage of the security-association information
The functions on the adapter are used instead of the software algorithms. The 10/100 Mbps Ethernet PCI
Adapter II is available for manual and IKE tunnels.
The IP Security hardware acceleration feature is available in the 5.1.0.25 or later level of the
bos.net.ipsec.rte and devices.pci.1410ff01.rte file sets.
Security 217

There is a limit on the number of security associations that can be offloaded to the network adapter on the
receive side (inbound traffic). On the transmit side (outbound traffic), all packets that use a supported
configuration are offloaded to the adapter. Some tunnel configurations can not be offloaded to the adapter.
The 10/100 Mbps Ethernet PCI Adapter II supports the following features:
v DES, 3DES, or NULL encryption through ESP
v HMAC-MD5 or HMAC-SHA-1 authentication through ESP or AH, but not both. (If ESP and AH both
used, ESP must be performed first. This is always true for IKE tunnels, but the user can select the order
for manual tunnels.)
v Transport and Tunnel mode
v Offload of IPV4 packets
Note: The 10/100 Mbps Ethernet PCI Adapter II cannot handle packets with IP options.
To enable the 10/100 Mbps Ethernet PCI Adapter II for IP Security, you may have to detach the network
interface and then enable the IPsec Offload feature.
To detach the network interface, perform the following steps using the SMIT interface:
To enable the IPsec Offload feature, do the following using the SMIT interface:
1. Login as the root user.
2. Type smitty eadap at the command line and press Enter.
3. Select the Change / Show Characteristics of an Ethernet Adapter option and press Enter.
4. Select the 10/100 Mbps Ethernet PCI Adapter II and press Enter.
5. Change the IPsec Offload field to yes and press Enter.
To detach the network interface, from the command line, type the following:
# ifconfig enX detach
To enable the IPsec offload attribute, from the command line, type the following:
# chdev -l entX -a ipsec_offload=yes
To verify that the IPsec offload attribute has been enabled, from the command line, type the following:
# lsattr -El entX detach
To disable the IPsec offload attribute, from the command line, type the following:
# chdev -l entX -a ipsec_offload=no
Use the enstat command to ensure that your tunnel configuration is taking advantage of the IPsec offload
attribute. The enstat command shows all the statistics of transmit and receive IPsec packets when the
IPsec offload attribute is enabled. For example, if the Ethernet interface is ent1, type the following:
# entstat -d ent1
The output will be similar to the following example:
.
.
.
10/100 Mbps Ethernet PCI Adapter II (1410ff01) Specific Statistics:
--------------------------------------------
.
.
.
218 AIX Version 6.1 Security
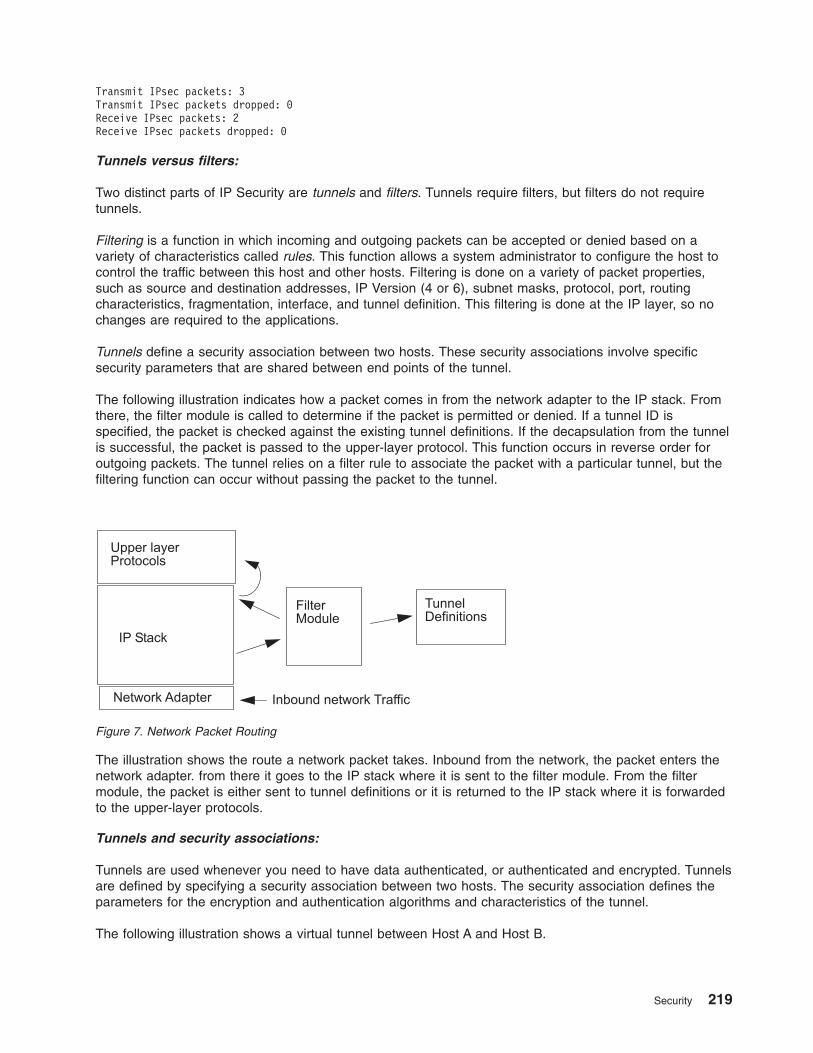
Transmit IPsec packets: 3
Transmit IPsec packets dropped: 0
Receive IPsec packets: 2
Receive IPsec packets dropped: 0
Tunnels versus filters:
Two distinct parts of IP Security are tunnels and filters. Tunnels require filters, but filters do not require
tunnels.
Filtering is a function in which incoming and outgoing packets can be accepted or denied based on a
variety of characteristics called rules. This function allows a system administrator to configure the host to
control the traffic between this host and other hosts. Filtering is done on a variety of packet properties,
such as source and destination addresses, IP Version (4 or 6), subnet masks, protocol, port, routing
characteristics, fragmentation, interface, and tunnel definition. This filtering is done at the IP layer, so no
changes are required to the applications.
Tunnels define a security association between two hosts. These security associations involve specific
security parameters that are shared between end points of the tunnel.
The following illustration indicates how a packet comes in from the network adapter to the IP stack. From
there, the filter module is called to determine if the packet is permitted or denied. If a tunnel ID is
specified, the packet is checked against the existing tunnel definitions. If the decapsulation from the tunnel
is successful, the packet is passed to the upper-layer protocol. This function occurs in reverse order for
outgoing packets. The tunnel relies on a filter rule to associate the packet with a particular tunnel, but the
filtering function can occur without passing the packet to the tunnel.
The illustration shows the route a network packet takes. Inbound from the network, the packet enters the
network adapter. from there it goes to the IP stack where it is sent to the filter module. From the filter
module, the packet is either sent to tunnel definitions or it is returned to the IP stack where it is forwarded
to the upper-layer protocols.
Tunnels and security associations:
Tunnels are used whenever you need to have data authenticated, or authenticated and encrypted. Tunnels
are defined by specifying a security association between two hosts. The security association defines the
parameters for the encryption and authentication algorithms and characteristics of the tunnel.
The following illustration shows a virtual tunnel between Host A and Host B.
Figure 7. Network Packet Routing
Security 219

The illustration shows a virtual tunnel running between Host A and Host B. Security association A is an
arrow directed from Host A to Host B. Security association B is an arrow directed from Host B to Host A. A
security association consists of the Destination Address, SPI, Key, Crypto Algorithm and Format,
Authentication Algorithm, and Key Lifetime.
The Security Parameter Index (SPI) and the destination address identify a unique security association.
These parameters are required for uniquely specifying a tunnel. Other parameters such as cryptographic
algorithm, authentication algorithm, keys, and lifetime can be specified or defaults can be used.
Tunnel considerations:
You should consider several things before deciding which type of tunnel to use for IP security.
IKE tunnels differ from manual tunnels because the configuration of security policies is a separate process
from defining tunnel endpoints.
In IKE, there is a two-step negotiation process. Each step of the negotiation process is called a phase,
and each phase can have separate security policies.
When the Internet Key negotiation starts, it must set up a secure channel for the negotiations. This is
known as the key management phase or phase 1. During this phase, each party uses preshared keys or
digital certificates to authenticate the other and pass ID information. This phase sets up a security
association during which the two parties determine how they plan to communicate securely and then which
protections are to be used to communicate during the second phase. The result of this phase is an IKE or
phase 1 tunnel.
The second phase is known as the data management phase or phase 2 and uses the IKE tunnel to create
the security associations for AH and ESP that actually protect traffic. The second phase also determines
the data that will be using the IP Security tunnel. For example, it can specify the following:
v A subnet mask
v An address range
v A protocol and port number combination
Figure 8. Establishment of a Secure Tunnel Between Hosts A and B
220 AIX Version 6.1 Security

This illustration shows the two-step, two-phase process for setting up an IKE tunnel.
In many cases, the endpoints of the key management (IKE) tunnel will be the same as the endpoints of
the data management (IP Security) tunnel. The IKE tunnel endpoints are the IDs of the machines carrying
out the negotiation. The IP Security tunnel endpoints describe the type of traffic that will use the IP
Security tunnel. For simple host-to-host tunnels, in which all traffic between two tunnels is protected with
the same tunnel, the phase 1 and phase 2 tunnel endpoints are the same. When negotiating parties are
two gateways, the IKE tunnel endpoints are the two gateways, and the IP Security tunnel endpoints are
the machines or subnets (behind the gateways) or the range of addresses (behind the gateways) of the
tunnel users.
Key management parameters and policy:
You can customize key-management policy by specifying the parameters to be used during IKE
negotiation. For example, there are key-management policies for pre-shared key or signature mode
authentication. For Phase 1, the user must determine certain key-management security properties with
which to carry out the exchange.
Phase 1 (the key management phase) sets the following parameters of an IKE tunnel configuration as
shown in the table below:
Key Management (Phase 1) Tunnel Name of this IKE tunnel. For each tunnel, the endpoints of the negotiation
must be specified. These are the two machines that plan to send and
validate IKE messages. The name of the tunnel may describe the tunnel
endpoints such as VPN Boston or VPN Acme.
IKE Tunnel Setup Process
Key Management (Phase 1)
Data Management (Phase 2)
IKE SA Parameters
IP Sec Protocols (AH, ESP) Generate session keys
Exchange and authenticate IDs
Identify parties using IP Sec
Result: IP Sec (phase 2) tunnel
Use public key cryptography toestablish first shared secret
Exchange and authenticate IDs
Identify the negotiating parties
IKE (phase 1) tunnelResult:
AuthenticationHashKey Lifetime...
Encapsulation ModeEncapsulation AlgorithmAuthentication AlgorithmKey Lifetimes
Step 1: Negotiation Step 2: Key Exchange
Figure 9. IKE Tunnel Setup Process
Security 221

Host Identity Type ID type that will be used in the IKE exchange. The ID type and value must
match the value for the preshared key to ensure that proper key lookup is
performed. If a separate ID is used to search a preshared key value, the
host ID is the key’s ID and its type is KEY_ID. The KEY_ID type is useful if a
single host has more than one preshared key value.
Host Identity Value of the host ID represented as an IP address, a fully qualified domain
name (FQDN), or a user at the fully qualified domain name (user@FQDN).
For example, [email protected].
IP Address IP address of the remote host. This value is required when the host ID type
is KEY_ID or whenever the host ID type cannot be resolved to an IP
address. For example, if the user name cannot be resolved with a local
name server, the IP address for the remote side must be entered.
Data management parameters and policy:
The data management proposal parameters are set during phase 2 of an IKE tunnel configuration. They
are the same IP Security parameters used in manual tunnels and describe the type of protection to be
used for protecting data traffic in the tunnel. You can start more than one phase 2 tunnel under the same
phase 1 tunnel.
The following endpoint ID types describe the type of data that uses the IP Security Data tunnel:
Host, Subnet, or Range Describes whether the data traffic traveling in the tunnel will be for a
particular host, subnet, or address range.
Host/Subnet ID Contains the host or subnet identity of the local and remote systems passing
traffic over this tunnel. Determines the IDs sent in the phase 2 negotiation
and the filter rules that will be built if the negotiation is successful.
Subnet mask Describes all IP addresses within the subnet (for example, host 9.53.250.96
and mask 255.255.255.0)
Starting IP Address Range Provides the starting IP address for the range of addresses that will be using
the tunnel (for example, 9.53.250.96 of 9.53.250.96 to 9.53.250.93)
Ending IP Address Range Provides the ending IP address for the range of addresses that will be using
the tunnel (for example, 9.53.250.93 of 9.53.250.96 to 9.53.250.93)
Port Describes data using a specific port number (for example, 21 or 23)
Protocol Describes data being transported with a specific protocol (for example, TCP
or UDP). Determines the protocol sent in the phase 2 negotiation and the
filter rules that will be built if the negotiation is successful. The protocol for
the local endpoint must match the protocol for the remote end point.
Choosing a tunnel type:
The decision to use manual tunnels or IKE tunnels depends on the tunnel support of the remote end and
the type of key management desired.
When available, use IKE tunnels because they offer industry-standard secure key negotiation and key
refreshment. They also take advantage of the IETF ESP and AH header types and support anti-replay
protection. You can optionally configure signature mode to allow digital certificates.
If the remote end uses one of the algorithms requiring manual tunnels, manual tunnels should be used.
Manual tunnels ensure interoperability with a large number of hosts. Because the keys are static and
difficult to change and might be cumbersome to update, they are not as secure. Manual tunnels can be
used between a host running this operating system and any other machine running IP Security and having
222 AIX Version 6.1 Security

a common set of cryptographic and authentication algorithms. Most vendors offer Keyed MD5 with DES, or
HMAC MD5 with DES. This subset works with almost all implementations of IP Security.
The procedure used in setting up manual tunnels, depends on whether you are setting up the first host of
the tunnel or setting up the second host, which must have parameters matching the first host setup. When
setting up the first host, the keys can be autogenerated, and the algorithms can be defaulted. When
setting up the second host, import the tunnel information from the remote end, if possible.
Another important consideration is determining whether the remote system is behind a firewall. If it is, the
setup must include information about the intervening firewall.
Using IKE with DHCP or dynamically assigned addresses:
One common scenario for using IP Security with an operating system is when remote systems are
initiating IKE sessions with a server, and their identity cannot be tied to a particular IP address.
This case can occur in a Local Area Network (LAN) environment such as using IP Security to connect to a
server on a LAN and wanting to encrypt the data. Other common uses involve remote clients dialing into a
server and using either a fully qualified domain name (FQDN), or e-mail address (user@FQDN) to identify
the remote ID.
In the Key Management phase (Phase 1), an RSA Signature is the only authentication mode supported if
you use main mode with non-IP address IDs. In another words, if you want use pre-shared key
authentication, you must use aggressive mode or main mode with IP addresses as IDs. In fact, when the
number of DHCP clients with whom you want establish IPsec tunnels is large, it becomes impractical to
define unique, pre-shared keys for each DHCP client, so it is recommend you use RSA Signature
authentication in this scenario. You also can use Group ID as a remote ID in tunnel definition so that you
only define the tunnel once with all DHCP clients (see tunnel definition sample file /usr/samples/ipsec/group_aix_responder.xml). Group ID is a unique feature of AIX IPsec. You can define a group ID to
include any IKE IDs (like a single IP address), FQDN, User FQDN, a range or set of IP addresses, and so
on, and then use this Group ID as the phase 1 or phase 2 remote ID in your tunnel definitions.
Note: When Group ID is used, tunnel should be defined as Responder role only. That means you must
activate this tunnel from the DHCP client side.
For the Data Management phase (Phase 2), when the IP Security associations are being created to
encrypt TCP or UDP traffic, a generic data management tunnel can be configured. Therefore, any request
that was authenticated during phase 1, will use the generic tunnel for defined Data Management phase if
the IP address is not explicitly configured in the database. This allows any address to match the generic
tunnel and can be used as long as the rigorous public key-based security validation was successful in
phase 1.
Using XML to define a generic data management tunnel:
You can define a generic Data Management tunnel using the XML format understood by ikedb.
See the section entitled “Command-line interface for IKE tunnel configuration” on page 228 for more
information on the IKE XML interface and the ikedb command. Generic Data Management tunnels are
used with DHCP. The XML format uses the tag name IPSecTunnel for what Web-based System Manager
calls a Data Management tunnel. This is also referred to as a phase 2 tunnel in other contexts. A generic
Data Management tunnel is not a true tunnel, but an IPSecProtection that is used if an incoming Data
Management message (under a specific Key Management tunnel) does not match any Data Management
tunnel defined for that Key Management tunnel. It is only used in the case where the AIX system is the
responder. Specifying a generic Data Management tunnel IPSecProtection is optional.
Security 223

The generic Data Management tunnel is defined in the IKEProtection element. There are two XML
attributes, called IKE_IPSecDefaultProtectionRef and IKE_IPSecDefaultAllowedTypes, that are used for
this.
First, you need to define an IPSecProtection that you would like to use as the default if no IPSecTunnels
(Data Management tunnels) match. An IPSecProtection that is to be used as a default must have an
IPSec_ProtectionName that begins with _defIPSprot_.
Now go to the IKEProtection that you would like to use this default IPSecProtection. Specify an
IKE_IPSecDefaultProtectionRef attribute that contains the name of the default IPSec_Protection.
You must also specify a value for the IKE_IPSecDefaultAllowedTypes attribute in this IKEProtection. It
can have one or more of the following values (if multiple values, they should be space-separated):
Local_IPV4_Address
Local_IPV6_Address
Local_IPV4_Subnet
Local_IPV6_Subnet
Local_IPV4_Address_Range
Local_IPV6_Address_Range
Remote_IPV4_Address
Remote_IPV6_Address
Remote_IPV4_Subnet
Remote_IPV6_Subnet
Remote_IPV4_Address_Range
Remote_IPV6_Address_Range
These values correspond to the ID types specified by the initiator. In the IKE negotiation, the actual IDs
are ignored. The specified IPSecProtection is used if the IKE_IPSecDefaultAllowedTypes attribute
contains a string beginning with Local_ that corresponds to the initiator’s local ID type, and contains a
string beginning with Remote_ that corresponds to the initiator’s remote ID type. In other words, you must
have at least one Local_ value and at least one Remote_ value in any IKE_IPSecDefaultAllowedTypes
attribute in order for the corresponding IPSec_Protection to be used.
General data management tunnel example:
A Data Management tunnel can be used to send a message to the system.
An initiator sends the following to the AIX system in a phase 2 (Data Management) message:
local ID type: IPV4_Address
local ID: 192.168.100.104
remote ID type: IPV4_Subnet
remote ID: 10.10.10.2
remote netmask: 255.255.255.192
The AIX system does not have a Data Management tunnel matching these IDs. But it does have an
IPSecProtection with the following attributes defined:
IKE_IPSecDefaultProtectionRef="_defIPSprot_protection4"
IKE_IPSecDefaultAllowedTypes="Local_IPV4_Address
Remote_IPV4_Address
Remote_IPV4_Subnet
Remote_IPV4_Address_Range"
The local ID type of the incoming message, IPV4_Address, matches one of the Local_ values of the
allowed types, Local_IPV4_Address. Also, the remote ID of the message, IPV4_Subnet, matches the value
Remote_IPV4_Subnet. Therefore the Data Management tunnel negotiation will proceed with
_defIPSprot_protection4 as the IPSecProtection.
224 AIX Version 6.1 Security

The /usr/samples/ipsec/default_p2_policy.xml file is a full XML file defining a generic IPSecProtection
that can be used as an example.
Using Web-based System Manager to define a generic data management tunnel:
You can use the Web-based System Manager to define a generic Data Management tunnel.
To define a generic Data Management tunnel using the Web-based System Manager interface do the
following:
1. Select a Key Management tunnel in the IKE Tunnels container, and select the action to Define a Data
Management Tunnel.
2. Select generic Data Management tunnel. The configuration panels are similar to the panels used to
define a Data Management tunnel. However, the choices for the ID types are different. Explicit IDs do
not need to be specified. The ID types, which are IP V4 or V6 Address Only, IP V4 or V6 Subnet Only,
and IP V4 or V6 Address or Subnet, cover all allowable cases of IDs.
3. Set the rest of the information the same way as in a Data Management Tunnel and click OK. Each Key
Management tunnel can only have one associated Generic Tunnel.
Note: A generic data management tunnel can only be used in the case where the AIX system is the
responder.
Configuring Internet key exchange tunnels
You can configure Internet Key Exchange (IKE) tunnels using the Web-based System Manager interface,
the System Management Interface Tool (SMIT), or the command line.
Using Web-based System Manager to configure IKE tunnels:
Web-based System Manager can be used to configure IKE tunnels.
Using the basic configuration wizard:
You can use the the basic configuration wizard to define an IKE tunnel through Web-based System
Manager using pre-shared keys or certificates as the authentication method.
The Web-based System Manager adds new key management and data management IKE tunnels to the IP
Security subsystem, allows you to input minimal data and choose some options, and makes use of
common default values for such parameters as tunnel lifetime.
When using the basic configuration wizard, keep the following in mind:
v The wizard can be used only for initial tunnel configuration. To modify, delete, or activate a tunnel, use
the IKE Tunnel plug-in or task bar.
v The tunnel name must be unique on your system, but you can use the same name on the remote
system. For example, on the local and remote systems, the tunnel name can be hostA_to_hostB, but
the Local IP Address and the Remote IP Address fields (endpoints) are switched.
v Phase 1 and phase 2 tunnels are defined with the same encryption and authentication algorithms.
v The preshared key must be entered in hexadecimal form (without a leading 0x) or ASCII text.
v If digital certificates are chosen as the authentication method, you must use the Key Manager tool to
create a digital certificate.
v The host ID type can only be IP Address.
v The transforms and proposals you create are assigned names that end with the user-defined tunnel
name. You can view the transforms and proposals in Web-based System Manager through VPN and the
IKE Tunnel plug-in.
Use the following procedure to configure a new tunnel using the wizard:
Security 225

1. Open Web-based System Manager using the wsm command from the command line.
2. Select the Network plug-in.
3. Select Virtual Private Networks (IP Security).
4. From the Console area, select the Overview and Tasks folder.
5. Select Configure a Basic Tunnel Configuration wizard.
6. Click on Next on the Step 1 Introduction panel, and then follow the steps to configure an IKE tunnel.
Online help is available by pressing F1 if you need it.
After a tunnel is defined using the wizard, the tunnel definition displays in the Web-based System
Manager IKE tunnels list and can be activated or modified.
Advanced IKE tunnel configuration:
You can configure key management and data management tunnels separately, using the following
procedures.
Configuring key management tunnels:
IKE tunnels are configured using Web-based System Manager.
Perform the following steps to add a key management tunnel:
1. Open Web-based System Manager using the wsm command.
2. Select the Network plug-in.
3. Select Virtual Private Networks (IP Security).
4. From the Console area, select Overview and Tasks.
5. Select Start IP Security. This action loads the IP Security kernel extensions and starts the isakmpd,
tmd, and cpsd daemons.
A tunnel is created by defining the key management and data management endpoints and their
associated security transforms and proposals.
v Key management is the authentication phase. It sets up a secure channel between the negotiating
parties needed before the final IP Security parameters and keys are computed.
v Data management describes the type of traffic that will be using a particular tunnel. It can be
configured for a single host or group of hosts (with the use of subnets or IP ranges) along with
specified protocol and port numbers.
The same key management tunnel can be used to protect multiple data management negotiations and
key refreshes, as long as they take place between the same two endpoints; for example, between two
gateways.
6. To define the key management tunnel endpoints, click Internet Key Exchange (IKE) Tunnels on the
Identification tab.
7. Enter information to describe the identities of the systems taking part in the negotiations. In most
cases, IP addresses are used, and a policy compatible with the remote side must be created.
On the Transforms tab, use matching transforms on both sides, or contact the administrator on the
remote end to define a matching transform. A transform containing several choices can be created to
allow flexibility when proposing or matching on a transform.
8. If using preshared keys for authentication, enter the preshared key under the key tab. This value must
match on both the remote and local machines.
9. Create a transform to be associated with this tunnel by clicking Add on the Transforms tab.
To enable digital certificates and signature mode support, choose an authentication method of RSA
Signature or RSA Signature with CRL Checking.
For more information about digital certificates, see “Digital certificates and the key manager concepts”
on page 231.
226 AIX Version 6.1 Security

Configuring data management tunnels:
To complete IKE tunnel setup, you need to configure data management tunnel endpoints and proposals.
Open Web-based System Manager, as described in “Creating IKE tunnels using digital certificates” on
page 239. Perform the following steps to create a data management tunnel:
1. Select a key management tunnel and define any unique options. Most data management options can
remain as defined by the default.
2. Specify endpoint types (such as IP address, subnet, or IP address range) under the Endpoints tab.
You can select a port number and protocol or accept the default.
3. On the Proposals panel, you can create a new proposal by clicking the Add button or clicking OK to
create a proposal. If there are multiple proposals, you can use the Move Up or Move Down buttons to
change the search order.
Group support:
IP security supports grouping IKE IDs in a tunnel definition to associate multiple IDs with a single security
policy without having to create separate tunnel definitions.
Grouping is especially useful when setting up connections to several remote hosts, because you can avoid
setting up or managing multiple tunnel definitions. Also, if changes must be made to a security policy, you
do not need to change multiple tunnel definitions.
A group must be defined before using that group name in a tunnel definition. The group’s size is limited to
1 KB. On the initiator’s side of the negotiation, you can use groups as a remote ID in data management
tunnel definitions only. On the responders side of the negotiation, you can use groups as a remote ID in
key management and data management tunnel definitions.
A group is composed of a group name and a list of IKE IDs and ID types. IDs can be the same type or a
mix of the following:
v IPv4 addresses
v IPv6 addresses
v FQDN
v user@FQDN
v X500 DN types
During a Security Association negotiation, the IDs in a group are searched linearly for the first match.
Web-based System Manager can be used to define a group that is to be used for the remote endpoint of a
Key Management tunnel. To define a group using Web-based System Manager, perform the following
steps:
1. Select a Key Management tunnel in the IKE Tunnel container.
2. Open the Properties dialog.
3. Select the Identification tab.
4. Select group ID definition for the remote host identity type.
5. Select the Configure Group Definition button and enter the group members in the window.
Refer to “Command-line interface for IKE tunnel configuration” on page 228 for information on defining
groups from the command line.
Using the SMIT interface for IKE tunnel configuration:
You can use the SMIT interface to configure IKE tunnels and perform basic IKE database functions.
Security 227

SMIT uses underlying XML command functions to perform additions, deletions, and modifications to the
IKE tunnel definitions. IKE SMIT is used in configuring IKE tunnels quickly and provides examples of the
XML syntax used to create IKE tunnel definitions. The IKE SMIT menus also allow you to back up, restore,
and initialize the IKE database.
To configure an IPv4 IKE tunnel, use the smitty ike4 fast path. To configure an IPv6 IKE tunnel, use the
smitty ike6 fast path. The IKE database functions can be found in the Advanced IP Security Configuration
menu.
All IKE database entries added through SMIT can be viewed or modified through the Web-based System
Manager tool.
Command-line interface for IKE tunnel configuration:
The ikedb command allows a user to retrieve, update, delete, import, and export information in the IKE
database using an XML interface.
The ikedb command allows the user to write to (put) or read from (get) the IKE database. The input and
output format is an Extensible Markup Language (XML) file. The format of an XML file is specified by its
Document Type Definition (DTD). The ikedb command allows the user to see the DTD that is used to
validate the XML file when doing a put. While entity declarations can be added to the DTD using the -e
flag, this is the only modification to the DTD that can be made. Any external DOCTYPE declaration in the
input XML file will be ignored and any internal DOCTYPE declaration might result in an error. The rules
followed to parse the XML file using the DTD are specified in the XML standard. The /usr/samples/ipsec
file has a sample of a typical XML file that defines common tunnel scenarios. See the ikedb command
description in the AIX Version 6.1 Commands Reference for syntax details.
You can use the ike command to start, stop, and monitor IKE tunnels. The ike command can also be used
to activate, remove, or list IKE and IP Security tunnels. See the ike command description in the AIX
Version 6.1 Commands Reference for syntax details.
The following examples show how to use ike, ikedb, and several other commands to configure and check
the status of your IKE tunnel:
1. To start a tunnel negotiation (activate a tunnel) or to allow the incoming system to act as a responder
(depending on the role that is specified), use the ike command with a tunnel number, as follows:
# ike cmd=activate numlist=1
You can also use remote id or IP addresses, as shown in the following examples:
# ike cmd=activate remid=9.3.97.256
# ike cmd=activate ipaddr=9.3.97.100, 9.3.97.256
Because it might take several seconds for the commands to complete, the command returns after the
negotiation is started.
2. To display the tunnel status, use the ike command, as follows:
# ike cmd=list
The output looks similar to the following:
Phase 1 Tunnel ID [1]
Phase 2 Tunnel ID [1]
The output shows phase 1 and phase 2 tunnels that are currently active.
3. To get a verbose listing of the tunnel, use the ike command, as follows:
# ike cmd=list verbose
The output looks similar to the following:
Phase 1 Tunnel ID 1
Local ID Type: Fully_Qualified_Domain_Name
Local ID: bee.austin.ibm.com
228 AIX Version 6.1 Security

Remote ID Type: Fully_Qualified_Domain_Name
Remote ID: ipsec.austin.ibm.com
Mode: Aggressive
Security Policy: BOTH_AGGR_3DES_MD5
Role: Initiator
Encryption Alg: 3DES-CBC
Auth Alg: Preshared Key
Hash Alg: MD5
Key Lifetime: 28800 Seconds
Key Lifesize: 0 Kbytes
Key Rem Lifetime: 28737 Seconds
Key Rem Lifesize: 0 Kbytes
Key Refresh Overlap: 5%
Tunnel Lifetime: 2592000 Seconds
Tunnel Lifesize: 0 Kbytes
Tun Rem Lifetime: 2591937 Seconds
Status: Active
Phase 2 Tunnel ID 1
Local ID Type: IPv4_Address
Local ID: 10.10.10.1
Local Subnet Mask: N/A
Local Port: any
Local Protocol: all
Remote ID Type: IPv4_Address
Remote ID: 10.10.10.4
Remote Subnet Mask: N/A
Remote Port: any
Remote Portocol: all
Mode: Oakley_quick
Security Policy: ESP_3DES_MD5_SHA_TUNNEL_NO_PFS
Role: Initiator
Encryption Alg: ESP_3DES
AH Transform: N/A
Auth Alg: HMAC-MD5
PFS: No
SA Lifetime: 600 Seconds
SA Lifesize: 0 Kbytes
SA Rem Lifetime: 562 Seconds
SA Rem Lifesize: 0 Kbytes
Key Refresh Overlap: 15%
Tunnel Lifetime: 2592000 Seconds
Tunnel Lifesize: 0 Kbytes
Tun Rem Lifetime: 2591962 Seconds
Assoc P1 Tunnel: 0
Encap Mode: ESP_tunnel
Status: Active
4. To display the filter rules in the dynamic filter table for the newly activated IKE tunnel, use the lsfilt
command as follows:
# lsfilt -d
The output looks similar to the following example:
1 permit 0.0.0.0 0.0.0.0 0.0.0.0 0.0.0.0 no udp eq 4001 eq 4001 both both no all
packets 0 all
2 *** Dynamic filter placement rule *** no
0 permit 0.0.0.0 0.0.0.0 0.0.0.0 0.0.0.0 yes all any 0 any 0 both both no all
packets 0 all
*** Dynamic table ***
0 permit 0.0.0.0 0.0.0.0 0.0.0.0 0.0.0.0 no udp eq 500 eq 500 local both no all
packets 0
0 permit 0.0.0.0 0.0.0.0 0.0.0.0 0.0.0.0 no ah any 0 any 0 both inbound no all
packets 0
0 permit 0.0.0.0 0.0.0.0 0.0.0.0 0.0.0.0 no esp any 0 any 0 both inbound no all
Security 229

packets 0
1 permit 10.10.10.1 255.255.255.255 10.10.10.4 255.255.255.255 no all any 0 any
0 both outbound yes all packets 1
1 permit 10.10.10.4 255.255.255.255 10.10.10.1 255.255.255.255 no all any 0 any
0 both inbound yes all packets 1
This example shows a machine that has one IKE tunnel and no other tunnels. The dynamic filter
placement rule (rule #2 in this example output of the static table) can be moved by the user to control
placement relative to all other user-defined rules. The rules in the dynamic table are constructed
automatically as tunnels are negotiated and corresponding rules are inserted into the filter table.
These rules can be displayed, but not edited.
5. To turn on logging of the dynamic filter rules, set the logging option for rule #2 to Yes, use the chfilt
command, as shown in the following example:
# chfilt -v 4 -n 2 -l y
For more details on logging IKE traffic, see “Logging facilities” on page 252.
6. To deactivate the tunnel, use the ike command as follows:
# ike cmd=remove numlist=1
7. To view tunnel definitions, use the ikedb command as follows:
# ikedb -g
8. To put definitions to the IKE database from an XML file that has been generated on a peer machine
and overwrite any existing objects in the database with the same name, use the ikedb command as
follows:
# ikedb -pFs peer_tunnel_conf.xml
The peer_tunnel_conf.xml is the XML file generated on a peer machine.
9. To get the definition of the phase 1 tunnel named tunnel_sys1_and_sys2 and all dependent phase 2
tunnels with respective proposals and protections, use the ikedb command, as follows:
# ikedb -gr -t IKETunnel -n tunnel_sys1_and_sys2
10. To delete all preshared keys from the database, use the ikedb command, as follows:
# ikedb -d -t IKEPresharedKey
For general information on IKE tunnel group support, see “Group support” on page 227. You can use the
ikedb command to define groups from the command line.
AIX IKE and Linux affinity:
It is possible to configure an AIX IKE tunnel using Linux configuration files.
To configure an AIX IKE tunnel using Linux configuration files (AIX 5.1 and later), use the ikedb command
with the -c flag (conversion option), which lets you use the /etc/ipsec.conf and /etc/ipsec.secrets Linux
configuration files as IKE tunnel definitions. The ikedb command parses the Linux configuration files,
creates an XML file, and optionally adds the XML tunnel definitions to the IKE database. You can then
view the tunnel definitions by using either the ikedb -g command or the Web-based System Manager.
IKE tunnel configuration scenarios:
The following scenarios describe the type of situations most customers encounter when trying to set up
tunnels. These scenarios can be described as the branch office, business partner, and remote access
cases.
v In the branch office case, the customer has two trusted networks that they want to connect
together—the engineering group of one location to the engineering group of another. In this example,
there are gateways that connect to each other and all the traffic passing between the gateways use the
same tunnel. The traffic at either end of the tunnel is decapsulated and passes in the clear within the
company intranet.
230 AIX Version 6.1 Security
In the first phase of the IKE negotiation, the IKE security association is created between the two
gateways. The traffic that passes in the IP Security tunnel is the traffic between the two subnets, and
the subnet IDs are used in the phase 2 negotiation. After the security policy and tunnel parameters are
entered for the tunnel, a tunnel number is created. Use the ike command to start the tunnel.
v In the business partner scenario, the networks are not trusted, and the network administrator may want
to restrict access to a smaller number of hosts behind the security gateway. In this case, the tunnel
between the hosts carries traffic protected by IP Security for use between two particular hosts. The
protocol of the phase 2 tunnel is AH or ESP. This host-to-host tunnel is secured within a
gateway-to-gateway tunnel.
v In the remote access case, the tunnels are set up on demand and a high level of security is applied.
The IP addresses may not be meaningful, therefore, fully qualified domain names or user@ fully
qualified domain names are preferred. Optionally, you can use KEYID to relate a key to a host ID.
Digital certificates and the key manager concepts
Digital certificates bind an identity to a public key, through which you can verify the sender or the recipient
of an encrypted transfer.
Beginning with AIX 4.3.2, IP Security uses digital certificates to enable public-key cryptography, also
known as asymmetric cryptography, which encrypts data using a private key known only to the user and
decrypts it using an associated public (shared) key from a given public-private key pair. Key pairs are long
strings of data that act as keys to a user’s encryption scheme.
In public-key cryptography, the public key is given to anyone with whom the user wants to communicate.
The sender digitally signs all secure communications with the corresponding private key for their assigned
key pair. The recipient uses the public key to verify the sender’s signature. If the message is successfully
decrypted with the public key, the receiver can verify that the sender was authenticated.
Public-key cryptography relies on trusted, third parties, known as a certification authorities (CAs), to issue
reliable digital certificates. The recipient specifies which issuing organizations or authorities are deemed
trusted. A certificate is issued for a specific amount of time; when its expiration date has passed, it must
be replaced.
AIX 4.3.2 and later versions provide the Key Manager tool, which manages digital certificates. The
following sections provide conceptual information about the certificates themselves.
Format of digital certificates:
The digital certificate contains specific pieces of information about the identity of the certificate owner and
about the certification authority. See the following figure for an illustration of a digital certificate.
Security 231

This illustration shows the four entities of a digital certificate. From the top they are, Owner’s Distinguished
Name, Owners Public Key, Issuer’s (CA) Distinguished Name, and Issuer’s Signature.
The following list further describes the contents of the digital certificate:
Owner’s Distinguished Name
Combination of the owner’s common name and context (position) in the directory tree. In the
following figure of a simple directory tree, for example, Prasad is the owner’s common name and
the context is country=US, organization=ABC, lower organization=SERV; therefore, the
distinguished name is:
/C=US/O=ABC/OU=SERV/CN=prasad.austin.ibm.com
Figure 10. Contents of a Digital Certificate
Figure 11. Example of Deriving Distinguished Name from Directory Tree
232 AIX Version 6.1 Security

This illustration is a directory tree with O=ABC at the top level and branching to two entities on the
second level. Level two contains OU=AIX and OU=Acctg on separate branches; each has a
branch leading to a single entity on the last level. The last level contains CN=Prasad and
CN=Peltier respectively.
Owner’s Public Key
Used by the recipients to decrypt data.
Subject Alternate Name
Can be an identifier such as an IP address, e-mail address, fully qualified domain name, and so
on.
Issue Date
Date the digital certificate was issued.
Expiration Date
Date the digital certificate expires.
Issuer’s Distinguished Name
Distinguished name of the Certification Authority.
Issuer’s Digital Signature
Digital signature used to validate a certificate.
Security considerations for digital certificates:
A digital certificate alone cannot prove identity.
The digital certificate only allows you to verify the identity of the digital certificate owner by providing the
public key that is needed to check the owner’s digital signature. You can safely send your public key to
another because your data cannot be decrypted without the other part of the key pair, your private key.
Therefore, the owner must protect the private key that belongs to the public key in the digital certificate. All
communications of the owner of a digital certificate can be deciphered, if the private key is known. Without
the private key, a digital certificate cannot be misused.
Certification authorities and trust hierarchies:
A digital certificate is only as trustworthy as the certification authority (CA) that issued it.
As part of this trust, the policies under which certificates are issued should be understood. Each
organization or user must determine which certification authorities can be accepted as trustworthy.
The Key Manager tool also allows organizations to create self-signed certificates, which can be useful for
testing or in environments with a small number of users or machines.
As a user of a security service, you need to know its public key to obtain and validate any digital
certificates. Also, simply receiving a digital certificate does not assure its authenticity. To verify its
authenticity, you need the public key of the certification authority that issued that digital certificate. If you
do not already hold an assured copy of the CA’s public key, then you might need an additional digital
certificate to obtain the CA’s public key.
Certificate revocation lists:
A digital certificate is expected to be used for its entire validity period. If needed, however, a certificate can
be invalidated before its actual date of expiration.
Invalidating the certificate might be necessary, for example, if an employee leaves the company or if the
certificate’s private key has been compromised. To invalidate a certificate, you must notify the appropriate
Security 233

Certificate Authority (CA) of the circumstances. When a CA revokes a certificate, it adds the invalid
certificate serial number to a Certificate Revocation List (CRL).
CRLs are signed data structures that are issued periodically and made available in a public repository.
CRLs can be retrieved from HTTP or LDAP servers. Each CRL contains a current time stamp and a
nextUpdate time stamp. Each revoked certificate in the list is identified by its certificate serial number.
When configuring an IKE tunnel and using digital certificates as your authentication method, you can
confirm the certificate has not been revoked by selecting RSA Signature with CRL Checking. If CRL
Checking is enabled, the list is located and checked during the negotiation process to establish the key
management tunnel.
Note: To use this feature of IP Security, your system must be configured to use a SOCKS server
(version 4 for HTTP servers), an LDAP server, or both. If you know which SOCKS or LDAP
server you are using to obtain CRLs, you can make the necessary configuration selections by
using Web-based System Manager. Select CRL Configuration from the Digital Certificates
menu.
Uses for digital certificates in Internet applications:
Internet applications that use public-key cryptography systems must use digital certificates to obtain the
public keys.
There are many applications that use public-key cryptography, including the following ones:
Virtual Private Networks (VPN)
Virtual Private Networks, also called secure tunnels, can be set up between systems such as
firewalls to enable protected connections between secure networks over unsecured communication
links. All traffic destined to these networks is encrypted between the participating systems.
The protocols used in tunneling follow the IP Security and IKE standards, which allow for a secure,
encrypted connection between a remote client (for example, an employee working from home) and
a secure host or network.
Secure Sockets Layer (SSL)
SSL is a protocol that provides privacy and integrity for communications. It is used by Web servers
for secure connections between Web servers and Web browsers, by the Lightweight Directory
Access Protocol (LDAP) for secure connections between LDAP clients and LDAP servers, and by
Host-on-Demand V.2 for connections between the client and the host system. SSL uses digital
certificates for key exchange, server authentication, and, optionally, client authentication.
Secure Electronic Mail
Many electronic mail systems, using standards such as PEM or S/MIME for secure electronic mail,
use digital certificates for digital signatures and for the exchange of keys to encrypt and decrypt
mail messages.
Digital certificates and certificate requests:
A certificate request must be created and sent to a CA to request a digital certificate.
A signed digital certificate contains fields for the owner’s distinguished name, the owner’s public key, the
CA’s distinguished name and the CA’s signature. A self-signed digital certificate contains its owner’s
distinguished name, public key, and signature.
The certificate request contains fields for the requestor’s distinguished name, public key, and signature.
The CA verifies the requestor’s signature with the public key in the digital certificate to ensure that:
v The certificate request was not modified in transit between the requestor and the CA.
234 AIX Version 6.1 Security
v The requestor possesses the corresponding private key for the public key that is in the certificate
request.
The CA is also responsible for verifying to some level the identity of the requestor. Requirements for this
verification can range from very little proof to absolute assurance of the owner’s identity.
Key Manager tool:
The Key Manager tool manages digital certificates, and is located in the gskkm.rte file set on the
expansion pack.
To set up digital certificates and signature support, at minimum you must do tasks 1, 2, 3, 4, 6, and 7.
Then, use Web-based System Manager to create an IKE tunnel and associate a policy with the tunnel that
uses RSA Signature as the authentication method.
You can create and configure a key database from the Web-based System Manager VPN Overview
window by selecting the Managing Digital Certificates option, or by using the certmgr command to open
the Key Manager tool from the command line.
This section describes how to use Key Manager to do the following tasks:
Creating a key database:
A key database enables VPN endpoints to connect using valid digital certificates. The key database (*.kdb)
format is used with IP Security VPNs.
The following types of CA digital certificates are provided with Key Manager:
v RSA Secure Server Certification Authority
v Thawte Personal Premium Certification Authority
v Thawte Personal Freemail Certification Authority
v Thawte Personal Basic Certification Authority
v Thawte Personal Server Certification Authority
v Thawte Server Certification Authority
v Verisign Class 1 Public Primary Certification Authority
v Verisign Class 2 Public Primary Certification Authority
v Verisign Class 3 Public Primary Certification Authority
v Verisign Class 4 Public Primary Certification Authority
These signature digital certificates enable clients to attach to servers that have valid digital certificates
from these signers. After you create a key database, you can use it as created to attach to a server that
has a valid digital certificate from one of the signers.
To use a signature digital certificate that is not on this list, you must request it from the CA and add it to
your key database. See “Adding a CA root digital certificate” on page 236.
To create a key database using the certmgr command, use the following procedure:
1. Start the Key Manager tool by typing:
# certmgr
2. Select New from the Key Database File list.
3. Accept the default value, CMS key database file, for the Key database type field.
4. Enter the following file name in the File Name field:
ikekey.kdb
Security 235

5. Enter the following location of the database in the Location field:
/etc/security
Note: The key database must be named ikekey.kbd and it must be placed in the /etc/security
directory. Otherwise, IP Security cannot function correctly.
6. Click OK. The Password Prompt screen is displayed.
7. Enter a password in the Password field, and enter it again in the Confirm Password field.
8. If you want to change the number of days until the password expires, enter the desired number of
days in the Set expiration time? field. The default value for this field is 60 days. If you do not want
the password to expire, clear the Set expiration time? field.
9. To save an encrypted version of the password in a stash file, select the Stash the password to a
file? field and enter Yes.
Note: You must stash the password to enable the use of digital certificates with IP Security.
10. Click OK. A confirmation screen displays, verifying that you have created a key database.
11. Click OK again and you return to the IBM Key Management screen. You can either perform other
tasks or exit the tool.
Adding a CA root digital certificate:
After you have requested and received a root digital certificate from a CA, you can add it to your
database.
Most root digital certificates are of the form *.arm, such as the following example:
cert.arm
To add a CA root digital certificate to a database, use the following procedure:
1. Unless you are already using Key Manager, start the tool by typing:
# certmgr
2. From the main screen, select Open from the Key Database File list.
3. Highlight the key database file to which you want to add a CA root digital certificate and click Open.
4. Enter the password and click OK. When your password is accepted, you are returned to the IBM Key
Management screen. The title bar now shows the name of the key database file you selected,
indicating that the file is now open and ready to be worked with.
5. Select Signer Certificates from the Personal/Signer Certificates list.
6. Click Add.
7. Select a data type from the Data type list, such as:
Base64-encoded ASCII data
8. Enter a certificate file name and location for the CA root digital certificate, or click Browse to select
the name and location.
9. Click OK.
10. Enter a label for the CA root digital certificate, such as Test CA Root Certificate, and click OK. You
are returned to the Key Management screen. The Signer Certificates field now shows the label of
the CA root digital certificate you just added. You can either perform more tasks or exit the tool.
Establishing trust settings:
Installed CA certificates are set to trusted by default. You can change the trust setting if needed.
To change the trust setting, do the following steps:
1. Unless you are already using Key Manager, start the tool by typing:
236 AIX Version 6.1 Security

# certmgr
2. From the main screen, select Open from the Key Database File list.
3. Highlight the key database file in which you want to change the default digital certificate and click
Open.
4. Enter the password and click OK. After your password is accepted, you are returned to the IBM Key
Management screen. The title bar shows the name of the key database file you selected, indicating
that the file is now open.
5. Select Signer Certificates from the Personal/Signer Certificates list.
6. Highlight the certificate you want to change and click View/Edit, or double-click on the entry. The Key
Information screen is displayed for the certificate entry.
7. To make this certificate a trusted root certificate, select the check box next to Set the certificate as a
trusted root and click OK. If the certificate is not trusted, clear the check box instead and click OK.
8. Click OK from the Signer Certificates screen. You are returned to the IBM Key Management screen.
You can either perform other tasks or exit the tool.
Deleting a CA root digital certificate:
If you no longer want to use one of the CAs in your signature digital certificate list, you must delete the CA
root digital certificate.
Note: Before deleting a CA root digital certificate, create a backup copy in case you later want to recreate
the CA root.
To delete a CA root digital certificate from a database, use the following procedure:
1. Unless you are already using Key Manager, start the tool by typing:
# certmgr
2. From the main screen, select Open from the Key Database File list.
3. Highlight the key database file from which you want to delete a CA root digital certificate and click
Open.
4. Enter the password and click OK. After your password is accepted, you are returned to the Key
Management screen. The title bar shows the name of the key database file you selected, indicating
that the file is now open and ready to be edited.
5. Select Signer Certificates from the Personal/Signer Certificates list.
6. Highlight the certificate you want to delete and click Delete. The Confirm screen is displayed.
7. Click Yes. You are returned to the IBM Key Management screen. The label of the CA root digital
certificate no longer appears in the Signer Certificates field. You can either perform other tasks or exit
the tool.
Requesting a digital certificate:
To acquire a digital certificate, generate a request using Key Manager and submit the request to a CA.
The request file you generate is in the PKCS#10 format. The CA then verifies your identity and sends you
a digital certificate.
To request a digital certificate, use the following procedure:
1. Unless you are already using Key Manager, start the tool by typing:
# certmgr
2. From the main screen, select Open from the Key Database File list.
3. Highlight the /etc/security/ikekey.kdb key database file from which you want to generate the request
and click Open.
Security 237

4. Enter the password and click OK. After your password is accepted, you are returned to the IBM Key
Management screen. The title bar shows the name of the key database file you selected, indicating
that the file is now open and ready to be edited.
5. Select Personal Certificate Requests from the Personal/Signer Certificates list (in AIX Version 4)
or select Create → New Certificate Request (beginning in AIX 5.1).
6. Click New.
7. From the following screen, enter a Key Label for the self-signed digital certificate, such as:
keytest
8. Enter a common name (the default is the host name) and organization, and then select a country. For
the remaining fields, either accept the default values, or choose new values.
9. Define the subject alternate name. The optional fields associated with subject alternate are e-mail
address, IP address, and DNS name. For a tunnel type of IP address, type the same IP address that
is configured in the IKE tunnel into the IP address field. For a tunnel ID type of user@FQDN,
complete the e-mail address field. For a tunnel ID type of FQDN, type a fully qualified domain name
(for example, hostname.companyname.com) in the DNS name field.
10. At the bottom of the screen, enter a name for the file, such as:
certreq.arm
11. Click OK. A confirmation screen is displayed, verifying that you have created a request for a new
digital certificate.
12. Click OK. You are returned to the IBM Key Management screen. The Personal Certificate
Requests field now shows the key label of the new digital certificate request (PKCS#10) created.
13. Send the file to a CA to request a new digital certificate. You can either perform other tasks or exit the
tool.
Adding (Receiving) a new digital certificate:
After you receive a new digital certificate from a CA, you must add it to the key database from which you
generated the request.
To add (receive) a new digital certificate, use the following procedure:
1. Unless you are already using Key Manager, start the tool by typing:
# certmgr
2. From the main screen, select Open from the Key Database File list.
3. Highlight the key database file from which you generated the certificate request and click Open.
4. Enter the password and click OK. After your password is accepted, you are returned to the IBM Key
Management screen. The title bar shows the name of the key database file you selected, indicating
that the file is now open and ready to be edited.
5. Select Personal Certificate Requests from the Personal/Signer Certificates list.
6. Click Receive to add the newly received digital certificate to your database.
7. Select the data type of the new digital certificate from the Data type list. The default is
Base64-encoded ASCII data.
8. Enter the certificate file name and location for the new digital certificate, or click Browse to select the
name and location.
9. Click OK.
10. Enter a descriptive label for the new digital certificate, such as:
VPN Branch Certificate
11. Click OK. You are returned to the IBM Key Management screen. The Personal Certificates field
now shows the label of the new digital certificate you just added. You can either perform other tasks
or exit the tool. If there is an error loading the certificate, check that the certificate file begins with the
text ——-BEGIN CERTIFICATE——- and ends with the text ——-END CERTIFICATE——-.
238 AIX Version 6.1 Security

For example:
-----BEGIN CERTIFICATE-----
ajdkfjaldfwwwwwwwwwwadafdw
kajf;kdsajkflasasfkjafdaff
akdjf;ldasjkf;safdfdasfdas
kaj;fdljk98dafdas43adfadfa
-----END CERTIFICATE-----
If the text does not match, edit the certificate file so that it starts and ends appropriately.
Deleting a digital certificate:
At times it will be necessary to delete a digital certificate.
Note: Before deleting a digital certificate, create a backup copy in case you later want to re-create it.
To delete a digital certificate from your database, use the following procedure:
1. Unless you are already using Key Manager, start the tool by typing:
# certmgr
2. From the main screen, select Open from the Key Database File list.
3. Highlight the key database file from which you want to delete the digital certificate and click Open.
4. Enter the password and click OK. After your password is accepted, you are returned to the IBM Key
Management screen. The title bar shows the name of the key database file you selected, indicating
that the file is now open and ready to be edited.
5. Select Personal Certificate Requests from the Personal/Signer Certificates list.
6. Highlight the digital certificate you want to delete and click Delete. The Confirm screen is displayed.
7. Click Yes. You are returned to the IBM Key Management screen. The label of the digital certificate
you just deleted no longer appears in the Personal Certificates field. You can either perform other
tasks or exit the tool.
Changing a database password:
At times it will be necessary to change a database password.
To change the key database, use the following procedure:
1. Unless you are already using Key Manager, start the tool by typing:
# certmgr
2. From the main screen, select Change Password from the Key Database File list.
3. Enter a new password in the Password field, and enter it again in the Confirm Password field.
4. If you want to change the number of days until the password expires, enter the desired number of
days in the Set expiration time? field. The default value for this field is 60 days. If you do not want
the password to expire, clear the Set expiration time? field.
5. To save an encrypted version of the password in a stash file, select the Stash the password to a
file? field and enter Yes.
Note: You must stash the password to enable the use of digital certificates with IP Security.
6. Click OK. A message in the status bar indicates that the request completed successfully.
7. Click OK again and you return to the IBM Key Management screen. You can either perform other
tasks or exit the tool.
Creating IKE tunnels using digital certificates:
To create IKE tunnels that use digital certificates, you must use Web-based System Manager and the Key
Manager tool.
Security 239
To enable the use of digital certificates when defining the key management IKE tunnel policies, you must
configure a transform that uses signature mode. Signature mode uses an RSA signature algorithm for
authentication. IP Security provides the Web-based System Manager dialog ″Add/Change a Transform″ to
allow you to select an authentication method of RSA Signature or RSA Signature with CRL Checking.
At least one endpoint of the tunnel must have a policy defined that uses a signature mode transform. You
can also define other transforms using signature mode through Web-based System Manager.
The IKE key management tunnel types (the Host Identity Type field on the Identification tab) supported
by IP Security are as follows:
v IP address
v Fully Qualified Domain Name (FQDN)
v user@FQDN
v X.500 Distinguished Name
v Key identifier
Use Web-based System Manager to select host-identity types on the Key Management Tunnel
Properties - Identification tab. If you select IP Address, FQDN, or user@FQDN, you must enter values
in Web-based System Manager and then provide these values to the CA. This information is used as the
Subject Alternate Name in the personal digital certificate.
For example, if you choose a host identity type of X.500 Distinguished Name from the Web-based System
Manager list on the Identification tab, and you enter the host identity as /C=US/O=ABC/OU=SERV/CN=name.austin.ibm.com, the following are the values that you must enter in Key Manager when
creating a digital certificate request:
v Common name: name.austin.ibm.com
v Organization: ABC
v Organizational unit: SERV
v Country : US
The X.500 Distinguished Name entered is the name set up by your system or LDAP administrator.
Entering an organizational unit value is optional. The CA then uses this information when creating the
digital certificate.
For another example, if you choose a host identity type of IP Address from the list, and you enter the host
identity as 10.10.10.1, the following are the values you must enter in the digital certificate request:
v Common name: name.austin.ibm.com
v Organization: ABC
v Organizational unit: SERV
v Country : US
v Subject alternate IP address field: 10.10.10.1
After you create the digital certificate request with this information, the CA uses this information to create
the personal digital certificate.
When requesting a personal digital certificate, the CA needs the following information:
v You are requesting a X.509 certificate.
v The signature format is MD5 with RSA encryption.
v Whether you are specifying Subject Alternate Name. Alternate name types are:
– IP address
– Fully qualified domain name (FQDN)
240 AIX Version 6.1 Security

– user@FQDN
The following subject alternate-name information is included in the certificate request file.
v Your planned key use (the digital signature bit must be selected).
v The Key Manager digital certificate request file (in PKCS#10 format).
For specific steps using the Key Manager tool to create a certificate request, see “Requesting a digital
certificate” on page 237.
Before activating the IKE tunnel, you must add the personal digital certificate you received from the CA
into the Key Manager database, ikekey.kdb. For more information, see “Adding (Receiving) a new digital
certificate” on page 238.
IP Security supports the following types of personal digital certificates:
Subject DN
The Subject Distinguished Name must be in the following format and order:
/C=US/O=ABC/OU=SERV/CN=name.austin.ibm.com
The Key Manager tool allows only one OU value.
Subject DN and Subject Alternate Name as an IP address
The Subject Distinguished Name and Subject Alternate Name can be designated as an IP
address, as shown in the following:
/C=US/O=ABC/OU=SERV/CN=name.austin.ibm.com and 10.10.10.1
Subject DN and Subject Alternate Name as FQDN
The Subject Distinguished Name and Subject Alternate Name can be designated as a fully
qualified domain name, as shown in the following:
/C=US/O=ABC/OU=SERV/CN=name.austin.ibm.com and bell.austin.ibm.com.
Subject DN and Subject Alternate Name as user@FQDN
The Subject Distinguished Name and Subject Alternate Name can be designated as a user
address (user_ID@fully_qualified_domain_name), as shown in the following:
/C=US/O=ABC/OU=SERV/CN=name.austin.ibm.com and [email protected].
Subject DN and multiple Subject Alternate Names
The Subject Distinguished Name can be associated with multiple Subject Alternate Names, as
shown in the following:
/C=US/O=ABC/OU=SERV/CN=name.austin.ibm.com and bell.austin.ibm.com, 10.10.10.1, and
Network address translation
IP Security can use devices whose addresses undergo network address translation (NAT).
NAT is widely used as part of firewall technology for Internet-connection sharing, and it is a standard
feature on routers and edge devices. The IP Security protocol depends on identifying remote endpoints
and their policy based on the remote IP address. When intermediate devices such as routers and firewalls
translate a private address to a public address, the required authentication processing in IP Security might
fail because the address in the IP packet has been modified after the authentication digest was calculated.
With the new IP Security NAT support, devices that are configured behind a node that performs network
address translation are able to establish an IP Security Tunnel. The IP Security code is able to detect
when a remote address has been translated. Using the new IP Security implementation with support for
NAT allows a VPN client to connect from home or on the road to the office through an internet connection
with NAT enabled.
Security 241

This diagram shows the difference between a NAT-enabled IP Security implementation, with UDP
encapsulated traffic and an implementation that is not NAT-enabled.
Configuring IP security to work with NAT:
In order to use NAT in IP Security, you must set the ENABLE_IPSEC_NAT_TRAVERSAL variable in the
/etc/isakmpd.conf file. When this variable is set, filter rules are added to send and receive traffic on port
4500.
The following example shows the filter rules when the ENABLE_IPSEC_NAT_TRAVERSAL variable is set.
Dynamic rule 2:
Rule action : permit
Source Address : 0.0.0.0 (any)
Source Mask : 0.0.0.0 (any)
Destination Address : 0.0.0.0 (any)
Destination Mask : 0.0.0.0 (any)
Source Routing : no
Protocol : udp
Source Port : 0 (any)
Destination Port : 4500
Scope : local
Direction : inbound
Fragment control : all packets
Tunnel ID number : 0
Dynamic rule 3:
Rule action : permit
Source Address : 0.0.0.0 (any)
Source Mask : 0.0.0.0 (any)
Destination Address : 0.0.0.0 (any)
Destination Mask : 0.0.0.0 (any)
Source Routing : no
Protocol : udp
Source Port : 4500
Destination Port : 0 (any)
Scope : local
Direction : outbound
Fragment control : all packets
Tunnel ID number : 0
Setting the ENABLE_IPSEC_NAT_TRAVERSAL variable also adds some additional filter rules in the filter
table. Special IPSEC NAT messages use UDP encapsulation and filter rules must be added to allow this
traffic to flow. In addition, in phase 1 signature mode is required. If IP Address is used as the identifier in
the certificate, it should contain the private ip address.
IP Security also needs to send NAT keep alive messages to maintain the mapping of the original IP
Address and the NAT address. The interval is specified by the NAT_KEEPALIVE_INTERVAL variable in
Figure 12. NAT-enabled IP Security
242 AIX Version 6.1 Security

/etc/isakmpd.conf file. This variable specifies how frequently NAT keepalive packets are sent in seconds.
If you do not specify a value for NAT_KEEPALIVE_INTERVAL, a default value of 20 seconds is used.
Limitations when using NAT exchanges:
Endpoints behind NAT devices must protect their traffic using the ESP protocol.
ESP is the predominate header selected for IP Security, and will be usable for most customer applications.
ESP includes hashing of the user data, but not of the IP Header. The integrity checking in the AH header
incorporates the IP source and destination addresses in the keyed message integrity check. NAT or
reverse NAT devices that make changes to the address fields invalidate the message integrity check.
Therefore, if only the AH protocol is defined in the phase 2 policy for a tunnel, and NAT is detected in a
phase 1 exchange, a Notify Payload saying NO_PROPOSAL_CHOSEN is sent.
Additionally, a connection using NAT must select tunnel mode so that the original IP address is
encapsulated in the packet. Transport mode and addresses with NAT are not compatible. If a NAT is
detected and only transport mode is proposed in phase 2, a Notify Payload saying NO_PROPOSAL_CHOSEN is
sent.
Avoiding tunnel mode conflicts:
Remote peers might negotiate entries that overlap in a gateway. This overlap causes a tunnel mode
conflict.
The following figure shows a tunnel mode conflict.
The gateway has two possible Security Associations (SAs) for the 10.1.2.3 IP address. These duplicate
remote addresses cause confusion over where to send packets coming from the server. When a tunnel is
configured between Suzy’s server and Ari’s laptop, the IP address is used, and Suzy cannot configure a
tunnel with Bob with the same IP address. To avoid a tunnel mode conflict, you should not define a tunnel
with the same IP address. Because the remote address is not under the control of the remote user, other
ID types should be used to identify the remote host such as fully qualified domain name or user at fully
qualified domain name.
Configuring manual tunnels
The following procedures configure IP Security to use manual tunnels.
Setting up tunnels and filters:
The process of setting up a tunnel is to define the tunnel on one end, import the definition on the other
end, and activate the tunnel and filter rules on both ends. The tunnel is then ready to use.
To set up a manual tunnel, it is not necessary to separately configure the filter rules. As long as all traffic
between two hosts goes through the tunnel, the necessary filter rules are automatically generated.
Figure 13. Tunnel Mode Conflict
Security 243

Information about the tunnel must be made to match on both sides if it is not explicitly supplied. For
instance, the encryption and authentication algorithms specified for the source will be used for the
destination if the destination values are not specified.
Removing filters:
To completely remove filters and stop IP security, use the rmdev command.
The default filter rule is still active even if filtering is turned off with the mkfilt -d command. This command
allows you to suspend or remove all filters rules and load new rules while the protection of the default rule
remains. The default filter rule is DENY. If you deactivate filtering with the mkfilt -d command, reports
from the lsfilt command will show that filtering is turned off, but no packets being allowed in or out. If you
want to stop IP security entirely, use the rmdev command.
Creating a manual tunnel on the first host:
You can configure a tunnel using the Web-based System Manager Network application, the
SMITips4_basic fast path (for IP Version 4), the SMIT ips6_basic fast path (for IP version 6) or you can
create the tunnel manually using the following procedure.
The following is a sample of the gentun command used to create a manual tunnel:
gentun -v 4 -t manual -s 5.5.5.19 -d 5.5.5.8 \
-a HMAC_MD5 -e DES_CBC_8 -N 23567
You can use the lstun -v 4 command to list the characteristics of the manual tunnel created by the
previous example. The output looks similar to the following example:
Tunnel ID : 1
IP Version : IP Version 4
Source : 5.5.5.19
Destination : 5.5.5.8
Policy : auth/encr
Tunnel Mode : Tunnel
Send AH Algo : HMAC_MD5
Send ESP Algo : DES_CBC_8
Receive AH Algo : HMAC_MD5
Receive ESP Algo : DES_CBC_8
Source AH SPI : 300
Source ESP SPI : 300
Dest AH SPI : 23576
Dest ESP SPI : 23576
Tunnel Life Time : 480
Status : Inactive
Target : -
Target Mask : -
Replay : No
New Header : Yes
Snd ENC-MAC Algo : -
Rcv ENC-MAC Algo : -
To activate the tunnel, type the following code:
mktun -v 4 -t1
The filter rules associated with the tunnel are automatically generated.
To view the filter rules, use the lsfilt -v 4 command. The output looks similar to the following example:
Rule 4:
Rule action : permit
Source Address : 5.5.5.19
Source Mask : 255.255.255.255
Destination Address : 5.5.5.8
244 AIX Version 6.1 Security
Destination Mask : 255.255.255.255
Source Routing : yes
Protocol : all
Source Port : any 0
Destination Port : any 0
Scope : both
Direction : outbound
Logging control : no
Fragment control : all packets
Tunnel ID number : 1
Interface : all
Auto-Generated : yes
Rule 5:
Rule action : permit
Source Address : 5.5.5.8
Source Mask : 255.255.255.255
Destination Address : 5.5.5.19
Destination Mask : 255.255.255.255
Source Routing : yes
Protocol : all
Source Port : any 0
Destination Port : any 0
Scope : both
Direction : inbound
Logging control : no
Fragment control : all packets
Tunnel ID number : 1
Interface : all
Auto-Generated : yes
To activate the filter rules, including the default filter rules, use the mktun -v 4 -t 1 command.
To set up the other side (when it is another machine using this operating system), the tunnel definition can
be exported on host A and then imported to host B.
The following command exports the tunnel definition into a file named ipsec_tun_manu.exp and any
associated filter rules to the file ipsec_fltr_rule.exp in the directory indicated by the -f flag:
exptun -v 4 -t 1 -f /tmp
Creating a manual tunnel on the second host:
To create the matching end of the tunnel, the export files are copied and imported into the remote
machine.
Use the following command to create the matching end of the tunnel:
imptun -v 4 -t 1 -f /tmp
where
1 Is the tunnel to be imported
/tmp Is the directory where the import files reside
The tunnel number is generated by the system. You can obtain it from the output of the gentun command
or by using the lstun command to list the tunnels and determine the correct tunnel number to import. If
there is only one tunnel in the import file, or if all the tunnels are to be imported, the -t option is not
needed.
If the remote machine is not running this operating system, the export file can be used as a reference for
setting up the algorithm, keys, and security parameters index (SPI) values for the other end of the tunnel.
Security 245

Export files from a firewall product can be imported to create tunnels. To do this, use the -n option when
importing the file, as follows:
imptun -v 4 -f /tmp -n
IP security filter configuration
Filtering can be set up to be simple, using mostly autogenerated filter rules, or can be customized by
defining very specific filter functions based on the properties of the IP packets.
Each line in a filter table is known as a rule. A collection of rules determine what packets are accepted in
and out of the machine and how they are directed. Matches to filter rules on incoming packets are done by
comparing the source address and SPI value to those listed in the filter table. Therefore, this pair must be
unique. Filter rules can control many aspects of communications, including source and destination
addresses and masks, protocol, port number, direction, fragment control, source routing, tunnel, and
interface type.
The types of filter rules are as follows:
v Static filter rules are created in the filter table to be used for the general filtering of traffic or for
associating with manual tunnels. They can be added, deleted, modified, and moved. An optional
description text field can be added to identify a specific rule.
v Autogenerated filter rules and user-specified filter rules (also called autogenerated filter rules) are a
specific set of rules created for use of IKE tunnels. Both static and dynamic filter rules are created
based on data management tunnel information and on data management tunnel negotiation.
v Predefined filter rules are generic filter rules that cannot be modified, moved, or deleted, such as the
all traffic rule, the ah rule, and the esp rule. They pertain to all traffic.
The direction flag (-w) of the genfilt command is used to specify when the specified rule should be used
either during input packet processing or output packet processing. When the both value for this flag is
used, it specifies that this rule is used during both input and output processing. In AIX IPsec, when filtering
is turned on, at least one rule determines the fate of any network packet (be it incoming or outgoing). If
you want a rule to be used only during processing of an incoming packet (or outgoing packet), you can
choose to do so by using the -w switch of the genfilt command. For example, when a packet is sent out
from host A to host B, the outgoing IP packet has the source address of A and the destination address of
B. On host A, this packet is processed by the IPsec filter during the outbound processing and during the
inbound processing on host B. Assume there is a gateway G between host A and host B. On gateway G,
this same packet (all the immutable fields having the same value) is processed twice: once for the inbound
processing and once for the outbound processing (if the ipforwarding option is set). For the packet to
travel from host A to host B through gateway G, you need a permit rule with:
v On host A – src addr set to A, dest addr to B, direction to outbound
v On host B – src addr set to A, dest addr to B, direction to inbound
But on the gateway G, you will be requiring two rules:
1. src addr set to A, dest addr to B, direction to outbound
2. src addr set to A, dest addr to B, direction to inbound
The above rules can be replaced by: src addr set to A, dest addr to B and direction to both. Therefore,
the value of both for direction is typically used in gateways that have the ipforwarding option set to no.
The above configuration is only for the packets travelling from host A to host B through the gateway G. If
you want the packets to travel in the reverse direction (from host B to host A through the gateway G), then
you need another rule for that.
Note: Direction both implies that the associated rule is used for both incoming and outgoing packets.
However, it doesn’t mean that the rule is applied when the source and destination addresses are
reversed. For instance, if server A has a rule with A as source address and B as destination
246 AIX Version 6.1 Security
address and the direction is set to both, then A as incoming packet with B as source address and
A as destination does not match this rule. Typically the both option is used in gateways that
forward the packets.
Associated with these filter rules are Subnet masks, which group IDs that are associated with a filter rule,
and the host-firewall-host configuration option. The following sections describe the different types of filter
rules and their associated features.
IP filters for AIX:
IPFilter is a software package that can be used to provide network address translation (NAT) or firewall
services.
IPFilter version 4.1.13 open source software has been ported to AIX, consistent with the licensing
presented on the IP Filter website (http://coombs.anu.edu.au/~avalon/). The IPFilter software is shipped on
the AIX 5.3 expansion pack, beginning with AIX 5L Version 5.3 with the 5300-05 Technology Level. The
installp package, ipfl, includes the man page and license.
On AIX, the IPFilter product loads as a kernel extension, /usr/lib/drivers/ipf. The ipf, ipfs, ipfstat, ipmon,
and ipnat binaries are also shipped with this package.
After installing the package, run the following command to load the kernel extension:
/usr/lib/methods/cfg_ipf -l
Run the following command to unload the kernel extension:
/usr/lib/methods/cfg_ipf -u
Remember to enable ipforwarding (network option) if packet forwarding is needed. For more information
about IPFilter, including man pages and an FAQ, check the IPFilter website (http://coombs.anu.edu.au/~avalon/).
Static filter rules:
Each static filter rule contains space-separated fields.
The following list provides the name of each field in a static filter rule followed by an example from rule 1
in parentheses:
v Rule_number (1)
v Action (permit)
v Source_addr (0.0.0.0)
v Source_mask (0.0.0.0)
v Dest_addr (0.0.0.0)
v Dest_mask (0.0.0.0)
v Source_routing (no)
v Protocol (udp)
v Src_prt_operator (eq)
v Src_prt_value (4001)
v Dst_prt_operator (eq)
v Dst_prt_value (4001)
v Scope (both)
v Direction (both)
v Logging (no)
Security 247
v Fragment (all packets)
v Tunnel (0)
v Interface (all).
Example of static filter rules
1 permit 0.0.0.0 0.0.0.0 0.0.0.0 0.0.0.0 no udp eq 4001 eq 4001 both both no all
packets 0 all
2 permit 0.0.0.0 0.0.0.0 0.0.0.0 0.0.0.0 no ah any 0 any 0 both both no all packets
0 all
3 permit 0.0.0.0 0.0.0.0 0.0.0.0 0.0.0.0 no esp any 0 any 0 both both no all packets
0 all
4 permit 10.0.0.1 255.255.255.255 10.0.0.2 255.255.255.255 no all any 0 any 0 both
outbound no all packets 1 all outbound traffic
5 permit 10.0.0.2 255.255.255.255 10.0.0.1 255.255.255.255 no all any 0 any 0 both
inbound no all packets 1 all
6 permit 10.0.0.1 255.255.255.255 10.0.0.3 255.255.255.255 no tcp lt 1024 eq 514 local
outbound yes all packets 2 all
7 permit 10.0.0.3 255.255.255.255 10.0.0.1 255.255.255.255 no tcp/ack eq 514 lt 1024
local inbound yes all packets 2 all
8 permit 10.0.0.1 255.255.255.255 10.0.0.3 255.255.255.255 no tcp/ack lt 1024 lt 1024
local outbound yes all packets 2 all
9 permit 10.0.0.3 255.255.255.255 10.0.0.1 255.255.255.255 no tcp lt 1024 lt 1024 local
inbound yes all packets 2 all
10 permit 10.0.0.1 255.255.255.255 10.0.0.4 255.255.255.255 no icmp any 0 any 0 local
outbound yes all packets 3 all
11 permit 10.0.0.4 255.255.255.255 10.0.0.1 255.255.255.255 no icmp any 0 any 0 local
inbound yes all packets 3 all
12 permit 10.0.0.1 255.255.255.255 10.0.0.5 255.255.255.255 no tcp gt 1023 eq 21 local
outbound yes all packets 4 all
13 permit 10.0.0.5 255.255.255.255 10.0.0.1 255.255.255.255 no tcp/ack eq 21 gt 1023 local
inbound yes all packets 4 all
14 permit 10.0.0.5 255.255.255.255 10.0.0.1 255.255.255.255 no tcp eq 20 gt 1023 local
inbound yes all packets 4 all
15 permit 10.0.0.1 255.255.255.255 10.0.0.5 255.255.255.255 no tcp/ack gt 1023 eq 20 local
outbound yes all packets 4 all
16 permit 10.0.0.1 255.255.255.255 10.0.0.5 255.255.255.255 no tcp gt 1023 gt 1023 local
outbound yes all packets 4 all
248 AIX Version 6.1 Security

17 permit 10.0.0.5 255.255.255.255 10.0.0.1 255.255.255.255 no tcp/ack gt 1023 gt 1023 local
inbound yes all packets 4 all
18 permit 0.0.0.0 0.0.0.0 0.0.0.0 0.0.0.0 no all any 0 any 0 both both yes all
packets
Each rule in the previous example is described as follows:
Rule 1
For the Session Key daemon. This rule only appears in IP Version 4 filter tables. It uses port
number 4001 to control packets for refreshing the session key. Rule 1 an example of how the port
number can be used for a specific purpose.
Note: Do not modify this filter rule, except for logging purposes.
Rules 2 and 3
Allow processing of authentication headers (AH) and encapsulating security payload (ESP)
headers.
Note: Do not modify Rules 2 and 3, except for logging purposes.
Rules 4 and 5
Set of autogenerated rules that filter traffic between addresses 10.0.0.1 and 10.0.0.2 through
tunnel 1. Rule 4 is for outbound traffic, and rule 5 is for inbound traffic.
Note: Rule 4 has a user-defined description of outbound traffic.
Rules 6 through 9
Set of user-defined rules that filter outbound rsh, rcp, rdump, rrestore, and rdist services between
addresses 10.0.0.1 and 10.0.0.3 through tunnel 2. In this example, logging is set to Yes, so that
the administrator can monitor this type of traffic.
Rules 10 and 11
Set of user-defined rules that filter both inbound and outbound icmp services of any type between
addresses 10.0.0.1 and 10.0.0.4 through tunnel 3.
Rules 12 through 17
User-defined filter rules that filter outbound file transfer protocol (FTP) service from 10.0.0.1 and
10.0.0.5 through tunnel 4.
Rule 18
Autogenerated rule always placed at the end of the table. In this example, it permits all packets
that do not match the other filter rules. It can be set to deny all traffic not matching the other filter
rules.
Each rule can be viewed separately (using lsfilt) to list each field with its value. For example:
Rule 1:
Rule action : permit
Source Address : 0.0.0.0
Source Mask : 0.0.0.0
Destination Address : 0.0.0.0
Destination Mask : 0.0.0.0
Source Routing : yes
Protocol : udp
Source Port : eq 4001
Destination Port : eq 4001
Scope : both
Direction : both
Logging control : no
Security 249

Fragment control : all packets
Tunnel ID number : 0
Interface : all
Auto-Generated : yes
The following list contains all the parameters that can be specified in a filter rule:
-v IP Version: 4 or 6.
-a Action:
d Deny
p Permit
-s Source address. Can be an IP address or hostname.
-m Source subnet mask.
-d Destination address. Can be an IP address or hostname.
-M Destination subnet mask.
-g Source routing control: y or n.
-c Protocol. Values can be udp, icmp, tcp, tcp/ack, ospf, pip, esp, ah and all.
-o Source port or ICMP type operation.
-p Source port or ICMP type value.
-O Destination port or ICMP code operation.
-P Destination port or ICMP code value.
-r Routing:
r Forwarded packets.
l Local destined/originated packets.
b Both.
-l Log control.
y Include in log.
n Do not include in log.
-f Fragmentation.
y Applies to fragments headers, fragments, and non-fragments.
o Applies only to fragments and fragment headers.
n Applies only to non-fragments.
h Applies only to non-fragments and fragment headers.
-t Tunnel ID.
-i Interface, such as tr0 or en0.
For more information, see the genfilt and chfilt command descriptions.
Autogenerated filter rules and user-specified filter rules:
Certain rules are autogenerated for the use of the IP Security filter and tunnel code.
Autogenerated rules include:
v Rules for the session key daemon that refresh the IP version 4 keys in IKE (AIX 4.3.3 and later)
v Rules for the processing of AH and ESP packets.
Filter rules are also autogenerated when defining tunnels. For manual tunnels, autogenerated rules specify
the source and destination addresses and the mask values, as well as the tunnel ID. All traffic between
those addresses will flow through the tunnel.
250 AIX Version 6.1 Security
For IKE tunnels, autogenerated filter rules determine protocol and port numbers during IKE negotiation.
The IKE filter rules are kept in a separate table, which is searched after the static filter rules and before
the autogenerated rules. IKE filter rules are inserted in a default position within the static filter table, but
they can be moved by the user.
Autogenerated rules permit all traffic over the tunnel. User-defined rules can place restrictions on certain
types of traffic. Place these user-defined rules before the autogenerated rules, because IP Security uses
the first rule it finds that applies to the packet. The following is an example of user-defined filter rules that
filter traffic based on ICMP operation.
1 permit 10.0.0.1 255.255.255.255 10.0.0.4 255.255.255.255 no icmp any 8 any 0
local outbound no all packets 3 all
2 permit 10.0.0.4 255.255.255.255 10.0.0.1 255.255.255.255 no icmp any 0 any 0 local
inbound no all packets 3 all
3 permit 10.0.0.4 255.255.255.255 10.0.0.1 255.255.255.255 no icmp any 8 any 0 local
inbound no all packets 3 all
4 permit 10.0.0.1 255.255.255.255 10.0.0.4 255.255.255.255 no icmp any 0 any 0 local
outbound no all packets 3 all
To simplify the configuration of a single tunnel, filter rules are autogenerated when tunnels are defined.
This function can be suppressed by specifying the -g flag in the gentun. You can find a sample filter file
with genfilt commands to generate filter rules for different TCP/IP services in /usr/samples/ipsec/filter.sample.
Predefined filter rules:
Several predefined filter rules are autogenerated with certain events.
When the ipsec_v4 or ipsec_v6 device is loaded, a predefined rule is inserted into the filter table and then
activated. By default, this predefined rule is to permit all packets, but it is user-configurable and you can
set it to deny all packets.
Note: When configuring remotely, ensure that the deny rule is not enabled before the configuration is
complete, to prevent your session from getting locked out of the machine. The situation can be
avoided either by setting the default action to permit or by configuring a tunnel to the remote
machine before activating IP Security.
Both IP Version 4 and IP Version 6 filter tables have a predefined rule. Either may be independently
changed to deny all. This will keep traffic from passing unless that traffic is specifically defined by
additional filter rules. The only other option to change on the predefined rules is chfilt with the -l option,
which allows packets matching that rule to be logged.
To support IKE tunnels, a dynamic filter rule is placed in the IP Version 4 filter table. This is the position at
which dynamic filter rules are inserted into the filter table. This position can be controlled by the user by
moving its position up and down the filter table. After the tunnel manager daemon and isakmpd daemon
are initialized to allow IKE tunnels to be negotiated, rules are automatically created in the dynamic filter
table to handle IKE messages as well as AH and ESP packets.
Subnet masks:
Subnet masks are used to group a set of IDs that are associated with a filter rule. The mask value is
ANDed with the ID in the filter rules and compared to the ID specified in the packet.
For example, a filter rule with a source IP address of 10.10.10.4 and a subnet mask of 255.255.255.255
specified that an exact match must occur of the decimal IP address, as shown in the following:
Binary Decimal
Source IP address 1010.1010.1010.0100 10.10.10.4
Security 251
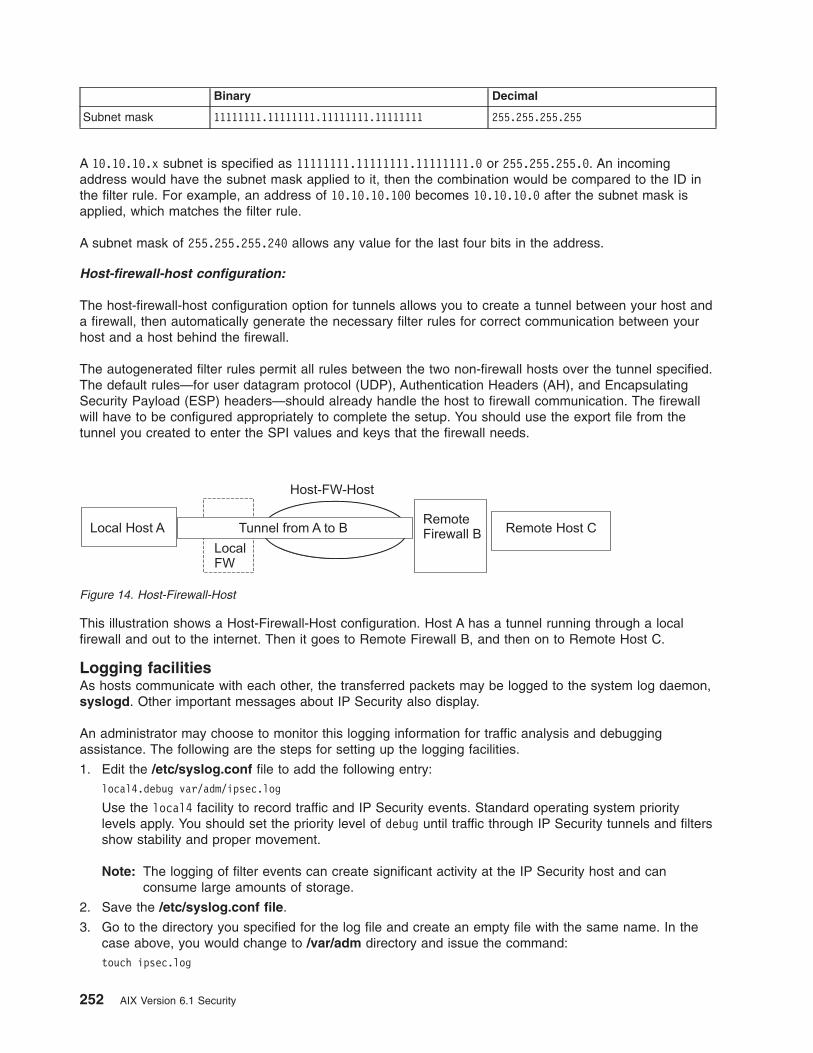
Binary Decimal
Subnet mask 11111111.11111111.11111111.11111111 255.255.255.255
A 10.10.10.x subnet is specified as 11111111.11111111.11111111.0 or 255.255.255.0. An incoming
address would have the subnet mask applied to it, then the combination would be compared to the ID in
the filter rule. For example, an address of 10.10.10.100 becomes 10.10.10.0 after the subnet mask is
applied, which matches the filter rule.
A subnet mask of 255.255.255.240 allows any value for the last four bits in the address.
Host-firewall-host configuration:
The host-firewall-host configuration option for tunnels allows you to create a tunnel between your host and
a firewall, then automatically generate the necessary filter rules for correct communication between your
host and a host behind the firewall.
The autogenerated filter rules permit all rules between the two non-firewall hosts over the tunnel specified.
The default rules—for user datagram protocol (UDP), Authentication Headers (AH), and Encapsulating
Security Payload (ESP) headers—should already handle the host to firewall communication. The firewall
will have to be configured appropriately to complete the setup. You should use the export file from the
tunnel you created to enter the SPI values and keys that the firewall needs.
This illustration shows a Host-Firewall-Host configuration. Host A has a tunnel running through a local
firewall and out to the internet. Then it goes to Remote Firewall B, and then on to Remote Host C.
Logging facilities
As hosts communicate with each other, the transferred packets may be logged to the system log daemon,
syslogd. Other important messages about IP Security also display.
An administrator may choose to monitor this logging information for traffic analysis and debugging
assistance. The following are the steps for setting up the logging facilities.
1. Edit the /etc/syslog.conf file to add the following entry:
local4.debug var/adm/ipsec.log
Use the local4 facility to record traffic and IP Security events. Standard operating system priority
levels apply. You should set the priority level of debug until traffic through IP Security tunnels and filters
show stability and proper movement.
Note: The logging of filter events can create significant activity at the IP Security host and can
consume large amounts of storage.
2. Save the /etc/syslog.conf file.
3. Go to the directory you specified for the log file and create an empty file with the same name. In the
case above, you would change to /var/adm directory and issue the command:
touch ipsec.log
Figure 14. Host-Firewall-Host
252 AIX Version 6.1 Security

4. Issue a refresh command to the syslogd subsystem:
refresh -s syslogd
5. If you are using IKE tunnels, ensure the /etc/isakmpd.conf file specifies the desired isakmpd logging
level. (See “Internet Protocol security problem diagnosis” on page 257 for more information on IKE
logging.)
6. While creating filter rules for your host, if you would like packets matching a specific rule to be logged,
set the -l parameter for the rule to Y (Yes) using the genfilt or the chfilt commands.
7. Turn on packet logging and start the ipsec_logd daemon using the command:
mkfilt -g start
You can stop packet logging by issuing the following command:
mkfilt -g stop
The following sample log file contains traffic entries and other IP Security log entries:
1. Aug 27 08:08:40 host1 : Filter logging daemon ipsec_logd (level 2.20)
initialized at 08:08:40 on 08/27/97A
2. Aug 27 08:08:46 host1 : mkfilt: Status of packet logging set to Start
at 08:08:46 on 08/27/97
3. Aug 27 08:08:47 host1 : mktun: Manual tunnel 2 for IPv4, 9.3.97.244, 9.3.97.130
activated.
4. Aug 27 08:08:47 host1 : mkfilt: #:1 permit 0.0.0.0 0.0.0.0 0.0.0.0 0.0.0.0
udp eq 4001 eq 4001 both both l=n f=y t=0 e= a=
5. Aug 27 08:08:47 host1 : mkfilt: #:2 permit 0.0.0.0 0.0.0.0 0.0.0.0 0.0.0.0
ah any 0 any 0 both both l=n f=y t=0 e= a=
6. Aug 27 08:08:47 host1 : mkfilt: #:3 permit 0.0.0.0 0.0.0.0 0.0.0.0 0.0.0.0
esp any 0 any 0 both both l=n f=y t=0 e= a=
7. Aug 27 08:08:47 host1 : mkfilt: #:4 permit 10.0.0.1 255.255.255.255 10.0.0.2
255.255.255.255 icmp any 0 any 0 local outbound l=y f=y t=1 e= a=
8. Aug 27 08:08:47 host1 : mkfilt: #:4 permit 10.0.0.2 255.255.255.255 10.0.0.1
255.255.255.255 icmp any 0 any 0 local inbound l=y f=y t=1 e= a=
9. Aug 27 08:08:47 host1 : mkfilt: #:6 permit 0.0.0.0 0.0.0.0 0.0.0.0 0.0.0.0
all any 0 any 0 both both l=y f=y t=0 e= a=
10. Aug 27 08:08:47 host1 : mkfilt: Filter support (level 1.00) initialized at
08:08:47 on 08/27/97
11. Aug 27 08:08:48 host1 : #:6 R:p o:10.0.0.1 s:10.0.0.1 d:10.0.0.20 p:udp
sp:3327 dp:53 r:l a:n f:n T:0 e:n l:67
12. Aug 27 08:08:48 host1 : #:6 R:p i:10.0.0.1 s:10.0.0.20 d:10.0.0.1 p:udp
sp:53 dp:3327 r:l a:n f:n T:0 e:n l:133
13. Aug 27 08:08:48 host1 : #:6 R:p i:10.0.0.1 s:10.0.0.15 d:10.0.0.1 p:tcp
sp:4649 dp:23 r:l a:n f:n T:0 e:n l:43
14. Aug 27 08:08:48 host1 : #:6 R:p o:10.0.0.1 s:10.0.0.1 d:10.0.0.15 p:tcp
sp:23 dp:4649 r:l a:n f:n T:0 e:n l:41
15. Aug 27 08:08:48 host1 : #:6 R:p i:10.0.0.1 s:10.0.0.15 d:10.0.0.1 p:tcp
sp:4649 dp:23 r:l a:n f:n T:0 e:n l:40
16. Aug 27 08:08:51 host1 : #:4 R:p o:10.0.0.1 s:10.0.0.1 d:10.0.0.2 p:icmp
t:8 c:0 r:l a:n f:n T:1 e:n l:84
17. Aug 27 08:08:51 host1 : #:5 R:p i:10.0.0.1 s:10.0.0.2 d:10.0.0.1 p:icmp
t:0 c:0 r:l a:n f:n T:1 e:n l:84
18. Aug 27 08:08:52 host1 : #:4 R:p o:10.0.0.1 s:10.0.0.1 d:10.0.0.2 p:icmp
t:8 c:0 r:l a:n f:n T:1 e:n l:84
19. Aug 27 08:08:52 host1 : #:5 R:p i:10.0.0.1 s:10.0.0.2 d:10.0.0.1 p:icmp
t:0 c:0 r:l a:n f:n T:1 e:n l:84
20. Aug 27 08:32:27 host1 : Filter logging daemon terminating at 08:32:27 on
08/27/97l
The following paragraphs explain the log entries.
1 Filter logging daemon activated.
2 Filter packet logging set to on with the mkfilt -g start command.
3 Tunnel activation, showing tunnel ID, source address, destination address, and time stamp.
4-9 Filters have been activated. Logging shows all loaded filter rules.
Security 253

10 Message showing activation of filters.
11-12 These entries show a DNS lookup for a host.
13-15 These entries show a partial Telnet connection (the other entries have been removed from this
example for space reasons).
16-19 These entries show two pings.
20 Filter logging daemon shutting down.
The following example shows two hosts negotiating a phase 1 and a phase 2 tunnel from the initiating
host’s point of view. (The isakmpd logging level has been specified as isakmp_events.)
1. Dec 6 14:34:42 host1 Tunnel Manager: 0: TM is processing a
Connection_request_msg
2. Dec 6 14:34:42 host1 Tunnel Manager: 1: Creating new P1 tunnel object (tid)
3. Dec 6 14:34:42 host1 isakmpd: 192.168.100.103 >>> 192.168.100.104 ( SA PROPOSAL
TRANSFORM )
4. Dec 6 14:34:42 host1 isakmpd: ::ffff:192.168.100.103 <<< 192.168.100.104 ( SA
PROPOSAL TRANSFORM )
5. Dec 6 14:34:42 host1 isakmpd: Phase I SA Negotiated
6. Dec 6 14:34:42 host1 isakmpd: 192.168.100.103 >>> 192.168.100.104 ( KE NONCE )
7. Dec 6 14:34:42 host1 isakmpd: ::ffff:192.168.100.103 <<< 192.168.100.104 ( KE
NONCE )
8. Dec 6 14:34:42 host1 isakmpd: Encrypting the following msg to send: ( ID HASH
)
9. Dec 6 14:34:42 host1 isakmpd: 192.168.100.103 >>> 192.168.100.104 ( Encrypted
Payloads )
10. Dec 6 14:34:42 host1 isakmpd: ::ffff:192.168.100.103 <<< 192.168.100.104 (
Encrypted Payloads )
11. Dec 6 14:34:42 host1 Tunnel Manager: 1: TM is processing a P1_sa_created_msg
(tid)
12. Dec 6 14:34:42 host1 Tunnel Manager: 1: Received good P1 SA, updating P1
tunnel (tid)
13. Dec 6 14:34:42 host1 Tunnel Manager: 0: Checking to see if any P2 tunnels need
to start
14. Dec 6 14:34:42 host1 isakmpd: Decrypted the following received msg: ( ID HASH
)
15. Dec 6 14:34:42 host1 isakmpd: Phase I Done !!!
16. Dec 6 14:34:42 host1 isakmpd: Phase I negotiation authenticated
17. Dec 6 14:34:44 host1 Tunnel Manager: 0: TM is processing a
Connection_request_msg
18. Dec 6 14:34:44 host1 Tunnel Manager: 0: Received a connection object for an
active P1 tunnel
19. Dec 6 14:34:44 host1 Tunnel Manager: 1: Created blank P2 tunnel (tid)
20. Dec 6 14:34:44 host1 Tunnel Manager: 0: Checking to see if any P2 tunnels need
to start
21. Dec 6 14:34:44 host1 Tunnel Manager: 1: Starting negotiations for P2 (P2 tid)
22. Dec 6 14:34:45 host1 isakmpd: Encrypting the following msg to send: ( HASH SA
PROPOSAL TRANSFORM NONCE ID ID )
23. Dec 6 14:34:45 host1 isakmpd: 192.168.100.103 >>> 192.168.100.104 ( Encrypted
Payloads )
24. Dec 6 14:34:45 host1 isakmpd: ::ffff:192.168.100.103 <<< 192.168.100.104 (
Encrypted Payloads )
25. Dec 6 14:34:45 host1 isakmpd: Decrypted the following received msg: ( HASH SA
PROPOSAL TRANSFORM NONCE ID ID )
26. Dec 6 14:34:45 host1 isakmpd: Encrypting the following msg to send: ( HASH )
27. Dec 6 14:34:45 host1 isakmpd: 192.168.100.103 >>> 192.168.100.104 ( Encrypted
Payloads )
28. Dec 6 14:34:45 host1 isakmpd: Phase II SA Negotiated
29. Dec 6 14:34:45 host1 isakmpd: PhaseII negotiation complete.
30. Dec 6 14:34:45 host1 Tunnel Manager: 0: TM is processing a P2_sa_created_msg
31. Dec 6 14:34:45 host1 Tunnel Manager: 1: received p2_sa_created for an existing
tunnel as initiator (tid)
32. Dec 6 14:34:45 host1 Tunnel Manager: 1: Filter::AddFilterRules: Created filter
rules for tunnel
33. Dec 6 14:34:45 host1 Tunnel Manager: 0: TM is processing a List_tunnels_msg
254 AIX Version 6.1 Security

The following paragraphs explain the log entries.
1-2 The ike cmd=activate phase=1 command initiates a connection.
3-10 The isakmpd daemon negotiates a phase 1 tunnel.
11-12 The Tunnel Manager receives a valid phase 1 security association from the responder.
13 The Tunnel Manager checks whether ike cmd=activate has a phase 2 value for more work. It
does not.
14-16 The isakmpd daemon finishes the phase 1 negotiation.
17-21 The ike cmd=activate phase=2 command initiates a phase 2 tunnel.
22-29 The isakmpd daemon negotiates a phase 2 tunnel.
30-31 The Tunnel Manager receives a valid phase 2 security association from responder.
32 The Tunnel Manager writes the dynamic filter rules.
33 The ike cmd=list command views the IKE tunnels.
Labels in field entries:
The fields in the log entries are abbreviated to reduce DASD space requirements.
# The rule number that caused this packet to be logged.
R Rule Type
p Permit
d Deny
i/o Direction the packet was traveling when it was intercepted by the filter support code. Identifies IP address of
the adapter associated with the packet:
v For inbound (i) packets, this is the adapter that the packet arrived on.
v For outbound (o) packets, this is the adapter that the IP layer has determined should handle the
transmission of the packet.
s Specifies the IP address of the sender of the packet (extracted from the IP header).
d Specifies the IP address of the intended recipient of the packet (extracted from the IP header).
p Specifies the high-level protocol that was used to create the message in the data portion of the packet. May
be a number or name, for example: udp, icmp, tcp, tcp/ack, ospf, pip, esp, ah, or all.
sp/t Specifies the protocol port number associated with the sender of the packet (extracted from the TCP/UDP
header). When the protocol is ICMP or OSPF, this field is replaced with t, which specifies the IP type.
dp/c Specifies the protocol port number associated with the intended recipient of the packet (extracted from the
TCP/UDP header). When the protocol is ICMP, this field is replaced with c, which specifies the IP code.
- Specifies that no information is available
r Indicates whether the packet had any local affiliation.
f Forwarded packets
l Local packets
o Outgoing
b Both
l Specifies the length of a particular packet in bytes.
f Identifies if the packet is a fragment.
T Indicates the tunnel ID.
i Specifies what interface the packet came in on.
Internet Key-Exchange logging:
Security 255

You can enable logging of Internet Key-Exchange events to the SYSLOG facility with the isakmpd
daemon.
For the isakmpd daemon, you enable logging using the ike cmd=log command. You can set the logging
level in the /etc/isakmpd.conf configuration file with the log_level parameter. Depending on the amount
of information that you want to log, you can set the level to none, errors, isakmp_events, or information.
For example, to specify that you want to log protocol information and implementation information, specify
the following parameter:
log_level=INFORMATION
Note: For AIX 5.1 and earlier, the isakmpd daemon logs data to a separate file. This file is specified in
/etc/isakmpd.conf file.
The isakmpd daemon starts one of two processes: it sends a proposal, or it evaluates a proposal. If the
proposal is accepted, a security association is created and the tunnel is set up. If the proposal is not
accepted or the connection ends before the negotiation completes, the isakmpd daemon indicates an
error. The entries in the SYSLOG facility from tmd indicate whether the negotiation succeeded. A failure
caused by a certificate that was not valid is logged to the SYSLOG facility. To determine the exact cause
of a failed negotiation, review the data in the logging file that is specified in /etc/syslog.conf.
The SYSLOG facility adds a prefix to each line of the log, noting the date and time, the machine, and the
program. The following example uses googly as the machine name and isakmpd as the program name:
Nov 20 09:53:50 googly isakmpd: ISAKMP_MSG_HEADER
Nov 20 09:53:50 googly isakmpd: Icookie : 0xef06a77488f25315, Rcookie :0x0000000000000000
Nov 20 09:53:51 googly isakmpd: Next Payload : 1(SA), Maj Ver : 1, Min Ver : 0
Nov 20 09:53:51 googly isakmpd: Xchg Type : 2 (ID protected), Flag= 0, Encr : No,COMMIT : No
Nov 20 09:53:51 googly isakmpd: Msg ID : 0x00000000
To improve clarity, use the grep command to extract log lines of interest (such as all isakmpd logging)
and the cut command to remove the prefix from each line.
The /etc/isakmpd.conf file:
You can configure options for the isakmpd daemon in the /etc/isakmpd.conf file.
The following options are available in the /etc/isakmpd.conf file.
Log configuration
Determine the amount of information that you want to log. Then set the level. The IKE daemons
use this option to specify the level of logging.
Syntax: none | error | isakmp_events | information
where the level has the following meaning:
none No logging. This is the default.
error Log protocol errors or appliation programming interface (API) errors.
isakmp_events
Log IKE protocol events or errors. Use this level when debugging a problem.
information
Log protocol information and implementation information.
Unrecognized IP address negotiation
You can set this option to YES or NO. When you set this option to YES, the local IKE database
must contain an IP address for both phase-1 tunnel endpoints. You must specify YES for the host
256 AIX Version 6.1 Security

to accept an incoming main-mode tunnel. The IP address can be the primary ID or an optional IP
address that is associated with some other ID type.
Set this option to NO to accept an incoming main-mode connection. When you set the option to
NO, the host might accept the connection even when the IKE database does not specify IP
addresses for the phase 1 endpoints. However, in order for the host to accept the connection, you
must use certificate-based authentication. This allows a host with a dynamically assigned IP
address to initiate a main mode tunnel to the machine.
If you do not specify this parameter, the default is NO.
Syntax: MAIN_MODE_REQUIRES_IP= YES | NO
SOCKS4 server configuration
The SOCKS4_PORTNUM option is optional. If you do not specify it, the default SOCKS-server port
value of 1080 is used. The port value is used when the SOCKS server communicates with the
HTTP server.
Syntax: mnemonic = valuewhere mneumonic and value can be the following values:
SOCKS4_SERVER= specifies the server name
SOCKS4_PORTNUM= specifies the SOCKS-server port number
SOCKS4_USERID= user ID
LDAP server configuration
Syntax: mnemonic = valuewhere mnemonic and value can be the following values:
LDAP_SERVER= specifies the LDAP server name
LDAP_VERSION= the version of the LDAP server (can be 2 or 3)
LDAP_SERVERPORT= the LDAP-server port number
LDAP_SEARCHTIME=client-search timeout value
CRL Fetch Order
This option defines whether the HTTP or LDAP server is queried first, when both servers are
configured. The CRL_FETCH_ORDER option is optional. The default fetch order is HTTP first, then
LDAP, depending on whether both HTTP and LDAP servers are configured.
Syntax: CRL_FETCH_ORDER= protocol#, protocol#where protocol# can be HTTP or LDAP.
Internet Protocol security problem diagnosis
The following are some hints and tips that might assist you when you encounter a problem.
Set up logging when IPSec is first configured. Logs are very useful in determining what occurs with the
filters and tunnels. (For detailed log information, see “Logging facilities” on page 252.)
Troubleshooting manual tunnel errors:
The following are descriptions of several possible tunnel errors, along with their solutions.
Error: Issuing mktun command results in the following error:
insert_tun_man4(): write failed : The requested resource is busy.
Problem: The tunnel you requested to activate is already active or you have colliding SPI values.
To fix: Issue the rmtun command to deactivate, then issue the mktun command to activate. Check to see
if the SPI values for the failing tunnel match any other active tunnel. Each tunnel should have its own
unique SPI values.
Security 257

Error: Issuing mktun command results in the following error:
Device ipsec_v4 is in Defined status.
Tunnel activation for IP Version 4 not performed.
Problem: You have not made the IP Security device available.
To fix: Issue the following command:
mkdev -l ipsec -t 4
You might have to change -t option to 6 if you are getting the same error for IP Version 6 tunnel
activation. The devices must be in available state. To check the IP Security device state, issue the
following command:
lsdev -Cc ipsec
Error: Issuing a gentun command results in the following error:
Invalid Source IP address
Problem: You have not entered a valid IP address for the source address.
To fix: For IP Version 4 tunnels, check to see that you have entered an available IP Version 4 address for
the local machine. You cannot use host names for the source when generating tunnels, you might only
use host names for the destination.
For IP Version 6 tunnels, check to see that you entered an available IP Version 6 address. If you type
netstat -in and no IP Version 6 addresses exist, run /usr/sbin/autoconf6 (interface) for a link local
autogenerated address (using MAC address) or use the ifconfig command to manually assign an
address.
Error: Issuing a gentun command results in the following error:
Invalid Source IP address
Problem: You have not entered a valid IP address for the source address.
To fix: For IP Version 4 tunnels, check to see that you have entered an available IP Version 4 address for
the local machine. You cannot use host names for the source when generating tunnels, you may only
use host names for the destination.
For IP Version 6 tunnels, check to see that you entered an available IP Version 6 address. If you type
netstat -in and no IP Version 6 addresses exist, run /usr/sbin/autoconf6 (interface) for a link local
auto-generated address (using MAC address) or use ifconfig to manually assign an address.
Error: Issuing mktun command results in the following error:
insert_tun_man4(): write failed : A system call received a parameter that is not valid.
Problem: Tunnel generation occurred with invalid ESP and AH combination or without the use of the new
header format when necessary.
To fix: Check to see which authentication algorithms are in use by the particular tunnel in question.
Remember that the HMAC_MD5 and HMAC_SHA algorithms require the new header format. The new
header format can be changed using the SMIT fast path ips4_basic or the -z parameter with the chtun
command. Also, remember that DES_CBC_4 cannot be used with the new header format.
258 AIX Version 6.1 Security
Error: Starting IP Security from Web-based System Manager results in a Failure message.
Problem: The IP Security daemons are not running.
To fix: View which daemons are running by entering the ps -ef command. The following daemons are
associated with IP Security:
v tmd
v isakmpd
v cpsd
The cpsd daemon is active only if the digital certificate code is installed (the fileset named gskit.rte or
gskkm.rte) and you have configured the Key Manager tool to contain digital certificates.
If the daemons are not active, stop IP Security using Web-based System Manager and then restart it,
which automatically starts the appropriate daemons.
Error: Trying to use IP Security results in the following error:
The installed bos.crypto is back level and must be updated.
Problem: The bos.net.ipsec.* files have been updated to a newer version, but the corresponding
bos.crypto.* files have not.
To fix: Update the bos.crypto.* files to the version that corresponds with the updated bos.net.ipsec.*
files.
Troubleshooting Internet Key Exchange tunnel errors:
The following sections describe errors that can occur when using Internet Key Exchange (IKE) tunnels.
Internet Key Exchange tunnel process flow:
This section describes the process flow for the internet key exchange tunnel.
The IKE tunnels are set up by the communication of the ike command or the Web-based System Manager
VPN panels with the following daemons:
Table 13. Daemons used by IKE tunnels.
tmd Tunnel Manager daemon
isakmpd IKE daemon
cpsd Certificate proxy daemon
For IKE tunnels to be correctly set up, the tmd and isakmpd daemons must be running. If IP Security is
set to start at reboot, these daemons start automatically. Otherwise, they must be started using
Web-based System Manager.
The Tunnel Manager gives requests to the isakmpd command to start a tunnel. If the tunnel already exists
or is not valid (for instance, has an invalid remote address), it reports an error. If negotiation has started, it
may take some time, depending on network latency, for the negotiation to complete. The ike cmd=list
command can list the state of the tunnel to determine if the negotiation was successful. Also, the Tunnel
Manager logs events to syslog to the levels of debug, event, and information, which can be used to
monitor the progress of the negotiation.
The sequence is as follows:
1. Use Web-based System Manager or the ike command to initiate a tunnel.
2. The tmd daemon gives the isakmpd daemon a connection request for key management (phase 1).
3. The isakmpd daemon responds with SA created or an error message.
Security 259

4. The tmd daemon gives the isakmpd daemon a connection request for a data management tunnel
(phase 2).
5. The isakmpd daemon responds with SA created or an error message.
6. Tunnel parameters are inserted into the kernel tunnel cache.
7. Filter rules are added to the kernel dynamic filter table.
When the machine is acting as a responder, the isakmpd daemon notifies the Tunnel Manager tmd
daemon that a tunnel has been negotiated successfully and a new tunnel is inserted into the kernel. In
such cases, the process starts with step 3 and continues until step 7, without the tmd daemon issuing
connection requests.
Parse payload logging function:
The security association (SA) between two end points is established by exchanging IKE messages. The
Parse Payload function parses the messages in a human-readable format.
Parse payload logging can be enabled by editing the /etc/isakmpd.conf file. The logging entry in the
/etc/isakmpd.conf file looks similar to the following:
information
The type of IKE payloads that Parse Payload logs depends on the content of the IKE message. Examples
include SA Payload, Key Exchange Payload, Certificate Request Payload, Certificate Payload, and
Signature Payload. The following is an example of a Parse Payload log in which an
ISAKMP_MSG_HEADER is followed by five payloads:
ISAKMP_MSG_HEADER
Icookie : 0x9e539a6fd4540990, Rcookie : 0x0000000000000000
Next Payload : 1(SA), Maj Ver : 1, Min Ver : 0
Xchg Type : 4 (Aggressive), Flag= 0, Encr : No,COMMIT : No
Msg ID : 0x00000000
len : 0x10e(270)
SA Payload:
Next Payload : 4(Key Exchange), Payload len : 0x34(52)
DOI : 0x1(INTERNET)
bitmask : 1(SIT_IDENTITY_ONLY
Proposal Payload:
Next Payload : 0(NONE), Payload len : 0x28(40)
Proposal # : 0x1(1), Protocol-ID : 1(ISAKMP)
SPI size : 0x0(0), # of Trans : 0x1(1)
Transform Payload:
Next Payload : 0(NONE), Payload len : 0x20(32)
Trans # : 0x1(1), Trans.ID : 1(KEY_IKE)
Attr : 1(Encr.Alg ), len=0x2(2)
Value=0x1(1),(DES-cbc)
Attr : 2(Hash Alg ), len=0x2(2)
Value=0x1(1),(MD5)
Attr : 3(Auth Method ), len=0x2(2)
Value=0x3(3),(RSA Signature)
Attr : 4(Group Desc ), len=0x2(2)
Value=0x1(1),(default 768-bit MODP group)
Attr : 11(Life Type ), len=0x2(2)
Value=0x1(1),(seconds)
Attr : 12(Life Duration), len=0x2(2)
Value=0x7080(28800)
Key Payload:
Next Payload : 10(Nonce), Payload len : 0x64(100)
Key Data :
33 17 68 10 91 1f ea da 38 a0 22 2d 84 a3 5d 5d
a0 e1 1f 42 c2 10 aa 8d 9d 14 0f 58 3e c4 ec a3
9f 13 62 aa 27 d8 e5 52 8d 5c c3 cf d5 45 1a 79
8a 59 97 1f 3b 1c 08 3e 2a 55 9b 3c 50 cc 82 2c
260 AIX Version 6.1 Security
d9 8b 39 d1 cb 39 c2 a4 05 8d 2d a1 98 74 7d 95
ab d3 5a 39 7d 67 5b a6 2e 37 d3 07 e6 98 1a 6b
Nonce Payload:
Next Payload : 5(ID), Payload len : 0xc(12)
Nonce Data:
6d 21 73 1d dc 60 49 93
ID Payload:
Next Payload : 7(Cert.Req), Payload len : 0x49(73)
ID type : 9(DER_DN), Protocol : 0, Port = 0x0(0)
Certificate Request Payload:
Next Payload : 0(NONE), Payload len : 0x5(5)
Certificate Encoding Type: 4(X.509 Certificate - Signature)
Within each payload, a Next Payload field points to the payload following the current payload. If the
current payload is the last one in the IKE message, the Next Payload field has the value of zero (None).
Each Payload in the example has information pertaining to the negotiations that are going on. For
example, the SA payload has the Proposal and Transform Payloads, which in turn show the encryption
algorithm, authentication mode, hash algorithm, SA life type, and SA duration that the initiator is proposing
to the responder.
Also, the SA Payload consists of one or more Proposal Payloads and one or more Transform Payloads.
The Next Payload field for Proposal Payload has a value of either 0 if it is the only Proposal Payload or a
value of 2 if it is followed by one more Proposal Payloads. Similarly, the Next Payload field for a
Transform Payload has a value of 0 if it is the only Transform Payload, or a value of 3 if it is followed by
one more Transform Payloads, as shown in the following example:
ISAKMP_MSG_HEADER
Icookie : 0xa764fab442b463c6, Rcookie : 0x0000000000000000
Next Payload : 1(SA), Maj Ver : 1, Min Ver : 0
Xchg Type : 2 (ID protected), Flag= 0, Encr : No,COMMIT : No
Msg ID : 0x00000000
len : 0x70(112)
SA Payload:
Next Payload : 0(NONE), Payload len : 0x54(84)
DOI : 0x1(INTERNET)
bitmask : 1(SIT_IDENTITY_ONLY
Proposal Payload:
Next Payload : 0(NONE), Payload len : 0x48(72)
Proposal # : 0x1(1), Protocol-ID : 1(ISAKMP)
SPI size : 0x0(0), # of Trans : 0x2(2)
Transform Payload:
Next Payload : 3(Transform), Payload len : 0x20(32)
Trans # : 0x1(1), Trans.ID : 1(KEY_IKE)
Attr : 1(Encr.Alg ), len=0x2(2)
Value=0x5(5),(3DES-cbc)
Attr : 2(Hash Alg ), len=0x2(2)
Value=0x1(1),(MD5)
Attr : 3(Auth Method ), len=0x2(2)
Value=0x1(1),(Pre-shared Key)
Attr : 4(Group Desc ), len=0x2(2)
Value=0x1(1),(default 768-bit MODP group)
Attr : 11(Life Type ), len=0x2(2)
Value=0x1(1),(seconds)
Attr : 12(Life Duration), len=0x2(2)
Value=0x7080(28800)
Transform Payload:
Next Payload : 0(NONE), Payload len : 0x20(32)
Trans # : 0x2(2), Trans.ID : 1(KEY_IKE)
Attr : 1(Encr.Alg ), len=0x2(2)
Value=0x1(1),(DES-cbc)
Attr : 2(Hash Alg ), len=0x2(2)
Value=0x1(1),(MD5)
Security 261

Attr : 3(Auth Method ), len=0x2(2)
Value=0x1(1),(Pre-shared Key)
Attr : 4(Group Desc ), len=0x2(2)
Value=0x1(1),(default 768-bit MODP group)
Attr : 11(Life Type ), len=0x2(2)
Value=0x1(1),(seconds)
Attr : 12(Life Duration), len=0x2(2)
Value=0x7080(28800)
The IKE message header of a Parse Payload log shows the exchange type (Main Mode or Aggressive
Mode), the length of the entire message, the message identifier, and so on.
The Certificate Request Payload requests a certificate from the responder. The responder sends the
certificate in a separate message. The following example shows the Certificate Payload and Signature
Payload that are sent to a peer as a part of an SA negotiation. The certificate data and the signature data
are printed in hex format.
ISAKMP_MSG_HEADER
Icookie : 0x9e539a6fd4540990, Rcookie : 0xc7e0a8d937a8f13e
Next Payload : 6(Certificate), Maj Ver : 1, Min Ver : 0
Xchg Type : 4 (Aggressive), Flag= 0, Encr : No,COMMIT : No
Msg ID : 0x00000000
len : 0x2cd(717)
Certificate Payload:
Next Payload : 9(Signature), Payload len : 0x22d(557)
Certificate Encoding Type: 4(X.509 Certificate - Signature)
Certificate: (len 0x227(551) in bytes
82 02 24 30 82 01 8d a0 03 02 01 02 02 05 05 8e
fb 3e ce 30 0d 06 09 2a 86 48 86 f7 0d 01 01 04
05 00 30 5c 31 0b 30 09 06 03 55 04 06 13 02 46
49 31 24 30 22 06 03 55 04 0a 13 1b 53 53 48 20
43 6f 6d 6d 75 6e 69 63 61 74 69 6f 6e 73 20 53
65 63 75 72 69 74 79 31 11 30 0f 06 03 55 04 0b
13 08 57 65 62 20 74 65 73 74 31 14 30 12 06 03
55 04 03 13 0b 54 65 73 74 20 52 53 41 20 43 41
30 1e 17 0d 39 39 30 39 32 31 30 30 30 30 30 30
5a 17 0d 39 39 31 30 32 31 32 33 35 39 35 39 5a
30 3f 31 0b 30 09 06 03 55 04 06 13 02 55 53 31
10 30 0e 06 03 55 04 0a 13 07 49 42 4d 2f 41 49
58 31 1e 30 1c 06 03 55 04 03 13 15 62 61 72 6e
65 79 2e 61 75 73 74 69 6e 2e 69 62 6d 2e 63 6f
6d 30 81 9f 30 0d 06 09 2a 86 48 86 f7 0d 01 01
01 05 00 03 81 8d 00 30 81 89 02 81 81 00 b2 ef
48 16 86 04 7e ed ba 4c 14 d7 83 cb 18 40 0a 3f
55 e9 ad 8f 0f be c5 b6 6d 19 ec de 9b f5 01 a6
b9 dd 64 52 34 ad 3d cd 0d 8e 82 6a 85 a3 a8 1c
37 e4 00 59 ce aa 62 24 b5 a2 ea 8d 82 a3 0c 6f
b4 07 ad 8a 02 3b 19 92 51 88 fb 2c 44 29 da 72
41 ef 35 72 79 d3 e9 67 02 b2 71 fa 1b 78 13 be
f3 05 6d 10 4a c7 d5 fc fe f4 c0 b8 b8 fb 23 70
a6 4e 16 5f d4 b1 9e 21 18 82 64 6d 17 3b 02 03
01 00 01 a3 0f 30 0d 30 0b 06 03 55 1d 0f 04 04
03 02 07 80 30 0d 06 09 2a 86 48 86 f7 0d 01 01
04 05 00 03 81 81 00 75 a4 ee 9c 3a 18 f2 de 5d
67 d4 1c e4 04 b4 e5 b8 5e 9f 56 e4 ea f0 76 4a
d0 e4 ee 20 42 3f 20 19 d4 25 57 25 70 0a ea 41
81 3b 0b 50 79 b5 fd 1e b6 0f bc 2f 3f 73 7d dd
90 d4 08 17 85 d6 da e7 c5 a4 d6 9a 2e 8a e8 51
7e 59 68 21 55 4c 96 4d 5a 70 7a 50 c1 68 b0 cf
5f 1f 85 d0 12 a4 c2 d3 97 bf a5 42 59 37 be fe
9e 75 23 84 19 14 28 ae c4 c0 63 22 89 47 b1 b6
f4 c7 5d 79 9d ca d0
Signature Payload:
Next Payload : 0(NONE), Payload len : 0x84(132)
262 AIX Version 6.1 Security

Signature: len 0x80(128) in bytes
9d 1b 0d 90 be aa dc 43 95 ba 65 09 b9 00 6d 67
b4 ca a2 85 0f 15 9e 3e 8d 5f e1 f0 43 98 69 d8
5c b6 9c e2 a5 64 f4 ef 0b 31 c3 cb 48 7c d8 30
e3 a2 87 f4 7c 9d 20 49 b2 39 00 fa 8e bf d9 b0
7d b4 8c 4e 19 3a b8 70 90 88 2c cf 89 69 5d 07
f0 5a 81 58 2e 15 40 37 b7 c8 d6 8c 5c e2 50 c3
4d 19 7e e0 e7 c7 c2 93 42 89 46 6b 5f f8 8b 7d
5b cb 07 ea 36 e5 82 9d 70 79 9a fe bd 6c 86 36
Digital certificate and signature mode problems:
The following are possible digital certificate and signature mode problems you can encounter, and
corresponding solutions.
Error: The cpsd (Certificate Proxy Server daemon) does not start. An entry similar to the following appears in
the log file:
Sep 21 16:02:00 ripple CPS[19950]: Init():LoadCaCerts() failed, rc=-12
Problem: The certificate database has not opened or has not been found.
To Fix: Ensure that the Key Manager certificate databases are present in /etc/security. The following
files make up the database: ikekey.crl, ikekey.kdb, ikekey.rdb, ikekey.sth.
If only the ikekey.sth file is missing, the stash password option was not selected when the Key Manager
database was created. The password must be stashed to enable using digital certificates with IP Security.
(See Creating a Key Database for more information.)
Error: Key Manager gives the following error when receiving a certificate:
Invalid Base64-encoded data was found
Problem: Superfluous data has been found in the certificate file or else data was lost or corrupted.
To Fix: The ’DER’ Encoded Certificate should be contained within the following strings (shown below). No
other characters should precede or follow other than the BEGIN and END CERTIFICATE strings.
-----BEGIN CERTIFICATE-----
MIICMTCCAZqgAwIBAgIFFKZtANowDQYJKoZIhvcNAQEFBQAwXDELMAkGA1UEBhMC
RkkxJDAiBgNVBAoTG1NTSCBDb21tdW5pY2F0aW9ucyBTZWN1cml0eTERMA8GA1UE
CxMIV2ViIHRlc3QxFDASBgNVBAMTC1Rlc3QgUlNBIENBMB4XDTk5MDkyMTAwMDAw
MFoXDTk5MTAyMTIzNTk1OVowOzELMAkGA1UEBhMCVVMxDDAKBgNVBAoTA0lCTTEe
MBwGA1UEAxMVcmlwcGxlLmF1c3Rpbi5pYm0uY29tMIGfMA0GCSqGSIb3DQEBAQUA
A4GNADCBiQKBgQC5EZqo6n7tZrpAL6X4L7mf4yXQSm+m/NsJLhp6afbFpPvXgYWC
wq4pvOtvxgum+FHrE0gysNjbKkE4Y6ixC9PGGAKHnhM3vrmvFjnl1G6KtyEz58Lz
BWW39QS6NJ1LqqP1nT+y3+Xzvfv8Eonqzno8mglCWMX09SguLmWoU1PcZQIDAQAB
oyAwHjALBgNVHQ8EBAMCBaAwDwYDVR0RBAgwBocECQNhhzANBgkqhkiG9w0BAQUF
AOBgQA6bgp4Zay34/fyAlyCkNNAYJRrN3Vc4NHN7IGjUziN6jK5UyB5zL37FERW
hT9ArPLzK7yEZs+MDNvB0bosyGWEDYPZr7EZHhYcoBP4/cd0V5rBFmA8Y2gUthPi
Ioxpi4+KZGHYyLqTrm+8Is/DVJaQmCGRPynHK35xjT6WuQtiYg==
-----END CERTIFICATE-----
The following options can help you diagnose and solve this problem.
v If data was lost or corrupted, recreate the Certificate
v Use an ASN.1 parser (available on the Internet World Wide Web) to check whether the certificate is
valid by parsing the certificate successfully.
Error: Key Manager gives the following error when receiving a personal certificate:
No request key was found for the certificate
Problem: A Personal Certificate Request does not exist for the personal certificate being received.
To Fix: Create the Personal Certificate Request again and request a new certificate.
Security 263
Error: Web-based System Manager gives the following error when you configure an IKE tunnel:
Error 171 in the Key Management (Phase 1) Tunnel operation:
PUT_IRL_FAILED
Problem: One cause for this error is that the host identity type, which is configured on the IKE dialog
(Identification tab), is invalid. This can happen when the host identity type selected from the pull-down list
does not logically match the type entered in the Host Identity field. For example, if you select a host
identity type of X500 Distinguished Name, you must to enter a properly formatted distinguished name in
the Host Identity field.
To Fix: Ensure the distinguished name you enter is correct for the type selected in the host identity
pull-down list.
Error: An IKE negotiation fails and an entry similar to the following appears in the log file:
inet_cert_service::channelOpen():clientInitIPC():error,rc =2
(No such file or directory)
Problem: The cpsd is not running or has stopped.
To Fix: Start IP Security using Web-based System Manager. This action also starts the appropriate
daemons.
Error: An IKE negotiation fails and an entry similar to the following appears in the log file:
CertRepo::GetCertObj: DN Does Not Match: ("/C=US/O=IBM/CN=ripple.austin.ibm.com")
Problem: The X.500 Distinguished Name (DN) entered while defining the IKE tunnel does not match the
X.500 DN in the personal certificate.
To Fix: Change the IKE tunnel definition in Web-based System Manager to match the distinguished name
in the certificate.
Error: While defining IKE tunnels in Web-based System Manager, the Digital certificate check box is disabled
under the Authentication Method tab.
Problem: The policy associated with this tunnel does not use RSA signature mode authentication.
To Fix: Change the transform of the associated policy to use the RSA signature authentication method.
For example, you can choose IBM_low_CertSig as a key management policy when defining a IKE tunnel.
Tracing facilities:
Tracing is a debugging facility for tracing kernel events. Traces can be used to get more specific
information about events or errors occurring in the kernel filter and tunnel code.
The SMIT IP Security trace facility is available through the Advanced IP Security Configuration menu. The
information captured by this trace facility includes information on Error, Filter, Filter Information, Tunnel,
Tunnel Information, Capsulation/Decapsulation, Capsulation Information, Crypto, and Crypto Information.
By design, the error trace hook provides the most critical information. The info trace hook can generate
critical information and may have an impact on system performance. This tracing provides clues as to
what a problem might be. Tracing information is also required when speaking with a service technician. To
access the tracing facility, use the SMIT fast path smit ips4_tracing (for IP Version 4) or smit
ips6_tracing (for IP Version 6).
ipsecstat command:
You can use the ipsecstat command to list the status of IP Security devices, IP Security crypto algorithms,
and statistics of IP Security packets.
Issuing the ipsecstat command will generate the following sample report, which shows that the IP Security
devices are in the available state, that there are three authentication algorithms installed, three encryption
264 AIX Version 6.1 Security

algorithms installed, and that there is a current report of packet activity. This information could be useful to
you in determining where a problem exists if you are troubleshooting your IP Security traffic.
IP Security Devices:
ipsec_v4 Available
ipsec_v6 Available
Authentication Algorithm:
HMAC_MD5 -- Hashed MAC MD5 Authentication Module
HMAC_SHA -- Hashed MAC SHA Hash Authentication Module
KEYED_MD5 -- Keyed MD5 Hash Authentication Module
Encryption Algorithm:
CDMF -- CDMF Encryption Module
DES_CBC_4 -- DES CBC 4 Encryption Module
DES_CBC_8 -- DES CBC 8 Encryption Module
3DES_CBC -- Triple DES CBC Encryption Module
IP Security Statistics -
Total incoming packets: 1106
Incoming AH packets:326
Incoming ESP packets: 326
Srcrte packets allowed: 0
Total outgoing packets:844
Outgoing AH packets:527
Outgoing ESP packets: 527
Total incoming packets dropped: 12
Filter denies on input: 12
AH did not compute: 0
ESP did not compute:0
AH replay violation:0
ESP replay violation: 0
Total outgoing packets dropped:0
Filter denies on input:0
Tunnel cache entries added: 7
Tunnel cache entries expired: 0
Tunnel cache entries deleted: 6
Note: Beginning with AIX 4.3.2, there is no need to use CDMF because DES is now available worldwide.
Reconfigure any tunnels that use CDMF to use DES or Triple DES.
IP security reference
There are commands and methods for IP security. You can also migrate IKE tunnels, filters, and
pre-shared keys.
List of commands:
The following table provides a list of commands.
ike cmd=activate Starts an Internet Key Exchange (IKE) negotiation (AIX 4.3.3 and later).
ike cmd=remove Deactivates IKE tunnels (AIX 4.3.3 and later)
ike cmd=list Lists IKE tunnels (AIX 4.3.3 and later)
ikedb Provides the interface to the IKE tunnel database(AIX 5.1 and later)
gentun Creates a tunnel definition
mktun Activates tunnel definition(s)
chtun Changes a tunnel definition
rmtun Removes a tunnel definition
lstun Lists tunnel definition(s)
exptun Exports tunnel definition(s)
imptun Imports tunnel definition(s)
genfilt Creates a filter definition
mkfilt Activates filter definition(s)
Security 265

mvfilt Moves a filter rule
chfilt Changes a filter definition
rmfilt Removes a filter definition
lsfilt Lists filter definition(s)
expfilt Exports filter definition(s)
impfilt Imports filter definition(s)
ipsec_convert Lists status of IP security
ipsecstat Lists status of IP security
ipsectrcbuf Lists the contents of IP security tracing buffer
unloadipsec Unloads a crypto module
List of methods:
The following table provides a list of methods.
defipsec Defines an instance of IP Security for IP Version 4 or IP Version 6
cfgipsec Configures and loads ipsec_v4 or ipsec_v6
ucfgipsec Unconfigures ipsec_v4 or ipsec_v6
IP security migration:
You can migrate your IKE tunnels, filters and pre-shared keys from AIX 4.3 to AIX 5.2.
Migrating IKE tunnels:
To migrate your tunnels, complete the following steps on a system running AIX 4.3:
1. Run the bos.net.ipsec.keymgt.pre_rm.sh script. When you run this script, the following files are
created in the /tmp directory:
a. p2proposal.bos.net.ipsec.keymgt
b. p1proposal.bos.net.ipsec.keymgt
c. p1policy.bos.net.ipsec.keymgt
d. p2policy.bos.net.ipsec.keymgt
e. p1tunnel.bos.net.ipsec.keymgt
f. p2tunnel.bos.net.ipsec.keymgt
Attention: Run this script only once. If you update the database and run the script again, you will
lose all of the files, and you can not retrieve them. Read the script in “The
bos.net.ipsec.keymgt.pre_rm.sh script” on page 267 before you migrate your tunnels.
2. Save the files created by the script and the /tmp/lpplevel file to some external media, such as a CD or
floppy disk.
Migrating pre-shared keys:
Perform the following steps to update the pre-shared key format.
The IKE tunnel pre-shared key database is also corrupted during migration. To update the pre-shared key
format, complete the following steps on the system that has been migrated to AIX 5.2:
1. Save the output of the ikedb -g command by running the following command:
ikedb -g > out.keys
2. Edit the out.keys file to replace FORMAT=ASCII with FORMAT=HEX for the pre-shared key format.
3. Input the XML file by running the following command:
ikedb -pF out.keys
266 AIX Version 6.1 Security
Migrating filters:
Perform the following steps to migrate filters.
1. Export the filter rules files to the /tmp directory using SMIT by completing the following steps:
a. Run the smitty ipsec4 command.
b. Select Advanced IP Security Configuration—>Configure IP Security Filter Rules—>Export IP
Security filter rules.
c. Enter /tmp for the directory name.
d. Under the Filter Rules option press F4 and select all from the list.
e. Press enter to save the filter rules in the /tmp/ipsec_fltr_rule.exp file on the external media.
Complete this process for all of the systems you are migrating from AIX 4.3 to AIX 5.2.
2. Copy the six tunnel files created by the script, the /tmp/lpplevel file, and the /tmp/ipsec_fltr_rule.exp
file to the /tmp directory on the migrated system.
3. Run the bos.net.ipsec.keymgt.post_i.sh script to repopulate the tunnel configurations into the
database.
4. Run the ikedb -g command to verify that the tunnels are in the database.
Note: If you do not see the tunnel information in the database, run the script again, but rename all the
*.loaded files in /tmp directory to their original names.
On a system that has been migrated to AIX 5.2, the filter database is corrupted after migration. If you run
the lsfilt command on the migrated system, you will get the following error:
Cannot get ipv4 default filter rule
To update the filter database, complete the following steps:
1. Replace the ipsec_filter file and the ipsec_filter.vc file in the /etc/security directory with the
uncorrupted files from a newly migrated system running AIX 5.2. If you do not have these files, you
can request them from IBM Service.
2. Import the filter rules files to the /tmp directory using SMIT by completing the following steps:
a. Run the smitty ipsec4 command.
b. Select Advanced IP Security Configuration—>Configure IP Security Filter Rules—>Import IP
Security filter rules.
c. Enter /tmp for the directory name.
d. Under the Filter Rules option press F4 and select all from the list.
e. Press Enter to recreate the filter rules. You can list the filter rules through SMIT or with the lsfilt
command.
The bos.net.ipsec.keymgt.pre_rm.sh script:
The bos.net.ipsec.keymgt.pre_rm.sh script saves the contents of the tunnel database on a system
running AIX 4.3.
#!/usr/bin/ksh
keymgt_installed=`lslpp -Lqc bos.net.ipsec.keymgt 2>/dev/null | awk -F: ’{print $6}’ | head -1`
if [ ! "$keymgt_installed" ]
then
exit 0
fi
# Copy the database to a save directory in case changes fail
if [ -d /etc/ipsec/inet/DB ]
then
Security 267

cp -R /etc/ipsec/inet/DB /etc/ipsec/inet/DB.sav || exit $?
fi
# Remember the level you are migrating from
VRM=$(LANG=C lslpp -Lqc bos.net.ipsec.keymgt 2>/dev/null | awk -F: ’{print $3}’ | \
awk -F. ’{print $1"."$2"."$3}’)
VR=${VRM%.*}
echo $VRM > /tmp/lpplevel
IKEDB=$(which ikedb) || IKEDB=/usr/sbin/ikedb
XMLFILE=/tmp/full_ike_database.bos.net.ipsec.keymgt
PSKXMLFILE=/tmp/psk_ike_database.bos.net.ipsec.keymgt
# See if ikedb exists.
if [ -f $IKEDB ]
then
# If either of the ikedb calls below fails, that’s OK. Just remove the
# resulting file (which may contain garbage) and continue. The post_i
# script will simply not import the file if it doesn’t exist, which will
# mean part or all of the IKE database is lost, but this is preferable
# to exiting the script with an error code, which causes the entire
# migration to fail.
$IKEDB -g > $XMLFILE
if [ $? -ne 0 ]
then
rm -f $XMLFILE || exit $?
fi
if [[ $VR = "5.1" ]]; then
# This is a special case. The 5.1 version of ikedb is the only
# one that does not include preshared keys in the full database
# output. So we have to retrieve those separately.
$IKEDB -g -t IKEPresharedKey > $PSKXMLFILE
if [ $? -ne 0 ]
then
rm -f $PSKXMLFILE || exit $?
fi
fi
# Make sure ikegui command is installed
elif [ -f /usr/sbin/ikegui ]
then
# Get database information and save to /tmp
/usr/sbin/ikegui 0 1 0 0 > /tmp/p1proposal.bos.net.ipsec.keymgt 2>/dev/null
RC=$?
if [[ $RC -ne 0 ]]
then
rm -f /tmp/p1proposal.bos.net.ipsec.keymgt || exit $?
fi
/usr/sbin/ikegui 0 1 1 0 > /tmp/p1policy.bos.net.ipsec.keymgt 2>/dev/null
RC=$?
if [[ $RC -ne 0 ]]
then
rm -f /tmp/p1policy.bos.net.ipsec.keymgt || exit $?
fi
/usr/sbin/ikegui 0 2 0 0 > /tmp/p2proposal.bos.net.ipsec.keymgt 2>/dev/null
RC=$?
if [[ $RC -ne 0 ]]
then
rm -f /tmp/p2proposal.bos.net.ipsec.keymgt || exit $?
fi
268 AIX Version 6.1 Security
/usr/sbin/ikegui 0 2 1 0 > /tmp/p2policy.bos.net.ipsec.keymgt 2>/dev/null
RC=$?
if [[ $RC -ne 0 ]]
then
rm -f /tmp/p2policy.bos.net.ipsec.keymgt || exit $?
fi
/usr/sbin/ikegui 0 1 2 0 > /tmp/p1tunnel.bos.net.ipsec.keymgt 2>/dev/null
RC=$?
if [[ $RC -ne 0 ]]
then
rm -f /tmp/p1tunnel.bos.net.ipsec.keymgt || exit $?
fi
/usr/sbin/ikegui 0 2 2 0 > /tmp/p2tunnel.bos.net.ipsec.keymgt 2>/dev/null
RC=$?
if [[ $RC -ne 0 ]]
then
rm -f /tmp/p2tunnel.bos.net.ipsec.keymgt || exit $?
fi
fi
The bos.net.ipsec.keymgt.post_i.sh script:
The bos.net.ipsec.keymgt.post_i.sh script loads the contents of the tunnel database on to a migrated
system running AIX 5.2.
#!/usr/bin/ksh
function PrintDot {
echo "echo \c"
echo "\".\c"
echo "\\\c\c"
echo "\"\c"
echo
}
function P1PropRestore {
while :
do
read NAME
read MODE
if [[ $? = 0 ]]; then
echo "ikegui 1 1 0 $NAME $MODE \c"
MORE=1
while [[ $MORE = 1 ]];
do
read AUTH
read HASH
read ENCRYPT
read GROUP
read TIME
read SIZE
read MORE
echo "$AUTH $HASH $ENCRYPT $GROUP $TIME $SIZE $MORE \c"
done
echo " > /dev/null 2>&1"
PrintDot
else
return 0
fi
done
}
function P2PropRestore {
Security 269

while :
do
read NAME
FIRST=yes
MORE=1
while [[ $MORE = 1 ]];
do
read PROT
if [[ $? = 0 ]]; then
read AH_AUTH
read ESP_ENCR
read ESP_AUTH
read ENCAP
read TIME
read SIZE
read MORE
if [[ $FIRST = "yes" ]]; then
echo "ikegui 1 2 0 $NAME $MODE \c"
fi
echo "$PROT $AH_AUTH $ESP_ENCR $ESP_AUTH $ENCAP $TIME $SIZE $MORE \c"
FIRST=no
else
return 0
fi
done
echo " > /dev/null 2>&1"
PrintDot
done
}
function P1PolRestore {
while :
do
read NAME
read ROLE
if [[ $? = 0 ]]; then
read TIME
read SIZE
read OVERLAP
read TTIME
read TSIZE
read MIN
read MAX
read PROPOSAL
echo "ikegui 1 1 1 $NAME $ROLE $OVERLAP $TTIME $TSIZE $MIN $MAX 1 0 0 $PROPOSAL > \
/dev/null 2>&1"
PrintDot
else
return 0
fi
done
}
function P2PolRestore {
while :
do
read NAME
read ROLE
if [[ $? = 0 ]]; then
read IPFS
read RPFS
read TIME
read SIZE
read OVERLAP
read TTIME
read TSIZE
read MIN
270 AIX Version 6.1 Security

read MAX
echo "ikegui 1 2 1 $NAME $ROLE $IPFS $RPFS $OVERLAP $TTIME $TSIZE $MIN $MAX 1 0 0 \c"
MORE=1
while [[ $MORE = 1 ]];
do
read PROPOSAL
read MORE
echo "$PROPOSAL $MORE \c"
FIRST=no
done
else
return 0
fi
echo " > /dev/null 2>&1"
PrintDot
done
}
function P1TunRestore {
while :
do
read TUNID
read NAME
if [[ $? = 0 ]]; then
read LID_TYPE
read LID
if [[ $LPPLEVEL = "4.3.3" ]]; then
read LIP
fi
read RID_TYPE
read RID
read RIP
read POLICY
read KEY
read AUTOSTART
echo "ikegui 1 1 2 0 $NAME $LID_TYPE \"$LID\" $LIP $RID_TYPE \"$RID\" \
$RIP $POLICY $KEY $AUTOSTART > /dev/null 2>&1"
PrintDot
else
return 0
fi
done
}
function P2TunRestore {
while :
do
read TUNID
read NAME
if [[ $? = 0 ]]; then
read P1TUN
read LTYPE
read LID
read LMASK
read LPROT
read LPORT
read RTYPE
read RID
read RMASK
read RPROT
read RPORT
read POLICY
read AUTOSTART
echo "ikegui 1 2 2 0 $NAME $P1TUN $LTYPE $LID $LMASK $LPROT $LPORT $RTYPE
\$RID $RMASK $RPROT $RPORT $POLICY $AUTOSTART > /dev/null 2>&1"
PrintDot
else
Security 271
return 0
fi
done
}
function allRestoreWithIkedb {
ERRORS=/tmp/ikedb_msgs.bos.net.ipsec.keymgt
echo > $ERRORS
$IKEDB -p $XMLFILE 2>> $ERRORS
if [ -f $PSKXMLFILE ]
then
$IKEDB -p $PSKXMLFILE 2>> $ERRORS
fi
}
P1PROPFILE=/tmp/p1proposal.bos.net.ipsec.keymgt
P2PROPFILE=/tmp/p2proposal.bos.net.ipsec.keymgt
P1POLFILE=/tmp/p1policy.bos.net.ipsec.keymgt
P2POLFILE=/tmp/p2policy.bos.net.ipsec.keymgt
P1TUNFILE=/tmp/p1tunnel.bos.net.ipsec.keymgt
P2TUNFILE=/tmp/p2tunnel.bos.net.ipsec.keymgt
XMLFILE=/tmp/full_ike_database.bos.net.ipsec.keymgt
PSKXMLFILE=/tmp/psk_ike_database.bos.net.ipsec.keymgt
CMD_FILE=/tmp/commands
IKEDB=$(which ikedb) || IKEDB=/usr/sbin/ikedb
echo "building ISAKMP database \n"
$IKEDB -x || exit $?
if [ -f $XMLFILE ]; then
echo "\nRestoring database entries\c"
allRestoreWithIkedb
echo "\ndone\n"
elif [ -f /tmp/*.bos.net.ipsec.keymgt ]; then
echo "\nRestoring database entries\c"
LPPLEVEL=`cat /tmp/lpplevel`
echo > $CMD_FILE
touch $P1PROPFILE; P1PropRestore < $P1PROPFILE >> $CMD_FILE
touch $P2PROPFILE; P2PropRestore < $P2PROPFILE >> $CMD_FILE
touch $P1POLFILE; P1PolRestore < $P1POLFILE >> $CMD_FILE
touch $P2POLFILE; P2PolRestore < $P2POLFILE >> $CMD_FILE
touch $P1TUNFILE; P1TunRestore < $P1TUNFILE >> $CMD_FILE
touch $P2TUNFILE; P2TunRestore < $P2TUNFILE >> $CMD_FILE
mv $P1PROPFILE ${P1PROPFILE}.loaded
mv $P2PROPFILE ${P2PROPFILE}.loaded
mv $P1POLFILE ${P1POLFILE}.loaded
mv $P2POLFILE ${P2POLFILE}.loaded
mv $P1TUNFILE ${P1TUNFILE}.loaded
mv $P2TUNFILE ${P2TUNFILE}.loaded
ksh $CMD_FILE
echo "done\n"
fi
Network Information Services and NIS+ security
NIS+ security is an integral part of the NIS+ namespace. You cannot set up security independently from
the namespace. For this reason, instructions for setting up security are woven through the steps used to
set up the other components of the namespace.
272 AIX Version 6.1 Security

Operating system security mechanisms
Operating system security is provided by gates that users must pass through before entering the operating
system environment, and permission matrixes that determine what they are able to do once inside. In
some contexts, secure RPC passwords have been referred to as network passwords.
The overall system is composed of four gates and two permission matrixes:
Dialup gate
To access a given operating system environment from the outside through a modem and phone
line, you must provide a valid login ID and dial-up password.
Login gate
To enter a given operating system environment you must provide a valid login ID and user
password.
Root gate
To gain access to root privileges, you must provide a valid root user password.
Secure RPC gate
In an NIS+ environment running at security level 2 (the default), when you try to use NIS+ services
and gain access to NIS+ objects (servers, directories, tables, table entries, and so on) your identity
is confirmed by NIS+, using the secure RPC process.
Entering the secure RPC gate requires presentation of a secure RPC password. Your secure RPC
password and your login password normally are identical. When that is the case, you are passed
through the gate automatically without having to re-enter your password. (In some contexts,
secure RPC passwords have been referred to as network passwords. See the Administering NIS+
Credentials section in the AIX Version 6.1 Network Information Services (NIS and NIS+) Guide for
information about handling two passwords that are not identical.)
A set of credentials is used to automatically pass your requests through the secure RPC gate. The
process of generating, presenting, and validating your credentials is called authentication because
it confirms who you are and that you have a valid secure RPC password. This authentication
process is automatically performed every time you request NIS+ service.
In an NIS+ environment running in NIS-compatibility mode, the protection provided by the secure
RPC gate is significantly weakened because everyone has read rights for all NIS+ objects and
modify rights for those entries that apply to them regardless of whether or not they have a valid
credential (that is, regardless of whether or not the authentication process has confirmed their
identity and validated their secure RPC password). Because this situation allows anyone to have
read rights for all NIS+ objects and modify rights for those entries that apply to them, an NIS+
network running in compatibility mode is less secure than one running in normal mode. (In secure
RPC terminology, any user without a valid credential is considered a member of the nobody class.
See “Authorization classes” on page 278 for a description of the four classes.)
For details on how to administer NIS+ authentication and credentials, see the Administering NIS+
Credentials section in the AIX Version 6.1 Network Information Services (NIS and NIS+) Guide.
File and directory matrix
Once you have gained access to an operating system environment, your ability to read, execute,
modify, create, and destroy files and directories is governed by the applicable permissions.
NIS+ objects matrix
Once you have been properly authenticated to NIS+, your ability to read, modify, create, and
destroy NIS+ objects is governed by the applicable permissions. This process is called NIS+
authorization.
For details on NIS+ permissions and authorization, see the Administering NIS+ Access Rights
section in the AIX Version 6.1 Network Information Services (NIS and NIS+) Guide.
Security 273

NIS+ Security mechanisms
Once an NIS+ security environment has been set up, you can add and remove users, change
permissions, reassign group members, and perform all other routine administrative tasks needed to
manage an evolving network.
The security features of NIS+ protect the information in the namespace, as well as the structure of the
namespace itself, from unauthorized access. Without these security features, any NIS+ client could obtain,
change, or even damage information stored in the namespace.
NIS+ security serves two purposes:
Authentication
Authentication is used to identify NIS+ principals. Every time a principal (either user or machine)
tries to access an NIS+ object, the user’s identity and secure RPC password is confirmed and
validated. (You should not have to enter a password as part of the authentication process.
However, if for some reason your secure RPC password is different from your login password, you
must perform a keylogin the first time you try accessing NIS+ objects or services. To perform a
keylogin, you must provide a valid secure RPC password. See the Administering NIS+
Credentials section in the AIX Version 6.1 Network Information Services (NIS and NIS+) Guide.)
Authorization
Authorization is used to specify access rights. Every time NIS+ principals try to access NIS+
objects, they are placed in one of four authorization classes (owner, group, world, nobody). The
NIS+ security system allows NIS+ administrators to specify different read, modify, create, or
destroy rights to NIS+ objects for each class. For example, a given class could be permitted to
modify a particular column in the passwd table but not read that column, or a different class could
be allowed to read some entries of a particular table but not others.
For example, a given NIS+ table might allow one class to both read and modify the information in
the table, but a different class is only allowed to read the information, and a third class is not even
allowed to do that. This is similar in concept to the operating system’s file and directory
permissions system. (See “Authorization classes” on page 278 for more information on classes.)
Authentication and authorization prevents someone with root privileges on machine A from using the su
command to assume the identity of a second user who is either not logged in at all or logged in on
machine B, and then accessing NIS+ objects with the second user’s NIS+ access privileges.
Note, however, that NIS+ cannot prevent someone who knows another user’s login password from
assuming that other user’s identity and NIS+ access privileges. Nor can NIS+ prevent a user with root
privileges from assuming the identity of another user who is logged in from the same machine.
The following figure details the NIS+ security process.
274 AIX Version 6.1 Security
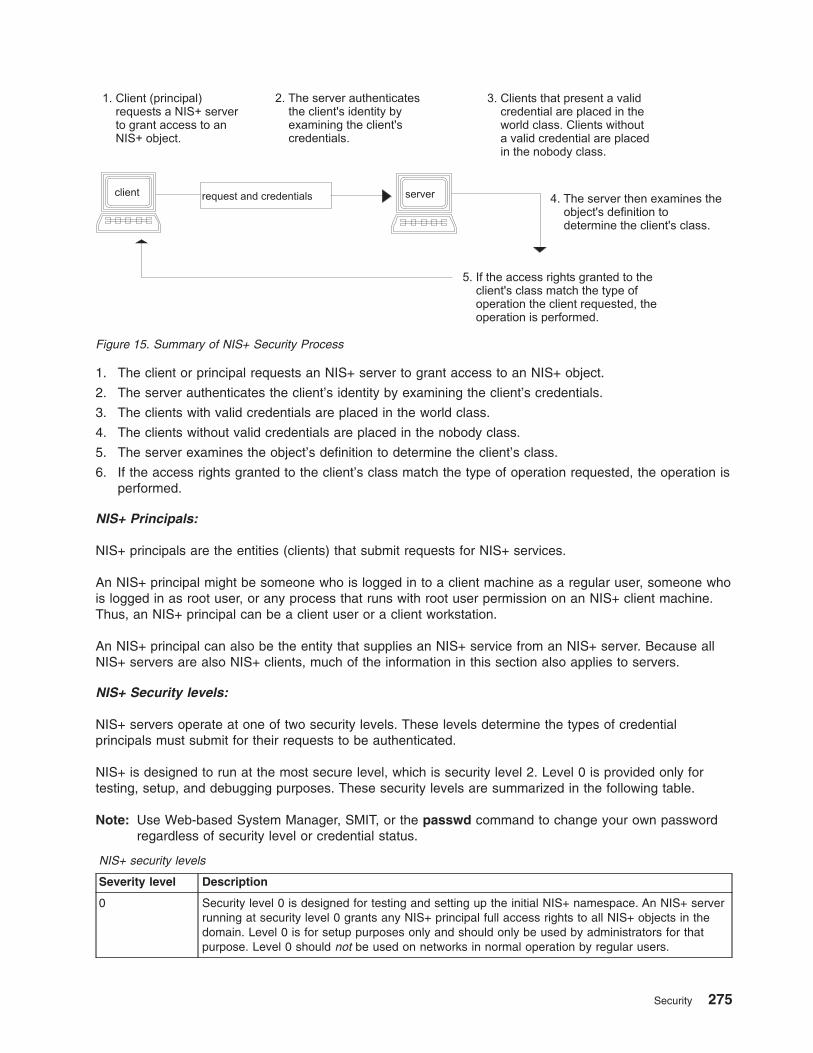
1. The client or principal requests an NIS+ server to grant access to an NIS+ object.
2. The server authenticates the client’s identity by examining the client’s credentials.
3. The clients with valid credentials are placed in the world class.
4. The clients without valid credentials are placed in the nobody class.
5. The server examines the object’s definition to determine the client’s class.
6. If the access rights granted to the client’s class match the type of operation requested, the operation is
performed.
NIS+ Principals:
NIS+ principals are the entities (clients) that submit requests for NIS+ services.
An NIS+ principal might be someone who is logged in to a client machine as a regular user, someone who
is logged in as root user, or any process that runs with root user permission on an NIS+ client machine.
Thus, an NIS+ principal can be a client user or a client workstation.
An NIS+ principal can also be the entity that supplies an NIS+ service from an NIS+ server. Because all
NIS+ servers are also NIS+ clients, much of the information in this section also applies to servers.
NIS+ Security levels:
NIS+ servers operate at one of two security levels. These levels determine the types of credential
principals must submit for their requests to be authenticated.
NIS+ is designed to run at the most secure level, which is security level 2. Level 0 is provided only for
testing, setup, and debugging purposes. These security levels are summarized in the following table.
Note: Use Web-based System Manager, SMIT, or the passwd command to change your own password
regardless of security level or credential status.
NIS+ security levels
Severity level Description
0 Security level 0 is designed for testing and setting up the initial NIS+ namespace. An NIS+ server
running at security level 0 grants any NIS+ principal full access rights to all NIS+ objects in the
domain. Level 0 is for setup purposes only and should only be used by administrators for that
purpose. Level 0 should not be used on networks in normal operation by regular users.
Figure 15. Summary of NIS+ Security Process
Security 275

NIS+ security levels
Severity level Description
1 Security level 1 uses AUTH_SYS security. This level is not supported by NIS+ and should not be
used.
2 Security level 2 is the default. The highest level of security currently provided by NIS+, it
authenticates only requests that use data encryption standard (DES) credentials. Requests with
no credentials are assigned to the nobody class and have whatever access rights have been
granted to that class. Requests that use invalid DES credentials are retried. After repeated failure
to obtain a valid DES credential, requests with invalid credentials fail with an authentication error.
(A credential might not be valid for a variety of reasons, such as the principal making the request
is not logged in through keylogin on that machine, the clocks are out of sync, there is a key
mismatch, and so on.)
NIS+ Authentication and credentials
NIS+ credentials authenticate the identity of each principal requesting an NIS+ service or access to an
NIS+ object.
The NIS+ credential or authorization process is an implementation of the Secure RPC system.
The credential or authentication system prevents someone from assuming another’s identity. That is, it
prevents someone with root privileges on one machine from using the su command to assume the identity
of a second user who is either not logged in at all or logged in on another machine and then accessing
NIS+ objects with the second user’s NIS+ access privileges.
Note: NIS+ cannot prevent someone who knows another user’s login password from assuming that other
user’s identity and the other user’s NIS+ access privileges. Nor can NIS+ prevent a user with root
privileges from assuming the identity of another user who is currently logged in on the same
machine.
After a server authenticates a principal, it then checks the NIS+ object that the principal wants to access to
verify what operations that principal is authorized to perform. (For further information about authorization,
see “NIS+ authorization and access” on page 278.)
User and machine credentials:
There are several different credential types for users and machines
For the basic types of principal, users and machines, the following different types of credentials exist:
User credentials
When someone is logged in to an NIS+ client as a regular user, requests for NIS+ services include
that person’s user credentials.
Machine credentials
When a user is logged in to an NIS+ client as root user, request for services use the client
workstation’s credentials.
DES versus local credentials:
NIS+ principals can have DES or local credentials.
DES credentials:
Data Encryption Standard (DES) credentials provide secure authentication.
276 AIX Version 6.1 Security

When this guide refers to NIS+ checking a credential to authenticate an NIS+ principal, it is the DES
credential that NIS+ is validating.
Note: Using DES credentials is only one method of achieving authentication. Do not equate DES
credentials with NIS+ credentials.
Each time a principal requests an NIS+ service or access to an NIS+ object, the software uses the
credential information stored for that principal to generate a credential for that principal. DES credentials
are generated from information created for each principal by an NIS+ administrator, as explained in the
Administering NIS+ Credentials section in the AIX Version 6.1 Network Information Services (NIS and
NIS+) Guide.
v When the validity of a principal’s DES credential is confirmed by NIS+, that principal is authenticated.
v A principal must be authenticated before being placed in the owner, group, or world authorization
classes. In other words, you must have a valid DES credential in order to be placed in one of those
classes. (Principals without a valid DES credential are automatically placed in the nobody class.)
v DES credential information is always stored in the cred table of the principal’s home domain, regardless
of whether that principal is a client user or a client workstation.
Local credentials:
Local credentials are a map between a user’s user ID number and their NIS+ principal name, which
includes their home domain name.
When users log in, the system looks up their local credential, which identifies their home domain where
their DES credential is stored. The system uses that information to get the user’s DES credential
information.
When users log in to a remote domain, those requests use their local credential, which points back to their
home domain. NIS+ then queries the user’s home domain for that user’s DES credential information. This
allows a user to be authenticated in a remote domain even though the user’s DES credential information is
not stored in that domain. The following figure illustrates this concept.
This illustration shows a domain hierarchy. The user’s home domain has local and DES credentials. The
subdomain only has local credentials. Home and the subdomain are labeled Client User Credentials.
Local credential information can be stored in any domain. To log in to a remote domain and be
authenticated, a client user must have a local credential in the cred table of the remote domain. If a user
does not have a local credential in a remote domain the user is trying to access, NIS+ cannot locate the
user’s home domain to obtain the user’s DES credential. In such a case, the user would not be
authenticated and would be placed in the nobody class.
User types and credential types:
Figure 16. Credential and Domains
Security 277

A user can have both types of credential, but a machine can only have a DES credential.
Root cannot have NIS+ access, as root, to other machines because the root UID of every machine is
always zero. If root (UID=0) of machine A tried to access machine B as root user, that conflicts with
machine B’s already existing root (UID=0). Thus, a local credential is not appropriate for a client
workstation; it is allowed only for a client user.
NIS+ authorization and access
The basic purpose of NIS+ authorization is to specify the access rights that each NIS+ principal has for
each NIS+ object and service.
After the principal making an NIS+ request is authenticated, NIS+ places that principal in an authorization
class. The access rights (permissions) that specify which operations a principal may do with a given NIS+
object are assigned on a class basis. In other words, one authorization class may have certain access
rights while a different class has different rights.
Authorization classes are owner, group, world, and nobody. Access rights are create, destroy, modify, and
read.
Authorization classes:
NIS+ objects do not grant access rights directly to NIS+ principals.
NIS+ objects grant access rights to the following classes of principal:
Owner
The principal who happens to be the object’s owner gets the rights granted to the owner class.
Group Each NIS+ object has one group associated with it. The members of an object’s group are
specified by the NIS+ administrator. The principals who belong to the object’s group class get the
rights granted to the group class. (In this context, groups refers to NIS+ groups, and not operating
system or net groups. For a description of NIS+ groups, see “Group class” on page 279.
World The world class encompasses all NIS+ principals that a server has been able to authenticate.
(That is, everyone who has been authenticated but who is not in either the owner or group
classes.)
Nobody
All principals belong to the nobody class, including those who are not authenticated.
The following figure illustrates the class relationship:
278 AIX Version 6.1 Security

This illustration shows a series of ovals within ovals that represents the relationship between authorization
classes. The smallest oval is Owner, encompassed by a larger oval labeled Group, encompassed by an
oval labeled World, encompassed by an oval labeled Nobody.
For any NIS+ request, the system determines which class the requesting principal belongs to and the
principal can then use whatever access rights belong to that class.
An object can grant any combination of access rights to each of these classes. Normally, however, a
higher class is assigned the same rights as all the lower classes, as well as possible additional rights.
For instance, an object could grant read access to the nobody and world classes, both read and modify
access to the group class, and read, modify, create, and destroy access to the owner class.
The following section describes the authorization classes in detail:
Owner class:
The owner is a single NIS+ principal.
A principal making a request for access to an NIS+ object must be authenticated (present a valid DES
credential) before being granted owner-access rights.
By default, an object’s owner is the principal that created the object. However, an object’s owner can cede
ownership to another principal by two different methods:
v The principal specifies a different owner at the time the object is created (see the Administering NIS+
Access Rights section in the AIX Version 6.1 Network Information Services (NIS and NIS+) Guide).
v The principal changes the ownership of the object after it is created (see the Administering NIS+ Access
Rights section in the AIX Version 6.1 Network Information Services (NIS and NIS+) Guide).
After a principal cedes ownership, that principal cedes all owner’s access rights to the object and keeps
only the rights the object assigns to either the group, the world, or nobody.
Group class:
The object’s group is a single NIS+ group. (In this context, group refers to NIS+ groups, and not operating
system or net groups.)
Figure 17. Authorization Classes
Security 279

A principal making a request for access to an NIS+ object must be authenticated (present a valid DES
credential) and belong to the group before being granted group-access rights.
An NIS+ group is a collection of NIS+ principals, grouped together as a convenience for providing access
to the namespace. The access rights granted to an NIS+ group apply to all the principals that are
members of that group. (An object’s owner, however, does not need to belong to the object’s group.)
When an object is created, the creator can opt for a default group. A nondefault group can be specified
either when the object is created or at any time later.
Information about NIS+ groups is stored inNIS+ group objects, under the groups_dir subdirectory of every
NIS+ domain. (Note that information about NIS+ groups is not stored in the NIS+ group table. That table
stores information about operating system groups.) Instructions for administering NIS+ groups are provided
in the Administering NIS+ Groups section in the AIX Version 6.1 Network Information Services (NIS and
NIS+) Guide.
World class:
The world class contains all NIS+ principals that are authenticated by NIS+; that is, all members in the
owner and group class, as well as all other principals who present a valid DES credential.
Access rights granted to the world class apply to all authenticated principals.
Nobody class:
The nobody class contains all principals, even those without a valid DES credential.
Authorization classes and the NIS+ object hierarchy:
NIS+ security applies authorization classes independently to a hierarchy of objects.
Directory objects are the top level of the default hierarchy, then group or table objects, then columns, then
entries. The following definitions provide more information about each level:
Directory level
Each NIS+ domain contains two NIS+ directory objects: groups_dir and org_dir. Each groups_dir
directory object contains various groups. Each org_dir directory object contains various tables.
Group or table level
Groups contain individual entries and possibly other groups. Tables contain both columns and
individual entries.
Column level
Each table has one or more columns.
Entry (row) level
Each group or table has one or more entries.
The four authorization classes apply at each level. Thus, a directory object has an owner and a group.
Each table within a directory object has its own owner and group, which can be different from the owner
and group of the directory object. Within a table, a column or an entry can have its own owner or group,
which can be different from the owner and group of the table as a whole or of the directory object as a
whole.
NIS+ access rights:
NIS+ objects specify access rights for NIS+ principals in the same way that operating system files specify
permissions for operating system users.
280 AIX Version 6.1 Security

Access rights specify the types of operations that NIS+ principals are allowed to perform on NIS+ objects.
(You can examine these by using the niscat -o command.)
NIS+ operations vary among different types of objects, but all operations fall into one of the following
access-rights categories: read, modify, create, and destroy.
Read A principal with read rights to an object can view the contents of that object.
Modify
A principal with modify rights to an object can change the contents of that object.
Destroy
A principal with destroy rights to an object can destroy or delete the object.
Create
A principal with create rights to a higher-level object can create new objects within that level. If you
have create rights to a NIS+ directory object, you can create new tables within that directory. If you
have create rights to a NIS+ table, you can create new columns and entries within that table.
Every communication from an NIS+ client to an NIS+ server is a request to perform one of these
operations on a specific NIS+ object. For instance, when an NIS+ principal requests the IP address of
another workstation, it is effectively requesting read access to the hosts table object, which stores that
type of information. When a principal asks the server to add a directory to the NIS+ namespace, it is
actually requesting modify access to the directory’s parent object.
These rights logically evolve down from directory to table to table column and entry levels. For example, to
create a new table, you must have create rights for the NIS+ directory object where the table will be
stored. When you create that table, you become its default owner. As owner, you can assign yourself
create rights to the table, which allows you to create new entries in the table. If you create new entries in a
table, you become the default owner of those entries. As table owner, you can also grant table-level create
rights to others. For example, you can give your table’s group class table-level create rights. In that case,
any member of the table’s group can create new entries in the table. The individual member of the group
who creates a new table entry becomes the default owner of that entry.
NIS+ Security and administrative rights
NIS+ does not enforce any requirement that there be a single NIS+ administrator. Whoever has
administrative rights over an object (that is, the authority to create, destroy, and for some objects, modify
rights) is considered to be an NIS+ administrator for that object.
Whoever creates an NIS+ object sets the initial access rights to that object. If the creator restricts
administrative rights to the object’s owner (initially the creator), only the owner has administrative power
over that object. On the other hand, if the creator grants administrative rights to the object’s group, then
everyone in that group has administrative power over that object.
Theoretically, you could grant administrative rights to the world class, or even the nobody class. The
software allows you to do that. But granting administrative rights beyond the group class effectively
nullifies NIS+ security. Thus, if you grant administrative rights to either the world or the nobody class, you
are, in effect, defeating the purpose of NIS+ security.
NIS+ security reference
The following commands are used to administer passwords, credentials, and keys.
chkey Changes a principal’s secure RPC key pair. Unless you want to re-encrypt your current private key
with a new password, use the passwd command instead. The chkey command does not affect
the principal’s entry either in the passwd table or /etc/passwd file.
keylogin
Decrypts and stores a principal’s secret key with the keyserv.
Security 281

keylogout
Deletes stored secret key from keyserv.
keyserv
Enables the server for storing private encryption keys.
newkey
Creates a new key pair in public-key database.
nisaddcred
Creates credentials for NIS+ principals.
nisupdkeys
Updates public keys in directory objects.
passwd
Changes and administers principal’s password.
Network File System security
The Network File System (NFS) is a widely available technology that allows data to be shared between
various hosts on a network.
Beginning with the release of AIX 5.3.0, NFS also supports the use of Kerberos 5 authentication in
addition to DES. Kerberos 5 security is provided under a protocol mechanism called RPCSEC_GSS.
In addition to the standard UNIX authentication system, NFS provides a means to authenticate users and
machines in networks on a message-by-message basis. This additional authentication system uses Data
Encryption Standard (DES) encryption and public key cryptography.
Beginning with the release of AIX 5L™ Version 5.2, NFS also supports the use of Kerberos 5
authentication in addition to DES. Kerberos 5 security is provided under a protocol mechanism called
RPCSEC_GSS. For a description of how to administer and use Kerberos authentication with NFS, see the
NFS Administration Guide.
General guidelines for securing Network File System
There are several guidelines that help you secure the Network File System (NFS).
v Ensure that the latest software patches are installed. Patches that address security issues should be
considered especially important. All software in a given infrastructure should be maintained. For
example, installing patches in an operating system but failing to install patches on a Web server may
provide an attacker with a way to attach your environment that could have been avoided if the Web
server been updated as well. To subscribe to IBM System p™ Security Alerts for information about the
latest available security information, visit the following Web address: http://www14.software.ibm.com/webapp/set2/subscriptions/pqvcmjd.
v Configure the NFS server to export file systems with the least amount of privileges necessary. If users
only need to read from a file system, they should not be able to write to the file system. This can
mitigate an attempt to overwrite important data, modify configuration files, or write malicious executable
code to an exported file system. Specify privileges using SMIT or by directly editing the /etc/exports
file.
v Configure the NFS server to export file systems explicitly for the users who should have access to it.
Most implementations of NFS will allow you to specify which NFS clients should have access to a given
file system. This will mitigate attempts by unauthorized users to access file systems. In particular, do not
configure a NFS server to export a file system to itself.
v Exported file systems should be in their own partitions. An attacker could cause system degradation by
writing to an exported file system until it is full. This may make the file system unavailable to other
applications or users that needed it.
282 AIX Version 6.1 Security

v Do not allow NFS clients to access the file system with root user credentials or unknown user
credentials. Most implementations of NFS can be configured to map requests from a privileged or
unknown user to an unprivileged user. This will avert scenarios where an attacker tries to access files
and perform file operations as a privileged user.
v Do not allow NFS clients to run suid and sgid programs on exported file systems. This will prevent NFS
clients from executing malicious code with privileges. If the attacker is able to make the executable
owned by a privileged owner or group, significant harm can be done to the NFS server. This can be
done by specifying the mknfsmnt -y command option.
v Use Secure NFS. Secure NFS uses DES encryption to authenticate hosts involved in RPC transactions.
RPC is a protocol used by NFS to communicate requests between hosts. Secure NFS will mitigates
attempts by an attacker to spoof RPC requests by encrypting the time stamp in the RPC requests. A
receiver successfully decrypting the time stamp and confirm that it is correct serves as confirmation that
the RPC request came from a trusted host.
v If NFS is not needed, turn it off. This will reduce the number of possible attack vectors available to an
intruder.
Beginning with AIX 5.3 and AIX Version 6.1, NFS also supports the use of the AES encryption type with
Kerberos 5 authentication in addition to Triple DES and Single DES. For a description of how to configure
Kerberos 5 to use the AES encryption type, see the NFS System Management guide. The AIX 5.3 NFS V4
implementation supports the following types of encryption:
v des-cbc-crc
v des-cbc-md4
v des-cbc-md5
v des3-cbc-sha1
v aes256-cts
For more information about implementing the items discussed, refer to the following information:
v AIX 5L Version 5.1 information
– NFS Installation and Configuration: http://publibn.boulder.ibm.com/doc_link/en_US/a_doc_lib/aixbman/commadmn/nfs_install.htm
– exports File for NFS: http://publibn.boulder.ibm.com/doc_link/en_US/a_doc_lib/files/aixfiles/exports.htm
– Secure NFS: http://publibn.boulder.ibm.com/doc_link/en_US/a_doc_lib/aixbman/commadmn/nfs_secure.htm
– mknfsmnt Command: http://publibn.boulder.ibm.com/doc_link/en_US/a_doc_lib/cmds/aixcmds3/mknfsmnt.htm
v AIX 5L Version 5.2 information
– NFS Installation and Configuration: http://publib16.boulder.ibm.com/pseries/en_US/aixbman/commadmn/nfs_install.htm
– exports File for NFS: http://publib16.boulder.ibm.com/pseries/en_US/files/aixfiles/exports.htm
– Network File System (NFS) Security: http://publib16.boulder.ibm.com/pseries/en_US/aixbman/security/secure_nfs.htm
– mknfsmnt Command: http://publib16.boulder.ibm.com/pseries/en_US/cmds/aixcmds3/mknfsmnt.htm
Network File System authentication
NFS uses the DES algorithm for different purposes. NFS uses DES to encrypt a time stamp in the remote
procedure call (RPC) messages sent between NFS servers and clients. This encrypted time stamp
authenticates machines just as the token authenticates the sender.
Because NFS can authenticate every RPC message exchanged between NFS clients and servers, this
provides an additional, optional level of security for each file system. By default, file systems are exported
Security 283

with the standard UNIX authentication. To take advantage of this additional level of security, you can
specify the secure option when you export a file system.
Public key cryptography for secure Network File System:
Both the public key and the secret key of the user are stored and indexed by the net name in the
publickey.byname map.
The secret key is DES-encrypted with the user login password. The keylogin command uses the
encrypted secret key, decrypts it with the login password, then gives it to a secure local key server to save
for use in future RPC transactions. Users are not aware of their public and secret keys because the
yppasswd command, in addition to changing the login password, generates the public and secret keys
automatically.
The keyserv daemon is an RPC service that runs on each NIS and NIS+ machine. For information on how
NIS+ uses keyserv, see AIX Version 6.1 Network Information Services (NIS and NIS+) Guide. Within NIS,
keyserv runs the following public key subroutines:
v key_setsecret subroutine
v key_encryptsession subroutine
v key_decryptsession subroutine
The key_setsecret subroutine tells the key server to store the secret key of the user (SKA) for future use;
it is normally called by the keylogin command. The client program calls the key_encryptsession
subroutine to generate the encrypted conversation key, which is passed in the first RPC transaction to a
server. The key server looks up the server public key and combines it with the secret key of the client (set
up by a previous key_setsecret subroutine) to generate the common key. The server asks the key server
to decrypt the conversation key by calling the key_decryptsession subroutine.
Implicit in these subroutine calls is the name of the caller, which must be authenticated in some manner.
The key server cannot use DES authentication to do this, because it would create a deadlock. The key
server solves this problem by storing the secret keys by the user ID (UID) and only granting requests to
local root processes. The client process then runs a root-user-owned setuid subroutine that makes the
request on the part of the client, telling the key server the real UID of the client.
Network File System authentication requirements:
Secure NFS authentication is based on the ability of a sender to encrypt the current time, which the
receiver can then decrypt and check against its own clock.
This process has the following requirements:
v The two agents must agree on the current time.
v The sender and receiver must be using the same DES encryption key.
Agreeing on the current time:
If the network uses time synchronization, the timed daemon keeps the client and server clocks
synchronized. If not, the client computes the proper time stamps based on the server clock.
To do this, the client determines the server time before starting the RPC session, and then computes the
time difference between its own clock and that of the server. The client then adjusts its time stamp
accordingly. If, during the course of an RPC session, the client and server clocks become unsynchronized
to the point where the server begins rejecting the client requests, the client will redetermine the server
time.
Using the same DES key:
284 AIX Version 6.1 Security

The client and server compute the same DES encryption key by using public key cryptography.
For any client A and server B, a key called the common key can only be deduced by A and B. This key is .
The client derives the common key by computing the following formula:
KAB
= PKBSKA
where K is the common Key, PK is the Public Key, and SK is the Secret Key, and each of these keys is a
128-bit number. The server derives the same common key by computing the following formula:
KAB
= PKASKB
Only the server and client can calculate this common key since doing so requires knowing one secret key
or the other. Because the common key has 128 bits, and DES uses a 56-bit key, the client and server
extract 56 bits from the common key to form the DES key.
Network File System authentication process:
When a client wants to talk to a server, it randomly generates a key used for encrypting the time stamps.
This key is known as the conversation key (CK).
The client encrypts the conversation key using the DES common key (described in Authentication
Requirements) and sends it to the server in the first RPC transaction. This process is illustrated in the
following figure.
This figure shows client A connecting to server B. The term K(CK) means CK is encrypted with the DES
common key K. In its first request, the client RPC credential contains the client name (A), the conversation
key (CK), and the variable called win (window) encrypted with CK. (The default window size is 30
minutes.) The client verifier in the first request contains the encrypted time stamp and an encrypted verifier
of the specified window, win + 1. The window verifier makes guessing the right credential much more
difficult, and increases security.
After authenticating the client, the server stores the following items in a credential table:
Figure 18. Authentication Process. This figure illustrates the authentication process.
Security 285

v Client name, A
v Conversation key, CK
v Window
v Time stamp
The server only accepts time stamps that are chronologically greater than the last one seen, so any
replayed transactions are guaranteed to be rejected. The server returns to the client in the verifier an index
ID into the credential table, plus the client time stamp minus 1, encrypted by CK. The client knows that
only the server could have sent such a verifier, because only the server knows what time stamp the client
sent. The reason for subtracting 1 from the time stamp is to ensure that it is not valid and cannot be
reused as a client verifier. After the first RPC transaction, the client sends just its ID and an encrypted time
stamp to the server, and the server sends back the client time stamp minus 1, encrypted by CK.
Naming network entities for DES authentication
DES authentication does its naming by using net names. For information on how NIS+ handles DES
authentication, see the AIX Version 6.1 Network Information Services (NIS and NIS+) Guide.
A net name is a string of printable characters to authenticate. The public and secret keys are stored on a
per-net-name rather than a per-user-name basis. The netid.byname NIS map maps the net name into a
local UID and group-access list.
User names are unique within each domain. Net names are assigned by concatenating the operating
system and user ID with the NIS and Internet domain names. A good convention for naming domains is to
append the Internet domain name (com, edu, gov, mil) to the local domain name.
Network names are assigned to machines as well as to users. A net name of a machine is formed much
like that of a user. For example, a machine named hal in the eng.xyz.com domain has the net name
[email protected]. Correct authentication of machines is important for diskless machines that need full
access to their home directories over the network.
To authenticate users from any remote domain, make entries for them in two NIS databases. One is an
entry for their public and secret keys; the other is for their local UID and group-access list mapping. Users
in the remote domain can then access all of the local network services, such as the NFS and remote
logins.
The /etc/publickey file
The /etc/publickey file contains names and public keys, which NIS and NIS+ use to create the publickey
map.
The publickey map is used for secure networking. Each entry in the file consists of a network user name
(which refers to either a user or a host name), followed by the user public key (in hexadecimal notation), a
colon, and the user-encrypted secret key (also in hexadecimal notation). By default, the only user in the
/etc/publickey file is the user nobody.
Do not use a text editor to alter the /etc/publickey file because the file contains encryption keys. To alter
the /etc/publickey file, use either the chkey or newkey commands.
Public key systems booting considerations
When restarting a machine after a power failure, all of the stored secret keys are lost, and no process can
access secure network services, such as mounting an NFS. Root processes could continue if there were
someone to enter the password that decrypts the secret key of the root user. The solution is to store the
root-user decrypted secret key in a file that the key server can read.
286 AIX Version 6.1 Security

Not all setuid subroutine calls operate correctly. For example, if a setuid subroutine is called by owner A,
and owner A has not logged into the machine since it started, the subroutine cannot access any secure
network services as A. However, most setuid subroutine calls are owned by the root user, and the root
user secret key is always stored at startup time.
Secure Network File System performance considerations
There are several ways that secure NFS affects system performance.
v Both the client and server must compute the common key. The time it takes to compute the common
key is about one second. As a result, it takes about two seconds to establish the initial RPC connection,
because both client and server have to perform this operation. After the initial RPC connection, the key
server caches the results of previous computations, and so it does not have to recompute the common
key every time.
v Each RPC transaction requires the following DES encryption operations:
1. The client encrypts the request time stamp.
2. The server decrypts it.
3. The server encrypts the reply time stamp.
4. The client decrypts it.
Because system performance can be reduced by secure NFS, weigh the benefits of increased security
against system-performance requirements.
Secure Network File System checklist
This checklist helps ensure that secure NFS operates correctly.
v When mounting a file system with the -secure option on a client, the server name must match the
server host name in the /etc/hosts file. If a name server is being used for host-name resolution, make
sure the host information returned by the name server matches the entry in the /etc/hosts file.
Authentication errors result if these names do not match because the net names for machines are
based on the primary entries in the /etc/hosts file and keys in the publickey map are accessed by net
name.
v Do not mix secure and nonsecure exports and mounts. Otherwise, file access might be determined
incorrectly. For example, if a client machine mounts a secure file system without the -secure option or
mounts an nonsecure system with the -secure option, users have access as nobody, rather than as
themselves. This condition also occurs if a user unknown to NIS or NIS+ attempts to create or modify
files on a secure file system.
v Because NIS must propagate a new map after each use of the chkey and newkey commands, use
these commands only when the network is lightly loaded.
v Do not delete the /etc/keystore file or the /etc/.rootkey file. If you reinstall, move, or upgrade a
machine, save the /etc/keystore and /etc/.rootkey files.
v Instruct users to use the yppasswd command rather than the passwd command to change passwords.
Doing so keeps passwords and private keys synchronized.
v Because the login command does not retrieve keys out of the publickey map for the keyserv daemon,
the user must run the keylogin command. You may want to place the keylogin command in each user
profile file to run the command automatically during login. The keylogin command requires users to
enter their password again.
v When you generate keys for the root user at each host with either the newkey -h or chkey command,
you must run the keylogin command to pass the new keys to the keyserv daemon. The keys are
stored in the /etc/.rootkey file, which is read by the keyserv daemon each time the daemon is started.
v Periodically verify that the yppasswdd and ypupdated daemons are running on the NIS master server.
These daemons are necessary for maintaining the publickey map.
v Periodically verify that the keyserv daemon is running on all machines using secure NFS.
Security 287

Configuring secure Network File System
To configure secure NFS on NIS master and slave servers, use the Web-based System Manager Network
application or use the following procedure.
For information about using NFS with NIS+, see AIX Version 6.1 Network Information Services (NIS and
NIS+) Guide.
1. On the NIS master server, create an entry for each user in the NIS /etc/publickey file by using the
newkey command as follows:
v For a regular user, type:
smit newkey
OR
newkey -u username
For a root user on a host machine, type:
newkey -h hostname
v Alternatively, users can establish their own public keys by using the chkey or newkey commands.
2. Create the NIS publickey map by following the instructions in AIX Version 6.1 Network Information
Services (NIS and NIS+) Guide. The corresponding NIS publickey.byname map resides only on the
NIS servers.
3. Uncomment the following stanzas in the /etc/rc.nfs file:
#if [ -x /usr/sbin/keyserv ]; then
# startsrc -s keyserv
#fi
#if [ -x /usr/lib/netsvc/yp/rpc.ypupdated -a -d /etc/yp/`domainname` ]; then
# startsrc -s ypupdated
#fi
#DIR=/etc/passwd
#if [ -x /usr/lib/netsvc/yp/rpc.yppasswdd -a -f $DIR/passwd ]; then
# startsrc -s yppasswdd
#fi
4. Start the keyserv, ypupdated, and yppasswdd daemons by using the startsrc command.
To configure secure NFS on NIS clients, start the keyserv daemon by using the startsrc command.
Exporting a file system using Secure Network File System
You can export a secure NFS using the Web-based System Manager Network application or by using one
of the following procedures.
v To export a secure NFS file system using SMIT, perform the following steps:
1. Verify that NFS is already running by running the lssrc -g nfs command. The output indicates that
the nfsd and the rpc.mountd daemons are active.
2. Verify that the publickey map exists and that the keyserv daemon is running. For more information,
see “Configuring secure Network File System.”
3. Run the smit mknfsexp fast path.
4. Specify the appropriate values for the PATHNAME of directory to export, MODE to export directory,
and EXPORT directory now, system restart or both fields. Specify yes for the Use SECURE option
field.
5. Specify any other optional characteristics, or accept the default values.
6. Exit SMIT. If the /etc/exports file does not exist, it will be created.
7. Repeat steps 3 through 6 for each directory you want to export.
v To export a secure NFS file system by using a text editor, perform the following steps:
1. Open the /etc/exports file with your favorite text editor.
288 AIX Version 6.1 Security

2. Create an entry for each directory to be exported, using the full path name of the directory. List each
directory to be exported starting in the left margin. No directory should include any other directory
that is already exported. See the /etc/exports file documentation for a description of the full syntax
for entries in the /etc/exports file, including how to specify the secure option.
3. Save and close the /etc/exports file.
4. If NFS is currently running, type:
/usr/sbin/exportfs -a
Using the -a option with the exportfs command sends all information in the /etc/exports file to the
kernel.
v To export an NFS file system temporarily (that is, without changing the /etc/exports file), type:
exportfs -i -o secure /dirname
where dirname is the name of the file system you want to export. The exportfs -i command specifies
that the /etc/exports file is not to be checked for the specified directory, and all options are taken
directly from the command line.
Mounting a file system using Secure Network File system
You can explicitly mount a secure NFS directory.
To mount a secure NFS directory explicitly, perform the following steps:
1. Verify that the NFS server has exported the directory by running the command:
showmount -e ServerName
where ServerName is the name of the NFS server. This command displays the names of the directories
currently exported from the NFS server. If the directory you want to mount is not listed, export the
directory from the server.
2. Establish the local mount point by using the mkdir command. For NFS to complete a mount
successfully, a directory that acts as the mount point (or placeholder) of an NFS mount must be
present. This directory should be empty. This mount point can be created like any other directory, and
no special attributes are needed.
3. Verify that the publickey map exists and that the keyserv daemon is running. For more information, see
“Configuring secure Network File System” on page 288.
4. Type
mount -o secure ServerName:/remote/directory /local/directory
where ServerName is the name of the NFS server, /remote/directory is the directory on the NFS
server you want to mount, and /local/directory is the mount point on the NFS client.
Note: Only the root user can mount a secure NFS.
Enterprise identity mapping
Today’s network environments are made up of a complex group of systems and applications, resulting in
the need to manage multiple user registries. Dealing with multiple user registries quickly grows into a large
administrative problem that affects users, administrators, and application developers. Enterprise Identity
Mapping (EIM) allows administrators and application developers to address this problem.
This section describes the problems, outlines current industry approaches, and explains the EIM approach.
Managing multiple user registries
Many administrators manage networks that include different systems and servers, each with a unique way
of managing users through various user registries.
Security 289

In these complex networks, administrators are responsible for managing each user’s identities and
passwords across multiple systems. Additionally, administrators often must synchronize these identities
and passwords. Users are burdened with remembering multiple identities and passwords and with keeping
them synchronized. Because user and administrator overhead in this environment is expensive,
administrators often spend valuable time troubleshooting failed login attempts and resetting forgotten
passwords instead of managing the enterprise.
The problem of managing multiple user registries also affects application developers who want to provide
multiple-tier or heterogeneous applications. Customers have important business data spread across many
different types of systems, with each system possessing its own user registries. Consequently, developers
must create proprietary user registries and associated security semantics for their applications. Although
this solves the problem for the application developer, it increases the overhead for users and
administrators.
Current approaches to enterprise identity mapping
Several current industry approaches for solving the problem of managing multiple user registries are
available, but they all provide incomplete solutions. For example, Lightweight Directory Access Protocol
(LDAP) provides a distributed user registry solution. However, to use solutions such as LDAP,
administrators must manage yet another user registry and security semantics or replace existing
applications that are built to use those registries.
Using this type of solution, administrators must manage multiple security mechanisms for individual
resources, thereby increasing administrative overhead and potentially increasing the likelihood of security
exposures. When multiple mechanisms support a single resource, the chances of changing the authority
through one mechanism and forgetting to change the authority for one or more of the other mechanisms is
much higher. For example, a security exposure can result when a user is appropriately denied access
through one interface, but allowed access through one or more other interfaces.
After completing this work, administrators find that they have not completely solved the problem. Generally,
enterprises have invested too much money in current user registries and in their associated security
semantics to make using this type of solution practical. Creating another user registry and associated
security semantics solves the problem for the application provider, but not the problems for users or
administrators.
Another solution is to use a single sign-on approach. Several products are available that allow
administrators to manage files that contain all of a user’s identities and passwords. However, this approach
has several weaknesses:
v It addresses only one of the problems that users face. Although it allows users to sign on to multiple
systems by supplying one identity and password, the user is still required to have passwords on other
systems, or the need to manage these passwords.
v It introduces a new problem by creating a security exposure because clear-text or decryptable
passwords are stored in these files. Passwords should never be stored in clear-text files or be easily
accessible by anyone, including administrators.
v It does not solve the problems of third-party application developers that provide heterogeneous,
multiple-tier applications. They must still provide proprietary user registries for their applications.
Despite these weaknesses, some enterprises use these solutions because they provide some relief for the
multiple user registry problems.
Enterprise identity mapping usage
The EIM architecture describes the relationships between individuals or entities (such as file servers and
print servers) in the enterprise and the many identities that represent them within an enterprise. In
addition, EIM provides a set of APIs that allow applications to ask questions about these relationships.
290 AIX Version 6.1 Security

For example, given a person’s user identity in one user registry, you can determine which identity in
another user registry represents that same person. If the user has authenticated with one identity and you
can map that identity to the appropriate identity in another user registry, the user does not need to provide
credentials for authentication again. You need only know which identity represents that user in another
user registry. Therefore, EIM provides a generalized identity-mapping function for the enterprise.
The ability to map between a user’s identities in different registries provides many benefits. Primarily,
applications can have the flexibility of using one registry for authentication while using an entirely different
registry for authorization. For example, an administrator could map an SAP identity to access SAP
resources.
Identity mapping requires that administrators perform the following steps:
1. Create EIM identifiers that represent people or entities in their enterprise.
2. Create EIM registry definitions that describe the existing user registries in their enterprise.
3. Define the relationship between the user identities in those registries to the EIM identifiers that they
created.
No code changes are required to existing registries. Mappings are not required for all identities in a user
registry. EIM allows one-to-many mappings (in other words, a single user with more than one identity in a
single user registry). EIM also allows many-to-one mappings (in other words, multiple users sharing a
single identity in a single user registry, which although supported is not advised for security reasons). An
administrator can represent any user registry of any type in EIM.
EIM does not require copying existing data to a new repository and trying to keep both copies
synchronized. The only new data that EIM introduces is the relationship information. Administrators
manage this data in an LDAP directory, which provides the flexibility of managing the data in one place
and having replicas wherever the information is used.
For more information about Enterprise Identity Mapping, refer to the following Web sites:
v http://publib.boulder.ibm.com/eserver/
v http://www.ibm.com/servers/eserver/security/eim/
Kerberos
Kerberos is a network authentication service that provides a means of verifying the identities of principals
on physically insecure networks. Kerberos provides mutual authentication, data integrity and privacy under
the realistic assumption that network traffic is vulnerable to capture, examination, and substitution.
Kerberos tickets are credentials that verify your identity. There are two types of tickets: a ticket-granting
ticket and a service ticket. The ticket-granting ticket is for your initial identity request. When logging into a
host system, you need something that verifies your identity, such as a password or a token. After you have
the ticket-granting ticket, you can then use your ticket-granting ticket to request service tickets for specific
services. This two-ticket method is the called the trusted third-party of Kerberos. Your ticket-granting ticket
authenticates you to the Kerberos server, and your service ticket is your secure introduction to the service.
The trusted third-party or intermediary in Kerberos is called the Key Distribution Center (KDC). The KDC
issues all the Kerberos tickets to the clients.
The Kerberos database keeps a record of every principal; the record contains the name, private key,
expiration date of the principal, and some administrative information about each principal. The master KDC
contains the master copy of the database and passes it to slave KDCs.
This section contains the following Kerberos information:
Security 291

Secure remote commands overview
The following provides details about secure remote commands.
Note: Beginning with Distributed Computing Environment (DCE) version 2.2, the DCE security server can
return Kerberos Version 5 tickets.
Note: Beginning with AIX 5.2, all the secure remote commands (rcmds) use the Kerberos Version 5 library
provided by Network Authentication Service (NAS) version 1.3. In a DCE realm, the ftp command
uses the GSSAPI library from the libdce.a DCE library, and in a native realm, the ftp command
uses the GSSAPI library from NAS version 1.3. NAS version 1.3 is located on the Expansion Pack
CD. The only LPP that is required is the krb5.client.rte fileset.
Note: If you are migrating to AIX 5.2 and had Kerberos Version 5 or Kerberos Version 4 installed, the
installation scripts prompt the user to install krb5.client.rte.
The secure rcmds are rlogin, rcp, rsh, telnet, and ftp. These commands are known collectively as the
Standard AIX method. (This method refers to the authentication method used by AIX 4.3 and prior
releases.) The additional methods provided are Kerberos Version 5 and Kerberos Version 4.
When using the Kerberos Version 5 authentication method, the client gets a Kerberos Version 5 ticket from
the DCE security server or Kerberos server. The ticket is a portion of the user’s current DCE or local
credentials encrypted for the TCP/IP server with which they want to connect. The daemon on the TCP/IP
server decrypts the ticket. This action allows the TCP/IP server to absolutely identify the user. If the DCE
or local principal described in the ticket is allowed access to the operating system user’s account, the
connection proceeds. The secure rcmds support Kerberos clients and servers from both Kerberos Version
5 and DCE.
In addition to authenticating the client, Kerberos Version 5 forwards the current user’s credentials to the
TCP/IP server. If the credentials are marked as forwardable, the client sends them to the server as a
Kerberos ticket-granting ticket (TGT). On the TCP/IP server side, if a user is communicating with a DCE
security server, the daemon upgrades the TGT into full DCE credentials using the k5dcecreds command.
The ftp command uses a different authentication method than the other secure rcmds. It uses the GSSAPI
security mechanism to pass the authentication between the ftp command and the ftpd daemon. Using the
clear, safe, and private subcommands, the ftp client supports data encryption.
Between operating system clients and servers, the ftp command allows multiple byte transfers for
encrypted data connections. The standards define only single byte transfers for encrypted data
connections. When connected to third-party machines and using data encryption, the ftp command follows
the single byte transfer limit.
System configuration:
For all of the secure rcmds, a system-level configuration mechanism determines which authentication
methods are allowed for that system. The configuration controls both outgoing and incoming connections.
The authentication configuration consists of the libauthm.a library and the lsauthent and chauthent
commands, that provide command line access to the get_auth_methods and set_auth_methods library
routines.
The authentication method defines which method is used to authenticate a user across a network. The
system supports the following authentication methods:
v Kerberos Version 5 is the most common method, as it is the basis for DCE.
292 AIX Version 6.1 Security

v Kerberos Version 4 is used only by the rlogin, rsh, and rcp secure rcmds. It is provided to support
backward compatibility only on SP™ systems. A Kerberos Version 4 ticket is not upgraded to DCE
credentials.
v Standard AIX is the authentication method that is used by AIX 4.3 and prior releases.
If more than one authentication method is configured and the first method fails to connect, the client
attempts to authenticate using the next authentication method configured.
Authentication methods can be configured in any order. The only exception is that Standard AIX must be
the final authentication method configured, because there is no fallback option. If Standard AIX is not a
configured authentication method, password authentication is not attempted and any connection attempt
using this method is rejected.
You can configure the system without any authentication methods. In this case, the machine refuses all
connections from and to any machine using secure rcmds. Also, because Kerberos Version 4 is only
supported with the rlogin, rsh, and rcp commands, a system configured to use only Kerberos Version 4
does not allow connections using telnet or FTP.
Kerberos Version 5 user validation:
The Kerberos Version 5 authentication method can be used to validate a user.
When using the Kerberos Version 5 authentication method, the TCP/IP client gets a service ticket
encrypted for the TCP/IP server. When the server decrypts the ticket, it has a secure method of identifying
the user (by DCE or local principal). However, the server still needs to determine if this DCE or local
principal is allowed access to the local account. Mapping the DCE or local principal to the local operating
system account is handled by a shared library, libvaliduser.a, which has a single subroutine, called
kvalid_user. If a different method of mapping is preferred, the system administrator must provide an
alternative for the libvaliduser.a library.
DCE configuration:
To use the secure rcmds, two DCE principals must exist for every network interface to which they can be
connected.
The two DCE principals are:
host/FullInterfaceName
ftp/FullInterfaceName
where:
FullInterfaceName
Interface name and domain name
Local configuration:
To use the secure rcmds, two local principals must exist for every network interface to which they can be
connected.
The two local principals are:
host/FullInterfaceName@Realmname
ftp/FullInterfaceName@Realmname
where:
FullInterfaceName
Interface name and domain name
Security 293
RealmName
Name of the local Kerberos Version 5 realm
See the following sources for related information:
v The get_auth_method and set_auth_method subroutines in AIX Version 6.1 Technical Reference:
Communications Volume 2
v The chauthent command in AIX Version 6.1 Commands Reference, Volume 1
v The lsauthent command in AIX Version 6.1 Commands Reference, Volume 3
Authenticating to AIX using Kerberos
AIX provides both KRB5 and KRB5A Kerberos authentication load modules. Even though both modules do
Kerberos authentication, the KRB5 load module performs Kerberos principal management, whereas the
KRB5A load module does not.
The KRB5 load module uses the IBM Network Authentication Services’ Kerberos database interface to
manipulate the Kerberos identities and principals. Using the KRB5 load module, an AIX system
administrator can manage Kerberos-authenticated users and their associated Kerberos principals by using
the existing AIX user-administration commands without any change. For example, to create an AIX user,
as well as a Kerberos principal associated with that user, run the mkuser command.
The KRB5A load module performs only authentication. The Kerberos principal management is done
separately by using Kerberos principal-management tools. The KRB5A load module is used in an
environment where Kerberos principals are stored on a non-AIX system and cannot be managed from AIX
by using the Kerberos database interface. KRB5A is intended to be used against Microsoft Windows 2000
Active Directory server where Kerberos principal management is performed using the Active Directory
account management tools and APIs.
Installing and configuring the system for Kerberos integrated login using KRB5:
Network Authentication Services (IBM Kerberos implementation) is shipped on the Expansion Pack.
To install the Kerberos Version 5 client package, install the krb5.client.rte fileset. To install the Kerberos
Version 5 server package, install the krb5.server.rte fileset. To install the entire Kerberos Version 5
package, install the krb5 package.
To avoid namespace collisions between DCE and Kerberos commands (that is, between the klist, kinit,
and kdestroy commands), the Kerberos commands are installed in the /usr/krb5/bin and the
/usr/krb5/sbin directories. You can add these directories to your PATH definition. Otherwise, to run the
Kerberos commands, you must specify fully qualified command path names.
Network Authentication Services documentation is provided in the krb5.doc.lang.pdf|html package, where
lang represents the supported language.
Configuring the Kerberos Version 5 KDC and kadmin servers:
Provides information on configuring the Kerberos Version 5 KDC and kadmin servers.
Note: Do not install both DCE and Kerberos server software be installed on the same physical system. If
you must do so, the default operational internet port numbers must be changed for either the DCE
clients and server or for the Kerberos clients and server. In either case, such a change can affect
interoperability with existing DCE and Kerberos deployments in your environment. For information
about coexistence of DCE and Kerberos, refer to Network Authentication Services documentation.
Note: Kerberos Version 5 is set up to reject ticket requests from any host whose clock is not within the
specified maximum clock skew of the KDC. The default value for maximum clock skew is 300
294 AIX Version 6.1 Security
seconds (five minutes). Kerberos requires that some form of time synchronization is configured
between the servers and the clients. It is recommended that you use the xntpd or timed daemons
for time synchronization. To use the timed daemon, do the following:
1. Set up the KDC server as a time server by starting the timed daemon, as follows:
timed -M
2. Start the timed daemon on each Kerberos client.
timed -t
To configure the Kerberos KDC and kadmin servers, run the mkkrb5srv command. For
example, to configure Kerberos for the MYREALM realm, the sundial server, and the xyz.com
domain, type the following:
mkkrb5srv -r MYREALM -s sundial.xyz.com -d xyz.com -a admin/admin
Wait a few minutes for the kadmind and krb5kdc commands to start from /etc/inittab.
Running the mkkrb5srv command results in the following actions:
1. Creates the /etc/krb5/krb5.conf file. Values for realm name, Kerberos admin server, and domain name
are set as specified on the command line. The /etc/krb5/krb5.conf file also sets the paths for the
default_keytab_name, kdc, and admin_server log files.
2. Creates the /var/krb5/krb5kdc/kdc.conf file. The /var/krb5/krb5kdc/kdc.conf file sets the values for
the kdc_ports, kadmin_port, max_life, max_renewable_life, master_key_type, and supported_enctypes
variables. This file also sets the paths for the database_name, admin_keytab, acl_file, dict_file, and
key_stash_file variables.
3. Creates the /var/krb5/krb5kdc/kadm5.acl file. Sets up the access control for admin, root, and host
principals.
4. Creates the database and one admin principal. You are asked to set a Kerberos master key and to
name and set the password for a Kerberos administrative principal identity. For disaster-recovery
purposes, it is critical that the master key and administrative principal identity and password are
securely stored away.
For more information, see “Sample runs” on page 296 and “Error messages and recovery actions” on
page 296.
Configuring the Kerberos Version 5 clients:
After Kerberos installation is complete, it is not apparent to normal users that the Kerberos technology is in
use and that they have ticket-granting tickets (TGTs) associated with their running processes. The login
process to the operating system remains unchanged, therefore, you must configure the system to use
Kerberos as the primary means of user authentication.
To configure systems to use Kerberos as the primary means of user authentication, run the mkkrb5clnt
command with the following parameters:
mkkrb5clnt -c KDC -r realm -a admin -s server -d domain -A -i database -K -T
For example, to configure the sundial.xyz.com KDC with the MYREALM realm, sundial.xyz.com admin
server, the xyz.com domain, and the files database, type the following:
mkkrb5clnt -c sundial.xyz.com -r MYREALM -s sundial.xyz.com -d xyz.com -A -i files -K -T
The previous example results in the following actions:
1. Creates the /etc/krb5/krb5.conf file. Values for realm name, Kerberos admin server, and domain name
are set as specified on the command line. Also, updates the paths for default_keytab_name, kdc, and
kadmin log files.
Security 295

2. The -i flag configures fully integrated login. The database entered is the location where AIX user
identification information is stored. This is different than the Kerberos principal storage. The storage
where Kerberos principals are stored is set during the Kerberos configuration.
3. The -K flag configures Kerberos as the default authentication scheme. This allows the users to
become authenticated with Kerberos at login time.
4. The -A flag adds an entry in the Kerberos Database to make root an admin user for Kerberos.
5. The -T flag acquires the server admin TGT-based admin ticket.
If a system is installed that is located in a different DNS domain than the KDC, the following additional
actions must be performed:
1. Edit the /etc/krb5/krb5.conf file and add another entry after [domain realm].
2. Map the different domain to your realm.
For example, if you want to include a client that is in the abc.xyz.com domain into your MYREALM realm , the
/etc/krb5/krb5.conf file includes the following additional entry:
[domain realm]
.abc.xyz.com = MYREALM
Error messages and recovery actions:
Errors that can occur when using the mkkrb5srv command include the following:
v If the krb5.conf, kdc.conf, or kadm5.acl files already exist, the mkkrb5srv command does not modify
the values. You receive a message that the file already exists. Any of the configuration values can be
changed by editing the krb5.conf, kdc.conf, or kadm5.acl files.
v If you mistype something and no database is created, remove the configuration files created and rerun
the command.
v If there is inconsistency between the database and configuration values, remove the database from the
/var/krb5/krb5kdc/* directory and rerun the command.
v Make sure the kadmind and the krb5kdc daemons are started on your machine. Use the ps command
to verify that the daemons are running. If these daemons have not started, check the log file.
Errors that can occur when using the mkkrb5clnt command include the following:
v Incorrect values for krb5.conf can be fixed by editing the /etc/krb5/krb5.conf file.
v Incorrect values for the -i flag can be fixed by editing the /usr/lib/security/methods.cfg file.
Files created:
The mkkrb5srv command creates the following files:
v /etc/krb5/krb5.conf
v /var/krb5/krb5kdc/kadm5.acl
v /var/krb5/krb5kdc/kdc.conf
The mkkrb5clnt command creates the following file:
v /etc/krb5/krb5.conf
The mkkrb5clnt -i files option adds the following stanza to the /usr/lib/security/methods.cfg file:
KRB5:
program =
options =
KRB5files:
options =
Sample runs:
296 AIX Version 6.1 Security

This section provides examples from sample runs.
The following is an example of the mkkrb5srv command:
# mkkrb5srv -r MYREALM -s sundial.xyz.com -d xyz.com -a admin/admin
Output similar to the following displays:
Fileset Level State Description
----------------------------------------------------------------------------
Path: /usr/lib/objrepos
krb5.server.rte 1.3.0.0 COMMITTED Network Authentication Service
Server
Path: /etc/objrepos
krb5.server.rte 1.3.0.0 COMMITTED Network Authentication Service
Server
The -s option is not supported.
The administration server will be the local host.
Initializing configuration...
Creating /etc/krb5/krb5.conf...
Creating /var/krb5/krb5kdc/kdc.conf...
Creating database files...
Initializing database ’/var/krb5/krb5kdc/principal’ for realm ’MYREALM’
master key name ’K/M@MYREALM’
You will be prompted for the database Master Password.
It is important that you NOT FORGET this password.
Enter database Master Password:
Re-enter database Master Password to verify:
WARNING: no policy specified for admin/admin@MYREALM;
defaulting to no policy. Note that policy may be overridden by
ACL restrictions.
Enter password for principal "admin/admin@MYREALM":
Re-enter password for principal "admin/admin@MYREALM":
Principal "admin/admin@MYREALM" created.
Creating keytable...
Creating /var/krb5/krb5kdc/kadm5.acl...
Starting krb5kdc...
krb5kdc was started successfully.
Starting kadmind...
kadmind was started successfully.
The command completed successfully.
Restarting kadmind and krb5kdc
The following is an example of the mkkrb5clnt command:
mkkrb5clnt -r MYREALM -c sundial.xyz.com -s sundial.xyz.com \
-a admin/admin -d xyz.com -i files -K -T -A
Output similar to the following displays:
Initializing configuration...
Creating /etc/krb5/krb5.conf...
The command completed successfully.
Password for admin/admin@MYREALM:
Configuring fully integrated login
Authenticating as principal admin/admin with existing credentials.
WARNING: no policy specified for host/diana.xyz.com@MYREALM;
defaulting to no policy. Note that policy may be overridden by
ACL restrictions.
Principal "host/diana.xyz.com@MYREALM" created.
Administration credentials NOT DESTROYED.
Authenticating as principal admin/admin with existing credentials.
Administration credentials NOT DESTROYED.
Authenticating as principal admin/admin with existing credentials.
Principal "kadmin/admin@MYREALM" modified.
Security 297

Administration credentials NOT DESTROYED.
Configuring Kerberos as the default authentication scheme
Making root a Kerberos administrator
Authenticating as principal admin/admin with existing credentials.
WARNING: no policy specified for root/diana.xyz.com@MYREALM;
defaulting to no policy. Note that policy may be overridden by
ACL restrictions.
Enter password for principal "root/diana.xyz.com@MYREALM":
Re-enter password for principal "root/diana.xyz.com@MYREALM":
Principal "root/diana.xyz.com@MYREALM" created.
Administration credentials NOT DESTROYED.
Cleaning administrator credentials and exiting.
Eliminating the dependency on the kadmind daemon during authentication:
The KRB5 load module will fail authentication when the kadmind daemon is not available. This
dependency to the kadmind daemon during authentication can be eliminated by setting the kadmind
options parameter in the methods.cfg file.
The possible values are No or False for disabling the kadmind lookups and Yes or True for enabling
kadmind lookups (the default value is Yes). When this option is set to No, the kadmind daemon is not
contacted during authentication. Therefore, users can log into the system regardless of the status of the
kadmind daemon (provided that the user enters the correct password when the system prompts one).
However, AIX user administration commands such as mkuser, chuser, or rmuser will not work to
administrate Kerberos integrated users if the daemon is not available (for example, either the daemon is
down or the machine is not accessible).
The default value for the kadmind option parameter is Yes. This means that kadmind lookups will be
performed during authentication. In the default case, if the daemon is not available, the authentication may
take longer.
To disable the checking of the kadmind daemon during authentication, modify the stanzas in the
methods.cfg file as follows:
KRB5:
program = /usr/lib/security/KRB5
options = kadmind=no
KRB5files:
options = db=BUILTIN,auth=KRB5
When the kadmind daemon is not available, the root user will not be able to change user passwords. In a
situation such as a forgotten password, you must make the kadmind daemon available. Also, if a user
chooses to enter a Kerberos principal name at the login prompt, the primary name of the principal name
will be truncated according to the AIX user name length limitation. This truncated name will be used for
AIX user identification information retrieval (for example, to retrieve your home directory value).
If the kadmind daemon is not available (the daemon is down or not reachable), the mkuser command
gives the following error:
3004-694 Error adding "krb5user": You do not have permission.
Additionally, the chuser and lsuser commands will manage only AIX related attributes and not Kerberos
related attributes. The rmuser command will not delete the Kerberos principal and the passwd command
will fail for Kerberos authenticated users.
If the network where the kadmind daemon resides is not accessible, response time will be delayed.
Setting the kadmind option to No in the methods.cfg file eliminates the delays during authentication when
the machine is not accessible.
298 AIX Version 6.1 Security

When the kadmind daemon is down, users cannot log in if their passwords are expired. Expired
passwords need to be changed. Password changes require the availability of the kadmind daemon.
Consequently, users who require a password change or have expired passwords, will not be able to log in
when the kadmind daemon is down.
When you set kadmind=no but the kadmind daemon is running, lsuser will fail to retrieve the Kerberos
related attributes. However, login, su, passwd, mkuser, chuser, and rmuser commands will succeed.
Installing and configuring the system for Kerberos integrated login using KRB5A:
When the KRB5A load module is used for authentication, a series of steps, such as creation of Kerberos
principals, must be performed.
The following section explains how to authenticate an AIX Network Authentication Service client against an
Active Directory KDC.
Install the krb5.client.rte file set from the Expansion Pack.
Note: The KRB5A authentication load module is only supported in AIX 5.2 and later.
Configuring the AIX Kerberos Version 5 clients with a Windows 2000 active directory server:
Use the config.krb5 command to configure an AIX Kerberos client.
Configuring the client requires Kerberos Server information. If a Windows 2000 Active Directory server is
chosen as the Kerberos server, the following options can be used with the config.krb5 command:
-r realm = Windows 2000 Active Directory server domain name
-d domain = Domain name of the machine hosting the Windows 2000 Active Directory server
-c KDC = Host name of the Windows 2000 Server
-s server = Host name of the Windows 2000 Server
1. Use the config.krb5 command as shown in the following example:
config.krb5 -C -r MYREALM -d xyz.com -c w2k.xyz.com -s w2k.xyz.com
2. Windows 2000 supports DES-CBC-MD5 and DES-CBC-CRC encryption types. Change the krb5.conf
file to contain information similar to the following:
[libdefaults]
default_realm = MYREALM
default_keytab_name = FILE:/etc/krb5/krb5.keytab
default_tkt_enctypes = des-cbc-crc des-cbc-md5
default_tgs_enctypes = des-cbc-crc des-cbc-md5
3. Add the following stanzas in the methods.cfg file:
KRB5A:
program = /usr/lib/security/KRB5A
options = authonly
KRB5Afiles:
options = db=BUILTIN,auth=KRB5A
4. On a Windows 2000 Active Directory server, do the following:
a. Use the Active Directory Management tool to create a new user account for the krbtest AIX host,
as follows:
1) Select the Users folder.
2) Use the mouse to right-click on New.
3) Choose user.
4) Type the name krbtest.
b. Use the Ktpass command from the command line to create a keytab file and set up the account
for the AIX host. For example, to create a keytab file called krbtest.keytab, type:
Ktpass -princ host/krbtest.xyz.com@MYREALM -mapuser krbtest -pass password -out krbtest.keytab
Security 299

c. Copy the keytab file to the AIX host system.
d. Merge the keytab file into the /etc/krb5/krb5.keytab file as follows:
$ ktutil
ktutil: rkt krbtest.keytab
ktutil: wkt /etc/krb5/krb5.keytab
ktutil: q
e. Create Windows 2000 domain accounts using the Active Directory user-management tools.
f. Create AIX accounts corresponding to the Windows 2000 domain accounts so that the login
process uses Kerberos authentication, as follows:
mkuser registry=KRB5Afiles SYSTEM=KRB5Afiles user0
KRB5A authentication load module questions and troubleshooting information
This provides answers to KRB5A authentication load module questions and troubleshooting information.
Note: The KRB5A authentication load module is only supported in AIX 5.2 and later.
v How do I configure an AIX Kerberos client that authenticates against an active directory server
KDC?
Use the config.krb5 command to configure an AIX Kerberos client. Configuring the client requires
Kerberos Server information. If a Windows 2000 Active Directory server is chosen as the Kerberos
server, then use the config.krb5 command with the following options:
-r realm
Active Directory domain name
-d domain
Domain name of the machine hosting the Active Directory service
-c KDC
The host name of the Windows 2000 server
-s server
The host name of the Windows 2000 server
Use the config.krb5 command as shown in the following example:
config.krb5 -C -r MYREALM -d xyz.com -c w2k.xyz.com -s w2k.xyz.com
Windows 2000 supports DES-CBC-MD5 and DES-CBC-CRC encryption types. Change the krb5.conf
file to contain information similar to the following:
[libdefaults]
default_realm = MYREALM
default_keytab_name = FILE:/etc/krb5/krb5.keytab
default_tkt_enctypes = des-cbc-crc des-cbc-md5
default_tgs_enctypes = des-cbc-crc des-cbc-md5
Add the following stanzas in the methods.cfg file:
KRB5A:
program = /usr/lib/security/KRB5A
options = authonly
KRB5Afiles:
options = db=BUILTIN,auth=KRB5A
On the Active Directory server, do the following:
1. Use the Active Directory Management tool to create a new user account for the krbtest AIX host.
– Select The Users folder.
– Right-click with the mouse and select New.
– Choose user.
– Type the name krbtest.
300 AIX Version 6.1 Security
2. Use the Ktpass command from the command line to create a krbtest.keytab file and set up the
account for the AIX host as follows:
Ktpass -princ host/krbtest.xyz.com@MYREALM -mapuser krbtest -pass password \
-out krbtest.keytab
3. Copy the krbtest.keytab file to the AIX host system.
4. Merge the krbtest.keytab file into the /etc/krb5/krb5.keytab file as follows:
$ ktutil
ktutil: rkt krbtest.keytab
ktutil: wkt /etc/krb5/krb5.keytab
ktutil: q
5. Create Windows 2000 domain accounts using the Active Directory user management tools.
6. Create AIX accounts corresponding to the Windows 2000 domain accounts such that the login
process will know to use Kerberos authentication, as follows:
mkuser registry=KRB5Afiles SYSTEM=KRB5Afiles user0
v How do I modify an AIX configuration for Kerberos integrated login?
To enable Kerberos integrated login, modify the methods.cfg file. The compound load-module entry
must be added to the methods.cfg file. The authentication side is KRB5A. The database side can be
chosen as either BUILTIN or LDAP. BUILTIN is the standard AIX user account repository that uses ASCII
files. For example, if you choose BUILTIN as the AIX user account repository, then modify the
methods.cfg file as follows:
Example: Local file system is chosen as the AIX user account repository.
KRB5A:
program = /usr/lib/security/KRB5A
options=authonly
KRB5Afiles:
options = db=BUILTIN,auth=KRB5A
Example: LDAP is chosen as the AIX user account repository.
KRB5A:
program = /usr/lib/security/KRB5A
options=authonly
LDAP:
program = /usr/lib/security/LDAP
KRB5ALDAP:
options = auth=KRB5A,db=LDAP
v How do I create an AIX user for Kerberos integrated login with the KRB5A load module?
To create an AIX user for Kerberos integrated login with the KRB5A load module, use the mkuser
command as follows:
mkuser registry=KRB5Afiles SYSTEM=KRB5Afiles auth_domain=MYREALM foo
v How do I create Kerberos principals on active directory?
Creating Windows 2000 user accounts implicitly creates the principals. For example, if you create a
user account named foo on Active Directory then the principal foo@MYREALM associated with the foo user
is also created. For information on creating users on Active Directory, see the Active Directory user
management documentation.
v How do I change the password of Kerberos authenticated user?
To change the password of a Kerberos authenticated user, use the passwd command, as follows:
passwd -R KRB5Afiles foo
v How do I remove a Kerberos authenticated user?
Security 301

To remove a Kerberos authenticated user, use the rmuser command. However, this only removes the
user from AIX. The user must also be removed from Active Directory using the Active Directory user
management tools.
passwd -R KRB5Afiles foo
v How do I migrate an AIX user to a Kerberos authenticated user?
If the user already has an account on Active Directory, then the chuser command converts the user into
an Kerberos authenticated user, as shown in the following example:
chuser registry=KRB5Afiles SYSTEM=KRB5Afiles auth_domain=MYREALM foo
If the user does not have an account in Active Directory then create an account on Active Directory.
Then use the chuser command. The Active Directory account may or may not have the same AIX user
name. If a different name is chosen, then use the auth_name attribute to map to the Active Directory
name. For example, to map the chris AIX user name to the christopher Active Directory user name,
type the following:
chuser registry=KRB5Afiles SYSTEM=KRB5Afiles auth_name=christopher auth_domain=MYREALM chris
v What do I do if the password is forgotten?
On Active Directory, the password must be changed by the administrator. On AIX, the root user cannot
set the password of a Kerberos principal.
v What is the purpose of the auth_name and auth_domain attributes?
The auth_name and auth_domain attributes are used to map AIX user names into Kerberos principal
names on Active Directory. For example, if the AIX user, chris, has auth_name=christopher and
auth_domain=SOMEREALM, the Kerberos principal name is christopher@SOMEREALM. The SOMEREALM realm
name is not the same as the MYREALM default realm name. This allows the chris user to authenticate to
the SOMEREALM realm instead of to the MYREALM realm.
These attributes are optional.
v Can a Kerberos-authenticated user become authenticated using standard AIX authentication?
The answer is yes. Perform the following actions to authenticate the Kerberos-authenticated user using
AIX authentication:
1. The user sets the AIX password (/etc/security/passwd) using the passwd command, as follows:
passwd -R files foo
2. Change the SYSTEM attribute of the user, as follows:
chuser -R KRB5Afiles SYSTEM=compat foo.
This changes the authentication from Kerberos to crypt.
If you want to use crypt authentication as a backup mechanism, the SYSTEM attribute is changed as
follows:
chuser -R KRB5Afiles SYSTEM="KRB5Afiles or compat" foo.
v Do I need to set up Kerberos server on AIX when using a Windows 2000 active directory server?
No, because users are authenticating against an Active Directory KDC, there is no need to configure the
KDC on AIX. If you want to use AIX Network Authentication Services KDC as the Kerberos server
instead, then the Kerberos server must be configured.
v What do I do if AIX does not accept my password?
Check that the password meets the requirements of both AIX and Kerberos. KDC must also be
configured and running correctly.
v What do I do if I cannot log into the system?
If you cannot log into the system, do the following:
– Verify that the KDC is up and running.
- On AIX systems, type the following:
ps -ef | grep krb5kdc
- On Windows 2000 systems, do the following:
302 AIX Version 6.1 Security

1. In the Control Panel, double-click the Administrative Tools icon
2. Double-click the Services icon.
3. Verify that the Kerberos Key Distribution Center is in the Started state.
– On AIX systems, verify that the /etc/krb5/krb5.conf file points to the correct KDC, and has valid
parameters.
– On AIX systems, verify that client keytab file contains the host ticket. For example, assume you have
the /etc/krb5/krb5.keytab default keytab file. Type the following:
$ ktutil
ktutil: rkt /etc/krb5/krb5.keytab
ktutil: l
slot KVNO Principal
------ ------ ------------------------------------------------------
1 4 host/krbtest.xyz.com@MYREALM
ktutil: q
– Verify that, if the auth_name and auth_domain attributes are set, they refer to a valid principal name
on the ADS KDC.
– Verify that the SYSTEM attribute is set for Kerberos login (KRB5Afiles or KRB5ALDAP).
– Verify that password is not expired.
v How can I disable TGT verification?
The host/Host_Name principal is used to verify a TGT. The keys for this host principal are stored in the
Kerberos default keytab file and the keytab file needs to be securely transferred from the Windows
2000 Active Directory server to the client machine as explained in the Security Guide. The TGT
verification could be disabled by specifying an option in the /usr/lib/security/methods.cfg file under the
KRB5A stanza as follows:
KRB5A:
program = /usr/lib/security/KRB5A
options = tgt_verify=no
KRB5Afiles:
options = db=BUILTIN,auth=KRB5A
The possible values for tgt_verify are No or False for disabling, and Yes or True for enabling. By
default, the TGT verification is enabled. When tgt_verify is set to No, TGT verification is not performed
and there is no need to transfer the keys of the host principal. This eliminates the need for the keytab
file for authentication purposes when KRB5A module is used.
Kerberos module
The Kerberos module is a kernel extension used by the NFS client and server code. It allows the NFS
client and server code to process Kerberos message integrity and privacy functions without making calls to
the gss daemon.
The Kerberos module is loaded by the gss daemon. The methods used are based on Network
Authentication Service version 1.2, which is, in turn, based on MIT Kerberos.
The location of the Kerberos module is: /usr/lib/drivers/krb5.ext.
For related information, see the gss daemon.
Remote authentication dial-in user service server
IBM’s Remote Authentication Dial-In User Service (RADIUS) is a network access protocol designed to do
authentication, authorization, and accounting. It is a port-based protocol that defines the communications
between Network Access Servers (NAS) and authentication and accounting servers.
Security 303

A NAS operates as a client of RADIUS. Transactions between the client and the RADIUS server are
authenticated through the use of a shared secret, which is not sent over the network. Any user passwords
sent between the client and the RADIUS server are encrypted.
The client is responsible for passing user information to designated RADIUS servers and then acting on
the response that is returned. RADIUS servers are responsible for receiving user connection requests,
authenticating the user, and then returning all configuration information necessary for the client to deliver
service to the user. A RADIUS server can act as a proxy client to other RADIUS servers when advanced
proxy information is configured. RADIUS uses User Datagram Protocol (UDP) as the transport protocol.
Installing the RADIUS server
You can install the RADIUS server using either the installp command or SMIT. The RADIUS software is
on the AIX base media, and the image names are radius.base and bos.msg.<lang>.rte.
If you plan to use the LDAP directory as your information database to store user names and passwords,
you must install the ldap.server. The installp software must be installed on each RADIUS server
installation.
The RADIUS daemons can be started using the SRC master commands. When started, there will be
multiple radiusd processes running:
v One process for authorization
v One process for accounting
v One process is a monitor process for the other daemons
Upon reboot, the daemons are automatically started at run level 2. To change this routine, modify the
/etc/rc.d/rc2.d/Sradiusd file.
Stopping and restarting RADIUS
You must stop and restart the radiusd daemons whenever changes are made to the RADIUS server’s
/etc/radius/radiusd.conf configuration file, or to the default authorization files, /etc/radius/authorization/default.policy or /etc/radius/authorization/default.auth. This can be handled from SMIT or from a
command line.
To stop and restart the RADIUS server, use the following commands:
>stopsrc -s radiusd
>startsrc -s radiusd
Stopping and starting RADIUS is necessary because the daemon must build a memory table of all default
attributes contained in the above configuration files. Shared memory is used for each local user and the
local user table only gets built at daemon initialization time for performance reasons.
On-demand feature:
You can start multiple RADIUS authentication and accounting server daemons as needed.
Each server listens on a separate port. The radiusd.conf file is shipped with a default port number of
1812 for authentication and 1813 for accounting. These are IANA assigned port numbers. By updating
radiusd.conf, these port numbers, along with other ports (multiples) as needed, can be used. Be sure to
use port numbers that are not assigned to existing services. When multiple port numbers are entered in
the Authentication_Ports and Accounting_Ports fields in the radiusd.conf file, a radiusd daemon is
started for each port. The daemons will listen on their respective port number.
RADIUS configuration files
The RADIUS daemon uses several configuration files. Sample versions of these files are shipped in the
RADIUS package.
304 AIX Version 6.1 Security
All configuration files are owned by the root user and the security group. You can edit all of the
configuration files, except the dictionary file, with the System Management Interface Tool (SMIT). The
server must be restarted before any modifications to the configuration files will take effect.
radiusd.conf file:
The radiusd.conf file contains the configuration parameters for RADIUS.
By default, RADIUS searches for the radiusd.conf file in the /etc/radius directory. Configuration file
entries must be in the formats as shown in the file. RADIUS accepts only valid keywords and values, and
uses the default if a valid keyword or value is not used. When you launch the RADIUS daemons, check
the SYSLOG output for configuration parameter errors. Not all configuration errors lead to the server
stopping.
This file should be appropriately read-protected and write-protected because it affects the behavior of
authentication and accounting servers. Also, confidential data might exist in the file.
Important: If you edit the radiusd.conf file, do not change the order of the entries. SMIT panels rely on
the order.
The following is an example of the radiusd.conf file:
#------------------------------------------------------------------#
# CONFIGURATION FILE #
# #
# By default RADIUS will search for radiusd.conf in the #
# /etc/radius directory. #
# #
# Configuration file entries need to be in the below #
# formats. RADIUS will accept only valid "Keyword : value(s)", #
# and will use defaults, if "Keyword : value(s)" are not #
# present or are in error. #
# #
# It is important to check the syslog output when launching #
# the radius daemons to check for configuration parameter #
# errors. Once again, not all configuration errors will lead to #
# the server stopping. #
# #
# Lastly, this file should be appropriately read/write protected, #
# because it will affect the behavior of authentication and #
# accounting, and confidential or secretive material may #
# exist in this file. #
# #
# IF YOU ARE EDITING THIS FILE, DO NOT CHANGE THE ORDER OF THE #
# ENTRIES IN THIS FILE. SMIT PANELS DEPEND ON THE ORDER. #
# #
# #
#------------------------------------------------------------------#
#------------------------------------------------------------------#
# Global Configuration #
# #
# RADIUSdirectory : This is the base directory for the RADIUS #
# daemon. The daemon will search this #
# directory for further configuration files. #
# #
# Database_location : This is the value of where the #
# authentication (user ids & passwords) #
# will be stored and retrieved. #
# Valid values: Local, LDAP, UNIX #
# UNIX - User defined in AIX system #
# Local - Local AVL Database using raddbm #
# LDAP - Central Database #
# #
Security 305

# Local_Database : This indicates the name of the local #
# database file to be used. #
# This field must be completed if the #
# Database location is Local. #
# #
# Debug_Level : This pair sets the debug level at which #
# the RADIUS server will run. Appropriate #
# values are 0,3 or 9. The default is 3. #
# Output is directed to location specified #
# by *.debug stanza in /etc/syslog.conf #
# #
# Each level increases the amount of messages#
# sent to syslog. For example "9" includes #
# the new messages provided by "9" as well #
# as all messages generated by level 0 and 3.#
# #
# 0 : provides the minimal output to the #
# syslogd log. It sends start up #
# and end messages for each RADIUS #
# process. It also logs error #
# conditions. #
# #
# 3 : includes general ACCESS ACCEPT, REJECT #
# and DISCARD messages for each packet. #
# This level provides a general audit #
# trail for authentication. #
# #
# 9 : Maximum amount of log data. Specific #
# values of attributes while a #
# transaction is passing thru #
# processing and more. #
# [NOT advised under normal operations] #
# #
#------------------------------------------------------------------#
RADIUSdirectory : /etc/radius
Database_location : UNIX
Local_Database : dbdata.bin
Debug_Level : 3
#------------------------------------------------------------------#
# Accounting Configuration #
# #
# Local_Accounting : When this flag is set to ON or TRUE a file #
# will contain a record of ACCOUNTING START #
# and STOP packets received from the Network #
# Access Server(NAS). The default log file #
# is: #
# /var/radius/data/accounting #
# #
# Local_accounting_loc : /var/radius/data/accounting #
# path and file name of the local #
# accounting data file. Used only if Local_ #
# Accounting=ON. If the default is #
# changed, then the path and file need to #
# to be created (with proper permissions) #
# by the admin. #
# #
#------------------------------------------------------------------#
Local_Accounting : ON
Local_Accounting_loc : /var/radius/data/accounting
#------------------------------------------------------------------#
# Reply Message Attributes #
# #
# Accept_Reply-Message : Sent when the RADIUS server #
# replies with an Access-Accept packet #
# #
# Reject_Reply-Message : Sent when the RADIUS server #
# replies with an Access-Reject packet #
306 AIX Version 6.1 Security

# #
# Challenge_Reply-Message : Sent when the RADIUS server #
# replies with an Access-Challenge #
# packet #
#------------------------------------------------------------------#
Accept_Reply-Message :
Reject_Reply-Message :
Challenge_Reply-Message :
Password_Expired_Reply-Message :
#------------------------------------------------------------------#
# Support Renewal of Expired Password #
# #
# Allow_Password_Renewal: YES or NO #
# Setting this attribute to YES allows #
# users to update their expired password#
# via the RADIUS protocol. This requires#
# the hardware support of #
# Access-Password-Request packets. #
#------------------------------------------------------------------#
Allow_Password_Renewal : NO
#------------------------------------------------------------------#
# Require Message Authenticator in Access-Request #
# #
# Require_Message_Authenticator: YES or NO #
# Setting this attribute to YES #
# checks message authenticator #
# in Access-Request packet.If not#
# present, it will discard the #
# packet. #
#------------------------------------------------------------------#
Require_Message_Authenticator : NO
#------------------------------------------------------------------#
# Servers ( Authentication and Accounting ) #
# #
# Authentication_Ports : This field indicates on which port(s) #
# the authentication server(s) will listen#
# on. If the field is blank an #
# authentication daemon will not be #
# started. #
# The value field may contain more than #
# one value. Each value is REQUIRED to #
# be separated by a comma ’,’. #
# #
# The value field must contain a numeric #
# value, like "6666". In this case a #
# server daemon will listen on "6666". #
# #
# Accounting_Ports : The same as authentication_Ports. See #
# above definitions. #
# #
# [NOTE] There is no check for port conflicts. If a server is #
# currently running on the specified port the deamon will #
# error and not run. Be sure to check the syslog output #
# insure that all servers have started without incident. #
# #
# #
# [Example] #
# Authentication_Ports : 1812,6666 (No Space between commas) #
# #
# In the above example a sever will be start for each port #
# specified. In the case #
# #
# 6666 : port 6666 #
# #
#------------------------------------------------------------------#
Authentication_Ports : 1812
Accounting_Ports : 1813
Security 307

#------------------------------------------------------------------#
# LDAP Directory User Information #
# #
# Required if RADIUS is to connect to a LDAP Version 3 Directory #
# and the Database_location field=LDAP #
# #
# LDAP_User : User ID which has admin permission to connect #
# to the remote (LDAP) database. This is the #
# the LDAP administrator’s DN. #
# #
# LDAP_User_Pwd : Password associated with the above User Id #
# which is required to authenticate to the LDAP #
# directory. #
# #
#------------------------------------------------------------------#
LDAP_User : cn=root
LDAP_User_Pwd :
#------------------------------------------------------------------#
# LDAP Directory Information #
# #
# If the Database_location field is set to "LDAP" then the #
# following fields need to be completed. #
# #
# LDAP_Server_name : This field specifies the fully qualified#
# host name where the LDAP Version 3 #
# Server is located. #
# LDAP_Server_Port : The TCP port number for the LDAP server #
# The standard LDAP port is 389. #
# LDP_Base_DN : The distinguished name for search start #
# LDAP_Timeout : # seconds to wait for a response from #
# the LDAP server #
# LDAP_Hoplimit : maximum number of referrals to follow #
# in a sequence #
# LDAP_Sizelimit : size limit (in entries) for search #
# LDAP_Debug_level : 0=OFF 1=Trace ON #
# #
#------------------------------------------------------------------#
LDAP_Server_name :
LDAP_Server_port : 389
LDAP_Base_DN : cn=aixradius
LDAP_Timeout : 10
LDAP_Hoplimit : 0
LDAP_Sizelimit : 0
LDAP_Debug_level : 0
#------------------------------------------------------------------#
# PROXY RADIUS Information #
# #
# #
# Proxy_Allow : ON or OFF. If ON, then the server #
# can proxy packets to realms it #
# knows of and the following #
# fields must also be configured. #
# Proxy_Use_Table : ON or OFF. If ON, then the server #
# can use table for faster #
# processing of duplicate requests #
# Can be used without proxy ON, but #
# it is required to be ON if #
# Proxy_Use_Table is set to ON. #
# Proxy_Realm_name : This field specifies the realm #
# this server services. #
# Proxy_Prefix_delim : A list of separators for parsing #
# realm names added as a prefix to #
# the username. This list must be #
# mutually exclusive to the Suffix #
# delimiters. #
# Proxy_Suffix_delim : A list of separators for parsing #
# realm names added as a suffix to #
308 AIX Version 6.1 Security

# the username. This list must be #
# mutually exclusive to the Prefix #
# delimiters. #
# Proxy_Remove_Hops : YES or NO. If YES then the #
# will remove its realm name, the #
# realm names of any previous hops #
# and the realm name of the next #
# server the packet will proxy to. #
# #
# Proxy_Retry_count : The number of times to attempt #
# to send the request packet. #
# #
# Proxy_Time_Out : The number of seconds to wait #
# in between send attempts. #
# #
#------------------------------------------------------------------#
Proxy_Allow : OFF
Proxy_Use_Table : OFF
Proxy_Realm_name :
Proxy_Prefix_delim : $/
Proxy_Suffix_delim : @.
Proxy_Remove_Hops : NO
Proxy_Retry_count : 2
Proxy_Time_Out : 30
#------------------------------------------------------------------#
# Local Operating System Authentication Configuration #
# #
# UNIX_Check_Login_Restrictions : ON or OFF. If ON, during #
# local operating system authen- #
# tication, a call to #
# loginrestrictions() will be #
# made to verify the user has #
# no local login restrictions. #
# #
#------------------------------------------------------------------#
UNIX_Check_Login_Restrictions : OFF
#------------------------------------------------------------------#
# Global IP Pooling Flag #
# #
# Enable_IP_Pool : ON or OFF. If ON, then RADIUS Server will do #
# IP address assignment from a pool of addresses #
# defined to the RADIUS server. #
# #
#------------------------------------------------------------------#
Enable_IP_Pool : OFF
#------------------------------------------------------------------#
/etc/radius/clients file:
The clients file contains a list of clients that are allowed to make requests of the RADIUS server.
Typically, for each client, NAS or AP, you must enter the client IP address along with the shared secret
between the RADIUS server and the client and an optional poolname for IP pooling.
The file consists of entries in the following form:
<Client IP Address> <Shared Secret> <Pool Name>
A sample entry list appears as follows:
10.10.10.1 mysecret1 floor6
10.10.10.2 mysecret2 floor5
A shared secret is a character string that is configured on both the client hardware and on the RADIUS
server. The maximum length of the shared secret is 256 bytes and is case sensitive. The shared secret is
Security 309

not sent in any of the RADIUS packets and is never sent over the network. System administrators must
make sure the exact secret is configured on both sides (client and RADIUS server). The shared secret is
used for encrypting the user password information and can be used for verifying message integrity by the
use of a Message Authentication attribute.
Each client’s shared secret should be unique in the /etc/radius/clients file and, like any good password, it
is best to use a mixture of uppercase/lowercase letters, numbers, and symbols in the secret. To keep a
shared secret secure, make it at least 16 characters in length. The /etc/radius/clients file can be modified
using SMIT. The shared secret should be changed often to prevent dictionary attacks.
The poolname is the name of the pool from which global IP addresses are allocated during dynamic
translation. The system administrator creates the poolname when setting up the RADIUS server. Using a
SMIT panel, the poolname is added from Configure Proxy Rules → IP Pool → Create an IP Pool. It is
used during server side IP pooling.
/etc/radius/dictionary file:
The dictionary file contains descriptions of the attributes that are defined by the RADIUS protocol and
supported by the AIX RADIUS Server.
It is used by the RADIUS daemon when validating and creating packet data. Vendor-specific attributes
should also be added here. The dictionary file can be modified using any editor. There is no SMIT
interface.
The following is part of a sample dictionary file:
########################################################################
# #
# This file contains dictionary translations for parsing #
# requests and generating responses. All transactions are #
# composed of Attribute/Value Pairs. The value of each attribute #
# is specified as one of 4 data types. Valid data types are: #
# #
# string - 0-253 octets #
# ipaddr - 4 octets in network byte order #
# integer - 32 bit value in big endian order (high byte first) #
# date - 32 bit value in big endian order - seconds since #
# 00:00:00 GMT, Jan. 1, 1970 #
# #
# Enumerated values are stored in the user file with dictionary #
# VALUE translations for easy administration. #
# #
# Example: #
# #
# ATTRIBUTE VALUE #
# --------------- ----- #
# Framed-Protocol = PPP #
# 7 = 1 (integer encoding) #
# #
########################################################################
ATTRIBUTE User-Name 1 string
ATTRIBUTE User-Password 2 string
ATTRIBUTE CHAP-Password 3 string
ATTRIBUTE NAS-IP-Address 4 ipaddr
ATTRIBUTE NAS-Port 5 integer
ATTRIBUTE Service-Type 6 integer
ATTRIBUTE Framed-Protocol 7 integer
ATTRIBUTE Framed-IP-Address 8 ipaddr
ATTRIBUTE Framed-IP-Netmask 9 ipaddr
ATTRIBUTE Framed-Routing 10 integer
310 AIX Version 6.1 Security

ATTRIBUTE Filter-Id 11 string
.
.
.
Note: Any attribute that is defined in the default.policy file or the default.auth file (or for a specific
user_id.policy or user_id.auth file), must be a valid RADIUS attribute as defined in the local AIX
dictionary configuration file. If an attribute is not found in the dictionary, the radiusd daemon does
not load and an error message is logged.
Note: If the dictionary, the default.policy file and the default.auth file, for the system is modified, you
must restart the RADIUS daemons by running the stopsrc command and the startsrc command or
by using SMIT.
/etc/radius/proxy file:
The /etc/radius/proxy file is a configuration file that supports the proxy feature. This file maps known
realms that the proxy server can forward packets to.
The /etc/radius/proxy file uses the IP address of the server that handles packets for that realm and the
shared secret between the two servers.
The file contains the following fields that you can modify with SMIT:
v Realm Name
v Next Hop IP address
v Shared Secret
The following is an example of a /etc/radius/proxy file:
Note:
The shared secret should be 16 characters in length. The same shared secret must be configured
on the RADIUS server next hop.
# @(#)91 1.3 src/rad/usr/sbin/config_files/proxy, radconfig, radius530 1/23/04 13:11:14
#######################################################################
# #
# This file contains a list of proxy realms which are #
# authorized to send/receive proxy requests/responses to/from #
# this RADIUS server and their Shared secret used in encryption.#
# #
# The first field is the name of the realm of the remote RADIUS #
# Server. #
# #
# The second field is a valid IP address for the remote RADIUS #
# Server. #
# #
# The third column is the shared secret associated with this #
# realm. #
# #
# NOTE: This file contains sensative security information and #
# precautions should be taken to secure access to this #
# file. #
# #
#######################################################################
# REALM NAME REALM IP SHARED SECRET
#---------------- ------------------- ----------------------
# myRealm 10.10.10.10 sharedsec
Security 311

Authentication
Traditional authentication uses a name and a fixed password and generally takes place when the user first
logs in to a machine or requests a service. RADIUS relies on an authentication database to store user IDs,
passwords, and other information.
For user authentication, the server can use a local database, UNIX passwords or LDAP. Database location
is configured in the server’s /etc/radius/radiusd.conf file during setup, or by updating the file through
SMIT. See “RADIUS configuration files” on page 304 for more information on RADIUS configuration files.
User databases:
The RADIUS software can use different databases to store user information.
You can use a local, UNIX, or LDAP database to store user information.
UNIX:
The UNIX authentication option allows RADIUS to use the local system authentication method to
authenticate the user.
To use local UNIX authentication, edit the radiusd.conf file’s database_location field, or select UNIX in
SMIT’s Database Location field. This authentication method calls the UNIX authenticate() application
program interface (API) to authenticate a user ID and password. Passwords are saved in the same data
file that UNIX uses, such as /etc/passwords. User IDs and passwords are created using the mkuser
command or through SMIT.
To use the UNIX database, select UNIX in the Database Location field as shown below:
Configure Server
RADIUS Directory /etc/radius
*Database Location [UNIX]
Local AVL Database File Name [dbdata.bin]
Local Accounting [ON]
Debug Level [3]
.
.
.
Local:
If either the radiusd.conf file’s database_location field or SMIT’s Database Location entry contains the
word Local, then the RADIUS Server will use /etc/radius/dbdata.bin as the location for all of the user IDs
and passwords.
The local user database is flat file that contains the user ID and password information. Passwords are
saved in a hashed format. Hashing is a fast addressing technique for directly accessing data in the
memory space. To add, delete, or modify user passwords, run the raddbm command or use SMIT. When
the radiusd daemon starts, it reads the radiusd.conf file and loads the user IDs and passwords into
memory.
Note: The maximum user ID length is 253 characters and the maximum password length is 128
characters.
To use the local user database, select Local in the Database Location field as shown below:
312 AIX Version 6.1 Security

Configure Server
RADIUS Directory /etc/radius
*Database Location [Local]
Local AVL Database File Name [dbdata.bin]
Local Accounting [ON]
Debug Level [3]
.
.
.
LDAP:
RADIUS can use LDAP Version 3 to store remote user data.
RADIUS will use LDAP Version 3 API calls to access user data remotely. LDAP Version 3 access occurs if
the database_location field in the /etc/radiusd.conf file is set to LDAP and the server name, the LDAP
administrator user ID, and LDAP administrator password are configured.
AIX uses the LDAP Version 3 client libraries that are supported and packaged in the IBM Tivoli Directory
Server. LDAP is a scalable protocol and the benefit of using LDAP is that user and in-process data can be
located in a centralized location, easing administration of the RADIUS server. You can use the command
line utility, ldapsearch, to view any of the RADIUS data.
Also, LDAP must be configured and administered before it can be used for RADIUS. Read the IBM Tivoli
Directory Server publications at http://publib.boulder.ibm.com/tividd/td/IBMDirectoryServer5.2.html to learn
more about setting up the LDAP server.
The RADIUS server provides LDAP ldif files to add the RADIUS schema, including object classes and
attributes, to a directory, but you must set up and configure LDAP.
A separate suffix is created specifically for RADIUS to use the RADIUS LDAP objects. This suffix is a
container with the name cn=aixradius, and it contains two object classes as described in “RADIUS LDAP
server configuration” on page 314. You apply a RADIUS-supplied ldif file that creates the suffix and
RADIUS schema.
When you use LDAP as the authentication database you get the following features:
1. A user database that can be seen and accessed from all RADIUS servers
2. A list of active users
3. The feature of allowing a maximum number of logins per user ID
4. An EAP type that can be configured per user
5. A password expiration date.
To use the LDAP database, select LDAP in the Database Location field as shown below:
Configure Server
RADIUS Directory /etc/radius
*Database Location [LDAP]
Local AVL Database File Name [dbdata.bin]
Local Accounting [ON]
Debug Level [3]
.
.
.
Security 313

RADIUS LDAP server configuration:
When LDAP user authentication is configured, the LDAP server schema must be updated. The LDAP
system administrator must add AIX RADIUS defined attributes and objectclasses to the LDAP directory
before defining LDAP RADIUS users.
You must add a suffix to the LDAP server. The suffix for RADIUS is named cn=aixradius. A suffix is a
distinguished name that identifies the top entry in a directory hierarchy.
When a suffix is added, the LDAP directory has an empty container. A container is an empty entry that can
be used to partition the namespace. A container is similar to a file system directory, where it can have
directory entries beneath it. User profile information can then be added to the LDAP directory through
SMIT. The LDAP administrator ID and password are stored in the /etc/radius/radiusd.conf file and can be
configured through SMIT on a RADIUS server.
To organize the information stored in LDAP directory entries, the schema defines object classes. An object
class consists of a set of required and optional attributes. Attributes are in the form of type=value pairs, in
which the type is defined by a unique object identifier (OID) and the value has a defined syntax. Every
entry in the LDAP directory is an instance of an object.
Note: The object class, by itself, does not define a directory information tree or namespace. This only
occurs when entries are created and the specific instance of object classes are given unique
distinguished names. For example, when a container object class is given a unique DN, it can then
be associated with two other entries which are instances of the object class organizational unit. The
result is a tree-like structure or namespace.
Object classes are specific to the RADIUS server and are applied from an ldif file. Some of the attributes
are existing LDAP schema attributes and some are specific to RADIUS. The new RADIUS object classes
are structural and abstract.
For security purposes, the binds to the LDAP server use the simple bind or SASL API call, ldap_bind_s
which will include the DN and, CRAM-MD5 as the authentication method, and the LDAP administrator
password. This will transmit message digests rather than the password themselves over the network.
CRAM-MD5 is a security mechanism where there is not special configuration necessary on either side
(client or server).
Note: All of the attributes in the object classes are single-value.
RADIUS LDAP namespace:
The RADIUS LDAP namespace has the cn=aixradius container as the top of its hierarchy. Below
cn=aixradius, there are two organizational units (OUs). These OUs are containers that help make the
entries unique.
The following figure graphically depicts the RADIUS LDAP schema. This figure shows containers and
organizational units all represented by circles and connected by lines or branches. The aixradius
container, in the center, branches down to two organizational units: ibm-radiususer and
ibm-radiusactiveusers. Below the ibm-radiususer container are implied userid, password and maxLogin
containers. Below the ibmradiusactiveusers container are implied userid +, login number, login status
and session_id containers. Above the aixradius container is the aixsecurity container and the root
container is at the top.
314 AIX Version 6.1 Security

LDAP namespace schema files:
The LDAP schema files define object classes and RADIUS-specific attributes for the LDAP namespace.
The following LDAP schema files are located in the /etc/radius/ldap directory:
IBM.V3.radiusbase.schema.ldif
This file defines top level object class for the RADIUS server (cn=aixradius). The file also creates
the following branches under the cn=aixradius object class:
ou=ibm-radiususer
ou=ibm-radiusactiveusers
You can add the required information by using the following command:
ldapadd -D ldap_admin_id -w password -i /etc/radius/ldap/IBM.V3.radiusbase.schema.ldif
You can run this command on the LDAP server system, or you can run it remotely with the -h
(host system name) option.
IBM.V3.radius.schema.ldif
This file defines the RADIUS-specific attributes and object classes.
You can add the new RADIUS attributes and object classes by typing the following command:
ldapmodify -D ldap_admin_id -w password -i /etc/radius/ldap/IBM.V3.radius.schema.ldif
You must also specify LDAP as the database location through SMIT and enter the LDAP server
name and administrator password. After you do this, you can add RADIUS LDAP users to the
directory through SMIT.
User profile object class:
Figure 19. RADIUS LDAP Namespace
Security 315
LDAP user profiles must be entered into the system before the RADIUS server can authenticate a user to
the system. Profiles contain the user ID and password.
User profile objects provide the data about the specific individuals that have access to the network and
contain authentication information. The ibm-radiusUserInstance object class is accessed synchronously
with the LDAP API calls from the daemon. The unique field, which is the start of the DN is the user ID.
The MaxLoginCount field limits the number of times the LDAP user can log in.
Active login list object class:
The LDAP active login list represents the data that contains information about the users currently logged
in.
There are multiple records per user with a starting record of login_number = 1, up to the MaxLoginCount
number of 5. The session ID is taken from the RADIUS start_accounting message. The partially
completed records are created when an ibm-radiusUserInstance object is created. This means that most
of the fields are empty before RADIUS accounting packets are received. After a RADIUS
start_accounting message is received, the ibm-radiusactiveusers object updates to specify that the user
is now currently logged in, and the unique session information is written to the correct login number. After
the stop_accounting message is received, the information in the active login list record is cleared. The
active login record is updated to reflect that the user is now logged off. The session numbers in the start
and stop accounting messages are the same unique number. The object class will be accessed
synchronously in the LDAP API calls.
Password authentication protocol:
Password Authentication Protocol (PAP) provides security by coding the user’s password with an MD5
hash algorithm of a value that both the client and server can construct.
It works as follows:
1. In packets that have the user password, the Authentication field contains a 16 octet random number
called the Request Authenticator.
2. The Request Authenticator and the client’s shared secret are put into an MD5 hash. The result is a 16
octet hash.
3. The user-provided password is padded to 16 octets with nulls.
4. The hash from step 2 is XORed (Exclusive-OR) with the padded password. This is the data sent in the
packet as the user_password attribute.
5. The RADIUS server calculates the same hash as that in Step 2.
6. This hash is XORed with the packet data from Step 4, thus recovering the password.
Challenge handshake authentication protocol:
RADIUS also supports the use of the PPP’s CHAP for password protection.
With CHAP, the user’s password is not sent across the network. Instead, an MD5 hash of the password is
sent, and the RADIUS server reconstructs the hash from the user’s information, including the stored
password, then compares this with the value sent by the client.
Extensible authentication protocol:
The Extensible Authentication Protocol (EAP) is a protocol designed to support multiple authentication
methods.
316 AIX Version 6.1 Security
EAP specifies the structure of an authentication communication between a client and an authentication
server, without defining the content of the authentication data. This content is defined by the specific EAP
method that is used for authentication. Common EAP methods include:
v MD5-challenge
v One-time password
v Generic token card
v Transport layer security (TLS)
RADIUS takes advantage of EAP by specifying RADIUS attributes that are used to transfer EAP data
between the RADIUS server and its clients. This EAP data can then be sent by the RADIUS server
directly to back-end servers that implement the various EAP authentication methods.
The AIX RADIUS server supports only the MD5-challenge EAP method. The EAP method used to
authenticate a user is set, at the user level, by setting a value in the user’s entry in either the local
database or LDAP. By default, EAP is turned off for each user.
Authorization
RADIUS allows authorization attributes per user as defined in the authorization policy files, default.auth
and default.policy.
Authorization attributes are valid RADIUS protocol attributes that are specified in the RFC and defined in
the /etc/radius/dictionary file. Authorization is optional and depends on how the hardware NAS or access
point is configured. You must configure authorization attributes if they are needed. Authorization only
happens after a successful authentication occurs.
Policies are configurable user attribute-value pairs that can control how the user accesses the network.
Policies can be defined as being global to the RADIUS server, or user-specific.
Two authorization configuration files are shipped: /etc/radius/authorization/default.auth and
default.policy. The default.policy file is used to match the incoming access request packets. The file
contains attribute-value pairs that are initially blank and must be configured to the desired settings. After
authentication, the policy will determine if an access accept or access reject packet is returned to the
client.
Each user can also have a user_id.policy file. If a user has a unique policy file created for their specific
user ID, then that files’ attributes are checked first. If the attribute-value pairs in the user_id.policy file do
not exactly match, then the default.policy file is checked. If the attribute pairs from the access request
packet do not match in either file, then an access reject packet is sent. If a match is found in one or the
other file, an access accept packet is sent to the client. This effectively establishes two levels of policy.
The default.auth file is used as the list of attribute-value pairs to return to the client once the policy has
been checked. The default.auth file also contains attribute-value pairs that are initially blank and must be
configured to the desired settings. You must edit the default.auth file or use SMIT to configure the desired
authorization attribute settings. Each attribute that contains a value will automatically be returned to the
NAS in an access accept packet.
You can also define user-specific return authorization attributes by creating a file based on the unique user
name with the .auth extension, such as user_id.auth. This custom file must reside in the
/etc/radius/authorization directory. There is a SMIT panel that allows you create and edit each user file.
Each user’s authorization attributes are sent back in an access accept packet along with any default
authorization attributes found in the default.auth file. If the values are common in the default.auth file and
the user_id.auth file, then the user’s values override the default values. This allows for some global
authorization attributes (services or resources) to all users and then for more specific, per user, level of
authorization.
Security 317

The authorization process is as follows:
1. At daemon startup time, the default policy and authorization lists from the /etc/radius/authorization/default.policy file and the default.auth file are read into memory.
2. Authenticate the user ID and password.
3. The incoming packet is checked for attribute-value pairs.
a. Check the custom user_id.auth file.
b. If no match is found, then check the default.policy file.
c. If no match is found, then send an access reject packet.
4. Apply the user’s authorization attributes if there are any.
a. Read the /etc/radius/authorization/user_id.auth file and the default.auth file, and compare the
two entries.
b. Use the entry that is in the user’s file above the global entry.
5. Return the authorization attributes in an access accept packet.
Accounting
The RADIUS accounting server is responsible for receiving accounting requests from a client and returning
responses to the client indicating that it has successfully received the request and written the accounting
data.
You can enable local accounting in the radiusd.conf file.
When a client is configured to use RADIUS accounting, it will generate an ACCOUNTING_START packet
describing the type of service being delivered and the user to whom it is being delivered at the start of
service delivery. The client will send the packet to the RADIUS accounting server, which returns an
acknowledgment that the packet has been received. At the end of service delivery, the client generates an
ACCOUNTING_STOP packet describing the type of service that was delivered and, optionally, statistics
such as elapsed time, input and output octets, or input and output packet numbers. When the
ACCOUNTING_STOP packet is received by the RADIUS accounting server, it returns an acknowledgment
to the accounting client that the packet has been received.
The ACCOUNTING_REQUEST, whether for START or STOP, is submitted to the RADIUS accounting
server via the network. It is recommended that the client continue attempting to send the
ACCOUNTING_REQUEST packet until it receives an acknowledgment. The client can also forward
requests to an alternate server or servers in the event that the primary server is down or unreachable
through the use of proxy configuration. For more information on proxy services, see “Proxy services” on
page 319.
Accounting data is written in standard RADIUS format of attribute=value to the local /etc/var/radius/data/accounting file. The data written is the accounting data in the packet, with a time stamp. If the RADIUS
accounting server is unable to successfully record the accounting packet, it will not send an
Accounting_Response acknowledgment to the client and error information will be logged to the syslog
file.
/var/radius/data/accounting file:
The /var/radius/data/accounting captures what the client sends in the ACCOUNTING START and
ACCOUNTING STOP packets.
The /var/radius/data/accounting file is empty when first installed. Data is written to the file based on what
the client sends in the ACCOUNTING START and ACCOUNTING STOP packets.
The following is a sample of the type of data the AIX RADIUS server writes to the /var/radius/data/accounting file. Your information will differ depending on how your system is set up.
318 AIX Version 6.1 Security

Note:
v Be sure the /var filesystem is large enough to handle all the accounting data.
v Third-party Perl scripts can be used to parse the data in this file. Examples of scripts that
generate reports from the accounting data can be found at http://www.pgregg.com/projects/radiusreport
v The accounting packets can also be proxied.Thu May 27 14:43:19 2004
NAS-IP-Address = 10.10.10.1
NAS-Port = 1
NAS-Port-Type = Async
User-Name = "rod"
Acct-Status-Type = Start
Acct-Authentic = RADIUS
Service-Type = Framed-User
Acct-Session-Id = "0000000C"
Framed-Protocol = PPP
Acct-Delay-Time = 0
Timestamp = 1085686999
Thu May 27 14:45:19 2004
NAS-IP-Address = 10.10.10.1
NAS-Port = 1 <-- rod was physically connected to port #1 on the hardware
NAS-Port-Type = Async
User-Name = "rod"
Acct-Status-Type = Stop
Acct-Authentic = RADIUS
Service-Type = Framed-User
Acct-Session-Id = "0000000C" <-- note the session id’s are the same so can match up start with stops
Framed-Protocol = PPP
Framed-IP-Address = 10.10.10.2 <-- IP address of user rod
Acct-Terminate-Cause = User-Request <-- user cancelled the session
Acct-Input-Octets = 4016
Acct-Output-Octets = 142
Acct-Input-Packets = 35
Acct-Output-Packets = 7
Acct-Session-Time = 120 <--- seconds
Acct-Delay-Time = 0
Timestamp = 1085687119 <--- note "rod" was only logged on for 120 seconds (2 minutes)
Proxy services
Proxy services allow the RADIUS server to forward requests from a NAS to another RADIUS server and
then return a reply message to the NAS. Proxy services are based on a realm name.
The RADIUS server can act as both a proxy server and a back-end server simultaneously. This
mechanism is applicable for both accounting and authentication packets. Proxy is disabled by default in
the radiusd.conf file.
Realms:
Realms are identifiers that are placed before or after the values normally contained in the User-Name
attribute that a RADIUS server can use to identify the server to contact to start the authentication and
accounting process.
The following example illustrates how realms are used with RADIUS:
User, Joe, is employed by company XYZ in Sacramento. The realm for this area is SAC. However, Joe is
currently in New York City on a remote assignment. The realm for New York City is NYC. When Joe dials
into the NYC realm, the User-Name passed is SAC/Joe. This notifies the NYC RADIUS realm server that
this packet needs to be forwarded to the server that does the authenticating and accounting for SAC realm
users.
Security 319

Realm user-name attribute:
Authentication and accounting packets are routed through the realm is based on the User-Name attribute.
This attribute defines the order of realms the packet goes through in order to route it to the final server
that does the authentication or accounting.
Packets are routed by stringing realms together in the User-Name attribute. The actual realms that are
inserted into the User-Name attribute, which ultimately determines the path of the packet, is a decision left
up to the administrator deploying the RADIUS layout. It is possible to put the names of the realm hops in
front of the User-Name attribute, as well as behind it. The most popular characters to delineate the
different realms are the slash (/) as the prefix delineator in front of the User-Name attribute, and
ampersand (&) as the suffix delineator behind the User-Name attribute. Delineators are configured in the
radiusd.conf file. The User-Name attribute is parsed from left to right.
An example of a User-Name attribute using only the prefix method is the following:
USA/TEXAS/AUSTIN/joe
An example of a User-Name attribute using only the suffix method is the following:
joe@USA@TEXAS@AUSTIN
It is possible to use both prefix and suffix methods. It is important to remember when specifying the realm
hops a packet will go through that the order of hops is parsed left to right, and all prefix hops are
processed before processing suffix hops. The user must be authenticated, or the accounting data written,
at a single node.
The following example, using both methods, yields the same result as the previous examples:
USA/joe@TEXAS@AUSTIN
Configuring proxy services:
RADIUS proxy configuration information is located in the proxy file in the /etc/radius directory.
The initial proxy file contains example entries. There are three fields in the proxy file: Realm Name, Next
Hop IP address, and Shared Secret.
To configure proxy rules, select from the following::
Configure Proxy Rules
List all Proxy
Add a Proxy
Change / Show Characteristics of a Proxy
Remove a Proxy
Select the List all Proxy option to read the /etc/radius/proxy file and display the three fields in column
format. The following are the column headers:
realm_name next_hop_address shared_secret
Select Add a Proxy to display the following screen. Information is retrieved from the panel and the data is
appended to the bottom of the /etc/radius/proxy file.
Each hop of the proxy chain uses the shared secret between the two RADIUS servers. The shared secret
is contained in the /etc/radius/proxy_file. The shared secret should be unique per proxy hop in the chain.
For more information about creating shared secrets, see “/etc/radius/clients file” on page 309.
320 AIX Version 6.1 Security

To add a proxy, select from the fields as shown below:
Add a Proxy
*Realm Name [] (max 64 chars)
*Next Hop IP address (dotted decimal) [xx.xx.xx.xx]
*Shared Secret [] (minimum 6, maximum 256 chars)
Selecting the Change/Show option displays a list of the realm names. The list is displayed in a pop-up
screen and you must select a realm name.
The Remove a Proxy option displays a list of the realm names. The list is displayed in a pop-up screen
and the user must select a realm name. After a name is selected, a verification pop-up screen is displayed
before the realm is removed.
The following example is the proxy configuration information section of a radiusd.conf file:
#------------------------------------------------------------------#
# PROXY RADIUS Information #
# #
# #
# Proxy_Allow : ON or OFF. If ON, then the server #
# can proxy packets to realms it #
# knows of and the following #
# fields must also be configured. #
# Proxy_Use_Table : ON or OFF. If ON, then the server #
# can use table for faster #
# processing of duplicate requests #
# Can be used without proxy ON, but #
# it is required to be ON if #
# Proxy_Use_Table is set to ON. #
# Proxy_Realm_name : This field specifies the realm #
# this server services. #
# Proxy_Prefix_delim : A list of separators for parsing #
# realm names added as a prefix to #
# the username. This list must be #
# mutually exclusive to the Suffix #
# delimiters. #
# Proxy_Suffix_delim : A list of separators for parsing #
# realm names added as a suffix to #
# the username. This list must be #
# mutually exclusive to the Prefix #
# delimiters. #
# Proxy_Remove_Hops : YES or NO. If YES then the #
# will remove its realm name, the #
# realm names of any previous hops #
# and the realm name of the next #
# server the packet will proxy to. #
# #
# Proxy_Retry_count : The number of times to attempt #
# to send the request packet. #
# #
# Proxy_Time_Out : The number of seconds to wait #
# in between send attempts. #
# #
#------------------------------------------------------------------#
Proxy_Allow : OFF
Proxy_Use_Table : OFF
Proxy_Realm_name :
Proxy_Prefix_delim : $/
Proxy_Suffix_delim : @.
Proxy_Remove_Hops : NO
Proxy_Retry_count : 2
Proxy_Time_Out : 3
Configuring the RADIUS server:
Security 321

The RADIUS server daemon uses several configuration files. Server configuration information is saved in
the /etc/radius/radiusd.conf file. The packaged server configuration file is shipped with default values.
Note:
The following is a sample RADIUS Configure Server SMIT panel:
Configure Server
RADIUS Directory /etc/radius
*Database Location [UNIX]
Local AVL Database File Name [dbdata.bin]
Local Accounting [ON]
Local Accounting Directory []
Debug Level [3]
Accept Reply-Message []
Reject Reply-Message []
Challenge Reply-Message []
Password Expired Reply Message []
Support Renewal of Expired Passwords [NO]
Require Message Authenticator [NO]
*Authentication Port Number [1812]
*Accounting Port Number [1813]
LDAP Server Name []
LDAP Server Port Number [389]
LDAP Server Admin Distinguished Name []
LDAP Server Admin Password []
LDAP Base Distinguished Name [cn=aixradius]
LDAP Size Limit [0]
LDAP Hop Limit [0]
LDAP wait time limit [10]
LDAP debug level [ 0]
Proxy Allowed [OFF]
Proxy Use table [OFF]
Proxy Realm Name []
Proxy Prefix Delimiters [$/]
Proxy Suffix Delimiters [@.]
NOTE: prefix & suffix are mutually exclusive
Proxy Remove Hops [NO]
Proxy Retry Count [2]
Proxy Timeout [30]
UNIX Check Login Restrictions [OFF]
Enable IP Pool [ON]
Logging utilities
The RADIUS server uses SYSLOG to log activity and error information.
There are three levels of log information:
0 Only problems or errors and the starting of daemons are logged.
3 Logs an audit trail of access_accept, access_reject*, discard, and error messages.
Note: discard messages are logged when an incoming packet is invalid and a response packet is not
generated.
9 Includes 0 and 3 level logging information and much more. Only run level 9 logging to debug.
The default level of logging is level 3. Logging at level 3 is used to improve the level of auditing of the
RADIUS server. Depending on what level the server is logging, you can use the activities stored in the log
to check for suspicious patterns of activity. If security is violated, the SYSLOG output can be used to
determine how and when the violation occurred and perhaps the amount of access gained. This
information is useful in the development of better security measures to prevent future problems.
322 AIX Version 6.1 Security
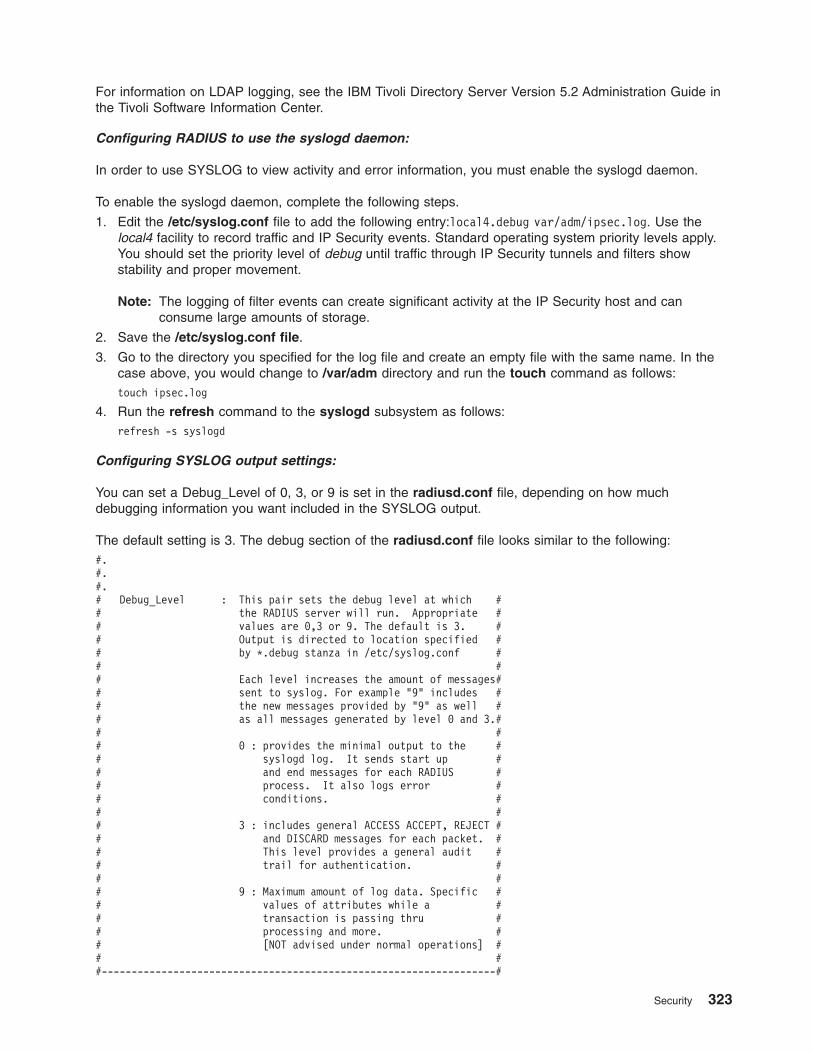
For information on LDAP logging, see the IBM Tivoli Directory Server Version 5.2 Administration Guide in
the Tivoli Software Information Center.
Configuring RADIUS to use the syslogd daemon:
In order to use SYSLOG to view activity and error information, you must enable the syslogd daemon.
To enable the syslogd daemon, complete the following steps.
1. Edit the /etc/syslog.conf file to add the following entry:local4.debug var/adm/ipsec.log. Use the
local4 facility to record traffic and IP Security events. Standard operating system priority levels apply.
You should set the priority level of debug until traffic through IP Security tunnels and filters show
stability and proper movement.
Note: The logging of filter events can create significant activity at the IP Security host and can
consume large amounts of storage.
2. Save the /etc/syslog.conf file.
3. Go to the directory you specified for the log file and create an empty file with the same name. In the
case above, you would change to /var/adm directory and run the touch command as follows:
touch ipsec.log
4. Run the refresh command to the syslogd subsystem as follows:
refresh -s syslogd
Configuring SYSLOG output settings:
You can set a Debug_Level of 0, 3, or 9 is set in the radiusd.conf file, depending on how much
debugging information you want included in the SYSLOG output.
The default setting is 3. The debug section of the radiusd.conf file looks similar to the following:
#.
#.
#.
# Debug_Level : This pair sets the debug level at which #
# the RADIUS server will run. Appropriate #
# values are 0,3 or 9. The default is 3. #
# Output is directed to location specified #
# by *.debug stanza in /etc/syslog.conf #
# #
# Each level increases the amount of messages#
# sent to syslog. For example "9" includes #
# the new messages provided by "9" as well #
# as all messages generated by level 0 and 3.#
# #
# 0 : provides the minimal output to the #
# syslogd log. It sends start up #
# and end messages for each RADIUS #
# process. It also logs error #
# conditions. #
# #
# 3 : includes general ACCESS ACCEPT, REJECT #
# and DISCARD messages for each packet. #
# This level provides a general audit #
# trail for authentication. #
# #
# 9 : Maximum amount of log data. Specific #
# values of attributes while a #
# transaction is passing thru #
# processing and more. #
# [NOT advised under normal operations] #
# #
#------------------------------------------------------------------#
Security 323

The following examples show sample output for various debug levels.
Accounting packet with debug level 3
Aug 18 10:23:57 server1 syslog: [0]:Monitor process [389288] has started
Aug 18 10:23:57 server1 radiusd[389288]: [0]:Local database (AVL) built.
Aug 18 10:23:57 server1 radiusd[389288]: [0]:Authentication process started : Pid= 549082 Port = 1812
Aug 18 10:23:57 server1 radiusd[389288]: [0]:Accounting process started : Pid= 643188 Port = 1813
Aug 18 10:23:57 server1 radiusd[643188]: [0]:Socket created [15]
Aug 18 10:23:57 server1 radiusd[643188]: [0]:Bound Accounting socket [15]
Aug 18 10:23:57 server1 radiusd[549082]: [0]:Socket created [15]
Aug 18 10:23:57 server1 radiusd[549082]: [0]:Bound Authentication socket [15]
Aug 18 10:24:07 server1 radiusd[643188]: [1]:*** Start Process_Packet() ***
Aug 18 10:24:07 server1 radiusd[643188]: [1]:Code 4, ID = 96, Port = 41639 Host = 10.10.10.10
Aug 18 10:24:07 server1 radiusd[643188]: [1]:ACCOUNTING-START - sending Accounting Ack to User [ user_id1 ]
Aug 18 10:24:07 server1 radiusd[643188]: [1]:Sending Accounting Ack of id 96 to 10.10.10.10 (client1.ibm.com)
Aug 18 10:24:07 server1 radiusd[643188]: [1]:send_acct_reply() Outgoing Packet:
Aug 18 10:24:07 server1 radiusd[643188]: [1]: Code = 5, Id = 96, Length = 20
Aug 18 10:24:07 server1 radiusd[643188]: [1]:*** Leave Process_Packet() ***
Aug 18 10:24:13 server1 radiusd[643188]: [2]:*** Start Process_Packet() ***
Aug 18 10:24:13 server1 radiusd[643188]: [2]:Code 4, ID = 97, Port = 41639 Host = 10.10.10.10
Aug 18 10:24:13 server1 radiusd[643188]: [2]:ACCOUNTING-STOP - sending Accounting Ack to User [ user_id1 ]
Aug 18 10:24:14 server1 radiusd[643188]: [2]:Sending Accounting Ack of id 97 to 10.10.10.10 (client1.ibm.com)
Aug 18 10:24:14 server1 radiusd[643188]: [2]:send_acct_reply() Outgoing Packet:
Aug 18 10:24:14 server1 radiusd[643188]: [2]: Code = 5, Id = 97, Length = 20
Aug 18 10:24:14 server1 radiusd[643188]: [2]:*** Leave Process_Packet() **
Accounting packets at level 9
Aug 18 10:21:18 server1 syslog: [0]:Monitor process [643170] has started
Aug 18 10:21:18 server1 radiusd[643170]: [0]:Local database (AVL) built.
Aug 18 10:21:18 server1 radiusd[643170]: [0]:Authentication process started : Pid= 389284 Port = 1812
Aug 18 10:21:18 server1 radiusd[643170]: [0]:Accounting process started : Pid= 549078 Port = 1813
Aug 18 10:22:03 server1 radiusd[643170]: [0]:PID = [389284] dead
Aug 18 10:22:03 server1 radiusd[643170]: [0]:PID = [549078] dead
Aug 18 10:22:03 server1 radiusd[643170]: [0]:All child processes stopped. radiusd parent stopping
Aug 18 10:22:09 server1 syslog: [0]:Monitor process [1081472] has started
Aug 18 10:22:09 server1 radiusd[1081472]: [0]:Local database (AVL) built.
Aug 18 10:22:09 server1 radiusd[1081472]: [0]:Inside client_init()
Aug 18 10:22:09 server1 radiusd[1081472]: [0]:Number of client entries read: 1
Aug 18 10:22:09 server1 radiusd[1081472]: [0]:Inside read_authorize_policy routine for file:
/etc/radius/authorization/default.policy.
Aug 18 10:22:09 server1 radiusd[1081472]: [0]:Inside read_authorize_file routine for file:
/etc/radius/authorization/default.policy.
Aug 18 10:22:09 server1 radiusd[1081472]: [0]:read_authorize_file() routine complete.
Aug 18 10:22:09 server1 radiusd[1081472]: [0]:Inside read_authorize_file routine for file:
/etc/radius/authorization/default.auth.
Aug 18 10:22:09 server1 radiusd[1081472]: [0]:read_authorize_file() routine complete.
Aug 18 10:22:09 server1 radiusd[549080]: [0]:connect_to_LDAP_server:Database Location (where the data
resides)=LDAP.
Aug 18 10:22:09 server1 radiusd[549080]: [0]:connect_to_LDAP_server:LDAP Server name= server1.austin.ibm.com.
Aug 18 10:22:09 server1 radiusd[549080]: [0]:connect_to_LDAP_server:LDAP Server port= 389.
Aug 18 10:22:09 server1 radiusd[1081472]: [0]:Authentication process started : Pid= 549080 Port = 1812
Aug 18 10:22:09 server1 radiusd[389286]: [0]:connect_to_LDAP_server:Database Location (where the data
resides)=LDAP.
Aug 18 10:22:09 server1 radiusd[389286]: [0]:connect_to_LDAP_server:LDAP Server name= server1.austin.ibm.com.
Aug 18 10:22:09 server1 radiusd[389286]: [0]:connect_to_LDAP_server:LDAP Server port= 389.
Aug 18 10:22:09 server1 radiusd[1081472]: [0]:Accounting process started : Pid= 389286 Port = 1813
Aug 18 10:22:10 server1 radiusd[549080]: [0]:Socket created [15]
Aug 18 10:22:10 server1 radiusd[549080]: [0]:Bound Authentication socket [15]
Aug 18 10:22:10 server1 radiusd[389286]: [0]:Socket created [15]
Aug 18 10:22:10 server1 radiusd[389286]: [0]:Bound Accounting socket [15]
Aug 18 10:22:15 server1 radiusd[389286]: [1]:*** Start Process_Packet() ***
Aug 18 10:22:15 server1 radiusd[389286]: [1]:Incoming Packet:
Aug 18 10:22:15 server1 radiusd[389286]: [1]: Code = 4, Id = 94, Length = 80
Aug 18 10:22:15 server1 radiusd[389286]: [1]: Authenticator = 0xC5DBDDFE6EFFFDBD6AE64CA35947DD0F
Aug 18 10:22:15 server1 radiusd[389286]: [1]: Type = 40, Length = 6, Value = 0x00000001
Aug 18 10:22:15 server1 radiusd[389286]: [1]: Type = 1, Length = 8, Value = 0x67656E747931
Aug 18 10:22:15 server1 radiusd[389286]: [1]: Type = 4, Length = 6, Value = 0x00000000
Aug 18 10:22:15 server1 radiusd[389286]: [1]: Type = 8, Length = 6, Value = 0x0A0A0A01
Aug 18 10:22:15 server1 radiusd[389286]: [1]: Type = 44, Length = 8, Value = 0x303030303062
Aug 18 10:22:15 server1 radiusd[389286]: [1]: Type = 30, Length = 10, Value = 0x3132332D34353638
324 AIX Version 6.1 Security
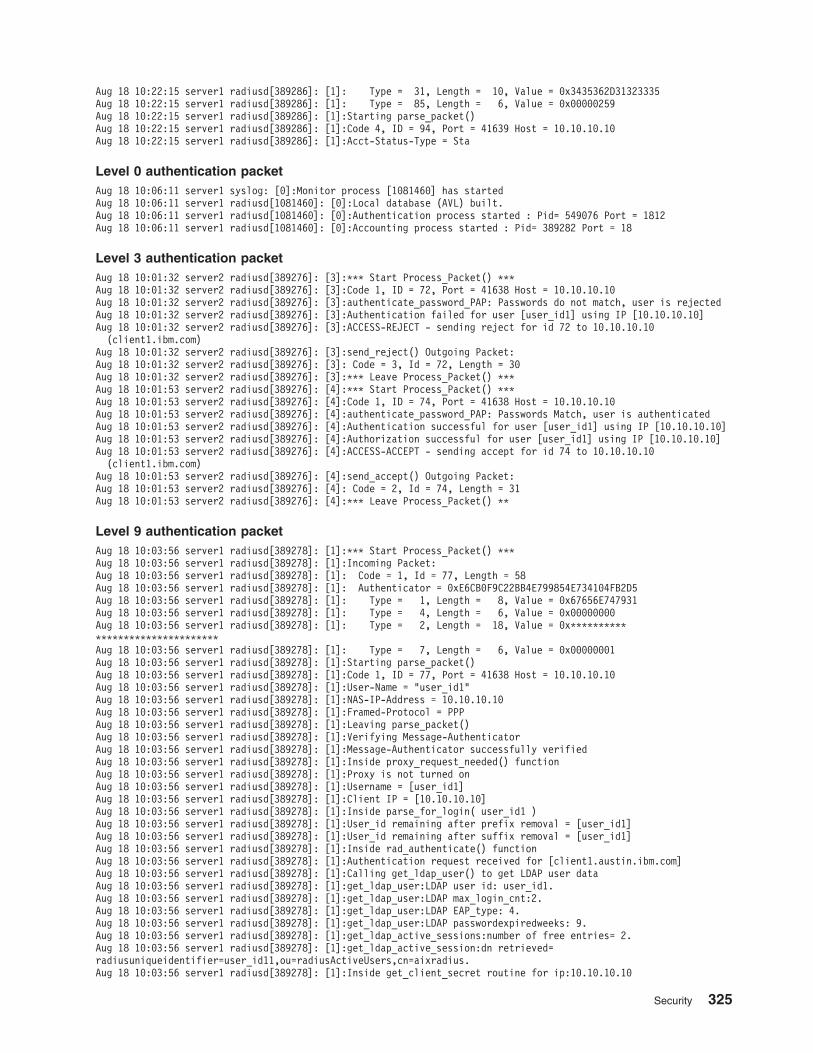
Aug 18 10:22:15 server1 radiusd[389286]: [1]: Type = 31, Length = 10, Value = 0x3435362D31323335
Aug 18 10:22:15 server1 radiusd[389286]: [1]: Type = 85, Length = 6, Value = 0x00000259
Aug 18 10:22:15 server1 radiusd[389286]: [1]:Starting parse_packet()
Aug 18 10:22:15 server1 radiusd[389286]: [1]:Code 4, ID = 94, Port = 41639 Host = 10.10.10.10
Aug 18 10:22:15 server1 radiusd[389286]: [1]:Acct-Status-Type = Sta
Level 0 authentication packet
Aug 18 10:06:11 server1 syslog: [0]:Monitor process [1081460] has started
Aug 18 10:06:11 server1 radiusd[1081460]: [0]:Local database (AVL) built.
Aug 18 10:06:11 server1 radiusd[1081460]: [0]:Authentication process started : Pid= 549076 Port = 1812
Aug 18 10:06:11 server1 radiusd[1081460]: [0]:Accounting process started : Pid= 389282 Port = 18
Level 3 authentication packet
Aug 18 10:01:32 server2 radiusd[389276]: [3]:*** Start Process_Packet() ***
Aug 18 10:01:32 server2 radiusd[389276]: [3]:Code 1, ID = 72, Port = 41638 Host = 10.10.10.10
Aug 18 10:01:32 server2 radiusd[389276]: [3]:authenticate_password_PAP: Passwords do not match, user is rejected
Aug 18 10:01:32 server2 radiusd[389276]: [3]:Authentication failed for user [user_id1] using IP [10.10.10.10]
Aug 18 10:01:32 server2 radiusd[389276]: [3]:ACCESS-REJECT - sending reject for id 72 to 10.10.10.10
(client1.ibm.com)
Aug 18 10:01:32 server2 radiusd[389276]: [3]:send_reject() Outgoing Packet:
Aug 18 10:01:32 server2 radiusd[389276]: [3]: Code = 3, Id = 72, Length = 30
Aug 18 10:01:32 server2 radiusd[389276]: [3]:*** Leave Process_Packet() ***
Aug 18 10:01:53 server2 radiusd[389276]: [4]:*** Start Process_Packet() ***
Aug 18 10:01:53 server2 radiusd[389276]: [4]:Code 1, ID = 74, Port = 41638 Host = 10.10.10.10
Aug 18 10:01:53 server2 radiusd[389276]: [4]:authenticate_password_PAP: Passwords Match, user is authenticated
Aug 18 10:01:53 server2 radiusd[389276]: [4]:Authentication successful for user [user_id1] using IP [10.10.10.10]
Aug 18 10:01:53 server2 radiusd[389276]: [4]:Authorization successful for user [user_id1] using IP [10.10.10.10]
Aug 18 10:01:53 server2 radiusd[389276]: [4]:ACCESS-ACCEPT - sending accept for id 74 to 10.10.10.10
(client1.ibm.com)
Aug 18 10:01:53 server2 radiusd[389276]: [4]:send_accept() Outgoing Packet:
Aug 18 10:01:53 server2 radiusd[389276]: [4]: Code = 2, Id = 74, Length = 31
Aug 18 10:01:53 server2 radiusd[389276]: [4]:*** Leave Process_Packet() **
Level 9 authentication packet
Aug 18 10:03:56 server1 radiusd[389278]: [1]:*** Start Process_Packet() ***
Aug 18 10:03:56 server1 radiusd[389278]: [1]:Incoming Packet:
Aug 18 10:03:56 server1 radiusd[389278]: [1]: Code = 1, Id = 77, Length = 58
Aug 18 10:03:56 server1 radiusd[389278]: [1]: Authenticator = 0xE6CB0F9C22BB4E799854E734104FB2D5
Aug 18 10:03:56 server1 radiusd[389278]: [1]: Type = 1, Length = 8, Value = 0x67656E747931
Aug 18 10:03:56 server1 radiusd[389278]: [1]: Type = 4, Length = 6, Value = 0x00000000
Aug 18 10:03:56 server1 radiusd[389278]: [1]: Type = 2, Length = 18, Value = 0x**********
**********************
Aug 18 10:03:56 server1 radiusd[389278]: [1]: Type = 7, Length = 6, Value = 0x00000001
Aug 18 10:03:56 server1 radiusd[389278]: [1]:Starting parse_packet()
Aug 18 10:03:56 server1 radiusd[389278]: [1]:Code 1, ID = 77, Port = 41638 Host = 10.10.10.10
Aug 18 10:03:56 server1 radiusd[389278]: [1]:User-Name = "user_id1"
Aug 18 10:03:56 server1 radiusd[389278]: [1]:NAS-IP-Address = 10.10.10.10
Aug 18 10:03:56 server1 radiusd[389278]: [1]:Framed-Protocol = PPP
Aug 18 10:03:56 server1 radiusd[389278]: [1]:Leaving parse_packet()
Aug 18 10:03:56 server1 radiusd[389278]: [1]:Verifying Message-Authenticator
Aug 18 10:03:56 server1 radiusd[389278]: [1]:Message-Authenticator successfully verified
Aug 18 10:03:56 server1 radiusd[389278]: [1]:Inside proxy_request_needed() function
Aug 18 10:03:56 server1 radiusd[389278]: [1]:Proxy is not turned on
Aug 18 10:03:56 server1 radiusd[389278]: [1]:Username = [user_id1]
Aug 18 10:03:56 server1 radiusd[389278]: [1]:Client IP = [10.10.10.10]
Aug 18 10:03:56 server1 radiusd[389278]: [1]:Inside parse_for_login( user_id1 )
Aug 18 10:03:56 server1 radiusd[389278]: [1]:User_id remaining after prefix removal = [user_id1]
Aug 18 10:03:56 server1 radiusd[389278]: [1]:User_id remaining after suffix removal = [user_id1]
Aug 18 10:03:56 server1 radiusd[389278]: [1]:Inside rad_authenticate() function
Aug 18 10:03:56 server1 radiusd[389278]: [1]:Authentication request received for [client1.austin.ibm.com]
Aug 18 10:03:56 server1 radiusd[389278]: [1]:Calling get_ldap_user() to get LDAP user data
Aug 18 10:03:56 server1 radiusd[389278]: [1]:get_ldap_user:LDAP user id: user_id1.
Aug 18 10:03:56 server1 radiusd[389278]: [1]:get_ldap_user:LDAP max_login_cnt:2.
Aug 18 10:03:56 server1 radiusd[389278]: [1]:get_ldap_user:LDAP EAP_type: 4.
Aug 18 10:03:56 server1 radiusd[389278]: [1]:get_ldap_user:LDAP passwordexpiredweeks: 9.
Aug 18 10:03:56 server1 radiusd[389278]: [1]:get_ldap_active_sessions:number of free entries= 2.
Aug 18 10:03:56 server1 radiusd[389278]: [1]:get_ldap_active_session:dn retrieved=
radiusuniqueidentifier=user_id11,ou=radiusActiveUsers,cn=aixradius.
Aug 18 10:03:56 server1 radiusd[389278]: [1]:Inside get_client_secret routine for ip:10.10.10.10
Security 325

Aug 18 10:03:56 server1 radiusd[389278]: [1]:Found NAS-IP = [10.10.10.10]
Aug 18 10:03:56 server1 radiusd[389278]: [1]:Found shared secret.
Aug 18 10:03:56 server1 radiusd[389278]: [1]:authenticate_password_PAP: Passwords Match, user is authenticated
Aug 18 10:03:56 server1 radiusd[389278]: [1]:is_ldap_pw:password for user has NOT expired
Aug 18 10:03:56 server1 radiusd[389278]: [1]:Authentication successful for user [user_id1] using IP [10.10.10.10]
Aug 18 10:03:56 server1 radiusd[389278]: [1]:Inside rad_authorize() routine.
Aug 18 10:03:56 server1 radiusd[389278]: [1]:Inside read_authorize_policy routine for file:
/etc/radius/authorization/user_id1.policy.
Aug 18 10:03:56 server1 radiusd[389278]: [1]:Inside read_authorize_file routine for file:
/etc/radius/authorization/user_id1.policy.
Aug 18 10:03:56 server1 radiusd[389278]: [1]:Did not open /etc/radius/authorization/user_id1.policy file.
File may not be found.
Aug 18 10:03:56 server1 radiusd[389278]: [1]:Error reading policy file: /etc/radius/authorization/user_id1.policy.
Aug 18 10:03:56 server1 radiusd[389278]: [1]:rad_authorize:default policy list and userpolicy list were empty.
Aug 18 10:03:56 server1 radiusd[389278]: [1]:In create_def_copy() routine.
Aug 18 10:03:56 server1 radiusd[389278]: [1]:Successfully made a copy of the master authorization list.
Aug 18 10:03:56 server1 radiusd[389278]: [1]:Inside read_authorize_file routine for file:
/etc/radius/authorization/user_id1.auth.
Aug 18 10:03:56 server1 radiusd[389278]: [1]:Did not open /etc/radius/authorization/user_id1.auth file.
File may not be found.
Aug 18 10:03:56 server1 radiusd[389278]: [1]:rad_authorize:copy authorization list and user list were empty.
Aug 18 10:03:56 server1 radiusd[389278]: [1]:Authorization successful for user [user_id1] using IP [10.10.10.10]
Aug 18 10:03:56 server1 radiusd[389278]: [1]:ACCESS-ACCEPT - sending accept for id 77 to 10.10.10.10
(client1.austin.ibm.com)
Aug 18 10:03:56 server1 radiusd[389278]: [1]:Inside proxy_response_needed() function
Aug 18 10:03:56 server1 radiusd[389278]: [1]:Proxy is not turned on
Aug 18 10:03:56 server1 radiusd[389278]: [1]:Inside get_client_secret routine for ip:10.10.10.10
Aug 18 10:03:56 server1 radiusd[389278]: [1]:Found NAS-IP = [10.10.10.10]
Aug 18 10:03:56 server1 radiusd[389278]: [1]:Found shared secret.
Aug 18 10:03:56 server1 radiusd[389278]: [1]:send_accept() Outgoing Packet:
Aug 18 10:03:56 server1 radiusd[389278]: [1]: Code = 2, Id = 77, Length = 31
Aug 18 10:03:56 server1 radiusd[389278]: [1]:send_accept() Outgoing Packet:
Aug 18 10:03:56 server1 radiusd[389278]: [1]: Code = 2, Id = 77, Length = 31
Aug 18 10:03:56 server1 radiusd[389278]: [1]: Authenticator = 0xCCB2B645BBEE86F5E4FC5BE24E904B2A
Aug 18 10:03:56 server1 radiusd[389278]: [1]: Type = 18, Length = 11, Value = 0x476F6F646E65737321
Aug 18 10:03:56 server1 radiusd[389278]: [1]:*** Leave Process_Packet() ***
Aug 18 10:04:18 server1 radiusd[389278]: [2]:*** Start Process_Packet() ***
Aug 18 10:04:18 server1 radiusd[389278]: [2]:Incoming Packet:
Aug 18 10:04:18 server1 radiusd[389278]: [2]: Code = 1, Id = 79, Length = 58
Aug 18 10:04:18 server1 radiusd[389278]: [2]: Authenticator = 0x774298A2B6DD90D7C33B3C10C4787D41
Aug 18 10:04:18 server1 radiusd[389278]: [2]: Type = 1, Length = 8, Value = 0x67656E747931
Aug 18 10:04:18 server1 radiusd[389278]: [2]: Type = 4, Length = 6, Value = 0x00000000
Aug 18 10:04:18 server1 radiusd[389278]: [2]: Type = 2, Length = 18, Value = 0x*******
*************************
Aug 18 10:04:18 server1 radiusd[389278]: [2]: Type = 7, Length = 6, Value = 0x00000001
Aug 18 10:04:18 server1 radiusd[389278]: [2]:Starting parse_packet()
Aug 18 10:04:18 server1 radiusd[389278]: [2]:Code 1, ID = 79, Port = 41638 Host = 10.10.10.10
Aug 18 10:04:18 server1 radiusd[389278]: [2]:User-Name = "user_id1"
Aug 18 10:04:18 server1 radiusd[389278]: [2]:NAS-IP-Address = 10.10.10.10
Aug 18 10:04:18 server1 radiusd[389278]: [2]:Framed-Protocol = PPP
Aug 18 10:04:18 server1 radiusd[389278]: [2]:Leaving parse_packet()
Aug 18 10:04:18 server1 radiusd[389278]: [2]:Verifying Message-Authenticator
Aug 18 10:04:18 server1 radiusd[389278]: [2]:Message-Authenticator successfully verified
Aug 18 10:04:18 server1 radiusd[389278]: [2]:Inside proxy_request_needed() function
Aug 18 10:04:18 server1 radiusd[389278]: [2]:Proxy is not turned on
Aug 18 10:04:18 server1 radiusd[389278]: [2]:Username = [user_id1]
Aug 18 10:04:18 server1 radiusd[389278]: [2]:Client IP = [10.10.10.10]
Aug 18 10:04:18 server1 radiusd[389278]: [2]:Inside parse_for_login( user_id1 )
Aug 18 10:04:18 server1 radiusd[389278]: [2]:User_id remaining after prefix removal = [user_id1]
Aug 18 10:04:18 server1 radiusd[389278]: [2]:User_id remaining after suffix removal = [user_id1]
Aug 18 10:04:18 server1 radiusd[389278]: [2]:Inside rad_authenticate() function
Aug 18 10:04:18 server1 radiusd[389278]: [2]:Authentication request received for [client1.austin.ibm.com]
Aug 18 10:04:18 server1 radiusd[389278]: [2]:Calling get_ldap_user() to get LDAP user data
Aug 18 10:04:18 server1 radiusd[389278]: [2]:get_ldap_user:LDAP user id: user_id1.
Aug 18 10:04:18 server1 radiusd[389278]: [2]:get_ldap_user:LDAP max_login_cnt:2.
Aug 18 10:04:18 server1 radiusd[389278]: [2]:get_ldap_user:LDAP EAP_type: 4.
Aug 18 10:04:18 server1 radiusd[389278]: [2]:get_ldap_user:LDAP passwordexpiredweeks: 9.
Aug 18 10:04:18 server1 radiusd[389278]: [2]:get_ldap_active_sessions:number of free entries= 2.
Aug 18 10:04:18 server1 radiusd[389278]: [2]:get_ldap_active_session:dn retrieved=
radiusuniqueidentifier=user_id11, ou=radiusActiveUsers, cn=aixradius.
Aug 18 10:04:18 server1 radiusd[389278]: [2]:Inside get_client_secret routine for ip:10.10.10.10
Aug 18 10:04:18 server1 radiusd[389278]: [2]:Found NAS-IP = [10.10.10.10]
326 AIX Version 6.1 Security

Aug 18 10:04:18 server1 radiusd[389278]: [2]:Found shared secret.
Aug 18 10:04:18 server1 radiusd[389278]: [2]:authenticate_password_PAP: Passwords do not match, user is rejected
Aug 18 10:04:18 server1 radiusd[389278]: [2]:Authentication failed for user [user_id1] using IP [10.10.10.10]
Aug 18 10:04:18 server1 radiusd[389278]: [2]:ACCESS-REJECT - sending reject for id 79 to 10.10.10.10
(client1.austin.ibm.com)
Aug 18 10:04:18 server1 radiusd[389278]: [2]:Inside proxy_response_needed() function
Aug 18 10:04:18 server1 radiusd[389278]: [2]:Proxy is not turned on
Aug 18 10:04:18 server1 radiusd[389278]: [2]:Inside get_client_secret routine for ip:10.10.10.10
Aug 18 10:04:18 server1 radiusd[389278]: [2]:Found NAS-IP = [10.10.10.10]
Aug 18 10:04:18 server1 radiusd[389278]: [2]:Found shared secret.
Aug 18 10:04:18 server1 radiusd[389278]: [2]:send_reject() Outgoing Packet:
Aug 18 10:04:18 server1 radiusd[389278]: [2]: Code = 3, Id = 79, Length = 30
Aug 18 10:04:18 server1 radiusd[389278]: [2]:send_reject() Outgoing Packet:
Aug 18 10:04:18 server1 radiusd[389278]: [2]: Code = 3, Id = 79, Length = 30
Aug 18 10:04:18 server1 radiusd[389278]: [2]: Authenticator = 0x05D4865C6EBEFC1A9300D2DC66F3DBE9
Aug 18 10:04:18 server1 radiusd[389278]: [2]: Type = 18, Length = 10, Value = 0x4261646E65737321
Aug 18 10:04:18 server1 radiusd[389278]: [2]:*** Leave Process_Packet() **
Password expiration
Password expiration allows the RADIUS client to be notified when a user’s password has expired, and to
update the user’s password through the RADIUS protocol.
Password expiration involves supporting four more packet types and a new attribute. The new packet
types are shipped in the AIX dictionary and the password expiration feature must be turned on.
It may not be desirable in every RADIUS installation to allow expired password updating through RADIUS.
An entry in the radiusd.conf file gives you the option to allow or disallow support for expired password
changing through RADIUS. The default for this option is to disallow. You can add a
Password_Expired_Reply_Message user reply message and this is returned in the password-expired packet.
Password attributes, both old and new, must be encrypted and decrypted with the PAP method.
Vendor-specific attributes
Vendor-specific attributes (VSA) are defined by remote-access server vendors, usually hardware vendors,
to customize how RADIUS works on their servers.
The vendor-specific attributes are necessary if you want to give users permission for more than one type
of access. The VSAs may be used in combination with RADIUS-defined attributes.
VSAs are optional, but if the NAS hardware requires additional attributes to be configured in order to
function properly, you must add the VSAs to the dictionary file.
VSAs can also be used for further authorization. Along with User-Name and Password, you can use
VSAs for authorization. On the server side, the user authorization policy file contains the list of attributes to
be checked in the Access-Request packet for a particular user. If the packet does not contain the attributes
listed in the users file, then an access_reject is sent back to NAS. VSAs can also be used as an
attribute=value pair list in the user_id.policy file.
The following is a sample VSA section taken from the dictionary:
########################################################################
# #
# This section contains examples of dictionary translations for #
# parsing vendor specific attributes (vsa). The example below is for #
# "Cisco." Before defining an Attribute/Value pair for a #
# vendor a "VENDOR" definition is needed. #
# #
# Example: #
# #
# VENDOR Cisco 9 #
# #
# VENDOR: This specifies that the Attributes after this entry are #
# specific to Cisco. #
# Cisco : Denotes the Vendor name #
Security 327
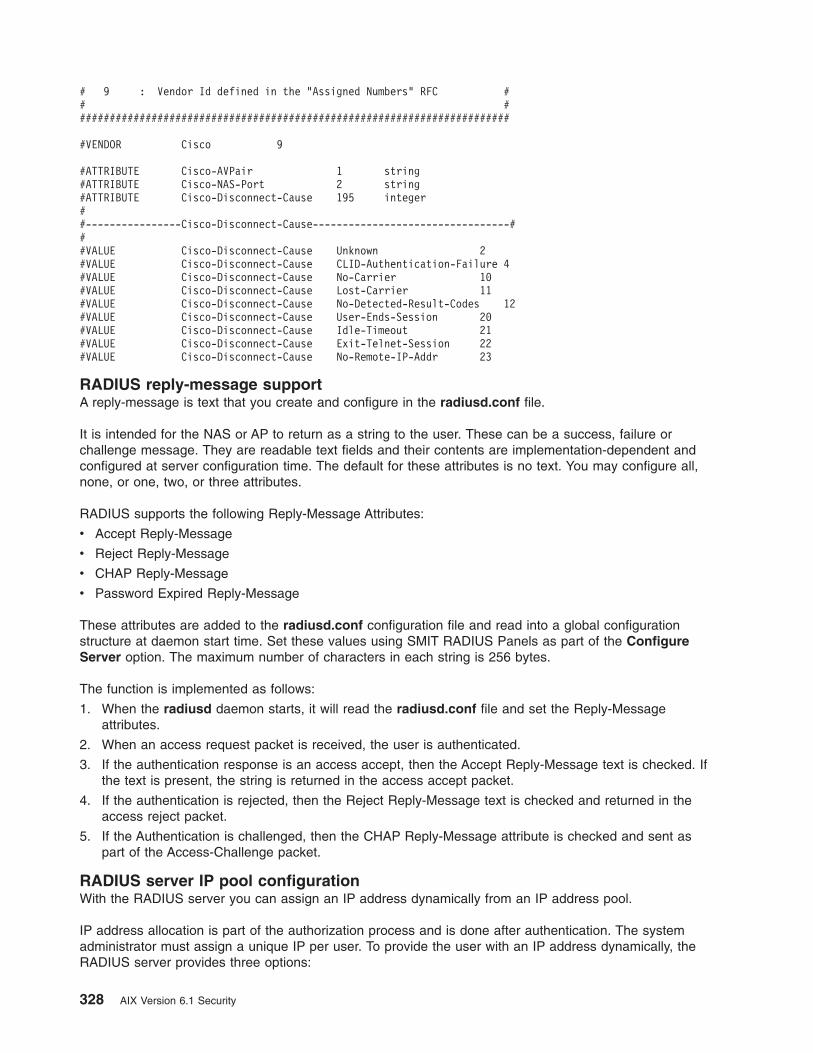
# 9 : Vendor Id defined in the "Assigned Numbers" RFC #
# #
########################################################################
#VENDOR Cisco 9
#ATTRIBUTE Cisco-AVPair 1 string
#ATTRIBUTE Cisco-NAS-Port 2 string
#ATTRIBUTE Cisco-Disconnect-Cause 195 integer
#
#----------------Cisco-Disconnect-Cause---------------------------------#
#
#VALUE Cisco-Disconnect-Cause Unknown 2
#VALUE Cisco-Disconnect-Cause CLID-Authentication-Failure 4
#VALUE Cisco-Disconnect-Cause No-Carrier 10
#VALUE Cisco-Disconnect-Cause Lost-Carrier 11
#VALUE Cisco-Disconnect-Cause No-Detected-Result-Codes 12
#VALUE Cisco-Disconnect-Cause User-Ends-Session 20
#VALUE Cisco-Disconnect-Cause Idle-Timeout 21
#VALUE Cisco-Disconnect-Cause Exit-Telnet-Session 22
#VALUE Cisco-Disconnect-Cause No-Remote-IP-Addr 23
RADIUS reply-message support
A reply-message is text that you create and configure in the radiusd.conf file.
It is intended for the NAS or AP to return as a string to the user. These can be a success, failure or
challenge message. They are readable text fields and their contents are implementation-dependent and
configured at server configuration time. The default for these attributes is no text. You may configure all,
none, or one, two, or three attributes.
RADIUS supports the following Reply-Message Attributes:
v Accept Reply-Message
v Reject Reply-Message
v CHAP Reply-Message
v Password Expired Reply-Message
These attributes are added to the radiusd.conf configuration file and read into a global configuration
structure at daemon start time. Set these values using SMIT RADIUS Panels as part of the Configure
Server option. The maximum number of characters in each string is 256 bytes.
The function is implemented as follows:
1. When the radiusd daemon starts, it will read the radiusd.conf file and set the Reply-Message
attributes.
2. When an access request packet is received, the user is authenticated.
3. If the authentication response is an access accept, then the Accept Reply-Message text is checked. If
the text is present, the string is returned in the access accept packet.
4. If the authentication is rejected, then the Reject Reply-Message text is checked and returned in the
access reject packet.
5. If the Authentication is challenged, then the CHAP Reply-Message attribute is checked and sent as
part of the Access-Challenge packet.
RADIUS server IP pool configuration
With the RADIUS server you can assign an IP address dynamically from an IP address pool.
IP address allocation is part of the authorization process and is done after authentication. The system
administrator must assign a unique IP per user. To provide the user with an IP address dynamically, the
RADIUS server provides three options:
328 AIX Version 6.1 Security

v Framed Pool Attribute
v Using the Vendor Specific Attribute
v RADIUS Server Side IP pooling
Framed Pool Attribute
The IP pool poolname must be defined on the Network Access Server (NAS). The NAS must be
RFC2869-compliant for the RADIUS server to send an Framed-Pool attribute in an Access-Accept pack
(type 88 attribute). The system administrator must configure the NAS and update the authorization
attributes for the user by including the Framed-Pool attribute in either the global default.auth file or the
user.auth file on the RADIUS server. The dictionary file in the RADIUS server includes this attribute:
ATTRIBUTE Framed-Pool 88 string
If the NAS cannot use multiple address pools, the NAS ignores this attribute. The address pool on the
NAS contains a list of IP addresses. The NAS dynamically picks one of the IP addresses defined in the
specified pool and assigns it to the user.
Vendor Specific Attributes
Some independent software vendors (ISV) cannot use the Framed-Pool attribute, but do have the ability
to define IP address pools. The RADIUS server can utilize these address pools by using the
Vendor-Specific Attribute (VSA) model. For example, a Cisco NAS provides an attribute called
Cisco-AVPair. The dictionary file in the RADIUS server includes this attribute:
VENDOR Cisco 9
ATTRIBUTE Cisco-AVPair 1 string
When the NAS sends an Access-Request packet, it includes this attribute with Cisco-AVPair=”ip:addr-pool=poolname” where poolname is the name of the address pool defined on the NAS. After the request is
authenticated and authorized, the RADIUS server returns the attribute in the Access-Accept packet. The
NAS can then use the defined pool to allocate the IP address to the user. The system administrator must
configure the NAS and update the authorization attributes for the user by including the VSA attribute in
either the global default.auth file or the user.auth file on the RADIUS server.
Radius Server Side IP Pooling
The RADIUS server can be configured to generate an IP address from a pool of IP addresses. The IP
address is returned in the Framed-IP-Address attribute of the Access-Accept packet.
The system administrator can define a pool of IP addresses using the SMIT interface. The addresses are
maintained in the /etc/radius/ippool_def file. Poolnames are defined in the etc/radius/clients file. The
system administrator must also configure the NAS-Port number. The RADIUS server daemon uses
information from the etc/radius/clients and /etc/radius/ippool_def files to create data files. Once the
daemon starts, the system administrator cannot change or add the poolnames or IP address ranges until
the RADIUS servers have stopped. When the RADIUS server daemon is started, it reads the configuration
file (/etc/radius/radius.conf) and if IP Allocation is enabled (Enable_IP_Pooling=YES), sets the global IP
allocation flag (IP_pool_flag) to On. The daemon then checks to see if the poolname.data file exists. If it
does, it reads the file and keeps that information in shared memory. It then updates the file and shared
memory based on the requests coming in from the clients. If the file does not exist, then the daemon
creates a new file using information from the etc/radius/clients and the /etc/radius/ippool_def files. The
poolname.data file has a maximum size limit of 256 MB (AIX segment size limit). If the poolname.data
file is more than 256 MB, the RADIUS server logs an error message and exits.
The daemon gets IP-pool details from the /etc/radius/ippool_def file and maintains a table of IP
addresses for each pool name in shared memory. The table has entries for NAS-IP-address, NAS-port and
IN USE flag. The daemon maintains a hash table that is keyed by the NAS-IP NAS-port. When requests
Security 329

come in from multiple users, the UDP queues the requests, and the daemon retrieves the NAS-IP and
NAS-port data from the request. Using that information, it checks to see whether a poolname has been
defined for that NAS by checking the information read from the etc/radius/clients file.
The daemon attempts to get an unused address from the pool. If an unused address is available, it is
marked as “in use” by the NAS-IP and NAS-port flags, and is returned to the RADIUS server. The IP
address is put into the Framed-IP-Address attribute by the daemon, and returned to the NAS in the
accept packet. The poolname.data file is also updated to be in sync with the information in shared
memory.
If the pool does not exist, or exists but does not have any more unused addresses, an error is returned to
the RADIUS server. The error Could not allocate IP address is logged in the log file and an
Access-Reject packet is sent to the NAS by the RADIUS server.
The error codes are:
v NOT_POOLED – There is no pool defined for the nas_ip.
v POOL_EXHAUSTED – The pool is defined for the nas_ip, but all of the addresses in the pool are
currently in use.
When the authentication request comes from a NAS and NAS-port combination that already has an IP
address allocated, the daemon returns the previous allocation to the pool, by marking the IN USE flag to
Off, and clearing the NAS-IP-address and NAS-port entries in the table. It then allocates a new IP address
from the pool.
The IP address is also returned to the pool when the RADIUS server receives an Accounting-Stop packet
from the NAS. The Accounting-Stop packet must contain the NAS-IP-address and NAS-port entries. The
daemon accesses the ippool_mem file for the following cases:
v The request comes in to get a new IP address. Sets the IN USE flag to true.
v An Accounting-Stop packet is received. It releases the IP address by setting the “in use” flag to false.
In each case, the shared memory system calls ensure that the data in shared memory and the
poolname.data files are in sync. The system administer can turn IP allocation ON or OFF using the
Enable_IP_Pooling parameter in the RADIUS server configuration file (radiusd.conf). This is useful in
cases where the system admin has an assigned IP address in either the global default.auth or user.auth
file. To use that assigned IP address, the system administrator must set Enable_IP_Pool = NO.
An example of an /etc/radius/ippool_def file created through SMIT:
Pool Name Start Range End Range
Floor5 192.165.1.1 192.165.1.125
Floor6 192.165.1.200 192.165.1.253
The following is an example of an /etc/radiusclients file created through SMIT:
NAS-IP Shared Secret Pool Name
1.2.3.4 Secret1 Floor5
1.2.3.5 Secret2 Floor6
1.2.3.6 Secret3 Floor5
1.2.3.7 Secret4
In the example above for the NAS-IP-Address 1.2.3.7, the pool name is blank. In this case, IP pooling is
not done for this NAS (even if the global IP_pool_flag = True). When the Access-Request packet comes
in, the RADIUS server does the authentication and authorization. If successful, it sends the static IP
330 AIX Version 6.1 Security

address defined in the request, or from the global default.auth file or user.auth file, in the Access-Accept
packet. In this case, the NAS-Port attribute is not required.
If IP pooling is True, the system administrator has also defined a static IP address as part of the global
default.auth or user.auth, or as part of the Access-Request packet. The RADIUS server replaces that IP
address with the IP address allocated from the defined pool name for that NAS. If all IP addresses in the
pool are in use, the server logs the error (pool is full) and sends an Access-Reject packet. The server
ignores any static IP address defined in the auth files.
If IP pooling is True and a valid pool name is defined for the NAS, when an Access-Request packet comes
in from that NAS-IP, and it does not have the NAS-Port defined, the server sends a Access-Reject packet.
The following is an example of theFloor5.data file created by the daemon:
IP Address NAS-IP NAS-Port In Use
192.165.1.1 1.2.3.4 2 1
192.165.1.2 1.2.3.4 3 0
............ ....... .... ....
192.165.1.124 1.2.3.6 1 1
192.165.1.125 1.2.3.6 6 1
The following is an example of theFloor6.data file created by the daemon:
IP Address NAS-IP NAS-Port In Use
192.165.200 1.2.3.4 1 1
192.165.201 1.2.3.4 4 1
............ ....... .... ....
192.165.1.252 1.2.3.4 5 0
192.165.1.253 1.2.3.4 6 1
When it is necessary to release all allocated IP addresses for a specified NAS (for example, when a NAS
stops), it might be necessary to release all the IP addresses from all the pools to initialize the
poolname.data file. The system administrator can do with the following menu actions using SMIT:
v Clear IP Pool for a Client
v Clear entire IP Pool
SMIT Panels for IP Pool
In Client Configuration, Add a Client, you can enter the optional Pool Name. The name can be a
maximum of 64 characters. When the Pool Name is blank, IP pooling is not done and the RADIUS server
assigns the IP address defined by the system administrator through the Framed-IP-Address authorization
attribute.
When IP Pool is selected, the following options display:
v List all IP Pools
v Create an IP Pool
v Change/Show Characteristics of an IP Pool
v Delete an IP Pool
v Clear IP Pool for a Client
Security 331

v Clear entire IP Pool
List all IP Pools: Use this option to list the Pool Name, Start Range IP address and Stop Range IP
address.
Create an IP Pool: Use this option to add the pool name, start range, and end range. This data is
appended to the bottom of the ippool_def file. Checks are made to ensure there are no duplicate pool
names and that the IP address ranges are disjoint. This action can only be performed when the RADIUS
server daemons are not running.
Change/Show Characteristics of an IP Pool: This option shows a list of the pool names in a pop-up
panel. From this panel, you must select a specific pool name. When you select a pool name, a panel with
the selected name displays. When you press Enter, the data for that pool name is updated in the
ippool_def file. This action can only be performed when the RADIUS server daemons are not running.
Delete an IP Pool: Selecting this option displays a list of pool names that you can select. When you select
the pool name, the Are You Sure pop-up panel displays to provide a confirmation before the selected pool
name is deleted. The rmippool script is invoked to delete the selected pool name from the ippool_def
file. This action can only be performed when the RADIUS server daemons are not running.
Clear IP Pool for a Client: This option marks the IN-USE entry to 0 for the IP addresses that belong to
the NAS, which means that all IP addresses for this NAS are now available. This action can only be done
when the RADIUS server daemons are not running.
Clear Entire IP Pool: When this option is selected, an Are You Sure pop-up panel displays to provide a
confirmation before the entire ippool_mem file is cleared. This action can only be performed when the
RADIUS server daemons are not running.
RADIUS SMIT panels
When using SMIT to configure the RADIUS server, fields marked with an asterisk (*) are required fields.
The SMIT fast-path is:
smitty radius
The RADIUS Main Menu is as follows:
RADIUS Server
Configure Server
Configure Clients
Configure Users
Configure Proxy Rules
Advanced Server Configuration
Start RADIUS Server daemons
Stop RADIUS Server daemons
The following screen capture shows a sample RADIUS Configure Server SMIT panel:
332 AIX Version 6.1 Security

Configure Server
RADIUS Directory /etc/radius
*Database Location [UNIX]
Local AVL Database File Name [dbdata.bin]
Local Accounting [ON]
Local Accounting Directory []
Debug Level [3]
Accept Reply-Message []
Reject Reply-Message []
Challenge Reply-Message []
Password Expired Reply Message []
Support Renewal of Expired Passwords [NO]
Require Message Authenticator [NO]
*Authentication Port Number [1812]
*Accounting Port Number [1813]
LDAP Server Name []
LDAP Server Port Number [389]
LDAP Server Admin Distinguished Name []
LDAP Server Admin Password []
LDAP Base Distinguished Name [cn=aixradius]
LDAP Size Limit [0]
LDAP Hop Limit [0]
LDAP wait time limit [10]
LDAP debug level [ 0]
Proxy Allowed [OFF]
Proxy Use table [OFF]
Proxy Realm Name []
Proxy Prefix Delimiters [$/]
Proxy Suffix Delimiters [@.]
NOTE: prefix & suffix are mutually exclusive
Proxy Remove Hops [NO]
Proxy Retry Count [2]
Proxy Timeout [30]
UNIX Check Login Restrictions [OFF]
Enable IP Pool [ON]
Detailed SMIT help information is available for all fields and menu options by pressing the F1 key.
Random number generator
Random numbers are required when generating the Authenticator field of a RADIUS packet.
It is important to provide the best possible generator because an intruder could try to trick the RADIUS
server into responding to a predicted request and then use the response to masquerade as that RADIUS
server to a future access-request. The AIX RADIUS Server uses the /dev/urandom kernel extension to
generate pseudo random numbers. This kernel extension collects entropy samples from hardware sources
by way of the pseudo device driver. This device has been through NIST testing to ensure proper
randomness.
NLS enablement
The RADIUS raddbm command and the SMIT panels are NLS enabled and each uses the standard AIX
NLS API calls to provide this function.
Related information
Commands: installp, mkuser, and raddbm
AIX Intrusion prevention
AIX intrusion prevention detects inappropriate, unauthorized or other data that might be considered
harmful to a system.
Security 333

The following section describes the various types of intrusion detection provided by AIX.
Related information
Commands: chfilt, ckfilt, expfilt, genfilt, impfilt, lsfilt, mkfilt, mvfilt, rmfilt.
Intrusion detection
Intrusion detection is the action of monitoring and analyzing system events in order to intercept and reject
any attempt of unauthorized system access. In AIX, this detection of unauthorized access or attempted
unauthorized access is done by observing certain actions, and then applying filter rules to these actions
Note: You must install the bos.net.ipsec filesets on the host system to enable intrusion detection. The
detection technologies are built upon the existing AIX Internet Protocol Security (IPsec) features.
Pattern matching filter rules:
Pattern matching is the use of an IPsec filter rule for filtering networking packets. A filter pattern can be a
text string, a hexadecimal string, or a file containing more than one pattern. After a pattern filter rule is
established and that pattern is detected in the body of any network packet, then the predefined action of
the filter rule will result.
Pattern matching filter rules only apply to inbound network packets. Use the genfilt command to add a
filter rule to the filter rule table. The filter rules generated by this command are called manual filter rules.
Use the mkfilt command to activate or deactivate the filter rules. The mkfilt command can also be used to
control the filter logging function.
A pattern file can contain a list, one per line, of text patterns or hexadecimal patterns. Pattern matching
filter rules can be used to guard against viruses, buffer overflows, and other network security attacks.
Pattern matching filter rules can have a negative impact on system performance if they are used too
broadly, and with a high number of patterns. It is best to keep the scope of their application as narrow as
possible. For example, if a known virus pattern applies to sendmail, then specify the sendmail SMTP
destination port 25 in the filter rule. This allows all other traffic to pass without incurring a performance
impact from pattern matching.
The genfilt command recognizes and understands the pattern format used in some versions found at
http://www.clamav.net.
Types of patterns:
There are three basic types of patterns: text, hexadecimal, and file. Pattern matching filter rules apply to
incoming packets only.
Text pattern
A text filter pattern is an ASCII string that looks similar to the following:
GET /../../../../../../../../
Hexadecimal pattern
A hexadecimal pattern looks similar to the following:
0x33c0b805e0cd16b807e0cd1650558becc7460200f05d0733ffb8c800b9fffff3abb00150
e670e47132c0e67158fec03c8075f033c033c9b002fa99cd26fb4183f90575f5c3
Note: A hexadecimal pattern is differentiated from a text pattern by the leading 0x.
334 AIX Version 6.1 Security

Files that contain text patterns
A file can contain a list, one per line, of text patterns or hexadecimal patterns. Sample pattern files can be
found at http://www.clamav.net.
Shun port and shun host filter rules:
By setting a shun filter rule, you can affect a remote host or the remote host and port pair from accessing
the local machine.
A shun filter rule dynamically creates an effect rule that denies the remote host or the remote host and
port pair from accessing the local machine when the rule’s specified criteria are met.
Because it is common for an attack to be preceded by a port scan, shun port filter rules are especially
useful in preventing an intrusion by detecting this attack behavior.
For example, if the local host does not use the server port 37, which is the time server, then the remote
host should not be accessing port 37, unless it is running a port scan. Place a shun port filter rule on port
37 so that if the remote host attempts to access that port, the shun filter rule creates an effective rule that
blocks that host from further access for the amount of time specified shun rule expiration time field.
If a shun rule’s expiration time field is set to 0, then the dynamically created effective shun rule does not
expire.
Note:
1. An expiration time specified by the shun port filter rule applies only to the dynamically created
effect rule.
2. Dynamically created effect rules can only be viewed with the lsfilt -a command.
Shun host filter rules
When the criteria of a shun host filter rule is met, then the dynamically created effective rule will block or
shun all network traffic from the remote host for the specified expiration time.
Shun port filter rules
When the criteria of a shun port filter rule is met, then the dynamically created effective rule will only block
or shun network traffic from this remote host’s particular port, until the expiration time is exceeded.
Stateful filter rules:
Stateful filters examine information such as source and destination addresses, port numbers, and status.
Then, by applying IF, ELSE or ENDIF filter rules to these header flags, stateful systems can make filtering
decisions in the context of an entire session rather than that of an individual packet and its header
information.
Stateful inspection examines incoming and outgoing communication packets. When stateful filter rules are
activated with the mkfilt -u command, the rules in the ELSE block are always examined until the IF rule is
satisfied. After the IF rule or condition is satisfied, the rules in the IF block are used until the filter rules are
reactivated with the mkfilt -u command.
The ckfilt command will check the syntax of the stateful filter rules and display them in a display in a
illustrative manner such as the following:
%ckfilt -v4
Beginning of IPv4 filter rules.
Rule 2
Security 335
IF Rule 3
IF Rule 4
Rule 5
ELSE Rule 6
Rule 7
ENDIF Rule 8
ELSE Rule 9
Rule 10
ENDIF Rule 11
Rule 0
Timed rules:
Timed rules specify the amount of time, in seconds, that the filter rule is applied after it is made effective
with the mkfilt -v [4|6] -u command.
The expiration time is specified with the genfilt -e command. For more information, see the mkfilt and
genfilt commands.
Note: Timers have no effect on IF, ELSE or ENDIF rules. If an expiration time is specified in a shun host
or shun port rule, the time applies only to the effect rule that is initiated by the shun rule. Shun rules
have no expiration time.
Accessing filter rules from SMIT
You can configure rules from SMIT.
To configure filter rules from SMIT, complete the following steps.
1. From a command line, enter the following command:smitty ipsec4
2. Select Advanced IP Security Configuration.
3. Select Configure IP Security Filter Rules.
4. Select Add an IP Security Filter Rule.
336 AIX Version 6.1 Security

Add an IP Security Filter Rule
Type or select values in entry fields.
Press Enter AFTER making all desired changes.
[TOP] [Entry Fields]
* Rule Action [permit] +
* IP Source Address []
* IP Source Mask []
IP Destination Address []
IP Destination Mask []
* Apply to Source Routing? (PERMIT/inbound only) [yes] +
* Protocol [all] +
* Source Port / ICMP Type Operation [any] +
* Source Port Number / ICMP Type [0] #
* Destination Port / ICMP Code Operation [any] +
* Destination Port Number / ICMP Type [0] #
* Routing [both] +
* Direction [both] +
* Log Control [no] +
* Fragmentation Control [0] +
* Interface [] +
Expiration Time (sec) [] #
Pattern Type [none] +
Pattern / Pattern File []
Description []
Where "Pattern Type" may be one of the following
x none x#
x pattern x
x file x
x Anti-Virus patterns
The choices for the action field are: permit, deny, shun_host, shun_port, if, else, endif.
If a pattern file is specified, then it must be readable when the filter rules are activated with the mkfilt -a
command. The filter rules are stored in the /etc/security/ipsec_filter database.
AIX Security Expert
AIX Security Expert provides a center for all security settings (TCP, NET, IPSEC, system, and auditing).
AIX Security Expert is a system security hardening tool. AIX Security Expert provides simple menu settings
for High Level Security, Medium Level Security, Low Level Security, and AIX Standard Settings security
that integrate over 300 security configuration settings while still providing control over each security
element for advanced administrators. AIX Security Expert can be used to implement the appropriate level
of security, without the necessity of reading a large number of papers on security hardening and then
individually implementing each security element.
AIX Security Expert can be used to take a security configuration snapshot. This snapshot of this security
policy can be used to set up the same security configuration on other systems. This both saves time and
ensures that all systems have the proper security configuration in an enterprise environment. It is also
possible to check the security of a system which has been previously configured with AIX Security Expert.
If any security configuration changes have been made outside the scope of AIX Security Expert, these
changes will be reported.
During migration from AIX 5.3 to AIX 6.1, the /etc/security/aixpert/core/appliedaixpert.xml file will be
preserved (if it exists) and converted to AIX 6.1 XML format. System administrators can later use this file
with the aixpert -f option to apply the same security settings that are present on AIX 5.3 to AIX 6.1. This
ability helps users keep the same security settings across AIX releases.
Security 337

AIX 6.1 provides several new AIX Security Expert features:
v Secure by default
v Distributed security policy through AIX Security Expert and LDAP
v Customizable security policy through user-defined AIX Security Expert XML rules
v File permission manager fpm command for managing SUID programs
v Stringent check for weak passwords
AIX Security Expert relives the system administrator from the need to be a security expert on a large array
of products. AIX Security Expert also aids the system administrator in configurations required by
government and security compliance standards. AIX Security Expert centralizes the configuration and
control of system security and handles the interactions and interdependencies between different security
components. This allows AIX Security Expert to present the system administrator with a simple,
easy-to-use, security dashboard, where all of the complex configuration details and component
interdependencies are resolved internally. This eliminates security vulnerabilities and service outages
caused by human error during configuration.
AIX Security Expert can be run from Web-based System Manager, SMIT or you can use the aixpert -c -l
s command.
AIX Security Expert settings
The following coarse-grain security settings are available:
High Level Security
High-level security
Medium Level Security
Medium-level security
Low Level Security
Low-level security
Customized Options
Optional user defined XML security policy
Distributed Security Options
Optional AIX Expert Security XML security policies distributed via LDAP
Advanced Security Custom
User-specified security
Default Security
Original system default security
Undo Security
Some AIX Security Expertconfiguration settings can be undone
Check Security
Provides a detailed report of current security settings
SOX-COBIT Best Practices Security
Commonly accepted security configuration for SOX-COBIT compliance
SOX-COBIT Best Practices Security Audit
Produce an audit report based on the system complying with the above configuration
AIX Security Expert security hardening
Security hardening protects all elements of a system by tightening security or implementing a higher level
of security.
338 AIX Version 6.1 Security

Security hardening helps ensure that all security configuration decisions and settings are adequate and
appropriate. Hundreds of security configuration settings might have to be changed to harden the security
of an AIX system.
AIX Security Expert provides a menu to centralize effective common security configuration settings. These
settings are based on extensive research on properly securing UNIX systems. Default security settings for
broad security environment needs (High Level Security, Medium Level Security, and Low Level Security)
are provided, and advanced administrators can set each security configuration setting independently.
Configuring a system at too high a security level might deny services that are needed. For example, telnet
and rlogin are disabled for High Level Security because the login password is sent over the network
unencrypted. If a system is configured at too low a security level, the system can be vulnerable to security
threats. Since each enterprise has its own unique set of security requirements, the predefined High Level
Security, Medium Level Security, and Low Level Security configuration settings are best suited as a
starting point for security configuration rather than an exact match for the security requirements of a
particular enterprise.
The practical approach to using AIX Security Expert, is to establish a test system (in a realistic test
environment) similar to the production environment in which it will be deployed. Install necessary business
applications and run AIX Security Expert via the GUI. The AIX Security Expert will analysis this running
system in this trusted state. Depending on the security options you chose, AIX Security Expert will enable
port scan protection will be enabled, turn on auditing, block network ports that are not in use by the
business applications or other services, along with many other security settings. After re-testing with these
security configurations in place, the system is ready to be deployed in a production environment. Also, the
AIX Security Expert XMLfile defining the security policy or configuration of this system can be easily be
used to implement the exact same configuration on similar systems in your enterprise.
For more information on security hardening, see NIST Special Publication 800-70, NIST Security
Configurations Checklist Program for IT Products.
Secure by default
Secure By Default (SbD) is the concept of installing a minimal set of software in a secure configuration.
The AIX Secure by Default (SbD) installation option installs a lighter version of the TCP client and server
filesets, that excludes vulnerable commands and files. The bos.net.tcp.client and bos.net.tcp.server
filesets are part of the SbD installation and contain all commands and files except for any applications that
allow for the transmission of passwords over the network in clear text format such as telnet and ftp. In
addition, applications that might be exploited, such as rsh, rcp, and sendmail, are excluded from the SbD
filesets.
The final automated process of the SbD install is to impose the AIX Security Expert high-level security
configuration settings. You can do this by running the aixpert command from /etc/firstboot script:
/usr/sbin/aixpert -f /etc/security/aixpert/core/SbD.xml -p 2>/etc/security/aixpert/log/firstboot.log
It is possible to move the machine out of SbD mode by changing the ODM variable SbD_STATE to
sbd_disable, installing the bos.net.tcp.client and bos.net.tcp.server filesets again, and using the AIX
Security Expert to bring the system to its default security level.
It is not possible to use migration install or preservation install to achieve a SbD installed system. SbD is a
separate install menu path.
It is possible to have a securely configured system without using the SbD install option. For example, the
AIX Security Expert High, Medium, or Low level security options can be configured on a regular install.
Security 339
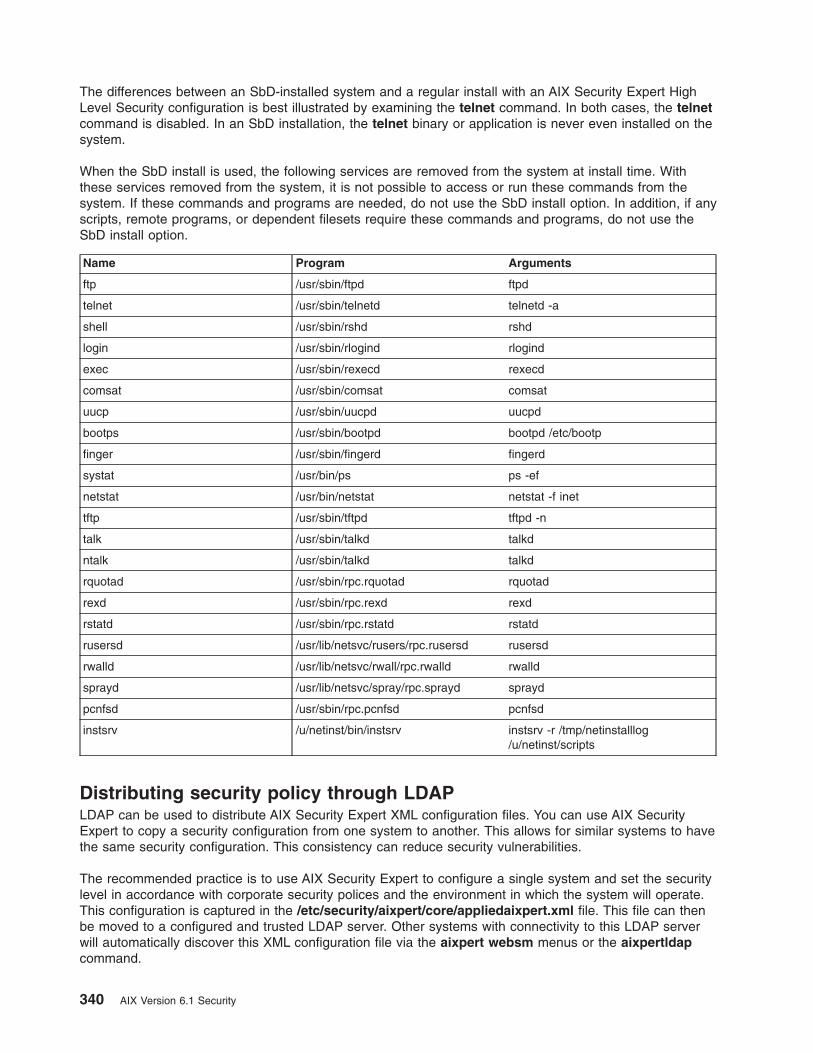
The differences between an SbD-installed system and a regular install with an AIX Security Expert High
Level Security configuration is best illustrated by examining the telnet command. In both cases, the telnet
command is disabled. In an SbD installation, the telnet binary or application is never even installed on the
system.
When the SbD install is used, the following services are removed from the system at install time. With
these services removed from the system, it is not possible to access or run these commands from the
system. If these commands and programs are needed, do not use the SbD install option. In addition, if any
scripts, remote programs, or dependent filesets require these commands and programs, do not use the
SbD install option.
Name Program Arguments
ftp /usr/sbin/ftpd ftpd
telnet /usr/sbin/telnetd telnetd -a
shell /usr/sbin/rshd rshd
login /usr/sbin/rlogind rlogind
exec /usr/sbin/rexecd rexecd
comsat /usr/sbin/comsat comsat
uucp /usr/sbin/uucpd uucpd
bootps /usr/sbin/bootpd bootpd /etc/bootp
finger /usr/sbin/fingerd fingerd
systat /usr/bin/ps ps -ef
netstat /usr/bin/netstat netstat -f inet
tftp /usr/sbin/tftpd tftpd -n
talk /usr/sbin/talkd talkd
ntalk /usr/sbin/talkd talkd
rquotad /usr/sbin/rpc.rquotad rquotad
rexd /usr/sbin/rpc.rexd rexd
rstatd /usr/sbin/rpc.rstatd rstatd
rusersd /usr/lib/netsvc/rusers/rpc.rusersd rusersd
rwalld /usr/lib/netsvc/rwall/rpc.rwalld rwalld
sprayd /usr/lib/netsvc/spray/rpc.sprayd sprayd
pcnfsd /usr/sbin/rpc.pcnfsd pcnfsd
instsrv /u/netinst/bin/instsrv instsrv -r /tmp/netinstalllog
/u/netinst/scripts
Distributing security policy through LDAP
LDAP can be used to distribute AIX Security Expert XML configuration files. You can use AIX Security
Expert to copy a security configuration from one system to another. This allows for similar systems to have
the same security configuration. This consistency can reduce security vulnerabilities.
The recommended practice is to use AIX Security Expert to configure a single system and set the security
level in accordance with corporate security polices and the environment in which the system will operate.
This configuration is captured in the /etc/security/aixpert/core/appliedaixpert.xml file. This file can then
be moved to a configured and trusted LDAP server. Other systems with connectivity to this LDAP server
will automatically discover this XML configuration file via the aixpert websm menus or the aixpertldap
command.
340 AIX Version 6.1 Security

Any existing LDAP Server can be updated with the aixpert schema to distribute the aixpert configuration
XML files onto each client connected. If the LDAP server does not have the aixpert schema updated,
update the aixpert schema onto LDAP with the following command: ldapmodify -c -D <bindDN> -w
<bindPwd> -i /etc/security/ldap/sec.ldif Once the LDAP server is updated with aixpert schema,
clients can place their XML configuration files on LDAP using the -u option of the aixpertldap command.
These configuration files needs to be updated manually, otherwise the Distributed Security option of
WebSM will not be able to provide users with any menus.
Note: This feature relies on the trust model LDAP has in place. Users who have privileges to write to
LDAP can modify the data uploaded by users of a different machine. Similarly, if an LDAP client
has a security vulnerability, then this can be exploited to read and understand the security status of
other LDAP clients by reading the AIX Security Expert XML configuration files associated with the
client.
For example, an appliedaixpert.xml file can be saved on the LDAP server under the name
BranchOfficeSecurityProfile. Or a differently configured appliedaixpert.xml file might be saved under
the name InternetDirectAttachedSystemsProfile. As other systems with LDAP connectivity are
configured with AIX Security Expert, these security profiles are automatically presented as menu options.
This allows the system administer to select the security profile which best suites their environment within
the guidelines of their corporate security policies.
Then AIX Security Expert is used to secure a system. The complete list of security configuration settings
implemented on the system is captured in the file /etc/security/aixpert/core/appliedaixpert.xml. This file
is the security policy for this system. The security policy is compared when the AIX Security Expert Check
Security option is used. This security policy can also be copied and applied to other systems, which
provides consistency in the security of systems throughout your IT environment. There are two ways to
copy a security policy onto other systems, manually or through LDAP.
AIX Security Expert security policy copy
You can use AIX Security Expert to copy a security policy from one system to another.
You can run AIX Security Expert on one system and apply the same security policy on other systems. For
example, Bob wishes to apply AIX Security Expert on his six AIX systems. He applies the security settings
on one system (Alpha) with High, Medium, Low, Advanced, or AIX Standard Settings security. He tests this
system for compatibility issues within his environment. If he is satisfied with these settings, he can apply
the same settings on the other AIX systems by name. He copies the settings from the system Alpha to the
system where he wants to apply the same security settings by copying the /etc/security/aixpert/core/appliedaixpert.xml file from Alpha to the other system.
Note: Do not copy this file to the same directory and filename on the other system, because the aixpert
command will write over /etc/security/aixpert/core/appliedaixpert.xml as it implements the
security policy.
Instead, copy Alpha’s security policy to the /etc/security/aixpert/custom/ directory. This allows the other
system to view and apply Alpha’s security policy through the AIX Security Expert system management
GUI, or directly with the aixpert command.
For example, if the Alpha’s appliedaixpert.xml security policy was placed on the other systems as
/etc/security/aixpert/custom/AlphaPolicy, then the command aixpert -f /etc/security/aixpert/custom/AlphaPolicy would immediately apply this security policy and this system would have the same
security configuration as machine Alpha. Additionaly, when Alpha’s security policy is in this directory, it is
visible and can be applied through the other systems system management console via the path of Aix
Security Expert -> Overview and Tasks -> Customized Options -> AlphaPolicy.
Security 341

Customizable security policy with user-defined AIX Security Expert
XML rules
You can use XML files to configure unique security policies.
AIX Security Expert dynamically recognizes these XML files and incorporates them in the websm menus.
This allows unique security policies and third-party applications to be configured with websm. Any custom
XMLsecurity policy files created should be placed in the directory /etc/security/aixpert/custom/ with a
descriptive file. Therefore, when AIX Security Expert is accessed via a console graphical interface, the rich
set of graphical XML features in the aixpert DTD will be fully realized.
The DTD is as follows:
<?xml version=’1.0’?>
<!--START-->
<!ELEMENT AIXPertSecurityHardening (AIXPertEntry+)>
<!-- AIXPertEntry should contain only one instance of the following elements. -->
<!ELEMENT AIXPertEntry (AIXPertRuleType,
AIXPertDescription, AIXPertPrereqList, AIXPertCommand,
AIXPertArgs,AIXPertGroup)>
<!-- AIXPertEntry’s name should be unique. -->
<!ATTLIST AIXPertEntry
name ID #REQUIRED
function CDATA ""
>
<!ELEMENT AIXPertRuleType EMPTY>
<!ATTLIST AIXPertRuleType type (LLS|MLS|HLS|DLS|SCBPS|Prereq) "DLS">
<!ELEMENT AIXPertDescription (#PCDATA)>
<!ELEMENT AIXPertPrereqList (#PCDATA)>
<!ELEMENT AIXPertCommand (#PCDATA)>
<!ELEMENT AIXPertArgs (#PCDATA)*>
<!ELEMENT AIXPertGroup (#PCDATA)*>
The AIXPertEntry name is a unique name within the XMLfile. This name will be the name of the selectable
graphic button when this file is viewed via a system console via the path Aix Security Expert -> Overview
and Tasks -> Customized Options -> <xml file=″″></xml>.
<!ELEMENT AIXPertRuleType EMPTY>
This XML file should be specified as custom.
<!ATTLIST AIXPertRuleType type (LLS|MLS|HLS|DLS|SCBPS|Prereq|Custom) ″DLS″
This XML file should be specified as custom.
<!ELEMENT AIXPertDescription (#PCDATA)>
When viewed via the above mentioned graphical interface, the description text is displayed as a
pop-up window then the mouse is placed on this button.
<!ELEMENT AIXPertPrereqList (#PCDATA)>
It is possible to select a prerequisite rule to this rule. The prerequisite rule must return 0, before
aixpert will implement this rule. If this XML file is viewed through a graphical interface, thisrule will
be grayed-out if the prerequisite rule is not satisfied. If you are creating a prerequisite rule, the
AIXPertRuleType must be ’Prereq’.
The AIXPertDescription field of the prerequisite rule should describe what should be done to
satisfy the prereq rule. If the Custom rules is grayed-out because one of its Prereq rules is not
satisfied, then the user is shown the description pop-up window of the Prereq rule, which explains
what the user must do to correct the prerequisite condition.
342 AIX Version 6.1 Security

<!ELEMENT AIXPertCommand (#PCDATA)>
This element must be the full path and command which aixpert will execute for this security rule,
e.g. /usr/bin/ls.
<!ELEMENT AIXPertArgs (#PCDATA)*>
This element must contain any arguments to the above command, e.g. -l
<!ELEMENT AIXPertGroup (#PCDATA)*>
It is possible to group a set of aixpert rules when they are displayed via a graphical interfaces. For
example, a common set of rules might all specify a AIXPertGroup name of ″Network Security″.
Stringent check for weak passwords
This AIX feature checks for weak passwords when passwords are changed. If this option is selected with
AIX Security Expert, this additional password check is performed when a user selects or changes their
password. This check guards against the use of English dictionary words and the 1000 most common US
first names based on a recent US Census.
COBIT control obectives supported by AIX Security Expert
AIX Security Expert supports the SOB-COBIT Best Practices Security level in addition to the High,
Medium, Low, AIX Default and Advanced Security settings.
The United States Congress enacted the ’Sarbanes-Oxley Act of 2002’ to protect investors by improving
the accuracy and reliability of financial information disclosed by corporations. The COBIT control objectives
feature will help System Administrators to configure, maintain, and audit their IT systems for compliance
with this law. The SOX Configuration Assistant is accessed thru the AIX Security Export websm menus or
the aixpert command line. The feature assists with the SOX section 404 of the Sarbanes-Oxley Act, but
The AIX Security Expert SOX Configuration Assistant automatically implements security settings commonly
associated with COBIT best practices for SOX Section 404, Internal Controls. Additionally, the AIX Security
Expert provides a SOX audit feature which reports to the auditor whether the system is currently
configured in this manner. The feature allows for the automation of system configuration to aid in IT SOX
compliance and in the automation of the audit process.
Since SOX does not offer guidance on how IT must comply with section 404, the IT industry has focused
on the existing governance detailed by www.isaca.org/. More specifically, the IT governance covered by
Control Objectives for Information and related Technology (COBIT).
AIX Security Expert supports the following control objectives:
v Password policy enforcement
v Violation and Security Activity Reports
v Malicious software prevention, detection and correction, and unauthorized software
v Firewall architecture and connections with public networks
AIX Security Expert does not support all of the attributes specified under each control objective. The
supported attributes and their respective control objectives are summarized in the following tables:
Password policy enforcement
Description Security setting
Maximum password age maxage=13
Enforce password history histsize=20
Minimum password age minage=1
Minimum password length minlen=8
Contains at least 6 characters Minalpha=6
Security 343

Description Security setting
Similarity to old password mindiff=4
Password expiration warning days pwdwarntime=14
Security violations and activity report
Description Security setting Remarks
Auditing Enabled yes
No direct root logins yes
Enable auditing for priviledge
escalation
yes AIXpert leverages the USER_SU
audit event. Please ensure this event
is turned on.
Malicious software detection and correction
AIX Security Expert leverages the AIX trusted software execution feature to ensure that the software is not
tampered with by anyone. The trustchk command checks the consistency of the objects that are
registered in the Trusted Software database.
Firewall setup
AIX Security Expert turns on IPSec and enables filter rules to avoid port scans. The ports that are
shunned are listed in the following table:
Service Description
Tcp/11, udp/11 Systat
Tcp/13, udp/13 Daytime
(RFC 867) Tcp/19, udp/19 Character Generator
Tcp/25 Simple Mail Transfer (SMTP)
Tcp/43, udp/43 Who Is (nickname)
Tcp/63, udp/63 Whois++
Tcp/67, udp/67 Bootstrap protocol server (bootps)
Tcp/68, udp/68 Bootstrap protocol client (bootpc)
Tcp/69, udp/69 Trivial file transfer
(tftp) Tcp/79, udp/79 Finger
Tcp/87 Private Terminal Link
Tcp/110 Post office protocol – version 3 (POP3)
Udp/111 SUN Remote Procedure Call
Tcp/113 Authentication Service (auth)
Udp/123 Network Time Protocol
Udp/161 SNMP
Udp/162 SNMPTRAP
Tcp/194 Internet Relay chat Protocol
Tcp/443 http protocol over TLS/SSL
Tcp/511 PassGo
344 AIX Version 6.1 Security
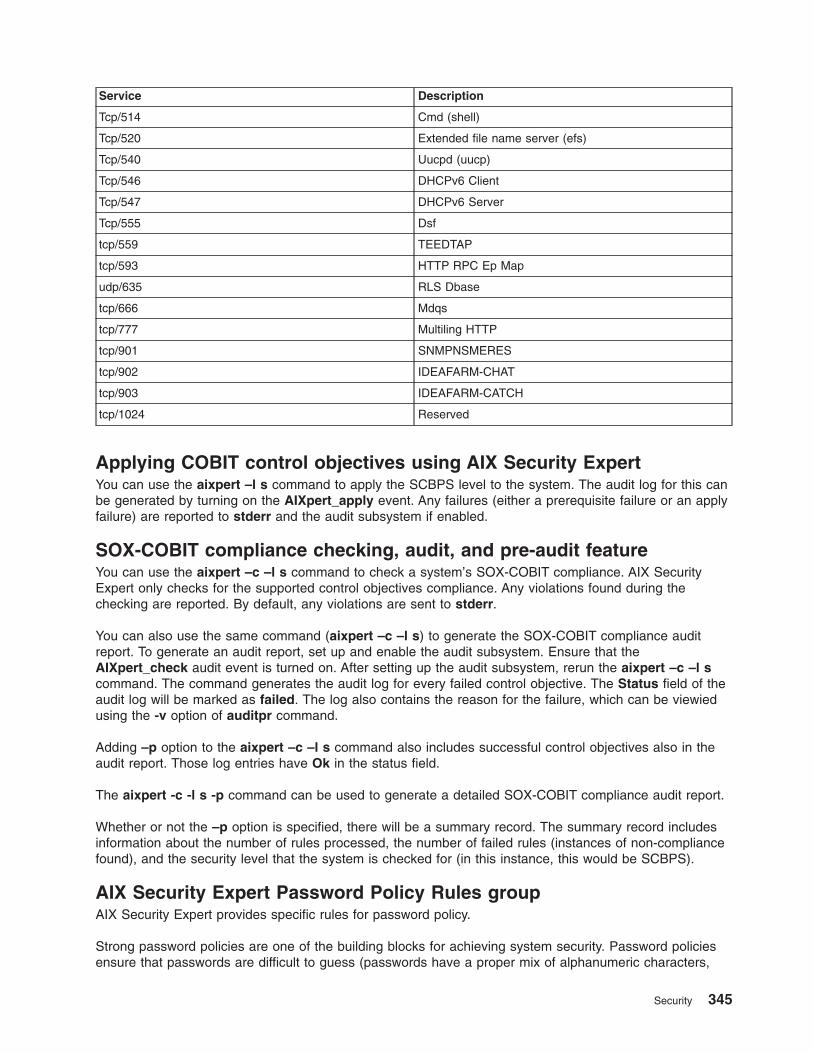
Service Description
Tcp/514 Cmd (shell)
Tcp/520 Extended file name server (efs)
Tcp/540 Uucpd (uucp)
Tcp/546 DHCPv6 Client
Tcp/547 DHCPv6 Server
Tcp/555 Dsf
tcp/559 TEEDTAP
tcp/593 HTTP RPC Ep Map
udp/635 RLS Dbase
tcp/666 Mdqs
tcp/777 Multiling HTTP
tcp/901 SNMPNSMERES
tcp/902 IDEAFARM-CHAT
tcp/903 IDEAFARM-CATCH
tcp/1024 Reserved
Applying COBIT control objectives using AIX Security Expert
You can use the aixpert –l s command to apply the SCBPS level to the system. The audit log for this can
be generated by turning on the AIXpert_apply event. Any failures (either a prerequisite failure or an apply
failure) are reported to stderr and the audit subsystem if enabled.
SOX-COBIT compliance checking, audit, and pre-audit feature
You can use the aixpert –c –l s command to check a system’s SOX-COBIT compliance. AIX Security
Expert only checks for the supported control objectives compliance. Any violations found during the
checking are reported. By default, any violations are sent to stderr.
You can also use the same command (aixpert –c –l s) to generate the SOX-COBIT compliance audit
report. To generate an audit report, set up and enable the audit subsystem. Ensure that the
AIXpert_check audit event is turned on. After setting up the audit subsystem, rerun the aixpert –c –l s
command. The command generates the audit log for every failed control objective. The Status field of the
audit log will be marked as failed. The log also contains the reason for the failure, which can be viewied
using the -v option of auditpr command.
Adding –p option to the aixpert –c –l s command also includes successful control objectives also in the
audit report. Those log entries have Ok in the status field.
The aixpert -c -l s -p command can be used to generate a detailed SOX-COBIT compliance audit report.
Whether or not the –p option is specified, there will be a summary record. The summary record includes
information about the number of rules processed, the number of failed rules (instances of non-compliance
found), and the security level that the system is checked for (in this instance, this would be SCBPS).
AIX Security Expert Password Policy Rules group
AIX Security Expert provides specific rules for password policy.
Strong password policies are one of the building blocks for achieving system security. Password policies
ensure that passwords are difficult to guess (passwords have a proper mix of alphanumeric characters,
Security 345

digits, and special characters), expire regularly, and are not reusable after expiration. The following table
lists the password policy rules for each security setting.
Table 14. AIX Security Expert Password Policy Rules
Action button
name Definition
Value set by AIX Security
Expert Undo
Minimum number
of characters
Sets appropriate value to mindiff attribute of
/etc/security/user, which specifies the minimum
number of characters required in a new password that
were not in the old password.
High Level Security
4
Medium Level Security
3
Low Level Security
No effect
AIX Standard Settings
No limit
Yes
Minimum age for
password
Sets appropriate value to minage attribute of
/etc/security/user, which specifies the minimum
number of weeks before a password can be changed.
High Level Security
1
Medium Level Security
No limit
Low Level Security
No effect
AIX Standard Settings
No limit
Yes
Maximum age for
password
Sets appropriate value to maxage attribute of
/etc/security/user, which specifies the maximum
number of weeks before a password can be changed.
High Level Security
13
Medium Level Security
13
Low Level Security
52
AIX Standard Settings
No limit
Yes
Minimum length for
password
Sets appropriate value to minlen attribute of
/etc/security/user, which specifies the minimum
length of a password.
High Level Security
8
Medium Level Security
8
Low Level Security
8
AIX Standard Settings
No limit
Yes
Minimum number
of alphabetic
characters
Sets appropriate value to minalpha attribute of
/etc/security/user, which specifies the minimum
number of alphabetic characters in a password.
High Level Security
2
Medium Level Security
1
Low Level Security
No effect
AIX Standard Settings
No limit
Yes
346 AIX Version 6.1 Security

Table 14. AIX Security Expert Password Policy Rules (continued)
Action button
name Definition
Value set by AIX Security
Expert Undo
Password reset
time
Sets appropriate value to histexpire attribute of
/etc/security/user, which specifies the number of
weeks before a password can be reset.
High Level Security
26
Medium Level Security
26
Low Level Security
52
AIX Standard Settings
No limit
Yes
Maximum times a
char can appear in
a password
Sets appropriate value to maxrepeats attribute of
/etc/security/user, which specifies the maximum
number of times a character can appear in a
password.
High Level Security
2
Medium Level Security
No effect
Low Level Security
No effect
AIX Standard Settings
8
Yes
Password reuse
time
Sets appropriate value to histsize attribute of
/etc/security/user, which specifies the number of
previous passwords that a user cannot reuse.
High Level Security
20
Medium Level Security
4
Low Level Security
4
AIX Standard Settings
No limit
Yes
Time to change
password after the
expiration
Sets appropriate value to maxexpired attribute of
/etc/security/user, which specifies the maximum
number of weeks after maxage that an expired
password can be changed by the user.
High Level Security
2
Medium Level Security
4
Low Level Security
8
AIX Standard Settings
-1
Yes
Minimum number
of non-alphabetic
characters
Sets appropriate value to minother attribute of
/etc/security/user, which specifies the minimum of
non-alphabetic characters in a password.
High Level Security
2
Medium Level Security
1
Low Level Security
No effect
AIX Standard Settings
No limit
Yes
Security 347

Table 14. AIX Security Expert Password Policy Rules (continued)
Action button
name Definition
Value set by AIX Security
Expert Undo
Password
expiration warning
time
Sets appropriate value to pwdwarntime attribute of
/etc/security/user, which specifies the number of
days before the system issues a warning that a
password change is required.
High Level Security
14
Medium Level Security
14
Low Level Security
5
AIX Standard Settings
No limit
Yes
AIX Security Expert User Group System and Password definitions
group
AIX Security Expert performs specific actions for user, group, and password definitions.
Table 15. AIX Security Expert User Group System and Password Definitions
Action button
name Description
Value set by AIX Security
Expert Undo
Check group
definitions
Verifies the correctness of group definitions. Runs
the following command to fix and report errors:
% grpck -y ALL
High Level Security
Yes
Medium Level Security
Yes
Low Level Security
Yes
AIX Standard Settings
No effect
No
TCB update Uses the tcbck command to verify and update
TCB. Runs the following command:
% tcbck -y ALL
High Level Security
Yes
Medium Level Security
Yes
Low Level Security
Yes
AIX Standard Settings
Yes
No
Check file
definitions
Uses the sysck command to check and fix the file
base of /etc/objrepos/inventory:
% sysck -i -f \
/etc/security/sysck.cfg.rte
High Level Security
Yes
Medium Level Security
Yes
Low Level Security
Yes
AIX Standard Settings
No effect
No
348 AIX Version 6.1 Security

Table 15. AIX Security Expert User Group System and Password Definitions (continued)
Action button
name Description
Value set by AIX Security
Expert Undo
Check password
definitions
Verifies the correctness of password definitions.
Runs the following command to fix and report
errors:
% pwdck -y ALL
High Level Security
Yes
Medium Level Security
Yes
Low Level Security
Yes
AIX Standard Settings
No effect
No
Check user
definitions
Verifies correctness of user definitions. Runs the
following command to fix and report errors:
% usrck -y ALL
High Level Security
Yes
Medium Level Security
Yes
Low Level Security
Yes
AIX Standard Settings
No effect
No
AIX Security Expert Login Policy Recommendations group
AIX Security Expert provides specific settings for login policy.
Note: To ensure better accountability of security-related activities that are performed by root, it is
recommended that users first log in using their normal user ID and then run the su command to run
commands as root, rather than logging in as root. The system can then associate different users to
activities performed using the root account when multiple users know and use the root password.
Table 16. AIX Security Expert Login Policy Recommendations
Action button name Description
Value set by AIX Security
Expert Undo
Interval between
unsuccessful logins
Sets appropriate value to logininterval attribute of
/etc/security/login.cfg, which specifies the time
interval (in seconds) during which the unsuccessful
login attempts for a port must occur before the port is
disabled. For example, if logininterval is set to 60
and logindisable is set to 4, the account is disabled if
there are four unsuccessful login attempts within one
minute.
High Level Security
300
Medium Level Security
60
Low Level Security
No effect
AIX Standard Settings
No limit
Yes
Number of login
attempts before
locking the account
Sets appropriate value to loginretries attribute of
/etc/security/user, which specifies the number of
consecutive login attempts per account before the
account is disabled. Do not set on root.
High Level Security
3
Medium Level Security
5
Low Level Security
No effect
AIX Standard Settings
No limit
Yes
Security 349

Table 16. AIX Security Expert Login Policy Recommendations (continued)
Action button name Description
Value set by AIX Security
Expert Undo
Remote root login Changes the value of rlogin attribute of
/etc/security/user, which specifies whether remote
login is allowed or not on the system for root account.
High Level Security
False
Medium Level Security
False
Low Level Security
No effect
AIX Standard Settings
True
Yes
Re-enable login
after locking
Sets appropriate value to loginreenable attribute of
/etc/security/login.cfg, which specifies the time
interval (in seconds) after which a port is unlocked
after the port is disabled by logindisable.
High Level Security
360
Medium Level Security
30
Low Level Security
No effect
AIX Standard Settings
No limit
Yes
Disable login after
unsuccessful login
attempts
Sets appropriate value to logindisable attribute of
/etc/security/login.cfg, which specifies the number of
unsuccessful login attempts on a port before the port
is locked.
High Level Security
10
Medium Level Security
10
Low Level Security
No effect
AIX Standard Settings
No limit
Yes
Login timeout Sets appropriate value to logintimeout attribute of
/etc/security/login.cfg, which specifies the time
interval allowed to type in a password.
High Level Security
30
Medium Level Security
60
Low Level Security
60
AIX Standard Settings
60
Yes
Delay between
unsuccessful logins
Sets appropriate value to logindelay attribute of
/etc/security/login.cfg, which specifies the delay (in
seconds) between unsuccessful logins. An additional
delay period is added after each failed login. For
example, if logindelay is set to 5, the terminal will
wait five seconds after the first failed login until the
next request. After a second failed login, the terminal
will wait 10 seconds (2*5), and after a third failed
login, the terminal will wait 15 seconds (3*5).
High Level Security
10
Medium Level Security
5
Low Level Security
5
AIX Standard Settings
No limit
Yes
350 AIX Version 6.1 Security

Table 16. AIX Security Expert Login Policy Recommendations (continued)
Action button name Description
Value set by AIX Security
Expert Undo
Local login Changes the value of login attribute of
/etc/security/user, which specifies whether console
login is allowed or not on the system for root account.
High Level Security
False
Medium Level Security
No effect
Low Level Security
No effect
AIX Standard Settings
True
Yes
AIX Security Expert Audit Policy Recommendations group
AIX Security Expert provides specific audit policy settings.
As with other security settings, bin auditing also needs the analysis (prerequisite) rules to be satisfied
before applying any audit rules for High, Medium, or Low Level Security. The following analysis rules need
to be satisfied for bin auditing:
1. The prerequisite rule to audit must check to see that audit is not currently running. If auditing is already
running, then audit has been previously configured and AIX Security Expert must not alter the existing
audit configuration and procedure.
2. There must be at least 100 megabytes of free space in a volume group that is automatically varied on
or the /audit filesystem must currently exist with a size of 100 megabytes or more.
If the above prerequisite conditions are met, and the audit options is selected with in AIX Security Expert,
then AIX Security Expert will configure and enable auditing on the system in the following manner. The AIX
Security Expert Enable binaudit action button sets audit policy. Auditing must be enabled on the system.
1. The /audit JFS file system must be created and mounted before starting audit. The file system must
have a size of at least 100 megabytes.
2. Audit must be run in bin mode. The /etc/security/audit/config file must be configured as follows:
start:
binmode = on
streammode = off
bin:
trail = /audit/trail
bin1 = /audit/bin1
bin2 = /audit/bin2
binsize = 10240
cmds
= /etc/security/audit/bincmds
.
.
etc
3. Add the auditing entries for root and normal user for High, Medium, and Low Level Security.
4. Audit must be enabled on reboot for High, Medium, and Low Level Security.
5. New users created must have audit enabled for High, Medium, and Low Level Security. This can be
done by adding an auditclasses entry to the user stanza in the /usr/lib/security/mkuser.default file.
6. A cronjob must be added to avoid filling up the /audit filesystem.
The audit undo rule must shut down audit and remove its enablement on reboot.
Security 351

The following tables lists the values set by AIX Security Expert for Enable binaudit:
Table 17. Values set by AIX Security Expert for Enable binaudit
High Level Security Medium Level Security Low Level Security AIX Standard Settings
Add the following auditing
entries for root and normal
user:
Root:
General
Src
Cron
Tcpip
Ipsec
Lvm
User:
General
Src
Cron
Tcpip
Add the following entry in
the user stanza of the
/usr/lib/security/mkuser.default file for
enabling auditing for newly
created users:
auditclasses=general,SRC,
cron,tcpip
Add the following auditing
entries for root and normal
user:
Root:
General
Src
Tcpip
User:
General
Tcpip
Add the following entry in
the user stanza of the
/usr/lib/security/mkuser.default file for
enabling auditing for newly
created users:
auditclasses=general,
tcpip
Add the following auditing
entries for root and normal
user:
Root:
General
Tcpip
User:
General
Add the following entry in
the user stanza of the
/usr/lib/security/mkuser.default file for
enabling auditing for newly
created users:
auditclasses=general
The /etc/security/audit/config file contains the
following entry:
default=login
Audit class login is defined
as follows:
login = USER_SU,
USER_Login,
USER_Logout,
TERM_Logout,
USER_Exit
Add the following auditing
entries for root and normal
user:
root: general
src
cron
tcpip
ipsec
lvm
aixpertUser: general
src
cron
tcpip
Add the following entry in
the user stanza of the
/usr/lib/security/mkuser.default file for
enabling auditing for newly
created users:
auditclasses=general,SRC,
cron,tcpip
Add the following auditing
entries for root and normal
user:
root: general
src
tcpip
aixpertUser: general
tcpip
Add the following entry in
the user stanza of the
/usr/lib/security/mkuser.default file for
enabling auditing for newly
created users:
auditclasses=general,
tcpip
Add the following auditing
entries for root and normal
user:
root: general
tcpip
aixpertUser: general
Add the following entry in
the user stanza of the
/usr/lib/security/mkuser.default file for
enabling auditing for newly
created users:
auditclasses=general
Yes
352 AIX Version 6.1 Security

The cronjob must run every hour and check the size of /audit. If the Audit Freespace Equation is true then
the Audit Trail Copy Actions must be performed. The Audit Freespace Equation is defined to ensure that
the /audit filesystem is not full; if the /audit filesystem is full, the Audit Trail Copy Actions are done
(disabling auditing, taking backup of /audit/trail to /audit/trailOneLevelBack, and re-enabling auditing).
AIX Security Expert /etc/inittab Entries group
AIX Security Expert comments out specific entries in /etc/inittab so that they do not start when the system
boots.
Table 18. AIX Security Expert /etc/inittab Entries
Action button
name Description
Value set by AIX
Security Expert Undo
Disable
qdaemon/Enable
qdaemon
Comments out or uncomments the following entry in /etc/inittab:
qdaemon:2:wait:/usr/bin/startsrc –sqdaemon
High Level Security
Comment
Medium Level
Security
Comment
Low Level Security
No effect
AIX Standard
Settings
Uncomment
Yes
Disable lpd
daemon/Enable
lpd daemon
Comments out or uncomments the following entry in /etc/inittab:
lpd:2:once:/usr/bin/startsrc -s lpd
High Level Security
Comment
Medium Level
Security
Comment
Low Level Security
No effect
AIX Standard
Settings
Uncomment
Yes
Disable
CDE/Enable CDE
If the system does not have an LFT configured, comments out or
uncomments the following entry in /etc/inittab:
dt:2:wait:/etc/rc.dt
High Level Security
Comment
Medium Level
Security
Comment
Low Level Security
No effect
AIX Standard
Settings
Uncomment
Yes
Security 353

Table 18. AIX Security Expert /etc/inittab Entries (continued)
Action button
name Description
Value set by AIX
Security Expert Undo
Disable piobe
daemon/Enable
piobe daemon
Comments out or uncomments the following entry in /etc/inittab:
piobe:2:wait:/usr/lib/lpd/pio/etc/pioinit >/dev/null 2>&1
High Level Security
Comment
Medium Level
Security
Comment
Low Level Security
No effect
AIX Standard
Settings
Uncomment
Yes
AIX Security Expert /etc/rc.tcpip Settings group
AIX Security Expert comments out specific entries in /etc/rc.tcpip so that they do not start when the
system boots.
The following table lists entries that are commented out in /etc/rc.tcpip so that they do not start when the
system boots.
Table 19. AIX Security Expert /etc/rc.tcpip Settings
Action button
name Description
Value set by AIX
Security Expert Undo
Disable mail
client/Enable
mail client
Comments out or uncomments the following entry from
/etc/rc.tcpip:
start /usr/lib/sendmail "$src_running"
High Level Security
Comment
Medium Level
Security
No effect
Low Level Security
No effect
AIX Standard
Settings
Uncomment
Yes
Disable routing
daemon
Comments out the following entry from /etc/rc.tcpip:
start /usr/sbin/routed "$src_running" -q
High Level Security
Yes
Medium Level
Security
No effect
Low Level Security
No effect
AIX Standard
Settings
Yes
Yes
354 AIX Version 6.1 Security
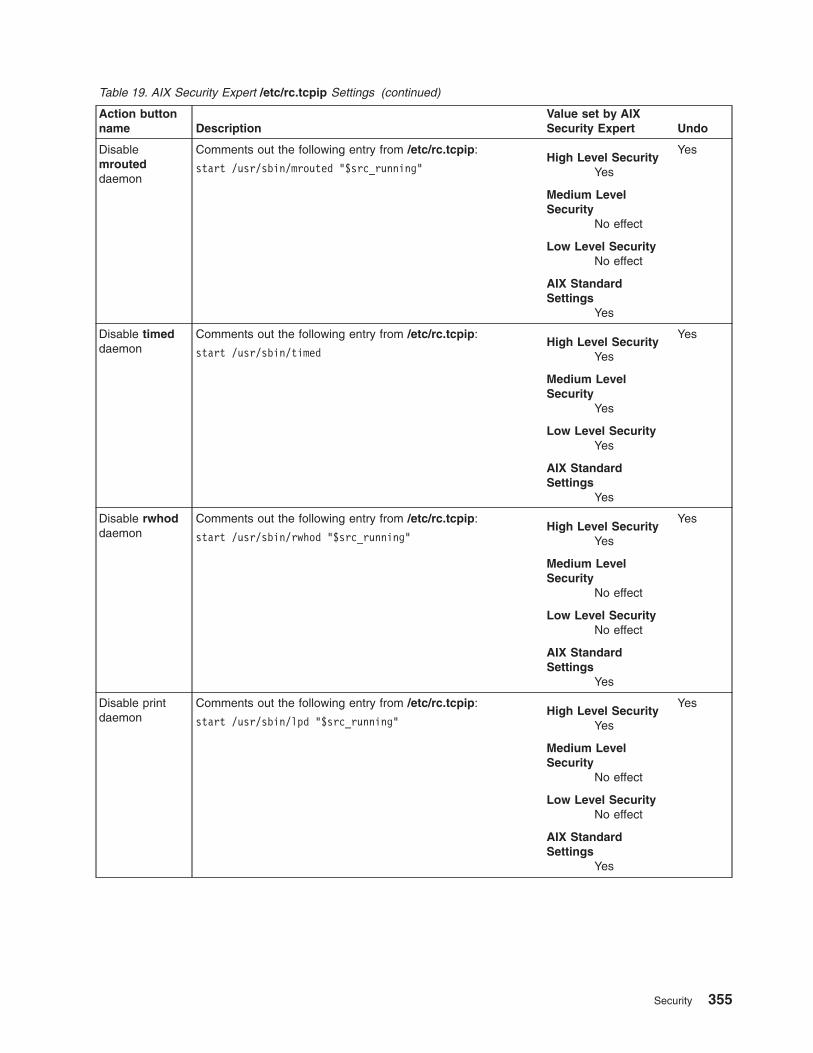
Table 19. AIX Security Expert /etc/rc.tcpip Settings (continued)
Action button
name Description
Value set by AIX
Security Expert Undo
Disable
mrouted
daemon
Comments out the following entry from /etc/rc.tcpip:
start /usr/sbin/mrouted "$src_running"
High Level Security
Yes
Medium Level
Security
No effect
Low Level Security
No effect
AIX Standard
Settings
Yes
Yes
Disable timed
daemon
Comments out the following entry from /etc/rc.tcpip:
start /usr/sbin/timed
High Level Security
Yes
Medium Level
Security
Yes
Low Level Security
Yes
AIX Standard
Settings
Yes
Yes
Disable rwhod
daemon
Comments out the following entry from /etc/rc.tcpip:
start /usr/sbin/rwhod "$src_running"
High Level Security
Yes
Medium Level
Security
No effect
Low Level Security
No effect
AIX Standard
Settings
Yes
Yes
Disable print
daemon
Comments out the following entry from /etc/rc.tcpip:
start /usr/sbin/lpd "$src_running"
High Level Security
Yes
Medium Level
Security
No effect
Low Level Security
No effect
AIX Standard
Settings
Yes
Yes
Security 355

Table 19. AIX Security Expert /etc/rc.tcpip Settings (continued)
Action button
name Description
Value set by AIX
Security Expert Undo
Disable SNMP
daemon/Enable
SNMP daemon
Comments out or uncomments the following entry from
/etc/rc.tcpip:
start /usr/sbin/snmpd "$src_running"
High Level Security
Comment
Medium Level
Security
Comment
Low Level Security
No effect
AIX Standard
Settings
Uncomment
Yes
Stop DHCP
Agent
Comments out the following entry from /etc/rc.tcpip:
start /usr/sbin/dhcprd "$src_running"
High Level Security
Yes
Medium Level
Security
Yes
Low Level Security
No effect
AIX Standard
Settings
Yes
Yes
Stop DHCP
Server
Comments out the following entry from /etc/rc.tcpip:
start /usr/sbin/dhcpsd "$src_running"
High Level Security
Yes
Medium Level
Security
Yes
Low Level Security
No effect
AIX Standard
Settings
Yes
Yes
Stop autoconf6 Comments out the following entry from /etc/rc.tcpip:
start /usr/sbin/autoconf6 “"
High Level Security
Yes
Medium Level
Security
No effect
Low Level Security
No effect
AIX Standard
Settings
Yes
Yes
356 AIX Version 6.1 Security

Table 19. AIX Security Expert /etc/rc.tcpip Settings (continued)
Action button
name Description
Value set by AIX
Security Expert Undo
Disable DNS
daemon
Comments out the following entry from /etc/rc.tcpip:
start /usr/sbin/named "$src_running"
High Level Security
Yes
Medium Level
Security
No effect
Low Level Security
No effect
AIX Standard
Settings
Yes
Yes
Disable gated
daemon
Comments out the following entry from /etc/rc.tcpip:
start /usr/sbin/gated "$src_running"
High Level Security
Yes
Medium Level
Security
Yes
Low Level Security
Yes
AIX Standard
Settings
Yes
Yes
Stop DHCP
Client
Comments out the following entry from /etc/rc.tcpip:
start /usr/sbin/dhcpd "$src_running"
High Level Security
Yes
Medium Level
Security
Yes
Low Level Security
No effect
AIX Standard
Settings
Yes
Yes
Disable DPID2
daemon
Comments out the following entry from /etc/rc.tcpip:
start /usr/sbin/dpid2 "$src_running"
High Level Security
Yes
Medium Level
Security
No effect
Low Level Security
No effect
AIX Standard
Settings
Yes
Yes
Security 357

Table 19. AIX Security Expert /etc/rc.tcpip Settings (continued)
Action button
name Description
Value set by AIX
Security Expert Undo
Disable NTP
daemon
Comments out the following entry from /etc/rc.tcpip:
start /usr/sbin/xntpd "$src_running"
High Level Security
Yes
Medium Level
Security
Yes
Low Level Security
No effect
AIX Standard
Settings
Yes
Yes
AIX Security Expert /etc/inetd.conf Settings group
AIX Security Expert comments out specific entries in /etc/inetd.conf.
Default installation of AIX enables a number of network services that can possibly compromise the security
of the system. AIX Security Expert disables unnecessary and unsecure services by commenting out their
respective entries from the /etc/inetd.conf file. For AIX Standard Settings, these entries are
uncommented. The following table lists entries that are commented out or uncommented in
/etc/inetd.conf.
Table 20. AIX Security Expert /etc/inetd.conf Settings
Action button
name Description
Value set by AIX
Security Expert Undo
Disable sprayd
in
/etc/inetd.conf
Comments out the following entry from /etc/inetd.conf:
sprayd sunrpc_udp udp wait root \
/usr/lib/netsvc/
High Level Security
Yes
Medium Level Security
Yes
Low Level Security
No effect
AIX Standard Settings
Yes
Yes
Disable UDP
chargen service
in
/etc/inetd.conf
Comments out the following entry from /etc/inetd.conf:
chargen dgram udp wait root internal
High Level Security
Yes
Medium Level Security
No effect
Low Level Security
No effect
AIX Standard Settings
Yes
Yes
358 AIX Version 6.1 Security

Table 20. AIX Security Expert /etc/inetd.conf Settings (continued)
Action button
name Description
Value set by AIX
Security Expert Undo
Disable telnet /
Enable telnet
Comments out or uncomments the following entry from
/etc/inetd.conf:
telnet stream tcp6 nowait root \
/usr/sbin/telnetd telnetd
High Level Security
Comment
Medium Level Security
No effect
Low Level Security
No effect
AIX Standard Settings
Uncomment
Yes
Disable UDP
Echo service in
/etc/inetd.conf
Comments out the following entry from /etc/inetd.conf:
echo dgram udp wait root internal
High Level Security
Yes
Medium Level Security
No effect
Low Level Security
No effect
AIX Standard Settings
Yes
Yes
Disable tftp in
/etc/inetd.conf
Comments out the following entry from /etc/inetd.conf:
tftp dgram udp6 SRC nobody \
/usr/sbin/tftpd tftpd -n
High Level Security
Yes
Medium Level Security
Yes
Low Level Security
No effect
AIX Standard Settings
Yes
Yes
Disable krshd
daemon
Comments out the following entry from /etc/inetd.conf:
kshell stream tcp nowait root \
/usr/sbin/krshd krshd
High Level Security
Yes
Medium Level Security
No effect
Low Level Security
No effect
AIX Standard Settings
Yes
Yes
Disable
rusersd in
/etc/inetd.conf
Comments out the following entry from /etc/inetd.conf:
rusersd sunrpc_udp udp wait root \
/usr/lib/netsvc/
High Level Security
Yes
Medium Level Security
Yes
Low Level Security
No effect
AIX Standard Settings
Yes
Yes
Security 359

Table 20. AIX Security Expert /etc/inetd.conf Settings (continued)
Action button
name Description
Value set by AIX
Security Expert Undo
Disable rexecd
in
/etc/inetd.conf
/ Enable rexecd
in
/etc/inetd.conf
Comments out the following entry from /etc/inetd.conf:
exec stream tcp6 nowait root \
/usr/sbin/rexecd rexecd
High Level Security
Comment
Medium Level Security
Comment
Low Level Security
No effect
AIX Standard Settings
Uncomment
Yes
Disable POP3D Comments out the following entry from /etc/inetd.conf:
pop3 stream tcp nowait root \
/usr/sbin/pop3d pop3d
High Level Security
Yes
Medium Level Security
No effect
Low Level Security
No effect
AIX Standard Settings
Yes
Yes
Disable pcnfsd
in
/etc/inetd.conf
Comments out the following entry from /etc/inetd.conf:
pcnfsd sunrpc_udp udp wait root \
/usr/sbin/rpc.pcnfsd pcnfsd
High Level Security
Yes
Medium Level Security
No effect
Low Level Security
No effect
AIX Standard Settings
Yes
Yes
Disable bootpd
in
/etc/inetd.conf
Comments out the following entry from /etc/inetd.conf:
bootps dgram udp wait root \
/usr/sbin/bootpd
High Level Security
Yes
Medium Level Security
Yes
Low Level Security
No effect
AIX Standard Settings
Yes
Yes
Disable rwalld
in
/etc/inetd.conf
Comments out the following entry from /etc/inetd.conf:
rwalld sunrpc_udp udp wait root \
/usr/lib/netsvc/
High Level Security
Yes
Medium Level Security
Yes
Low Level Security
No effect
AIX Standard Settings
Yes
Yes
360 AIX Version 6.1 Security

Table 20. AIX Security Expert /etc/inetd.conf Settings (continued)
Action button
name Description
Value set by AIX
Security Expert Undo
Disable UDP
discard service
in
/etc/inetd.conf
Comments out the following entry from /etc/inetd.conf:
discard dgram udp wait root \
internal
High Level Security
Yes
Medium Level Security
No effect
Low Level Security
No effect
AIX Standard Settings
Yes
Yes
Disable TCP
daytime service
in
/etc/inetd.conf
/ Enable TCP
daytime service
in
/etc/inetd.conf
Commentsout or uncomments the following entry from
/etc/inetd.conf:
daytime stream tcp nowait root \
internal
High Level Security
Comment
Medium Level Security
No effect
Low Level Security
No effect
AIX Standard Settings
Uncomment
Yes
Disable netstat
in
/etc/inetd.conf
Comments out the following entry from /etc/inetd.conf:
netstat stream tcp nowait nobody \
/usr/bin/netstat
High Level Security
Yes
Medium Level Security
Yes
Low Level Security
No effect
AIX Standard Settings
Yes
Yes
Disable rshd
daemon/Enable
rshd daemon
Comments out or uncomments the following entry from
/etc/inetd.conf:
shell stream tcp6 nowait root \
/usr/sbin/rshd rshd rshd
High Level Security
Comment
Medium Level Security
Comment
Low Level Security
Comment
AIX Standard Settings
Uncomment
Yes
Disable cmsd
service in
/etc/inetd.conf
/ Enable cmsd
service in
/etc/inetd.conf
Comments out or uncomments the following entry from
/etc/inetd.conf:
cmsd sunrpc_udp udp wait root \
/usr/dt/bin/rpc.cms cmsd
High Level Security
Comment
Medium Level Security
No effect
Low Level Security
No effect
AIX Standard Settings
Uncomment
Yes
Security 361

Table 20. AIX Security Expert /etc/inetd.conf Settings (continued)
Action button
name Description
Value set by AIX
Security Expert Undo
Disable
ttdbserver
service in
/etc/inetd.conf
/ Enable
ttdbserver
service in
/etc/inetd.conf
Comments out or uncomments the following entry from
/etc/inetd.conf:
ttdbserver sunrpc_tcp tcp wait \
root /usr/dt/bin/
High Level Security
Comment
Medium Level Security
No effect
Low Level Security
No effect
AIX Standard Settings
Uncomment
Yes
Disable uucpd
in
/etc/inetd.conf
/ Enable uucpd
in
/etc/inetd.conf
Commentsout or uncomments the following entry from
/etc/inetd.conf:
uucp stream tcp nowait root \
/usr/sbin/uucpd uucpd
High Level Security
Comment
Medium Level Security
No effect
Low Level Security
No effect
AIX Standard Settings
Uncomment
Yes
Disable UDP
time service in
/etc/inetd.conf
/ Enable UDP
time service in
/etc/inetd.conf
Comments out or uncomments the following entry from
/etc/inetd.conf:
time dgram udp wait root internal
High Level Security
Comment
Medium Level Security
No effect
Low Level Security
No effect
AIX Standard Settings
Uncomment
Yes
Disable TCP
time service in
/etc/inetd.conf
/ Enable TCP
time service in
/etc/inetd.conf
Comments out or uncomments the following entry from
/etc/inetd.conf:
time stream tcp nowait root \
internal
High Level Security
Comment
Medium Level Security
No effect
Low Level Security
No effect
AIX Standard Settings
Uncomment
Yes
Disable rexd in
/etc/inetd.conf
Comments out the following entry from /etc/inetd.conf:
rexd sunrpc_tcp tcp wait root \
/usr/sbin/tpc.rexd.rexd rexd
High Level Security
Yes
Medium Level Security
Yes
Low Level Security
Yes
AIX Standard Settings
Yes
Yes
362 AIX Version 6.1 Security

Table 20. AIX Security Expert /etc/inetd.conf Settings (continued)
Action button
name Description
Value set by AIX
Security Expert Undo
Disable TCP
chargen service
in
/etc/inetd.conf
Comments out the following entry from /etc/inetd.conf:
chargen stream tcp nowait root \
internal
High Level Security
Yes
Medium Level Security
No effect
Low Level Security
No effect
AIX Standard Settings
Yes
Yes
Disable rlogin
in
/etc/inetd.conf
/ Enable rlogin
in
/etc/inetd.conf
Comments out or uncomments the following entry from
/etc/inetd.conf:
login stream tcp6 nowait root \
/usr/sbin/rlogind rlogind
High Level Security
Comment
Medium Level Security
Comment
Low Level Security
No effect
AIX Standard Settings
Uncomment
Yes
Disable talk in
/etc/inetd.conf
Comments out or uncomments the following entry from
/etc/inetd.conf:
talk dgram udp wait root \
/usr/sbin/talkd talkd
High Level Security
Comment
Medium Level Security
Comment
Low Level Security
Comment
AIX Standard Settings
Uncomment
Yes
Disable fingerd
in
/etc/inetd.conf
Comments out the following entry from /etc/inetd.conf:
finger stream tcp nowait nobody \
/usr/sbin/fingerd fingerd
High Level Security
Yes
Medium Level Security
Yes
Low Level Security
No effect
AIX Standard Settings
Yes
Yes
Disable FTP /
Enable FTP
Comments out or uncomments the following entry from
/etc/inetd.conf:
ftp stream tcp6 nowait root \
/usr/sbin/ftpd ftpd
High Level Security
Comment
Medium Level Security
No effect
Low Level Security
No effect
AIX Standard Settings
Uncomment
Yes
Security 363

Table 20. AIX Security Expert /etc/inetd.conf Settings (continued)
Action button
name Description
Value set by AIX
Security Expert Undo
Disable IMAPD Comments out the following entry from /etc/inetd.conf:
imap2 stream tcp nowait root \
/usr/sbin/imapd imapd
High Level Security
Yes
Medium Level Security
No effect
Low Level Security
No effect
AIX Standard Settings
Yes
Yes
Disable comsat
in
/etc/inetd.conf
Comments out the following entry from /etc/inetd.conf:
comsat dgram udp wait root \
/usr/sbin/comsat comsat
High Level Security
Yes
Medium Level Security
No effect
Low Level Security
No effect
AIX Standard Settings
Yes
Yes
Disable
rquotad in
/etc/inetd.conf
Comments out the following entry from /etc/inetd.conf:
rquotad sunrpc_udp udp wait root \
/usr/sbin/rpc.rquotad
High Level Security
Yes
Medium Level Security
Yes
Low Level Security
Yes
AIX Standard Settings
Yes
Yes
Disable UDP
daytime service
in
/etc/inetd.conf
/ Enable UDP
daytime service
in
/etc/inetd.conf
Comments out or uncomments the following entry from
/etc/inetd.conf:
daytime dgram udp wait root internal
High Level Security
Comment
Medium Level Security
No effect
Low Level Security
No effect
AIX Standard Settings
Uncomment
Yes
Disable
krlogind in
/etc/inetd.conf
Comments out the following entry from /etc/inetd.conf:
klogin stream tcp nowait root \
/usr/sbin/krlogind krlogind
High Level Security
Yes
Medium Level Security
No effect
Low Level Security
No effect
AIX Standard Settings
Yes
Yes
364 AIX Version 6.1 Security

Table 20. AIX Security Expert /etc/inetd.conf Settings (continued)
Action button
name Description
Value set by AIX
Security Expert Undo
Disable TCP
Discard service
in
/etc/inetd.conf
Comments out the following entry from /etc/inetd.conf:
discard stream tcp nowait root \
internal
High Level Security
Yes
Medium Level Security
No effect
Low Level Security
No effect
AIX Standard Settings
Yes
Yes
Disable TCP
echo service in
/etc/inetd.conf
Comments out the following entry from /etc/inetd.conf:
echo stream tcp nowait root internal
High Level Security
Yes
Medium Level Security
No effect
Low Level Security
No effect
AIX Standard Settings
Yes
Yes
Disable sysstat
in
/etc/inetd.conf
Comments out the following entry from /etc/inetd.conf:
systat stream tcp nowait nodby \
/usr/bin/ps ps -ef
High Level Security
Yes
Medium Level Security
Yes
Low Level Security
No effect
AIX Standard Settings
Yes
Yes
Disable rstatd
in
/etc/inetd.conf
Comments out the following entry from /etc/inetd.conf:
rstatd sunrpc_udp udp wait root \
/usr/sbin/rpc.rstatd rstatd
High Level Security
Yes
Medium Level Security
Yes
Low Level Security
No effect
AIX Standard Settings
Yes
Yes
Disable dtspc in
/etc/inetd.conf
Comments out the following entry from /etc/inetd.conf:
dtspc stream tcp nowait root \
/usr/dt/bin/dtspcd
High Level Security
Yes
Medium Level Security
No effect
Low Level Security
No effect
AIX Standard Settings
Yes
Yes
Security 365

AIX Security Expert Disable SUID of Commands group
By default, the following commands are installed with the SUID bit set. For High, Medium, and Low
security, this bit is unset. For AIX Standard Settings, the SUID bit is restored on these commands.
Table 21. AIX Security Expert Disable SUID of Commands
Action button name Description
Value set by AIX Security
Expert Undo
hls_filepermgr File Permissions Manager: Runs fpm
command with high option to remove setuid,
setgid from privileged commands
High Level Security Yes
mls_filepermgr File Permissions Manager: Runs fpm
command with medium option to remove
setuid, setgid from privileged commands
Medium Level Security Yes
lls_filepermgr File Permissions Manager: Runs fpm
command with low option to remove setuid,
setgid from privileged commands
Low Level Security Yes
AIX Security Expert Disable Remote Services group
AIX Security Expert disables unsecure commands for High Level Security and Medium Level Security.
The following commands and daemons are exploited frequently for finding security loopholes. For High
Level Security and Medium Level Security, these unsecure commands are denied execute permissions
and the daemons are disabled. For Low Level Security, these commands and daemons are not affected.
For AIX Standard Settings, these commands and daemons are enabled for use.
v rcp
v rlogin
v rsh
v tftp
v rlogind
v rshd
v tftpd
Table 22. AIX Security Expert Disable Remote Services
Action button name Description
Value set by AIX Security
Expert Undo
Enable unsecure
daemons
If TCB is enabled, sets execute permissions of the
rlogind, rshd, and tftpd daemons, updates the
sysck database with the mode bit changes for these
daemons. If TCB is not enabled, execute
permissions on the rlogind, rshd, and tftpd
daemons are set.
High Level Security
No effect
Medium Level Security
No effect
Low Level Security
No effect
AIX Standard Settings
No effect
Yes
366 AIX Version 6.1 Security

Table 22. AIX Security Expert Disable Remote Services (continued)
Action button name Description
Value set by AIX Security
Expert Undo
Disable secure
commands
1. If TCB is enabled, removes the execute
permissions of the rcp, rlogin, rsh commands
and tftp, and updates the sysck database with
the mode bit changes of these commands. If
TCB is not enabled, removes the execute
permissions on the rcp, rlogin, and rsh
commands.
2. Stops the current instances of rcp, rlogin, rsh,
tftp, and uftp commands, unless one of these
commands is the parent process of AIX Security
Expert.
3. Adds tcpip: stanza to /etc/security/config to
restrict .netrc usage in ftp and rexec.
High Level Security
Yes
Medium Level Security
No effect
Low Level Security
No effect
AIX Standard Settings
No effect
Yes
Enable unsecure
commands
1. If TCB is enabled, sets the execute permissions
of the rcp, rlogin, rsh, and tftp commands and
updates the sysck database with the mode bit
changes of these commands. If TCB is not
enabled, sets the execute permissions on the
rcp, rlogin, and rsh commands.
2. Removes the /etc/security/config file.
High Level Security
No effect
Medium Level Security
No effect
Low Level Security
No effect
AIX Standard Settings
Yes
Yes
Disable unsecure
daemons
1. If TCB is enabled, removes execute
permissions of the rlogind, rshd, and tftpd
daemons and updates the sysck database with
the mode bit changes of these daemons. If TCB
is not enabled, removes the execute
permissions of the rlogind, rshd, and tftpd
daemons.
2. Stops the current instances of the rlogind,
rshd, and tftpd daemons, unless one of these
daemons is the parent process of AIX Security
Expert.
High Level Security
Yes
Medium Level Security
No effect
Low Level Security
No effect
AIX Standard Settings
No effect
Yes
Stop NFS daemon v Removes all NFS mounts
v Disables NFS
v Removes NFS startup script from /etc/inittab
High Level Security
Yes
Medium Level Security
No effect
Low Level Security
No effect
AIX Standard Settings
No effect
Yes
Security 367

Table 22. AIX Security Expert Disable Remote Services (continued)
Action button name Description
Value set by AIX Security
Expert Undo
Enable NFS daemon v Exports all entries listed in /etc/exports
v Adds an entry to /etc/inittab to run /etc/rc.nfs on
system restart
v Runs /etc/rc.nfs immediately
High Level Security
No effect
Medium Level Security
No effect
Low Level Security
No effect
AIX Standard Settings
Yes
Yes
AIX Security Expert Remove access that does not require
Authentication group
AIX supports few services that do not require user authentication to log into the network.
The /etc/hosts.equiv file and any local $HOME/.rhosts files define hosts and user accounts that can run
remote commands on a local host without a password. Unless this capability is explicitly required, these
files should be cleared.
Table 23. AIX Security Expert Remove access that does not require Authentication
Action button
name Description Value set by AIX Security Expert Undo
Remove rhosts and
netrc services
.rhosts and .netrc files store
usernames and passwords in plain
text format, which can be exploited.
High Level Security
Remove .rhosts and .netrc files
from home directories of all users,
including root.
Medium Level Security
Remove .rhosts and .netrc files
from home directories of all users,
including root.
Low Level Security
Remove .rhosts and .netrc files
from home directory of root.
AIX Standard Settings
Remove .rhosts and .netrc files
from home directories of all users,
including root.
Yes
368 AIX Version 6.1 Security

Table 23. AIX Security Expert Remove access that does not require Authentication (continued)
Action button
name Description Value set by AIX Security Expert Undo
Remove entries
from
/etc/hosts.equiv file
The /etc/hosts.equiv file, along with
a local user’s $HOME/.rhosts file,
defines which users on foreign hosts
are permitted to remotely run
commands on the local host. If
someone on the foreign host learns
the details of the username and
hostname, they can find ways to run
remote commands on the local host
without any authentication.
High Level Security
Remove all entries from
/etc/hosts.equiv.
Medium Level Security
Remove all entries from
/etc/hosts.equiv.
Low Level Security
Remove all entries from
/etc/hosts.equiv.
AIX Standard Settings
Remove all entries from
/etc/hosts.equiv.
Yes
AIX Security Expert Tuning Network Options group
Tuning network options to the proper values is a large part of security. Setting a network attribute to 0
disables the option and setting the network attribute to 1 enables the option.
The following table lists the network attribute settings for High, Medium, and Low Level Security. This table
also provides a description of how the proposed value of any particular network option helps ensure the
security of the network.
Table 24. AIX Security Expert Tuning Network Options for network security
Action button name Description
Value set by AIX Security
Expert Undo
Network option
ipsrcrouteforward
Specifies whether or not the system forwards
source-routed packets. Disabling ipsrcrouteforward
prevents access through source routing attacks.
High Level Security
0
Medium Level Security
0
Low Level Security
No effect
AIX Standard Settings
1
Yes
Network option
ipignoreredirects
Specifies whether or not to process received
redirects.
High Level Security
1
Medium Level Security
No effect
Low Level Security
No effect
AIX Standard Settings
No limit
Yes
Security 369
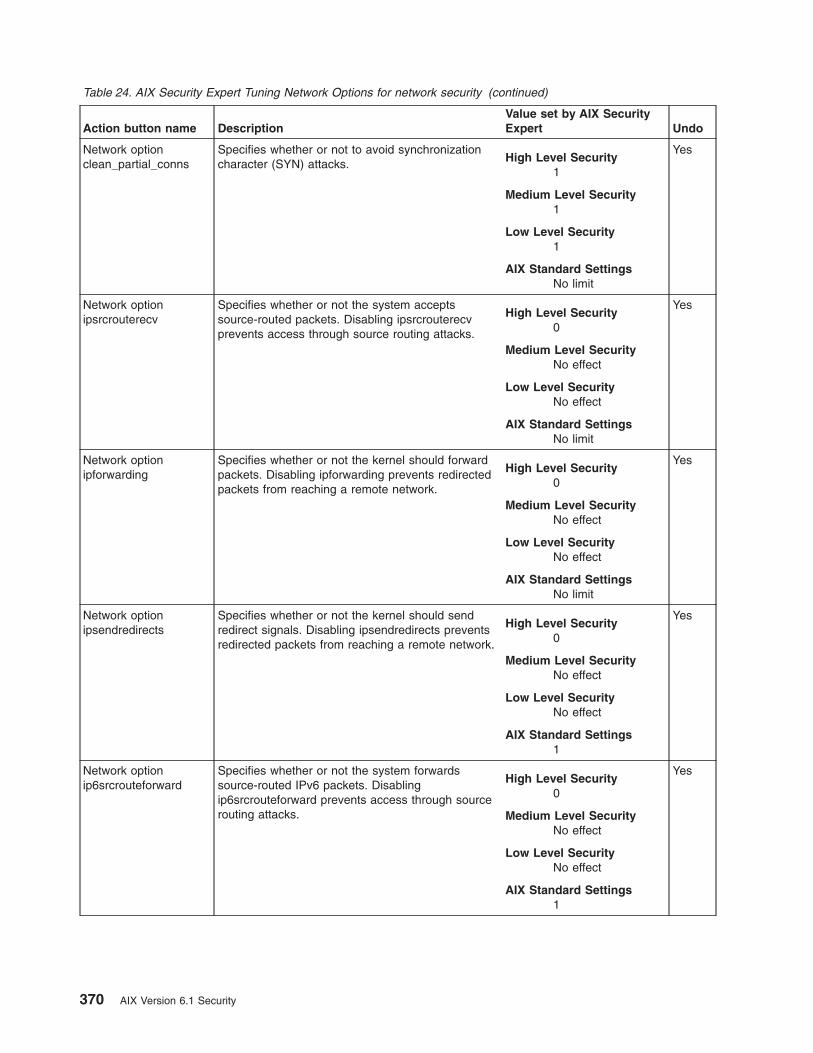
Table 24. AIX Security Expert Tuning Network Options for network security (continued)
Action button name Description
Value set by AIX Security
Expert Undo
Network option
clean_partial_conns
Specifies whether or not to avoid synchronization
character (SYN) attacks.
High Level Security
1
Medium Level Security
1
Low Level Security
1
AIX Standard Settings
No limit
Yes
Network option
ipsrcrouterecv
Specifies whether or not the system accepts
source-routed packets. Disabling ipsrcrouterecv
prevents access through source routing attacks.
High Level Security
0
Medium Level Security
No effect
Low Level Security
No effect
AIX Standard Settings
No limit
Yes
Network option
ipforwarding
Specifies whether or not the kernel should forward
packets. Disabling ipforwarding prevents redirected
packets from reaching a remote network.
High Level Security
0
Medium Level Security
No effect
Low Level Security
No effect
AIX Standard Settings
No limit
Yes
Network option
ipsendredirects
Specifies whether or not the kernel should send
redirect signals. Disabling ipsendredirects prevents
redirected packets from reaching a remote network.
High Level Security
0
Medium Level Security
No effect
Low Level Security
No effect
AIX Standard Settings
1
Yes
Network option
ip6srcrouteforward
Specifies whether or not the system forwards
source-routed IPv6 packets. Disabling
ip6srcrouteforward prevents access through source
routing attacks.
High Level Security
0
Medium Level Security
No effect
Low Level Security
No effect
AIX Standard Settings
1
Yes
370 AIX Version 6.1 Security

Table 24. AIX Security Expert Tuning Network Options for network security (continued)
Action button name Description
Value set by AIX Security
Expert Undo
Network option
directed_broadcast
Specifies whether or not to permit a directed
broadcast to a gateway. Disabling
directed_broadcast helps prevent directed packets
from reaching a remote network.
High Level Security
0
Medium Level Security
0
Low Level Security
0
AIX Standard Settings
No limit
Yes
Network option
tcp_pmtu_discover
Enables or disables path MTU discovery for TCP
applications. Disabling tcp_pmtu_discover prevents
access through source routing attacks.
High Level Security
0
Medium Level Security
0
Low Level Security
0
AIX Standard Settings
1
Yes
Network option
bcastping
Permits response to ICMP echo packets sent to the
broadcast address. Disabling bcastping prevents
smurf attacks.
High Level Security
0
Medium Level Security
0
Low Level Security
0
AIX Standard Settings
No limit
Yes
Network option
icmpaddressmask
Specifies whether or not the system responds to an
ICMP address mask request. Disabling
icmpaddressmask prevents access through source
routing attacks.
High Level Security
0
Medium Level Security
0
Low Level Security
0
AIX Standard Settings
No limit
Yes
Network option
udp_pmtu_discover
Enables or disables path maximum transfer unit
(MTU) discovery for UDP applications. Disabling
udp_pmtu_discover prevents access through source
routing attacks.
High Level Security
0
Medium Level Security
0
Low Level Security
0
AIX Standard Settings
1
Yes
Security 371

Table 24. AIX Security Expert Tuning Network Options for network security (continued)
Action button name Description
Value set by AIX Security
Expert Undo
Network option
ipsrcroutesend
Specifies whether or not applications can send
source-routed packets. Disabling ipsrcroutesend
prevents access through source routing attacks.
High Level Security
0
Medium Level Security
No effect
Low Level Security
No effect
AIX Standard Settings
1
Yes
Network option
nonlocsrcroute
Specifies to the Internet Protocol whether or not
strictly source-routed packets can be addressed to
hosts outside the local network. Disabling
nonlocsrcroute prevents access through source
routing attacks.
High Level Security
0
Medium Level Security
No effect
Low Level Security
No effect
AIX Standard Settings
No limit
Yes
Network option
tcp_tcpsecure
Protects TCP connections against vulnerabilities.
Values:
v 0 = no protection
v 1 = sending a fake SYN to an established
connection
v 2 = sending a fake RST to an established
connection
v 3 = injecting data in an established TCP
connection
v 5-7 = combination of the above vulnerabilities
High Level Security
7
Medium Level Security
7
Low Level Security
5
AIX Standard Settings
No limit
Yes
Network option
sockthresh
Specifies the network memory usage limit. No new
socket connections are allowed to exceed the value
of the sockthresh tunable.
Specifies the maximum amount of network memory
that can be allocated for sockets.
High Level Security
60
Medium Level Security
70
Low Level Security
85
AIX Standard Settings
No limit
Yes
372 AIX Version 6.1 Security

The following network options are related to network performance rather than network security.
Table 25. AIX Security Expert Tuning Network Options for network performance
Action button name Description
Value set by AIX Security
Expert Undo
Network option rfc1323 The rfc1323 tunable enables the TCP window
scaling option.
High Level Security
1
Medium Level Security
1
Low Level Security
1
AIX Standard Settings
No limit
Yes
Network option
tcp_sendspace
The tcp_sendspace tunable specifies how much
data the sending application can buffer in the kernel
before the application is blocked on a send call.
High Level Security
262144
Medium Level Security
262144
Low Level Security
262144
AIX Standard Settings
16384
Yes
Network option
tcp_mssdflt
Default maximum segment size used in
communicating with remote networks.
High Level Security
1448
Medium Level Security
1448
Low Level Security
1448
AIX Standard Settings
1460
Yes
Network option
extendednetstats
Enables more-extensive statistics for network
memory services.
High Level Security
1
Medium Level Security
1
Low Level Security
1
AIX Standard Settings
No limit
Yes
Network option
tcp_recvspace
The tcp_recvspace tunable specifies how many
bytes of data the receiving system can buffer in the
kernel on the receiving sockets queue.
High Level Security
262144
Medium Level Security
262144
Low Level Security
262144
AIX Standard Settings
16384
Yes
Security 373

Table 25. AIX Security Expert Tuning Network Options for network performance (continued)
Action button name Description
Value set by AIX Security
Expert Undo
Network option sb_max The sb_max tunable sets an upper limit on the
number of socket buffers queued to an individual
socket, which controls how much buffer space is
consumed by buffers that are queued to a sender’s
socket or to a receiver’s socket.
High Level Security
1048576
Medium Level Security
1048576
Low Level Security
1048576
AIX Standard Settings
1048576
Yes
AIX Security Expert IPsec filter rules group
AIX Security Expert provides the following IPsec filters.
Table 26. AIX Security Expert IPsec filter rules
Action button name Description
Value set by AIX Security
Expert Undo
Shun host for 5
minutes
Shuns or blocks packets intended for several tcp
and udp ports with known vulnerabilities on the host
for five minutes. The host will not accept any
packets destined for these ports for five minutes.
High Level Security
Yes
Medium Level Security
No effect
Low Level Security
No effect
AIX Standard Settings
No effect
Yes
Guard host against
port scans
Guards against port scans. Any remote host
performing a port scan is shunned or blocked for
five minutes. All packets from this remote host are
not accepted for five minutes.
High Level Security
Yes
Medium Level Security
Yes
Low Level Security
No effect
AIX Standard Settings
No effect
Yes
AIX Security Expert Miscellaneous group
AIX Security Expert provides miscellaneous security settings for High, Medium, and Low Level Security.
374 AIX Version 6.1 Security

Table 27. AIX Security Expert Miscellaneous group
Action button
name Description
Value set by AIX Security
Expert Undo
Remove dot from
path root
Check $HOME/.profile , $HOME/.kshrc,
$HOME/.cshrc, and $HOME/.login files for ″.″ in
the PATH environment variable and remove it if it
exists.
High Level Security
Yes
Medium Level Security
Yes
Low Level Security
Yes
AIX Standard Settings
Yes
Yes
Limit system
access
Ensures that root is the only user permitted to run
cron jobs.
High Level Security
Makes root the only
user in the cron.allow
file and removes the
cron.deny file.
Medium Level Security
No effect
Low Level Security
No effect
AIX Standard Settings
Removes the
cron.allow file and
deletes all entries in the
cron.deny file.
Yes
Remove dot from
/etc/environment
Removes “.” from PATH environment variable in
/etc/environment file.
High Level Security
Yes
Medium Level Security
Yes
Low Level Security
Yes
AIX Standard Settings
Yes
Yes
Remove dot from
non-root path
Remove “.” from the PATH environment variable
from the $HOME/.profile , $HOME/.kshrc,
$HOME/.cshrc, and $HOME/.login files of all
non-root users.
High Level Security
Yes
Medium Level Security
No effect
Low Level Security
No effect
AIX Standard Settings
No effect
No
Security 375

Table 27. AIX Security Expert Miscellaneous group (continued)
Action button
name Description
Value set by AIX Security
Expert Undo
Add root user in
/etc/ftpusers file
Add root user name to /etc/ftpusers file to disable
remote root ftp.
High Level Security
Yes
Medium Level Security
Yes
Low Level Security
No effect
AIX Standard Settings
Yes
Yes
Remove root user
in /etc/ftpusers file
Remove root entry from /etc/ftpusers to enable
remote root ftp.
High Level Security
No effect
Medium Level Security
No effect
Low Level Security
No effect
AIX Standard Settings
Yes
Yes
Set login herald Checks /etc/security/login.cfg to ensure that a
herald value is not specified. If the default herald is
being used, the herald should be changed. The
herald can be changed only if the system’s locale is
en_US or another English locale. If this criteria is
met, the herald attribute’s value in the default
stanza of /etc/security/login.cfg file is set to the
following:
Unauthorized use of this \
system is prohibited.\nlogin:
Note: The security setting takes effect only for new
sessions. The security setting does not take effect
in the session where the configuration was set.
High Level Security
herald=″Unauthorized
use of this system is
prohibited.\nlogin:″
Medium Level Security
herald=″Unauthorized
use of this system is
prohibited.\nlogin:″
Low Level Security
herald=″Unauthorized
use of this system is
prohibited.\nlogin:″
AIX Standard Settings
herald=
Yes
Remove guest
account
For High, Medium, and Low security, removes the
guest account as well as guest’s data on the
machine. For AIX Standard Settings, the guest
account is created on the system.
Note: A system administrator must set the
password for this account explicitly, as AIX Security
Expert is not designed to handle such user
interactive tasks.
High Level Security
Remove guest account
and data
Medium Level Security
Remove guest account
and data
Low Level Security
Remove guest account
and data
AIX Standard Settings
Adds the guest account
on the machine.
Yes
376 AIX Version 6.1 Security
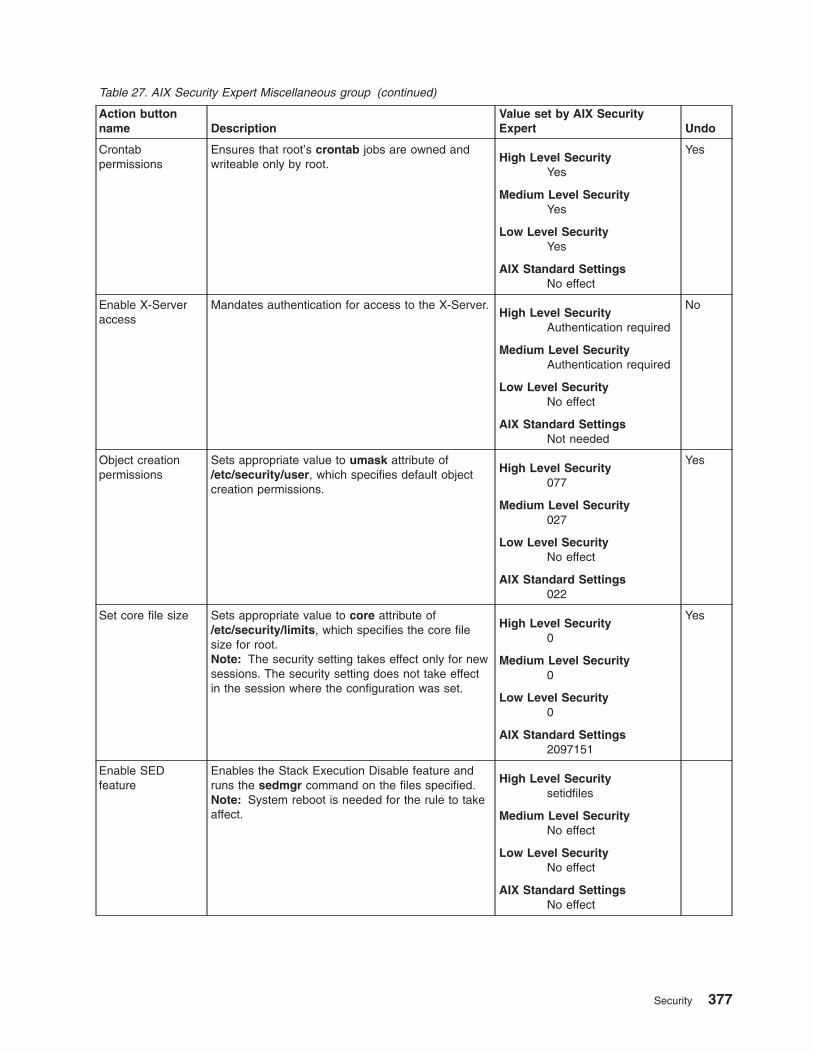
Table 27. AIX Security Expert Miscellaneous group (continued)
Action button
name Description
Value set by AIX Security
Expert Undo
Crontab
permissions
Ensures that root’s crontab jobs are owned and
writeable only by root.
High Level Security
Yes
Medium Level Security
Yes
Low Level Security
Yes
AIX Standard Settings
No effect
Yes
Enable X-Server
access
Mandates authentication for access to the X-Server.
High Level Security
Authentication required
Medium Level Security
Authentication required
Low Level Security
No effect
AIX Standard Settings
Not needed
No
Object creation
permissions
Sets appropriate value to umask attribute of
/etc/security/user, which specifies default object
creation permissions.
High Level Security
077
Medium Level Security
027
Low Level Security
No effect
AIX Standard Settings
022
Yes
Set core file size Sets appropriate value to core attribute of
/etc/security/limits, which specifies the core file
size for root.
Note: The security setting takes effect only for new
sessions. The security setting does not take effect
in the session where the configuration was set.
High Level Security
0
Medium Level Security
0
Low Level Security
0
AIX Standard Settings
2097151
Yes
Enable SED
feature
Enables the Stack Execution Disable feature and
runs the sedmgr command on the files specified.
Note: System reboot is needed for the rule to take
affect.
High Level Security
setidfiles
Medium Level Security
No effect
Low Level Security
No effect
AIX Standard Settings
No effect
Security 377
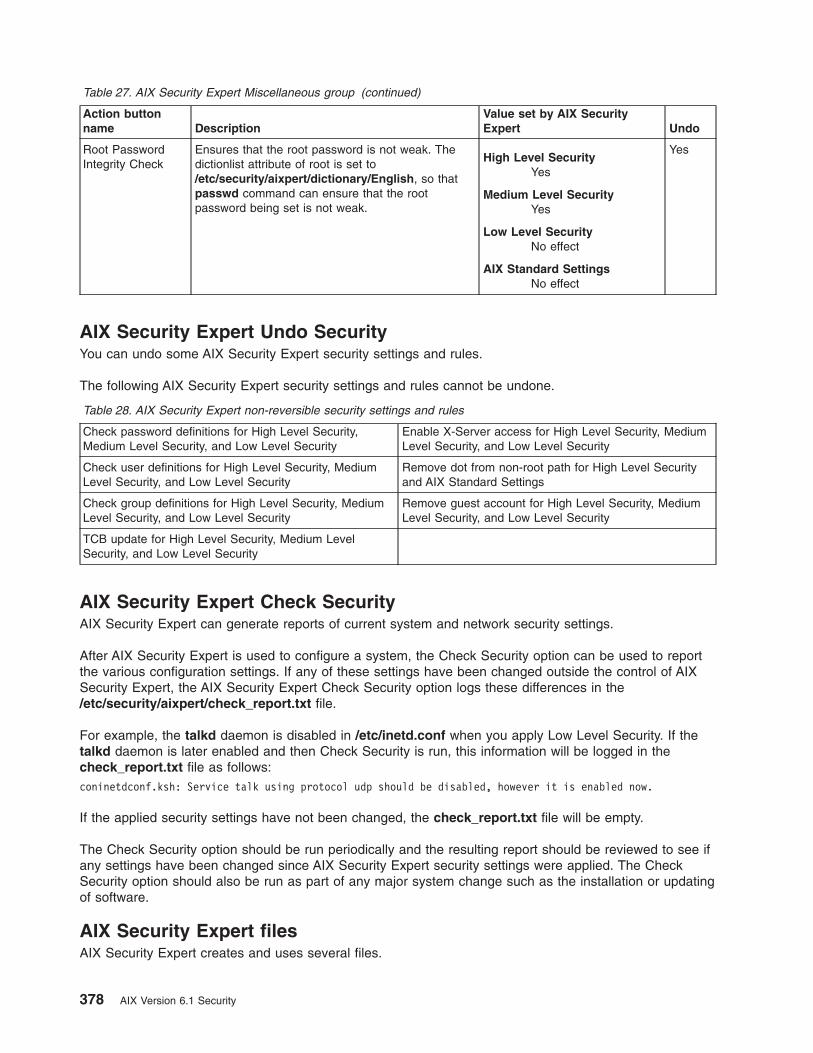
Table 27. AIX Security Expert Miscellaneous group (continued)
Action button
name Description
Value set by AIX Security
Expert Undo
Root Password
Integrity Check
Ensures that the root password is not weak. The
dictionlist attribute of root is set to
/etc/security/aixpert/dictionary/English, so that
passwd command can ensure that the root
password being set is not weak.
High Level Security
Yes
Medium Level Security
Yes
Low Level Security
No effect
AIX Standard Settings
No effect
Yes
AIX Security Expert Undo Security
You can undo some AIX Security Expert security settings and rules.
The following AIX Security Expert security settings and rules cannot be undone.
Table 28. AIX Security Expert non-reversible security settings and rules
Check password definitions for High Level Security,
Medium Level Security, and Low Level Security
Enable X-Server access for High Level Security, Medium
Level Security, and Low Level Security
Check user definitions for High Level Security, Medium
Level Security, and Low Level Security
Remove dot from non-root path for High Level Security
and AIX Standard Settings
Check group definitions for High Level Security, Medium
Level Security, and Low Level Security
Remove guest account for High Level Security, Medium
Level Security, and Low Level Security
TCB update for High Level Security, Medium Level
Security, and Low Level Security
AIX Security Expert Check Security
AIX Security Expert can generate reports of current system and network security settings.
After AIX Security Expert is used to configure a system, the Check Security option can be used to report
the various configuration settings. If any of these settings have been changed outside the control of AIX
Security Expert, the AIX Security Expert Check Security option logs these differences in the
/etc/security/aixpert/check_report.txt file.
For example, the talkd daemon is disabled in /etc/inetd.conf when you apply Low Level Security. If the
talkd daemon is later enabled and then Check Security is run, this information will be logged in the
check_report.txt file as follows:
coninetdconf.ksh: Service talk using protocol udp should be disabled, however it is enabled now.
If the applied security settings have not been changed, the check_report.txt file will be empty.
The Check Security option should be run periodically and the resulting report should be reviewed to see if
any settings have been changed since AIX Security Expert security settings were applied. The Check
Security option should also be run as part of any major system change such as the installation or updating
of software.
AIX Security Expert files
AIX Security Expert creates and uses several files.
378 AIX Version 6.1 Security

/etc/security/aixpert/core/aixpertall.xml
Contains an XML listing of all possible security settings.
/etc/security/aixpert/core/appliedaixpert.xml
Contains an XML list of applied security settings.
/etc/security/aixpert/core/secaixpert.xml
Contains an XML listing of selected security settings when processed by the AIX Security Expert
GUI.
/etc/security/aixpert/log/aixpert.log
Contains a trace log of applied security settings. AIX Security Expert does not use syslog; AIX
Security Expert writes directly to /etc/security/aixpert/log/aixpert.log.
Note: The AIX Security Expert XML and log files are created with the following permissions:
/etc/security/aixpert/
drwx------
/etc/security/aixpert/core/
drwx------
/etc/security/aixpert/core/aixpertall.xml
r--------
/etc/security/aixpert/core/appliedaixpert.xml
/etc/security/aixpert/core/secaixpert.xml
/etc/security/aixpert/log
drwx------
/etc/security/aixpert/log/aixpert.log
-rw-------
/etc/security/aixpert/core/secundoaixpert.xml
rw-------
/etc/security/aixpert/check_report.txt
rw-------
AIX Security Expert High level security scenario
This is a scenario for AIX Security Expert High level security.
The AIX Security Expert view of security levels is derived in part from the National Institute of Standards
and Technology document Security Configuration Checklists Progarm for IT Pruducts - Guidance for
CheckLists Users and Developers (http://csrc.nist.gov/checklists/download_sp800-70.html). However, High,
Medium, and Low level security mean different things to different people. It is important to understand the
environment in which your system operates. If you chose a security level that too high, you could lock
yourself out of your computer. If you chose a security level that is too low, your computer might be
vulnerable to a cyber attack.
This is an example of an environment that requires High Level Security. Bob will be colocating his system
with an Internet service provider. The system will be connected directly to the Internet, will run as a HTTP
server, will contain sensitive user data, and needs to be administered remotely by Bob. The system should
be set up and tested on an isolated local network before the system is put online with the ISP.
High level security is the correct security level for this environment, but Bob needs remote access to the
system. High level security does not permit telnet, rlogin, ftp, and other common connections that
transmit passwords over the network in the clear. These passwords can easily be snooped by someone on
the Internet. Bob needs a secure method to log in remotely, such as openssh. Bob can read the complete
Security 379

AIX Security Expert documentation to see if there is anything unique to his environment that might be
inhibited by High level security. If so, he can deselect this when the detailed High level security panel is
displayed. Bob should also configure and start the HTTP server or any other services he intends to offer
on his system.
When Bob then selects High level security, AIX Security Expert will recognize that the running services are
required and will not block access to their ports. Access to all other ports could be a vulnerability and High
level security will block these ports. After testing this configuration, Bob’s machine is now ready to go live
on the Internet.
AIX Security Expert Medium level security scenario
This is a scenario for AIX Security Expert Medium level security.
Alice needs to security harden a system that will be connected to the corporate network, which resides
behind the corporate firewall. The network is secure and well-administered. This system will be used by a
large number of users who need to access the system telnet and ftp. Alice wants the common security
settings in place, such as port scan protection and password expirations, but the system must also be
open to most remote access methods. In this scenario, Medium level security is the most appropriate
security setting for Alice’s system.
AIX Security Expert Low level security scenario
This is a scenario for AIX Security Expert Low level security.
Bruce has been administering a system for some time. The system resides on an isolated secure local
network. This system is used for a wide variety of people and services. He wants to bring the system up
from the minimal level of security, but cannot interrupt any form of access to the system. Low level security
is the correct security level for Bruce’s machine.
Security checklist
The following is a checklist of security actions to perform on a newly installed or existing system.
Although this list is not a complete security checklist, it can be used as a foundation to build a security
checklist for your environment.
v When installing a new system, install AIX from secure base media. Perform the following procedures at
installation time:
– Do not install desktop software, such as CDE, GNOME, or KDE, on servers.
– Install required security fixes and any recommended maintenance and technology level fixes. See
the IBM System p eServer Support Fixes website (http://www-03.ibm.com/servers/eserver/support/unixservers/aixfixes.html) for the newest service bulletins, security advisories, and fix information.
– Back up the system after the initial installation and store the system backup in a secure location.
v Establish access control lists for restricted files and directories.
v Disable unnecessary user accounts and system accounts, such as daemon, bin, sys, adm, lp, and
uucp. Deleting accounts is not recommended because it deletes account information, such as user IDs
and user names, which may still be associated with data on system backups. If a user is created with a
previously deleted user ID and the system backup is restored on the system, the new user might have
unexpected access to the restored system.
v Review the /etc/inetd.conf, /etc/inittab, /etc/rc.nfs, and /etc/rc.tcpip files on a regular basis and
remove all unnecessary daemons and services.
v Verify that the permissions for the following files are set correctly:
-rw-rw-r-- root system /etc/filesystems
-rw-rw-r-- root system /etc/hosts
-rw------- root system /etc/inittab
380 AIX Version 6.1 Security
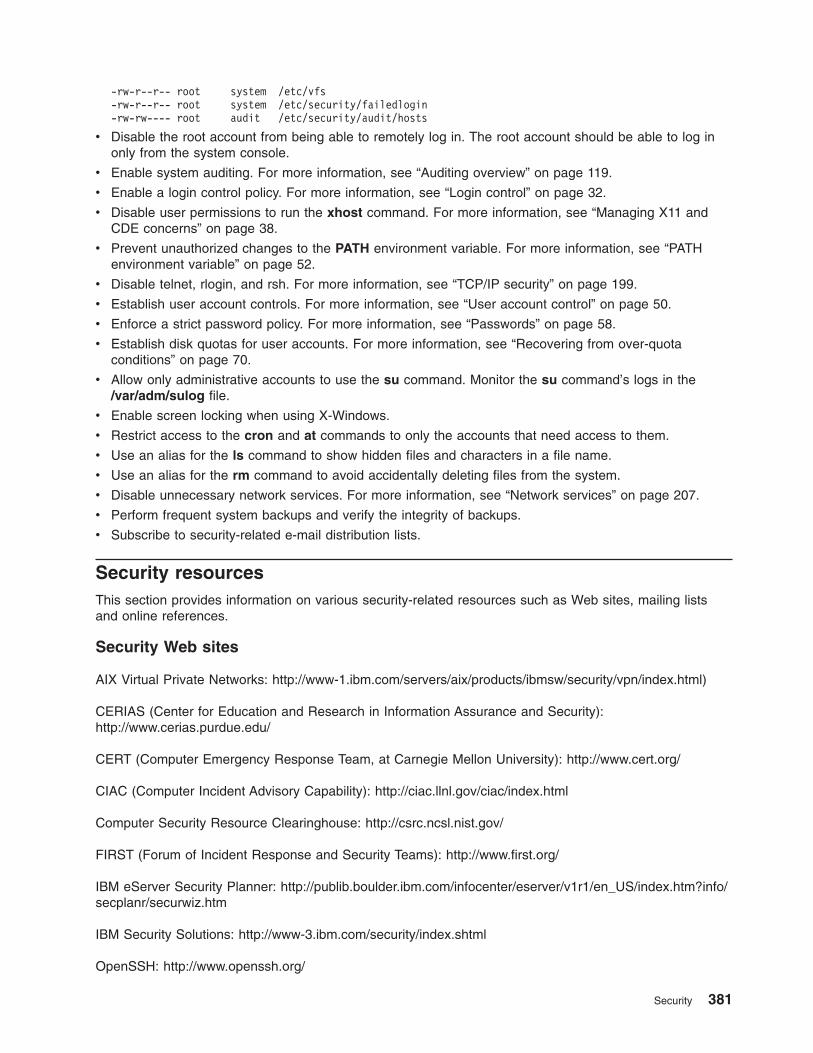
-rw-r--r-- root system /etc/vfs
-rw-r--r-- root system /etc/security/failedlogin
-rw-rw---- root audit /etc/security/audit/hosts
v Disable the root account from being able to remotely log in. The root account should be able to log in
only from the system console.
v Enable system auditing. For more information, see “Auditing overview” on page 119.
v Enable a login control policy. For more information, see “Login control” on page 32.
v Disable user permissions to run the xhost command. For more information, see “Managing X11 and
CDE concerns” on page 38.
v Prevent unauthorized changes to the PATH environment variable. For more information, see “PATH
environment variable” on page 52.
v Disable telnet, rlogin, and rsh. For more information, see “TCP/IP security” on page 199.
v Establish user account controls. For more information, see “User account control” on page 50.
v Enforce a strict password policy. For more information, see “Passwords” on page 58.
v Establish disk quotas for user accounts. For more information, see “Recovering from over-quota
conditions” on page 70.
v Allow only administrative accounts to use the su command. Monitor the su command’s logs in the
/var/adm/sulog file.
v Enable screen locking when using X-Windows.
v Restrict access to the cron and at commands to only the accounts that need access to them.
v Use an alias for the ls command to show hidden files and characters in a file name.
v Use an alias for the rm command to avoid accidentally deleting files from the system.
v Disable unnecessary network services. For more information, see “Network services” on page 207.
v Perform frequent system backups and verify the integrity of backups.
v Subscribe to security-related e-mail distribution lists.
Security resources
This section provides information on various security-related resources such as Web sites, mailing lists
and online references.
Security Web sites
AIX Virtual Private Networks: http://www-1.ibm.com/servers/aix/products/ibmsw/security/vpn/index.html)
CERIAS (Center for Education and Research in Information Assurance and Security):
http://www.cerias.purdue.edu/
CERT (Computer Emergency Response Team, at Carnegie Mellon University): http://www.cert.org/
CIAC (Computer Incident Advisory Capability): http://ciac.llnl.gov/ciac/index.html
Computer Security Resource Clearinghouse: http://csrc.ncsl.nist.gov/
FIRST (Forum of Incident Response and Security Teams): http://www.first.org/
IBM eServer Security Planner: http://publib.boulder.ibm.com/infocenter/eserver/v1r1/en_US/index.htm?info/secplanr/securwiz.htm
IBM Security Solutions: http://www-3.ibm.com/security/index.shtml
OpenSSH: http://www.openssh.org/
Security 381

IBM System p Security home page: http://www-1.ibm.com/servers/eserver/pseries/security/
Security mailing lists
CERT: http://www.cert.org/contact_cert/
IBM System p eServer Support Subscription Service: http://www14.software.ibm.com/webapp/set2/subscriptions/pqvcmjd
comp.security.unix: news:comp.security.unix
Security online references
faqs.org: http://www.faqs.org/faqs/computer-security/
IBM AIX Information Center: http://publib16.boulder.ibm.com/pseries/index.htm
Summary of common AIX system services
The following table lists the more common system services within AIX. Use this table to recognize a
starting point for securing your system.
Before you secure your system, back up all your original configuration files, especially the following:
v /etc/inetd.conf
v /etc/inittab
v /etc/rc.nfs
v /etc/rc.tcpip
Service Daemon Started by Function Comments
inetd/bootps inetd /etc/inetd.conf bootp services
to diskless
clients
v Necessary for Network
Installation Management (NIM)
and remote booting of systems
v Works concurrently with tftp
v Disable in most cases
inetd/chargen inetd /etc/inetd.conf character
generator
(testing only)
v Available as a TCP and UDP
service
v Provides opportunity for Denial
of Service attacks
v Disable unless you are testing
your network
inetd/cmsd inetd /etc/inetd.conf calendar
service (as
used by CDE)
v Runs as root, therefore a
security concern
v Disable unless you require this
service with CDE
v Disable on back room database
servers
inetd/comsat inetd /etc/inetd.conf Notifies
incoming
electronic mail
v Runs as root, therefore a
security concern
v Seldom required
v Disable
382 AIX Version 6.1 Security
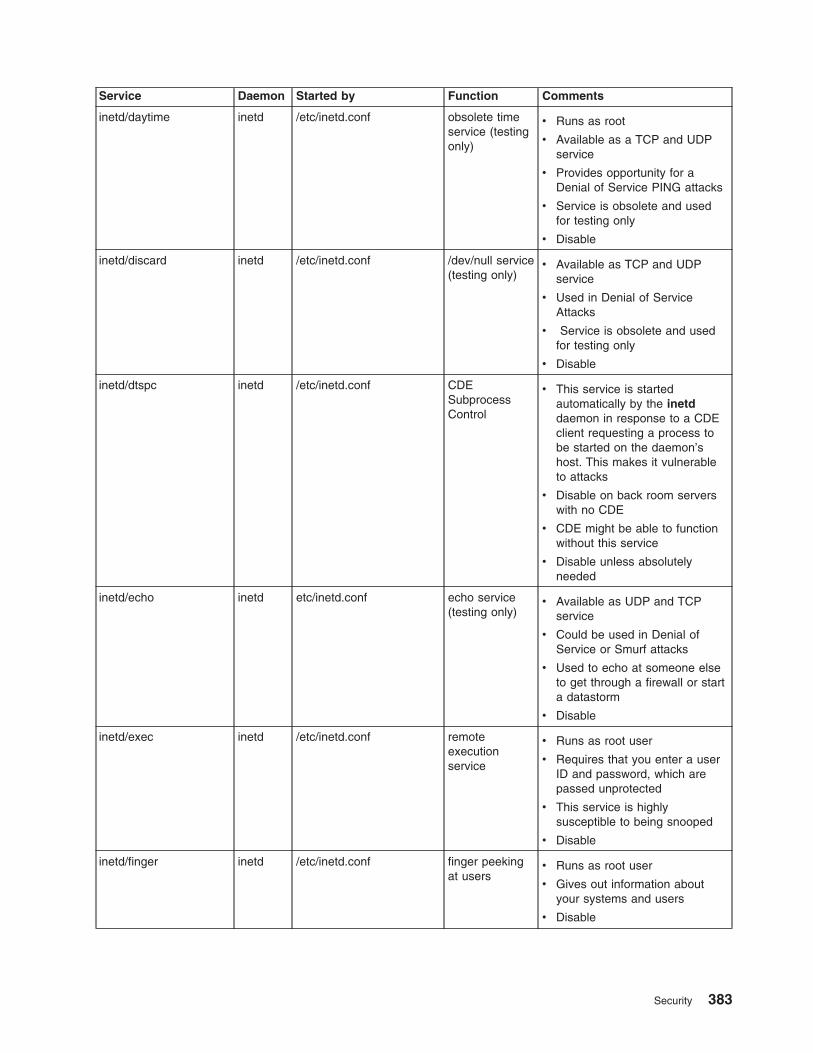
Service Daemon Started by Function Comments
inetd/daytime inetd /etc/inetd.conf obsolete time
service (testing
only)
v Runs as root
v Available as a TCP and UDP
service
v Provides opportunity for a
Denial of Service PING attacks
v Service is obsolete and used
for testing only
v Disable
inetd/discard inetd /etc/inetd.conf /dev/null service
(testing only)
v Available as TCP and UDP
service
v Used in Denial of Service
Attacks
v Service is obsolete and used
for testing only
v Disable
inetd/dtspc inetd /etc/inetd.conf CDE
Subprocess
Control
v This service is started
automatically by the inetd
daemon in response to a CDE
client requesting a process to
be started on the daemon’s
host. This makes it vulnerable
to attacks
v Disable on back room servers
with no CDE
v CDE might be able to function
without this service
v Disable unless absolutely
needed
inetd/echo inetd etc/inetd.conf echo service
(testing only)
v Available as UDP and TCP
service
v Could be used in Denial of
Service or Smurf attacks
v Used to echo at someone else
to get through a firewall or start
a datastorm
v Disable
inetd/exec inetd /etc/inetd.conf remote
execution
service
v Runs as root user
v Requires that you enter a user
ID and password, which are
passed unprotected
v This service is highly
susceptible to being snooped
v Disable
inetd/finger inetd /etc/inetd.conf finger peeking
at users
v Runs as root user
v Gives out information about
your systems and users
v Disable
Security 383

Service Daemon Started by Function Comments
inetd/ftp inetd /etc/inetd.conf file transfer
protocol
v Runs as root user
v User id and password are
transferred unprotected, thus
allowing them to be snooped
v Disable this service and use a
public domain secure shell suite
inetd/imap2 inetd /etc/inetd.conf Internet Mail
Access Protocol
v Ensure that you are using the
latest version of this server
v Only necessary if you are
running a mail server.
Otherwise, disable
v User ID and password are
passed unprotected
inetd/klogin inetd /etc/inetd.conf Kerberos login v Enabled if your site uses
Kerberos authentication
inetd/kshell inetd /etc/inetd.conf Kerberos shell v Enabled if your site uses
Kerberos authentication
inetd/login inetd /etc/inetd.conf rlogin service v Susceptible to IP spoofing, DNS
spoofing
v Data, including User IDs and
passwords, is passed
unprotected
v Runs as root user
v Use a secure shell instead of
this service
inetd/netstat inetd /etc/inetd.conf reporting of
current network
status
v Could potentially give network
information to hackers if run on
your system
v Disable
inetd/ntalk inetd /etc/inetd.conf Allows users to
talk with each
other
v Runs as root user
v Not required on production or
back room servers
v Disable unless absolutely
needed
inetd/pcnfsd inetd /etc/inetd.conf PC NFS file
services
v Disable service if not currently
in use
v If you need a service similar to
this, consider Samba, as the
pcnfsd daemon predates
Microsoft’s release of SMB
specifications
384 AIX Version 6.1 Security

Service Daemon Started by Function Comments
inetd/pop3 inetd /etc/linetd.conf Post Office
Protocol
v User IDs and passwords are
sent unprotected
v Only needed if your system is a
mail server and you have
clients who are using
applications that only support
POP3
v If your clients use IMAP, use
that instead, or use the POP3s
service. This service has a
Secure Socket Layer (SSL)
tunnel
v Disable if you are not running a
mail server or have clients who
need POP services
inetd/rexd inetd /etc/inetd.conf remote
execution
v Runs as root user
v Peers with the on command
v Disable service
v Use rshand rshd instead
inetd/quotad inetd /etc/inetd.conf reports of file
quotas (for NFS
clients)
v Only needed if you are running
NFS file services
v Disable this service unless
required to provide an answer
for the quota command
v If you need to use this service,
keep all patches and fixes for
this service up to date
inetd/rstatd inetd /etc/inetd.conf Kernel Statistics
Server
v If you need to monitor systems,
use SNMP and disable this
service
v Required for use of the rup
command
inetd/rusersd inetd /etc/inetd.conf info about user
logged in
v This is not an essential service.
Disable
v Runs as root user
v Gives out a list of current users
on your system and peers with
rusers
inetd/rwalld inetd /etc/inetd.conf write to all
users
v Runs as root user
v If your systems have interactive
users, you might need to keep
this service
v If your systems are production
or database servers, this is not
needed
v Disable
Security 385

Service Daemon Started by Function Comments
inetd/shell inetd /etc/inetd.conf rsh service v Disable this service if possible.
Use Secure Shell instead
v If you must use this service,
use the TCP Wrapper to stop
spoofing and limit exposures
v Required for theXhier software
ditribution program
inetd/sprayd inetd /etc/inetd.conf RPC spray
tests
v Runs as root user
v Might be required for diagnosis
of NFS network problems
v Disable if you are not running
NFS
inetd/systat inetd /etc/inted.conf ″ps -ef″ status
report
v Allows for remote sites to see
the process status on your
system
v This service is disabled by
default. You must check
periodically to ensure that the
service has not been enabled
inetd/talk inetd /etc/inetd.conf establish split
screen between
2 users on the
net
v Not a required service
v Used with the talk command
v Provides UDP service at Port
517
v Disable unless you need
multiple interactive chat
sessions for UNIX user
inetd/ntalk inetd /etc/inetd.conf ″new talk″
establish split
screen between
2 users on the
net
v Not a required service
v Used with the talk command
v Provides UDP service at Port
517
v Disable unless you need
multiple interactive chat
sessions for UNIX user
inetd/telnet inetd /etc/inetd.conf telnet service v Supports remote login sessions,
but the password and ID are
passed unprotected
v If possible, disable this service
and use Secure Shell for
remote access instead
inetd/tftp inetd /etc/inetd.conf trivial file
transfer
v Provides UDP service at port 69
v Runs as root user and might be
compromised
v Used by NIM
v Disable unless you are using
NIM or have to boot a diskless
workstation
386 AIX Version 6.1 Security

Service Daemon Started by Function Comments
inetd/time inetd /etc/inetd.conf obsolete time
service
v Internal function of inetd that is
used by rdate command.
v Available as TCP and UDP
service
v Sometimes used to synchronize
clocks at boot time
v Service is outdated. Use
ntpdate instead
v Disable this only after you have
tested your systems
(boot/reboot) with this service
disabled and have observed no
problems
inetd/ttdbserver inetd /etc/inetd.conf tool-talk
database server
(for CDE)
v The rpc.ttdbserverd runs as
root user and might be
compromised
v Stated as a required service for
CDE, but CDE is able to work
without it
v Should not be run on back
room servers or any systems
where security is a concern
inetd/uucp inetd /etc/inetd.conf UUCP network v Disable unless you have an
application that uses UUCP
inittab/dt init /etc/rc.dt script in the
/etc/inittab
desktop login to
CDE
environment
v Starts the X11 server on the
console
v Supports the X11 Display
Manager Control Protocol
(xdcmp) so that other X11
stations can log into the same
machine
v Service should be used on
personal workstations only.
Avoid using it for back room
systems
inittab/dt_nogb init /etc/inittab desktop login to
CDE
environment
(NO graphic
boot)
v No graphical display until the
system is up fully
v Same concerns as inittab/dt
inittab/httpdlite init /etc/inittab web server for
the docsearch
command
v Default web server for the
docsearch engine
v Disable unless your machine is
a documentation server
Security 387
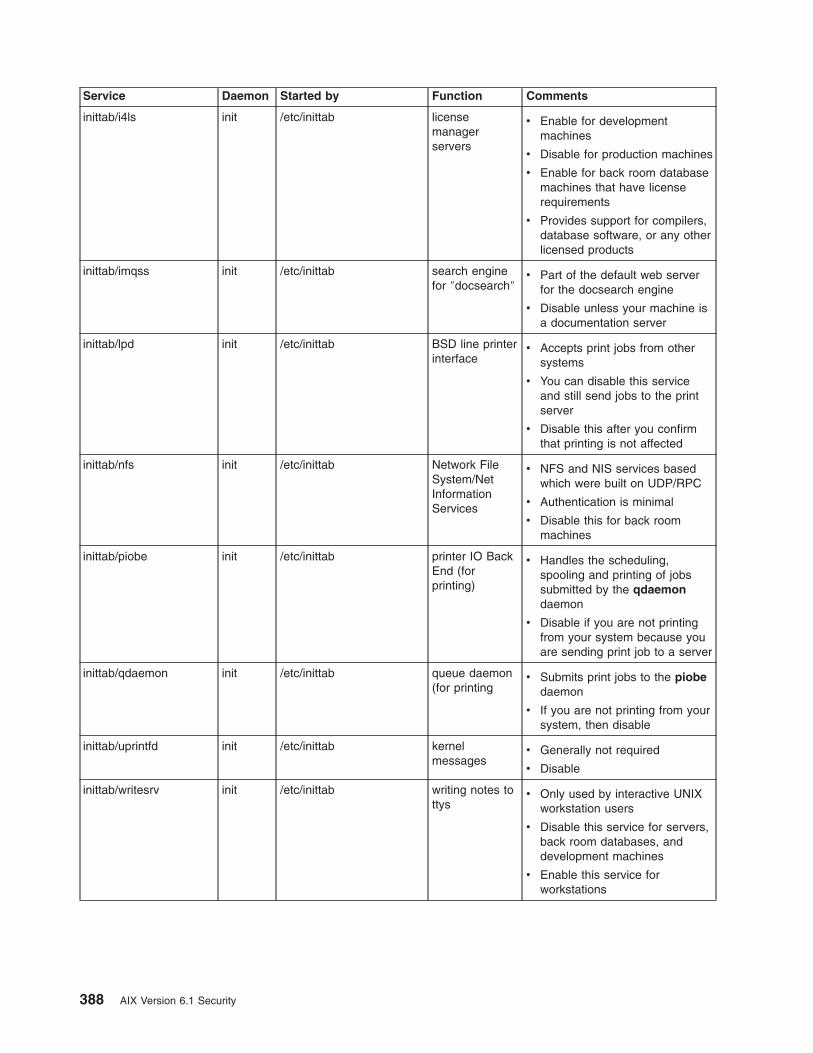
Service Daemon Started by Function Comments
inittab/i4ls init /etc/inittab license
manager
servers
v Enable for development
machines
v Disable for production machines
v Enable for back room database
machines that have license
requirements
v Provides support for compilers,
database software, or any other
licensed products
inittab/imqss init /etc/inittab search engine
for ″docsearch″
v Part of the default web server
for the docsearch engine
v Disable unless your machine is
a documentation server
inittab/lpd init /etc/inittab BSD line printer
interface
v Accepts print jobs from other
systems
v You can disable this service
and still send jobs to the print
server
v Disable this after you confirm
that printing is not affected
inittab/nfs init /etc/inittab Network File
System/Net
Information
Services
v NFS and NIS services based
which were built on UDP/RPC
v Authentication is minimal
v Disable this for back room
machines
inittab/piobe init /etc/inittab printer IO Back
End (for
printing)
v Handles the scheduling,
spooling and printing of jobs
submitted by the qdaemon
daemon
v Disable if you are not printing
from your system because you
are sending print job to a server
inittab/qdaemon init /etc/inittab queue daemon
(for printing
v Submits print jobs to the piobe
daemon
v If you are not printing from your
system, then disable
inittab/uprintfd init /etc/inittab kernel
messages
v Generally not required
v Disable
inittab/writesrv init /etc/inittab writing notes to
ttys
v Only used by interactive UNIX
workstation users
v Disable this service for servers,
back room databases, and
development machines
v Enable this service for
workstations
388 AIX Version 6.1 Security
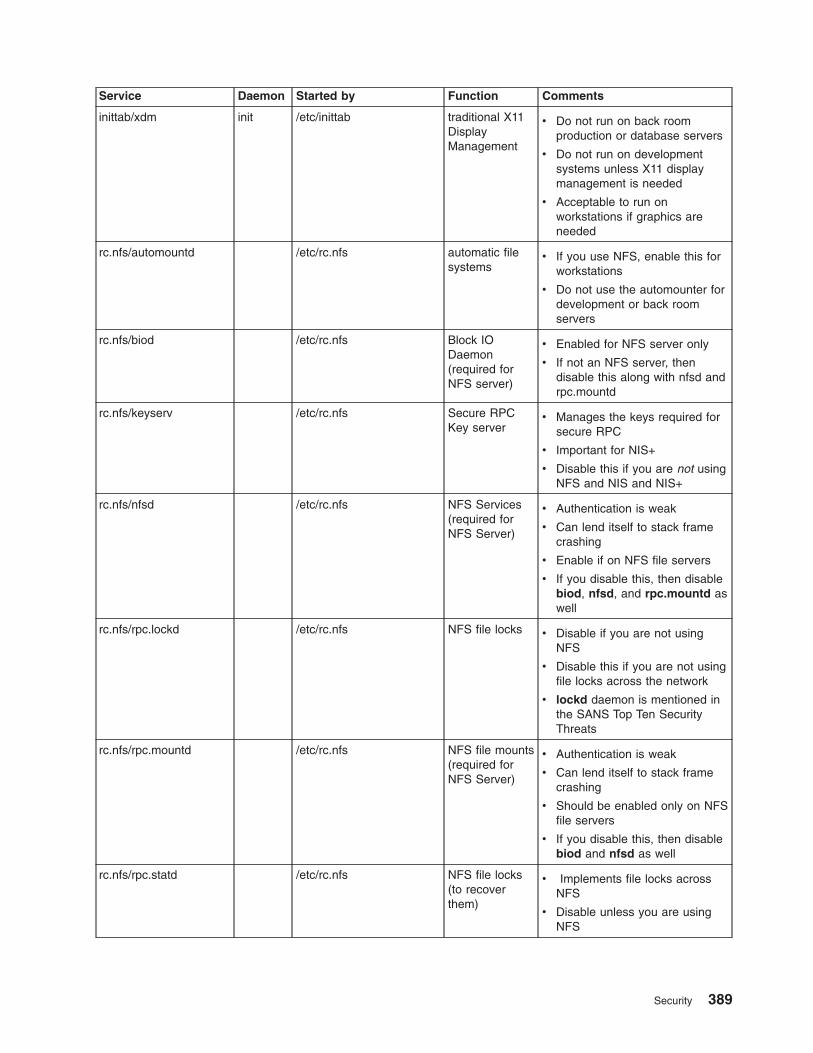
Service Daemon Started by Function Comments
inittab/xdm init /etc/inittab traditional X11
Display
Management
v Do not run on back room
production or database servers
v Do not run on development
systems unless X11 display
management is needed
v Acceptable to run on
workstations if graphics are
needed
rc.nfs/automountd /etc/rc.nfs automatic file
systems
v If you use NFS, enable this for
workstations
v Do not use the automounter for
development or back room
servers
rc.nfs/biod /etc/rc.nfs Block IO
Daemon
(required for
NFS server)
v Enabled for NFS server only
v If not an NFS server, then
disable this along with nfsd and
rpc.mountd
rc.nfs/keyserv /etc/rc.nfs Secure RPC
Key server
v Manages the keys required for
secure RPC
v Important for NIS+
v Disable this if you are not using
NFS and NIS and NIS+
rc.nfs/nfsd /etc/rc.nfs NFS Services
(required for
NFS Server)
v Authentication is weak
v Can lend itself to stack frame
crashing
v Enable if on NFS file servers
v If you disable this, then disable
biod, nfsd, and rpc.mountd as
well
rc.nfs/rpc.lockd /etc/rc.nfs NFS file locks v Disable if you are not using
NFS
v Disable this if you are not using
file locks across the network
v lockd daemon is mentioned in
the SANS Top Ten Security
Threats
rc.nfs/rpc.mountd /etc/rc.nfs NFS file mounts
(required for
NFS Server)
v Authentication is weak
v Can lend itself to stack frame
crashing
v Should be enabled only on NFS
file servers
v If you disable this, then disable
biod and nfsd as well
rc.nfs/rpc.statd /etc/rc.nfs NFS file locks
(to recover
them)
v Implements file locks across
NFS
v Disable unless you are using
NFS
Security 389
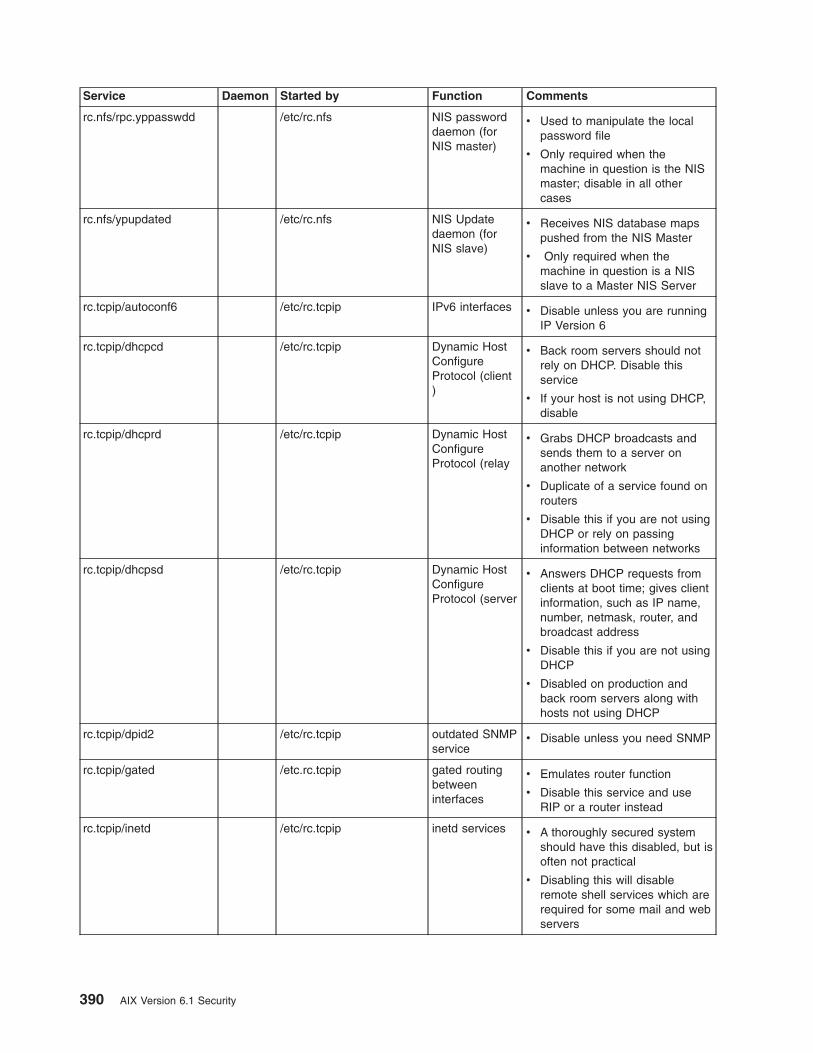
Service Daemon Started by Function Comments
rc.nfs/rpc.yppasswdd /etc/rc.nfs NIS password
daemon (for
NIS master)
v Used to manipulate the local
password file
v Only required when the
machine in question is the NIS
master; disable in all other
cases
rc.nfs/ypupdated /etc/rc.nfs NIS Update
daemon (for
NIS slave)
v Receives NIS database maps
pushed from the NIS Master
v Only required when the
machine in question is a NIS
slave to a Master NIS Server
rc.tcpip/autoconf6 /etc/rc.tcpip IPv6 interfaces v Disable unless you are running
IP Version 6
rc.tcpip/dhcpcd /etc/rc.tcpip Dynamic Host
Configure
Protocol (client
)
v Back room servers should not
rely on DHCP. Disable this
service
v If your host is not using DHCP,
disable
rc.tcpip/dhcprd /etc/rc.tcpip Dynamic Host
Configure
Protocol (relay
v Grabs DHCP broadcasts and
sends them to a server on
another network
v Duplicate of a service found on
routers
v Disable this if you are not using
DHCP or rely on passing
information between networks
rc.tcpip/dhcpsd /etc/rc.tcpip Dynamic Host
Configure
Protocol (server
v Answers DHCP requests from
clients at boot time; gives client
information, such as IP name,
number, netmask, router, and
broadcast address
v Disable this if you are not using
DHCP
v Disabled on production and
back room servers along with
hosts not using DHCP
rc.tcpip/dpid2 /etc/rc.tcpip outdated SNMP
service
v Disable unless you need SNMP
rc.tcpip/gated /etc.rc.tcpip gated routing
between
interfaces
v Emulates router function
v Disable this service and use
RIP or a router instead
rc.tcpip/inetd /etc/rc.tcpip inetd services v A thoroughly secured system
should have this disabled, but is
often not practical
v Disabling this will disable
remote shell services which are
required for some mail and web
servers
390 AIX Version 6.1 Security
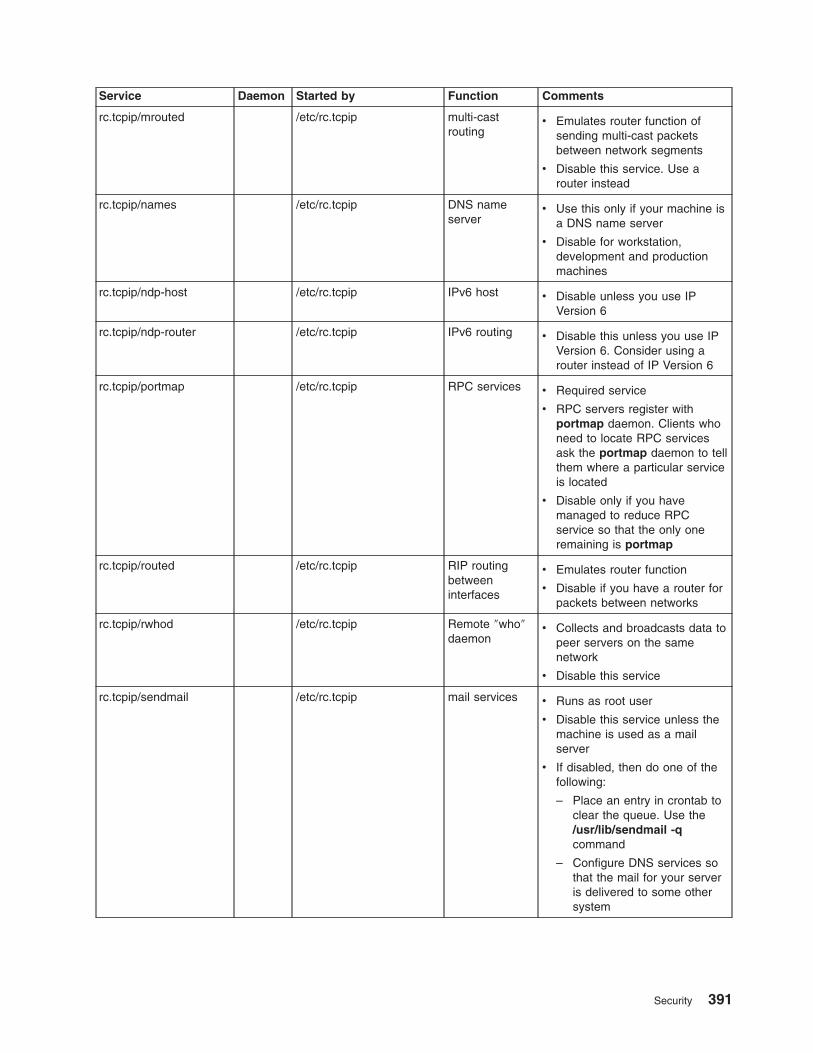
Service Daemon Started by Function Comments
rc.tcpip/mrouted /etc/rc.tcpip multi-cast
routing
v Emulates router function of
sending multi-cast packets
between network segments
v Disable this service. Use a
router instead
rc.tcpip/names /etc/rc.tcpip DNS name
server
v Use this only if your machine is
a DNS name server
v Disable for workstation,
development and production
machines
rc.tcpip/ndp-host /etc/rc.tcpip IPv6 host v Disable unless you use IP
Version 6
rc.tcpip/ndp-router /etc/rc.tcpip IPv6 routing v Disable this unless you use IP
Version 6. Consider using a
router instead of IP Version 6
rc.tcpip/portmap /etc/rc.tcpip RPC services v Required service
v RPC servers register with
portmap daemon. Clients who
need to locate RPC services
ask the portmap daemon to tell
them where a particular service
is located
v Disable only if you have
managed to reduce RPC
service so that the only one
remaining is portmap
rc.tcpip/routed /etc/rc.tcpip RIP routing
between
interfaces
v Emulates router function
v Disable if you have a router for
packets between networks
rc.tcpip/rwhod /etc/rc.tcpip Remote ″who″
daemon
v Collects and broadcasts data to
peer servers on the same
network
v Disable this service
rc.tcpip/sendmail /etc/rc.tcpip mail services v Runs as root user
v Disable this service unless the
machine is used as a mail
server
v If disabled, then do one of the
following:
– Place an entry in crontab to
clear the queue. Use the
/usr/lib/sendmail -q
command
– Configure DNS services so
that the mail for your server
is delivered to some other
system
Security 391

Service Daemon Started by Function Comments
rc.tcpip/snmpd /etc/rc.tcpip Simple Network
Management
Protocol
v Disable if you are not
monitoring the system via
SNMP tools
v SNMP may be required on
critical servers
rc.tcpip/syslogd /etc/rc.tcpip system log of
events
v Disabling this service is not
recommended
v Prone to denial of service
attacks
v Required in any system
rc.tcpip/timed /etc/rc.tcpip Old Time
Daemon
v Disable this service and use
xntp instead
rc.tcpip/xntpd /etc/rc.tcpip New Time
Daemon
v Keeps clocks on systems in
sync
v Disable this service.
v Configure other systems as
time servers and let other
systems synchronize to them
with a cron job that calls
ntpdate
dt login /usr/dt/config/Xaccess unrestricted
CDE
v If you are not providing CDE
login to a group of X11 stations,
you can restrict dtlogin to the
console.
anonymous FTP service user rmuser -p
<username>
anonymous ftp v Anonymous FTP ability
prevents you from tracing FTP
usage to a specific user
v Remove user ftp if that user
account exists, as follows:
rmuser -p ftp
v Further security can be
obtained by populating the
/etc/ftpusers file with a list of
those who should not be able to
ftp to your system
392 AIX Version 6.1 Security

Service Daemon Started by Function Comments
anonymous FTP writes anonymous ftp
uploads
v No file should belong to ftp.
v FTP anonymous uploads allow
the potential for misbehaving
code to be placed on your
system.
v Put the names of those users
you want to disallow into the
/etc/ftpusers file
v Some examples of
system-created users you might
want to disallow from
anonymously uploading via FTP
to your system are: root,
daemon, bin.sys, admin.uucp,
guest, nobody, lpd, nuucp, ladp
v Change the owner and group
rights to the ftpusers files as
follows: chown root:system
/etc/ftpusers
v Change the permissions to the
ftpusers files to a stricter
setting as follows: chmod 644
/etc/ftpusers
ftp.restrict ftp to system
accounts
v No user from the outside should
be allowed to replace root files
using ftpusers file
root.access /etc/security/user rlogin/telnet to
root account
v Set the rlogin option in the
etc/security/user file to false
v Anyone logging in as root
should first log in under their
own name and then su to root;
this provides an audit trail
snmpd.readWrite /etc/snmpd.conf SNMP
readWrite
communities
v If you are not using SNMP,
disable the SNMP daemon.
v Disable community private and
community system in the
/etc/snmpd.conf file
v Restrict ’public’ community to
those IP addresses that are
monitoring your system
syslog.conf configure
syslogd
v If you have not configured
/etc/syslog.conf, then disable
this daemon
v If you are using syslog.conf to
log system messages, then
keep enabled
Summary of network service options
To achieve a higher level of system security, there are several network options that you can change using
0 to disable and 1 to enable. The following list identifies these parameters you can use with the no
command.
Security 393
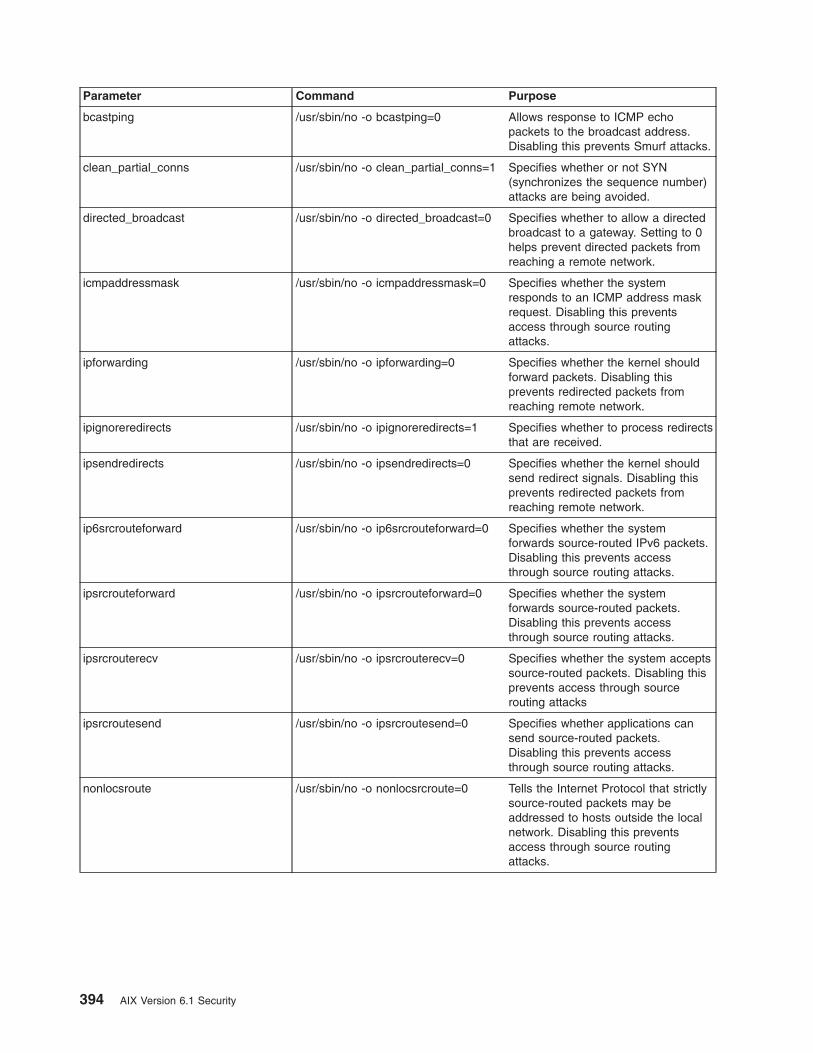
Parameter Command Purpose
bcastping /usr/sbin/no -o bcastping=0 Allows response to ICMP echo
packets to the broadcast address.
Disabling this prevents Smurf attacks.
clean_partial_conns /usr/sbin/no -o clean_partial_conns=1 Specifies whether or not SYN
(synchronizes the sequence number)
attacks are being avoided.
directed_broadcast /usr/sbin/no -o directed_broadcast=0 Specifies whether to allow a directed
broadcast to a gateway. Setting to 0
helps prevent directed packets from
reaching a remote network.
icmpaddressmask /usr/sbin/no -o icmpaddressmask=0 Specifies whether the system
responds to an ICMP address mask
request. Disabling this prevents
access through source routing
attacks.
ipforwarding /usr/sbin/no -o ipforwarding=0 Specifies whether the kernel should
forward packets. Disabling this
prevents redirected packets from
reaching remote network.
ipignoreredirects /usr/sbin/no -o ipignoreredirects=1 Specifies whether to process redirects
that are received.
ipsendredirects /usr/sbin/no -o ipsendredirects=0 Specifies whether the kernel should
send redirect signals. Disabling this
prevents redirected packets from
reaching remote network.
ip6srcrouteforward /usr/sbin/no -o ip6srcrouteforward=0 Specifies whether the system
forwards source-routed IPv6 packets.
Disabling this prevents access
through source routing attacks.
ipsrcrouteforward /usr/sbin/no -o ipsrcrouteforward=0 Specifies whether the system
forwards source-routed packets.
Disabling this prevents access
through source routing attacks.
ipsrcrouterecv /usr/sbin/no -o ipsrcrouterecv=0 Specifies whether the system accepts
source-routed packets. Disabling this
prevents access through source
routing attacks
ipsrcroutesend /usr/sbin/no -o ipsrcroutesend=0 Specifies whether applications can
send source-routed packets.
Disabling this prevents access
through source routing attacks.
nonlocsroute /usr/sbin/no -o nonlocsrcroute=0 Tells the Internet Protocol that strictly
source-routed packets may be
addressed to hosts outside the local
network. Disabling this prevents
access through source routing
attacks.
394 AIX Version 6.1 Security

Parameter Command Purpose
tcp_icmpsecure /usr/sbin/no -o tcp_icmpsecurer=1 Protects TCP connections against
ICMP (Internet Control Message
Protocol) source quench and PMTUD
(Path MTU Discovery) attacks.
Checks the payload of the ICMP
message to test the sequence
number of the TCP header is within
the range of acceptable sequence
numbers. Values: 0=off (default);
1=on.
ip_nfrag /usr/sbin/no -o ip_nfrag=200 Specifies the maximum number of
fragments of an IP packet that can be
kept on the IP reassembly queue at a
time (default value of 200 keeps up to
200 fragments of an IP packet in the
IP reassembly queue).
tcp_pmtu_discover /usr/sbin/no -o tcp_pmtu_discover=0 Disabling this prevents access
through source routing attacks.
tcp_tcpsecure /usr/sbin/no -o tcp_tcpsecure=7 Protects TCP connections against
vulnerabilities. Values: 0=no
protection; 1=sending a fake SYN to
an established connection; 2=sending
a fake RST to an established
connection; 3=injecting data in an
established TCP connection;
5–7=combination of the above
vulnerabilities.
udp_pmtu_discover /usr/sbin/no -o udp_pmtu_discover=0 Enables or disables path MTU
discovery for TCP applications.
Disabling this prevents access
through source routing attacks.
For more information about network-tunable options, see Performance management.
Trusted AIX
Trusted AIX enables Multi Level Security (MLS) capabilities in AIX.
Note: MLS is also referred to as label-based security.
As compared to regular AIX, Trusted AIX label-based security implements labels for all subjects and
objects in the system.
Note: The Trusted AIX install option enables the Labeled Security AIX environment. Access controls in the
system are based on labels that provide for a Multi Level Security (MLS) environment and includes
support for the following:
v Labeled objects: Files, IPC objects, network packets, and other labeled objects
v Labeled printers
v Trusted Network: Support for RIPSO and CIPSO in IPv4 and IPv6
Please note that once you choose this mode of installation, you will not be able to go back to a
regular AIX environment without performing an overwrite install of regular AIX. Evaluate your need
Security 395

for a Trusted AIX environment before choosing this mode of install. More details about Trusted AIX
can be found in the AIX publicly available documentation.
Standard AIX provides a set of security features to allow information managers and administrators to
provide a basic level of system and network security. The primary AIX security features include the
following:
v login and password controlled system and network access
v user, group, and world file access permissions
v access control lists (ACLs)
v Audit subsystem
v Role Based Access Control (RBAC)
Trusted AIX builds upon these primary AIX operating system security features to further enhance and
extend AIX security into the networking subsystems.
Trusted AIX is compatible with the AIX application programming interface (API). Any application that runs
on AIX can also run on Trusted AIX. However, due to additional security restrictions, MLS-unaware
applications may need privileges to operate in a Trusted AIX environment. The tracepriv command can be
used to profile applications in such scenarios.
Trusted AIX extends the AIX API to support additional security functionality. This allows customers to
develop their own secure applications can be developed using the AIX API and new Trusted AIX
extensions.
Trusted AIX enables AIX systems to process information at multiple security levels. It is designed to meet
the US Department of Defense (DoD) TCSEC and European ITSEC criteria for enhanced B1 security.
See Securing the Base Operating System and Securing the Network for information on standard AIX
security.
Introduction to Trusted AIX
Trusted AIX enhances the security of the standard AIX operating system by providing for
label-based-security capabilities within the operating system.
Trusted AIX label-based environment can be installed by choosing the install time options. If you install
Trusted AIX, you will not be able to go back to a regular AIX environment without performing an overwrite
install of regular AIX. Once installed, Trusted AIX environment will apply to the entire AIX system, including
any WPARs created within the AIX environment. While label based security (also termed as Multi Level
Security, or MLS) is often used in the defence and intelligence industries, it can also be used in the
commercial industries. This can be achieved by customizing the labels available on Trusted AIX. A fresh
install of Trusted AIX provides for labels that adhere to standard MLS implementations.
Trusted AIX environment consists of regular AIX with some additional packages and file sets. Additionally,
kernel switches will force the kernel to operate in Trusted AIX mode. When booted through a CD or DVD,
the system boots in the regular AIX environment. When install menus are displayed, the installer can
choose the Trusted AIX option and start installing the MLS-related files. When installation is complete, the
installer must initiate the first boot resequence. During the first boot sequence, Config Assistant provides
menus for the various users and ISSO, SA, and SO users are set up; then, the system completes the boot
operation and the MLS is established.
Trusted AIX enhances system security through four primary elements of information security:
v Confidentiality
v Integrity
396 AIX Version 6.1 Security

v Availability
v Accountability
In addition to the security features provided by AIX, Trusted AIX adds the following capabilities:
Sensitivity labels (SLs)
All processes and files are labeled according to their security level. Processes can only access
objects that are within the process’ security range.
Integrity labels (TLs)
All processes and files are labeled according to their integrity level. Files cannot be written by
processes that have a lower integrity level label than the file. Processes cannot read from files that
have a lower integrity level label than the process.
File security flags
Individual files can have additional flags to control security related operations.
Kernel security flags
The entire system can have different security features enabled or disabled.
Privileges
Many commands and system calls are only available to processes with specific privileges.
Authorizations
Each user can be granted a unique set of authorizations. Each authorization allows the user to
perform specific security-related functions. Authorizations are assigned to users through roles.
Roles Role Based Access Control function, as part of Trusted AIX, provides for selective delegation of
administrative duties to non-root users. This delegation is achieved by collecting the relevant
authorizations into a Role and then assigning the role to a non-root user.
Confidentiality
Threats centered around disclosure of information to unauthorized parties are a confidentiality issue.
Trusted AIX provides object reuse and access control mechanisms for protecting all data resources. The
operating system ensures that protected data resources can only be accessed by specifically authorized
users and that those users cannot make the protected resources available to unauthorized users either
deliberately or accidentally.
Administrators can prevent sensitive files from being written to floppy disks or other removable media, from
being printed on unprotected printers, or from being transferred over a network to unauthorized remote
systems. This security protection is enforced by the operating system and cannot be bypassed by
malicious users or rogue processes.
Integrity
Threats centered around modification of information by unauthorized parties are an integrity issue.
Trusted AIX offers numerous security mechanisms which ensure the integrity of trusted computing base
and protected data, whether the data is generated on the system or imported via network resources.
Various access control security mechanisms ensure that only authorized individuals can modify
information. To prevent malicious users or rogue processes from seizing or disabling system resources,
Trusted AIX eliminates the root privilege. Special administrative authorizations and roles allow the
separation of administration duties, rather than giving a user root privileges.
Security 397
Availability
Threats centered around accessibility of services on a host machine are an availability issue. For example,
if a malicious program fills up file space so that a new file cannot be created, there is still access, but no
availability.
Trusted AIX protects the system from attacks by unauthorized users and processes that can create a
denial of service. Unprivileged processes are not allowed to read or write protected files and directories.
Accountability
Threats centered around not knowing which processes performed which actions on a system are an
accountability issue. For example, if the user or process that altered a system file cannot be traced, you
cannot determine how to stop such actions in the future.
This enhanced security feature ensures identification and authentication of all users prior to allowing user
access to the system. The audit services provide the administrator a set of auditable events and an audit
trail of all security-related system events.
Notes about Trusted AIX
v Trusted AIX is installed through the AIX install menus. Additional options can be chosen during
installation of Trusted AIX. The option related to LSPP EAL4+ configuration is supported.
v Trusted AIX environment cannot revert to regular AIX environment without performing an overwrite
install of regular AIX.
v Root is disabled from logging in a Trusted AIX environment.
v In a Trusted AIX environment, any WPARs created will also operate in the Labeled Security
environment.
v Trusted AIX supports both MAC (Mandatory Access Control) and MIC (Mandatory Integrity Control).
Customer can define separate sets of labels for MAC and MIC.
v Label Encodings file is located in the /etc/security/enc directory and captures the label-to-binary
translation information. The default Label Encodings file adheres to the Compartmented Mode
Workstations (CMW) labels-related naming requirements.
v NIM installs are supported when initiated from Client. NIM install push from Server is not possible
because root is disabled for logins on MLS systems.
v The JFS2 (J2) file system (using Extended Attributes version 2) has been enabled for storing Labels in
AIX. Other file systems (such as J1 or NFS) can only be mounted in a Trusted AIX environment as
single-level file systems (label assigned to the mount point).
v X environment is disabled for Trusted AIX.
v Trusted AIX supports CIPSO and RIPSO protocols for netowork-based label-based communication.
These protocols are supported for both IPv4 and IPv6.
v Some AIX security mechanisms are common between regular AIX and Trusted AIX. Two of these
common security mechanisms are Role Based Access Control (RBAC) and Trusted Execution for
integrity verification.
v Since root is disabled when Trusted AIX is installed, the installer must set up passwords for ISSO, SA,
and SO users during the first boot after install. The system remains usable until these passwords are
created.
v The AIX 6 security features Redbook contains use cases and examples for Trusted AIX.
Multi-level security
The main goal of a secure system is to enforce a site security policy to provide accountability and
availability.
398 AIX Version 6.1 Security

The Trusted AIX security policy provides a defined set of rules that determine the types of allowable
system access. This includes holding users accountable for their actions and preventing changes to the
operating system.
Trusted AIX uses access control and specific need-to-know criteria to control access to files, directories,
processes, and devices.
Trusted AIX maintains an audit trail of all security-relevant events. This audit trail allows for individual
accountability, even with programs which modify effective and real user IDs, such as the su command.
Trusted AIX also restricts administrative functions to specific individuals with authorizations and least
privilege (the granting of the most restrictive set of privileges that will permit a user or process to perform
an operation).
Identification and authentication
Identification and authentication (I&A) security mechanisms are responsible for assuring that each
individual requesting access to the system is properly identified and authenticated. Identification requires a
user name and authentication requires a password
All Trusted AIX accounts are password protected. The ISSO (Information Systems Security Officer) can
configure the system to allow a user to select his/her own password, subject to password length and
complexity constraints. The ISSO can also specify minimum and maximum password aging parameters
(expiration periods) on a per-user basis, including warning periods prior to password expiration.
The identification and authentication security mechanisms require that all usernames and user IDs be
unique. Accounts without valid passwords cannot be used for login. A user with the ISSO role must add
the initial password for all new users. Each user is assigned an additional unique identifier that is used for
auditing purposes.
Only the encrypted form of the password is stored. Passwords are not stored on the system in plain text
form. The encrypted passwords are stored in a shadow password file, which is protected against access
except by privileged processes. For more information, see the passwd command.
Trusted AIX systems recognize two types of accounts: system accounts and user accounts. System
accounts are those with a user ID less than 128. Although system accounts may have associated
passwords, they cannot be used for logging on to the system.
Discretionary access control
Discretionary access controls (DAC) are the security aspects that are under the control of the file or
directory owner.
UNIX permissions
A user with owner access to a resource can do the following:
v Directly grant access to other users
v Grant access to a copy to other users
v Provide a program to allow access to the original resource (for example, using SUID programs)
The traditional UNIX permission bit method (owner/group/other and read/write/execute) is an example of
this DAC functionality.
Permission bits enable users to grant or deny access to the data in a file to users and groups (based on
the need-to-know criterion). This type of access is based on the user ID and the groups to which the user
belongs. All file system objects have associated permissions to describe access for the owner, group, and
world.
Security 399

The owner of a file can also grant access privileges to other users by changing the ownership or group of
the file with the chown and chgrp commands
umask
When a file is created, all permission bits are initially turned on. The file then has certain permission bits
removed by the umask process, which has been set during the login process. The default umask applies
to every file created by the user’s shell and every command run from the user’s shell.
By default, the umask setting for kernel items is 000 (which leaves all permissions available to all users).
AIX sets the kernel umask to 022 (which turns off group and world write permission bits). However, users
may override this setting if needed.
Note: Be very cautious about changing the umask to a setting more permissive than 022. If more
permissions are available on files and processes, the system as a whole becomes less secure.There are two methods to override the default umask setting:
v You can change the umask values in your .profile, .login, or .chsrc files. These changes will affect any
file that is created during your login session.
v You can set the umask levels for individual processes with the umask command. After running the
umask command, all new files that are created will be affected by the new umask value until one of the
following two events occur:
– You run the umask command again
OR
– You exit the shell in which the umask command was issued
If you run the umask command with no arguments, the umask command returns the current umask value
for your session.
You should allow the login session to inherit the kernel’s 022 umask value by not specifying a umask in
your profiles. Umask values less restrictive than 022 should only be used with great caution.
If additional permissions are needed for certain files, these permissions should be set with judicious use of
the chmod command after the files have been created.
Access Control Lists
In addition to the standard UNIX permission bits and umask value, AIX also supports access control lists
(ACLs).
UNIX permission bits only control access for the file owner, one group, and everyone on the system. With
an ACL, a file owner can specify access rights for additional specific users and groups. Like permission
bits, ACLs are associated with individual system objects, such as file or directory.
setuid and setgid permission bits
The setuid and setgid permission bits (set user ID and set group ID) allow a program file to run with the
user ID or group ID of the file owner rather than the user ID or group ID of the person who is running the
program, This is accomplished by setting the setuid and setgid bits that are associated with the file. This
permits the development of protected subsystems, where users can access and run certain files without
having to own the files.
If the setgid bit is set on a parent directory when an object is created, the new object will have the same
group as the parent directory, rather than the group of the object’s creator. However, objects created in a
directory with the setuid bit set are owned by the object’s creator, not the directory owner. The
setuid/setgid bits of the parent directory are inherited by subdirectories when subdirectories are created.
400 AIX Version 6.1 Security

The setuid and setgid permission bits represent a potential security risk. A program that is set to run with
root as the owner could have essentially unlimited access to the system. On Trusted AIX systems,
however, the use of privileges and other access controls significantly reduces this security risk.
Role Based Access Control elements
Trusted AIX supports Role Based Access Control (RBAC). RBAC an operating system mechanism through
which the root/system super user specific system functions can also be performed by regular users using
the roles that are assigned to them.
The core elements of AIX RBAC are:
Authorizations
These strings indicate the privilege operation that they represent and control by name directly. For
example an authorization string aix.network.manage defines the network management function in
AIX.
Privileges
A privilege is an attribute of a process that allows the process to bypass specific system
restrictions and limitations. Privileges are associated with a process and are typically acquired
through the execution of a privileged command.
Roles Role elements in AIX RBAC allow users to combine a set of management functions in the system
and assign these functions to be managed by a regular user. Roles in AIX consist of a collection of
authorizations (these can be both system authorizations as well as custom authorizations) and any
other roles (as sub roles).
See RBAC for more information on Role Based Access Control.
Mandatory Access Control
Mandatory access control is a system-enforced method of restricting access to objects based on the
sensitivity of the object and the clearance of the user. By contrast, Discretionary Access Control is
enforced by individual file owners rather than by the system.
Use of labels for MAC
Trusted AIX uses a system of labels to enforce MAC. On a Trusted AIX system, all named objects have
sensitivity labels (SLs) to identify the object’s sensitivity level. Processes also have SLs. Process SLs
indicate which levels of sensitive information the processes are allowed to access. In general, a process
must have a sensitivity level equal to or greater than that of an object in order to access the object. The
SLs can be used to make files read-only accessible or to completely prevent files from being accessed by
regular users.
All system objects such as files, IPC objects, network connections, and processes, have SLs. SLs are
automatically placed on objects when the objects are created. All core dumps are considered objects and
are automatically labeled by the system.
Objects that exist prior to the installation of Trusted AIX receive the default SYSTEM_LOW SLs (SLSL) when
these objects are accessed after Trusted AIX installation. The SLs are not set permanently on these
objects. The settxattr command must be run on the object to set the SLs. For objects that are created
after Trusted AIX installation, the object’s SLs are set to the SL of the creating process.
Users and labels
The system assigns each user account a range of valid SLs, either by system default or by a user-specific
setting, and the user can only operate within this range. A process or user can only create files and
directories at the current sensitivity label of the process or user and can only read and write files subject to
the system-imposed MAC restrictions.
Security 401

MAC enforcement
Mandatory Access Control is enforced any time a process attempts to open a file system object, retrieve
the attributes of a file system object, send a signal to a process, transfer data through a STREAM, or send
or receive a packet through a network interface. Access to any file system object is only possible if both
MAC and DAC criteria are met. When a user attempts to access a file, MAC restrictions are enforced
before DAC restrictions, such as permission bits or ACLs, are checked.
Access to file system objects is restricted not only by the SL of the object but also by the SL of the
directory in which the object resides. Thus, a file system object can be protected at a different sensitivity
level (the directory’s SL) than the SL of the object itself. A file system object can have multiple names
(links) located in one or more directories. Although each name (link) is protected at the same SL as the file
to which the link points, the effective protection of the various links may differ because the links are in
directories with different levels of protection.
The name of an object is stored in the directory where the object resides. Thus, any process with access
to that directory is able to view the names of all objects in the directory. However, only processes with
proper access may read from or write to one of the objects.
Listing and changing SLs
The SLs of objects and processes on the system can be viewed with the lstxattr command and can be
modified using the settxattr commands.
Only users with proper authorizations and processes with the proper privileges can change the SL of a file
or process.
With the settxattr command, to change a filesystem object SL to a lower-level SL the user should have
the aix.mls.label.sl.downgrade authorization. To upgrade a filesystem object SL the user should have
the aix.mls.label.sl.upgrade authorization. To alter the SL of processes, to upgrade the user should
have aix.mls.proc.sl.upgrade authorization and to downgrade the user should have
aix.mls.proc.sl.downgrade authorization.
MAC on open file descriptors
For read/write and simple file accesses, MAC checks are performed when a process accesses a file. Once
a process has a file descriptor for the file, it can read and write the file even if the process SL changes to
a level lower than the SL of the file. However, some operations, such as setting file owner, permissions,
labels, and privileges, perform access checks after a process has obtained a file descriptor.
This means that MAC checks and partitioned directory path resolutions are not performed when a process
accesses a file using a file descriptor. The SL of the file and/or process may change and access is still
permitted.
Mandatory Integrity Control
Mandatory Integrity Control is a system-enforced method of restricting access to and modification of
objects based on the integrity of the object and the clearance of the user. While MAC is concerned with
the sensitivity of an object, MIC is concerned with the object’s trustworthiness.
Use of labels for MIC
Trusted AIX uses a system of labels to enforce MIC. On a Trusted AIX system, all named objects have
integrity labels (TLs) to identify the object’s integrity level. Processes also have TLs. Process TLs indicate
which level of information integrity the process is allowed to access. The higher the TL, the more
trustworthy the object or process is.
402 AIX Version 6.1 Security

A process must be at least as trustworthy as an object in order to modify the object. Therefore, a process
must have a TL equal to or greater than the TL of the object. Therefore, integrity labels can be used to
make files accessible for read-only.
In addition, a process cannot use data from an object that is less trustworthy than the process itself.
Therefore, an object must have a TL equal to or greater than that of the process.
All system objects, such as files and processes, have TLs. TLs are automatically placed on objects when
the objects are created. All core dumps are considered objects and are automatically labeled by the
system.
Objects that exist on the system prior to the installation of Trusted AIX receive the default SYSTEM_LOW TL
(SLTL) whenever the objects are accessed after Trusted AIX installation. The TLs are not set permanently
on these objects. The settxattr command must be run on these objects to set the TLs. For objects that
are created after Trusted AIX installation, the TLs of these objects are set to the integrity level of the
process that created the objects.
Users and labels
The system assigns each user account a range of valid TLs, either by system default or by a user-specific
setting, and the user can only operate within this range. A process or user can only create files and
directories at the current TL of the process or user, and can only read and write files subject to the
system-imposed MIC restrictions.
MIC enforcement
Mandatory Integrity Control is enforced whenever MAC is enforced. Additionally, MIC is enforced when a
file or directory is deleted or renamed.
Changing TLs
The TLs of objects and processes can be viewed with the lstxattr command and modified with the
settxattr command.
Only users with proper authorizations and processes with the proper privileges can change the TL of a file
or process. With the settxattr command, to change a filesystem object TL to a lower-level TL, the user
should have the aix.mls.label.tl.downgrade authorization. To upgrade a filesystem object TL the user
should have the aix.mls.label.tl.upgrade authorization. To alter the TL of processes, to upgrade the
user should have aix.mls.proc.tl.upgrade authorization and to downgrade the user should have
aix.mls.proc.tl.downgrade authorization.
NOTL
There is a special TL, NOTL, that can be applied on file systems, ipc objects, or processes. When an object
or process has an NOTL TL, no MIC checks are performed on the object or process. Only privileged users
can set a TL to NOTL or change a TL if the TL is currently NOTL.
MIC on open file descriptors
For read/write and simple file accesses, MIC checks are performed when a process accesses a file. Once
a process has a file descriptor for a file, it can read and write the file even if the process TL changes to a
level lower than the file’s TL. However, some operations, such as setting file owner, permissions, labels,
and privileges, perform access checks after a process has obtained a file descriptor. This means that MIC
checks are not performed when a process accesses a file using a file descriptor. The TL of the file and/or
process may change and access will still be permitted.
Security 403

Labels
Labels are used to represent security levels for subjects and objects on Trusted AIX systems. The labels
to be used in a system and the relationship between labels are defined by the ISSO.
Sensitivity labels (SLs):
The SLs associated with each subject and object are used to enforce a mandatory access control policy
based on the Bell-LaPadula Model of access control.
An SL consists of two parts:
v A hierarchical classification
v A set of one or more compartments
Each installation site can define the names and relationships of the labels on that system. A system
administrator can set up these names and relationships as required by site policies in the label encodings
file.
SL classifications:
Classifications have a hierarchical order and represent a level of sensitivity.
For example, if Top Secret, Secret, and Unclassified are valid classifications at a site, Top Secret is
more sensitive than Secret and Secret is more sensitive than Unclassified. Trusted AIX supports up to
32,000 hierarchical classifications.
SL compartments:
Compartments represent topics or work groups. Each compartment has a name, such as NATO or CRYPTO.
Compartments have no intrinsic ordering, but the ISSO can impose constraints on which compartments
and classifications can be combined. Trusted AIX supports up to 1,024 compartments.
SL components:
In human-readable form, an SL is represented by a string of elements. The first element represents the
classification; the remaining elements represent the compartments. The elements are separated by a
space.
For example, if a file contains top secret information regarding the Brazilian economy, the hierarchical
classification of the file could be top secret (TS), and the compartments might be Brazil (B) and economy
(e). The human-readable form of the SL would be TS B e or Top Secret Brazil economy.
SL relationships:
As a system user, it is important to understand the relationships between labels and how labels are used.
There are three types of relationships between MAC labels:
v Dominance
v Equality
v Non-Comparable
Dominance
One SL (L1) is said to dominate another (L2) only if both of the following conditions are true:
v The classification in L1 equals or exceeds the classification in L2
404 AIX Version 6.1 Security

v The set of compartments in L1 completely contains the set of compartments in L2
For example, if we assume one SL L1 of top secret information on the compartments A and B (TS A B),
and another SL L2 of secret information on the compartment A but not B (S A), then TS A B would dominate
S A because the classification TS dominates classification S and the set of compartments in L1 completely
contains the set of compartments in L2. L2 would not dominate L1 in this example.
Table 29. SL dominance
L1 L2 Dominance
Label Compartment Label Compartment
TOP SECRET A,B SECRET A L1 > L2
Equality
One SL (L1) is said to equal another SL (L2) only if both of the following conditions are true:
v The classification in L1 equals the classification in L2
v The set of compartments in L1 is identical to the set of compartments in L2
If two labels are equal, then each label dominates the other. For example, if we assume the SL for a file
with top secret information on compartment A (TS A) and another file with top secret information on the
compartment A (also TS A), then the SLs would be equal and would dominate each other.
Table 30. SL equality
L1 L2 Dominance
Label Compartment Label Compartment
TOP SECRET A TOP SECRET A L1 = L2
Non-comparable
Two SLs can be disjoint (L1 is not equal to L2, L1 does not dominate L2, and L2 does not dominate L1).
One SL (L1) is said to be non-comparable to another (L2) only if the following condition is true:
v The set of compartments in L1 does not completely contain the set in L2 and L2 does not completely
contain the set in L1. Therefore, L1 and L2 are considered disjoint
For example, if we assume that a file with label L1 has top secret information on the compartments A and
B (TS A B), and L2 is the label for a file with classified information on the compartment C (C C), then L1 is
non-comparable to L2.
Table 31. Non-comparable SLs
L1 L2 Dominance
Label Compartment Label Compartment
TOP SECRET A, B CLASSIFIED C -
Integrity labels (TLs):
TLs represent the level of trust in a system object or process. The structure of TLs is the same as that of
SLs, except that TLs have only hierarchical classifications and no compartments.
A process can modify or delete an object only if the TL of the process dominates the TL of the object. A
process can delete or rename an object only if the TL of the process dominates both the TL of the object
and the TL of the directory where the object resides. A process can access an object only if the TL of the
object dominates the TL of the process.
Security 405

To determine the TL of an object or process, use the lstxattr command. To change the TL of an object or
process, use the settxattr command.
Labels on subjects and objects:
In Trusted AIX, processes are identified as subjects and each process has SLs.
The SL used for MAC checks is called the Effective SL (ESL). An ESL must lie within the process
clearance ranges. The clearance range has an upper bound and a lower bound. The upper bound is
called the Maximum clearance (Max CL) and the lower bound is called the Minimum clearance (Min CL).
The ESL, Max CL, and Min CL are stored in the process credential structure and are assigned during
process creation. The Max CL must dominate Min CL and ESL and the ESL must dominate Min CL. The
settxattr and lstxattr commands can be used to list and set the SLs of processes.
Access to various objects in the system need to be controlled. An object could be any one of the following:
v process
v files (Data files or binaries)
v IPC objects, network packets, etc.
All objects and subjects on a MLS system are labeled.
Directory
Directories are associated with a SL range; minimum SL and maximum SL. The maximum SL
should dominate or equal the minimum SL. All files in a directory lie within this range.
Files Regular files are associated with two SLs but their values are always the same. So effectively they
have only one SL. Symbolic links could have different values for the SLs.
Special Files
Special files like devices, ttys, and fifos are associated with a maximum and minimum SL.
Directory, files, and special files have only one integrity label (TL) where as processes are
associated with a minimum and maximum TLs.
Process
All processes are associated with maximum and minimum sensitivity cleareance range as well as
a maximum and minimum integrity clearance range. These values are inherited from the user’s
clearance values. The sensitivity and integrity level at which the process is executing is known as
the effective sensitivity and effective integrity levels.
User clearance labels:
Users have maximum and minimum sensitivity clearance labels (SCLs) and maximum and minimum
integrity clearance labels (TCLs)
Maximum and minimum sensitivity clearance labels
Each user has a maximum sensitivity clearance label (max SCL). The user’s effective SL must be
dominated by the max SCL. The max SCL is used to restrict certain users from viewing highly sensitive
data. The min SCL is used to prevent users at a high security level from transmitting data to users at a
lower security level.
For example, assume that user A has a max SCL and min SCL both of PUBLIC_A, and user B has a max
SCL and min SCL both of PUBLIC_B. Without a min SCL, user A could communicate information to user B
by logging in with an effective SL of IMPL_LO and writing to a file that user B could then read. With the min
SCL, however, user A must log in at PUBLIC_A and can only write files at PUBLIC_A. Any files written at
PUBLIC_A are not readable by user B.
406 AIX Version 6.1 Security

Maximum and minimum integrity clearance labels
Each user also has a maximum integrity clearance label (max TCL). The user’s effective TL must be
dominated by the max TCL. The max TCL is used to restrict certain users from viewing highly sensitive
data. The min TCL is also used to prevent users at a high security level from transmitting data to users at
a lower security level.
Labels on file system objects:
All files include specific security information. When a new file is created, it has the same SL as the
process that created the file. The SL of the information in a file can be upgraded or downgraded by raising
or lowering the file’s SL.
Directories are assigned a minimum and maximum SL when the directories are created. On creation, both
are set equal to the effective SL of the creating process, essentially creating a single-level directory. Only
users with the proper privileges and authorizations can changes these SLs. New objects can be created in
this directory only if the effective SL of the process creating the new object falls within the range of the
directory’s SLs.
A window is normally created as a separate child process with an SL equal to the user’s effective SL.
Devices (for example, the pseudo-terminals associated with windows) also have SLs associated with them.
A named pipe, which is a device used for interprocess communication, inherits the effective SL of the
process that created the named pipe. A stream, which is a device used to provide a bidirectional data
channel for interprocess communications, also inherits the effective SL of the process that created the
stream.
All devices have a minimum SL and a maximum SL. The maximum SL must dominate the minimum SL.
By default, the minimum SL and maximum SL are set equal. A process can only access such a device in
read mode if the process’s SL dominates the minimum SL of the device or directory. A process may only
access such a device in write mode if the process’s SL is within the range defined by the minimum and
maximum SLs of the device or directory.
File security flags
Objects can be marked with file security flags (FSFs) that affect the way processes deal with the objects.
See File Security Flags for a list of FSFs and the privileges required to set each FSF. Processes do not
have file security flags.
Removing files:
You can only remove an object from a file system if the following are true:
v The process attempting to remove the object must be able to see the filename in the directory that
contains the file. That is, the process must have search access in each directory in the path down to the
directory from which the object is to be removed, and the process must have an effective SL that
dominates each of these directories. Use the ls command to see file name.
v The process must have write access to the directory from which the object is to be removed.
Printing files:
The printer subsystem automatically labels all output with the appropriate sensitivity labels. Each print job
is automatically provided a banner page and a trailer page that show all security relevant labels and
markings.
Backing up and restoring files:
When writing to disks or tapes on AIX with the backup command, SLs are included with the data.
Security 407

SO authorization is required to use the backup or restore commands to import or export unlabeled data
from tapes or disks. When unlabeled data is written, the data is assigned a default SL of SYSTEM_LOW for
files and an SL range of SYSTEM_LOW to SYSTEM_HIGH for directories.
Labels on IPC objects:
All AIX IPC facilities involve the creation and access of intermediary objects.
There are three different IPC facilities defined in AIX:
v Message queues
v Semaphores
v Shared memory
All of these involve creating and accessing intermediary objects, called IPC objects, for interprocess
communication. Each IPC object is protected by a set of attributes similar to the attributes that protect
files. These attributes are:
v The user ID and group ID of the object owner
v The user ID and group ID of the object creator
v The resource access mode, which is analogous to file access permission bits. Each object has read,
write, and execute access for world, group, and object owner.
v A sequence number to track resource usage
v A key to identify the resource
As with other system objects, Trusted AIX extends these attributes with additional security attributes. On a
Trusted AIX system, all IPC objects also have the following attributes:
v A sensitivity label (SL)
v An integrity label (TL)
You can use the settxattr command to view all of the security attributes of an IPC object. Reading an IPC
object’s attributes requires DAC READ and MAC READ access to the object.
Access to IPC objects:
IPC objects are created, deleted, and accessed via several system calls that are discussed in the Trusted
AIX Programmer’s guide chapter. Typical users do not perform these operations. This topic presents a
general overview of the rules for the creation, deletion, and access of IPC objects.
To access an IPC object, a process must pass DAC, MIC, and MAC access checks.
DAC access checks are based on the mode (owner, group, or world) of the object and the user and group
IDs of the process. A process has DAC owner access to an IPC object if the process effective UID is the
same as either the object owner UID or object creator UID. This also applies to DAC group access.
MAC access is based on the SLs of the process and object. MIC access is based on the TLs of the
process and object.
Access rules for IPC object contents are the same as for IPC object attributes. To read either the contents
or attributes of an IPC object, DAC READ, MIC READ, and MAC READ access are required. To write to an IPC
object, DAC WRITE, MIC WRITE, and MAC WRITE access is required.
IPC object attributes are more tightly restricted than IPC object contents. Changing IPC object attributes
therefore requires greater privilege. To modify standard AIX attributes such as mode, a process needs DAC
OWNER and MAC WRITE access to the object. To change the SL of an IPC object, the process must have all
of the following:
408 AIX Version 6.1 Security

v PV_SL_PROC privilege
v DAC OWNER (downgrade only)
v DAC WRITE
v MAC WRITE
v PV_SL_UG privilege to upgrade SL, or PV_SL_DG privilege to downgrade SL
v PV_MAC_CL if existing or new SL outside clearance of process
v MIC WRITE
To change the TL of an IPC object, the process must have all of the following:
v PV_TL privilege
v DAC OWNER
v MAC WRITE
v MIC WRITE
Additionally, in order to lock or unlock a shared memory segment in memory, a process must have the
PV_KER_IPC_O privilege. A process also requires the PV_KER_IPC privilege to change msg qbytes of a
message queue in the msgctl
subroutine.
IPC object creation and deletion:
There are no restrictions on IPC object creation. When a process creates an IPC object, the object inherits
the process SL and TL.
The IPC object’s access mode must be specified by the system call that creates the object.
To delete an IPC object, the process must have DAC OWNER, MIC WRITE and MAC WRITE access to the object.
Trusted Networking:
A set of secure networking requirements are needed for the extended security attributes of enhanced
security systems. AIX Trusted Network supports several recognized secure networking standards, including
U.S. DoD RFC1108 Revised Internet Protocol Security Option (RIPSO) and the Commercial Internet
Protocol Security Option (CIPSO).
AIX includes Trusted Network support for both IPv4 and IPv6. When communicating with other trusted
systems, the SL is encapsulated in the IP options according to CIPSO/RIPSO standards. MAC checks are
enforced at the IP layer for SLs that are sent or received on the packets. The allowed label range is
configured with network rules. Network rules consist of host rules and interface rules. AIX Trusted Network
installs only default interface rules (one rule per configured interface). You can configure host rules to allow
more granular filtering. You can use the netrule command to configure both host and interface rules.
Operations supported by the netrule command include adding, deleting, listing, and querying rules.
You can also use the tninit command to initialize the Trusted Network subsystem and maintain the
Trusted Network rules database.
Root disablement:
The root user account is disabled on Trusted AIX systems. This is primarily to minimize the damages that
can be caused to the system by a single user with all privileges.
All types of system logins as root user are disabled. Only the su command allows root user logins.
Processes owned by root are not assigned any special privileges. The root-owned setuid and non-setuid
programs work as before when invoked by authorized users. For unauthorized users, the program will run
if the DAC modebits or ACLs allow execution, but the program will not be assigned any privileges, so the
Security 409

program may not be able to perform privileged operations when run by unauthorized users. Therefore, it is
necessary to assign proper privileges to newly installed applications if the applications are expected to
perform privileged operations.
System administration tasks can be performed by users who have been assigned Information System
Security Officer (ISSO), System Administrator (SA), or System Officer (SO) roles. These roles allow any
user to perform system administration tasks.
Note: During installation of Trusted AIX the su attribute of the root account is set to false. To allow
access to the root account to other administrative users, the ISSO authorized user will need to
reset this attribute to true using the chuser command and assign a password to this account.
Label support in auditing:
The primary purpose of the audit subsystem is to monitor and record security-relevant events.
The information provided by the audit subsystem enables the following types of information to be recorded:
v Attempts to violate the security policy
v Successful completion of security-relevant actions
The audit subsystem provides the following capabilities:
v Determine which events to audit
v Turn auditing on and off while the system is running
v Switch audit trail files seamlessly (with no loss of information)
v Convert audit information into human-readable form
v Select and process subsets of audit information
When setting up the audit subsystem, the ISSO should understand what is to be audited, the conditions
under which auditing occurs, and how to initiate and stop auditing. See Auditing overview for detailed
information on configuring, starting and stopping, administering, and reviewing audit. See Audit Data
Structures for additional information on auditable events and record formats.
The audit subsystem maintains its current state and is automatically restarted in that state after a
power-down, system crash, power failure, or other interruption. The audit subsystem can automatically
shut itself off, shut down the system, or change audit files if a condition occurs where it can no longer
store audit records in the existing audit file. Audit files can be automatically switched when the file system
fills to a specified level. However, in the event of a catastrophic power failure, a small number of audit
records may be lost.
Multilevel and partitioned directories:
A multilevel directory is a standard directory that is assigned an SL range rather than a single SL. A
partitioned directory appears as a single directory to the user. However, the files shown to the user actually
reside in a hidden subdirectory of the partitioned directory.
Multilevel directories:
A multilevel directory is a standard directory that is assigned an SL range rather than a single SL.
To view the filenames in a multilevel directory, the process must be operating at a security level that is
higher than the minimum SL of the directory. To create or delete the actual files, the process must be
operating within the SL range of the multilevel directory.
410 AIX Version 6.1 Security

Each file in a multilevel directory has its own SL and is protected by the standard MAC restrictions.
However, any process with access to the directory is able to view the names of all objects in the directory.
Thus, a process could have MAC read and write capabilities in a directory, but be unable to read and/or
write some files in the directory, even though the process can view the names of all files in the directory.
Partitioned directories:
A partitioned directory appears as a single directory to the user. However, the files shown to the user
actually reside in a hidden subdirectory of the partitioned directory.
Multilevel directories pose a security risk. A process operating at a high security level can read a file at a
lower security level and then create files at the same high security level. While MAC features prevent
lower-security processes from reading the new files, lower-security processes can still see the names of
the new files. If the high security process gave the new files names based on the content of the original
high security file, then lower-security processes could gain access to higher-security information by reading
the new file names.
When a partitioned directory is created and a process addresses the directory, the system creates a
hidden subdirectory with the same SL as the addressing process. If the process then creates a file, the file
is actually created in the hidden subdirectory. A partitioned directory may have several such hidden
subdirectories in it, but a process addressing the partitioned directory will only see the files in the hidden
subdirectory with the same SL as that of the addressing process. When a process creates a child directory
of a partitioned subdirectory, that child directory is a partitioned sub-subdirectory.
A partitioned directory is assigned an SL range from SYSTEM_LOW to SYSTEM_HIGH. Thus, any
process can access the partitioned directories.
Users with aix.mls.pdir.mkdir authorization can create partitioned directories with the pdmkdir command.
Empty partitioned directories can be removed with the pdrmdir command. The pdset command can be
used to change a regular directory into a partitioned directory type. There is no command to change a
partitioned directory into a regular directory.
Within a partitioned directory, you can link a file in one partitioned subdirectory to all other existing
partitioned subdirectories with a higher SL in the same partitioned directory. This allows access to a file
within a partitioned directory by all processes with access to that partitioned subdirectory or to higher-level
partitioned subdirectories in the same partitioned directory. You can use the pdlink command for this file
linking.
Partitioned directory access modes:
A process is assigned one of two modes on creation, real mode or virtual mode. The mode determines
how the process views partitioned directories.
A real-mode process treats partitioned directories as standard multilevel directories. All partitioned
subdirectories can be accessed as standard directories, subject to normal DAC, MIC, and MAC
restrictions. A real-mode process can enter a partitioned directory and view all subdirectories, subject to
DAC, MIC, and MAC restrictions.
A virtual-mode process never enters a partitioned directory, but is instead redirected to the partitioned
subdirectory whose maximum and minimum SLs are both equal to the effective SL of the process.
A real-mode process can run a command in virtual mode with the pdmode command (for example, pdmode
ls). Similarly, a virtual-mode process can run a command in real mode, also with the pdmode command
(for example, pdmode -r ls). However, this requires aix.mls.pdir.mode authorization. With this
Security 411

authorization, you can also switch from a shell running in virtual mode to a shell running in real mode by
running pdmode -r sh. No authorization is required to launch a program in virtual mode while running in
real mode.
Viewing and changing directory types:
You can use the lstxattr command to display the directory type as part of the secflags attribute. FSF_PDIR
indicates a partitioned directory, FSF_PSDIR indicates a partitioned subdirectory, and FSF_PSSDIR indicates a
partitioned sub-subdirectory. To change a regular directory type to a partitioned directory type, use the
pdset command.
Trusted AIX administration
Managing a Trusted AIX system involves a number of factors that are specific to Trusted AIX.
Trusted AIX installation
Trusted AIX can be enabled only during base operating system installation using the Security Model
option of the install menu.
The migration option for Trusted AIX is not supported. For preservation installation the file systems must
be JFS2. For a promptless network install, see Table 32 for the passwords associated with default
administrative users.
Table 32. Passwords for default administrative users
User Password
isso isso
sa sa
so so
Run modes
Two run modes, configuration mode and operational mode, are available to allow for system configuration
and maintenance and for daily operations.
When the system boots up, it initially runs in configuration mode. After initialization is complete, the run
mode is changed to operational.
Configuration mode is used to maintain and recover the system. When the system is booted in single-user
mode, the system is minimally configured and networking is disabled. Configuration mode is used for
administration of critical, security-relevant parts of the system.
Operational mode is the standard system operating mode. The system changes to this mode after all tasks
required to enter the default run level have been completed.
The system run mode can be displayed with the getrunmode command and can be modified with the
setrunmode command.
Kernel security flags
Kernel security flags are used to enable/disable certain security features such as label check enforcement,
checking for integrity labels during read operations, and other purposes.
The kernel checks for kernel security flags before enforcing security checks. These flags are supported
only when Trusted AIX is enabled. In the user space, these flags are stored in the ODM database.
Depending upon the run mode of the system, the kernel checks for the corresponding kernel security
flags.
412 AIX Version 6.1 Security
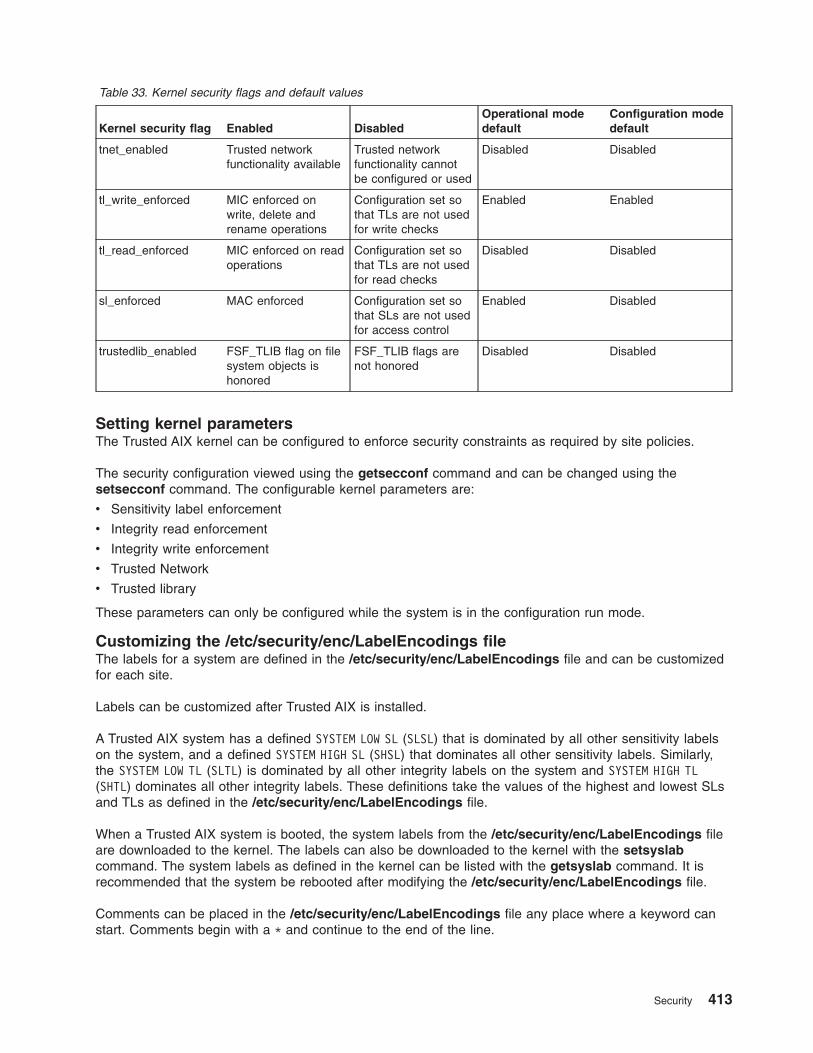
Table 33. Kernel security flags and default values
Kernel security flag Enabled Disabled
Operational mode
default
Configuration mode
default
tnet_enabled Trusted network
functionality available
Trusted network
functionality cannot
be configured or used
Disabled Disabled
tl_write_enforced MIC enforced on
write, delete and
rename operations
Configuration set so
that TLs are not used
for write checks
Enabled Enabled
tl_read_enforced MIC enforced on read
operations
Configuration set so
that TLs are not used
for read checks
Disabled Disabled
sl_enforced MAC enforced Configuration set so
that SLs are not used
for access control
Enabled Disabled
trustedlib_enabled FSF_TLIB flag on file
system objects is
honored
FSF_TLIB flags are
not honored
Disabled Disabled
Setting kernel parameters
The Trusted AIX kernel can be configured to enforce security constraints as required by site policies.
The security configuration viewed using the getsecconf command and can be changed using the
setsecconf command. The configurable kernel parameters are:
v Sensitivity label enforcement
v Integrity read enforcement
v Integrity write enforcement
v Trusted Network
v Trusted library
These parameters can only be configured while the system is in the configuration run mode.
Customizing the /etc/security/enc/LabelEncodings file
The labels for a system are defined in the /etc/security/enc/LabelEncodings file and can be customized
for each site.
Labels can be customized after Trusted AIX is installed.
A Trusted AIX system has a defined SYSTEM LOW SL (SLSL) that is dominated by all other sensitivity labels
on the system, and a defined SYSTEM HIGH SL (SHSL) that dominates all other sensitivity labels. Similarly,
the SYSTEM LOW TL (SLTL) is dominated by all other integrity labels on the system and SYSTEM HIGH TL
(SHTL) dominates all other integrity labels. These definitions take the values of the highest and lowest SLs
and TLs as defined in the /etc/security/enc/LabelEncodings file.
When a Trusted AIX system is booted, the system labels from the /etc/security/enc/LabelEncodings file
are downloaded to the kernel. The labels can also be downloaded to the kernel with the setsyslab
command. The system labels as defined in the kernel can be listed with the getsyslab command. It is
recommended that the system be rebooted after modifying the /etc/security/enc/LabelEncodings file.
Comments can be placed in the /etc/security/enc/LabelEncodings file any place where a keyword can
start. Comments begin with a * and continue to the end of the line.
Security 413

The /etc/security/enc/LabelEncodings file contains version information and the following mandatory
sections. Each section should start with one of these section keywords followed by a colon (:).
v classifications
v information labels
v sensitivity labels
v clearances
v channels
v printer banners
v accreditation range
The /etc/security/enc/LabelEncodings file begins with the VERSION entry. This entry is a sequence of
characters and can contain white spaces.
Each of the following keywords can be present in a section. These keywords terminate with a semicolon
(;):
name=name
Keyword to define the full name of the classification or compartment
sname=name
Keyword to define to abbreviated name. Optional.
aname=name
Alternate keyword for the classification. Optional.
value=value
Keyword to specify the internal integer value of the classification or compartment
compartments=bit
Keyword to specify which compartment bit must be 0 or 1 if the word is present in the label
Trusted AIX enhancements to the label encoding format
The label encoding as prescribed by the Defense Intelligence Agency Document DDS-2600-6216-93 does
not support the integrity labels.
By default, sensitivity labels are used as integrity labels. Trusted AIX provides support for an optional
integrity labels section which can be different from the sensitivity labels sections. This provides flexibility of
having different classification names and values for sensitivity and integrity labels. For example, the
sensitivity labels can be prefixed with SL, and integrity labels with TL as follows:
Table 34. Sensitivity labels classification names and values
name sname value
name= SL IMPLEMENTATION LOW sname= SL_IMPL_LO value= 0
name= SL UNCLASSIFIED sname= SL_U value= 20
name= SL PUBLIC sname= SL_PUB value= 40
name= SL SENSITIVE sname= SL_SEN value= 60
name= SL RESTRICTED sname= SL_RES value= 80
name= SL CONFIDENTIAL sname= SL_CON value= 100
name= SL SECRET sname= SL_SEC value= 120
name= SL TOP SECRET sname= SL_TS value= 140
414 AIX Version 6.1 Security

Table 35. Integrity labels classification names and values
name sname value
name= TL IMPLEMENTATION LOW sname= TL_IMPL_LO value= 0
name= TL UNCLASSIFIED sname= TL_U value= 20
name= TL PUBLIC sname= TL_PUB value= 40
name= TL SENSITIVE sname= TL_SEN value= 60
name= TL RESTRICTED sname= TL_RES value= 80
name= TL CONFIDENTIAL sname= TL_CON value= 100
name= TL SECRET sname= TL_SEC value= 120
name= TL TOP SECRET sname= TL_TS value= 140
The following rules apply to the integrity labels section:
v The ″INTEGRITY LABELS″ section should be added only after the ″NAME INFORMATION LABELS″
section. In cases where the administrator has not defined the optional ″NAME INFORMATION LABELS″
section, the ″INTEGRITY LABELS″ section should be added next to the ″ACCREDITATION RANGE″
section.
v There should be only one ″INTEGRITY LABELS″ section in the label encoding file. The same section
applies to both objects and subjects.
v The new ″INTEGRITY LABELS″ section is an optional section. In case this section is not present, the
classifications as given in the mandatory ″CLASSIFICATIONS″ section should be used.
v The ″INTEGRITY LABELS″ section would be similar to the ″CLASSIFICATIONS″ section. It would
contain the following keywords: ″name=″, ″sname=″, ″aname=″, and ″value=″. The keywords ″initial
compartments=″ and″initial markings=″, which are part of ″CLASSIFICATIONS″ section, would not be
valid in ″INTEGRITY LABELS″ section.
v The data range for ″value=″ would be the same as that for the ″CLASSIFICATIONS″ section –
minimum of 0 to maximum of 32,000.
Starting up the system
System security is automatically invoked during the system startup sequence. You should verify that the
security parameters displayed during the startup sequence are correct for the system.
Configuration startup mode:
Configuration mode is used to maintain and recover the system.
When the system is booted in single-user mode, the system is minimally configured and networking is
disabled.
Operational startup mode:
Operational mode is used for daily operation.
Normally, the system should be booted directly into multiuser mode. If the boot authorization program
receives a valid username and password, the system enters operational mode, a console login
authentication screen is displayed, and valid users can then log in.
Security mechanisms such as sensitivity labels, discretionary access controls, mandatory access controls,
privilege checks, identification and authentication, and authorizations, are active in both configuration mode
and operational modes, as dictated by the relevant security configuration flags. For more information, see
the getsecconf command.
Security 415

It is recommended that the system be operated only in operational mode to ensure that all expected
system functionality is available.
Boot process:
New boot scripts added to the /etc/inittab file on Trusted AIX systems. The new boot scripts are
rc.mls.boot, rc.mls.net, and rc.mls, and are executed in that order.
The steps executed in the rc.mls.boot script are:
1. An interactive integrity check is run to prompt the user for information on how to handle each
discrepancy (using the trustchk command)
2. Set the configuration mode kernel security flags (using the setsecconf command)
3. Set the system labels (Minimum and Maximum Sensitivity Labels and Integrity Labels)
4. The configuration mode kernel security flags are displayed on the screen
The steps executed in the rc.mls.net script are:
1. Initialize the Trusted AIX AIX sub-system.
2. If the /etc/security/rules.int file exists, it will load the rules database into the kernel.
The steps executed in the rc.mls script are:
1. Initialize the Trusted AIX AIX sub-system.
2. If the /etc/security/rules.int file exists, it will load the rules database into the kernel.
Note: Any change to the boot scripts can result in a system malfunction.
Customizing system startup:
Although not recommended, boot authentication and system integrity checking at system startup can be
disabled.
An operator must be physically present at the system console to start up the system unless boot
authentication and system integrity checking are disabled.
Disabling BOOT authentication:
BOOT authentication can be disabled by running the rmitab bootauth command or using the SMIT menu.
Disabling system integrity check:
You can disable the automatic system boot integrity check by removing the trustchk line from the
rc.mls.boot script.
Shutting down the system
System shutdown is a privileged operation and is protected by the aix.system.boot.shutdown
authorization.
Any user with the SO role or another role that has this authorization can shut down the system.
Trusted recovery
There may be times when the system powers down in an unclean state. This can be the result of a power
outage, an accidental power down, or a hardware failure. Trusted AIX can recover from these
circumstances without special reboot procedures.
416 AIX Version 6.1 Security

When the system reboots, all protection mechanisms are active, regardless of how the system was
powered down. During the system startup procedure, all file systems are automatically checked for
damage before users can log on. The startup scripts run the fsck command to secure or make
inaccessible to unauthorized users any damaged or compromised files.
The trustchk command reports any inconsistencies in the security attributes of files or directories and
interactively prompts the user to repair these attributes. The trustchk command should be run whenever
there is a possibility that the integrity of the file system may have been compromised. See the trustchk
command for more information.
Login
Every Trusted AIX user should have the proper sensitivity and integrity clearances assigned so that they
can log in to the system.
The user’s clearances are defined as user attributes in the /etc/security/user file. The minsl and maxsl
attributes define the sensitivity clearance of the user. The mintl and maxtl attributes define the integrity
clearance for the user. The defsl and deftl attributes define the effective sensitivity and integrity levels of
the user at login.
User clearance attributes can be modified with the chuser and chsec commands and can be listed with the
lsuser and lssec commands.
Users can list their own labels but cannot change them. To list the clearance levels of other users, a user
must have the aix.mls.clear.read authorization. To modify clearances, a user must have the
aix.mls.clear.write authorization.
To log in, all of the following dominance rules must be true:
v The minsl value must be dominated by the defsl value
v The defsl value must be dominated by the maxsl value
v The mintl value must be dominated by the deftl value
v The deftl value must be dominated by the maxtl value
You can specify the desired effective sensitivity and integrity levels during login using the –e and –t
options of the login command. See the login command for more information.
To log in at a sensitivity level that is not in the accreditation range of the system, you must have the
aix.mls.label.outsideaccred authorization.
Trusted AIX does not allow system users (users with a uid less than 128) to log in.
Reasons for login failures
A login attempt can fail for a number of reasons.
A login attempt will fail if any of the following are true:
v An invalid login ID was entered
v An invalid password was entered
v The account is marked as locked because the number of previous bad login attempts for this account
exceeds the system limit
v The login port is marked as locked because the number of previous bad login attempts for the port
exceeds the system limit
v The login ID does not have a valid clearance
v The specified label (or the default sensitivity or integrity label for the login ID if no label was specified) is
not valid, is not within the clearance for the login ID, is not within the clearance of the login device, or is
not within the accreditation range of the system
Security 417

v The user does not have DAC access to the pathname of the login shell program, or the user account
does not have DAC exec access to the login shell program
v The user does not have MAC or MIC read access to the pathname of the login shell program or does
not have MAC or MIC read access to the login shell program
v The uid of the login ID was less than 128
Switching user with the su command
On a Trusted AIX system, when the su command with the - option is invoked, the current user’s
clearances must dominate the new user’s clearance level.
The following conditions must be met for both sensitivity and integrity labels:
v the current user’s maximum clearance must dominate the new user’s maximum clearance.
v the new user’s minimum clearance must dominate the current user’s minimum clearance
v the current user’s effective clearance must be dominated by the new user maximum clearance and
must dominate the new user’s minimum clearance.
User security responsibilities
There are certain responsibilities which users must be aware of, understand, and follow. Users must keep
passwords private, report changes in their user status, report suspected security violations, and more.
Passwords
Passwords should be memorized and should not be written down on any medium. If a password is
obtained by another user, this can compromise the security of information on the system.
The most obvious threat to password security is the compromise of passwords. The simplest way to
protect an account from an unauthorized attack by a user who may have discovered a password is to
periodically change the password. Passwords should be changed frequently enough to reduce the
probability of compromise during the lifetime of the individual password. The longer any single password is
used, the more opportunities there are for compromise.
If users are allowed to select their own passwords, the new password must be at least six characters long
and must contain at least two alphabetic characters and one numeric character. The password should not
reflect any personal or professional aspect of the user (for example, friends, user’s name, pet’s name, or
job title) and should not be a common word that might be found in a dictionary. Password-guessing
schemes often scan one or more dictionaries and a substantial list of personal items, such as the user’s
name, the names of children or pets, and birthdays.
Passwords can have a finite lifetime, determined by the ISSO. If a password has expired and the user
attempts to log in, the user is notified that the password must be changed and the user is allowed to log in
unless the password is changed. It is recommended that user passwords be changed more frequently than
the specified password lifetime. If there is any suspicion that a user’s password has been compromised,
the password should be changed immediately.
Leaving your system unattended
You should never leave a system unattended while any user is logged into an active session. If you must
be away from the machine for even a short period of time, it is strongly recommended that you log off the
system before leaving.
Secure system management
Management of a secure computer system involves the creation and enforcement of security policies and
regular system monitoring.
418 AIX Version 6.1 Security

The following list should serve as a starting point for the development of a secure facilities management
policy for your site:
v The maximum security level in the system’s accreditation range should not be greater than the
maximum security level for the site in which the system is located.
v The system hardware should be in a secure location. The most secure locations are generally interior
rooms that are not on the ground floor.
v Physical access to the system hardware should be restricted, monitored, and documented.
v System backups and archival media should be stored in a secure location, separate from the system
hardware site. Physical access to this location should be restricted in the same manner as access to
the system hardware.
v Access to operating manuals and administrative documentation should be restricted to a valid
need-to-know basis.
v System reboots, power failures, and shutdowns should be recorded. File system damage should be
documented and all affected files should be analyzed for potential security policy violations.
v Installation of new programs, whether imported or created, should be restricted and monitored. New
programs should be carefully scrutinized and tested before being run.
v Unusual or unexpected behavior of any system software should be documented and reported, and the
cause of the behavior determined.
v Whenever possible, at least two people should administer a system. One person should have the isso
role and the other should have the sa role.
v The PV_ROOT privilege should not be used. To administer the system, the execution of privileged
programs by ISSO, SA, or SO users should be sufficient.
v Audit information should be collected in logs and reviewed regularly. Irregular or unusual events should
be noted and their cause investigated.
v The number of logins with the isso, sa, and so roles should be minimized.
v The number of setuid and setgid programs should be minimized and should only be used in protected
subsystems.
v Privileges assigned to new programs should be determined and minimized by reviewing those assigned
to existing programs.
v Security attributes of files and directories should be verified regularly with the trustchk command.
v All passwords should contain at least 8 characters. This should be regularly verified by an ISSO user.
v All users should have a valid default login shell. This should be regularly verified by an SA user.
v The user IDs of normal users should not be system IDs. This should be regularly verified by an SA user.
A system id is one which has a uid lesser than 128.
System configuration:
Certain steps must be taken by the ISSO and SA to properly configure the system. The ISSO is primarily
responsible for managing security, while the SA is primarily responsible for daily administration.
The ISSO performs the following tasks:
v Installs and configures the basic security functionality, including system auditing, accounting, and
security for allocatable devices.
v Edits the system startup scripts in the /etc/rc.mls and /etc/rc.mls.boot files to meet the site security
policy.
Note: Any changes made to the system startup scripts are not part of the evaluated configuration and
must be addressed before accrediting the system.
v Configures the system-wide login parameters.
v Configures the system-wide password parameters.
Security 419

v Configures the SL range for tty devices that allow users to log in to the SL ranges specified for the tty
port. See the chsec command for more information.
v Configures system device SLs for tape drives and floppy disk drives. See the setsecattr command for
more information.
v Configures the site-configurable security features of the system.
Note: Any changes made to the configurable security features are not part of the evaluated
configuration and must be addressed before accrediting the system. Changing the default
configuration settings can result in the system operating in a less-secure mode.
v Configures the trusted security database for trusted boot and trusted recovery. See the trustchk
command for more information.
v Configures the user groups on the system.
The ISSO and SA work together to configure printers. The SA configures the printers for the system and
the ISSO configures the SL range for the printers.
Network configuration:
The ISSO is primarily responsible for network security and the SA is primarily responsible for daily network
administration. The ISSO and the SA work together to properly configure the network.
Network security is configured with default settings during Trusted AIX installation. It can also pass
sensitivity labels to other Trusted AIX hosts on the network. The ISSO installs and configures the basic
network functionality provided with the system. The ISSO configures the network tables and then runs the
tninit command to save the databases.
Network access:
When connecting to a non-Trusted AIX system via a network or to a Trusted AIX system that not using the
Trusted Networking feature, some security attributes may not be transmitted by the non-Trusted AIX
system. In this case, the Trusted AIX system applies default security mechanisms. The default security
mechanisms are established by a system administrator.
User account configuration:
The ISSO and SA work together to configure user accounts on the system. The ISSO is primarily
responsible for managing security-related user attributes and the SA is primarily responsible for other user
attributes.
The ISSO performs the following tasks for each user:
v Configures clearance. See the chsec and chuser commands for more information
v Configures roles and authorizations
v Configures user groups
v Sets the home directory clearance level. See the settxattr command for more information
v Sets the password
v Sets the audit masks
The SA performs the following tasks:
v Configures user accounts
v Informs the ISSO of new user accounts that require security attributes
Filesystem configuration:
420 AIX Version 6.1 Security

Most file systems are supported on Trusted AIX, however, the support for Trusted AIX security related
extended attributes on file system objects is available only on JFS2 with EAv2.
A JFS2 with EAv1 filesystem is converted to EAv2 when it is mounted on a Trusted AIX system. Files on
these JFS2 filesystems do not have security attributes. The system uses the default SYSTEM_LOW attributes
to access these files. The security attributes can be set on the files by the settxattr command.
In a network environment, a directory on one system can be marked as shared, meaning that the directory
can be mounted and accessed on other systems in the network as if it were the root directory of a
filesystem on a local disk partition.
A file system can be either a multilevel filesystem (MLFS) or a single-level filesystem (SLFS). Each file
object in MLFS has its own labels, whereas all objects in SLFS have the same labels as the mount point.
SLFS does not support multilevel directories and partitioned directories.
Filesystem access:
When a process attempts to access a filesystem object, the system verifies access to each pathname
component.
If a process does not have search access to all of the directories in the pathname, this process cannot
access the object. When a relative pathname is used, access to the current directory is checked whether
or not the current directory is explicitly referenced using a period (.) at the beginning of the pathname.
Trusted Network management:
There are a number of considerations for managing a Trusted Network, including configuration and the
configuration database, netrule syntax and rule specification, Trusted Network flags, and RIPSO/CIPSO
options.
Default configuration warning:
The networking capabilities of AIX Trusted Network have been carefully designed to allow any conceivably
desired configuration. However, changing the configuration from the default values without understanding
AIX Trusted Network can be dangerous.
It is possible, by improperly configuring a machine, to automatically downgrade, upgrade, or remove
security information altogether. Therefore, you should not change the default values in the networking
tables unless you are familiar with AIX Trusted Network.
AIX Trusted Network configuration database:
The network configuration at boot time is established by the rules.host and rules.int files.
After a default Trusted AIX installation, there are no host rules or rule files. The netrule command can be
used with the -u flag to save the new or updated rules to files. The files are binary databases that can be
manipulated with the tninit command. A user must have the aix.mls.network.init authorization to use
the tninit command.
Displaying the AIX Trusted Network rules database:
The contents of an AIX Trusted Network rules database set can be displayed with the disp action of the
tninit command.
Security 421

Enter the following command to append the extensions of .host and .int to filename to generate the
filenames of the host rules database and the interface rules database. The contents of both files will be
sent to the standard out stream in human-readable form.
tninit disp filename
Enter the following command to display the boot default configuration:
tninit disp /etc/security/rules
Loading the AIX Trusted Network rules database:
The tninit command reads a set of AIX Trusted Network rules databases and loads them into the kernel to
become the active set. The filenames of the host and interface accreditation tables are specified in the
same method as the tninit disp action.
The optional -m flag specifies that the system should maintain the existing host rules. If the -m flag is not
specified, all existing host rules are removed before the new active set is loaded. If the -m flag is
specified, the existing and new host rule sets are aggregated, with the new rules overwriting the existing
rules if there is a conflict. All interface rules are overwritten whether or not the -m flag is specified.
The following command loads new rules while maintaining the old rules set:
tninit -m load /dir/dir/filename
This command used the file specified by the filename parameter and appends the .host and .int
extensions to create the two files that comprise the database.
Saving the AIX Trusted Network rules database:
Similar semantics are used for loading and saving the rules database.
Any specified filename is appended with .int and .host to create the two files used to store the database.
The tninit command’s save action stores all of the rules that are currently active in the kernel.
To create the default rule set, you must use the netrule command to tailor the kernel rules to fit the
desired site security policy, and then run the tninit command. The following command creates the
/etc/security/rules.int and /etc/security/rules.host files:
tninit save /etc/security/rules
AIX Trusted Network kernel configuration:
You can use the netrule command to completely configure the kernel’s AIX Trusted Network rule set to fit
the site’s security policy if you have the aix.mls.network.config authorization.
The netrule command can be used to manipulate both host and network interface rules in the kernel. See
the netrule command for more information.
Each interface in a system must have a rule associated with it. If you attempt to delete an interface rule, it
reverts to its default state. If you add another interface rule, the new interface rule overwrites the current
rule. The default interface rule can be viewed by querying the interface rule with the interface name as
“default.” For example: # netrule iq default
netrule syntax:
There are host and interface syntax rules for the netrule command.
The netrule command has the following syntax rules when used for hosts:
422 AIX Version 6.1 Security
netrule h l [ i | o | io ]
netrule h q { i | o } src_host_rule_specification dst_host_rule_rule_specification
netrule h - [ { i | o } [ u ] [ src_host_rule_specification dst_host_rule_specification ]
netrule h + { i | o } [ u ] src_host_rule_specification dst_host_rule_specification [ flags ] [
RIPSO/CIPSO_options ] security
The netrule command has the following syntax rules when used for interfaces:
netrule i l
netrule i q interface
netrule i + [ u ] interface [ flags ] [ RIPSO/CIPSO_options ] security
The first element, h or i, indicates a host or network interface operation.
The desired action is listed next. There are four distinct actions available:
l List all rules
q Query a particular rule
- Remove a host rule or revert an interface rule to its default state
+ Add or overwrite a rule
The third element in host rules identifies the rule type. For host rules, there is a distinction between
incoming and outgoing rules. The in rules apply to all incoming packets while out rules apply to all
outgoing packets; i indicates an in rule, o indicates an out rule, and, when applicable, io or nothing
indicates both in and out rules. If the last element u is specified when adding or removing a host or
interface rule, the /etc/security/rules.host and /etc/security/rules.int files are updated after the host
or interface rule is successfully added or removed.
AIX Trusted Network rule specification:
Interface rules require that you enter the name of the network interface. Host rules are much more flexible
and therefore require a more complex rule specification.
To specify an interface, enter the name of the network interface the rule should apply to. Network interface
names are names such en0. You can use the ifconfig -a command to see the network interface names.
You must specify a particular interface by name only. You cannot specify a port, protocol, or subnet mask.
Host rules require a more complex rule specification. The AIX Trusted Network system uses the most
specific applicable rule. For example, a site policy can be configured so that a host rule with a mask of 24
applies to all hosts on a subnet, but a more specific rule can apply to a single host on the net, and this
host uses the more-specific rule. Another more specific rule can also apply to one specific TCP port on
this host. The flexibility of AIX Trusted Network configuration gives you the ability to implement whatever
site security policy is needed for the application. The exact syntax is:
source_host [ /mask ] [ = proto ] [ :start_port_range [ :end_port_range ]]
destination_host [ /mask ] [ = proto ] [ :start_port_range [ :end_port_range ]]
source_host
The host name, IPv4 address, or IPv6 address of the source host.
Security 423

destination_host
The host name, IPv4 address, or IPv6 address of the destination host.
mask The subnet mask. The number indicates how many bits from the MSB are relevant. When an IPv4
address/subnet pair is written a.b.c.d/e, e is a number from 0 to 32. This number specifies the
number of ones at the beginning of the subnet mask. For example, for an IPv4 address, /24
specifies a netmask of 255.255.255.0, which, when seen as 32 bits, is
11111111.11111111.11111111.00000000. This is 24 ones followed by eight zeros.
proto The protocol number or name as recorded in the /etc/protocols file (for example, =tcp).
start_port_range
Either the TCP or UDP port to which the rule applies, or the beginning of the range if the rule
applies to a range of ports. This can be either the port number or the name of the UDP or TCP
service as recorded in the /etc/services file.
end_port_range
The upper bound of the port range.
AIX Trusted Network flag description:
The AIX Trusted Network system has two flag clusters. If these are not specified, the default values are
used.
The -d and -r flags are used as follows:
-d drop
drop AIX Trusted Network can be configured to drop all packets
r Drop all packets on this interface
n Do not automatically drop all packets on this interface (interface default)
i Use interface default (host default, host only)
-frflag:tflag
rflag Security option requirement on incoming (received) packets
r RIPSO only
c CIPSO only
e Either CIPSO or RIPSO
n Neither CIPSO or RIPSO (system default)
a No restrictions
i Use interface/system default (default)
tflag Security option handling on outgoing (transmitted) packets
r RIPSO placed on all outgoing packet IP headers
c CIPSO placed on all outgoing packet IP headers
i Use interface default (host default, host only)
RIPSO/CIPSO options:
The AIX Trusted Network subsystem supports options for the configuration of CIPSO and RIPSO packet
labeling.
-rpafs=PAF_field [, PAF_field ... ]
424 AIX Version 6.1 Security

Specifies each PAF_field that is accepted when IPSO packets are received. There can be up to 256 of
these fields.
-epaf=PAF_field
Specifies the PAF_field that is attached to error responses when error packets are sent using IPSO on
transmitted packets.
-tpaf=PAF_field
Specifies the PAF_field that is applied to outgoing packets when IPSO is used on transmitted packets.
PAF_field:NONE | PAF [ + PAF ... ]
A PAF_field is a collection of PAFs. There are five individual PAFs that can be included in a single
PAF_field. These are GENSER, SIOP-ESI, SCI, NSA, and DOE. A PAF_field is a combinations of these
values separated by a plus sign (+). For example a PAF_field containing both GENSER and SCI is
represented as GENSER+SCI. The special PAF_field NONE can be used; this specifies the PAF_field
without any PAFs set.
-DOI=doi
Specifies the domain of interpretation for CIPSO packets. Incoming CIPSO packets must have this DOI
and outgoing CIPSO packets will be labeled with this DOI.
-tags=tag[,tag ...]
tag=1 | 2 | 5
Specifies the set of tags that are accepted and available to be transmitted by CIPSO options. This is a
combination of 1, 2, and 5 separated by commas. For example 1,2 would enable tags 1 and 2.
AIX Trusted Network security policy:
The minimum SL allowed, the maximum SL allowed, and the default SL must be specified.
The implicit or default SL is applied to all packets that do not carry any information about their own SL.
The levels are entered in the following syntax:
+min +max +default
Any label that is valid according to the label encodings file can be used. Quotes are not required for labels
that include spaces.
netrule examples:
The following are examples of the netrule command.
Enter the following to configure en0 to pass no security options and to allow all packets through:
netrule i+ en0 +impl_lo +ts all +impl_lo
Enter the following to configure the host 185.0.0.62 to accept only CIPSO packets within the range of
CONFIDENTIAL A to TOP SECRET ALL:
netrule h+i 192.168.0.0 /24 185.0.0.62 -fc:c +confidential a +top secret all +confidential a
Enter the following to drop all telnet packets from a subnet:
Security 425

netrule h+i 192.168.0.0 /24 =tcp :telnet 192.0.0.5 -dr +impl_lo +impl_lo +impl_lo
See the netrule command for more information and examples.
Managing user accounts:
Identification and authentication (I&A) information about each user is protected and is used to uniquely
identify the user and verify the user’s access permissions within the system.
User identity information includes the user’s name, login ID text name, user ID, group ID, home directory,
password, password aging parameters, shell, clearances, authorizations, and audit mask. Most
user-related information is stored in the following files:
/etc/passwd
User names, user IDs, primary group assignments, and home directories
/etc/group
Secondary group assignments and home directories
/etc/security/passwd
User passwords in encrypted form
/etc/security/user
Login restrictions, password parameters (such as minimum length), umask, etc.
The /etc/security/passwd and /etc/security/user files are not readable by normal users. The
/etc/security/passwd fie is protected with no discretionary access bits turned on and an SL of
SYSTEM_HIGH. Preventing normal users from reading the encrypted password eliminates sequential
encryption/comparison routines that attempt to match the encrypted password.
Authorized users can edit these files directly, but it is often more convenient to use the smit command to
edit user parameters. The smit command invokes the System Management Interface Tool (SMIT), which
displays menus with choices for system management tasks such as user maintenance.
User and group IDs:
There are two classes of user IDs: system IDs and normal user IDs. System IDs are reserved for
ownership of protected subsystems and special system administration functions. Normal user IDs are
assigned to individuals who use the system interactively.
Each user has a unique user ID used to identify the user on the system. Each user can also be assigned
one or more group IDs, Group IDs are shared by users in the same group and are not necessarily unique.
There are range limits on the numeric values used for IDs. The following table defines the ID range limits.
The values have been defined to allow for a sufficient number of system and normal user and group IDs.
System user ID
0 to 127
Normal user ID
128 to MAXUID
Normal group ID
0 to MAXUID-1
The MAXUID value is defined in the /usr/include/sys/param.h file
Care should be taken when assigning user ID values for new users. If a normal user is inadvertently
assigned a user ID value less than 128, the user will not be able to log onto the system.
426 AIX Version 6.1 Security

User ID values should not be reused. When a user is deleted, it is recommended that the entries remain in
the /etc/passwd and /etc/security/passwd files and the account be locked. You can do this with the smit
command. This prevents a user from logging in and the ID from being reused. Not reusing the ID prevents
a new user from accessing files that belong to the previous user and that may not have been removed.
This also allows the audit trail to be reconstructed with no ambiguity.
The /etc/passwd, /etc/security/passwd, and /etc/group files can be managed with the mkuser, chuser,
rmuser, pwdadm, and passwd commands. These commands enforce all of the above precautions as
well as all other system security considerations. The mkuser command can only add normal users to the
system.
Note: Carefully enforce the following standards:
v Never reassign a previous used user ID to a new user
v Never assign duplicate user IDs
v Never assign a system ID to a normal user
v Never assign MAXUID as a user ID or group ID
Passwords:
A password is a character string that is associated with a user and is used to authenticate the user at the
start of a session.
The password is stored in encrypted form in the shadow file. The unencrypted password is not stored
anywhere on the system.
Note: The passwords for role users are extremely important to the security of a system and should be
protected at all times.
Password aging:
Users can change their passwords as long as password aging criteria are satisfied.
Password aging requires users to change their password if the password has existed on the system for a
defined time period. Password aging includes a minimum age and a maximum age time period. A
password cannot be changed before the passage of this minimum age time period. The password must be
changed after the maximum age time period.
Password aging parameters can be set in the /etc/security/user file. The following parameters are related
to password aging:
maxage
Maximum number of weeks a password is valid
maxexpired
Maximum number of weeks after maxage that an expired password can be changed by a user
minage
Minimum number of weeks between password changes
minlen
Minimum length of a password
Other parameters can be set to specify the characters that are allowed in a password. See the passwd
command for a complete list of password parameters.
Shell:
Security 427

While working in an application, such as a word processor or a spreadsheet, users do not generally need
to interact directly with the operating system, since the application manages that interaction. However,
some users need to interact directly with the operating system, without another application’s interface.
When direct interaction with the operating system is needed, users must use a shell program. A shell
program allows users to enter AIX commands and directly access files and directories and perform other
operations. Every user must have a default shell program specified in their /etc/passwd file. The user’s
default shell program (such as /bin/sh, /bin/csh, or /bin/ksh) is run by the login or xterm command when
the user needs to use a shell.
Login effective SL and TL:
Users are assigned a default login SL and TL. The default login SL and TL are the effective SL and
effective TL of the user’s process after a successful login.
If a user does not want to log in at their default login SL, they can choose a different SL at login time by
using the -e option of the login command. The SL supplied by the user must be dominated by the user’s
clearance and contained in the system accreditation range. The TL can be specified by the user at login
time by using the -t option of the login command.
The default login SL and TL are defined in the /etc/security/user file, along with the username and
clearance for each user. The effective SL of the user must be lie between the tty SL range as specified in
the /etc/security/login.cfg file. The user’s effective SL must be dominated by the tty’s maximum SL and
dominate the minimum SL. The effective TL of the user must be same as the tty’s TL.
Clearances:
A user’s process shell is assigned six labels during login.
The effective SL is used by the system in MAC checks. The minimum SL clearance and maximum SL
clearance limit the effective SL; the effective SL cannot dominate the maximum SL clearance, and it must
dominate the minimum SL. The effective TL is used by the system in MIC checks. The minimum TL
clearance and maximum TL clearance limit the effective TL; the effective TL cannot dominate the
maximum TL clearance, and it must dominate the minimum TL.
An ISSO-authorized user can modify any user’s SL clearance, TL clearance, default longin SL, and default
login TL. These values are defined in the /etc/security/user file.
Division of responsibility for user information:
A single user cannot add a user to the system. Users are added to the system by the combined actions of
SA- and ISSO-authorized users.
An SA-authorized user can add non-security related user information, which includes the user’s name,
user ID, group ID, login ID text name, shell, and home directory. An ISSO-authorized user can add
security-related user information, which includes the user’s password, clearance, audit mask, and roles.
The requirement for two people to add a user prevents a single user with authorization from granting
system-wide authorization to any other user.
Enhanced auditing:
Trusted AIX has enhanced the auditing subsystem to capture additional security details.
New audit record fields:
428 AIX Version 6.1 Security

The following fields have been added to all of the AIX audit records for Trusted AIX. These new fields can
be used with the auditselect command as select criteria.
v Roles of the audited process
v Effective TL of the audited process or object
v Effective SL of the audited process or object
v Effective privileges of the audited process
Trusted AIX also audits the following security attributes in some audit trails:
v TL of the audited process or object
v SL of the audited process or object
v Trusted AIX-related security flags
You can display these new security attributes with the auditpr -v command.
Audit ranges:
Trusted AIX includes a mechanism that allows administrators to specify a set of auditing ranges based on
the TL and/or SL of the audited processes or objects. All objects and subjects whose TL or SL is out of the
auditing ranges are ignored.
To set the audit ranges for processes and objects, add a war stanza in the /etc/security/audit/config file:
war:
obj_min_sl = "impl_lo a,b"
obj_max_sl = "TS a,c"
sub_min_sl = "impl_lo a,b"
sub_max_sl = "TS a,c"
obj_min_tl = impl_lo
obj_max_tl = TS
sub_min_tl = impl_lo
sub_max_tl = TS
The obj_min_sl and obj_max_sl define the SL audit range for objects. The sub_min_sl and sub_max_sl
define the SL audit range for subjects (processes). The obj_min_tl and obj_max_tl define the TL audit
range for objects. The sub_min_tl and sub_max_tl define the TL audit range for subjects (processes).
The war stanza is read by the audit start command and is uploaded to kernel before the audit subsystem
is started. If the war stanza is omitted, the current audit ranges in the kernel are removed. The kernel
does not perform any TL or SL audit range checks if there is no TL SL audit range in the kernel.
Trusted AIX kernel flag:
When a system is configured as aTrusted AIX system at install time, a global kernel flag is enabled in the
_system_configuration variable. The __MLS_KERNEL() macro is provided in the kernel to determine
whether the system is configured as a Trusted AIX system. This macro can be called by user-space
applications or kernel routines. A return value of 1 from the __MLS_KERNEL() macro indicates that the
system is configured as Trusted AIX. Any other return value indicates that the system is not configured as
a Trusted AIX system.
Updating existing programs:
Existing privileged or trusted programs generally function correctly on a trusted system without change.
However, certain changes can be made to enhance the level of trust and/or upward compatibility of these
programs. Many of the recommendations for creating new programs also apply to updating existing
programs. The following recommendations particularly apply:
Security 429
v Programs that test to determine whether they are privileged processes (that is, whether the effective
user ID is 0) should be modified in accordance with the guidelines in Direct Privilege Checking
v Code that manipulates the standard UNIX system permission bits (the mode bits) should be changed to
reflect the possible existence of ACLs
v Code that used to run as setuid-to-root should be examined for the use of privileges and should have
the appropriate privileges assigned
Backup and restore:
Import and export of data on Trusted AIX systems uses trusted versions of the backup and restore
commands.
The backup and restore commands have been extended to handle labels. These extensions are
transparent to the user and, aside from the labeling extensions, these commands function identically to the
standard AIX backup and restore commands. To disable the backup or restore of the extended security
information, the -O flag can be used.
The import/export system is protected by a combination of privilege and authorization mechanisms.
cron restrictions:
The cron command is disabled and will not run any jobs when the system is in configuration mode. If the
system is in operational mode, the cron command runs jobs at the sensitivity label at which the job was
submitted and the user’s default integrity label.
There are restrictions such as the user’s minimum clearance and maximum clearance. Depending on
which is more recent, the clearance is taken from either the settings of the time that the job was submitted
or the last time the cron command restarted. Only an SA user can administer the cron command.
Mounting and accessing filesystems:
Trusted AIX supports labeling (SLs, and TLs) on JFS2 with EAv2 file systems. An SA or SO can mount a
file system that does not support labeling (CDFS or HSFS) if necessary. In this case, all of the files on the
mounted file system do not have individual SLs, TLs, or FSFs, but instead inherit the security attributes of
the mount point.
Trusted AIX system management
Guidelines for proper management of a Trusted AIX system must be followed to ensure system security.
Trusted AIX system management is performed by certain users whose accounts are associated with
administrative roles. These users are called the Information System Security Officer (ISSO), the System
Administrator (SA), and the System Officer (SO), and each of these users has authorizations that allow
them to perform a specific subset of administrative tasks. These users are associated with the system
defined roles isso, sa, and so, respectively. The terms ISSO, SA, and SO are used to refer to users
having the isso, sa, and so roles, respectively. Some administrative duties can only be carried out by two
of the three system managers working together, because one manager acting alone does not possess
sufficient authorizations to complete these duties. For example, when adding a new user to the system,
only the SA can add a new user account and only the ISSO can establish the user’s password, clearance,
and audit mask. This division of labor is known as the two-man rule.
Note: The effectiveness of the two-man rule depends on the authorizations that are assigned to the
administrative roles. Associating more authorizations to the administrative roles than are needed
can make the system susceptible to insider attacks. See RBAC for more information on associating
authorizations to roles.
430 AIX Version 6.1 Security

The system defined roles isso, sa, and so are associated with the following Trusted AIX authorizations by
default. Proper care should be taken if these associations are changed as this could make the system
vulnerable.
Table 36. Roles and authorizations
isso sa so
aix.mls.login
aix.mls.printer
aix.mls.network.config
aix.mls.network.init
aix.mls.network.config
aix.mls.login
aix.mls.pdir
aix.mls.system.label
aix.mls.tpath
aix.mls.label
aix.mls.system.config
aix.mls.proc
aix.mls.clear
aix.mls.lef
aix.mls.stat
aix.mls.printer
Managing the system for Information System Security Officers:
A Trusted AIX system is managed by the coordinated activities of ISSO, SA, and SO users.
During Trusted AIX installation, three default user accounts of isso, sa, and so are created (if these
accounts are not already present in the case of migration from regular AIX to Trusted AIX). These users
are associated with the isso, sa and so respectively.
Note: The default accounts are only intended for the initial setup and configuration of a Trusted AIX
system. It is recommended that these roles be assigned to other regular users. After these roles
have been assigned to other users, the default user account can be removed. See Installation and
migration for more information on Trusted AIX installation.
ISSO activities
The primary responsibility of the Information System Security Officer (ISSO) is security administration of
the system. Only a user with ISSO authorization can perform ISSO activities. These activities include:
v Planning, implementing, and enforcing site security policy
v Establishing system-wide defaults for user clearance, authorizations, privileges, login controls, and
password parameters
v Setting up user authentication profiles reflecting the level of trust placed in users when user accounts
are created by the system administrator
v Assigning security attributes, SLs, and TLs to devices such as terminals, printers, removable disk
drives, and magnetic tape drives
v Assigning security flags, labels, privileges, and authorization sets to files
Security 431

v Recovering the system to a trusted state in the event of a system failure
Managing the audit system:
Access to the auditing commands is limited to users with the AUDITSYS authorization. For more
information, refer to the audit, auditselect, and auditpr commands.
The following example shows:
1. How to create a filesystem to be used for the audit trail files
2. How to start the audit system
3. How to cause some records to be generated
4. How to parse the audit trail to retrieve various types of records.
Run the following commands as a user with FSADMIN authorization:
/usr/sbin/crfs -v jfs -g rootvg -m /audit -a size=32M -A yes
mount /audit
Use the /tbin/auctlmod -e command to add the following entry to the users section of the
/etc/security/audit/config file:
username = ALL
Replace username with the name of a real user who can log onto the system.
As an ISSO user, create a file called /tmp/top_secret and change the SL of the file to TS ALL.
touch /tmp/top_secret
/usr/sbin/settxattr -f sl= "TS ALL" /tmp/top_secret
Run the following command as a user with AUDITSYS authorization:
/usr/sbin/audit start
The audit system has now been set up and started so that it will record the actions of the user specified
by username when this user logs on to the system.
Log on to the system with the user specified by username in the /etc/security/audit/config file and run
the following commands:
ls -l /tmp/top_secret
exit
As a user with AUDITSYS authorization, run the following commands:
audit shutdown
$ /usr/sbin/auditselect -e “mac_fail==WILDCARD” /audit/trail | \
/usr/sbin/auditpr -v -APSV > /tmp/audit_trail-mac_failure
Examine the audit trail that was redirected to the /tmp/audit_trail-mac_failure file and search for
mac_fail. The auditselect has been modified to accept the following options:
v subj_sl
v obj_sl
v mac_fail
v mac_pass
v mic_fail
v mic_pass
v priv_fail
432 AIX Version 6.1 Security

v priv_pass
v auth_pass
v fsf_fail
v fsf_pass
These options all use the word WILDCARD as the matched value.
Managing object and processes labels:
Every filesystem object and system process have associated labels.
All filesystem objects other than regular files have a range of sensitivity labels and an integrity label.
Processes have a range of both sensitivity and integrity labels. In addition to the ranges, processes have
an effective SL and effective TL. This label indicates the current SL or TL at which the process is running.
You can view the labels with the lstxattr command. You can set the labels of the filesystem objects and
processes with the settxattr command.
Managing network security:
AIX Trusted Network requires that several tables be defined by the ISSO. These tables are stored in the
/etc/security directory. The tninit command is used to generate the binary version and then load it into the
kernel.
Host and network interface rules determine how the system deals with incoming and outgoing network
packets. Host rules apply to specific hosts. Network interface rules apply to interfaces through which hosts
connect to the network. If there are any conflicts between a host rule and an interface rule, the host rule
takes precedence.
Use the netrule command to add, edit, and query rules. In general, the rules pertain to protocols used,
ranges of addresses (both hosts and ports) to which to apply the rules, and which SLs to assign to the
packets. See the netrule command for more information.
Use the tninit command to initialize the AIX Trusted Network subsystem, to save the rules in binary
format, and to display the rules in text format.
Security configurable features:
The configurable feature settings are displayed during the boot sequence.
The configurable settings are stored in the ODM. These settings can be displayed with the getsecconf
command and can be modified by an ISSO user with the setsecconf command.
Managing labels:
An ISSO user can add, modify, or delete label encodings by modifying the /etc/security/enc/LabelEncodings file. The /etc/security/enc/LabelEncodings file defines how human-readable names are
mapped to the binary representation of system sensitivity labels.
Note: Modifying the sensitivity label encodings file on a running system can result in invalid labels unless
extreme care is taken. Since objects can be labeled with single words or constrained combinations
of words, carelessly changing, adding, or deleting word combination constraints can result in invalid
labels.
The /etc/security/enc/LabelEncodings file is translated into binary form by the l_init library routine and
stored in tables. These tables are used to convert SLs, printer banners, and clearances to and from their
internal binary encodings.
Security 433
Trusted AIX uses the MITRE Compartmented Mode Workstation Labeling software as the basis for
labeling implementation. The document Compartmented Mode Workstation Labeling: Encodings Format,
DDS-2600-6216-93 (MTR 10649 revision 1), September 1993 explains the standard label encodings
format.
The standard label encoding format treats the integrity labels and sensitivity labels the same as given in
the Sensitivity Labels section of the /etc/security/enc/LabelEncodings file.
Trusted AIX optionally supports an Integrity Labels section which allows the integrity labels to be different
from the sensitivity labels.
Managing partitioned directories:
To a normal user process, a partitioned directory appears and functions the same as a regular directory.
However, with a partitioned directory, different processes with different SLs see different contents of the
same directory.
For example, if a process running at the SECRET security label creates a file named foo in a partitioned
directory, then a second process running at the TOP SECRET security label cannot see or access the file
foo in that directory. Also, the second process can create its own foo file without interfering with the first
foo file.
This is accomplished using hidden subdirectories. For each unique SL with which a process accesses the
partitioned directory, there is a partitioned subdirectory. When a process accesses the partitioned directory,
the system automatically redirects the process to the hidden subdirectory. In the example above, the two
foo files are actually in different subdirectories, even though they appear to the user to be in the same
directory.
See “Partitioned directories” on page 411 for more information on partitioned directories.
Partitioned directories are supported in JFS2 with EAv2.
Creating a partitioned directory:
When a partitioned directory is created, the default SL range is System Low SL to System High SL. When
a partitioned directory is accessed, the kernel automatically creates a label-specific child directory (if one
does not already exist) and redirects the user process to this child directory.
Use the pdmkdir command to create a partitioned directory. The pdmkdir command requires
aix.mls.pdir.create authorization to override DAC, MAC, and MIC restrictions. Use the pdrmdir command
to remove an empty partitioned directory.
Partitioned subdirectories and sub-subdirectories
The label-specific child directories of a partitioned directory are partitioned subdirectories. When a process
creates a child directory under a partitioned subdirectory (with the mkdir command), the child directory is
a partitioned sub-subdirectory.
When a partitioned subdirectory is created, it inherits the security attributes of its parent partitioned
directory, except for the minimum SL and maximum SL. The minimum and maximum SL are set to the
effective SL of the virtual mode process that first accesses the partitioned subdirectory.
Trusted AIX recognizes four different types of directories:
v regular directory (dir)
v partitioned directory (pdir)
434 AIX Version 6.1 Security

v partitioned subdirectory (psdir)
v partitioned sub-subdirectory (pssdir)
Virtual mode and real mode:
There are two different partitioned directory access modes: virtual mode and real mode.
In virtual mode, a process accessing a partitioned directory can only see the contents of its label-specific
partitioned subdirectory. A partitioned directory is never visible to a process running in virtual mode. A
partitioned directory is visible to a process running in real mode. Processes running in real mode can see
all real contents of partitioned directories and partitioned subdirectories. For real-mode processes, the
system does not perform any redirection.
By default, processes run in virtual mode. Real mode is intended only for file system administration
purposes. Use the pdmode command to run commands in a mode other than that of the current process
shell or to switch to a shell in a different mode.
Although a real-mode user process can see and manipulate partitioned directories and subdirectories, this
type of access and manipulation should be performed with caution. For example, if a regular directory is
created or moved into a partitioned directory by a real-mode process, the directory will never be visible to
processes running in virtual mode.
Although a partitioned directory looks like a regular directory to a virtual-mode process, there are still some
restrictions on the partitioned directory.
Hierarchy:
There is a hierarchy of partitioned directories and subdirectories.
The following rules govern the hierarchy of partitioned directories and subdirectories:
v A directory must be one of four types:
– a regular directory
– a partitioned directory
– a partitioned subdirectory
– a partitioned sub-subdirectory
v A directory cannot be of more than one type at any time
v The parent of a partitioned subdirectory must be a partitioned directory
v Every child directory of a partitioned subdirectory must be a partitioned sub-subdirectory
v The parent of a partitioned sub-subdirectory must be a partitioned subdirectory
Any violation of these rules results in an invalid partitioned directory tree and an inconsistent file system
whose behavior is undefined.
Mounting filesystems:
A partitioned directory or subdirectory can be a mount point, but a partitioned sub-subdirectory cannot be a
mount point. Similarly, the root of a filesystem that is being mounted can be a partitioned directory or
subdirectory, but it cannot be a partitioned sub-subdirectory.
Creating and deleting directories:
Security 435

When a virtual-mode process running is in a partitioned sub-subdirectory, the mkdir command creates a
regular directory. If the same process is in a partitioned subdirectory and executes a mkdir command, a
partitioned sub-subdirectory is automatically created. Any empty directory can be deleted, subject to MAC,
MIC, and DAC restrictions.
Moving directories:
MAC, MIC, and DAC restrictions apply when directories are moved.
A regular directory can be moved anywhere. If its new parent directory is a partitioned subdirectory, the
regular directory that was moved become a partitioned sub-subdirectory. Otherwise, it will still be a regular
directory. If its new parent is a partitioned directory and its name clashes with the name of a potential
partitioned subdirectory, any later virtual-mode process redirection to that potential partitioned subdirectory
will fail.
A partitioned directory can be moved to another regular directory and it will still be a partitioned directory
after being moved. Nested partitioned directories are not supported in Trusted AIX because they provide
no additional advantage.
A partitioned subdirectory can only be moved into a partitioned directory and is still a partitioned
subdirectory after being moved. Moving a partitioned subdirectory into a regular directory, a partitioned
subdirectory, or a partitioned sub-subdirectory is prohibited.
A partitioned sub-subdirectory can be moved anywhere. If its new parent is a regular directory, a
partitioned directory, or a partitioned sub-subdirectory, it becomes a regular directory. Otherwise, it is still a
partitioned sub-subdirectory.
Table 37. Directory movement summary
Move directory of
type To regular directory
To partitioned
directory
To partitioned
subdirectory
To partitioned
sub-subdirectory
Regular Allowed. Remains a
regular directory
Allowed1. Remains a
regular directory.
Allowed1. Becomes a
partitioned
sub-subdirectory.
Allowed. Remains a
regular directory.
Partitioned Allowed. Remains a
partitioned directory.
Allowed1. Remains a
partitioned directory.
Not allowed. Allowed. Remains a
partitioned directory.
Partitioned
subdirectory
Not allowed. Allowed. Remains a
partitioned
subdirectory
Not allowed. Not allowed.
Partitioned
sub-subdirectory
Allowed. Becomes a
regular directory.
Allowed. Becomes a
regular directory.
Allowed. Remains a
sub-subdirectory.
Allowed. Becomes a
regular directory.
1 If the name clashes with the name of a potential (currently nonexistent) partitioned subdirectory, any later
virtual-mode process redirection to the partitioned subdirectory will fail.
Changing directory type:
The pdset command can be used to change a regular directory to a partitioned directory type. There is no
command to change a partitioned directory to a regular directory.
Replacing inode numbers:
When a partitioned subdirectory is accessed and its inode number or the inode number of its parent
partitioned directory (..) is needed, the inode number of its parent partitioned directory or the inode number
of the parent of its parent partitioned directory is returned, respectively. When a partitioned
436 AIX Version 6.1 Security

sub-subdirectory is accessed and the inode number of the parent of the partitioned sub-subdirectory(..) is
needed, the inode number of its grandparent partitioned directory is returned.
Partitioned directory commands:
These commands apply to partitioned directories.
pdmkdir
Create partitioned directories
pdrmdir
Remove partitioned directories and subdirectories
pdlink Link files across partitioned subdirectories
pdset Set directories to partitioned directories
pdmode
Return current directory access mode
Run command with specified directory access mode
A regular directory that has been converted to a partitioned directory can be converted back to a regular
directory.
System security review:
It is the responsibility of the ISSO to review the security status of the system. A system security review
needs to be carried out immediately after installation and at any other time that the system integrity may
have been compromised, and system security reviews should also be conducted periodically.
The system integrity database directory, which is stored in the /etc/security/tsd/tsd.dat file, contains
security-related information of filesystem objects such as critical commands and system devices. This
database must be updated when a new device is added or the security information of the files is modified.
See the trustchk command for more information.
The trustchk command compares the current security settings of a file, directory, or device with the
corresponding entry in the system integrity database and repairs any security attribute inconsistencies. The
trustchk command can only be run by an ISSO-authorized user.
TTY management:
The minimum SL, maximum SL, and TL for tty devices are defined in the ttys database in the
/etc/login.cfg file. Refer to chsec command for more information.
The effective SL of the user logging in over the TTY port should be within the range defined for this port in
this file. If a TL other than NOTL is specified for the TTY port, then the effective TL of the user must be the
same as the specified TL.
Managing user clearances:
Each user, including the ISSO, SA, and SO users, must have labels to log in to the system. The user
clearance can be specified in the /etc/security/user file as part of the user’s stanza. The minsl, maxsl,
defsl, mintl, maxtl, and deftl attributes specify the minimum SL, maximum SL, default SL, minimum TL,
maximum TL, and default TL, respectively, for the user. If these attributes are specified in the user’s
stanza, the values specified in the default stanza of the file are assigned to the user.
Only an ISSO user can modify the security clearance database. The user’s clearance can be listed with
the lsuser and lssec commands and can be modified using the chuser and chsec commands.
Security 437

The default SL value must be dominated by the maximum SL value and must dominate the minimum SL.
Similarly, the default TL value must be dominated by the maximum TL value and must dominate the
minimum TL.
Note: For a user to successfully log in to the system, the above relation must hold true.
Managing the system for System Administrators:
SA users are primarily responsible for the aspects of the system administration that are not related to
security.
The responsibilities of SA users include the following:
v Adding, removing, and maintaining user accounts
v Sharing with the ISSO user the task of ensuring the internal integrity of system software and filesystems
v Creating and maintaining file systems. This includes planning disk layout, partitioning disks and
changing disk partition sizes, allocating swap space and space for system and user directories,
monitoring filesystem usage, detecting and handling bad disk blocks, and managing filesystem space by
moving, deleting, archiving, or compressing files and file systems.
v Identifying and reporting system problems by analyzing error data and testing system components such
as filesystems, system memory, and devices.
Managing user accounts:
The SA user is responsible for adding new users to the system. The ISSO user is responsible for enabling
new users to log on and execute commands on the system.
See Managing the system for Information System Security Officers for information on adding
authorizations to user accounts.
Once the SA user has added a user has been added to the system, an ISSO user must be notified so that
the initial password can be set up to enable the new user to access the system.
When it is determined that a user should no longer have access to the system, the user should be
immediately removed. Removing a user can only be done by an SA user. The user ID of a user removed
from the system should not be reused unless it is given back to the original user, and then only when
reinstating this user on the system.
See the mkuser, rmuser, chuser, and pwadm commands for information on establishing and modifying
user accounts
Managing printers:
Once a printer has been properly installed, it is added to the system by the combined actions of SA and
SO users. The SO user adds the printer to the system and the SA user establishes the printer’s SL range.
An ISSO user has the authority to perform both of these tasks.
Note: For the CC LSPP evaluated configuration, the printer must be treated as a single-level device and
the low and high SLs must be set to the same label.
The printer’s SL range must not be established until the printer has been added to the system. Use the
smit command to manage printers.
Note: Labeled printing of PostScript® and ASCII files is only supported on PostScript printers.
438 AIX Version 6.1 Security

MAC access to a printer is determined by the SL of the process that is printing the file. This SL appears
on the banner, header/footer, and trailer pages. The process using the lp command must have MAC, MIC,
and DAC access to the file that is being printed. Otherwise, the lp command does not generate a print
request.
When a printer is removed from the system, the printer profile should be immediately deleted from the
system. This can only be done by a user with the SO authorization.
Managing filesystems:
A filesystem consists of directories, data files, executable files, and special files. A filesystem can reside on
various mass storage devices such as hard disk drives and floppy diskettes.
Although only an SA user can create and maintain filesystems, both SA and SO users can mount and
unmount filesystems.
Checking filesystems with the fsck command:
The internal integrity of a filesystem should be checked periodically with the fsck command. The fsck
command must be run on unmounted filesystems. The fsck command can only be executed by an SA
user.
By default, the fsck command runs interactively, prompting the user for the action to perform when an
orphaned file or directory is found. A user has an option to delete the file or attempt to recover the file. If a
user specifies that the file should be recovered, the fsck command attempts to store the file in the
/lost+found directory.
After the fsck command has completed and recovered files are stored in the /lost+found directory, an
ISSO user should review the files to determine their security level. It is recommended that the /lost+found
directory be assigned the SYSTEM_HIGH SL to prevent normal users from accessing recovered files.
See the fsck command for more information.
Managing the system for System Officers:
S0 users are primarily responsible for the security-related aspects of the system administration.
Managing filesystems:
System Officers are responsible for filesystem management
Supported filesystems:
Trusted AIX supports all disk-based filesystems.
All filesystems except JFS2 are supported on Trusted AIX as single-level filesystems. These files systems
can be mounted on a Trusted AIX system, will automatically receive labels and other security attributes,
and will be subject to the security mechanisms enforced by Trusted AIX. All file objects in a single-level
filesystem have the same security attributes. These security attributes are inherited from the mount point.
JFS2 is implemented on Trusted AIX as multilevel filesystems. Each file object in a multilevel filesystem
has its own security attributes (security labels). For example, a JFS2 directory has independent minimum
and maximum SLs.
In single-level filesystems, the minimum and maximum SLs of the mount point are equal and all directories
and files below the mount point must also equal those SLs.
Security 439

Mounting and unmounting filesystems:
An SO user (with the aix.fs.manage.mount authorization) is allowed to mount or unmount a filesystem.
The mount command uses the device special file name and the mount directory as options.
When multilevel JFS2 filesystems are mounted, the mount directory is assigned the label of the root of the
file system. On a multilevel filesystem, each file has its own sensitivity and integrity labels. If a file is
modified, its label is updated accordingly.
Managing printers:
An SO user can use the lpadmin command to add and remove printers, modify printers, and exercise
certain other types of control over the printer subsystem. An SA user can use the lpadmin command to
add or modify the Sensitivity Labels (SLs) for a printer and can use the enable and disable commands to
enable and disable printers.
Printer subsystem:
The printer subsystem performs many tasks related to printer operation.
Printer subsystem tasks include the following:
v Administering printers and their attributes
v Receiving, storing, and scheduling user print jobs
v Scheduling print jobs for multiple printers
v Starting programs that interface with printers
v Keeping track of the status of printers and print jobs
v Reporting problems when they arise
v Restricting user print jobs to those that fall within the SL range of the printer
v Restricting access to user print jobs once submitted
v Restricting access to printer support files and directories
v Proper labeling of printer output
Printer security features:
The printer subsystem is modified in Trusted AIX to incorporate several security features.
The printer subsystem is a protected subsystem owned by the system ID lp. This prevents normal users
from accessing printer support files and directories, other than the user’s own submitted print jobs, and
printer device special files.
The printer subsystem verifies that the user’s submitted print job falls within the printer’s SL range. This
verification is performed when a user submits a print job with the lp command and before the submitted
job is printed by the lpsched daemon. The administrator should be aware of the printer subsystem
security checks in case a user’s print job is denied.
Banner pages are printed for all print jobs. The banner page includes the print job’s human-readable SL. A
banner page appears at the front and rear of all print jobs. Any user can print without banners, but this is
an auditable action. You should always verify that the header and footer labels on each page are correct
and are dominated by the labels on the banner page.
Note: The line printer administrator must establish the label range for each printer. For the CC
LSPP-evaluated configuration, each printer must have a single label to prevent inadvertent
disclosure of labeled information. To assign a single label to a printer, run the following command:
440 AIX Version 6.1 Security

lpadmin -d printer_name -Jlabel -Llabel This ensures that only information with the specified label
can be printed on the printer.
Printer command summary:
Some printer subsystem commands can be run by any user. However, some printer subsystem commands
can only be run by an SO, SA, or ISSO user.
The following table lists the printer subsystem commands can be run by any user:
lp Sends a file to a printer
lpstat Gives a status report of the printer subsystem
Printer subsystem administration commands require SO authorization, except that a user with SA or ISSO
authorization can run the lpadmin command to specify a label range of the printer and run the lpstat
command to display printer and job request SLs. The following table lists the printer subsystem
administration commands:
accept
Allows jobs on a printer
cancel
Cancels a print request of a file
disable
Deactivates a printer
enable
Activates a printer
lpadmin
Sets up or changes printer configuration
lpfilter
Sets up or changes a printer filter
lpforms
Sets up or changes a printer form
lpmove
Moves print requests
lpsched
Prints a request
lpshut stops the print service
lpusers
Sets up or changes print priority
reject Prevents jobs on a printer
Command line printer management:
You can use the accept, enable, disable, lpstat, and lp commands to manage a printer from the
command line.
You can use the accept command to allow jobs to be sent to a printer. Run the following command to
allow the printer laser to accept print jobs:
/usr/sbin/accept laser
Security 441

The printer specified by laser can now receive print job requests. However, the print jobs will not be
printed unless the printer is enabled. Run the enable command to enable a printer:
/usr/bin/enable laser
The enable and disable commands are administration commands and can only be run by a user with
ISSO or SA authorization.
To confirm that the printer was set up properly, run the following lpstat command:
lpstat -p laser -l
This command displays the long status report of the printer laser. If you run the lpstat command without
the -l option, a shorter status report displays. If the user is an SA or ISSO authorized and the -l option is
used, the SL range of the printer is also reported.
To determine the status of a print request, run the following lpstat command:
lpstat -o
This command lists all lp print requests. If the user is SA or ISSO authorized, the effective SL and
clearance of each request is reported.
To print the filename, run the following lp command:
lp -d laser filename
Otherwise, you must specify the print job destination when you run the lp command.
If a default destination printer has been set by the administrator, the -d destination_ptr option is not
necessary. For example, to print the file filename on the printer laser, the enter the following lp command:
lp filename
Managing system shutdown:
An SO user can shut down the system either by either rebooting the system or halting the system
completely.
The following commands can be run by an SO user to reboot or halt the system or to change the init state
of the system:
reboot
Automatically reboots the system
halt Halts all system operations
shutdown
Halts all system operations
init Changes the system’s init state
File backup and restore:
Backups help prevent data loss in the event of a hardware failure or the accidental deletion of a file.
Backups should be made on a regular basis, with incremental backups made between complete backups.
The backup and restore commands include options to specify file backup names, locations, types, and
other options. You can use the mksysb command to creates a Trusted AIX installable image of the root
volume group, either in a file or on a bootable tape. You can run these commands using the smit
command. Filesystem backups should be properly labeled and stored in a secure location.
442 AIX Version 6.1 Security

Trusted AIX programming
System security depends on the trusted computing base (TCB) software, hardware, and firmware. This
includes the entire operating system kernel, all device drivers and System V STREAMS modules, kernel
extensions, and all trusted programs. All files used by these programs in making security decisions are
also considered a part of the TCB.
The creation of trusted software requires a thorough understanding of the basic system security principles
and features. Almost all security flaws in UNIX-based systems are due to poorly written trusted software.
However, with Trusted AIX kernel security checks, you can write applications that use enhanced security
features. An application written for Trusted AIX can be sensitive to files and processes at different security
levels and can behave differently depending on the level of process or file that the application is using.
Such an application is known as a multilevel-aware (MLS) application.
A trusted system programmer must be thoroughly versed in Trusted AIX security features and must
understand all new Trusted AIX system calls and security-relevant commands and libraries. This
information is intended for programmers who create or modify trusted software. It contains guidelines,
principles, and cautions for the modification and creation of trusted software. While this offers introductory
explanations to some security principles and methods, it is recommended that trusted system
programmers read other material on secure systems.
Principles of trusted software
There are several important principles involved in creating and modifying trusted software, including trust
and privileges, trusted software design, least privilege, programming conventions, and protection of the
TCB.
Trust and privilege:
A process can bypass basic security restrictions (MAC, MIC, DAC, and other restricted operations) only if
the process is adequately privileged. Any process that is running with a privilege or privileges is called a
privileged process and the program that the process is running is called a privileged (trusted) program.
The term privilege refers to an individual attribute that allows a process to perform a security-related
operation. Trusted AIX identifies and groups certain security operations and associates a distinct privilege
with each operation. This effectively removes the superuser (or root) privilege from the base system.
Privileges are associated with processes and executable files.
Programs must be trusted under the following circumstances:
v The program is configured or is intended to run as a privileged process. This applies to any program
that is intended to be run by a privileged process.
v The program is relied upon by another trusted program in making security decisions. For example, a
program that alters a sensitive database must be trusted if other programs rely on the data in the
database to make a security decision.
It is important to ensure that untrusted programs can never run as privileged processes. There are several
ways to prevent untrusted programs from running as privileged processes:
v Do not normally allow privileged processes to execute untrusted programs. For example, caution users
running privileged shell-like programs not to run untrusted programs in a privileged shell-like program.
v Never allow innate, inherited, or authorized privileges for untrusted executable files.
All portions of the operating system kernel, including device drivers, STREAMS modules, and kernel
extensions, must be trusted. Data objects such as files and physical devices are also considered trusted if
they contain information relied on by a trusted program to make security decisions.
Trusted software design:
Security 443

The process of creating trusted software is similar to that for any critical software component. The creation
of trusted software should follow a carefully understood and documented specification, design,
implementation, testing, and configuration control cycle.
The most important aspects of trusted software design are the identification of the subjects and objects
and the definition of precise security actions at the proper level of abstraction. Most security policies are
restrictions on subjects, objects, and actions. When subjects request permission to read, alter, or create
objects, security policies monitor those requests and approve or deny these requests.
Subjects
A subject is normally represented by a user ID and group IDs. Normally the process’s effective user and/or
group ID is used for this purpose, although it may be appropriate in some cases to use the real user
and/or group ID.
Objects
An object is any collection of data to which access should be controlled. In most cases, objects are files.
Although it is common for trusted programs to control access to logically distinct objects within the same
file, it is generally better practice to map objects one-to-one onto files.
In some cases, a subject can also be considered an object. For example, a process is normally
considered a subject. However, when one process attempts to affect a second process, the second
process is normally considered an object with respect to this operation.
Requests
Requests are sets of actions that a trusted module performs on behalf of a subject. Each request must be
clearly identified in terms of the request’s inputs, possible outputs, and results, including all side effects.
The precise identification of all requests is an important prelude to the definition of security policies.
Security policies
Security policies include simple statements indicating when requests involving specified objects will be
performed on behalf of specified subjects. Subjects, objects, and requests should be carefully defined and
security policies should be concise and straightforward. It is important to specify the identity of the
requesting subject and the objects involved for the purposes of auditing.
Least privilege:
The principle of least privilege states that software modules should be given the minimal capabilities
needed to accomplish their intended task.
Least privilege includes the principle that trusted programs should voluntarily limit their own sensitive
capabilities to be usable in as few areas of the program as possible. Least privilege helps to reduce the
damage from software errors or from unexpected side effects. All trusted software should be designed
according to the principle of least privilege.
Assignment and removal of privilege:
One trusted software technique is for a program to perform all operations for which privilege is required
early in its execution and then to relinquish privilege for the remainder of the duration of its operation. This
is called privilege bracketing.
Remember the following considerations related to the use of privileges:
444 AIX Version 6.1 Security

v Each user’s process is assigned a set of maximum privileges at process execution. This set of
privileges can always be reduced but can never be increased by the unprivileged user.
v It is the responsibility of the executing process to raise and lower the privileges of the maximum set into
and out of the effective set when performing privileged operations.
v Process privileges are modified when processes run executable files which have non-empty innate
privilege sets. See the exec command for more information.
v Processes are also given a limiting privilege set when the processes are run. With appropriate
privileges, a process can raise privileges in the maximum set up to those in the limiting set.
Short-lived MAC label changes:
When a process must change its MAC label from its normal operating label, the duration of the label
change should be as brief as possible. This can be accomplished with the use of library routines.
See “Trusted AIX system calls” on page 477 for more information on these library routines.
Short-lived opens of sensitive files:
A sensitive file is a file, such as the shadow password file that contains information that could compromise
system security. When sensitive files are opened for reading or writing, they should be kept open only as
long as necessary.
The close-on-exec attribute of the file descriptor should be set using the fcntl system call. This prevents
unauthorized processes from inheriting open file descriptors via the exec system call.
Centralization of sensitive operations:
A sensitive operation is an operation that requires privileges. If a sensitive operation is performed by an
unprivileged process, it can compromise the security of the system.
Sensitive operations should be restricted to distinct modules (subroutines or separate programs). By
breaking down a large program into separate programs, some of the programs will need fewer or no
privileges. This lessens the possibility of accidental compromise of the system’s security
Use of effective root directories:
A program can be confined to a particular directory tree by setting the program’s effective root directory to
the base directory of the tree (with the chroot system call) and setting the program’s working directory
inside this same tree. In effect, this is a least-privilege mechanism because it limits the files that even a
privileged process can access to those within the tree. This can be particularly effective when the parent
(trusted) process so limits trusted or untrusted child processes.
While changing root directories provides protection to files outside of the new root tree, it does pose a
potential security problem. Changing the root directory can create a means of comprising the security of
the new root tree if this is not done cautiously. This occurs when the runtime linker and shared objects in
the new root tree can be forged. This procedure should be used carefully and sparingly.
Use of protected subsystems:
Protected subsystems provide integrity protection for special subsystems. A subsystem is a collection of
programs and/or data files, owned by the same user ID and/or group ID, that are used to implement a
specific function in the system.
A subsystem can include setuid or setgid programs. A protected subsystem is a subsystem with a user ID
that is a system user ID.
Security 445

A system user ID is a user ID with a value less than or equal to 127. Users cannot log in with system user
IDs. Using protected subsystems can significantly reduce the number of privileged processes.
Minimal access modes:
Trusted programs (actually all programs) should only open objects in read/write access modes that are
absolutely necessary. Basically, this means never opening an object for write-and-read when opening for
read is sufficient. For particularly sensitive situations, the process should open for write-only in the specific
locations where write is required.
These techniques are particularly important when a program creates other processes, since the passing of
privileges and other general capabilities (for example, open connections to sensitive files) is a critical
aspect of trusted software design. Privileges can override all restrictions. Careful design and consideration
should be applied when creating new commands that will have privileges.
Other trusted programming conventions:
Trusted AIX uses many other trusted programming conventions.
Redundancy:
Redundancy is a useful technique for security systems. Security is seldom absolute, but is instead almost
always a matter of placing a sufficient number of roadblocks in the path of anyone attempting to
improperly access a system.
The advantage of redundant security checks is that if one check fails or is compromised, other checks
may provide protection. The disadvantage of redundant checks is that the overall security checks are
separated or distributed through the system. Therefore, while redundant checks can be extremely useful,
they must be carefully designed, documented, and maintained.
Non-duplication of kernel checks:
It is rarely advisable for a process to perform a check that the kernel can perform. For example, a process
should never read the MAC label of a file and perform the mandatory access check itself. Whenever
possible, checking the kernel should perform a check.
There are two major reasons that the kernel should perform checks.
v Kernel operations are atomic with respect to other processes, whereas process checks can be
effectively concurrent with other processes.
v More importantly, the precise algorithms used can change with newer kernel versions. It is difficult to
track such changes for algorithms that are a part of end-user software.
Direct privilege checking:
Programs should not attempt to determine whether they are invoked as privileged processes (for example,
by examining their effective or maximum privilege vector). Instead, programs should assume they are
invoked as privileged where appropriate.
If the program is not a privileged process, the privileged system calls will fail and the program can take the
appropriate action. It is not usually an effective security measure for a program to itself refuse to perform
certain operations unless it is privileged. If the program is privileged, then the check is meaningless. If the
program is not privileged, then the program can do no more harm than any other unprivileged process.
However, this check can be used effectively as an aid to accidental misuse. A meaningful error message
can be given stating that the program was intended to be privileged but is not.
446 AIX Version 6.1 Security

Propagation of sensitive capabilities:
A sensitive capability is a capability of a trusted program that could compromise the security of the system
if provided to an untrusted program.
Caution should be used when a privileged program propagates its privileges or general capabilities to
other programs via the fork and exec family of system calls. The exec system calls are the most
important since these pass privileges from one program to another. The fork system call creates a new
process, but the new process privileges are identical to those of the parent. The primary danger is that the
executable program file may not be trustable or may have been altered by an untrusted program. The
following cautions should be considered:
v Trusted programs should be careful to not pass open connections to objects (primarily files) to a child
process unless the child and its descendants can be trusted to properly access the file in the mode in
which the file is opened. It may be best for the process to pass a new connection to the object whose
modes are more restrictive than those that would otherwise exist.
v A trusted process that runs with an effective root directory other than absolute root should be confident
that its child processes will not be confused. For example, when the child program opens a trusted file,
such as the shadow password file, it can use an absolute pathname under the assumption that its
effective root is absolute.
v There may be cases in which the trusted program needs to impose a more restrictive umask on its
children.
v Many process attributes are inherited by child processes. If a trusted program knows that a child
process is untrusted and has a MAC label that does not dominate that of the trusted process and these
attributes were inherited by the trusted program from an untrusted ancestor, then these attributes can
be a source of potential covert channels.
v Be aware of the rules of privilege propagation for the fork and exec system calls. Privileges of the
parent process become the privileges of the child process when a fork system call occurs. Privileges
are modified during an exec system call.
In extremely sensitive situations, a trusted program can examine the access controls on a trusted file to
help ensure that the file is properly protected from modification by untrusted programs. For example, a file
can be required to be owned by root with at most DAC write permission allowed for the file’s owner.
Effective root environments:
Trusted programs frequently rely on correct absolute pathnames. For example, the login program relies on
the /etc/security/passwd file to be the correct shadow password file.
This includes not only data files, but also the executable files for trusted programs. While an untrusted
program cannot use the chroot system call to directly change the program’s effective root directory, there
may be situations in which the TCB allows untrusted programs to run under an effective root. There are
potential security problems if these untrusted programs can execute a trusted program that relies on an
absolute pathname.
Authentication with real and effective IDs:
Trusted programs may need to use several user and group IDs that are associated with a process. It is
important to understand the distinctions between these IDs and their appropriate use.
Real user and group IDs
Real user and group IDs normally represent the login identity of the login session in which a process was
created. In some cases, real IDs (particularly the real user ID) can be used for security decisions. One
such instance is authorization checking. Real user IDs are used by commands as a form of identity
verification. This can be particularly useful in thwarting malicious or careless use of the setuid-on-exec or
Security 447
setgid-on-exec control bits. However, checking real IDs departs from standard UNIX practice and should
only be done when necessary. The overall principle in UNIX systems is that effective IDs are used for
access and other related security checks. Departing from this accepted practice should not be done
without careful consideration and documentation.
Effective user and group IDs
Effective user and group IDs should be used in all access control decisions (DAC and MAC). System
users have user ID values between 0 and 127. Normal users have ID values of 128 and above.
Absolute pathnames for trusted commands:
Some security penetration schemes attempt to create a fake trusted program and place it in the search
path of a shell-like program that is being used by an administrative or even regular user. For example, a
fake copy of the passwd command can be used to capture an existing or new user password.
Proper administrative practice is for the current working directory to be removed from the search path to
guard against this. However, there may be other search paths that are not necessarily strongly protected,
and regular users must be allowed to put the current working directory in their search path. An effective
counter measure is for a trusted program to always be invoked by an absolute pathname (for example
/usr/bin/passwd). The trusted program itself checks its first invocation argument and invocation name. If
the appropriate absolute pathname is not used, the trusted program refuses to run. The trusted program
should also ensure that it does not have an effective root directory that is different from absolute root.
Note: This is effective only to the extent that users are trained to issue the absolute pathname. If a user
inadvertently uses the relative pathname instead and a fake program is invoked, the security
penetration scheme is not averted.
Directory tree structuring:
Directory trees should be carefully structured to enhance the protection of critical files. The basic guideline
is that directory search access should be as limiting as possible (for example, placing all publicly
accessible files into directories that close to the root of the file system).
It is also a good idea to place very sensitive directories as close to absolute root as possible, since this
minimizes the number of intermediate directories that need to be protected.
Read-only filesystems:
Perhaps the ultimate in directory tree structuring is where trusted files that are seldom changed are placed
on their own filesystem and mounted as read-only. This virtually ensures that their contents cannot be
modified during normal system operation. This technique is often used for large collections of executable
files for trusted programs.
If modification of a file is required, the filesystem can be remounted as writable in a more protected
context (for example in single-user mode or on a separate, more protected machine). It is recommended
that programs be used to scan the filesystem for correct configuration (for example, proper DAC, MIC and
MAC labels) after such updates.
In addition, the DAC, MIC, and MAC information cannot be altered on a read-only filesystem. Once the
filesystem is properly configured, this should protect against security penetration schemes that attempt to
alter the DAC information and/or MIC and MAC labels.
Password handling:
448 AIX Version 6.1 Security

It is generally not a good practice for programs other than the standard system utilities to query the user
for the login password. Passwords are extremely sensitive information and their handling should be tightly
restricted to the few existing well-trusted system utilities.
It may be appropriate for certain trusted subsystems to implement their own specific passwords. However,
it can be dangerous to rely on such private password schemes since these are not as secure as the
system-enforced mechanisms.
Protection of the Trusted Computing Base (TCB):
Files that hold elements of the TCB must be protected from modification, and in some cases disclosure
(reading), by untrusted programs.
Protection from modification is critical, and protection from disclosure can be critical. Files that must be
protected include the following:
v All files that contain data used by a trusted program in making a security decision (for example the
shadow password file)
v All executable files for trusted program
v Pseudofiles that allow access to portions of the TCB (for example /dev/kmem).
Note: System initialization files (the rc files) must especially be protected as a part of the TCB
Protection from modification:
Protection from unauthorized modification is primarily accomplished by setting the DAC information to an
appropriate value. Normally, these files would be owned by a system user ID with write access allowed
only to the owner of the file.
MIC is designed to protect against modification by protecting the integrity of objects. By placing a high MIC
label on a file, processes with a lower MIC label are prevented from modifying, deleting, or renaming the
file. This is the ideal method to prevent unwanted modification of files.
In some cases, MAC can be used to protect against unauthorized modification. However, MAC is designed
to protect only against disclosure (reading) and is not well suited for protecting against modification. Basic
MAC policy does not prohibit subjects from modifying higher-label objects. Although not allowed for direct
file writes, certain trusted subsystems may allow this. Also, many trusted files, such as executable program
files, need to be kept at a low MAC label so that they can be generally accessed. Therefore, setting a high
MAC label on a file is not always feasible.
File security flags also protect against file modification. some file security flags prevent modification of
objects by even privileged subjects. If the FSF_TLIB file security flag is set for a file, the file can only be
changed when the system is in configuration mode, assuming the trustedlib_enabled kernel security flag
is turned on. To set FSF_TLIB for a file, a process must have the PV_TCB privilege in its EPS. Another
relevant file security flag is the FSF_APPEND flag, which prevents the modification of previously written
data. A file with the FSF_APPEND flag set can only have data added to it. This can be useful for an
application that logs records to a file.
These flags are usually set for files by integrators rather than under program control. Programmers should
be aware of these flags and their functions.
Protection from disclosure:
Security 449

DAC and MAC can be used to protect TCB files from read access. The MAC labels on these files must
accurately reflect the sensitivity of the information in these files. For example, if a certain algorithm is
classified, then the MAC label on the executable file of a program that uses the algorithm must be
appropriately set.
It is acceptable practice to set the MAC label artificially high (that is, higher than the actual classification of
the data in the file) to protect the data from disclosure. However, such inflated classifications should be
used sparingly.
In almost all cases, the entire directory chain from absolute root must be protected in order for a file itself
to be adequately protected. Otherwise, a malicious program may be able to unlink a portion of the
directory chain and create a new subtree with a fake copy of the file.
For example, suppose a trusted file is stored at /A/B/foo. While foo is protected from modification, the
directory B is not. A malicious untrusted program could then remove the link in B to foo and create a new
file foo with a false copy of the old file foo. Trusted programs that open /A/B/foo will then open the false
file and will have been unwittingly fooled into using its false data.
Trusted programs rely on correct pathnames to access TCB files. For this reason, the symbolic link files
used in pathnames for TCB files should be protected as strongly as the files themselves.
In some cases, MIC can be used to protect against unauthorized disclosure. However, MIC is primarily
intended for protection only against modification (writing) and is not well suited for protection against
disclosure.
Sensitivity label operations:
There are trusted program guidelines for situations involving subjects or objects with different sensitivity
labels.
You should be familiar with the form of a sensitivity label and the dominance relationship between labels.
To be higher that means to dominate, and to be lower is to be dominated by, while to upgrade means to
raise the classification of data to a higher label, and to downgrade means to lower the classification of
data to a lower label..
Basic MAC constraint:
The basic mandatory access control constraint is that untrusted subjects cannot cause data labeled at
sensitivity label A to be labeled at B unless B dominates A.
The basic MAC constraint covers all classes of data. It includes restrictions on relabeling data (that is,
changing the label on a data container) and on the movement of labeled data between data containers.
At various levels of the system (system call, system service utilities, etc.), this basic constraint is cast into
more specific sets of rules, but always with the same basic philosophy, that data can, at most, be
upgraded. For example, a first level of expansion is that processes can open for reading any of a large
class of objects when the label of the process dominates the label of the object, and open for writing if the
label of the object dominates that of the process.
For a regular file, write operations are further restricted to files at the same label as the process. For
directories and devices, write operations are allowed if the subject SL dominates the object minimum SL
and the object maximum SL dominates the subject SL. For FIFO special files (named pipes), read
operations are also restricted to FIFO special files at the same label as the process for covert channel
reasons.
450 AIX Version 6.1 Security

While data can migrate to a higher sensitivity label, this capability is not required for a given object and
situation. For example, the operating system itself does not let an unprivileged process open a higher label
file for writing, although this is permitted under the basic MAC constraint. Whether to allow this upgrading
to untrusted subjects is a matter of design and philosophy. In some cases this is useful and in some cases
it is not. For example, the difficulty associated with direct writes to higher-label files is that the process
cannot read these files, and so the write to a higher-label file is less than useful. However, a simple trusted
utility that raised the label of a file at the request of an untrusted subject can be an acceptable and useful
utility.
At the system-call level, the restriction is only on unprivileged processes. This means that privileged
processes are not bound by this constraint. However, virtually all services that the trusted system performs
will be designed for untrusted users, and therefore at the user-service level the constraint predominates.
The basic MAC constraint applies to all of the means that untrusted programs have at their disposal to
transfer data. However, the basic MAC constraint is often broken into two components. The first
component deals only with those operating system features intended for data transfer (or labeling). These
features include reading and writing files and interprocess data communication, for example. The second
component deals with means of communication not intended as such; these are called covert channels. It
is nearly impossible to completely enforce the basic MAC constraint with respect to covert channels. For
this reason, low data rate (for example, 0.1 bits per second) covert channels are allowed to exist, although
only when there is a reasonable trade-off against other factors.
The basic MAC restriction is straightforward and simple, and there are relatively few detailed guidelines for
dealing with multilevel data.
Multilevel operations:
The sec_setplab system call allows a privileged process to arbitrarily change its process label.
Since nearly all MAC and MIC constraints on unprivileged processes are also enforced for privileged
processes on preexisting system calls (that is, those that are defined in the base operating system),
privileged processes that need to perform multilevel operations must rely heavily on the sec_setplab
system call. However, trusted programs should only use sec_setplab() only in the following manner:
v All uses of the sec_setplab system call to perform multilevel operations (for example, opening higher
label files for reading) should be done only through library routines that reflect the semantics of the
actual, high-level operation performed and that hide the detailed use of the sec_setplab system call.
v The only exceptions are very simple process label changes that are not a part of a larger multilevel
operation. These simple operations can use the sec_setplab system call directly.
There are two reasons for these guidelines for the sec_setplab system call. First, a sensitive and
potentially dangerous feature such as the sec_setplab system call should only be used in a
well-designed, modular manner. Second, as standards for trusted systems evolve, low-level system calls
may support various mechanisms for multilevel operations.
Encapsulating high-level operations in library routines provides excellent upward compatibility and
adaptability to evolving versions of the operating system and helps ensure portability between trusted
versions of the UNIX system.
The trusted system provides a basic set of such routines. These routines should be used whenever
possible. This set of routines should be expanded with successive operating system versions. A trusted
system programmer can also create such library routines where needed.
Another exception to the MAC and MIC constraints is the use of one or more of the available MAC or MIC
privileges to bypass the MAC or MIC restraints. Care should be exercised when allowing the use of any of
these privileges.
Security 451

System V Interprocess Communication (IPC):
Interprocess Communication (IPC) mechanisms (message queues, semaphores, and shared memory) are
subject to DAC, MIC, and MAC restrictions. Normally, there are no commands for creating and using
System V IPC objects.
The AIX IPC-related system calls have been modified to be multilevel-aware for Trusted AIX. These
modified system calls are:.
v msgget
v msgsnd
v msgrcv
v msgctl
v semget
v semop
v semctl
v shmget
v shmctl
v shmat
v shmdt
In addition, the following system calls designed specifically for manipulating the MAC attributes of IPC
objects have been added toTrusted AIX:
sec_getmsgsec
Get security attributes of message queues
sec_getsemsec
Get security attributes of semaphores
sec_getshmsec
Get security attributes of shared memory segments
sec_setmsglab
Set security attributes of message queues
sec_setsemlab
Set security attributes of semaphores
sec_setshmlab
Set security attributes of shared memory segments
See Access to IPC objects for the privilege requirements for processes to manipulate IPC objects. The
settxattr command can be used to manipulate an IPC attribute.
Implementation of high and system high MIC and MAC labels:
It is often necessary for a trusted process to determine a MAC label that dominates all other labels on the
system. There are two different MAC labels that can be used, the implementation high MAC label or the
system high MAC label.
The implementation high MAC label is the highest MAC label supported by Trusted AIX. It is likely that this
label has a hierarchical classification and contains categories that are not in use for the site. This label is
easily generated, but the label must be used with care. No process should create objects at this label.
The system high MAC label is the highest MAC label that is in use for the site. This is defined by the
administrator in the LabelEncodings file.
452 AIX Version 6.1 Security

The use of the system high MAC label is less efficient but is highly recommended since the administrator
can effectively constrain the actions of even privileged processes by properly setting the appropriate
parameter in the LabelEncodings file.
MIC has analogous implementation high and system high labels.
User and system login ranges:
Trusted programs that perform services for users may need to limit MIC and MAC labels involved in those
operations to values at which the user is allowed to log in and/or to the system-wide allowed login labels.
The clearances that are assigned to users on the system are in the user database file /etc/security/user
and are accessed using the getuserattr and getuserattrs library routines.
Trusted AIX allows users to operate on the system at any label that is listed in the system accreditation
range and that is dominated by the user’s maximum clearance and tjat dominates the user’s minimum
clearance. All programs that allow users to operate at different labels should always ensure that the new
label is valid for the user.
For example, suppose a utility named upgrade was defined to raise the MAC label on a file at the request
of any user. The basic MAC restriction demands that upgrade only accept files whose MAC label is
dominated by that of the user. Further, it is deemed prudent (although not strictly necessary from the basic
MAC restriction) that the new label be one at which the user is allowed to log in, which includes both
per-user and system-wide label range restrictions. The upgrade utility would use both the sl_cmp and
accredrange interfaces for this purpose.
Directory tree structure:
The system calls function so that directory trees created by unprivileged processes follow a nondecreasing
label structure, where the label of a file equals that of its parent directory or is within the range of the
partitioned directory, and the label of a directory dominates that of its parent directory (note that
domination includes equivalence). This is a natural structure for untrusted programs.
However, privileged processes are not bound by this restriction and can create directory trees where the
parent directory MAC label relationships are arbitrary. Such configurations are useful because MAC search
access is restricted closer to the root of the tree. For example, aggregation protection, where the MAC
label of a collection of data objects is higher than any single label of the objects, can be implemented by
setting the MAC label of a directory higher than any of its elements. Untrusted processes must then
dominate the label of the directory to gain access to the aggregation of data.
Great care should be used in creating directory trees that have decreasing labels. It is not possible for an
unprivileged process to open a file for writing when the file does not dominate or equal its parent’s label.
Partitioned directory manipulations:
There are several system calls that have different behavior as a result of the implementation of partitioned
directories.
The following system calls behave differently as a result of the implementation of partitioned directories:
v getdirents
v link
v mkdir
v mount
v rename
v rmdir
Security 453

v stat
v lstat
v fstat
Process mode:
The pdmode command can execute a command with a specified mode. A process can use the
setppdmode system call to set its own mode to real mode or virtual mode. The setppdmode system call
requires the PV_PROC_PDMODE privilege to succeed. There is no mechanism for a process to change
the mode of another process.
Directory type:
The pdset command can be used to change a regular directory into a partitioned directory, but there is no
command to change a partitioned directory (or partitioned subdirectory or sub-subdirectory) to a regular
directory.
The pdmkdir system call can also be used to create partitioned directories. The pdmkdir system call
requires the PV_FS_PDMODE privilege.
MIC and MAC label considerations:
All programs should use only the sl_cmp and tl_cmp functions to determine the relationship between MIC
and MAC labels.
This is extremely important since the internal label format can change with later system versions and these
library routines track the evolving formats. Similarly, there are many other library routines that manipulate
MIC and MAC labels that should be used wherever possible.
The setea, lsetea, and fsetea system calls change the MIC or MAC label of a file. The fsetea system call
accepts a file descriptor.
Device drivers:
There are some principles and guidelines that should be followed when creating device drivers for Trusted
AIX systems. You should be familiar with the mechanisms for creating device drivers for the base system
and with precautions regarding the use of these mechanisms.
Device management subsystem:
A device in an AIX system is an abstraction and is used to cover all data objects accessed by referencing
device special files. In some cases, these data objects represent actual physical devices and in some
cases they are quite different (including cases such as /dev/null where there is no data storage object at
all). The latter instances are often referred to as pseudo-devices.
Trusted AIX systems provide two types of devices: single-label and multilevel devices. A multilevel device
is trusted to process data at more than one sensitivity level at a time. A single-label device is usually
untrusted. The labels on the data are normally associated with the information that a multilevel device
handles in a way that ensures that the data is always properly labeled. A single-label device normally
relies on exterior labeling.
A hard disk is an example of a multilevel device. All of the data that is placed on a hard disk has
associated sensitivity labels. A printer is physically located in an environment which requires a security
clearance to enter is an example of a single-label device. Only data at that clearance can be sent to the
printer.
454 AIX Version 6.1 Security

Device driver development cautions:
Device drivers are part of the operating system kernel and as such are unrestricted in their actions. The
creation or modification of device drivers is as sensitive as modification of the kernel itself. Unfortunately,
end users often need to create or modify device drivers. This should only be done with extreme caution.
It is impossible to list all of the specific cautions to be used when writing device drivers, since there are so
many ways that drivers (sometimes quite innocently) can subvert the security of the system. Therefore, the
creation of secure device drivers is left more to the judgment and experience of the designers.
Device drivers should perform nothing more than simple device management. Device drivers created
essentially for the purpose of adding new system calls to the system, including many pseudo-device
drivers such as those for /dev/kmem, should be considered new system calls and designed accordingly.
The guidelines in this section refer principally to those drivers that are legitimate device managers.
You should study standard device drivers before you attempt to create new ones. The principal security
actions of device drivers are those involved with the execution of the open and ioctl system calls.
Opening devices:
As with most system objects, most of the security checks associated with accessing a device are
performed when the device is opened with the open system call.
The kernel first performs a set of basic operations and then passes the processing of the open request to
the device driver. The kernel makes the following security checks before passing control to the device
driver:
v If the process does not have MAC access to the device special file, the open fails
v If the process does not have MIC access to the device special file, the open fails
v If the process does not have DAC access to the device special file, the open fails
With many devices, reading from the device (with the read system call) alters the state of the device in a
manner that can be detected by another process whose MAC label does not dominate the reading
process. This constitutes a potential covert channel. Devices that are first-in-first-out (FIFO) in nature are
subject to this problem. In these cases, it is common practice to restrict read access to processes that are
at the same MAC label as the device. This is done by a check within the device driver.
There are few specific rules or guidelines for the design of irregular devices. You must understand and
apply the basic principles of mandatory and discretionary access control. Fortunately, most device drivers
can be configured as regular devices and the eccentricities of irregular device drivers do not need to be
dealt with often.
Device driver open examples:
The following are examples of irregular device handling taken from standard system device drivers. These
are intended to illustrate the possible diversity of such device drivers.
/dev/null
/dev/null is a pseudo-device that has no data container. Data written to /dev/null is discarded and
end-of-file (EOF) is always returned in response to read requests. Therefore, no MAC device restriction on
open is required. For compatibility, DAC access on the /dev/null device file is required although this is not
strictly necessary.
Security 455

/dev/tty
When a process issues an open on /dev/tty, the device driver actually attempts to open the terminal that
is the controlling terminal of the requesting process. Therefore, MIC, MAC, and DAC access must be
checked for the process’s controlling terminal process instead of for /dev/tty. For compatibility, DAC
access to /dev/tty is required, although this is not strictly necessary.
ioctl restrictions:
Although all device-driver interface functions must be trusted, the ioctl interface usually requires special
attention.
As a general rule, only processes with write access can alter a characteristic of a file that can be detected
by other processes who do not have write access. Having write access means either that the process has
the file open for writing or that the MAC label of the process is equal to the label of the device. This
restriction stems from the basic MAC restriction that no process can perform an action that can be
detected by processes at lower MAC labels.
If the purpose of the action is a user data read/write operation, then the restriction must be enforced as
stated. Otherwise, cases where the restriction is not enforced are considered covert channels, and should
be bandwidth limited and/or auditable.
Some device control actions may need to be limited to privileged processes even when the device is not
configured as a trusted device.
Other restrictions:
There are relatively few other cases where the device driver may need to enforce special security checks.
One example is when a read on a device alters the state of the device in a manner that can be detected
by a process whose MAC label is not dominated by that of the reading process. This presents a potential
covert channel that may need to be restricted or audited by the device driver itself.
Device driver programming summary:
The following guidelines should be considered when implementing device drivers.
Note: New system calls have been added to support extended security for each read/write on Streams
and FIFO devices. Two new library API’s, eread() and ewrite() support this extended security
attribute. If it is an MLS Kernel, a security flag DEV_SEC_ERDWR is set on the device. Similarly
for FIFO GNF_SEC_ERDWR is set on the device. These flags enable additional security checks on
each read/write.
General design techniques
All security checks within the device driver should be written in a modular fashion and should be easily
identifiable.
Checks within device drivers
It is always better to keep MIC, MAC, and DAC checks out of a device driver. Device drivers without such
checks can be easily ported to or from untrusted systems or other types of trusted systems.
In a regular device driver implementation, the kernel performs MIC, MAC, and DAC checks and the driver
performs any additional required privilege checks. In an irregular device driver implementation, all checks
(MIC, MAC, DAC, and privilege checks) are performed in the device driver. The choice of whether to
456 AIX Version 6.1 Security
implement a regular or irregular device driver is a matter of design judgment.
DAC
DAC is enforced for each device special file based on the filesystem entry point used to access the
device.
Checking for correct installation
Any device driver that performs MAC checks should securely handle (within reasonable bounds) the
possibility that the device was defined incorrectly.
Privileged access
It may ne appropriate for a device driver to limit certain device operations to privileged processes.
However, there are a few specific recommendations for these situations.
You can use the refmon kernel function to determine if you have the necessary privileges.
Least privilege:
Trusted AIX introduces the least privilege concept. Least privilige separates the once-powerful root user
into a privilge mechanism with finer granularity.This division of privileges ensures that if there is a
programming error or other defect in the trusted software, very little damage to system security is possible.
Privilege operations:
There are four privilege vectors associated with each process: effective, maximum, inheritable, and
limiting.
The maximum privilege vector defines the upper limit for the privileges that can be active for each process.
The effective privilege vector defines the privileges that are examined to make a privilege decision. Note
that the effective privilege set is always a subset of the maximum privilege set, which in turn is always a
subset of the limiting privilege set. The limiting privilege set defines the privileges that a process may have
in its maximum, inheritable, and effective privilege sets. The inheritable privilege set represents the set of
privileges that are inherited by the child processes across forks and execs.
When a new text image is executed, the privilege escalation is performed based on the following
algorithm. The special privileges mentioned are PV_ROOT, PV_SU_, PV_SU_EMUL, PV_SU_ROOT,
PV_AZ_ROOT and PV_SU_UID.
The following algorithm demonstrates two important concepts about the least privilege subsystem. The first
concept is that the special privileges (PV_ROOT, PV_SU_, PV_SU_EMUL, PV_SU_ROOT,
PV_AZ_ROOT, and PV_SU_UID) are the only privileges that are allowed to unconditionally propagate
across the execution of a new process image. The second concept is that the process’s effective privilege
vector is cleared of all privileges unless the file has FSF_EPS set. This ensures backward compatibility
with applications that may need to run under the trusted system without being bracketed for the least
privilege system.
new_max_privs = old_inheritable_privs
new_max_privs = new_max_privs | file_innate_privs
IF (user was assigned some of authorizations in file PAS)
new_max_privs = new_max_privs | file_authorized_privs
new_max_privs = new_max_privs & old_limiting_privs
IF (old_max_privs contain one or more special privileges)
new_max_privs += same set of special privileges
IF (FSF_EPS is set for the executable)
new_eff_privs = new_max_privs
Security 457

ELSE
new_eff_privs = old_inheritable_privs
IF (old_eff_privs contain one or more special privileges)
new_eff_privs += same set of special privileges
new_limiting_privs = old_limiting_privs
Assignment and removal of privileges:
The following standard system library routines illustrate how privileges are manipulated on the system.
These routines are only useful to privileged programs on the system.
priv_raise
Changes the process’s effective privilege vector by adding (or raising) the specified list of
privileges. The list of privileges must be in the process’s maximum privilege vector or an error
indication is returned.
priv_remove
Changes the process’s effective and maximum privilege vector by removing the specified list of
privileges. If the process cannot remove the effective or maximum privileges, an error indication is
returned.
priv_lower
Changes the process’s effective privilege vector by removing (or lowering) the specified list of
privileges. If the process cannot lower the effective privileges, an error indication is returned.
Each of these routines accepts a comma-separated list of privileges that are terminated by a -1 (negative
one, an invalid privilege number). The technique for raising and lowering privileges around the smallest
section of code that may require these privileges is known as privilege bracketing. All trusted applications
should use privilege bracketing to reduce the likelihood of security violations by poorly designed or
implemented software.
setppriv
Changes the process’s effective, maximum, inheritable, and limiting privilege vector by setting the
privilege sets. If the privilege sets passed are invalid or are not permitted, an error indication is
returned.
Authorizations:
Authorizations provide various sets of privileges to users with certain authorizations.
Typically, a command or utility checks for any relevant authorizations at the beginning of execution and
then sets its own privileges accordingly. Therefore, users with a specific authorization receive a different
set of privileges for each command performed, according to how the command is programmed.
To remove cumbersome privilege setting from the code itself, AIX provides authorization sets and privilege
sets external to a binary. With the Privileged Authorization Set (PAS) and Authorized Privilege Set (APS),
the system, rather than the command itself, performs privilege setting based on authorization.
checkauths
Compares the passed in list of authorizations to the authorizations associated with the current
process.
For more information about authorization checking, see “RBAC Authorizations” on page 78.
Auditing:
Trusted AIX includes a set of commands for managing the audit trail generation and information. It is
unlikely that a trusted system programmer will need to modify or add to these programs.
audit Controls the audit daemon
458 AIX Version 6.1 Security
auditbin
Controls audit trail files
auditselect
Merges and selects audit records from audit trail files
auditpr
Displays the selected audit events in human-readable form
The primary area where audit is of concern to the trusted system programmer is in the audit events that
are generated by trusted programs. Most trusted programs need to issue messages to the system audit
trail.
Situations to audit:
There are few precise guidelines for determining which situations should be detected and audited by a
trusted program. It is primarily a matter of judgment and audit strategy. The base system divides situations
into successes, failures, object accesses, and possible covert channels.
Successes:
It is importatn to audit successful operations to establish a basic usage history.
For example, it is important that a device allocation program records when a particular user allocates and
deallocates a device. This allows a program to trace the flow of information through the system and
determine responsibility if the device is later determined to have been misused. On the other hand, some
auditing philosophies have little concern about successful operations, because such operations were
determined to be legal and proper by the trusted software.
Failures:
Auditing failed operations can be useful to detect users who attempt to gain access to disallowed services
or data. The frequent occurrence of such failures can indicate malicious (if not particularly clever)
personnel.
The base system divides failures into five categories:
v Privilege failures (an attempt by an unprivileged process to perform an action that is restricted to
privileged processes)
v MAC failures (failure of an action because the action would violate MAC restrictions)
v MIC failures (failure of an action because the action would violate MIC restrictions)
v DAC failures (failure of an action because the action would violate DAC restrictions)
v Other failures (for example, an attempt to log in with an incorrect password)
Object accesses:
It is necessary to audit object access to monitor users who access a given object (for example, the
shadow password file).
Potential covert channels:
Auditing of potential covert channels is important since covert channels can be used for passing
information between processes at different MAC labels. The use of potential covert channels does not
mean that these channels were used for this purpose, only that such use is possible.
Security 459

Each entry written by the audit system includes the reason for the audit entry (success, MAC failure, MIC
failure, DAC failure, privilege failure, other failure, object access, or potential covert channel). This includes
both audit records written by the system itself and audit records written by user programs.
It can be useful to consider whether the user was trusted (that is, an administrator), but there is no
absolute method of determining whether trusted or untrusted user require stronger auditing. For example,
although administrators are assumed trusted and in this regard may require less auditing, their actions can
be far-reaching and it can be useful to record the actions of an unauthorized administrator. Regular users
can do less damage and in this sense require less auditing, but they are also less trustworthy and
therefore may need more auditing. System administrators often apply increased auditing to their actions to
demonstrate their innocence in the case of a security breach.
The following events should be auditable:
v Successful operations, especially those that involve the transfer of information or the changing of
access control parameters
v Operations that fail for security reasons
v Operations by administrators, whether successful or not
v The potential use of covert channels
v Operations that access a specific object
v Actions that affect the subsequent content of the actual audit trail
Audit information levels:
High-level audit information is more useful than low-level audit information. Trusted programs maintain a
high-level view of operations and can produce excellent audit messages.
Recording only that an administrator opened a security file for writing is much less useful than recording
the actual higher-level operation that was performed on the file (for example, recording that an
administrator created a new entry in the file, including the key information for the new entry). It is highly
recommended that audit information be at as high of a level as possible.
It is better to include information about a single event rather than include information about several events.
The principal reason for splitting an audit occurrence among more than one event is so that the separate
occurrences can be selectively enabled.
Audit classes and events:
Each trusted program must determine the audit class, audit event type, and reason that it uses when it
issues audit messages using the auditlog system call.
Each audit event belongs to an audit class. By assigning events into classes, you can more effectively
deal with a large numbers of events. Audit class definitions are defined in the /etc/security/audit/config
file.
The audit class is used to enable and disable the recording of events. If it is important for two events to be
separately enabled, these events should not be in the same audit class. However, it is generally a good
practice to group events into classes. Normally, each trusted program or set of related trusted programs
will reserve one audit class name (or in rare case, a few audit class names) for its own use.
The system actions that are auditable are defined as audit events in the /etc/security/audit/events file.
Covert channels:
460 AIX Version 6.1 Security

All trusted software is assumed to not participate in covert channel schemes. In addition, the software
must be designed so that it cannot be utilized by untrusted software to exploit covert channels. This
section defines covert channels and gives guidelines for their detection and limitation.
Definition of covert channels:
No process at a label A shall be able to perform an action that is detectable by another process at label B
except when label B dominates label A.
This definition can be broken down into two situations: direct data operations and incidental operations.
Direct data operations are intended for users as a direct means of storing or communicating user data,
such as reading and writing files. These operations must absolutely adhere to the basic MAC constraint.
All other operations are incidental operations. The use of an incidental operation to pass data contrary to
the basic MAC restriction is called a covert channel.
The exploitation of a covert channel requires two untrusted processes, which will be referred to as the
sender (at label X) and receiver (at label Y). It is assumed that the MAC label of the receiver does not
dominate that of the sender (if it did, data flow from the sender to the receiver would be a legal upgrade).
To exploit this channel, both the sender and receiver utilize certain conventions regarding the use of
agreed-upon resources in order to transmit data contrary to MAC.
The only criteria for covert exploitation is that the receiver’s label of the receiver does not dominate the
sender’s label and that both the sender and receiver are untrusted. Both the sender and receiver are
commonly used on behalf of the same user. It is assumed that the TCB itself upholds the basic MAC
restriction and is free of any code that violates this restriction by the malicious use of covert channels. (In
fact, privileged processes have many more effective ways to violate MAC without having to resort to covert
channels.) It is the ability of untrusted processes to exploit covert channels by using trusted programs that
is of concern.
In general, covert channels should be precluded from the system. However, there are some cases where
other system needs (for example, performance, reliability, or compatibility) are unacceptably constrained
without the presence of covert channels.
Bandwidth guidelines:
The base system uses the following guidelines for the limitation of covert channels based on bandwidth:
More than 100 bits/second
These channels are not allowed to exist
0.1 to 100 bits/second
Channels in this range can exist when absolutely necessary, but their use is detected and audited
whenever possible
Fewer than 0.1 bits/second
Channels in this range can exist where necessary but there is no special need to detect their use
It is highly recommended that all additional TCB programs follow these same guidelines. Furthermore,
consider that even relatively slow channels of 10 bits per second can transmit 4,500 bytes per hour, which
is a significant amount of data to be illegally downgraded. Therefore, every effort should be made to limit
covert channels to as low a bandwidth as possible.
The bandwidth of most covert channels is usually lowered by activities of processes other than those
processes that may be exploiting the channel. However, it is recommended this effect not be relied on to
limit the bandwidth of covert channels, since there are periods of low activity on all systems.
Detection of covert channels:
Security 461

Detection of covert channels is largely a matter of careful analysis and design. There are few specific
guidelines for the detection of covert channels.
The term module refers to the unit of TCB code that detects or limits covert channel use, whether in the
kernel or in a process. Detecting covert channels is primarily a matter of determining whether an untrusted
process (the sender) at a level A can use a module to perform an action that is detectable by another
process (the receiver) at level B, when level B does not dominate level A.
For example, a common covert channel is data that is written to a file by a trusted process on behalf of an
untrusted user when the MAC label of the file does not dominate the MAC label of the user.
Relatively few methodologies for detecting covert channels have been proposed. The most prominent is
the Shared Resource Matrix (SRM). Refer to the following for a description of this technique:
v v Kemmerer, R.A. ″Shared Resource Matrix Methodology: An Approach to Identifying Storage and
Timing Channels,″ ACM Transactions on Computing Systems 1(3) 1983, 256-277.
v v Tsai, CR. ″A Formal Method for the Identification of Covert Storage Channels in Source Code,″
Proceedings of the 1987 IEEE Symposium on Security and Privacy, 74-87.
Covert channel detection through auditing:
The ability to audit the potential use of a covert channel can be an effective counter to this threat.
However, in order for the auditing to be useful, the audit event must be relatively rare. The audit is of little
use if the ratio of actual exploitations to the incidental use of the event that causes the audit is low.
Limiting covert channels:
The best way to limit covert channels is to simply remove them.
Otherwise they should be limited according to the guidelines discussed in Bandwidth Guidelines. In
addition, whenever possible and effective, potential use of the channels should be audited.
In general, it is difficult for kernel or device driver code to confine covert channels, since the kernel and
device driver code are designed for efficiency and their channels are higher bandwidth. Trusted processes
can more easily limit covert channels.
Note: There is no reason to limit covert channel use by processes at the same label or when the receiver
dominates the sender. Therefore, most TCB modules can increase system performance by
imposing no limitations in these cases.
Per-label quotas:
Many covert channels involve the use of a resource pool that is shared among processes at different MAC
labels. These can be effectively limited by creating separate fixed-size resource pools for each MAC label,
so that a process can only modulate resource use from the pool for its MAC label.
Over time, unused resources can be moved from one pool to another to accommodate dynamic demand.
This resource migration is itself a covert channel, but one of much lower bandwidth that is easily limited.
Time delays:
One technique for limiting covert channels is for the TCB to ensure that a certain amount of time passes
when a service where channels exist is performed. This can be as simple as having the module sleep for
a specified time, which can be calculated based on the amount of information that is being passed.
462 AIX Version 6.1 Security

However, unless properly done, time delays can often be thwarted by programs that are exploiting the
covert channel. For example, the exploiting processes can create many sets of sender/receiver processes.
While the TCB can easily limit each set to a certain bandwidth using delay techniques, the aggregate of all
sets is the bandwidth of this single channel.
It is better for a certain TCB service to ensure that time delays are applied in some manner to all
processes that might be using the service.
Time delays can be useful for confinement, but they are prone to relatively simple countermeasures by
malicious programs and must be carefully designed.
Data limitations:
The covert channel bandwidth can be lowered not only by increasing the time, but also by decreasing the
amount of information that is returned. Programs that return data as a series of operations can often
simply return fewer or smaller packets of information within the same time frame.
Approximate time:
Many of the techniques for exploiting covert channels require the exploiting processes to have an accurate
way to measure relative or absolute time. These channels can sometimes be limited by not allowing the
process to accurately determine time.
While it is relatively easy to ensure that TCB services that return time information make the time
approximate, processes sometimes have other ways of measuring the passage of time, such as counting
their own instruction times. Such techniques for limiting channels should be used with care.
Noisemakers:
The bandwidth of most covert channels is usually lowered, sometimes drastically, by the activities of
processes other than those that are exploiting the channel. It is possible, though not recommended, to
create trusted programs whose purpose is to ensure that a certain level of activity is always present.
These are sometimes known as noisemakers.
While the use of noisemakers may be conceptually appealing, it is usually difficult for noisemakers to
determine when they should be making noise and when they should not. Therefore, this is not a
recommended technique for covert channel limitation.
U-T-U chains:
There may be situations where an untrusted process, U1, invokes a privileged, trusted process, T, which
then invokes another untrusted process, U2 which is at a different label than U1. U1 and U2 represent
untrusted processes at different MAC labels with special covert channel potential by virtue of one being a
descendant of the other. (Actually, T and U can be sequences of trusted and/or untrusted processes.) We
refer to this situation as the U-T-U chain.
Trusted processes must ensure that information does not pass between two untrusted processes against
the basic MAC principle, which includes both the exclusion of disallowed direct data operations and also
covert channels. You should consider the following:
v File descriptors cannot be left open when U2 could not have opened the file in the read/write mode in
which it is open
v The environment variables must be cleared if the label of U2 does not dominate U1
v The working directory passed from U1 through to U2 can constitute a covert channel (probably small) if
the label of U2 does not dominate U1. Similarly, many of the process parameters that are automatically
inherited by the child process could constitute a covert channel.
Security 463

It is possible for U-T-U chains to be managed properly (that is, the covert channels can be sufficiently
constrained). However, this is difficult to ensure, and U-T-U chains should generally be avoided. Note,
however, that the concern is that U2 is not trusted--it might safely be trusted but unprivileged.
Examples of covert channels:
The following are examples of covert channels that might exist in modules created by a systems
programmer.
Printing service covert channel example:
This is an example of a printing service covert channe.
A trusted line printer service correctly tags each submitted job with the MAC label of the requesting
process and maintains that label with the queued jobs for use in eventual printing. Jobs with relatively long
names are allowed.
A status program allows the user to see all of the jobs that are queued for the user, including the
user-assigned job name, regardless of the label of the job. This can be used as a covert channel since the
sender process can then create jobs whose name contains data to be covertly passed to receivers that
operate on behalf of the same user.
Note: The only criteria for covert exploitation is that the receiver’s label does not dominate the sender’s
label and that both the sender and receiver are untrusted. Both sender and receiver will commonly
be on behalf of the same user.
This channel is closed by allowing the user to only view jobs that are dominated by the user’s current
MAC label. This forces the MAC label of the receiver to dominate that of the sender and the channel can
only be used for a legal upgrade. As a matter of courtesy, the status program could give the user an ″other
jobs exist″ message if non-dominated jobs existed. This represents a much smaller channel with a good
operational reason for existence.
Note: Auditing the detection of higher-level jobs can be useful, since this detection will probably be rare in
normal operation.
This is a common example of a covert channel where multilevel named data objects (queued printing jobs
in this case) are accessible by processes at different MAC labels. The channel is effectively removed by
applying the MAC label of the object to the name also. Attributes other than name, such as size, can also
carry covert information.
Resource pools example:
When a trusted program performs a service for an untrusted client, the trusted program allocates a specific
type of resource (for example a buffer) from a pool of resources that is shared among processes at
different MAC labels.
One way to use this as a covert channel is for the sender and receiver to arrange to have all but one
resource allocated, possibly by other programs running at different or diverse MAC labels or under
different or diverse user IDs. The sender then causes the single remaining resource to be allocated or not
allocated, and the receiver detects this by also trying to allocate the resource.
This is a classic example of a shared resource channel. This can be confined by the allocation of per-label
resource pools as described above. It can also be detected by auditing.
Databases example:
464 AIX Version 6.1 Security

A trusted database system allows user programs to place data into a multilevel database. Direct access is
properly controlled via the basic MAC restrictions.
However, the time required to place an entry into a database is highly dependent on the current total size
of the database. Therefore, the sender can place or remove entries to affect the size of the database, and
the receiver can simply measure the time it takes to place an entry to detect this size. This channel is
likely to be low bandwidth unless the database access is quite efficient.
A guaranteed minimum access time can be imposed in an effort to limit the channel. The time delay can
be pseudorandom so that the average wasted time is lessened. However, this is still a time delay scheme
and should be carefully implemented.
The simple auditing of all accesses is not likely to be effective since it will be difficult to detect the
exploitation of the channel among the many non-malicious uses of the database.
Programming examples:
This section provides several trusted programming examples
Trusted program privilege check example:
This is a modular routine for a trusted program to check whether or not the calling process has a specific
privilege.
#include <sys/priv.h>
#include <sys/secattr.h>
int
priv_check (int priv)
{
/* the process’s security attributes */
secattr_t secattr;
/* get the calling process’s security attributes */
if ( sec_getpsec(-1, &secattr;) != 0 )
{
return (-1);
/* error retrieving the process’s cred structure */
}
/*
* return whether or not specified priv is in the
* calling process’s maximum privilege set
*/
return privbit_test(secattr.sc_maxpriv, priv);
}
Change effective Sensitivity Label example:
This program changes the effective sensitivity label of the current process to system high.
The following privileges are required in the program’s innate privilege set:
v PV_LAB_LEF
v PV_LAB_SLUG
v PV_LAB_SL_SELF#include <stdio.h>
#include <mls/mls.h>
#include <unistd.h>
#include <sys/secattr.h>
#include <userpriv.h>
Security 465

#include <sys/mac.h>
#include <sys/secconf.h>
#define SUCCESS 0
#define ERROR 1
int
main()
{
sl_t sl_syshi; /* System high SL */
secattr_t attr;
char *clBuffer = NULL;
/*
* Get the system high and low SLs.
*/
if ((sec_getsyslab(NULL, &sl_syshi, NULL, NULL)) != 0 ) {
fprintf (stderr, "Call to sec_getsyslab failed.\n");
exit(ERROR);
}
/*
* Initialize this process with initlabeldb() to access the
* system default Label database.
*/
priv_raise(PV_LAB_LEF , -1);
if (initlabeldb(NULL) != 0) {
fprintf(stderr, "Could not read the Label Encodings Database.\n");
exit(ERROR);
}
priv_remove(PV_LAB_LEF, -1);
/*
* Get the process clearance range and effective SL.
*/
priv_raise(PV_LAB_SLUG, PV_LAB_SL_SELF, -1);
if (sec_getpsec(-1, &attr) != 0) {
fprintf (stderr, "Problem getting Trusted AIX security attributes of program.\n");
exit(ERROR);
}
/* malloc for the maximum SL label length that can be formed for process */
if((clBuffer = (char *) malloc(maxlen_cl())) == NULL) {
perror("malloc");
exit(ERROR);
}
/* Convert the binary effective SL to human readable */
if (clbtohr(clBuffer, &attr.sc_sl, HR_LONG) != 0) {
fprintf(stderr, "Unable to convert SL to human readable form.\n");
exit(ERROR);
}
printf("Program’s intitial effective SL = %s.\n",clBuffer);
/*
* Set the process effective SL to system high.
* The process may not have its maximum SL at system high,
* so set it also to system high.
*/
attr.sc_sl = sl_syshi;
attr.sc_sl_cl_max = sl_syshi;
if (sec_setplab(-1, &attr.sc_sl, NULL, &attr.sc_sl_cl_max,
NULL, NULL, NULL) != 0) {
fprintf (stderr, "Problem setting the effective SL of program.\n");
exit(ERROR);
}
466 AIX Version 6.1 Security

priv_lower(PV_LAB_SLUG, PV_LAB_SL_SELF, -1);
if (sec_getpsec(-1, &attr) != 0) {
fprintf (stderr, "Problem getting Trusted AIX security attributes of program.\n");
exit(ERROR);
}
/* Convert the binary effective SL to human readable */
if (clbtohr(clBuffer, &attr.sc_sl, HR_LONG) != 0) {
fprintf(stderr, "Unable to convert to SL to human readable form.\n");
exit(ERROR);
}
printf("Program’s modified effective SL = %s.\n",clBuffer);
return(SUCCESS);
}
Setting sensitivity label classifications and comparing sensitivity labels examples:
This is an example of setting the classifications of sensitivity labels and using the library routines for
comparisons between the sensitivity labels.
The PV_LAB_LEF privilege is required in the program’s proxy privilege set and in the calling process’s
maximum privilege set.
#include <stdio.h>
#include <mls/mls.h>
#include <userpriv.h>
#include <errno.h>
#define SUCCESS 0
#define ERROR 1
int
main (int argc, char **argv)
{
/* Sensitivity labels */
sl_t sl1, sl2;
/* strings to hold labels’ names */
char *slBuffer1 = NULL;
char *slBuffer2 = NULL;
if (argc != 3) {
fprintf(stderr, "Usage: compare slabel1 slabel2\n");
exit(ERROR);
}
/*
* Initialize this process with initlabeldb() to access the
* system default Label database.
*/
priv_raise(PV_LAB_LEF , -1);
if (initlabeldb(NULL) != 0) {
fprintf(stderr, "Could not read the Label Encodings Database.\n");
exit(ERROR);
}
priv_remove(PV_LAB_LEF, -1);
/* Convert the passed SL to binary format */
if (slhrtob(&sl1, argv[1]) != 0) {
fprintf(stderr, "Unable to convert %s to binary form.\n", argv[1]);
exit(ERROR);
}
if (slhrtob(&sl2, argv[2]) != 0) {
fprintf(stderr, "Unable to convert %s to binary form.\n", argv[2]);
exit(ERROR);
}
Security 467
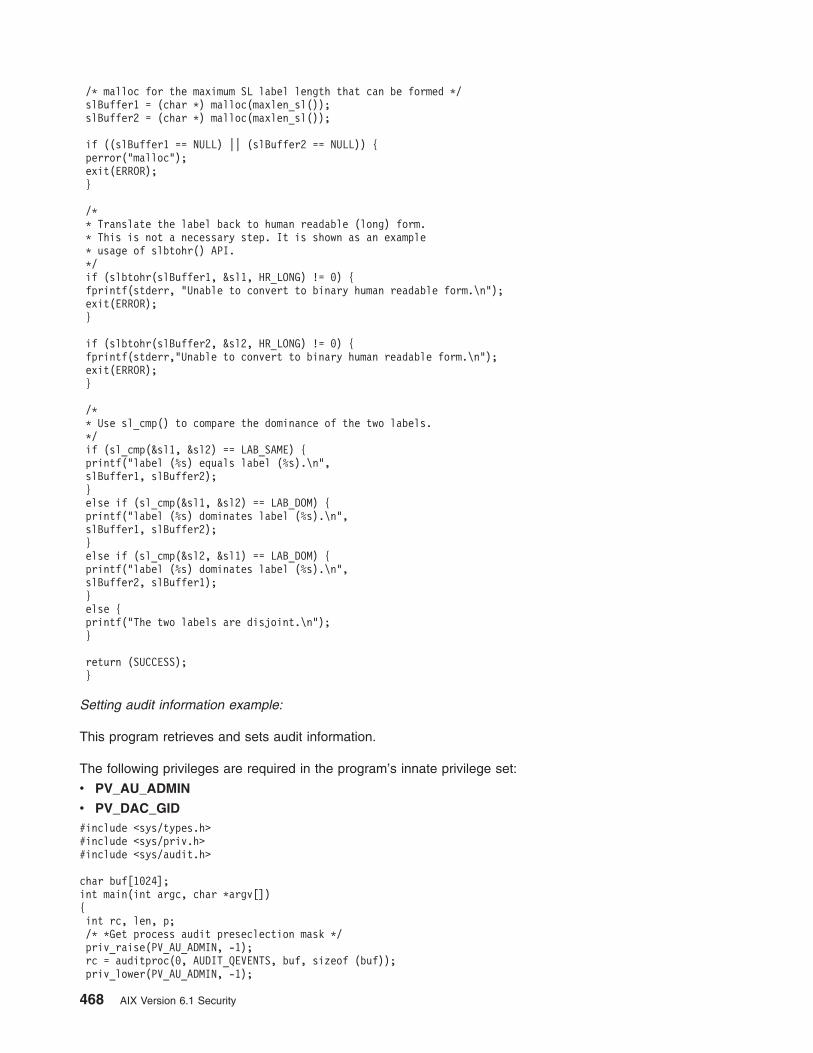
/* malloc for the maximum SL label length that can be formed */
slBuffer1 = (char *) malloc(maxlen_sl());
slBuffer2 = (char *) malloc(maxlen_sl());
if ((slBuffer1 == NULL) || (slBuffer2 == NULL)) {
perror("malloc");
exit(ERROR);
}
/*
* Translate the label back to human readable (long) form.
* This is not a necessary step. It is shown as an example
* usage of slbtohr() API.
*/
if (slbtohr(slBuffer1, &sl1, HR_LONG) != 0) {
fprintf(stderr, "Unable to convert to binary human readable form.\n");
exit(ERROR);
}
if (slbtohr(slBuffer2, &sl2, HR_LONG) != 0) {
fprintf(stderr,"Unable to convert to binary human readable form.\n");
exit(ERROR);
}
/*
* Use sl_cmp() to compare the dominance of the two labels.
*/
if (sl_cmp(&sl1, &sl2) == LAB_SAME) {
printf("label (%s) equals label (%s).\n",
slBuffer1, slBuffer2);
}
else if (sl_cmp(&sl1, &sl2) == LAB_DOM) {
printf("label (%s) dominates label (%s).\n",
slBuffer1, slBuffer2);
}
else if (sl_cmp(&sl2, &sl1) == LAB_DOM) {
printf("label (%s) dominates label (%s).\n",
slBuffer2, slBuffer1);
}
else {
printf("The two labels are disjoint.\n");
}
return (SUCCESS);
}
Setting audit information example:
This program retrieves and sets audit information.
The following privileges are required in the program’s innate privilege set:
v PV_AU_ADMIN
v PV_DAC_GID#include <sys/types.h>
#include <sys/priv.h>
#include <sys/audit.h>
char buf[1024];
int main(int argc, char *argv[])
{
int rc, len, p;
/* *Get process audit preseclection mask */
priv_raise(PV_AU_ADMIN, -1);
rc = auditproc(0, AUDIT_QEVENTS, buf, sizeof (buf));
priv_lower(PV_AU_ADMIN, -1);
468 AIX Version 6.1 Security
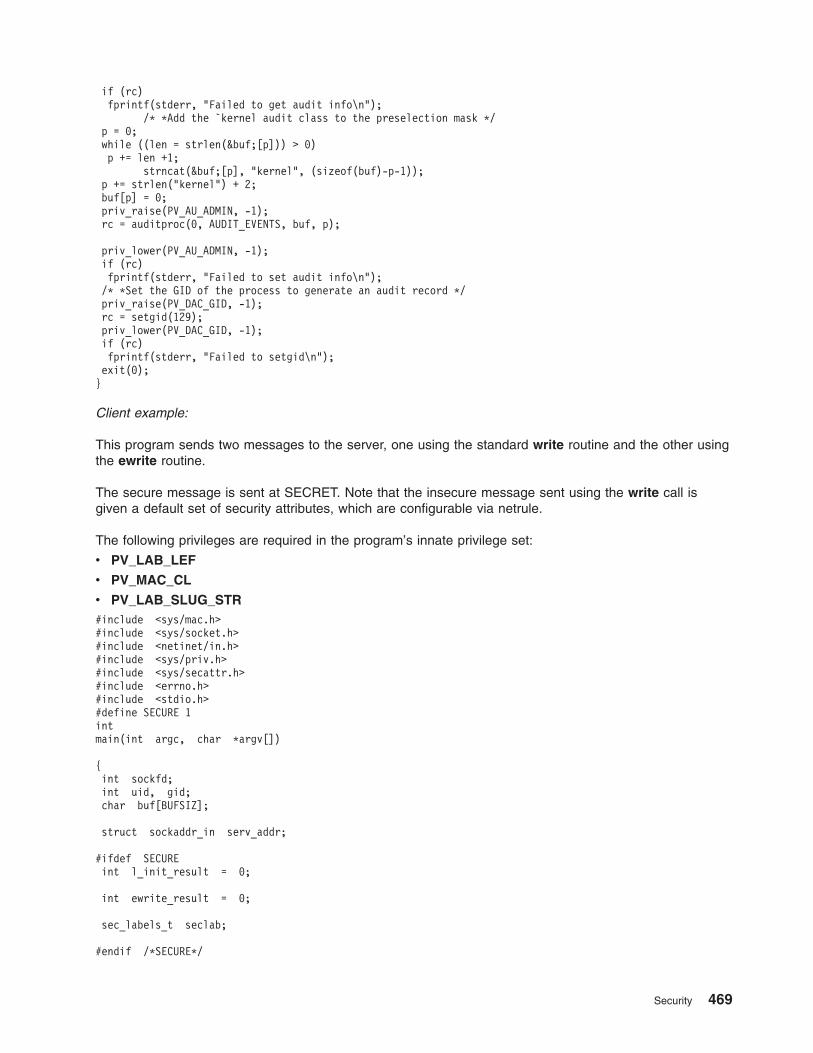
if (rc)
fprintf(stderr, "Failed to get audit info\n");
/* *Add the `kernel audit class to the preselection mask */
p = 0;
while ((len = strlen(&buf;[p])) > 0)
p += len +1;
strncat(&buf;[p], "kernel", (sizeof(buf)-p-1));
p += strlen("kernel") + 2;
buf[p] = 0;
priv_raise(PV_AU_ADMIN, -1);
rc = auditproc(0, AUDIT_EVENTS, buf, p);
priv_lower(PV_AU_ADMIN, -1);
if (rc)
fprintf(stderr, "Failed to set audit info\n");
/* *Set the GID of the process to generate an audit record */
priv_raise(PV_DAC_GID, -1);
rc = setgid(129);
priv_lower(PV_DAC_GID, -1);
if (rc)
fprintf(stderr, "Failed to setgid\n");
exit(0);
}
Client example:
This program sends two messages to the server, one using the standard write routine and the other using
the ewrite routine.
The secure message is sent at SECRET. Note that the insecure message sent using the write call is
given a default set of security attributes, which are configurable via netrule.
The following privileges are required in the program’s innate privilege set:
v PV_LAB_LEF
v PV_MAC_CL
v PV_LAB_SLUG_STR#include <sys/mac.h>
#include <sys/socket.h>
#include <netinet/in.h>
#include <sys/priv.h>
#include <sys/secattr.h>
#include <errno.h>
#include <stdio.h>
#define SECURE 1
int
main(int argc, char *argv[])
{
int sockfd;
int uid, gid;
char buf[BUFSIZ];
struct sockaddr_in serv_addr;
#ifdef SECURE
int l_init_result = 0;
int ewrite_result = 0;
sec_labels_t seclab;
#endif /*SECURE*/
Security 469

uid = getuid();
gid = getgid();
if ( argc != 3 )
{
fprintf(stderr, "Usage:%s: ADDR PORT\n", argv[0]);
exit(1);
}
#ifdef SECURE
/*
* * Gain access to the Label Encodings Database
*
* */
priv_raise(PV_LAB_LEF,-1);
l_init_result = initlabeldb(NULL);
if ( priv_remove(PV_LAB_LEF, -1) != 0 )
{
fprintf(stderr, "Privilege Failure\n");
exit(1);
}
if ( l_init_result != 0 )
{
fprintf(stderr, "Could not read the Label Encodings Database\n");
exit(0);
}
#endif /*SECURE*/
/*
* * Fill in the structure "serv_addr" with the address
* of
* * the server that we want to connect with.
* */
memset ((char *) &serv_addr;, ’\0’, sizeof(serv_addr));
serv_addr.sin_family = AF_INET;
serv_addr.sin_addr.s_addr = inet_addr(argv[1]);
serv_addr.sin_port = htons(atoi(argv[2]));
/* Open a TCP socket (an Internet stream socket). */
if ( (sockfd = socket(AF_INET, SOCK_STREAM, 0)) < 0)
{
perror("tcpclient: ");
fprintf(stderr, "client: Cant open stream socket\n");
exit(0);
}
if ( connect(sockfd, (struct sockaddr *) &serv_addr;,
sizeof(serv_addr)) < 0 )
{
perror("tcpclient: ");
fprintf(stderr, "client: Cant connect to server\n");
exit(0);
}
/*
* * Send a normal write to the server, which will be
* * assigned default security attributes
* */
strcpy(buf, "This has the default security attributes.\n");
if ( write(sockfd, buf, strlen(buf)+1) == -1 )
{
perror("tcpclient: ");
fprintf(stderr, "write error\n");
}
#ifdef SECURE
470 AIX Version 6.1 Security

strcpy(buf, "This message is at SECRET\n");
/* Setup the SL and CLs */
slhrtob(&seclab.sl;, "SECRET");
slhrtob(&seclab.sl_cl_min;, "SECRET");
slhrtob(&seclab.sl_cl_max;, "SECRET A B");
seclab.sl.sl_format = STDSL_FORMAT;
seclab.sl_cl_min.sl_format = STDSL_FORMAT;
seclab.sl_cl_max.sl_format = STDSL_FORMAT;
/* This ewrite call needs PV_MAC_CL and PV_LAB_SLUG_STR */
priv_raise(PV_MAC_CL,PV_LAB_SLUG_STR,-1);
ewrite_result = ewrite(sockfd, buf,strlen(buf)+1, &seclab;);
priv_lower(PV_MAC_CL,PV_LAB_SLUG_STR,-1);
if (ewrite_result == -1)
{
perror("tcpclient call");
fprintf(stderr, "ewrite error\n");
}
fflush(stderr);
#endif /*SECURE*/
fprintf(stderr, "exiting ..... \n");
sleep(3);
close(sockfd);
exit(0);
}
Server example:
This program acts as a server and uses the eread routine to receive messages that are sent to its port.
After successfully receiving a message, this program outputs the security attributes of the message.
The following privileges are required in the program’s innate privilege set (without assigning FSF_EPS
secflags):
v PV_LAB_LEF
v PV_MAC_CL
v PV_MAC_R_STR#include <sys/mac.h>
#include <sys/socket.h>
#include <sys/priv.h>
#include <sys/secattr.h>
#include <sys/stropts.h>
#include <netinet/in.h>
#include <errno.h>
#include <stropts.h>
#include <unistd.h>
#include <stdio.h>
#include <mls/mls.h>
#define MAX_HR_LABEL_LEN 2048
#define SECURE 1
int
main(int argc, char *argv[])
{
pid_t childpid;
uint clilen;
int sockfd, newsockfd;
struct sockaddr_in cli_addr, serv_addr;
#ifdef SECURE
int l_init_result;
char label_str[MAX_HR_LABEL_LEN];
sec_labels_t seclab;
#endif /* SECURE */
if ( argc != 2 )
Security 471

{
fprintf(stderr, "Usage:%s PORT\n", argv[0]);
exit(1);
}
#ifdef SECURE
priv_raise(PV_LAB_LEF, -1);
l_init_result = initlabeldb(NULL);
if (priv_remove(PV_LAB_LEF, -1) != 0)
{
fprintf(stderr, "Privilege Failure\n");
exit(1);
}
if (l_init_result != 0)
{
fprintf(stderr, "Could not read the Label Encodings Database\n");
exit(1);
}
#endif /* SECURE */
/* Open a TCP socket (an Internet stream socket). */
if ( (sockfd = socket(AF_INET, SOCK_STREAM, 0)) < 0 )
{
perror("tcpserver: ");
fprintf(stderr, "server: Cant open stream socket\n");
exit(1);
}
/*Bind our local address so that the client can send to us*/
memset((char *) &serv_addr;, ’\0’, sizeof(serv_addr));
serv_addr.sin_family = AF_INET;
serv_addr.sin_addr.s_addr = htonl(INADDR_ANY);
serv_addr.sin_port = htons(atoi(argv[1]));
if ( bind(sockfd, (struct sockaddr *) & serv_addr,
sizeof(serv_addr)) < 0 )
{
perror("tcpserver: ");
fprintf(stderr, "server: Cant bind local address\n");
exit(0);
}
listen(sockfd, 5);
for (;;)
{
/*
* * Wait for a connection from a client process.
* */
fprintf(stdout, "Waiting for a connection from a client\n");
clilen = sizeof(cli_addr);
newsockfd = eaccept(sockfd, (struct sockaddr *) & cli_addr,
&clilen;, &seclab;);
if ( newsockfd < 0 )
{
perror("tcpserver: ");
fprintf(stderr, "server: accept error\n");
}
/* Print SL */
if ( slbtohr(label_str, &seclab.sl;, HR_SHORT) != 0 )
{
fprintf(stderr,"problem converting sl to string\n");
}
else
{
fprintf(stdout, "sl = %s.\n",label_str);
}
/* Print MIN CLEARANCE */
if ( slbtohr(label_str, &seclab.sl_cl_min;, HR_SHORT) != 0 )
{
fprintf(stderr,"problem converting min clearance to string\n");
}
472 AIX Version 6.1 Security

else
{
fprintf(stdout, "sl_cl_min = %s.\n",label_str);
}
/* Print MAX CLEARANCE */
if ( slbtohr(label_str, &seclab.sl_cl_max;, HR_SHORT) != 0 )
{
fprintf(stderr,"problem converting max clearance to string\n");
}
else
{
fprintf(stdout, "sl_cl_max = %s.\n",label_str);
}
if ( (childpid = fork()) < 0 )
{
perror("tcpserver: ");
fprintf(stderr, "server: fork error\n");
exit(0);
}
else if ( childpid == 0 ) /* child process */
{
int i, j;
char buf[BUFSIZ];
#ifdef SECURE
sec_labels_t e_seclab;
#endif /* SECURE */
close(sockfd);
for (;;)
{
int ret, flag;
struct strbuf ctstr, dtstr;
char ctbuf[2048], dtbuf[2048];
ctstr.maxlen=2048;
ctstr.buf = ctbuf;
dtstr.maxlen=2048;
dtstr.buf = dtbuf;
#ifdef SECURE
fprintf(stdout, "Calling eread\n");
priv_raise(PV_MAC_CL,PV_MAC_R_STR,-1);
ret = eread(newsockfd, buf, sizeof(buf),&e_seclab;);
priv_lower(PV_MAC_CL,PV_MAC_R_STR,-1);
if ( ret < 1 )
{
if ( ret == -1 )
fprintf(stderr, "eread error\n");
else
fprintf(stderr, "eread no data\n");
close(newsockfd);
exit(ret);
}
fprintf(stdout, "\n%s", buf);
fprintf(stdout, "\n");
/* Print SL */
if ( slbtohr(label_str, &e_seclab.sl;, HR_SHORT) != 0 )
{
fprintf(stderr, "problem converting sl to string\n");
}
else
{
fprintf(stdout, "sl = %s.\n",label_str);
}
/* Print MIN CLEARANCE */
if ( slbtohr(label_str,&e_seclab.sl_cl_min;,HR_SHORT)!= 0)
{
fprintf(stderr,"problem converting min CL to string\n");
}
Security 473

else
{
fprintf(stdout, "sl_cl_min = %s.\n",label_str);
}
/* Print MAX CLEARANCE */
if ( slbtohr(label_str,&e_seclab.sl_cl_max;,HR_SHORT) !=0)
{
fprintf(stderr,"problem converting max CL to string\n");
}
else
{
fprintf(stdout, "sl_cl_max = %s.\n",label_str);
}
fflush(stdout);
#else /* NOT SECURE */
fprintf(stdout, "Calling read\n");
if (read(newsockfd, buf, sizeof(buf)) < 1)
{
if (ret == -1)
fprintf(stderr, "read error\n");
else
fprintf(stderr, "read no data\n");
close(newsockfd);
exit(ret);
}
fprintf(stdout, "%s\n", buf);
fflush(stdout);
#endif /* NOT SECURE */
}
}
/* parent process */
close(newsockfd);
}
}
Trusted AIX user and port security attributes:
User and port security attributes are used to retrieve the clearance attributes of users and ports and
compare the user’s clearance attributes against the ports.
The following additional attributes are defined in the usersec.h file for Trusted AIX.
S_MINSL
Minimum sensitivity clearance label of the user. Type SEC_CHAR
S_MAXSL
Maximum sensitivity clearance label of the user. Type SEC_CHAR
S_DEFSL
Default sensitivity label of the user. Type SEC_CHAR
S_MINTL
Minimum integrity clearance label of the user. Type SEC_CHAR.
S_MAXTL
Maximum integrity clearance label of the user. Type SEC_CHAR.
S_DEFTL
Default integrity label of the user. Type SEC_CHAR
The following attributes are valid for ports.
S_MINSL
Minimum sensitivity label assigned to the port. Type SEC_CHAR.
474 AIX Version 6.1 Security

S_MAXSL
Maximum sensitivity label assigned to the port. Type SEC_CHAR
S_TL Integrity label assigned to the port. Type SEC_CHAR
The following example determines if a user can login on the specified port.
#include <mls/mls.h>
#include <usersec.h>
#include <stdio.h>
#include <errno.h>
struct userlabels {
sl_t minsl;
sl_t maxsl;
sl_t defsl;
tl_t mintl;
tl_t maxtl;
tl_t deftl;
};
struct portlabels {
sl_t minsl;
sl_t maxsl;
tl_t tl;
};
void getuserlabels(char * username, struct userlabels *usrlab);
void getportlabels (char * portname, struct portlabels *portlab);
void displayuseraccess (char * username, struct userlabels *usrlab,
struct portlabels *portlab);
int
main (int argc, char **argv)
{
struct userlabels usrlab;
struct portlabels portlab;
char *username = NULL;
char *portname = NULL;
if (argc != 3 ) {
fprintf (stderr, "Usage: %s <username> <portname>\n", argv[0]);
exit(1);
}
username = argv[1];
portname = argv[2];
initlabeldb(NULL);
getuserlabels(username, &usrlab;);
getportlabels(portname, &portlab;);
displayuseraccess(username , &usrlab;, &portlab;);
endlabeldb();
}
void getuserlabels(char *username, struct userlabels *userlab)
{
dbattr_t attributes[6];
memset (attributes, 0, sizeof(attributes));
attributes[0].attr_name = S_MINSL;
attributes[0].attr_type = SEC_CHAR;
attributes[1].attr_name = S_MAXSL;
attributes[1].attr_type = SEC_CHAR;
Security 475

attributes[2].attr_name = S_DEFSL;
attributes[2].attr_type = SEC_CHAR;
attributes[3].attr_name = S_MINTL;
attributes[3].attr_type = SEC_CHAR;
attributes[4].attr_name = S_MAXTL;
attributes[4].attr_type = SEC_CHAR;
attributes[5].attr_name = S_DEFTL;
attributes[5].attr_type = SEC_CHAR;
if (getuserattrs(username, attributes, 6)) {
fprintf(stderr,
"Error retriving attributes for user %s\n", username);
exit (1);
}
if (clhrtob (&(userlab->minsl), attributes[0].attr_char)) {
fprintf(stderr, "minsl conversion error\n");
exit (1);
}
if (clhrtob(&(userlab->maxsl), attributes[1].attr_char)) {
fprintf(stderr, "maxsl conversion error\n");
exit (1);
}
if (clhrtob(&(userlab->defsl), attributes[2].attr_char)) {
fprintf(stderr, "defsl conversion error\n");
exit (1);
}
if (tlhrtob(&(userlab->mintl), attributes[3].attr_char)) {
fprintf(stderr, "mintl conversion error\n");
exit (1);
}
if (tlhrtob(&(userlab->maxtl), attributes[4].attr_char)) {
fprintf(stderr, "maxtl conversion error\n");
exit (1);
}
if (tlhrtob(&(userlab->deftl), attributes[5].attr_char)) {
fprintf(stderr, "deftl conversion error\n");
exit (1);
}
printf("User %s has the following clearance values\n", username);
printf("minsl:%s\n", attributes[0].attr_char);
printf("maxsl:%s\n", attributes[1].attr_char);
printf("defsl:%s\n", attributes[2].attr_char);
printf("mintl:%s\n", attributes[3].attr_char);
printf("maxtl:%s\n", attributes[4].attr_char);
printf("deftl:%s\n", attributes[5].attr_char);
return;
}
void getportlabels(char *portname, struct portlabels *portlab)
{
int rc =0;
char *val = NULL;
if ( (rc = getportattr(portname,S_MINSL,(char*)&val;, SEC_CHAR)) != 0 ) {
perror ("Error retrieving port attributes");
exit(1);
476 AIX Version 6.1 Security

}
if (slhrtob(&(portlab->minsl), val)) {
fprintf(stderr, "port minsl conversion error\n");
exit (1);
}
if ( (rc = getportattr(portname,S_MAXSL, (char*)&val;, SEC_CHAR)) != 0 ) {
perror ("Error retrieving port attributes");
exit(1);
}
if (slhrtob(&(portlab->maxsl), val)) {
fprintf(stderr, "port maxsl conversion error\n");
exit (1);
}
if ( (rc = getportattr(portname,S_TL, (char*)&val;, SEC_CHAR)) != 0 ) {
perror ("Error retrieving port attributes");
}
if (tlhrtob(&(portlab->tl), val)) {
fprintf(stderr, "port tl conversion error\n");
exit (1);
}
return;
}
void displayuseraccess (char *username, struct userlabels *usrlab, struct portlabels *portlab)
{
CMP_RES_T cmpres;
cmpres = sl_cmp(&(usrlab->defsl), &(portlab->minsl));
if (cmpres != LAB_DOM && cmpres != LAB_SAME) {
printf("Default SL of user does not dominate the minimum SL of tty \n");
exit(1);
}
cmpres = sl_cmp(&(portlab->maxsl), &(usrlab->defsl));
if (cmpres != LAB_DOM && cmpres != LAB_SAME) {
printf("Default SL of user is not dominated by maximum SL of tty \n");
exit(1);
}
cmpres = tl_cmp(&(portlab->tl), &(usrlab->deftl));
if (cmpres != LAB_SAME) {
printf("Default TL of user is not same as TL of tty \n");
exit(1);
}
printf("The user can login on the specified port\n");
return;
}
Trusted AIX system calls:
System calls are provided to manipulate additional Trusted AIX functionality.
eaccept
Accepts a connection on a socket
ebind Binds extended to handle security attributes
econnect
Initiates a connection on a socket extended to handle security attributes
Security 477
eread Reads from a stream and retrieve the message security attributes
ereadv
Reads from a stream and retrieve the message security attributes
erecv recv, recvfrom, recvmsg extended to handle security attributes
erecvfrom
recv, recvfrom, recvmsg extended to handle security attributes
erecvmsg
recv, recvfrom, recvmsg extended to handle security attributes
esend send, sendto, sendmsg extended to handle security attributes
esendmsg
send, sendto, sendmsg extended to handle security attributes
esendto
send, sendto, sendmsg extended to handle security attributes
ewrite Writes to a stream and set the message security attributes
ewritev
Writes to a stream and set the message security attributes
sec_getmsgsec
Gets security attributes of message queues
sec_getpsec
Gets the security information associated with a process
sec_getrunmode
Retrieves the kernel’s mode of operation
sec_getsecconf
Returns the current security configuration flags
sec_getsemsec
Gets security attributes of semaphores
sec_getshmsec
Gets security attributes of shared memory segments
sec_getsyslab
Gets the default system sensitivity labels
sec_gettlibbufsize
Retrieves library path entries in kernel
sec_gettlibpath
Retrieves library path entries in kernel
pdmkdir
Makes/sets/unsets a partitioned directory or subdirectory
sec_setauditrange
Sets the system global audit label range
sec_setplab
Sets the effective sensitivity label, minimum sensitivity clearance, maximum sensitivity clearance,
and integrity label of the specified process
setppdmode
Sets the partitioned directory mode (real or virtual) of the process
478 AIX Version 6.1 Security

setppriv
Sets the privilege sets associated with a process
sec_setptlibmode
Sets the TLIB mode of the process
sec_setrunmode
Sets the kernel’s mode of operation
sec_setsecconf
Sets the kernel security configuration flags
sec_setsemlab
Sets security attributes of semaphores
sec_setshmlab
Sets security attributes of shared memory segments
sec_setsyslab
Sets the default system sensitivity, information, and integrity labels
AIX C library functions:
Subroutines and macros are provided to manipulate additional Trusted AIX functionality.
accredrange
Determine if a sensitivity label is within accreditation range.
clbtohr
Convert the given binary clearance label to human readable format
clhrtob
Convert the given human readable clearance label to binary format
getfsfbitindex, getfsfbitstring
Routines to get the File Security flag Strings and indices
getmax_sl, getmax_tl
Retrieve maximum sensitivity and integrity labels from the Label Encoding file.
getmin_sl, getmin_tl
Retrieve minimum sensitivity and integrity labels from the Label Encoding file.
getsecconfig, setsecconfig
Routines to retrieve and set the kernel security configuration flags for the runmodes
initlabeldb, endlabeldb
Label Database initialization and termination routines.
maxlen_sl, maxlen_cl, maxlen_tl
Retrieve maximum length of Human readable labels based on the initialized Label Encoding file.
priv_isnull
Determines if any privileges are set in the given privilege set
priv_lower
Privilege set operations
priv_raise
Privilege set operations
priv_remove
Privilege set operations
priv_subset
Privilege set operations
Security 479

privbit_clr
Clears a specified privilege in the specified privilege set
priv_clrall
Clears all privileges in the specified privilege set
priv_comb
Combines the first two specified privilege sets and places the result in the third specified privilege
set
priv_copy
Copies the first specified privilege set into the second specified privilege set
priv_isnull
Determines if no privileges are set in the given privilege set
priv_mask
Computes the intersection of the first two specified privilege sets and places the result in the third
specified privilege set
priv_rem
Removes the privileges in the second specified privilege set from the first specified privilege set
and places the result in the third specified privilege set
privbit_set
Sets the specified privilege in the specified privilege set
priv_setall
Sets all privileges in the specified privilege set
priv_subset
Determines if the first specified privilege set is a subset of the second specified privilege set
privbit_test
Tests to see if the specified privilege is set in the specified privilege set
slbtohr, clbtohr, tlbtohr
Binary Label to Human readable conversion routines.
slhrtob, clhrtob, tlhrtob
Human readable to Binary Label conversion routines
sl_clr, tl_clr
Routines to reset the labels
sl_cmp, tl_cmp
Label comparison routines
tl_cmp
Compare integrity labels
Trusted AIX privileges
The following privileges are available on Trusted AIX. A synopsis and description of each privilege and its
uses is provided. Some privileges form a hierarchy, where one privilege can grant all of the rights
associated with another privilege.
When checking for privileges, the system first checks to determine if the process has the lowest privilege
needed, and then proceeds up the hierarchy checking for the presence of more powerful privileges. For
example, a process with the PV_AU_ privilege automatically has the PV_AU_ADMIN, PV_AU_ADD,
PV_AU_PROC, PV_AU_READ, and PV_AU_WRITE privilege and a process with the PV_ROOT privilege
automatically has all of the privileges listed below except the PV_SU_ privileges.
Audit privileges:
480 AIX Version 6.1 Security

The following audit privileges are available on Trusted AIX. A synopsis and description of each privilege
and its uses is provided. Some privileges form a hierarchy, where one privilege can grant all of the rights
associated with another privilege.
When checking for privileges, the system first checks to determine if the process has the lowest privilege
needed, and then proceeds up the hierarchy checking for the presence of more powerful privileges. For
example, a process with the PV_AU_ privilege automatically has the PV_AU_ADMIN, PV_AU_ADD,
PV_AU_PROC, PV_AU_READ, and PV_AU_WRITE privilege and a process with the PV_ROOT privilege
automatically has all of the privileges listed below except the PV_SU_ privileges.
PV_AU_
Equivalent to all of the other PV_AU_ privileges combined
PV_AU_ADD
Allows a process to record/add an audit record
PV_AU_ADMIN
Allows a process to configure and query the audit system
PV_AU_PROC
Allows a process to get and set an audit state of a process
PV_AU_READ
Allows a process to read a file marked as an audit file
PV_AU_WRITE
Allows a process to write or delete a file marked as an audit file, or to mark a file as an audit file
Authorization privileges:
The following authorization privileges are available on Trusted AIX. A synopsis and description of each
privilege and its uses is provided. Some privileges form a hierarchy, where one privilege can grant all of
the rights associated with another privilege.
When checking for privileges, the system first checks to determine if the process has the lowest privilege
needed, and then proceeds up the hierarchy checking for the presence of more powerful privileges. For
example, a process with the PV_AU_ privilege automatically has the PV_AU_ADMIN, PV_AU_ADD,
PV_AU_PROC, PV_AU_READ, and PV_AU_WRITE privilege and a process with the PV_ROOT privilege
automatically has all of the privileges listed below except the PV_SU_ privileges.
PV_AZ_ADMIN
Allows a process to modify the kernel security tables
PV_AZ_READ
Allows a process to retrieve the kernel security tables
PV_AZ_ROOT
Causes a process to pass authorization checks during an exec system call
PV_AZ_CHECK
Allows a process to pass all authorization checks
DAC privileges:
The following DAC privileges are available on Trusted AIX. A synopsis and description of each privilege
and its uses is provided. Some privileges form a hierarchy, where one privilege can grant all of the rights
associated with another privilege.
When checking for privileges, the system first checks to determine if the process has the lowest privilege
needed, and then proceeds up the hierarchy checking for the presence of more powerful privileges. For
example, a process with the PV_AU_ privilege automatically has the PV_AU_ADMIN, PV_AU_ADD,
Security 481

PV_AU_PROC, PV_AU_READ, and PV_AU_WRITE privilege and a process with the PV_ROOT privilege
automatically has all of the privileges listed below except the PV_SU_ privileges.
PV_DAC_
Equivalent to all of the other PV_DAC_ privileges combined
PV_DAC_O
Allows a process to override DAC ownership restrictions
PV_DAC_R
Allows a process to override DAC read restrictions
PV_DAC_W
Allows a process to override DAC write restrictions
PV_DAC_X
Allows a process to override DAC execute restriction
PV_DAC_UID
Allows a process to set or change its user ID (UID)
PV_DAC_GID
Allows a process to set or change its group ID (GID)
PV_DAC_RID
Allows a process to set or change its role ID (RID)
Filesystem privileges:
The following filesystem privileges are available on Trusted AIX. A synopsis and description of each
privilege and its uses is provided. Some privileges form a hierarchy, where one privilege can grant all of
the rights associated with another privilege.
When checking for privileges, the system first checks to determine if the process has the lowest privilege
needed, and then proceeds up the hierarchy checking for the presence of more powerful privileges. For
example, a process with the PV_AU_ privilege automatically has the PV_AU_ADMIN, PV_AU_ADD,
PV_AU_PROC, PV_AU_READ, and PV_AU_WRITE privilege and a process with the PV_ROOT privilege
automatically has all of the privileges listed below except the PV_SU_ privileges.
PV_FS_
Equivalent to all of the other PV_FS_ privileges combined
PV_FS_MKNOD
Allows a process to perform the mknod system call to create a file of any type.
PV_FS_MOUNT
Allows a process to mount and unmount a filesystem
PV_FS_CHOWN
Allows a process to change the ownership of a file
PV_FS_QUOTA
Allows a process to manage information related to disk quotas
PV_FS_LINKDIR
Allows a process to make a hard link to a directory
PV_FS_RESIZE
Allows a process to perform extend and shrink type operations on a filesystem
PV_FS_CNTL
Allows a process to perform various control operations, except extend and shrink operations, on
filesystems
482 AIX Version 6.1 Security

PV_FS_CHROOT
Allows a process to change its root directory
PV_FS_PDMODE
Allows a process to make or set a partitioned-type directory
Process privileges:
The following process privileges are available on Trusted AIX. A synopsis and description of each privilege
and its uses is provided. Some privileges form a hierarchy, where one privilege can grant all of the rights
associated with another privilege.
When checking for privileges, the system first checks to determine if the process has the lowest privilege
needed, and then proceeds up the hierarchy checking for the presence of more powerful privileges. For
example, a process with the PV_AU_ privilege automatically has the PV_AU_ADMIN, PV_AU_ADD,
PV_AU_PROC, PV_AU_READ, and PV_AU_WRITE privilege and a process with the PV_ROOT privilege
automatically has all of the privileges listed below except the PV_SU_ privileges.
PV_PROC_
Equivalent to all of the other PV_PROC_ privileges combined
PV_PROC_PRIO
Allows a process/thread to change priority, policy, and other scheduling parameters
PV_PROC_CORE
Allows a process to dump core
PV_PROC_RAC
Allows a process to create more processes than the per-user limit
PV_PROC_RSET
Allows to attach resource set (rset) to a process or thread
PV_PROC_ENV
Allows a process to set user information in the user structure
PV_PROC_CKPT
Allows a process to checkpoint or restart another process
PV_PROC_CRED
Allows a process to set process credential attributes
PV_PROC_SIG
Allows a process to send a signal to an unrelated process
PV_PROC_PRIV
Allows a process to modify or view privilege sets associated with a process
PV_PROC_TIMER
Allows a process to submit and use fine granularity timers
PV_PROC_RTCLK
Allows a process to access the CPU-time clock
PV_PROC_VARS
Allows a process to retrieve and update process tunable parameters
PV_PROC_PDMODE
Allows a process to change the REAL mode of partitioned directory
Kernel privileges:
Security 483

The following kernel privileges are available on Trusted AIX. A synopsis and description of each privilege
and its uses is provided. Some privileges form a hierarchy, where one privilege can grant all of the rights
associated with another privilege.
When checking for privileges, the system first checks to determine if the process has the lowest privilege
needed, and then proceeds up the hierarchy checking for the presence of more powerful privileges. For
example, a process with the PV_AU_ privilege automatically has the PV_AU_ADMIN, PV_AU_ADD,
PV_AU_PROC, PV_AU_READ, and PV_AU_WRITE privilege and a process with the PV_ROOT privilege
automatically has all of the privileges listed below except the PV_SU_ privileges.
PV_KER_
Equivalent to all of the other PV_KER_ privileges combined
PV_KER_ACCT
Allows a process to perform restricted operations related to the accounting subsystem
PV_KER_DR
Allows a process to invoke dynamic reconfiguration operations
PV_KER_TIME
Allows a process to modify the system clock and time
PV_KER_RAC
Allows a process to use large (non-pageable) pages for shared memory segments
PV_KER_WLM
Allows a process to initialize and modify WLM configuration
PV_KER_EWLM
Allows a process to initialize or query the eWLM environment
PV_KER_VARS
Allows a process to examine or set kernel run time tunable parameters
PV_KER_REBOOT
Allows a process to shut down the system
PV_KER_RAS
Allows a process to configure or write RAS records, error logging, tracing, and dump functions
PV_KER_LVM
Allows a process to configure the LVM subsystem
PV_KER_NFS
Allows a process to configure the NFS subsystem
PV_KER_VMM
Allows a process modify swap parameters and other VMM tunable parameters in the kernel
PV_KER_WPAR
Allows a process to configure a workload partition
PV_KER_CONF
Allows a process to perform various system configuration operations
PV_KER_EXTCONF
Allows a process to perform various configuration tasks in kernel extensions
PV_KER_IPC
Allows a process to raise the value of the IPC message queue buffer and allow shmget system
calls with ranges to attach
PV_KER_IPC_R
Allows a process to read an IPC message queue, semaphore set, or shared memory segment
484 AIX Version 6.1 Security

PV_KER_IPC_W
Allows a process to write an IPC message queue, semaphore set, or shared memory segment
PV_KER_IPC_O
Allows a process to read override DAC ownership on all IPC objects
PV_KER_SECCONFIG
Allows a process to set kernel security flags
PV_KER_PATCH
Allows a process to patch kernel extensions
Label privileges:
The following label privileges are available on Trusted AIX. A synopsis and description of each privilege
and its uses is provided. Some privileges form a hierarchy, where one privilege can grant all of the rights
associated with another privilege.
When checking for privileges, the system first checks to determine if the process has the lowest privilege
needed, and then proceeds up the hierarchy checking for the presence of more powerful privileges. For
example, a process with the PV_AU_ privilege automatically has the PV_AU_ADMIN, PV_AU_ADD,
PV_AU_PROC, PV_AU_READ, and PV_AU_WRITE privilege and a process with the PV_ROOT privilege
automatically has all of the privileges listed below except the PV_SU_ privileges.
PV_LAB_
Equivalent to all other label privileges (PV_LAB_*) combined
PV_LAB_CL
Allows a process to modify subject SCLs, subject to the clearance of the process
PV_LAB_CLTL
Allows a process to modify subject TCLs, subject to the clearance of the process
PV_LAB_LEF
Allows a process to read the labeling database
PV_LAB_SLDG
Allows a process to downgrade SLs, subject to the clearance of the process
PV_LAB_SLDG_STR
Allows a process to downgrade the SL of a packet, subject to the clearance of the process
PV_LAB_SL_FILE
Allows a process to change object SLs, subject to the clearance of the process
PV_LAB_SL_PROC
Allows a process to change subject SL, subject to the clearance of the process
PV_LAB_SL_SELF
Allows a process to change its own SL, subject to the clearance of the process
PV_LAB_SLUG
Allows a process to upgrade SLs, subject to the clearance of the process
PV_LAB_SLUG_STR
Allows a process to upgrade the SL of a packet, subject to the clearance of the process
PV_LAB_TL
Allows a process to modify subject and object TLs
MAC privileges:
Security 485

The following MAC privileges are available on Trusted AIX. A synopsis and description of each privilege
and its uses is provided. Some privileges form a hierarchy, where one privilege can grant all of the rights
associated with another privilege.
When checking for privileges, the system first checks to determine if the process has the lowest privilege
needed, and then proceeds up the hierarchy checking for the presence of more powerful privileges. For
example, a process with the PV_AU_ privilege automatically has the PV_AU_ADMIN, PV_AU_ADD,
PV_AU_PROC, PV_AU_READ, and PV_AU_WRITE privilege and a process with the PV_ROOT privilege
automatically has all of the privileges listed below except the PV_SU_ privileges.
PV_MAC_
Equivalent to all other MAC privileges (PV_MAC_*) combined
PV_MAC_CL
Allows a process to bypass sensitivity clearance restrictions
PV_MAC_R_PROC
Allows a process to bypass MAC read restrictions when getting information about a process,
provided that the target process’s label is within the clearance of the acting process
PV_MAC_W_PROC
Allows a process to bypass MAC write restrictions when sending a signal to a process, provided
that the target process’s label is within the clearance of the acting process
PV_MAC_R
Allows a process to bypass MAC read restrictions
PV_MAC_R_CL
Allows a process to bypass MAC read restrictions when the object’s label is within the clearance
of the process
PV_MAC_R_STR
Allows a process to bypass MAC read restrictions when reading a message from a STREAM,
provided that the message’s label is within the clearance of the process
PV_MAC_W
Allows a process to bypass MAC write restrictions
PV_MAC_W_CL
Allows a process to bypass MAC write restrictions when the object’s label is within the clearance
of the process
PV_MAC_W_DN
Allows a process to bypass MAC write restrictions when the process label dominates the object’s
label and the object’s label is within the clearance of the process
PV_MAC_W_UP
Allows a process to bypass MAC write restrictions when the process label is dominated by the
object’s label and the object’s label is within the clearance of the process
PV_MAC_OVRRD
Bypass MAC restrictions for files flagged as being exempt from MAC
MIC privileges:
The following MIC privileges are available on Trusted AIX. A synopsis and description of each privilege and
its uses is provided. Some privileges form a hierarchy, where one privilege can grant all of the rights
associated with another privilege.
When checking for privileges, the system first checks to determine if the process has the lowest privilege
needed, and then proceeds up the hierarchy checking for the presence of more powerful privileges. For
example, a process with the PV_AU_ privilege automatically has the PV_AU_ADMIN, PV_AU_ADD,
486 AIX Version 6.1 Security

PV_AU_PROC, PV_AU_READ, and PV_AU_WRITE privilege and a process with the PV_ROOT privilege
automatically has all of the privileges listed below except the PV_SU_ privileges.
PV_MIC
Allows a process to bypass integrity restrictions
PV_MIC_CL
Allows a process to bypass integrity clearance restrictions
Network privileges:
The following network privileges are available on Trusted AIX. A synopsis and description of each privilege
and its uses is provided. Some privileges form a hierarchy, where one privilege can grant all of the rights
associated with another privilege.
When checking for privileges, the system first checks to determine if the process has the lowest privilege
needed, and then proceeds up the hierarchy checking for the presence of more powerful privileges. For
example, a process with the PV_AU_ privilege automatically has the PV_AU_ADMIN, PV_AU_ADD,
PV_AU_PROC, PV_AU_READ, and PV_AU_WRITE privilege and a process with the PV_ROOT privilege
automatically has all of the privileges listed below except the PV_SU_ privileges.
PV_NET_
Equivalent to all other network privileges (PV_NET_*) combined
PV_NET_CNTL
Allows a process to modify network tables
PV_NET_PORT
Allows a process to bind to a restricted port
PV_NET_RAWSOCK
Allows a process to have direct access to a network layer
PV_NET_CONFIG
Allows a process to configure networking parameters
Superuser privileges:
The following superuser privileges are available on Trusted AIX. A synopsis and description of each
privilege and its uses is provided. Some privileges form a hierarchy, where one privilege can grant all of
the rights associated with another privilege.
When checking for privileges, the system first checks to determine if the process has the lowest privilege
needed, and then proceeds up the hierarchy checking for the presence of more powerful privileges. For
example, a process with the PV_AU_ privilege automatically has the PV_AU_ADMIN, PV_AU_ADD,
PV_AU_PROC, PV_AU_READ, and PV_AU_WRITE privilege and a process with the PV_ROOT privilege
automatically has all of the privileges listed below except the PV_SU_ privileges.
PV_SU_
Equivalent to all other super user privileges (PV_SU_*) combined
PV_SU_ROOT
Grants a process the equivalent of all privileges associated with standard superuser
PV_SU_EMUL
Grants a process the equivalent of all privileges associated with the standard superuser when the
process UID is 0
PV_SU_UID
Causes the getuid system call to return 0
Miscellaneous privileges:
Security 487

The following miscellaneous privileges are available on Trusted AIX. A synopsis and description of each
privilege and its uses is provided. Some privileges form a hierarchy, where one privilege can grant all of
the rights associated with another privilege.
When checking for privileges, the system first checks to determine if the process has the lowest privilege
needed, and then proceeds up the hierarchy checking for the presence of more powerful privileges. For
example, a process with the PV_AU_ privilege automatically has the PV_AU_ADMIN, PV_AU_ADD,
PV_AU_PROC, PV_AU_READ, and PV_AU_WRITE privilege and a process with the PV_ROOT privilege
automatically has all of the privileges listed below except the PV_SU_ privileges.
PV_ROOT
Grants a process the equivalent of all other privileges except PV_SU_ (and the privileges that
PV_SU_ dominates)
PV_TCB
Allows a process to modify the kernel trusted library paths
PV_TP
Indicates that a process is a trusted path process and allows actions that are limited to trusted
path processes
PV_TP_SET
Allows a process to set or clear the kernel trusted path flag
PV_WPAR_CKPT
Allows a process to perform checkpoint and restart operations in workload partitions
PV_DEV_CONFIG
Allows a process to configure system kernel extensions and devices
PV_DEV_LOAD
Allows a process to load and unload system kernel extensions and devices in the system
PV_DEV_QUERY
Allows a process to query kernel modules
Troubleshooting Trusted AIX
The answers to common questions may help you troubleshoot Trusted AIX.
How do I login to Trusted AIX?
Trusted AIX creates three administrative users during installation with appropriate roles as given
below.
The passwords to these accounts have to be set when the system boots up the first time after
Trusted AIX installation. If you installed the system in promptless mode from the network, the
password to these default accounts are as below.
User Password
isso isso
sa sa
so so
How do I su to root?
At the time of Trusted AIX installation, the su attribute of root is set to false so that no user can
access this account. To access this account the default administrative users, isso and sa, will have
to change this attribute of the root account to true using the chuser command.
If su is enabled to root and password for root account is not set, then any user on the system can
access the root account. To avoid this, it is recommended that the password of the root account
be set before resetting the su attribute
488 AIX Version 6.1 Security

Should I create administrative users of my own or use the default administrative users?
The default administrative users are only for setting up the system for customization purposes. It is
highly recommended, but not necessary, that these accounts be used only as for customizing the
system.
Create your own three administrative users with appropriate roles of isso, sa, and so, and delete
or disable these default users.
Why can’t I login to the system?
If you try to login in as root (account with uid 0) or any account having uid less than 128, access
will be denied. These accounts are referred to as system accounts. To access system accounts,
you need to login as a non-system account user and su to the account.
Is any error related to the label encodings file displayed while logging in?
If the label encodings file is corrupted you will have to enter single user mode as root user. The
root account is accessible only in single user mode.
Verify that the label encodings file (/etc/security/enc/LabelEncodings) is proper with the labck
command. If the file is improper, modify the file and recheck with the labck command before
exiting the single user mode.
Run trustchk in interactive mode (trustchk -t ALL) to validate the state of the system.
Why can’t I compile any program on Trusted AIX which uses Trusted AIX library APIs?
The development toolkit is not installed by default. You will need to install the bos.mls.adt fileset
from the installation media.
How do I correct changes that I made to privileges of commands that caused those commands to
stop working correctly?
Run trustchk in interactive mode (trustchk -t) for those commands to fix the privileges.
Why can’t I access the /etc/security/enc directory?
To access the /etc/security/enc directory the shell requires the PV_LAB_LEF and PV_MAC_R
privileges. Assign these privileges to your shell.
How do I disable trustchk at boot.
Remove or comment the trustchk line in the /etc/rc.mls script.
How do I prevent the system from prompting for boot authentication at every boot?
You might have enabled boot authentication for your system. You can disable it using the SMIT
menu from the Trusted AIX sub menu.
Why doesn’t my change work when I attempt to change the SL of a file system object?
There are several possibilities:
Did /usr/sbin/settxattr return any error messages?
If so, check those for further information. For example:
Did you have permission to execute /usr/sbin/settxattr?
If not, check your privileges and authorizations.
Was the syntax correct?
Refer the settxattr man page for syntax.
Does the requested SL or its abbreviation exist?
Requesting "con a b" will work on a system with a default Label Encodings file
(/etc/security/enc/LabelEncodings), but requesting "conf a b" will not, even
though both would seem logical abbreviations for ″confidential compartment A
compartment B.″
Did you need to use quotes for a multiple-word label?
settxattr -f sl=con <filename> will work, settxattr -f -a sl="con a b"
<filename> will work, but settxattr -a sl=con a b <filename> will not work.
Security 489

Did settxattr return any error messages?
If no error messages were returned, the file system object may be a symbolic link. If the
object you were trying to change is a symbolic link, first determine whether you wish to
change the SL of the link itself or the object that the link points to. settxattr does not
follow links but instead sets the labels of the link itself.
How do I install a third-party application so that it will work correctly on the system?
If you installed a third party application and it is not working correctly, it might be accessing certain
restricted files or directories which might require extra privileges. After evaluating the need of the
application to access these restricted objects, determine the privileges needed as below.
v Assign PV_ROOT to your shell
v Run tracepriv -f -e <third party command>
This will list the privilege required by the application. Add these to the privileged command
database using the setsecattr command.
Why can’t I execute certain commands?
Since most of the commands are protected by authorizations, execution of some of the privileged
commands will be allowed only if the invoking user has the corresponding authorization. It can be
verified by identifying whether the authorization required for the command’s execution exists in one
of the roles activated for the current session.
Check your active authorizations with rolelist -ae and the authorization required by the
command using lssecattr -c <command>.
Why don’t some commands display labels properly.
Most of these commands rely on the file /etc/security/enc/LabelEncodings for conversion of
labels to human readable form and vice-versa. If this file is corrupted, or has been modified, the
commands may not function as intended.
File security flags
The file security flags affect the way that files are accessed. These flags are stored as part of the
extended attributes (EA) of the file itself. The file security flags are defined in the header file.
FSF_APPEND
File can only be appended to and not altered in operational mode.
FSF_AUDIT
The file is marked as part of the audit subsystem. To read or write these files, the process must
have the PV_AU_READ or PV_AU_WRITE privileges respectively.
FSF_MAC_EXMPT
EPS with the PV_MAC_OVRRD privilege ignores MAC restrictions when attempting to access the
object.
FSF_PDIR
The directory is a partitioned directory.
FSF_PSDIR
The directory is a partitioned subdirectory.
FSF_PSSDIR
The directory is a partitioned sub-subdirectory.
FSF_TLIB
The object is marked as part of the Trusted Library. The machine must be running in configuration
mode or the trustedlib_enabled kernel security flag must be OFF.
490 AIX Version 6.1 Security
FSF_TLIB_PROC
Processes marked as TLIB processes can only link oto *.so libraries that have the TLIB flag set.
The system must be running in configuration mode or the trustedlib_enabled kernel security flag
must be OFF.
Trusted AIX commands
Security-related commands are provided to manage a Trusted AIX system:
labck Verifies a LabelEncodings file
getsecconf
Displays the kernel security flags
setsecconf
Changes the Trusted AIX kernel security flags
getsyslab
Shows the kernel maximum and minimum labels
setsyslab
Sets the kernel maximum and minimum labels
getrunmode
Displays the current running mode of the system
setrunmode
Switches the running mode of the system
pdlink Links files across partitioned subdirectories
pdmkdir
Creates partitioned directories and subdirectories
pdmode
Returns the current partitioned directory access mode or runs a command with a specified
partitioned directory access mode
pdrmdir
Removes partitioned directories and associated subdirectories
pdset Sets/unsets partitioned (sub)directories
bootauth
Verifies that an authorized user is booting the system
chuser
Changes the user’s clearance attributes
lsuser Displays the user’s clearance attributes
chsec Changes the user’s clearance attributes and port labels
lssec Displays the user’s clearance attributes and port labels
trustchk
Checks the attributes of files
lstxattr
Displays the label and security flag attributes of files, processes, and IPC objects
settxattr
Changes the label and security flag attributes of files, processes, and IPC objects
Security 491

492 AIX Version 6.1 Security

Notices
This information was developed for products and services offered in the U.S.A.
IBM may not offer the products, services, or features discussed in this document in other countries.
Consult your local IBM representative for information on the products and services currently available in
your area. Any reference to an IBM product, program, or service is not intended to state or imply that only
that IBM product, program, or service may be used. Any functionally equivalent product, program, or
service that does not infringe any IBM intellectual property right may be used instead. However, it is the
user’s responsibility to evaluate and verify the operation of any non-IBM product, program, or service.
IBM may have patents or pending patent applications covering subject matter described in this document.
The furnishing of this document does not give you any license to these patents. You can send license
inquiries, in writing, to:
IBM Director of Licensing
IBM Corporation
North Castle Drive
Armonk, NY 10504-1785
U.S.A.
The following paragraph does not apply to the United Kingdom or any other country where such
provisions are inconsistent with local law: INTERNATIONAL BUSINESS MACHINES CORPORATION
PROVIDES THIS PUBLICATION "AS IS" WITHOUT WARRANTY OF ANY KIND, EITHER EXPRESS OR
IMPLIED, INCLUDING, BUT NOT LIMITED TO, THE IMPLIED WARRANTIES OF NON-INFRINGEMENT,
MERCHANTABILITY OR FITNESS FOR A PARTICULAR PURPOSE. Some states do not allow disclaimer
of express or implied warranties in certain transactions, therefore, this statement may not apply to you.
This information could include technical inaccuracies or typographical errors. Changes are periodically
made to the information herein; these changes will be incorporated in new editions of the publication. IBM
may make improvements and/or changes in the product(s) and/or the program(s) described in this
publication at any time without notice.
Licensees of this program who wish to have information about it for the purpose of enabling: (i) the
exchange of information between independently created programs and other programs (including this one)
and (ii) the mutual use of the information which has been exchanged, should contact:
IBM Corporation
Dept. LRAS/Bldg. 003
11400 Burnet Road
Austin, TX 78758-3498
U.S.A.
Such information may be available, subject to appropriate terms and conditions, including in some cases,
payment of a fee.
The licensed program described in this document and all licensed material available for it are provided by
IBM under terms of the IBM Customer Agreement, IBM International Program License Agreement or any
equivalent agreement between us.
For license inquiries regarding double-byte (DBCS) information, contact the IBM Intellectual Property
Department in your country or send inquiries, in writing, to:
© Copyright IBM Corp. 2002, 2007 493

IBM World Trade Asia Corporation
Licensing
2-31 Roppongi 3-chome, Minato-ku
Tokyo 106, Japan
IBM may use or distribute any of the information you supply in any way it believes appropriate without
incurring any obligation to you.
Information concerning non-IBM products was obtained from the suppliers of those products, their
published announcements or other publicly available sources. IBM has not tested those products and
cannot confirm the accuracy of performance, compatibility or any other claims related to non-IBM products.
Questions on the capabilities of non-IBM products should be addressed to the suppliers of those products.
Any references in this information to non-IBM Web sites are provided for convenience only and do not in
any manner serve as an endorsement of those Web sites. The materials at those Web sites are not part of
the materials for this IBM product and use of those Web sites is at your own risk.
This information contains examples of data and reports used in daily business operations. To illustrate
them as completely as possible, the examples include the names of individuals, companies, brands, and
products. All of these names are fictitious and any similarity to the names and addresses used by an
actual business enterprise is entirely coincidental.
Trademarks
The following terms are trademarks of International Business Machines Corporation in the United States,
other countries, or both:
AIX
AT
DB2
DFS
eServer
IBM
Lotus Notes
POWER3
POWER4
pSeries
SecureWay
SP
Tivoli
UNIX is a registered trademark of The Open Group in the United States and other countries.
Java and all Java-based trademarks and logos are registered trademarks of Sun Microsystems, Inc. in the
United States, other countries, or both.
Linux is a trademark of Linus Torvalds in the United States, other countries, or both.
Microsoft, Active Directory, and Windows are trademarks of Microsoft Corporation in the United States,
other countries, or both.
Other company, product, or service names may be trademarks or service marks of others.
494 AIX Version 6.1 Security

Index
Special characters/dev/urandom 333
/etc/publickey file 286
/etc/radius/dictionary file 310
/etc/radius/proxy file 311
/usr/lib/security/audit/config 201
/var/radius/data/accounting file 318
.netrc 201
Aaccess control
extended permissions 108
lists 106, 108
access modesbase permissions 108
access rights 278, 281
Account ID 45
Active Directory 294, 299
group member attribute selection 137
password attribute selection 136
Active Directory through LDAPconfiguring AIX 136
adding a CA root digital certificate 236
administrative rights 281
AIXconfiguring to work with Active Directory through
LDAP 136
AIX Security Expert 337, 339, 341, 345, 348, 349,
351, 353, 354, 358, 366, 368, 369, 374, 375, 378,
379, 380
/etc/inetd.conf settings 358
/etc/inittab entries 353
/etc/rc.tcpip settings 354
Audit Policy Recommendations 351
Check Security 378
Disable Remote Services 366
Disable SUID of Commands 366
files 379
High level security scenario 379
IPsec filter rules 374
login policy recommendations 349
Low level security scenario 380
Medium level security scenario 380
Miscellaneous 375
network security 337
password policy rules 345
Remove access that does not require
Authentication 368
reports 337
security policy copy 341
settings 337, 339, 341, 345, 348, 349, 351, 353,
354, 358, 366, 368, 369, 374, 375, 378, 379, 380
system security 337, 339, 341, 345, 348, 349, 351,
353, 354, 358, 366, 368, 369, 374, 375, 378, 379,
380
Tuning Network Options 369
AIX Security Expert (continued)undo 337
Undo Security 378
user group system and password definitions
group 348
AIX Standard Settings 337
aixpert command 337
assigning privileges to a running process 95
auditrecord processing 121
watch command 125
auditingcollecting event information 119
configuration of 120
detecting events 119
event selection 125
example, real-time file monitoring 129
kernel audit trail 119
kernel audit trail mode 121
loggingevent selection 121
logging eventsdescription of 120
overview 119
records format 120
setting up 126
auditing integrity 9
auditing session roles 95
authentication 65, 276
authentication for Windows serversKerberos 138
authorization 278
and hierarchy 280
classes 278
Bbase permissions 108
CCAPP/EAL4+
see also Controlled Access Protection Profile and
Evaluation Assurance Level 4+ and Labeled
Security Protection Profile and Evaluation
Assurance Level 4+ 12
CAPP/EAL4+ and Network Installation Management
(NIM) Environment 14
CAPP/EAL4+ organizational environment 18
CAPP/EAL4+ system physical environment 17
Certificate Authentication Serviceoverview 156
Certification Authority (CA)adding root certificate to database 236
deleting root certificate from database 237
list of CAs 235
receiving certificate from 238
© Copyright IBM Corp. 2002, 2007 495

Certification Authority (CA) (continued)requesting certificate from 237
trust settings 236
changing key database password 239
chsec command 45
commandsaixpert 337
commands, LDAP 145
Common Criteriasee also Controlled Access Protection Profile and
Evaluation Assurance Level 4+ and Labeled
Security Protection Profile and Evaluation
Assurance Level 4+ 12
configuration file, RADIUS 305
Configuring security policies 10
Controlled Access Protection Profile and Evaluation
Assurance Level 4+ 13, 14
administrative interfaces 12
systems supported 12
user interfaces 12
Controlled Access Protection Profile and Evaluation
Assurance Level 4+ and Labeled Security Protection
Profile and Evaluation Assurance Level 4+ 12
Controlled Access Protection Profile and Evaluation
Assurance Level 4+ compliant system 12
creating a key database 235
creating IKE tunnels with digital certificates 240
credentials 276
DES 277
local 277
Ddacinet 206
deleting a CA root digital certificate 237
deleting a personal digital certificate 239
DES credentials 277
determining required privileges for a command 86
digital certificatesadding root 236
creating IKE tunnels with 240
creating key database 235
deleting personal 239
deleting root 237
managing 235
receiving 238
requesting 237
trust settings 236
disk quota systemoverview 70
recovering from over-quota conditions 70
setting up 71
dist_uniqid 45
EEIM
see also Enterprise Identity Mapping 289
Enterprise Identity Mapping 289
current approach 291
extended permissions 108
Ffiles
/etc/radius/clients 309
default.auth 317
default.policy 317
ldap.client 304
ldap.server 304
radius.base 304
user_id.auth 317
filtersrelationship to tunnels 219
rules 215
filters, setting up 246
flags 37
flags, SED 37
Framed Pool Attribute 328
ftp 292
Ggeneric data management tunnel
using Web-based System Manager 225
using XML 223
group member attribute selectionActive Directory 137
HHigh Level Security 337
Iidentification 65
IKEfeatures 213
IKE tunnelscreating
using digital certificates 240
Installing a CAPP/EAL+ system 13
Installing a LSPP/EAL+ system 16
Internet Engineering Task Force (IETF) 211
Internet Key Exchangesee IKE 213
Internet Protocolsecurity 212
features 212
IKE features 213
operating system 212
Internet Protocol (IP) security 211
configuration 246
planning 217
installation 216
logging 252
predefined filter rules 251
problem determination 257
reference 265
intrusion detection 334
filter rulesSMIT 336
496 AIX Version 6.1 Security

intrusion detection (continued)patterns
types 334
rulespattern matching 334
shun filter 335
shun host 335
stateful filter 335
intrusion prevention 334
IPsee Internet Protocol 212
IP pooling 328
IP securityfilters 215
and tunnels 219
SAs 219
security associations 213
tunnelsand filters 219
and SAs 219
choosing which type 220
tunnels and key management 214
IP SecurityDigital Certificate Support 216
IPv4also see Internet Protocol (IP) security 211
IPv6 211
ITDS 135
Security Information ServerSetting Up 131
Kkadmind daemon 298
Kerberos 291
authenticating users to AIX 294
authentication for Windows servers 138
installing and configuring for Kerberos integrated
login using KRB5 294
installing and configuring for Kerberos integrated
login using KRB5A 299
secure rcmdsftp 292
rcp 292
rlogin 292
rsh 292
telnet 292
kerbos module 303
kernel extensionskerbos 303
kernel security tables 89
key database, establishing trust settings for 236
key managementand tunnels 214
Key Manager 235
keylogin commandsecure NFS 284
keyschanging database password 239
creating a database 235
KRB5 294
KRB5A 299
LLDAP
AuditingSecurity Information Server 145
ClientSetting Up 133
communicating with 139, 141
Exploitation of the Security Subsystem 131
mksecldap 145
overview 130
User Management 138
LDAP Attribute Mapping 147
LDAP commands 145
LDAP netgroups 134
LDAP servers 135
ldap.cfg file format 146
Light Directory Access Protocol (See LDAP) 131
local credentials 277
logging IP Security 252
login control 32
changing the CDE login screen 34
changing the welcome message 33
enforcing automatic logoff 35
securing unattended terminals 35
setting up 33
tightening system default login parameters 35
login user ID 52, 65
Low Level Security 337
lsldap command 145
LSPP and Evaluation Assurance Level 4+ 16, 17
LSPP/EAL4+ and Network Installation Management
(NIM) Environment 17
LSPP/EAL4+ configuration installation (only available
with Trusted AIX) 16
LSPP/EAL4+ organizational environment 18
LSPP/EAL4+ system physical environment 17
Mmechanism 36
Medium Level Security 337
mgrsecurity 46, 47, 58
mkgroup command 45
mksecldap command 145
mkuser command 45
modes and monitoring 36
modes, SED 36
monitoring, SED 36
mount commandsecure NFS
file systems 289
multiple base DN support 139
multiple organizational units 137
Nnetgroups 134
Index 497
networksecurity 337
Network Authentication Service 294, 299
Network Authentication Service (NAS) 292
network trusted computing base 204
NFS (Network File System)/etc/publickey file 286
secure NFS 282
administering 287
authentication requirements 284
configuring 288
file systems 289
how to export a file system 288
net name 286
network entities 286
performance 287
public key cryptography 284
NIS+principals 275
security 274
NLS enablement 333
OOpenSSH
configuration of compilation 195
installing and configuring 193
introduction 193
Kerberos Version 5 support 197
using with Kerberos Version 5 198
Web addresses 193
operating system security 273
authentication 273
gates 273
secure RPC password 273
PPAM
adding a module 192
changing the /etc/pam.conf file 192
configuration file/etc/pam.conf 188
debug 192
introduction 185
library 186
loadable authentication module 190
modules 187
password attribute selectionActive Directory 136
passwords 58
/etc/password file 59
establishing good passwords 58
extending restrictions 65
recommended password options 60
secure RPC 273
patternsfiles 334
hexadecimal 334
text 334
permissionsbase 108
extended 108
PKCS #11 153
subsystem configuration 154
usage 155
PKI 156
principalssecurity 275
privilege naming and hierarchy 84
privileged command database 85
programssetuid/setgid 39
proxy server, configure 320
proxy services, RADIUS 319
public key cryptographysecure NFS 284
Public Key Infrastructure 156
Qquota system
see disk quota system 70
RRADIUS 304
accounting 318
server operation 318
authentication 312
user databases 312
Authentication MethodsCHAP 316
EAP 317
PAP 316
authorization 317
configuration files 305
accounting 318
clients 309
dictionary 310
proxy 311
radiusd.conf file 305
configuring 322
installing 304
IP pool configuration 328
LDAPactive call list object class 316
name space overview 314
schema 315
user profile object class 316
LDAP serverconfiguration 314
local UNIX authentication 312
password expiration 327
protocolsupported standards 304
proxyprefixes and suffixes 320
realm example 319
services 319
498 AIX Version 6.1 Security

RADIUS (continued)proxy services
configuring 320
random number generator 333
Reply-Message support 328
SMIT panels 332
Starting and Stopping 304
utilitieslogging 322
Vendor-Specific Attributes 327
RADIUS server 328
radiusd.conf file 305
RBAC-aware applications 99
rcp 292
Remote Authentication Dial-In User Service 304
rlogin 292
root account 46
disabling direct root login 46
root user processescapabilities of 116
rsh 292
SSAK 5
secldapclntd daemon 145
secure attention keyconfiguring 5
Secure Attention Key 11
secure NFS 282
secure RPC password 273
securityaccount ID 45
configuration 337, 339, 345, 348, 349, 351, 353,
354, 358, 366, 368, 369, 374, 375, 378, 379, 380
Internet Protocol (IP) 211
introduction 1
administrative tasks 47, 58
network 337
NIS+ 274
administrative rights 281
authentication 274
authorization 274, 278
credentials 276
levels 275
principals 275
operating system 273
policy 341
root account 46
system 337, 339, 341, 345, 348, 349, 351, 353,
354, 358, 366, 368, 369, 374, 375, 378, 379, 380
TCP/IP 199
security associations (SA) 213
relationship to tunnels 219
security authentication 65
security hardening 337, 339, 341, 345, 348, 349, 351,
353, 354, 358, 366, 368, 369, 374, 375, 378, 379, 380
Security Parameters Index (SPI)and security associations 213
Security policies configuration 10
security tableskernel 89
SED 35
SED mechanism 36
SED modes and monitoring 36
ServerSecurity Information
ITDS 131
setgid programuse of 115
setgid programs 39
setuid programuse of 115
setuid programs 39
Stack Execution Disable 35, 36, 37
supported LDAP servers 135
system security 337, 339, 341, 345, 348, 349, 351,
353, 354, 358, 366, 368, 369, 374, 375, 378, 379, 380
system-defined authorizations 79
TTCB 1
tcbck commandconfiguring 5
using 3
TCP/IP/etc/ftpusers 203
/etc/hosts.equiv 202
/usr/lib/security/audit/config 201
.netrc 201
IP securityIKE features 213
installation 216
planning configuration 217
predefined filter rules 251
problem determination 257
reference 265
IP Security 211
security 199
data 205
DOD 205
NTCB 204
operating system-specific 199, 200
remote command execution access 202
restricted FTP users 203
SAK 200
TCP/IP-specific 201, 203
trusted shell 200
see Internet Protocol 212
telnet 292
trust settings for key database, establishing 236
Trusted AIXLSPP/EAL4+ configuration installation 16
Trusted Communication Pathuse of 5
Trusted Computing Baseauditing of 120
auditing the security state of 2
checking with tcbck command 3
Index 499

Trusted Computing Base (continued)file system
checking 3
overview 1
trusted fileschecking 3
trusted program 4
Trusted Computing Base Settrusted files 6
Trusted Execution 6
Trusted Execution Path 11
trusted file 7
Trusted Library Path 11
Trusted Shell 11
Trusted Signature Database 7
auditing integrity 9
tunnelsand key management 214
choosing which type 220
relationship to filters 219
relationship to SAs 219
Uuser account
control of 50
User and group name length limitconfiguring and retrieving 48
v_max_logname 48
user authentication 65
User ManagementLDAP 138
VVendor Specific Attribute 328
Virtual Private Network (VPN) 211
VPNbenefits 216
XXML 223, 225
500 AIX Version 6.1 Security

Readers’ Comments — We’d Like to Hear from You
AIX Version 6.1
Security
Publication No. SC23-6603-00
We appreciate your comments about this publication. Please comment on specific errors or omissions, accuracy,
organization, subject matter, or completeness of this book. The comments you send should pertain to only the
information in this manual or product and the way in which the information is presented.
For technical questions and information about products and prices, please contact your IBM branch office, your IBM
business partner, or your authorized remarketer.
When you send comments to IBM, you grant IBM a nonexclusive right to use or distribute your comments in any
way it believes appropriate without incurring any obligation to you. IBM or any other organizations will only use the
personal information that you supply to contact you about the issues that you state on this form.
Comments:
Thank you for your support.
Submit your comments using one of these channels:
v Send your comments to the address on the reverse side of this form.
v Send your comments via e-mail to: [email protected]
If you would like a response from IBM, please fill in the following information:
Name
Address
Company or Organization
Phone No. E-mail address
Readers’ Comments — We’d Like to Hear from You SC23-6603-00
SC23-6603-00
���
Cut or FoldAlong Line
Cut or FoldAlong Line
Fold and Tape Please do not staple Fold and Tape
Fold and Tape Please do not staple Fold and Tape
NO POSTAGENECESSARYIF MAILED IN THEUNITED STATES
BUSINESS REPLY MAIL FIRST-CLASS MAIL PERMIT NO. 40 ARMONK, NEW YORK
POSTAGE WILL BE PAID BY ADDRESSEE
IBM Corporation
Information Development
Department 04XA-905-6C006
11501 Burnet Road
Austin, TX 78758-3493
_ _ _ _ _ _ _ _ _ _ _ _ _ _ _ _ _ _ _ _ _ _ _ _ _ _ _ _ _ _ _ _ _ _ _ _ _ _ _ _ _ _ _ _ _ _ _ _ _ _ _ _ _ _ _ _ _ _ _ _ _ _ _ _ _ _ _ _ _ _ _ _ _ _ _ _ _ _ _ _ _ _ _ _ _ _ _ _ _
_ _ _ _ _ _ _ _ _ _ _ _ _ _ _ _ _ _ _ _ _ _ _ _ _ _ _ _ _ _ _ _ _ _ _ _ _ _ _ _ _ _ _ _ _ _ _ _ _ _ _ _ _ _ _ _ _ _ _ _ _ _ _ _ _ _ _ _ _ _ _ _ _ _ _ _ _ _ _ _ _ _ _ _ _ _ _ _ _
__
__
__
__
__
__
__
__
__
__
__
__
__
__
__
__
__
__
__
__
__
__
__
__
__
__
__
__
__
__
__
__
__
__
__
__
__
__
__
__
__
__
__
__
__
__
__
__
__
_


���
Printed in U.S.A.
SC23-6603-00