aja vtr xchange - aja video systems · 2 5. on the top menu bar, select aja vtr xchange…...
TRANSCRIPT

VTR XchangeUser Guide
December 5, 2005 P/N101659

Trademarks
AJA, KONA, and Io are trademarks of AJA Video, Inc.
Apple, the Apple logo, AppleShare, AppleTalk, FireWire and Macintosh are registered trademarks of Apple Computer, Inc. Final Cut Pro, QuickTime and the QuickTime Logo are trademarks of Apple Computer, Inc. DVCPRO HD® is a registered trademark of Panasonic Inc.
All other trademarks are the property of their respective holders.
Notice
Copyright © 2005/2006 AJA Video, Inc. All rights reserved. All information in this manual is subject to change without notice. No part of the document may be reproduced or transmitted in any form, or by any means, electronic or mechanical, including photocopying or recording, without the express written permission of AJA Inc.
Contacting Support
To contact AJA Video for sales or support, use any of the following methods:
443 Crown Point Circle, Grass Valley, CA. 95945 USA
Telephone: 800.251.4224 or 530.274.2048Fax: 530.274.9442
Web: http://www.aja.comSupport Email: [email protected] Sales Email: [email protected]
When calling for support, first read the Chapter on
Troubleshooting
at the back of this manual. You can often save time and effort by looking there first for simple remedies and information on how to get support from AJA and Apple Computer Inc.

1
1
AJA VTR Xchange User’s Guide — Table of Contents
Table of Contents
Trademarks . . . . . . . . . . . . . . . . . . . . . . . . . . . . . . . . . . . . . . . . . . . . . . . . . . . . . . . . . . . . . . . . . . . iiNotice . . . . . . . . . . . . . . . . . . . . . . . . . . . . . . . . . . . . . . . . . . . . . . . . . . . . . . . . . . . . . . . . . . . . . . . iiContacting Support . . . . . . . . . . . . . . . . . . . . . . . . . . . . . . . . . . . . . . . . . . . . . . . . . . . . . . . . . . . . . iiOverview . . . . . . . . . . . . . . . . . . . . . . . . . . . . . . . . . . . . . . . . . . . . . . . . . . . . . . . . . . . . . . . . . . . . . 1System Requirements . . . . . . . . . . . . . . . . . . . . . . . . . . . . . . . . . . . . . . . . . . . . . . . . . . . . . . . . . . . 1Initial Set Up . . . . . . . . . . . . . . . . . . . . . . . . . . . . . . . . . . . . . . . . . . . . . . . . . . . . . . . . . . . . . . . . . 1Menus and Usage . . . . . . . . . . . . . . . . . . . . . . . . . . . . . . . . . . . . . . . . . . . . . . . . . . . . . . . . . . . . . . 3Changing Capture Settings . . . . . . . . . . . . . . . . . . . . . . . . . . . . . . . . . . . . . . . . . . . . . . . . . . . . . . . 5Keyboard Shortcuts . . . . . . . . . . . . . . . . . . . . . . . . . . . . . . . . . . . . . . . . . . . . . . . . . . . . . . . . . . . . . 6Entering Timecode . . . . . . . . . . . . . . . . . . . . . . . . . . . . . . . . . . . . . . . . . . . . . . . . . . . . . . . . . . . . . 7

2

Introduction
Overview
AJA VTR Xchange is a Macintosh OSX software application that allows users to capture from and record to any deck that can be interfaced with supported AJA capture and playback devices.
The software consists of a main control/view window and several setup screens. Keyboard shortcuts are available for most functions.
NOTE: For deck control with VTR Xchange, an RS-422 cable must be connected to the machine control ports on the AJA device (KONA) and the deck.
System Requirements
AJA VTR Xchange works with the following AJA products:
•
KONA 2
•
KONA LS
•
KONA LH
•
KONA LHeThis software application will run on any Macintosh approved for use with those AJA products.
Initial Set Up
1.
Launch AJA VTR Xchange
2.
On the top menu bar, select Video … Capture Settings.
3.
On the Compression page, select the desired codec from the drop-down box. In the Motion dialogue, select the desired frame rate for the destination files. The Best setting will match the destination frame rate to the source frame rate. You can use the Kona Control Panel application's
Input
tab to decide which codec is best for your application.
4.
On the Source page, select the KONA format in the drop-down box that best matches the format of the source video. If desired, select one of the tools from the drop-down box in the Preview pane on the right to verify the legality of the source video.
2
5.
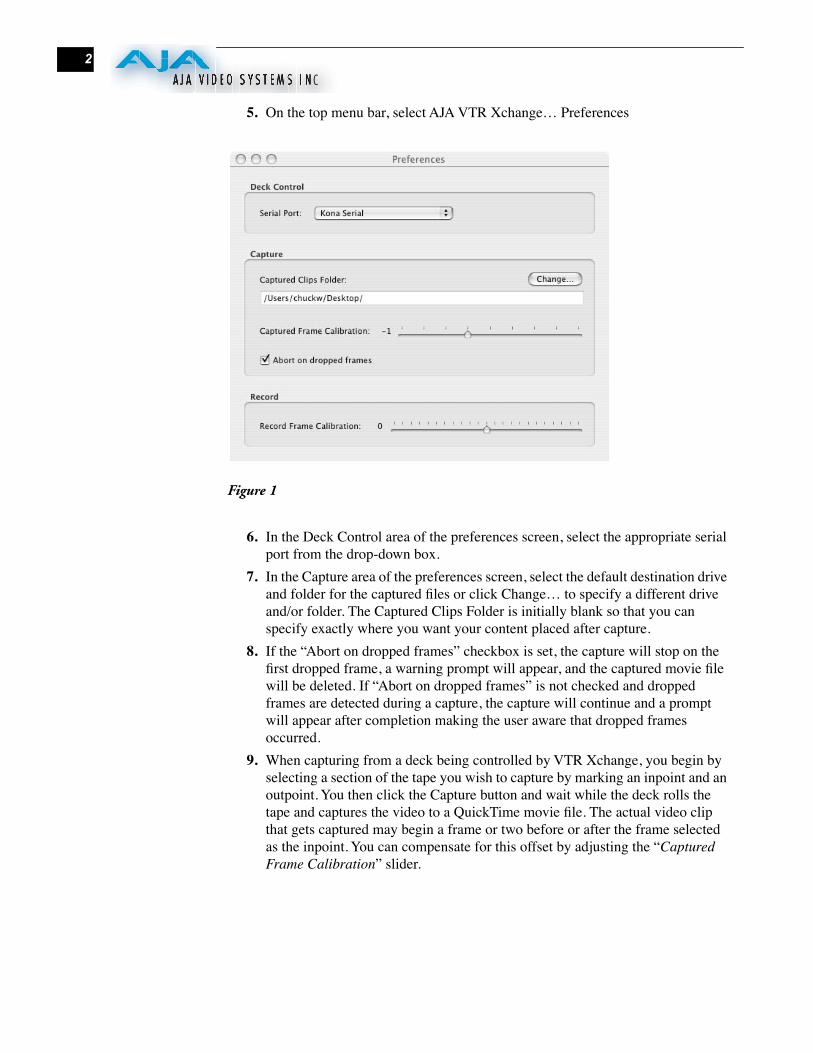
On the top menu bar, select AJA VTR Xchange… Preferences
Figure 1
6.
In the Deck Control area of the preferences screen, select the appropriate serial port from the drop-down box.
7.
In the Capture area of the preferences screen, select the default destination drive and folder for the captured files or click Change… to specify a different drive and/or folder. The Captured Clips Folder is initially blank so that you can specify exactly where you want your content placed after capture.
8.
If the “Abort on dropped frames” checkbox is set, the capture will stop on the first dropped frame, a warning prompt will appear, and the captured movie file will be deleted. If “Abort on dropped frames” is not checked and dropped frames are detected during a capture, the capture will continue and a prompt will appear after completion making the user aware that dropped frames occurred.
9.
When capturing from a deck being controlled by VTR Xchange, you begin by selecting a section of the tape you wish to capture by marking an inpoint and an outpoint. You then click the Capture button and wait while the deck rolls the tape and captures the video to a QuickTime movie file. The actual video clip that gets captured may begin a frame or two before or after the frame selected as the inpoint. You can compensate for this offset by adjusting the “
Captured Frame Calibration
” slider.
1
3
VTR Xchange User’s Guide — Menus and Usage
The easiest way to set the Captured Frame Calibration slider is to capture a short clip of video that has burn-in timecode. When the capture is complete, the clip will open up in a VTR Xchange player window. You should then see the burn-in timecode in the clip as well as the timecode displayed below the clip. If the timecode displayed below the clip is less than the burn-in timecode, decrease the “Captured Frame Calibration” number by moving the slider to the left. After adjustment, repeat the capture and compare operation again, repeating this process until the two timecodes agree. Once calibrated, capturing should remain frame-accurate. If you change video format or compression, you may have to re-calibrate.
10.
The “
Record Frame Calibration
” slider calibrates “edit to tape” in a manner similar to the Captured Frame Calibration. To calibrate recording, open a short video clip with burn-in timecode in VTR Xchange's player window. Set an inpoint for the clip that ends in the same frame number as the burn-in timecode on the first frame of the clip. This will make it easier to compare timecodes. Press “edit to tape” and wait for the recording to complete. Shuttle the deck to the location just recorded to. You may have to shuttle the tape a few frames past the inpoint before the burned-in timecode begins to change. If the timecode displayed below the decks video is less than the burn-in timecode, decrease the “Captured Frame Calibration” number by moving the slider to the left. After adjustment, repeat the compare operation again, repeating this process until the two timecodes agree.
Menus and Usage
File…Open:
(command + o) Open a clip for playback through VTR Xchange. Connect a deck to the KONA's outputs to print clips to tape. Open recently opened clips under File… Open Recent.
File…Eject Tape:
(command + e) If an RS-422 cable is connected from the deck to the KONA, selecting eject tape or pressing command + e will eject the tape from your VTR.
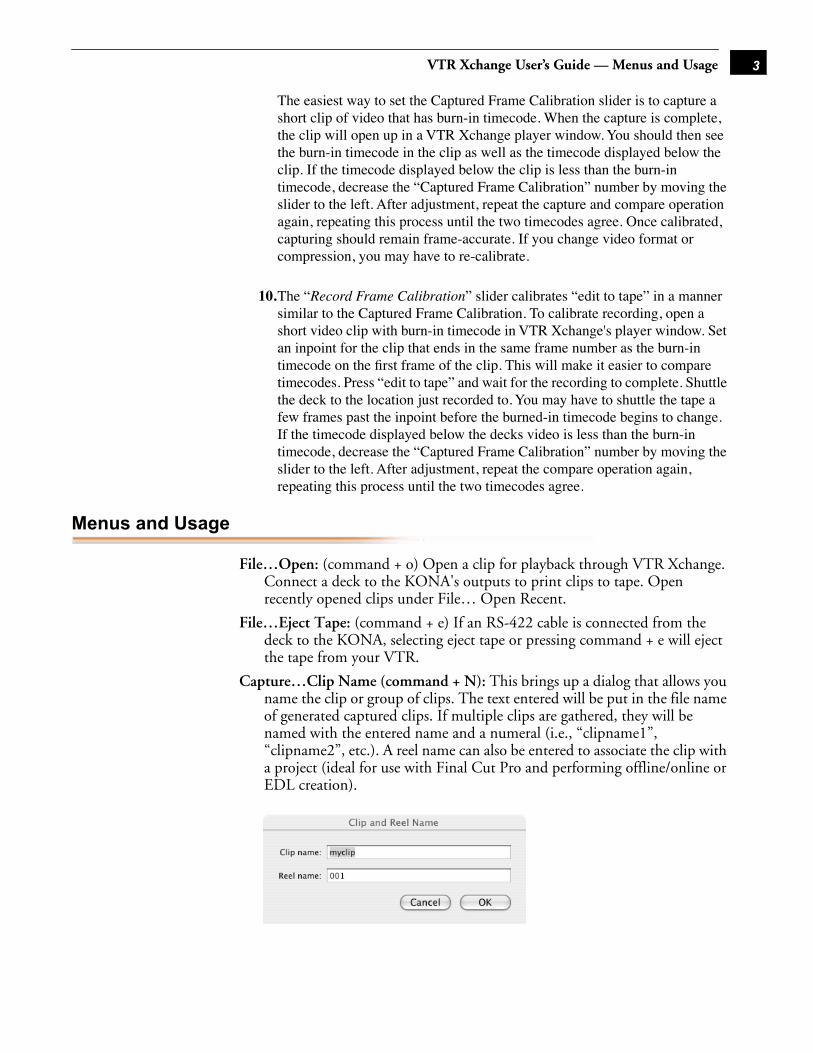
Capture…Clip Name (command + N):
This brings up a dialog that allows you name the clip or group of clips. The text entered will be put in the file name of generated captured clips. If multiple clips are gathered, they will be named with the entered name and a numeral (i.e., “clipname1”, “clipname2”, etc.). A reel name can also be entered to associate the clip with a project (ideal for use with Final Cut Pro and performing offline/online or EDL creation).

4
Capture…Capture Now
(command + k) This will start a capture and save the clip to the location set under AJA VTR Xchange…Preferences. Press command + k again to stop the capture. As soon as you begin the capture, you’ll see a status dialog telling you the capture is underway. When the capture concludes, the clip will be displayed in a window that allows you to review the clip. Capture Now clips do not contain a timecode number relevant to the information on a tape—even when RS422 is connected. The clip in this case, unlike when a standard capture is performed, will begin at 00:00:00:00.
Main Window

1
5
VTR Xchange User’s Guide — Changing Capture Settings
Changing Capture Settings
Capture Settings, Figure 2
To configure capture settings, go to the top menu bar and under the
Capture
menu, select
“Capture Settings.”
The first group of settings are the compression settings (figure 2, “A”). Codecs installed on the system can be selected from the Compression Type drop-down.The Motion settings set the frame rate of the capture in Frames per Second. Best will capture as close to the incoming source's frame rate as your system (storage I/O) will allow. Other frame rates may be selected as appropriate to match the Compression Codec being used. The Preview pane (see “C”) has two small display windows. The top window displays the input signal of the KONA card. The Preview selection box is used to verify the legality of the source video and has the following options:
•
None (displays blue box, no preview)
•
Compressed (displays real-time preview of KONA's input with currently selected compressor applied)
•
Vectorscope
•
Waveform
•
Histogram
•
RGB Parade
•
RGB Histogram
Use the drop-down box on the Source page to set the format of the source video.

6
Figure 3
Click “OK” after making any changes to your capture settings.
Keyboard Shortcuts
The following shortcuts work while in the main capture window.
Key Pressed Function
Spacebar Starts and stops playback. When tape is moving, this stops tape.
i Mark in
Shift + i (I) Cue deck to inpoint
o Mark out
Shift + o (O) Cue deck to outpoint
right arrow Step deck to next frame

1
7
VTR Xchange User’s Guide — Entering Timecode
Entering Timecode
This topic provides advice about entering timecode into VTR Xchange. You are not required to enter a timecode in strict HH:MM:SS:FF format. Acceptable formats and entry methods are listed below:
•
Valid delimiter characters can be a space, period, colon, semicolon, comma or slash.
•
Timecode entered can have multiple delimiters like Final Cut Pro. For example, entering “9..” gives 00:09:00:00 when you hit return.
•
Leading zeros need not be typed: “1.2.3.4” becomes 01:02:03:04 when you hit return.
•
You can type a large number for minutes, seconds, or frames: “200.0” is interpreted as 200 seconds and becomes 00:03:20:00 when you hit return (assuming 30 fps timecode).
•
Hitting return while typing converts whatever you have typed into standard HH:MM:SS:FF format.
•
Hitting the escape key while typing in timecode restores the previous timecode value.
•
You can enter timecode without any delimiters at all—similar to Final Cut Pro. For example, if you enter 01221413, it will be interpreted as 01:22:14:13. This represents 1 hour, 22 minutes, 14 seconds, and 13 frames. When only a partial number is entered, VTR Xchange considers the rightmost pair of numbers frames and puts each successive pair of numbers to the left in the remaining seconds, minutes, and hours areas. Omitted numbers default to 00. For example, if you enter 1223, Final Cut Pro interprets it as 00:00:12:23. Note: when the rightmost pair of numbers is not a valid frame number, the entire number entered will be
left arrow Step deck to previous frame
Shift + right arrow Play
Shift + left arrow Reverse play
J, K, L Same as Final Cut Pro™: each press steps deck speed to the previous (J) or next (L) speed in this list: -35x, -5x, -2x, -1x, 1x, 2x, 5x, and 35x. Pressing the K key stops the deck. When pressing J while holding down K, deck steps back one frame; continuing to hold down J causes the deck to roll at half speed. The L key behaves similarly in the forward direction. Holding down K, while holding down J or L causes the deck to roll at half speed.
JKL keys also work in the player window with speed steps of 1x, 2x, or 4x. Holding down K and J or L plays the movie at 1/3 speed. Hitting J or L with K down steps ahead or back one frame at a time.
Key Pressed Function

8
evaluated as absolute frames.
Example:
If your framerate is 25 fps and you enter 213, VTR Xchange interprets this as 02:13 (two seconds and 13 frames). However, if you enter 398, it will be interpreted as 398 frames. This happens because the frame counter cannot be higher than 24 when you use 25 fps timecode. A value of “03:98” is not a valid timecode number, so VTR Xchange interprets the value as absolute frames.