ajax - media.bc.pt
TRANSCRIPT

AJAXLAN Module
Installation Guide and
Central Station Receiver User Manual
C

GUARANTEEDuring the guarantee period the manufacturer shall, at its sole discretion, replace or repair any de-fective product when it is returned to the factory. All parts replaced and/or repaired shall be covered for the remainder of the original guarantee, or for ninety (90) days, whichever period is longer. The original purchaser shall immediately send manufacturer a written notice of the defective parts or workmanship, which written notice must in all cases be received prior to expiry of the guarantee.
INTERNATIONAL GUARANTEEForeign customers shall enjoy the same guarantee rights as those enjoyed by any customer in Bulgaria, except that manufacturer shall not be liable for any related customs duties, taxes or VAT, which may be payable.
GUARANTEE PROCEDUREThis guarantee will be granted when the appliance in question is returned. The manufacturer shall accept no product whatsoever, of which no prior notice has been received.
CONDITIONS FOR WAIVING THE GUARANTEEThis guarantee shall apply to defects in products resulting only from improper materials or work-manship, related to its normal use. It shall not cover:§ Damages resulting from improper transportation and handling;§ Damages caused by natural calamities, such as fire, floods, storms, earthquakes or lightning;§ Damages caused by incorrect voltage, accidental breakage or water; beyond the control of the manufacturer;§ Damages caused by unauthorized system incorporation, changes, modifications or surrounding objects;§ Damages caused by peripheral appliances unless such peripheral appliances have been supplied by the manufacturer;§ Defects caused by inappropriate surrounding of installed products;§ Damages caused by failure to use the product for its normal purpose; § Damages caused by improper maintenance;§ Damages resulting from any other cause, bad maintenance or product misuse.In the case of a reasonable number of unsuccessful attempts to repair the product, covered by this guarantee, the manufacturer’s liability shall be limited to the replacement of the product as the sole compensation for breach of the guarantee. Under no circumstances shall the manufacturer be li-able for any special, accidental or consequential damages, on the grounds of breach of guarantee, breach of agreement, negligence, or any other legal notion.
WAIVERThis Guarantee shall contain the entire guarantee and shall be prevailing over any and all other guarantees, explicit or implicit (including any implicit guarantees on behalf of the dealer, or adapt-ability to specific purposes), and over any other responsibilities or liabilities on behalf of the manu-facturer. The manufacturer does neither agree, nor empower, any person, acting on his own behalf, to modify or alter this Guarantee, nor to replace it with another guarantee, or another liability with regard to this product.
UNWARRANTED SERVICES The manufacturer shall repair or replace unwarranted products, which have been returned to its factory, at its sole discretion under the conditions below. The manufacturer shall accept no products for which no prior notice has been received.The products, which the manufacturer deems repairable, will be repaired and returned. The manu-facturer has prepared a price list and those products, which can be repaired, shall be paid for every repaired appliance.The closest equivalent product, available at the time, shall replace the products manufacturer deems un-repairable. The current market price shall be charged for every replaced product.

AJAX LAN Module - Installation and Programming Manual 3
Table of Contents
1. General Information ....................................................................................4
2. Installation ..................................................................................................5
2.1 General View and Description of Basic Components ...............................5
2.2 Situation in an universal plastic box .........................................................5
3. Programming of the AJAX Module .............................................................6
3.1 Installation of TTProgSuite Software ........................................................6
3.2 Customers Setting ....................................................................................6
3.3 LAN module Configuration .......................................................................9
3.3.1 LAN Configuration Section ....................................................................9
3.3.2 SMTP Configuration Section .................................................................10
3.3.3 System Configuration Section ...............................................................11
3.3.4 SIA Configuration Section......................................................................12
3.3.5 PGMs Configuration Section .................................................................13
4. Default parameters .....................................................................................16
5. Central Station Receiver - CSR Software...................................................17
5.1. Configuration of Monitoring Software connection ....................................18
5.2. Configuration of AJAX LAN modules communication..............................18
5.3. Account Managements ............................................................................19
5.4. Program Start-up .....................................................................................21
6. Remote firmware update of the AJAX LAN Module....................................22
APPENDIX - AJAX Event Messages ..............................................................24
WARNINGS: This manual contains information on limitations regarding product use and function and information on the limitations as to liability of the manufacturer. The entire manual should be carefully read!This manual is subject to change without notice!
!

4 AJAX LAN Module - Installation and Programming Manual
1. General InformationAJAX LAN module is an additional accessory for built-in installation in AVA, CA60plus, CA8x4 or any other alarm or fire system. Its purpose is to transmit the system status to a Monitoring station (CSR) via Internet. The AJAX Module enables easy monitoring and transmitting of the alarm events occurring in the alarm systems to existing Monitoring stations using standard monitoring software. The communication is protected by AES 128 encryption algorithm.The AJAX LAN module transmits the system status to 4 e-mail addresses via Internet by means of e-mail messages or e-mail to SMS.
Figure 1. AJAX LAN module functional working diagram.
The LAN module communicates with AVA and CA8x4 control panels through UART (9600 Hz). The communication with CA60plus is by means of GPIO (2400 Hz).In case of an alarm event the LAN module generates an information package and trans-mits it (e-mail / CSR) in parallel to the receivers (users / monitoring station). The LAN module also follows the status of the Internet communication. If there are problems in alarm event transferring (no confirmation / ACK in CSR communication / either the con-nection is lost neither the server is failed /at SMPT/) the LAN module will automatically make N retries to deliver the message, where N is a programmed number of retries. If the connection with the primary server is permanently failed the LAN module will transmit the messages to a Backup CSR Server and will proceed to follow for the recovering of the first connection. When the primary Server becomes available again the LAN module will stop sending messages and data to the Backup CSR server.The LAN module also always follows the status of the Monitoring Station as sends poll-ing messages over pre-programmed interval.In message transferring (polling and alarm) can be used data encryption for the package protection. The algorithm is AEC128 as the encryption key is 128 bits. This key could be programmed in the LAN module and in the Monitoring Station in order to decode the information properly. Using an encryption is not mandatory, but it is strongly recom-mended. By default the encryption is disabled (because the key of the Monitoring Station is unknown).
AJAX

AJAX LAN Module - Installation and Programming Manual 5
2. Installation2.1 General View and Description of Basic Components
- LED LAN Action (yellow) - LED LAN Link (green) - USB Connector - LED Indication (green): PRI - Status of the Primary CSR* SEC - Status of the Backup CSR* COM - Panel Communication Status - Reset Jumper** - Mounting holes (CA60plus, CA8x4) - Mounting holes (AVA) - Interface connector - Terminals: I/O 1-4 - Input / Output GND/BLK - Common Ground GRN - Terminal for connecting to Ca60plus RED - Power Supply
* CSR - Central Station Receiver (see item 5)** Put a jumper to reset the module parameters by default
Figure 2. General View.
2.2 Situation in an universal plastic box
Figure 3. Mounting in an universal plastic box for AVA and CA60plus.
GR
NR
EDB
LK

6 AJAX LAN Module - Installation and Programming Manual
3. Programming of the AJAX Module3.1 Installation of TTProgSuite SoftwareAJAX Module can be programmed and configured by means of TTProgramming Suite Software which is available to you country distributor. To install the software you just have to copy the folder TTProgrSuite to your local computer (monitoring station) and run the file pTTProgSuite.exe. A start window is shown on:
Figure. 4 - TT Programming Suite Starting window.
When you run the TTProgramming Suite for the first time you have to do as follows:- Enter a password, minimum 4 digits or letters, the entered symbols are expressed with “*“;- Verify the entered password, the entered symbols are expressed with “*“;- Click the Log In Button to enter the program.To cancel running of the program you have to click the Cancel Button.NOTE: On the next starting of the software the program will ask only for a password.
3.2 Customers SettingWhen you log into the program the main program screen appears.
Fig. 5 - Main Screen of TT Programming Suite.On the left side you can choose action to perform: add New Customer , Edit Customer or Delete Customer. On the right side there is a list with currently configured customers (empty).
Password: ******Verify: ******

AJAX LAN Module - Installation and Programming Manual 7
To be able to program the AJAX LAN module you have to create a customer - click the New Customer button and Add New Customer dialog window appears.
Click on the Panel Type box to choose the type of the panel you are programming. • Choose LAN ver.XX for programming CA60plus, CA8x4 or any other panel. The Edit IP button must appear in the left bottom corner of the screen.• Choose AVA ver.XX for programming of AVA control panel. In that case a field Com-municator will appear on the right side. The user can choose between two options for programming - LAN and COM (programming via communicator). Choose LAN ver.XX.The Edit IP button must appear in the left bottom corner.To set connection settings with AJAX LAN module click on Edit IP button and enter con-nection settings:
Figure 7. IP configuration screen
In the Panel IP Address field enter the IP address of AJAX LAN module that the soft-ware will try to connect. In the Panel Port field enter the port used by configuration software. By default this port is set to 5067.Check the Use encryption box if your module using encryption for configuration over Ethernet. Then you have to set an encryption password in Encryption pass field. En-cryption password can be any 16 symbol sequence 0-9 and a-f to A-FWhen all parameters are set, click OK button to apply changes or Cancel to discard them.
Available fields on the screen:- First Name- Surname- Telephone Number- E-mail Address- Panel Telephone- Panel IDAll these fields are for user information only and they are optional.
Figure 6. Add New Customer screen - Basic view

8 AJAX LAN Module - Installation and Programming Manual
Check settings added on Add New Customer dialog window and then click the Add button. The information for the specified customer appears on the Customers list. Se-lect a Customer Number to which you want to connect then click on the down arrow on Connect button.
Figure 8. TTPrograming Suite - Choosing the type of the connection.
Choose one of the suggested of the program types of the connection: • LAN Connection, or • USB Connection. By selecting connection type the program will try to connect to AJAX LAN module with programmed settings. If a USB Connection is selected then the TCP settings are ig-nored and the software connects to the AJAX LAN module connected to USB on that computer!
NOTE: To avoid any IP conflicts problems it is strongly recommended when make connection for the first time to use the USB Connection op-tion and leave AJAX LAN module not connected to your local network!NOTE: When programming via USB the IP Configuration settings (see Figure 7) are ignored !!!So, any AJAX LAN module can be configured via USB without any knowledge of his TCP settings!
!

AJAX LAN Module - Installation and Programming Manual 9
3.3 LAN module ConfigurationConnection status can be monitored in Current Operation field on the left side of the TTProgramming Suite main screen. When connection is successful by clicking Pro-gramming tab on the left side of the TTProgramming Suite main screen the LAN module Configuration dialog window appears:
Figure 9. The LAN module Configuration screen.
Press the Upload button to read the configuration data from AJAX LAN module or the Download button to write the configuration data to the device. If you want to close the LAN module Configuration dialog window click on the Close button.
3.3.1 LAN Configuration SectionThe AJAX LAN module LAN Network parameters are set by default:
Figure 10. The LAN Configuration Section

10 AJAX LAN Module - Installation and Programming Manual
The fields in the LAN Configuration section are as follows:• IP Address - Set IP address of the AJAX LAN module• TCP Mask - Set Netmask address of the AJAX LAN module• Default Router - Set Default Router address of the AJAX LAN module• Port - this port is used by programming software to access the LAN module. If you change the default port then you must change it in the Customer → Edit Customer menu.• DHCP Enabled - Check if IP address is obtained via DHCP protocol. In this case the IP Address, TCP Mask and Default Router fields are ignored!• MAC - MAC address of the AJAX LAN module.
It is strongly recommended: DO NOT CHANGE THE MAC ADDRESS!!!
3.3.2 SMTP Configuration Section
Figure 11. The SMTP Configuration Section
!
AJAX LAN Module - Installation and Programming Manual 11
To program AJAX LAN module for sending e-mail messages on a specific events check the SMTP Enabled field. If your mail server use authentication check the SMTP Enable field too. AJAX LAN module can send event up to 4 receiver e-mail addresses specified in fields Receiver Mail 1 - 4. The Source Mail field is the e-mail address that the LAN module will use to send mes-sages. So, this is the same as “from” field in outlook express. If server use authentication then fields User Name and Password must be filled, other-wise leave them empty. The SMTP Server field is IP address of the e-mail server the AJAX LAN module should use.The SMTP Port field is the SMTP port provided from SMTP serverField Messages - for each message you can specify to send or not e-mail when the specified event occurs. To check/uncheck with a click all messages for a given e-mail address simply check/uncheck Check/Uncheck all box for desired receiver e-mail.
3.3.3 System Configuration Section
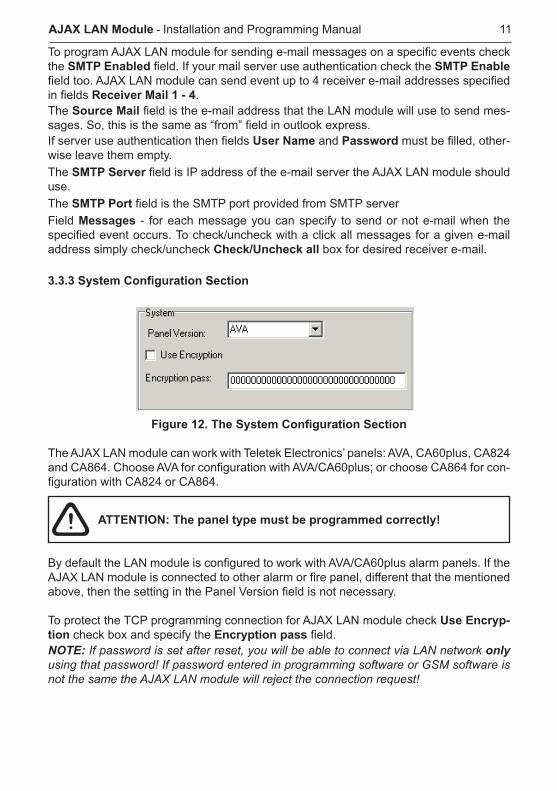
Figure 12. The System Configuration Section
The AJAX LAN module can work with Teletek Electronics’ panels: AVA, CA60plus, CA824 and CA864. Choose AVA for configuration with AVA/CA60plus; or choose CA864 for con-figuration with CA824 or CA864.
ATTENTION: The panel type must be programmed correctly!
By default the LAN module is configured to work with AVA/CA60plus alarm panels. If the AJAX LAN module is connected to other alarm or fire panel, different that the mentioned above, then the setting in the Panel Version field is not necessary.
To protect the TCP programming connection for AJAX LAN module check Use Encryp-tion check box and specify the Encryption pass field. NOTE: If password is set after reset, you will be able to connect via LAN network only using that password! If password entered in programming software or GSM software is not the same the AJAX LAN module will reject the connection request!
!

12 AJAX LAN Module - Installation and Programming Manual
3.3.4 SIA Configuration Section
Figure 13. The SIA Configuration Section
These setting are related with communication with Central Station Receiver /CSR/ pro-vided from Teletek Electronics JSC - see item 5, page 17.AJAX LAN module can send alarm event to Primary and Backup monitoring centers. The use of Backup receiver is optional, if used the Backup Source Enabled box must be checked.For each receiver /CSR/ you have to specify the IP address of the computer where Teletek Central Station Receiver works, Local Port and Remote Port.Each AJAX LAN module send polling messages to the CSR on a programmed time inter-val. For proper monitoring the Use Polling CSR box must be checked, otherwise CSR will not be able to detect “communication lost” with AJAX LAN module. The programmed polling interval must be at least two times smaller than the defined AJAX LAN modules timeout defined in CSR software. The other fields are defined as follows:Poll Period Seconds - Polling period in secondsPoll Period Hours - Polling period in hoursCSR Timeout - This timeout (in seconds) defines the maximum timeout for waiting the CSR to response. By default the timeout is set to 1 sec.

AJAX LAN Module - Installation and Programming Manual 13
Number Retries - If no response is received within the CSR Timeout then the AJAX LAN module will retransmit the packet. This parameters set the maximum number of retries before entering Sleep mode.Sleep Period - Specifies the Sleep mode interval (in seconds). For this release it is recommended to leave that field unchanged.The data to the CSR can be protected by encryption password entered in Encryption Password and Encryption Password Verification fields. In this case Is CSR Encrypt-ed box must be checked.Next enter the Account Number. This number identifies each AJAX LAN module.Currently the value of Receiver Number should be ‘1’ and the Account Prefix set to ‘0’. The AJAX LAN module can update its time with CSR time. To use that function you have to check the Time Stamp Enabled box.
ATTENTION: It’s highly recommended that the Time Stamp Enabled box to be always checked!
3.3.5 PGMs Configuration Section
Figure 14A. The PGMs Configuration Section - General View
!
14 AJAX LAN Module - Installation and Programming Manual
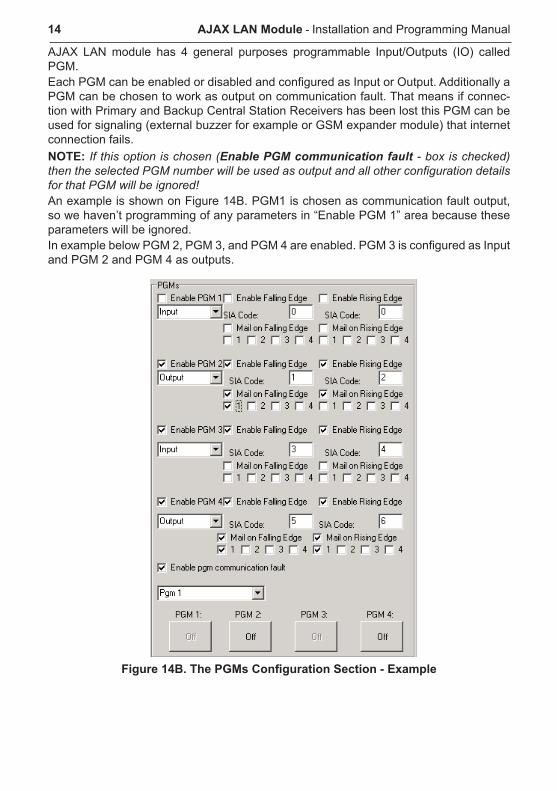
AJAX LAN module has 4 general purposes programmable Input/Outputs (IO) called PGM.Each PGM can be enabled or disabled and configured as Input or Output. Additionally a PGM can be chosen to work as output on communication fault. That means if connec-tion with Primary and Backup Central Station Receivers has been lost this PGM can be used for signaling (external buzzer for example or GSM expander module) that internet connection fails. NOTE: If this option is chosen (Enable PGM communication fault - box is checked) then the selected PGM number will be used as output and all other configuration details for that PGM will be ignored!An example is shown on Figure 14B. PGM1 is chosen as communication fault output, so we haven’t programming of any parameters in “Enable PGM 1” area because these parameters will be ignored.In example below PGM 2, PGM 3, and PGM 4 are enabled. PGM 3 is configured as Input and PGM 2 and PGM 4 as outputs.
Figure 14B. The PGMs Configuration Section - Example

AJAX LAN Module - Installation and Programming Manual 15
When a PGMx is enabled events can be assigned for both falling and rising edges on that PGM. The entered numbers must be the same as indexes in Messages field in SMTP Configuration section. This means if a rising edge occurs on PGM 3 then AJAX LAN module will send SIA Event with number 4 (Fire Restore). In that way every PGM can be assigned with valuable SIA events. This allows easy integration into any alarm panel that has PGM outputs.When the AJAX LAN module’s PGM is configured as Output (see PGM 2 or PGM 3 on figure 14B) its output state (logic signal level) can be switched from configuration soft-ware by clicking on PGM2 or PGM4 buttons. For Output PGMs again SIA events can be assigned in the same way as Inputs.When PGM is configured as output then the PGM state button become Enabled (see PGM 2 and PGM 3) button.The AJAX LAN module can be programmed to send e-mail with programmed SIA Event code for rising and/or falling edge for each enabled PGM. To enable sending e-mail on falling or rising edge just check the Mail on Falling Edge or/and Mail on Rising Edge check boxes. Then check the destination e-mails should receive e-mail for this PGM. For example (see Figure 14B) AJAX LAN module will send e-mails for PGM 4 as fol-lows:• E-mail to programmed “Receiver Mail 1” (from “SMTP Configuration” section) on falling edge, and • E-mail to programmed “Receiver Mail 3” (from “SMTP Configuration” section) on rising edge.
16 AJAX LAN Module - Installation and Programming Manual
4. Default parameters.The default parameters of the AJAX LAN Module are configured in the begging of the installation. There must be placed jumper at the position 5 in Figure 2, when the power is on. After the initial configuration the jumper must be placed off.The Default parameters of the module are as follows:• All e-mail settings are DISABLED. E-mail messages will be sent only when are introduced valid settings for E-mail server, e-mail address and messages filtering.• DHCP (Dynamic Host Configuration Protocol) is DISABLED. • IP address: 192.168.0.247 Netmask: 255.255.255.000 IP router: 192.168.0.1These settings are considered as common and mostly used for home and other user networks. Note: If in the available network already exits a specific IP address, then the device must be programmed through its USB! In case of LAN programming the LAN module must not be connected to the avail-able LAN network to avoid IP address conflicts. Recommended configuration is: LAN module, computer and switch (not connected to network). • SIA default parameters. 1. By default the SIA protocol is DISABLED. This is necessary to avoid trans- mitting of false alarm messages to the Monitoring station. 2. No encryption is used. 3. Only a Main Central Server is used. 4. Max. repetition count - 3. 5. Time for confirmation from the Monitoring station - 1 second. 6. Polling interval - 10 seconds. 7. Account - 1234. 8. Receiver - not used (reserved, should be 0). 9. Account prefix - not used (reserved, should be 0).For the proper working of the LAN module has to be programmed valid settings of: - Network connection (ТСР -Transmission Control Protocol settings); - E-mail address (SMTP - Simple Mail Transfer Protocol settings)*; - Communication (SIA settings)*.* Note: The SIA and SMTP are not compulsory. For example, if the user does not want to receive e-mail messages, then it has to be programmed - SMPT Enabled = 0.ATTENTION: The new programmed parameters of LAN module will be configured after restarting it!NOTE: The LAN module does not transmit the events happen before starting of the system! This means, that at starting the LAN module it will be stored the current system status (the status of the used control panel - AVA or CA60plus) and the module will start to transmit every new event in the system. If the Internet connection is failed (the e-mail server is busy, the Central Stations are failed or there is a temporary Internet connection loss) the LAN module will store the current system status. When the Internet connec-tion is recovered, the LAN module will transmit all the events occur from the moment of Internet failure. The last is not relevant for the CA60plus control panel, because the LAN module has no access to the LOG-file, and just follow the system current status.

AJAX LAN Module - Installation and Programming Manual 17
5. Central Station Receiver - CSR SoftwareTeletek Central Station Receiver software communicates with up to 100000 AJAX LAN modules. Its main functions are to maintenance information from AJAX LAN modules and forward it to Monitoring Software over TCP/IP connection. When the program is started the main program window appears on the screen (Figure 15).
Figure 15. Teletek Monitoring Station main screen
By default the communication is disabled and all requests from AJAX LAN module sent to Monitoring software will be discarded.

18 AJAX LAN Module - Installation and Programming Manual
5.1. Configuration of Monitoring Software connection The important parameters for setting Monitoring station connection are shown on Figure 16.
Figure 16. Monitoring Software connection parameters.
The port specified in Monitoring Station Port field must be the same as assigned in the Monitoring software, while in Monitoring Station IP address must be entered the IP address of PC where the monitoring station communication driver run.
5.2. Configuration of Ajax LAN modules communication Sample settings for Ajax LAN modules communication is shown on figure 17.
Figure 17. Ajax LAN modules connection settings

AJAX LAN Module - Installation and Programming Manual 19
In the AJAX LAN modules Source Port field user must enter source port for all AJAX LAN modules. This is the port that software will “listen” for incoming packet from AJAX LAN modules.
Important: All AJAX LAN modules that send their status to a given Cen-tral Station Receiver must be with the same Source IP port!
In field AJAX LAN modules timeout must be specified the maximum time the soft-ware will wait for packet from every AJAX LAN modules before sending an Error mes-sage. This techniques are used to detect some problems in communication with AJAX LAN modules (for example network provider Internet fails, cable disconnection etc.). The specified period of time must no be less then 10 seconds in case of many AJAX LAN modules connected to that Station. However this period can vary depending on the installer.Once the parameters are set, the Central Station Receiver program can be started by pressing the Start CSR button and the connection status appears in Monitoring Station Status field.
5.3. Account ManagementsAll information to add new account for monitoring is in New Account Details section as shown in Figure 18. In Account field must be entered an Account ID as specified in AJAX LAN module Configuration - see Figure 13. If encryption is used then the Use En-cryption for that Account check box must be checked and encryption password must be typed in Encryption Password and Encryption Password Verification fields.
Figure 18. Adding New Account information
Important: To protect your system and guarantee maximum level of secu-rity Teletek Electronics highly recommends encryption password to be always used!If encryption is not used for that account Use encryption for that Account check box must be unchecked. To add entered account in list of monitored accounts the user must click on “Add New Account” button and account will appear in Account List field as shown in Figure 19.
!
!

20 AJAX LAN Module - Installation and Programming Manual
Figure 19. Account Details
The fields are defined as follows:• Working Accounts field shows the total number of monitored account;• Selected Account field shows the current selected account. On account selection all fields in the Change Account group are changed with related information for that ac-count.

AJAX LAN Module - Installation and Programming Manual 21
Below are explained all account fields in the Change Account group:• Account - account ID of selected account.• Account Creation Date and Time - this is the date the account in added into database of monitored accounts.• Encryption Password and Encryption Password Verification fields shows the pass-word used for decrypting packets from AJAX LAN module.• Source IP address - this is the IP address of AJAX LAN module that sends messages with that account.• Source Port - The port used by AJAX LAN modules for sending messages.
NOTE: There are two ports used for communication: source and destination, while AJAX’s Source port must be same for all modules connected to a given Receiver, the destination port could be different.
• Last Received Packet Time - This field gives information for time of last receiving packet from AJAX LAN module.• Last Packet Encrypted - give encryption information - used or not.• Encryption Status - give encryption decoding status.• Account Status - shows information about account processing activity - Online or Missing.• Delete Account - The operator can erase an account by pressing this button.• Save Configuration - Created database of an account can be saved pressing the but-ton as shown in Figure 20.
Figure 20. Configuration SavingAlso previously saved configuration can be load by pressing the Load Configuration button.
NOTE: While configuration saving can be performed anytime, the configura-tion loading can be done only when the Central Station Receiver is stopped!
5.4. Program Start-upYou can configure the software to start automatically with you Windows starts.To do that check the Enable Auto Start check box and click the Change Start-Up Pa-rameters button.
!
!

22 AJAX LAN Module - Installation and Programming Manual
6. Remote firmware update of the AJAX LAN ModuleThe AJAX LAN module versions 1.1 and above are restarted automatically after programming. There are two criteria for automatic restarting:
USB programminga) - If AJAX LAN module is programmed via USB then by pressing the Download button the restarting function is activated, but the actual restarting is performed 5 seconds after the USB cable is unplugged!LAN programmingb) - In case of LAN programming, the restarting function is activated, but the actual restarting of AJAX LAN module is performed 5 seconds after disconnecting from module (by pressing the Disconnect button).
The AJAX LAN module versions 1.1 and above have feature for remote firmware update. That means the installer can remotely change current software version of the LAN module via LAN/Internet network in case of a new version with advance parameters. When connected via pTTProgSuite program, the software automatically checks the current software version of AJAX LAN module. If there is newer version of firmware, then the operator will be asked for optional firmware update as shown on Figure 21.
Figure 21. Firmware Update Question.
If you want to update the firmware of the LAN module click on the OK button. If you want to discard the update - click on the Cancel button.After choosing the OK button a new warnning message will appear on the screen:
Figure 22. Firmware update start process.

AJAX LAN Module - Installation and Programming Manual 23
Here you can cancel again the firmware update process by clicking the Cancel button.By clicking the OK button the software will actually start firmware update.
NOTE: The process can take several minutes depending on your internet connection! Please, be patient and wait for the firmware update status messages!
Upon completion of firmware update process the message shown on Figure 23 appears. The next message that must appear is shown at Figure 24 which means that the firmware is updated and the system is restarted and connection is closed by the AJAX LAN module.
Figure 23. Firmware Update Status.
Figure 24. Disconnection Status.
NOTE: If by any reason firmware update is interrupted the system will continue its work with the old version of firmware, so the entire process must be restared.
!
!

24 AJAX LAN Module - Installation and Programming Manual
APPENDIX - AJAX Event Messages No Event Name SIA Code No Event Name SIA Code
AVA Control Panel1. EV_BURG_ALARM BA 36. EV_TEST_AUTO RP
2. EV_BURG_ALARM_REST BH 37. EV_TEST_MANUAL RX
3. EV_FIRE FA 38. EV_FUSE YP
4. EV_FIRE_REST FH 39. EV_FUSE_REST YQ
5. EV_PANIC PA 40. EV_SYSTEM_RESET YW
6. EV_PANIC_REST PH 41. EV_AC_LOSS AT
7. EV_TAMPER TA 42. EV_AC_REST AR
8. EV_TAMPER_REST TH 43. EV_BAT_LOW YT
9. EV_MEDICAL MA 44. EV_BAT_REST YR
10. EV_MEDICAL_REST MH 45. EV_ARM_FAILED -
11. EV_SENSOR UB 46. EV_ExpM_TAMPER ES
12. EV_SENSOR_BPS_R UU 47. EV_ExpM_TAMPER_R EJ
13. EV_WATER_ALARM WA 48. EV_RF_BATT XT
14. EV_WATER_ALARM_R WH 49. EV_RF_BATT_R XR
15. EV_FIRE_BPS FB 50. EV_RF_INTERF XQ
16. EV_FIRE_BPS_REST FU 51. EV_RF_INTERF_R XH
17. EV_HEAT_ALARM KA 52. EV_HI_SENS -
18. EV_HEAT_ALARM_R KH 53. EV_HI_SENS_R -
19. EV_TAMP_BPS TB 54. EV_LOW_SENS -
20. EV_TAMP_BPS_REST TU 55. EV_LOW_SENS_R -
21. EV_FREEZE_ALARM ZA 56. EV_BELL_FAULT YA
22. EV_FREEZE_ALARM_R ZH 57. EV_BELL_FAULT_R YH
23. EV_DISARM_USER OP 58. EV_EV_ExpM_LOST EM
24. EV_DISARM_REMOTE OQ 59. EV_EV_ExpM_LOST_R EN
25. EV_DISARM_KEY OS 60. EV_CLEAN_SENSOR AS
26. EV_ARM_USER CL
27. EV_ARM_REMOTE CQ
28. EV_ARM_KEY CS
29. EV_QUICK_ARM CL
30. EV_PROG_ENG LB
31. EV_PROG_ENG_END LX
32. EV_DURESS HA
33. EV_COMM_LINE YS
34 EV_COMM_LINE_REST YK
35. EV_COMM_FAL YC
AJAX LAN Module - Installation and Programming Manual 25
APPENDIX - AJAX Event Messages (Continued)No Event Name SIA Code
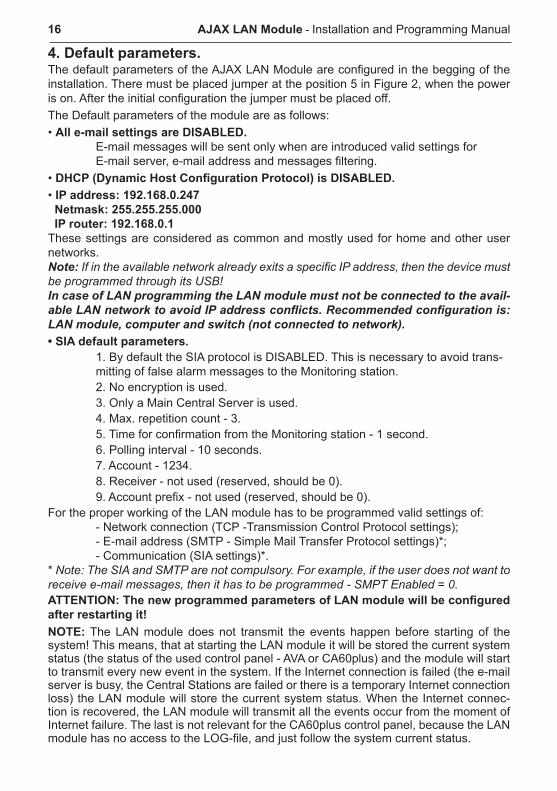
CA60plus Control Panel1. BURG_ALARM BA
2. BURG_ALARM_REST BH
3. BURG_TROUBLE BB
4. DISARM_USER OP
5. ARM_USER CL
6. AC_LOSS AT
7. AC_REST AR
8. BAT_REST YR
9. BAT_LOW YT
10. FUSE_REST YQ
11. FUSE YP
12. LINE_ERR_REST YK
13. LINE_ERR YS
14. COMM_FAL_REST YC
15. COMM_FAL YS
16. TAMPER_REST TH
17. TAMPER TA

26 AJAX LAN Module - Installation and Programming Manual
APPENDIX - AJAX Event Messages (Continued)No Event Name SIA Code No Event Name SIA Code
CA8x4 Control Panel1. MEDICAL ALARM MA 12. Fail to communicate YC
2. FIRE ALARM FA 13. Open/Close CL
3. PANIC ALARM PA 14. Open/close by User CL
4. DURES HA 15. Automitic Open/Close CP
5. Burglary Alarm BA 16. Remote Arm/Disarm CQ
6. Tamper Alarm TA 17. Quick Arm CL
7. Expansion Module Failure EM 18. KeySwitch Open/Close CS
8. Expansion Device Tamper ES 19. Zone Bypass HB
9. AC Trouble AT 20. Program Mode Entry LB
10. Battery Missing YM 21. Program Mode Exit LX
11. Communication YS
CA8x4 RESTORE EVENT CODES1. MEDICAL ALARM MH 14. Open/Close OP
2. FIRE ALARM FH 15. Open/close by User OP
3. PANIC ALARM PH 16. Automitic Open/Close OA
4. DURES HH 17. Remote Arm/Disarm OQ
5. Burglary Alarm BH 18. Quick Arm OP
6. Tamper Alarm TH 19. KeySwitch Open/Close OS
7. Expansion Module Failure EN 20. Unsuccessfull Access Restore DO
8. Expansion Device Tamper EJ 21. Zone Bypass HU
9. AC Trouble AR 22. Program Mode Entry LB
10. System Battery Trouble YR 23. Program Mode Exit LX
11. Battery Missing YR 24. System Power UP RR
12. Communication YK 25. Group Bypass HU
13. Fail to communicate YK

AJAX LAN Module - Installation and Programming Manual 27
APPENDIX - AJAX Event Messages (Continued)No Event Name SIA Code
AJAX Status Codes1. Watchdog Reset YW
2. LAN or USB Programming Started LB
3. LAN or USB Programming End LX
4. AVA Communication Trouble YS
5. AVA Communication Trouble Restore YK
No Event Name SIA CodeCentral Station Receiver Status Codes
1. AVA Communication Trouble YS
2. AVA Communication Trouble Restore YK

1802
0540
, Rev
A, 1
2/20
07