al tm… · 30’x install instructions 6-9 40’x ... you ever run into problems with the...
TRANSCRIPT

FESTIVALTM
INSTALL INSTRUCTIONS
I f Y O U c a n I M A G I N E i t . . . W E c a n B U I L D i t

www.aztectents.com
***IMPORTANT SAFETY INFORMATION***
Proper personnel safety equipment should be worn at all times during theinstallation of any tenting products.
Hard Hat
Safety Glasses
Work Gloves
Long Pants
Steel Toe Boots
OSHA Approved Harness and restraint system (for off ground activities)
WARNING!The safe installation and use of commercial tenting products can vary from site to site and during varying climacticconditions. Careful consideration should be paid to any installation during windy conditions and shall be monitoredthroughout the duration of the installation. Periodic maintenance and monitoring of the installation by the installer isrequired. Techniques other than those specified in this document may be required during these types of conditions.
Users and installers shall indemnify and hold harmless Aztec Tent for any claim resulting from the improper installa-tion and/or maintenance of this unit.
Soil conditions also vary from site to site. The included anchoring package for this tent may need to be supplementedwith alternate anchoring during windy conditions and in areas with questionable soil holding power. Full productengineering may be available.
NOTICEThis tent product is not intended to be used as a shelter from severe weather. Aztec assumes no liability for such use.An evacuation plan for the area covered within this tented space is imperative and shall be thoroughly posted for allusers and potential occupants of the tent. Severe weather including electrical storm systems, moderate to severewind, heavy rains, snow, or any condition that raises any doubt to the structural integrity of the tent are immediatesigns that an evacuation is necessary. Severe bodily injury and/or death can occur.
The installation of electrical, plumbing, lighting, appliances and/or HVAC equipment are not covered within this manu-al. Users/Installers shall follow local code requirements for the installation of these items using certified personnel.Aztec Tents shall be indemnified and held harmless from any such use or injury resulting from its use.

www.aztectents.com
Contents10’x/15’x/20’x Install Instructions 4-5
30’x Install Instructions 6-9
40’x Install Instructions 10-13
Diagrams 14-29
Replacement Parts 30
Parts Photos 31
Thank you for your recent purchase from Aztec Tents. The following procedures will help you through your installation. Ifyou ever run into problems with the installation of your Aztec Tent give one of our sales/service professionals a call. Acomplete listing of sales, service, and operational support is always available on our website at www.aztectents.com.
Questions? Call us.
Aztec Tents
2665 Columbia StreetTorrance, CA 90503 USADirect (310) 347-3010Toll Free (800) 228-3687Fax (310) 381-0722

www.aztectents.com
Installation-
Step 1: Lay out the parts of the tent in place so they are easy to access.See the specific diagram for your size of tent in the pages fol-lowing the instructions. Connect the perimeter pipes to the cor-ner fittings and use the pins to secure the connection. Theperimeter pipe is 9’4” long for the 10x10, 14’4” long for the15x15, and 19’4” for the 20x20 Festival Frame Tent.
Step 2:Connect the cables to stretch across to the opposite corner fit-ting. Start at position one with the cable connected and stretchthe cable to corner 2 marked on the diagram to the right. Followby attaching the other cross cable to corner #3 and pull towardcorner #4
Step 3: As the cables are made to very exact specifications you willneed to lift corner #4 off the ground approximately 24”. By liftingthis corner you will close the gap and distance between corners3 and 4 allowing the cable to slip over the support nub on thefitting. When you lower the frame back to the ground the cableswill become very tight.
Step 4: Cover the ground and the cables with a ground cloth. Unfoldthe tent top and pull over the frame. Each corner of the tent fab-ric has a thick webbing loop that needs to be pulled tight overthe nub on the exterior of the corner fitting.
1
23
4
LOOSE CABLE ON TOP
A
B
C
D
FESTIVALTOOL

www.aztectents.com
Step 5: Raise half the tent and install and pin the leg to the corner fit-tings and connect and pin the baseplate to the bottom of eachleg. Now that you can gain access under the tent top, slide thepin of the mast through the crown at the peak of the fabric andplace the roller wheel on the bottom of the mast on the topcable.
Step 6:Push the bottom of the mast toward the point where the twocables cross. Once the mast is vertical push the bottom cabledown so it snaps into the groove on the bottom mast connec-tion.
Connect the Bottom Mast Caps to the bottom of the mast tosecure it.
Step 7: Lift the other side of the tent and install and pin to the cornerfittings and baseplate connectors.
Using the included rope tensioners connect the spring snap tothe ring on the valance tensioning rope. The rope tensioner isdesigned for use for 7’, 8’ and 10’ legs and therefore a loopneeds to be tied at the opposite end to just reach the baseplate.Once the spring snap is connected and the loop is over the nubon the Qwik Base Plate you can apply even tension to tightenthe valance tensioning system.
Step 8: For the highest performance in windy conditions you shouldanchor the baseplates as well as with tiedowns installed at a 45degree angle.

www.aztectents.com
Installation- 30’ Wide
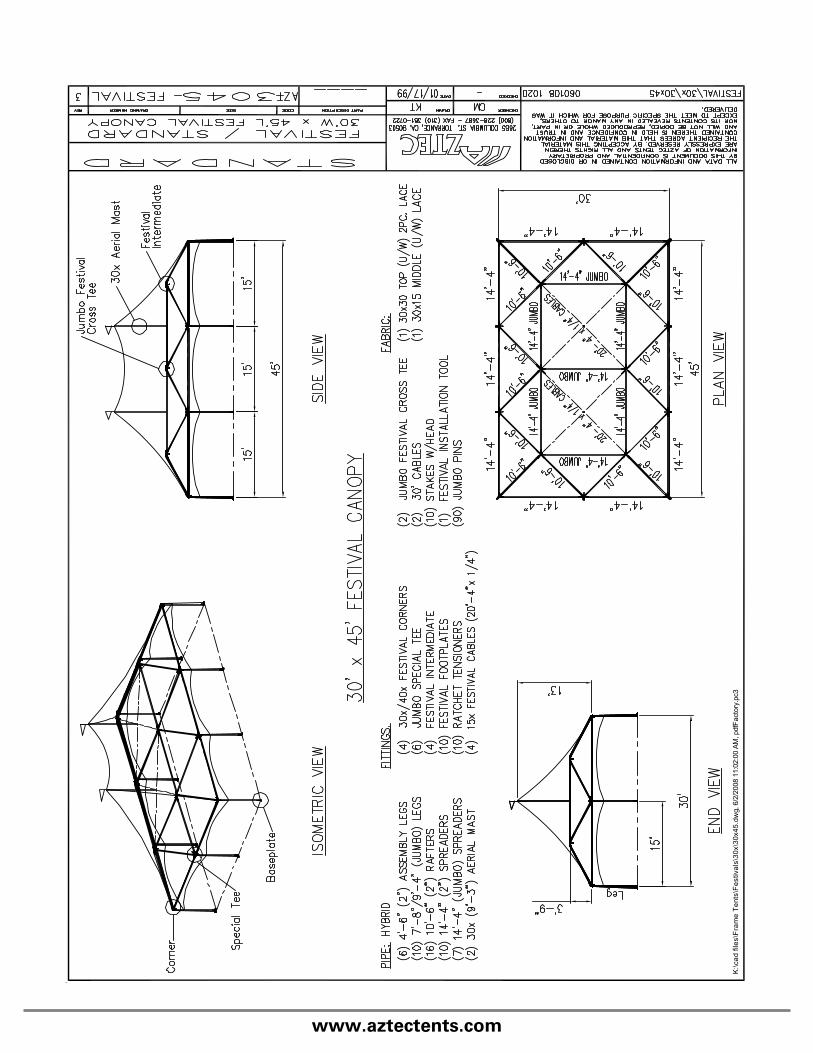
Step 1: Assemble (first) square of the "Aerial Mast Sub Frame" whichconsists of (4) 14'-4" Jumbo Tubes, (2) Festival IntermediateFittings, (2) Festival Cross Tees, (2) Diagonal Cables and (10)Festival Pins. Assemble and Pin the four sides. Attach diagonalcables. Lift the last corner of the square assembly to enableattachment of cable over last hook. Lay frame down flat on theground. Assemble (second) square of the "Aerial Mast SubFrame" to the first square above which adds (3) Jumbo Tubes,(2) Festival Intermediates, (2) Cables and (6) Festival Pins.Assemble and Pin the three additional sides forming (second)square. Attach diagonal cables. Lift last corner (this must beone of two added / un-tensioned corners) of Square Two assem-bly to enable attachment of cable over last hook. Lay this addedframe down flat on the ground. Important Note: The bottom diagonal cables must be orientedparallel on all frames with multiple masts.
Step 2:Lift along one of the long sides of the "Aerial Mast Sub Frame"by tipping the "Aerial Mast Sub Frame" up on it's other longside. Place and Pin the Assembly Legs (4’6" pipe) onto theFitting stubs provided under the Festival Cross Tees and theFestival Intermediates. Lift along the opposite long side by tip-ping the "Aerial Mast Sub Frame" up on Assembly Legs to placeremaining Assembly Legs.
Step 3: Layout the perimeter fittings around the tent including cornerfittings and Jumbo Special Tee Fittings. Starting from one cor-ner of the subframe connect and pin the three 10’6” hip bracepipes into place. Also connect and pin these pipes to the cornerfitting and the Jumbo Special Tee Fittings.
Step 4:Continue working around the frame from this corner connectingall of the 10’6” brace piping that connects the upper “subframe”to the perimeter framing. At this time also loop the 30’ CrossCable over the lateral arm of the Jumbo Special Tee Fitting andstretch the cable across the tent to the opposing Jumbo SpecialTee Fitting and once again loop over the lateral arm of theopposing Jumbo Special Tee Fitting.
Once installed this cable will restrain the frame from spreadingpast its intended 30’ width.
www.aztectents.com
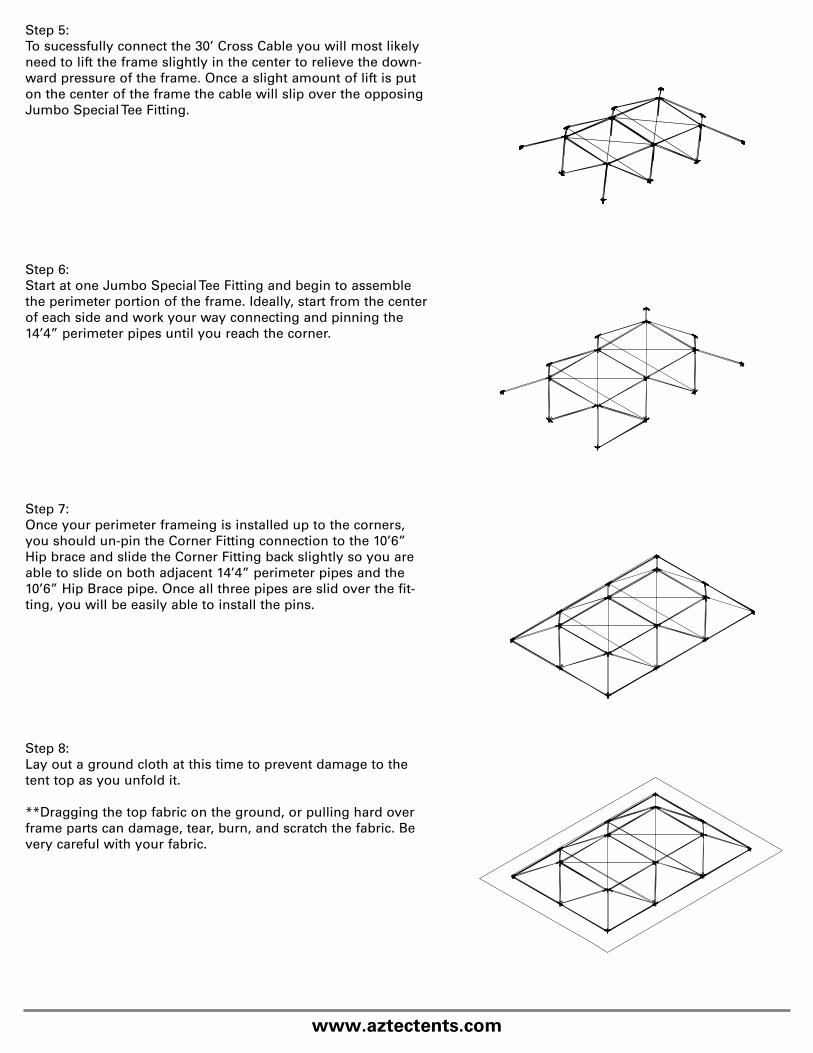
Step 5:To sucessfully connect the 30’ Cross Cable you will most likelyneed to lift the frame slightly in the center to relieve the down-ward pressure of the frame. Once a slight amount of lift is puton the center of the frame the cable will slip over the opposingJumbo Special Tee Fitting.
Step 6:Start at one Jumbo Special Tee Fitting and begin to assemblethe perimeter portion of the frame. Ideally, start from the centerof each side and work your way connecting and pinning the14’4” perimeter pipes until you reach the corner.
Step 7:Once your perimeter frameing is installed up to the corners,you should un-pin the Corner Fitting connection to the 10’6”Hip brace and slide the Corner Fitting back slightly so you areable to slide on both adjacent 14’4” perimeter pipes and the10’6” Hip Brace pipe. Once all three pipes are slid over the fit-ting, you will be easily able to install the pins.
Step 8:Lay out a ground cloth at this time to prevent damage to thetent top as you unfold it.
**Dragging the top fabric on the ground, or pulling hard overframe parts can damage, tear, burn, and scratch the fabric. Bevery careful with your fabric.

www.aztectents.com
Step 9: Unfold the tent sections on the drop cloth and carefully pullthem over the frame. The Festival tops are available in both 1pc“Fixed” sizes and multiple sectioned expandable sections. If youare using a 1pc “Fixed” top you will want to pull the fabric tightover the frame and secure the festival corner loops over the cor-ner fittings using the festival tool. For expandable top users,please continue to step 10.
Step 10:Expandable sections connect to each other with a lace/grommetconnection and a velcro weather flap. Position the multiple sec-tions over the frame. Starting at the peak of the tent, positionthe two adjoining peak mast fittings together and position thelace side of the connection on the bottom. Pass the lace web-bing through the #2 grommet of the connecting section and pulltoward the next grommet. Pass the next lace webbing throughthe next grommet and also pass through the previous lace loopand pull toward the next grommet. Continue lacing the sectionsuntil you reach the last lace/grommet where you will need to tie-off the lace webbing to itself with a double overhand knot. Asyou work your way down the laceline be sure to connect thevelcro weather flap to the adjoining section. Repeat with allother lacelines.
Step 11: Position your tent jacks next to each perimeter fitting along oneside of the tent. Once tent jack (sold seperately) must be used ateach leg to avoid overstressing the frame members. Connectthe jacks securly to each perimeter fitting and begin lifting theframe. At this time you need to remove the 4’6” Assembly Legs
**At no time should a tent jack be left unmanned. The user mustremain in control of the jack to keep from tipping over.
Step 12: Once the frame is lifted just past the height of the legs you willbe able to have a separate crew member slide the leg polesover the fittings and pin into place. Also be sure to install andpin the baseplates at this time. The stake hole and hook shouldbe positioned on the outside of the tent. Lower the frame to siton the ground.
Now that you can gain access under the tent top, slide the pinof the mast through the crown at the peak of the fabric andplace the roller wheel (on the bottom of the mast) on the topcable.Push the bottom of the mast toward the point where thetwo cables cross. Once the mast is vertical push the bottomcable down so it snaps into the groove on the bottom mast con-nection.
Connect the Bottom Mast Caps to the bottom of the mast tosecure it. Continue with other masts.

www.aztectents.com
Step 13:Reposition the tent jacks to the opposite side of the tent. Securethe jacks to the perimeter fittings and raise the opposite side ofthe tent just past the height of the leg allowing you to installand pin the leg to the perimeter fitting and the baseplate. Atthis time also install and pin the legs on the 30’ end of the tent.
Step 14:Anchor the tent with the included stakes and 1” In-LineRatchets. The ratchets should be snapped to the eyebolt at eachof the perimeter fittings and preferably the stakes shall be driv-en through the pear-shaped ring on the In-Line Ratchet. Thestakes should be driven straight into the ground at a distanceequal to the height of the leg. Once the stakes are driven,engage the ratchets and apply significant tension to the straps.
Step 15:Using the included ratchet tensioners (included in bag with tenttops) connect the 1” narrow hook to the ring on the valancetensioning rope. The ratchet tensioner is designed for use for 8’and 10’ legs. Once the spring snap is connected and the loop isover the nub on the Base Plate you can apply even tension totighten the valance tensioning system.

www.aztectents.com
Installation- 40’ Wide
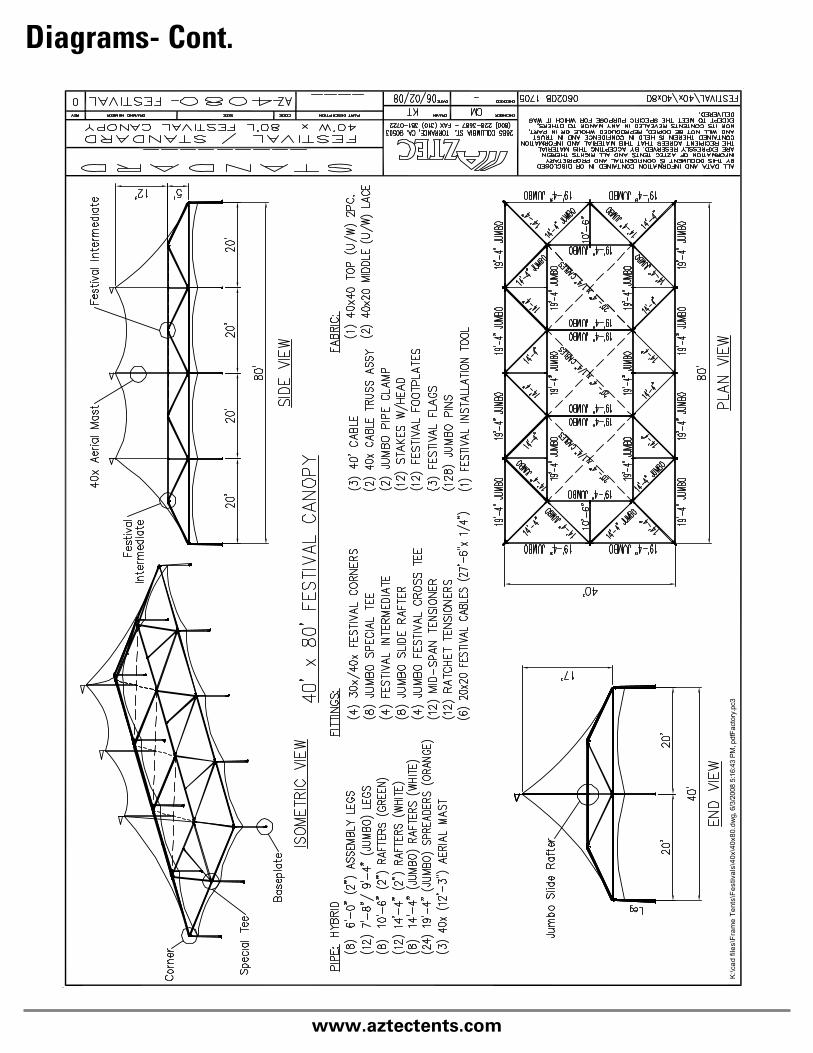
Step 1: Assemble (first) square of the "Aerial Mast Sub Frame" whichconsists of (4) 19'-4" Jumbo Tubes, (2) Festival IntermediateFittings, (2) Festival Cross Tees, (2) Diagonal Cables and (10)Festival Pins. Assemble and Pin the four sides. Attach diagonalcables. Lift the last corner of the square assembly to enableattachment of cable over last hook. Lay frame down flat on theground. Assemble (second) square of the "Aerial Mast SubFrame" to the first square above which adds (3) Jumbo Tubes,(2) Festival Intermediates, (2) Cables and (6) Festival Pins.Assemble and Pin the three additional sides forming (second)square. Attach diagonal cables. Lift last corner (this must beone of two added / un-tensioned corners) of Square Twoassembly to enable attachment of cable over last hook. Laythis added frame down flat on the ground. Important Note: The bottom diagonal cables must be orientedparallel on all frames with multiple masts.
Step 2:Lift along one of the long sides of the "Aerial Mast Sub Frame"by tipping the "Aerial Mast Sub Frame" up on it's other longside. Place and Pin the Assembly Legs (6’0”" pipe) onto theFitting stubs provided under the Festival Cross Tees and theFestival Intermediates. Lift along the opposite long side by tip-ping the "Aerial Mast Sub Frame" up on Assembly Legs toplace remaining Assembly Legs.
Step 3: Layout the perimeter fittings around the tent including cornerfittings and Jumbo Special Tee Fittings. Starting on the uppersubframe connect and bolt the Jumbo Slide Rafter Fittings atthe midpoint of each 19’4”Jumbo Pipes and connect and pinthe 10’6” brace pipes into place. Also connect and pin thesepipes to the Jumbo Special Tee Fittings located on the perime-ter.
Step 4:Begin connecting and pinning all of the 14’4” Jumbo pipesaround the tent. Always connect and pin to the upper subframe first and then connect and pin to the perimeter fitting.

www.aztectents.com
Step 5:Continue connecting and pining all of the remaining 14’4”Jumbo support pipes.
Step 6:At this time also loop the 40’ Cross Cable over the lateral arm ofthe Jumbo Special Tee Fitting and stretch the cable across thetent to the opposing Jumbo Special Tee Fitting and once againloop over the lateral arm of the opposing Jumbo Special TeeFitting.
Once installed this cable will restrain the frame from spreadingpast its intended 40’ width.
Step 7:Start at one Jumbo Special Tee Fitting and begin to assemblethe perimeter portion of the frame. Ideally, start from the centerof each side and work your way connecting and pinning the19’4” perimeter pipes until you reach the corner.
Step 8:Once your perimeter frameing is installed up to the corners, youshould un-pin the Corner Fitting connection to the 14’4” Hipbrace and slide the Corner Fitting back slightly so you are ableto slide on both adjacent 19’4” perimeter pipes and the 14’4”Hip Brace pipe. Once all three pipes are slid over the fitting, youwill be easily able to install the pins.
Also now install the 40x Festival Jumbo Truss Cable. This cableis only used when you have multiple subframe extensions (ex.in 40x60’s and larger). Attach cables to the Festival Intermediatefittings, install riser pipe and pin to Festival Jumbo Cross Teeand tighten turbuckle.

www.aztectents.com
Step 9:Lay out a ground cloth at this time to prevent damage to thetent top as you unfold it.
**Dragging the top fabric on the ground, or pulling hard overframe parts can damage, tear, burn, and scratch the fabric. Bevery careful with your fabric.
Step 10: Unfold the tent sections on the drop cloth and carefully pullthem over the frame. The Festival tops are available in both 1pc“Fixed” sizes and multiple sectioned expandable sections. Ifyou are using a 1pc “Fixed” top you will want to pull the fabrictight over the frame and secure the festival corner loops overthe corner fittings using the festival tool. For expandable topusers, please continue to step 10.
Step 11:Expandable sections connect to each other with a lace/grommetconnection and a velcro weather flap. Position the multiple sec-tions over the frame. Starting at the peak of the tent, positionthe two adjoining peak mast fittings together and position thelace side of the connection on the bottom. Pass the lace web-bing through the #2 grommet of the connecting section andpull toward the next grommet. Pass the next lace webbingthrough the next grommet and also pass through the previouslace loop and pull toward the next grommet. Continue lacingthe sections until you reach the last lace/grommet where youwill need to tie-off the lace webbing to itself with a double over-hand knot. As you work your way down the laceline be sure toconnect the velcro weather flap to the adjoining section. Repeatwith all other lacelines.
Step 11: Position your tent jacks next to each perimeter fitting along oneside of the tent. Once tent jack (sold seperately) must be usedat each leg to avoid overstressing the frame members. Connectthe jacks securly to each perimeter fitting and begin lifting theframe. At this time you need to remove the 6’0” Assembly Legs
**At no time should a tent jack be left unmanned. The usermust remain in control of the jack to keep from tipping over.

www.aztectents.com
Step 12: Once the frame is lifted just past the height of the legs you willbe able to have a separate crew member slide the leg polesover the fittings and pin into place. Also be sure to install andpin the baseplates at this time. The stake hole and hook shouldbe positioned on the outside of the tent. Lower the frame to siton the ground.
Now that you can gain access under the tent top, slide the pinof the mast through the crown at the peak of the fabric andplace the roller wheel (on the bottom of the mast) on the topcable.Push the bottom of the mast toward the point where thetwo cables cross. Once the mast is vertical push the bottomcable down so it snaps into the groove on the bottom mastconnection.
Connect the Bottom Mast Caps to the bottom of the mast tosecure it. Continue with other masts. Also now install the 40xFestival Jumbo Truss Cable. This cable is only used when youhave multiple subframe extensions (ex. in 40x60’s and larger).Attach cables to the Festival Intermediate fittings, install riserpipe and pin to Festival Jumbo Cross Tee and tighten turbuckle.
Step 13:Reposition the tent jacks to the opposite side of the tent. Securethe jacks to the perimeter fittings and raise the opposite side ofthe tent just past the height of the leg allowing you to installand pin the leg to the perimeter fitting and the baseplate. Atthis time also install and pin the legs on the 30’ end of the tent.
Step 14:Anchor the tent with the included stakes and 2” In-LineRatchets. The ratchets should be snapped to the eyebolt at eachof the perimeter fittings and preferably the stakes shall be driv-en through the pear-shaped ring on the In-Line Ratchet. Thestakes should be driven straight into the ground at a distanceequal to the height of the leg. Once the stakes are driven,engage the ratchets and apply significant tension to the straps.
Step 15:Using the included ratchet tensioners (included in bag with tenttops) connect the 1” narrow hook to the ring on the valancetensioning rope. The ratchet tensioner is designed for use for 8’and 10’ legs. Once the spring snap is connected and the loop isover the nub on the Base Plate you can apply even tension totighten the valance tensioning system.
Also install the midspan tensioners at the midpoint of theperimeter pipes to the straps located on the unerside of thefabric top.
Cable TrussAssbly 40x
MidspanTensioners

www.aztectents.com
K:\
ca
d f
ile
s\F
ram
e T
en
ts\F
estiva
ls\1
0x\1
0x1
0.d
wg, 6/3
/2008 6
:00:2
9 P
M, pdfF
acto
ry.p
c3
10'
Diagrams

www.aztectents.com
K:\
ca
d f
ile
s\F
ram
e T
en
ts\F
estiva
ls\1
0x\1
0x2
0.d
wg, 6/3
/2008 6
:06:0
4 P
M, pdfF
acto
ry.p
c3
10'

www.aztectents.com
K:\
ca
d f
ile
s\F
ram
e T
en
ts\F
estiva
ls\1
5x\1
5x1
5.d
wg, 6/3
/2008 6
:10:2
0 P
M, pdfF
acto
ry.p
c3
Diagrams- Cont.

www.aztectents.com
K:\
ca
d f
ile
s\F
ram
e T
en
ts\F
estiva
ls\1
5x\1
5x3
0.d
wg, 6/3
/2008 6
:12:5
7 P
M, pdfF
acto
ry.p
c3

www.aztectents.com
K:\
ca
d f
ile
s\F
ram
e T
en
ts\F
estiva
ls\2
0x\2
0x2
0.d
wg, 6/3
/2008 6
:37:0
1 P
M, pdfF
acto
ry.p
c3
Diagrams- Cont.

www.aztectents.com
K:\
ca
d f
ile
s\F
ram
e T
en
ts\F
estiva
ls\2
0x\2
0x3
0.d
wg, 8/2
9/2
006 3
:40:0
5 P
M, pdfF
acto
ry.p
c3

K:\
ca
d f
ile
s\F
ram
e T
en
ts\F
estiva
ls\2
0x\2
0x4
0.d
wg, 6/3
/2008 6
:45:5
3 P
M, pdfF
acto
ry.p
c3
www.aztectents.com
Diagrams- Cont.

www.aztectents.com

www.aztectents.com
K:\
ca
d f
ile
s\F
ram
e T
en
ts\F
estiva
ls\3
0x\3
0x3
0.d
wg, 5/2
8/2
008 6
:08:4
0 P
M, pdfF
acto
ry.p
c3
Diagrams- Cont.
www.aztectents.com
K:\
ca
d f
ile
s\F
ram
e T
en
ts\F
estiva
ls\3
0x\3
0x4
5.d
wg, 6/2
/2008 1
1:0
2:0
0 A
M, pdfF
acto
ry.p
c3

www.aztectents.com
K:\
ca
d f
ile
s\F
ram
e T
en
ts\F
estiva
ls\3
0x\3
0x6
0.d
wg, 6/2
/2008 5
:50:4
5 P
M, pdfF
acto
ry.p
c3
Diagrams- Cont.

www.aztectents.com
K:\
ca
d f
iles\F
ram
e T
en
ts\F
estiva
ls\H
ex\3
0x H
ex.d
wg, 6/3
/2008 5
:50:4
7 P
M, pdfF
acto
ry.p
c3

www.aztectents.com
K:\
ca
d f
ile
s\F
ram
e T
en
ts\F
estiva
ls\4
0x\4
0x4
0.d
wg, 6/3
/2008 4
:38:0
5 P
M, pdfF
acto
ry.p
c3
Diagrams- Cont.

www.aztectents.com
K:\
ca
d f
ile
s\F
ram
e T
en
ts\F
estiva
ls\4
0x\4
0x6
0.d
wg, 6/3
/2008 5
:11:4
5 P
M, pdfF
acto
ry.p
c3
www.aztectents.com
K:\
ca
d f
ile
s\F
ram
e T
en
ts\F
estiva
ls\4
0x\4
0x8
0.d
wg, 6/3
/2008 5
:16:4
3 P
M, pdfF
acto
ry.p
c3
Diagrams- Cont.

www.aztectents.com
K:\
ca
d f
iles\F
ram
e T
en
ts\F
estiva
ls\H
ex\4
0x H
ex.d
wg, 6/3
/2008 5
:47:1
2 P
M, pdfF
acto
ry.p
c3

Parts Listing
www.aztectents.com
Festival Corner 10/15Festival Corner 20XFestival Corner 30X 40XFest HEX 120 Degree CornerFestival Side Fitting 10X 15X
Fest Jumbo Side Fitting 20XFestival Jumbo Sp Tee 30X 40XFestival IntermediateFestival Jumbo Cross TeeFestival Cable 10X
Festival Cable 10X15Festival Cable 15X 30XFestival Cable 20x15Festival Cable 20X 40XFest. 30x HEX Cable(29'-1.5")
Festival 30' Cross CableFestival 40' Cross CableFestival Aerial Mast 10XFestival Aerial Mast 15XFestival Aerial Mast 20X
Festival Aerial Mast 30XFestival Aerial Mast 40XFestival Fabric ToolFestival Rope Tensioner 10x15xFest Ratchet Tensioner20/30/40
Fest Jumbo Slide Rafter Ftg.Fest Jumbo Pipe ClampMid-Span TensionerQwik Footplate2' Adjustable Qwik Baseplate
Fest Footplate 20/30/40Festival 2' Adj. Footplate10' Festival Gutter15' Festival Gutter20' Festival Gutter
Fest Cable Truss Assembly 40xFestival Mast Flag BlackFestival Mast Flag BlueFestival Mast Flag GreenFestival Mast Flag Red
Festival Mast Flag WhiteFestival Mast Flag YellowFestival Bottom Mast CapFestival Mast Bottom w/Wheel
Festival Mast Top PinAcadapin/Assembly PinJumbo Pin
7' 8" - 2" Pipe9' 4" - 2" Pipe10' 6" - 2" Pipe14' 4" - 2" Pipe7' 8" - Jumbo Pipe9' 4" - Jumbo Pipe14' 4" - Jumbo Pipe19' 4" - Jumbo Pipe
Z29700010Z29700020Z29700030Z29700035Z29700040
Z29700050Z29700060Z29700070Z29700080Z29700090
Z29700095Z29700100Z29700110Z29700120Z29700129
Z29700130Z29700140Z29700150Z29700160Z29700170
Z29700180Z29700190Z29700250Z29700260Z29700270
Z29700280Z29700290Z299F00210Z299F00200Z299F00180
Z29700300Z29700310Z29700320Z29700330Z29700340
Z29700350Z29700360BKZ29700360BLZ29700360GRZ29700360RD
Z29700360WHZ29700360YL
Z29700370Z29700380
Z29700390Z299F00160Z299F00170
Z299P20708Z299P20904Z299P21006Z299P21404Z299PJ0708Z299PJ0904Z299PJ1404Z299PJ1904
Item Item No.
51013146
121415133
34456
67
273341
4756201
54248
513569
121111
1117
60.10.1
78101314182736
Weight lbs

Parts Images
Festival Corner 10x/15x Festival Corner 20x Festival Corner 30x/40x Festival Side Fitting 10x/15x
Jumbo Festival Side Fitting20x
Jumbo Special Tee 30x/40x Festival Intermediate Festival Jumbo Cross Tee
Qwik Footplate 10x/15x Festival Footplate 20x/30x/40x Midspan Tensioner Festival Tool
Jumbo Slide Rafter Fitting Jumbo Pipe Clamp Cable Truss Assmebly 40x Aerial Mast (Specify Size)
Cross Cable (Specify 30x or 40x) Festival Cable (Specify Size) Ratchet & Rope Tensioner Jumbo Pin

I f Y O U c a n I M A G I N E i t . . . W E c a n B U I L D i t
www.aztectents.com
Aztec Tents
2665 Columbia StreetTorrance, CA 90503
Toll Free (800) 228-3687Fax (310) 381-0722