alarm system and dialler products - daitem · the system behaves as if it is being disarmed but...
TRANSCRIPT

ALARM SYSTEM
AND
DIALLER
PRODUCTS
USER GUIDE

2
You have just bought a DAITEM security system, designed to coverall your protection needs. We would like to thank you for yourconfidence.
• The installation of your system should be carried out according to applicable national standards. If your system is to bepowered by 230 VAC mains power the connection must be carried out by a certified electrician.
• Your security system is simple to use. We advise you to switch it on (arm it) every time you leave your home. • Do not leave your remote control in view.• Keep a back-up remote control in a secret place.• If one of the devices in your system is lost, stolen or sabotaged, call your installer right away.• Keep the access codes to your control keypads secret.• Switch your security system to partial protection mode to protect unoccupied rooms.
• Close all the protected doors and windows.• Switch on (arm) your security system.• If necessary, check for any fault indications or entrances left open.
When you leave home
• Check that all doors and windows are closed.• Check your security system is operating properly by performing a real test on the system.• Switch on (arm) your system.
When you’re going to be away for a while
Precautions
Installing a dialler unit on the control panel (which does not have one when delivered) or installing a separate dialler in yourhome can provide your installer with remote access to your alarm system. This will allow your installer to: • perform maintenance operations, • modify parameter settings,• download data via the internet according to the conditions described in the dialler product user manual. It is up to your
installer to define with you the specific contractual conditions for accessing your system.
Important
If you have any comments about how we might improve our guides and our products, we would be grateful if you couldsend them in writing to: Daitem - Service consommateur
rue du Pré de l’Orme - F-38926 CROLLES cedex
We would appreciate your suggestions
PRODUCT APPLICATIONThe equipment marketed by DAITEM is designed to contribute to the protection and comfort of homes and someprofessional premises or to contribute to the protection and wellbeing of persons, according to the technical limits andenvironments described in the documentation supplied by DAITEM and recommended by the retailer.
CE MARKING AND REGULATIONSThe products marketed by DAITEM comply with the essential requirements of the applicable European directives. CEmarking certifies that the products comply with these directives and the standards that define the technical specifications tobe applied.
Your retailer will provide you with the conditions under which the manufacturer’s guarantee and after-sales service apply.
Disposing of waste electrical and electronic devices at the end of their service life (Applicable in European Union countries and otherEuropean countries with a waste collection system). This symbol on products or product packaging indicates that the product must not bethrown out with normal household waste. It must be taken to an appropriate collection point for recycling waste electrical and electronic equip-
ment. By disposing of such products in the appropriate manner, you are helping to prevent any harmful effects they may have on the environmentand human health. For further information about recycling this product, you should consult your local authorities, waste collection centre or the shopwhere you bought the product.
DAITEM shall in no way be held responsible for the consequences of the temporary or permanent unavailability of the SPTNswitched public telephone network, the GSM/GPRS mobile network or the Ethernet (ADSL) network. Some features are onlyavailable with control panel versions 2.0.0 or later.
Enter on your control panel keypad to check!
Warning
master code (factory: 0000)

3
Contents
ALARM SYSTEM USER GUIDE
1. Operating your security system.......................................................................................................................................... 41.1 Arming or disarming the system....................................................................................................................................... 41.2 Deactivating the exit time delay when the last exit is closed.......................................................................................... 41.3 Disarming the system under duress (this feature is only available with a remote monitoring service) ......................... 41.4 Arming or disarming one or several groups..................................................................................................................... 51.5 Partially arming the system............................................................................................................................................... 51.6 Arming the system in presence mode.............................................................................................................................. 61.7 Arming the system when a door or window is open....................................................................................................... 61.8 Automatic timed Arm/Disarm ........................................................................................................................................... 7 1.9 System reactivation........................................................................................................................................................... 7
2. The keypads transfer information about the control panel status................................................................................ 8
3. Configuring the system locally using the keypad built into the control panel ............................................................ 93.1 Modifying the language..................................................................................................................................................... 93.2 Modifying the date and time............................................................................................................................................. 93.3 Modifying your master code............................................................................................................................................. 93.4 Modifying the user codes ............................................................................................................................................... 103.5 Disabling or enabling the user codes............................................................................................................................. 10
4. Restricting access to commands..................................................................................................................................... 104.1 Restricting access using the user codes ....................................................................................................................... 104.2 Restricting access using the tags................................................................................................................................... 114.3 Disabling or enabling a tag ............................................................................................................................................. 11
5. Testing the devices............................................................................................................................................................. 12
6. Performing a real test on the system .............................................................................................................................. 13
7. The control panel indicates alarms.................................................................................................................................. 14
8. The control panel indicates faults .................................................................................................................................... 15
9. Consulting the events log.................................................................................................................................................. 16
10. Additional keypad functions............................................................................................................................................ 1710.1 Querying the status of your system ............................................................................................................................. 1710.2 Triggering an alarm (if keypad button has been reprogrammed)................................................................................ 1710.3 Triggering a silent alarm (if keypad button has been reprogrammed) ........................................................................ 17
DIALLER PRODUCT USER GUIDE
Foreword .................................................................................................................................................................................. 18
1. Introduction.......................................................................................................................................................................... 191.1 Operation for outgoing calls ........................................................................................................................................... 201.2 Operation for incoming calls........................................................................................................................................... 20
2. Configuring a dialler locally using the built-in keypad.................................................................................................. 212.1 Modifying the language................................................................................................................................................... 212.2 Modifying the date and time........................................................................................................................................... 212.3 Modifying your master code........................................................................................................................................... 212.4 Modifying your video code (GSM/GPRS - Ethernet ADSL) .......................................................................................... 222.5 Enabling or disabling remote access via the Internet (mains-powered GPRS - Ethernet ADSL) ............................... 222.6 Recording or modifying the personalised welcome message for vocal transmissions (PSTN-GSM) ........................ 232.7 Modifying the numbers of individual correspondents (PSTN - GSM) .......................................................................... 23
3. Outgoing calls ..................................................................................................................................................................... 243.1 Dialler call cycle procedure............................................................................................................................................. 243.2 Procedure for voice calls to individuals (PSTN - GSM)................................................................................................. 253.3 List of commands possible during listen-in period ....................................................................................................... 253.4 List of voice messages and SMS transmitted to an individual correspondent according to the type of event
(PSTN - GSM).................................................................................................................................................................. 263.5 Procedure for calls to a remote monitoring centre (PSTN-GSM/GPRS - Ethernet ADSL).......................................... 27
4. Incoming calls ..................................................................................................................................................................... 284.1 Voice remote operation over the telephone via the PSTN or GSM network (mains-powered)................................... 284.2 Configuring and operating the dialler from a PC connected via Internet (mains-powered GPRS - Ethernet ADSL). 304.3 Remote operation over SMS via the GSM network (mains-powered) ......................................................................... 31
5. Testing calls to your correspondents (PSTN-GSM/GPRS- Ethernet ADSL) .............................................................. 32
6. Instructions sheet (to be completed and given to your correspondents) .................................................................. 33
DAITEM GUARANTEE AND EXTENSION CONDITIONS .............................................................................................. 35

4
The LED indicating the reading zone flashes. Hold the tag against the pictogram .
1. Operating your security system
The control panel can operate up to 8intrusion protection groups (dependingon the type of control panel) eitherindividually or at the same time.
• Using a remote control:
or
1.1 Arming or disarming the system
1.2 Deactivating the exit time delay when the last exit is closed
Armed: all groups armed
“bip, Armed”
Off: All groups disarmed
“bip, Off”
• Using a control keypad:
Using a keypad:
+ or
or and
master code
Using a vocal keypad with tag reader and proximity detector
G4 G3
G1G2
master code
Group disarmed
Group armed
This function allows users to quietly alert a correspondent when they are forced to disarm their alarm system by an intruder. The system behaves as if it is being disarmed but sends a specific silent alarm message via the telephone line to the remotemonitoring centre.
1.3 Disarming the system under duress (this feature is only available with a remote monitoring service)
Users must check that this specific alert message can be processed by their remote monitoring centre.
IMPORTANT: if a telephone transmission unit card has been installed.
Example: 4 intrusion protection groups
The exit time delay can be deactivated when one of the entrances with a detector programmed for this function is closed. Deactivation of this time delay can be automatically programmed by determining a door or window detector in charge ofarming one, several or all groups.
“bip, Armed”or
“bip, Off”
ALARM SYSTEM USER GUIDE

5
Example using a control keypad:
• Arming groups 3 + 4
master code
The LEDindicating thereading zoneflashes. Holdthe tag against the pictogram.
1.4 Arming or disarming one or several groups
Groups 3 + 4 armed
“bip, Armedgroup 3-4”
Groups 1 + 2 disarmed
“bip, Off group 1-2”
• Using a remote keypad:
+ or ...
+ or and...
master code
• Using a vocal keypad with tag reader:
Group disarmed
Group armed
Group unchanged
group n° from 1 to 8
group n° from 1 to 8
Example using a vocal keypad with tag reader:
• Disarming groups 1 + 2
master code
The LED indicating the reading zone flashes. Hold the tag against the pictogram .
“bip, Off, Group 1-2”
The LED indicating the reading zone flashes. Hold the tag against the pictogram .
• Using a remote control:
or
1.5 Partially arming the system
Armed Partial 1:Group 1 only is armed
“bip, ArmedPartial 1”
Armed Partial 2:Group 2 only is armed
“bip, ArmedPartial 2”
• Using a control keypad:
+ or
or and
master code
• Using a vocal keypad with tag reader:
Group disarmed
Group armed
For P2, your installer mustreprogramme the key.
“bip, ArmedPartial 1”or
“bip, ArmedPartial 2”

6
The control panel is factory programmed to prevent system arming in case a door or window (with a protection deviceinstalled on it) has been left open.This factory programming can be modified by the installer.
1.7 Arming the system when a door or window is open
Example: arming with exit 2 open
You arm the system You close exit 2 You arm the system End of exit time delay
The control panel doesnot arm the system
“bip, exit 2opened”
“bip, armed” “bip, armed”
The LED indicating the reading zone flashes. Hold the tag against the pictogram .
1.6 Arming the system in presence mode
Armed Presence: Group 1 only armed
“bip, ArmedPresence”
• Using a control keypad:
+
and
master code
• Using a vocal keypad with tag reader::
Group disarmed
Group armed
The control panel allows for partial protection and quiet system responses in the event of intrusion: Armed Presence.
IMPORTANT: there is no exit time delay or entry time delay in armed presence mode.
ENTRY TIME DELAYThe entry time delay is the time allowed to disarm the system from inside the premises (e.g. using the keypad) without triggeringthe alerts and deterrents. Users can decide on the most suitable time delay for them with their installer.A vocal warning “BIP, BIP, BIP, BIP, PROTECTION_ACTIVE” tells users to disarm the system.
EXIT TIME DELAYThe exit time delay is the time allowed to leave the premises without triggering the alarm system. Users can decide on the mostsuitable time delay for them with their installer. The end of this time delay is indicated by the control panel as it repeats the voicemessage that the system is armed.
“bip, ArmedPresence”
7
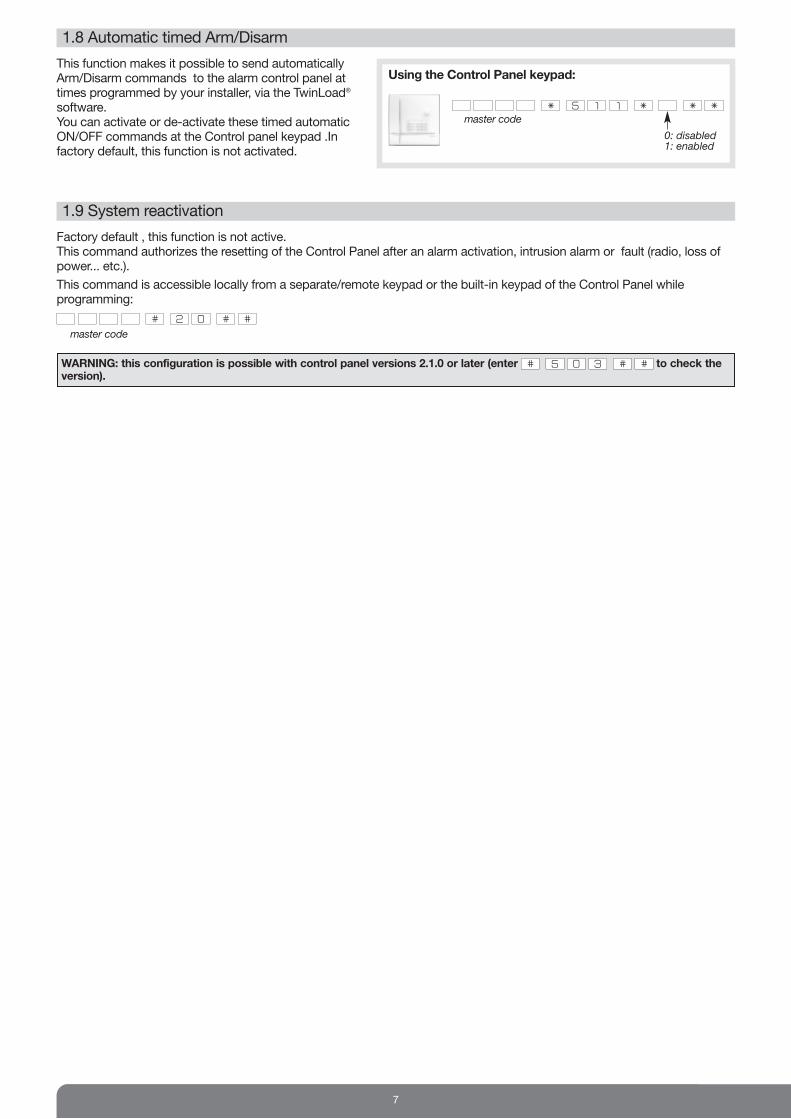
This function makes it possible to send automaticallyArm/Disarm commands to the alarm control panel attimes programmed by your installer, via the TwinLoad®
software.You can activate or de-activate these timed automaticON/OFF commands at the Control panel keypad .Infactory default, this function is not activated.
1.8 Automatic timed Arm/Disarm
Using the Control Panel keypad:
master code
0: disabled1: enabled
Factory default , this function is not active.This command authorizes the resetting of the Control Panel after an alarm activation, intrusion alarm or fault (radio, loss ofpower... etc.).
This command is accessible locally from a separate/remote keypad or the built-in keypad of the Control Panel whileprogramming:
1.9 System reactivation
master code
WARNING: this configuration is possible with control panel versions 2.1.0 or later (enter to check theversion).

8
2. The keypads transfer information about the control panel status
The keypads can be used to: • operate your system,• check the status of your system.
IMPORTANT• Only commands sent from control and information keypads light up the LEDs.• Only commands issued from a vocal keypad trigger voice messages indicating possible alarms, faults and the status of exits.
Commandssent to:
Command Indications & messages at the information
& command keypad
Message issued by vocal keypad with tag reader
LED status Buzzer
A control panel
Disarm keyfob 1.5 sG long beep “Bip, Off” or “Bip, Fault System”
OFF/Disarmwith alarm memory G G G 3 short beeps
Arm keyfob 1.5 sR long beep “Bip, Armed”
ON/Arm with fault keyfob 1.5 sR 3 short beeps
Armed partial 1 keyfob 1.5 sR long beep “Bip, Armed Partial 1”
Armed partial 2 keyfob 1.5 sR long beep “Bip, Armed Partial 2”
ON Partial 1, with a fault keyfob 1.5 sR 3 short beeps
ON Partial 2, with a fault keyfob 1.5 sR 3 short beeps
Arm group X keyfob 1.5 sR long beep “Bip, Armed Group X
ON Group X with an anomaly keyfob 1.5 sR 3 short beeps
ON blocked (1) R R R 3 short beeps
Disarm group X keyfob 1.5 sG long beep Bip, Off Group X”
OFF group X with alarm memory G G G 3 short beeps
Arm in presence mode “Bip, Armed Presence”
Alarms memorised “Bip, Off, Alarm System”
Faults memorised “Bip, Armed, Fault System” or “Bip, Off, Fault System”
Exits open keyfob 1.5 sR 3 short beeps “Bip, Armed, Exit Opened”
Switching receiver,remote control unit
Transmit a home automationcommand (light, relay, etc.) keyfob 1.5 sG
Switch to test mode “Bip, Test mode”
Switch to installation mode “Bip, Installation mode”
Switch to user mode “Bip, Off”
System status query
“Bip, system status, Armed”
“Bip, System_status, Armed Partial 1 or 2”
“Bip, System_status, Off”
“Bip, System_status, Armed Group X”
“Bip, System_status, Armed Presence”
“Bip, System_status,...Fault System”
“Bip, System_status,...Exit Opened”
“Bip, System_status,...Exit Inhibited”
(1) A stopped ON/Arming operation means the system has been unableto complete Arming due to a system fault.
X: group 1 to 8 depending on type of control panel
: green LED
: red LED
G
R

9
3. Configuring the system locally using the keypad built into the control panel
If 5 wrong access codes are entered on the keypad in less than 5 minutes this will block the keypad for 5 minutes and thecontrol panel will be informed.
You can replace the original language with another language.
To modify the language, enter:
Factory setting: English
Your installer will have already configured your control panel but you can modify some of the programming at any time.
3.1 Modifying the language
0: French1: Italian2: German
3: Spanish4: Dutch5: English
“bip + chosenlanguage”master code
IMPORTANT • To keep your codes confidential, we recommend you change the keypad access codes often and regularly clean the keys.• To prevent unwanted calls to correspondents, do not end the master code with a “0”.
The events memorised by the control panel are date and time stamped.
To programme the date and time manually, proceed as follows:
3.2 Modifying the date and time
Do not lose your codes as you will need them in order to programme new codes. However, if you do lose your codes,contact your installer who will put the system back into its factory configuration and programme the codes again. Yourmaster code allows you to configure the control panel and access all the system commands using the built-in keypad.
3.3 Modifying your master code
• Date To modify the date, enter: “bip + date
announced”
• TimeTo modify the time, enter: “bip + time
announced”
Day Month
Hour Minutes
Year(e.g. for 2012,
enter 12)
master code
master code
To modify the master code, enter:
Factory master code: 0000
Example: To replace the factory master code “0000” with the new code “1423”, enter:
... ... ...
“beep”
old master code
new master code
new mastercode repeated
IMPORTANT: all access codes must differ from each other.

10
4. Restricting access to commands
The user codes can have separate and limited access to:• specific keypad control keys,• specific groups.Only the command keys or groups selected during programming can be accessed when the user code is entered.
To restrict a user code to (a) specific command key(s), use the keypad to enter:
To restrict a user code to (a) specific group(s), use the keypad to enter:
...
...
4.1 Restricting access to user codes
master code user code01 to 32 (chosen usernumber)
user code command keys
master code user code01 to 32 (chosen usernumber)
user code group(s) 1 to 8
The user codes limit access to certain commands. They are meant for occasional users.
Using the keypad, enter:
3.4 Modifying the user codes
IMPORTANT: a programmed user code is automatically enabled.
master code new user code01 to 32 (chosen usernumber)
new user coderepeated
The following procedure can be followed to enable or disable user codes without modifying their programming.
Using the keypad, enter:
3.5 Disabling or enabling the user codes
master code 0: disabled1: enabled
01 to 32 (chosen usernumber)
Example, after entering the master code (1234), to restrict user code 1 (1213) to Group 1 and Group 2, enter:
In this case, user code 1 can only disarm and arm Group 1 and Group 2.
Example, arming groups 1 and 2:
WARNING: the 32 user codes are only available with control panel keypad versions 2.1.0 or later. Enter to check the version.
user code
master code

11
The tags can have separate and limited access to specific command keys and specific groups. Only the command keys orgroups selected during programming can be accessed using the tag.
To restrict a tag to (a) specific command key(s), use the keypad to enter:
To restrict a tag to (a) specific group(s), use the keypad to enter:
...
...
4.2 Restricting access using the tags
master code tag n° from 01 to 32
tag n° from 01 to 32
command key(s)
master code tag n° from 01 to 32
tag n° from 01 to 32
group(s) 1 to 8
• To cancel a tag’s restricted access, use the keypad to enter:
Example: to cancel the restrictions linked to tag 02, use the keypad to enter:
master code tag n° from 01 to 32
tag n° from 01 to 32
The access restrictions linkedto tag 02 will be cancelled.
• To restrict access to a command key and a group, use the keypad to enter:
Example: to restrict tag 01 to Armed/Off Group 1 and Armed Partial 1 commands, use the keypad to enter:
group(s) 1 to 8
“Armed Partial 1”command key
Only the commands for Off and Armed Group 1 and ArmedPartial One are accessibleusing tag 01.
master code tag n° from 01 to 32
tag n° from 01 to 32
A registered tag is automatically enabled.
To disable or enable a tag, use the keypad to enter:
Examples:• to disable tag 01, enter:
• to enable tag 02, enter:
4.3 Disabling or enabling a tag
0: disabled1: enabled
master code tag n° from 01 to 32
WARNING: the 32 tags are only available with control panel keypad versions 2.1.0 or later. Enter to check the version.
master code
WARNING: the 32 tags are only available with control panel keypad versions 2.1.0 or later. Enter to check the version.
master code

12
IMPORTANT: once a year or before going away for a long period, we advise you to test your security system. The TEST MODEallows you to test each device in the system without triggering the sirens.
IMPORTANT: before moving in front of an infrared detector, wait for 90 seconds in an unprotected area.
5. Testing the devices
4. Switch the control panel to user mode
3. Test each remote control unit• Press the Off key on each remote
control unit.or• Enter your master code and press
the Off key on each keypad.
1. Switch the control panel to test mode
• Open then close all exits protected by a door/window or multicontactdetector.
• Check the message issued by thecontrol panel.
2. Test each detector• Move in front of each motion detector.• Check the message issued by the control panel.
master code
“bip, Test_mode”
“bip, intrusion,detector n°”
“bip, intrusion,detector n°”
“bip, Off, RemoteControl Unit n°”
“bip, Off”
master code
TEST MODE
or
) ) ) ) )
) ) ) ) )
) ) ) ) )
) ) ) ) )

13
1. Close all the exits and leave the protected areas for at least 90 seconds.
2. Arm the system
ƒ when it receives the Arm command, the control panel responds: “beep, Armed”
3. Wait until the end of the Exit time delay
ƒ the control panel announces: “Armed”
4. Enter a protected room
ƒ • the control panel and sirens are triggered,• the telephone dialler calls the programmed correspondents depending
on the type of events transmitted. (1) (2)
5. Let the sirens sound for 30 seconds and then disarm the system (3)
ƒ on receipt of the “Off” command, the sirens stop and the control panel responds. For example: “Bip, Off, on 21 10 2012 at 7:30 PM, intrusion, detector 3, group 1”.
6. Check transmission of the alarm (and any alarm images or films) to your programmed correspondents. (1) (2)
((((((((((
(((((
(((((
“beep, Armed”
“Armed”
(1) If a dialler unit or separate dialler have been installed.(2) Intrusions alarms which appear during an entry delay, are transmitted only 60 seconds after termination of the “Entry
beeps” and provided that during this entry period no system “OFF” command is received.(3) For voice calls only, the transmission of the call to correspondents is stopped when the system is disarmed.
IMPORTANT• You are now going to perform a real test on your security system. This test will trigger the alarm units and transmit a message to your correspondents by phone. We recommend you warn yourcorrespondents beforehand (if a dialler unit has been installed in the control panel or a separate dialler has been installed).• The sounding level of the sirens can cause hearing disorders. The necessary precautions must therefore be taken beforecarrying out the tests.
6. Performing a real test on the system USER MODE
) ) ) ) )
) ) ) ) )
“Bip, Off, on 21 10 2012 at 7:30 PM, intrusion,detector 3, group 1”
14
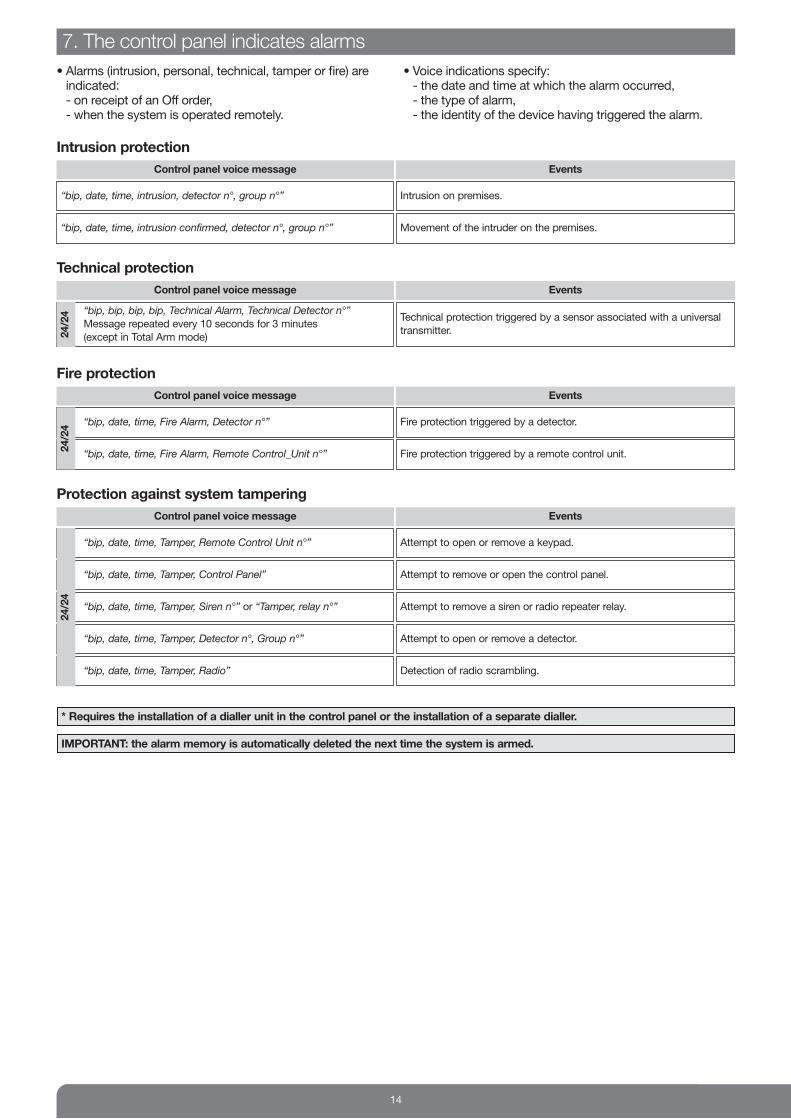
Control panel voice message Events
“bip, date, time, intrusion, detector n°, group n°” Intrusion on premises.
“bip, date, time, intrusion confirmed, detector n°, group n°” Movement of the intruder on the premises.
Intrusion protection
IMPORTANT: the alarm memory is automatically deleted the next time the system is armed.
* Requires the installation of a dialler unit in the control panel or the installation of a separate dialler.
• Alarms (intrusion, personal, technical, tamper or fire) areindicated:- on receipt of an Off order,- when the system is operated remotely.
• Voice indications specify:- the date and time at which the alarm occurred,- the type of alarm,- the identity of the device having triggered the alarm.
7. The control panel indicates alarms
Control panel voice message Events
“bip, bip, bip, bip, Technical Alarm, Technical Detector n°”
Message repeated every 10 seconds for 3 minutes
(except in Total Arm mode)
Technical protection triggered by a sensor associated with a universal
transmitter.
Technical protection
Control panel voice message Events
“bip, date, time, Fire Alarm, Detector n°” Fire protection triggered by a detector.
Fire protection
“bip, date, time, Fire Alarm, Remote Control_Unit n°” Fire protection triggered by a remote control unit.
24/24
Control panel voice message Events
Protection against system tampering
“bip, date, time, Tamper, Remote Control Unit n°” Attempt to open or remove a keypad.
“bip, date, time, Tamper, Control Panel” Attempt to remove or open the control panel.
“bip, date, time, Tamper, Siren n°” or “Tamper, relay n°” Attempt to remove a siren or radio repeater relay.
“bip, date, time, Tamper, Detector n°, Group n°” Attempt to open or remove a detector.
“bip, date, time, Tamper, Radio” Detection of radio scrambling.
24/24
24/24

15
* Requires the installation of a dialler unit in the control panel or the installation of a separate dialler.
• The control panel permanently monitors the state ofdevices:- power supply,- tamper system,- telephone line availability*,- radio link.
• The control panel indicates faults:- on receipt of an Off or Arm order,- when the system status is queried or consulted remotely.
8. The control panel indicates faults
Control panel voice message Events
“bip, Fault, Voltage, Control_panel” Control panel battery low
“bip, Fault, Voltage, Detector n°” Detector battery low
Device power supply faults
“bip, Fault, Voltage, Battery, Control panel” The control panel does not have a Li-Ion back-up battery
“bip, Fault, Voltage, Siren n°” Siren battery low
“bip, Fault, Voltage, Relay n°” Radio relay battery low
“bip, Fault, Voltage, Remote Control Unit n°” Keypad or keyfob Low battery power
Control panel voice message Events
“bip, Fault, Tamper, Control panel” Control panel tamper fault
“bip, Fault, Tamper, Detector n°, Group n°” Detector tamper fault
Device tamper faults
“bip, Fault, Tamper, Siren n° or Tamper, Relay n°” Siren or radio repeater relay tamper fault
“bip, Fault, Tamper, Remote Control Unit n°” Keypad tamper fault
Control panel voice message Events
Device radio link faults
“bip, Fault, Radio_link, Detector n°, Group n°” Loss of radio link between a detector and the control panel
“bip, Fault, Radio_link, Siren n° or Tamper, Relay n°” Loss of radio link with a siren or radio repeater relay
“bip, Fault, Radio_link, Remote Control Unit n°” Loss of radio link between a keypad and the control panel

16
The events log contains the last 1,000 date and time stamped event to have occurred in the system. It makes it possible tokeep track of all system operation and maintenance activities. The complete events log can be consulted locally using the control panel keypad.
The events log records:• intrusion protection status changes,• automatic inhibitions of exits left open,• alarms,• faults,• system mode changes.
To access the events log, enter:
then press: for the next event
ƒ to repeat the event
ƒ for previous
ƒ to fast forward (10 events by 10 events)
ƒ to end consultation
Each event in the log is displayed with the following information:• date and time,• event name,• identity of devices having triggered the event,• detection zone (for intrusion and fire alarms).
Example:
9. Consulting the events log
master code
After 30 seconds without the keypadbeing pressed, the control panelautomatically exits the events log.
“bip, on 25/02/2012 at 3 PM,Intrusion, Detector 3, Group 1”“bip, on 13/01/2012 at 12 PM,
Tamper, Siren 1”

17
• Control keypad:
or
• Vocal keypad with tag reader:
or
• Control keypad:
or
• Vocal keypad with tag reader:
or or
10. Additional keypad functions
10.1 Querying the status of your system
master code master code
master code
“bip,system_status”
10.2 Triggering an alarm (if a keypad button has been reprogrammed)
master code AlarmPress and holdlonger than 2 s
IMPORTANT: the sounding level of the sirens can cause hearing disorders. The necessary precautions must therefore be takenbefore carrying out the tests.
((((((((((
(((((
(((((
AlarmPress and hold longer than 2 s
• Control keypad:
or
• Vocal keypad with tag reader:
or
10.3 Triggering a silent alarm (if a keypad button has been reprogrammed)
master code Silent alarmPress and hold longer than 2 s
Silent alarmPress and hold longer than 2 s
((((((((((
“bip,system_status”
The LED indicating the reading zone flashes.Hold the tag against the pictogram .
The LED indicating the reading zone flashes.Hold the tag against the pictogram .
The LED indicating the reading zone flashes.Hold the tag against the pictogram .

18
USER INFORMATION
The dialler is designed to protect homes and some business premises. This alarm transmission device triggers aremote alarm in the event of a break-in but is also able to remotely transmit films and videos of the monitored site inreal time.It should be noted that the installation of a video monitoring system in a public building is subject to regulations.Employees and members of the public entering the building must be clearly and constantly informed of the presenceof the video monitoring system in compliance with legal requirements. The installation of a video monitoring system on private premises is authorised, on condition that the cameras cannotsee beyond the premises. Furthermore, individuals who are filmed on a private property must be duly informed of this. The installer is responsible for the installation of such a video monitoring system while the user is responsible for itsuse and compliance with associated legal specifications.
Exclusion of liability and communication networks (unavailability):DAITEM shall not be held liable for use of the equipment described herein that does not comply with contractualstipulations. DAITEM reminds users that its systems operate via telecommunications networks such as switched public telephone,radio, GSM, IP, GPRS, WIFI networks, etc. As DAITEM is not responsible for managing such networks, it has no control over them. Their availability can only beguaranteed by their operator. DAITEM also draws users’ attention to the fact that should these networks become unavailable, its own systems may alsobecome unavailable. If such a situation should arise, independent of the will of DAITEM, the company informs users that neither it nor themanufacturer shall be held liable for the damaging consequences that such a situation may result in.
ONLY FOR VIDEOS
Foreword
DIALLER PRODUCT USER GUIDE
GSM/
GPRSETHE
RNET
(ADSL)
fi only concerns dialler units using the media stipulated(present example: GSM/GPRS and/or Ethernet ADSL)
KEY:
fi Only concerns an alarm system fitted with one or several image transmission detector(s).
ONLY WITH THE USE OF IMAGE TRANSMISSION DETECTORS
fi Only concerns an alarm system fitted with one or several compatible IP video cameras
ONLY WITH COMPATIBLE IP CAMERAS
19
1. Introduction
A dialler unit can either be factory-mounted in a separate dialler or integrated into a control panel with siren and keypadtransforming the device into a control panel with siren, keypad and dialler. In what follows all of the products cited above shall be referred to as diallers.
The different control panels with siren andkeypad: each control panel can be fitted withone of the dialler units listed opposite hencetransforming the product into a control panelwith dialler.
The different separate diallers:
Dialler unit and transmission media:Depending on its reference, the dialler unit has different transmission media (see tables above). To describe the use of theproduct, it is assumed that the dialler has three transmission media: PSTN, GSM/GPRS and ADSL.
Control panel
reference
Choice ofdialler
Transmission media
SH320AU
SH340AU
SH380AU
SH501AX PSTN -
Ethernet(ADSL)
SH502AX - GSM/GPRS
SH503AX PSTN GSM/GPRS
SH504AX - -
Separate dialler reference
Transmission media
SH511AX PSTN -
Ethernet(ADSL)
SH512AX - GSM/GPRS
SH513AX PSTN GSM/GPRS
SH514AX - -
Dialler
Loudspeaker
Three-colour LED
Microphone
12 programming buttons
4 customisable control buttons:• armed• off• armed partial 1• armed partial 2
Blue light
(1) Only concerns a control panel with siren, keypad and dialler when the system is disarmed in user mode.
LEDs Colours LED status Indication
Three-colourLED
red steady button pressed or line occupied (incoming/outgoing call)
continuous rapid flashing operation blocked when powered (power supply, radio, transmission module link or keypad)
12 s maximum rapid flashing connection test, date and reference
1 flash every 5 s permanent indication of test mode
2 flashes every 10 s permanent indication of installation mode
3 rapid flashes error
green steady for 10 seconds valid access code
steady recording of 10 s maximum voice message
orange rapid flashing memory zone transfer
1 flash every 20 s (1) system fault (voltage fault, media fault or loss of system product radio link)
Blue light modulated indication of renewedcontrol panel transmissions
mode change: installation, test and use
arming or disarming
system status command
one of the 4 customisable keys pressed (arm, disarm, arm partial 1 and 2)
LED indications
20
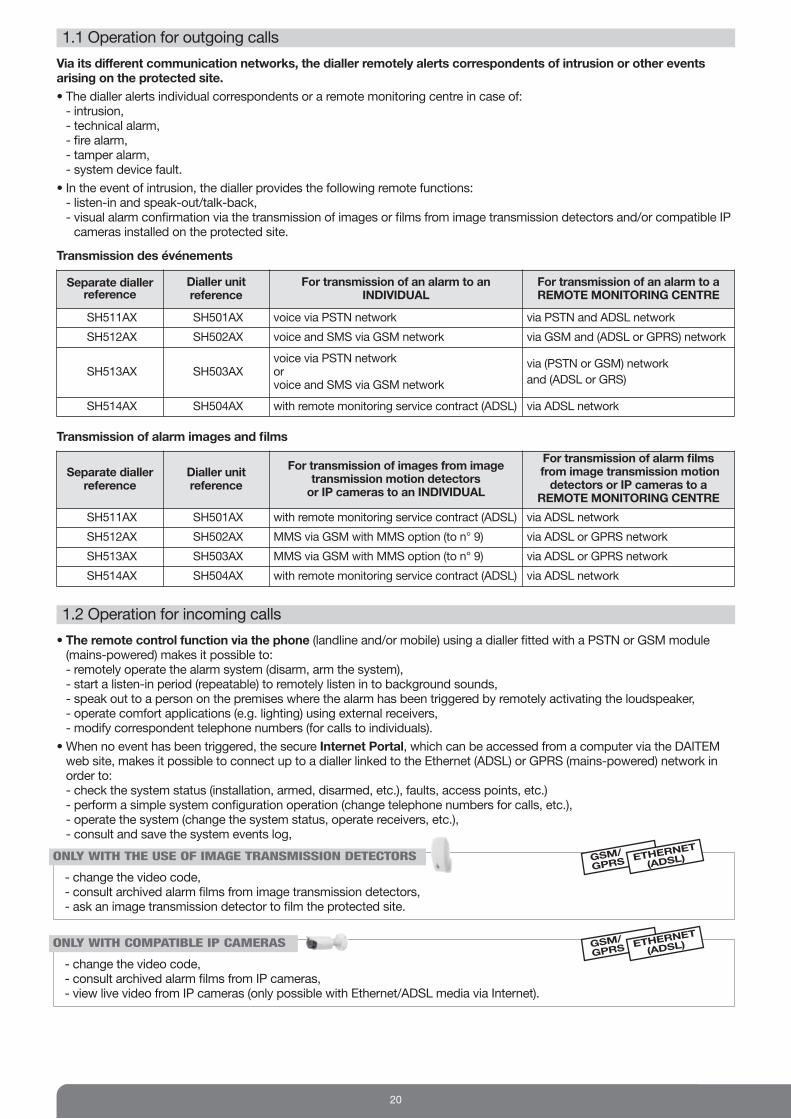
1.1 Operation for outgoing calls
Via its different communication networks, the dialler remotely alerts correspondents of intrusion or other eventsarising on the protected site.
• The dialler alerts individual correspondents or a remote monitoring centre in case of:- intrusion,- technical alarm,- fire alarm, - tamper alarm,- system device fault.
• In the event of intrusion, the dialler provides the following remote functions:- listen-in and speak-out/talk-back,- visual alarm confirmation via the transmission of images or films from image transmission detectors and/or compatible IP
cameras installed on the protected site.
1.2 Operation for incoming calls
• The remote control function via the phone (landline and/or mobile) using a dialler fitted with a PSTN or GSM module(mains-powered) makes it possible to:- remotely operate the alarm system (disarm, arm the system),- start a listen-in period (repeatable) to remotely listen in to background sounds,- speak out to a person on the premises where the alarm has been triggered by remotely activating the loudspeaker,- operate comfort applications (e.g. lighting) using external receivers,- modify correspondent telephone numbers (for calls to individuals).
• When no event has been triggered, the secure Internet Portal, which can be accessed from a computer via the DAITEMweb site, makes it possible to connect up to a dialler linked to the Ethernet (ADSL) or GPRS (mains-powered) network inorder to:- check the system status (installation, armed, disarmed, etc.), faults, access points, etc.)- perform a simple system configuration operation (change telephone numbers for calls, etc.),- operate the system (change the system status, operate receivers, etc.),- consult and save the system events log,
Transmission des événements
Separate diallerreference
Dialler unitreference
For transmission of an alarm to anINDIVIDUAL
For transmission of an alarm to aREMOTE MONITORING CENTRE
SH511AX SH501AX voice via PSTN network via PSTN and ADSL network
SH512AX SH502AX voice and SMS via GSM network via GSM and (ADSL or GPRS) network
SH513AX SH503AXvoice via PSTN networkorvoice and SMS via GSM network
via (PSTN or GSM) network
and (ADSL or GRS)
SH514AX SH504AX with remote monitoring service contract (ADSL) via ADSL network
Separate diallerreference
Dialler unitreference
For transmission of images from imagetransmission motion detectors or IP cameras to an INDIVIDUAL
For transmission of alarm filmsfrom image transmission motiondetectors or IP cameras to a
REMOTE MONITORING CENTRE
SH511AX SH501AX with remote monitoring service contract (ADSL) via ADSL network
SH512AX SH502AX MMS via GSM with MMS option (to n° 9) via ADSL or GPRS network
SH513AX SH503AX MMS via GSM with MMS option (to n° 9) via ADSL or GPRS network
SH514AX SH504AX with remote monitoring service contract (ADSL) via ADSL network
Transmission of alarm images and films
- change the video code,- consult archived alarm films from image transmission detectors,- ask an image transmission detector to film the protected site.
ONLY WITH THE USE OF IMAGE TRANSMISSION DETECTORS
- change the video code,- consult archived alarm films from IP cameras,- view live video from IP cameras (only possible with Ethernet/ADSL media via Internet).
ONLY WITH COMPATIBLE IP CAMERAS
GSM/
GPRSETHE
RNET
(ADSL)
GSM/
GPRSETHE
RNET
(ADSL)

21
2. Configuring a dialler locally using the built-in keypad
If 5 wrong access codes are entered on the keypad in less than 5 minutes this will block the keypad for 5 minutes and thecontrol panel will be informed.
IMPORTANT• To keep your codes confidential, we recommend you change the keypad access codes often and regularly clean the keys.• To prevent unwanted calls to correspondents, do not end the master code with a “0”.
You can replace the original language with another language.
To modify the language, enter:
Factory setting: French
Your installer will have already configured your dialler but you can modify some of the programming at any time.
2.1 Modifying the language
The events memorised by the dialler are date and time stamped.
To programme the date and time manually, proceed as follows:
2.2 Modifying the date and time
Do not lose your codes as you will need them in order to programme new codes. However, if you do lose your codes,contact your installer who will put the system back into its factory configuration and programme the codes again. Yourmaster code allows you to configure the dialler and access all the system commands using the built-in keypad. Your mastercode can also be used to access your device remotely (using a telephone or a computer connected to the dialler via thesecure Internet Portal):
2.3 Modifying your master code
0: French1: Italian2: German
3: Spanish4: Dutch5: English
“bip + chosenlanguage”
DIALLER
master code
• Date To consult the date, enter:
To modify the date, enter: “bip + dateannounced”
• TimeTo consult the time, enter:
To modify the time, enter: “bip + timeannounced”
Day(1 to 31)
Month(1 to 12)
Hour(0 to 24)
Minutes(0 to 59)
Year(e.g. for 2012,
enter 12)DIALLER
DIALLER
master code
master code
master code
master code
To modify the master code, enter:
Factory master code: 0000
Example: To replace the factory master code “0000” with the new code “1423”, enter:
... ... ...
“beep”
old mastercode
new master code
new master code
IMPORTANT: access codes must all be different.
DIALLER

22
2.4 Modifying your video code (GSM/GPRS-Ethernet ADSL)
Accessing the dialler remotely using a computer connected via Internet (mains-powered GPRS or Ethernet media)• The installer (or remote monitoring centre) will call you to switch the system to test mode. Using a computer and
TwinLoad® configuration and maintenance software, your installer or centre can perform remote maintenance operations in(factory) test mode.
• You can authorise your installer to remotely access your dialler in installation or user mode (only when the system isdisarmed or 24/24 = system armed or disarmed).
Whatever the case, video (if there is any video) can only be accessed using your personal video code during theidentification phase following remote access to your dialler from a computer connected via the secure Internet Portal.
Your dialler’s factory configuration does not allow access to your installer (or remote monitoring centre) in installation or usermode but you can modify this access at any time. Your installer will help you to define the best procedure for you.
IMPORTANT• To ensure privacy, videos can only be accessed via the secure Internet Portal using a video access code specific to the user.• Precautions when choosing the code: - do not use 1234, 7654 or 2468 type sequences,- do not choose the same code as the master code,- do not make a note of your codes anywhere.
• These parameters can be modified via the Daitem secure Internet Portal.
To modify the video code, enter
Factory video code: 4444
... ......
old videocode
new video code new video code
GPRS ETHE
RNET
(ADSL)
2.5 Enabling or disabling remote access via the Internet (mains-powered GPRS – Ethernet ADSL)
mains-po
wered
GPRS ETHE
RNET
(ADSL)
master code
A. To modify the installer’s authorisation to access the system remotely using a computer equipped with TwinLoad®
configuration and maintenance software, enter:
Factory setting: 1: test mode
“bip + chosenmode”
0: unauthorised1: test mode2: disarmed3: 24/24
master code
DIALLER
B. To modify the remote monitoring centre’s authorisation to access the system remotely using a computer equipped withTwinLoad® configuration and maintenance software, enter:
Factory setting: 1: test mode
“bip + chosenmode”
0: unauthorised1: test mode2: disarmed3: 24/24
DIALLER
C. To modify the user’s authorisation to access the system remotely via the Daitem secure Internet Portal, enter:
Factory setting: 1: authorised
“bip + chosenmode”
0: unauthorised1: authorised
DIALLER
master code
master code
23
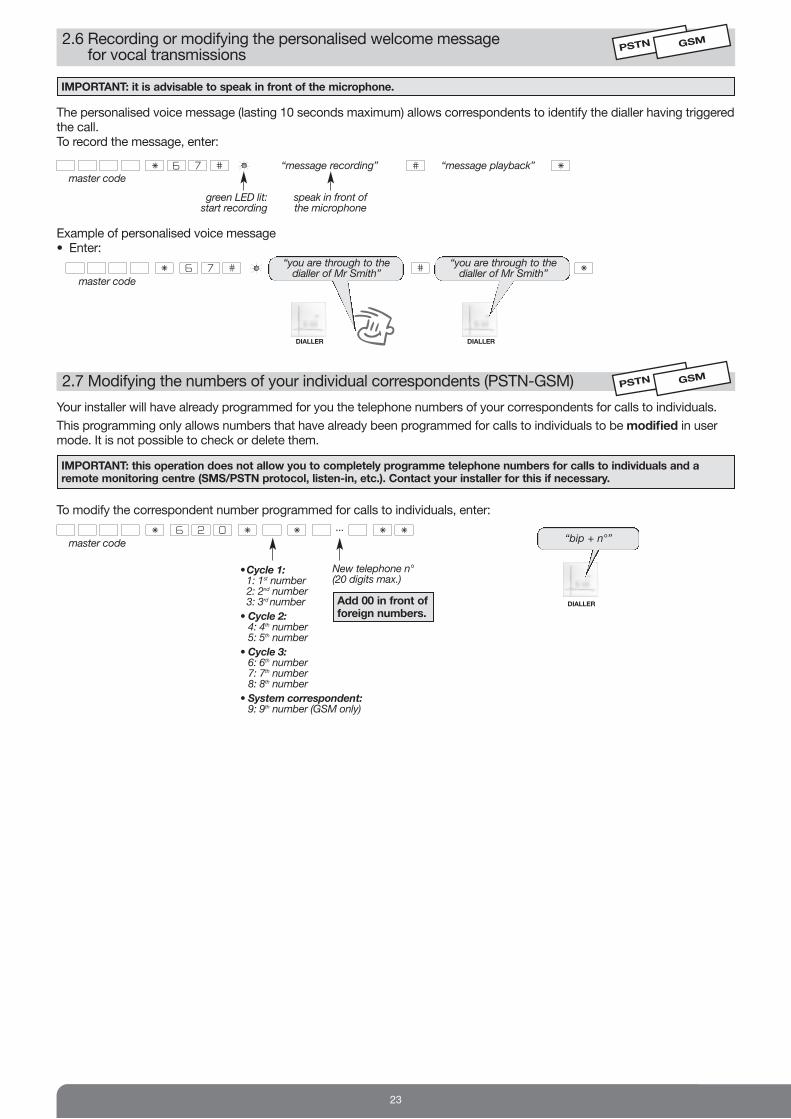
2.6 Recording or modifying the personalised welcome message for vocal transmissions
PSTN GSM
IMPORTANT: it is advisable to speak in front of the microphone.
DIALLER DIALLER
The personalised voice message (lasting 10 seconds maximum) allows correspondents to identify the dialler having triggeredthe call.To record the message, enter:
Example of personalised voice message• Enter:
“message recording” “message playback”
“you are through to thedialler of Mr Smith”
“you are through to thedialler of Mr Smith”
2.7 Modifying the numbers of your individual correspondents (PSTN-GSM)
Your installer will have already programmed for you the telephone numbers of your correspondents for calls to individuals.
This programming only allows numbers that have already been programmed for calls to individuals to be modified in usermode. It is not possible to check or delete them.
To modify the correspondent number programmed for calls to individuals, enter:
...
green LED lit: start recording
x
speak in front ofthe microphone
master code
master code
master code
New telephone n° (20 digits max.)
• Cycle 1:1: 1st number2: 2nd number3: 3rd number
• Cycle 2:4: 4th number5: 5th number
• Cycle 3:6: 6th number7: 7th number8: 8th number
• System correspondent:9: 9th number (GSM only)
Add 00 in front offoreign numbers.
IMPORTANT: this operation does not allow you to completely programme telephone numbers for calls to individuals and aremote monitoring centre (SMS/PSTN protocol, listen-in, etc.). Contact your installer for this if necessary.
“bip + n°”
DIALLER
PSTN GSM
24
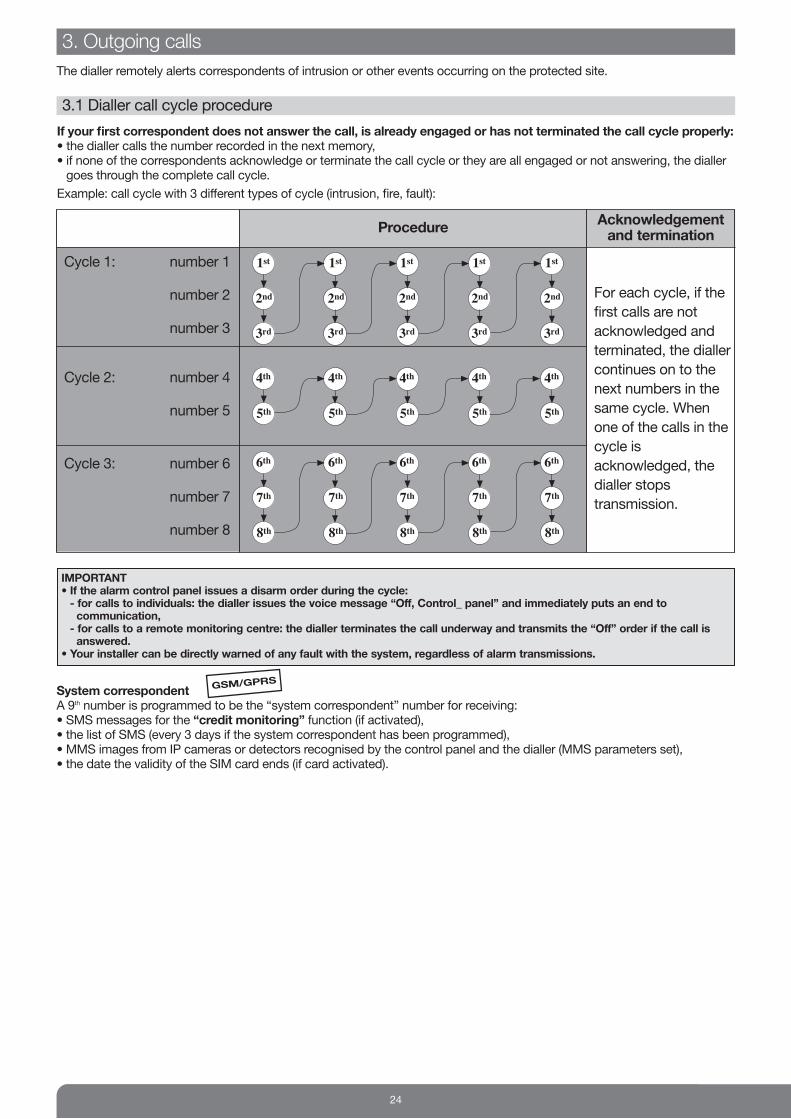
If your first correspondent does not answer the call, is already engaged or has not terminated the call cycle properly:• the dialler calls the number recorded in the next memory,• if none of the correspondents acknowledge or terminate the call cycle or they are all engaged or not answering, the dialler
goes through the complete call cycle.
Example: call cycle with 3 different types of cycle (intrusion, fire, fault):
ProcedureAcknowledgementand termination
For each cycle, if the
first calls are not
acknowledged and
terminated, the dialler
continues on to the
next numbers in the
same cycle. When
one of the calls in the
cycle is
acknowledged, the
dialler stops
transmission.
Cycle 1: number 1
number 2
number 3
Cycle 2: number 4
number 5
Cycle 3: number 6
number 7
number 8
3. Outgoing calls
IMPORTANT• If the alarm control panel issues a disarm order during the cycle:- for calls to individuals: the dialler issues the voice message “Off, Control_ panel” and immediately puts an end to communication,- for calls to a remote monitoring centre: the dialler terminates the call underway and transmits the “Off” order if the call is answered.
• Your installer can be directly warned of any fault with the system, regardless of alarm transmissions.
System correspondentA 9th number is programmed to be the “system correspondent” number for receiving:• SMS messages for the “credit monitoring” function (if activated),• the list of SMS (every 3 days if the system correspondent has been programmed),• MMS images from IP cameras or detectors recognised by the control panel and the dialler (MMS parameters set),• the date the validity of the SIM card ends (if card activated).
GSM/GPRS
The dialler remotely alerts correspondents of intrusion or other events occurring on the protected site.
3.1 Dialler call cycle procedure

25
3.2 Procedure for voice calls to individuals
: press on the telephone handset during the listen-in period when you want to stop listen-in and end the call.
(1) Voice call to an individual with automatic listen-in if this has been programmed (for GSM voice calls there is no message inviting thecorrespondent to “press *”).
(2) For vocal transmissions, this identification message can be replaced with a voice message (see Configuring the dialler locally using the built-inkeypad/Recording or modifying the personalised welcome message for vocal transmissions).
(3) Telephone transmission can be followed by a listen-in period during which the correspondent can listen in to what is happening on the protectedpremises in order to confirm the alarm and issue telephone commands.
“bip, dialler identificationn° (2), intrusion,
detector n°, group n°,press 0 to acknowledge
and terminate”
“longbip”
Thecorrespondentpicks up the calland hears:press ..., press ...
The correspondentlistens to the alarmmessage delivered5 times by the dialler (if it is notacknowledged)
The dialler confirmscycle
acknowledgementand termination
End of call, long beep
and dialler hangs up
60 s60 s 60 sdialling
pick-up
Phone rings for 60 s max
Event triggered
“press* ...,press * ...” (1)
The correspondentlistens to sounds inthe home and endsthe listen-in period by pressing or hanging up (3)
“long bip,system listen-in”
1
2
34
5
67
8
9
0*
riiiing
riiiing
PROTECTED SITE DIALLER
CORRESPONDENT
N.B. for calls to an individual using SMS and MMS digital protocol:• each correspondent, from n° 1 to 8, can receive SMS alarm calls via the GSM network. The numbers programmed for SMScannot acknowledge and terminate the call cycle underway.
• the individual system correspondent, n° 9, can receive up to 5 MMS alarm images via the GSM network with the MMS option.
Depending on the alarm transmitted and the parameters set on the dialler by the installer, a listen-in and speak-out/talk-backperiod can be activated. During this period, commands can be sent to the system using the telephone handset keys.
(1) Function only available with GSM media
List of events enabling listen-in period:• Intrusion• Intrusion confirmed• Tamper• Alarm• Silent alarm• Test call
Command description Command n°
Disarm command relay 1 11relay 2 12relay 3 13relay 4 14
Arm command relay 1 21relay 2 22relay 3 23relay 4 24
Stop siren 30
Activate siren 31
Repeat listen-in period for 60 s (5 times max.) #
Stop listen-in and hang up dialler ⁄
Allow speak-out/talk-back 7
Allow listen-in 8
Allow speak-out/talk-back and listen-in (1) 9
for comfort typeapplications using the Daitem receiver(lighting, etc.)
3.3 List of possible commands during the listen-in period
PSTN GSM

26
Format of messages transmitted: dialler, identification, “message”:• identification:
- for voice type messages: corresponds to the identification of the number programmed for voice calls or to thepersonalised welcome message recorded for vocal transmissions only,
- for SMS type messages: corresponds to the identification of the number programmed for SMS.• “message”:
- PER: corresponds to the name of the peripheral (control panel, control panel with dialler, detector, remote control unit,siren, dialler, device, alarm device, radio repeater relay),
- N°: number of peripheral, of group, etc.
3.4 List of messages and SMS transmitted according to the type of event (PSTN-GSM)
Events “message”
Type of transmission
Voice SMS
Intrusion “Intrusion detector N°, group N°” x x
Intrusion confirmed “Intrusion confirmed detector N°, group N°” x x
Fire alarm “Fire Alarm PER N°” x x
Prealarm “Prealarm, detector N°, group N°” x x
Prealarm confirmed “Prealarm confirmed, detector N°, group N°” x x
Deterrence “Deterrence, detector N°, group N°” x x
Deterrence confirmed “Deterrence confirmed, detector N°, group N°” x x
Tamper “Tamper PER N°” x x
Main battery fault “Fault battery voltage PER N°” x x
Back-up battery fault “Fault accumulator voltage PER N°” x x
Radio link fault “Fault Radio link PER N°” x x
Radio tamper “Radio Tamper PER N°” x x
Telephone line tamper “Telephone line Tamper N°” x x
GSM scrambling tamper “GSM Interference tamper” x x
Alarm and silent alarm “Alert PER N°” x x
Test call “Test call” x x
Mains connected “Mains connected PER N°” x x
Mains disconnected “Mains disconnected PER N°” x x
General technical alarm “Technical alarm PER N°” x x
SIM credit monitoring “Text operator” x
MMS transfer (GSM with MMS option) “Alarm video” x
Test cycle call “Test cycle call” x
Totally arm “Total armed” x
Arm group “Armed Group N°” x
Partially arm 1 “Armed partial 1” x
Partially arm 2 “Armed partial 2” x
Totally disarm “Off” x
Disarm group “Off group N°” x
GSMPSTN GSM
27
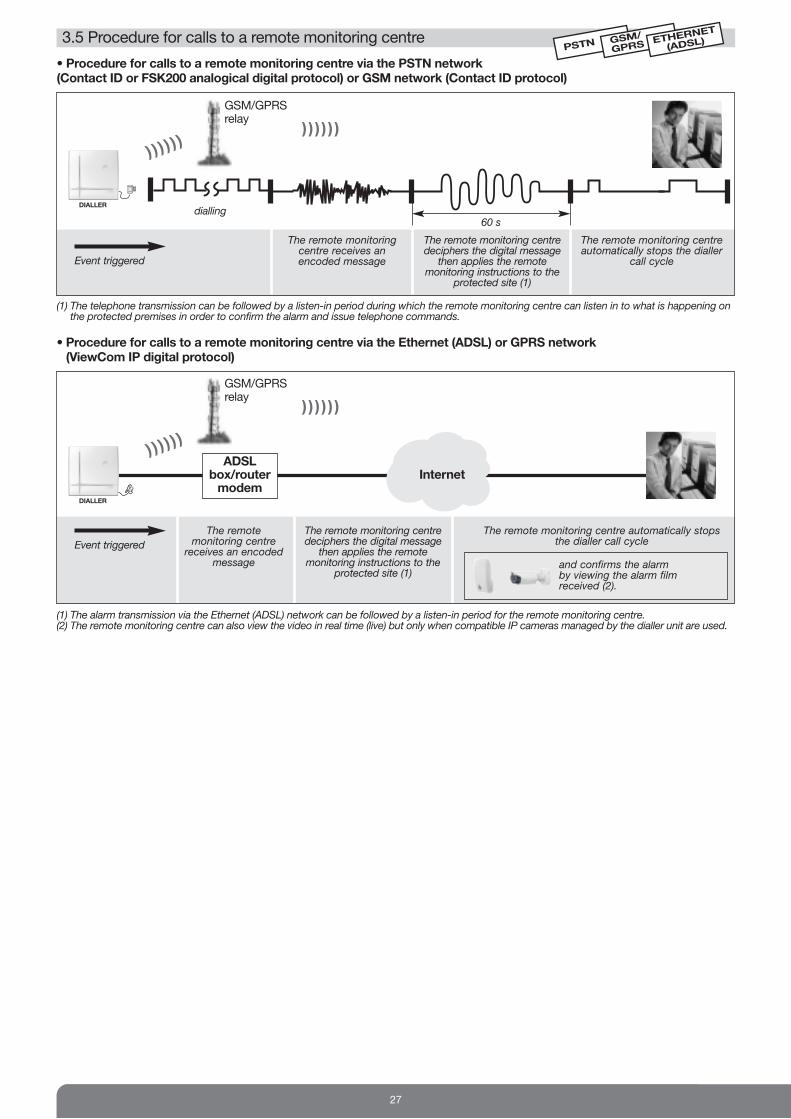
3.5 Procedure for calls to a remote monitoring centre
• Procedure for calls to a remote monitoring centre via the PSTN network (Contact ID or FSK200 analogical digital protocol) or GSM network (Contact ID protocol)
The remote monitoringcentre receives anencoded message
The remote monitoring centredeciphers the digital messagethen applies the remote
monitoring instructions to theprotected site (1)
The remote monitoring centreautomatically stops the dialler
call cycle
60 sdialling
(1) The telephone transmission can be followed by a listen-in period during which the remote monitoring centre can listen in to what is happening onthe protected premises in order to confirm the alarm and issue telephone commands.
(1) The alarm transmission via the Ethernet (ADSL) network can be followed by a listen-in period for the remote monitoring centre.(2) The remote monitoring centre can also view the video in real time (live) but only when compatible IP cameras managed by the dialler unit are used.
• Procedure for calls to a remote monitoring centre via the Ethernet (ADSL) or GPRS network (ViewCom IP digital protocol)
The remotemonitoring centrereceives an encoded
message
ADSLbox/routermodem
Internet
The remote monitoring centredeciphers the digital messagethen applies the remote
monitoring instructions to theprotected site (1)
The remote monitoring centre automatically stopsthe dialler call cycle
DIALLER
DIALLER
) ) ) )) )
GSM/GPRSrelay
) ) ) ) ) )
GSM/GPRSrelay
) ) ) ) ) )
) ) ) )) )
Event triggered
Event triggered
PSTNGSM
/
GPRSETHE
RNET
(ADSL)
and confirms the alarm by viewing the alarm film received (2).
28
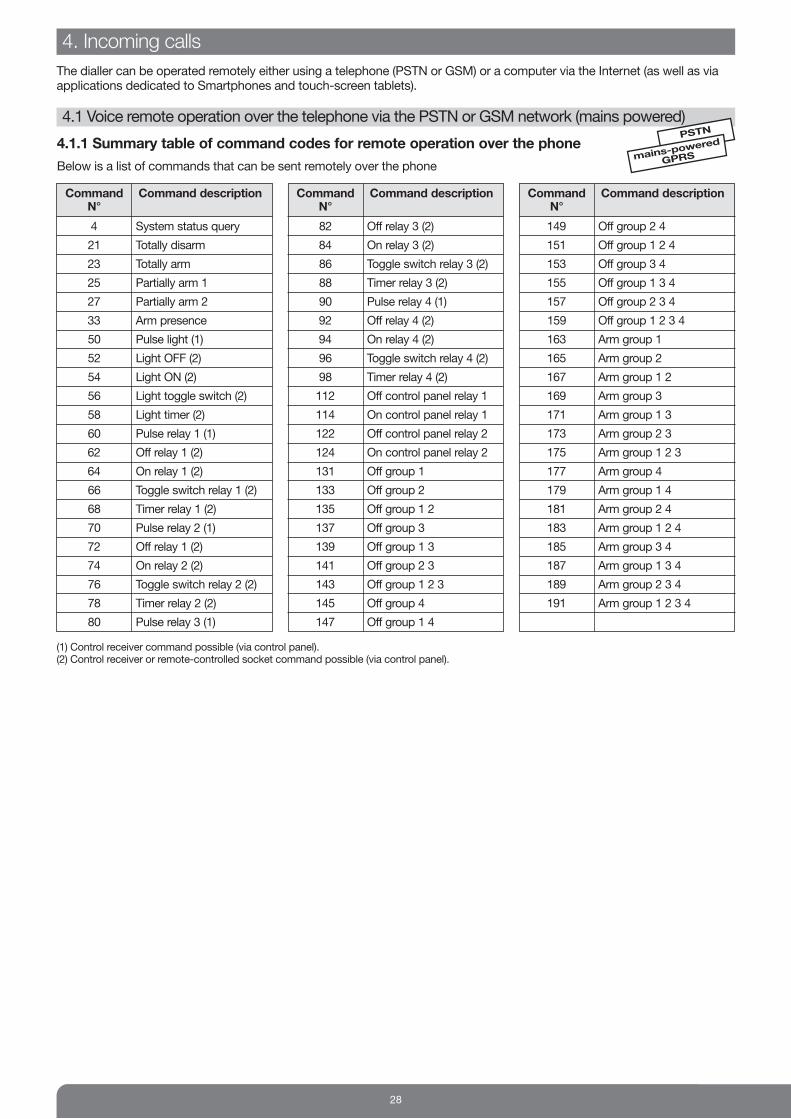
4.1.1 Summary table of command codes for remote operation over the phone
Below is a list of commands that can be sent remotely over the phone
4. Incoming calls
The dialler can be operated remotely either using a telephone (PSTN or GSM) or a computer via the Internet (as well as viaapplications dedicated to Smartphones and touch-screen tablets).
4.1 Voice remote operation over the telephone via the PSTN or GSM network (mains powered)
Command Command descriptionN°
4 System status query
21 Totally disarm
23 Totally arm
25 Partially arm 1
27 Partially arm 2
33 Arm presence
50 Pulse light (1)
52 Light OFF (2)
54 Light ON (2)
56 Light toggle switch (2)
58 Light timer (2)
60 Pulse relay 1 (1)
62 Off relay 1 (2)
64 On relay 1 (2)
66 Toggle switch relay 1 (2)
68 Timer relay 1 (2)
70 Pulse relay 2 (1)
72 Off relay 1 (2)
74 On relay 2 (2)
76 Toggle switch relay 2 (2)
78 Timer relay 2 (2)
80 Pulse relay 3 (1)
Command Command descriptionN°
82 Off relay 3 (2)
84 On relay 3 (2)
86 Toggle switch relay 3 (2)
88 Timer relay 3 (2)
90 Pulse relay 4 (1)
92 Off relay 4 (2)
94 On relay 4 (2)
96 Toggle switch relay 4 (2)
98 Timer relay 4 (2)
112 Off control panel relay 1
114 On control panel relay 1
122 Off control panel relay 2
124 On control panel relay 2
131 Off group 1
133 Off group 2
135 Off group 1 2
137 Off group 3
139 Off group 1 3
141 Off group 2 3
143 Off group 1 2 3
145 Off group 4
147 Off group 1 4
Command Command descriptionN°
149 Off group 2 4
151 Off group 1 2 4
153 Off group 3 4
155 Off group 1 3 4
157 Off group 2 3 4
159 Off group 1 2 3 4
163 Arm group 1
165 Arm group 2
167 Arm group 1 2
169 Arm group 3
171 Arm group 1 3
173 Arm group 2 3
175 Arm group 1 2 3
177 Arm group 4
179 Arm group 1 4
181 Arm group 2 4
183 Arm group 1 2 4
185 Arm group 3 4
187 Arm group 1 3 4
189 Arm group 2 3 4
191 Arm group 1 2 3 4
PSTN
mains-po
wered
GPRS
(1) Control receiver command possible (via control panel).(2) Control receiver or remote-controlled socket command possible (via control panel).
29
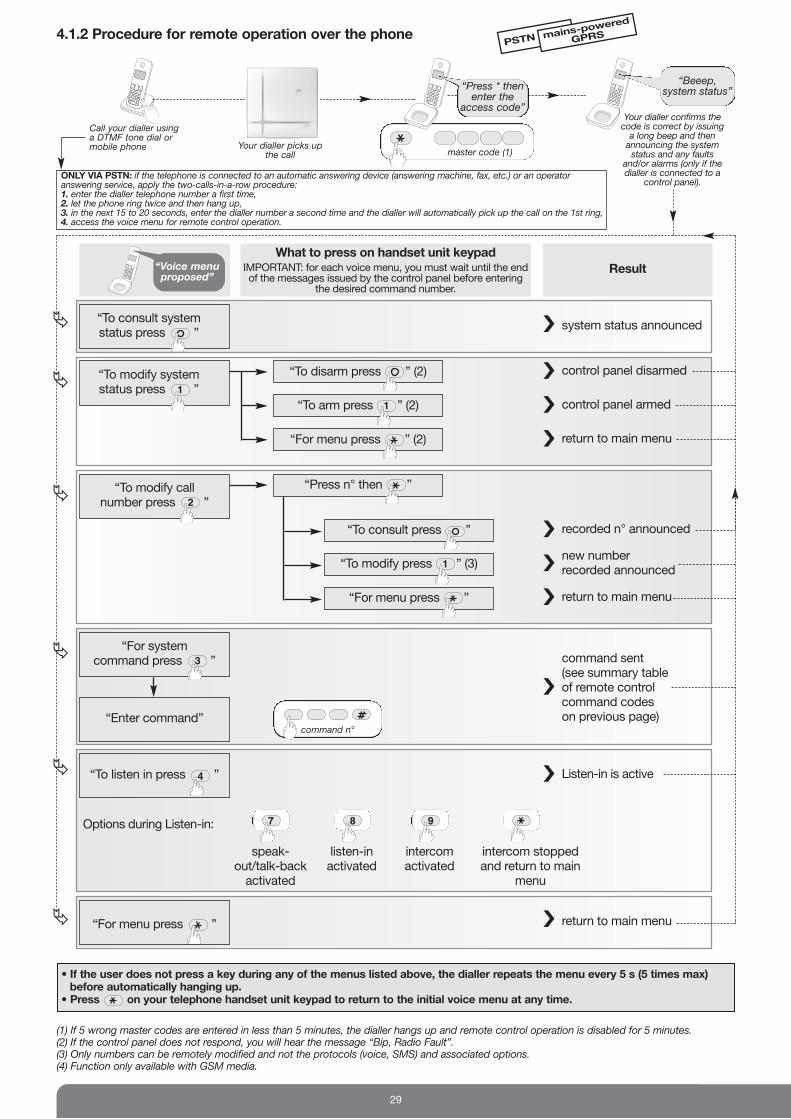
4.1.2 Procedure for remote operation over the phone
1
2
34
5
67
8
9
0*
Call your dialler usinga DTMF tone dial ormobile phone
Your dialler confirms thecode is correct by issuing a long beep and thenannouncing the systemstatus and any faults
and/or alarms (only if thedialler is connected to a
control panel).ONLY VIA PSTN: if the telephone is connected to an automatic answering device (answering machine, fax, etc.) or an operatoranswering service, apply the two-calls-in-a-row procedure:1. enter the dialler telephone number a first time,2. let the phone ring twice and then hang up,3. in the next 15 to 20 seconds, enter the dialler number a second time and the dialler will automatically pick up the call on the 1st ring,4. access the voice menu for remote control operation.
master code (1)
“Press * thenenter the
access code”
“Beeep, system status”
Result
What to press on handset unit keypadIMPORTANT: for each voice menu, you must wait until the endof the messages issued by the control panel before entering
the desired command number.
control panel disarmedá
system status announcedá
“To modify system status press ”1
“To consult systemstatus press ”
“To disarm press ” (2)
“To arm press ” (2)1
“For menu press ” (2)
“For system command press ”3
“To modify call number press ”2
“Voice menuproposed”
command sent (see summary table of remote controlcommand codes on previous page)
á
command n°“Enter command”
ƒ
return to main menuá“For menu press ”
ƒ
ƒ
ƒ
ƒ
ƒ
recorded n° announcedá
“Press n° then ”
“To consult press ”
new number recorded announcedá“To modify press ” (3)1
return to main menuá“For menu press ”
control panel armedá
return to main menuá
(1) If 5 wrong master codes are entered in less than 5 minutes, the dialler hangs up and remote control operation is disabled for 5 minutes.(2) If the control panel does not respond, you will hear the message “Bip, Radio Fault”.(3) Only numbers can be remotely modified and not the protocols (voice, SMS) and associated options. (4) Function only available with GSM media.
Your dialler picks up the call
• If the user does not press a key during any of the menus listed above, the dialler repeats the menu every 5 s (5 times max)before automatically hanging up.
• Press on your telephone handset unit keypad to return to the initial voice menu at any time.
PSTNmain
s-powere
d
GPRS
“To listen in press ”4 Listen-in is activeá
Options during Listen-in:
speak-out/talk-back
activated
7
listen-inactivated
8
intercomactivated
9
intercom stopped and return to main
menu

30
You can connect up to your alarm system via the Internet using a PC in order to configure and operate the system. Access ispossible in user mode if the dialler is connected to the Ethernet (ADSL) network or GPRS network (mains-powered dialler)and subject to the rights controlled by the user during programming of parameter 613 (factory setting: access authorised,see chapter on Configuring the dialler locally using the built-in keypad/Enabling or disabling remote access via theInternet).
4.2.1 General
This paragraph describes the implementation and use of the secure Internet Portal accessible via the DAITEM site. It doesnot explain how Vista MS-Windows or the web browser works. For more information about these environments, refer to thecorresponding manuals. The Daitem Internet Portal can be accessed from a PC fitted with Internet Explorer, Firefox or Chrome (as well as usingapplications dedicated to Smartphones and touch-screen tablets: iPhone/iPad and Android).
4.2.2 How the Daitem secure Internet Portal works
The Daitem Internet Portal is designed to operate the system. It has the following functionalities:• connection to a dialler via the Internet (using Ethernet (ADSL) or mains-powered GPRS media),• provision of information about the system (installation, arming, disarming, etc.), faults and access,• simple system configuration (changing telephone numbers for calls),• operating the system (changing the system status, issuing receiver commands, etc.),• consulting and saving the system events log,
4.2 Configuring and operating the dialler from a PC connected via the Internet
4.2.3 Warning
• change the video code,• consult archived alarm films from image transmission detectors,• ask an image transmission detector to film the protected site,
ONLY WITH THE USE OF IMAGE TRANSMISSION DETECTORS
• change the video code,• consult archived alarm films shot by IP cameras,• instantly view (real time) video shot by IP cameras (only possible with Ethernet/ADSL media via Internet).
ONLY WITH COMPATIBLE IP CAMERAS
In case of video use only: the first “live video” consultation may require the installation of an additional ActiveX, Plugin orApplet java module.
GSM/
GPRSETHE
RNET
(ADSL)
GSM/
GPRSETHE
RNET
(ADSL)
mains-po
wered
GPRS ETHE
RNET
(ADSL)
4.2.4 Accessing the alarm system via the secure Internet Portal
A. BLOCK DIAGRAMS
B. ACCESSING THE PORTAL
1. Open your web browser on your PC (Internet Explorer, Firefox).2. Go to the Daitem web site and click on the link which gives access to the dedicated portal.3. Follow the instructions in the different menus
• Accessing the dialler when you are not on the installation site
• Accessing the dialler when you are on the installation site
SecureInternetPortal
SecureInternetPortal
User PC
User PC
ADSL box/
routermodem
ADSL box/
routermodem
DIALLER DIALLER
GSM/GPRSrelay
) ) ) ) ) )
) )) )) )
) )) )) )
GSM/GPRSrelay
) ) ) ) ) )
230 VAC mainspower supply
230 VAC mainspower supply

31
4.3 Remote operation over SMS via the GSM network (mains-powered)
To operate your system by SMS, send an SMS message to the Control/communicator using a mobile phone with thefollowing syntax: master code # command number # #.
mains-po
wered
GSM
Command Command descriptionN°
21 Totally disarm
23 Totally arm
25 Partially arm 1
27 Partially arm 2
33 Arm presence
NB: if the transmission of the ON/OFF command is successful, the user can receive confirmation messages of ON total /OFF total of the system.
32
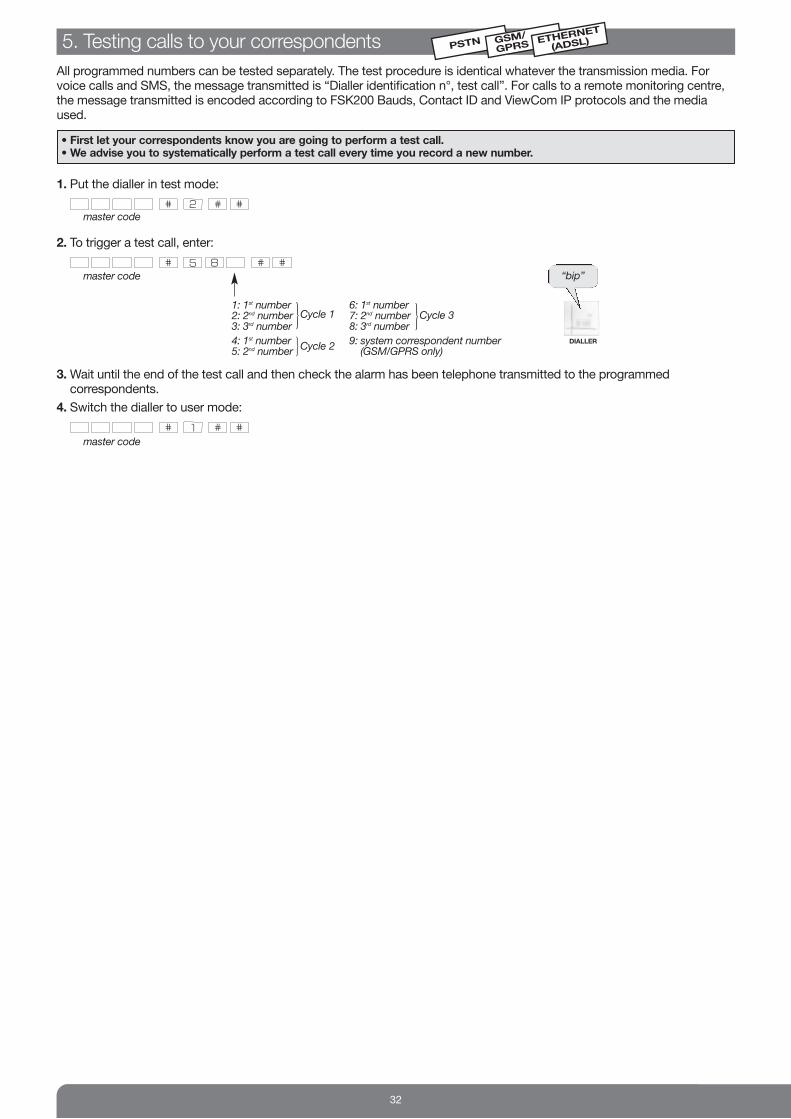
5. Testing calls to your correspondents
All programmed numbers can be tested separately. The test procedure is identical whatever the transmission media. Forvoice calls and SMS, the message transmitted is “Dialler identification n°, test call”. For calls to a remote monitoring centre,the message transmitted is encoded according to FSK200 Bauds, Contact ID and ViewCom IP protocols and the mediaused.
1. Put the dialler in test mode:
2. To trigger a test call, enter:
3. Wait until the end of the test call and then check the alarm has been telephone transmitted to the programmedcorrespondents.
4. Switch the dialler to user mode:
PSTNGSM
/
GPRSETHE
RNET
(ADSL)
• First let your correspondents know you are going to perform a test call.• We advise you to systematically perform a test call every time you record a new number.
1: 1st number2: 2nd number3: 3rd number
4: 1st number5: 2nd number
master code
master code
master code
6: 1st number7: 2nd number8: 3rd number
9: system correspondent number(GSM/GPRS only)
}Cycle 1 }Cycle 3}Cycle 2 DIALLER
“bip”

33
• If you are not supposed to acknowledge and terminate the dialler’s call cycle, hang up.• if you are supposed to acknowledge and terminate the dialler’s call cycle, press 0 on the your telephone handset and you willhear a long confirmation beep.
6. Instructions sheet (to be filled in and given to your correspondents)
• - The correspondent can acknowledge and terminate the dialler call cycle: ❑ yes ❑ no
When you pick up the phone you will hear:➜ a voice message repeated several times specifying the event having triggered the call,➜ a request to acknowledge the dialler: “Press 0 to acknowledge”.
• The correspondent can listen in to what is happening on the protected premises: ❑ yes ❑ noCorrespondents whose number has been programmed with the listen-in option can listen in to what is happening on theprotected premises for 60 seconds (once the message has been delivered). This period can be repeated 4 times bypressing on the telephone handset # key.
PSTN GSM/GPR
S
• General information about the caller:
Name: __________________________________________________________________ Tel.: _________________________________
Address:_______________________________________________________________________________________________________
Identification n°: _________________________________________________________________
Welcome message (if a message has been recorded this replaces the identification number): ___________________________
______________________________________________________________________________________________________________
✂
• Instructions:Make a note of the instructions to be followed if the dialler calls.
------------------------------------------------------------------------------------------------------------------------------------------------
---------------------------------------------------------------------------------------------------------------------------------------------------
------------------------------------------------------------------------------------------------------------------------------------------------
---------------------------------------------------------------------------------------------------------------------------------------------------
(1) Function only available with GSM media
Command description Command n°
Disarm command relay 1 11relay 2 12relay 3 13relay 4 14
Arm command relay 1 21relay 2 22relay 3 23relay 4 24
Stop siren 30
Activate siren 31
Repeat listen-in period for 60 s (5 times max.) #
Stop listen-in and hang up dialler ⁄
Allow speak-out/talk-back 7
Allow listen-in 8
Allow speak-out/talk-back and listen-in (1) 9
for comfort typeapplications using the Daitem receiver(lighting, etc.)
34
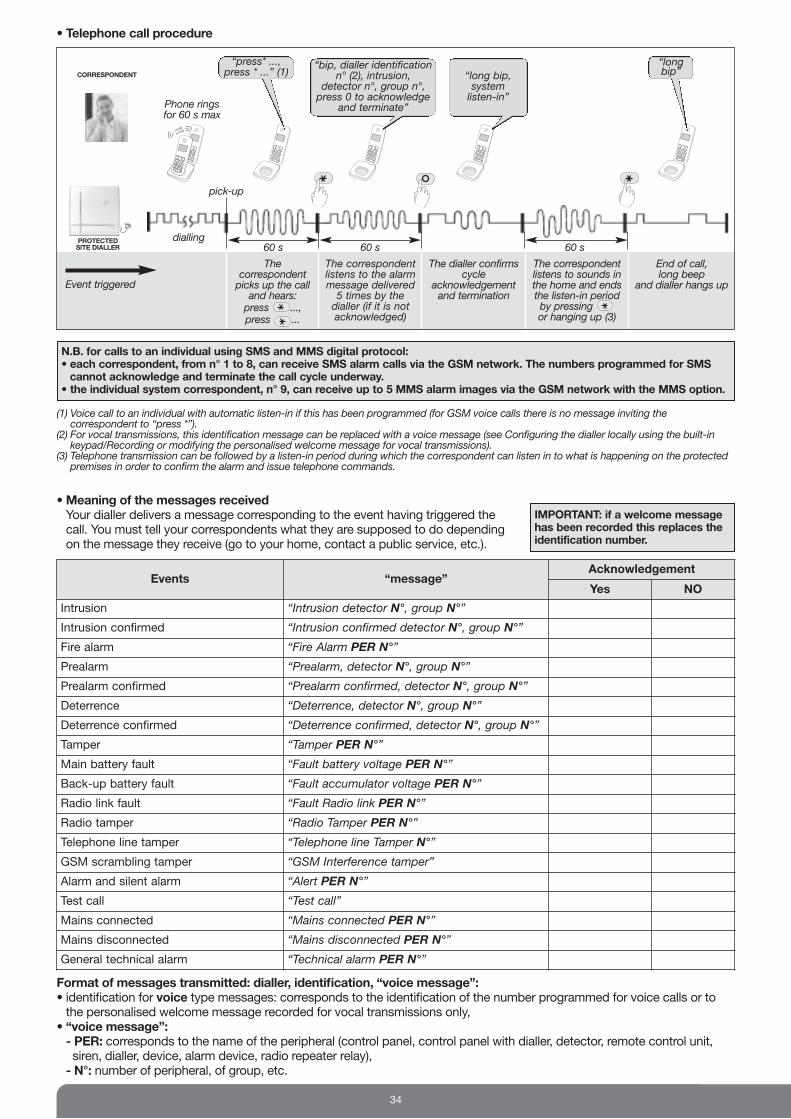
• Meaning of the messages receivedYour dialler delivers a message corresponding to the event having triggered thecall. You must tell your correspondents what they are supposed to do dependingon the message they receive (go to your home, contact a public service, etc.).
IMPORTANT: if a welcome messagehas been recorded this replaces theidentification number.
Format of messages transmitted: dialler, identification, “voice message”: • identification for voice type messages: corresponds to the identification of the number programmed for voice calls or to
the personalised welcome message recorded for vocal transmissions only,• “voice message”:- PER: corresponds to the name of the peripheral (control panel, control panel with dialler, detector, remote control unit,
siren, dialler, device, alarm device, radio repeater relay),- N°: number of peripheral, of group, etc.
• Telephone call procedure
(1) Voice call to an individual with automatic listen-in if this has been programmed (for GSM voice calls there is no message inviting thecorrespondent to “press *”).
(2) For vocal transmissions, this identification message can be replaced with a voice message (see Configuring the dialler locally using the built-inkeypad/Recording or modifying the personalised welcome message for vocal transmissions).
(3) Telephone transmission can be followed by a listen-in period during which the correspondent can listen in to what is happening on the protectedpremises in order to confirm the alarm and issue telephone commands.
“bip, dialler identificationn° (2), intrusion,
detector n°, group n°,press 0 to acknowledge
and terminate”
“longbip”
Thecorrespondentpicks up the calland hears:press ..., press ...
The correspondentlistens to the alarmmessage delivered5 times by the dialler (if it is notacknowledged)
The dialler confirmscycle
acknowledgementand termination
End of call, long beep
and dialler hangs up
60 s60 s 60 sdialling
pick-up
Phone rings for 60 s max
Event triggered
“press* ...,press * ...” (1)
The correspondentlistens to sounds inthe home and endsthe listen-in period by pressing or hanging up (3)
“long bip,system listen-in”
1
2
34
5
67
8
9
0*
riiiing
riiiing
PROTECTED SITE DIALLER
CORRESPONDENT
N.B. for calls to an individual using SMS and MMS digital protocol:• each correspondent, from n° 1 to 8, can receive SMS alarm calls via the GSM network. The numbers programmed for SMScannot acknowledge and terminate the call cycle underway.
• the individual system correspondent, n° 9, can receive up to 5 MMS alarm images via the GSM network with the MMS option.
Events “message”Acknowledgement
Yes NO
Intrusion “Intrusion detector N°, group N°”
Intrusion confirmed “Intrusion confirmed detector N°, group N°”
Fire alarm “Fire Alarm PER N°”
Prealarm “Prealarm, detector N°, group N°”
Prealarm confirmed “Prealarm confirmed, detector N°, group N°”
Deterrence “Deterrence, detector N°, group N°”
Deterrence confirmed “Deterrence confirmed, detector N°, group N°”
Tamper “Tamper PER N°”
Main battery fault “Fault battery voltage PER N°”
Back-up battery fault “Fault accumulator voltage PER N°”
Radio link fault “Fault Radio link PER N°”
Radio tamper “Radio Tamper PER N°”
Telephone line tamper “Telephone line Tamper N°”
GSM scrambling tamper “GSM Interference tamper”
Alarm and silent alarm “Alert PER N°”
Test call “Test call”
Mains connected “Mains connected PER N°”
Mains disconnected “Mains disconnected PER N°”
General technical alarm “Technical alarm PER N°”

Section to be retained
Guarantee extension form Section to be returned
Daitem guarantee and conditions for extension
ATRAL SYSTEM guarantees its DAITEM products for 2
years commencing from date of purchase by the initial
user.
IMPORTANT: this guarantee is automatically extended to
5 YEARS if the guarantee extension request form opposite
is correctly completed (including the installer’s stamp,
purchase date, the guarantee label for the system plus the
guarantee labels of the other products making up the
installation) and is returned to ATRAL SYSTEM within 10
days of purchase.
Where subsequent add-on accessories are concerned, you
simply need to return the guarantee extension form for the
additional products in order that they may also be included.
DAITEM offers a technical telephone helpline. For all technical questions, or
before returning any product, contact DAITEM technical support, who will
inform you of the best procedure to follow for the particular case.
The DAITEM guarantee covers the products only, not including batteries.
Furthermore, the installation and any possible maintenance operations are the
responsibility of the installer and are not covered by this guarantee (apart from
errors in the assembly instructions).
As a general rule, the DAITEM guarantee entitles customers to the exchange
of products recognised as faulty by ATRAL SYSTEM.
In exceptional circumstances, ATRAL SYSTEM reserves the right to choose to
carry out repairs to products.
ATRAL SYSTEM shall undertake to replace defective products with an
identical or equivalent product within the guarantee period.
All products exchanged under guarantee benefit from the remaining guarantee
period of the original product.
Any possible unavailability occurring on the networks – the availability of
telecommunications networks (public telephone network, GSM…) cannot be
100% guaranteed – may result in the unavailability of our own systems,
without engaging the liability of ATRAL SYSTEM.
In addition, this guarantee cannot be applied in cases of:
l Incorrect usage
l Installation not in conformity to ATRAL SYSTEM specifications
l Interference with the electronics
l Breakage through fall or impact
l Mechanical or electronic alteration of the product
l Use of supplies other than those recommended by ATRAL SYSTEM
l Natural disaster, atmospheric phenomena or vandalism.
Products suspected of being faulty must be returned to ATRAL SYSTEM by
the installer in accordance with the instructions provided by DAITEM technical
support, accompanied by the duplicate of the purchase order. Products are
transported at the sender’s expense and risk, and carriage forward returns will
be refused by the ATRAL SYSTEM goods inwards department. All products
that are the object of an exchange become the property of ATRAL SYSTEM.
It is recommended that all invoices relating to products be carefully conserved,
as you may be required to produce them for application of the guarantee.
In the interest of improving its products, ATRAL SYSTEM reserves the right to
modify them without prior notice.
GM Techtronics Ltd.
Unit 17 Paxcroft Farm
Hilperton - Trowbridge - Wiltshire
BA14 6JB England
✂
✂
Product(s) purchased on:
We recommend that you complete the system guarantee extension form now.
Stick the guarantee label for each product in the appropriate space. If you have just bought several products
(even with different references), only return this guarantee extension form for all the products.
Mr p Mrs p Miss p Comp. p Surname First name
Address
Postcode Town Tel.
Received on:
Area reserved for DAITEM
Installer’s stamp
Replacementwithin guarantee
Tick the appropriate box:System
Other products
Purchase
Replacementwithin guarantee
Tick the appropriate box:Telephone transmitter
Purchase
Guarantee label
Guarantee label
Guarantee label
Replacement outside guarantee
Replacement outside guarantee

Product(s) purchased on:
Installer’s stamp
GM Techtronics Ltd.
Unit 17 Paxcroft Farm
Hilperton - Trowbridge - Wiltshire
BA14 6JB England
Section to be retained
For increased satisfaction, spare us a few minutes of your time…
Section to be returned
Daitem guarantee and conditions for extension
Daitem undertakes to treat this information in its entirety as strictly confidential.
What are the protected premises used for?Main home pSecond home pBusiness premises p
What type are the protectedpremises?Individual house pFlat pShop pOffices pStores and warehouses pFactory pOther p
Are you…?An owner pA tenant p
How did you hear about Daitem?Advertising pProfessional recommendation pFriend’s advice pOn the Internet pAt a trade fair pOther p
Do you have an alarm systemalready?Yes, to protect these premises pYes, to protect other premises pNo p
Is the user guide clear?Yes pNo p
Please tick the 3 main reasons for your purchase:Ease of use pEase of installation pEfficiency of system pIndependence from 230V mains power pReputation of brand pProduct aesthetics pUpgradeable nature of system p
Did the 100% wire free technologyplay a part in your choice?Yes pNo p
Did the quality/price ratio appear to you to be:Good pQuite good pQuite poor pPoor p
If you live in an individual house,which of the following is youraccommodation equipped with?Door with access code pIntercom system pVideophone pDoorbell only pAutomated gate pNon-automated gate pAutomated garage door pNon-automated garage door pA garden or yard p
Do you own a personal computer?Yes pNo p
Do you have access to the Internet?Yes pNo p
Profession of head of household(or your profession where businesspremises are concerned)Farmer pShopkeeper, craftsperson, company owner pExecutive pMiddle management, technician, supervisor pEmployee pWorker pRetired pInactive for other reasons p
Age of head of household(or your age where business premises are concerned)Less than 30 pBetween 30 and 39 pBetween 40 and 49 pBetween 50 and 59 pBetween 60 and 69 pOver 70 p
Composition of household(only if the protected premises are used for residential purposes)1 person p2 persons p3 persons p4 persons p5 persons or more p
In accordance with Article 27 of Law No. 78-17 of 06/01/78, you have the right to access and to correct data relating to you.
Waste processing of electrical and electronic devices at the end of their service life (Applicable in European Union countries and other Europeancountries with a waste collection system). Used on products or product packaging, this symbol indicates that the product must not be thrown out withhousehold waste. It must be taken to a waste collection point for electrical and electronic product recycling. When you make sure that this product is
disposed of in the most appropriate manner, you are helping to protect the environment and human health. If you would like additional information concer-ning the recycling of this product, please contact your town/city council, nearest waste collection centre or the shop where you bought the product.

37

38

39
ALARM CONTROL PANEL
Standard: EN 50130-4 and 5 versions 2011EN 50131-3EN 50131-6EN 50131-4EN 50131-5-3
ELECTRONIC INTRUSIONDETECTION EQUIPMENT
PRODUCT SAFETYEMC AND ENVIRONMENTAL
COMPATIBILITYNF&A2P GRADE 2
NF&A2P Grade 2 - According to certificate NF324-H58
TRADE MARK: Daitem
PRODUC REFERENCES: SH320AU / SH340AU / SH380AU
CERTIFICATION No.: 1201300012
CNPP Cert.Route de la Chappelle Réanville
BP 2265F-27950 Saint-Marcel
www.cnpp.com
AFNOR Certification 11 rue Francis de Pressensé
F-93571 La Plaine Saint DenisCedex
http://www.marque-nf.com

805137/B - 0
7.2014