alcatel omnipcx 4400 - diagramas dediagramasde.com/diagramas/otros2/fafcad66069ab1e33e04...alc etl...
TRANSCRIPT

A L C ET L
Alcatel OmniPCX 4400
SECTION 4
SBC Alcatel 4059
Ed.03


A L C ET L
Alcatel OmniPCX 4400
Section 4 - SBC Alcatel 4059
Section 4 - SBC Alcatel 4059
SUMMARY
SBC Alcatel 4059General information ....................................................................................... 4. 3
1. General information.............................................................................. 4. 32. Reference to the other modules............................................................. 4. 4
Installation - Hardware................................................................................... 4. 51. Equipment required............................................................................... 4. 52. Connection ............................................................................................. 4. 5
Installation - Software..................................................................................... 4. 71. PC configuration..................................................................................... 4. 72. Software installation procedure ............................................................ 4. 73. Loading the software ............................................................................. 4.104. Uninstalling the application .................................................................. 4.155. Session opening procedure ................................................................... 4.16
Management ................................................................................................... 4.171. General Information.............................................................................. 4.172. Parametering the attendant for the 4059 MAC application ................. 4.173. Configuring display of incoming calls to the 4059 MAC
application ............................................................................................ 4.18Customized management................................................................................ 4.19
1. General Information.............................................................................. 4.192. Accessing the directory configuration menus ........................................ 4.193. Configuring the LDAP directory ............................................................. 4.214. Configuring ODBC directories................................................................ 4.225. Other LDAP and OBCD directory management operations ................. 4.27
Ed.03 Ref.3BA19919ENAA 4.1

A L C ET L
Alcatel OmniPCX 4400
Section 4 - SBC Alcatel 4059
4.2 Ref.3BA19919ENAA Ed.03

A L C ET L
Alcatel OmniPCX 4400
Section 4 - SBC Alcatel 4059 SBC Alcatel 4059General information
44A01609000A000AAEN
SBC Alcatel 4059General informationEdition: 03
1. General information
The Alcatel 4059 MAC (Multimedia Attendant Console) terminal, also called SBC (Screen BasedConsole), is a Windows� graphic application which is used to activate all the functions of anattendant console on a compatible PC. This application also provides the maximum level of comfortand user friendliness.In addition, the simplified opening procedure provides multi-user access to the SBC application. Onlythe management and configuration of the screen is controlled by the individual user, as the installationdata management is common to all users.Thanks to the user friendliness of the multi-windowing facility, the PC used need not be dedicatedentirely to the SBC application. It may also support standard applications such as word processingand spreadsheet packages or PBX appllications such as the system management or infocenter. For anincoming call, an attendant using any application may connect to the SBC application to handle thecall.Note: the A4715 charging application is not compatible with the SBC application.The Alcatel 4059 MAC application has a specific Alcatel keyboard which improves the operation ofthe attendant workstation.The Alcatel keyboard is a PC-type keyboard to which a set of function keys has been added. An audiohandset may also be connected either on the right or left hand side of the keyboard.In addition to the features which are available on an attendant set, the SBC 4059 offers applicationswhich expand the possibilities open to the attendant:
- supervision of a list of devices,
- use of system directories.The screen displays windows which feature:
- information (BLF, programmable keys, status of the attendant set, etc.),
- call handling,
- user entry keys.All the information relating to the subscriber is displayed on the screen, which enables the serviceprovided to be used to the full.For instructions on how to use the screen, refer to the module Alcatel 4059 attendant console - Presen-tation.Warning: As of R4.2, installing more than 6 attendants (4059 or other) in an installation will modifythe display windows on the attendant consoles during operation, the mode toggles from �counter� to�list�.As of R4.2, the number of attendants resulting in display modification can be configured inmanagement as a threshold (from 1 to 20).
Ed.03 Ref.3BA19919ENAA 4.3

A L C ET L
Alcatel OmniPCX 4400
SBC Alcatel 4059 Section 4 - SBC Alcatel 4059General information
2. Reference to the other modules
SBC 4059 terminal is described in the following modules:
- Installation hardware (see module SBC Alcatel 4059 - Installation - Hardware),
- Installation software (see module SBC Alcatel 4059 - Installation - Software),
- Management (see module SBC Alcatel 4059 - Management),
- Customized management (see module SBC Alcatel 4059 - Customized management),
- User manual (see module Alcatel 4059 attendant console - Presentation).
4.4 Ref.3BA19919ENAA Ed.03

A L C ET L
Alcatel OmniPCX 4400
Section 4 - SBC Alcatel 4059 SBC Alcatel 4059Installation - Hardware
44A01609000A560AAEN
SBC Alcatel 4059InstallationHardware
Edition: 03
1. Equipment required
- For releases prior to R4.1, a TA MAC (ref 3AK 17095 AB) including a MAC/PC connectioninterface (ref 3AK 27004 AB).
- As from R4.1, a TA MMK (ref 3AK 17095 AC).
- An Alcatel MMK keyboard (ref 3AK 17043 AB).
- A connection cable from the TA to the PC (MAC/PC cable) (ref 3AK 17016 AB).
- A connection cable from the TA to the PC (MAC/PC cable) (ref 3AK 12314 AB).
- A UA RJ45 (8 pin) line lead to the system (ref 1AB 04521 0024).
2. Connection
For releases prior to R4.1, please refer to module TA-MAC (MMK V1) - Connection.
As from R4.1, please refer to module TA-MMK (MMK V2) - Connection.
Ed.03 Ref.3BA19919ENAA 4.5

A L C ET L
Alcatel OmniPCX 4400
SBC Alcatel 4059 Section 4 - SBC Alcatel 4059Installation - Hardware
4.6 Ref.3BA19919ENAA Ed.03

A L C ET L
Alcatel OmniPCX 4400
Section 4 - SBC Alcatel 4059 SBC Alcatel 4059Installation - Software
44A01609001A560AAEN
SBC Alcatel 4059InstallationSoftware
Edition: 03
1. PC configuration
The following is a list of the minimum equipment necessary to install the software:
- a Pentium 400 or equivalent,
- a VGA screen,
- 4 Mb of RAM for the application,
- 64 Mb of RAM for Windows 95 or NT with the application,
- 15 Mb or more hard disk,
- a CD-ROM drive,
- a mouse.The following software packages must also be added:
- WINDOWS 95 or 2000 (release 4.014.9 or higher of the 4059) or WINDOWS NT 4.0 Pack 4minimum,
- 4059 software on CD-ROM.The PC must have a serial communication interface (COM port) for the connection.
2. Software installation procedure
2.1. General InformationReminder: before installation, the technician must connect as a site administrator.The Windows 95 or 2000 installation procedure and the Windows NT 4.0 Pack3 procedure are iden-tical.The technician must :
1. insert the CD-ROM containing the Alcatel software in the drive,
2. then go to the CD-ROM welcome page.
Once this page is opened, double click on the icon to run the Setup program.
Ed.03 Ref.3BA19919ENAA 4.7

A L C ET L
Alcatel OmniPCX 4400
SBC Alcatel 4059 Section 4 - SBC Alcatel 4059Installation - Software
2.2. Selecting the installation language
This screen is used to select the language used to load the software. Validate the software using the�Ok� key.
2.3. Selecting the installation language
Validate the choice with the �Continue� key.
4.8 Ref.3BA19919ENAA Ed.03

A L C ET L
Alcatel OmniPCX 4400
Section 4 - SBC Alcatel 4059 SBC Alcatel 4059Installation - Software
2.4. Entering the customer information
In this screen, the attendant configures the company name and address. Validate the choice withthe �Continue� key.
2.5. Selecting the installation package
Select the package required for the installation in2
and validate the entry with �Install� key.
Remark: packages1
and3
are optional and not vital for the installation of package2
.
The following operations are available to the attendant:
Ed.03 Ref.3BA19919ENAA 4.9

A L C ET L
Alcatel OmniPCX 4400
SBC Alcatel 4059 Section 4 - SBC Alcatel 4059Installation - Software
Select all orDeselect all
to select or deselect all the packages.
Language to modify the installation language.
Exit to exit the installation program.
3. Loading the software
3.1. General Information
The software loading procedure in Windows 95 Windows NT 4.0 Pack4 is different to that of Windows2000.
With Windows 2000, there is an extra stage at the end of loading with installation of the Alcatel mul-timedia keyboard driver.
3.2. Selecting the installation directory.
In this screen, the operator can change, if required, the directory into which files are loaded.Note: By clicking �End� in the following screens the loading phase can be interupted.
Use:
Other Directory... to change the installation directory path,
4.10 Ref.3BA19919ENAA Ed.03

A L C ET L
Alcatel OmniPCX 4400
Section 4 - SBC Alcatel 4059 SBC Alcatel 4059Installation - Software
3.3. Defining the launch shortcut
Click on the �Continue� key.
3.4. LoadingA dialog box indicates the progress of the loading.
Use:Cancel to interrupt the loading.
3.5. Restarting the system.Once loading has completed, the rest of the Alcatel 4059 MAC application installation procedurediffers according to the operating system on the PC.
1. in Windows 95 and Windows NT 4.0 Pack4 :
When loading is complete a window requesting the computer to be rebooted is displayed. click OK:
Once the computer has rebooted, refer to § 3.7 : Configuring physical access on the PC.
2. in Windows 2000 :
A window shows that the Alcatel multimedia keyboard driver is being initialized. There are twopossible cases:
� first installation : there is an extra stage with the installation of the Alcatel multimediakeyboard driver. Refer to § 3.6 : Installing the keyboard driver (For Windows 2000 only)
Ed.03 Ref.3BA19919ENAA 4.11

A L C ET L
Alcatel OmniPCX 4400
SBC Alcatel 4059 Section 4 - SBC Alcatel 4059Installation - Software
� Installation update When loading is complete a window requesting the computer to berebooted is displayed. click OK:
Once the computer has rebooted, refer to the § 3.7 : Configuring physical access on the PC.Note: Restarting the computer enables the different system files to be updated.
3.6. Installing the keyboard driver (For Windows 2000 only)This stage corresponds to the installation of the keyboard and the mouse driver. The following windowis displayed:
Select Alcatel Multimedia kayboard then click �Ok�. The following window is displayed:
4.12 Ref.3BA19919ENAA Ed.03

A L C ET L
Alcatel OmniPCX 4400
Section 4 - SBC Alcatel 4059 SBC Alcatel 4059Installation - Software
This window allows the Microsoft signature of the previously selected keyboard to be identified. Tocontinue, click �Yes�. The following window is for installation of the mouse driver:
Select Mouse on PS2 port with Alcatel Multimedia keyboard then click �Ok�. The followingwindow is displayed:
This window allows for the Microsoft signature of the previously selected mouse to be identified. Tocontinue, click �Yes�.
When loading is complete a window requesting the computer to be rebooted is displayed. click OK:
Ed.03 Ref.3BA19919ENAA 4.13

A L C ET L
Alcatel OmniPCX 4400
SBC Alcatel 4059 Section 4 - SBC Alcatel 4059Installation - Software
3.7. Configuring physical access on the PC
In this screen, the operator configures physical access settings for the newly installed application with:
- the name identifying access,
- choice of protocol. For an installation using the 4059 MAC application and the TA-MMK unit,physical access must be configured with PAC/PC protocol.Note: with the TA-MAC unit, access must be configured with MAC/PC protocol.
- the choice of port (com1 to 4) for the connection between PC and set.
- the choice of MPB mode (set by default at "enable super & combined").
Click �Ok� to confirm.
Remark: this step is not performed in the case of a software upgrade. If the attendant wishes tomodify exisiting access parameters, the Alcatel ABCA applications configurator window (shownbelow) must be used.To display this window, click the menu Start >> Programs >> Alcatel 4400 Applications >>Setup tool for ABCA applications. When the window is displayed, select the application then click�Access... �.
3.8. Configuration report
The following screen is used to check the correspondence between the "applications" (or sessions) andthe physical accesses.
4.14 Ref.3BA19919ENAA Ed.03

A L C ET L
Alcatel OmniPCX 4400
Section 4 - SBC Alcatel 4059 SBC Alcatel 4059Installation - Software
In this screen, the attendant may select the type of session, i.e. associate one of the applications abovewith an access.
The attendant may use:
Access... to define, modify or delete an access.
Quit to exit the dialog box.
About: to provide information on the user of this software and the versions of the files.
4. Uninstalling the application
Important: as of 4059 application, the attendant also has a personal directory permitting theattendant to save up to 3000 users. This directory is saved under ALCABC32\store.dat. Remember tosave this file in case of deinstallation of the 4059 application, otherwise it is deleted.
The installation is uninstalled from the directory where the files of the installed version are stored. Thisdirectory is defined when the application is loaded and may be modified.
The attendant opens this directory then double clicks on the icon.
A dialog box opens where the attendant is asked to select the application to be deleted. Select theapplication then validate with the �Ok� key.
The attendant is asked to confirm the selection of the application to be deleted. Confirm with the �Yes�key.
Ed.03 Ref.3BA19919ENAA 4.15

A L C ET L
Alcatel OmniPCX 4400
SBC Alcatel 4059 Section 4 - SBC Alcatel 4059Installation - Software
The application is uninstalled and the following screen is displayed:
Click on the �Continue� key.
icon disappears from the desk top, the Start menu and Programs in the OmniPCX 4400 Appli-cations panel to confirm the uninstallation of the version.
5. Session opening procedure
When the software is installed, the procedure to open an Alcatel 4059 MAC session is launched auto-matically after the PC is powered up.
In this case, the attendant may enter the name and password used to open a Windows session.
Once the application has been accessed:
- double-click on the icon.
- or click on the menu Start >> Programs >> Alcatel 4400 Applications >> Alcatel4059 MAC.
4.16 Ref.3BA19919ENAA Ed.03

A L C ET L
Alcatel OmniPCX 4400
Section 4 - SBC Alcatel 4059 SBC Alcatel 4059Management
44A01609000A160AAEN
SBC Alcatel 4059ManagementEdition: 03
1. General Information
An attendant must be declared in management on the PBX in order to be able to use the 4059 MACapplication. For more details on the different items in the management menus, refer to module Atten-dants - Management.
As of R4.2, the Manager can configure a threshold which indicates the maximum number of attendantsallowed before incoming call display changes from �list� mode to �counter� mode.Remark: The two modes (�list� and �counter� are presented to the module Alcatel 4059 attendantconsole - Basic screens - § Supervision icons.
2. Parametering the attendant for the 4059 MAC application
Object name: Attendant > Attendant sets
Attributes:
Attendant Id: : Enter the attendant reference number.
Attendant Group Id: : Enter the number of the attendant group to which this set isattached (-1 no attendant group).
Shelf Address : According to the sire:
Board Address : According to the sire:
Equipment Address : According to the site:
Set Type : Select:- 4059 MAC- MAC 2 equipts
Warning:- the MAC 2 equipts option must be selected if the Alcatel
4059 terminal uses the TA-MMK unit (as from R4.1).- both options are possible if the Alcatel 4059 terminal
uses the TA-MAC unit (releases prior to R4.1).
Entity Number : Enter the entity number attributed to the attendant.
V24 extension, : Select yes.
MAC/PC": : Select "MAC/PC".
Ed.03 Ref.3BA19919ENAA 4.17

A L C ET L
Alcatel OmniPCX 4400
SBC Alcatel 4059 Section 4 - SBC Alcatel 4059Management
Warning: as the TA unit receives its power supply from the UA links, 4 pieces of equipment mustbe placed in order. These equipments are allocated automatically to the 4059 MAC, regardless ofwhether or not used.Remark: the TA-MMK unit only uses one UA link for it�s power supply but it is recommended toselect MAC 2equipts.
The attendant console must be declared:
- on devices 0, 2, 4, etc... of the UA board if the configuration is MAC 2equipts.
- on devices 0, 4, 8, 12, 16, 20, 24 or 28 of the UA board if the configuration is 4059 MAC.
3. Configuring display of incoming calls to the 4059 MAC application
Display configuration of calls in the application (�list� or �counter� mode) is via an attendant thresholdthat can be managed for each group of attendants.
Object name: Attendant > Attendant groups
Attributes:
Physical directory number : Displays the directory number of the selected attendantgroup.
Threshold greater than listson 4059
: Enter threshold value, must be between 1 and 20 (6 bydefault).
4.18 Ref.3BA19919ENAA Ed.03

A L C ET L
Alcatel OmniPCX 4400
Section 4 - SBC Alcatel 4059 SBC Alcatel 4059Customized management
44A01609000A161AAEN
SBC Alcatel 4059Customized managementEdition: 03
1. General Information
The 4059 application allows access to different types of external directories that can be used for the�Call by name� telephone feature. These directories are LDAP and ODBC type directories.
To use these directories, the site manager must first configure access to them from the 4059 applica-tion. This access differs depending on whether the directory is ODBC or LDAP type.
To carry out this operation, the site manager is supposed to have the required knowledge of:
- the Windows� environment,
- ODBC and LDAP operating principles,
- the �Call by name� telephone feature. For more information, refer to module Alcatel 4059attendant console - Telephone features - § Call by name.
Reminders:LDAP (Lightweight Directory Access Protocol) is a client-server protocol that offers access to directoryservices via the network and/or the Internet.ODBC (Open Database Connectivity) is a format defined by Microsoft allowing a user to access adatabase running in Windows. This database can be a telephone directory for a 4059 application.Important: from the 4059 application, the attendant also has a personal directory enabling theattendant to save up to 3000 users. This directory is saved under ALCABC32\store.dat. Remember tosave this file in case of deinstallation of the 4059 application, otherwise it is deleted.
2. Accessing the directory configuration menus
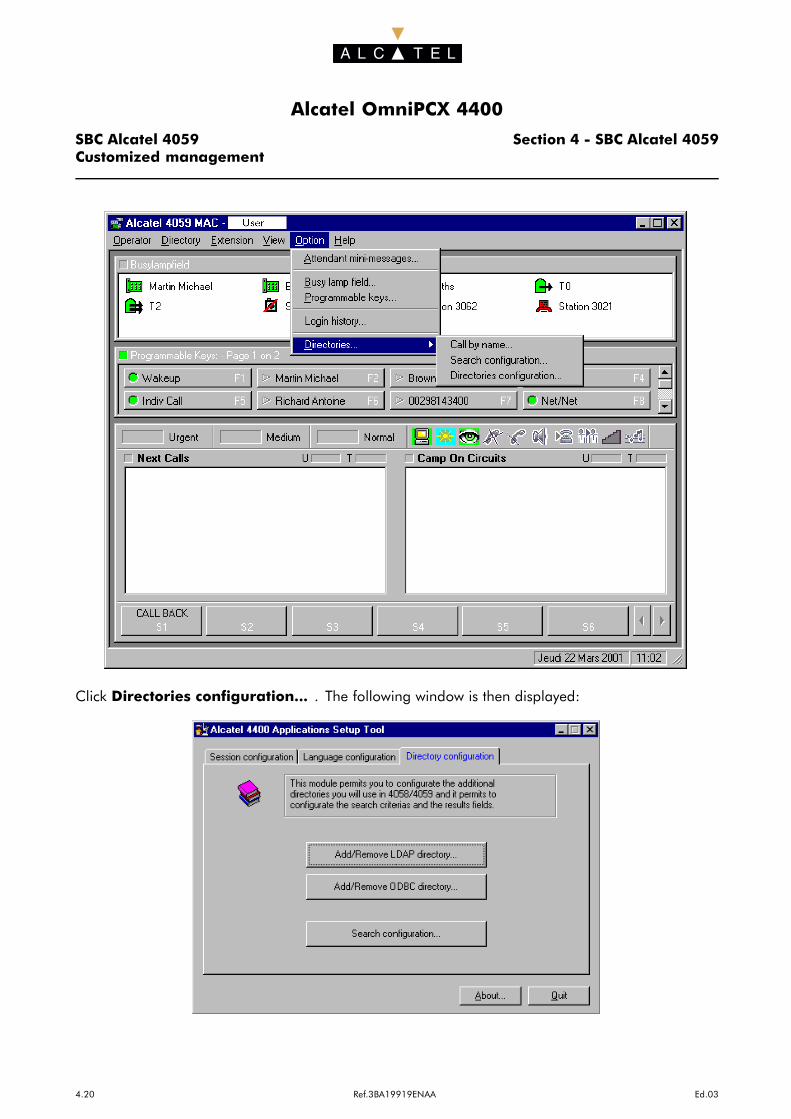
From the main screen of the 4059 application, select the Option menu, then Directories as follows:
Ed.03 Ref.3BA19919ENAA 4.19
A L C ET L
Alcatel OmniPCX 4400
SBC Alcatel 4059 Section 4 - SBC Alcatel 4059Customized management
Click Directories configuration... . The following window is then displayed:
4.20 Ref.3BA19919ENAA Ed.03
A L C ET L
Alcatel OmniPCX 4400
Section 4 - SBC Alcatel 4059 SBC Alcatel 4059Customized management
This dialog box allows the manager to program different directory configuration parameters:
- Add/Delete an LDAP directory... :to add, modify or delete a LDAP type directory,
- Add/Delete an LDAP directory... :to add, modify or delete a LDAP type directory,
- Configuration : to modify the existing LDAP and/or ODBC directory parameters.Remark: it is possible to configure several ODBC directories and only one LDAP directory for the4059 application.
3. Configuring the LDAP directory
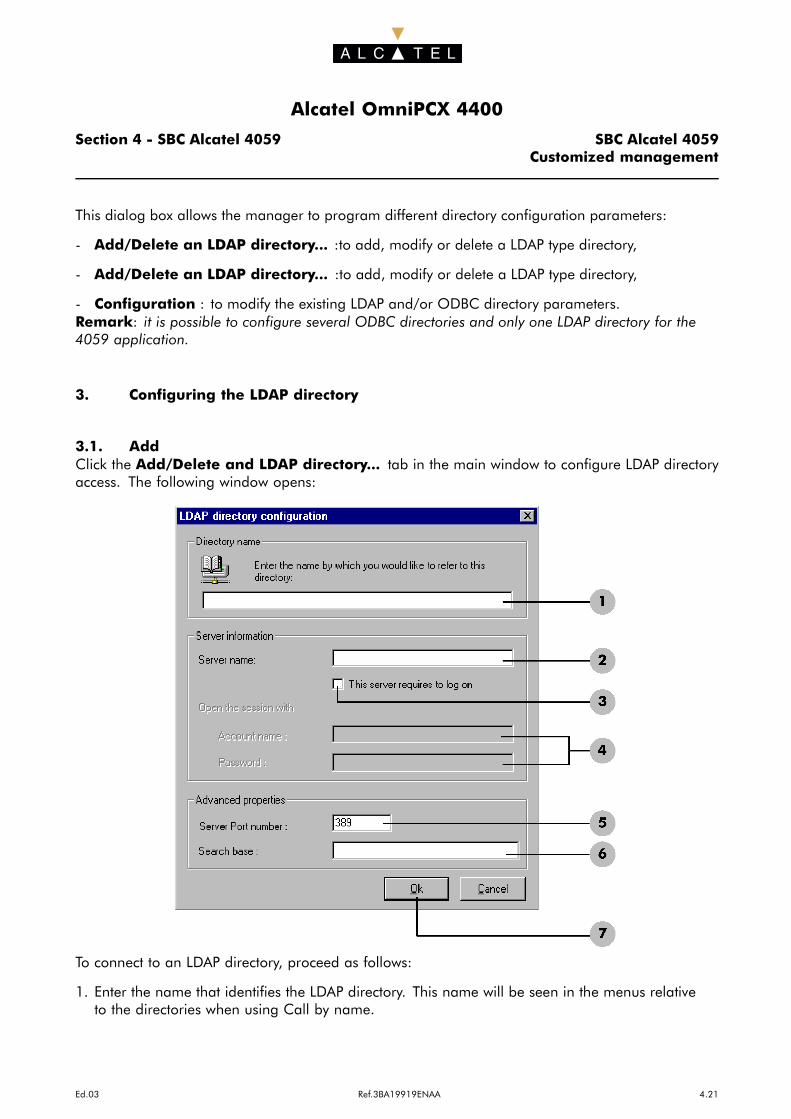
3.1. AddClick the Add/Delete and LDAP directory... tab in the main window to configure LDAP directoryaccess. The following window opens:
To connect to an LDAP directory, proceed as follows:
1. Enter the name that identifies the LDAP directory. This name will be seen in the menus relativeto the directories when using Call by name.
Ed.03 Ref.3BA19919ENAA 4.21

A L C ET L
Alcatel OmniPCX 4400
SBC Alcatel 4059 Section 4 - SBC Alcatel 4059Customized management
2. Enter the name or IP address of the LDAP server.
3. Click the box if the connection to the LDAP server requires access rights (name and pasword).
4. Enter the name and the password used for the connection to the LDAP server (only if the box3
is activated).
5. Enter the port number of the connection to the LDAP server (389 by default).
6. Enter data allowing a more precise search in the requested directory. This is a string of characters,as shown below:Example: o=ALCATEL corresponds to the following syntax: o (organization) = company.
7. Confirm by clicking �OK� .
Once this last operation is complete, the application checks the parameters entered and availabilityof the requested server. If the configuration is accedted, the main screen is re-displayed. Otherwise,repeat the procedure described above while checking that the server used is available.Note: Once management of the directory has been carried out, it is necessary to go at least once tothe �Search Configuration� menu presented to the § 5 : Other LDAP and OBCD directory managementoperations § 5 : Other LDAP and OBCD directory management operations
3.2. Modifying
Add/Delete an LDAP directory... tab in the main window. The "LDAP directory configuration" windowis opened with the settings for the existing LDAP directory.
Modify the fields required, then confirm by clicking OK.
3.3. Delete
Add/Delete an LDAP directory... tab in the main window. The "LDAP directory configuration" windowis opened with the settings for the existing LDAP directory.
Delete the connection to the LDAP directory by using the �Cancel...� button. .
4. Configuring ODBC directories
4.1. Add
Add/Delete an LDAP directory... tab in the main window. The following window opens:
4.22 Ref.3BA19919ENAA Ed.03
A L C ET L
Alcatel OmniPCX 4400
Section 4 - SBC Alcatel 4059 SBC Alcatel 4059Customized management
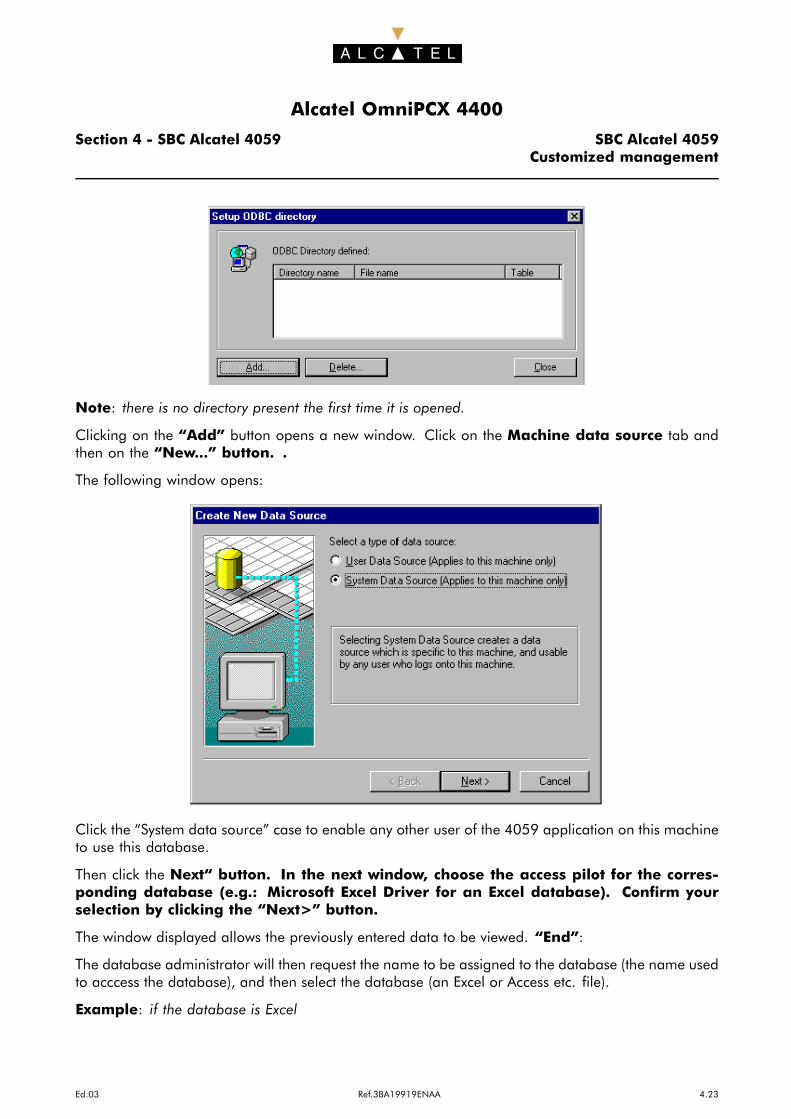
Note: there is no directory present the first time it is opened.
Clicking on the �Add� button opens a new window. Click on the Machine data source tab andthen on the �New...� button. .
The following window opens:
Click the �System data source� case to enable any other user of the 4059 application on this machineto use this database.
Then click the Next� button. In the next window, choose the access pilot for the corres-ponding database (e.g.: Microsoft Excel Driver for an Excel database). Confirm yourselection by clicking the �Next>� button.
The window displayed allows the previously entered data to be viewed. �End�:
The database administrator will then request the name to be assigned to the database (the name usedto acccess the database), and then select the database (an Excel or Access etc. file).
Example: if the database is Excel
Ed.03 Ref.3BA19919ENAA 4.23

A L C ET L
Alcatel OmniPCX 4400
SBC Alcatel 4059 Section 4 - SBC Alcatel 4059Customized management
1. Enter the name to be assigned to the database (e.g.: telephone directory).
2. Click the Selected Folder... button. A search window is opened in which the following actionsare carried out:
� selection of the source file for the directory required,
� confirm data entered with �OK� .
3. Return to the previous window. Confirm by clicking �OK� .Note: these steps and those that follow differ according to the type of database required (here,Excel). In other cases, follow the on-screen instructions for the type of database required;The following window displays the database created.Example:
Select the database (here, telephone directory) and click �OK�. The following window is then dis-played:
4.24 Ref.3BA19919ENAA Ed.03

A L C ET L
Alcatel OmniPCX 4400
Section 4 - SBC Alcatel 4059 SBC Alcatel 4059Customized management
Proceed as follows:
1. Select one of the sheets (1 to 3) in the source file that is to be used as directory.
2. Enter the name identifying this directory. This name will be seen in the menus relative to thedirectories when using Call by name.
3. Confirm by clicking �OK� .
A new window is opened:
Example:
This window is used to match the column titles of the selected sheet (accessed by a drop-down menu
in ) and the three standard fields (name, first name and directory number) that are essential for
Call by name calls (in ).
Ed.03 Ref.3BA19919ENAA 4.25

A L C ET L
Alcatel OmniPCX 4400
SBC Alcatel 4059 Section 4 - SBC Alcatel 4059Customized management
Once the fields are associated, click �OK� . The directory created can be accessed from the 4059application.Note: Once the management of the directory has been carried out, it is necessary to go at leastonce to the �Search Configuration� menu presented to the § 5 : Other LDAP and OBCD directorymanagement operations
4.2. Modifying
1. If the modification is on the directory name:
Add/Delete an LDAP directory... tab (see § 2 : Accessing the directory configuration menus). thefollowing window is displayed:
Example:
Click on the directory name and then modify it. Confirm changes by pressing �Enter�.
2. If the modification is on the basic data (new source file):
Follow the principle of the "add" procedure until the "Select the data source" window is displayed.When this opens, select the database to be modified, then continue as for the "add" procedure.
4.3. Delete
Add/Delete an LDAP directory... tab (see § 2 : Accessing the directory configuration menus). thefollowing window is displayed:
4.26 Ref.3BA19919ENAA Ed.03

A L C ET L
Alcatel OmniPCX 4400
Section 4 - SBC Alcatel 4059 SBC Alcatel 4059Customized management
Example:
Select the directory to be deleted, then confirm by pressing the �Delete� button.
5. Other LDAP and OBCD directory management operations
Reminder: when Call by name is carried out, the attendant can access additional information on therequested subscriber by opening a window called "Other data" (see the user manual, module Alcatel4059 attendant console - Telephone features - § End of timer). Opening and lay-out of this windowdepend on the management that the site manager performed previously on the directory of therequested subscriber. This management is described here.
Click the Search Configuration... Installation (see § 2 : Accessing the directory configuration menus)If there are directories, the following window opens:
Example:
Select the appropriate directory, then click the �OK� button.Note: if the directory has already been modified, a window is displayed, asking whether themodifications to be made must apply to all users or to the current user only. Select the option yourequire, then click �OK�.
The following window opens:
Ed.03 Ref.3BA19919ENAA 4.27

A L C ET L
Alcatel OmniPCX 4400
SBC Alcatel 4059 Section 4 - SBC Alcatel 4059Customized management
The area on the right displays the basic configuration with the fields: name, first name and directorynumber. These are the fields that the attendant sees displayed in the "Other data" window when he/sherequests additional information on a subscriber (after running the �Call by Name� feature).
The area on the left displays fields that are still available.
To insert a new field in the right area, proceed as follows:
1. Click the required field in the left screen.
2. Click the button. The field switches to the right area and is preceded by the �text� field icon.
3. Modify the type of field added if it is not text. To do this, select the corresponding field icon(�directory number� or �Email�). If the field icon has not been assigned correctly, the attendant willnot be able to use it during "call by name".
To insert a new field in the right area, proceed as follows:
1. Click on the requested field.
4.28 Ref.3BA19919ENAA Ed.03

A L C ET L
Alcatel OmniPCX 4400
Section 4 - SBC Alcatel 4059 SBC Alcatel 4059Customized management
2. Click the button. The field switches to the left area.
Before confirming changes, the installer can configure the order of the fields appear in with the
and buttons. Fields appear in this order in the "Other data" window.
Confirm by clicking �OK� � .
Note: if the directory is LDAP type and if the PC has the OmniVista 4760 application installed, anadditional parameter is displayed with the request "Use the Alcatel 4760 to display other data". Ifthis parameter is validated, the attendant will thus use the OmniVista 4760 application to viewthe additional subscriber information.
Ed.03 Ref.3BA19919ENAA 4.29