alliance ssr helmet alliance ssr...
TRANSCRIPT
IC
ON M
OTOS
PORT
S AL
LIAN
CE S
SR H
ELM
ET
ALLIANCE SSR HELMET
ICON M
OTOSPORTS ALLIANCE SSR M
ANUAL
ICON
MOT
OSPO
RTS
ALLI
ANCE
SSR
HEL
MET
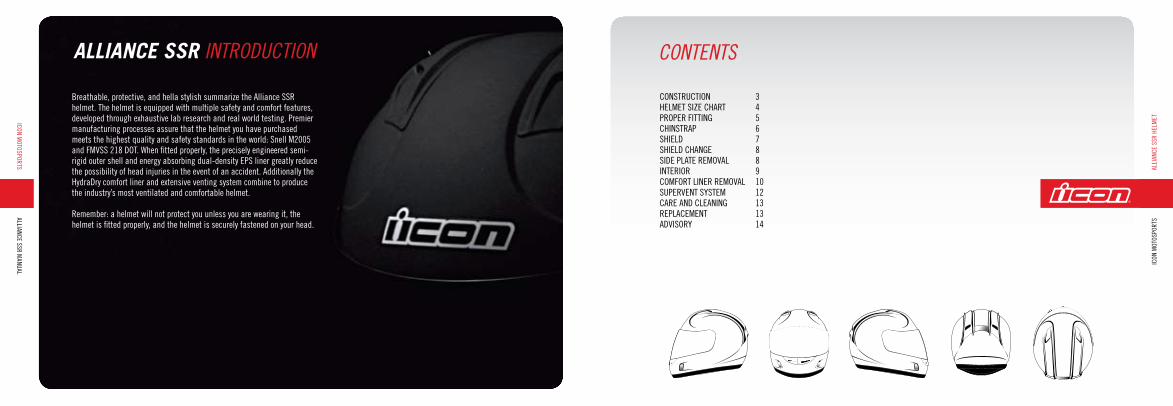
ALLIANCE SSR INTRODUCTION
CONSTRUCTION 3HELMET SIZE CHART 4PROPER FITTING 5CHINSTRAP 6SHIELD 7SHIELD CHANGE 8SIDE PLATE REMOVAL 8INTERIOR 9COMFORT LINER REMOVAL 10SUPERVENT SYSTEM 12CARE AND CLEANING 13REPLACEMENT 13ADVISORY 14
CONTENTS
Breathable, protective, and hella stylish summarize the Alliance SSR helmet. The helmet is equipped with multiple safety and comfort features, developed through exhaustive lab research and real world testing. Premier manufacturing processes assure that the helmet you have purchased meets the highest quality and safety standards in the world: Snell M2005 and FMVSS 218 DOT. When fitted properly, the precisely engineered semi-rigid outer shell and energy absorbing dual-density EPS liner greatly reduce the possibility of head injuries in the event of an accident. Additionally the HydraDry comfort liner and extensive venting system combine to produce the industry’s most ventilated and comfortable helmet.
Remember: a helmet will not protect you unless you are wearing it, the helmet is fitted properly, and the helmet is securely fastened on your head.
ICON M
OTOSPORTS ALLIANCE SSR M
ANUAL
3
IC
ON M
OTOS
PORT
S AL
LIAN
CE S
SR H
ELM
ET
4
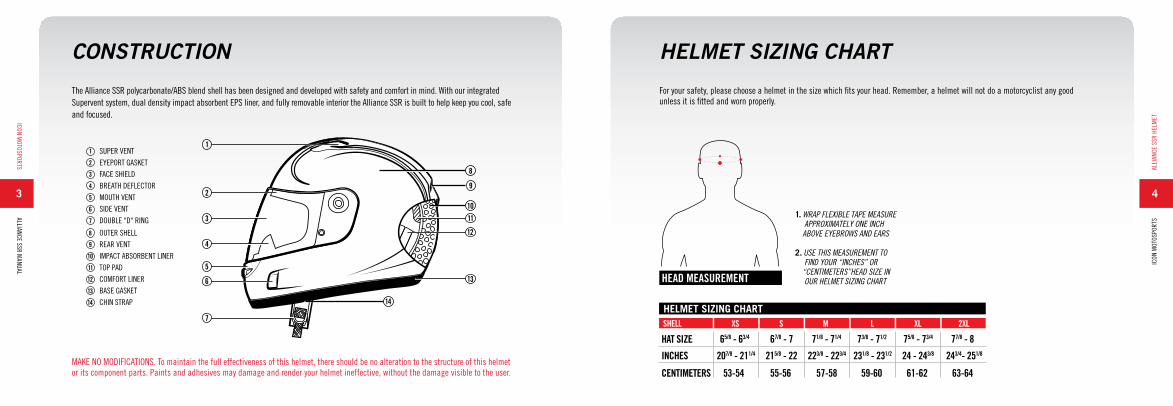
CONSTRUCTION
The Alliance SSR polycarbonate/ABS blend shell has been designed and developed with safety and comfort in mind. With our integrated Supervent system, dual density impact absorbent EPS liner, and fully removable interior the Alliance SSR is built to help keep you cool, safe and focused.
HELMET SIZING CHART
For your safety, please choose a helmet in the size which fits your head. Remember, a helmet will not do a motorcyclist any good unless it is fitted and worn properly.
MAKE NO MODIFICATIONS. To maintain the full effectiveness of this helmet, there should be no alteration to the structure of this helmet or its component parts. Paints and adhesives may damage and render your helmet ineffective, without the damage visible to the user.
SUPER VENTEYEPORT GASKETFACE SHIELDBREATH DEFLECTORMOUTH VENTSIDE VENTDOUBLE "D" RING
OUTER SHELLREAR VENTIMPACT ABSORBENT LINERTOP PADCOMFORT LINERBASE GASKETCHIN STRAP
ICON M
OTOSPORTS ALLIANCE SSR M
ANUAL
5
IC
ON M
OTOS
PORT
S AL
LIAN
CE S
SR H
ELM
ET
6
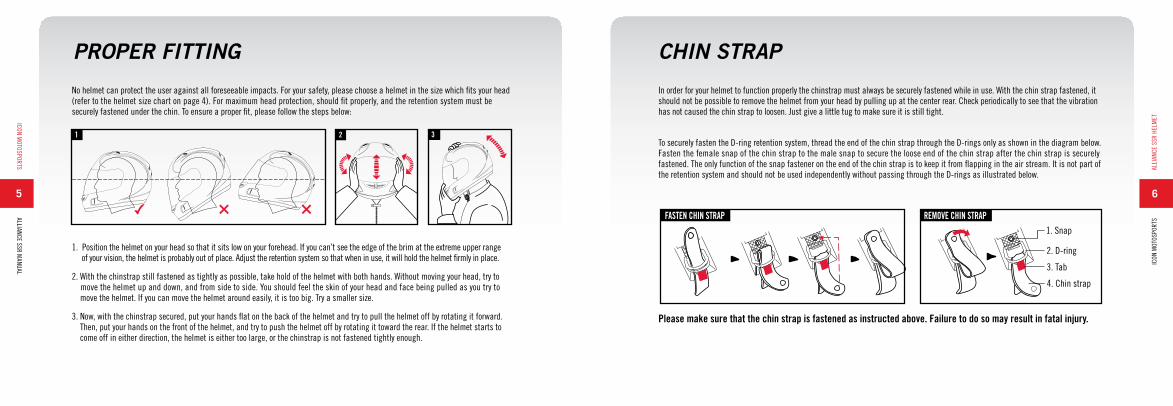
No helmet can protect the user against all foreseeable impacts. For your safety, please choose a helmet in the size which fits your head (refer to the helmet size chart on page 4). For maximum head protection, should fit properly, and the retention system must be securely fastened under the chin. To ensure a proper fit, please follow the steps below:
1. Position the helmet on your head so that it sits low on your forehead. If you can’t see the edge of the brim at the extreme upper range of your vision, the helmet is probably out of place. Adjust the retention system so that when in use, it will hold the helmet firmly in place.
2. With the chinstrap still fastened as tightly as possible, take hold of the helmet with both hands. Without moving your head, try to move the helmet up and down, and from side to side. You should feel the skin of your head and face being pulled as you try to move the helmet. If you can move the helmet around easily, it is too big. Try a smaller size.
3. Now, with the chinstrap secured, put your hands flat on the back of the helmet and try to pull the helmet off by rotating it forward. Then, put your hands on the front of the helmet, and try to push the helmet off by rotating it toward the rear. If the helmet starts to come off in either direction, the helmet is either too large, or the chinstrap is not fastened tightly enough.
In order for your helmet to function properly the chinstrap must always be securely fastened while in use. With the chin strap fastened, it should not be possible to remove the helmet from your head by pulling up at the center rear. Check periodically to see that the vibration has not caused the chin strap to loosen. Just give a little tug to make sure it is still tight.
To securely fasten the D-ring retention system, thread the end of the chin strap through the D-rings only as shown in the diagram below. Fasten the female snap of the chin strap to the male snap to secure the loose end of the chin strap after the chin strap is securely fastened. The only function of the snap fastener on the end of the chin strap is to keep it from flapping in the air stream. It is not part of the retention system and should not be used independently without passing through the D-rings as illustrated below.
Please make sure that the chin strap is fastened as instructed above. Failure to do so may result in fatal injury.
2 3
RIGHT CHEEK PAD LEFT CHEEK PAD
COMFORT LINER
CHIN CURTAIN
XXS
35mm
XS
30mm
S
30mm
M
25mm
L
30mm
XL
25mm
XXL
20mm
3XL
20mm
HELMET SHELL SIZE
15mm
12mm
15mm
12mm
12mm
9mm
7mm
7mm
1
2 31
4 EE5 6
3
2 2
1 1
2
1
PROPER FITTING CHIN STRAP
2 31
ICON M
OTOSPORTS ALLIANCE SSR M
ANUAL
7
IC
ON M
OTOS
PORT
S AL
LIAN
CE S
SR H
ELM
ET
8
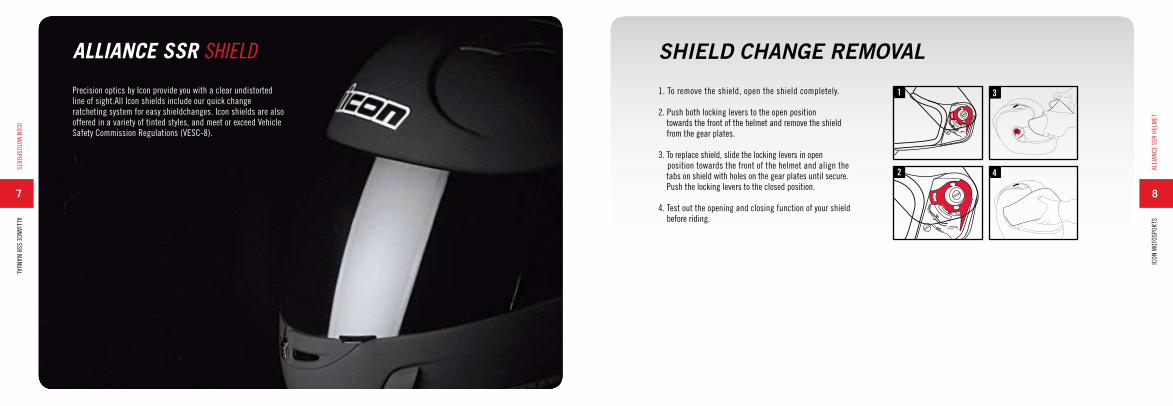
SHIELD CHANGE REMOVAL
1. To remove the shield, open the shield completely.
2. Push both locking levers to the open position towards the front of the helmet and remove the shield from the gear plates.
3. To replace shield, slide the locking levers in open position towards the front of the helmet and align the tabs on shield with holes on the gear plates until secure. Push the locking levers to the closed position.
4. Test out the opening and closing function of your shield before riding.
Precision optics by Icon provide you with a clear undistorted line of sight.All Icon shields include our quick change ratcheting system for easy shieldchanges. Icon shields are also offered in a variety of tinted styles, and meet or exceed Vehicle Safety Commission Regulations (VESC-8).
ALLIANCE SSR SHIELD
1
2
EE3
EE4
ICON M
OTOSPORTS ALLIANCE SSR M
ANUAL
9
IC
ON M
OTOS
PORT
S AL
LIAN
CE S
SR H
ELM
ET
10
Your Alliance SSR helmet features a fully customizable HydraDry comfort liner. HydraDry is a moisture wicking material that keeps the rider’s head drier and cooler as well as drying much faster when it does get wet.
The size of a helmet is based on a combination of three factors: outer shell size, inner eps thickness, and cheekpad thickness. The fit of the helmet can be customized by replacing your existing cheekpads with thinner cheekpads (for a looser fit), or thicker cheekpads (for a tighter fit).
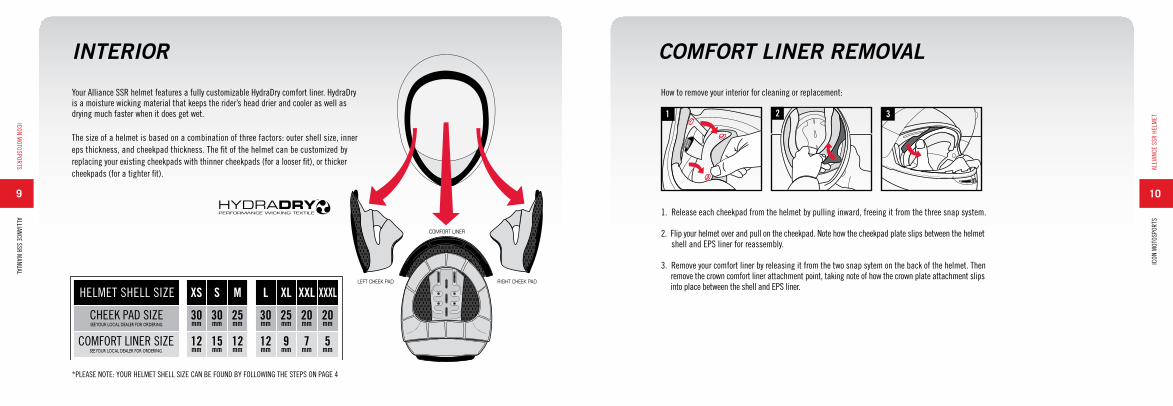
INTERIOR
1. Release each cheekpad from the helmet by pulling inward, freeing it from the three snap system.
2. Flip your helmet over and pull on the cheekpad. Note how the cheekpad plate slips between the helmet shell and EPS liner for reassembly.
3. Remove your comfort liner by releasing it from the two snap sytem on the back of the helmet. Then remove the crown comfort liner attachment point, taking note of how the crown plate attachment slips into place between the shell and EPS liner.
COMFORT LINER REMOVAL
How to remove your interior for cleaning or replacement:
RIGHT CHEEK PADLEFT CHEEK PAD
COMFORT LINER
XS
30mm
S
30mm
M
25mm
L
30mm
XL
25mm
XXL
20mm
HELMET SHELL SIZE
12mm
15mm
12mm
12mm
9mm
7mm
XXXL
20mm
5mm
2 3
RIGHT CHEEK PAD LEFT CHEEK PAD
COMFORT LINER
CHIN CURTAIN
XXS
35mm
XS
30mm
S
30mm
M
25mm
L
30mm
XL
25mm
XXL
20mm
3XL
20mm
HELMET SHELL SIZE
15mm
12mm
15mm
12mm
12mm
9mm
7mm
7mm
1
2 31
4 EE5 6
3
2 2
1 1
2
1
*PLEASE NOTE: YOUR HELMET SHELL SIZE CAN BE FOUND BY FOLLOWING THE STEPS ON PAGE 4
ICON M
OTOSPORTS ALLIANCE SSR M
ANUAL
11
IC
ON M
OTOS
PORT
S AL
LIAN
CE S
SR H
ELM
ET
12
DOMAIN
MAIN FRAME
AIRFRAME
ALLIANCE SS
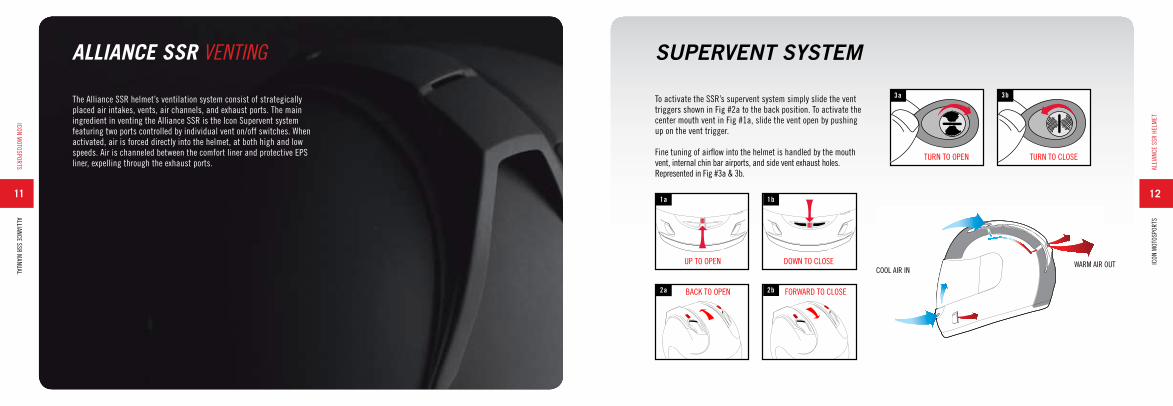
SUPERVENT SYSTEMALLIANCE SSR VENTING
The Alliance SSR helmet’s ventilation system consist of strategically placed air intakes, vents, air channels, and exhaust ports. The main ingredient in venting the Alliance SSR is the Icon Supervent system featuring two ports controlled by individual vent on/off switches. When activated, air is forced directly into the helmet, at both high and low speeds. Air is channeled between the comfort liner and protective EPS liner, expelling through the exhaust ports.
To activate the SSR’s supervent system simply slide the vent triggers shown in Fig #2a to the back position. To activate the center mouth vent in Fig #1a, slide the vent open by pushing up on the vent trigger.
Fine tuning of airflow into the helmet is handled by the mouth vent, internal chin bar airports, and side vent exhaust holes. Represented in Fig #3a & 3b.
DOWN TO CLOSEUP TO OPEN
TURN TO OPEN TURN TO CLOSE
3b
1b
3a
1a
BACK TO OPEN FORWARD TO CLOSE2b2a
COOL AIR INWARM AIR OUT
DOWN TO CLOSEUP TO OPEN
TURN TO OPEN TURN TO CLOSE
3b
1b
3a
1a
BACK TO OPEN FORWARD TO CLOSE2b2a
DOWN TO CLOSEUP TO OPEN
TURN TO OPEN TURN TO CLOSE
3b
1b
3a
1a
BACK TO OPEN FORWARD TO CLOSE2b2a
DOWN TO CLOSEUP TO OPEN
TURN TO OPEN TURN TO CLOSE
3b
1b
3a
1a
BACK TO OPEN FORWARD TO CLOSE2b2a
DOWN TO CLOSEUP TO OPEN
TURN TO OPEN TURN TO CLOSE
3b
1b
3a
1a
BACK TO OPEN FORWARD TO CLOSE2b2a
DOWN TO CLOSEUP TO OPEN
TURN TO OPEN TURN TO CLOSE
3b
1b
3a
1a
BACK TO OPEN FORWARD TO CLOSE2b2a
ICON M
OTOSPORTS ALLIANCE SSR M
ANUAL
13
IC
ON M
OTOS
PORT
S AL
LIAN
CE S
SR H
ELM
ET
14
CARE AND CLEANING
ADVISORY
Let’s face it, Icon helmets look cool and you want to keep them that way. We’ve found the following methods work really well to keep our helmets looking sharp and ready to roll. Remember, never use gas, pre-mix, carb cleaner, brake cleaner or any other random unlabeled spray can lying around the garage. Chemicals and harsh solvents can break down the materials in your helmet; it’s like using brake cleaner to polish your plastics—don’t do it!
EXTERIOR POLISHING1. For gloss helmet finishes, use spray automotive wax that is specifically designed for cars with a clear coat. (Available at any automotive store.) 2. For matte finishes, you know better than to polish a matte finish don’t you?
STORAGEIt is a good idea to protect your helmet if it is stored for a period of time. Store your helmet inside the helmet bag we have provided in a secure, dry place out of direct exposure to sunlight.
INTERIOR CLEANING1. Remove interior lining as shown on page 10.2. Soak your interior in a mild solution of baby shampoo.3. Rinse in clean water several times until all soap is gone.4. Let interior air dry and replace accordingly.* Never machine wash or dry your helmet interior.
Although your helmet is solid and very well constructed, it should be handled with care, dropping a helmet on the ground, or other hard surfaces may eventually degrade the helmet’s performance. Additionally, if the helmet falls to the ground at highway speeds unocupied, the owner must be aware that some unseen damage may have occurred.
SNELL RECOMMENDATIONThe Snell Memorial Foundation advises that if you are participating in an activity that requires you to wear a helmet, it is strongly recommended that you avoid hitting anything with your head. The Foundation also states that if you suspect your helmet has been compromised, or the helmet has been involved in an impact while in use, replace it. For more infor-mation, visit http://www.smf.org/
2 3
RIGHT CHEEK PAD LEFT CHEEK PAD
COMFORT LINER
CHIN CURTAIN
XXS
35mm
XS
30mm
S
30mm
M
25mm
L
30mm
XL
25mm
XXL
20mm
3XL
20mm
HELMET SHELL SIZE
15mm
12mm
15mm
12mm
12mm
9mm
7mm
7mm
1
2 31
4 EE5 6
3
2 2
1 1
2
1
EXTERIOR CLEANING (GLOSS HELMETS)1. Lay a warm wet, cloth towel on the exterior of the helmet for at least 5 minutes to soften dried on bugs. (Don’t skip this step!)2. Using a fresh, wet, clean cloth and mild dish soap wipe down the exterior to get rid of road grime and softened bug guts.3. Use another fresh dry cloth towel to dry the helmet and get rid of any water spots.
SHIELD CLEANINGYour helmet is equipped with a scratch resistant fog free shield. Common household cleaners such as Windex ® and Pledge ® can leave behind unwanted residues, or in some extreme cases damage the shield itself. It is our recommendation the same steps outlined above for cleaning the exterior of your helmet should be applied to cleaning the exterior of your shield. Use no cleaners or detergents on the inside of your shield. Using anything other than a clean soft cloth, micro fiber cloth, or the bag supplied with your helmet, will ruin or reduce the effectiveness of the fog free coating.
EXTERIOR CLEANING (RUBATONE HELMETS)1. Lay a warm, wet, cloth towel on the exterior of the helmet for at least 5 minutes to soften dried on bugs.2. Remove the now softened bugs and road grime with a light blot-ting action. For this use the soft part of your helmet bag provided or a clean microfiber cloth.* Never rub aggressively with anything on the Rubatone or you can ruin the finish.
ICON M
OTOSPORTS ALLIANCE SSR M
ANUAL
ICON IS A REGISTERED TRADEMARK. ALL RIGHTS RESERVED. COPYRIGHT© 2007 LEMANS CORPORATION. REPLACEMENT PARTS AND SPECIFICATIONS SUBJECT TO CHANGE WITHOUT NOTICE. PRINTED IN KOREATHE USA. REV. 01.
Manufactured by J-Tech Corp. in Korea
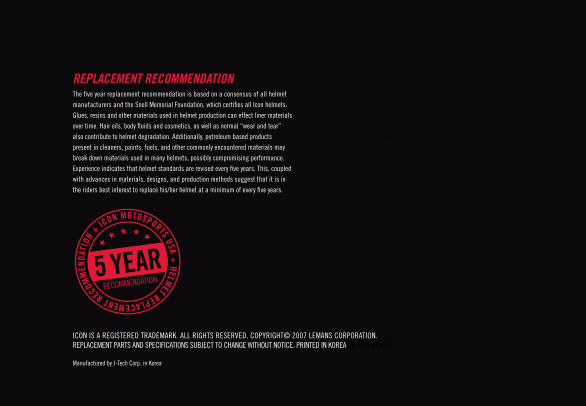
REPLACEMENT RECOMMENDATIONThe five year replacement recommendation is based on a consensus of all helmet manufacturers and the Snell Memorial Foundation, which certifies all Icon helmets. Glues, resins and other materials used in helmet production can effect liner materials over time. Hair oils, body fluids and cosmetics, as well as normal “wear and tear” also contribute to helmet degradation. Additionally, petroleum based products present in cleaners, paints, fuels, and other commonly encountered materials may break down materials used in many helmets, possibly compromising performance. Experience indicates that helmet standards are revised every five years. This, coupled with advances in materials, designs, and production methods suggest that it is in the riders best interest to replace his/her helmet at a minimum of every five years.
2 3
RIGHT CHEEK PAD LEFT CHEEK PAD
COMFORT LINER
CHIN CURTAIN
XXS
35mm
XS
30mm
S
30mm
M
25mm
L
30mm
XL
25mm
XXL
20mm
3XL
20mm
HELMET SHELL SIZE
15mm
12mm
15mm
12mm
12mm
9mm
7mm
7mm
1
2 31
4 EE5 6
3
2 2
1 1
2
1