allscripts pm patient registration and scheduling
TRANSCRIPT

Your phone has been automatically muted. Please use the Q&A panel to
ask questions during the presentation!

Enabling physician groups to realize the full
potential of Electronic Health Records
Allscripts Practice Management –
Patient Registration and Scheduling
January 16, 2015
Presenter:
Kim Baxter -
Professional Services Consultant

What we will learn today:
• Patient Registration
• Explanation fields
• Review remaining tabs and
their purpose:
• Document Management
• Service Inquiry
• Automatic Registration
• And Allscripts PM Today
• Schedule a patient
• explanation fields
• “right click” options
• Review remaining tabs and
their purpose:
• Scheduling Activities
• Scheduling Reports
• Schedule Planning
• Referrals

Navigation/Common Terminology
Function Group
Function Folders
Navigation
Pane
Child Window
(Working Window)
Menu Bar
Toolbar
Minimize Parent Window
Maximize Parent Window
Closes Application

Icons

Tips and Tricks
– Moving between open panes
• F9 - Keeps current window open
• Right click the navigation pane for opening, closing and bringing
other windows to the front.
• Use the navigation icons in the toolbar.

Practice Options –
Require more than one search by fields
when searching for a patient
Practice Options –
Under the registration tab you can make
specific fields required. You can also Highlight
the required fields so the staff know they will not
be able to save a registration without entering
into that field.

Identify the required fields in
registration by checking the
required box.

Patient Management• Patient Registration
– Summary Tab
• At a glance view of
>Patient Demographics
>Account Information – Guarantor, Subscriber, etc.
>Policy Information - Type, Carrier, Status
– Patient Tab
• Change information or create a new account from this screen
– Account Tab
• Account Type – Medicare, Standard, Workers Comp
• Contact Information – Parents, Spouse, Emergency Contact
– Policies Tab
• Contains detailed information regarding Insurance Policies
– Additional Information
• HIPAA, Race, Ethnicity, Language, AKA, etc.
– Chart tab

This button will
turn blue when
you hover over it
if it links to a
secondary tab on
the screen.

This screen gives you the
basic demographic
information about the
patient. The patient’s SSN
is automatically
hyphenated if the option
Hide SSN is selected on
the General tab in
Practice Options or
Organization
Options.
You can click on this
icon and the entire SS#
will appear temporarily.

Completing the Account
tab for the first time
When you are adding a new
patient and you click the
Account tab for the first time,
Account Build opens.
lists 2 options:
*Search for an Existing
Account
*Build a New Account
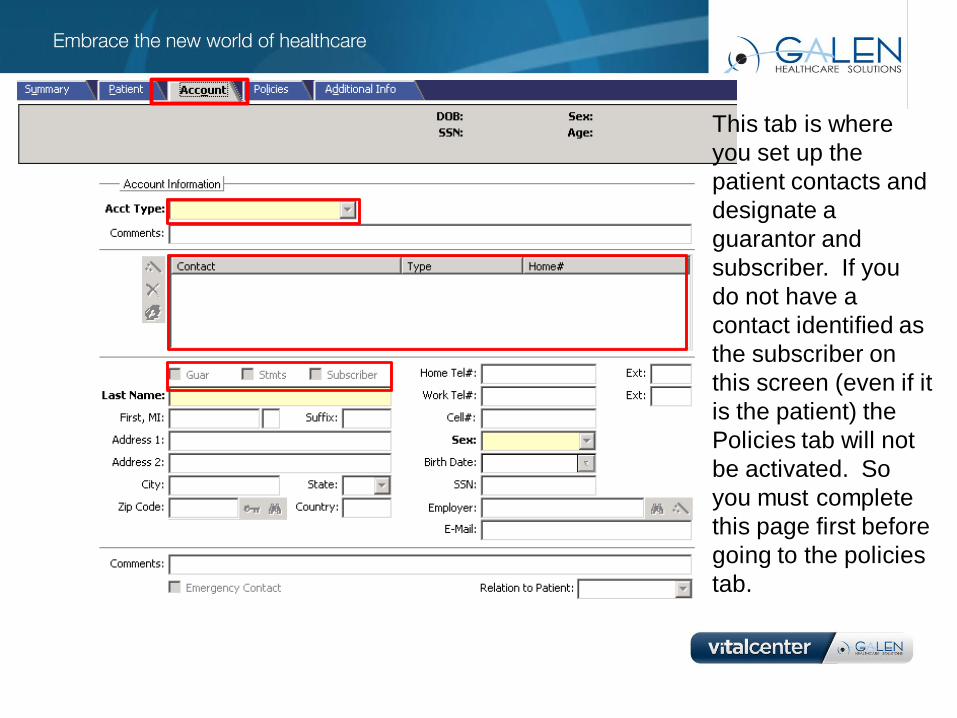
This tab is where
you set up the
patient contacts and
designate a
guarantor and
subscriber. If you
do not have a
contact identified as
the subscriber on
this screen (even if it
is the patient) the
Policies tab will not
be activated. So
you must complete
this page first before
going to the policies
tab.

List all policy
information for
patient.
Can have
more than one
primary policy.
Therefore it is
very important
to complete as
much
information as
possible for
each
Coverage.

Can create new additional information as needed
per your organization. However, important fields
here are Race, Ethnicity and HIPAA which are
required for MU.

Patient specific - allows you to add, update, remove, organize,
etc. notes on a patient account
Filter by specific Note types.
Canned notes can be created under File Maintenance>Note
Type Maintenance

DocumentsPatient SpecificList of documents
that have been
sent or are
scheduled to be
sent.
Non-Patient SpecificBatch jobs just as new
patient documents,
reminders, etc.
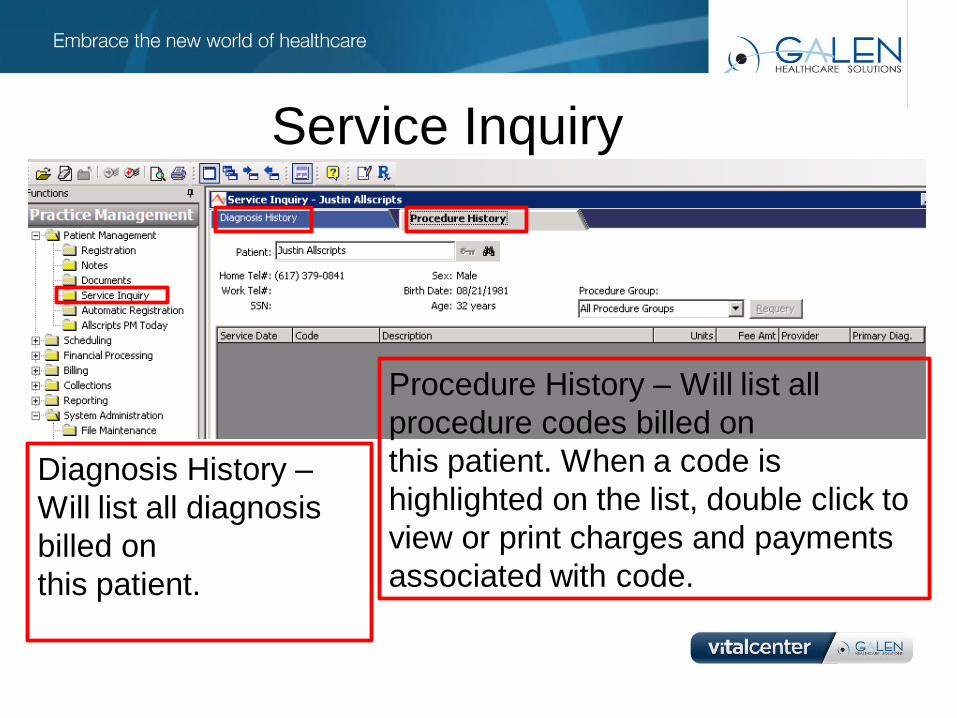
Service Inquiry
Diagnosis History –
Will list all diagnosis
billed on
this patient.
Procedure History – Will list all
procedure codes billed on
this patient. When a code is
highlighted on the list, double click to
view or print charges and payments
associated with code.

Automatic Registration
Allows for an interface that sends demographic patient information to the
PM system. Before it is accepted into the system someone will have to
accept the imports. The first tab if the import patient tab and kicks off the
process. You define the Format you are wanting to run. (Maybe you
have an interface with Hospital Registration and a patient portal.) You
will have two separate formats. Until you select the format and exchange
date information, the options are greyed out at the bottom of the screen.
Clear test data – self explanatory
Validate – Once you have reviewed changes, registered your new
patients, and if chosen removed test data then you validate the import.
Register New – Allows you to review only new patient information
before accepting it into your system.
Review Changes – Allows you to review changes to existing patients
before accepting it into your system.

Automatic Registration
Same constraints as the
previous window however this
just generates a list of
patients that are going to be
queued for import.
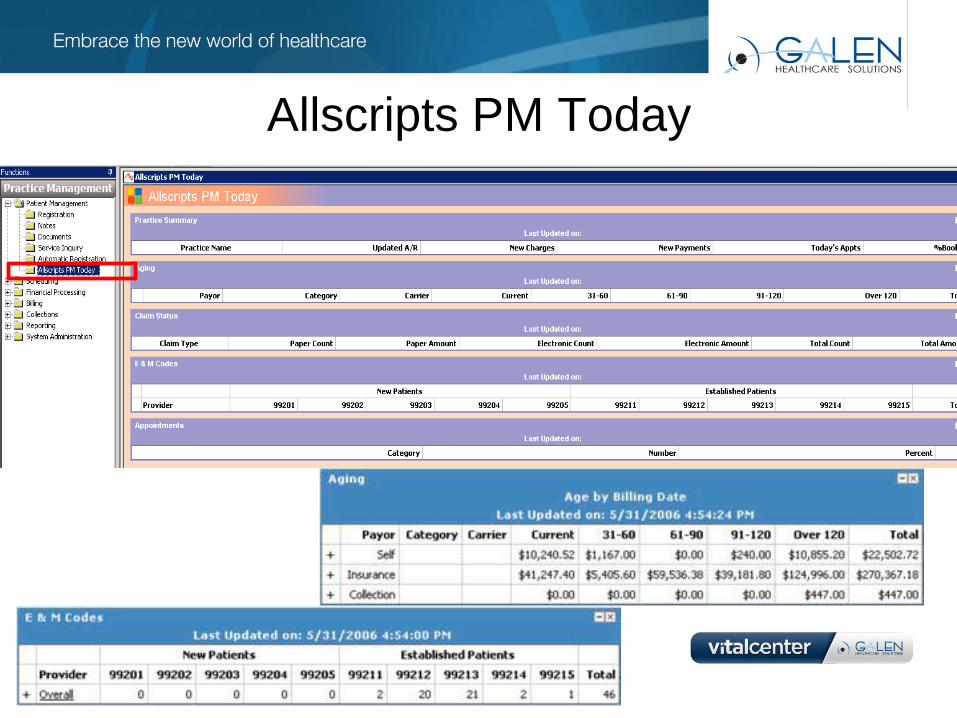
Allscripts PM Today

This is a great tool if set up correctly. It is also called the digital dashboard. It is
very easy to set up but a lot of people do not understand what they are actually
looking at and misinterpret the data. There is a document called DigitalDashboard
Allscript PM that explains the setup and the interpretation of the data in detail.
The purpose of this tool is to get a snapshot of the following areas of your practice.
Practice Summary which shows you the Updated A/R, New Charges, New
Payments, Todays’s Appts (# of booked appts.) and % Booked. (%Booked =
Appointment time booked for the day / Total appointment available for the day)
Appointments breaks down the appointments for today into a graph and pie chart.
IT shows the booked, Acknowledged, Encounters opened, Charged, No Shows,
Cancelled and Bumped
Aging – people tend to complain about this section because it does not match the
Aged Trial Balance Report. The difference here is the aging bracket definitions. In
the ATB the set up by the user under Practice Options. The Aging brackets here are
set values predefined by the system. You can see above there are + signs by the
different payor types. You can expand a row and show more detail all the way down
to Specific plan and claims pending.
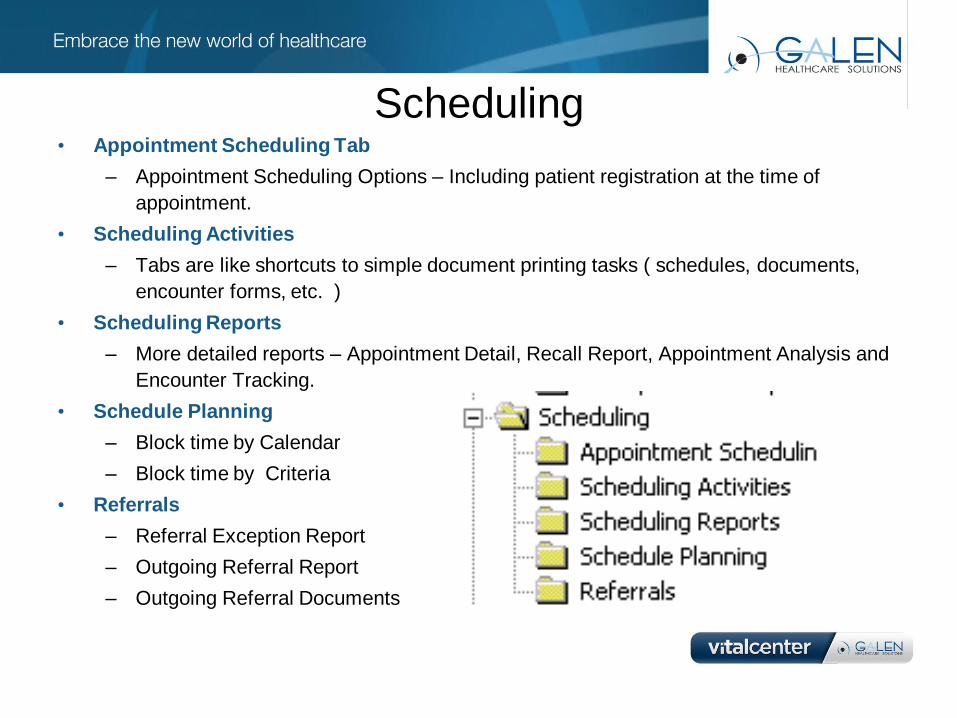
Scheduling• Appointment Scheduling Tab
– Appointment Scheduling Options – Including patient registration at the time of
appointment.
• Scheduling Activities
– Tabs are like shortcuts to simple document printing tasks ( schedules, documents,
encounter forms, etc. )
• Scheduling Reports
– More detailed reports – Appointment Detail, Recall Report, Appointment Analysis and
Encounter Tracking.
• Schedule Planning
– Block time by Calendar
– Block time by Criteria
• Referrals
– Referral Exception Report
– Outgoing Referral Report
– Outgoing Referral Documents

Tips and Tricks
If your workflow allows it, it is recommended
to set defaults for your schedules and batches
to save time.
Defaults can be
for a Department,
Site, or Particular
Resource
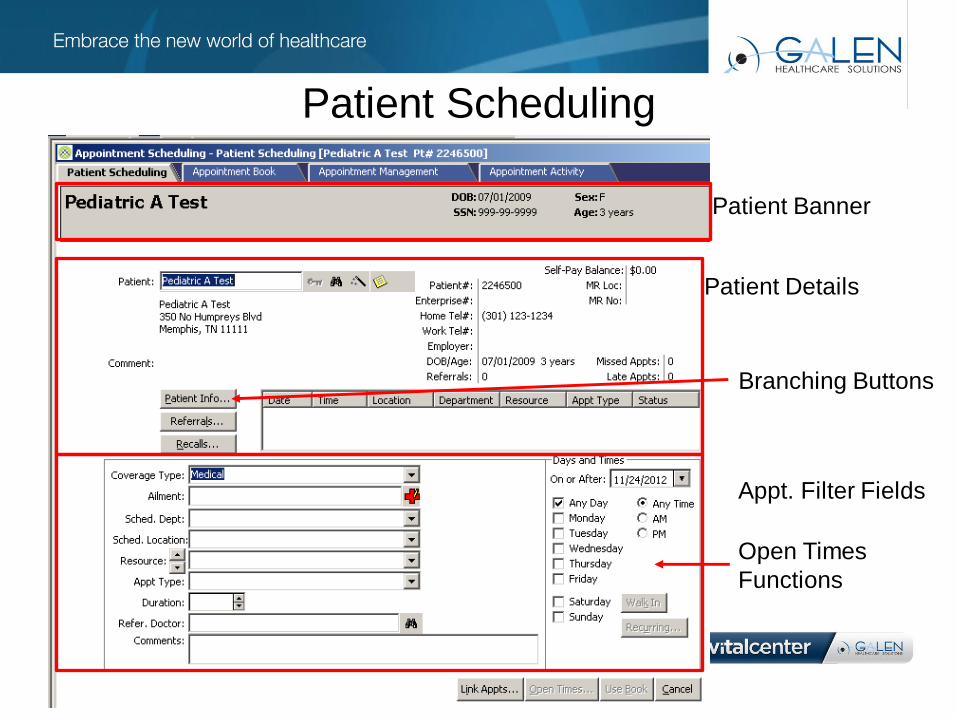
Patient Scheduling
Patient Banner
Patient Details
Appt. Filter Fields
Branching Buttons
Open Times
Functions

• Patient Banner
– Date of Birth
– Sex
– SSN*
– Age
* The SSN can be
hidden by selecting this
option under
Practice/Org Options,
General Tab. Only the
last four digits will then
be displayed.
• Patient Details– Patient Name *
– Address
– Patient/Enterprise #
– Home/Work #
– Employer
– DOB/Age
– # of active refferals
– # of missed/late appts
– Self Pay Balance
– Copay Amt
– MR Location/#
*A yellow or red flag by name and
address indicates the patients account
type has been flagged

• Branching Buttons– Patient Information
– Referrals
– Recalls
When selected opens a new
screen that allows perform or
review a task without leaving the
scheduling screen.
• Future Appt Grid– A list of all future appointments.
To view a log of all
appointments and their status
click on the Appointment
Activity Tab.
• Appointment Filters– Coverage Type – Patients
coverage type
– Ailment – Typically used for Work
Comp or Accident coverage
– Schedule Dept
– Appt. Type/Duration
– Referring Doctor – The Dr. that is
referring for this appointment only.
– Comments
– To the right Criteria options to use
the Open Time functionality

• Days and Times
– Used with Open Times functionality
– On or After Date for a date range
– Selective days of the week
– AM/PM restrictions
• Walk In Button
– Enabled when the appropriate
buttons are filled in.
– Will allow forcing in an appointment
• Recurring Button
– Enabled when you have Coverage
Type and Appt. Type filled in.
– Allows scheduling patient for
recurring appointments that meet
the above criteria
• Link Appts – Allows linking multiple appts for the same patient same day. Coverage
type has to be entered.
• Open Times – Must have preferences defined in Appt. Filters. Will list available
openings instead of having to scrool through book.
• Use Book – Takes you the appropriate appt. book
• Cancel – Cancels appt. in process of being booked.

- Ailment info is access by
clicking the red + in the
appointment Filter fields.
This is mostly used when
entering accident or
workers compensation
information.
- Can be made required by
marking so in Practice/Org
options, General Tab.
- Can impact Charge Entry
and Import Charges.
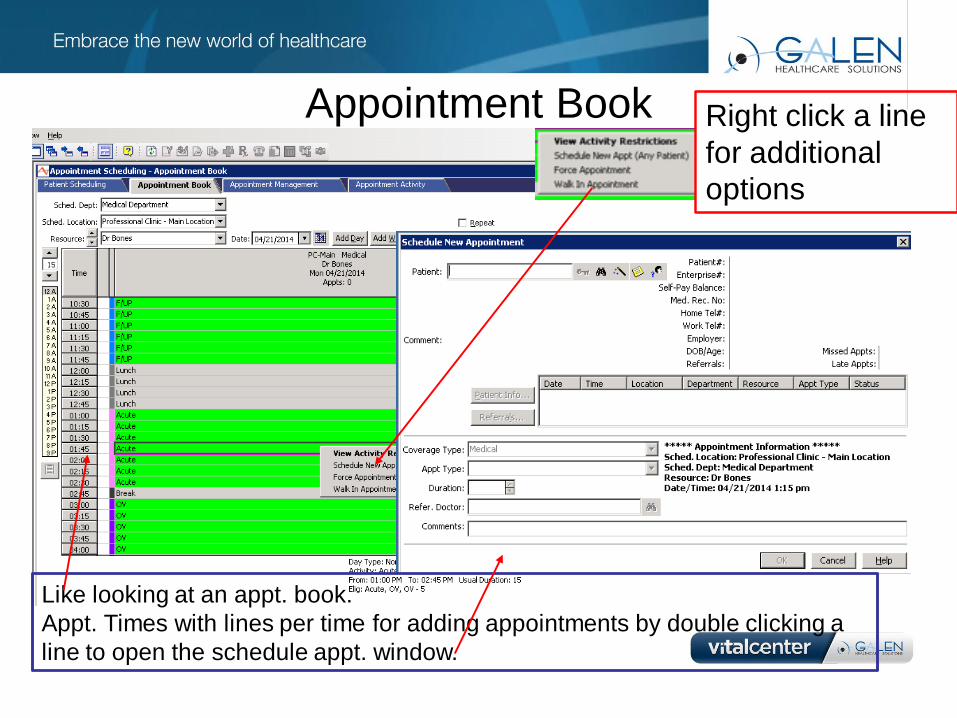
Appointment Book
Like looking at an appt. book.
Appt. Times with lines per time for adding appointments by double clicking a
line to open the schedule appt. window.
Right click a line
for additional
options

After completing
the Schedule New
Appt. fields you will
be given a screen
for schedule appt.
Options are:
Referral Required
Wait List (If you are putting pt. on a waitlist)
Print Appt. Reminder
Print an Encounter Form
Print Med. Record Slip (not used much these days)

Appointment Management
At a glance view by
• Dept./Location and/or
• Resource
• by Date/ Date Range
• Appt. Status
• Bumped List or Wait List.
Right
Click
Options

Access by
double-
clicking an
individual
appt. line or
using the right
click option.
Request Eligibility
if one has not
been previously
requested.
Takes you to the
referral work queue.
(Next slide)
Encounter Form –Print or reprint an
encounter form on
demandMed Rec Slip – print an
on demand medical
record slipAppt. Remind – print
an on demand reminder
Move Appt. – Lets you move an appointment if
you need to.
Patient Info. – Take you to the patient
details window
Ok, Cancel and Help

Referral Work Queue - Lists all incoming
referrals
- Highlight line to
populate lower
information.
- Also can add notes on
referrals
- Add Attachments
- Link to existing appt.

Patient Specific
list of past or
future
appointments.
Can filter on
Appt. Status.
Right Click Options –Register - is only available
when the appt. slot selected is
scheduled for potential patient
(phone registration)
Reschedule Bumped Appt. -
only available when selecting
an appt. in list that has been
bumped.
Request Eligibility – only
available when an eligibility has
not been done in a previous 24
hour period.

Scheduling Activities
Print a schedule - Select all preferences by clicking on the
icon.
- Select date/date range
- AM/PM (leave unchecked for both)
- Include Coverage Status (optional)
- Select Times (optional)
- You can store setting for future reports
- Run to spool and print report

* Run batch job for printing
encounter forms
• Can also restart (incase
of an error) at a
particular encounter #
• Other Filters
• Grouping preferences
and level of detail
options
Individual encounter
forms will need to be
printed from the schedule.

• Can be used for all
appointment related
reminders as well as
healthcare related
reminders. However, with
most offices using EMR’s.
Those are handled within
the EMR system.
• Documents are built in File
Maintenance > Document
File Maintenance>Patient
Documents.Can select a
Level of Detail.

Batch printing
appointment related
documents
Setup of documents is
done in Document File
Maintenance and
Scheduling or Patient
Document types. Once
document is created then
it will be listed in the
Document Drop down
window as shown here.

Scheduling ReportsThis report will
allow you a
list of appts.
By date or
date booked.
Running by date
booked is a good
auditing tool or if a staff
member books
incorrectly you can look
by dates booked to
narrow down a list of
the errors made.

This report is good to run for the following:• Count of appointments by status within a selected date
range
• Count of the number of blocked hours within the specific
date range
• Count of the contact hours within the specific date range
Utilization percent by Resource ( provider or service
area)

BEST PRACTICE
REPORT• Should be ran DAILY!
• Gives you a list of all scheduled
appointments that have an assigned
encounter number and the status of
the encounter.
• It details the Appt. Date and Time,
Patient # and Name, Scheduling
location, Scheduled department, the
Resource, Appointment Type,
Duration, Encounter Number and
Status.
• This is report is excellent for tracking
missing charges.

• Gives you a list of patients that have s recall entered on their
account.
• Can select all or filter to specific types.
• The sample report shows the headers of Recall Date, Patient # and
name, Phone numbers, Recall Type Comments, Resource and is the
an appointment linked (Y or N).

Schedule Planning
Two ways to
block (open
appointment
slots) for a
resource.
• By Calendar
• By Criteria

Block Time by Calendar• Provider schedules are made up of Day Types that are created to meet the criteria set forth by the
providers office. Users will use Day Types to Block a provider’s schedule. Blocking a schedule is
this case is opening up times for the provider to be available for appointments.
• Go to Schedule Planning using one of the following methods:
– F9, type SCP, then press Enter.
– Double-click Scheduling > click Schedule Planning
• At Sched. Dept accept the default or click the drop down then select a Scheduling Department.
• At Sched. Location accept the default or click the drop down then select a Scheduling Location.
• At Resource accept the default or click the drop down then select a Resource. Once all three fields
are filled, the Query button is enabled.
• Click Query. This activates the screen.
• Accept the current month or move to another month or year.
• Point and click on each day of a given month that are to be blocked using the same Day Type.
• Click Block, then click the drop down to open the list of Day Types.
– Click on the name of a Day Type to select it.
– Click OK. The days you selected now appear in white with the abbreviation of the Day Type to identify
how the days will be blocked.
– Repeat steps 7 and 8 until you have selected all the days in the month to be blocked.
• Click Save (Alt+s) to complete the process. Blocked days now display in green.

Block Time by Criteria• Assign Day Types for days or group of days using a date range.
Go to Schedule Planning using one of the following methods:
– F9, type SCP, then press Enter.
– Double-click Scheduling > click Schedule Planning
• At Sched. Dept accept the default or click on the drop down button then select a Scheduling Department.
• At Sched. Location accept the default or click on the drop down button then select a Scheduling Location.
• At Resource accept the default or click on the drop down button then select a Resource.
• At Block From Date enter the date that you want to start blocking on.
• At Block Through Date enter the last date you want to block.
• At Selected Days of the Week check the box for one of the following:
– any combination of Monday, Tuesday, Wednesday, Thursday, Friday, Saturday, Sunday
– All Days
– Weekdays
• The days you checked populate in the grid.
• At Day Type click on the drop down button to open the list. Then click to make a selection. Repeat this step
for each day listed in the grid.
• Click Block. If scheduled appointments will be bumped as a result of this action, the Accept Re-Block
window opens.
• Review the detail on the screen, then do one or both of the following:
– Check Keep Forced Appointments which may be Retained.
– At Bumped Reason click on the drop down button to select a reason.
– Click Cancel to cancel the blocking process.

Referrals
List of referrals
• With missing
authorization
numbers
• An expiration date
that is near expiration
• Also identify incoming
referrals with zero
visits remaining.

List of outgoing referrals• How many visits
authorized
• Expiration Date
• Referred to
provider/organization
• Referral type (consult,
consult/treat, etc.)

Used to print
any referral
related forms or
documents.
Documents for this section are setup in File
Maintenance>Document Maintenance
• Data Type: Referral Information

Thank you for joining us today, for additional
assistance….
You can contact us through our website at
www.galenhealthcare.com