alpari uk userguide metatrader4 multiterminal
TRANSCRIPT
User Guide
January 2011
Multiterminal
MetaTrader Multi Terminal
Alpari (UK) Limited 201 Bishopsgate London, EC2M 3AB United Kingdom
The contents of this document may change.
Copyright © 2010 Alpari (UK) Ltd. All rights reserved.

Copyright © 2011 Alpari (UK) Ltd, 201 Bishopsgate, London EC2M 3AB, United Kingdom Page 2 of 55
Important Information – Disclaimer This document has been provided to you at your unsolicited request. This document is provided to you on the basis that you acknowledge that you have read and understood the following terms: Alpari (UK) Limited is authorised and regulated by the Financial Services Authority (“FSA”) under the Financial Services and Markets Act 2000 and entered on the FSA’s Register of authorised persons with registration number 448002. It is registered in the UK, registered number 05284142. Its registered office is 201 Bishopsgate, London, EC2M 3AB. Confidentiality - This document and its contents are confidential to the person to whom it is delivered and should not be copied, or distributed in whole or in part or disclosed by such persons to any other person without the prior written consent of Alpari (UK) Limited. If you are not the intended recipient you must not use or disclose the information in this document in any way. Factual Information / No advice: - This document contains purely factual information and is an outline of matters for discussion only. It does not constitute financial product advice and should not be relied on as such. It is indicative only and is not intended to set forth a final expression of the terms and conditions of any financial product. Nothing in this document shall be construed as a solicitation to buy or sell any security or product, or to engage in or refrain from engaging in any transaction. None of the information takes into account your personal objectives, financial situation or needs and you must determine whether the information is appropriate in terms of your particular circumstances. Alpari (UK) Limited is dealing with you exclusively on the basis that you have sufficient knowledge, experience and/or professional financial, tax, legal and other advice to undertake your own assessment of the information. Not complete - The information contained in this document is subject to discussion, completion and amendment. This document does not contain all the information necessary to fully evaluate an investment in any structure and, as such, no reliance should be placed on the contents of this document. No offer - No part of the information is to be construed as solicitation, invitation or offer to make a financial investment. Past Performance - Past performance is not a reliable indication of future performance. Forward Statements - This document may contain forward-looking statements and estimates (“Forward Statements”). No representation is made or will be made that any Forward Statements will be achieved or will prove to be correct. Actual future results and operation could vary materially from the Forward Statements. Third Party Information - The material in this document has been prepared in good faith by Alpari (UK) Limited. However, certain parts of this material have been obtained or are based upon information obtained from third parties which may not have been checked or verified. Except to the extent permitted by law, and only to the extent so required, Alpari (UK) Limited makes any warranty in relation to, or accepts any responsibility or liability for any loss or damage suffered by any person arising out of or in relation to the material. Not legally binding - No proposal put forward in this paper is intended to be binding upon Alpari (UK) Limited, whether by way of agreement, representation or otherwise. Alpari (UK) Limited will not be obliged to carry out any proposals or fulfil any terms mentioned herein and will not be responsible for any loss or damage caused as a result of any person relying upon statements made herein. Errors and omissions - To the extent permitted by law, Alpari (UK) Limited accepts no responsibility for errors or misstatements, negligent or otherwise. The information may be based on assumptions or market conditions and may change without notice. Unless expressly stated, the information contained in this document is current as at the date of this document. To the maximum extent permitted by law, Alpari (UK) Limited, its respective directors, employees, advisers or agents accept no liability for any loss arising from the use of this document or its contents or otherwise arising in connection with it. Opinions expressed are subject to change without notice. We do not guarantee the integrity of any e-mails or attached files and are not responsible for any changes made to them by any other person.

Copyright © 2011 Alpari (UK) Ltd, 201 Bishopsgate, London EC2M 3AB, United Kingdom Page 3 of 55
About This Document ............................................................................................ 7
Audience ...................................................................................................................................... 7
Assumptions ................................................................................................................................ 7
Scope ........................................................................................................................................... 7
Typographical Conventions ......................................................................................................... 7
Lists ....................................................................................................................................................... 7
Interface Naming .................................................................................................................................. 7
About the Procedures ........................................................................................................................... 7
About the Interfaces in This Guide .............................................................................................. 7
Documentation Feedback ........................................................................................................... 8
Technical Support and Product Inquiries .................................................................................... 8
Client Services Contact Information ..................................................................................................... 8
By Phone ............................................................................................................................................... 8
By Email ................................................................................................................................................. 8
Product and Sales Information ............................................................................................................. 8
Getting Started ...................................................................................................... 9
General ........................................................................................................................................ 9
Security System ........................................................................................................................... 9
Live Update .................................................................................................................................. 9
Accounts .............................................................................................................. 10
User Interface ...................................................................................................... 11
Main Menu ................................................................................................................................ 11
File menu ................................................................................................................................... 11
Edit Menu .................................................................................................................................. 13
View Menu ................................................................................................................................ 13

Copyright © 2011 Alpari (UK) Ltd, 201 Bishopsgate, London EC2M 3AB, United Kingdom Page 4 of 55
Tools Menu ................................................................................................................................ 14
Window Menu ........................................................................................................................... 14
Help Menu ................................................................................................................................. 15
Toolbar ...................................................................................................................................... 16
Market Watch............................................................................................................................ 17
Terminal Settings ....................................................................................................................... 19
Options (Detailed) ................................................................................................ 20
Servers ....................................................................................................................................... 20
Data Centre (access points) ....................................................................................................... 20
Proxy Server Connection ........................................................................................................... 21
Personal data ............................................................................................................................. 22
News .......................................................................................................................................... 22
Trade ................................................................................................................... 23
Symbol by Default ..................................................................................................................... 23
Lots by Default ........................................................................................................................... 23
Lots Allocation ........................................................................................................................... 23
Deviation ................................................................................................................................... 24
Email .......................................................................................................................................... 25
SMTP server ........................................................................................................................................ 25
From .................................................................................................................................................... 25
To: ....................................................................................................................................................... 25
Events ........................................................................................................................................ 26
Client Accounts .................................................................................................... 27
Adding Accounts ........................................................................................................................ 27
Connecting Accounts ................................................................................................................. 28

Copyright © 2011 Alpari (UK) Ltd, 201 Bishopsgate, London EC2M 3AB, United Kingdom Page 5 of 55
Account Details .......................................................................................................................... 30
Security Tab ............................................................................................................................... 32
Open Orders .............................................................................................................................. 33
Trade History ............................................................................................................................. 36
Trading ................................................................................................................. 38
Order Types ............................................................................................................................... 38
Market Order ............................................................................................................................. 38
Pending Order ........................................................................................................................... 38
Stop Loss .................................................................................................................................... 39
Take Profit ................................................................................................................................. 39
Types of Execution .................................................................................................................... 40
Instant Execution ................................................................................................................................ 40
Request Execution .............................................................................................................................. 40
Execution by Market ........................................................................................................................... 40
Trade Orders .............................................................................................................................. 41
New Order ................................................................................................................................. 41
Market Order ............................................................................................................................. 41
Pending Orders .......................................................................................................................... 44
Close Order ................................................................................................................................ 44
Close by Order ........................................................................................................................... 45
Multiple Close By Order ............................................................................................................ 46
Pending Order ........................................................................................................................... 47
Modifying an Order ................................................................................................................... 48
Delete Order .............................................................................................................................. 49
Copyright © 2011 Alpari (UK) Ltd, 201 Bishopsgate, London EC2M 3AB, United Kingdom Page 6 of 55
News .......................................................................................................................................... 50
Alerts ......................................................................................................................................... 51
Alerts Management ................................................................................................................... 52
Mailbox ...................................................................................................................................... 53
Journal ....................................................................................................................................... 54

Copyright © 2011 Alpari (UK) Ltd, 201 Bishopsgate, London EC2M 3AB, United Kingdom Page 7 of 55
About This Document
The MT4 Multi Terminal User guide provides an overview of MT4 Multi Terminal User guide and step-by-step procedures for using it to perform currency trading activities.
Audience
The audience for this document is MT4 Multi Terminal users. For use of MT4 users should refer to the MT4 User guide.
Assumptions
This User Guide assumes that the user has a basic familiarity with the Windows operating system.
Scope
This guide contains the information and procedures for all the major Multi Terminal features and functions.
Typographical Conventions
This User Guide has a few typographical conventions that you should be aware of.
Lists
Sequential procedures are numbered lists.
Simple lists of items (ordered or not) are bulleted.
Interface Naming
The names of Web pages, dialog boxes, warning and error messages, etc. are italicized.
About the Procedures
All procedures start with logging in and continue through the completion of the procedure.
About the Interfaces in This Guide
This guide is prepared with Windows XP. If you are using Windows Vista or Windows 7, there may be some variations of the screens.

Copyright © 2011 Alpari (UK) Ltd, 201 Bishopsgate, London EC2M 3AB, United Kingdom Page 8 of 55
Documentation Feedback
We welcome and value your feedback on our documents. If you would like to send us comments, opinions, requests, etc., email us at: [email protected].
Technical Support and Product Inquiries
Client Services Contact Information
By Phone
London
+44 20 7426 2930
By Email
Product and Sales Information
Sales - [email protected]
General Inquiries - [email protected]
Copyright © 2011 Alpari (UK) Ltd, 201 Bishopsgate, London EC2M 3AB, United Kingdom Page 9 of 55
Getting Started
General
The Multi Terminal is a part of the MetaTrader 4 online trading system. It is intended for: managing a set of client accounts; performing trade operations; controlling and handling open positions and pending orders; receiving quotes and news in the online mode.
The Multi Terminal can operate under Microsoft Windows 98SE/ME/2000/XP/2003/Vista. Hardware
requirements are limited to software ones.
Security System
Data exchange between the Terminal and the server is performed by encryption based on 128-bit keys.
This is sufficient to ensure security of trading. However, besides this system, the Terminal allows to use
one more system: An advanced security system based on a digital signature algorithm of RSA. It is an
asymmetric encryption algorithm that implies presence of a public and a private key. The public key can
be freely distributed and used for checking the authenticity of a message signed with a private key.
Knowing of the public key is guaranteed not to be possible basis for decoding the private one within an
acceptable period of time.
The Advanced security system is based on electronic digital signatures that can be enabled on the
server.
If the Advanced security system is enabled for a trading account, to use a different computer, it is
necessary for the user to transfer the generated RSA keys into the computer the user intends to use. The
keys represent files with KEY extension and are stored in the /profiles folder.
If either key has been lost or damaged, please report this to support.
Live Update
A live update system (LiveUpdate) is built into the Terminal. It allows the user to be informed and install
newer versions of software. This system is always enabled.
The Terminal checks for new versions of the program when it connects to the server. If a new version
has been discovered, a new window named "Live Update" will appear. The client will be asked to
download the update(s). To download these updates, the "Start" button must be select. The updating
process and the list of files to be downloaded can be observed in this window. After the updates have
been downloaded, the new version of the Terminal will be automatically installed and restarted. Please
note, if there is no connection to the server, the live updating process will not start

Copyright © 2011 Alpari (UK) Ltd, 201 Bishopsgate, London EC2M 3AB, United Kingdom Page 10 of 55
Accounts
To make full use of the Multi Terminal, multiple accounts are needed. Users can apply for live accounts with Alpari here:
https://my.alpari.co.uk/en/openliveaccount/
Users can register for Demo accounts here:
https://my.alpari.co.uk/en/mtdemo/
Please note: User can connect up to 128 live accounts to the Multi Terminal and up to 10 demo accounts.

Copyright © 2011 Alpari (UK) Ltd, 201 Bishopsgate, London EC2M 3AB, United Kingdom Page 11 of 55
User Interface
The Terminal consists of six windows/option menus from which the user can make use of the function available.
Main Menu
The main menu of the Terminal is located under the program heading and represents a set of sub-menus.
The main menu consists of File, Edit, View, Tools, Windows and Help sub menus.
File menu
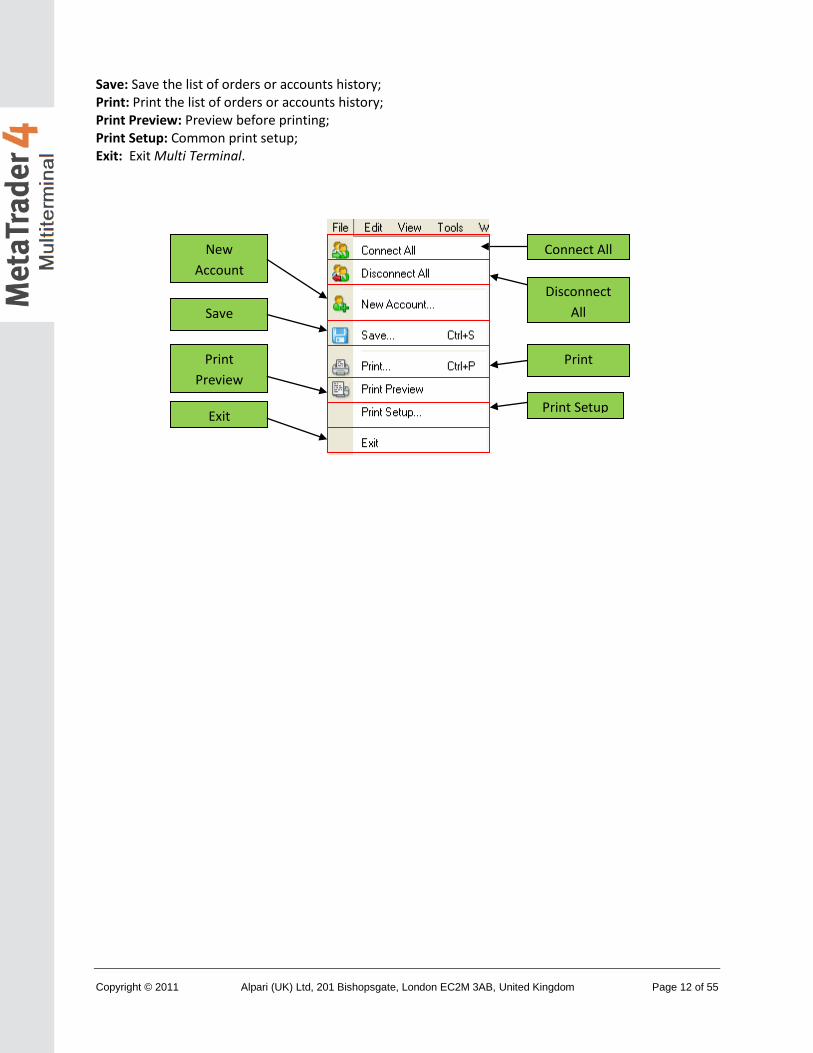
The File menu contains commands for managing accounts, for printing and saving reports. The following commands are available in the menu:
Connect All: Connect all accounts to the server; Disconnect All: Disconnect all accounts from the server; New Account: Add a new account to the list of managed accounts;
Main Menu Tool bar
Market
Watch
Window
Accounts
Window
Toolbar
Window
Order
Management
Window
Copyright © 2011 Alpari (UK) Ltd, 201 Bishopsgate, London EC2M 3AB, United Kingdom Page 12 of 55
Save: Save the list of orders or accounts history; Print: Print the list of orders or accounts history; Print Preview: Preview before printing; Print Setup: Common print setup; Exit: Exit Multi Terminal.
Connect All
Disconnect
All
New
Account
Save
Print Print
Preview
Print Setup Exit

Copyright © 2011 Alpari (UK) Ltd, 201 Bishopsgate, London EC2M 3AB, United Kingdom Page 13 of 55
Edit Menu
The Edit menu contains find and copy commands. The following commands are available in the menu:
Copy: Copy selected data into clipboard;
Find: search facility according to a given criteria;
Find Next: Continue the search and find next item in according to the given criteria.
View Menu
The View menu contains commands for managing signal windows, toolbar, and the program interface
language. Some of these commands are duplicated in the toolbar. The following commands are
available in the menu:
Languages: Call the sub-menu managing languages of the Terminal. Having selected a desired language,
the user can switch the Terminal interface to this language. For the changes to take effect, the Terminal
must be restarted.
Toolbar: Show or hide the toolbar of the Terminal.
Status Bar: Show or hide a status bar located in the lower part of the Terminal window.
Market Watch: Open/close the "Market Watch" signal window where the current quotes are published.
The window can also be accessed by selecting Ctrl+M or by selecting the market watch button in the
toolbar.
Accounts: Open/close the "Accounts" window where the list of managed accounts is located. The
window can also be accessed by selecting buttons Ctrl+A or by selecting the accounts button in the
toolbar.
Toolbox: open/close the "Toolbox" window. The user can manage signals in this window; look through
the news, emails, and journal. The window can also be accessed by selecting Ctrl+T or by selecting the
toolbox button in the toolbar.
Full Screen: Enable/disable the full screen mode. As soon as this option is enabled, toolbar and status
bar will be disabled and all signal windows will be closed. The Terminal heading, main menu, workspace
remain on the screen. The repeated execution of the command returns the Terminal its initial
appearance. The same action can be performed by F11 button.
Copy
Find
Find Next
Edit

Copyright © 2011 Alpari (UK) Ltd, 201 Bishopsgate, London EC2M 3AB, United Kingdom Page 14 of 55
Tools Menu
The Tools menu contains the only command to open Terminal settings window.
Options: Open the Terminal setting window. The user can set up parameters for connection, trades,
emails, and events in this window. More details can be found in the "Terminal Settings" section. The
Options window can also be called by selecting Ctrl+O or by selecting the options button in the toolbar.
More information on Terminal options is given in the Options section
Window Menu
The Window menu contains commands for switching between order and trade windows.
Orders: Switch to open orders window;
History: Switch to trade history window;
New Order: Switch to new orders window;
Orders History
New
Order
Close
Order
Close By
Multiple
Close By
Pending
Order Modify
Order Delete
Order
Full Screen
Toolbox Accounts
Market
Watch Status Bar
Toolbar
Languages
Options

Copyright © 2011 Alpari (UK) Ltd, 201 Bishopsgate, London EC2M 3AB, United Kingdom Page 15 of 55
Close Order: Switch to close orders window;
Close By: Switch to close by orders window;
Multiple Close By: Switch to multiple close by orders window;
Pending Order: Switch to placing pending orders window;
Modify Order: Switch to modifying orders window;
Delete Order: Switch to deleting pending orders window;
Help Menu
The Help menu is auxiliary. Execution of the menu commands does not influence the Terminal operation
in any way. The user can do the following from this menu:
Help Topics: Open the built-in help files. All settings and functions of the Multi Terminal are described in
it. F1 button performs the same action.
About: Opens the "About..." window where the user can find information about the company, its
contact details, along with the Terminal version. This can be useful if any trouble shooting is need
Help
Topics
About

Copyright © 2011 Alpari (UK) Ltd, 201 Bishopsgate, London EC2M 3AB, United Kingdom Page 16 of 55
Toolbar
The main commands used in the Terminal are duplicated in the toolbar in the form of buttons. Normally,
the toolbar is placed under the main menu, but it can easily be moved to any program window area.
Toolbar can be shown or hidden by the "View — Toolbar" menu command. The Toolbar is customizable;
it allows placing necessary, often used commands within. To set up a toolbar, the user has to open its
context menu (right mouse-button click) and execute the "Customize..." command.
The following commands are available in the toolbar:
Connect All: Connect all accounts to the server;
Disconnect All: Disconnect all accounts from the server;
New Account: Add a new account to the list of managed accounts;
Save: Save the list of orders or accounts history;
Print: Print the list of orders or accounts history;
Print Preview: Preview before printing;
Find: Finding a list element according to the given criterion;
Find Next: Continue the search and find the next list element.
Market Watch: Open/close the "Market Watch" signal window.
Accounts: Open/close the "Accounts" window.
Toolbox: Open/close the "Toolbox" window.
Full Screen: Enable/disable the full screen mode.
Options: Open the Terminal setting window.
Help Topics: Opens the built-in help files
Accounts Help
Connect
All
Disconnect
All
Add New
Account
Add New
Account
Tool Box Print/Print
Preview
Full
Screen
Find/ Find
Next
Save
Account
Options
Copyright © 2011 Alpari (UK) Ltd, 201 Bishopsgate, London EC2M 3AB, United Kingdom Page 17 of 55
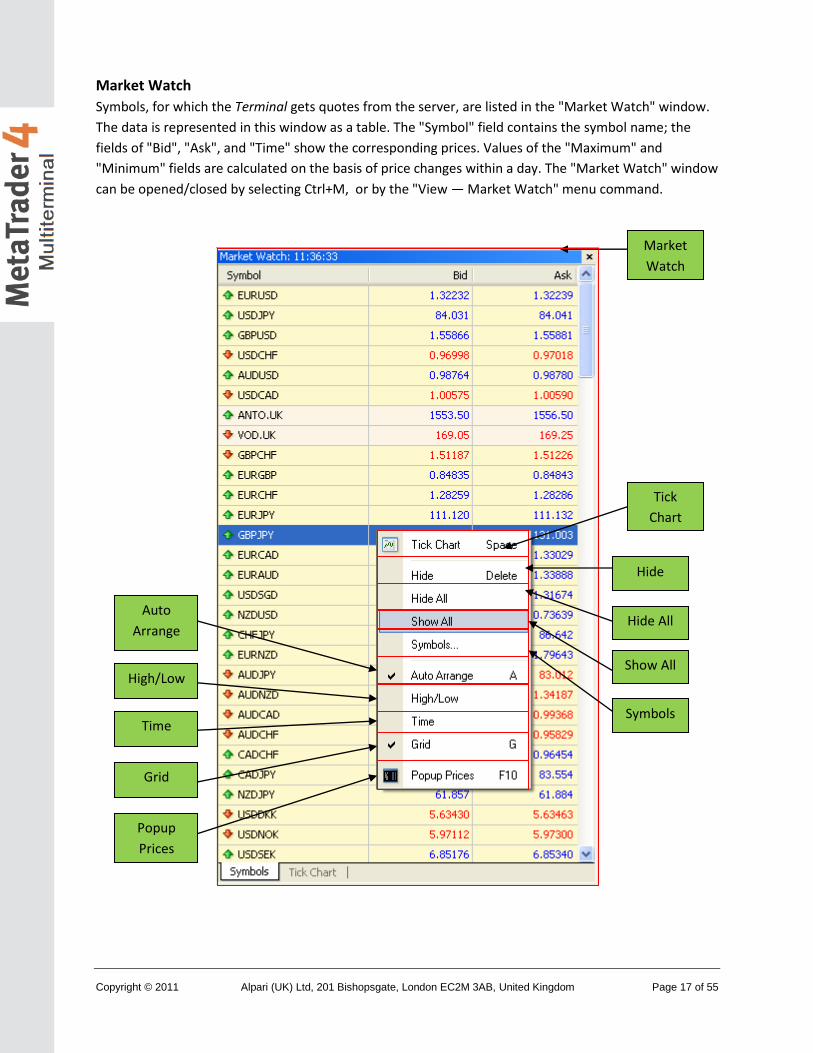
Market Watch
Symbols, for which the Terminal gets quotes from the server, are listed in the "Market Watch" window.
The data is represented in this window as a table. The "Symbol" field contains the symbol name; the
fields of "Bid", "Ask", and "Time" show the corresponding prices. Values of the "Maximum" and
"Minimum" fields are calculated on the basis of price changes within a day. The "Market Watch" window
can be opened/closed by selecting Ctrl+M, or by the "View — Market Watch" menu command.
Market
Watch
Tick
Chart
Hide
Hide All
Show All
Symbols
Auto
Arrange
High/Low
Time
Grid
Popup
Prices

Copyright © 2011 Alpari (UK) Ltd, 201 Bishopsgate, London EC2M 3AB, United Kingdom Page 18 of 55
The "Market Watch" window context menu offers the following options:
Tick Chart: Opens the tick chart of the symbol selected. The tick chart is located directly in the "Market
Watch" window.
Hide: Delete (hide) the symbol from the list. To minimize the traffic, it is recommended to hide unused
symbols from the quotes window using this command or by pressing of the Delete button.
Please note: If there are open positions or pending orders for the symbol, the symbol cannot be deleted.
Hide All: Deletes all symbols from the list. This command does not apply to symbols for which there are
open positions.
Show All: Show the list of all available securities. After this command has been executed, quotes will
income for all these symbols.
Symbols: Symbols are grouped in the window according to their types. The "Show Symbol" command
allows to add necessary symbols to the quotes window, and that of "Hide Symbol" — to delete a symbol
from it. The "Properties" window command allows to view the symbol parameters (spread, digits, stops
level, etc.).
High/Low: Add the highest and the lowest values of the daily price to the quotes displayed.
Time: Show time of incoming quotes.
Auto Arrange: Automatic arranging of columns when changing the window size. Auto Arrange can also
be enabled by pressing A;
Grid: Show/hide the grid separating columns. The grid can also be shown by selecting G;
Popup Prices : Opens an additional quotes window. The list of symbols in this window is the same as
that in the "Market Watch" window at the moment of the command execution. This means that changes
in the symbol list in the "Market Watch" window do not influence that in the "Popup Prices". In the
context menu of this window, there are commands allowing setting up data displaying parameters,
enable the full screen mode, or locate the window over all others.
Copyright © 2011 Alpari (UK) Ltd, 201 Bishopsgate, London EC2M 3AB, United Kingdom Page 19 of 55
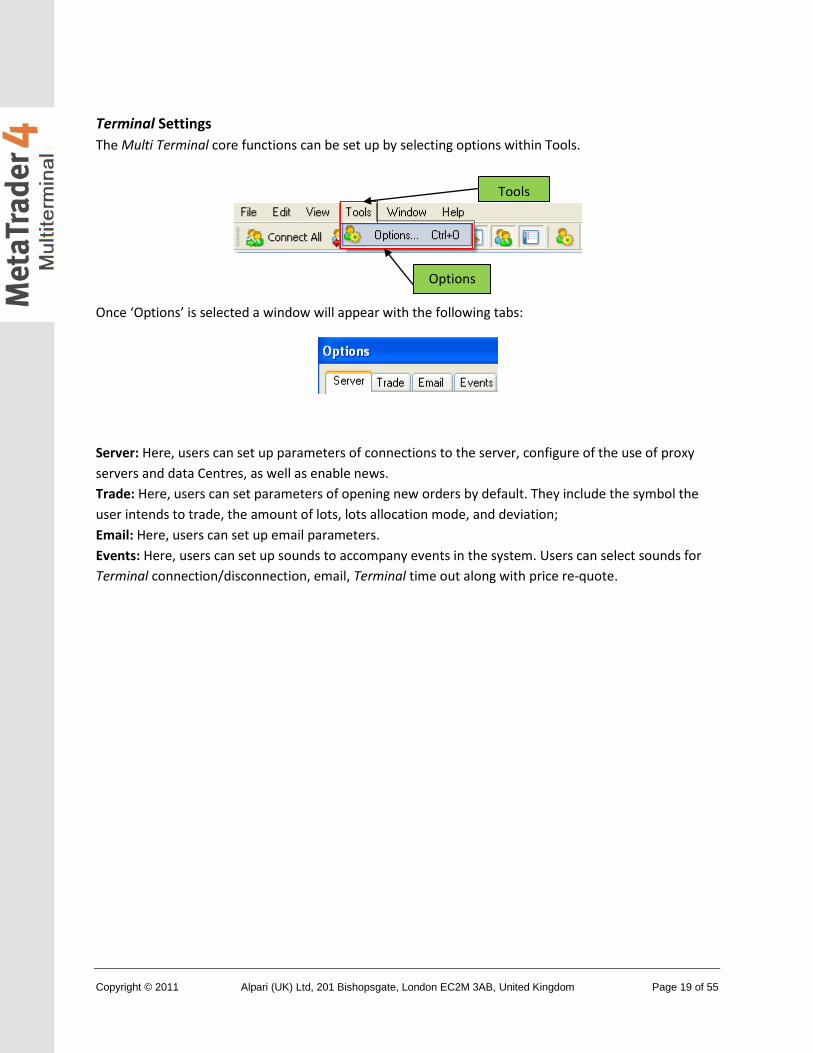
Terminal Settings
The Multi Terminal core functions can be set up by selecting options within Tools.
Once ‘Options’ is selected a window will appear with the following tabs:
Server: Here, users can set up parameters of connections to the server, configure of the use of proxy
servers and data Centres, as well as enable news.
Trade: Here, users can set parameters of opening new orders by default. They include the symbol the
user intends to trade, the amount of lots, lots allocation mode, and deviation;
Email: Here, users can set up email parameters.
Events: Here, users can set up sounds to accompany events in the system. Users can select sounds for
Terminal connection/disconnection, email, Terminal time out along with price re-quote.
Tools
Options

Copyright © 2011 Alpari (UK) Ltd, 201 Bishopsgate, London EC2M 3AB, United Kingdom Page 20 of 55
Options (Detailed)
Servers
In order to function, the Multi Terminal is fed data continuously from the incoming server. If a Terminal
does not receive quotes the user will not be able to trade. The Server tab contains settings of the server
connection.
It is necessary to select one of available servers from this list. The Multi Terminal is bound to Alpari
servers, meaning only the servers shown can be selected.
Data Centre (access points)
Date Centres are a part of the trading platform and represent specialized proxy servers. They allow
saving common traffic: the same quotes and news are given to several Terminals at the same time.
Access points are located between the server and a Terminal. One server can have several access points
through which all traders will connect to it. After a Terminal has been installed, connection to data
centres is set up automatically. It is highly recommended not to change anything in this window.
Incorrect settings of connections to Data Centres can be the reason for no connection between the
Terminal and the server.
Server
Tab
Server
Options

Copyright © 2011 Alpari (UK) Ltd, 201 Bishopsgate, London EC2M 3AB, United Kingdom Page 21 of 55
To manually enter settings of access points, the Data Centre auto configuration option must be disabled.
The must enter the correct IP address along with port number in the Data Centre field. The settings
must be checked by pressing the "Test" button located to the left of this field. If settings are correct, the
corresponding message will appear. After that, it will be possible to start working. If an error message
appears, please ensure all the data is entered correctly.
Proxy Server Connection
A proxy server is an intermediate between the trader's computer and the trading server. It is mostly
used by internet providers or by local networks. If a connection problem occurs, you should turn to your
systems administrator or to the internet provider. If a proxy is used, the Terminal must be set up in a
corresponding way. Setting of "Enable proxy server" checkbox will enable proxy server support and
activate the "Proxy..." button. Pressing of this button will open the window where proxy server
parameters should be specified (these data can be given by the system administrator or the internet
provider):
Server: Proxy server address and type (HTTP, SOCKS5, or SOCKS4);
Login: A user login for access to the proxy server. If login is not needed, this field must remain
empty;
Password: A password for access to the proxy server. If password is not needed, this field must
remain empty.
After the parameters have been specified, it is recommended to press the "Test" button to check how
the settings work. If they have been tested successfully, the "OK" button must be selected in order to
make the settings effective. Error message occur if the proxy server was set up incorrectly. Here please
refer to the system administrator or internet provider.
Data
Centre

Copyright © 2011 Alpari (UK) Ltd, 201 Bishopsgate, London EC2M 3AB, United Kingdom Page 22 of 55
Personal data
When adding accounts it is necessary to specify login (account number) and password. After an account
has been added and if "Keep personal settings and data at start-up" option is enabled, its password will
be stored at the hard disk. When connecting the account to the server, this password will be used to
connect the account automatically. If the option is disabled, a password must be entered manually at
each connection of the account. Also, all personal mail, received by the internal mail system, will be
deleted if the option is disabled.
News
The Terminal allows for news to feed through. News will filter through once a connection is established
with the server.

Copyright © 2011 Alpari (UK) Ltd, 201 Bishopsgate, London EC2M 3AB, United Kingdom Page 23 of 55
Trade Settings used for orders opening are grouped in the Trade tab. Parameters input here facilitate opening
of orders and cannot cause critical changes in the Terminal operation.
Symbol by Default
The "Symbol by default" option allows the user to define the symbol value when a order window is
open. The "Last used" parameter means that the symbol of the latest trade operation will be set
automatically. For the same symbol to be set repeatedly, the "Default" parameter must be enabled, and
the necessary symbol must be chosen from the list.
Lots by Default
The initial amount of lots can be defined ("Lots by default" option): "Last used" is a parameter used in
the previous trade, and "by default" is a constant, manually set value.
Lots Allocation
When placing new orders, it is necessary to specify the total lots allocation for all accounts. The specified
total lots will be distributed among accounts according to the specified lots allocation method:
Predefined volume: It will be necessary to specify manually the lots amount for each
order when placing the order, later this predefined volume will apply at placing orders.
Total volume for each order: The total lots will apply at placing each order.
Equal parts: The total lots will be allocated among all orders in equal parts.
By equity ratio: The total lots will be allocated among orders based on the ratio
between equities of accounts.
By free margin ratio: The total lots will be allocated among orders on the ratio between
free margins of accounts.
Trade
Tab
Symbol by Default
Lots by Default
Lots Allocation
Deviation by
Default

Copyright © 2011 Alpari (UK) Ltd, 201 Bishopsgate, London EC2M 3AB, United Kingdom Page 24 of 55
Please note: When the total volume is allocated between orders on accounts with different deposit
currencies based on equity ratio or free margin ratio, the equity or free margin is adduced to the
Summary Currency that can be chosen in the context menus in the Accounts panel and of the Orders or
History tabs.
The "Lots Allocation" option allows defining the method to allocate lots among accounts at placing
orders: "the last used value" — parameter used in the preceding operation, or "by default" — lots
allocation method defined manually.
Deviation
The symbol price can change within the order time. As a result, the price of the prepared order will not
correspond with the market one, and the position will not be opened. The "Deviation" option helps to
avoid this. Maximum permissible deviation from the value given in the order can be specified in this
field. If prices do not correspond, the program will modify the order by allowing opening a new position.
Copyright © 2011 Alpari (UK) Ltd, 201 Bishopsgate, London EC2M 3AB, United Kingdom Page 25 of 55
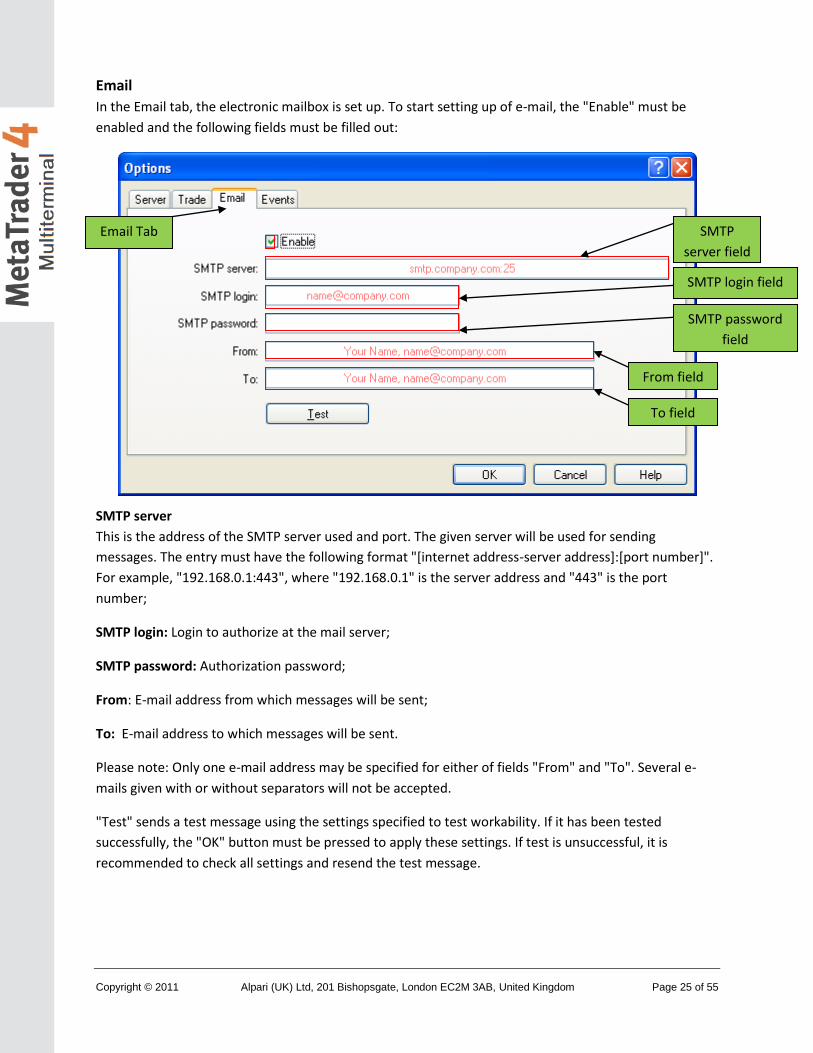
In the Email tab, the electronic mailbox is set up. To start setting up of e-mail, the "Enable" must be
enabled and the following fields must be filled out:
SMTP server
This is the address of the SMTP server used and port. The given server will be used for sending
messages. The entry must have the following format "[internet address-server address]:[port number]".
For example, "192.168.0.1:443", where "192.168.0.1" is the server address and "443" is the port
number;
SMTP login: Login to authorize at the mail server;
SMTP password: Authorization password;
From: E-mail address from which messages will be sent;
To: E-mail address to which messages will be sent.
Please note: Only one e-mail address may be specified for either of fields "From" and "To". Several e-
mails given with or without separators will not be accepted.
"Test" sends a test message using the settings specified to test workability. If it has been tested
successfully, the "OK" button must be pressed to apply these settings. If test is unsuccessful, it is
recommended to check all settings and resend the test message.
Email Tab SMTP
server field
SMTP login field
SMTP password
field
From field
To field

Copyright © 2011 Alpari (UK) Ltd, 201 Bishopsgate, London EC2M 3AB, United Kingdom Page 26 of 55
Events
System events signals can be set up in the Terminal (not to be mixed up with alerts). For this to be done,
the "Enable" option must be enabled in the Events tab. A table containing the list of system events and
corresponding actions will become active. System events are:
Connect: Connection to the server. Signal of successful connection to the server;
Disconnect: No connection to the server. Signal of interrupted connection to the server;
Email Notify: Notifying about an incoming mail. If this signal has triggered, it is recommended to check
the "Toolbox — Mailbox" window;
Timeout: A certain time range is predefined for performing trade operations. If this range has been
exceeded for some reason, the operation will not be performed, and this signal will trigger;
OK: Trade operation has been successfully performed. No errors occurred during performing of this
operation;
News: Receiving of news. If this signal has triggered, it is recommended to check the "Toolbox — News"
window;
Re-quote: Price changed during preparation of a trade.
To disable a specific event simply double click on the even name.
Connect field
Disconnect field
Email Notify field
Timeout field
Ok field
News field
Re-Quote
Field
Email Tab
Copyright © 2011 Alpari (UK) Ltd, 201 Bishopsgate, London EC2M 3AB, United Kingdom Page 27 of 55
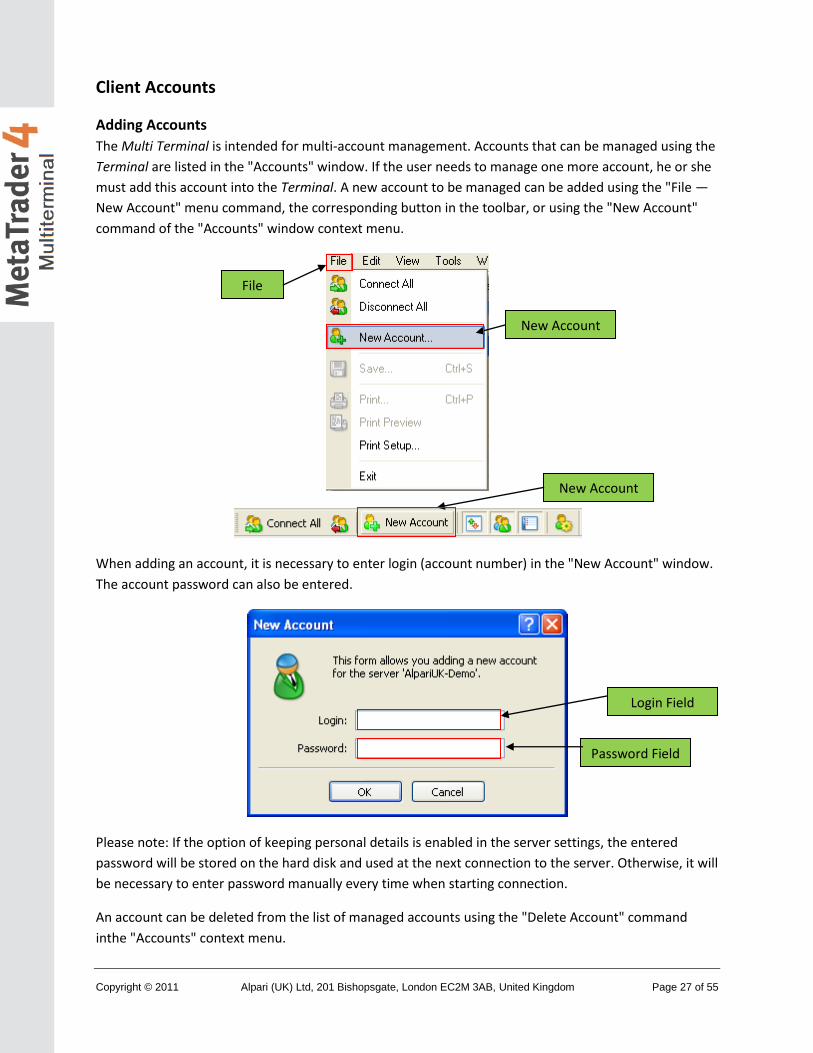
Client Accounts
Adding Accounts
The Multi Terminal is intended for multi-account management. Accounts that can be managed using the
Terminal are listed in the "Accounts" window. If the user needs to manage one more account, he or she
must add this account into the Terminal. A new account to be managed can be added using the "File —
New Account" menu command, the corresponding button in the toolbar, or using the "New Account"
command of the "Accounts" window context menu.
When adding an account, it is necessary to enter login (account number) in the "New Account" window.
The account password can also be entered.
Please note: If the option of keeping personal details is enabled in the server settings, the entered
password will be stored on the hard disk and used at the next connection to the server. Otherwise, it will
be necessary to enter password manually every time when starting connection.
An account can be deleted from the list of managed accounts using the "Delete Account" command
inthe "Accounts" context menu.
New Account
File
New Account
Login Field
Password Field
Copyright © 2011 Alpari (UK) Ltd, 201 Bishopsgate, London EC2M 3AB, United Kingdom Page 28 of 55
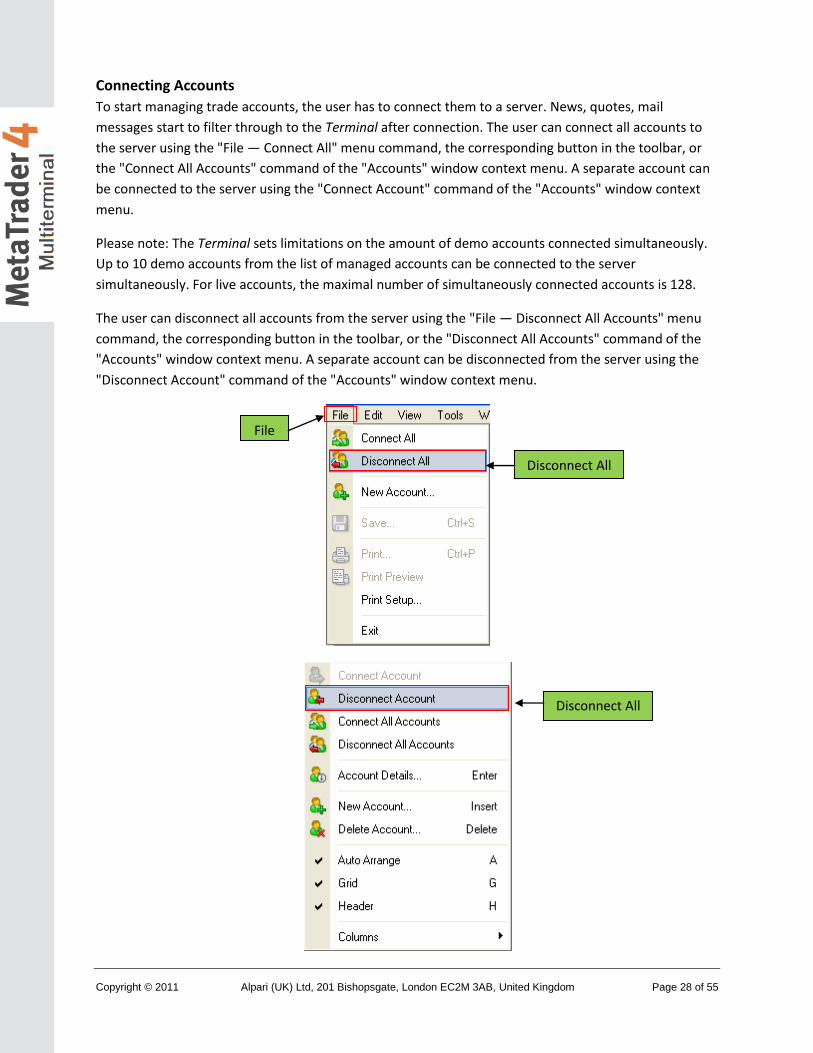
Connecting Accounts
To start managing trade accounts, the user has to connect them to a server. News, quotes, mail
messages start to filter through to the Terminal after connection. The user can connect all accounts to
the server using the "File — Connect All" menu command, the corresponding button in the toolbar, or
the "Connect All Accounts" command of the "Accounts" window context menu. A separate account can
be connected to the server using the "Connect Account" command of the "Accounts" window context
menu.
Please note: The Terminal sets limitations on the amount of demo accounts connected simultaneously.
Up to 10 demo accounts from the list of managed accounts can be connected to the server
simultaneously. For live accounts, the maximal number of simultaneously connected accounts is 128.
The user can disconnect all accounts from the server using the "File — Disconnect All Accounts" menu
command, the corresponding button in the toolbar, or the "Disconnect All Accounts" command of the
"Accounts" window context menu. A separate account can be disconnected from the server using the
"Disconnect Account" command of the "Accounts" window context menu.
Disconnect All
File
Disconnect All

Copyright © 2011 Alpari (UK) Ltd, 201 Bishopsgate, London EC2M 3AB, United Kingdom Page 29 of 55
If there are connected accounts with different deposit currencies, an additional command "Summary
currency" appears in the context menu. It allows choosing the currency that will be used for the
representation of the total result of all accounts; also it affects the calculation of the allocation of the
total volume between orders when opening positions.

Copyright © 2011 Alpari (UK) Ltd, 201 Bishopsgate, London EC2M 3AB, United Kingdom Page 30 of 55
Account Details
After the account has connected to the server, it is possible to view the account details. Account details
can be done by either, double clicking on an account, or by right clicking on an account and then
selecting Account details from the menu.
Account
Details
Orders Time
Type Lots Price S/L T/P Time
Symbol
Price
Swap
GBP
Trades Tab
Right Click for
Menu
Double Left
click to go
directly to
Account
Details
Copyright © 2011 Alpari (UK) Ltd, 201 Bishopsgate, London EC2M 3AB, United Kingdom Page 31 of 55
The "Trade" tab within the window displays the current open positions of the account, the account
balance line and the financial results of open positions, as well as pending orders placed. All trade
operations are displayed as a table containing the following fields (from left to right):
Order: This is a unique ticket number assigned to every trade/order and balance transfer.
Time: Time when the position was opened. The record appears as YYYY.MM.DD HH:MM
(year.month.day hour:minute).
Type: Type of order. There are some types of trade operations available: "Buy" — a long position, "Sell"
— a short position, and pending orders Sell Stop, Sell Limit, Buy Stop and Buy Limit;
Symbol: This field shows the name of the symbol traded.
Lots: The amount of lots used to trade.
Price: Open price of a trade (not to be confused with the current price described below).
S/L: Level of the Stop Loss order placed. If the order is not specified, zero value by default will be
entered in this field
T/P: Level of the Take Profit order placed. If the order is not specified, zero value will be entered in this
field.
Time: Close time of a trade. The record appears as YYYY.MM.DD HH:MM (year.month.day hour:minute).
This field will be empty for open positions and pending orders placed;
Price: The current price of the trade.(not to be confused with the open price of the position described
above) or the close price of a position;
Commission: Any commission charges will be shown in this field.
Taxes: Taxes charged on commission;
Swap: Swap charges are shown in this field;
Profit: This field will show the profit or loss of the trade, if the position is still open the floating p/l will
be shown
Expiration: Expiration time for a pending order. This field must be empty for market orders and for
pending orders, for which the expiration time was not specified.
The profit of positions can be displayed in points, in the term currency or in the deposit currency using
the context menu commands. The account trading history can be requested using the "History"
command of the context menu.

Copyright © 2011 Alpari (UK) Ltd, 201 Bishopsgate, London EC2M 3AB, United Kingdom Page 32 of 55
Security Tab
The "Security" tab in the "Account Details" window allows changing the users password. To change a
password, it is necessary to enter the current password of the account, its new password, then confirm
the new password and press "Change".
Security
New Password

Copyright © 2011 Alpari (UK) Ltd, 201 Bishopsgate, London EC2M 3AB, United Kingdom Page 33 of 55
Open Orders
Currently open positions and pending orders placed are displayed in the "Orders" tab. All trade
operations are shown as a table with the following fields (from left to right):
Order: The operation ticket number. This is the unique number of the trade operation;
Login: Trade Account Login ID;
Time: Time when the position was opened. The record appears as YYYY.MM.DD HH:MM
(year.month.day hour:minute). It is this time when the position was opened;
Type: Type of the trade operation. There are some types of trade operations available: "Buy" — a long
position, "Sell" — a short position, and pending orders Sell Stop, Sell Limit, Buy Stop and Buy Limit;
Symbol: This field shows the name of a security used in a trade operation;
Lots: The amount of lots used in the operation. The minimum amount of lots allowed in operations is
limited by the brokerage company, the maximum — by deposit available;
Orders Tab
Login ID Time Type Symbol Lots Price S/L T/P
Price
Swap
Profit

Copyright © 2011 Alpari (UK) Ltd, 201 Bishopsgate, London EC2M 3AB, United Kingdom Page 34 of 55
Price: Open price of a position (not to be confused with the current price described below). It is this
price at which the position was opened;
S/L: Level of the Stop Loss order placed. If the order is not specified, zero value will be entered in this
field. If the distance between the current price and the Stop Loss level becomes less than or equal to 10
points, this field of the order is coloured red. If the distance shortens to 1 point, it becomes yellow.
T/P: Level of the Take Profit order placed. If the order is not specified, zero value will be entered in this
field. If the distance between the current price and the Take Profit level becomes less than or equal to
10 points then this field of the order is coloured green. If the distance shortens to 1 point, it becomes
yellow.
Commission: Fees charged by the brokerage company for trading operations made are written in this
field;
Taxes: Taxes charged on commission;
Swap: Swaps are fixed in this field;
Profit: The financial result of the trade considering the current price is given in this field. A positive value
means that the trade was profitable; a negative value means that the trade was losing;
Expiration: expiration time for a pending order. This field must be empty for market orders and for
those pending orders, for which the expiration time was not specified.
Comment: the order comment specified at its placing.
The profit of positions can be displayed in points, in the term currency or in the deposit currency using
the context menu commands. The account trading history can be requested using the "History"
command of the context menu or a corresponding button. The "Save" context menu command and the
corresponding button allow saving a report about the account trading as a HTML file.
If there are connected accounts with different deposit currencies, an additional command "Summary
currency" appears in the context menu. It allows choosing the currency that will be used for the
Profit Displayed
Save data
Summary
Currency

Copyright © 2011 Alpari (UK) Ltd, 201 Bishopsgate, London EC2M 3AB, United Kingdom Page 35 of 55
representation of the total result of all accounts; also it affects the calculation of the allocation of the
total volume between the orders when opening positions.
Copyright © 2011 Alpari (UK) Ltd, 201 Bishopsgate, London EC2M 3AB, United Kingdom Page 36 of 55
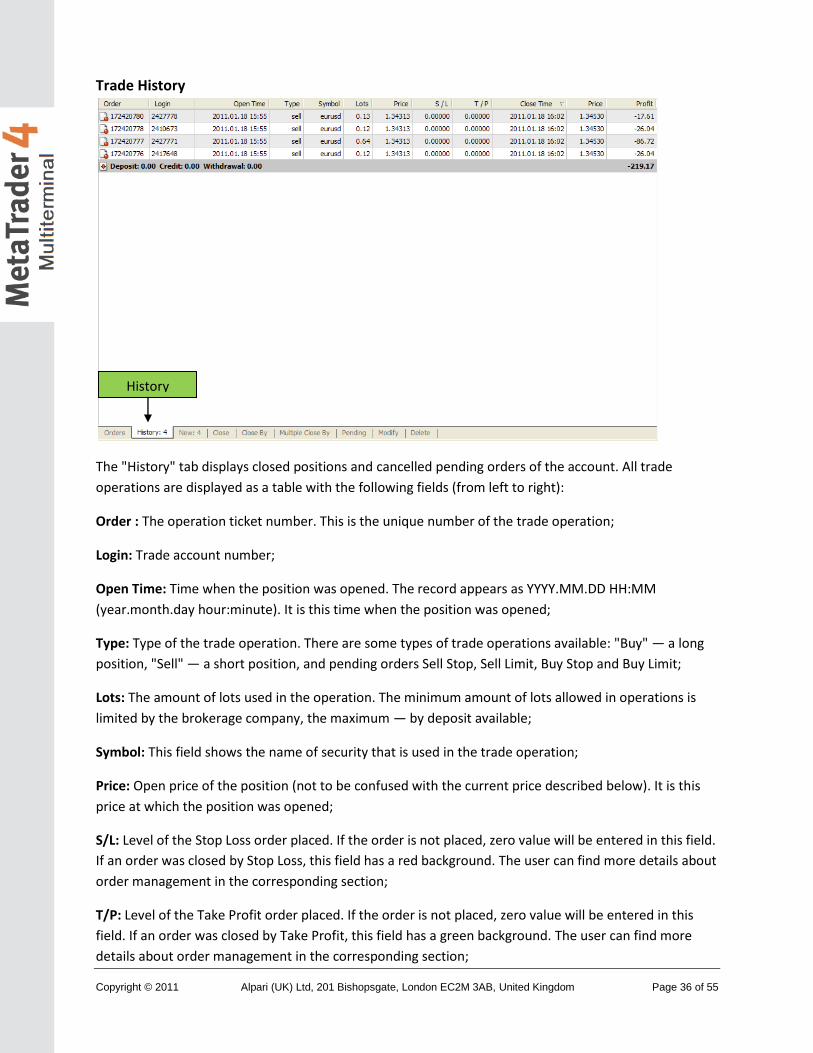
Trade History
The "History" tab displays closed positions and cancelled pending orders of the account. All trade
operations are displayed as a table with the following fields (from left to right):
Order : The operation ticket number. This is the unique number of the trade operation;
Login: Trade account number;
Open Time: Time when the position was opened. The record appears as YYYY.MM.DD HH:MM
(year.month.day hour:minute). It is this time when the position was opened;
Type: Type of the trade operation. There are some types of trade operations available: "Buy" — a long
position, "Sell" — a short position, and pending orders Sell Stop, Sell Limit, Buy Stop and Buy Limit;
Lots: The amount of lots used in the operation. The minimum amount of lots allowed in operations is
limited by the brokerage company, the maximum — by deposit available;
Symbol: This field shows the name of security that is used in the trade operation;
Price: Open price of the position (not to be confused with the current price described below). It is this
price at which the position was opened;
S/L: Level of the Stop Loss order placed. If the order is not placed, zero value will be entered in this field.
If an order was closed by Stop Loss, this field has a red background. The user can find more details about
order management in the corresponding section;
T/P: Level of the Take Profit order placed. If the order is not placed, zero value will be entered in this
field. If an order was closed by Take Profit, this field has a green background. The user can find more
details about order management in the corresponding section;
History
Copyright © 2011 Alpari (UK) Ltd, 201 Bishopsgate, London EC2M 3AB, United Kingdom Page 37 of 55
Close Time: Time of closing a position or time of pending order deletion. The record appears as
YYYY.MM.DD HH:MM (year.month.day hour:minute);
Price: Closing price of the position;
Commission: Fees charged by the brokerage company for trading operations made are written in this
field;
Taxes: Taxes charged on commission;
Swap: Swaps are fixed in this field;
Profit: The financial result of the trade considering the current price is given in this field. A positive value
means that the trade was profitable, a negative value means that the trade was losing;
Expiration: Expiration time for a pending order. This field must be empty for market orders and for
those pending orders, for which the expiration time was not specified.
Comment: The order comment specified at its placing.
The profit of positions can be displayed in points, in the term currency or in the deposit currency using
the context menu commands. The account trading history can be requested using the "History"
command of the context menu or a corresponding button. The "Save " context menu command and the
corresponding button allow saving a report about the account trading as a HTML file. Using the
corresponding commands of the context menu, the user can request for the accounts trading histories
for various periods. The chosen period also affects reports that are saved using the corresponding
command mentioned above.
If there are connected accounts with different deposit currencies, an additional command "Summary
currency" appears in the context menu. It allows choosing the currency that will be used for the
representation of the total result of all accounts; also it affects the calculation of the allocation of the
total volume between the orders when opening positions.

Copyright © 2011 Alpari (UK) Ltd, 201 Bishopsgate, London EC2M 3AB, United Kingdom Page 38 of 55
Trading
Order Types
Users can control and manage open/close orders/positions through several types of orders. The following orders can be used in the Terminal: Market order, Pending order, Stop Loss and Take Profit.
Market Order
Market order is an order to buy or sell a financial instrument at the current price. Execution of this order results in opening a trade position. Financial instruments are bought at ASK price and sold at BID price. Stop Loss and Take Profit orders (described below) can be attached to a market order. Execution mode of market orders depends on the security traded.
Pending Order
A Pending order is an order that allows the user to buy or sell a symbol at a pre-defined price in the future. This type of orders is used for opening a trade position provided the future quotes reach the pre-defined level. There are four types of pending orders available in the Terminal:
Buy Limit: Buy provided the future "ASK" price is equal to the pre-defined value. The current price level is higher than the value of the placed order. Orders of this type are usually placed in anticipation of that the symbol price, having fallen to a certain level, will increase;
Buy Stop: Buy provided the future "ASK" price is equal to the pre-defined value. The current price level is lower than the value of the placed order. Orders of this type are usually placed in anticipation of that the symbol price, having reached a certain level, will keep on increasing;
Sell Limit: Sell provided the future "BID" price is equal to the pre-defined value. The current price level is lower than the value of the placed order. Orders of this type are usually placed in anticipation of that the symbol price, having increased to a certain level, will fall;
Sell Stop: Sell provided the future "BID" price is equal to the pre-defined value. The current price level is higher than the value of the placed order. Orders of this type are usually placed in anticipation of that the symbol price, having reached a certain level, will keep on falling.

Copyright © 2011 Alpari (UK) Ltd, 201 Bishopsgate, London EC2M 3AB, United Kingdom Page 39 of 55
Stop Losses and Take Profits can be attached to a pending order. After a pending order has triggered, its Stop Loss and Take Profit levels will be attached to the open position automatically.
Stop Loss
This order is used for minimizing losses if the symbol price has started to move in an unprofitable direction. If the symbol price reaches this level, the position will be closed automatically. The Multi Terminal checks long positions with the BID price for the meeting of this order provisions, and it does with ASK price for short positions.
Take Profit
Take Profit order is intended for gaining profit when the symbol price has reached a certain level. Execution of this order results in closing a position. MT4 checks long positions with BID price for meeting of this order provisions, and it does with ASK price for short positions.
Please note: Stop loss and Take profit orders can only be set for existing open orders.
Copyright © 2011 Alpari (UK) Ltd, 201 Bishopsgate, London EC2M 3AB, United Kingdom Page 40 of 55
Types of Execution
There are three order execution modes in the Multi Terminal:
Instant Execution
In this mode the order is executed at the price offered on screen, if the price is valid it will be executed, if not the user will be re-quoted.
Request Execution
In this mode high volume orders will be request executed.
Execution by Market
In this order execution mode, there are no re quotes, when the user either opens or closes a position the order will be executed at the best price available.
Please note: The price may sometimes differ from the price seen on the platform as the price may have moved from the last market snapshot or the key desired volume maybe larger than the best tradable Bid/Offer.
Copyright © 2011 Alpari (UK) Ltd, 201 Bishopsgate, London EC2M 3AB, United Kingdom Page 41 of 55
Trade Orders
New Order
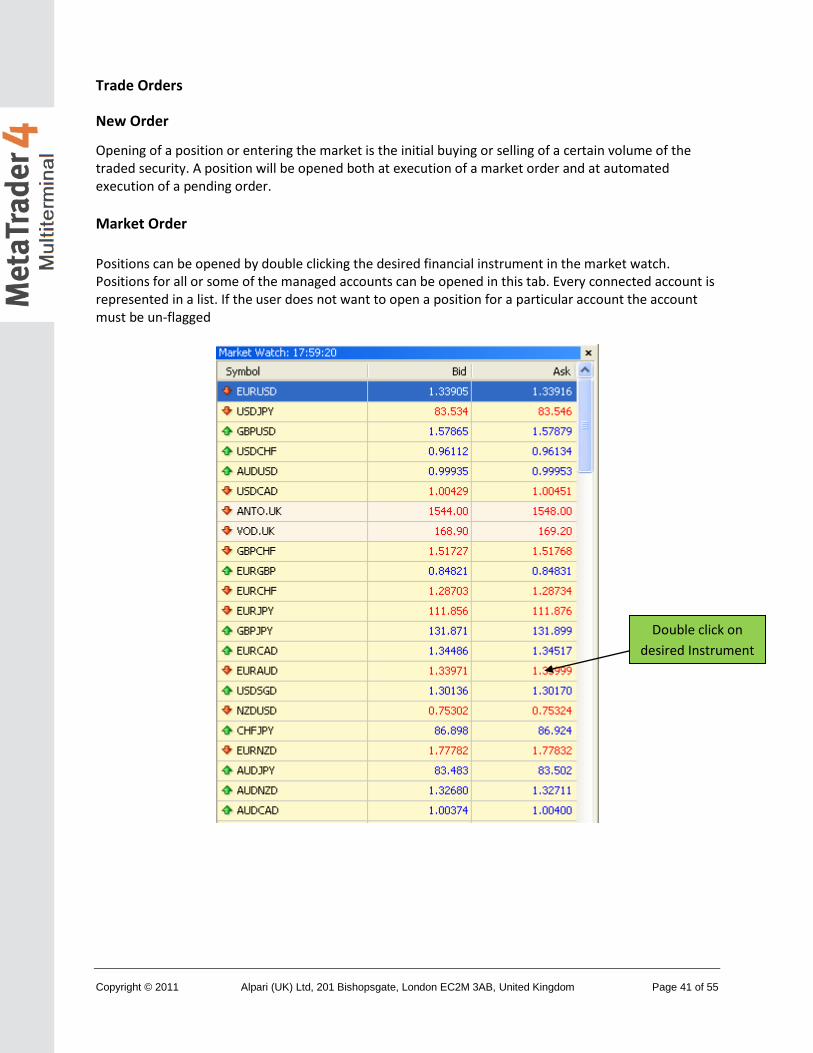
Opening of a position or entering the market is the initial buying or selling of a certain volume of the traded security. A position will be opened both at execution of a market order and at automated execution of a pending order.
Market Order
Positions can be opened by double clicking the desired financial instrument in the market watch. Positions for all or some of the managed accounts can be opened in this tab. Every connected account is represented in a list. If the user does not want to open a position for a particular account the account must be un-flagged
Double click on
desired Instrument

Copyright © 2011 Alpari (UK) Ltd, 201 Bishopsgate, London EC2M 3AB, United Kingdom Page 42 of 55
When opening positions, it is necessary to specify their details:
Symbol: The symbol the user desires to trade
Stop Loss: Stop Loss order level (optional).
Take Profit: Take Profit order level (optional).
Please note: Zero values in the Stop Loss and Take Profit fields will mean that no stop loss or take profit orders will be place. Also if the Take Profit or Stop Loss levels are too close to the market the order will not be placed.
Comment: Non-obligatory comment. Its length may not exceed 25 characters. After the position has been opened, the comment cannot be changed.
Total Volume: Total volume (total amount of lots) of trades in accounts. The total volume is allocated among accounts according to the preset volume allocation method.
Lots Allocation: method of the total volume allocation among accounts:
Predefined volume: The predefined volume will be used at placing orders. It will be necessary to specify manually the lots amount for each order by double-clicking in the "Volume" field, later this predefined volume will apply at placing orders.
Total volume for each order: the total volume will be used at placing of every order.
Equal parts: the total volume will be allocated among all orders in equal parts.
New Order
Window
Symbol
Account
List
Stop Loss Take Profit
Total
Volume
Client
check
box

Copyright © 2011 Alpari (UK) Ltd, 201 Bishopsgate, London EC2M 3AB, United Kingdom Page 43 of 55
On equity ratio: the total volume will be allocated among orders according to the accounts equity ratio.
On free margin ratio: the total volume will be allocated among orders according to the accounts free margin ratio.
Please note: When the total volume is allocated between orders on accounts with different deposit currencies based on equity ratio or free margin ratio, the equity or free margin are adduced to the summary currency that can be chosen in the context menus of the accounts panel and of the Orders or History tabs.
Maximum deviation from quoted price: the maximum deviation value given in points. If the user is re-quoted, the new price deviation from the previously quoted price is calculated. If this deviation is less or equal to the preset parameter, the order will be executed at the new price without any further notifications.
Please note: The deviation in placing orders is only used in the Instant Execution mode.
After all necessary fields have been filled, the user has to specify whether he/she wants to buy or sell. This can be done by selecting either the buy button or the sell button.
Copyright © 2011 Alpari (UK) Ltd, 201 Bishopsgate, London EC2M 3AB, United Kingdom Page 44 of 55
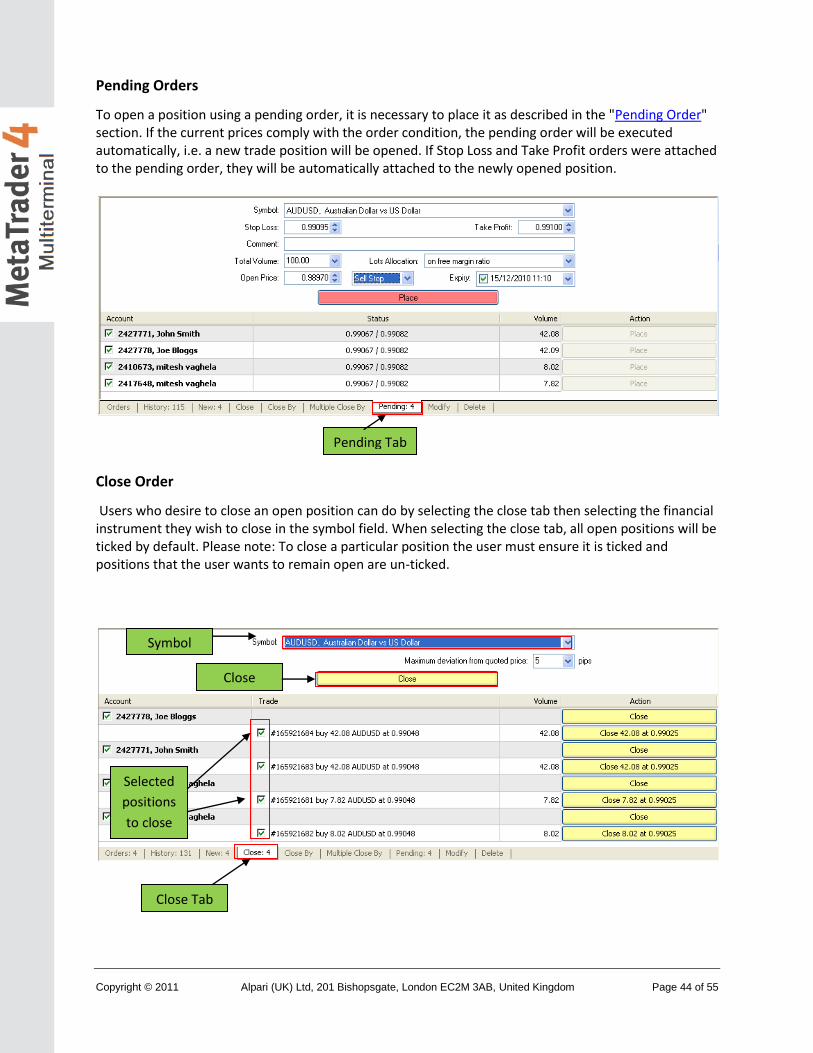
Pending Orders
To open a position using a pending order, it is necessary to place it as described in the "Pending Order" section. If the current prices comply with the order condition, the pending order will be executed automatically, i.e. a new trade position will be opened. If Stop Loss and Take Profit orders were attached to the pending order, they will be automatically attached to the newly opened position.
Close Order
Users who desire to close an open position can do by selecting the close tab then selecting the financial instrument they wish to close in the symbol field. When selecting the close tab, all open positions will be ticked by default. Please note: To close a particular position the user must ensure it is ticked and positions that the user wants to remain open are un-ticked.
Pending Tab
Selected
positions
to close
Close Tab
Symbol
Close
Position
Copyright © 2011 Alpari (UK) Ltd, 201 Bishopsgate, London EC2M 3AB, United Kingdom Page 45 of 55
Please note: In request execution mode, the proposed quotes will only be active for a few seconds. If no
decision is made during this time the user will have to try closing the position again. The Multi Terminal
allows partial close of the open position. Users can define the value by selecting a smaller volume size
than the current open volume.
Note: When changing volume size for partial closure, please remember to hit the ENTER key to apply
changes.
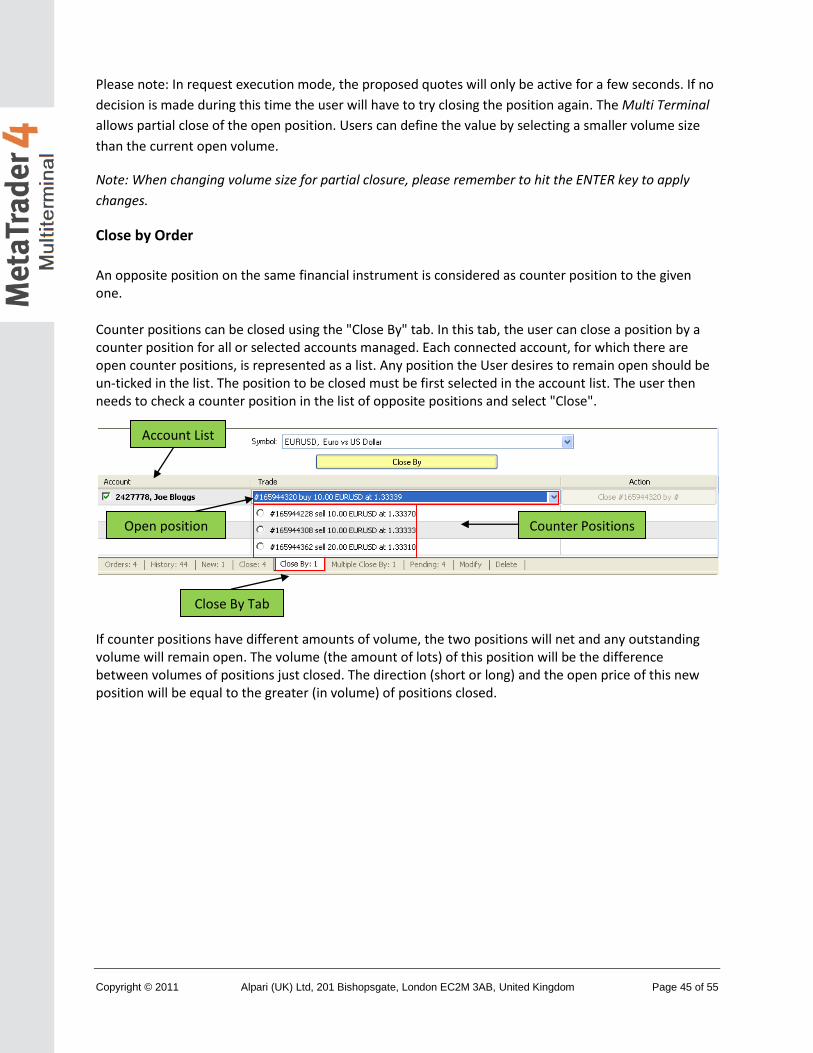
Close by Order
An opposite position on the same financial instrument is considered as counter position to the given one.
Counter positions can be closed using the "Close By" tab. In this tab, the user can close a position by a counter position for all or selected accounts managed. Each connected account, for which there are open counter positions, is represented as a list. Any position the User desires to remain open should be un-ticked in the list. The position to be closed must be first selected in the account list. The user then needs to check a counter position in the list of opposite positions and select "Close".
If counter positions have different amounts of volume, the two positions will net and any outstanding volume will remain open. The volume (the amount of lots) of this position will be the difference between volumes of positions just closed. The direction (short or long) and the open price of this new position will be equal to the greater (in volume) of positions closed.
Close By Tab
Open position Counter Positions
Account List

Copyright © 2011 Alpari (UK) Ltd, 201 Bishopsgate, London EC2M 3AB, United Kingdom Page 46 of 55
Multiple Close By Order
Multiple closing of several counter positions allows closing more than two counter positions for one symbol simultaneously.
Several counter positions will be closed using the "Multiple Close By" tab. Counter positions for all or some of the managed accounts can be closed in this tab. Every connected account that has open counter positions and every open position are represented in an account list. If there is no need to close positions for an account, this account line must be un-ticked in the list. To close counter positions for a symbol, the user must select “Multiple Close By".
If the difference between counter positions volume sums is not equal to zero, the trade will result in opening a new position with the volume equal to this difference. The newly opened position will further participate in multiple close, but according to its open time (earlier orders are closed at first). And so on until either all positions are closed or the last resulting position is opened.
Multiple
Close By Tab
Account List
Open Positions
Multiple
Close By
(Close All)
Multiple Close By
(Close open
positions in
account)
Copyright © 2011 Alpari (UK) Ltd, 201 Bishopsgate, London EC2M 3AB, United Kingdom Page 47 of 55
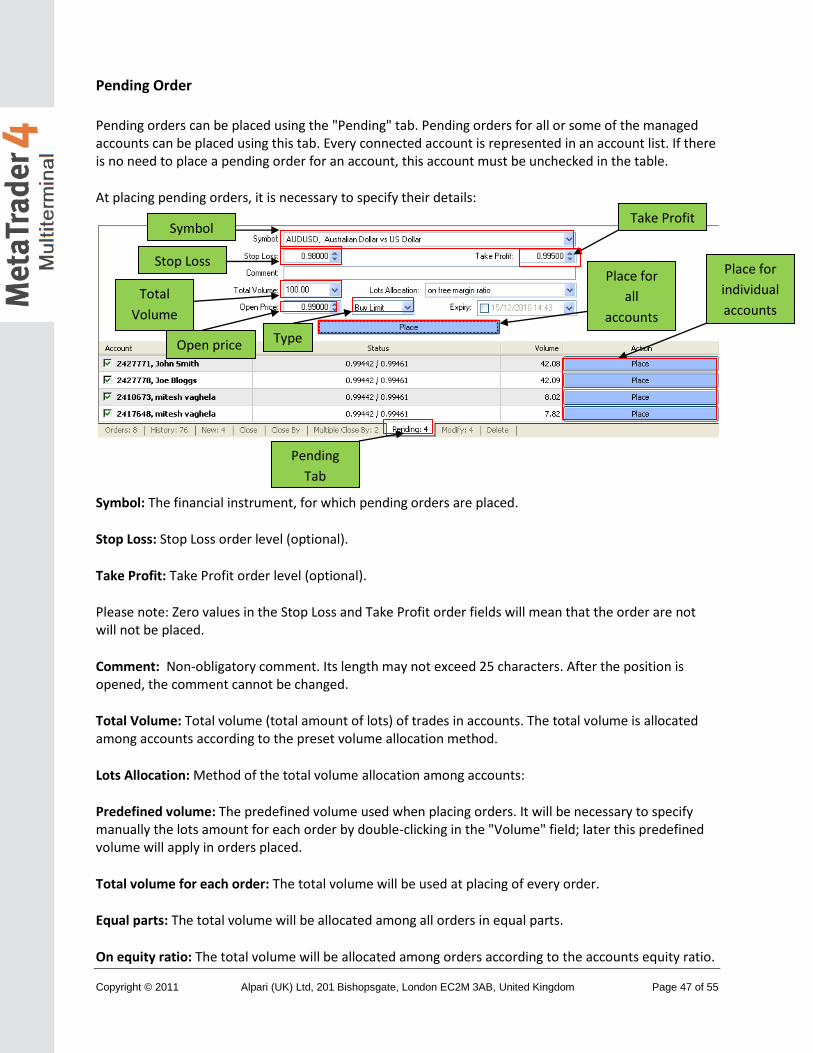
Pending Order
Pending orders can be placed using the "Pending" tab. Pending orders for all or some of the managed accounts can be placed using this tab. Every connected account is represented in an account list. If there is no need to place a pending order for an account, this account must be unchecked in the table.
At placing pending orders, it is necessary to specify their details:
Symbol: The financial instrument, for which pending orders are placed.
Stop Loss: Stop Loss order level (optional).
Take Profit: Take Profit order level (optional).
Please note: Zero values in the Stop Loss and Take Profit order fields will mean that the order are not will not be placed.
Comment: Non-obligatory comment. Its length may not exceed 25 characters. After the position is opened, the comment cannot be changed.
Total Volume: Total volume (total amount of lots) of trades in accounts. The total volume is allocated among accounts according to the preset volume allocation method.
Lots Allocation: Method of the total volume allocation among accounts:
Predefined volume: The predefined volume used when placing orders. It will be necessary to specify manually the lots amount for each order by double-clicking in the "Volume" field; later this predefined volume will apply in orders placed.
Total volume for each order: The total volume will be used at placing of every order.
Equal parts: The total volume will be allocated among all orders in equal parts.
On equity ratio: The total volume will be allocated among orders according to the accounts equity ratio.
Type
Take Profit
Pending
Tab
Place for
all
accounts
Symbol
Stop Loss
Total
Volume
Open price
Place for
individual
accounts
Copyright © 2011 Alpari (UK) Ltd, 201 Bishopsgate, London EC2M 3AB, United Kingdom Page 48 of 55
On free margin ratio: The total volume will be allocated among orders according to the accounts free margin ratio.
Please note: When the total volume is allocated between orders on accounts with different deposit currencies based on equity ratio or free margin ratio, the equity or free margin are adduced to the Summary Currency that can be chosen in the context menus of the Accounts panel and of the Orders or History tabs.
Open Price: price level, at which the order must trigger.
Type: type of the pending order: Buy Limit, Buy Stop, Sell Limit, or Sell Stop.
Expiry: set the time period, within which the order is valid (optional). If the order does not trigger until
this time, it will be deleted automatically. The expiry time set must be at a minimum of ten minutes
away from time the order is set.
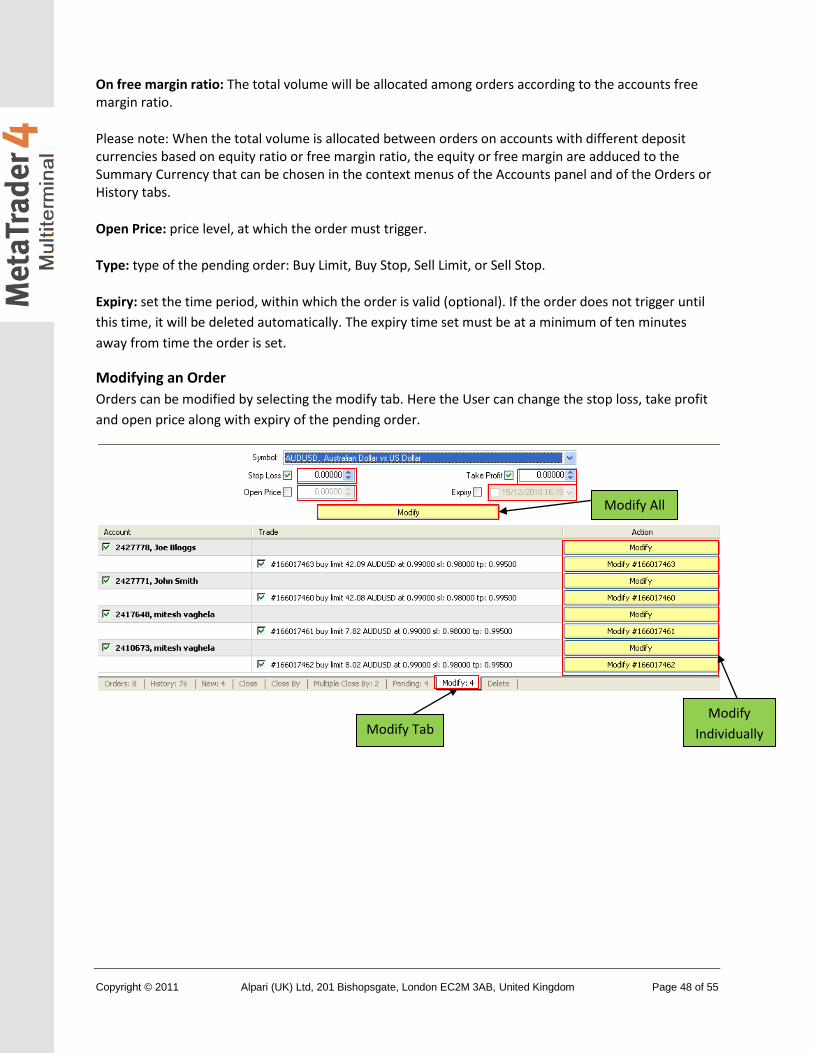
Modifying an Order
Orders can be modified by selecting the modify tab. Here the User can change the stop loss, take profit
and open price along with expiry of the pending order.
Modify Tab Modify
Individually
Modify All

Copyright © 2011 Alpari (UK) Ltd, 201 Bishopsgate, London EC2M 3AB, United Kingdom Page 49 of 55
Delete Order
Users can delete orders placed by selecting the delete tab. Here all orders will be listed. Users can select to delete all orders, or choose to delete individual orders.
Delete Tab Delete
Orders
Individually
Delete all
Orders

Copyright © 2011 Alpari (UK) Ltd, 201 Bishopsgate, London EC2M 3AB, United Kingdom Page 50 of 55
News
The list of incoming news is stored in the "News" tab. The news topics are represented as a table and
arranged according to the incoming time. The news incoming time, its topic and category are published
in the table. This list is updated automatically at incoming of the latest news.
The following commands are available in the context menu:
View: view selected news. The user can also read news by double-click with the left mouse button on
the topic;
Category: Show/hide the "Category" column;
Auto Arrange: Automatic arrangement of columns when changing a window size;
Grid: Show/hide grid to separate columns.
The "Enable news” option in the option window has to be has to be enabled in order for the news tab to
function.
News Tab

Copyright © 2011 Alpari (UK) Ltd, 201 Bishopsgate, London EC2M 3AB, United Kingdom Page 51 of 55
Alerts
Users can set alerts via the alerts tab. The alerts can be set using specific conditions meaning any alerts
set by the user will only trigger if the conditions placed are met.
Alerts Tab
Create
Alert Tab
Enable
Action
Symbol
Source
Timeout
Condition Value

Copyright © 2011 Alpari (UK) Ltd, 201 Bishopsgate, London EC2M 3AB, United Kingdom Page 52 of 55
The following condition fields have to be filled in order to set an alert:
Enable: alert on/off. When the alert is off, it is not deleted, but it will stop functioning. This option is
similar to the "Enable On/Off" context menu command and pressing of the Space key;
Action: assign an action to be performed when an event happens: play a sound, run a file, or send an
email. When playing a sound or running a file, one should specify the corresponding files. At sending a
message, one should specify the topic and text of the message;
Symbol: the financial instrument the user desires an alert for;
Condition: Condition ("Time=", "Bid<", "Bid>", "Ask<", "Ask>") under which the alert will trigger;
Value: Check the value of the condition. If the symbol price is equal to this value, the alert will trigger;
Source: The alert. When a sound is played or a file is run, one should specify the path to the
corresponding file. When a message is sent by email, one should input the message. It must be noted
that one should set up email parameters for sending message;
Timeout: the length in time for the alert
Maximum iterations: maximum amount of times the alert triggering repeats.
Alerts Management
User can modify alerts by either double clicking on the alert set, alternatively alerts can be deleted by
bringing up the alerts menu by a left click on the alert.
Modify
Delete
Enable

Copyright © 2011 Alpari (UK) Ltd, 201 Bishopsgate, London EC2M 3AB, United Kingdom Page 53 of 55
Mailbox
The "Mailbox" is intended for working with the internal mailing system. It is in this window of the
"Toolbox" where all messages that are sent to the Terminal are stored. They are represented as a table
with the following fields:
Time: The time the email was received;
To: The login of recipient;
From: The sender name;
Subject: The subject of the message.
Using a double-click of the left mouse button on the necessary message or the "View" context menu
command, the user can view the content of the selected message. If the user right clicks on the message
a menu will appear. Here the user can delete a message using the "Delete" command, alternatively the
user can create a new message from this menu.
Time To From Subject
Mailbox
Create
View
Delete
Copyright © 2011 Alpari (UK) Ltd, 201 Bishopsgate, London EC2M 3AB, United Kingdom Page 54 of 55
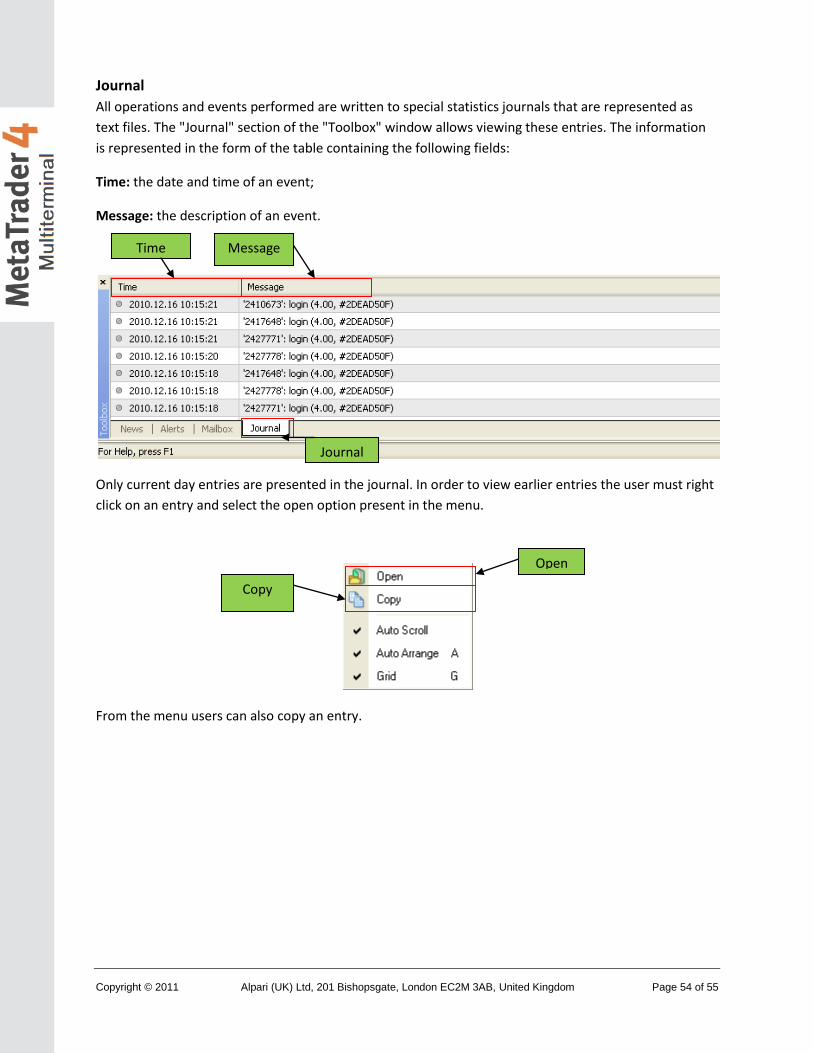
Journal
All operations and events performed are written to special statistics journals that are represented as
text files. The "Journal" section of the "Toolbox" window allows viewing these entries. The information
is represented in the form of the table containing the following fields:
Time: the date and time of an event;
Message: the description of an event.
Only current day entries are presented in the journal. In order to view earlier entries the user must right
click on an entry and select the open option present in the menu.
From the menu users can also copy an entry.
Time Message
Journal
Copy
Open

Copyright © 2011 Alpari (UK) Ltd, 201 Bishopsgate, London EC2M 3AB, United Kingdom Page 55 of 55