alphago vs alphago - deepmind … · viewers of the match will remember, alphago has a strong...
TRANSCRIPT

AlphaGo vs AlphaGo
Game 1: “Fighting”
Commentary by Fan Hui
Go expert analysis by Gu Li and Zhou Ruiyang
Translated by Lucas Baker, Teddy Collins, and Thore Graepel

Game 1: Fighting Moves 113
Before we begin, I would like to note that these games were played very quickly. AlphaGo's selfplay games often take place under blitz time settings, with only 5 seconds per move. Obviously, this would be extremely fast for human players, and even AlphaGo understandably makes a few mistakes when playing at this speed. This game was played on February 29, 2016, nine days prior to the Lee Sedol match. As viewers of the match will remember, AlphaGo has a strong proclivity for the Chinese opening. In this game, Black approaches the corner at 5 before completing the Chinese opening. White approaches from the left at 8, then invades the corner at the 33 point. This opening appears frequently in professional games. However, Black 13 struck Gu Li and Zhou Ruiyang as highly unusual. They wondered, "Will this be enough?" A professional would normally block at A.

Diagram 1
This is one common line of play. Black gains outside influence, while White lives in the corner in sente. White concludes by extending at 12. Generally speaking, while most professionals would slightly prefer this fastpaced opening for White, few would be willing to accept such a simple result for Black as the game line. The match with Lee Sedol demonstrated AlphaGo’s strategic brilliance to the world. We know that it has an outstanding sense of the whole board, it can control every aspect of the game, and it takes great care to coordinate every stone with all the others. In light of this, from a global perspective, Black 13 was probably not a mistake.

Moves 1420
After the corner is settled, Black plays not on the right side, but on the top. Following the approach at 17, Black extends at 19. This strategy appears frequently in AlphaGo’s selfplay games. White 20 then approaches at the bottom, but doesn’t Go theory advise to play on the wider side? Should White have played on the right? It is hard to say.

Diagram 2
What happens if White plays a high pincer on the right side? Zhou Ruiyang showed one way for Black to respond with 2 through 10. This way, it immediately becomes clear that White 1 is badly positioned, while Black's stance on the top is not bad at all. This variation fails for White.

Diagram 3
Well, what if White kicks instead? Since Black already has stone at A, Black can hane directly on the second line, then atari at 4. The presence of A makes B unimportant, so overall, Black has succeeded in establishing a fastpaced opening. From these two variations, it seems Black A was no mistake. Was this move a product of AlphaGo's wholeboard thinking? If so, then White's corner approach at 20 makes sense as a way to counter it.

Moves 2130
Black 21 through White 26 are a common way to settle the local shape. With 27, Black invades the upper right corner. Although a few rare moves have appeared so far, all of them are understandable. After seeing White's turn at 30, however, our shock was palpable: "This move is so defensive!" "No human would play like this!" White's playing style looks extremely cautious. Why not the hane?

Diagram 4
If White were to hane, the ensuing position would resemble Diagram 4. Black's bump at 14 is a smart, pragmatic way to fix the shape. White's formation on the right looks good, but on closer examination, it becomes apparent that Black is not only doing fine on points, but is also very thick. Is this variation actually good for White? With this analysis, we began to understand White’s reasoning, but Gu Li and Zhou Ruiyang emphasised that this would be a very difficult prescription for professional players to swallow.

Moves 3035
In these few days of research, AlphaGo never ceased to amaze. The invasion at 34 is the
proper followup to White 30, but Black astonished us once again by responding indirectly
with the knight's move at 35. "There is nothing AlphaGo will not do! It fears nothing!" "No
human would play this move either!". Of course, the more we saw of these audacious moves over time, the less they surprised us.
Why doesn't Black press down directly on White 34?

Diagram 5
If Black simply attaches, this would be the normal variation, but the knight’s move at White 6 also strengthens the top side. Now White’s earlier turn at 30 makes sense. In this diagram, Black's rapid opening has become a dull one, which probably explains why Black eschewed the normal way of playing.

Moves 3640
After the necessary jump at 36, White follows up with the excellent attachment at 38! Both Gu Li and Zhou Ruiyang applauded this move. But what about A could Black have played the hane and cut immediately?
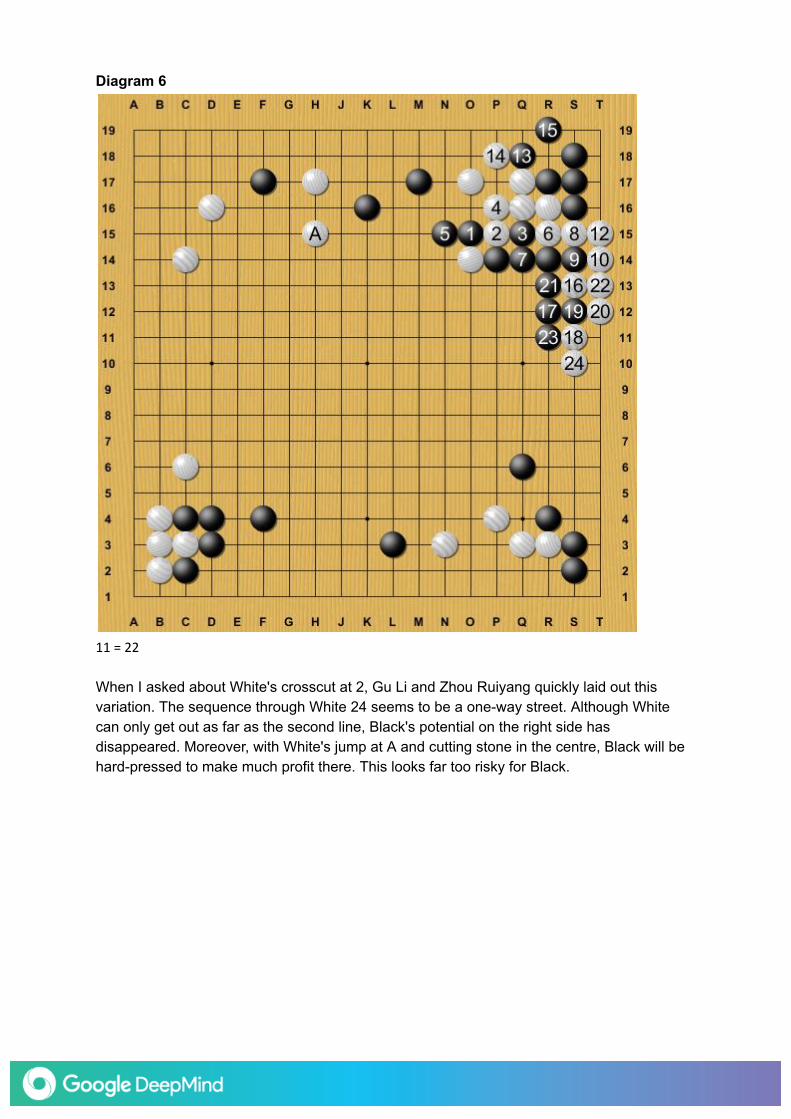
Diagram 6
11 = 22
When I asked about White's crosscut at 2, Gu Li and Zhou Ruiyang quickly laid out this variation. The sequence through White 24 seems to be a oneway street. Although White can only get out as far as the second line, Black's potential on the right side has disappeared. Moreover, with White's jump at A and cutting stone in the centre, Black will be hardpressed to make much profit there. This looks far too risky for Black.

Moves 4168
The following moves through 51 are necessary. When Black extends at 51, AlphaGo
assesses Black's win rate at 50%: a completely balanced game.
AlphaGo plays a wide range of different openings, and many of them resemble this one to
some degree. The more games it plays, the more chances AlphaGo will have to develop
new variations of this opening family.
In our research, Gu Li and Zhou Ruiyang concluded that Black 41 is problematic, since the
exchange with White 42 clearly strengthens White. Playing 41 as the kosumi at 42 would
have caused White more shape problems.
After Black sacrifices the two stones at 55 and 57 in return for the kosumi at 63, Black's win
rate rises to 52%.
Black may have judged this variation acceptable because it secures ample territory on the
right. However, it is also important to note that White's top side group is alive because of
Black's aji.

Diagram 7
Although the placement at 1 and hane at 5 prevent White from making two eyes at the top, White can aim at the cutting point with the attachment at 6, seamlessly producing a second eye in the middle. As long as this aji remains, White will have no trouble living.

Moves 6981
Black’s jump at 69 is a natural way of strengthening the right while increasing the pressure on the bottom. The moves through 76 are a middle game joseki following the Chinese opening, but it is important to note that Black usually exchanges A for B. By omitting this connection, Black retains the possibility of later cutting at B instead. The attachment at 77 is a common tactic for AlphaGo. The aim is simple: create a ladder breaker for the two stones in the centre. White has no choice but to reply with 78 and 80. Next, Black's double hane at 81 is a very aggressive play.
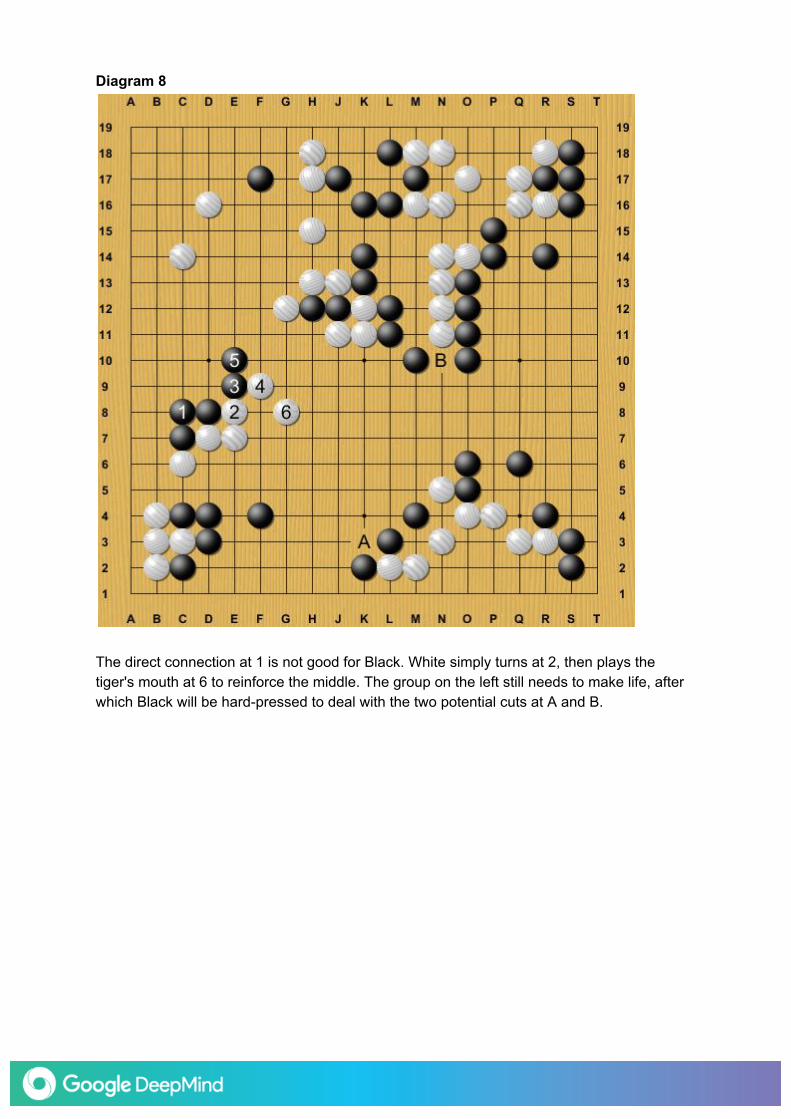
Diagram 8
The direct connection at 1 is not good for Black. White simply turns at 2, then plays the tiger's mouth at 6 to reinforce the middle. The group on the left still needs to make life, after which Black will be hardpressed to deal with the two potential cuts at A and B.
Moves 8297
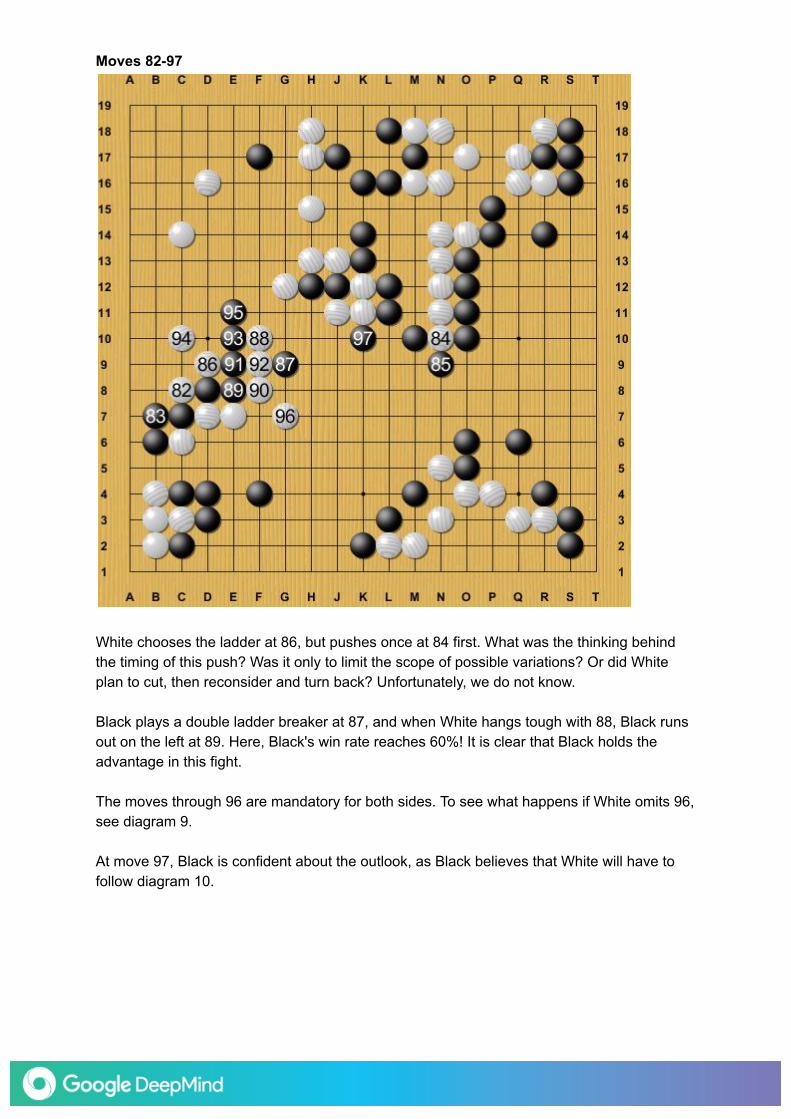
White chooses the ladder at 86, but pushes once at 84 first. What was the thinking behind the timing of this push? Was it only to limit the scope of possible variations? Or did White plan to cut, then reconsider and turn back? Unfortunately, we do not know. Black plays a double ladder breaker at 87, and when White hangs tough with 88, Black runs out on the left at 89. Here, Black's win rate reaches 60%! It is clear that Black holds the advantage in this fight. The moves through 96 are mandatory for both sides. To see what happens if White omits 96, see diagram 9. At move 97, Black is confident about the outlook, as Black believes that White will have to follow diagram 10.

Diagram 9
White has too many weaknesses to kill Black with 1. After 2 through 8, White's stones are split into two groups, one of which must die.

Diagram 10
Black believes that White must capture the two stones, giving Black the chance to live on the
left with 4. Now White cuts boldly at 7! However, Black can push at 10, then run out with the
knight’s move at 12. White is not strong enough here to do any serious harm to Black's
position.
This variation would have been ideal for Black.

Moves 98104
In the game, White chooses the turn at 98. Next, concentrating energy in preparation for the cut at 104, White blocks at 100. Although this move loses a few points, it gains thickness. Now White can finally slice through at 104, unsheathing a sharp and deadly blade! But is this move really as severe as it looks? If you believe Black can no longer hold the position together, then you have underestimated AlphaGo! Earlier, does White have to respond at 98? See diagrams 11 and 12.

Diagram 11
If White ignores Black 97, and instead captures Black's three stones on the left, then Black will claim the three in the centre. This capture removes the potential cut at A, so White must reinforce with 5 to protect the large group at the top. Moreover, there are still gaps on White's left side, so Black reserves the right to attach at 6 and live inside White's area. If Black does live, White will fall short on territory, but the aji of the attachment at B prevents White from killing the invader. There are many variations in this area for the interested reader to investigate.

Diagram 12
If White runs out with 1, Black makes use of the ingenious turn at 2. To avoid capture, White
must extend with 3. However, after Black connects at 4, White still has weak points at A, B,
and C, and no way to fix them all at once.

Diagram 13
Black may plan to handle the cut with the atari at 1 followed by the push at 3. However,
White's turn at 98 enables the atari at 4, sealing Black in completely. Even if Black can find a
way to live locally, the bottom side will shortly be in great danger as well.
When White plays 4, Black cannot play the ko. Not only would this be a flowerviewing ko for
White, but White has far more ko threats.

Moves 104117
To prevent diagram 13, Black must extend at 105. When White plays 108, it is possible for Black to save the two stones, but since the central dragon is not yet alive, running out with 109 takes priority. White 112 is good move order, forcing Black to invest another move on the right side. Now, when White connects at 116, Black faces a dilemma: protect the dragon with A, or reinforce the right side territory with 117? In the game Black chooses territory, protecting with 117. What about playing at A? See diagram 14.

Diagram 14
Black was originally planning to atari at 1, but now White takes two key stones. Although Black suffers an immense loss on the right side, Black can play atari at 3 to capture the lower left. After White plays at 4 to protect the middle, Black connects at 5 to kill White's corner. White then turns to the lower right side up through move 14. This places Black in a bind: if Black takes gote to defend the right side, White will defend the upper left, and Black will fall short on territory. It will be a very close game, but a lost one nonetheless. When assessing the game, AlphaGo assumes that both sides are as strong as it is capable of modeling, and that blunders on either side would be rare. In this sense, AlphaGo is extremely "honourable" in its evaluation.

Moves 117124
Black decides to strengthen the right side, mainly because it has found a countersqueeze
with 119 and 121 that allows the center dragon to connect back to the left side. Although at
first glance White's capture of the three centre stones looks spectacular, it is important to
remember that protecting with A is sente. If White does not respond, Black can cut at B to kill
all the white stones above. From this perspective, Black's loss is limited.
However, White has been plotting for some time, and extends at 124! Even after Black's
reinforcement, can White still live?

Diagram 15
If Black wants to kill, the only chance is to play at 1, but now White will peep at 2! Through 14, Black proves unable to kill White's group. This variation is very complicated, with both sides playing exquisite moves that we still do not fully comprehend, but one thing is certain: if White can at least make ko, the result is unacceptable for Black. This may be one reason why Black chose the game line.

Diagram 16
If Black attaches at 4 against the peep at 3, then after exchanging 5 and 7, White can play 9 through 19. It will be very difficult for Black to kill White unconditionally. This variation is highly complex, and even after investigating it, we are still not certain of the best moves for both sides. I believe this is why AlphaGo chose to tenuki.

Moves 124137
With the atari at 125, Black resolutely abandons the right side for the left! White fixes up the middle in sente with 126, then makes life on the right side with 128. After 134, Black has no chance of killing White. Black 135 makes a tiger’s mouth to reinforce the bottom. White 136, testing Black's response, is a very agile reply. After Black cuts at 137, the aji of the clamp at A remains. Could Black have defended differently? See diagram 17.

Diagram 17
If Black tries to resist being forced by jumping to 1, then White will play the tesuji at 2, forcing Black to connect above. Due to the shortage of liberties at A, Black has now lost the prospect of cutting off White's stones in the centre.

Moves 137156
The great exchange continues! Ignoring the cutting point, White turns to capture a portion of the right side, letting Black cut with 143 and swallow up the centre group. Which is bigger, the right side or the centre? With apologies to the reader, I must admit we don't know. In an exchange this complex, one must consider many aspects of the position, all of which may vary in response to small changes. A single mistake can lead to total collapse. While playing out these sequences, we often felt overwhelmed due to the number of factors and the complexity of the calculations. To think that AlphaGo considers all of this, using just five seconds per move, is truly frightening! After 143, White takes advantage of Black’s shortage of liberties to clamp at 146. Through 151, Black has no choice but to retreat, after which White still has the hane at A. If this seems confusing, don’t worry, we will return to it soon.

Finally, White connects up the left with the atari at 152. But when I saw White 156, I was
shocked! If Black plays at B, White can no longer live on the side, and besides that is short
of liberties. How could White possibly escape death?

Diagram 18
If Black connects at 1, White's cut at 2 is the tesuji. If Black ataris directly, White can capture with 4 and 6.

Diagram 19
4 = 23, 10 = 25
Of course, Black can at atari at 1 before capturing, but White can descend at 4 to take away
Black's liberties. Following the peep at 6 and cut at 8, through 26, Black loses the capturing
race by one liberty.

Diagram 20
If, instead of 13 in the previous diagram, Black attaches at 1 in diagram 20, Black can
temporarily break through. However, after White squeezes with 2 and 4, wedges at 6, and
connects with 8, Black is still in dire straits. Ultimately the race ends with one eye to no eyes
in favor of White, so Black dies.

Moves 157160
Although White has succeeded in connecting up the left, Black has sente moves at A and B, and will have no difficulty living. Interestingly, Black tenukis to make the placement at 157! Still more puzzling is the reply: White plays at 158 and captures a stone! Can Black no longer live on the left? Is White dead at the bottom? What happened!?

Diagram 21
When Black makes the placement, White can live with the diagonal attachment at 1, but Black has the magnificent endgame tesuji of the knight's move at 2. Through 7, Black has defended against White's hane at A in sente, and can now return to make life on the left side with 8. This could be the reason for Black’s placement and White's response.

Moves 160167
After White 160, although Black can capture White on the bottom, White would then reinforce and kill Black on the left. Weighing the pros and cons, Black decides to make life on the left side. From the attachment at 161 up to 167, the position becomes ko. Black exhibits AlphaGo’s most distinctive characteristic…persistence! Can White prevent ko here?

Diagram 22
If White connects at 1, Black must enter the corner directly. After Black hanes at 6, the corner is already alive because of the peep at A. White will now have trouble settling on top. Moreover, White's group at the bottom is still hanging in the balance.

Diagram 23
What if White just connects when Black plays ko? In this case, Black can directly invade the corner through 14, and White's position falls apart.

Moves 167194
169 = 181, 172 = 184, 175 = 181, 178 = 184
The ko fight begins! It is worth noting that the ko threat at 176 is a very pleasant one for White. Black cannot atari at A, or White could simply create a second ko at B. After 186, Black thinks the balance of ko threats favors White, and concedes the ko to live with 187. Through 191, Black finally secures life on the left. After the atari at 192, White makes a tiger’s mouth at 194. This is the final tesuji of the game!

Diagram 24
If Black connects at 1, White simply wedges at 2, leaving a very interesting life and death situation at the bottom. Black might try throwing in at 3, then descending at 5. Locally speaking, White is dead, but the sequence of 6 through 12 makes an eye in sente on the left. White lives.

Diagram 25
If Black defends with the clamp at 1 instead, White makes life directly with 2. This way, the connection at A will be White's sente, promising a tidy profit in the endgame.

Moves 195225
The long battle has finally reached its conclusion. Seeing Black's capture at 195, we finally understood that White never intended to make life at the bottom. Instead, White wedges at 196. Could it be that White always thought the right side was bigger? Regardless of how it arrived at this decision, White has chosen the path to victory. Black must now secure the bottom with move 197, and after 198 the endgame begins. Just when I thought everything was over, I saw White 226. Why doesn't White connect? Is there really something here?

Diagram 26
If White connects, Black has the tesuji of 2 and 4. Now, when White ataris, Black can connect underneath in ko. This variation is clearly unacceptable for White.

Diagram 27
If White descends, Black can extend upwards. Through 6, Black is unconditionally alive. The fact that one can live so tenaciously in a space so small this is what makes Go such a marvelous game!

Moves 226274
After 226, we have finally entered the small endgame. After 274 moves, White wins by 1.25 stones, for a 2.5 point victory. This should be the part where I rack my brains to comprehensively summarize the game. Yet all I can say is: so many battles! Countless sacrifices! Countless exchanges! And all with only five seconds per move! In a game as endlessly complex as this one, both sides surely made a few errors, but I believe they were not the least bit significant. After all, error is also an essential and fascinating part of the game. I am grateful to Gu Li and Zhou Ruiyang for their help, as I would not have been able to discover and comprehend these many variations on my own. I could never have understood the complex interactions in this game without them. At every step, they diligently and conscientiously searched for the best moves. After playing through this game, we felt incredible fatigue. Yet we sensed that if we had continued our study, we would have uncovered even more fascinating variations. I must bring my commentary to an end here but perhaps your own investigation has just begun.
