alpine level i study guide
TRANSCRIPT

Alpine Level I Study Guide


Alpine Level I Study Guide
Professional Ski Instructors of America Education Foundation

CREDITS
Education DirectorLinda J. Crockett
Technical EditorWeems Westfeldt
Cover Illustration/Design StandardsLee Reedy Creative
Graphic Design/Pre-press ProductionKen Grasman
Digital Photo DesignBoulder Media Group
PhotographyScott Markewitz
Still ImagesRodnunsky Arts, Ltd.
Copyright 1996 by the Professional Ski Instructors of America Education Foundation
All rights reserved. No part of this work may be reproduced, stored in a retrieval system,or transmitted, in any form or by any means, electronic, mechanical, photocopying,recording or otherwise, without the prior written permission of the Professional SkiInstructors of America Education Foundation. The American Teaching System andCenter Line are registered trademarks of the Professional Ski Instructors of AmericaEducation Foundation.
ISBN 1-882409-09-4

5A L P I N E L E V E L I S T U D Y G U I D E
Table of Contents
Acknowledgments . . . . . . . . . . . . . . . . . . . . . . . . . . . . . . . . . . . . . 6
Study Guide Organization . . . . . . . . . . . . . . . . . . . . . . . . . . . . . . . 7
Skier Level 1
Step 1 Introduction and Equipment Orientation . . . . . . . . . . . 9
Step 2 Walking, Stepping, and Sliding . . . . . . . . . . . . . . . . . . 17
Step 3 Climbing . . . . . . . . . . . . . . . . . . . . . . . . . . . . . . . . . . . . 27
Step 4 Straight Run . . . . . . . . . . . . . . . . . . . . . . . . . . . . . . . . . 37
Skier Level 2
Step 5 Gliding and Braking Wedge . . . . . . . . . . . . . . . . . . . . 45
Step 6 Wedge Traverse and Stop . . . . . . . . . . . . . . . . . . . . . . 55
Step 7 First Wedge Turns . . . . . . . . . . . . . . . . . . . . . . . . . . . . 63
Step 8 Riding the Lift . . . . . . . . . . . . . . . . . . . . . . . . . . . . . . . . 73
Skier Level 3
Step 9 Linking Wedge Turns in the Fall Line . . . . . . . . . . . . . 81
Step 10 Varying Wedge Turn Shape . . . . . . . . . . . . . . . . . . . . 93
Skier Level 4
Step 11 Providing Mileage and Guidance . . . . . . . . . . . . . . 103
Step 12 Introducing Matching and Skidding . . . . . . . . . . . . 109
Step 13 Methodical Approach to Matching and Skidding . . 117

6 A L P I N E L E V E L I S T U D Y G U I D E
Acknowledg-mentsThe PSIA Steering Committeedeveloped the concept of present-ing the American Teaching Systemalpine information as an assort-ment of materials. The pieces ofthe system manual, study guides,video, and handbook work syner-gistically to produce a completepicture of an effective alpine lesson.
• The Alpine Manual covers theAmerican Teaching System, therole of PSIA in the ski industry,and a variety of subjects thatcontribute to the working knowl-edge of ski instruction.
• The study guides available forLevel I, II, and III instructorscontain the step-by-step proce-dures for conducting a ski lesson.They are written to be useful forthe instructor who teaches, or ispreparing for certification, at thatlevel.
• The Alpine References video runsparallel to the content in themanual and study guides. Itprovides moving images of theskiing discussed in the ATSpublications and was the sourceof most of the photos.
• The Alpine Handbook—a pocket-sized guide—contains exercisesand drills that can be used withany level of class to developimproved learning and skillsacquisition.
The study guides were co-authoredby David Mannetter and NancyOakes of the PSIA AlpineDemonstration Team. These indi-viduals drew upon insights, ideas,
and their personal experiences todescribe how to present an excel-lent ski lesson. Reading the studyguides is like taking a privatelesson with one of these accom-plished skiers. David and Nancyset a fine example of teamwork inproducing the study guides.
Pat Butowick, a ski instructor atHeavenly Ski Resort and a technicalwriter/editor, developed the studyquestions relating to each chapterof the study guides. She painstak-ingly distilled the key points toprovide a valuable tool for studyand discussion. In true PSIA spirit,Pat always provided what wasrequired, plus a little extra.
Weems Westfeldt, a formermember of the PSIA AlpineDemonstration Team, and currentlya trainer with the ski schools ofAspen, served as technical editorfor the study guides as well as themanual. Weems worked 25 hours aday to accomplish this task.
Bill Grout, senior executiveeditor for SKIING Magazine, readthrough the study guides and con-stantly challenged us to providetechnical information in skier-friendly terms.
The PSIA Alpine Demonstra-tion Team developed the core ofideas presented in this edition. Theteam is instrumental in PSIA’seducational process and provides aconstant source of creative energy.
The PSIA Board of Directorssupported the project both inencouragement and funding.
The review panel for this publica-tion consisted of the followingindividuals, who offered valuableadvice:
Jack CopelandJohanna HallMegan HarveyGlen Peterson, Ph.D.Sue SpencerCalvin Yamamoto
PSIA instructors are also acknowl-edged, because it is you who cantake the words on these pages andtransform them into memorableexperiences for your students.
Linda J. CrockettPSIA Education Director

7A L P I N E L E V E L I S T U D Y G U I D E
Study GuideOrganizationThis study guide contains suggest-ed steps for teaching novicethrough beginning wedge christielessons. It begins with the first mo-ment of the first lesson for “never-evers,” giving step-by-step guid-ance for helping your students ac-quire the skills they need.
The book has 13 steps in all—each building on the successes ofthe previous step—moving fromsimpler to more complex activities.These steps cover ski lessons upthrough the introduction of Level 4lessons.
The sections “talk” you throughthe skills and exercises studentsneed to learn so they can balance,glide, stop, and ultimately turn onskis. It discusses both what toteach and how to teach it. Sampleprogressions and progression op-tions are provided. These are fol-lowed by a technical summary ofskill development for each level.
Following the concepts, youwill find questions and answers forchecking your understanding.Plus, notes pages are interspersedfor listing your own progressionsand other pertinent informationfrom your ski school training.
The Alpine Level I Study Guidecorresponds with the AlpineManual. You can refer to the man-ual whenever you need backgroundinformation about the SkiingModel, which is the basis for theconcepts and progressions in thisbook. The following list describeswhere you should look in the man-ual to find specific information thatsupports this study guide.
Level 1 Skier: see Chapter 4, PhaseOne-Beginning
Steps 1-6: see Chapter 4, TheSkiing Model, Level 1,see also Chapter 5, SkiEquipment
Level 2 Skier:Steps 7-8: see Chapter 4, The
Skiing Model, Level 2,(Wedge Turn; Balancing,Rotary, Edge-control, andPressure-controlMovements)
Level 3 Skier:Steps 9-11: see Chapter 4, The
Skiing Model, Level 3,(Wedge Turn; Balancing,Rotary, Edge-control andPressure-controlMovements)
Level 4 Skier:Steps 12-13: see Chapter 4, The
Skiing Model, Levels 3 and4,(Wedge Christie; Balancing,Rotary, Edge-control andPressure-controlMovements)
Good luck in your ski teachingcareer, and remember: the guestalways comes first. If you keep thatin mind, the rest follows naturally.
Note: As you work with any of thematerials in the AmericanTeaching System, you may comeacross unfamiliar ski terminology.Please refer to the glossary and/ortext of the Alpine Manual forexplanation of these concepts. Skiinstructors use terms in a varietyof ways, so in any technicaldiscussion always state what youmean and ask others to do the same.While the use of ski terminology is
an effective way to communicatewith other instructors, you willwant to develop non-technicaltranslations of these termsfor students.

8 A L P I N E L E V E L I S T U D Y G U I D E

9A L P I N E L E V E L I S T U D Y G U I D E
Skier Level 1
Step 1: Introductionand EquipmentOrientation
Terrain
Ideal beginner terrain is a verygentle slope which ends on a flatsection, or better still, has a“counter-slope,” to stop the skier.The hill should be flat enough thatthe skier will stop on the flat sec-tion or counter-slope without hav-ing to do anything other than standwith weight distributed equallyover the feet. If and when morechallenge is desired, have studentclimb higher up the slope.
Lesson Outcome
The students learn key facts aboutthe mountain environment and be-come familiar with the basic func-tions of their ski equipment.
Getting to Know theGroup and EstablishingRapport
At the ski school meeting area sign,get to know your class and helpthem to feel comfortable with you.
1. Introduce yourself to the group.Establish eye contact and calleach person by name. Thismakes everyone feel special.
2. Assess the students’ needs andabilities by asking questions.For example, ask what othersports they enjoy so that youcan gauge their athletic abilities.Ask where they live so you can
understand the environmentthey come from. Ask what theirexpectations are. Make sureyou’re not the only one doingthe talking. Real conversationeases tension and helps youlearn about your students.
3. Help the members of the groupget to know each other by intro-ducing them to each other andencouraging conversation.Developing trust and rapportwithin the group is crucial increating a comfortable learningenvironment. Simply learningyour students’ names will helpto show them that you careabout them, and promotes trust.Try to create an environment ofmutual support and enthusiasmto help individuals becomemore comfortable with eachother. Encourage the students toask questions when they areconfused.
The MountainEnvironment
• Describe the importance of botheye and skin protection whilemaking sure everyone hassunglasses or goggles andsunscreen.
• Let your students know wherethe nearest drinking water is andexplain the importance of properhydration. For example, higherelevations and sunny, springweather can be dehydrating,causing headaches and fatigue.
• Relate pertinent information re-garding ski clothing, gloves, hats,or headbands. For instance, bluejeans are inappropriate ski attirefor a cold, snowy day (especially
in New England or in theNorthwest). Wearing mittens orgloves, even when the weather iswarm, protects the hands frompotential abrasions—especiallywhen the snow is icy, corn-like,or machine-made. Obviously,when it is snowing, a ski hat sur-passes no hat or a headband.Likewise, goggles are better thansunglasses in harsh conditions.Remember, these people arenewcomers to the sport, andwhat is obvious to you may betotally foreign to them.
Ski Equipment
• Show your students how to carrytheir ski equipment. More oftenthan not, first-time skiers will beoverwhelmed with the amount ofgear that is required. While theirskis are off, show them how theski brakes click together, thenplace the skis on one shoulderwith the tips forward and thepoles in the other hand.
• Explain the basic functions ofskis, ski boots, bindings, andpoles. Most first-timers use rentalequipment. This is actually anadvantage: If the equipmentdoesn’t suit their needs, they canreplace it quickly.
Skis
A ski possesses a tip, a tail, a mid-section where the bindings aremounted, a low-friction, plasticbase, and two metal edges. Thebase promotes sliding; the edgesfacilitate turning, braking, andstopping. (Keep your explanationssimple. Describing sidecut and

10 A L P I N E L E V E L I S T U D Y G U I D E
S k i e r L e v e l 1
camber is too much informationfor the beginning student).
Assess the length of your stu-dents’ skis. At beginning levels,skis should be chest to head high.Skis that are too long or too shortwill impede proper learning andcreate frustration. If the skis are aninappropriate length, send the stu-dent back to the rental shop at theend of the lesson.
Boots
Well-fitting ski boots are critical tothe newcomer’s success. Bootsshould be neither so tight that thefeet fall asleep nor so loose that thefoot is swimming inside. Explainthat the proper fit should feel like afirm, comfortable handshake. Asock that is wrinkled inside theboot or one that is too thick andbulky can create misery. Check tomake sure the students’ boots areon the correct feet! Make sure theboot tongue is lined up over the in-step so the boot flexes properly andcomfortably. Then help adjust andsecure the buckles.
Finally, have your studentspractice walking in their bootswhile checking for functional anklebend. If they cannot flex their an-kles or walk comfortably, suggestthat they try another model at theend of the lesson.
Bindings
Show the students how to step intoand out of their bindings. Showthem how to clean the snow fromthe bottoms of their boots whileleaning on one ski pole for balance.Make sure they understand that the
bindings must also be clear of ex-cess snow in order to functionproperly. If the rental shop has ad-justed the bindings for left and rightboots, make sure the student match-es the appropriate boot to ski.
Ski Poles
Finally, show your students how togrip their ski poles. Demonstratehow to put on the pole straps byputting the hand up through thebottom of the loop and graspingstrap and grip together in the palmof the hand. Explain that ski polesare not used for braking or turningbut as balancing aids and for pro-pelling oneself across flat terrain.
Ask questions to check for un-derstanding of basic equipmentfunctions. Pace the lesson accord-ing to your students’ needs andphysical abilities. You’ll help thesenewcomers enjoy the sport rightfrom the start if you express friend-liness, patience, and empathy.

11A L P I N E L E V E L I S T U D Y G U I D E

12 A L P I N E L E V E L I S T U D Y G U I D E
S k i e r L e v e l 1
Questions: Introduction and Equipment Orientation
1. There are many ways to gauge the athletic abilities of students you’ve never seen ski. What way is specifi-cally mentioned in the Introduction and Equipment Orientation section of this workbook?
_______________________________________________________________________
2. Fill in the blank:The altitude and sunny, spring weather can be dehydrating, which can cause your students to experience
________________________________.
3. Fill in the blanks:You would want to tell a novice skier that a ski’s edges can be used for ________________________ and
__________________________.
4. List the parts of a ski.
_________________________________________________
_________________________________________________
_________________________________________________
_________________________________________________
_________________________________________________
5. Choose the best answer:About how long should a ski be for a beginning skier?A. Arms length above the head.B. Anywhere from chest to the head high.C. 6 to 10” (15 to 25 cm) above your head.D. None of the above.
6. Fill in the blanks (one or more words per blank).To properly grip a ski pole, put your hand up through the bottom of the _________________________ and
then grasp the ______________________ and ______________________ together in the palm of the hand.
7. Name two acceptable uses for ski poles that you might tell your novice students during their first ski lesson.
_______________________________________________________________________________________
_______________________________________________________________________________________

13A L P I N E L E V E L I S T U D Y G U I D E
8. Fill in the blanks:
_____________________ are better than __________________ for protecting the eyes in harsh conditions.
9. True or False:Ski boots should feel fairly snug, like a firm handshake. _____________________

14 A L P I N E L E V E L I S T U D Y G U I D E
S k i e r L e v e l 1
Answers: Introduction and Equipment Orientation
1. One way of gauging the athletic abilities of students you’ve never seen ski is to ask them what other sportsthey enjoy.
2. The altitude and sunny, spring weather can be dehydrating and can cause headaches and/or fatigue.
3. You would want to tell a novice skier that a ski’s edges promote turning and facilitate slowing down andstopping.
4. The parts of a ski are:TipsTailMidsection for bindingsBaseMetal edges on both sides of the base
5. B. Skis for beginners should be chest to head high.
6. To properly grip a ski pole, put your hand up through the bottom of the loop of the pole strap and then graspthe strap and pole grip together in the palm of the hand.
7. At the novice level, ski poles can be used to balance and to propel the student around on flat terrain. Students should not use their poles to stop themselves.
8. Goggles are better than sunglasses for protecting the eyes in harsh conditions.
9. True. Ski boots should feel fairly snug, like a firm handshake.

15A L P I N E L E V E L I S T U D Y G U I D E
Notes

16 A L P I N E L E V E L I S T U D Y G U I D E
S k i e r L e v e l 1

17A L P I N E L E V E L I S T U D Y G U I D E
Step 2: Walking,Stepping, andSliding
Lesson Outcome
Students learn to control their skiswhile walking, stepping, and slid-ing on flat terrain.
The Athletic Stance
Once the students are familiar withtheir equipment and have their skison, explain how to balance on skis.Describe and demonstrate the bal-anced athletic stance. This is a fair-ly tall stance in which the weight isbalanced equally over both feet,with the ankles, knees, hips, andspine bent forward slightly. Theupper body is upright but relaxed,the hands are comfortably aheadwithin the peripheral vision. Thehips and upper body are centeredover the feet. Viewed from the side,the head and shoulders appear tobe “stacked” over the hips and feet.Photo 1 shows an athletic stancewhen standing still and while mov-ing.
Class Arrangement andHandling
Define the boundaries of the prac-tice area so the group is protectedfrom other skier traffic. Explain toyour students that they will bewalking in a small circle within thepractice area. This circular classformat provides your students theopportunity to interact with eachother, and it allows you to givethem individual feedback. This for-mat works particularly well with
larger groups. If you stand in thecenter of the circle, you have thebest vantage point for observingyour students.
Keep your instructions clear andsimple. Avoid talking too much andoverloading your students with toomuch information. Instead, keepthem moving and doing.
Walking
Now your students are ready to walkslowly on skis across flat terrain.
1. Begin walking very slowly. Callthe names of the students in theorder in which you would likethem to follow you.
2. For now, allow your students tolift their skis off the snow witheach step if they wish. Encour-age small steps and show thesimilarity to walking move-ments without skis. (It may behelpful to describe skis as“extra-long feet”). Have themhold their poles lightly under-neath the grips and allow thearms to swing the ski poles for-ward naturally. The right armshould move forward with theleft foot in a natural “cross-lateral” walking motion.
Note: Small children may notyet have the motor skill devel-opment for this movementpattern (refer to AmericanTeaching System: Children’sDevelopment, PSIA, 1994).
3. Lead the group in a circle witheach member a ski length apart.
4. Once the circle is established,you can walk to the center. This
Photo 1. Athletic Stance

18 A L P I N E L E V E L I S T U D Y G U I D E
S k i e r L e v e l 1
gives you an optimal viewpointfor observing the movementsand providing individualfeedback.
Make corrections immediately(see Table 1).
• Encourage a fairly tall stancewith the skis a hip-width apart,the torso, hips, knees, and anklesslightly flexed, and even weightdistribution over both skis.
• The upper body should be stableso the legs and feet can be active.
Arm and upper body move-ments should not be exaggerated,as this disrupts balance.
If necessary, show the groupimproper body postures. It is oftenhelpful to show students what theirposture looks like. Often, how theylook is very different from a move-ment may feel to them. Such ademonstration, when contrastedwith a demonstration of correctposture, can be very helpful inanchoring the proper sensations.
Stepping to Turn Around
Now that your students haveformed a circle, have them turn andwalk in the opposite direction. Forthe sake of simplicity, show themthe star step. See photo 2 for themovements of the star step. Thestar step is so-named because thetracks left in the snow by the skisresemble a star with many points. 1. Lift either ski and point your
toes or the tip of the lifted ski inthe direction you wish to go.
2. Set that foot and ski down. 3. Follow with the other foot and
ski. 4. Point out to your students that
because their feet are “extra-long,” they will have to movethe lead ski slightly away fromthe one on which they arestanding to avoid pinning them-selves to the ground.
5. Repeat steps 1-3 until you haveturned 180 degrees and are fac-ing in the opposite direction.
Sliding
As your students begin to walk inthe opposite direction around thecircle, ask them to slide their feetinstead of lifting them. Now poleuse becomes more important. Showyour students how to slide one skiforward, then the other, while coor-dinating the use of their poles topropel themselves forward.
As the group becomes morecomfortable with walking and slid-ing from ski to ski, have thempractice gliding on both skis whilepushing with their poles. Photo 3shows sliding with a pole push.
Progression Options
• Practice scooter turns, walking,stepping, and sliding with oneski off and one ski on. Switchfeet.
• Practice sliding with no poles. • Stand with both skis on, pick up
one ski and balance on the other.Switch legs.
• Balance on one ski and turn thelifted ski sideways. Switch legs.
• Emphasize foot sensitivity.
Describe the sensations yourstudents should be feeling intheir feet.
Draw a foot in the snow andexplain that the students should feeltheir weight over the entire foot, in-stead of only on the ball or the heel.Focusing on the arch ensures equaldistribution over the whole foot.
Practice rolling the ankles andknees in toward each other, tippingthe skis up on their inside edges toanchor the feeling of pressure onthe arches and big toes. Then roll
Improper Body Postures
Posture Result
Over-flexed hips Student’s weight too far back, over the tails of the skis
Over-flexed ankles and torso Student’s weight too far forward, over the tips of the skis
Skis too close together Student has lateral balancing problems
Low body position Muscles become fatigued
Table 1

19A L P I N E L E V E L I S T U D Y G U I D E
the knees and ankles away fromeach other so that the skis tip upon the outside edges while feelingmore pressure on the little toe andoutside of the feet. As you arerolling the ankles and knees, discusspressure spots on the ankle and leg.
Develop increased foot andankle awareness by tipping bothknees and ankles to the right, thento the left.
Practice feeling the entire footso that the skis remain flat on thesnow. Foster this solid foot plat-
form by gently hopping up anddown by flexing and extending theankles, knees, and hips.
Technical Aspects of SkillDevelopment
Balancing Movements
Your students have learned to bal-ance fore and aft on their skis byestablishing a fairly tall stance witha slight flex in the ankles, knees,hips, and spine. They’ve also
learned to center the hips andupper body over the feet and skis.
Rotary Movements
The most obvious rotary move-ment in this progression occurswhen the student changes direc-tions by opening the ski tips or skitails. Opening the ski tips requiresan outward rotation of the leg andfoot, while opening the tailsrequires an inward rotation. Also,balancing on one ski while turningthe lifted ski back and forth utilizesboth outward and inward rotation.Walking in a circle is a more subtlerotary movement, depending on thesize of the circle, and can utilizefull body rotation. Walking in asmall circle requires more leg ro-tation than full body rotation, yetutilizes both to a degree. Main-taining a flat ski while walkingrequires control of the inward oroutward rotation of the leg.
Photo 2. Star Step
Photo 3. Sliding with a Pole Push
A B
C D

20 A L P I N E L E V E L I S T U D Y G U I D E
S k i e r L e v e l 1
Edge-control Movements
Maintaining a flat ski requiresedge-control movements throughinward or outward control of theleg. Much of the fine-tuning forsustaining a flat ski comes from thefoot and ankle. Maintaining a flatski while stepping side to siderequires lateral edge-control move-ments of the leg and ankle.
Pressure-control Movements
Distributing weight equally overboth soles of the feet and the entireski is a pressure-control movement.Feeling more pressure on contactpoints like the arch and big toe isalso a pressure-control movement.Walking on skis requires shiftingweight from one ski to the otherski for moving forward, whilestepping requires shifting weightlaterally from ski to ski formoving sideways.

21A L P I N E L E V E L I S T U D Y G U I D E

22 A L P I N E L E V E L I S T U D Y G U I D E
S k i e r L e v e l 1
Questions: Walking, Stepping, and Sliding
1. Circle one or more of the following which describe(s) the natural athletic stance.A. Fairly tallB. Fairly lowC. Slight flex in the ankles, knees, and hips—spine straightD. Slight flex in the ankles, knees, hips, and spineE. Hips and upper body centered over the feet and skisF. Hips and upper body slightly countered to the skis
2. Choose the best answer:Where should you place your weight when walking straight ahead on skis?A. Ball of footB. Whole footC. Heel of foot
3. Define cross-lateral movement and give an example of it.
_______________________________________________________________________________________
_______________________________________________________________________________________
_______________________________________________________________________________________
4. Choose the best answer:In the circle formation, where is the best place to stand to observe the movements of your students?A. In the center of the circleB. Outside the circleC. Within the circle
5. True or false:One cause of lateral balancing problems (for the student just learning to ski) is over-flexed ankles, coupled with an over-flexed torso.
6. True or false:Walking in a low position on skis can cause the muscles to fatigue.
7. What is the star step? What is its purpose? Give a detailed description of how to perform it.
_______________________________________________________________________________________
_______________________________________________________________________________________
_______________________________________________________________________________________

23A L P I N E L E V E L I S T U D Y G U I D E
8. After you’ve shown your students how to walk by lifting their skis, what might you logically have them try next while walking.
_______________________________________________________________________________________
_______________________________________________________________________________________
9. True or false:Your students will need to use their poles to slide across flat terrain.
10. What is a scooter turn?
_______________________________________________________________________________________
_______________________________________________________________________________________
11. Describe the exercise given in the Walking, Stepping, and Sliding progression for helping students feel a solid foot platform.
_______________________________________________________________________________________
_______________________________________________________________________________________
12. True or false:Walking in a small circle requires both leg and full body rotation movements.
13. Circle the best choice:When you first open your ski tips to change directions while walking, you rotate your leg (outward) / (inward).
14. Choose one or more of the following:Much of the fine-tuning for sustaining a flat ski comes from what part(s) of the body? A. The footB. The legC. The ankleD. The spine

24 A L P I N E L E V E L I S T U D Y G U I D E
S k i e r L e v e l 1
Answers: Walking, Stepping, and Sliding
1. A, D, & E. The natural athletic stance is a fairly tall stance with ankles, knees, hips, and spine slightlyflexed. The hips and upper body are centered over the feet and skis.
2. B. When walking straight ahead on skis, you should place most of your weight on the entire foot, instead ofonly on the ball or the heel.
3. Cross-lateral movements are where opposite sides of the body move at the same time. One example of across-lateral movement is walking. When you walk, the right foot and ski move forward as the left hand andpole move forward, and the left foot and ski move forward as the right hand and pole move forward.
4. A. The center of the circle is the best place to stand to observe the movements of your students.
5. False. One cause of lateral balancing problems for a student just learning to ski is standing with the skis tooclose together. The skis can catch and cause the skier to fall over. Over-flexing the ankles and torso pullsthe skier’s weight over the tips and forebody of the skis.
6. True. Walking or standing in a low position on skis can cause the muscles to fatigue more rapidly than walk-ing in a fairly tall position.
7. The star step is so named because the tracks left in the snow by the skis resemble a star with many points.It is a method of turning around while walking.
8. After you’ve shown your students how to walk by lifting their skis, you might want to have them try slidingwhile walking.
9. False. However, it will be easier if they push against their poles to slide across flat terrain.
10. A scooter turn is a method for changing directions by walking, stepping, and sliding with one ski off andone ski on.
11. There are a number of effective ways to help your students feel a solid foot platform. The Walking,Stepping, and Sliding progression in this workbook contains the following exercise:
To help your students feel the entire foot so that their skis remain flat on the snow, have them gently hop upand down by flexing and extending the ankles, knees, and hips.
12. True. Making any kind of direction change requires a rotary movement. Although walking in a small circlerequires more leg rotation than full body rotation, it does involve both to a degree.
13. Opening the ski tips to begin to change directions while walking requires an outward rotation of the leg.
14. A & C. Much of the fine-tuning for sustaining a flat ski comes from the foot and ankle.

25A L P I N E L E V E L I S T U D Y G U I D E
Notes

26 A L P I N E L E V E L I S T U D Y G U I D E
S k i e r L e v e l 1

27A L P I N E L E V E L I S T U D Y G U I D E
Step 3: Climbing
Once the group is comfortable withwalking, stepping, and sliding onflat terrain, it is time to climb asmall incline. There are a varietyof ways to climb on skis. The mostcommon is the sidestep.
Lesson Outcome
The students learn to climb up anddown a small slope on skis.
Class Arrangement andHandling
First, define the boundaries of yourpractice area so that it’s as far awayas possible from other groups andskier traffic. Next, identify slopeaspect for your students. Describethe fall line as the line a ball wouldfollow if it rolled down the hill.Have your students place their skisperpendicular to the fall line thenearby slope.
If your class is small (2-5 students),arrange the students in a verticalline with all student facing thesame direction; if your class islarge (6 or more students), dividethe class into two vertical linesfacing each other with enoughroom for you to sidestepbetween them.
Arranging large classes into twofacing lines creates an environmentin which everyone feels includedand provides everyone with a goodview of your demonstrations. Theformat also allows students to learnfrom watching each other.
Note: From the time your classmoves onto a slope, you need todescribe skiing in relation to the fallline. In maneuvers not involving aturn, it is sometimes enough torefer to the uphill or downhill ski.The American Teaching Systemmaterials use the following conven-tion for describing linked turns:
The ski on the outside of theturn is referred to as the outside ski(it is the outside/downhill ski).
The ski on the inside of the turnis referred to as the inside ski (it isthe inside/uphill ski).
Sidestepping
Your students are now ready tosidestep, starting on flat terrain andthen moving onto the nearby gentleslope. Have them try the followingsteps. 1. Lift the ski closest to the slope
and move it laterally in the di-rection of the slope.
2. Set the ski down and step on it.3. Lift the other ski and place it
next to the first ski. 4. Repeat until they have side-
stepped a few steps up theslope.
5. Sidestep back down the slope.
You will probably have to explainand demonstrate how to make theuphill edges of the skis bite intothe snow to prevent the skis fromslipping sideways back down thehill. Talk about pointing the kneesup the hill without changing thedirection that the skis are pointingor that the body is facing.
Some students may betterunderstand the idea of tipping theirankles into the hill, while for others
kicking snow up the hill with theuphill edge of the ski may be aclearer explanation. The more waysyou can describe the same maneu-ver, the easier it will be for you toreach everyone in the class. Insteadof insisting that all your studentsunderstand what you say, it is up toyou to find the words that commu-nicate with each person.
Hints for Sidestepping
As students practice sidestepping,encourage small, slow steps so theyuse the appropriate movements.When their skis slip backwards orforwards, check their stance, mak-ing sure that their weight is evenlydistributed over their skis. Theyshould feel more pressure on theoutside of their foot and little toe inthe uphill boot. Similarly, theyshould feel contact with their archand big toe in their downhill boot.
If their skis scissor or separate,advise them to take smaller stepsand roll both knees uphill to pro-vide the correct edge angle to keepthe skis from slipping.
At first, students may rely ontheir ski poles to help supportthem. Explain that they should usetheir poles to maintain balancerather than support their bodies.Encourage a fairly tall stanceallowing their legs to support theirbodies. Sidestepping is shownin photo 4.

28 A L P I N E L E V E L I S T U D Y G U I D E
S k i e r L e v e l 1
Bullfighter Turn
After your group has sidesteppedback down to the flats, have themspread out so that everyone can seeyou demonstrate while they prac-tice the bullfighter turn at the sametime. The bullfighter turn is shownin photo 5. Have your studentsimagine themselves practicing on aslope. Orient them to an imaginaryfall line. Then show them the fol-lowing sequence.
1. Put the palms of their hands onthe very tops of their ski polegrips.
2. Raise their poles and point themstraight out in front of theirbodies so that they are level andheld at arm’s length.
3. Turn their shoulders and armsso that their poles point straightdown the imaginary fall line.
4. While bending slightly at thewaist, place their poles in thesnow so that their elbows arelocked straight and there aretwo or three feet between thepole points.
5. Step their skis around so thatthey face straight down theimaginary hill.
Practice this a couple of times onthe flat before sidestepping upagain and attempting it on the hill.
Getting Up From a Fall
At some point in the lesson, youshould teach the class how to getup after falling.
1. From a seated position on thesnow, demonstrate how to align
the skis perpendicular to the fallline by pulling the feet and skisaround until they are downhillfrom the body.
2. Show your students how toplace their poles uphill and usethem to push and pull their bod-ies up over their feet and skis.
3. If any students have trouble,suggest removing the uphill ski.Explain that it is easier to put aski back on while standing andbalancing on the downhill ski. Itis often easier to get up from afall on a gentle slope instead ofon the flats.
Hints For Improving theSidestep and Integratingit with Other Maneuvers
• Consider integrating sidesteppingand the bullfighter turns with thestraight run progression given inthe next step.
• Repetition and exploration ofmovements anchor the sensa-tions of skiing.
• Also, keeping the eyes up andforward fosters a proper skiingstance and allows your studentsto pay attention to what they feelin their feet.
Progression Options
• In extreme cases, when one ormore members of the group arehaving great difficulty control-ling their skis in a sidestep, havethem practice sidesteppingmovements without skis.Likewise, if they are having trou-ble with one side, have thempractice with one ski off and oneski on. Take the ski off on the
Photo 4. Sidestepping
A
B
C

29A L P I N E L E V E L I S T U D Y G U I D E
side that is causing the mosttrouble. If they have difficultycoordinating pole use with step-ping movements, have themsidestep without ski poles.
• Explore herringbone steps or“V-steps” by pointing the tips outin a “V” and rolling both anklesinward. The herringbone isshown in photo 6. Begin on flatterrain, then move to a gradualincline and step straight up thefall line. Show the students howto spread their ski tips about twoto three feet apart from oneanother by pointing the kneesoutward. At the same time, havethem roll their knees and anklesinward so that both skis roll ontotheir inside edges. Lift one ski upand forward. Set the ski backdown and lift the other ski upand forward, placing the tail ofthe ski ahead of the binding ofthe weighted ski. Repeating thisprocess will allow your studentsto V-step forward and eventuallyup a gentle slope. Exaggerateyour movements to make themeasier to see.
Some students may feel morecomfortable and in control with theherringbone step than the sidestep.Try, however, to promote bothways of stepping so the studentdevelops more options and a fullrange of movement patterns.Developing sidestepping move-ments is a prerequisite for intro-ducing traversing and sideslipping.Likewise, developing the move-ments of the herringbone step is aprerequisite for introducing skatingon flat terrain.
Photo 5. Bullfighter Turn
A
B
C

30 A L P I N E L E V E L I S T U D Y G U I D E
S k i e r L e v e l 1
Technical Aspects of SkillDevelopment
Balancing Movements
Establish a fairly tall stance with aslight flex in the ankles, knees,hips, and spine. Center the hips andupper body over the feet and skis.Center your weight evenly over theentire uphill edges of the skis.
Rotary Movements
Sidestepping uses rotary move-ments, since the action of tippingthe knees laterally requires inwardand outward rotation of the legs.As you sidestep, your uphill legrotates outward and your downhillleg rotates inward. In the herring-bone step, both legs rotate outward,then inward.
Edge-control Movements
Herringbone and sidesteppingrequire skiers to maintain an edgedski. Maintaining an edged skirequires inward or outward controlof the leg. Rolling the knees andankles slightly uphill promotes agreater edge angle. Much of thefine-tuning for sustaining an edgedski comes from the foot and ankle.Developing edge-control move-ments while stepping keeps theskis from slipping sideways allow-ing you to move continually andcompetently up a gentle slope.
Pressure-control Movements
Balancing on an edged ski to steplaterally up a slope requires pres-sure-control movements. Feeling
inward pressure over the downhillarch allows you to stand solidly onyour downhill ski, so that you canlift the other ski up and place it onthe uphill edge. Feeling the outsideof the uphill foot and the little toehelps you to balance on the uphilledge of the uphill ski, so that youcan lift the downhill ski and placeit next to the uphill ski. Adjustingpressure on contact points like thearch and big toe are pressure con-trol movements. If either one ofyour skis slides backwards, youare standing too much on the tail.Likewise, if your ski slides for-ward, you are over-pressuringthe tip.
Photo 6. Herringbone
A
B
C

31A L P I N E L E V E L I S T U D Y G U I D E

32 A L P I N E L E V E L I S T U D Y G U I D E
S k i e r L e v e l 1
Questions: Climbing
1. What class arrangement might work best when teaching the sidestep to a large group of students?A. A circle with the instructor in the center and the students around the outsideB. Micro-teachingC. A vertical line with everyone facing the same directionD. Two vertical lines facing one another
2. True or false:The sidestepping lesson is a good time to introduce the concept of the fall line.
3. List two ways to tell your students to angle their knees into the hill to prevent their skis from slipping while sidestepping.
_______________________________________________________________________________________
_______________________________________________________________________________________
4. True or false:Students who have sidestepped up the hill for the first time should sidestep back down it unless they know a technique for turning around.
5. Fill in the missing step in the following description of the bullfighter turn:1. Stand perpendicular to the fall line.2. Put the palms of your hands on the tops of your ski pole grips.3. Raise your poles and point them straight out in front of your body so that
they are level and held at arm’s length. 4. __________________________________________________________________________________
__________________________________________________________________________________
__________________________________________________________________________________5. Step your skis around so that they face straight down the hill.
6. Choose one or more of the following:When sidestepping, you should feel more pressure on:
A. The outside and little toe of the downhill footB. The arch and big toe of the downhill footC. The outside and little toe of the uphill footD. The arch and big toe of the uphill foot

33A L P I N E L E V E L I S T U D Y G U I D E
7. Choose one or more of the following:What would you do for a students whose skis separate in the sidestep?A. Encourage a fairly tall stance, allowing their legs to support their bodiesB. Have them take smaller steps and roll both knees uphillC. Have them direct their knees inward in an “A” frame
8. Circle the correct choice:You should use your poles (to support your body) / (to maintain balance) in the sidestep.
9. Fill in the blank:Skiers who have trouble getting back up after they fall should take off the ______________________ ski.
10. Circle the best choices:To use a herringbone to move up the hill:1. Face your body (uphill) / (slightly to the right, if you intend to step to the right first or slightly to the
left, if you intend to step to the left first).2. Spread your ski tips about (1 to 2) / (2 to 3) feet apart by pointing the knees (inward) / (outward).3. Roll your ankles (inward) / (outward) so that both skis roll onto their (inner) / (outer) edges.4. Lift one ski up and forward.5. Set that ski back down on the snow.6. Lift your other ski up and forward, placing its (tip) / (tail) ahead of the binding section
of the weighted ski.7. Repeat this process to move up the slope.

34 A L P I N E L E V E L I S T U D Y G U I D E
S k i e r L e v e l 1
Answers: Climbing
1. D. When teaching the sidestep to a large group of students, try dividing them into two lines. Have the linesface each other leaving enough room between them for demonstrations and providing assistance from themiddle.
Note: Terrain, class composition, and area policy (to name just a few factors) all affect the definition of a“large class.” Additionally, even with a large class, there may be good reasons for using some other classarrangement. Consult your area trainer or supervisor, if in doubt.
2. True. The sidestep lesson is a good time to introduce the concept of the fall line, since your students will beplacing their skis across the fall line to sidestep.
3. There are many ways to describe how to angle your knees into the hill to keep your skis from slipping whileyou sidestep. You could use any (or all) of the following descriptions:
• Point your knees up the hill.• Roll your ankles into the hill.• Kick snow up the hill with the edge of your ski.
Note: Be sure to point out to your students that they should not change the position of either their skis orbody while angling their knees into the hill.
4. True. If you have not yet shown your students what to do once they’ve reached the top, you should havethem sidestep back down the hill the first time they sidestep up it. Sidestepping back down also anchors thistechnique for your students.
5. To perform the bullfighter turn:1. Stand perpendicular to the fall line.2. Put the palms of your hands on the tops of your ski pole grips.3. Raise your poles and point them straight out in front of your body so that they are level and held at
arm’s length. 4. Turn your shoulders and arms so that your poles point straight down the fall line. While bending
slightly at the waist, place your poles in the snow beneath you so that your elbows are locked straight and there are two or three feet between the pole points.
5. Step your skis around so that they face straight down the hill.
6. B & C. In sidestepping, you should feel more pressure on the arch and big toe of the downhill foot and onthe outside and little toe of the uphill foot.
7. B. Have students whose skis separate in the sidestep take smaller steps and roll both knees uphill so thattheir skis will be edged enough not to slip.
8. In the sidestep, you should use your poles to maintain balance rather than support your body.

35A L P I N E L E V E L I S T U D Y G U I D E
9. Skiers who are having trouble getting up after a fall should take off the uphill ski since it is easier to put aski back on while standing and balancing on the downhill ski.
10. To use a herringbone to move up the hill:1. Face your body uphill.2. Spread your ski tips about 2 to 3 feet apart by pointing the knees outward.3. Roll your ankles inward so that both skis roll onto their inner edges.4. Lift one ski up and forward.5. Set that ski back down on the snow.6. Lift the other ski up and forward, placing its tail ahead of binding section of the weighted ski.7. Repeat this process to move up the slope.

36 A L P I N E L E V E L I S T U D Y G U I D E
S k i e r L e v e l 1
Notes

37A L P I N E L E V E L I S T U D Y G U I D E
Step 4: Straight Run
Terrain
An ideal beginner slope should bevery gentle with flat terrain at thebottom. Beyond the flat terrain,there should be a slight uphill, orcounter-slope (which is also calleda runout). This runout allows thestudents to come to a stop withouthaving to do anything but stand ontheir skis and glide.
Lesson Outcome
The student descends a small in-cline while maintaining flat skisand a balanced, upright position.
By this time, new skiers shouldhave a fairly sense feel for balanc-ing while they move themselvesaround on the snow (i.e., dynamicbalance). They are now ready fortheir first straight runs, where theywill experience sliding with thehelp of gravity for the first time!
Class Arrangement andHandling
Assemble the group in two linesfacing each other, about two skilengths apart. Call the students outone at a time (alternating from eachline) to practice straight-runningafter you’ve demonstrated it your-self. As they try it, you should standat the bottom and provide simpleand brief corrections, tailoring yourremarks to individual needs.
Straight Run
Explain that the first descent isbrief and the speed is slow to elim-inate any concerns about stopping.First, climb only a short distanceso that they do not build too muchspeed. Assure them that the gentleterrain and flat area will stop theirforward movement. Before sendingthe first student down the hill,review the bullfighter turn with
another demonstration. The first run is an exhilarating
moment in the student’s develop-ment. Share in their excitement andeagerness to try the next straightrun. As each student finishes, havethat student step out of the way andbegin climbing back uphill whilethe next student is getting ready.Plan on demonstrating at least oncefor every two or three students, sothat everyone has a fresh and clear
Straight Run
Problem Solution
Student over-flexes the hips and adopts a “seated” position.
Student has trouble keeping skis straight and tracking parallel (the skis separate).
Student leans back and to one side; the tip of the other ski lifts off the snow.
Table 2
Advise the student to standcentered with hips over feet.Feeling the ankle flex intothe tongue of the boot, withthe weight over the balls ofthe feet promotes a centeredstance. Focusing on thesefoot and ankle sensationsinside the boot eliminatesthe problem of sitting back.
Suggest that the student distribute the weight equallyover both skis and over thesoles of both feet.
A stable upper bodycentered over the feetprovides even pressure overboth skis and eliminates thisproblem. Advise the studentto keep the upper bodyfacing the fall line. Have thestudent pick a distant objectdown the fall line to use as atarget to look at.

38 A L P I N E L E V E L I S T U D Y G U I D E
S k i e r L e v e l 1
image in their mind of what theyare trying to do. If your group isfairly athletic and seems to becatching on quickly, one or tworuns are enough. If they seem moretentative, give them more chancesto practice.
See Table 2 for some commonproblems your students may havein the straight run and suggestionsfor correcting them.
While still working on straightruns, introduce the following pro-gression options for enhancing skilldevelopment. Before executing anew exercise, however, practicebasic movements from a stationaryposition on flat terrain. Provideclear instructions and a visualdemonstration with each new task.
Progression Options
1. First ask your students to lift upone ski and then the other whilesliding. This will help them findtheir balance from foot to footand ski to ski. This is shown inphoto 7.
2. Next run, ask them to exagger-ate extending and flexing theirlegs. Leaning slightly forwardand slightly backward in a runwill help them find “center” oftheir feet and skis.
3. As a final straight-run exercise,have the students step out of thefall line. Ask them to lift onefoot and point the tip slightly tothe side from where both skiswere pointing. This is the samemovement as star stepping, butperformed while in motion.Repeat the process of pointing
and stepping until they are fac-ing across the hill or have cometo a stop.
Since there is so much activity inthis progression, watch for signs offatigue. Have anyone who lookstired simply watch for a few runs.If the whole group looks tired, it istime for a juice break to revitalizeand provide energy for success.
Alternate between demonstrat-ing and providing immediate, con-cise feedback. The straight run pro-gression is exciting and fun for thenewcomers. Be cautious about giv-ing too much instruction, as it maycause frustration. Your enthusiasmcan provide enough motivation.Keep an eye on the movements ofeveryone in your group. When youhave eight or more students, watch-ing everyone and giving feedbackbecomes more challenging. If youmiss a person’s run, try to catch itthe next time. Praise and congrat-ulate the students when the move-ments are correct. Offer brief andsimple corrections to pro-mote success. Provide equalamounts of praise and instructionto everyone in the group so thateveryone feels included.
More ProgressionOptions
• Straight run in a low stance. • Straight run in a tall stance. • Straight run without poles. • Exploring both a tall and low
stance in a straight run. • Focusing on hand positioning
both arms and hands even, for-ward, and away from the torso.
• From a stationary position on flat
Photo 7. Balancing Exercise
A
B
C

39A L P I N E L E V E L I S T U D Y G U I D E
terrain, practice balancing on oneski. Pick the tail of the ski off thesnow, pick up the tip, then pickup the whole ski. Switch skis.
• Repeat the one-legged balancingexercise while moving in astraight run. Pick up the tail, thenpick up the tip. Switch skis.
• Practice balancing on one ski,then switch skis in the samestraight run.
• Practice stepping sideways dur-ing a straight run. Step to theopposite side during the next run.
• Practice stepping out of the fallline and turning to a stop.
• From a stationary position on flatterrain, practice hopping fromboth skis. Focus on initiating thejumping action with the ankles.
• Practice hopping while movingin a straight run. See how manytimes you can hop during astraight run.
Note: Older class members mayquickly lose interest in hopping.
Technical Aspects ofSkill Development
Balancing Movements
Establish a fairly tall stance withslight flex in the ankles, knees,hips, and spine. The student’sweight must be centered evenlyover both skis, so that the skistrack in a straight direction.Targeting the upper body toward adistant object helps center the hipsand torso over the feet and skis.Feeling weight evenly distributedover the sole of the foot alsopromotes a centered stance.
Rotary Movements
Maintaining an even track whilestraight running requires control ofboth the inward or outward rotationof the legs, so the skis do not turn.Keeping the body square with thefall line controls rotary move-ments, so the skis run flat andstraight.
Edge-control Movements
Maintaining flat skis requires edge-control movements. Foot and anklerelationship to alignment withinthe boot promotes flat skis so thatthey run straight. Again, keepingthe body square to the fall linemaintains flat skis.
Pressure-control Movements
Feeling even pressure underneaththe entire sole of each footpromotes equal weight distribution.Targeting the body toward a distantobject helps center the hips andtorso between the feet and skis,also promoting even weight distri-bution over the skis so that theyrun flat and straight.

40 A L P I N E L E V E L I S T U D Y G U I D E
S k i e r L e v e l 1
Questions: Straight Run
1. Choose the best answer:What type of terrain would be best for your group’s first straight run?A. A gentle slopeB. A gentle slope which leads to a flat area that is at least 5 feet in lengthC. A gentle slope which leads to a flat area of 10 or more feetD. A gentle slope which leads to a flat are which leads to a slope which goes slightly uphillE. None of the above
2. Define dynamic balance.
_______________________________________________________________________________________
3. Choose the best answer:About how often should you demonstrate the straight run when you first show it to an average groupof students? A. OnceB. Once for every studentC. Once for every three to four studentsD. Once for every eight to nine studentsE. None of the above
4. Choose one or more of the following:A desirable body position for a straight run is:A. Fairly tallB. Fairly lowC. With ankles, knees, and hips slightly flexed and the spine straightD. With ankles, knees, hips, and spine slightly flexedE. With hips and upper body centered over the feet and skisF. With hips and upper body slightly countered to the skis
5. True or false:To correct a squatted body position in a straight run, have the student look at a distant object that is directly down the fall line.
6. True or false:For the straight run, feeling weight evenly distributed over the soles of both feet promotes a centered stance.
7. Fill in the blanks:A fairly athletic group should only have to practice the straight run
_________________ or _________________ time(s).

41A L P I N E L E V E L I S T U D Y G U I D E
8. What does the Straight Run progression recommend you have your students do to find the center of balance of their skis?
_______________________________________________________________________________________
9. Choose one or more of the following which can help your students keep their skis flat on the snow in a straight run.A. Controlling the inward and outward rotation of the legsB. Keeping the body square with the fall lineC. Feeling even weight distribution under the soles of the feet with a slight amount of pressure
on the boot’s tongueD. Targeting the body toward an object that is some distance down the fall line
10. Where should the skier’s weight be to help both skis to track together in a straight run?
_______________________________________________________________________________________

42 A L P I N E L E V E L I S T U D Y G U I D E
S k i e r L e v e l 1
Answers: Straight Run
1. D. Ideally, the skier trying out a straight run for the first time will come to a gradual stop automatically (andeffortlessly) when the terrain changes from a gentle slope to a flat area to a slope which goes slightly uphill.
2. Dynamic balance is balancing while moving.
3. C. You should demonstrate the straight run once for every three or four students in an average class.
Note: Due to differences in class size, length of lessons, ability levels, and other area and situation-specificconsiderations, the number of times suggested in the Straight Run progression for demonstrating the straightrun may not be appropriate for your class. Use your judgement and check with your area supervisor ortrainer, if in doubt.
4. A, D, & E. The skier should be in a fairly tall stance with ankles, knees, hips, and spine slightly flexed andwith the hips and upper body centered over the feet and skis.
5. False. Looking down the fall line at a distant object stabilizes the upper body. To correct a squatted bodyposition in a straight run, have the student stand centered with hips over feet and ask the student to feel theankle flex into the tongue of the boot with the weight distributed over the balls of the feet.
6. True. For the straight run, feeling even pressure under the entire length of the soles of both feet equally onboth feet promotes a centered stance. Telling the student to stand centered with hips over feet also promotesa centered stance. For over-flexed hips and a squatted/seated position, feeling the ankle flex into the tongueof the boot and the weight distributed over the balls of the feet equally over both feet will promote acentered stance.
7. A fairly athletic group should only have to practice the straight run one or two times.
8. One way for your students to find the center of balance on their skis is to first lean slightly forward and thenslightly backward. They will find their balance between these two stances.
9. A, B, C, & D. It is necessary to control the inward and outward rotation of the legs to keep the skis flat onthe snow. Keeping the body square with the fall line controls rotary movements so that the skis run flat andstraight. Distributing the weight evenly over the soles of the feet with a slight amount of pressure on theboot’s tongue promotes even foot and ankle alignment in the boot, which in turn helps keep the skis flat.Targeting the body toward an object some distance down the fall line promotes even weight distributionover the skis so that they run flat and straight.
10. In a straight run, the skier’s weight should be equally distributed over both skis to help both skis tracktogether.

43A L P I N E L E V E L I S T U D Y G U I D E
Notes

44 A L P I N E L E V E L I S T U D Y G U I D E

45A L P I N E L E V E L I S T U D Y G U I D E
Skier Level 2
Step 5: Gliding andBraking Wedge
Terrain
As with any new maneuver at thislevel, introduce the wedge on flatterrain.
Lesson Outcome
The students learn to glide down asmall incline with their skis in awedge, and they learn to controltheir speed and stop by varying thesize of the wedge. The glidingwedge is depicted in photo 8.
Class Arrangementand Handling
Continue to use the two-line classmanagement style outlined in thestraight run progression.
Preparing for a Wedge(Tails-out Method)
1. Show your students how to stepthe tail of one ski out to the sidefrom a basic stance to a wedgeposition, while leaving the tip inthe same place on the snow.
2. Ask them to do the same thingwith the other foot and ski.
3. Now, from the basic athleticstance with the skis parallel,show them how to “brush” thetails of both skis out to form awedge. Make sure they maintaina tall stance and stable upperbody as they do this. Tell themto apply pressure to the insidecuff of the boot and arch of the
foot while brushing the tails out. 4. As they begin to show some
proficiency with stepping andbrushing the skis into a wedge,have them hop and push thetails out, then hop and pull theskis to the parallel position.Once they are comfortable withthis, have them hop in and outof a wedge without pausingbetween the two moves. (This isjust like jumping jacks withoutthe arm movements.) Keeppracticing so the studentsanchor the feeling of hoppingboth skis simultaneously.
5. Before proceeding, check theirunderstanding of the move-ments necessary for changingtheir skis from a flat, parallelposition to a wedge.
Alternative Preparationfor the Wedge (Tips-inMethod)
1. Have the student pick up oneski and turn it inward.
2. Ask them to do the same thingwith the other foot and ski.
3. Starting from a very widestance, with skis parallel andflat on the snow, have them hopup and turn both ski tips inwardto form a wedge.
5. Once they are comfortabledoing this, have them hop inand out of the wedge withoutpausing between the twomoves.
Now the students are ready to startsliding in a wedge.
Gliding Wedge
1. Demonstrate a narrow, glidingwedge from a fairly tall stancewith the feet slightly wider thanhip-width apart. Demonstratethe difference between a narrowwedge and wide wedge andencourage the narrow wedgefor gliding.
2. Briefly review correct ski poleuse. Explain how to hold thehands in front so they are visi-ble within the peripheral vision.Show them how to hold theirpoles with the baskets angledtoward the tails of their skis.
3. Finally, have your class practicewedging the skis while moving.Again, until the studentsbecome more confident in theirability, it is critical to practicefor only a short distance so theydo not build too much speed.
Provide simple corrections whilethe students practice the glidingwedge (Table 3).
Photo 8. Gliding Wedge

46 A L P I N E L E V E L I S T U D Y G U I D E
S k i e r L e v e l 2
Gliding WedgeMovement Options
After the students have experi-enced gliding in a wedge for tworuns, have them combine thestraight run and the gliding wedge.Have them start down the slopewith the skis parallel, then pushthem out to a wedge to finish therun. If the students are fairly athletic,have them try hopping from
parallel position into the wedge. Spend two to three more runs
exploring these options if the grouplooks like they are up for it. If atany time during the progressionsome students need to rest, suggestthat they sit out for a couple of laps.Just be careful not to forget them.
Next, show your students howto vary the size of the wedge—usea wider wedge for slowing downand stopping. Assign a numerical
value to various wedge sizes. Forexample, 1 is a narrow, glidingwedge; 2 is a medium-size wedge;and 3 is a larger, braking wedge.While sliding down the beginnerslope, have them practice changingwedge sizes. Have them push openthe tails of their skis into a progres-sively wider wedge. Explain thatthe wedge size changes accordingto the distance between the tails,while the ski tips stay relatively thesame distance apart.
Have them practice flexing thelegs as they push open the tails. Tellthem to exert pressure on the insideof the arch and the inside cuff ofthe boot. Then, before coming to astop, have them stand up tall again.Standing up, or “relaxing tall,” willreduce the size of the wedge.Repeating these rising and sinkingmovements during the same runprovides the sensations of speedingup and slowing down.
Braking Wedge
Now teach your students the brak-ing wedge so they learn to stop.
Set your poles in the snow andask your students to make a bigenough wedge to stop between thepoles. Be sure to leave a couple ofski-lengths between the poles sothat your students do not run intothem.
Before moving on to the nextstep check their understanding ofgliding versus braking wedgemovements, as well as their under-standing of slowing down andstopping. The purpose is to anchorthe sensation of brushing the skissmoothly over the snow surfacefrom a centered stance. Pay atten-
Problems with a Wedge
Problem Solution
Trouble maintaining a wedge
One or both skis separate and track in an uncontrol-lable manner or the student travels to left or right rather than gliding directly down the fall line.
Wedge widens because the ski tips are too far apart, causing the skis to separate.
Table 3
Encourage a balanced stanceby keeping the hips and torsocentered between the feetand skis. Maintainingsymmetry in the wedgerequires pushing both feetequally.
Keep the upper body facingdownhill or targeted towarda distant landmark (tree, lifttower, etc.) that is in line withthe fall line. Also, encouragepushing equally against bothtails while keeping the ski tipsturning toward each other,about three to four inchesapart. This will prevent oneski from traveling in frontof the other.
Keep the ski tips closertogether. Again, emphasizepushing or brushing thetails apart. Encourageturning the tips towardeach other.

47A L P I N E L E V E L I S T U D Y G U I D E
tion to what each individual isfeeling so that you can customizefeedback to that person’s sensa-tions. Some students may feelwhat it means to brush the edges;others may require more straight-forward concepts, such as “pointthe toes in, push the heels out.” Ifstudents connect with the term“pushing,” make sure that they arepushing from a centered stance,rather than from the back seat.Promote a forward and centeredstance by encouraging them tofeel more pressure under the ballsof their feet and on the shin againstthe tongue of the boot. The moreways you say the same thing,the sooner you will reach allof your students.
Progression Options
• Practice gliding in a wedge froma tall stance.
• Practice gliding in a wedge froma low stance. Feel how the lower,centered stance decreases thespeed.
• Explore extension and flexion ina gliding wedge.
• Practice wedging without poles. • Practice wedge change-ups. Ski
in a narrow wedge, then stand upto allow the skis to run flat andparallel; then wedge again.
• From a stationary position on flatterrain, practice hopping fromflat and parallel skis to a wedgeposition. Focus on hopping tailsinto a wedge while keeping theupper body centered between thefeet. Hop back to a parallel.
• Focus on hopping tips in from awide stance parallel while keep-ing the upper body centered
between the feet. Hop back to aparallel.
• Practice wedge hops while mov-ing in a straight run. See howoften a student can hop during astraight run. (Once again, yourolder class members may quicklylose interest in hopping).
• Practice a braking wedge anduse the poles to push andgenerate momentum.
• Practice a gliding wedge, to abraking wedge, then stop.
• Hold poles vertically by theirpole shafts and frame thedirection or object for targeting.Framing a direction promotes astable upper body and properbody alignment.
Technical Aspects of SkillDevelopment
Balancing Movements
Establish a fairly tall stance with aslight flex in the ankles, knees,hips, and spine. Center the hipsand upper body over the feet andskis. Center the student’s weightevenly over both skis, so that theskis run straight in a gliding orbraking wedge. Targeting theupper body toward a distant objecthelps center the hips and torsoover the feet and skis. Feelingweight evenly distributed over theinside arches of the feet also pro-motes a centered stance.
Rotary Movements
By pointing the toes in and pushingthe heels out, a simultaneous inwardrotation occurs in both legs. Rollingthe knees and ankles inward is a
rotary movement (and an edgingmovement). This rolling anklemovement occurs inside a rigid bootthat is connected to the ski and di-rectly affects the ski, twisting it in-ward. Pushing the tails further outwhile pointing the tips inward for abraking wedge increases the inwardrotation of the legs.
Edge-control Movements
Exploring different wedge sizesand edge angles, stationary ormoving, uses edge-control move-ments. Brushing the skis across thesnow promotes soft and continuousedging movements, while digging-in with the edges encouragesharsher, abrupt edging movements.Pushing the tails out while pointingthe tips in increases edge angle andpromotes slowing. Feeling increasedpressure on contact points—arches,big toes, and the insides of theankles—also increases edge angle.This increased pressure should beevenly distributed so that the edge-control movements are even andthe skis move straight in a glidingor braking wedge.
Pressure-control Movements
Feeling even pressure on contactpoints arch, big toe and the insideof the ankle when creating a wedgeis a pressure-control movement.Pushing both skis equally in awedge requires pressure control.Feeling this even pressurepromotes equal weight distributionbetween the skis so that the skistravel straight in a gliding orbraking mode. Targeting the bodytoward a distant object promotes

48 A L P I N E L E V E L I S T U D Y G U I D E
S k i e r L e v e l 2
even weight distribution over theskis so that they run straight.Pushing the tails out in a brakingwedge increases the edge angleand therefore the pressureto the skis.

49A L P I N E L E V E L I S T U D Y G U I D E

50 A L P I N E L E V E L I S T U D Y G U I D E
S k i e r L e v e l 2
Questions: Gliding and Braking Wedge
1. Choose the best answer:How far apart should your ski tips be in a gliding or braking wedge?A. TouchingB. 3 to 4 inchesC. 11 to 12 inches
2. Choose one of the following:For the gliding wedge, what class arrangement affords your students the best view of your demonstrations as well as of each other and creates a comfortable learning atmosphere?A. Two vertical lines facing one another with the instructor between themB. A vertical line with everyone facing the instructorC. Semicircular, with the instructor at the radiusD. A circle with the instructor in the center and the students around the outside
3. True or false:You should teach the gliding and braking wedge on the same type of terrain as the straight run.
4. Circle the correct choice:In the gliding wedge, your skis should be (slightly less than hip width apart) (slightly wider than hip width apart).
5. Where should the tips of your ski poles point when you are skiing in a gliding wedge?
_______________________________________________________________________________________
6. Choose the best answer:Where should you hold your hands when skiing in a gliding wedge?A. Slightly in front of your body and waist highB. Directly to the sides of your body and waist highC. Slightly in front of your body and just high enough for you to see them out of the corner of your eye
7. True or false:An unbalanced stance in a wedge with the hips and torso not being centered between the skis can result in one or both skis separating or in difficulty in keeping the skis in a wedge.
8. Choose one or more of the following:For students who try to travel directly down the fall line in a wedge, but travel to one side instead:A. They look at a target slightly downhill and to the other sideB. They keep their upper bodies facing downhillC. They push equally against the tails of both skis while keeping their ski tips pointed toward each other
about 3 to 4 inches apartD. They push equally against the tails of both skis while allowing their ski tips to move to about
11 to 12 inches apart

51A L P I N E L E V E L I S T U D Y G U I D E
9. Choose one or more of the following:When increasing the size of the wedge, the ski tips:A. Stay about the same distance from each otherB. Move out at a constant rateC. Move out to about 11 to 12 inches apart
10. True or false:Sink or flex the legs to reduce the size of the wedge.
11. True or false. Wedging from a lower, centered stance decreases the skier’s speed.
12. What is a wedge change-up?
_______________________________________________________________________________________
13. True or false:Framing a direction by looking through ski poles which you are holding vertically in front of you promotes a stable upper body and proper body alignment.
14. Fill in the blank with one or more words:For the skis to run straight in a gliding or braking wedge, the student’s weight should be ________________ evenly over both skis.
15. Circle the best choice:Pushing the tails of the skis out while pointing the tips inward for a braking wedge increases the (inward) / (outward) rotation of the legs.
16. Circle the best choices:Pushing the tails out in a braking wedge (increases) / (decreases) the edge angle which (increases) / (decreases) the pressure to the skis.
52 A L P I N E L E V E L I S T U D Y G U I D E
S k i e r L e v e l 2
Answers: Gliding and Braking Wedge
1. B. Your ski tips should be fairly close together with three to four inches between them in a gliding or brakingwedge.
2. A. Assembling the group in two lines which face each other (for large groups) affords your students the bestview of your wedge demonstrations and of each other and also creates a comfortable learning atmosphere.
3. True. You should teach the gliding and braking wedge on the same type of terrain as the straight run (a gen-tle slope that leads to a flat area that leads to an area that goes slightly uphill).
4. In the gliding wedge, your skis should be slightly wider than hip width apart.
5. Your ski pole tips should point toward the tails of your skis when you are skiing in a gliding wedge.
6. C. When you are skiing in a gliding wedge, you should hold your hands slightly in front of your body, justhigh enough for you to see them in your peripheral vision.
7. True. Students who have trouble maintaining a wedge position, or who have one or both skis separate andtrack in an uncontrollable manner while trying to wedge, may not have their hips and torsos centered be-tween their feet and skis. Maintaining symmetry in the wedge position requires pushing both feet out equal-ly so that the tails displace and the tips point inward.
8. B & C. When students try to use a wedge to travel directly down the fall line, but travel to one side instead,you can suggest that they do either of the following:
Keep their upper bodies facing downhill.
Push equally against the tails of both skis while keeping the ski tips pointed toward each other about 3 to 4inches apart.
9. A. When increasing the size of the wedge, the tips stay about the same distance from each other.
10. False. To reduce the size of the wedge, stand up or “relax tall.”
Sinking or flexing the legs while opening the tails and exerting more pressure on the inside arches and cuffsof the boot will increase the size of the wedge.
11. True. Wedging from a lower, centered stance should decrease the skier’s speed.
12. A wedge change-up is where you move your skis into a wedge, then bring them parallel, then wedge themagain.
13. True. Framing a direction with your ski poles does promote a stable upper body and proper body alignment.

53A L P I N E L E V E L I S T U D Y G U I D E
14. For the skis to run straight in a gliding or braking wedge, the student’s weight should be centered evenlyover both skis.
15. Pushing the tails out while pointing the tips inward for a braking wedge increases the inward rotationof the legs.
16. Pushing the tails out in a braking wedge increases the edge angle which increases the pressure to the skis.

54 A L P I N E L E V E L I S T U D Y G U I D E
S k i e r L e v e l 2
Notes

55A L P I N E L E V E L I S T U D Y G U I D E
Step 6: WedgeTraverse and Stop
Note: The wedge traverse buildscontrol and confidence if yourbeginner terrain is challenging (forexample, if it slopes in differentdirections, with more than one fallline). Introducing it at this point iscritical if the slope served by yourbeginner lift (because this is wherethe students will be skiing shortly)is steeper than the slope you’vebeen using so far. The wedgetraverse is shown in photo 9.
Terrain
Slowing down and stopping is acontinual concern for the studentespecially the more timid student.Keep working on the same terrainyou did in the straight run andwedge progressions. Stay on thelower sections of the slope for thisexercise, even though you probablyclimbed a little higher for practic-ing the braking wedge andgliding wedge. Students may beslightly spread out and working attheir own paces within the bound-ary that you established earlier.
Lesson Outcome
The students keep their skis in awedge while traversing a gentleslope. They learn to control speedand stop by varying the size of thewedge. They learn the terminologyof “downhill” and “uphill” ski.
Class Arrangement andHandling
Organize the group in a revolvingline format. Instead of practicingfrom two groups, establish onegroup where some of the group aresidestepping into the traverse area,while others are moving along theflats to the sidestep area. Therevolving line format keeps thegroup moving, while allowingthem to observe each other.Provide simple corrections to eachstudent during the traverse.
Wedge Traverse
1. From a stationary position onthe slope, demonstrate a tallstance with the upper bodycentered over the feet and skis.
2. Spread the tails of your skis andpoint the tips inward to form awedge.
3. Make sure your students under-stand the difference between thedownhill and uphill ski. Explainthat while the students are tra-versing, they should feel moreof their weight over the uphilledge of the downhill ski.Demonstrate that the downhillski can be tipped higher onedge than the uphill ski bypointing or rolling the downhillknee uphill. Show how the knee
controls the edge angle of theski when you move it fromside to side.
4. Pick a target a tree, for examplethat is slightly downhill of thedirection of travel. Demonstratehow to align the body by point-ing the head, shoulders, upperbody, and hips toward the target.Then show how the uphill hip,knee, foot, and ski are slightlyahead of their downhillcounterparts.
5. Demonstrate a traversing wedgewhile using the flat runout toslow down and stop. Providesimple corrections while thestudents practice traversing in agliding wedge (see Table 4).Most students will have a“good” and “bad” side; practiceso both sides develop symmetry.
Stopping: WedgeChange-up in a Traverse
Practice slowing down and stop-ping in a wedge traverse using awedge change-up, going from anarrow gliding wedge to a larger,braking wedge. Explain that thedownhill ski continues to holdmost of the weight. Describingwhat the students should feelinside their boots as skis slowdown and stop to anchorthose sensations.
Stopping: Stepping theSkis Uphill from aParallel Traverse
Before moving on, show thestudents another option for comingto a stop from a traverse: takingparallel steps uphill until they stop.
Photo 9. Wedge Traverse

56 A L P I N E L E V E L I S T U D Y G U I D E
S k i e r L e v e l 2
1. Lift the uphill ski and point thetip a little more uphill. Use asmall step.
2. Step onto the uphill ski; step thedownhill ski close to it.
3. Repeat the process until the skisare pointing directly across thefall line. Once the skis areperpendicular to the hill, thestudent will come to a stop.
4. Use the bullfighter turn to getmoving again.
5. Try this maneuver in both direc-tions.
Slowing down and stopping in awedge traverse and stepping theskis in a parallel traverse are greatmaneuvers to establish in a stu-dent’s repertoire. Once your stu-dents have correctly established thefundamental movement patterns,these alternatives provide greatoptions for reducing speed and
stopping. Also, these traversingmethods are more comforting thanslowing down and stopping in thefall line. When the student pro-gresses to a steeper slope, thewedge traverse is a less intimidat-ing option. Stepping the skis froma traverse quickly controls speedand also helps the skier avoidobstacles. Build students’ confidenceby reviewing all the options forreducing speed and stopping.
Progression Options
• Explore flexion and extensionmovements while traversing in agliding wedge.
• Practice wedge change-upswhile traversing. Explore variouswedge sizes from narrow towide, while weighting the down-hill ski and maintaining atraverse.
• Create different edge angleswhile exploring various wedgesizes. Experience the differencebetween brushing the skis againstthe snow and making the skisbite into the snow, feeling a plat-form build underneath the ski.
• Practice traversing in a widewedge, using the poles to pushand generate momentum. Use awide wedge to a stop.
• Practice traversing in a narrowwedge with more weight on thedownhill ski.
• Practice traversing in an openparallel stance with more weighton the downhill ski. Step the skisuphill to a stop.
• Practice a parallel traverse.
Technical Aspects of SkillDevelopment
Balancing Movements
A fairly tall stance with a slightflex in the ankles, knees, hips, andspine provides efficient muscularand skeletal support. The hips andtorso are balanced fore and aft overthe feet and skis even in a wedge.Moving the uphill ski, knee, hip,shoulder, arm and hand slightlyahead of their downhill counter-parts creates a powerfully bal-anced, countered stance.
Rotary Movements
By pointing the toes in and/orpushing the heels out, a simultane-ous inward rotation occurs in thelegs. Varying the wedge sizescauses some inward leg rotation.
Wedge Traverse
Problem Solution
Trouble maintaining weighton the downhill ski.
Trouble maintaining a wedge while traversing.
Table 4
Roll the downhill kneeinward, creating a greateredge angle and therefore abetter platform for holdingthe skier’s weight. Align theupper body over the feetrather than into the hill.
Make sure that the uphill ski,boot, knee, hip, and shoulderare slightly ahead of thedownhill side, ensuring thecorrect body alignment fora successful traverse in agliding wedge.

57A L P I N E L E V E L I S T U D Y G U I D E
Edge-control Movements
Exploring different wedge sizesand edge angles uses edge controlmovements. Scraping (brushing)the edges across the snow can beperformed aggressively or in amore refined, subtle manner.
Pressure-control Movements
Pressure-control movementsinclude continued application ofpressure at various contact points(such as the arch and big toe), aswell as the shifting of more weightto the downhill from the uphill skiwhile traversing. This creates aplatform that combines edgecontrol with pressure controlmovements as the edge angle isincreased and more weight isadded to the ski.

58 A L P I N E L E V E L I S T U D Y G U I D E
S k i e r L e v e l 2
Questions: Wedge Traverse and Stop
1. Choose the best answer:In the wedge traverse your upper body:A. Should be over your feet and should face in the direction of travelB. Should be over your feet and should face slightly downhill from the direction of travelC. Should angle slightly into the hill and should face in the direction of travelD. Should angle slightly into the hill and should face slightly downhill from the direction of travel
2. True or false:In the wedge traverse your uphill ski, knee, hip, shoulder, arm, and hand should be slightly ahead of your downhill ski, knee, hip, shoulder, arm, and hand.
3. Choose the best answer:In the wedge traverse your weight should be:A. Evenly distributed over the inside edges of both skisB. More on the inside edge of your uphill skiC. More on the inside edge of your downhill ski
4. Circle the best choice out of the three given:In a wedge traverse, the edge angle of the downhill ski should be (less than) / (greater than) / (the same as) that of the uphill ski.
5. Choose one or more of the following:To help a skier who has trouble maintaining a wedge while traversing you could:A. Make sure the skier’s head and upper body are facing in the direction of travelB. Make sure the skier’s head and upper body are facing slightly downhill from the direction of travelC. Have the skier lean slightly into the hillD. Have the skier lean slightly back
6. The Wedge Traverse and Stop progression in this study guide mentions two ways to come to a stop from a wedge traverse. Describe one of these.
_______________________________________________________________________________________
_______________________________________________________________________________________
7. True or false:In a wedge traverse, the upper body should be centered over the feet and skis.
8. Choose one or more of the following that will result in an increased edge angle in a wedge traverse:A. Increasing the size of your wedgeB. Decreasing the size of your wedgeC. Tipping the uphill knee into the hillD. Tipping the downhill knee into the hill

59A L P I N E L E V E L I S T U D Y G U I D E
9. True or false:A higher edge angle in the wedge traverse decreases pressure on the skis.

60 A L P I N E L E V E L I S T U D Y G U I D E
S k i e r L e v e l 2
Answers: Wedge Traverse and Stop
1. B. In the wedge traverse your upper body should be over your feet and should face slightly downhill fromthe direction of travel.
2. True. In the wedge traverse your uphill ski, knee, hip, shoulder, arm, and hand should be slightly ahead oftheir downhill counterparts.
3. C. In the wedge traverse your weight should be more on the inside edge of your downhill ski (with yourupper body centered over your feet and skis).
4. When wedge traversing, your weight should be over the inside edge of your downhill ski and the edge angleof the downhill ski should be greater than that of the uphill ski.
5. B. To help a skier who has trouble maintaining a wedge while traversing, you can reinforce the correct bodyalignment by making sure that the skier’s the head and upper body are facing forward and slightly downhill.
You can also ensure the correct body alignment by making sure that the skier’s uphill ski, boot, knee, hip,and shoulder are slightly ahead of their downhill counterparts
6. Two ways to come to a stop from a wedge traverse that were described in the Wedge Traverse and Stopprogression are:• Increasing the size of the wedge• Taking parallel steps uphill
7. True. In the wedge traverse the upper body should be centered over the feet and skis.
8. A & D. If you increase the size of your wedge your skis will edge more because of the way the body is put together:since the leg is attached at the hip joint, as the feet move further from the mid-line of the body, a natural in-crease of edge angle will occur.By tipping your downhill knee further inward in a wedge traverse, you increase the edge angle of the down-hill ski.
9. False. A higher edge angle in the wedge traverse increases pressure on the ski because there is less surfacearea of the ski in contact with the snow.

61A L P I N E L E V E L I S T U D Y G U I D E
Notes

62 A L P I N E L E V E L I S T U D Y G U I D E
S k i e r L e v e l 2

63A L P I N E L E V E L I S T U D Y G U I D E
Step 7: First WedgeTurns
Lesson Outcome
The students keep their skis in awedge while changing direction ongentle terrain. They learn to linkwedge turns together.
Introducing the FirstWedge Turn
When introducing the first wedgeturn, avoid complicated or wordyinstructions. Teach it either bydemonstrating it or with progres-sions that help your studentsdiscover it for themselves.
Turning Toward aLandmark
1. Ask the students to point theirskis in one direction.
2. Pick out a distant landmark likea tree or lift tower that is acrossthe slope or on the horizon sothere is no risk of running intoit. See photo 10 for an exampleof this concept.
3. Tell the students to start movingin a gliding wedge, then turntoward the target.
Following a Line Drawnin the Snow
1. With your pole tip start drawinga line in the snow straight downthe fall line.
2. Then curve the line so it eventu-ally points across the hill.
3. Have your students follow theline while in a wedge.
With this, you don’t even need tomention the word “turn.” The stu-dents will discover for themselvesthat they can turn their skis withtheir feet and legs. Work on oneturn at time, and give your groupplenty of time to learn to turn inone direction before starting to turnin the other direction.
The Fan
1. Demonstrate how to turn fromthe fall line by skiing awayfrom the group. a. Show a centered stance with
appropriate flex in theankles, knees, hips, andupper torso.
b. Point the tips of the skisinward to form a wedge.
c. Explain where you are goingto turn and look a distanttarget that is slightly downthe fall line from where youare going to turn.
d. As you begin turning yourskis out of the fall line, pointyour shoulders, torso andhips toward the target.Explain that the purpose of
targeting is to keep the upperbody stable so the legs andfeet can turn the skis.
e. Turn your skis in the intend-ed direction with your legsand feet, while maintainingthe same size wedge.
2. Next, demonstrate how it’s doneby skiing toward the group.Make sure the turn occurs grad-ually and smoothly. As the skisturn out of the fall line, showhow the downhill ankle andknee gradually flex inward sothat the edge angle of the out-side/downhill ski increases.
3. Organize the group into twolines and have the studentspractice by alternating fromeach line.
Keep the group moving whileoffering simple, individualized tips(Table 5). As with everything youhave taught so far, provide specificfeedback as soon as all members ofthe group have tried the maneuver.Keep your comments positive:most people respond better to posi-tive reinforcement than to negativefeedback.
Photo 10. Turning Toward a Landmark

64 A L P I N E L E V E L I S T U D Y G U I D E
S k i e r L e v e l 2
4. Demonstrate how to turn theskis uphill in a wedge position(and have your students practiceit). Turning uphill also anchorsa slowing-down sensation whileproviding another option forstopping. Remember, your stu-dents, especially the more tenta-tive students, are extremely con-cerned about controlling theirspeed. Turning uphill is a good
option. Draw a line on the snowthat fish-hooks uphill and haveyour students turn on it. You canalso stand above where youwould like the students to turnand cue them into turning to-wards you. If you taught them awedge traverse, you can intro-duce their first turn by turninguphill from a traverse, usingthe same tactics.
5. Have your students practiceturning across the fall line whileexaggerating extension and flex-ion. This anchors the sensationof flattening the downhill ski.This extension, coupled withturning both legs and feet, steersthe skis into the fall line and ini-tiates the turn. a. While moving, extend and
straighten both legs slightly. b. Turn both legs and feet in a
small wedge so the skismove from across the slopeto enter the fall line.
c. Continue steering or guidingthe skis by turning the legsand feet throughout the turn.
d. Complete the turn withflexion while bending theoutside/downhill kneeinward.
6. Develop turn symmetry bypracticing turns while maintain-ing the same size wedge both inthe fall line and across the fallline. When students can turn ineach direction, they are ready tostart linking turns.
7. To link turns:a. Let your students start in
the fall line. b. Start by drawing a line that
represents two turns, goingin each direction withoutinterruption.
c. For the first attempt, let themsimply follow the line.
d. Then, demonstrate two ormore linked turns with aextension prior to initiatingthe turn so that the move-ments continue from oneturn to the next. In photo 11,you can see the extensionthat occurs at turn initiation.
Common Problems with the Wedge Turn
Problem Solution
Inside ski runs straightduring turn.
Excessive turning with thewhole body.
Turning too sharply andquickly.
Table 5
Suggest that the student keepthe body centered over thefeet and skis. Emphasize thevalue of turning both legswhile maintaining a stableupper body pointed towarda target. Flatten the insideski to the slope. Keep theankles and knees of theinside leg flexed.
Reinforce the importance oftargeting the upper body andfeeling tension in the stomachmuscles. Focus on the insidehip and point it in thedirection of the turn. Thisfocus helps “separate” thebody so that the legs canturn efficiently underneatha stable upper body.
Reinforce the importanceof being patient. Suggestcounting “1-2-3 and turn”to students who arerushing their turns.
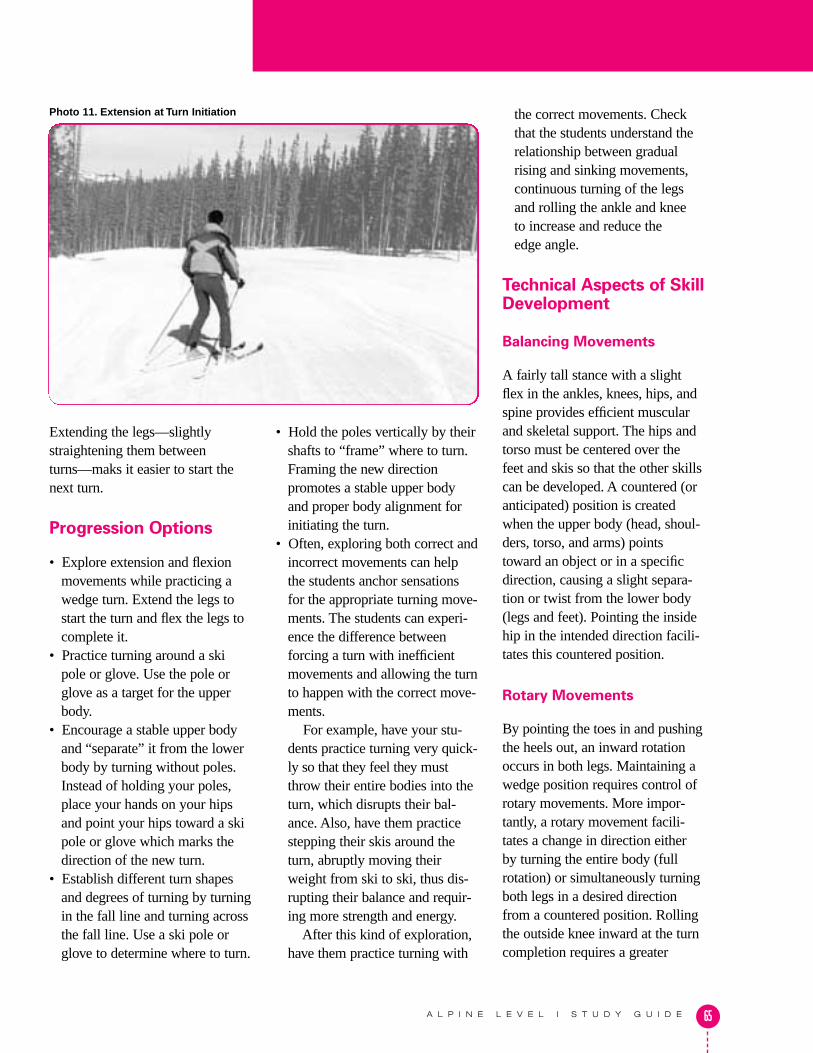
65A L P I N E L E V E L I S T U D Y G U I D E
Extending the legs—slightlystraightening them betweenturns—maks it easier to start thenext turn.
Progression Options
• Explore extension and flexionmovements while practicing awedge turn. Extend the legs tostart the turn and flex the legs tocomplete it.
• Practice turning around a skipole or glove. Use the pole orglove as a target for the upperbody.
• Encourage a stable upper bodyand “separate” it from the lowerbody by turning without poles.Instead of holding your poles,place your hands on your hipsand point your hips toward a skipole or glove which marks thedirection of the new turn.
• Establish different turn shapesand degrees of turning by turningin the fall line and turning acrossthe fall line. Use a ski pole orglove to determine where to turn.
• Hold the poles vertically by theirshafts to “frame” where to turn.Framing the new directionpromotes a stable upper bodyand proper body alignment forinitiating the turn.
• Often, exploring both correct andincorrect movements can helpthe students anchor sensationsfor the appropriate turning move-ments. The students can experi-ence the difference betweenforcing a turn with inefficientmovements and allowing the turnto happen with the correct move-ments.
For example, have your stu-dents practice turning very quick-ly so that they feel they mustthrow their entire bodies into theturn, which disrupts their bal-ance. Also, have them practicestepping their skis around theturn, abruptly moving theirweight from ski to ski, thus dis-rupting their balance and requir-ing more strength and energy.
After this kind of exploration,have them practice turning with
the correct movements. Checkthat the students understand therelationship between gradualrising and sinking movements,continuous turning of the legsand rolling the ankle and kneeto increase and reduce theedge angle.
Technical Aspects of SkillDevelopment
Balancing Movements
A fairly tall stance with a slightflex in the ankles, knees, hips, andspine provides efficient muscularand skeletal support. The hips andtorso must be centered over thefeet and skis so that the other skillscan be developed. A countered (oranticipated) position is createdwhen the upper body (head, shoul-ders, torso, and arms) pointstoward an object or in a specificdirection, causing a slight separa-tion or twist from the lower body(legs and feet). Pointing the insidehip in the intended direction facili-tates this countered position.
Rotary Movements
By pointing the toes in and pushingthe heels out, an inward rotationoccurs in both legs. Maintaining awedge position requires control ofrotary movements. More impor-tantly, a rotary movement facili-tates a change in direction eitherby turning the entire body (fullrotation) or simultaneously turningboth legs in a desired directionfrom a countered position. Rollingthe outside knee inward at the turncompletion requires a greater
Photo 11. Extension at Turn Initiation

66 A L P I N E L E V E L I S T U D Y G U I D E
S k i e r L e v e l 2
inward rotation of the outside leg.This rolling action works in con-junction with edging movements.
Edge-control Movements
Exploring different wedge sizesand edge angles uses edge controlmovements. Increasing or reducingthe edge angle of the downhill skiwhen completing a turn determinesthe degree of edge penetration andpressure. Extension and flexionhelp reduce or increase edge angle.
Pressure-control Movements
Pressuring movements includecontinued feelings of more pres-sure at various contact points (suchas the arch and big toe), moreweight on outside/downhill ski atturn completion, as well as equalweight distribution over both feetand skis at turn initiation. Thischange in weight distributioncouples with the movements ofextending the legs or rising to startthe turn, while flexing the legs orsinking to complete the turn. Exten-sion and flexion are pressure-control movements.

67A L P I N E L E V E L I S T U D Y G U I D E

68 A L P I N E L E V E L I S T U D Y G U I D E
S k i e r L e v e l 2
Questions: First Wedge Turns
1. Describe two ways mentioned in the First Wedge Turns progression for “sneaking” your students into turning without actually demonstrating a turn or describing the mechanics or sensations of turning.
2. True or false:Wedge turns made toward a distant target enable the legs and feet to turn the skis under a stable upper body.
3. Choose one or more of the following which could help correct the problem of turning excessively with the whole body when making wedge turns:A. Keep the ankle and knee of the inside leg flexedB. Target the upper body toward a distant object and feel some tension in the stomach musclesC. Point the inside hip in the direction of the turnD. Feel the weight distributed equally between both feet, over the soles of both feet
4. Choose one or more of the following:To correct the problem of turning too sharply and quickly:A. Suggest that the student keep the body centered over the feet and skisB. Emphasize the value of turning both legsC. Suggest counting “1-2-3 and turn”
5. Circle the best choice:Turning (uphill) / (downhill) anchors a sensation of slowing down while providing another option for stopping.
6. True or false:To begin a new wedge turn, you should combine the movements of turning your legs to steer the skis in the new direction with sinking.
7. Choose one or more of the following:Placing your hands on your hips and pointing your hips toward a ski pole or ski glove which marks the direction of the new turn:A. Anchors the feeling of extending and flexingB. Encourages a stable upper bodyC. Promotes the separation of the upper and lower body
8. Circle the best choice:(Flex) / (Extend) the legs to start a turn and (flex) / (extend) the legs to complete the turn.
9. True or false:In wedge turns, a fairly tall stance with a slight flex in the ankles, knees, hips, and spine provides an efficient use of the body.
10. True or false:Pointing the inside hip in the intended direction of a turn facilitates a slightly countered position.

69A L P I N E L E V E L I S T U D Y G U I D E
11. Circle the best choice:By pointing the toes in and pushing the heels out, both legs rotate (inward) / (outward) at the same time.
12. Circle the best choice:Rising and sinking in a turn are (rotary) / (pressure-control) movements.

70 A L P I N E L E V E L I S T U D Y G U I D E
S k i e r L e v e l 2
Answers: First Wedge Turns
1. Two methods described in the First Wedge Turns progression for “sneaking” your students into turning with-out actually demonstrating a turn or describing the mechanics or sensations of turning are:a. Telling them to turn toward a landmark that is in the desired direction (across the slope or horizon so
that there no risk of the student hitting the object).b. Drawing a line on the snow and having them follow it. With this method, you do not even mention the
word turn.• Start by drawing the line straight down the fall line.• Then draw it so that it gradually points across the hill.
2. Targeting the body toward a distant object while turning provides stability, enabling the legs and feet to turnthe skis underneath a stable body. The legs and feet (lower body) turn more than the upper body.
3. B & C. To correct the problem of turning excessively with the whole body (in wedge turns):
• Target the upper body and feel some tension in the stomach muscles.
• Focus on the inside hip and point it in the direction of the turn. This focus helps “separate” the body so that the legs can turn efficiently underneath a stable upper body.
4. C. To correct the problem of turning too sharply and quickly, suggest counting 1-2-3 and turn. Simply rein-forcing the importance of being patient can help also.
5. Turning uphill anchors a slowing down sensation while providing another option for stopping.
6. False. To begin a new wedge turn, you should combine the movements of turning your legs to steer the skisin a new direction with rising or extending, not sinking (flexing).
7. B & C. Placing your hands on your hips and pointing your hips toward a ski pole or ski glove which marksthe direction of the new turn encourages a stable upper body as well as upper and lower body separation.
8. Extend the legs to start a turn and flex the legs to complete the turn.
9. True. In wedge turns, a fairly tall stance with a slight flex in the ankles, knees, hips, and spine provides amuscular and skeletal (therefore more efficient) use of the body.
10. True. Pointing the inside hip in the intended direction of a turn facilitates a slightly countered position. Acountered position promotes simultaneous leg rotation and turning the skis in an intended direction.
11. By pointing the toes in and pushing the heels out a simultaneous inward rotation occurs in the legs.
12. Rising (extension) and sinking (flexion) in a turn are pressure-control movements.

71A L P I N E L E V E L I S T U D Y G U I D E
Notes

72 A L P I N E L E V E L I S T U D Y G U I D E
S k i e r L e v e l 2

73A L P I N E L E V E L I S T U D Y G U I D E
Step 8: Ridingthe Lift
Note: This section contains generalguidelines for riding the lift.Because of differences in terrain,lifts, and lesson content from areato area, policies may differ. If indoubt, check with your supervisoror trainer.
Lesson Outcome
Students learn to ride the lift anddevelop the confidence to ride itby themselves.
After the students practice turningin both directions and stopping in awedge, they are ready to ride thelift. Make sure that they can handlethe new terrain that the lift services.Review operations and safetyconsiderations for loading, riding,and unloading the lift. Riding thelift for the first time is intimidatingfor many people and for some, it isfrightening. You need not rush theprocess of getting on the lift. Talkyour group through your ski area’sloading procedures. Have yourstudents watch other students loadthe lift while you highlight thekey steps.
General Procedures forRiding the Chairlift
Describe chairlift riding proceduresfor your students. As stated, theactual procedure will vary fromarea to area.
Explain how to:
1. Go through the lift line, waiting
area, and loading area. 2. Take the pole straps off the
wrists before reaching theloading area.
3. Wait at the designated spot inthe waiting area until the lift hassafely passed before movinginto the loading area.
4. Proceed quickly to the loadingsign in the loading area once itis their turn. Tell them to“chase” the chair that has justbeen loaded. Point out that thetiming of the loading procedureis quick, so it is important to beready.
5. Carry the ski poles in the cor-rect hand, according to ski areaoperations. Usually, they shouldcarry their poles in the outsidehand when there is a center poleon the chairlift, and the insidehand when there are outsidepoles on the chairlift. For achairlift that has poles on theoutside of the chair, instructyour students to put their polesin the hand nearest their part-ners while looking away fromtheir partners over the oppositeshoulder.
6. Grab hold of the chairlift polewith their free hand and quicklysit down once the chair arrives.
7. Keep their skis running straightuntil they are off the ground.
8. Pull the safety bar or foot restdown (if available) and avoidswinging the chair.
9. Look for the lift shack at the topof the hill to let them know theyare nearing the top.
10.Look for the unloading sign atthe top. Lift the safety bar, ifpresent. Once their feet touchthe ground, they should stand
up near the sign, leaning for-ward at the same time. Don’tpush on chair, as it may swingbackwards. Explain that thesensation is similar to getting upfrom a deep, soft sofa.
11.Do not wedge on the unloadingramp as you may catch the tailof your lift partners’ skis.Wedge to slow down only whenwell clear of partner.
12.Regroup after unloading at anagreed-upon landmark or place(far right or far left).
Simulate Riding the Chair
Simulate the experience of unload-ing by skiing over a small bump. Ifa bench or chair is in the area,practice sitting down and standingup with skis on while holding thepoles with one hand. Showstudents how to push themselvesout of the chair with one arm,while reaching forward with theopposite arm, which is carryingtheir poles. Explain that the goalof unloading is to stand and pullthemselves up and forwardover their feet.
Considerations for Chairand Surface Lifts
Explain to the group that if theydrop something, they should leaveit. The lift operator will retrieve itand promptly send it up to them.Advise the group to be aware ofany loose clothing or equipment sothat it does not catch on the lift.
After careful explanations andpractice simulations of loading andunloading, you can check thegroup’s understanding by asking

74 A L P I N E L E V E L I S T U D Y G U I D E
S k i e r L e v e l 2
questions. Organize the group forthe first ride. It is a good idea ad-vise the lift operator that the groupis riding the lift for the first time.Be patient and review whatever isnecessary. Provide clear and simpleinstructions for your class.
General Procedures forRiding Surface Lifts
Describe general procedures forriding rope tows, t-bars, or anyother surface lift.
1. Explain to your students thatthey must use their legs and feetto support themselves, ratherthan leaning or sitting on thelift. Advise them to maintainflat skis and to distribute theirweight evenly over both skiswhile keeping them parallel andin the track. Explain that if theyshould fall they should let go,quickly move out of the track,and wait for instructions.
2. Take off your skis so you canwalk beside students and helpstabilize them for the firstfew yards.
3. When unloading a surface lift,the student simply lets go andslides forward. Once they aresliding in balance, they shouldmake a wedge and move off theunloading ramp.
4. As with the chair, they shouldregroup at an agreed-upon land-mark or place after unloading.
Technical Aspects of SkillDevelopment
Balancing Movements
A fairly tall stance with a slightflex in the ankles, knees, hips, andspine is needed for riding surfacelifts and unloading from chair lifts.The upper body is centered overthe feet and skis at unloading.
Rotary Movements
On surface lifts maintaining aparallel relationship of the skisrequires rotary control movementsso that the skis do not separate andtravel out of the track.
Edge-control Movements
Maintaining a flat ski on surfacelifts requires edge control.
Pressure-control Movements
Distributing weight evenly overboth skis is a pressure-controlmovement.

75A L P I N E L E V E L I S T U D Y G U I D E

76 A L P I N E L E V E L I S T U D Y G U I D E
S k i e r L e v e l 2
Questions: Riding the Lift
1. Choose one or more of the following:Typically, what skills should your students have before riding the beginner’s lift for the first time?A. Stopping in a wedgeB. Turning in both directionsC. Linking wedge turnsD. Wedge christie
2. Circle the best choices:Ski poles are usually carried in the (inside) / (outside) hand when there is a center chairlift pole and in the (inside) / (outside) hand when the chairlift’s structural poles are located on the outside.
3. Circle the best choices:You are getting ready to load a chairlift that has structural poles located on both sides. You put your ski poles in the correct hand, and then you look (toward) / (away) from your partner over the shoulder (nearest your partner) / (furthest away from your partner).
4. Fill in the blank:When unloading from a chairlift, stand up and lean ________________________ at the same time.
5. Your wedge turn students have unloaded from the chairlift for the first time and are standing in balance on the unloading ramp. What does the Riding the Lift section of this study guide suggest they do to slow down?
______________________________________________________________________________________
6. Fill in the blank:In a typical class, some students may feel excited, enthusiastic even impatient about their first chairlift ride. You can expect a number of others to feel ____________________.
7. What rotary control movement does a skier use when riding up a surface lift?
______________________________________________________________________________________
8. What edge-control movement does a skier use when riding up a surface lift?
______________________________________________________________________________________

77A L P I N E L E V E L I S T U D Y G U I D E

78 A L P I N E L E V E L I S T U D Y G U I D E
S k i e r L e v e l 2
Answers: Riding the Lift
Note: Because of differences in terrain, lifts, lesson level content and other area-specific considerations, you mayneed to handle certain parts of the lift-loading lesson differently from the way they are outlined in the Riding theLift progression. Check with your area supervisor or trainer, if in doubt.
1. A & B. After your students have practiced stopping in a wedge and turning in both directions, they shouldbe ready to ride the beginner’s lift.
2. Poles are usually carried in the outside hand when there is a center chairlift pole and in the inside hand whenthe chairlift’s structural poles are on the outside of the chair.
3. Once you have put your poles in the inside hand when getting ready to load a chairlift with poles located onthe outside, you usually look away from your partner over the shoulder furthest away from your partner (tothe outside of the chairlift).
4. When unloading from a chairlift, stand up and lean forward at the same time.
5. The Riding the Lift section of this study guide suggests that wedge turn students make a wedge to slowdown once off the unloading ramp and well clear of lift partners.
Note: This may not be appropriate at your area. If in doubt, check with your supervisor or trainer.
6. While some of your class may feel excited, enthusiastic even impatient about the prospect of their first chair-lift ride, you can definitely expect at least a part of the class to feel apprehensive and/or afraid.
7. When riding a surface lift, the skiers need to keep their skis parallel so they do not separate or travel out ofthe track. Maintaining a parallel relationship of the skis requires rotary control movements.
8. Students need to keep their skis flat when riding up a surface lift. Maintaining a flat skirequires edge control.

79A L P I N E L E V E L I S T U D Y G U I D E
Notes

80 A L P I N E L E V E L I S T U D Y G U I D E

81A L P I N E L E V E L I S T U D Y G U I D E
Skier Level 3
Step 9: LinkingWedge Turns in theFall Line
Terrain
A gentle slope serviced by a begin-ner lift.
Lesson Outcome
The students learn to link turnstogether with gradual directionchanges while maintaining awedge position. This progressionalso integrates and explains thefollow-me and call-down methodsof class handling.
Note: Handle the first run off thelift with a little caution and a lot ofempathy. Even the easiest beginnerrun may seem steep and frighteningto your students, especially when itis new to them. People tend toforget what they have learnedwhen they are frightened.
Review Wedge Turns
Review the movements for wedgeturns. These include a continuousturning of the legs underneath aquiet body, a gradual rising andsinking motion, and rolling theankles and knees to reduce orincrease the edge angle and weightto the outside ski. Through repeti-tion and exploring each movementin linked turns, students increasetheir understanding of the timingand coordination of movementsnecessary for rhythmic,round turns.
Moving Downslope:The Follow-me Format
The follow-me approach iseffective in helping the groupmove down the mountain comfort-ably, and it teaches the students tolearn good turn-shape tacticsand control.
1. Organize the students in a lineup-slope. Explain that they willbe following your lead downthe slope.
2. Invite the person either at thebottom or the top of the line tofollow you, then have the nextperson follow that person, andso on.
3. Keep rotating the group so thateveryone gets a chance tofollow right behind you.
4. Explain that it’s safer for thestudents to stop below, ratherthan above, the group afterpracticing a maneuver. Whenstopping, pick a spot withample room to line up withoutpresenting a hazard to them-selves or other skier traffic.
5. If the trail is somewhat steep,have your group traverse thetrail using the wedge change-up(described in Wedge Traverseand Stop section) for control.When you reach the edge of thetrail, use a bullfighter turn toturn around, then go back acrossthe hill with wedge change-ups.Repeat this process as often asnecessary to get to the lessintimidating part of the slope.This process will help yourstudents with their confidencebecause they will realize thatthey have control of their skis.
Linking Wedge Turns inthe Fall Line Using theFollow-me Format
Once you have reached appropriateterrain, relate briefly the task thegroup will be practicing—to turnthe skis with the legs in a wedgeposition while following the tracksof the person ahead. Have yourstudents follow you down the fallline to a designated stopping areawhile you make six to eight turns.Look over your shoulder occasion-ally, making sure everyone isfollowing successfully. Usually,some are able to follow your trackswhile others are not. Encouragethem to turn their legs and feet tocontrol their skis and their speedand to make direction changes.Also, check that your students arebalancing in a centered stance ontheir skis while maintaining aconsistent wedge.
Linking Wedge Turns:the Call-down Format
Next, use the call-down format tohave students practice the sametask of counting while exaggeratingtheir rising and sinking movements.
1. First, define a corridor in thefall line about two to three skilengths wide. Mark the outsidedimensions with ski poles orlines drawn in the snow.
2. Explain that the task is to skiwithin the boundaries of thecorridor.
3. Demonstrate the task. 4. Call each student by name or
rotate students from the top (orbottom) of the group.

82 A L P I N E L E V E L I S T U D Y G U I D E
S k i e r L e v e l 3
Note: Each student performs thetask alone. A student can feelintimidated about skiing in front ofothers and being openly analyzed,so be sensitive to this.
The call-down format allows youthe opportunity to observe each
individual’s skiing and then providefeedback once they stop. To keepthe pace moving, offer feedback toone student while observing thenext student ski. If you have trou-ble doing both things at the sametime, you may be talking too much.
Reinforce your students’
success when they perform the taskcorrectly with comments such as:“Yes, that’s great,” or “Yes, feel therhythm as you rise and sink.”When the student does not accom-plish the task, address the solution:“Try re-centering your hips andtorso over your feet to help you
Problems with Turn Shaping
Problem Solution
Turning too short to followthe tracks and losing speed.
Not turning enough and gaining speed.
Table 6
Emphasize the importance of smooth, gradual movements.Suggest that they breathe deeply to help them relax. Tell students to inhale as they turn the tips of their skis into the fallline and exhale as they turn their tips out of the fall line. Finally, suggest that they “separate” their upper bodies from theirlower bodies. Help them achieve this kind of alignment bytargeting their upper bodies toward an object slightly to the rightof the fall line for a right turn, and toward another object slightlyleft of the fall line for a turn to the left.
Suggest that students turn their legs in the new direction as soonas the ski tips cross the fall line. If necessary, have the student stand on one ski, lift the other skioff the snow, and turn it in the air. This exercise helps anchorthe sensation of turning the skis with the legs and feet.
Photo 12. Flexion and Extension in a Wedge Turn
A B C

83A L P I N E L E V E L I S T U D Y G U I D E
rise into the turn,” or “feel the ballsof your feet to balance forward.”
The call-down format encour-ages students to choose their ownpath, which is often easier thanfollowing behind someone. Thedownside of the method is thatsome students must stand aroundwhile others perform, so make surethat they are standing in a warmspot in the sun and/or shelteredfrom the wind.
The call-down approach to classhandling works well when alternat-ed with the follow-me format. Thecall-down format provides youwith a great opportunity to observethe progress of both the group andits individual members. Thefollow-me method provides a goodlearning environment for thestudents continual visual demon-stration and specific guidelines forskiing down the slope.
Controlling Speed
Skiers have two options for con-trolling speed during a turn.
1. Braking by pushing the tails ofthe skis out.
2. Turning uphill by continuing toturn the legs while shifting theweight from both skis to theoutside/downhill ski—called“shaping” the turn (Table 6).
Reducing speed with the firstmethod is effective when emer-gency speed reduction is neces-sary. But using this methodalone disrupts rhythm andmomentum to the next turn. Tocreate continuous rhythm fromturn to turn, emphasize thesecond method.
Extending and Flexingin the Turn
Focus on establishing rhythmwhile extending and flexing in theturn. Flexion and extension in awedge turn can be seen in photo12. Have your class follow you asyou ski down to a designated stop-ping area while making turns in thefall line.
1. Have them count “up-2-3” asthey rise and guide their ski tipsinto the fall line.
2. Have them count “down-2-3” asthey move out of the fall line.
Make sure that each student fullyunderstands and feels the range ofleg movements while turning. Thelegs extend as they turn the skisinto the fall line and flex as theyturn the skis out of the fall line.
Turn the skis continuously.Understanding the idea of continu-ous leg motion helps your studentslink rhythmic wedge turns and pro-vides them with information aboutthe fundamentals for future devel-opment. Once they can performthese continuous movements, theywill experience the wonderfulsensation of maintaining a constantspeed and fluidity from turn to turn.
Table 7 shows solutions to com-mon problems your students mayexperience performing the task ofturning within a corridor usingextension and flexion.
Weight Distribution
Next, help the student understandand feel the subtle changes of
weight distribution that occur inthe turn. Using both the follow-meand call-down formats, practiceturns while focusing on feeling theweight changes.
1. Draw a diagram in the snow,showing the weight distributionchanges throughout a turn.
2. Explain that the movements ofextending and turning the skitips into the fall line coincidewith equally weightingboth skis.
3. As they flex and complete theturn, they should feel more oftheir weight move graduallyover the outside/downhill ski.
4. Rolling the outside knee inwardswhile turning the ski tips out ofthe fall line facilitates a weightshift to the outside ski.
5. Discuss the pressure points ofthe feet being over the big toeand inside arch of the foot whenthe skis are in a wedge. Theyshould also feel contact on theinside shaft of the leg againstthe inside of the boot. When theoutside knee rolls inward, thepressure on the arch and shaftof the leg increases.
6. Steer the tip of the inside ski byturning the inside leg. Thisaction keeps the skis fromcrossing.
Combining Movements
A simple diagram drawn on thesnow helps illustrate how a combi-nation of movements from the out-side leg and ski shape a round arcon the snow. The inside leg alsoturns and complements the turningmovements of the outside leg. This

84 A L P I N E L E V E L I S T U D Y G U I D E
S k i e r L e v e l 3
is a good time to reinforce thedifferences between the outsideand inside leg or ski. Explain that,when turning, the outside ski is thefurthest ski from the turn. The skithe closest to the turn is the insideski. These are tough concepts tounderstand at first, so be patient ifthe light bulb does not come onquickly. If necessary, reintroducethem at another time.
Rhythmic wedge turns requirecontinuous turning of the legs andgradual rising (extension) and sink-ing (flexion) movements as well asrolling the ankle and knee forincreasing or reducing the edgeangle and weight to the outside ski.Discovering the rhythm, subtletiming, and coordination of these
movements is the key to perform-ance. Focusing and repeating onemovement at a time helps developunderstanding. Once studentsexperience the sensations of themovements, they can apply thecombination and timing ofmovements for linking rhythmicwedge turns.
It is unrealistic to cover all ofthis information in one run, so pickany of the previously mentionedtopics and teach it for two runs,with a lift ride in between. Thestudents then have time to digestthe information and apply it. Smalldoses of information with lots ofski and practice time are thequickest routes toward success.
Progression Options
• Explore different turn shapes,from Z-shapes to square shapesto rounded, C-shapes. Use aglove or ski pole as a marker todefine the shape of the turn.
• Encourage a stable upper bodyby skiing without poles. Placethe hands on the hips and turn.
• Practice turning around a skipole or glove that you haveplaced down the fall line. Usethe pole or glove as a target forthe upper body.
• Explore both correct and incor-rect movements to help studentsanchor the correct movements.Help them experience the differ-ence between forcing a turn withinefficient movements and allow-ing the turn to happen with thecorrect movements. For example,practice turning very quickly sothat students feel that they mustthrow their entire body into theturn, thus disrupting theirbalance. Also, practice steppingthe skis around the turn abruptly,moving the weight from ski toski. After this kind of explo-ration, practice turning with thecorrect movements.
Check that the students under-stand the relationship betweengradual extension and flexion,continuous turning of the legsand rolling the ankle and kneefor increasing and reducingedge angle.
• From a wedge, have the studentspress their weight onto one skiwhile gliding. Encourage them tohave the patience to wait for theski to turn. While they may feeluncomfortable with the speed
Problems Turning within a Corridor
(Once extension and flexion have been introduced)
Problem Solution
Student cannot stay withinthe corridor.
Turn shape is elongated orsquare instead of round
Turn shape is angular andmovements abrupt.
Table 7
Chances are the student isstiff-legged, with no up anddown motion, or locked into asquatting position. Encouragea centered stance. This broad-ens the student’s potentialrange of motion. Then em-phasize a rising motion tostart the turn. Rise and turnthe ski tips into the fall line.
Suggest constant steering ofthe skis by turning the legs asthey rise and sink.
Review the importance ofpatiently rounding outthe turns.

85A L P I N E L E V E L I S T U D Y G U I D E
that results from this very grad-ual turn, they will learn that thedesign of the ski will eventuallycause them to turn. Because theywill go a bit faster in this activity,select terrain that is extremelyflat. If at any time they feel theyare losing control, tell them tomake a bigger wedge with bothfeet and legs to slow down.
• On very flat terrain, practicesteering the skis from a verysmall wedge, with very littleturn-to-turn deviation. Describehow they might steer their carwith their feet on the steeringwheel: twist both feet first in onedirection, then the other.
Technical Aspects of SkillDevelopment
Balancing Movements
A fairly tall stance with a slightflex in the ankles, knees, hips, andspine allows for more efficient useof the body. The hips and torsomust be centered over the feet andskis to allow the correct muscularactivity. Developing turning of thelegs that is somewhat independentof the upper body will enhancebalance and allow stronger turningof the legs and feet. This indepen-dence, though slight at this stage, isimportant for continued develop-ment in skiing proficiency.
Rotary Movements
By pointing the toes in and push-ing the heels out, a simultaneous,inward rotation occurs in the legs.Maintaining a wedge positionrequires control of rotary move-
ments. More importantly, rotarymovements facilitate a change indirection. This direction changecan be the result of turning theentire body (full rotation) or ofturning both legs in the desireddirection without allowing theupper body to follow. Both areexamples of rotary movements, butthe second is the more efficient anddesirable. Turning the legs and feetindependently of the upper body isoften called steering, especiallywhen the outside ski is activelyedged as well. Tipping the outsideknee inward at the turn completionrequires a greater inward rotationof the outside leg. The flexionduring the second half of the turnwill increase the range of motion toallow continued turning of the legs.
Edge-control Movements
Exploring different wedge sizesand edge angles uses edge controlmovements. Rolling the insideknee into or away from the turnduring completion increases orreduces the edge angle. Increasingedge angle increases turning powerbecause the curve along the edgebecomes more fully engaged in theturn. Flexion helps the knee to tip.
Pressure-control Movements
The inward tipping of the kneeincreases pressure on the ski byreducing surface area. As thestudent moves more weight to theoutside ski during a turn, pressureis also increased. Flexion andextension help to control the pres-sure that is naturally generatedwhile skiing. Extension can reduce
pressure by flattening the skis andreleasing edge angles, especially ifthe outside knee is rolled down thehill after completion of the turn.Extension also facilitates equaldistribution of weight over bothfeet at turn initiation. Flexion thattakes place during the second halfof the turn helps absorb some ofthe pressure that is generated as theedge angle of the ski is increased.

86 A L P I N E L E V E L I S T U D Y G U I D E
S k i e r L e v e l 3
Questions: Linking Wedge Turns in the Fall Line
1. Choose one or more of the following:Movements for wedge turns include:A. Continuous turning of the legs underneath a quiet bodyB. A gradual rising and sinking motionC. Rolling the ankles and knees to reduce or increase the edge angle
2. Choose the best answer:When your students ski down to you in the call-down format, they should stop:A. Below the groupB. Next to the groupC. Above to the group
3. Prior to having the group ski down the hill in the follow-me format, it is a good idea to tell them where you plan to stop. To do this, you could call their attention to a ________________ near the destination.
4. Choose the best answer:You have just taken your students to a new hill to teach them to link fall-line wedge turns. The hill is somewhat steep for this maneuver, but is perfect further down. What does the progression on Linking Wedge Turns in the Fall Line suggest doing to get your students to the perfect terrain?A. Have them make broad, sweeping turnsB. Have them make a series of linked hockey stops, using the bullfighter turn to change directionsC. Have them take their skis off and walkD. Have them make a series of traverses first in one direction and then the other, using wedge change-ups
during the traverse and the bullfighter turn to change directions at the end of each traverse
5. Circle the best choice:Students who turn and cut short of your turning tracks while trying to follow you down the slope in linked wedge turns down the fall line are (underturning) / (overturning).
6. Choose one or more of the following.To help students who turn and cut short of your turning tracks while trying to follow you down the slope in linked wedge turns down the fall line, you could have them:A. Stand on one ski and turn the lifted ski in the air B. Turn their legs in the new direction as soon as their ski tips cross the fall lineC. Inhale as they turn the tips of their skis into the fall line and exhale as they turn their tips out
of the fall lineD. Target the upper body toward an object slightly to the right of the fall line for a right turn, and toward
another object slightly left of the fall line for a left turnE. Exercise patience and make gradual movements
7. True or false:One way to help your students establish rhythm while rising and sinking in the turn is to have them count “up-2-3” as they rise and guide their ski tips into the fall-line and “down-2-3” once in the fall-line.

87A L P I N E L E V E L I S T U D Y G U I D E
8. Each of the following statements applies to one of two formats: the call-down format or the follow-me format. Write the name of the correct format after to each statement.
The downside of this format is that the group stands around for a short while, so make sure that they are standing in a warm and comfortable spot.
______________________
This format allows you a better opportunity to observe and critique the individual’s skiing movements.
______________________
This format provides a continual visual demonstration and a specific guideline for skiing down a slope.
______________________
9. Choose the best answer:To help a student who is trying to link fall-line wedge turns within a described corridor, but who turns outside that corridor:A. Encourage patience in the turnB. Encourage the student to distribute the weight equally over both feet, rather than shift the weight
abruptly from foot to footC. Encourage the student to be centered on the skis and have the student use more up and down motion
in the turn
10. Circle the best choice:Some students who start to build up too much speed in the fall line rely totally on pushing their skis’ tails out to slow down. This disrupts their rhythm and momentum. To create a continuous rhythm from turn to turn, the students could:A. Continuously turn their legs while shifting their weight from the inside to the outside skiB. Continuously turn their legs while shifting their weight from both skis to the outside skiC. Shift their weight from both skis to the outside ski after turning their legs to complete the turn
11. Circle the best choices:In fall-line wedge turns, the legs (flex) / (extend) as they turn the skis into the fall line and (flex) / (extend)as they turn the skis out of the fall line.
12. Choose the best answer:As you enter the completion phase of your wedge turn:A. You should feel more of your weight gradually move over the outside or downhill skiB. You should feel your weight move evenly over both skisC. You should feel more of your weight gradually move over the inside or uphill ski
13. Circle the best choice:While completing a wedge turn, roll the (inside) / (outside) knee inward while turning the ski tips out of the fall line.

88 A L P I N E L E V E L I S T U D Y G U I D E
S k i e r L e v e l 3
14. Circle the best choice:When turning, the outside ski is (closest to) / (furthest from) the turn.
15. Fill in the blank:Steering the tip of the inside ski by turning the inside leg can keep the skis from _____________________ .
16. Choose one or more of the following:Having your students make a wedge turn with their hands on their hips:A. Encourages a stable upper bodyB. Is desirable only if they actually use their hips to make the skis turnC. Neither of the above
17. Choose one or more of the following:During the completion phase of a wedge turn, the following lead(s) to an increase in pressure to the downhill ski:A. Tipping the downhill knee inwardB. The weight moving to the outside skiC. Sinking (flexion) to complete the turn
18. Circle the best choice:(Flexion) / (Extension) facilitates an equal distribution of weight over both feet at turn initiation.

89A L P I N E L E V E L I S T U D Y G U I D E

90 A L P I N E L E V E L I S T U D Y G U I D E
S k i e r L e v e l 3
Answers: Linking Wedge Turns in the Fall Line
1. A, B, & C. Movements for wedge turns include a continuous turning of the legs underneath a quiet body, agradual rising and sinking motion, and rolling the ankles and knees to reduce or increase the edge angle andweight to the outside ski.
2. A. When your students ski down to you in the call down format, they should stop below the group.
3. When having the group ski down the hill in the follow-me format, it is a good idea to describe a landmarknear the spot you plan to stop.
4. D. If you have just taken your students to a new hill to teach them to link fall-line wedge turns, but havefound that part of the hill too steep, the progression for Linking Wedge Turns in the Fall Line suggests thatyou have your students do the following:1. Traverse the hill using wedge change-ups.2. Use a bullfighter turn to turn around3. Traverse back in the other direction using wedge change-ups.4. Repeat #1-3 until they’ve reached the appropriate terrain.
Note: The above suggestion is not appropriate for all types of terrain or even all classes at this level. If indoubt, ask your area trainer or supervisor.
5. Students who turn and cut short of your turning tracks while trying to follow you down the slope in linkedwedge turns down the fall line are overturning, which causes a loss of momentum.
6. C, D, & E. There are a number of ways to help students who turn and cut short of your turning tracks whiletrying to follow you down the slope in linked wedge turns down the fall line. Several of these are to:
• Suggest that they breathe deeply to help them relax.
Tell them to inhale as they turn the tips of their skis into the fall line and exhale as they turn their tipsout of the fall line.
• Suggest that they “separate” their upper bodies from their lower bodies.
Help them achieve this kind of alignment by targeting their upper bodies toward an object slightly to theright of the fall line for a right turn, and toward another object slightly left of the fall line for a left turn.
• Emphasize the importance of patience and gradual movements.
7. True. One way to help your students establish rhythm while rising and sinking in the turn is to have themcount “up-2-3” as they rise and guide their ski tips into the fall line and “down-2-3” once in the fall line.
The rising and sinking movements combine with continuous turning of the legs.

91A L P I N E L E V E L I S T U D Y G U I D E
8. The downside of the call-down format is that the group stands around for a short while, so make sure thatthey are standing in a warm and comfortable spot.The call-down format affords you a good opportunity to observe and critique an individual’s skiing movements. The follow-me method provides a continual visual demonstration and a specific guideline for skiing down a slope.
9. C. To help a student who is trying to link fall-line wedge turns within a described corridor, but who turnsoutside that corridor, encourage a centered stance and more up and down motion in the turn.
10. B. To create a continuous rhythm from turn to turn, students who rely totally upon pushing their tails out tocontrol the speed which builds up in the fall line could turn their legs continuously while shifting theirweight from both skis to the outside ski.
11. In fall-line wedge turns, the legs extend as they turn the skis into the fall line and flex as they turn the skisout of the fall line.The legs turn the skis continuously while flexing and extending.
12. C. As you begin to complete your wedge turn, you should feel more of your weight gradually move over theoutside or downhill ski
13. While completing a wedge turn, roll the outside knee inward while turning the ski tips out of the fall line tofacilitate a weight shift to the outside ski.
14. When turning, the outside ski is furthest from the turn, while the inside ski is closest to the turn.
15. In wedge turns, steer the tip of the inside ski by turning the inside leg to keep the skis from crossing.
16. A. Having your wedge turn students place their hands on their hips encourages a stable upper body. Don’tlet them use their hips to make the skis turn, as this will contribute to problems in the future.
17. A & B. During a wedge turn, the inward tipping of the knee will increase pressure on the ski by reducingsurface area. As the student moves more weight to the outside ski during a turn, pressure is also increased.
The sinking that takes place during the second half of the turn will help to absorb some of the pressure thatis generated as the edge angle of the ski is increased.
18. Extension facilitates an equal distribution of weight over both feet at turn initiation.

92 A L P I N E L E V E L I S T U D Y G U I D E
S k i e r L e v e l 3
Notes

93A L P I N E L E V E L I S T U D Y G U I D E
Step 10: VaryingWedge Turn Shape
Lesson Outcome
The student learns a variety of turnshapes, from slight directionchanges on gentle terrain to com-plete turns across the fall line asthe terrain steepens. This gives thestudent the ability to turn ondemand and vary the degree ofdirection change.
Overview
Varying turn shapes furtherexplores the rhythm, timing, andcoordination of the key movementsnecessary for making linked wedgeturns. This progression helpsdevelop the key movements of
• continuous turning of the legs.• gradual rising and sinking
movements.• rolling the ankle and knee to
reduce or increase the edge angleand weight to the outside ski.
Turn Shapes
Briefly clarify what turn shapes areby drawing diagrams in the snowillustrating the possibilities:• Z, or angular shapes• J, or square shapes• C, or half-moon shapes • S-shapes or linked C-shapes
Ultimately, the goal in skiing is tolink many S-shaped turns together.These S-shaped turns can alsohave a variety of shapes. Forexample, the S-shapes can beperfectly symmetrical, squat or
elongated, or short or scalloped.Explain to the students that theycan combine the key movementsfor turning in different ways tocreate different shapes of turns.
Using the Clock to Turn
This is designed to create anawareness of the fall line and therelationship between turns in thefall line and across the fall line.Using a gentle slope with a consis-tent fall line, compare the slope tothe face of a clock. Directly downthe fall line is 12:00. Perpendicularto the right of 12:00 is 3:00, andperpendicular to the left is 9:00.Help the students orient themselvesto skiing across the fall line bypointing their skis to 3:00 to turnright and 9:00 to turn left.
Using the follow-me format,have your class practice linking sixto eight turns together. Discuss thesensations of slowing both thespeed and timing of movements.Don’t belabor it, but help the skiersunderstand the relationshipbetween speed and timing. Next,practice turning toward 12:30 toturn right, and 11:30 to turn left.Turning in the fall line promotes asense of maintaining a gentlespeed, while generating aquick rhythm.
Turn Completion withGarlands
Use wedge garlands (across theslope) to further develop the sensa-tions of continually turning thelegs. Garlands are short, scallopedturns that emphasize the beginningand end of the turn, without a mid-
dle. Explain that you are going tofocus on the bottom part, or end, ofthe garland. Emphasize the impor-tance of maintaining a stable upperbody. The hips and torso are oneunit and are centered over the feetand skis.
Demonstrate a few garlandswhile moving toward the groupand then away from the group.Then make gradual directionchanges by turning your ski tipsleft and right. Be sure to maintain anarrow wedge, with the feet about18 inches apart.
Have the group practice gar-lands following you across a trailthat has little or no skier traffic.Make five or six passes across thetrail, while isolating differentwedge turning sensations. Startwith one movement and graduallybuild the intensity by integratinganother movement:
1. Integrate the wedge garland ex-ercises with fall-line wedge turnon gentle terrain to help expandawareness of the movements.
2. Have the class practice garlandswhile feeling the movements ofboth feet and legs. Emphasizethe continuity of movementswhile using both legs to turn theski tips. Discuss the shapes ofthe arcs the skis are making onthe snow. These shapes aremostly shallow semicircles.Check for understanding,making sure that each indivi-dual is aware of foot and legturning and the turn shape thismovement creates.
3. Anchor foot and leg turningsensations by practicing thestationary exercise of standing

94 A L P I N E L E V E L I S T U D Y G U I D E
S k i e r L e v e l 3
on one foot and turning theother foot and ski in the air.Pick up the downhill ski andturn it back and forth whilediscussing the sensations.Discuss the contact points of thefoot inside the boot. Try to gen-erate an individual awareness ofa sensation that is turning theski. For some students, feelingthe big toe and little toe turningthe ski is an obvious sensation.Others might feel the arch andstill others might feel the legand ankle. Try to identify theindividual’s sensations and usethat feeling as a personal cue.
4. During the next set of garlands,focus on the bottom part of thegarland and feel the contactpoints of the downhill foot.
Using Leg and FootTurning in Fall-Line Turns
Next, practice wedge turns on gen-tle terrain with gradual directionchanges in the fall line whilefocusing on the sensations of legand foot turning. Target the bodytoward 12:00 while guiding the skitips toward 1:00 to turn right and11:00 to turn left. Discuss theshapes made by this type of turn.Gradual direction changes alsomake semicircular shapes, similarto the wedge garland shapes.
Refining TurnCompletion withGarlands
Again, have your class practicegarlands. 1. Integrate the action of tipping
the knee inward with the leg
turning movement. Pay atten-tion to the performance of thedownhill leg. Focus on thebottom of the turn, emphasizingthe action of rolling the down-hill knee inward while turningthe leg and foot. Describe howthe pressure to the contactpoints of the downhill foot andleg increases. Describe the useof the ski as a tool that is brush-ing or sculpting curved arcsalong the snowy surface. Thedownhill foot, ankle, knee, andleg control this inscribing orsculpting action, making semi-circular arcs on the snow.Encourage a rhythm with cueslike “roll and turn, roll and turn.”
2. Repeat another pass of garlands,exaggerating the sinking actionthat complements the rollingmovements of the downhillankle, knee, and leg. This actionincreases the skis’ capabilitiesof directional changes. Compare the shapes created bythe different movements.Simply turning the leg and footin the garland turn creates aseries of shallow semicircularshapes. Increasing the intensityof the movements makes aseries of deeper, curved shapesthat are more C-shaped. Checkto see if your students under-stand how different shapes areachieved in the garland turns.
Turn Initiation withGarlands
Once the students are aware of themovements that shape the bottompart of the turn in linked garlands,explore the movements that begin
at the top of the garlands. Continueto focus on the action of thedownhill leg.
Start from a stationary position.
1. Position the skis in a wedge,while bending the knees for-ward and slightly inward.
2. Practice the extension and flex-ion while flattening and edgingthe downhill ski. Increase theedge angle of the ski whilebending the legs and rolling thedownhill knee inward. Then,flatten the downhill ski byextending the legs and pointingthe downhill knee outward.Integrate the flexing andextending actions that flattenand edge the ski while practic-ing garlands. Continue focusingon the turn beginning during ex-tension and flattening the skis inthe garland format. Developboth sides. The idea is to repeatthe strong sensation of flatten-ing the downhill ski andreleasing the edge angle, whilealigning the hips to facilitate aturning movement of the legs.
Coordinating TurnInitiation andCompletion Movements
Coordinate extension and edgerelease to guide the ski tips into thefall line with the flexing move-ments described previously. Focuson the turning and rolling action ofthe downhill leg and knee that flat-ten the ski, then guide it into thefall line and finally, along withincreased edge angle and furtherguidance, shape the turn. Turn

95A L P I N E L E V E L I S T U D Y G U I D E
completion is shown in photo 13.Practice these movements whilemaking wedge turns acrossthe fall line.
1. Using both legs to turn, targetthe inside hip (or right side ofthe hips) toward 2:00 and turnright.
2. Target the left side of the hipstoward 10:00 and turn left.
3. Target the hips and torso a littleless and turn the skis a littlemore.
4. Compare the deeper, rounder,more completed S-shaped turnsto the wedge turns made in thefall line.
Coordinating LegTurning Action withProper WeightDistribution
Next, coordinate the timing ofweight distribution with the rollingand turning action of the legs byhaving your students practicepedal-wedge turns. “Pedal” wedgesare much like pedaling a bike.Pressing on the ski while guiding ithelps it turn. Transferring weightfrom one foot to the other shouldbe like pressing first on one pedaland then the other. The movementsshould be smooth and progressive.
Emphasize equal weight distrib-ution between both feet and skis,while aligning the hips toward theclock target to begin the turn.Then, while rolling the outsideknee inward to complete the turn,concentrate on feeling the weightprogressively increase to the out-side ski. Try to establish a rhythmbetween equalizing the weight and
pressuring the outside ski. Thestudents will eventually feel thiscontinuous rhythm. When thestudents feel comfortable, slightlyincrease the speed. With increasedspeed, the student should feel adefinite weight change from oneski to the other. Point out thesimilarity of pedaling action withriding a bicycle. Identify howquickly the skis track across the
fall line, with the increase ofpressure to the outside ski. Thestudent will feel an obvioussense of control.
You can introduce pedal wedgeturns to your students either byhaving them turn across the fallline or by having them makegarland wedges. Soften the intensityof this pedal movement andcombine it with leg turning action,
Photo 13. Turn Completion
A
B

96 A L P I N E L E V E L I S T U D Y G U I D E
S k i e r L e v e l 3
creating a rounder, S-shaped turnthat has a beginning, a middle,and an end.
Putting the MovementsTogether
Finally, play with different turnshapes from gradual directionalchanges to turns across the fall line.
1. Increase or decrease the intensi-ty of the rising and sinkingmovements to help shape theturn and add rhythm for linkingturns with continuous motion.
2. Ski on steeper terrain andincrease both the leg turningmovements, and flexion andextension, so the skis travelacross the fall line, controllingthe student’s speed.
3. Explore the obvious weightchange with the pedal-wedgeturns so the student can turn ondemand.
4. You can incorporate the garlandtactics and pedal turn exercisesof this progression whenteaching fall-line wedge turns.Wedge garlands are great fordeveloping and repeating turninitiation and completion move-ments. On a busy slope, you canintegrate garland tasks with fall-line skiing, instead. For bothfall-line skiing and garlands,caution your students to look upthe hill for oncoming traffic be-fore performing a task.
Progression Options
• Explore different turn shapes inthe fall line—from Z-shapes tosquare shapes to C- and round
shapes. Use a ski glove or skipole as a marker to determine theshape of the turn.
• Make round wedge turns withand without a traverse. Vary thelength of traverse to suit terrain.
• Add a numerical count: 1-2 forturns closer to the fall line, 1-2-3-4 for turns crossing the fallline and 1-2-3-4-5 for turnstraversing the fall line.
• Have students visualize whereeach turn starts and finishes tobuild confidence and accuracy.
Technical Aspects of SkillDevelopment
Balancing Movements
A fairly tall stance with a slight flexin the ankles, knees, hips, and spineallows efficient use of the body.The hips and torso must be centeredover the feet and skis to allow thecorrect muscular activity. Flexionand extension as well as someseparation of upper and lower bodydecrease rigid positioning and helpcreate the fluid rhythms necessaryin dynamic balance.
Rotary Movements
Establishing and maintaining awedge requires inward rotation ofboth legs. Varying turn shapes fromgradual direction changes to turn-ing across the fall line increases theintensity of the leg turning move-ment. Flexion allows a greaterrange of motion in the legs so thatthe outside knee can be moved in-ward during turn completion.Extension reduces the inward turn-ing of the legs.
Edge-control Movements
Exploring different turn shapesrequires active edging movementsthat come from increasing the in-ward tipping of the outside leg. Asedge angle is increased, ski-snowinteraction increases. Again, themovement is enhanced by flexionof the legs: the more the turncomes across the fall line, thegreater the flexion. Extension alsobecomes more important at thisstage because the edges need to bereleased to successfully begin anew turn. During extension, theoutside knee is actively rolleddownhill and toward the new turn,which flattens the ski and guides ittoward the new turn.
Pressure-control Movements
During gradual direction changes,weight is more equally distributedover both feet. As the skis areturned more and more out of thefall line, edge angles increase,resulting in greater pressure on theoutside ski. Flexion is used to helpcontrol this increase. The more theskis are turned out of the fall line,the more the weight shifts to theoutside ski. The extension not onlyreduces edge angles, but con-tributes to an equalization ofpressure over both skis to beginthe new turn.

97A L P I N E L E V E L I S T U D Y G U I D E

98 A L P I N E L E V E L I S T U D Y G U I D E
S k i e r L e v e l 3
Questions: Varying Wedge Turn Shape
1. Skis can make a number of different shapes in the snow. Name three turn shapes and give a brief description of each.
_______________________________________________________________________________________
_______________________________________________________________________________________
_______________________________________________________________________________________
2. A garland is:A. A series of direction changes that do not lead the skier to cross the fall lineB. A series of direction changes that initially do not cross the fall line but end up doing soC. Sliding in a direction across the fall line.
3. Using the clock analogy, straight down the fall line would be 12:00. To have your students make a very gradual direction change just to the right of the fall line, have them target the body toward
____________________ o’clock and guide their ski tips toward ________________________ o’clock.
4. Circle the best choice:Simply turning the leg and foot in the garland wedge turn makes a series of (deeply curved, “C” shaped turns) / (shallow semi-circular turns).
5. True or false.If you increase the speed of pedal wedge turns, you should feel your weight equalize between your skis.
6. Choose one or more of the following:Pedal wedge turns can be introduced using:A. GarlandsB. Wedge turns across the fall lineC. Neither of the above
7. True or false:Increasing or decreasing the intensity of rising and sinking movements throughout the turn helps shape the turn and adds rhythm for linking turns together with continuous motion.
8. Choose one of the following:Which of the following is not a part of the garland?A. Beginning of the turnB. Middle of the turnC. End of the turn
9. Circle the best choice:(Flexion) / (Extension) allows a greater range of motion in the legs.

99A L P I N E L E V E L I S T U D Y G U I D E
10. True or false:The more the turn comes across the fall line, the less flexion you should use to complete it.
11. Circle the best choice:During extension, the outside knee is actively rolled (uphill) / (downhill) toward the new turn, which flattens the ski and guides it toward the new turn.
12. Fill in the blank:As skis are turned more and more out of the fall line, edge angles increase, resulting in greater
_____________________ on the outside ski.
13. Circle the best choice:Extension (increases) / (reduces) edge angles.

100 A L P I N E L E V E L I S T U D Y G U I D E
S k i e r L e v e l 3
Answers: Varying Wedge Turn Shape
1. Some of the turn shapes which skis can make in the snow are: “Z” or angular shapes, “J” or square shapes,“C” or half-moon shapes, and “S” shapes. “S” shapes also vary: they can be squat and elongated, or shortand scalloped.
2. A. A garland is a series of direction changes that do not lead the skier to cross the fall line. They are short,scalloped turns which emphasize the beginning and end of the turn, without the middle part.
3. Using the clock analogy, straight down the fall line would be 12:00. To have your students make a verygradual direction change just to the right of the fall line, have them target the body toward 12 o’clock andguide their ski tips toward somewhere around 1:00. (3 o’clock would be straight across the fall line, whichwould not result in a gradual turn).
4. Simply turning the leg and foot in the garland wedge turn makes a series of shallow semicircular shapes.Increasing the application and intensity of the movements makes a series of deeper curved shapes that aremore “C” shaped.
5. False. If you increase the speed of pedal wedge turns, you should feel a definite weight change from one skito the other.
6. A & B. Two of the many possible ways of introducing pedal wedge turns are through fall-line wedge turnsor wedge garlands.
7. True. Increasing or decreasing the intensity of rising and sinking movements throughout the turn helps shapethe turn and adds rhythm for linking turns together with continuous motion.
8. B. Garlands are short, scalloped turns which emphasize the beginning and end of the turn, without a middlepart.
9. Using flexion during turn completion allows a greater range of motion in the legs so that the outside kneecan be tipped or rolled inward.
10. False. The more the turn comes across the fall line, the greater the flexion.
11. During extension, the outside knee is actively rolled downhill toward the new turn, which flattens the ski andguides it toward the new turn.
12. As skis are turned more and more out of the fall line, edge angles increase, resulting in greater pressure onthe outside ski. You use flexion to help control this increase.
13. Extension reduces edge angles. It also contributes to an equalization of pressure over both skis to begin thenew turn.

101A L P I N E L E V E L I S T U D Y G U I D E
Notes

102 A L P I N E L E V E L I S T U D Y G U I D E
103A L P I N E L E V E L I S T U D Y G U I D E
Skier Level 4
Step 11: ProvidingMileage andGuidance
Lesson Outcome
Students anchor the ability to linkwedge turns through guided prac-tice time. Spend the first run linkinground wedge turns to allow yourgroup to warm up. This is the timeto give plenty of positive reinforce-ment and to correct any errors.Common errors include: Leaninginside during the turn; rotating(twisting the upper body to makethe skis turn); using too large awedge (resulting in the inside footbeing anchored in the snow some-times referred to as “edge-lock” ofthe inside ski); leading the turnwith the outside foot and skiinstead of the inside.
Correct errors by explainingwhat they are doing now (withoutdwelling on the errors), describingwhat they should do instead,demonstrating the correct move-ment, and giving them the oppor-tunity to try it. Sometimes it ishelpful to use a demonstration toshow students what they look like,and then to demonstrate the appro-priate movements. This can helpthem understand that what you areasking for is different from whatthey are doing. Once your studentshave attempted the task, give theman evaluation of their performance,followed by practice time andmore feedback. This process willtake at least one run, and, quitepossibly, two or more.
In most group lessons, it is not
uncommon to have a bit of a mix-ture of student abilities. Even ifyou start out with a group that isperfectly matched in its abilities,you may end up with slightlydifferent levels in your lessonbecause everyone learns at a differ-ent rate. Ask your ski school trainerhow you should deal with slow stu-dents and/or a split in their groupat this point.
With that in mind, an importantgoal for students who are gettingready to learn wedge christies isplenty of mileage, with positivereinforcement and correctionswhere necessary. The secondarygoal for your students is matchingand skidding, which in most casesis very attainable.
When the group can make goodwedge turns in both directions,introduce/review the concept offlexion and extension. They mayhave these movements in theirskiing without knowing why orhow, or even being aware of it.
1. Encourage them to extend tostart the new turn by “relaxingtall” on both feet or by slightlystraightening their knees andankles.
2. As they start to extend, havethem steer their skis by pointingtheir knees and ankles towardthe new turn.
3. As the skis come into the fallline, tell your students to startflexing by gradually bendingtheir knees and ankles. Theyshould feel steady pressureagainst the tongue of the outsideboot, and they should be tryingto lower their hips toward thearches of their feet. At this
level, students should be tryingto actively pressure the outsideski a little more than the insideski. As they continue to flex onthe outside ski, ski design willinteract with the snow to helpthem finish the turn.
4. During these practice segments,you should select a meetingplace for your group, and givethem the chance to choose theirown line/rhythm to practice in.Keep an eye on all of them,giving plenty of encouragementand, if necessary, corrections.
Note: The value of demonstrationsand feedback/reinforcement cannotbe overstated at this (or any) stage.Use a variety of communicationstyles. Both your statements andyour actions convey informationto students.

104 A L P I N E L E V E L I S T U D Y G U I D E
S k i e r L e v e l 4
Questions: Providing Mileage and Guidance
1. Name two important goals for a beginning wedge christie lesson.
_______________________________________________________________________________________
_______________________________________________________________________________________
2. Circle the best choice:In wedge turns, once you’ve begun extending into the turn, the (inside) / (outside) foot should be slightly ahead of the other foot.
3. Fill in the blanks:Extend into a new wedge turn by slightly straightening your _________________ and _________________.
4. Circle the best choice:During the completion phase of a wedge turn, you should feel more pressure on the (front) / (back) of the outside boot.
5. True or false:Beginning wedge christie students should be trying to actively pressure the outside ski a little more than the inside ski.
6. Fill in the blank:Using too large a wedge can result in the inside ski being anchored in the snow.
This is sometimes referred to as ___________________________.

105A L P I N E L E V E L I S T U D Y G U I D E
106 A L P I N E L E V E L I S T U D Y G U I D E
S k i e r L e v e l 4
Answers: Providing Mileage and Guidance
1. Two important goals for a beginning wedge christie lesson are:• mileage (with positive reinforcement and corrections when necessary)• matching and skidding
2. In wedge turns, you should lead with the inside foot.
3. Extend into a new wedge turn by slightly straightening your knees and ankles.
4. You should feel pressure against the front (the tongue) of your outside boot and should be trying to loweryour hips toward the arches of your feet as you flex to complete your wedge turn.
5. True. Beginning wedge christie students should be trying to actively pressure the outside ski a little morethan the inside ski.
6. Using too large a wedge can result in the inside ski being anchored in the snow. This is sometimes referredto as edge-lock.

107A L P I N E L E V E L I S T U D Y G U I D E
Notes

108 A L P I N E L E V E L I S T U D Y G U I D E
S k i e r L e v e l 4

109A L P I N E L E V E L I S T U D Y G U I D E
Step 12: IntroducingMatching andSkidding
Lesson Outcome
This section introduces the con-cepts of matching and skidding.Matching the skis means to movethem toward a parallel relationship.Skidding is the result of skismoving forward and sidewayssimultaneously. Students are intro-duced to parallel skiing movementsthrough spontaneous matching ofthe skis from a narrow wedge. Yourgroup is now ready to start work-ing on matching their skis in awedge christie. A wedge-christieturn is depicted in photo 14. At thisstage, the matching should general-ly occur somewhere in the bottomthird of the turn. Learning to matchis dependent upon having goodmechanics in the wedge turn,which is why you need to followthe steps outlined above beforeyou introduce matching.
Spontaneous Matching
The simplest approach—and there-fore the one you should start with—is to ask your students to ski with aslightly smaller wedge. This causestheir speed to increase a little bit,and, in many cases, this is all theyneed to allow their skis to matchspontaneously. A spontaneousmatch is one that occurs withoutyour students making any mechan-ical changes in their movements.The rule that applies is: if you takesomething away from yourstudents, you must give themsomething to replace it. By asking
them to ski with a smaller wedge,you may be taking away the feel-ing of control from some of yourstudents. Replace this perceivedloss with a finished turn shape thatallows them to slow down at theend of the turn.
A finished turn is more rounded inthe bottom arc of the turn andbrings the skier farther across thefall line than an unfinished turn
shape. In a more finished turn,skiers will be moving a little fasterduring the turn itself, but will slowdown again as the turn is finished.
Using the Terrain
Your choice of terrain can alsoenhance your students’ chance ofexperiencing a spontaneous match.A run that has terrain rolls in it isperfect. Time your demonstration
Photo 14. Wedge-christie Turn
A
C
B
D

110 A L P I N E L E V E L I S T U D Y G U I D E
S k i e r L e v e l 4
so that the second half of your turnhappens on the downhill side of theroll. Ask your students to try thesame thing that you just showedthem. Call them down one at atime so that you can watch each ofthem and provide feedback whenthey are finished. As they make thesecond half of their turn on thedownhill side of the roll, there isless friction on their skis, resultingin greater speed.
Because of the increased forcefrom increased speed, the insideski matches the outside ski andboth skis skid. The skidding helpscontrol the turn because it main-tains enough friction to limit theacceleration of the skis. Onceeveryone has tried the maneuverover the rolling terrain, lead themthrough a practice segment. It isimportant that they turn where youturn (as opposed to when you turn)because you are choosing theterrain that maximizes their chancesof spontaneous matching.

111A L P I N E L E V E L I S T U D Y G U I D E

112 A L P I N E L E V E L I S T U D Y G U I D E
S k i e r L e v e l 4
Questions: Introducing Matching and Skidding
1. Circle the best choice:For beginning wedge christie students, matching should generally occur somewhere in the (top) / (middle) / (bottom) of the turn.
2. Define a spontaneous match.
_______________________________________________________________________________________
_______________________________________________________________________________________
3. Choose the best answer:Which of the following can help beginning wedge christie students match their skis:A. Increased speedB. Smaller wedgeC. Terrain rollsD. All of the aboveE. A & B
4. True or false:Skidding maintains enough friction to limit acceleration of the skis.
5. Choose one or more of the following:To help your beginning wedge christie students slow down during the finish of their turns, have them:A. Perform a check maneuver by simultaneously pressuring the heels of both feetB. Use turn shapeC. Ski more squarely to their skisD. Assume a more countered positionE. Use rotary push-off

113A L P I N E L E V E L I S T U D Y G U I D E

114 A L P I N E L E V E L I S T U D Y G U I D E
S k i e r L e v e l 4
Answers: Introducing Matching and Skidding
1. For beginning wedge christie students, matching should generally occur somewhere in the bottom third ofthe turn.
2. A spontaneous match occurs when the skis come into a parallel relationship without the skier having made amechanical change in his/her movements.
3. D. An easy way to get your beginning wedge christie students to match their skis is to have them ski with aslightly smaller wedge. The increased speed which results from skiing with a slightly smaller wedge canlead to a spontaneous matching of the skis. Having your beginning wedge christie students make the secondhalf of their turns on the downhill side of a terrain roll can also help them achieve a spontaneous match.There will be less friction on their skis, which, combined with a little more speed, will help their skismatch and skid.
4. True. Skidding creates more friction and will slow the skis down.
5. B. To help your beginning wedge christie students slow down during the finish of their turns, have them usethe shape of the turn itself to slow down.

115A L P I N E L E V E L I S T U D Y G U I D E
Notes

116 A L P I N E L E V E L I S T U D Y G U I D E
S k i e r L e v e l 4

117A L P I N E L E V E L I S T U D Y G U I D E
Step 13: MethodicalApproach toMatching andSkidding
Lesson Outcome
Students learn to match their skisin the last third of the turn and toskid forward and diagonally forspeed control. Students learn tomake wedge turns that end withparallel skis, use traversing, uphillchristies, sideslipping, andgarlands. They also explore move-ments for slipping forward andlaterally to develop speed control,which increases confidence.
Matching in a Traverse
If some of your students wereunable to achieve a spontaneousmatching, try a more methodicalapproach. Standing still at the sideof the trail, show them how topoint their inside knee in the samedirection as the outside knee. Thismovement will flatten and steer theinside ski and allow it to match theoutside ski. If they flex as theypoint the inside knee, the finish ofthe turn turn becomes easier still.Now apply the same movementswhile gliding on easy terrain. Inthe beginning, avoid skiing into thefall line. Start with a traverse thatallows your group to experiencethe movements without actuallyturning.
1. Move to the side of the trail. 2. Start gliding in the traverse with
the ankles, knees, and hipsflexed.
3. Open into a wedge with a slight
extension. 4. Flex with most of the pressure
on the outside/downhill ski. 5. While flexing, point the inside
knee up the hill in the samedirection as the outside knee.The inside ski matches theoutside ski quite easily.
6. Repeat the movement three orfour times during the traverse(as much as the width of the runallows).
7. Stop at the other side of thetrail.
8. Try the same exercise going inthe opposite direction.
Once the students can perform thismovement comfortably and com-petently, demonstrate a completeturn in which you actively pointthe inside knee uphill during thelast third of the turn. Emphasizethat most of the pressure remainson the outside foot and ski. Afterhaving all the members of yourclass execute a turn or two (whileyou provide positive reinforce-ment), have them practice thismovement while skiing for one ormore runs.
Matching Through UphillChristies
Uphill christies are very importantbecause they
• isolate many of the movementsthat characterize the completionof a parallel turn.
• provide another option for slow-ing down and stopping.
• help students refine their balanceso they begin to stand more con-sistently over the “sweet spot” of
the ski. • help students understand and
apply their knowledge of howthe interaction of edge angle andpressure on the ski causes it togrip and turn.
Perform this exercise for uphillchristies.
1. Move your class to the side of ashallow trail (ideally, one with-out a lot of traffic).
2. From a static position, have yourstudents flex the knees andankles (use about 1/3 of theavailable flexion), primarily con-centrating on the downhill leg.
3. Students should flex their legsby moving the ankle forwardand in an inward, diagonaldirection. Have your studentsstand so that they feel a bit ofpressure on the front of the shin.
4. Ask your students to notice thesensation of weight, or pressure,on the bottoms of their feet.
Where do they feel most ofthe pressure? If it is moretoward the heel, show them howto move the hips slightly for-ward until they feel equal pres-sure along the entire bottom ofthe foot (ball, arch, and heel). Ifthey feel more pressure on thefront, ask them to move theirhips slightly back toward theheel without losing shin contactagainst the tongue of the boot.
5. Once you have reinforced thecorrect stance, have studentspractice moving in and out ofthat stance to anchor the feelingsbefore sliding across the hill.
The inside leg should mirrorthe activity of the outside leg,

118 A L P I N E L E V E L I S T U D Y G U I D E
S k i e r L e v e l 4
with slight pressure on the littletoe side of the inside/uphill foot.The focal point of balance andpressure should be on theoutside foot and ski. As inwedge turns, the legs shouldmove independently of theupper body.
6. Now your students are ready toperform an uphill christie whileskiing across the slope. Explainthat when they flex their legsand apply pressure on the front,inner part of the ski boot, thetips of the skis begin to bite intothe snow and begin to turn.(They should twist or guidetheir ski tips while flexing).
7. Demonstrate this maneuver, firsttoward your group, and thenaway from them.
8. Give your class ample opportu-nity to practice these move-ments, while coaching them toimprove their performance inthe process. When yourstudents can successfully exe-cute uphill christies, ask themto apply the same uphill christiemovement to the bottom part(last third) of their turns. Onappropriate terrain, link a seriesof wedge-christie turns. Use theuphill christie movement toaccomplish the matching andskidding portion of the turn.The students quickly find thatthe skis will make the last bitof the turn for them!
Matching ThroughSideslipping
To further develop matching, teachthe group to sideslip forward anddiagonally across the hill.
1. From a static position, ask themto face their hips and shouldersslightly down the hill.
2. Have them place both poles inthe snow uphill and to eitherside of their bodies.
3. Show them how to push withtheir poles so the skis slid later-ally across the snow surface.
4. Have them practice this activityon both sides. Emphasize howmuch easier it is to make theskis slip when they relax theirknees and ankles. By pointingthe knees and ankles slightlydownhill, the students will soonfind that they don’t even have topush on their poles to executethis maneuver.
Combining the ForwardSideslip and UphillChristie
To enhance edging and pressure-control skills, you can combine theforward sideslip with the uphillchristie in a simple garland pro-gression.
1. From a shallow traverse (onethat is just steep enough toallow the skier to glide acrossthe hill), have your students rollboth feet and knees into the hillwhile lightly pressuring thefront of the downhill boot.
2. Once the tips of their skis haveclimbed the hill a little, haveyour students roll their kneesand ankles slightly downhill toinitiate a forward sideslip.
3. Roll both knees and feet backinto the hill for another uphillchristie.
4. Repeat in the opposite direction.
5. Gradually work these activitiesmore down the hill (similar to afan progression) to continuebuilding on this theme. Let thecomfort level of your groupdictate how close to the fall lineyou take this activity.
This progression refines your stu-dents’ ability to use edging andguiding movements. These activi-ties are also an important stepbecause they begin to bridge thegap between beginning andintermediate skiing!
Matching ThroughHockey Slides
Continue to refine these move-ments by teaching your students tomake hockey slides. Hockey slides,like the uphill christie, require asimultaneous tipping of the legsand feet. They also require that yousteer your skis more actively bytwisting your legs and feet. Hockeyslides are useful for controllingspeed in rough terrain and in con-fined areas such as the bottom ofthe chairlift. Try a fan progressionto introduce these to your group.
Demonstrate the hockey slides andhave your students practice them.
1. From a shallow traverse, quicklyflex the legs while twisting thefeet and legs in the intendedturn direction. As in the diago-nal sideslip, the skis begin toskid somewhat sideways downthe hill.
2. While the skis are skidding,gradually tip the legs (knees,ankles, feet) into the hill. This

119A L P I N E L E V E L I S T U D Y G U I D E
engages the edges progressivelyand slows you.
3. Work the exercise progressivelycloser to the fall line. In otherwords, with each successfulrepetition, point the skis a littlemore directly toward the fallline. Again, let the comfort levelof your group be your guide.
4. Repeat this progression in theopposite direction.
Wedge Parallel Garlands
The wedge parallel garland is awonderfully playful exercise foranchoring the timing of wedge andparallel movements in preparationfor beginning wedge christies. Theidea is to steer the skis into the fallline in a wedge and the back out ofthe fall line (in the original direc-tion) in a parallel relationship ofthe skis. The skis never cross thefall line to make a complete turn.Demonstrate the wedge parallelgarland and then have your stu-dents practice it.
1. As you open your skis into awedge by extending, steer themslightly toward the fall line.
2. Just as the tips enter the fallline, before they face downhill,steer the skis back up the hill.Flex, point, and twist the insideknee uphill so the skis match.
3. Repeat these steps while devel-oping a rhythm with both theup-and-down motion as welland the opening-and-closingmovements.
4. Repeat in the opposite direction.After the group has performed aseries of wedge parallel gar-lands in both directions, they
are ready to link turns incorpor-ating these movements. Providea good visual demonstrationand lots of mileage so themovements are firmlyentrenched in the students’“muscle memory.”
5. Begin the turn by brushingopening the tails of the skis to awedge while extending with thelegs.
6. Continue extension as youguide your ski tips into the fallline.
7. Steer your skis out of the fallline and into the new directionwith a flexing movement,developing more pressure onthe outside ski. With theincrease of pressure on theoutside ski, the inside legsmoves more freely.
8. Roll or point the inside kneeback up the hill while twistingthe inside foot and leg into aparallel relationship as you steeryour skis across the fall line.
9. Repeat the sequence in the op-posite direction, linking all themovements together for a suc-cession of turns.
Introduce these exercises into thelesson to help develop parallelmovements and to improvedwedge-christie turns. Tactically, itis best to have your student samplethese exercises, rather than attemptto perform them perfectly.Incorporate these exercises intoyour lesson to help the student per-form more confidently on challeng-ing terrain and snow.
For example, uphill christies areperfect for controlling speed onsteeper terrain. Wedge parallel gar-
lands can be used effectively on asteeper face to maintain your stu-dents’ confidence while keepingthem from moving into the fall line.Traversing or slipping forward isespecially helpful for getting downbumpy or rough terrain. Hockeyslides are essential for making aquick move to avoid an obstacle orto negotiate a steep, difficult run.Developing and maintaining confi-dence at this level is critical.Maintaining the students’ interest isalso crucial. These exercise can beused tactically for moving offgroomed terrain and to introducestudents to more challenging ter-rain. More importantly, they areprerequisites for bridging the gapbetween beginning and intermedi-ate phases. This can lead to smallsuccesses and long-term rewards.
Progression Options
• Play with the thumper traverse.Tap the inside ski while traversingto promote matching.
• Make linked wedge turns using anarrow wedge while tapping theinside ski during the last third ofthe turn. Do the same withwedge-christie turns.
• Practice matching the skis acrossa shallow traverse to enhancematching.
• Practice traversing on the down-hill ski.
• Practice slipping forward whileflexing and extending.
• Practice wedge parallel garlandswhile steering deeper into the fallline.
• Focus on releasing and weightingthe downhill ski in a wedgeparallel garland. Repeat in the

120 A L P I N E L E V E L I S T U D Y G U I D E
S k i e r L e v e l 4
other direction. • Focus on releasing and weight-
ing the downhill ski in a forwardsideslip traverse. Repeat in theother direction.
Technical Aspects of SkillDevelopment
Balancing Movements
At this level, balance is activelyfocused on the outside ski duringthe second half of the turn. Thisrepresents a higher level of skill ac-quisition than before.
Rotary Movements
Prior to this lesson, studentslearned to steer with both legs toguide their skis in wedge turns. Inthis lesson, they learn to steer theinside leg much more actively thanbefore, which contributes to theability to match the inside ski tothe outside ski. The action of point-ing the inside knee uphill, ortoward the center of the turn,involves external leg rotation. Asstudents learn to refine this move-ment, it becomes increasinglyimportant.
Edge-control Movements
The act of pointing the knee alsocontributes to a release of the edgeof the inside ski, which assistsinside leg steering (externalrotation of the leg). This is a muchmore refined edging movementthan these students have employedprior to this stage.
Pressure-control Movements
By standing and balancing more onthe outside ski during a wedge-christie turn, students are learningto refine pressure control from footto foot. Pointing the inside knee tosteer that leg and ski to the insideof the turn flattens that ski, resultingin reduced friction between the skiand snow and less pressure onthe inside ski.

121A L P I N E L E V E L I S T U D Y G U I D E

122 A L P I N E L E V E L I S T U D Y G U I D E
S k i e r L e v e l 4
Questions: Methodical Approach to Matching and Skidding
1. Choose the best answer:To help beginning wedge christie students match their skis, you could show them how to point their inside knee:A. In the same direction their outside knee is pointing as they begin their turnB. In the same direction their outside knee is pointing as they end their turnC. In the opposite direction the outside knee is pointing as they begin their turnD. In the opposite direction the outside knee is pointing as they end their turn
2. Choose one or more of the following:For a beginning wedge christie student, pointing the inside knee toward the center of the turn:A. Facilitates inside leg steeringB. Is an example of counter-rotationC. Involves an external rotation of the legD. Releases the edge
3. True or false:To match and skid at the beginning wedge christie level, you should be balanced over the outside ski during the first half of the turn.
4. Describe how to make a beginning wedge-christie turn from a traverse.
_______________________________________________________________________________________
_______________________________________________________________________________________
_______________________________________________________________________________________
_______________________________________________________________________________________
5. Choose one or more of the following:Which of the following is/are appropriate for teaching matching during a beginning wedge christie lesson?A. Thousand stepsB. Wedge parallel garlandsC. Leapers
6. The text describes several benefits to learning the uphill christie. Name two of these.
_______________________________________________________________________________________
_______________________________________________________________________________________
7. Circle the best choice:During an uphill christie, the focal point of balance and pressure should be on the (inside) / (outside) foot and ski.

123A L P I N E L E V E L I S T U D Y G U I D E
8. Choose one or more of the following:During the uphill christie, feeling contact on the front of the boot:A. Should only occur at the end of the christieB. Always moves your weight onto the ball of your foot C. Helps keep the body from rocking fore and aft over the feet
9. What can you do with your knees and ankles to make sideslipping easier?
_______________________________________________________________________________________
_______________________________________________________________________________________
10. True or false:To enhance edging and pressure control skills, you could combine the forward sideslip with the uphill christie.
11. Circle the best choice:(Hockey slides) / (Uphill christies) require more active steering of the skis.
12. Choose the best answer:Which of the following exercises can help you anchor the timing of wedge and parallel movements in preparation for beginning wedge christies:A. Uphill christiesB. Wedge parallel garlandsC. Hockey slides
13. Circle the best choice:During a wedge-christie turn, (increased) / (decreased) pressure on the outside ski during the last third of the turn allows the inside ski to move more freely.
14. Circle the best choice:Traversing or slipping forward is especially helpful for (getting down bumpy terrain) /(making quick moves to avoid obstacles).
15. True or false:Hockey slides are especially helpful for controlling speed on rough terrain and in confined areas.
16. What is a thumper traverse?
_______________________________________________________________________________________
_______________________________________________________________________________________
17. Circle the best choice:Standing and balancing more on the outside ski during a wedge-christie turn involves a (rotary) / (pressure-control) movement.

124 A L P I N E L E V E L I S T U D Y G U I D E
S k i e r L e v e l 4
18. Circle the best choice:When the inside ski flattens in a wedge-christie turn, pressure on that ski (increases) / (decreases).

125A L P I N E L E V E L I S T U D Y G U I D E
126 A L P I N E L E V E L I S T U D Y G U I D E
S k i e r L e v e l 4
Answers: Methodical Approach to Matching and Skidding
1. B. To help beginning wedge christie students match their skis, you could show them how to point their in-side knee in the same direction the outside knee is pointing as they finish their turn.
Pointing the inside knee in the same direction as the outside knee in the bottom third of the turn flattens theinside ski and allows it to match the outside ski.
2. A, C, & D. For a beginning wedge christie student, the action of pointing the inside knee toward the centerof the turn facilitates inside leg steering, involves an external rotation of the leg, and contributes to the re-lease of the edge of that ski.
3. False. To match and skid at the beginning wedge christie level, you should be balanced over the outside skiduring the second half of the turn.
4. To make a wedge-christie turn from a traverse:1. Glide in a traverse with skis parallel and knees and ankles flexed.2. Open your skis into a wedge with a slight extension.3. Flex with most of the weight (pressure) on the outside (downhill) ski.4. Point the inside knee up the hill in the same direction the outside knee is pointing.
5. B. There are many exercises you could use to help your wedge christie students learn to match their skis.One of these is wedge parallel garlands (a series of incomplete turns across the hill which never cross thefall line).
6. Uphill christies can help beginning wedge christie students:• more fully utilize the design of the skis in the turn.• learn another option for slowing down and stopping. • refine their balance so that they will begin to stand more consistently over the “sweet spot” of the ski.• understand and apply their knowledge of how the interaction of edge angle and pressure on the ski
can cause the ski to grip and turn in the snow.• learn the movements for completing beginning wedge-christie turns.• control speed on steeper terrain.
7. Outside. The focal point of balance and pressure should be on the outside foot and ski. Just as in wedgeturns, the legs should move independently of the upper body.
8. C. During the uphill christie, feeling contact on the front of the boot helps keep the body from rocking foreand aft over the feet.
9. To make sideslipping easier• relax your knees and ankles • point your knees and ankles slightly downhill
10. True. Combining the forward sideslip with the uphill christie will enhance edging and pressure-control skills.

127A L P I N E L E V E L I S T U D Y G U I D E
11. Hockey slides. While both hockey slides and uphill christies require a simultaneous tipping of both the feetand legs, hockey slides require that you steer your skis more actively by twisting your feet and legs.
12. B. The wedge parallel garland can help you anchor the timing of wedge and parallel movements in prepara-tion for beginning wedge christies.
13. Increased. With the increase of pressure on the outside ski during a wedge-christie turn, the inside leg canmove more freely.
14. Traversing or slipping forward is especially helpful for getting down bumpy terrain.
15. True. Hockey slides are useful for controlling speed on rough terrain and in confined areas. They are alsouseful for avoiding obstacles or negotiating steep, difficult runs.
16. A thumper traverse is an exercise in which you tap the inside ski while traversing. It promotes matching.
17. Pressure control. Skiers learn to refine pressure control from foot to foot by standing and balancing more onthe outside ski during a wedge-christie turn.
18. Decreases. When the inside ski flattens in a wedge-christie turn, pressure on that ski is decreased. As the in-side knee is pointed to steer the inside leg into the turn, the inside ski flattens, resulting in less friction be-tween that ski’s edge and the snow.

128 A L P I N E L E V E L I S T U D Y G U I D E
S k i e r L e v e l 4
Notes

129A L P I N E L E V E L I S T U D Y G U I D E
