aluminon method - river source · aluminon method* 1. enter the stored program number for aluminum...
TRANSCRIPT

71
Method 8012ALUMINUM (0 to 0.80 mg/L) For water and wastewater
Aluminon Method*
1. Enter the stored program number for aluminum (Al).
Press: PRGM
The display will show:PRGM ?
Note: Adjust the pH of stored samples before analysis.Note: For most accurate results, perform a Reagent Blank Correction using deionized water (see Section 1).
2. Press: 1 ENTER
The display will show mg/L, Al and the ZERO icon.Note: Total aluminum determination requires a digestion prior to analysis (see Section 2).Note: For alternate form (Al2O3), press CONC.
3. Fill a 50-mL graduated mixing cylinder to the 50-mL mark with sample.Note: Rinse cylinder with 1:1 Hydrochloric Acid and deionized water before use to avoid errors due to contaminants absorbed on the glass.Note: Sample temperature must be 20-25 °C (68-77 °F) for accurate results.
4. Add the contents of one Ascorbic Acid Powder Pillow. Stopper. Invert several times to dissolve powder.
5. Add the contents of one AluVer® 3 Aluminum Reagent Powder Pillow. Stopper. Note: A red-orange color develops if aluminum is present.Note: Inconsistent results will occur if any powder is undissolved.
6. Press: TIMER ENTER
A three-minute reaction period will begin. Invert the cylinder repeatedly for the three minutes.
7. Pour 25 mL of mixture into a 25-mL sample cell (the prepared sample).
8. Add the contents of one Bleaching 3 Reagent Powder Pillow to the remaining 25 mL in the mixing graduated cylinder (the blank). Stopper the cylinder.
* Adapted from Standard Methods for the Examination of Water and Wastewater

72
9. The display will show: 00:30 Timer 2Press: ENTER
A thirty-second reaction period will begin. Vigorously shake the cylinder for the 30-second period.Note: This solution should turn a light to medium orange upon bleaching. It will not become colorless.
10. Pour the 25 mL of mixture in the cylinder into a second 25-mL sample cell (the blank).
11. The display will show: 15:00 TIMER 3Press: ENTER
A 15-minute reaction period will begin.
12. Within three minutes after the timer beeps, place the blank into the cell holder. Tightly cover the sample cell with the instrument cap.
13. Press: ZERO
The cursor will move to the right, then the display will show:
0.000 mg/L AlNote: If Reagent Blank Correction is on, the display may flash “limit”. See Section 1.
14. Immediately place the prepared sample into the cell holder. Tightly cover the sample cell with the instrument cap.
15. Press: READ
The cursor will move to the right, then the result in mg/L aluminum will be displayed.Note: Clean the graduated cylinder and sample cells with soap and brush immediately following the test.Note: Standard Adjust may be performed using a prepared standard (see Section 1).
ALUMINUM, continued

73
Sampling and StorageCollect samples in a clean glass or plastic container. Preserve the sample by adjusting the pH to 2 or less with nitric acid (about 1.5 mL per liter). Preserved samples can be stored up to six months at room temperature. Before analysis, adjust the pH to 3.5–4.5 with 5.0 N Sodium Hydroxide. Correct the test result for volume additions; see Correcting for Volume Additions in Section 1 for more information.
Accuracy CheckStandard Additions Method
a) Snap the neck off an Aluminum Voluette Ampule Standard Solution, 50 mg/L as Al.
b) Use the TenSette Pipet to add 0.1 mL, 0.2 mL, and 0.3 mL of standard, respectively, to three 50-mL samples. Swirl gently to mix. Also prepare a sample without any standard added (the unspiked sample).
c) Analyze each sample as described above. The aluminum concentration should increase 0.1 mg/L for each 0.1 mL of standard added.
d) If these increases do not occur, see Standard Additions (Section 1) for more information.
Standard Solution MethodPrepare a 0.40-mg/L aluminum standard solution by pipetting 1.00 mL of Aluminum Standard Solution, 100 mg/L as Al3+, into a 250-mL volumetric flask. Dilute to the mark with deionized water. Prepare this solution immediately before use. Perform the aluminum procedure as described above. The mg/L Al reading should be 0.40 mg/L Al.
Or, using the TenSette Pipet, add 0.8 mL of solution from an Aluminum Voluette Ampule Standard Solution (50 mg/L as Al) into a 100-mL volumetric flask. Dilute to volume with deionized water. Prepare this standard immediately before testing and use as the sample.
Method PerformancePrecisionIn a single laboratory, using a standard solution of 0.40 mg/L Al and two representative lots of reagent with the instrument, a single operator obtained a standard deviation of ±0.013 mg/L Al.
ALUMINUM, continued
74
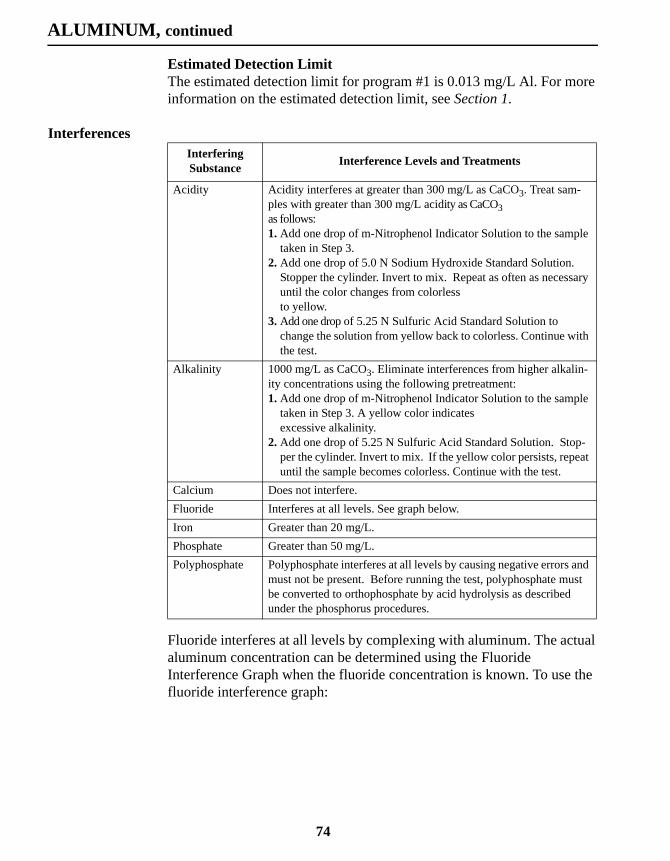
Estimated Detection LimitThe estimated detection limit for program #1 is 0.013 mg/L Al. For more information on the estimated detection limit, see Section 1.
Interferences
Fluoride interferes at all levels by complexing with aluminum. The actual aluminum concentration can be determined using the Fluoride Interference Graph when the fluoride concentration is known. To use the fluoride interference graph:
Interfering Substance Interference Levels and Treatments
Acidity Acidity interferes at greater than 300 mg/L as CaCO3. Treat sam-ples with greater than 300 mg/L acidity as CaCO3 as follows:1. Add one drop of m-Nitrophenol Indicator Solution to the sample
taken in Step 3.2. Add one drop of 5.0 N Sodium Hydroxide Standard Solution.
Stopper the cylinder. Invert to mix. Repeat as often as necessary until the color changes from colorless to yellow.
3. Add one drop of 5.25 N Sulfuric Acid Standard Solution to change the solution from yellow back to colorless. Continue with the test.
Alkalinity 1000 mg/L as CaCO3. Eliminate interferences from higher alkalin-ity concentrations using the following pretreatment:1. Add one drop of m-Nitrophenol Indicator Solution to the sample
taken in Step 3. A yellow color indicates excessive alkalinity.
2. Add one drop of 5.25 N Sulfuric Acid Standard Solution. Stop-per the cylinder. Invert to mix. If the yellow color persists, repeat until the sample becomes colorless. Continue with the test.
Calcium Does not interfere.Fluoride Interferes at all levels. See graph below.Iron Greater than 20 mg/L.Phosphate Greater than 50 mg/L.Polyphosphate Polyphosphate interferes at all levels by causing negative errors and
must not be present. Before running the test, polyphosphate must be converted to orthophosphate by acid hydrolysis as described under the phosphorus procedures.
ALUMINUM, continued

189
Method 8143COPPER (0 to 210.0 µg/L) For water, wastewater and seawater
Porphyrin Method*
1. Enter the stored program number for copper (Cu), porphyrin method.
Press: PRGM
The display will show:PRGM ?
2. Press: 22 ENTER
The display will show µg/L, Cu and the ZERO icon.Note: Total copper determination needs a prior digestion; use either the Digesdahl or vigorous digestion (Section 2).
3. Fill two sample cells with 10 mL of sample.Note: Wash all glassware with detergent. Rinse with tap water. Rinse again with Nitric Acid Solution, 1:1. Rinse a third time with copper-free, deionized water.
4. Add the contents of one Copper Masking Reagent Powder Pillow to one of the sample cells (the blank). Swirl to dissolve.Note: The other sample cell is the prepared sample.
5. Add the contents of one Porphyrin 1 Reagent Powder Pillow to each sample cell. Swirl to dissolve the powder.
6. Add the contents of one Porphyrin 2 Reagent Powder Pillow to each sample cell. Swirl to dissolve the powder.Note: The yellow color will turn blue momentarily. If any copper is present, the yellow color will return.
7. Press: TIMER ENTER
A three-minute reaction period will begin.
8. After the timer beeps, place the blank into the cell holder. Tightly cover the sample cell with the instrument cap.
* Adapted from Ishii and Koh, Bunseki Kagaku, 28 473 (1979)

190
Sampling and StorageCollect samples in acid-washed plastic bottles. To preserve, adjust the pH to 2 or less with nitric acid (about 5 mL per liter). Store preserved samples up to six months at room temperature.
Before testing, adjust the pH of the sample to between 2 and 6. If the sample is too acidic, adjust the pH with 5.0 N Sodium Hydroxide Standard Solution. Correct test results for volume additions; see Correction for Volume Additions in Section 1 for more information.
9. Press: ZERO
The cursor will move to the right, then the display will show:
0.0 µg/L Cu
10. Place the prepared sample into the cell holder. Tightly cover the sample cell with the instrument cap.Note: If samples with high levels of metal are analyzed, a slight metallic deposit or yellow buildup may appear on the sample cell wall. Remove by rinsing with nitric acid. Dilute a fresh sample and repeat the test. Multiply the result by the dilution factor; see Section 1.
11. Press: READ
The cursor will move to the right, then the result in µg/L copper (Cu) will be displayed.Note: Standard Adjust may be performed using a prepared standard (see Standard Adjust in Section 1).
.
COPPER, continued

191
Accuracy CheckStandard Additions Method
a) Fill six (3 pairs) 25-mL graduated mixing cylinders with 25 mL of sample. Properly mark each pair of cylinders as “sample” and “blank”.
b) Using a TenSette Pipet, add 0.1 mL of Copper Standard Solution, 10.0 mg/L Cu, to two of the cylinders. Add 0.2 mL of standard to two more of the cylinders. Add 0.3 mL of standard to the other two cylinders, making a total of six samples (2 for each volume of standard).
c) Analyze the samples as described above. The copper concentration reading should increase by 40 µg/L for each 0.1 mL of standard added.
d) If these increases do not occur, see Standard Additions in Section 1 for more information.
Standard Solution MethodTo assure the accuracy of the test, prepare a 100 µg/L copper standard:
a) Pipet 1.00 mL of Copper Standard Solution, 10.0 mg/L Cu, into a 100-mL volumetric flask.
b) Dilute to volume with copper-free, reagent-grade water.
c) Use this standard in place of the sample in the procedure. The reading should be 100 µg/L Cu.
d) Prepare this solution daily.
Method PerformancePrecisionIn a single laboratory, using a standard solution of 100 µg/L copper and two representative lots of reagent with the instrument, a single operator obtained a standard deviation of ±3.4 µg/L copper.
Estimated Detection LimitThe estimated detection limit for program 22 is 5.4 µg/L Cu. For more information on the estimated detection limit, see Section 1.
COPPER, continued
307
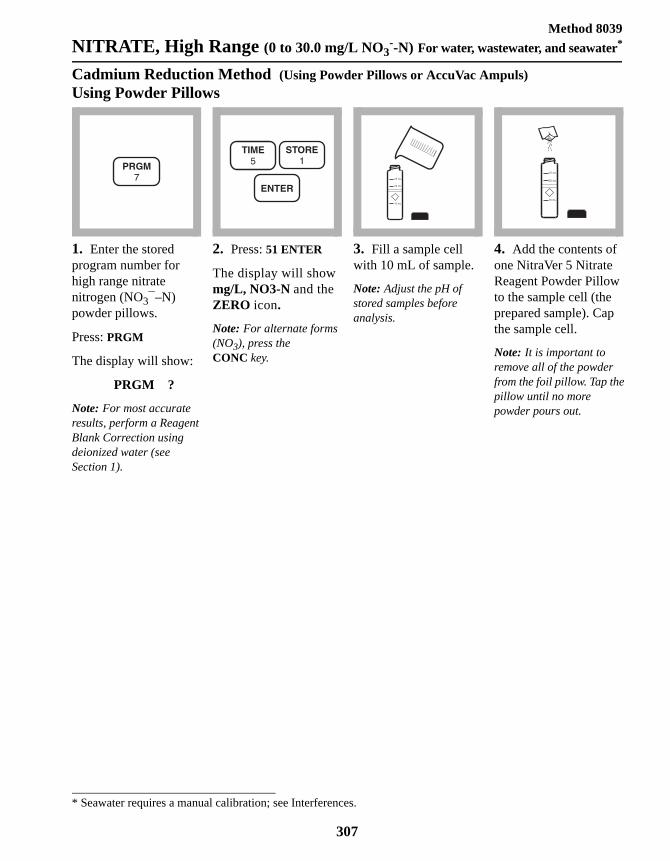
Method 8039NITRATE, High Range (0 to 30.0 mg/L NO3
--N) For water, wastewater, and seawater*
Cadmium Reduction Method (Using Powder Pillows or AccuVac Ampuls) Using Powder Pillows
* Seawater requires a manual calibration; see Interferences.
1. Enter the stored program number for high range nitrate nitrogen (NO3¯–N) powder pillows.
Press: PRGM
The display will show:
PRGM ?
Note: For most accurate results, perform a Reagent Blank Correction using deionized water (see Section 1).
2. Press: 51 ENTER
The display will show mg/L, NO3-N and the ZERO icon.
Note: For alternate forms (NO3), press the CONC key.
3. Fill a sample cell with 10 mL of sample.
Note: Adjust the pH of stored samples before analysis.
4. Add the contents of one NitraVer 5 Nitrate Reagent Powder Pillow to the sample cell (the prepared sample). Cap the sample cell.
Note: It is important to remove all of the powder from the foil pillow. Tap the pillow until no more powder pours out.

308
5. Press: TIMER ENTER
A one-minute reaction period will begin. Shake the sample cell vigorously until the timer beeps.
Note: It is important to shake the cell vigorously. Shaking time and technique influence color development. For most accurate results, do successive tests on a standard solution and adjust the shaking time to obtain the correct result.
6. After the timer beeps, the display will show: 5:00 TIMER 2
Press: ENTER
A five-minute reaction period will begin.
Note: A deposit will remain after the reagent dissolves and will not affect test results.
Note: An amber color will develop if nitrate nitrogen is present.
7. Fill another cell with 10 mL of sample (the blank). Wipe off any fingerprints or liquid.
8. Place the blank into the cell holder. Tightly cover the sample cell with the instrument cap.
9. When the timer beeps, press ZERO.
The cursor will move to the right, then the display will show:
0.0 mg/L NO3-N
Note: If Reagent Blank Correction is on, the display may flash “limit”. See Section 1.
10. Place the prepared sample into the cell holder. Tightly cover the sample cell with the instrument cap.
11. Press: READ
The cursor will move to the right, then the result in mg/L NO3-N (or alternate form) will be displayed.
Note: Use of the Standard Adjust feature for each new lot of reagent is highly recommended. See Accuracy Check.
Note: Rinse the sample cell immediately after use to remove all cadmium particles. Save the spent sample for proper hazardous waste disposal for cadmium.
NITRATE, High Range, continued

311
Accuracy CheckStandard Additions Method
a) Fill three 25-mL mixing cylinders with 25 mL of sample.
b) Snap the neck off a Nitrate Nitrogen Ampule Standard, 500 mg/L nitrate nitrogen.
c) Use the TenSette Pipet to add 0.1, 0.2, and 0.3 mL of Nitrate Nitrogen Standard Solution to the three samples. Stopper and mix thoroughly.
d) For AccuVac analysis, transfer the solutions to clean, dry 50-mL beakers. For analysis with powder pillows, transfer only 10 mL of solution to clean, dry sample cells.
e) Analyze each sample as described above. The nitrate nitrogen (NO3
--N) concentration should increase 2.0 mg/L for each 0.1 mL of standard added.
f) If these increases do not occur, see Standard Additions (Section 1) for more information.
Standard Solution MethodUse a Hach Nitrate-Nitrogen Standard Solution, 10.0 mg/L NO3
--N, listed under Optional Reagents as the sample and perform the procedure as described above.
Standard AdjustTo adjust the calibration curve using the reading obtained with the 10.0-mg/L standard solution, press the SETUP key and scroll (using the arrow keys) to the STD setup option. Press ENTER to activate the standard adjust option. Then enter 10.0 to edit the standard concentration to match that of the standard used. Press ENTER to complete the curve adjustment. See Section 1, Standard Curve Adjustment for more information. If you are using a reagent blank correction, the blank correction should be entered before the Standard Adjust value is entered.
Method PerformancePrecisionIn a single laboratory using standard solutions of 25.0 mg/L nitrate nitrogen (NO3
--N) and two representative lots of reagent with the instrument, a single operator obtained a standard deviation of +0.3 mg/L nitrate nitrogen for program #50 and ±1.7 mg/L nitrate nitrogen for program # 51.
NITRATE, High Range, continued

312
Estimated Detection LimitThe estimated detection limit for program 50 is 0.5 mg/L NO3
--N and 0.8 mg/L NO3
--N for program 51. For more information on the estimated detection limit, see Section 1.
Interferences
Summary Of MethodCadmium metal reduces nitrates present in the sample to nitrite. The nitrite ion reacts in an acidic medium with sulfanilic acid to form an intermediate diazonium salt which couples to gentisic acid to form an amber-colored product.
Pollution Prevention and Waste ManagementNitraVer 5 contains cadmium metal. Both samples and reagent blanks will contain cadmium (D006) at a concentration regulated as hazardous wastes by the Federal RCRA. Do not pour these solutions down the drain. See Section 3 for more information on proper disposal of these materials.
Interfering Substance Interference Levels and Treatments
Chloride Chloride concentrations above 100 mg/L will cause low results. The test may be used at high chloride concentrations (seawater) but a calibration must be done using standards spiked to the same chloride concentration.
Ferric iron All levels
Nitrite All levelsCompensate for nitrite interference as follows:Add 30-g/L Bromine Water dropwise to the sample in Step 3 until a yellow color remains.Add one drop of 30-g/L Phenol Solution to destroy the color. Pro-ceed with Step 4. Report the results as total nitrate and nitrite.
pH Highly buffered samples or extreme sample pH may exceed the buffering capacity of the reagents and require sample pretreatment.
Strong oxidizing and reducing sub-stances
Interfere at all levels.
NITRATE, High Range, continued

475
Method 8048PHOSPHORUS, REACTIVE (0 to 2.50 mg/L PO43-) For water, wastewater, seawater
(Also called Orthophosphate) PhosVer 3 (Ascorbic Acid) Method* (Powder Pillows or AccuVac Ampuls) USEPA Accepted for wastewater analysis reporting**
Using Powder Pillows
* Adapted from Standard Methods for the Examination of Water and Wastewater.** Procedure is equivalent to USEPA method 365.2 and Standard Method 4500-PE for wastewater.
1. Enter the stored program number for reactive phosphorus, ascorbic acid method.
Press: PRGM
The display will show:
PRGM ?
Note: For most accurate results, perform a Reagent Blank Correction using deionized water (see Section 1).
2. Press: 79 ENTER
The display will show mg/L, PO4 and the ZERO icon.
Note: For alternate forms (P, P2O5), press the CONC key.
3. Fill a sample cell with 10 mL of sample.
Note: For samples with extreme pH, see Interferences following these steps.
Note: Clean glassware with 1:1 HCl. Rinse again with deionized water. Do not use detergents containing phosphates to clean glassware.
4. Add the contents of one PhosVer 3 Phosphate Powder Pillow for 10-mL sample to the cell (the prepared sample). Shake for 15 seconds.
Note: A blue color will form if phosphate is present.

476
5. Press:
TIMER ENTER
A two-minute reaction period will begin. Perform Steps 6-8 during this period.Note: If the acid-persulfate digestion was used, an 8-10 minute reaction period is required.
6. Fill another sample cell with 10 mL of sample (the blank).
7. Place the blank into the cell holder. Tightly cover the sample cell with the instrument cap.
8. Press: ZERO
The cursor will move to the right, then the display will show:
0.00 mg/L PO4
Note: If Reagent Blank Correction is on, the display may flash “limit”. See Section 1.
9. After the timer beeps, place the prepared sample into the cell holder. Tightly cover the sample cell with the instrument cap.
10. Press: READ
The cursor will move to the right, then the result in mg/L phosphate (PO43-) will be displayed.
Note: Standard Adjust may be performed using a 2.0-mg/L PO43-standard; see Section 1.
PHOSPHORUS, REACTIVE, continued

479
Sampling and StorageCollect sample in plastic or glass bottles that have been cleaned with 1:1 Hydrochloric Acid Solution and rinsed with deionized water. Do not use commercial detergents containing phosphate for cleaning glassware used in this test.
Analyze samples immediately after collection for best results. If prompt analysis is impossible, preserve samples for up to 48 hours by filtering immediately and storing samples at 4 °C. Warm to room temperature before testing.
Accuracy CheckStandard Additions Method
a) Fill three 25-mL graduated mixing cylinders with 25 mL of sample.
b) Snap the neck off a Phosphate PourRite Ampule Standard Solution, 50 mg/L as PO43-.
c) Use the TenSette Pipet to add 0.1 mL, 0.2 mL, and 0.3 mL of standard, respectively, to the three mixing cylinders. Stopper each and mix thoroughly.
d) For analysis with AccuVacs, transfer solutions to dry, clean 50 mL beakers to fill the AccuVac ampules. For analysis with powder pillows, transfer only 10 mL of solution to the sample cells.
e) Analyze each standard addition sample as described in the procedure. The phosphate concentration should increase 0.2 mg/L PO43- for each 0.1 mL of standard added.
f) If these increases do not occur, see Standard Additions in Section 1.
Standard Solution MethodPrepare a 2.0 mg/L PO43- standard solution by pipetting 4.0 mL of Phosphate Standard Solution, 50 mg/L as PO43-, into an acid-washed Class A 100-mL volumetric flask. Dilute to volume with deionized water. Stopper and invert to mix. Use this solution in place of the sample in the procedure to insure the accuracy of the test. The mg/L PO43- reading should be 2.00 mg/L.
PHOSPHORUS, REACTIVE, continue
480
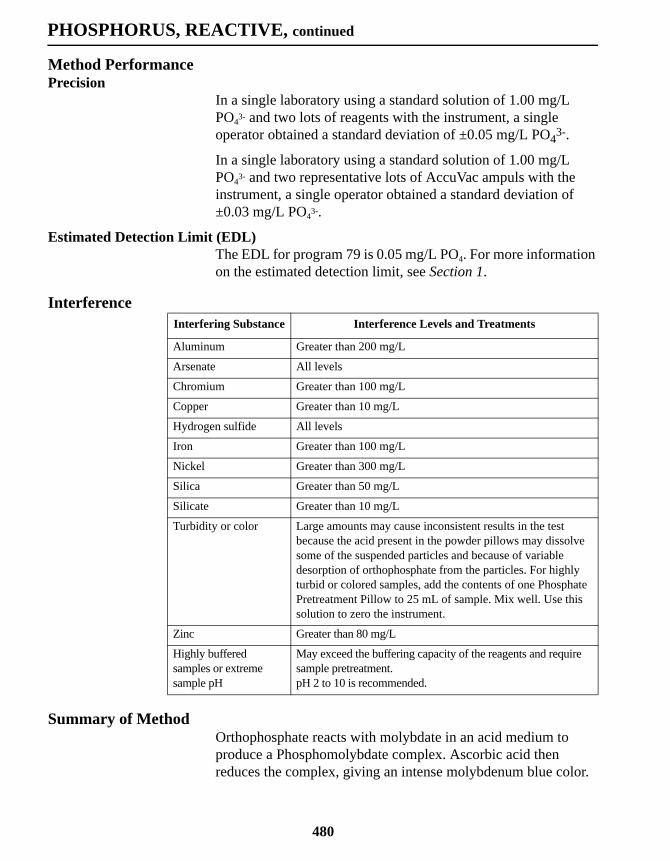
Method PerformancePrecision
In a single laboratory using a standard solution of 1.00 mg/L PO43- and two lots of reagents with the instrument, a single operator obtained a standard deviation of ±0.05 mg/L PO43-.
In a single laboratory using a standard solution of 1.00 mg/L PO43- and two representative lots of AccuVac ampuls with the instrument, a single operator obtained a standard deviation of ±0.03 mg/L PO43-.
Estimated Detection Limit (EDL)The EDL for program 79 is 0.05 mg/L PO4. For more information on the estimated detection limit, see Section 1.
Interference
Summary of MethodOrthophosphate reacts with molybdate in an acid medium to produce a Phosphomolybdate complex. Ascorbic acid then reduces the complex, giving an intense molybdenum blue color.
Interfering Substance Interference Levels and Treatments
Aluminum Greater than 200 mg/L
Arsenate All levels
Chromium Greater than 100 mg/L
Copper Greater than 10 mg/L
Hydrogen sulfide All levels
Iron Greater than 100 mg/L
Nickel Greater than 300 mg/L
Silica Greater than 50 mg/L
Silicate Greater than 10 mg/L
Turbidity or color Large amounts may cause inconsistent results in the test because the acid present in the powder pillows may dissolve some of the suspended particles and because of variable desorption of orthophosphate from the particles. For highly turbid or colored samples, add the contents of one Phosphate Pretreatment Pillow to 25 mL of sample. Mix well. Use this solution to zero the instrument.
Zinc Greater than 80 mg/L
Highly buffered samples or extreme sample pH
May exceed the buffering capacity of the reagents and require sample pretreatment. pH 2 to 10 is recommended.
PHOSPHORUS, REACTIVE, continued