amazing books part 1 - michael · pdf fileoracle academy . amazing books . part 1 . amazing...
TRANSCRIPT

Oracle Academy Amazing Books Part 1

Amazing Books Part 1
SCENARIO Cicely Williams inherited her uncle's bookstore after he retired in 2001. In the last several years, the bookstore's sales have skyrocketed. Cicely can no longer continue to manage the business without using a database to store customer records, track inventory, and access accounting information. Eventually, Cicely would like to take the business online, but first she needs an easier way to manage the details of her business in house. She needs to be able to: • search inventory for book titles, authors, ISBN numbers, book editions, book
subjects, and publishers. • track sales for other merchandise items and display wholesale and retail
prices for all items • insert, update, and delete items from her items inventory • track customer information for emailing store specials, new books, book
signings, etc. • place and view customer orders Recently, Cicely hired a consulting company to determine the information needs of her business. The consultants developed an Entity Relationship Diagram detailing the business' data and functionality requirements. Now, Cicely is ready to have you design an easy to use, but robust application interface for her office. Having just completed the Oracle Internet Academy Data Modeling and SQL course, you are confident in your ability to design the application Cicely needs.
Oracle Academy 2 Database Programming with SQL Copyright © 2011, Oracle. All rights reserved.

Amazing Books Part 1
INSTRUCTIONS The Amazing Books Project uses the Oracle Application Express (APEX) SQL Workshop and Application Builder tools to build a database for the Amazing Books bookstore. The project is divided into seven parts. Each part consists of several steps. Each step has detailed instructions and supporting graphics. Part 1: Building the tables and adding column constraints. Part 2: Creating the application's pages, page style, and Popup List of Values. Part 3: Creating the input forms and report regions for the application's CUSTOMERS, SUBJECTS, PUBLISHERS, ITEM_TYPES pages. Creating the Orders Report and Items Report pages. Part 4: Inputting data into the CUSTOMERS, SUBJECTS, PUBLISHERS, ITEM_TYPES tables. Part 5: Creating the LOVs for the application’s ORDERS and ITEMS pages. Creating the buttons to link to the Orders Report and Items Report pages. Part 6: Inputting data into the Orders and Items table. Part 7: Formatting report attributes.
Let's begin with Part 1....
Oracle Academy 3 Database Programming with SQL Copyright © 2011, Oracle. All rights reserved.

Amazing Books Part 1
Part 1: Building Tables and Adding Constraints In this section, you use the Object Browser in APEX to:
• Build the base tables for the project • Add primary key constraints • Add foreign key constraints
Be sure to have a copy of the entity relationship diagram (ERD) and schema diagrams available as you go through this section. You will need to reference them as you build the tables. Step 1: Logging on to APEX. Log on to APEX using your Workspace, Username, and Password. See your instructor for this information and the correct URL for APEX.
Step 2: Accessing SQL Workshop and the Object Browser 2.1 Launch SQL Workshop In the Home window of APEX, click the SQL Workshop icon.
Oracle Academy 4 Database Programming with SQL Copyright © 2011, Oracle. All rights reserved.

Amazing Books Part 1
The SQL Workshop tools are displayed.
2.2 Use the Object Browser to create the tables for the project. Click the drop-down menu for Object Browser. Select Create ▶ Table.
Step 3: Creating the CUSTOMERS table 3.1 Review the CUSTOMERS entity in the ERD and data model.
CUSTOMERS # customer_id * customer_name * address * city o state_province *country o email
CUSTOMERS pk customer_id customer_name address city state_province country email
Oracle Academy 5 Database Programming with SQL Copyright © 2011, Oracle. All rights reserved.
Amazing Books Part 1
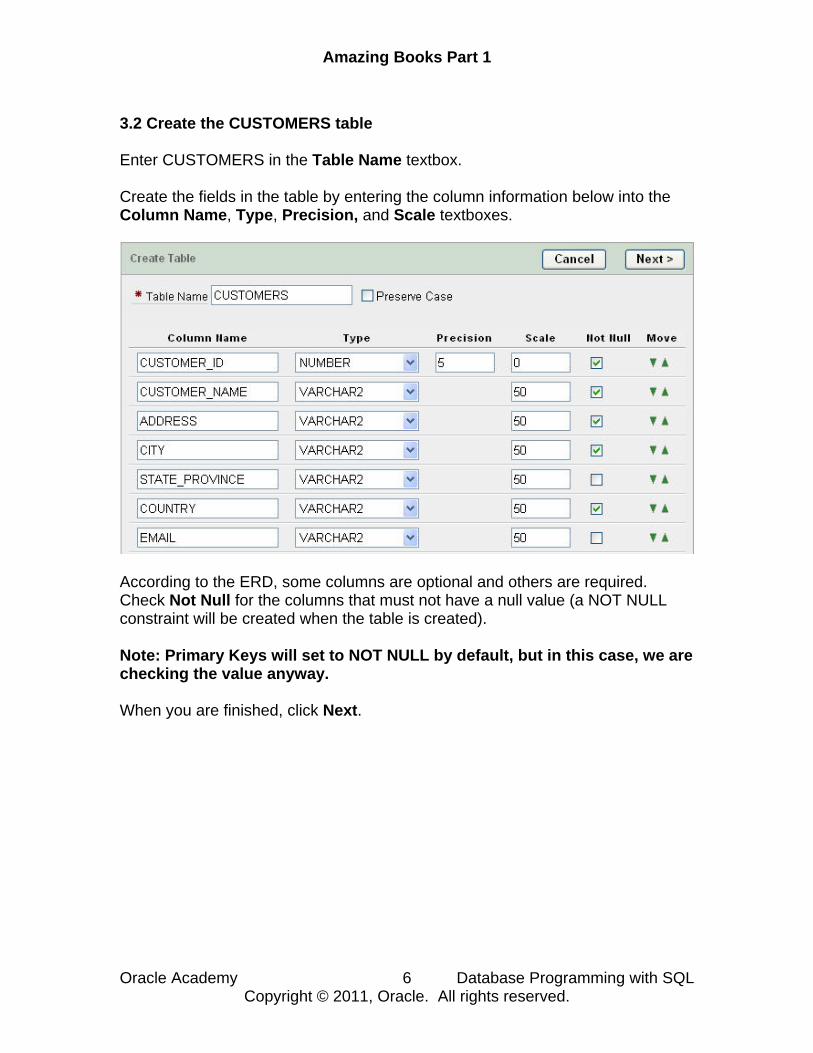
3.2 Create the CUSTOMERS table Enter CUSTOMERS in the Table Name textbox. Create the fields in the table by entering the column information below into the Column Name, Type, Precision, and Scale textboxes.
According to the ERD, some columns are optional and others are required. Check Not Null for the columns that must not have a null value (a NOT NULL constraint will be created when the table is created). Note: Primary Keys will set to NOT NULL by default, but in this case, we are checking the value anyway. When you are finished, click Next.
Oracle Academy 6 Database Programming with SQL Copyright © 2011, Oracle. All rights reserved.
Amazing Books Part 1
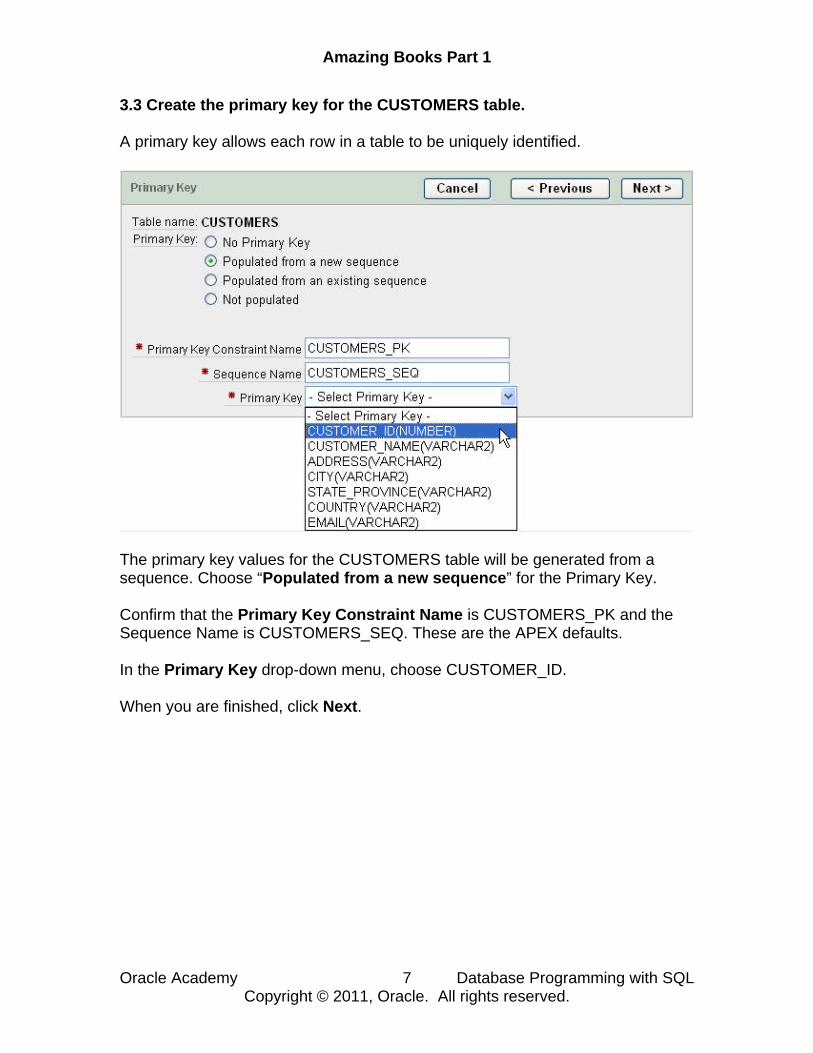
3.3 Create the primary key for the CUSTOMERS table. A primary key allows each row in a table to be uniquely identified.
The primary key values for the CUSTOMERS table will be generated from a sequence. Choose “Populated from a new sequence” for the Primary Key. Confirm that the Primary Key Constraint Name is CUSTOMERS_PK and the Sequence Name is CUSTOMERS_SEQ. These are the APEX defaults. In the Primary Key drop-down menu, choose CUSTOMER_ID. When you are finished, click Next.
Oracle Academy 7 Database Programming with SQL Copyright © 2011, Oracle. All rights reserved.

Amazing Books Part 1
3.4 Click Next to skip creating a foreign key for the CUSTOMERS table. We will create the required foreign keys after we have created all the tables.
3.5 Click Finish to skip creating other constraints for the CUSTOMERS table. No other constraints are needed for the CUSTOMERS table.
Oracle Academy 8 Database Programming with SQL Copyright © 2011, Oracle. All rights reserved.

Amazing Books Part 1
3.6 Confirm the create table request The final step in the create table process is to confirm your request to create the CUSTOMERS table. You can review the SQL code that will be used to create the table by expanding the SQL section. If you are satisfied the code is correct, then click Create in the Create Table window.
Oracle Academy 9 Database Programming with SQL Copyright © 2011, Oracle. All rights reserved.

Amazing Books Part 1
3.7 Examine the new table The newly created table should look like the sample below. DO NOT MAKE ANY OTHER CHANGES TO THIS TABLE AT THIS TIME.
3.8 Return to the SQL Workshop by clicking the appropriate tab.
Oracle Academy 10 Database Programming with SQL Copyright © 2011, Oracle. All rights reserved.

Amazing Books Part 1
Step 4: Creating the ORDERS table Click the drop-down menu for Object Browser. Select Create ▶ Table.
4.1 Review the ORDERS entity in the ERD and data model.
ORDERS pk order_id fk customer_id order_date quantity fk item_id
ORDERS # order_id * order_date * quantity
4.2 Create the ORDERS table with the following column definitions
Oracle Academy 11 Database Programming with SQL Copyright © 2011, Oracle. All rights reserved.
Amazing Books Part 1
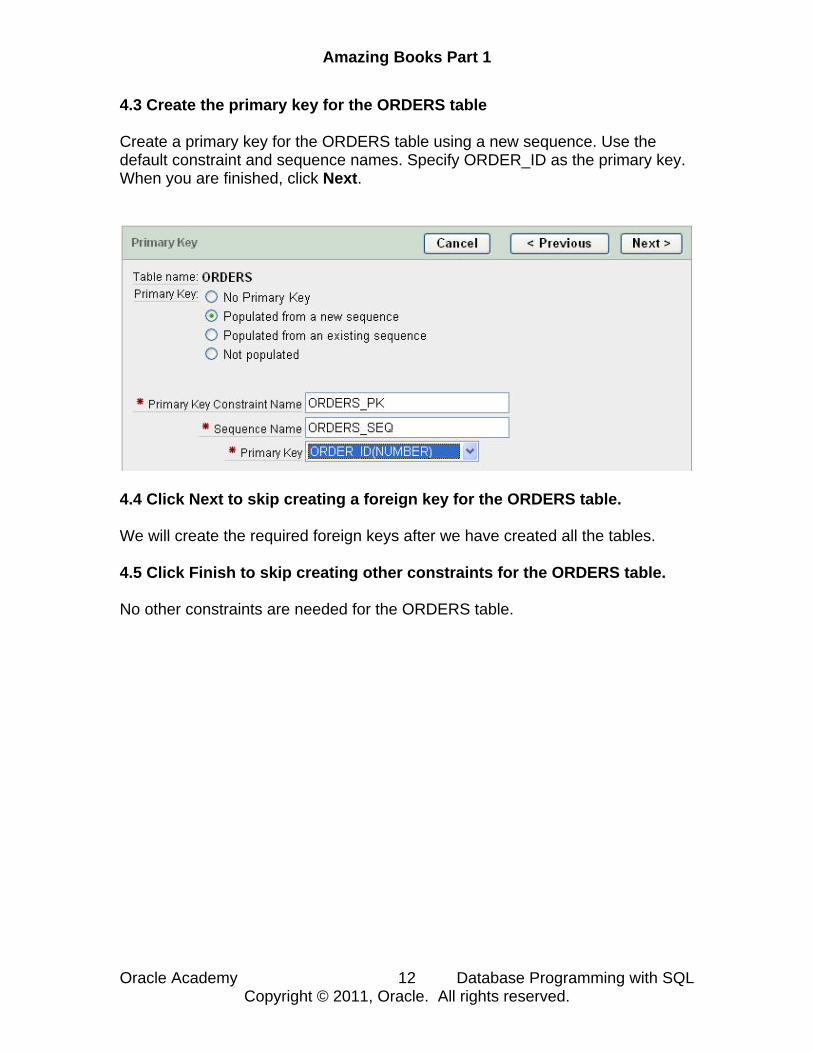
4.3 Create the primary key for the ORDERS table Create a primary key for the ORDERS table using a new sequence. Use the default constraint and sequence names. Specify ORDER_ID as the primary key. When you are finished, click Next.
4.4 Click Next to skip creating a foreign key for the ORDERS table. We will create the required foreign keys after we have created all the tables. 4.5 Click Finish to skip creating other constraints for the ORDERS table. No other constraints are needed for the ORDERS table.
Oracle Academy 12 Database Programming with SQL Copyright © 2011, Oracle. All rights reserved.

Amazing Books Part 1
4.6 Confirm the create table request The final step in the create table process is to confirm your request to create the ORDERS table. You can review the SQL code that will be used to create the table by expanding the SQL section. If you are satisfied the code is correct, then click Create in the Create Table window.
4.7 Examine the new table.
4.8 Return to the SQL Workshop by clicking the appropriate tab.
Oracle Academy 13 Database Programming with SQL Copyright © 2011, Oracle. All rights reserved.

Amazing Books Part 1
Step 5: Creating the ITEMS table 5.1 Review the ITEMS entity in the ERD and data model.
ITEMS # item_id * isbn * title * author * wholesale_cost * retail_price
ITEMS pk item_id isbn title author fk publisher_id fk subject_id fk item_type_id wholesale_cost retail_price
5.2 Create the ITEMS table with the following column definitions Note: if you run out of textboxes, click Add Column. When you are completely done adding all columns, click Next to continue.
Oracle Academy 14 Database Programming with SQL Copyright © 2011, Oracle. All rights reserved.

Amazing Books Part 1
5.3 Create the primary key for the ITEMS table Create a primary key for the ITEMS table using a new sequence. Use the default constraint and sequence names. Specify ITEM_ID as the primary key. When you are finished, click Next. 5.4 Click Next to skip creating a foreign key for the ITEMS table. We will create the required foreign keys after we have created all the tables. 5.5 Click Finish to skip creating other constraints for the ITEMS table. No other constraints are needed for the ITEMS table. 5.6 Click Create to confirm the create table request 5.7 Examine the new table.
5.8 Return to SQL Workshop.
Oracle Academy 15 Database Programming with SQL Copyright © 2011, Oracle. All rights reserved.

Amazing Books Part 1
Step 6: Creating the SUBJECTS table 6.1 Review the SUBJECTS entity in the ERD and data model.
SUBJECTS # subject_id * subject
SUBJECTS pk subject_id subject
6.2 Create the SUBJECTS table with the following column definitions
6.3 Create the primary key for the SUBJECTS table Create a primary key for the SUBJECTS table using a new sequence. Use the default constraint and sequence names. Specify SUBJECT_ID as the primary key. When you are finished, click Next. 6.4 Click Next to skip creating a foreign key. We will create the required foreign keys after we have created all the tables. 6.5 Click Finish to skip creating other constraints. No other constraints are needed for this table. 6.6 Click Create to confirm the create table request 6.7 Examine the new table and return to the SQL Workshop.
Oracle Academy 16 Database Programming with SQL Copyright © 2011, Oracle. All rights reserved.

Amazing Books Part 1
Step 7: Creating the PUBLISHERS table 7.1 Review the PUBLISHERS entity in the ERD and data model.
PUBLISHER #publisher_id *publisher
PUBLISHERS pk publisher_id publisher
7.2 Create the PUBLISHERS table with the following column definitions.
7.3 Create the primary key for the PUBLISHERS table Create a primary key for the table using a new sequence. Use the default constraint and sequence names. Specify PUBLISHER_ID as the primary key. When you are finished, click Next. 7.4 Click Next to skip creating a foreign key. We will create the required foreign keys after we have created all the tables. 7.5 Click Finish to skip creating other constraints. No other constraints are needed for this table. 7.6 Click Create to confirm the create table request. 7.7 Examine the new table and return to the SQL Workshop.
Oracle Academy 17 Database Programming with SQL Copyright © 2011, Oracle. All rights reserved.

Amazing Books Part 1
Step 8: Creating the ITEM_TYPES table 8.1 Review the ITEM_TYPES entity in the ERD and data model.
ITEM_TYPES # item_type_id * item_type
ITEM_TYPES pk item_type_id item_type
8.2 Create the ITEM_TYPES table with the column definitions below.
8.3 Create the primary key for the ITEM_TYPES table Create a primary key for the table using a new sequence. Use the default constraint and sequence names. Specify ITEM_TYPE_ID as the primary key. When you are finished, click Next. 8.4 Click Next to skip creating a foreign key. We will create the required foreign keys after we have created all the tables. 8.5 Click Finish to skip creating other constraints. No other constraints are needed for this table. 8.6 Click Create to confirm the create table request. 8.7 Examine the new table and return to the SQL Workshop.
Oracle Academy 18 Database Programming with SQL Copyright © 2011, Oracle. All rights reserved.

Amazing Books Part 1
Step 9: Creating the foreign keys between all tables Now that all tables are created, we will create the foreign keys that connect the tables. 9.1 Review the Amazing Books ERD, focusing on the five foreign keys.
9.2 Create the foreign key that relates each row in the ORDERS table to the appropriate row in the CUSTOMERS table Click the drop-down menu for Object Browser. Select Browse ▶ Table.
Oracle Academy 19 Database Programming with SQL Copyright © 2011, Oracle. All rights reserved.
Amazing Books Part 1
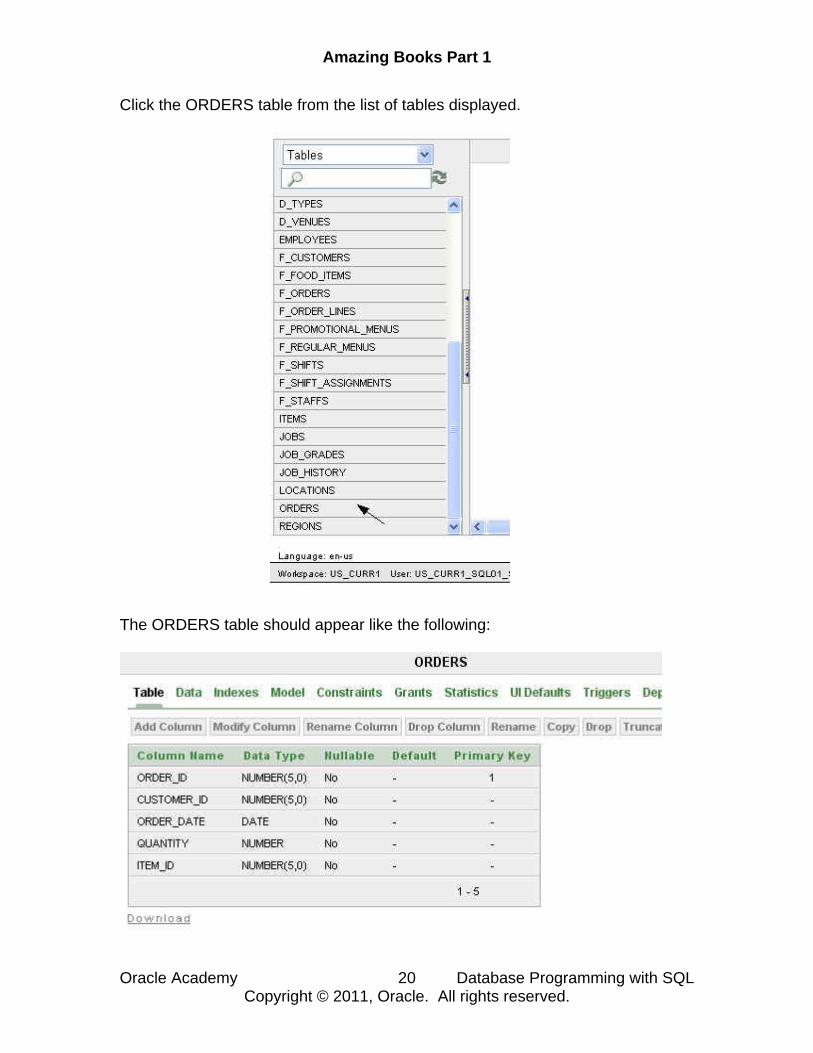
Click the ORDERS table from the list of tables displayed.
The ORDERS table should appear like the following:
Oracle Academy 20 Database Programming with SQL Copyright © 2011, Oracle. All rights reserved.

Amazing Books Part 1
Click the CONSTRAINTS tab to begin creating the foreign key between the ORDERS table and the CUSTOMERS table.
Click the CREATE button to create a foreign key constraint. Populate the fields with the following values and click NEXT to continue.
Click FINISH to create the foreign key.
Oracle Academy 21 Database Programming with SQL Copyright © 2011, Oracle. All rights reserved.

Amazing Books Part 1
Confirm the foreign key is now created in the ORDERS table referencing the CUSTOMER table using the CUSTOMER table's primary key.
Return to the SQL Workshop by clicking the appropriate tab.
Oracle Academy 22 Database Programming with SQL Copyright © 2011, Oracle. All rights reserved.

Amazing Books Part 1
9.3 Create the foreign key that relates each row in the ORDERS table to the appropriate row in the ITEMS table Click the drop-down menu for Object Browser. Select Browse ▶ Table.
Click the ORDERS table from the list of tables displayed.
Oracle Academy 23 Database Programming with SQL Copyright © 2011, Oracle. All rights reserved.

Amazing Books Part 1
The ORDERS table should appear like the following:
Click the CONSTRAINTS tab to create the foreign key between the ORDERS table and the ITEMS table.
Click the CREATE button to create a foreign key constraint. Populate the fields with the following values and click NEXT to continue.
Oracle Academy 24 Database Programming with SQL Copyright © 2011, Oracle. All rights reserved.

Amazing Books Part 1
Click FINISH to create the foreign key.
Confirm the foreign key is now created in the ORDERS table referencing the ITEMS table using the ITEMS table primary key.
Return to the SQL Workshop by clicking the appropriate tab.
Oracle Academy 25 Database Programming with SQL Copyright © 2011, Oracle. All rights reserved.

Amazing Books Part 1
9.4 Create the foreign keys that relate each row in the ITEMS table to the appropriate rows in the SUBJECTS, PUBLISHERS, and ITEM_TYPES table Click the drop-down menu for Object Browser. Select Browse ▶ Table.
Click to SELECT the ITEMS table from the list of tables displayed.
Oracle Academy 26 Database Programming with SQL Copyright © 2011, Oracle. All rights reserved.

Amazing Books Part 1
The ITEMS table should appear like the following example.
Click the CONSTRAINTS tab to create the foreign keys between the ITEMS table and the ITEM_TYPES table.
Click the CREATE button to create a foreign key between the ITEMS table and the ITEM_TYPES table. Populate the fields with the following values and click NEXT to continue.
Click FINISH to create the foreign key.
Oracle Academy 27 Database Programming with SQL Copyright © 2011, Oracle. All rights reserved.
Amazing Books Part 1
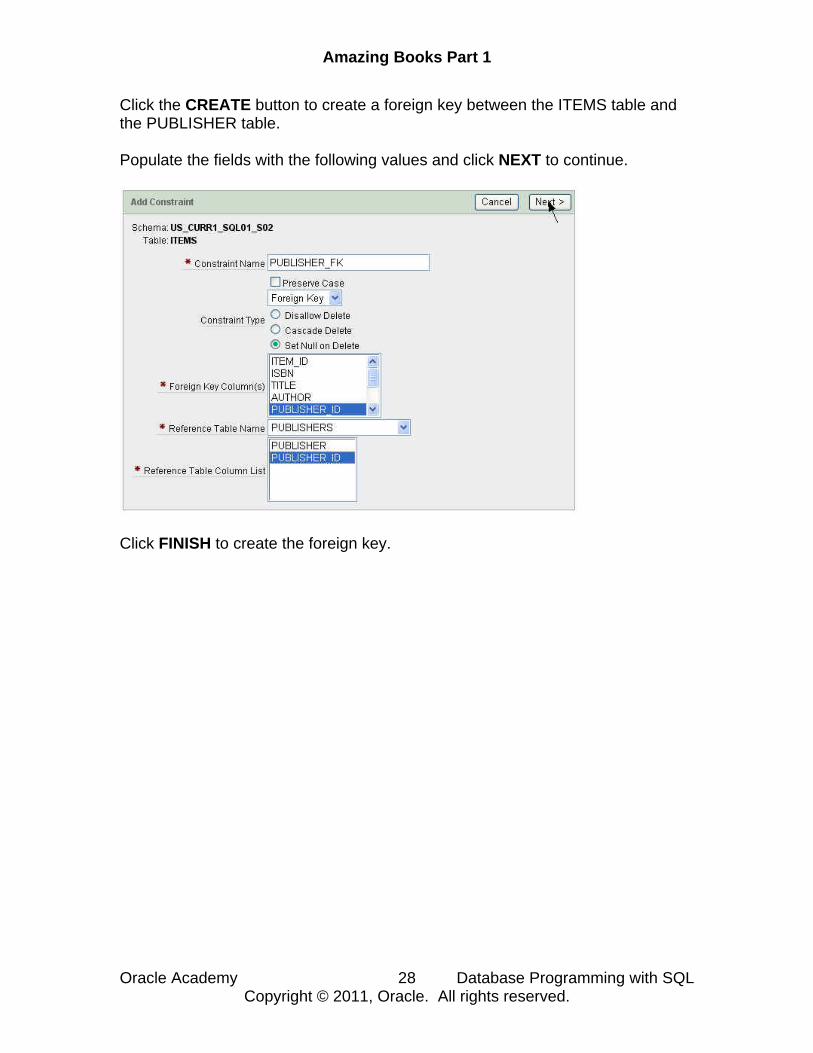
Click the CREATE button to create a foreign key between the ITEMS table and the PUBLISHER table. Populate the fields with the following values and click NEXT to continue.
Click FINISH to create the foreign key.
Oracle Academy 28 Database Programming with SQL Copyright © 2011, Oracle. All rights reserved.
Amazing Books Part 1
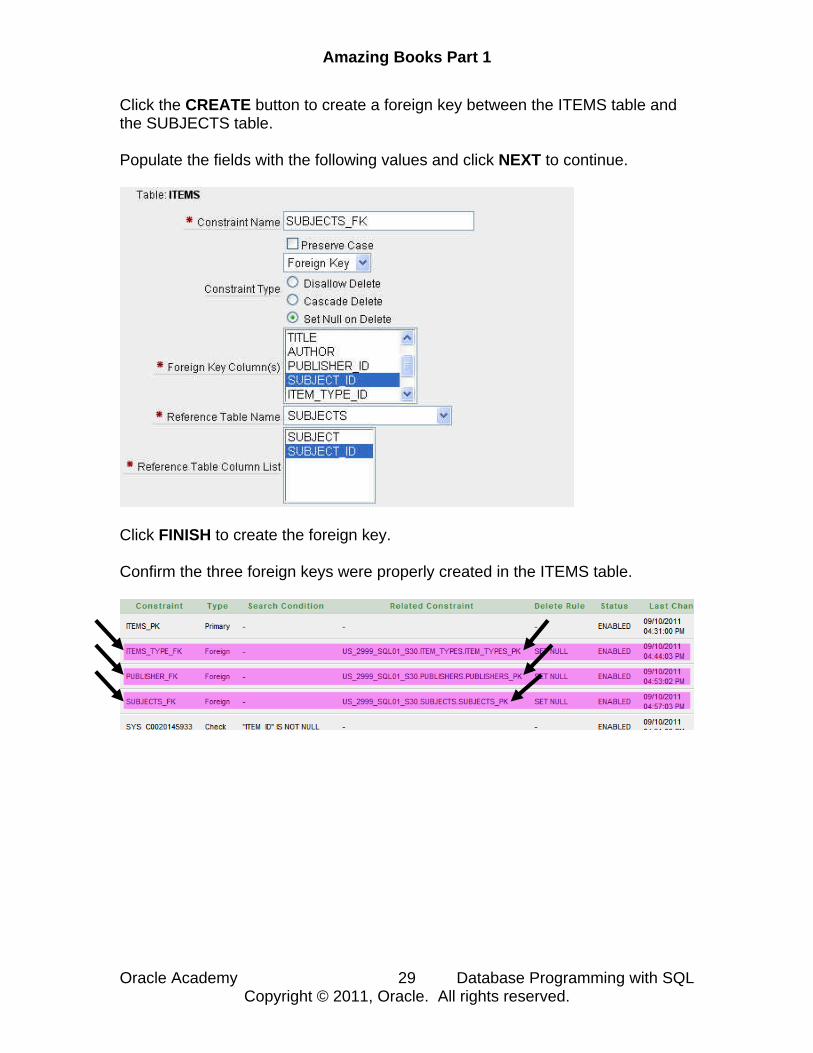
Click the CREATE button to create a foreign key between the ITEMS table and the SUBJECTS table. Populate the fields with the following values and click NEXT to continue.
Click FINISH to create the foreign key. Confirm the three foreign keys were properly created in the ITEMS table.
Oracle Academy 29 Database Programming with SQL Copyright © 2011, Oracle. All rights reserved.

Amazing Books Part 1
Oracle Academy 30 Database Programming with SQL Copyright © 2011, Oracle. All rights reserved.
Summary In Steps 3 through 8, you created six tables: CUSTOMERS, ORDERS, SUBJECTS, PUBLISHERS, ITEM_TYPES, and ITEMS. In Step 9, you created five foreign keys—two foreign keys in the ORDERS table creating a connection to the CUSTOMERS and ITEMS tables, and three foreign keys in the ITEMS table creating a connection to the SUBJECTS, PUBLISHERS, and ITEM_TYPES tables. These tables are the foundation for the application you will create in Part 2. You will continue to add functionality to the application throughout this project. Let's continue...