amica ioak 1718
DESCRIPTION
Amica oven manualTRANSCRIPT

INSTRUCTION MANUALBUILT-IN ELECTRIC OVEN
IOAK-1718 / 8048866(10.2010./1)
1143.4TdYDbHaOQVS
C
ECO
MENU
CLEAN

2
DEAR CUSTOMER,
The oven is exceptionally easy to use and extremely efficient. After reading the instruction manual, operating the oven will be easy.
Before being packaged and leaving the manufacturer, the oven was thoroughly checked with regard to safety and functionality.
Before using the appliance, please read the instruction manual carefully.By following these instructions carefully you will be able to avoid any problems in using the appliance.
It is important to keep the instruction manual and store it in a safe place so that it can be consulted at any time.It is necessary to follow the instructions in the manual carefully in order to avoid possible accidents.
Caution!Do not use the oven until you have read this instruction manual.
The oven is intended for household use only.
The manufacturer reserves the right to introduce changes which do not affect the operation of the appliance.

3
TABLE Of CONTENTS
Safety instructions ............................................................................................................. 4
Description of the appliance ............................................................................................. 7
Installation ........................................................................................................................... 9
Operation ............................................................................................................................11
Baking in the oven – practical hints ............................................................................... 27
Cleaning and maintenance .............................................................................................. 29
Technical data ................................................................................................................... 33

4
SAfETY INSTRUCTIONS
The appliance becomes hot during operation. Take care not to touch the hot parts inside the oven.
Always keep children away from the oven. While in operation direct contact with the oven may cause burns!
Ensure that small items of household equipment, including connection leads, do not touch the hot oven as the insulation material of this equipment is usually not resistant to high temperatures.
Donotleavetheovenunattendedwhenfrying.Oilsandfatsmaycatchfiredueto overheating or boiling over.
Do not put pans weighing over 15 kg on the opened door of the oven.
Do not use harsh cleaning agents or sharp metal objects to clean the door as they can scratch the surface, which could then result in the glass cracking.
Donotusetheovenintheeventofatechnicalfault.Anyfaultsmustbefixedbyanappropriatelyqualifiedandauthorisedperson.
In the event of any incident caused by a technical fault, disconnect the power and report the fault to the service centre to be repaired.
The rules and provisions contained in this instruction manual should be strictly observed. Do not allow anybody who is not familiar with the contents of this instruc-tion manual to operate the oven.
This appliance is not intended for use by persons (including children) with reduced physical,sensoryormentalcapabilities,or lackofexperienceandknowledge,unless they have been given supervision or instruction concerning use of the ap-pliance by a person responsible for their safety.
Children should be supervised to ensure that they do not play with the appli-ance.
The oven should not be cleaned using steam cleaning equipment.

5
Using energy in a respon-sible way not only saves money but also helps the environment. So let’s save energy! And this is how you can do it:
Do not uncover the pan too often (a watched pot never boils!).Do not open the oven door unnecessarily often.
Only use the oven when cooking larger dishes.Meat of up to 1 kg can be prepared more economically in a pan on the cooker hob.
Make use of residual heat from the oven.If the cooking time is greater than 40 minutes switch off the oven 10 minutes before the end time.
Important! When using the timer, set appropriately shorter cooking times according to the dish being prepared.
Make sure the oven door is properly closed.Heat can leak through spillages on the door seals. Clean up any spillages immediately.
Do not install the cooker in the direct vicinity of refrigerators/freezers.Otherwise energy consumption increases unnecessarily.
HOW TO SAVE ENERGY

6
During transportation, protec-tive packaging was used to protect the appliance against any damage. After unpack-ing, please dispose of all elements of packaging in a way that will not cause dam-
age to the environment. All materials used for packaging the appli-ance are environmentally friendly; they are 100% recyclable and are marked with the appropriate symbol.
Caution! During unpacking, the packag-ing materials (polythene bags, polystyrene pieces, etc.) should be kept out of reach of children.
UNPACKING DISPOSAL Of THE APPLIANCE
Old appliances should not sim-ply be disposed of with normal household waste, but should be delivered to a collection and recycling centre for electric and electronic equipment. A symbol shown on the product, the
instruction manual or the packaging shows that it is suitable for recycling.
Materials used inside the appliance are recyclable and are labelled with information concerning this. By recycling materials or other parts from used devices you are making asignificantcontributiontotheprotectionofour environment.
Information on appropriate disposal centres for used devices can be provided by your local authority.

7
C
ECO
MENU
CLEAN
C
ECO
MENU
CLEAN
DESCRIPTION Of THE APPLIANCE
Oven function selection knob
Electronic programmer
Control knob(-) and (+)
ECO button
button CLEAN(oven cleaning)
menu button
preset programmes button
temperature selec-tion button
Oven door handle

8
SPECIfICATIONS Of THE APPLIANCE
Cookerfittings:
Baking trayGrill grate(drying rack)
Roasting tray
Fork and rotisserie frame
Sideracks
Telescopicrunners*
*optional

9
Installing the oven
The kitchen area should be dry and aired andequippedwith efficient ventillation.When installing the oven, easy access to all control elements should be ensured.
This is a Y–type design built–in oven, which means that its back wall and one sidewall canbeplacednext toahighpiece of furniture or a wall. Coating or veneerusedonfittedfurnituremustbeapplied with a heat–resistant adhesive (100°C). This prevents surface deforma-tion or detachment of the coating.
Hoods should be installed according to the manufacturer’s instructions.
Make an opening with the dimensions given in the diagram for the oven to be fitted.
Make sure the mains plug is disconnected and then connect the oven to the mains supply.
Insert the oven completely into the open-ing without allowing the four screws in the places shown in the diagram to fall out.
INSTALLATION

10
21
230V 1N~
INSTALLATION
Electrical connection
Warning: This appliance must be earthed.
The appliance must be installed by a com-petent electrician using a double pole control unit of 16 ampere minimum capacity with 3mm minimum contact separation at all poles.
We recommend that the appliance is con-nectedbyaqualifiedelectricianwhoismem-ber of the N.C.E.I.C. and who will comply with the I.E.E. and local regulation.
Access to the main terminal is gained by opening the terminal block cover at the rear of theappliance (usea small flat-bladed screwdriver).
Connection shuld be made with 1,5mm2 twin and earth cable.
First strip the wires, then push the cab-lethrough the cable clamp in the terminal block cover.
Connect the cable to the terminal block and tighten the cable clamp screw (see diagram).
Closetheterminalbox,ensuringthatthecover is engaged on the locking tabs.
Live(Red or Brown)
Neutral(Black or Blue)
Earth(Green/Yellowor sleeving)
Cable clamp

11
OPERATION
Before using the oven for the first time
Remove packaging, clean the interior of the oven,
Takeoutandwashtheovenfittingswithwarm water and a little washing-up liqu-id,
Switch on the ventilation in the room or open a window,
Gently press the knob and turn it right to position or (see section: elec-tronic programmer operation and oven control),
Heat up the oven (to a temperature of 250°C for approximately 30minutes),remove any stains and wash the interior carefully.
Important!To clean the oven, only use a cloth well rang out with warm water to which a little washing-up liquid has been added.
Important!Before using an oven whose type containstheletter„O”checkfittingofthe heating element in the oven’s side chamber walls. If the heating element isnotcorrectlyfitted,liftitandinsertinto the grooves in the chamber’s side walls.
Important!When the appliance is switched on for thefirsttimeorwhentherehasbeena power cut, 12:00 is shown on the display and .symbolisflashing.Set the correct time using the control knob .Time will be set if setting is not chan-ged within 5 seconds and the menu button is not pressed MENU .Operation of the oven is not possi-ble if current time is not set.
The oven is equipped with a retractable knobs. In order to select a function do the following:1. Gently press and release a knob which will pop out,2. Turn the oven functions selection knob to the desired function.Symbols printed around the knob indicate available oven functions.
1
2

12
OPERATION
function symbols
Electronic programmer operation and oven control
kgC
CCLEAN
ECO
MENU
ECO
C
MENU
- preset programmes button
- temperature selection button
- menu button
- ECO button
- oven cleaning button
- oven lighting
- defrosting
- end time
- cook time - automatic power cut out
- child lock
- time
CLEAN
- kitchen timer
- ECO function
- probe
- preset program
- oven cleaning
- oven level

13
OPERATION
1.Switch on the oven.
Important! Electronic programmer is ready for operation after correct time has been set.
When the appliance is switched on for the firsttimeorwhentherehasbeenapowercut,12:00 is shown on the display and symbolisflashing.Setthecorrecttimeusingthe control knob .
Time will be set if setting is not changed within 5 seconds and the menu button is not pressed. MENU .Operation of the oven is not possible if current time is not set.
2.Setting kitchen timer
Press the MENU button repeatedly until symbol (kitchen timer) flashes. “00:00”willbe displayed instead of current time. Set the timer using the control knob (with one minute resolution). Time will be set if setting is not changed within 5 seconds and the menu button MENU is not pressed. Current time is shown and symbol is displayed.
An acoustic signal is sounded after the set time has elapsed (two beeps - a pause - two beeps). The sequence of acoustic signals is repeated for approximately oneminutein three second intervals. The symbol is flashing.Todeactivatethealarmpressanybutton or turn oven function selector knob to “0”oroperatethecontrolknob.Oncealarmis deactivated, the symbol (kitchen timer) goes out.

14
OPERATION
4.Setting cook time and end time (delay mode)When the symbol (Cook Time) is shown, press the MENU button repeatedly until the symbol(EndTime)flashes.Currenttime
is displayed. Set End Time using the control knob.
3.Setting cook time
Press the MENU button until symbol (Cook Time)isflashing(itisonlypossiblewhenthefunction selector knob is set to a position otherthan“0”).“00:00”willbedisplayed insteadofcurrenttime. Set cooking time using the control knob
. Time will be set if setting is not changed within 5 seconds and the menu button is not pressed MENU . Cook time countdown begins and symbol is on.
An acoustic signal is sounded after the set time has elapsed (4 beeps - a pause - 4 beeps). The sequence of acoustic signals is repeated forapproximatelyoneminuteinthreesecondintervals. “00:00” is displayedand the symbol(cooktime)isflashing.
To deactivate the alarm press any button or turn oven function selector knob to “0”or operate the control knob. Once alarm is deactivated, current time and the selected function are displayed, the symbol (cook time) is off.
End Time will be set if setting is not changed within 5 seconds and the menu button MENU
is not pressed. End Time symbol is dis-played. When then delay time has elapsed, the electronic programmer switches to mode (Cook Time). Cook Time countdown begins,
symbol (End Time) is off and symbol (Cook Time) is on.
An acoustic signal is sounded after the set time has elapsed (4 beeps - a pause - 4 beeps). The sequence of acoustic signals isrepeatedforapproximatelyoneminuteinthreesecondintervals.“00:00”isdisplayedand the symbol(cooktime)isflashing.
To deactivate the alarm press any button or turn oven function selector knob to “0”or operate the control knob. Once alarm is deactivated, current time and the selected function are displayed, the symbol (cook time) is off.
In order to erase Cook Time, End Time or Kitchen Timer settings, press and hold MENU CLEAN buttons for approximately 3 seconds and all settings will be erased. Erasing the settings is only possible when one of the electronic programmer’s settings (Cook Time, End Time, Kitchen Timer) was previously set.

15
OPERATION
5.Operating the oven
5.1 Available oven function selector knob settings.
0 Oven is off
Independent oven lightingSet the knob in this position to light up the oven interior.
Top and bottom heaters onSet the knob in this position for co-nventional baking. This setting is ideal for baking cakes,meat, fish, breadand pizza (it is necessary to preheat the oven and use a baking tray) on one oven level. Temperature range: 30-280°C.
C
Top heater, bottom heater and fan are on.This knob setting is most suitable for baking cakes. Convection baking (re-commended for baking) Temperature range: 30-280°C.
Roaster and rotating spit on.Rotisserie roasting on a rotating spit.Temperature range: 30-280°C.
Roaster on.Roasting is used for cooking of small portions of meat: steaks, schnitzel, fish, toasts, Frankfurter sausages, (thickness of roasted dish should not exceed2-3cmandshouldbeturnedover during roasting) Temperature range: 30-280°C.
C
C
C

16
OPERATION
Convection roastingIn this knob setting, the oven’s co-nvection roasting function is on. In this mode the roasting process is speeded up, which enhances the taste of a cooked dish. Temperature range: 30-280°C.
C
Enhanced roaster (super roaster)In this setting both roaster and top he-ater are on. This increases temperatu-re in the top part of the oven’s interior, which makes it suitable for browning and roasting of larger portions of food. Temperature range: 30-280°C.
C
Convection with ring heating ele-mentSetting the knob in this position allows the oven to be heated up by a heating element with air circulation forced by a rotatingfanfittedinthecentralpartofthe back wall of the of and chamber. Lower baking temperatures than in the conventional oven can be used.
Heating the oven up in this manner en-sures uniform heat circulation around the dish being cooked in the oven.Baking of ready made (frozen) dishes such as cakes, pizza, chips.Defrosting (meat, fruits, vegetables, bread) – for delicate foods (for con-sumption in the fresh, raw state – i.e. strawberries) heating is not turned on, when defrosting meat, set thermostat temperature to 50 – 75°C.Drying fruits, mushrooms (on several levels, temperature of 50 – 80°C) Temperature range: 30-280°C.
C

17
OPERATION
fan onUse this setting for defrosting of frozen pastry and bread.
Bottom heater onWhen the knob is set to this position the oven is heated using only the bottom heater. Baking of cakes from the bottom until done (moist cakes withfruitstuffing).Temperaturerange:30-240°C.
Roaster, top heater (super roaster )and rotating spit on.Combination of the super roaster function and the rotating spit.Temperature range: 30-280°C.
Top heater onSetting the knob to this position allows the oven to be heated only by the top heater. Browning on top, finishing baking, grilling Temperature range: 30-230°C
C
C
C
Convection with ring heating ele-ment and bottom heater onWith this setting the convection fan and bottom heater are on, which increases the temperature at the bot-tom of the cooked dish. Intense heat from the bottom, moist cakes, pizza. Temperature range: 30-280°C.
C

18
OPERATION
5.2 Displaying and changing temperature setting
Default temperature setting for a programme is displayed after selecting . oven func-tion.Thisisindicatedbytheflashing°Conthedisplay. Use the control knob to change the temperature setting (in 5°C increments). New temperature will be set if setting is not changed within 5 seconds or MENU button is pressed or °C button is pressed C .
Temperature can be changed during a pro-gramme when °C button is pressed C .
Current temperature is displayed as a percen-tage of the initially set temperature:
If the function selector knob it is set to „0” and current temperature exceeds 60°C,the thermometer symbol is on to warn the user that the oven is still hot; when current temperature is below 60°C, the thermometer symbol is off.
100%75%50%25%
5.3 ECO function
ECO function saves energy by making use of residual heat. When a ECO function is activa-ted, electronic programmer switches off the appliance before reaching the End Time.
ECO function can be activated for the follo-wing oven functions:
To activate the eco-function set (Cook Time) or (Cook Time) and (End Time). Electronic programmer will switch off the ap-pliance at a time determined by the formula “EndTimeminusResidualHeatTime”.
Activate ECO function.
After selecting any oven function compatible with the ECO function, set (Cook Time) or (Cook Time) and (End Time). Then press the ECO . button. The symbol will be displayedconfirmingthattheECOfunctionhas been activated.
To deactivate the ECO function press ECO button or operate oven function selector knob. When the ECO function is not activated symbol is off.
An acoustic signal is sounded (4 beeps - a pause - 4 beeps) after the initially set time has elapsed. The sequence of acoustic signals isrepeatedforapproximatelyoneminuteinthreesecondintervals.“00:00”isdisplayedand the symbolisflashing.

19
OPERATION
5.4 Aqualytic function
Cleaning of the oven chamber with steam.
Pour 50 cl (two glasses) of water at the bottom of the oven chamber. Close the oven door. To activate the Aqualytic function press CLEAN . The symbolisflashing.Thetemperatureis set automatically and (Cook Time) is set to 00:30). Cook time and temperature are shown on the display. Oven graphic symbol isflashingindicatingtherecommendedovenfunction . Set the function selector knob as recommended. Electronic programmer confirmsthecorrectsettingbyashortaco-ustic signal and . symbol is shown. If the recommended oven function is not set within 10 seconds, Aqualytic function is deactivated. Temperature set for the Aqualytic function is 90°C.
To deactivate the Aqualytic function press CLEAN button or operate the oven function
selector knob. Once the Aqualytic function is deactivated, electronic programmer will switch to normal mode of operation (normal cooking settings).
An acoustic signal is sounded (4 beeps - a pause - 4 beeps) after the initially set time has elapsed. The sequence of acoustic signals isrepeatedforapproximatelyoneminuteinthreesecondintervals.“00:00”isdisplayedand the symbolisflashing.
To deactivate the alarm press any button or turn oven function selector knob to „0” or operate the control knob. Once the process isfinished,currenttimeisdisplayed.
To deactivate the alarm press any button or turn oven function selector knob to „0” or operate the control knob . Once cooking is finished, current time is displayedalongwith the selected oven function.If you wish to activate the ECO function for a given oven function but (Cook Time) or (Cook Time) and (End Time) has not been set, anextendedacousticsignalissoundedand
symbolisflashing(forapproximately0.3seconds) to indicate that the ECO function cannot be activated for the selected oven functionorinputdataisnotsufficient.
ECO function is only available if (Cook Time) is set to at least 10 minutes. If meat temperature probe is connected, its set tar-get temperature must be at least 3°C higher than current temperature. ECO function is deactivated automatically if (Cook Time) or meat probe target temperature has been changed and is lower than the required minimum values. ECO function is also deac-tivated in the event meat temperature probe causes an error.
The set (Cook Time) or (Cook Time) and (End Time) are irrelevant when cooking using the probe. In this case press the ECO button last after oven chamber tem-perature and meat probe temperature have been set.
20
OPERATION
5.5 Using the probe
To use the meat temperature probe, it must be connected to an appropriate socket in the oven chamber. Correct probe connection is indicated by symbol on the display. De-fault probe temperature is 60°C but it can be changed using the control knob with 1°C increments from 30°C to 99°C. When oven is operating in this mode, current probe temperature is displayed.
Temperature setting can be changed when cooking by pressing C . button. Probe temperature initially set is displayed and it can’t be changed by operating the control knob If no setting is changed within 5 se-conds, temperature set for the oven chamber is displayed. This temperature can be chan-ged by operating the control knob Probe temperature and oven chamber temperature will be set if setting is not changed within 5 seconds or MENU button is pressed or °C button is pressed. C .
Current time and probe temperature are di-splayed and symbol (meat temperature probe) is on.
When oven function selector knob is opera-ted, probe temperature and oven chamber temperature setting mode will be invoked again.
An acoustic signal is sounded (4 beeps - a pause - 4 beeps) when the initially set tempe-rature is achieved. The sequence of acoustic signalsisrepeatedforapproximatelyonemi-nute in three second intervals. Current probe temperature and symbolareflashing.
To deactivate the alarm press any button or turn oven function selector knob to „0” or operate the control knob. Once the process isfinished,currenttimeisdisplayed.
The use of temperature probe is recom-mended when cooking large portions of meat (at least 1 kg).
The use of temperature probe is not recom-mended when cooking poultry and meat with bones.When not in use, disconnect the temperature probe from its socket and remove from oven chamber.
Important!Use only original temperature probe supplied with the appliance.
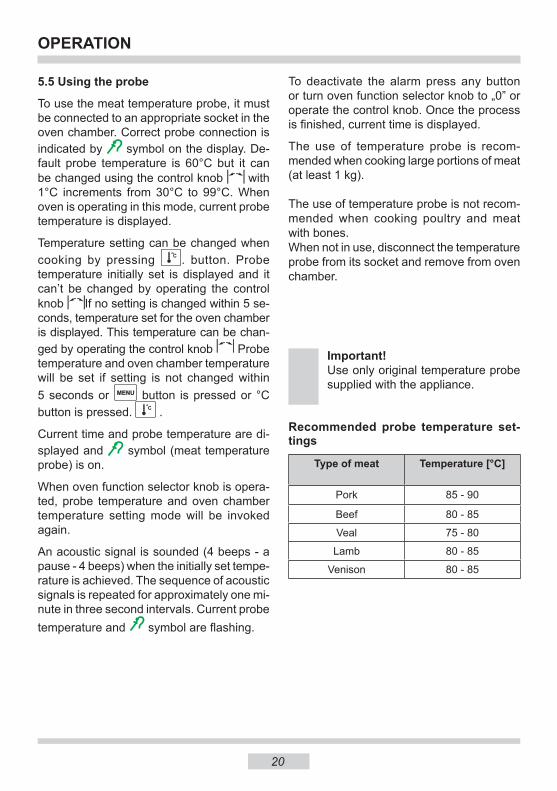
Type of meat Temperature [°C]
Pork 85 - 90
Beef 80 - 85
Veal 75 - 80
Lamb 80 - 85
Venison 80 - 85
Recommended probe temperature set-tings

21
OPERATION
5.6 Preset programmes
Preset programmes incorporate ready co-oking recipes. Preset programmes combine a given oven function or a number of oven functions with a suitable cook time, which depends on food weight to be cooked.
IOperating instructions will indicate which of the preset programmes can be used to cook a given type of food. To activate a preset pro-gramme, press , when function selector knobisin“0”position. (recipe)isflashing,and“P01”isdisplayed.Youcanchangethepreset programme by operating the control knob . . If the selected preset programme requires the use of temperature probe and the probe is disconnected or if the programme does not require the use of temperature probe and the probe is connected, then the probe symbol isflashing.
Toconfirmselectionofthepresetprogramme,press , button; a short acoustic signal is sounded to indicate correct temperature probeconnectionandreadinessforthenextstage. If is not pressed within 10 se-conds, the programme will be cancelled. If the selected programme requires entry of cooked foodweight,thenweightvalueflashesonthedisplay. Weight can be changed by operating the control knob .Toconfirmselectionofthe programme, press , button; a short beep is heard. If is not pressed within 10 seconds, the programme will be cancelled. In the right section of the display, oven graphic symbolisflashingindicatingtherecommen-ded oven function
For preset programmes which do not require the use of temperature probe, Cook Time and set temperature are shown on the display. For preset programmes which require the use of temperature probe, current time and set probe temperature are shown on the display.
Set the function selector knob on the function recommended by the programme. Electronicprogrammerconfirmsthecorrectsetting by a short acoustic signal. Cook time and temperature are shown on the display. For programmes which require the use of temperature probe, current probe tempera-ture is displayed when the main programme is started. If the recommended oven function is not set within 10 seconds, the programme will be cancelled.
To check programme settings, press at any time during preheating or during the main programme. Programme number and weight (where applicable) are displayed for programs which do not require the use of temperature probe or programme number and the set probe temperature. In this case, however, it is not possible to change these settings. To change the settings, end the programme and reset it. When programme settings (Cook Time, temperature, probe temperature) are changed when preset programme is in use, the symbol goes out.
To cancel the programme, operate the oven function selector knob.

22
OPERATION
For programmes which do not require the use of temperature probe, an acoustic signal is sounded (4 beeps - a pause - 4 beeps) after the initially set time has elapsed. The sequence of acoustic signals is repeated for approximately oneminute in three secondintervals. “00:00” is displayed and the symbolisflashing.
For programs which require the use of tem-perature probe an acoustic signal is sounded (4 beeps - a pause - 4 beeps) when the ini-tially set probe temperature is achieved. The sequence of acoustic signals is repeated for approximately oneminute in three secondintervals , symbol, current probe tempera-ture and areflashingonthedisplay.
Setthefunctionselectorknobto“0”positionor press any button to cancel the alarm. Once theprocess is finished, current timeis displayed.
When a preset programme incorporating the preheat function is selected, the oven is preheated to the desired temperature before switching to the main programme. During preheating symbol is on. For preset programmes which do not require the use of temperature probe, cook time and set tempe-rature for the main programme are displayed. For preset programmes which require the use of temperature probe, current time and set probe temperature are shown on the display. Thermometer symbol on the display shows current temperature as percentage of the initially set target oven temperature.
An acoustic signal is sounded (for beeps - a pause - 4 beeps) and symbolisflashingtoindicate that the set target oven temperature has been achieved. The alarm can be silen-ced by pressing any button. Once the alarm is off,theflashingsymbols indicate that pre-heat temperature has been reached. To start the main programme, place food in the
oven and press button. For preset pro-grammes incorporating the preheat function, it is not possible to set the End Time.
List of preset programmes - see following pages.

23
OPERATION
Preset programmesProgramme Oven function /
preheatedCook Time / probe
temperatureTemperature set Oven level
P01Pork
85°C 180°C 3
P02Beef
80°C 180°C 3
P03Veal
75°C 170°C 3
P04Poultry - chicken
85 min 190°C 3
P05Poultry - duck
90 min 180°C 3
P06Poultry - goose
115 min 170°C 2
P07 Thick base pizza
preheated
40 min 200°C 3
P08 Frozen pizza
preheated
20 min 200°C 3
P09Frozenfish
preheated
20 min 175°C 3
P10French bread pizza preheated
20 min 180°C 3
P11Frozenlasagne preheated
40 min 200°C 3
P12FrozenChips preheated
20 min 225°C 3
P13Crumble cake
preheated
30 min 175°C 3
P14Fruitcake
preheated
30 min 175°C 3
P15Swiss roll
preheated
10 min 200°C 3

24
OPERATION
5.7 Child Lock
To activate the child lock simultaneously press and hold MENU and C buttons for approximately3seconds symbol will be displayedconfirmingthechildlockfunctionhas been set.
When the child lock safety device is active it can only be deactivated by simultaneously pressing MENU & C . buttons. Error alarm (single extendedacoustic signal) indicatesthat a button or a control knob has been operated when the child lock safety device is set.
When the child lock device is set, it is not possible to modify any programme and there is no access to special functions. Operating a knob when the child lock safety device is set cancels the previously set function, child locksymbolisflashingandanacousticsignalis sounded. If the oven function control knob
,is set to “0”,Child Lock safety devicesymbol is on.
5.9 Muting the sound
It is possible to mute the sound emitted by the electronic programmer. To mute the sound turn the control knob anticlockwise and press MENU CLEAN buttons. To restore the sound turn the control knob clockwise and press MENU CLEAN buttons.
It should be noted that when the sound is muted no acoustic signal is sounded for confirmationorwhenoperatingerrorsoccur,however acoustic signals of the electronic programmer are sounded as normal.
5.8 Operating error
If an operating error occurs (induced by the user)asingleextendedacousticsignalwillbesounded. An operating error will result from pressing any inactive buttons, turning the control knob in wrong direction or performing any action which will not lead to parameter entryormodification.
5.10 Automatic power cut out
Electronic programmer will shut down the appliance if the function selector knob is inpositionotherthan“0”foracertaintime.Depending on the temperature maintained in the oven chamber, the appliance will shut down after 2 to 10 hours.
The symbol (automatic power cut out) is flashingwhentheelectronicprogrammerhasshut down the appliance.
To switch on the appliance, turn the function selector knob to“0”.
25
OPERATION
Important!When the fast oven heat-up func-tion has been selected, the chamber should not contain a baking tray with dough or other elements that do not constitutetheovenfittings.The fast heat-up function is not recom-mended for use with the programmer set.
fast oven heat-up
In ovens with automatic air circulation, equipped with a fan and an ultra-fan heater, the fast heat-up function may be used – the oven will reach a temperature of 150°C within approximately4minutes. Mode of operation:
set the oven function to the position of ultra-fan and bottom heater
set the temperature to the position of 150°C,
the oven warms up to the temperature of 150°C (or lower if set); the oven reaching the temperature is signalled by the red light of the temperature regulator going off,
now put the tray with dough into the oven,
set the oven function knob to the selected heating mode, (see the chapter Baking in the oven – practical hints).

Use of the grill
The grilling process operates through infrared rays emitted onto the dish by the incandes-cent grill heater.
In order to switch on the grill you need to: Set the oven knob to the position marked grill Heattheovenforapprox.5minutes(withthe oven door shut). Insert a tray with a dish onto the appropriate cooking level; and if you are grilling on the grate insert a tray for dripping on the level immediately below (under the grate). Close the oven door.
Use of the rotisserie
The rotisserie enables rotating grilling in the oven. It is intended for grilling poultry, kebabs, sausages and similar dishes. Switching the rotisserie motor on and off is done at the same time as switching the grilling function with rotisserie When using these funtions during grilling the rotisserie motor can stop momentarily or the rotating direction can be changed. This does not affect the functionality and the grill-ing quality.
Preparing dishes using the rotisserie:(see the diagram below) put the food on the rotisserie spit and
secure it using the forks; insert the rotisserie frame into the oven
on the third level from the bottom; insert the spit end into the motor drive
coupling, making sure that the groove of the metal part of the rotisserie handle rests on the frame;
unscrew the handle; insert the tray onto the lowest level of the
oven chamber and close the door.
Warning!When using function grill it is rec-ommended that the oven door is closed.When the grill is in use accessible parts can become hot. It is best to keep children away from the oven.
26
OPERATION

27
BAKING IN THE OVEN – PRACTICAL HINTS
Baking
we recommend using the baking trays which were provided with your cooker;
it is also possible to bake in cake tins and trays bought elsewhere which should be put on the drying rack; for baking it is better to use black trays which conduct heat better and shorten the baking time;
shapes and trays with bright or shiny surfaces are not recommended when using the conventional heating method (top and bottom heaters), use of such tins can result in undercooking the base of cakes;
when using the ultra-fan function it is not necessary to initially heat up the oven chamber, for other types of heating you should warm up the oven chamber before the cake is inserted;
before the cake is taken out of the oven, check if it is ready using a wooden stick (if the cake is ready the stick should come out dry and clean after being inserted into the cake);
after switching off the oven it is advisable to leave the cake inside for about 5 min.;
temperatures for baking with the ultra-fan function are usually around 20 – 30 degrees lower than in normal baking (using top and bottom heaters);
thebakingparametersgiveninTableareapproximateandcanbecorrectedbasedonyourownexperienceandcookingpreferences;
ifinformationgiveninrecipebooksissignificantlydifferentfromthevaluesincludedin this instruction manual, please apply the instructions from the manual.
Roasting meat
cook meat weighing over 1 kg in the oven, but smaller pieces should be cooked on the gas burners.
use heatproof ovenware for roasting, with handles that are also resistant to high temperatures;
when roasting on the drying rack or the grate we recommend that you place a baking tray with a small amount of water on the lowest level of the oven;
it is advisable to turn the meat over at least once during the roasting time and during roasting you should also baste the meat with its juices or with hot salty water – do not pour cold water over the meat.

28
BAKING IN THE OVEN – PRACTICAL HINTS
Caution!ThefiguresgiveninTablesareapproximateandcanbeadaptedbasedonyourownexperienceandcookingpreferences.
Type of
dish
P - program M - manual
Oven functions
Temperature Level Time in minutes
P15 160 - 200 2 - 3 30 - 50
P13 160 - 180 2 20 - 40*
P14 140 - 160 2 10 - 40*
P08 200 - 230 1 - 3 10 - 20
M 210 - 220 2 45 - 60
P09 160 - 180 2 - 3 45 - 60
M 190 2 - 3 60 - 70
M 230 - 250 4 14 - 18
M 225 - 250 2 120 - 150
P02 160 - 180 2 120 - 160
M 160 - 230 2 90 - 120
P01 160 - 190 2 90 - 120
P04 200 - 220 2 - 3 50 - 60
M 160 - 180 2 45 - 60
M 175 - 190 2 60 - 70
M 190 - 210 2 40 - 50
M 170 - 190 3 40 - 50
* Baking smaller items

29
Replacing halogen lighting in the oven
Before replacing the halogen bulb, make sure the appliance is disconnected from electric mains to avoid possible electric shock.
CLEANING AND MAINTENANCE
By ensuring proper cleaning and mainte-nance of your cooker you can have a sig-nificantinfluenceonthecontinuingfault-freeoperation of your appliance.
Before you start cleaning, the cooker must be switched off and you should ensure that all knobs are set to the “”/“0” posi-tion. Do not start cleaning until the cooker has completely cooled.
The oven should be cleaned after every use. When cleaning the oven the lighting should be switched on to enable you to see the surfaces better.
The oven chamber should only be washed with warm water and a small amount of washing-up liquid.
Aqualytic function Proceed as described in the section
“Electronic programmer operation andoven control”, pt 5.4.
When the steam cleaning process is completed, wipe out the chamber with a damp cloth or a sponge soaked in a mild solution of washing-up liquid.
After cleaning wipe over chamber dry.
Use a soft, moisture absorbing cloth to clean surfaces
Caution! Do not use cleaning products contain-ing abrasive materials for the cleaning and maintenance of the glass front panel.
1. Disconnect power from oven2.Remove shelves and trays from the oven.3. If the oven has telescopic shelf supports, remove them also.4. Use a flat screwdriver to pry the lampcover loose, remove it, wash and carefully wipe dry.5. Pull the halogen bulb out by sliding it down using a cloth or paper. If necessary, replace the halogen bulb with a new one G9, 230V, 25W.6. Replace the halogen bulb in its socket.7. Replace lamp coverNote: Make sure not to touch the halogen directly with your fingers!
Oven lighting

Dismounting the side racks
30
Dismounting the side racks
Ovens marked with the letter D are equipped with easily removable wire guides (side racks*) of oven inserts. To remove them for washing purposes, pull the front catch (Z1), then tilt the guide and remove it from the rear catch (Z2). After washing the guides, put them in the mounting holes of the oven and press the catches (Z1 and Z2).
CLEANING AND MAINTENANCE
Ovens types marked with the letters Db in the model number have moveable stainless telescopic runners* attached to the side racks. The runners should be taken out and washed along with the side racks. Before putting trays on the telescopic runners they should be pulled out (if the oven is warmed up the runners should be pulled out by hooking the back edge of trays on the bumpers in the front part of the telescopic runners) and then insert them together with a tray.
*optional
Z2
Z1

CLEANING AND MAINTENANCECLEANING AND MAINTENANCE
Door removalIn order to obtain easier access to the oven chamber for cleaning, it is possible to remove the door. To do this, tilt the safety catch part of the hinge upwards. Close the door lightly, lift andpullitouttowardsyou.Inordertofitthedoor back on to the cooker, do the inverse. When fitting, ensure that the notch of thehinge is correctly placed on the protrusion ofthehingeholder.Afterthedoorisfittedtothe oven, the safety catch should be carefully lowered down again. If the safety catch is not set it may cause damage to the hinge when closing the door.
Removing the inner panel1. Use a cross-head screwdriver to turn the
sideclampboltsloose(fig.A).2. Push the clamps off with a flat screw-
driver. Pull the upper door slat loose. (fig.A,B).3. Pull the inner glass panel from its seat
(in the lower section of the door) (fig.C).
3a. Remove the inner panel.4. Clean the panel with warm water with
some cleaning agent added. Carry out the same in reverse order to
reassemble the inner glass panel. Its smooth surface shall be pointed up-wards.
C
A
B
Tilting the hinge safety catches
Removal of the internal glass panel
31

32
Regular inspections
Besides keeping the oven clean, you should: carry out periodic inspections of the con-
trol elements and cooking units of the cooker.Aftertheguaranteehasexpiredyou should have a technical inspection of the cooker carried out at a service centre at least once every two years,
fixanyoperationalfaults, carry out periodical maintenance of the
cooking units of the oven.
Caution!All repairs and regulatory activities should be carried out by the ap-propriate service centre or by an appropriatelyauthorisedfitter.
CLEANING AND MAINTENANCE
OPERATION IN CASE Of EMERGENCY
In the event of an emergency, you should: switch off all working units of the oven disconnect the mains plug call the service centre someminorfaultscanbefixedbyreferringtotheinstructionsgiveninthetablebelow.
Before calling the customer support centre or the service centre check the following points that are presented in the table.
PROBLEM REASON ACTION1. The appliance does not work.
Break in power supply. Check the household fuse box;ifthereisablownfusereplace it with a new one.
2. The programmer display shows“12:00”.
The appliance was discon-nected from the mains or there was a temporary power cut.
Set the current time (see ‘Use of the programmer’).
3. The oven lighting does not work.
The bulb is loose or damaged. Tighten up or replace the blown bulb (see ‘Cleaning and Maintenance’).

33
Certificate of compliance CE
The Manufacturer hereby declares that this product complies with the general requirements pursuant to the following European Directives:
The Low Voltage Directive 73/23/EEC, Electromagnetic Compatibility Directive 89/336/EEC,
and therefore the product has been marked with the symbol and the Declaration of Conformity has been issued to the manufacturer and is available to the competent authorities regulating the market.
Electrical supply 220-240V ~50Hz
Maximumload 3,3kW
Oven:bottom heater 1,3 kWtop heater 0,9 kWgrill 2,0 kWultra-fan 2,0 kW
Usable capacity of the oven* 53 litres
Energy rating on the energy label
Cooker dimensions H/W/D 59,5 / 59,5 / 57,5 cm
Weight approx.35kg
Complies with EU regulations EN 60335-1, EN 60335-2-6 standards
* according to EN 50304thecapacitydependsontheovenfittings–indicatedontheenergylabel.
TECHNICAL DATA

34

35

Service Help LineFor the UK: please call 0844 815 8880
0818 46 46 46For Ireland: please call