an018 confirguring device for m2m - advanced network devices · 2019-09-30 · configuring a device...
TRANSCRIPT

[AN018]
Version 2.0
9/22/2017
2017 ADVANCED NETWORK DEVICES
3820 NORTH VENTURA DR.
ARLINGTON HEIGHTS, IL 60004
U.S.A
ALL RIGHTS RESERVED
Configuring a Device for InformaCast M2M

Configuring a Device for InformaCast M2M
Advanced Network Devices • 3820 Ventura Dr. Arlington Hts. IL 60004 • Fax: 847-359-5418 Support: [email protected] • 847-463-2237 • www.anetdsupport.com
2 v2.0
PROPRIETARY NOTICE AND LIABILITY DISCLAIMER
The information disclosed in this document, including all designs and related materials, is the valuable
property of Digital Advanced Network Devices and/or its licensors. Advanced Network Devices and/or its
licensors, as appropriate, reserve all patent, copyright and other proprietary rights to this document, including
all design, manufacturing, reproduction, use, and sales rights thereto, except to the extent said rights are
expressly granted to others.
The Advanced Network Devices product(s) discussed in this document are warranted in accordance with the
terms of the Warranty Statement accompanying each product. However, actual performance of each product
is dependent upon factors such as system configuration, customer data, and operator control. Since
implementation by customers of each product may vary, the suitability of specific product configurations and
applications must be determined by the customer and is not warranted by Advanced Network Devices.
To allow for design and specification improvements, the information in this document is subject to change at
any time, without notice. Reproduction of this document or portions thereof without prior written approval of
Advanced Network Devices is prohibited.
Static Electric Warning
TROUBLESHOOTING AND ADDITIONAL RESOURCES
Complete Support Site with User Guides and Help: http://www.anetdsupport.com/
Additional App Notes: http://www.anetdsupport.com/AppNotes
Customer Feedback Survey: http://www.anetdsupport.com/survey
AND Legal Disclaimer: http://www.anetd.com/legal
Configuring a Device for InformaCast M2M
Advanced Network Devices • 3820 Ventura Dr. Arlington Hts. IL 60004 • Fax: 847-359-5418 Support: [email protected] • 847-463-2237 • www.anetdsupport.com
3 v2.0
M2M PLUGIN OVERVIEW
Machine-to-Machine (M2M) technology allows communication between devices via the network. With M2M,
an AND device triggered by an event like a contact closure input will transmit a message over the network to
InformaCast, which will translate the message and trigger messages to other devices. The M2M plugin uses
this technology to send Informacast broadcasts as triggered by an AND contact closure input, as well as trigger
an AND contact closure output when it receives a broadcast.
Once you have configured your contact closures, you can add them to InformaCast as input and output ports:
Input ports allow you to trigger InformaCast broadcasts from contact closure activation.
Output ports allow you to activate a contact closure, as triggered by a broadcast (accomplished by
adding the output port(s) as a recipient to InformaCast’s messages).
The M2M plugin requires these prerequisites:
Successful InformaCast installation.
Fully configured contact closures.
A valid M2M plugin license, included with your InformaCast license.
This document covers procedures for working with the M2M plugin including:
Configure Contact Closure Device
Configure Contact Closure Input Port
Configure Contact Closure Output Port
Contact Closure Schedules
Trigger an InformaCast Broadcast from a Contact Closure Input
Trigger a Contact Closure Output with an InformaCast Broadcast

Configuring a Device for InformaCast M2M
Advanced Network Devices • 3820 Ventura Dr. Arlington Hts. IL 60004 • Fax: 847-359-5418 Support: [email protected] • 847-463-2237 • www.anetdsupport.com
4 v2.0
CONFIGURE CONTACT CLOSURE DEVICE
Before you can use the M2M Plugin, you must add and configure the AND device with contact closures.
1) From the InforaCast web interface, select Plugins M2M Contact Closures to access the Maintain
Contact Closures page.
2) Click the Add button to access the Add Contact Closure page:
Name
Enter a unique name for the AND device associated with the contact closure(s). (Contact closures
cannot share names.)
Description
Enter a description of the AND device associated with the contact closure(s).
IP Address
Enter the IP address of the AND device associated with the contact closure(s). Use DHCP address
reservation to guarantee the IP address of the device remains consistent over time.

Configuring a Device for InformaCast M2M
Advanced Network Devices • 3820 Ventura Dr. Arlington Hts. IL 60004 • Fax: 847-359-5418 Support: [email protected] • 847-463-2237 • www.anetdsupport.com
5 v2.0
SNMP Community Name
Enter the SNMP community name that is configured for this device. For AND devices, this value
should match the SNMP Write Community string in the device’s configuration file (see Configure
Contact Closures via the Configuration File).
3) Click the Save button. The Maintain Contact Closures page will appear, reminding you to configure
your newly added device’s I/O port(s).
EDIT OR DELETE A CONTACT CLOSURE
Click the Contact Closures link to access the Maintain Contact Closures page.
To delete, click the Delete button for the contact closure you want to delete, and click
the OK button on the dialog box that appears to confirm.
To edit, click the Name link for the contact closure to bring up the Edit Contact Closure page. Make
your desired changes, and click the Save button.
Configuring a Device for InformaCast M2M
Advanced Network Devices • 3820 Ventura Dr. Arlington Hts. IL 60004 • Fax: 847-359-5418 Support: [email protected] • 847-463-2237 • www.anetdsupport.com
6 v2.0
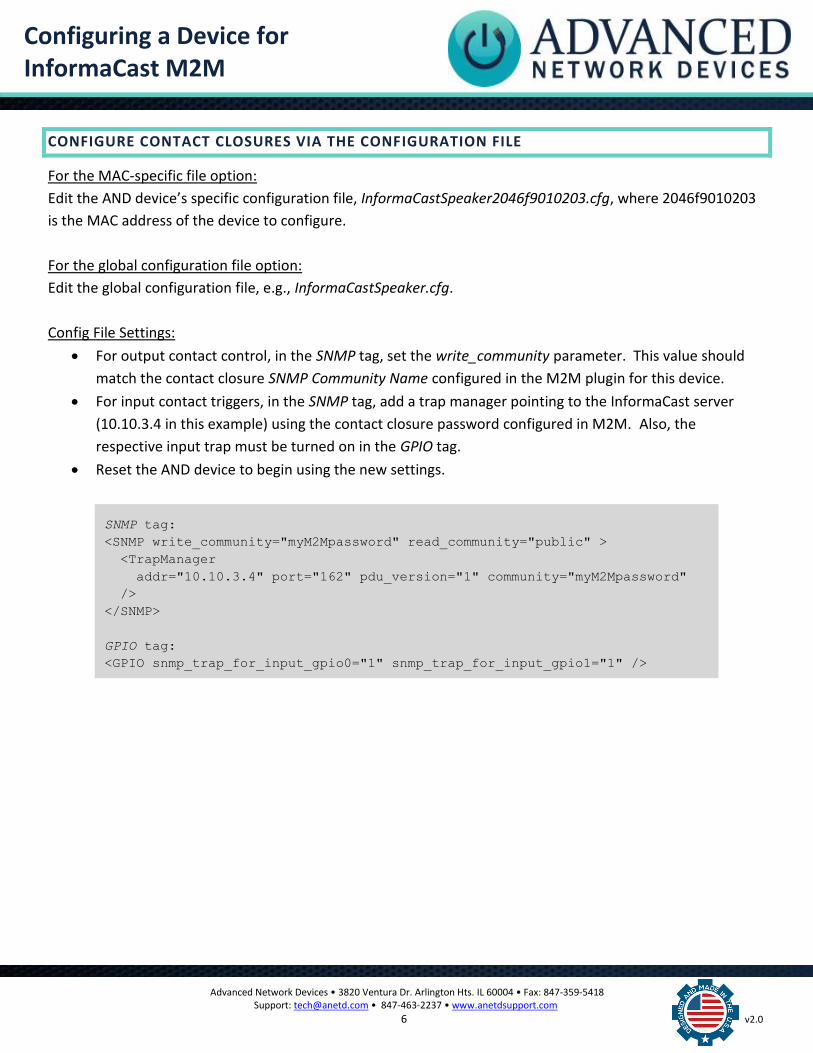
CONFIGURE CONTACT CLOSURES VIA THE CONFIGURATION FILE
For the MAC-specific file option:
Edit the AND device’s specific configuration file, InformaCastSpeaker2046f9010203.cfg, where 2046f9010203
is the MAC address of the device to configure.
For the global configuration file option:
Edit the global configuration file, e.g., InformaCastSpeaker.cfg.
Config File Settings:
For output contact control, in the SNMP tag, set the write_community parameter. This value should
match the contact closure SNMP Community Name configured in the M2M plugin for this device.
For input contact triggers, in the SNMP tag, add a trap manager pointing to the InformaCast server
(10.10.3.4 in this example) using the contact closure password configured in M2M. Also, the
respective input trap must be turned on in the GPIO tag.
Reset the AND device to begin using the new settings.
SNMP tag:
<SNMP write_community="myM2Mpassword" read_community="public" >
<TrapManager
addr="10.10.3.4" port="162" pdu_version="1" community="myM2Mpassword"
/>
</SNMP>
GPIO tag:
<GPIO snmp_trap_for_input_gpio0="1" snmp_trap_for_input_gpio1="1" />
Configuring a Device for InformaCast M2M
Advanced Network Devices • 3820 Ventura Dr. Arlington Hts. IL 60004 • Fax: 847-359-5418 Support: [email protected] • 847-463-2237 • www.anetdsupport.com
7 v2.0
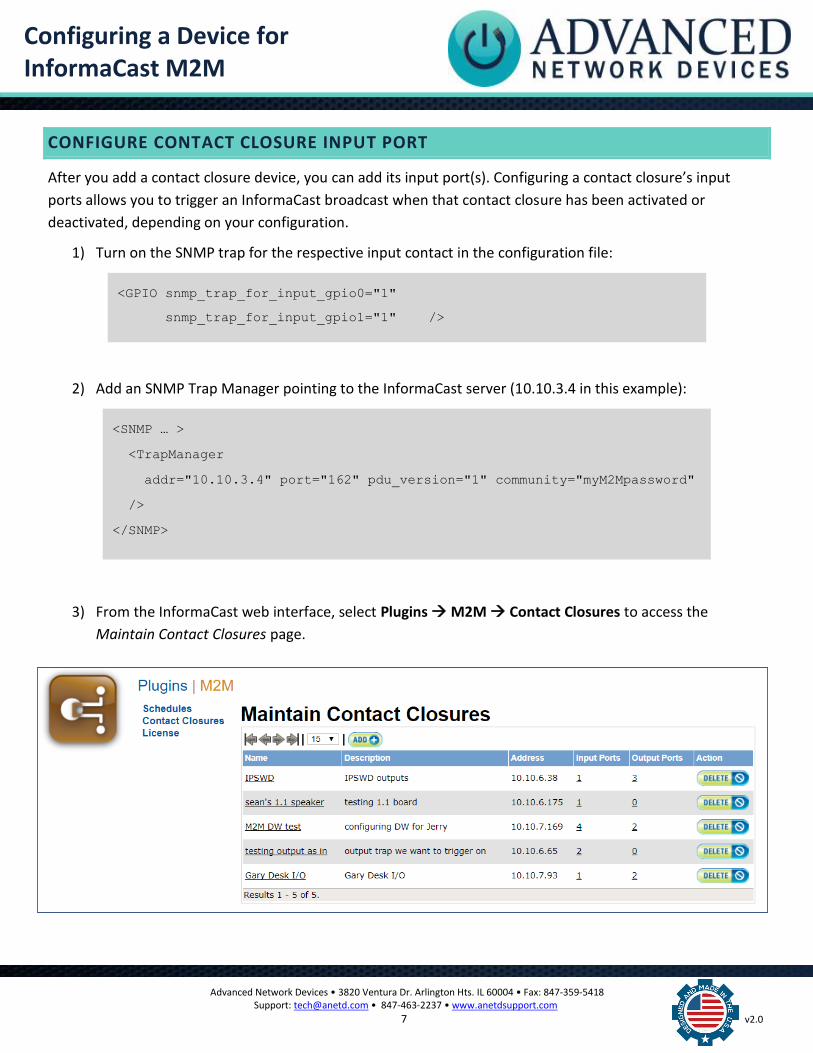
CONFIGURE CONTACT CLOSURE INPUT PORT
After you add a contact closure device, you can add its input port(s). Configuring a contact closure’s input
ports allows you to trigger an InformaCast broadcast when that contact closure has been activated or
deactivated, depending on your configuration.
1) Turn on the SNMP trap for the respective input contact in the configuration file:
2) Add an SNMP Trap Manager pointing to the InformaCast server (10.10.3.4 in this example):
3) From the InformaCast web interface, select Plugins M2M Contact Closures to access the
Maintain Contact Closures page.
<GPIO snmp_trap_for_input_gpio0="1"
snmp_trap_for_input_gpio1="1" />
<SNMP … >
<TrapManager
addr="10.10.3.4" port="162" pdu_version="1" community="myM2Mpassword"
/>
</SNMP>

Configuring a Device for InformaCast M2M
Advanced Network Devices • 3820 Ventura Dr. Arlington Hts. IL 60004 • Fax: 847-359-5418 Support: [email protected] • 847-463-2237 • www.anetdsupport.com
8 v2.0
4) Click the Input Port number of the device to which you want to add an input port to bring up the
Maintain Contact Closure Input Ports page.
5) Click the Add button to bring up the Add Contact Closure Input Port page.
Configuring a Device for InformaCast M2M
Advanced Network Devices • 3820 Ventura Dr. Arlington Hts. IL 60004 • Fax: 847-359-5418 Support: [email protected] • 847-463-2237 • www.anetdsupport.com
9 v2.0
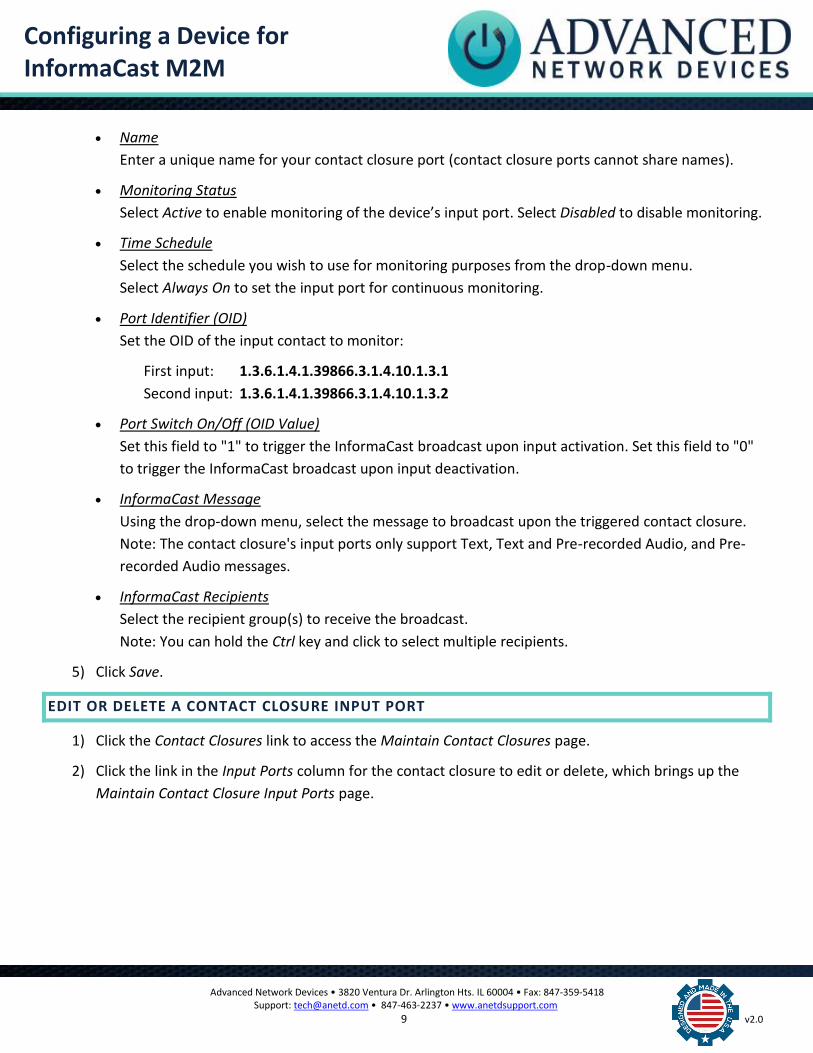
Name
Enter a unique name for your contact closure port (contact closure ports cannot share names).
Monitoring Status
Select Active to enable monitoring of the device’s input port. Select Disabled to disable monitoring.
Time Schedule
Select the schedule you wish to use for monitoring purposes from the drop-down menu.
Select Always On to set the input port for continuous monitoring.
Port Identifier (OID)
Set the OID of the input contact to monitor:
First input: 1.3.6.1.4.1.39866.3.1.4.10.1.3.1
Second input: 1.3.6.1.4.1.39866.3.1.4.10.1.3.2
Port Switch On/Off (OID Value)
Set this field to "1" to trigger the InformaCast broadcast upon input activation. Set this field to "0"
to trigger the InformaCast broadcast upon input deactivation.
InformaCast Message
Using the drop-down menu, select the message to broadcast upon the triggered contact closure.
Note: The contact closure's input ports only support Text, Text and Pre-recorded Audio, and Pre-
recorded Audio messages.
InformaCast Recipients
Select the recipient group(s) to receive the broadcast.
Note: You can hold the Ctrl key and click to select multiple recipients.
5) Click Save.
EDIT OR DELETE A CONTACT CLOSURE INPUT PORT
1) Click the Contact Closures link to access the Maintain Contact Closures page.
2) Click the link in the Input Ports column for the contact closure to edit or delete, which brings up the
Maintain Contact Closure Input Ports page.

Configuring a Device for InformaCast M2M
Advanced Network Devices • 3820 Ventura Dr. Arlington Hts. IL 60004 • Fax: 847-359-5418 Support: [email protected] • 847-463-2237 • www.anetdsupport.com
10 v2.0
To delete, click on the corresponding Delete button. Click the OK button to confirm the delete.
To edit, click the name of the input port to edit, make changes on the Edit Contact Closure Input
Port page, and press the Save button.

Configuring a Device for InformaCast M2M
Advanced Network Devices • 3820 Ventura Dr. Arlington Hts. IL 60004 • Fax: 847-359-5418 Support: [email protected] • 847-463-2237 • www.anetdsupport.com
11 v2.0
CONFIGURE CONTACT CLOSURE OUTPUT PORT
You can add an output port as a recipient to an InformaCast broadcast, thus activating or deactivating a
contact closure upon receipt of a specific broadcast. Make sure to create two actions for an output port: one
to turn on the device connected to the output port, and one to turn it off (e.g., Strobe Light On and Strobe
Light Off).
Firmware 1.6 and above supports a GPIO output pulse option, which activates the respective GPIO output for
the specified number of milliseconds, then de-activates the output automatically. If using the pulsed output,
only one action is necessary.
1) Set the SNMP Write Community string in the configuration file to match the selected SNMP Community
Name used in the M2M contact closure:
<SNMP
write_community="myM2Mpassword" >
…
</SNMP>
2) To enable the pulse option, set up the pulse width in milliseconds in your configuration file:
<GPIO
gpio0_when_input_gpio0="1"
removal_time_ms_input_gpio0="1000"
pulse_ms_output_gpio0="1000"
/>
3) From the InformaCast web interface, select Plugins M2M Contact Closures to access the
Maintain Contact Closures page.

Configuring a Device for InformaCast M2M
Advanced Network Devices • 3820 Ventura Dr. Arlington Hts. IL 60004 • Fax: 847-359-5418 Support: [email protected] • 847-463-2237 • www.anetdsupport.com
12 v2.0
4) Click the Output Port number of the device to which you want to add an output port to bring up the
Maintain Contact Closure Output Ports page.
5) Click the Add button to bring up the Add Contact Closure Output Port page.
Name
Enter a unique name for your contact closure port (contact closure ports cannot share names).
Monitoring Status
Select Active to enable monitoring of the device’s output port. Select Disabled to disable it.
Time Schedule
Select the schedule you wish to use for monitoring purposes from the drop-down menu.
Select Always On to set the output port for continuous monitoring.

Configuring a Device for InformaCast M2M
Advanced Network Devices • 3820 Ventura Dr. Arlington Hts. IL 60004 • Fax: 847-359-5418 Support: [email protected] • 847-463-2237 • www.anetdsupport.com
13 v2.0
Port Identifier (OID) Set the OID of the output contact to control: First output: 1.3.6.1.4.1.39866.3.1.4.11.1.21.1
If using the pulsed output option, also set the OID of the output contact to control as follows: First output: 1.3.6.1.4.1.39866.3.1.4.11.1.22.1
Field Type
Set this field to "Integer".
Port Switch On/Off (OID Value)
Set this field to
“1” to activate the contact closure
“0” to deactivate the contact closure
6) Click Save.
Once you save your settings, you can add the output contact to a recipient group to activate or deactivate the
contact closure with an InformaCast Message.
Each output port will appear as an InformaCast recipient, listed as follows:
M2M Output Port: <Contact Closure Name>: <Output Port Name>
<Contact Closure Name> Name entered on the Add/Edit Contact Closure page
<Output Port Name> Name entered on the Add/Edit Contact Closure Output Port page.
EDIT OR DELETE A CONTACT CLOSURE OUTPUT PORT
1) Click the Contact Closures link to access the Maintain Contact Closures page.
2) Click the link in the Output Ports column for the contact closure to edit or delete, which brings up the
Maintain Contact Closure Output Ports page.
Configuring a Device for InformaCast M2M
Advanced Network Devices • 3820 Ventura Dr. Arlington Hts. IL 60004 • Fax: 847-359-5418 Support: [email protected] • 847-463-2237 • www.anetdsupport.com
14 v2.0
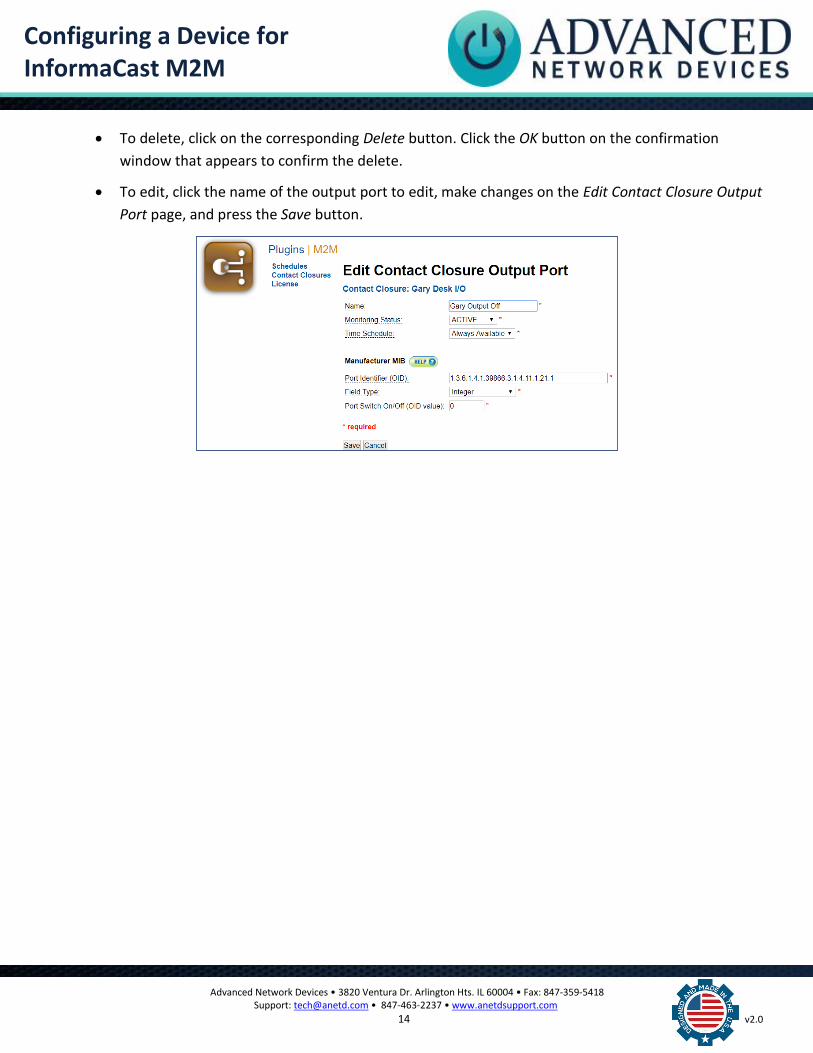
To delete, click on the corresponding Delete button. Click the OK button on the confirmation
window that appears to confirm the delete.
To edit, click the name of the output port to edit, make changes on the Edit Contact Closure Output
Port page, and press the Save button.

Configuring a Device for InformaCast M2M
Advanced Network Devices • 3820 Ventura Dr. Arlington Hts. IL 60004 • Fax: 847-359-5418 Support: [email protected] • 847-463-2237 • www.anetdsupport.com
15 v2.0
CONTACT CLOSURE SCHEDULES
You can use the M2M Plugin to monitor contact closures based on a set schedule.
1) Select Plugins M2M Schedules to access the Maintain Schedules page.
2) Click the Add button to bring up the Add Schedule page:
Name
Enter the name of your new schedule (e.g. Weekday Monitoring).
Description
Enter a description of your new schedule.
Time of Day
Use these fields and dropdown menus to enter the start and end time for monitoring a contact
closure. The time of day can extend into the following day.
Day(s) of Week Checkboxes
Enter the days of the week to which this schedule pertains. The starting time is tied to the selected
day of the week; the ending time may extend into the next day.
3) Click the Save button.

Configuring a Device for InformaCast M2M
Advanced Network Devices • 3820 Ventura Dr. Arlington Hts. IL 60004 • Fax: 847-359-5418 Support: [email protected] • 847-463-2237 • www.anetdsupport.com
16 v2.0
EDIT OR DELETE A CONTACT CLOSURE SCHEDULE
To modify or delete a schedule:
1) Click the Schedules link to access the Maintain Schedules page.
2) To delete, click on the corresponding Delete button, and then click OK on the pop-up window to
confirm the delete.
Note: You cannot delete any schedules associated with an input port or an output port. You must first
remove the schedule from the port and then delete the schedule.
3) To edit, select the Name link of the schedule, make needed changes on the Edit Schedule page, and
press the Save button.

Configuring a Device for InformaCast M2M
Advanced Network Devices • 3820 Ventura Dr. Arlington Hts. IL 60004 • Fax: 847-359-5418 Support: [email protected] • 847-463-2237 • www.anetdsupport.com
17 v2.0
TRIGGER AN INFORMACAST BROADCAST FROM A CONTACT CLOSURE
By configuring a contact closure’s input port(s), you can trigger an InformaCast broadcast upon activation or
deactivation of that contact closure, depending on your configuration. Whenever the contact closure is
triggered, the message that you selected from the InformaCast Message drop-down menu will broadcast to
the recipients you selected in the InformaCast Recipients field.
Create schedules to limit when messages broadcast. A broadcast can include text, text and pre-recorded
audio, or pre-recorded audio message types only. Make sure to select Active from the Monitoring Status drop-
down menu to enable the InformaCast broadcast.
1) Set up the InformaCast Message (audio and/or text) that you want broadcast when pressing the
button.
2) Set up the InformaCast Recipient group of speakers, phones, and/or displays that should broadcast the
message.
3) Add the contact closure device to InformaCast (see Configure Contact Closure Device).
4) Add the contact closure's input port to InformaCast. Link the contact closure input port to the
InformaCast Message (the audio and/or text event), and set up the AND device to report the button
press to InformaCast via SNMP (see Configure Contact Closure Input Port).
The contact closure's input should now trigger the InformaCast Message when pressed.
Configuring a Device for InformaCast M2M
Advanced Network Devices • 3820 Ventura Dr. Arlington Hts. IL 60004 • Fax: 847-359-5418 Support: [email protected] • 847-463-2237 • www.anetdsupport.com
18 v2.0
TRIGGER A CONTACT CLOSURE OUTPUT WITH AN INFORMACAST BROADCAST
Configuring a contact closure’s output port allows you to add that output port as a recipient to an InformaCast
broadcast, thus activating/deactivating a contact closure upon receipt of a specific broadcast. You will need to
create two actions for an output port: one to turn on the device connected to the output port, and one to turn
it off (e.g., Strobe Light On and Strobe Light Off). Also, make sure you have configured the output port
as Active in the Monitoring Status drop-down menu.
1) Add the contact closure device to InformaCast (see Configure Contact Closure Device).
2) Add the contact closure's output port to InformaCast, and configure the AND device's SNMP Write
Community string (see Configure Contact Closure Output Port).
3) In the InformaCast web interface, select Recipients Edit Recipient Groups to access the Edit
Recipient Groups page, where you can edit an existing recipient group or create a new recipient group.
4) Determine how you will select your recipients:
If you choose to select recipients individually, your output port(s) will appear as M2M Output
Port with your contact closure and port’s name following a colon in the Select Individual Recipients
pop-up window.
If you choose to select existing recipient groups, make sure to select a recipient group that already
includes your output port(s).
If you choose to make rules, you can select the following on the Add/Edit Recipient Group page:
First drop-down menu InformaCast Device Type
Second drop-down Does
Third drop-down Equal
Fourth drop-down M2M
Click the View button to verify the list of matching recipients includes your contact closure.
5) Click the Update button to save your changes.
6) Go to Messages Send or Edit Messages to access the Send or Edit Messages page.
7) Click the Send button for the message that you want to broadcast to bring up the Send Message page.
8) Select the recipient group(s) that contain your contact closure output port(s), and click the
Send button.