an4881, mpc57xx sar adc implementation and use ... · (rsd) sd adc total number of inputs ......
TRANSCRIPT

1 IntroductionAnalog-to-Digital Converters (ADCs) are used in a rapidlyincreasing number of automotive applications. From simplymonitoring DC voltages to supporting radar detection ofobstacles in ADAS solutions, ADCs find wide acceptance inautomotive Micro Controller Units (MCUs). The highlyintegrated Qorivva MPC57xx MCUs on the market todayincorporate high performance ADCs supporting up to 84channels with various combinations of Sigma Delta (SD)ADC, enhanced queued eQADC, and SuccessiveApproximation (SAR) ADC architectures in the same device.In these advanced MCUs, conversions from multiple types ofanalog inputs are supported in real time with a minimum ofcontrol required by the CPUs inside the MCU.
Depending on the system application requirements, theMPC57xx devices use three different ADC architectures:
• eQADC (an RSD solution)• Successive Approximation Register (SAR)• Sigma Delta modulator (SD)
The SAR is available in two speed variants - a 1 MSPS (MegaSamples Per Second) SAR and 400 KSPS (Kilo Samples PerSecond) SAR.
This application note discusses SAR ADC implementation anduse in the MPC57xx family of devices. The documentincludes the following topics:
• MPC57xx Device Family ADC implementation
Freescale Semiconductor Document Number: AN4881
Application Note Rev 0, 06/2014
MPC57xx SAR ADCImplementation and Useby: Curt Hillier, Siva M, Neeraj Jain, Sudhansu Mishra, Steve Mihalik, and Sanjoy
Dey
© 2014 Freescale Semiconductor, Inc.
Contents
1 Introduction................................................................1
2 MPC57xx ADC Integration and FeatureSets.......................................................... .................. 2
3 SAR ADC integration examples......... ...................... 3
4 Designing for best possibleperformance........................................... ................... 5
4.1 Input circuit.................................................... 6
4.2 Clock circuit....................... ........................... 9
4.3 Power supply circuit............... ..................... 13
4.4 PCB design recommendations......................15
4.4.1 Power supply design..... .................16
4.4.2 Decoupling capacitors... ................ 16
4.4.3 Grounding................. .................... 16
4.4.4 PCB routing................ ................... 17
5 SAR ADC calibration for gain error andoffset error.................................................. .............17
6 SAR ADC initialization example............................ 18
7 Conclusion...............................................................22
8 References.............................. ................................. 23
• MPC57xx SAR ADC features• Designing for best ADC performance• Calibrating the SAR to minimize gain error and offset error• Initializing the SAR ADC
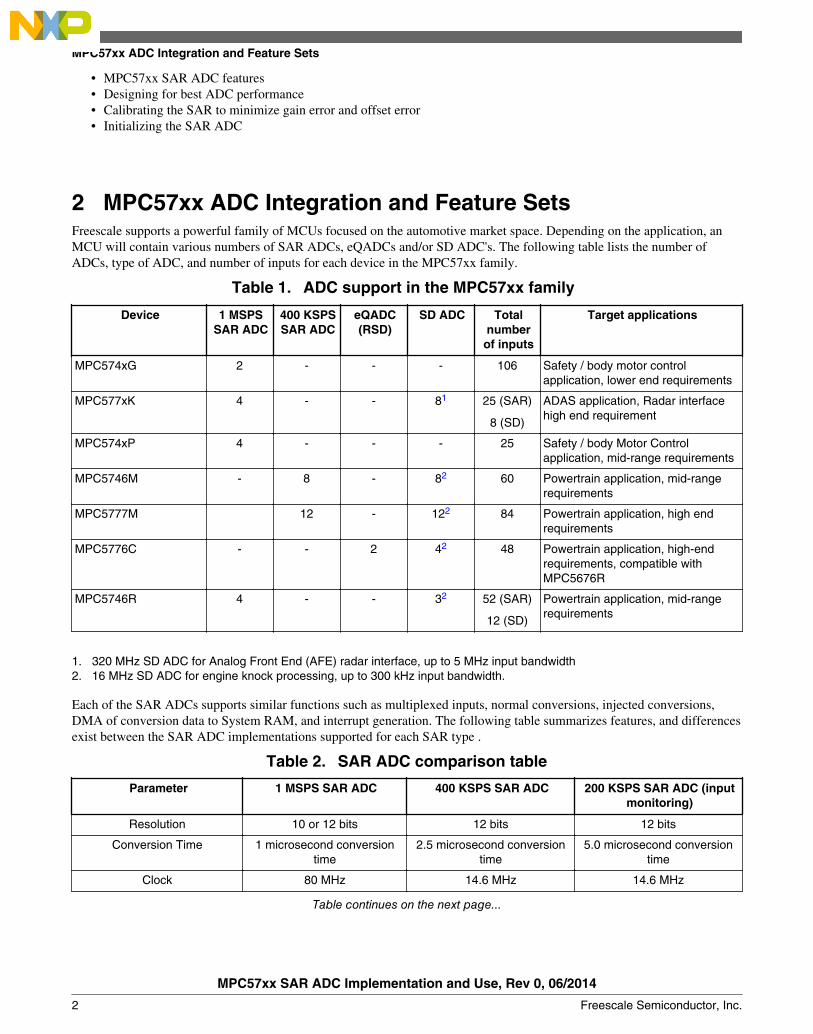
2 MPC57xx ADC Integration and Feature SetsFreescale supports a powerful family of MCUs focused on the automotive market space. Depending on the application, anMCU will contain various numbers of SAR ADCs, eQADCs and/or SD ADC's. The following table lists the number ofADCs, type of ADC, and number of inputs for each device in the MPC57xx family.
Table 1. ADC support in the MPC57xx family
Device 1 MSPSSAR ADC
400 KSPSSAR ADC
eQADC(RSD)
SD ADC Totalnumberof inputs
Target applications
MPC574xG 2 - - - 106 Safety / body motor controlapplication, lower end requirements
MPC577xK 4 - - 81 25 (SAR)
8 (SD)
ADAS application, Radar interfacehigh end requirement
MPC574xP 4 - - - 25 Safety / body Motor Controlapplication, mid-range requirements
MPC5746M - 8 - 82 60 Powertrain application, mid-rangerequirements
MPC5777M 12 - 122 84 Powertrain application, high endrequirements
MPC5776C - - 2 42 48 Powertrain application, high-endrequirements, compatible withMPC5676R
MPC5746R 4 - - 32 52 (SAR)
12 (SD)
Powertrain application, mid-rangerequirements
1. 320 MHz SD ADC for Analog Front End (AFE) radar interface, up to 5 MHz input bandwidth2. 16 MHz SD ADC for engine knock processing, up to 300 kHz input bandwidth.
Each of the SAR ADCs supports similar functions such as multiplexed inputs, normal conversions, injected conversions,DMA of conversion data to System RAM, and interrupt generation. The following table summarizes features, and differencesexist between the SAR ADC implementations supported for each SAR type .
Table 2. SAR ADC comparison table
Parameter 1 MSPS SAR ADC 400 KSPS SAR ADC 200 KSPS SAR ADC (inputmonitoring)
Resolution 10 or 12 bits 12 bits 12 bits
Conversion Time 1 microsecond conversiontime
2.5 microsecond conversiontime
5.0 microsecond conversiontime
Clock 80 MHz 14.6 MHz 14.6 MHz
Table continues on the next page...
MPC57xx ADC Integration and Feature Sets
MPC57xx SAR ADC Implementation and Use, Rev 0, 06/2014
2 Freescale Semiconductor, Inc.
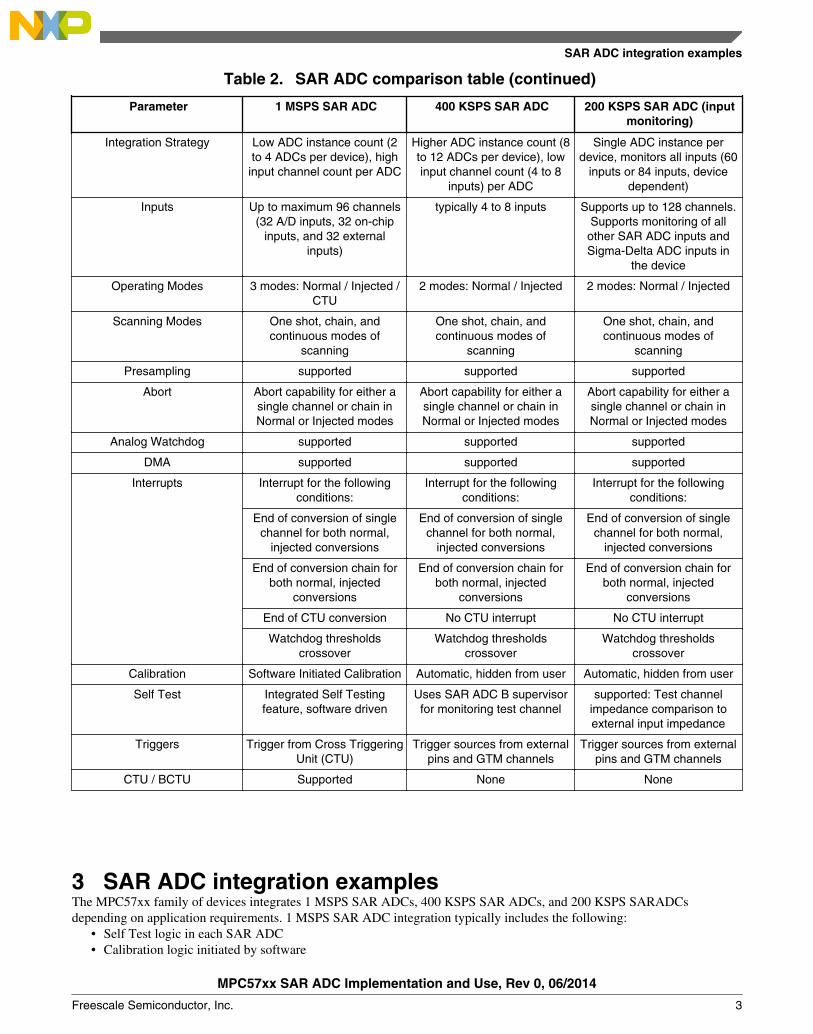
Table 2. SAR ADC comparison table (continued)
Parameter 1 MSPS SAR ADC 400 KSPS SAR ADC 200 KSPS SAR ADC (inputmonitoring)
Integration Strategy Low ADC instance count (2to 4 ADCs per device), highinput channel count per ADC
Higher ADC instance count (8to 12 ADCs per device), lowinput channel count (4 to 8
inputs) per ADC
Single ADC instance perdevice, monitors all inputs (60
inputs or 84 inputs, devicedependent)
Inputs Up to maximum 96 channels(32 A/D inputs, 32 on-chip
inputs, and 32 externalinputs)
typically 4 to 8 inputs Supports up to 128 channels.Supports monitoring of all
other SAR ADC inputs andSigma-Delta ADC inputs in
the device
Operating Modes 3 modes: Normal / Injected /CTU
2 modes: Normal / Injected 2 modes: Normal / Injected
Scanning Modes One shot, chain, andcontinuous modes of
scanning
One shot, chain, andcontinuous modes of
scanning
One shot, chain, andcontinuous modes of
scanning
Presampling supported supported supported
Abort Abort capability for either asingle channel or chain inNormal or Injected modes
Abort capability for either asingle channel or chain inNormal or Injected modes
Abort capability for either asingle channel or chain inNormal or Injected modes
Analog Watchdog supported supported supported
DMA supported supported supported
Interrupts Interrupt for the followingconditions:
Interrupt for the followingconditions:
Interrupt for the followingconditions:
End of conversion of singlechannel for both normal,
injected conversions
End of conversion of singlechannel for both normal,
injected conversions
End of conversion of singlechannel for both normal,
injected conversions
End of conversion chain forboth normal, injected
conversions
End of conversion chain forboth normal, injected
conversions
End of conversion chain forboth normal, injected
conversions
End of CTU conversion No CTU interrupt No CTU interrupt
Watchdog thresholdscrossover
Watchdog thresholdscrossover
Watchdog thresholdscrossover
Calibration Software Initiated Calibration Automatic, hidden from user Automatic, hidden from user
Self Test Integrated Self Testingfeature, software driven
Uses SAR ADC B supervisorfor monitoring test channel
supported: Test channelimpedance comparison toexternal input impedance
Triggers Trigger from Cross TriggeringUnit (CTU)
Trigger sources from externalpins and GTM channels
Trigger sources from externalpins and GTM channels
CTU / BCTU Supported None None
3 SAR ADC integration examplesThe MPC57xx family of devices integrates 1 MSPS SAR ADCs, 400 KSPS SAR ADCs, and 200 KSPS SARADCsdepending on application requirements. 1 MSPS SAR ADC integration typically includes the following:
• Self Test logic in each SAR ADC• Calibration logic initiated by software
SAR ADC integration examples
MPC57xx SAR ADC Implementation and Use, Rev 0, 06/2014
Freescale Semiconductor, Inc. 3

• Triggers from Cross Triggering Logic• Triggers from eTPU and external sources• Monitoring of internal voltages
Figure 1 illustrates 1 MSPS SAR integration in the MPC5746R device.
System RAM
ADC Bandgap
Temp Sensor
PMC Signals
SAR ADCs (4)
Conversion Results
SIUL2
INTC
Muxing
ETPU
Reaction Channel
BCTU
Trig
ger I
nput
s
EMIOS
External Pins
SA
R A
DC
Lim
it Fl
agCTU Trigger N
orm
al
Trig
gers
PIT
Con
vers
ion
Res
ult
Trig
ger O
ut to
AD
Cs E
TPU
EM
IOS
Ext
erna
l Trig
ger
DMA
.
.
.
Ext
erna
l Inp
uts
ADC Self TestLogic in each SAR ADC
1Msps
Figure 1. 1 MSPS SAR ADC integration
400 KSPS and 200 KSPS SAR ADC integration typically includes the following:• Self Test of 400 KSPS SAR ADCs supported by the 200 KSPS SAR ADC_B• No Calibration needed• No CTU logic support• Triggers from external sources such as Generic Timer Module (GTM)
Figure 2 illustrates 400 KSPS and 200 KSPS SAR ADC implementation in the MPC5777M device.
SAR ADC integration examples
MPC57xx SAR ADC Implementation and Use, Rev 0, 06/2014
4 Freescale Semiconductor, Inc.
input mux analog switch
pad cells
Sigma-Delta ADC inputs
ADC bandgap
Temp sensor
PMC signals
2nd level SoC mux
MSCR
MSCR
MSCR
MSCR MSCR
TIM
TIM
TIM
TOM/ATOM
watchdog triggers
external pin trigger inputs
GTM SIUL2
SARADC Normal Triggers
Injection Triggers
INTC
DMA
RAM
SARADC_B
400Ksps
200Ksps
SARADC_B usedfor Self Test of SARADC (0..11)
(0..11)
Figure 2. 400 KSPS and 200 KSPS SAR ADC integration (MPC5777M example)
4 Designing for best possible performanceThis section provides guidelines to achieve the best dynamic performance from a Successive Approximation Register (SAR)ADC. There are several parameters defining performance for an ADC [4]. This document concentrates only on dynamicparameters and how to achieve maximum dynamic performance. Signal-to-Noise Ratio (SNR), Total Harmonic Distortion(THD), and Signal-to-Noise and Distortion (SINAD) are the most common dynamic specs for ADCs.
These recommendations are supported by theory and silicon test data which was collected at Freescale on a Bench Validationboard for the MPC57XX device family. Even though silicon results are shared for a 12-bit SAR ADC only, guidelines areapplicable for any other SAR ADC evaluation. It is strongly recommended to validate the dynamic performance in additionto adhering to guidelines in this note.
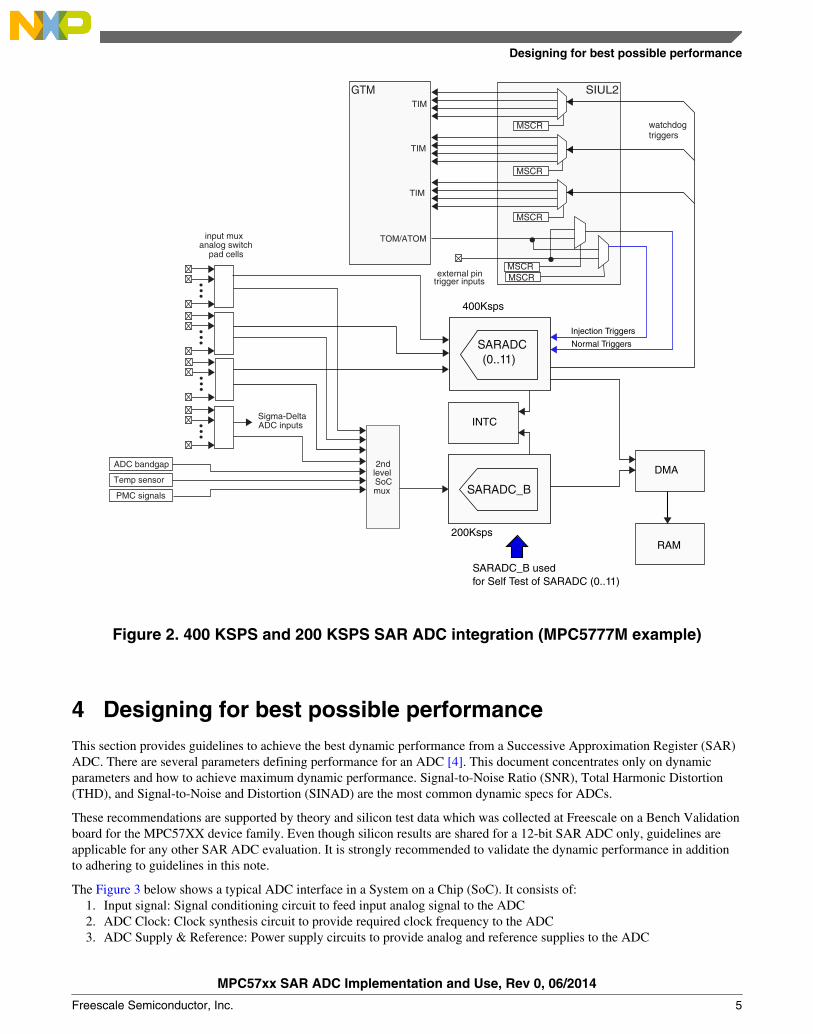
The Figure 3 below shows a typical ADC interface in a System on a Chip (SoC). It consists of:1. Input signal: Signal conditioning circuit to feed input analog signal to the ADC2. ADC Clock: Clock synthesis circuit to provide required clock frequency to the ADC3. ADC Supply & Reference: Power supply circuits to provide analog and reference supplies to the ADC
Designing for best possible performance
MPC57xx SAR ADC Implementation and Use, Rev 0, 06/2014
Freescale Semiconductor, Inc. 5

Linear Regulator SMPS Regulators
ADC
POWER MANAGEMENT
Digital I/O
IRC XOSC PLL
CLOCK MANAGEMENT
SIGNALCONDITIONINGCIRCUITS
Analog Input
MCU
Figure 3. Typical ADC in an SoC
Equation 1 on page 6 gives the relation between ADC output, input and reference voltage for an ideal SAR ADC.
Equation 1
VIN = Analog input voltage
VREF = ADC reference voltage
N = resolution of the ADC (number of bits)
From Equation 1 on page 6 it is clear that any noise at the input and reference will have direct impact on the output voltage.Noise at the ADC clock input will also impact the ADC performance. To measure true performance of an ADC, performanceof all these circuits should be better as compared to ADC. Table 3 shows the effect of external noise on the overallperformance of the ADC. Here external noise refers to input signal source noise, clock jitter related noise, ADC referencevoltage noise or combination of all. From Table 3 it is clear that to get true of performance of ADC, quality of externalsystem should be at least 10 dB better than Device Under Test (DUT). In this application note, basic circuit details, theirimportance and results are shared for an ADC input, clock and supply interfacing blocks.
Table 3. Effect of external circuit noise on ADC performance
VREF (V) ADC SNR(dB)
ADC Noise(rms V)
ExternalCircuit Noise
(dB)
ExternalCircuit Noise
(rms V)
System SNR(dB)
SystemNoise (rms
V)
Error inmeasuredSNR (dB)
5 70 559 90 56 70.0 562 0.0
5 70 559 85 99 69.9 568 -0.1
5 70 559 80 177 69.6 586 -0.4
5 70 559 76 280 69.0 625 -1.0
5 70 559 70 559 67.0 791 -3.0
Designing for best possible performance
MPC57xx SAR ADC Implementation and Use, Rev 0, 06/2014
6 Freescale Semiconductor, Inc.
4.1 Input circuit
The SAR ADC consists of a sample-and-hold circuitry to acquire the input voltage VIN, a comparator, a successiveapproximation register sub-circuit, and an internal reference capacitive Digital to Analog Converter (DAC). This DACsupplies the comparator with an analog voltage equivalent of the digital code output of the SAR, for comparison with VIN.Any SAR ADC will have two phases: sampling phase and conversion phase. During the sampling phase the input has tosettle to the less than or equal to quantization level, i.e. 0.5 LSB. In the sampling phase, the sample and hold switch is closed,thereby charging the internal SAR ADC capacitors. During the conversion phase, the sample and hold switch is open and theSAR approximates its registers to the held VIN.
The Input signal conditioning circuit typically consists of buffer followed by a first order RC-low pass filter. Figure 4 showsa simple mixer circuit using an ideal Op Amp.
In the input circuit, the RC filter serves two purposes, it limits the amount out-of-band noise arriving at the ADC input andhelps to attenuate any voltage kicks from the ADC sampling. Low pass filter RC bandwidth is a function of input frequency,resolution, sampling time of ADC. For a given RC bandwidth, selection of the R and C values depends on the Op Ampdriving capability and ADC Input channel capacitance. The lower limit on the R value comes from the Op Amp. There is anupper limit on C also due to the Op Amp capability. The Op Amp cannot drive big capacitance values in the order of tens ofnF. Figure 6 shows an FFT plot using R = 1 Ohm and C = 47 nF. Figure 6 clearly shows that the Op Amp is not able to drivebig capacitances such as 47 nF and due to this quality of the input signal is distorted -- notice the harmonic components in theFFT at the output of the ADC. The lower limit on the capacitance is a function of SoC input sampling capacitance. There is alimit on the boundary values of R and C, but within the range any value of R and C is allowed. Freescale recommendschecking the ADC performance on silicon to get optimal R and C values. Figure 5 shows a typical FFT plot with R = 36 Ohmand C = 3 nF.
For capacitor, selection of type of dielectric material is important. Capacitor voltage coefficient determines the THD of thesystem. Select the capacitor with low voltage coefficient. Silver Mica, polypropylene, polystyrene, and COG/NPO types havelower voltage coefficient as compared to other types. Generally COG/NPO types are readily available in wide range and withdifferent foot print sizes.
Designing for best possible performance
MPC57xx SAR ADC Implementation and Use, Rev 0, 06/2014
Freescale Semiconductor, Inc. 7
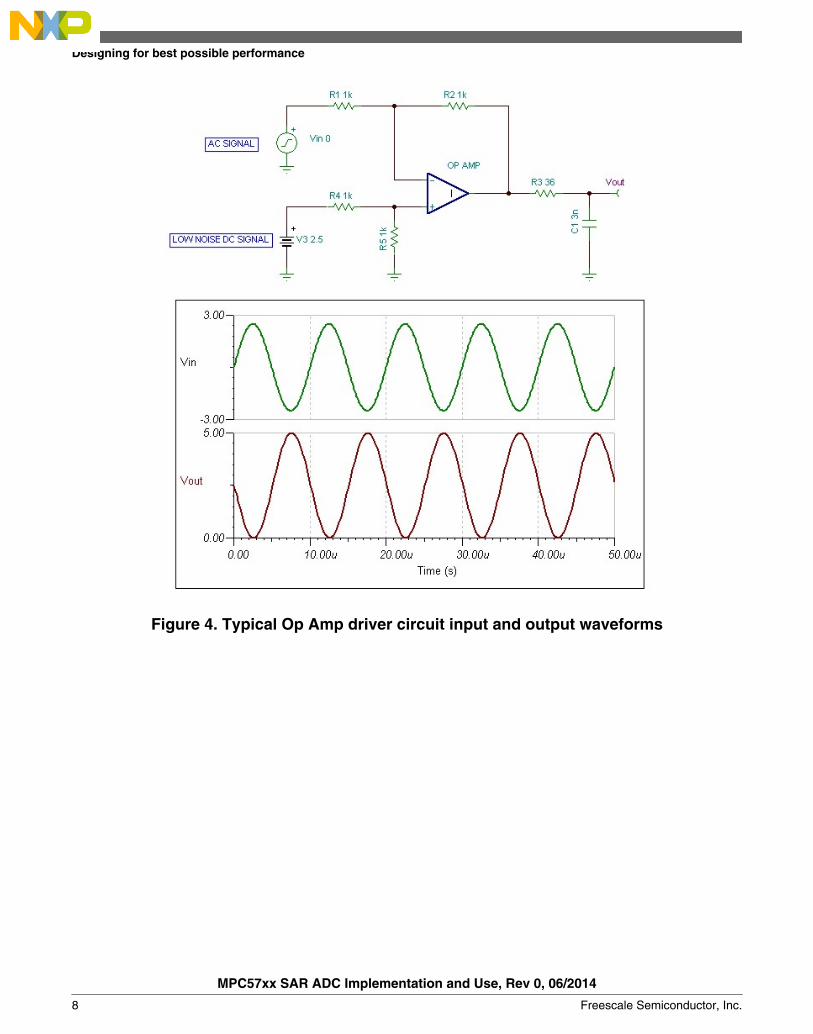
Figure 4. Typical Op Amp driver circuit input and output waveforms
Designing for best possible performance
MPC57xx SAR ADC Implementation and Use, Rev 0, 06/2014
8 Freescale Semiconductor, Inc.
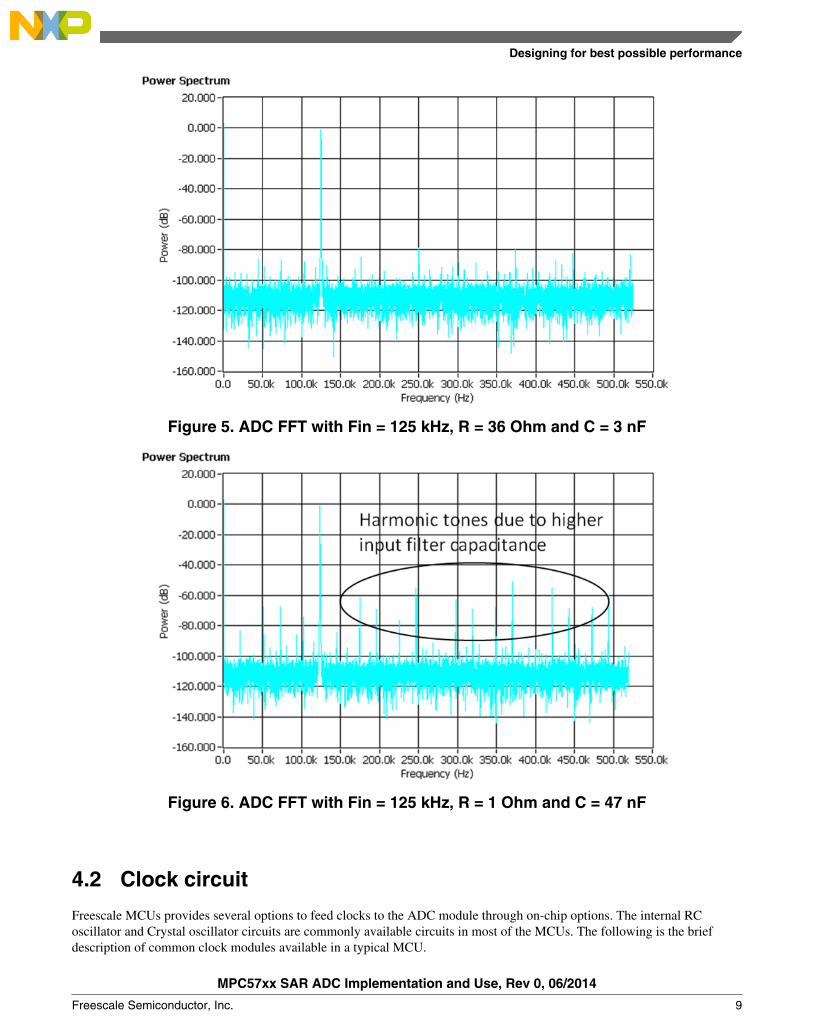
Figure 5. ADC FFT with Fin = 125 kHz, R = 36 Ohm and C = 3 nF
Figure 6. ADC FFT with Fin = 125 kHz, R = 1 Ohm and C = 47 nF
4.2 Clock circuit
Freescale MCUs provides several options to feed clocks to the ADC module through on-chip options. The internal RCoscillator and Crystal oscillator circuits are commonly available circuits in most of the MCUs. The following is the briefdescription of common clock modules available in a typical MCU.
Designing for best possible performance
MPC57xx SAR ADC Implementation and Use, Rev 0, 06/2014
Freescale Semiconductor, Inc. 9
Internal RC Oscillator (IRC OSC): Provides fast startup, low power, but generally suffer from high jitter, poor accuracyover temperature and supply voltage.
CRYSTAL OSCILLATOR (XTAL OSC): Typically provides very high initial accuracy and a moderately low temperaturecoefficient, low jitter and will have higher startup time and consumes more power.
PLL: Generally it will be used to bring different frequency clocks to various modules of SOC using a fixed reference source.Input reference clock to the PLL can be either IRC or XTAL OSC. Proceeding further below nomenclature will be used.
IRC+PLL: Input reference clock to the PLL is Internal RC oscillator. PLL is programmed to provide required clockfrequency to ADC
XTAL+PLL: Input reference clock to the PLL is crystal oscillator. PLL is programmed to provide required clock frequencyto ADC
Selection of clock circuit combinations is important because it will impact the dynamic performance of the ADC. The term"jitter" describes timing errors within a system.
It can be shown that jitter on the sampling clock degrades the overall SNR per the simple equation:
Equation 2
Equation 3
where:
fIN = analog input frequencytRMS = RMS clock jitterN = resolution of the ADC (number of bits)
From Equation 2 on page 10 it is clear that the degradation in SNR is dependent on the input frequency and clock RMS jitter.It should be noted that this equation assumes IDEAL ADC of infinite resolution, where the only error source is clock jitter.Ideal SNR limitation of the ADC for a given resolution is given by Equation 3 on page 10. From Table 3 it is clear that clocksource quality should be at least 10 dB better than DUT. Consequently, to get proper performance for a 12-bit SAR ADC atfIN = 125 kHz, clock jitter should be less than 100 ps (corresponds to 82 dB at fIN = 125 kHz).
RMS clock jitter can be calculated by integrated phase noise to the required BW. Generally the upper frequency range for theintegration should be twice the sampling frequency [3]. In our example case we use the 1 MSPS SAR ADC, therefore,integration bandwidth is from zero to 2 MHz. Figure 7 and Figure 8 shows phase noise plot of IRC+PLL and XTAL+PLLcollected using Agilent E5052B Signal Source Analyzer with integration from close to DC to 2 MHz. Measured RMS jitter is50 ns and 25 ps approximately for IRC+PLL and XTAL+PLL respectively.
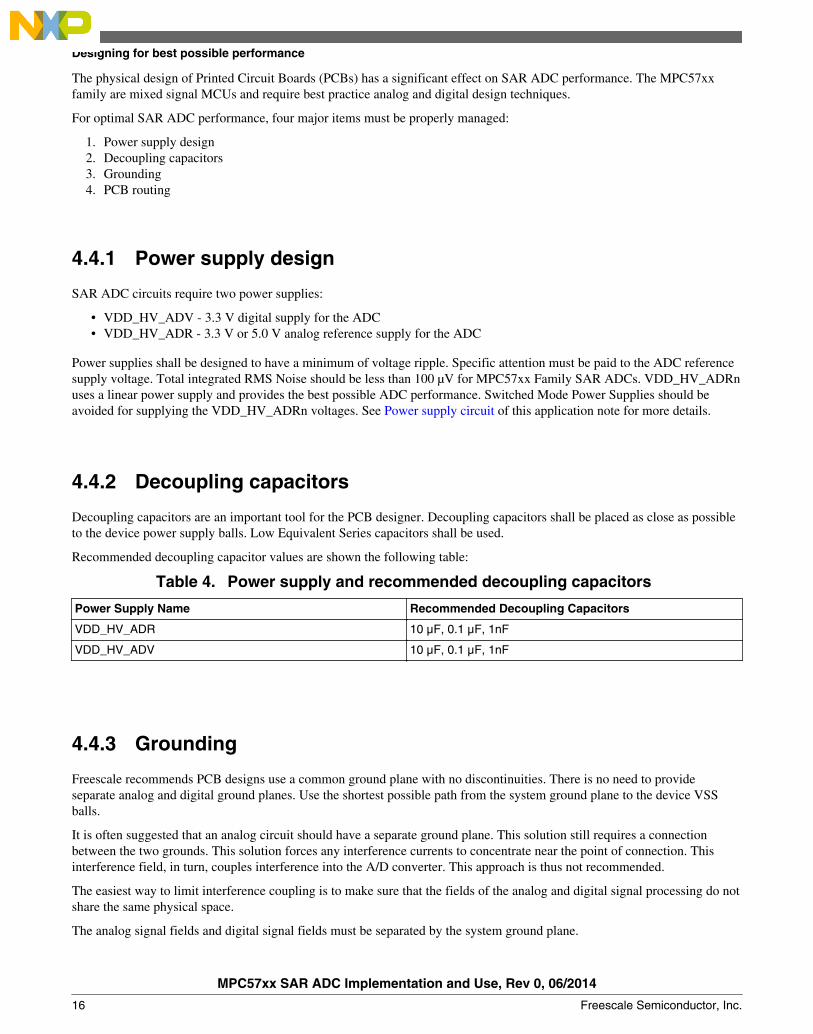
Figure 9 and Figure 10 show the effect of clock sources on the ADC dynamic performance for a 12-bit 1 MSPS ADC withFin=125 kHz for IRC+PLL and XTAL+PLL respectively. From the figures it is clear the noise floor has gone up and alsosome smearing is observed around the fundamental for IRC+PLL as clock source for ADC. IRC should never be used as aclock source if dynamic performance is important. Below are some of the reasons for this:
• IRC has very high Jitter (in nS range)• Jitter will not be constant, multiple measurements will result in varying Jitter• IRC Jitter will vary with Voltage & Temperature
Due to above issues Run-to-Run variation can be observed in the SNR measurements.
Designing for best possible performance
MPC57xx SAR ADC Implementation and Use, Rev 0, 06/2014
10 Freescale Semiconductor, Inc.
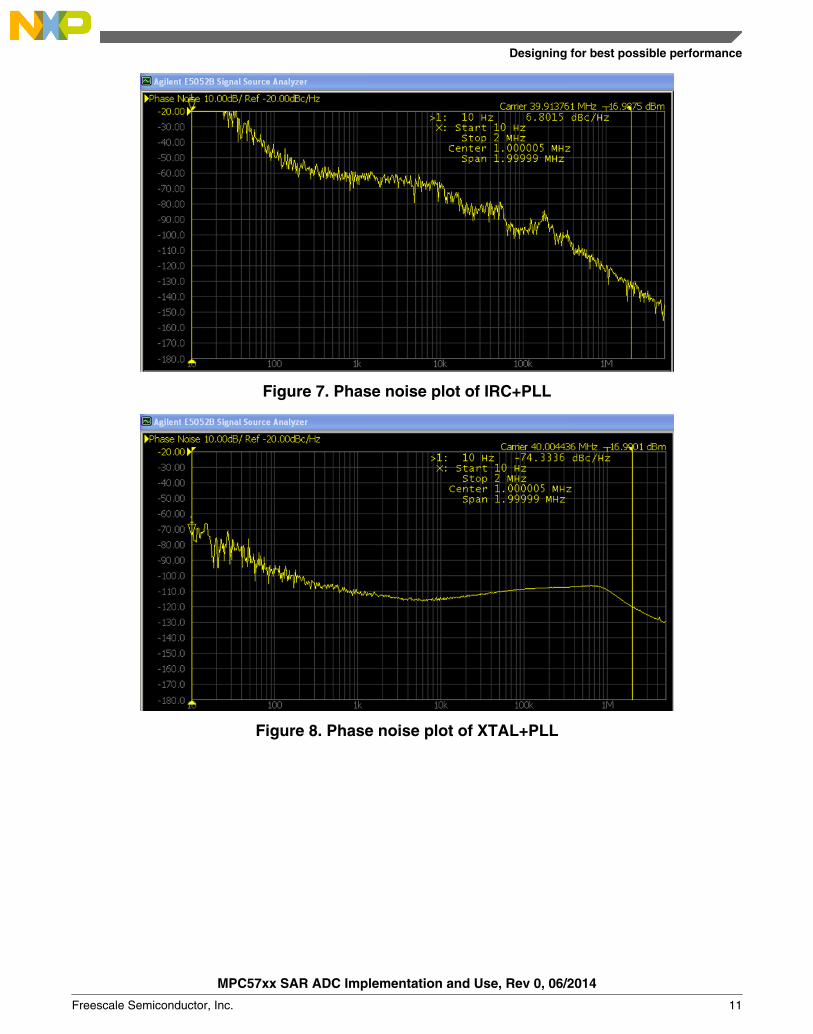
Figure 7. Phase noise plot of IRC+PLL
Figure 8. Phase noise plot of XTAL+PLL
Designing for best possible performance
MPC57xx SAR ADC Implementation and Use, Rev 0, 06/2014
Freescale Semiconductor, Inc. 11
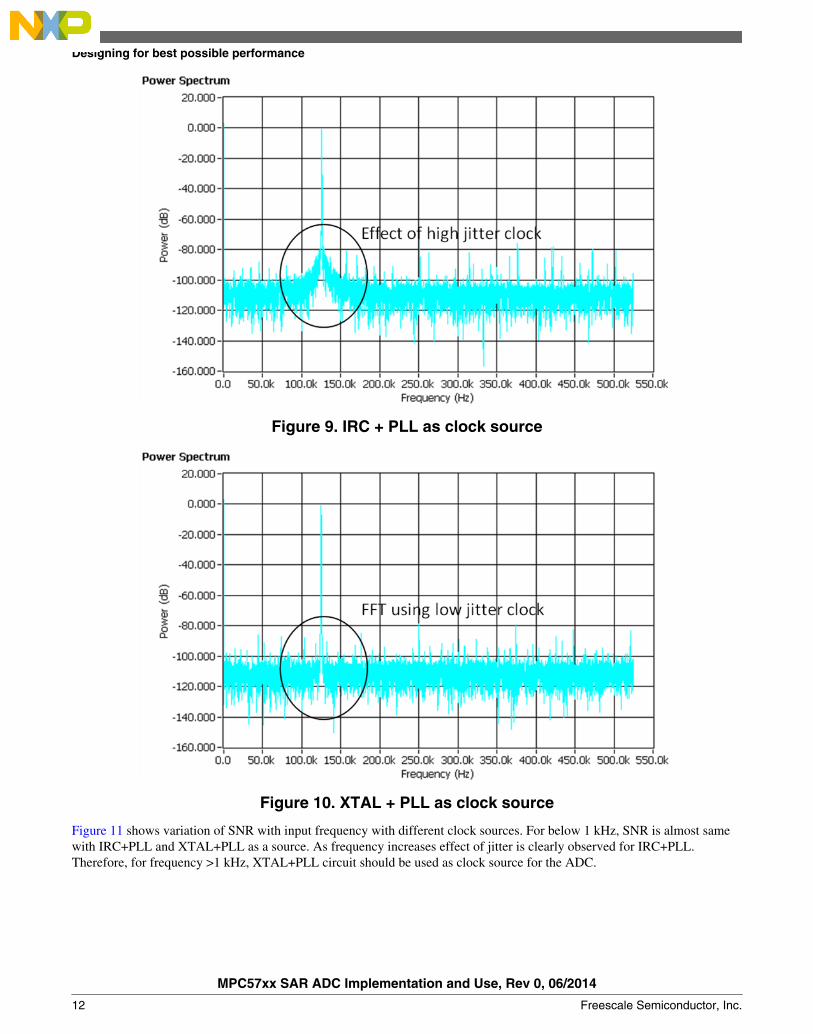
Figure 9. IRC + PLL as clock source
Figure 10. XTAL + PLL as clock source
Figure 11 shows variation of SNR with input frequency with different clock sources. For below 1 kHz, SNR is almost samewith IRC+PLL and XTAL+PLL as a source. As frequency increases effect of jitter is clearly observed for IRC+PLL.Therefore, for frequency >1 kHz, XTAL+PLL circuit should be used as clock source for the ADC.
Designing for best possible performance
MPC57xx SAR ADC Implementation and Use, Rev 0, 06/2014
12 Freescale Semiconductor, Inc.

Figure 11. Effect of clock source on ADC performance
4.3 Power supply circuit
Noise, stability and drive capability are some of the important characteristics need to be considered for a SAR ADC voltagereference circuit. From Equation 1 on page 6 it is clear that noise at the reference will impact the ADC performance. Figure12 shows the variation of system noise with DC input voltage for a SAR ADC. Here data is collected with a low noise andnoisy voltage reference circuit at the same conditions. From Figure 12, it is clear that effect of the reference noise is notconstant and is dependent on the ADC input [2].
Designing for best possible performance
MPC57xx SAR ADC Implementation and Use, Rev 0, 06/2014
Freescale Semiconductor, Inc. 13

Figure 12. Effect of reference noise on the ADC performance
Given the importance of a low noise reference source, it is important to pick a good quality IC to drive the ADC reference.Selection of the reference source depends on application. In case of standalone ADCs, voltage references can be used.However an ADC reference source in a SoC typically has some, if not all, of the below requirements:
• Wide working reference voltage range (for example, some SAR ADCs support both a 3.3 V supply option and a 5.0 Voption.) If the application requires, a dynamically adjustable reference could be used.
• In SoCs, generally multiple ADC will be used. Most of the times all will share common reference. Therefore, it is goodto go for higher driving capability source to supply any surge current requirements.
• In SoCs, generally supply will be shared across the several IPs, so recommended decoupling capacitors will be in theorder of µF. The reference source should be capable of driving capacitance in the order of µF.
• The reference source should have good immunity across temperature, supply.
For the above requirements an adjustable Low Drop Out (LDO) regulator supply is a better choice as compared to voltagereferences. From Table 3, it is clear that for MPC57XX family, any regulator whose RMS noise is less than 100 µV(corresponding to 85 dB at VREF= 5 V) is sufficient to achieve datasheet performance specifications. Figure 13 and Figure14 show FFT plots collected using low noise and noisy source reference circuits.
Designing for best possible performance
MPC57xx SAR ADC Implementation and Use, Rev 0, 06/2014
14 Freescale Semiconductor, Inc.

Figure 13. Low noise VREF. 12-bit 1 MSPS SAR ADC FFT; Fin=10 kHz, SNR= 70 dB,THD= 77 dB
Figure 14. High noise VREF. 12-bit 1 MSPS SAR ADC FFT; Fin=10 kHz, SNR= 63 dB,THD= 77 dB
4.4 PCB design recommendations
Designing for best possible performance
MPC57xx SAR ADC Implementation and Use, Rev 0, 06/2014
Freescale Semiconductor, Inc. 15
The physical design of Printed Circuit Boards (PCBs) has a significant effect on SAR ADC performance. The MPC57xxfamily are mixed signal MCUs and require best practice analog and digital design techniques.
For optimal SAR ADC performance, four major items must be properly managed:
1. Power supply design2. Decoupling capacitors3. Grounding4. PCB routing
4.4.1 Power supply design
SAR ADC circuits require two power supplies:
• VDD_HV_ADV - 3.3 V digital supply for the ADC• VDD_HV_ADR - 3.3 V or 5.0 V analog reference supply for the ADC
Power supplies shall be designed to have a minimum of voltage ripple. Specific attention must be paid to the ADC referencesupply voltage. Total integrated RMS Noise should be less than 100 μV for MPC57xx Family SAR ADCs. VDD_HV_ADRnuses a linear power supply and provides the best possible ADC performance. Switched Mode Power Supplies should beavoided for supplying the VDD_HV_ADRn voltages. See Power supply circuit of this application note for more details.
4.4.2 Decoupling capacitors
Decoupling capacitors are an important tool for the PCB designer. Decoupling capacitors shall be placed as close as possibleto the device power supply balls. Low Equivalent Series capacitors shall be used.
Recommended decoupling capacitor values are shown the following table:
Table 4. Power supply and recommended decoupling capacitors
Power Supply Name Recommended Decoupling Capacitors
VDD_HV_ADR 10 μF, 0.1 μF, 1nF
VDD_HV_ADV 10 μF, 0.1 μF, 1nF
4.4.3 Grounding
Freescale recommends PCB designs use a common ground plane with no discontinuities. There is no need to provideseparate analog and digital ground planes. Use the shortest possible path from the system ground plane to the device VSSballs.
It is often suggested that an analog circuit should have a separate ground plane. This solution still requires a connectionbetween the two grounds. This solution forces any interference currents to concentrate near the point of connection. Thisinterference field, in turn, couples interference into the A/D converter. This approach is thus not recommended.
The easiest way to limit interference coupling is to make sure that the fields of the analog and digital signal processing do notshare the same physical space.
The analog signal fields and digital signal fields must be separated by the system ground plane.
Designing for best possible performance
MPC57xx SAR ADC Implementation and Use, Rev 0, 06/2014
16 Freescale Semiconductor, Inc.
4.4.4 PCB routing
For proper PCB routing, the designer must use transmission line and field energy concepts to ensure noise and cross couplingeffects are properly managed within the design. Analog signals shall have their own physical space, one dielectric away fromground. Digital signals and supplies shall have their own physical space, separated by exactly one dielectric away fromground. The designer must ensure the digital signals and analog signals are not routed in the same space.
The following points must be achieved in the design:• Power distribution: All power supply planes shall be placed one dielectric away from system ground. This can be
achieved by keeping power supply feeds on the layer adjacent to a system ground plane layer• Charge Well placement: For 55 nm compatible designs, decoupling capacitors providing charge wells shall be placed
within ½ cm from each power supply ball / via.• High noise immunity: Route the following elements in their own space immediately adjacent (e.g. one dielectric away
from ground):• Analog power supplies• Analog signals• Digital power supplies• Digital signals
NOTE• Avoid routing digital power supply traces and/or digital signals in the same space
as analog supplies and/or signals.• Ensure the return paths for all signals are kept within their respective spaces. Do
not cross or share return paths for different types of signals.
5 SAR ADC calibration for gain error and offset errorMost SAR ADCs exhibit gain error and offset errors. These errors manifest as non-linearity at the zero scale endpoint(minimum voltage level) and the full scale endpoint (maximum voltage level). These non-linearities are defined as:
• Zero-Scale Error (EZS) is the difference between actual first transition voltage and the ideal first transition voltage.Considering the first transition Ideal Code Width (ICW(0)) occurs at 1/2 LSB, and the first transition Calculated CodeWidth (CCW(0)) occurs at some input voltage level measured during device test, the Zero-Scale Error is given by: EZS= CCW[0] - ICW(0)
• Full-Scale Error (EFS) is the difference between the actual last transition voltage and the ideal last transition voltage.Assuming the last transition Ideal Code Width (ICW(last)) is 1 1/2 LSB, the Full-Scale Error is given by: E
FS =
CCW(last) - ICW(last)
The following graphs show Zero-Scale Error, Full-Scale Error and their relationship to Offset Error and Gain Error.
SAR ADC calibration for gain error and offset error
MPC57xx SAR ADC Implementation and Use, Rev 0, 06/2014
Freescale Semiconductor, Inc. 17

Figure 2. Endpoints Error Graph
Adjusted Transfer Function
$7 $6 $5 $4 $3 $2 $1
Conversion
654
Input Voltage in LSB
7
Zero- and Full-Scale Error
VREFH(+) Zero-Scale Error
(-) Full-Scale Error
Ideal Transfer Function
Ideal S.L. Transfer Function Plus Offset
$7 $6 $5 $4 $3 $2 $1
Conversion
6 5 4
Input Voltage in LSB
7
Offset and Gain Error
VREFH(+) Offset Error
(+) Gain Error
Adjusted Straight-Line Trans Func.
Figure 15. Endpoint error graphs
In relation to EZS and EFS, Offset Error and Gain Error are defined as:
• Offset Error (EO), Adjusted Offset, or Zero-Scale Offset is the difference between the actual and ideal firsttransition voltages. This is the same definition as Zero-Scale Error.
• Gain Error (EG) or Adjusted Gain Error is the difference in the slope of the Actual and the Ideal Straight-LineTransfer Functions. The error is not measured as a slope but rather as the difference in the total available input rangefrom the first to the last conversions between the Ideal and Adjusted Straight-Line Transfer Functions. It is can also beexpressed by: EG = EFS-EZS
The above definitions are adapted from AN2438/D ADC Definitions and Specifications. For a complete discussion of Zero-Scale Error, Full-Scale Error, Offset Error and Gain Error, refer to AN2438/D [1].
The 1 MSPS SAR ADC has a user software driven calibration feature to compensate for Offset and Error and Gain Error.The calibration is initiated by programming fields in the Calibration, Built-In Self Test (BIST) Control and status Register(CALBISTREG). The user software initiates the calibration procedure at device boot time and can further execute theprocedure during run time if the application requires it (e.g. if the supply voltages change). The 1 MSPS SAR is designed tobe performance stable over temperature, therefore, no re-calibration is required at hot or cold temperature extremes.
NOTE• Calibration must be run after power-up reset and any reset (when registers are
initialized). The routine must also be recalled if the operating conditions(specifically VREFH) change. This should also be re-called, if the Self-Testindicates that a recalibration is needed.
• If Calibration fails as indicated by the status bit CALBISTREG[TEST_FAIL] = 1,the user should execute the Calibration one more time. If the calibration succeeds,then continue normal device operation. If the Calibration fails repeatedly, thedevice should be replaced.
Refer to the SAR ADC initialization example section of this application note for step-by-step calibration programmingexample.
6 SAR ADC initialization exampleTo initialize the SAR ADC, the following steps must be completed as a minimum:
SAR ADC initialization example
MPC57xx SAR ADC Implementation and Use, Rev 0, 06/2014
18 Freescale Semiconductor, Inc.

1. Configure input pads and ADC normal conversion registers2. Calibrate the ADC3. Initialize SAR ADC modes and clock4. Power on the ADC and start conversions
The tables below list the major steps and registers involved to support the initialization.
Table 5. Sample code high level overview
Step Description Sample Code Function Name Details
1a Configure inputpads for analog
ADC1_PadConfig_ChanSelect( ) Program the SIUL2.MSCR register. Referto I/O signal definition spreadsheet for yourspecific SOC. Determine which pads toconfigure for analog inputs.
1b Select the channelsto scan
ADC1_PadConfig_ChanSelect( ) Program the Normal Conversion Register(SARADC_n.NCMR0). Align the NCMR0channel to the input pin(s) configured inStep 1.
2 Calibrate the ADC ADC1_Calibration( ) See separate table for details (SAR ADCcalibration)
3 Initialize SARADCMode, Clock, andstart conversions
ADC1_Init( ) See separate table for details (SAR ADCconfiguration)
5 Read theconversion data
ADC1_Read_Chan( ) Read conversion data from theSARADC_n.CDR[adc_channel] register.
Table 6 shows the steps for configuring the SAR calibration feature.
Table 6. SAR ADC calibration sequence
Step Description Register Programming Sequence
1 Configure the ADC (reset MCR[PWDN] andMCR[ADCLKSEL])
ADC_1.MCR.B.PWDN = 1; ADC_1.MCR.B.ADCLKSEL = 1;
2 Configure the Calibration, BIST Control, andStatus Register (CALBISTREG) for testconditions. The default values are set formaximum accuracy (recommended).
/* Modify here if default values from CALBISTREG need to bechanged */
3 Set CALBISTREG[TEST_EN]. The routine willstart immediately.
ADC_1.CALBISTREG.B.TEST_EN = 1;ADC_1.MCR.B.PWDN = 0;
4 Wait until CALBISTREG[C_T_BUSY] becomes0.
while(ADC_1.CALBISTREG.B.C_T_BUSY){}
5 Check the value of MSR[CALIBRATD] todetermine whether calibration was successful.
if(ADC_1.CALBISTREG.B.TEST_FAIL){ ADC1_Calibration_Failed = 1; /* Calibration not done butfailed*/ } else { ADC1_Calibration_Failed = 0; /* Calibrationdone and passed*/ }
Table 7 lists the steps for initializing the SAR and starting conversions.
SAR ADC initialization example
MPC57xx SAR ADC Implementation and Use, Rev 0, 06/2014
Freescale Semiconductor, Inc. 19
Table 7. SAR ADC initialization sequence
Step Description Details
1 Specify how to handle overwriting olderconversion results
OWREN = 0 (do not overwrite)
OWREN = 1 (enable overwrite)
2 Select channels if not already selected prior toinitialization
NMCR, etc.
3 Specify mode, such as normal scan MODE = x
4 Specify ADC clock PWDN = 1
ADCLKSEL = x
PWDN = 0
5 Trigger or enable trigger to module Example: Normal conversion start: NSTART=1. Can alsouse injected conversion start (JSTART=1). If supported,Cross Triggering Unit (CTU) is used.
The following lists C code in main.c and adc.c supporting SAR ADC calibration and initialization.
/*****************************************************************************//* FILE NAME: main_core_0.c COPYRIGHT (c) Freescale 2014 *//* All Rights Reserved *//* DESCRIPTION: Initializes ADC1 to read to analog channels 9 & 10. *//* The four most significant bits read from channel 9 light up *//* LEDs on Freescale evaluation board. Channel 9 is connected *//* to a pot on the EVB so turning the pot outputs values 0-0xF.*//* *//*****************************************************************************/
#include "project.h"#include "ADC.h"
extern void system160 MHz(void);extern void __ghs_board_devices_init_AFTER_main(void);void peri_clock_gating (void); /* Configure gating/enabling peri. clocks for modes*/void LED_Config(void); /* Assign LED ports on Freescale EVBs as GPIO outputs */void update_LEDs(void); /* Update LEDs with scaled chan 9 result */
extern uint16_t Result[3]; /* ADC channel conversion results */
/************************************ Main ***********************************/
void main(){ SWT_disable_0(); /* Disable watchdog for core 0 */ memory_config_160 MHz(); /* Configure wait states, flash master access, etc.*/ crossbar_config(); /* Configure crossbar */ peri_clock_gating(); /* Configure gating/enabling peri. clocks for modes*/ system160 MHz(); LED_Config(); /* Assign LED ports on Freescale LED as GPIO outputs*/
ADC1_PadConfig_ChanSelect(); /* Configure ADC pads & select scan channels */ ADC1_Calibration(); /* Calibrate the ADC */ ADC1_Init(); /* Init ADC1 to read channles 9, 10 (ports PB4, PB5) */
while(1){ if (ADC_1.ISR.B.ECH) { /* If selected normal scan channels finished converting */ ADC1_Read_Chan(); /* Read conversion results */ update_LEDs(); /* Update LEDs with scaled chan 9 result */ ADC_1.ISR.R = 0x00000001; /* Clear End of CHain (ECH) status bit */ } } }
SAR ADC initialization example
MPC57xx SAR ADC Implementation and Use, Rev 0, 06/2014
20 Freescale Semiconductor, Inc.

/******************** End of Main ***************************************/
void peri_clock_gating (void) { MC_ME.RUN_PC[0].R = 0x00000000; /* gate off clock for all RUN modes */ MC_ME.RUN_PC[1].R = 0x000000FE; /* config. peri clock for all RUN modes */ /* Note: RUN_PC0 is default cfg for PCTLs */ MC_ME.PCTL[25].B.RUN_CFG = 0x1; /* ADC1: select peri. cfg. RUN_PC[1] */ MC_ME.PCTL[94].B.RUN_CFG = 0x1; /* SIUL: select peri. cfg. RUN_PC[1] */}
void LED_Config(void) { /* Assign LED ports as GPIO outputs */ SIUL2.GPDO[98].R = 1; /* LED1 Initial value: 1 = LED off on FSL EVB */ SIUL2.GPDO[99].R = 1; /* LED2 Initial value: 1 = LED off on FSL EVB */ SIUL2.GPDO[100].R = 1; /* LED3 Initial value: 1 = LED off on FSL EVB */ SIUL2.GPDO[101].R = 1; /* LED4 Initial value: 1 = LED off on FSL EVB: scaled ch 9 LSB */ SIUL2.MSCR[ 98].B.OBE = 1; /* Port PG2 - LED 1 on Freescale EVB */ SIUL2.MSCR[ 99].B.OBE = 1; /* Port PG3 - LED 2 on Freescale EVB */ SIUL2.MSCR[100].B.OBE = 1; /* Port PG4 - LED 3 on Freescale EVB */ SIUL2.MSCR[101].B.OBE = 1; /* Port PG5 - LED 4 on Freescale EVB */}
void update_LEDs(void) { /* Update LEDs with scaled chan 9 result */ /* If Result bit is 0, then LED is turned ON */ /* If Result bit is 1, then LED is turned OFF */ SIUL2.GPDO[98].R = (Result[0] & 0x0800)>>11; /* LED1: scaled ch 9 LSB */ SIUL2.GPDO[99].R = (Result[0] & 0x0400)>>10; /* LED2 */ SIUL2.GPDO[100].R = (Result[0] & 0x0200)>>9; /* LED3 */ SIUL2.GPDO[101].R = (Result[0] & 0x0100)>>8; /* LED4: scaled ch 9 MSB */}
/*****************************************************************************//* FILE NAME: ADC.c COPYRIGHT (c) Freescale 2014 *//* All Rights Reserved *//* DESCRIPTION: ADC module functions. *//* *//*****************************************************************************/ #include "ADC.h"
#define ADC_VREF 5000 /* *** ADC ref voltage for both ADC modules. 3300 mv or 5000 mv */uint16_t Result[3]; /* ADC channel conversion results */uint16_t ResultInMv[3]; /* ADC channel conversion results in mv */
void ADC1_PadConfig_ChanSelect(void) { /* Config ADC pads & select scan chans */ /* Note: MSCR.SSS configuration is not needed for inputs if there is */ /* no SSS value is in signal spreadsheet */ /* Note: ADC1 channel 9 on port PB4 is connected to pot on FSL EVB */ SIUL2.MSCR[20].B.APC = 1; /* PB4 = func ADC1_P[0] = ADC 1 chan 9 */ SIUL2.MSCR[21].B.APC = 1; /* PB5 = func ADC1_P[1] = ADC 1 chan 10 */ SIUL2.MSCR[22].B.APC = 1; /* PB6 = func ADC1_P[1] = ADC 1 chan 11 */ ADC_1.NCMR0.B.CH9 = 1; /* Enable chan 9 for normal conversion on ADC1 */ ADC_1.NCMR0.B.CH10 = 1; /* Enable chan 10 for normal conversion on ADC1 */ ADC_1.NCMR0.B.CH11 = 1; /* Enable chan 11 for normal conversion on ADC1 */}
void ADC1_Calibration(void) {
uint32_t ADC1_Calibration_Failed = 1; /* Calibration has not passed yet */
ADC_1.MCR.B.PWDN = 1; /* Power down for starting calibration process */ ADC_1.MCR.B.ADCLKSEL = 1; /* ADC clock = bus clock (80 MHz FS80) */ /* Note: Since ADC is at max 80 MHz frequency, use default values */ /* for Calibration, BIST control and ADCx_CALBISTREG */ ADC_1.MCR.B.PWDN = 0; /* Power back up after setting ADCLKSEL */ ADC_1.CALBISTREG.B.TEST_EN = 1; /* Enable calibration test */ while(ADC_1.CALBISTREG.B.C_T_BUSY){} /* Wait for calibration to finish */ if(ADC_1.CALBISTREG.B.TEST_FAIL) { /* Check for Calibration Fail */ ADC1_Calibration_Failed = 1; /* Calibration not done but failed*/
SAR ADC initialization example
MPC57xx SAR ADC Implementation and Use, Rev 0, 06/2014
Freescale Semiconductor, Inc. 21

} else { ADC1_Calibration_Failed = 0; /* Calibration done and passed*/ }}
void ADC1_Init(void) { ADC_1.MCR.B.PWDN = 1; /* Power down for starting module initialization */ ADC_1.MCR.B.OWREN = 1; /* Enable overwriting older conversion results */ ADC_1.MCR.B.MODE = 1; /* Scan mode (1) used instead of one shot mode */ ADC_1.MCR.B.ADCLKSEL = 1; /* ADC clock = bus clock (80 MHz FS80) */ ADC_1.MCR.B.PWDN = 0; /* ADC_1 now on ready to receive conversion triggers */ ADC_1.MCR.B.NSTART = 1; /* Initiate trigger for normal scan */}
void ADC1_Read_Chan (void) { Result[0]= ADC_1.CDR[9].B.CDATA; /* Read Chan 9 conversion result data */ Result[1]= ADC_1.CDR[10].B.CDATA; /* Read Chan 10 conversion result data */ Result[2]= ADC_1.CDR[11].B.CDATA; /* Read Chan 11 conversion result data */ ResultInMv[0] = (uint16_t) (ADC_VREF*Result[0]/0xFFF); /* Converted result in mv */ ResultInMv[1] = (uint16_t) (ADC_VREF*Result[1]/0xFFF); /* Converted result in mv */ ResultInMv[2] = (uint16_t) (ADC_VREF*Result[2]/0xFFF); /* Converted result in mv */}
7 ConclusionThe 1 MSPS and 400 KSPS SAR ADC implementation in the MPC57xx family of MCUs provide industry leading analog todigital conversion solutions. The MCUs support a wide range of analog sensing applications including knock sensing, voltagemonitoring, and Advanced Driver Assistance Systems (ADAS).
The strength of MCUs designed for the automotive market is their mixed signal feature set, incorporating both highperformance analog circuits with high-speed digital multi-CPU-cores. Freescale invests significant engineering research anddevelopment in adhering to best practices of mixed signal design techniques and validating the MCUs across semiconductorprocess variation, temperature extremes, and voltage extremes. This focus on meeting design performance across Process /Voltage / Temperature (PVT) in a mixed signal MCU for automotive applications requiring single digit part per millionfailure rates is the ‘holy grail’ of the industry. Intelligent architectures and design diligence coupled with exhaustive testingbring this holy grail of reliable MCUs to reality.
For an ADC, input signal, clock and reference supply are most critical sources of noise. They are equally important and havea direct impact on the ADC dynamic performance. For input frequencies up to 200 kHz and high resolution ADC testing,Audio Precision AP27XX is one of the promising sources available in the market. But AP27XX can provide only bipolarsignal. Op Amp can be used as signal conditioning circuit between source and DUT. Input RC filter bandwidth depends onseveral factors such as input frequency, resolution of the ADC, throughput, sampling time and input sampling capacitance.The designer must ensure proper selection of R and C values such that the driving Op Amp is stable. If RC filter bandwidth isselected lower than the requirement, which will cause less than required settling while sampling the input signal, it willdistort the input signal resulting in as harmonic tones in the ADC FFT.
Several clock source options are available in the MCU. Selecting a proper clock source for an ADC is important to get truedynamic performance of the ADC. For dynamic performance, the best combination (lowest jitter) clock source is the XOSCand PLL.
Noise, stability and drive capability are some of the important characteristics to be considered while selecting a referencepower supply source for the SAR ADC. SAR ADC presents a dynamic load, so both input and reference circuit should havegood driving capability. To achieve the best dynamic performance, the external system (input signal, power supply, and clockcircuits together) should be at least 10 dB better than DUT.
Conclusion
MPC57xx SAR ADC Implementation and Use, Rev 0, 06/2014
22 Freescale Semiconductor, Inc.

8 References1. IEEE Std 1241-2010, IEEE Standard for Terminology and Test Methods for Analog-to-Digital Converters.2. Data Conversion Handbook, By Walt Kester, Analog Devices, Inc.3. Oljaca, M., Klein, W., “Converter voltage reference performance improvement secrets”, Instrumentation &
Measurement Magazine, IEEE, Volume: 12 Issue: 5 October 2009, Page(s): 21-274. "AN2438/D ADC Definitions and Specifications." J. Feddeler and Bill Lucas, available at http://www.freescale.com/,
2003.
References
MPC57xx SAR ADC Implementation and Use, Rev 0, 06/2014
Freescale Semiconductor, Inc. 23

How to Reach Us:
Home Page:freescale.com
Web Support:freescale.com/support
Information in this document is provided solely to enable system andsoftware implementers to use Freescale products. There are no expressor implied copyright licenses granted hereunder to design or fabricateany integrated circuits based on the information in this document.Freescale reserves the right to make changes without further notice toany products herein.
Freescale makes no warranty, representation, or guarantee regardingthe suitability of its products for any particular purpose, nor doesFreescale assume any liability arising out of the application or use ofany product or circuit, and specifically disclaims any and all liability,including without limitation consequential or incidental damages.“Typical” parameters that may be provided in Freescale data sheetsand/or specifications can and do vary in different applications, andactual performance may vary over time. All operating parameters,including “typicals,” must be validated for each customer application bycustomer's technical experts. Freescale does not convey any licenseunder its patent rights nor the rights of others. Freescale sells productspursuant to standard terms and conditions of sale, which can be foundat the following address: freescale.com/SalesTermsandConditions.
Freescale, the Freescale logo, and Qorivva are trademarks of FreescaleSemiconductor, Inc., SafeAssure and SafeAssure logo are trademarksof Freescale Semiconductor, Inc.Reg. U.S. Pat. & Tm. Off. All otherproduct or service names are the property of their respective owners.
© 2014 Freescale Semiconductor, Inc.
Document Number AN4881Revision 0, 06/2014