anaplan informatica connector - s3. · pdf fileanaplan informatica connector document version...
TRANSCRIPT

Anaplan Informatica Connector Document Version 2.31
(updated 20-NOV-2017)
Anaplan Informatica Connector
Document Version 2.31
Anaplan Informatica Connector
© 2017 Anaplan, Inc. All Rights Reserved. i Document Version 2.31
Version Control
Version Number Date Changes
2.1 MAR 2017 New Template applied
2.2 AUG 2017 INTEGRA-1180 - New functionality and behaviors
2.21 AUG 2017 1.2 – Tested file size increased
2.8 – Deprecation note added
Minor Formatting
2.3 SEP 2017 Added 3.1 Extract Import Action Dump File and Send to
Target Connector section and added formatting to improve
pagination.
2.31 NOV 2017 Added 3.2 File Isolation in Anaplan.
Anaplan Informatica Connector
Document Version 2.31 ii © 2017 Anaplan, Inc. All Rights Reserved.
Anaplan Informatica Connector ................................................................................................. 0
1 Introduction ..................................................................................................................... 1
1.1 About the Anaplan Connector ............................................................................ 1
1.2 About Version 2.0 ............................................................................................... 1
1.3 Informatica Prerequisites .................................................................................... 2
1.4 Anaplan Prerequisites ......................................................................................... 3
2 Anaplan Connector .......................................................................................................... 4
2.1 Anaplan Connector Properties ............................................................................ 5
2.2 Counts for Rows .................................................................................................. 6
Informatica Count behavior ......................................................... 6
2.3 Limitations and Testing Settings ......................................................................... 7
2.4 Column Separator and Text Delimiter ................................................................ 8
2.5 Configuration of an Anaplan Connection with Basic Authentication ................. 8
To configure an Anaplan connection with basic Authentication . 8
2.6 Configuration of an Anaplan Connection with a Certificate-based Authentication .................................................................................................. 10
To configure an Anaplan connection with a Certificate based Authentication ........................................................................... 10
2.7 Proxy Access on Secure Agent .......................................................................... 11
2.8 Specify dump file location ................................................................................. 13
3 Import Data Synchronization Service Task and Configuration ...................................... 14
Step 1: Definition ........................................................................................................... 14
Step 2: Source ................................................................................................................ 14
Step 3: Target ................................................................................................................. 15
Step 4: Data Filters ......................................................................................................... 16
Step 5: Field Mapping .................................................................................................... 16
Step 6: Advanced Scheduling Options ........................................................................... 17
3.1 Extract Import Action Dump File and Send to Target Connector ..................... 18
3.2 File Isolation in Anaplan .................................................................................... 20
Anaplan Informatica Connector
© 2017 Anaplan, Inc. All Rights Reserved. 1 Document Version 2.31
1 Introduction
This guide explains how administrators and end users can configure and use the Anaplan
Connector for Informatica Cloud® Version 2.0 to:
• export data from Anaplan
• import data into Anaplan
• delete data from Anaplan
• run a process that contains any combination of model-to-model Import and Delete
actions
1.1 ABOUT THE ANAPLAN CONNECTOR
The advantages of using the Anaplan Connector for Informatica Cloud include:
• Automation: no need to run actions manually from the Anaplan UI
• Ease of configuration: no need to write a batch file (Windows) or shell script
(UNIX/Linux/MacOS) for Anaplan Connect
• Flexibility: the mapping you create can take advantage of all the functionality that
Informatica provides
• Connectivity: access hundreds of source connectors available to Informatica Cloud
• Native Scheduling: schedule integration jobs using Informatica Cloud
1.2 ABOUT VERSION 2.0
Version 2.0 introduces support for Informatica Data Synchronization Service (DSS) tasks,
which are wizard-like and easy to use. Underlying the DSS in Version 2.0 is the Flat File
Connector, which can also be used to manually create a custom mapping.
The following table compares Version 2.0 to Version 1.0.
Version 2.0 Version 1.0
Support for:
• DSS Tasks - easy to use and similar to a wizard
• Mappings - with the Flat File Connector or any number of connectors
Support for:
• FileIO connection mapping
Anaplan Informatica Connector
Document Version 2.31 2 © 2017 Anaplan, Inc. All Rights Reserved.
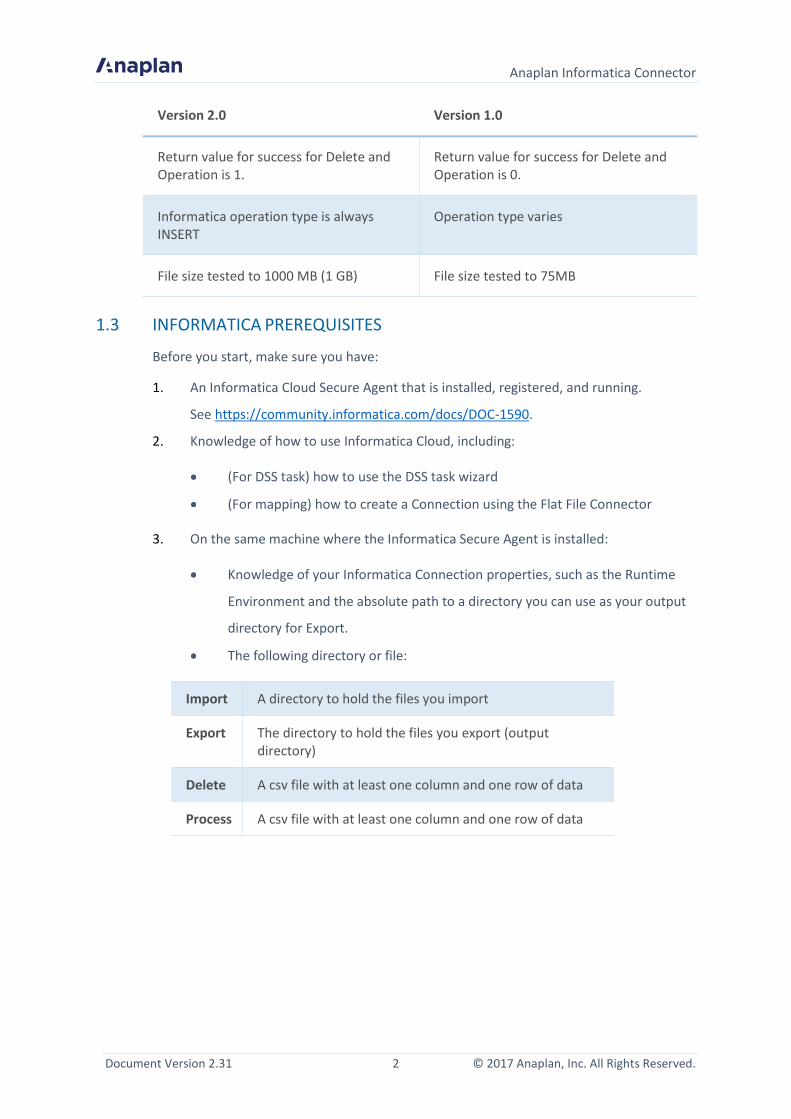
Version 2.0 Version 1.0
Return value for success for Delete and Operation is 1.
Return value for success for Delete and Operation is 0.
Informatica operation type is always INSERT
Operation type varies
File size tested to 1000 MB (1 GB) File size tested to 75MB
1.3 INFORMATICA PREREQUISITES
Before you start, make sure you have:
1. An Informatica Cloud Secure Agent that is installed, registered, and running.
See https://community.informatica.com/docs/DOC-1590.
2. Knowledge of how to use Informatica Cloud, including:
(For DSS task) how to use the DSS task wizard
(For mapping) how to create a Connection using the Flat File Connector
3. On the same machine where the Informatica Secure Agent is installed:
Knowledge of your Informatica Connection properties, such as the Runtime
Environment and the absolute path to a directory you can use as your output
directory for Export.
The following directory or file:
Import A directory to hold the files you import
Export The directory to hold the files you export (output directory)
Delete A csv file with at least one column and one row of data
Process A csv file with at least one column and one row of data
Anaplan Informatica Connector
© 2017 Anaplan, Inc. All Rights Reserved. 3 Document Version 2.31
1.4 ANAPLAN PREREQUISITES
Make sure you have:
1. An Anaplan account with access to a model and workspace.
2. Knowledge of how to use and configure Anaplan actions.
3. Your Anaplan model must already have a corresponding action that you can run
manually from the Anaplan graphical user interface:
For Export walkthrough, an Export action that exports data from a model
Note: Only exports that have a Tabular Single Column or Tabular Multiple Column layout are supported.
For Import, an Import action that imports data into a model
For Delete, an Other action that deletes data from a model
For Process, a Process action that contains multiple actions
4. If you’re using Certificate-based Authentication, make sure you:
Have an Anaplan Certificate file installed on the same machine as your
Informatica Cloud Secure Agent.
Know the path to that certificate on the machine that is running the Secure
Agent.
Anaplan Informatica Connector
Document Version 2.31 4 © 2017 Anaplan, Inc. All Rights Reserved.
2 Anaplan Connector
Anaplan Operation
Connection Type Informatica Operation Type must be: Source Connection Target Connection
Export AnaplanV2 Flat File INSERT
Import Flat File AnaplanV2 INSERT
Process Flat File AnaplanV2 INSERT
Delete Flat File AnaplanV2 INSERT
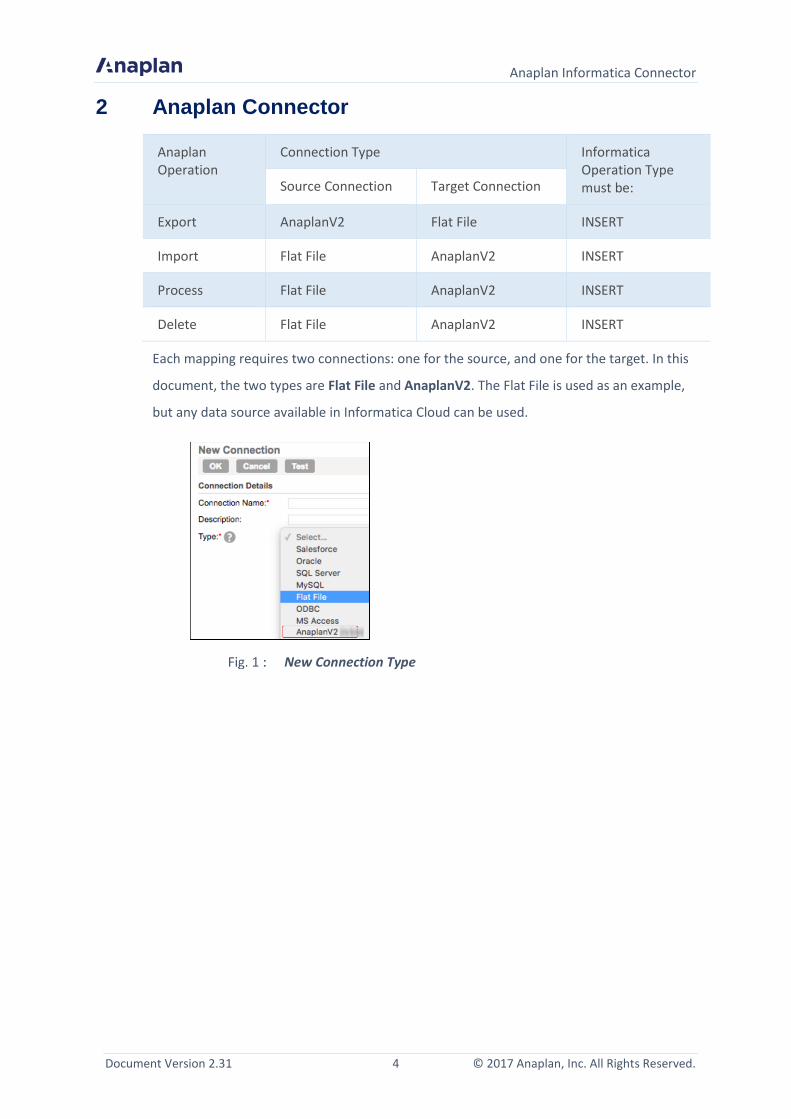
Each mapping requires two connections: one for the source, and one for the target. In this
document, the two types are Flat File and AnaplanV2. The Flat File is used as an example,
but any data source available in Informatica Cloud can be used.
New Connection Type
Anaplan Informatica Connector
© 2017 Anaplan, Inc. All Rights Reserved. 5 Document Version 2.31
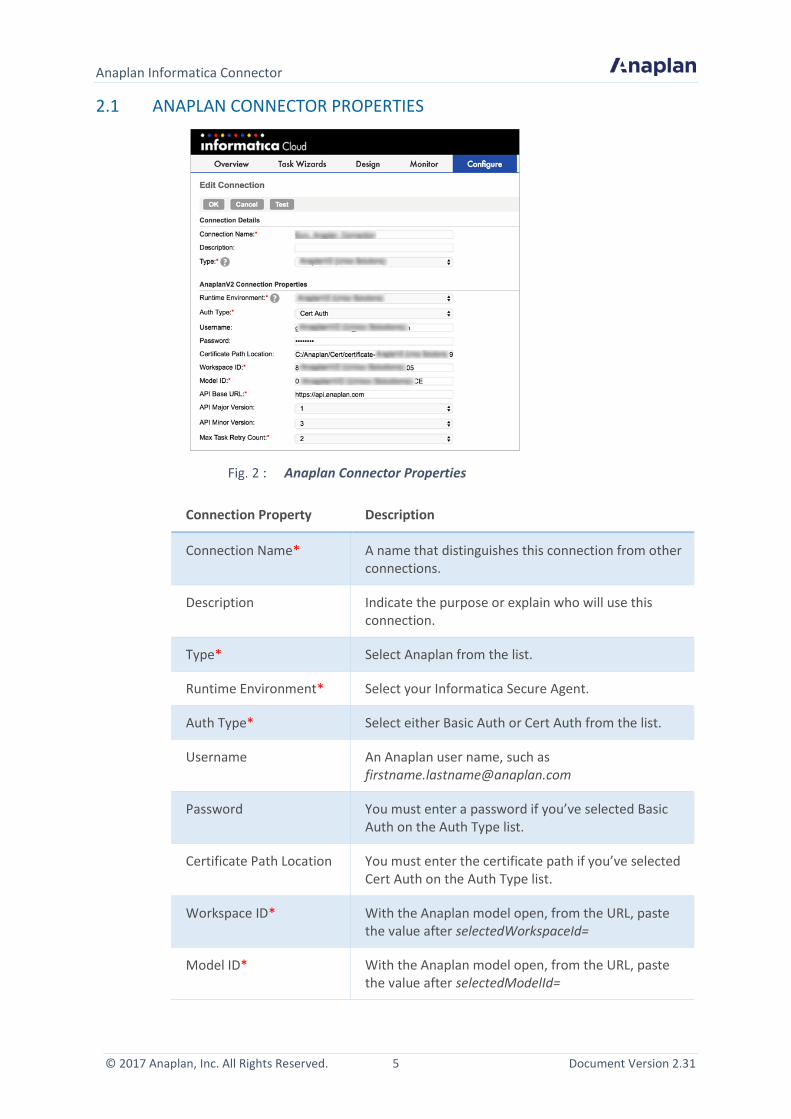
2.1 ANAPLAN CONNECTOR PROPERTIES
Anaplan Connector Properties
Connection Property Description
Connection Name* A name that distinguishes this connection from other connections.
Description Indicate the purpose or explain who will use this connection.
Type* Select Anaplan from the list.
Runtime Environment* Select your Informatica Secure Agent.
Auth Type* Select either Basic Auth or Cert Auth from the list.
Username An Anaplan user name, such as [email protected]
Password You must enter a password if you’ve selected Basic Auth on the Auth Type list.
Certificate Path Location You must enter the certificate path if you’ve selected Cert Auth on the Auth Type list.
Workspace ID* With the Anaplan model open, from the URL, paste the value after selectedWorkspaceId=
Model ID* With the Anaplan model open, from the URL, paste the value after selectedModelId=
Anaplan Informatica Connector
Document Version 2.31 6 © 2017 Anaplan, Inc. All Rights Reserved.
Connection Property Description
API Base URL* Enter the following URL: https://api.anaplan.com.
API Major Version* By default, the API major version is set to 1. This is the latest Anaplan API version.
API Minor Version By default, the API minor version is set to 3. This is the latest Anaplan API version.
Max Task Retry Count* By default, the Max Task Retry count is set to 2. Note that if you select a greater value, this will slow down the integration.
* Mandatory fields
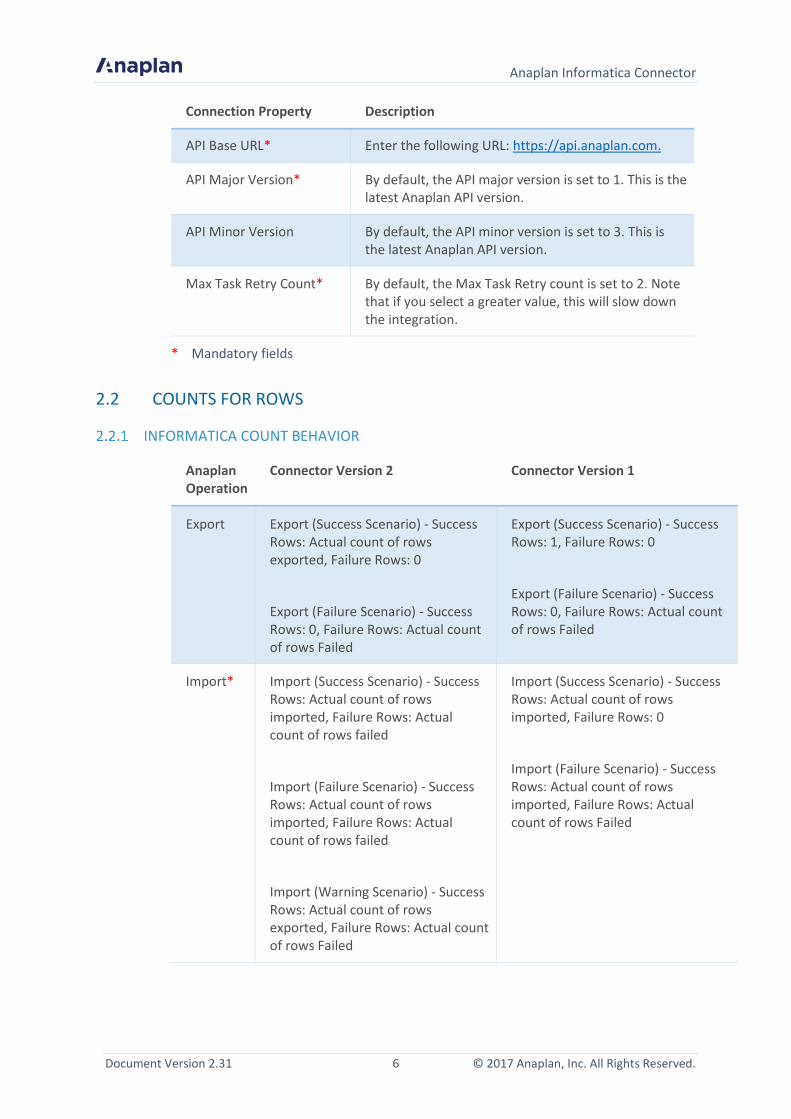
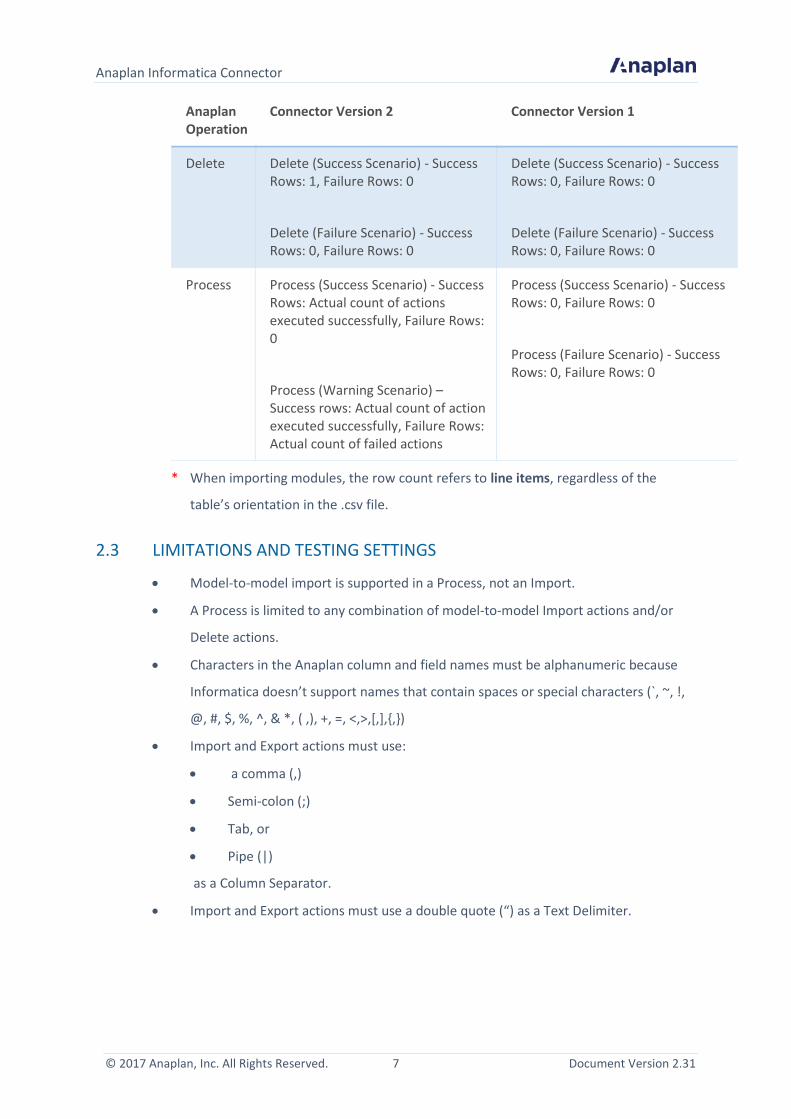
2.2 COUNTS FOR ROWS
INFORMATICA COUNT BEHAVIOR
Anaplan Operation
Connector Version 2 Connector Version 1
Export Export (Success Scenario) - Success Rows: Actual count of rows exported, Failure Rows: 0
Export (Failure Scenario) - Success Rows: 0, Failure Rows: Actual count of rows Failed
Export (Success Scenario) - Success Rows: 1, Failure Rows: 0
Export (Failure Scenario) - Success Rows: 0, Failure Rows: Actual count of rows Failed
Import* Import (Success Scenario) - Success Rows: Actual count of rows imported, Failure Rows: Actual count of rows failed
Import (Failure Scenario) - Success Rows: Actual count of rows imported, Failure Rows: Actual count of rows failed
Import (Warning Scenario) - Success Rows: Actual count of rows exported, Failure Rows: Actual count of rows Failed
Import (Success Scenario) - Success Rows: Actual count of rows imported, Failure Rows: 0
Import (Failure Scenario) - Success Rows: Actual count of rows imported, Failure Rows: Actual count of rows Failed
Anaplan Informatica Connector
© 2017 Anaplan, Inc. All Rights Reserved. 7 Document Version 2.31
Anaplan Operation
Connector Version 2 Connector Version 1
Delete Delete (Success Scenario) - Success Rows: 1, Failure Rows: 0
Delete (Failure Scenario) - Success Rows: 0, Failure Rows: 0
Delete (Success Scenario) - Success Rows: 0, Failure Rows: 0
Delete (Failure Scenario) - Success Rows: 0, Failure Rows: 0
Process Process (Success Scenario) - Success Rows: Actual count of actions executed successfully, Failure Rows: 0
Process (Warning Scenario) – Success rows: Actual count of action executed successfully, Failure Rows: Actual count of failed actions
Process (Success Scenario) - Success Rows: 0, Failure Rows: 0
Process (Failure Scenario) - Success Rows: 0, Failure Rows: 0
* When importing modules, the row count refers to line items, regardless of the
table’s orientation in the .csv file.
2.3 LIMITATIONS AND TESTING SETTINGS
• Model-to-model import is supported in a Process, not an Import.
• A Process is limited to any combination of model-to-model Import actions and/or
Delete actions.
• Characters in the Anaplan column and field names must be alphanumeric because
Informatica doesn’t support names that contain spaces or special characters (`, ~, !,
@, #, $, %, ^, & *, ( ,), +, =, <,>,[,],{,})
• Import and Export actions must use:
• a comma (,)
• Semi-colon (;)
• Tab, or
• Pipe (|)
as a Column Separator.
• Import and Export actions must use a double quote (“) as a Text Delimiter.
Anaplan Informatica Connector
Document Version 2.31 8 © 2017 Anaplan, Inc. All Rights Reserved.
Import and Export of 1000 MB have been tested with the following settings:
• Informatica Secure Agent: 6 GB of RAM
• DTM JVM: -Xmx1024m
Note: Review the Informatica documentation for more information about increasing the field buffer size and increasing Secure Agent memory.
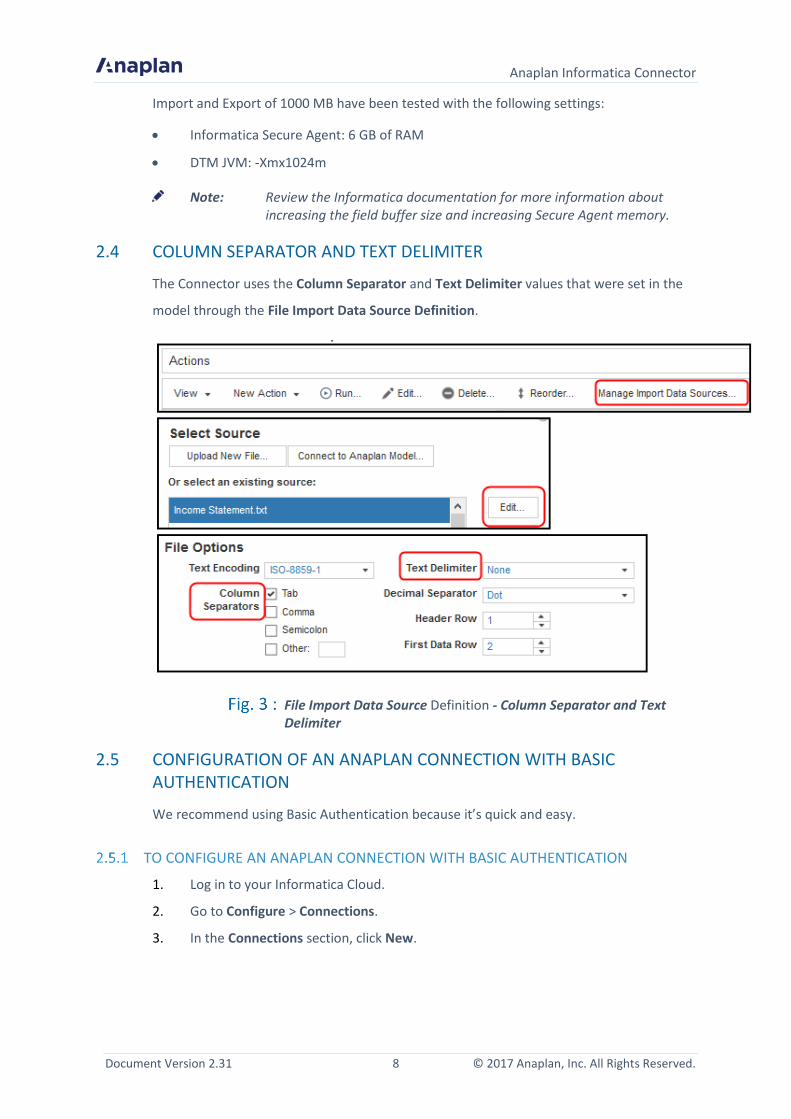
2.4 COLUMN SEPARATOR AND TEXT DELIMITER
The Connector uses the Column Separator and Text Delimiter values that were set in the
model through the File Import Data Source Definition.
File Import Data Source Definition - Column Separator and Text Delimiter
2.5 CONFIGURATION OF AN ANAPLAN CONNECTION WITH BASIC AUTHENTICATION
We recommend using Basic Authentication because it’s quick and easy.
TO CONFIGURE AN ANAPLAN CONNECTION WITH BASIC AUTHENTICATION
1. Log in to your Informatica Cloud.
2. Go to Configure > Connections.
3. In the Connections section, click New.
Anaplan Informatica Connector
© 2017 Anaplan, Inc. All Rights Reserved. 9 Document Version 2.31
4. In the Connection Details section:
a. Enter a Connection Name.
b. On the Type list, click AnaplanV2.
Configuration - Connection Type List
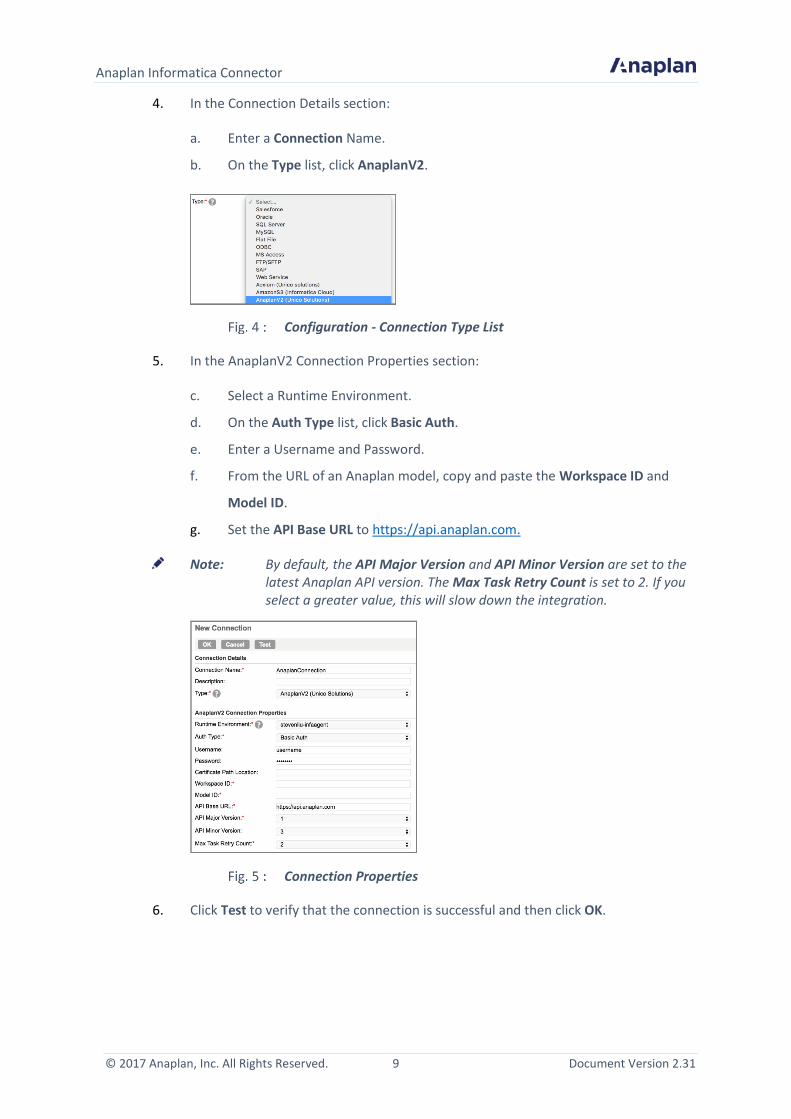
5. In the AnaplanV2 Connection Properties section:
c. Select a Runtime Environment.
d. On the Auth Type list, click Basic Auth.
e. Enter a Username and Password.
f. From the URL of an Anaplan model, copy and paste the Workspace ID and
Model ID.
g. Set the API Base URL to https://api.anaplan.com.
Note: By default, the API Major Version and API Minor Version are set to the latest Anaplan API version. The Max Task Retry Count is set to 2. If you select a greater value, this will slow down the integration.
Connection Properties
6. Click Test to verify that the connection is successful and then click OK.
Anaplan Informatica Connector
Document Version 2.31 10 © 2017 Anaplan, Inc. All Rights Reserved.
2.6 CONFIGURATION OF AN ANAPLAN CONNECTION WITH A CERTIFICATE-BASED AUTHENTICATION
If you choose to use Certificate-based authentication, note that:
• You can download an Anaplan certificate by following the instructions at
https://community.anaplan.com/anapedia/getting-started/end-user/certificates.
• Once you’ve downloaded the Anaplan certificate, it is under your control and
Anaplan Inc. is not responsible for keeping it secure.
• Informatica Cloud assumes that the location of any files (including certificates) that
are referenced are located on a directory that the Cloud Secure Agent can access.
TO CONFIGURE AN ANAPLAN CONNECTION WITH A CERTIFICATE BASED AUTHENTICATION
1. Log in to your Informatica Cloud.
2. Go to Configure > Connections.
3. In the Connections section, click New.
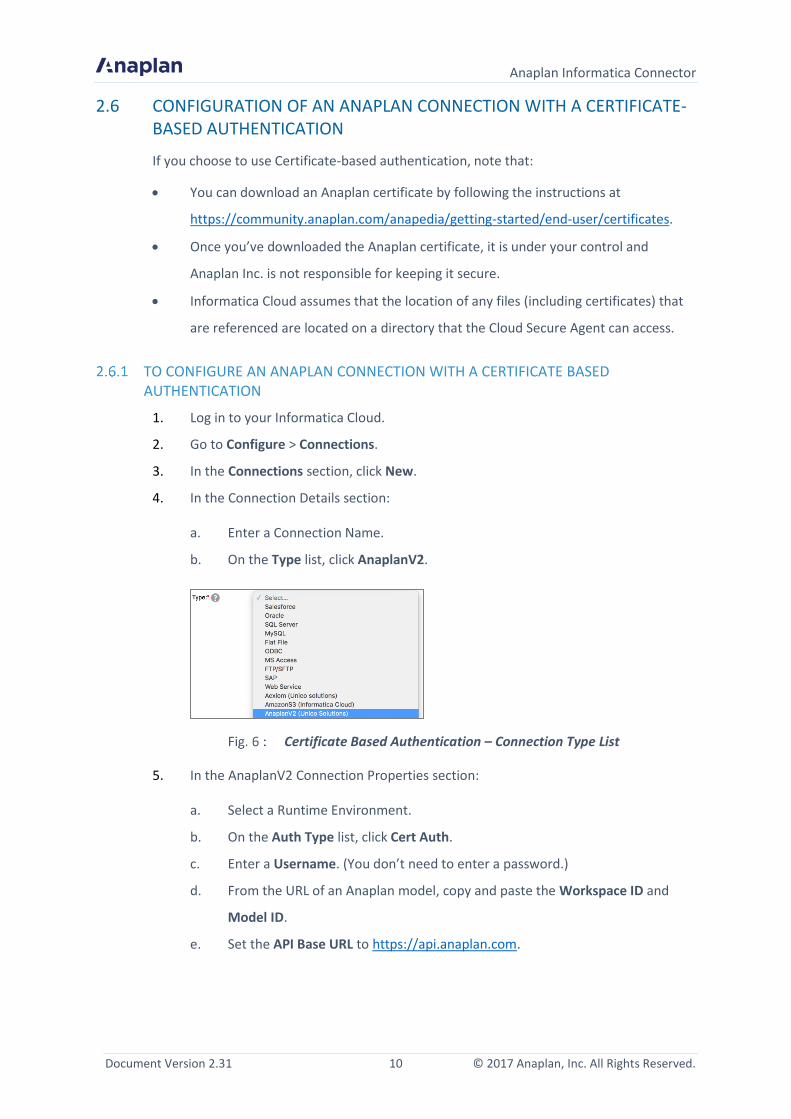
4. In the Connection Details section:
a. Enter a Connection Name.
b. On the Type list, click AnaplanV2.
Certificate Based Authentication – Connection Type List
5. In the AnaplanV2 Connection Properties section:
a. Select a Runtime Environment.
b. On the Auth Type list, click Cert Auth.
c. Enter a Username. (You don’t need to enter a password.)
d. From the URL of an Anaplan model, copy and paste the Workspace ID and
Model ID.
e. Set the API Base URL to https://api.anaplan.com.
Anaplan Informatica Connector
© 2017 Anaplan, Inc. All Rights Reserved. 11 Document Version 2.31
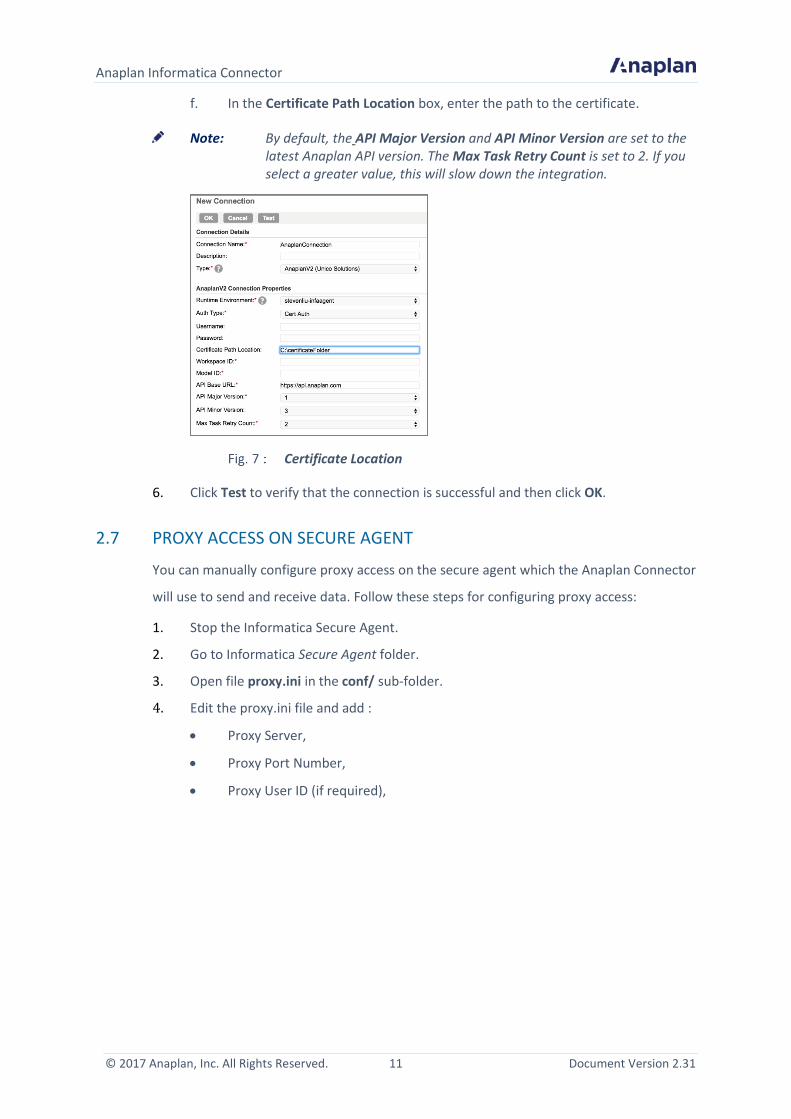
f. In the Certificate Path Location box, enter the path to the certificate.
Note: By default, the API Major Version and API Minor Version are set to the latest Anaplan API version. The Max Task Retry Count is set to 2. If you select a greater value, this will slow down the integration.
Certificate Location
6. Click Test to verify that the connection is successful and then click OK.
2.7 PROXY ACCESS ON SECURE AGENT
You can manually configure proxy access on the secure agent which the Anaplan Connector
will use to send and receive data. Follow these steps for configuring proxy access:
1. Stop the Informatica Secure Agent.
2. Go to Informatica Secure Agent folder.
3. Open file proxy.ini in the conf/ sub-folder.
4. Edit the proxy.ini file and add :
• Proxy Server,
• Proxy Port Number,
• Proxy User ID (if required),
Anaplan Informatica Connector
Document Version 2.31 12 © 2017 Anaplan, Inc. All Rights Reserved.
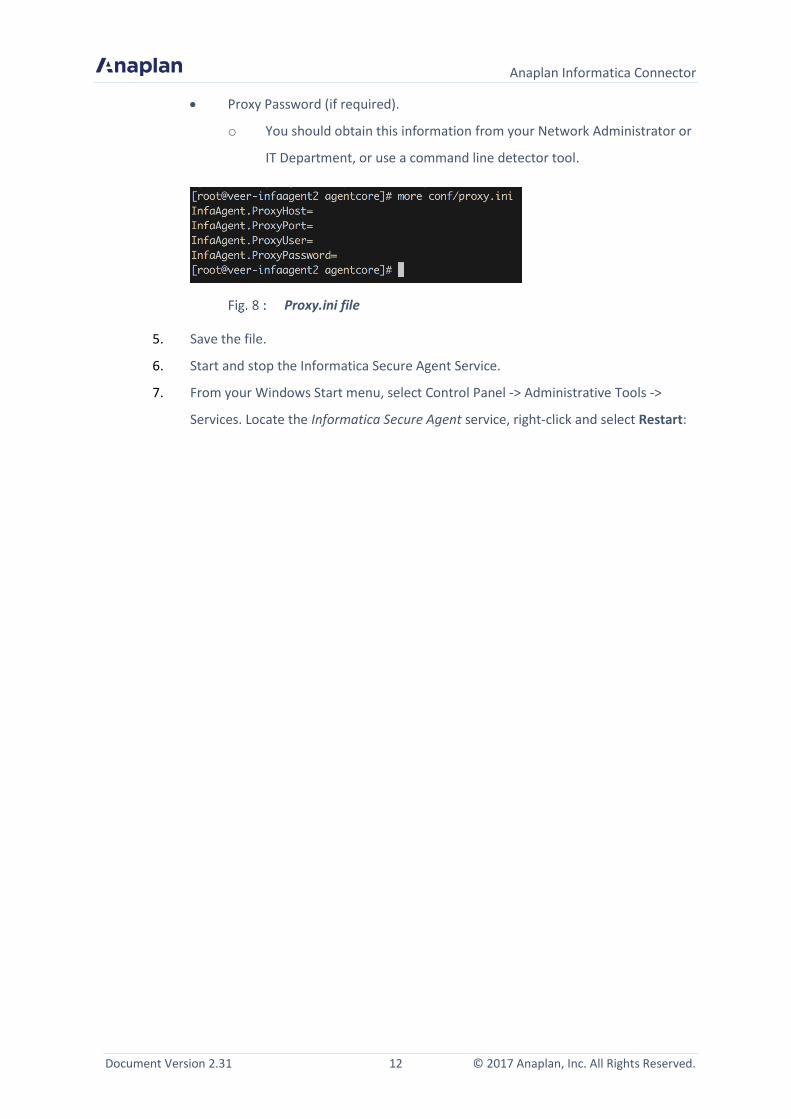
• Proxy Password (if required).
o You should obtain this information from your Network Administrator or
IT Department, or use a command line detector tool.
Proxy.ini file
5. Save the file.
6. Start and stop the Informatica Secure Agent Service.
7. From your Windows Start menu, select Control Panel -> Administrative Tools ->
Services. Locate the Informatica Secure Agent service, right-click and select Restart:
Anaplan Informatica Connector
© 2017 Anaplan, Inc. All Rights Reserved. 13 Document Version 2.31
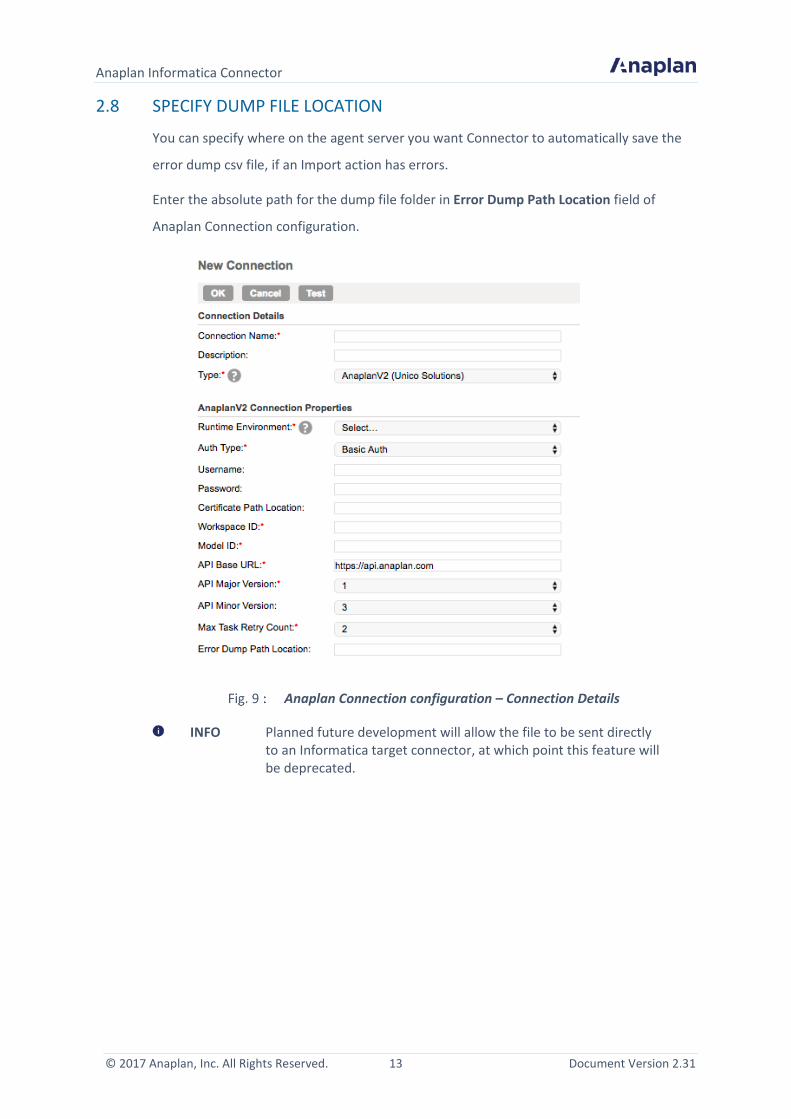
2.8 SPECIFY DUMP FILE LOCATION
You can specify where on the agent server you want Connector to automatically save the
error dump csv file, if an Import action has errors.
Enter the absolute path for the dump file folder in Error Dump Path Location field of
Anaplan Connection configuration.
Anaplan Connection configuration – Connection Details
INFO Planned future development will allow the file to be sent directly to an Informatica target connector, at which point this feature will be deprecated.
Anaplan Informatica Connector
Document Version 2.31 14 © 2017 Anaplan, Inc. All Rights Reserved.
3 Import Data Synchronization Service Task and Configuration
You can use a Data Synchronization Service (DSS) task to automate the import of a Flat File
into Anaplan using the Data Synchronization Task Wizard.
Make sure there is a .csv file in the Flat File connection. This is the .csv file that will be
imported into Anaplan.
For more information, see Informatica Prerequisites and Anaplan Prerequisites.
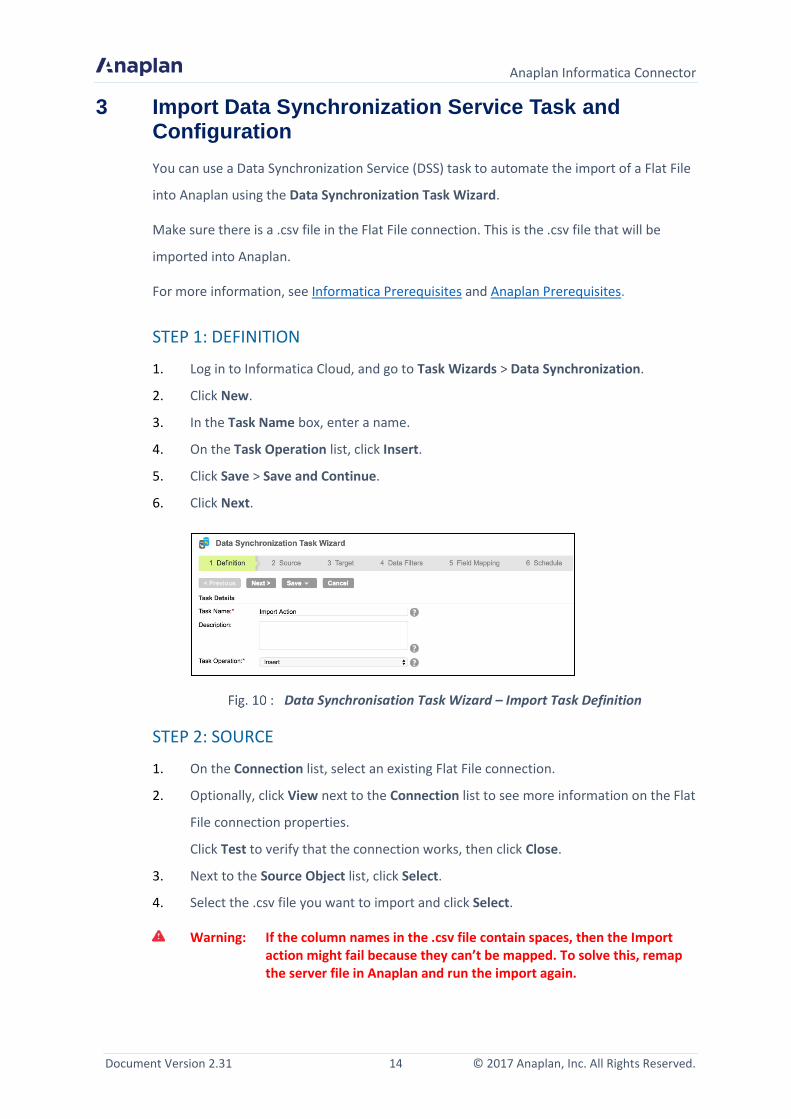
STEP 1: DEFINITION
1. Log in to Informatica Cloud, and go to Task Wizards > Data Synchronization.
2. Click New.
3. In the Task Name box, enter a name.
4. On the Task Operation list, click Insert.
5. Click Save > Save and Continue.
6. Click Next.
Data Synchronisation Task Wizard – Import Task Definition
STEP 2: SOURCE
1. On the Connection list, select an existing Flat File connection.
2. Optionally, click View next to the Connection list to see more information on the Flat
File connection properties.
Click Test to verify that the connection works, then click Close.
3. Next to the Source Object list, click Select.
4. Select the .csv file you want to import and click Select.
Warning: If the column names in the .csv file contain spaces, then the Import action might fail because they can’t be mapped. To solve this, remap the server file in Anaplan and run the import again.
Anaplan Informatica Connector
© 2017 Anaplan, Inc. All Rights Reserved. 15 Document Version 2.31
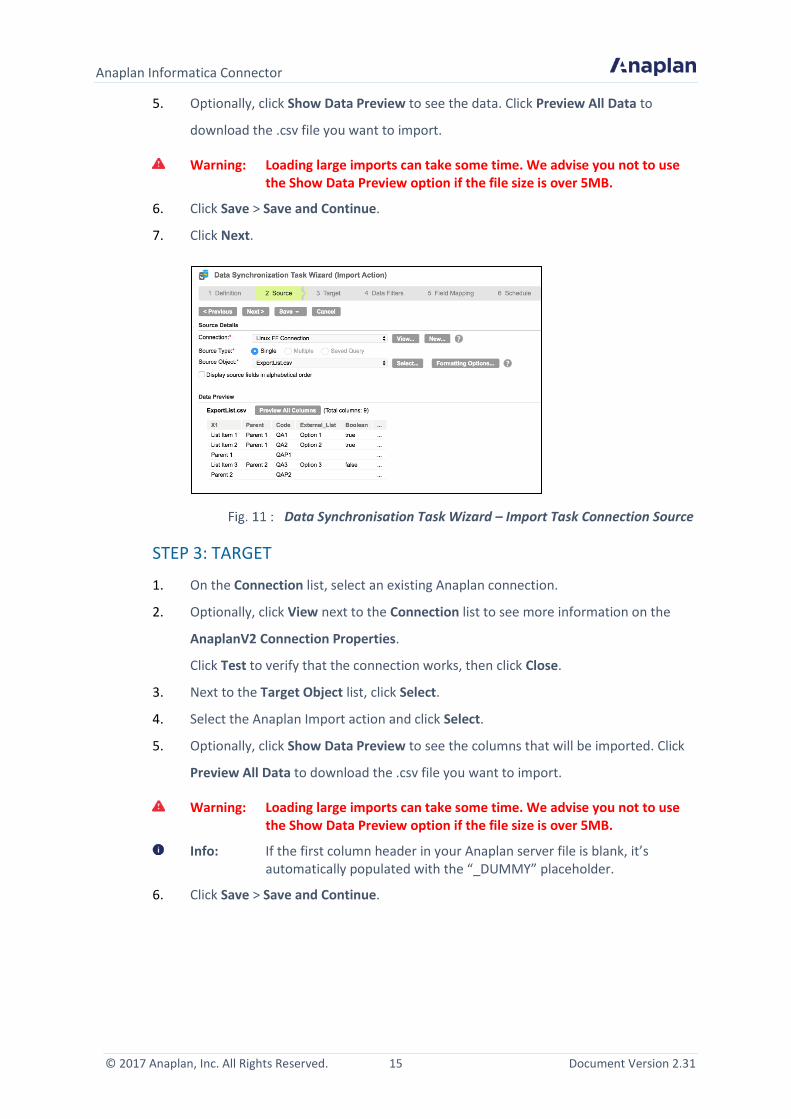
5. Optionally, click Show Data Preview to see the data. Click Preview All Data to
download the .csv file you want to import.
Warning: Loading large imports can take some time. We advise you not to use the Show Data Preview option if the file size is over 5MB.
6. Click Save > Save and Continue.
7. Click Next.
Data Synchronisation Task Wizard – Import Task Connection Source
STEP 3: TARGET
1. On the Connection list, select an existing Anaplan connection.
2. Optionally, click View next to the Connection list to see more information on the
AnaplanV2 Connection Properties.
Click Test to verify that the connection works, then click Close.
3. Next to the Target Object list, click Select.
4. Select the Anaplan Import action and click Select.
5. Optionally, click Show Data Preview to see the columns that will be imported. Click
Preview All Data to download the .csv file you want to import.
Warning: Loading large imports can take some time. We advise you not to use the Show Data Preview option if the file size is over 5MB.
Info: If the first column header in your Anaplan server file is blank, it’s automatically populated with the “_DUMMY” placeholder.
6. Click Save > Save and Continue.
Anaplan Informatica Connector
Document Version 2.31 16 © 2017 Anaplan, Inc. All Rights Reserved.
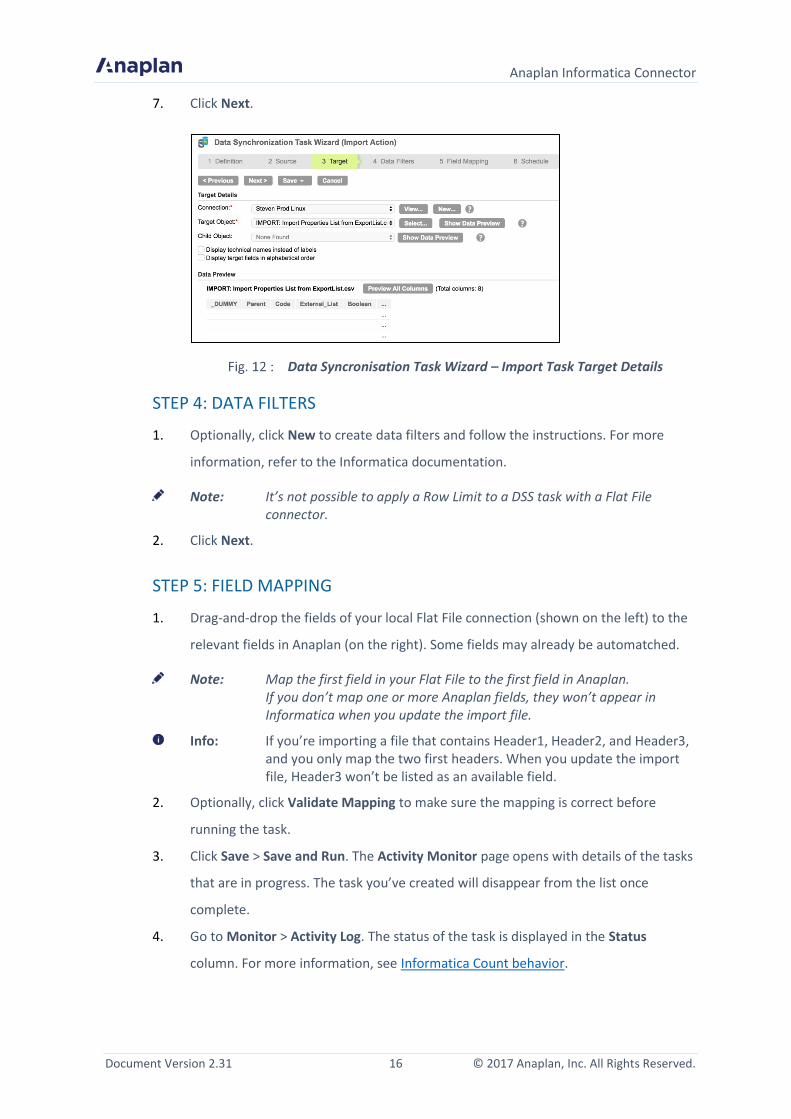
7. Click Next.
Data Syncronisation Task Wizard – Import Task Target Details
STEP 4: DATA FILTERS
1. Optionally, click New to create data filters and follow the instructions. For more
information, refer to the Informatica documentation.
Note: It’s not possible to apply a Row Limit to a DSS task with a Flat File connector.
2. Click Next.
STEP 5: FIELD MAPPING
1. Drag-and-drop the fields of your local Flat File connection (shown on the left) to the
relevant fields in Anaplan (on the right). Some fields may already be automatched.
Note: Map the first field in your Flat File to the first field in Anaplan. If you don’t map one or more Anaplan fields, they won’t appear in Informatica when you update the import file.
Info: If you’re importing a file that contains Header1, Header2, and Header3, and you only map the two first headers. When you update the import file, Header3 won’t be listed as an available field.
2. Optionally, click Validate Mapping to make sure the mapping is correct before
running the task.
3. Click Save > Save and Run. The Activity Monitor page opens with details of the tasks
that are in progress. The task you’ve created will disappear from the list once
complete.
4. Go to Monitor > Activity Log. The status of the task is displayed in the Status
column. For more information, see Informatica Count behavior.
Anaplan Informatica Connector
© 2017 Anaplan, Inc. All Rights Reserved. 17 Document Version 2.31
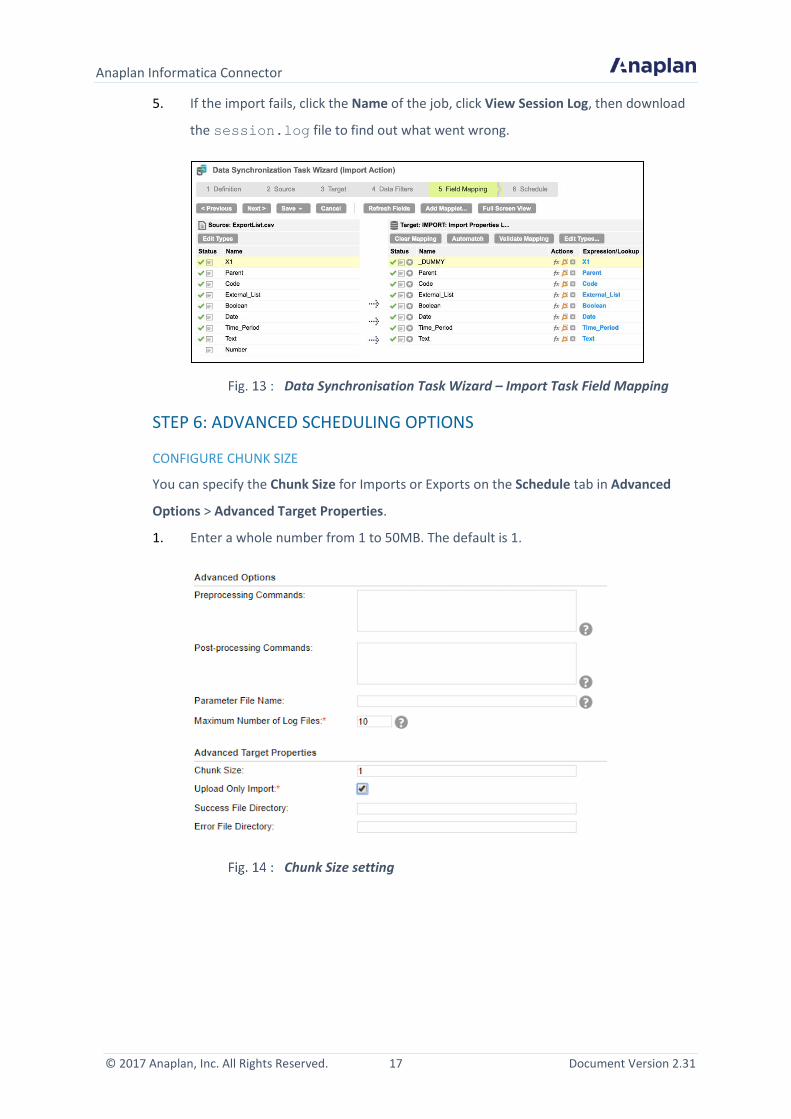
5. If the import fails, click the Name of the job, click View Session Log, then download
the session.log file to find out what went wrong.
Data Synchronisation Task Wizard – Import Task Field Mapping
STEP 6: ADVANCED SCHEDULING OPTIONS
CONFIGURE CHUNK SIZE
You can specify the Chunk Size for Imports or Exports on the Schedule tab in Advanced
Options > Advanced Target Properties.
1. Enter a whole number from 1 to 50MB. The default is 1.
Chunk Size setting
Anaplan Informatica Connector
Document Version 2.31 18 © 2017 Anaplan, Inc. All Rights Reserved.
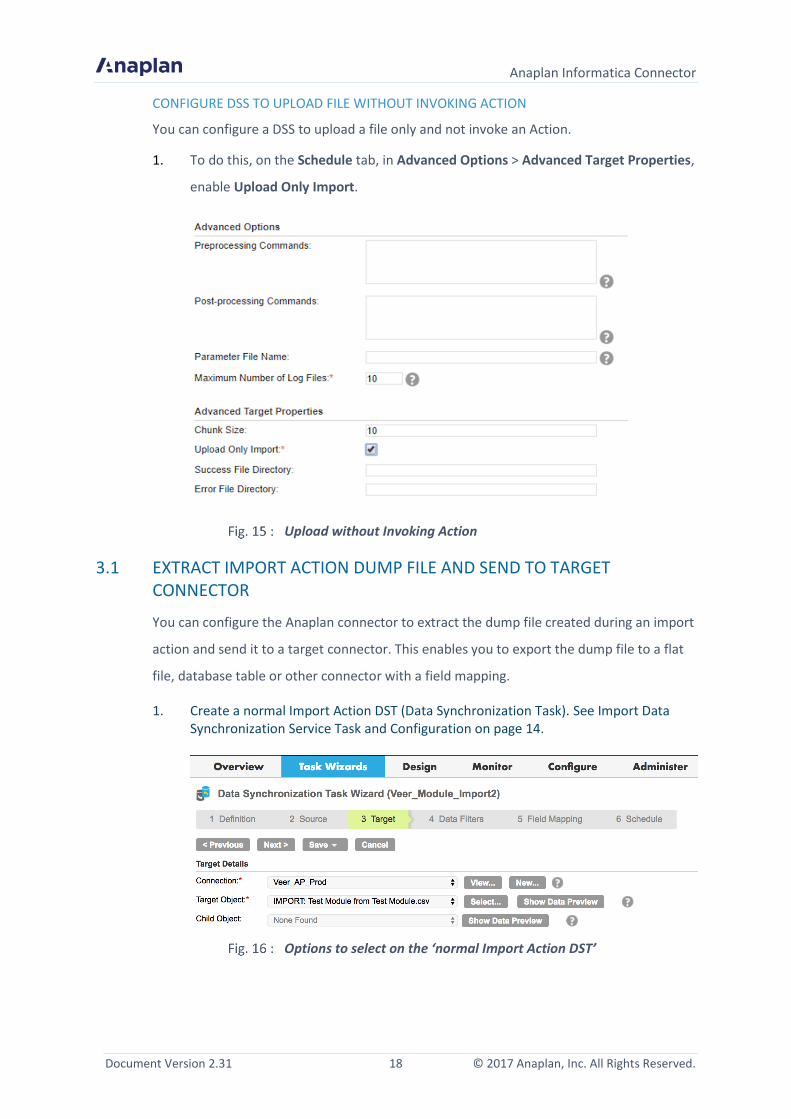
CONFIGURE DSS TO UPLOAD FILE WITHOUT INVOKING ACTION
You can configure a DSS to upload a file only and not invoke an Action.
1. To do this, on the Schedule tab, in Advanced Options > Advanced Target Properties,
enable Upload Only Import.
Upload without Invoking Action
3.1 EXTRACT IMPORT ACTION DUMP FILE AND SEND TO TARGET CONNECTOR
You can configure the Anaplan connector to extract the dump file created during an import
action and send it to a target connector. This enables you to export the dump file to a flat
file, database table or other connector with a field mapping.
1. Create a normal Import Action DST (Data Synchronization Task). See Import Data Synchronization Service Task and Configuration on page 14.
Options to select on the ‘normal Import Action DST’
Anaplan Informatica Connector
© 2017 Anaplan, Inc. All Rights Reserved. 19 Document Version 2.31
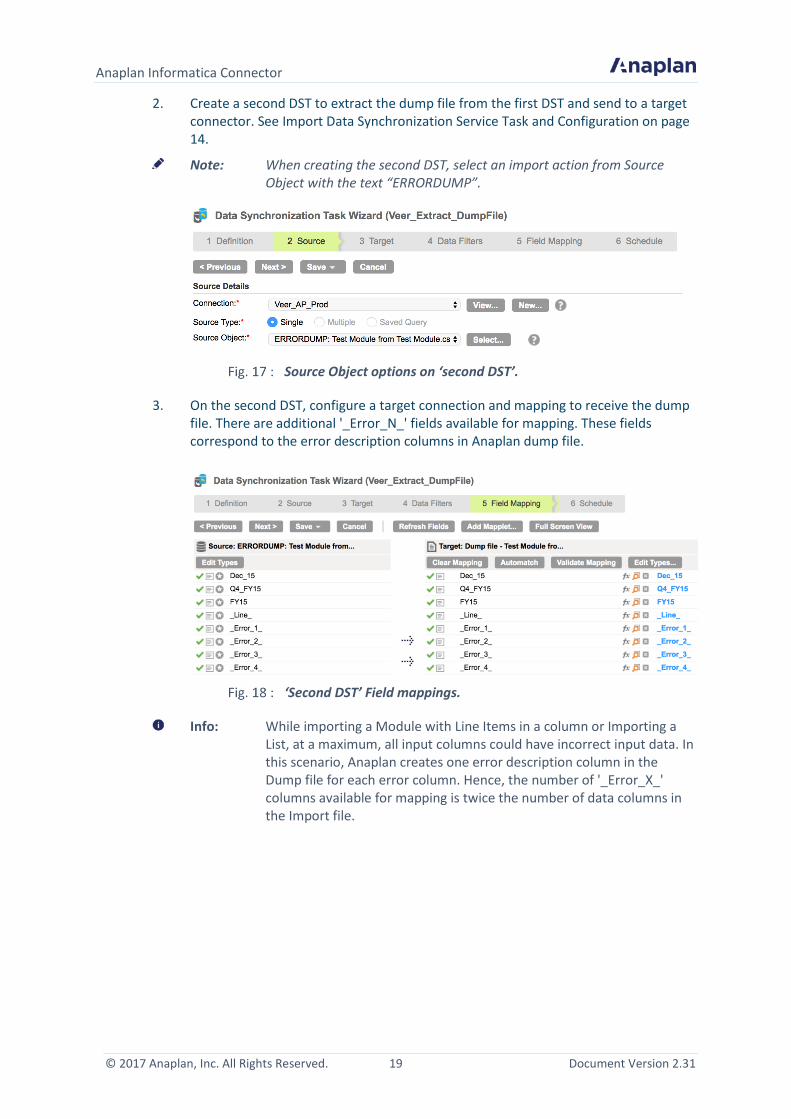
2. Create a second DST to extract the dump file from the first DST and send to a target connector. See Import Data Synchronization Service Task and Configuration on page 14.
Note: When creating the second DST, select an import action from Source Object with the text “ERRORDUMP”.
Source Object options on ‘second DST’.
3. On the second DST, configure a target connection and mapping to receive the dump file. There are additional '_Error_N_' fields available for mapping. These fields correspond to the error description columns in Anaplan dump file.
‘Second DST’ Field mappings.
Info: While importing a Module with Line Items in a column or Importing a List, at a maximum, all input columns could have incorrect input data. In this scenario, Anaplan creates one error description column in the Dump file for each error column. Hence, the number of '_Error_X_' columns available for mapping is twice the number of data columns in the Import file.

Anaplan Informatica Connector
Document Version 2.31 20 © 2017 Anaplan, Inc. All Rights Reserved.
4. Create a Task Flow with the two DSTs that you created earlier. a. Run the ‘Import Action DST’. b. Run the second DST to push the first dump file to a target connector.
Task flow with the two DSTs.
3.2 FILE ISOLATION IN ANAPLAN
Anaplan now provides a mechanism for Workspace Administrators to set the privacy level
of files associated with Import and Export Actions. This is referred to as file isolation. In
summary:
Data files set as private files can be accessed only by the user who originally
uploaded or exported the data.
Data files can be set as default files for Administrators, to be accessible only by
Workspace Administrators. Alternately, they can be set as Default for all users
(Everyone), including standard end users.
The ability for users to maintain unique private files has an effect on data integrations with
Anaplan, including the Anaplan Connector for Informatica Cloud. When working with the
Anaplan Connector, you must ensure that:
The Import Action file exists in the model and can be accessed by the user ID
that will be used to run the integration with the Action. If this user ID is
different from the user ID that created the Action, the data file must be set as
a default file.
The Export Action file exists in the model. If it doesn’t exist, you can’t view the
Informatica DSS Data Preview for an export.
For more details on file isolation, see the “Overview of Private and Default Files” article in
Anapedia and the release notes in Platform Releases.