android enterprise migration bluebook
TRANSCRIPT

Android Enterprise Migration Bluebook
Migration from Device Admin to Android Enterprise

Table of Contents
Introduction Audience
Using the Guide
EMM-Specific Functionality
Pre-deployment Key Milestones
Device Admin
Determining Impact
Android Enterprise as Default
Overview Analysis Key Milestones
Documenting DA Use Cases
Examples
Requirements Mapping Document Requirements
Cap-and-grow
Management Mode
App Migration Strategy
Managed Google Play
Private Applications and Play Developer Console
Android Enterprise Features
Minimum OS Support
Identity Model
Provisioning Method
Device Strategy
Android Enterprise Recommended Devices
Examples
Proof of Concept Complete a Proof-of-Concept
Infrastructure
EMM Instance
Certificates and VPN
Firewall
Devices
Consoles
Static IP Addresses
Set up User Apps
Policy Groups and Feature Setup
Feature Testing
Walkthrough and Setup Documentation
Deployment Migrate Today
Production Rollout
Android Champions
Evaluation
Documentation
Cap-and-grow
Field Migration
In-house and Rip-and-Replace Provisioning

Introduction This guide is intended to provide information and best practices on how to move from a legacy device administrator Android deployment to Android Enterprise. The legacy method is referred to as “DA”.
The guide is an Android Enterprise deployment manual with a focus on migration. Though we concentrate on migrating from DA, the concepts presented apply as well to migrating between different mobile management solutions that implement Android Enterprise.
This guide is a living document. As Android Enterprise evolves, we will continue to update it to reflect new features and best practices.
Audience
This guide is intended for EMM (enterprise mobility management) administrators with previous Android experience. It is not a general guide on using Android or explaining how it works. Context provided will occasionally fall outside the scope of Android Enterprise. In these cases, we will provide references to outside documentation. The documentation will at times be technical in nature so the reader is expected to have experience researching advanced mobility topics.
We also assume the reader has a basic understanding of the advantages of Android Enterprise over DA and has already decided to migrate.
Using the Guide
The sections are self-contained but ordered to be read sequentially from migration planning to implementation. While reading every section is not required to progress, you should still understand all the concepts presented in them. Make sure to check off the key milestones before moving forward.
If you notice any mistakes, incorrect content, or missing content please flag the issue and send a message to [email protected]

EMM-Specific Functionality
Google reviews and validates EMM solutions for consistency completeness. However, it is ultimately up to the EMM providers themselves to choose which Android Enterprise features to implement and which Android Enterprise solutions to submit for validation. A lack of validation does not mean a lack of support for a given Android Enterprise feature so you should always consult your EMM provider for information on feature support or feature requests.
Pre-deployment In this section, we establish a baseline of knowledge necessary for planning your DA migration. We also provide a brief summary of motivations for migrating.
Key Milestones
● Understand what device admin is and why it’s considered legacy
● Understand device admin deprecation impact
● Understand why Android Enterprise is preferred to device admin
Device Admin
Android included support for enterprise apps by offering the Android Device Administration API as of Android 2.2. The Device Administration API provides device administration features at the system level. These APIs allow developers to create security-aware apps that are useful in local administrative settings, but in the absence of more powerful enterprise APIs, became the basis for enterprise device management in early versions of Android. Since the introduction of Device Admin API, enterprises’ needs have evolved. Devices are accessing more confidential resources and being used in a wider variety of use cases than Android’s original device admin API was designed for.
Simultaneously, organizations demand a higher trust relationship than device admin was designed to support. Because a device admin can be enabled by any application that the user authorizes, it doesn’t support several enterprise use cases where holistic management is required.

Device admin has been considered a legacy management approach since Android’s fully managed device and work profile modes were introduced in Android 5.0. Because device admin isn’t well suited to support today’s enterprise requirements, we recommend customers and partners adopt fully managed device and work profile modes to manage their devices from now on.
Determining Impact
The following Device Admin APIs will fail to work when when your EMM DPC is upgraded to target the Android Q API level:
● USES_POLICY_DISABLE_CAMERA
● USES_POLICY_DISABLE_KEYGUARD_FEATURES
● USES_POLICY_EXPIRE_PASSWORD
● USES_POLICY_LIMIT_PASSWORD
If your EMM solution relies on any of these, you will eventually have to migrate. Please contact your EMM provider to find out if this is the case for your deployment.
Only devices which run DPCs targeting Q features are required to migrate if they are still on DA. Devices running DPCs targeting an API level below Q will not be impacted even if the devices are upgraded to Android Q. Likewise, DPCs targeting an API level below Q will continue to be installable on devices running Android Q.
Note that apps uploaded to Google Play are now required to target a recent Android API level to ensure that users benefit from significant security and performance improvements. It’s reasonable to expect that the API target will increase as new API versions are released. This means that EMM may eventually have to target Q if they wish to update their DPCs over Play.
You can read more about Play’s API level requirement here: https://developer.android.com/distribute/best-practices/develop/target-sdk
Android Enterprise as Default
Besides DA deprecation, Android Enterprise is actively being developed with new functions and management modes. Android Enterprise is the modern management solution that will serve your organization's needs well into the future.

See this article for more info on why it’s time to migrate: https://blog.google/products/android-enterprise/why-its-time-enterprises-adopt-androids-modern-device-management-apis/
You may find certain situations where the Android Enterprise solution isn’t preferable to Device Admin. In these cases you should file feature requests against Android Enterprise via your EMM provider. Feature inclusion is based on user feedback and we are responsive to enterprise and EMM needs.
Overview We approach our DA migration by dividing into four main phases:

A migration document is started in the Analysis phase which is passed into subsequent phases and expanded upon through the Deployment phase. This model should look familiar. Many IT infrastructure deployments follow this progression and DA migration is no different.
In the analysis phase, we document the policies in use today. Next is feature mapping where we match those policies to the corresponding ones in Android Enterprise. The proof-of-concept phase is where we start applying and testing the new policies. The deployment phase is where we develop our strategy for rolling out the new solution to users.
Analysis Before choosing which features to implement in Android Enterprise, an administrator needs to understand their current deployment. In this section we show how to analyze a legacy Android setup and document it for feature mapping against Android Enterprise.
Key Milestones
● DA policies documented ○ Security ○ Management ○ Usability
● App catalog documented ● Device inventory created ● Use case documentation generated
The goal in the analysis phase is to create a document that provides enough information to understand which features need to be implemented in Android Enterprise.
The information in this document is then passed to the Feature Mapping phase covered in the next section of this guide.

The dependency diagram for the analysis documents look like this:

Documenting DA Use Cases
1. Create a spreadsheet and list the current policy groups in your EMM console
2. Create separate use cases based on the existing policy groups
3. For each use case, document its:
a. Name
b. Business owner
c. User identity model
d. Device Requirements
i. Security
ii. Management
iii. Usability
e. Device inventory
i. Make and model
ii. OS Version
f. Apps
For each app list:
i. App name
ii. Package name
iii. Hosting method
iv. Whether the app is public or private
v. Whether the app is mandatory (true/false)
We define a use case as the set of all features and requirements suited for a particular role in an organization. We recommended breaking up every use case into separate mini-deployments to simplify planning.
Most EMM providers allow creating groups of policies. This should be the first place to look when enumerating an organization’s use cases. In case the grouping defined is not suitable, you will need to ask the owner or a member of the business unit who can describe its requirements.
User identity model refers to the source of truth for user accounts on the device. This could be per device, Active Directory, LDAP, or Google Directory for example. It could even be “none”.

Device requirements can either be listed as they appear in your current console or as a simple description. We organize them within “Security”, “Management”, and “Usability” to make feature mapping easier in the next section. However this can be organized in any way logical to your organisation.
A device inventory will be needed to determine the minimum OS level to support, devices to replace, provisioning method, and more.
In the Apps section, the hosting method refers to whether the app is currently being served on Google Play or self-hosted on an internal server or EMM instance.
The next question is relevant if the app is hosted on Google Play. Apps served publicly are available to anyone who has access to the Google Play store.
Developers can also opt to serve apps privately, where only one or a select number of enterprises can view and download them.
Examples
Here and in subsequent sections we follow fictional customers’ migration journeys. We step through key milestones for a single use case at each and provide examples of what an organization might do when using this guide. We will refer back to these customers in later sections of the guide.
Sales Ltd.
Sales Ltd is a small appliance company. It sells appliances across the country. A field sales team at the company uses Android phones for email and viewing internal company websites over VPN. Team members use their personal phones for work but Sales Ltd. enforces a few compliance policies on them. This is what their use case document looks like:
Name Field Sales
Owner Francois Black
User Identity Active Directory

Device Requirements
Type Description
Security Business data needs to be password protected
Need to be able to erase business data on device
Management Needs VPN configuration
Need to Lock down GPS
Usability
Need to set custom user icons
Business contact info should be visible when receiving calls
Device Inventory Make and Model
OS Version Qty
Nexus 5 5.0 5
Nexus 5 6.1 10
Apps
Name Hosting Method
Gmail Google Play

Bank Corp.
Bank Corp. is a large regional bank. It provides services to small businesses through a team of client advisors. The bank requires total control of advisor devices to guard against harmful apps. They use certificate-based authentication on Gmail and have strong wireless protection on their network among other security controls.They also have a self-hosted app, called ClientSecure, which is used to access customer data.
Name Client Advisor
Owner Kimberly Dealer
User Identity Active Directory
Device Requirements
Type Description
Security Lock corporate data if device compliance not met
Need app scanning against harmful apps
Strong password complexity
Management Need client certificates
Disable screen capture
Configuration WiFi SSIDs
Control app permissions

Usability Ability to request device logs remotely
Custom lock-screen message
Device Inventory
Make and Model
OS Version Qty
Google Pixel 8.0 50
Apps Name Hosting Method
Gmail Google Play
ClientSecure Self-hosted
Signage LLC
Signage LLC is a large digital signage company that provides wayfinder kiosks to airports. They need the ability to deploy Android devices with a single application running that cannot be closed. In addition, they need to be able to control system updates in order to avoid disruptions. They apply a template for each airport deployment that looks like the following:
Name Wayfinder Kiosk
Owner Joseph Santiago
User Identity Service accounts
Device Requirements
Type Description

Security Lock down config settings on device
Management Configure WiFi network
Usability Lock to AirportMapper app only
Remote swapping of the locked app
Device Inventory
Make and Model OS Version Qty
Nexus 10 Tablet 4.2 100
Apps Name Hosting Method
AirportMapper Custom side-loaded

Requirements Mapping With the legacy deployment use cases documented, we are now able to determine our Android Enterprise feature requirements.
Key Milestones
● Management method chosen
● App migration strategy created
● Android Enterprise features mapped
● Minimum Android OS level determined
● Provisioning method chosen
● Identity model chosen
● Device strategy created
The goal of this section is to document those requirements in order to prepare for a proof-of-concept deployment.

The dependency diagram for the requirements looks like this:
Document Requirements
We summarize the steps you need to take to document your Android Enterprise feature requirements. Each step is explored in more detail below.
1. Choose a management mode
a. Fully managed device mode if device is corporate-owned
b. Work profile mode if device is owned by the end user
2. Create an app migration strategy
3. Map use case requirements to Android Enterprise features
a. Create two new columns beside the device requirements titled “Feature” and “OS”
b. Review the list of Android Enterprise features for the management mode chosen in step 2: developers.google.com/android/work/requirements/features

c. Document the feature for each device requirement that most closely matches it and its corresponding Android version
4. Determine Android OS level to support
a. Compare the versions for the features listed in the previous step. The highest Android version listed is the minimum OS version that your deployment will support.
5. Choose identity model: developers.google.com/android/work/overview#identity_models
a. Managed Google Play Accounts is recommended
b. Google Accounts only if you’re a Google Cloud Identity (including G-Suite or Chrome OS) customer
6. Choose a provisioning method: developers.google.com/android/work/prov-devices
a. Choose based on minimum OS and management method chosen
7. Create device strategy
a. Refer to the device inventory in the analysis documentation, minimum OS version chosen in step 5
b. For each inventory item document an action that needs to be taken to meet requirements:
i. “No action”: If devices meet minimum OS level
ii. “Upgrade”: If devices support and can be updated to the supported OS
iii. “Replace”: If devices cannot be updated to supported OS level
1. If devices need to be replaced, choose a replacement device
2. Choose from devices in the Enterprise Recommended program: https://www.android.com/enterprise/recommended/
3. Otherwise choose from Android Enterprise compatible devices list: https://www.android.com/enterprise/device-catalog/
iv. “Age Out”: Allowing devices to age out of the fleet naturally is part of the cap-and-grow model of device replacement.
Cap-and-grow
In cases where an upgrade or replacement is necessary, it might be advisable to wait until a device refresh cycle or other event to replace the devices. This is the so-called cap-and-grow model. In cap-and-grow, you gather all requirements and set up all necessary infrastructure but only replace device and move them into modern management at the end of their usual lifecycle or when they need replacement due to loss or breakage.

This provides a convenient way to roll out devices slowly and spread out capital expenditures associated with replacing mobile devices.
Management Mode
The management mode chosen for migrated devices determines Android Enterprise features available for management, provisioning methods that can be used, and how devices can be enrolled.
There are two Android Enterprise management modes that can be chosen for a given use case:
● Work profile
● Fully managed device
Detailed information for each mode can be found here: https://developers.google.com/android/work/requirements
The choice depends first on the owner of the devices then on the device use case. If the device is owned by the end-user, then “Work profile” should be chosen. If the use case requires that the admin have more control of the device or that the end-user only have access to a few apps, then “fully managed device” should be used.
Creating a work profile does not require a device reset and the mode separates work from personal data. BYOD use cases typically call for deploying work profiles. Fully managed device mode is for more restrictive use cases and requires a full device reset.

Features available for each management mode can be found below
● Work profile: https://developers.google.com/android/work/requirements/work-profile
● Fully managed device: https://developers.google.com/android/work/requirements/fully-managed-device
App Migration Strategy
Copy the Apps section from the analysis phase into a spreadsheet. This info will be expanded upon.
For every app:
1. Document the package name if available on Play
a. The easiest way to determine the package name of an app is to find it on the Google Play website and read its id parameter from the URL
b.
c. If sideloaded, create and document a unique package name for uploading to Play
2. Note if the app needs to be unwrapped (see explanation below)
3. Note if app is custom or developed in-house

4. List any set of configuration properties that need to be set (see explanation below)
App wrapping refers to the process of applying a layer of custom policies to an app without requiring any changes to the app itself. System administrators often do this to provide an extra level of security to protect corporate data or to comply with corporate networking policies. App wrapping is typically applied using a custom SDK but some EMM vendors provide the ability to wrap apps from within their consoles.
Wrapped apps should behave as normal Android apps but in some cases an app may need to be unwrapped in order to function properly on Android Enterprise. You should also consider unwrapping an app if the policies applied to them are already covered in Android Enterprise. Consult your app wrapping provider if you experience any trouble with wrapped apps in Android Enterprise.
Some apps require configuration settings in order to work properly in an organization or to comply with corporate policy. An email client might require a mail server address or a VPN client might need the name of a certificate to use for creating a secure network tunnel. Android Enterprise has made it easy for administrators to set these properties remotely by using managed configurations. Managed configurations work by reading a list of configuration settings that are embedded in a managed app. These settings are defined by the app developer. Your EMM then uses this list to present configuration options in their console. When the administrator sets these options, they are delivered to managed devices automatically via Google Play.
You can find more details about managed configurations here: https://developer.android.com/work/managed-configurations
Managed Google Play
One of the biggest differences between legacy and Android Enterprise is how applications are managed. App management is centered around Managed Google Play and merits some explanation here. Play is used for:
● App approval - Admins browse Play and choose the applications that they would like their users to have

● App distribution - Once an app is approved, admins can choose to have them automatically pushed to user device or simply make them available in in the Managed Play Store for users to choose (more on this to follow)
● Approving app permission - Admins can accept app permissions on behalf of the user
● Managed configurations - Admins can set configuration properties for applications that support them
EMMs use the Play EMM APIs to communicate with Play directly or integrate the Managed Play iFrame in their consoles
● Play EMM API: https://developers.google.com/android/work/play/emm-api/
● Managed Play iFrame: https://developers.google.com/android/work/play/emm-api/managed-play-iframe

Another aspect of Play is the Managed Play Store client on the users device. When admins approve the apps that their users can install, the Play Store client is where user can choose to install them, assuming the apps aren’t already pushed automatically by the admin.
A few things to keep in mind concerning apps on the Managed Play Store:
● It’s a whitelist. There is no blacklist functionality as of yet. Every app that is allowed to be installed by users must individually be chosen by the admin. Optionally, the admin can choose to enable access to all applications available on Play
● IT admins can approve any app that is available in public Google Play
● There’s no difference between apps available in Managed Play Store and public Google Play, the only exception being any additional apps that developers choose to deploy to specific enterprises. More on this in the next section.
Private Applications and Play Developer Console
Organizations which develop custom apps that they need to distribute to their users (and only their users) need to become familiar with the Google Play Console. The console allows you to:
● Upload custom apps
● Mark custom apps as private so they’re only available to specific enterprises
● Manage multiple development channels for custom apps to enable beta testing before wider distribution
If your EMM integrates the Managed Google Play iFrame in their console, you can manage your organization’s custom apps and access the Play console directly from your EMM console. This enables faster publishing of custom apps, and it does not require you to pay the one time fee of $25 for creating a Play Developer account.

App submission process
1. Log in to the Google Play console with the same account that was used to bind your organization to an EMM. It isn’t mandatory to use the same account but it’s best practice.
2. Upload your custom app
3. Select the checkbox that denotes the app is for private distribution
4. Create separate distribution channels for development and production
Once a private application is approved for use within your organization, it can be managed like any other application from the EMM console: https://play.google.com/apps/publish
There are other aspects of Managed Google Play not covered here like custom store layouts, system update management, and Google Play Protect. A thorough understanding of Managed Google Play is highly recommended: https://developer.android.com/distribute/google-play/work
Android Enterprise Features
At this point you should have the requirements for your migration use case and the management mode that will be employed. This is enough information to determine the Android Enterprise features to document from the features page listed here: developers.google.com/android/work/requirements/features
Refer back to the https://developers.google.com/android/work/requirements page for details on individual features.

Caveats to watch for:
● Many legacy features that share names with modern features may not behave the same way.
● Features that exist within Android Enterprise may not all be supported by your EMM. Contact your EMM provider for feature requests, clarification on implementation, and any workarounds if features are missing.
● Don't forget to note the Android version that supports each feature. It will be used to determine the minimum OS your deployment can support.
Minimum OS Support
You will need to determine a minimum Android version to support in order to ensure that the Android Enterprise Features chosen in the previous step are all available on your organization’s devices.
This can be done by choosing the highest Android version listed beside the Android Enterprise features that need to be implemented for each use case.
If you find that the minimum Android version necessary is too high, you will need to loosen the requirement to allow for more device choice. A higher minimum OS allows for more features. If only some devices require a higher minimum OS, consider breaking those out into a separate use case.
Identity Model
Android Enterprise features are managed by APIs provided to EMMs. Individual users are targeted for policies via their identity. The two options to consider are:
● Managed Google Play Accounts
● Google Cloud Identity Accounts
Detailed information on the models can be found here: https://developers.google.com/android/work/overview#identity_models
As mentioned in the summary steps, Managed Google Play Accounts should be the default choice. They’re generic, obfuscated accounts created for easy setup and identification within Android Enterprise. They’re maintained entirely within the EMM so there is no complex sync required.
Google accounts should only be used if you are (or will be) a Google Cloud Identity, G-Suite or ChromeOS device customer.
Provisioning Method
The provisioning method describes the way the EMM DPC is downloaded onto an Android device. The method chosen depends on the device management mode, hardware capabilities, and the version of Android running on the device.
In work profile mode, there is one common option and it does not require a factory reset on the device:
● Manual DPC install
○ This method involves having the DPC manually downloaded and installed from the Google Play store. In some cases the DPC installer is sideloaded onto devices but this is not recommended.
There are more provisioning options for fully managed device mode but these can only be employed during initial device setup. This means that devices already in use will require a full reset:
● Zero-touch (recommended)
○ Zero- touch allows IT admins to create provisioning configurations and apply them to devices via a web console. These configurations are automatically applied to devices on first boot. There is no need for the admins to physically handle the managed devices making this the easiest deployment method in most cases. Note that devices need to be zero-touch compatible and purchased from authorized resellers.
○ Ideal for most fully managed device deployment scenarios.
○ Available on Android 8.0+ (7.1+ for Pixel devices)
○ Find authorized resellers at the Zero-touch page: https://www.android.com/enterprise/management/zero-touch/

● NFC
○ Using a programmer app provided by the EMM, administrators can transfer information about DPC, Wi-Fi, and other EMM configuration parameters to another device using NFC.
○ Ideal for “white glove prep” scenarios where a large number of devices need to be provisioned and the programming device can be physically present.
○ Available on Android 5.1+
● QR code
○ Similar to the NFC method, QR code provisioning allows passing along configuration parameters to other devices but requires only a camera on the device being provisioned. In addition, there is no need for a physical programming device to be present. The admin can generate a code and email it to an end-user or print it on a piece of paper. During device setup, a user taps on the welcome screen 6 times to initiate download of the QR reader app then scans the code. As of Android 9.0, the QR code is built into the operating system.
○ Ideal for devices that don’t support NFC and scenarios where devices are distributed remotely and a programmer device cannot be present.
○ Available on Android 7.0+
● EMM token
○ Also known as “afw#” method.
○ During device setup, when prompted for an account to use, the user instead enters afw#<EMM code>. That is “afw#” and an EMM-specific code appended to it. The advantage of this provisioning method is that it’s available on the widest variety of Android devices. It requires no optional hardware such as a camera or NFC chip. Unlike the ZT, QR, and NFC methods though, there is no way to provide extra parameters for configuration. This method requires the most manual steps and should be used when other methods are not readily available.
○ Available on Android 5.1+

An example of a provisioning method decision tree:
Device Strategy
You will have to document a choice about what to do with devices in the DA fleet being migrated. In this step we’re only documenting what action will need to be taken for each group of devices. However you also need to consider any new devices that will enter your fleet if the migration also calls for an expansion in a use case. Note that there is no platform-level automation for migrating from DA so there will be some manual steps required even for devices that do not have to be replaced.
Device strategy is illustrated by the following diagram:
Device upgradeability will depend on the OEM and carrier being used. Contact them for more information on your specific devices.

The following shows an example of what the device strategy document may look like for corporate-owned, fully managed devices where the decision was made to support a minimum OS level of 8.0:
Make/Model Qty State Action
Nexus 5 10 Incompatible, not upgradeable Replace w/Pixel 2
Nexus 6P 40 Incompatible, upgradeable Upgrade to Android 8.1
Google Pixel 80 Compatible Re-enroll device
Google Pixel 2 10 New Devices Distribute via Zero-touch
Note that even though the above example calls for replacement of Nexus 5 devices, they don’t have to be changed right away. Recall from the section on cap-and-grow that an organization has the option of waiting for a device refresh or some other event to migrate these users.
Android Enterprise Recommended Devices
When purchasing new devices, consider devices that are Android Enterprise Recommended. Devices in the Enterprise Recommended program meet an elevated set of hardware and feature requirements validated by Google in order to ensure a consistent and robust enterprise experience.
Recommended devices and information about the program can be found on the Enterprise Recommended page: https://www.android.com/enterprise/recommended/
Note that the Enterprise Recommended program is optional. The absence of a device from the program does not imply that it lacks advanced features. Compatible devices from OEMs that have opted not to join the program can be found in the Android Device Catalog.

The Android Device Catalog lists all devices that are minimally compatible with Android Enterprise, including those in the Enterprise Recommended program. You can use it to ensure that devices in your existing fleet will be able to run Android Enterprise or to search for devices that contain specific features.
See the Android Device Catalog page for more information: https://www.android.com/enterprise/device-catalog/
Examples Sales Ltd.
Mgmt. Mode
Work Profile
Apps Name Hosting Method
Access Mandatory? Package Name
Gmail Google Play
Public Y com.google.android.gm
Features Description Feature OS
Business data needs to be password protected
Device security challenge
5.0+
Need to be able to erase business data on device
Wipe and lock
5.0+
Needs VPN configuration Managed configuration
5.0+

management
Lock down GPS Location sharing management
5.0+
Set custom user icons Enterprise customization
7.0+
Business contact info should be visible when receiving calls
Cross-profile contact management
7.0+
Minimum OS
7.0
Identity Model
Google Accounts
Device Strategy
Make and Model
OS Version
Qty Max Version
Strategy
Nexus 5
5.0 5 6.0.1 Age out
Nexus 5
6.0.1 10 6.0.1 Replace

Bank Corp.
Mgmt. Mode
Fully managed device
Apps Name Hosting Method
Access Mandatory? Package Name
Gmail Google Play
Public N com.google.android.gm
Client- Secure
Self- hosted
Private Y com.bankcorp.clientsec
Features Description Feature OS
Lock corporate data if device compliance not met
Compliance enforcement
5.0+
Need app scanning against harmful apps
SafetyNet support
ANY
Strong password complexity Advanced passcode management
5.0+
Need client certificates Certificate management
5.0+
Disable screen capture Screen capture
5.0+

management
Configuration WiFi SSIDs WiFi configuration management
6.0+
Control app permissions Runtime permission policy management
6.0+
Ability to request device logs remotely
Remote debugging
7.0+
Custom lock-screen message Lock screen messages
7.0+
Min. OS 7.0
Identity Model
Google Play Accounts
Device Strategy
Make and Model
OS Version
Qty Max Version Strategy
Google Pixel
8 50 9.0 Re-enroll

Signage LLC
Mgmt. Mode
Fully managed device
Apps Name Hosting Method
Access Mandatory? Package Name
AirportMapper
Custom side-loaded
Private Y com.signage.airmap
Features Description Feature OS
Lock down config settings on device Lock task mode management
6.0+
Configure WiFi network WiFi configuration management
6.0+
Lock to AirportMapper app only Lock task mode management
6.0+
Remote swapping of the locked app Lock task mode management
6.0+
Min. OS 6.0
Identity Model
Google Play Accounts

Device Strategy
Make and Model OS Version Qty Max Version Strategy
Nexus 10 4.2 100 5.1 Replace
Proof of Concept With the Android Enterprise requirements documented, we are now ready to set up a test instance and start our proof-of-concept deployment.
● EMM instance created
● Network configured
● Apps migrated
● Policy groups created
● Android Enterprise features configured
● Features tested and confirmed by use case owner
● Device setup walkthrough completed and documented
The goal of this section is to set up the Android Enterprise instance, implement the features required for your use cases, verify that the features are working as intended, and begin user setup documentation. There is no need to create a separate tracker for verifying features here. It’s sufficient to take the documentation generated in the requirements mapping phase and simply check them off.
Earlier in the guide we suggested separating each use case into separate deployments. Since there is only one production EMM instance, we will be consolidating them here.

This stage differs from the previous ones in that there are two pieces of documentation that are created. However, only one is passed on to the next and final stage:
● Feature verification checklist: This is a master worksheet where features are verified by the owners defined in the analysis phase for each use case. This document does not need to get passed into the next stage.
● User setup documentation: In the final step of this stage, a walkthrough is done where a device is taken from setup though configuration as an end-user would. It’s an opportune time to begin documentation that will eventually be passed to device users.
The POC dependency diagram will look like this:

Complete a Proof-of-Concept
We summarize the steps needed to conduct a proof-of-concept:
1. Set up deployment infrastructure
a. Create an EMM instance (Consult EMM documentation)
b. Configure network
2. Set up user apps
3. Create policy groups in EMM console
4. Configure Android Enterprise features for each EMM policy group
5. Test and confirm features in every EMM policy group
6. Complete a device setup walkthrough for each use case
7. Document setup steps
Infrastructure
EMM Instance
Consult EMM documentation for instructions on how to set up an Android Enterprise instance for the POC. Steps here can vary. In some instances, a virtual machine will have to be created to host the new instance. In others it's simply a push button in the console UI.
Certificates and VPN
In most instances, certificate and VPN infrastructure is already set up and configuration is done separately from Android Enterprise. If not, make sure any general configuration is complete before configuring EMM policy groups.
Note that some VPN clients are configured via managed configuration: https://developer.android.com/work/managed-configurations

Firewall
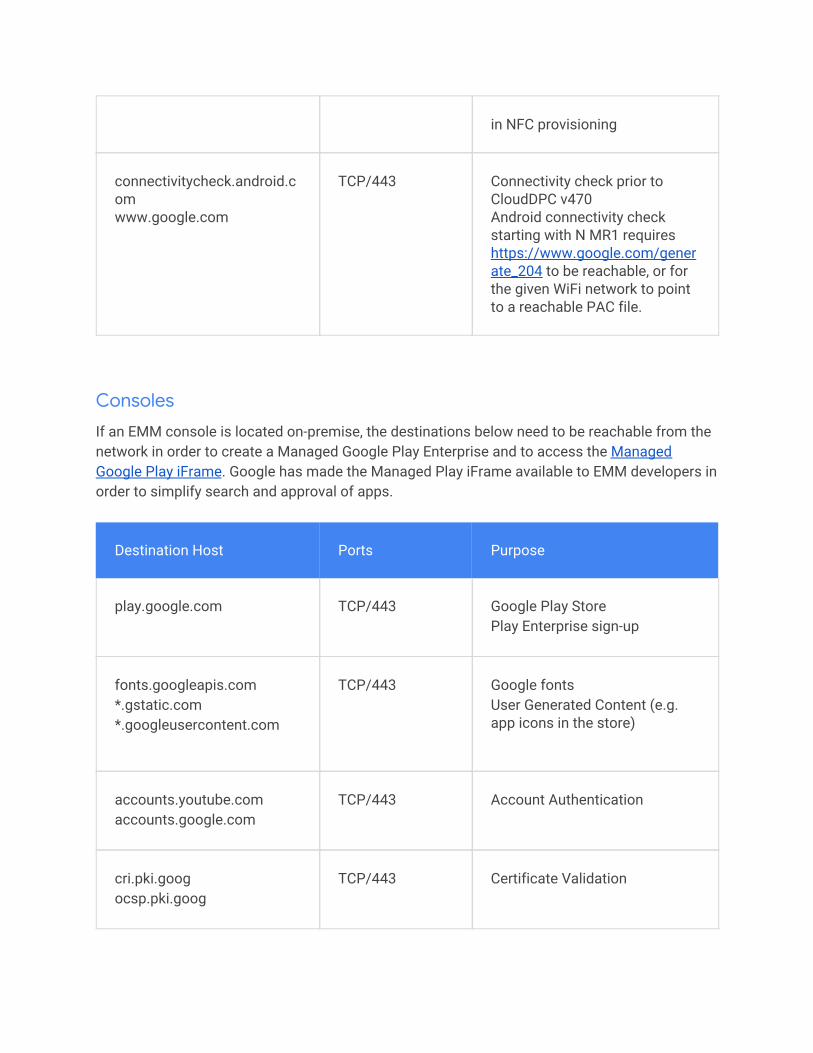
Android devices generally do not require inbound ports opened on the network in order to function correctly. However there are a number of outbound connections that administrators should be aware of when setting up their network environments for Android Enterprise.
This list is not exhaustive and is subject to change. It covers known endpoints for current and past versions of enterprise management APIs. Please note that the majority of these are not browsable. Thus, you can safely block port 80 for these URLs (they are all behind SSL).
The rules contained here apply regardless of whether your EMM solution is implemented using the Play EMM API or Android Management API.
Note that OEMs often have their own hosts that need to be reached in order for their devices to function properly. Please contact your OEM for any additional ports that may be required.
Devices
Destination Host Ports Purpose
play.google.com android.com google-analytics.com googleusercontent.com *gstatic.com *gvt1.com *.ggpht.com dl.google.com dl-ssl.google.com android.clients.google.com *gvt2.com *gvt3.com
TCP/443 TCP,UDP/5228-5230
Google Play and updates gstatic.com, googleusercontent.com - contains User Generated Content (e.g. app icons in the store) *gvt1.com, *.ggpht, dl.google.com, dl-ssl.google.com, android.clients.google.com - Download apps and updates, Play Store APIs gvt2.com and gvt3.com are used for Play connectivity monitoring for diagnostics.

*.googleapis.com TCP/443 EMM/Google APIs/PlayStore APIs
accounts.google.com accounts.google.[country]
TCP/443 Authentication For accounts.google.[country], use your local top-level domain for [country]. For example, for Australia use accounts.google.com.au, and for United Kingdom use accounts.google.co.uk.
gcm-http.googleapis.com gcm-xmpp.googleapis.com android.googleapis.com
TCP/443,5228-5230,5235,5236
Google Cloud Messaging (e.g. EMM Console <-> DPC communication, like pushing configs)
fcm.googleapis.com fcm-xmpp.googleapis.com
TCP/443,5228-5230
Firebase Cloud Messaging (e.g. Find My Device, EMM Console <-> DPC communication, like pushing configs)
pki.google.com clients1.google.com
TCP/443 Certificate Revocation list checks for Google-issued certificates
clients2.google.com clients3.google.com clients4.google.com clients5.google.com clients6.google.com
TCP/443 Domains shared by various Google backend services such as crash reporting, Chrome Bookmark Sync, time sync (tlsdate), and many others
omahaproxy.appspot.com
TCP/443 Chrome updates
android.clients.google.com TCP/443 CloudDPC download URL used
in NFC provisioning
connectivitycheck.android.com www.google.com
TCP/443 Connectivity check prior to CloudDPC v470 Android connectivity check starting with N MR1 requires https://www.google.com/generate_204 to be reachable, or for the given WiFi network to point to a reachable PAC file.
Consoles
If an EMM console is located on-premise, the destinations below need to be reachable from the network in order to create a Managed Google Play Enterprise and to access the Managed Google Play iFrame. Google has made the Managed Play iFrame available to EMM developers in order to simplify search and approval of apps.
Destination Host Ports Purpose
play.google.com TCP/443 Google Play Store Play Enterprise sign-up
fonts.googleapis.com *.gstatic.com *.googleusercontent.com
TCP/443 Google fonts User Generated Content (e.g. app icons in the store)
accounts.youtube.com accounts.google.com
TCP/443 Account Authentication
cri.pki.goog ocsp.pki.goog
TCP/443 Certificate Validation

apis.google.com TCP/443 GCM and other Google web services
ogs.google.com TCP/443 iFrame UI elements
notifications.google.com TCP/443 Desktop/Mobile Notifications
Static IP Addresses
Google doesn't provide specific IPs, so you should allow your firewall to accept outgoing connections to all IP addresses contained in the IP blocks listed in Google's ASN of 15169 listed here.
Note that IPs of Google peers and edge nodes are not listed in the AS15169 blocks. See peering.google.com for more information about Google’s Edge Network.
Set up User Apps
This section focuses on app migration strategies when hosting on Google Play. Hosting internally or on alternative app stores is not recommended. Consult EMM documentation for instructions on hosting apps outside of Google Play.
1. Follow the instructions for getting started with Managed Google Play here: https://support.google.com/googleplay/work/answer/6138458?hl=en
2. Refer to documentation created in the “App Migration Strategy” section in the Requirements Mapping phase for each app.
3. If the app is free and available on Google Play publicly
a. Sign in to the Managed Google Play console with the enterprise administrator account. The administrator account is the one used to create the enterprise from the EMM-initiated sign-up process or the managed Google Play console: http://play.google.com/work

i. Note that most major EMMs have implemented the Managed Google Play iFrame. If this is true for your EMM, you can skip this step and manage apps directly from your console: https://developers.google.com/android/work/play/emm-api/managed-play-iframe
b. Search for, and click the app you’d like to approve
c. Click Approve
d. To accept the app permissions on behalf of your company, click Approve
e. Click Done
4. If the app is private
a. Refer to the unique APK name created in your app documentation
b. Register as a developer in the Google Play console: https://play.google.com/apps/publish/signup/
c. Follow instructions for publishing private apps here: https://support.google.com/googleplay/work/answer/6145139?hl=en&ref_topic=6145152
5. Custom apps
a. Register as a developer in the Google Play console if you have not done so already: https://play.google.com/apps/publish/signup/
i. Note that most major EMMs have implemented the Managed Google Play iFrame. If this is true for your EMM, you can skip this step and manage apps directly from your console: https://developers.google.com/android/work/play/emm-api/managed-play-iframe
b. Refer to the unique APK name created in your app documentation
c. Locate the source code for the app for the app and ensure it meets the minimum requirements for target API level: https://developer.android.com/distribute/best-practices/develop/target-sdk
d. Follow the same instructions for publishing private apps: https://support.google.com/googleplay/work/answer/6145139?hl=en&ref_topic=6145152
6. Manage app permissions
a. Instructions located here: https://support.google.com/googleplay/work/answer/6137917?hl=en&ref_topic=6137710

Policy Groups and Feature Setup
Refer back to the feature requirements documentation generated in the previous migration stage. EMMs usually provide a way to create policy groupings. Policies are applied to the group and then users and devices are assigned to those groups. At this time you should create a group for each use case collected.
For each Android Enterprise feature listed in the groups:
1. Consult EMM documentation for how to configure the named Android Enterprise feature in your console
2. If the feature is not available, you will have to find an alternative feature as a workaround
3. If no workaround exists, open a feature request on your EMM support portal
4. Apply any managed configurations to apps pushed to your groups if necessary. You can read about managed configurations here: https://developer.android.com/work/managed-configurations
5. If certificate and VPN settings are applied at the app level, configure them now
Feature Testing
1. Create a checklist in a spreadsheet with columns for Android Enterprise Feature, Owner, and results.
2. Copy the requirements listed in the Feature Requirement Mapping phase
3. For each requirement listed
a. Test the feature
b. Get verification from the owner of this use case that the feature works as expected
4. If the feature does not work as expected, revisit the feature detail page for a workaround or alternatively consult your EMM provider for assistance or feature requests
5. Repeat each step for at least one device from the inventory collected
Walkthrough and Setup Documentation
Once all features are tested and verified, complete a device setup walkthrough as would be experienced by an end user. This will act as a final end-to-end test before production deployment. As the walkthrough is completed, document the instructions and take screenshots. This document can then be distributed to users later.

Deployment Theory and planning is now over, time to deploy! In this section we explore how to roll out and prepare your users for migration.
Key Milestones
● IT Staff migrated
● Use case deployment order established
● Android Champions and messaging platform chosen
● Rollout strategy set (ie: cap and grow vs big bang)
● User documentation complete
● New devices ordered
Migrate Today
Start with yourself, IT staff, Android champions, and advanced users. Document these initial experiences and watchpoints.
Production Rollout
Make a list of use cases and potential departments or user groups to roll out to. Evaluate which would be the least disruptive. You should try to limit the scope of disruption when there’s more uncertainty. This can mean choosing to roll out to the smallest group of users first. This can also mean to initiate the deployment with a larger staff but one that is more comfortable with change.
Adapt your rollout plan based on user feedback. Modify apps and services per user group to deliver the best tools for each employee or business unit if need be.
Android Champions
When evaluating which use cases to roll out to first, consider targeting individual users who are eager testers, tech savvy and can deal with disruption, or even just fans of Android. Successful

migrations take into account user sentiment early in the process and communicate change effectively to ensure user buy-in.
Successful deployments designate Android Champions to help service users migrating onto the new platform.
You can also leverage the champions to create a community to enable collaboration and proactive communications to users.
Evaluation
Allow a reasonable amount of time between migrating different groups of users. There are some events like app updates, app configuration changes, and security updates that don’t happen frequently enough to accurately gauge their behavior in production.
Monitor OS, security patch, and application versions to identify risks and areas for improvement.
Documentation
A tedious but critical practice in successful DA migrations has been good user documentation. A step-by-step guide with screenshots on what users need to do is highly suggested if you want to enable users to migrate devices themselves. Some organizations even create short instructional videos.
Highlight what the user needs to know to get started and build from there. Consider holding in-person and online training sessions or webinars to enable users and minimize support costs.
Another option is to document only instructions on how to use a device once it’s been migrated. This allows users to get a peek at what’s coming and to know what to expect. Communicate early and often via multiple channels, to ensure the message reaches critical mass.
Cap-and-grow
A popular rollout strategy has been to get all your production systems for Android Enterprise tested and ready but only complete device migration later. In this scenario, legacy devices continue to be used but any new devices added will be managed under modern methods. We covered the cap-and-grow concept briefly in the device strategy section of the requirements gathering phase.

Note that in many cases, a separate EMM instance may not be necessary. Some EMMs support legacy Android management and Android Enterprise simultaneously. Here are some examples of where the cap-and-grow strategy may be used:
● An auto manufacturer has decided that they want to move to Android Enterprise but would have to replace a third of their device fleet. The devices that are not compatible are older devices that will be refreshed soon anyway. The organization decides that they will move all their compatible devices to Android Enterprise first and only begin moving users with incompatible devices in a year once the devices are due for a refresh.
● A retail organization has decided to move to Android Enterprise and has done a device analysis and found that all their devices are compatible. Great! However, they do not have the resources to migrate any user devices immediately. The organization decides that they will set up their Android Enterprise instance but only move devices when their users bring devices in for maintenance.
● An employment temp agency wants to move to Android Enterprise but there is a lot of user and device turnover. Since the agency knows that all of their device fleet will be back through IT support within a year, they don’t migrate any users at all and simply put new users under Android Enterprise when they start.
There are many valid reasons why an organization may not or cannot move to modern management right away but this is not a barrier to planning your move to Android Enterprise.
Field Migration
Field migrations are particularly challenging. Even with good documentation, if a user misses or otherwise bungles a deployment step, they may be left with no local IT staff to help them. A suggested strategy here is to provision the devices and then ship them out to the user. They are then only responsible for enrolling with their credentials.
The ideal option is to mandate zero-touch enabled devices. Users here cannot escape device provisioning and can simply reset if something goes wrong to start the process over.
In-house and Rip-and-Replace Provisioning
Some organizations decide to migrate devices over to Android Enterprise all at once within their support or IT organizations. There are a few considerations that need to be taken if you decide to do this.
● This option is usually cost prohibitive for larger organizations both in time and resources associated with replacing many devices at once. We recommend this option if no others are available. Consider working with a trusted managed services provider instead.

● There is a limit to the number of devices that can be registered with a single Managed Google Play account. There are two types of these accounts that can be created by your EMM
○ User account - Provides a single user access to managed Google Play from all their devices with a maximum of 10 devices
○ Device account - Provides access to managed Google Play from a single device. Used in dedicated device use cases
○ More information can be found in the Play EMM API developer pages: https://developers.google.com/android/work/play/emm-api/user-accounts
● You must ensure critical web endpoints aren’t blocked on your network. We touch on this in the Infrastructure section of this guide
● We highly recommend using the new Zero-touch enrollment for provisioning devices if available and if deploying into fully managed device mode