andymark dart 12”files.andymark.com/am-3072a-dart-12-assembly... andymark dart 12” tools needed...
TRANSCRIPT

www.andymark.com
AndyMark DART 12”
Tools Needed Part Number
1/16" hex wrench am-3172
3/32" hex wrench am-3173
5/32" hex wrench am-2751
3/16" hex wrench am-2752
flat head screwdriver
Phillips head screwdriver am-2833
7/16" wrench am-2745
1/2" wrench am-2746
3/4" wrench
Medium strength thread locking adhesive am-3171
Small hammer
Part Number Description QTY
These Parts Are Pre-Assembled by AndyMark
am-0031 Bearing, 3/16"ID (R3) 1
am-0209 Bearing, 3/8"ID 1614ZZ 2
am-1028 Screw, #10-32x3/8” Pan Head Philips 8
am-1121 Machine key, 2x2x10mm 1
am-1388 Shoulder Screw, 18-8 Thread, 3/16" dia, 1/2" long, 8-32
1
am-1404 Screw, FHCS 10-32 x 0500 4
am-2383 Collar Clamp, 5/16” Bore, Aluminum 2
am-3251 DART Base Plate 1
am-3253 DART Bearing Block 1
am-3254 DART 12 Square Tube 1
am-3255 DART Back Block with Magnet 1
am-3257 DART 12 Lead Screw 1
am-3259 DART Ram End Bearing 1
am-3260 Spacer, 0.25 th x 0.382 id x 0.625 od aluminum
2
am-3262 Brass Nut for Lead Screw 1
am-3265 Pulley for Timing Belt, 30 tooth, 5/16 bore, 0.20 pitch XL
1
am-3268 Gear, 14 tooth, 48 dp, 20 pa, 0.1875 bore, plated
1
am-3467 DART Ram Cap 1
ip-3256a_tube DART Ram 12 Tube, threaded both ends 1
These Parts Are to Be Assembled by the End User
am-0033 Retainer Clip, 8mm 1
am-1012 Screw, SHCS ¼-20 x 2000 4
am-1015 Nut, Nylock ¼-20 4
am-1026 Washer, #10 2
am-1120 Screw, SHCS 10-32 x 625 3
am-1121 Machine Key, 2x2x10mm 1
am-1400 Screw, #10-32x5/8” Pan Head Philips 1
am-2619 Potentiometer 1
am-2650 Spacer 2
am-3249 DART Pivot Block 1
am-3250 DART Cap Plate 1
am-3263 Pulley for Timing Belt, 12 tooth 1
am-3267 Gear, 96T 1
am-3274 Belt, HTD 48T 1

www.andymark.com
Step 2: Install Brass Nut (am-3262) onto Lead Screw (am-3257) with flange closest to the narrow end of the screw. Position nut so that the flange face is even with end of threads of the lead screw.
Step 5: Press the one of the 3/8" ID bearings (am-0209) into a pocket of the Bearing Block. Insert the ¼” long, 3/8” id aluminum spacer (am-3260) into the middle of the Bearing Block. Press the other 3/8” ID ball bearings into the Bearing Block pocket. Keep the spacer hole and the bearing holes aligned.
Step 6: Slide the Bearing Block onto the narrow end of the Lead Screw. Position the Bearing Block so that the face with the tapped holes is adjacent to the face of the Back Block with the magnets.
Step 1: Slide 5/16" collar clamp onto end of lead screw with the least amount of machined off leads. Tighten screw on collar clamp.
Step 3: Insert the Back Block (am-3255) onto the Brass Nut, leading with the smaller interior shoulder fitting on the Brass Nut threads. Press the Back Block all the way to the flange of the nut. This may be a tight fit, and can be screwed or tapped into position with a small hammer.
Step 4: Apply thread lock adhesive on the Brass Nut and Ram Cap outer threads. Hold the flats of the Brass Nut in a vice with a rag to protect marring on the Brass Nut. Screw the Ram Cap onto the Ram Tube while also threading it onto the Brass Nut. Use a ¾ wrench to tighten the Rap Cap.
www.andymark.com
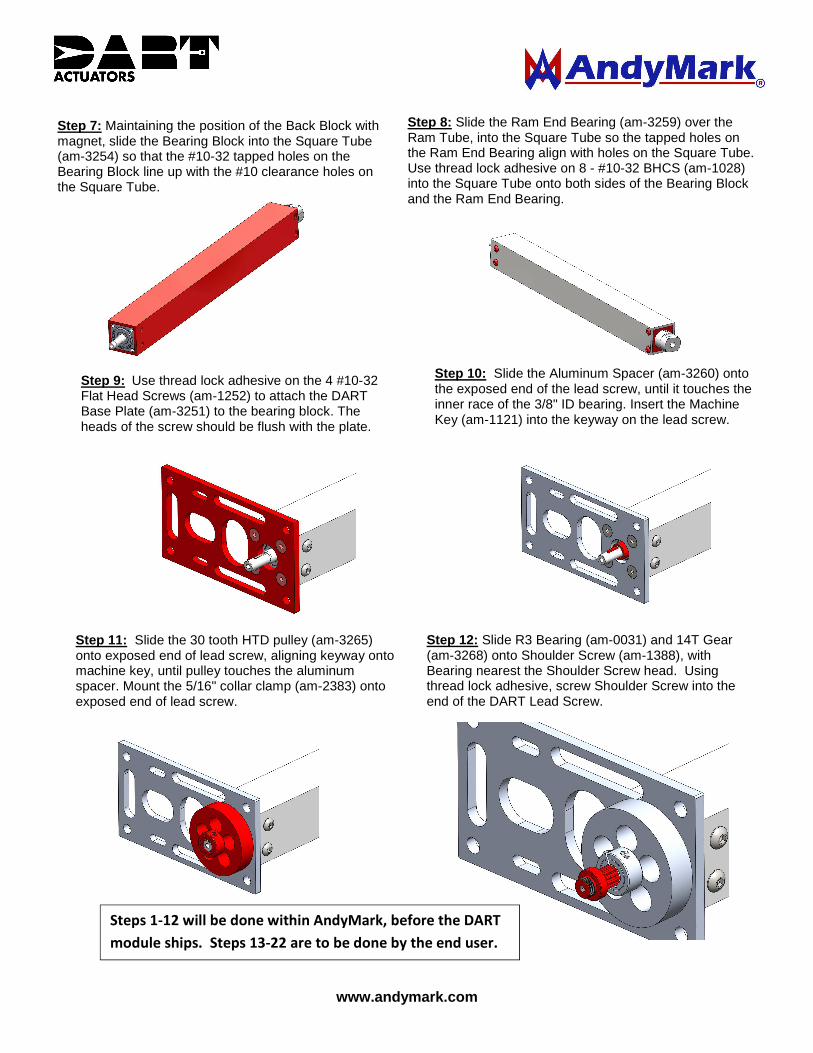
Step 12: Slide R3 Bearing (am-0031) and 14T Gear (am-3268) onto Shoulder Screw (am-1388), with Bearing nearest the Shoulder Screw head. Using thread lock adhesive, screw Shoulder Screw into the end of the DART Lead Screw.
Step 11: Slide the 30 tooth HTD pulley (am-3265) onto exposed end of lead screw, aligning keyway onto machine key, until pulley touches the aluminum spacer. Mount the 5/16" collar clamp (am-2383) onto exposed end of lead screw.
Step 9: Use thread lock adhesive on the 4 #10-32 Flat Head Screws (am-1252) to attach the DART Base Plate (am-3251) to the bearing block. The heads of the screw should be flush with the plate.
Step 10: Slide the Aluminum Spacer (am-3260) onto the exposed end of the lead screw, until it touches the inner race of the 3/8" ID bearing. Insert the Machine Key (am-1121) into the keyway on the lead screw.
Step 7: Maintaining the position of the Back Block with magnet, slide the Bearing Block into the Square Tube (am-3254) so that the #10-32 tapped holes on the Bearing Block line up with the #10 clearance holes on the Square Tube.
Step 8: Slide the Ram End Bearing (am-3259) over the Ram Tube, into the Square Tube so the tapped holes on the Ram End Bearing align with holes on the Square Tube. Use thread lock adhesive on 8 - #10-32 BHCS (am-1028) into the Square Tube onto both sides of the Bearing Block and the Ram End Bearing.
Steps 1-12 will be done within AndyMark, before the DART
module ships. Steps 13-22 are to be done by the end user.

www.andymark.com
Step 18: Install potentiometer (am-2619) onto Cap Plate (am-3250), using 1/2" wrench, with counter bored portion of plate facing blue potentiometer body. Position the lock washer included with the potentiometer between the nut and the Cap Plate.
Step 17: Install Pivot Block (am-3249) on outside of Cap Plate, using 2 - #10-32 SHCS (am-1120) and 5/32" hex wrench. The outside of the Cap Plate is identified by the counter bore on the center hole in the plate (that is where the potentiometer is installed).
Step 16: Install the 48 tooth HTD timing belt (am-3274) onto both pulleys. Pull the CIM Motor away from the Square Tube so that the belt is tight on the pulleys. Make sure the belt teeth engage both pulleys. Tighten the 2 - #10 SHCS to fasten the CIM Motor in place.
Step 15: Install the 8mm retaining clip (am-0033) over the CIM Motor shaft, pressing it on until it touches the pulley hub face. Use a 7/16” socket to press the clip, for easy installation.
Step 13: Slide the output shaft of a CIM Motor (not included) into the motor slot on the Base Plate. Use 2 - #10-32 SHCS (am-1120) with #10 washers (am-1026) in to attach the CIM Motor to the back side of the Base Plate. Do not tighten completely yet.
Step 14: Insert the 2x2x10mm machine key (am-1121) into the CIM Motor keyway. Slide the 12 tooth HTD pulley (am-3263) on the CIM Motor shaft and over the machine key with the hub facing out. Press the pulley onto the shaft until the pulley face touches the CIM Motor face.

www.andymark.com
Step 21: Install Spacers (am-2650) on either side of the assembly, between the Cap Plate and Base Plate. Install 4 - 1/4-20 SHCS (am-1012) and Nylock Nuts (am-1015), through corner holes on Cap Plate, Base Plate, and Spacers, using 3/16" hex wrench and 7/16" wrench.
Step 22: Tighten small set screw on plastic potentiometer gear with 1/16" hex wrench.
Step 19: Turn potentiometer shaft clockwise until it stops. Turn potentiometer shaft 1/2 turn counterclockwise. Install plastic potentiometer gear onto potentiometer shaft, with hub side of gear facing out.
Step 20: Install Cap Plate onto DART assembly so that the R3 bearing on the end of the lead screw fits into the bearing hole on the Cap Plate. The plastic potentiometer gear will need to move slightly in order to nest the R3 bearing into the hole. This plastic gear needs to mesh with the 14 tooth gear on the lead screw shaft, but not rub against the heads of the adjacent #10-32 screws.