annual a plethora of report writing tips reporting …c.ymcdn.com/sites/€¦ · retail, recovery,...
TRANSCRIPT

July 2011News and Information for Users of Sage Timberline Office Software
Reporting is the key to how all of us disseminate management information, so TUG tapped into its pool of Sage
Timberline Office (STO) connoisseurs for some advice. Boy, did they come up with some good stuff. From the simple to the divine, here are some wise words from our panel of experts!
Start with Lay Out!by: Lenni WittSage Certified Timberline Consultant Aronson & Company
People don’t think that designing the report is important, but it is – really! In fact, the very best way to design a report is to sketch it out on paper. Figure out what you want the report to look like, what information will be presented, what the layout will be, what the page header will say, whether or not you’ll have a footer, all those things. Sometimes it can be helpful to pull out an Excel spreadsheet that you’re trying to mimic in Report Designer so that you can use that as a template. You’ll find that if you lay it out on paper and know what you want to “say” in the report, it’ll be that much easier to create the report.
Here are a couple of good ways to learn new things in Report Designer: one of the best ways to teach yourself new techniques is to look at the formulas and functions in canned reports. Some of the best minds at Timberline are behind many of those reports, and you can learn an enormous amount
from studying their formulas. Another great learning tool is the Help feature on Functions; studying the syntax and Examples and reading through the Comments can widen your perspective and give you great ideas for using formulas. You might find that there are functions you didn’t know existed, like DAYS and TABLE and MATCH.
Property Management Formula Functionsand Lookupby: David HalperSage Certified Timberline ConsultantThe Rand Group
Rent roll, lease abstracts, occupancy statistics and other property management reports require charge amounts, square footages, revenue projections, days occupied and vacant, addresses other relevant lease, unit, retail, recovery, property data. We use the PM Formula Functions and Report Designer functions to help retrieve the data.
For example, because tenants can have more than one address type that we need to specify the specific address type such as Billing or Street. We accomplish this with the LOOKUP report function using the fields that uniquely define a tenant address. From the tenant address record data dictionary we learn the fields that uniquely define a tenant address are the tenant and address type. Thus, the formula for a tenant billing City address would
A Plethora of Report Writing Tipsand Tricks from the Experts
o Continues
A Plethora of Report Writing Tip and
Tricks from the Experts ............. ...1
Message from the TUG President ...... ...5
Sage Working on Report
Performance... ..............................5
Sage Integrating SQL Server Reporting
Services into the Sage
Desktop Environment... ................6
Using Multiple Transaction
Files in a Report... ........................7
Tips and Tricks for Crystal Reports When
Working with Address Book.. ...... .8
Stop Printing Reports...Setup
MyAssistant to Do it For You.. ...... .9
TUG Online WebEx Training and
Open Forums... ...........................10
To Create...or Not to Create!... ............11
TUG Committee Leadership
and Involvement... ......................12
Tracking Multiple Subcontractor
Bids Using Bid Grid... ..................13
Certified Payroll Setup... .....................16
Use These AB Exercises to
Strengthen Sage Timberline
Office Relationships... ................19
To: The Estimating Guru... ...................20
ANNUALREPORTING ISSUE
July 2011 News and Information for Users of Sage Timberline Office Software
u 2 u
the TUG PulsePublished by the
Timberline Users Group, Inc.and sent to all members.
Board of DirectorsMatt Weaver, President
Julie Brown, Vice President
Sharon Hessong, Treasurer
Jon Banse, Secretary
Natalie Allen, Past President
Janice Barnard
Scott Bishop
Tim Cooke
Barbara Morse
Michael Suhovecky
Marlene Williams
Lenni M. Witt
Publications CommitteeJulie Brown
David Brown
Sharon Hessong
Maeva Mayes
Liz Perez-Lavin
Val Steffen
Eire Stewart
Shanna Torges
Timberline Users Group3525 Piedmont Road
Building Five, Suite 300
Atlanta, GA 30305
e-mail: [email protected]
Phone: 404.760.8171
Fax: 404.240.0998Toll Free: 866.846.0999
Web Sitewww.TUGweb.com
be LOOKUP(City,Tenant ID, “BILLING”). The data dictionary can be printed from Report Designer – Tools – Available fields. The fields that uniquely define the record are always in Standard Order 1.
There are some records in which the LOOKUP isn’t the best choice and won’t work. Consider the unit square footage. Many reports and the recovery process require the unit square footage as of a certain date. The unit square footage record data dictionary tells us the fields that uniquely identify a square footage record are the property, unit, square footage type and “as of date.” What if we wanted know the square footage for a specific date? We need the square footage record that is closest to but not after the requested date.
For example, suppose we had a square footage record for 1/1/11 for 1,000 SF and 4/1/11 for 1,500 SF. If I asked the question what was the unit square footage as of 3/1/11 you would say 1,000 SF because the date is between 1/1/11 and 4/1/11. Thus, we can’t use the LOOKUP function to retrieve the unit square footage.
Don’t worry, Timberline has provided Property Management Formula Functions that will do this for us. That PM Function is “Effective Unit Sqr. Feet” and the parameters (fields) needed to retrieve the unit square footage for a specific date are the Property, Unit, Square Footage Type and Date. Given these parameters and using the example above, the function will find and return a value of 1,000 SF. Other records are similar to the Unit Square Footage Record, such as the Lease Recurring Charge Log, and require the use of a PM Formula Function. The PM Formula Functions can be found in Report Designer –Help – Index – PM Functions.
Two of the best Formulas to learn are “Lookup” and “IF” – you can solve most of the issues you will run into creating RD reports with these two formulas.
So, What if?by: Bill KormoskiSage Certified Timberline ConsultantKormoski & Associates LLC
IF examples:
• IftheAccountsPayableamountpaid is equal to the invoice amount, ‘Paid’ is returned. Otherwise, the return value is blank. IF(Amount Paid = Amount, ‘Paid’)• Youcouldreturnthebalanceasthe value if false by changing the formula to:IF(Amount Paid = Amount, ‘Paid’, Amount - Amount Paid)• IftheReceivesLienWaivercheckbox in the Accounts Payable Vendor record is marked, the text Check lien waiver is returned; otherwise, n/a is returned.IF(Receives Lien Waiver, ‘Check lien waiver’, ‘n/a’)• IftheAccountsPayableinvoiceamount times the tax rate of .065 is greater than the tax amount on the invoice record or if the tax amount on the invoice is zero, the calculated tax is returned. If the calculated tax is less than or equal to the tax amount on the invoice (and the tax amount is not zero), the tax amount is returned.IF(Amount * .065 > Tax OR Tax = 0, Amount * .065, Tax)• TocreateaJobCosttransactionreport with separate columns for Accounts Payable, Payroll Costs, Direct Costs, Other Entries and Estimate Entries, use these formulas:
Accounts Payable column – IF(Transaction Type = ‘AP Cost’, Amount)
Payroll Costs column – IF(Transaction Type = ‘PR Cost’, Amount)
Direct Costs column – IF(Transaction Type = ‘JC Cost’, Amount)
o Continues

July 2011News and Information for Users of Sage Timberline Office Software
u 3 u
Other Entries column – IF(Transaction Type NE ‘AP Cost’ AND Transaction Type NE ‘PR Cost’ AND Transaction Type NE ‘JC Cost’ AND Transaction type NE ‘Original Estimate’ AND Transaction Type NE ‘Approved Estimate Changes’, Amount)
Estimate Entries column – IF(Transaction Type = ‘Original Estimate’ OR Transaction Type = ‘Approved Estimate Changes’, Amount)
Let’s Sort it All Out!by: Mike Pieczynski, CPATimberline Consultant – MidwestOnPoint Software Consulting Inc.
A report’s sort order is one of the most powerful and process efficiency tools available to us in report design. In Sage Timberline Report Designer the sort controls:
• PrintControls• SummaryLevels• TotalsandSub-totals• PageBreaks• LineSpacing
This is huge! If you want totals by Project Manager, for instance, the easiest way to achieve this is by verifying that Project Manager is in the report’s sort order. It’s that simple!
When using Sage Timberline Report Designer, the sort should be verified immediately after determining the driving record on your report. In this example I’ll be working in a new report with the only table being the JC Job.
To verify the sort, click on Design > Sort Order.
Notice the second pull-down menu provides multiple choices on the JC Job. These are the primary and alternates sorts built in to the database indexes. These indexed fields are specific to the table you are processing.
Start a new report and select only the JC Job table. Select “print in job order,” then add the job to your new design. Now click on Design > Group Page Breaks and notice what our options are: We can page break on the Year (Prefix A of the Job ID), or we can page break on the Job.
What if we want to group up and page break on the Project Manager so that a PM’s jobs are together? Project Manager is not part of the primary or alternate table indexes. Not to worry! Simply go back to Design > Sort Options and click on the “Custom sort” Icon.
A dialog window will open where you choose the tables and fields for your sort.
In this case, I selected to sort first on the Project Manager, then on the Job. Click OK to close the Sort window.
Now go back to Report > Group Page Breaks and check out your options:
Your report now groups information by PM, then Job, and you can easily page break by PM and reset page number if you wish. You find the same effects on options for print controls, summary level, totals and sub-totals, and line spacing.
The best way to drive database concepts home is to test and try different scenarios with data you understand. Using reports you are comfortable with try changing the sort order and then look at the effects on the important report functions listed above.
Tips and Tricks – A report sort order can be changed after the design is started, but it can be kind of tricky. After you change a sort order be sure and check print controls, summary level, totals and sub-totals, page breaks and line spacing. Be careful and check whether accumulating functions need adjustment as well (IE: ASUM). Good luck!
Here’s Looking Up at You, Kid!by: Bill KormoskiSage Certified Timberline ConsultantKormoski & Associates LLC
LOOKUP – Payroll exampleTo retrieve the Tax Description for a Tax ID from the PR-Tax record when the main record is PR-Employee Tax, use this formula:LOOKUP(Description, Tax ID)
LOOKUP – Accounts Payable exampleTo retrieve the General Ledger account title for each account when the main record is the AP-Distribution record, use this formula:LOOKUP(Title, Accounts Payable Account)
o Continues

July 2011 News and Information for Users of Sage Timberline Office Software
u 4 u
LOOKUP – About data not on primary record Sometimes the information necessary to complete the key value parameter is not available as fields on the main record. For example, the keys for the PR-Employee Tax record are Employee, Tax level and Tax ID. • TheEmployeefieldcanusuallybe found on other field lists.• TheTaxlevelmustbeoneofthree values: 1 for Federal; 2 for State; and 3 for City. These value definitions can be found in the Available Fields Printout in the Special Values column.• TaxIDmustbeenteredasavalue matching one of the taxes that are set up. Because you are matching an alphanumeric field, you must put quotation marks around the ID.
For example, Federal Withholding tax has a tax level of 1 and an ID of ‘FWH.’
LOOKUP(QTD Taxable, Employee, 1, ‘FWH’)• ToreturntheYTDsubject-toamountfor Medicare from the Check record, use this formula. The Medicare deduction is a field on the Employee Tax record.
LOOKUP(YTD Subject-to, Employee, 1, ‘MED’)Tax level is 1 for Federal because you are looking for the federal Medicare tax.Tax ID for Medicare taxes is ‘MED.’
LOOKUP – About using with accumulating functionsTo total fields that originate in different records, use the LOOKUP function along with an accumulating function to locate and total these fields. Without the use of the LOOKUP function, all fields listed in accumulating functions must originate in the same record. For example, to find the skill level from the PR-Employee record when the primary record is PR-Time, use this formula:
ASUM(, IF(LOOKUP(Skill Level, Employee) = ‘Journeyman’, Units))
This formula totals units for all employees with a skill level of journeyman. The LOOKUP function allows you to access the field Skill Level from the PR-Employee record even
though the field being accumulated, Units, is on the PR-Time record. The components of this formula are:
• ASUM—functionusedtocreateatotal.• ,—indicatesnobreakfields(break parameter omitted) and that you want a report total.• IF—functionusedtoconditionformula.• LOOKUP—youwanttolookuptheSkill Level from the PR-Employee record. The key for this record is Employee, which is on the PR-Time record.• SkillLevel—thefieldyouwantto look up.• Employee—thekeyfromthePR- Employee record (where Skill Level is stored). Employee is on the PR-Time record.• =—indicatescomparisonforthe IF function.• ‘Journeyman’—iscomparedtothe value found in the LOOKUP to determine if there is an exact match to the text. This field is case-sensitive.• Units—whenamatchisfound,the Units from each PR-Time record are added to get a total units when the Skill Level is ‘Journeyman.’
Report on Reportsby: Matt Weaver, MCPMeyer Najem Construction, LLC
Need a list of the reports that appear on the reports menu in Timberline? You can get a list of reports (with sub-menus, report titles, design type and the report design file location) from the Report Manager. Here’s how to do it.
1. Open the module you are working with (in this example, PJ).2. Open the Report Manager from the Reports menu.
3. Click on the Print button.4. Click on Printer Setup.
5. Check the Print to file box, Click OK, Click Start.
6. The Print File Selection window opens, choose a location to save the file, enter a File name, change the ‘Save as type’ to Plain Text (*.txt) , click Save to create the file.
7. You can then close out of the Report Manager.8. You now have a Plain Text File. I suggest importing into Excel. The Plain Text file will include: Sub-menus; titles; design type; and report design name. If you have custom reports or changed the path to report, the design name will list out the path and filename.
9. Once imported, you have a list of all the reports in PJ or whatever module you are using. You can add additional information, such as a brief description, to the Excel list. This helps out when training or reviewing reporting options.

July 2011News and Information for Users of Sage Timberline Office Software
u 5 u
I am looking forward to another great year for TUG. I am also honored to have the opportunity to serve as you as president. I look forward to the challenges, networking, social time and all things that make TUG such a great organization. I also have a great support team in the Board of Directors. We are confident that we will continue to grow our membership and provide valuable services for our members. If you have a question or comment, please feel free to contact me at [email protected].
Power to the User!
First off, thank you! We at TUG realize that it has been another challenging year for the construction industry. It is our
membership and volunteers that keep the user group strong. I know we have asked a lot of TUG Board members, committee chairs and members, administration, exhibitors and volunteers, and we certainly appreciate your time and efforts.
A special thanks goes out to Natalie Allen, 2010-2011 TUG president. Under her leadership, we made some difficult and necessary changes that have allowed TUG to continue to be a great organization. We are still working hard to offer a valuable service to our members. I encourage you to think about getting involved with a committee,
write an article for the Pulse or answer a question on TUG Talk. Everyone’s contribution makes a difference.
We are also working more closely with Sage Software than ever before. This relationship provides TUG and Sage direct interaction and networking with the resources of both groups. TUG is a collection of “super users” that can offer valuable insight to Sage.
At the 2011 TUG National Users Conference in May, Sage challenged TUG to develop a process to gather, review, prioritize and recommend product enhancements, software usability improvements and general feedback to Sage Timberline Office. Sage is looking to TUG to be a “single voice” of the customer. Are we up to the challenge? YES! We have already started setting up the framework to provide Sage feedback that truly represents the TUG membership. In the coming months, we will deliver more information on how you can help us provide feedback to Sage.
Message from the TUG Presidentby: Matt Weaver, MCP
Meyer Najem Construction, LLC
“TUG is a collection of ‘super users’ that can offer valuable insight to Sage.”
In the upcoming 9.8 version of Sage Timberline Office, Sage has made a number of performance improvements. These performance improvements were focused on Security, Task Loading from the Desktop and other selected tasks. An area Sage is now focusing on is Report Performance.
If you have specific reports that you feel are taking longer than expected in comparison to others, and would like to participate in a Research Focus Group, please send your contact information to Dennis Stejskal at [email protected].
Sage Working on Report Performance

July 2011 News and Information for Users of Sage Timberline Office Software
u 6 u
Many users of Sage Timberline Office (STO) realize the power of using the Sage Desktop for running STO for everyday tasks, but did you know that the Sage Desktop can be used for running
SQL Server Reporting Services (SSRS) reports? As SSRS reports can be displayed as Web pages, and the Sage Desktop supports HTML pages, there is a great opportunity to utilize SSRS within the familiar Sage Desktop environment. There are three main ways that SSRS can be integrated into the Sage Desktop that we will cover.
What You Will Need1. Our SQL replication tool to get your Sage Timberline Office data into a SQL database – this allows you to run Crystal or SSRS reports across all of your data folders. Your CrystalReports will also run in a fraction of the time on a SQL database.2. Sage Desktop installed and configured.3. A working Web browser. Internet Explorer Version 8 or greater is recommended (this is Microsoft,after all), but others may work as well.
Display the SSRS Report Manager within the Desktop as Your Home PageThis method allows opening the Reports Manager just as you would within a Web browser. The advantage of this method is that users can browse and run any report that they have permissions for and has been published to the reporting infrastructure right within the desktop application.
1. Open a Web browser, and browse to your SSRS Reports server folder, including the folder location.
2. Organize the folder into the format that you would like to see within the Sage Desktop.3. Copy the full URL from your Web browser.4. Open up Sage Desktop and in the menu, click on [Tools], [Options].5. Click the [Select…] button and choose Web link as the Home Page Type. Click [OK].6. Paste the Web link you copied from your browser and click [OK], [OK].7. The Report Manager now appears as the home page.
Running a SSRS Report as the Home Page ReportThis method can be used to run a SSRS report just like running a Crystal Report as the home page report. Instead of just opening up the Report Manager to browse to a report, we want a SSRS report to run without any of the top navigation area normally displayed when running a report in the Report Manager. Additionally, we may want to hide the parameters so that they can be expanded if required, or even remove them altogether. Instead of using the Report Manager to get the URL of the report, we are going to use the Report Viewer to directly run the report.
1. Open a Web browser, and browse toyour SSRS Reports server folder, including the folder location.2. Note the folder and report name that you want to use in the Report Manager and enter it in as part of the URL. Replace <server name>, <report folder(s)> and <report name> with valid values from your environment, following the syntax of http://<server name>/reportserver?/<report folder(s)>/ <reportname>&rs:Command=Render&<additional parameters>3. There are additional parameters that can be specified in the URL to control many of the elements within the Report Viewer. Some of the popular ones are to show or hide the parameters list, specify a zoom value, or to even provide report parameters and values. Here are a few examples of report URLs with parameters: a. This example collapses the report parameter area, but leaves it available to expand if necessary: http://<Server Name>/ReportServer?/ADC/JC Receivables Aging by Job&rs:Command=Render&rc:Parameters=Collapsed b. This example sets the report zoom property to fill available width space in the Web browser: http://<ServerName>//ReportServer?/ADC/JC ReceivablesAging by Job&rs:Command=Render&rc:Zoom= Page Width
Sage Integrating SQL Server Reporting Servicesinto the Sage Desktop Environment
by: Bill VanderpolAnterra Technology
o Continues

July 2011News and Information for Users of Sage Timberline Office Software
u 7 u
For a full listing of available parameter values, use the following Microsoft TechNet article: http://technet.microsoft.com/en-us/library/ms152835.aspx.
4. It is strongly recommended that you use a text document or other to store the URL locations and report names. Use copy and paste to put them into your document, ready for testing.5. Always test your URLs in a Web browser to make sure they are functioning, and correct errors as necessary. Note that your Web browser will automatically translate all illegal characters into valid URL characters, for example empty spaces into “%20.” 6. Once your URL is valid and works as expected in your browser, copy the URL.7. Open up Sage Desktop and in the menu, click on [Tools],[Options].
8. Click the [Select…] button and choose Web link as the Home Page Type. Click [OK].9. Paste the Web link you copied, and click [OK], [OK].10. The SSRS Report appears as your home page with options as specified:
Add a Report Location to My Tasks in Sage DesktopThe My Tasks bar in Sage Desktop is also compatible with SSRS Reports. Using the last two methods, we can add either the Reports Manager location, or individual reports in My Tasks.
1. If the My Tasks bar is not visible, turn it on in Sage Desktop using [View],[My Tasks]. You should see a blue bar on the side appear.2. If desired, new Groups can be set up within the My Tasks to group similar reports, and make navigation easier. Right-click within the My Tasks bar, and choose [Add New Group…]. Type a name to use.3. Create and copy the report URL using the methods described in Display the SSRS Report Manager within the Desktop as your Home Page or Running a SSRS Report as the Home Page Report4. From the Sage Desktop menu, choose [My Tasks], [Add to My Tasks].5. Click the drop-down list for [Select a type of task], and choose [Web Link].6. Click the [Select] button and paste your report URL.7. Fill in a report name in the [Type a name for the task] box.8. Select a group in which to place the task or create a new group.
Timberline allows you to incorporate multiple transaction files in most reports. Using the AP Paid Invoice Register as an example, here is how you would incorporate the AP Master File and two history files in a single report print out:
1. Click on [Reports], [Cash Management], [Paid Invoice Register].2. Data File Selection box will open. Select both [AP Invoice (history)] and [AP Master].3. Next, the File Selection box will open. Holding down the “Shift” key, click on the history files you want to include. This will add individual files to your report. To add a series of consecutive files, hold down the “Ctrl” key and click on the first and last file in the series. This will incorporate all the files in between.4. If your report options are set to “Include File Names” (click on [Tools], [Options], [Reports]), the files used will appear in the upper right hand corner of the print out.
Using Multiple Transaction Files in a Report

July 2011 News and Information for Users of Sage Timberline Office Software
u 8 u
Displaying the formal Company Name or Person Name for a Contact rather than the “Sort As” Name.When using the {ABM_MASTER__CONTACT} data table, the CONTACT_NAME field is convenient to drop into a report. It will give you the Person’s name with the Company name in parentheses for a Person Contact [“Suzie Person (Company)”] or the Company Name with the location in parentheses for a Company Contact [“Company, Inc. (Minneapolis)”], but be aware that it is based on the “Sort As” name for that contact, NOT the “Person Name” or “Company Name”. To display the formal name rather than the “Sort As” name, you need to add the {ABM_MASTER__PERSON} and the {ABM_MASTER__COMPANY} data tables – make sure that each is linked from the {ABM_MASTER__CONTACT} data table based on the Contact_ID field and that each is linked with a “Left Outer” join. Then you can create a formula to display the formal name:
If {ABM_MASTER__CONTACT.Type} = “Person” Then {ABM_MASTER__PERSON.Person_Name} Else {ABM_MASTER__COMPANY.Company_Name}
Displaying the formal Company Name of a Person Contact.If you wish to display the “formal” Company Name in parentheses after the formal Person Name, you need to take it a step further. You need to add the {ABM_MASTER__COMPANY} data table to the report a second time, but this time link it (with a Left Outer Join) to the Company_ID field in the {ABM_MASTER__PERSON} data table. Note that when you add the data table a second time, you will first be prompted “are you sure?,” then Crystal will give the new instance of the data table a new name by adding an “_1” to the end so you will have {ABM_MASTER__COMPANY_1}:
If {ABM_MASTER__CONTACT.Type} = “Person” Then {ABM_MASTER__PERSON.Person_Name} & “ (“ & {ABM_MASTER__COMPANY_1.Company_Name} & “)” Else {ABM_MASTER__COMPANY.Company_Name} & “ (“ & {ABM_MASTER_COMPANY.Location} & “)” \\ Note the second line uses ABM_MASTER__COMPANY_1 and the third line uses ABM_MASTER__COMPANY
The following Screen shot shows that data table relationships from the report “!TUG PJ Job Contact List formal names Example.rpt,” which can downloaded from www.TUGweb.com.
Displaying a Contact based on that contact’s “Role” in the PJ Job Contact List.To select a contact based on the “Role” in the PJ Job Contact List, you must use both the {PJM_MASTER__JOB_CONTACT_LIST} and the {ABM_MASTER__CONTACT} data tables. Use a formula to select the role you wish:
If {PJM_MASTER__JOB_CONTACT_LIST.Role} = “Architect (Primary)” Then {ABM_MASTER__CONTACT.Contact_Name}
Note that you can combine all three of these techniques to create a more functional (and more complicated) formula:
If {PJM_MASTER__JOB_CONTACT_LIST.Role} = “Architect (Primary)” Then If {ABM_MASTER__CONTACT.Type} = “Person” Then {ABM_MASTER__PERSON.Person_Name} & “ (“ & {ABM_ MASTER__COMPANY_1.Company_Name} & “)” Else {ABM_MASTER__COMPANY.Company_Name} & “ (“ & {ABM_MASTER_COMPANY.Location} & “)”
The report “!TUG PJ Job Contact List role Example.rpt” shows an example of this technique using subreports to display the contacts with the role “Owner (Primary)” or “Architect (Primary)” for each open job, and can downloaded from www.TUGweb.com.
Tips and Tricks for Crystal ReportsWhen Working with Address Book
by: Tom MooreWebster Moore Group

July 2011News and Information for Users of Sage Timberline Office Software
u 9 u
Is your reporting process as productive as you would like it to be? Answering the following will shed some light on the subject.
1. Do your employees have the information they need, when they need it?2. Are the reports that you distribute always reviewed? If not, why not?3. Do you have an exception-based reporting system (reports based on situations that arise) in place? 4. How much time is spent generating and distributing reports?
This article outlines how to setup MyAssistant for Sage Timberline Office (STO) to automate the generation and distribution of reports. It also explains how to filter reports to provide each recipient only their information.
Automate Reportingwith MyAssistantThe MyAssistant for STO software automatically performs “Tasks” that you define. In defining a MyAssistant Task, you can:
• Specifya“Condition”thatneedsto be met before an action is taken. Print the Available Conditions report on the MyAssistant Reports menu to get a feel for the type of conditions you might specify. • ProvideascheduleastowhentheTask will be executed.• Definethecontentofane-mail message, including who will receive the messages and what each message will contain.
Perform the following to generate and send management reports to a specified distribution list:
• StarttheMyAssistantTaskManager application. The MyAssistant Task Manager allows you to create “Tasks” that the MyAssistant software will perform on a specified schedule.• SelecttheReportDistributionfolderand then check the Activate box next to Send a Report to activate this Task. This starts the Task activation wizard where you outline the Task MyAssistant should perform.
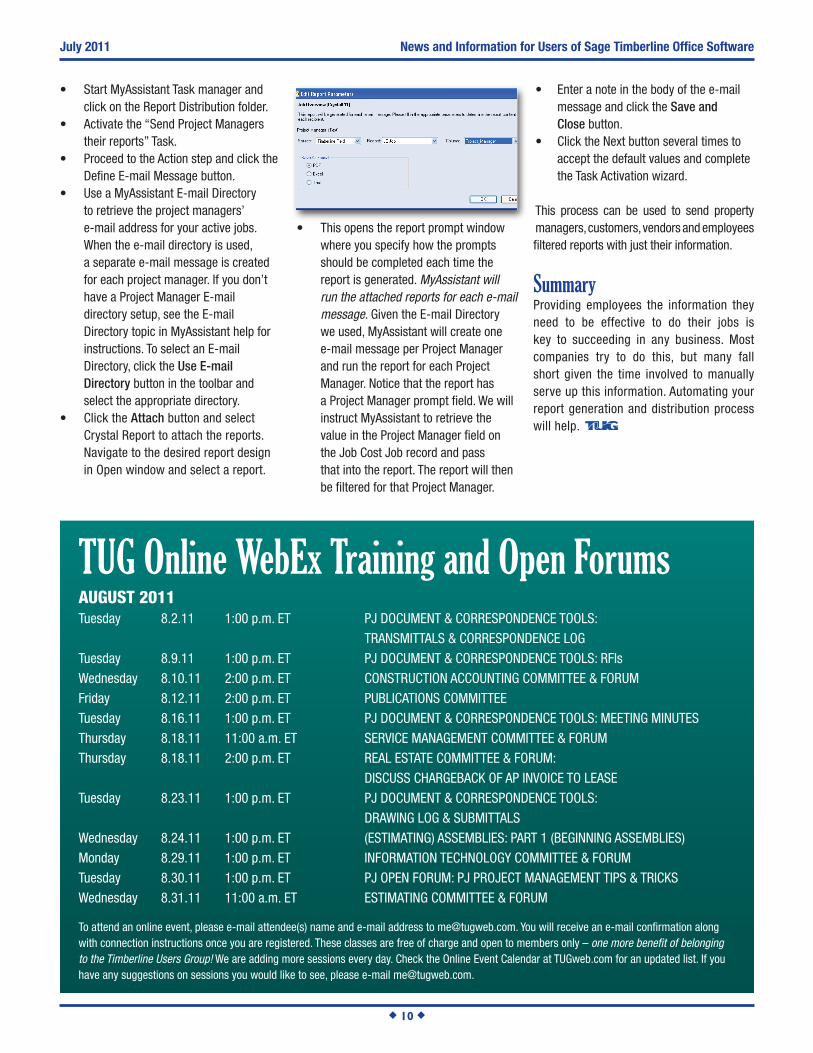
• Specifythescheduleforthereports to be generated and sent. Click the Next button.• ClicktheDefine E-mail Message button to specify the reports to be sent and the distribution list.
• Firstspecifywhowillreceivethe reports by entering their e-mail addresses on the To, Cc or Bcc lines. If Microsoft Outlook is installed on the machine you’re working on, you can click the To button to select e-mail addresses from your Global Address Book.• Reportscanbeattachedusingthe Attach button in the toolbar. Click Attach and then select Crystal Report. Navigate to the desired report design in Open window and select a report. • MyAssistantwillthenopenthereport and display any report prompts for you to specify how the prompts should be completed when MyAssistant runs the report. Specify the values for each prompt by entering a specific value or select a Timberline database field from which MyAssistant will extract a value. You can also indicate the file format (PDF or Excel) for the attached reports. • Enteranoteinthebodyofthee-mail message and click the Save and Close button.• ClicktheNext button several times to accept the default values and complete the Task Activation wizard.
You are done. MyAssistant will generate and send the specified reports on the predetermined schedule.
Filtering Reports by ReceiptUsing the MyAssistant E-mail Directories and the report prompts, the content of the reports attached to each e-mail message can be filtered. For example, to filter the reports sent to each Project Manager to just contain their jobs:
Stop Printing Reports...Setup MyAssistant to Do it For Youby: Dennis Ernshaw
Innovative Software Design
o Continues
July 2011 News and Information for Users of Sage Timberline Office Software
u 10 u
AUGUST 2011Tuesday 8.2.11 1:00 p.m. ET PJ DOCUMENT & CORRESPONDENCE TOOLS: TRANSMITTALS & CORRESPONDENCE LOGTuesday 8.9.11 1:00 p.m. ET PJ DOCUMENT & CORRESPONDENCE TOOLS: RFIsWednesday 8.10.11 2:00 p.m. ET CONSTRUCTION ACCOUNTING COMMITTEE & FORUMFriday 8.12.11 2:00 p.m. ET PUBLICATIONS COMMITTEETuesday 8.16.11 1:00 p.m. ET PJ DOCUMENT & CORRESPONDENCE TOOLS: MEETING MINUTESThursday 8.18.11 11:00 a.m. ET SERVICE MANAGEMENT COMMITTEE & FORUM Thursday 8.18.11 2:00 p.m. ET REAL ESTATE COMMITTEE & FORUM: DISCUSS CHARGEBACK OF AP INVOICE TO LEASETuesday 8.23.11 1:00 p.m. ET PJ DOCUMENT & CORRESPONDENCE TOOLS: DRAWING LOG & SUBMITTALSWednesday 8.24.11 1:00 p.m. ET (ESTIMATING) ASSEMBLIES: PART 1 (BEGINNING ASSEMBLIES)Monday 8.29.11 1:00 p.m. ET INFORMATION TECHNOLOGY COMMITTEE & FORUMTuesday 8.30.11 1:00 p.m. ET PJ OPEN FORUM: PJ PROJECT MANAGEMENT TIPS & TRICKSWednesday 8.31.11 11:00 a.m. ET ESTIMATING COMMITTEE & FORUM
To attend an online event, please e-mail attendee(s) name and e-mail address to [email protected]. You will receive an e-mail confirmation along with connection instructions once you are registered. These classes are free of charge and open to members only – one more benefit of belonging to the Timberline Users Group! We are adding more sessions every day. Check the Online Event Calendar at TUGweb.com for an updated list. If you have any suggestions on sessions you would like to see, please e-mail [email protected].
TUG Online WebEx Training and Open Forums
• StartMyAssistantTaskmanagerand click on the Report Distribution folder.• Activatethe“SendProjectManagers their reports” Task.• ProceedtotheActionstepandclickthe Define E-mail Message button.• UseaMyAssistantE-mailDirectory to retrieve the project managers’ e-mail address for your active jobs. When the e-mail directory is used, a separate e-mail message is created for each project manager. If you don’t have a Project Manager E-mail directory setup, see the E-mail Directory topic in MyAssistant help for instructions. To select an E-mail Directory, click the Use E-mail Directory button in the toolbar and select the appropriate directory.• ClicktheAttach button and select Crystal Report to attach the reports. Navigate to the desired report design in Open window and select a report.
• Thisopensthereportpromptwindow where you specify how the prompts should be completed each time the report is generated. MyAssistant will run the attached reports for each e-mail message. Given the E-mail Directory we used, MyAssistant will create one e-mail message per Project Manager and run the report for each Project Manager. Notice that the report has a Project Manager prompt field. We will instruct MyAssistant to retrieve the value in the Project Manager field on the Job Cost Job record and pass that into the report. The report will then be filtered for that Project Manager.
• Enteranoteinthebodyofthee-mail message and click the Save and Close button.• ClicktheNextbuttonseveraltimesto accept the default values and complete the Task Activation wizard.
This process can be used to send property managers, customers, vendors and employees filtered reports with just their information.
SummaryProviding employees the information they need to be effective to do their jobs is key to succeeding in any business. Most companies try to do this, but many fall short given the time involved to manually serve up this information. Automating your report generation and distribution process will help.
July 2011News and Information for Users of Sage Timberline Office Software
u 11 u
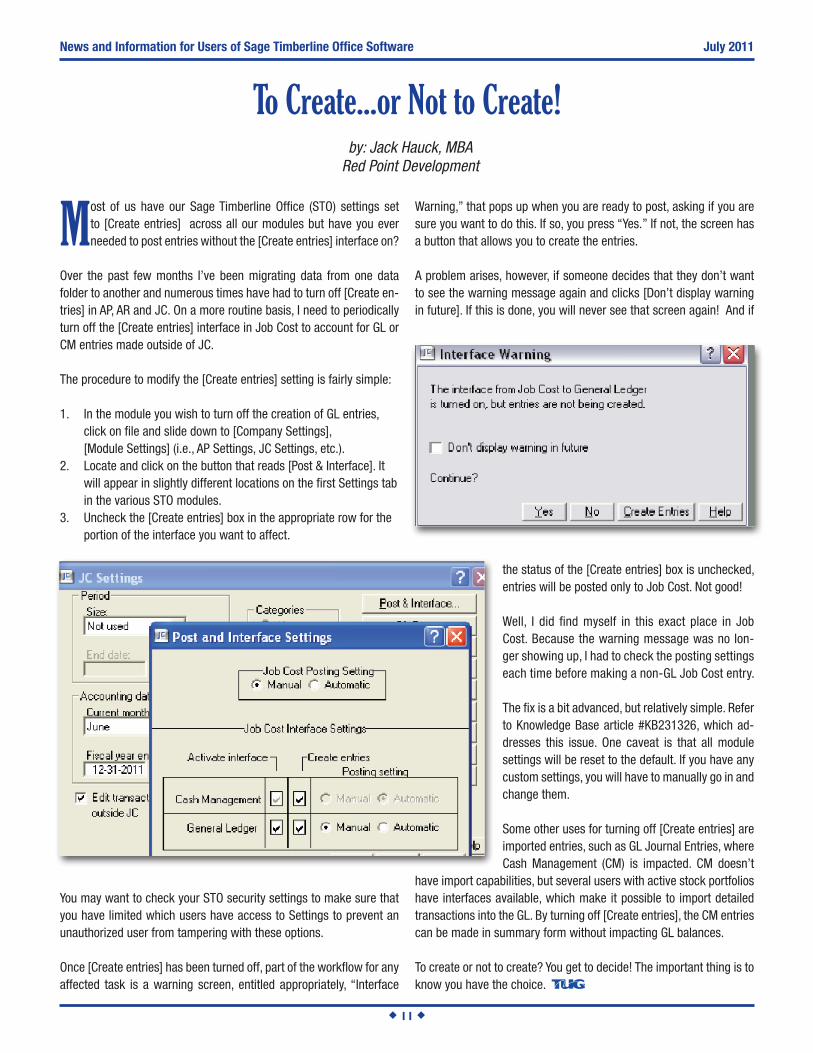
Warning,” that pops up when you are ready to post, asking if you are sure you want to do this. If so, you press “Yes.” If not, the screen has a button that allows you to create the entries.
A problem arises, however, if someone decides that they don’t want to see the warning message again and clicks [Don’t display warning in future]. If this is done, you will never see that screen again! And if
the status of the [Create entries] box is unchecked, entries will be posted only to Job Cost. Not good!
Well, I did find myself in this exact place in Job Cost. Because the warning message was no lon-ger showing up, I had to check the posting settings each time before making a non-GL Job Cost entry. The fix is a bit advanced, but relatively simple. Refer to Knowledge Base article #KB231326, which ad-dresses this issue. One caveat is that all module settings will be reset to the default. If you have any custom settings, you will have to manually go in and change them.
Some other uses for turning off [Create entries] are imported entries, such as GL Journal Entries, where Cash Management (CM) is impacted. CM doesn’t
have import capabilities, but several users with active stock portfolios have interfaces available, which make it possible to import detailed transactions into the GL. By turning off [Create entries], the CM entries can be made in summary form without impacting GL balances.
To create or not to create? You get to decide! The important thing is to know you have the choice.
Most of us have our Sage Timberline Office (STO) settings set to [Create entries] across all our modules but have you ever needed to post entries without the [Create entries] interface on?
Over the past few months I’ve been migrating data from one data folder to another and numerous times have had to turn off [Create en-tries] in AP, AR and JC. On a more routine basis, I need to periodically turn off the [Create entries] interface in Job Cost to account for GL or CM entries made outside of JC.
The procedure to modify the [Create entries] setting is fairly simple:
1. In the module you wish to turn off the creation of GL entries, click on file and slide down to [Company Settings], [Module Settings] (i.e., AP Settings, JC Settings, etc.).2. Locate and click on the button that reads [Post & Interface]. It will appear in slightly different locations on the first Settings tab in the various STO modules.3. Uncheck the [Create entries] box in the appropriate row for the portion of the interface you want to affect.
You may want to check your STO security settings to make sure that you have limited which users have access to Settings to prevent an unauthorized user from tampering with these options.
Once [Create entries] has been turned off, part of the workflow for any affected task is a warning screen, entitled appropriately, “Interface
by: Jack Hauck, MBARed Point Development
To Create...or Not to Create!

July 2011 News and Information for Users of Sage Timberline Office Software
u 12 u
If you are looking to increase your involvement with TUG, now is the time. We are currently looking for volunteers to serve as committee chairs and/or committee members for TUG’s 2011-2012 fiscal year
(term runs until June 30, 2012).
Committees meet online using WebEx (usually once a month). Take advantage of this opportunity to learn and share your Sage Timberline Office experiences with other users by becoming involved in a committee. Committee involvement also offers specialized training and networking on specific modules, such as PJ or Estimating.
We currently have the following committees: Construction Accounting; Conference Activities; Education; Estimating; Information Technology; Local Chapters; Project Management; Publications; Real Estate; and Service Management. For detailed committee descriptions and a list of the current chairs and members, please the “Who’s Who @ TUG” link on www.TUGweb.com.
If you are interested in joining or leading a committee, please contact TUG staff at [email protected].
The current committee list includes:
Committee Chair Board Representative
Construction Accounting Elizabeth Perez-Lavin Natalie Allen
Conference Activities Matt Weaver Scott Bishop
Education Tom Moore Julie Brown
Estimating Scott Bishop Tim Cooke
Information Technology TBD Matt Weaver
Local Chapters Marlene Williams Jon Banse
Project Management Mary Jo Hamik TBD
Publications Eire Stewart Mike Suhovecky
Real Estate TBD Sharon Hessong
Service Management Marlene Williams TBD
TUG Committee Leadership and Involvementby: Matt Weaver, MCP
Meyer Najem Construction, LLC

July 2011News and Information for Users of Sage Timberline Office Software
u 13 u
Do you want or need the capability to enter and track multiple subcontractor bids and make last minute Cuts and Adds changes? If you are using Estimated Extended you already have
that capability built in with Bid Grid.
The Bid Grid provides you with the ability to track multiple subcontractor bids for an item or group of items (scope of work) during the bidding process. Bid Grid also allows you to compare the subcontractor bids to your self-perform estimate for the same scope of work.
1. Single-Item Bid Grid• ToopentheBidGridforasingleitem,firstyouwillgotothat item in the estimate spreadsheet, go to the Sub Amount Column and click on the Bid Grid icon located on the left side of the Sub Amount cell, and the Bid Grid will open. • OncetheBidGridisopenyouwillnoticeatthetopthatyouare in a Bid Grid and which item this Bid Grid is for with item number and description.• AlsoatthetopoftheBidGridyouwillseeaprinticon.Thiswill allow you to print all of the subcontractor bids, as well as the self-perform costs for that Bid Grid.• YouwillseetheBidGridname.ThedefaultnamewillbeBid Grid 1, 2, 3, etc. You can rename the Bid Grid, up to 30 characters, to something that will help you identify that Bid Grid.• JustbelowBidGridnamethereistheactualBidGrid.Withinthat are four columns: Sub Name; Bid Quantity; Unit Cost; and Amount. For a single item the Bid Grid will automatically insert the Bid Quantity, Unit Cost and Amount and will assign self- perform in the Sub Name.
2. Multiple-Item Bid Grid• ToopentheBidGridformultipleitems,youwillneedtohighlight all of the items, IN THE SUB AMOUNT COLUMN, to be included in the Bid Grid. You can use the [SHIFT] or [CTRL] keys to highlight the sub amount cells for the items to be included. Once the items are highlighted, you can right-click in any of the highlighted cells (I prefer the first cell in the list) and select [Open Bid Grid…] and the Multiple Item Bid Grid will open.
• OncetheBidGridisopenyouwillnoticeitlookslikethe single-item Bid Grid with a few exceptions.
by: Scott R. Bishop, CEPHDR Constructors, Inc.
Tracking Multiple Subcontractor Bids Using Bid Grid
o Continues
Bid Grid Name Item Number and Description
Highlight only the Sub Amount column of the items to be included in the Bid Grid.
Right–click in the highlighted area and select Open Bid Grid.
Sub Name, Bid Quantity, Unit Cost, Amount

July 2011 News and Information for Users of Sage Timberline Office Software
u 14 u
• Atthetopofthewindowinsteadofhavingtheitemnumber and description, it says Multiple Items. • YoucanrenamethisBidGridwhateverisappropriateforthis scope of work.• Intheactualgridyouwillnoticethatitprefillswithself- perform just like before, but there is no Bid Quantity or Unit Cost and only the Amount appears. It calculates the totals for all of the included items and inserts that into the amount.• Becausemultipleitemsareincluded,theGidGriddoesn’t know which quantity to use for the Bid Quantity. Once you enter subcontractors into the grid you can enter a bid quantity \ if your bids are unit cost bids, or you can leave it blank if your bids will be lump sum.• Atthebottomofthewindowis[ListIncludedItems…].Youcan click on that to list the items that are included in the Bid Grid.• Thenextstepistobeginenteringyoursubcontractorsand their pricing into the grid. You can enter subcontractors into the Bid Grid that are already in your address book as subcontractors or you can add them “on the fly.” You can also set subcontractors up for the estimate only.• ToenterasubcontractorintotheBidGridfromtheaddress book, right-click in the blank cell under Sub Name, select [List Subcontractors] then [List Address Book Subcontractors…]. Select the subcontractor you want from the list and the name will appear in the grid.
• ToenterasubcontractorintotheBidGridfromthelistof Estimate Subcontractors, follow the same instructions for address book subcontractors, but select [List Estimate Subcontractors…]. Then select the subcontractor you want from the list and the name will appear in the grid. NOTE: To make this an effective option you may want to create your list of estimate subcontractors when you are setting up the estimate.
• Toenterasubcontractor“onthefly,”clickintheblankcellin the Sub Name and type the name in the cell. Once you type the name in click outside the cell and you will get a “Company Not Found” message window. Click [Add] button and the “Company Setup” window will open and you can set up the company. Click [Save & Close] button.
o Continues
Enter subcontractor name in cell.

July 2011News and Information for Users of Sage Timberline Office Software
u 15 u
• Onceyouhaveyousubcontractor(s)enteredintothegridyou can start entering their bid amounts. Assuming they have given you lump sum bids, you can enter that in the Amount column. As you enter the amounts in, the subcontractors will automatically be sorted by amount, either ascending or descending.
• YoucanalsosetupBidGridforunitpricing,oryoucan determine unit pricing based on lump sum amounts. Click in the bid quantity cell and enter the quantity you want to use as the basis or the quantities provided by the subcontractor. You can tab over one cell and enter the unit of measure. The unit cost will be calculated based on the lump sum amount you entered earlier. If you are given a unit price for the work you can also enter that and the total amount will be calculated.
• Nowyouarereadytoselectthesubcontractortousein the estimate. To select, highlight the row of the subcontractor you want to use, right click and select [Use Subcontractor]. A window will open with two options: 1) Clear the labor, material, equipment and other amounts; 2) Keep the existing labor, material, equipment and other amounts. Select the first option and click [OK]. The checkmark will move from self- perform to the selected subcontractor. Click [Close] and you will see the lump sub amount in the Sub Amount column and the subcontractor name in the Sub Name column. NOTE: An asterisk will appear in the Sub Amount of the other items that are included in a Bid Grid.
o Continues
Order of subs changed based on amount.
Enter lump sum amount and bid quantity and unit price is calculated.
Enter bid quantity and unit cost and total amount is calculated.

News and Information for Users of Sage Timberline Office Software
u 16 u
July 2011
o Continues
There are always many calls with questions on how to setup certified payroll. Below you will find the steps along with screen
shots on how to do this task.
Job Setup: In order for the time entered to be included in certified payroll reporting, the Certified job, require daily entry option needs to be marked on the Scope, PR and EQ tab in Job Cost Job Setup.
When the Certified job, require daily entry option is marked, an Hourly Distribution entry box will appear during time entry (unless you have a date column on your timesheet view).
Certified Classes: From the Setup menu, select Certified Classes. This entry grid is used for defining the Certified Class codes.
Certified Pay Rate Table: From the Setup menu, select Other Tables, Pay Rate Tables. Timberline provides a certified pay rate table
called CERTIFIED. In order for the certified payroll reports provided by Timberline to work, the certified pay rate table ID must be CERTIFIED. The minimum table columns that must be checked are Job, Certified class, and Certified?.
Rate Table: From within the Pay Rate Table Setup, click on the Table button.
Table Columns:• Job: Enter the job ID.• Certified Class: Enter the certified class ID.• Certifd:Thisboxmustbecheckedona certified pay rate table.• Rate: Enter the required hourly pay rate required for the specified job and certified class.• Fringe Rate: Enter the required hourly fringe rate required for the specified job and certified class.
Certified Payroll Setupby: Gaylene Willis
Sage Software
3. Sorting and Reporting• Onceyouhaveenteredyoursubcontractor(s),pricingand selected them in the estimate you can create a sort sequence and report on them.• TocreateanewsortsequenceforSubcontractors,doubleclick on one of the sort sequence tabs at the bottom of the spreadsheet and the spreadsheet sequence window will open. Next clear out the sequence window on the right, scroll down the list of available elements (on the left) and move Subcontractor over to the right. Click [OK] and the new sort sequence (tab) will appear with the subcontractors listed in alphabetical order. NOTE: The items that are under the *unassigned* are the items in your estimate that are classified as self-perform.• YoucannowrunandprintareportforyourSubcontractors. The report setup is the same for any other reports you run, whether it’s Spreadsheet or Standard Estimate reports.
Subcontractoramount and
name appear in estimate.
News and Information for Users of Sage Timberline Office Software
u 17 u
July 2011
o Continues
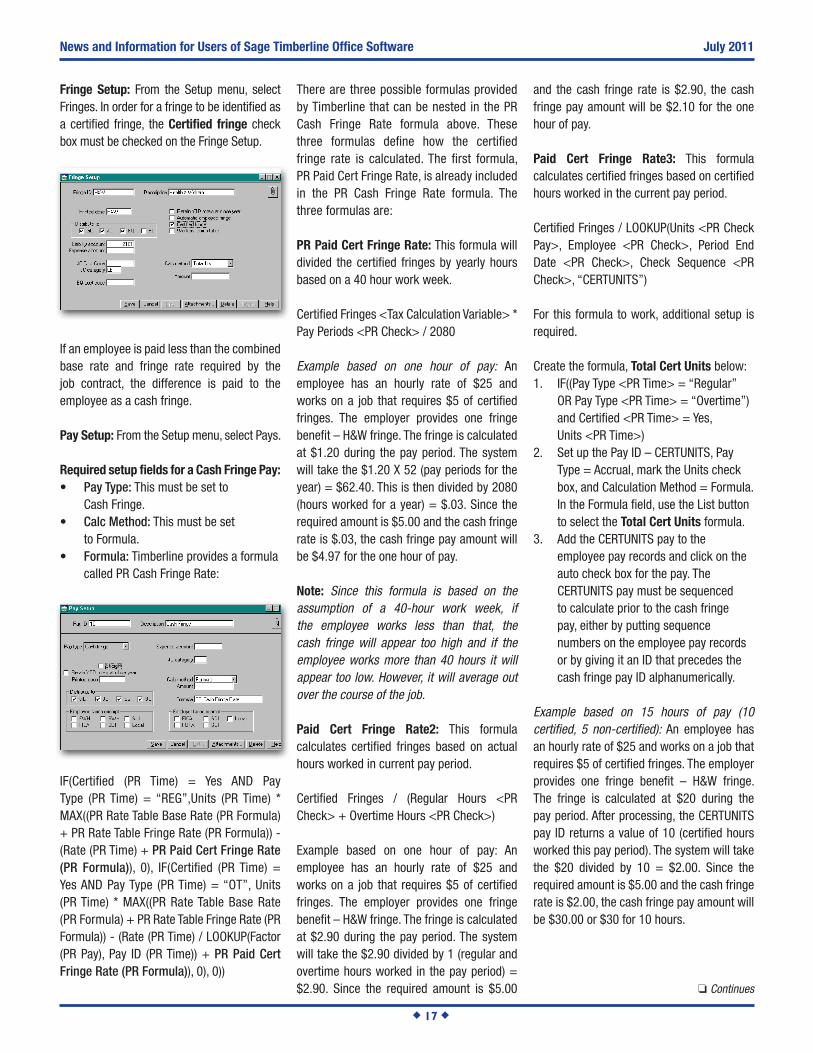
Fringe Setup: From the Setup menu, select Fringes. In order for a fringe to be identified as a certified fringe, the Certified fringe check box must be checked on the Fringe Setup.
If an employee is paid less than the combined base rate and fringe rate required by the job contract, the difference is paid to the employee as a cash fringe.
Pay Setup: From the Setup menu, select Pays.
Required setup fields for a Cash Fringe Pay:• Pay Type: This must be set to Cash Fringe.• Calc Method: This must be set to Formula.• Formula: Timberline provides a formula called PR Cash Fringe Rate:
IF(Certified (PR Time) = Yes AND Pay Type (PR Time) = “REG”,Units (PR Time) * MAX((PR Rate Table Base Rate (PR Formula) + PR Rate Table Fringe Rate (PR Formula)) - (Rate (PR Time) + PR Paid Cert Fringe Rate (PR Formula)), 0), IF(Certified (PR Time) = Yes AND Pay Type (PR Time) = “OT”, Units (PR Time) * MAX((PR Rate Table Base Rate (PR Formula) + PR Rate Table Fringe Rate (PR Formula)) - (Rate (PR Time) / LOOKUP(Factor (PR Pay), Pay ID (PR Time)) + PR Paid Cert Fringe Rate (PR Formula)), 0), 0))
There are three possible formulas provided by Timberline that can be nested in the PR Cash Fringe Rate formula above. These three formulas define how the certified fringe rate is calculated. The first formula, PR Paid Cert Fringe Rate, is already included in the PR Cash Fringe Rate formula. The three formulas are:
PR Paid Cert Fringe Rate: This formula will divided the certified fringes by yearly hours based on a 40 hour work week.
Certified Fringes <Tax Calculation Variable> * Pay Periods <PR Check> / 2080
Example based on one hour of pay: An employee has an hourly rate of $25 and works on a job that requires $5 of certified fringes. The employer provides one fringe benefit – H&W fringe. The fringe is calculated at $1.20 during the pay period. The system will take the $1.20 X 52 (pay periods for the year) = $62.40. This is then divided by 2080 (hours worked for a year) = $.03. Since the required amount is $5.00 and the cash fringe rate is $.03, the cash fringe pay amount will be $4.97 for the one hour of pay.
Note: Since this formula is based on the assumption of a 40-hour work week, if the employee works less than that, the cash fringe will appear too high and if the employee works more than 40 hours it will appear too low. However, it will average out over the course of the job.
Paid Cert Fringe Rate2: This formula calculates certified fringes based on actual hours worked in current pay period.
Certified Fringes / (Regular Hours <PR Check> + Overtime Hours <PR Check>)
Example based on one hour of pay: An employee has an hourly rate of $25 and works on a job that requires $5 of certified fringes. The employer provides one fringe benefit – H&W fringe. The fringe is calculated at $2.90 during the pay period. The system will take the $2.90 divided by 1 (regular and overtime hours worked in the pay period) = $2.90. Since the required amount is $5.00
and the cash fringe rate is $2.90, the cash fringe pay amount will be $2.10 for the one hour of pay.
Paid Cert Fringe Rate3: This formula calculates certified fringes based on certified hours worked in the current pay period.
Certified Fringes / LOOKUP(Units <PR Check Pay>, Employee <PR Check>, Period End Date <PR Check>, Check Sequence <PR Check>, “CERTUNITS”)
For this formula to work, additional setup is required.
Create the formula, Total Cert Units below:1. IF((Pay Type <PR Time> = “Regular” OR Pay Type <PR Time> = “Overtime”) and Certified <PR Time> = Yes, Units <PR Time>)2. Set up the Pay ID – CERTUNITS, Pay Type = Accrual, mark the Units check box, and Calculation Method = Formula. In the Formula field, use the List button to select the Total Cert Units formula.3. Add the CERTUNITS pay to the employee pay records and click on the auto check box for the pay. The CERTUNITS pay must be sequenced to calculate prior to the cash fringe pay, either by putting sequence numbers on the employee pay records or by giving it an ID that precedes the cash fringe pay ID alphanumerically. Example based on 15 hours of pay (10 certified, 5 non-certified): An employee has an hourly rate of $25 and works on a job that requires $5 of certified fringes. The employer provides one fringe benefit – H&W fringe. The fringe is calculated at $20 during the pay period. After processing, the CERTUNITS pay ID returns a value of 10 (certified hours worked this pay period). The system will take the $20 divided by 10 = $2.00. Since the required amount is $5.00 and the cash fringe rate is $2.00, the cash fringe pay amount will be $30.00 or $30 for 10 hours.

July 2011 News and Information for Users of Sage Timberline Office Software
u 18 u
If you choose to use either PR Cert Fringe Rate2 or PR Cert Fringe Rate3 formulas, you will need to copy and rename both the PR Cash Fringe Rate formula and either the PR Cert Fringe Rate2 or the PR Cert Fringe Rate3 formula to your Public Formulas. The renamed PR Cash Fringe Rate formula will need to be modified to include the Certified fringe rate formula you have chosen to use.
Employee Setup: From the Setup menu, Select Employees. The employee’s Certified class must be entered on the Entry Info tab in the Employee Master file.
Employee Setup Pays Table: Once in the Employee Master file record, click on the Pays button to open the Pays Table. Here, the cash fringe pay ID may be entered with the Auto box checked.
Note: If using the PR Cert Fringe Rate3 formula: Add the CERTUNITS pay to the employee pay records and click on the auto check box for the pay. The CERTUNITS pay must be sequenced to calculate prior to the cash fringe pay, either by putting sequence numbers on the employee pay records or by giving it an ID that precedes the cash fringe pay ID alphanumerically.
This completes the Certified Payroll setup.
Certified Payroll ReportsCertified Report: From the Reports menu, select Other, Certified Report. This report provides the certified payroll information by job and employee.
Report date: This is the date of the report. It does not affect the information printing on the report.
Period End Dates / to: Enter the range of Period End Dates on which you want to condition the report.
Include Voided Checks: This box defaults to checked.
Note: Not all of the columns on the report could be shown in the screen capture above. Columns not shown: Total Gross, FWH & FICA, SWH & SUI / SDI, Other Deducts, and Net.
Bi-weekly Certified Report: From the Reports menu, select Other, Bi-weekly Certified Report. This report provides the same information as the Certified Report, however, it allows you to print the check information one week at a time for a bi-weekly payroll.
Report date: This is the date of the report. It does not affect the information printing on the report.
Period End Date: Enter the Period End Date for which you want to condition the report.
Include Voided Checks: This box defaults to checked.
Which Week?: Use the drop-down menu to select either the first or second week of the bi-weekly payroll.
Note: Not all of the columns on the report could be shown in the screen capture above. Columns not shown: Total CHK Gross, FWH & FICA, SWH & SUI / SDI, Other Deducts, and Net Pay.

July 2011News and Information for Users of Sage Timberline Office Software
u 19 u
In discussions with Sage Timberline Office (STO) users we find that many are unclear about how the Address Book (AB) module
is utilized. This article will hopefully bring clarity to those who have wondered about the usefulness of this (free) module.
Why AB? – Many construction and real estate firms struggle with a myriad of contact databases and keeping them synchronized and up to date. STO helps to alleviate this problem with a central AB.
What information does AB contain? – Contact information from vendors in Accounts Payable, customers in Accounts Receivable and estimating sub/vendor data is written to AB as it is entered in each of those modules. Additional contacts can be added directly using the AB or Project Management menus.
How is AB organized? – The AB is made up of two types of records: Company and Person. Company records usually contain general information about a company as a whole (including up to four addresses), as well as Persons associated with the company. The Person record contains specific information about a particular contact, similar to a MS Outlook contact.
Can I customize AB? – There are a variety of ways that AB can be customized. One way that AB can be tailored to a specific company is by modifying the default settings
in Custom Descriptions (File...Company Settings...Custom Descriptions). Each of the AB customizable fields can be changed to meet your company’s criteria. For example, the list of trades that your company uses.
Another way that the functionality of AB can be extended is by adding Custom Fields (File...Company Settings...Custom Fields) to each Company and/or Person Record. If additional information is needed beyond the standard fields included in AB, Custom Fields is a great solution. Of course, attachments are available on both Company and Person records to extend the functionality ever more.
How does AB relate to other modules? – As mentioned earlier, AB shares information with Accounts Payable Vendors, Accounts Receivable Customers and Estimating Sub/Vendors. The key to making this work is the “Use As” field on the Company record or the Person record in AB. Additional information about which fields are shared can be found by checking the Prefills topic in AB help.
How do I set up Companies and Persons? – Company and Person records can be set up and modified in one of three areas, depending on the modules installed and security settings: • ABCompanySetup (always available if security permits)• ProjectManagement (if installed and security permits)• EstimatingandBuyout (if installed and security permits)
Person record setup can also be accomplished through Company record setup. This allows information from both records to be available on one screen, as well as linking the information together. Multiple Persons (contacts) can be added to each Company record.
How can AB information be used? – AB information is available throughout the STO system. Here are some of the most common uses:• IntheABmoduletolookupcontact information (Inquiries) or print contact lists (Reports) for distribution to team members.
• FromanySTOprintselection(Usethe Send button as shown below). Send Method will default from AB setup for Company and/or Person selected and can be changed at run time. Note: Use the ellipse button to send to an e-mail address not currently in the system.
Use These AB Exercises to StrengthenSage Timberline Office Relationships
by: Ron Smith, PresidentCoast Software, Inc.
o Continues

July 2011 News and Information for Users of Sage Timberline Office Software
u 20 u
• InEstimatingandBuyouttoselect Suppliers and Subcontractors for Bid Grid entry (Estimating) and sending Requests for Quotes (Buyout).• InProjectManagementwheretheAB is used prominently in communicating with business partners. Job-specific contacts lists can be assigned and distribution lists set up to further enable efficient contact with players on a project. u To set up Job Contacts go to Setup Job...Site/Contacts in Project Management.
How can I extend the use of AB? – While AB is great for communicating within STO, you may need to import, export or synchronize information with other applications. One common need is Customer Relationship Management and another is Outlook/Smart Phone synchronization. Please see help topic on Sage CRM and consult with your STO Business Partner for more information on third-party solutions to these needs.
AB is a great tool to help strengthen relationships with your business partners, so get out there and work it!
u To set up Job Distribution Lists go to Setup Jobs...Site/Contacts... Distribution Lists. u The AB Company and Person records, as well as Job Contact lists and Distribution lists, are available on most document entry screens. Note: Distribution lists are only available on multiple contacts fields (e.g., CC: on RFI Entry). u Note: Remember to add your Company and Person records into the AB and select your record as the Default Sender under File...Send Settings in Project Management.
To: Estimating GuruOh great and wise one, I am drowning in estimates. We have been using the software for several years and have kept every estimate we have ever done. Now we have thousands of estimates and no one has any idea of what’s in them, which ones should be saved and what to do with the rest. Plus, I’m being eaten out of hard disk space. Is there any hope?
– Plagued by Too Many Estimates
TO: PlaguedOf course there’s hope and the first step is admitting you have a problem. You only have 11 more steps to go. Your solution comes in the guise of Estimating Explorer, which most of you got when you purchased your estimating software. Estimating Explorer will let you see summary, cover page and totals page information so you can quickly select which estimates you want to keep, which you want to delete and which you want to archive. Plus, it allows you to delete the files or create a compressed archive of the estimate(s) right from within Estimating Explorer. To access Estimating Explorer, go to Start>All Programs>Sage Software>Sage Timberline Office>Estimating and select Estimating Explorer.
– As Always, “The Guru”
ESTIMATING TIPS & TRICKS