app portal 2015 r2 sp4 installation guide...chapter 2 preparing to install app portal app portal...
TRANSCRIPT

App Portal 2015 R2 SP4Installation Guide

Legal Information
Copyright NoticeCopyright © 2016 Flexera Software LLC. All Rights Reserved.This product contains proprietary and confidential technology, information and creative works owned by Flexera Software LLC and its licensors, if any. Any use, copying, publication, distribution, display, modification, or transmission of such technology in whole or in part in any form or by any means without the prior express written permission of Flexera Software LLC is strictly prohibited. Except where expressly provided by Flexera Software LLC in writing, possession of this technology shall not be construed to confer any license or rights under any Flexera Software LLC intellectual property rights, whether by estoppel, implication, or otherwise.All copies of the technology and related information, if allowed by Flexera Software LLC, must display this notice of copyright and ownership in full.
Intellectual PropertyFor a list of trademarks and patents that are owned by Flexera Software, see http://www.flexerasoftware.com/intellectual-property. All other brand and product names mentioned in Flexera Software products, product documentation, and marketing materials are the trademarks and registered trademarks of their respective owners.
Restricted Rights LegendThe Software is commercial computer software. If the user or licensee of the Software is an agency, department, or other entity of the United States Government, the use, duplication, reproduction, release, modification, disclosure, or transfer of the Software, or any related documentation of any kind, including technical data and manuals, is restricted by a license agreement or by the terms of this Agreement in accordance with Federal Acquisition Regulation 12.212 for civilian purposes and Defense Federal Acquisition Regulation Supplement 227.7202 for military purposes. The Software was developed fully at private expense. All other use is prohibited.
Book Name: App Portal 2015 R2 SP4 Installation Guide
Part Number: APP-2015R2SP4-IG00
Product Release Date: 26 April 2016

Contents
1 App Portal 2015 R2 SP4 Installation Guide . . . . . . . . . . . . . . . . . . . . . . . . . . . . . . . . . . . . . . . . . . . 5Contacting Us. . . . . . . . . . . . . . . . . . . . . . . . . . . . . . . . . . . . . . . . . . . . . . . . . . . . . . . . . . . . . . . . . . . . . . . . . . . . . . . . . . . . . .5
2 Preparing to Install App Portal . . . . . . . . . . . . . . . . . . . . . . . . . . . . . . . . . . . . . . . . . . . . . . . . . . . . . 7App Portal Overview . . . . . . . . . . . . . . . . . . . . . . . . . . . . . . . . . . . . . . . . . . . . . . . . . . . . . . . . . . . . . . . . . . . . . . . . . . . . . . . .7
Important Points to Consider Prior to Installation . . . . . . . . . . . . . . . . . . . . . . . . . . . . . . . . . . . . . . . . . . . . . . . . . . . . . . . . . . . . . . .8Getting Support for App Portal . . . . . . . . . . . . . . . . . . . . . . . . . . . . . . . . . . . . . . . . . . . . . . . . . . . . . . . . . . . . . . . . . . . . . . . . . . . . . . .9App Portal Installation Files . . . . . . . . . . . . . . . . . . . . . . . . . . . . . . . . . . . . . . . . . . . . . . . . . . . . . . . . . . . . . . . . . . . . . . . . . . . . . . . . 10
System Requirements . . . . . . . . . . . . . . . . . . . . . . . . . . . . . . . . . . . . . . . . . . . . . . . . . . . . . . . . . . . . . . . . . . . . . . . . . . . . . .11Environment Requirements . . . . . . . . . . . . . . . . . . . . . . . . . . . . . . . . . . . . . . . . . . . . . . . . . . . . . . . . . . . . . . . . . . . . . . . . . . . . . . . . 11Client Requirements . . . . . . . . . . . . . . . . . . . . . . . . . . . . . . . . . . . . . . . . . . . . . . . . . . . . . . . . . . . . . . . . . . . . . . . . . . . . . . . . . . . . . . 13Server Requirements . . . . . . . . . . . . . . . . . . . . . . . . . . . . . . . . . . . . . . . . . . . . . . . . . . . . . . . . . . . . . . . . . . . . . . . . . . . . . . . . . . . . . . 14Supported Deployment Technologies . . . . . . . . . . . . . . . . . . . . . . . . . . . . . . . . . . . . . . . . . . . . . . . . . . . . . . . . . . . . . . . . . . . . . . . 16Supported ITSM Systems . . . . . . . . . . . . . . . . . . . . . . . . . . . . . . . . . . . . . . . . . . . . . . . . . . . . . . . . . . . . . . . . . . . . . . . . . . . . . . . . . . 18Supported Cloud Applications. . . . . . . . . . . . . . . . . . . . . . . . . . . . . . . . . . . . . . . . . . . . . . . . . . . . . . . . . . . . . . . . . . . . . . . . . . . . . . 19
Pre-Installation Checklist . . . . . . . . . . . . . . . . . . . . . . . . . . . . . . . . . . . . . . . . . . . . . . . . . . . . . . . . . . . . . . . . . . . . . . . . . . .19Recommended Configuration . . . . . . . . . . . . . . . . . . . . . . . . . . . . . . . . . . . . . . . . . . . . . . . . . . . . . . . . . . . . . . . . . . . . . . . . . . . . . . 20Pre-Installation Tasks. . . . . . . . . . . . . . . . . . . . . . . . . . . . . . . . . . . . . . . . . . . . . . . . . . . . . . . . . . . . . . . . . . . . . . . . . . . . . . . . . . . . . . 21Information to Gather . . . . . . . . . . . . . . . . . . . . . . . . . . . . . . . . . . . . . . . . . . . . . . . . . . . . . . . . . . . . . . . . . . . . . . . . . . . . . . . . . . . . . 25Documents to Gather . . . . . . . . . . . . . . . . . . . . . . . . . . . . . . . . . . . . . . . . . . . . . . . . . . . . . . . . . . . . . . . . . . . . . . . . . . . . . . . . . . . . . 26
Preparing the App Portal Web Site . . . . . . . . . . . . . . . . . . . . . . . . . . . . . . . . . . . . . . . . . . . . . . . . . . . . . . . . . . . . . . . . . . .27Enable Active Directory User Discovery and Add Attribute Extensions . . . . . . . . . . . . . . . . . . . . . . . . . . . . . . . . . . . . . . . . . . . 27Unlock Windows Authentication in IIS for the Default Web Site (Windows Server 2008 R2, 2012, and 2012 R2) . . . . . . . 29Creating a Site Alias . . . . . . . . . . . . . . . . . . . . . . . . . . . . . . . . . . . . . . . . . . . . . . . . . . . . . . . . . . . . . . . . . . . . . . . . . . . . . . . . . . . . . . . 31Enabling Roles and Features in Windows Server 2012 . . . . . . . . . . . . . . . . . . . . . . . . . . . . . . . . . . . . . . . . . . . . . . . . . . . . . . . . . 31
3 Installing App Portal . . . . . . . . . . . . . . . . . . . . . . . . . . . . . . . . . . . . . . . . . . . . . . . . . . . . . . . . . . . . 35
4 Installing the App Portal Web Service . . . . . . . . . . . . . . . . . . . . . . . . . . . . . . . . . . . . . . . . . . . . . . 43
App Portal 2015 R2 SP4 Installation Guide APP-2015R2SP4-IG00 3

Contents
5 Upgrading the App Portal Web Site. . . . . . . . . . . . . . . . . . . . . . . . . . . . . . . . . . . . . . . . . . . . . . . . 49Upgrading: Read This First! . . . . . . . . . . . . . . . . . . . . . . . . . . . . . . . . . . . . . . . . . . . . . . . . . . . . . . . . . . . . . . . . . . . . . . . . .49
Planning Your Upgrade. . . . . . . . . . . . . . . . . . . . . . . . . . . . . . . . . . . . . . . . . . . . . . . . . . . . . . . . . . . . . . . . . . . . . . . . . . . . . . . . . . . . 50Changes to Version Support and Upgrade Method . . . . . . . . . . . . . . . . . . . . . . . . . . . . . . . . . . . . . . . . . . . . . . . . . . . . . . . . . . . 50Changes to User/Computer Syncing . . . . . . . . . . . . . . . . . . . . . . . . . . . . . . . . . . . . . . . . . . . . . . . . . . . . . . . . . . . . . . . . . . . . . . . . 51Changes Related to Custom User Discoverable Attributes. . . . . . . . . . . . . . . . . . . . . . . . . . . . . . . . . . . . . . . . . . . . . . . . . . . . . . 52Changes Related to Multiple Deployment Technology Support . . . . . . . . . . . . . . . . . . . . . . . . . . . . . . . . . . . . . . . . . . . . . . . . . 53
Performing the Upgrade. . . . . . . . . . . . . . . . . . . . . . . . . . . . . . . . . . . . . . . . . . . . . . . . . . . . . . . . . . . . . . . . . . . . . . . . . . . .54Running the App Portal Upgrader . . . . . . . . . . . . . . . . . . . . . . . . . . . . . . . . . . . . . . . . . . . . . . . . . . . . . . . . . . . . . . . . . . . . . . . . . . 54Retaining Previous CSS Customizations After Upgrade . . . . . . . . . . . . . . . . . . . . . . . . . . . . . . . . . . . . . . . . . . . . . . . . . . . . . . . . 57
Troubleshooting Database Upgrade Failed Error During Upgrade . . . . . . . . . . . . . . . . . . . . . . . . . . . . . . . . . . . . . . . . .58Moving App Portal from One Server to Another. . . . . . . . . . . . . . . . . . . . . . . . . . . . . . . . . . . . . . . . . . . . . . . . . . . . . . . .59
Index . . . . . . . . . . . . . . . . . . . . . . . . . . . . . . . . . . . . . . . . . . . . . . . . . . . . . . . . . . . . . . . . . . . . . . . . . 61
4 APP-2015R2SP4-IG00 App Portal 2015 R2 SP4 Installation Guide
1
App Portal 2015 R2 SP4Installation Guide
The App Portal 2015 R2 SP4 Installation Guide explains how to install App Portal from an administrator’s point of view. This guide covers how to setup and install the App Portal web site and App Portal Web Service, and how to perform post-configuration tasks.
Instructions for installing App Portal are presented in the following sections:
Important • This document does not cover how to use, manage, or install System Center Configuration Manager, Altiris Client Management Suite, or JAMF Casper.
Contacting UsYou may contact us from anywhere in the world by visiting our Web site at:
http://www.flexerasoftware.com
Table 1-1 • App Portal 2015 R2 SP4 Installation Guide
Section Description
Preparing to Install App Portal Lists the system requirements, and provides a list of steps that you need to take prior to installation.
Installing App Portal Explains how to run the App Portal installer.
Installing the App Portal Web Service Explains how to run the App Portal Web Service installer.
Upgrading the App Portal Web Site Explains how to upgrade an existing installation of App Portals.
App Portal 2015 R2 SP4 Installation Guide APP-2015R2SP4-IG00 Company Confidential 5
Chapter 1 App Portal 2015 R2 SP4 Installation GuideContacting Us
6 Company Confidential APP-2015R2SP4-IG00 App Portal 2015 R2 SP4 Installation Guide
2
Preparing to Install App PortalThis chapter lists system requirements and steps you need to take prior to installing App Portal.
• App Portal Overview
• System Requirements
• Pre-Installation Checklist
• Preparing the App Portal Web Site
App Portal OverviewApp Portal provides users with a familiar and easy-to-use storefront to request software automatically from System Center Configuration Manager, Altiris Client Management Suite, JAMF Casper, or AirWatch. You can use App Portal to facilitate any type of request including software, OSD images, service packs, computers, and office supplies. You can also use App Portal to request access to cloud applications such as Salesforce or Office 365. App Portal uses approval and inventory management policies to ensure requests are secure and receive the proper approval.
• Important Points to Consider Prior to Installation
• Getting Support for App Portal
• App Portal Installation Files
App Portal 2015 R2 SP4 Installation Guide APP-2015R2SP4-IG00 7
Chapter 2 Preparing to Install App PortalApp Portal Overview
Important Points to Consider Prior to InstallationTo have the most productive experience using App Portal, review this guide in entirety and consider the following points before performing the installation:
• Upgrading from App Portal 7.3.1 or 7.5.x—If you are upgrading from App Portal 7.3.1 or 7.5.x, it is very important that you review all of the information in the Upgrading: Read This First! section before beginning the upgrade.
• App Portal obtains data from Active Directory as well as your deployment system—App Portal obtains its data from Active Directory as well as the System Center Configuration Manager or Altiris database. User data is refreshed when the Active Directory User Discovery is run. Be sure to schedule this process to run at regular intervals.
• Four user-to-computer relationship methods—App Portal creates its user-to-computer relationship using one of four methods: last logon, primary console, managed by, and user affinity [for System Center 2012 Configuration Manager and System Center Configuration Manager (Current Branch) only]. Please review and understand what the most effective and reliable method will be for you.
• App Portal Web Service requirement on primary sites—App Portal requires that the App Portal Web Service be installed on:
• System Center Configuration Manager (Current Branch)—At the Single Primary site or the CAS Site (if present)
• System Center 2012 Configuration Manager—At the Single Primary site or the CAS Site (if present)
• System Center 2007 Configuration Manager—At the Single Primary site or the Central site and all of its Primary sites (if present)
• Altiris—Not required, but ASDK should be enabled.
• Service account and DNS alias requirement—App Portal requires a service account and DNS alias established prior to beginning the installation.
• SysAdmin permissions required—The installer account and the upgrader account need to have SysAdmin permissions on the SQL Server. This account needs permission to create the App Portal database, and also to assign the service account with DB_DataReader and Execute permission on the deployment technology database and database owner permission on the App Portal database during installation.
Important • The App Portal service account must have database owner permission to read/write to the App Portal database even after the installation is complete.
8 APP-2015R2SP4-IG00 App Portal 2015 R2 SP4 Installation Guide

Chapter 2 Preparing to Install App PortalApp Portal Overview
Getting Support for App PortalApp Portal is fully supported by its world-class support staff during your evaluation process and post-sales. We promise quick resolution or explanation ensuring that the product performs flawlessly in your environment.
You can contact Flexera Software support by visiting the support site at:
https://flexeracommunity.force.com/customer/
When contacting technical support, please provide following information:
Table 2-1 • Required Support Information
Information Description
Log Files Include the log files from the Logs directory:
• C:\Program Files (x86)\Flexera Software\App Portal\Logs• C:\Program Files (x86)\Flexera Software\AppPortalWebService\Logs
(from the Primary Sites)
When you encounter a particularly complicated issue, one which could be caused by environmental issues and which cannot be easily reproduced on other systems, you may want to use the debug logging feature, which can be enabled on the Site Management > Debug Log view.
Rather than just a log of error messages, a debug log is an exhaustive log of all events—such as actions, methods, stack trace, execution path—and provides a very low level detail of the entire request life cycle of the App Portal web site.
Important • Because debug logging slows down the system considerably, it should only be turned on when performing troubleshooting, preferably before App Portal is in a production environment.
Description Include a detailed description of the problem including:
• Expected behavior• Desired behavior• User experience
Environmental Factors
List the environmental factors that may be unique to you including:
• Client firewalls• System lockdown• Anything else that you may think contributes
Steps to Reproduce
Include a detailed list of the steps to follow to reproduce the problem you are experiencing.
App Portal 2015 R2 SP4 Installation Guide APP-2015R2SP4-IG00 9

Chapter 2 Preparing to Install App PortalApp Portal Overview
App Portal Installation FilesThese App Portal installation files can be downloaded from the Flexera Software Product and License Center. The files that you need to download depend upon whether you are upgrading an existing installation of App Portal or installing App Portal for the first time.
Note • The App Portal user documentation, in both PDF and HTML format, can be accessed on the App Portal HelpNet site:
http://helpnet.flexerasoftware.com/appportal
Table 2-2 • App Portal Installation Files
Type of Customer Files Needed Purpose
New Customer AppPortalSetup_2015_R2.exe Use to install the App Portal 2015 R2 Web Site
AppPortalUpgrade_2015_R2_ServicePack_4.exe Use to upgrade the App Portal 2015 R2 Web Site to 2015 R2 SP4
AppPortalWebServiceSetup_2015_R2_ServicePack_4.exe Use to install the App Portal Web Service on the deployment technology machine
FlexeraServiceGateway_v1.0.exe Use to install the Flexera Service Gateway
ActiveX Control for Internet Explorer.msi Use to install the Active X control for Internet Explorer (if you are prompted)
Existing Customer
AppPortalUpgrade_2015_R2_ServicePack_4.exe Use to upgrade the App Portal 2015 R2 Web Site and Web Service to App Portal 2015 R2 SP4
10 APP-2015R2SP4-IG00 App Portal 2015 R2 SP4 Installation Guide

Chapter 2 Preparing to Install App PortalSystem Requirements
System RequirementsApp Portal requires certain systems configurations in order to function properly. These requirements are exact and if they are not present, it will have negative effects on the installation, operation, and experience of App Portal.
This section lists the system requirements for App Portal:
• Environment Requirements
• Client Requirements
• Server Requirements
• Supported Deployment Technologies
• Supported ITSM Systems
• Supported Cloud Applications
Environment RequirementsPrior to beginning App Portal installation, make sure that your environment meets or is able to meet the following requirements:
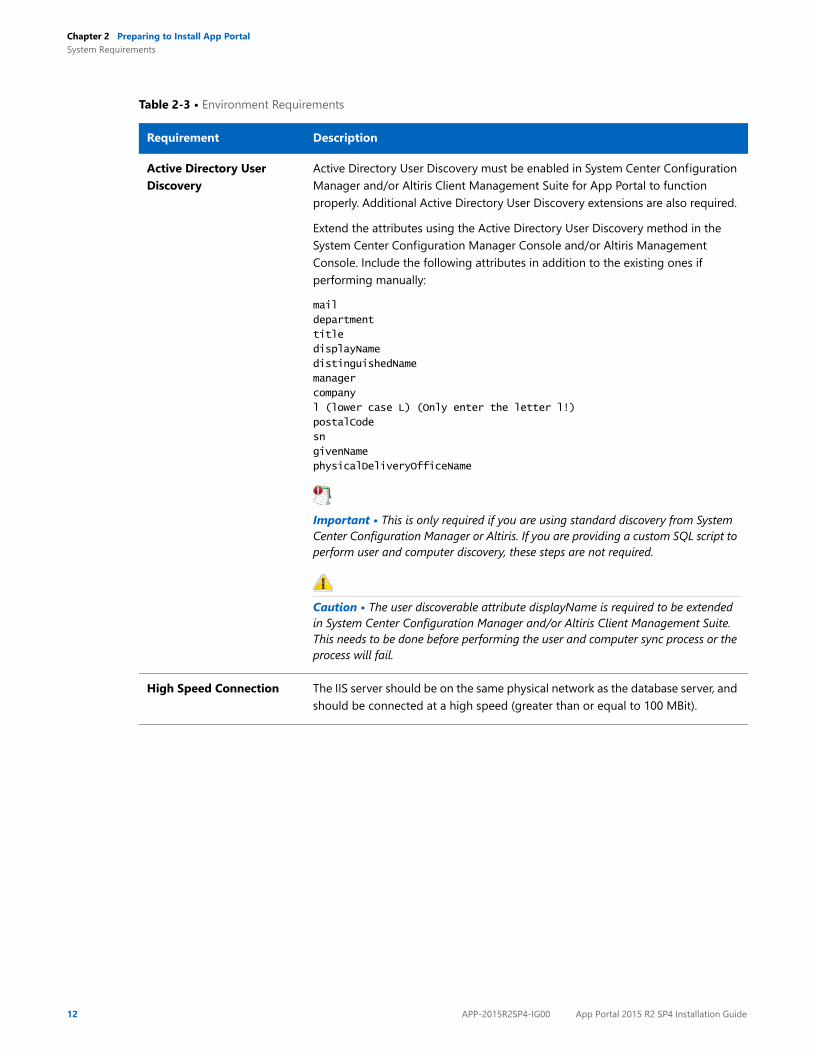
Table 2-3 • Environment Requirements
Requirement Description
Active Directory Microsoft Active Directory is required for App Portal. It is fully supported under Windows Server 2008 R2 or later domains operating at all functional levels.
DNS If you choose Use Reverse DNS as a computer discovery method during App Portal installation, a DNS service is required that supports and contains Reverse DNS Zones.
Database Software Microsoft SQL Server 2008 R2 or later
SMTP Compatible Mail System
App Portal requires an SMTP-compatible mail system. App Portal supports local and remote SMTP servers.
Internet Information Server (IIS)
App Portal supports the versions of IIS that are installed with Windows Server 2008 R2 or higher.
App Portal is installed into a virtual directory named ESD and is accessible using http://alias/ESD.
A DNS A-RECORD must be created to access the site if you wish to use an alias.
Integrated Authentication App Portal uses a user’s current Active Directory credentials to authenticate to IIS/App Portal.
App Portal 2015 R2 SP4 Installation Guide APP-2015R2SP4-IG00 11
Chapter 2 Preparing to Install App PortalSystem Requirements
Active Directory User Discovery
Active Directory User Discovery must be enabled in System Center Configuration Manager and/or Altiris Client Management Suite for App Portal to function properly. Additional Active Directory User Discovery extensions are also required.
Extend the attributes using the Active Directory User Discovery method in the System Center Configuration Manager Console and/or Altiris Management Console. Include the following attributes in addition to the existing ones if performing manually:
department
title
displayName
distinguishedName
manager
company
l (lower case L) (Only enter the letter l!)
postalCode
sn
givenName
physicalDeliveryOfficeName
Important • This is only required if you are using standard discovery from System Center Configuration Manager or Altiris. If you are providing a custom SQL script to perform user and computer discovery, these steps are not required.
Caution • The user discoverable attribute displayName is required to be extended in System Center Configuration Manager and/or Altiris Client Management Suite. This needs to be done before performing the user and computer sync process or the process will fail.
High Speed Connection The IIS server should be on the same physical network as the database server, and should be connected at a high speed (greater than or equal to 100 MBit).
Table 2-3 • Environment Requirements
Requirement Description
12 APP-2015R2SP4-IG00 App Portal 2015 R2 SP4 Installation Guide

Chapter 2 Preparing to Install App PortalSystem Requirements
Client RequirementsThe following are the App Portal client requirements:
Table 2-4 • Client Requirements
Requirement Description
Desktop Operating Systems
• Windows 7 or greater• Mac OS X 10.7.x or greater
Note • To deploy software using App Portal, App Portal requires that the device needs to be managed by Microsoft System Center Configuration Manager, Symantec Altiris, or Casper.
Mobile Operating Systems
• Google Android• iOS• Windows Phone
Note • To deploy mobile apps using App Portal, the device needs to be registered and managed by AirWatch.
Browser Microsoft Internet Explorer 9.0 or greater
App Portal requires that the client’s web browser be Internet Explorer 9.0 or greater; however Internet Explorer 10 or 11 are preferred for the best experience.
Firefox, Chrome
App Portal also supports Firefox and Chrome browsers; however these browsers do not support Active X and therefore will always discover the computer using the Reverse DNS discovery method.
Note • The fall back to ReverseDNS on these browsers is only done if ActiveX is the primary computer discovery method chosen. If the discovery method is set to SCCM, then App Portal will honor that for all browsers.
Trusted Sites The App Portal web site must be added to the trusted sites list for Internet Explorer. For example:
http://APPPORTALSERVER
Important • This is very important.
App Portal 2015 R2 SP4 Installation Guide APP-2015R2SP4-IG00 13

Chapter 2 Preparing to Install App PortalSystem Requirements
Server RequirementsThe following are the server requirements for the App Portal Web Service and the App Portal installation platform:
• App Portal Web Service Server
• App Portal Installation Platform
• App Portal Service Account Required Permissions
App Portal Web Service ServerThe following are the system requirements for the servers where the App Portal Web Service is installed:
The instructions for installing the App Portal Web Service depends upon your deployment technology:
• For System Center 2012 Configuration Manager and System Center Configuration Manager (Current Branch), the App Portal Web Service only needs to be installed on the CAS or Central site.
For System Center 2012 Configuration Manager and System Center Configuration Manager (Current Branch), folders will be created called App Portal Users For Site XXX and App Portal Computers for site XXX.
• For System Center 2007 Configuration Manager, the App Portal Web Service must be installed on every primary site server.
Therefore, you are required to run the App Portal Web Service installer on each primary site, confirming the local server name and System Center Configuration Manager SQL database of the primary site server. A default System Center Configuration Manager Collection called App Portal Collection for Site XXX will be created on each primary site. This collection will be populated as necessary to service the clients that report to that site.
For System Center 2007 Configuration Manager, an advertisement folder called App Portal Advertisements for Site XXX will be created to contain the advertisements created by App Portal.
Table 2-5 • App Portal Web Service Server
Requirement Description
Authentication Windows Authentication
Microsoft .NET Framework A minimum of Microsoft .NET Framework 2.0 SP1 is required on all primary sites.
IIS App Portal supports the versions of IIS that are installed with Windows Server 2008 R2 or higher.
The IIS Application Server and Web Server roles need to be installed.
ASP.NET ASP.NET needs to be installed.
14 APP-2015R2SP4-IG00 App Portal 2015 R2 SP4 Installation Guide

Chapter 2 Preparing to Install App PortalSystem Requirements
App Portal Installation Platform The App Portal installation platform must meet the following requirements:
App Portal Service Account Required PermissionsPrior to installing App Portal, you need to identify and configure an App Portal service account. This service account will be used for App Portal’s interaction with SQL Server and Active Directory, and requires the following permissions:
Table 2-6 • App Portal Installation Platform
Requirement Description
Authentication Windows Authentication
Operating System Windows Server 2008 R2 or later
IIS App Portal supports the versions of IIS that are installed with Windows Server 2008 R2 or higher.
The IIS Application Server and Web Server roles need to be installed.
Microsoft .NET Framework Microsoft .NET Framework 4.6.1 is required for App Portal.
ASP.NET ASP.NET needs to be installed.
Table 2-7 • Required Permissions for App Portal Service Account
Entity Required Permissions
SQL Server System administrator (SysAdmin) permission, including permission to create the App Portal database.
System Center Configuration Manager / Altiris Database
Full administrator access, including read (db_datareader) and EXECUTE access on the Microsoft System Center Configuration Manager or Altiris Client Management database in SQL.
App Portal Database DBO permission on the App Portal database, including read/write permission.
App Portal 2015 R2 SP4 Installation Guide APP-2015R2SP4-IG00 15

Chapter 2 Preparing to Install App PortalSystem Requirements
Important • The App Portal service account must continue to have these permissions even after the installation is complete.
Supported Deployment TechnologiesApp Portal 2015 R2 SP4 supports the following deployment technologies for software distribution:
• Microsoft System Center Configuration Manager (Current Branch)
• Microsoft System Center 2012 Configuration Manager
• Microsoft System Center 2007 Configuration Manager
• Altiris Client Management Suite 7.1 or later
• AirWatch 7.x (for mobile application deployment)
• JAMF Casper Suite 9.6.4
Note • App Portal supports JAMF Casper Suite 9.6.4 on premises version; the cloud version is not supported. Inventory can be collected from Macintosh computers running OS X 10.7.x or later.
Client Workstations Whether or not the App Portal service account requires administrative permissions on the client workstations depends upon the deployment technology that you are using.
• System Center 2012 Configuration Manager or System Center Configuration Manager (Current Branch)—The App Portal service account does not require administrative permissions on the client workstations.
• System Center 2007 Configuration Manager or Altiris—The App Portal service account requires full administrative permissions on the client workstations. These permissions are used by App Portal to run machine policy evaluation for accelerated software deployments and rerunning advertisements as necessary. They are also used if client-side commands and actions have been created within App Portal.
Table 2-7 • Required Permissions for App Portal Service Account (cont.)
Entity Required Permissions
16 APP-2015R2SP4-IG00 App Portal 2015 R2 SP4 Installation Guide

Chapter 2 Preparing to Install App PortalSystem Requirements
The purpose of App Portal’s support for multiple deployment technologies is to enable you to:
• Provide a seamless end user experience while you are upgrading from System Center 2007 Configuration Manager to System Center 2012 Configuration Manager or System Center Configuration Manager (Current Branch).
• Present a single App Portal instance to your users even if your organization uses both System Center Configuration Manager and Altiris deployment technologies across your enterprise.
• Provide your users with a universal app store containing both desktop and mobile applications.
You enter the deployment technology connection settings by opening the Deployment tab on the Site Management > Settings view, and then entering the settings on the ConfigMgr, SCCM 2012, SCCM 2007, Altiris, AirWatch, or Casper subtabs.
Figure 2-1: Site Management > Site Settings > Deployment Tab
App Portal 2015 R2 SP4 Installation Guide APP-2015R2SP4-IG00 17

Chapter 2 Preparing to Install App PortalSystem Requirements
App Portal can only be connected to multiple servers of the same type if they are set up in a hierarchical relationship, with only the “main” site’s connection information entered on the Site Management >Settings > Deployment tab. The following table describes the acceptable hierarchical relationships for the deployment technologies:
Important • App Portal does not support connecting to multiple, disconnected deployment servers that are using the same deployment technology and version.
Note • When using System Center Configuration Manager, Microsoft .NET Framework 4.6.1 is required to be installed on the IIS server in order to run the App Portal service and web site. This is not required when using Altiris Client Management Suite.
Supported ITSM SystemsApp Portal 2015 R2 SP4 provides out-of-the-box support for the following ITSM systems:
• ServiceNow
• BMC Remedy IT Service Management Suite
Note • If you would like to integrate with an ITSM system other than ServiceNow or BMC Remedy, you can use App Portal’s reusable framework to connect to and configure integration to that system.
Table 2-8 • Hierarchical Relationships for Deployment Technologies
Technology Description
System Center Configuration Manager (Current Branch)
System Center 2012 Configuration Manager
Single Primary Site OR Central Administration Site > Child Primary Sites
For System Center Configuration Manager (Current Branch) or System Center 2012 Configuration Manager, App Portal only communicates with one site: either a Single Primary Site or a Central Administration Site (which in turn replicates data to all Child Primary Sites).
System Center 2007 Configuration Manager
Central Site > Child Primary Sites
App Portal supports multiple System Center 2007 Configuration Manager Child Primary Sites; however, they need to be in the same hierarchy of the Central Site that is configured in System Center Configuration Manager.
Altiris Client Management Suite 7.1 or later
Single Primary Site OR Central Site > Child Primary Sites
For Altiris. App Portal only communicates with one site: either a Single Primary Site or a Central Site (which in turn replicates data to all Child Primary Sites).
18 APP-2015R2SP4-IG00 App Portal 2015 R2 SP4 Installation Guide

Chapter 2 Preparing to Install App PortalPre-Installation Checklist
Supported Cloud ApplicationsApp Portal 2015 R2 SP4 provides out-of-the-box support for the following cloud applications:
• Box
• Salesforce
• Microsoft Office 365
If you connect App Portal to one of these cloud applications, App Portal can offer a catalog item that will automatically create an account for the requester in that cloud application.
Pre-Installation ChecklistThe Pre-Installation Checklist provides you with a list of activities and questions that should be completed prior to working with Flexera Software consulting to customize an installation of App Portal for your organization.:
Table 2-9 • Sections in the Pre-Installation Checklist
Section Details
Recommended Configuration Lists the version of App Portal and hardware sizing recommendations for the App Portal platform that will be installed.
Pre-Installation Tasks Lists activities that should be reviewed and completed.
Information to Gather Provides a list of items you should gather and questions you should answer.
Documents to Gather Provides a list of documents that you should gather.
App Portal 2015 R2 SP4 Installation Guide APP-2015R2SP4-IG00 19

Chapter 2 Preparing to Install App PortalPre-Installation Checklist
Recommended ConfigurationThe following table provides a summary of the recommended App Portal configuration, including hardware sizing recommendations.
Note • The App Portal service can only be enabled and running on a single web server at a time.
Tip • It is recommended that the App Portal database reside on its own Microsoft SQL Server. It is not necessary to install App Portal on the same SQL Server as the System Center Configuration Manager or Altiris.
Table 2-10 • Recommended App Portal Configuration
Component Development / Lab Environment Production Environment
Server Count 1 1
Server Role App Portal Web Server App Portal Web Server
Processor 1 processor, 2 core 2 processors, 4 core
Memory (RAM) 8 GB 32 GB
Hard Disk Space 70 GB 70 GB
Database sizing recommendations
50 GB (based on estimated growth size of the deployment technology database of 500 GB)
20 APP-2015R2SP4-IG00 App Portal 2015 R2 SP4 Installation Guide

Chapter 2 Preparing to Install App PortalPre-Installation Checklist
Pre-Installation TasksThe steps provided in the checklist below are provided to help you prepare for the Flexera Software services engagement. Although Flexera Software is unable to identify every cause for delays in implementation, the checklist below greatly reduces typical delays experienced during an implementation of App Portal.
Table 2-11 • Pre-Installation Tasks
# Task Task Details Yes No N/A
APT01 Download App Portal content
Connect to the Flexera Software Product and Licensing Center:
https://flexerasoftware.flexnetoperations.com
Download all of the files for the version of App Portal that will be installed.
• App Portal Setup• App Portal Upgrader• App Portal Web Service Setup• App Portal ActiveX Control for Internet
Explorer• Flexera Service Gateway Installer
Store the downloaded files to a UNC file share.
Also, obtain the App Portal user documentation from the App Portal HelpNet site:
http://helpnet.flexerasoftware.com/appportal
APT02 Download the App Portal license file
Connect to the Flexera Software Product and Licensing Center to download the license file for App Portal.
Store the downloaded license file to a UNC file share.
APT03 Review App Portal Installation Guide
Review installation guide to identify any risks for the pending implementation of App Portal.
APT04 Review App Portal Release Notes
Review the release notes to identify any risks for the pending implementation of App Portal.
App Portal 2015 R2 SP4 Installation Guide APP-2015R2SP4-IG00 21
Chapter 2 Preparing to Install App PortalPre-Installation Checklist
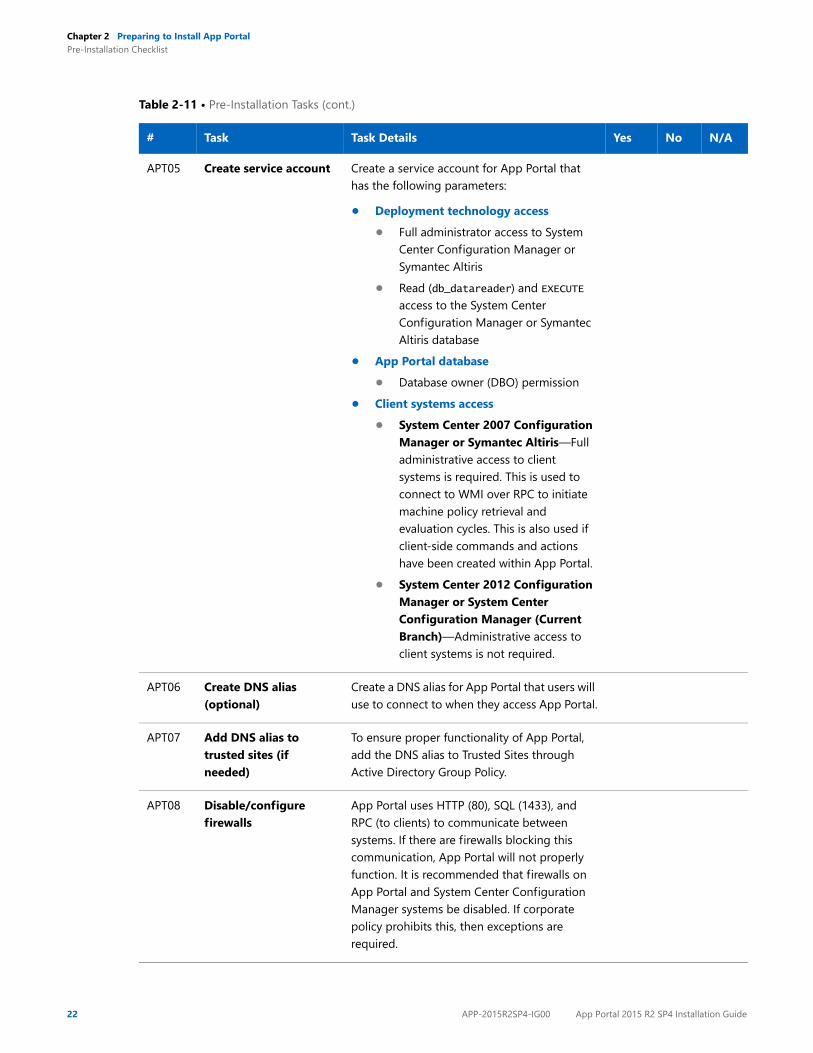
APT05 Create service account Create a service account for App Portal that has the following parameters:
• Deployment technology access• Full administrator access to System
Center Configuration Manager or Symantec Altiris
• Read (db_datareader) and EXECUTE access to the System Center Configuration Manager or Symantec Altiris database
• App Portal database• Database owner (DBO) permission
• Client systems access• System Center 2007 Configuration
Manager or Symantec Altiris—Full administrative access to client systems is required. This is used to connect to WMI over RPC to initiate machine policy retrieval and evaluation cycles. This is also used if client-side commands and actions have been created within App Portal.
• System Center 2012 Configuration Manager or System Center Configuration Manager (Current Branch)—Administrative access to client systems is not required.
APT06 Create DNS alias (optional)
Create a DNS alias for App Portal that users will use to connect to when they access App Portal.
APT07 Add DNS alias to trusted sites (if needed)
To ensure proper functionality of App Portal, add the DNS alias to Trusted Sites through Active Directory Group Policy.
APT08 Disable/configure firewalls
App Portal uses HTTP (80), SQL (1433), and RPC (to clients) to communicate between systems. If there are firewalls blocking this communication, App Portal will not properly function. It is recommended that firewalls on App Portal and System Center Configuration Manager systems be disabled. If corporate policy prohibits this, then exceptions are required.
Table 2-11 • Pre-Installation Tasks (cont.)
# Task Task Details Yes No N/A
22 APP-2015R2SP4-IG00 App Portal 2015 R2 SP4 Installation Guide
Chapter 2 Preparing to Install App PortalPre-Installation Checklist
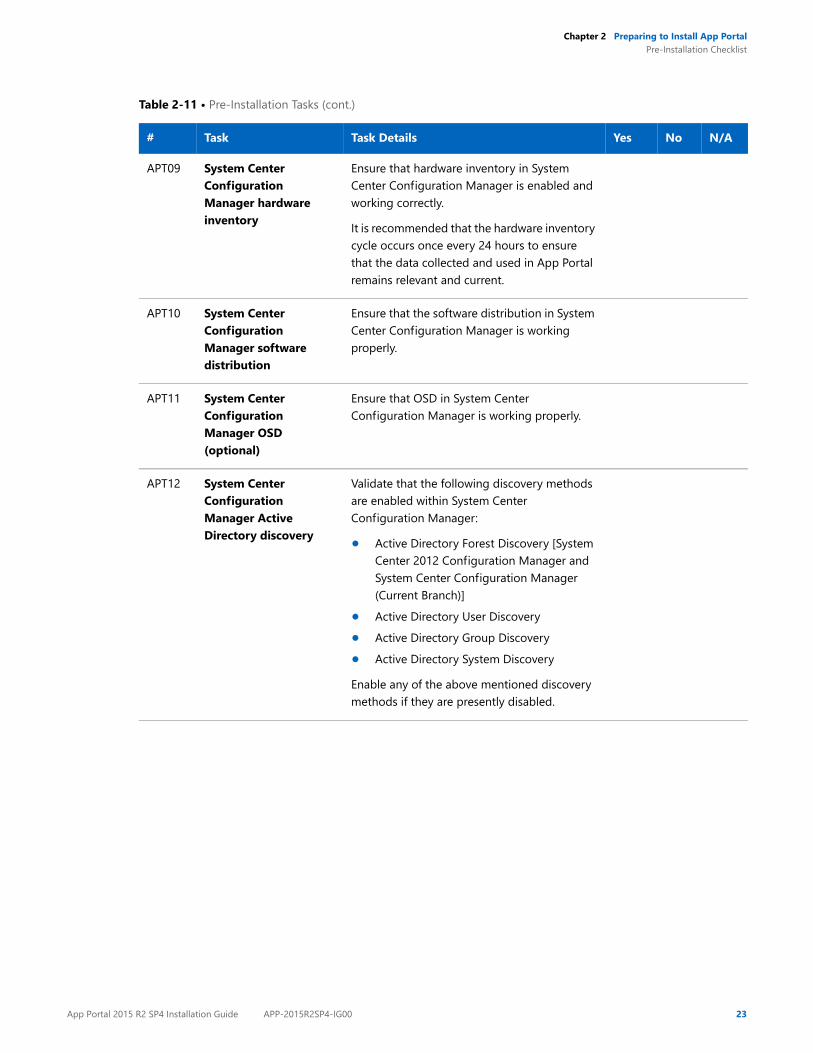
APT09 System Center Configuration Manager hardware inventory
Ensure that hardware inventory in System Center Configuration Manager is enabled and working correctly.
It is recommended that the hardware inventory cycle occurs once every 24 hours to ensure that the data collected and used in App Portal remains relevant and current.
APT10 System Center Configuration Manager software distribution
Ensure that the software distribution in System Center Configuration Manager is working properly.
APT11 System Center Configuration Manager OSD (optional)
Ensure that OSD in System Center Configuration Manager is working properly.
APT12 System Center Configuration Manager Active Directory discovery
Validate that the following discovery methods are enabled within System Center Configuration Manager:
• Active Directory Forest Discovery [System Center 2012 Configuration Manager and System Center Configuration Manager (Current Branch)]
• Active Directory User Discovery• Active Directory Group Discovery• Active Directory System Discovery
Enable any of the above mentioned discovery methods if they are presently disabled.
Table 2-11 • Pre-Installation Tasks (cont.)
# Task Task Details Yes No N/A
App Portal 2015 R2 SP4 Installation Guide APP-2015R2SP4-IG00 23

Chapter 2 Preparing to Install App PortalPre-Installation Checklist
APT13 Extend System Center Configuration Manager user discovery attributes
Add the following attributes to Active Directory user discovery within System Center Configuration Manager and ensure that a full sync is run following the changes:
department
title
distinguishedName
manager
company
l (lower case L)
postalCode
sn
givenName
physicalDeliveryOfficeName
displayName
Code: Add Additional Attributes Using PowerShell (x86)
CD 'C:\Program Files\Microsoft
Configuration Manager\AdminConsole\bin\'
Import-Module
.\ConfigurationManager.psd1
CD XXX:
Set-CMDiscoveryMethod –
ActiveDirectoryUserDiscovery -
AddAdditionalAttribute "department",
"title", "sn", "givenName",
"physicalDeliveryOfficeName", "manager",
"company", "l", "postalCode",
"displayName"
APT14 Download Full .NET Framework 4.6.1 (Windows Server 2008 R2 or Later)
Download the full installation of .NET Framework 4.6.1 from Microsoft's download site.
Store downloaded installation file to a UNC file share.
APT15 Review Computer Browser service (optional)
On the server that App Portal web server will be installed, identify if the Computer Browser service is enabled. If not enabled, it is recommended that this be enabled for installation.
Table 2-11 • Pre-Installation Tasks (cont.)
# Task Task Details Yes No N/A
24 APP-2015R2SP4-IG00 App Portal 2015 R2 SP4 Installation Guide

Chapter 2 Preparing to Install App PortalPre-Installation Checklist
Information to GatherPrior to Flexera Software consulting personnel starting the customer engagement, you should collect all of the information detailed in the table below. Having this information for day one execution of services helps reduce the risk of delays during implementation phases of the effort.
APT16 Gather installer account permissions
The account that will be performing the installation of App Portal must have the following permissions/rights:
• Local administrator rights to App Portal web server.
• SQL Server Admin (SA) rights to the SQL Server where the App Portal database will be installed.
Have access to file store location where the App Portal installation files and license file are stored.
APT17 Verify SMTP relay functionality
App Portal sends email via existing Customer SMTP system. There are no configuration settings for authentication into SMTP, so the email administrator may need to create an exception to accept SMTP calls from the App Portal web server.
APT18 Provision the App Portal web server
Based on the information provided above on server sizing, provision the App Portal web server prior to the beginning of the services engagement.
Table 2-12 • Information to Gather
Query # Query Response
APQ01 UNC to App Portal installation files
APQ02 App Portal service account credentials
APQ03 App Portal web server name
APQ04 SCCM CAS/CEN server name
APQ05 SCCM CAS/CEN database server name
Table 2-11 • Pre-Installation Tasks (cont.)
# Task Task Details Yes No N/A
App Portal 2015 R2 SP4 Installation Guide APP-2015R2SP4-IG00 25

Chapter 2 Preparing to Install App PortalPre-Installation Checklist
Documents to GatherPrior to Flexera Software consulting personnel starting the customer engagement, you should gather the following document examples displayed in the table below. The information within the listed documents will provide the Flexera Software consulting personnel the data that they need to plan for the design of the App Portal solution within your environment.
APQ06 SCCM CAS/CEN database SQL instance (if any)
APQ07 Name of all SCCM primary site server(s)
APQ08 App Portal DNS alias
APQ09 SMTP server name
APQ10 Email address for App Portal (such as [email protected]).
APQ11 Do you have a Reverse DNS zone for Intranet?
APQ12 Is Computer Browser service enabled?
Table 2-13 • Documents to Gather
Doc. # Document Type Yes No N/A
APD01 Active Directory domain and forest hierarchy diagram
APD02 System Center Configuration Manager hierarchy diagram
APD03 Software approval process diagram
APD04 License procurement process diagram
APD05 Existing Flexera Software product diagrams
APD06 Third party integration solution diagrams
APD07 Third party integration solution API / Web Service data
Table 2-12 • Information to Gather
Query # Query Response
26 APP-2015R2SP4-IG00 App Portal 2015 R2 SP4 Installation Guide

Chapter 2 Preparing to Install App PortalPreparing the App Portal Web Site
Preparing the App Portal Web SiteTo prepare the App Portal web site, perform the following tasks:
• Enable Active Directory User Discovery and Add Attribute Extensions
• Unlock Windows Authentication in IIS for the Default Web Site (Windows Server 2008 R2, 2012, and 2012 R2)
• Creating a Site Alias
• Enabling Roles and Features in Windows Server 2012
Enable Active Directory User Discovery and Add Attribute Extensions
App Portal collects data from discovery in your deployment system. Active Directory User Discovery must be enabled in System Center Configuration Manager, Altiris Client Management Suite, and /or Casper for App Portal to function properly.
Additional Active Directory user discovery extensions are also required. There are twelve (12) attribute extensions that App Portal relies on. It is necessary to inventory the additional Active Directory attributes and have them present in your deployment system before you start the user/device sync process in App Portal.
Caution • The user discoverable attribute displayName is required to be extended in System Center Configuration Manager and/or Altiris Client Management Suite. This needs to be done before the starting the user/device sync process in App Portal or the process will fail.
To add Active Directory user discovery attribute extensions, perform the following steps.
Task: To add Active Directory user discovery attribute extensions:
1. Confirm that at least one account in the domain being inventoried has the following Active Directory attributes populated:
DisplayName
Email Address
Department
Title
Full User Name
User Name
Last Name
First Name
Office
Manager
Company
City
Postal Code
App Portal 2015 R2 SP4 Installation Guide APP-2015R2SP4-IG00 27

Chapter 2 Preparing to Install App PortalPreparing the App Portal Web Site
2. Once confirmed, open the Active Directory User Discovery method in the System Center Configuration Manager Console and/or Altiris Management Console and include the following attributes in addition to the existing ones:
displayName
department
title
sn
givenName
physicalDeliveryOfficeName
distinguishedName
manager
company
l (lower case L) (Only enter the letter l!)
postalCode
Important • This is only required if you are using standard discovery from System Center Configuration Manager or Altiris. If you are providing a custom SQL script to perform user and computer discovery, these steps are not required.
3. Initiate a discovery, and once the discovery process is complete, verify that a user account in the All Users collection has the additional attributes listed above.
28 APP-2015R2SP4-IG00 App Portal 2015 R2 SP4 Installation Guide

Chapter 2 Preparing to Install App PortalPreparing the App Portal Web Site
Unlock Windows Authentication in IIS for the Default Web Site (Windows Server 2008 R2, 2012, and 2012 R2)
If you are using Windows Server 2012 or Windows Server 2012 R2, you need to unlock the windowsAuthentication section for the Default Web Site in IIS to allow web applications to use Windows Authentication, which is a requirement of App Portal.
To unlock the Default Web Site option, perform the following steps.
Task: To unlock the Default Web Site option:
1. Open IIS 7 Manager.
2. Select Default Web Site in the tree. The Default Web Site Home view opens.
3. Double click Configuration Editor. The Configuration Editor opens.
App Portal 2015 R2 SP4 Installation Guide APP-2015R2SP4-IG00 29

Chapter 2 Preparing to Install App PortalPreparing the App Portal Web Site
4. From the Section list, expand the tree and select windowsAuthentication (which is under system.webServer > security > authentication).
5. In the Actions panel on the right, click Unlock Section.
30 APP-2015R2SP4-IG00 App Portal 2015 R2 SP4 Installation Guide

Chapter 2 Preparing to Install App PortalPreparing the App Portal Web Site
Creating a Site AliasApp Portal operates under the security context of a service account. In order for IIS to properly authenticate a user, it is required that an alias (DNS A-RECORD) be established prior to installing. This ensures that there will be no authentication problems between Active Directory and IIS when the installation is complete.
Note • If, instead of specifying an alias, you want to specify the actual server name during installation, you do not need to create a DNS A-RECORD because one already exists for the server. However, if you wish to use an alias instead of the server name, a DNS A-RECORD for that alias must be created to access the site.
Enabling Roles and Features in Windows Server 2012
If you are installing App Portal on Windows Server 2012, it is recommended that you perform the following steps to enable roles and features.
Task: To enable roles and features in Windows Server 2012:
1. Open the Windows Server 2012 Server Manager.
2. Open the Add Roles and Features wizard.
App Portal 2015 R2 SP4 Installation Guide APP-2015R2SP4-IG00 31
Chapter 2 Preparing to Install App PortalPreparing the App Portal Web Site
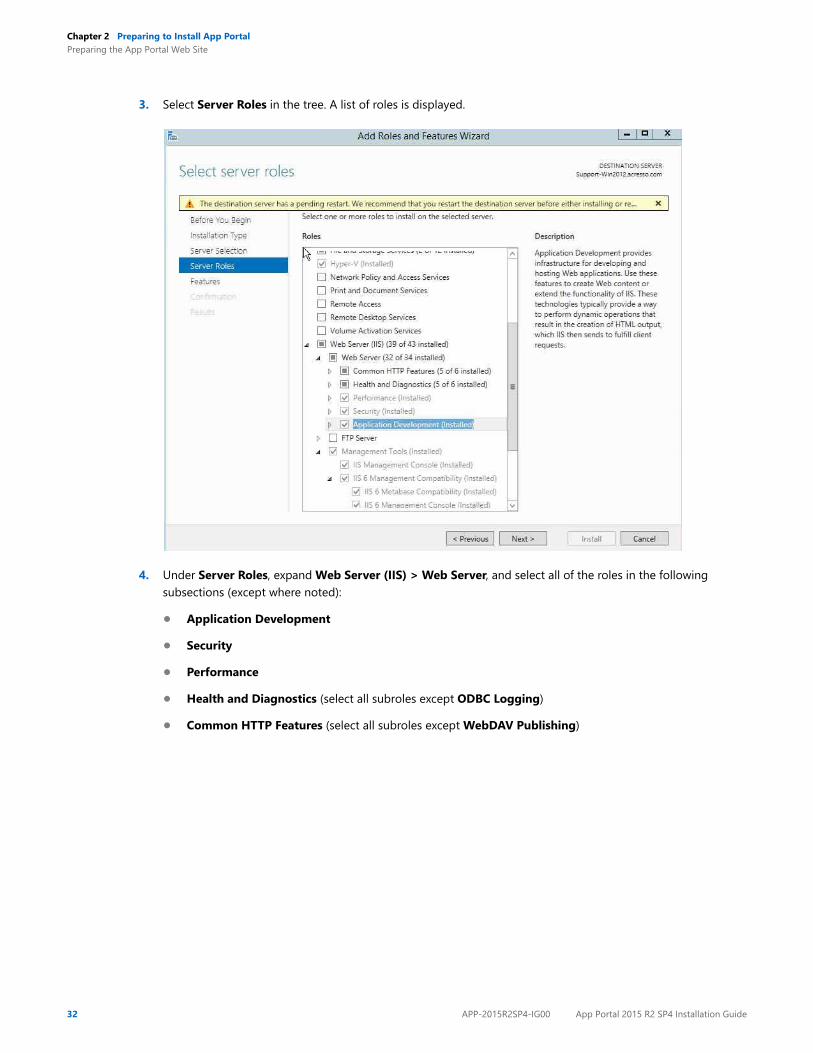
3. Select Server Roles in the tree. A list of roles is displayed.
4. Under Server Roles, expand Web Server (IIS) > Web Server, and select all of the roles in the following subsections (except where noted):
• Application Development
• Security
• Performance
• Health and Diagnostics (select all subroles except ODBC Logging)
• Common HTTP Features (select all subroles except WebDAV Publishing)
32 APP-2015R2SP4-IG00 App Portal 2015 R2 SP4 Installation Guide

Chapter 2 Preparing to Install App PortalPreparing the App Portal Web Site
5. Select Features in the tree. A list of features is displayed.
6. Under Features, select the following features:
• .NET Framework 3.5 Features
• .NET Framework 3.5 (includes .NET 2.0 and 3.0)
• HTTP Activation
• .NET Framework 4.5 Features
• .NET Framework 4.5
• ASP.NET 4.5
• WCF Services (select all subfeatures except Message Queuing (MSMQ Activation)
• Background Intelligent Transfer Service
• IIS Server Extension
• Compact Server
• SMB 1.0/CIFS File Sharing Support
• Windows Process Activation Service
• Remote Server Administration Tools > Feature Administration Tools > BITS Server Extensions Tools
• WoW64 Support
App Portal 2015 R2 SP4 Installation Guide APP-2015R2SP4-IG00 33

Chapter 2 Preparing to Install App PortalPreparing the App Portal Web Site
34 APP-2015R2SP4-IG00 App Portal 2015 R2 SP4 Installation Guide
3
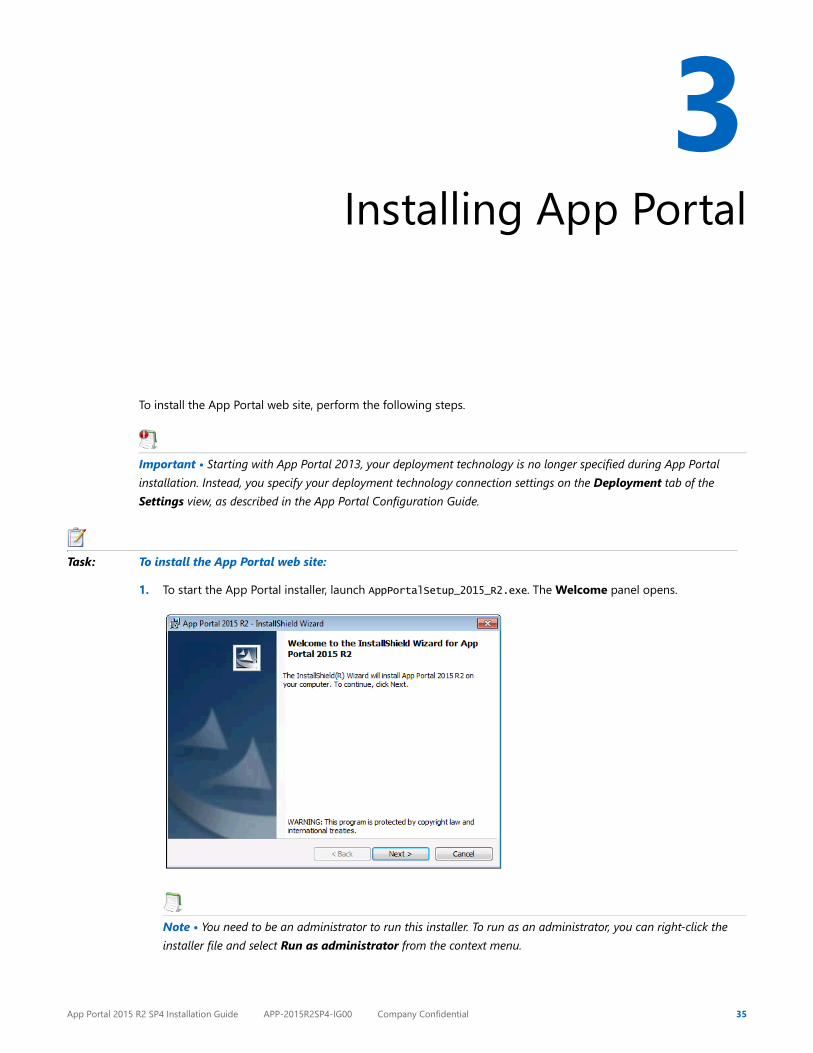
Installing App PortalTo install the App Portal web site, perform the following steps.
Important • Starting with App Portal 2013, your deployment technology is no longer specified during App Portal installation. Instead, you specify your deployment technology connection settings on the Deployment tab of the Settings view, as described in the App Portal Configuration Guide.
Task: To install the App Portal web site:
1. To start the App Portal installer, launch AppPortalSetup_2015_R2.exe. The Welcome panel opens.
Note • You need to be an administrator to run this installer. To run as an administrator, you can right-click the installer file and select Run as administrator from the context menu.
App Portal 2015 R2 SP4 Installation Guide APP-2015R2SP4-IG00 Company Confidential 35

Chapter 3 Installing App Portal
2. Click Next. The License Agreement panel opens.
3. Read and accept the license agreement and click Next to continue. The Destination Folder panel opens.
36 Company Confidential APP-2015R2SP4-IG00 App Portal 2015 R2 SP4 Installation Guide

Chapter 3 Installing App Portal
4. Click Next. The Specify Site Alias panel opens.
5. Do one of the following:
• If you have already created a DNS alias for the identity of the site, enter it in this field.
Note • If you enter an alias, it needs to already be created on your DNS servers. The App Portal Web Site installer will not create it for you.
Note • If you specify an alias, a DNS A-RECORD for that alias must be created in order to access the App Portal site. It is important that the alias be an DNS A-RECORD, and not a CNAME record.
• If you do not want to use an alias, you can accept the default value, which is the server machine name.
Note • If you specify the server machine name, you do not need to create a DNS A-RECORD because one already exists for the server.
Tip • After installation, you can edit the DNS Alias value on the General tab of the Site Management > Settings > Web Site view.
App Portal 2015 R2 SP4 Installation Guide APP-2015R2SP4-IG00 Company Confidential 37
Chapter 3 Installing App Portal
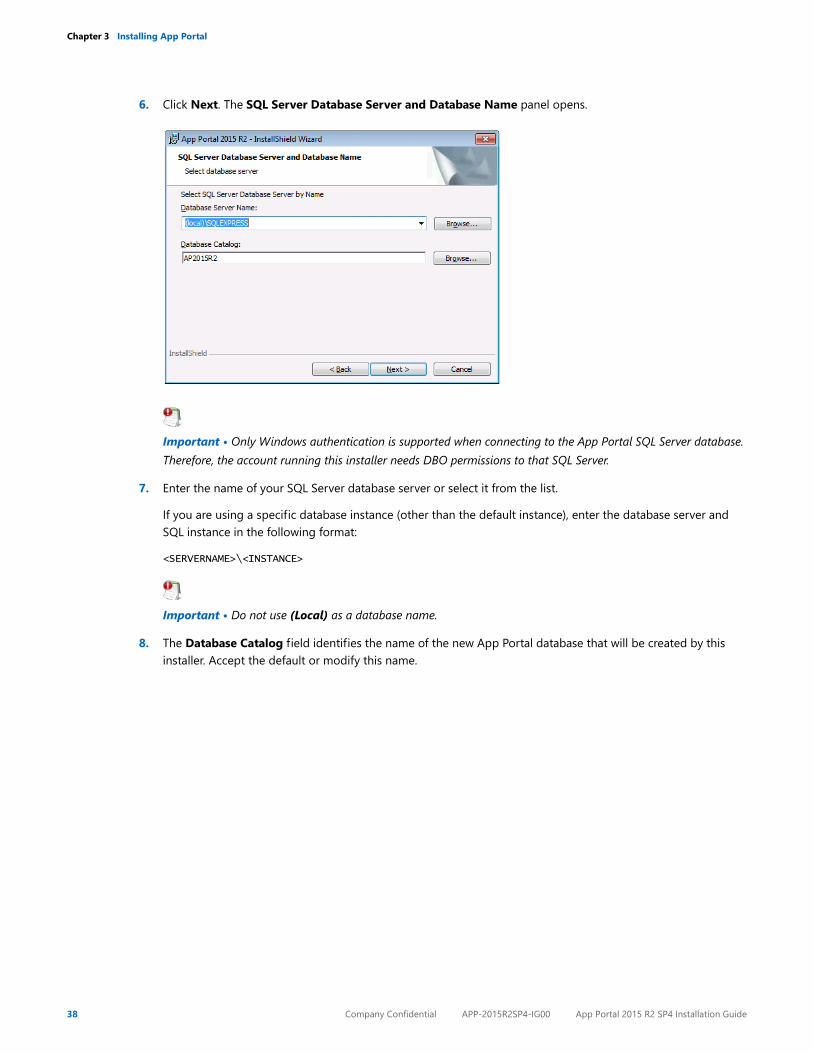
6. Click Next. The SQL Server Database Server and Database Name panel opens.
Important • Only Windows authentication is supported when connecting to the App Portal SQL Server database. Therefore, the account running this installer needs DBO permissions to that SQL Server.
7. Enter the name of your SQL Server database server or select it from the list.
If you are using a specific database instance (other than the default instance), enter the database server and SQL instance in the following format:
<SERVERNAME>\<INSTANCE>
Important • Do not use (Local) as a database name.
8. The Database Catalog field identifies the name of the new App Portal database that will be created by this installer. Accept the default or modify this name.
38 Company Confidential APP-2015R2SP4-IG00 App Portal 2015 R2 SP4 Installation Guide

Chapter 3 Installing App Portal
9. Click Next to continue. The Logon Information panel opens.
10. A user account is required to interact with Active Directory and SQL. This same account will be used for the App Portal service. The account requires administrative rights on clients to make use of the remote policy execution and to rerun advertisements. Enter user account information in Domain\Username format, along with a password.
Note • Enter the credentials that App Portal will use to communicate with System Center Configuration Manager and/or Altiris Client Management Suite, SQL Server, Active Directory, and clients. This must be the same account, so it is recommended that you use a devoted service account. This account must also have administrator rights on all client machines.
11. Click Next to continue. The Active Directory and Mail Information panel opens.
12. Confirm or populate the Global Catalog Server field.
App Portal 2015 R2 SP4 Installation Guide APP-2015R2SP4-IG00 Company Confidential 39

Chapter 3 Installing App Portal
13. Enter the name of the SMTP Server that will be used for relaying email.
Note • You may need to configure the SMTP server internally to accept relay from this server’s IP address.
Note • You can also enter the mail settings after installation on the Site Management > Settings > Email subtab of the Admin tab.
14. Enter the Email Prefix (from field) and Email Suffix (domain name).
15. Click Next to continue. If an existing App Portal database is found, the App Portal Database panel opens.
16. Select one of the following options:
• Upgrade the database—Select this option to upgrade the existing database to App Portal 2015 R2 SP4. Selecting this option means that existing records in the database will remain.
• Delete and recreate the database—Select this option to delete the existing database and create a new one. All records in the original database will be lost.
40 Company Confidential APP-2015R2SP4-IG00 App Portal 2015 R2 SP4 Installation Guide

Chapter 3 Installing App Portal
17. Click Next. The Computer Discovery Method and Sample Data Population panel opens.
18. Select one of the following options to specify the method to use for discover the active machine visiting the App Portal site:
• Use Active X Control—Will install a signed Active X control that will transfer the computer name from the client to the server. Active X will give the most consistent result. A separate installer, Active X control for Internet Explorer.msi, is included for large scale distribution of the control. Administrative permissions are required for its installation.
Note • You can use SCCM to deploy the Active X control, or just add your App Portal site to the Trusted Zone in Internet Explorer.
• Reverse DNS—Uses the reverse DNS zones in Active Directory (if present) to look up the computer name by IP address.
Note • If you select Reverse DNS, every computer in your DNS will be discovered, not just those in SCCM. It only searches the Active Directory DNS, so if you have other DNS providers, it will not work.
19. If you want to populate the installation with sample catalog data, select the Populate Sample App Portal Data option.
App Portal 2015 R2 SP4 Installation Guide APP-2015R2SP4-IG00 Company Confidential 41
Chapter 3 Installing App Portal
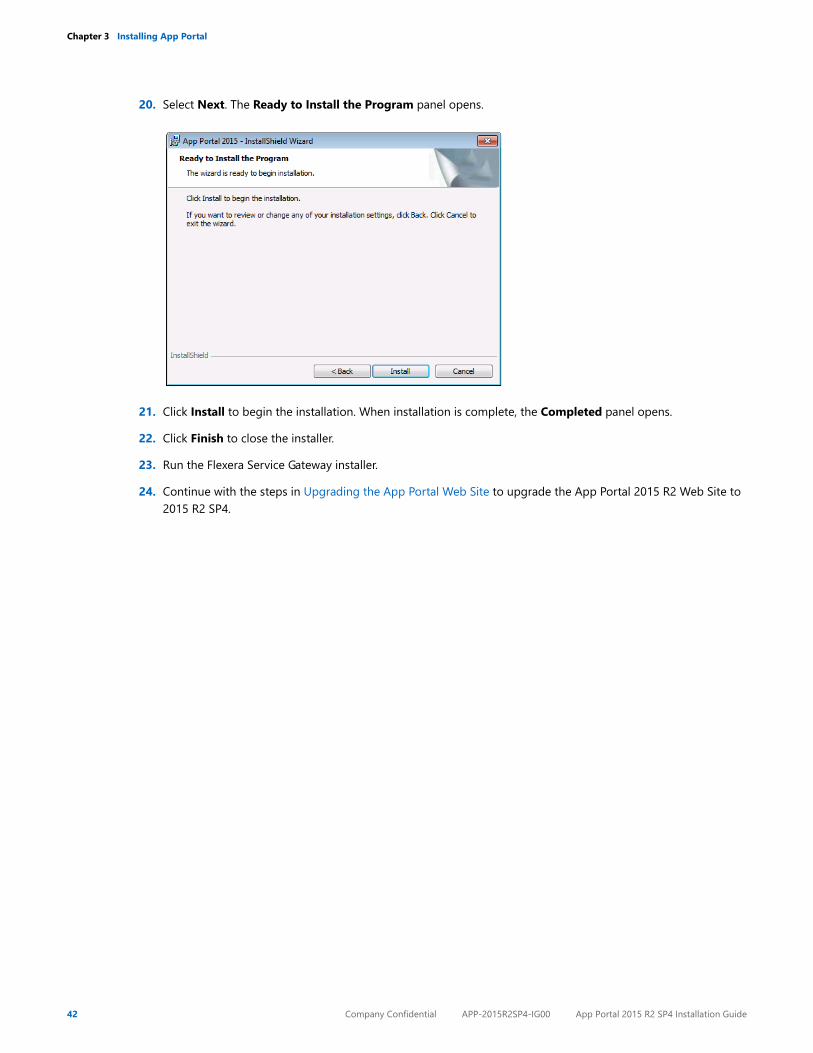
20. Select Next. The Ready to Install the Program panel opens.
21. Click Install to begin the installation. When installation is complete, the Completed panel opens.
22. Click Finish to close the installer.
23. Run the Flexera Service Gateway installer.
24. Continue with the steps in Upgrading the App Portal Web Site to upgrade the App Portal 2015 R2 Web Site to 2015 R2 SP4.
42 Company Confidential APP-2015R2SP4-IG00 App Portal 2015 R2 SP4 Installation Guide

4
Installing the App PortalWeb Service
Note • You are required to install the App Portal Web Service when using Microsoft System Center Configuration Manager deployment technology. It is not required when using Altiris deployment technology.
Important • You must first install the App Portal Web Site, as described in Installing App Portal, before installing the App Portal Web Service on any server.
The location(s) where you install the App Portal Web Service depends upon the version of System Center Configuration Manager you are using:
• System Center 2012 Configuration Manager or System Center Configuration Manager (Current Branch)—When using single primary/CAS with System Center 2012 Configuration Manager or System Center Configuration Manager (Current Branch), you need to install the App Portal Web Service only on the single primary/CAS.
• System Center 2007 Configuration Manager—When using System Center 2007 Configuration Manager, you must install the App Portal Web Service on the central site and at all the primary site(s).
To install the App Portal Web Service, perform the following steps:
Task: To install App Portal Web Service:
1. Verify that the Microsoft .NET 4.6.1 or later framework is installed on the CAS or primary site server. If it is not installed, use Control Panel > Programs and Features > Turn Windows features on or off to install it.
2. To start the App Portal Web Service installer, open the App Portal Web Service installer file, AppPortalWebServiceSetup_2015_R2_ServicePack_4.exe.
Note • You need to be an administrator to run this installer. To run as an administrator, you can right-click the App Portal Web Service installer file and select Run as administrator from the context menu.
App Portal 2015 R2 SP4 Installation Guide APP-2015R2SP4-IG00 Company Confidential 43

Chapter 4 Installing the App Portal Web Service
3. On the User Account Control dialog box, click Yes. The Welcome panel opens.
4. Click Next. The License Agreement panel opens.
44 Company Confidential APP-2015R2SP4-IG00 App Portal 2015 R2 SP4 Installation Guide

Chapter 4 Installing the App Portal Web Service
5. Read and accept the license agreement and click Next to continue. The Destination Folder panel opens.
6. If you want to install App Portal Web Service in the specified directory, click Next. If you want to select a different directory, click Change, select a new directory, and then click Next. The Primary Site Server Setup panel opens.
The fields on this panel are populated with information that the installer obtained from the Microsoft System Center Configuration Manager installation on this machine.
App Portal 2015 R2 SP4 Installation Guide APP-2015R2SP4-IG00 Company Confidential 45

Chapter 4 Installing the App Portal Web Service
7. Click Next. The Ready to Install the Program panel opens.
8. Click Install to begin the installation. When installation is complete, the Completed panel opens.
9. Click Finish to close the installer.
10. Upon completion of the installer, a new collection should have been created in Microsoft System Center Configuration Manager named App Portal Collection for (SiteCode). Open the Configuration Manager Console and verify that this collection exists.
Note • The account used to install App Portal Web Service has been granted full administrative access to the site. See the App Portal Configuration Guide for information on configuring site security.
46 Company Confidential APP-2015R2SP4-IG00 App Portal 2015 R2 SP4 Installation Guide

Chapter 4 Installing the App Portal Web Service
11. Navigate your browser to http://<sitealias>/esd/. The App Portal web site opens.
Note • You may be prompted to install an Active X control. Click Install.
12. When you first access App Portal you will be prompted to upload your license file provided. Follow the instructions on screen to upload the file.
13. Repeat this procedure for each Primary Site.
App Portal 2015 R2 SP4 Installation Guide APP-2015R2SP4-IG00 Company Confidential 47

Chapter 4 Installing the App Portal Web Service
48 Company Confidential APP-2015R2SP4-IG00 App Portal 2015 R2 SP4 Installation Guide

5
Upgrading the App PortalWeb Site
To upgrade an existing installation of App Portal to App Portal 2015 R2 SP4, first review the Upgrading: Read This First! section and then perform the upgrade.
• Upgrading: Read This First!
• Performing the Upgrade
• Troubleshooting Database Upgrade Failed Error During Upgrade
• Moving App Portal from One Server to Another
Important • If you are upgrading from a previous release of App Portal and you are using Symantec Altiris as your deployment technology, you cannot use the App Portal Upgrader to perform an upgrade. Instead, you need to perform a complete installation and point to your existing Altiris database.
Upgrading: Read This First!When upgrading an existing version of App Portal to App Portal 2015 R2 SP4, it is very important that you review the following information before you begin the upgrade.
• Planning Your Upgrade
• Changes to Version Support and Upgrade Method
• Changes to User/Computer Syncing
• Changes Related to Custom User Discoverable Attributes
• Changes Related to Multiple Deployment Technology Support
App Portal 2015 R2 SP4 Installation Guide APP-2015R2SP4-IG00 Company Confidential 49

Chapter 5 Upgrading the App Portal Web SiteUpgrading: Read This First!
Planning Your UpgradeWhen performing your upgrade to App Portal 2015 R2 SP4, it is recommended that you include the following steps in your upgrade process:
• Step 1: Review the Release Notes—Thoroughly review the App Portal 2015 R2 Release Notes and the App Portal 2015 R2 SP4 Release Notes.
• Step 2: Upgrade and test in a lab environment—Before rolling out the App Portal upgrade in production, first upgrade App Portal in a lab environment using a clone or subset of your production data and test it thoroughly to make sure it still operates as per your requirements.
• Step 3: Production rollout—When you are ready to roll out the App Portal upgrade to your production environment, it is recommended that you include the following steps:
a. Backup your existing App Portal database.
b. Take a snapshot of the App Portal server, if possible.
c. Provide downtime notice to your end users.
d. Schedule your service window to allow for adequate testing post-production upgrade.
e. Test your recovery model.
Changes to Version Support and Upgrade Method
The method of upgrading to App Portal 2015 R2 SP4 and the supported versions have changed.
• Supported upgrade versions—You can only upgrade to App Portal 2015 R2 SP4 from the following previous versions:
• App Portal 2015 R2
• App Portal 2015
• App Portal 2014
• App Portal 2013 R2
• App Portal 2013
• App Portal 7.5.x
Important • To upgrade from one of these supported versions to App Portal 2015 R2 SP4, use the App Portal 2015 R2 SP4 Upgrader, which can be downloaded from the Flexera Software Product and License Center.
50 Company Confidential APP-2015R2SP4-IG00 App Portal 2015 R2 SP4 Installation Guide

Chapter 5 Upgrading the App Portal Web SiteUpgrading: Read This First!
• Automatic rollback of the database using an older version of the Upgrader is no longer supported—Previously, if something went wrong with an upgrade, you could roll it back by running the Upgrader of the older version over the newer version. This functionality is no longer supported. If, after upgrading to App Portal 2015 R2 SP4 you want to roll back App Portal to the previous version, you will now need to manually restore the old database first, and then uninstall and then reinstall App Portal and point to the restored database. Therefore, you must back up your database before you start the upgrade.
Important • It is imperative that you back up your database before you start the upgrade.
Changes to User/Computer Syncing
Note • This section only applies if upgrading from App Portal 7.5.x.
In App Portal 7.5.x, all user and computer data was stored in System Center Configuration Manager only. App Portal 2015 R2 SP4 now maintains its own replica of user and device information.
The following changes have been made to the way users and computers are synced with the deployment technology:
• All App Portal deployment settings are migrated and synced—The App Portal 2015 R2 SP4 upgrade process will migrate all settings, and also run the sync process to sync the users, computers, and user-computer relationships.
• Syncing time depends on number of users—The amount of time that the sync process will take depends upon the number of users, computers, and user-computer relationships. For example, for 50,000 users, it takes about 25 minutes.
• Syncing of newly discovered computers may impact request on behalf functionality—In App Portal 2015 R2 SP4, the syncing of users and computers happens automatically at 2 a.m. Any machines that are discovered in System Center Configuration Manager after 2 a.m. will only be synced if the user logs on to the machine and accesses App Portal. This may impacts the request on behalf feature if you are trying to submit a request for a new machine that was discovered by System Center Configuration Manager after the sync, but before the user has logged on to the machine and accesses App Portal.
App Portal 2015 R2 SP4 Installation Guide APP-2015R2SP4-IG00 Company Confidential 51

Chapter 5 Upgrading the App Portal Web SiteUpgrading: Read This First!
Changes Related to Custom User Discoverable Attributes
Note • This section only applies if upgrading from App Portal 7.5.x.
If you are using any custom user discoverable attributes in the App Portal instance that is being upgraded, then, after the upgrade, you will need to provide a custom sync SQL query to sync up the custom attributes.
Task: To sync custom user discoverable attributes:
1. Run the App Portal 2015 R2 SP4 Upgrader.
2. After the upgrade is successfully completed, open the Admin > Settings > Deployment > Common tab, enter an SQL query in the Custom User ID Sync SQL Query and Custom User Sync SQL Query boxes, and then click Sync Data Now to sync the data.
Note • Before performing the sync, you can test the queries you entered by clicking the Test User Sync Settings button.
3. After the sync, open the Admin > Settings > Active Directory > Property Mapping tab and view the custom user discoverable attributes.
4. Because, after the sync, there might potentially be duplicate attributes, perform the following additional steps:
a. For each custom user discoverable attribute that has been added and is a duplicate, locate its entry in the WD_ADProperty table in the App Portal database.
b. For each duplicated custom property, delete the row that has NULL values in the AppPortalColumnName and AppPortalTableName columns in this WD_ADProperty table.
52 Company Confidential APP-2015R2SP4-IG00 App Portal 2015 R2 SP4 Installation Guide

Chapter 5 Upgrading the App Portal Web SiteUpgrading: Read This First!
Changes Related to Multiple Deployment Technology Support
Note • This section only applies if upgrading from App Portal 7.5.x.
Because App Portal 2015 R2 SP4 supports multiple deployment technologies (System Center 2007 Configuration Manager, System Center 2012 Configuration Manager, and Altiris) in a single instance of App Portal, several changes to functionality have occurred.
• Inventory management is only supported for a single System Center Configuration Manager deployment technology—Inventory management is only supported for System Center 2007 Configuration Manager or System Center 2012 Configuration Manager, but not both, even if both are configured. You specify your deployment technology source for Inventory on the Deployment > Common tab of the Settings view.
• Evaluating collection membership is only supported for a single deployment technology—Evaluating collection membership for conditions across the product is supported for only one deployment technology: System Center 2007 Configuration Manager, System Center 2012 Configuration Manager, or Altiris. You specify your source for Evaluating collection membership on the Deployment > Common tab of the Settings view.
• Auto-discovery of System Center Configuration Manager clients is no longer supported—Since App Portal is now supporting multiple client technologies, and because App Portal syncs the users, computers, and user-computer relationships, App Portal 2015 R2 SP4 will no longer support auto-discovering clients and creating client DDR in System Center Configuration Manager.
• App Portal no longer references System Center Configuration Manager resource IDs—App Portal no longer references System Center Configuration Manager resource IDs. Instead, App Portal 2015 R2 SP4 references user and computer names in its schema. Any custom reports accessing the System Center Configuration Manager user and computer IDs must be updated to use the Name column, not the resource ID.
• displayName attribute—The user discoverable attribute displayName is now required to be extended in System Center Configuration Manager. This needs to be done before the running the upgrade, or else the user and computer sync process will fail.
App Portal 2015 R2 SP4 Installation Guide APP-2015R2SP4-IG00 Company Confidential 53

Chapter 5 Upgrading the App Portal Web SitePerforming the Upgrade
Performing the UpgradeTo upgrade a previously installed version of App Portal to App Portal 2015 R2 SP4, perform the following tasks:
• Running the App Portal Upgrader
• Retaining Previous CSS Customizations After Upgrade
Running the App Portal UpgraderTo upgrade an existing installation of App Portal using the App Portal Upgrader, perform the following steps:
Note • Before running the App Portal Upgrader, make sure that you first uninstall any previously installed App Portal hot fixes.
Important • The administrator account that will be using the App Portal Upgrader to upgrade App Portal and the App Portal database requires at least “Application Administrator” permissions within System Center Configuration Manager. If the account does not have these permissions, an “Access is denied” error is encountered when attempting to upgrade App Portal.
Task: To upgrade App Portal:
1. Download the latest App Portal 2015 R2 SP4 Upgrader from the Flexera Software Product and License Center and make it accessible to the machine where App Portal is installed.
2. Right click the App Portal 2015 R2 SP4 Upgrader installer file and select Run as administrator from the context menu. The User Account Control dialog box opens prompting you to confirm that you want to allow the program to make changes to this computer.
3. Click Yes. A message box opens warning you that the App Portal 2015 R2 Service Pack 4 is a full upgrade that cannot be automatically rolled back.
4. If you want to continue, click Yes.
54 Company Confidential APP-2015R2SP4-IG00 App Portal 2015 R2 SP4 Installation Guide

Chapter 5 Upgrading the App Portal Web SitePerforming the Upgrade
5. The App Portal Upgrader dialog box opens, which enables you to further configure the actions for the upgrader.
Important • If you have modified any CSS files to customize the colors used in the App Portal interface, those customizations will be lost upon upgrade. However, starting with App Portal 2015 R2, you now can easily alter the colors used in your site using the Corporate Branding tab of the Site Management > Settings > Web Site view. For more information, see Retaining Previous CSS Customizations After Upgrade.
6. On the Upgrade Options tab, select the components of App Portal that you wish to upgrade:
• Upgrade Website
• Upgrade Database
• Upgrade Web Services on Primary Sites
• Backup App Portal Database
App Portal 2015 R2 SP4 Installation Guide APP-2015R2SP4-IG00 Company Confidential 55

Chapter 5 Upgrading the App Portal Web SitePerforming the Upgrade
7. On the Language Options tab, specify whether to delete all existing language data, and whether to add/update existing language data:
8. Click Start Upgrade to initiate the process. You will see the following progress bar and installation messages scroll by.
Important • When you click Start Upgrade, If there is an entry in any of the following files, a message box will open letting you know that these custom styles will become obsolete and prompting you to confirm the upgrade:
• Custom.css
• Custom.Flexera.css
• wdcssCustom.css
9. You may see a warning that the installer was not able to update the App Portal Web Service web files. If this warning appears, perform the following steps:
a. Click the OK button on this message. A Windows Explorer window will open to the Temp path indicated in the message revealing the update web files.
b. Copy these files and paste them in the following the folder, replacing the files that are there:
C:\Program Files (x86)\AppPortalWebService
56 Company Confidential APP-2015R2SP4-IG00 App Portal 2015 R2 SP4 Installation Guide

Chapter 5 Upgrading the App Portal Web SitePerforming the Upgrade
c. If the Confirm Folder Replace dialog box opens, select the Do this for all current items option and click Yes.
d. If the Copy File dialog box opens stating that there is already a file with the same name in this location, select the Do this for the next # conflicts option, then click the Copy and Replace option.
10. Click Close on the App Portal Upgrader dialog box to complete the upgrade.
11. Launch App Portal and specify your deployment technology settings for System Center Configuration Manager and/or Altiris Client Management Suite, as described in the Configuring Your Deployment Technology section of the App Portal 2015 R2 SP4 Configuration Guide.
Retaining Previous CSS Customizations After Upgrade
If, in a previous release of App Portal, you have modified any of your App Portal web site’s CSS files to customize the colors, fonts, or layout of the App Portal interface, those customizations will be lost upon upgrade, and you will need to take some action to retain those customizations in the upgraded site.
When you are using the App Portal Upgrader, an alert will be displayed if you have customized the CSS styles in any of the following files:
The following alert is displayed:
After upgrade, older custom themes/css files will become obsolete. Do you want to continue?
If you encounter this alert, click Yes to continue the upgrade, and then perform one of the following tasks to retain your user interface customizations in the upgraded site:
• Customize Using the App Portal Interface
• Customize by Editing LESS Files
Customize Using the App Portal InterfaceTo customize the background, hover, icon, heading, and hyperlink colors used throughout the site (including the navigation bar), then open the Corporate Branding tab of the Site Management > Settings > Web Site view and specify your desired colors, as described in Customizing the App Portal User Interface Colors at:
http://helpnet.flexerasoftware.com/appportal2015R2sp4/default.htm#helplibrary/AP_Colors.htm
Table 5-1 • Custom CSS Files in Previous Releases of App Portal
CSS File Location in the App Portal 2015 Installation Directory
Custom.css AppPortal\AP\Content
wdcssCustom.css AppPortal\Web
Custom.Flexera.css AppPortal\Web\App_Themes\Flexera
App Portal 2015 R2 SP4 Installation Guide APP-2015R2SP4-IG00 Company Confidential 57

Chapter 5 Upgrading the App Portal Web SiteTroubleshooting Database Upgrade Failed Error During Upgrade
Customize by Editing LESS FilesIf you want to make modifications other than those listed above, you need to edit the CSS classes in the custom LESS files listed in the following table.
When editing these files, you can you can use the styles in your previously customized corresponding *.css file (listed in Custom CSS Files in Previous Releases of App Portal) for reference.
Troubleshooting Database Upgrade Failed Error During Upgrade
ProblemIn some instances during the upgrade process, the upgrade may fail and display the following message:
Executing Database upgrade script for database AppPortal on FLEXCM
Error detected during database upgrade. Please look at C:\ESD_Error_Log.txt for more information.
Database Upgrade failed. Check C:\ESD_Error_Log.txt for more info and contact Flexera Software for
assistance.
Done!
A review of the ESD_Error_Log.txt file will reveal more detail about the cause of the error:
Failed to backup the database AppPortal.
Cannot open backup device 'C:\ESD_Upgrade_Backup'. Operating system error 5 (Access is denied).
BACKUP DATABASE is terminating abnormally.
CauseThe App Portal Upgrade performs four functions during installation:
1. Upgrade Website
2. Upgrade Database
3. Upgrade Web Services on Primary Sites
4. Backup Self Service Database
Even though the backup is last on the list of options, it is performed first.
Table 5-2 • Custom LESS Files
LESS File Installed Location
custom.less
wdcssCustom.less
\App Portal\Web\Content
Custom.Flexera.less \App Portal\Web\App_Themes\Flexera
58 Company Confidential APP-2015R2SP4-IG00 App Portal 2015 R2 SP4 Installation Guide

Chapter 5 Upgrading the App Portal Web SiteMoving App Portal from One Server to Another
The upgrade failure in this case is caused by insufficient permissions of the SQL service account. In order to write a file to the root of the C:\ drive, an account must be a member of the local administrators group.
SolutionTemporarily add the SQL service account to the local administrators group on the SQL server hosting the App Portal database. This will allow the SQL service account to successfully write a backup copy of the existing App Portal database to the root of the C:\ drive. Once the upgrade has completed, you can remove the SQL service account from the local administrators group.
Moving App Portal from One Server to Another
You may need to move App Portal from one server to another, such as when you upgrade your server operating system from Windows Server 2008 R2 to Windows Server 2012. Because you have an existing database, this activity might require more steps than just uninstalling App Portal from the old server, installing it on the new server, and then pointing to your existing App Portal database. If you are also upgrading to a newer App Portal version at the same time, more complexity is added. In these scenarios, the following steps are recommended.
Task: To move App Portal from one server to another:
1. Backup the App Portal web server and database.
2. Provision the Windows Server 2012 system.
3. Disable the ESDService on the App Portal web server.
4. Install the same version of App Portal on the Windows Server 2012 system and attach it to the existing App Portal database.
5. Verify the App Portal environment.
6. Change DNS alias, as needed.
7. Decommission the Windows Server 2008 App Portal web server.
8. Once stability is verified, upgrade App Portal to the latest supportable version per the standard upgrade instructions.
App Portal 2015 R2 SP4 Installation Guide APP-2015R2SP4-IG00 Company Confidential 59
Chapter 5 Upgrading the App Portal Web SiteMoving App Portal from One Server to Another
60 Company Confidential APP-2015R2SP4-IG00 App Portal 2015 R2 SP4 Installation Guide

Index
AActive Directory 11Active Directory User Discovery 12App Portal
features and benefits 7files included in installation 10setting permissions 15system requirements 11upgrading App Portal Central site 49
App Portal service account 15
CComputer Discovery Method 41
Iinstallation files 10installing
App Portal Central Site 35Internet Information Server (IIS) 11
Ppermissions 15
RReverse DNS 41
SSite Alias 31
Specify Site Alias 37system requirements 11
App Portal server 15App Portal Web Service 14client 13environment 11server 14
Uupgrading 49Use Active X Control 41
App Portal 2015 R2 SP4 Installation Guide APP-2015R2SP4-IG00 61

Index
62 APP-2015R2SP4-IG00 App Portal 2015 R2 SP4 Installation Guide