application dependency discovery manager: administering€¦ · integrating t addm with jazz for...
TRANSCRIPT
Tivoli Application Dependency Discovery ManagerVersion 7.3
Administrator's Guide
IBM

Tivoli Application Dependency Discovery ManagerVersion 7.3
Administrator's Guide
IBM

NoteBefore using this information and the product it supports, read the information in “Notices” on page 239.
Edition notice
This edition applies to version 7, release 3 of IBM Tivoli Application Dependency Discovery Manager (productnumber 5724-N55) and to all subsequent releases and modifications until otherwise indicated in new editions.
© Copyright IBM Corporation 2006, 2018.US Government Users Restricted Rights – Use, duplication or disclosure restricted by GSA ADP Schedule Contractwith IBM Corp.
Contents
Tables . . . . . . . . . . . . . . . v
About this information . . . . . . . . viiConventions used in this information center . . . viiTerms and definitions . . . . . . . . . . . vii
Administering . . . . . . . . . . . . 1TADDM overview . . . . . . . . . . . . 1
Discovery process overview . . . . . . . . 3Topology building process overview . . . . . 14Log files and logging . . . . . . . . . . 15
Securing the environment . . . . . . . . . 15Controlling user access to configuration items . . 15Lockouts . . . . . . . . . . . . . . 19Encryption . . . . . . . . . . . . . 20FIPS compliance . . . . . . . . . . . . 21SP800-131 compliance . . . . . . . . . . 22Security for a synchronization server deployment 22Security for a streaming server deployment. . . 23Configuring for LDAP. . . . . . . . . . 24Configuring for WebSphere federated repositories 25Configuring for Microsoft Active Directory . . . 30Securing TADDM web services . . . . . . . 31Installing customized SSL certificates for use inTADDM . . . . . . . . . . . . . . 32
Managing the TADDM servers . . . . . . . . 33Checking TADDM server status . . . . . . 33Starting the TADDM server . . . . . . . . 35Stopping the TADDM server . . . . . . . 36Backing up data . . . . . . . . . . . . 37Restoring data . . . . . . . . . . . . 37Copying discovery scopes, profiles, and customserver templates between TADDM servers . . . 38Deploying the Discovery Management Console 38Configuring TADDM communication. . . . . 39TADDM server properties reference . . . . . 56Verifying data integrity . . . . . . . . . 93Managing credential cache - cachemgr utility . . 96
Preparing for discovery . . . . . . . . . . 98Configuring user logon ID . . . . . . . . 98Configuring for alternative methods of discovery 98Configuring the level of discovery . . . . . 106Configuring for discovery of Windows systems 115Configuring for discovery of placeholders . . . 122
Creating Level 3 application servers with nocredentials . . . . . . . . . . . . . 123Configuring location tagging . . . . . . . 124
Maintenance and tuning. . . . . . . . . . 127Bulk load parameters tuning . . . . . . . 127Database maintenance . . . . . . . . . 128Discovery performance tuning. . . . . . . 138Java Virtual Machine: IBM parameters tuning 141Java Virtual Machine properties tuning . . . . 143Network tuning . . . . . . . . . . . 143DNS tuning . . . . . . . . . . . . . 144Synchronization server tuning . . . . . . . 144Windows system tuning . . . . . . . . . 145
Reporting . . . . . . . . . . . . . . 145External report viewers . . . . . . . . . 145JSP report viewers . . . . . . . . . . . 147Reporting with Tivoli Common Reporting . . . 149Reporting with BIRT . . . . . . . . . . 162
Integrating TADDM with other Tivoli products . . 182Supported versions . . . . . . . . . . 182Integrating TADDM with IBM Tivoli Monitoringvia OSLC Automation . . . . . . . . . 184Integrating TADDM with other products viaOSLC Automation. . . . . . . . . . . 194Integrating TADDM with IBM Tivoli Monitoring(old method) . . . . . . . . . . . . 197Registering configuration items for the ContextMenu Service and Data Integration Service . . 200Creating a Discovery Library store . . . . . 203Configuring for launch in context . . . . . 205Sending change events to external systems . . 208Scheduling jobs with IBM Tivoli WorkloadScheduler. . . . . . . . . . . . . . 221Integrating TADDM with IBM Tivoli BusinessService Manager . . . . . . . . . . . 222Integrating TADDM with Jazz for ServiceManagement . . . . . . . . . . . . 223Tivoli Directory Integrator . . . . . . . . 236Business entities compatibility with earlierversions . . . . . . . . . . . . . . 236
Notices . . . . . . . . . . . . . . 239Trademarks . . . . . . . . . . . . . . 240
© Copyright IBM Corp. 2006, 2018 iii

iv Application Dependency Discovery Manager: Administering
Tables
1. Discovered entities with descriptions . . . . 22. Services default interface settings . . . . . 403. Services default interface settings . . . . . 404. Ping Sensor and Port Sensor default ports 415. Default host settings for domain server public
connectivity services . . . . . . . . . 436. Default port settings for domain server public
connectivity services . . . . . . . . . 437. Default host settings for domain server local
connectivity services . . . . . . . . . 448. Communication between the database server
and the domain server.. . . . . . . . . 449. Communication between Discovery
Management Portal, API clients and Webportal and Data Management Portal clients,and the domain server.. . . . . . . . . 45
10. Communication between the anchor andgateway, and the domain server. . . . . . 45
11. Local connectivity communicationconfiguration for a domain server. . . . . . 45
12. Default host settings for primary storageserver, secondary storage server, and discoveryserver public connectivity services . . . . . 46
13. Default port settings for primary storageserver, secondary storage server, and discoveryserver public connectivity services . . . . . 47
14. Default host settings for primary storageserver and secondary storage serverinter-server connectivity services . . . . . 47
15. Default port settings for primary storageserver inter-server connectivity services . . . 47
16. Default port settings for secondary storageserver inter-server connectivity services . . . 47
17. Default host settings for primary storageserver, secondary storage server, and discoveryserver local connectivity services . . . . . 48
18. Inter-server connectivity communicationconfiguration in the streaming serverdeployment. . . . . . . . . . . . . 48
19. Communication between DiscoveryManagement Portal, API clients and Webportal and Data Management Portal clients,and the TADDM servers. . . . . . . . . 49
20. Communication between the anchor andgateway, and the discovery server. . . . . . 51
21. Local connectivity communicationconfiguration in the streaming serverdeployment. . . . . . . . . . . . . 51
22. Default host settings for domain server andsynchronization server public connectivityservices . . . . . . . . . . . . . . 52
23. Default host settings for domain server publicconnectivity services . . . . . . . . . 52
24. Default port settings for synchronization serverpublic connectivity services . . . . . . . 53
25. Default host settings for domain server andsynchronization server inter-serverconnectivity services . . . . . . . . . 53
26. Default port settings for domain serverinter-server connectivity services . . . . . 53
27. Default port settings for synchronization serverinter-server connectivity services . . . . . 53
28. Default host settings for the domain serverand synchronization server local connectivityservices . . . . . . . . . . . . . . 54
29. Inter-server connectivity communicationconfiguration in the synchronization serverdeployment. . . . . . . . . . . . . 54
30. Communication between DiscoveryManagement Portal, API clients and Webportal and Data Management Portal clients,and the domain and synchronization servers. . 55
31. Communication between the anchor andgateway, and the domain server. . . . . . 55
32. Local connectivity communicationconfiguration in the synchronization serverdeployment. . . . . . . . . . . . . 56
33. Sensor names used in themakeASDScriptPackage command. . . . . . 100
34. SSH keys . . . . . . . . . . . . . 10935. The hierarchyDomain and hierarchyType
attributes values. . . . . . . . . . . 12236. Buffer pool size guidelines (db_cache_size) 13737. Monitoring Coverage reports . . . . . . 16638. Predefined sensor reports . . . . . . . 16739. Predefined snapshot reports . . . . . . 17040. The supported products versions. . . . . . 18341. Integrating TADDM with IBM Tivoli
Monitoring via OSLC Automation . . . . 18442. Topics that contain more information about
discovery over OSLC. . . . . . . . . . 19543. User tasks with corresponding integration
capabilities to use . . . . . . . . . . 19844. Topics that contain more information about
discovery using IBM Tivoli Monitoring . . . 19845. Topics that contain more information about
change events . . . . . . . . . . . 20046. Topics that contain more information about
launch in context . . . . . . . . . . 20047. Valid graph values and their relationship to
the guid parameter. . . . . . . . . . 20748. Operator names of a TADDM MQL query. 21049. State codes . . . . . . . . . . . . 223
© Copyright IBM Corp. 2006, 2018 v

vi Application Dependency Discovery Manager: Administering
About this information
The purpose of this PDF document version is to provide the related topics fromthe information center in a printable format.
Conventions used in this information centerIn the IBM® Tivoli Application Dependency Discovery Manager (TADDM)documentation certain conventions are used. They are used to refer to theoperating system-dependent variables and paths, the COLLATION_HOME directory, andthe location of the collation.properties file, which is referenced throughout theTADDM documentation, including in the messages.
Operating system-dependent variables and paths
In this information center, the UNIX conventions are used for specifyingenvironment variables and for directory notation.
When using the Windows command line, replace $variable with %variable% forenvironment variables, and replace each forward slash (/) with a backslash (\) indirectory paths.
If you are using the bash shell on a Windows system, you can use the UNIXconventions.
COLLATION_HOME directory
TADDM root directory is also referred to as the COLLATION_HOME directory.
On operating systems such as AIX® or Linux, the default location for installingTADDM is the /opt/IBM/taddm directory. Therefore, in this case, the$COLLATION_HOME directory is /opt/IBM/taddm/dist.
On Windows operating systems, the default location for installing TADDM is thec:\IBM\taddm directory. Therefore, in this case, the %COLLATION_HOME% directory isc:\IBM\taddm\dist.
Location of collation.properties file
The collation.properties file contains TADDM server properties and includescomments about each of the properties. It is located in the $COLLATION_HOME/etcdirectory.
Terms and definitionsRefer to the following list of terms and definitions to learn about importantconcepts in the IBM Tivoli Application Dependency Discovery Manager (TADDM).
access collectionA collection that is used to control the access to configuration items andpermissions to modify configuration items. You can create accesscollections only when data-level security is enabled.
© Copyright IBM Corp. 2006, 2018 vii
asynchronous discoveryIn TADDM, the running of a discovery script on a target system todiscover systems that cannot be accessed directly by the TADDM server.Because this discovery is performed manually, and separately from atypical credentialed discovery, it is called “asynchronous”.
business applicationA collection of components that provides a business functionality that youcan use internally, externally, or with other business applications.
CI See configuration item.
collectionIn TADDM, a group of configuration items.
configuration item (CI)A component of IT infrastructure that is under the control of configurationmanagement and is therefore subject to formal change control. Each CI inthe TADDM database has a persistent object and change history associatedwith it. Examples of a CI are an operating system, an L2 interface, and adatabase buffer pool size.
credentialed discoveryTADDM sensor scanning that discovers detailed information about thefollowing items:v Each operating system in the runtime environment. This scanning is also
known as Level 2 discovery, and it requires operating system credentials.v The application infrastructure, deployed software components, physical
servers, network devices, virtual systems, and host data that are used inthe runtime environment. This scanning is also known as Level 3discovery, and it requires both operating system credentials andapplication credentials.
credential-less discoveryTADDM sensor scanning that discovers basic information about the activecomputer systems in the runtime environment. This scanning is alsoknown as Level 1 discovery, and it requires no credentials.
Data Management PortalThe TADDM web-based user interface for viewing and manipulating thedata in a TADDM database. This user interface is applicable to a domainserver deployment, to a synchronization server deployment, and to eachstorage server in a streaming server deployment. The user interface is verysimilar in all deployments, although in a synchronization serverdeployment, it has a few additional functions for adding andsynchronizing domains.
discover worker threadIn TADDM, a thread that runs sensors.
Discovery Management ConsoleThe TADDM client user interface for managing discoveries. This console isalso known as the Product Console. It is applicable to a domain serverdeployment and to discovery servers in a streaming server deployment.The function of the console is the same in both of these deployments.
discovery serverA TADDM server that runs sensors in a streaming server deployment butdoes not have its own database.
viii Application Dependency Discovery Manager: Administering
domainIn TADDM, a logical subset of the infrastructure of a company or otherorganization. Domains can delineate organizational, functional, orgeographical boundaries.
domain serverA TADDM server that runs sensors in a domain server deployment andhas its own database.
domain server deploymentA TADDM deployment with one domain server. A domain serverdeployment can be part of a synchronization server deployment.
In a domain server deployment, the following TADDM server propertymust be set to the following value:com.collation.cmdbmode=domain
launch in contextThe concept of moving seamlessly from one Tivoli® product UI to anotherTivoli product UI (either in a different console or in the same console orportal interface) with single sign-on and with the target UI in position atthe proper point for users to continue with their task.
Level 1 discoveryTADDM sensor scanning that discovers basic information about the activecomputer systems in the runtime environment. This scanning is alsoknown as credential-less discovery because it requires no credentials. Ituses the Stack Scan sensor and the IBM® Tivoli® Monitoring Scope sensor.Level 1 discovery is very shallow. It collects only the host name, operatingsystem name, IP address, fully qualified domain name, and Media AccessControl (MAC) address of each discovered interface. Also, the MACaddress discovery is limited to Linux on System z® and Windows systems.Level 1 discovery does not discover subnets. For any discovered IPinterfaces that do not belong to an existing subnet that is discoveredduring Level 2 or Level 3 discovery, new subnets are created based on thevalue of the com.collation.IpNetworkAssignmentAgent.defaultNetmaskproperty in the collation.properties file.
Level 2 discoveryTADDM sensor scanning that discovers detailed information about eachoperating system in the runtime environment. This scanning is also knownas credentialed discovery, and it requires operating system credentials.Level 2 discovery collects application names and the operating systemnames and port numbers that are associated with each running application.If an application has established a TCP/IP connection to anotherapplication, this information is collected as a dependency.
Level 3 discoveryTADDM sensor scanning that discovers detailed information about theapplication infrastructure, deployed software components, physical servers,network devices, virtual systems, and host data that are used in theruntime environment. This scanning is also known as credentialeddiscovery, and it requires both operating system credentials and applicationcredentials.
multitenancyIn TADDM, the use by a service provider or IT vendor of one TADDMinstallation to discover multiple customer environments. Also, the serviceprovider or IT vendor can see the data from all customer environments,but within each customer environment, only the data that is specific to the
About this information ix
respective customer can be displayed in the user interface or viewed inreports within that customer environment.
Product ConsoleSee Discovery Management Console.
script-based discoveryIn TADDM, the use, in a credentialed discovery, of the same sensor scriptsthat sensors provide in support of asynchronous discovery.
SE See server equivalent.
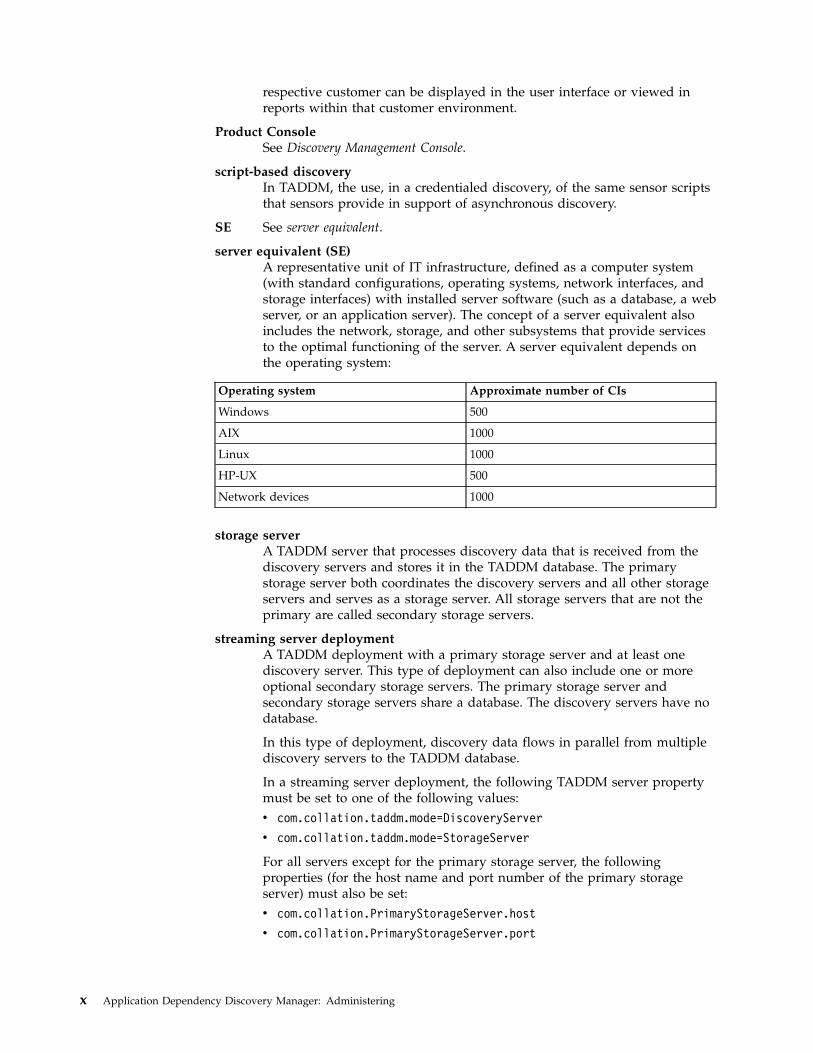
server equivalent (SE)A representative unit of IT infrastructure, defined as a computer system(with standard configurations, operating systems, network interfaces, andstorage interfaces) with installed server software (such as a database, a webserver, or an application server). The concept of a server equivalent alsoincludes the network, storage, and other subsystems that provide servicesto the optimal functioning of the server. A server equivalent depends onthe operating system:
Operating system Approximate number of CIs
Windows 500
AIX 1000
Linux 1000
HP-UX 500
Network devices 1000
storage serverA TADDM server that processes discovery data that is received from thediscovery servers and stores it in the TADDM database. The primarystorage server both coordinates the discovery servers and all other storageservers and serves as a storage server. All storage servers that are not theprimary are called secondary storage servers.
streaming server deploymentA TADDM deployment with a primary storage server and at least onediscovery server. This type of deployment can also include one or moreoptional secondary storage servers. The primary storage server andsecondary storage servers share a database. The discovery servers have nodatabase.
In this type of deployment, discovery data flows in parallel from multiplediscovery servers to the TADDM database.
In a streaming server deployment, the following TADDM server propertymust be set to one of the following values:v com.collation.taddm.mode=DiscoveryServer
v com.collation.taddm.mode=StorageServer
For all servers except for the primary storage server, the followingproperties (for the host name and port number of the primary storageserver) must also be set:v com.collation.PrimaryStorageServer.host
v com.collation.PrimaryStorageServer.port
x Application Dependency Discovery Manager: Administering
If the com.collation.taddm.mode property is set, thecom.collation.cmdbmode property must not be set or must be commentedout.
synchronization serverA TADDM server that synchronizes discovery data from all domain serversin the enterprise and has its own database. This server does not discoverdata directly.
synchronization server deploymentA TADDM deployment with a synchronization server and two or moredomain server deployments, each of which has its own local database.
In this type of deployment, the synchronization server copies discoverydata from multiple domain servers one domain at a time in a batchedsynchronization process.
In a synchronization server deployment, the following TADDM serverproperty must be set to the following value:com.collation.cmdbmode=enterprise
This type of deployment is obsolete. Therefore, in a new TADDMdeployment where more than one server is needed, use the streamingserver deployment. A synchronization server can be converted to become aprimary storage server for a streaming server deployment.
TADDM databaseIn TADDM, the database where configuration data, dependencies, andchange history are stored.
Each TADDM server, except for discovery servers and secondary storageservers, has its own database. Discovery servers have no database. Storageservers share the database of the primary storage server.
TADDM serverA generic term that can represent any of the following terms:v domain server in a domain server deploymentv synchronization server in a synchronization server deploymentv discovery server in a streaming server deploymentv storage server (including the primary storage server) in a streaming
server deployment
target systemIn the TADDM discovery process, the system to be discovered.
utilization discoveryTADDM sensor scanning that discovers utilization information for the hostsystem. A utilization discovery requires operating system credentials.
About this information xi

xii Application Dependency Discovery Manager: Administering
Administering
TADDM overviewIBM Tivoli Application Dependency Discovery Manager (TADDM) is aconfiguration management tool that helps IT operations personnel ensure andimprove application availability in application environments. TADDM provides thedetails of configuration items (CIs) using automated, agentless discovery of assetsand their application dependencies, and it includes a discovery library technologyto help leverage data from other sources.
TADDM provides operational staff with a top-down view of applications so thatthey can quickly understand the structure, status, configuration, and changehistory of their business-critical applications. When performance and availabilityproblems occur, this view helps the staff to immediately isolate issues and to moreeffectively plan for application change without disruption. The TADDM database, aconfiguration management database, is created and maintained without requiringcustom infrastructure modeling. TADDM also provides complete cross-tierdependency maps, topological views, change tracking, event propagation, anddetailed reports and analytics.
TADDM depends on the discovery of information, which is performed usingsensors that are deployed as part of the TADDM product. The data that resultsfrom the discovery process is used to create cross-tier dependency maps that linkthe physical and logical topologies. This hierarchical directory represents yourentire runtime environment.
The following steps are a high-level summary of what TADDM does:1. Sensors determine and collect the identity, attributes, and settings of each
application, system, and network component.2. The configuration data, dependencies, and change history are stored in the
TADDM database, and the topologies are stored on the TADDM server. WhenCIs are discovered, they are stored in the TADDM database from the followingsources:v Sensorsv Discovery library books, which are also known as Identity Markup Language
(IdML) books, that are generated by external management software systemsv APIs
3. The discovered data is displayed as runtime, cross-tier application topologiesin the TADDM user interface. Subsequent discoveries update the topology.Also, TADDM maintains the change history of the infrastructure configurationand dependencies.
4. TADDM generates reports and additional topological views of the informationthat is stored in the TADDM database.
Entities that TADDM discovers
Table 1 on page 2 lists and describes the entities that TADDM discovers in yourenvironment.
© Copyright IBM Corp. 2006, 2018 1

Table 1. Discovered entities with descriptions
Entity Description
Network tier The following devices are discovered with the MIB2 (RFC1213) parameter values for each device:
v Routers
v Switches
v Load balancers
v Firewalls
v Generic IP devices
System tier The following devices are discovered at the system tier:
v Server hosts and disks
v Host IP interfaces
v Database servers
v Load balancers or clusters
Application tier The following components are discovered at theapplication tier. Also, for each component (except for thegeneric processes), version information, configuration filesand properties, host information, and vendor-specificextensions are discovered.
v Custom servers, based on custom templates that youdesign
v Java EE application servers and configurations
v Java EE and Java SE components and modules
v Web server components
v Web modules, configuration files, and installationdirectories
v Generic JVM processes
v Databases
Infrastructure services The system infrastructure services that support theapplication environment are discovered, and thedependency structure between these service componentsand the application components are discovered. Thefollowing components are in the infrastructure service:
v DNS and NFS services
v LDAP
Relationship structure In addition to the discovery of components, the physicaland logical connectivity at the network, system, andapplication tiers are discovered at the following level ofsupport in each of the tiers:
v Layer 3 IP connectivity
v Layer 2 connectivity
v Application component runtime dependencies
v Infrastructure service dependencies
Configurations and interdependencies are discovered across the following entities:v Application components, such as Web servers, application servers, and databasesv System components, such as hosts, operating systems, load balancers, and
database serversv Network components, such as routers, switches, and firewalls
2 Application Dependency Discovery Manager: Administering
v Infrastructure services, such as DNS and LDAP services
Note: Using virtual IP addresses or multiple network interface controllers mightcause TADDM to report incorrect results. When planning a discovery, consider thenetwork infrastructure.
Discovery process overviewDiscovery is a multilevel process that collects configuration information about theentire application infrastructure, identifying deployed software components,physical servers, network devices, virtual systems, and host data that is used in theruntime environment. Discovery is performed using sensors that are part ofTADDM product.
The job of the sensor is to discover configuration items (CIs), create model objects,and persist the model objects to the TADDM database. The sensors use protocolsthat are specific to the resources that they are designed to discover. The followingprotocols are examples:v Cisco Discovery Protocol (CDP)v Java™ Management Extensions (JMX)v Secure Shell (SSH)v Simple Network Management Protocol (SNMP)v Structured Query Language (SQL)
When possible, a secure connection is used between the TADDM server and thetarget systems.
TADDM does not run discoveries over IPv6 networks, but IPv6 attributes arediscovered by discoveries running on IPv4 networks.
SensorsTADDM provides a variety of specialized sensors for discovery of almost allcomponents in the typical data center, across the application software, host, andnetwork tiers. You can also develop custom sensors for unique components.Sensors reside on the TADDM server and collect configuration attributes anddependencies.
Sensors are nonintrusive, meaning that they run on the TADDM server rather thanon the client workstation. Therefore, by using TADDM, you can gatherdiscovery-related information without incurring the costs of local installation andmaintenance of an agent on each client workstation that you want to discover.
Because sensors use secure network connections, encrypted access credentials, andhost-native utilities, they are secure, and they provide the same level of dataacquisition that you have when you use software that is located on the clientworkstation.
A sensor has the following three configurable aspects:
Scope The discovery scope is typically a valid IP range, a subnet, or a specificaddress. It sets the boundary for the discovery.
Access listThe access list is a collection of the credentials, such as the user names,passwords, and Simple Network Management Protocol (SNMP)community strings, that the sensor uses when accessing the configuration
Administering 3
items in the application infrastructure. You must configure the access listfor the configuration items that you want to discover.
ScheduleDiscovery can be run on demand, run on a schedule, or driven byexternally triggered events. The schedule identifies whether sensors are runon demand or on a schedule.
How a sensor discovers configuration items:
These steps outline how a sensor discovers configuration items (CIs) in yourenvironment.1. To identify the active IP devices in the specified scope, the sensor tries a TCP
connection on several ports (such as 22, 23 and 135) to detect a response. Anyresponse is enough to inform the sensor that the device exists.
2. The sensor tries to connect to the IP device on several ports (such as 22 and135) to determine the technology to use to discover the host.
3. If a port using the Secure Shell (SSH) protocol is open, the sensor tries toestablish an SSH connection using credentials from the access list. In sequence,the sensor tries access list entries of type computer system or windowscomputer system until either an entry works, or the sensor reaches the end ofthe access list with no success.
4. If a Windows Management Instrumentation (WMI) port is open, an SSHconnection is established with a gateway computer system (if one can be foundfor the target system). In sequence, the sensor tries access list entries of typewindows computer system until either an entry works, or the sensor reachesthe end of the access list with no success.
5. If a session cannot be established, an SNMP sensor is run. If a session isestablished, a computer system sensor is run.
6. A computer system sensor tries to determine the type of operating system thatis installed.
7. TADDM runs a sensor that is specific to the operating system to discover theoperating system in more depth.
8. During the in-depth discovery of the operating system, which is based onspecific criteria (such as port number and process name), TADDM runssoftware-specific sensors to discover application details.
How an application sensor is started:
This information describes how an application sensor is started.
The GenericServerSensor runs the following commands:
On Linux, Solaris, AIX, and Linux on System z® operating systems
v lsof -nP -i to get the port informationv ps axww to get the command line information
On Windows operating systems
v netstat.exe -nao to get the port informationv wmic process list to get the command line information
The process ID (PID) is used to merge the output. The template matcher thenoperates on the merged data. When the logging level is set to DEBUG in thecollation.properties file, the output of these commands is located in thefollowing logs:
4 Application Dependency Discovery Manager: Administering
v GenericServerSensor.log
v DiscoverManager.log
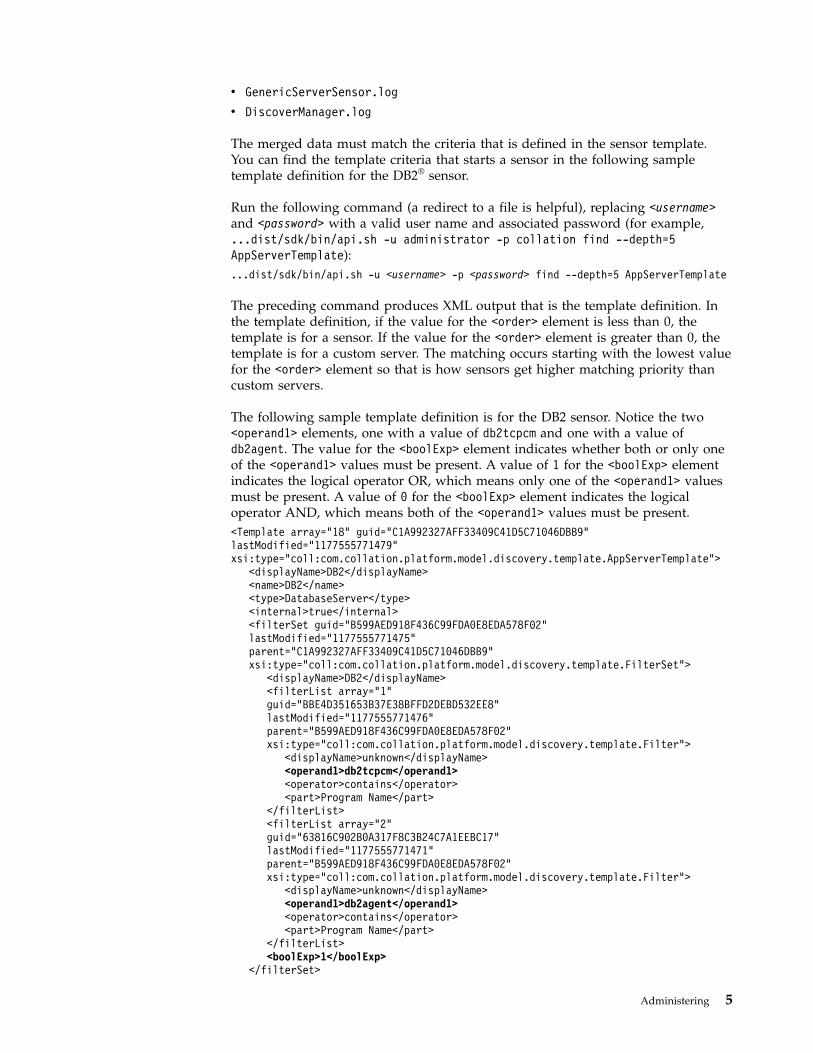
The merged data must match the criteria that is defined in the sensor template.You can find the template criteria that starts a sensor in the following sampletemplate definition for the DB2® sensor.
Run the following command (a redirect to a file is helpful), replacing <username>and <password> with a valid user name and associated password (for example,...dist/sdk/bin/api.sh -u administrator -p collation find --depth=5AppServerTemplate):...dist/sdk/bin/api.sh -u <username> -p <password> find --depth=5 AppServerTemplate
The preceding command produces XML output that is the template definition. Inthe template definition, if the value for the <order> element is less than 0, thetemplate is for a sensor. If the value for the <order> element is greater than 0, thetemplate is for a custom server. The matching occurs starting with the lowest valuefor the <order> element so that is how sensors get higher matching priority thancustom servers.
The following sample template definition is for the DB2 sensor. Notice the two<operand1> elements, one with a value of db2tcpcm and one with a value ofdb2agent. The value for the <boolExp> element indicates whether both or only oneof the <operand1> values must be present. A value of 1 for the <boolExp> elementindicates the logical operator OR, which means only one of the <operand1> valuesmust be present. A value of 0 for the <boolExp> element indicates the logicaloperator AND, which means both of the <operand1> values must be present.<Template array="18" guid="C1A992327AFF33409C41D5C71046DBB9"lastModified="1177555771479"xsi:type="coll:com.collation.platform.model.discovery.template.AppServerTemplate">
<displayName>DB2</displayName><name>DB2</name><type>DatabaseServer</type><internal>true</internal><filterSet guid="B599AED918F436C99FDA0E8EDA578F02"lastModified="1177555771475"parent="C1A992327AFF33409C41D5C71046DBB9"xsi:type="coll:com.collation.platform.model.discovery.template.FilterSet">
<displayName>DB2</displayName><filterList array="1"guid="BBE4D351653B37E38BFFD2DEBD532EE8"lastModified="1177555771476"parent="B599AED918F436C99FDA0E8EDA578F02"xsi:type="coll:com.collation.platform.model.discovery.template.Filter">
<displayName>unknown</displayName><operand1>db2tcpcm</operand1><operator>contains</operator><part>Program Name</part>
</filterList><filterList array="2"guid="63816C902B0A317F8C3B24C7A1EEBC17"lastModified="1177555771471"parent="B599AED918F436C99FDA0E8EDA578F02"xsi:type="coll:com.collation.platform.model.discovery.template.Filter">
<displayName>unknown</displayName><operand1>db2agent</operand1><operator>contains</operator><part>Program Name</part>
</filterList><boolExp>1</boolExp>
</filterSet>
Administering 5
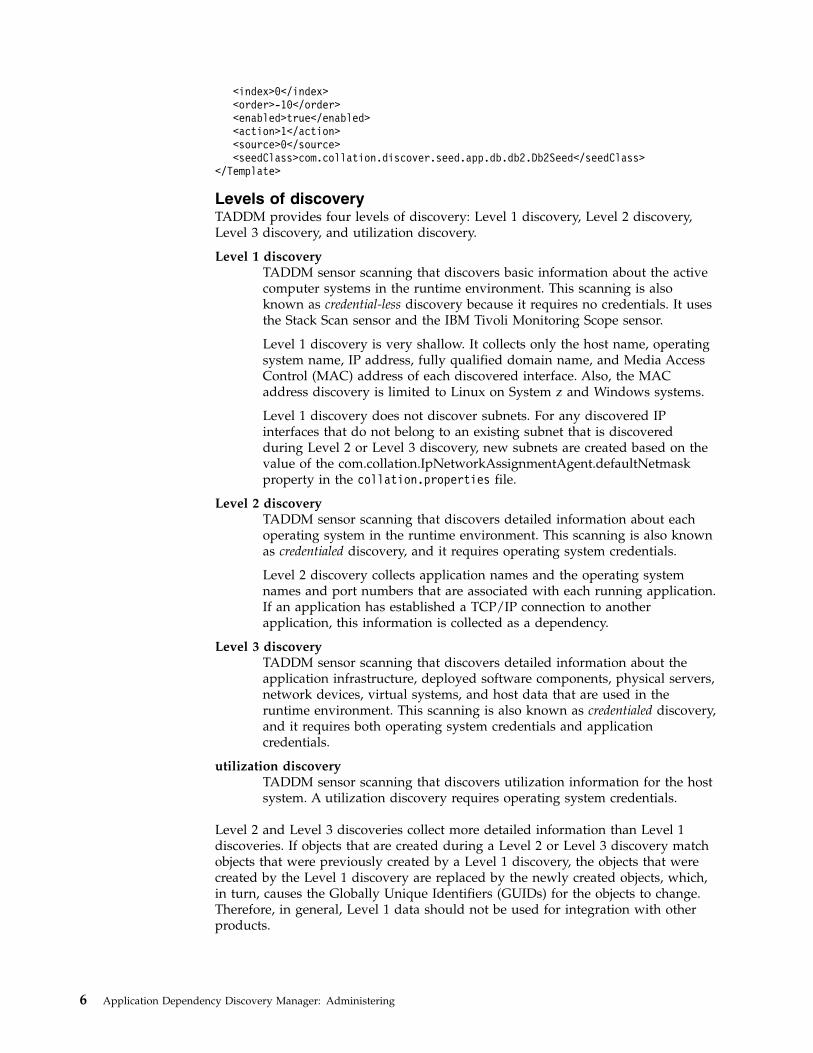
<index>0</index><order>-10</order><enabled>true</enabled><action>1</action><source>0</source><seedClass>com.collation.discover.seed.app.db.db2.Db2Seed</seedClass>
</Template>
Levels of discoveryTADDM provides four levels of discovery: Level 1 discovery, Level 2 discovery,Level 3 discovery, and utilization discovery.
Level 1 discoveryTADDM sensor scanning that discovers basic information about the activecomputer systems in the runtime environment. This scanning is alsoknown as credential-less discovery because it requires no credentials. It usesthe Stack Scan sensor and the IBM Tivoli Monitoring Scope sensor.
Level 1 discovery is very shallow. It collects only the host name, operatingsystem name, IP address, fully qualified domain name, and Media AccessControl (MAC) address of each discovered interface. Also, the MACaddress discovery is limited to Linux on System z and Windows systems.
Level 1 discovery does not discover subnets. For any discovered IPinterfaces that do not belong to an existing subnet that is discoveredduring Level 2 or Level 3 discovery, new subnets are created based on thevalue of the com.collation.IpNetworkAssignmentAgent.defaultNetmaskproperty in the collation.properties file.
Level 2 discoveryTADDM sensor scanning that discovers detailed information about eachoperating system in the runtime environment. This scanning is also knownas credentialed discovery, and it requires operating system credentials.
Level 2 discovery collects application names and the operating systemnames and port numbers that are associated with each running application.If an application has established a TCP/IP connection to anotherapplication, this information is collected as a dependency.
Level 3 discoveryTADDM sensor scanning that discovers detailed information about theapplication infrastructure, deployed software components, physical servers,network devices, virtual systems, and host data that are used in theruntime environment. This scanning is also known as credentialed discovery,and it requires both operating system credentials and applicationcredentials.
utilization discoveryTADDM sensor scanning that discovers utilization information for the hostsystem. A utilization discovery requires operating system credentials.
Level 2 and Level 3 discoveries collect more detailed information than Level 1discoveries. If objects that are created during a Level 2 or Level 3 discovery matchobjects that were previously created by a Level 1 discovery, the objects that werecreated by the Level 1 discovery are replaced by the newly created objects, which,in turn, causes the Globally Unique Identifiers (GUIDs) for the objects to change.Therefore, in general, Level 1 data should not be used for integration with otherproducts.
6 Application Dependency Discovery Manager: Administering
Discovery profilesTo run a discovery, you must specify a discovery profile, which defines a set ofoptions for discovery. Using discovery profiles, you can configure individualsensors, manage multiple configurations of the same sensor, choose the appropriateconfiguration based on a set of criteria, and manage sets of configurations ofdifferent sensors to be applied on a single discovery run.
By selecting the appropriate discovery profile, you can control the depth ofdiscovery, or discovery level.
By default, TADDM provides four discovery profiles. Three are for the three levelsof discovery that you can choose (Level 1, Level 2, or Level 3), depending onwhether you want to do a credential-less or credentialed discovery. The remainingprofile is for a utilization discovery.
If no profile is specified, the Level 3 discovery profile is used by default, althoughyou can change the default profile in the Discovery Management Console.
For additional information on discovery profiles, see A Flexible Approach toDiscovery on the TADDM wiki at https://www.ibm.com/developerworks/community/wikis/home?lang=en#!/wiki/Tivoli%20Application%20Dependency%20Discovery%20Manager/page/A%20Flexible%20Approach%20to%20Discovery.
Enabling and disabling sensors
You can globally disable a sensor even if the sensor has been enabled by a profile.You can also globally enable a sensor and allow the setting in the profile to work.
For example, if a sensor is globally enabled, and is enabled in the profile, thesensor runs. If the sensor is globally enabled, but is disabled in the profile, thesensor does not run when the respective profile is selected for running a discovery.
For the global enabling and disabling to work for sensors that have an osgidirectory ($COLLATION_HOME/osgi/plugins), you must change theAgentConfigurations in the osgi directory.
For example, for the Db2Sensor, look for these directories:v $COLLATION_HOME/osgi/plugins/
com.ibm.cdb.discover.sensor.app.db.db2_x.x.x/Db2Sensor.xml
v $COLLATION_HOME/osgi/plugins/com.ibm.cdb.discover.sensor.app.db.db2windows_x.x.x/Db2WindowsSensor.xml
where x.x.x is the sensor plugin version, for example 7.3.
When editing the XML files, to enable the sensor, set enabled to true. To disablethe sensor, set enabled to false.
For sensors that do not use the osgi/plugins directory, the configurationinformation is stored in the sensor configuration XML file that is in theetc/discover-sensors directory.
Asynchronous and script-based discoveryIn asynchronous and script-based discovery, instead of running individualcommands, sensors provide a discovery script, which they run against the targetsystem.
Administering 7
Not all sensors support asynchronous and script-based discovery. Only sensors thatprovide a discovery script can support these types of discovery.
For information about which sensors support asynchronous and script-baseddiscovery, see the Sensors that support script-based and asynchronous discovery topic inthe TADDM Sensor Reference.
Some differences from a nonscript-based discovery
Asynchronous discovery and script-based discovery differ from a nonscript-baseddiscovery in the following important ways:v In comparison to the discovery results from a nonscript-based Level 2 or Level 3
discovery, the discovery results from an asynchronous or a script-baseddiscovery might not be as complete. Most sensors discover a greater number ofmodel objects, attributes, and relationships in a nonscript-based discovery thanin an asynchronous or a script-based discovery.
v In asynchronous or script-based discovery, application sensors are started onlyonce for a given target system. However, if the application is listening on morethan one port, each application instance is discovered.In a nonscript-based discovery, an application sensor is started for eachapplication instance.
Asynchronous discovery:
You can run the asynchronous discovery to discover systems that cannot beaccessed directly by the TADDM server. This includes systems that are in securelocations (for example, systems that are not network-accessible), systems that donot run Secure Shell (SSH), and systems with sensitive information, for whichcredentials cannot be obtained.
In the asynchronous discovery, users run a discovery script on a target system. Thediscovery script contains a main script and several sensor scripts. Each sensorscript provides a discovery capability that is similar to a function that the sensorperforms, when it is run in a typical discovery.
The output of the discovery script is an archive file that contains the discoveryresults. You must copy this file to the TADDM server. During a TADDM discovery,TADDM sensors process the discovery results from this archive file (rather thanrunning commands).
Because this discovery is performed manually, and separately from a typicaldiscovery where credentials are required, it is called “asynchronous”.
To run asynchronous discovery, the asynchronous discovery sensor is required. Formore information, see the TADDM Sensor Reference.
For information about configuring sensors to run asynchronous discovery, see“Configuring for asynchronous discovery” on page 98.
Script-based discovery:
In a script-based discovery, you can use a discovery script in a typical discovery,where credentials are required. In this kind of discovery, the same sensor scriptsare used as in the asynchronous discovery.
8 Application Dependency Discovery Manager: Administering
In script-based discovery, a sensor does not run individual commands. Rather, thesensor script is run on the target system. Application-specific credentials might notbe needed.
For example, to discover the IBM WebSphere® application in a typical discovery,you must create an access list entry with credentials for the WebSphere applicationif security is enabled. However, using script-based discovery, the WebSphere accesslist entry is not needed. Script-based discovery also eliminates the use ofapplication-specific protocols like Java Management Extensions (JMX), which canextend application discovery through IBM Tivoli Monitoring.
For information about configuring sensors to run script-based discovery, see“Configuring for script-based discovery” on page 102.
Concurrent discoveryYou can run more than one discovery at the same time, which is called concurrentdiscovery. For example, because a large discovery can take several hours tocomplete, you might want to start smaller discoveries before the large discoverycompletes. Before you run concurrent discoveries, you must correctly configurethem.
You can run a concurrent discovery using a different discovery profile than the oneused to start the first discovery.
To manage concurrent discoveries, use the Discovery Management Console or theapi.sh script. For more information about using the api.sh script, see theCommand-line interface API topic in the TADDM SDK Developer's Guide.
You can run concurrent discoveries on the same target system. If two or morediscoveries are monitoring some of the same IP addresses, each discovery operatesindependently.
If a password change occurs while a discovery is running, and a concurrentdiscovery is started, the sensors in that concurrent discovery will immediately usethe new credentials, assuming that those sensors did not start before the passwordchange occurred.
TADDM does not support concurrent discovery with a profile-based access list.
If changes are made to the custom server template while a discovery is running,any concurrent discovery that is started continues to use the existing version of thecustom server template. The next separate, and non-concurrent, discovery that isstarted uses the new version of the custom server template.
Determining the displayed FQDNYou can configure a preferred method of determining the fully qualified domainname (FQDN) for each discovered system.
For a Level 1 discovery, the FQDN is the result of a reverse lookup of the IPaddress. This lookup uses the resolver library provided by the operating systemand it uses any configuration provided there. For example, if, at the operatingsystem level, the host file is preferred over DNS, information in the hosts file isconsidered first.
For a Level 2 discovery, TADDM performs a reverse lookup of all discovered IPaddresses using the resolver library provided by the operating system. Again, the
Administering 9
operating system configuration dictates from where the reverse lookup getsinformation. If DNS is not configured, or the DNS returns unwanted FQDNs, youcan use the hosts file to override it.
After the discovered IP addresses have been looked up, an attempt is made tomatch an FQDN to the computer system. There are a number of different ways toget an FQDN and each method is attempted, in a predefined order, until a validFQDN is found. You can modify the order so that your preferred method has ahigher priority. The following methods are available:
Method 1TADDM selects the FQDN of an IP interface where the host portion of theFQDN matches the host name of the discovered system. If there aremultiple matches, the selected FQDN depends on the priority of thedomain name as defined in the property:com.collation.platform.os.FqdnPriorities. This property lists thedomain names in order of priority. To prioritize the domains, enter thename of the domains as a comma-separated list on one line:com.collation.platform.os.FqdnPriorities=domain1.company.com,domain2.company.com,domain3.company.com
The FQDN with the highest priority for its domain is returned as theFQDN. This method uses information that is discovered about FQDNs ofinterfaces and computer system names.
If the priorities are not defined, TADDM goes through all of the IPinterfaces. TADDM checks if the FQDN associated with a given IP interfaceequals the name of the computer system or if the host name portion of thisFQDN equals the name of the computer system. The FQDN first matchingthe criteria is returned as the FQDN.
For example, a computer system named “myname” has two interfaces withthe following FQDNs:v interface #1 myname.domain1.comv interface #2 myname.domain2.com
If the com.collation.platform.os.FqdnPriorities is not defined then thefirst match is returned as the FQDN name. Both names have the hostportion of the FQDN matching the host name of the discovered system butthe FQDN returned is “myname.domain1.com”. To prioritize which nameis selected, use the property com.collation.platform.os.FqdnPriorities.For example, if the com.collation.platform.os.FqdnPriorities entrycontains the following information:com.collation.platform.os.FqdnPriorities=domain2.com,domain1.com
In this case, the FQDN returned is “myname.domain2.com” because thisname has a higher priority.
Method 2The property com.collation.platform.os.command.fqdn specifies anexternal command on the TADDM server that is used to do the reverselookup. The following examples show how to use this property, enter theproperty on one line:com.collation.platform.os.command.fqdn=nslookup $1| grep Name | awk ’{print $2}’com.collation.platform.os.command.fqdn.AIX=nslookup $1| grep Name | awk ’{print $2}’com.collation.platform.os.command.fqdn.Linux=nslookup $1
10 Application Dependency Discovery Manager: Administering

| grep Name | awk ’{print $2}’com.collation.platform.os.command.fqdn.SunOS=nslookup $1| grep Name | awk ’{print $2}’com.collation.platform.os.command.fqdn.Windows=nslookup $1
Method 3The property com.collation.platform.os.command.hostOfHostnamespecifies an external command on the target system that is used to providethe FQDN. The following example shows how to use this property on aUNIX system, enter the property on one line:com.collation.platform.os.command.hostOfHostname=host `hostname`| awk {’print $1’}
Method 4The FQDN of the primary interface is used. The primary IP interface isspecified as the lowest IP value where the IP values are sorted inascending order.
Method 5The IP address of the primary interface is used.
Method 6The name of the computer system is used.
Method 7Set to the session context IP.
Method 8Set FQDN for CS as FQDN for the session IP.
You can define the order in which these methods are attempted by setting thecom.collation.platform.os.fqdnSearchOrder property. The value of this propertyis a comma-separated list of the numbers of the methods. The default value is1,2,3,4,5,6,7,8. In this case, TADDM first tries to use method 1. If it does not returna valid FQDN, it tries method 2, and so on, until it gets a valid FQDN and stops.A valid FQDN is a fully qualified domain name that conforms to the rulesspecified in RFC 1035.
This solution is also applicable for computer systems that are discovered throughthe use of SNMP sensors. You can define which solutions have a higher priorityand therefore can be used to find an FQDN more quickly.
In all cases, properly configured DNS is the preferred way of setting host names. IfDNS cannot be used, use the hosts file. The use of DNS or the hosts file are thestandard ways of providing name resolution for IP addresses. TADDM providesways to override these methods, but because any other methods are unique toTADDM, they might lead to names that are inconsistent with names in othermanagement systems.
Tracing a discoveryYou can trace the phases of discovery from when a discovery starts to when thechange history is updated and the topology dependencies are built. Each phase ofa discovery is recorded in an associated log file.
Discovery run phase and log file
After you start a discovery, each discovery is assigned a unique identifier (run ID).A time stamp of YYYY-MM-DD-hh:mm:ss:SSS identifies the discovery run, forexample, 20110517225225948. The YYYY-MM-DD portion represents the year,month, and day. The hh:mm:ss.sss represents the time of day on a 24-hour clock,
Administering 11
carried out to the thousandths of a second. In the preceding example, the date is2011/05/17 and the time is 22:52:25.948. You can use this identifier to createseparate log files for each sensor in the $COLLATION_HOME/log/sensors directory.The time stamp is used within the log files.
During a discovery, the process flow manager monitors the state of the discoveryand the state of the sensor events. The process flow manager also manages thehand off from one service to another. The process flow activity is stored in the$COLLATION_HOME/log/services/ProcessFlowManager.log file on the discovery ordomain server.
The following examples show various activities that are monitored by the processflow manager and how this information is stored in the log file.
Starting discovery:– 2011-05-17 22:53:01,643 ProcessFlowManager [RMI TCP Connection(42)-127.0.0.1] INFOprocessflowmgr.ProcessFlowManagerImpl - [ProcessFlowManagerImpl.I.0] startDiscovery()started discovery with run id 2,011,051,722,525,948– 2011-05-17 22:53:01,643 ProcessFlowManager [RMI TCP Connection(42)-127.0.0.1] INFOprocessflowmgr.ProcessFlowManagerImpl - [ProcessFlowManagerImpl.I.22] startDiscovery()setting the discoveryRun’s run id to 2,011,051,722,525,948– 2011-05-17 22:53:01,973 ProcessFlowManager [RMI TCP Connection(42)-127.0.0.1] INFOprocessflowmgr.ProcessFlowManagerImpl -Discovery run, 2011051722525948 started with profile Level 2 Discovery
Discovery done:– 2011-05-17 22:56:11,689 ProcessFlowManager [RMI TCP Connection(45)-127.0.0.1] INFOprocessflowmgr.ProcessFlowManagerImpl - [ProcessFlowManagerImpl.I.36]discoveryDone(2,011,051,722,525,948) called by Discovery Manager
Discovery event:– 2011-05-17 22:53:49,901 ProcessFlowManager [RMI TCP Connection(45)-127.0.0.1] INFOprocessflowmgr.ProcessFlowManagerImpl - [ProcessFlowManagerImpl.I.32]discoveryProgress(2,011,051,722,525,948, Discovered - The CustomAppServerSensor(JavaServer 9.156.47.175:36750) sensor discovered the following: CustomAppServerResult,JavaServer,9.156.47.175:36750.) called by Discovery Manager
Topology builder phase and log file
The topology builder builds the relations and dependencies between thediscovered items. The topology builder runs a list of agents that are listed in the$COLLATION_HOME/etc/TopologyBuilderConfigurationDefault.xml file. The topologyagents run at specified intervals. However, events that occur during a discoveryand when a discovery is completed can also trigger the topology builder. Eachagent carries out a specific task, for example, consolidates, figures outdependencies, builds dependencies charts, and removes old information. Thetopology builder log files are stored in the $COLLATION_HOME/log/services/TopologyBuilder.log and $COLLATION_HOME/log/agents/*.log files on the domainserver, synchronization server, and primary storage server.
The following examples show the various stages when building relationships andshows how this information is stored in the log file.
Starting builder execution:– 2011-05-17 22:56:11,717 TopologyBuilder [RMI TCP Connection(158)-127.0.0.1]INFO cdb.TivoliStdMsgLogger- CTJOT0400I Topology builder is starting.
Topobuilder done:– 2011-05-17 23:16:39,429 TopologyBuilder [[email protected]]INFO engine.TopologyBuilderEngine - Topology agent completed :all normally in seconds 30.367
12 Application Dependency Discovery Manager: Administering
Moving to next TopoAgent:– 2011-05-17 23:16:29,774 TopologyBuilder [[email protected]]INFO cdb.TivoliStdMsgLogger - CTJOT0403I Topology builder agent classcom.ibm.cdb.topomgr.topobuilder.agents.ComputerSystemConsolidationAgent is stopping.– 2011-05-17 23:16:30,078 TopologyBuilder [[email protected]]INFO cdb.TivoliStdMsgLogger - CTJOT0402I Topology builder agent classcom.ibm.cdb.topomgr.topobuilder.agents.ComputerSystemTypeAgent is starting.
If you find problems, for example the topology builder is hanging, checkfor the last started topology agent in the log file to identify the problem. Ifthere are no entries in the TopologyBuilder.log file, check the entries inthe TopologyManager.log file after the timestamp of the last started agent.If you know which agents cause the problems, you can also check the$COLLATION_HOME/log/agents/agentName.log file to identify them.
Other services and log files
The change manager processes events and updates the change history records. Thisprocessing is independent of the discovery phase; it receives events from otherservices, for example, the topology builder process and the bulk load program.When you open a topology view, the view manager builds the structures that arerequired for the GUI to render the topology efficiently. The services logs are storedin the : $COLLATION_HOME/log/services directory. Each service log has the samename as the service, for example, services/ChangeManager.log file.
The following examples show how this information is stored in the service logfiles.
ChangeManager:2011-05-19 13:22:42,342 ChangeManager [ChgWork-1] INFO changemgr.ChangeManagerPersisterImpl -[ChangeManagerPersister.I.3] Got a create or delete event
ViewManager:2011-05-19 16:37:22,428 ViewManager [RMI TCP Connection(174)-127.0.0.1]INFO viewmgr.ViewMetaLoader - [ViewMetaLoader.I.31] getViewMeta()found view meta definition for view Business Application Topology
Last successful credentials cachingTADDM can cache last working access credentials. They can be reused in the next(Level 2 or script-based) discovery.
During the initial discovery of a target, TADDM server iterates through the accesslist and validates each item against the discovery target. When the valid credentialsare found, they are stored in a cache and reused during the consecutive discoveriesof the same discovery target.
A cache can store the two following values:
credentialsThis value is stored in a cache when the valid credentials for a discoverytarget are found during the discovery. During the next discovery, they areread from the cache and checked whether they are still valid. If they arestill valid, they are used for the discovery. If they are no longer valid andthe fallback is disabled, the information that the last attempt failed isstored in the server and the discovery is stopped. When the fallback isenabled, the server iterates through the access list and tries to find newvalid credentials. To enable the fallback, set thecom.ibm.cdb.security.auth.cache.fallback.failed property to true.
Administering 13
information that the last attempt failed (along with the last error)This value is stored in a cache when the valid credentials for a discoverytarget are not found during the discovery. If the fallback is disabled, theinformation that the last attempt failed is displayed and the discovery isstopped. If the fallback is enabled, the server iterates through the access listand tries to find new valid credentials. To enable the fallback, set thecom.ibm.cdb.security.auth.cache.fallback.invalid property to true.
By default, fallback in both cases is enabled. You can customize the fallbackbehavior and credentials caching by appropriately setting the access credentialscaching properties.
Note: Credentials are cached per IP address, location tag, credential type, andprotocol that is used during connection. When access entry is removed, allassociated cache entries are also removed. Credentials cache can be managed bythe new utility cachemgr.
Limitationsv Credentials caching is not used in Level 3 discovery. It is used only for Level 2
computer system discovery and script-based sensors.v A cache does not track scope access restriction changes. For example, if a
discovery target is within scope access restriction and is discovered and cached,and then moved out of scoped restriction, the cached value is still used.
v The cached value has precedence over the profiled access list. For example, ifyou run discovery by using the main access list and valid credentials are stored,the cache value is still used, even if you specify other credentials in a profile.
You can remove a cached value by using the cachemgr utility. If you often usedifferent profiles with different access entries against the same discovery target orscope, you can disable caching for them. Otherwise, wrong credentials might beused in the discovery.
Topology building process overviewTADDM runs the topology building process on a periodic basis. Until the topologybuilding process has completed after a discovery or after a bulk load operation,unreconciled objects might exist in the TADDM database, and the topologyrelationships might be incomplete.
This process is the same regardless of which type of TADDM deployment you use.
Topology building includes the following operations:
Cleaning up the TADDM databaseThe process deletes old entities, removes dependencies that are lackingsources or targets, and removes other items that are superseded.
Establishing dependencies between configuration itemsThe process creates dependencies between communicating processes, suchas between an application and the underlying database and betweensending and receiving WebSphere MQ queues. It also establishesdependencies between parts of an application cluster, or simply betweentwo computer systems.
Creating and augmenting configuration itemsThe process uses information from existing configuration items andconnections to synthesize new configuration items. For example, TADDM
14 Application Dependency Discovery Manager: Administering
might create a new configuration item that is called“ApplicationServerClusters” and is based on information that is derivedfrom earlier discoveries and bulk load operations.
Creating information for topology viewsThe process generates and stores information that can be used by the DataManagement Portal to display topology views more quickly.
Exporting dataThe process queries the TADDM database to export configuration iteminformation ito external systems. For example, integration with RegistryServices is implemented as a topology agent.
Log files and loggingThe TADDM Troubleshooting Guide and its topics describe the TADDM log files andhow to set up logging for troubleshooting.
Securing the environmentIn secure environments, TADDM enforces authentication to help protectconfidential information.
You can use the Data Management Portal to configure user accounts. Each usermust have a valid user account to use the Data Management Portal to accessdiscovered information about network and infrastructure components.
When you log in to the Discovery Management Console and select the Establish asecure (SSL) session option, all data is encrypted (including user names andpasswords) before it is sent over the network.
In the discovery process, the TADDM server uses Secure Shell (SSH) protocol tosecurely communicate with all computer hosts and other devices that support SSH.
The server supports both key-based SSH authentication, and login-based,password-based SSH authentication. When login-based, password-based SSHauthentication is used, the user names and passwords that you define in the accesslist are used to log in to the computer hosts to be discovered.
See also “Security properties” on page 87.
Controlling user access to configuration itemsTADDM controls user access to configuration items through the use of accesscollections, roles, and permissions.
Access control to configuration items is established by the following process:1. Configuration items are aggregated into access collections.2. Roles are defined that aggregate sets of permissions.3. Users or user groups are defined, and roles are assigned to each user or user
group to grant specific permissions (for specific access collections) to that user.
In the context of security in TADDM, a user is a person who is given access toconfiguration items, and a user group is several users who have the same roles orpermissions.
Administering 15
You can create users and user groups in the Data Management Portal. The accessof users and user groups to configuration items is defined by the roles and accesscollections that you assign to each user or user group. You can change theseassignments at any time.
PermissionsA permission authorizes the user to perform an action or access a specificconfiguration item. Permissions are aggregated into roles, and users are grantedpermissions by assigning them roles that have those permissions.
TADDM provides four permissions, each of which is classified as either adata-level permission or a method-level permission.
Data-level permissions
Read and Update are data-level permissions.
Read The user can view information about a configuration item.
UpdateThe user can change information about a configuration item.
Method-level permissions
Discover and Admin are method-level permissions.
DiscoverThe user can start a discovery, create and update discovery scope objects,or create new objects from, for example, the Edit menu of the DiscoveryManagement Console.
A user without the Discover permission cannot log in to the DiscoveryManagement Console, or view the Discovery tab in the Data ManagementPortal.
AdminThe user can create or update users, roles, and permissions. The user canalso configure authorization policy with the authorization manager.
Enabling data-level security
You can enable data-level security for AIX, Linux, Linux on System z, andWindows operating systems by editing the collation.properties file.
To enable data-level security so that you can grant Read and Update permissionsselectively, complete the following steps.1. In the collation.properties file, locate the following line, and change the
value of the property from false to true:com.collation.security.enabledatalevelsecurity=false
2. Save the file.3. Stop the TADDM server.4. Restart the TADDM server.
Note: In a streaming server deployment, you must update thecollation.properties file on each storage server, and restart each storage server.
16 Application Dependency Discovery Manager: Administering
You can set more granular permissions by creating access collections. If data-levelsecurity is enabled, major TADDM resources can be secured by using accesscollections. If data-level security is enabled, users can modify only those CIscontained within access collections to which they have Update permission.
Auxiliary resources, such as physical geography resources that include theSiteInfo attribute, are not displayed when creating an access collection.
RolesA role is a set of permissions that can be assigned to a user. Assigning a roleconfers specific access capabilities.
When you assign a role to a user, you must specify one or more access collectionsfor that role. This limits the scope of the role to only those access collections thatare appropriate for that user.
For example, Sarah is responsible for the NT servers and workstations of yourcompany, and you assign her the supervisor role for an access collection thatcontains those systems. Jim is responsible for the Linux systems, and you assignhim the supervisor role for an access collection that contains those systems.Although Sarah and Jim are assigned the same role (because they perform thesame operations), they have access to different resources.
Note: If you are using a synchronization server, you must create the role for eachTADDM domain, and synchronize the domain servers with the synchronizationserver.
Predefined roles
TADDM provides the following predefined roles:
operatorThis role has Read permission.
supervisorThis role has Read, Update, and Discover permissions.
administratorThis role has Read, Update, Discover, and Admin permissions.
Additional roles that you can create
You can create additional roles to assign other combinations of permissions. Thefollowing combinations might be especially useful:
Read + UpdatePermission to read and update objects in assigned access collections.
Read + Update + AdminPermission to read and update objects in assigned access collections and tocreate users, roles, and permissions.
Access collectionsTADDM does not manage access to configuration items on an individual basis.Instead, the configuration items are aggregated into sets called access collections.An access collection is a set of configuration items that is managed collectively forsecurity purposes.
Administering 17
The security of each access collection is managed by creating roles and assigningthe roles to users. The role applies only to the access collections that you specifywhen assigning the role to a user. Therefore, access collections are used to limit thescope of the role.
When you install TADDM, the access collection that is namedDefaultAccessCollection is created, and it contains all configuration items. Allusers have Read and Update permissions for this access collection by default,unless you enable data-level security.
Note: Users do not have permissions to read and update access collections, theycan only read and update individual configuration items. However, users haveRead and Update permissions for those access collections that are members ofaccess collections assigned to them.
Resetting security policiesIf you need to reset the security policies (permissions, roles, and access collections)to their default state, you can do so by replacing two files. However, resettingsecurity policies requires that you delete and re-create all users.
About this task
The security policies are stored in the following two files in the$COLLATION_HOME/var/policy directory, and these files are used to initialize thesecurity policies:v AuthorizationPolicy.xml
v AuthorizationRoles.xml
After the security policies are initialized, these files are renamed and stored in thesame directory. For example, the following files have been renamed:v AuthorizationPolicy.backup.xml
v AuthorizationRoles.backup.xml
Default versions of the files, which contain the supplied security policies, are alsolocated in the same directory. The following files are the default versions:v DefaultPolicy.xml
v DefaultRoles.xml
Procedure
To restore the default security policies, complete the following steps:1. To save the current policy files, rename them, or move them to a different
directory.2. Delete any users that you created.3. Delete the $COLLATION_HOME/var/ibmsecauthz directory.4. Create a copy of the DefaultPolicy.xml file, and name it
AuthorizationPolicy.xml.5. Create a copy of the DefaultRoles.xml file, and name it
AuthorizationRoles.xml.6. Restart the server.7. As needed, create users.
18 Application Dependency Discovery Manager: Administering

LockoutsYou can use lockouts to lock a single user, or all users, out of TADDM if theconfigured number of failed login attempts allowed is exceeded. Using the lockoutfeature provides better authentication control and helps to prevent the use ofbrute-force password cracking.
A local lockout is triggered if a single user exceeds the configured number of failedlogin attempts. As a result, the user cannot log in to TADDM for a configuredlength of time.
When a global lockout is triggered, no users can log in to TADDM for a configuredlength of time. A global lockout is triggered by one of the following two situations:v The number of active lockouts for different users exceeds the configured number
of maximum global lockouts allowed.v The number of failed login attempts for unique user names exceeds the
configured limit.
When a lockout is triggered, existing sessions are not affected.
You can specify the number of failed login attempts allowed and the length of timefor which a lockout remains active by configuring properties in thecollation.properties file. For more information about these properties, see“Lockout properties” on page 84.
When a global lockout time elapses, any local lockouts in progress areautomatically cleared.
In a synchronization server deployment, the synchronization server controls thesecurity of all TADDM domains. Any lockouts that were active on the domainserver before it was connected to the synchronization server are cleared whensynchronization between the domain server and the synchronization server isenabled.
The failed login attempts that count towards the total can be of any type, forexample, using the CLI API, Java API, tools (scripts), SOAP, REST, DiscoveryManagement Console, or Data Management Portal. The lockout feature applies tointegrations that use the TADDM API, but it does not apply to logins using singlesign-on, or database-based integrations, for example Tivoli Common Reporting.
A TADDM server administrator can clear a local or a global lockout by using the$COLLATION_HOME/bin/lockmgr.sh script. You can run the script from the followingservers:v Domain server, in a domain server deploymentv Synchronization server, in a synchronization server deploymentv Primary storage server, in a streaming server deployment
You can run the lockmgr.sh script with the following options:
lockmgr.sh -sDisplays the lockout status.
lockmgr.sh -gClears an active global lockout.
lockmgr.sh -u usernameClears an active local lockout for a particular user.
Administering 19
lockmgr.sh -hDisplays help information for the lockmgr.sh script.
EncryptionEncryption is the process of transforming data into an unintelligible form in such away that the original data either cannot be obtained or can be obtained only byusing a decryption process.
Fix Pack 5
TADDM uses the property 'com.collation.security.algo.aes.keylength' to
decide the algorithm (AES 128 or AES 256) from the 'FIPS-compliant IBMJCEFIPS'security provider to encrypt the following items:v Passwords, including entries in the collation.properties and userdata.xml filesv Access list entries that are stored in the database
For example:
This property defines the key length for AES-com.collation.security.algo.aes.keylength=128.
When you install TADDM for the first time, an encryption key is generated, andpasswords are encrypted using this new encryption key. The default location forthe encryption key is the etc/TADDMSec.properties file.
Changing the location of the TADDM encryption key
To change the location of the encryption key, change the value of thecom.collation.security.key property in the collation.properties file. You canset the property to another location that is relative to the $COLLATION_HOMEdirectory.
To avoid data loss, store a backup copy of the encryption key in a separatelocation. The key can be restored if a problem occurs with the original copy.
Changing the TADDM encryption key in a domain serverdeployment
Note: TADDM does not support changing the encryption key after installation in astreaming server deployment and synchronization server deployment.
To change the TADDM encryption key in a domain server deployment, use thebin/changekey.sh script (or the equivalent batch script file). This script migratesencrypted entries in the collation.properties and userdata.xml files and migratesaccess list entries that are stored in the database. To use the bin/changekey.shscript, ensure that you are logged in as the non-root user that was defined duringinstallation.
You must restart TADDM after successful use of this script.
Format for running the script./changekey.sh $COLLATION_HOME admin_user admin_password
Example./changekey.sh /opt/IBM/taddm/dist administrator taddm
20 Application Dependency Discovery Manager: Administering
FIPS complianceYou can configure TADDM to operate in a mode that uses FIPS-compliantalgorithms for encryption by setting the FIPSMode property,com.collation.security.FIPSMode to true.
Set the com.collation.security.FIPSMode property to true in the following files:v $COLLATION_HOME/dist/etc/collation.properties
v $COLLATION_HOME/dist/sdk/etc/collation.properties
v sdk/etc/collation.properties of every TADDM SDK installations that connectto the FIPS-compliant TADDM.
The default value of the com.collation.security.FIPSMode property is false.
When in FIPS mode, TADDM uses the following FIPS 140-2 approvedcryptographic providers:v IBMJCEFIPS (certificate 376)v IBMJSSEFIPS (certificate 409)
For more information about certificates 376 and 409, see the National Institute ofStandards and Technology (NIST) Web site, http://csrc.nist.gov/groups/STM/cmvp/documents/140-1/1401val2004.htm.
FIPS mode can be used with all types of TADDM discoveries with the followingexceptions:v Level 2 SNMP discoveryv Level 2 i5/OS discoveryv Level 2 ZEnterprise discoveryv Level 2 VMware ESXi discoveryv Level 3 VMware Virtual Center discoveryv Level 3 JBoss discoveryv Level 3 Oracle Application Server discoveryv Level 3 WebLogic discoveryv Level 3 SAP CCMS and SLD discoveryv Level 3 EMC discovery
v Fix Pack 1 Level 3 Sybase discoveryv Level 2 and 3 discoveries, where Windows Management Instrumentation (WMI)
or PowerShell session (PowerShell session is supported in TADDM 7.3.0.2, orlater) is used to discover Windows platforms, only if Windows TADDM server,Windows gateways, and Windows discovery targets do not run inFIPS-compliant mode. To configure Windows servers to run in theFIPS-compliant mode, see the Windows documentation, for examplehttp://support.microsoft.com/kb/811833.
When in FIPS mode, TADDM sensors that use SSH cannot connect to the serversthat support only SSHv1 protocol or only SSHv2 protocol with too weak ciphers.TADDM is not able to verify whether SSH implementation on target servers isFIPS-compliant. You must check whether SSH implementations that you use inyour environment are FIPS-compliant.
In FIPS mode, when you use TADDM SDK and Discovery Management Console inthe secure mode, only IBM Java is supported.
Administering 21

Related concepts:“SP800-131 compliance”You can configure TADDM to support the National Institute of Standards andTechnology (NIST) SP800-131a security standard.
SP800-131 complianceYou can configure TADDM to support the National Institute of Standards andTechnology (NIST) SP800-131a security standard.
SP800-131a security standard requires longer key lengths and strongercryptography than other standards, for example FIPS 140-2 standard. It alsorequires Transport Layer Security (TLS) v1.2. For more information, seehttp://csrc.nist.gov/publications/nistpubs/800-131A/sp800-131A.pdf.
⌂To enable the SP800-131a mode, set the com.ibm.jsse2.sp800-131 property tostrict in the following files:v $COLLATION_HOME/dist/etc/collation.properties
v $COLLATION_HOME/dist/sdk/etc/collation.properties
v sdk/etc/collation.properties of every TADDM SDK installation that connectsto the SP800-131 compliant TADDM.
By default, the com.ibm.jsse2.sp800-131 property is not set.
The SP800-131a compliance mode is supported for the same types of TADDMdiscoveries as in case of FIPS mode.
In the SP800-131 mode, TADDM uses the most secure SSL protocol (TLS v1.2) inencrypted communication. Make sure that the following requirements are met.v When you use Data Management Portal over Web SSL port (HTTPS), you must
first configure your web browser to support the TLS v1.2 protocol.v When you use TADDM SDK and Discovery Management Console in the secure
mode, you must enable the TLS v1.2 protocol in your Java RuntimeEnvironment. Additionally, only IBM Java is supported.
v When your SSL certificate does not comply with the SP800-131a standard, itneeds to be re-created. For required steps, see “Installing customized SSLcertificates for use in TADDM” on page 32.
Related concepts:“FIPS compliance” on page 21You can configure TADDM to operate in a mode that uses FIPS-compliantalgorithms for encryption by setting the FIPSMode property,com.collation.security.FIPSMode to true.
Security for a synchronization server deploymentIf you use a synchronization server deployment, you must make security changeswhen configuring the synchronization server for your environment.
If you are using the TADDM file-based registry and a TADDM domain is added toa synchronization server, you must re-create in the synchronization server anyusers that already exist in a domain, including assigned roles and access that isgranted to access collections. If you are using a Lightweight Directory AccessProtocol (LDAP) or WebSphere federated repositories user registry, you must addto the synchronization server the authorization for any users that access TADDM.
22 Application Dependency Discovery Manager: Administering
When you add a domain to the synchronization server, authentication andauthorization for the new domain is delegated to the synchronization server.
Logins to the domain are processed at the synchronization server. In addition,security manager method calls are processed by the synchronization server.
The following list summarizes other security information that you need to know toconfigure your synchronization server:v For TADDM to function properly, the Data Management Portal must be running
on the synchronization server. A TADDM domain delegates security operationsto the Data Management Portal, and this delegation is updated every 2.5minutes. If 5 minutes pass and this delegation is not updated, the TADDMdomain no longer delegates security operations and proceeds as if nosynchronization server is present. In this situation, TADDM UIs must berestarted to re-establish the sessions with the synchronization server.
v In each of the following situations, a TADDM UI must be restarted tore-establish sessions with the correct synchronization server:– The domain in which the UI is running is added to the Data Management
Portal running on a synchronization server.– The UI is opened in a domain while that domain is connected to a Data
Management Portal, but the synchronization server later becomes unavailable,such as during a restart of the synchronization server or when networkproblems occur.
v Roles, permissions, and access collections that are stored in the TADDM serverare synchronized from the domain to the synchronization server. User to rolemappings are not synchronized.
v Roles that you created for the domain can be used by the synchronization serverafter these objects are synchronized from the domain to the synchronizationserver.
v Users are not synchronized to the synchronization server.v A central user registry, such as LDAP or a WebSphere federated repositories
registry, is the preferred method of authentication for the synchronization server.Using a central user registry, user passwords are stored in one location.
v Access collections cannot span domains.v Synchronization works from the domain to the synchronization server. Objects
that are created in the synchronization server are not propagated to the domain.v Create and populate access collections at the domain, and synchronize with the
synchronization server.v Create roles at the domain, and synchronize with the synchronization server.v Authorize users at the synchronization server to provide access to access
collections from multiple domains.
Security for a streaming server deploymentIf you use a streaming server deployment, authentication and authorization aredelegated to the primary storage server.
If you use the TADDM file-based registry, you must create and authorize TADDMusers at the primary storage server. If you use a Lightweight Directory AccessProtocol (LDAP) or WebSphere federated repositories user registry, you mustauthorize TADDM users at the primary storage server. The preferred registry typefor TADDM authentication is one with a central user registry, such as a LDAPregistry or a WebSphere federated repository registry.
Administering 23
Logins to the discovery servers and secondary storage servers are processed at theprimary storage server. Therefore, user authentication is performed against the userregistry for which the primary storage server is configured. In addition, securitymanager functions are processed by the primary storage server.
For TADDM to function properly, the primary storage server must be running.
If the primary storage server is stopped or restarted, a TADDM user interface mustbe restarted to re-establish sessions with the primary storage server.
Configuring for LDAPYou can configure an external LDAP server for user authentication.
Before you begin
If you want to authenticate to an LDAP user registry, configure an LDAP V2 or V3registry.
About this task
When using LDAP and/or VMM the LDAP users and/or groups are always storedin LDAP/VMM and do not need to be created in TADDM. TADDM is used onlyto assign roles to the LDAP users and groups. Only these user/group to rolemappings, known as permissions, need to be created and stored in TADDM. Theadministrator user ID is a special internal TADDM user that is always processedusing file-based security regardless of what user registry is configured. This usercan always be used to initially assign roles to the LDAP users and groups.
Procedure
To use LDAP or VMM for user authentication, complete the following steps:1. Configure TADDM to use the LDAP registry by configuring the appropriate
properties in the collation.properties file.2. Log into the Data Management Portal using the TADDM administrator user ID.3. Complete one of the following steps:v In the Users pane, use the Search Users field to search the LDAP registry for
the appropriate user.v In the User Groups pane, use the Search Groups field to search the LDAP
registry for the appropriate user group.
Note: The search results list the users or group names returned by the LDAPregistry search. It is not a means to create users, or copy users from LDAP intoTADDM. The purpose of the list is to display what TADDM permissions needto be created for the users.
4. After the user (or group) is listed, assign the required TADDM roles to them.Only these permissions, and not the LDAP users (or groups), are stored inTADDM.
What to do next
To configure SSL for LDAP, complete the following steps:1. In the collation.properties file, locate the following property, and change the
value of the property from false to true:com.collation.security.auth.ldapUseSSL
24 Application Dependency Discovery Manager: Administering

2. Configure the following truststore and keystore properties, as appropriate:com.collation.security.auth.ldapClientKeyStore
com.collation.security.auth.ldapClientKeyStorePassphrase
com.collation.security.auth.ldapClientTrustStore
com.collation.security.auth.ldapClientTrustStorePassphrase
3. If necessary, change the port on which the LDAP server is listening for SSLconnections by configuring the following property:com.collation.security.auth.ldapPortNumber
Configuring for WebSphere federated repositoriesIf you have a Tivoli WebSphere application configured for a central user registrythat uses WebSphere federated repositories, you can configure for WebSpherefederated repositories in a federated repositories registry.
Configuring the TADDM server to use WebSphere federatedrepositoriesWebSphere federated repositories is a flexible meta-repository within WebSpherethat supports multiple types of user registries, including Microsoft ActiveDirectory.
Before you begin
You must configure TADDM to use WebSphere federated repositories if you useother Tivoli products in your environment, and you require single sign-on betweenTADDM and any of the following products:v IBM Tivoli Change and Configuration Management Database (CCMDB) or IBM
SmartCloud Control Desk (SCCD)v IBM Tivoli Business Service Manager
TADDM requires additional services not present in a standard WebSpheredistribution, so when you configure TADDM for federated repositories, you mustuse one of the following WebSphere installations:v WebSphere Application Server Network Deployment, as installed with CCMDB
or SCCDv WebSphere Application Server, as installed with IBM Tivoli Business Service
Manager
To see supported versions of the products, go to the “Supported versions” on page182 section.
Before beginning this procedure, you must already have configured the WebSpherefederated repositories authentication service on a WebSphere Application ServerNetwork Deployment server. For more information, refer to the IBM Tivoli Changeand Configuration Management Database (CCMDB) documentation or IBMSmartCloud Control Desk (SCCD) documentation.
About this task
This configuration enables single sign-on between Tivoli applications usingWebSphere Lightweight Third-Party Authentication (LTPA) tokens. For example,configuring TADDM to use the same WebSphere federated repositories used byCCMDB or SCCD supports single sign-on for launch in context between IBM TivoliCCMDB or IBM SCCD and TADDM.
Administering 25
To automatically configure TADDM to use WebSphere federated repositories,install TADDM and select WebSphere Federated Repositories as your user registryduring installation.
This configuration is supported on all TADDM server types, on all deployments.
Procedure
To perform the configuration manually, complete the following steps:1. Stop the TADDM server.2. Specify the user management module used by this TADDM server. The
following values are valid:
file This value is used for a file-based user registry. (This is the defaultvalue.)
ldap This value is used for an LDAP user registry.
vmm This value is used for a user registry that uses the federatedrepositories of WebSphere Application Server.
For example, in the $COLLATION_HOME/etc/collation.properties file:com.collation.security.usermanagementmodule=vmm
3. Specify the WebSphere host name and port in the collation.properties file.For example:com.collation.security.auth.websphereHost=localhostcom.collation.security.auth.webspherePort=2809
When specifying the WebSphere port in the collations.properties file, usethe following property: com.collation.security.auth.webspherePort. TheWebSphere port should be the bootstrap port for the WebSphere server. ForWebSphere Application Server and the embedded version of WebSphereApplication Server, the default port is 2809. For WebSphere Application ServerNetwork Deployment, which IBM Tivoli CCMDB or IBM SCCD uses, thedefault port is 9809.
4. Specify the WebSphere administrator user name and password in thecollation.properties file. For example:com.collation.security.auth.VMMAdminUsername=administratorcom.collation.security.auth.VMMAdminPassword=password
5. Make the following change to the authentication services configuration file:v For the Linux, AIX, and Linux on System z operating systems, the file is
located in the following path: $COLLATION_HOME/etc/ibmessclientauthncfg.properties.
v For the Windows operating systems, the file is located in the followingpath: %COLLATION_HOME%\etc\ibmessclientauthncfg.properties.
In the authnServiceURL property, substitute the fully qualified domain name ofthe system your WebSphere instance is installed on and the HTTP port of theWebSphere instance.# This is the URL for the Authentication ServiceauthnServiceURL=http://localhost:9080/TokenService/services/Trust
6. Copy the WebSphere orb.properties and iwsorbutil.jar files into the JREused by your TADDM installation. For example in a TADDM Linuxinstallation, do the following:a. Copy dist/lib/websphere/6.1/orb.properties to dist/external/
jdk-Linux-i686/jre/lib/.
26 Application Dependency Discovery Manager: Administering
b. Copy dist/lib/websphere/6.1/iwsorbutil.jar to dist/external/jdk-Linux-i686/jre/lib/ext/.
7. Specify the WebSphere host name and port in the sas.client.props file:v For the Linux, AIX, and Linux on System z operating systems, file is located
in the following path: $COLLATION_HOME/etc/sas.client.props.v For the Windows operating systems, file is located in the following path:
%COLLATION_HOME%\etc\sas.client.props, for example:com.ibm.CORBA.securityServerHost=host1.austin.ibm.comcom.ibm.CORBA.securityServerPort=2809
Note: For WebSphere Application Server and the embedded version ofWebSphere Application Server, the default port is 2809. For WebSphereApplication Server Network Deployment, which IBM Tivoli CCMDB or IBMSCCD uses, the default port is 9809.
8. Specify the WebSphere administrator user name and password in thesas.client.props file. For example:# RMI/IIOP user identitycom.ibm.CORBA.loginUserid=administratorcom.ibm.CORBA.loginPassword=password
9. Optional: To encrypt the login password in the sas.client.props file,complete the following steps:a. Copy the sas.client.props file back to the TADDM server, in the
$COLLATION_HOME/etc directory.b. Encrypt the password as follows, depending on which operating system
you have installed WebSphere.v For Linux, AIX, and Linux on System z operating systems:
Use the PropFilePasswordEncoder.sh command.v For Windows operating systems:
Use PropFilePasswordEncoder.bat For example,C:\WebSphere\profiles\AppSrv01\bin\PropFilePasswordEncoder C:\temp\sas.client.props com.ibm.CORBA.loginPassword
c. Copy the sas.client.props file back to the TADDM server, in the etcdirectory.
10. Start the TADDM server.
What to do next
After the installation is finished, you can use the default administrator userdefined in the local TADDM file-based repository to configure additional TADDMusers, including TADDM administrators. These additional TADDM users areauthenticated using WebSphere federated repositories.
There are security configurations for Tivoli CCMDB or IBM SCCD that allowgroups and group memberships to be created and maintained in the Maximo® userand group applications.
When Tivoli CCMDB or IBM SCCD is configured for this, TADDM uses its own,separate repository from Tivoli CCMDB or IBM SCCD. Users must be created inboth Tivoli CCMDB or IBM SCCD/Maximo and TADDM.
TADDM can be configured to use user and group definitions in external userregistries through WebSphere federated repositories. However, TADDM cannot useuser and group definitions that are stored in Tivoli CCMDB because these are not
Administering 27

supported by WebSphere federated repositories.
Updating authentication service LTPA keysIf you are using single sign-on with WebSphere federated repositories, you mustkeep the authentication service Lightweight Third-Party Authentication (LTPA)keys synchronized with those used by WebSphere federated repositories.
Procedure
If the LTPA keys used by WebSphere federated repositories are changed, use thisprocess to resynchronize the keys used by the authentication service:1. Export the new WebSphere LTPA keys:
a. In the WebSphere administrative console, navigate to Secureadministration, applications, and infrastructure > Authenticationmechanisms and expiration.
b. For Cross-cell single sign-on, specify a file name and password for the fileto contain the exported LTPA keys.
2. At a command prompt, navigate to the bin directory of the appropriateWebSphere profile.
3. Run the following WebSphere wsadmin command:wsadmin> $AdminTask importESSLTPAKeys {-pathname pathname -password password}
where pathname and password are the values you specified for the file name andpassword when exporting the LTPA keys.
4. Restart the WebSphere server.
Securing the authentication channelWhen you configure TADDM to use WebSphere federated repositories, you cansecure communications between the authentication client and the authenticationservice.
About this task
TADDM uses an authentication service that supports single sign-on. Theauthentication service is installed during the installation of IBM Tivoli Change andConfiguration Management Database (IBM SmartCloud Control Desk (SCCD)) orIBM Tivoli Business Service Manager.
To see supported versions of the products, go to the “Supported versions” on page182 section.
There are two mechanisms by which you can secure communications between anauthentication client and an authentication service:v SSLv Client authentication
Configuring the authentication channel for SSL:
You can secure communications by using the WebSphere signer certificates toconfigure SSL between the authentication client and the authentication server.
28 Application Dependency Discovery Manager: Administering
Procedure
To configure for SSL between the authentication client and the authenticationserver, complete the following steps:1. Do one of the following:
a. If you are using the WebSphere instance installed by Tivoli IntegratedPortal, navigate to SSL certificate and key mgmt > Manage endpointsecurity configurations > Node1 > Key stores and certificates >NodeDefaultTrustStore > Signer certificates.
b. If you are using the WebSphere instance installed by Tivoli Change andConfiguration Management Database (CCMDB) or IBM SmartCloud ControlDesk, navigate to SSL certificate and key mgmt > Manage endpointsecurity configurations > ctgNode01 > Key stores and certificates >NodeDefaultTrustStore > Signer certificates.
2. Export the WebSphere signer certificates to files (for example, exportdummyclientsigner to signer1.cert and dummyserversigner to signer2.cert).If you are unsure about which certificates to export, you must export all of thesigner certificates.
3. Copy the .cert files to the TADDM server. Create a truststore and import theWebSphere signer certificates as follows:$COLLATION_HOME/external/jdk-Linux-i686/jre/bin/keytool \-genkey -alias truststore -keystore truststore.jks$COLLATION_HOME/external/jdk-Linux-i686/jre/bin/keytool \-import -trustcacerts -alias default -file signer1.cert -keystore truststore.jks$COLLATION_HOME/external/jdk-Linux-i686/jre/bin/keytool \-import -trustcacerts -alias dummyserversigner -file signer2.cert -keystore truststore.jks
4. Include the truststore password and location in the $COLLATION_HOME/etc/collation.properties entries:com.collation.security.auth.ESSClientTrustStore=/opt/IBM/taddm/dist/etc/truststore.jkscom.collation.security.auth.ESSClientTrustPwd=password
5. Update the Tivoli Authentication Service URL in theibmessclientauthncfg.properties file to use https and port 9443. Ensure thatthe WebSphere host name is correct, substituting it for localhost, and that thenon-https entry is commented out.# This is the URL for the ESS Authentication Service#authnServiceURL=http://localhost:9080/TokenService/services/TrustauthnServiceURL=https://localhost:9443/TokenService/services/Trust
Configuring client authentication:
To configure client authentication between the authentication client and theauthentication server, it is recommended that you enable WebSphere applicationsecurity.
Before you begin
After WebSphere application security is enabled, you can add the role calledTrustClientRole to the WebSphere administrator user that you specified during theTADDM installation. This method provides added security for the authenticationservice by restricting the users that can authenticate to the authentication service toonly those users with the TrustClientRole.
Procedure
To add the TrustClientRole to the WebSphere administrator specified duringTADDM installation, complete the following steps:1. Log in to the WebSphere Administration Console.
Administering 29
2. Under the Security tab, click Enterprise Applications. The EnterpriseApplications pane is displayed.
3. In the Enterprise Applications table, click the Authentication Service application(authnsvc_ctges) in the Name column. The Enterprise Applications >authnsvc_ctges pane is displayed.
4. In the Enterprise Applications > authnsvc_ctges pane, in the Detailed Propertieslist, click Security role to user/group mapping. The Enterprise Applications >authnsvc_ctges > Security role to user/group mapping pane is displayed.
5. In the table on the Enterprise Applications > authnsvc_ctges > Security role touser/group mapping pane, complete the following steps:v In the table, select the check box next to TrustClientRole.v Clear the Everyone check box.v Click Lookup Users or Lookup Groups. The Enterprise Applications >
authnsvc_ctges > Security role to user/group mapping > Lookup users orgroups pane is displayed.
v In the Enterprise Applications > authnsvc_ctges > Security role touser/group mapping > Lookup users or groups pane, complete the followingsteps:– Search for users or groups, by using the Limit and Search string input
boxes. When a group or user is found, it is displayed in the Available list.– From the Available list, select the user or group that you want.– Click Move to add that user or group to the Selected list.
v Click OK. The Enterprise Applications > authnsvc_ctges > Security role touser/group mapping pane is displayed.
v In the Enterprise Applications > authnsvc_ctges > Security role touser/group mapping pane, clear the Everyone check box.
v Click OK. The Enterprise Applications > authnsvc_ctges pane is displayed.v Click Save to save the configuration. The Enterprise Applications pane is
displayed.v Click OK. The Enterprise Applications > authnsvc_ctges pane is displayed.
Configuring for Microsoft Active DirectoryYou can use Microsoft Active Directory as the authentication method for TADDMusing LDAP or using WebSphere federated repositories as an intermediary. If yourequire single sign-on to TADDM, you should use WebSphere federatedrepositories.
About this task
You can use the users defined in an Active Directory registry, without definingnew users, by configuring TADDM to use Active Directory. You can configureTADDM to use Active Directory as an LDAP registry, or you can configureTADDM to use WebSphere federated repositories and then configure WebSpherefederated repositories for Active Directory.
When you configure for Active Directory during the TADDM installation, you canconfigure TADDM to use any user from Active Directory as your TADDMadministrator. The administrator is allowed to configure access to TADDM andgrant other users access to TADDM objects and services.
This configuration is supported on all TADDM server types, on all deployments.
30 Application Dependency Discovery Manager: Administering
Procedure
To configure for Microsoft Active Directory, complete the following steps:
Do one of the following:v To configure Microsoft Active Directory using LDAP:
1. Configure TADDM for LDAP. For more information on configuring TADDMfor LDAP, see “Configuring for LDAP” on page 24.
2. Ensure that when you are using Active Directory, you setcom.collation.security.auth.ldapFollowReferrals to true in thecollation.properties file.
v To configure Microsoft Active Directory using WebSphere federated repositories:1. Configure TADDM for WebSphere federated repositories. For more
information on configuring TADDM for WebSphere federated repositories,see “Configuring the TADDM server to use WebSphere federatedrepositories” on page 25.
2. Configure WebSphere federated repositories for Microsoft ActiveDirectory.For more information on configuring supported entity types in afederated repository configuration, see the section called Configuringsupported entity types in a federated repository configuration in theWebSphere Application Server Information Center,http://www-01.ibm.com/support/knowledgecenter/SSAW57_6.1.0/com.ibm.websphere.nd.doc/info/ae/ae/twim_entitytypes.html.
Securing TADDM web servicesYou can configure TADDM to disable the HTTP port by setting thecom.ibm.cdb.secure.tomcat property (TADDM 7.3.0) or thecom.ibm.cdb.secure.liberty property (TADDM 7.3.0.1, and later) incollation.properties to true. Additionally you can set more secure SSL protocolby using the com.ibm.cdb.http.ssl.protocol flag.
The default value of com.ibm.cdb.secure.tomcat and com.ibm.cdb.secure.libertyproperties is false. When the HTTP port is disabled, TADDM can be accessed onlyby the HTTPS port, for example https://example.com:9431.
Limitation: When you have TADDM installed in the streaming serverdeployment, and your discovery servers and secondary storage servers are up andrunning, you can set the com.ibm.cdb.secure.tomcat orcom.ibm.cdb.secure.liberty property to true. In such case, the HTTP port isdisabled and you can use TADDM in the secure mode. However, if you want toadd a new discovery server or secondary storage server to your deployment, youmust temporarily enable the HTTP port, because the TADDM installer does notsupport the HTTPS protocol. To temporarily disable the secure mode, complete thefollowing steps:1. Change the value of the com.ibm.cdb.secure.tomcat or
com.ibm.cdb.secure.liberty property to false.2. Restart the TADDM server.3. Install a new discovery server or secondary storage server.4. Change the value of the com.ibm.cdb.secure.tomcat or
com.ibm.cdb.secure.liberty property to true.5. Restart the TADDM server.
Administering 31
The default value of the com.ibm.cdb.http.ssl.protocol property is TLS. Thesecure values are TLS, TLSv1.1, and TLSv1.2. If you want to use the most secureprotocols TLSv1.1 and TLSv1.2, you must first configure your web browser tosupport them.
Installing customized SSL certificates for use in TADDMYou can install your own customized SSL certificates and use them with TADDM.
Procedure1. Create a backup copy of the following keystore files:v $COLLATION_HOME/etc/serverkeys
v $COLLATION_HOME/etc/jssecacerts.cert
2. Go to the $COLLATION_HOME/etc directory, open command line and enter thekeytool and TADDM sslpassphrase parameters with the values in thefollowing manner:v Linux operating system:
keytool=../external/jdk-Linux-x86_64/bin/keytoolpass=XXXXXXXX30374
v Windows operating system:set keytool=..\external\jdk-Windows-i386-64\bin\keytool.exeset pass=XXXXXXXX30374
The value of the pass parameter is the value of thecom.collation.sslpassphrase property that is specified in thecollation.properties file.
3. Remove self-signed certificate and key from TADDM by running the followingcommands:v Linux operating system:
$keytool -delete -alias collation -noprompt -keystore jssecacerts.cert-storepass $pass$keytool -delete -alias collation -noprompt -keystore serverkeys -storepass$pass
v Windows operating system:%keytool% -delete -alias collation -noprompt -keystore jssecacerts.cert-storepass %pass%%keytool% -delete -alias collation -noprompt -keystore serverkeys -storepass%pass%
4. Generate SSL key with the required CN, validity, algorithm, and otherparameters, and save it to the serverkeys file. For example, you can run thefollowing command:v Linux operating system:
$keytool -genkey -alias collation -keystore serverkeys -validity 3650-keyAlg RSA -sigalg SHA256WithRSA -keypass $pass -storepass $pass -dname"CN=John Public, OU=Engineering, OU=NA, o=Company, L=Manhattan,S=New York, c=US"
v Windows operating system:%keytool% -genkey -alias collation -keystore serverkeys -validity 3650-keyAlg RSA -sigalg SHA256WithRSA -keypass %pass% -storepass %pass% -dname"CN=John Public, OU=Engineering, OU=NA, o=Company, L=Manhattan,S=New York, c=US"
5. Create another backup copy of the serverkeys file, where you saved thegenerated SSL key.
6. Generate the certificate signing request (CSR file) by running the followingcommand:
32 Application Dependency Discovery Manager: Administering
v Linux operating system:$keytool -certreq -alias collation -storepass $pass -file/tmp/certreq.csr -keystore serverkeys
v Windows operating system:%keytool% -certreq -alias collation -storepass %pass% -fileC:\temp\certreq.csr -keystore serverkeys
7. Use the CSR file to get the SSL certificate from official certificate authority. Savethe certificate on your TADDM server, for example in the tmp directory onLinux operating system, or in the C:\temp directory on Windows operatingsystem as the cert.crt file.
8. Import the generated certificate to TADDM, to both serverkeys andjssecacerts.cert files by running the following commands:
Important: For the -file parameter, specify the path to the file where yousaved the SSL certificate in the previous step, for example /tmp/cert.crt onLinux operating system, or C:\temp\cert.crt on Windows operating system.v Linux operating system:
$keytool -import -trustcacerts -alias collation -noprompt -keystoreserverkeys -storepass $pass -keypass $pass -file /tmp/cert.crt$keytool -import -trustcacerts -alias collation -noprompt -keystorejssecacerts.cert -storepass $pass -keypass $pass -file /tmp/cert.crt
v Windows operating system:%keytool% -import -trustcacerts -alias collation -noprompt -keystoreserverkeys -storepass %pass% -keypass %pass% -file C:\temp\cert.crt%keytool% -import -trustcacerts -alias collation -noprompt -keystorejssecacerts.cert -storepass %pass% -keypass %pass% -file C:\temp\cert.crt
9. Restart the TADDM server.
What to do next
Keep the backup copies of the serverkeys file that you generated in step 4, and thefile where you saved the SSL certificate in step 7. If you must replace or renew thecertificate, these files are necessary. To replace, or renew the certificate, completethe following steps:1. Repeat the steps 2 and 3.2. Restore the serverkeys file.3. Repeat the steps 8 and 9.
Managing the TADDM serversBefore you configure TADDM for discovery, you must understand how to managethe TADDM servers, which includes many tasks.
Checking TADDM server statusYou can use the Administrator Console or the control command to check thestatus of the TADDM server.
Using the Administrator Console to check status
To use the Administrator Console to check the status, open a web browser, andenter the URL and port number of the system where you installed the TADDMserver. The following URL is an example:http://system.company.com:9430
Administering 33
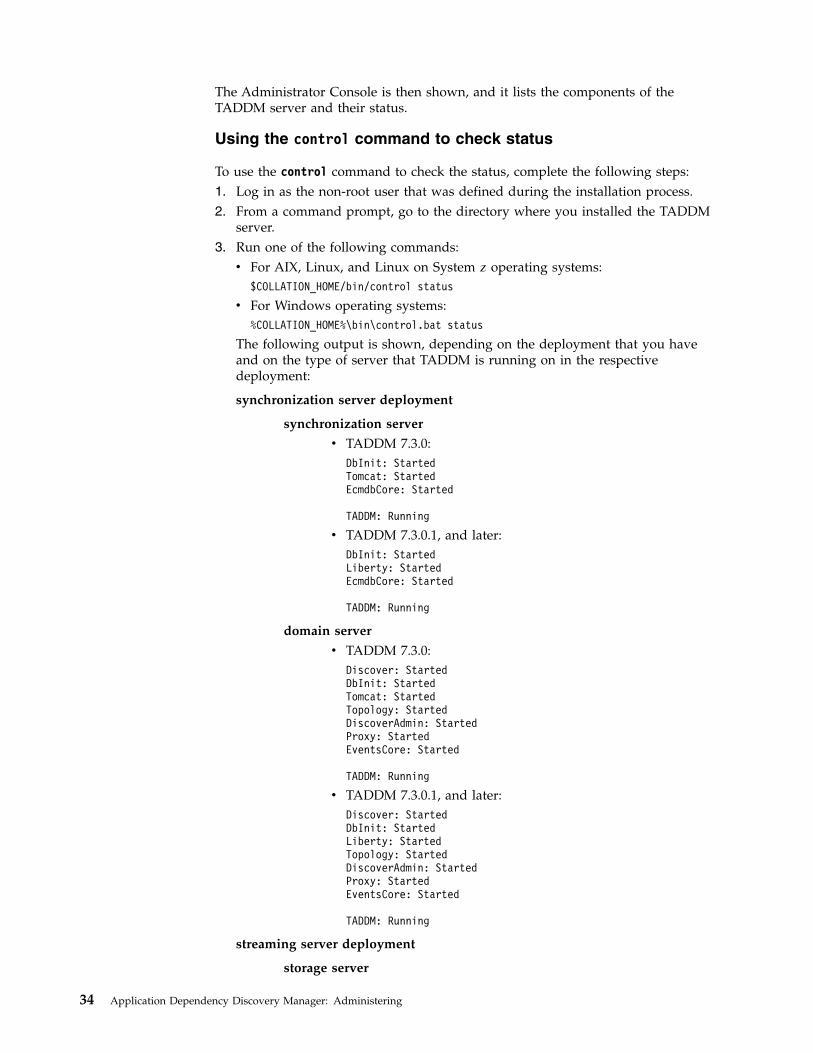
The Administrator Console is then shown, and it lists the components of theTADDM server and their status.
Using the control command to check status
To use the control command to check the status, complete the following steps:1. Log in as the non-root user that was defined during the installation process.2. From a command prompt, go to the directory where you installed the TADDM
server.3. Run one of the following commands:v For AIX, Linux, and Linux on System z operating systems:
$COLLATION_HOME/bin/control status
v For Windows operating systems:%COLLATION_HOME%\bin\control.bat status
The following output is shown, depending on the deployment that you haveand on the type of server that TADDM is running on in the respectivedeployment:
synchronization server deployment
synchronization server
v TADDM 7.3.0:DbInit: StartedTomcat: StartedEcmdbCore: Started
TADDM: Running
v TADDM 7.3.0.1, and later:DbInit: StartedLiberty: StartedEcmdbCore: Started
TADDM: Running
domain server
v TADDM 7.3.0:Discover: StartedDbInit: StartedTomcat: StartedTopology: StartedDiscoverAdmin: StartedProxy: StartedEventsCore: Started
TADDM: Running
v TADDM 7.3.0.1, and later:Discover: StartedDbInit: StartedLiberty: StartedTopology: StartedDiscoverAdmin: StartedProxy: StartedEventsCore: Started
TADDM: Running
streaming server deployment
storage server
34 Application Dependency Discovery Manager: Administering
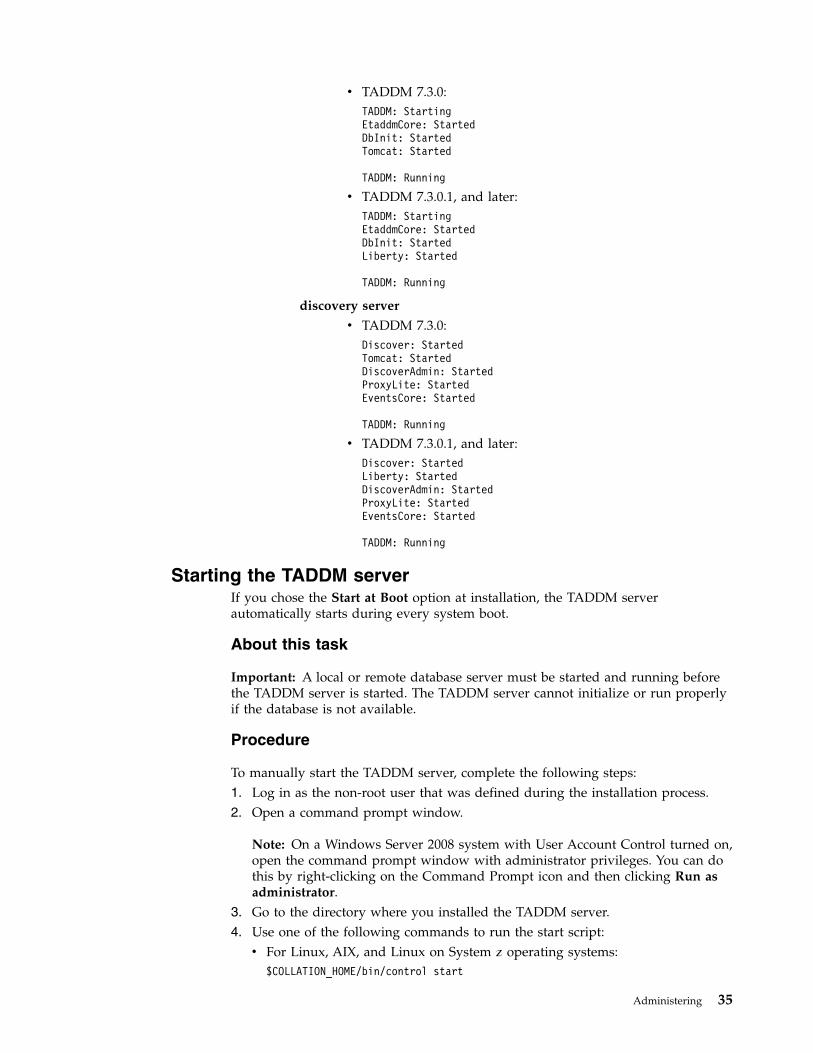
v TADDM 7.3.0:TADDM: StartingEtaddmCore: StartedDbInit: StartedTomcat: Started
TADDM: Running
v TADDM 7.3.0.1, and later:TADDM: StartingEtaddmCore: StartedDbInit: StartedLiberty: Started
TADDM: Running
discovery server
v TADDM 7.3.0:Discover: StartedTomcat: StartedDiscoverAdmin: StartedProxyLite: StartedEventsCore: Started
TADDM: Running
v TADDM 7.3.0.1, and later:Discover: StartedLiberty: StartedDiscoverAdmin: StartedProxyLite: StartedEventsCore: Started
TADDM: Running
Starting the TADDM serverIf you chose the Start at Boot option at installation, the TADDM serverautomatically starts during every system boot.
About this task
Important: A local or remote database server must be started and running beforethe TADDM server is started. The TADDM server cannot initialize or run properlyif the database is not available.
Procedure
To manually start the TADDM server, complete the following steps:1. Log in as the non-root user that was defined during the installation process.2. Open a command prompt window.
Note: On a Windows Server 2008 system with User Account Control turned on,open the command prompt window with administrator privileges. You can dothis by right-clicking on the Command Prompt icon and then clicking Run asadministrator.
3. Go to the directory where you installed the TADDM server.4. Use one of the following commands to run the start script:v For Linux, AIX, and Linux on System z operating systems:
$COLLATION_HOME/bin/control start
Administering 35
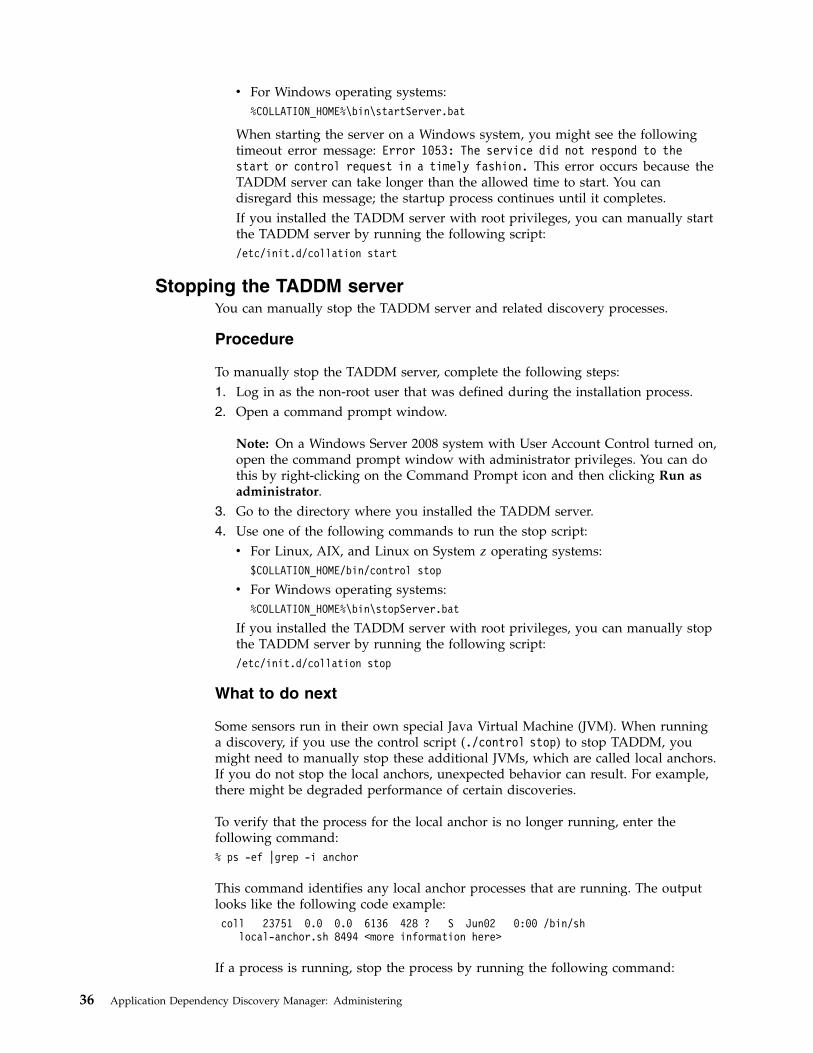
v For Windows operating systems:%COLLATION_HOME%\bin\startServer.bat
When starting the server on a Windows system, you might see the followingtimeout error message: Error 1053: The service did not respond to thestart or control request in a timely fashion. This error occurs because theTADDM server can take longer than the allowed time to start. You candisregard this message; the startup process continues until it completes.If you installed the TADDM server with root privileges, you can manually startthe TADDM server by running the following script:/etc/init.d/collation start
Stopping the TADDM serverYou can manually stop the TADDM server and related discovery processes.
Procedure
To manually stop the TADDM server, complete the following steps:1. Log in as the non-root user that was defined during the installation process.2. Open a command prompt window.
Note: On a Windows Server 2008 system with User Account Control turned on,open the command prompt window with administrator privileges. You can dothis by right-clicking on the Command Prompt icon and then clicking Run asadministrator.
3. Go to the directory where you installed the TADDM server.4. Use one of the following commands to run the stop script:v For Linux, AIX, and Linux on System z operating systems:
$COLLATION_HOME/bin/control stop
v For Windows operating systems:%COLLATION_HOME%\bin\stopServer.bat
If you installed the TADDM server with root privileges, you can manually stopthe TADDM server by running the following script:/etc/init.d/collation stop
What to do next
Some sensors run in their own special Java Virtual Machine (JVM). When runninga discovery, if you use the control script (./control stop) to stop TADDM, youmight need to manually stop these additional JVMs, which are called local anchors.If you do not stop the local anchors, unexpected behavior can result. For example,there might be degraded performance of certain discoveries.
To verify that the process for the local anchor is no longer running, enter thefollowing command:% ps -ef |grep -i anchor
This command identifies any local anchor processes that are running. The outputlooks like the following code example:coll 23751 0.0 0.0 6136 428 ? S Jun02 0:00 /bin/sh
local-anchor.sh 8494 <more information here>
If a process is running, stop the process by running the following command:
36 Application Dependency Discovery Manager: Administering
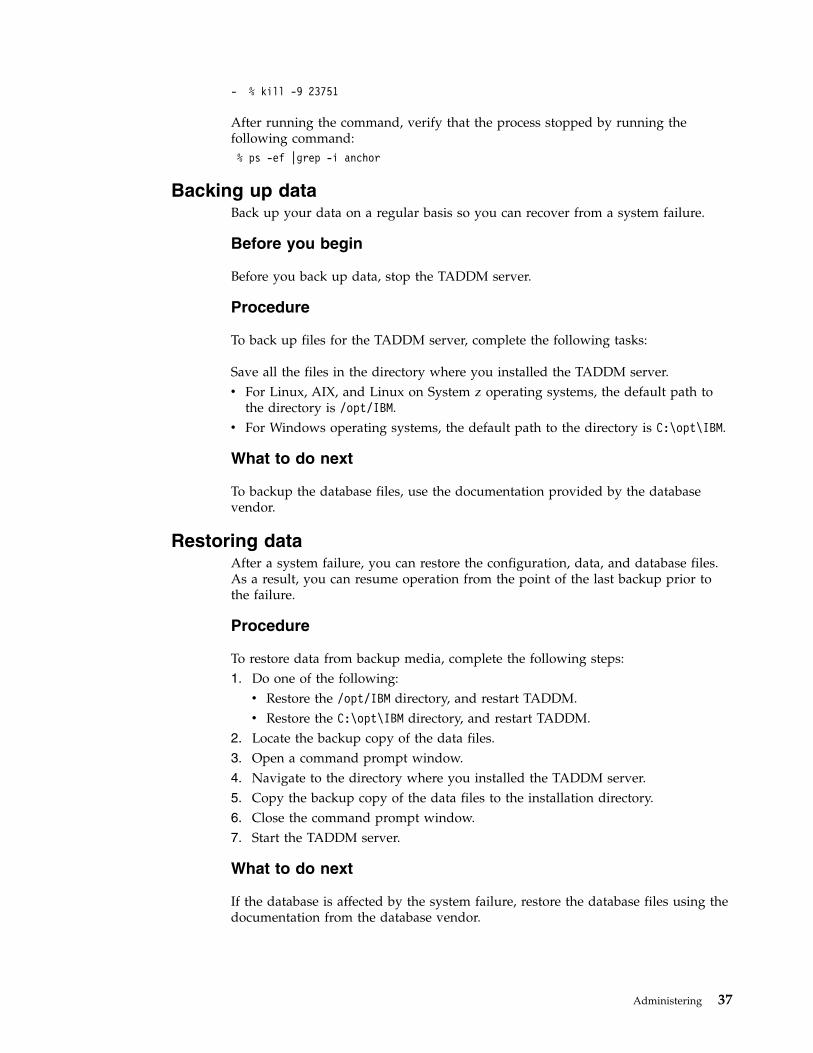
- % kill -9 23751
After running the command, verify that the process stopped by running thefollowing command:% ps -ef |grep -i anchor
Backing up dataBack up your data on a regular basis so you can recover from a system failure.
Before you begin
Before you back up data, stop the TADDM server.
Procedure
To back up files for the TADDM server, complete the following tasks:
Save all the files in the directory where you installed the TADDM server.v For Linux, AIX, and Linux on System z operating systems, the default path to
the directory is /opt/IBM.v For Windows operating systems, the default path to the directory is C:\opt\IBM.
What to do next
To backup the database files, use the documentation provided by the databasevendor.
Restoring dataAfter a system failure, you can restore the configuration, data, and database files.As a result, you can resume operation from the point of the last backup prior tothe failure.
Procedure
To restore data from backup media, complete the following steps:1. Do one of the following:v Restore the /opt/IBM directory, and restart TADDM.v Restore the C:\opt\IBM directory, and restart TADDM.
2. Locate the backup copy of the data files.3. Open a command prompt window.4. Navigate to the directory where you installed the TADDM server.5. Copy the backup copy of the data files to the installation directory.6. Close the command prompt window.7. Start the TADDM server.
What to do next
If the database is affected by the system failure, restore the database files using thedocumentation from the database vendor.
Administering 37
Copying discovery scopes, profiles, and custom servertemplates between TADDM servers
You can use the datamover.sh|bat command to copy discovery scopes, discoveryprofiles, and custom server templates between TADDM servers.
You can export discovery scopes, profiles, and custom server templates (all entities)or specify which entity to export from a server. Then on the destination server youcan import the entity or entities.
Restriction: To maintain data integrity, you must move the data between the sameversions of TADDM servers.
To copy the entities between TADDM servers, complete the following steps:1. Run the following command on the source server to export the required entity
or entities to a file:datamover.sh|bat -u user -p password -a action [-t type ] [-f filename]
where:
userThe TADDM user name.
passwordThe TADDM user password.
actionSpecify one of the following actions: import, export, or help.
Optional: typeSpecify one of the following actions: all, scope, profile, template. Thedefault value is all.
Optional: filenameSpecify a file name. The default value is datamover.xml.
Default discovery profiles are not exported, all custom server templates, usercreated profiles, and scopes can be exported.After running the command, the information about exported entities isdisplayed. For example, if the output file is exporthost.xml, the followinginformation is provided:Exported 6 scopesExported 1 profilesExported 57 templates
2. Copy the file or files to the destination server and run the datamover.sh|batand import the entity or entities.The following rules are applied when importing entities:v If a scope or profile with the same name exists on the server then the
imported scope or profile is renamed. The file is renamed to name_TADDM.v If a template exists with the same name on the server then the template is
merged to the existing template.
Deploying the Discovery Management ConsoleAfter you confirm that the TADDM server is available, you can deploy theDiscovery Management Console.
38 Application Dependency Discovery Manager: Administering
Procedure
To deploy the Discovery Management Console, complete the following steps:1. Provide users with the URL (including the port number) of the system where
you installed the TADDM server.For example, you can provide users with something similar to the followingURL:http://system.company.com:9430
2. Provide users with their user name and password.3. Specify whether users should use Secure Sockets Layer (SSL).
In cases where SSL is being used, instruct users to save a truststore for theTADDM server by following the instructions on the Discovery ManagementConsole Installation and Start page. For more information, see the TADDMInstallation Guide.
Important: You should use SSL for all communication between the DiscoveryManagement Console and the TADDM server.
4. Users need to have a supported Java runtime environment installed on thesystem used to view the Discovery Management Console. For more informationabout client prerequisites, see the TADDM Installation Guide.
5. Refer users to the TADDM User's Guide for information about how to start theDiscovery Management Console.
Configuring TADDM communicationTo establish TADDM communication, you must configure all necessary services,connections, and firewalls.
TADDM services
TADDM connectivity can be divided into three areas:
Public connectivityPublic connectivity covers network connectivity that is done from outsideof the TADDM infrastructure. For example, Data Management Portal,Discovery Management Console, or API clients, which connect to theTADDM server. It is the highest level of connectivity.
Inter-server connectivityInter-server connectivity covers network connectivity between elements ofthe TADDM core infrastructure, that is, discovery servers and storageservers. It is the middle level of connectivity.
Local connectivityLocal connectivity covers network connectivity between local services onone machine. It is the lowest level of connectivity.
You can configure connectivity for each service during the installation phase, orlater by changing configuration properties in the collation.propertiesconfiguration file.
Services default interfaceTo configure services default listen interface, change thecom.ibm.cdb.global.hostname property in the collation.properties file.
Administering 39
Table 2. Services default interface settings
Name Configuration property Default interface
Global services host com.ibm.cdb.global.hostname 0.0.0.0
Listen interface that depends on the type of communicationTo configure listening interfaces separately for services for eachconnectivity area, change the appropriate property in thecollation.properties file.
Table 3. Services default interface settings
Name Configuration property Default interface
Publicconnectivityservices host
com.ibm.cdb.public.hostname Defined bycom.ibm.cdb.global.hostname
Inter-serverconnectivityservices host
com.ibm.cdb.interserver.hostname Defined bycom.ibm.cdb.global.hostname
Localconnectivityservices host
com.ibm.cdb.local.hostname 127.0.0.1
Note: If no interface is specified or an interface has the 0.0.0.0. value,one local external network interface must be open to communication withitself. If an interface is specified, it must be open to communication withitself.
Listen interface for specific services
You can configure separate TCP port for each service during the installation phase,or later by changing respective property in the collation.properties file.
Service interface configurationTo configure a specific listen interface for each service, change theappropriate property with the host suffix in the collation.properties file.
Example for the TopologyManager service:com.ibm.cdb.service.TopologyManager.host=192.168.1.5
Note: This naming convention does not apply to public or inter-serverservice registries.
Service port configurationTo configure a specific listen port for each service, change the appropriateproperty with the port suffix in the collation.properties file.
The following example is for the TopologyManager service:com.ibm.cdb.service.TopologyManager.port=9550
SSL service configuration
To configure a specific listen interface or port for each SSL service, change theappropriate property with the secure infix in the collation.properties file.
The following example is for the SecureApiServer service:v com.ibm.cdb.service.SecureApiServer.secure.host=192.168.1.5
40 Application Dependency Discovery Manager: Administering
v com.ibm.cdb.service.SecureApiServer.secure.port=9531
Web portal interface (HTTP and HTTPS) configuration
To configure a listen interface for a web portal (HTTP and HTTPS), change thecom.ibm.cdb.service.web.host property in the collation.properties file.
Note: The HTTP and HTTPS host is configured by changing one property incontrast to other services.
Database connections
To configure a specific database connection, change the com.collation.db.port andcom.collation.db.server properties in the collation.properties file.
For example:v com.collation.db.port=65432
v com.collation.db.server=9.156.47.156
DNS connections
If you want to use fully qualified domain names (FQDN) for communication,ensure that the host that participates in communication can resolve the FQDN fromDNS service.
Sensor connections
Configuration of the ports that are used by the ping sensor and the port sensor tomake connections is included in the documentation of the ping sensor and the portsensor. Ensure that the ports to the services that you want to discover are opened.
Table 4. Ping Sensor and Port Sensor default ports
Port name Default port Protocol
SSH 22 TCP
Telnet 23 TCP
DNS 53 TCP
WMI 135 TCP
Fix Pack 2
PowerShell 5985, 5986 TCP
LDAP 389 TCP
SMB 445 TCP
Oracle 1521 TCP
CiscoWorks 1741 TCP
Anchor connections
TADDM can connect to an anchor server by using one of the following connectiontypes: ssh or direct. To configure a specific anchor connection type, change thevalue of the com.collation.discover.anchor.connectType property in thecollation.properties file to either ssh and direct.
Administering 41
To configure a specific anchor connection type for a particular address, change thecom.collation.discover.anchor.connectType property with the IP address as asuffix, in the collation.properties file, for example:com.collation.discover.anchor.connectType.1.2.3.4=direct
Additionally, port 8497 is defined as the default port for connection to an anchorserver. You can configure this port by using the Discovery Management Console.v In ssh mode, open ports for SSH communication on a public interface that is
accessed from the TADDM server and from the anchor connection port on aloopback interface on the machine that is hosting the anchor server.
v In direct mode, open ports for SSH communication and anchor connection on apublic interface that is accessed from the TADDM server.
Gateway connections
TADDM can connect to a gateway server using a SSH connection.
On the gateway, the host SSH port must be open for communication on a publicinterface that is accessed from the TADDM server.
Resolving a server's host name to a fully qualified domain name
To ensure successful communication between servers, the host server must be ableto resolve its host name to a fully qualified domain name (FQDN) by using theoperating system's resolver library. One of the following conditions must befulfilled:v In the search order of the operating system's host resolution, DNS must precede
local files. To configure this setting, refer to the operating system documentation.v In the host file, the TADDM server's FQDN must precede the short name.
If neither of these conditions can be fulfilled, you can set thecom.collation.serverID property in the collation.properties file to the IP orhost name of the TADDM server. Also, ensure that the ServerID in SynchronizationServer / Enterprise Server > Data Management Portal > Domain Management >Domain Host Name is set to the same value.
Ephemeral ports
TADDM communication includes the usage of ephemeral ports. These ports aretemporary and are specific to an operating system. Each operating system has adefined range of port numbers from which specific ports are chosen randomly.TADDM does not define these ports. For information about the range of ports,necessary configuration and more details, see documentation of the operatingsystem that you use.
Configuring firewallsTo establish TADDM communication, you must configure the necessary firewalls.The details of this task vary depending on whether you have configured a domainserver deployment, streaming server deployment or synchronization serverdeployment.
The firewall configuration information is presented in tables. Each table includesthe direction of the communication. On the target machine, the target service portmust be open on the firewall as the source of the outgoing connections and as thedestination of the incoming connections. On the source machine, the target service
42 Application Dependency Discovery Manager: Administering
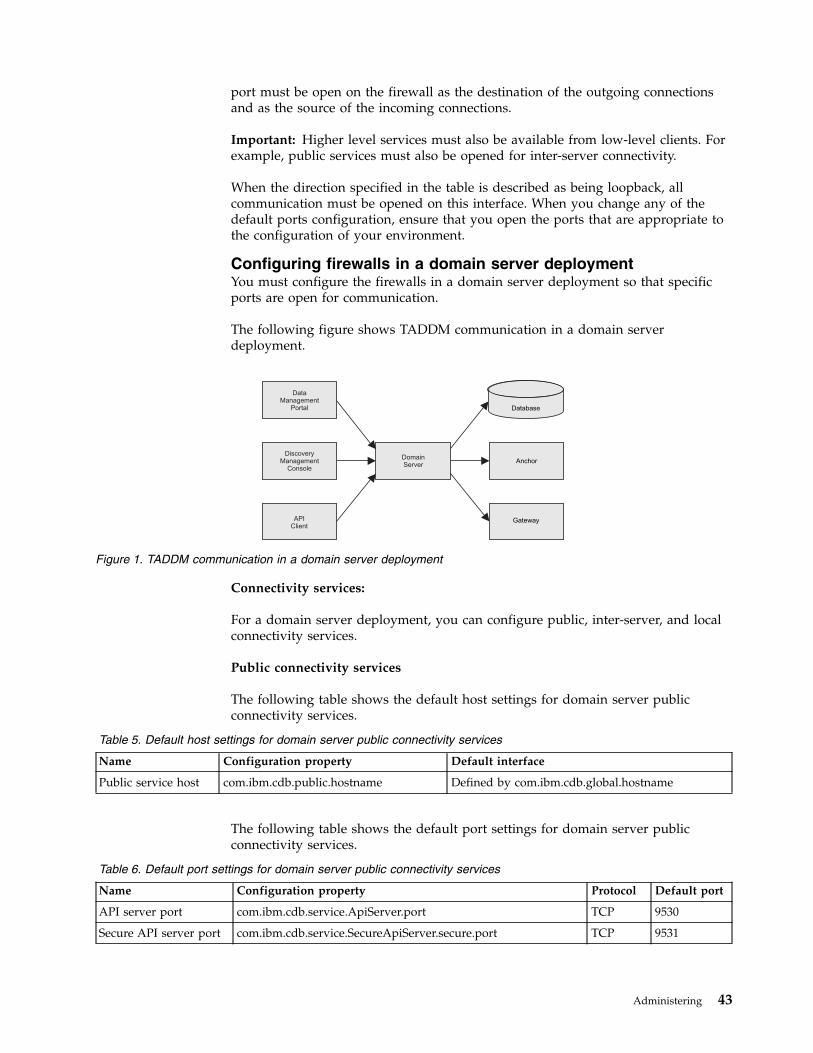
port must be open on the firewall as the destination of the outgoing connectionsand as the source of the incoming connections.
Important: Higher level services must also be available from low-level clients. Forexample, public services must also be opened for inter-server connectivity.
When the direction specified in the table is described as being loopback, allcommunication must be opened on this interface. When you change any of thedefault ports configuration, ensure that you open the ports that are appropriate tothe configuration of your environment.
Configuring firewalls in a domain server deploymentYou must configure the firewalls in a domain server deployment so that specificports are open for communication.
The following figure shows TADDM communication in a domain serverdeployment.
Connectivity services:
For a domain server deployment, you can configure public, inter-server, and localconnectivity services.
Public connectivity services
The following table shows the default host settings for domain server publicconnectivity services.
Table 5. Default host settings for domain server public connectivity services
Name Configuration property Default interface
Public service host com.ibm.cdb.public.hostname Defined by com.ibm.cdb.global.hostname
The following table shows the default port settings for domain server publicconnectivity services.
Table 6. Default port settings for domain server public connectivity services
Name Configuration property Protocol Default port
API server port com.ibm.cdb.service.ApiServer.port TCP 9530
Secure API server port com.ibm.cdb.service.SecureApiServer.secure.port TCP 9531
DataManagement
Portal
DiscoveryManagement
Console
APIClient
DomainServer
Anchor
Gateway
Database
Figure 1. TADDM communication in a domain server deployment
Administering 43
Table 6. Default port settings for domain server public connectivity services (continued)
Name Configuration property Protocol Default port
HTTP port (withoutSSL)
com.ibm.cdb.service.web.port TCP 9430
HTTPS port (with SSL) com.ibm.cdb.service.web.secure.port TCP 9431
GUI servercommunication port
com.ibm.cdb.service.ClientProxyServer.port TCP 9435
GUI server SSLcommunication port
com.ibm.cdb.service.SecureClientProxyServer.secure.port TCP 9434
Public service registryport
com.ibm.cdb.service.registry.public.port TCP 9433
Local connectivity services
Local services ports are not explicitly set. All ports must be open on the interfacethat is defined for local services. The default interface is the loopback.
The following table shows the default host settings for domain server localconnectivity services.
Table 7. Default host settings for domain server local connectivity services
Name Configuration property Default interface
Local service host com.ibm.cdb.local.hostname 127.0.0.1
Configuring communication in the domain server deployment:
To establish successful communication in the domain server deployment, configurepublic, and local connectivity services.
The following tables show the elements that you can connect in the domain serverdeployment and the ports that you must open for the communication to besuccessful.
Communication between the database server and the domain server
Table 8. Communication between the database server and the domain server.
Element A Port Direction Element B Configuration property
Databaseserver
5000 Domain server
Communication between Discovery Management Portal, API clients and Webportal and Data Management Portal clients, and the domain server
44 Application Dependency Discovery Manager: Administering

Table 9. Communication between Discovery Management Portal, API clients and Web portal and Data ManagementPortal clients, and the domain server.
Element A Port Direction Element B Configuration property
DiscoveryManagementPortal
9433 Domain server - Public serviceregistry
com.ibm.cdb.service.registry.public.port
9435 Domain server -ClientProxyServer
com.ibm.cdb.service.ClientProxyServer.port
9434 Domain server -SecureClientProxyServer
com.ibm.cdb.service.SecureClientProxyServer.secure.port
API clients 9433 Domain server - Public serviceregistry
com.ibm.cdb.service.registry.public.port
9530 Domain server - API server com.ibm.cdb.service.ApiServer.port
9531 Domain server - Secure APIserver
com.ibm.cdb.service.SecureApiServer.secure.port
Web portal andDataManagementPortal clients
9430 Domain server - Web com.ibm.cdb.service.web.port
9431 Domain server - Secure web com.ibm.cdb.service.web.secure.port
Communication between the anchor and gateway, and the domain server
Table 10. Communication between the anchor and gateway, and the domain server.
Element A Port Direction Element B Configuration property
Anchor (in sshmode) - SSH
22 Domain server (in ssh mode)
Anchor (indirect mode) -SSH
Domain server (in direct mode)
Anchor (in sshmode) - SSHtunnelforwarding
8497 Domain server (in ssh mode)
Anchor (indirect mode) -direct
Domain server (in direct mode)
Gateway - SSH 22 Domain server
Local communication
Table 11. Local connectivity communication configuration for a domain server.
Local communication Direction Configuration property
Domain server - Local serviceregistry
com.ibm.cdb.local.hostname
Domain server - Local services
Domain server - 127.0.0.1
Configuring firewalls in a streaming server deploymentYou must configure the firewalls in a streaming server deployment so that specificports are open for communication.
Administering 45
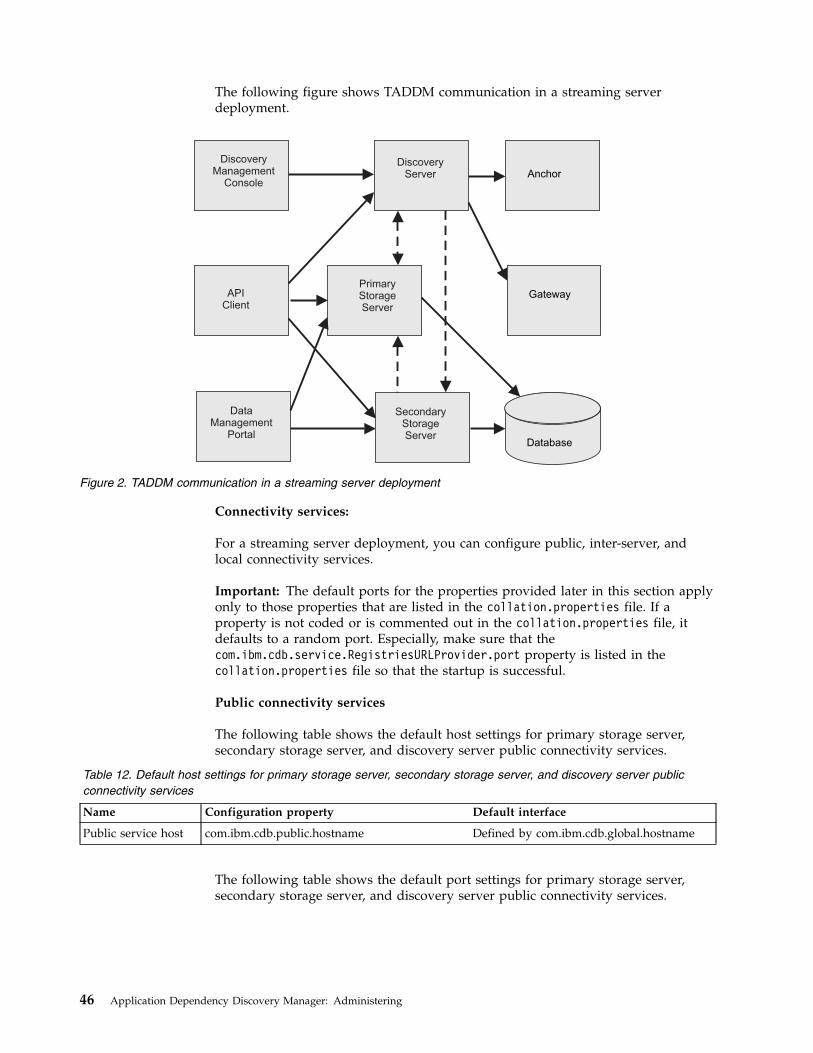
The following figure shows TADDM communication in a streaming serverdeployment.
Connectivity services:
For a streaming server deployment, you can configure public, inter-server, andlocal connectivity services.
Important: The default ports for the properties provided later in this section applyonly to those properties that are listed in the collation.properties file. If aproperty is not coded or is commented out in the collation.properties file, itdefaults to a random port. Especially, make sure that thecom.ibm.cdb.service.RegistriesURLProvider.port property is listed in thecollation.properties file so that the startup is successful.
Public connectivity services
The following table shows the default host settings for primary storage server,secondary storage server, and discovery server public connectivity services.
Table 12. Default host settings for primary storage server, secondary storage server, and discovery server publicconnectivity services
Name Configuration property Default interface
Public service host com.ibm.cdb.public.hostname Defined by com.ibm.cdb.global.hostname
The following table shows the default port settings for primary storage server,secondary storage server, and discovery server public connectivity services.
DiscoveryManagement
Console
APIClient
DiscoveryServer Anchor
Gateway
DataManagement
Portal
PrimaryStorageServer
Database
SecondaryStorageServer
Figure 2. TADDM communication in a streaming server deployment
46 Application Dependency Discovery Manager: Administering
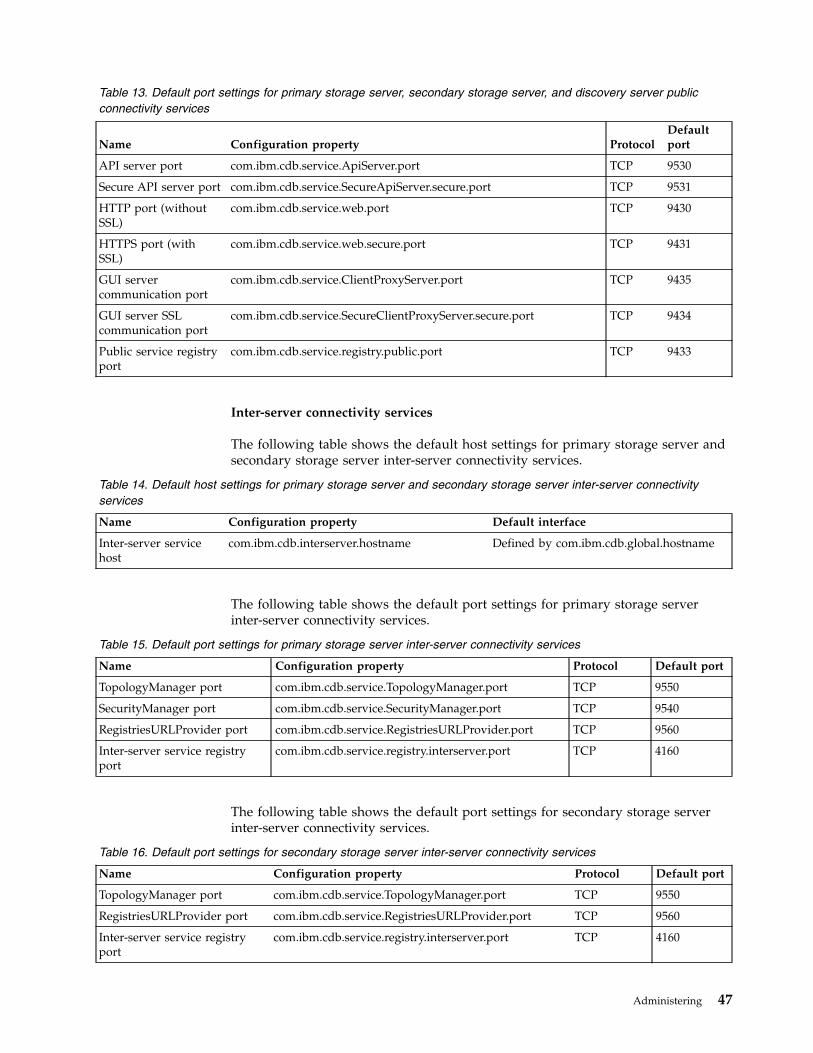
Table 13. Default port settings for primary storage server, secondary storage server, and discovery server publicconnectivity services
Name Configuration property ProtocolDefaultport
API server port com.ibm.cdb.service.ApiServer.port TCP 9530
Secure API server port com.ibm.cdb.service.SecureApiServer.secure.port TCP 9531
HTTP port (withoutSSL)
com.ibm.cdb.service.web.port TCP 9430
HTTPS port (withSSL)
com.ibm.cdb.service.web.secure.port TCP 9431
GUI servercommunication port
com.ibm.cdb.service.ClientProxyServer.port TCP 9435
GUI server SSLcommunication port
com.ibm.cdb.service.SecureClientProxyServer.secure.port TCP 9434
Public service registryport
com.ibm.cdb.service.registry.public.port TCP 9433
Inter-server connectivity services
The following table shows the default host settings for primary storage server andsecondary storage server inter-server connectivity services.
Table 14. Default host settings for primary storage server and secondary storage server inter-server connectivityservices
Name Configuration property Default interface
Inter-server servicehost
com.ibm.cdb.interserver.hostname Defined by com.ibm.cdb.global.hostname
The following table shows the default port settings for primary storage serverinter-server connectivity services.
Table 15. Default port settings for primary storage server inter-server connectivity services
Name Configuration property Protocol Default port
TopologyManager port com.ibm.cdb.service.TopologyManager.port TCP 9550
SecurityManager port com.ibm.cdb.service.SecurityManager.port TCP 9540
RegistriesURLProvider port com.ibm.cdb.service.RegistriesURLProvider.port TCP 9560
Inter-server service registryport
com.ibm.cdb.service.registry.interserver.port TCP 4160
The following table shows the default port settings for secondary storage serverinter-server connectivity services.
Table 16. Default port settings for secondary storage server inter-server connectivity services
Name Configuration property Protocol Default port
TopologyManager port com.ibm.cdb.service.TopologyManager.port TCP 9550
RegistriesURLProvider port com.ibm.cdb.service.RegistriesURLProvider.port TCP 9560
Inter-server service registryport
com.ibm.cdb.service.registry.interserver.port TCP 4160
Administering 47
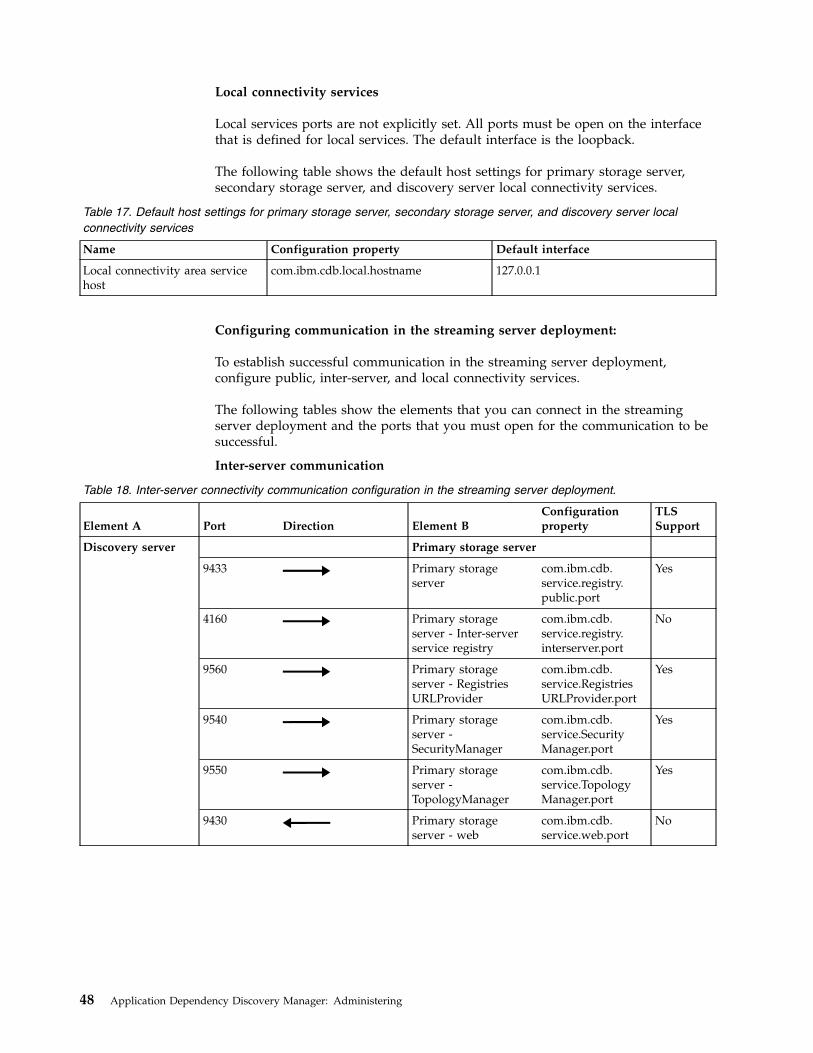
Local connectivity services
Local services ports are not explicitly set. All ports must be open on the interfacethat is defined for local services. The default interface is the loopback.
The following table shows the default host settings for primary storage server,secondary storage server, and discovery server local connectivity services.
Table 17. Default host settings for primary storage server, secondary storage server, and discovery server localconnectivity services
Name Configuration property Default interface
Local connectivity area servicehost
com.ibm.cdb.local.hostname 127.0.0.1
Configuring communication in the streaming server deployment:
To establish successful communication in the streaming server deployment,configure public, inter-server, and local connectivity services.
The following tables show the elements that you can connect in the streamingserver deployment and the ports that you must open for the communication to besuccessful.
Inter-server communication
Table 18. Inter-server connectivity communication configuration in the streaming server deployment.
Element A Port Direction Element BConfigurationproperty
TLSSupport
Discovery server Primary storage server
9433 Primary storageserver
com.ibm.cdb.service.registry.public.port
Yes
4160 Primary storageserver - Inter-serverservice registry
com.ibm.cdb.service.registry.interserver.port
No
9560 Primary storageserver - RegistriesURLProvider
com.ibm.cdb.service.RegistriesURLProvider.port
Yes
9540 Primary storageserver -SecurityManager
com.ibm.cdb.service.SecurityManager.port
Yes
9550 Primary storageserver -TopologyManager
com.ibm.cdb.service.TopologyManager.port
Yes
9430 Primary storageserver - web
com.ibm.cdb.service.web.port
No
48 Application Dependency Discovery Manager: Administering
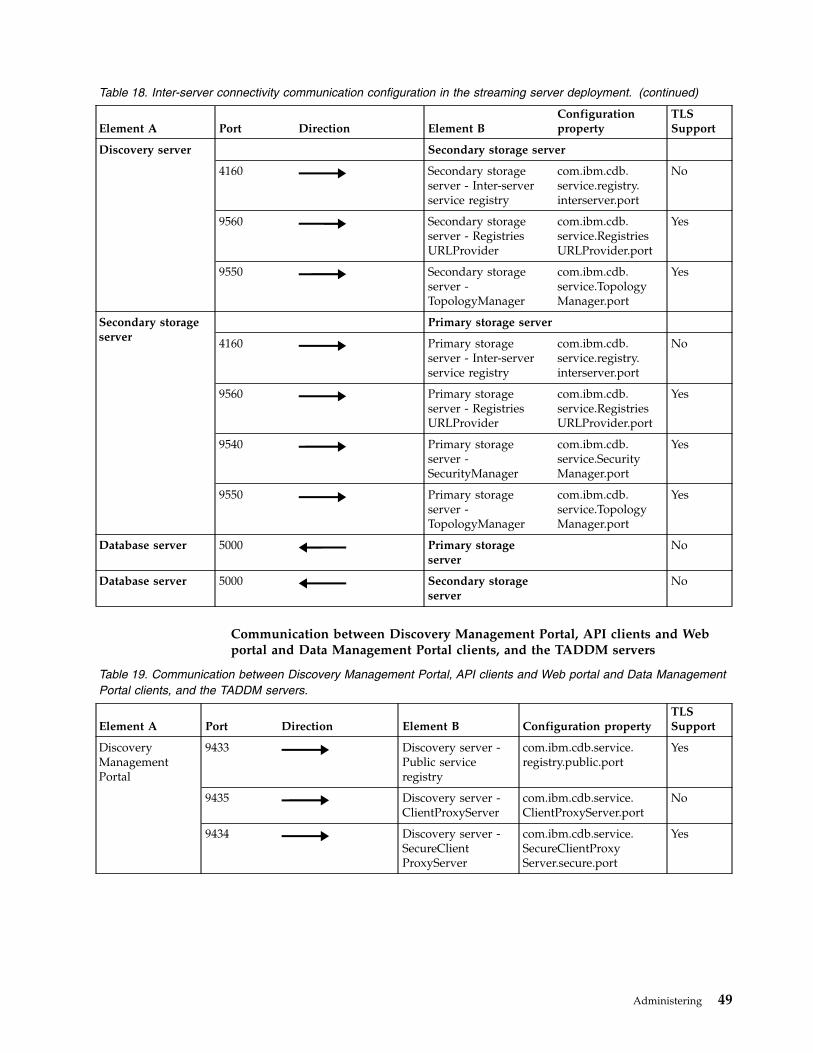
Table 18. Inter-server connectivity communication configuration in the streaming server deployment. (continued)
Element A Port Direction Element BConfigurationproperty
TLSSupport
Discovery server Secondary storage server
4160 Secondary storageserver - Inter-serverservice registry
com.ibm.cdb.service.registry.interserver.port
No
9560 Secondary storageserver - RegistriesURLProvider
com.ibm.cdb.service.RegistriesURLProvider.port
Yes
9550 Secondary storageserver -TopologyManager
com.ibm.cdb.service.TopologyManager.port
Yes
Secondary storageserver
Primary storage server
4160 Primary storageserver - Inter-serverservice registry
com.ibm.cdb.service.registry.interserver.port
No
9560 Primary storageserver - RegistriesURLProvider
com.ibm.cdb.service.RegistriesURLProvider.port
Yes
9540 Primary storageserver -SecurityManager
com.ibm.cdb.service.SecurityManager.port
Yes
9550 Primary storageserver -TopologyManager
com.ibm.cdb.service.TopologyManager.port
Yes
Database server 5000 Primary storageserver
No
Database server 5000 Secondary storageserver
No
Communication between Discovery Management Portal, API clients and Webportal and Data Management Portal clients, and the TADDM servers
Table 19. Communication between Discovery Management Portal, API clients and Web portal and Data ManagementPortal clients, and the TADDM servers.
Element A Port Direction Element B Configuration propertyTLSSupport
DiscoveryManagementPortal
9433 Discovery server -Public serviceregistry
com.ibm.cdb.service.registry.public.port
Yes
9435 Discovery server -ClientProxyServer
com.ibm.cdb.service.ClientProxyServer.port
No
9434 Discovery server -SecureClientProxyServer
com.ibm.cdb.service.SecureClientProxyServer.secure.port
Yes
Administering 49
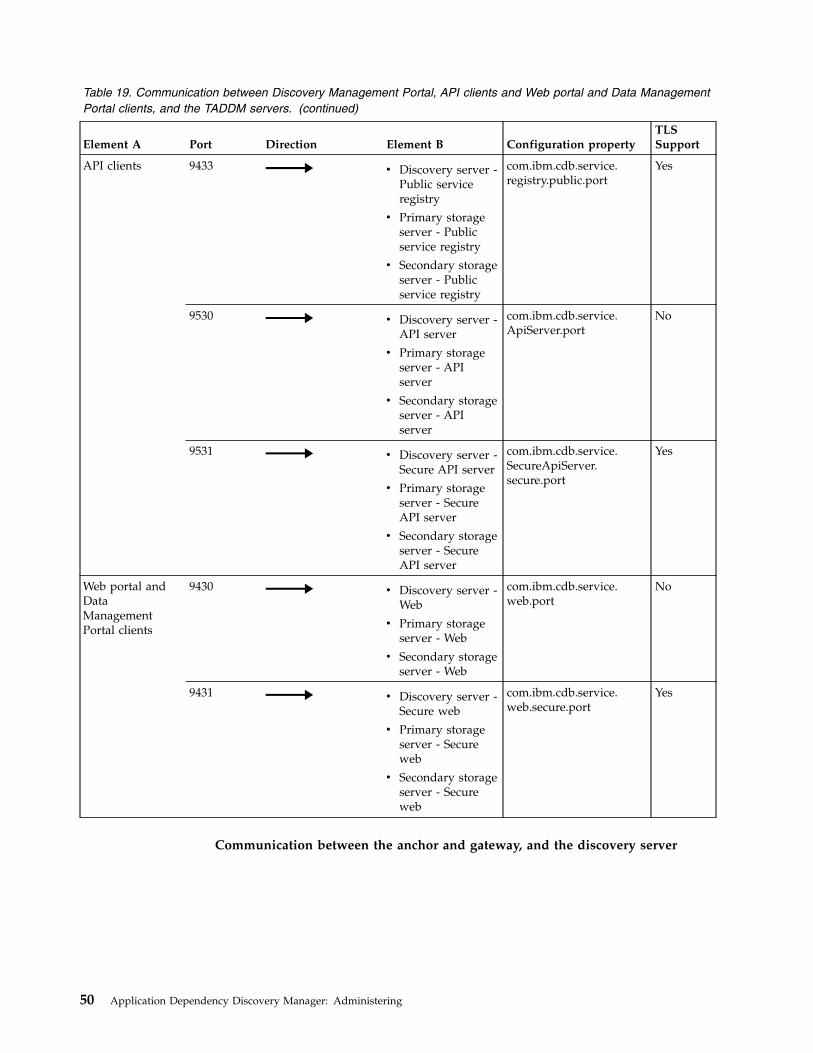
Table 19. Communication between Discovery Management Portal, API clients and Web portal and Data ManagementPortal clients, and the TADDM servers. (continued)
Element A Port Direction Element B Configuration propertyTLSSupport
API clients 9433 v Discovery server -Public serviceregistry
v Primary storageserver - Publicservice registry
v Secondary storageserver - Publicservice registry
com.ibm.cdb.service.registry.public.port
Yes
9530 v Discovery server -API server
v Primary storageserver - APIserver
v Secondary storageserver - APIserver
com.ibm.cdb.service.ApiServer.port
No
9531 v Discovery server -Secure API server
v Primary storageserver - SecureAPI server
v Secondary storageserver - SecureAPI server
com.ibm.cdb.service.SecureApiServer.secure.port
Yes
Web portal andDataManagementPortal clients
9430 v Discovery server -Web
v Primary storageserver - Web
v Secondary storageserver - Web
com.ibm.cdb.service.web.port
No
9431 v Discovery server -Secure web
v Primary storageserver - Secureweb
v Secondary storageserver - Secureweb
com.ibm.cdb.service.web.secure.port
Yes
Communication between the anchor and gateway, and the discovery server
50 Application Dependency Discovery Manager: Administering
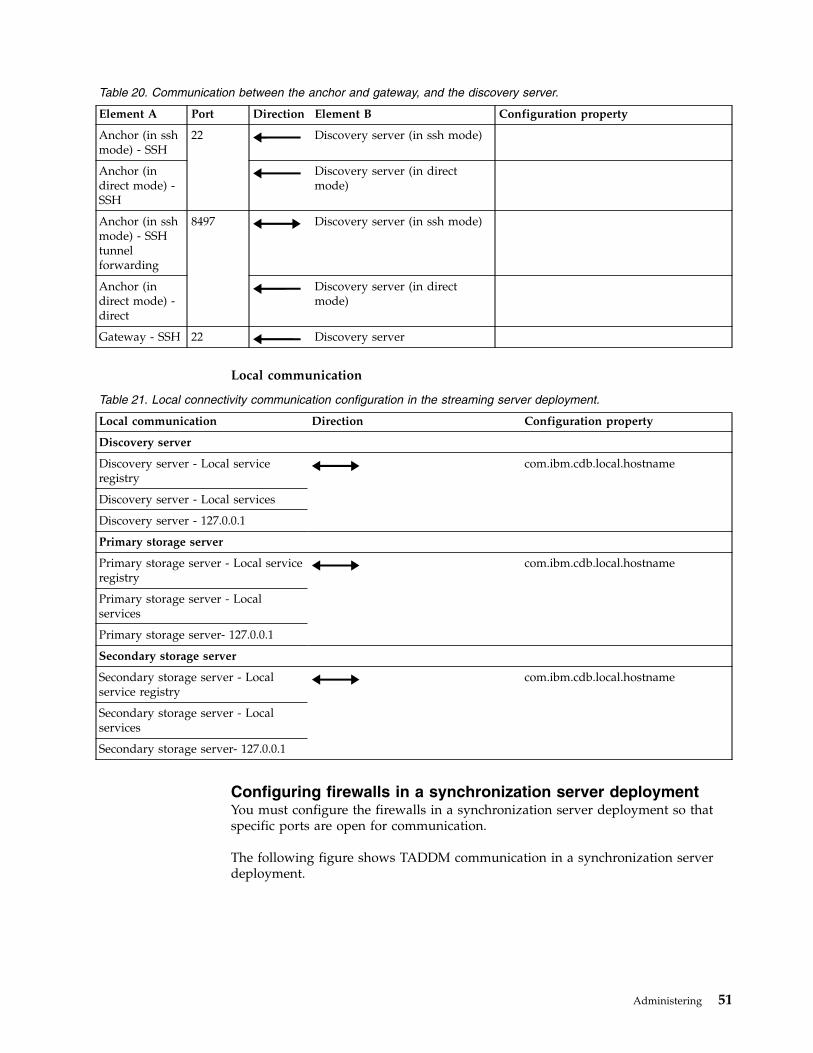
Table 20. Communication between the anchor and gateway, and the discovery server.
Element A Port Direction Element B Configuration property
Anchor (in sshmode) - SSH
22 Discovery server (in ssh mode)
Anchor (indirect mode) -SSH
Discovery server (in directmode)
Anchor (in sshmode) - SSHtunnelforwarding
8497 Discovery server (in ssh mode)
Anchor (indirect mode) -direct
Discovery server (in directmode)
Gateway - SSH 22 Discovery server
Local communication
Table 21. Local connectivity communication configuration in the streaming server deployment.
Local communication Direction Configuration property
Discovery server
Discovery server - Local serviceregistry
com.ibm.cdb.local.hostname
Discovery server - Local services
Discovery server - 127.0.0.1
Primary storage server
Primary storage server - Local serviceregistry
com.ibm.cdb.local.hostname
Primary storage server - Localservices
Primary storage server- 127.0.0.1
Secondary storage server
Secondary storage server - Localservice registry
com.ibm.cdb.local.hostname
Secondary storage server - Localservices
Secondary storage server- 127.0.0.1
Configuring firewalls in a synchronization server deploymentYou must configure the firewalls in a synchronization server deployment so thatspecific ports are open for communication.
The following figure shows TADDM communication in a synchronization serverdeployment.
Administering 51
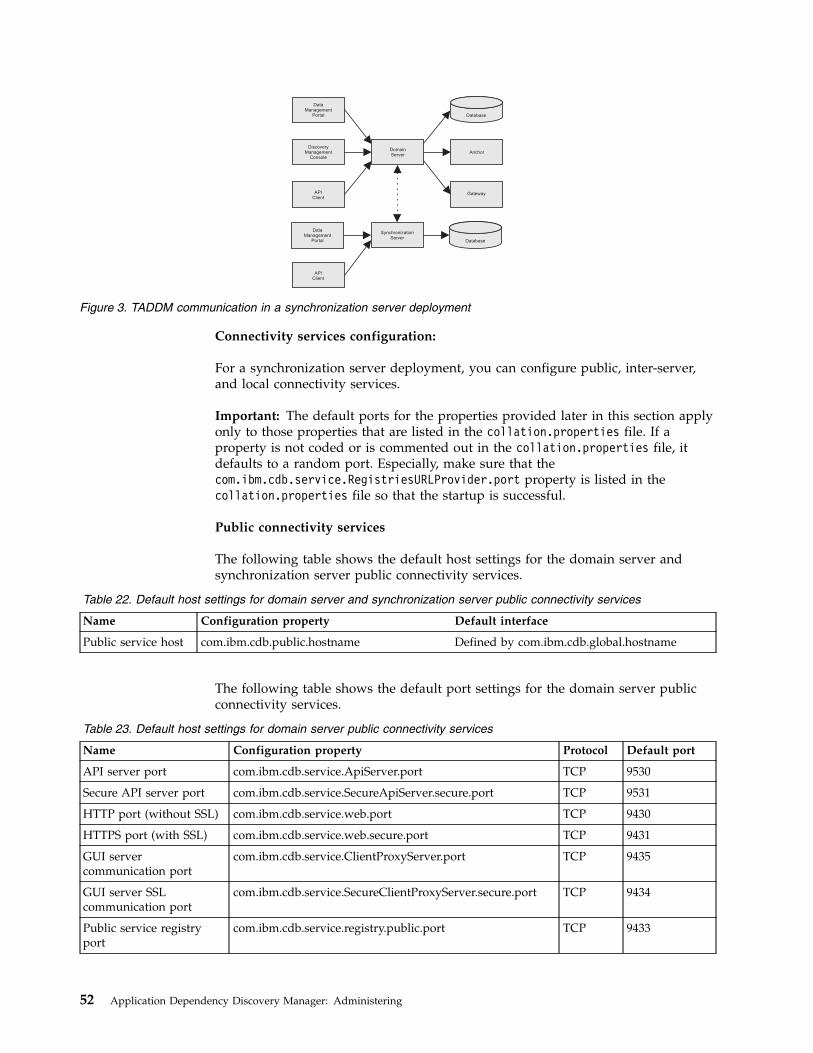
Connectivity services configuration:
For a synchronization server deployment, you can configure public, inter-server,and local connectivity services.
Important: The default ports for the properties provided later in this section applyonly to those properties that are listed in the collation.properties file. If aproperty is not coded or is commented out in the collation.properties file, itdefaults to a random port. Especially, make sure that thecom.ibm.cdb.service.RegistriesURLProvider.port property is listed in thecollation.properties file so that the startup is successful.
Public connectivity services
The following table shows the default host settings for the domain server andsynchronization server public connectivity services.
Table 22. Default host settings for domain server and synchronization server public connectivity services
Name Configuration property Default interface
Public service host com.ibm.cdb.public.hostname Defined by com.ibm.cdb.global.hostname
The following table shows the default port settings for the domain server publicconnectivity services.
Table 23. Default host settings for domain server public connectivity services
Name Configuration property Protocol Default port
API server port com.ibm.cdb.service.ApiServer.port TCP 9530
Secure API server port com.ibm.cdb.service.SecureApiServer.secure.port TCP 9531
HTTP port (without SSL) com.ibm.cdb.service.web.port TCP 9430
HTTPS port (with SSL) com.ibm.cdb.service.web.secure.port TCP 9431
GUI servercommunication port
com.ibm.cdb.service.ClientProxyServer.port TCP 9435
GUI server SSLcommunication port
com.ibm.cdb.service.SecureClientProxyServer.secure.port TCP 9434
Public service registryport
com.ibm.cdb.service.registry.public.port TCP 9433
DataManagement
Portal
DiscoveryManagement
Console
APIClient
DomainServer
Gateway
DataManagement
Portal
APIClient
SynchronizationServer
Database
Anchor
Database
Figure 3. TADDM communication in a synchronization server deployment
52 Application Dependency Discovery Manager: Administering
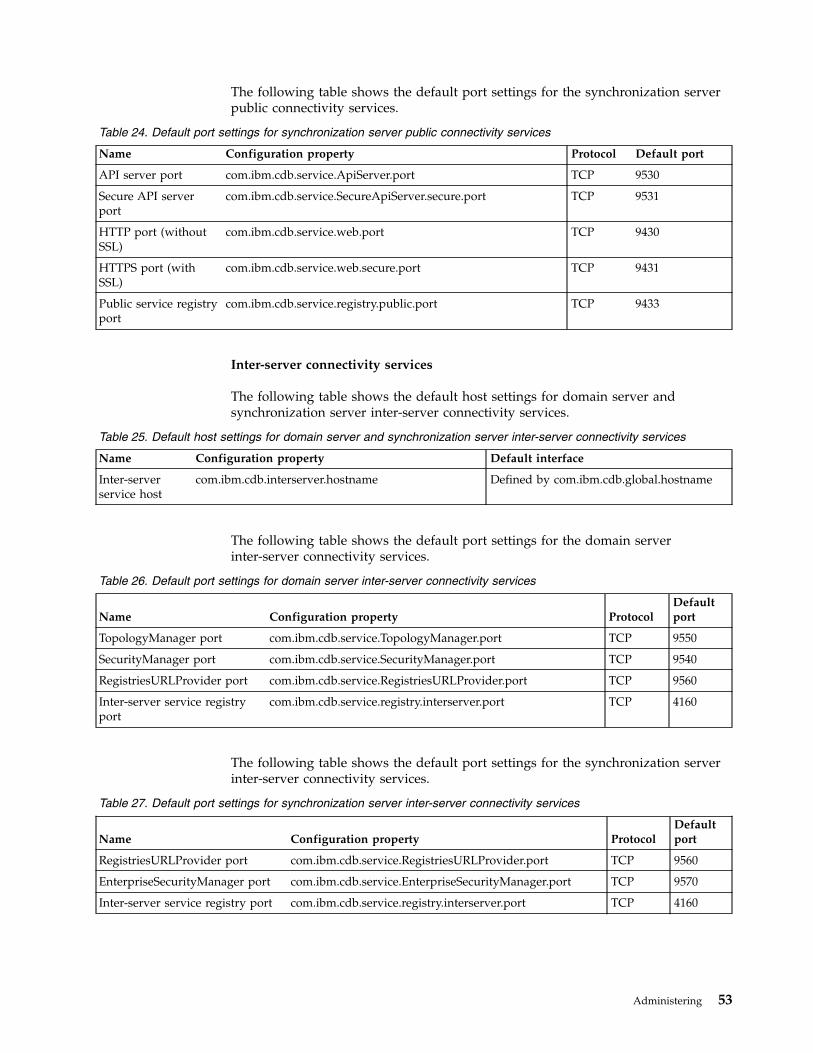
The following table shows the default port settings for the synchronization serverpublic connectivity services.
Table 24. Default port settings for synchronization server public connectivity services
Name Configuration property Protocol Default port
API server port com.ibm.cdb.service.ApiServer.port TCP 9530
Secure API serverport
com.ibm.cdb.service.SecureApiServer.secure.port TCP 9531
HTTP port (withoutSSL)
com.ibm.cdb.service.web.port TCP 9430
HTTPS port (withSSL)
com.ibm.cdb.service.web.secure.port TCP 9431
Public service registryport
com.ibm.cdb.service.registry.public.port TCP 9433
Inter-server connectivity services
The following table shows the default host settings for domain server andsynchronization server inter-server connectivity services.
Table 25. Default host settings for domain server and synchronization server inter-server connectivity services
Name Configuration property Default interface
Inter-serverservice host
com.ibm.cdb.interserver.hostname Defined by com.ibm.cdb.global.hostname
The following table shows the default port settings for the domain serverinter-server connectivity services.
Table 26. Default port settings for domain server inter-server connectivity services
Name Configuration property ProtocolDefaultport
TopologyManager port com.ibm.cdb.service.TopologyManager.port TCP 9550
SecurityManager port com.ibm.cdb.service.SecurityManager.port TCP 9540
RegistriesURLProvider port com.ibm.cdb.service.RegistriesURLProvider.port TCP 9560
Inter-server service registryport
com.ibm.cdb.service.registry.interserver.port TCP 4160
The following table shows the default port settings for the synchronization serverinter-server connectivity services.
Table 27. Default port settings for synchronization server inter-server connectivity services
Name Configuration property ProtocolDefaultport
RegistriesURLProvider port com.ibm.cdb.service.RegistriesURLProvider.port TCP 9560
EnterpriseSecurityManager port com.ibm.cdb.service.EnterpriseSecurityManager.port TCP 9570
Inter-server service registry port com.ibm.cdb.service.registry.interserver.port TCP 4160
Administering 53
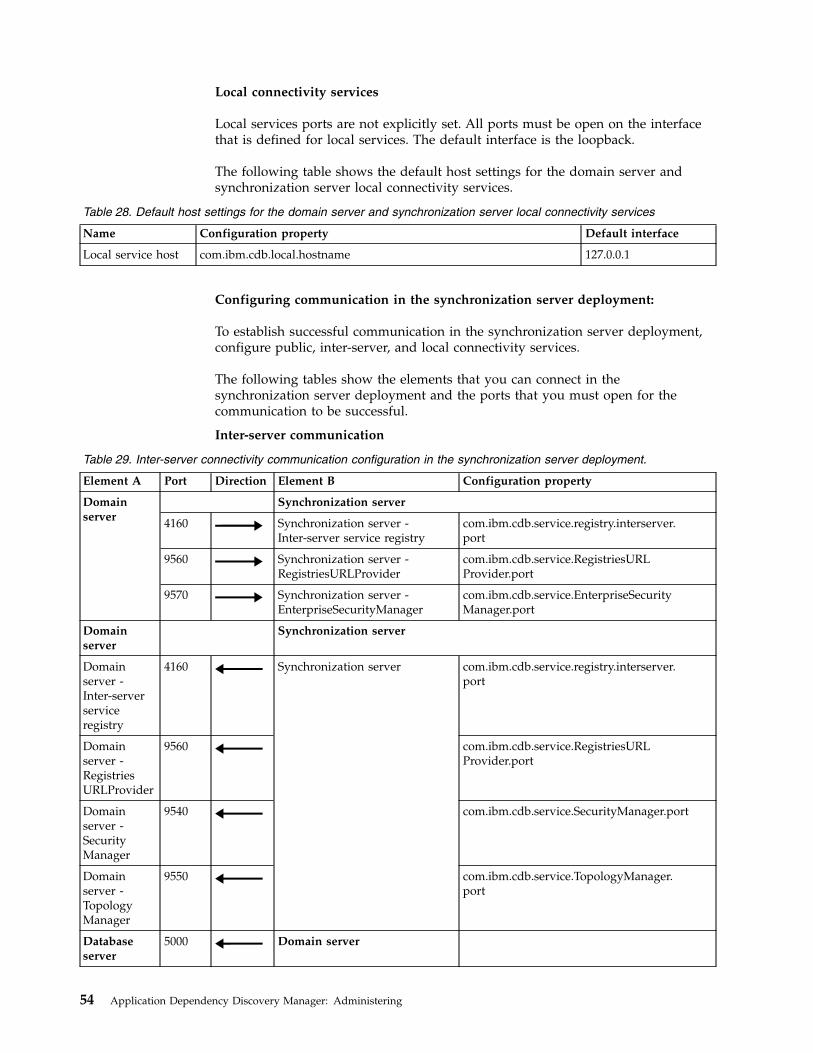
Local connectivity services
Local services ports are not explicitly set. All ports must be open on the interfacethat is defined for local services. The default interface is the loopback.
The following table shows the default host settings for the domain server andsynchronization server local connectivity services.
Table 28. Default host settings for the domain server and synchronization server local connectivity services
Name Configuration property Default interface
Local service host com.ibm.cdb.local.hostname 127.0.0.1
Configuring communication in the synchronization server deployment:
To establish successful communication in the synchronization server deployment,configure public, inter-server, and local connectivity services.
The following tables show the elements that you can connect in thesynchronization server deployment and the ports that you must open for thecommunication to be successful.
Inter-server communication
Table 29. Inter-server connectivity communication configuration in the synchronization server deployment.
Element A Port Direction Element B Configuration property
Domainserver
Synchronization server
4160 Synchronization server -Inter-server service registry
com.ibm.cdb.service.registry.interserver.port
9560 Synchronization server -RegistriesURLProvider
com.ibm.cdb.service.RegistriesURLProvider.port
9570 Synchronization server -EnterpriseSecurityManager
com.ibm.cdb.service.EnterpriseSecurityManager.port
Domainserver
Synchronization server
Domainserver -Inter-serverserviceregistry
4160 Synchronization server com.ibm.cdb.service.registry.interserver.port
Domainserver -RegistriesURLProvider
9560 com.ibm.cdb.service.RegistriesURLProvider.port
Domainserver -SecurityManager
9540 com.ibm.cdb.service.SecurityManager.port
Domainserver -TopologyManager
9550 com.ibm.cdb.service.TopologyManager.port
Databaseserver
5000 Domain server
54 Application Dependency Discovery Manager: Administering
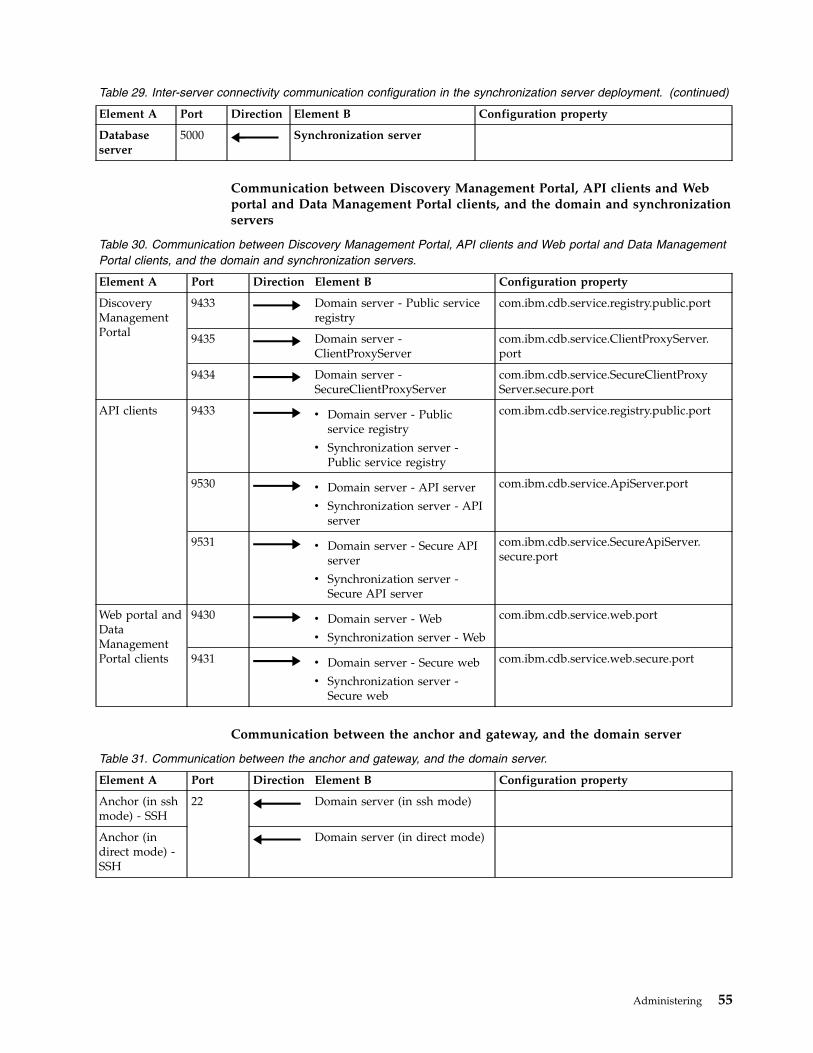
Table 29. Inter-server connectivity communication configuration in the synchronization server deployment. (continued)
Element A Port Direction Element B Configuration property
Databaseserver
5000 Synchronization server
Communication between Discovery Management Portal, API clients and Webportal and Data Management Portal clients, and the domain and synchronizationservers
Table 30. Communication between Discovery Management Portal, API clients and Web portal and Data ManagementPortal clients, and the domain and synchronization servers.
Element A Port Direction Element B Configuration property
DiscoveryManagementPortal
9433 Domain server - Public serviceregistry
com.ibm.cdb.service.registry.public.port
9435 Domain server -ClientProxyServer
com.ibm.cdb.service.ClientProxyServer.port
9434 Domain server -SecureClientProxyServer
com.ibm.cdb.service.SecureClientProxyServer.secure.port
API clients 9433 v Domain server - Publicservice registry
v Synchronization server -Public service registry
com.ibm.cdb.service.registry.public.port
9530 v Domain server - API server
v Synchronization server - APIserver
com.ibm.cdb.service.ApiServer.port
9531 v Domain server - Secure APIserver
v Synchronization server -Secure API server
com.ibm.cdb.service.SecureApiServer.secure.port
Web portal andDataManagementPortal clients
9430 v Domain server - Web
v Synchronization server - Web
com.ibm.cdb.service.web.port
9431 v Domain server - Secure web
v Synchronization server -Secure web
com.ibm.cdb.service.web.secure.port
Communication between the anchor and gateway, and the domain server
Table 31. Communication between the anchor and gateway, and the domain server.
Element A Port Direction Element B Configuration property
Anchor (in sshmode) - SSH
22 Domain server (in ssh mode)
Anchor (indirect mode) -SSH
Domain server (in direct mode)
Administering 55
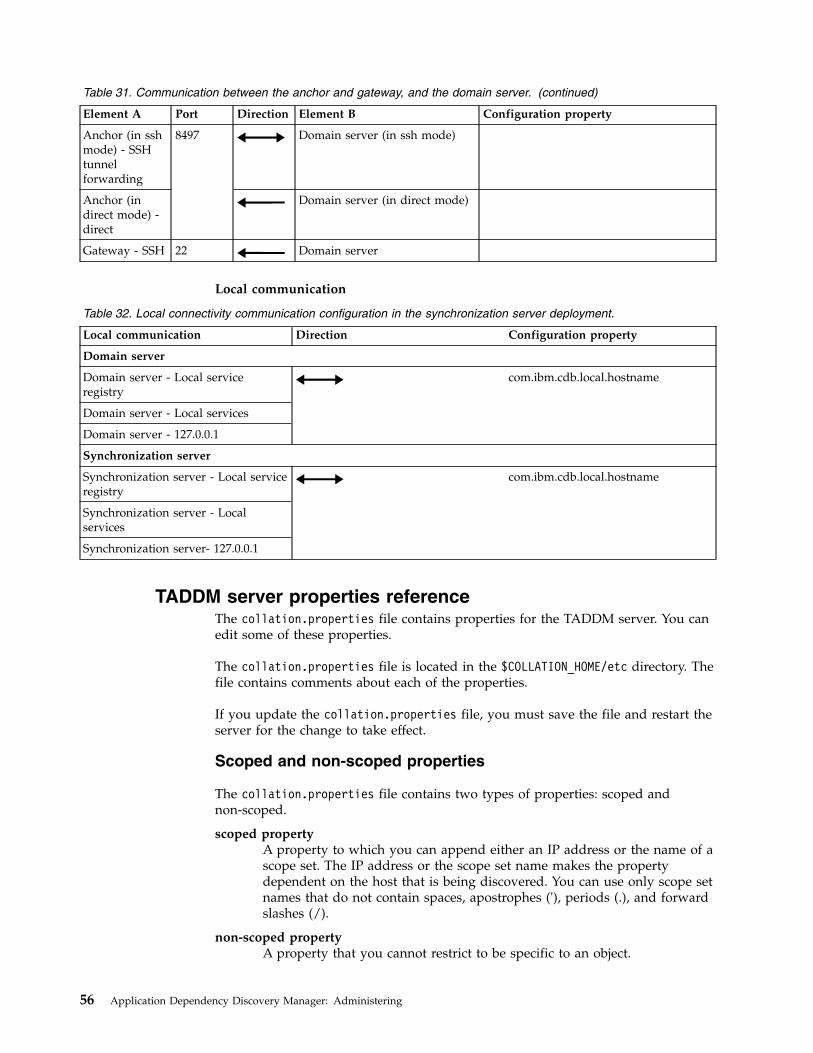
Table 31. Communication between the anchor and gateway, and the domain server. (continued)
Element A Port Direction Element B Configuration property
Anchor (in sshmode) - SSHtunnelforwarding
8497 Domain server (in ssh mode)
Anchor (indirect mode) -direct
Domain server (in direct mode)
Gateway - SSH 22 Domain server
Local communication
Table 32. Local connectivity communication configuration in the synchronization server deployment.
Local communication Direction Configuration property
Domain server
Domain server - Local serviceregistry
com.ibm.cdb.local.hostname
Domain server - Local services
Domain server - 127.0.0.1
Synchronization server
Synchronization server - Local serviceregistry
com.ibm.cdb.local.hostname
Synchronization server - Localservices
Synchronization server- 127.0.0.1
TADDM server properties referenceThe collation.properties file contains properties for the TADDM server. You canedit some of these properties.
The collation.properties file is located in the $COLLATION_HOME/etc directory. Thefile contains comments about each of the properties.
If you update the collation.properties file, you must save the file and restart theserver for the change to take effect.
Scoped and non-scoped properties
The collation.properties file contains two types of properties: scoped andnon-scoped.
scoped propertyA property to which you can append either an IP address or the name of ascope set. The IP address or the scope set name makes the propertydependent on the host that is being discovered. You can use only scope setnames that do not contain spaces, apostrophes ('), periods (.), and forwardslashes (/).
non-scoped propertyA property that you cannot restrict to be specific to an object.
56 Application Dependency Discovery Manager: Administering
For example, the following properties are non-scoped properties:v com.collation.log.filesize
v com.collation.discover.agent.command.lsof.Linux
However, the com.collation.discover.agent.command.lsof.Linux property can bea scoped property if you append either an IP address or a scope set name to theproperty, as shown in the following examples:v Example of appending the IP address 129.42.56.212:
com.collation.discover.agent.command.lsof.Linux.129.42.56.212=sudo lsof
v Example of appending a scope set named “scope1”:com.collation.discover.agent.command.lsof.Linux.scope1=sudo lsof
Properties that you must not changeChanging some properties in the collation.properties file can make your systeminoperative.
You must not change the following properties:
com.collation.versionIdentifies the product version.
com.collation.branchIdentifies the branch of code.
com.collation.buildnumberIdentifies the build number. This number is set by the build process.
com.collation.oalbuildnumberIdentifies the build number for another build process.
com.collation.SshWeirdReauthErrorList=Permission deniedThe value of this property must be Permission denied.
The property is needed because Windows systems can randomly denyvalid login attempts. You can try the user name and password pairs thathave previously worked during discovery runs.
Access credentials caching propertiesThese properties apply to access credentials caching.
com.ibm.cdb.security.auth.cache.disabled=falseThe default value is false.
This property determines whether credentials caching is disabled.
This property is a scoped and profiled property. You can append an IPaddress, the name of a scope set or a profile name. You can also set it inthe profile configuration in Discovery Management Console.
com.ibm.cdb.security.auth.cache.fallback.failed=trueThe default value is true.
This property turns on fallback, when a cache contains valid credentials,but upon retrieval, it fails to validate. If fallback is enabled and cachedcredentials are no longer valid, cache iterates over all available access entrytypes until a match is found.
This property is a scoped and profiled property. You can append an IPaddress, the name of a scope set or profile name.
The following entries are the examples of entries that can be found in thecollation.properties file:
Administering 57
com.ibm.cdb.security.auth.cache.fallback.failed=falsecom.ibm.cdb.security.auth.cache.fallback.failed.10.160.160.11=truecom.ibm.cdb.security.auth.cache.fallback.failed.ScopeA=truecom.ibm.cdb.security.auth.cache.fallback.failed.GroupA=truecom.ibm.cdb.security.auth.cache.fallback.failed.Level_2_Discovery=false
You can also set this property in Discovery Management Console in theprofile configuration on the Platform Properties tab.
com.ibm.cdb.security.auth.cache.fallback.invalid=trueThe default value is true.
This property turns on fallback, when entry read from cache containsinvalid attempt (the last access failed, there was no valid credentials). Iffallback is enabled, cache iterates over all available access entry types untila match is found.
This property is a scoped and profiled property, you can append an IPaddress, the name of a scope set or profile name.
The following entries are the examples of entries that can be found in thecollation.properties file:com.ibm.cdb.security.auth.cache.fallback.invalid=falsecom.ibm.cdb.security.auth.cache.fallback.invalid.10.160.160.11=truecom.ibm.cdb.security.auth.cache.fallback.invalid.ScopeA=truecom.ibm.cdb.security.auth.cache.fallback.invalid.GroupA=truecom.ibm.cdb.security.auth.cache.fallback.invalid.Level_2_Discovery=false
You can also set this property in Discovery Management Console in theprofile configuration on the Platform Properties tab.
Fix Pack 5 com.ibm.cdb.security.auth.cache.itm.disabled=trueThe default value is true.
This property determines whether credentials caching is disabled for OSLCdiscovery.
This property is a scoped and profiled property. You can append an IPaddress, the name of a scope set or a profile name. You can also set it inthe profile configuration in Discovery Management Console.
Related concepts:“Last successful credentials caching” on page 13TADDM can cache last working access credentials. They can be reused in the next(Level 2 or script-based) discovery.
API port propertiesThese properties apply to API ports.
com.ibm.cdb.service.ApiServer.port=9530The default value is 9530. The value must be an integer.
This property specifies the port that the API server listens on for non-SSLrequests. The value can be set to any available port on the server. Anyclient that uses the API for connection must specify this port for a non-SSLconnection.
com.ibm.cdb.service.SecureApiServer.secure.port=9531The default value is 9531. The value must be an integer.
This property specifies the port that the API server listens on for SSLrequests. The value can be set to any available port on the server. Anyclient that uses the API for connection must specify this port for an SSLconnection.
58 Application Dependency Discovery Manager: Administering
Cleanup agents propertiesThe cleanup agents remove the orphaned aliases and configuration items, or fix themissing rows in the tables. Most of them read properties that are defined in thecollation.properties file.
AliasesCleanupAgent
The agent removes aliases from the ALIASES table that no longer match the CInaming attributes. It also removes aliases and rows in the PERSOBJ table which donot have any corresponding CIs. The agent reads the following properties from thecollation.properties file:
Fix Pack 2 com.ibm.cdb.topomgr.topobuilder.deleteAliasesWithoutMasterThe default value is true.
The property specifies whether the aliases that do not have thecorresponding master alias are deleted from the ALIASES table. By default,the deletion is enabled.
com.ibm.cdb.topomgr.topobuilder.max.row.fetchThe default value is 1000.
The property configures the batch size used to fetch aliases from theALIASES table.
If you set the property to -1, the agent does not verify the aliases.
com.ibm.cdb.topomgr.topobuilder.max.row.deleteThe default value is 5000.
The property configures the batch size used to delete aliases.
If you set the property to -1, the agent does not remove aliases but onlyreports the corrupted ones.
com.ibm.cdb.topomgr.topobuilder.agents.AliasesCleanupAgent.maxNumberOfMastersToScan
The default value is 1000.
The property configures the number of CIs that require aliases verificationduring a single run of the agent.
com.ibm.cdb.topomgr.topobuilder.cleanupOrphanedAliasesAndPersobjThe default value is true. The agent runs the cleanup.
The property enables or disables the cleanup of those aliases in theALIASES table and GUIDs in the PERSOBJ table which do not have anycorresponding CIs.
com.ibm.cdb.topomgr.topobuilder.DelayToRemoveAliasesThe default value is 12 (hours). The orphaned aliases that are older than 12hours are removed by the agent.
The property defines the time in hours after which the aliases without acorresponding CI are removed by the agent. It protects new aliases thatmight not have a corresponding CI because the CI storing is not complete.
Use this property with caution. Do not set it to a smaller value.
Administering 59
AliasesJnTableCleanupAgent
This agent removes old rows from the ALIASES_JN table. This table contains thehistory of changes to the ALIASES table. It is used to find potential over merges ofconfiguration items in the database. The agent reads the following properties fromthe collation.properties file:
Fix Pack 2
com.ibm.cdb.topomgr.topobuilder.agents.AliasesJnTableCleanupAgent.maxRowThe default value is 5000. It is advised not to change the default value.
This property specifies the maximum number of rows that are deleted at atime by the agent.
com.ibm.cdb.topomgr.topobuilder.agents.AliasesJnTableCleanupAgent.removeOlderThanDays
The default value is 30 (days).
This property removes rows that are older than the specified time. Bydefault, it removes rows that are older than 30 days.
If you set this property to 0 or a lower value, the agent is disabled.
com.ibm.cdb.topomgr.topobuilder.agents.AliasesJnTableCleanupAgent.timeoutThe default value is 1800 (seconds).
This property specifies time, after which the agent times out. If thespecified time is not enough to delete all old rows, the agent attempts todelete them the next time it runs.
DependencyCleanupAgent
The agent removes the dormant Relationship objects. The agent reads the followingproperties from the collation.properties file:
com.ibm.cdb.topomgr.topobuilder.agents.DependencyCleanupAgent.timeoutThe default value in seconds is 600. After this time, the agent stopsremoving the objects, even if there are still some left.
com.ibm.cdb.topomgr.topobuilder.agents.DependencyCleanupAgent.removeOlderThanDays
The default value in days is 90. The Relationship objects, which are olderthan the specified value are treated as dormant objects.
ObjectsWithoutAliasesCleanupAgent
The agent removes the CIs that do not have the aliases in the ALIASES table. Theagent reads the following property from the collation.properties file:
com.ibm.cdb.topomgr.topobuilder.agents.ObjectsWithoutAliasesCleanupAgent.maxToRemove
The default value is 1000
The property limits the number of CIs that the agent removes during onerun. If you set the property to -1, the agent exits without performing anycleanup, and shows the ObjectsWithoutAliasesCleanupAgent is disabledmessage.
60 Application Dependency Discovery Manager: Administering
PersobjCleanupAgent
The agent fixes all missing rows in the PERSOBJ table. It does not use anyconfiguration in the collation.properties file. The agent shows the summary ofhow many rows were fixed, like in the following example:2012-08-22 18:12:21,500 TopologyBuilder [[email protected]]INFO agents.PersobjCleanupAgent - Fixed 10 rows in PERSOBJ table
StorageExtentCleanupAgent
The agent removes the dormant StorageExtent objects. The agent reads thefollowing properties from the collation.properties file:
com.ibm.cdb.topomgr.topobuilder.agents.StorageExtentCleanupAgent.timeoutThe default value in seconds is 1800. After this time, the agent stopsremoving the objects, even if there are still some left.
com.ibm.cdb.topomgr.topobuilder.agents.StorageExtentCleanupAgent.removeOlderThanDays
The default value in days is 1. The StorageExtent objects, which are morethan 1 day older than their parent ComputerSystems are treated asdormant objects.
VlanInterfaceCleanupAgent
The agent removes the dormant VlanInterface objects. The agent reads thefollowing properties from the collation.properties file:
com.ibm.cdb.topomgr.topobuilder.agents.VlanInterfaceCleanupAgent.timeoutThe default value in seconds is 1800. After this time, the agent stopsremoving the objects, even if there are still some left.
com.ibm.cdb.topomgr.topobuilder.agents.VlanInterfaceCleanupAgent.removeOlderThanDays
The default value in days is 1. The VlanInterface objects which are morethan 1 day older than their parent Vlans are treated as dormant objects.
Commands that might require elevated privilegeThese properties specify the operating system commands that TADDM uses thatmight require elevated privilege, such as root (or superuser) authority, to run onthe target system.
Typically, sudo is used on UNIX and Linux systems to provide privilege escalation.The following alternatives can be used instead of sudo:v Enable the setuid access right on the target executable programv Add the discovery service account to the group associated with the target
executable programv Use root for the discovery service account (not preferred)
For each property, sudo can be configured globally, meaning to run the commandwith sudo on every operating system target, or restricted to a specific IP address orscope set.
Important: On each target system for which privilege escalation is needed, sudomust be configured with the NOPASSWD option. Otherwise, your discovery hangsuntil sudo times out.
Administering 61
com.collation.discover.agent.command.hastatus.Linux=sudo /opt/VRTSvcs/bin/hastatuscom.collation.discover.agent.command.haclus.Linux=sudo /opt/VRTSvcs/bin/hacluscom.collation.discover.agent.command.hasys.Linux=sudo /opt/VRTSvcs/bin/hasyscom.collation.discover.agent.command.hares.Linux=sudo /opt/VRTSvcs/bin/harescom.collation.discover.agent.command.hagrp.Linux=sudo /opt/VRTSvcs/bin/hagrpcom.collation.discover.agent.command.hatype.Linux=sudo /opt/VRTSvcs/bin/hatypecom.collation.discover.agent.command.hauser.Linux=sudo /opt/VRTSvcs/bin/hauser
v These properties are required to discover Veritas Cluster components.v To execute these commands without sudo, the TADDM service account
must be a member of the Veritas Admin Group on the target.
com.collation.discover.agent.command.vxdisk=vxdiskcom.collation.discover.agent.command.vxdg=vxdgcom.collation.discover.agent.command.vxprint=vxprintcom.collation.discover.agent.command.vxlicrep=vxlicrepcom.collation.discover.agent.command.vxupgrade=vxupgrade
v These properties discover Veritas standard storage information plusadditional Veritas specific information like disk group, Veritas volumes,plexes, and subdisks.
com.collation.platform.os.command.ps.SunOS=/usr/ucb/ps axwwcom.collation.platform.os.command.psEnv.SunOS=/usr/ucb/ps axwweeecom.collation.platform.os.command.psParent.SunOS=ps -elf -oruser,pid,ppid,commcom.collation.platform.os.command.psUsers.SunOS=/usr/ucb/ps auxw
v These properties are required to discover process information aboutSolaris systems.You can specify a particular Solaris version by appending the SunOSversion number to the property name. For example, the followingproperty is specific to Solaris 10:com.collation.platform.os.command.ps.SunOS5.10=sudo /usr/ucb/ps axww
com.collation.platform.os.command.ps.Linux=ps axwwcom.collation.platform.os.command.psEnv.Linux=ps axwweeecom.collation.platform.os.command.psParent.Linux=ps -ax -oruser,pid,ppid,commcom.collation.platform.os.command.psUsers.Linux=ps auxw
v These properties are required to discover process information aboutLinux systems.
com.collation.platform.os.command.ps.AIX=ps axwwcom.collation.platform.os.command.psEnv.AIX=ps axwweeecom.collation.platform.os.command.psParent.AIX=ps -elf -o ruser,pid,ppid,commcom.collation.platform.os.command.psUsers.AIX=ps auxw
v These properties are required to discover process information about AIXsystems.
com.collation.platform.os.command.ps.HP-UX=sh UNIX95= ps -elfx -opid,tty,state,time,argscom.collation.platform.os.command.psEnv.HP-UX=ps -eflxcom.collation.platform.os.command.psParent.HP-UX=sh UNIX95= ps -elfx -oruser,pid,ppid,commcom.collation.platform.os.command.psUsers.HP-UX=ps -efx
62 Application Dependency Discovery Manager: Administering
v These properties are required to discover process information aboutHP-UX systems.
com.collation.discover.agent.command.lsof.Vmnix=lsofcom.collation.discover.agent.command.lsof.Linux=lsofcom.collation.discover.agent.command.lsof.SunOS.1.2.3.4=sudo lsofcom.collation.discover.agent.command.lsof.Linux.1.2.3.4=sudo lsofcom.collation.discover.agent.command.lsof.HP-UX=lsofcom.collation.discover.agent.command.lsof.AIX=lsof
v These properties are required to discover process or port information.You can specify a particular Solaris version by appending the SunOSversion number to the property name. For example, the followingproperty is specific to Solaris 10:com.collation.discover.agent.command.lsof.SunOS5.10=sudo /usr/local/bin/lsof
com.collation.discover.agent.command.dmidecode.Linux=dmidecodecom.collation.discover.agent.command.dmidecode.Linux.1.2.3.4=sudo dmidecode
v These properties are required to discover manufacturer, model, andserial number on Linux systems.
com.collation.discover.agent.command.vmcp.Linux=This property can be used to discover a guest user ID on a target Linuxvirtual system running on a z/VM® operating system.
com.collation.discover.agent.command.cat.SunOS=catcom.collation.discover.agent.command.cat.SunOS.1.2.3.4=sudo cat
v This property is required to discover configuration information for aCheck Point firewall on Solaris systems.
com.collation.discover.agent.command.interfacesettings.SunOS=sudo nddcom.collation.discover.agent.command.interfacesettings.Linux=sudo mii-toolcom.collation.discover.agent.command.interfacesettings.SunOS.1.2.3.4=sudo nddcom.collation.discover.agent.command.interfacesettings.Linux.1.2.3.5=sudomii-toolcom.collation.discover.agent.command.interfacesettings.HP-UX=lanadmincom.collation.discover.agent.command.interfacesettings.AIX=netstat
v These properties are required to discover advanced network interfaceinformation (interface speed, for example).
com.collation.discover.agent.command.adb.HP-UX=adbcom.collation.discover.agent.command.adb.HP-UX.1.2.3.4=sudo adb
v This property is required to discover processor information about HPsystems.
com.collation.discover.agent.command.kmadmin.HP-UX=kmadmincom.collation.discover.agent.command.kmadmin.HP-UX.1.2.3.4=sudo/usr/sbin/kmadmin
v This property is required to discover kernel modules on HP systems.
com.collation.platform.os.command.partitionTableListing.SunOS=prtvtoc
v This property is required to discover partition table information aboutSolaris systems.
com.collation.platform.os.command.lvm.lvdisplay.1.2.3.4=sudo lvdisplay -ccom.collation.platform.os.command.lvm.vgdisplay.1.2.3.4=sudo vgdisplay -ccom.collation.platform.os.command.lvm.pvdisplay.1.2.3.4=sudo pvdisplay -c
v These properties are required to discover storage volume information.
Administering 63
com.collation.platform.os.command.lputil.SunOS.1.2.3.4=sudo/usr/sbin/lpfc/lputil
v This property is required to discover Emulex fibre channel HBAinformation on Solaris systems.
com.collation.platform.os.command.crontabEntriesCommand.SunOS=crontab -lcom.collation.platform.os.command.crontabEntriesCommand.Linux=crontab -l-ucom.collation.platform.os.command.crontabEntriesCommand.AIX=crontab -lcom.collation.platform.os.command.crontabEntriesCommand.HP-UX=crontab -l
v These properties are required to discover crontab entries. You canspecify these properties as a scoped property by appending an IPaddress or a scope set name to the property. The following example usesan appended IP address:com.collation.platform.os.command.crontabEntriesCommand.AIX.1.2.3.4=crontab -l
com.collation.platform.os.command.filesystems.Linux=df -kTPcom.collation.platform.os.command.filesystems.SunOS=df -k | grep -v 'Nosuch file or directory' | grep -v 'Input/output error' | awk '{print $1,$2, $4, $6}'com.collation.platform.os.command.filesystems.AIX=df -k | grep -v 'No suchfile or directory' | grep -v 'Input/output error' | awk '{print $1, $2, $3,$7}com.collation.platform.os.command.filesystems.HP-UX=df -kP | grep -v 'Nosuch file or directory' | grep -v 'Input/output error' | grep -v Filesystem
v These properties are required to discover file systems.
com.collation.platform.os.command.fileinfo.ls=sudo lscom.collation.platform.os.command.fileinfo.ls.1.2.3.4=sudo lscom.collation.platform.os.command.fileinfo.cksum=sudo cksumcom.collation.platform.os.command.fileinfo.cksum.1.2.3.4=sudo cksumcom.collation.platform.os.command.fileinfo.dd=sudo ddcom.collation.platform.os.command.fileinfo.dd.1.2.3.4=sudo dd
v These properties are required for privileged file capture.v Privileged file capture is used in situations where the discovery service
account does not have read access to application configuration files thatare required for discovery.
com.collation.discover.agent.WebSphereVersionAgent.versionscript=sudoThis property can be enabled for access to the WebSphere versionInfo.shfile if the discovery user does not have access on the target WebSphereApplication Server system.
com.collation.platform.os.command.fileinfo.OnlyDirectoryRecursiveThis flag changes the way the configuration files are discovered. Thedefault value is False.
If you change this flag to True, this mechanism does not use the findcommand to recursively discover the content of a directory.
When you set the flag to False, this mechanism uses the find command todiscover a file recursively, without the exact location of the file beingspecified.
Context Menu Service and Data Integration Service propertiesThese properties apply to the Context Menu Service (CMS) and Data IntegrationService (DIS).
64 Application Dependency Discovery Manager: Administering
com.ibm.cdb.DisCmsIntegration.enabled=trueThe default value is true.
This property specifies whether to enable the CMSDISAgent topologybuilder agent for periodic updates of TADDM data that is registered withthe Context Menu Service and Data Integration Service database.
com.ibm.cdb.DisCmsIntegration.dbUser=userThis property specifies the database user ID for the Context Menu Serviceand Data Integration Service database.
com.ibm.cdb.DisCmsIntegration.dbPassword=passwordThis property specifies the password for the Context Menu Service andData Integration Service database user.
com.ibm.cdb.DisCmsIntegration.dbUrl=urlThis property specifies the database URL for the Context Menu Service andData Integration Service database.
com.ibm.cdb.DisCmsIntegration.dbDriver=driverThis property specifies the database driver for the Context Menu Serviceand Data Integration Service.
com.ibm.cdb.DisCmsIntegration.changehistory.days_previous=30The default value is 30.
This property specifies the number of days of change history to bedisplayed in change reports for the Context Menu Service and DataIntegration Service.
Database propertiesThese properties apply to the TADDM database.
com.collation.db.password=passwordThis property specifies the database password, which is stored on theTADDM server, for the database user.
com.collation.db.archive.password=passwordThis property specifies the database password, which is stored on theTADDM server, for the database archive user.
com.ibm.cdb.db.max.retriesThis property specifies the number of retry attempts to establish theconnection to the database.
com.ibm.cdb.db.timeoutThis property specifies the sleep time (in milliseconds) between the retryattempts.
com.ibm.cdb.db.connection.ssl.enable=falseThis property specifies whether the connection to the database isestablished in the SSL mode for the database user.
The default value is false.
com.ibm.cdb.db.connection.ssl.truststore.file=filenameThis property specifies a truststore file that is used for the SSL connectionto the database for the database user. The truststore file must be in the$COLLATION_HOME/etc/ directory.
com.ibm.cdb.db.connection.ssl.truststore.password=passwordThis property specifies a truststore password that is used for the SSLconnection to the database for the database user.
Administering 65
com.ibm.cdb.db.archive.connection.ssl.enable=falseThis property specifies whether the connection to the database isestablished in the SSL mode for the archive database user.
The default value is false.
com.ibm.cdb.db.archive.connection.ssl.truststore.file=filenameThis property specifies a truststore file that is used for the SSL connectionto the database for the archive database user. The truststore file must be inthe $COLLATION_HOME/etc/ directory.
com.ibm.cdb.db.archive.connection.ssl.truststore.password=passwordThis property specifies a truststore password that is used for the SSLconnection to the database for the archive database user.
To encrypt the database passwords in the collation.properties file, complete thefollowing steps:1. Edit the database user, or archive the user password using clear text, or both.2. Stop the TADDM server.3. Run either the encryptprops.sh file or the encryptprops.bat file (located in the
$COLLATION_HOME/bin directory). This script encrypts the passwords.4. Restart the TADDM server.
Discovery propertiesThese properties apply to discovery generally. The TADDM server properties thataffect a specific sensor are documented in the TADDM Sensor Reference for therespective sensor.
Fix Pack 4 com.discover.anchor.maxChannelNumberThis property specifies the maximum number of channels openedsimultaneously in the SSH session between the TADDM server and theanchor. If the number of opened channels is too high, the discovery onsuch anchor might hang, and the sensors included in such scope mighttime out. In such case, use this property to control the number of openedchannels.
The default value is 50.
Fix Pack 4 com.collation.platform.os.copyToLocal.preferScpCommandThis property specifies whether the external scp command is used to copyfiles from remote hosts, usually discovery targets, to the TADDM server.The external scp command is defined in thecom.collation.platform.os.scp.command property. To enable the usage ofexternal scp command, set this property to true.
The default value of this property is false.
Note: This property applies only to the SSH sessions that are establishedwith a key-based login (see “Configuring for discovery using the SecureShell (SSH)” on page 108). In case of authentication with a user name anda password, the internal scp command is used regardless of thecom.collation.platform.os.copyToLocal.preferScpCommand propertyvalue.
This property is a scoped property. You can append an IP address or thename of a scope set to the property. For example:com.collation.platform.os.copyToLocal.preferScpCommand.12.234.255.4=true
66 Application Dependency Discovery Manager: Administering
com.collation.platform.os.scp.commandThis property specifies the path to the Operating System scp command. Itcan be used when an internal SSH client fails to send files between theTADDM server and remote hosts, usually discovery targets. You can alsouse an alternative command but it must have the same syntax as the scpcommand.
The example value: /usr/local/bin/scp.
Fix Pack 3 com.collation.platform.session.ssh.winAuthThis property specifies whether logging in with Windows credentials isattempted when SSH session is used. The default value is true.
You can set the value to false, if there is a risk that during the discoverythere are attempts to log in to non-Windows servers with Windowscredentials. It can prevent locking out Windows Active Directory accounts.
Fix Pack 3 com.collation.platform.os.ignoreL2InterfaceDescriptionThis property specifies the descriptions of discovered L2Interfaces that youwant to be ignored during the computer system signature calculation. Forexample, if you do not want Microsoft Load Balancer Interface to be usedto calculate the signature of a computer system, specify the followingvalue:com.collation.platform.os.ignoreL2InterfaceDescription=Microsoft LoadBalancer Interface
The value of this property is treated as a regular expression. It means thatyou can add more than one interface description, and you do not need touse any separator such as comma.
Fix Pack 3 com.ibm.cdb.topomgr.topobuilder.agents.ConnectionDependencyAgent2.dependencyPlaceholders
This property, if set to true, creates placeholder App Servers forundiscovered dependencies.
Note: This property is not included in the collation.properties file bydefault. You must add it there.
When you set the value to true for the first time, you must restart TADDMto enable extended attributes for LogicalConnection and SSoftwareServerclasses. These extended attributes are necessary for proper functioning ofthis feature.
For more information about placeholders, see “Configuring for discoveryof placeholders” on page 122.
com.collation.platform.session.EncodingOverRideThis property specifies the type of encoding used during a discoverysession. It is especially useful when your target servers use differentencoding than the one in the TADDM server.
The value of this property is the name of the encoding, for example UTF-8.It is not included in the collation.properties file by default, you mustadd it there.
You can also add a scope, or an IP address to this property. For example:com.collation.platform.session.EncodingOverRide.37.53.105.24=UTF-8
com.collation.discover.anchor.forceDeployment=trueThe default value is true.
Administering 67

This property specifies whether the anchors for the discovered scope are tobe deployed during discovery startup.
If you set the value to false, the anchors are deployed only if either of thefollowing conditions are met:v If any IP address from the scope cannot be pingedv If port 22 cannot be reached on any of the discovered IP addresses
If chained anchors exist, this condition applies to all anchors in the chain.If an anchor in the chain is restricted with a condition, the prior anchorsmust meet the condition before all the anchors can be deployed.
com.collation.discover.anchor.lazyDeployment=falseThe default value is false.
This property specifies whether files that a sensor requires are copied whenan anchor is deployed (a value of false) or when the sensor that requiresthe files is about to start (a value of true).
For example, the IBM WebSphere sensor has dependencies in thedist/lib/websphere directory. The size of the directory is 130 MB. If thevalue of this property is false, the dependency data is copied to the targethost when the anchor is deployed. If the value is true, the data is copiedwhen the WebSphere sensor is about to be run on the anchor. If noWebSphere sensor is run through the anchor, 130 MB is not sent to theremote host.
com.collation.discover.DefaultAgentTimeout=600000The value is 600000 (in milliseconds), which is 10 minutes.
This property specifies the timeout for sensors in milliseconds. The defaulttimeout should not be changed. Instead, you can specify the timeout forindividual sensors.
To override the timeout for a particular sensor, add the following line tothe collation.properties file:com.collation.discover.agent.sensorNameSensor.timeout=
timeInMilliseconds
Here is an example:com.collation.discover.agent.OracleSensor.timeout=1800000
com.collation.IpNetworkAssignmentAgent.defaultNetmask=ip_start-ip_end/netmask[, ...]
This property defines how IP addresses discovered during a Level 1discovery are assigned to generated subnets. A Level 1 discovery does notdiscover subnets. Instead, IpNetwork objects are generated to contain anyinterfaces that are not associated with an existing subnet discovered duringa Level 2 or Level 3 discovery. This configuration property defines whichIpNetwork objects are created, and how many nodes each subnet contains.(It also applies to any interface discovered during a Level 2 or Level 3discovery that for any reason cannot be assigned to a discovered subnet.)
The value for this property consists of a single line containing one or moreentries separated by commas. Each entry describes an IP address range inIPv4 dotted decimal format, with a subnet mask specified as an integer inthe range of 8 - 31. Discovered interfaces in the specified range are thenplaced in created subnets that are no larger than the size that is specifiedby the subnet mask.
68 Application Dependency Discovery Manager: Administering
For example, the following value defines two subnet address ranges withdifferent subnet masks:9.0.0.0-9.127.255.255/23, 9.128.0.0-9.255.255.255/24
The specified address ranges can overlap. If a discovered IP addressmatches more than one defined range, it is assigned to the first matchingsubnet as they are listed in the property value.
After you create or change this configuration property and restart theTADDM server, any subsequent Level 1 discoveries use the definedsubnets. To reassign existing IpInterface objects in the TADDM database,go to the $COLLATION_HOME/bin directory and run one of the followingcommands:v adjustL1Networks.sh (Linux and UNIX systems)v adjustL1Networks.bat (Windows systems)
If the value is not specified correctly then the appropriate messages aredisplayed only when running the command-line utilityadjustL1Networks.sh (Linux and UNIX systems) or adjustL1Networks.bat(Windows systems). Otherwise the messages are placed in theTopologyBuilder.log file in the $COLLATION_HOME/log/services directory,and in the IpNetworkAssignmentAgent.log file in the $COLLATION_HOME/log/agents directory.
This script reassigns all IpInterface objects discovered during Level 1discoveries to the appropriate subnets as described in the configurationproperty. Any generated IpNetwork object that contains no interfaces isthen deleted from the database. After the script is completed, the TADDMinterface might show multiple notifications of changed componentsbecause of the modified objects. You can clear these notifications byrefreshing the window.
Note: Before you use this command, make sure that the TADDM server isrunning, and that no discovery or bulk load operation is currently inprogress. This script is not supported on the synchronization server.
com.collation.number.persist.discovery.run=30The default value is 30.
Specifies the number of discoveries for which information is saved in thediscovery history in the Data Management Portal and the DiscoveryManagement Console.
To change the default value in a streaming server deployment, enter thenew value on the primary storage server.
com.collation.platform.os.hostappdescriptorfiles.dir="path"Specifies the fully qualified path to the directory where componentapplication descriptor files for computer systems (hosts) are deployed. Thisproperty is required if you want to add computer systems to businessapplications using application descriptors. You can scope this property to aspecific host name or IP address in order to specify a different location foreach host. The following examples show how to specify the hostapplication descriptor path:v Linux and UNIX systems: /home/taddm/hostappdescriptorsv Windows systems: c://taddm//hostappdescriptors
com.collation.platform.session.GatewayForceSshSpecifies whether to force the gateway to act independently of the anchor.
Administering 69
Valid values are true and false. Set the value to true to resolve Cygwinissues when both the gateway and anchor are on the same system. Whenthe value is set to true, an SSH session is used to transfer traffic betweenthe gateway and anchor rather than a local session.
com.collation.rediscoveryEnabled=falseThe default value is false.
This property applies to the rediscovery of a configuration item that hasalready been discovered. The rediscovery functionality is available in theData Management Portal.
Restriction: Rediscovery cannot use the credentials from a custom profile,it uses the credentials from the global list.
Note:
To enable rediscovery in a domain server deployment, set the value to trueon the domain server.
To enable rediscovery in a streaming server deployment, set the value totrue on the discovery server and the storage server.
Rediscovery in a streaming server deploymentWhen rediscovery is used in a streaming server deployment, aconfiguration item can be discovered by different discoveryservers, but only the last discovery server to discover theconfiguration item can rediscover that configuration item. Becausethere are multiple discovery servers, rediscovery information for aconfiguration item is overwritten by each discovery server.
When you enable rediscovery on the discovery server, for eachobject discovered, additional information about the rediscovery iscreated.
When you enable rediscovery on the storage server, each objectthat is discovered is stored with additional information about therediscovery.
If rediscovery is enabled on the discovery server but disabled onthe storage server, information about rediscovery will not beavailable in the TADDM database. In addition, you must ensurethat the same credentials are used for both the discovery serverand the storage server.
com.ibm.cdb.discover.sensor.sys.utilization.workingdir=/tmp/taddmThe default value is /tmp/taddm.
This property specifies the root path for the IBM Tivoli Utilization sensorscripts to run on the target system. If this value is not specified the pathdefined by the com.ibm.cdb.taddm.script.path property is used.
com.ibm.cdb.locationTagSpecifies the location tag attribute for each configuration item (CI) createdon the TADDM server. The location tag attribute, which identifies thelocation of a CI, is used to support static location tags. Before specifyingthis tag, you must set the com.ibm.cdb.locationTaggingEnabled value totrue.
com.ibm.cdb.locationTaggingEnabled=falseThe default value is false.
70 Application Dependency Discovery Manager: Administering
Specifies whether location tagging functionality is enabled. Set the value ofthis property to true to:v Specify a location tag attribute for each configuration item (CI) created
on the TADDM server (static location tags). See thecom.ibm.cdb.locationTag property for details.
v Specify a dynamic location tag for configuration items (CIs) createdduring a single discovery, using the command-line interface (CLI).Dynamic location tags override location tags that already exist (staticlocation tags).
v Specify a dynamic location tag for configuration items (CIs) createdwhen loading data using the bulkload program.
v Specify a location tag value when running a BIRT report to filter thedata and report information only about that specified location.
v Create a location tag value for configuration items created during atypology build process.
com.ibm.cdb.taddm.hostSpecifies the TADDM server host alias. If this value is not specified thesystem hostname is used. If the TADDM server cannot resolve the systemhostname or it resolves to the localhost then you must specify thisproperty manually.
com.ibm.cdb.taddm.script.path=/tmp/taddmThe default value is /tmp/taddm.
This property specifies the root path for the sensor scripts to run on thetarget system. In this location, a subdirectory tree is created using theformat: host_alias/discovery_number/sensor_name. The host_alias nameis retrieved from the com.ibm.cdb.taddm.host property. If this property isnot specified the system hostname is used. To differentiate betweenconcurrent discoveries on the same discovery server, a number is assignedto the discovery_number directory. The discovery scripts and discoveryresults are stored using this directory structure.
com.collation.discover.agent.signature.ignore.1.2.3.4=trueThis property is used to skip an IP address during the signaturecalculation.
In case of some configurations, the signature for a computer system mightresult as not unique, which causes problems during the reconciliation withthe existing entries in the TADDM database. For example, it can happenwhen you use virtual machines with virtual network cards that have avalid hardware address and IP address. In such cases, you must excludethe signature calculation and use other naming rules, for exampleProductModel, Manufacturer or Serial Number.
For each IP address that you want to be ignored, add thecom.collation.discover.agent.signature.ignore.1.2.3.4=true property,where 1.2.3.4 is the IP address to be ignored.
If you want many IP addresses to be ignored, you can create a discoveryscope. Add thecom.collation.discover.agent.signature.ignore.blacklist=trueproperty to the collation.properties file, where blacklist is the discoveryscope with all IP addresses to be ignored.
Administering 71
Advanced discovery properties:
The advanced discovery properties specify the buffer capacity for storing workitems, the number of restarts of particular discovery elements, or the time value forprinting the statistics to a log. Do not change these properties unless you mustclosely tune the discovery process.
com.ibm.cdb.discover.buffers.workitem.capacity=64The default value is 64. However, this value is always twice the value ofcom.collation.discover.dwcount, which is 32 by default.
This property specifies the buffer capacity for storing discovery workitems. It is used to limit the memory requirements of the discovery processand thus avoid the OutOfMemory errors. For each discovery, a new sensoris started.
Do not set the value to be smaller than the number of the discoveryworkers that is specified in com.collation.discover.dwcount, becauseotherwise some of them are left in the idle state.
com.ibm.cdb.discover.buffers.workitem.maxresets=10The default value is 10.
This property specifies the number of times a sensor can restart in case ofan unexpected failure, such as a failure of a TADDM JVM that isresponsible for the discovery.
Also, the number of restarts for an element of the discovery process islimited by com.ibm.cdb.discover.runrestartlimit that specifies thenumber of discovery restarts.
com.ibm.cdb.discover.buffers.seed.capacity=100The default value is 100.
This property specifies the buffer capacity for storing seed work items. It isused to limit the memory requirements of the discovery process and thusavoid the OutOfMemory errors.
com.ibm.cdb.discover.buffers.result.capacity=100The default value is 100.
This property specifies the buffer capacity for storing result work items. Itis used to limit the memory requirements of the discovery process andthus avoid the OutOfMemory errors. For each result work item, a newsensor can start.
Set the value to the same size ascom.ibm.cdb.discover.buffers.discovered.capacity.
com.ibm.cdb.discover.buffers.result.maxresets=10The default value is 10.
This property specifies the number of times a discovery process can start anew sensor for a result work item in case of an unexpected failure, such asa failure of a TADDM JVM that is responsible for the discovery.
Also, the number of restarts for an element of the discovery process islimited by com.ibm.cdb.discover.runrestartlimit that specifies thenumber of discovery restarts.
com.ibm.cdb.discover.buffers.discovered.capacity=100The default value is 100.
72 Application Dependency Discovery Manager: Administering
This property specifies the buffer capacity for storing discovered workitems. Each discovered work item represents a discovery result that isstored in the database.
Do not specify this value to be smaller than the number of the databasewriting threads that is specified incom.collation.discover.observer.topopumpcount.
com.ibm.cdb.discover.buffers.statistics.interval.seconds=60The default value is 60. Specify the value in seconds.
This property specifies the time value for saving the discovery bufferstatistics to a log. The log is at /log/services/DiscoveryState.log.
com.ibm.cdb.discover.buffers.timeout.interval.seconds=600The default value is 600, which is 10 minutes. Specify the value in seconds.
This property specifies the time value for checking the work items fortimeout.
com.ibm.cdb.discover.runcontroller.statistics.interval.seconds=60The default value is 60. Specify the value in seconds.
This property specifies the time value for saving the discovery runstatistics to a log. The log is at /log/services/DiscoveryRunController.log.
com.ibm.cdb.discover.runrestartlimit=11The default value is 11.
This property specifies the number of times an uninitialized discovery canbe restarted after a failure. The discovery is in the uninitialized state whenthe process is not yet started for all of the elements of the discovery scope.
com.collation.discovery.oracle.tablelimit=1000The default value is 1000. The property supports only positive values.
This property controls the quantity of tables that are discovered by Oraclesensor.
Concurrent discovery properties:
These properties apply to concurrent discovery.
com.collation.discover.concurrent.discovery=trueThe default value is true.
This property is used to enable concurrent discovery.
com.collation.discover.max.concurrent.discoveries=10The default value is 10.
This property defines the maximum number of concurrent discoveries.
Asynchronous discovery properties:
These properties apply to asynchronous discovery.
com.ibm.cdb.discover.asd.AsyncDiscoveryResultsDirectory=var/asddThe default value is var/asdd, which is relative to the com.collation.homedirectory.
Administering 73
This property defines the location of the root directory for the archive fileson the TADDM server that contain asynchronous discovery results. Thelocation can be a relative or absolute path. A relative path is relative to thecom.collation.home directory.
com.ibm.cdb.discover.asd.ProcessUnreachableIPs=falseThe default value is false.
This property is used to enable the processing of unreachable IP addresses,which are used in asynchronous discovery. To enable the processing ofthese addresses, set the value to true.
com.ibm.cdb.tarpath=tarThe default value is tar.
This property specifies the path of the tar command on the TADDM serverin asynchronous discovery.
On operating systems such as AIX or Linux, this property is typically notneeded because the tar command is already installed and available.However, to generate an asynchronous discovery script package or toprocess discovery archive files on a TADDM server that is running theWindows operating system, you must install a third party tar program andspecify the full path name for that program.
The following example shows how to specify the path of the tar commandon the TADDM server for the AIX operating system:com.ibm.cdb.tarpath=tar
com.ibm.cdb.targettarpath=tarThe default value is tar.
This property specifies the path of the tar command on the target systemin asynchronous discovery.
On target operating systems such as AIX or Linux, this property istypically not needed because the tar command is already installed andavailable. However, to generate discovery archive files on Solaris operatingsystems, because of a limitation in the length of file names, you must usethe gtar archive utility, and you must specify the path to the utility.
The following examples show how to specify the path of the tar commandon the target system, depending on the operating system:
For AIXcom.ibm.cdb.targettarpath.AIX=tar
For Solariscom.ibm.cdb.targettarpath.SunOS=/usr/sfw/bin/gtar
Script-based discovery properties:
These properties apply to script-based discovery.
Fix Pack 4 com.ibm.cdb.discover.enableOutputFileSplittingProcess=trueThe default value is true.
This property specifies whether the main output file that is created duringa script-based discovery is split into smaller files. By default, the file issplit. This setting prevents performance issues when the output file islarge. See also thecom.ibm.cdb.discover.numberOfLinesForOutputFileSplittingProcessproperty.
74 Application Dependency Discovery Manager: Administering
Fix Pack 4
com.ibm.cdb.discover.numberOfLinesForOutputFileSplittingProcess=10000The default value is 10000.
This property is enabled only when thecom.ibm.cdb.discover.enableOutputFileSplittingProcess property is setto true.This property specifies the approximate number of lines allowed in thesmaller output files, which were created by splitting the main output file.The exact number of lines is determined by the file format. After thespecified number of lines, the file is split only when the end of themeaningful set of data is reached to ensure that the whole file format iscorrect. It means that when the value is set to 10000, the smaller files canhave, for example, 10200 lines.
com.ibm.cdb.taddm.asd.prefix=shThe default value is sh.
This property specifies a prefix to be added to script that is run during adiscovery, for example prefix script.sh. This property is a scopedproperty, you can append either an IP address or the name of a scope set.
com.ibm.cdb.discover.DeleteScriptDiscoveryOutputs=trueThe default value is true.
This property specifies whether to delete the script output that, duringscript-based discovery, is copied to the TADDM server for processing bythe sensors. This output might be useful for troubleshooting, but bydefault, it is deleted after discovery completes. If you set the value of thisproperty to false, the script output will not be deleted.
com.ibm.cdb.discover.DeleteRemoteBeforeScriptsRun=falseThe default value is false.
This property specifies whether TADDM removes any outputs that are leftby previous discovery from the remote directory before attempting to run anew discovery.
com.ibm.cdb.discover.PreferScriptDiscovery=falseThe default value is false.
This property is used to enable script-based discovery, and it affects onlythe sensors that support script-based discovery. Setting the value to trueenables script-based discovery.
com.ibm.cdb.discover.smallFileSizeLimit=1048576The default value is 1048576 (1024*1024 - 1 MB).
This property defines the limit of file size expressed in bytes for copyoperations that triggers the checksum usage. The files, the size of which isbelow this limit, are copied without the checksum calculations. The files,the size of which equals the limit, or is greater than this limit, are copiedonly if they are not present in the target directory and their checksum doesnot match the local (source) file.
You can disable the limit by using the following values:v 0 - copy operation always uses the checksum.v -1 - copy operation always avoids using the checksum.
Administering 75
Properties for discovery using IBM Tivoli Monitoring (old method):
These properties apply to discovery using IBM Tivoli Monitoring (old method).
The old integration method
This section applies to a deprecated method of TADDM integration with IBMTivoli Monitoring. Starting with the TADDM version 7.3.0, it is advised to integratewith IBM Tivoli Monitoring 6.3 using OSLC Automation. The old method ofintegration with the use of IBM Tivoli Monitoring Scope sensor is deprecated andwill be removed from future releases. For more information about properties thatare used to configure the discovery process by using OSLC Automation, see“Integrating TADDM with IBM Tivoli Monitoring via OSLC Automation” on page184 and “Properties for discovery using OSLC Automation Session” on page 78.
Properties that affect how TADDM discovers Tivoli Monitoring endpoints
TADDM Level 2 and Level 3 discovery normally requires a domain server (in adomain or synchronization server deployment) or a discovery server (in astreaming server deployment) to connect directly to a target system using one ofthe following methods:v Secure Shell (SSH) for UNIX-based target systemsv Windows Management Instrumentation (WMI) for Windows systems
To use these methods, the domain or discovery server must know the usercredentials (account and password).
Discovery using IBM Tivoli Monitoring allows TADDM to discover Level 2 (andsome Level 3) information about target systems for which no user credentials areavailable. Sensors run through the Tivoli Monitoring infrastructure, and only thecredentials of the Tivoli Enterprise Portal Server are required. After the IBM TivoliMonitoring Scope sensor has been configured and run, future Level 2 discoveriesuse Tivoli Monitoring for discovery by default. Because you might not want thisdefault behavior in your environment, TADDM provides the following serverproperties to control whether Tivoli Monitoring or direct connection (SSH or WMI)is used for discovery. These properties can be set at a global level or for a specificscope or discovery profile.
com.ibm.cdb.session.allow.ITM=trueThe default value is true, which means that TADDM can use IBM TivoliMonitoring to discover Tivoli Monitoring endpoints.
This property specifies whether TADDM can use IBM Tivoli Monitoring todiscover Tivoli Monitoring endpoints.
To connect directly to a Tivoli Monitoring endpoint, set the value to false.
You can also use this property to specify a custom discovery scope, asindicated in the following example:
com.ibm.cdb.session.allow.ITM.ip_address=falseThe following example specifies that TADDM uses the discoveryscope 10.20.30.40 and connects directly to the endpoint even if itis monitored by Tivoli Monitoring:com.ibm.cdb.session.allow.ITM.10.20.30.40=false
com.ibm.cdb.session.prefer.ITM=trueThe default value is true, which means that TADDM uses IBM TivoliMonitoring to discover Tivoli Monitoring endpoints.
76 Application Dependency Discovery Manager: Administering
This property specifies whether TADDM uses IBM Tivoli Monitoring as thepreferred method for discovering Tivoli Monitoring endpoints, assumingthat discovery using IBM Tivoli Monitoring is allowed for the endpoints. IfTADDM uses IBM Tivoli Monitoring for the discovery and the discovery isnot successful, TADDM then uses a direct connection to the endpoints.Similarly, if discovery using IBM Tivoli Monitoring is not preferred anddirect connection to the endpoint is not successful, TADDM tries to connectto the endpoints using IBM Tivoli Monitoring, again assuming thatdiscovery using IBM Tivoli Monitoring is allowed for the endpoints.
You can also use this property to specify a custom discovery scope, asindicated in the following example:
com.ibm.cdb.session.prefer.ITM.ip_address=falseThe following example specifies that TADDM uses the discoveryscope 10.20.30.40 and connects directly to the Tivoli Monitoringendpoints:com.ibm.cdb.session.prefer.ITM.10.20.30.40=false
com.ibm.cdb.session.prefer.ITM.Level_3_Discovery=falseThe default value is false, which means that TADDM connects directly tothe Tivoli Monitoring endpoints if you use a Level 3 discovery profile, butfor all other discovery levels, TADDM uses IBM Tivoli Monitoring todiscover the Tivoli Monitoring endpoints, depending on the values of thefollowing properties:v com.ibm.cdb.session.allow.ITM
v com.ibm.cdb.session.prefer.ITM
This property specifies whether TADDM uses IBM Tivoli Monitoring todiscover Tivoli Monitoring endpoints if you use a Level 3 discovery profile.
If you set the value to true, TADDM can use IBM Tivoli Monitoring todiscover the Tivoli Monitoring endpoints from a Level 3 discovery profile.
Properties for tuning the connection between the TADDM server and the portalserver
For an IBM Tivoli Monitoring Level 2 discovery, TADDM uses the followingTADDM server properties to tune connection recovery behavior if the connectionbetween the TADDM server and the Tivoli Enterprise Portal Server lags:
com.collation.discover.agent.ITM.CmdWrapperSelectionPattern=This property specifies the commands that must be wrapped by a scriptwhen running a discovery through an IBM Tivoli Monitoring environment.
com.collation.platform.session.ITMSessionConnectionCooldownPeriod=60000This property specifies the time interval in milliseconds to wait before theconnection to the Tivoli Enterprise Portal Server is reinitialized after afailure has been detected.
com.collation.platform.session.ITMSessionConnectionRetryLimit=5This property specifies the number of times to try accessing a connection ifthe initial connection fails before reporting an error.
com.collation.platform.session.ITMSessionNumProgressChecks=600This property specifies the number of times that a connection is checkedfor progress before the connection fails.
Administering 77
com.collation.platform.session.ITMSessionProgressCheckInterval=1000This property specifies the time interval in milliseconds between eachconnection progress check.
Properties for discovery using OSLC Automation Session:
These properties apply to discovery using OSLC Automation Session.
Properties related to integration over OSLC
com.ibm.cdb.topobuilder.integration.oslc.automationproviderThis property specifies direct URL addresses of OSLC Execute AutomationService Providers that are not registered in Jazz SM Registry Services.
The following example shows URL addresses of OSLC Execute AutomationService Provider for ITM:com.ibm.cdb.topobuilder.integration.oslc.automationprovider=http://<AUTOMATION_PROVIDER_INSTALLATION_HOST>:15210/itmautomationprovider
The following example shows how to specify URL addresses for severalOSLC Execute Automation Service Providers:com.ibm.cdb.topobuilder.integration.oslc.automationprovider.1=http://9.1.1.1:15210/itmautomationprovidercom.ibm.cdb.topobuilder.integration.oslc.automationprovider.2=http://9.2.2.2:15210/itmautomationprovider
com.ibm.cdb.topobuilder.integration.oslc.automation.scope.alwaysrefresh=falseThe default value is false.
This property is a global property that specifies whetherOSLCAutomationAgent rebuilds scope sets during every run. Rebuildingthe scope sets requires connection to Jazz SM Registry Services or OSLCExecute Automation Service Providers, or both.
If the property is set to true, the agent rebuilds scope sets, even if theautomation plan provided by OSLC Execute Automation Service Providerdid not change since the last agent's run.
com.ibm.cdb.topobuilder.integration.oslc.frsurlThis property specifies Jazz SM Registry Services (FRS) IP address that isused in integration with other products over OSLC. Jazz SM RegistryServices address must have the following format:protocol://ip_or_hostname:port
This property is also used by OSLCAgent.
com.ibm.cdb.topobuilder.integration.oslc.automation.frsurlThis property specifies the IP address in the form of a full path to theregistration collection of Jazz SM Registry Services (FRS). It may be usedwhen Jazz SM Registry Services uses other services path than the default/oslc.
Properties related to discovery using Automation Session
com.ibm.cdb.session.oslcautomation.pluginId=com.ibm.cdb.session.oslcautomation_1.0.0
The default value is com.ibm.cdb.session.oslcautomation_1.0.0.
This property specifies OSGI bundle id of the OSLC Automation Sessionplug-in.
78 Application Dependency Discovery Manager: Administering
com.ibm.cdb.session.itm.endpointClass=com.collation.platform.session.oslcautomation.OSLCAutomationEndpoint
The default value is com.collation.platform.session.oslcautomation.OSLCAutomationEndpoint.
This property specifies the endpoint class to be used.
com.ibm.cdb.session.allow.OSLCAutomation=trueThe default value is true.
This property is a scoped property that specifies whether TADDM can usethe OSLC Automation Session during the discovery.
Example of usage:com.ibm.cdb.session.allow.OSLCAutomation=truecom.ibm.cdb.session.allow.OSLCAutomation.9.100.1.0=truecom.ibm.cdb.session.allow.OSLCAutomation.scope_set2=true
com.ibm.cdb.session.prefer.OSLCAutomation=trueThe default value is true.
This property is a scoped property that specifies whether OSLCAutomation Session is a preferred session for a discovery. The value of thisproperty takes precedence over any other preferred values, for example, astandard ITM session.
Example of usage:com.ibm.cdb.session.prefer.OSLCAutomation=truecom.ibm.cdb.session.prefer.OSLCAutomation.9.100.100.200=truecom.ibm.cdb.session.prefer.OSLCAutomation.scope_name1=true
com.ibm.cdb.session.oslcautomation.timeout.httpconnect=60000The default value is 60000 (60 seconds). The value is expressed inmilliseconds.
This property is a global property that specifies timeout for connection toOSLC Execute Automation Service Provider.
com.ibm.cdb.session.oslcautomation.timeout.httpread=240000The default value is 240000 (4 minutes). The value is expressed inmilliseconds.
This property is a global property that specifies timeout for reading datafrom OSLC Execute Automation Service Provider.
com.ibm.cdb.session.oslcautomation.request.async.maxretries=60The default value is 60.
This property is a global property that specifies the maximum number ofconsecutive requests for asynchronously generated AutomationResults.
com.ibm.cdb.session.oslcautomation.request.async.delay=10000The default value is 10000 (10 seconds). The value is expressed inmilliseconds.
This property is a global property that specifies the delay time betweenconsecutive requests for asynchronously generated AutomationResults.
Note: Fix Pack 4 In case the SSH Session to server fails due to timeout issues, tryconfiguring an optimum value for the below property:
com.collation.mindterm.Ssh2Preferences= hello-timeout=30; alive = 25;compression= 9
Administering 79
com.collation.discover.agent.app.packagedapp.mysap.SLDServerPortList = 51200This property allows to change the SLD port and the specified port shall beadded in the sensor configuration.
com.ibm.cdb.security.auth.cache.itm.disabled=trueThe default value is true.
This property determines whether credentials caching is disabled for OSLCdiscovery.
This property is a scoped and profiled property. You can append an IPaddress, the name of a scope set or a profile name. You can also set it inthe profile configuration in Discovery Management Console.
DNS lookup customization propertiesThese properties apply to DNS lookup customization.
com.collation.platform.os.disableDNSLookups=falseThe default value is false.
Valid values are true or false. If you change the property to true, DNSlookups are disabled for the TADDM server.
com.collation.platform.os.disableRemoteHostDNSLookups=falseThe default value is false.
Valid values are true or false. If you change the property to true, namelookups (DNS only) are disabled on remote discovered hosts. This propertyforces all name lookups to occur on the TADDM server.
com.collation.platform.os.command.fqdn=nslookup $1 | grep Name | awk'{print $2}'
The default value is nslookup $1 | grep Name | awk '{print $2}'.
This command is used to find the fully-qualified domain name (fqdn). Inmost situations, this property is not needed because the default fullyqualified domain name (FQDN) algorithm works in most productionenvironments. If this property is not needed, you must comment it out.However, in environments where the fully-qualified domain name is to bederived from the host name, you might enable this property. For example,enable this property if the host names are configured as aliases in DNS.
If this property is used, ensure that DNS is available and properlyconfigured. Otherwise, the nslookup command is likely to fail or have aslow response time.
If enabled, this property is only used on the TADDM server. Currently,only AIX, and Linux operating systems are supported. This property is notsupported on a Windows TADDM server.
GUI propertiesThese properties apply to the TADDM GUI.
Fix Pack 3 com.ibm.cdb.gui.supportedJRE.warning=trueThis property specifies whether the warning message CTJTG0034E isdisplayed when the Discovery Management Console is started. Thismessage warns you that you have an unsupported version of Java runtimeenvironment. If you want to use TADDM with the unsupported version ofJava runtime environment, and you do not want this message to bedisplayed, set this property to false.
The default value of this property is true.
80 Application Dependency Discovery Manager: Administering
GUI JVM memory properties:
These properties apply to GUI JVM memory.
com.collation.gui.initial.heap.size=128m
The default value is 128m.Initial heap size for the TADDM user interface.
com.collation.gui.max.heap.size=512m
The default value is 512m.Maximum heap size for the TADDM userinterface.
These properties are appropriate for a small TADDM domain. For the purposes ofsizing, the following categories of TADDM servers are used (based on serverequivalents):v Small: up to 1000 server equivalentsv Medium: 1000 - 2500 server equivalentsv Large: 2500 - 5000 server equivalents
Increasing these values for medium and large environments improve performancefor some GUI operations. Some views do not complete properly if there is notsufficient memory available to TADDM at the time of the action.
For a medium environment:
com.collation.gui.initial.heap.size=256m
The default value is 256m.
com.collation.gui.max.heap.size=768m
The default value is 768m.
For a large environment:
com.collation.gui.initial.heap.size=512m
The default value is 512m.
com.collation.gui.max.heap.size=1024m
The default value is 1024m.
GUI port properties:
These properties apply to GUI ports.
com.collation.tomcatshutdownport=9436 (TADDM 7.3.0 only)The default value is 9436.
This port is used for the Tomcat shutdown command.
com.ibm.cdb.service.web.port=9430The default value is 9430.
The HTTP port is used without SSL.
com.ibm.cdb.service.web.secure.port=9431The default value is 9431.
The HTTPS port is used with SSL.
Administering 81
com.ibm.cdb.service.ClientProxyServer.port=9435The default value is 9435.
The RMI data port to use without SSL.
com.ibm.cdb.service.SecureClientProxyServer.secure.port=9434The default value is 9434.
The RMI data port to use with SSL.
com.ibm.cdb.service.registry.public.port=9433The default value is 9433.
The public service registry port.
LDAP propertiesThese properties apply to LDAP.
An external LDAP server can be used for user authentication. Both anonymousauthentication and password-based authentication are supported with an externalLDAP server.
The LDAP server host name, port number, base distinguished name, binddistinguished name, and password (required for password-based authentication)are configurable in the collation.properties file. You can also configure thespecific naming attribute that can be searched for to match the user ID (UID).
LDAP configuration is recommended in synchronization server and domain serverdeployments. In an enterprise environment, configure the domain server and thesynchronization server to use the same user registry. When you log in to a domainserver that is connected to a synchronization server, the login is processed at thesynchronization server. If a network connection problem occurs between thesynchronization server and a domain server, you can successfully log in to thedomain server without reconfiguration if the domain server is configured to usethe same user registry as the synchronization server.
com.collation.security.auth.ldapAuthenticationEnabled=trueThe default value is true.
This property is used to enable LDAP authentication.
com.collation.security.auth.ldapBaseDN=ou=People,dc=ibm,dc=comThe default value is ou=People,dc=ibm,dc=com.
This property defines the LDAP Base Distinguished Name (DN). TheLDAP Base Distinguished Name is the starting point for all LDAPsearches.
com.collation.security.auth.ldapBaseGroupDNIn the collation.properties file, this property is commented out bydefault.
This property defines the LDAP root branch for searching groups, whichcan be different from the root branch for all LDAP queries. To specify morethan one LDAP root branch for searching for groups, separate the branchnames by using the “;” character.
If you do not specify a value for this property, the default value is thevalue of the com.collation.security.auth.ldapBaseDN property.
com.collation.security.auth.ldapBindDN=uid=ruser,dc=ibm,dc=comThe default value is uid=ruser,dc=ibm,dc=com.
82 Application Dependency Discovery Manager: Administering
If simple authentication is used, this property defines the user ID that isused to authenticate to LDAP.
Important:
v If a value for com.collation.security.ldapBindDN is not supplied or ifthe property is commented out, an anonymous connection to LDAP isattempted. The following example shows how the property can becommented out with the number sign (#):#com.collation.security.auth.ldapBindDN=uid=ruser,dc=ibm,dc=com
v If a value is specified for com.collation.security.auth.ldapBindDN,simple authentication is used and
v a value for com.collation.security.auth.ldapBindPassword must alsobe specified.
com.collation.security.auth.ldapBindPassword=ruserThe default value is ruser.
If simple authentication is used, this property defines the user passwordthat is used to authenticate to LDAP.
com.collation.security.auth.ldapClientKeyStore=ks_pathThe property defines the location of the keystore that contains thecertificates on the TADDM server. The store must contain the clientcertificate to authenticate the TADDM server with the LDAP server.
com.collation.security.auth.ldapClientKeyStorePassphrase=ks_passphraseOptional: This property defines the password to the keystore.
com.collation.security.auth.ldapClientTrustStore=ts_pathThe property defines the location of the truststore that contains thecertificates on the TADDM server. The store must contain the LDAP servercertificate.
com.collation.security.auth.ldapClientTrustStorePassphrase=ts_passphraseOptional: This property defines the password to the truststore.
com.collation.security.auth.ldapGroupMemberAttribute=memberThe default value is member.
This property defines the name of the attribute used to contain themembers of a group in LDAP.
com.collation.security.auth.ldapGroupNamingAttribute=cnThe default value is cn.
This property defines the name of the attribute used for naming groups inLDAP.
com.collation.security.auth.ldapGroupObjectClass=groupofnamesThe default value is groupofnames.
This property defines the class used to represent user groups in LDAP.
com.collation.security.auth.ldapHostName=ldap.ibm.comThe default value is ldap.ibm.com.
This property defines the host name for the LDAP server.
com.collation.security.auth.ldapPortNumber=389The default value is 389.
This property defines the port for the LDAP server.
Administering 83
com.collation.security.auth.ldapUIDNamingAttribute=uidThe default value is uid.
This property defines the name of the attribute used for naming users inLDAP.
com.collation.security.auth.ldapUserObjectClass=personThe default value is person.
This property defines the name of the class used to represent users inLDAP.
com.collation.security.auth.ldapUseSSL=falseThe default value is false.
The property is used to enable authentication to an LDAP user registrywith an SSL connection.
com.collation.security.usermanagementmodule=ldapThe default value is ldap.
This property defines the user management module used by the TADDMserver. The valid values are:v file for a file-based user registry. The default value is true.v ldap for an LDAP user registryv vmm for a user registry that uses the federated repositories of WebSphere
Application Server
Lockout propertiesThese properties apply to lockouts.
com.collation.security.lockout.treshold=3The default value is 3.
This property specifies the number of failed login attempts, for a particularuser, that triggers a local lockout for that user.
com.collation.security.lockout.timeout=30The default value is 30.
This property specifies the time, in minutes, for which the user whotriggered the local lockout, is locked out of TADDM when a local lockoutis triggered.
com.collation.security.lockout.globalthreshold=100The default value is 100.
This property specifies the number of simultaneous single-user lockoutsthat triggers a global lockout.
com.collation.security.lockout.globaltimeout=30The default value is 30.
This property specifies the time, in minutes, for which all users are lockedout of TADDM when a global lockout is triggered.
com.collation.security.lockout.failedloginthreshold=1000The default value is 1000.
This property specifies the total number of failed login attempts for uniqueusers that triggers a global lockout.
Logging propertiesThese properties apply to logging.
84 Application Dependency Discovery Manager: Administering
com.collation.log.filesize=20MBThe default value is 20MB.
The maximum size for the log file. When the file reaches this size limit, anew log file is created. The current log file is saved with the .N fileextension. N is the number 1 through the value set in thecom.collation.log.filecount property. You set how many log files can becreated and kept before the files are rotated with thecom.collation.log.filecount property.
You can enter the number of bytes directly, or by specifying the number ofkilobytes or megabytes using KB and MB, respectively.
The following examples are valid log file size values:v 1000000v 512 KBv 10 MB
com.collation.log.filecount=5The default value is 5.
The number of log files that you maintain.
com.collation.log.level.vm.vmName=INFOThe default value is INFO
Sets the log level for each virtual system.
vmName is a Java virtual system associated with a TADDM service name.The following list identifies other valid options:v Topologyv DiscoverAdminv EventsCorev Proxyv Discoverv EcmdbCorev StorageServicev DiscoveryService
The following list identifies other valid options:v FATAL
v ERROR
v WARNING
v INFO
v DEBUG (Setting the DEBUG option decreases system performance.)v TRACE (Setting the TRACE option causes passwords to be logged.)
Performance propertiesThese properties apply to TADDM performance.
com.collation.discover.dwcount=32The default value is 32. The value must be an integer.
This property influences the discovery rate. A discover worker thread is athread that runs sensors. This property specifies how many discover
Administering 85
worker threads can run simultaneously, and it applies only for a discoveryserver in a streaming server deployment or a domain server in a domainserver deployment.
For discovery using IBM Tivoli Monitoring (old method that uses IBMTivoli Monitoring Scope sensor), the value must be set to 16. For all othertypes of discovery, the valid range of values is 32 - 160.
com.collation.discover.observer.topopumpcount=16The default value is 16. The value must be an integer.
This property influences the rate at which discovery results are stored inthe TADDM database. It specifies the number of writer threads that arecreated for communicating with the TADDM database.
For a discovery server in a streaming server deployment, this propertycontrols the number of threads that the discovery server uses to senddiscovery results to the storage server pool.
For a storage server in a streaming server deployment, this propertycontrols the number of threads that receive discovery results from thediscovery servers.
For a domain server in a domain server deployment, this property controlsthe number of threads that receive discovery results from the discoverworker threads.
The threads then use a database connection from the connection pool tocommunicate with the TADDM database (for example, to store results andto retrieve data). If no more pooled JDBC connections exist, the threadcreates a non-pooled connection.
com.ibm.cdb.discover.observer.topopump.threshold=0.7com.ibm.cdb.discover.observer.topopump.threshold.topo_agent_grp_name=0.7
The default value is 0.7. The value must be a floating constant.
This property specifies the fraction of database writer threads that you canstart when the topology agents are running. You can specify the thresholdvalue separately for a particular agent group or all of them at once. If thevalue is not defined for agent group, the general threshold value is used.This value allows limitation of threads that store the discovery results inthe TADDM database when the topology agents are running.
com.ibm.cdb.typesServiceRefreshInterval=120The default value is 120. The minimum value is 30, and the maximumvalue is 1800.
This property specifies, in seconds, the refresh interval for updatingcomponent types when you create a custom query, display a changehistory, or display component comparison information.
com.ibm.cdb.ea.metaRefreshFrequency=20The default value is 20. The value must be an integer.
This property specifies, in seconds, the refresh interval for updatinginformation about the defined extended attributes, for example in thestorage servers.
Secure Shell (SSH) propertiesThese properties apply to the Secure Shell (SSH).
86 Application Dependency Discovery Manager: Administering
Fix Pack 1 com.ibm.cdb.platform.SshVersionSessionSkipListThis property specifies the versions of SSH servers for which the session isnot established. In case of such servers, the session sensor is finishedwithout failure.
The value of this property is a comma-separated list, for exampleCisco,Data ONTAP,SSH-2.0-OpenSSH_5.9 PKIX FIPS,OpenSSH_OA.
com.collation.SshLogInput=falseThe default value is false.
Valid values are true or false. If you set the value to true, SSH input islogged.
com.collation.SshPort=22The default value is 22. The value must be an integer.
This property indicates the port that the server uses for all SSHconnections.
com.collation.SshSessionCommandTimeout=120000The default value is 120000. The value must be an integer.
This value indicates the time (in milliseconds) that is allowed for the SSHcommand to run. If this property is used from an agent, the value for thisproperty must be a lesser value than the value for the AgentRunnerTimeoutproperty to be effective.
com.collation.SshWeirdReauthErrorList=Permission denied
This property allows for the retry of the user name and password pairsthat previously worked during discovery runs. The property is neededbecause Windows systems randomly deny valid login attempts. Theproperty needs to have the Permission denied setting. Do not change thisproperty.
com.collation.WmiInstallProviderTimeout=240000The default value is 240000. The value must be an integer.
This value indicates the time (in milliseconds) that is allowed to wait forthe WMI InstallProvider script to run.
com.collation.SshSessionReuseSuppressListSome versions of the SSH server do not support the reuse of connectionsas implemented by TADDM. The SSH server versions that are notsupported for reuse must be added to this property so that TADDMsuccessfully discovers targets that run those SSH server versions.
The value of this property is a comma-separated list. It is sufficient tospecify only the beginning of the SSH server version, for exampleSSH-2.0-BoKS_SSH_6.
You can find the SSH server version in the session sensor log file.
Security propertiesThese properties apply to security.
Fix Pack 3 com.ibm.cdb.secure.server=falseThe default value is false.
This property specifies whether all TADDM services from the public andexternal RMI registries are secure. If set to true, all public services that arenot secure (ClientProxyServer and API Server) are moved to the internal
Administering 87
RMI registry. Also, the SSL protocol is enforced on external services, forexample, RegistriesURLProvider, SecurityManager, and TopologyManager.
If you set this property to true, set also thecom.collation.security.enablesslforconsole andcom.collation.security.enforceSSL properties to true.
This property might affect the integration with other products that connectto TADDM with unsecured connection.
If you modify the default value of this property, set it in the followinglocations:v $COLLATION_HOME/dist/etc/collation.properties
v $COLLATION_HOME/dist/sdk/etc/collation.properties
v sdk/etc/collation.properties of every TADDM SDK installation.
Fix Pack 5
If server is running in secure mode (com.ibm.cdb.secure.server
= true), the following port will be secured with SSL protocol:v com.ibm.cdb.service.registry.public.port (Default Value:9433)
If server is running in secure mode (com.ibm.cdb.secure.server = true),then while launching the Data Management Console, check box 'Establish asecure (SSL) session' must be checked.
Fix Pack 1 com.ibm.cdb.secure.liberty=falseThe default value is false.
Valid values are true or false. To disable the non-secure HTTP port, setthis flag to true.
com.collation.security.privatetruststore=trueThe default value is true.
Valid values are true or false. The value must be true when SSL isenabled.
com.collation.security.enablesslforconsole=trueThe default value is true.
Valid values are true or false.
com.collation.security.enabledatalevelsecurity=falseThe default value is false.
Valid values are true or false. To restrict access to collections of TADDMobjects by user or user group, set this value to true.
com.collation.security.enforceSSL=falseThe default value is false.
Valid values are true or false. To disable non-secure connections and forcethe use of SSL connections, set this flag to true.
com.collation.security.usermanagementmodule=fileThe default value is file.
There are three options for this property:v file for a TADDM file-based user registryv ldap for an LDAP user registryv vmm for a user registry that uses the federated repositories of WebSphere
Application Server
88 Application Dependency Discovery Manager: Administering

com.collation.security.auth.sessionTimeout=240The default value is 240. The value must be an integer.
com.collation.security.auth.searchResultLimit=100The default value is 100. The value must be an integer.
Use this property if you have many users.
Important: If you have more than 100 users in an LDAP or WebSphereFederated repository, increase this value to support the expected number ofusers. For example, com.collation.security.auth.searchResultLimit=150
com.collation.security.auth.websphereHost=localhostThe default value is localhost.
Type the fully qualified domain name of the system that hosts thefederated repositories functionality of the WebSphere Application Server.
com.collation.security.auth.webspherePort=2809The default value is 2809.
It must be an integer value. This value indicates the WebSphere systemport.
com.ibm.cdb.service.SecurityManager.port=9540For servers other than a synchronization server:
The default value is 9540.
Specifies the firewall port that is used by the security manager.
For a synchronization server:The default value is not set.Domains communicate with a synchronization server by using a port thatis specified in the com.collation.EnterpriseSecurityManager.portparameter. The default value for this property is 19433.
com.collation.cdm.analytics.authorizedRole=
The Analytics pane can be restricted to a specific role. By default, thisproperty is not defined in the collation.properties file and the Analyticspane is available for everyone. The value of the property must be the nameof the role that is allowed to access the pane.
The access to the following areas of the Analytics pane can be subject tothe specified role:
v Fix Pack 2 Grouping Patternsv Inventory Summaryv Application Summaryv Service Summaryv System Inventoryv Software Server Inventoryv BIRT Reports
com.collation.security.discoverOutsideScope=trueThe default value is true.
Valid values are true or false. To disable discovering elements which arenot inside the scope, set this flag to false.
com.ibm.cdb.secure.tomcat=false (TADDM 7.3.0 only)The default value is false.
Administering 89
Valid values are true or false. To disable the non-secure HTTP port, setthis flag to true.
com.ibm.cdb.http.ssl.protocol=TLSThe default value is TLS.
This property modifies the SSL protocol that is used by Web SSL port(HTTPS port), by default 9431. You can set the port by using thecom.ibm.cdb.service.web.secure.port property.
For the list of supported values, see IBM Java 7 documentation athttp://www-01.ibm.com/support/knowledgecenter/SSYKE2_7.0.0/com.ibm.java.security.component.70.doc/security-component/jsse2Docs/protocols.html. If you use the most secure protocols, for example TLS v1.1or TLS v1.2, you must first configure your web browser to support them.Additionally, too strong protocols might affect integration with otherproducts that connect to TADDM through Web SSL port.
Fix Pack 5
When com.ibm.cdb.http.ssl.protocol=TLSv1.2 and JAVA7 is
being used at the client side, the following settings need to be updated:<JAVA_HOME>/jre/lib/security/java.securityjdk.tls.disabledAlgorithms=SSLv2, SSLv3, TLSv1, TLSv1.1
Also TLSv1 and TLSv1.1 should be disabled in the browser.
⌂com.ibm.cdb.ssl.protocol=TLSThis property is not added to the collation.properties file by default. Ifit is not added, the default value is TLS. To modify it, add this property tothe collation.properties file manually with the new value.
This property modifies the SSL protocol that is used by the following ports:v The port that the API server listens on for SSL requests, by default 9531.
You can set the port by using thecom.ibm.cdb.service.SecureApiServer.secure.port property.
v The RMI data port to use with SSL, by default 9434. You can set the portby using thecom.ibm.cdb.service.SecureClientProxyServer.secure.port property.
For the list of supported values, see IBM Java 7 documentation athttp://www-01.ibm.com/support/knowledgecenter/SSYKE2_7.0.0/com.ibm.java.security.component.70.doc/security-component/jsse2Docs/protocols.html. If you use the most secure protocols, for example TLS v1.1or TLS v1.2, you must first configure your web browser to support them.Additionally, too strong protocols might affect integration with otherproducts that connect to TADDM through the listed ports.
⌂com.ibm.cdb.http.ssl.ciphers=Ciphers are getting set to the LibertyServer and communication will bedone on the given ciphers only. Otherwise it will pick the default cipherswhich could be the weak algorithms.
⌂com.ibm.cdb.rmi.ssl.protocol=This property com.ibm.cdb.rmi.ssl.protocol helps to enable specificprotocol on SSL Connection which was created oncom.ibm.cdb.ssl.protocol.
com.ibm.cdb.rmi.ssl.protocol must be from supported protocol list oncom.ibm.cdb.ssl.protocol.
90 Application Dependency Discovery Manager: Administering
⌂com.ibm.cdb.rmi.ssl.ciphers=With this property you can set the ciphers algorithms for RMI data portand port on that API server listens.
Temporary directory propertiesThese properties apply to the use of temporary directories.
Temporary directories are used by TADDM to store temporary files under certainconditions. For example, anchor log files, discovery scripts, discovery results, andinformation required by some sensors when running a discovery can be stored intemporary directories. TADDM uses three temporary directories: ANCHOR_DIR,ASD_TEMP_DIR, and TADDM_TEMP_ROOT.
com.ibm.cdb.taddm.anchor.root=.\The default value is .\.
This entry specifies the location of the ANCHOR_DIR directory where theanchor server is deployed. This property is a scoped property, and you canappend the IP address, name of the scope, or operating system to thisproperty. For example, com.ibm.cdb.taddm.anchor.root.SunOS=.
For a Windows system, the following property name and default value areused:com.ibm.cdb.taddm.anchor.root.Windows=%windir%\\temp\\
The property value uses variables that are resolved on target hosts. TheLinux, AIX, and SunOS variables must be prefixed with a dollar sign ($).Variables for Windows must be enclosed in percent signs (%). For example,com.ibm.cdb.taddm.anchor.root=$TMP/taddmdirs/anchor andcom.ibm.cdb.taddm.anchor.root.Windows=%TEMP%\\taddmdirs\\anchor.
If the resolved property value is a relative directory path, it is prefixedwith:v %windir%\\temp\\ - for Windowsv Home directory - for AIX, Linux, and SunOS systems
The path is suffixed with the taddmversion/anchor directory. For example,/home/taddmusr/taddm7.2.1/anchor and c:\Windows\Temp\taddm7.2.1\anchor.
com.ibm.cdb.taddm.asd.tempThis entry specifies the location of the ASD_TEMP_DIR directory and thisdirectory stores discovery scripts and discovery results. This property is ascoped property, you can customize the property by appending the IPaddress or operating system to this property.
In the specified location, taddmversion/asd/ directory is created. Forexample, /tmp/taddm7.2.1/asd/. If you specify a new location, all usersmust have all access rights to the new location.
com.ibm.cdb.taddm.file.temp=.\The default value is .\
This entry specifies the location of the TADDM_TEMP_ROOT and this directoryis used by various sensors to store temporary data that is necessary forrunning a discovery. Examples of sensors that store temporary data areDB2® and WebLogic sensors.
The TADDM_TEMP_ROOT directory is created in the home directory intaddmversion/temp/. For example, /home/taddmusr/taddm7.2.1/temp/.
Administering 91
Topology builder propertiesThese properties apply to the topology builder.
com.collation.topobuilder.RuntimeGcUnknownServerRetentionSpan=5The default value is 5.
This property specifies how long (in days) to keep unknown processes. Themaximum value is 14. Unknown processes determine when custom servertemplates are needed, however, without regular clean up, the number ofunknown processes can build up over time. This might cause topologyperformance issues. The zOS Address Spaces item is not removed by thisprocessing.
com.collation.topobuilder.RuntimeGcThreadCount=The default value is 4.
This property adds parallelism to the RuntimeGC agent which canimprove performance
com.collation.topobuilder.agent.DerivedAppToAppDependencyAgent.ServiceDependency.enabled
The default value is false.
This property specifies whether the topology agentDerivedAppToAppDependency creates a dependency between businessapplications when their members are in service dependency.
To enable the agent to create such dependency, set the property to true.
Topology manager propertiesThese properties apply to the topology manager.
com.ibm.JdoQuery.FetchBatchSize=500The default value is 500.
The batch size is a configurable property and corresponds to thekodo.FetchBatchSize property. This property represents the number ofrows to fetch at a time when scrolling through a result set of a query run.
com.ibm.cdb.service.TopologyManager.port=9550The default value is 9550.
Specifies the firewall port used by the topology manager.
View manager propertiesThese properties apply to the view manager.
Fix Pack 2 com.ibm.taddm.hideNetworkConnectionUnusedColumns.enabledThe default value is false.
This property specifies whether the following columns of the NetworkConnections tab are displayed in Data Management Portal:v Flows
v Packets
v Octets
v First Seen
v Last Seen
To hide these columns, set this property to true.
com.collation.view.maxnodes=500The default value is 500. The value must be an integer.
92 Application Dependency Discovery Manager: Administering
This property specifies the maximum number of nodes that can be viewedin a topology graph in Data Management Portal. If you set the property toa higher value, you can view larger topologies. However, it might increasememory requirements.
Verifying data integrityYou can run the verify-data command to verify the data integrity of configurationitems in the TADDM database. You can verify relationships, inheritance mapping,duplicates, and over merges.
Before you begin
Do not run a discovery, bulkload, or synchronization with the repair optionenabled. The data integrity tool analyzes a great amount of data and it might takesome time to finish the process, especially with the repair option enabled. TheTADDM server must be up and running but make sure that it does not performany tasks.
About this task
The Data integrity verification tool reports and repairs configuration items dataintegrity problems in the TADDM database. The executable script is in the$COLLATION_HOME/bin directory. The tool reports and logs to the verify-data.logfile. You can stop the tool and run it again at any time.
Verifying relationshipsVerification for relationships queries and verifies foreign keys in all model andintersection tables.
About this task
With the repair option enabled, the verification for relationships removes childobjects if a parent object does not exist in the database, and clears invalid foreignkey values for relationships that are defined as being not contained. It might alsodelete a significant number of low-level configuration items. However, if the itemsdo not have a parent object, they can be safely removed.
Procedure
To verify relationships, run one of the following commands:v verify-data.sh -v ro [-a repair]
v verify-data.bat -v ro [-a repair]
Verifying inheritance mappingVerification for inheritance mapping queries all tables that map a configurationitem class, and verifies that all tables contain an entry for each row.
About this task
When the repair option is enabled, the records are re-created.
Procedure
To verify inheritance mapping, run one of the following commands:v verify-data.sh -v io [-a repair]
Administering 93
v verify-data.bat -v io [-a repair]
Verifying duplicatesVerification for duplicates searches for duplicated configuration items based onnaming rule field values in the database.
About this task
With the repair option enabled, the duplicated objects are merged. After the merge,the durable object remains in the database, and the transient object is deleted.
The merge is performed by several threads in parallel. The default number ofthreads is 5. You can change the number of threads in the collation.propertiesfile by setting the com.ibm.cdb.topomgr.dataverification.generator.ThreadCountflag to an appropriate number, as in the following example:v com.ibm.cdb.topomgr.dataverification.generator.ThreadCount=10
You must restart the TADDM server after you change the number of threads.
Some errors might occur during the merge of the objects. The cause of the errors isincluded in a log file.v ERROR_INVALID_DURABLE_GUID
v ERROR_INVALID_TRANSIENT_GUID
The cause of the errors are missing aliases in the aliases table or an invalid object.You must wait for the cleanup agents to delete the invalid objects.
Procedure
To verify duplicates, run one of the following options:v verify-data.sh -v dup [-a repair]
v verify-data.bat -v dup [-a repair]
Verifying over mergesVerification for over merges uses the data that is gathered in the ALIASES_JN tableto find and report GUIDs with large numbers of master alias changes.
About this task
The ALIASES_JN table contains history of changes to the ALIASES table. Overmerge is a situation when a few objects change their parent to the same modelobject. Child objects are then clustered around some number of parent objects.Over merges that occurred before the TADDDM 7.2.1 Fix Pack 3 was installedcannot be found because there is no required data in the ALIASES_JN table.Verification does not have the repair option because it might find and report falsepositive results.
By default, the detailed tracking is enabled for the ComputerSystem, AppServer,and Operating System classes, and all other classes that inherit from them. If youwant to enable tracking for different classes, you can edit the following property inthe collation.properties file:com.ibm.tivoli.namereconciliation.service.overmergeClasses
The following is the example of the property that is specified to look for theComputerSystem, AppServer, and Operating System classes:
94 Application Dependency Discovery Manager: Administering
com.ibm.tivoli.namereconciliation.service.overmergeClasses=ComputerSystem,AppServer,OperatingSystem
Meaning of the actions that are used to run the command:v s1s2s1 - Verification looks for CIs that change their naming attributes values in a
loop. For example, a computer system with a signature A, then signature B, andthen again signature A would be detected.
v s1s2s3 - Verification looks for CIs that contain a number of changes for givennaming attributes.
v m1m2m1 - Verification looks for CIs which GUIDs changed their master GUIDmany times. For example, an alias A with a master GUID B that was laterreassigned to master GUID C, and then again reassigned back to master GUID Bwould be detected.
v m1m2m3 - Verification looks for CIs which GUIDs changed their master GUIDsa few times.
v WinCSLinCSWinCS - Verification looks for CIs that changed their type a fewtimes. For example, a computer system that was initially stored asWindowsComputerSystem, and later updated to LinuxUnitaryComputerSystem,and then again updated to WindowsComputerSystem would be detected.
Procedure
To verify over merges, run one of the following commands:v verify-data.sh -v om [-a <action>] [-p <class>] [-from <time stamp>] [-to
<time stamp>]
v verify-data.bat -v om [-a <action>] [-p <class>] [-from <time stamp>] [-to<time stamp>]
where:– <action>: s1s2s1, s1s2s3, m1m2m1, m1m2m3, WinCSLinCSWinCS– <class>: any class from the TADDM model, for example, ComputerSystem.– <time stamp>: time stamp in the YYYY-MM-DD HH24:MI:SI format.
Exampleverify-data.sh -v om -a s1s2s1 m1m2m1 WinCSLinCSWinCS-p ComputerSystem -from 2012-11-13 14:50:00 -to 2012-11-14 14:50:01
This command looks for over merges of type s1s2s1, m1m2m1, andWinCSLinCSWinCS for the ComputerSystem class, and all classes that inherit fromit, crated between 2012-11-13 14:50:00 and 2012-11-14 14:50:01.
Solving the over merge issue:
An over merge occurs when a few objects change their parent to the same modelobject. Child objects are then clustered around some number of parent objects.
Procedure
1. Run the over merges verification.2. Check the reported configuration items. Verification might incorrectly report
them as over merges.3. Correct the configuration in environments that might be the cause of over
merge. The configuration problems might include the same signature, serialnumber, VMID, and other CIs naming attributes.
4. Remove the over merged objects from the TADDM database.
Administering 95
5. Run a discovery on deleted objects, and validate the results.6. Remove all records from the ALIASES_JN table after solving any over merge
problems.
Managing credential cache - cachemgr utilityYou can use the cachemgr.sh or cachemgr.bat command to list and delete thecontent of credentials cache.
Command syntax
cachemgr -h | -u user -p password (-l|-r) valid|invalid|all [[ -s IP|scope|scopegroup|range|subnet ] [ -a addressSpace ] [ -n accessCredentialName ] [ -c type ] [ -dyyyy/mm/dd ] [ -k key ] [ -t locationTag ]]
Parameters
-a, --addressSpace addressSpaceIs the address space name.
-c, --class typeIs the type of a selected access entry that is described by the name of thespecific class that implements access entry.
-d, --date yyyy/mm/ddIs the date threshold that is used to select entries not modified until specifiedtime. The format is yyyy/mm/dd.
-h, --helpShows help.
-k, --key keyIs the key of a selected cache entry.
-l, --list valid|invalid|allIs the listing operation that is controlled by the following arguments:v valid - lists only valid authentication attempts held in a cache.v invalid - lists only invalid authentication attempts held in a cache.v all - lists both valid and invalid authentication attempts held in a cache.
-n, --name accessCredentialNameIs the name of access credentials, the same as in the access list.
-p, --password passwordIs the password for the user that logs in to the TADDM server.
-r, --remove valid|invalid|allIs the remove operation that is controlled by the following arguments:v valid - removes only valid authentication attempts held in a cache.v invalid - removes only invalid authentication attempts held in a cache.v all - removes both valid and invalid authentication attempts held in a cache.
-s, --scope IP|scope|scope group|range|subnetIs the scope of an access entry. It is controlled by the following arguments:v IP
v scope
v scope group
v range
96 Application Dependency Discovery Manager: Administering
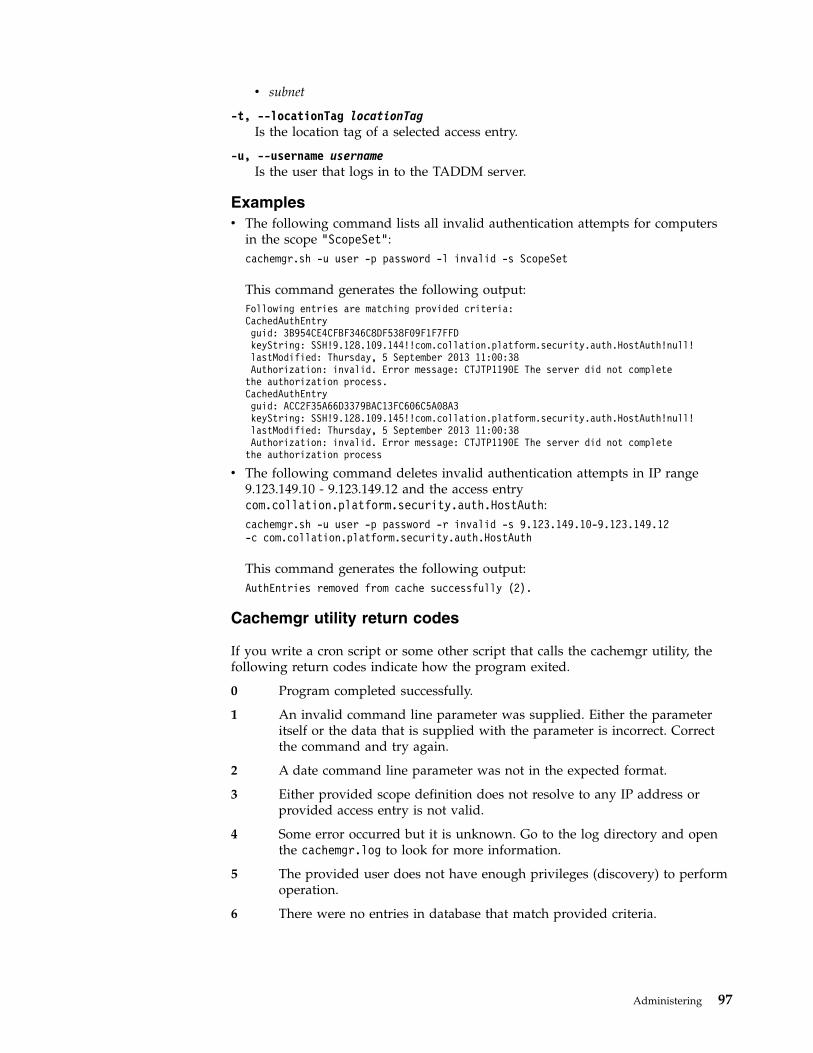
v subnet
-t, --locationTag locationTagIs the location tag of a selected access entry.
-u, --username usernameIs the user that logs in to the TADDM server.
Examplesv The following command lists all invalid authentication attempts for computers
in the scope "ScopeSet":cachemgr.sh -u user -p password -l invalid -s ScopeSet
This command generates the following output:Following entries are matching provided criteria:CachedAuthEntryguid: 3B954CE4CFBF346C8DF538F09F1F7FFDkeyString: SSH!9.128.109.144!!com.collation.platform.security.auth.HostAuth!null!lastModified: Thursday, 5 September 2013 11:00:38Authorization: invalid. Error message: CTJTP1190E The server did not complete
the authorization process.CachedAuthEntryguid: ACC2F35A66D3379BAC13FC606C5A08A3keyString: SSH!9.128.109.145!!com.collation.platform.security.auth.HostAuth!null!lastModified: Thursday, 5 September 2013 11:00:38Authorization: invalid. Error message: CTJTP1190E The server did not complete
the authorization process
v The following command deletes invalid authentication attempts in IP range9.123.149.10 - 9.123.149.12 and the access entrycom.collation.platform.security.auth.HostAuth:cachemgr.sh -u user -p password -r invalid -s 9.123.149.10-9.123.149.12-c com.collation.platform.security.auth.HostAuth
This command generates the following output:AuthEntries removed from cache successfully (2).
Cachemgr utility return codes
If you write a cron script or some other script that calls the cachemgr utility, thefollowing return codes indicate how the program exited.
0 Program completed successfully.
1 An invalid command line parameter was supplied. Either the parameteritself or the data that is supplied with the parameter is incorrect. Correctthe command and try again.
2 A date command line parameter was not in the expected format.
3 Either provided scope definition does not resolve to any IP address orprovided access entry is not valid.
4 Some error occurred but it is unknown. Go to the log directory and openthe cachemgr.log to look for more information.
5 The provided user does not have enough privileges (discovery) to performoperation.
6 There were no entries in database that match provided criteria.
Administering 97
Preparing for discoveryTo optimize the information that TADDM gathers from your environment duringdiscoveries, you must complete configuration tasks to prepare your environmentfor discovery.
About this task
The specific configuration tasks are dependent on the type and level of discoverythat you must support in your environment.
What to do next
In addition to configuring your environment for discovery, you must configureTADDM sensors as appropriate. For information about how to do this, see theTADDM Sensor Reference.
For information about how to run a discovery, including defining a scope andsetting a schedule, see the TADDM User's Guide.
Configuring user logon IDTADDM requires an interactive user to successfully run discoveries. You mustconfigure the user logon ID.
An interactive user logon ID is used in a non-interactive mode for all discoverysessions, including a server to gateway session and a gateway to target session.The user must be interactive to be able to run commands. However, the commandsare run in a non-interactive way, which means that a user runs the command andwaits for the results.
In /etc/passwd, set the user in the following way:taddmusr:x:100:100::/export/home/taddmusr:/bin/sh
where taddmusr is the TADDM user name.
Configuring for alternative methods of discoveryYou might want to use alternative methods of discovery such as asynchronousdiscovery, script-based discovery, or discovery using IBM Tivoli Monitoring.
Notes:
1. Asynchronous and script-based discovery is supported only if the targetcomputer system is running the AIX, FreeBSD, HP NonStop, Linux (on x86systems only), Solaris, or Windows operating system.
2. If the target computer system is running the Solaris operating system,script-based discovery might not work if SunSSH 1.0 is used.
Configuring for asynchronous discoveryTo run an asynchronous discovery, you must first configure the discovery.
About this task
To configure for asynchronous discovery, you must generate a discovery scriptpackage, copy the package to the target system, and run the script on the target
98 Application Dependency Discovery Manager: Administering
system. The output of the discovery script is an archive file that contains thediscovery results. You must then move this archive file to the TADDM server.
Note: If you configured the discovery to run in the asynchronous mode and thenupgraded TADDM, you must generate a discovery script package again becausethe sensor plug-in ID might change.
Procedure1. To generate a discovery script package, enter one of the following commands
from the $COLLATION_HOME/bin directory:v Regular method
makeASDScriptPackage OUTPUT_DIR UNAME [IPADDRESS] [PACKING_METHOD]
OUTPUT_DIRThe directory path for the script package.
UNAMEThe operating system of the target system, on which the script is tobe run. The valid values are AIX, Linux, SunOS, FreeBSD, Windows, orNONSTOP_KERNEL.
IPADDRESS (optional)The IP address of the target system on which the script is to be run.
The scripts that are used for asynchronous discovery use informationfrom TADDM server properties that are defined in thecollation.properties file, and some of these properties might bescoped.
scoped propertyA property to which you can append either an IP address orthe name of a scope set. The IP address or the scope setname makes the property dependent on the host that is beingdiscovered. You can use only scope set names that do notcontain spaces, apostrophes ('), periods (.), and forwardslashes (/).
If you have customized any of the TADDM server properties so thatthey are scoped, you should include the IPADDRESS option in themakeASDScriptPackage command.
PACKING_METHOD (optional)The method to use to package the files. The valid values are tar orzip.
If no method is specified, the method is determined by the operatingsystem. For example, for operating systems such as Linux, the tarmethod is used.
By default, the system path is searched for the archive utility. Ifnecessary, add the com.ibm.cdb.tarpath property to thecollation.properties file, and specify an alternative path for thearchive utility.
On Solaris operating systems, because of a limitation in the length offile names, you must use the gtar archive utility, and you mustspecify the path to the utility.
The following example shows how to specify the path of the tarcommand on the TADDM server for the AIX operating system:com.ibm.cdb.tarpath=tar
Administering 99

The following examples show how to specify the path of the tarcommand on the target system, depending on the operating system:
For AIXcom.ibm.cdb.targettarpath.AIX=tar
For Solariscom.ibm.cdb.targettarpath.SunOS=/usr/sfw/bin/gtar
For example, to generate a discovery script package for the AIX operatingsystem, enter the following command:./makeASDScriptPackage /tmp AIX
This command creates the following AIX script package in the tmp directory:/tmp/taddm_AIX.tar.
v Extended methodmakeASDScriptPackage --outputDir OUTPUT_DIR --uname UNAME[--ipAddress IP_ADDRESS] [--packingMethod PACKING_METHOD] [--sensors SENSOR]
--outputDir OUTPUT_DIRSee the description of the OUTPUT_DIR parameter of the regularmethod.
--uname UNAMESee the description of the UNAME parameter of the regular method.
[--ipAddress IP_ADDRESS] (optional)See the description of the IPADDRESS parameter of the regularmethod.
[--packingMethod PACKING_METHOD] (optional)See the description of the PACKING_METHOD parameter of theregular method.
[--sensors SENSOR] (optional)The name of the sensor that you want to include in your package.The following table contains the sensor names that must be used inthis command.
Table 33. Sensor names used in the makeASDScriptPackage command.
Sensor Name used in the command
Apache sensor apacheserver
Citrix XenServer sensor xenserver
FreeBSD computer system sensor computersystem
Generic server sensor genericserver
HP NonStop computer system sensor computersystem
IBM AIX computer system sensor computersystem
IBM DB2 sensor db2
IBM Lotus® Domino® server sensor dominoserverinitial
IBM Tivoli Utilization sensor utilization
IBM WebSphere MQ Server sensor mqserver
IBM WebSphere sensor webspherescript
JBoss Application Server 7 sensor jboss7
KVM sensor kvm
Linux computer system sensor computersystem
100 Application Dependency Discovery Manager: Administering
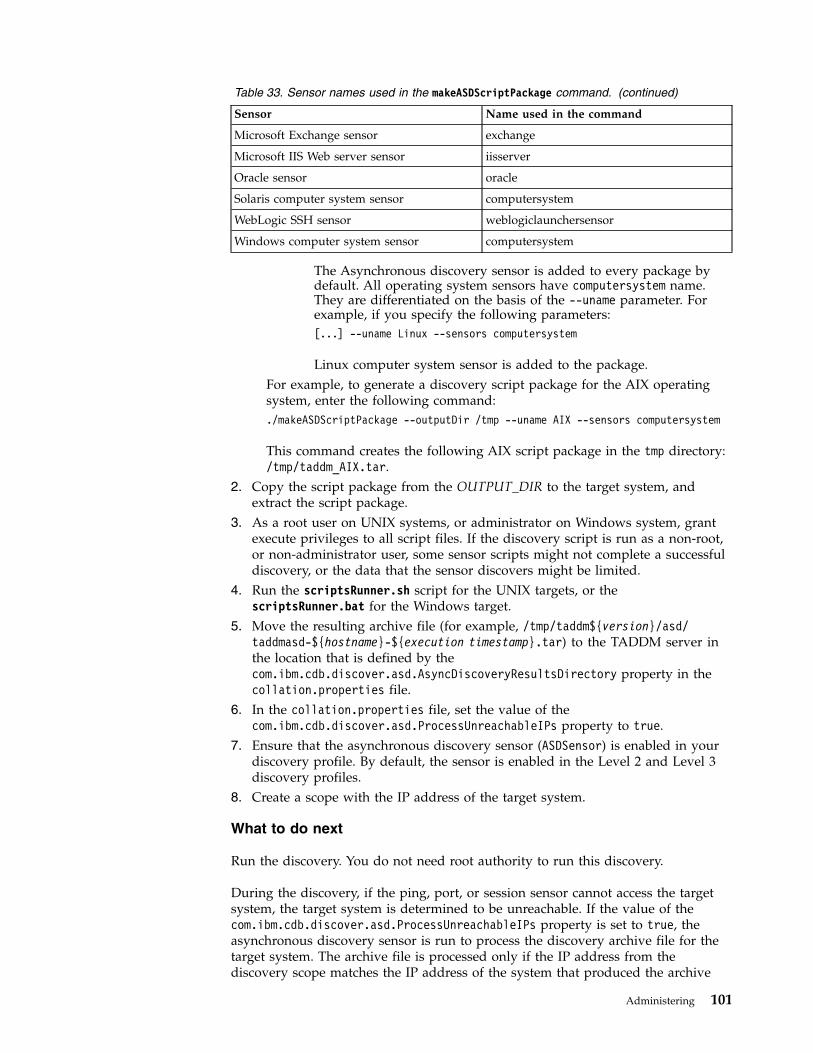
Table 33. Sensor names used in the makeASDScriptPackage command. (continued)
Sensor Name used in the command
Microsoft Exchange sensor exchange
Microsoft IIS Web server sensor iisserver
Oracle sensor oracle
Solaris computer system sensor computersystem
WebLogic SSH sensor weblogiclaunchersensor
Windows computer system sensor computersystem
The Asynchronous discovery sensor is added to every package bydefault. All operating system sensors have computersystem name.They are differentiated on the basis of the --uname parameter. Forexample, if you specify the following parameters:[...] --uname Linux --sensors computersystem
Linux computer system sensor is added to the package.For example, to generate a discovery script package for the AIX operatingsystem, enter the following command:./makeASDScriptPackage --outputDir /tmp --uname AIX --sensors computersystem
This command creates the following AIX script package in the tmp directory:/tmp/taddm_AIX.tar.
2. Copy the script package from the OUTPUT_DIR to the target system, andextract the script package.
3. As a root user on UNIX systems, or administrator on Windows system, grantexecute privileges to all script files. If the discovery script is run as a non-root,or non-administrator user, some sensor scripts might not complete a successfuldiscovery, or the data that the sensor discovers might be limited.
4. Run the scriptsRunner.sh script for the UNIX targets, or thescriptsRunner.bat for the Windows target.
5. Move the resulting archive file (for example, /tmp/taddm${version}/asd/taddmasd-${hostname}-${execution timestamp}.tar) to the TADDM server inthe location that is defined by thecom.ibm.cdb.discover.asd.AsyncDiscoveryResultsDirectory property in thecollation.properties file.
6. In the collation.properties file, set the value of thecom.ibm.cdb.discover.asd.ProcessUnreachableIPs property to true.
7. Ensure that the asynchronous discovery sensor (ASDSensor) is enabled in yourdiscovery profile. By default, the sensor is enabled in the Level 2 and Level 3discovery profiles.
8. Create a scope with the IP address of the target system.
What to do next
Run the discovery. You do not need root authority to run this discovery.
During the discovery, if the ping, port, or session sensor cannot access the targetsystem, the target system is determined to be unreachable. If the value of thecom.ibm.cdb.discover.asd.ProcessUnreachableIPs property is set to true, theasynchronous discovery sensor is run to process the discovery archive file for thetarget system. The archive file is processed only if the IP address from thediscovery scope matches the IP address of the system that produced the archive
Administering 101
file. Based on the contents of the archive file, sensors will be scheduled to processtheir script output. After the archive file is processed, it is renamed totarfilename.tar_DONE so that it is not processed again.
The discovery archive file is processed only once. If a sensor is not enabled toprocess its script output at the time that the archive file is processed, running asecond discovery with the sensor enabled does not process a previously processedarchive file, unless you complete the following steps:1. Rename the archive file to its original name. For example, remove _DONE from
the file name.2. The .processed file in the $COLLATION_HOME/var/asdd directory contains a list of
the processed archive files. Remove the name of the archive file from the.processed file.
Multiple archive files from different systems can be processed in a single discoveryrun, but only one archive file per target system is processed during a singlediscovery run. If one target system has multiple archive files, only the one withlatest time stamp is processed.
To discover multiple archive files from different systems in a single discovery run,copy each archive file to the location that is defined by thecom.ibm.cdb.discover.asd.AsyncDiscoveryResultsDirectory property. Include theIP address of each target system in the discovery scope.
Because the discovery script uses the tar command to create the discovery archivefile, if you are using a TADDM server that is running the Windows operatingsystem, you must install a third party tar program for TADDM to use to extractthe files from the archive file. The location of the tar program is defined by thecom.ibm.cdb.tarpath property.
Restriction: Your tar program must support long file paths. GNU Tar 1.13 is notsupported because it might truncate long file names.
Configuring for script-based discoveryTo run a script-based discovery, you must first configure the discovery.
About this task
In comparison to regular sensors, sensors that are run in the script-based mode aremore apparent, which means that all commands that the sensor uses are in onescript, which you can view. For the list of the sensors that support script-basedmode, and the restrictions that apply to some of the sensors, see the Sensors thatsupport script-based and asynchronous discovery topic in the TADDM Sensor Reference.
Procedure
Configure the sensor in one of the following ways:v
Enabling all sensors that support script-based discoveryTo globally enable all sensors that support script-based discovery, openthe collation.properties file and set the value of thecom.ibm.cdb.discover.PreferScriptDiscovery property to true.
v
102 Application Dependency Discovery Manager: Administering

Enabling all sensors that support script-based discovery in a specific discoveryprofile
For a specific discovery profile, to enable all sensors that supportscript-based discovery, complete the following steps:1. In the Discovery Management Portal, select the discovery profile for
which you want to enable script-based mode.2. In the Platform Properties tab, set the value of the
com.ibm.cdb.discover.PreferScriptDiscovery property to true.v
Enabling a sensor that supports script-based discovery in a discovery profile In a discovery profile, to enable a specific sensor that supportsscript-based discovery, update the configuration of that sensor in therespective discovery profile. Complete the following steps:1. In Discovery Management Portal, go to the discovery profile that
contains the sensor that you want to enable.2. In the Sensor Configuration tab, select the sensor and click New.3. In the Create Configuration window, specify the name of the
configuration and select the Perform Script Based Discovery option.4. Click OK to save the configuration.
What to do next
Configuring TADDM to select non-default users for the discoveryBy default, only the user that is requested by the script is used for thediscovery. If you have problems with running a discovery with the defaultuser and you have another user that has all required permissions, you canconfigure TADDM to select this user for the discovery.
Note: Use the following configuration with caution. If a user that does nothave all required permissions is used for a discovery, the discovery mightfail, or some of the targets might not be discovered.
In the plugin.xml file that you can find in a package for each sensor in theCOLLATION_HOME/osgi/plugins directory, edit the script node definition, forexample, like in the plugin.xml snippet of IBM WebSphere MQ Serversensor:<scriptset>
<ostype>AIX</ostype><mainScript name="sensorCommon.sh" /><script name="script.sh" authClassName="com.collation.platform.security.
auth.MQServerAuth" authMode="preferred" hostAuthFallback="true”/></scriptset>
The following properties can be defined:
authModeDefines how TADDM approaches entries in the Access List for thetype that is specified by authClassName. The following values areavailable:v single - only a user that is requested by the script is used. This
is the default value.v preferred - first a user who is preferred by the script is used,
but if it is not available or fails, the remaining Access List entriesof the defined type are used.
Administering 103
v regular - Access List entries are used in their specified orderwithout checking the user preference.
hostAuthFallbackDefines whether, in case of problems with establishing connectionto the target for a specific authClassName or the preferred user, orboth, TADDM falls back to the session that is established by thegeneric user that is used for connecting to the target. The followingvalues are available:v false - the default value.v true.
Configuring for discovery using IBM Tivoli Monitoring (oldmethod)TADDM can perform Level 1, Level 2, and some Level 3 discoveries using IBMTivoli Monitoring 6.2.1 or later infrastructure.
The old integration methodThis section applies to a deprecated method of TADDM integration withIBM Tivoli Monitoring. Starting with the TADDM version 7.3.0, it isadvised to integrate with IBM Tivoli Monitoring 6.3 using OSLCAutomation. The old method of integration with the use of IBM TivoliMonitoring Scope sensor is deprecated and will be removed from futurereleases. For more information about configuring for discovery by usingOSLC Automation, see “Configuring for discovery over OSLC AutomationSession” on page 105.
If you are using IBM Tivoli Monitoring 6.2.1-TIV-ITM-FP0001,6.2.2-TIV-ITM-FP0002, or a later level, you can discover Tivoli Monitoringendpoints through the Tivoli Enterprise Portal Server. These fix packs resolveAPAR IZ63983, which improves Tivoli Monitoring performance during TADDMdiscoveries. Using earlier releases or levels of IBM Tivoli Monitoring to performTADDM discoveries through the Tivoli Enterprise Portal Server might causeexcessive processor and network load, especially on Tivoli Monitoring components.
Note: Discovery using IBM Tivoli Monitoring is only possible when the TivoliEnterprise Portal Server database is on Microsoft SQL Server and DB2. It is notpossible when Apache Derby database is used as the Tivoli Enterprise PortalServer database.
TADDM server properties that are specific to discovery using TivoliMonitoring
For information about the TADDM server properties that are specific to discoveryusing IBM Tivoli Monitoring, including properties that affect how TADDMdiscovers Tivoli Monitoring endpoints, see “Properties for discovery using IBMTivoli Monitoring (old method)” on page 76.
In a discovery profile, you can configure the TADDM server properties that affecthow TADDM discovers Tivoli Monitoring endpoints. To do this, complete thefollowing steps, depending on whether you are using a custom profile or thedefault profile:
Configuring the properties for a custom profile
1. Start the Discovery Management Console.2. Open Discovery Profiles.
104 Application Dependency Discovery Manager: Administering

3. Click the discovery profile that you want to configure.4. Click the Platform Properties tab.5. Change the value of the property that you want to update, and select
the Included check box for this property.6. Save the changes.
Configuring the properties for the default profileIn the $COLLATION_HOME/etc/collation.properties file, add (or edit) therespective property, as indicated in the following example, wherediscovery_profile represents the profile name:com.ibm.cdb.session.allow.ITM.discovery_profile=true
For example, the following property specifies that TADDM uses thediscovery profile “Utilization Discovery” and uses IBM Tivoli Monitoringto discover Tivoli Monitoring endpoints:com.ibm.cdb.session.allow.ITM.Utilization_Discovery=true
Note: In the collation.properties file, you must replace the spacecharacter between “Utilization” and “Discovery” in the profile name withan underscore character.
Additional TADDM server properties that you might need to configure
The following configuration tips describe additional TADDM server properties thatyou might need to configure:v The value of the following property, which is specific to Windows systems, must
be set to true (which is the default value) to enable discovery of Windows targetsystems in discovery using IBM Tivoli Monitoring. If the value is set to false,TADDM cannot establish an IBM Tivoli Monitoring session to Windows targetsystems.com.collation.AllowPrivateGateways=true
v High processor usage might occur on the Tivoli Enterprise Portal Server duringthe discovery. To minimize this, you can limit the number of discover workerthreads that run during the discovery. On the TADDM server, set the followingserver property:com.collation.discover.dwcount=16
v In a large IBM Tivoli Monitoring environment, the IBM Tivoli Monitoring Scopesensor might time out before completing. To allow for a longer processing time,set the following server properties:com.collation.platform.session.ITMSessionNumProgressChecks=3600com.collation.discover.agent.ITMScopeSensor.timeout=3600000
Configuring for discovery over OSLC Automation SessionTADDM can run Level 2, and some Level 3 discoveries by using OSLC.
Before you begin
To configure the discovery on scope sets provided by OSLC Execute AutomationService Providers, you must meet the following requirements:v You must have at least one installed and working OSLC Execute Automation
Service Provider.v TADDM must be connected to OSLC Execute Automation Service Provider.
Administering 105
Procedure
To run a discovery over OSLC Automation Session, complete the following steps:1. Add access credentials of the product that you are integrating with to the
access list. To do so, create a new access list entry of type “Integration”>”OSLCAutomation”. If you are integrating TADDM with ITM, provide ITM TEPScredentials. During the discovery, OSLC Automation access list entries and ITMaccess list entry type are used to ensure compatibility with earlier versions.
2. Check the discovery scope. The scope sets are created periodically byOSLCAutomationAgent. The new scope sets are listed in the Scope Sets tab. Ifyou are integrating TADDM with ITM, one scope set per each ITM TEMS iscreated. You can run OSLCAutomationAgent manually by using the followingcommand:/taddm/dist/support/bin/runtopobuild.sh -a OSLCAutomationAgent
3. Configure discovery properties that allow using OSLC Automation Session. Youcan set the properties in the collation.properties file or in a new customdiscovery profile.v The collation.properties file:
com.ibm.cdb.session.prefer.OSLCAutomation=truecom.ibm.cdb.session.allow.OSLCAutomation=true
The examples of scoped properties:com.ibm.cdb.session.prefer.OSLCAutomation.9.222.222.124=falsecom.ibm.cdb.session.prefer.OSLCAutomation.Level_3_Discovery=false
v Custom discovery profile. In Discovery Management Console, create a newdiscovery profile and configure the Platform Properties tab in the followingway:com.ibm.cdb.session.allow.OSLCAutomation=truecom.ibm.cdb.session.prefer.OSLCAutomation=true
4. Run a regular discovery of scopes created by OSLCAutomationAgent bychoosing either of the following methods:v The default L2, or L3 profile when the collation.properties file is
configured to support OSLCAutomation Session.v The new discovery profile with properly configured Platform Properties tab.
Related reference:“Properties for discovery using OSLC Automation Session” on page 78These properties apply to discovery using OSLC Automation Session.“Command line interface for OSLCAutomationAgent” on page 196OSLCAutomationAgent is used to collect data from OSLC Execute AutomationService Providers. You can use commands to run the agent manually, and torefresh or update the scope sets that it creates.
Configuring the level of discoveryYou must configure the level of discovery.
Configuring for Level 1 discoverySome minimal configuration is required for Level 1 discovery (credential-lessdiscovery), which scans the TCP/IP stack to gather basic information about activecomputer systems.
106 Application Dependency Discovery Manager: Administering
About this task
For Level 1 discovery, you must configure the network devices in yourenvironment that you want the TADDM server to discover.
Procedure
To do this, complete the following steps:1. Depending on your SNMP version, record the following information for use
with the TADDM server:v For SNMP V1 and V2, record the SNMP MIB2 GET COMMUNITY string.v For SNMP V3, record the SNMP user name and password.
2. Assign permission for MIB2 System, IP, Interfaces, and Extended Interfaces.
Configuring for Level 2 discoveryIn addition to the requirements for Level 1 discovery, Level 2 discovery requiresconfiguration to support discovery of detailed host configuration information.
Before you begin
If the target systems are IBM Tivoli Monitoring endpoints that are discovered bythe IBM Tivoli Monitoring Scope sensor, the credentials for those target systems arenot required for Level 2 discovery. For more information, see the following sources:v “Integrating TADDM with IBM Tivoli Monitoring (old method)” on page 197v “Configuring for discovery using IBM Tivoli Monitoring (old method)” on page
104v TADDM Sensor Reference for information about the IBM Tivoli Monitoring Scope
sensor
About this task
On the target operating systems (computer systems) that you want TADDM todiscover, at a minimum, you must configure the following software:
Secure Shell (SSH)You can use either OpenSSH or the vendor-supplied version of SSH that isprovided with the operating system. For more information about Windowsoperating systems, see “Windows Management Instrumentation (WMI)dependency” on page 120.
SUNWscpu (Solaris environment only)To provide complete information about processes, install the SUNWscpu(Source Compatibility) package.
LiSt Open Files (lsof)To provide complete information on dependencies, install the LiSt OpenFiles (lsof) program according to the requirements in lsof requirements in theTADDM Wiki at https://www.ibm.com/developerworks/community/wikis/home?lang=en#!/wiki/Tivoli%20Application%20Dependency%20Discovery%20Manager/page/TADDM%20lsof%20requirements.
Creating the service account:
You must create a service account on all computer systems that are discoveredusing SSH key-based and password-based connections. This is the primary methodfor discovering the computer systems (servers) in your network.
Administering 107
About this task
To simplify the discovery setup, create the same service account on each targetcomputer system that you want to discover. The service account must allow accessto all resources on the target computer system that TADDM must discover. Theservice account must have write access privileges to its home directory on eachtarget computer system. This directory requires approximately 20 MB of free space.During a discovery, scripts and temporary result files can be stored in thisdirectory. After the discovery is run, the files are deleted.
A service account with non-root privilege can be used. However, to run on thetarget computer system, some operating system commands that are used duringdiscovery might require elevated privilege, such as root (or superuser) authority.
Procedure
Complete one of the following procedures to create a service account on the targetcomputer system:1. For a Linux, Solaris, AIX, and Linux for System z operating system, assume
that the service account name is coll and use the following commands tocreate the service account:# mkdir -p /export/home/coll# useradd -d /export/home/coll -s /bin/sh \
-c "Service Account" -m coll# chown -R coll /export/home/coll
2. For a Windows computer system, create a service account that is a member ofthe local administrator's group. This account can be a local account or a domainaccount. Because TADDM relies on WMI for discovery, the account must haveaccess to all WMI objects on the local computer. The service account must becreated on the Windows Gateway and all target Windows computer systems.
Note: The service account must have read/write access to the\WINDOWS\system32 or \WINDOWS\system64 directory and its subdirectories. OnWindows Server 2008 systems, new users do not have the required access bydefault, so you must explicitly grant it for the service account.
Configuring for discovery using the Secure Shell (SSH):
The TADDM server can connect to either OpenSSH (version 1 or 2) or to thevendor-supplied version of SSH that is provided with the operating system.
The TADDM server supports the following authentication methods:v SSH2 key-based login (RSA or DSA key) and SSH1 key-based login (RSA only)v User name and password using SSH2, and user name and password using SSH1
Although you can use any of the authentication methods, the SSH2 key-basedlogin is preferred. The server automatically tries each method in the order listedpreviously and uses the first method that works successfully. The TADDM serverthen uses the same method with that host for the entire discovery run.
Note: For SSH2 key-based login, the TADDM server attempts login only with onekey, RSA or DSA, whichever is found on the TADDM server. If both keys exist,only RSA is used.
108 Application Dependency Discovery Manager: Administering
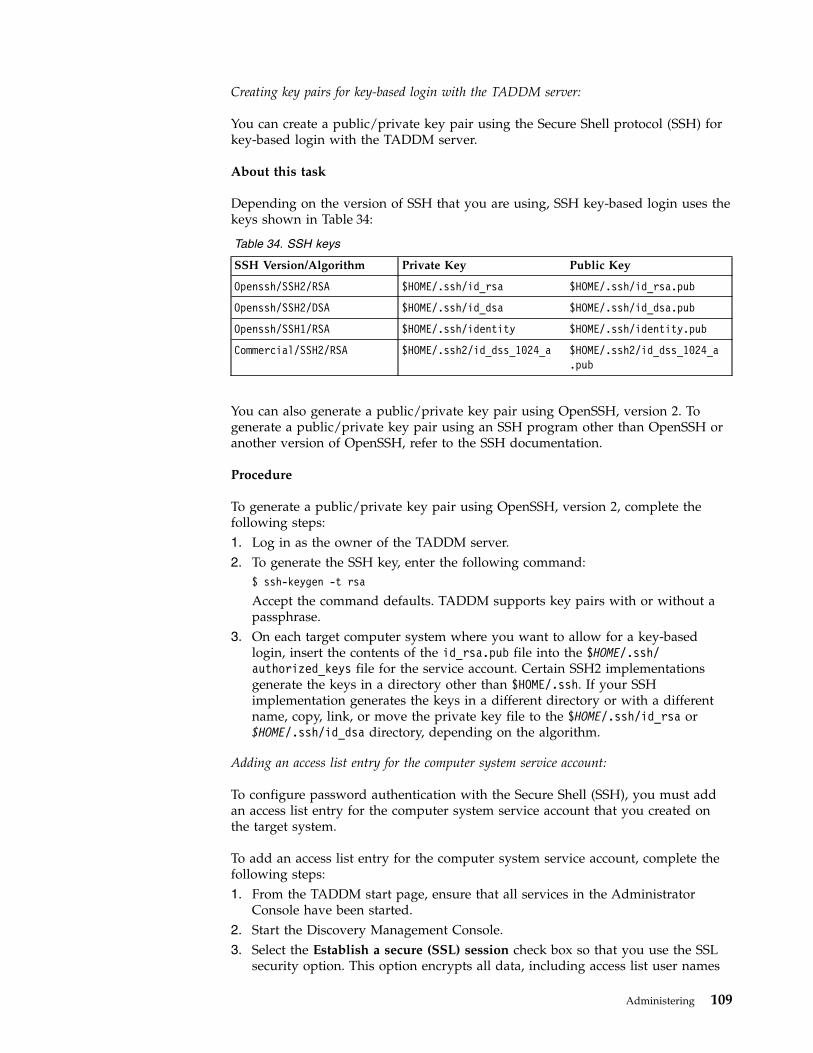
Creating key pairs for key-based login with the TADDM server:
You can create a public/private key pair using the Secure Shell protocol (SSH) forkey-based login with the TADDM server.
About this task
Depending on the version of SSH that you are using, SSH key-based login uses thekeys shown in Table 34:
Table 34. SSH keys
SSH Version/Algorithm Private Key Public Key
Openssh/SSH2/RSA $HOME/.ssh/id_rsa $HOME/.ssh/id_rsa.pub
Openssh/SSH2/DSA $HOME/.ssh/id_dsa $HOME/.ssh/id_dsa.pub
Openssh/SSH1/RSA $HOME/.ssh/identity $HOME/.ssh/identity.pub
Commercial/SSH2/RSA $HOME/.ssh2/id_dss_1024_a $HOME/.ssh2/id_dss_1024_a.pub
You can also generate a public/private key pair using OpenSSH, version 2. Togenerate a public/private key pair using an SSH program other than OpenSSH oranother version of OpenSSH, refer to the SSH documentation.
Procedure
To generate a public/private key pair using OpenSSH, version 2, complete thefollowing steps:1. Log in as the owner of the TADDM server.2. To generate the SSH key, enter the following command:
$ ssh-keygen -t rsa
Accept the command defaults. TADDM supports key pairs with or without apassphrase.
3. On each target computer system where you want to allow for a key-basedlogin, insert the contents of the id_rsa.pub file into the $HOME/.ssh/authorized_keys file for the service account. Certain SSH2 implementationsgenerate the keys in a directory other than $HOME/.ssh. If your SSHimplementation generates the keys in a different directory or with a differentname, copy, link, or move the private key file to the $HOME/.ssh/id_rsa or$HOME/.ssh/id_dsa directory, depending on the algorithm.
Adding an access list entry for the computer system service account:
To configure password authentication with the Secure Shell (SSH), you must addan access list entry for the computer system service account that you created onthe target system.
To add an access list entry for the computer system service account, complete thefollowing steps:1. From the TADDM start page, ensure that all services in the Administrator
Console have been started.2. Start the Discovery Management Console.3. Select the Establish a secure (SSL) session check box so that you use the SSL
security option. This option encrypts all data, including access list user names
Administering 109
and passwords, before the data is transmitted between the DiscoveryManagement Console and the TADDM server.
4. Add a computer system access list entry for the service account, and specifythe login name and password.
Configuring System p and System i:
Discovery of an IBM Power5 technology-based system (System p or System i®) andits logical partitions is done through a management console. TADDM supports twotypes of management consoles: the Hardware Management Console (HMC) andthe Integrated Virtualization Manager (IVM).
TADDM discovers the management console using SSH. The discovery scope mustinclude the IP address of the management console and the Access List mustinclude an entry of type Computer System with the proper credentials (user nameand password) specified.
In addition to the user credentials, the discovery user must be defined on themanagement console with the following minimal permissions:v Hardware Management Console (HMC)
– For an HMC management console, a user based on the hmcoperator role isneeded. For example, create a new role called taddmViewOnly based on thehmcoperator role. In addition, the following command line tasks must beassigned to the new role:
Managed SystemNeeded to use the lshwres and lssyscfg commands
Logical PartitionNeeded to use the lshwres, lssyscfg, and viosvrcmd commands.
HMC ConfigurationNeeded to use the lshmc comand.
v Integrated Virtualization Manager (IVM).For an IVM management console, a user with the View Only role is needed.
Configuring for Level 3 discoveryIn addition to the requirements for Level 2 discovery, Level 3 discovery requiresconfiguration to support discovery of application configuration and host data.
Configuring Web and application servers for discovery:
You must configure the Web servers and application servers in your environmentthat you want the TADDM server to discover.
This section provides the steps for configuring Web and application servers.
The Microsoft IIS server does not require configuration. There are no special accessrequirements. The user account that is already established on the host is sufficient.
For the Apache Web server, the TADDM service account for the host system musthave read permissions to the Apache configuration files, such as the httpd.conffile.
For the Oracle iPlanet Web server, the TADDM service account for the host systemmust have read permissions to the iPlanet configuration files.
110 Application Dependency Discovery Manager: Administering
For Lotus Domino servers, ensure that you meet the prerequisites that are in theIBM Lotus Domino server sensor topic in the TADDM Sensor Reference.
Configuring an Oracle Application server:
The discovery of an Oracle Application server uses JAR files that are included withthe Oracle Application server. These JAR files are not included in the TADDMserver installation.
About this task
There is a property in the $COLLATION_HOME/etc/collation.properties file forpointing to an existing installation of the Oracle Application server. The followingtext is in the $COLLATION_HOME/etc/collation.properties file:# Location of the root directory for Oracle Application Server onthe Tivoli Application Dependency Discovery Managerserver# 1. An example is /home/oracle/product/10.1.3/OracleAS_1# 2. A relative directory is relative to com.collation.home# 3. This directory (and its subdirectories) must be accessible
for the user under which the server runs, usually the collation user.# 4. Ignore if you do not intend to discover an Oracle Application server.
To point to an existing installation of the Oracle Application server, edit thefollowing line in the $COLLATION_HOME /etc/collation.properties file:com.collation.oracleapp.root.dir=lib/oracleapp
In an Oracle Application server installation, the directories that contain therequired JAR files are owned by the oracle user with permissions: rwx------. Thismeans no user other than from the owner (usually, an Oracle application) canaccess these directories. If the TADDM server is run using the oracle user, thesedirectories are accessible. However, if this is not the case, you must change thedirectory permissions of the following directories to 711 so that all users can accessthe them:v OracleAppServerHome
v OracleAppServerHome/j2ee
v OracleAppServerHome/j2ee/home
v OracleAppServerHome/opmn
v OracleAppServerHome/opmn/lib, where an example of OracleAppServerHome is/home/oracle/product/10.1.3/OracleAS_1
For discovery of an Oracle Application server, thecom.collation.platform.os.ignoreLoopbackProcesses property in the$COLLATION_HOME/etc/collation.properties file must be set to true:com.collation.platform.os.ignoreLoopbackProcesses=true
Procedure
To configure the access list, complete the following steps:1. From the Discovery Management Console, create a discovery scope set that
contains your Oracle Application server, or use an existing scope that containsyour Oracle Application Server.
2. To create an access list, click the Access List icon.3. In the Access List window, click Add.
Administering 111
4. In the Component Type field of the Access Details window, click ApplicationServers.
5. In the Vendor field, click Oracle Application Server.6. Type the credentials for the Oracle Application server.
Configuring the Microsoft Exchange server:
You must configure the Microsoft Exchange server that you want the TADDMserver to discover.
About this task
To discover the Microsoft Exchange Server, the Microsoft Exchange Managementservice must be running on the target Windows system. The Windows service IDfor the TADDM service account must be created on the Windows system on whichthe Microsoft Exchange server is running. The Windows service ID must have fullpermission (Execute Methods, Full Write, Partial Write, Provider Write, EnableAccount, Remote Enable, Read Security, and Edit Security) to the following WMInamespaces:v Root\CIMV2v Root\CIMV2\Applications\Exchangev Root\MicrosoftExchangeV2
If the Windows service ID for the TADDM service account has sufficientpermissions to discover a Microsoft Exchange server, the sensor uses the Windowsservice ID and a separate Microsoft Exchange server access list entry is notrequired.
If the Windows service ID for the TADDM service account does not have sufficientpermissions to discover a Microsoft Exchange server, you must create a separateMicrosoft Exchange server access list.
Procedure
To configure the access list, complete the following steps:1. From the Discovery Management Console, create a discovery scope set that
contains your Microsoft Exchange Server, or use an existing scope that containsyour Microsoft Exchange Server.
2. To create an access list, click the Access List icon.3. In the Access List window, click Add.4. In the Component Type field of the Access Details window, click Messaging
Servers.5. In the Vendor field, click Microsoft Exchange Server.6. Type the credentials for the Microsoft Exchange Server.
Configuring VMware servers:
When properly configured, the TADDM discovery process returns informationabout VMware servers.
112 Application Dependency Discovery Manager: Administering
About this task
To configure VMware servers for discovery, set the read-only permissions for thenon-root TADDM service account in the VMware ESX console. As an alternative,you can use the root user for discovery. For more information about VMwareservers, you can search the topics on the VMware community athttps://communities.vmware.com/welcome.
Database set up for discovery:
To support discovery of your databases, you must create DB2, Oracle, or Sybasedatabase users for the TADDM server. The TADDM server uses these databaseusers to collect information about the databases that are running on remote hosts.
Creating a DB2 user:
To more completely discover DB2 instances on remote computer hosts, create aDB2 user.
Procedure
To create a DB2 user, complete the following steps:1. Create a user with access to the following items:v The DB2 database TADDM serverv All the instances in the DB2 database TADDM server that need to be
discovered2. Configure this DB2 user to have SSH access to the system that hosts the DB2
database server.3. In the TADDM server access list, complete the following steps to add the user
name and password for the DB2 user:a. In the Discovery Management Console toolbar, click Discovery > Access
List. The Access List pane is displayed.b. Click Add. The Access Details window is displayed.c. In the Access Details window, complete the following information:
1) In the Component Type list, select Database.2) In the Vendor list, select DB2.3) Enter the Name, User Name, and Password for the DB2 user.
d. Click OK to save your information. The Access List pane is displayed withthe new information.
Creating a Microsoft SQL Server user:
To more completely discover Microsoft SQL Server instances on remote computerhosts, create a Microsoft SQL server user.
Procedure
To create a Microsoft SQL server user, complete the following steps:1. Create a Microsoft SQL server user with db_datareader role privileges and
VIEW_ANY_DEFINITION permission. This might need to be completed by theMicrosoft SQL server administrator.
Administering 113
2. In the Discovery Management Console, complete the following steps to add theuser name and password for the Microsoft SQL server user in the TADDMserver access list:a. In the toolbar, click Discovery > Access List. The Access List pane is
displayed.b. Click Add. The Access Details window is displayed.c. In the Access Details window, enter the following information:
1) In the Component Type list, select Database.2) In the Vendor list, select Microsoft SQL server.3) Enter the Name, User Name, and Password.
d. Click OK to save your information. The Access List pane is displayed withthe new information.
Creating an Oracle user:
To more completely discover Oracle instances on remote computer hosts, create anOracle user.
Procedure
To create an Oracle user, complete the following steps:1. Create an Oracle user with SELECT_CATALOG_ROLE privileges. This might
need to be completed by the Oracle administrator.For example, use the following command to create the IBM Oracle user:create user collation identified by collpassword;grant connect, select_catalog_role to collation;
2. In the Discovery Management Console, complete the following steps to add theuser name and password for the Oracle user in the TADDM server access list:a. In the toolbar, click Discovery > Access List. The Access List pane is
displayed.b. Click Add. The Access Details window is displayed.c. In the Access Details window, complete the following information:
1) In the Component Type list, select Database.2) In the Vendor list, select Oracle.3) Enter the Name, User Name, and Password for the computer.
d. Click OK to save your information. The Access List pane is displayed withthe new information.
Creating a Sybase user:
To completely discover Sybase ASE on remote computer hosts, create a Sybase userassigned to an appropriate role.
Procedure
To create a Sybase user, complete the following steps:1. Use the following command to create a Sybase user that is a member of sa-role.
sp_role "grant",sa_role,IBM
Ensure that the Sybase IQ user is a member of DBA. If the Sybase IQ user isnot a member of DBA, the Sybase IQ database-specific information cannot befound.
114 Application Dependency Discovery Manager: Administering

2. In the Discovery Management Console, complete the following steps to add theuser name and password for the Sybase user in the TADDM server access list:a. To create an access list, click the Access List icon.b. In the Access List window, click Add.c. In the Component Type field of the Access Details window, click Database.d. In the Vendor field, click Database.e. Type the credentials (user name and password) to establish Java Database
Connectivity (JDBC) to the Sybase server.
Configuring for discovery of Windows systemsFor discovery of Windows computer systems, TADDM supports bothgateway-based discovery and SSH-based discovery, as well as asynchronous andscript-based discovery.
For details about asynchronous discovery, see “Configuring for asynchronousdiscovery” on page 98. For details about script-based discovery, see “Configuringfor script-based discovery” on page 102.
Gateway-based discovery requires a dedicated Windows computer system, whichis accessible through SSH, to serve as the gateway. All discovery requests gothrough the gateway. The gateway uses Windows Management Instrumentation(WMI) to discover the target Windows computer systems.
Fix Pack 2
If you use TADDM 7.3.0.2, or later, instead of WMI, you can also use
PowerShell session to discover the target Windows computer systems. You canconfigure TADDM to allow communication via the PowerShell session only. Fordetails, see the Configuring for discovery through a firewall without an anchor topic inthe TADDM User's Guide.
SSH-based discovery does not require a dedicated gateway computer system.Instead, discovery uses a direct SSH connection to the target Windows computersystem.
Typically, gateway-based discovery is preferred over SSH-based discovery becauseconfiguring the gateway and WMI, or PowerShell, are easier than configuring SSH.WMI is available by default on all Windows target systems that are supported byTADDM. PowerShell is supported only for targets that run Windows Server 2008,and later. You must have PowerShell version 2, or later, installed on the gatewayand the target systems. Other than the gateway computer, which requires an SSHserver, no special software requirements exist for the Windows targets. However,discovery using SSH can be faster because a gateway is not involved in thediscovery flow, and no WMI Provider is deployed.
Doing a direct discovery requires an SSH server on each Windows target system.In addition, for direct discovery using SSH, you must install the Microsoft .NETFramework version 2, or 3 on each Windows target system. .NET Framework isnot installed by default on Windows Server 2000.
Note: Fix Pack 2 If you use TADDM 7.3.0.2, or later, you can also install .NETFramework versions 4, or 4.5.
For both types of discovery, the TADDM Windows discovery program,TaddmTool.exe file, is used to perform the discovery. For discovery using agateway, the TaddmTool program is deployed to the gateway during discovery
Administering 115
initialization. For discovery using SSH, the TaddmTool program is deployed toeach Windows target computer system. The TaddmTool program is a .NETapplication.
By default, TADDM is configured to use only gateway-based discovery. Thisconfiguration is controlled by the following two TADDM server properties, whichare described in the TADDM Sensor Reference for the Windows computer systemsensor:v com.collation.AllowPrivateGateways=true
v com.collation.PreferWindowsSshOverGateway=false
By default, TADDM is configured to use the WMI session. To learn when to usethe PowerShell session and how to enable it, see “PowerShell session” on page 121.
Whether you use a Windows gateway with WMI or directly connect with SSH, theinformation that is retrieved is identical. The following list identifies theprerequisites for gateway-based and SSH-based discovery:
Prerequisites for gateway-based discovery with WMI
1. A dedicated Windows Server computer system is required to serve asthe gateway. Operating system requirements for gateway servers arethe same as Windows operating system requirements for TADDMservers. For details about supported Windows operating systems, seethe TADDM server software requirement topic in the TADDM InstallationGuide.
2. The gateway must be in the same firewall zone as the Windowscomputers to be discovered.
3. You must install a supported version of an SSH server on the gatewaycomputer system.
4. The gateway uses remote WMI to discover each Windows target. Inaddition, a WMI Provider is automatically deployed to each Windowstarget computer system during the discovery initialization. The WMIProvider is used to discover data not included in the core WMI. EnableWMI on the Windows target computer system to be discovered. Bydefault, on most Windows 2000 and later systems, WMI is enabled.
Fix Pack 2 Prerequisites for gateway-based discovery with PowerShell
1. A dedicated Windows Server computer system is required to serve asthe gateway. Operating system requirements for gateway servers arethe same as Windows operating system requirements for TADDMservers. For details about supported Windows operating systems, seethe TADDM server software requirement topic in the TADDM InstallationGuide.
2. You must install PowerShell version 2, or later, on the gateway and thetarget systems. Only targets that run Windows Server 2008, or later, aresupported.
3. You must configure the gateway by running the following command:Set-Item WSMan:\localhost\Client\TrustedHosts * -Force
This command sets the trustedHosts list. By default, the list exists butit is empty, so it must be set before the remote session is opened. Withthe -Force parameter, PowerShell executes the command withoutprompting you for each step.
116 Application Dependency Discovery Manager: Administering
4. You must configure the target systems by running the followingcommand:Enable-PSRemoting -Force
This command starts the WinRM service, sets it to start automaticallywith your system, and creates a firewall rule to allow the incomingconnections. With the -Force parameter, PowerShell executes theseactions without prompting you for each step.
Prerequisites for SSH-based discovery
1. You must install a supported version of an SSH server on eachWindows target system.
2. You must install the Microsoft .NET Framework version 2, or 3 on eachWindows Server target system.
Note: Fix Pack 2 If you use TADDM 7.3.0.2, or later, you can also install.NET Framework versions 4, or 4.5.
See also the Configuring for a non-admin Windows discovery topic in the TADDMSensor Reference.
Configuring Bitvise WinSSHDYou can use Bitvise WinSSHD to provide SSH access to Windows systems.
Before you begin
For gateway-based discovery, Bitvise WinSSHD must be installed on the gatewaysystem. For direct SSH discovery, Bitvise WinSSHD must be installed on eachWindows system.
For more information about the supported Bitvise WinSSHD versions, see theWindows gateways topic in the TADDM Installation Guide.
Bitvise WinSSHD is available from http://www.bitvise.com/.
About this task
The following steps describe how to configure Bitvise WinSSHD 5.22. The specificsteps can differ depending on the release of Bitvise WinSSHD that you have.
Procedure1. To restrict SSH host access to the TADDM server, complete the following steps:
a. In the WinSSHD Control Panel, click Open easy settings.b. On the Server settings tab, for the Open Windows Firewall field, select As
set in Advanced WinSSHD settings.c. Click Save Changes.d. In the WinSSHD Control Panel, click Edit advanced settings. The Advanced
WinSSDH Settings window is displayed.e. Click Settings > Session.f. Set the value of the following items to 0:v IP blocking - window durationv IP blocking - lockout time
g. Click OK.
Administering 117
h. In the WinSSHD Control Panel, click Edit advanced settings. The AdvancedWinSSDH Settings window is displayed.
i. Click Settings > Access Control.j. In the right pane, click IP rules.k. Click Add.l. Type the IP address of the TADDM server.m. In the Number of significant bits field, type 32.n. In the Description field, type TADDM server.o. Ensure that the Allow connect check box is selected.p. Click OK.q. Remove the 0.0.0.0/0 entry from the list.
2. To create and configure a virtual group and users, complete the following steps:a. In the WinSSHD Control Panel, click Edit advanced settings. The Advanced
WinSSDH Settings window is displayed.b. Click Settings > Virtual Groups.c. To add a new group, click Add.d. In the Group and Windows Account Name fields, type a name.e. Click OK.f. Click Settings > Virtual Accounts.g. To add a new account, click Add.h. In the Virtual account name field, type a name.i. Set a password using the link for the virtual account password.j. From the drop-down list, select the virtual group that you created in a
previous step, and ensure that the Use group default Windows accountcheck box is selected.
k. Click OK.3. In the WinSSHD Control Panel, click Start WinSSHD.
What to do next
If you are discovering multiple Windows servers, you might experience thefollowing message:A Working gateway cannot be found
For more information about additional configuration that might help, see theGateway problems topic in the TADDM Troubleshooting Guide.
Configuring the Cygwin SSH daemonYou can use the Cygwin SSH daemon (sshd) to provide SSH access to Windowssystems.
About this task
For gateway-based discovery, the Cygwin SSH daemon must be installed on thegateway system; for direct SSH discovery, the daemon must be installed on eachWindows system.
For more information about the supported Cygwin SSH daemon versions, see theWindows gateways topic in the TADDM Installation Guide.
118 Application Dependency Discovery Manager: Administering
Important: For successful discovery by using Cygwin SSH, the followingrequirements must be fulfilled:v Anchors and gateways are supported on Cygwin 64-bit edition on Windows
Server 2012 x64 and Windows Server 2008 x64.v The discovery user and the user that starts the service must be the same. The
discovery user must be a member of the Administrators group.
Cygwin is available from http://www.cygwin.com/.
Procedure
To configure the Cygwin SSH daemon:1. Start the cygwin bash shell.2. From your system information, use the cygwin mkpasswd utility to create an
initial /etc/passwd. You can also use the mkgroup utility to create an initial/etc/ group. See the Cygwin User's Guide for more details.For example, the following command sets up the password file, passwd, fromthe local accounts on your system:mkpasswd -l > /etc/passwd
3. Run the ssh-host-config program setup.4. Configure SSH. Answer Yes to all questions.5. Start the SSH server by running the following command:
net start sshd
What to do next
The Cygwin (sshd) service must use an administrative domain user account whenaccessing the gateway server. This user account is required for some sensors forexample, the Microsoft Exchange sensor. Complete the following steps:1. Configure the domain user account by running the following commands:
mkpasswd -u [domain_user] -d [domain] >> /etc/passwdmkgroup -d [domain] >> /etc/group
2. Start the services.msc program. Check the log on properties for the Cygwin(sshd) service that was created. Verify that the service is set up to be run by anadministrative domain user account.
3. Cygwin (sshd) configuration and log files must be owned by the same domainuser account that the Cygwin (sshd) service uses to accesses the gateway. Runthe following commands:
$ chown [domain_user] /var/log/sshd.log$ chown -R [domain_user] /var/empty$ chown [domain_user] /etc/ssh*
4. The domain user account must have the following permissions on the gatewayserver:v Adjust memory quotas for a processv Create a token objectv Log on as a servicev Replace a process level token
If you are discovering multiple Windows servers, you might experience thefollowing message:A Working gateway cannot be found
Administering 119
For more information about additional configuration that might help, see theGateway problems topic in the TADDM Troubleshooting Guide.
Configuring Remotely AnywhereYou can use Remotely Anywhere to provide SSH access to Windows systems.
About this task
For more information about the supported Remotely Anywhere versions, see theWindows gateways topic in the TADDM Installation Guide.
For gateway-based discovery, Remotely Anywhere must be installed on thegateway system.
For direct SSH discovery, Remotely Anywhere must be installed on each Windowssystem.
You can use the default configuration values in Remotely Anywhere. For moreinformation, go to http://remotelyanywhere.com/.
Configuring Tectia SSH ServerYou can use Tectia SSH Server to provide SSH access to the Windows systems.
About this task
For more information about the supported Tectia SSH Server versions, see theWindows gateways topic in the TADDM Installation Guide.
For the gateway-based discovery, Tectia SSH Server must be installed on thegateway system.
For the direct SSH discovery, Tectia SSH Server must be installed on each Windowssystem.
You can use the default configuration values in Tectia SSH Server. For moreinformation, go to http://www.ssh.com.
Windows Management Instrumentation (WMI) dependencyTADDM relies on Windows Management Instrumentation (WMI) to discoverWindows computer systems. TADDM can be configured to restart the WMI serviceif a problem occurs with WMI. If the WMI service is restarted, all WMI-dependentservices that were running before the restart are also restarted.
The following TADDM server properties control the restarting of WMI.
Note: The default value for WMI restart is false. Setting the values of thefollowing properties to true might provide more reliable Windows discovery, butyou must also consider the potential negative impact of the WMI service beingtemporarily stopped and restarted.v com.collation.RestartWmiOnAutoDeploy=false
v com.collation.RestartWmiOnAutoDeploy.1.2.3.4=false
v com.collation.RestartWmiOnFailure=false
v com.collation.RestartWmiOnFailure.1.2.3.4=false
120 Application Dependency Discovery Manager: Administering
For more information about the TADDM server properties that the Windowscomputer system sensor uses, see the Configuring the collation.properties file topic inthe Windows computer system sensor section of the TADDM Sensor Reference.
PowerShell sessionFix Pack 2
To discover Windows computer systems, you can use either the WMI or thePowerShell session. In comparison to the WMI session, with the PowerShellsession TADDM sends fewer requests to access target systems, which reduces thenumber of events that are logged. The PowerShell session can be used only withthe script-based sensors. If you want to start using the PowerShell session, youmust enable it because it is disabled by default.
You can use both sessions at the same time. If you are running regular andscript-based discoveries, you cannot disable the WMI session because the regulardiscovery fails without it. However, you can prioritize the usage of the PowerShellsession.
Important: If you run only regular discoveries, PowerShell session is notsupported.
You can control the usage and prioritization of the PowerShell session by using thefollowing properties:v com.collation.PowerShellAccessEnabled=false
v com.collation.WmiAccessEnabled=true
v com.collation.PreferPowerShellOverWMI=true
v com.collation.PowerShellPorts=5985,5986
v com.ibm.cdb.session.ps.useSSL=false
v com.ibm.cdb.session.ps.allowDNS=true
v com.ibm.cdb.session.ps.fallbackToIP=true
v com.collation.PowerShellTimeoutFudge=10000
v Fix Pack 3 com.ibm.cdb.session.ps.urlPrefix=wsman
To enable the PowerShell session, set the com.collation.PowerShellAccessEnabledproperty to true. The PowerShell session is preferred over the WMI session bydefault.
To learn more about these properties, see the Configuring the collation.propertiesfile entries for the Windows computer system sensor in the TADDM SensorReference.
Note: In a very specific case, when you configured your firewall to allowcommunication via PowerShell session only, you must open PowerShell ports andconfigure the Ping sensor property. For details, see the Configuring for discoverythrough a firewall without an anchor topic in the TADDM User's Guide.
Example scenarios
Depending on how you discover your Windows target systems, you can configurethe preceding properties in the following ways.v You are using only the sensors that support script-based discovery. In such case,
you can enable PowerShell session by setting thecom.collation.PowerShellAccessEnabled property to true and disable the WMI
Administering 121
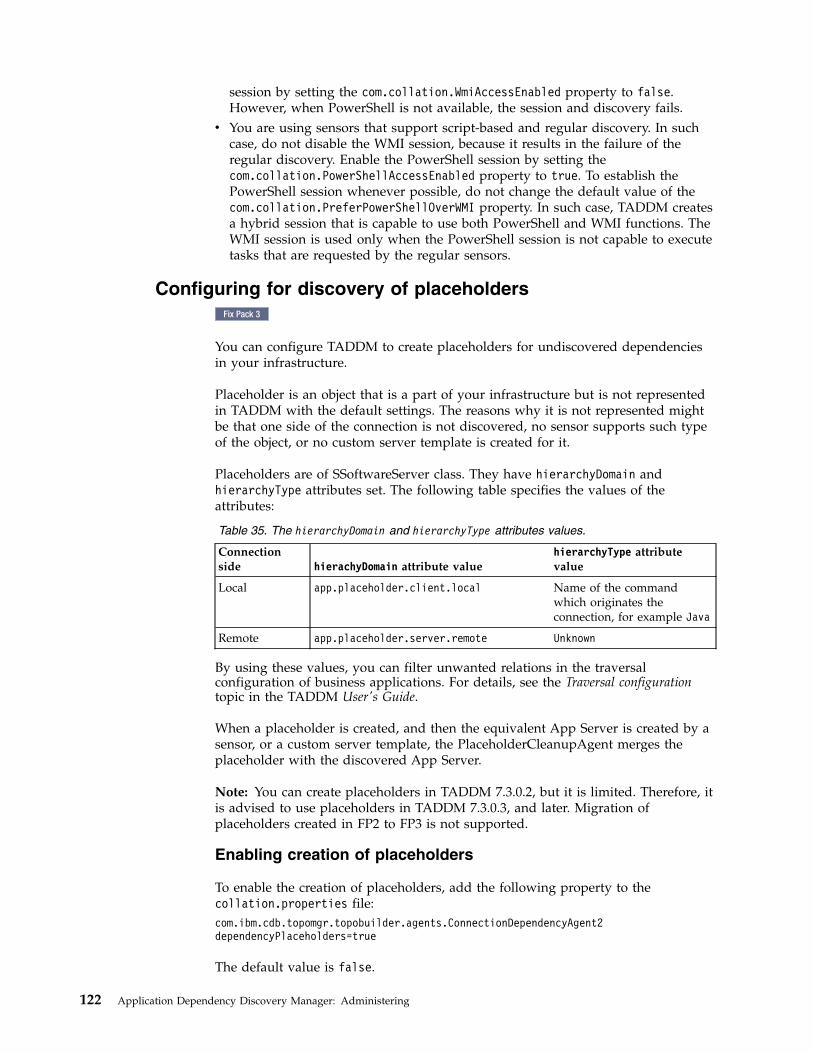
session by setting the com.collation.WmiAccessEnabled property to false.However, when PowerShell is not available, the session and discovery fails.
v You are using sensors that support script-based and regular discovery. In suchcase, do not disable the WMI session, because it results in the failure of theregular discovery. Enable the PowerShell session by setting thecom.collation.PowerShellAccessEnabled property to true. To establish thePowerShell session whenever possible, do not change the default value of thecom.collation.PreferPowerShellOverWMI property. In such case, TADDM createsa hybrid session that is capable to use both PowerShell and WMI functions. TheWMI session is used only when the PowerShell session is not capable to executetasks that are requested by the regular sensors.
Configuring for discovery of placeholdersFix Pack 3
You can configure TADDM to create placeholders for undiscovered dependenciesin your infrastructure.
Placeholder is an object that is a part of your infrastructure but is not representedin TADDM with the default settings. The reasons why it is not represented mightbe that one side of the connection is not discovered, no sensor supports such typeof the object, or no custom server template is created for it.
Placeholders are of SSoftwareServer class. They have hierarchyDomain andhierarchyType attributes set. The following table specifies the values of theattributes:
Table 35. The hierarchyDomain and hierarchyType attributes values.
Connectionside hierachyDomain attribute value
hierarchyType attributevalue
Local app.placeholder.client.local Name of the commandwhich originates theconnection, for example Java
Remote app.placeholder.server.remote Unknown
By using these values, you can filter unwanted relations in the traversalconfiguration of business applications. For details, see the Traversal configurationtopic in the TADDM User's Guide.
When a placeholder is created, and then the equivalent App Server is created by asensor, or a custom server template, the PlaceholderCleanupAgent merges theplaceholder with the discovered App Server.
Note: You can create placeholders in TADDM 7.3.0.2, but it is limited. Therefore, itis advised to use placeholders in TADDM 7.3.0.3, and later. Migration ofplaceholders created in FP2 to FP3 is not supported.
Enabling creation of placeholders
To enable the creation of placeholders, add the following property to thecollation.properties file:com.ibm.cdb.topomgr.topobuilder.agents.ConnectionDependencyAgent2dependencyPlaceholders=true
The default value is false.
122 Application Dependency Discovery Manager: Administering
When you set this property to true for the first time, you must restart TADDM toenable extended attributes for LogicalConnection and SoftwareServer classes. Theseextended attributes are necessary for proper functioning of this feature.
In case, above property is set to true then there is no need to set the belowproperties in collation.properties explicitly, rather their default coded values willbe used.com.ibm.taddm.dependencyPlaceholders.create.localClient.to.remoteServer=true
The default value is true.com.ibm.taddm.dependencyPlaceholders.create.remoteClient.to.localServer=false
The default value is false.
Note: Placeholders behaviour can be changed by setting these properties incollation.properties.
Important: When you enable the creation of placeholders, your businessapplications might grow significantly and the building process might be longer. Toprevent it, you can filter unwanted relations in the traversal configuration ofbusiness applications.
Viewing placeholders
You can view the placeholders in the Inventory Summary pane after you set thefilter to Placeholders. Placeholders for undiscovered dependencies are in theSoftware Servers tab.
Creating custom server templates
You can use placeholders to create custom server templates in the following ways:v By using information about placeholders that is generated by the bizappscli
tool. For details, see the Actions for analyzing the content of business applicationstopic in the TADDM User's Guide.
v By using the command line information that is displayed on the Runtime tab inthe Details pane for placeholders of type app.placeholder.*.local.
For more information about custom server templates, see the Creating and managingcustom server templates topic in the TADDM User's Guide.
Creating Level 3 application servers with no credentialsFix Pack 2
If you want to discover basic Level 3 information about your infrastructureelements, you do not need to provide credentials in the access list. You can createapplication servers by using sensor internal templates. These templates can beprocessed by CustomAppServerTopoAgent, or during a discovery run by customserver template sensor.
About this task
By creating application servers with no credentials you can discover only basicinformation about your infrastructure, for example what kind of software is
Administering 123
installed. Choose this mode if you do not want to provide credentials for Level 3discovery, but want to discover basic information about your infrastructure.
There are two methods to create Level 3 application servers. You can run customserver template sensor, or enable CustomAppServerTopoAgent.
Procedurev Run a discovery with custom server template sensor
Complete the following steps:1. In collation.properties file, set the
com.collation.internaltemplatesenabled property to true. This propertyenables internal templates of Level 3 sensors. The default value is false.
2. Run the discovery by using a profile that does not contain sensor that wouldnormally discover the information that you want to discover by usingcustom server template sensor. For example, if you want to discover basicinformation for DB2 server, choose Level 2 profile discovery, or your ownprofile that does not contain IBM DB2 sensor. If the profile contains IBM DB2sensor, then this sensor is run instead of the custom server template sensor.
v Run the CustomAppServerTopoAgentCustomAppServerTopoAgent uses runtime processes previously discovered bygeneric server sensor. You can run the agent manually, or set it to runautomatically. Complete the following steps:1. For both manual and automatic modes of the agent, in collation.properties
file, set the com.collation.internaltemplatesenabled property to true. Thisproperty enables internal templates of Level 3 sensors. The default value isfalse.
2. To manually start the CustomAppServerTopoAgent, run the followingcommand:COLLATION_HOME/support/bin/runtopobuild.sh -a CustomAppServerTopoAgent
3. To set up automatic runs of the agent, set thecom.ibm.cdb.topobuilder.groupinterval.discovery= property in thecollation.properties file.This property specifies how often the agent runs. By default, no value isprovided, which means that the agent is disabled. To enable it, specify thevalue in hours, for examplecom.ibm.cdb.topobuilder.groupinterval.discovery=4.
v Optional: Select templates to exclude from processingIf you want to enable only some of internal templates of Level 3 sensors, youcan control it by using the following property:com.collation.discovery.ignoreTemplateList
This property specifies a list of internal templates that you do not want toprocess. The value of this property is a semicolon-separated list of templatenames, for examplecom.collation.discovery.ignoreTemplateList=DB2Unix;MSSQL. You can find thename of an internal template in Data Management Portal in the Object Namefield, which is in the General tab in the Details pane of Other DatabaseServers.
Configuring location taggingLocation tagging indicates where each Configuration Item (CI) was created. Itenables location-based filtering of configuration items in BIRT reports and APIqueries.
124 Application Dependency Discovery Manager: Administering
If you enable location tagging, each discovered object that is stored in thediscovery database includes the locationTag attribute (string). Objects such asrelationships, aggregation objects, and inheriting objects that are created bytopology agents, include location tag data under certain conditions:v A one-to-one relationship (such as Dependency or NetworkConnection) includes
a location tag if the location is the same for both connected objects.v An aggregation object (such as a cluster) includes a location tag if the location is
the same for all aggregated objects.
Note: In case of custom collections, the locationTag attribute is set only whenthe value of location tag of all custom collection's core CIs is the same. When thecustom collection is extended with a core CI that has a different location tag, thelocationTag attribute for such custom collection is cleared.
v A simple object includes the location tag from the object it is based on.
In all other cases, objects that are created by topology agents do not include alocation tag value.
To enable location tagging, set the following property in the collation.propertiesfile:com.ibm.cdb.locationTaggingEnabled=true
Location tag values can be either static (specified for a particular server or anchor)or dynamic (specified for a specific discovery or IdML book import). A location tagvalue is limited to 192 characters. If the specified location tag exceeds 192characters, it is cut to required length.
Limitations
When you run a Level L1 discovery, Configuration Items which are already presentin the database are not updated. As a result, location tags are assigned only to thenewly discovered objects.
Static location taggingStatic location tagging assigns the locationTag attribute to all objects that arediscovered or loaded using the IdML book import based on static configuration ofthe TADDM or anchor server.
TADDM server
To configure the location tag value for CIs that are created on a TADDM server,specify the following property in the collation.properties file:com.ibm.cdb.locationTag=location
where location is the location tag value you want to use.
Anchor
To configure the location tag value for CIs that are created on an anchor, configurethe anchor_location_n attribute in the $COLLATION_HOME/etc/anchor.propertiesfile. The following example entries from the anchor.properties file indicate howthe location information for anchors is set:anchor_host_1=192.168.1.13anchor_scope_1=FIRST_SCOPEanchor_zone_1=FIRST_ZONE
Administering 125
anchor_location_1=FIRST_LOCATIONanchor_host_2=192.168.2.22anchor_scope_2=SECOND_SCOPEanchor_location_2=SECOND_LOCATIONPort=8497
If a location tag is not specified for an anchor, the location of each of the CIs thatare created on the anchor is set to the location that is specified for either theTADDM server to which the CIs are connected.
If the location tag value is not specified for the anchor or the TADDM server, nolocation information is set for that CI.
Dynamic location taggingDynamic location tagging sets the locationTag attribute using a value specified fora specific discovery or IdML book import.
Discovery
To specify a location tag value during discovery, launch the discovery from thecommand line and specify the location tag using the optional -l or -myLocationoption, as in the following example:api.sh -u administrator -p collation discover start -n discovery1 -p myProfile -l myLocation myScope
where locationTag is the location tag value you want to use. The value youspecify overrides any static location tag value for objects created during thisspecific discovery.
Note: If the location tagging is not enabled in the collation.properties file,specifying a location tag during discovery request causes a discovery exception.
IdML book import
To specify a location tag value while importing an IdML book, specify the locationtag using the optional -l option, as in the following example:loadidml.sh -f idml_book.xml -l locationTag
where locationTag is the location tag value you want to use. If you want to importmultiple IdML books with different location tags, each book must be loadedseparately.
Access listYou can create access list entries with a location tag assigned.
The location tag attribute is obligatory but can be changed later. The credentials arefiltered by location, that is why only the access entries for specific locations areused. This limits the possibility of sniffing the password from other customers orlocations. If you run discovery without a location tag, none of the taggedcredentials are used.
When a new access entry is added with the location tag set to the asteriskcharacter (*), it is used as the last access entry that is tried during a discoverywhile establishing a session to the endpoint.
The asterisk character (*) is the default value and can be changed by setting thefollowing parameter:com.ibm.cdb.locationTag.global=GLOBAL
126 Application Dependency Discovery Manager: Administering

In such case, the access entry with the GLOBAL tag is the last one that is tried whenrunning a discovery. The preceding location tag is used only for the access list andhas no influence on location tags that are assigned to CIs that are discoveredduring a discovery.
BIRT reportsBusiness Intelligence and Reporting Tools (BIRT) reports can be filtered to generatethe data for specific customer location.
If location tagging is enabled, the text field is on the BIRT reports pane below thelist of reports. You can run a BIRT report against any location tag so it sees thedata that belongs only to that location.
None of the Out-of-the-Box reports can handle the location tags. If you need to usethe BIRT reports, they must be updated manually to support filtering by locationtag.
Maintenance and tuningTo maximize TADDM performance, you might want to perform additionalconfiguration steps and ongoing maintenance tasks.
Bulk load parameters tuningYou can customize the behavior of the Bulk Loader by specifying particularparameters at run time or configuring the bulkload.properties file.
There are three distinct phases for loading data using the Bulk Loader:1. Analyze the objects and relationships to determine the graphs in the data.
Typically, 1 - 5% of execution time2. Construct model objects and build graphs.
Typically, 2 - 5% of execution time3. Pass the data to the application programming interface (API) server.
Typically, 90 - 99% of execution time
There are two options for loading data:v Data can be loaded one record at a time. This is the default mode. You must
load records one at a time for the following files:– Files with errors.– Files with extended attributes.
v Data can be loaded in bulk. This is called graph writing because a entire graphis loaded, rather than just one record.Bulk loading with the graph write option is faster than loading records one at atime. (Reference the Bulk Load measurements for details). The followingexample shows the graph write option, where -g=buffer and blocks of data arepassed to the API server:./loadidml.sh –g –f /home/confignia/testfiles/sample.xml
The following parameters in the bulkload.properties can be used to improveperformance when loading data in bulk:com.ibm.cdb.bulk.cachesize=2000
The cachesize parameter controls the number of objects processed in a singlewrite operation when bulk loading with the graph write option. Increasing the
Administering 127
cache size value improves performance at the risk of running out of memoryeither on the client or at the server. Alter the number only when specificinformation is available to indicate that processing a file with a larger cacheprovides some benefit in performance. The default cache size value is 2000, andthe maximum cache size value is 40000.com.ibm.cdb.bulk.allocpoolsize=1024
This value specifies the maximum amount of memory that can be allocated tothe Bulk Loader process. It is an Xmx value that is passed to the main Java classof the Bulk Loader. Specify the value in megabytes.Make sure that a Java virtual machine is not running out of memory. You can dothat by collecting thread dumps of TADDM processes and reviewing them. Ifnecessary, increase the memory size.
Tip: Tests that were run on the ITNMIP book indicate that the performance isoptimal when you set the bulk load process properties and parameters to thefollowing values:com.ibm.cdb.bulk.cachesize=4000com.ibm.cdb.bulk.allocpoolsize=4096value-Xms768M|-Xmx1512M|-DTaddm.xmx64=6g|
It is also important that you run the RUNSTATS command frequently during thebulk loading process.
Database maintenanceTo maintain optimal performance of your system, you must plan for and completeregularly scheduled maintenance and tuning of the TADDM database.
Default database configurations
The default database configurations that are provided with TADDM are sufficientfor proof of concept, proof of technology, and small pilot implementations ofTADDM.
Tuning guidelines for both DB2 and Oracle databases
The following tuning guidelines apply to both DB2 and Oracle databases:1. Based on storage capacity alone, do not limit the number of physical disk
drives that are available to your database.2. Ideally, the following components should be placed on separate disk drives or
arrays:v Application data (such as tables and indexes)v Database logsv Database temporary space: used for sort and join operations
3. Use the fastest disks that are available for your log files.4. Enable Asynchronous I/O at the operating system level.
For more information on DB2 and Oracle database tuning, refer to DatabasePerformance Tuning on AIX at http://www.redbooks.ibm.com/redbooks/pdfs/sg245511.pdf.
For more information that is specific to DB2 database tuning, also refer to RelationalDatabase Design and Performance Tuning for DB2 Database Servers at
128 Application Dependency Discovery Manager: Administering
http://www-01.ibm.com/support/docview.wss?uid=tss1wp100764 and to DB2UDB Version 8 Product Manuals at http://www.ibm.com/support/docview.wss?rs=71&uid=swg27009554.
Deleting old database recordsThe number of data records in the tables grows over time, and depending on theamount of storage space available, from time to time, you might want to removedata manually to maintain the tables at a smaller size. After you clear theCHANGE_HISTORY_TABLE, you can remove the corresponding entries in theCHANGE_CAUSE_TABLE. You can also improve performance and usability of thedata integrity tool by deleting old records from the ALIASES_JN table.
Deleting records from CHANGE_HISTORY_TABLE andCHANGE_CAUSE_TABLE:
You can remove old records to improve performance and maintain the tables at asmaller size. After you remove the records from the CHANGE_HISTORY_TABLE,you can safely remove the corresponding entries from theCHANGE_CAUSE_TABLE.
To free storage space in TADDM databases, use SQL queries to remove old datamanually from the CHANGE_HISTORY_TABLE. The following command is anexample of such an SQL query, where the integer 1225515600000 represents thedate, 1 November 2008, expressed in the same format as that returned by theSystem.currentTimeMillis() Java method, or a number equal to the difference,measured in milliseconds, between the current time and midnight, 1 January 1970UTC:DELETE FROM CHANGE_HISTORY_TABLEWHERE PERSIST_TIME < 1225515600000 (this is the Java time stamp)
To convert a date to a Java time stamp, use the following code:import java.util.*;import java.text.*;import java.sql.Timestamp;
public class DateToString {
public static void main(String args[]) {try {
String str = args[0];SimpleDateFormat formatter = new SimpleDateFormat("dd/MM/yyyy");Date date = formatter.parse(str);
long msec = date.getTime();
System.out.println("Date is " +date);System.out.println("MillSeconds is " +msec);
} catch (ParseException e){System.out.println("Exception :"+e); }
}}
Run the code as follows:java DateToString 1/11/2008Date is Sat Nov 01 00:00:00 EST 2008MillSeconds is 1225515600000
Use the resulting Java time stamp in the SQL query.
Administering 129

If an exceptional number of records exist in the CHANGE_HISTORY_TABLE, youmight want to perform incremental deletes (deleting a subset of records at a time)to avoid filling transaction logs in the database.
After you clear the CHANGE_HISTORY_TABLE, you can safely remove thecorresponding entries in the CHANGE_CAUSE_TABLE. TheCHANGE_CAUSE_TABLE is a link table that is used for change propagation. Forexample, if you add a new software component to the operating system, the tablelinks this change to the computer system on which the operating system runs. Youcan remove records in the CHANGE_CAUSE_TABLE with the followingcommand:delete from change_cause_table where cause_id not in (select id from change_history_table)
Timeframes for removing data
To limit database growth over time, you can manage the size of the change historydata stored by TADDM. When determining the optimal time frame for removingdata from the change history table, consider what you use the change history datafor, and whether the change history information is used by other applications.
If the change history information is being used by another application, ensure thatyou perform application synchronizations more frequently than the number ofweeks of change history data maintained in the CHANGE_HISTORY_TABLE.
The following examples illustrate some typical scenarios:v If you are using change history data for problem determination and you want to
investigate problems that occurred five weeks ago, keep at least five weeks ofdata in CHANGE_HISTORY_TABLE.
v If you synchronize Tivoli Business Service Manager (TBSM) weekly, maintainmore than one week of change history data in the TADDM change history table.
It is important to note that in synchronization server deployments, a large amountof change history data on the domain servers increases the time a fullsynchronization takes to complete.
Data maintenance in a synchronization server deployment
In a domain server deployment, you can base data maintenance decisions solely onthe data needs for the domain. However, in a synchronization server deployment,you must coordinate the removal of change history data between each domainserver database and the synchronization server database, and you must remove thedata from all of these databases.
In a synchronization server deployment, use the following guidelines for datamaintenance:v Keep change history data at the domain level for a period of time that is greater
than the period of time between each scheduled synchronization of the domainserver databases with the synchronization server database. For example, if thesynchronization occurs on a weekly schedule, maintain at least two weeks ofchange history data in each domain server database.
v Remove data from a domain server database first. Then remove data from thesynchronization server database.
v The best practice is to maintain the same number of weeks of change historydata in all TADDM databases. However, the period that change history data is
130 Application Dependency Discovery Manager: Administering
kept in the synchronization server database can vary from the period that suchdata is kept in the domain server databases.
v After you determine a timeframe for data removal that meets the specific needsof your environment, the best practice is to remove the data just after theoccurrence of a synchronization between the domain server databases and thesynchronization server database.
Deleting records from the ALIASES_JN table:
When old records are deleted from the ALIASES_JN table, it can improveperformance and usability of the data integrity tool, and can free additional spacein the database.
About this task
The ALIASES_JN table contains the history of changes to the ALIASES table. Thedata integrity tool requires the gathered data to find possible configuration itemover merges in the database. Over time, the number of data records in theALIASES_JN table grows to a significant size. The size of this table affects both theperformance and the usability of the data integrity tool, and increases the need forstorage space on the TADDM database.
The topology agent AliasesJnTableCleanup performs the cleanup of theALIASES_JN table.
By default it removes all rows older than 30 days. You can change the age at whichrecords are deleted by configuring the following property in thecollation.properties file:com.ibm.cdb.topomgr.topobuilder.agents.AliasesJnTableCleanupAgent.removeOlderThanDays=30
If you set the property to a value of -1, the agent is disabled. If you set the agevalue too low, the verify-data tool with the over merge option might not producecomplete results.
By default, the agent runs for no longer than 1800 seconds (30 minutes). If thislength of time is not enough to remove all of the aged rows, an attempt to deletethe remaining ones is made the next time the agent is run. You can set the agenttimeout value by configuring the following property in the collation.propertiesfile:com.ibm.cdb.topomgr.topobuilder.agents.AliasesJnTableCleanupAgent.timeout=1800
DB2 database maintenanceYou must maintain the TADDM DB2 database regularly to ensure acceptableperformance.
About this task
The following DB2 utilities are available:
REORGAfter many changes to table data that are caused by the insertion, deletion,and updating of variable length columns activity, logically sequential datamight be on non-sequential physical data pages. Because of that, thedatabase manager performs extra read operations to access data.Reorganize DB2 tables to eliminate fragmentation and reclaim space byusing the REORG utility. Use the REORG utility as needed, if RUNSTATS takes
Administering 131
longer than typically to complete, or the DB2 REORGCHK command indicatesa need for it. Shut down the TADDM server when you run the REORGutility, as during an offline table or index reorganization (datadefragmentation), applications can access but not update the data in tables.Since TopologyBuilder runs frequently, even without discovery, such locksmight cause unpredictable results within the application.
RUNSTATS (manual statistics collection)The DB2 optimizer uses information and statistics in the DB2 catalog todetermine the best access to the database, which is based on the query thatis provided. Statistical information is collected for specific tables andindexes in the local database when you run the RUNSTATS utility. Whensignificant numbers of table rows are added or removed, or if data incolumns, for which you collect statistics, is updated, the RUNSTATScommand must be used to update the statistics. For optimal performance,complete the RUNSTATS task weekly, or daily in situations, where there ishigh database activity. Lack of updated statistics might cause severeperformance degradation within TADDM. You can run the RUNSTATS utilitywhile the TADDM server is running. TADDM requires specific RUNSTATSformat that is described later, and DB2 AUTO_RUNSTATS option must beturned off.
AUTO_RUNSTATS (automatic statistics collection)You can enable the automatic statistics collection, also known asauto-runstats, to let DB2 decide whether the TADDM database statisticsmust be updated. The RUNSTATS utility is run in the background and thedatabase statistics are always up to date.
To enable automatic statistics collection, you must set the parametersAUTO_MAINT, AUTO_TBL_MAINT, and AUTO_RUNSTATS to ON. Run the followingcommand:CONNECT TO <db alias>UPDATE DB CONFIG USING AUTO_MAINT ON AUTO_TBL_MAINT ON AUTO_RUNSTATS ON
where <db alias> is the name of your database.
Restriction: You can use this utility only when you have DB2 APARIT05733 installed and the DB2_SELECTIVITY=DSCC parameter set. The DB2APAR IT05733 is included in the following and later releases of DB2:v 9.7 Fix Pack 11v 10.1 Fix Pack 6v 10.5 Fix Pack 7
To set the DB2_SELECTIVITY=DSCC parameter on DB2 version 10.x, run thefollowing command:db2set -immediate DB2_SELECTIVITY=DSCC
Note: DB2 9.7 does not support the -immediate parameter. To set theDB2_SELECTIVITY=DSCC parameter in this version, run the db2setDB2_SELECTIVITY=DSCC command and restart DB2.
Note: If the TADDM user upgrades the DB2 version in a TADDMinstallation, then compatible version of the driver should also be updated.You can ask your DBA for db2jcc.jar from the TADDM DB2 server, oryou can download the one appropriate for your version of DB2here:http://www-01.ibm.com/support/docview.wss?uid=swg21363866.Once you have it, stop TADDM, copy it to dist/lib/jdbc/, confirm
132 Application Dependency Discovery Manager: Administering
permissions are correct so that the TADDM user can read the file and thenstart TADDM. Repeat this step on all TADDM servers in yourenvironment.
DB2 HEALTH MONITORIt is good practice to run the DB2 health monitor against the TADDMdatabase to proactively monitor if conditions changed such that RUNSTATS,or REORG, or any other tuning is required. The health monitor can alert adatabase administrator of potential system health issues. The healthmonitor proactively detects issues that might lead to hardware failures, orto unacceptable system performance, or capability. Thanks to the proactivehealth monitoring, you can address an issue before it becomes a problemthat affects system performance.
DB2 PERFORMANCE ANALYSIS SUITEWhen a DB2 problem is suspected, the Performance Analyst tool canquickly analyze a DB2 snapshot that is taken during the time of theproblem and suggest actions. You can download this tool athttps://www.ibm.com/developerworks/community/groups/community/perfanalyst.
To take a DB2 snapshot for TADDM, complete the following steps:1. Connect to your TADDM database from the DB2 server and run the
following command:db2 -tf updmon.sql
where the updmon.sql file contains the following entries:UPDATE MONITOR SWITCHES USING BUFFERPOOL ON ;UPDATE MONITOR SWITCHES USING LOCK ON ;UPDATE MONITOR SWITCHES USING SORT ON ;UPDATE MONITOR SWITCHES USING STATEMENT ON ;UPDATE MONITOR SWITCHES USING TABLE ON ;UPDATE MONITOR SWITCHES USING UOW ON ;UPDATE MONITOR SWITCHES USING TIMESTAMP ON ;RESET MONITOR ALL
2. After step 1 is completed, run the “DB2 get monitor switches”command to check whether they are all set. They all must have statusON.
3. Run the process, with which you have performance issues.4. At appropriate intervals, while the slow process is running, run the
following command from DB2:db2 get snapshot for all on <dbname> > <dbname>-dbsnap.out
Run this command from the same window that you ran the commandin step 1. This command cannot be run with the use of a script.
5. Run the snapshots by using a different time stamped output file eachtime. Run them with such intervals that there are three, or foursnapshots during the process, but the time between the runs does notexceed 1 hour.
Once the snapshot is collected, analyze them with the Performance Analysttool, starting with the last snapshot. For example, high CPU and highaverage execution time on the statement tab for a query that is run manytimes generally indicates an optimization issue, which can be resolved withthe RUNSTATS utility. A high overflow percent on the tables tab can indicatea need for the REORG utility. Check the buffer pool tab to ensure that thereare no alerts, too small buffer pool might lead to poor performance.
Administering 133
Before you begin
After any major maintenance that generates a schema change, for example,after you apply a fix pack, you must generate theTADDM_table_statistics.sql file on the TADDM storage server. The file isneeded for the RUNSTATS database maintenance tasks that you mustperform regularly. TADDM requires a special format to update databasestatistics because of a DB2 limitation when handling columns with largecommon prefixes such as the class names, which are used extensivelywithin TADDM. For this reason, do not use DB2 AUTO_RUNSTATS option, usethe RUNSTATS syntax that you generate by completing the following steps.However, if you have DB2 APAR IT05733 installed and theDB2_SELECTIVITY=DSCC parameter set, you can use the AUTO_RUNSTATSoption.
Note: The following instructions are given for the Linux and UNIXoperating systems. To perform database maintenance on the Windowsoperating system, use the corresponding .bat script instead of the .shscript.
To generate the TADDM_table_stats.sql file, complete the following steps:1. Run the following command:
cd $COLLATION_HOME/bin
2. Run the following command, where tmpdir is a directory, where this filecan be created:./gen_db_stats.jy > tmpdir/TADDM_table_stats.sql
In a streaming server deployment, run this command on the primarystorage server.
3. Copy the file to the database server, or provide it to your databaseadministrator (DBA) to run against the TADDM database as shown instep 2 in the Procedure. Update database statistics at least weekly, ormore often, if there are large changes to any tables.
Procedure
To perform maintenance on a DB2 database, complete the following steps:1. To use the REORG utility, complete the following steps:
a. On the database server, place the following SQL query, which generates theREORG TABLE commands, in a file:select ’reorg table ’||CAST(RTRIM(creator) AS VARCHAR(40))||’."’||substr(name,1,60)||’" ; ’ from sysibm.systables where creator= ’dbuser’ and type = ’T’ and name not in (’CHANGE_SEQ_ID’)order by 1;
where dbuser is the value from com.collation.db.user=.
Note: Make sure that the letter case of dbuser is the same as for the valuethat is specified in the database's sysibm.systables table, column creator.
b. Stop the TADDM server.c. At a DB2 command line, connect to the database and run the following
commands:db2 –x –tf temp.sql > cmdbreorg.sqldb2 –tvf cmdbreorg.sql > cmdbreorg.out
d. Make sure that the REORG utility was successful by checking thecmdbreorg.out file for errors.
134 Application Dependency Discovery Manager: Administering
e. Start the TADDM server.2. To use the RUNSTATS utility, complete the following steps. Automate the process
to run at least weekly.a. On the database server, run the TADDM-specific RUNSTATS command by
using the output that you generated earlier:db2 -tvf tmpdir/TADDM_table_stats.sql > table_stats.out
b. Make sure that the RUNSTATS utility was successful by checking thetable_stats.out file for errors.
DB2 for z/OS database maintenanceThese maintenance and tuning guidelines apply to IBM DB2 for z/OS® databases.
Procedure
These guidelines assume that the DB_USER is the primary DB2 database user IDand ARCHIVE_USER is the secondary DB2 database user ID.1. Use the Discovery Management Console to run a discovery. This method
populates the domain database with data.2. Stop the TADDM server.3. Generate and run the REORG control statement for each table spaces used by
TADDM.SELECT ’REORG TABLESPACE ’||DBNAME||’.’||NAME FROM SYSIBM.SYSTABLESPACEWHERE CREATOR IN (’DB_USER’, ’ARCHIVE_USER’) ORDER BY 1;
4. Generate and run the REORG control statement for indexes used by TADDM.SELECT ’REORG INDEX ’||CREATOR||’.’||NAME FROM SYSIBM.SYSINDEXESWHERE CREATOR IN (’DB_USER’, ’ARCHIVE_USER’);
5. Generate and run the RUNSTATS control statement for table spaces used byTADDM.SELECT ’RUNSTATS TABLESPACE ’||DBNAME||’.’||NAME||’ INDEX(ALL)SHRLEVEL REFERENCE’ FROM SYSIBM.SYSTABLESPACEWHERE CREATOR IN (’DB_USER’, ’ARCHIVE_USER’) ORDER BY 1;
6. Regenerate and run the UPDATE index statistics statements for each TADDMDB user.SELECT ’UPDATE SYSIBM.SYSINDEXES SET FIRSTKEYCARDF=FULLKEYCARDFWHERE NAME = ’||’’’’||CAST(RTRIM(name) AS VARCHAR(40))||’’’’||’AND CREATOR = ’||’’’’||CAST(RTRIM(creator) AS VARCHAR(40))||’’’’||’AND TBNAME = ’||’’’’||CAST(RTRIM(tbname) AS VARCHAR(40))||’’’’||’AND TBCREATOR = ’||’’’’||CAST(RTRIM(tbcreator) AS VARCHAR(40))||’’’’||’;’from sysibm.sysindexes awhere tbcreator in (’DB_USER’, ’ARCHIVE_USER’)AND NAME IN(SELECT IXNAMEFROM SYSIBM.SYSKEYS BWHERE A.CREATOR = B.IXCREATORAND A.NAME = B.IXNAMEAND COLNAME = ’PK__JDOIDX’)AND TBNAME IN(SELECT NAMEFROM SYSIBM.SYSTABLES CWHERE A.TBCREATOR = C.CREATORAND A.TBNAME = C.NAMEAND CARDF > 0);
where DB_USER is the primary DB2 database user ID, and ARCHIVE_USER is thesecondary DB2 database user ID.
Administering 135
7. Regenerate and run the UPDATE column statistics statements for each TADDMDB user.SELECT ’UPDATE SYSIBM.SYSCOLUMNS SET COLCARDF=(SELECT FULLKEYCARDF FROMSYSIBM.SYSINDEXES WHERE NAME = ’||’’’’||CAST(RTRIM(name)AS VARCHAR(40))||’’’’||’AND CREATOR = ’||’’’’||CAST(RTRIM(creator) AS VARCHAR(40))||’’’’||’AND TBNAME = ’||’’’’||CAST(RTRIM(tbname) AS VARCHAR(40))||’’’’||’AND TBCREATOR = ’||’’’’||CAST(RTRIM(tbcreator) AS VARCHAR(40))||’’’’||’)WHERE NAME = ’||’’’’||’PK__JDOIDX’||’’’’||’ AND TBNAME = ’||’’’’||CAST(RTRIM(tbname) AS VARCHAR(40))||’’’’||’AND TBCREATOR = ’||’’’’||CAST(RTRIM(tbcreator) AS VARCHAR(40))||’’’’||’;’from sysibm.sysindexes awhere tbcreator in (’DB_USER’, ’ARCHIVE_USER’)AND NAME IN(SELECT IXNAMEFROM SYSIBM.SYSKEYS BWHERE A.CREATOR = B.IXCREATORAND A.NAME = B.IXNAMEAND COLNAME = ’PK__JDOIDX’)AND TBNAME IN(SELECT NAMEFROM SYSIBM.SYSTABLES CWHERE A.TBCREATOR = C.CREATORAND A.TBNAME = C.NAMEAND CARDF > 0);
8. Regularly monitor your largest tables based on your use of TADDM, and adjusttheir storage attributes if necessary. In particular, monitor the size of thefollowing database tables, which can become large:v ALIASESv CHANGE_CAUSE_TABLEv CHANGE_HISTORY_TABLEv MSSOBJLINK_RELv PERSOBJv SUPERIORS
Use ALTER statements to modify the PRIQTY and SECQTY attributesaccording to the needs of your environment. If appropriate, consider movingtables to separate table spaces.
9. Use the REBIND command on the following packages with theKEEPDYNAMIC(YES) option:v SYSLH200v SYSLH201v SYSLH202
Oracle database maintenanceThese maintenance and tuning guidelines apply to Oracle databases.1. Run the dbms_stats package on the database tables. Oracle uses a cost-based
optimizer. The cost-based optimizer needs data to decide on the access plan,and this data is generated by the dbms_stats package. Oracle databases dependon data about the tables and indexes. Without this data, the optimizer mustestimate.Rebuilding the indexes and running the dbms_stats package is criticallyimportant for optimal performance with Oracle databases. After the database ispopulated, this should be done on a regularly scheduled basis, for example,weekly.v REBUILD INDEX: After many changes to table data, caused by insertion,
deletion, and updating activity, logically sequential data might be on
136 Application Dependency Discovery Manager: Administering
non-sequential physical data pages, so that the database manager mustperform additional read operations to access data. Rebuild the indexes tohelp improve SQL performance.a. Generate the REBUILD INDEX commands by running the following SQL
statement on the Oracle database, where dbuser is the value fromcom.collation.db.user=:select ’alter index dbuser.’||index_name||’ rebuild tablespace ’||tablespace_name||’;’ from dba_indexes where owner = ’dbuser’and index_type not in (’LOB’);
This generates all of the ALTER INDEX commands that you need to run.b. Run the commands in SQLPLUS or some comparable facility. Rebuilding
the indexes on a large database takes 15 - 20 minutes.2. DBMS_STATS: Use the Oracle RDBMS to collect many different kinds of statistics
as an aid to improving performance. The optimizer uses information andstatistics in the dictionary to determine the best access to the database based onthe query provided. Statistical information is collected for specific tables andindexes in the local database when you run the DBMS_STATS command. Whensignificant numbers of table rows are added or removed, or if data in columnsfor which you collect statistics is updated, run the DBMS_STATS command againto update the statistics.v The gen_db_stats.jy program in the $COLLATION_HOME/bin directory outputs
the database commands for either an Oracle or DB2 database to update thestatistics on the TADDM tables. The following example shows how theprogram is used:a. cd $COLLATION_HOME/binb. Run this SQL statement, where tmpdir is a directory where this file is
created:./gen_db_stats.jy > tmpdir/TADDM_table_stats.sql
In a streaming server deployment, run this statement on the primarystorage server.
c. After this is complete, copy the file to the database server and run thefollowing command:– To execute a script file in SQLPlus, type @ and then the file name: SQL
> @{file}
d. Run the commands in SQLPLUS or some comparable facility.3. Buffer pool: A buffer pool or buffer cache is a memory structure inside Oracle
System Global Area (SGA) for each instance. This buffer cache is used forcaching data blocks in the memory. Accessing data from the memory issignificantly faster than accessing data from disk. The goal of block buffertuning is to efficiently cache frequently used data blocks in the buffer cache(SGA) and provide faster access to data. Tuning block buffer is a key task inany Oracle tuning initiative and is a part of the ongoing tuning and monitoringof production databases. The Oracle product maintains its own buffer cacheinside the SGA for each instance. A properly sized buffer cache can usuallyyield a cache hit ratio over 90%, which means that nine requests out of ten aresatisfied without going to disk. If a buffer cache is too small, the cache hit ratiowill be small and more physical disk I/O results. If a buffer cache is too big,parts of the buffer cache are underutilized and memory resources are wasted.
Table 36. Buffer pool size guidelines (db_cache_size)
Number of CIs Guideline buffer pool size
< 500,000 38000
Administering 137
Table 36. Buffer pool size guidelines (db_cache_size) (continued)
Number of CIs Guideline buffer pool size
500,000 - 1,000,000 60000
> 1,000,000 95000
4. You can double the size of maximum open cursors, if the discovery orbulkloading takes too long to complete and NRS contain the following error:com.ibm.tivoli.namereconciliation.service.NrsServicegetAliases(masterGuid)SEVERE: NOTE ⌂*** SQL State = 60000. SQL Code = 604. SQL Message =ORA-00604: error occurred at recursive SQL level 1ORA-01000: maximum open cursors exceededORA-01000: maximum open cursors exceeded
5. Verify that the versions of your Oracle JDBC driver and the Oracle server arethe same. If necessary, replace the Oracle JDBC driver file in the followinglocations.
Note: This only applies when BIRT Report Viewer is enabled.v TADDM 7.3.0 - $COLLATION_HOME/deploy-tomcat/birt-viewer/WEB-INF/
platform/plugins/org.eclipse.birt.report.data.oda.jdbc_2.2.1.r22x_v20070919/drivers/
v TADDM 7.3.0.1, and later - $COLLATION_HOME/apps/birt-viewer/WEB-INF/platform/plugins/org.eclipse.birt.report.data.oda.jdbc_2.2.1.r22x_v20070919/drivers/
v $COLLATION_HOME/lib/jdbc/
Database communicationWhen the database is unavailable, the storage server tries to establish theconnection again.
When there is no connection between the database and the storage server, thestorage server waits as long as it is specified in the com.ibm.cdb.db.timeoutproperty and makes an attempt to connect to the database. The number of theretry attempts to establish the connection is specified in thecom.ibm.cdb.db.max.retries property.
To learn more about the database properties, go to the Database properties section.
Discovery performance tuningYou can update the com.collation.discover.dwcount,com.collation.discover.observer.topopumpcount, andcom.ibm.cdb.discover.observer.topopump.threshold properties in thecollation.properties file to influence the discovery rate and the rate at which thediscovery results are stored in the TADDM database, or to limit the number ofthreads that are responsible for storing data.
For details about these properties, see “Performance properties” on page 85.
If you increase the values of the com.collation.discover.dwcount orcom.collation.discover.observer.topopumpcount properties, you might also haveto increase the amount of installed memory by increasing the maximum heap sizesetting for the following Java Virtual Machines (JVMs):
For the dwcount property:
138 Application Dependency Discovery Manager: Administering
v In a streaming server deployment:– Discover– DiscoverService
v In a domain server deployment:– Discover
For the topopumpcount property:
v In a streaming server deployment:– StorageService
v In a domain server deployment:– Topology
For more information, see “Java Virtual Machine: IBM parameters tuning” on page141.
For more information about tuning for discovery performance, see the documenttitled Tuning Discovery Performance at http://www.ibm.com/software/brandcatalog/ismlibrary/.
Discovery rate tuningThe discovery rate attribute is the area with the most potential for tuning. Theproperty with the most impact on performance is the number of discover workerthreads. You can also use the in-progress sensors to monitor performance orimprove it by specifying the session pool sizes.
A discover worker thread is a thread that runs sensors. The following propertyspecifies the maximum number of discover worker threads:com.collation.discover.dwcount=32
If the server has sufficient spare capacity, you can increase this number and allowmore sensors to run in parallel.
In-progress sensors
To monitor performance, you can look at the in-progress sensors. An in-progresssensor can be in one of three stages of execution:
startedA sensor in this stage is discovering a CI or CIs.
discoveredA sensor in this stage finished discovering a CI or CIs, but is waiting forits results to be saved in the data store.
storingA sensor in this stage saves its discovery results in the database.
To order the in-progress sensors by execution stage, click the Description column.
By observing a discovery run and comparing the number of in-progress sensorsthat are in the started stage versus the number of in-progress sensors in thediscovered or storing stages, you can assess whether attribute discovery is faster orslower than attribute storage for a particular environment. As with all changes tothe collation.properties file, you must restart the server for the change to takeeffect.
Administering 139
Examples:
In-progress sensors: STARTED, DISCOVERED, STORING.
If the number of (DISCOVERED + STORING) is smaller than STARTED, it mightindicate that discovery is the performance bottleneck.
If the number of (DISCOVERED + STORING) exceeds STARTED, it might indicatethat storage is the performance bottleneck.
Session and gateway pool sizes
To discover attributes of a particular CI, a sensor requires an SSH or WMI sessionwith its host computer. To improve performance, these sessions are pooled andcached. The default pool sizes are sufficient in most cases but if they are not largeenough, they can limit the discovery rate. You can change the following propertyto true to monitor for this condition:com.collation.platform.session.ExtraDebugging=false
You must restart the discovery server for the change to take effect. After you run adiscovery, you can search the DiscoverManager logs for waiting time issues thatare related to the session pools. To do so, search the logs for pool lock. Thefollowing is an example of performance degradation that is caused by session poolcontention:2006-08-04 16:11:50,733 DiscoverManager [DiscoverWorker-34]WindowsComputerSystemAgent(192.168.16.181)INFO session.SessionClientPool -Session client [3x ssh2:/[email protected]]#9612508waited 158.682 seconds for pool lock
You can increase the pool size if the waiting time for a session is too long. Thereare two ways to do it. You can globally change the pool size for sessions per hostby editing the following property in the collation.properties file:com.collation.platform.session.PoolSize=3
It is however unlikely that the contention concerns the sessions for all or evenmost hosts in the environment. The contention is likely restricted to a smallernumber of larger hosts that are used by many sensors. The discovery server uses ascoped property which means that many of the properties in thecollation.properties file use one value for general targets and a different one forspecific targets. You can adjust this property by adding an IP address or adiscovery server scope name, like in the following example:com.collation.platform.session.PoolSize.10.10.250.1=20
In this case, the pool size for 10.10.250.1 is 20 but for all other hosts it is 3. You canlook at the log messages like the one from the DiscoverManager logs anddetermine for which hosts the default session pool size is insufficient, and makethe appropriate changes to the collation.properties file.
A related setting is the gateway pool size. It sets the number of sessions that areallowed between the discovery server and the Windows gateway. You can specifyit be editing the following property:com.collation.platform.session.GatewayPoolSize=10
If your environment consists mainly of Windows computer systems, adjust thisproperty upwards so it is equal to the number of discover worker threads.
140 Application Dependency Discovery Manager: Administering
Storage tuningStorage is the second major area for tuning. If the number of sensors in the storingstage is approximately the value of the property that specifies the number ofparallel storage threads, storage of the discovery results is causing the performancebottleneck. To improve performance, you can also limit the number of threads thatare responsible for storing data.
The following property specifies the number of parallel storage threads. It is one ofthe main settings for controlling the discovery storage performance:com.collation.discover.observer.topopumpcount
To improve storage performance when the topology agents are running, you canlimit the number of threads that are responsible for storing data during adiscovery. As a result, a discovery takes less time to complete. To specify the limitof threads that are running, edit the following properties in thecollation.properties file:
com.ibm.cdb.discover.observer.topopump.thresholdThis property specifies the number of storage threads to limit.
com.ibm.cdb.discover.observer.topopump.threshold.<agentGroupName>This property specifies the number of storage threads to limit when thespecified agent group is running.
The following table shows how much thecom.ibm.cdb.discover.observer.topopump.threshold property can improve thediscovery performance. The calculations concern a database with 76 000configuration items.
Threshold property value Percentage time improvement
0.2 55
0.5 33
0.7 13
1 0
Java Virtual Machine: IBM parameters tuningYou can set Java Virtual Machine (JVM) parameters that reduce fragmentation ofthe Java heap and can help improve performance.
Fragmentation of the Java heap can occur as the number of objects that areprocessed increases. There are a number of parameters that you can set to helpreduce fragmentation in the heap.v A kCluster is an area of storage that is used exclusively for class blocks. It is
large enough to hold 1280 entries. Each class block is 256 bytes long. Thisdefault value is usually too small and can lead to fragmentation of the heap. Setthe kCluster parameter, -Xk, as follows to help reduce fragmentation of theheap. These are starting values and might have to be tuned in yourenvironment. An analysis of a heap dump would be best to determine the idealsize.– Topology: -Xk8300– EventsCore: -Xk3500– DiscoverAdmin: -Xk3200– Proxy: -Xk5700
Administering 141
– Discover: -Xk3700Implement these changes in the collation.properties file by adding entries inthe JVM Vendor Specific Settings section. For example, to implement thesechanges for the Topology server, add the following line:com.collation.Topology.jvmargs.ibm=-Xk8300
v Another option for fragmentation issues is to allocate some space specifically forlarge objects; > 64K. Use the -Xloratio parameter. For example:– -Xloratio0.2
This command reserves x% of the active Java heap (not x% of -Xmx but x% ofthe current size of the Java heap), to the allocation of large objects (≥64 KB) only.If changed, -Xmx should be changed to make sure that you do not reduce thesize of the small object area. An analysis of a heap dump would be best todetermine the ideal setting for this parameter.
There are a few additional parameters that can be set that affect Java performance.To change an existing JVM option to a different value, edit one of the followingfiles:v For a domain server in TADDM 7.3.0, the $COLLATION_HOME/deploy-tomcat/ROOT/
WEB-INF/cmdb-context.xml file.v For a domain server in TADDM 7.3.0.1, and later, the $COLLATION_HOME/apps/
ROOT/WEB-INF/cmdb-context.xml file.v For a synchronization server in TADDM 7.3.0, the $COLLATION_HOME/deploy-
tomcat/ROOT/WEB-INF/ecmdb-context.xml file.v For a synchronization server in TADDM 7.3.0.1, and later, the
$COLLATION_HOME/apps/ROOT/WEB-INF/ecmdb-context.xml file.v For a discovery server in TADDM 7.3.0, the $COLLATION_HOME/deploy-tomcat/
ROOT/WEB-INF/discovery-server-context.xml file.v For a discovery server in TADDM 7.3.0.1, and later, the $COLLATION_HOME/apps/
ROOT/WEB-INF/discovery-server-context.xml file.v For a storage server in TADDM 7.3.0, the $COLLATION_HOME/deploy-tomcat/ROOT/
WEB-INF/storage-server-context.xml file.v For a storage server in TADDM 7.3.0.1, and later, the $COLLATION_HOME/apps/
ROOT/WEB-INF/storage-server-context.xml file.
To edit one of these files to change the settings for one of the TADDM services,first find the service in the file. The following example shows the beginning of aservice definition in the XML file:<bean id="Discover"class="com.collation.platform.service.ServiceLifecycle" init-method="start"destroy-method="stop"><property name="serviceName"><value>Discover</value></property>
Within the definition, there are some elements and attributes that control the JVMarguments. For example:<property name="jvmArgs"><value>-Xms8M;-Xmx512M;-Djava.nio.channels.spi.SelectorProvider=sun.nio.ch.PollSelectorProvider</value></property>
142 Application Dependency Discovery Manager: Administering
The JVM arguments can be set as a semicolon separated list in the followingelement:<property name="jvmArgs"><value>
You can also modify the JVM properties that are in the collation.properties file.Those properties can have one of the following forms:
com.collation.JVM.jvmargs.VENDORSuch property is added to the values that are read from the *-config.xmlfile.
com.collation.jvmargs.VENDORSuch property is added to all TADDM JVMs.
com.collation.JVM.jvmargsSuch property overwrites all the values that are specified in the*-config.xml file.
wherev JVM is Proxy, Topology, EventsCore, ExcmdbCore, DiscoverAdmin, StorageService,
DiscoveryService
v VENDOR is ibm or sun
Java Virtual Machine properties tuningIn the collation.properties file, the default values for the Java Virtual Machine(JVM) properties that apply to the TADDM Discovery Management Console arebased on the number of server equivalents (SEs) in your environment.
Default values for JVM properties that apply to DiscoveryManagement Consolev Small environment (fewer than 1000 SEs):
– com.collation.gui.initial.heap.size=128m– com.collation.gui.max.heap.size=512m
v Medium environment (1000–2500 SEs):– com.collation.gui.initial.heap.size=256m– com.collation.gui.max.heap.size=768m
v Large environment (2500–5000 SEs):– com.collation.gui.initial.heap.size=512m– com.collation.gui.max.heap.size=1024m
Network tuningAfter a system is implemented, the network should be monitored to ensure that itsbandwidth is not being consumed more than 50%.
The network can influence the overall performance of your application, and it istypically is a factor in performance when a time delay exists in the followingsituations:v A delay between when a client system sends a request to the server and when
the server receives this requestv A delay between when the server system sends data back to the client system
and when the client system receives this data
Administering 143
DNS tuningTADDM is sensitive to the performance of the deployed DNS infrastructure. Evenif DNS performance is adequate for other applications, some configuration mightbe required to optimize performance for TADDM.
TADDM peforms a large number of DNS lookup queries in order to resolvemeaningful display names for components and events. Unlike most otherapplications, TADDM uses primarily reverse lookups (mapping IP addresses tonames) rather than forward lookups (mapping names to IP addresses).
Because of this usage pattern, problems with DNS performance can have a largereffect on TADDM performance than on other applications. For example, a DNSresponse time of 500 milliseconds would probably not significantly affect a typicalapplication, but might cause noticeable performance issues for TADDM because ofthe large number of DNS queries it performs. Additionally, because otherapplications perform only forward lookups, a performance problem with reverselookups would not affect most applications, but would affect TADDM.
In general, performance problems with the DNS infrastructure should be addressedin order to benefit all consumers of DNS services. If this is not possible, there areseveral ways in which you can mitigate the effect of DNS performance problemson TADDM:v Make sure in-addr.arpa delegation for reverse lookups is configured correctly.
Delegation problems can cause long pauses or hangs during reverse lookups asthe TADDM server tries to reach servers that do not exist. This type ofconfiguration issue affects only applications (like TADDM) that perform reverselookups.
v Set up at least one caching/forwarding DNS server on a TADDM server system,and configure the TADDM servers to use that DNS server for lookups. Thisallows DNS lookups to be cached in the local TADDM environment, based onthe TTL rules for the zones. This type of server is stateless and therefore requiresminimal maintenance and adds little overhead.
v Set up at least one DNS slave server on a TADDM server system, and configurethe TADDM servers to use that DNS server for lookups. This allows DNSlookups to be performed within the local TADDM environment withoutcommunicating with the broader DNS infrastructure. A DNS slave servermaintains state automatically and therefore requires minimal maintenance andadds little overhead.
v Use an alternative method for lookups, such as a hosts file, instead of DNS.(This approach can have significant maintenance requirements.)
Note: Do not change the default DNS cache parameters in the java.security file.Although caching parameters can affect DNS performance, changes to thisconfiguration file are not preserved when TADDM maintenance fixes are applied.Instead, use one of the approaches described in this topic to optimize DNSperformance.
Synchronization server tuningThe performance of the synchronization server is highly dependent on databaseprocessing and therefore, on database maintenance and tuning. If you experienceperformance problems with synchronization processing, refer to the information ondatabase tuning, and especially note the buffer pool settings for DB2 databases, thebuffer cache settings for Oracle databases, and the information about databasemaintenance.
144 Application Dependency Discovery Manager: Administering
Specifically for the synchronization server, update the DB2 database configurationby entering the following command:UPDATE DATABASE CONFIG FOR TADDM USING
UTIL_HEAP_SZ 5000LOGBUFSZ 1024LOCKLIST 20000SORTHEAP 2048PCKCACHESZ AUTOMATIC
;
Windows system tuningTo assign more memory for TADDM services, tune the Windows systems.
Complete the following tasks:v The system paging file must not be located on the same drive as the operating
system. If possible, put the system paging file on a separate disk drive.v Configure the database and application server to maximize data for networking
applications.
ReportingYou can create and add custom reports to the Data Management Portal usingexternal report viewers, JSP report viewers, or the BIRT reporting system.
External report viewersYou use an external report viewer to run an external program that generates areport. The external program uses the TADDM API through a command line toaccess data. The report is then shown in the user interface.
Creating the external report viewer logicAn external report can be implemented inside any executable program. Examplesare a Perl script, a shell script, or Java program. The external program must outputa valid HTML file through standard output for the resulting report to appear inthe Data Management Portal.
About this task
A typical implementation of an external report viewer uses a shell script to querythe TADDM API and output the XML results of the query to a temporary file. Theshell script then starts an XSLT processor to transform the query results into HTMLoutput that is output to STDOUT.
Important: External report viewers that use the TADDM API must supplycredentials to the command line program api.sh script on Linux and UNIX andthe api.bat file on Windows. Because the credentials are command line argumentsto the api.sh script and api.bat, they might be visible to other users of the systemvia process lists. To prevent disclosure of sensitive passwords, it might be useful toset up a dummy account that has read access to the objects that should appear inexternally-generated reports.
The following example is a simple external report bourne shell scriptimplementation. Copy the following contents into a new file, $COLLATION_HOME/sdk/bin/appServers.sh, and make the file readable and executable by the user thatthe TADDM server runs under:
Administering 145
#!/bin/sh# Set environment variables for called scriptsexport COLLATION_HOME=/opt/ibm/taddm/dist
# Invoke the query via API and output to $COLLATION_HOME/sdk/bin/appServers.xml# NOTE: Change 'restrictedUser’ and 'restrictedPassword’ to your dummy account# credentials.sh $COLLATION_HOME/sdk/bin/api.sh -l log -H localhost -u restrictedUser -prestrictedPassword \ find AppServer > $COLLATION_HOME/sdk/bin/appServers.xml
# Invoke the XSLT processorsh $COLLATION_HOME/sdk/bin/xslt.sh -XSL $COLLATION_HOME/sdk/bin/appServers.xsl
The following example is of the appServers.xsl style sheet used to transform theappServers.xml file generated by the shell script. The report displays applicationserver names and their product versions. Copy the contents into a new file,$COLLATION_HOME/sdk/bin/appServers.xsl and make the file readable by the userthe TADDM server runs under.<?xml version="1.0" encoding="UTF-8"?><xsl:stylesheet version = ’1.0’ xmlns:xsl="http://www.w3.org/1999/XSL/Transform"xmlns:coll="urn:www-collation-com:1.0" xmlns:xhtml="http://www.w3.org/1999/xhtml">
<xsl:variable name="nl"><xsl:text></xsl:text></xsl:variable>
<xsl:variable name="pageheadertext">Simple Application Server report
</xsl:variable>
<xsl:variable name="pagefootertext">End Simple Application Server report
</xsl:variable>
<xsl:template match="/"><html>
<head><link rel="stylesheet" type="text/css" media="all"
href="styles.css" /></head>
<body><h3>
<xsl:value-of select="$pageheadertext"/></h3>
<table border="1" width="100%"><tr>
<th>Product Version/th><th>Name/th>
</tr>
<xsl:apply-templates select="document(’appServers.xml’)/coll:results"/></table>
<xsl:value-of select="$nl"/></body></html></xsl:template>
<xsl:template match="coll:AppServer"><tr><td>xsl:value-of select="coll:productVersion"/></td><td>xsl:value-of select="coll:displayName"/></td>
</tr></xsl:template>
</xsl:stylesheet>
146 Application Dependency Discovery Manager: Administering
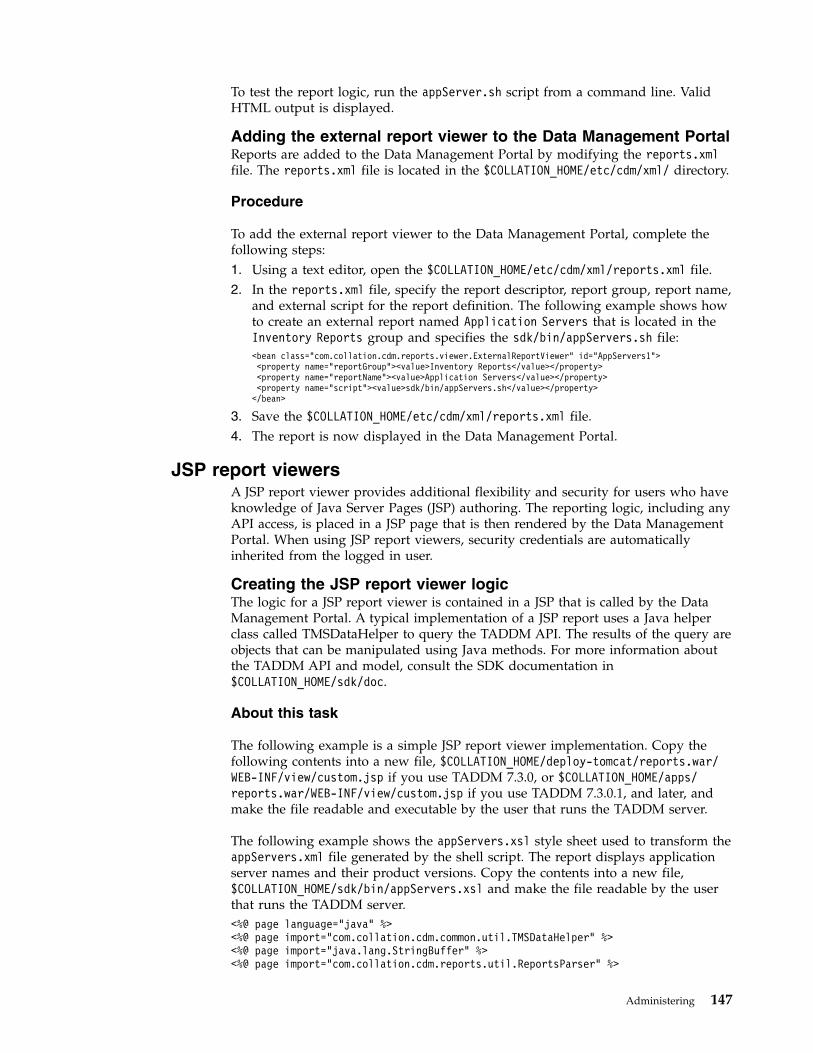
To test the report logic, run the appServer.sh script from a command line. ValidHTML output is displayed.
Adding the external report viewer to the Data Management PortalReports are added to the Data Management Portal by modifying the reports.xmlfile. The reports.xml file is located in the $COLLATION_HOME/etc/cdm/xml/ directory.
Procedure
To add the external report viewer to the Data Management Portal, complete thefollowing steps:1. Using a text editor, open the $COLLATION_HOME/etc/cdm/xml/reports.xml file.2. In the reports.xml file, specify the report descriptor, report group, report name,
and external script for the report definition. The following example shows howto create an external report named Application Servers that is located in theInventory Reports group and specifies the sdk/bin/appServers.sh file:<bean class="com.collation.cdm.reports.viewer.ExternalReportViewer" id="AppServers1"><property name="reportGroup"><value>Inventory Reports</value></property><property name="reportName"><value>Application Servers</value></property><property name="script"><value>sdk/bin/appServers.sh</value></property></bean>
3. Save the $COLLATION_HOME/etc/cdm/xml/reports.xml file.4. The report is now displayed in the Data Management Portal.
JSP report viewersA JSP report viewer provides additional flexibility and security for users who haveknowledge of Java Server Pages (JSP) authoring. The reporting logic, including anyAPI access, is placed in a JSP page that is then rendered by the Data ManagementPortal. When using JSP report viewers, security credentials are automaticallyinherited from the logged in user.
Creating the JSP report viewer logicThe logic for a JSP report viewer is contained in a JSP that is called by the DataManagement Portal. A typical implementation of a JSP report uses a Java helperclass called TMSDataHelper to query the TADDM API. The results of the query areobjects that can be manipulated using Java methods. For more information aboutthe TADDM API and model, consult the SDK documentation in$COLLATION_HOME/sdk/doc.
About this task
The following example is a simple JSP report viewer implementation. Copy thefollowing contents into a new file, $COLLATION_HOME/deploy-tomcat/reports.war/WEB-INF/view/custom.jsp if you use TADDM 7.3.0, or $COLLATION_HOME/apps/reports.war/WEB-INF/view/custom.jsp if you use TADDM 7.3.0.1, and later, andmake the file readable and executable by the user that runs the TADDM server.
The following example shows the appServers.xsl style sheet used to transform theappServers.xml file generated by the shell script. The report displays applicationserver names and their product versions. Copy the contents into a new file,$COLLATION_HOME/sdk/bin/appServers.xsl and make the file readable by the userthat runs the TADDM server.<%@ page language="java" %><%@ page import="com.collation.cdm.common.util.TMSDataHelper" %><%@ page import="java.lang.StringBuffer" %><%@ page import="com.collation.cdm.reports.util.ReportsParser" %>
Administering 147
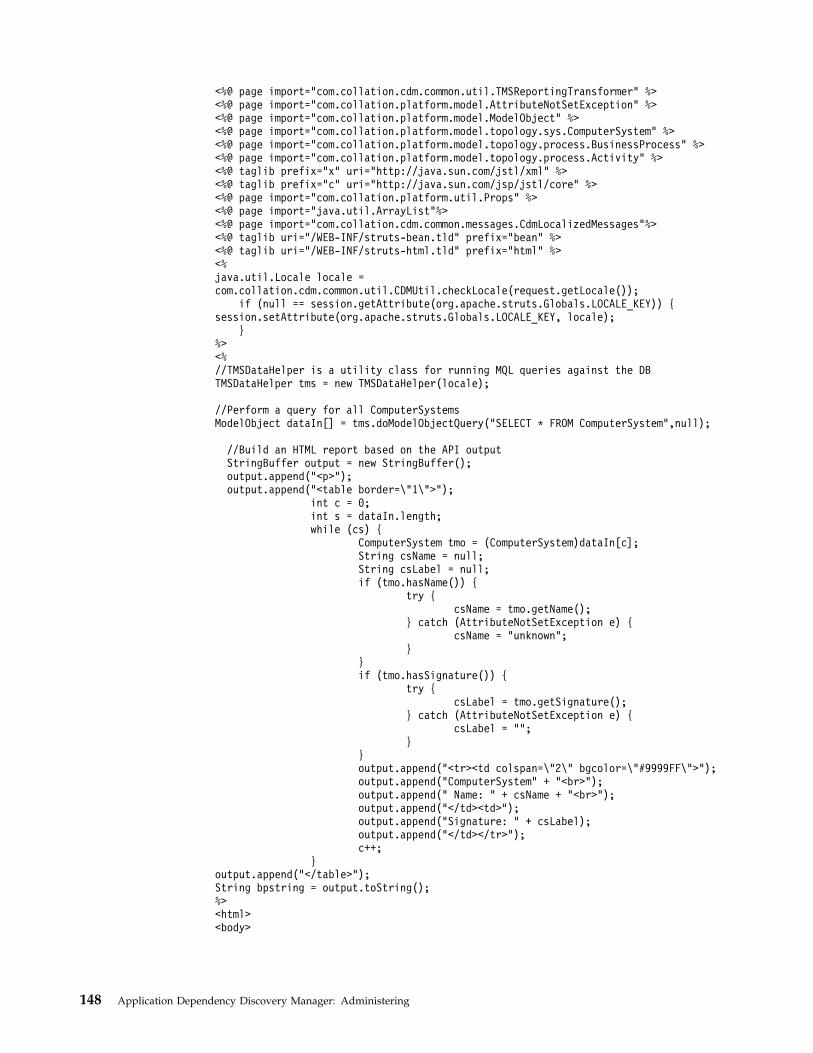
<%@ page import="com.collation.cdm.common.util.TMSReportingTransformer" %><%@ page import="com.collation.platform.model.AttributeNotSetException" %><%@ page import="com.collation.platform.model.ModelObject" %><%@ page import="com.collation.platform.model.topology.sys.ComputerSystem" %><%@ page import="com.collation.platform.model.topology.process.BusinessProcess" %><%@ page import="com.collation.platform.model.topology.process.Activity" %><%@ taglib prefix="x" uri="http://java.sun.com/jstl/xml" %><%@ taglib prefix="c" uri="http://java.sun.com/jsp/jstl/core" %><%@ page import="com.collation.platform.util.Props" %><%@ page import="java.util.ArrayList"%><%@ page import="com.collation.cdm.common.messages.CdmLocalizedMessages"%><%@ taglib uri="/WEB-INF/struts-bean.tld" prefix="bean" %><%@ taglib uri="/WEB-INF/struts-html.tld" prefix="html" %><%java.util.Locale locale =com.collation.cdm.common.util.CDMUtil.checkLocale(request.getLocale());
if (null == session.getAttribute(org.apache.struts.Globals.LOCALE_KEY)) {session.setAttribute(org.apache.struts.Globals.LOCALE_KEY, locale);
}%><%//TMSDataHelper is a utility class for running MQL queries against the DBTMSDataHelper tms = new TMSDataHelper(locale);
//Perform a query for all ComputerSystemsModelObject dataIn[] = tms.doModelObjectQuery("SELECT * FROM ComputerSystem",null);
//Build an HTML report based on the API outputStringBuffer output = new StringBuffer();output.append("<p>");output.append("<table border=\"1\">");
int c = 0;int s = dataIn.length;while (cs) {
ComputerSystem tmo = (ComputerSystem)dataIn[c];String csName = null;String csLabel = null;if (tmo.hasName()) {
try {csName = tmo.getName();
} catch (AttributeNotSetException e) {csName = "unknown";
}}if (tmo.hasSignature()) {
try {csLabel = tmo.getSignature();
} catch (AttributeNotSetException e) {csLabel = "";
}}output.append("<tr><td colspan=\"2\" bgcolor=\"#9999FF\">");output.append("ComputerSystem" + "<br>");output.append(" Name: " + csName + "<br>");output.append("</td><td>");output.append("Signature: " + csLabel);output.append("</td></tr>");c++;
}output.append("</table>");String bpstring = output.toString();%><html><body>
148 Application Dependency Discovery Manager: Administering
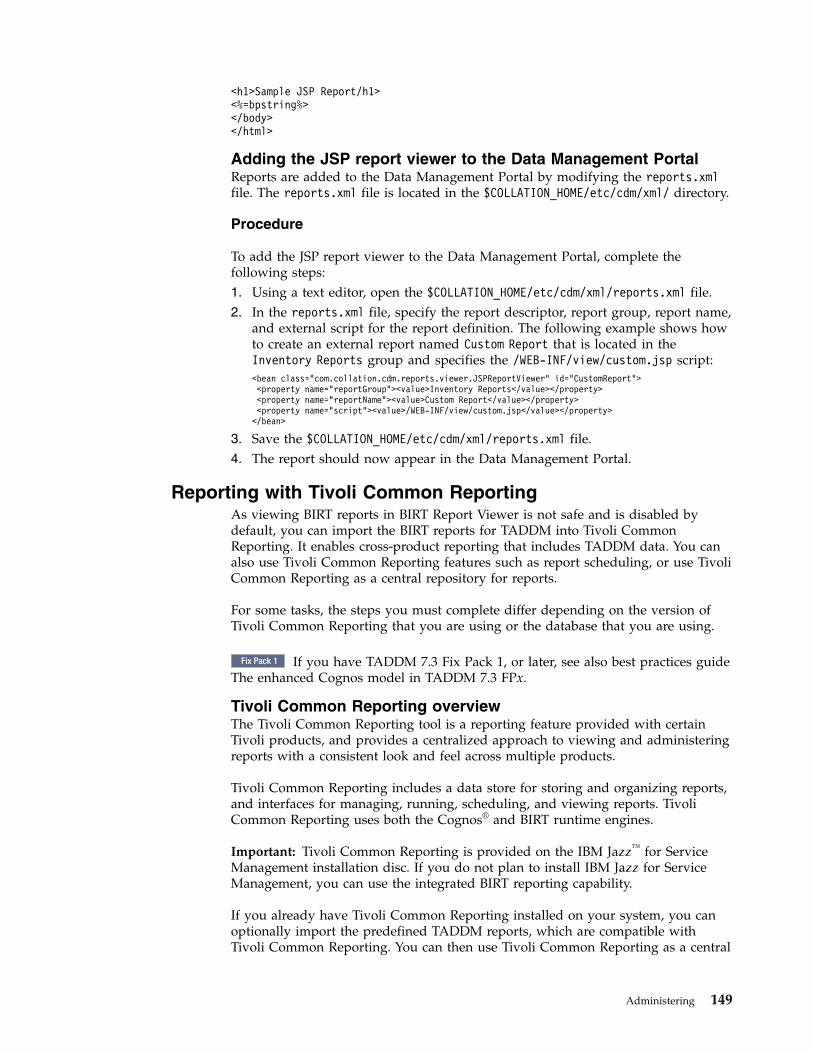
<h1>Sample JSP Report/h1><%=bpstring%></body></html>
Adding the JSP report viewer to the Data Management PortalReports are added to the Data Management Portal by modifying the reports.xmlfile. The reports.xml file is located in the $COLLATION_HOME/etc/cdm/xml/ directory.
Procedure
To add the JSP report viewer to the Data Management Portal, complete thefollowing steps:1. Using a text editor, open the $COLLATION_HOME/etc/cdm/xml/reports.xml file.2. In the reports.xml file, specify the report descriptor, report group, report name,
and external script for the report definition. The following example shows howto create an external report named Custom Report that is located in theInventory Reports group and specifies the /WEB-INF/view/custom.jsp script:<bean class="com.collation.cdm.reports.viewer.JSPReportViewer" id="CustomReport"><property name="reportGroup"><value>Inventory Reports</value></property><property name="reportName"><value>Custom Report</value></property><property name="script"><value>/WEB-INF/view/custom.jsp</value></property></bean>
3. Save the $COLLATION_HOME/etc/cdm/xml/reports.xml file.4. The report should now appear in the Data Management Portal.
Reporting with Tivoli Common ReportingAs viewing BIRT reports in BIRT Report Viewer is not safe and is disabled bydefault, you can import the BIRT reports for TADDM into Tivoli CommonReporting. It enables cross-product reporting that includes TADDM data. You canalso use Tivoli Common Reporting features such as report scheduling, or use TivoliCommon Reporting as a central repository for reports.
For some tasks, the steps you must complete differ depending on the version ofTivoli Common Reporting that you are using or the database that you are using.
Fix Pack 1
If you have TADDM 7.3 Fix Pack 1, or later, see also best practices guide
The enhanced Cognos model in TADDM 7.3 FPx.
Tivoli Common Reporting overviewThe Tivoli Common Reporting tool is a reporting feature provided with certainTivoli products, and provides a centralized approach to viewing and administeringreports with a consistent look and feel across multiple products.
Tivoli Common Reporting includes a data store for storing and organizing reports,and interfaces for managing, running, scheduling, and viewing reports. TivoliCommon Reporting uses both the Cognos® and BIRT runtime engines.
Important: Tivoli Common Reporting is provided on the IBM Jazz™ for ServiceManagement installation disc. If you do not plan to install IBM Jazz for ServiceManagement, you can use the integrated BIRT reporting capability.
If you already have Tivoli Common Reporting installed on your system, you canoptionally import the predefined TADDM reports, which are compatible withTivoli Common Reporting. You can then use Tivoli Common Reporting as a central
Administering 149
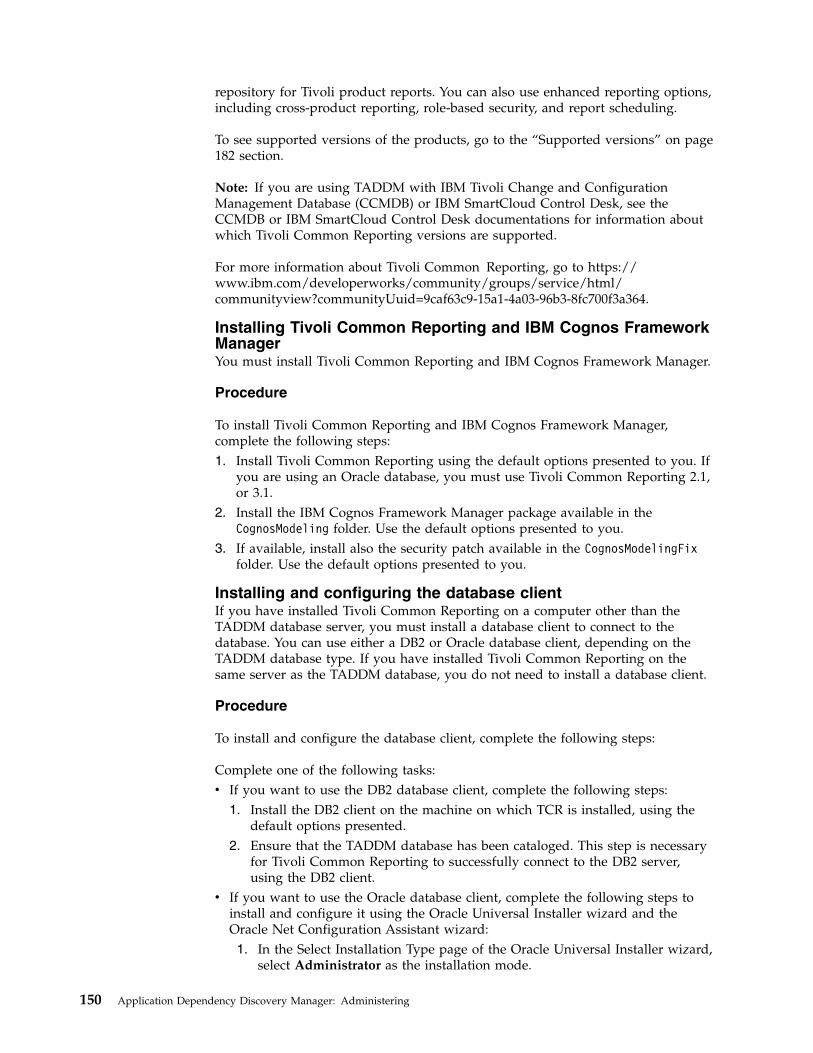
repository for Tivoli product reports. You can also use enhanced reporting options,including cross-product reporting, role-based security, and report scheduling.
To see supported versions of the products, go to the “Supported versions” on page182 section.
Note: If you are using TADDM with IBM Tivoli Change and ConfigurationManagement Database (CCMDB) or IBM SmartCloud Control Desk, see theCCMDB or IBM SmartCloud Control Desk documentations for information aboutwhich Tivoli Common Reporting versions are supported.
For more information about Tivoli Common Reporting, go to https://www.ibm.com/developerworks/community/groups/service/html/communityview?communityUuid=9caf63c9-15a1-4a03-96b3-8fc700f3a364.
Installing Tivoli Common Reporting and IBM Cognos FrameworkManagerYou must install Tivoli Common Reporting and IBM Cognos Framework Manager.
Procedure
To install Tivoli Common Reporting and IBM Cognos Framework Manager,complete the following steps:1. Install Tivoli Common Reporting using the default options presented to you. If
you are using an Oracle database, you must use Tivoli Common Reporting 2.1,or 3.1.
2. Install the IBM Cognos Framework Manager package available in theCognosModeling folder. Use the default options presented to you.
3. If available, install also the security patch available in the CognosModelingFixfolder. Use the default options presented to you.
Installing and configuring the database clientIf you have installed Tivoli Common Reporting on a computer other than theTADDM database server, you must install a database client to connect to thedatabase. You can use either a DB2 or Oracle database client, depending on theTADDM database type. If you have installed Tivoli Common Reporting on thesame server as the TADDM database, you do not need to install a database client.
Procedure
To install and configure the database client, complete the following steps:
Complete one of the following tasks:v If you want to use the DB2 database client, complete the following steps:
1. Install the DB2 client on the machine on which TCR is installed, using thedefault options presented.
2. Ensure that the TADDM database has been cataloged. This step is necessaryfor Tivoli Common Reporting to successfully connect to the DB2 server,using the DB2 client.
v If you want to use the Oracle database client, complete the following steps toinstall and configure it using the Oracle Universal Installer wizard and theOracle Net Configuration Assistant wizard:1. In the Select Installation Type page of the Oracle Universal Installer wizard,
select Administrator as the installation mode.
150 Application Dependency Discovery Manager: Administering
2. In the Specify Home Details page, specify the name of the installation andthe path to the location to where you want to install the product.
3. In the Product-Specific Prerequisite Checks page, ensure that each of therequirements for installation and configuration are met. Do not continuewith the installation until each check has a status of Succeeded.
4. In the Welcome page of the Oracle Net Configuration Assistant wizard,ensure that the Perform typical configuration check box is not selected.
5. In the Naming Methods Configuration, Select Naming Method page, setLocal Naming as the naming method.
6. In the Net Service Name Configuration, Service Name page, type theservice name of your remote Oracle database server, for example, ORCL.
7. In the Net Service Name Configuration, Select Protocols page, select TCP asthe protocol to use to connect to the database.
8. In the Net Service Name Configuration, TCP/IP Protocol page, type thehost name of the computer on which the database is running. Select Usethe standard port number of 1521.
9. In the Net Service Name Configuration, Test page, select Yes, perform atest.If your database user name and password are correct, the following text isdisplayed:Connecting... Test successful.
If a successful connection to the database is not made, you might need tochange your login credentials. To change the database login credentials clickChange Login and specify a valid database user name and password.
10. In the Net Service Name Configuration, Net Service Name page accept thedefault service name, which should be the service name you specifiedearlier.
11. Create a Windows system variable called TNS_ADMIN and set the value to thefull path of the folder containing the tnsnames.ora file. During installationthe tnsnames.ora file is created in the %ORACLE_HOME%/client_1/NETWORK/ADMIN folder, for example C:/oracle/product/10.2.0/client_1/NETWORK/ADMIN.
12. Set the TNS_ADMIN variable in thestartTCRserver.sh/bat script to point tothe location of the tnsnames.ora file, for example %ORACLE_HOME%/client_1/NETWORK/ADMIN.
13. Reboot the computer to ensure that the new system variable is available.
Configuring IBM Cognos Framework ManagerYou must update IBM Cognos 10 Framework Manager properties with appropriatevalues.
About this task
Note: The following procedure applies to configuring IBM Cognos 10 FrameworkManager for Tivoli Common Reporting 3.1. However, it is the same for IBMCognos 8 Framework Manager for Tivoli Common Reporting 2.1.
When you install Tivoli Common Reporting the IBM Cognos Configurationprogram is installed and some property values are updated. When you install IBMCognos 10 Framework Manager, a different version of the IBM CognosConfiguration program is installed, but not all of the properties are updated. Youmust manually copy some property values from the Tivoli Common Reporting
Administering 151
version of IBM Cognos Configuration to the IBM Cognos 10 Framework Managerversion of IBM Cognos Configuration.
Procedure
To configure IBM Cognos 10 Framework Manager, complete the following steps:1. Open the version of IBM Cognos Configuration installed by Tivoli Common
Reporting. To open this program click Start > Programs > Tivoli CommonReporting 3.1 > IBM Cognos Configuration.
2. Open the version of IBM Cognos Configuration installed by IBM Cognos 10. Toopen this program click Start > Programs > IBM Cognos 10 > IBM CognosConfiguration.
3. For each version of IBM Cognos Configuration, click Local Configuration >Environment.
4. Copy the value of the Gateway URI property from the Tivoli CommonReporting version of IBM Cognos Configuration to the Gateway URI propertyof the IBM Cognos 10 version of IBM Cognos Configuration. The URI syntax is:http://tcrhost:16310/tarf/servlet/dispatch.
5. Copy the value of the External dispatcher URI property from the TivoliCommon Reporting version of IBM Cognos Configuration to the DispatcherURI for external applications property of the IBM Cognos 10 version of IBMCognos Configuration. The URI syntax is: http://tcrhost:16310/tarf/servlet/dispatch.
6. Save changes made to the IBM Cognos 10 version of IBM CognosConfiguration.
Generating the TADDM modelFix Pack 1
You can generate the TADDM model to have the up-to-date snapshot of theTADDM database content, including definitions of all extended attributes. If youdo not use extended attributes, you can skip this procedure and use the prebuiltTADDM Cognos model file, the $COLLATION_HOME/etc/reporting/tcr/model.xmlfile.
Before you begin
The generated TADDM model includes all Common Data Model classes that aresupported by TADDM and extended attributes definitions that are stored in theTADDM database. You can publish the TADDM model in Tivoli CommonReporting server and use it in Cognos reports. You can generate the TADDMmodel many times. Each time the model is regenerated, it contains the updatedTADDM database content.
Notes:
v If extended attribute definitions are removed from the TADDM database afterthe TADDM model is published in Tivoli Common Reporting server, the Cognosreports that use them might stop working.
v If you use the Windows operating system, change the extension of the scriptsthat are used in the following procedure from .sh to .bat.
152 Application Dependency Discovery Manager: Administering
Procedure1. On the TADDM server, open the $COLLATION_HOME/bin directory.2. Refresh the extended attributes views by completing the following steps:
a. If you created any extended attribute views, remove them by running thefollowing command:./extattr_views.sh remove
b. Generate SQL scripts with extended attribute views definitions by runningthe following command:./extattr_views.sh scripts
c. Create the extended attribute views with the use of the generated SQLscripts by running the following command:./extattr_views.sh create
3. To generate the Cognos model file, run the following command:./genCognosModel.sh
The generated TADDM model is stored in the model.xml file and it is placed inthe ⌂$COLLATION_HOME/etc/reporting/tcr directory. The log messages of thecommand are in the $COLLATION_HOME/log/genCognosModel.log file.
What to do next
You can publish the generated TADDM model in Tivoli Common Reporting serverby using IBM Cognos Framework Manager. For more information, see “Publishingthe model using IBM Cognos Framework Manager” on page 157.
For more information about extended attributes views, see the Extended attributesviews topic in the TADDM SDK Developer's Guide.
Importing the model and sample reports into Tivoli CommonReportingYou can import sample TADDM reports into Tivoli Common Reporting version 2.1and 3.1.
About this task
This procedure applies to Tivoli Common Reporting version 2.1.
Procedure
To import the model and sample reports into Tivoli Common Reporting 2.1,complete the following steps:1. Copy the $COLLATION_HOME/etc/reporting/TADDMPackage.zip package from the
TADDM server to the TCRComponent/cognos/deployment folder of the TivoliCommon Reporting server.
2. Open Tivoli Common Reporting home page.3. Click Reporting > Common Reporting.4. From the Launch menu, select Administration. The Administration pane is
displayed.5. Click the Configuration tab.6. Click the New Import icon. The New Import wizard is displayed.7. From the list of available packages, select TADDMPackage. Click Next.
Administering 153
8. Optional: In the Description field, type a description of the package. ClickNext.
9. Select the check box next to the package name.10. In the Options section, click The owner from the source and New and
existing entries. From the Recording level menu, select Basic. Click Next.11. Click Save and run once. Click Next.
About this task
This procedure applies to Tivoli Common Reporting version 3.1.
Procedure
To import the model and sample reports into Tivoli Common Reporting 3.1,complete the following steps:1. Copy the $COLLATION_HOME/etc/reporting/TADDMPackage.zip package from the
TADDM server to the reporting/cognos/deployment folder of the JazzSMinstallation.
2. Open Tivoli Common Reporting home page.3. Click Reporting > Common Reporting.4. From the Launch menu, select IBM Cognos Administration. The
Administration pane is displayed.5. Click the Configuration tab.6. Go to Content Administration. Click the New Import icon. The New Import
wizard is displayed.7. From the list of available packages, select TADDMPackage. Click Next.8. Optional: In the Description field, type a description of the package. Click
Next.9. Select the check box next to the package name. Click Next.
10. In the Entry ownership section, click The owner from the source and Newand existing entries. From the Recording level menu in the Deploymentrecord section, select Basic. Click Next.
11. Verify that the provided values are correct. Click Next.12. Click Save and run once. Click Finish.13. Click Run.
Data views in the TADDM modelYou can generate reports from the TADDM data model file, model.xml file.
The data model is organized into several namespaces. The namespace is a logicalcontainer in which all the names are unique. Each namespace contains querysubjects, query items, and objects. The following namespaces are present after youimport the TADDM model.xml file:
Fix Pack 1 CDM namespacesThese views contain the query subjects for almost all Common Data Modelclasses, including discovery-related classes, split into several namespacesby their package names. Package names are sorted alphabetically. TheSimplified Model classes are distinguished by the simple prefix in thenamespace name. You can use this data to generate reports that containdifferent types of CDM objects.
154 Application Dependency Discovery Manager: Administering
The query subjects in CDM namespaces contain predefined relationshipsthat are related to the Parent attributes. For example, theapp.j2ee.J2EEDomain class has the attribute Servers of the typeapp.j2ee.J2EEServer[]. And the app.j2ee.J2EEServer class has theattribute Parent of the app.j2ee.J2EEDomain type. Therefore, between allcompatible pairs of CDM classes, there are predefined relationships, forexample:v app.j2ee.J2EEDomain [0..1] - [0..n] app.j2ee.J2EEServerv app.j2ee.J2EEDomain [0..1] - [0..n] app.j2ee.jboss.JBossServerv app.j2ee.J2EEDomain [0..1] - [0..n]
app.j2ee.weblogic.WebLogicServer
v app.j2ee.jboss.JBossDomain [0..1] - [0..n]app.j2ee.jboss.JBossServer
v app.j2ee.websphere.WebSphereCell [0..1] - [0..n]app.j2ee.websphere.WebSphereServer
In TADDM 7.3.0.1, some query subjects in CDM namespaces are definedfor non-persistent attributes of the array type. In TADDM 7.3.0.2, querysubjects are defined for all attributes of the array type. Their names havethe following format: "[name of the class declaring the arrayattribute]-->[array attribute name]". For example, the simple.SGroupclass has the GroupMembers attribute of the ModelObject[] type, so thequery subject is "SGroup-->GroupMembers". These query subjects containpredefined relationships between the described array attributes and allCDM classes that contain these attributes. For example, for the mentionedGroupMembers attribute, the following relationships are defined amongothers:v simple.SGroup [1..1] - [0..n] simple."SGroup-->GroupMembers"v simple.SBaseCollection [1..1] - [0..n] simple."SGroup--
>GroupMembers"
v app.biztalk.BizTalkGroup [1..1] - [0..n] simple."SGroup-->GroupMembers"
v app.hacmp.HACMPResourceGroup [1..1] - [0..n] simple."SGroup-->GroupMembers"
To use attributes of the array type, you must define a relationship betweenan attribute of the array type and the required CDM class by using its PK_Cattribute or, in case of non-persistent attribute of the array type(ModelObject[]), its Guid attribute. For example:
v Fix Pack 2 To create a Cognos report that shows sys.zOS.ZReportFileobjects as ZReportfiles of the sys.ComputerSystem objects, you mustdefine a join between the following columns in IBM Cognos ReportStudio:sys."ComputerSystem-->ZReportfiles".PK__ZReportfiles_C[0..n]-[0..1] sys.zOS.ZReportFile.PK_C
v To create a Cognos report that shows app.AppServer objects asGroupMembers of the simple.SBaseCollection objects, you must define ajoin between the following columns in IBM Cognos Report Studio:simple."SGroup-->GroupMembers".GroupMembersGuids [0..n]-[0..1] app.AppServer.Guid
Fix Pack 2 In many cases, there is no need to manually create joins forattributes of the array type because there are corresponding Parentattributes of the dependent objects. The Cognos model contains
Administering 155
relationships for them. For example, you do not need to manually createjoins to create a report that shows sys.FileSystem objects as FileSystemsof the sys.ComputerSystem objects, because the sys.FileSystem objects havethe Parent attribute that points to the sys.ComputerSystem objects.
Fix Pack 3
In TADDM 7.3.0.3, and later, the Cognos model contains query
items of Data Time type for all attributes of the time stamp type. Forexample, sys.aix.AixUnitaryComputerSystem query subject contains thefollowing query items:v LastStoredTime of the type Int64, which points to the
LASTSTOREDTIME_C column in the building block view. Examplevalue in the column: 1445417251307.
v LastStoredTimeT of the type Data Time, which points to theLASTSTOREDTIME_T column in the building block view. Examplevalue in the column: Oct 21, 2015 10:47:31 AM.
The LastStoredTimeT query item is the equivalent of the LastStoredTimequery item, only it is expressed in the Coordinated Universal Time format,instead of UNIX epoch (long integer). The query items that contain the Tsuffix are the time stamp equivalents of the original long integer attribute.
WebSphere namespace
Note: Fix Pack 1 WebSphere namespace is deprecated in TADDM 7.3.0.1,and later.This view contains the primary query subjects for a WebSphereenvironment. You can use this data to generate WebSphere-specific reports,such as listing the properties or JVM settings of WebSphere servers. ThisWebSphere Server query subject is linked to the AppServer query subjectcontained in the shared namespace. The WebSphere cluster and WebSpherecell query subjects are linked to the AppServer cluster and J2EE Domainquery subjects contained in the shared namespace.
Shared namespace
Note: Fix Pack 1 Shared namespace is deprecated in TADDM 7.3.0.1, andlater.This view contains query subjects that are considered to be key classes andcan be used as a bridge to join data between different namespaces. Theshared namespace contains information about computer systems andcollection classes. You can use this data to create inventory reports.
Business applications namespace
Note: Fix Pack 1 Business applications namespace is deprecated in TADDM7.3.0.1, and later.This view contains query subjects for a business application, namely,Application and FunctionalGroup query subjects. The functional groupquery subject is linked to the shared namespace through the Collectionquery subject. You can use this data to create reports showing businessapplications and their members.
Database namespace
Note: Fix Pack 1 Database namespace is deprecated in TADDM 7.3.0.1, andlater.This view contains query subjects related to database and database servers.
156 Application Dependency Discovery Manager: Administering
You can use the All Databases query subject to generate general databasereports rather than vendor-specific database reports. The database contentis linked to the shared namespace through the AppServers query subject.
Dependencies and relationships namespace
Note: Fix Pack 1 Dependencies and relationships namespace is deprecatedin TADDM 7.3.0.1, and later.This view contains query subjects that represent generated relationshipsand dependencies, such as IP dependencies or switch to devicerelationships. You can use the general purpose relationship(unlinked)query subject to create manual links when creating a report or query. TheSwitchToDevice query subject joins switches to computer system objects inthe shared namespace. There are three query subjects related to serveraffinity. The Server query subject shows the union of all computer systems,application servers, and service objects in the database. The Affinity(target-linked) query subject, joins each affinity relationship to its targetin the Server query subject. The Affinity (source-linked) query subjectjoins each affinity relationship to its source in the Server query subject. Theserver content is linked to the shared namespace through the computersystem, application server, and service query subjects. You can use thisdata to generate a general report showing relationship betweenconfiguration items in the network.
Publishing the model using IBM Cognos Framework ManagerIf you want to add objects to the TADDM data model (model.xml file), you mustedit the file, and then import it using IBM Cognos 10 Framework Manager.
About this task
The following procedure applies to IBM Cognos 10 Framework Manager. However,it is the same for IBM Cognos 8 Framework Manager.
Procedure
To import the data model using IBM Cognos 10 Framework Manager, complete thefollowing steps:1. Start IBM Cognos 10 Framework Manager.2. Create a new project.3. When prompted to do so, enter credentials for the Tivoli Common Reporting
server. You might be prompted to enter these credentials more than once.4. Close the IBM Cognos 10 Framework Manager.5. Copy the following file from the TADDM server to the Cognos Framework
project folder:$COLLATION_HOME/etc/reporting/tcr/model.xml
Overwrite the existing model.xml file in the Cognos Framework project folder.6. Start IBM Cognos 10 Framework Manager and open the project you created
earlier.7. In the Project Viewer pane, click Data Sources >
content_manager_data_source_name.8. If you are using a DB2 database with a different name than the one that is
defined in the Cognos database source, replace the contents of the Schemafield with the DB2 instance name used for the TADDM database.
Administering 157
9. Save the project.10. In the Project Viewer pane, click Packages.11. Right-click the package name and select Publish Packages. Verifying and
publishing the TADDM Cognos model might take several minutes.
Configuring the data source in Tivoli Common ReportingYou can use Tivoli Common Reporting to configure the data source.
Before you begin
Ensure that one of the following situations is true:v The TADDM database is cataloged locally.v Tivoli Common Reporting is running on the server hosting the TADDM
database.
If you are using a DB2 database, check that the schema name matches the DB2instance name. The schema name specifies the DB2 database name used toauthorize access to the specified database. You specified the DB2 instance namewhen installing TADDM. The default instance name specified in the TADDMmodel.xml file is DB2INST1. If required, change the name of the schema.
If you are using an Oracle database, ensure that the schema name is blank.
Procedure
To configure the data source using Tivoli Common Reporting, complete thefollowing steps:1. Open Tivoli Common Reporting home page.2. Click Reporting > Common Reporting.3. From the Launch menu, depending on which version of Tivoli Common
Reporting you use, select one of the following menu items:v Version 2.1 - Administration.v Version 3.1 - IBM Cognos Administration.
The Administration pane is displayed.4. Click the Configuration tab.5. Click the New Data Source icon. The New Data Source wizard is displayed.6. In the Name field, type CMDBTCR. The name CMDBTCR is referenced in the data
model so you must give the new data source the same name.7. From the Type menu, select the type of database you are using.8. Complete one of the following steps:v If your database type is DB2, in the DB2 database name field, type the
TADDM database name or the alias of the cataloged TADDM database.v If your database type is Oracle, in the SQL*Net connect string field, type
the service name of the Oracle database, for example, ORCL. You specifiedthe Oracle database service name when configuring the Oracle DatabaseClient. You can check the Oracle database service name in the%TNS_ADMIN%/tnsnames.ora file. Search for the following string:SERVICE_NAME =
9. In the Signon section, specify the database user name and password.10. To test the database connection, click Test. In the View the Results page of the
New Data Source wizard, the status of the test is displayed.
158 Application Dependency Discovery Manager: Administering
Importing the TADDM report package to Tivoli CommonReportingTo import the predefined TADDM reports into Tivoli Common Reporting, you canimport the TADDM report package.
Before you begin
You must first have the Tivoli Common Reporting feature installed on yoursystem. Tivoli Common Reporting is provided with some Tivoli products but is notcurrently included with TADDM.
About this task
A Tivoli Common Reporting report package is a .zip file containing one or morereports or report designs along with their required resources, in a format that canbe used by Tivoli Common Reporting. The predefined BIRT reports for TADDMare provided in a report package that you can import to Tivoli Common Reporting.
For some BIRT reports, there are different versions of the same report availabledepending on which server the report is being run, for example, theTADDM_SNAPSHOT_CHANGE report on the domain server or storage server,and the TADDM_SNAPSHOT_SYNC_CHANGE report on the synchronizationserver. Generally, only the appropriate version of a report is available, but afterimporting BIRT reports into Tivoli Common Reporting, both versions of a reportmight be available. Ensure that you use only the version of the report that isappropriate to the server on which you want to run the report.
After importing BIRT reports into Tivoli Common Reporting, some reports withthe text “Drill-through only” in the report name might be available. These reportsare intended to be run by drilling down through selected data in another reportand you must not run them separately.
The Server Affinity by Scope report cannot be imported into Tivoli CommonReporting.
For more information about importing report packages, refer to the Tivoli CommonReporting documentation.
Procedure
To import TADDM reports, complete the following steps:1. If you are using Tivoli Common Reporting 1.3, complete the following steps:
a. In the Tivoli Common Reporting report navigation window, go to theNavigation tab.
b. Right-click the root node of the navigation tree (Report Sets).c. Click Import Report Package.d. In the Import Report Package window, specify the location of the
TADDMReports.zip report package file. This file is located in the$COLLATION_HOME/etc/reporting directory.
e. Expand Advanced Options and do the following:1) Select the Overwrite check box. This ensures that any previously
installed copies of the reports are overwritten.2) In the Security Set field, type the name of the security set into which
you want to import the contents of the report package.
Administering 159
f. Click Import. The TADDM report package is imported into the TivoliCommon Reporting data store.
2. If you are using Tivoli Common Reporting 2.1, complete the following steps:a. Open a command line and navigate to TIP_install_dir/tipv2Components/
TCRComponent/bin.b. Run the import command:
trcmd -user userID -password password -import -bulk pkgFile
where pkgFile is the path to the TADDMReports.zip report package file copiedto the Tivoli Common Reporting server from $COLLATION_HOME/etc/reporting on the TADDM server.
c. TADDM report package is imported into the Tivoli Common Reporting datastore.
3. If you are using Tivoli Common Reporting 3.1, complete the following steps:a. Open a command line and navigate to JazzSM_install_dir/reporting/bin.b. Run the import command:
trcmd -user userID -password password -import -bulk pkgFile
where pkgFile is the path to the TADDMReports.zip report package file copiedto the Tivoli Common Reporting server from $COLLATION_HOME/etc/reporting on the TADDM server.
c. TADDM report package is imported into the Tivoli Common Reporting datastore.
What to do next
After you import the TADDM reports, you must reconfigure the JDBC data sourcefor each report.
Configuring TADDM BIRT reports in Tivoli Common ReportingAfter importing the TADDM reports to Tivoli Common Reporting, you mustconfigure the JDBC data source used by each report.
Before you begin
Before you configure JDBC access, make sure the appropriate JDBC driver files areinstalled in the Tivoli Common Reporting drivers directory. For Tivoli CommonReporting 1.3 they are in the following directory:tcr_install_dir/products/tcr/lib/birt-runtime-2_2_1/ReportEngine/plugins/org.eclipse.birt.report.data.oda.jdbc_2.2.1.r22x_v20070919/drivers
For Tivoli Common Reporting 2.1 they are in the following directory:tip_install_dir/tip21Components/TCRComponent/lib/birt-runtime-2_2_2/ReportEngine/plugins/org.eclipse.birt.report.data.oda.jdbc_2.2.2.r22x_v20071206/drivers
For Tivoli Common Reporting 3.1 they are in the following directory:JazzSM_install_dir/reporting/lib/birt-runtime-2_2_2/ReportEngine/plugins/org.eclipse.birt.report.data.oda.jdbc_2.2.2.r22x_v20071206/drivers
If you are using an Oracle database, ensure that either ojdbc14.jar or ojdbc5.jaris included in the directory.
160 Application Dependency Discovery Manager: Administering
About this task
Imported reports are initially configured to use a default data source. You mustmodify the data source properties of each TADDM report to use the databasewhere discovery data is stored. The TADDM reports do not use a shared datasource. Therefore, complete the following steps to configure data source propertiesof all the TADDM reports.
Procedure
To configure JDBC data sources for Tivoli Common Reporting, complete thefollowing steps:1. If you are using Tivoli Common Reporting 1.3, complete the following steps:
a. In the Tivoli Common Reporting Reports table, right-click the TADDMreport that you want to configure.
b. Click Data Sources from the pop-up menu.c. In the Report Data Sources window, type the JDBC driver, URL, user ID
and password information. You can find the correct values for these settingsin the collation.properties file in the $COLLATION_HOME/etc directory.
d. Repeat the previous steps for each of the TADDM reports you want toconfigure.
2. If you are using Tivoli Common Reporting 2.1, or 3.1 complete the followingsteps:a. Open a command line and navigate to tip_install_dir/tip21Components/
TCRComponent/bin for Tivoli Common Reporting 2.1, or toJazzSM_install_dir/reporting/bin for Tivoli Common Reporting 3.1.
b. To configure all JDBC sources for all reports, run the modify command onone line:
Important: The following commands include the name of the directory thatcontains BIRT reports, ’IBM Tivoli Products’. This name applies toTADDM 7.3.0.1, and later. If you use TADDM 7.3.0, replace this name with’Tivoli Products’.trcmd -user userID -password password -modify-datasources -reports -reportname "/content/package[@name=’IBM TivoliProducts’]/folder[@name=’TADDM Reports’]//report" -setdatasourceodaDriverClass=driverClass odaURL=jdbcUrlodaUser=dbUser odaPassword=dbPassword
For example, if you use a DB2 database, enter the following command onone line:trcmd -user tipadmin -password tipadmin -modify -datasources -reports-reportname "/content/package[@name=’IBM Tivoli Products’]/folder[@name=’TADDM Reports’]//report" -setdatasourceodaDriverClass=com.ibm.db2.jcc.DB2DriverodaURL=jdbc:db2://100.101.102.103:50000/SAMPLEDBodaUser=db2inst1 odaPassword=db2inst1
For example, if you use an Oracle database, enter the following commandon one line:trcmd -user tipadmin -password tipadmin -modify -datasources -reports-reportname "/content/package[@name=’IBM Tivoli Products’]/folder[@name=’TADDM Reports’]//report" -setdatasourceodaDriverClass=oracle.jdbc.driver.OracleDriverodaURL=jdbc:oracle:thin:@192.168.0.1:1521:orclodaUser=taddm_dev odaPassword=taddm_dev
Administering 161
Verifying TADDM reportsYou can check to ensure that TADDM reports are being displayed correctly inTivoli Common Reporting.
Procedure
To verify that TADDM reports are being displayed correctly in Tivoli CommonReporting, complete the following steps:1. Open Tivoli Common Reporting home page.2. Click Reporting > Common Reporting.3. Ensure that the TADDM and Tivoli Products folders are displayed.4. Click TADDM.5. Click the Run icon to run one of the reports. The report is displayed.6. Ensure that the report is displayed correctly and in full.7. Using the breadcrumb trail, return to Public Folders.8. Click Tivoli Products > TADDM Reports. Click the Run icon to run one of the
reports. The report is displayed.9. Ensure that the report is displayed correctly and in full.
Reporting with BIRTYou can use the Business Intelligence and Reporting Tools (BIRT) reporting featureto run predefined and custom reports based on data from the TADDM database.
Overview of BIRT reportingIn addition to the built-in reports available from the Data Management Portal, youcan also design, develop, and install reports based on the open source BusinessIntelligence and Reporting Tools (BIRT) system.
Important: Viewing the BIRT reports in Data Managemenet Portal in BIRT ReportViewer (BIRT runtime engine) is not safe, therefore it is disabled. It is preferred toview the BIRT reports by using the Tivoli Common Reporting (TCR) after youimport the TADDM reports to TCR.
If you are aware of the risks, you can restore BIRT Report Viewer and use it asspecified in the following paragraphs.
TADDM includes the open source BIRT runtime engine as an integratedcomponent. In addition, TADDM also includes hundreds of predefined databaseviews and predefined reports. In addition to the predefined reports, you can alsouse the BIRT designer tool to create new reports to use with the TADDM BIRTruntime engine. These reports can use JDBC data sources that extract data by usingpredefined database views.
The Data Management Portal interface provides ways to manage these BIRTreports. You can add new reports, download selected reports, delete reports youhave uploaded, or run reports. The predefined reports are also packaged so theycan be used with the Tivoli Common Reporting tool.
162 Application Dependency Discovery Manager: Administering
Business Intelligence and Reporting Tools
Business Intelligence and Reporting Tools (BIRT) is an open source, based onEclipse system for designing, developing, and running reports. You can developBIRT reports for TADDM, designing them to use JDBC data sources and SQLqueries of predefined database views.
Important: BIRT reports must not use data taken directly from the TADDMdatabase tables. Instead, always design your reports to use a JDBC data source andthe TADDM database views that are documented in TADDM SDK Developer'sGuide.
The BIRT system includes two major components:v The BIRT designer, a graphical tool for designing and developing new reportsv The BIRT runtime engine, which provides support for running reports and
rendering published report output
TADDM includes the BIRT runtime engine, which you can use to run thepredefined reports. If you want to create your own BIRT reports, you mustdownload the BIRT designer tool that matches the version of the BIRT runtimeengine included with TADDM (currently version 2.2.1).
For more information about the BIRT project, including how to download the BIRTdesigner tool, see http://www.eclipse.org/birt.Related tasks:“Restoring BIRT Report Viewer” on page 178If you aware of the risks related to security and still want to use BIRT ReportViewer, you can restore it.
Predefined BIRT reportsThe predefined BIRT reports included with TADDM provide information aboutdiscovered systems, operating systems, and server processes.
AppServer Inventory Report:
The AppServer Inventory Report includes all of the application servers discoveredby TADDM. When you run the report, you can specify a parameter value limitingthe report to application servers of a specific type. The report groups thediscovered application servers by system, listed by fully qualified host name.
The data for this report is taken from the CM_APP_SERVERS_PER_HOST_Vdatabase view.
Computer System Inventory Report:
The Computer System Inventory Report includes all computer systems in theTADDM database that have been assigned IP addresses, listed by fully qualifiedhost name. This report has no parameters.
This report is designed to be exported to a comma-separated file that can beimported into a spreadsheet application. If a system does not have an IP address, itis not included in the report. The same computer system name might be listedmultiple times in the report, once for each unique IP address (including the127.0.0.1 loopback address).
Administering 163
The data for this report is taken from the CM_COMPUTER_SYSTEMS_V databaseview.
Computer System Inventory Report by operating system type:
The Computer System Inventory Report by operating system type includes alldiscovered computer systems whose operating systems were also discovered. Thisreport has no parameters.
This report is designed to be exported to a comma-separated file that can beimported into a spreadsheet application. The same computer system name mightbe listed multiple times in the report, once for each unique IP address (includingthe 127.0.0.1 loopback address). To be included in this report, an operating systemmust be associated with a system in the TADDM database. Similarly, any systemthat does not have an operating system defined in the TADDM database is notincluded.
Click the name of a system in the report to open a drill-through Inventory DetailsReport for that system.
The data for this report is taken from the following database views:v DP_UNITARY_COMP_GENERAL_Vv DP_UNITARY_COMP_OS_Vv DP_UNITARY_COMP_IP_INTERFACE_Vv BB_OPERATINGSYSTEM62_V
ITNM IP Report:
Provides information about the installed instances of the Network Managerproduct and lists all Network Manager resources that have a relationship to acomputer system.
The Network Manager Inventory Report is available in the TADDM DomainManager console. The report has the following sections:
Server SummaryProvides information about the installed instances of the Network Managerproduct, including the Network Manager versions installed, the hostaddresses of the servers where Network Manager is installed, and theURLs to access the Network Manager GUI.
Resource SummaryLists all Network Manager resources that have a relationship to a computersystem, including information on their IP address, manufacturer, type ofresource (for example, router), and unique identifier in the NetworkManager database.
Concise Computer System Inventory Report:
The Concise Computer System Inventory Report allows you to view the IPaddresses discovered using a Level 1 discovery profile. For each IP address, thereport also shows the associated computer system name, as well as the operatingsystem or control software name (if this information has been discovered).
Although the Concise Computer System Inventory Report is intended for use aftera Level 1 discovery, you can also use it after a Level 3 discovery. However, other
164 Application Dependency Discovery Manager: Administering

reports such as the Computer System Inventory Report provide more detailedinformation after a discovery with credentials.
Fibre Channel Network Report:
The Fibre Channel Network Report displays fibre channel connections between aselected Fibre Channel switch and other computer systems.
To run the report, you specify the worldwide name (WWN) of the Fibre Channelswitch to view the fibre channel connections between this switch and othercomputer systems. In the Parameter window, type the name (WWN) or select itfrom the drop-down list of discovered Fibre Channel switches.
The following information is displayed in the report for each connected computersystem:v Computer System (display name; WWN in the case of Fibre Channel switches)v Manufacturerv Modelv Serial Number
You can click a computer system display name in the report to open another FibreChannel Network Report. This report shows the fibre channel connections betweenthe selected computer system and other computer systems.
Host Bus Adaptor Inventory Report:
The Host Bus Adaptor Inventory Report displays a list of all discovered host busadapters and the computer systems on which they are installed.
For each host bus adapter discovered, the following information is displayed in thereport:
Host Bus Adaptor NameThe name of the host bus adapter.
Fully Qualified Domain NameThe fully-qualified domain name of the computer systems on which thehost bus adapter is installed.
Host uses storage arraysA Boolean value indicating whether the hosting computer system uses anystorage volumes located in a storage array.
Inventory Summary:
The Inventory Summary includes a pie chart of the operating systems installed ondiscovered computer systems, based on the scopes discovered by TADDM. Eachsegment of the chart represents an operating system type and indicates the overallcount of discovered servers running that operating system. This report has noparameters.
Click any segment of the chart to open a drill-through Computer System InventoryReport for the selected operating system type.
The data for this report is taken from the BB_OPERATINGSYSTEM62_V databaseview.
Administering 165
Monitoring Coverage reports:
The Monitoring Coverage reports show details about various components in yourenvironment. You can generate a report for operating systems, databases, Microsoftapplications, VMware servers, and System p components in your environment.These components are monitored by IBM Tivoli Monitoring 6.1, or later agents.You can run this report from the BIRT Reports pane of the Data ManagementPortal.
Table 37 lists the coverage reports available. The report monitoring coverage foroperating systems can be populated by the IBM® Tivoli® Monitoring Scope sensor.However, the remaining reports require the IBM® Tivoli® Monitoring discoverylibrary adapter (DLA) to populate the reports.
The reports contain three sections:
Coverage by type
This section displays the number of monitored, unmonitored, and totalinstances grouped by report type. The Coverage Details window shows agraphical representation of the following statistics:v Overall Coveragev Coverage by platform
Coverage details
This section displays the fully qualified domain name, managed systemname, and monitoring status grouped by report type. The monitoringstatus is listed, along with agent version information, if monitored.Clicking the MSN of a monitored system opens the Agent Details window.
Agent details
This section displays detailed information about the agent and theoperating system running on it. The information displayed depends onwhether the agent is monitored or unmonitored. Affinity and source tokeninformation is included along with a launch in context link to the TivoliEnterprise Portal view of IBM Tivoli Monitoring.
The Management Software System section provides an inventory of the installedIBM Tivoli Monitoring agents and a launch in context link to workspaces in IBMTivoli Monitoring. The Monitoring Coverage Summary provides a list of monitoredand unmonitored systems, which you can use to monitor and maintain monitoringagents.
A level 1 discovery can use the IBM Tivoli Monitoring Scope sensor to populatethe monitoring coverage for operating systems report. The other reports must bepopulated by the IBM Tivoli Monitoring discovery library adapter (DLA). See theTADDM Administrator's Guide for information about IBM Tivoli Monitoring DLA.
Table 37 lists the coverage reports available.
Table 37. Monitoring Coverage reports
Report name Description
Monitoring coverage foroperating systems
This report shows the details for the operating system inyour environment.
Monitoring coverage fordatabases
This report shows the details for the DB2 instance and SQLsever in your environment.
166 Application Dependency Discovery Manager: Administering
Table 37. Monitoring Coverage reports (continued)
Report name Description
Monitoring coverage forMicrosoft applications
This report shows the details for the Active Directory,Cluster Server, Exchange Server, Host Integration Server,Hyper-V server role enabled, and Internet InformationServices server.
Monitoring coverage forVMware
This report shows the details for the VMware ESX serversand VMware Virtual Center servers.
Monitoring coverage forSystem p
This report shows the details for the System p, HardwareManagement Console, Virtual I/O Server, and AIX logicalpartitions.
Sensor reports:
The predefined sensor reports collate the information gathered on sensor metrics.
Table 38 lists the predefined sensor reports available.
Table 38. Predefined sensor reports
Report name Description
TADDM_SENSORS_WEEKLY_METRICS_ALL
TADDM_SENSORS_WEEKLY_METRICS
This report shows the weekly percentage success rate for sensorsthat are enabled in a Level 1 discovery profile, Level 2 discoveryprofile, or a Level 3 discovery profile. The following information isdisplayed:
v Date
v Level 1 (L1) % Success
v Level 2 (L2) % Success
v Level 3 (L3) % Success
v L1, L2 % Success
v All % Success
The second “TADDM_SENSORS_WEEKLY_METRICS” reportcontains the same information but presents the information byusing a bar chart.
Administering 167
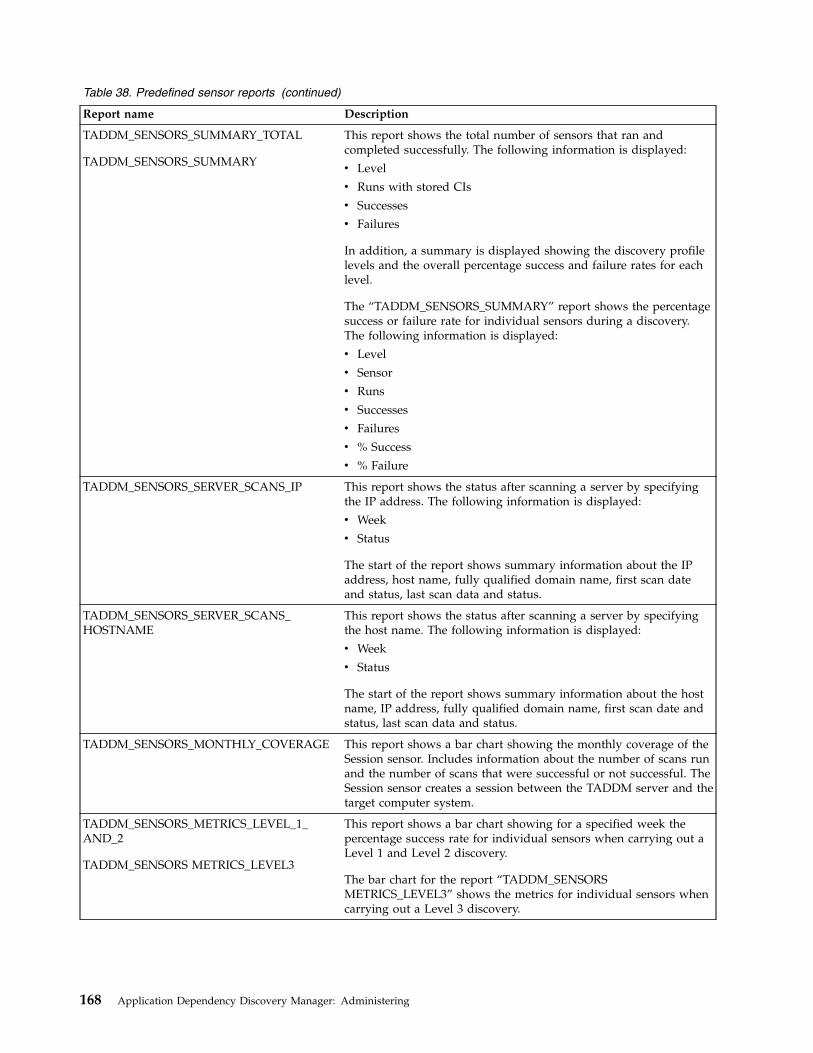
Table 38. Predefined sensor reports (continued)
Report name Description
TADDM_SENSORS_SUMMARY_TOTAL
TADDM_SENSORS_SUMMARY
This report shows the total number of sensors that ran andcompleted successfully. The following information is displayed:
v Level
v Runs with stored CIs
v Successes
v Failures
In addition, a summary is displayed showing the discovery profilelevels and the overall percentage success and failure rates for eachlevel.
The “TADDM_SENSORS_SUMMARY” report shows the percentagesuccess or failure rate for individual sensors during a discovery.The following information is displayed:
v Level
v Sensor
v Runs
v Successes
v Failures
v % Success
v % Failure
TADDM_SENSORS_SERVER_SCANS_IP This report shows the status after scanning a server by specifyingthe IP address. The following information is displayed:
v Week
v Status
The start of the report shows summary information about the IPaddress, host name, fully qualified domain name, first scan dateand status, last scan data and status.
TADDM_SENSORS_SERVER_SCANS_HOSTNAME
This report shows the status after scanning a server by specifyingthe host name. The following information is displayed:
v Week
v Status
The start of the report shows summary information about the hostname, IP address, fully qualified domain name, first scan date andstatus, last scan data and status.
TADDM_SENSORS_MONTHLY_COVERAGE This report shows a bar chart showing the monthly coverage of theSession sensor. Includes information about the number of scans runand the number of scans that were successful or not successful. TheSession sensor creates a session between the TADDM server and thetarget computer system.
TADDM_SENSORS_METRICS_LEVEL_1_AND_2
TADDM_SENSORS METRICS_LEVEL3
This report shows a bar chart showing for a specified week thepercentage success rate for individual sensors when carrying out aLevel 1 and Level 2 discovery.
The bar chart for the report “TADDM_SENSORSMETRICS_LEVEL3” shows the metrics for individual sensors whencarrying out a Level 3 discovery.
168 Application Dependency Discovery Manager: Administering

Table 38. Predefined sensor reports (continued)
Report name Description
TADDM_SENSORS_FAILED_LEVELS_1_2_3
TADDM_SENSORS_FAILED_LEVEL
This report shows a pie chart for a given week based on failureswhen carrying out a Level 1, Level 2, or Level 3 discovery. Eachsegment of the chart represents session issues, sensor issues,connect issues, and other issues.
The pie chart for the report “TADDM_SENSORS_FAILED_LEVEL”report shows the metrics for a specified discovery level.
TADDM_SENSORS_EVENTS_SENSOR_IP
TADDM_SENSORS_EVENTS_SENSOR
TADDM_SENSORS_EVENTS_IP
TADDM_SENSORS_DONE_EVENTS_RUN
This report shows the event data for a specified sensor and IPaddress. The following information is displayed:
v Date
v Sensor Details
v Severity
v Description
The “TADDM_SENSORS_EVENTS_SENSOR” report contains thesame information but shows the event data for a specified sensor.
The “TADDM_SENSORS_EVENTS_IP” report contains the sameinformation but shows the event data for a specified IP address.
The “TADDM_SENSORS_DONE_EVENTS_RUN” report containsthe same information but shows the event data for a specifieddiscovery run.
Server Affinity by Scope:
The Server Affinity by Scope report displays relationships between servers,arranged according to the source and target of each relationship. The first tabledisplays all servers within the specified scope that are sources of relationships, andthe connections from those servers to other servers. The second table displays allservers within the specified scope that are targets of relationships, and theconnections to those servers from other servers.
The Server Affinity by Scope report is available only in domain serverdeployments.
To view a graph that visualizes the server-to-server communications, click Launchthe Affinity Graph. The graph shows transactional and service dependenciesbetween computer systems, with dependencies indicated by links drawn betweensystems. The graph includes all dependency links that include at least one systemwithin the discovery scope, with systems that are members of the scopehighlighted in yellow.
The links that are shown in the affinity graph can represent either transactional orservice relationships. The direction of a link indicates which system is the sourceand which is the target of the dependency relationship. The source and targetobjects can be of several types, depending on the relationship:v Computer systemv Application serverv Service
Links on the graph are always drawn between computer systems. For arelationship involving an application server or service, the link connects to the host
Administering 169
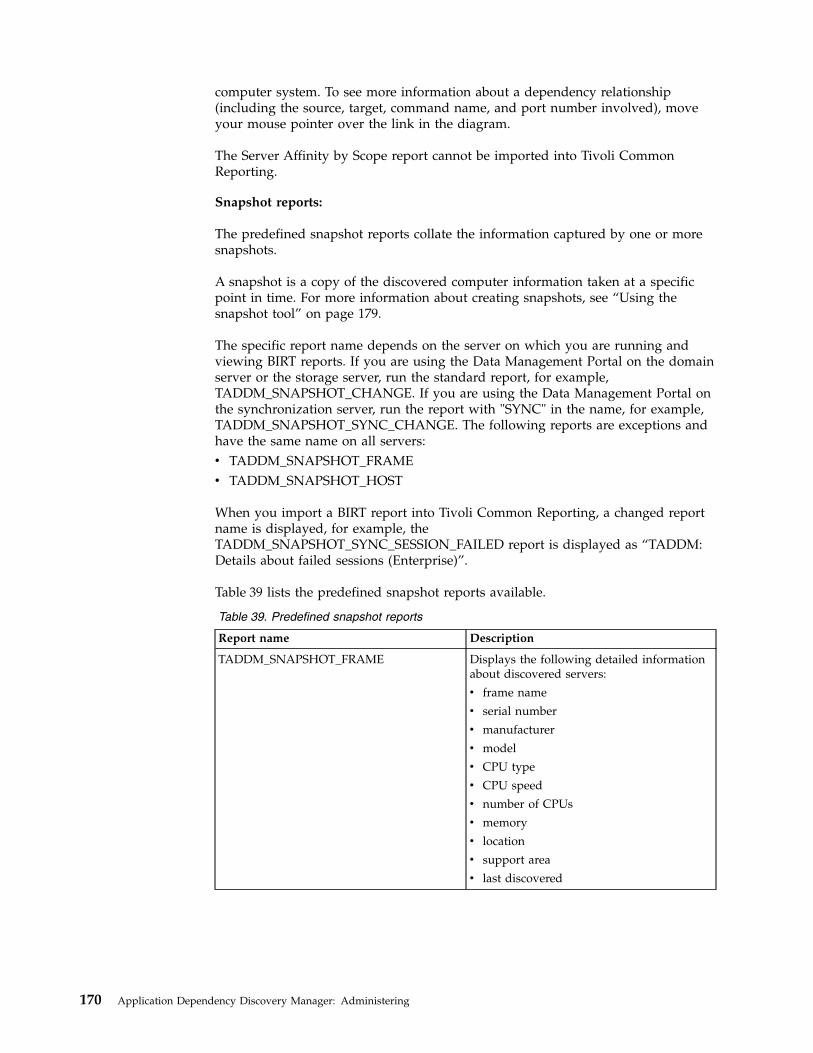
computer system. To see more information about a dependency relationship(including the source, target, command name, and port number involved), moveyour mouse pointer over the link in the diagram.
The Server Affinity by Scope report cannot be imported into Tivoli CommonReporting.
Snapshot reports:
The predefined snapshot reports collate the information captured by one or moresnapshots.
A snapshot is a copy of the discovered computer information taken at a specificpoint in time. For more information about creating snapshots, see “Using thesnapshot tool” on page 179.
The specific report name depends on the server on which you are running andviewing BIRT reports. If you are using the Data Management Portal on the domainserver or the storage server, run the standard report, for example,TADDM_SNAPSHOT_CHANGE. If you are using the Data Management Portal onthe synchronization server, run the report with "SYNC" in the name, for example,TADDM_SNAPSHOT_SYNC_CHANGE. The following reports are exceptions andhave the same name on all servers:v TADDM_SNAPSHOT_FRAMEv TADDM_SNAPSHOT_HOST
When you import a BIRT report into Tivoli Common Reporting, a changed reportname is displayed, for example, theTADDM_SNAPSHOT_SYNC_SESSION_FAILED report is displayed as “TADDM:Details about failed sessions (Enterprise)”.
Table 39 lists the predefined snapshot reports available.
Table 39. Predefined snapshot reports
Report name Description
TADDM_SNAPSHOT_FRAME Displays the following detailed informationabout discovered servers:
v frame name
v serial number
v manufacturer
v model
v CPU type
v CPU speed
v number of CPUs
v memory
v location
v support area
v last discovered
170 Application Dependency Discovery Manager: Administering
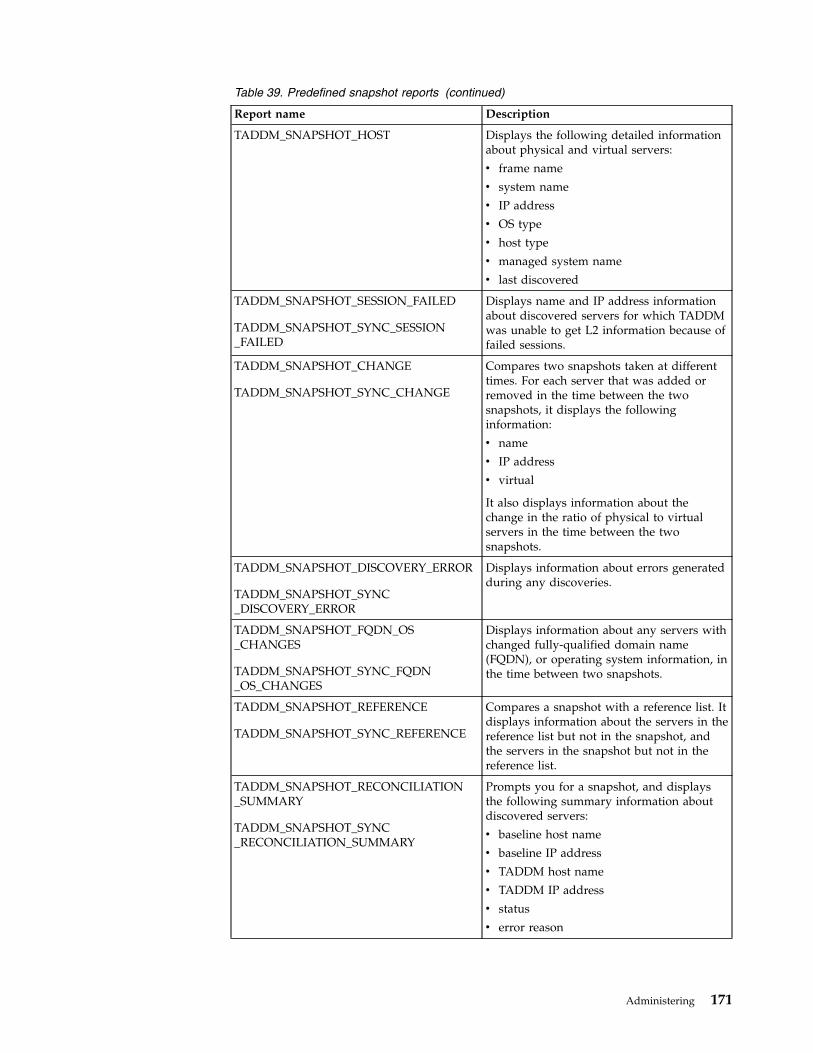
Table 39. Predefined snapshot reports (continued)
Report name Description
TADDM_SNAPSHOT_HOST Displays the following detailed informationabout physical and virtual servers:
v frame name
v system name
v IP address
v OS type
v host type
v managed system name
v last discovered
TADDM_SNAPSHOT_SESSION_FAILED
TADDM_SNAPSHOT_SYNC_SESSION_FAILED
Displays name and IP address informationabout discovered servers for which TADDMwas unable to get L2 information because offailed sessions.
TADDM_SNAPSHOT_CHANGE
TADDM_SNAPSHOT_SYNC_CHANGE
Compares two snapshots taken at differenttimes. For each server that was added orremoved in the time between the twosnapshots, it displays the followinginformation:
v name
v IP address
v virtual
It also displays information about thechange in the ratio of physical to virtualservers in the time between the twosnapshots.
TADDM_SNAPSHOT_DISCOVERY_ERROR
TADDM_SNAPSHOT_SYNC_DISCOVERY_ERROR
Displays information about errors generatedduring any discoveries.
TADDM_SNAPSHOT_FQDN_OS_CHANGES
TADDM_SNAPSHOT_SYNC_FQDN_OS_CHANGES
Displays information about any servers withchanged fully-qualified domain name(FQDN), or operating system information, inthe time between two snapshots.
TADDM_SNAPSHOT_REFERENCE
TADDM_SNAPSHOT_SYNC_REFERENCE
Compares a snapshot with a reference list. Itdisplays information about the servers in thereference list but not in the snapshot, andthe servers in the snapshot but not in thereference list.
TADDM_SNAPSHOT_RECONCILIATION_SUMMARY
TADDM_SNAPSHOT_SYNC_RECONCILIATION_SUMMARY
Prompts you for a snapshot, and displaysthe following summary information aboutdiscovered servers:
v baseline host name
v baseline IP address
v TADDM host name
v TADDM IP address
v status
v error reason
Administering 171
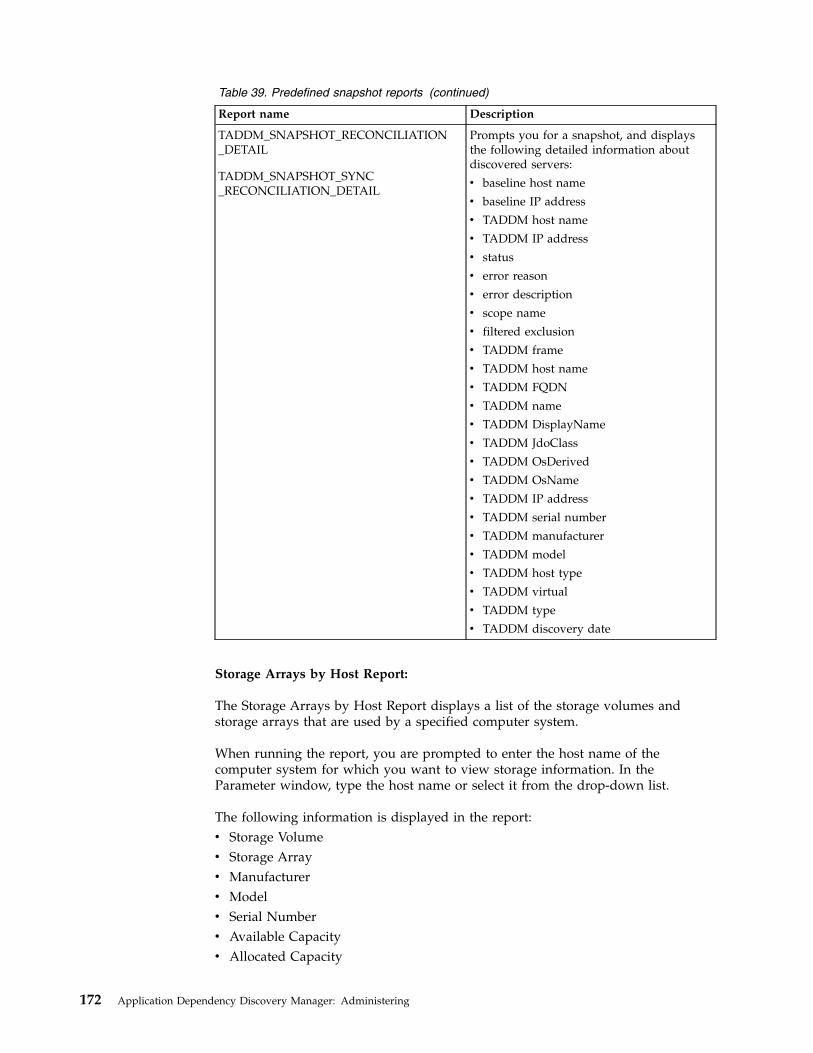
Table 39. Predefined snapshot reports (continued)
Report name Description
TADDM_SNAPSHOT_RECONCILIATION_DETAIL
TADDM_SNAPSHOT_SYNC_RECONCILIATION_DETAIL
Prompts you for a snapshot, and displaysthe following detailed information aboutdiscovered servers:
v baseline host name
v baseline IP address
v TADDM host name
v TADDM IP address
v status
v error reason
v error description
v scope name
v filtered exclusion
v TADDM frame
v TADDM host name
v TADDM FQDN
v TADDM name
v TADDM DisplayName
v TADDM JdoClass
v TADDM OsDerived
v TADDM OsName
v TADDM IP address
v TADDM serial number
v TADDM manufacturer
v TADDM model
v TADDM host type
v TADDM virtual
v TADDM type
v TADDM discovery date
Storage Arrays by Host Report:
The Storage Arrays by Host Report displays a list of the storage volumes andstorage arrays that are used by a specified computer system.
When running the report, you are prompted to enter the host name of thecomputer system for which you want to view storage information. In theParameter window, type the host name or select it from the drop-down list.
The following information is displayed in the report:v Storage Volumev Storage Arrayv Manufacturerv Modelv Serial Numberv Available Capacityv Allocated Capacity
172 Application Dependency Discovery Manager: Administering
Storage Array Consumers Report:
The Storage Array Consumers Report displays a list of the computer systems andapplication servers that use a specified storage array.
When running the report, you are prompted to enter the name of a storage array.In the Parameter window, type the name of the storage array or select it from thedrop-down list.
The report is displayed in the form of the following three tables:
Computer systems using the storage array storage_array_nameThis table lists all discovered computer systems that use the specifiedstorage array.
Application servers using the storage array storage_array_nameThis table lists all discovered application servers that use the specifiedstorage array.
Business applications using the storage array storage_array_nameThis table lists all discovered business applications that use the specifiedstorage array.
System Connection Topology Report:
The System Connection Topology Report displays a textual report of computersystems with network connections to or from other computer systems. When yourun the report, you must enter the configuration item for which you want to runthe report, and you must specify whether it is a computer system or businessapplication.
If the report is run for a computer system, all computer systems with networkconnections to or from the selected computer system are displayed in a table, alongwith metrics for each network connection. If the report is run for a businessapplication, all computer systems with network connections to or from the selectedbusiness application are displayed in a table.
You can view the system connection topology for each computer system byclicking the name of the system in the report.
System Utilization Hourly Peak Report:
The System Utilization Hourly Peak Report displays system hourly utilization peakvalues for systems in the specified scope, on the specified date.
The utilization metrics include the following information:v hourly 95 percent CPU utilizationv hourly peak percent memory utilizationv hourly peak network bandwidth utilizationv hourly peak disk I/O utilization
System Utilization Report:
The System Utilization Report displays generic server operating systemconfiguration, and associated utilization information.
Server operating system configuration data includes the following information:
Administering 173
v CPUv memoryv file system
It is the latest server configuration information available to TADDM. Serverutilization data includes the following:v CPUv memoryv networkv disk
Unknown Servers Report:
The Unknown Servers Report includes all of the discovered server processes thatare not recognized by TADDM. The report groups the discovered server processesby system, listed by fully qualified host name. This report has no parameters.
Unknown servers are identified after a discovery by a topology build agent. Thetopology build agent runs in the background on a periodic basis, depending on thevalue of the configured frequency, so unknown servers might not be recognizedimmediately after a discovery completes. Every four hours is the default frequencyat which the topology build agent runs.
For this reason, if you run the Unknown Servers Report before the topology buildagent has completed, the report might not list all unknown servers.
The following information is displayed in the report:
Name The name of the computer on which the unknown server process isrunning.
Context IPThe IP address of the computer on which the unknown server process isrunning.
PID The process ID of the unknown server process.
PPID The process ID of the parent process of the unknown server process.
Command LineThe command being used to run the unknown server process.
The data for this report is taken from the BB_RUNTIMEPROCESS15_V databaseview.
Running a BIRT reportYou can use the Analytics section of the Data Management Portal to run a BIRTreport.
About this task
Important: Running a BIRT report in Data Management Portal is only possible ifyou have BIRT Report Viewer enabled. BIRT Report Viewer is disabled because ofsecurity issues. The alternative way to view the BIRT reports is by using the TivoliCommon Reporting (TCR) after you import the TADDM reports to TCR. If you areaware of the risks, you can restore BIRT Report Viewer.
174 Application Dependency Discovery Manager: Administering

Procedure
To run a BIRT report, complete the following steps:1. In the Functions pane, click Analytics.2. In the Analytics section, click BIRT Reports. The TADDM BIRT Reports list
opens, displaying all of the available BIRT reports.3. In the TADDM BIRT Reports list, click to highlight the report you want to run.4. Optional: Specify the location tag value. The
com.ibm.cdb.locationTaggingEnabled value in the COLLATION_HOME/etc/collation.propertes file must be set to true. Only the report data for thisspecific location tag is displayed.
Note: The BIRT reports included with TADDM do not currently supportlocation filtering without additional customization.
5. Click Run Report. If the report has any parameters, you are then prompted tospecify the parameter values. When you have finished specifying parametervalues, click OK.
Results
The formatted report is displayed in the BIRT Report Viewer window. Click theicons at the top of the report to page forward and backward in the report, print thereport, or export it to a file. To open a drill-through report showing additionaldetails about a subset of the report data, click a link in the report.
Note: Exported reports in .doc format are compatible with Microsoft Word 2003 orlater.
Running a BIRT report from the command line interfaceYou can run a BIRT report from the command line interface of the TADDM server.
Procedure
To run a BIRT report from the command line interface, complete the followingsteps:1. Open a command prompt and depending on the version of TADDM you use,
navigate to one of the following directories:v 7.3.0: $COLLATION_HOME/deploy-tomcat/birt-viewer/WEB-INF/resourcesv 7.3.0.1, and later: $COLLATION_HOME/apps/birt-viewer/WEB-INF/resources
2. Set the BIRT_HOME variable. Do one of the following:v On Linux, depending on the version of TADDM you use, run one of the
following commands:– 7.3.0:
export BIRT_HOME=$COLLATION_HOME/deploy-tomcat/birt-viewer
– 7.3.0.1, and later:export BIRT_HOME=$COLLATION_HOME/apps/birt-viewer
v On Windows, depending on the version of TADDM you use, run one of thefollowing commands:– 7.3.0:
set BIRT_HOME=%COLLATION_HOME%/deploy-tomcat/birt-viewer
– 7.3.0.1, and later:set BIRT_HOME=%COLLATION_HOME%/apps/birt-viewer
Administering 175
3. Run the BIRT report. Do one of the following:v On Linux, run the following command:
./genReport.sh -f format -o output -F parameters report
v On Windows, run the following command:genReport.bat -f format -o output -F parameters report
The following command-line options are used with the genReport program:
formatThe output format of the report file. Valid values are PDF and HTML.
outputThe path to the report file you want to produce. For example,/home/cognos/utilization.pdf on Linux, or C:\data\utilization.pdfon Windows.
parameters
(Optional) The path to a properties file, where each property representsa parameter required by the report. For example /home/cognos/utilization.properties on Linux, or C:\data\utilization.propertieson Windows.
The following text is an example of the contents of a properties file:scope=All Windows Machinesmetric=ALLoperator=N/Avalue1=N/Avalue2=N/Aappdeps=N/A
You must ensure that spaces in a parameter name are escaped with thebackslash character. For example, if the parameter name is Snapshot IDParameter, the entry in the properties file should beSnapshot\ ID\ Parameter=my_id
report The path of the report you want to run, with the string "compiled"appended to the name. For example:v On Linux and TADDM 7.3.0: $COLLATION_HOME/deploy-tomcat/birt-
viewer/WEB-INF/report/taddm_server_utilization.rptdesigncompiled.
v On Linux and TADDM 7.3.0.1, and later: $COLLATION_HOME/apps/birt-viewer/WEB-INF/report/taddm_server_utilization.rptdesigncompiled.
v On Windows and TADDM 7.3.0: %COLLATION_HOME%\deploy-tomcat\birt-viewer\WEB-INF\report\taddm_server_utilization.rptdesigncompiled.
v On Windows and TADDM 7.3.0.1, and later: %COLLATION_HOME%\apps\birt-viewer\WEB-INF\report\taddm_server_utilization.rptdesigncompiled
Results
Note: The genReport command does not generate drill-through reports. Therefore,links in the generated report do not function.
176 Application Dependency Discovery Manager: Administering
Importing a BIRT reportYou can use the Data Management Portal to add custom reports by importing BIRTreport designs.
Before you begin
To add a custom report, you must first design and develop the report using theBIRT designer tool. The report design must be saved to a .rptdesign file that youcan access from the client system.
Note: Fix Pack 3 In TADDM 7.3.0.3, and later, the columns in extended attributesdatabase views have specific data types, for example, VARCHAR. In the previousTADDM releases, the columns had only CLOB type. Therefore, after you upgradeto Fix Pack 3, the BIRT reports that use extended attributes might stop working.For example, if extended attributes columns are not cast to a specific data type, forexample, VARCHAR, errors might be generated.
Procedure
To import a BIRT report, complete the following steps:1. In the Functions pane of the Data Management Portal, click Analytics.2. In the Analytics section, click BIRT Reports. The TADDM BIRT Reports list
opens, displaying all of the available BIRT reports.3. Click New.4. When prompted, specify the details of the new report, including the name,
description, and the location of the report design file. The name and descriptionare used to identify the report in the TADDM BIRT Reports list.
5. Click OK.
Results
The report design is uploaded to the server, and the new report becomes availablefrom the Data Management Portal.
Note: If the report already exists on the server, the import fails. This can happeneven if the existing report is not visible in the Data Management Portal. (Forexample, the Server Affinity report is not supported on the synchronization server,and is therefore not shown in the Data Management Portal even if it exists on theserver.)
Deleting a BIRT reportYou can use the Data Management Portal to delete BIRT reports from the server.
Before you begin
Deleting a report from the server removes the .rptdesign file used by the reportfrom the report directory of the server. If you want to save the report design forfuture use, make sure you have a backup copy of the .rptdesign file before youdelete the report.
Procedure
To delete a BIRT report, complete the following steps:1. In the Functions pane, click Analytics.
Administering 177
2. In the Analytics section, click BIRT Reports. The TADDM BIRT Reports listopens, showing all of the available BIRT reports.
3. Select the report that you want to delete.4. Click Delete.5. To refresh the TADDM BIRT Reports list, click Refresh.
Results
The selected report is deleted from the server and is no longer displayed in theTADDM BIRT Reports list in the Data Management Portal. In addition, the.rptdesign file for the report is deleted from the report directory of the TADDMserver.
Exporting a BIRT report designYou can use the Data Management Portal to export a BIRT report design from theserver.
About this task
You might want to export a report design if you want to use an existing report asthe basis for a new custom report, or if you want to import the report design intoa different server.
Procedure
To export a BIRT report design, complete the following steps:1. In the Functions pane, click Analytics.2. In the Analytics section, click BIRT Reports. The TADDM BIRT Reports list
opens, showing all of the available BIRT reports.3. Select the report that you want to export.4. Click Download.5. When prompted by your browser, specify that you want to save the file, and
specify a location.
Results
The design used by the selected report is saved in the location you specified as a.rptdesign file. You can open and modify this file using the BIRT designer tool.
Restoring BIRT Report ViewerIf you aware of the risks related to security and still want to use BIRT ReportViewer, you can restore it.
Procedure1. In the collation.properties file, set the com.ibm.taddm.birtviewer.enabled
property to true:com.ibm.taddm.birtviewer.enabled=true
2. Restart the TADDM server.
Note: In case of the TADDM server upgrade, this flag is set to false bydefault.
178 Application Dependency Discovery Manager: Administering
Using the snapshot toolYou can use the snapshot tool to take a copy of the computer system information,discovery events, and the server applications running at the time of the snapshot.
You can also use the snapshot tool to load information used in reconciliationprocessing, for example:v load a list of expected servers, also known as a reference listv load a list of excluded servers
You can use reports to query the information captured by the snapshot tool, forexample:v which servers have been added or removedv the ratio of physical to virtual serversv which servers could not be fully discovered because an ssh session was not
successfully establishedv the delta between the list of discovered servers and the list of expected servers
Restriction: Take snapshots after the discovery and topology agents finished theirrun. If you take a snapshot before the topology agents finish processing thediscovered information, some snapshot reports, such as Snapshot Session FailedReport, might be incomplete.
The snapshot.sh command syntax:
You can use the snapshot.sh command to take a snapshot of the system, and theassociated events and servers. The snapshot.sh command is in the$COLLATION_HOME/bin directory.
You can run the snapshot.sh command on the TADDM server. In a streamingserver deployment, you must run the snapshot.sh command on the primarystorage server.
Command syntax
snapshot.sh action [action_parameter]
Parameters
addexclude filename [exclude_list]Adds the exclude list to the file, or replaces an existing instance of it in the file.
addref filename [reference_list]Adds the reference list to the file, or replaces an existing instance of it in thefile.
clearClears all snapshot data and drops tables.
compare [snapshot_A snapshot_B]Shows the delta between the last two snapshots, or snapshot_A andsnapshot_B, based on the host name.
compareref [snapshot_A reference_list]Shows the delta between the snapshot and the reference list.
Administering 179
comparesig [snapshot_A snapshot_B]Shows the delta between the last two snapshots, or snapshot_A andsnapshot_B, based on the signature for changes in the host name or operatingsystem.
compsysShows the computer systems.
detail [snapshot_A]Shows all details of the computer systems in the latest snapshot, orsnapshot_A.
detailos [snapshot_A]Shows operating system information of the computer systems in the latestsnapshot, or snapshot_A.
helpShows detailed help on the usage of the snapshot.api command.
list [snapshot_A]Shows the latest snapshot, or snapshot_A.
listall [default]Shows all snapshots.
listexclude [exclude_list]Shows the latest exclude list, or the one specified by name.
listref [reference_list]Shows the latest reference list, or the one specified by name.
listallexcludeShows all exclude lists.
listallrefShows all reference lists.
nosession [snapshot_A]Shows computer systems that failed to host a session in the latest snapshot, orsnapshot_A.
remove snapshot_A [type]Removes snapshot A, or remove all snapshots of the specified type.
removeexclude exclude_listRemoves the exclude list specified by name.
removeref reference_listRemoves the reference list specified by name.
session [snapshot_A]Shows the computer systems that hosted a session in the latest snapshot orsnapshot_A.
sensorerror [snapshot_A]Shows all sensor errors from the latest snapshot or snapshot_A.
take [type] [desciption]Takes a snapshot, including type and description information, if specified.
Using the snapshot tool to help reduce the number of physical servers:
You can use the snapshot tool when replacing many physical servers with fewerphysical servers, running virtual servers.
180 Application Dependency Discovery Manager: Administering

Procedure
To get information that is useful when attempting to reduce the number ofphysical servers used, complete the following steps:1. Perform a discovery of all known systems.2. Using the snapshot tool, take a snapshot:
snapshot.sh take
Optionally, you can add type and description information to the snapshot:snapshot.sh take type description
3. In the Data Management Portal, run the TADDM_SNAPSHOT_SESSION_FAILEDreport. The report returns information about which systems were notdiscovered because an ssh session could not be established.
4. Ensure that ssh sessions can be established with all systems. It might benecessary to update the authentication details in TADDM.
5. Perform a discovery of only the systems that were not accessed as part of thefirst discovery to ensure that all connection problems have been resolved.
6. After an appropriate length of time, for example, one month, perform adiscovery of all known systems.
7. In the Data Management Portal, run the TADDM_SNAPSHOT_CHANGE report. Thereport returns information about the new systems visible since the snapshotwas taken, the systems no longer present, and the physical to virtual ratio aspercentages.
Using the snapshot tool to reconcile expected and actual system lists:
You can use the snapshot tool and the predefined reports to verify that the list ofservers available on the network matches the list of expected servers.
Procedure
To reconcile the expected and actual systems, complete the following steps:1. Prepare a reference list containing the list of expected servers. The reference list
is a text file in comma-separated values (CSV) format, with the following fields:v host namev IP addressv framev operating systemv host typev commentsv support areav location
For more information about the syntax of the reference file, run thesnapshot.sh command with the help parameter:snapshot.sh help
2. If required, prepare an exclusion list containing the list of servers to be ignoredin the reconciliation process. The exclusion list is a text file in CSV format, withthe following fields:v host namev exclude type
Administering 181
For more information about the syntax of the exclusion file, run thesnapshot.sh command with the help parameter:snapshot.sh help
3. Using the snapshot tool, take a snapshot:snapshot.sh take
Optionally, you can add type and description information to the snapshot:snapshot take type description
4. In the Data Management Portal, run one of the following BIRT reports:v TADDM_SNAPSHOT_RECONCILIATION_SUMMARY
v TADDM_SNAPSHOT_RECONCILIATION_DETAIL
Using snapshot reports in a synchronization server deployment:
You can gather information in a synchronization server deployment by running theenterprise version of the predefined snapshot reports.
Procedure
To run predefined snapshot reports in a synchronization server deployment,complete the following steps:1. If it has not already been created, set up the snapshot table. To do this,
complete the following steps:a. On each TADDM server, run the snapshot.sh command with no
parameters.b. Restart TADDM at each domain and synchronization server.
This procedure creates the snapshot tables if they do not exist already. Thesnapshot tables need to be set up only once per TADDM environment.
2. Run a discovery at each TADDM domain, taking snapshot at each domain,when required.
3. Perform a sync at the synchronization server. Ensure that you include alldomains.
4. Create an enterprise snapshot. At the synchronization server, run the followingcommand:snapshot.sh take
5. Run the reports at each domain. Use the regular version of each snapshotreport, for example TADDM_SNAPSHOT_CHANGE.
6. Run the reports at the synchronization server. Use the enterprise version ofeach snapshot report, for example TADDM_SNAPSHOT_SYNC_CHANGE.
Integrating TADDM with other Tivoli productsFor extended capabilities in managing your IT environment, you can integrate IBMTivoli Application Dependency Discovery Manager (TADDM) with other Tivoliproducts, including IBM Tivoli Business Service Manager, IBM Tivoli Monitoring,and event management systems such as IBM Tivoli Netcool/OMNIbus.
Supported versionsYou can use the following table to see which versions of the products that TADDMcan be integrated with are supported.
182 Application Dependency Discovery Manager: Administering
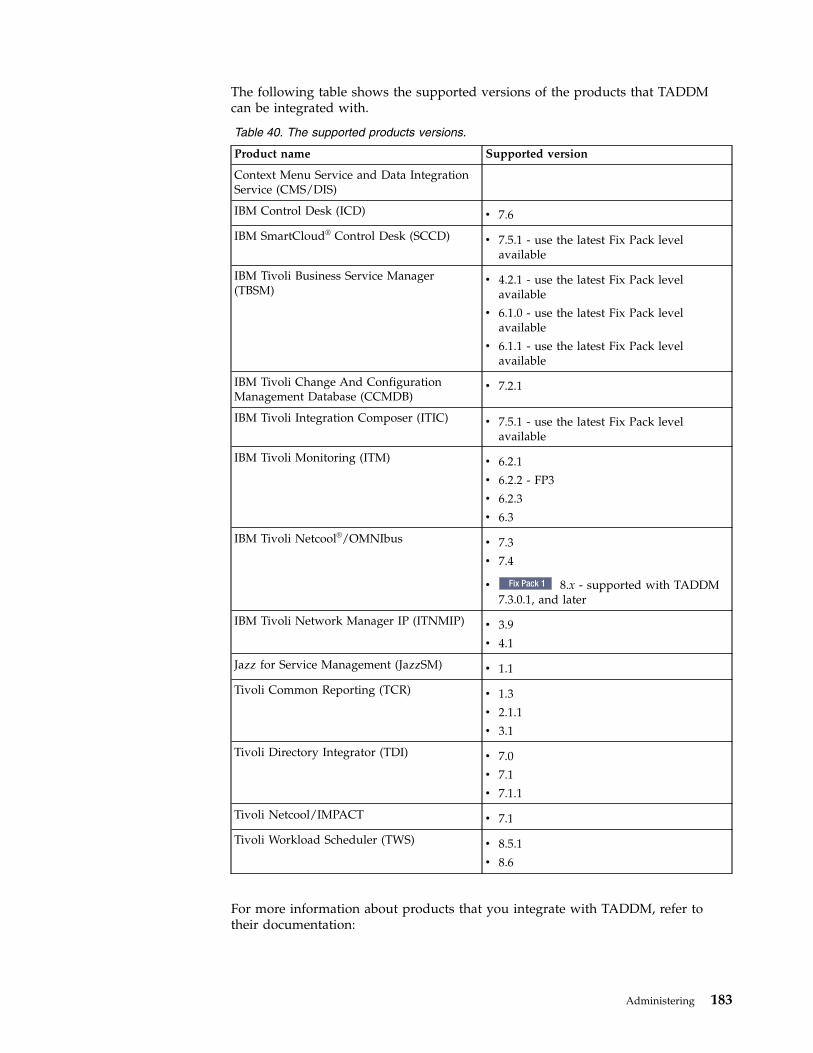
The following table shows the supported versions of the products that TADDMcan be integrated with.
Table 40. The supported products versions.
Product name Supported version
Context Menu Service and Data IntegrationService (CMS/DIS)
IBM Control Desk (ICD) v 7.6
IBM SmartCloud® Control Desk (SCCD) v 7.5.1 - use the latest Fix Pack levelavailable
IBM Tivoli Business Service Manager(TBSM)
v 4.2.1 - use the latest Fix Pack levelavailable
v 6.1.0 - use the latest Fix Pack levelavailable
v 6.1.1 - use the latest Fix Pack levelavailable
IBM Tivoli Change And ConfigurationManagement Database (CCMDB)
v 7.2.1
IBM Tivoli Integration Composer (ITIC) v 7.5.1 - use the latest Fix Pack levelavailable
IBM Tivoli Monitoring (ITM) v 6.2.1
v 6.2.2 - FP3
v 6.2.3
v 6.3
IBM Tivoli Netcool®/OMNIbus v 7.3
v 7.4
v Fix Pack 1 8.x - supported with TADDM7.3.0.1, and later
IBM Tivoli Network Manager IP (ITNMIP) v 3.9
v 4.1
Jazz for Service Management (JazzSM) v 1.1
Tivoli Common Reporting (TCR) v 1.3
v 2.1.1
v 3.1
Tivoli Directory Integrator (TDI) v 7.0
v 7.1
v 7.1.1
Tivoli Netcool/IMPACT v 7.1
Tivoli Workload Scheduler (TWS) v 8.5.1
v 8.6
For more information about products that you integrate with TADDM, refer totheir documentation:
Administering 183
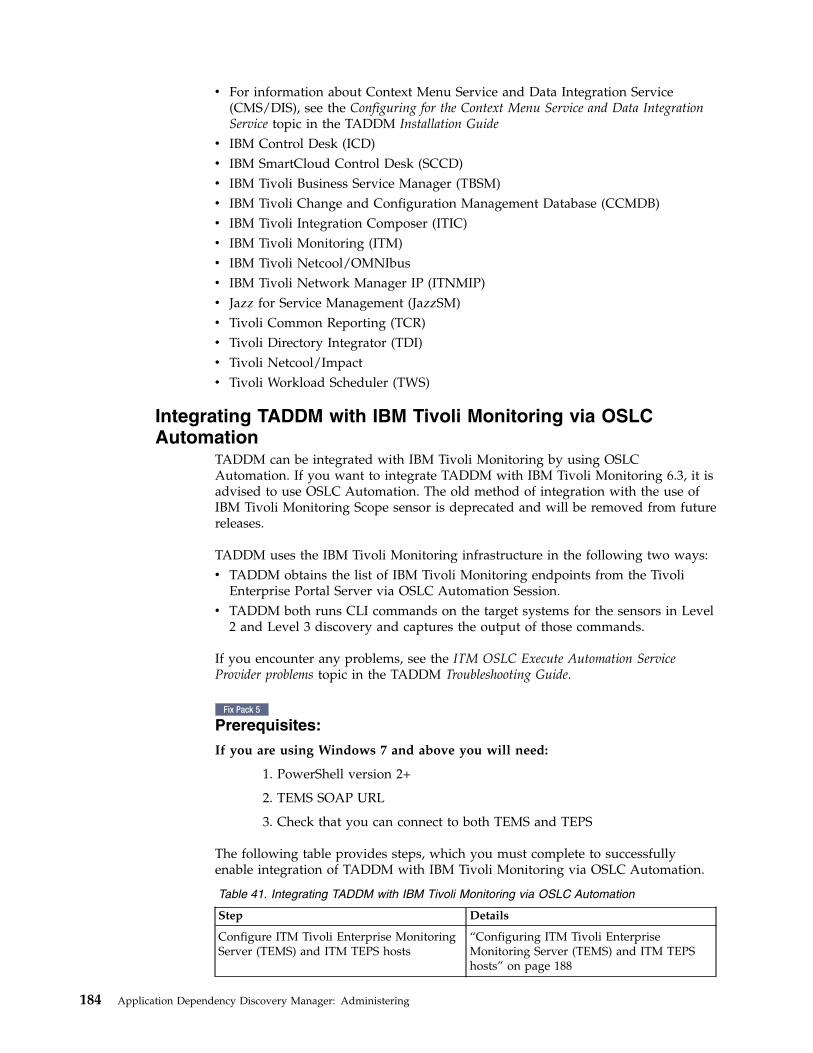
v For information about Context Menu Service and Data Integration Service(CMS/DIS), see the Configuring for the Context Menu Service and Data IntegrationService topic in the TADDM Installation Guide
v IBM Control Desk (ICD)v IBM SmartCloud Control Desk (SCCD)v IBM Tivoli Business Service Manager (TBSM)v IBM Tivoli Change and Configuration Management Database (CCMDB)v IBM Tivoli Integration Composer (ITIC)v IBM Tivoli Monitoring (ITM)v IBM Tivoli Netcool/OMNIbusv IBM Tivoli Network Manager IP (ITNMIP)v Jazz for Service Management (JazzSM)v Tivoli Common Reporting (TCR)v Tivoli Directory Integrator (TDI)v Tivoli Netcool/Impactv Tivoli Workload Scheduler (TWS)
Integrating TADDM with IBM Tivoli Monitoring via OSLCAutomation
TADDM can be integrated with IBM Tivoli Monitoring by using OSLCAutomation. If you want to integrate TADDM with IBM Tivoli Monitoring 6.3, it isadvised to use OSLC Automation. The old method of integration with the use ofIBM Tivoli Monitoring Scope sensor is deprecated and will be removed from futurereleases.
TADDM uses the IBM Tivoli Monitoring infrastructure in the following two ways:v TADDM obtains the list of IBM Tivoli Monitoring endpoints from the Tivoli
Enterprise Portal Server via OSLC Automation Session.v TADDM both runs CLI commands on the target systems for the sensors in Level
2 and Level 3 discovery and captures the output of those commands.
If you encounter any problems, see the ITM OSLC Execute Automation ServiceProvider problems topic in the TADDM Troubleshooting Guide.
Fix Pack 5
Prerequisites:
If you are using Windows 7 and above you will need:
1. PowerShell version 2+
2. TEMS SOAP URL
3. Check that you can connect to both TEMS and TEPS
The following table provides steps, which you must complete to successfullyenable integration of TADDM with IBM Tivoli Monitoring via OSLC Automation.
Table 41. Integrating TADDM with IBM Tivoli Monitoring via OSLC Automation
Step Details
Configure ITM Tivoli Enterprise MonitoringServer (TEMS) and ITM TEPS hosts
“Configuring ITM Tivoli EnterpriseMonitoring Server (TEMS) and ITM TEPShosts” on page 188
184 Application Dependency Discovery Manager: Administering
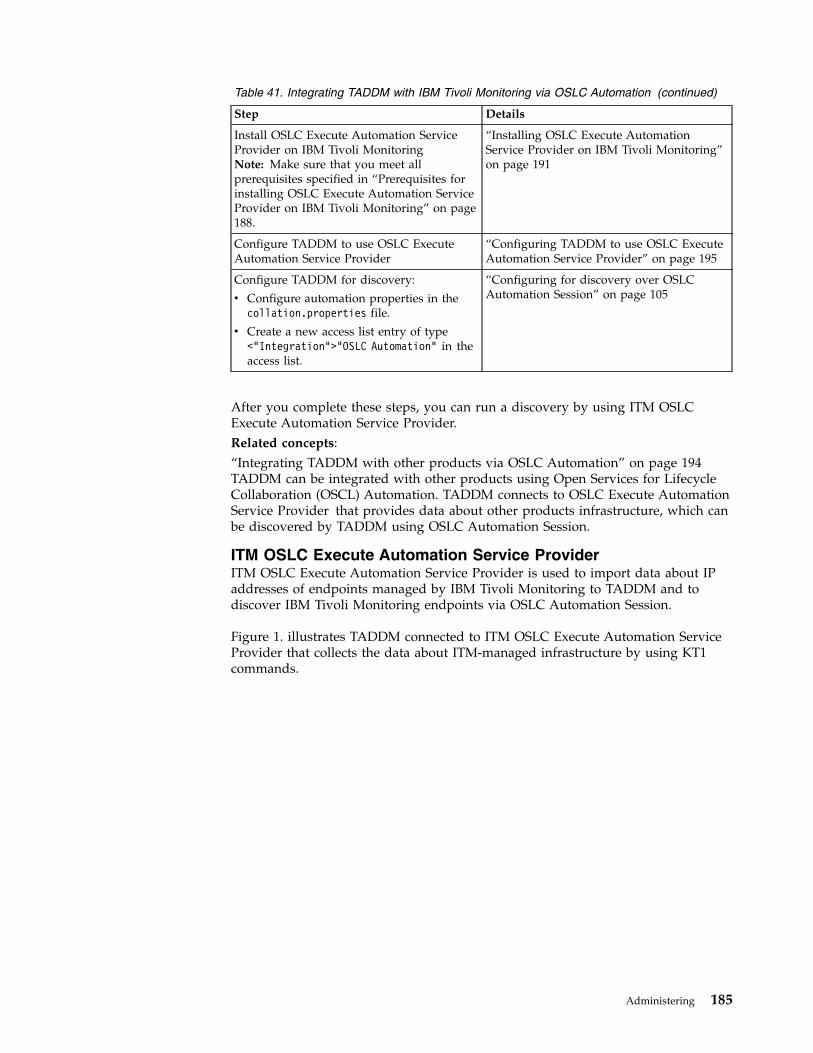
Table 41. Integrating TADDM with IBM Tivoli Monitoring via OSLC Automation (continued)
Step Details
Install OSLC Execute Automation ServiceProvider on IBM Tivoli MonitoringNote: Make sure that you meet allprerequisites specified in “Prerequisites forinstalling OSLC Execute Automation ServiceProvider on IBM Tivoli Monitoring” on page188.
“Installing OSLC Execute AutomationService Provider on IBM Tivoli Monitoring”on page 191
Configure TADDM to use OSLC ExecuteAutomation Service Provider
“Configuring TADDM to use OSLC ExecuteAutomation Service Provider” on page 195
Configure TADDM for discovery:
v Configure automation properties in thecollation.properties file.
v Create a new access list entry of type<"Integration">"OSLC Automation" in theaccess list.
“Configuring for discovery over OSLCAutomation Session” on page 105
After you complete these steps, you can run a discovery by using ITM OSLCExecute Automation Service Provider.Related concepts:“Integrating TADDM with other products via OSLC Automation” on page 194TADDM can be integrated with other products using Open Services for LifecycleCollaboration (OSCL) Automation. TADDM connects to OSLC Execute AutomationService Provider that provides data about other products infrastructure, which canbe discovered by TADDM using OSLC Automation Session.
ITM OSLC Execute Automation Service ProviderITM OSLC Execute Automation Service Provider is used to import data about IPaddresses of endpoints managed by IBM Tivoli Monitoring to TADDM and todiscover IBM Tivoli Monitoring endpoints via OSLC Automation Session.
Figure 1. illustrates TADDM connected to ITM OSLC Execute Automation ServiceProvider that collects the data about ITM-managed infrastructure by using KT1commands.
Administering 185
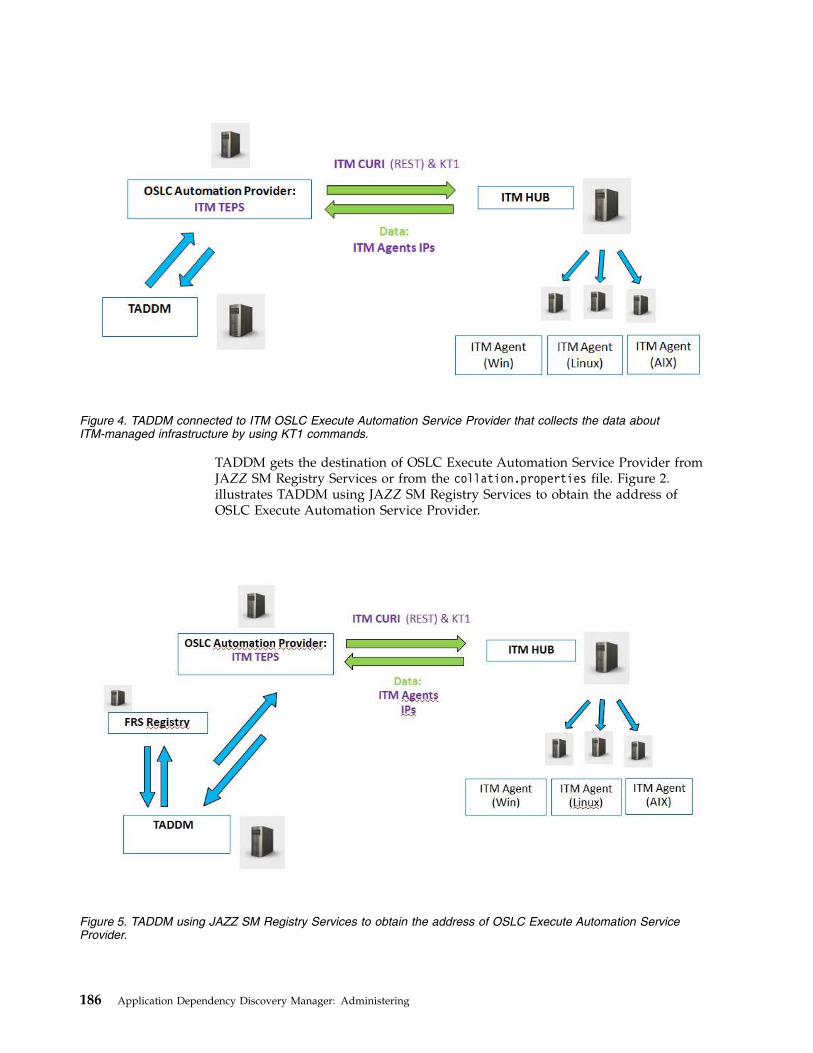
TADDM gets the destination of OSLC Execute Automation Service Provider fromJAZZ SM Registry Services or from the collation.properties file. Figure 2.illustrates TADDM using JAZZ SM Registry Services to obtain the address ofOSLC Execute Automation Service Provider.
Figure 4. TADDM connected to ITM OSLC Execute Automation Service Provider that collects the data aboutITM-managed infrastructure by using KT1 commands.
Figure 5. TADDM using JAZZ SM Registry Services to obtain the address of OSLC Execute Automation ServiceProvider.
186 Application Dependency Discovery Manager: Administering
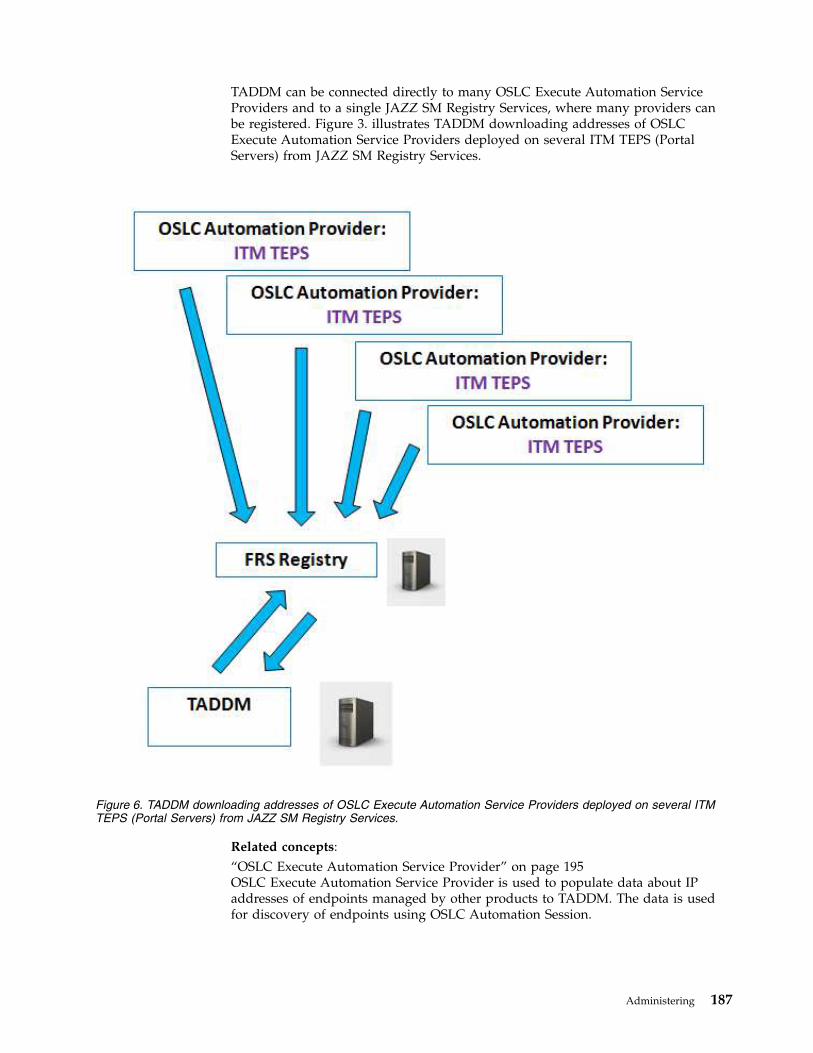
TADDM can be connected directly to many OSLC Execute Automation ServiceProviders and to a single JAZZ SM Registry Services, where many providers canbe registered. Figure 3. illustrates TADDM downloading addresses of OSLCExecute Automation Service Providers deployed on several ITM TEPS (PortalServers) from JAZZ SM Registry Services.
Related concepts:“OSLC Execute Automation Service Provider” on page 195OSLC Execute Automation Service Provider is used to populate data about IPaddresses of endpoints managed by other products to TADDM. The data is usedfor discovery of endpoints using OSLC Automation Session.
Figure 6. TADDM downloading addresses of OSLC Execute Automation Service Providers deployed on several ITMTEPS (Portal Servers) from JAZZ SM Registry Services.
Administering 187
ITM OSLC Execute Automation Service Provider installationTo import data about IP addresses of endpoints managed by IBM TivoliMonitoring (ITM) to TADDM, or to run a discovery, you must install OSLCExecute Automation Service Provider on IBM Tivoli Monitoring.
If you encounter any problems, see the ITM OSLC Execute Automation ServiceProvider problems topic in the TADDM Troubleshooting Guide.
Prerequisites for installing OSLC Execute Automation Service Provider on IBMTivoli Monitoring:
Before you install OSLC Execute Automation Service Provider on IBM TivoliMonitoring (ITM), you must configure your environment to meet all prerequisites.
ITM OSLC Execute Automation Service Provider must be installed on ITM TivoliEnterprise Portal Server (TEPS) host. The supported version of IBM TivoliMonitoring is IBM Tivoli Monitoring 6.3.
Configuring ITM Tivoli Enterprise Monitoring Server (TEMS) and ITM TEPShosts
Fix Pack 5 Step 1- Reconfiguring TEMS and TEPS
The TEMS and TEPS configuration is best done using the Manage TivoliEnterprise Monitoring Services (MTEMS) GUI.
For the Windows OS, start the ITM kinconfig .exe process to bring up heManage Tivoli Enterprise Monitoring Services (MTEMS) GUI.
For Unix/Linux you can start the MTEMS GUI using the CLI command“./itmcmd manage”.
For each of the two ITM components (TEMS and TEPS) :v Highlight the component on the MTEMS UIv Right click and select Reconfigure
This will take you into the TEMS or the TEPS configuration window.
Provide all the TEMS parameters correctly (TEMS Type, TEMS Name andprotocol in the main configuration settings and Hostname/IP Address andPort in the Advanced settings) and select “OK”.
Select “Enable the dashboard data provider” in the TEPS configurationwindow.
Fix Pack 5 Step 2 - Executing TADDM Scripts and ConfigurationThis step includes the execution of two main TADDM scripts to help setupthe integration of TADDM to ITM.
1. Configure the provider.properties file
ITM TEMS hostEnable KT1 commands (tacmd get/put/execute) by running one of thefollowing scripts on ITM TEMS host:v For Linux operating system:
TADDM_CD_ISO/itm-discovery-support/configure_tems.sh <-i <ITM_HOME>>[-t <TEMP-DIR>
v For Windows operating system:TADDM_CD_ISO/itm-discovery-support/configure_tems.ps1 <-i <ITM_HOME>>[-t <TEMP-DIR>
188 Application Dependency Discovery Manager: Administering
where <ITM_HOME> is the directory of ITM TEPS installation, forexample /opt/IBM/ITM, and <TEMP-DIR> is the temporary files destinationdirectory. The default value of the <TEMP-DIR> parameter is/var/log/automation_provider.
Fix Pack 5
When completed you should see the following lines at the end
of the script execution.INFO: Stopping ITM TEPS...INFO: ITM TEPS has stopped.INFO: Starting ITM TEPS...INFO: ITM TEPS has started.INFO: Checking if TEPS is running...INFO: Checking if OSLC Automation Provider is installed...INFO: Installation of OSLC Automation Provider successfully finished.
Note: For an initial user id validation (tacmd get/put/execute), usehttp:1920 or https:3661 then use ip.pipe:1920 or ip.spipe:3660 for KT1work from an automation provider to the discovered target. Theseprotocols shall be enabled in ITM to complete the discovery.
ITM TEPS hostVerify whether ITM dashboard data provider is installed or enabled. If not,optionally install or enable it. See the Verifying the dashboard dataprovider is enabled topic in the IBM Tivoli Monitoring documentation.
Important: If you use 64-bit Windows operating system, make sure that yoursystem PATH (or path entry in the kfwenv file) points to 64-bit TMAITM6 directory.If it is not there, add it manually. For example, if you have ITM installed in theC:\IBM\ITM\ directory, you must have C:\IBM\ITM\TMAITM6_x64 specified in eithersystem path environment variable or in the PATH directive in theC:\IBM\ITM\CNPS\kfwenv file.
Fix Pack 5
2. Run the automation_provider script from ITM TEPS host
Execute the automation_provider script on your server:v For Linux operating system:
automation_provider.sh install -t /tmp/log -i /opt/IBM/ITM -c/tmp/provider.properties
v For Windows operating system:automation_provider.ps1 install -t /tmp/log -i /opt/IBM/ITM -c/tmp/provider.properties
An important point to note here is that even if a provider.properties file iscreated prior to running the automation_provider script, this is ignoredand a 'default' provider.properties is created in the ITM TEPS configpath($ITM_HOME/iw/profiles/ITMProfile/installedApps/ITMCell/itmautomationprovider.ear/itmautomationprovider.war/WEB-INF/provider.properties)
You will have to locate this file, manually make the changes to theparameters and then restart the TEPS for the file to be effective.
Required files
The following files must be present in the directory, from which you run theinstallation script:v The installation script:
Administering 189
– For Linux and AIX operating systems: TADDM_CD_ISO/itm-discovery-support/automation_provider.sh, and its submodules located in theTADDM_CD_ISO/itm-discovery-support/mod/sh/.
– For Windows operating system: TADDM_CD_ISO/itm-discovery-support/automation_provider.ps1, and its submodules located in theTADDM_CD_ISO/itm-discovery-support/mod/ps/.
v itmautomationprovider.ear - the package with ITM OSLC Execute AutomationService Provider. The exact location of the file is TADDM_CD_ISO/itm-discovery-support/ear/itmautomationprovider.ear.
v provider.properties - the example configuration file for ITM OSLC ExecuteAutomation Service Provider. The file can be configured manually and passed toinstall script as a parameter. If not passed, you must provide the requiredparameters during the installation. The exact location of the file isTADDM_CD_ISO/itm-discovery-support/template_provider.properties.
v KT1 support libraries for the appropriate operating system and its architecture,32 or 64 bit.– For Linux operating system:
TADDM_CD_ISO/itm-discovery-support/linux32TADDM_CD_ISO/itm-discovery-support/linux64
– For AIX operating system:TADDM_CD_ISO/itm-discovery-support/aix32TADDM_CD_ISO/itm-discovery-support/aix64
– For Linux on IBM System Z (zLinux):TADDM_CD_ISO/itm-discovery-support/linuxz32TADDM_CD_ISO/itm-discovery-support/linuxz64
– For Windows operating system:TADDM_CD_ISO/itm-discovery-support/win32TADDM_CD_ISO/itm-discovery-support/win64
Configuring the provider.properties file
You shall optionally configure the provider.properties file by setting thefollowing parameters:v com.ibm.automationprovider.registration.host=http://localhost:15210 -
enables connection to ITM. The value specifies a public URL for TEPS. Thedefault value of this parameter is http://localhost:15210.
Note: Modify the localhost to represent the hostname or IP address of TEPSserver.
v com.ibm.automationprovider.itm.curi.url=http://localhost:15210 - specifiesthe URL address of ITM CURI (REST) provider. The default value ishttp://localhost:15210.
Note: Modify localhost in this case to represent the hostname or IP address ofyour TEPS server.
v com.ibm.automationprovider.itm.soap.url=http://localhost:1920///cms/soap -specifies the URL address of ITM SOAP. The default value ishttp://localhost:1920///cms/soap.
Note: Modify localhost in this case to represent the hostname or IP address ofyour hub TEMS server, which may or may not be on the same host as yourTEPS (most production environments should have TEMS and TEPS on separateservers).
190 Application Dependency Discovery Manager: Administering
Note: If you have nondefault configuration of ITM CURI or ITM SOAP, or if youconfigured SSL security on ITM TEPS, or both, make sure that you specify correctURL addresses for the com.ibm.automationprovider.itm.curi.url andcom.ibm.automationprovider.itm.soap.url properties.
The values of the parameters specified in the provider.properties file haveprecedence over the values of the parameters defined from command line.
Fix Pack 5
If you intend to run a discovery on the RTEMS then ensure that you
have the parameter "KT1_TEMS_SECURE=YES" enabled in the environment file.
Registering OSLC Execute Automation Service Providers in JAZZ SM RegistryServices (FRS)
You can optionally register OSLC Execute Automation Service Providers in JAZZSM Registry Services. Choose one of the following methods:v Add the following parameters to the provider.properties file:
– com.ibm.automationprovider.frs.url - specifies FRS URL address forregistration of OSLC Execute Automation Service Provider. The full URLaddress of the collection is required, for example http://9.122.100.100:9083/oslc/pr/collection.
– com.ibm.automationprovider.frs.user - specifies the user name that is usedfor connection to FRS.
– com.ibm.automationprovider.frs.password - specifies the password that isused for connection to FRS.
– com.ibm.automationprovider.registration.initialdelay=5000 - specifies thetime between the start of OSLC Execute Automation Service Provider and thefirst attempt to register in FRS. The default value is 5000 and is expressed inmilliseconds. To disable the registration, set the value to -1.
v Add the -f option in the command line, for example ./automation_provider.sh-f, and during the provider installation, when prompted, provide the requiredparameters.
Installing OSLC Execute Automation Service Provider on IBM TivoliMonitoring:
To install OSLC Execute Automation Service Provider on IBM Tivoli Monitoring(ITM), you must run the automation_provider script. OSLC Execute AutomationService Provider can be installed in a noninteractive or interactive mode.
Procedure
To install OSLC Execute Automation Service Provider, run the followingautomation_provider script from ITM TEPS host:v For Linux operating system:
TADDM_CD_ISO/itm-discovery-support/automation_provider.sh install[-i <ITM-HOME>] [-t <TEMP-DIR>] [[-c <CONFIG-FILE> | [-h <TEPS-IP>][-p <TEPS-PORT>]] [-f]
v For Windows operating system:TADDM_CD_ISO/itm-discovery-support/automation_provider.ps1 install[-i <ITM-HOME>] [-t <TEMP-DIR>] [[-c <CONFIG-FILE> | [-h <TEPS-IP>][-p <TEPS-PORT>]] [-f]
where:
Administering 191
-i <ITM-HOME>is the directory of ITM TEPS installation, for example /opt/IBM/ITM.
-t <TEMP-DIR>is the temporary files destination directory. The default value is/var/log/automation_provider.
-h <TEPS-IP>is the IP address of ITM TEPS host.
-p <TEPS-PORT>is the HTTP port of ITM TEPS.
-c <CONFIG-FILE>is the destination of the provider.properties file, which contains OSLCExecute Automation Service Provider configuration.
-f is a flag that you can use to be prompted during the installation to providethe required parameters to register OSLC Execute Automation ServiceProviders in JAZZ SM Registry Services
Important: All parameters of the installation script are optional. You can specifythem in any order.Examples:automation_provider.sh install -t /tmp/log -i /opt/IBM/ITM -h 9.100.100.200 -p 15210automation_provider.ps1 install -i /opt/IBM/ITM
v You can install OSLC Execute Automation Service Provider in a noninteractivemode. Complete the following steps:1. Configure the provider.properties file. See the “Configuring the
provider.properties file” on page 190 section.2. Run the following automation_provider script from ITM TEPS host:
– For Linux operating system:automation_provider.sh install -t /tmp/log-i /opt/IBM/ITM -c /tmp/provider.properties
– For Windows operating system:automation_provider.ps1 install -t /tmp/log-i /opt/IBM/ITM -c /tmp/provider.properties
Note: If you have nondefault configuration of ITM CURI or ITM SOAP, or ifyou configured SSL security on ITM TEPS, or both, install OSLC ExecuteAutomation Service Provider in a noninteractive mode. Make sure that youspecify correct URL addresses for thecom.ibm.automationprovider.itm.curi.url andcom.ibm.automationprovider.itm.soap.url properties.
v You can install OSLC Execute Automation Service Provider in an interactivemode. During the installation, provide values for required parameters asspecified in the “Configuring the provider.properties file” on page 190 section.
Verifying OSLC Execute Automation Service Provider installation:
You can verify whether the OSLC Execute Automation Service Provider wassuccessfully installed on IBM Tivoli Monitoring.
Procedure
1. Ensure that ITM TEMS has any running Windows, Linux, or UX agents byrunning the following commands:
192 Application Dependency Discovery Manager: Administering
/opt/IBM/ITM /bin/tacmd login -u admin -p password -s localhost/opt/IBM/ITM /bin/tacmd listSystems
2. Ensure that each ITM TEMS has an Automation Plan. The plans must containIP addresses of ITM endpoints. Open the following web addresses in your webbrowser:http://<ITM_TEPS>:<ITM_PORT>/itmautomationproviderhttp://<ITM_TEPS>:<ITM_PORT>/itmautomationprovider/services/plans
Examplehttp://9.100.200.100:15210/itmautomationprovider/services/plans
Checking the status of ITM OSLC Execute Automation Service Provider:
You can check the status of ITM OSLC Execute Automation Service Providerinstallation.
Procedure
Run the following automation_provider script:v For Linux operating system:
automation_provider.sh status [i- <ITM-HOME>] [t- <TEMP-DIR>]
v For Windows operating system:automation_provider.ps1 status [i- <ITM-HOME>] [t- <TEMP-DIR>]
where:
i- <ITM-HOME>is the directory of ITM TEPS installation, for example /opt/IBM/ITM.
t- <TEMP-DIR>is the temporary files destination directory. The default value is/var/log/automation_provider.
Important: All parameters of the script are optional. You can specify them in anyorder.
Examplesautomation_provider.sh statusautomation_provider.ps1 status -i /opt/IBM/ITMautomation_provider.sh status -t /tmp/log -i /opt/IBM/ITM
Uninstalling OSLC Execute Automation Service Provider:
You can uninstall ITM OSLC Execute Automation Service Provider by running theautomation_provider script.
Procedure
Run the following automation_provider script:v For Linux operating system:
automation_provider.sh uninstall [i- <ITM-HOME>] [t- <TEMP-DIR>]
v For Windows operating system:automation_provider.ps1 uninstall [i- <ITM-HOME>] [t- <TEMP-DIR>]
where:
i- <ITM-HOME>is the directory of ITM TEPS installation, for example /opt/IBM/ITM.
Administering 193

t- <TEMP-DIR>is the temporary files destination directory. The default value is/var/log/automation_provider.
Important: All parameters of the script are optional. You can specify them in anyorder.
Examplesautomation_provider.sh uninstallautomation_provider.ps1 uninstall -i /opt/IBM/ITMautomation_provider.sh uninstall -t /tmp/log -i /opt/IBM/ITM
Configuring the discovery for ITM OSLC Execute AutomationService ProviderWhen you use ITM OSLC Execute Automation Service Provider, you can configurethe discovery process by setting the following properties.
com.collation.discover.dwcount=32The default value is 32.
This property is a TADDM server property, which defines the number ofdiscovery worker threads.
For the best results, set the com.collation.discover.dwcount andKT1_RPC_THREADS properties to the same value.
com.ibm.automationprovider.kt1.concurenttasks.limit=100The default value is 100.
This property is an ITM OSLC Execute Automation Service Providerproperty that can be edited in the provider.properties file. It defines thenumber of concurrent requests that the provider issues to TEMS. Excessiverequests are queued at the provider level.
Note: Change the value of this property only if additional throttlingbetween TADDM and TEMS is required, or more than 100 KT1 workerthreads are set.
KT1_RPC_THREADS=10The default value is 10.
This is an ITM TEMS property that can be edited in theITM_HOME/config/kbbenv.ini file. It defines the number of worker threadsthat respond to KT1 requests.
For the best results, set the KT1_RPC_THREADS andcom.collation.discover.dwcount properties to the same value.
Integrating TADDM with other products via OSLC AutomationTADDM can be integrated with other products using Open Services for LifecycleCollaboration (OSCL) Automation. TADDM connects to OSLC Execute AutomationService Provider that provides data about other products infrastructure, which canbe discovered by TADDM using OSLC Automation Session.
The discovery with the usage of OSLC Execute Automation Service Provider is ageneric process, which can be enhanced to include the discovery of other productsthat implement their own OSLC Execute Automation Service Providers. During thediscovery, one port per OSLC Execute Automation Service Provider host or JazzSM Registry Services, or both, is opened. It ensures better security control.
194 Application Dependency Discovery Manager: Administering
The following table lists topics that contain more information about discovery overOSLC.
Table 42. Topics that contain more information about discovery over OSLC.
Information Location
Configuring for discovery “Configuring for discovery over OSLCAutomation Session” on page 105
TADDM server properties “Properties for discovery using OSLCAutomation Session” on page 78
Sensors that support discovery using OSLCAutomation Session
See the Sensors that support discovery usingOSLC Automation Session topic in theTADDM Sensor Reference
OSLC Execute Automation Service ProviderOSLC Execute Automation Service Provider is used to populate data about IPaddresses of endpoints managed by other products to TADDM. The data is usedfor discovery of endpoints using OSLC Automation Session.
TADDM can get the destination of OSLC Execute Automation Service Providerfrom Jazz SM Registry Services or from the collation.properties file.
TADDM can be connected directly to many OSLC Execute Automation ServiceProviders and to a single instance of Jazz SM Registry Services, where many OSLCExecute Automation Service Provider can be registered. Every OSLC ExecuteAutomation Service Provider stores information about an instance of a particularproduct with which TADDM integrates, for example about ITM HUB.Related reference:“ITM OSLC Execute Automation Service Provider” on page 185ITM OSLC Execute Automation Service Provider is used to import data about IPaddresses of endpoints managed by IBM Tivoli Monitoring to TADDM and todiscover IBM Tivoli Monitoring endpoints via OSLC Automation Session.
Configuring TADDM to use OSLC Execute Automation Service Provider:
To be able to run discovery using OSLC Automation Session, you must configureTADDM to use OSLC Execute Automation Service Provider.
Procedure
To configure TADDM to use OSLC Execute Automation Service Provider, completethe following steps:1. Ensure that OSLC Execute Automation Service Provider is installed and that it
is running.2. Connect TADDM to OSLC Execute Automation Service Provider. You can do it
in two ways, directly or by using Jazz for Service Management RegistryServices. These methods can be combined in case of more than one OSLCExecute Automation Service Provider.v To directly connect TADDM to OSLC Execute Automation Service Provider,
add the addresses of OSLC Execute Automation Service Providers to thecom.ibm.cdb.topobuilder.integration.oslc.automationprovider property inthe collation.properties file.
Administering 195
v To connect TADDM to OSLC Execute Automation Service Provider by usingJazz for Service Management Registry Services, enable TADDM Jazz SMRegistry Services lookup of OSLC Execute Automation Service Providers.Complete the following steps:a. Ensure that JAZZ SM Registry Services is running.b. Ensure that OSLC Execute Automation Service Providers are connected to
Jazz SM Registry Services.c. Configure one of following properties in the collation.properties file to
provide address to Jazz SM Registry Services:com.ibm.cdb.topobuilder.integration.oslc.frsurlcom.ibm.cdb.topobuilder.integration.oslc.automation.frsurl
3. Restart the TADDM server.
Results
After you configure TADDM, you can run discovery using OSLC AutomationSession.Related reference:“Properties for discovery using OSLC Automation Session” on page 78These properties apply to discovery using OSLC Automation Session.
Command line interface for OSLCAutomationAgentOSLCAutomationAgent is used to collect data from OSLC Execute AutomationService Providers. You can use commands to run the agent manually, and torefresh or update the scope sets that it creates.
The addresses of OSLC Execute Automation Service Providers are configured inthe collation.properties file or downloaded from Jazz SM Registry Services, orboth. The agent connects to every OSLC Execute Automation Service Provider toget the list of Automation Plans that are compatible with TADDM. TheAutomation Plans consist of the IP addresses that the agent uses to cache andcreate discovery scope sets. For example, when TADDM integrates with IBM TivoliMonitoring, the Automation Plans consist of the IP addresses of ITM TEMS serversand endpoints (agents) that are managed by IBM Tivoli Monitoring.OSLCAutomationAgent caches and creates scope sets with IP addresses of IBMTivoli Monitoring agents. Each ITM TEMS has a separate scope set.
OSLCAutomationAgent runs periodically in the Integration Agents' group.
You can use the following commands on OSLCAutomationAgent.v To run the agent manually, use the following command:
/taddm/dist/support/bin/runtopobuild.sh -a OSLCAutomationAgent
v To refresh scope sets, use the following command:/taddm/dist/support/bin/runtopobuild.sh -a OSLCAutomationAgent -s true
Note: Scope sets are refreshed only in case of changes in ITM AutomationProvider's Automation Plan. To force the scope sets refresh, use the followingcommand:/taddm/dist/support/bin/runtopobuild.sh -a OSLCAutomationAgent--forceScopeSetRefresh true
The scope sets are available in Discovery Management Console in the Scopespane.
196 Application Dependency Discovery Manager: Administering
v To display the cached scope sets, use the following commands:/taddm/dist/support/bin/runtopobuild.sh -a OSLCAutomationAgent -d true/taddm/dist/support/bin/runtopobuild.sh -a OSLCAutomationAgent--displayCache true
The scope sets are displayed in the following TADDM log files:– <COLLATION_HOME>/dist/log/services/TopologyBuilder.log
– <COLLATION_HOME>/dist/log/agents/OSLCAutomationAgent.log
The following example shows the output, which can be found in the<COLLATION_HOME>/dist/log/agents/OSLCAutomationAgent.log file:2014-07-22 11:42:54,660 TopologyBuilder [pool-1-thread-1] DEBUGoslc.OSLCAutomationAgent - OSLCAutomationAgent:displaying cache2014-07-22 11:42:54,669 TopologyBuilder [pool-1-thread-1] INFOoslc.OSLCAutomationAgent - <AGENT_IP_2> http://9.120.100.100:15210/
itmautomationprovider/services/plans/2 14060099337642014-07-22 11:42:54,669 TopologyBuilder [pool-1-thread-1] INFOoslc.OSLCAutomationAgent - <AGENT_IP_2> http:///9.120.100.100:15210/
itmautomationprovider/services/plans/2 14060099337642014-07-22 11:42:54,675 TopologyBuilder [pool-1-thread-1] DEBUGoslc.OSLCAutomationAgent - OSLCAutomationAgent:cache end
Related concepts:“Topology building process overview” on page 14TADDM runs the topology building process on a periodic basis. Until the topologybuilding process has completed after a discovery or after a bulk load operation,unreconciled objects might exist in the TADDM database, and the topologyrelationships might be incomplete.
Integrating TADDM with IBM Tivoli Monitoring (old method)Depending on the specific tasks that you must do in your IT environment, you canuse the integration capabilities that are available between IBM Tivoli ApplicationDependency Discovery Manager (TADDM) and IBM Tivoli Monitoring. You canintegrate TADDM with IBM Tivoli Monitoring by using IBM Tivoli MonitoringScope sensor.
New integration method
Important: Starting with the TADDM version 7.3.0, it is advised to integrate withIBM Tivoli Monitoring 6.3 using OSLC Automation. The old method of integrationwith the use of IBM Tivoli Monitoring Scope sensor is deprecated and will beremoved from future releases.
Learn more about TADDM integration with IBM Tivoli Monitoring by using OSLCAutomation at “Integrating TADDM with IBM Tivoli Monitoring via OSLCAutomation” on page 184 and about sensors that support discovery using OSLCAutomation in the Sensors that support discovery using OSLC Automation topic of theTADDM Sensor Reference.
The old integration method
All of the following sections apply to the old method of integration. You can stilluse it, but remember that this method is deprecated and will be removed fromfuture releases.
Administering 197
Table 1. correlates some tasks that you might need to do with the integrationcapabilities that you should use, and the remaining sections provide an overviewof these integration capabilities.
Table 43. User tasks with corresponding integration capabilities to use
Task Integration capability to use
Gain insight into availability by viewing theoperating system settings, applicationsettings, and change history of systems thatare monitored by IBM Tivoli Monitoring.
v “Discovery using IBM Tivoli Monitoring”
v “Launch in context” on page 200
Ensure that operating systems that arediscovered by TADDM are monitored foravailability.
v “Discovery using IBM Tivoli Monitoring”
v “Monitoring Coverage reports” on page200
View the availability and performance ofsystems that are discovered by TADDM.
v “IBM Tivoli Monitoring DLA” on page199
v “Monitoring Coverage reports” on page200
Monitor a business application forconfiguration changes.
v “Discovery using IBM Tivoli Monitoring”
v “Change events” on page 200
v “Launch in context” on page 200
Discovery using IBM Tivoli Monitoring
TADDM can perform Level 1, Level 2, and some Level 3 discoveries using an IBMTivoli Monitoring 6.2.1 or later infrastructure. TADDM discovers configurationitems in the IBM Tivoli Monitoring environment by using only the credentials foryour Tivoli Enterprise Portal Server rather than the credentials for each computerthat the portal server monitors.
TADDM leverages the Tivoli Monitoring infrastructure in the following two ways:v TADDM obtains the list of Tivoli Monitoring endpoints from the Tivoli
Enterprise Portal Server both to create basic Level 1 discovery information andto create scopes for deeper Level 2 and 3 discovery.
v TADDM uses the Tivoli Monitoring infrastructure both to run CLI commands ontarget systems for the sensors in Level 2 and 3 discovery and to capture theoutput of those commands
This capability provides the following benefits:v Rapid deployment of TADDM in existing Tivoli Monitoring environmentsv No need for TADDM anchor and gateway serversv No need to define scope sets that contain computers to scan. Only a scope with
a single entry for the Tivoli Enterprise Portal Server is required.v No need to define an access list (operating system credentials) for discovery
targetsv Only a single access list entry for the Tivoli Enterprise Portal Server GUI logon
is required.
Table 44. Topics that contain more information about discovery using IBM Tivoli Monitoring
Information Location of information
Configuring for discovery usingIBM Tivoli Monitoring
“Configuring for discovery using IBM TivoliMonitoring (old method)” on page 104
198 Application Dependency Discovery Manager: Administering
Table 44. Topics that contain more information about discovery using IBM TivoliMonitoring (continued)
Information Location of information
TADDM server properties thatapply to discovery using IBM TivoliMonitoring
“Properties for discovery using IBM TivoliMonitoring (old method)” on page 76
v Sensors that support discoveryusing IBM Tivoli Monitoring
v IBM Tivoli Monitoring Scopesensor, including informationabout configuring the sensor andabout troubleshooting anyknown problems that mightoccur when deploying or usingthe sensor
TADDM Sensor Reference
IBM Tivoli Monitoring DLA
The IBM Tivoli Monitoring discovery library adapter (DLA) extracts configurationdata from Tivoli Monitoring about the computer systems and databases that TivoliMonitoring monitors. The output of the DLA is a formatted XML file that containsthese components and their relationships. The output of the DLA also includesdata that represents Tivoli Monitoring agents and data that is used for launchingavailability views from TADDM. For detailed information about loading theDLA-exported data into TADDM, see the The bulk load program topic in theTADDM User's Guide.
To run DLA, complete the following steps:1. Generate DLA on ITM as specified in the Using the Tivoli Management Services
Discovery Library Adapter topic at http://www-01.ibm.com/support/knowledgecenter/SSTFXA_6.2.2.1/com.ibm.itm.doc_6.2.2fp1/discoverylibraryadapter_tms.htm?lang=en.
2. Copy the DLA output file to the TADDM host.3. Use the bulk load program to load DLA from ITM to TADDM. Use the
following command:$COLLATION_HOME/bin/loadidml.sh -u user -p password -f path_to _DLA
When you install new Tivoli Monitoring agents, they can provide additionalsupport to the Tivoli Monitoring DLA. The agents provide information to populatethe monitoring coverage reports, only the monitoring coverage for operatingsystems report does not require a DLA.
When you install an agent, you must enable application support for those agentsto ensure that the agent participates in the output generated by the DLA. Not allagents support the Tivoli Monitoring DLA.
For information about configuring application support for non-standard agents, seethe appropriate documentation. To verify that an agent supports the TivoliMonitoring DLA, see the documentation for the IBM Tivoli Composite ApplicationManager agent.
Administering 199
Monitoring Coverage reports
The Monitoring Coverage reports show details about various components in yourenvironment. You can generate a report for operating systems, databases, Microsoftapplications, VMware servers, and System p components in your environment.These components are monitored by IBM Tivoli Monitoring 6.1 or later agents.
For more information about Monitoring Coverage reports, see TADDM User'sGuide.
Change events
You can configure TADDM to notify IBM Tivoli Monitoring when a change to adiscovered resource is detected.
Table 45. Topics that contain more information about change events
Information Location of information
v Configuring TADDM to sendchange events
v Configuring an IBM TivoliMonitoring data provider
v Configuring change events for abusiness system
“Sending change events to external systems” on page208
Launch in context
With launch in context, you can view TADDM data within the Tivoli EnterprisePortal views of IBM Tivoli Monitoring.
By configuring topology views to show in the Tivoli Enterprise Portal, you canview physical infrastructure, application infrastructure, and business systemtopologies within Tivoli Enterprise Portal availability views.
Table 46. Topics that contain more information about launch in context
Information Location of information
URLs that are required for displayof topology views
“Configuring for launch in context” on page 205
Instructions for configuring launchin context for viewing the operatingsystem settings, applicationsettings, and change history forincoming change events
“Creating detail links in configuration change eventreports in IBM Tivoli Monitoring” on page 218
Registering configuration items for the Context Menu Serviceand Data Integration Service
If you are using the Context Menu Service (CMS) and Data Integration Service(DIS) to enable flexible cross-product launch points, you must register TADDMconfiguration items (CIs) in the CMS/DIS database.
Before you begin
Before you can use the Context Menu Service and Data Integration Service, youmust first set up the CMS/DIS database.
200 Application Dependency Discovery Manager: Administering
About this task
TADDM CIs are registered in the CMS/DIS database in two ways:v Initial registration using the CMS/DIS registration scriptv Periodic automatic updates by the CMSDISAgent topology builder agent
Running initial registrationTo complete initial registration of TADDM configuration items (CIs) in the ContextMenu Service and Data Integration Service database, you must manually run therun_cms_dis_registration script. The CMSDISAgent topology builder agent doesnot automatically update CI registration until after this initial registration iscomplete.
About this task
If you are using a streaming server deployment, run the registration script on theprimary storage server. If you are using a synchronization server deployment, runthe registration script on the synchronization server.
Procedure
To complete initial registration of TADDM CIs:1. At a command prompt, navigate to the $COLLATION_HOME/bin directory.2. Run the run_cms_dis_registration script for your operating system:v Linux and UNIX systems:
./run_cms_dis_registration.sh [ register [guid] |clean [guid [classtype]] |re-register-all | register-menu |help ]
v Windows systems:run_cms_dis_registration.bat [ register [guid] |
clean [guid [classtype]] |re-register-all | register-menu |help ]
Where:
register [guid]
Registers TADDM data in the Context Menu Service and Data IntegrationService database. You can optionally specify the globally unique identifier(GUID) of a model object you want to register.
The first time you run the script with the register option and no GUIDspecified, all TADDM data is registered in the database, and all launchpoints are registered with the Context Menu Service. Subsequent runs withthis option register only changes to TADDM data that have occurred sincethe previous run. This option is the default option.
If you specify a GUID, only the model object with the specified GUID isregistered.
Note: Initial registration of all TADDM data can take a long time.
clean [guid [classtype]]
Unregisters TADDM data currently in the database.
Administering 201
If you do not specify a GUID, all TADDM data is unregistered. If youspecify a GUID, only the model object with the specified GUID isunregistered. If the model object with the specified GUID is no longeravailable in TADDM, you must also specify the model object type.
re-register-allUnregisters all TADDM data and launch points and then repeats the initialregistration. This option is equivalent to running the script with the cleanoption and then with the register option.
register-menuUpdates the menu definitions only that are registered in the Context MenuService database. Use this option when the TADDM data is registered butyou want to update the menu definitions only.
helpShows help information for the script.
Examplev This example registers all TADDM data with the Context Menu Service and Data
Integration Service when run for the first time; on subsequent runs, it registersall changes since the last run:./run_cms_dis_registration.sh
v This example registers only the model object with the specified GUID../run_cms_dis_registration.sh register 3950DF835FA0337A829D864415CC1384
v This example removes all registered TADDM data:./run_cms_dis_registration.sh clean
v This example removes the object with the specified GUID and model object type:./run_cms_dis_registration.sh clean 3950DF835FA0337A829D864415CC1384
LinuxUnitaryComputerSystem
v This example removes all registered TADDM data and then repeats theregistration:./run_cms_dis_registration.sh re-register-all
What to do next
If you want to run the registration script again at a later time, first disable theCMSDISAgent topology builder agent to stop incremental updates. To disable theagent, edit the $COLLATION_HOME/etc/collation.properties file and set thefollowing property:com.ibm.cdb.DisCmsIntegration.enabled=false
After the script finishes, you must then re-enable the agent by setting the propertyto true.
Configuring the CMSDISAgentThe CMSDISAgent runs periodically as a topology builder agent and updates theregistration of TADDM configuration items (CIs) in the Context Menu Service andData Integration Service database, registering any new or modified CIs andderegistering any deleted CIs.
About this task
If enabled, the CMDDISAgent begins running after you complete the initialregistration of TADDM CIs using the run_cms_dis_registration script. You can
202 Application Dependency Discovery Manager: Administering
modify the agent configuration to change how the agent runs.
Procedurev To enable or disable the CMSDISAgent, edit the $COLLATION_HOME/etc/
collation.properties file and set the following property:com.ibm.cdb.DisCmsIntegration.enabled=value
where value is either true or false. If the value is set to true, the agent runsperiodically after the initial registration is completed. (This property does notaffect the operation of the run_cms_dis_registration script, which can be run atany time.)
v To customize which CIs are registered in the database, modify the following filesin the $COLLATION_HOME/etc/cmsdis directory:
classtype-changehistory.listLists the model object types of CIs for which TADDM haslaunch-in-context support for the change history report.
classtype-detailPanel.listLists the model object types of CIs for which TADDM haslaunch-in-context support for the details panel.
You can remove any model object types that are not needed for other productsto launch TADDM in context. Do not add any types to these files; TADDMmight not support launching in context for additional types. After modifying theclass type list files, disable the agent and then run the run_cms_dis_registrationscript again, specifying the re-register-all option.
Creating a Discovery Library storeA Discovery Library store is a directory or folder on a computer in the data center,and it represents the common location for all Discovery Library Adapters (DLAs)to write the XML files that contain resource information. XML data files to be bulkloaded into a TADDM system are placed in the Discovery Library store. To use thebulk loader program, you must create a Discovery Library store.
Before you begin
A DLA is a software program that extracts data from a source application such asIBM Tivoli Monitoring or IBM Tivoli Business Service Manager.
Each DLA writes XML files that contain resource information in a particular XMLformat called the Identity Markup Language (IdML). Any XML file that is writtenin the IdML format is commonly referred to as a book. To see the Tivoli collectionof books that can load the TADDM database with data from other Tivoli products,see http://www.ibm.com/software/brandcatalog/ismlibrary/.
DLAs are specific to a particular product because each product has a distinctmethod of accessing the resources from the environment. The configuration andinstallation of a DLA is different for every application. A typical DLA is installedon a system that has access to the data of a particular application. For example, theDLA for IBM Tivoli Monitoring is installed on a computer that has access to theIBM Tivoli Monitoring enterprise management system database. All DLAs are runusing the command-line interface and can be scheduled to run using any type ofscheduling program in your environment (for example, cron).
Administering 203

You can create a DLA to extract information from existing products or databases inyour environment.
For more information about how to create a DLA and about the IdMLspecification, or for additional details about the Discovery Library store, see theTADDM Discovery Library Adapter Developer's Guide.
About this task
Typically, the Discovery Library store is located on the TADDM server. If you donot set up the Discovery Library store on the TADDM server, you must ensure thatthe TADDM bulk load program that runs on the TADDM server can access theDiscovery Library store. Other applications can run on the same computer thathosts the Discovery Library store.
Procedure
To create the Discovery Library store, complete the following steps:1. Create a directory to store the XML files on a computer, with a distinct
directory name (for example, c:\IBM\DLFS). Optionally, you can createsubdirectories in the main Discovery Library store for each DLA that is used.
2. Set up a File Transfer Protocol Server (FTP) with at least one user ID. The userID must have the following permissions: write, rename, and read access to thedirectory that stores the Discovery Library XML files. If you are not using FTPto transfer the XML files to the Discovery Library store, ensure that the toolyou use and the user ID used to run the tool have write permissions to theDiscovery Library store directory.
3. Ensure that the various Discovery Library Adapters have access to the name ofthe system (host name) that hosts the Discovery Library store. Most DiscoveryLibrary Adapters copy XML files to the Discovery Library store.
4. Ensure that the various Discovery Library Adapters have the user ID andpassword to connect to the FTP server.
5. If the DLA does not use FTP, copy your XML files (books) that you want thebulk loader program to access into that shared directory. The shared directorymust be accessible by the bulk loader program.The book writers and the administrator are not responsible for getting thebooks into the Discovery Library store. For example, set up a cron job to sendthe produced IdML books to the Discovery Library store using FTP.
What to do next
If you are creating a Discovery Library store and want to set up a TADDMdatabase to contain DLA books, a local drive on the domain server can be thenetworked Discovery Library store. This directory must be defined in the$COLLATION_HOME/etc/bulkload.properties file on the domain server where thedata is loaded. If you have multiple domain servers, configure the correct bulkloader program to access the corresponding shared directory. The bulk loader doesnot delete XML files from the Discovery Library store. You must maintain the filesin the Discovery Library store. Ensure that there is enough disk space on the serverfor the files in the directory. If new XML files are added to the directory frequently,you must regularly clean up the directory.
If you have a synchronization server deployment, you must choose from thefollowing options:
204 Application Dependency Discovery Manager: Administering
v If the resources that are referenced in a book are contained in the scopedefinitions that are defined on one domain server, load that book into therespective domain server.
v If the resources that are referenced in a book are not contained in the scopedefinitions that are defined on one domain server, load all of the books into thesynchronization server.
Configuring for launch in contextTo see more detailed information about components in your environment, you canlaunch TADDM views from other Tivoli applications. To configure your applicationto launch TADDM views in context, you must specify a URL.
Views that you can launch from other Tivoli applicationsFrom other Tivoli applications, you can launch Data Management Portal views.You can also launch the details and change history report for a specifiedconfiguration item (CI).
In the Data Management Portal views, you can see more information for thefollowing component groupings:v Business applicationsv Business servicesv Collections
If both the TADDM server and the application from which TADDM is beinglaunched are not configured for a single sign-on, a sign-on window is shown.Before you can view additional information in the Data Management Portal, youmust provide a user name and password.
Specifying the URL to launch TADDM viewsTo launch TADDM views in context from other Tivoli applications, you mustspecify a URL.
The URL format for launching in context is:Protocol://TADDMHostname:TADDMPort/ContextRoot/?queryString
The following list describes the valid values for each variable in the URL format:
ProtocolThe Web protocol to use. Valid values are http or https.
TADDMHostnameThe host name for the TADDM server to which you are launching.
TADDMPortThe port number for the TADDM server to which you are launching. Thedefault value is 9430.
ContextRootThe following values are valid:
cdm/servlet/LICServletThe relative path to the Java servlet that is deployed in the ApacheTomcat server for TADDM 7.3.0, and in the WAS Liberty Profile serverfor TADDM 7.3.0.1, and later, and later.
Administering 205
cdm/queryHomePage.doThe relative path to the Query Home Page, when launched from IBMTivoli Monitoring, using single sign-on, and specifying search text.
queryStringContains name-value pair parameters that are delimited by separators. Theformat for a name-value pair is name=value. Use = to separate names andvalues, and use & to separate name-value pairs.
The following list describes the valid name-value pairs that can be used in thequeryString variable:
viewSpecifies that you want to display change history.
The only valid value is changehistory.
days_previousSpecifies the time period (the number of past days) for which to show thechange history of a particular configuration item.
The valid value is a positive integer.
hoursbackSpecifies the time period (the number of past hours) for which to show thechange history of a particular configuration item.
The valid value is a positive integer.
guidSpecifies the Globally Unique Identifier (GUID) for a configuration item.
For the domain server and the synchronization server, Table 47 on page 207lists the valid values for the graph parameter and indicates whether theguid parameter is optional or required based on the respective graph value.
If the graph parameter is specified with any of the following values, theguid parameter is optional:v businessapplications
v applicationinfrastructure
v physicalinfrastructure
If the graph parameter is specified with any other type of topology graph,the guid parameter is required.
The valid value is a valid string representation of a GUID, as shown in thefollowing example:BA2842345F693855A3165A4B5F0D8BDE
You should specify only one GUID for each URL request for launch incontext.
graphSpecifies the type of topology graph to be launched.
If you also specify a configuration item by providing its GUID on the guidparameter, the requested configuration item is then selected, if it is foundin the topology graph that is specified on this graph parameter.
For the domain server and the synchronization server, Table 47 on page 207lists the valid values for the graph parameter and indicates whether theguid parameter is optional or required based on the respective graph value.
206 Application Dependency Discovery Manager: Administering
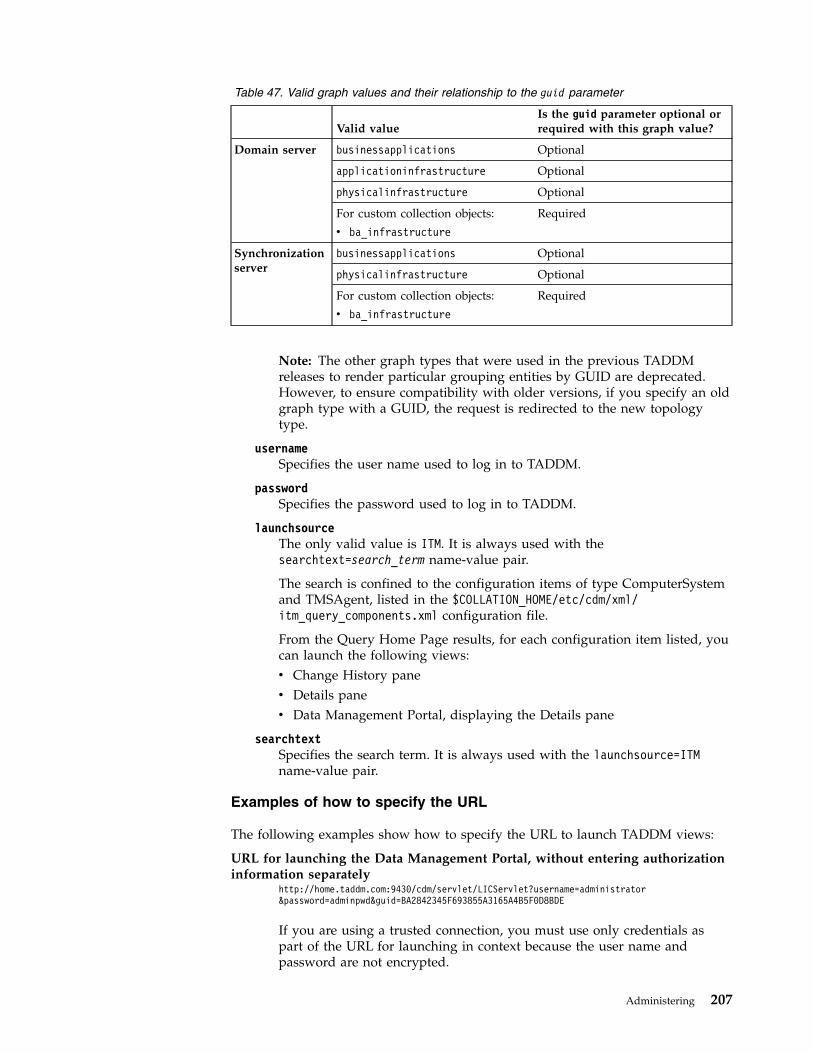
Table 47. Valid graph values and their relationship to the guid parameter
Valid valueIs the guid parameter optional orrequired with this graph value?
Domain server businessapplications Optional
applicationinfrastructure Optional
physicalinfrastructure Optional
For custom collection objects:
v ba_infrastructure
Required
Synchronizationserver
businessapplications Optional
physicalinfrastructure Optional
For custom collection objects:
v ba_infrastructure
Required
Note: The other graph types that were used in the previous TADDMreleases to render particular grouping entities by GUID are deprecated.However, to ensure compatibility with older versions, if you specify an oldgraph type with a GUID, the request is redirected to the new topologytype.
usernameSpecifies the user name used to log in to TADDM.
passwordSpecifies the password used to log in to TADDM.
launchsourceThe only valid value is ITM. It is always used with thesearchtext=search_term name-value pair.
The search is confined to the configuration items of type ComputerSystemand TMSAgent, listed in the $COLLATION_HOME/etc/cdm/xml/itm_query_components.xml configuration file.
From the Query Home Page results, for each configuration item listed, youcan launch the following views:v Change History panev Details panev Data Management Portal, displaying the Details pane
searchtextSpecifies the search term. It is always used with the launchsource=ITMname-value pair.
Examples of how to specify the URL
The following examples show how to specify the URL to launch TADDM views:
URL for launching the Data Management Portal, without entering authorizationinformation separately
http://home.taddm.com:9430/cdm/servlet/LICServlet?username=administrator&password=adminpwd&guid=BA2842345F693855A3165A4B5F0D8BDE
If you are using a trusted connection, you must use only credentials aspart of the URL for launching in context because the user name andpassword are not encrypted.
Administering 207
URL for launching the Query Home Page window for IBM Tivoli Monitoringwhen using single sign-on and searching for a configuration item that matchesthe search text
http://home.taddm.com:9430/cdm/queryHomePage.do?launchsource=itm&searchtext=127.0.0.1
URL for showing a topology of a custom collection indicated by the guidparameter
http://home.taddm.com:9430/cdm/servlet/LICServlet?username=administrator&password=adminpwd&graph=ba_infrastructure&guid=BA2842345F693855A3165A4B5F0D8BDE
Sending change events to external systemsYou can configure TADDM to notify an external event-handling system when achange to a discovered resource is detected.
To send change events from TADDM, you must have one or more of the followingevent-handling systems installed:v IBM Tivoli Monitoring 6.2.1 Fixpack 2, or laterv IBM TivoliNetcool/OMNIbus, including the Event Integration Facility (EIF)
probe
To see supported versions of the products, go to the “Supported versions” on page182 section.
When a discovery completes, TADDM checks for changes to items being trackedby external event-handling systems. If any are detected, they are sent, using EIF,directly to IBM Tivoli Netcool/OMNIbus and to IBM Tivoli Monitoring using theUniversal Agent.
The Universal Agent converts the received notifications to asynchronous events,and forwards the data to the IBM Tivoli Enterprise Monitoring Server componentof IBM Tivoli Monitoring. The IBM Tivoli Monitoring Server stores the events anduses them to evaluate situations. The events are then passed to the IBM TivoliEnterprise Portal for display.
IBM Tivoli Netcool/OMNIbus servers process received events according to theirinternal rules and display them.
To set up the sending of change events from TADDM to external event-handlingsystems, you must enable change events in TADDM, and configure each externalrecipient to handle incoming events, as appropriate.
Configuring TADDM to send change eventsTo send change events, you must configure TADDM with information about theevent-handling systems to which you want to send change events.
About this task
Depending on your type of TADDM deployment, make the following changes onthe following TADDM servers:v In a domain server deployment, make the changes on the domain server.v In a synchronization server deployment, make the changes on the
synchronization server.v In a streaming server deployment, make the changes on the primary storage
server.
208 Application Dependency Discovery Manager: Administering
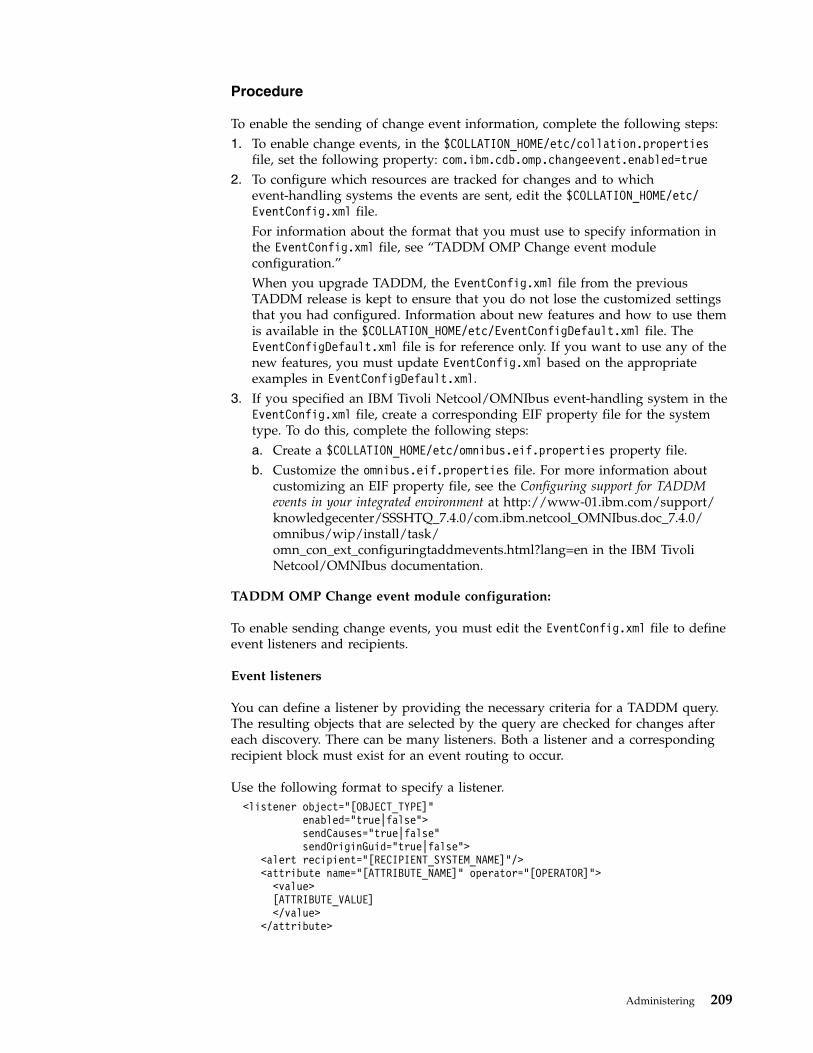
Procedure
To enable the sending of change event information, complete the following steps:1. To enable change events, in the $COLLATION_HOME/etc/collation.properties
file, set the following property: com.ibm.cdb.omp.changeevent.enabled=true2. To configure which resources are tracked for changes and to which
event-handling systems the events are sent, edit the $COLLATION_HOME/etc/EventConfig.xml file.For information about the format that you must use to specify information inthe EventConfig.xml file, see “TADDM OMP Change event moduleconfiguration.”When you upgrade TADDM, the EventConfig.xml file from the previousTADDM release is kept to ensure that you do not lose the customized settingsthat you had configured. Information about new features and how to use themis available in the $COLLATION_HOME/etc/EventConfigDefault.xml file. TheEventConfigDefault.xml file is for reference only. If you want to use any of thenew features, you must update EventConfig.xml based on the appropriateexamples in EventConfigDefault.xml.
3. If you specified an IBM Tivoli Netcool/OMNIbus event-handling system in theEventConfig.xml file, create a corresponding EIF property file for the systemtype. To do this, complete the following steps:a. Create a $COLLATION_HOME/etc/omnibus.eif.properties property file.b. Customize the omnibus.eif.properties file. For more information about
customizing an EIF property file, see the Configuring support for TADDMevents in your integrated environment at http://www-01.ibm.com/support/knowledgecenter/SSSHTQ_7.4.0/com.ibm.netcool_OMNIbus.doc_7.4.0/omnibus/wip/install/task/omn_con_ext_configuringtaddmevents.html?lang=en in the IBM TivoliNetcool/OMNIbus documentation.
TADDM OMP Change event module configuration:
To enable sending change events, you must edit the EventConfig.xml file to defineevent listeners and recipients.
Event listeners
You can define a listener by providing the necessary criteria for a TADDM query.The resulting objects that are selected by the query are checked for changes aftereach discovery. There can be many listeners. Both a listener and a correspondingrecipient block must exist for an event routing to occur.
Use the following format to specify a listener.<listener object="[OBJECT_TYPE]"
enabled="true|false">sendCauses="true|false"sendOriginGuid="true|false">
<alert recipient="[RECIPIENT_SYSTEM_NAME]"/><attribute name="[ATTRIBUTE_NAME]" operator="[OPERATOR]"><value>[ATTRIBUTE_VALUE]</value>
</attribute>
Administering 209
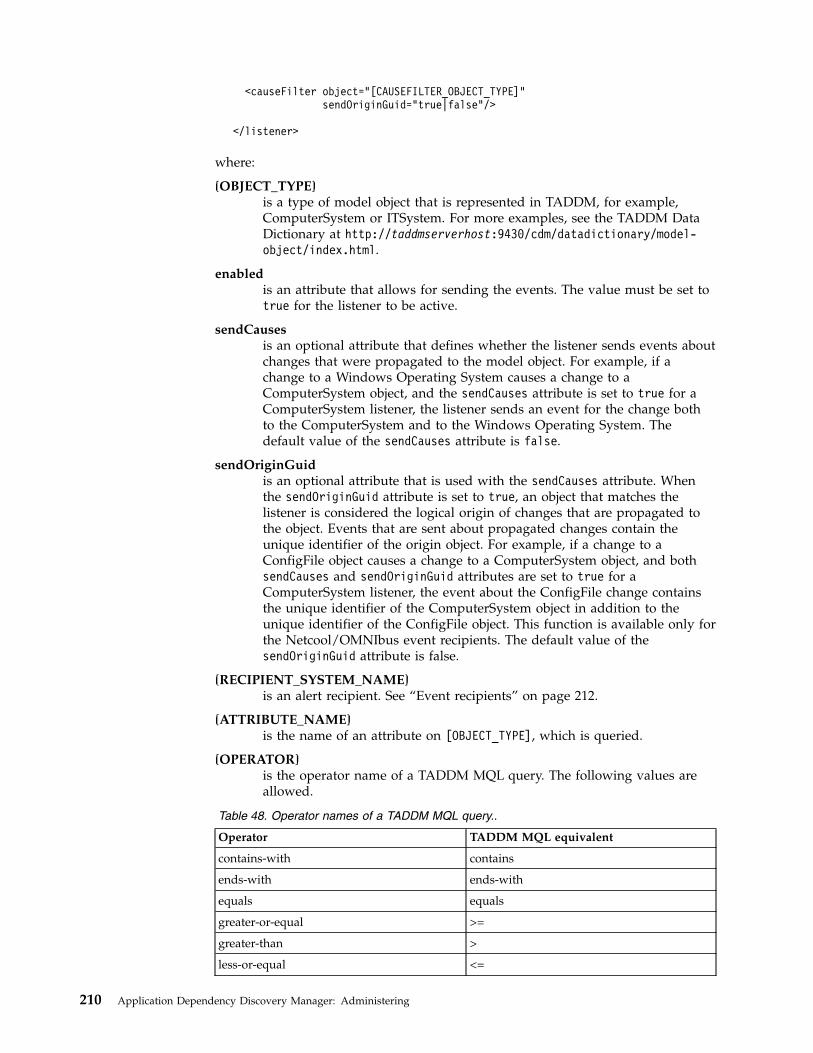
<causeFilter object="[CAUSEFILTER_OBJECT_TYPE]"sendOriginGuid="true|false"/>
</listener>
where:
[OBJECT_TYPE]is a type of model object that is represented in TADDM, for example,ComputerSystem or ITSystem. For more examples, see the TADDM DataDictionary at http://taddmserverhost:9430/cdm/datadictionary/model-object/index.html.
enabledis an attribute that allows for sending the events. The value must be set totrue for the listener to be active.
sendCausesis an optional attribute that defines whether the listener sends events aboutchanges that were propagated to the model object. For example, if achange to a Windows Operating System causes a change to aComputerSystem object, and the sendCauses attribute is set to true for aComputerSystem listener, the listener sends an event for the change bothto the ComputerSystem and to the Windows Operating System. Thedefault value of the sendCauses attribute is false.
sendOriginGuidis an optional attribute that is used with the sendCauses attribute. Whenthe sendOriginGuid attribute is set to true, an object that matches thelistener is considered the logical origin of changes that are propagated tothe object. Events that are sent about propagated changes contain theunique identifier of the origin object. For example, if a change to aConfigFile object causes a change to a ComputerSystem object, and bothsendCauses and sendOriginGuid attributes are set to true for aComputerSystem listener, the event about the ConfigFile change containsthe unique identifier of the ComputerSystem object in addition to theunique identifier of the ConfigFile object. This function is available only forthe Netcool/OMNIbus event recipients. The default value of thesendOriginGuid attribute is false.
[RECIPIENT_SYSTEM_NAME]is an alert recipient. See “Event recipients” on page 212.
[ATTRIBUTE_NAME]is the name of an attribute on [OBJECT_TYPE], which is queried.
[OPERATOR]is the operator name of a TADDM MQL query. The following values areallowed.
Table 48. Operator names of a TADDM MQL query..
Operator TADDM MQL equivalent
contains-with contains
ends-with ends-with
equals equals
greater-or-equal >=
greater-than >
less-or-equal <=
210 Application Dependency Discovery Manager: Administering
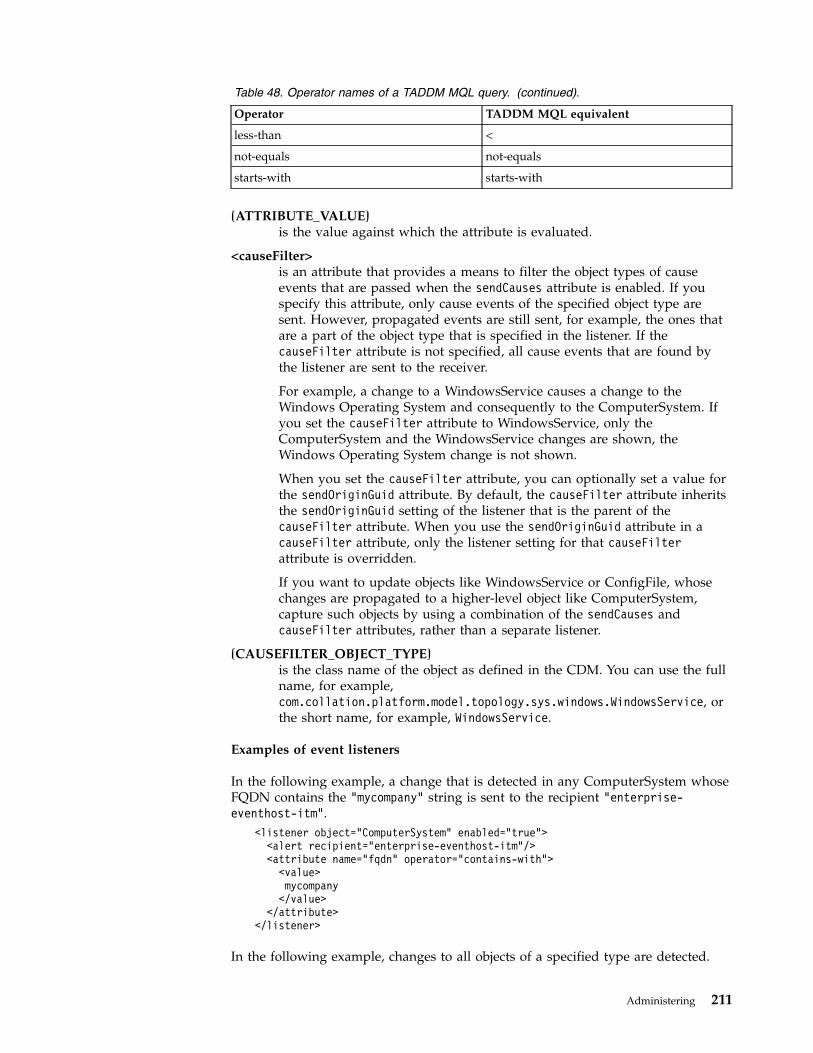
Table 48. Operator names of a TADDM MQL query. (continued).
Operator TADDM MQL equivalent
less-than <
not-equals not-equals
starts-with starts-with
[ATTRIBUTE_VALUE]is the value against which the attribute is evaluated.
<causeFilter>is an attribute that provides a means to filter the object types of causeevents that are passed when the sendCauses attribute is enabled. If youspecify this attribute, only cause events of the specified object type aresent. However, propagated events are still sent, for example, the ones thatare a part of the object type that is specified in the listener. If thecauseFilter attribute is not specified, all cause events that are found bythe listener are sent to the receiver.
For example, a change to a WindowsService causes a change to theWindows Operating System and consequently to the ComputerSystem. Ifyou set the causeFilter attribute to WindowsService, only theComputerSystem and the WindowsService changes are shown, theWindows Operating System change is not shown.
When you set the causeFilter attribute, you can optionally set a value forthe sendOriginGuid attribute. By default, the causeFilter attribute inheritsthe sendOriginGuid setting of the listener that is the parent of thecauseFilter attribute. When you use the sendOriginGuid attribute in acauseFilter attribute, only the listener setting for that causeFilterattribute is overridden.
If you want to update objects like WindowsService or ConfigFile, whosechanges are propagated to a higher-level object like ComputerSystem,capture such objects by using a combination of the sendCauses andcauseFilter attributes, rather than a separate listener.
[CAUSEFILTER_OBJECT_TYPE]is the class name of the object as defined in the CDM. You can use the fullname, for example,com.collation.platform.model.topology.sys.windows.WindowsService, orthe short name, for example, WindowsService.
Examples of event listeners
In the following example, a change that is detected in any ComputerSystem whoseFQDN contains the "mycompany" string is sent to the recipient "enterprise-eventhost-itm".
<listener object="ComputerSystem" enabled="true"><alert recipient="enterprise-eventhost-itm"/><attribute name="fqdn" operator="contains-with"><value>mycompany</value>
</attribute></listener>
In the following example, changes to all objects of a specified type are detected.
Administering 211
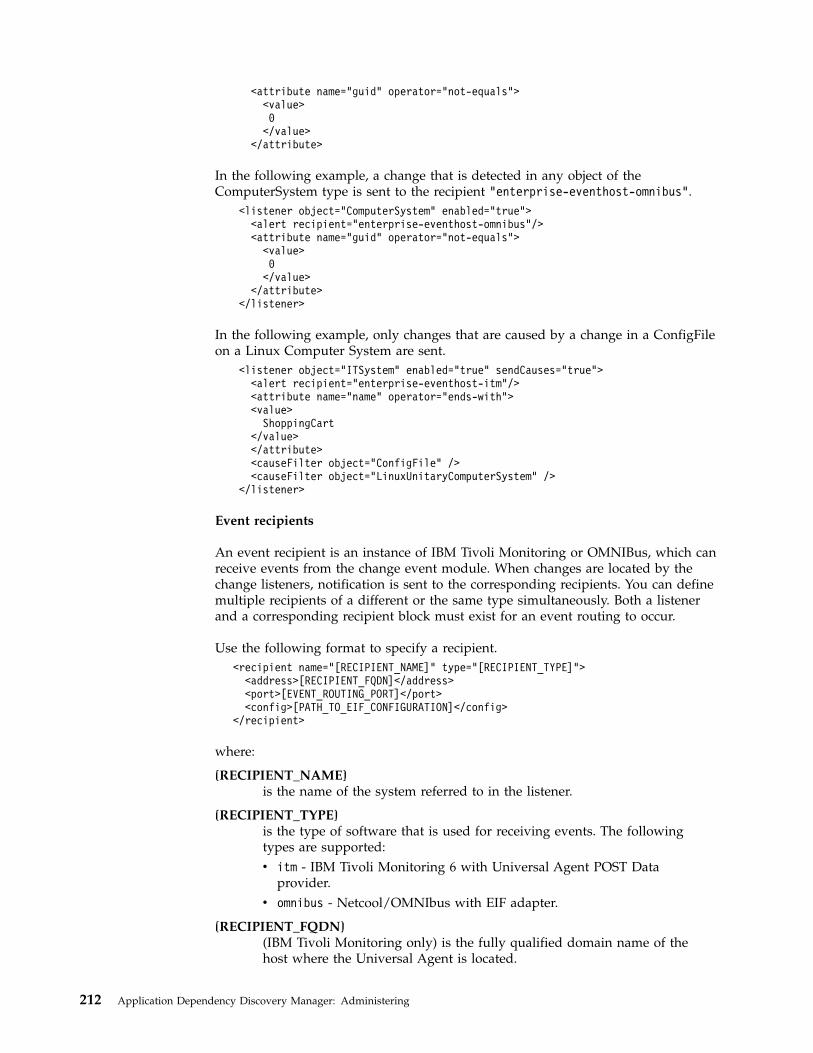
<attribute name="guid" operator="not-equals"><value>0</value>
</attribute>
In the following example, a change that is detected in any object of theComputerSystem type is sent to the recipient "enterprise-eventhost-omnibus".
<listener object="ComputerSystem" enabled="true"><alert recipient="enterprise-eventhost-omnibus"/><attribute name="guid" operator="not-equals"><value>0</value>
</attribute></listener>
In the following example, only changes that are caused by a change in a ConfigFileon a Linux Computer System are sent.
<listener object="ITSystem" enabled="true" sendCauses="true"><alert recipient="enterprise-eventhost-itm"/><attribute name="name" operator="ends-with"><value>ShoppingCart
</value></attribute><causeFilter object="ConfigFile" /><causeFilter object="LinuxUnitaryComputerSystem" />
</listener>
Event recipients
An event recipient is an instance of IBM Tivoli Monitoring or OMNIBus, which canreceive events from the change event module. When changes are located by thechange listeners, notification is sent to the corresponding recipients. You can definemultiple recipients of a different or the same type simultaneously. Both a listenerand a corresponding recipient block must exist for an event routing to occur.
Use the following format to specify a recipient.<recipient name="[RECIPIENT_NAME]" type="[RECIPIENT_TYPE]">
<address>[RECIPIENT_FQDN]</address><port>[EVENT_ROUTING_PORT]</port><config>[PATH_TO_EIF_CONFIGURATION]</config>
</recipient>
where:
[RECIPIENT_NAME]is the name of the system referred to in the listener.
[RECIPIENT_TYPE]is the type of software that is used for receiving events. The followingtypes are supported:v itm - IBM Tivoli Monitoring 6 with Universal Agent POST Data
provider.v omnibus - Netcool/OMNIbus with EIF adapter.
[RECIPIENT_FQDN](IBM Tivoli Monitoring only) is the fully qualified domain name of thehost where the Universal Agent is located.
212 Application Dependency Discovery Manager: Administering
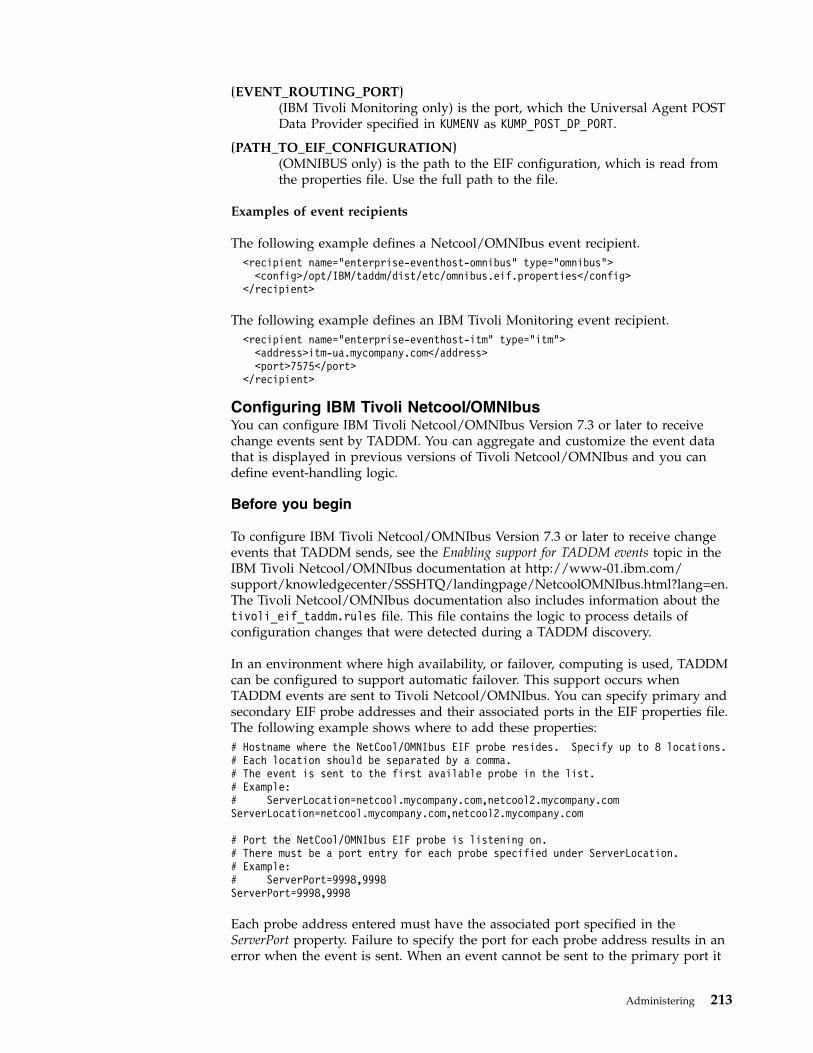
[EVENT_ROUTING_PORT](IBM Tivoli Monitoring only) is the port, which the Universal Agent POSTData Provider specified in KUMENV as KUMP_POST_DP_PORT.
[PATH_TO_EIF_CONFIGURATION](OMNIBUS only) is the path to the EIF configuration, which is read fromthe properties file. Use the full path to the file.
Examples of event recipients
The following example defines a Netcool/OMNIbus event recipient.<recipient name="enterprise-eventhost-omnibus" type="omnibus"><config>/opt/IBM/taddm/dist/etc/omnibus.eif.properties</config>
</recipient>
The following example defines an IBM Tivoli Monitoring event recipient.<recipient name="enterprise-eventhost-itm" type="itm"><address>itm-ua.mycompany.com</address><port>7575</port>
</recipient>
Configuring IBM Tivoli Netcool/OMNIbusYou can configure IBM Tivoli Netcool/OMNIbus Version 7.3 or later to receivechange events sent by TADDM. You can aggregate and customize the event datathat is displayed in previous versions of Tivoli Netcool/OMNIbus and you candefine event-handling logic.
Before you begin
To configure IBM Tivoli Netcool/OMNIbus Version 7.3 or later to receive changeevents that TADDM sends, see the Enabling support for TADDM events topic in theIBM Tivoli Netcool/OMNIbus documentation at http://www-01.ibm.com/support/knowledgecenter/SSSHTQ/landingpage/NetcoolOMNIbus.html?lang=en.The Tivoli Netcool/OMNIbus documentation also includes information about thetivoli_eif_taddm.rules file. This file contains the logic to process details ofconfiguration changes that were detected during a TADDM discovery.
In an environment where high availability, or failover, computing is used, TADDMcan be configured to support automatic failover. This support occurs whenTADDM events are sent to Tivoli Netcool/OMNIbus. You can specify primary andsecondary EIF probe addresses and their associated ports in the EIF properties file.The following example shows where to add these properties:# Hostname where the NetCool/OMNIbus EIF probe resides. Specify up to 8 locations.# Each location should be separated by a comma.# The event is sent to the first available probe in the list.# Example:# ServerLocation=netcool.mycompany.com,netcool2.mycompany.comServerLocation=netcool.mycompany.com,netcool2.mycompany.com
# Port the NetCool/OMNIbus EIF probe is listening on.# There must be a port entry for each probe specified under ServerLocation.# Example:# ServerPort=9998,9998ServerPort=9998,9998
Each probe address entered must have the associated port specified in theServerPort property. Failure to specify the port for each probe address results in anerror when the event is sent. When an event cannot be sent to the primary port it
Administering 213
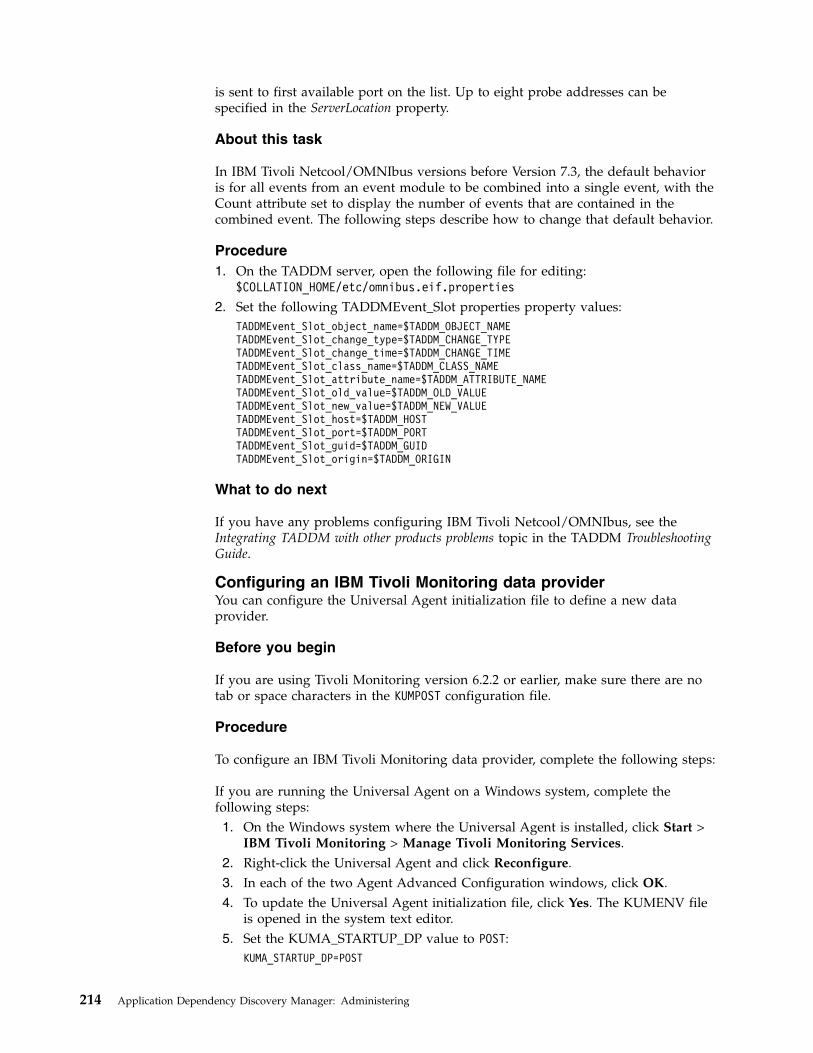
is sent to first available port on the list. Up to eight probe addresses can bespecified in the ServerLocation property.
About this task
In IBM Tivoli Netcool/OMNIbus versions before Version 7.3, the default behavioris for all events from an event module to be combined into a single event, with theCount attribute set to display the number of events that are contained in thecombined event. The following steps describe how to change that default behavior.
Procedure1. On the TADDM server, open the following file for editing:
$COLLATION_HOME/etc/omnibus.eif.properties
2. Set the following TADDMEvent_Slot properties property values:TADDMEvent_Slot_object_name=$TADDM_OBJECT_NAMETADDMEvent_Slot_change_type=$TADDM_CHANGE_TYPETADDMEvent_Slot_change_time=$TADDM_CHANGE_TIMETADDMEvent_Slot_class_name=$TADDM_CLASS_NAMETADDMEvent_Slot_attribute_name=$TADDM_ATTRIBUTE_NAMETADDMEvent_Slot_old_value=$TADDM_OLD_VALUETADDMEvent_Slot_new_value=$TADDM_NEW_VALUETADDMEvent_Slot_host=$TADDM_HOSTTADDMEvent_Slot_port=$TADDM_PORTTADDMEvent_Slot_guid=$TADDM_GUIDTADDMEvent_Slot_origin=$TADDM_ORIGIN
What to do next
If you have any problems configuring IBM Tivoli Netcool/OMNIbus, see theIntegrating TADDM with other products problems topic in the TADDM TroubleshootingGuide.
Configuring an IBM Tivoli Monitoring data providerYou can configure the Universal Agent initialization file to define a new dataprovider.
Before you begin
If you are using Tivoli Monitoring version 6.2.2 or earlier, make sure there are notab or space characters in the KUMPOST configuration file.
Procedure
To configure an IBM Tivoli Monitoring data provider, complete the following steps:
If you are running the Universal Agent on a Windows system, complete thefollowing steps:1. On the Windows system where the Universal Agent is installed, click Start >
IBM Tivoli Monitoring > Manage Tivoli Monitoring Services.2. Right-click the Universal Agent and click Reconfigure.3. In each of the two Agent Advanced Configuration windows, click OK.4. To update the Universal Agent initialization file, click Yes. The KUMENV file
is opened in the system text editor.5. Set the KUMA_STARTUP_DP value to POST:
KUMA_STARTUP_DP=POST
214 Application Dependency Discovery Manager: Administering
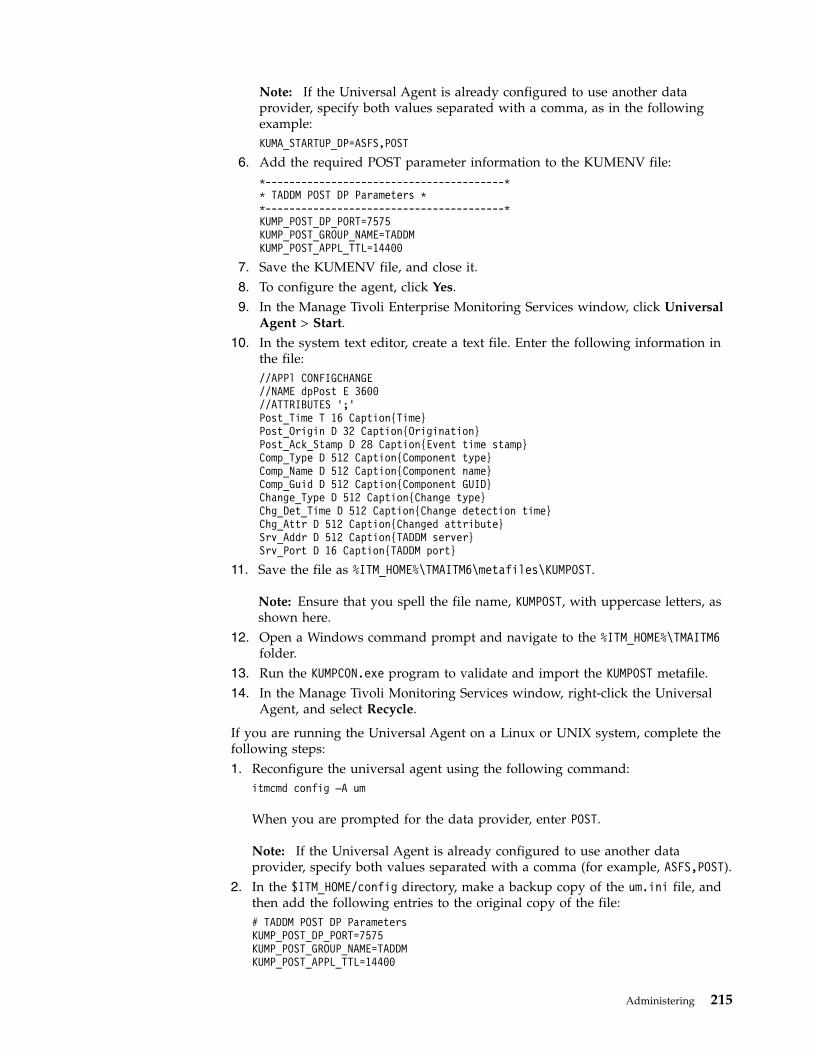
Note: If the Universal Agent is already configured to use another dataprovider, specify both values separated with a comma, as in the followingexample:KUMA_STARTUP_DP=ASFS,POST
6. Add the required POST parameter information to the KUMENV file:*----------------------------------------** TADDM POST DP Parameters **----------------------------------------*KUMP_POST_DP_PORT=7575KUMP_POST_GROUP_NAME=TADDMKUMP_POST_APPL_TTL=14400
7. Save the KUMENV file, and close it.8. To configure the agent, click Yes.9. In the Manage Tivoli Enterprise Monitoring Services window, click Universal
Agent > Start.10. In the system text editor, create a text file. Enter the following information in
the file://APPl CONFIGCHANGE//NAME dpPost E 3600//ATTRIBUTES ’;’Post_Time T 16 Caption{Time}Post_Origin D 32 Caption{Origination}Post_Ack_Stamp D 28 Caption{Event time stamp}Comp_Type D 512 Caption{Component type}Comp_Name D 512 Caption{Component name}Comp_Guid D 512 Caption{Component GUID}Change_Type D 512 Caption{Change type}Chg_Det_Time D 512 Caption{Change detection time}Chg_Attr D 512 Caption{Changed attribute}Srv_Addr D 512 Caption{TADDM server}Srv_Port D 16 Caption{TADDM port}
11. Save the file as %ITM_HOME%\TMAITM6\metafiles\KUMPOST.
Note: Ensure that you spell the file name, KUMPOST, with uppercase letters, asshown here.
12. Open a Windows command prompt and navigate to the %ITM_HOME%\TMAITM6folder.
13. Run the KUMPCON.exe program to validate and import the KUMPOST metafile.14. In the Manage Tivoli Monitoring Services window, right-click the Universal
Agent, and select Recycle.
If you are running the Universal Agent on a Linux or UNIX system, complete thefollowing steps:1. Reconfigure the universal agent using the following command:
itmcmd config –A um
When you are prompted for the data provider, enter POST.
Note: If the Universal Agent is already configured to use another dataprovider, specify both values separated with a comma (for example, ASFS,POST).
2. In the $ITM_HOME/config directory, make a backup copy of the um.ini file, andthen add the following entries to the original copy of the file:# TADDM POST DP ParametersKUMP_POST_DP_PORT=7575KUMP_POST_GROUP_NAME=TADDMKUMP_POST_APPL_TTL=14400
Administering 215
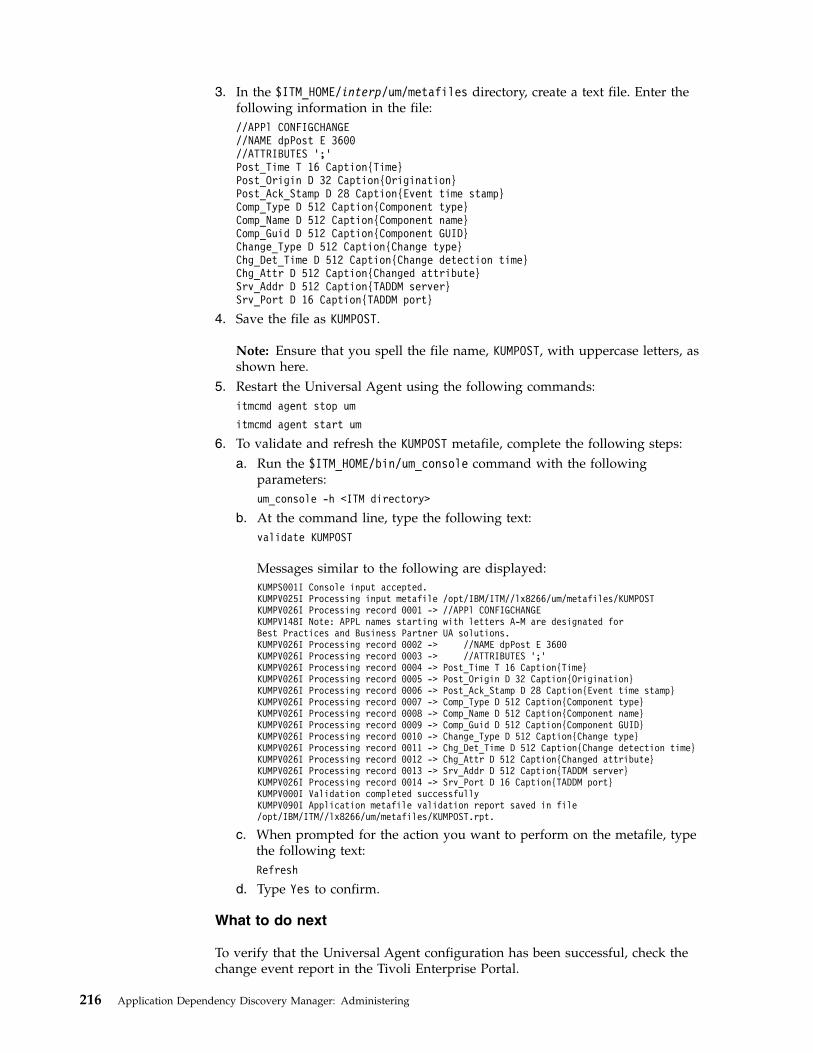
3. In the $ITM_HOME/interp/um/metafiles directory, create a text file. Enter thefollowing information in the file://APPl CONFIGCHANGE//NAME dpPost E 3600//ATTRIBUTES ’;’Post_Time T 16 Caption{Time}Post_Origin D 32 Caption{Origination}Post_Ack_Stamp D 28 Caption{Event time stamp}Comp_Type D 512 Caption{Component type}Comp_Name D 512 Caption{Component name}Comp_Guid D 512 Caption{Component GUID}Change_Type D 512 Caption{Change type}Chg_Det_Time D 512 Caption{Change detection time}Chg_Attr D 512 Caption{Changed attribute}Srv_Addr D 512 Caption{TADDM server}Srv_Port D 16 Caption{TADDM port}
4. Save the file as KUMPOST.
Note: Ensure that you spell the file name, KUMPOST, with uppercase letters, asshown here.
5. Restart the Universal Agent using the following commands:itmcmd agent stop um
itmcmd agent start um
6. To validate and refresh the KUMPOST metafile, complete the following steps:a. Run the $ITM_HOME/bin/um_console command with the following
parameters:um_console -h <ITM directory>
b. At the command line, type the following text:validate KUMPOST
Messages similar to the following are displayed:KUMPS001I Console input accepted.KUMPV025I Processing input metafile /opt/IBM/ITM//lx8266/um/metafiles/KUMPOSTKUMPV026I Processing record 0001 -> //APPl CONFIGCHANGEKUMPV148I Note: APPL names starting with letters A-M are designated forBest Practices and Business Partner UA solutions.KUMPV026I Processing record 0002 -> //NAME dpPost E 3600KUMPV026I Processing record 0003 -> //ATTRIBUTES ’;’KUMPV026I Processing record 0004 -> Post_Time T 16 Caption{Time}KUMPV026I Processing record 0005 -> Post_Origin D 32 Caption{Origination}KUMPV026I Processing record 0006 -> Post_Ack_Stamp D 28 Caption{Event time stamp}KUMPV026I Processing record 0007 -> Comp_Type D 512 Caption{Component type}KUMPV026I Processing record 0008 -> Comp_Name D 512 Caption{Component name}KUMPV026I Processing record 0009 -> Comp_Guid D 512 Caption{Component GUID}KUMPV026I Processing record 0010 -> Change_Type D 512 Caption{Change type}KUMPV026I Processing record 0011 -> Chg_Det_Time D 512 Caption{Change detection time}KUMPV026I Processing record 0012 -> Chg_Attr D 512 Caption{Changed attribute}KUMPV026I Processing record 0013 -> Srv_Addr D 512 Caption{TADDM server}KUMPV026I Processing record 0014 -> Srv_Port D 16 Caption{TADDM port}KUMPV000I Validation completed successfullyKUMPV090I Application metafile validation report saved in file/opt/IBM/ITM//lx8266/um/metafiles/KUMPOST.rpt.
c. When prompted for the action you want to perform on the metafile, typethe following text:Refresh
d. Type Yes to confirm.
What to do next
To verify that the Universal Agent configuration has been successful, check thechange event report in the Tivoli Enterprise Portal.
216 Application Dependency Discovery Manager: Administering
To open the change event report using IBM Tivoli Monitoring 6.2.1, or later,complete the following steps:1. Navigate to the Universal Agent that was configured to send and receive event
notifications from TADDM.2. Expand the CONFIGCHANGE node.3. Click the DPPOST node.
Creating configuration change situations in IBM Tivoli MonitoringYou can use the Situation function in the Tivoli Enterprise Portal to monitor changeevents and to trigger situations that are based on the information in a changeevent.
Procedure
To create a configuration change situation in IBM Tivoli Monitoring, complete thefollowing steps:
To create a configuration change situation if you are using IBM Tivoli Monitoring6.2.1, complete the following steps:1. In the Navigator pane of IBM Tivoli Enterprise Portal navigate to the
Universal Agent that was configured to send and receive event notificationsfrom TADDM.
2. Expand the CONFIGCHANGE node.3. Right-click the DPPOST node. Click Situations.4. In the “Situations for node_name” window, right-click Universal Data
Provider. Click Create New. The Create Situation or Rule window isdisplayed.
5. In the Name field, type the name of the situation. For example,ConfigurationChanged.
6. In the Description field, type the description of the situation. For example, Achange to a tracked object was detected by TADDM.
7. From the Monitored Application list, select Universal Data Provider.8. Ensure that the Correlate Situations across Managed Systems check box is
clear.9. Click OK. The “Select condition” window is displayed.
10. From the Attribute Group list, select DPPOST.11. From the Attribute Item list, select Component name.12. Click OK. The Formula tab for the situation is displayed.13. Configure the situation so that it is triggered when the component name
matches the name of the resource in your environment that you want tomonitor.
14. Click OK.
To create a configuration change situation if you are using IBM Tivoli Monitoring6.2.2, or later, complete the following steps:1. In the Navigator pane of IBM Tivoli Enterprise Portal navigate to the
Universal Agent that was configured to send and receive event notificationsfrom TADDM.
2. Expand the CONFIGCHANGE node.3. Right-click the DPPOST node. Click Situations.
Administering 217

4. In the “Situations for node_name” window, click Create new Situation. TheCreate Situation window is displayed.
5. In the Name field, type the name of the situation. For example,ConfigurationChanged.
6. In the Description field, type the description of the situation. For example, Achange to a tracked object was detected by TADDM.
7. From the Monitored Application list, select Universal Data Provider.8. Click OK. The “Select condition” window is displayed.9. From the Attribute Group list, select DPPOST.
10. From the Attribute Item list, select Component name.11. Click OK. The Formula tab for the situation is displayed.12. Configure the situation so that it is triggered when the component name
matches the name of the resource in your environment that you want tomonitor.
13. Click OK.14. In the Navigator pane of IBM Tivoli Enterprise Portal, right-click the node that
contains the change event report. Click Situations.15. In the “Situations for node_name” window, right-click the
ConfigurationChanged situation you created and click Start Situation.
Results
When configuration change events are received, their component name is checked.If the component name matches that of the component you have specified in thesituation formula, the configured situation is triggered.
Creating detail links in configuration change event reports in IBMTivoli MonitoringYou can create links in a report table to a workspace displaying change history anddetails directly from the TADDM server. These links give more detailedinformation than what is displayed in a report.
Procedure
To create a link, in a configuration change event report, to more detailed changeevent information, complete the following steps:1. To create a workspace to display the information, complete the following
steps:a. In the Navigator pane, right-click the node within which you want to
contain the workspace. Click File > Save workspace as. The SaveWorkspace As window is displayed.
b. In the Name field, type the name of the workspace. For example,ConfigChangeDetails.
c. In the Description field, type a description of the workspace. For example,Generic workspace for the change event table.
d. Select the Only selectable as the target of a Workspace Link check box.e. Click OK.
2. To configure the workspace using IBM Tivoli Monitoring 6.2.1, or later,complete the following steps:a. Configure the workspace to have one navigator pane and two browser
panes.
218 Application Dependency Discovery Manager: Administering
b. Click Edit > Properties.c. In the Browser pane, select the first instance of Getting Started.d. In the Style pane, select Use Provided Location.e. Click OK.f. In the Location field of one of the browser panes, type the URL of the
Change History view in TADDM. When you have typed the URL on oneline, do not press Enter.http://$taddm_server$:$taddm_port$/cdm/servlet/LICServlet?view=changehistory&hoursback=10000&console=web&guid=$taddm_guid$
The hoursback parameter specifies the number of hours for which changeevents are displayed. For example, setting hoursback to 6 displays allchange events in the previous six hours.
g. In the Browser pane, select the second instance of Getting Started.h. In the Style pane, select Use Provided Location.i. Click OK.j. In the Location field of the second of the browser panes, type the URL of
the Object Details view in TADDM. When you have typed the URL on oneline, do not press Enter.http://$taddm_server$:$taddm_port$/cdm/servlet/LICServlet?console=web&guid=$taddm_guid$
k. To save the new workspace, click File > Save.
Immediately after you have typed the URL into the Location field, do notpress Enter, but save the workspace.
3. Open IBM Tivoli Enterprise Portal. In the Report pane, right-click a row in theReport table.
4. Click Link To > Link Wizard. The Welcome page of the Workspace LinkWizard is displayed.
5. Click Create a new link. Click Next. The Link Name page of the WorkspaceLink Wizard is displayed.
6. In the Name field, type the name of the link. For example, Show Details.7. In the Description field, type a description of the link. For example, Link to
details.8. Click Next. The Link Type page of the Workspace Link Wizard is displayed.9. Click Absolute. Click Next. The Target Workspace page of the Workspace Link
Wizard is displayed.10. In the Navigator panel, select the node containing the workspace you created.
In the Workspace panel, select the workspace you created.11. Click Next. The Parameters page of the Workspace Link Wizard is displayed.12. You must add three symbols: "taddm_server", "taddm_port", and
"taddm_guid". To add a symbol, complete the following steps:a. Click Add Symbol. The Add Symbol window is displayed.b. In the Symbol field, type the name of the symbol.c. Click OK.
13. For each symbol you create, you must link it to an attribute representing thecorrect column in the report.v Link the "taddm_server" symbol to the TADDM server attribute.v Link the "taddm_port" symbol to the TADDM web console port number.v Link the "taddm_guid" symbol to the Component GUID attribute.
Administering 219
To link a symbol to an attribute, complete the following steps:a. In the Parameters page of the Workspace Link Wizard, select the symbol
you want to link to a report column.b. Click Modify Expression. The Expression Editor window is displayed.c. Click Symbol. The Symbols window is displayed.d. Navigate to Attributes, and select the attribute you want to link to the
symbol. Click OK.e. In the Expression Editor window, click OK. The Parameters page of the
Workspace Link Wizard is displayed.14. Click Next. The Summary page of the Workspace Link Wizard is displayed.15. Click Finish.
Results
If you have active events in your change event report, a link icon is displayed nextto each table row. To move to the target workspace, click the link icon and selectShow Details. In the table row, values are substituted for symbols. In theworkspace, the Change History and Object Details panels are launched in context.
Configuring change events for a business systemYou can use the change event functionality to send a change event whenever abusiness system is changed.
About this task
By default, TADDM does not indicate a business system as changed if one of thecomputers it depends on has changed.
Procedure
To enable the sending of change events for business systems, complete thefollowing steps:1. Open $COLLATION_HOME/etc/propagationserver.xml in an appropriate editor.2. In the Computer System section, for the application and business system
relationship elements, set the value of the enabled attribute to true. Forexample:<relationship enabled="true" source="sys.ComputerSystem" attribute="groups"target="app.Application" targetAttribute="true"collectionType="app.FunctionalGroup" radius="1"/>
<relationship enabled="true" source="sys.ComputerSystem" attribute="components"target="sys.BusinessSystem" targetAttribute="true"/>
3. Restart TADDM.4. Create a listener for the business system in the change event configuration
$COLLATION_HOME/etc/EventConfig.xml. In the following example, the eventrecipient is mycompany-itm, and the business system name is MyBiz.<listener object="ITSystem" enabled="true"><alert recipient="mycompany-itm"/><attribute name="name" operator="equals"><value>MyBiz</value></attribute>
</listener>
220 Application Dependency Discovery Manager: Administering
Scheduling jobs with IBM Tivoli Workload SchedulerYou can use the IBM Tivoli Workload Scheduler to schedule jobs in TADDM. TheIBM Tivoli Workload Scheduler is a software automation tool that provides thebackbone for automated workload management and monitoring.
Use IBM Tivoli Workload Scheduler 8.5.1 or later. You must install the MasterDomain Manager and Fault Tolerant Agent on the TADDM server. For informationabout how to install and configure Tivoli Workload Scheduler, seehttp://www-01.ibm.com/support/knowledgecenter/SSGSPN_8.5.1.1/com.ibm.tivoli.itws.doc_8.5.1.1/ic-homepage.html?lang=en. Scheduling objects aremanaged with the composer command-line program and are stored in the TivoliWorkload Scheduler.
The Tivoli Workload Scheduler jobs use the invokejob.sh script to run the requiredoperation. The invokejob.sh script is provided by TADDM installation.
The following parameters are common to all uses of the script:
Required: -u userThis value specifies the user running the API command.
Required: -p passwordThis value specifies the password that authenticates the user.
Required: --profile profileThis value defines the discovery profile.
Optional: -H hostThis value specifies the TADDM server host name. The default name islocalhost. If you use the -T parameter, you must also specify the -Hparameter.
Optional: -P portThis value specifies the TADDM server port. The default the value is 9433.
Optional: -v versionThis value specifies the version name or number. The default value is 0.
Optional: -t timeoutThis value specifies the amount of time before the job is automaticallyinterrupted.
Optional: -T | --truststorefile truststoreThis value specifies the location of the truststore file, jssecacerts.cert,with a certificate for connection to the TADDM server. This parameter isrequired for secure connection to TADDM. If you use this parameter, youmust also specify the -H parameter.
To schedule a job, complete the following steps:1. From the Tivoli Workload Scheduler, enter the TADDM job definition file in an
edit file. The following example shows a template job definition:WORKSTATION_ID#TADDM_JOBSCRIPTNAME "./opt/IBM/taddm/dist/bin/invokejob.sh -u
^TADDM_USERNAME^ -p ^TADDM_PASSWORD^ command [parameters]"STREAMLOGON taddmuserTASKTYPE UNIXRECOVERY STOP
^TADDM_USERNAME^ and ^TADDM_PASSWORD^ are variables that mustbe defined in Tivoli Workload Scheduler. These variables are mapped to values
Administering 221
that are stored in the database. For security reasons, use variables, especiallywhen coding passwords, to ensure that the values are not visible as open text.
2. Use the composer to add the edit file to the database.3. Add the job to a job stream, and schedule the job stream to run. The IBM Tivoli
Workload Scheduler agent starts and monitors the action of the invokejob.shscript.
Scheduling a discovery job
The following example runs a discovery on scope 127.0.0.1:dist/bin/invokejob.sh -u USER -p PASSWORD --timeout 60000 discover start--profile “Level 3 Discovery” 127.0.0.1
The following example runs a discovery on the MyScopeSet scope set, which mustalready exist in the scope list:dist/bin/invokejob.sh -u USER -p PASSWORD --timeout 60000 discover start--profile “Level 3 Discovery” MyScopeSet
In the preceding examples, the last parameter specifies the scope element or scopeset to be included in the discovery run. The profile parameter is required. Thename parameter, which is the name of the discovery run, is optional.
The following command is an example of how to stop a currently runningdiscovery:dist/bin/invokejob.sh -u USER -p PASSWORD --timeout 60000 discover stop
The discover stop command does not take any additional arguments.
Scheduling a domain synchronization job
The following example shows the command-line syntax and options for theTADDM script invokejob.sh to run a domain synchronization in a synchronizationserver deployment:dist/bin/invokejob.sh -u USER -p PASSWORD --timeout 60000 sync start TestDomain
Both the sync start and sync stop commands require one argument, the name ofthe domain for which to start or stop the synchronization job.
Integrating TADDM with IBM Tivoli Business Service ManagerDepending on the specific tasks that you must do in your IT environment, you canuse the integration capabilities that are available between TADDM and IBM TivoliBusiness Service Manager. To use these capabilities, you must have IBM TivoliBusiness Service Manager 4.2.1 Interim Fix 3, but no additional configuration ofTADDM is required.
Updating the lifecycle state for business applicationsYou can use the lifecycle state to filter objects for synchronization into IBM TivoliBusiness Service Manager from TADDM. You can use theBusinessServiceLifecycle program to list information about a business applicationor to set the lifecycle state of a business application.
The IBM Tivoli Business Service Manager ITsystems application includes onlybusiness applications. For this reason, the BusinessServiceLifecycle programsupports only business applications.
222 Application Dependency Discovery Manager: Administering
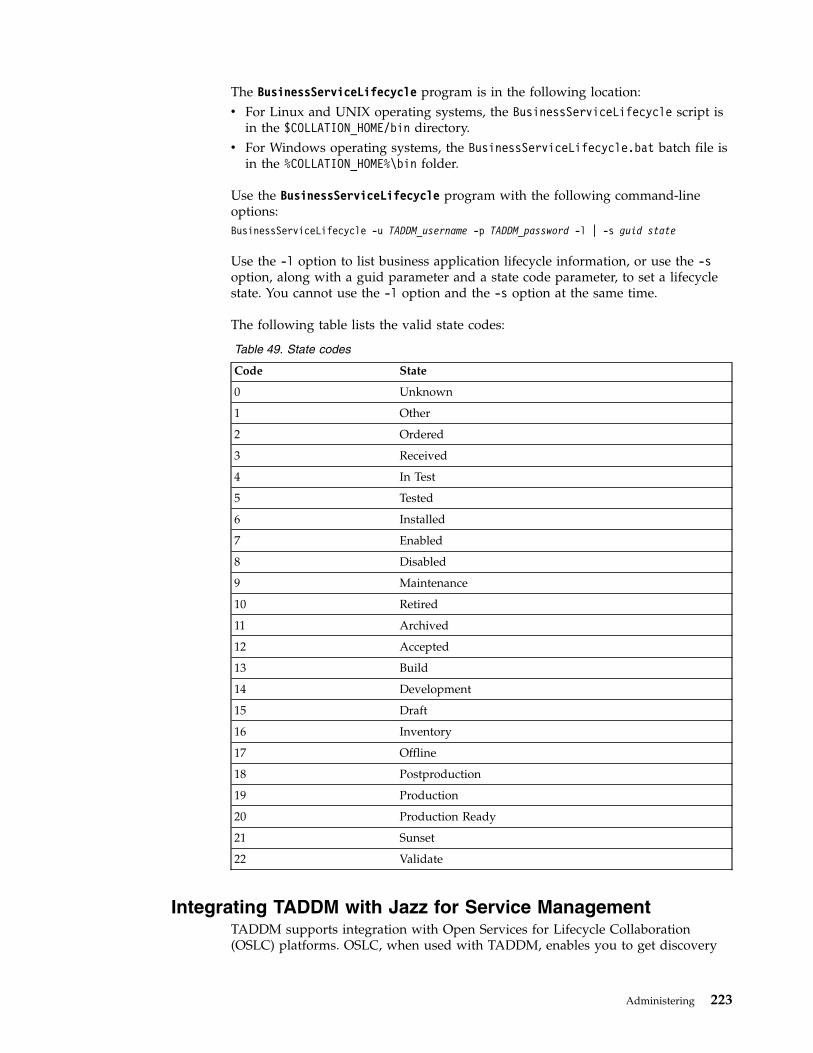
The BusinessServiceLifecycle program is in the following location:v For Linux and UNIX operating systems, the BusinessServiceLifecycle script is
in the $COLLATION_HOME/bin directory.v For Windows operating systems, the BusinessServiceLifecycle.bat batch file is
in the %COLLATION_HOME%\bin folder.
Use the BusinessServiceLifecycle program with the following command-lineoptions:BusinessServiceLifecycle -u TADDM_username -p TADDM_password -l | -s guid state
Use the -l option to list business application lifecycle information, or use the -soption, along with a guid parameter and a state code parameter, to set a lifecyclestate. You cannot use the -l option and the -s option at the same time.
The following table lists the valid state codes:
Table 49. State codes
Code State
0 Unknown
1 Other
2 Ordered
3 Received
4 In Test
5 Tested
6 Installed
7 Enabled
8 Disabled
9 Maintenance
10 Retired
11 Archived
12 Accepted
13 Build
14 Development
15 Draft
16 Inventory
17 Offline
18 Postproduction
19 Production
20 Production Ready
21 Sunset
22 Validate
Integrating TADDM with Jazz for Service ManagementTADDM supports integration with Open Services for Lifecycle Collaboration(OSLC) platforms. OSLC, when used with TADDM, enables you to get discovery
Administering 223
data presented in a the form standard resource definitions. Jazz for ServiceManagement platform is an IBM integration tool that is based on OSLC opencommunity specifications.
Jazz for Service Management provides a single point of configuration andadministration of, but not limited to, all Tivoli products. Jazz for ServiceManagement shows end-to-end view of IT resource, application, and businessrelationships.
TADDM OSLC REST CommunicationTADDM Representational State Transfer (REST) Service provides OSLC integrationacross a number of OSLC REST feeds. The service specifies the media types thatare returned when it is run and describes the security aspects that are connectedwith the service.
Common Resource Type Vocabulary (CRTV) is an IBM and OSLCcommunity-defined data model that TADDM supports, along with the TivoliCommon Data Model (CDM). TADDM support for OSLC makes CDM discoverydata available in the form of CRTV-defined resources.
OSLC REST interface:
A REST interface is available in TADDM for Open Services Lifecycle Collaboration(OSLC). You can use the OSLC REST interface to get information about registeredconfiguration items (CIs), their attributes, and change history.
You can get information about CI attributes only if the attributes are supported bythe Common Resource Type Vocabulary (CRTV) or TADDM vocabulary.
Each valid request must have a GUID that identifies the concrete CI.
There are two service types:
Configuration serviceThis service provides an interface to retrieve extended attributes for aCRTV resource.
Change history serviceThis service provides an interface to retrieve change history for a specifiedperiod of time, for a CRTV resource.
For each service, you can view the following three types of content:v RDF representationv OSLC compact viewv HTML preview
The following URL is the base address:http[s]://taddm_host:port/cdm/oslc/provider_name/ci_guid
wherev port is the port, on which the Tomcat server (TADDM 7.3.0) or WAS Liberty
Profile server (TADDM 7.3.0.1, and later) listens. The default value is 9430.v provider_name is one of the following two values, depending on which service
you want to use:– configuration
224 Application Dependency Discovery Manager: Administering
– changehistory
v ci_guid is the ID of the CI in TADDM
To view the HTML preview for a CI, use the following URL:v http[s]://taddm_host:port/cdm/oslc/provider_name/ci_guid/preview
The OSLC REST interface accepts only HTTP-GET requests. You can use the HTTPaccept header to specify the returned content type.
To view the OSLC compact view for the given CI, specify the following acceptheader:application/x-oslc-compact+xml
You view the RDF representation of the given CI, specify the following acceptheader:application/rdf+xml
This is the default behavior if no value is provided for the accept header.
OSLC compact view:
The OSLC compact view is an XML representation of a target resource.
The OSLC compact view is a preview provided by the OSLC REST interface. Toview a preview of a target resource, a representation of the resources, as defined inthe OSLC specification, must be supplied by the provider.
You can get this representation of the resource by using a HTTP GET request to theURI of the target resource along with the application/x-oslc-compact+xml accessheader.
If the provider supports the preview mechanism, it responds with a compactrepresentation that includes information that the consumer can use to display linksand a preview of the target resource.
Jazz for Service Management HTML preview:
Jazz for Service Management Registry Services provides an HTML user interface todeliver information about registered elements from connected external systems.
All elements that have data that are provided by TADDM have a HTML previewthat provides a fast overview of selected element data directly from TADDMserver.
TADDM provides Jazz for Service Management with a feeding service at thefollowing address:http[s]://host_name:port/cdm/oslc/configuration/guid/preview
where host_name and port are the host name and the port number of the TADDMserver and guid is the unique element identifier.
The URL shows a page with overview information about selected element. Thepage is displayed automatically in the Jazz for Service Management user interface.
Administering 225
The page content is similar to the General tab in the Inventory Summary Detailsview available in the TADDM Data Management Portal.
Security:
You can configure TADDM so that access to the feeds provided by the OSLC RESTinterface requires authentication.
To access the REST interface, you must authenticate using one of the followingmethods:
Basic HTTP authenticationCredentials must be placed in the authorization request header. The valueof that header must adhere to Basic HTTP authentication rules.
Single sign-onWhen using single sign-on, all requests submitted to the REST interfacemust carry a Lightweight Third-Party Authentication (LTPA) token. Toverify the token, TADDM must be configured to use WebSphere VirtualMember Manager (VMM) as a user repository.
For more information about configuring VMM, see “Configuring theTADDM server to use WebSphere federated repositories” on page 25.
To provide requested feeds to be presented without authentication, the followingproperty in the collation.properties file must be configured with a valid RegistryServices URL:com.ibm.cdb.topobuilder.integration.oslc.frsurl
Then, a pre-configured user name and password are used if valid credentials arenot included with the request.
The user name and password are taken from the web.xml deployment descriptorfile of the Common Data Model web application. You can configure thiscustomization using the following OSLCFilter init parameters:
OSLC_LOGIN_OFFIf this parameter is set to true, then the user name and password specifiedby the OSLC_USER and OSLC_PASSWORD parameters are used ifincoming requests do not contain their own, valid credentials.
If this parameter is set to false, the incoming request must contain validcredentials.The default value is true.
OSLC_USERThis parameter is set to the user name that is used if valid credentials arenot included with the request. If required, you can change the user nameused.
The default value is administrator.
OSLC_PASSWORDThis parameter is set to the password that is used if valid credentials arenot included with the request. If you change the administrator’s passwordusing the TADDM UI, you must update the password value set by thisparameter.
The default value is collation.
226 Application Dependency Discovery Manager: Administering
Exporting data to Registry Services using OSLCAgentYou can use the OSLCAgent topology agent to export configuration item (CI)information to Registry Services.
OSLCAgent is an automated solution for exporting data from TADDM to RegistryServices. The agent periodically performs the following tasks:v Queries for objects that can be registered in Registry Servicesv Translates them into RDF-formatted messagesv Posts them using HTTP
The OSLCAgent belongs to the Integration group. The time interval between runsis specified in the following entry in the collation.properties file:com.ibm.cdb.topobuilder.groupinterval.integration
The OSLCAgent can act as a configuration provider and a change history provider.These two roles can be enabled separately. To enable the configuration providerrole, set the following property to true:com.ibm.cdb.topobuilder.integration.oslc.enable.configurationsp
To enable the change history provider role, set the following property to true:com.ibm.cdb.topobuilder.integration.oslc.enable.changehistorysp
To configure the OSLCAgent to connect to Registry Services, you must specify theRegistry Services address and access entry details.
Configure the Registry Services address in the following property:com.ibm.cdb.topobuilder.integration.oslc.frsurl
Specify the Registry Services address in the following format:protocol://fqdn_or_ip_or_hostname:port
For example, http://192.0.2.24:9081
Note: Fully Qualified Domain Name (FQDN) or Fully Qualified Hostname arepreferred to IP address to provide consistency with other products and avoidintegration issues. However, if all other products that are used with TADDM useIP address, you must specify IP address. If no products are used with TADDM, itis still preferred to use FQDN in case other products are added later.
Create an access list entry of Integration/Registry Service type. Specify the username and password for Registry Services.
You can fine-tune how the OSLCAgent works using the following properties:
com.ibm.cdb.topobuilder.integration.oslc.maxtimeperrunThis property specifies the maximum time (in minutes) for which theOSLCAgent is allowed to run. This time can be exceeded for each providerby the length of time that is consumed by jobs that are submitted into thepool before the timeout event. If the property is not configured or is set to-1, the time that is allowed for a single run of the OSLCAgent is unlimited.
com.ibm.cdb.topobuilder.integration.oslc.jobspoolsizeThis property specifies the maximum number of concurrent jobs that areallowed to run. Each job registers a single CI. If the property is notconfigured, the default value is 10.
Administering 227
com.ibm.cdb.topobuilder.integration.oslc.frshttptimeoutThis property specifies, in milliseconds, the timeout for HTTP connections.The default value is 5000.
com.ibm.cdb.topobuilder.integration.oslc.frsfailfastafterThis property specifies the number of consecutive HTTP connectiontimeouts after which an agent considers Registry Services unavailable andstops attempting to connect. The default value is 5.
com.ibm.cdb.topobuilder.integration.oslc.unregisterableIPsThis property specifies IP addresses that should not be registered as theyare not public and might cause the overmerge of resource records. Thisproperty can contain regular expressions. The default value is127.0.0.1,01111111000000000000000000000001,0:0:0:0:0:0:0:1,00000000000000000000000000000000000000000000000000000000000000000000000000000000000000000000000000000000000000000000000000000001.
com.ibm.cdb.topobuilder.integration.oslc.unregisterableFQDNsThis property specifies fully qualified domain names that should not beregistered as they are not public and might cause the overmerge ofresource records. This property can contain regular expressions. Thedefault value is localhost.localdomain,localhost,loopback6(.?\u005c\w*)*.
com.ibm.cdb.topobuilder.integration.oslc.enablecrtvtype.CRTVTypeThis property specifies that the OSLCAgent processes only CIs of aparticular Common Resource Type Vocabulary (CRTV) type. If it isenabled, only CIs of that CRTV type are registered, updated, andunregistered.
For example, settingcom.ibm.cdb.topobuilder.integration.oslc.enablecrtvtype.ComputerSystem=true
specifies that only computer systems are processed.
The following CRTV types are allowed:v ComputerSystemv Database
v Fix Pack 2 SAPSystemv ServiceInstancev SoftwareModulev SoftwareServer
com.ibm.cdb.topobuilder.integration.oslc.history.days_previousThis property specifies the number of days of change history informationavailable using the launch in context (LIC) URL. The default value is 5.
You can use the days_previous property to control the amount of storagespace and processing time required for managing change historyinformation.
The LIC URL is listed in the OSLC Change History HTML preview.
If the value is greater than 0, then the days_previous parameter is appliedto the LIC URL to limit the amount of change history displayed.
If the value is 0, or less than 0, then the LIC URL does not contain thedays_previous parameter, and you can see the entire change history forthat CI.
228 Application Dependency Discovery Manager: Administering
Command line interface for OSLCAgentYou can use the OSLCAgent command line interface (CLI) to manually exportconfiguration item (CI) information to Registry Services.
For the OSLCAgent, you can pass a combination of commands and switches to theruntopobuild script or batch file. Each command and switch has a short,single-letter format, and a longer, more descriptive format. You can use anycombination of command and switch formats.
The following commands are available:v -R | –refreshAll true|false
This command registers all eligible CIs, even if they have been registeredalready.
v -r | -refreshGuid guid
This command registers the CI that has the specified GUID, even if it has beenregistered already.
v -l | -refreshIgnored true|false
If a CI is discovered in a position that is not deep enough, it might not havecorrectly formed naming rules. By default, the OSLCAgent ignores such CIs.This command forces the OSLCAgent to process these CIs again.
To specify particular actions, you can pass a switch with any command. There aretwo types of switches available.
You can use the following switches to enable or disable the processing of particularCRTV types:v -c | --enableComputerSystem true|false
v -d | --enableDatabase true|false
v -i | --enableServiceInstance true|false
v -m | --enableSoftwareModule true|false
v -s | --enableSoftwareServer true|false
For example, if you don’t want to re-register computer systems, use the -c falseswitches.
You can use the following switches to enable or disable the configuration andchange history roles:v -h | --enableChangeHistoryProvider true|false
v -p | --enableConfigurationProvider true|false
For example, if you don’t want to perform re-registration as a change historyprovider, use the -h false switches.
If you want default values to be used if you do not pass a command or a switchwhen running the runtopobuild script or batch file, configure the followingproperties in the collation.properties file:v com.ibm.cdb.topobuilder.integration.oslc.refreshAll=true|false
v com.ibm.cdb.topobuilder.integration.oslc.refreshGuid=guid
v com.ibm.cdb.topobuilder.integration.oslc.enablecrtvtype.crtv_type
Administering 229
For a full list of the available parameters and switches, go to $COLLATION_HOME/support/bin and run the runtopobuild script or batch file with the -H switch. forexample,./runtopobuild.sh -H
Registering configuration items with Registry ServicesThis topic lists the configuration items (CIs) discovered by TADDM that arequeried for registration with Registry Services, and lists the attributes that are set,along with detailed mapping information.
If a particular CI is not registered, every registering thread produces loginformation about why the CI is not registered. The list of unset naming ruleattributes are listed in the log. To configure the correct logging level, set thefollowing property value in the collation.properties file:com.collation.log.level.vm.Topology=DEBUG
The following attributes are common for every CRTV type:
guid Set with the GUID value of the CI.
name Set with the value of the name, label, or displayName attribute.
descriptionSet with the value of the description attribute.
lastDiscoveredTimeSet with the value of the lastModifiedTime attribute.
SoftwareServer
The CRTV SoftwareServer type contains the following TADDM classes andattributes:v WebSphereServer
– host– node– node.cell
v Db2Instance– home– host
v MQQueueManager– displayName | label | name
v AppServer– displayName | label | name– host
v CommunityServer– displayName | label
v SametimeServer– displayName | label
v MeetingServer– displayName | label
v SpecialityServer– displayName | label | name
230 Application Dependency Discovery Manager: Administering
v AgentManager– displayName | label
v SharePointRole– displayName | label | name
TADDM attributes are mapped to CRTV attributes in the following way:
TADDM attribute CRTV attribute Other information
PrimarySAP crtv:serverAccessPoint The serviceAccessPointresource is registered, alongwith the IpAddress resourceto which it points, usingcrtv:ipAddress.
version crtv:version
vendorName crtv:manufacturer
host crtv:runsOn crtv:runsOn points toComputerSystem
home crtv:instancePath For DatabaseServer andDb2Instance only.
dataPath crtv:instancePath For MQQueueManager only.
rdf:type is set to one of the following values:v J2EEServer
v WebSphereServer
v IBMHTTPServer
v WebServer
v Db2Instance
v OracleInstance
v MQQueueManager
v WebServer
v DatabaseInstance
v CICSRegion
ComputerSystem
The CRTV ComputerSystem type contains the following TADDM classes andattributes:v ComptuerSystem
One of the following combinations of attributes is set:– systemId &VMID– systemId– serialNumber & model & manufacturer &VMID– serialNumber & model & manufacturer– systemBoardUUID– ipInterfaces
TADDM attributes are mapped to CRTV attributes in the following way:
Administering 231
TADDM attribute CRTV attribute Other information
label or displayName crtv:name
OSVersion or OSRunning crtv:version
hostSystem crtv:dependsOn
fqdn crtv:fqdn
name crtv:shortHostname If name is set and it is avalid hostname.
ForSunSPARCComputerSystemonly.
ipInterface crtv:ipAddress All FQDNs for those IPaddresses are merged intocrtv:fqdn.
crtv:type is set with one of the following valuesv Generic
v SunFire
v SunSPARC
v SystemP
v Unitary
v Virtual
v WPAR
For a LinuxUnitaryComputerSystem, additional attributes are mapped in thefollowing way:
TADDM attribute CRTV attribute Other information
manufacturer crtv:manufacturer
model crtv:model
serialNumber crtv:serialNumber
VMID crtv:vmid If CPUType and Model areset:
v For intel, VMID is set tonull and an attempt ismade to setcrtv:systemBoardUUIDwith systemBoardUUID orconvertedUUID.
v For power, CS is ignored ifit has VMID set.
For a SunSPARCUnitaryComputerSystem, additional attributes are mapped in thefollowing way:
TADDM attribute CRTV attribute Other information
systemId crtv:hostid
VMID crtv:vmid
232 Application Dependency Discovery Manager: Administering
For any other computer system, additional attributes are mapped in the followingway:
TADDM attribute CRTV attribute Other information
manufacturer crtv:manufacturer
model crtv:model
serialNumber crtv:serialNumber
VMID crtv:VMID If OSRunning is set toWindowsOperatingSystem,VMID is set to null.
If OSRunning is set to HpUx,VMID, model, andserialNumber are set to null.
systemBoardUUID orconvertedUUID
crtv:systemBoardUUID
worldWideName crtv:hostid For FCSwitch, TapeLibrary,and TapeMediaChanger only.
Database
The CRTV Database type contains the following TADDM classes and attributes:v Db2Database
– name | displayNamev IDSDatabase
– name | displayNamev IMSDatabase
– name | displayNamev OracleDatabase
– name | displayNamev SqlServerDatabase
– name | displayNamev SybaseDatabase
– name | displayNamev DominoDatabase
– name | displayName
TADDM attributes are mapped to CRTV attributes in the following way:
TADDM attribute CRTV attribute Other information
name crtv:name
fileName crtv:name For DominoDatabase only.
parent crtv:dbInstance
ServiceInstance
Depending on whether the compatibility with earlier versions is enabled, the CRTVServiceInstance type contains the following TADDM classes and attributes:v When compatibility with earlier versions is enabled:
Administering 233
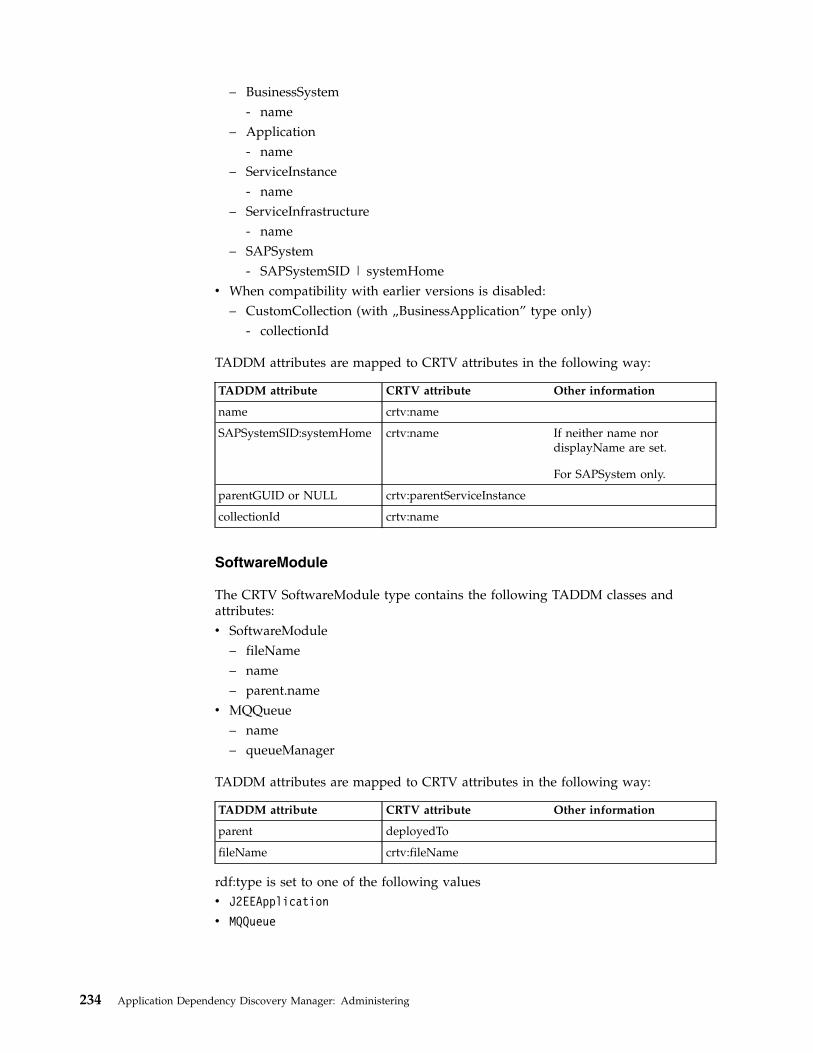
– BusinessSystem- name
– Application- name
– ServiceInstance- name
– ServiceInfrastructure- name
– SAPSystem- SAPSystemSID | systemHome
v When compatibility with earlier versions is disabled:– CustomCollection (with „BusinessApplication” type only)
- collectionId
TADDM attributes are mapped to CRTV attributes in the following way:
TADDM attribute CRTV attribute Other information
name crtv:name
SAPSystemSID:systemHome crtv:name If neither name nordisplayName are set.
For SAPSystem only.
parentGUID or NULL crtv:parentServiceInstance
collectionId crtv:name
SoftwareModule
The CRTV SoftwareModule type contains the following TADDM classes andattributes:v SoftwareModule
– fileName– name– parent.name
v MQQueue– name– queueManager
TADDM attributes are mapped to CRTV attributes in the following way:
TADDM attribute CRTV attribute Other information
parent deployedTo
fileName crtv:fileName
rdf:type is set to one of the following valuesv J2EEApplication
v MQQueue
234 Application Dependency Discovery Manager: Administering
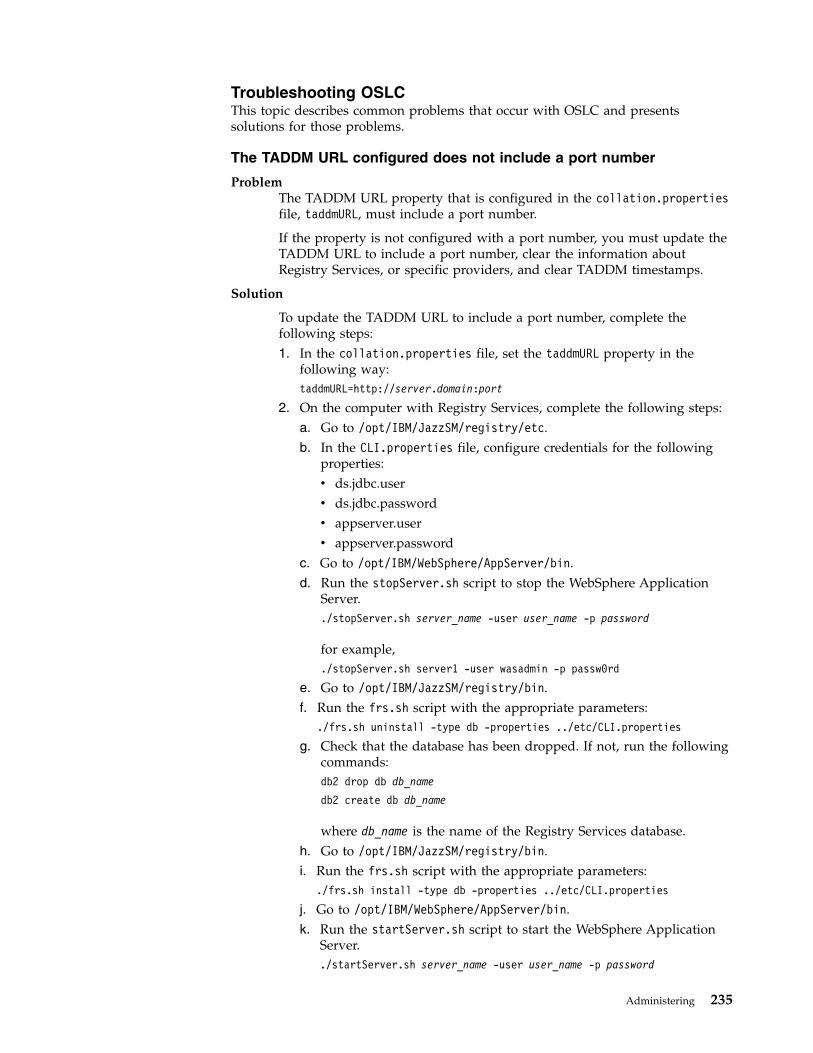
Troubleshooting OSLCThis topic describes common problems that occur with OSLC and presentssolutions for those problems.
The TADDM URL configured does not include a port number
ProblemThe TADDM URL property that is configured in the collation.propertiesfile, taddmURL, must include a port number.
If the property is not configured with a port number, you must update theTADDM URL to include a port number, clear the information aboutRegistry Services, or specific providers, and clear TADDM timestamps.
Solution
To update the TADDM URL to include a port number, complete thefollowing steps:1. In the collation.properties file, set the taddmURL property in the
following way:taddmURL=http://server.domain:port
2. On the computer with Registry Services, complete the following steps:a. Go to /opt/IBM/JazzSM/registry/etc.b. In the CLI.properties file, configure credentials for the following
properties:v ds.jdbc.userv ds.jdbc.passwordv appserver.userv appserver.password
c. Go to /opt/IBM/WebSphere/AppServer/bin.d. Run the stopServer.sh script to stop the WebSphere Application
Server../stopServer.sh server_name -user user_name -p password
for example,./stopServer.sh server1 -user wasadmin -p passw0rd
e. Go to /opt/IBM/JazzSM/registry/bin.f. Run the frs.sh script with the appropriate parameters:
./frs.sh uninstall -type db -properties ../etc/CLI.properties
g. Check that the database has been dropped. If not, run the followingcommands:db2 drop db db_name
db2 create db db_name
where db_name is the name of the Registry Services database.h. Go to /opt/IBM/JazzSM/registry/bin.i. Run the frs.sh script with the appropriate parameters:
./frs.sh install -type db -properties ../etc/CLI.properties
j. Go to /opt/IBM/WebSphere/AppServer/bin.k. Run the startServer.sh script to start the WebSphere Application
Server../startServer.sh server_name -user user_name -p password
Administering 235
for example,./startServer.sh server1 -user wasadmin -p passw0rd
l. Run the frs.sh script with the appropriate parameters:./frs.sh uninstall -type container -properties ../etc/CLI.properties
m. Run the frs.sh script with the appropriate parameters:./frs.sh install -type container -properties ../etc/CLI.properties
You might be able to remove an item from Registry Services for aspecific provider by using the following command:./frs.sh deleteProvider -providerUrl url -properties cli.properties
3. On the computer with the TADDM database, complete the followingsteps:a. Go to $COLLATION_HOME/support/bin.b. Run the runtopobuild script or batch file with the appropriate
parameters, for example:./runtopobuild.sh -a OSLCAgent -R
Tivoli Directory IntegratorWhen you purchase the IBM Tivoli Application Dependency Discovery Manager(TADDM), you also receive the Tivoli Directory Integrator, which enables you tointegrate TADDM with other data sources.
Tivoli Directory Integrator documentation at Knowledge Centerhttp://www-01.ibm.com/support/knowledgecenter/SSCQGF_7.1.0/KC_ditamaps/welcome.html?lang=en
TADDM integration scenarios at Tivoli Application Dependency DiscoveryManager Wiki
https://www.ibm.com/developerworks/community/wikis/home?lang=en#!/wiki/Tivoli%20Application%20Dependency%20Discovery%20Manager/page/Integration%20Scenarios
Business entities compatibility with earlier versionsA new function was introduced to enable integration between TADDM andproducts that read data from TADDM by using DataApi or directly from TADDMdatabase by using SQL. The examples of such products are IBM Tivoli BusinessService Manager (TBSM), IBM SmartCloud Control Desk (SCCD), Tivoli DirectoryIntegrator (TDI). The current Business Application data model relies onCustomCollection interface, which has nothing in common with formerApplication and ITSystem interfaces. The new function enables integration withother products without introducing any modifications to those systems.
In the future versions of TBSM and SCCD, the Business Application model will beintroduced with new features. The aim is to generate previous business entities,which are copies of custom collection instances.
The new function, which provides compatibility with earlier versions, consists ofthe following features.
Additional step while running BizAppsAgentThe additional step generates business entities (services, application,collection) compatible with earlier versions for each custom collection thatis generated by the agent.
236 Application Dependency Discovery Manager: Administering
To activate this step, a new property was added to thecollation.properties file,com.ibm.cdb.serviceinfrastructure.earlier.ver.compatibility. Thedefault value of this property is TRUE for the upgrade scenario and FALSEfor the fresh installation scenario.
OSLC supportOSLC agent was modified and is able to register either old businessentities or new custom collections. When compatibility flag is set to TRUE,old business entities are registered. Otherwise, custom collections are usedto produce a content for Jazz for Service Management (JazzSM).
In the future, a full reload of business entities will be required when integratingproduct starts to load data using new model objects (custom collections andnodes). Old business applications (applications) and new business applications(custom collections) cannot have the same GUID. To avoid duplicates, beforeloading new custom collections, users will have to remove old businessapplications.
Creating functional groups
New business applications, unlike old business applications, do not havefunctional groups. However, a new tiers functionality was introduced to servesimilar purposes. For each unique tier, to ensure compatibility with earlierversions, a functional group with a name corresponding to the tier name is created.
For more information, see the Business application tiers topic in the TADDM User'sGuide.
Administering 237

238 Application Dependency Discovery Manager: Administering
Notices
This information was developed for products and services offered in the U.S.A.IBM may not offer the products, services, or features discussed in this document inother countries. Consult your local IBM representative for information on theproducts and services currently available in your area. Any reference to an IBMproduct, program, or service is not intended to state or imply that only that IBMproduct, program, or service may be used. Any functionally equivalent product,program, or service that does not infringe any IBM intellectual property right maybe used instead. However, it is the user's responsibility to evaluate and verify theoperation of any non-IBM product, program, or service.
IBM may have patents or pending patent applications covering subject matterdescribed in this document. The furnishing of this document does not give youany license to these patents. You can send license inquiries, in writing, to:
IBM Director of LicensingIBM CorporationNorth Castle DriveArmonk, NY 10504-1785 U.S.A.
For license inquiries regarding double-byte (DBCS) information, contact the IBMIntellectual Property Department in your country or send inquiries, in writing, to:
Intellectual Property LicensingLegal and Intellectual Property LawIBM Japan, Ltd.1623-14, Shimotsuruma, Yamato-shiKanagawa 242-8502 Japan
The following paragraph does not apply to the United Kingdom or any othercountry where such provisions are inconsistent with local law:
INTERNATIONAL BUSINESS MACHINES CORPORATION PROVIDES THISPUBLICATION "AS IS" WITHOUT WARRANTY OF ANY KIND, EITHEREXPRESS OR IMPLIED, INCLUDING, BUT NOT LIMITED TO, THE IMPLIEDWARRANTIES OF NON-INFRINGEMENT, MERCHANTABILITY OR FITNESSFOR A PARTICULAR PURPOSE.
Some states do not allow disclaimer of express or implied warranties in certaintransactions, therefore, this statement might not apply to you.
This information could include technical inaccuracies or typographical errors.Changes are periodically made to the information herein; these changes will beincorporated in new editions of the publication. IBM may make improvementsand/or changes in the product(s) and/or the program(s) described in thispublication at any time without notice.
Any references in this information to non-IBM Web sites are provided forconvenience only and do not in any manner serve as an endorsement of those Websites. The materials at those Web sites are not part of the materials for this IBMproduct and use of those Web sites is at your own risk.
© Copyright IBM Corp. 2006, 2018 239
IBM may use or distribute any of the information you supply in any way itbelieves appropriate without incurring any obligation to you.
Licensees of this program who wish to have information about it for the purposeof enabling: (i) the exchange of information between independently createdprograms and other programs (including this one) and (ii) the mutual use of theinformation which has been exchanged, should contact:
IBM Corporation2Z4A/10111400 Burnet RoadAustin, TX 78758 U.S.A.
Such information may be available, subject to appropriate terms and conditions,including in some cases payment of a fee.
The licensed program described in this document and all licensed materialavailable for it are provided by IBM under terms of the IBM Customer Agreement,IBM International Program License Agreement or any equivalent agreementbetween us.
Any performance data contained herein was determined in a controlledenvironment. Therefore, the results obtained in other operating environments mayvary significantly. Some measurements may have been made on development-levelsystems and there is no guarantee that these measurements will be the same ongenerally available systems. Furthermore, some measurement may have beenestimated through extrapolation. Actual results may vary. Users of this documentshould verify the applicable data for their specific environment.
Information concerning non-IBM products was obtained from the suppliers ofthose products, their published announcements or other publicly available sources.IBM has not tested those products and cannot confirm the accuracy ofperformance, compatibility or any other claims related to non-IBM products.Questions on the capabilities of non-IBM products should be addressed to thesuppliers of those products.
All statements regarding IBM's future direction or intent are subject to change orwithdrawal without notice, and represent goals and objectives only.
This information contains examples of data and reports used in daily businessoperations. To illustrate them as completely as possible, the examples include thenames of individuals, companies, brands, and products. All of these names arefictitious and any similarity to the names and addresses used by an actual businessenterprise is entirely coincidental.
If you are viewing this information in softcopy form, the photographs and colorillustrations might not be displayed.
TrademarksIBM, the IBM logo, and ibm.com are trademarks or registered trademarks ofInternational Business Machines Corp., registered in many jurisdictions worldwide.Other product and service names might be trademarks of IBM or other companies.A current list of IBM trademarks is available on the Web at “Copyright andtrademark information” at http://www.ibm.com/legal/copytrade.shtml.
240 Application Dependency Discovery Manager: Administering
Java and all Java-based trademarks andlogos are trademarks or registeredtrademarks of Oracle and/or itsaffiliates.
Linux is a registered trademark of Linus Torvalds in the United States, othercountries, or both.
Microsoft and Windows are trademarks of Microsoft Corporation in the UnitedStates, other countries, or both.
UNIX is a registered trademark of The Open Group in the United States and othercountries.
Other company, product, and service names may be trademarks or service marksof others.
Notices 241

242 Application Dependency Discovery Manager: Administering


IBM®
Printed in USA