application note omron hmi/plc and sysmac studio · application note omron hmi/plc and sysmac...
TRANSCRIPT

Application Note Omron HMI/PLC and Sysmac Studio
This document guides you through the setup of proprietary vendor specific software installed on your PC. Your supervisor may provide you with addi-tional or alternative instructions.
The document consists of standard instructions that may not fit your particu-lar solution. Please visit our support website for latest revisions of documen-tation and firmware:
http://www.secomea.com
Version: 1.1, June 2015

Application note, Omron HMI or PLC and Sysmac Studio Page 2 of 17
Table of Contents
Document version history 3
Prerequisites for This Guide 3
1. TCP Ethernet Access 4
2. USB Connection to HMI/PLC 8
3. Ethernet connection via Windows XP under VMWare 13
4. USB connection via Windows XP under VMWare 15
Notices 17

Application note, Omron HMI or PLC and Sysmac Studio Page 3 of 17
Document version history Version Change log 0.9 Initial version 1.0 Official release 1.1 Updated version – included instructions for connecting to NA5 HMI
Prerequisites for This Guide This guide will assist you to setup a remote and online connection to the Omron equipment placed on the customer site using your Omron Sysmac Studio soft-ware installed on your PC. The version of Sysmac Studio used in this guide is 1.13; earlier versions might not have support for Omron’s HMI NA5.
The processes of connecting Sysmac Studio to an HMI and PLC is quite similar, therefore this guide will demonstrate only a connection to an HMI and will point out if there are any differences with the connection to a PLC.
The prerequisites for this guide are:
You have an operational LinkManager installed on your PC with a GateManager certificate that allows you to connect to the SiteManager agents;
You have the Omron software installed;
You have the Omron device agent installed and configured on the SiteManager at the remote site, and there is an access from SiteManager to the Omron HMI/PLC.
A network attached HMI must be configured with an agent device type Omron / Ethernet HMI on the SiteManager (minimum version 15175).
A network attached PLC must be configured with an agent device type Omron / Ethernet PLC on the SiteManager.
A USB attached HMI (such as the NA5-9W001S) must be configured with agent device type Omron / USB HMI on the SiteManager.
A USB attached PLC (such as the NJ501-1300) must be configured with agent device type Omron / USB PLC on the SiteManager.
Note: A USB connection requires a SiteManager model with USB support and minimum SiteManager version 13035 and LinkManager version 13025.
If any of these prerequisites are not met, you should contact the person / de-partment responsible within your own company or at the company responsible hereof.

Application note, Omron HMI or PLC and Sysmac Studio Page 4 of 17
System Overview The communication path is as follows: Sysmac Studio LinkManager GateManager SiteManager HMI/PLC.
This guide will elaborate on the components marked with bold.
The following system overview depicts a SiteManager 1029 at the customer lo-cation:
1. TCP Ethernet Access The following instructions describe how to connect Omron Sysmac Studio to an Omron HMI/PLC that is attached to a SiteManager via Ethernet. The de-scription shows a NA5-9W001S, but it could be any other Ethernet enabled Omron device.
Note: A network attached HMI must be configured with an agent device type Omron / Ethernet HMI on the SiteManager.
1. Locate the agent that represents your TCP/IP attached Omron HMI/PLC, and click on it:

Application note, Omron HMI or PLC and Sysmac Studio Page 5 of 17
2. You will not see any activity on it yet. This only starts when you connect to the HMI/PLC via your project in Sysmac (Make a note of the IP address of the HMI/PLC):
3. In Sysmac Studio, select HMI Communications Setup…
Note: If you are trying to connect to a PLC instead of an HMI, this menu will be called Controller.

Application note, Omron HMI or PLC and Sysmac Studio Page 6 of 17
4. Make sure you select Ethernet connection via hub. Type in the address ob-tained in step 2 and click OK.
Note1: If you try to test the connection by pressing the Test button, the result will, in most cases, be negative. This is a known issue with Sysmac Studio. Nevertheless, you can test the connection by sending ping (from Command Prompt on Windows OS or any other similar tool) to the IP address. Note2: In case you are trying to connect to a PLC, there will be an additional method to connect – Remote Connection via USB, and the window will look slightly different:

Application note, Omron HMI or PLC and Sysmac Studio Page 7 of 17
5. You can now go online with the HMI/PLC.
6. If successful, you will see a yellow line at the top of the project window. This means that you are online with the HMI/PLC.

Application note, Omron HMI or PLC and Sysmac Studio Page 8 of 17
2. USB Connection to HMI/PLC The following steps have been performed with Sysmac Studio 1.13 and USB drivers already installed on the PC, and an established USB connection from a SiteManager to an NA5-9W001S HMI. The same steps apply for Omron PLCs as well. (NB: You can also connect to an Omron G9SP Safety PLC us-ing the G9SP configuration. Refer to the separate guide for this)
Note: During Secomea lab testing, it was discovered that the USB connec-tion is very fragile to slow internet connections including ones with high la-tency. With a high-speed broadband connection, synchronizing and transferring took almost 3 times longer than normal. With a mobile broad-band connection, it was impossible to transfer a project. Therefore, we sug-gest that you read the remote IP address of the HMI/PLC via USB (if possible) or obtain it through the person / department responsible for the ini-tial configuration within your own company or at the company responsible, and then use Ethernet connection to transfer the project.
1. Locate the Omron USB HMI agent and click on it to establish a connection:
Note: The icon in front of the Agent is signifying the type of connection this Agent is using. This can help to distinguish between agents with the same name but different properties.

Application note, Omron HMI or PLC and Sysmac Studio Page 9 of 17
2. When connecting, the USB device should install itself as an Omron USB DirectLine modem. You can verify that the driver started correctly by opening the Device Manager and looking under Modems for the OMRON USB DirectLine device:
3. Check that device status says "This device is working properly".

Application note, Omron HMI or PLC and Sysmac Studio Page 10 of 17
4. In Sysmac Studio, select HMI Communications Setup…
Note: If you are trying to connect to a PLC, instead of HMI this menu will be called Controller.
5. Make sure you select Direct connection via USB. Then click OK.
Note: In case you are trying to connect to a PLC, there will be an additional method to connect – Remote Connection via USB.

Application note, Omron HMI or PLC and Sysmac Studio Page 11 of 17
6. Before connecting to the HMI/PLC you can test the USB connection by press-ing the Test button.
7. You can now go online with the HMI/PLC.

Application note, Omron HMI or PLC and Sysmac Studio Page 12 of 17
8. If successful, you will see a yellow line at the top of the project window. This means that you are online with the HMI/PLC.

Application note, Omron HMI or PLC and Sysmac Studio Page 13 of 17
3. Ethernet connection via Windows XP under VMWare You can run the Sysmac Studio software inside a VMWare engine, to an Omron PLC that is Ethernet attached to a SiteManager.
You can choose to run the LinkManager inside or outside the virtual machine. Note that LinkManager can only run inside VMWare if the host OS is Windows 7 and the PC’s CPU has support for virtualization.
The following steps illustrate VMWare Player (which can be downloaded from http://www.vmware.com/support/product-support/player/) and LinkManager run-ning outside a virtual machine (i.e. on the host OS system).
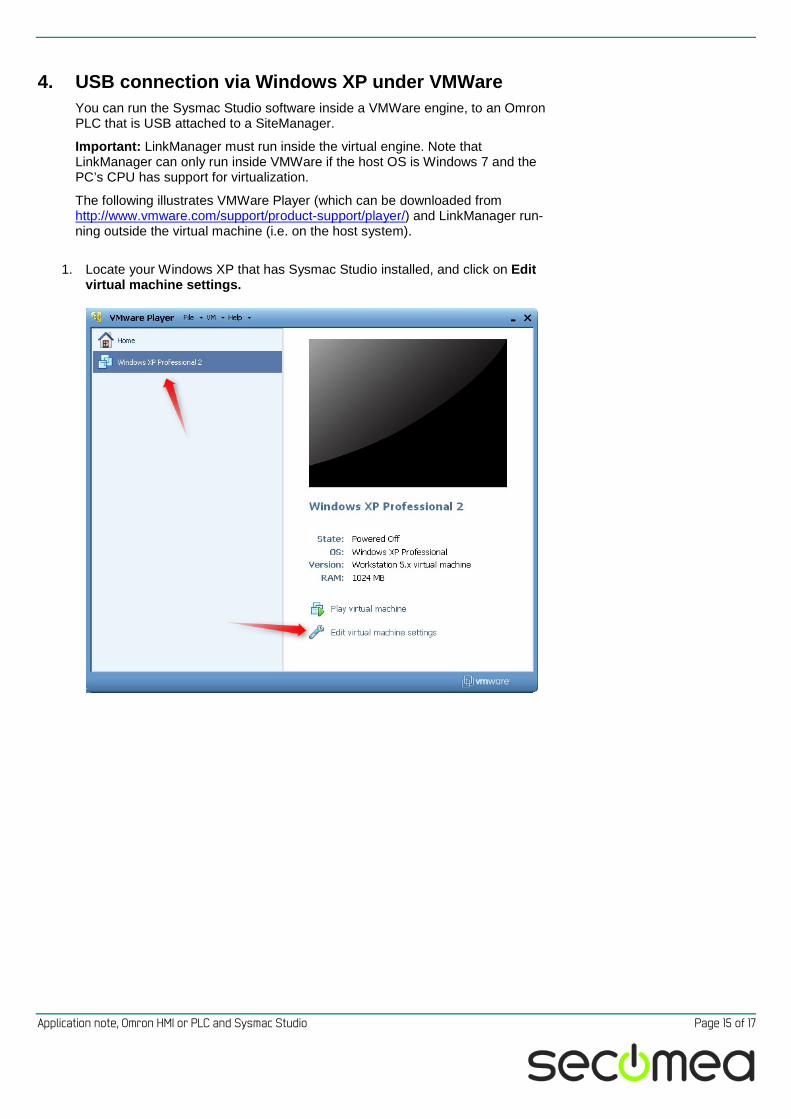
1. Locate your Windows XP that has Sysmac Studio installed, and click on Edit
virtual machine settings.

Application note, Omron HMI or PLC and Sysmac Studio Page 14 of 17
2. Make sure the Network Adapter settings are set to use NAT:
3. Start the VMWare engine and on the host PC start LinkManager.
4. Follow the procedure in section 1. TCP Ethernet Access, on page 4 to gain access to the PLC via LinkManager.
Application note, Omron HMI or PLC and Sysmac Studio Page 15 of 17
4. USB connection via Windows XP under VMWare You can run the Sysmac Studio software inside a VMWare engine, to an Omron PLC that is USB attached to a SiteManager.
Important: LinkManager must run inside the virtual engine. Note that LinkManager can only run inside VMWare if the host OS is Windows 7 and the PC’s CPU has support for virtualization.
The following illustrates VMWare Player (which can be downloaded from http://www.vmware.com/support/product-support/player/) and LinkManager run-ning outside the virtual machine (i.e. on the host system).
1. Locate your Windows XP that has Sysmac Studio installed, and click on Edit
virtual machine settings.
Application note, Omron HMI or PLC and Sysmac Studio Page 16 of 17
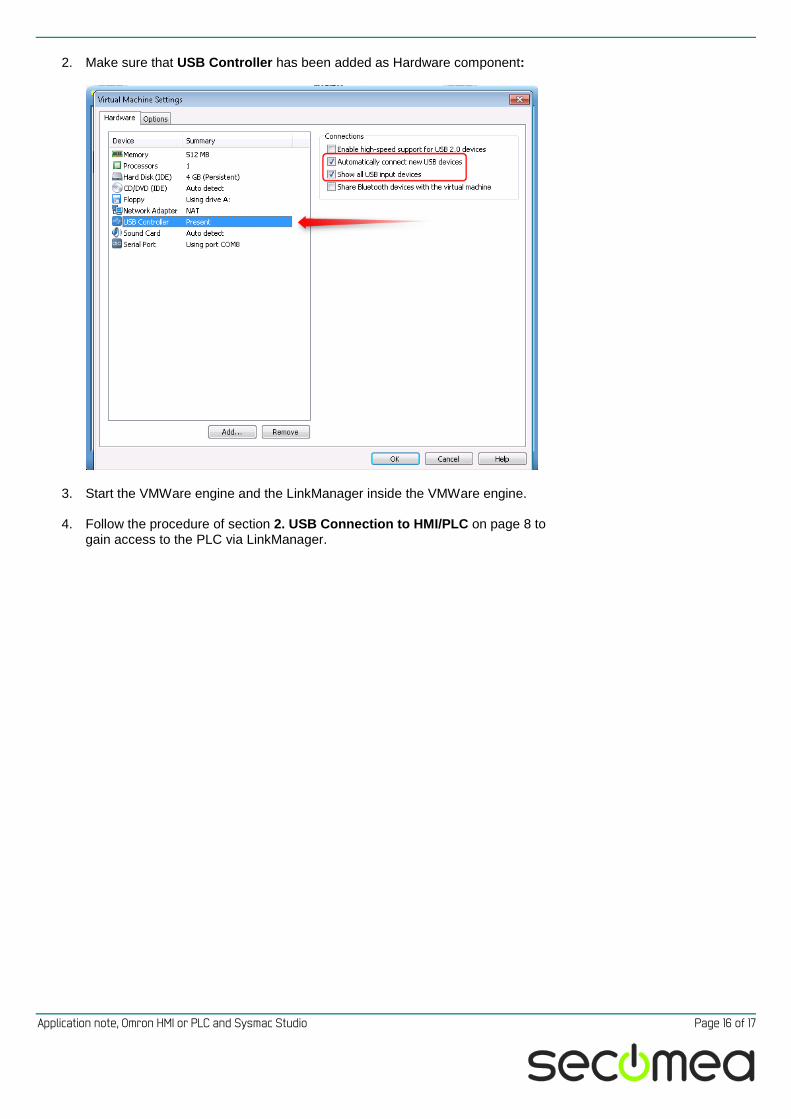
2. Make sure that USB Controller has been added as Hardware component:
3. Start the VMWare engine and the LinkManager inside the VMWare engine.
4. Follow the procedure of section 2. USB Connection to HMI/PLC on page 8 to gain access to the PLC via LinkManager.
Page 17 of 17
Notices
Publication and copyright © Copyright Secomea A/S 2013-2015. All rights reserved. You may download and print a copy for your own use. As a high-level administrator, you may use whatever you like from contents of this document to create your own instruc-tions for deploying our products. Otherwise, no part of this document may be copied or reproduced in any way, without the written consent of Secomea A/S. We would appreciate getting a copy of the material you produce in order to make our own material better and – if you give us permission – to inspire other users.
Trademarks SiteManager™, LinkManager™ and GateManager™ are trademark of Secomea A/S. Other trademarks are the property of their respective owners.
Disclaimer Secomea A/S reserves the right to make changes to this publication and to the products described herein without notice. The publication of this document does not represent a commitment on the part of Secomea A/S. Considerable effort has been made to ensure that this publication is free of inaccuracies and omis-sions but we cannot guarantee that there are none.
The following paragraph does not apply to any country or state where such pro-visions are inconsistent with local law:
SECOMEA A/S PROVIDES THIS PUBLICATION "AS IS" WITHOUT WARRANTY OF ANY KIND, EITHER EXPRESS OR IMPLIED, INCLUDING, BUT NOT LIMITED TO, THE IMPLIED WARRANTIES OF MERCHANTABILITY OR FITNESS FOR A PARTICULAR PURPOSE
SECOMEA A/S SHALL NOT BE LIABLE FOR ANY DIRECT, INDIRECT, INCIDENTAL, CONSEQUENTIAL, OR OTHER DAMAGE ALLEGED IN CONNECTION WITH THE FURNISHING OR USE OF THIS INFORMATION.
Secomea A/S Denmark CVR No. DK 31 36 60 38 E-mail: [email protected] www.secomea.com