applications hyundai azera 2006-2011 95- · pdf file– hyundai azera 2006-2011 ......
TRANSCRIPT
METRA. THE WORLD’S BEST KITS.™
© COPYRIGHT 2004-2011 METRA ELECTRONICS CORPORATION
APPLICATIONS
1-800-221-0932 metraonline.com
INSTALLATION INSTRUCTIONS FOR PART 95-7322
REV.
5/9
/12
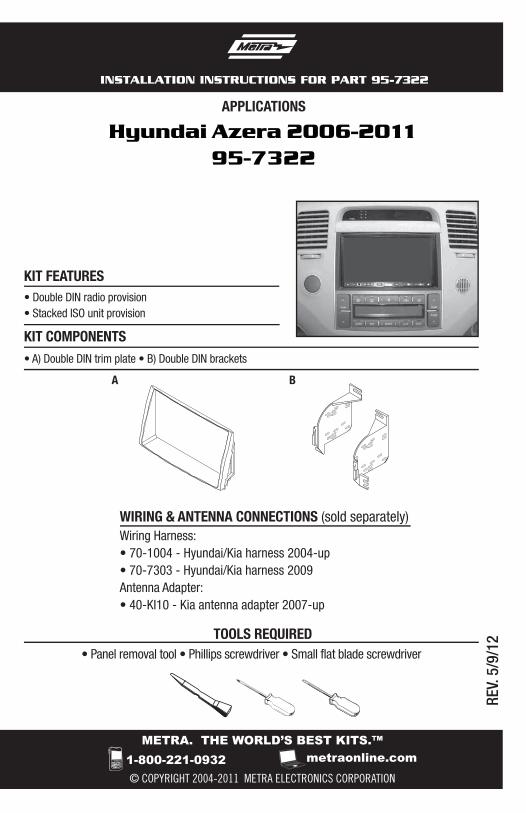
WIRING & ANTENNA CONNECTIONS (sold separately) Wiring Harness: • 70-1004 - Hyundai/Kia harness 2004-up• 70-7303 - Hyundai/Kia harness 2009Antenna Adapter:• 40-KI10 - Kia antenna adapter 2007-up
• Panel removal tool • Phillips screwdriver • Small flat blade screwdriver
TOOLS REQUIRED
Hyundai Azera 2006-201195-7322
BA
• A) Double DIN trim plate • B) Double DIN brackets
KIT FEATURES
KIT COMPONENTS
• Double DIN radio provision• Stacked ISO unit provision
Table of Contents
Dash Disassembly
– Hyundai Azera 2006-2011 ...........................................................................................3-4
Kit Assembly
– Double DIN radio provision ...............................................................................................5
– Stacked ISO unit provision ...............................................................................................6
KNOWLEDGE IS POWEREnhance your installation and fabrication skills by enrolling in the most recognized and respected mobile electronics school in our industry.Log onto www.installerinstitute.com or call 800-354-6782 for more information and take steps toward a better tomorrow.
Metra recommends MECP certified technicians
95-7322
CAUTION: Metra recommends disconnecting the negative battery terminal before beginning any installation. All accessories, switches, and especially air bag indicator lights must be plugged in before reconnecting the battery or cycling the ignition.
Note: Refer to the instructions included with the aftermarket radio.
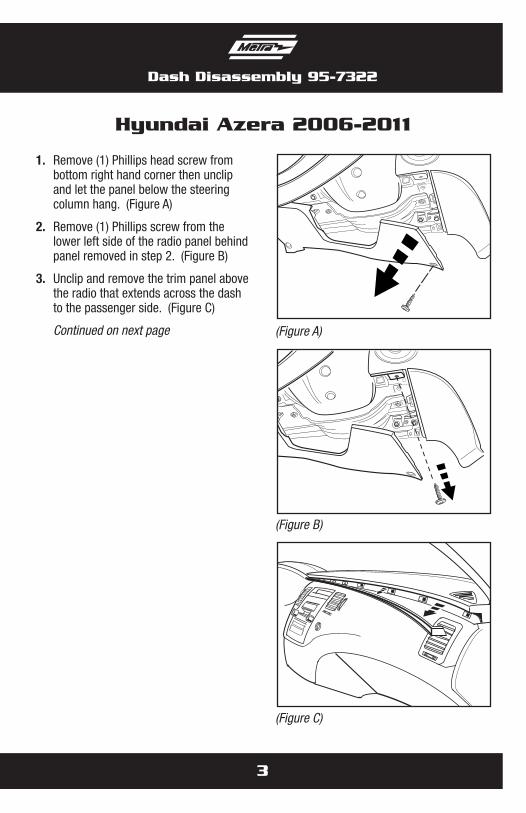
1. Remove (1) Phillips head screw from bottom right hand corner then unclip and let the panel below the steering column hang. (Figure A)
2. Remove (1) Phillips screw from the lower left side of the radio panel behind panel removed in step 2. (Figure B)
3. Unclip and remove the trim panel above the radio that extends across the dash to the passenger side. (Figure C)
Continued on next page
3
Hyundai Azera 2006-2011
Dash Disassembly 95-7322
(Figure A)
(Figure B)
(Figure C)
4
Dash Disassembly 95-7322
Hyundai Azera 2006-2011
TEMP
TEMP
MODEA/C
OFF
AUTO
DUAL
PASS
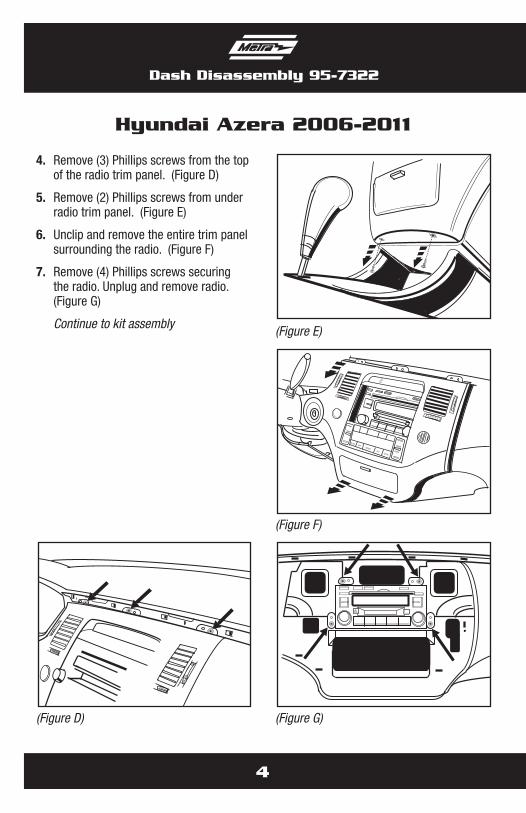
(Figure E)
(Figure F)
(Figure G)(Figure D)
4. Remove (3) Phillips screws from the top of the radio trim panel. (Figure D)
5. Remove (2) Phillips screws from under radio trim panel. (Figure E)
6. Unclip and remove the entire trim panel surrounding the radio. (Figure F)
7. Remove (4) Phillips screws securing the radio. Unplug and remove radio. (Figure G)
Continue to kit assembly
5
Kit Assembly 95-7322
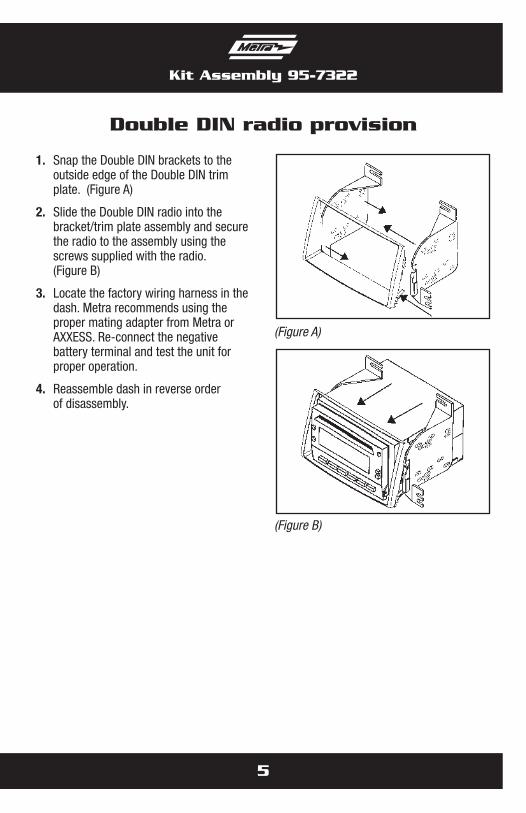
1. Snap the Double DIN brackets to the outside edge of the Double DIN trim plate. (Figure A)
2. Slide the Double DIN radio into the bracket/trim plate assembly and secure the radio to the assembly using the screws supplied with the radio. (Figure B)
3. Locate the factory wiring harness in the dash. Metra recommends using the proper mating adapter from Metra or AXXESS. Re-connect the negative battery terminal and test the unit for proper operation.
4. Reassemble dash in reverse order of disassembly.
Double DIN radio provision
(Figure A)
(Figure B)
Kit Assembly 95-7322
6
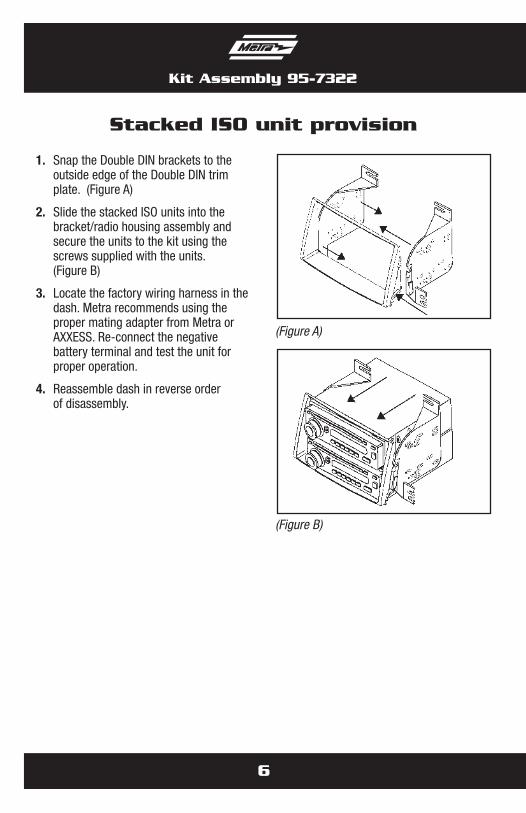
Stacked ISO unit provision
(Figure A)
(Figure B)
1. Snap the Double DIN brackets to the outside edge of the Double DIN trim plate. (Figure A)
2. Slide the stacked ISO units into the bracket/radio housing assembly and secure the units to the kit using the screws supplied with the units. (Figure B)
3. Locate the factory wiring harness in the dash. Metra recommends using the proper mating adapter from Metra or AXXESS. Re-connect the negative battery terminal and test the unit for proper operation.
4. Reassemble dash in reverse order of disassembly.

Notes
METRA. THE WORLD’S BEST KITS.™
© COPYRIGHT 2004-2011 METRA ELECTRONICS CORPORATION 1-800-221-0932 metraonline.com
INSTALLATION INSTRUCTIONS FOR PART 95-7322
REV.
5/9
/12
METRA. THE WORLD’S BEST KITS.™
© COPYRIGHT 2004-2011 METRA ELECTRONICS CORPORATION
APLICACIONES
1-800-221-0932 metraonline.com
INSTRUCCIONES DE INSTALACIÓN PARA LA PIEZA 95-7322
REV.
5/9
/12
HERRAMIENTAS REQUERIDAS
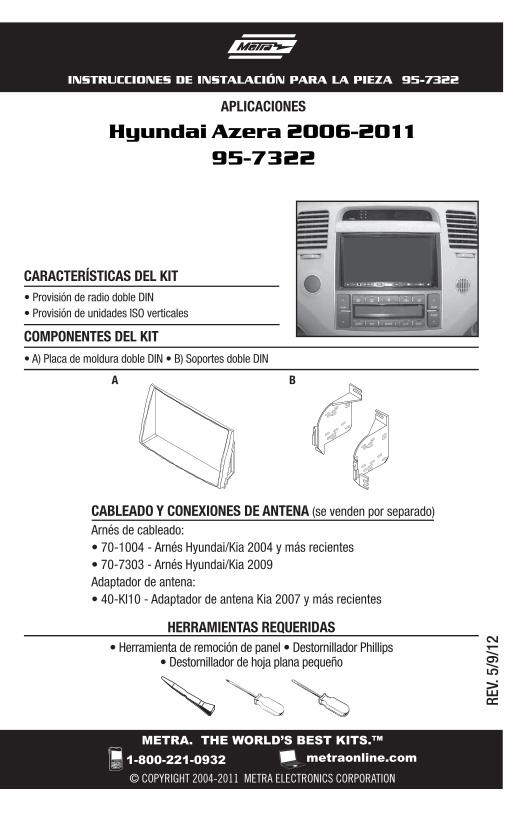
Hyundai Azera 2006-201195-7322
BA
• A) Placa de moldura doble DIN • B) Soportes doble DIN
CARACTERÍSTICAS DEL KIT
COMPONENTES DEL KIT
• Provisión de radio doble DIN• Provisión de unidades ISO verticales
CABLEADO Y CONEXIONES DE ANTENA (se venden por separado)Arnés de cableado:• 70-1004 - Arnés Hyundai/Kia 2004 y más recientes• 70-7303 - Arnés Hyundai/Kia 2009Adaptador de antena:• 40-KI10 - Adaptador de antena Kia 2007 y más recientes
• Herramienta de remoción de panel • Destornillador Phillips• Destornillador de hoja plana pequeño
Indice
Desmontaje del tablero
– Hyundai Azera 2006-2011 ...........................................................................................3-4
Ensamble del kit
– Provisión de radio doble DIN ............................................................................................5
– Provisión de unidades ISO verticales ................................................................................6
KNOWLEDGE IS POWEREnhance your installation and fabrication skills by enrolling in the most recognized and respected mobile electronics school in our industry.Log onto www.installerinstitute.com or call 800-354-6782 for more information and take steps toward a better tomorrow.
95-7322
PRECAUCIÓN: Metra recomienda desconectar el terminal negativo de la batería antes de comenzar cualquier instalación. Todos los accesorios, interruptores y, especialmente, las luces indicadoras de airbag deben estar enchufados antes de volver a conectar la batería o comenzar el ciclo de ignición.
Nota: Remítase a las instrucciones incluidas con el radio de posventa.
Metra recomienda técnicos con certificación del Programa de Certificación en Electrónica Móvil (Mobile Electronics Certification Program, MECP).
EL CONOCIMIENTO ES PODERMejore sus habilidades de instalación y fabricación inscribiéndose en la escuela de dispositivos electrónicos móviles más reconocida y respetada de nuestra industria. Regístrese en www.installerinstitute.com o llame al 800-354-6782 para obtener más información y avance hacia un futuro mejor.
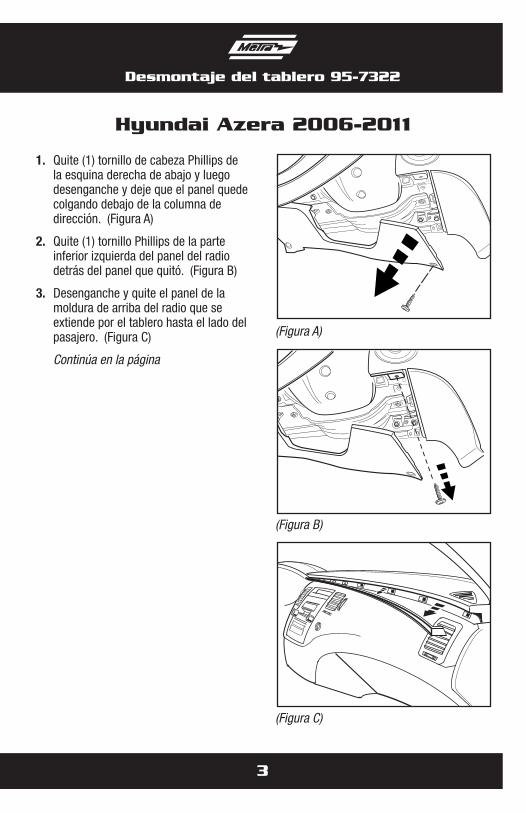
1. Quite (1) tornillo de cabeza Phillips de la esquina derecha de abajo y luego desenganche y deje que el panel quede colgando debajo de la columna de dirección. (Figura A)
2. Quite (1) tornillo Phillips de la parte inferior izquierda del panel del radio detrás del panel que quitó. (Figura B)
3. Desenganche y quite el panel de la moldura de arriba del radio que se extiende por el tablero hasta el lado del pasajero. (Figura C)
Continúa en la página
3
Hyundai Azera 2006-2011
Desmontaje del tablero 95-7322
(Figura A)
(Figura B)
(Figura C)
4
Desmontaje del tablero 95-7322
Hyundai Azera 2006-2011
TEMP
TEMP
MODEA/C
OFF
AUTO
DUAL
PASS
(Figura E)
(Figura F)
(Figura G)(Figura D)
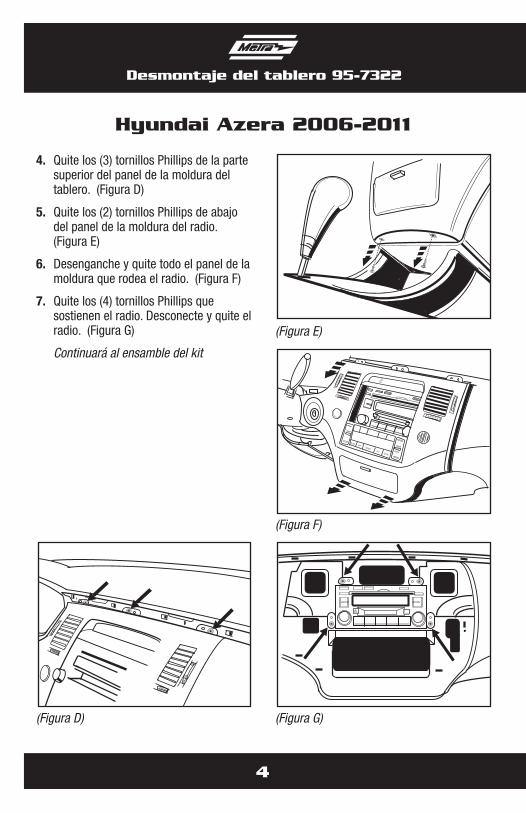
4. Quite los (3) tornillos Phillips de la parte superior del panel de la moldura del tablero. (Figura D)
5. Quite los (2) tornillos Phillips de abajo del panel de la moldura del radio. (Figura E)
6. Desenganche y quite todo el panel de la moldura que rodea el radio. (Figura F)
7. Quite los (4) tornillos Phillips que sostienen el radio. Desconecte y quite el radio. (Figura G)
Continuará al ensamble del kit
5
Ensamble del kit 95-7322
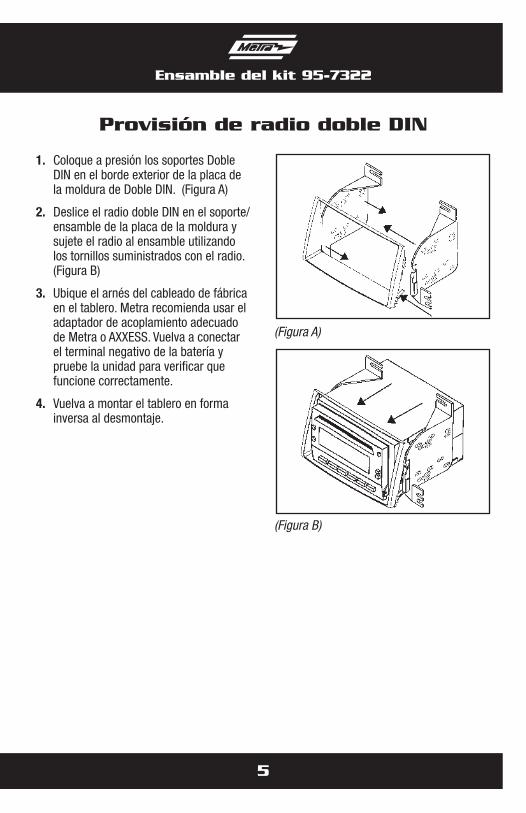
1. Coloque a presión los soportes Doble DIN en el borde exterior de la placa de la moldura de Doble DIN. (Figura A)
2. Deslice el radio doble DIN en el soporte/ensamble de la placa de la moldura y sujete el radio al ensamble utilizando los tornillos suministrados con el radio. (Figura B)
3. Ubique el arnés del cableado de fábrica en el tablero. Metra recomienda usar el adaptador de acoplamiento adecuado de Metra o AXXESS. Vuelva a conectar el terminal negativo de la batería y pruebe la unidad para verificar que funcione correctamente.
4. Vuelva a montar el tablero en forma inversa al desmontaje.
Provisión de radio doble DIN
(Figura A)
(Figura B)
Ensamble del kit 95-7322
6
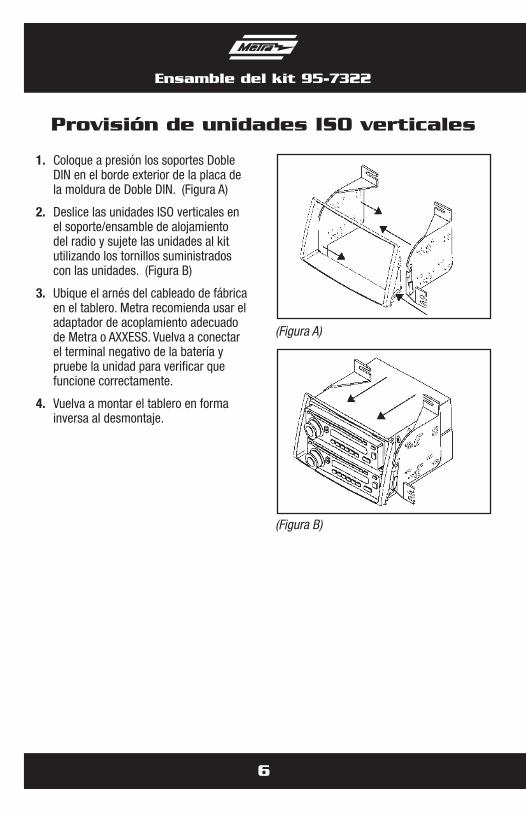
Provisión de unidades ISO verticales
(Figura A)
(Figura B)
1. Coloque a presión los soportes Doble DIN en el borde exterior de la placa de la moldura de Doble DIN. (Figura A)
2. Deslice las unidades ISO verticales en el soporte/ensamble de alojamiento del radio y sujete las unidades al kit utilizando los tornillos suministrados con las unidades. (Figura B)
3. Ubique el arnés del cableado de fábrica en el tablero. Metra recomienda usar el adaptador de acoplamiento adecuado de Metra o AXXESS. Vuelva a conectar el terminal negativo de la batería y pruebe la unidad para verificar que funcione correctamente.
4. Vuelva a montar el tablero en forma inversa al desmontaje.

Notas
METRA. THE WORLD’S BEST KITS.™
© COPYRIGHT 2004-2011 METRA ELECTRONICS CORPORATION 1-800-221-0932 metraonline.com
INSTRUCCIONES DE INSTALACIÓN PARA LA PIEZA 95-7322
REV.
5/9
/12