applications manual and cooking guide - henny · pdf fileapplications manual and cooking guide...
TRANSCRIPT

Applications Manualand Cooking Guide
Henny Penny CombisAll MCS, MCGand BCS Models

1
This manual should be retained in a convenient location for future reference.
Wiring diagram for this appliance is located inside the unit, behind the control panel.
LIMITED WARRANTY FOR HENNY PENNY APPLIANCESSubject to the following conditions, Henny Penny Corporation makes the following limited warranties to the original purchaser only for Henny Penny appliancesand replacement parts:
New Equipment Any part of a new appliance, except lamps and fuses, which proves to be defective in material or workmanship within two (2) years from date of original installation, will be repaired or replaced without charge F.O.B. factory, Eaton, Ohio, or F.O.B. authorized distributor. To validate this warranty, theregistration card for the appliance must be mailed to Henny Penny within ten (10) days after installation.
Replacement Parts Any appliance replacement part, except lamps and fuses, which proves to be defective in material or workmanship within ninety (90) daysfrom date of original installation will be repaired or replaced without charge F.O.B. factory, Eaton, Ohio, or F.O.B. authorized distributor.
The warranty for new equipment and replacement parts covers only the repair or replacement of the defective part and does not include any labor charges forthe removal and installation of any parts, travel or other expenses incidental to the repair or replacement of a part.
Extended Frypot Warranty Henny Penny will replace any frypot that fails due to manufacturing or workmanship issues for a period of up to seven (7) yearsfrom date of manufacture. This warranty shall not cover any frypot that fails due to any misuse or abuse, such as heating of the frypot without shortening.
0 to 3 Years During this time, any frypot that fails due to manufacturing or workmanship issues will be replaced at no charge for parts, labor, or freight.Henny Penny will either install a new frypot at no cost or provide a new or reconditioned replacement fryer at no cost.
4 to 7 Years During this time, any frypot that fails due to manufacturing or workmanship issues will be replaced at no charge for the frypot only.Any freight charges and labor costs to install a new frypot as well as the cost of any other parts replaced, such as insulation, thermal sensors, high limits,fittings, and hardware, will be the responsibility of the owner.
Any claim must be presented to either Henny Penny or the distributor from whom the appliance was purchased. No allowance will be granted for repairs madeby anyone else without Henny Penny’s written consent. If damage occurs during shipping, notify the carrier at once so that a claim may be filed.
THE ABOVE LIMITED WARRANTY SETS FORTH THE SOLE REMEDY AGAINST HENNY PENNY FOR ANY BREACH OF WARRANTY OR OTHER TERM. BUYER AGREESTHAT NO OTHER REMEDY (INCLUDING CLAIMS FOR ANY INCIDENTAL OR CONSEQUENTIAL DAMAGES) SHALL BE AVAILABLE.
The above limited warranty does not apply (a) to damage resulting from accident, alteration, misuse, or abuse; (b) if the equipment’s serial number is removedor defaced; or (c) to lamps and fuses. THE ABOVE LIMITED WARRANTY IS EXPRESSLY IN LIEU OF ALL OTHER WARRANTIES, EXPRESS OR IMPLIED, INCLUDINGMERCHANT ABILITY AND FITNESS, AND ALL OTHER WARRANTIES ARE EXCLUDED. HENNY PENNY NEITHER ASSUMES NOR AUTHORIZES ANY PERSON TOASSUME FOR IT ANY OTHER OBLIGATION OR LIABILITY.
WARNING: Improper installation, adjustment, alteration, service or maintenance can cause property damage,injury or death. Read the installation, operating and maintenance instructions thoroughly before installing or servicing this equipment.
Indication of Safety WarningsThroughout this manual you will see the following words and symbols relating to important issues of personal safety and proper operation. Their usage is described here:
The word DANGER indicates an imminent hazardwhich will result in highly serious injury, such as severe burns.
The word WARNING is used to alert you to a procedure, that if not performed properly, may cause personal injury.
The word CAUTION is used to alert you to a procedure, that if not performed properly, may damage the equipment.
The word IMPORTANT is used to highlight especially important information.
The word NOTE is used to separate additional useful subject matter for the sake of clarity.

2
Dear Customer:Congratulations on your decision to purchase a new Henny PennyMCS, MCG, or BCS Combi. In our opinion, you now possess one inthe family of the most advanced combis in the industry. As you becomefamiliar with its operation and more confident in the results, you will see the outstanding potential for quality, variety and productivity theseunits have to offer.
The Henny Penny Combi is not difficult to operate, but it is a fairlysophisticated piece of equipment. We recommend a thorough study of this Applications Manual. It is filled with information, suggestions,and explanations that will help you achieve the potential of the unit.Keep the manual in a safe place, but accessible for easy reference.
Henny Penny products are known for their outstanding craftsmanship,leading edge technology and user-friendly operation. As a company, webelieve in establishing a partnership with our customers that leads bothparties to long-term success. In that spirit, we remain interested in anyquestions, comments, suggestions or ideas you may have concerningyour new combi or this manual.
We hope you enjoy good food and good profits with your new HennyPenny Combi. Welcome to the world of imaginative cooking.
Henny Penny Corporation
+1 937 456.8400
Toll free in USA800 417.8417
www.hennypenny.com

Table of ContentsGeneral Information
Models and Features ................................................................................................5
Control Panel Functions ..........................................................................................8
Loading and Unloading..........................................................................................10
Cooking Modes ..............................................................................................................13
Moist Heat Mode ..................................................................................................14
Dry Heat Mode ....................................................................................................16
Combination Mode ..............................................................................................18
Forced Steaming ....................................................................................................20
Tender Steaming ....................................................................................................22
Rethermalizing ......................................................................................................24
Probe Cooking ................................................................................................................26
Additional Functions
Cool Down ............................................................................................................28
Steam Injection ......................................................................................................29
HACCP Interface ..................................................................................................30
Programming ..................................................................................................................32
Cleaning..........................................................................................................................35
Installation – Electric and Gas Units ..............................................................................37
Cooking Guides ..............................................................................................................45
Distributors ....................................................................................................................59
3

4
General InformationThe Combi Advantage
The Henny Penny MCS, MCG and BCS Combis have the potential to make your entire approach to foodservice production simpler, more consistent and more productive.
Simpler because, ultimately, you will use fewer appliances as you become more adept at utilizing the Combi for different applications.
More consistent because the Henny Penny Combi precisely generates specific cooking climates for up to five different modes over a wide range of temperatures to handle just about any type of food.
More productive because it is versatile, easy to use, cooks faster with less food shrinkage then conventional appliances, and practically cleans itself.
The Combi Concept
The Henny Penny Combi uses pressure-less steam and hot-air convection, individually, in sequence, or in combination regulated by the unit’s control system,to help you create the right conditions for cooking perfect foods. There are plenty ofother features and functions, all designed to make this effort easier and more precise.
As you become more familiar with the way the machine operates and the cookingconcepts it employs, experiment! Try different settings. Change modes and settingsat any time in the cooking cycle (you can.) Observe the results, adjust yourapproach. In short, learn and use the capabilities of the Combi to create the kindof food you want to create.
The Family
Henny Penny Combis are available in two versions, the MCS electric and MCG gas models, and the BCS electric model. All models accept mobile oven racks(optional on some sizes) and feature rugged stainless steel construction and a host of high-performance features (see next page.) The BCS is considered the basicmodel. The MCS/G models offer additional cooking modes as well as touch padcontrols, digital displays and programmable functions. As a result, certain sections,pages, or operating instructions in this manual may apply only to MCS/G units.This distinction is clearly noted in each case.
Please note that Henny Penny also offers the (LCS/LCG) Combi, a high-end unit that employs a completely different and technologically advanced control system.The ClimaPlus Combi allows precise control of a nearly infinite combination ofmoist and dry heat, offers up to 99 separate custom cooking programs, and featuresIQT Intelligent Cooking Technology. If you would like to learn more about theClimaPlus Combis, please contact your Henny Penny distributor.

5
GENERALINFORMATION
Models and Features at a glance
Models and sizes available
Model numbers are designated according to pan capacity. Units are availablein either electric (MCS, BCS) or gas (MCG, only.)
NOTE: Features may vary between gas and electric models. Accessories may varyaccording to unit size.
A reference such as “MCS models” or “MCS-6/10/1020/20/40” designates theMCS electric model in all sizes. A reference such as “MCG base-top models” or“MCG-6/10/1020” designates only MCG gas models of those sizes.
Base-topmodels
Floormodels
MCS-6MCG-6BCS-6
MCS-10MCG-10BCS-10
MCS-1020MCG-1020BCS-1020
MCS-20MCG-20BCS-20
20 steam table pans (1/1 GN)or 20 half sheet pans
MCS-40MCG-40BCS-40
40 steam table pans (1/1 GN)or 20 steam table pans (2/1 GN)or
40 half sheet pans or20 full sheet pans withrack adapter
6 steam table pans (1/1 GN) or6 half sheet pans
10 steam table pans (1/1 GN)or 10 half sheet pans
10 full sheet pans with rack adapter or
20 steam table pans (1/1 GN)or 10 steam table pans (2/1 GN)
12 x 20 x 21⁄2 (325 x 530 x 65)13 x 18 (330 x 457)
12 x 20 x 21⁄2 (325 x 530 x 65)13 x 18 (330 x 457)
18 x 26 (457 x 660)
12 x 20 x 21⁄2 (325 x 530 x 65)20 x 24 x 21⁄2 (530 x 650 x 65)
12 x 20 x 21⁄2 (325 x 530 x 65)13 x 18 (330 x 457)
12 x 20 x 21⁄2 (325 x 530 x 65)20 x 24 x 21⁄2 (530 x 650 x 65)13 x 18 (330 x 457)18 x 26 (457 x 660)
Model Designation Pan Capacity Pan size inches (mm)

6
Cooking Modes Cooking Modes■ Moist Heat ■ Moist Heat■ Dry Heat ■ Dry Heat■ Combination Moist and Dry ■ Combination Moist and Dry■ Tender Steaming■ Rethermalizing
Control Control■ Touchpad and electromechanical ■ Electromechanical controls for
controls for mode, time, temperature mode, time, temperaturemode, time, temperature ■ Lighted indicators
■ LED readouts ■ Cool Down■ Forced Steaming ■ Forced Steaming■ Steam Injection■ Cool Down■ Probe cooking■ Programmable operation with (9)
three-step custom cooking programcapacity
■ Custom cleaning program
Design and operation Design and operation■ Auto-reverse fan ■ Auto-reverse fan■ Filterless grease extraction ■ Filterless grease extraction■ Dual glass door ■ Dual glass door■ Safety latch handle (Standard on all ■ Safety latch handle (Standard on all
floor models, available as option on floor models, available as option onall base-top models) all base-top models)
■ HACCP interface and serial port ■ Auto flush■ Auto flush ■ Built-in retractable hand shower■ Built-in retractable hand shower
GENERALINFORMATION
Models andFeaturescontinued
Features
MCS/G BCS

GENERALINFORMATION
Models andFeaturescontinued
7
1. Moist heat is created and dispersed rapidly from the self-cleaning steam generator.
2. Dry heat up to 575°F (300°C) is produced by tubular electrical elements or gas burners.
3. Select cooking mode: Moist Heat, Dry Heat, or Combination modes. With MCS/G models you have the additional selection of Tender Steaming and Rethermalizing modes.
4. Set and select desired cabinet temperature and cooking time. With MCS/G models you may select probe cooking and set desired “done temperature.
5. Auto-reverse fan and air circulation system keep temperatures precise and heat distribution uniform throughout the cabinet, even when cooking full loads.
6. Hinged racking system or mobile oven rack accepts a wide range of pans and grids.
7. Coved corners, filterless grease extraction system, and built-in handshower minimize cleaning labor.
1
2
3
5
6
7
How it works
4

0
300°C575°F
20 - 99°C0 -120 mi65 - 210°F
D
°C °F
1 Warning light - lights red when steam generator temperatureexceeds 302°F (150°C)
2 NO WATER warning light - check water supply3 ON indicator light (green)
4 MOIST HEAT mode–212°F (100°C)• For steaming, stewing, blanching, preserving, etc.• Mode light blinks when temperature exceeds 40°F (5°C) over set point
5 DRY HEAT mode–85°F to 575°F (30°C to 300°C)• For roasting, baking grilling, etc
6 Mode selection switch 7 COMBINATION mode–85°F to 575°F (30°C to 300°C)
• For Combi-Steaming instead of roasting and glazing or baking• Forced Steaming between 213°F to 266°F (101°C to 130°C)–
firm vegetables or potatoes are cooked more quickly
8 TENDER STEAMING mode–85°F to 210°F (30°C to 99°C)• For blanching, poaching, simmering, soaking, vacuum cooking
9 RETHERMALIZING mode–85°F to 575°F (30°C to 300°C)• For reheating pre-cooked (chilled) food
10 PROGRAM function• Create and store up to 9, three-step cooking programs
11 Program START key12 Program NUMBER display (1 to 9 programs)13 Program ADVANCE key display (1 to 9 stages) 14 CABINET TEMPERATURE indicator key
• Key lights up when elements heat• Press key to display cabinet temperature
15 Temperature indicator (°F or °C)16 TEMPERATURE selection dial17 TEMPERATURE display
• Displays selected cooking temperature • Displays cabinet temperature when CABINET TEMPERATURE
indicator key (14) is pressed18 PROBE COOKING displays
• Upper display indicates actual internal food temperature• Lower display shows pre-selected “done” temperature
19 COOKING TIME display• Shows actual cooking time remaining• Press key to activate probe
20 PROBE COOKING key• Select food internal “done” temperature using TIMER/PROBE COOKING dial (21)
21 TIMER/PROBE COOKING dial• Set TIMER for 0 minutes to 120 minutes, press TIMER activation key (22)• Set PROBE temperature from 65°F to 210°F (20°C to 99°C), press PROBE
COOKING key (20)• Select “D” for Continuous Run
22 TIMER activation key• Press key to switch from PROBE COOKING• Select time using the TIMER/PROBE COOKING dial (21)
23 STEAM INJECTION • Four-second burst of steam in DRY HEAT mode between
248°F (120°C) and 480°F (250°C)24 COOL DOWN
• Fan continues to operate when door is open, reducing cabinet temperature rapidly25 Unit serial number (located on the left side of cabinet in the lower right hand corner)
• Please refer to this number when requesting service26 HACCP printer port
reset
MCG gas modelswill have thiskey pad display
IGNITIONRESET
COOLDOWN
key
STEAMINJECTION
key
8
Control Panel Functionsat a glance
GENERALINFORMATION
MCS MODELS6/10/1020/20/40

9
0
575550
500
450400 350
300
250
212
140
510
20
30
40
5060
70
80
90
100
D
4 Mode selection switch5 MOIST HEAT mode–212°F (100°C)
• For steaming, stewing, blanching, preserving...6 DRY HEAT mode–140°F to 575°F (60°C to 300°C)
• For roasting, baking grilling, etc.7 COMBINATION mode–140°F to 575°F (60°C to 300°C)
• For combi-steaming instead of roasting and glazing or baking• Forced steaming between 213°F to 266°F (101°C to 130°C)–
firm vegetables or potatoes are cooked more quickly
8 COOL DOWN function• Fan continues to operate when door is open, reducing cabinet
temperature rapidly9 TEMPERATURE selection dial
• For convection and combination modes 10 HEAT ON indicator
• Lights during DRY HEAT mode11 TIMER (0 to 120 minutes)
(UL -approved units: 0 to 100 minutes, CE-approved units: 0 to 120 minutes) • Set on “D” for Continuous Run
12 Unit serial number (located on the left side of cabinet in the lower right hand corner)• Please refer to this number when requesting service
1 Warning light– lights red when cabinettemperature exceeds 239°F (115°C)in steam mode
2 NO WATER warning light–check water supply/steam generator 3 ON indicator light (green)
Control Panel Functionsat a glance
GENERALINFORMATION
BCS MODELS6/10/1020/20/40

10
Loading and Unloading
Your Henny Penny Combi includes either a removable hinged racking system(standard with 6 and 10-pan units) or a mobile oven rack that is integral to the equipment’s operation. All pans and grids are loaded directly onto thehinged racking system, or onto the mobile oven rack which is then rolled intothe cooking cabinet.
Base-top Models
Removable Hinged Racking–Standard MCS/G/BCS- 6 & 10
To remove, simply lift rack upward and out of mountings. Reverse the action toreplace the rack. To move rack laterally on hinges, lift front of rack slightly to clearmounting and swivel rack.
Mobile Oven Racks (Standard on 1020)
Oven rack on transport cart rolls up to the front of the unit. Oven rack rolls completely into the cabinet. Standard with MCS/G/BCS-1020, available separately (rail system required) forMCS/G/BCS-6 and10.
* Additional racking systems optional.
Floor Models
Mobile Oven Racks (20 and 40)
Mobile oven rack rolls directly into unit. Specially designed oven rack allows cabinet door to close easily and completely around therack. Standard with MCS/G/BCS-20 and 40. Additional mobileoven racks or specially designed oven plate racks are available separately.
IMPORTANT! When using the oven rack on transport cart, be sure to lock the front casters of the transport cart when it is in the loading or unloading position at the front of the cabinet. Keep the front wheels of the oven rack locked at all times (using thelocking lever near the right front wheel) except when rolling it into or out of thecabinet and onto the transport cart itself. Following this procedure stabilizes theload. To keep pans in place lock both vertical hinged bars.
To Load■ Preheat unit to set temperature or above.■ Place food product on appropriate grids, pans and racks.■ If using mobile oven rack, slide full grids, pans and racks into shelves on mobile
oven rack. Be sure containers are secure on both sides.
Opening door during operation■ Open door slightly until fan stops and heat dissipates. Open door fully with care.
GENERALINFORMATION
Mobile Oven Racks
Transport Cart(optional)

X
Opening Door During OperationOpen door slightly to allow hot steam and/or vapors to escape. KEEP FACEAND HANDS AWAY FROM OPENING or burns could result. When steam and/or heat has dissipated open door fully with care. Escaping hot steamand/or vapors can cause serious burns. Interior surfaces, including pans, gridsand oven racks, can be extremely hot. To prevent burns, allow unit to cool oruse appropriate heat resistant protective mitt or pad when handling. Do not use built-in retractable hand shower when cabinet temperature is above 150°F(65°C) or burns could result.
11
NOTE: MCS/G and BCS models 20 & 40 have a built-in safety latch that letssteam and heat out before door fully opens. Safety latch is optional on models 6, 10and 1020. If your ClimaPlus Combi is NOT equipped with this feature, open doorslightly until fan stops and steam dissipates. Open door fully with care to unload.
■ Load hinged racking system with food containers or roll loaded mobile oven rackdirectly into unit.
■ Remove handle■ Shut door and begin cooking.
To unload■ Open door slightly until fan stops and heat and steam dissipates. Open door
fully with care.■ Insert cart handle. (MOR only)■ Using oven mitts or pads, remove food containers carefully from shelves in
hinged racking system.■ With floor units, roll mobile oven rack straight out of unit to appropriate location.■ With base-top models using transport cart, roll transport cart up to front of
unit and lock front casters. Roll oven rack out of unit and onto transport cart.Be sure wheels on oven rack are locked to stabilize load and reduce the chances of spills.
GENERALINFORMATION
Loading andUnloadingcontinued
WARNING: Surfaces of food containers, mobile oven racks and insidecabinet surfaces may be extremely hot. Always use insulated oven mitts orpads when removing food containers or handling mobile oven racks orburns could result.

12
Partial LoadsIndividual pans or racks of product can be easily loaded or unloaded while the unitis in operation.
■ Open door slightly until fan stops and heat and steam dissipates. Open door fully with care.
■ Using oven mitts or pads, load or unload individual containers.■ Shut door. Cooking process continues automatically.
Tips■ Preheat cooking cabinet prior to loading for full loads.■ Since no flavor transfer occurs during cooking, try to plan full loads based on
similar cooking climates (Moist, Dry, Combination) rather than food compatibility.■ When cooking for longer periods, or on continuous run cooking, load items
that will be done sooner toward the front of the oven. These can be removed individually when done.
■ For the greatest efficiency, try to cook with full loads. In general, cooking times and temperatures are not affected by the quantity of product in the cooking cabinet.
■ When loading roasts or large cuts of meat, place product on grids and load grids directly onto shelves near the bottom of the unit. Load an empty pan directly beneath the roast to catch drippings and roast bones.
■ For base-top models, consider the purchase of Combi Base Units. Several styles are available that offer storage for convenient access to pans, grids, and racks.
■ If rethermalizing plated portions is a frequent part of your production, consider the purchase of special plate racks and thermal covers.
GENERALINFORMATION
Loading andUnloadingcontinued

13
Cooking Modes
Henny Penny Combis operate with three basic cooking modes: Moist Heat, Dry Heat and Combination. The MCS/G model also incorporates two addi-tional modes: Tender Steaming and Rethermalizing. Almost all traditionalcooking processes can be accomplished in these modes. Cooking modes can beused exclusively or in any sequence or combination to achieve desired results.
Moist Heat Mode for steaming
The steam generator produces hygienic steam and releases it (without pressure) into the cooking cabinet where it is circulated at high speeds by the fan. The cookingtemperature in this mode is fixed at 212°F (110°C). This mode is used for steaming.
Dry Heat Mode for baking or roasting
Powerful heating elements heat the air inside the cabinet. The fan circulates this hot, dry air evenly throughout the interior. Temperature can be regulated preciselybetween 85-575°F (30-300°C)*.
Combination Mode for maintaining a moist environment at high temperaturesThe unit’s control system combines both Moist Heat and Dry Heat modes to create a humid cooking environment at temperatures even above 212°F (100°C).Selected temperatures can range from 85-575°F (30-300°C)*. The cooking environ-ment retains all humidity generated from the unit and from the moisture released by food as it cooks.*Lowest temperature on BCS - 140°F (60°C)
MCS/G models, only
Tender Steaming mode for low temperature steaming
In this mode an automatic sensor maintains the selected temperature lower than212°F (100°C) within a moist environment. Temperatures can be selected from 85-210°F (30-99°C).
Rethermalizing mode for ideal results when reheating
This special mode combines moist and dry heat to create the ideal climate for reheating cooked foods. Rethermalizing restores the look, taste and texture of freshhot food without drying or marking. Rethermalize works best at temperaturesbetween 85-575°F (30-300°C).

14
Moist Heat Mode 212°F (100°C)
Pressureless steam generation and auto-reverse fan quickly produce a cooking environment of 100% humidity. Perfect for steaming a wide variety of foods with no flavor transfer. Also used for stewing, blanching, poaching, simmering,soaking, thawing, rethermalizing, preserving.
Advantages■ Extremely short preheating time.■ Excellent food consistency.■ Conserves nutrients, color.■ No added fats or oils.■ Cook different products at the same time with no flavor transfer.■ Can be partially unloaded for serving convenience.■ No need to boil water in pots.
Menu suggestions■ Ingredient preparations–tomato concasees, garnishes, mushrooms, blanched
vegetables for stuffing, peeling, etc.■ Starters, appetizers–scrambled, poached or boiled eggs; vegetable pate, asparagus,
stuffed vegetables, cannelloni.■ Entrees–cooked beef, ham, turkey legs, steamed fish, chicken breasts.■ Sides–rice, dumplings, pasta, fresh and frozen vegetables, boiled potatoes, and
grains.
Tips■ Determine which foods can be cooked together for the greatest production
efficiency. This is best done by considering the cooking modes and temperatures. Keep in mind that fish, meat, vegetables, fruit, etc. can be cooked at the same time because no flavor transfer occurs.
■ Potatoes should always be cooked in perforated pans. This allows steam to circulate for faster, more even cooking.
■ In general, two shallower pans are better than one deeper pan. This avoids bruising.■ Dumplings should be placed in shallow pans not too close together.■ Rice, dry pasta, beans, and grains are foods to which water must be added prior
to cooking. Longer soaking times mean shorter cooking times.■ Tomatoes can be skinned easily when steamed for 30 to 60 seconds, then chilled
in cold water.■ Stock can be collected by inserting a container in the bottom of the oven rack.
COOKING MODES

BCS units
15
Operation and Settings
■ Set on MOIST HEAT mode and set TIMER on “D” Continuous Run.
■ Preheat until warm-up control light goes out.* Temperature will remain at 212°F (100°C).
* M model only
■ Load oven rack.
■ Set desired cooking time and press TIMER key OR set desired “done”temperature and press PROBE cooking key. OR set on Continuous Run.
■ Set dial to desired cooking time OR set on Continuous Run.
■ Unload oven when done. Blower and heat automatically stops when door is opened.
NOTE: MCS/G/BCS models 20 & 40 have a built-in safety latch that lets steam and heat out before door fully opens. Safety latch is optional on models 6, 10 and 1020. If your Combi is NOT equipped with this feature, open door slightly until fan stops and steam dissipates. Open door fully to unload.
COOKING MODES
Moist Heatcontinued
MCS/G units
XOpening Door During OperationOpen door slightly to allow hot steam and/or vapors to escape. KEEP FACE ANDHANDS AWAY FROM OPENING or burns could result. When steam and/or heathas dissipated open door fully with care. Escaping hot steam and/or vapors can causeserious burns. Interior surfaces, including pans, grids and oven racks, can be extremelyhot. To prevent burns, allow unit to cool or use appropriate heat resistant protectivemitt or pad when handling. Do not use built-in retractable hand shower when cabinettemperature is above 150°F (65°C) or burns could result.

16
Dry Heat Mode MCS/G: 85-575°F (30-300°C)BCS: 140-575°F (60-300°C)
Powerful convection heating and auto-reverse fan create the ideal environment forfast, even broiling, roasting, baking, browning, thawing, grilling and sautéing.
Advantages■ Powerful heating capability up to 575°F (300°C), even when fully loaded.■ Fast pre-heating.■ High-speed air circulation creates even heating for high quality food production.■ Consistent cooking and even browning at all rack levels.■ No added fats or oils are needed for cooking.■ Cook different products at the same time.■ Can be partially unloaded for serving convenience.
Menu suggestions■ Ingredient preparations–roasted bones for stock, melting butter, thawing
frozen ingredients.■ Starters, appetizers–meatballs, roast beef, grilled ham, sausage, chicken wings,
quiches, tarts, breadsticks, bread rolls, etc.■ Entrees–beef and pork roasts, ribs, chicken whole or piece, turkey, frozen lasagna,
pizza, pizza rolls.■ Sides–baked potatoes, soufflés, casseroles.■ Desserts–sponge cake, marble cake, puff pastries, frozen fruit puffs, pies, etc.
TipsCooking times
Proper cooking times will vary depending on the quality, weight, or size of theproduct being cooked. Generally, cooking time is not affected by the size of theload. However, avoid overloading grids or pans so air will circulate evenly aroundall product.
Roasting, broiling
■ Preheat up to 575°F (300°C). Load and set to desired temperature.■ Ideal thickness for steaks, chops, cutlets, or loin cuts: 1⁄2-1 in. (13-25mm).■ Cook on grids with drip pans underneath. This allows even browning on all sides.■ Group similarly sized products on the same grids.
Sautéing
■ Preheat enamel pan.■ Shallow pans work best.
Browning, finishing
■ Preheat up to 575°F (300°C). Load and set to desired temperature.
COOKING MODES

BCS units
MCS/G units
17
Baking
■ Preheat to desired baking temperature. In general, Combi baking temperatures will be 40-50°F (5-10°C) LOWER than conventional ovens.
■ When baking do NOT preheat pans.■ For bread, rolls, and muffins use only every second rack. Trays should not be
deeper than 23⁄4 in. (70mm).■ Defrost frozen bread dough and let rise for a short time before baking.■ Lightly mist breaded products with water or vegetable oil or brush with eggwash.■ When baking whole fish, wrap tail in foil and support it from underneath with
raw potatoes.
Operation and settings■ Set on DRY HEAT mode and set TIMER on “D” Continuous Run.■ Preheat until set temperature is reached or heat indicator light goes out. ■ Load oven rack.
■ Set desired cooking TEMPERATURE: 85-575°F (30-300°C). Selected cooking temperature appears in display. Press TEMPERATURE key to display current cabinet temperature.
■ Set desired cooking TIME and press TIMER key OR set desired “done”temperature and press PROBE cooking key. OR set on Continuous Run.
■ Set dial to desired cooking TEMPERATURE: 140-575°F (60-300°C).
■ Set dial to desired cooking time OR set on Continuous Run.
■ NOTE: Steam generator does not operate during Dry Heat Mode. However, humidity builds in the cabinet from the moisture escaping food as it cooks.
■ Unload oven when done. Blower and heat automatically shuts off when door is opened.
NOTE: MCS/G/BCS models 20 & 40 have a built-in safety latch that lets steamand heat out before door fully opens. Safety latch is optional on models 6, 10 and 1020. If your Combi is NOT equipped with this feature, open door slightly until fan stops and steam dissipates. Open door fully to unload.
COOKING MODES
Dry Heatcontinued

18
Combination Mode MCS/G: 85-575°F (30-300°C)BCS: 140-575°F (60-300°C)
Fast, consistent method for cooking foods that require a combination of moistand dry heat. In Combination Mode, the cabinet may be heated to any tem-perature in the range shown above. The steam generator introduces moist heatinto the cabinet as needed throughout the cooking cycle. Use when combi-baking,combi-roasting, combi-steaming, browning, braising, glazing, basting.
Advantages ■ Fast preheating.■ Cook with steam at temperatures above 212°F (100°C).■ Less food shrinkage from dehydration.■ More servings per cooked pound.■ Automatic basting.■ Foods retain more nutrients and flavor.■ No added fats or oils are needed for cooking.■ Even heating improves cooked quality of large meat portions.■ Cook different products at the same time with no flavor transfer.■ Consistent cooking and browning at all rack levels.■ Can be partially unloaded for serving convenience.
Menu suggestions■ Ingredients preparations–roasted bones for stock.■ Starters, appetizers–quiche, pastas, bread, rolls (frozen), etc.■ Entrees–roasts (beef, veal, pork, lamb) stuffed peppers, whole roast chicken,
turkey legs, casseroles, lasagna, etc.■ Sides–potatoes au gratin, baked potatoes, frozen vegetables, baked apples, etc.■ Desserts–yeast dough (choux pastry).
Tips■ To achieve even cooking and browning, always cook roasts on grids with plenty
of space around each roast for air to circulate.■ When practical, place roasts on grids with meat grain parallel to airflow for even
better results. ■ Cook large, fat-encrusted roasts in MOIST HEAT mode for the first one-third
of the total cooking time, then switch to COMBINATION mode with desired settings for the remainder. This technique helps seal in juices, flavors and nutrientswhile reducing shrinkage.
■ Condensation and juices can be collected in a pan under the roasts to be used later with roasted bones for sauce stocks.
■ Use chicken grid to roast whole chickens upright for even cooking, browning.
COOKING MODES

BCS units
MCS/G units
19
NOTE: BCS models do not have a separate mode for rethermalizing. When reheating items in BCS models, use Combination Mode with temperatures from280-320°F (138-160°C) for 5-8 minutes, depending on items and load size.
Operation and settings■ Set on COMBINATION mode and set TIMER on “D” Continuous Run.
■ Preheat until set temperature is reached or heat indicator light goes out.
■ Load oven rack.
■ Set desired cooking TEMPERATURE: 85-575°F (30-300°C). Selected cooking temperature appears in display. Press TEMPERATURE key to display current cabinet temperature.
■ Set desired cooking TIME and press TIMER key OR set desired “done”temperature and press PROBE cooking key. OR set on Continuous Run.
■ Set dial to desired cooking TEMPERATURE: 140-575°F (60-300°C).
■ Set dial to desired cooking time OR set on Continuous Run.
■ Unload oven when done. Blower and heat automatically shuts off when door is opened.NOTE: MCS/G/BCS models 20 & 40 have a built-in safety latch that lets steam and heat out before door fully opens. Safety latch is optional on models 6, 10 and 1020. If your is NOT equipped with this feature, open door slightly until fan stops and steam dissipates. Open door fully to unload.
COOKING MODES
Combinationcontinued
XOpening Door During OperationOpen door slightly to allow hot steam and/or vapors to escape. KEEP FACE ANDHANDS AWAY FROM OPENING or burns could result. When steam and/or heathas dissipated open door fully with care. Escaping hot steam and/or vapors can causeserious burns. Interior surfaces, including pans, grids and oven racks, can be extremelyhot. To prevent burns, allow unit to cool or use appropriate heat resistant protectivemitt or pad when handling. Do not use built-in retractable hand shower when cabinettemperature is above 150°F (65°C) or burns could result.

20
Forced Steaming 213-265°F (101-130°C)
A cooking technique that uses Combination Mode within a certain temperature range to achieve full-humidity steaming at temperatures wellabove boiling. Forced Steaming is excellent for cooking dense products, such as root vegetables and frozen casseroles.
Advantages■ Creates an intensified cooking process■ Shorter cooking times ■ Product retains color, nutrients■ Less shrinkage
Menu suggestions■ Potatoes, carrots, celery■ Frozen prepared foods
TipsApproximate temperature ranges for some common Forced Steamed items:
Celery 230°F 110°C
Carrots 240°F 115°C
Potatoes 257°F 125°C
Turnips, yams 248°F 120°C
Frozen lasagna 248°F 120°C
Frozen vegetables 248°F 120°C
Rice 248°F 120°C
COOKING MODES
Combination/Forced Steaming

21
BCS units
MCS/G units
Operation and settings■ Set on COMBINATION mode and set TIMER on “D” Continuous Run.
■ Preheat until set temperature is reached or heat indicator light goes out.
■ Load oven rack.
■ Set desired Forced Steaming TEMPERATURE: 213-265°F (101-130°C).
■ Set desired cooking TIME and press TIMER key OR set desired “done”temperature and press PROBE cooking key. OR set on Continuous Run.
■ Set dial to desired Forced Steaming TEMPERATURE: 213-265°F (101-130°C).
■ Set dial to desired cooking time OR set on Continuous Run.
■ Unload oven when done. Blower and heat automatically shuts off when door is opened.NOTE: MCS/G/BCS models 20 & 40 have a built-in safety latch that lets steamand heat out before door fully opens. Safety latch is optional on models 6, 10 and 1020. If your Combi is NOT equipped with this feature, open door slightly until fan stops and steam dissipates. Open door fully to unload.
COOKING MODES
Combination/Forced Steamingcontinued
XOpening Door During OperationOpen door slightly to allow hot steam and/or vapors to escape. KEEP FACE ANDHANDS AWAY FROM OPENING or burns could result. When steam and/or heathas dissipated open door fully with care. Escaping hot steam and/or vapors can causeserious burns. Interior surfaces, including pans, grids and oven racks, can be extremelyhot. To prevent burns, allow unit to cool or use appropriate heat resistant protectivemitt or pad when handling. Do not use built-in retractable hand shower when cabinettemperature is above 150°F (65°C) or burns could result.
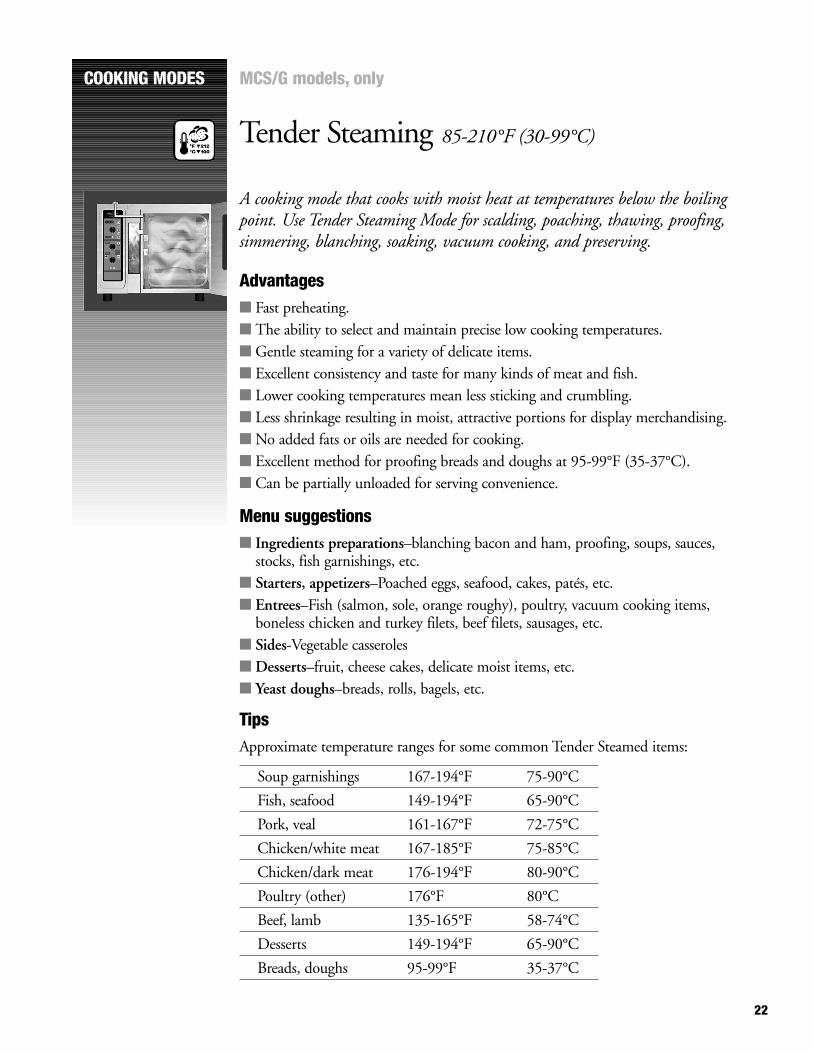
Tender Steaming 85-210°F (30-99°C)
A cooking mode that cooks with moist heat at temperatures below the boilingpoint. Use Tender Steaming Mode for scalding, poaching, thawing, proofing,simmering, blanching, soaking, vacuum cooking, and preserving.
Advantages■ Fast preheating.■ The ability to select and maintain precise low cooking temperatures. ■ Gentle steaming for a variety of delicate items.■ Excellent consistency and taste for many kinds of meat and fish.■ Lower cooking temperatures mean less sticking and crumbling.■ Less shrinkage resulting in moist, attractive portions for display merchandising.■ No added fats or oils are needed for cooking.■ Excellent method for proofing breads and doughs at 95-99°F (35-37°C).■ Can be partially unloaded for serving convenience.
Menu suggestions■ Ingredients preparations–blanching bacon and ham, proofing, soups, sauces,
stocks, fish garnishings, etc.■ Starters, appetizers–Poached eggs, seafood, cakes, patés, etc.■ Entrees–Fish (salmon, sole, orange roughy), poultry, vacuum cooking items,
boneless chicken and turkey filets, beef filets, sausages, etc. ■ Sides-Vegetable casseroles■ Desserts–fruit, cheese cakes, delicate moist items, etc.■ Yeast doughs–breads, rolls, bagels, etc.
TipsApproximate temperature ranges for some common Tender Steamed items:
Soup garnishings 167-194°F 75-90°C
Fish, seafood 149-194°F 65-90°C
Pork, veal 161-167°F 72-75°C
Chicken/white meat 167-185°F 75-85°C
Chicken/dark meat 176-194°F 80-90°C
Poultry (other) 176°F 80°C
Beef, lamb 135-165°F 58-74°C
Desserts 149-194°F 65-90°C
Breads, doughs 95-99°F 35-37°C
COOKING MODES MCS/G models, only
22
23
XOpening Door During OperationOpen door slightly to allow hot steam and/or vapors to escape. KEEP FACE ANDHANDS AWAY FROM OPENING or burns could result. When steam and/or heathas dissipated open door fully with care. Escaping hot steam and/or vapors can causeserious burns. Interior surfaces, including pans, grids and oven racks, can be extremelyhot. To prevent burns, allow unit to cool or use appropriate heat resistant protectivemitt or pad when handling. Do not use built-in retractable hand shower when cabinettemperature is above 150°F (65°C) or burns could result.
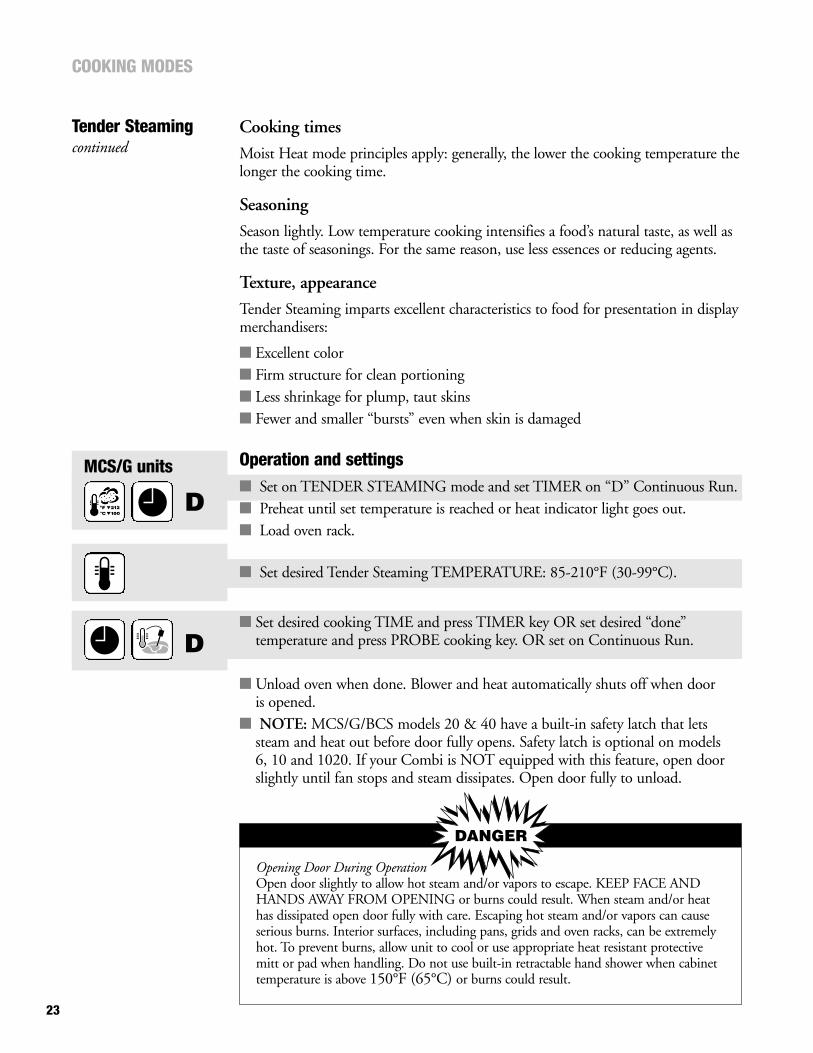
Cooking times
Moist Heat mode principles apply: generally, the lower the cooking temperature thelonger the cooking time.
Seasoning
Season lightly. Low temperature cooking intensifies a food’s natural taste, as well asthe taste of seasonings. For the same reason, use less essences or reducing agents.
Texture, appearance
Tender Steaming imparts excellent characteristics to food for presentation in display merchandisers:
■ Excellent color■ Firm structure for clean portioning■ Less shrinkage for plump, taut skins■ Fewer and smaller “bursts” even when skin is damaged
Operation and settings■ Set on TENDER STEAMING mode and set TIMER on “D” Continuous Run.■ Preheat until set temperature is reached or heat indicator light goes out. ■ Load oven rack.
■ Set desired Tender Steaming TEMPERATURE: 85-210°F (30-99°C).
■ Set desired cooking TIME and press TIMER key OR set desired “done”temperature and press PROBE cooking key. OR set on Continuous Run.
■ Unload oven when done. Blower and heat automatically shuts off when door is opened.
■ NOTE: MCS/G/BCS models 20 & 40 have a built-in safety latch that lets steam and heat out before door fully opens. Safety latch is optional on models 6, 10 and 1020. If your Combi is NOT equipped with this feature, open door slightly until fan stops and steam dissipates. Open door fully to unload.
COOKING MODES
Tender Steamingcontinued
MCS/G units

24
Rethermalizing
Rethermalizing Mode utilizes an optimum combination of moist and dry heatto maintain flavor and textures when bringing chilled cooked foods back up toserving temperatures.
Advantages ■ Different food products can be reheated without being covered.■ Perfect mode for re-heating ingredients, servings or meals previously cooked and
chilled as part of a cook/chill production process.■ Whole meals can be plated and chilled in quantity on special racks that roll
directly from the blast chiller into the Combi for rethermalizing.■ Allows more efficient use of time to prepare dishes and trays ahead of time.■ Less shrinkage.
Menu suggestions■ Starters, appetizers–pasta, vegetable dishes, macaroni & cheese, casseroles, spring
rolls, etc.■ Entrees–roasts, pasta, casseroles, chilled or frozen meat and fish, chilled or frozen
prepared entrees, stuffed vegetable dishes.■ Sides–rice and rice dishes, vegetables, noodles, new potatoes, potatoes au gratin,
potato pancakes, fries, etc.■ Desserts–fruit pies, cheese cakes, stewed fruit, etc.
Tips■ Proper rethermalizing temperatures will vary depending on type of food.■ Rethermalizing times depend on the type of food, the beginning internal
temperature and the number of plates or pans in the load.■ Use probe cooking when practical. Ideal serving temperatures are easier to achieve.■ Re-heating plated servings is more efficient, especially when preparing meals
in volume.■ Use special mobile oven rack designed to hold plates for rethermalizing. Racks
roll from blast chiller or walk-in directly into the ClimaPlus Combi. Fitted thermal covers are available to keep plates on rack warm for short periods or during transport.
■ Make sure food is arranged evenly on plates.
■ Apply sauces after rethermalizing.
NOTE: BCS models do not have a separate mode for rethermalizing. When reheating items in BCS models, use Combination Mode with temperatures from280-320°F (138-160°C) for 5-8 minutes, depending on items and load size.
COOKING MODES MCS/G models, only

25
■ Create a custom cooking program with Rethermalizing settings that can be used for similar recurring situations.
Operation and settings■ Set on RETHERMALIZING mode and set TIMER on “D” Continuous Run.■ Preheat until set temperature is reached or heat indicator light goes out. ■ Load oven rack.
■ Set desired Rethermalizing TEMPERATURE: Generally from 240-280°F (116-138°C).
■ Set desired cooking TIME and press TIMER key OR set desired “done” temper-ature and press PROBE cooking key. OR set on Continuous Run.
■ Unload oven when done. Blower and heat automatically shuts off when door is opened.
NOTE: MCS/G/BCS models 20 & 40 have a built-in safety latch that lets steamand heat out before door fully opens. Safety latch is optional on models 6, 10 and1020. If your Combi is NOT equipped with this feature, open door slightly untilfan stops and steam dissipates. Open door fully to unload.
COOKING MODES
Rethermalizingcontinued
XOpening Door During OperationOpen door slightly to allow hot steam and/or vapors to escape. KEEP FACE ANDHANDS AWAY FROM OPENING or burns could result. When steam and/or heathas dissipated open door fully with care. Escaping hot steam and/or vapors can causeserious burns. Interior surfaces, including pans, grids and oven racks, can be extremelyhot. To prevent burns, allow unit to cool or use appropriate heat resistant protectivemitt or pad when handling. Do not use built-in retractable hand shower when cabinettemperature is above 150°F (65°C) or burns could result.

26
Probe Cooking for achieving precise “done” temperatures
The Probe Cooking function allows the operator to select the food’s desired “done”temperature as well as the cooking temperature. The probe is inserted into the central part of the product to measure the actual internal temperature of the food as it cooks. The cooking cycle stops automatically when selected internal temperature is achieved.
Advantages ■ Cook to proper “doneness” for precise, consistent results with different types
of food.■ Prevents over cooking, less waste.■ Does not require constant observation of cooking process.■ Results in less shrinkage, more portions.■ Control panel simultaneously displays done temperature and current core
temperature.■ Eliminates wasteful and unattractive intrusive testing methods such as needle,
fork, or cutting.
When to useProbe cooking can be used for practically any type of food, most often with roasts,meats, poultry, casseroles, entreés, soups, rethermalizing plated portions.
Tips ■ When roasting meat for sliced cold servings, set food core temperature about
9°F (5°C) lower than recommended “done” temperature. Roast will continue to cook as it cools.
■ A hot probe may sear the meat on contact, leaving a hole or scar when probe is removed. Always cool probe prior to insertion.
■ Probe cooking temperatures can be changed or reset at any time during the cooking process. For example, you may wish to change cooking modes oraccelerate the cooking process after a certain core temperature is reached. Simply make those changes and reset probe “done” temperature to the desire cooked setting.
COOKINGFUNCTIONS
MCS/G models, only

27
Operation and settings
■ Set on any desired mode. Set TIMER on “D” Continuous Run.■ Load oven rack.■ Insert probe into thickest portion of the meat or other food item on center rack.
NOTE: Be sure probe is clean and cool prior to insertion.
■ Set desired cooking TEMPERATURE.
■ Press PROBE COOKING key and set desired probe “done” temperature.
■ Selected done temperature is displayed. Timer does not operate.■ No operator control or observation is necessary.■ A signal sounds when done temperature is reached. Blower and heat shuts off
automatically. (Cabinet will retain heat)■ Probe done temperature, as well as other settings, can be changed at any time.
Probe Cooking Guide to “Doneness”
Meat Probe “Done Temp” Appearance
Beef Rare 130°F 55°C Dark, blood red
Medium rare 140F 60°C Red meat, blood-red juice
Medium 145°F 63°C Light pink core
Well done 167-189°F 75-65°C Gray-brown throughout
Veal Fully cooked 155-170°F 69-77°C Red-brown to gray-white
Pork Medium 150°F 65°C Light pink
Well done 167-176°F 75-80°C Pale brown to gray-white
Cured 150°F 65°C Pale red-brown or nearlycolorless
Lamb Fully cooked 165°F 74°C Gray to pale-red juice, clear juice
Mutton Fully cooked 165°F 74°C Pale gray meat, red juice
Poultry Fully cooked 185°F 85°C White meat, nearly colorless juice
COOKINGFUNCTIONS
Probe Cookingcontinued
X
Probe sensor may be extremely hotWhen not in use, always place probe sensor in holder. Do not let probe sensor hang loose outsidethe cooking cabinet. Remove probe sensor from food before unloading unit.

28
Additional Functions: Cool Down
Cool Down is a keypad function that enables the fan to continue operatingwhen the door is open. This dissipates heat quickly. (MCS/G only)
Advantages■ Achieve rapid reduction in cabinet temperature when switching from a high
to a low cooking temperature.■ Saves time for efficient operation.■ Prevents overcooking, especially with shorter cooking times.
Operation and control■ Cool Down can be used in any cooking mode, at any temperature setting, and
at any time during the cooking process.
■ Unit must be in operation with door closed.
■ Cool Down automatically stops after 5 minutes.
■ Press the Cool Down key. Green LED on key will light. ■ Open door with care. ■ Actual cabinet temperature appears with flashing digits in Temperature display.■ Close door to continue cooking when desired cabinet temperature is achieved.
■ Set mode switch to COOL-DOWN.
■ Open door with care.■ Close door to continue cooking at a lower cabinet temperature.
COOKINGFUNCTIONS
BCS units
MCS/G units
XOpening Door During OperationOpen door slightly to allow hot steam and/or vapors to escape. KEEP FACE ANDHANDS AWAY FROM OPENING or burns could result. When steam and/or heathas dissipated open door fully with care. Escaping hot steam and/or vapors can causeserious burns. Interior surfaces, including pans, grids and oven racks, can be extremelyhot. To prevent burns, allow unit to cool or use appropriate heat resistant protectivemitt or pad when handling. Do not use built-in retractable hand shower when cabinettemperature is above 150°F (65°C) or burns could result.

29
Additional Functions: Steam Injection
Steam Injection is a keypad function enabled in Dry Heat mode that, whenactivated, sprays a four-second burst of water onto heating elements, creatingan immediate and brief humidified environment in the cooking cabinet.
Advantages■ Improves rising and browning of dough.■ Adds slight glaze to pastries.■ Keeps foods, and especially skins and crusts from dehydrating.■ Additional control for fruit, meat pastries and other items with varied textures,
densities and consistency.
Tips■ Use Steam Injection sparingly. If ongoing humidity is desired, use Combination
Mode or Forced Steaming.■ Use early in the baking process to improve dough and pastry rising.■ Can be used in all program steps that use Dry Heat between 248°F and 482°F
(120-250°C). When programmed, a four-second burst occurs every two minutes.
Operation and settings■ Steam Injection can only be activated when cooking in Dry Heat mode.■ Cooking temperature must be between 248°F and 482°F (120-250°C).
NOTE: Steam Injection will not operate until cabinet temperature is 248°F(120°C) or higher.
■ To activate, press STEAM INJECTION key.
■ Repeat as desired.
COOKINGFUNCTIONS
MCS/G models, only

30
COOKINGFUNCTIONS
Special Functions: HACCP Interface
A special capability that records, prints and/or transmits actual cooking datafor conformance with HACCP procedures.
Henny Penny Combis are equipped with a serial interface to output key cookingdata, core temperature progression, cabinet temperature, start and end times, etc.This data can be printed out directly in report form or downloaded to a PC environment.
Set UpFirst, connect a printer or PC to the unit using a standard serial cable. The combiserial port is located on the underside of the unit near the front. Once connected,follow the instructions below to begin recording data.
Recording data ■ Select any cooking mode.
■ Set desired cooking TEMPERATURE.
■ Press PROBE cooking key and set desired probe “done” temperature. Recording can only take place when using probe cooking. Be sure food probe is inserted.
■ Simultaneously press and hold TEMPERATURE key and STEAM INJECTIONkey for approximately 10 seconds until a flashing dot appears in the cooking temperature display.
■ Close cabinet door and begin cooking.■ The function stops at the end of the cooking cycle, or if the unit is turned off
for longer than 4 seconds. Data recording can be terminated prior to completionof the cooking process by pressing both the Temperature and Steam Injection keys at the same time again.
Outputting dataData can be output to the following devices:
■ A standard printer equipped with a serial RS232 interface that can be set to the specified transmission format.
■ Any PC with Windows 95 or higher operating system. Windows 95 and 98 include a terminal program in the “Hyper Terminal” folder within the Accessories program group. After launching the "Hypertrm" application program, the following settings must be made:
MCS/G models, only
31
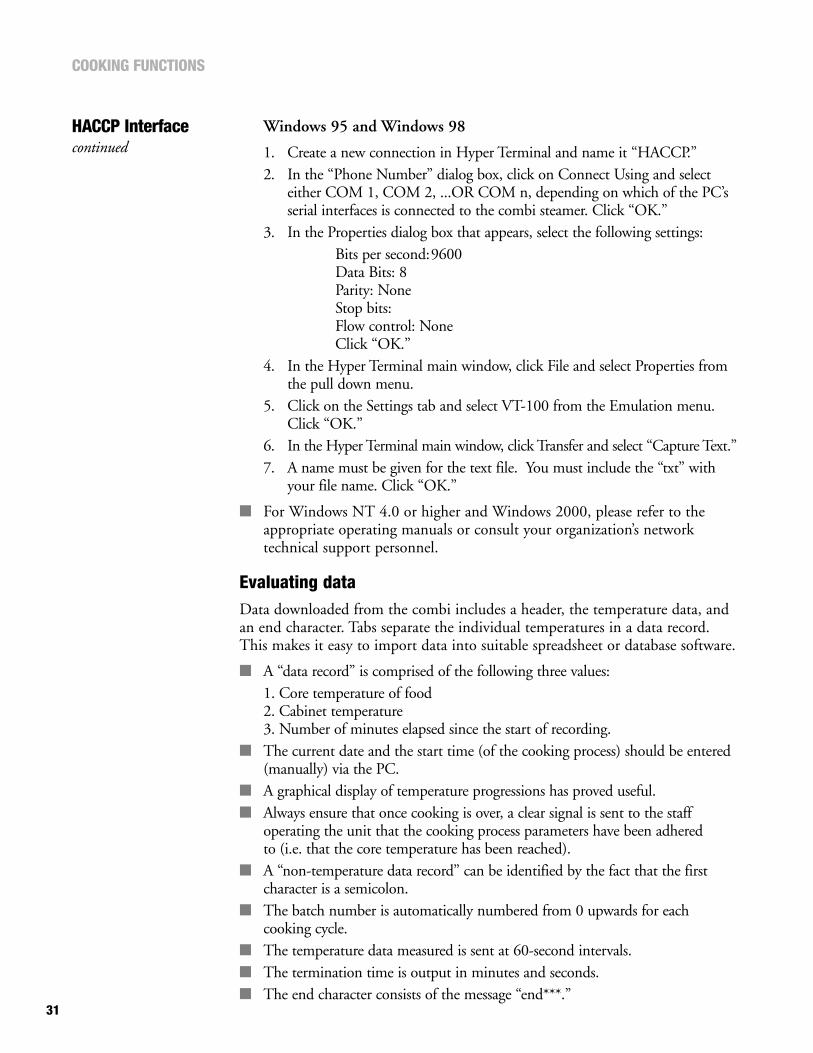
Windows 95 and Windows 98
1. Create a new connection in Hyper Terminal and name it “HACCP.”2. In the “Phone Number” dialog box, click on Connect Using and select
either COM 1, COM 2, ...OR COM n, depending on which of the PC’sserial interfaces is connected to the combi steamer. Click “OK.”
3. In the Properties dialog box that appears, select the following settings:Bits per second:9600Data Bits: 8Parity: NoneStop bits: Flow control: NoneClick “OK.”
4. In the Hyper Terminal main window, click File and select Properties from the pull down menu.
5. Click on the Settings tab and select VT-100 from the Emulation menu. Click “OK.”
6. In the Hyper Terminal main window, click Transfer and select “Capture Text.”7. A name must be given for the text file. You must include the “txt” with
your file name. Click “OK.”
■ For Windows NT 4.0 or higher and Windows 2000, please refer to the appropriate operating manuals or consult your organization’s network technical support personnel.
Evaluating dataData downloaded from the combi includes a header, the temperature data, and an end character. Tabs separate the individual temperatures in a data record. This makes it easy to import data into suitable spreadsheet or database software.
■ A “data record” is comprised of the following three values:1. Core temperature of food2. Cabinet temperature3. Number of minutes elapsed since the start of recording.
■ The current date and the start time (of the cooking process) should be entered (manually) via the PC.
■ A graphical display of temperature progressions has proved useful.■ Always ensure that once cooking is over, a clear signal is sent to the staff
operating the unit that the cooking process parameters have been adhered to (i.e. that the core temperature has been reached).
■ A “non-temperature data record” can be identified by the fact that the first character is a semicolon.
■ The batch number is automatically numbered from 0 upwards for each cooking cycle.
■ The temperature data measured is sent at 60-second intervals.■ The termination time is output in minutes and seconds.■ The end character consists of the message “end***.”
COOKING FUNCTIONS
HACCP Interfacecontinued

32
COOKINGFUNCTIONS
Programming
Programming capabilities of the MCS/G Combi allow operators to create customcooking programs that automatically operate the unit to programmed parameters.
If you are not already familiar with the MCS or MCG control panel, please reviewpage 8 before attempting to program your unit.
Memory■ Up to 9 total custom cooking programs are available to the operator.
An additional program for cleaning has been set by the manufacturer.
■ Each program can contain up to 3 separate steps (sets of parameters).
Control■ Automatic—Unit begins operation when Program Start key is pressed.
Unit shuts down when last program step has been completed.
■ Manual Override—Program operation can be interrupted at any time by simply selecting or setting a new value. The new value affects cooking process only in the step in which the program was overridden. Overriding the program DOES NOT cancel it. When the new value or function is achieved, and/or that step of the program is completed, program operation continues with the next programmed step, or shuts down unit if program is complete.
■ Program Lock—Cooking programs can be locked to prevent any unauthorized or undesired changes to the programs. If programming is locked out, only storedprograms will be displayed.
NOTE: When programming is locked you cannot manually override changes to programs.
Programming the MCS/G CombiTo create custom cooking programs:
■ Unit must be off. Open door.
■ Turn mode selector dial to PROG. The PROG LED will flash for five seconds, prompting a programming action. The letter “C” (Cleaning program) appears in the Program Number Display, the middle of three display keys immediately left.
NOTE: If the PROG LED does not flash, the programming function has been locked (see “To lock/unlock programming”.)
■ Select the desired program number (1-9) by pressing the display key farthest left. This key acts as the Program Selection key. The middle display will show the program number followed by a decimal point. Flashing program numbers are available for programming; non-flashing numbers indicate stored programs.
NOTE: If programming is locked, only stored program numbers will be displayed.
■ Program number and first cooking mode must be selected while the PROG LED is flashing within 5 seconds.
MCS/G models, only
5.
C START
START

33
C
5.
■ Begin entering cooking parameters for each step of the program by selecting desired cooking mode.
■ Continue current step by selecting additional parameters, such as cooking temperature, time or probe “done” temperature, or steam injection.
■ To move on to the next step in the program, select a cooking mode. It can be the same mode or a different one. If you wish to use the same mode, reset that mode by quickly turning the mode dial away from and back to its original setting. The Program Step Display now shows a number “2” with no decimal. Continue entering parameters.
■ When all steps have been entered in this manner, save the program by switching the mode dial to PROG.
■ Check the program by pressing the Program Start key (the display key next to PROG) repeatedly. Each step will be displayed in sequence with the corresponding LEDs and values indicating the various parameters of that stage. After the last step, the program number will be displayed.
To run a saved program
■ Do not open door. Turn the mode selector dial to PROG.■ Select the desired program number by pressing the Program Selection display key.■ Press the Program Start display key. Cooking program will begin.
To lock/unlock programming
■ Open door. Turn mode selector dial to PROG
■ Press TIMER activation key. Set TIMER to 110 minutes.
■ Press Program Start display key. When locking programming, display will show a dash. When unlocking programming, display will show “P”.
COOKINGFUNCTIONS
Programmingcontinued
MCS/G models, only
StepNumber
ProgramSelection
ProgramNumber
ProgramStart
C
5.Program
Start
�
110
START
START
START
START

34
To delete a program (must be unlocked)
■ Open door. Turn mode selector dial to PROG.■ Select program number to delete by pressing Program Selection display key.
Then select any cooking mode.
NOTE: both of these actions must be taken while PROG LED is flashing.
■ Set TIMER to “0”.
■ Turn mode selector dial back to PROG. The program has now been deleted and the program number is available for a new cooking program.
To change temperature scale °F/°C■ Open door. Turn mode selector dial to any cooking mode.
■ Simultaneously press and hold cooking TEMPERATURE key and COOL DOWN keys for about 10 seconds until Temperature Scale Indicator changes to the desired format. All temperatures will automatically be displayed in the new temperature scale.
COOKINGFUNCTIONS
MCS/G models, only
0
5.
0C 0F
START

35
CleaningYour Henny Penny Combi MUST be cleaned at least once a day to ensure propersanitation and continued trouble-free operation.
All models are equipped with a built-in retractable hand shower for rinsing. Theunit uses its own built-in water supply, plus heat and steam from Moist Heat modeoperation to do most of the work. MCS/G models are equipped with a presetcleaning program that requires less operator time.
For best results, use Henny Penny Oven and Grill Cleaner and follow the proce-dures outlined below:
To clean:
1. Allow cooking cabinet to cool down below 130°F (55°C). (Cool Down function can be used)
2. Turn unit off and disconnect electrical power to unit.
3. Swivel left hinged rack inward. (If using mobile oven rack, remove rack and guide frame.)
4. Using a flat-head screwdriver, turn the two quick fastening locks one-quarter turn counterclockwise. Baffle will swing open for cleaning.
NOTE: Floor units have 1 air baffle that opens in this manner.
5. Spray all interior cabinet surfaces (even behind the pivoted air baffle).
6. Replace air baffle and racking system, load grids and stainless steel pans and spray thoroughly with Henny Penny Oven and Grill/Combi Cleaner. Reconnect power.
To initiate factory pre-set cleaning program (MCS/G models only):
7. Set mode selector dial to PROG. The letter “C” appears in the program number display.
8. Press the Program Start display key and skip steps 6-8.
NOTE: If you do not wish to use pre-set cleaning program, skip steps 7-8.
9. Let cleaner act for approximately 20 minutes.
10. Select Moist Heat mode.
11. Select TIMER and set for 15 minutes.
12. Repeat process for heavily soiled cabinet.
13. Rinse thoroughly with built-in hand shower.
NOTE: To activate the hand shower water flow, pull hose to full extension andrelease to rest position. Press spray gun button.
C

36
Hand cleaning accessibility
■ The hinged racks can be removed for cleaning by lifting up on the racks, swiveling them inward, and lifting them off their mountings.
■ If using the mobile oven rack system, roll the rack out of the unit and remove the guide frame from the bottom of the unit by lifting it upward out of its mountings.
■ The air baffle, covering the left side of the interior cabinet, provides even airflow and protects operator from heating elements and fan.
NOTE: Wipe door gasket with clean cloth.
Descaling Maintenance
Limescale deposits occur naturally inside the steam generator. Time, heavy use, and hard water conditions result in a gradual build-up of these deposits, eventuallyaffecting the performance of, and potentially damaging, your combi. Periodic, professional descaling of the steam generator must be performed on a regular basisto ensure peak performance of your Henny Penny Combi.
Auto Flush
Auto Flush is an automatic feature in all models that drains and flushes the steamgenerator on a regular basis in order to keep the unit operating reliably betweendescalings. While it extends the time between service calls, the Auto Flush feature isnot meant to make descaling unnecessary.
IMPORTANTDescaling should ALWAYS be performed by a certified Henny Penny service tech-
nician, or a similarly qualified individual.
CLEANINGcontinued
Safety protection (gloves, goggles, etc.) is required when working with cleaning products. Please refer to cleaning product guidelines before use.

37
InstallationRefer to the following pages for important information regarding theinstallation of MCS/G and BCS Combis. It is recommended thatinstallation be accomplished by a certified and properly trained technician.
Site, leveling
1) Check for any transport damages. Should there be any signs of transport damage immediately inform your dealer/freight forwarder.
2) Check installation site. Check entrance clearance.Minimum entrance space needed without pallet:
Model 6 & 10: 351⁄2 in. (902 mm)Model 1020: 495⁄8 in. (1262 mm)Model 20: 397⁄8 in. (1012 mm)Model 40: 521⁄2 in. (1332 mm)
■ Floor at installation site must be level. ■ Cold water line should be in place. (page 40)■ 2 in. (50 mm) drain connection installed.■ Max. drain height for floor units: 4 in. (100mm)■ Electrical power supply/protective measures installed and sized correctly.
(page 38-39)
3) Remove all cartons, packing materials, documents etc. from the interior cabinet.4) Remove grid shelves/mobile rack from cabinet.5) Take unit off the pallet.
■ Moving unit without pallet: Models 6, 10, 1020 (fig. 1)
■ Moving unit without pallet: Models 20, 40 (fig. 2)
Minimum clearance sides and back:2 in. (50 mm)
Service clearance, left side:20 in. (500 mm)
Clearance for door opening:
Model 6 & 10: 201⁄2 in. (521 mm)Model 1020: 291⁄2 in. (749 mm)Model 20: 283⁄4 in. (730 mm)Model 40: 303⁄4 in. (781 mm)
fig. 1
fig. 2

38
Unit weights:
MCS/BCS 6 270 lbs. (123 kg) MCG 6 335 lbs. (152 kg)
MCS/BCS 10 334 lbs. (152kg) MCG 10 384 lbs. (174 kg)
MCS/BCS 1020 484 lbs. (220 kg) MCG 1020 584 lbs. (265 kg)
MCS/BCS 20 686 lbs. (312 kg) MCG 20 798 lbs. (362 kg
MCS/BCS 40 972 lbs. (442 kg) MCG 40 888 lbs. (403 kg)
6) Installation models 6, 10, 1020■ Place floor stand at the installation place and level by adjusting legs (fig. 3). ■ Minimum clearance required to neighboring equipment or walls (page 36)■ Place the unit on top of the stand. The unit’s legs must be centered on
the locating pins of the stand (fig. 4). ■ Unit must be level (fig. 5).
7) Installation models 20, 40■ The unit must be secured against shifting on the floor by means of floor
fixtures (fig. 6). If floor fixtures are glued to the floor (use polyurethane glue or similar), remove all grease from the floor first.
■ Place the unit at its final location and level by adjusting legs (fig. 5). ■ Minimum clearance required to neighboring equipment or walls (page 36)■ The area of floor under the unit where Mobile Oven Racks will roll in
must be level or door will not seal (fig. 7).
Electrical8) Electrical connection
■ Connect the unit only according to the information given on the data plate.■ Observe all regulations of your local Electrical Code.■ The appliance may only be connected by a licensed electrician.■ Each appliance requires an independent fused power supply line.■ Connection via GFI circuit breaker is advisable.■ On-site installation: provide accessible all-pole disconnection device with
minimum of 1⁄8 in. (3 mm) contact gap (not required for 120v gas units.)■ Connect appliance to ground.■ Special voltages on request. Circuit diagram is located behind the operator
panel.
Connected load for electric units:
INSTALLATION
continued
Model KWAmps
208v 3Phase 240v 3 Phase 208v 1 Phase 240v 1 Phase
MCS/BCS-6 10 28 24 48 42
MCS/BCS-10 19 53 45.8
MCS/BCS-1020 31.5 87.5 75.9
MCS/BCS-20 38 105.6 91.5
MCS/BCS-40 63 175.1 151.8
Fig. 3
Fig. 4
Fig. 5
Fig. 6
Fig. 7

39
Choose conductor size according above tables and your local regulations.
IMPORTANTGas units are voltage specific. Supply voltage must match voltage rated on data plate.
■ Gas units are supplied with grounded power cord and plug.■ Electric units are NOT supplied with power cord.
To connect power supply for electric units, models 6, 10:■ Open the operator panel. (fig. 8)■ Insert power cord through cable inlet under left side of unit to desired
length and secure the cable connection tight. (fig. 9)■ The circuit diagram is located behind the control panel.
To connect power supply for electric units, models 1020, 20, 40:■ Access power connection terminals by removing left side panel. ■ Insert power supply cable through cable inlet under left side of unit to desired
length and secure the cable connection tight. (fig. 9)■ Connect supply wires as follows:
Gray terminals: L1, L2, L3, phase sequence does not need to be observed
Blue terminal: Neutral (if applicable)Yellow/Green terminal: Ground
IMPORTANT/MCS OnlyHenny Penny Combi Ovens are shipped set up for 240 volts, but can be changedto operate on 208 volt by proceeding with the following steps:
1. Disconnect unit from power supply source.
2. Open service door (fig. 8) by loosening fastener at top of the unit over the control panel using a 5 mm Allen wrench. A rubber grommet must first be removed to access the bolt.
3. Remove jumper between pins 8 and 9 of connector shown at left. The jumper is removed for 208 volt supply, it stays in place between pins 8 and 9 for 240 volt.
4. Move transformer primary lead from the 240 volt terminal to the 208 volt terminal.
5. Secure all panels and covers.
NOTE: BCS electric units are voltage specific. Only MCS electric units are convertible.
INSTALLATION
Model Voltage Phase Cycle/Hz KW
MCG-6 120 1 60 1
MCG-10 120 1 60 1
MCG-1020 208/240 1 60 1.5
MCG-20 208/240 1 60 1.6
MCG-40 208/240 1 60 3.5
L1
L2
L3
N
fig. 8
fig. 9
CableInlet
240 Volt
208 Volt
Common
121110987654321
Electrical requirements of gas units:
(Electric)(Gas)

40
fig. 10
fig. 11
C B A
fig. 12
WA
WA
WZ
INSTALLATION Water supply9) Drain Connection (WA)
■ For drain connection (fig. 10) use only steam temperature resistant pipe, diameter 2 in. (50 mm) and constant slope 5%. No hose should be used.
■ Direct drain connection is possible, ventilated gap is an integrated part of the appliance (fig. 11).
■ Drain pipe should be supported to the wall/floor every 3 feet. ■ Max. water discharge rate during Auto Flush:11 gal./min. (0.7 liter/sec.) ■ Average drain water temperature: 150°F (65°C).
10) Water Connection (WZ)
■ Observe all local plumbing codes.■ Flush water line before connecting the water supply to the unit.■ Connect to cold, potable water only.■ Operational water pressure: MIN: 30 psi (150kPa) MAX: 88 psi (600kPa).
RECOMMENDED: 44 psi (300kPa).■ Water connection supplied by customer: min. 1⁄2 in. pressure hose with R 3⁄4 in.
tapered fitting.■ Customer fitted shut-off valve for each appliance.■ Water conductivity: 50-2000 µS, lower conductivity on request. ■ Maximum chloride concentration (Cl-): below 150 ppm (150 mgr/liter)
at any time.■ For conductivity above 2000 µS or higher chloride concentration use
hydrogen-ion exchanger (A in fig. 13) in the water supply line.■ Water Redox-Potential must be below 300mV at any time. ■ For higher Redox Potential use Active Carbon Filter (B in fig. 12). Observe
maintenance period of active carbon filter. ■ Use a 3 micron (0.08mm) particle filter (C in fig. 12) to prevent excessive
soiling of the supply water. ■ Recommended test instruments: Cl2 Tester (swimming pool accessories),
conductivity tester, redox meter.
Optional Treated Water Connection
■ To connect a dual water supply–treated soft water or warm water below■ 140°F (60°C)–disconnect T-water connection at the two water inlets (fig. 13).
Connect treated water to water inlet marked WZ2 and standard water to inlet marked WZ1. Treated water must comply with the above-mentioned water specifications.
fig. 13
WZ1 WZ2
3 ft.

41
General11) Technical Data
Working place specific noise level: <70dBAverage water consumption during operation:
Model 6: 3.17 gal/hr (0.2 l/min.)Model 10: 6.7 gal/hr (0.42 l/min.)Model 1020: 10.9 gal/hr (.069 l/min.)Model 20: 13.2 gal/hr (0.83 l/min.)Model 40: 15.8 gal/hr (1.0 l/min.)
Heat emission:
INSTALLATION
Model Latent Sensible
Model-6 .64 W (2.30 kJ)/hr 84 W (2.93 kJ)/hr
Model-10 1.05 W (8.50 kJ)/hr 1.4 W (5.00 kJ)/hr
Model-1020 1.67 W (6.00 kJ)/hr 2.4 W (8.50 kJ)/hr
Model-20 2.13 W (7.67 kJ)/hr 2.67 W (9.60 kJ)/hr
Model-40 3.7 W (13.35 kJ)/hr 4.26 W (15.34 kJ)/hr
Ventilation
Contact your local regulatory agency for ventilation requirements. If a ventilationhood is installed, observe the following:
■ The standards of the local authority.■ The hood should protrude 12-20 in. (300-500 mm) over the front of the
appliance.■ The integrated grease filter should be in the protruding part of the hood.
Specifications and technical descriptions in this applications manual are subject tochange without prior notice.
Gas supply12) Gas supply (for MCG units only)
The ClimaPlus gas model is available for either natural or propane gas. Checkthe data plate on the left corner of the unit to determine the proper gas supplyrequirement.
Model Gas Line Connection BTU Ratings
MCG-6 3⁄4 in. 1⁄2 in. 92,000
MCG-10 3⁄4 in. 3⁄4 in. 144,000
MCG-1020 1 in. 3⁄4 in. 250,000
MCG-20 1 in. 3⁄4 in. 276,000
MCG-40 11⁄4 in. 1 in. 410,000

42
DO NOT attempt to use any type of gas other than that specified on the dataplate. Incorrect gas supply could result in fire or explosion resulting in severeinjuries and/or property damage.
To avoid possible serious personal injury, the installation must conform with localcodes, or in the absence of local codes, with the National Fuel Gas Code, ANSIZ223.1-1988 or latest edition. In Canada, CAN/CGA-B 149.1 Natural GasInstallation Code CAN/CGA-B 149.2 Propane Installation Code.
■ All Henny Penny Combis are equipped with two heat exchanger systems. One is responsible for steam production, the second for dry heat. Each individual heat exchanger is heated with a separate burner assembly.
■ Separate gas valves for the steam burner and dry heat burner are responsible for the gas supply to the individual burners. All gas models have manual shut-off valves that can be accessed from the left without tools. To operate the valves, unscrew the two knurled screws and remove the service cover. Open or close manual valves as desired.
Gas Leak Test
■ After piping and fittings have been installed, check for gas leaks. A simple checking method is to turn on the gas and brush all connections with a soap solution. The appearance of bubbles indicates escaping gas. In this event, the piping connection must be redone until no bubbles occur.
Never use a lighted match or open flame to test for gas leaks. Escaping gas couldresult in fire or explosion resulting in severe injuries and/or property damage.
Gas pressure
■ The gas pressure should be measured when all other gas appliances in the kitchen are on high flame. The minimum and maximum incoming line flow pressures should be as follows:Natural: 7-10 in. water column (18-25 mb)Propane: 12-14 in. water column (30-35 mb)
INSTALLATION
continued

43
During pressure testing note the following:1. The unit and its individual shut-off valves must be disconnected from the gas
supply piping system during any pressure testing of that system when test pressures exceed 1⁄2 psig (3.45kPa). Turn OFF main gas shut-off valve or main gas supply line.
2. The unit must be isolated from the gas supply piping system by closing its individual manual shut-off valves during any pressure testing of the gas supply piping system at test pressure equal to or less than 1⁄2 psig (3.45kPa).
3. If incoming pressure is over 14 in. water column (35 mb) a separate regulator must be installed ahead of the manual gas shut-off valve.
To prevent damage to the control valve regulator, the first time the gas valve knob isturned to the ON position, it is very important to turn the knob very slowly.
NOTEAfter turning on the gas, the manual shut-off valve must remain open, except during pressure testing as outlined above, or when necessary during service maintenance.■ Incoming pressure reading can be taken by installing a gas pressure gauge on
the front of the unit’s main gas valves test port. This should be done with all gas appliances in operation on the same gas supply line. Should the manifold pressure drop below the desired level, consult your local gas utility service.
Gas Hook-up
INSTALLATION
continued
RIGHTA minimum pull of applianceaway from wall is acceptable inorder to disconnect hook-up.
WRONGMaximum pull prior to disconnectwill result in kinked ends and reduce hose and connector life.

44
Utilize elbows when necessary to avoid sharp kinks or excessive bending. For ease of movement, install with a “lazy” loop. Gas appliance must be disconnected prior to maximum movement. (Minimum movement is permissible to disconnect gas line.
Cable Restraint
Please refer to the illustration at left when installing cable restraint on all moveablegas appliancesEye-bolt is to be secured to the building using acceptable building practices.
Dry wall construction
Secure eye-bolt to a framing stud. DO NOT attach to dry wall only. Locate eye-boltat the same height as the gas service approximately 6 in. (150 mm) to either side ofservice. Cable restraint must be at least 6 in. (150 mm) shorter than flexible gas line.
INSTALLATION
continued
Couplings and hose should be installed in the same plane as shown at left. DO NOT OFFSETCOUPLINGS. This results in twisting and unduetorsion causing premature failure.
Correct way to install metal hose for vertical traverse.Note single, natural loop. Allowing a sharp bend,shown at right, strains and twists the metal hose to a point of early failure at the coupling.
Maintain the minimum or larger bending diameterbetween couplings for the longest life. Couplings tooclose together, as shown at right, create double bendscausing work fatigue failure of fittings.
In all installations where self-draining is not necessary,connect metal hose in a vertical loop. DO NOTCONNECT METAL HOSE HORIZONTALLYunless self-draining is necessary. Then use support onlower plane as show at left.

45
Cooking GuidesThe following section offers basic guidelines for preparing a wide variety ofpopular menu items in the Henny Penny MCS/G and BCS Combis.
Menu items are charted in a format that covers quantities, proper containers,modes, times, temperatures, and whether probe cooking and/or any available additional functions should be employed. As you gain experience with this equip-ment, you may wish to adjust these parameters or to add items that better suit the needs of your foodservice operation and the preferences of your customers. For your convenience, a blank chart has been included at the end of the section to assist you in recording data for your individual recipes.
Key to terms and abbreviations
Units of measure—temperatureTemperatures in the charts appear as number values without degree marks or F/C.Unless other wise indicated, temperatures measured in degrees Fahrenheit appearfirst; the Celsius equivalent follows immediately enclosed by parentheses.
212 (100) = 212°F (100°C)
Units of measure—weightWeights for quantities of food in the charts often appear as number values without unit measure abbreviations. Unless otherwise indicated, weight values are always represented in pounds and kilograms. The value representing weight or range of weight measured in pounds appears first; the metric equivalent in kilograms follows immediately enclosed by parentheses.
5-7 (2.3-3.2) = 5-7 lbs. (2.3-3.2 kg)
Multiple step programs may be programmed into the MCS/G combi. If utilizingthe BCS model each step must be manually entered at the completion of the previous step (keep in mind that the BCS is not equipped with a probe function).Single step methods are listed as an option to the multiple step programs and referenced for the BCS model.
Total TimeAs a convenience, cooking times for items with multiple time-cook only steps have been totaled and appear as Total Time. This cannot be done when any stepincludes probe cooking or preheating.
ALT = Designates an alternate method that can be used in place of the steps listed.
ContainersPerf = PerforatedPan = Stainless steel steam table panSheet, Sht = Sheet panAlum = AluminumEnamel, Enam = “Granite” style enamel cooking panGrid = Grid rack that fits right into the shelfChicken grid = Special grid for cooking whole birds uprightDrip pan = Single pan set on bottom rack to catch drippings from above

Item/Prep notes Container Max yield
Baked Chicken, pieces 1⁄2 sheet pan 16 pieces, mixed Step Mode Time Probe Temp
Eight cut. Season.
Time cook–check for internaltemp. 185 (85).
Per load Per load 1 Combi 10 —
—
—
6 96 pieces 2 Combi 10
10 160 pieces 3 Combi
Temp
340 (171)
360 (182)
380 (194) 5
1020 320 pieces 25
20 320 pieces
40
6
10
20
20
40 640 pieces BCS Combi
Total Time
360 (183) 30-35
BCS Combi 390 (199) 30
Cooking stages and suggested parameters
46
Item/Prep notes Container Max yield
Rotisserie Style Chicken Chicken grid 8 birds Step Mode Time Probe Temp
21⁄2-3 lb. whole birds. Season.
Time cook–check for internaltemp. 185 (85).
Per load Per load 1 Combi 13 —
—
—
6 16 birds 2 Combi 13
10 24 birds 3 Dry Heat
Temp
350 (177)
360 (183)
370 (188) 13
1020 48 birds 39
20 40 birds
40
2
3
6
5
12 96 birds BCS Combi
Total Time
365 (185) 35
Item/Prep notes Container Max yield
Turkey, whole Grid/drip pan 1 bird Step Mode Time
12-18 lb. (5.5-8 kg) bird.
Wash, stuff, season, baste.
Per load Per load 1 Combi — 165 (74)
185 (85)6 2 birds 2 Combi —
10 3 birds
Temp
280 (138)
340 (171)
1020 6 birds
20 6 birds
40
2
3
6
6
12 12 birds
Item/Prep notes Container Max yield
Turkey Breast, boneless Grid/drip pan 2 per grid Step Mode Time
8-10 lb. (3.6-4.5 kg) bonelessbreast.
Season.
With bone-in breasts, increasefinal core temp to 185 (85).
Per load Per load 1 Combi — 145 (63)
165 (74)6 6 breasts 2 Combi —
10 10 breasts
Temp
280 (138)
345 (174)
1020 20 breasts
20 20 breasts
40
3
5
10
10
20 40 breasts
Cooking stages and suggested parameters
Cooking stages and suggested parameters
Cooking stages and suggested parameters
Meat & Poultry
Item/Prep notes Container Max yield
Oven Fried Chicken 1⁄2 sheet pan 16 pieces, mixed Step Mode Time Probe Temp
Probe Temp
Probe Temp
Eight cut. Bread and prepare tooven fried recipe. Grease panlightly.
Time cook–check for internaltemp. 185 (85).
Per load Per load 1 Combi 15 —
—6 96 pieces 2 Combi 10
10 160 pieces
Temp
385 (196)
415 (213)
1020 320 pieces
20 320 pieces
40
6
10
20
20
40 640 pieces
25Total Time
BCS Combi 325 (163) 12-20 min/lb.
BCS Combi 325 (163) 10-12 min/lb.
Cooking stages and suggested parameters
Please note suggested parameters for BCS models, only, due to differences in features

47
Item/Prep notes Container Max yield
Steaks, chops Grid 10-12 steaks Step Mode Time Probe Temp
Season. Preheat grids to 575 (300). Vary time for thickness and desired doneness.
Pork, add 3-5 min.
Serving tip: Plate grid side up.
Per load Per load 1 Dry Heat
—6 60-72 2 Dry Heat 7-10
10 100-120
Temp
Preheat 575 (300)
485 (251)
1020 200-240
20 200-240
40
6
10
20
20
40 400-480
Item/Prep notes Container Max yield
Roast BeefRib Roast (Prime Rib)
Grid/drip pan 1 per grid Step Mode Time Probe Temp
10-18 lb. (4.5-8 kg) roast.Season.
Per load Per load 1 Dry Heat — 130 (54)
135 (57) rare145 (63) medium
155 (68) well
6 30-54 (13.5-24) 2 Dry Heat —
10 50-90 (22.5-40)
Temp
280 (138)
340 (171)
1 Dry Heat — 130 (54)
135 (57) rare145 (63) medium
155 (68) well
2 Dry Heat —
280 (138)
340 (171)
1020 100-180 (45-80)
20 100-180 (45-80)
40
3
5
10
10
20 200-360 (90-160)
30-48 (14-22)
50-80 (23-36)
100-160 (46-72)
100-160 (46-72)
3
5
10
10
20 200-320 (92-144)
Item/Prep notes Container Max yield
Beef Tenderloin Grid/drip pan 2 per grid Step Mode Time Probe Temp
5-8 lb. (2.3-3.6 kg) pieces.
Season.
Per load Per load
6
10
Temp
1020
20
40
Cooking stages and suggested parameters
Cooking stages and suggested parameters
Cooking stages and suggested parameters
Item/Prep notes Container Max yield
Hamburgers 1⁄2 sheet pan 8 patties per pan Step Mode Time Probe Temp
4 oz. frozen patties. Season. Per load Per load 1 Combi 8-12 —
Probe Temp
—
6 48 patties
10 80 patties
Temp
425 (218)
1020 160 patties
20 160 patties
40
6
10
20
20
40 320 patties
Item/Prep notes Container Max yield
Meatballs 3⁄4 in. enamel 5-7 lbs. (2.3-3.2 kg) Step Mode Time
1-21⁄2 oz. each meatball.
Mix ingredients and formaccording to recipe.
Per load Per load 1 Dry Heat 10
6 30-42 (14-19)
10 50-70 (23-32)
Temp
350 (177)
1020 100-140 (46-64)
20 100-140 (46-64)
40
6
10
20
20
40 200-280 (92-128)
Cooking stages and suggested parameters
Cooking stages and suggested parameters
BCS Dry Heat 280 (138) 15-20 min/lb.
BCS Dry Heat 280 (138) 4-6 min/lb.

48
Meat & Poultry continued
Pork
Item/Prep notes Container Max yield
Corned Beef Brisket, raw Grid/drip pan 1 piece per grid Step Mode Time Probe Temp
Probe Temp
Texture is more important than core temperature. Allowsufficient cook time for brisketto become very tender.
Per load Per load 1 Combi — 165-170 (74-77)
6 3 briskets ALT Combi 18-20 min/lb.
10 5 briskets
Temp
280 (138)
280 (138)
1020 10 briskets
20 10 briskets
40
3
5
10
10
20 20 briskets
48-60 (22-33)
80-120 (36-55)
160-240 (72-110)
160-240 (72-110)
320-480 (144-220)
Item/Prep notes Container Max yield
Beef Stew 21⁄2 in. pan 8-12 lbs. (3.6-5.5 kg) Step Mode Time
Step 1: Brown meat with Dry Heat mode.
Step 2: Mix all ingredients,cover and simmer to taste.
Per load Per load 1 Dry Heat 5
6 2 Combi 1-1.5 hrs.
10
Temp
320-360 (160-182)
280 (138)
1020
20
40
6
10
20
20
40
Cooking stages and suggested parameters
Cooking stages and suggested parameters
Item/Prep notes Container Max yield
Meatloaf 21⁄2 in. pan 8-10 lbs. (3.6-4.5 kg) Step Mode Time Probe Temp
Mix ingredients and formaccording to recipe.
Molds can be substituted for pans.
Probe cook.
Per load Per load 1 Tender Stm 15 —
150 (66)
—
6 24-30 (11-13.5) 2 Combi —
10 40-50 (18-22.5) 3 Dry Heat
Temp
180 (82)
280-320 (138-160)
335 (168) 10
1020 80-100 (36-45)
20 80-100 (36-45)
40
3
5
10
10
20 160-200 (72-90)
Cooking stages and suggested parameters
Item/Prep notes Container Max yield
Ribs (pork or beef) Grid 2 slabs Step Mode Time Probe Temp
Season or marinate. Per load Per load 1 Tender Stm 12-15 —
—
—
6 12 slabs 2 Combi 15-20
10 20 slabs 3 Dry Heat
Temp
180 (82)
Mode Time Probe Temp
8-10 —
Temp
350 (177)
280 (138)
350 (177) 15
1020 40 slabs 42-50
20 40 slabs
40
6
10
20
20
40 80 slabs
Total Time
Item/Prep notes Container Max yield
Bacon 1⁄2 sheet pan Approx.: 1 (.5) Step
Tray up. Approximately 1 lb. (.5 kg) per pan.
Per load Per load 1 Combi
6 6 (3)
10 10 (5)
1020 20 (10)
20 20 (10)
40
6
10
20
20
40 40 (20)
Cooking stages and suggested parameters
Cooking stages and suggested parameters
BCS Combi 280 (138) 1.25-1.75 hrs.
BCS Combi 335 (168) 20-25 min/lb.
BCS Combi 320 (160) 12-15 min/lb. depending on size of loaf

49
BCS Dry Heat 335 (168) 20
BCS Combi 325 (160) 8-12 min/lb.
Item/Prep notes Container Max yield
Sausage, links or patties 1⁄2 sheet pan 1.5 (.7) per pan Step Mode Time Probe Temp
Per load Per load 1 Combi 8-12 —
6 9 (4.2)
10 15 (7)
Temp
325 (163)
1020 30 (14)
20 30 (14)
40
6
10
20
20
40 60 (28)
Item/Prep notes Container Max yield
Smoked Sausage Grid or 1⁄2 sheet 4 (1.8) per grid Step Mode Time Probe Temp
Time cook or probe cook. Per load Per load 1 Combi 12-15 —
165 (74)6 24 (11) ALT Combi —
10 40 (18)
Temp
325 (163)
325 (163)
1020 80 (39)
20 80 (39)
40
6
10
20
20
40 160 (78)
Cooking stages and suggested parameters
Cooking stages and suggested parameters
Item/Prep notes Container Max yield
Italian Sausage, Bratts Grid or 1⁄2 sheet 4 (1.8) per grid Step Mode Time Probe Temp
Per load Per load 1 Tender Stm 7 —
—
—
6 24 (11) 2 Combi 7
10 40 (18) 3 Dry Heat
Temp
180 (82)
280 (138)
350 (177) 5
1020 80 (39) 19
20 80 (39)
40
6
10
20
20
40 160 (78)
Total Time
Item/Prep notes Container Max yield
Pork Tenderloin Grid or enamel 8-12 pieces Step Mode Time Probe Temp
Season. Per load Per load 1 Combi — 165 (74)
—6 48-72 ALT Combi 12-15 min/lb.
10 80-120
Temp
320 (160)
320 (160)
1020 160-240
20 160-240
40
6
10
20
20
40 320-480
24-36 (11-16.5)
40-60 (18-27.5)
80-120 (36-55)
80-120 (36-55)
160-240 (72-110)
Item/Prep notes Container Max yield
Pork Loin Grid/drip pan 1 per grid Step Mode Time Probe Temp
8-12 lb. (3.6-5.5 kg) loin roasts.Season.
Per load Per load 1 Moist 10 —
155 (68)
165 (74)
6 2 Combi —
10 3 Combi
Temp
212 (100)
320 (160)
350 (177) —
1020
20
40
3
5
10
10
20
Cooking stages and suggested parameters
Cooking stages and suggested parameters
Cooking stages and suggested parameters

50
Fish, Seafood
Item/Prep notes Container Max yield
Pork RoastFresh Ham, large
Grid/drip pan 2 per grid Step Mode Time Probe Temp
8 lbs. (3.6 kg) or more.
Season.
Per load Per load 1 Moist Heat 5 —
160 (71)
—
6 4 roasts 2 Combi —
10 6 roasts 3 Dry Heat
Temp
212 (100)
280 (138)
340 (171) 5
1020 12 roasts
20 12 roasts
40
2
3
6
6
12 24 roasts
Pork continued
Cooking stages and suggested parameters
Item/Prep notes Container Max yield
Smoked ham Grid/drip pan 1 per grid Step Mode Time Probe Temp
12-15 lbs. (5.5-6.8 kg) hams. Per load Per load 1 Combi — 165 (74)
—6 2 hams ALT Combi 18-22 min/lb.
10 3 hams
Temp
250 (121)
250 (121)
1020 6 hams
20 6 hams
40
2
3
6
6
12 12 hams
Cooking stages and suggested parameters
Item/Prep notes Container Max yield
Fish, poached Perf pan 8 lbs. (3.6 kg) Step Mode Time Probe Temp
Season. Per load Per load 1 Tender Stm — 140 (60)
—6 48 (21.6) ALT Tender Stm 12-15
10 80 (36)
Temp
180 (82)
180 (82)
1020 160 (72)
20 160 (72)
40
6
10
20
20
40 320 (144)
Item/Prep notes Container Max yield
Fish, baked 1⁄2 sheet pan 5 lbs. (2.3 kg) Step Mode Time Probe Temp
Lightly grease pan. Season and top.
Per load Per load 1 Combi 8-12 —
6 30 (14)
10 50 (23)
Temp
345 (174)
1020 100 (46)
20 100 (46)
40
6
10
20
20
40 200 (92)
Cooking stages and suggested parameters
Cooking stages and suggested parameters
Item/Prep notes Container Max yield
Fish steaks, grilled Grid 8-12 steaks Step Mode Time Probe Temp
11⁄2 - 21⁄2 in. (38-63 mm) steaks. Season. Preheat grid to 575 (300).
Per load Per load 1 Combi
—6 24-36 steaks 2 Combi 6-8
10 40-60 steaks
Temp
Preheat 575 (300)
485 (252)
1020 80-120 steaks
20 80-120 steaks
40
3
5
10
10
20 160-240 steaks
Cooking stages and suggested parameters
BCS Combi 320 (160) 15-18 min/lb.
BCS Moist Heat 212 (100) 8-12

51
BCS Moist Heat 212 (100) 5-8
Item/Prep notes Container Max yield
Breaded Fish Pieces 3⁄4 in. enamel 21⁄2 lbs. (1.1 kg) Step Mode Time Probe Temp
Lightly grease pan.
Spray top of product with shortening prior to cooking.
Per load Per load 1 Combi 6-8 —
6 15 (6.6)
10 25 (11)
Temp
425 (218)
1020 50 (23)
20 50 (23)
40
6
10
20
20
40 100 (45)
Cooking stages and suggested parameters
Item/Prep notes Container Max yield
Cocktail Shrimp Perf pan 5 lbs. (2.3 kg) Step Mode Time Probe Temp
Season. Cook in shell.
Remove and blast-chill immediately.
Per load Per load 1 Tender Stm 6-10 —
6 30 (13.8)
10 50 (23)
Temp
180 (82)
1020 100 (46)
20 100 (46)
40
6
10
20
20
40 200 (92)
Cooking stages and suggested parameters
Item/Prep notes Container Max yield
Whole Lobster, steamed Perf pan 3-4 lobsters Step Mode Time Probe Temp
Per load Per load 1 Moist 10-14 —
6 9-12
10 15-20
Temp
212 (100)
1020 30-40
20 30-40
40
3
5
10
10
20 60-120
Cooking stages and suggested parameters
Item/Prep notes Container Max yield
Clams, Mussels Perf pan 3 lbs. (1.4 kg) Step Mode Time Probe Temp
Cook in shell. Ladle butter,sauce over after cooking.
Per load Per load 1 Moist 8-10 —
6 9 (4.2)
10 15 (7)
Temp
212 (100)
1020 30 (14)
20 30 (14)
40
3
5
10
10
20 60 (28)
Cooking stages and suggested parameters
Item/Prep notes Container Max yield
Scallops, broiled Enamel 3 lbs. (1.4 kg) Step Mode Time Probe Temp
Drain and clean. Dredge in flour. Season. Lightly oil pan and preheat to 425 (218).Stir into pans when loading.
Per load Per load 1 Combi 4-8 —
6 9 (4.2)
10 15 (7)
Temp
385 (196)
1020 30 (14)
20 30 (14)
40
3
5
10
10
20 60 (28)
Cooking stages and suggested parameters

52
Meats, Special Cuts
Item/Prep notes Container Max yield
Cutlets, breaded 3⁄4 in. enamel 12-15 pieces Step Mode Time Probe Temp
Bread. Preheat pans to 575 (300).
Spray top of product with shortening prior to cooking.
Per load Per load 1 Combi
—6 72-90 2 Combi 6-8
10 120-150
Temp
Preheat 575 (300)
425 (218)
1020 240-300
20 240-300
40
6
10
20
20
40 480-600
Item/Prep notes Container Max yield
Medallions 3⁄4 in. enamel 12-15 pieces Step Mode Time Probe Temp
Season or marinate. Preheatpan to 575 (300).
Per load Per load 1 Combi
—6 72-90 2 Combi 6-8
10 120-150
Temp
Preheat 575 (300)
485 (252)
1020 240-300
20 240-300
40
6
10
20
20
40 480-600
Item/Prep notes Container Max yield
Scaloppini 3⁄4 in. enamel 12-15 Step Mode Time Probe Temp
Dredge in seasoned flour.Mist with oil. Oil pan lightly and preheat to 575 (300).
Serving tip: Plate pan side up.
Per load Per load 1 Combi
—6 72-90 2 Combi 5-7
10 120-150
Temp
Preheat 575 (300)
485 (252)
1020 240-300
20 240-300
40
6
10
20
20
40 480-600
Cooking stages and suggested parameters
Cooking stages and suggested parameters
Cooking stages and suggested parameters
Item/Prep notes Container Max yield
Baked Potatoes 1⁄2 sheet or grid 20 potatoes Step Mode Time Probe Temp
80 ct.
Wash, oil lightly or season.
Per load Per load 1 Combi
—6 120 potatoes 2 Combi 45
10 200 potatoes
Temp
Preheat 525 (270)
385 (196)
1020 400 potatoes
20 400 potatoes
40
6
10
20
20
40 800 potatoes
Cooking stages and suggested parameters
Potatoes
Item/Prep notes Container Max yield
Steamed Potatoes 21⁄2 in. perf pan 6 lbs. (2.7 kg) Step Mode Time Probe Temp
Wash and cut. Preheat. Per load Per load 1 Combi
—6 36 (16) 2 Moist 40-45
10 60 (27)
Temp
Preheat 280 (138)
212 (100)
1020 120 (54)
20 120 (54)
40
6
10
20
20
40 240 (108)
Cooking stages and suggested parameters

53
Item/Prep notes Container Max yield
Roasted Potatoes 1⁄2 sht or enam 6 lbs. (2.7 kg) Step Mode Time Probe Temp
Cut, oil, season. Per load Per load 1 Combi
—6 36 (16) 2 Combi 45
10 60 (27)
Temp
Preheat 525 (270)
385 (196)
1020 120 (54)
20 120 (54)
40
6
10
20
20
40 240 (108)
Cooking stages and suggested parameters
Breads
Item/Prep notes Container Max yield
Proofing 1⁄2 sheet pan 2 lbs. (.9 kg) Step Mode Time Probe Temp
Lightly grease pan.
Proof until dough doubles insize.
*Not recommended in BCS model.
Per load Per load 1 Tender Stm see notes —
6 6 (2.7)
10 10 (4.5)
Temp
95 (35)
1020 20 (9)
20 20 (9)
40
3
5
10
10
20 40 (18)
Cooking stages and suggested parameters
Item/Prep notes Container Max yield
Bread Dough 1⁄2 sheet pan 2 lbs. (.9 kg) Step Mode Time Add’l Functions
Proof first.
Lightly grease pan.
Per load Per load 1 Dry Heat 15-20 —
6 6 (2.7)
10 10 (4.5)
Temp
350 (177)
1020 20 (9)
20 20 (9)
40
3
5
10
10
20 40 (18)
Cooking stages and suggested parameters
Item/Prep notes Container Max yield
Rolls 1⁄2 sheet pan 12-15 rolls Step Mode Time Add’l Function
4 oz. rolls.
Proof first.
Lightly grease pan. Egg washrolls.
Per load Per load 1 Dry Heat 15-17 Steam Injection*
6 36-45 rolls
10 60-75 rolls
Temp
335 (168)
1020 120-150 rolls
20 120-150 rolls
40
3
5
10
10
20 240-300 rolls
Cooking stages and suggested parameters
Item/Prep notes Container Max yield
Muffins 1⁄2 sheet pan 1 dozen per pan Step Mode Time Add’l Function
4 oz. muffins.
Lightly grease pan.
Per load Per load 1 Combi 5 —
—6 3 dozen 2 Dry Heat 12-15
10 5 dozen
Temp
350 (177)
335 (168)
1020 10 dozen
20 10 dozen
40
3
5
10
10
20 20 dozen
17-20Total Time
Cooking stages and suggested parameters
* Not available on BCS models
BCS Dry Heat 335 (168) 17-20

54
Breads continued
Item/Prep notes Container Max yield
Cinnamon Rolls 1⁄2 sheet pan 2 lbs. (.9 kg) Step Mode Time Add’l Function
Proof first.
Lightly grease pan.
Per load Per load 1 Dry Heat 15-18 —
—6 6 (2.7)
10 10 (4.5)
Temp
335 (168)
1020 20 (9)
20 20 (9)
40
3
5
10
10
20 40 (18)
Cooking stages and suggested parameters
Item/Prep notes Container Max yield
Biscuits, frozen 1⁄2 sheet pan 2 dozen per pan Step Mode Time Add’l Function
Lightly grease pan.
Serving tip: Melted butter may be brushed on biscuit tops after cooking.
Per load Per load 1 Dry Heat 22-25 —
6 6 dozen
10 10 dozen
Temp
Step Mode TimeTemp
335 (168)
Add’l Function
1 Dry Heat 30-35 —340 (171)
1020 20 dozen
20 20 dozen
40
3
5
10
10
20 40 dozen
Cooking stages and suggested parameters
Item/Prep notes Container Max yield
Sheet CakeBrownies
1⁄2 sheet pan 54 2in. squares
Lightly grease pan.
Per load Per load
6 324 pieces
10 540 pieces
1020 1080 pieces
20 1080 pieces
40
6
10
20
20
40 2160 pieces
Step Mode TimeTemp Add’l Function
1 Dry Heat 6-9 —335 (168)
Cooking stages and suggested parameters
Item/Prep notes Container Max yield
Cookies 1⁄2 sheet pan 1 dozen per pan
2 oz. cookies.
Lightly grease pan.
Per load Per load
6 6 dozen
10 10 dozen
1020 20 dozen
20 20 dozen
40
6
10
20
20
40 40 dozen
Cooking stages and suggested parameters
Item/Prep notes Container Max yield
Strudel Perf alum 2 per pan Step Mode Time Add’l Function
Brush with egg wash. Per load Per load 1 Combi 45-55 —
6 6
10 10
Temp
335 (168)
1020 20
20 20
40
3
5
10
10
20 40
Cooking stages and suggested parameters

55
Item/Prep notes Container Max yield
Cobbler 21⁄2 in. pan 12 lbs. (5.5 kg) Step Mode Time Add’l Function
According to recipe. Per load Per load 1 Combi 20 —
—6 72 (33) 2 Dry Heat 40
10 120 (55)
Temp
365 (185)
345 (174)
1020 240 (110)
20 240 (110)
40
6
10
20
20
40 480 (220)
60Total Time
80Total Time
Cooking stages and suggested parameters
Item/Prep notes Container Max yield
Pie, fresh 1⁄2 sheet pan 2-3 pies per pan Step Mode Time Add’l Function
Brush tops with egg wash. Per load Per load 1 Dry Heat 35-45 —
6 6-9 pies
10 10-15 pies
Temp
335 (168)
1020 20-35 pies
20 20-35 pies
40
3
5
10
10
20 40-60 pies
Cooking stages and suggested parameters
Item/Prep notes Container Max yield
Bread Pudding 21⁄2 in. pan 12 lbs. (5.5 kg) Step Mode Time Probe Temp
According to recipe.
Lightly grease pans.
Per load Per load 1 Combi 40 —
—
—
6 36 (16.5) 2 Combi 30
10 60 (27.5) 3 Dry Heat
Temp
280-300 (138-149)
320-340 (160-171)
350 (177) 10
1020 120 (55)
20 120 (55)
40
3
5
10
10
20 240 (110) BCS Combi 320 (160) 80-90
Cooking stages and suggested parameters
Miscellaneous
Item/Prep notes Container Max yield
Entrees, frozen 21⁄2 in. pan 12 lbs. (5.5 kg) Step Mode Time Probe Temp
Brush with egg wash. Per load Per load 1 Combi 45-60 —
6 72 (33)
10 120 (55)
Temp
280-320 (138-160)
1020 240 (110)
20 240 (110)
40
6
10
20
20
40 480 (220)
Cooking stages and suggested parameters
Item/Prep notes Container Max yield
Entrees, fresh 21⁄2 in. pan 12 lbs. (5.5 kg) Step Mode Time Probe Temp
Use also for thawed entrees. Per load Per load 1 Combi — 165 (74)
6 72 (33)
10 120 (55)
Temp
280 (138)
1020 240 (110)
20 240 (110)
40
6
10
20
20
40 480 (220)
Cooking stages and suggested parameters

56
Miscellaneous continued
Item/Prep notes Container Max yield
Vegetables, frozen 21⁄2 in. perf. pan 9 lbs. (4 kg) Step Mode Time Probe Temp
Per load Per load 1 Moist 8-15 —
6 54 (24)
10 90 (40)
Temp
212 (100)
1020 180 (80)
20 180 (80)
40
6
10
20
20
40 360 (160)
Cooking stages and suggested parameters
Item/Prep notes Container Max yield
Vegetables, fresh 21⁄2 in. perf. pan 6 lbs. (2.7 kg) Step Mode Time Probe Temp
Cut to desired serving size. Per load Per load 1 Moist 6-10 —
6 36 (16)
10 60 (27)
Temp
212 (100)
1020 120 (54)
20 120 (54)
40
6
10
20
20
40 240 (108)
Cooking stages and suggested parameters
Item/Prep notes Container Max yield
Beans, dry 21⁄2 in. pan 6 lbs. (2.7 kg) dry Step Mode Time Probe Temp
Rinse and soak beans.
Stir every 10 to 15 minutes during step 2.
Per load yield is indicated in dry wt./cooked wt.
Per load Per load dry/cooked 1 Combi 30 —
—6 36/90 (16/41) 2 Combi 40-60
10 60/150 (27/68)
Temp
265 (129)
280 (138)
1020 120/300 (54/136)
20 120/300 (54/136)
40
6
10
20
20
40 240/600 (108/272) BCS Combi 270 (132) 1.5-2 hrs
Cooking stages and suggested parameters
Item/Prep notes Container Max yield
Rice 21⁄2 in. pan 3 lbs. (1.4 kg) dry Step Mode Time Probe Temp
Add liquid to rice and let standfor a minimum of 20 minutesbefore cooking.
Converted rice will cook quicker.
Per load yield is indicated in dry wt./cooked wt.
Per load Per load dry/cooked 1 Combi 20-40 —
6 18/42 (8.2/19)
10 30/70 (14/32)
Temp
260 (127)
1020 60/140 (28/64)
20 60/140 (28/64)
40
6
10
20
20
40 120/280 (56/128)
Cooking stages and suggested parameters
Item/Prep notes Container Max yield
Pasta 4 in. pan 6 lbs. (2.7 kg) dry Step Mode Time Probe Temp
Add water to pan covering pasta completely. Stir pastathoroughly after Step 1. Whendone, remove from unit anddrain immediately.
Per load yield is indicated in dry wt./cooked wt.
Per load Per load dry/cooked 1 Moist 8 —
—6 18/54 (8/24) 2 Moist 8-15
10 30/90 (13.5/40.5)
Temp
212 (100)
212 (100)
1020 60/180 (27/81)
20 60/180 (27/81)
40
3
5
10
10
20 120/360 (54/162)
Cooking stages and suggested parameters

57
Item/Prep notes Container Max yield
Egg Rolls, frozen 1⁄2 sheet pan 24 per pan Step Mode Time Probe Temp
3-4 oz. egg rolls. Per load Per load 1 Combi 8-12 —
6 144 egg rolls
10 240 egg rolls
Temp
480 (250)
1020 480 egg rolls
20 480 egg rolls
40
6
10
20
20
40 960 egg rolls
Cooking stages and suggested parameters
Item/Prep notes Container Max yield
Pizza, frozen Perf alum 1 pie per pan Step Mode Time Add’l Function
Maximum diameter pizza forhalf sheet pan is 12 in.
Models 1020 and 40 can accommodate larger pizzas on full size sheet pans
Per load Per load 1 Combi 8-10 —
6 6 pies
10 10 pies
Temp
350 (177)
1020 20 pies
20 20 pies
40
6
10
20
20
40 40 pies
Cooking stages and suggested parameters
Item/Prep notes Container Max yield
Eggs, hard cooked Grid 5 dozen per grid Step Mode Time Probe Temp
Set layer pack directly on combi grids.
For loose eggs, use perf pan.
Per load Per load 1 Moist 14-18 —
6 30 dozen
10 50 dozen
Temp
212 (100)
1020 100 dozen
20 100 dozen
40
6
10
20
20
40 200 dozen
Cooking stages and suggested parameters
Item/Prep notes Container Max yield
Egg Casserole 21⁄2 in. pan 5-7 lbs. (2.3-3.2 kg) Step Mode Time Probe Temp
Mix ingredients according torecipe.
Lightly grease pan.
Per load Per load 1 Combi 10 —
—6 15-21 (7-9.5) 2 Combi 7-10
10 25-35 (11.5-16)
Temp
280 (138)
320 (160)
1020 50-70 (23-32)
20 50-70 (23-32)
40
6
10
20
20
40 100-140 (46-64)
17-20Total Time
BCS Combi 17-20300 (149)
BCS Combi 45-50350 (177)
Cooking stages and suggested parameters
Item/Prep notes Container Max yield
Quiche 1⁄2 sheet pan 2-3 per pan Step Mode Time Probe Temp
Mix ingredients according torecipe. Place mixture in pieshells. Pie shells may requirepar-baking.
Per load Per load 1 Combi 20 —
6 12-18 2 Combi 25
10 20-30
Temp
350 (177)
365 (185)
1020 40-60
20 40-60
40
6
10
20
20
40 80-120
45Total Time
Cooking stages and suggested parameters
58
Item/Prep notes Container Max yield
Stir Fry 21⁄2 in. enam 8 lbs. (3.6 kg) Step Mode Time Probe Temp
Prepare ingredients according to recipe.
Preheat pans to 575 (300).
Sauce after removing food from unit.
Per load Per load dry /cooked 1 Combi
—6 48 (21.6) 2 Combi 8-10
10 80 (36)
Temp
Preheat 575 (300)
425 (218)
1020 160 (72)
20 160 (72)
40
6
10
20
20
40 320 (144)
Cooking stages and suggested parameters
Miscellaneous continued
Item/Prep notes Container Max yield
Step Mode Time Probe Temp
Per load Per load 1
6 2
10
Temp
BCS
1020
20
40
Cooking stages and suggested parameters
Item/Prep notes Container Max yield
Step Mode Time Probe Temp
Per load Per load 1
6 2
10
Temp
BCS
1020
20
40
Cooking stages and suggested parameters
Item/Prep notes Container Max yield
Step Mode Time Probe Temp
Per load Per load 1
6 2
10
Temp
BCS
1020
20
40
Cooking stages and suggested parameters
Item/Prep notes Container Max yield
Step Mode Time Probe Temp
Per load Per load 1
6 2
10
Temp
BCS
1020
20
40
Cooking stages and suggested parameters

Form No.: FM01-824 ©2001 Henny Penny Corporation, Eaton, OH 45320, Revised 3-01, Printed 3-01 Printed in USA
Henny Penny CorporationP.O. Box 60Eaton, OH 45320
+1 937 456.8400+1 937 456.8402 Fax
Toll free in USA800 417.8417800 417.8402 Fax
www.hennypenny.com