appwave™ enterprise store 4.1 administrator...
TRANSCRIPT
Product Documentation
AppWave™ Enterprise Administrator Guide
Version 5.0Published January, 2014
© 2014 Embarcadero Technologies, Inc. Embarcadero, the Embarcadero Technologies logos, and all other Embarcadero Technologies product or service names are trademarks or registered trademarks of Embarcadero Technologies, Inc. All other trademarks are property of their respective owners.
Embarcadero Technologies, Inc. is a leading provider of award-winning tools for application developers and database professionals so they can design systems right, build them faster and run them better, regardless of their platform or programming language. Ninety of the Fortune 100 and an active community of more than three million users worldwide rely on Embarcadero products to increase productivity, reduce costs, simplify change management and compliance and accelerate innovation. The company's flagship tools include: Embarcadero® Change Manager™, CodeGear™ RAD Studio, DBArtisan®, Delphi®, ER/Studio®, JBuilder® and Rapid SQL®. Founded in 1993, Embarcadero is headquartered in San Francisco, with offices located around the world. Embarcadero is online at www.embarcadero.com.
Contents
Welcome to AppWave . . . . . . . . . . . . . . . . . . . . . . . . . . . . . . . . . . . . . . . . . . . . . . . . . . . . . . . . . . . . . . . . . . . . 11
About This Document . . . . . . . . . . . . . . . . . . . . . . . . . . . . . . . . . . . . . . . . . . . . . . . . . . . . . . . . . . . . . . . . . . . . . . . . . . . .11
Introduction to AppWave Enterprise . . . . . . . . . . . . . . . . . . . . . . . . . . . . . . . . . . . . . . . . . . . . . . . . . . . . . . . . . . . . . . . .11
Additional Product Information. . . . . . . . . . . . . . . . . . . . . . . . . . . . . . . . . . . . . . . . . . . . . . . . . . . . . . . . . . . . . . . . . . . . .13
Installation Information . . . . . . . . . . . . . . . . . . . . . . . . . . . . . . . . . . . . . . . . . . . . . . . . . . . . . . . . . . . . . . . . . . . . 15
Installing AppWave . . . . . . . . . . . . . . . . . . . . . . . . . . . . . . . . . . . . . . . . . . . . . . . . . . . . . . . . . . . . . . . . . . . . . . . . . . . . . .15
Default Installation . . . . . . . . . . . . . . . . . . . . . . . . . . . . . . . . . . . . . . . . . . . . . . . . . . . . . . . . . . . . . . . . . 15
Custom Installation. . . . . . . . . . . . . . . . . . . . . . . . . . . . . . . . . . . . . . . . . . . . . . . . . . . . . . . . . . . . . . . . . 16
Upgrading AppWave from Previous Versions . . . . . . . . . . . . . . . . . . . . . . . . . . . . . . . . . . . . . . . . . . . . . . . . . . . . . . . . .19
Providing Users with AppWave Browser. . . . . . . . . . . . . . . . . . . . . . . . . . . . . . . . . . . . . . . . . . . . . . . . . . . . . . . . . . . . . .20
Administrator Installing AppWave Browser . . . . . . . . . . . . . . . . . . . . . . . . . . . . . . . . . . . . . . . . . . . . . 20
Admin directly installs AppWave Browser on a machine for all users . . . . . . . . . . . . . . . . . . . . . . . . 21
AppWave Configuration and Administration . . . . . . . . . . . . . . . . . . . . . . . . . . . . . . . . . . . . . . . . . . . . . . . . . . 25
Using the Dashboard Commands. . . . . . . . . . . . . . . . . . . . . . . . . . . . . . . . . . . . . . . . . . . . . . . . . . . . . . . . . . . . . . . . . . .26
Download AppWave Browser . . . . . . . . . . . . . . . . . . . . . . . . . . . . . . . . . . . . . . . . . . . . . . . . . . . . . . . . 27
Services Status . . . . . . . . . . . . . . . . . . . . . . . . . . . . . . . . . . . . . . . . . . . . . . . . . . . . . . . . . . . . . . . . . . . . 28
Set Up Embarcadero Licenses. . . . . . . . . . . . . . . . . . . . . . . . . . . . . . . . . . . . . . . . . . . . . . . . . . . . . . . . 29
Download Applications . . . . . . . . . . . . . . . . . . . . . . . . . . . . . . . . . . . . . . . . . . . . . . . . . . . . . . . . . . . . . 31
Manage Mastering Plug-ins . . . . . . . . . . . . . . . . . . . . . . . . . . . . . . . . . . . . . . . . . . . . . . . . . . . . . . . . . . 33
Import LDAP Users and Groups . . . . . . . . . . . . . . . . . . . . . . . . . . . . . . . . . . . . . . . . . . . . . . . . . . . . . . 34
Examples . . . . . . . . . . . . . . . . . . . . . . . . . . . . . . . . . . . . . . . . . . . . . . . . . . . . . . . . . . . . . . . . . . . . . . . 37
Updating and Deleting LDAP Users . . . . . . . . . . . . . . . . . . . . . . . . . . . . . . . . . . . . . . . . . . . . . . . . . 40
LDAP resources . . . . . . . . . . . . . . . . . . . . . . . . . . . . . . . . . . . . . . . . . . . . . . . . . . . . . . . . . . . . . . . . . . 41
Change Admin Password. . . . . . . . . . . . . . . . . . . . . . . . . . . . . . . . . . . . . . . . . . . . . . . . . . . . . . . . . . . . 41
Update Application Catalog Configuration . . . . . . . . . . . . . . . . . . . . . . . . . . . . . . . . . . . . . . . . . . . . . 41
Manage Disk Space . . . . . . . . . . . . . . . . . . . . . . . . . . . . . . . . . . . . . . . . . . . . . . . . . . . . . . . . . . . . . . . . 43
Publish Applications . . . . . . . . . . . . . . . . . . . . . . . . . . . . . . . . . . . . . . . . . . . . . . . . . . . . . . . . . . . . . . . . 44
Moderate Reviews . . . . . . . . . . . . . . . . . . . . . . . . . . . . . . . . . . . . . . . . . . . . . . . . . . . . . . . . . . . . . . . . . 45
Set up Backup License Server . . . . . . . . . . . . . . . . . . . . . . . . . . . . . . . . . . . . . . . . . . . . . . . . . . . . . . . . 46
Configuring the AppWave Service . . . . . . . . . . . . . . . . . . . . . . . . . . . . . . . . . . . . . . . . . . . . . . . . . . . . . . . . . . . . . . . . . .50
Configure AppWave Properties from the Start Menu. . . . . . . . . . . . . . . . . . . . . . . . . . . . . . . . . . . . . 51
Opening the Properties Dialog . . . . . . . . . . . . . . . . . . . . . . . . . . . . . . . . . . . . . . . . . . . . . . . . . . . . . 51
Stopping and Starting the AppWave Service. . . . . . . . . . . . . . . . . . . . . . . . . . . . . . . . . . . . . . . . . . 52
Configuring Additional Login Accounts . . . . . . . . . . . . . . . . . . . . . . . . . . . . . . . . . . . . . . . . . . . . . . 52
APPWAVE™ ENTERPRISE ADMINISTRATOR GUIDE 3

CONTENTS
Configuring Logging using the Configure AppWave Service Application . . . . . . . . . . . . . . . . . . 52
Configure Tomcat Logging . . . . . . . . . . . . . . . . . . . . . . . . . . . . . . . . . . . . . . . . . . . . . . . . . . . . 52
Configure AppWave Logging . . . . . . . . . . . . . . . . . . . . . . . . . . . . . . . . . . . . . . . . . . . . . . . . . . 53
Configure ELC Logging . . . . . . . . . . . . . . . . . . . . . . . . . . . . . . . . . . . . . . . . . . . . . . . . . . . . . . . 53
Configuring the JRE . . . . . . . . . . . . . . . . . . . . . . . . . . . . . . . . . . . . . . . . . . . . . . . . . . . . . . . . . . . . . . 54
Configuring Server Startup. . . . . . . . . . . . . . . . . . . . . . . . . . . . . . . . . . . . . . . . . . . . . . . . . . . . . . . . . 55
Configuring Server Shutdown . . . . . . . . . . . . . . . . . . . . . . . . . . . . . . . . . . . . . . . . . . . . . . . . . . . . . . 56
Service Status Information . . . . . . . . . . . . . . . . . . . . . . . . . . . . . . . . . . . . . . . . . . . . . . . . . . . . . . . . . . . . . . . . . . . . . . . . .57
Logging in to the AppWave ADMIN Page. . . . . . . . . . . . . . . . . . . . . . . . . . . . . . . . . . . . . . . . . . . . . . . . . . . . . . . . . . . .58
Logging out of AppWave . . . . . . . . . . . . . . . . . . . . . . . . . . . . . . . . . . . . . . . . . . . . . . . . . . . . . . . . . . . . . . . . . . . . . . . . .58
Configuring Catalog Updates . . . . . . . . . . . . . . . . . . . . . . . . . . . . . . . . . . . . . . . . . . . . . . . . . . . . . . . . . . . . . . . . . . . . . .59
Handling Notifications . . . . . . . . . . . . . . . . . . . . . . . . . . . . . . . . . . . . . . . . . . . . . . . . . . . . . . . . . . . . . . . . . . . . . . . . . . . .60
View Notification Messages. . . . . . . . . . . . . . . . . . . . . . . . . . . . . . . . . . . . . . . . . . . . . . . . . . . . . . . . . . 60
Manage Notifications . . . . . . . . . . . . . . . . . . . . . . . . . . . . . . . . . . . . . . . . . . . . . . . . . . . . . . . . . . . . . . . 61
Subscribe to the Notifications RSS News Feed . . . . . . . . . . . . . . . . . . . . . . . . . . . . . . . . . . . . . . . . . . 62
Subscribing to AppWave Notifications Using Internet Explorer. . . . . . . . . . . . . . . . . . . . . . . . . . . 63
Subscribing to AppWave Notifications Using Mozilla Firefox . . . . . . . . . . . . . . . . . . . . . . . . . . . . 64
Email Direct Marketing. . . . . . . . . . . . . . . . . . . . . . . . . . . . . . . . . . . . . . . . . . . . . . . . . . . . . . . . . . . . . . 64
Managing AppWave . . . . . . . . . . . . . . . . . . . . . . . . . . . . . . . . . . . . . . . . . . . . . . . . . . . . . . . . . . . . . . . . . . . . . . . . . . . . .66
Set System Properties . . . . . . . . . . . . . . . . . . . . . . . . . . . . . . . . . . . . . . . . . . . . . . . . . . . . . . . . . . . . . . 67
System Properties > General Tab . . . . . . . . . . . . . . . . . . . . . . . . . . . . . . . . . . . . . . . . . . . . . . . . . . . 68
System Properties > Email Tab . . . . . . . . . . . . . . . . . . . . . . . . . . . . . . . . . . . . . . . . . . . . . . . . . . . . . 70
System Properties > Proxy Server Tab . . . . . . . . . . . . . . . . . . . . . . . . . . . . . . . . . . . . . . . . . . . . . . . 72
System Properties > App Repository Tab. . . . . . . . . . . . . . . . . . . . . . . . . . . . . . . . . . . . . . . . . . . . . 74
System Properties > Optimization Tab . . . . . . . . . . . . . . . . . . . . . . . . . . . . . . . . . . . . . . . . . . . . . . . 75
Java Options . . . . . . . . . . . . . . . . . . . . . . . . . . . . . . . . . . . . . . . . . . . . . . . . . . . . . . . . . . . . . . . . 76
Tomcat Configuration . . . . . . . . . . . . . . . . . . . . . . . . . . . . . . . . . . . . . . . . . . . . . . . . . . . . . . . . . 77
Database Options . . . . . . . . . . . . . . . . . . . . . . . . . . . . . . . . . . . . . . . . . . . . . . . . . . . . . . . . . . . . 77
Logging Options . . . . . . . . . . . . . . . . . . . . . . . . . . . . . . . . . . . . . . . . . . . . . . . . . . . . . . . . . . . . . 78
Optimizing AppWave Performance . . . . . . . . . . . . . . . . . . . . . . . . . . . . . . . . . . . . . . . . . . . . . . 79
System Properties > Streaming Tab . . . . . . . . . . . . . . . . . . . . . . . . . . . . . . . . . . . . . . . . . . . . . . . . . 80
Manage Streaming Services . . . . . . . . . . . . . . . . . . . . . . . . . . . . . . . . . . . . . . . . . . . . . . . . . . . . . . . . . 82
Accessing the Streaming Service Pane . . . . . . . . . . . . . . . . . . . . . . . . . . . . . . . . . . . . . . . . . . . . . . . 83
Editing a Standalone Streaming Server . . . . . . . . . . . . . . . . . . . . . . . . . . . . . . . . . . . . . . . . . . . . . . 83
Deleting a Standalone Streaming Server . . . . . . . . . . . . . . . . . . . . . . . . . . . . . . . . . . . . . . . . . . . . . 84
Stopping and starting a Streaming Service . . . . . . . . . . . . . . . . . . . . . . . . . . . . . . . . . . . . . . . . . . . 84
Changing the Settings of a Streaming Service. . . . . . . . . . . . . . . . . . . . . . . . . . . . . . . . . . . . . . . . . 84
Creating a Standalone Streaming Server . . . . . . . . . . . . . . . . . . . . . . . . . . . . . . . . . . . . . . . . . . . . . 85
4 APPWAVE™ ENTERPRISE ADMINISTRATOR GUIDE

CONTENTS
Monitoring the Streaming Service. . . . . . . . . . . . . . . . . . . . . . . . . . . . . . . . . . . . . . . . . . . . . . . . . . . 88
Create a Backup License Server . . . . . . . . . . . . . . . . . . . . . . . . . . . . . . . . . . . . . . . . . . . . . . . . . . . . . . 88
Create Usage History Reports . . . . . . . . . . . . . . . . . . . . . . . . . . . . . . . . . . . . . . . . . . . . . . . . . . . . . . . . 88
Cumulative Reports for Licensed Apps. . . . . . . . . . . . . . . . . . . . . . . . . . . . . . . . . . . . . . . . . . . . . . . 89
Application Usage Frequency by User Report . . . . . . . . . . . . . . . . . . . . . . . . . . . . . . . . . . . . . 90
Application Usage Duration Report. . . . . . . . . . . . . . . . . . . . . . . . . . . . . . . . . . . . . . . . . . . . . . 91
Application Usage Duration by User Report . . . . . . . . . . . . . . . . . . . . . . . . . . . . . . . . . . . . . . . 92
License Denial Report . . . . . . . . . . . . . . . . . . . . . . . . . . . . . . . . . . . . . . . . . . . . . . . . . . . . . . . . . 92
License Denials by Application Report . . . . . . . . . . . . . . . . . . . . . . . . . . . . . . . . . . . . . . . . . . . 93
Application Usage and Denial Usage Report . . . . . . . . . . . . . . . . . . . . . . . . . . . . . . . . . . . . . . 94
Denied Users Report . . . . . . . . . . . . . . . . . . . . . . . . . . . . . . . . . . . . . . . . . . . . . . . . . . . . . . . . . . 95
Time Series Reports for Licensed Apps . . . . . . . . . . . . . . . . . . . . . . . . . . . . . . . . . . . . . . . . . . . . . . 95
Application Usage Over Time Report . . . . . . . . . . . . . . . . . . . . . . . . . . . . . . . . . . . . . . . . . . . . 96
High Watermark Report . . . . . . . . . . . . . . . . . . . . . . . . . . . . . . . . . . . . . . . . . . . . . . . . . . . . . . . 97
Hourly Application Usage Report . . . . . . . . . . . . . . . . . . . . . . . . . . . . . . . . . . . . . . . . . . . . . . . 98
Reporting Data Export . . . . . . . . . . . . . . . . . . . . . . . . . . . . . . . . . . . . . . . . . . . . . . . . . . . . . . . . 98
Cumulative Reports for Streamed Apps . . . . . . . . . . . . . . . . . . . . . . . . . . . . . . . . . . . . . . . . . . . . . . 99
Streamed Application Usage Frequency Report . . . . . . . . . . . . . . . . . . . . . . . . . . . . . . . . . . . 99
Streamed Application Usage Duration Report . . . . . . . . . . . . . . . . . . . . . . . . . . . . . . . . . . . . 100
Streamed Application Usage Duration by User Report . . . . . . . . . . . . . . . . . . . . . . . . . . . . . 100
Reporting Data Export . . . . . . . . . . . . . . . . . . . . . . . . . . . . . . . . . . . . . . . . . . . . . . . . . . . . . . . . . . . 101
Querying the ELC Database . . . . . . . . . . . . . . . . . . . . . . . . . . . . . . . . . . . . . . . . . . . . . . . . . . . . . . 101
Backing Up And Restoring Reports . . . . . . . . . . . . . . . . . . . . . . . . . . . . . . . . . . . . . . . . . . . . . . . . . . . . . . . . . . . . . . . .105
Backing up and Restoring AppWave Browser . . . . . . . . . . . . . . . . . . . . . . . . . . . . . . . . . . . . . . . . . . . . . . . . . . . . . . . .107
Collecting Log Files . . . . . . . . . . . . . . . . . . . . . . . . . . . . . . . . . . . . . . . . . . . . . . . . . . . . . . . . . . . . . . . . . . . . . . . . . . . . .108
License Management . . . . . . . . . . . . . . . . . . . . . . . . . . . . . . . . . . . . . . . . . . . . . . . . . . . . . . . . . . . . . . . . . . . . 109
Understanding AppWave Licenses . . . . . . . . . . . . . . . . . . . . . . . . . . . . . . . . . . . . . . . . . . . . . . . . . . . . . . . . . . . . . . . . .109
License Levels . . . . . . . . . . . . . . . . . . . . . . . . . . . . . . . . . . . . . . . . . . . . . . . . . . . . . . . . . . . . . . . . . . . . 109
License Types . . . . . . . . . . . . . . . . . . . . . . . . . . . . . . . . . . . . . . . . . . . . . . . . . . . . . . . . . . . . . . . . . . . . 109
Network Named User License . . . . . . . . . . . . . . . . . . . . . . . . . . . . . . . . . . . . . . . . . . . . . . . . . . . . . 110
Concurrent License . . . . . . . . . . . . . . . . . . . . . . . . . . . . . . . . . . . . . . . . . . . . . . . . . . . . . . . . . . . . . . 110
Workstation License . . . . . . . . . . . . . . . . . . . . . . . . . . . . . . . . . . . . . . . . . . . . . . . . . . . . . . . . . . . . . 110
Individual and Suite Licenses . . . . . . . . . . . . . . . . . . . . . . . . . . . . . . . . . . . . . . . . . . . . . . . . . . . . . . 110
Trial Licenses . . . . . . . . . . . . . . . . . . . . . . . . . . . . . . . . . . . . . . . . . . . . . . . . . . . . . . . . . . . . . . . . . . . 111
Licensing for AppWave 3rd Party Apps / AppWave Edition Licenses . . . . . . . . . . . . . . . . . . . . . 111
Premium or Custom App Product Licenses . . . . . . . . . . . . . . . . . . . . . . . . . . . . . . . . . . . . . . . . . . 112
APPWAVE™ ENTERPRISE ADMINISTRATOR GUIDE 5
CONTENTS
Managing Licenses. . . . . . . . . . . . . . . . . . . . . . . . . . . . . . . . . . . . . . . . . . . . . . . . . . . . . . . . . . . . . . . . . . . . . . . . . . . . . .112
View Licenses . . . . . . . . . . . . . . . . . . . . . . . . . . . . . . . . . . . . . . . . . . . . . . . . . . . . . . . . . . . . . . . . . . . . 114
Import New Embarcadero Licenses . . . . . . . . . . . . . . . . . . . . . . . . . . . . . . . . . . . . . . . . . . . . . . . . . . 115
Upgrading AppWave Licenses for Embarcadero Apps . . . . . . . . . . . . . . . . . . . . . . . . . . . . . . . . . . 118
Retrieving and Hosting the New License . . . . . . . . . . . . . . . . . . . . . . . . . . . . . . . . . . . . . . . . . . . . 119
Caching the New Version of the App . . . . . . . . . . . . . . . . . . . . . . . . . . . . . . . . . . . . . . . . . . . . . . . 121
Assigning Network Named User Licenses to Users and Groups . . . . . . . . . . . . . . . . . . . . . . . . . 123
Retrieve Licenses . . . . . . . . . . . . . . . . . . . . . . . . . . . . . . . . . . . . . . . . . . . . . . . . . . . . . . . . . . . . . . . . . 125
Setup 3rd Party Licenses . . . . . . . . . . . . . . . . . . . . . . . . . . . . . . . . . . . . . . . . . . . . . . . . . . . . . . . . . . . 134
Update Licenses . . . . . . . . . . . . . . . . . . . . . . . . . . . . . . . . . . . . . . . . . . . . . . . . . . . . . . . . . . . . . . . . . . 139
Upgrading Embarcadero Product Concurrent or Network Named User Licenses. . . . . . . . . . . . . 142
Reload Licenses . . . . . . . . . . . . . . . . . . . . . . . . . . . . . . . . . . . . . . . . . . . . . . . . . . . . . . . . . . . . . . . . . . 146
Delete Licenses. . . . . . . . . . . . . . . . . . . . . . . . . . . . . . . . . . . . . . . . . . . . . . . . . . . . . . . . . . . . . . . . . . . 148
Provide 3rd Party Application Licenses. . . . . . . . . . . . . . . . . . . . . . . . . . . . . . . . . . . . . . . . . . . . . . . . 149
Control License Usage . . . . . . . . . . . . . . . . . . . . . . . . . . . . . . . . . . . . . . . . . . . . . . . . . . . . . . . . . . . . . 151
Assigning Concurrent Licenses to Users . . . . . . . . . . . . . . . . . . . . . . . . . . . . . . . . . . . . . . . . . . . . . 152
Assigning Network Named Licenses to Users . . . . . . . . . . . . . . . . . . . . . . . . . . . . . . . . . . . . . . . . 156
Assigning Workstation Permissions for 3rd Party Apps. . . . . . . . . . . . . . . . . . . . . . . . . . . . . . . . . 160
Configuring Embarcadero XE and 3rd Party Licenses for Offline Usage . . . . . . . . . . . . . . . . . . . 164
Restricting Embarcadero Concurrent License Usage by IP Address . . . . . . . . . . . . . . . . . . . . . . 165
Reserving Concurrent Licenses for Embarcadero XE Apps . . . . . . . . . . . . . . . . . . . . . . . . . . . . . 168
Reserving Licenses for 3rd Party Apps . . . . . . . . . . . . . . . . . . . . . . . . . . . . . . . . . . . . . . . . . . . . . . 170
View Connected Users and Licenses Usage. . . . . . . . . . . . . . . . . . . . . . . . . . . . . . . . . . . . . . . . . . . . 173
Manage Licenses of 3rd Party Apps . . . . . . . . . . . . . . . . . . . . . . . . . . . . . . . . . . . . . . . . . . . . . . . . . . 173
Setting up Third Party Licenses . . . . . . . . . . . . . . . . . . . . . . . . . . . . . . . . . . . . . . . . . . . . . . . . . . . . 174
Configuring License Automation. . . . . . . . . . . . . . . . . . . . . . . . . . . . . . . . . . . . . . . . . . . . . . . . . . . 175
Manage Trial Licenses . . . . . . . . . . . . . . . . . . . . . . . . . . . . . . . . . . . . . . . . . . . . . . . . . . . . . . . . . . . . . 177
Assign Trial License Owner in AppWave . . . . . . . . . . . . . . . . . . . . . . . . . . . . . . . . . . . . . . . . . . . . 178
Assign Trial License Owner in AppWave Browser . . . . . . . . . . . . . . . . . . . . . . . . . . . . . . . . . . . . . 178
Provide Licenses to AppWave Browser Users . . . . . . . . . . . . . . . . . . . . . . . . . . . . . . . . . . . . . . . . . . . . . . . . . . . . . . . .178
Folder, User, and Group Management . . . . . . . . . . . . . . . . . . . . . . . . . . . . . . . . . . . . . . . . . . . . . . . . . . . . . . 185
Managing Folders . . . . . . . . . . . . . . . . . . . . . . . . . . . . . . . . . . . . . . . . . . . . . . . . . . . . . . . . . . . . . . . . . . . . . . . . . . . . . .185
Create Folders . . . . . . . . . . . . . . . . . . . . . . . . . . . . . . . . . . . . . . . . . . . . . . . . . . . . . . . . . . . . . . . . . . . 186
Use Existing Folders to Create a New Folder . . . . . . . . . . . . . . . . . . . . . . . . . . . . . . . . . . . . . . . . . . 190
Edit Folders . . . . . . . . . . . . . . . . . . . . . . . . . . . . . . . . . . . . . . . . . . . . . . . . . . . . . . . . . . . . . . . . . . . . . . 192
Delete Folders . . . . . . . . . . . . . . . . . . . . . . . . . . . . . . . . . . . . . . . . . . . . . . . . . . . . . . . . . . . . . . . . . . . 192
6 APPWAVE™ ENTERPRISE ADMINISTRATOR GUIDE
CONTENTS
Managing Users . . . . . . . . . . . . . . . . . . . . . . . . . . . . . . . . . . . . . . . . . . . . . . . . . . . . . . . . . . . . . . . . . . . . . . . . . . . . . . . .193
Create a User Manually . . . . . . . . . . . . . . . . . . . . . . . . . . . . . . . . . . . . . . . . . . . . . . . . . . . . . . . . . . . . 193
Create a User from an AppWave Browser Log In . . . . . . . . . . . . . . . . . . . . . . . . . . . . . . . . . . . . . . . 195
Create Users Using a CSV File . . . . . . . . . . . . . . . . . . . . . . . . . . . . . . . . . . . . . . . . . . . . . . . . . . . . . . . 195
View Users . . . . . . . . . . . . . . . . . . . . . . . . . . . . . . . . . . . . . . . . . . . . . . . . . . . . . . . . . . . . . . . . . . . . . . . 196
Change the Applications Available to a User or Group . . . . . . . . . . . . . . . . . . . . . . . . . . . . . . . . . . 197
Delete Users . . . . . . . . . . . . . . . . . . . . . . . . . . . . . . . . . . . . . . . . . . . . . . . . . . . . . . . . . . . . . . . . . . . . . 197
Monitor User Activity . . . . . . . . . . . . . . . . . . . . . . . . . . . . . . . . . . . . . . . . . . . . . . . . . . . . . . . . . . . . . . 197
Managing Groups. . . . . . . . . . . . . . . . . . . . . . . . . . . . . . . . . . . . . . . . . . . . . . . . . . . . . . . . . . . . . . . . . . . . . . . . . . . . . . .197
Use the Preconfigured Groups . . . . . . . . . . . . . . . . . . . . . . . . . . . . . . . . . . . . . . . . . . . . . . . . . . . . . . 198
Create Groups . . . . . . . . . . . . . . . . . . . . . . . . . . . . . . . . . . . . . . . . . . . . . . . . . . . . . . . . . . . . . . . . . . . 198
View, Edit, and Delete Groups . . . . . . . . . . . . . . . . . . . . . . . . . . . . . . . . . . . . . . . . . . . . . . . . . . . . . . 200
Application Management . . . . . . . . . . . . . . . . . . . . . . . . . . . . . . . . . . . . . . . . . . . . . . . . . . . . . . . . . . . . . . . . . 201
Understanding AppWave Apps . . . . . . . . . . . . . . . . . . . . . . . . . . . . . . . . . . . . . . . . . . . . . . . . . . . . . . . . . . . . . . . . . . .201
Caching Apps on AppWave . . . . . . . . . . . . . . . . . . . . . . . . . . . . . . . . . . . . . . . . . . . . . . . . . . . . . . . . . . . . . . . . . . . . . .202
Monitoring Download Progress . . . . . . . . . . . . . . . . . . . . . . . . . . . . . . . . . . . . . . . . . . . . . . . . . . . . . . . . . . . . . . . . . . .204
Importing Applications to the Product Repository . . . . . . . . . . . . . . . . . . . . . . . . . . . . . . . . . . . . . . . . . . . . . . . . . . . .205
Obtaining Embarcadero XE Apps Manually . . . . . . . . . . . . . . . . . . . . . . . . . . . . . . . . . . . . . . . . . . . . . . . . . . . . . . . . .206
Obtaining Embarcadero XE Apps Via the AppWave Media Kit. . . . . . . . . . . . . . . . . . . . . . . . . . . . . . . . . . . . . . . . . .207
Import Installers Individually . . . . . . . . . . . . . . . . . . . . . . . . . . . . . . . . . . . . . . . . . . . . . . . . . . . . . . . . 208
Import All Installers at Once . . . . . . . . . . . . . . . . . . . . . . . . . . . . . . . . . . . . . . . . . . . . . . . . . . . . . . . . 208
Importing 3rd Party Apps. . . . . . . . . . . . . . . . . . . . . . . . . . . . . . . . . . . . . . . . . . . . . . . . . . . . . . . . . . . . . . . . . . . . . . . . .209
Understanding App Inventory . . . . . . . . . . . . . . . . . . . . . . . . . . . . . . . . . . . . . . . . . . . . . . . . . . . . . . . . . . . . . . . . . . . . .210
Browsing the App Catalog . . . . . . . . . . . . . . . . . . . . . . . . . . . . . . . . . . . . . . . . . . . . . . . . . . . . . . . . . . . . . . . . . . . . . . .211
Automatically Updating the Application Catalog . . . . . . . . . . . . . . . . . . . . . . . . . . . . . . . . . . . . . . . . . . . . . . . . . . . . .213
Manually Updating the Application Catalog . . . . . . . . . . . . . . . . . . . . . . . . . . . . . . . . . . . . . . . . . . . . . . . . . . . . . . . . .214
Moderating Product Reviews . . . . . . . . . . . . . . . . . . . . . . . . . . . . . . . . . . . . . . . . . . . . . . . . . . . . . . . . . . . . . . . . . . . . .215
Managing Catalog Banners . . . . . . . . . . . . . . . . . . . . . . . . . . . . . . . . . . . . . . . . . . . . . . . . . . . . . . . . . . . . . . . . . . . . . . .217
Downloading Applications to Users . . . . . . . . . . . . . . . . . . . . . . . . . . . . . . . . . . . . . . . . . . . . . . . . . . . . . . . . . . . . . . . .219
AppWave Enterprise UI Customization . . . . . . . . . . . . . . . . . . . . . . . . . . . . . . . . . . . . . . . . . . . . . . . . . . . . . . 221
Customizing the AppWave User Interface Theme . . . . . . . . . . . . . . . . . . . . . . . . . . . . . . . . . . . . . . . . . . . . . . . . . . . .222
Customizing the Format of the User Interface Theme . . . . . . . . . . . . . . . . . . . . . . . . . . . . . . . . . . . . . . . . . . . . . . . . .223
Replacing the Images in the AppWave Admin User Interface . . . . . . . . . . . . . . . . . . . . . . . . . . . . . . . . . . . . . . . . . . .232
Logo. . . . . . . . . . . . . . . . . . . . . . . . . . . . . . . . . . . . . . . . . . . . . . . . . . . . . . . . . . . . . . . . . . . . . . . . . . . . 232
Menu . . . . . . . . . . . . . . . . . . . . . . . . . . . . . . . . . . . . . . . . . . . . . . . . . . . . . . . . . . . . . . . . . . . . . . . . . . . 232
Welcome to Embarcadero AppWave Dashboard . . . . . . . . . . . . . . . . . . . . . . . . . . . . . . . . . . . . . . . 237
User . . . . . . . . . . . . . . . . . . . . . . . . . . . . . . . . . . . . . . . . . . . . . . . . . . . . . . . . . . . . . . . . . . . . . . . . . . . . 240
APPWAVE™ ENTERPRISE ADMINISTRATOR GUIDE 7
CONTENTS
View User . . . . . . . . . . . . . . . . . . . . . . . . . . . . . . . . . . . . . . . . . . . . . . . . . . . . . . . . . . . . . . . . . . . . . . . . 241
Edit User . . . . . . . . . . . . . . . . . . . . . . . . . . . . . . . . . . . . . . . . . . . . . . . . . . . . . . . . . . . . . . . . . . . . . . . . 242
Add Concurrent Users . . . . . . . . . . . . . . . . . . . . . . . . . . . . . . . . . . . . . . . . . . . . . . . . . . . . . . . . . . . . . 242
Add Named Users . . . . . . . . . . . . . . . . . . . . . . . . . . . . . . . . . . . . . . . . . . . . . . . . . . . . . . . . . . . . . . . . 243
Import Users . . . . . . . . . . . . . . . . . . . . . . . . . . . . . . . . . . . . . . . . . . . . . . . . . . . . . . . . . . . . . . . . . . . . . 243
Create User . . . . . . . . . . . . . . . . . . . . . . . . . . . . . . . . . . . . . . . . . . . . . . . . . . . . . . . . . . . . . . . . . . . . . . 243
Manage Groups . . . . . . . . . . . . . . . . . . . . . . . . . . . . . . . . . . . . . . . . . . . . . . . . . . . . . . . . . . . . . . . . . . 243
Create Group . . . . . . . . . . . . . . . . . . . . . . . . . . . . . . . . . . . . . . . . . . . . . . . . . . . . . . . . . . . . . . . . . . . . 244
LDAP Users & Groups . . . . . . . . . . . . . . . . . . . . . . . . . . . . . . . . . . . . . . . . . . . . . . . . . . . . . . . . . . . . . 244
View Folder . . . . . . . . . . . . . . . . . . . . . . . . . . . . . . . . . . . . . . . . . . . . . . . . . . . . . . . . . . . . . . . . . . . . . . 244
Edit Folder. . . . . . . . . . . . . . . . . . . . . . . . . . . . . . . . . . . . . . . . . . . . . . . . . . . . . . . . . . . . . . . . . . . . . . . 245
App Folders. . . . . . . . . . . . . . . . . . . . . . . . . . . . . . . . . . . . . . . . . . . . . . . . . . . . . . . . . . . . . . . . . . . . . . 246
App Inventory . . . . . . . . . . . . . . . . . . . . . . . . . . . . . . . . . . . . . . . . . . . . . . . . . . . . . . . . . . . . . . . . . . . . 246
Version Updates . . . . . . . . . . . . . . . . . . . . . . . . . . . . . . . . . . . . . . . . . . . . . . . . . . . . . . . . . . . . . . . . . . 249
Download History . . . . . . . . . . . . . . . . . . . . . . . . . . . . . . . . . . . . . . . . . . . . . . . . . . . . . . . . . . . . . . . . . 250
Moderate Reviews . . . . . . . . . . . . . . . . . . . . . . . . . . . . . . . . . . . . . . . . . . . . . . . . . . . . . . . . . . . . . . . . 250
Banners Management . . . . . . . . . . . . . . . . . . . . . . . . . . . . . . . . . . . . . . . . . . . . . . . . . . . . . . . . . . . . . 251
Email Direct Marketing. . . . . . . . . . . . . . . . . . . . . . . . . . . . . . . . . . . . . . . . . . . . . . . . . . . . . . . . . . . . . 252
License Inventory . . . . . . . . . . . . . . . . . . . . . . . . . . . . . . . . . . . . . . . . . . . . . . . . . . . . . . . . . . . . . . . . . 252
License Files . . . . . . . . . . . . . . . . . . . . . . . . . . . . . . . . . . . . . . . . . . . . . . . . . . . . . . . . . . . . . . . . . . . . . 252
Retrieve License . . . . . . . . . . . . . . . . . . . . . . . . . . . . . . . . . . . . . . . . . . . . . . . . . . . . . . . . . . . . . . . . . . 253
Set Trial Owner . . . . . . . . . . . . . . . . . . . . . . . . . . . . . . . . . . . . . . . . . . . . . . . . . . . . . . . . . . . . . . . . . . . 253
Third Party Licenses . . . . . . . . . . . . . . . . . . . . . . . . . . . . . . . . . . . . . . . . . . . . . . . . . . . . . . . . . . . . . . . 253
License Assignments . . . . . . . . . . . . . . . . . . . . . . . . . . . . . . . . . . . . . . . . . . . . . . . . . . . . . . . . . . . . . . 254
Concurent Users, Named Users, and Workstation Permissions . . . . . . . . . . . . . . . . . . . . . . . . . . . . 255
Valid IPs . . . . . . . . . . . . . . . . . . . . . . . . . . . . . . . . . . . . . . . . . . . . . . . . . . . . . . . . . . . . . . . . . . . . . . . . . 256
Reservations and Workstation Reservations. . . . . . . . . . . . . . . . . . . . . . . . . . . . . . . . . . . . . . . . . . . . 257
Auto Activation Licenses . . . . . . . . . . . . . . . . . . . . . . . . . . . . . . . . . . . . . . . . . . . . . . . . . . . . . . . . . . . 257
Connected Users . . . . . . . . . . . . . . . . . . . . . . . . . . . . . . . . . . . . . . . . . . . . . . . . . . . . . . . . . . . . . . . . . 258
Service Status . . . . . . . . . . . . . . . . . . . . . . . . . . . . . . . . . . . . . . . . . . . . . . . . . . . . . . . . . . . . . . . . . . . . 258
Set Up Licenses. . . . . . . . . . . . . . . . . . . . . . . . . . . . . . . . . . . . . . . . . . . . . . . . . . . . . . . . . . . . . . . . . . . 259
System Properties Email. . . . . . . . . . . . . . . . . . . . . . . . . . . . . . . . . . . . . . . . . . . . . . . . . . . . . . . . . . . . 260
Streaming Service . . . . . . . . . . . . . . . . . . . . . . . . . . . . . . . . . . . . . . . . . . . . . . . . . . . . . . . . . . . . . . . . . 260
Publishing Progress . . . . . . . . . . . . . . . . . . . . . . . . . . . . . . . . . . . . . . . . . . . . . . . . . . . . . . . . . . . . . . . 261
AppWave Backup Setup . . . . . . . . . . . . . . . . . . . . . . . . . . . . . . . . . . . . . . . . . . . . . . . . . . . . . . . . . . . 261
Reports . . . . . . . . . . . . . . . . . . . . . . . . . . . . . . . . . . . . . . . . . . . . . . . . . . . . . . . . . . . . . . . . . . . . . . . . . 262
Notifications . . . . . . . . . . . . . . . . . . . . . . . . . . . . . . . . . . . . . . . . . . . . . . . . . . . . . . . . . . . . . . . . . . . . . 263
Home Page . . . . . . . . . . . . . . . . . . . . . . . . . . . . . . . . . . . . . . . . . . . . . . . . . . . . . . . . . . . . . . . . . . . . . . 264
8 APPWAVE™ ENTERPRISE ADMINISTRATOR GUIDE
CONTENTS
Background . . . . . . . . . . . . . . . . . . . . . . . . . . . . . . . . . . . . . . . . . . . . . . . . . . . . . . . . . . . . . . . . . . . . . . 264
AppWave Infrastructure Integration. . . . . . . . . . . . . . . . . . . . . . . . . . . . . . . . . . . . . . . . . . . . . . . . . . . . . . . . . 265
Distributing AppWave Browser Using Microsoft SCCM . . . . . . . . . . . . . . . . . . . . . . . . . . . . . . . . . . . . . . . . . . . . . . . .265
Create the Application Package . . . . . . . . . . . . . . . . . . . . . . . . . . . . . . . . . . . . . . . . . . . . . . . . . . . . . 265
Create a Program for the Package . . . . . . . . . . . . . . . . . . . . . . . . . . . . . . . . . . . . . . . . . . . . . . . . . . . 268
Advertise the Package . . . . . . . . . . . . . . . . . . . . . . . . . . . . . . . . . . . . . . . . . . . . . . . . . . . . . . . . . . . . . 271
Create and Update Distribution Points . . . . . . . . . . . . . . . . . . . . . . . . . . . . . . . . . . . . . . . . . . . . . . . 273
AppWave Glossary . . . . . . . . . . . . . . . . . . . . . . . . . . . . . . . . . . . . . . . . . . . . . . . . . . . . . . . . . . . . . . . . . . . . . . . . . 275
Index . . . . . . . . . . . . . . . . . . . . . . . . . . . . . . . . . . . . . . . . . . . . . . . . . . . . . . . . . . . . . . . . . . . . . . . . . . . . . . . . . . 293
APPWAVE™ ENTERPRISE ADMINISTRATOR GUIDE 9

CONTENTS
10 APPWAVE™ ENTERPRISE ADMINISTRATOR GUIDE
WELCOME TO APPWAVE
This section has the following topics:
• About This Document
• Introduction to AppWave Enterprise
• Additional Product Information
ABOUT THIS DOCUMENT
This AppWave Enterprise Administrator Guide is the primary reference for AppWave administrators. It provides an introduction to the product, installation information, and detailed instructions for common administrative tasks.
NOTE: For the latest versions of AppWave documents and for information that helps you install and upgrade, see the Embarcadero documentation website. Always make sure to consult the README for late breaking updates at docs.embarcadero.com/products/appwave.
INTRODUCTION TO APPWAVE ENTERPRISE
With AppWave™ Enterprise you get:
• AppWave™ Enterprise, where you can centrally provision, manage and update products and licenses inside your own firewall. AppWave™ Enterprise (AppWave) is lightweight software that centrally manages applications and licenses. You control what product versions are available to end users from their AppWave Browser. With network licensing, you can use AppWave to centrally control the list of authorized users. AppWave also provides support as you manage many third-party applications that can be mastered as apps in AppWave Studio. Using AppWave Studio, you can also broadcast in-house developed applications.
With AppWave you simplify licensing, reduce costs, and control access by consolidating, centralizing, and standardizing how you deliver applications. Database professionals and application developers have on-demand access to Embarcadero applications when needed. You can run multiple versions side-by-side, and adapt tool sets by project and platform to respond faster to changing business demands.
APPWAVE™ ENTERPRISE ADMINISTRATOR GUIDE 11
WELCOME TO APPWAVE
• AppWave Browser, a lightweight client that is the primary entry point for the various products used with AppWave. It allows users to launch, install, update, review, and select product versions, all from a single interface. It also provides access to AppWave Studio and AppWave Administrative functions. From the AppWave Browser you can access the AppWave Public Store where you can search for, run, and review hundreds of free apps. The same administrative functionality available in the Admin console application is also available on the AppWave Admin tab. For more information, see the AppWave Browser Apps User Guide and the AppWave Studio User Guide.
• AppWave Apps provides instant access to your products without installation. AppWave saves valuable time by allowing quick access to products, even in locked-down desktop environments where installing software is problematic. For more information about AppWave Apps, see Understanding AppWave Apps.
• AppWave Public Store provides access to hundreds of free apps and trials of Embarcadero apps over the internet from the AppWave Browser. In the AppWave Public Store, hosted by Embarcadero, you can search for, run, and review apps.
• AppWave Studio is used to create an app file for a customer product. This can be an Embarcadero product or a generic application. The creation process walks you through a series of steps where you author and then broadcast the AppWave app for your selected product. This can then be run on a local machine and launched using AppWave Browser. Once broadcast to AppWave, the app can be broadcast to AppWave Browser users over the network. You need a special license to use AppWave Studio, either AppWave for X, AppWave for Custom, or AppWave for Vendor. For more information, see the AppWave Studio User Guide.
• All-Access: Embarcadero All-Access licenses that are managed by AppWave provide you with industry-leading database tools, including DBArtisan®, Rapid SQL®, the ER/Studio® family of products, and many more. All-Access licenses also provide powerful application development tools, including Delphi®, JBuilder®, C++Builder®, the InterBase® SMP database, and more.
Supported database platforms, programming languages, frameworks, and roles include:
• Databases: Oracle, IBM® DB2, Sybase®, Microsoft® SQL Server, InterBase® SMP, and MySQL®.
• Languages and Frameworks: C++, Delphi®, Java™, PHP, Ruby™, ANSI SQL, Procedural SQL, UML®, HTML, XML, BPMN, Data Lineage, and ERD.
• Application and Database Roles: Developers, Architects, Performance Testers, and DBAs.
The benefits of Embarcadero All-Access include:
• Convenience: You have instant access to the right application when you need it.
• Flexibility: A single All-Access license serves the needs of developers, architects, performance testers, and DBAs, supporting multiple platforms, programming languages, and frameworks.
• Simplicity: It is much easier to buy, provision, and manage your applications.
12 APPWAVE™ ENTERPRISE ADMINISTRATOR GUIDE

WELCOME TO APPWAVE
• Predictability: A comprehensive set of applications provides year-over-year predictability and cost savings.
When you purchase Embarcadero All-Access, you get AppWave and AppWave Browser with:
• All-Access Membership provides support, updates, upgrades, new products, and access to premium content on the Embarcadero Developer Network (EDN).
• All-Access Pass is the license key that unlocks all applications for a given All-Access level. For more information about levels, see: www.embarcadero.com/products/all-access/membership-levels.
ADDITIONAL PRODUCT INFORMATION
The Embarcadero Web site provides access to information and resources useful through the life of your product. This includes access to:
• Technical Support
• Case studies, video presentations, webinars and white papers
• Product communities through the Embarcadero Developer Network
• Free trials of related products
See www.embarcadero.com/support:
APPWAVE™ ENTERPRISE ADMINISTRATOR GUIDE 13

WELCOME TO APPWAVE
14 APPWAVE™ ENTERPRISE ADMINISTRATOR GUIDE
INSTALLATION INFORMATION
AppWave™ Enterprise (AppWave) provides product and licensing control from a single Web-based browser interface. It manages a repository directory containing downloaded Embarcadero products. Application users get access to the products from AppWave Browser.
The AppWave installer sets up the components and directories used by AppWave. This section describes general installation information.
NOTE: See the ReadMe.htm file for any issues that could affect your installation of the product. at docs.embarcadero.com/products/appwave/. The AppWave Enterprise Admin Quick Start Guide also provides valuable information to help you install and configure AppWave.
This section covers these topics:
• Installing AppWave
• Upgrading AppWave from Previous Versions
• Providing Users with AppWave Browser
INSTALLING APPWAVE
The wizard-based installer guides you through the installation process. This section describes the wizard and provides information about decisions you must make during installation.
You must have administrative privileges to run the install. To complete the installation, you need to complete each panel of the Installation Wizard.
NOTE: If you are installing using the AppWave Media Kit, in addition to this document, see the Appwave Quick Start Guide.
There are two installation methods to choose from:
• Default Installation on page 15
• Custom Installation on page 16
DEFAULT INSTALLATION1 Double-click the AppWave installer and the License Agreement dialog displays.
2 Accept the default installation options by clicking Default Installation.
3 On the Pre-Installation Summary page that appears, click Print Summary so you have a record of the settings for later use.
APPWAVE™ ENTERPRISE ADMINISTRATOR GUIDE 15
INSTALLATION INFORMATION
4 Click Install.
5 To setup AppWave and customize settings for your organization such as creating users and managing licenses, click For Administrators. The AppWave Console is opened in your Internet Browser and the Dashboard displays.
To install AppWave Browser, click For End-Users and Authors. The AppWave service starts and the AppWave Browser installation starts.
6 Click Accept the End User License Agreement.
7 You can then create a desktop shortcut for AppWave Browser. AppWave Browser starts and connects to the AppWave you just installed.
CUSTOM INSTALLATION
Installation Wizard - License Agreement
1 Double-click the AppWave installer and the License Agreement dialog displays.
2 Select I accept the terms of the License Agreement and click Next. The Install Options page appears.
Installation Wizard - Install Options
1 Click Custom Installation and the Choose Install Folder panel appears.
NOTE: If a previous version of Embarcadero AppWave or ToolCloud is detected during installation you are prompted to either upgrade AppWave or remove the previous installation and install the new version. For more information, see the AppWave Read Me at docs.embarcadero.com.
Installation Wizard - Choose Install Folder
1 Enter the location where you want to install AppWave.
2 Click Next and the Application Repository panel appears.
16 APPWAVE™ ENTERPRISE ADMINISTRATOR GUIDE
INSTALLATION INFORMATION
Installation Wizard - Application Repository
AppWave distributes Embarcadero products through a repository of all cached applications. The repository is a directory local to AppWave or a directory on a network drive that has read privileges for all users, and read and write privileges for the AppWave administrator.
1 Choose the location where you want AppWave to store the products cached for AppWave Browser users.
Folder: This folder can be located on a local or network drive.
Use an existing share (UNC format): This allows you to connect to an existing repository. Specify the repository file location in UNC format, such as \\server\share\file_path.
Cache folder: This local folder is the directory where the applications that will be streamed are saved on the AppWave host. The primary purpose for the cache is to allow partial downloading of an application before showing the application to the user. This is especially important when working with large applications because caching the application allows the user to begin using the application sooner, before the entire application has been cached. You can later change the location of the cache folder on the System Properties, Streaming tab.
2 Click Next and the AppWave Ports panel appears.
Installation Wizard - AppWave Ports
1 In the Communication Port field, enter the port number AppWave uses to communicate with AppWave Browser and AppWave Studio users. The default port number is 80.
AppWave uses the following ports by default, which are set by the installer:
• Tomcat and other internal processes: 8009
• AppWave server port: 80 (In the AppWave System Properties options, you can change this port number after installation.)
• Shutdown port: 8082
• Database port: 3052
• Licenses port: 5567
• Installation port: 61616 (used for internal purposes)
So do not use these ports as the communication port or for other applications.
2 During normal operations, AppWave contacts and interacts with the following Embarcadero hosts: appwave.embarcadero.com, AppWave Store; license.codegear.com, All-Access license hosting; reg.codegear.com, AppWave registration; cc.codegear.com, auto update; and altd.embarcadero.com, product binaries and PADE plug-ins. In a restricted environment, add these URLs to your trusted list.
APPWAVE™ ENTERPRISE ADMINISTRATOR GUIDE 17
INSTALLATION INFORMATION
3 In the Shutdown Port field, enter the port number Windows uses to shutdown the service when the Administrator commands the AppWave service to stop. The default port number is 8082.
AppWave is automatically registered as a Windows service, therefore it starts when your machine starts. By default, the service is named Embarcadero AppWave.
4 In the InterBase Port field, enter the port number AppWave uses to communicate with the InterBase database. The default port number is 3052.
AppWave uses an InterBase database to store all its information.
5 Click Next and the Pre-Installation Summary panel appears.
Installation Wizard - Pre-Installation Summary
1 Review the installation details.
2 If the details are not correct, click Previous to return to previous panels and make the necessary changes.
If the details are correct, click Print Summary and store the installation details in a safe location for future reference.
3 Click Install.
Installation Wizard - Installing Embarcadero AppWave
The installation proceeds. The AppWave services are automatically started when the installation is complete.
Installation Wizard - Install Complete
1 When the install completes, click For Administrators or if you want, click For End-Users and Authors and the AppWave Browser is installed. The AppWave Dashboard opens in your default browser.
Using the AppWave console, you can manage users, groups, products, licenses, and system properties.
2 The host name and port number of AppWave display on the main page. Record this information for future reference.
Before you can use AppWave you must set up a license. Instructions for this are detailed in the AppWave Quick Start Guide and in the Managing Licenses section of this guide.
NOTE: You will need the host name in order to host your All-Access license if you need to host the license through Embarcadero’s license site at http://reg.codegear.com/srs6/el. When licensing through the AppWave Admin console, the host address is automatically filled in on the Retrieve License page.
18 APPWAVE™ ENTERPRISE ADMINISTRATOR GUIDE
INSTALLATION INFORMATION
Installation Notes
• Restricted Mode: In its default configuration, anyone inside your firewall can access your AppWave and run the applications broadcasted by it. Also, Apps broadcast from AppWave Studio to AppWave will immediately be added to the All Apps folder and will be available to the All Users group. To secure your AppWave, set Allow client to register user to off. You should also edit the All Users group and the All Apps folder, and the user to limit the licenses available for that user. For more information, see Managing AppWave, Managing Folders, Managing Groups, Managing Users and Publish Applications.
• Embarcadero License Center: Embarcadero License Center (ELC) is integrated with AppWave and installs automatically when you install AppWave.
• License Hosting: You use the Embarcadero Hosting web site at
http://reg.codegear.com/srs6/el/start.jsp
to create configuration files that let Embarcadero License Center track and control license distribution on AppWave. The site requires login and host server information. During AppWave installation, record the AppWave host name and IP address for later use on the License Hosting Website.
• If you do not want AppWave to start as a Windows service, you can reset or otherwise change the service by selecting Start > Embarcadero AppWave X.X > Configure AppWave. In the Embarcadero AppWave Properties dialog, select the General tab and change the service parameters.
• For instructions on providing AppWave Browser to users, see Providing Users with AppWave Browser.
• Installing on Amazon EC2: When AppWave is installed on an Amazon EC2 instance you must manually configure its IP address in the AppWave configuration file, aaserver.properties and then restart AppWave.
UPGRADING APPWAVE FROM PREVIOUS VERSIONS
The AppWave installer includes upgrade functionality. For information on upgrading, see the AppWave Read Me at docs.embarcadero.com.
You cannot upgrade a 32-bit AppWave to use the 64-bit AppWave software. You must backup your AppWave, uninstall it, and then install the AppWave 64-bit software.
AppWave 3.2.2 uses a new pricing model. In order to use any AppWave custom or premium apps you must purchase a new AppWave Edition license. For more information, see Licensing for AppWave 3rd Party Apps / AppWave Edition Licenses.
APPWAVE™ ENTERPRISE ADMINISTRATOR GUIDE 19
INSTALLATION INFORMATION
PROVIDING USERS WITH APPWAVE BROWSER
• Administrator Installing AppWave Browser
• User Installing AppWave Browser
ADMINISTRATOR INSTALLING APPWAVE BROWSERIn some cases, the administrator may need to install AppWave Browser for the users. such as when the user’s account does not have Administrative privileges; when multiple users will be using the same machine to run AppWave Browser; or when the administrator wants to install remotely for multiple users using Microsoft SCCM.
NOTE: When the AppWave Browser is installed using a Window Administrator account, Turbo Mode is automatically set to on. Turbo mode is the recommended mode for running AppWave Browser and is required for some complex apps. For information on Turbo Mode, see the AppWave Browser User Guide.
To facilitate administrative installations, AppWave Browser can be installed from the command line.
Command line options include:
-a: Installs for all users on a machine. After installing there will be a single instance of AppWave Browser on each machine/environment. Installing using this options sets AppWave Browser to run in Turbo mode for all users. All user-specific AppWave Browser files, such as option settings and favorites, are stored in the users’ directory at:
Windows XP: C:\Documents and Settings\All Users\Application Data\Embarcadero\AppWaveBrowser
Windows 7 and Windows 8: C:\ProgramData\Embarcadero\AppWaveBrowser
Uninstalling AppWave Browser affects all users on the machine/environment.
-silent: Installs without asking the installer any questions or showing any visual user interface. This accepts the End User License Agreement.
-accept_eula: Accepts the End User License Agreement so it is not shown during the install.
-repair: Allows the installer to repair an installation, where it will reinstall the browser over an existing installation rather than execute existing one
-nolaunch: Inhibits Browser launch after installation completion.
-installdir [directory]: Forces the install to a particular directory.
-appwaveurl [url]: Specifies the URL of the AppWave you want the Browser to auto connect to.
The following describes how the command line options can be used.
• Admin directly installs AppWave Browser on a machine for all users
20 APPWAVE™ ENTERPRISE ADMINISTRATOR GUIDE
INSTALLATION INFORMATION
• Admin pushes AppWave Browser out via SCCM
ADMIN DIRECTLY INSTALLS APPWAVE BROWSER ON A MACHINE FOR ALL USERSAs an administrator, you can install and configure AppWave Browser for all users on a machine through a command line parameter. Once installed, no additional configuration is required by the users.
1 Download AppWave Browser from AppWave.
2 On the users machine, run the AppWave Browser installer from the command line as follows:
AppWaveLauncher.exe -a -silent -nolaunch
Admin pushes AppWave Browser out via SCCM
As an administrator, you can install and configure AppWave Browser remotely using Microsoft’s System Center Configuration Manager (SCCM).
1 Download AppWave Browser from AppWave.
2 Follow the usual procedure for packaging and deploying an application using SCCM as described in their respective documentation. Specific details are provided in Distributing AppWave Browser Using Microsoft SCCM
3 Run the AppWave Browser installer from the command line with the silent installation option as follows:
AppWaveLauncher.exe -silent -nolaunch
User Installing AppWave Browser
In order to use AppWave, AppWave Browser must be downloaded. In order for the user to use applications, you must assign applications to the user or to the group to which the user belongs.
1 Provide the user with the AppWave host name and port number.
2 Instruct AppWave users to download AppWave Browser from AppWave.
3 Provide the users with the following instructions:
APPWAVE™ ENTERPRISE ADMINISTRATOR GUIDE 21
INSTALLATION INFORMATION
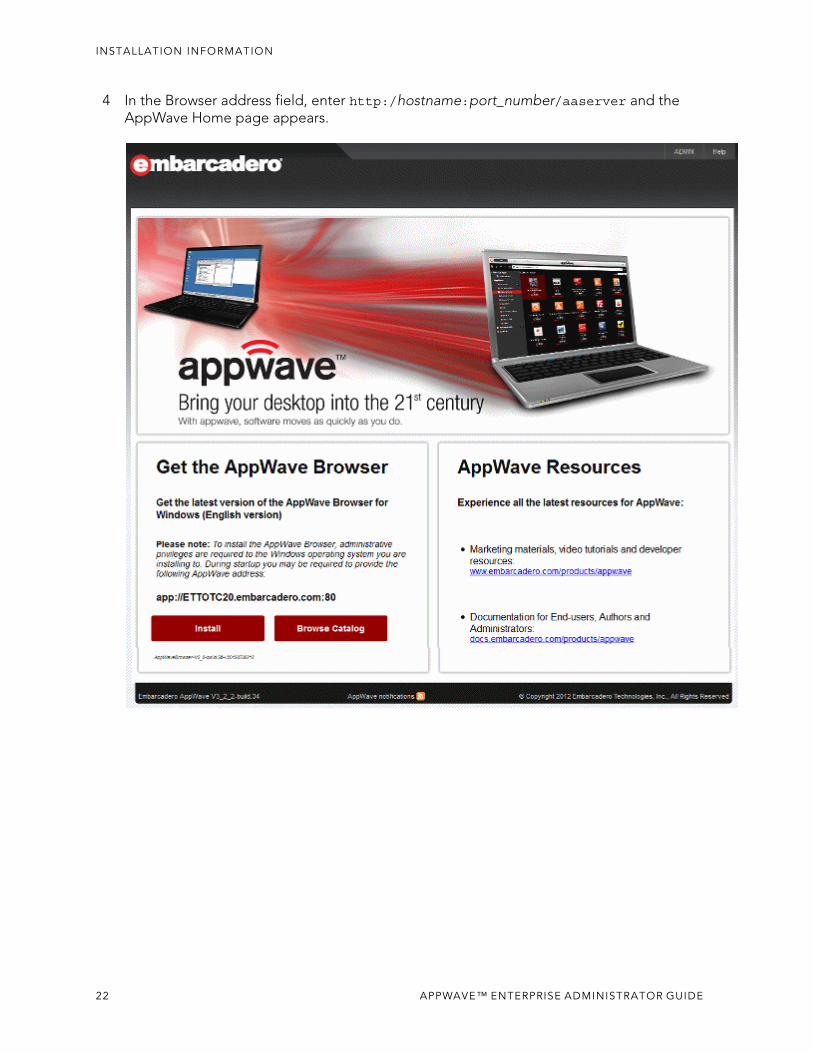
4 In the Browser address field, enter http:/hostname:port_number/aaserver and the AppWave Home page appears.
22 APPWAVE™ ENTERPRISE ADMINISTRATOR GUIDE
INSTALLATION INFORMATION
5 Click Install.
The AppWave Launcher is downloaded to the default download folder specified in the default Internet Browser. When the download is complete AppWave Browser installs and launches.
AppWave Browser preferences, and logs are kept in the following directory:
Windows XP: C:\Documents and Settings\user\Local Settings\Application Data\Embarcadero\
Vista/Windows 7 and Windows 8/Windows Server 2008: C:\Users\user\AppData\Local\Embarcadero\
For information on running and using AppWave Browser, see the AppWave Browser Apps User Guide and AppWave Studio User Guide.
For troubleshooting information, see the AppWave docwiki at http://docwiki.embarcadero.com/AppWave.
APPWAVE™ ENTERPRISE ADMINISTRATOR GUIDE 23

INSTALLATION INFORMATION
24 APPWAVE™ ENTERPRISE ADMINISTRATOR GUIDE
APPWAVE CONFIGURATION AND ADMINISTRATION
In most cases, the standard configuration of the AppWave™ Enterprise Store (AppWave) service will meet your needs, but in some circumstances you may want to customize the Windows service configuration. For more information, see Configuring the AppWave Service.
AppWave has seven administrative components that you manage through its interface; AppWave, Manage Users & Groups, Manage Folders, Manage Apps, Manage Licenses, System Management, and Reporting.
• AppWave contains the Dashboard which serves as a starting point for most administrative functions, including initial configuration applications and day-to-day management utilities. For more information, see Using the Dashboard Commands.
• Manage Users & Groups: Users access the product repository using AppWave Browser, to cache, run and upgrade products. You control the levels of access that users have to products on an individual or group basis. For more information, see Managing Users and Managing Groups.
• Manage Folders: Folders allow you to restrict users and groups to a certain set of products available on AppWave. For more information, see Managing Folders. Folders are also used to contain 3rd party apps managed by your AppWave Edition license.
• Manage Apps: Applications from Embarcadero are stored in the AppWave repository; the set of products is called the product catalog. The product catalog helps you manage product caching and versions. For more information, see Application Management.
• Manage Licenses: AppWave stores product licenses and shares them with users who cache the products using AppWave Browser. For more information, see the AppWave Quick Start Guide and Managing Licenses.
• System Management: Through the AppWave system management panes you can configure system properties such as what users can see when they connect, how applications are cached and streamed, proxy server details, along with streaming server detailsand backup licensing host configuration. For more information, see Managing AppWave.
• Reporting: Once you have the server setup and running you can gather statistics to help you manage users, groups, and licenses through the Reports. For more information, see Create Usage History Reports.
Additional management topics are included in this section:
• Configuring the AppWave Service
• Service Status Information
• Logging in to the AppWave ADMIN Page
• Logging out of AppWave
• Configuring Catalog Updates
APPWAVE™ ENTERPRISE ADMINISTRATOR GUIDE 25
APPWAVE CONFIGURATION AND ADMINISTRATION
• Handling Notifications
• Managing AppWave
• Backing up and Restoring AppWave. The InterBase database is at the heart of AppWave and contains all your program data. You can backup the following categories of AppWave information:
• Backing up and Restoring AppWave Browser
• Collecting Log Files
USING THE DASHBOARD COMMANDS
This section describes the commands found on the AppWave Dashboard, including the following:
• Download AppWave Browser
• Services Status
• Set Up Embarcadero Licenses
• Download Applications
• Manage Mastering Plug-ins
• Import LDAP Users and Groups
• Change Admin Password
• Update Application Catalog Configuration
• Manage Disk Space
• Moderate Reviews (appears only when there are pending reviews)
• Set up Backup License Server
26 APPWAVE™ ENTERPRISE ADMINISTRATOR GUIDE
APPWAVE CONFIGURATION AND ADMINISTRATION
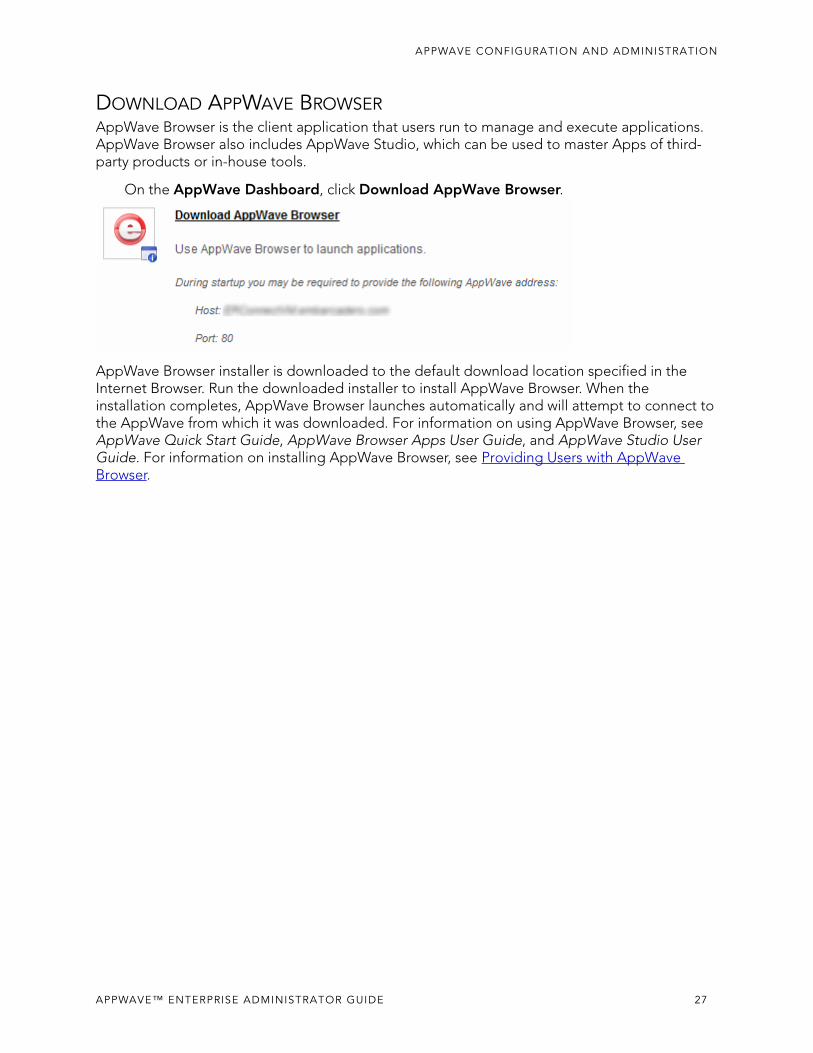
DOWNLOAD APPWAVE BROWSERAppWave Browser is the client application that users run to manage and execute applications. AppWave Browser also includes AppWave Studio, which can be used to master Apps of third-party products or in-house tools.
On the AppWave Dashboard, click Download AppWave Browser.
AppWave Browser installer is downloaded to the default download location specified in the Internet Browser. Run the downloaded installer to install AppWave Browser. When the installation completes, AppWave Browser launches automatically and will attempt to connect to the AppWave from which it was downloaded. For information on using AppWave Browser, see AppWave Quick Start Guide, AppWave Browser Apps User Guide, and AppWave Studio User Guide. For information on installing AppWave Browser, see Providing Users with AppWave Browser.
APPWAVE™ ENTERPRISE ADMINISTRATOR GUIDE 27
APPWAVE CONFIGURATION AND ADMINISTRATION
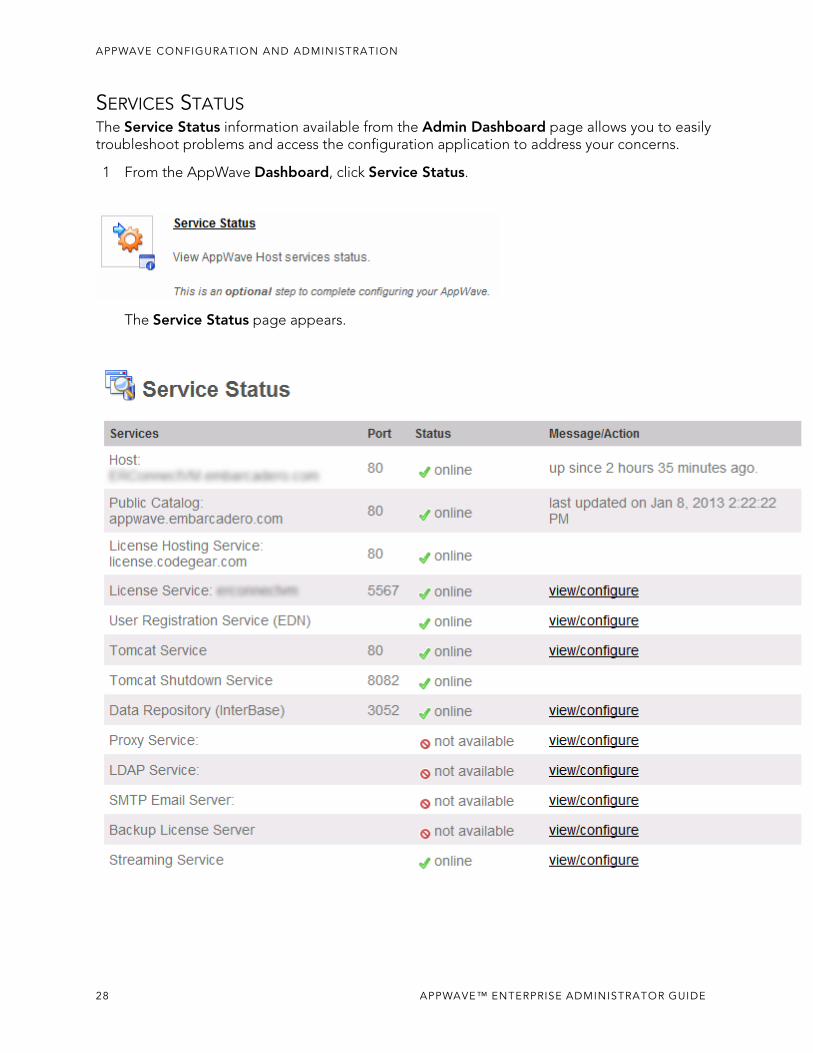
SERVICES STATUSThe Service Status information available from the Admin Dashboard page allows you to easily troubleshoot problems and access the configuration application to address your concerns.
1 From the AppWave Dashboard, click Service Status.
The Service Status page appears.
28 APPWAVE™ ENTERPRISE ADMINISTRATOR GUIDE
APPWAVE CONFIGURATION AND ADMINISTRATION
2 Click the link in the Message/Action column to bring up the page that allows you to view or reconfigure the service.
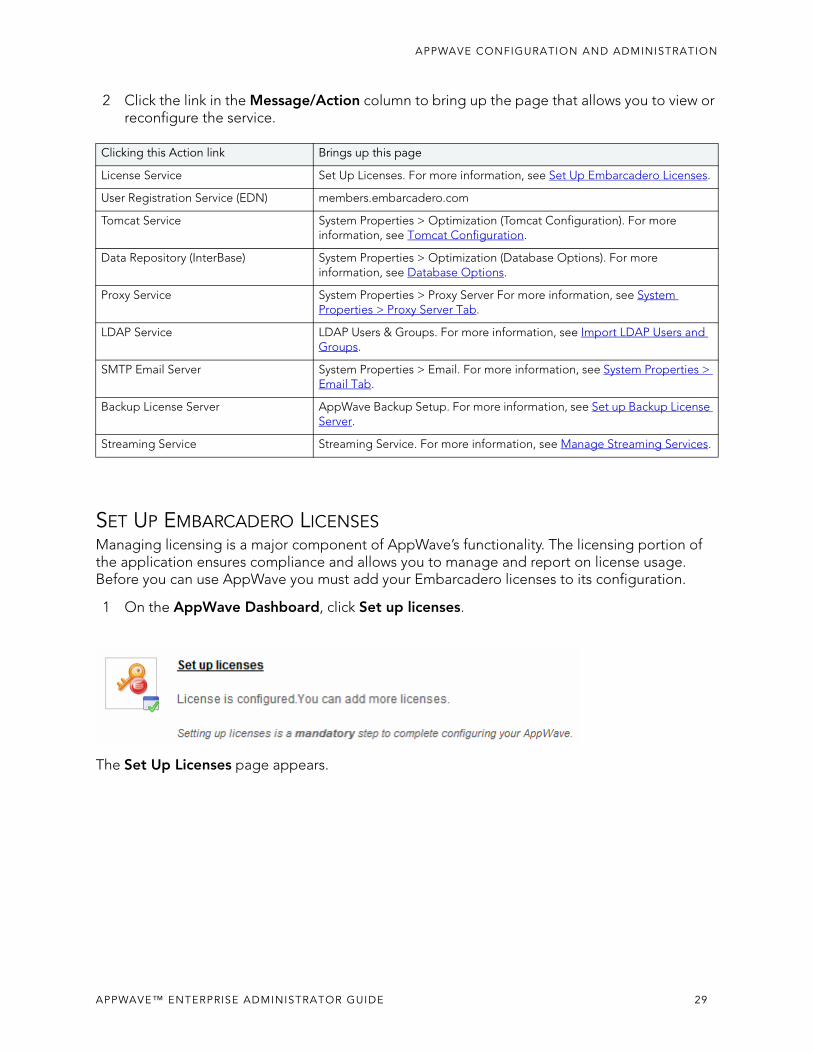
SET UP EMBARCADERO LICENSESManaging licensing is a major component of AppWave’s functionality. The licensing portion of the application ensures compliance and allows you to manage and report on license usage. Before you can use AppWave you must add your Embarcadero licenses to its configuration.
1 On the AppWave Dashboard, click Set up licenses.
The Set Up Licenses page appears.
Clicking this Action link Brings up this page
License Service Set Up Licenses. For more information, see Set Up Embarcadero Licenses.
User Registration Service (EDN) members.embarcadero.com
Tomcat Service System Properties > Optimization (Tomcat Configuration). For more information, see Tomcat Configuration.
Data Repository (InterBase) System Properties > Optimization (Database Options). For more information, see Database Options.
Proxy Service System Properties > Proxy Server For more information, see System Properties > Proxy Server Tab.
LDAP Service LDAP Users & Groups. For more information, see Import LDAP Users and Groups.
SMTP Email Server System Properties > Email. For more information, see System Properties > Email Tab.
Backup License Server AppWave Backup Setup. For more information, see Set up Backup License Server.
Streaming Service Streaming Service. For more information, see Manage Streaming Services.
APPWAVE™ ENTERPRISE ADMINISTRATOR GUIDE 29
APPWAVE CONFIGURATION AND ADMINISTRATION
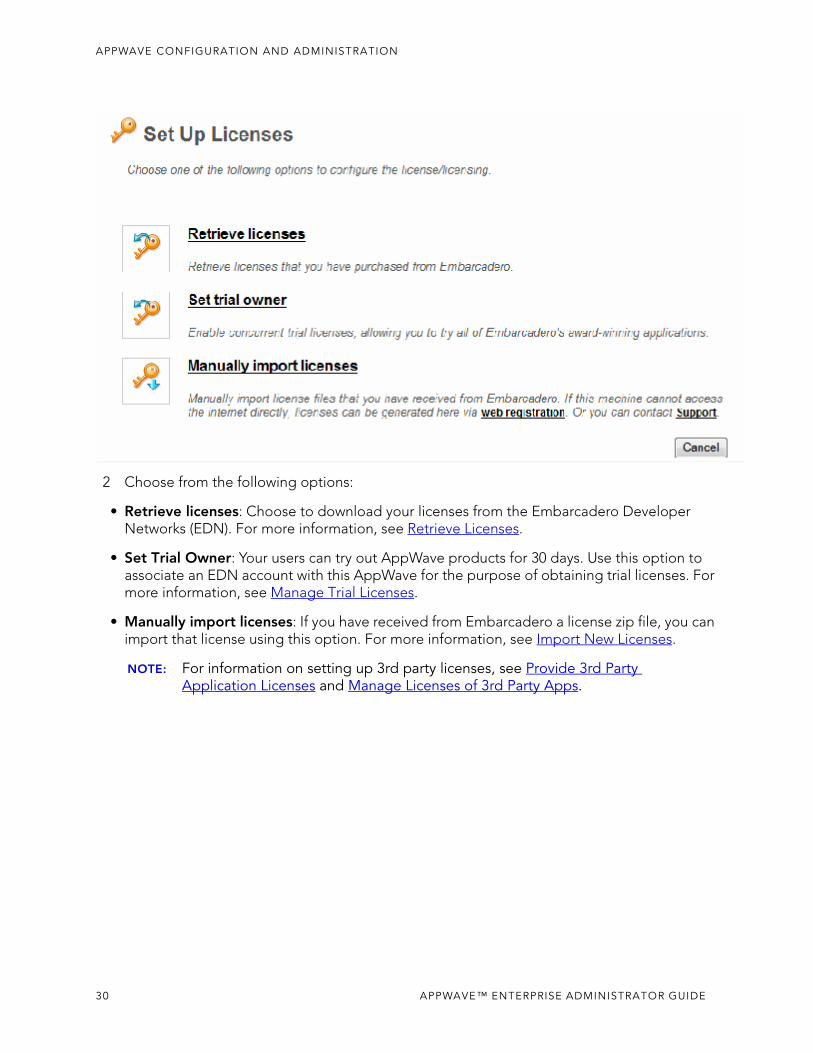
2 Choose from the following options:
• Retrieve licenses: Choose to download your licenses from the Embarcadero Developer Networks (EDN). For more information, see Retrieve Licenses.
• Set Trial Owner: Your users can try out AppWave products for 30 days. Use this option to associate an EDN account with this AppWave for the purpose of obtaining trial licenses. For more information, see Manage Trial Licenses.
• Manually import licenses: If you have received from Embarcadero a license zip file, you can import that license using this option. For more information, see Import New Licenses.
NOTE: For information on setting up 3rd party licenses, see Provide 3rd Party Application Licenses and Manage Licenses of 3rd Party Apps.
30 APPWAVE™ ENTERPRISE ADMINISTRATOR GUIDE
APPWAVE CONFIGURATION AND ADMINISTRATION
DOWNLOAD APPLICATIONSApplications will run faster for the AppWave Browser user if the product doesn’t have to be first downloaded to AppWave from the AppWave Public Store. Download applications to charge your AppWave with applications you know your users want.
Downloading applications is required before users can run the applications if the System Properties, User-initiated caching is set to Off. If User-initiated cached is set to on, an application that is only available on the internet will be first downloaded to AppWave before it is streamed to the AppWave user.
APPWAVE™ ENTERPRISE ADMINISTRATOR GUIDE 31
APPWAVE CONFIGURATION AND ADMINISTRATION
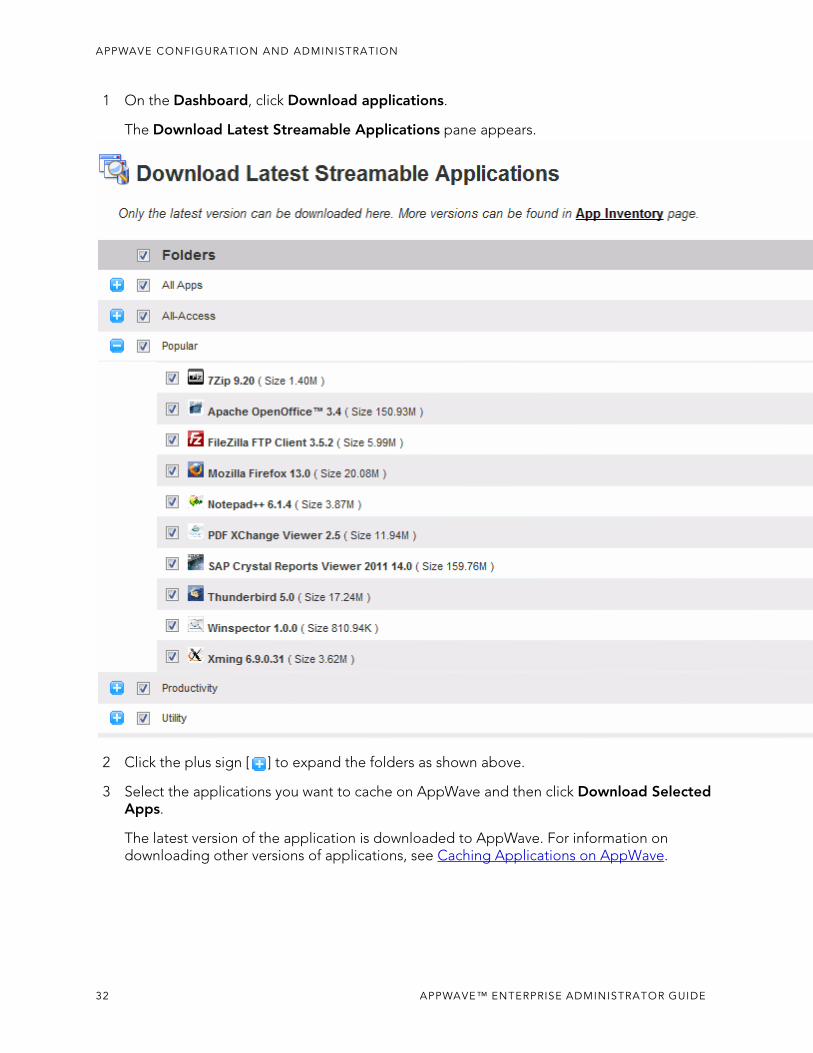
1 On the Dashboard, click Download applications.
The Download Latest Streamable Applications pane appears.
2 Click the plus sign [ ] to expand the folders as shown above.
3 Select the applications you want to cache on AppWave and then click Download Selected Apps.
The latest version of the application is downloaded to AppWave. For information on downloading other versions of applications, see Caching Applications on AppWave.
32 APPWAVE™ ENTERPRISE ADMINISTRATOR GUIDE
APPWAVE CONFIGURATION AND ADMINISTRATION
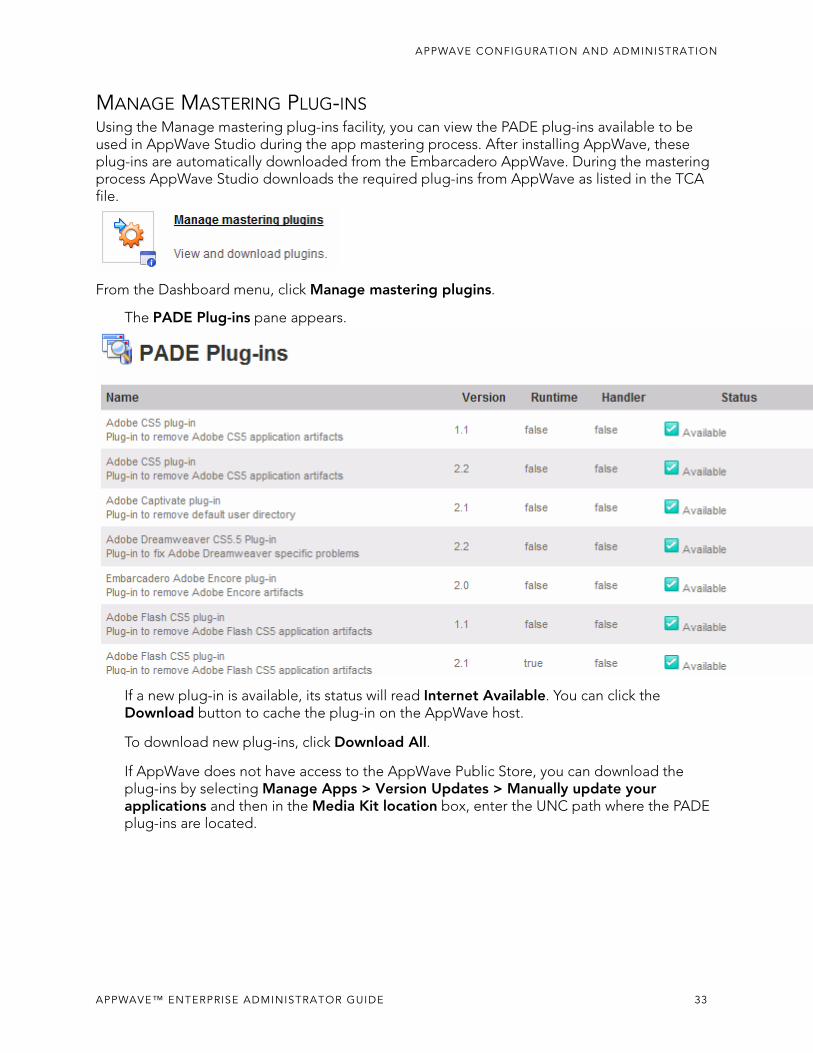
MANAGE MASTERING PLUG-INSUsing the Manage mastering plug-ins facility, you can view the PADE plug-ins available to be used in AppWave Studio during the app mastering process. After installing AppWave, these plug-ins are automatically downloaded from the Embarcadero AppWave. During the mastering process AppWave Studio downloads the required plug-ins from AppWave as listed in the TCA file.
From the Dashboard menu, click Manage mastering plugins.
The PADE Plug-ins pane appears.
If a new plug-in is available, its status will read Internet Available. You can click the Download button to cache the plug-in on the AppWave host.
To download new plug-ins, click Download All.
If AppWave does not have access to the AppWave Public Store, you can download the plug-ins by selecting Manage Apps > Version Updates > Manually update your applications and then in the Media Kit location box, enter the UNC path where the PADE plug-ins are located.
APPWAVE™ ENTERPRISE ADMINISTRATOR GUIDE 33
APPWAVE CONFIGURATION AND ADMINISTRATION
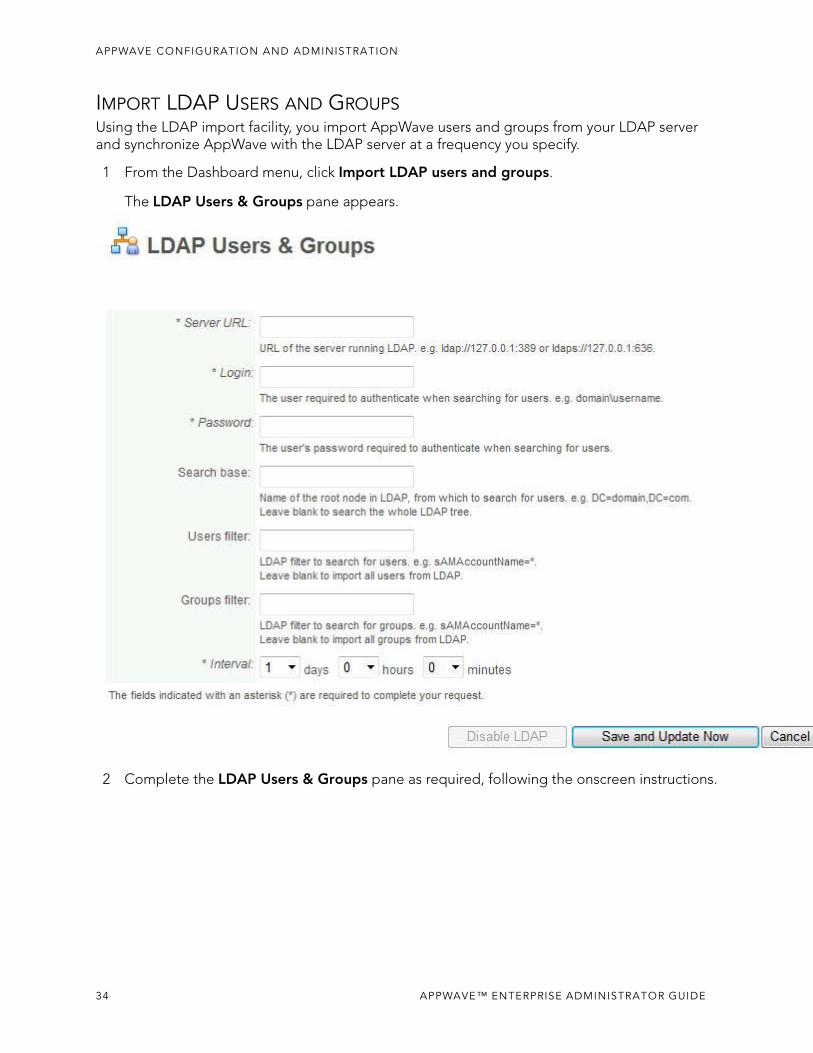
IMPORT LDAP USERS AND GROUPSUsing the LDAP import facility, you import AppWave users and groups from your LDAP server and synchronize AppWave with the LDAP server at a frequency you specify.
1 From the Dashboard menu, click Import LDAP users and groups.
The LDAP Users & Groups pane appears.
2 Complete the LDAP Users & Groups pane as required, following the onscreen instructions.
34 APPWAVE™ ENTERPRISE ADMINISTRATOR GUIDE
APPWAVE CONFIGURATION AND ADMINISTRATION
3 To Disable LDAP, click Disable LDAP.
To update AppWave users and groups now, click Save and Update Now.
To cancel your changes, click Cancel.
A progress bar appears at the top right of the LDAP page while the synchronization is in progress.
Users imported through LDAP integration are assigned to the All Users group and the All Apps folder. The All Apps folder is preconfigured to provide access to all applications available on AppWave. The All Apps folder can be edited to provide access to only specific applications.
The following describes options that require further explanation:
Search Base
You can synchronize LDAP Users and Groups with a specific organizational unit.
The following example contains three Organizational Units (OU):
• OU1 includes the two others OUs and their corresponding users and groups
• OU2 contains:
• groups: Group21, Group22
• users: User21, User22, User23
• OU: OU3
• OU3 has the following:
• groups: Group31, Group32
• users: User31, User32, User33
APPWAVE™ ENTERPRISE ADMINISTRATOR GUIDE 35
APPWAVE CONFIGURATION AND ADMINISTRATION
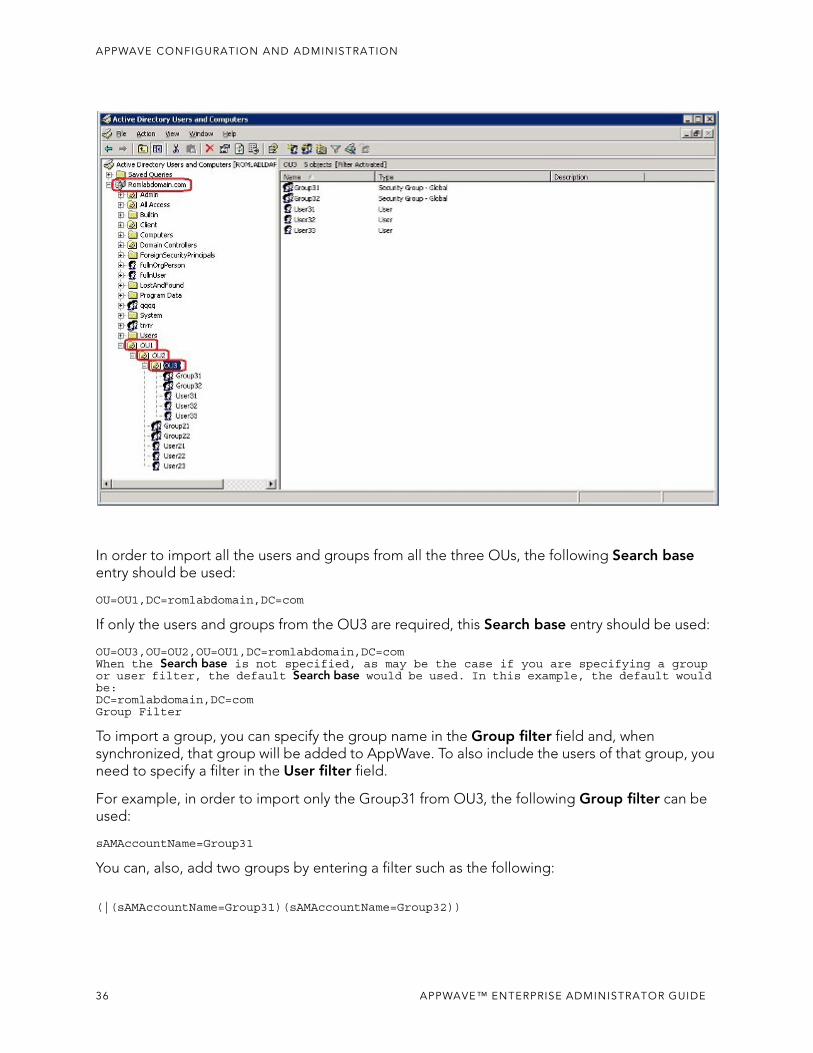
In order to import all the users and groups from all the three OUs, the following Search base entry should be used:
OU=OU1,DC=romlabdomain,DC=com
If only the users and groups from the OU3 are required, this Search base entry should be used:
OU=OU3,OU=OU2,OU=OU1,DC=romlabdomain,DC=comWhen the Search base is not specified, as may be the case if you are specifying a group or user filter, the default Search base would be used. In this example, the default would be:DC=romlabdomain,DC=comGroup Filter
To import a group, you can specify the group name in the Group filter field and, when synchronized, that group will be added to AppWave. To also include the users of that group, you need to specify a filter in the User filter field.
For example, in order to import only the Group31 from OU3, the following Group filter can be used:
sAMAccountName=Group31
You can, also, add two groups by entering a filter such as the following:
(|(sAMAccountName=Group31)(sAMAccountName=Group32))
36 APPWAVE™ ENTERPRISE ADMINISTRATOR GUIDE
APPWAVE CONFIGURATION AND ADMINISTRATION
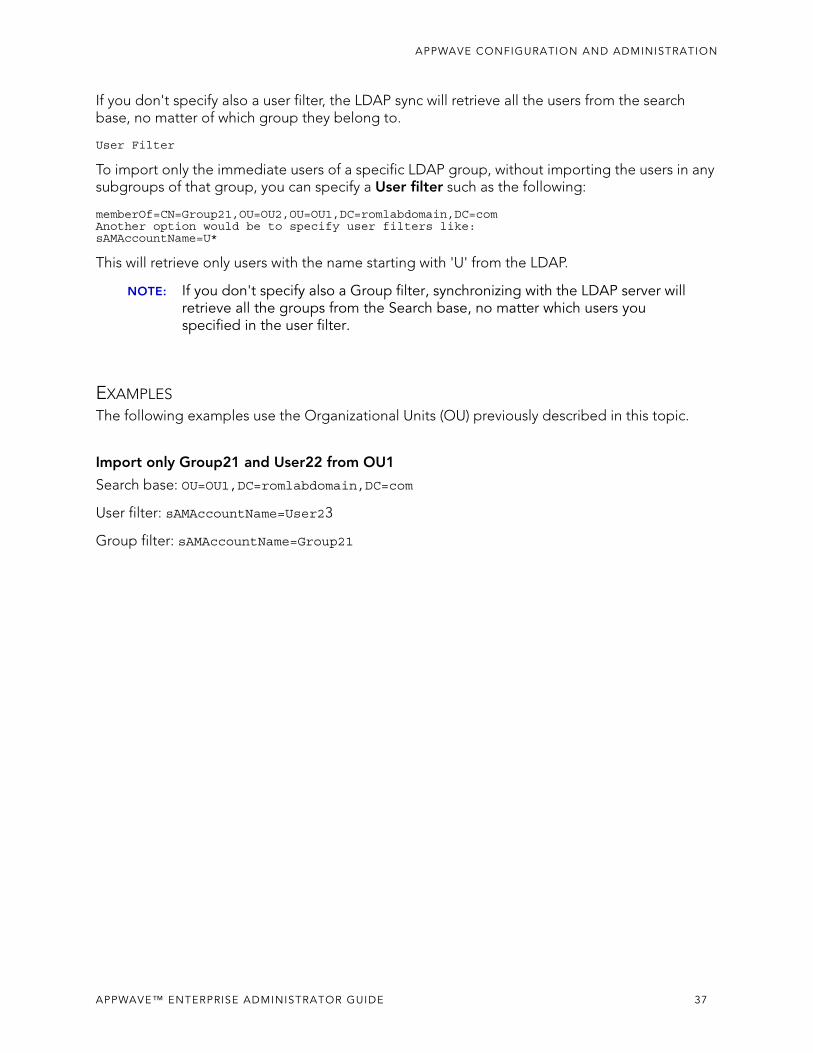
If you don't specify also a user filter, the LDAP sync will retrieve all the users from the search base, no matter of which group they belong to.
User Filter
To import only the immediate users of a specific LDAP group, without importing the users in any subgroups of that group, you can specify a User filter such as the following:
memberOf=CN=Group21,OU=OU2,OU=OU1,DC=romlabdomain,DC=comAnother option would be to specify user filters like:sAMAccountName=U*
This will retrieve only users with the name starting with 'U' from the LDAP.
NOTE: If you don't specify also a Group filter, synchronizing with the LDAP server will retrieve all the groups from the Search base, no matter which users you specified in the user filter.
EXAMPLESThe following examples use the Organizational Units (OU) previously described in this topic.
Import only Group21 and User22 from OU1
Search base: OU=OU1,DC=romlabdomain,DC=com
User filter: sAMAccountName=User23
Group filter: sAMAccountName=Group21
APPWAVE™ ENTERPRISE ADMINISTRATOR GUIDE 37
APPWAVE CONFIGURATION AND ADMINISTRATION
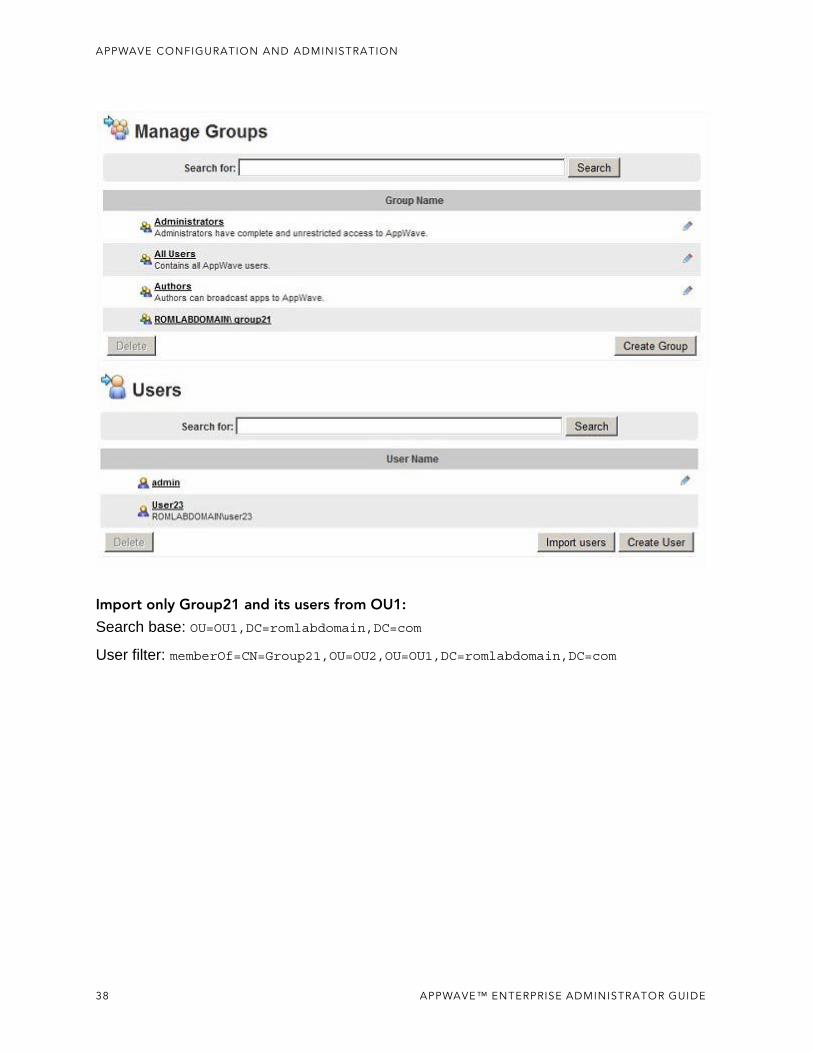
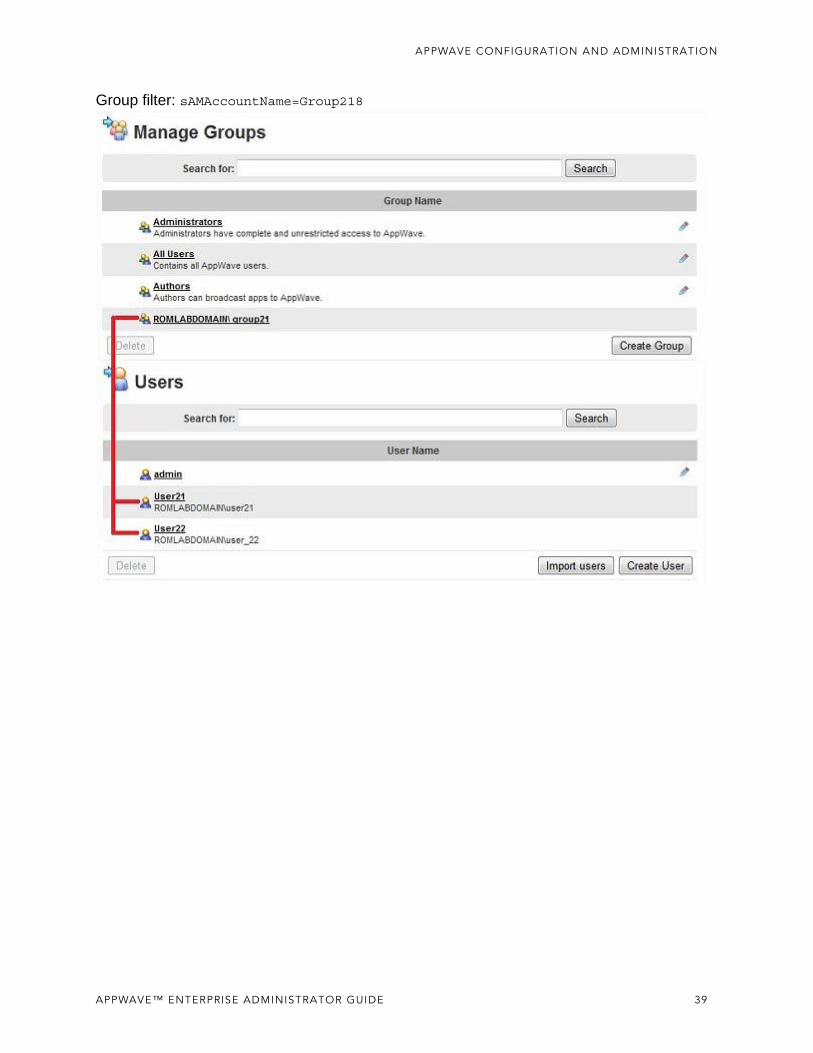
Import only Group21 and its users from OU1:
Search base: OU=OU1,DC=romlabdomain,DC=com
User filter: memberOf=CN=Group21,OU=OU2,OU=OU1,DC=romlabdomain,DC=com
38 APPWAVE™ ENTERPRISE ADMINISTRATOR GUIDE
APPWAVE CONFIGURATION AND ADMINISTRATION
Group filter: sAMAccountName=Group218
APPWAVE™ ENTERPRISE ADMINISTRATOR GUIDE 39
APPWAVE CONFIGURATION AND ADMINISTRATION
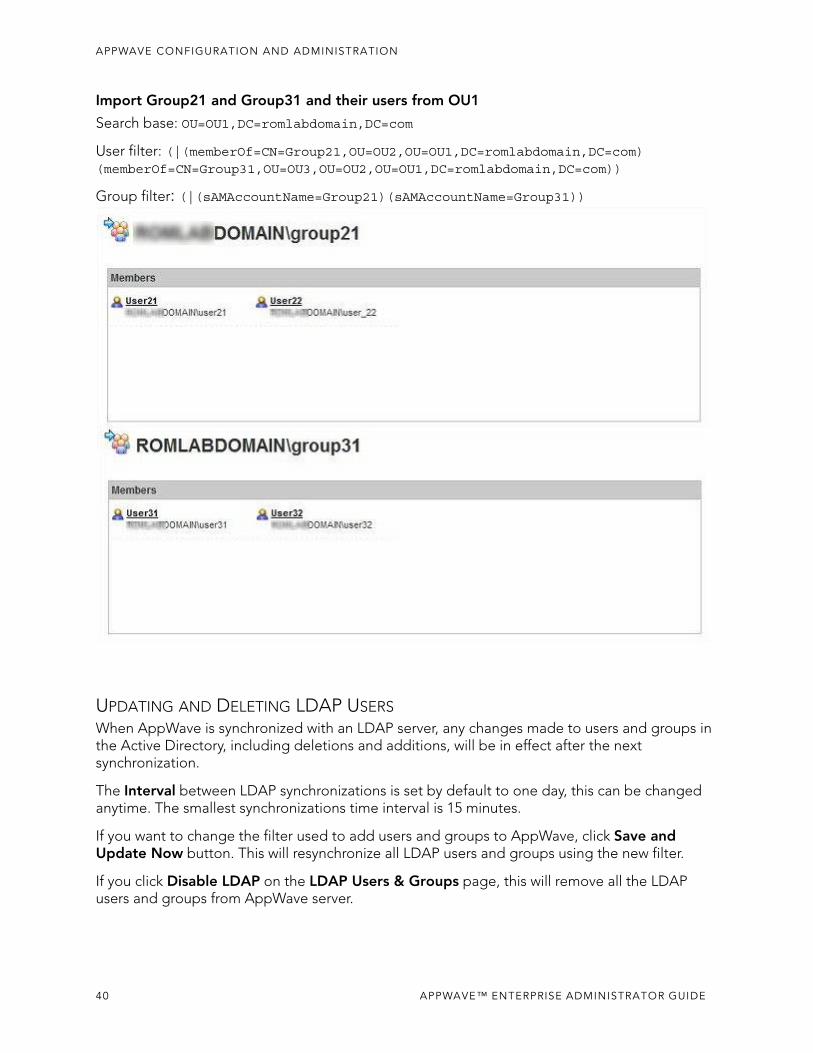
Import Group21 and Group31 and their users from OU1
Search base: OU=OU1,DC=romlabdomain,DC=com
User filter: (|(memberOf=CN=Group21,OU=OU2,OU=OU1,DC=romlabdomain,DC=com) (memberOf=CN=Group31,OU=OU3,OU=OU2,OU=OU1,DC=romlabdomain,DC=com))
Group filter: (|(sAMAccountName=Group21)(sAMAccountName=Group31))
UPDATING AND DELETING LDAP USERSWhen AppWave is synchronized with an LDAP server, any changes made to users and groups in the Active Directory, including deletions and additions, will be in effect after the next synchronization.
The Interval between LDAP synchronizations is set by default to one day, this can be changed anytime. The smallest synchronizations time interval is 15 minutes.
If you want to change the filter used to add users and groups to AppWave, click Save and Update Now button. This will resynchronize all LDAP users and groups using the new filter.
If you click Disable LDAP on the LDAP Users & Groups page, this will remove all the LDAP users and groups from AppWave server.
40 APPWAVE™ ENTERPRISE ADMINISTRATOR GUIDE
APPWAVE CONFIGURATION AND ADMINISTRATION
LDAP RESOURCESFor more information related to LDAP filters syntax, see the following:
• http://technet.microsoft.com/en-us/library/aa996205(v=exchg.65).aspx
• http://social.technet.microsoft.com/wiki/contents/articles/5392.active-directory-ldap-syntax-filters-en-us.aspx
• http://en.wikipedia.org/wiki/Lightweight_Directory_Access_Protocol
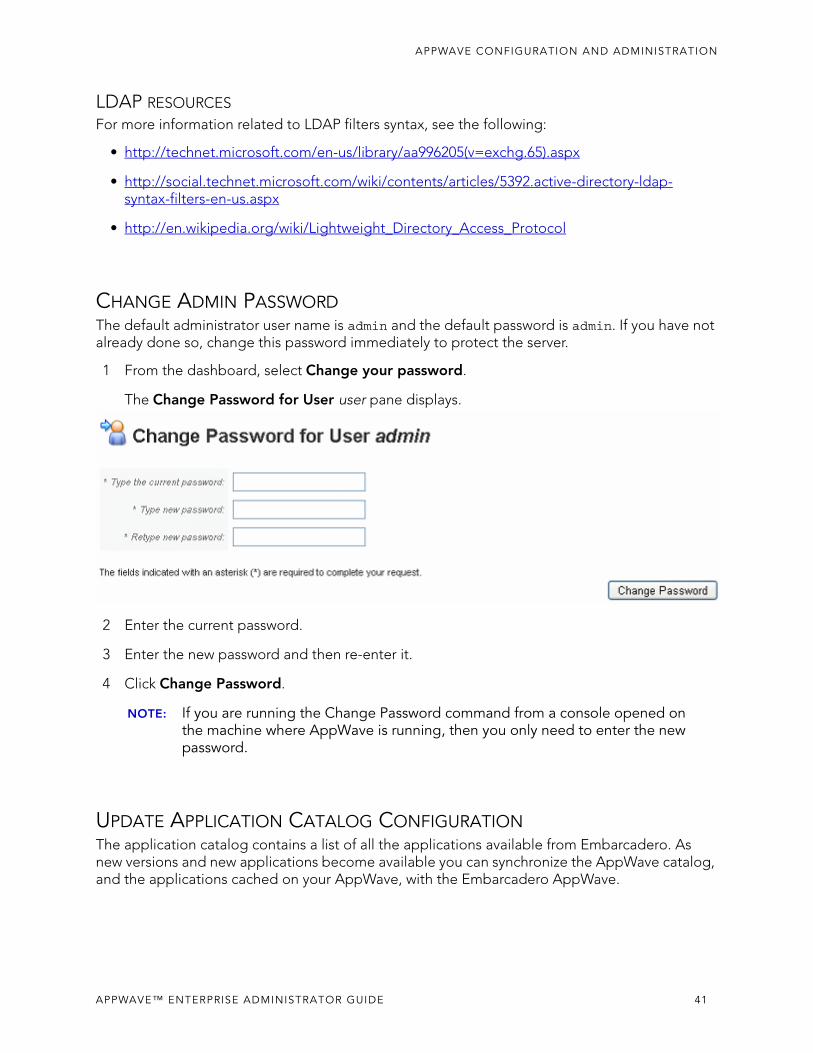
CHANGE ADMIN PASSWORDThe default administrator user name is admin and the default password is admin. If you have not already done so, change this password immediately to protect the server.
1 From the dashboard, select Change your password.
The Change Password for User user pane displays.
2 Enter the current password.
3 Enter the new password and then re-enter it.
4 Click Change Password.
NOTE: If you are running the Change Password command from a console opened on the machine where AppWave is running, then you only need to enter the new password.
UPDATE APPLICATION CATALOG CONFIGURATIONThe application catalog contains a list of all the applications available from Embarcadero. As new versions and new applications become available you can synchronize the AppWave catalog, and the applications cached on your AppWave, with the Embarcadero AppWave.
APPWAVE™ ENTERPRISE ADMINISTRATOR GUIDE 41
APPWAVE CONFIGURATION AND ADMINISTRATION
Updating the application catalog and downloading the applications to your AppWave are considered to be optional first steps when configuring AppWave. The application catalog is synchronized with the Embarcadero AppWave catalog when the AppWave service runs for the first time. You don’t need to download all the applications your license gives you access to all at once.
If you have enabled the System Property, User-initiated caching, when the AppWave Browser user launches an application that is not already cached on AppWave, the download from the Embarcadero AppWave to your AppWave automatically starts and when the download is finished the AppWave Browser user can immediately run the application. However, if the applications are cached on AppWave, then the applications launch much quicker. This is especially true for large applications such as RAD Studio.
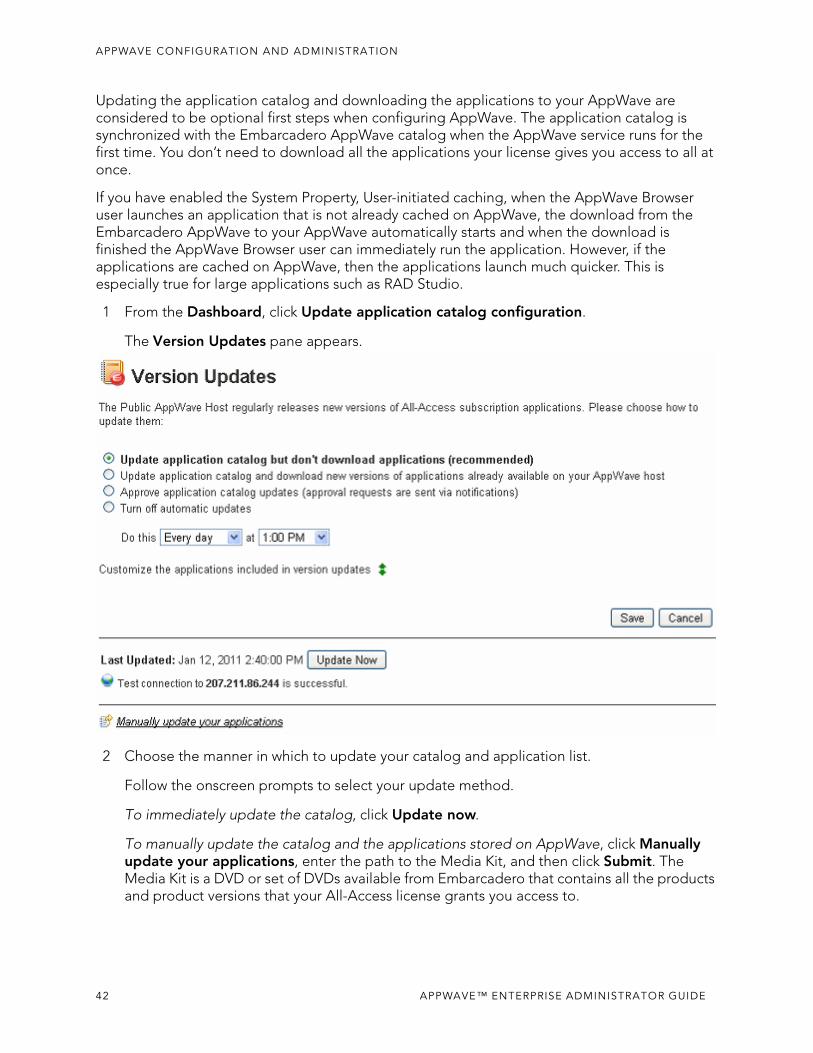
1 From the Dashboard, click Update application catalog configuration.
The Version Updates pane appears.
2 Choose the manner in which to update your catalog and application list.
Follow the onscreen prompts to select your update method.
To immediately update the catalog, click Update now.
To manually update the catalog and the applications stored on AppWave, click Manually update your applications, enter the path to the Media Kit, and then click Submit. The Media Kit is a DVD or set of DVDs available from Embarcadero that contains all the products and product versions that your All-Access license grants you access to.
42 APPWAVE™ ENTERPRISE ADMINISTRATOR GUIDE
APPWAVE CONFIGURATION AND ADMINISTRATION
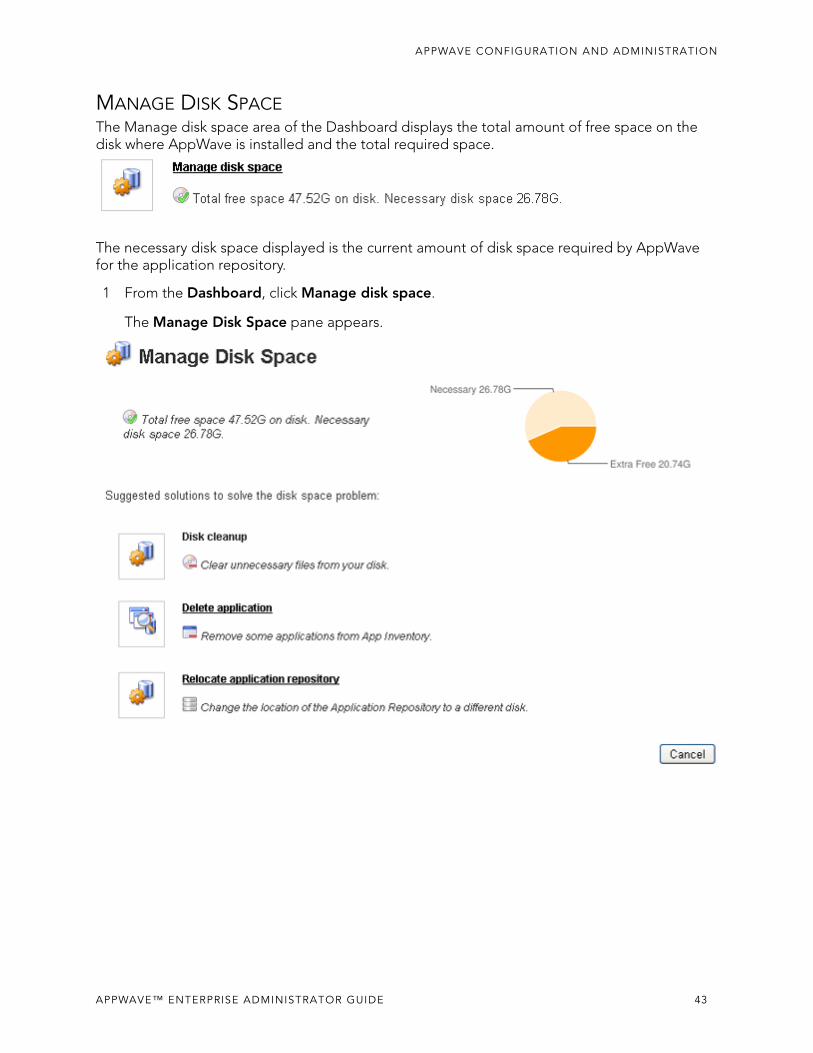
MANAGE DISK SPACEThe Manage disk space area of the Dashboard displays the total amount of free space on the disk where AppWave is installed and the total required space.
The necessary disk space displayed is the current amount of disk space required by AppWave for the application repository.
1 From the Dashboard, click Manage disk space.
The Manage Disk Space pane appears.
APPWAVE™ ENTERPRISE ADMINISTRATOR GUIDE 43
APPWAVE CONFIGURATION AND ADMINISTRATION
2 To remove some applications or out-of-date versions from the application inventory, click Delete application. The App Inventory appears. Applications which have been cached on AppWave have an Available status where you can click the name of the application and then on the application page you can choose the versions to delete and click Delete Apps to delete them.
To change the location of the Application Repository to a different disk, click Relocate application repository. By default, the application repository is located at
Windows XP: C:\Documents and Settings\All Users\Application Data\Embarcadero AppWave\Products
Windows Vista/Windows 7 and Windows 8/Windows Server 2008: C:\ProgramData\Embarcadero AppWave\Products
You can choose to locate the application repository at a different location on the machine where the AppWave is installed which has read/write privileges for the AppWave administrator and read privileges for all AppWave users. This can be either a local or a network disk.
To clear unnecessary files from your disk, from Windows Explorer delete any files unrelated to AppWave. This is just a suggested way to free up more disk space for AppWave usage.
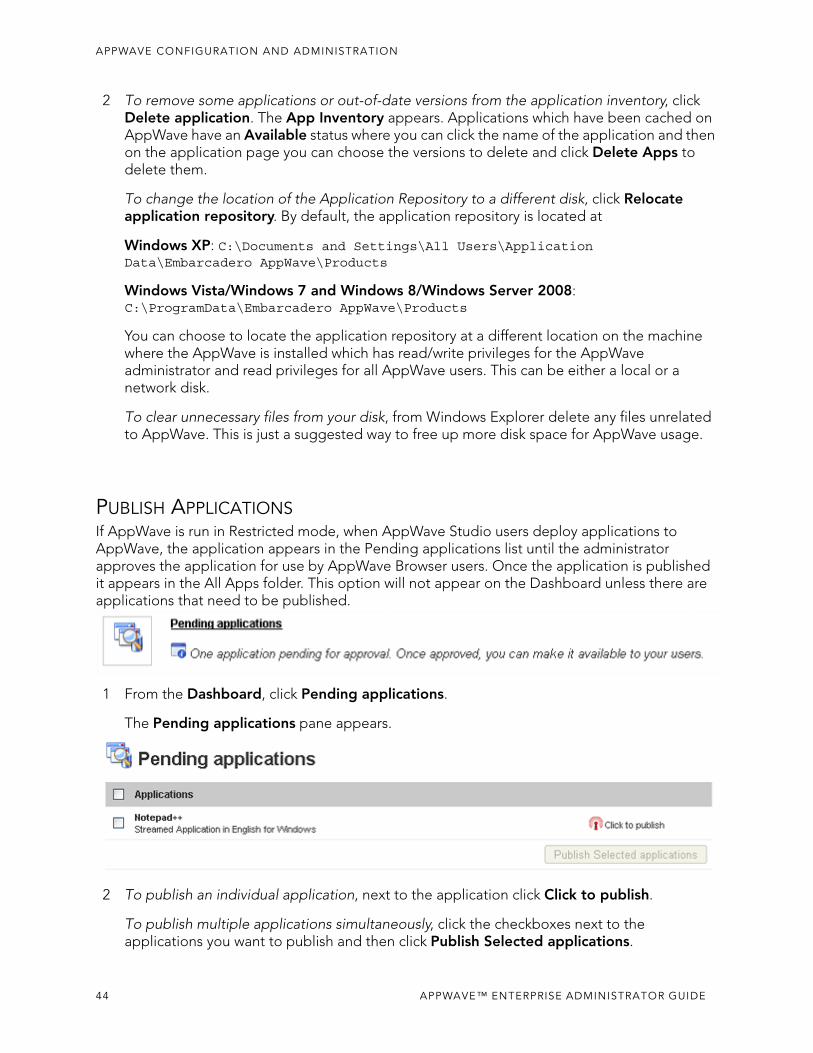
PUBLISH APPLICATIONSIf AppWave is run in Restricted mode, when AppWave Studio users deploy applications to AppWave, the application appears in the Pending applications list until the administrator approves the application for use by AppWave Browser users. Once the application is published it appears in the All Apps folder. This option will not appear on the Dashboard unless there are applications that need to be published.
1 From the Dashboard, click Pending applications.
The Pending applications pane appears.
2 To publish an individual application, next to the application click Click to publish.
To publish multiple applications simultaneously, click the checkboxes next to the applications you want to publish and then click Publish Selected applications.
44 APPWAVE™ ENTERPRISE ADMINISTRATOR GUIDE
APPWAVE CONFIGURATION AND ADMINISTRATION
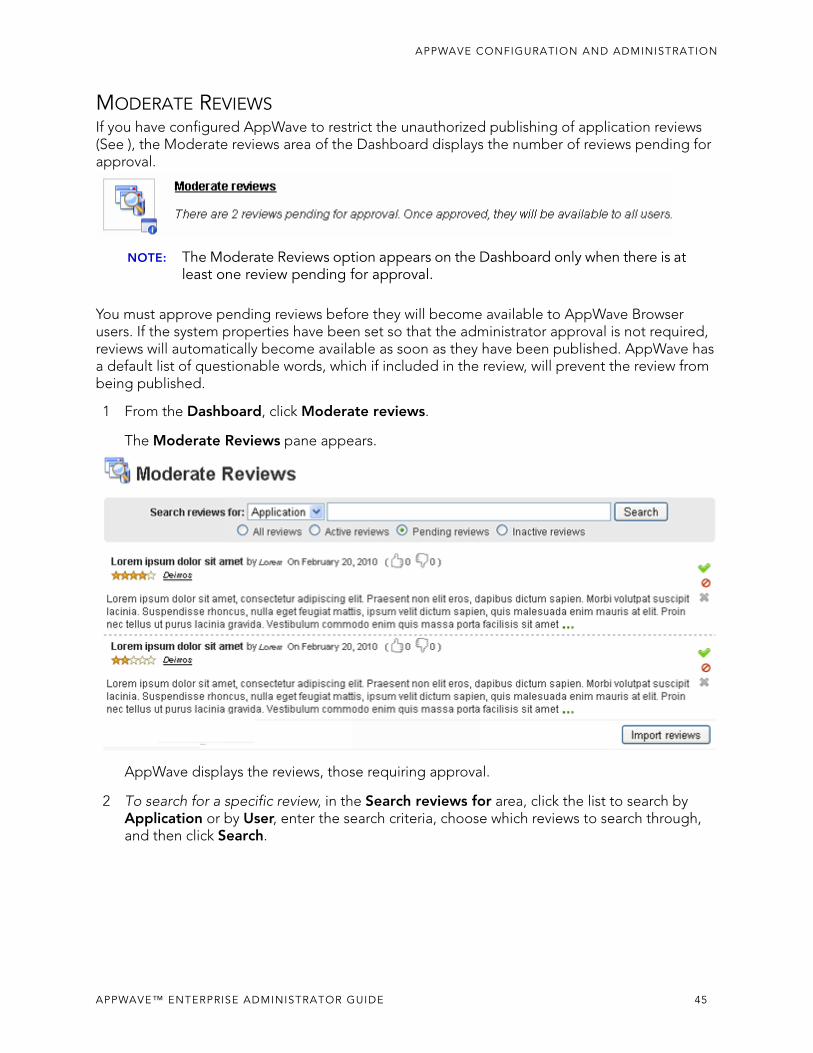
MODERATE REVIEWSIf you have configured AppWave to restrict the unauthorized publishing of application reviews (See ), the Moderate reviews area of the Dashboard displays the number of reviews pending for approval.
NOTE: The Moderate Reviews option appears on the Dashboard only when there is at least one review pending for approval.
You must approve pending reviews before they will become available to AppWave Browser users. If the system properties have been set so that the administrator approval is not required, reviews will automatically become available as soon as they have been published. AppWave has a default list of questionable words, which if included in the review, will prevent the review from being published.
1 From the Dashboard, click Moderate reviews.
The Moderate Reviews pane appears.
AppWave displays the reviews, those requiring approval.
2 To search for a specific review, in the Search reviews for area, click the list to search by Application or by User, enter the search criteria, choose which reviews to search through, and then click Search.
APPWAVE™ ENTERPRISE ADMINISTRATOR GUIDE 45
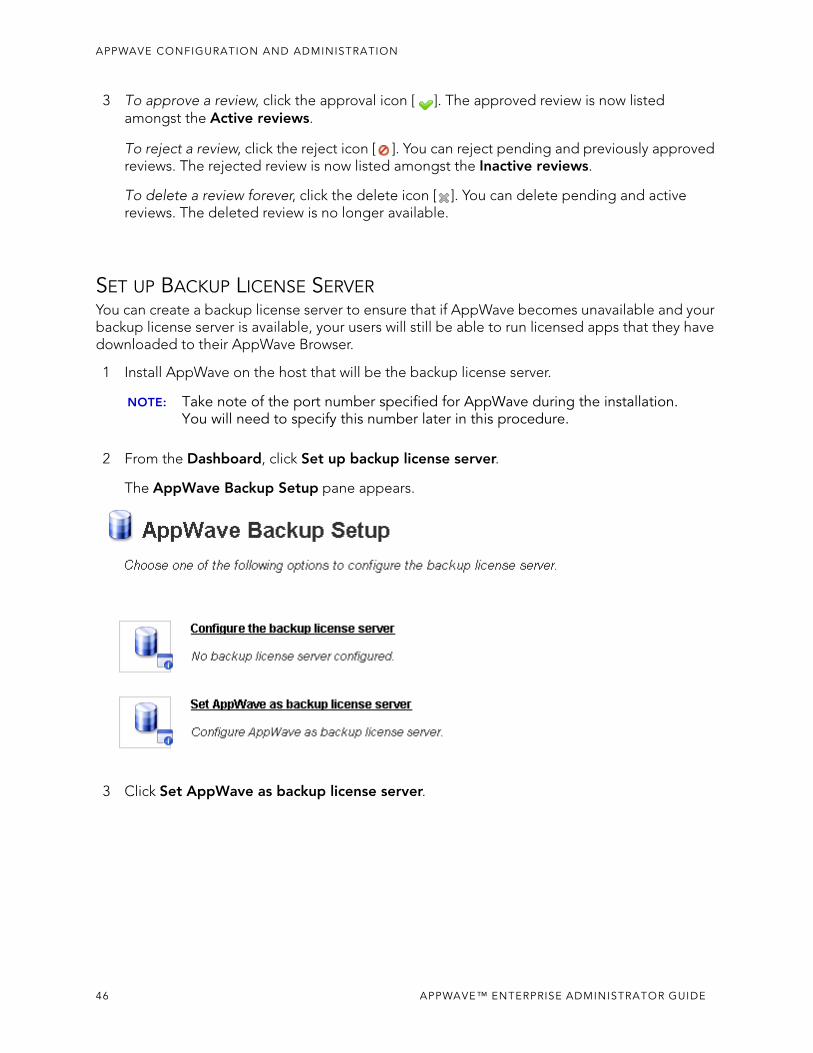
APPWAVE CONFIGURATION AND ADMINISTRATION
3 To approve a review, click the approval icon [ ]. The approved review is now listed amongst the Active reviews.
To reject a review, click the reject icon [ ]. You can reject pending and previously approved reviews. The rejected review is now listed amongst the Inactive reviews.
To delete a review forever, click the delete icon [ ]. You can delete pending and active reviews. The deleted review is no longer available.
SET UP BACKUP LICENSE SERVERYou can create a backup license server to ensure that if AppWave becomes unavailable and your backup license server is available, your users will still be able to run licensed apps that they have downloaded to their AppWave Browser.
1 Install AppWave on the host that will be the backup license server.
NOTE: Take note of the port number specified for AppWave during the installation. You will need to specify this number later in this procedure.
2 From the Dashboard, click Set up backup license server.
The AppWave Backup Setup pane appears.
3 Click Set AppWave as backup license server.
46 APPWAVE™ ENTERPRISE ADMINISTRATOR GUIDE
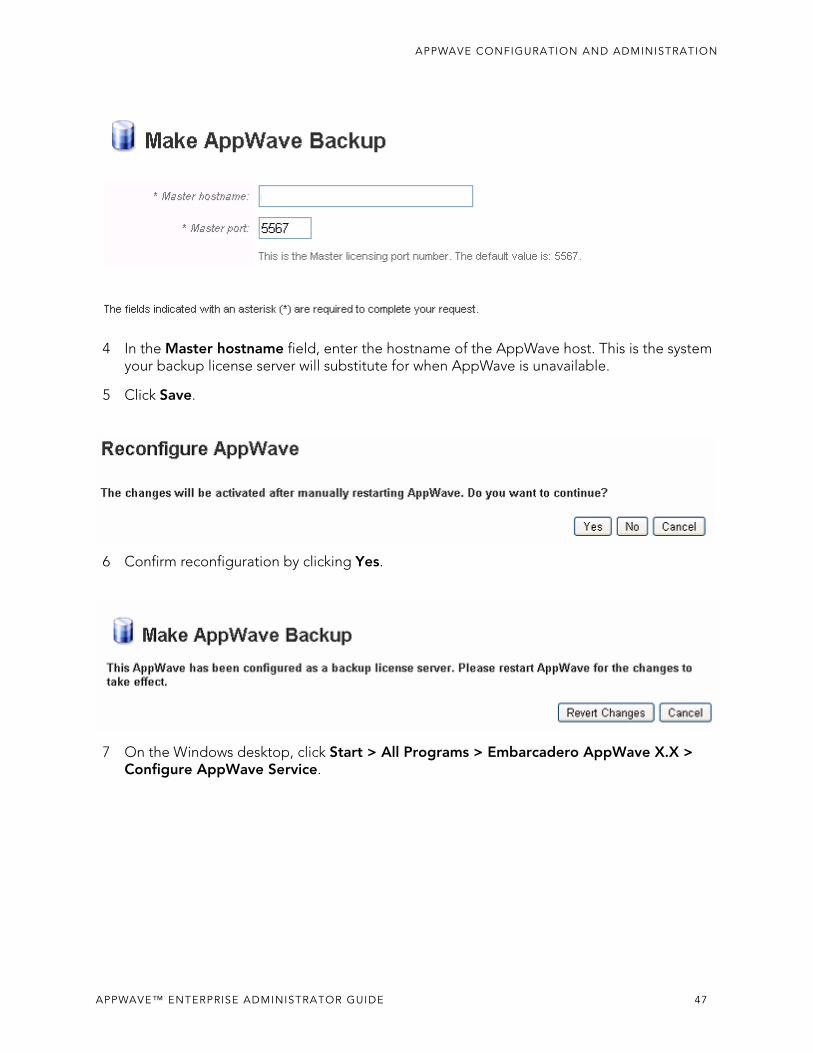
APPWAVE CONFIGURATION AND ADMINISTRATION
4 In the Master hostname field, enter the hostname of the AppWave host. This is the system your backup license server will substitute for when AppWave is unavailable.
5 Click Save.
6 Confirm reconfiguration by clicking Yes.
7 On the Windows desktop, click Start > All Programs > Embarcadero AppWave X.X > Configure AppWave Service.
APPWAVE™ ENTERPRISE ADMINISTRATOR GUIDE 47
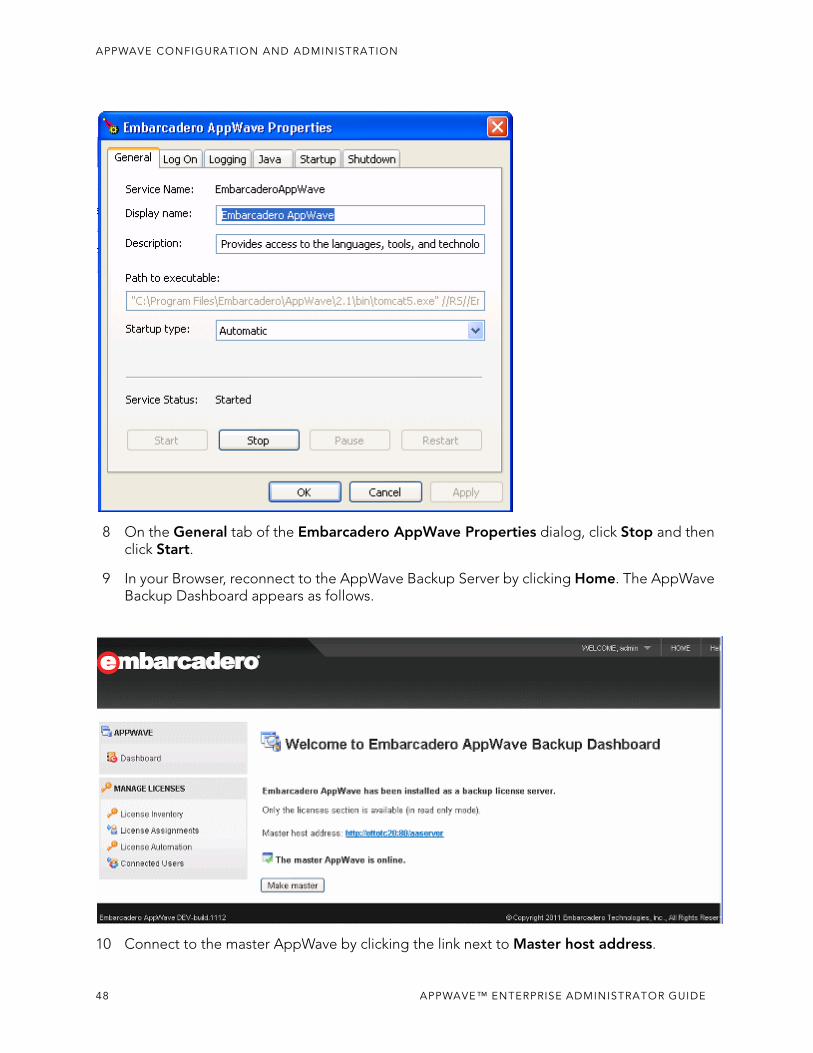
APPWAVE CONFIGURATION AND ADMINISTRATION
8 On the General tab of the Embarcadero AppWave Properties dialog, click Stop and then click Start.
9 In your Browser, reconnect to the AppWave Backup Server by clicking Home. The AppWave Backup Dashboard appears as follows.
10 Connect to the master AppWave by clicking the link next to Master host address.
48 APPWAVE™ ENTERPRISE ADMINISTRATOR GUIDE
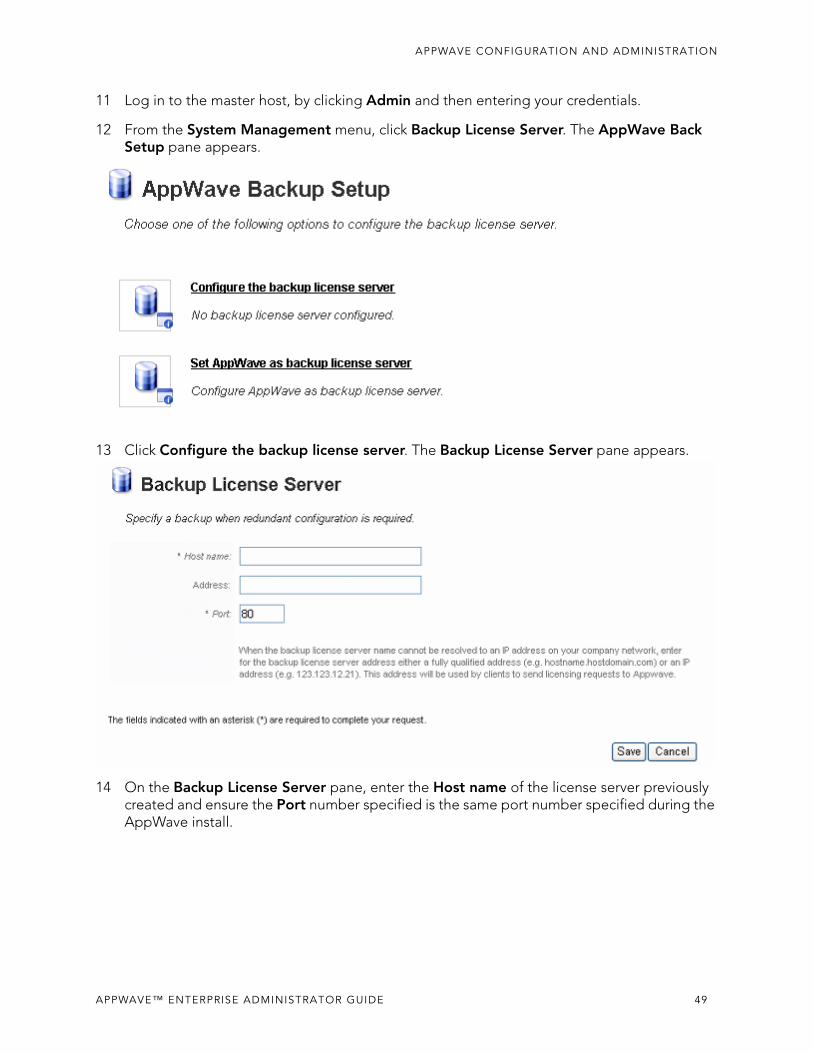
APPWAVE CONFIGURATION AND ADMINISTRATION
11 Log in to the master host, by clicking Admin and then entering your credentials.
12 From the System Management menu, click Backup License Server. The AppWave Back Setup pane appears.
13 Click Configure the backup license server. The Backup License Server pane appears.
14 On the Backup License Server pane, enter the Host name of the license server previously created and ensure the Port number specified is the same port number specified during the AppWave install.
APPWAVE™ ENTERPRISE ADMINISTRATOR GUIDE 49
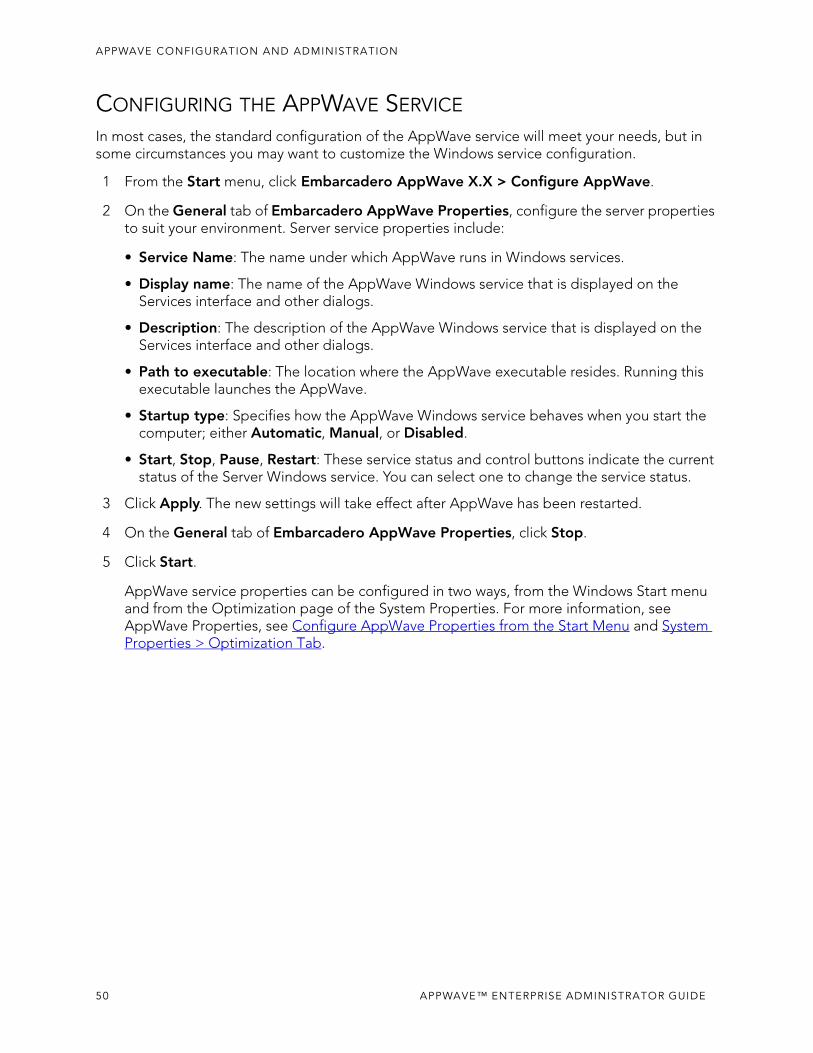
APPWAVE CONFIGURATION AND ADMINISTRATION
CONFIGURING THE APPWAVE SERVICE
In most cases, the standard configuration of the AppWave service will meet your needs, but in some circumstances you may want to customize the Windows service configuration.
1 From the Start menu, click Embarcadero AppWave X.X > Configure AppWave.
2 On the General tab of Embarcadero AppWave Properties, configure the server properties to suit your environment. Server service properties include:
• Service Name: The name under which AppWave runs in Windows services.
• Display name: The name of the AppWave Windows service that is displayed on the Services interface and other dialogs.
• Description: The description of the AppWave Windows service that is displayed on the Services interface and other dialogs.
• Path to executable: The location where the AppWave executable resides. Running this executable launches the AppWave.
• Startup type: Specifies how the AppWave Windows service behaves when you start the computer; either Automatic, Manual, or Disabled.
• Start, Stop, Pause, Restart: These service status and control buttons indicate the current status of the Server Windows service. You can select one to change the service status.
3 Click Apply. The new settings will take effect after AppWave has been restarted.
4 On the General tab of Embarcadero AppWave Properties, click Stop.
5 Click Start.
AppWave service properties can be configured in two ways, from the Windows Start menu and from the Optimization page of the System Properties. For more information, see AppWave Properties, see Configure AppWave Properties from the Start Menu and System Properties > Optimization Tab.
50 APPWAVE™ ENTERPRISE ADMINISTRATOR GUIDE
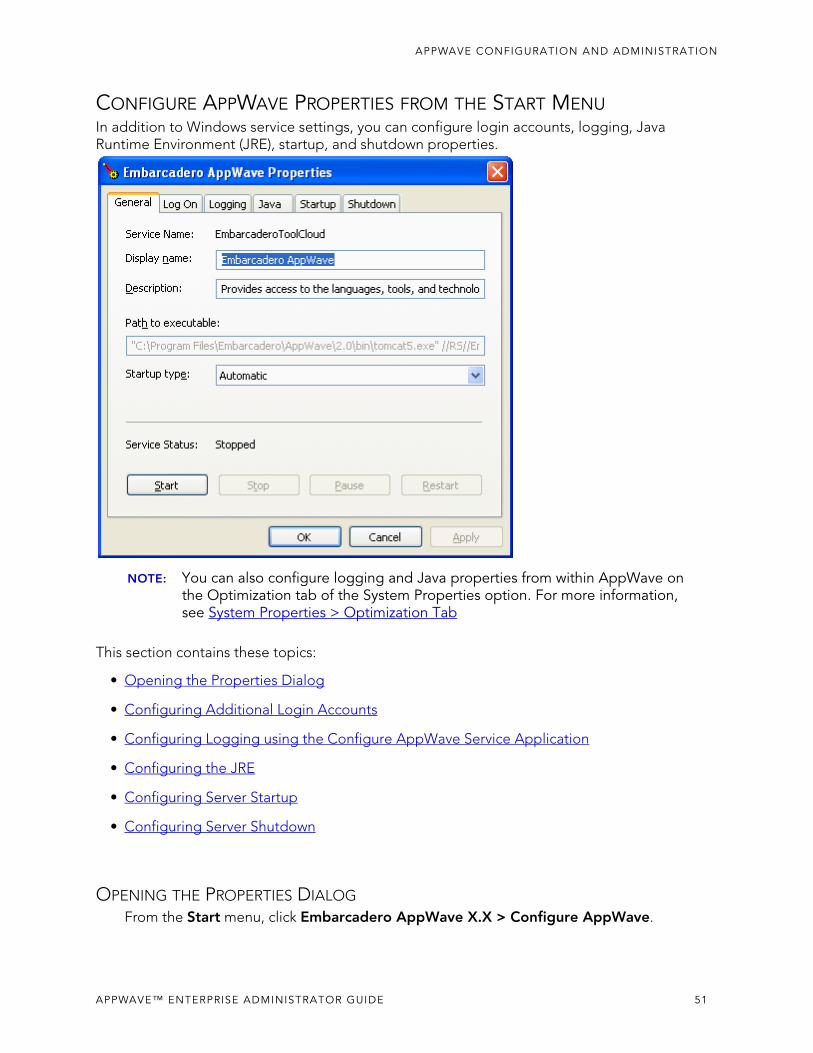
APPWAVE CONFIGURATION AND ADMINISTRATION
CONFIGURE APPWAVE PROPERTIES FROM THE START MENUIn addition to Windows service settings, you can configure login accounts, logging, Java Runtime Environment (JRE), startup, and shutdown properties.
NOTE: You can also configure logging and Java properties from within AppWave on the Optimization tab of the System Properties option. For more information, see System Properties > Optimization Tab
This section contains these topics:
• Opening the Properties Dialog
• Configuring Additional Login Accounts
• Configuring Logging using the Configure AppWave Service Application
• Configuring the JRE
• Configuring Server Startup
• Configuring Server Shutdown
OPENING THE PROPERTIES DIALOGFrom the Start menu, click Embarcadero AppWave X.X > Configure AppWave.
APPWAVE™ ENTERPRISE ADMINISTRATOR GUIDE 51
APPWAVE CONFIGURATION AND ADMINISTRATION
STOPPING AND STARTING THE APPWAVE SERVICEAppWave is installed as a Windows service and automatically starts when the computer starts. If you have trouble accessing AppWave, check to see if it is running. You may need to stop the AppWave service to perform maintenance on the system. You may need to restart the AppWave service to implement system property changes, such as the configuration of a proxy server.
1 From the Start menu, click Embarcadero AppWave X.X > Configure AppWave.
2 On the General tab, click Start to start the service or Stop to stop the service.
CONFIGURING ADDITIONAL LOGIN ACCOUNTS1 From the Start menu, click Embarcadero AppWave X.X > Configure AppWave.
2 Click the Log On tab.
3 You can choose to log on to AppWave under your local system account or under another account.
• To log on as another account, specify the credentials of the alternate account in the fields provided.
• To log on as the local system account, specify if the service will interact with the desktop.
4 Click OK.
CONFIGURING LOGGING USING THE CONFIGURE APPWAVE SERVICE APPLICATIONThere are three separate logs that are associated with AppWave: AppWave, Tomcat, and Embarcadero License Center (ELC). This section helps you configure logging for each of these.
• Configure Tomcat Logging
• Configure AppWave Logging
• Configure ELC Logging
CONFIGURE TOMCAT LOGGING
1 From the Start menu, click Embarcadero AppWave X.X > Configure AppWave Service.
2 Click the Logging tab.
52 APPWAVE™ ENTERPRISE ADMINISTRATOR GUIDE
APPWAVE CONFIGURATION AND ADMINISTRATION
3 Set the parameters that control server logs.
• Level: Indicates at what severity level server logging should occur. Choose Error, Info, Warning or Debug.
• Log Path: Specifies the location where log files will be stored.
• Log Prefix: Specifies a file name prefix to be used for the log files.
• Redirect Stdout: Indicates the full path of the file to which stdout messages are redirected.
• Redirect Stderror: Indicates the full path of the file to which stderror messages are redirected.
4 Click OK.
CONFIGURE APPWAVE LOGGING
AppWave logging can be run in debug mode, verbose mode, info mode, warn mode, error mode or fatal mode.
1 Using a text editor, open Embarcadero\AppWave\X.X\conf\log4jproperties in the AppWave installation directory.
2 Find the ToolCloud section.
3 By default, the logging is set to debug mode, in which case many log entries are made:
log4j.logger.com.embarcadero.allaccess=debug, f5
You can change the logging to log warning message only by changing the above line to:
log4j.logger.com.embarcadero.allaccess=warn, f5
CONFIGURE ELC LOGGING
There are several Embarcadero License Center (ELC) logging files for which you can control the size and how log file entries are appended to the file. These logs reside in the elc/logs directory in the AppWave installation directory. The log files you can change are info.log, error.log, db.log, and web.log.
APPWAVE™ ENTERPRISE ADMINISTRATOR GUIDE 53
APPWAVE CONFIGURATION AND ADMINISTRATION
You can change the following values for each of these logs:
MaxFileSize: Maximum size of the logger file.
MaxBackupIndex: Maximum number of log file that can be created without overwriting the existing ones. If MaxBackupIndex is 1, then when the maximum file size is reached, the oldest entries are replaced with the newest log entries. If MaxBackupIndex has a positive value, then after MaxfileSize is reached, a new file is created until MaxBackupIndex is also reached. Once MaxBackupIndex is reached then the first file is recreated and so on.
1 Using a text editor, open Embarcadero\AppWave\X.X\conf\log4j.properties in the AppWave installation directory.
2 Change the values of MaxFileSize and MaxBackupIndex as you require.
To change the info log, look for these three lines towards the beginning of log4j.properties.
log4j.appender.f1.File=elc/logs/info.loglog4j.appender.f1.MaxFileSize=1MBlog4j.appender.f1.MaxBackupIndex=4
To change the error log, look for these three lines towards the beginning of log4j.properties.
log4j.appender.f2.File=elc/logs/error.loglog4j.appender.f2.MaxFileSize=1MBlog4j.appender.f2.MaxBackupIndex=4
To change the db log, look for these three lines towards the beginning of log4j.properties.
log4j.appender.f3.File=elc/logs/db.loglog4j.appender.f3.MaxFileSize=1MBlog4j.appender.f3.MaxBackupIndex=4
To change the web log, look for these three lines towards the beginning of log4j.properties.
log4j.appender.f4.File=elc/logs/web.loglog4j.appender.f4.MaxFileSize=1MBlog4j.appender.f4.MaxBackupIndex=4Save the log4j.properties file.
CONFIGURING THE JRE1 From the Start menu, click Embarcadero AppWave X.X > Configure AppWave.
2 Click the Java tab.
54 APPWAVE™ ENTERPRISE ADMINISTRATOR GUIDE
APPWAVE CONFIGURATION AND ADMINISTRATION
3 Set the parameters that control the JRE within which AppWave runs.
• Use default: Indicates that AppWave should use the default Java settings as defined during the installation process.
• Java Virtual Machine: Indicates the directory path of the Java Virtual Machine (JVM) used for the Server.
• Java Classpath: Indicates the directory path of the Java classpath used for the Server.
• Java Options: Displays the Java options used for the Server.
• Initial memory pool: Specifies the initial memory pool size (in MB) for the JVM.
• Maximum memory pool: Specifies the maximum memory Pool size (in MB) for the JVM.
• Thread stack size: Specifies the thread stack size (in MB) for the JVM.
4 Click OK.
CONFIGURING SERVER STARTUP1 From the Start menu, click Embarcadero AppWave X.X > Configure AppWave.
2 Click the Startup tab.
3 Set the parameters that control how AppWave starts.
• Class: Indicates the classpath of AppWave.
• Image: Specifies a directory location for the AppWave image.
• Working Path: Specifies the working path directory location for AppWave.
• Method: Specifies the method.
• Arguments: Specifies the arguments used when executing the server class and working path.
• Timeout: Specifies the timeout settings on Server communication in seconds.
• Mode: Specifies the mode, JVM or Java.
4 Click OK.
APPWAVE™ ENTERPRISE ADMINISTRATOR GUIDE 55
APPWAVE CONFIGURATION AND ADMINISTRATION
CONFIGURING SERVER SHUTDOWN1 From the Start menu, click Embarcadero AppWave X.X > Configure AppWave.
2 Click the Startup tab.
Set the parameters that control how AppWave shuts down.
• Class: Indicates the classpath of AppWave.
• Image: Specifies a directory location for the AppWave image.
• Working Path: Specifies the working path directory location for AppWave.
• Method: Specifies the method.
• Arguments: Indicates the arguments used when executing the AppWave class and working path.
• Timeout: Specifies the timeout settings on AppWave communication in seconds.
• Mode: Specifies the mode, JVM or Java.
3 Click OK.
56 APPWAVE™ ENTERPRISE ADMINISTRATOR GUIDE
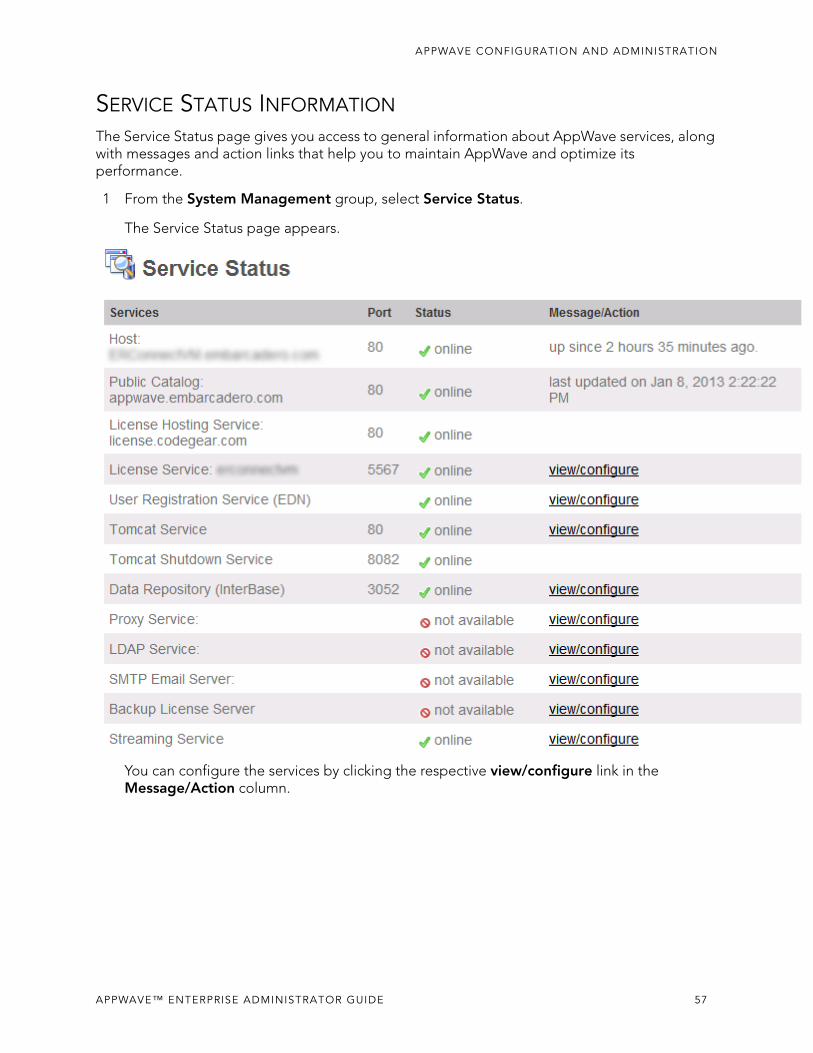
APPWAVE CONFIGURATION AND ADMINISTRATION
SERVICE STATUS INFORMATION
The Service Status page gives you access to general information about AppWave services, along with messages and action links that help you to maintain AppWave and optimize its performance.
1 From the System Management group, select Service Status.
The Service Status page appears.
You can configure the services by clicking the respective view/configure link in the Message/Action column.
APPWAVE™ ENTERPRISE ADMINISTRATOR GUIDE 57
APPWAVE CONFIGURATION AND ADMINISTRATION
LOGGING IN TO THE APPWAVE ADMIN PAGE
You manage products, licenses, and users from the AppWave ADMIN page.
1 In a browser, go to http://hostname:port_number or http://hostIPaddress:port_number.
For example, to access AppWave on port 8080, enter an address such as:
http://localhost:8080 (use when the browser is on the Server machine)
http://TUBETTIJ01:8080
http://10.28.65.900:8080
The above can be specified in the browser address bar.
If during installation you used the default server port number, 80, then you do not need to specify the port number (:port_number) in the browser address. For example:
http://localhost/aaserver
2 At the top of the AppWave HOME page, click ADMIN.
3 In the Login dialog box, enter the administrator user name and password.
The default administrator user name is admin and the default password is admin. You should change the password. For more information, see Configuring the AppWave Service.
If you get a message indicating that an error occurred while starting the server, try restarting the Embarcadero AppWave service. Right-click My Computer, select Manage > Services and Applications > Services. On the Services page you can stop and restart the service.
LOGGING OUT OF APPWAVE
At the top of the AppWave HOME page, click WELCOME, <admin name>, and then select LOGOUT.
58 APPWAVE™ ENTERPRISE ADMINISTRATOR GUIDE
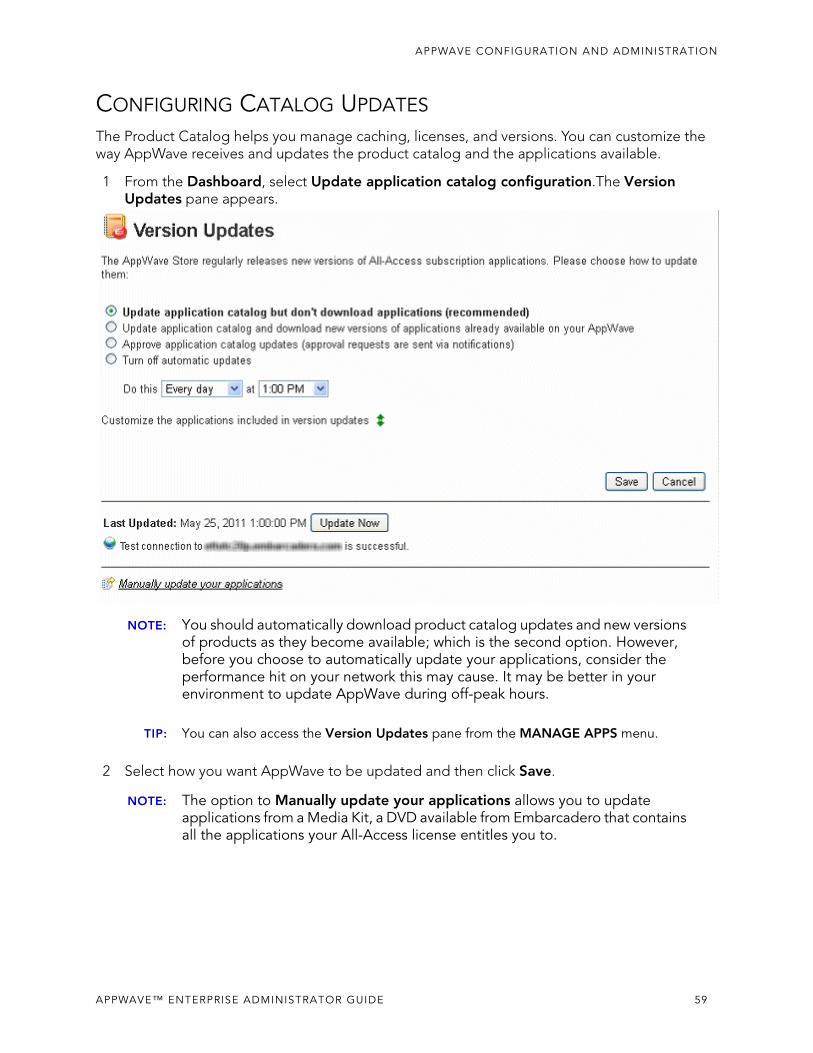
APPWAVE CONFIGURATION AND ADMINISTRATION
CONFIGURING CATALOG UPDATES
The Product Catalog helps you manage caching, licenses, and versions. You can customize the way AppWave receives and updates the product catalog and the applications available.
1 From the Dashboard, select Update application catalog configuration.The Version Updates pane appears.
NOTE: You should automatically download product catalog updates and new versions of products as they become available; which is the second option. However, before you choose to automatically update your applications, consider the performance hit on your network this may cause. It may be better in your environment to update AppWave during off-peak hours.
TIP: You can also access the Version Updates pane from the MANAGE APPS menu.
2 Select how you want AppWave to be updated and then click Save.
NOTE: The option to Manually update your applications allows you to update applications from a Media Kit, a DVD available from Embarcadero that contains all the applications your All-Access license entitles you to.
APPWAVE™ ENTERPRISE ADMINISTRATOR GUIDE 59
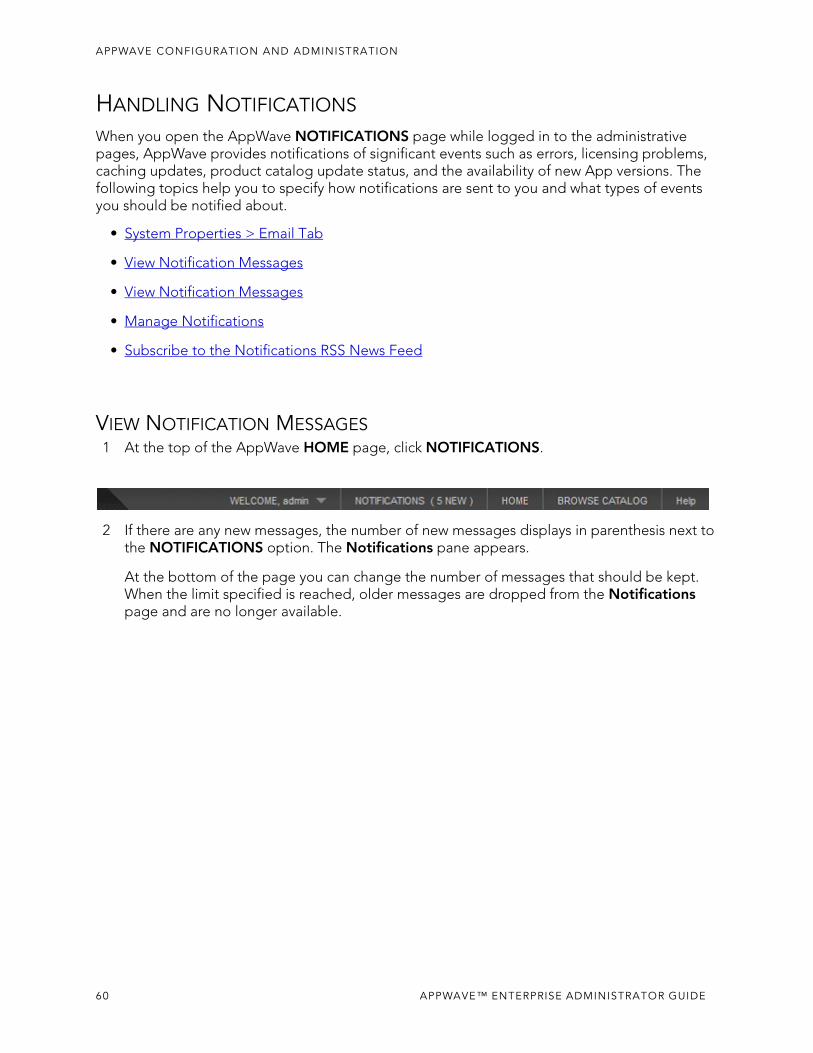
APPWAVE CONFIGURATION AND ADMINISTRATION
HANDLING NOTIFICATIONS
When you open the AppWave NOTIFICATIONS page while logged in to the administrative pages, AppWave provides notifications of significant events such as errors, licensing problems, caching updates, product catalog update status, and the availability of new App versions. The following topics help you to specify how notifications are sent to you and what types of events you should be notified about.
• System Properties > Email Tab
• View Notification Messages
• View Notification Messages
• Manage Notifications
• Subscribe to the Notifications RSS News Feed
VIEW NOTIFICATION MESSAGES1 At the top of the AppWave HOME page, click NOTIFICATIONS.
2 If there are any new messages, the number of new messages displays in parenthesis next to the NOTIFICATIONS option. The Notifications pane appears.
At the bottom of the page you can change the number of messages that should be kept. When the limit specified is reached, older messages are dropped from the Notifications page and are no longer available.
60 APPWAVE™ ENTERPRISE ADMINISTRATOR GUIDE

APPWAVE CONFIGURATION AND ADMINISTRATION
MANAGE NOTIFICATIONS1 At the top of the AppWave HOME page, click NOTIFICATIONS. The Notifications pane
appears.
2 Set the notification options.
• To mark a notification as having been read, click the Mark as read icon [ ] to the right of the message.
• To delete a notification, click the Delete notification icon [ ] to the right of the message.
• To mark all notifications as having been read, click the Mark all as read icon [ ] at the top of the Notifications page.
• To delete all notifications, click the Delete all icon [ ] at the top of the Notifications pane. Deleted notifications no longer display on the notifications page, but are archived by the system and can still be retrieved until the AppWave is restarted, at which time the archive is cleared.
• To view deleted notifications, click the View deleted icon [ ] at the top of the Notifications pane.
APPWAVE™ ENTERPRISE ADMINISTRATOR GUIDE 61
APPWAVE CONFIGURATION AND ADMINISTRATION
• To add a new application to a folder and make it available to users, click the Publish icon
[ ] and then on the Publish Applications pane, choose which folders to update with the new application and then click Publish Applications. The application will appear in the users’ lists of available applications but will still need to be downloaded to AppWave before the application can be launched.
• To download a new application to the AppWave repository, click the Download icon [ ]. Downloading Apps to AppWave’s repository enable the user to more quickly run the Apps.
• To change the number of notifications to save, at the bottom of the pane enter a new number in the Number of notifications to keep box. This number indicates the maximum number of notifications that display on the notification pane.
• To view deleted notifications that have been archived, click View deleted. Deleted notifications do not display on the Notifications pane by default, but they are archived so you can still retrieve them until AppWave has been restarted, at which time the archive is cleared.
3 Click Save.
NOTE: AppWave saves messages up to the specified amount. Once the maximum number is reached, AppWave deletes the oldest messages first to make room for new messages.
SUBSCRIBE TO THE NOTIFICATIONS RSS NEWS FEEDYou can view AppWave notifications, such as product update messages, by adding the News Feed to your Browser or other RSS News reader.
• Subscribing to AppWave Notifications Using Internet Explorer
• Subscribing to AppWave Notifications Using Mozilla Firefox
62 APPWAVE™ ENTERPRISE ADMINISTRATOR GUIDE
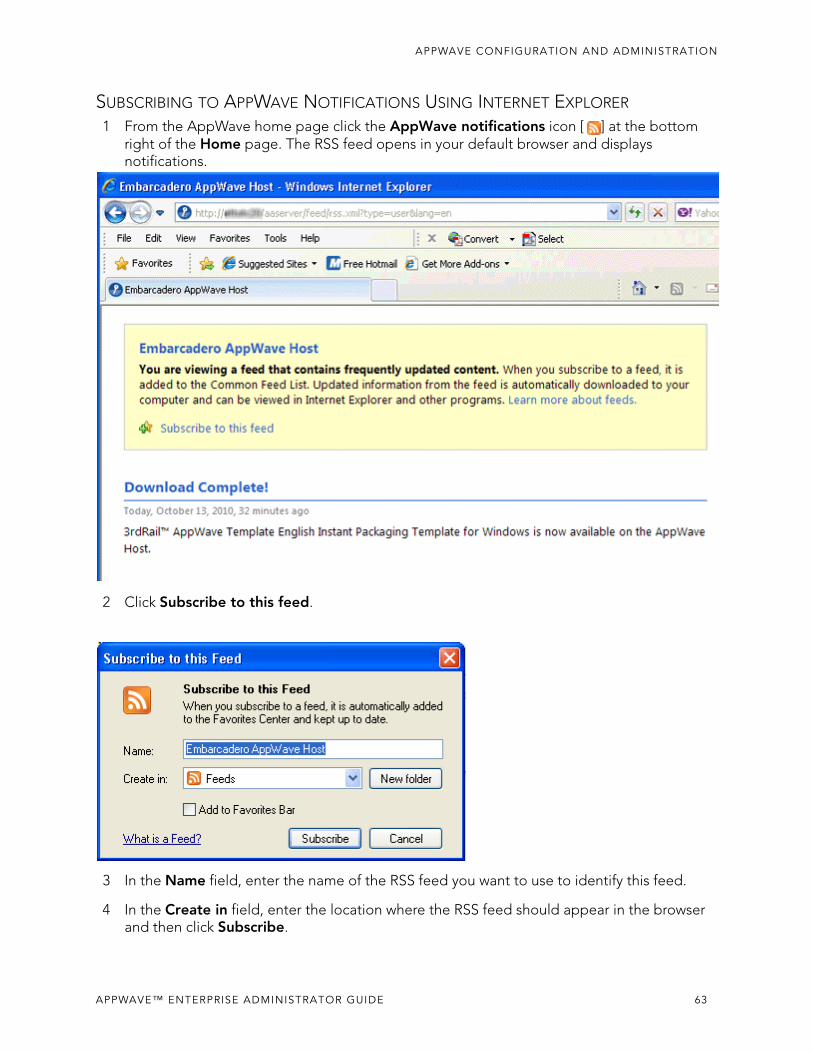
APPWAVE CONFIGURATION AND ADMINISTRATION
SUBSCRIBING TO APPWAVE NOTIFICATIONS USING INTERNET EXPLORER
1 From the AppWave home page click the AppWave notifications icon [ ] at the bottom right of the Home page. The RSS feed opens in your default browser and displays notifications.
2 Click Subscribe to this feed.
3 In the Name field, enter the name of the RSS feed you want to use to identify this feed.
4 In the Create in field, enter the location where the RSS feed should appear in the browser and then click Subscribe.
APPWAVE™ ENTERPRISE ADMINISTRATOR GUIDE 63

APPWAVE CONFIGURATION AND ADMINISTRATION
5 On the Browser toolbar, click Favorites to see the news feed. The Browser will monitor this feed for news even when the browser is not open.
SUBSCRIBING TO APPWAVE NOTIFICATIONS USING MOZILLA FIREFOX
1 From the AppWave home page click the AppWave notifications icon [ ] at the bottom right of the Home page. The Subscribe with Live Bookmark dialog appears
2 Change the Name of the Live Bookmark and the Folder as required and then click Subscribe.
3 Click the Bookmarks menu, navigate to the subscription folder and you will see another folder by the name specified above. In this folder you can see the AppWave notifications.
EMAIL DIRECT MARKETINGWith Email Direct Marketing (EDM), you can socialize AppWave amongst your users by notifying them about the highest rated, most popular, newest, and featured apps.
NOTE: Sending email must be enabled before you can use Email Direct Marketing. For more information, see “System Properties > Email tab” in the AppWave Administrator Guide.
1 From MANAGE APPS click Email Direct Marketing. The Email Direct Marketing page appears.
2 Complete the page and click Save.
NOTE: At this time AppWave does not provide an interface to change the content of the email, however you can edit the default template, defaultTemplate.jsp. It is located in <AppWave install folder>\webapps\aaserver\WEB-INF\jsp\edm\templates.
64 APPWAVE™ ENTERPRISE ADMINISTRATOR GUIDE
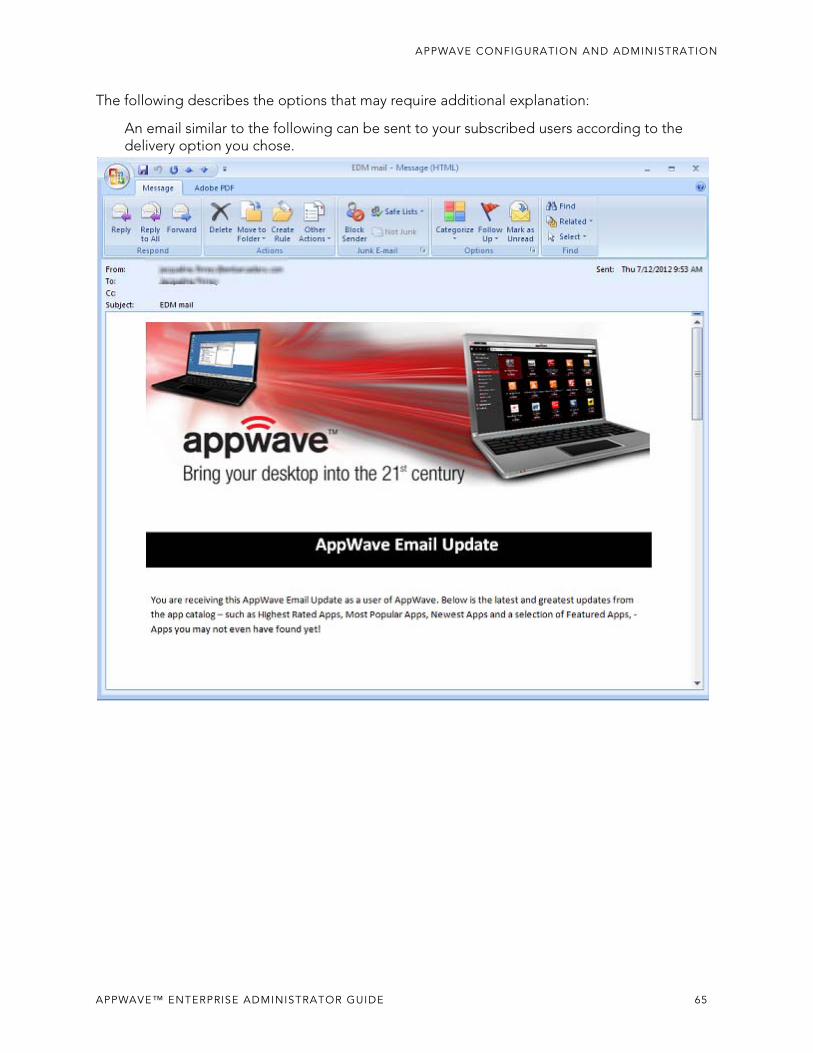
APPWAVE CONFIGURATION AND ADMINISTRATION
The following describes the options that may require additional explanation:
An email similar to the following can be sent to your subscribed users according to the delivery option you chose.
APPWAVE™ ENTERPRISE ADMINISTRATOR GUIDE 65
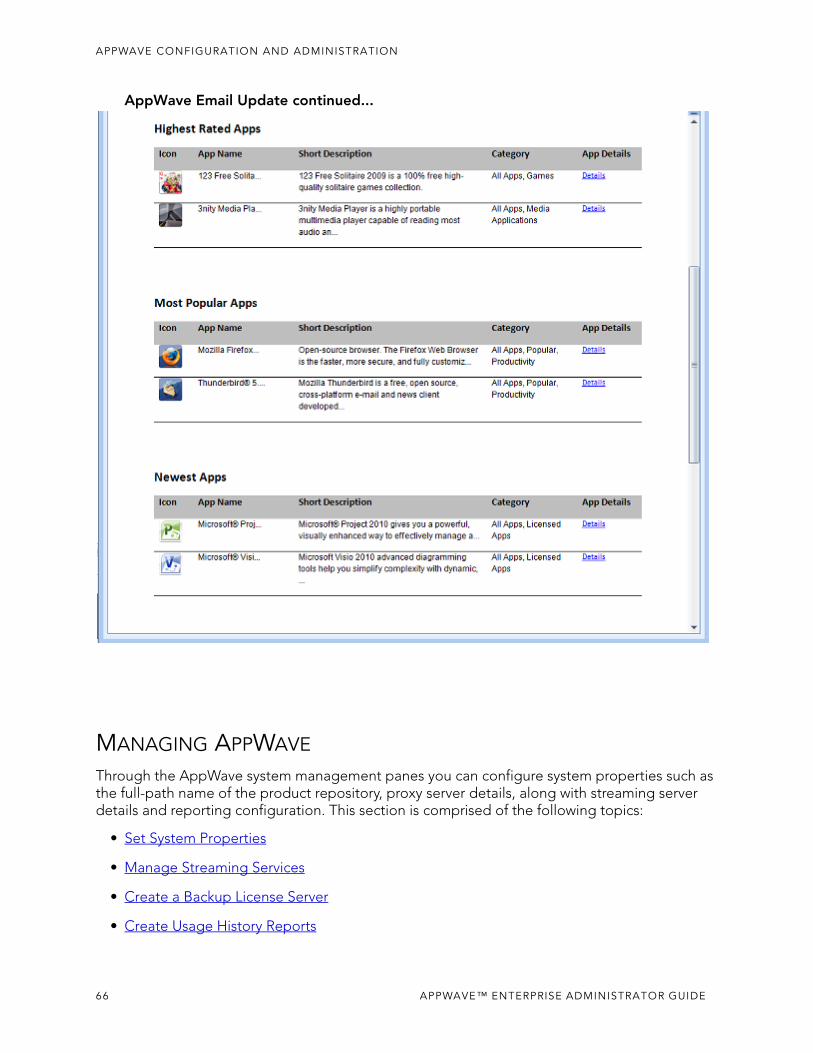
APPWAVE CONFIGURATION AND ADMINISTRATION
AppWave Email Update continued...
MANAGING APPWAVE
Through the AppWave system management panes you can configure system properties such as the full-path name of the product repository, proxy server details, along with streaming server details and reporting configuration. This section is comprised of the following topics:
• Set System Properties
• Manage Streaming Services
• Create a Backup License Server
• Create Usage History Reports
66 APPWAVE™ ENTERPRISE ADMINISTRATOR GUIDE
APPWAVE CONFIGURATION AND ADMINISTRATION
SET SYSTEM PROPERTIESFrom the System Properties pages you can configure AppWave behavior.
This section is comprised of the following topics:
• System Properties > General Tab
• System Properties > Email Tab
• System Properties > Proxy Server Tab
• System Properties > App Repository Tab
• System Properties > Optimization Tab
• System Properties > Streaming Tab
APPWAVE™ ENTERPRISE ADMINISTRATOR GUIDE 67
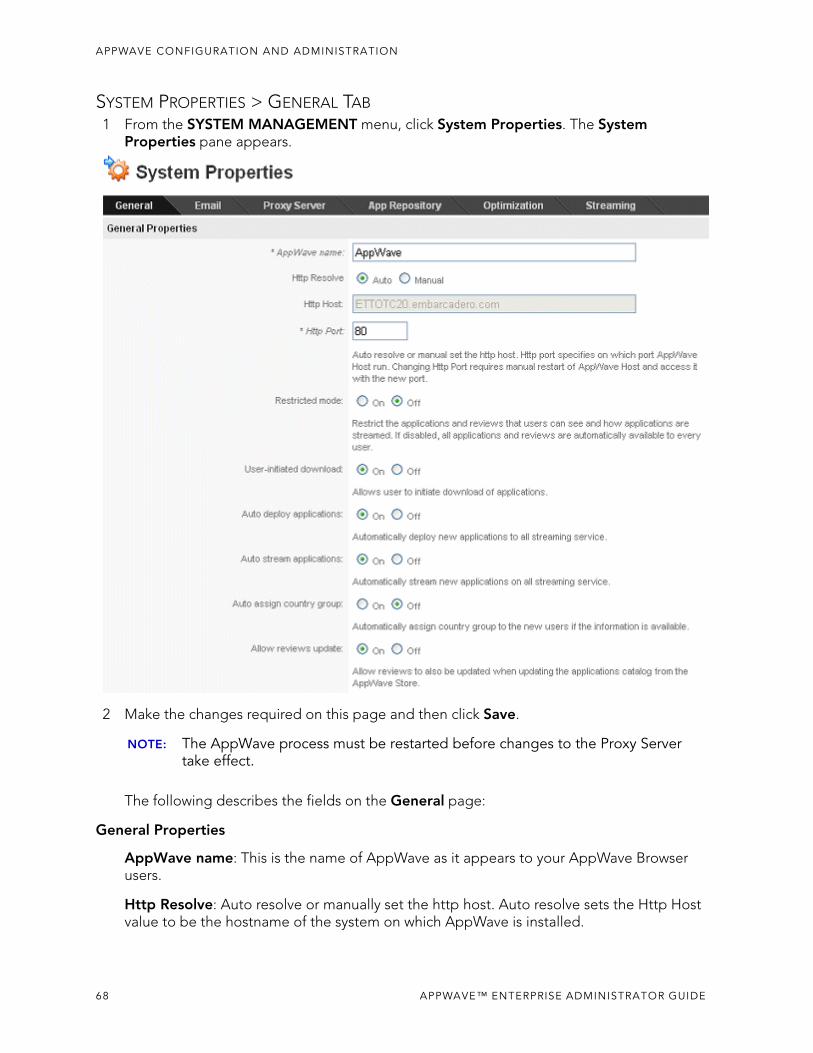
APPWAVE CONFIGURATION AND ADMINISTRATION
SYSTEM PROPERTIES > GENERAL TAB1 From the SYSTEM MANAGEMENT menu, click System Properties. The System
Properties pane appears.
2 Make the changes required on this page and then click Save.
NOTE: The AppWave process must be restarted before changes to the Proxy Server take effect.
The following describes the fields on the General page:
General Properties
AppWave name: This is the name of AppWave as it appears to your AppWave Browser users.
Http Resolve: Auto resolve or manually set the http host. Auto resolve sets the Http Host value to be the hostname of the system on which AppWave is installed.
68 APPWAVE™ ENTERPRISE ADMINISTRATOR GUIDE
APPWAVE CONFIGURATION AND ADMINISTRATION
Http Host: The hostname of the system on which AppWave is installed.
Http Port: The default port number for AppWave is 80. You can accept or change the port number setting during AppWave installation. After installing, you can change the port number here. Changes to the port number will be in effect after AppWave is restarted.
Restricted mode: Restricts the reviews that users can see, also restricts availability of custom Apps broadcasted to AppWave and affects how Apps are streamed. When running in Restricted mode, Apps broadcasted will require Admin approval before release and will be in a Pending state. For information on publishing pending applications, see Publish Applications. If disabled, all newly broadcasted Apps are automatically available to all users; they are published to the All Apps folder which is assigned to the All Users groups. If you want to monitor product reviews submitted by users and approve or reject their comments, select On. Reviews that contain questionable or inappropriate wording are automatically rejected.
User-initiated download: If set to On, when an AppWave Browser user runs an application that is internet available but not downloaded onto AppWave, downloading will be initiated. The application will be ready to run once it is downloaded to AppWave.
Auto deploy applications: If set to On, once applications have been cached to AppWave they are automatically copied to all streaming servers in order for the applications to be available when requested by the AppWave Browser user.
Auto stream applications: Once an application has been cached to AppWave, it is not automatically streamed. Setting this option to On automatically streams the application when it is added to AppWave.
Auto assign country group: This property works for EDN and LDAP users. If set to On, this creates groups automatically based on the AppWave Browser user’s location. This enables AppWave to restrict access to streamed applications based on the country, which is useful when export regulations dictate that certain applications cannot be used in specific countries.
Allow reviews update: If set to On, when updating the catalog, also allows reviews originating on the AppWave Store to be copied to AppWave.
Allow AppWave accounts: In environments where LDAP is integrated with AppWave, you can disallow local accounts, thus requiring all users to use their domain credentials to access AppWave. When this property is set to Off a local user cannot connect from the AppWave Browser or the AppWave console; the user needs to connect with a domain user name.
Allow Public Store to be visible: Set to off if you do not want AppWave Browser users to be able to access the AppWave Public Store via the internet.
Allow client to register user: Allows a new user account to be created when the AppWave Browser user attempting to connect to AppWave does not already have a user account.
Allow blank password: Allows new user accounts to be created that do not require a password.
Create user as author: Automatically assigns all new users to the Authors group which enables them to use AppWave Studio and master and broadcast applications through
APPWAVE™ ENTERPRISE ADMINISTRATOR GUIDE 69
APPWAVE CONFIGURATION AND ADMINISTRATION
AppWave Studio.
Download pool size: Specify the maximum number of simultaneous downloads that can be initiated by AppWave users.
License Notifications: Specify thresholds for license pool usage levels. When usage levels grow above specified levels, notifications will be generated. When usage levels reach high or critical, the chance of users being denied licenses increases and you should consider adding more licenses. License notifications can be generated for all licensed products managed by AppWave.
SYSTEM PROPERTIES > EMAIL TABYou can configure AppWave to send you an email when there are new or upgraded applications available; when a download has started, finished successfully or not; when the Embarcadero AppWave Store was checked for catalog updates and whether the catalog update was successful or not. If AppWave is configured to moderate reviewers comments you can also receive email notifications when new reviews have been submitted for your approval.
1 From the SYSTEM MANAGEMENT menu, click System Properties, and then click the
70 APPWAVE™ ENTERPRISE ADMINISTRATOR GUIDE
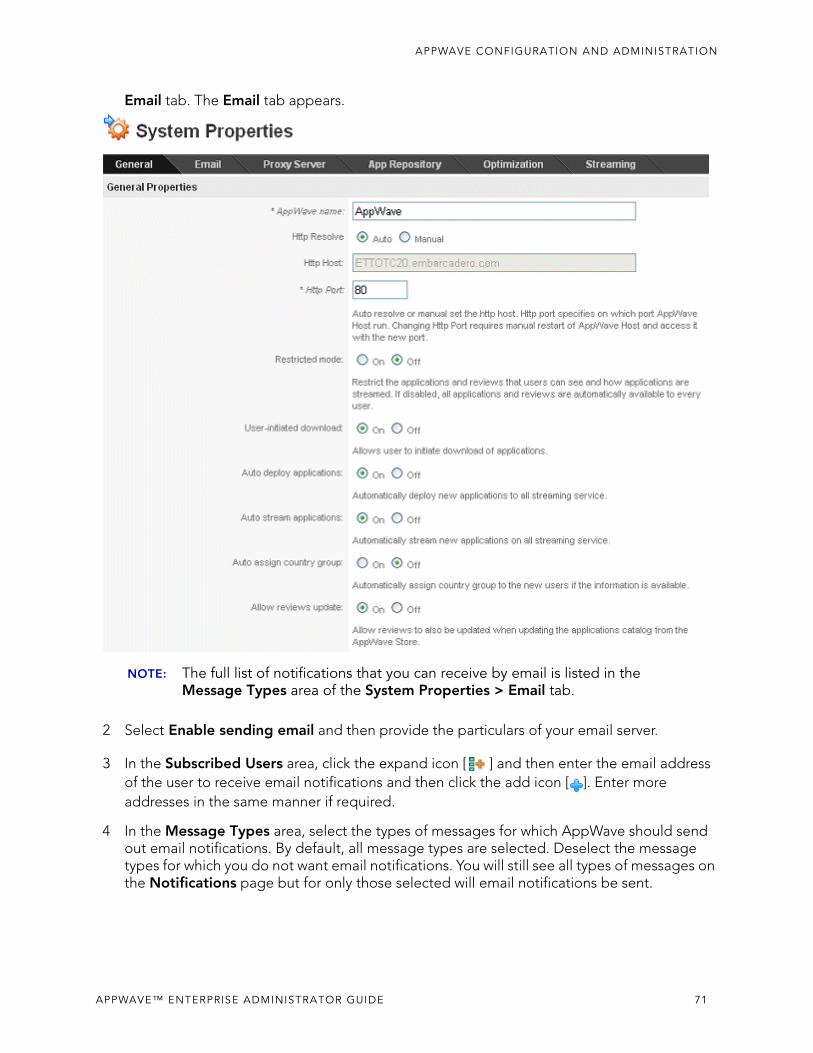
APPWAVE CONFIGURATION AND ADMINISTRATION
Email tab. The Email tab appears.
NOTE: The full list of notifications that you can receive by email is listed in the Message Types area of the System Properties > Email tab.
2 Select Enable sending email and then provide the particulars of your email server.
3 In the Subscribed Users area, click the expand icon [ ] and then enter the email address of the user to receive email notifications and then click the add icon [ ]. Enter more addresses in the same manner if required.
4 In the Message Types area, select the types of messages for which AppWave should send out email notifications. By default, all message types are selected. Deselect the message types for which you do not want email notifications. You will still see all types of messages on the Notifications page but for only those selected will email notifications be sent.
APPWAVE™ ENTERPRISE ADMINISTRATOR GUIDE 71

APPWAVE CONFIGURATION AND ADMINISTRATION
5 Click Save.
NOTE: You can also configure AppWave to send out notifications when license usage has reached certain levels by specifying the high usage and critical usage levels on the General tab of the System Properties page. For more information, see .
SYSTEM PROPERTIES > PROXY SERVER TAB5Security in some environments requires the use of an internet proxy. You can configure AppWave to use a proxy instead of connecting to the internet directly for catalog updates and product downloads, and communications with AppWave Browser users. Proxy settings are automatically recognized during AppWave start up and after clicking the Refresh button if they are set in Internet Explorer, in the Windows Control Panel, or have been imported to system-wide level using netsh/proxcfg or the bitsadmin utility.
1 From the SYSTEM MANAGEMENT menu, click System Properties and then click the Proxy Server tab.
The Proxy Server tab appears.
If a proxy server has not been set, this page indicates that a proxy server was not used.
72 APPWAVE™ ENTERPRISE ADMINISTRATOR GUIDE
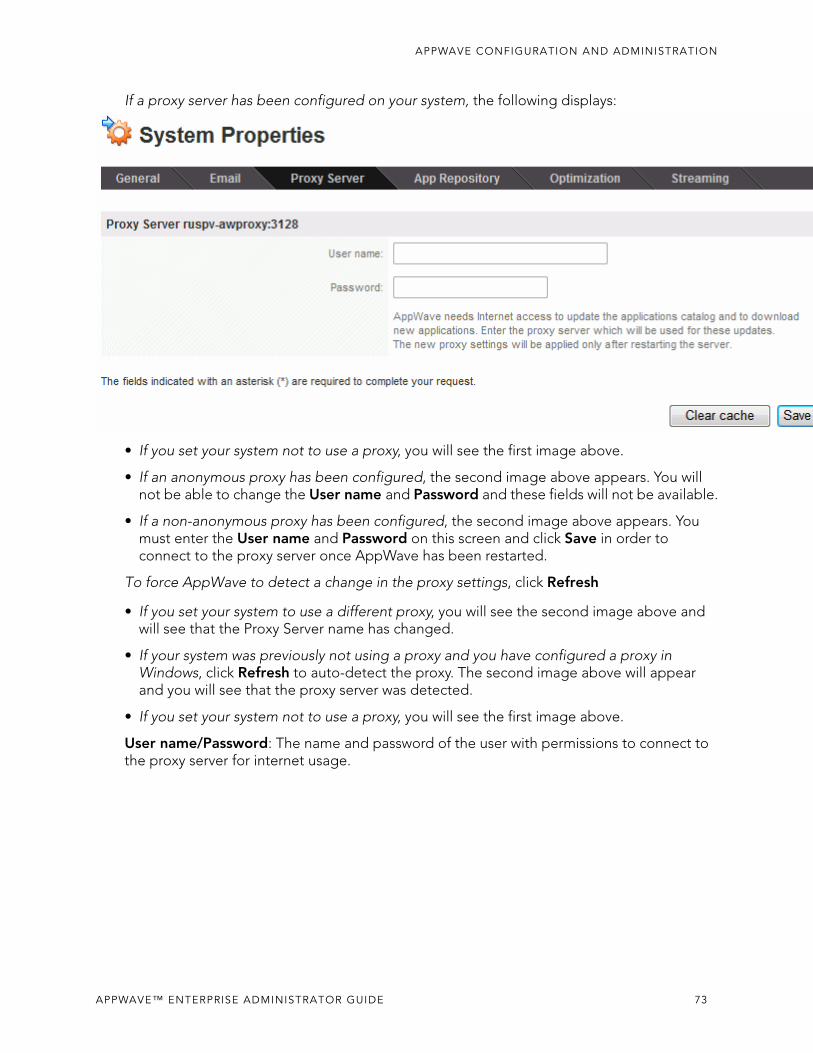
APPWAVE CONFIGURATION AND ADMINISTRATION
If a proxy server has been configured on your system, the following displays:
• If you set your system not to use a proxy, you will see the first image above.
• If an anonymous proxy has been configured, the second image above appears. You will not be able to change the User name and Password and these fields will not be available.
• If a non-anonymous proxy has been configured, the second image above appears. You must enter the User name and Password on this screen and click Save in order to connect to the proxy server once AppWave has been restarted.
To force AppWave to detect a change in the proxy settings, click Refresh
• If you set your system to use a different proxy, you will see the second image above and will see that the Proxy Server name has changed.
• If your system was previously not using a proxy and you have configured a proxy in Windows, click Refresh to auto-detect the proxy. The second image above will appear and you will see that the proxy server was detected.
• If you set your system not to use a proxy, you will see the first image above.
User name/Password: The name and password of the user with permissions to connect to the proxy server for internet usage.
APPWAVE™ ENTERPRISE ADMINISTRATOR GUIDE 73
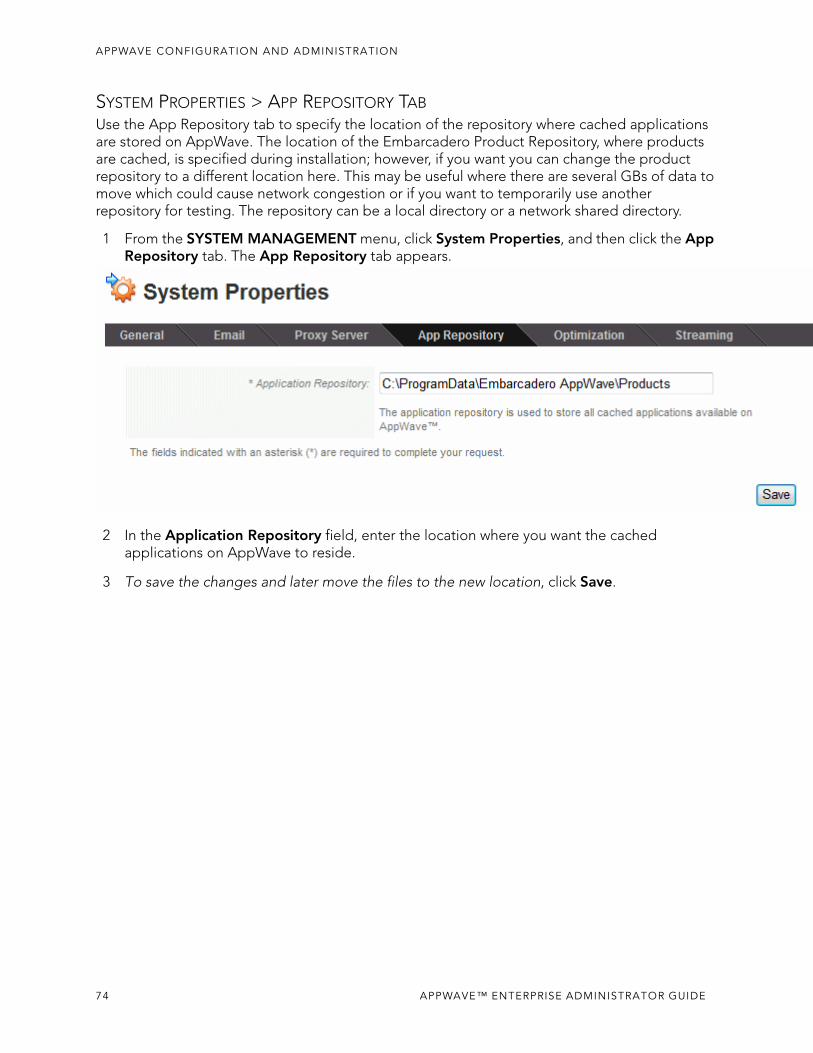
APPWAVE CONFIGURATION AND ADMINISTRATION
SYSTEM PROPERTIES > APP REPOSITORY TABUse the App Repository tab to specify the location of the repository where cached applications are stored on AppWave. The location of the Embarcadero Product Repository, where products are cached, is specified during installation; however, if you want you can change the product repository to a different location here. This may be useful where there are several GBs of data to move which could cause network congestion or if you want to temporarily use another repository for testing. The repository can be a local directory or a network shared directory.
1 From the SYSTEM MANAGEMENT menu, click System Properties, and then click the App Repository tab. The App Repository tab appears.
2 In the Application Repository field, enter the location where you want the cached applications on AppWave to reside.
3 To save the changes and later move the files to the new location, click Save.
74 APPWAVE™ ENTERPRISE ADMINISTRATOR GUIDE
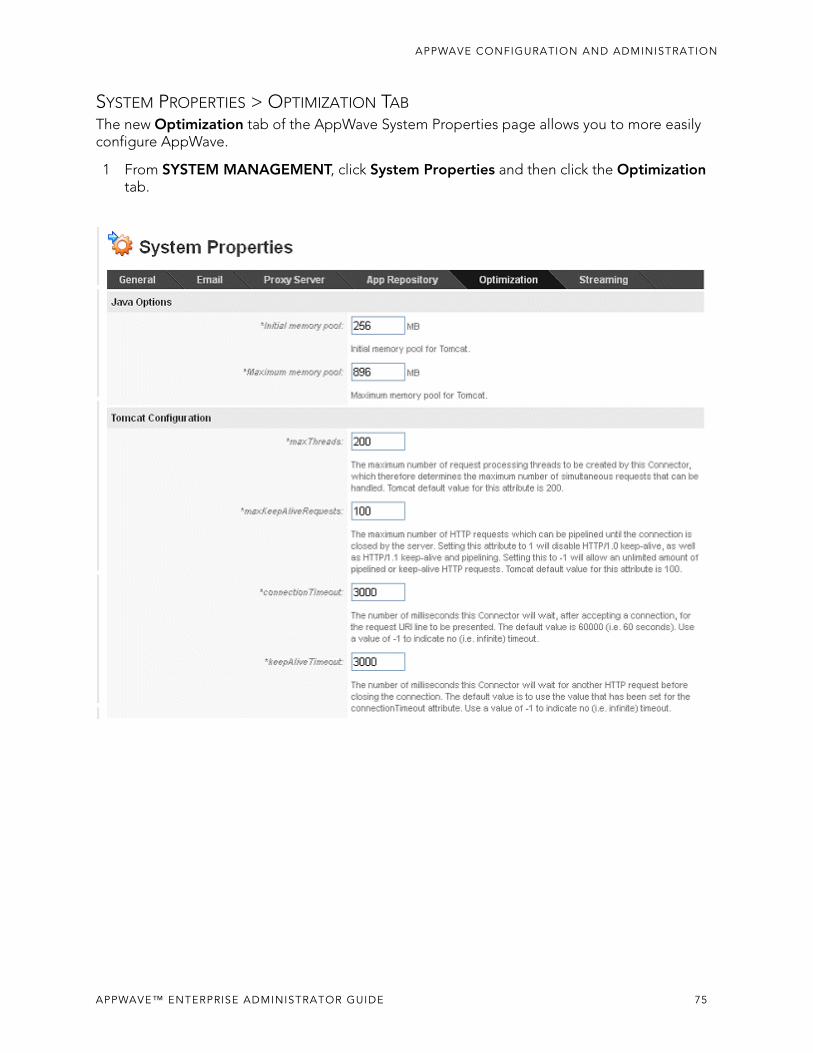
APPWAVE CONFIGURATION AND ADMINISTRATION
SYSTEM PROPERTIES > OPTIMIZATION TABThe new Optimization tab of the AppWave System Properties page allows you to more easily configure AppWave.
1 From SYSTEM MANAGEMENT, click System Properties and then click the Optimization tab.
APPWAVE™ ENTERPRISE ADMINISTRATOR GUIDE 75

APPWAVE CONFIGURATION AND ADMINISTRATION
System Properties > Optimization tab continued...
The following describes the Optimization options available:
• Java Options
• Tomcat Configuration
• Database Options
• Logging Options
JAVA OPTIONS
Initial memory pool: Initial amount of memory available for the Apache Tomcat web server.
Maximum memory pool: Maximum of memory available for the Apache Tomcat web server.
76 APPWAVE™ ENTERPRISE ADMINISTRATOR GUIDE
APPWAVE CONFIGURATION AND ADMINISTRATION
TOMCAT CONFIGURATION
The following descriptions for these Tomcat configuration parameters are courtesy of Tomcat.Apache.Org.
maxThreads: The maximum number of request processing threads that can be created by this Connector, which therefore determines the maximum number of simultaneous requests that can be handled. Tomcat default value for this attribute is 200.
maxKeepAliveRequests: The maximum number of HTTP requests which can be pipelined until the connection is closed by the server./ Setting this attribute to 1 will disable HTTP/1.0 keep-alive as well as HTTP/1.1 keep-alive and pipelining. Setting this to -1 will allow an unlimited amount of pipelined or keep-alive HTTP requests.Tomcat default value for this attribute is 100.
connectionTimeout: The number of milliseconds this Connector will wait, after accepting a connection, for the request URI line to be presented. The default value is 60000 (i.e. 60 seconds). Use a value of -1 to indicate no (ie.e. infinite) timeout.
keepAliveTimeout: The number of milliseconds this Connector will wait for another HTTP request before closing the connection. The default value is to use the value that has been set for the connectionTimeout attribute. Use a value of 01 to indicate no (i.e. infinite) timeout.
DATABASE OPTIONS
The InterBase database is at the heart of AppWave and contains all your program data including but not limited to, System Properties settings, Licenses, Users & Groups, Product Catalog, and Repository.
Backup Database: Backs up the database to a .ibk file on the disk. You will be informed when the backup is complete. The backup file will be saved to the installation directory in the data folder, for example,
C:\Program Files\Embarcadero\AppWave\4.0\data\tcdb20120611171916.ibk
The naming of the backup file follows this convention:
tcb+year+month+day+hr (24 hr clock)+min+sec.ibk
APPWAVE™ ENTERPRISE ADMINISTRATOR GUIDE 77
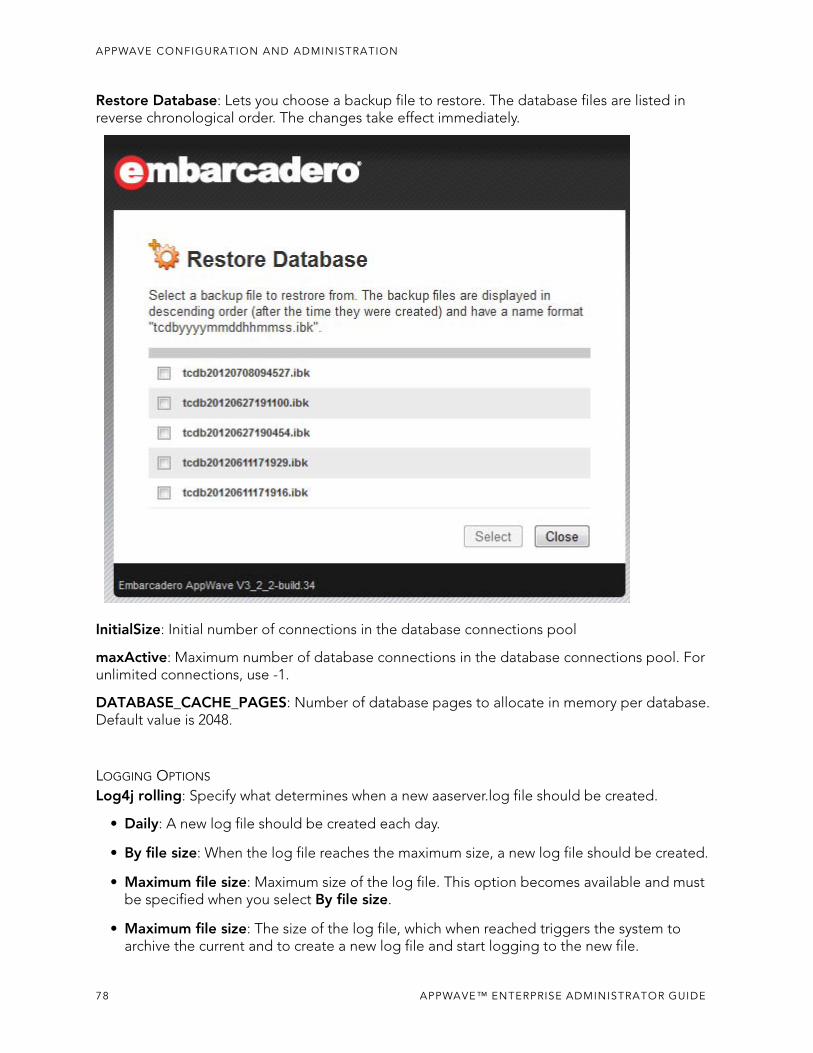
APPWAVE CONFIGURATION AND ADMINISTRATION
Restore Database: Lets you choose a backup file to restore. The database files are listed in reverse chronological order. The changes take effect immediately.
InitialSize: Initial number of connections in the database connections pool
maxActive: Maximum number of database connections in the database connections pool. For unlimited connections, use -1.
DATABASE_CACHE_PAGES: Number of database pages to allocate in memory per database. Default value is 2048.
LOGGING OPTIONS
Log4j rolling: Specify what determines when a new aaserver.log file should be created.
• Daily: A new log file should be created each day.
• By file size: When the log file reaches the maximum size, a new log file should be created.
• Maximum file size: Maximum size of the log file. This option becomes available and must be specified when you select By file size.
• Maximum file size: The size of the log file, which when reached triggers the system to archive the current and to create a new log file and start logging to the new file.
78 APPWAVE™ ENTERPRISE ADMINISTRATOR GUIDE
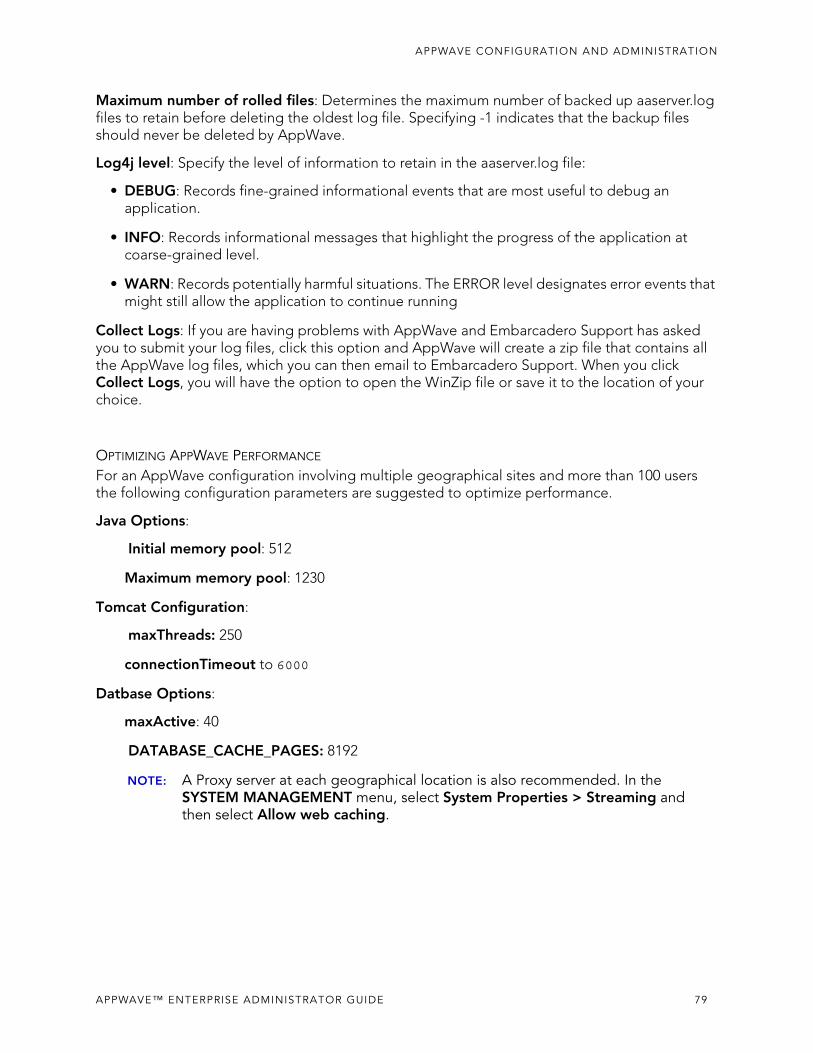
APPWAVE CONFIGURATION AND ADMINISTRATION
Maximum number of rolled files: Determines the maximum number of backed up aaserver.log files to retain before deleting the oldest log file. Specifying -1 indicates that the backup files should never be deleted by AppWave.
Log4j level: Specify the level of information to retain in the aaserver.log file:
• DEBUG: Records fine-grained informational events that are most useful to debug an application.
• INFO: Records informational messages that highlight the progress of the application at coarse-grained level.
• WARN: Records potentially harmful situations. The ERROR level designates error events that might still allow the application to continue running
Collect Logs: If you are having problems with AppWave and Embarcadero Support has asked you to submit your log files, click this option and AppWave will create a zip file that contains all the AppWave log files, which you can then email to Embarcadero Support. When you click Collect Logs, you will have the option to open the WinZip file or save it to the location of your choice.
OPTIMIZING APPWAVE PERFORMANCE
For an AppWave configuration involving multiple geographical sites and more than 100 users the following configuration parameters are suggested to optimize performance.
Java Options:
Initial memory pool: 512
Maximum memory pool: 1230
Tomcat Configuration:
maxThreads: 250
connectionTimeout to 6000
Datbase Options:
maxActive: 40
DATABASE_CACHE_PAGES: 8192
NOTE: A Proxy server at each geographical location is also recommended. In the SYSTEM MANAGEMENT menu, select System Properties > Streaming and then select Allow web caching.
APPWAVE™ ENTERPRISE ADMINISTRATOR GUIDE 79

APPWAVE CONFIGURATION AND ADMINISTRATION
SYSTEM PROPERTIES > STREAMING TABThe Streaming Server is responsible for streaming an application requested by the AppWave Browser user.
1 From the SYSTEM MANAGEMENT menu, click System Properties, and then click the Streaming tab. The Streaming tab appears.
2 Make the required changes and then click Save.
The following describes the options available on the Streaming tab.
80 APPWAVE™ ENTERPRISE ADMINISTRATOR GUIDE
APPWAVE CONFIGURATION AND ADMINISTRATION
General
Repository cache: This is the directory where the applications that will be streamed are saved on the AppWave host. The primary purpose for the cache is to allow partial downloading of an application before showing the application to the user. This is especially important when working with large applications because caching the application allows the user to begin using the application sooner, before the entire application has been cached.
HeartBeat period: Number of minutes between keep alive pings to the streaming server. The heartbeat maintains streaming server connectivity and alerts AppWave when the streaming server does not respond.
HeartBeat grace period: The number of minutes to wait for the streaming server to respond to a heartbeat. If the streaming server does not respond within this period the streaming server is considered to be offline and a notification is generated.
Web Caching: Web Caching configures a transparent proxy set up between AppWave and AppWave Browser. If this proxy is configured, AppWave would add special headers to streaming data sent to AppWave Browser. This allows the streamed data to be cached on the proxy server so that the next time an AppWave Browser user asks for the relevant application, the streamed data will be sent directly to AppWave Browser from the proxy. This ability may be useful when the communication channel between AppWave and AppWave Browser is poor.
Allow web caching: Turn on or off the special header in streamed data blocks.
Cache period: The time period the data block could be stored on the proxy server before it expires and is deleted.
Offline Use
Allow to download streamed applications: When enabled, allows the AppWave Browser user to download Apps to their desktop.
Allow to stream and launch streamed applications: If disabled, allows you to restrict specific groups from downloading and streaming applications. Select Off to grant only select groups the permission to download and stream applications.
When enabled, all users can download and stream applications.
APPWAVE™ ENTERPRISE ADMINISTRATOR GUIDE 81
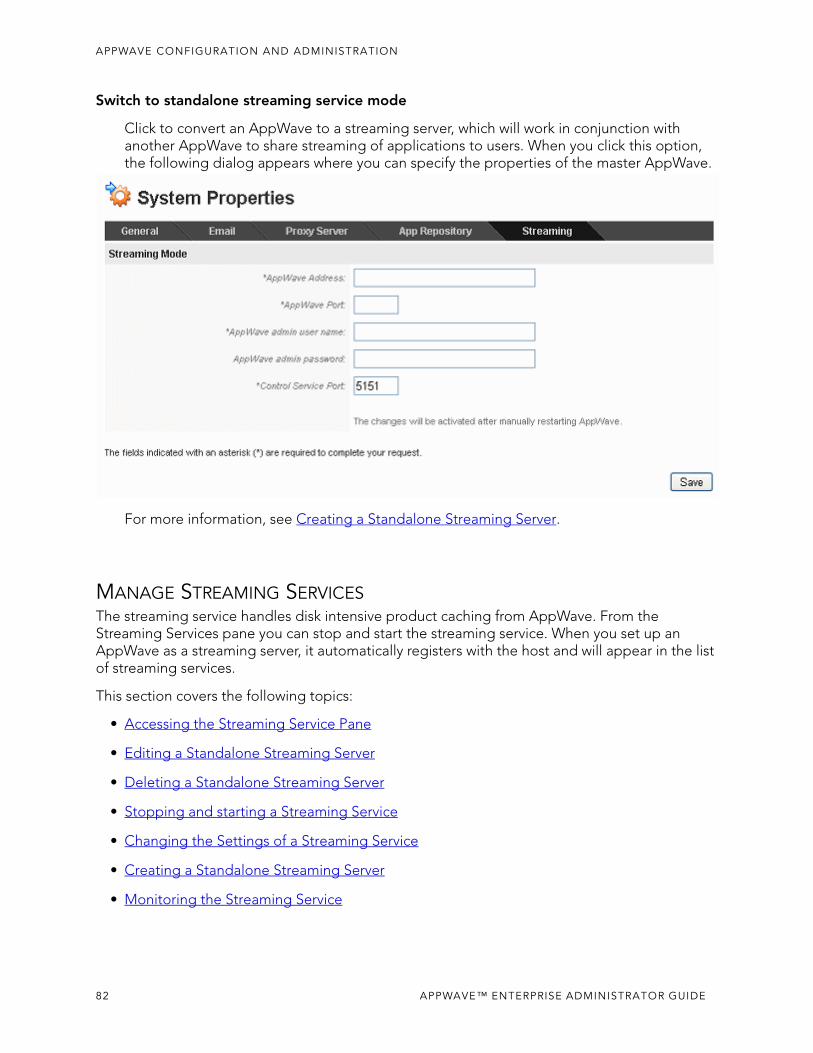
APPWAVE CONFIGURATION AND ADMINISTRATION
Switch to standalone streaming service mode
Click to convert an AppWave to a streaming server, which will work in conjunction with another AppWave to share streaming of applications to users. When you click this option, the following dialog appears where you can specify the properties of the master AppWave.
For more information, see Creating a Standalone Streaming Server.
MANAGE STREAMING SERVICESThe streaming service handles disk intensive product caching from AppWave. From the Streaming Services pane you can stop and start the streaming service. When you set up an AppWave as a streaming server, it automatically registers with the host and will appear in the list of streaming services.
This section covers the following topics:
• Accessing the Streaming Service Pane
• Editing a Standalone Streaming Server
• Deleting a Standalone Streaming Server
• Stopping and starting a Streaming Service
• Changing the Settings of a Streaming Service
• Creating a Standalone Streaming Server
• Monitoring the Streaming Service
82 APPWAVE™ ENTERPRISE ADMINISTRATOR GUIDE
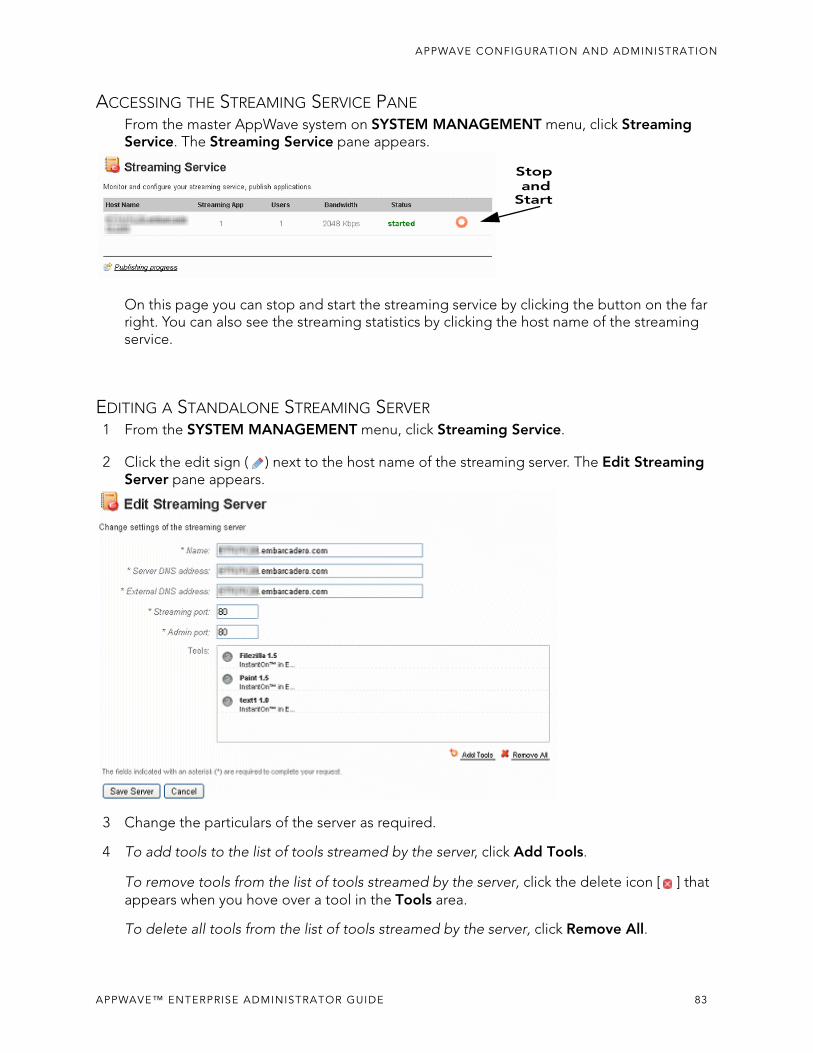
APPWAVE CONFIGURATION AND ADMINISTRATION
ACCESSING THE STREAMING SERVICE PANEFrom the master AppWave system on SYSTEM MANAGEMENT menu, click Streaming Service. The Streaming Service pane appears.
On this page you can stop and start the streaming service by clicking the button on the far right. You can also see the streaming statistics by clicking the host name of the streaming service.
EDITING A STANDALONE STREAMING SERVER1 From the SYSTEM MANAGEMENT menu, click Streaming Service.
2 Click the edit sign ( ) next to the host name of the streaming server. The Edit Streaming Server pane appears.
3 Change the particulars of the server as required.
4 To add tools to the list of tools streamed by the server, click Add Tools.
To remove tools from the list of tools streamed by the server, click the delete icon [ ] that appears when you hove over a tool in the Tools area.
To delete all tools from the list of tools streamed by the server, click Remove All.
Start
Stop and
APPWAVE™ ENTERPRISE ADMINISTRATOR GUIDE 83
APPWAVE CONFIGURATION AND ADMINISTRATION
5 When you have completed the changes you need, click Save Service.
DELETING A STANDALONE STREAMING SERVER1 From the SYSTEM MANAGEMENT menu, click Streaming Servers.
2 Select the checkbox next to the Host Name of the server you want to delete and select Delete.
STOPPING AND STARTING A STREAMING SERVICE51From the SYSTEM MANAGEMENT menu, click Streaming Service.
2 If the Status column of the server indicates that it is started, you can stop the streaming service by clicking the stop icon [ ] to the right of the Status column.
If the Status column of the server indicates that it is Stopped, you can start the streaming
service by clicking the start icon [ ] to the right of the Status column.
To view the progress of application publishing you have started, click Publishing Progress.
CHANGING THE SETTINGS OF A STREAMING SERVICE1 From the SYSTEM MANAGEMENT menu, click System Properties and then click the
Streaming tab.
84 APPWAVE™ ENTERPRISE ADMINISTRATOR GUIDE
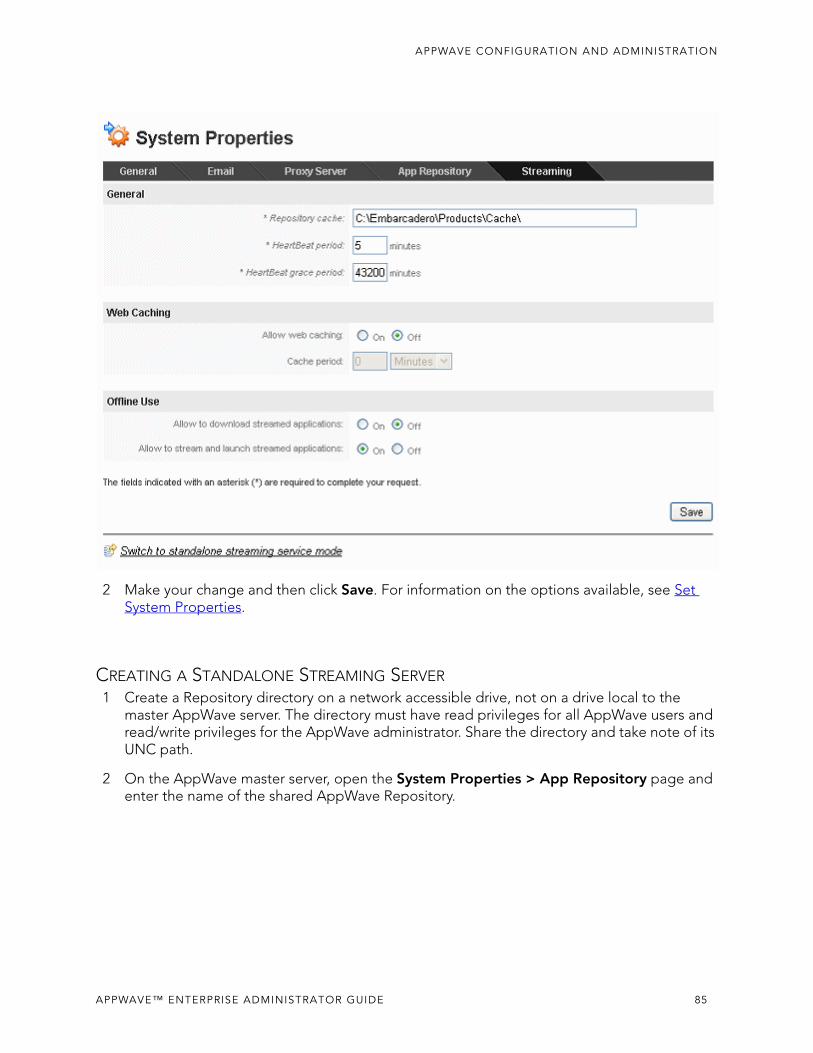
APPWAVE CONFIGURATION AND ADMINISTRATION
2 Make your change and then click Save. For information on the options available, see Set System Properties.
CREATING A STANDALONE STREAMING SERVER1 Create a Repository directory on a network accessible drive, not on a drive local to the
master AppWave server. The directory must have read privileges for all AppWave users and read/write privileges for the AppWave administrator. Share the directory and take note of its UNC path.
2 On the AppWave master server, open the System Properties > App Repository page and enter the name of the shared AppWave Repository.
APPWAVE™ ENTERPRISE ADMINISTRATOR GUIDE 85
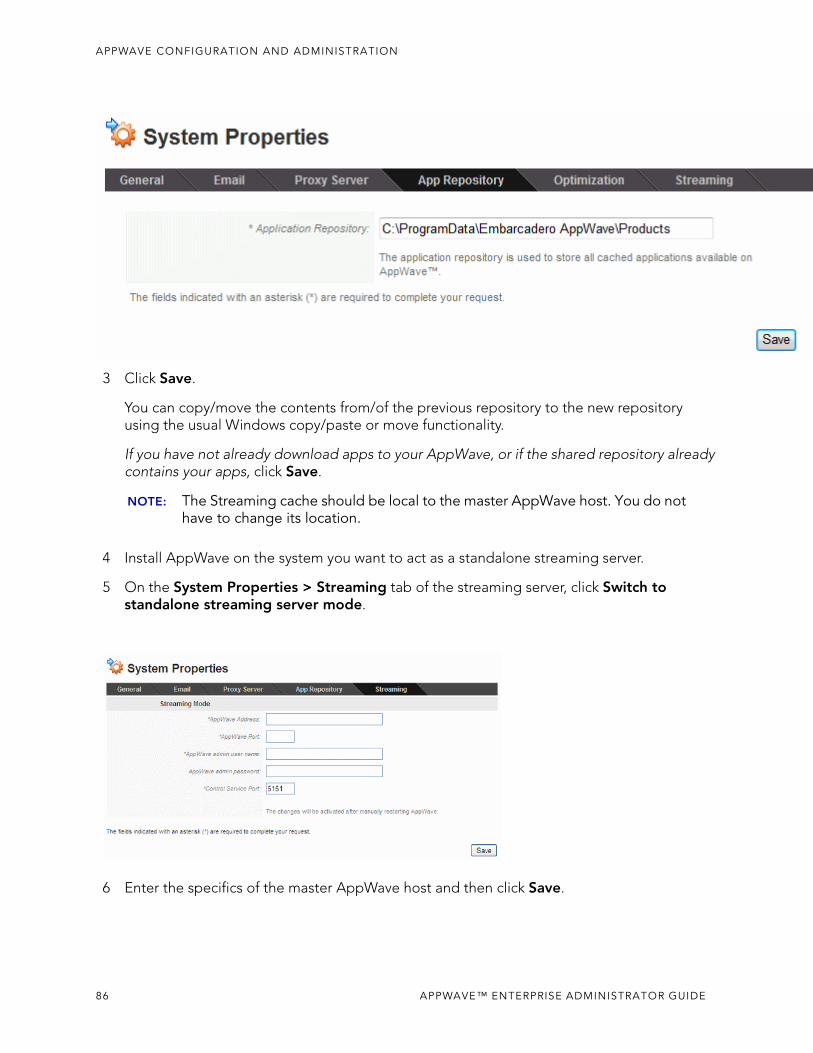
APPWAVE CONFIGURATION AND ADMINISTRATION
3 Click Save.
You can copy/move the contents from/of the previous repository to the new repository using the usual Windows copy/paste or move functionality.
If you have not already download apps to your AppWave, or if the shared repository already contains your apps, click Save.
NOTE: The Streaming cache should be local to the master AppWave host. You do not have to change its location.
4 Install AppWave on the system you want to act as a standalone streaming server.
5 On the System Properties > Streaming tab of the streaming server, click Switch to standalone streaming server mode.
6 Enter the specifics of the master AppWave host and then click Save.
86 APPWAVE™ ENTERPRISE ADMINISTRATOR GUIDE
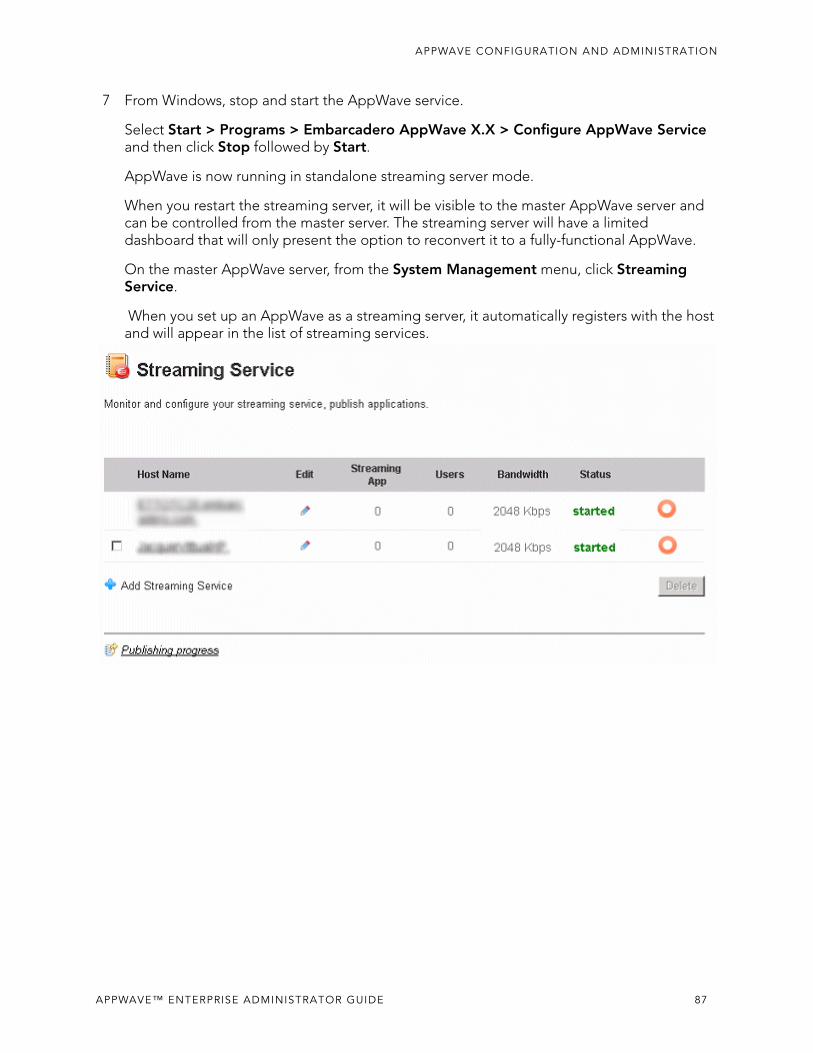
APPWAVE CONFIGURATION AND ADMINISTRATION
7 From Windows, stop and start the AppWave service.
Select Start > Programs > Embarcadero AppWave X.X > Configure AppWave Service and then click Stop followed by Start.
AppWave is now running in standalone streaming server mode.
When you restart the streaming server, it will be visible to the master AppWave server and can be controlled from the master server. The streaming server will have a limited dashboard that will only present the option to reconvert it to a fully-functional AppWave.
On the master AppWave server, from the System Management menu, click Streaming Service.
When you set up an AppWave as a streaming server, it automatically registers with the host and will appear in the list of streaming services.
APPWAVE™ ENTERPRISE ADMINISTRATOR GUIDE 87
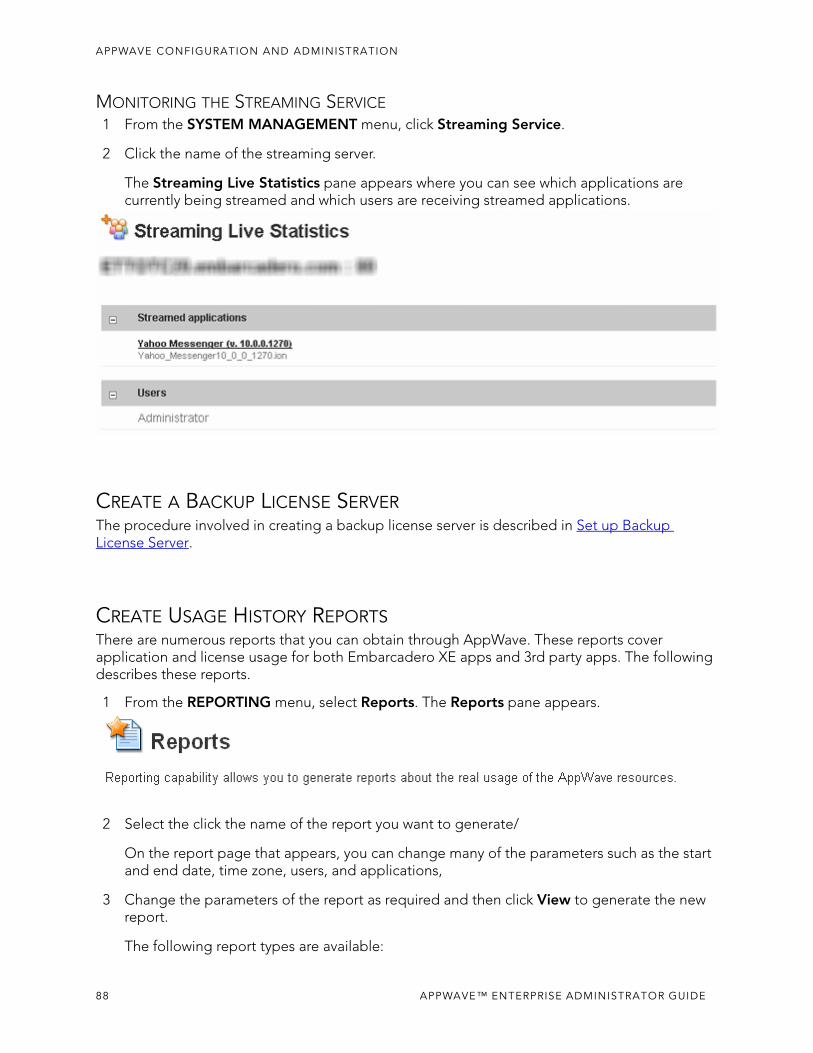
APPWAVE CONFIGURATION AND ADMINISTRATION
MONITORING THE STREAMING SERVICE1 From the SYSTEM MANAGEMENT menu, click Streaming Service.
2 Click the name of the streaming server.
The Streaming Live Statistics pane appears where you can see which applications are currently being streamed and which users are receiving streamed applications.
CREATE A BACKUP LICENSE SERVERThe procedure involved in creating a backup license server is described in Set up Backup License Server.
CREATE USAGE HISTORY REPORTSThere are numerous reports that you can obtain through AppWave. These reports cover application and license usage for both Embarcadero XE apps and 3rd party apps. The following describes these reports.
1 From the REPORTING menu, select Reports. The Reports pane appears.
2 Select the click the name of the report you want to generate/
On the report page that appears, you can change many of the parameters such as the start and end date, time zone, users, and applications,
3 Change the parameters of the report as required and then click View to generate the new report.
The following report types are available:
88 APPWAVE™ ENTERPRISE ADMINISTRATOR GUIDE
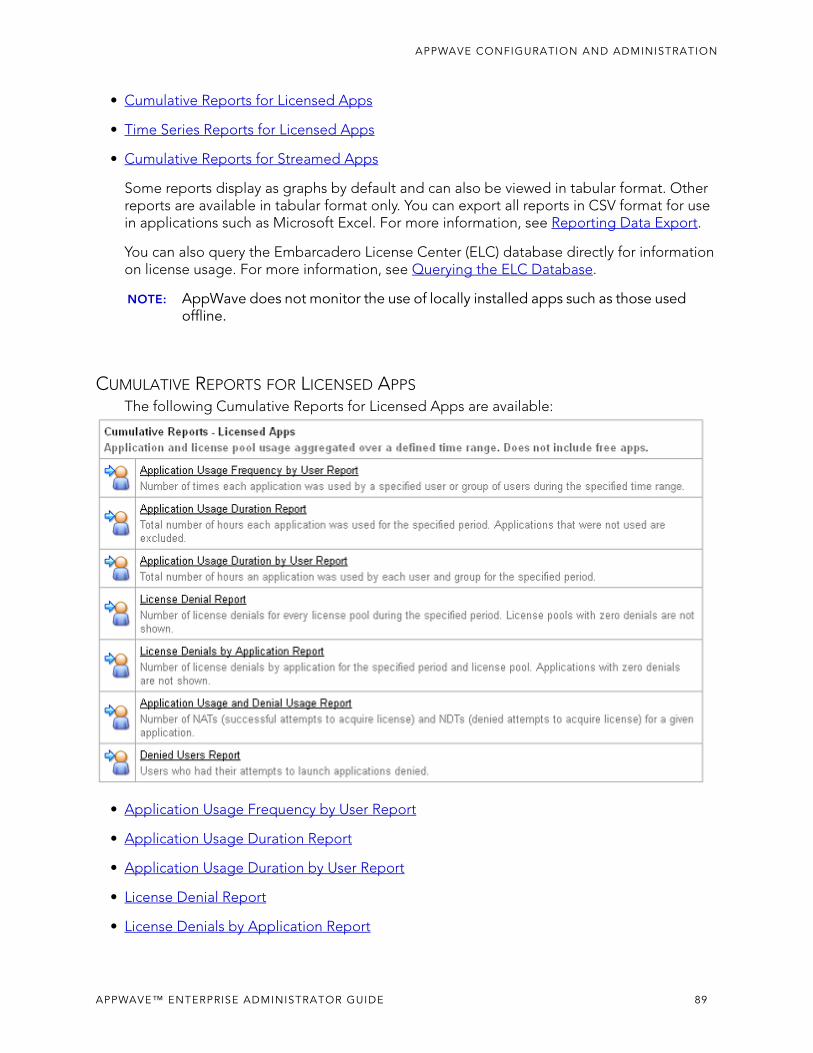
APPWAVE CONFIGURATION AND ADMINISTRATION
• Cumulative Reports for Licensed Apps
• Time Series Reports for Licensed Apps
• Cumulative Reports for Streamed Apps
Some reports display as graphs by default and can also be viewed in tabular format. Other reports are available in tabular format only. You can export all reports in CSV format for use in applications such as Microsoft Excel. For more information, see Reporting Data Export.
You can also query the Embarcadero License Center (ELC) database directly for information on license usage. For more information, see Querying the ELC Database.
NOTE: AppWave does not monitor the use of locally installed apps such as those used offline.
CUMULATIVE REPORTS FOR LICENSED APPSThe following Cumulative Reports for Licensed Apps are available:
• Application Usage Frequency by User Report
• Application Usage Duration Report
• Application Usage Duration by User Report
• License Denial Report
• License Denials by Application Report
APPWAVE™ ENTERPRISE ADMINISTRATOR GUIDE 89
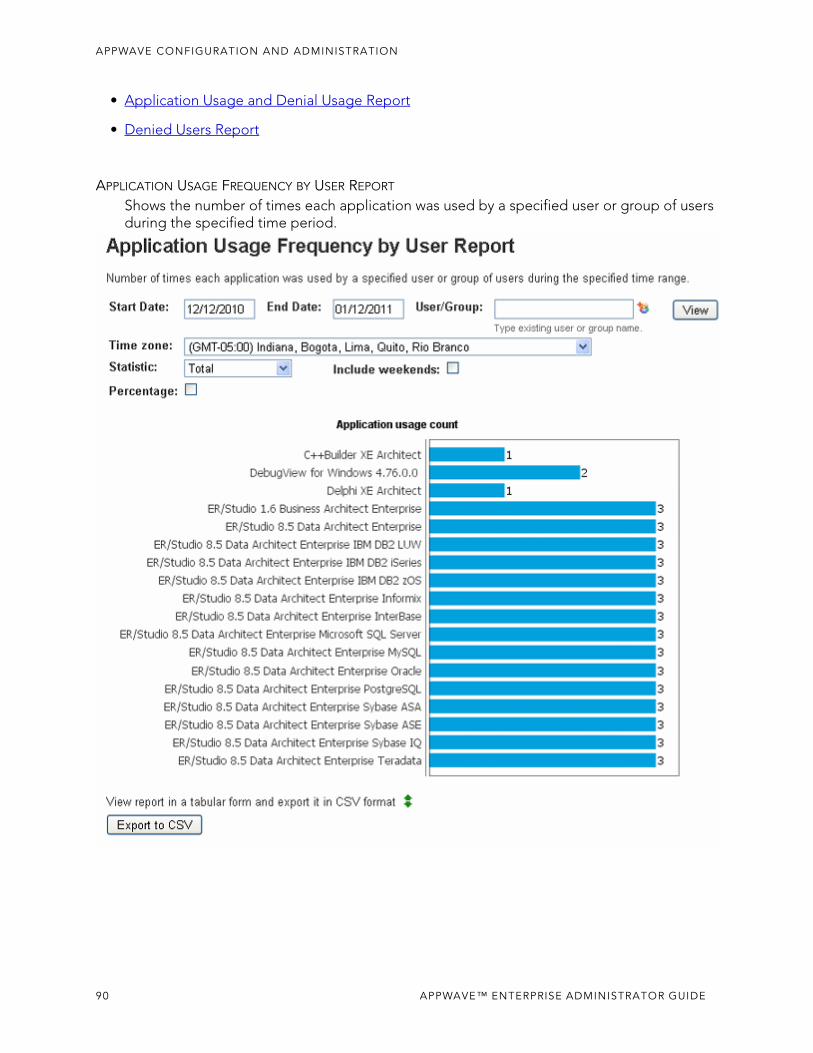
APPWAVE CONFIGURATION AND ADMINISTRATION
• Application Usage and Denial Usage Report
• Denied Users Report
APPLICATION USAGE FREQUENCY BY USER REPORT
Shows the number of times each application was used by a specified user or group of users during the specified time period.
90 APPWAVE™ ENTERPRISE ADMINISTRATOR GUIDE
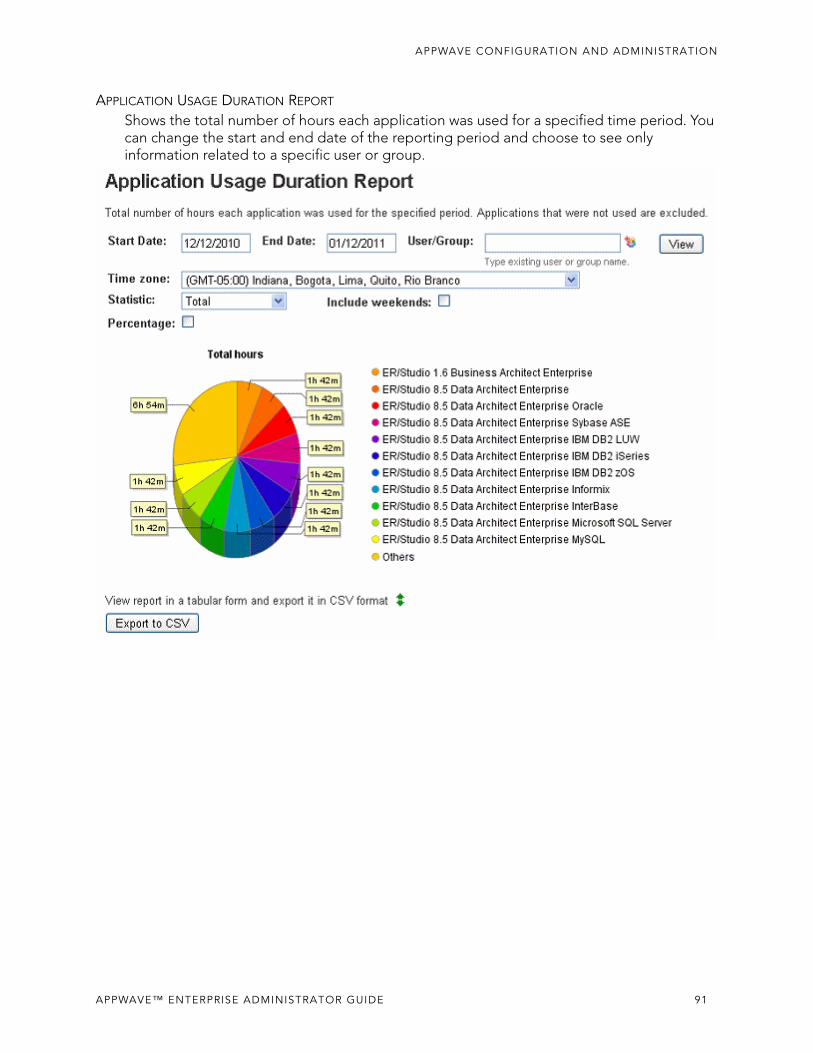
APPWAVE CONFIGURATION AND ADMINISTRATION
APPLICATION USAGE DURATION REPORT
Shows the total number of hours each application was used for a specified time period. You can change the start and end date of the reporting period and choose to see only information related to a specific user or group.
APPWAVE™ ENTERPRISE ADMINISTRATOR GUIDE 91
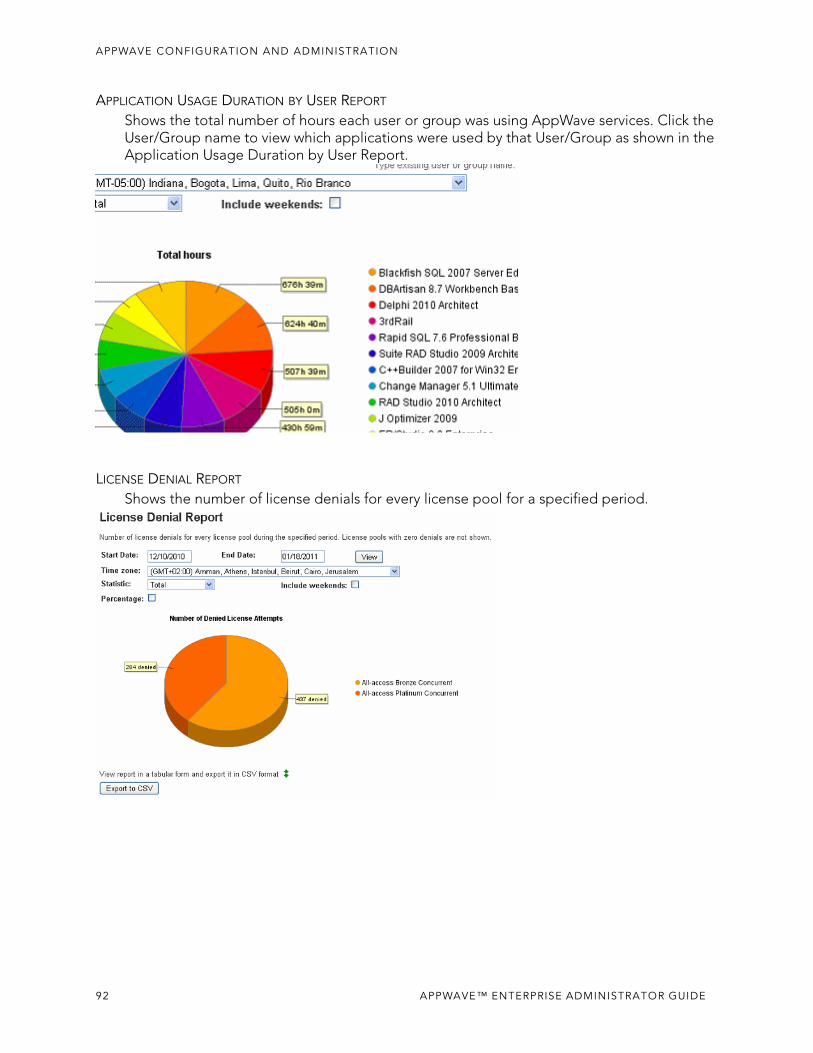
APPWAVE CONFIGURATION AND ADMINISTRATION
APPLICATION USAGE DURATION BY USER REPORT
Shows the total number of hours each user or group was using AppWave services. Click the User/Group name to view which applications were used by that User/Group as shown in the Application Usage Duration by User Report.
LICENSE DENIAL REPORT
Shows the number of license denials for every license pool for a specified period.
92 APPWAVE™ ENTERPRISE ADMINISTRATOR GUIDE
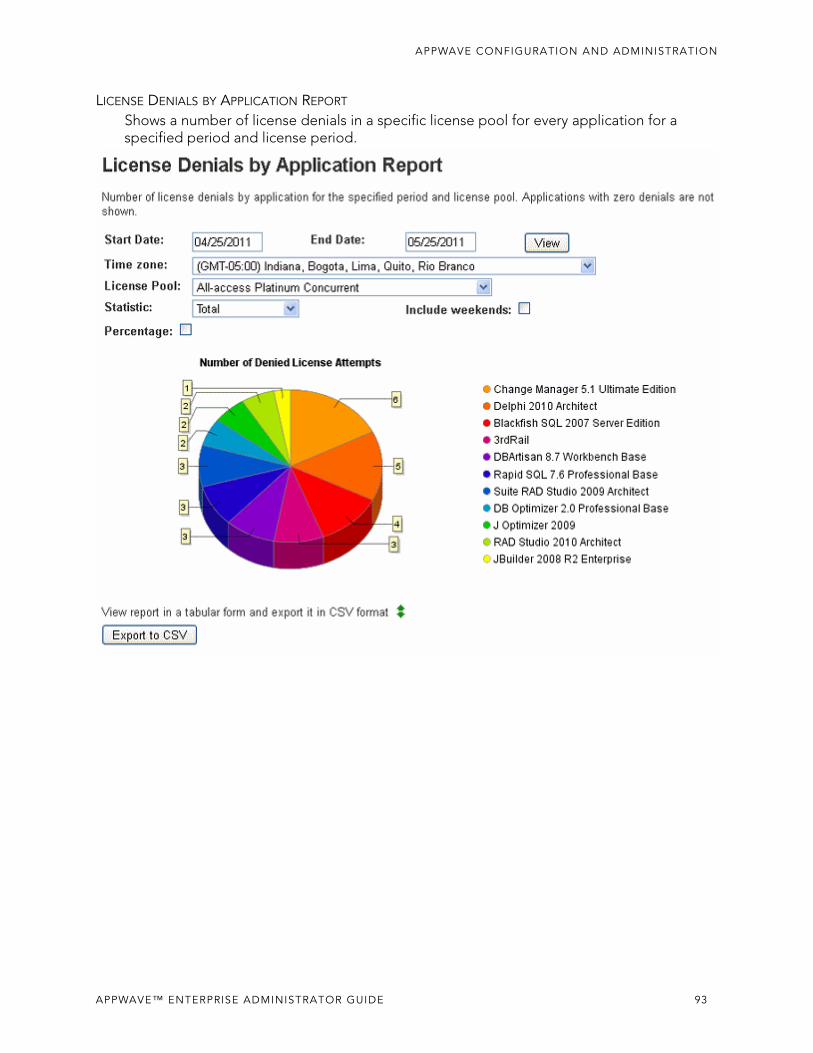
APPWAVE CONFIGURATION AND ADMINISTRATION
LICENSE DENIALS BY APPLICATION REPORT
Shows a number of license denials in a specific license pool for every application for a specified period and license period.
APPWAVE™ ENTERPRISE ADMINISTRATOR GUIDE 93

APPWAVE CONFIGURATION AND ADMINISTRATION
APPLICATION USAGE AND DENIAL USAGE REPORT
Shows number of successful and unsuccessful attempts to acquire a license for a given application.
94 APPWAVE™ ENTERPRISE ADMINISTRATOR GUIDE
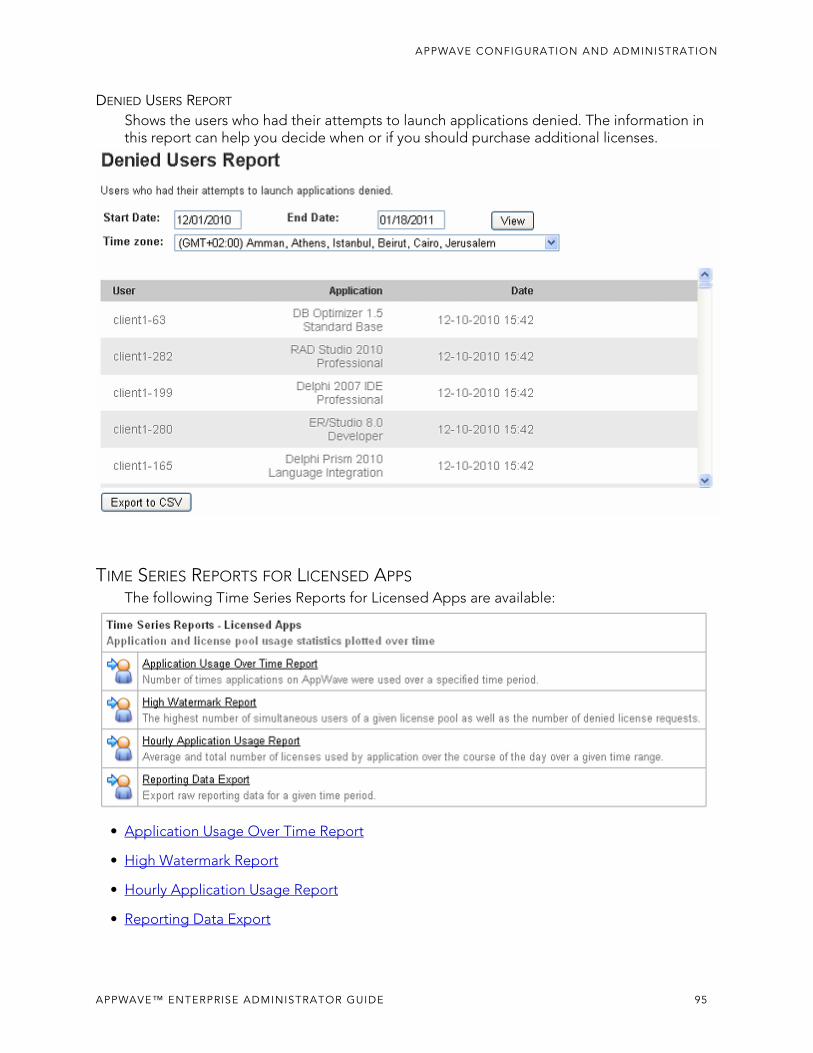
APPWAVE CONFIGURATION AND ADMINISTRATION
DENIED USERS REPORT
Shows the users who had their attempts to launch applications denied. The information in this report can help you decide when or if you should purchase additional licenses.
TIME SERIES REPORTS FOR LICENSED APPSThe following Time Series Reports for Licensed Apps are available:
• Application Usage Over Time Report
• High Watermark Report
• Hourly Application Usage Report
• Reporting Data Export
APPWAVE™ ENTERPRISE ADMINISTRATOR GUIDE 95
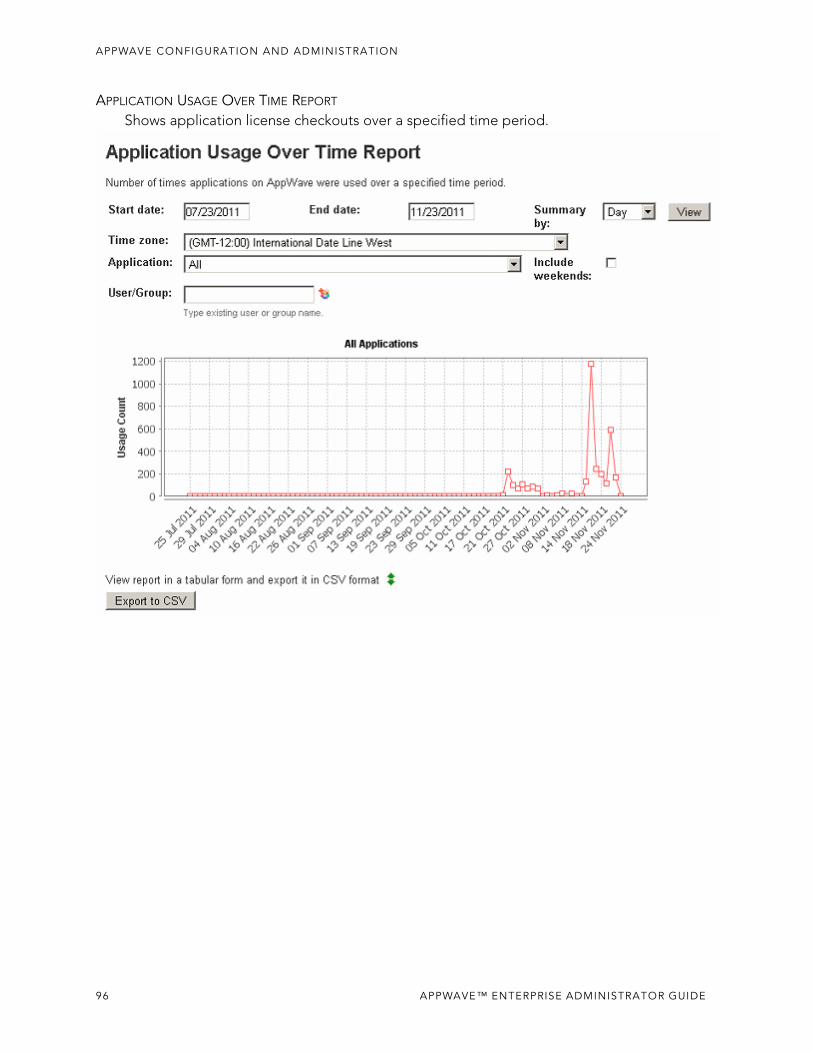
APPWAVE CONFIGURATION AND ADMINISTRATION
APPLICATION USAGE OVER TIME REPORT
Shows application license checkouts over a specified time period.
96 APPWAVE™ ENTERPRISE ADMINISTRATOR GUIDE

APPWAVE CONFIGURATION AND ADMINISTRATION
HIGH WATERMARK REPORT
Shows highest simultaneous license usage count and number of denied licence requests.
APPWAVE™ ENTERPRISE ADMINISTRATOR GUIDE 97
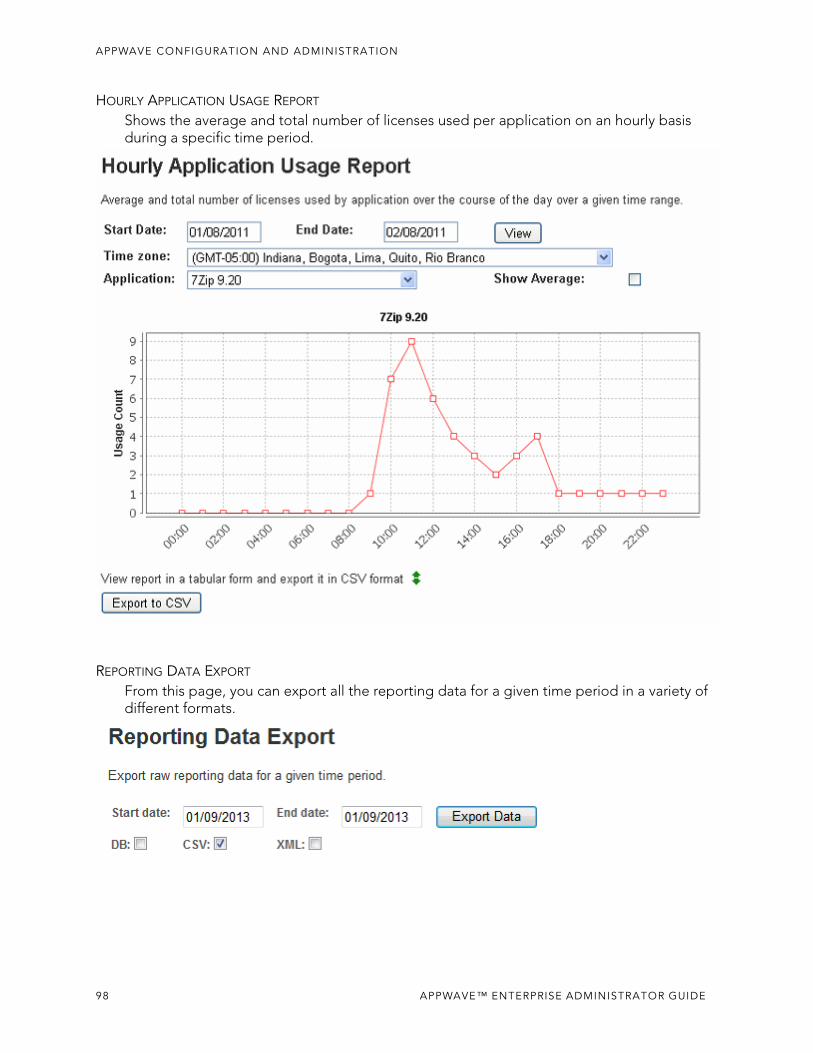
APPWAVE CONFIGURATION AND ADMINISTRATION
HOURLY APPLICATION USAGE REPORT
Shows the average and total number of licenses used per application on an hourly basis during a specific time period.
REPORTING DATA EXPORT
From this page, you can export all the reporting data for a given time period in a variety of different formats.
98 APPWAVE™ ENTERPRISE ADMINISTRATOR GUIDE
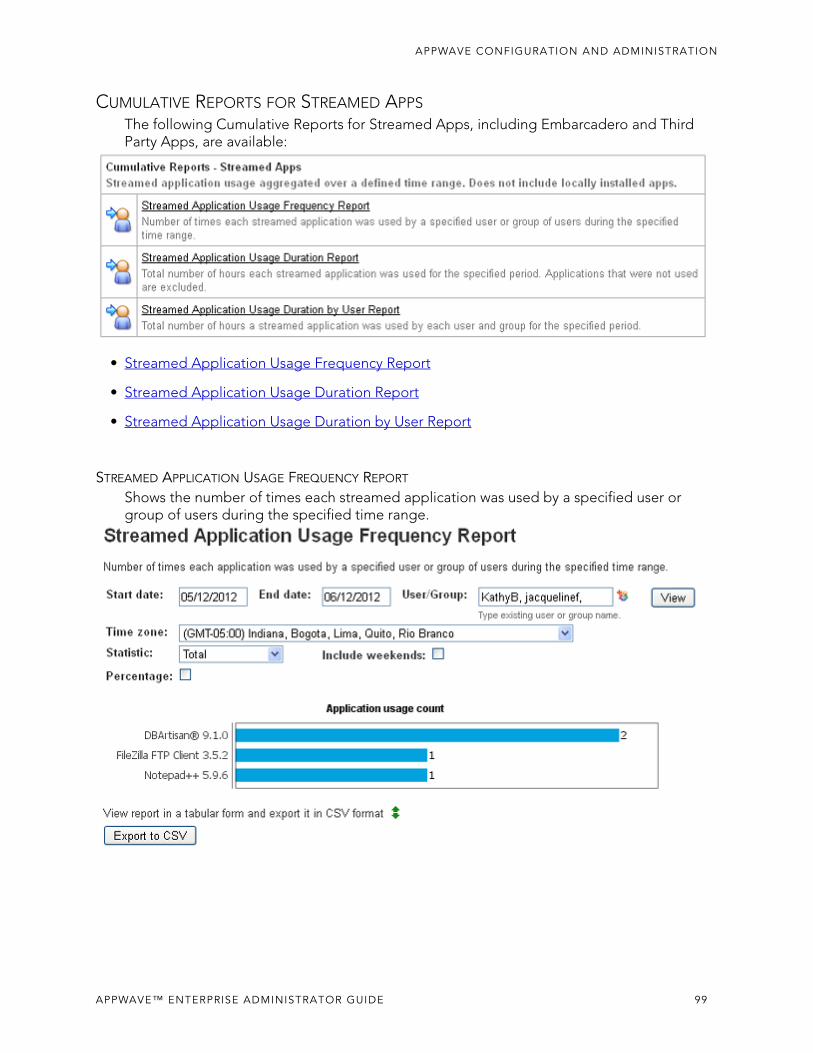
APPWAVE CONFIGURATION AND ADMINISTRATION
CUMULATIVE REPORTS FOR STREAMED APPSThe following Cumulative Reports for Streamed Apps, including Embarcadero and Third Party Apps, are available:
• Streamed Application Usage Frequency Report
• Streamed Application Usage Duration Report
• Streamed Application Usage Duration by User Report
STREAMED APPLICATION USAGE FREQUENCY REPORT
Shows the number of times each streamed application was used by a specified user or group of users during the specified time range.
APPWAVE™ ENTERPRISE ADMINISTRATOR GUIDE 99
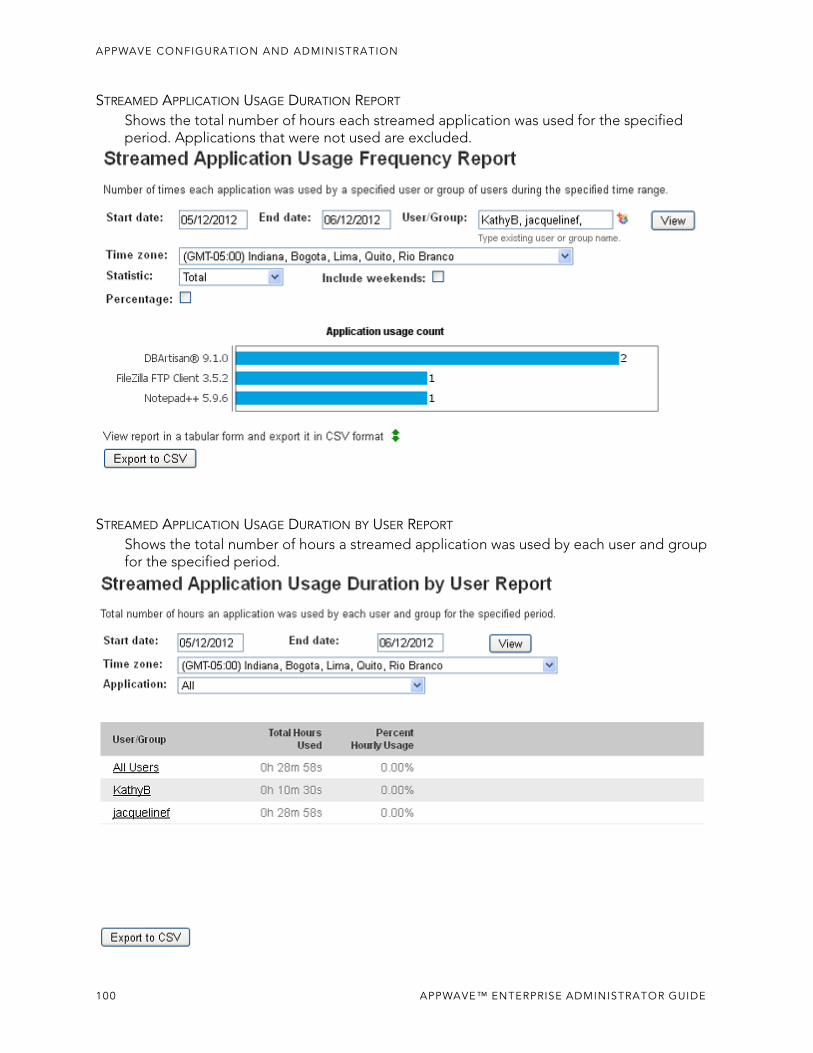
APPWAVE CONFIGURATION AND ADMINISTRATION
STREAMED APPLICATION USAGE DURATION REPORT
Shows the total number of hours each streamed application was used for the specified period. Applications that were not used are excluded.
STREAMED APPLICATION USAGE DURATION BY USER REPORT
Shows the total number of hours a streamed application was used by each user and group for the specified period.
100 APPWAVE™ ENTERPRISE ADMINISTRATOR GUIDE

APPWAVE CONFIGURATION AND ADMINISTRATION
REPORTING DATA EXPORTLets you export all raw reporting data over a specified time period. You can export the data in database, CSV or XML format.
QUERYING THE ELC DATABASEThere is a read-only user account that you can use to access the Embarcadero License Center (ELC) database. You can use this account to query the database and access the raw data in the ELC database.
The ELC database is an Interbase database. You can query the database using SQL.
You can view the structure of the ELC database by using the IBConsole.exe program which is located in ... C:\Program Files\Embarcadero\AppWave\X.X\InterBase\bin.
1 Launch IBConsole.exe.
2 Expand Local Server > Databases.
APPWAVE™ ENTERPRISE ADMINISTRATOR GUIDE 101
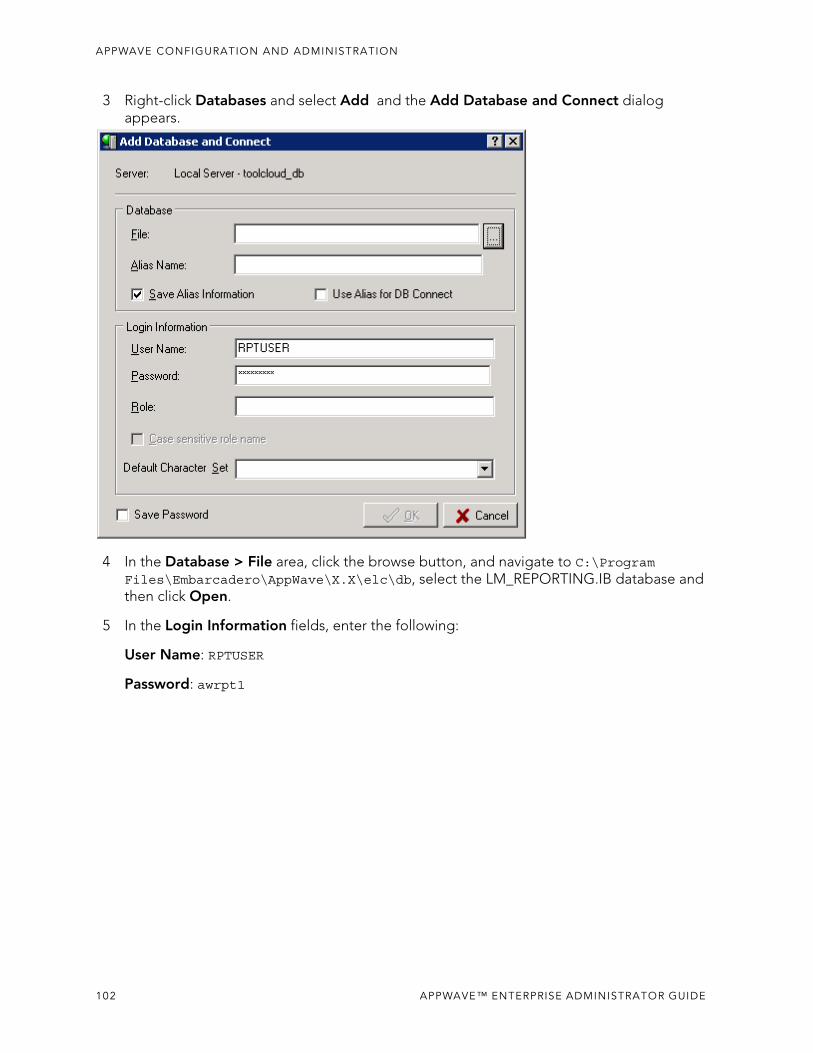
APPWAVE CONFIGURATION AND ADMINISTRATION
3 Right-click Databases and select Add and the Add Database and Connect dialog appears.
4 In the Database > File area, click the browse button, and navigate to C:\Program Files\Embarcadero\AppWave\X.X\elc\db, select the LM_REPORTING.IB database and then click Open.
5 In the Login Information fields, enter the following:
User Name: RPTUSER
Password: awrpt1
102 APPWAVE™ ENTERPRISE ADMINISTRATOR GUIDE
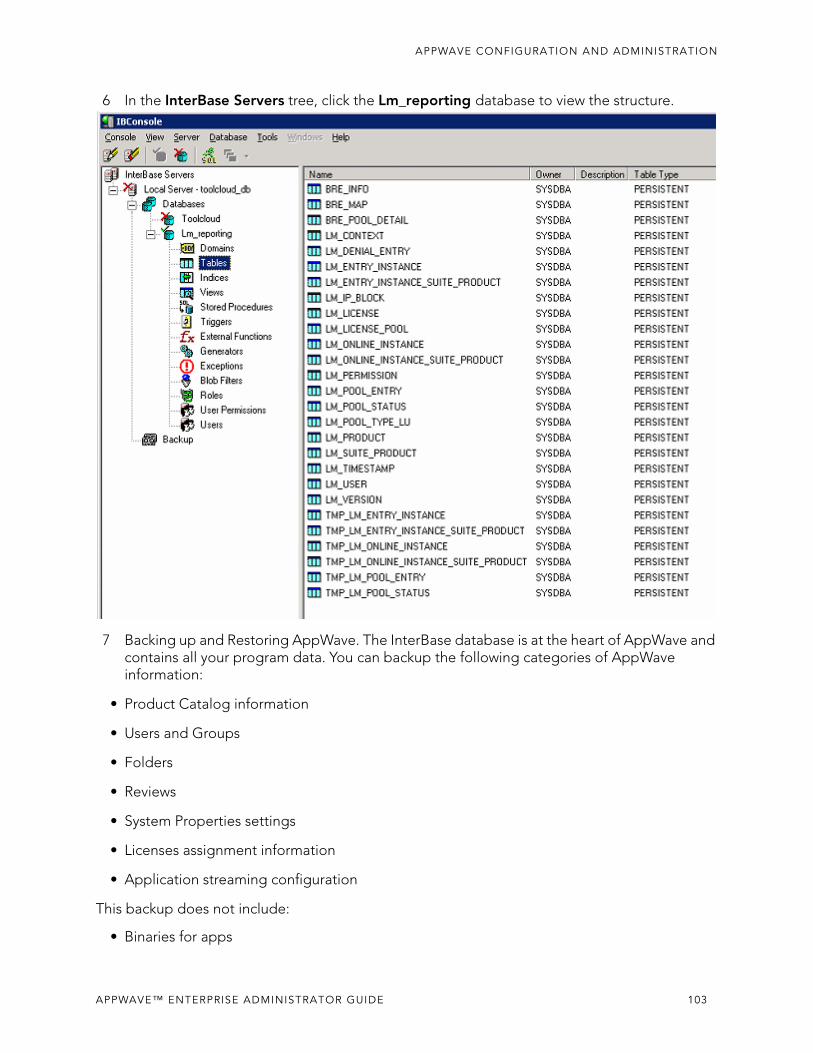
APPWAVE CONFIGURATION AND ADMINISTRATION
6 In the InterBase Servers tree, click the Lm_reporting database to view the structure.
7 Backing up and Restoring AppWave. The InterBase database is at the heart of AppWave and contains all your program data. You can backup the following categories of AppWave information:
• Product Catalog information
• Users and Groups
• Folders
• Reviews
• System Properties settings
• Licenses assignment information
• Application streaming configuration
This backup does not include:
• Binaries for apps
APPWAVE™ ENTERPRISE ADMINISTRATOR GUIDE 103
APPWAVE CONFIGURATION AND ADMINISTRATION
• Licenses
• Permissions
• Proxy details
• Server port
• Repository (if it is changed then the streaming service will be offline after restore)
• Optimization properties
• Notifications
You can configure AppWave to alert you when you have reached the database transaction limit by selecting Transaction limit in the Message Types section of the System Properties > Email tab. This alert signifies that it is time to backup your Interbase database
For information on backing up reports, see Backing Up And Restoring Reports.
1 From the SYSTEM MANAGEMENT section on the AppWave Dashboard, click System Properties and then click the Optimization tab.
The Optimization options appear.
In the Database Options section, click Backup Database.
Your database is backed up to the following location:
<installation folder>\data
with a file name resembling the following:
tcdb20120627191100.ibk
The file name is comprised of tcdb; followed by the date, month, day, hour, minute, and second to present the exact time of the backup; and has a suffix of ibk.
104 APPWAVE™ ENTERPRISE ADMINISTRATOR GUIDE
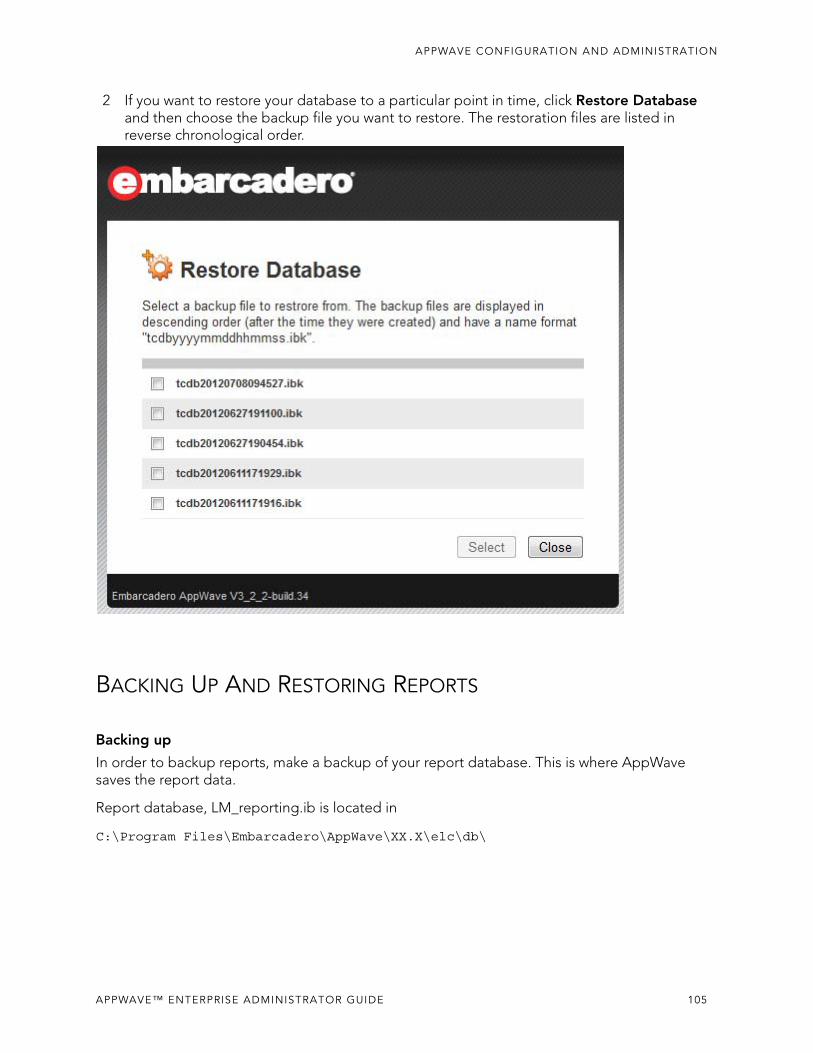
APPWAVE CONFIGURATION AND ADMINISTRATION
2 If you want to restore your database to a particular point in time, click Restore Database and then choose the backup file you want to restore. The restoration files are listed in reverse chronological order.
BACKING UP AND RESTORING REPORTS
Backing up
In order to backup reports, make a backup of your report database. This is where AppWave saves the report data.
Report database, LM_reporting.ib is located in
C:\Program Files\Embarcadero\AppWave\XX.X\elc\db\
APPWAVE™ ENTERPRISE ADMINISTRATOR GUIDE 105
APPWAVE CONFIGURATION AND ADMINISTRATION
Restoring
To restore the reports follow the steps:
1 Stop the AppWave service
2 Replace the old database with the backed up one.
3 Start AppWave.
106 APPWAVE™ ENTERPRISE ADMINISTRATOR GUIDE
APPWAVE CONFIGURATION AND ADMINISTRATION
BACKING UP AND RESTORING APPWAVE BROWSER
The following describes the steps to be performed in case of AppWave Browser data corruption, in order to ensure that the existing data is preserved.
NOTE: If the two AppWave Browser installations are not using the same version, consult Embarcadero support to make sure that the old and new data are still compatible.
1 Backup the following folders and files in a separate location:
• The database folderWindows 7 and Windows 8: C:\Users\<username>\AppData\Local\Embarcadero\AppWave
Windows XP: C:\Documents and Settings\<username>\Local Settings\Application Data\Embarcadero\AppWave
• The ToolBox.ini fileWindows 7 and Windows 8: C:\Users\<username>\AppData\Local\Embarcadero\AppWave
Windows XP: C:\Documents and Settings\<username>\Local Settings\Application Data\Embarcadero\AppWave
• The Product Repository folder which is set up in the AppWave Browser Tools and Options > Options > Cache Folder (by default, on Windows 7 and Windows 8: C:\ProgramData\Embarcadero\Product Repository
Windows XP: C:\Documents and Settings\All Users\Application Data\Embarcadero\Product Repository
If there is a StreamingCore folder in Product Repository, it should not be copied along with the other folders from the cache folder content.
• Workstation Licenses: If the AppWave Browser user has AppWave for Custom Apps (AW4CA) or AppWave for Premium Product (AW4X) workstation licenses, then back those up as well. The workstation licenses are saved in: Windows 7 and Windows 8: C:\ProgramData\Embarcadero
Windows XP: C:\Documents and Settings\All Users\Application Data\Embarcadero and shouldn’t be affected by AppWave Browser corruption, but only by a system data corruption. The backup/restore procedure is the same as for the other folders.
NOTE: These folders/files should be backed up again if the user changes connection data, folders, downloads apps, or modifies options.
2 If the AppWave Browser data becomes corrupted, AppWave Browser should be uninstalled and reinstalled.
APPWAVE™ ENTERPRISE ADMINISTRATOR GUIDE 107
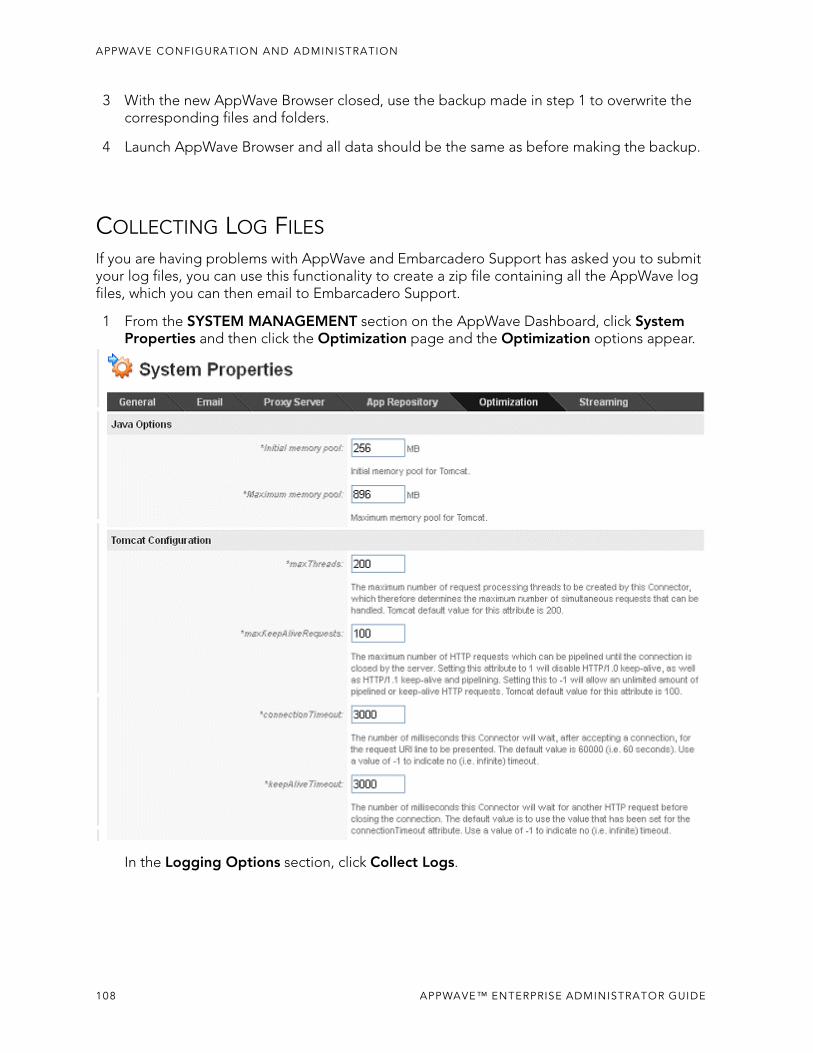
APPWAVE CONFIGURATION AND ADMINISTRATION
3 With the new AppWave Browser closed, use the backup made in step 1 to overwrite the corresponding files and folders.
4 Launch AppWave Browser and all data should be the same as before making the backup.
COLLECTING LOG FILES
If you are having problems with AppWave and Embarcadero Support has asked you to submit your log files, you can use this functionality to create a zip file containing all the AppWave log files, which you can then email to Embarcadero Support.
1 From the SYSTEM MANAGEMENT section on the AppWave Dashboard, click System Properties and then click the Optimization page and the Optimization options appear.
In the Logging Options section, click Collect Logs.
108 APPWAVE™ ENTERPRISE ADMINISTRATOR GUIDE
LICENSE MANAGEMENT
This section addresses management issues of licenses for Embarcadero products and AppWave Apps mastered with AppWave Studio.
This section includes these topics:
• Understanding AppWave Licenses
• Managing Licenses
• Provide Licenses to AppWave Browser Users
UNDERSTANDING APPWAVE LICENSES
AppWave licenses have three dimensions: platforms supported (operating system and database), license level, and license type.
• License Levels
• License Types
LICENSE LEVELSThe All-Access membership level or license level you purchase from Embarcadero determines which products your users can access. Each successive level provides access to a wider and more capable range of application development and database applications from the Embarcadero AppWave Store. In addition to application installers, streamed apps for the Embarcadero products you have licensed are included with every All-Access membership, at no extra cost to active members. For more information, see
Embarcadero All-Access - Membership Levels
on the Embarcadero Web site
http://www.embarcadero.com/products/all_access/membership_levels.php.
LICENSE TYPESEmbarcadero licenses grant you access to Embarcadero application, and database development and management tools. The following topics describe the various licenses:
• Network Named User License
• Concurrent License
• Workstation License
APPWAVE™ ENTERPRISE ADMINISTRATOR GUIDE 109
LICENSE MANAGEMENT
• Individual and Suite Licenses
• Trial Licenses
• Licensing for AppWave 3rd Party Apps / AppWave Edition Licenses
• Premium or Custom App Product Licenses
NETWORK NAMED USER LICENSEThis license is assigned to a named user. It can be used on any machine on the network by the named user. This type of license lets you manage your licenses easily with AppWave. The named license file name format is: named_XXXX.slip. A network named user license can be used when the user is offline. For more information, see Assigning Network Named Licenses to Users and Assigning Network Named Licenses to Users.
CONCURRENT LICENSEThis type of shared license can float to any authorized user on the network. This license type provides for a certain number of seats. AppWave provides users with a license on a first-come, first-served basis. However, you can reserve a number of licenses for a group of users. For more information, see Assigning Concurrent Licenses to Users, Reserving Concurrent Licenses for Embarcadero XE Apps and View Connected Users and Licenses Usage. A concurrent license can be used when the user is offline after the user makes the offline usage request from the Embarcadero app user interface. The concurrent license file name format is: concurrent_XXXX.slip.
WORKSTATION LICENSEThe workstation license is a license for the 3rd party App mastered with AppWave Studio. The Workstation license is managed by AppWave License Automation. You can assign or deny workstation licenses to specific machines, users or groups. You can also reserve workstation licenses to ensure certain users or groups always have access to a license when they need one. For more information, see Configuring License Automation, Assigning Workstation Permissions for 3rd Party Apps and Reserving Licenses for 3rd Party Apps.
INDIVIDUAL AND SUITE LICENSESIndividual licenses for Embarcadero products such as Delphi and DBArtisan and Suite licenses for Embarcadero products such as RAD Studio and All-Access can be named or concurrent licenses that can be recognized by AppWave. They are network licenses that requires AppWave. Individual and Suite licenses can be purchased separately from an All-Access license.
110 APPWAVE™ ENTERPRISE ADMINISTRATOR GUIDE
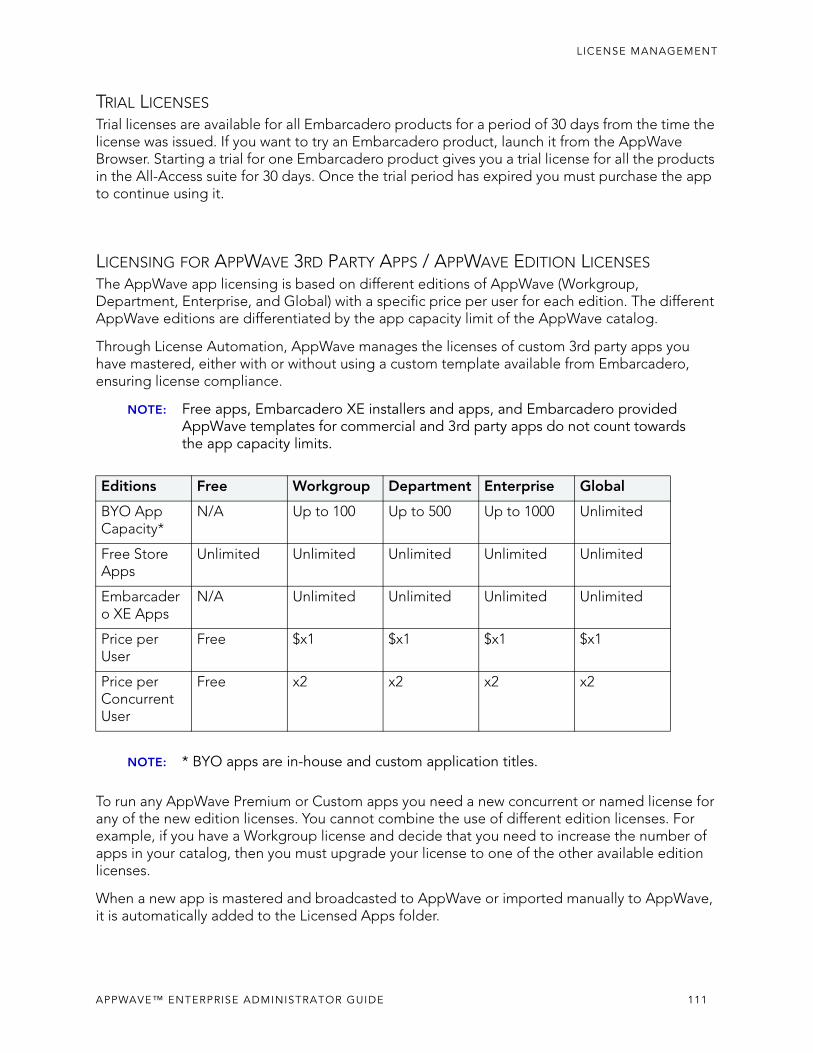
LICENSE MANAGEMENT
TRIAL LICENSESTrial licenses are available for all Embarcadero products for a period of 30 days from the time the license was issued. If you want to try an Embarcadero product, launch it from the AppWave Browser. Starting a trial for one Embarcadero product gives you a trial license for all the products in the All-Access suite for 30 days. Once the trial period has expired you must purchase the app to continue using it.
LICENSING FOR APPWAVE 3RD PARTY APPS / APPWAVE EDITION LICENSESThe AppWave app licensing is based on different editions of AppWave (Workgroup, Department, Enterprise, and Global) with a specific price per user for each edition. The different AppWave editions are differentiated by the app capacity limit of the AppWave catalog.
Through License Automation, AppWave manages the licenses of custom 3rd party apps you have mastered, either with or without using a custom template available from Embarcadero, ensuring license compliance.
NOTE: Free apps, Embarcadero XE installers and apps, and Embarcadero provided AppWave templates for commercial and 3rd party apps do not count towards the app capacity limits.
NOTE: * BYO apps are in-house and custom application titles.
To run any AppWave Premium or Custom apps you need a new concurrent or named license for any of the new edition licenses. You cannot combine the use of different edition licenses. For example, if you have a Workgroup license and decide that you need to increase the number of apps in your catalog, then you must upgrade your license to one of the other available edition licenses.
When a new app is mastered and broadcasted to AppWave or imported manually to AppWave, it is automatically added to the Licensed Apps folder.
Editions Free Workgroup Department Enterprise Global
BYO App Capacity*
N/A Up to 100 Up to 500 Up to 1000 Unlimited
Free Store Apps
Unlimited Unlimited Unlimited Unlimited Unlimited
Embarcadero XE Apps
N/A Unlimited Unlimited Unlimited Unlimited
Price per User
Free $x1 $x1 $x1 $x1
Price per Concurrent User
Free x2 x2 x2 x2
APPWAVE™ ENTERPRISE ADMINISTRATOR GUIDE 111
LICENSE MANAGEMENT
AppWave trial licensing in AppWave 3.2.2 and higher allows for OnDemand suite trails which entitles one 30-day trial license for 100 apps/per user.
The AppWave Admin Console has been updated to handle the new licensing model, enabling AppWave to enforce app and user capacity limitations, including admin alerts when capacity limits are reached that include information on how to acquire a license upgrade. You can configure AppWave to alert you when you have reached the limit of your AppWave Edition license by selecting Capacity Licensed limit in the Message Types section of System Properties > Email tab. The following is an example admin alert:
• Your AppWave license permits up to 100 apps. You have reached the maximum. Application "xmlmaker_c32 1.0.0.1 English Streamed Application for Windows" was not added to the catalog. Please remove apps to add, or contact Embarcadero Technologies to upgrade your AppWave license.
AppWave Browser users will be alerted to total user capacity limits when launching apps that have reached the current max app capacity limit. The following is an example AppWave Browser alert:
• You have reached the maximum capacity of users allowed to be connected to the AppWave. Please notify your AppWave Administrator - or try again later.
Admin notifications for licensing usage can be configured on the General tab of AppWave System Properties. For more information, see .
For information on configuring AppWave to use the AppWave Edition licenses to manage your apps and ensure license compliance, see For information on configuring AppWave to use the AppWave Edition licenses to manage your apps and ensure license compliance, see Setup 3rd Party Licenses.
PREMIUM OR CUSTOM APP PRODUCT LICENSESThrough License Automation, AppWave can manage the licenses of custom 3rd party Apps you have mastered. This provides the license key and displays information on how to use the license when the AppWave Browser user launches a 3rd party App. Depending on the App, in the AppWave License Automation pages, you need to provide the license as either a serial key or as a .csv file containing multiple serial keys. For more information, see Provide 3rd Party Application Licenses.
MANAGING LICENSES
This section contains these topics:
• View Licenses
• Import New Embarcadero Licenses
• Upgrading AppWave Licenses for Embarcadero Apps
112 APPWAVE™ ENTERPRISE ADMINISTRATOR GUIDE

LICENSE MANAGEMENT
• Retrieve Licenses
• Setup 3rd Party Licenses
• Update Licenses
• Reload Licenses
• Delete Licenses
• Provide 3rd Party Application Licenses
• Control License Usage
• View Connected Users and Licenses Usage
• Manage Licenses of 3rd Party Apps
• Manage Trial Licenses
APPWAVE™ ENTERPRISE ADMINISTRATOR GUIDE 113
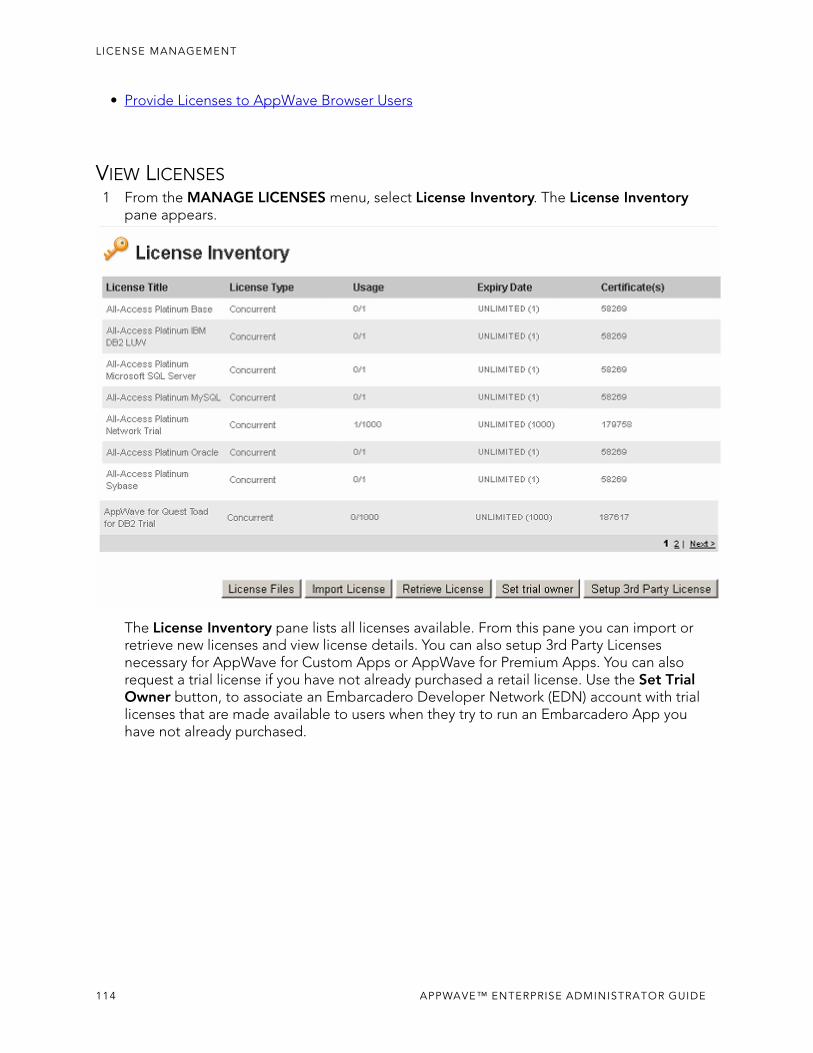
LICENSE MANAGEMENT
• Provide Licenses to AppWave Browser Users
VIEW LICENSES1 From the MANAGE LICENSES menu, select License Inventory. The License Inventory
pane appears.
The License Inventory pane lists all licenses available. From this pane you can import or retrieve new licenses and view license details. You can also setup 3rd Party Licenses necessary for AppWave for Custom Apps or AppWave for Premium Apps. You can also request a trial license if you have not already purchased a retail license. Use the Set Trial Owner button, to associate an Embarcadero Developer Network (EDN) account with trial licenses that are made available to users when they try to run an Embarcadero App you have not already purchased.
114 APPWAVE™ ENTERPRISE ADMINISTRATOR GUIDE

LICENSE MANAGEMENT
Viewing License Files
2 To view details of the license, click License Files. The License Files pane appears.
IMPORT NEW EMBARCADERO LICENSESIf you already have license files sent to you from Embarcadero, then you need to import these licenses.
1 On the Dashboard, click Set up licenses.
APPWAVE™ ENTERPRISE ADMINISTRATOR GUIDE 115
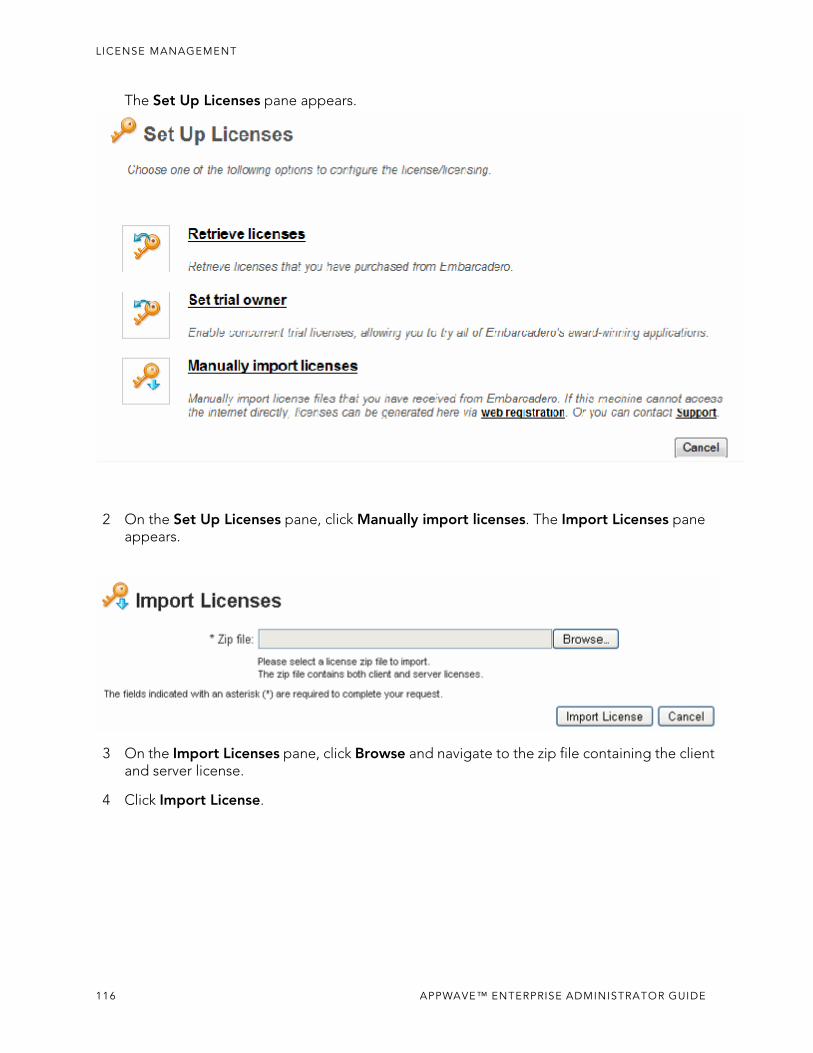
LICENSE MANAGEMENT
The Set Up Licenses pane appears.
2 On the Set Up Licenses pane, click Manually import licenses. The Import Licenses pane appears.
3 On the Import Licenses pane, click Browse and navigate to the zip file containing the client and server license.
4 Click Import License.
116 APPWAVE™ ENTERPRISE ADMINISTRATOR GUIDE
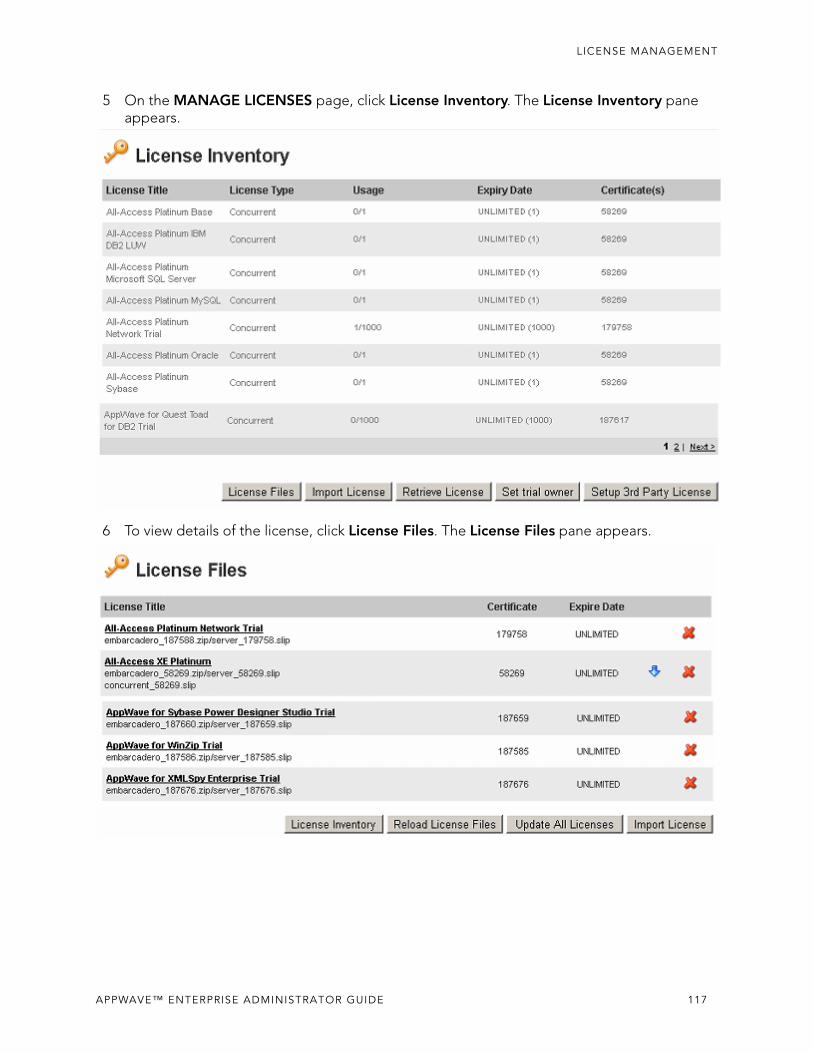
LICENSE MANAGEMENT
5 On the MANAGE LICENSES page, click License Inventory. The License Inventory pane appears.
6 To view details of the license, click License Files. The License Files pane appears.
APPWAVE™ ENTERPRISE ADMINISTRATOR GUIDE 117
LICENSE MANAGEMENT
UPGRADING APPWAVE LICENSES FOR EMBARCADERO APPSWhen you renew or upgrade your Embarcadero licenses, such as for ER/Studio Data Architect or DB Power Studio, you need to update them in AppWave. Embarcadero customer service will send you an email containing a special login name, password, and license certificate number that you use to retrieve the upgraded license.
The following are the steps you take to upgrade your Embarcadero licenses on AppWave.
• Retrieving and Hosting the New License
• Caching the New Version of the App
• Assigning Network Named User Licenses to Users and Groups
118 APPWAVE™ ENTERPRISE ADMINISTRATOR GUIDE
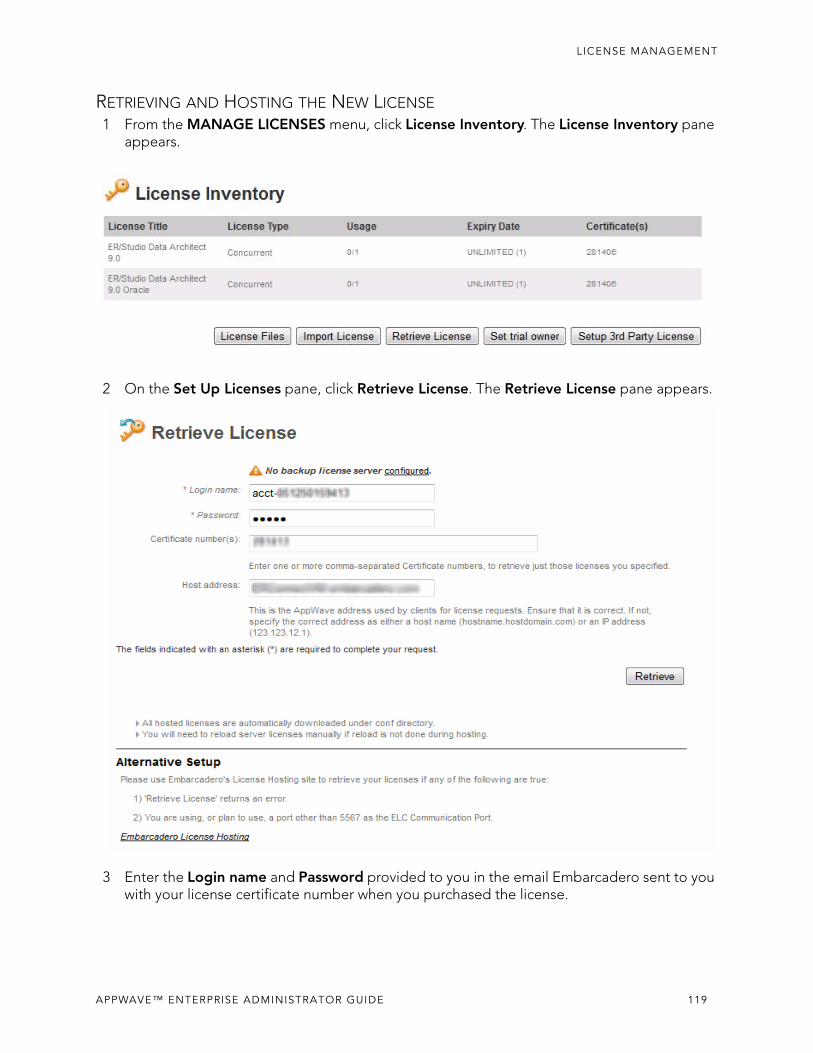
LICENSE MANAGEMENT
RETRIEVING AND HOSTING THE NEW LICENSE1 From the MANAGE LICENSES menu, click License Inventory. The License Inventory pane
appears.
2 On the Set Up Licenses pane, click Retrieve License. The Retrieve License pane appears.
3 Enter the Login name and Password provided to you in the email Embarcadero sent to you with your license certificate number when you purchased the license.
APPWAVE™ ENTERPRISE ADMINISTRATOR GUIDE 119
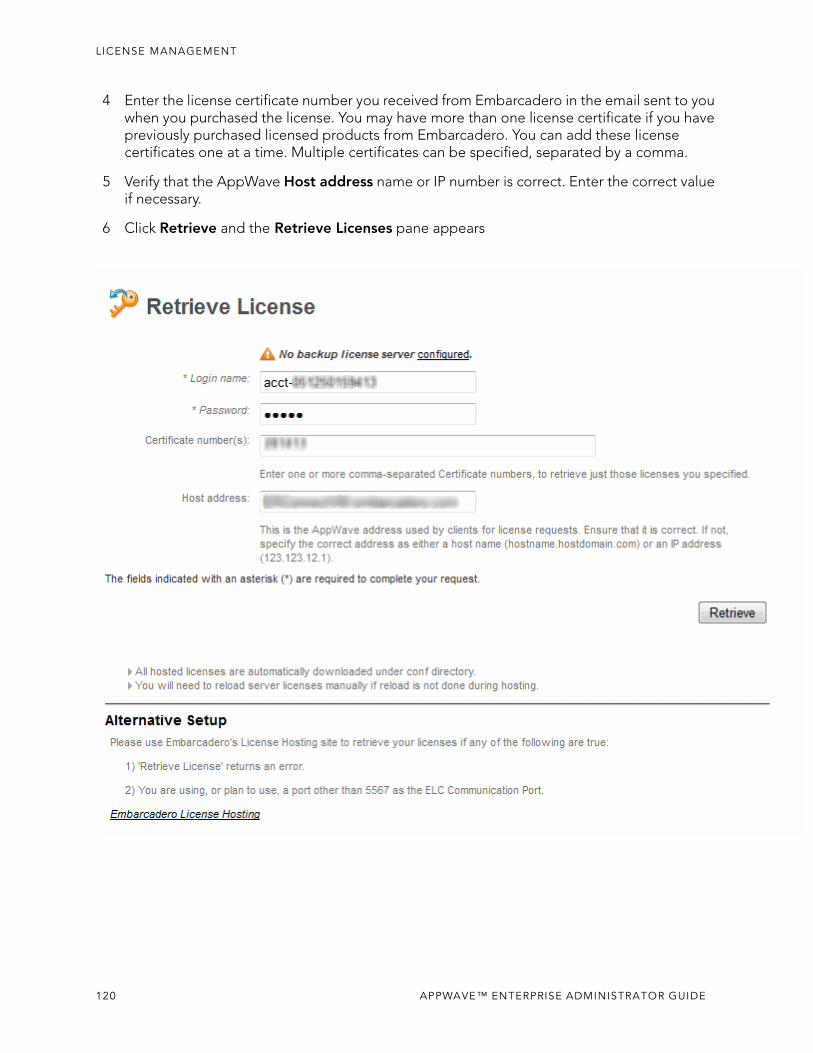
LICENSE MANAGEMENT
4 Enter the license certificate number you received from Embarcadero in the email sent to you when you purchased the license. You may have more than one license certificate if you have previously purchased licensed products from Embarcadero. You can add these license certificates one at a time. Multiple certificates can be specified, separated by a comma.
5 Verify that the AppWave Host address name or IP number is correct. Enter the correct value if necessary.
6 Click Retrieve and the Retrieve Licenses pane appears
120 APPWAVE™ ENTERPRISE ADMINISTRATOR GUIDE
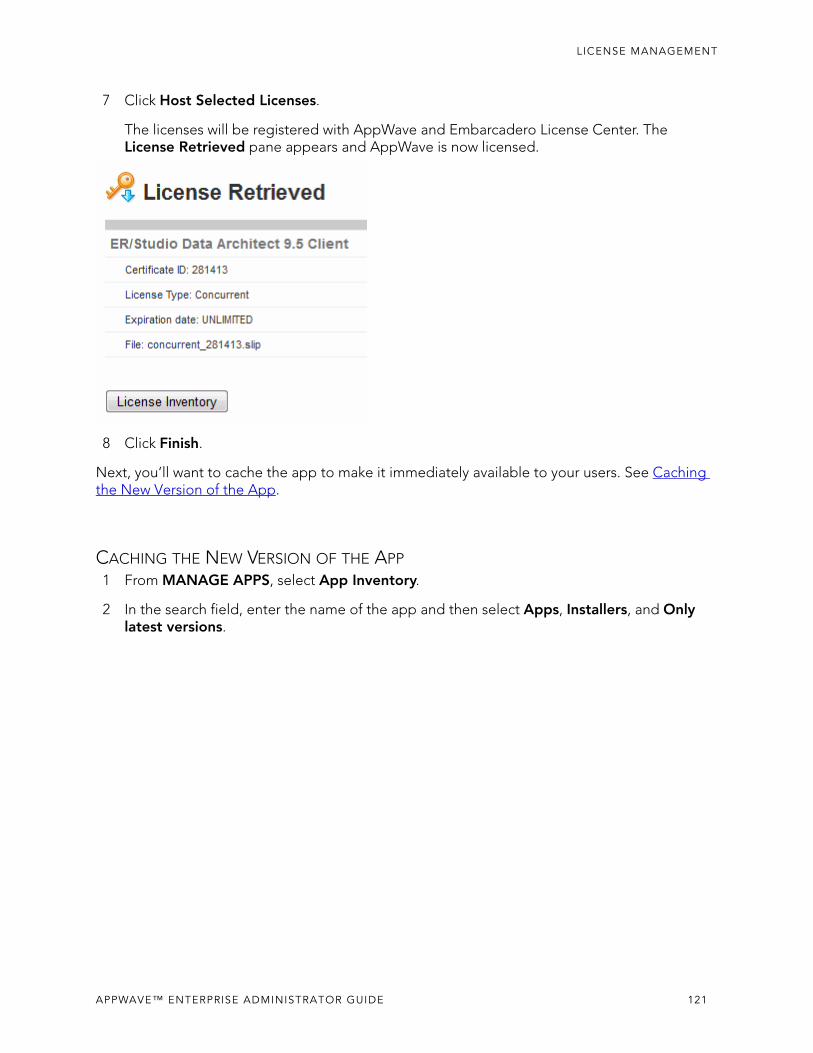
LICENSE MANAGEMENT
7 Click Host Selected Licenses.
The licenses will be registered with AppWave and Embarcadero License Center. The License Retrieved pane appears and AppWave is now licensed.
8 Click Finish.
Next, you’ll want to cache the app to make it immediately available to your users. See Caching the New Version of the App.
CACHING THE NEW VERSION OF THE APP1 From MANAGE APPS, select App Inventory.
2 In the search field, enter the name of the app and then select Apps, Installers, and Only latest versions.
APPWAVE™ ENTERPRISE ADMINISTRATOR GUIDE 121
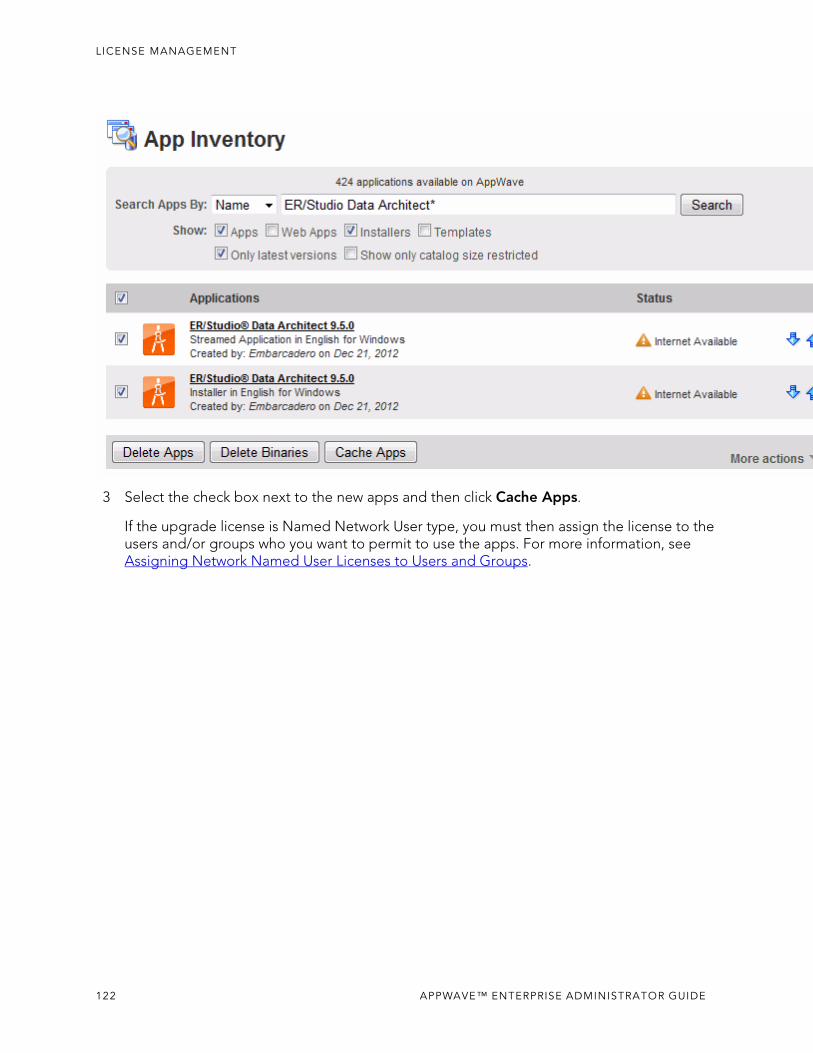
LICENSE MANAGEMENT
3 Select the check box next to the new apps and then click Cache Apps.
If the upgrade license is Named Network User type, you must then assign the license to the users and/or groups who you want to permit to use the apps. For more information, see Assigning Network Named User Licenses to Users and Groups.
122 APPWAVE™ ENTERPRISE ADMINISTRATOR GUIDE
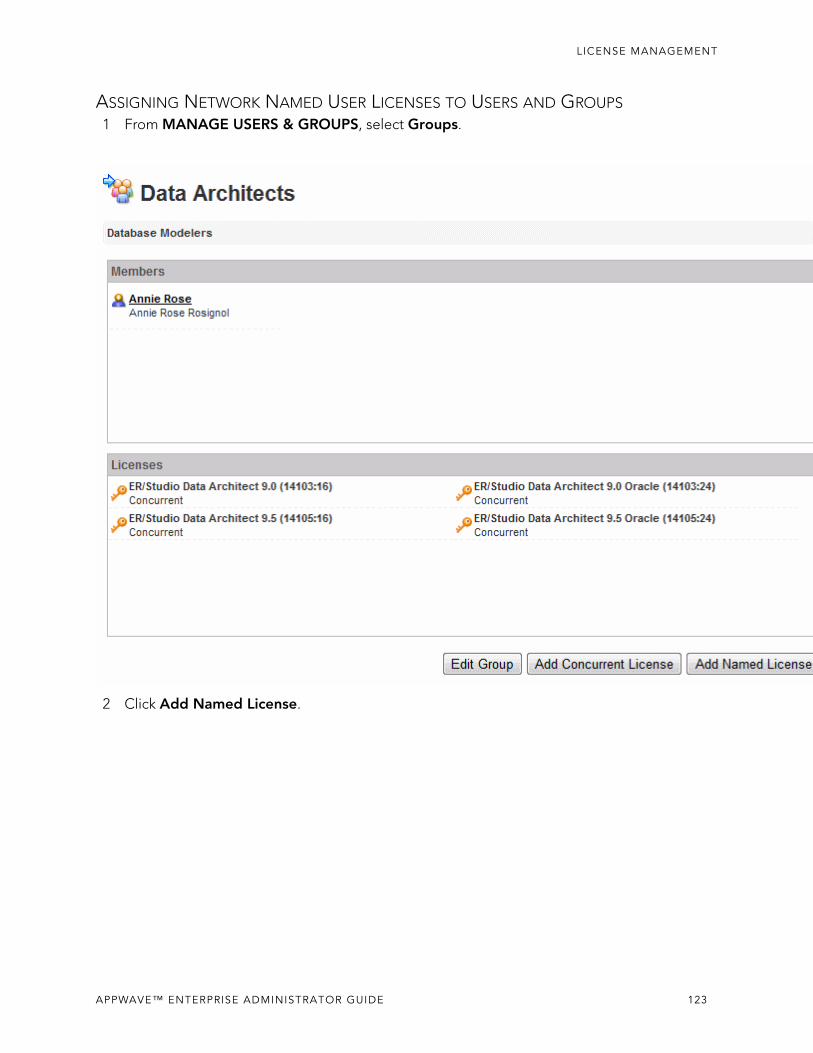
LICENSE MANAGEMENT
ASSIGNING NETWORK NAMED USER LICENSES TO USERS AND GROUPS1 From MANAGE USERS & GROUPS, select Groups.
2 Click Add Named License.
APPWAVE™ ENTERPRISE ADMINISTRATOR GUIDE 123
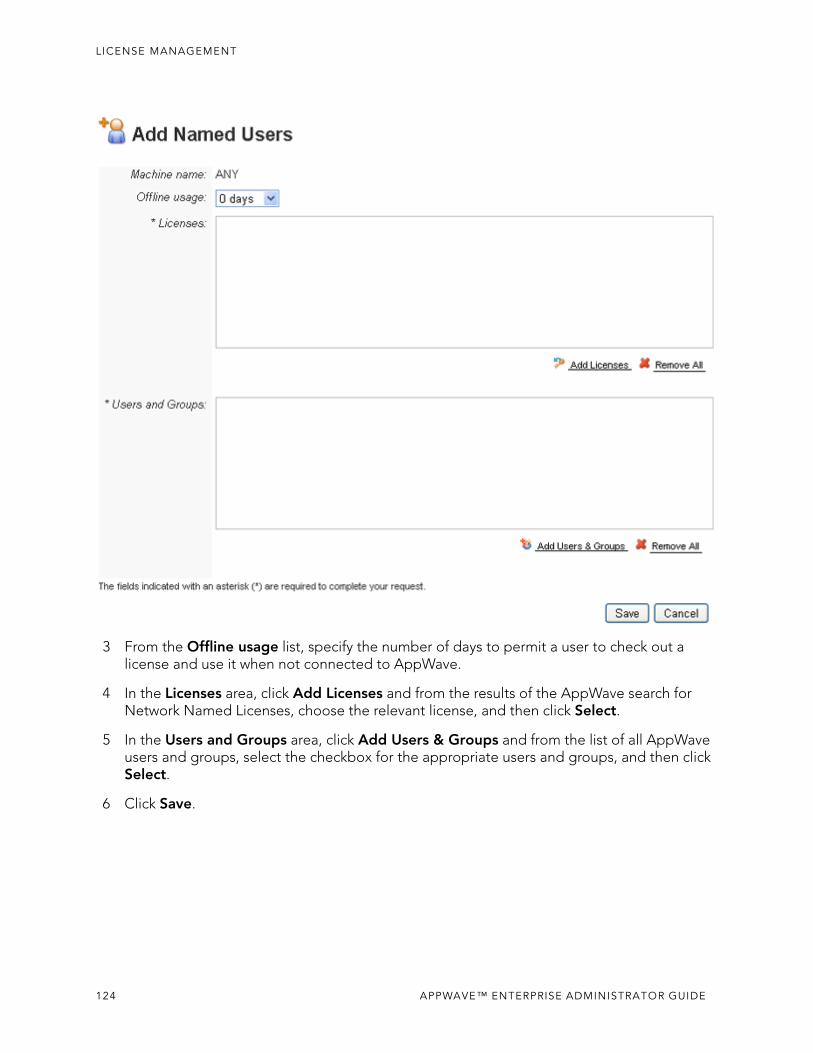
LICENSE MANAGEMENT
3 From the Offline usage list, specify the number of days to permit a user to check out a license and use it when not connected to AppWave.
4 In the Licenses area, click Add Licenses and from the results of the AppWave search for Network Named Licenses, choose the relevant license, and then click Select.
5 In the Users and Groups area, click Add Users & Groups and from the list of all AppWave users and groups, select the checkbox for the appropriate users and groups, and then click Select.
6 Click Save.
124 APPWAVE™ ENTERPRISE ADMINISTRATOR GUIDE
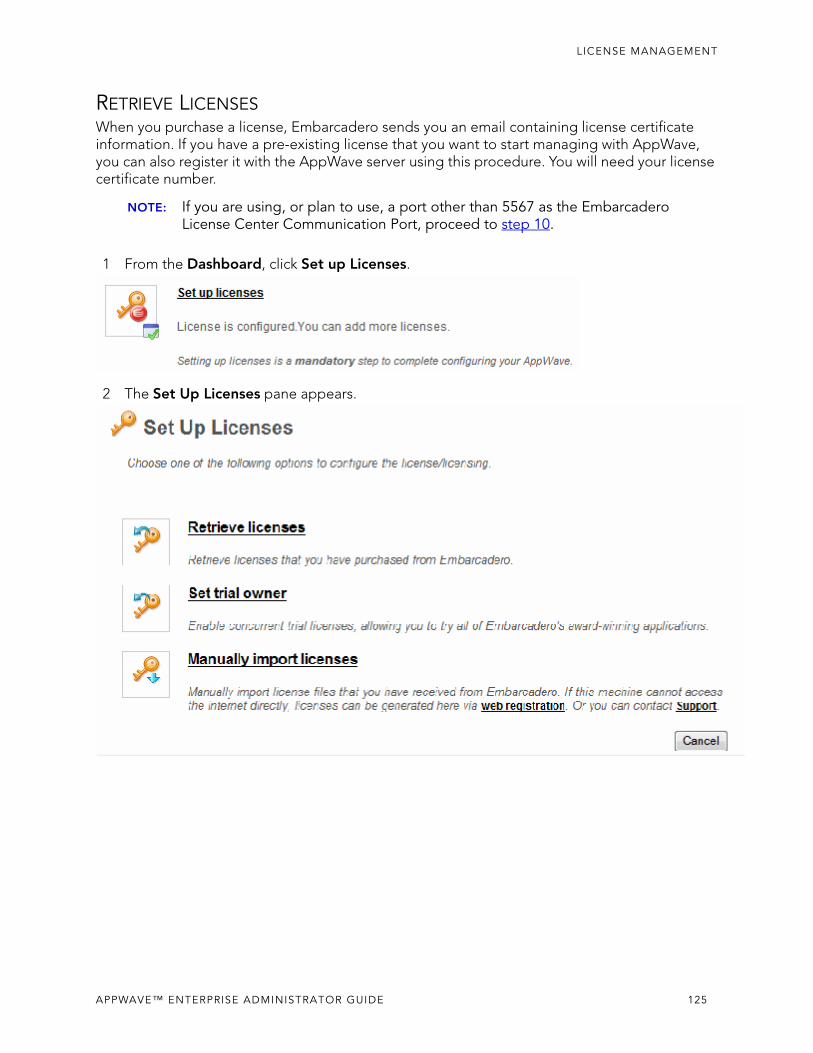
LICENSE MANAGEMENT
RETRIEVE LICENSESWhen you purchase a license, Embarcadero sends you an email containing license certificate information. If you have a pre-existing license that you want to start managing with AppWave, you can also register it with the AppWave server using this procedure. You will need your license certificate number.
NOTE: If you are using, or plan to use, a port other than 5567 as the Embarcadero License Center Communication Port, proceed to step 10.
1 From the Dashboard, click Set up Licenses.
2 The Set Up Licenses pane appears.
APPWAVE™ ENTERPRISE ADMINISTRATOR GUIDE 125
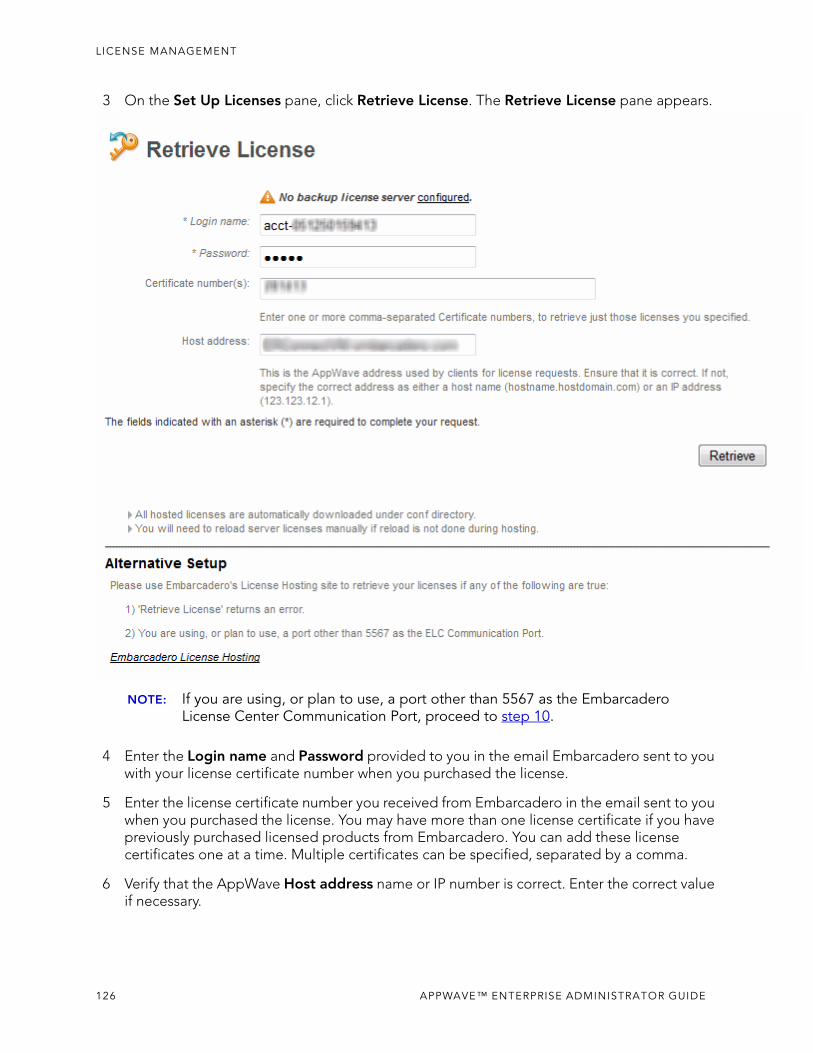
LICENSE MANAGEMENT
3 On the Set Up Licenses pane, click Retrieve License. The Retrieve License pane appears.
NOTE: If you are using, or plan to use, a port other than 5567 as the Embarcadero License Center Communication Port, proceed to step 10.
4 Enter the Login name and Password provided to you in the email Embarcadero sent to you with your license certificate number when you purchased the license.
5 Enter the license certificate number you received from Embarcadero in the email sent to you when you purchased the license. You may have more than one license certificate if you have previously purchased licensed products from Embarcadero. You can add these license certificates one at a time. Multiple certificates can be specified, separated by a comma.
6 Verify that the AppWave Host address name or IP number is correct. Enter the correct value if necessary.
126 APPWAVE™ ENTERPRISE ADMINISTRATOR GUIDE
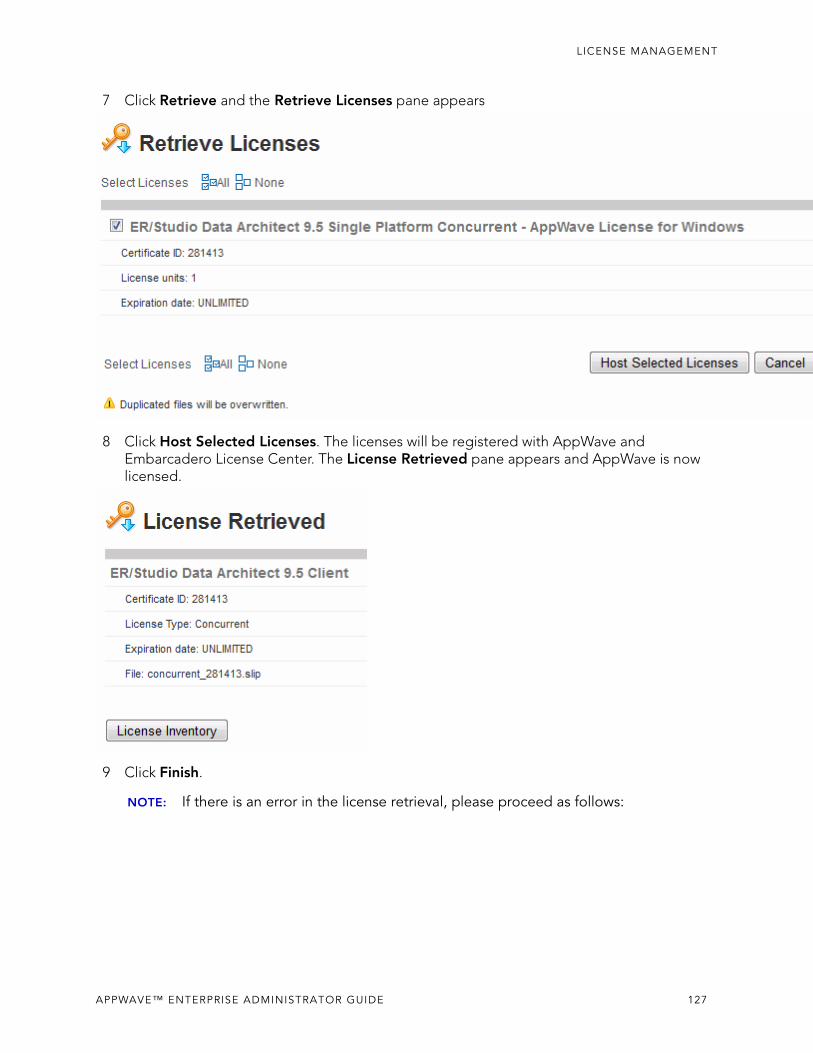
LICENSE MANAGEMENT
7 Click Retrieve and the Retrieve Licenses pane appears
8 Click Host Selected Licenses. The licenses will be registered with AppWave and Embarcadero License Center. The License Retrieved pane appears and AppWave is now licensed.
9 Click Finish.
NOTE: If there is an error in the license retrieval, please proceed as follows:
APPWAVE™ ENTERPRISE ADMINISTRATOR GUIDE 127
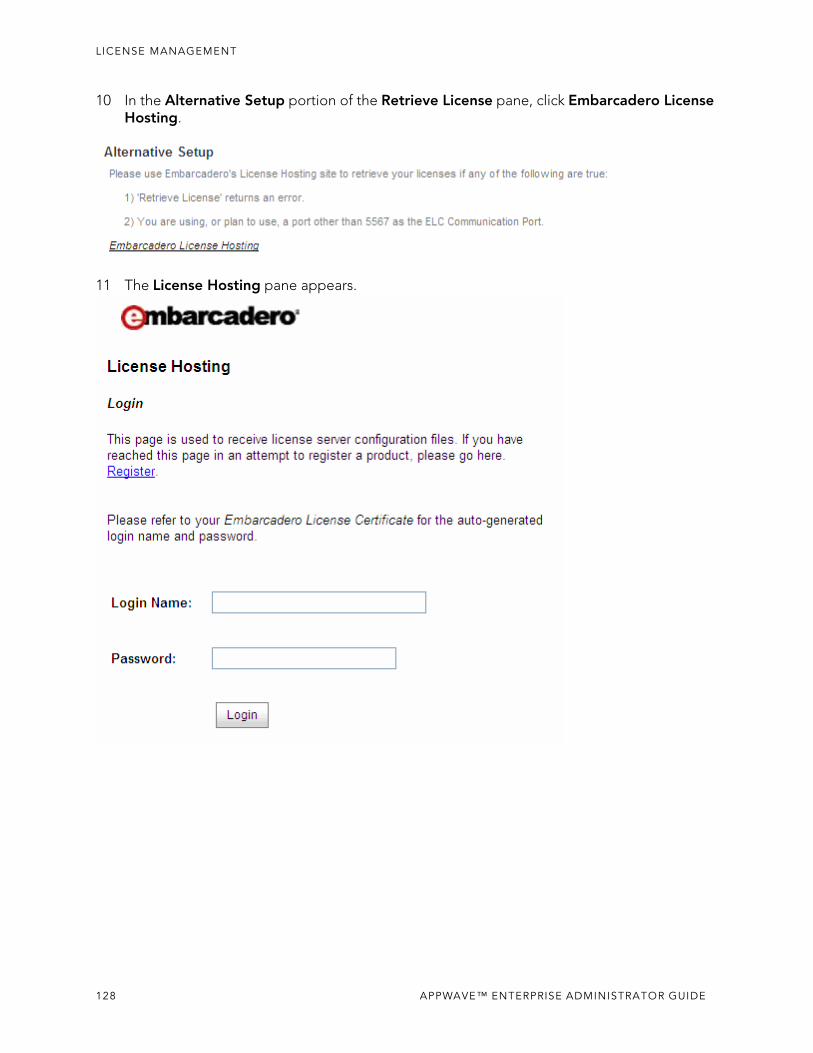
LICENSE MANAGEMENT
10 In the Alternative Setup portion of the Retrieve License pane, click Embarcadero License Hosting.
11 The License Hosting pane appears.
128 APPWAVE™ ENTERPRISE ADMINISTRATOR GUIDE
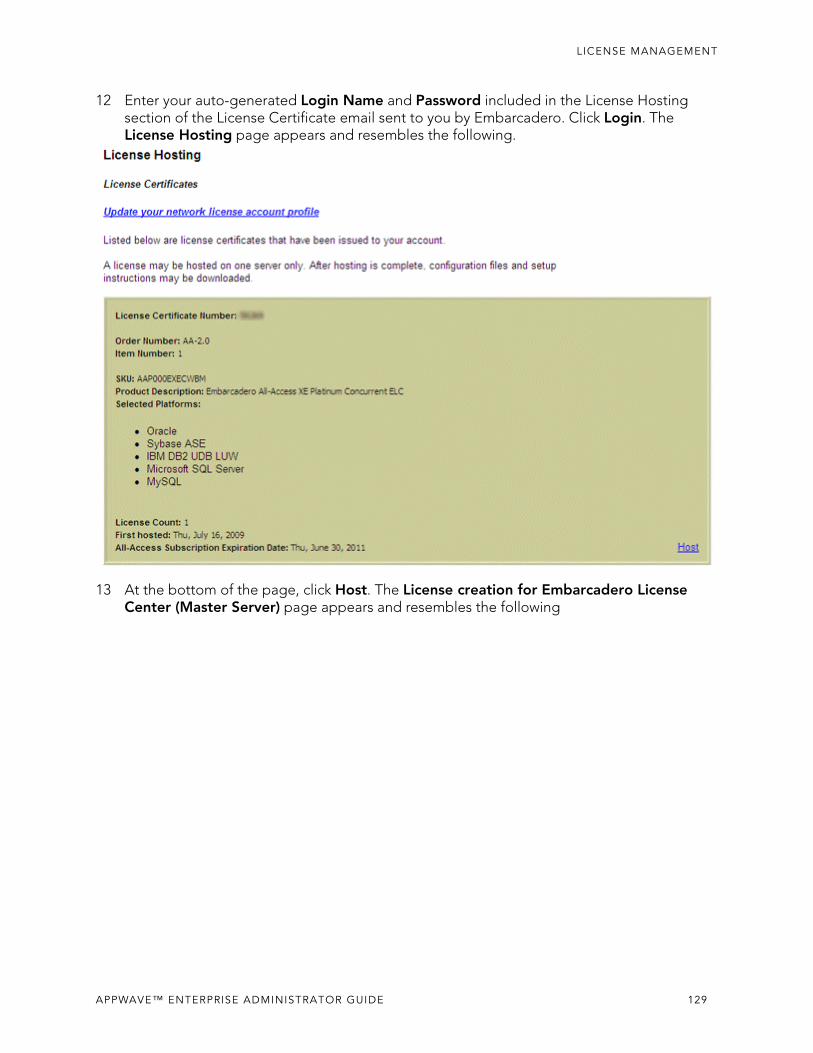
LICENSE MANAGEMENT
12 Enter your auto-generated Login Name and Password included in the License Hosting section of the License Certificate email sent to you by Embarcadero. Click Login. The License Hosting page appears and resembles the following.
13 At the bottom of the page, click Host. The License creation for Embarcadero License Center (Master Server) page appears and resembles the following
APPWAVE™ ENTERPRISE ADMINISTRATOR GUIDE 129
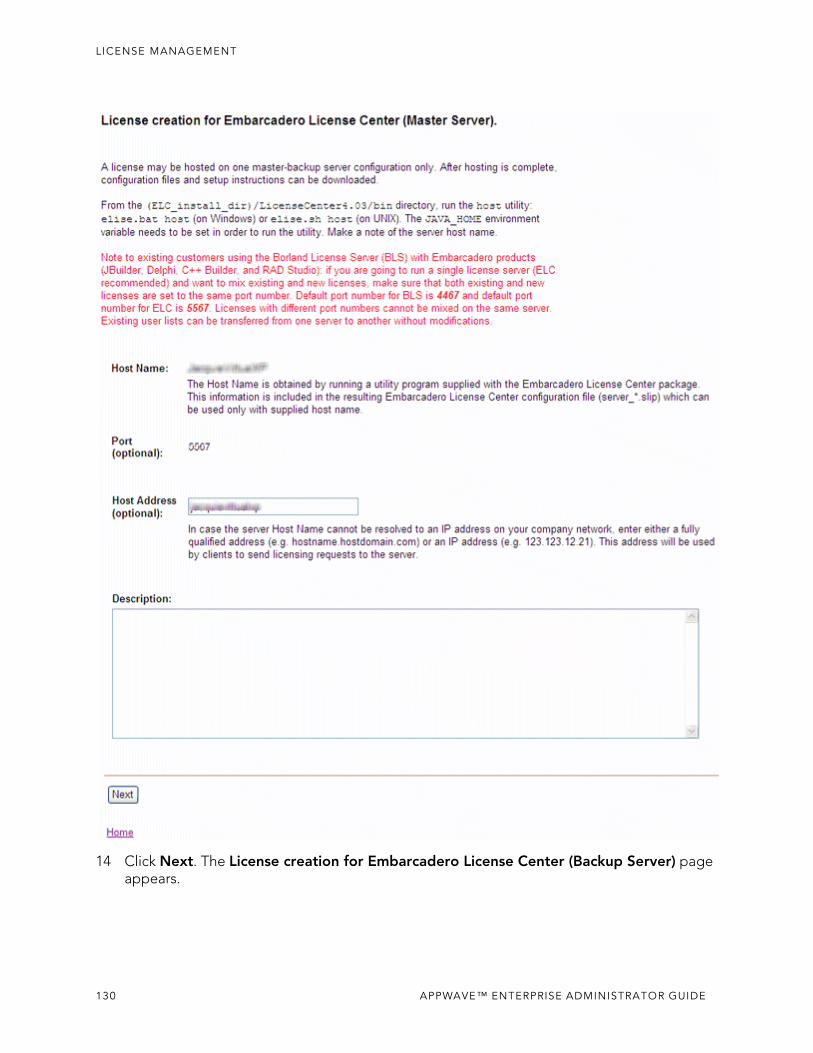
LICENSE MANAGEMENT
14 Click Next. The License creation for Embarcadero License Center (Backup Server) page appears.
130 APPWAVE™ ENTERPRISE ADMINISTRATOR GUIDE
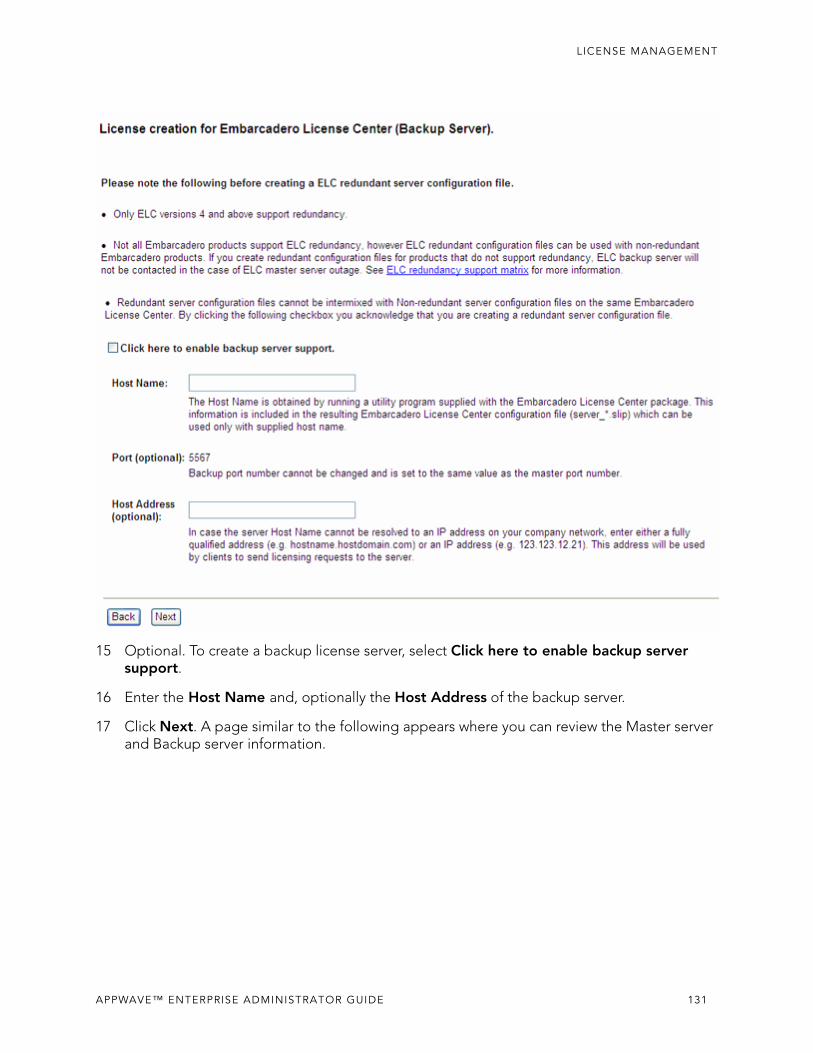
LICENSE MANAGEMENT
15 Optional. To create a backup license server, select Click here to enable backup server support.
16 Enter the Host Name and, optionally the Host Address of the backup server.
17 Click Next. A page similar to the following appears where you can review the Master server and Backup server information.
APPWAVE™ ENTERPRISE ADMINISTRATOR GUIDE 131
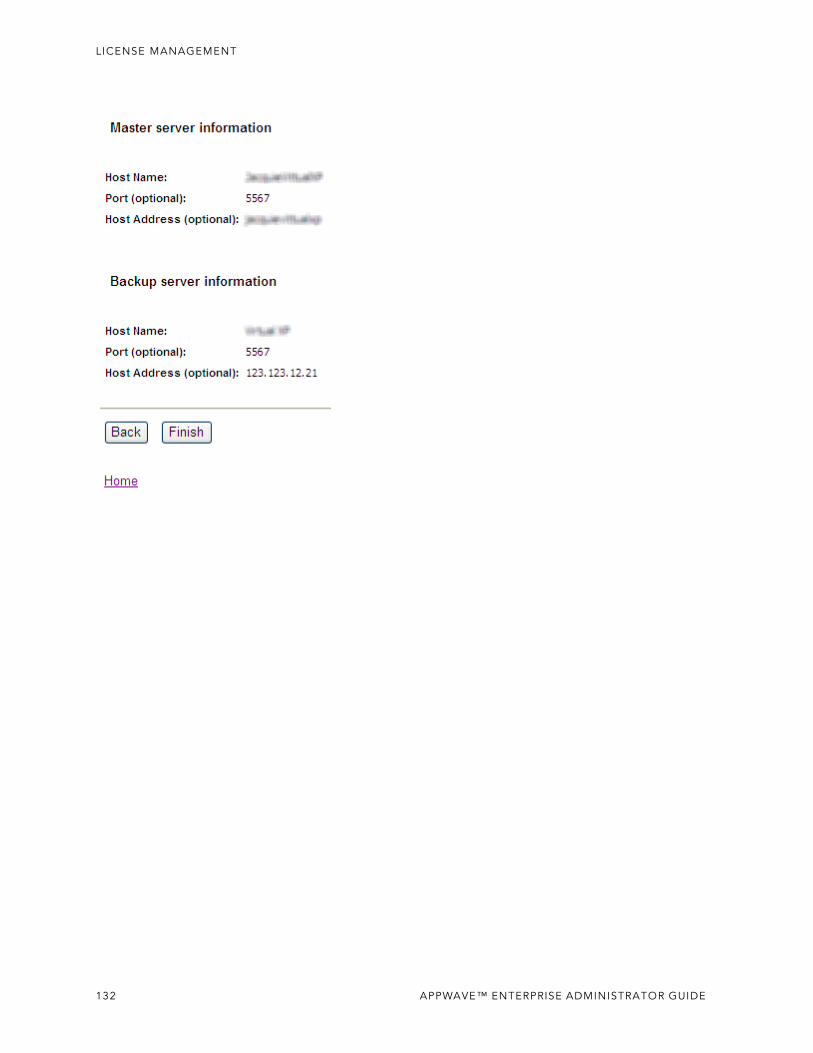
LICENSE MANAGEMENT
132 APPWAVE™ ENTERPRISE ADMINISTRATOR GUIDE
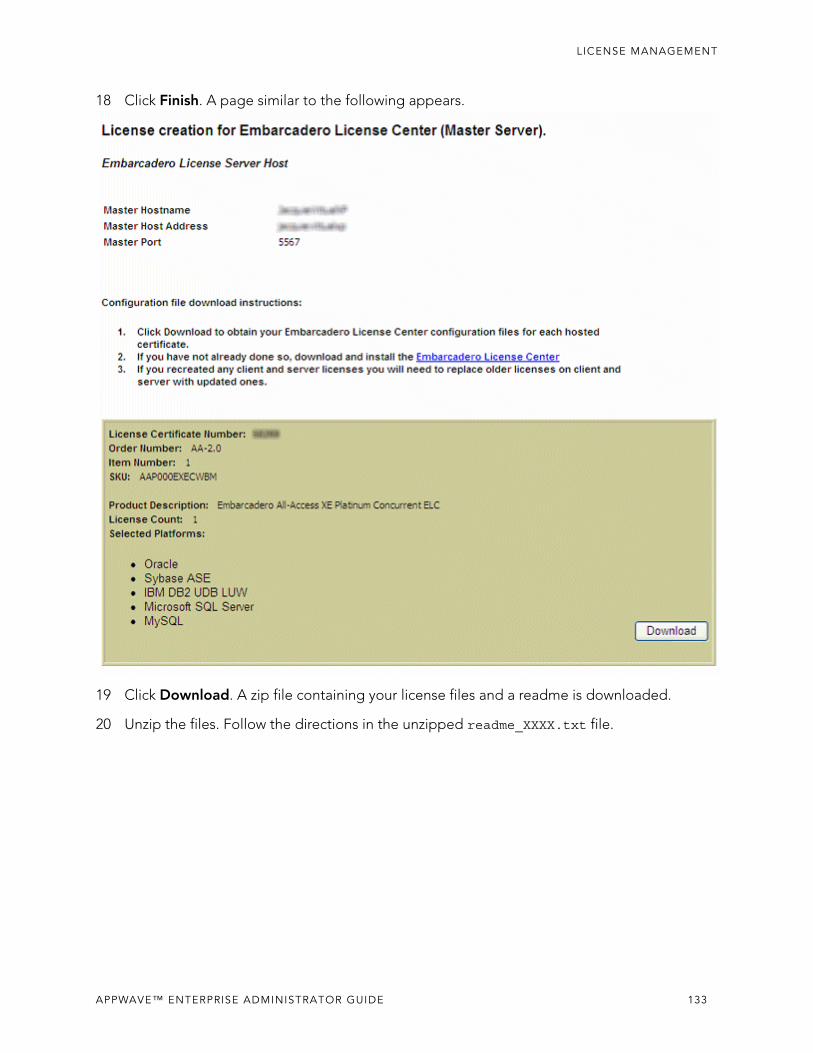
LICENSE MANAGEMENT
18 Click Finish. A page similar to the following appears.
19 Click Download. A zip file containing your license files and a readme is downloaded.
20 Unzip the files. Follow the directions in the unzipped readme_XXXX.txt file.
APPWAVE™ ENTERPRISE ADMINISTRATOR GUIDE 133
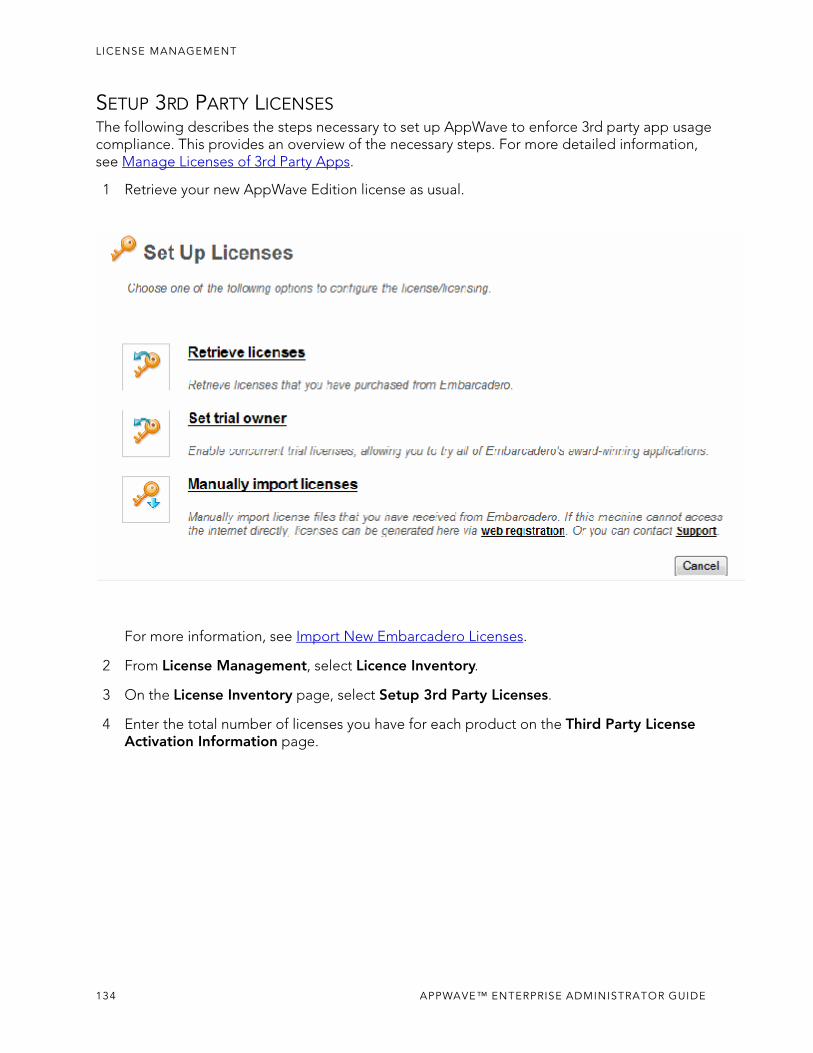
LICENSE MANAGEMENT
SETUP 3RD PARTY LICENSESThe following describes the steps necessary to set up AppWave to enforce 3rd party app usage compliance. This provides an overview of the necessary steps. For more detailed information, see Manage Licenses of 3rd Party Apps.
1 Retrieve your new AppWave Edition license as usual.
For more information, see Import New Embarcadero Licenses.
2 From License Management, select Licence Inventory.
3 On the License Inventory page, select Setup 3rd Party Licenses.
4 Enter the total number of licenses you have for each product on the Third Party License Activation Information page.
134 APPWAVE™ ENTERPRISE ADMINISTRATOR GUIDE
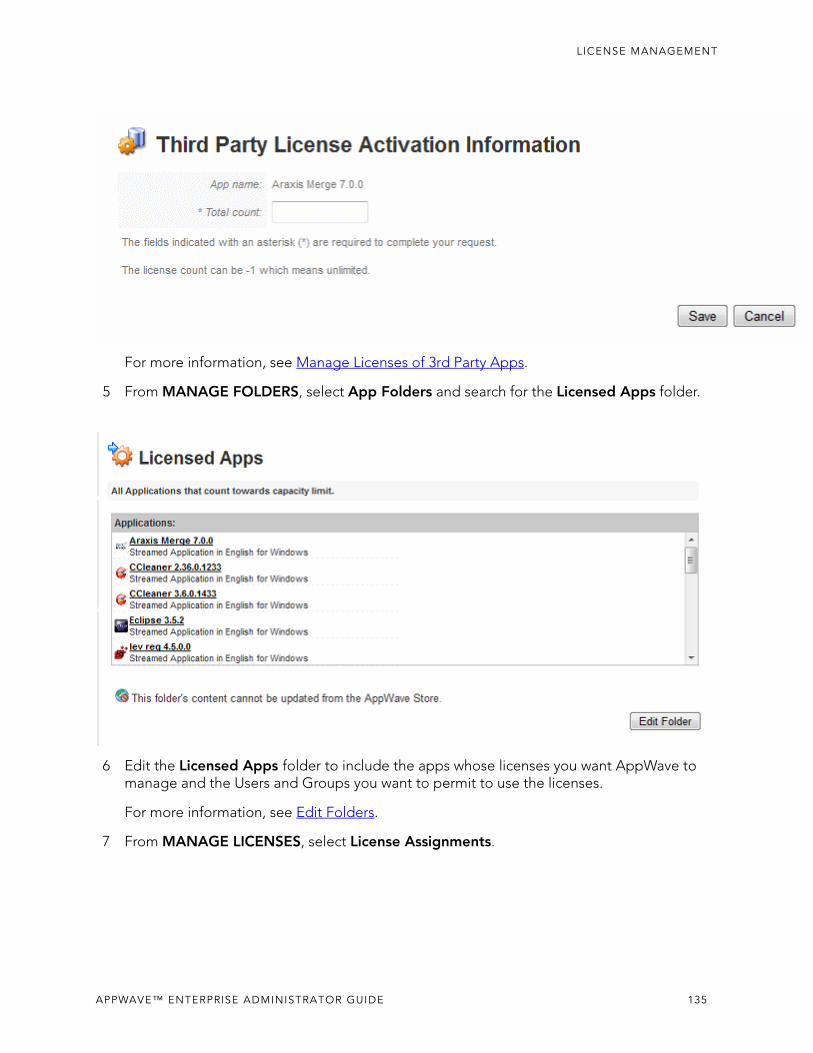
LICENSE MANAGEMENT
For more information, see Manage Licenses of 3rd Party Apps.
5 From MANAGE FOLDERS, select App Folders and search for the Licensed Apps folder.
6 Edit the Licensed Apps folder to include the apps whose licenses you want AppWave to manage and the Users and Groups you want to permit to use the licenses.
For more information, see Edit Folders.
7 From MANAGE LICENSES, select License Assignments.
APPWAVE™ ENTERPRISE ADMINISTRATOR GUIDE 135
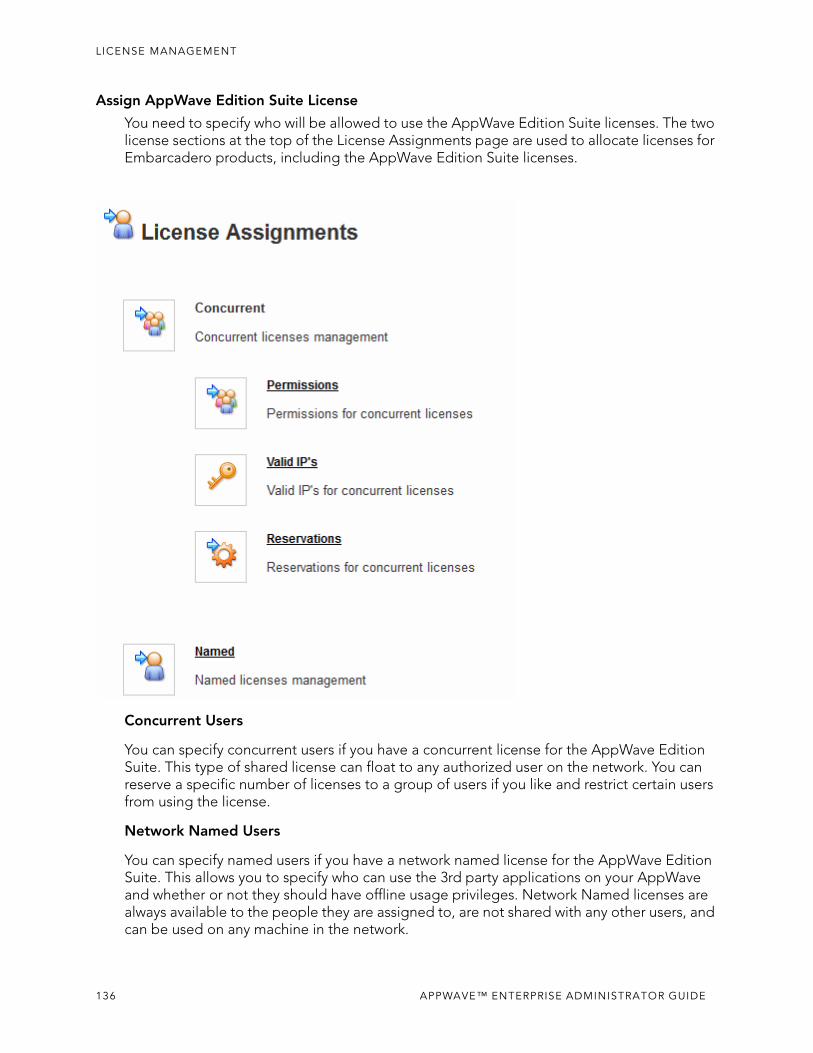
LICENSE MANAGEMENT
Assign AppWave Edition Suite License
You need to specify who will be allowed to use the AppWave Edition Suite licenses. The two license sections at the top of the License Assignments page are used to allocate licenses for Embarcadero products, including the AppWave Edition Suite licenses.
Concurrent Users
You can specify concurrent users if you have a concurrent license for the AppWave Edition Suite. This type of shared license can float to any authorized user on the network. You can reserve a specific number of licenses to a group of users if you like and restrict certain users from using the license.
Network Named Users
You can specify named users if you have a network named license for the AppWave Edition Suite. This allows you to specify who can use the 3rd party applications on your AppWave and whether or not they should have offline usage privileges. Network Named licenses are always available to the people they are assigned to, are not shared with any other users, and can be used on any machine in the network.
136 APPWAVE™ ENTERPRISE ADMINISTRATOR GUIDE
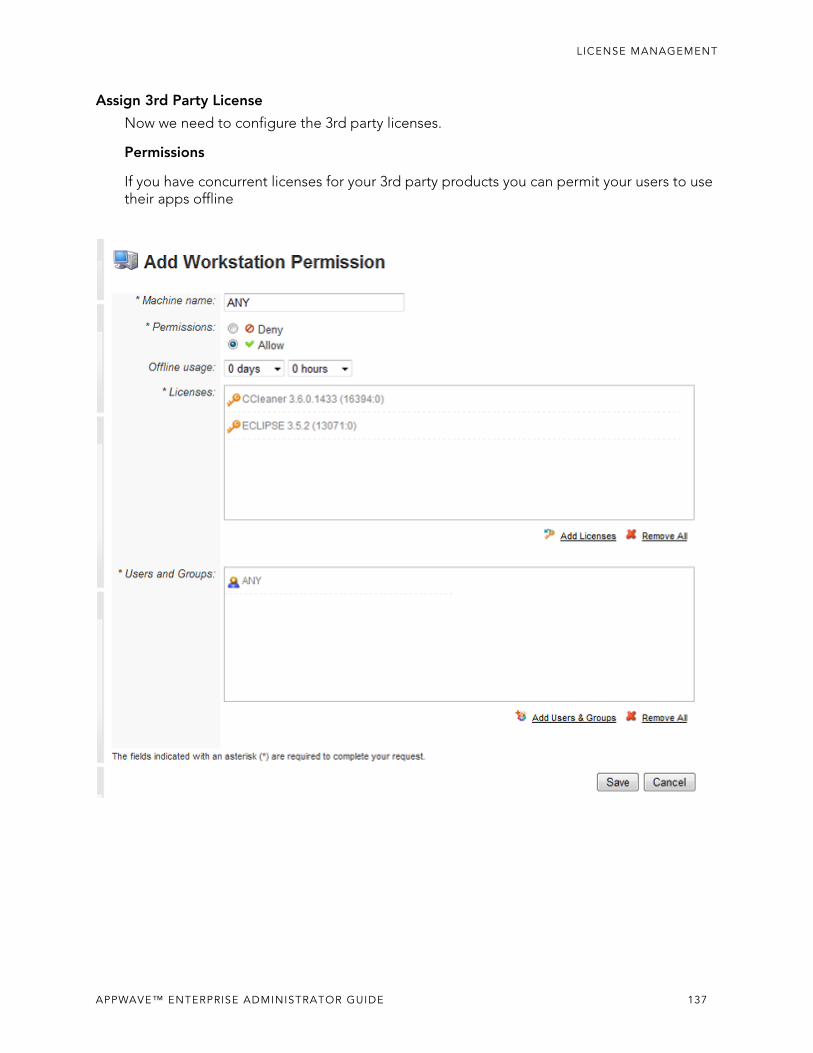
LICENSE MANAGEMENT
Assign 3rd Party License
Now we need to configure the 3rd party licenses.
Permissions
If you have concurrent licenses for your 3rd party products you can permit your users to use their apps offline
APPWAVE™ ENTERPRISE ADMINISTRATOR GUIDE 137

LICENSE MANAGEMENT
Reservations
You can add workstation reservations for both Concurrent and Named AppWave Edition Suite licenses.
Reports created will now include information on 3rd party license usage.
138 APPWAVE™ ENTERPRISE ADMINISTRATOR GUIDE
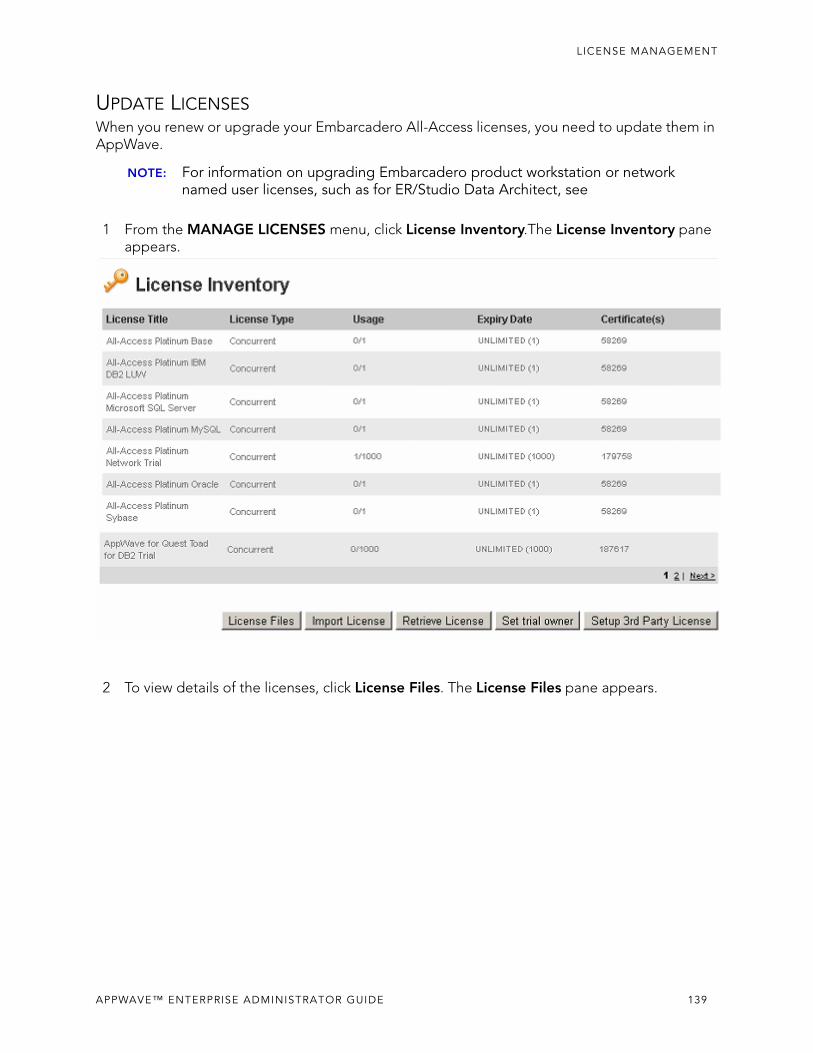
LICENSE MANAGEMENT
UPDATE LICENSESWhen you renew or upgrade your Embarcadero All-Access licenses, you need to update them in AppWave.
NOTE: For information on upgrading Embarcadero product workstation or network named user licenses, such as for ER/Studio Data Architect, see
1 From the MANAGE LICENSES menu, click License Inventory.The License Inventory pane appears.
2 To view details of the licenses, click License Files. The License Files pane appears.
APPWAVE™ ENTERPRISE ADMINISTRATOR GUIDE 139
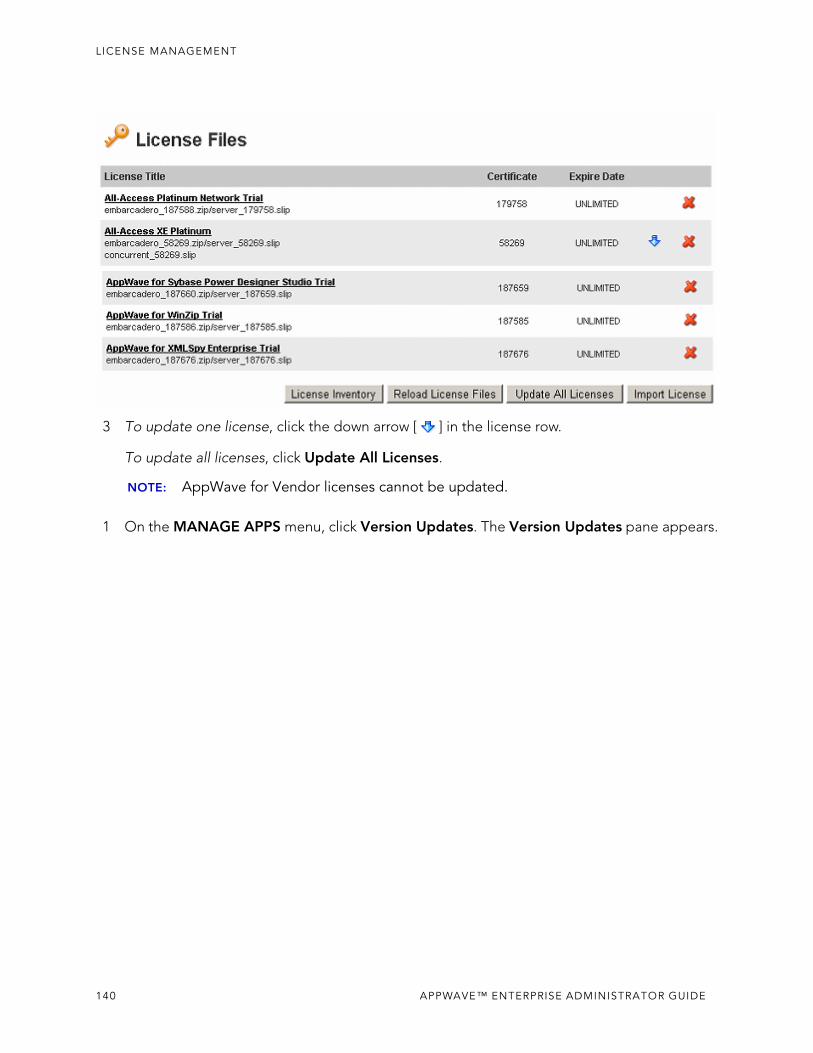
LICENSE MANAGEMENT
3 To update one license, click the down arrow [ ] in the license row.
To update all licenses, click Update All Licenses.
NOTE: AppWave for Vendor licenses cannot be updated.
1 On the MANAGE APPS menu, click Version Updates. The Version Updates pane appears.
140 APPWAVE™ ENTERPRISE ADMINISTRATOR GUIDE
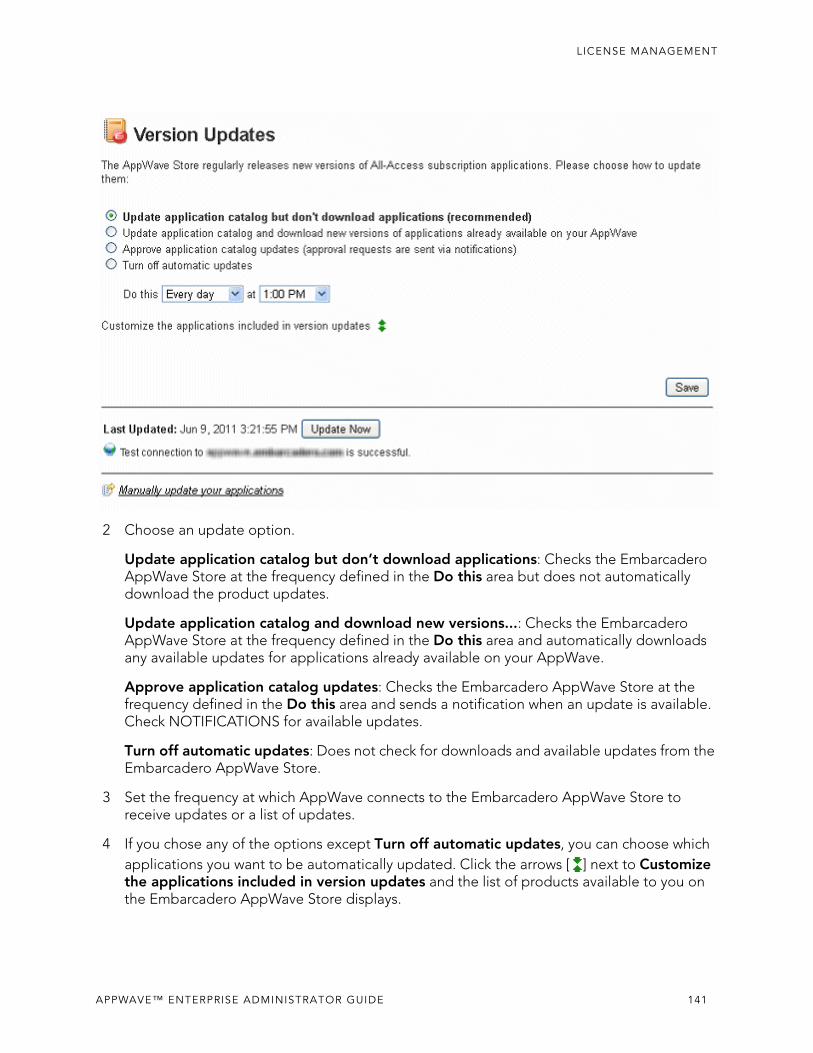
LICENSE MANAGEMENT
2 Choose an update option.
Update application catalog but don’t download applications: Checks the Embarcadero AppWave Store at the frequency defined in the Do this area but does not automatically download the product updates.
Update application catalog and download new versions...: Checks the Embarcadero AppWave Store at the frequency defined in the Do this area and automatically downloads any available updates for applications already available on your AppWave.
Approve application catalog updates: Checks the Embarcadero AppWave Store at the frequency defined in the Do this area and sends a notification when an update is available. Check NOTIFICATIONS for available updates.
Turn off automatic updates: Does not check for downloads and available updates from the Embarcadero AppWave Store.
3 Set the frequency at which AppWave connects to the Embarcadero AppWave Store to receive updates or a list of updates.
4 If you chose any of the options except Turn off automatic updates, you can choose which applications you want to be automatically updated. Click the arrows [ ] next to Customize the applications included in version updates and the list of products available to you on the Embarcadero AppWave Store displays.
APPWAVE™ ENTERPRISE ADMINISTRATOR GUIDE 141
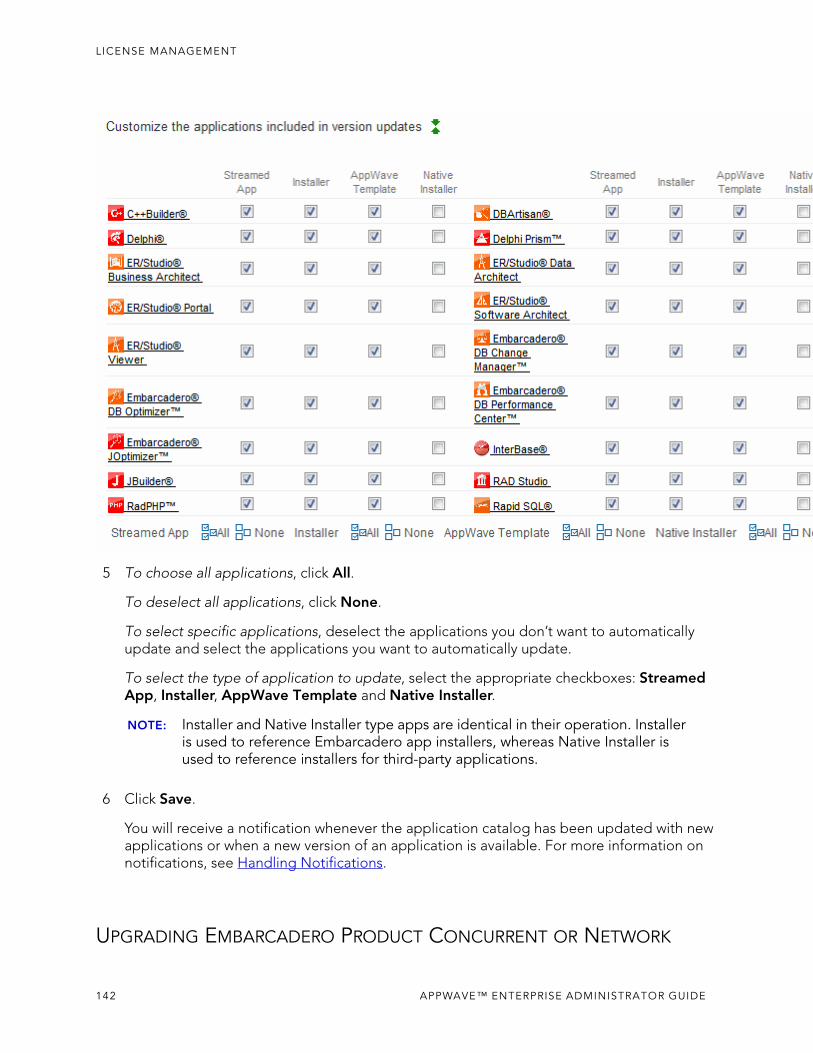
LICENSE MANAGEMENT
5 To choose all applications, click All.
To deselect all applications, click None.
To select specific applications, deselect the applications you don’t want to automatically update and select the applications you want to automatically update.
To select the type of application to update, select the appropriate checkboxes: Streamed App, Installer, AppWave Template and Native Installer.
NOTE: Installer and Native Installer type apps are identical in their operation. Installer is used to reference Embarcadero app installers, whereas Native Installer is used to reference installers for third-party applications.
6 Click Save.
You will receive a notification whenever the application catalog has been updated with new applications or when a new version of an application is available. For more information on notifications, see Handling Notifications.
UPGRADING EMBARCADERO PRODUCT CONCURRENT OR NETWORK
142 APPWAVE™ ENTERPRISE ADMINISTRATOR GUIDE
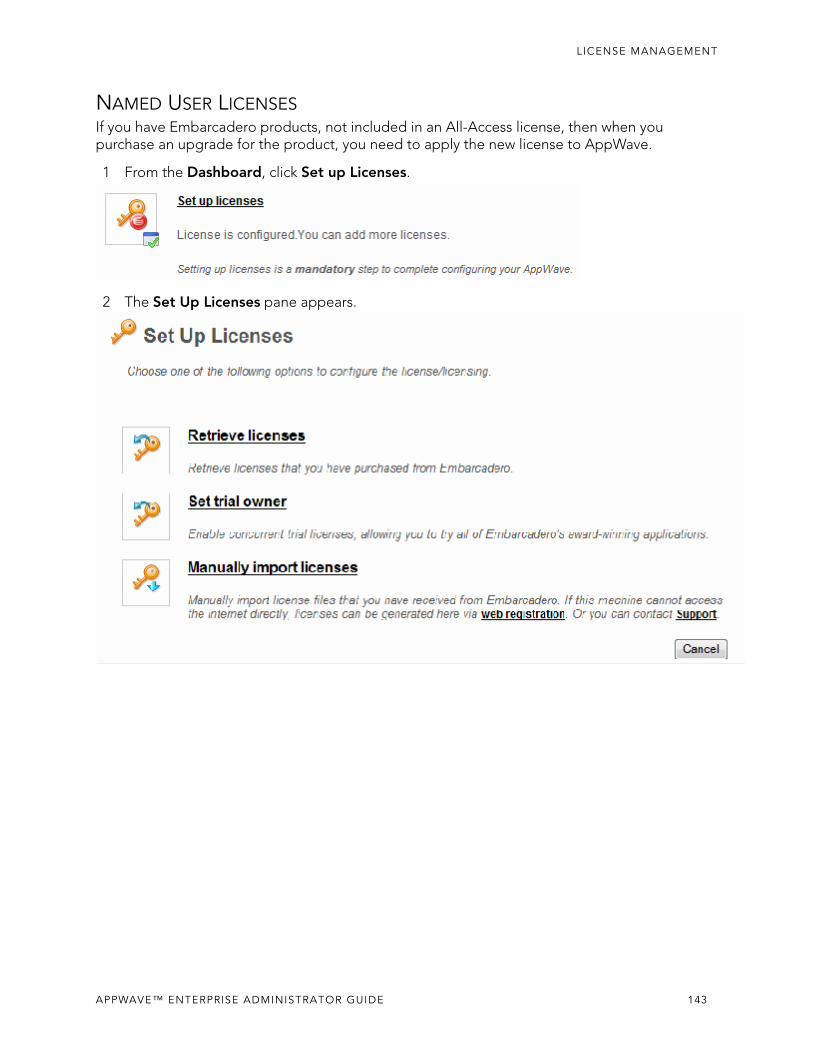
LICENSE MANAGEMENT
NAMED USER LICENSESIf you have Embarcadero products, not included in an All-Access license, then when you purchase an upgrade for the product, you need to apply the new license to AppWave.
1 From the Dashboard, click Set up Licenses.
2 The Set Up Licenses pane appears.
APPWAVE™ ENTERPRISE ADMINISTRATOR GUIDE 143
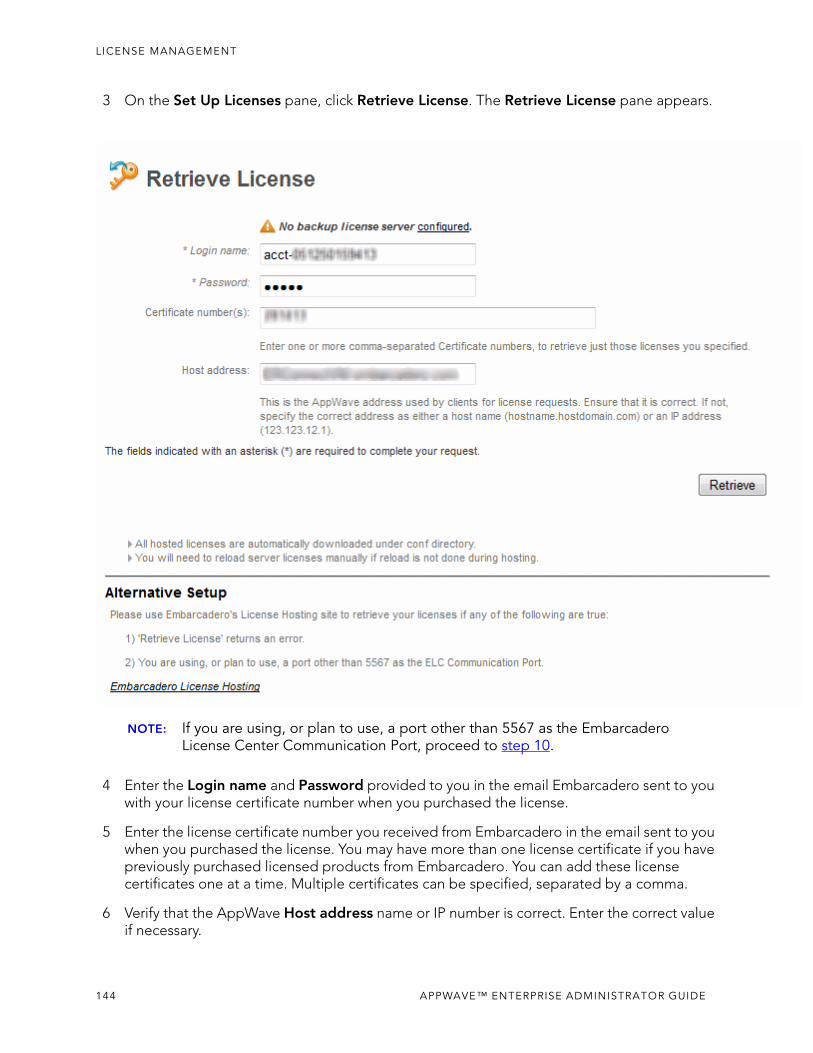
LICENSE MANAGEMENT
3 On the Set Up Licenses pane, click Retrieve License. The Retrieve License pane appears.
NOTE: If you are using, or plan to use, a port other than 5567 as the Embarcadero License Center Communication Port, proceed to step 10.
4 Enter the Login name and Password provided to you in the email Embarcadero sent to you with your license certificate number when you purchased the license.
5 Enter the license certificate number you received from Embarcadero in the email sent to you when you purchased the license. You may have more than one license certificate if you have previously purchased licensed products from Embarcadero. You can add these license certificates one at a time. Multiple certificates can be specified, separated by a comma.
6 Verify that the AppWave Host address name or IP number is correct. Enter the correct value if necessary.
144 APPWAVE™ ENTERPRISE ADMINISTRATOR GUIDE
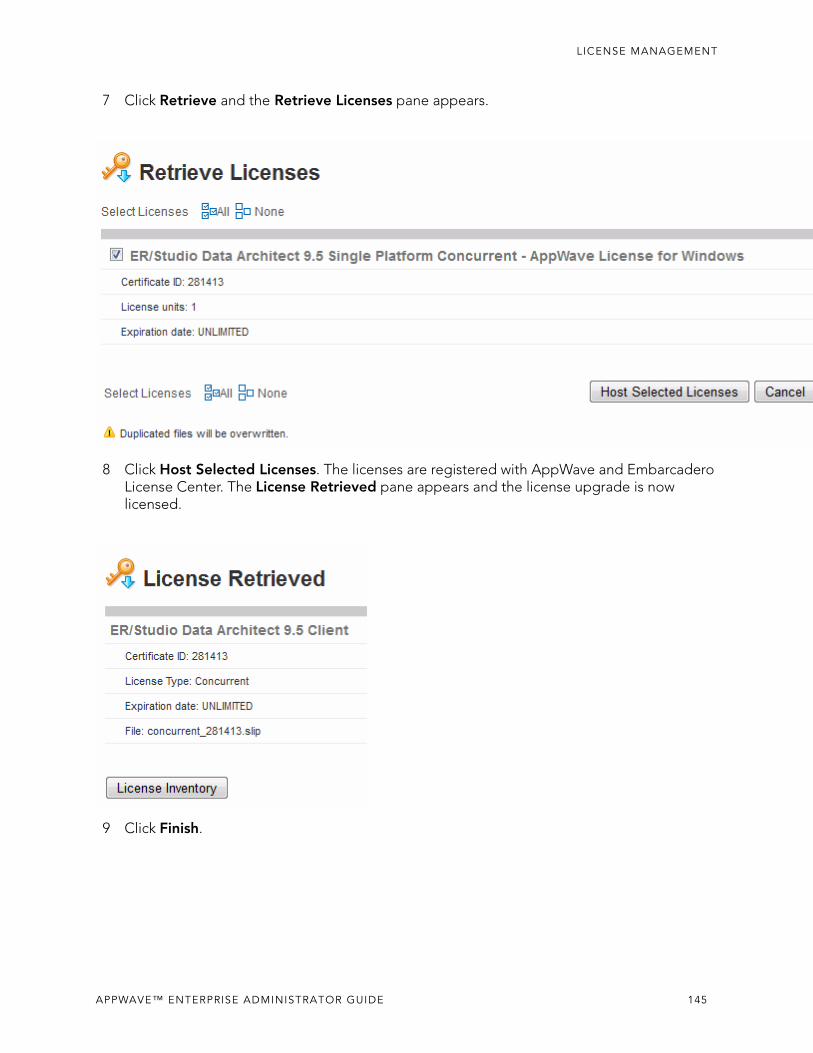
LICENSE MANAGEMENT
7 Click Retrieve and the Retrieve Licenses pane appears.
8 Click Host Selected Licenses. The licenses are registered with AppWave and Embarcadero License Center. The License Retrieved pane appears and the license upgrade is now licensed.
9 Click Finish.
APPWAVE™ ENTERPRISE ADMINISTRATOR GUIDE 145
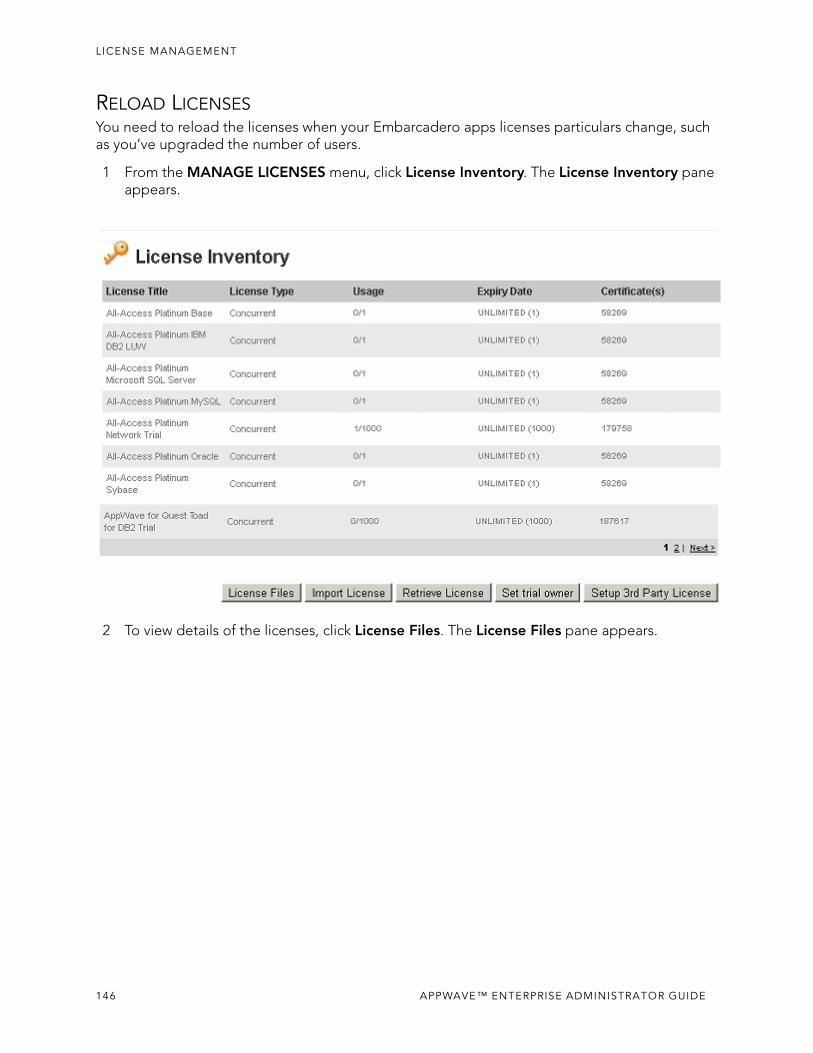
LICENSE MANAGEMENT
RELOAD LICENSESYou need to reload the licenses when your Embarcadero apps licenses particulars change, such as you’ve upgraded the number of users.
1 From the MANAGE LICENSES menu, click License Inventory. The License Inventory pane appears.
2 To view details of the licenses, click License Files. The License Files pane appears.
146 APPWAVE™ ENTERPRISE ADMINISTRATOR GUIDE
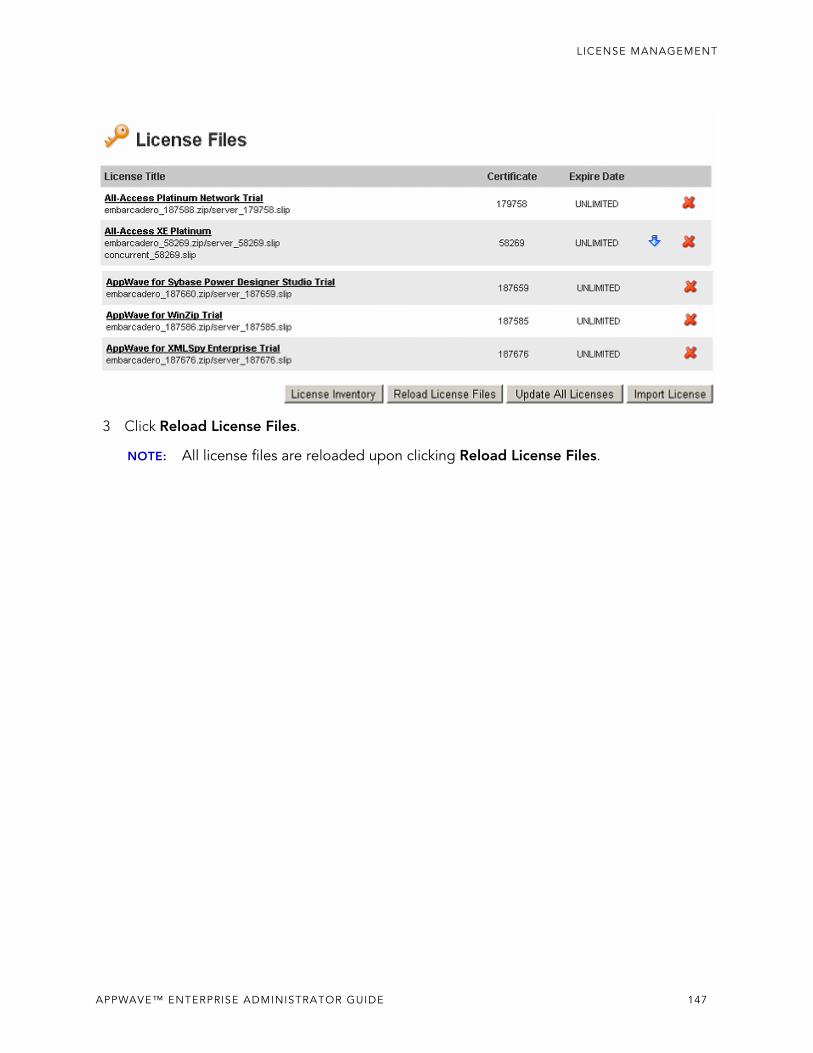
LICENSE MANAGEMENT
3 Click Reload License Files.
NOTE: All license files are reloaded upon clicking Reload License Files.
APPWAVE™ ENTERPRISE ADMINISTRATOR GUIDE 147
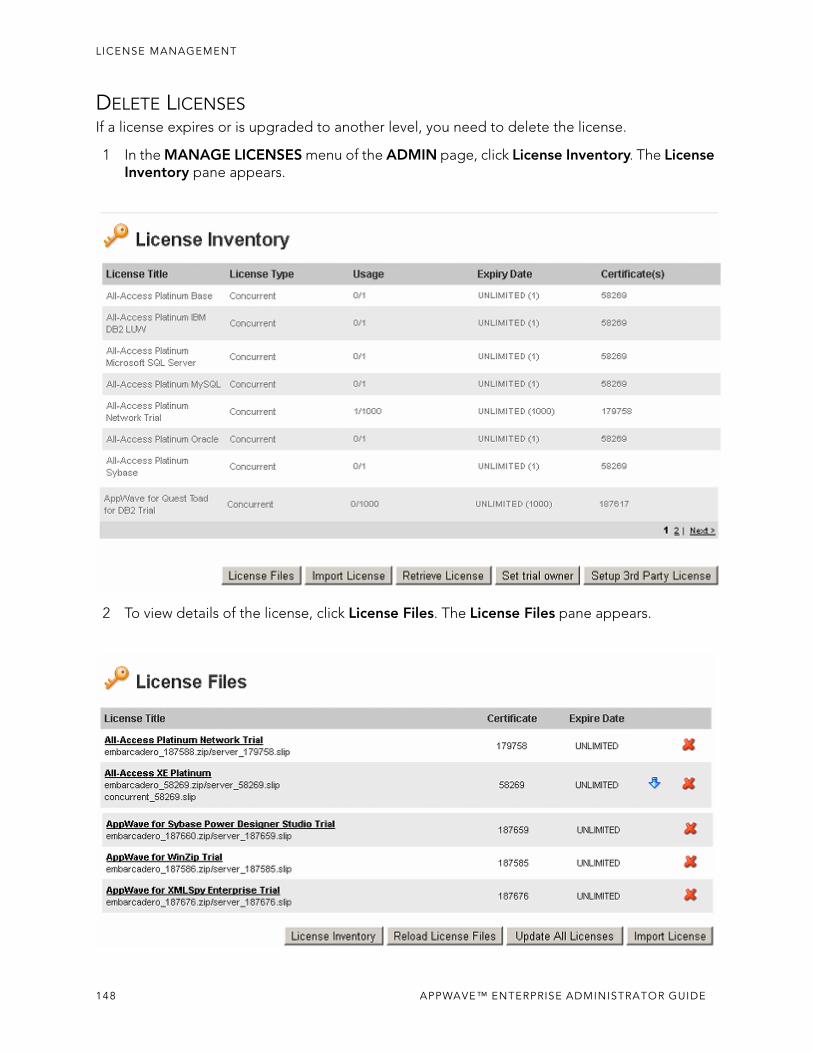
LICENSE MANAGEMENT
DELETE LICENSESIf a license expires or is upgraded to another level, you need to delete the license.
1 In the MANAGE LICENSES menu of the ADMIN page, click License Inventory. The License Inventory pane appears.
2 To view details of the license, click License Files. The License Files pane appears.
148 APPWAVE™ ENTERPRISE ADMINISTRATOR GUIDE
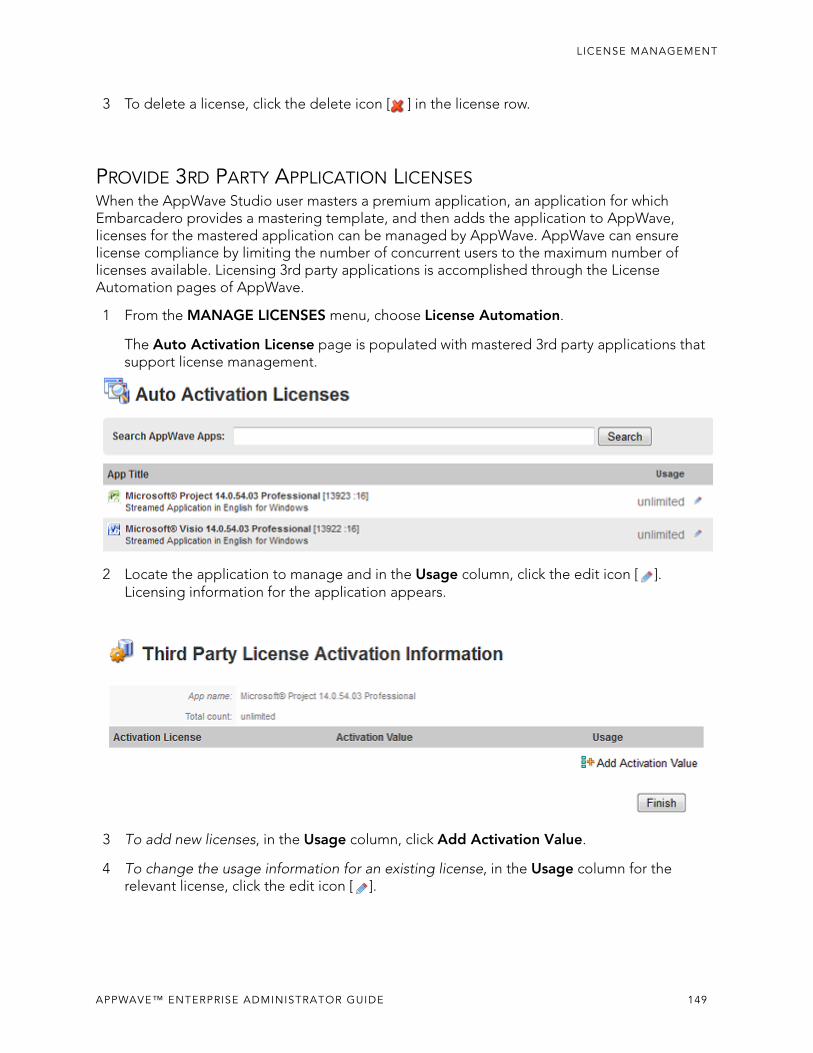
LICENSE MANAGEMENT
3 To delete a license, click the delete icon [ ] in the license row.
PROVIDE 3RD PARTY APPLICATION LICENSESWhen the AppWave Studio user masters a premium application, an application for which Embarcadero provides a mastering template, and then adds the application to AppWave, licenses for the mastered application can be managed by AppWave. AppWave can ensure license compliance by limiting the number of concurrent users to the maximum number of licenses available. Licensing 3rd party applications is accomplished through the License Automation pages of AppWave.
1 From the MANAGE LICENSES menu, choose License Automation.
The Auto Activation License page is populated with mastered 3rd party applications that support license management.
2 Locate the application to manage and in the Usage column, click the edit icon [ ]. Licensing information for the application appears.
3 To add new licenses, in the Usage column, click Add Activation Value.
4 To change the usage information for an existing license, in the Usage column for the relevant license, click the edit icon [ ].
APPWAVE™ ENTERPRISE ADMINISTRATOR GUIDE 149
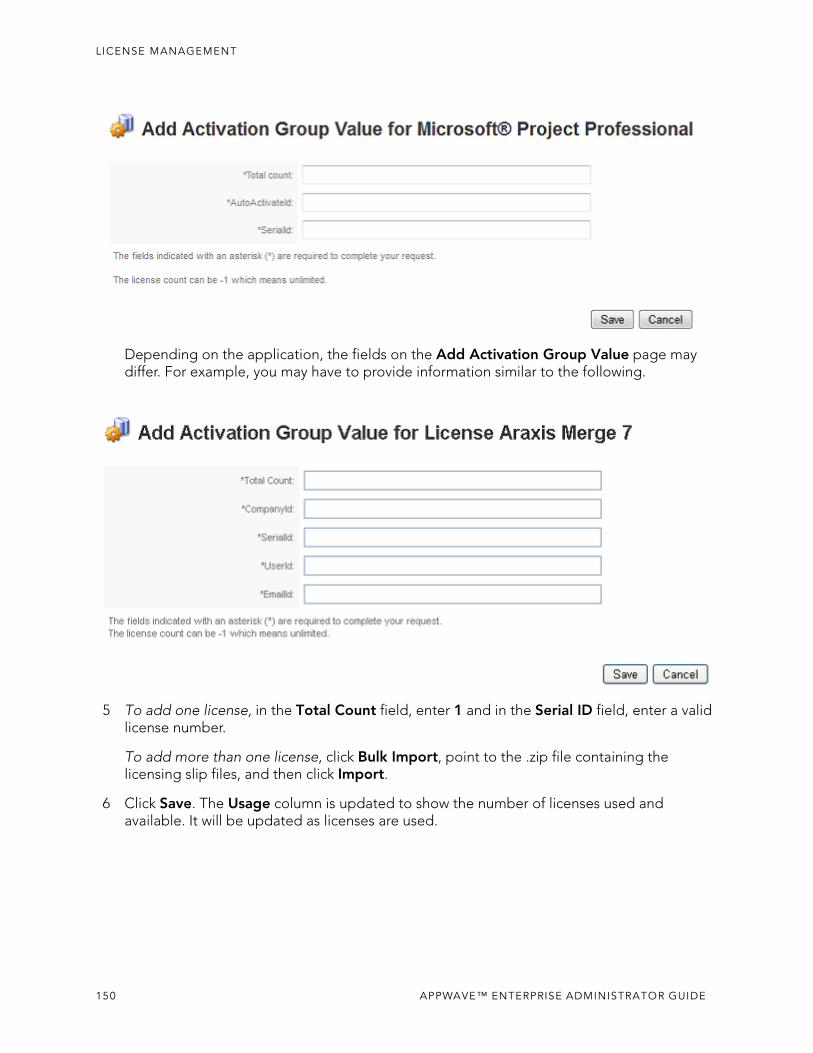
LICENSE MANAGEMENT
Depending on the application, the fields on the Add Activation Group Value page may differ. For example, you may have to provide information similar to the following.
5 To add one license, in the Total Count field, enter 1 and in the Serial ID field, enter a valid license number.
To add more than one license, click Bulk Import, point to the .zip file containing the licensing slip files, and then click Import.
6 Click Save. The Usage column is updated to show the number of licenses used and available. It will be updated as licenses are used.
150 APPWAVE™ ENTERPRISE ADMINISTRATOR GUIDE
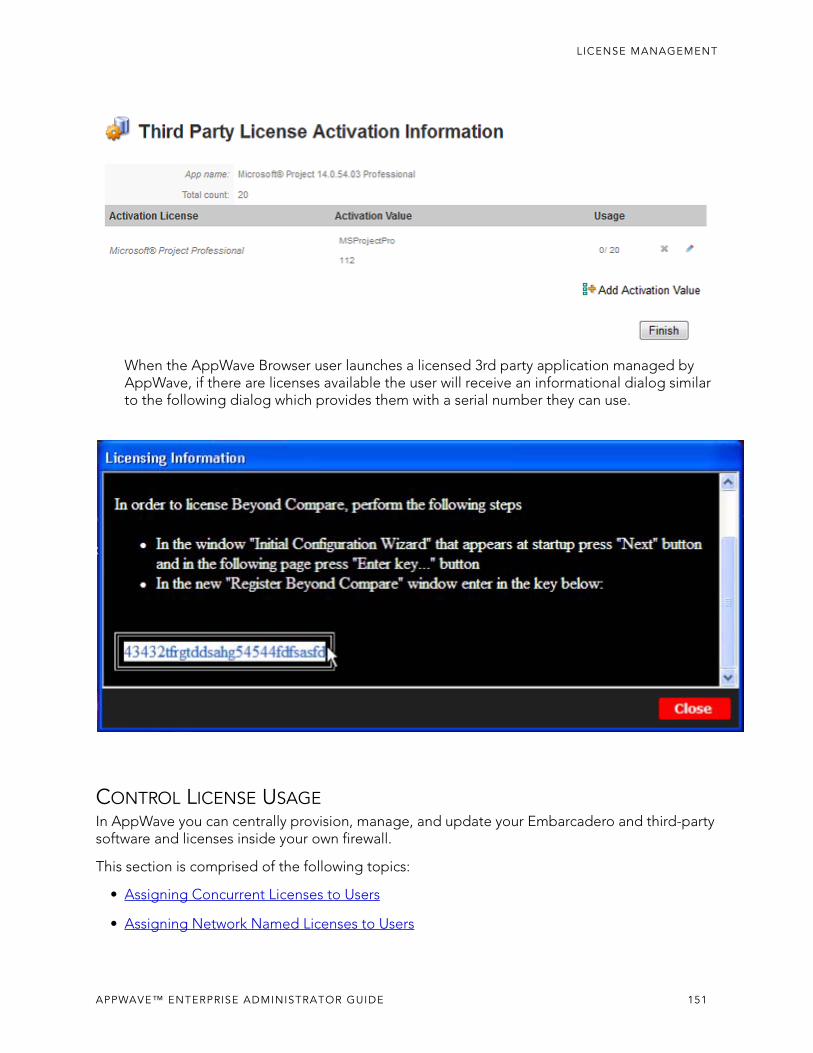
LICENSE MANAGEMENT
When the AppWave Browser user launches a licensed 3rd party application managed by AppWave, if there are licenses available the user will receive an informational dialog similar to the following dialog which provides them with a serial number they can use.
CONTROL LICENSE USAGEIn AppWave you can centrally provision, manage, and update your Embarcadero and third-party software and licenses inside your own firewall.
This section is comprised of the following topics:
• Assigning Concurrent Licenses to Users
• Assigning Network Named Licenses to Users
APPWAVE™ ENTERPRISE ADMINISTRATOR GUIDE 151

LICENSE MANAGEMENT
• Assigning Workstation Permissions for 3rd Party Apps
• Configuring Embarcadero XE and 3rd Party Licenses for Offline Usage
• Restricting Embarcadero Concurrent License Usage by IP Address
• Reserving Concurrent Licenses for Embarcadero XE Apps
• Reserving Licenses for 3rd Party Apps
ASSIGNING CONCURRENT LICENSES TO USERSConcurrent licenses are a pool of licenses that can be shared by users on a first-come, first-serve basis. A concurrent license can be borrowed from the license pool and when the user quits the application, the license is returned to the shared pool and made available for another user to use. This procedure helps you define which users can or cannot use the concurrent licenses.
1 From the MANAGE LICENSES menu, select License Assignments. The License Assignments pane appears.
152 APPWAVE™ ENTERPRISE ADMINISTRATOR GUIDE
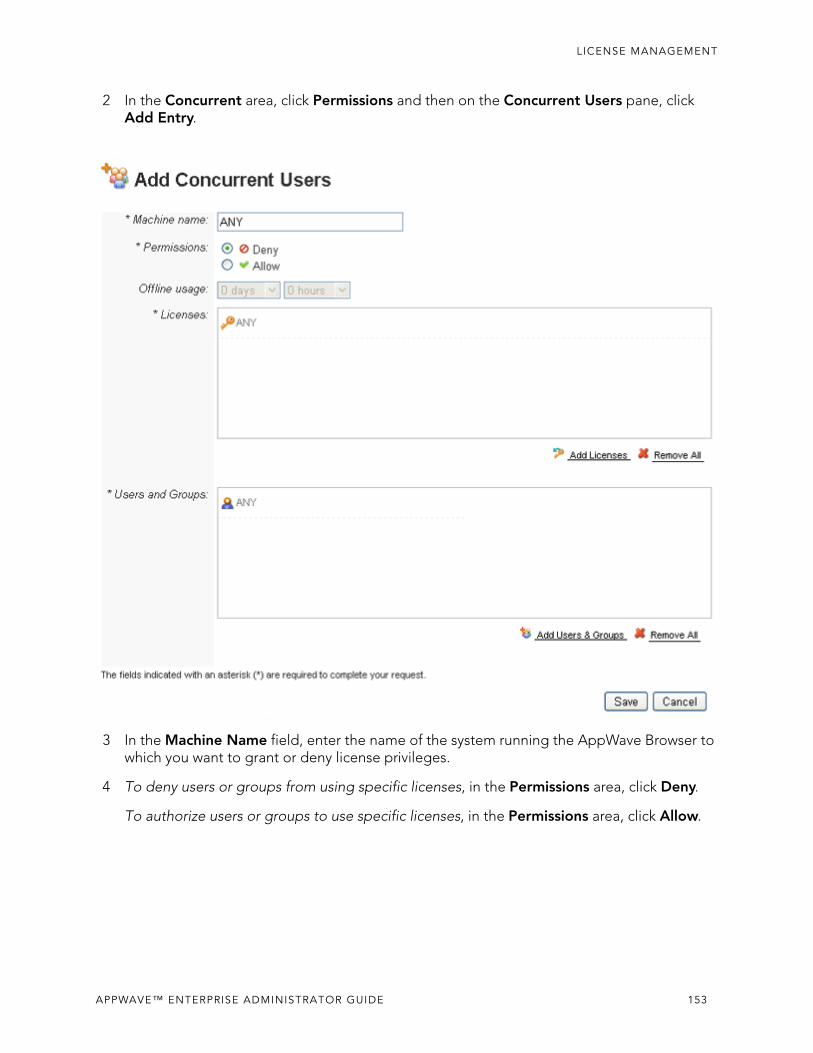
LICENSE MANAGEMENT
2 In the Concurrent area, click Permissions and then on the Concurrent Users pane, click Add Entry.
3 In the Machine Name field, enter the name of the system running the AppWave Browser to which you want to grant or deny license privileges.
4 To deny users or groups from using specific licenses, in the Permissions area, click Deny.
To authorize users or groups to use specific licenses, in the Permissions area, click Allow.
APPWAVE™ ENTERPRISE ADMINISTRATOR GUIDE 153
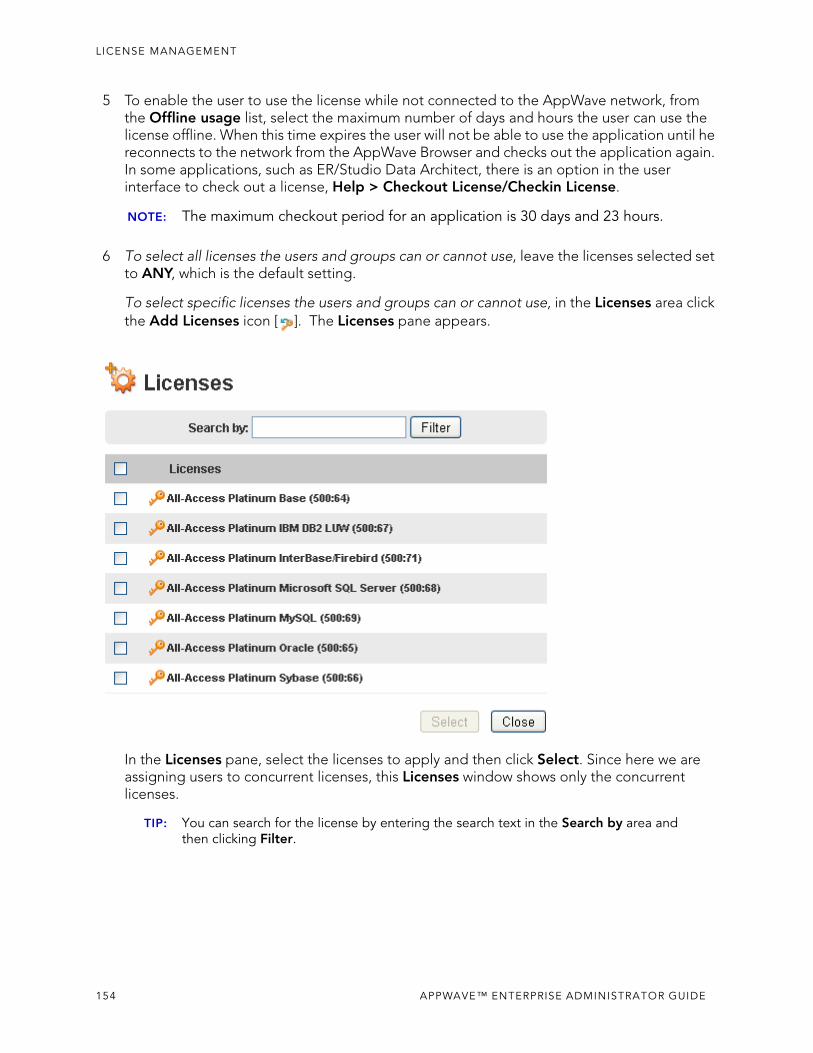
LICENSE MANAGEMENT
5 To enable the user to use the license while not connected to the AppWave network, from the Offline usage list, select the maximum number of days and hours the user can use the license offline. When this time expires the user will not be able to use the application until he reconnects to the network from the AppWave Browser and checks out the application again. In some applications, such as ER/Studio Data Architect, there is an option in the user interface to check out a license, Help > Checkout License/Checkin License.
NOTE: The maximum checkout period for an application is 30 days and 23 hours.
6 To select all licenses the users and groups can or cannot use, leave the licenses selected set to ANY, which is the default setting.
To select specific licenses the users and groups can or cannot use, in the Licenses area click the Add Licenses icon [ ]. The Licenses pane appears.
In the Licenses pane, select the licenses to apply and then click Select. Since here we are assigning users to concurrent licenses, this Licenses window shows only the concurrent licenses.
TIP: You can search for the license by entering the search text in the Search by area and then clicking Filter.
154 APPWAVE™ ENTERPRISE ADMINISTRATOR GUIDE
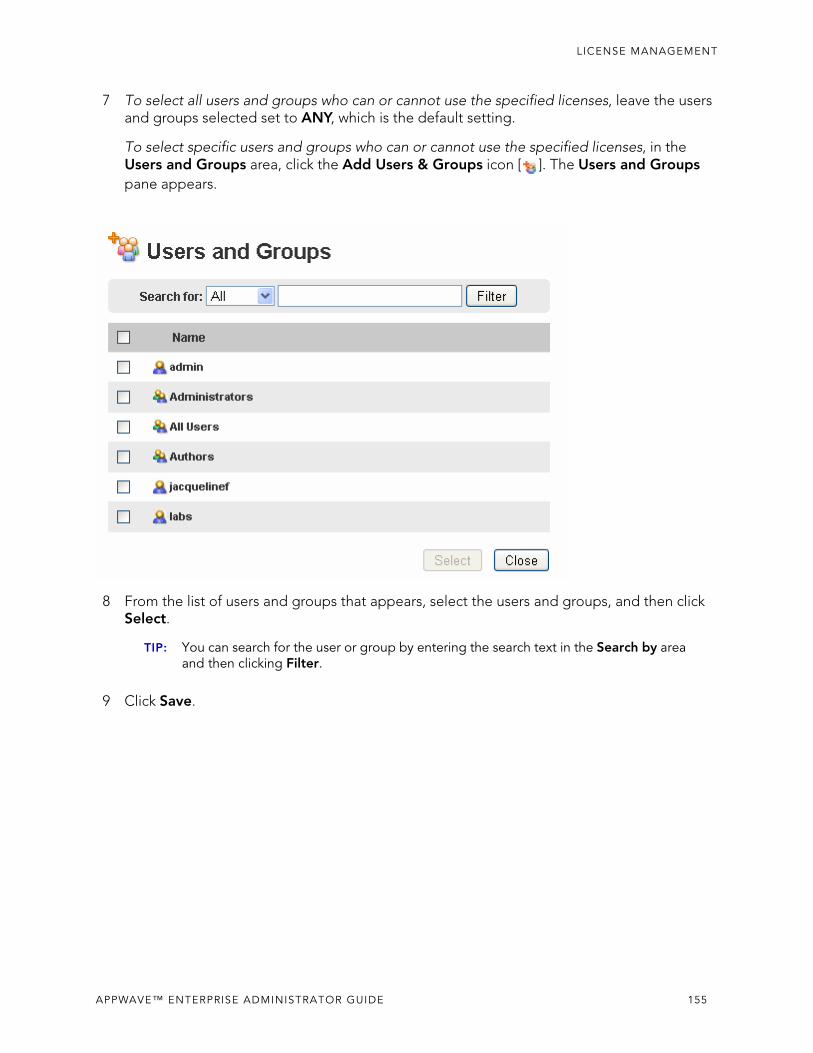
LICENSE MANAGEMENT
7 To select all users and groups who can or cannot use the specified licenses, leave the users and groups selected set to ANY, which is the default setting.
To select specific users and groups who can or cannot use the specified licenses, in the Users and Groups area, click the Add Users & Groups icon [ ]. The Users and Groups pane appears.
8 From the list of users and groups that appears, select the users and groups, and then click Select.
TIP: You can search for the user or group by entering the search text in the Search by area and then clicking Filter.
9 Click Save.
APPWAVE™ ENTERPRISE ADMINISTRATOR GUIDE 155
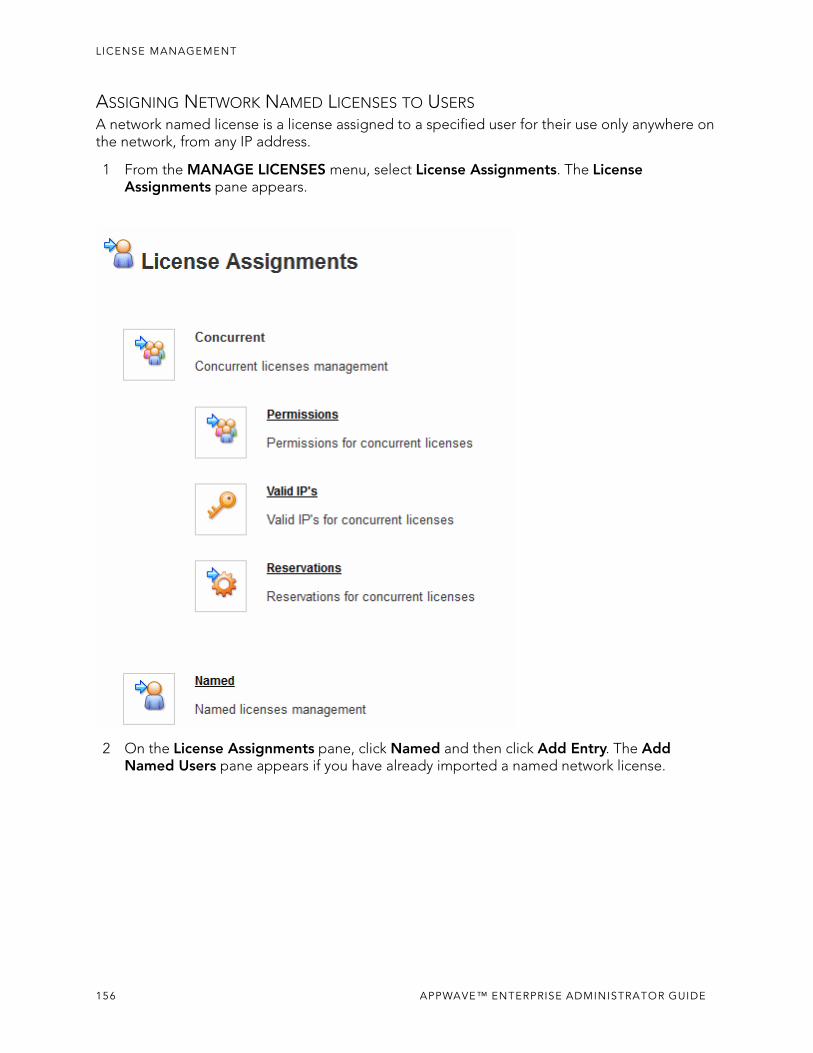
LICENSE MANAGEMENT
ASSIGNING NETWORK NAMED LICENSES TO USERSA network named license is a license assigned to a specified user for their use only anywhere on the network, from any IP address.
1 From the MANAGE LICENSES menu, select License Assignments. The License Assignments pane appears.
2 On the License Assignments pane, click Named and then click Add Entry. The Add Named Users pane appears if you have already imported a named network license.
156 APPWAVE™ ENTERPRISE ADMINISTRATOR GUIDE
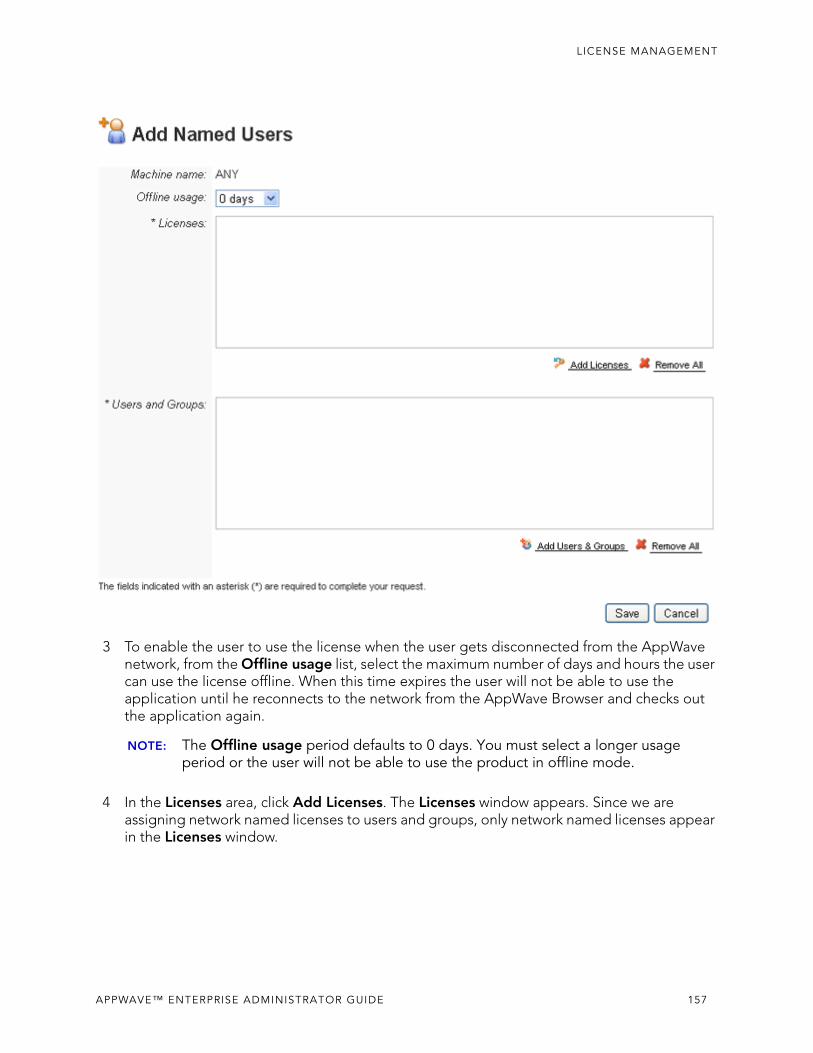
LICENSE MANAGEMENT
3 To enable the user to use the license when the user gets disconnected from the AppWave network, from the Offline usage list, select the maximum number of days and hours the user can use the license offline. When this time expires the user will not be able to use the application until he reconnects to the network from the AppWave Browser and checks out the application again.
NOTE: The Offline usage period defaults to 0 days. You must select a longer usage period or the user will not be able to use the product in offline mode.
4 In the Licenses area, click Add Licenses. The Licenses window appears. Since we are assigning network named licenses to users and groups, only network named licenses appear in the Licenses window.
APPWAVE™ ENTERPRISE ADMINISTRATOR GUIDE 157
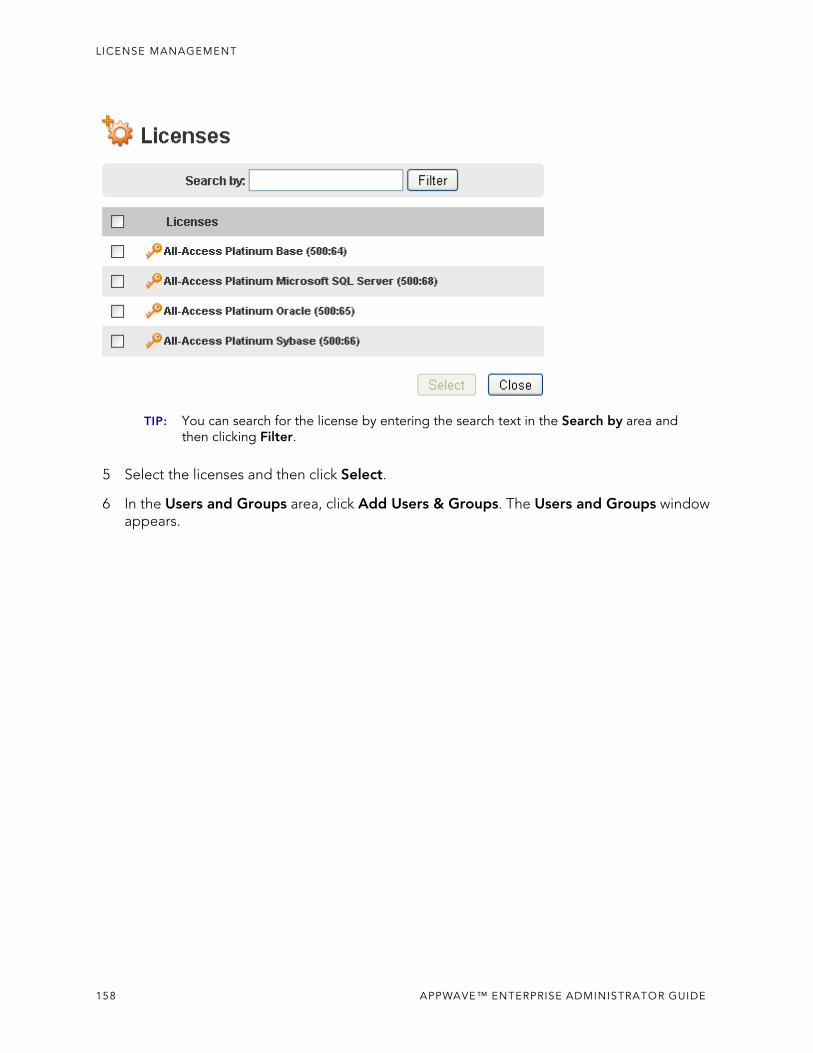
LICENSE MANAGEMENT
TIP: You can search for the license by entering the search text in the Search by area and then clicking Filter.
5 Select the licenses and then click Select.
6 In the Users and Groups area, click Add Users & Groups. The Users and Groups window appears.
158 APPWAVE™ ENTERPRISE ADMINISTRATOR GUIDE
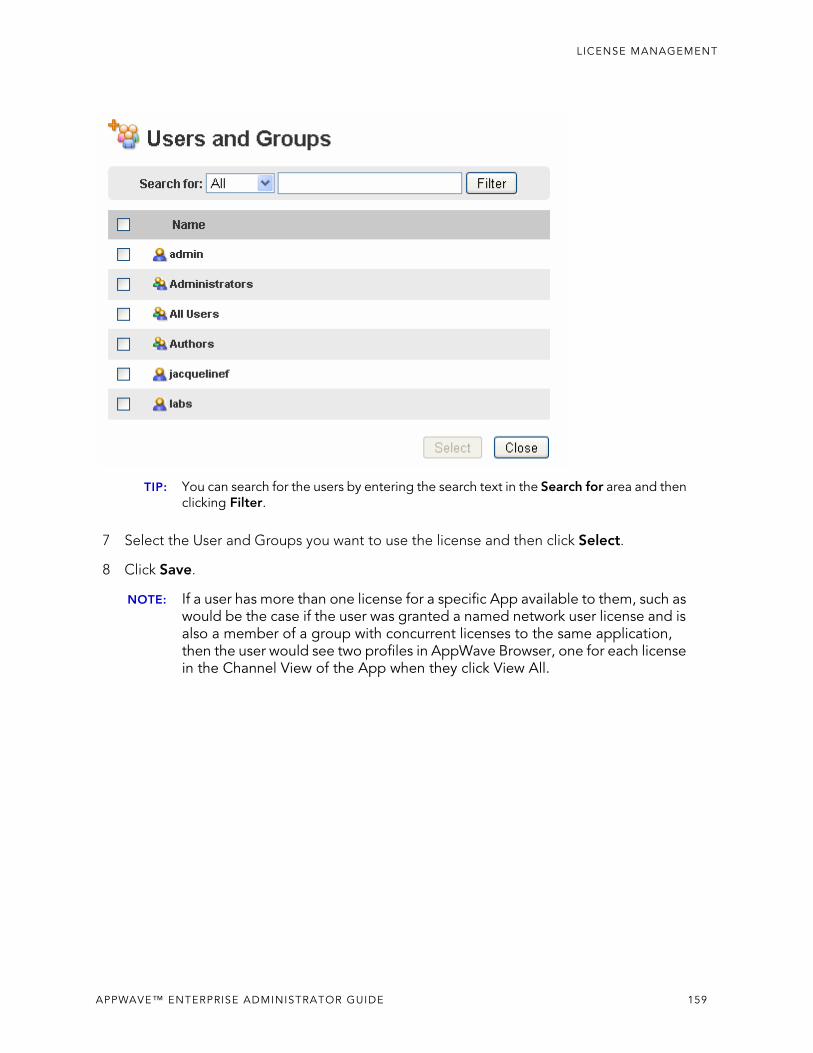
LICENSE MANAGEMENT
TIP: You can search for the users by entering the search text in the Search for area and then clicking Filter.
7 Select the User and Groups you want to use the license and then click Select.
8 Click Save.
NOTE: If a user has more than one license for a specific App available to them, such as would be the case if the user was granted a named network user license and is also a member of a group with concurrent licenses to the same application, then the user would see two profiles in AppWave Browser, one for each license in the Channel View of the App when they click View All.
APPWAVE™ ENTERPRISE ADMINISTRATOR GUIDE 159
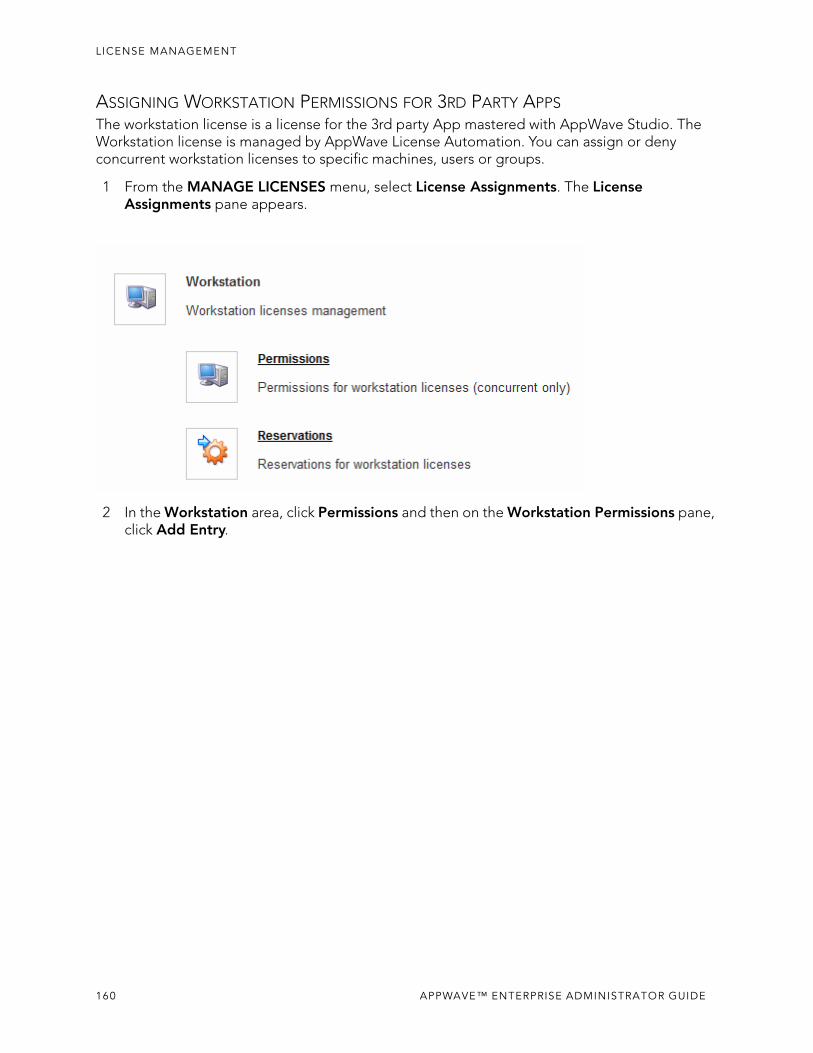
LICENSE MANAGEMENT
ASSIGNING WORKSTATION PERMISSIONS FOR 3RD PARTY APPSThe workstation license is a license for the 3rd party App mastered with AppWave Studio. The Workstation license is managed by AppWave License Automation. You can assign or deny concurrent workstation licenses to specific machines, users or groups.
1 From the MANAGE LICENSES menu, select License Assignments. The License Assignments pane appears.
2 In the Workstation area, click Permissions and then on the Workstation Permissions pane, click Add Entry.
160 APPWAVE™ ENTERPRISE ADMINISTRATOR GUIDE
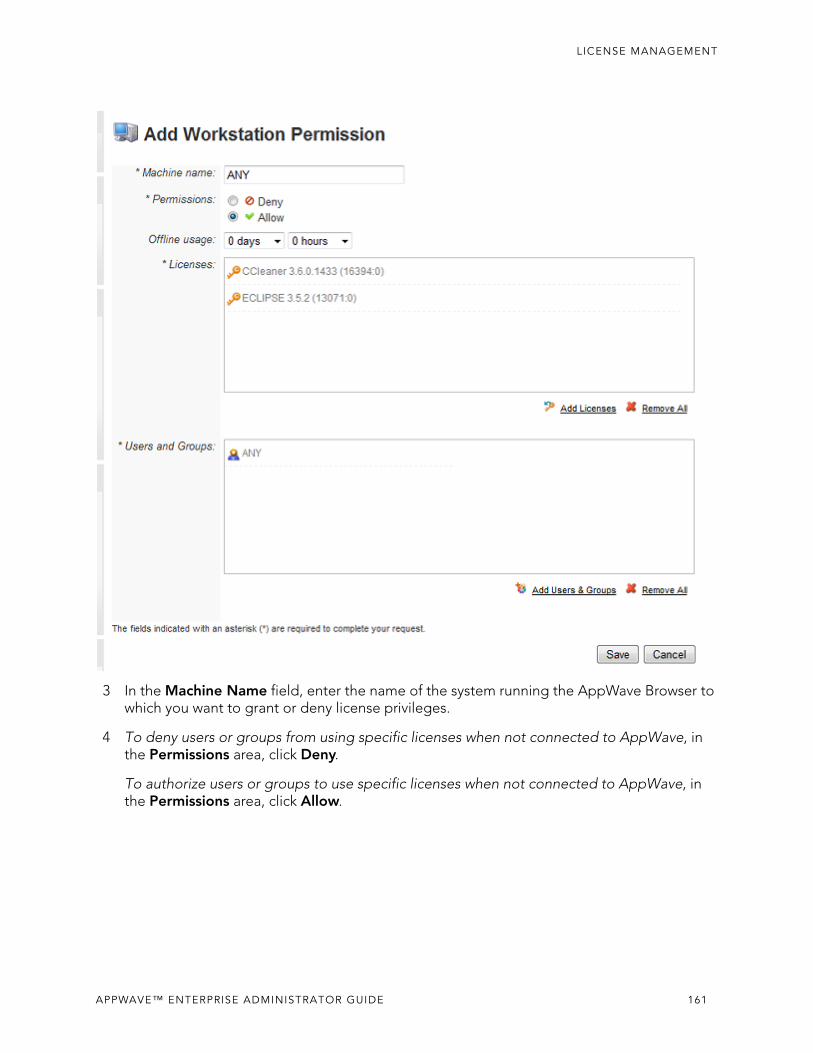
LICENSE MANAGEMENT
3 In the Machine Name field, enter the name of the system running the AppWave Browser to which you want to grant or deny license privileges.
4 To deny users or groups from using specific licenses when not connected to AppWave, in the Permissions area, click Deny.
To authorize users or groups to use specific licenses when not connected to AppWave, in the Permissions area, click Allow.
APPWAVE™ ENTERPRISE ADMINISTRATOR GUIDE 161
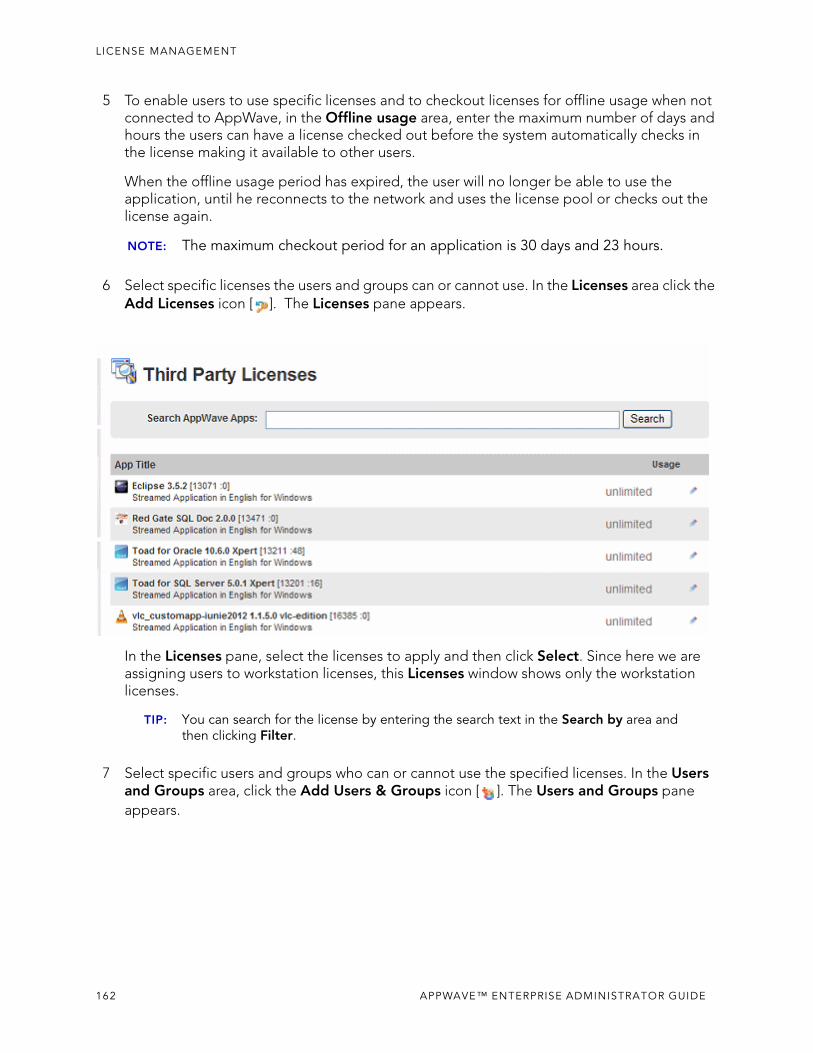
LICENSE MANAGEMENT
5 To enable users to use specific licenses and to checkout licenses for offline usage when not connected to AppWave, in the Offline usage area, enter the maximum number of days and hours the users can have a license checked out before the system automatically checks in the license making it available to other users.
When the offline usage period has expired, the user will no longer be able to use the application, until he reconnects to the network and uses the license pool or checks out the license again.
NOTE: The maximum checkout period for an application is 30 days and 23 hours.
6 Select specific licenses the users and groups can or cannot use. In the Licenses area click the Add Licenses icon [ ]. The Licenses pane appears.
In the Licenses pane, select the licenses to apply and then click Select. Since here we are assigning users to workstation licenses, this Licenses window shows only the workstation licenses.
TIP: You can search for the license by entering the search text in the Search by area and then clicking Filter.
7 Select specific users and groups who can or cannot use the specified licenses. In the Users and Groups area, click the Add Users & Groups icon [ ]. The Users and Groups pane appears.
162 APPWAVE™ ENTERPRISE ADMINISTRATOR GUIDE
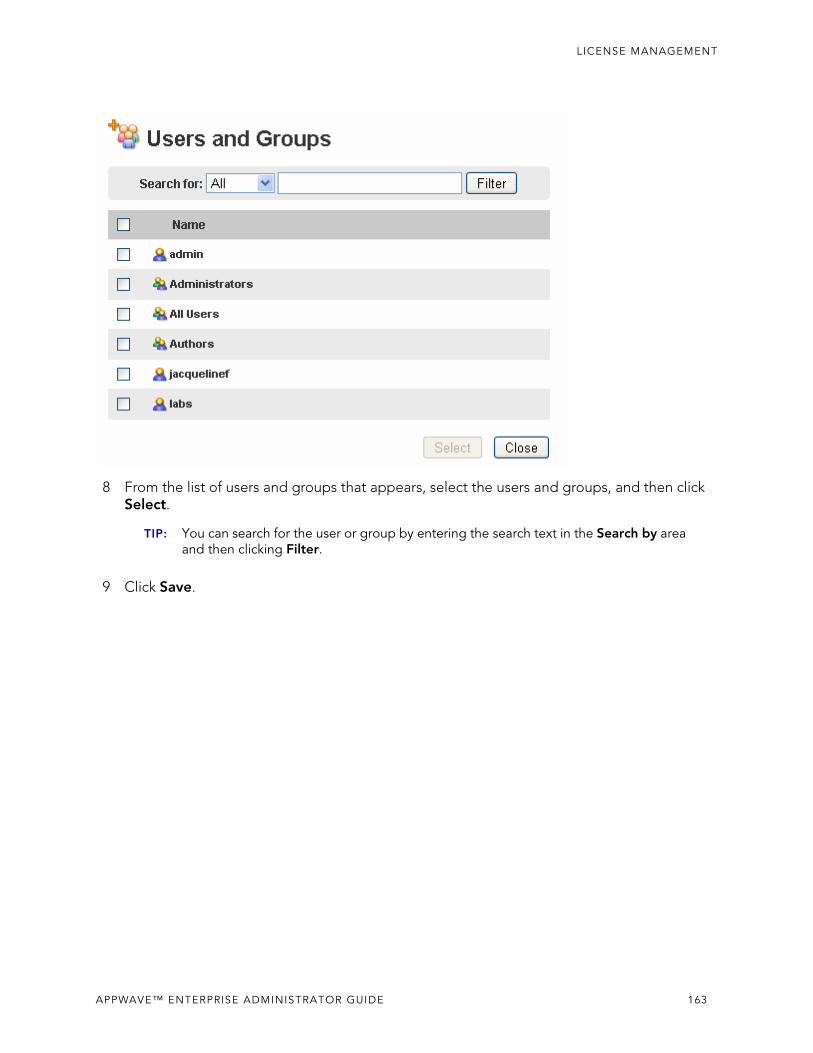
LICENSE MANAGEMENT
8 From the list of users and groups that appears, select the users and groups, and then click Select.
TIP: You can search for the user or group by entering the search text in the Search by area and then clicking Filter.
9 Click Save.
APPWAVE™ ENTERPRISE ADMINISTRATOR GUIDE 163
LICENSE MANAGEMENT
CONFIGURING EMBARCADERO XE AND 3RD PARTY LICENSES FOR OFFLINE USAGEYou can configure AppWave to allow a user to use an application with a concurrent or network named license when the user is not connected to AppWave.
Configure Offline Use:
For Concurrent licenses: Follow the procedure described in Assigning Concurrent Licenses to Users or Assigning Workstation Permissions for 3rd Party Apps ensuring that Permissions is set to Allow and the Offline Usage duration is specified. The user must set the application in offine mode from within the app. The following are the user instructions:
1 Download the application using AppWave Browser to your local repository. This happens automatically when you run the application.
2 Run the app. The app must be launched and then set for offline usage by selecting the license from the option available in the Help menu of the Embarcadero application, such as Checkin License/Checkout License.
You can continue to use the app offline for the time specified by the administrator. You can quit and relaunch the app without needing to connect to AppWave for a license for the Offline Usage duration period specified.
For Network Named licenses: For Embarcadero apps only: Follow the procedure described in Assigning Network Named Licenses to Users, ensuring that the Offline Usage duration is greater than zero (0) days. The following are the user instructions:
1 Download the application using AppWave Browser to your local repository. This happens automatically when you run the application.
2 Create a bookmark for the app so the app can be seen from the browser when not connected to AppWave.
3 Run the app. The Network Named license is automatically checked out when the you run the app.
You can continue to use the app offline for the time specified by the administrator. You can quit and relaunch the app without needing to connect to AppWave for a license for the Offline Usage duration period specified.
164 APPWAVE™ ENTERPRISE ADMINISTRATOR GUIDE
LICENSE MANAGEMENT
RESTRICTING EMBARCADERO CONCURRENT LICENSE USAGE BY IP ADDRESSBy default a user at any IP addresses can connect to AppWave providing they have a valid user name and password. On the Valid IP’s page you can restrict AppWave user access to Embarcadero concurrent licenses to only certain IP addresses or to ranges of IP Addresses.
1 From the MANAGE LICENSES menu, select License Assignments. The License Assignments pane appears.
APPWAVE™ ENTERPRISE ADMINISTRATOR GUIDE 165
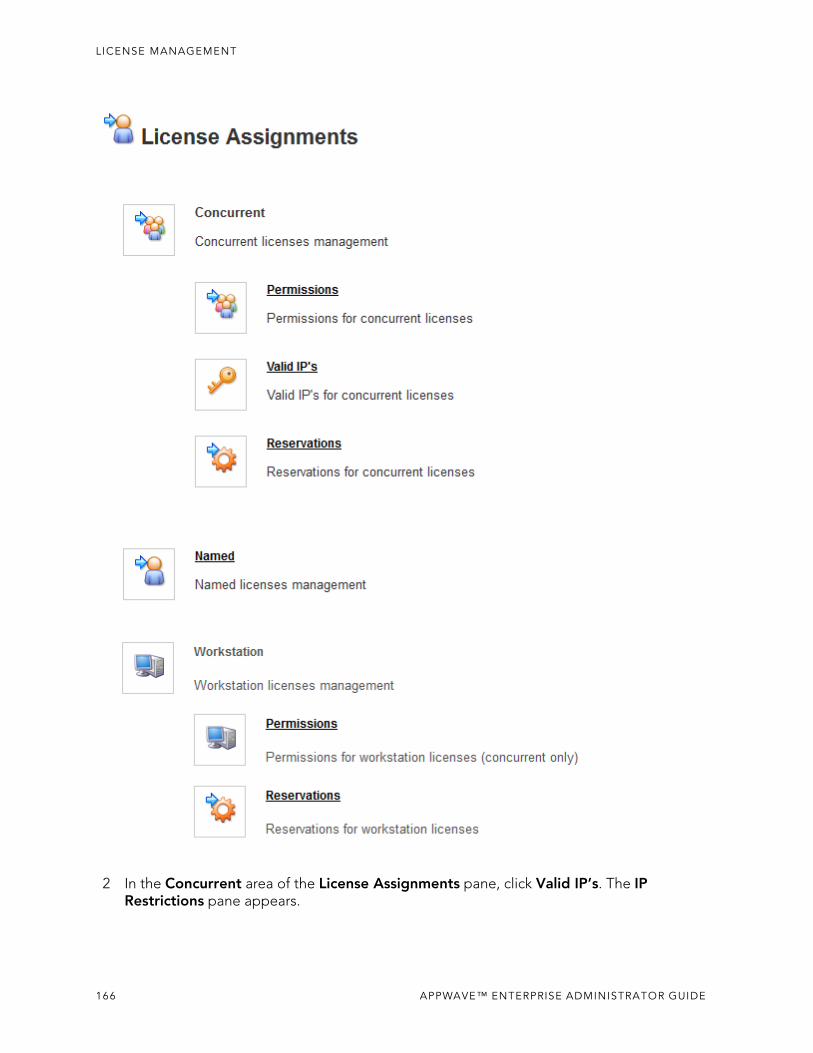
LICENSE MANAGEMENT
2 In the Concurrent area of the License Assignments pane, click Valid IP’s. The IP Restrictions pane appears.
166 APPWAVE™ ENTERPRISE ADMINISTRATOR GUIDE
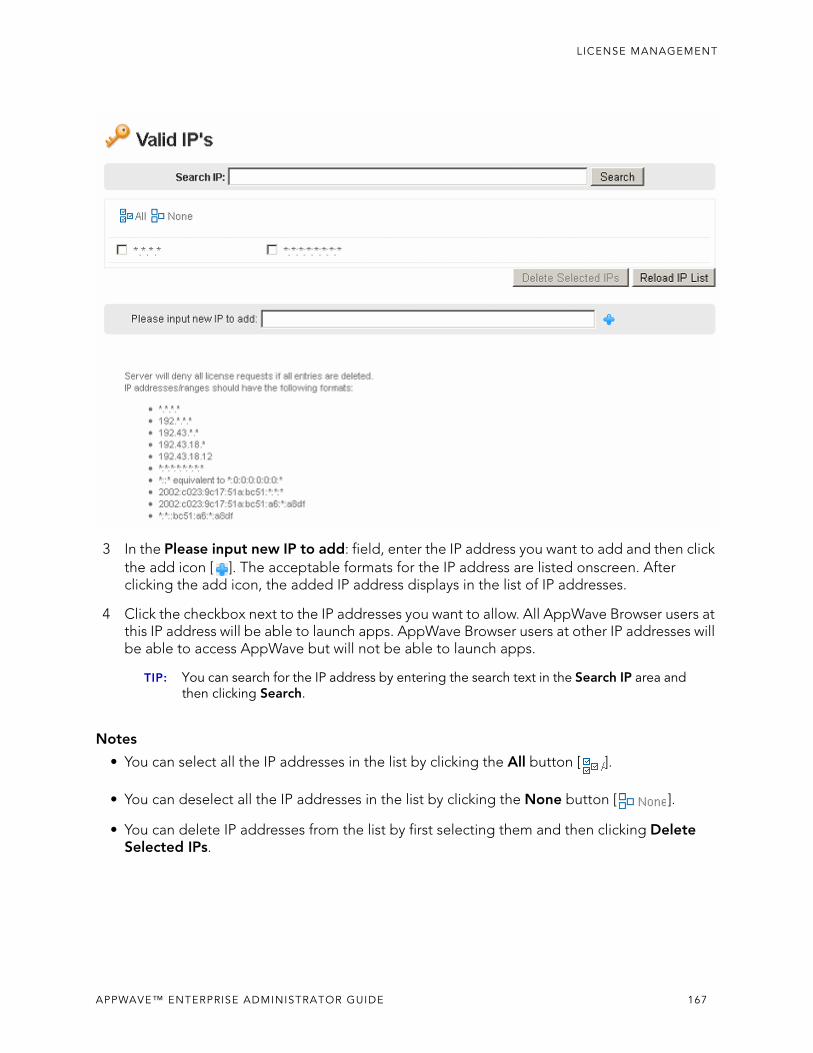
LICENSE MANAGEMENT
3 In the Please input new IP to add: field, enter the IP address you want to add and then click the add icon [ ]. The acceptable formats for the IP address are listed onscreen. After clicking the add icon, the added IP address displays in the list of IP addresses.
4 Click the checkbox next to the IP addresses you want to allow. All AppWave Browser users at this IP address will be able to launch apps. AppWave Browser users at other IP addresses will be able to access AppWave but will not be able to launch apps.
TIP: You can search for the IP address by entering the search text in the Search IP area and then clicking Search.
Notes
• You can select all the IP addresses in the list by clicking the All button [ ].
• You can deselect all the IP addresses in the list by clicking the None button [ ].
• You can delete IP addresses from the list by first selecting them and then clicking Delete Selected IPs.
APPWAVE™ ENTERPRISE ADMINISTRATOR GUIDE 167
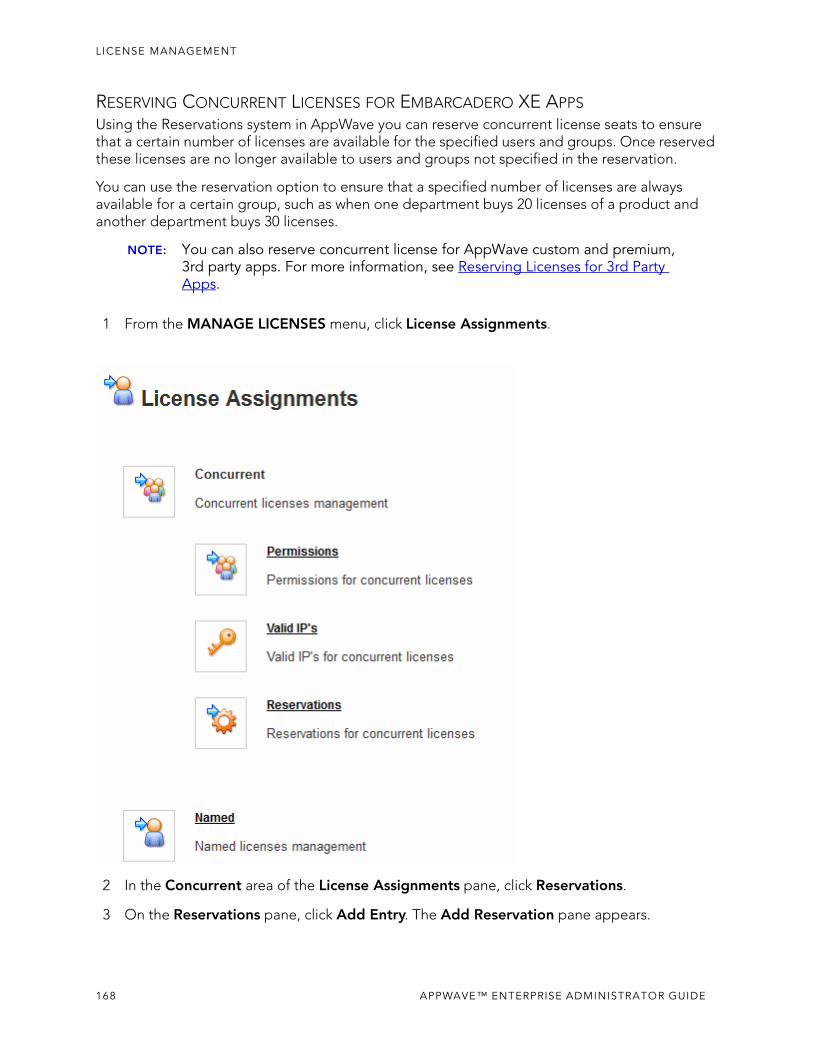
LICENSE MANAGEMENT
RESERVING CONCURRENT LICENSES FOR EMBARCADERO XE APPSUsing the Reservations system in AppWave you can reserve concurrent license seats to ensure that a certain number of licenses are available for the specified users and groups. Once reserved these licenses are no longer available to users and groups not specified in the reservation.
You can use the reservation option to ensure that a specified number of licenses are always available for a certain group, such as when one department buys 20 licenses of a product and another department buys 30 licenses.
NOTE: You can also reserve concurrent license for AppWave custom and premium, 3rd party apps. For more information, see Reserving Licenses for 3rd Party Apps.
1 From the MANAGE LICENSES menu, click License Assignments.
2 In the Concurrent area of the License Assignments pane, click Reservations.
3 On the Reservations pane, click Add Entry. The Add Reservation pane appears.
168 APPWAVE™ ENTERPRISE ADMINISTRATOR GUIDE
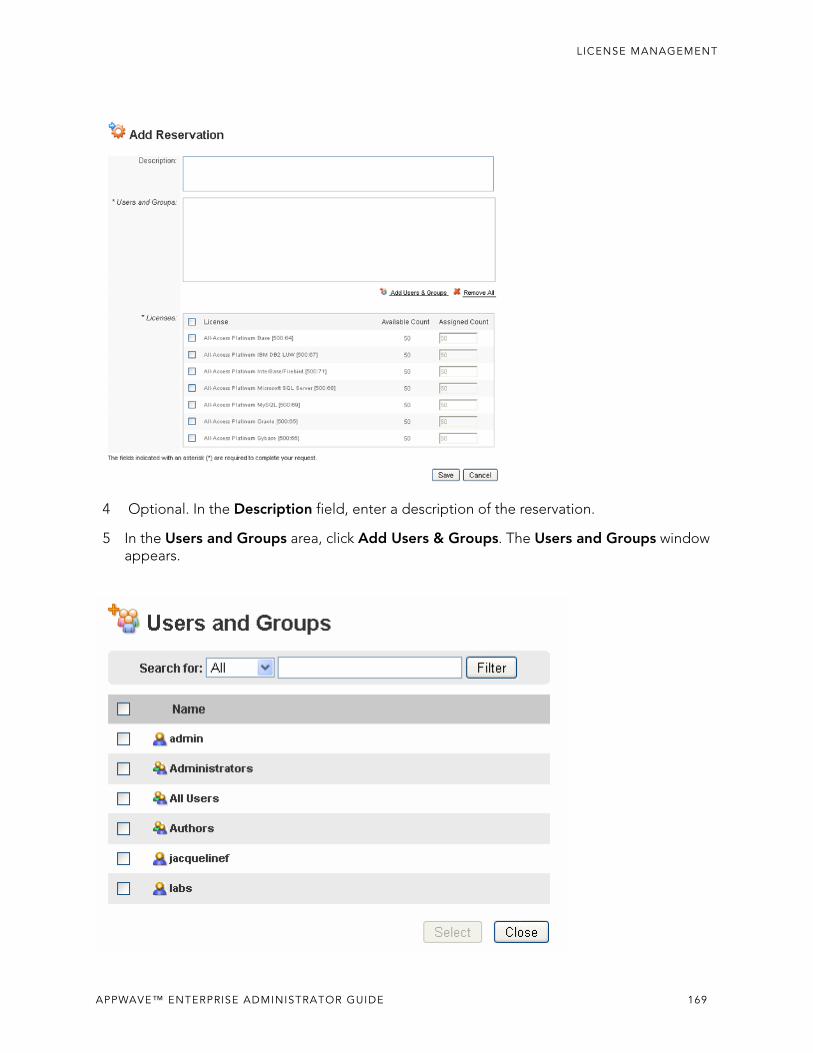
LICENSE MANAGEMENT
4 Optional. In the Description field, enter a description of the reservation.
5 In the Users and Groups area, click Add Users & Groups. The Users and Groups window appears.
APPWAVE™ ENTERPRISE ADMINISTRATOR GUIDE 169
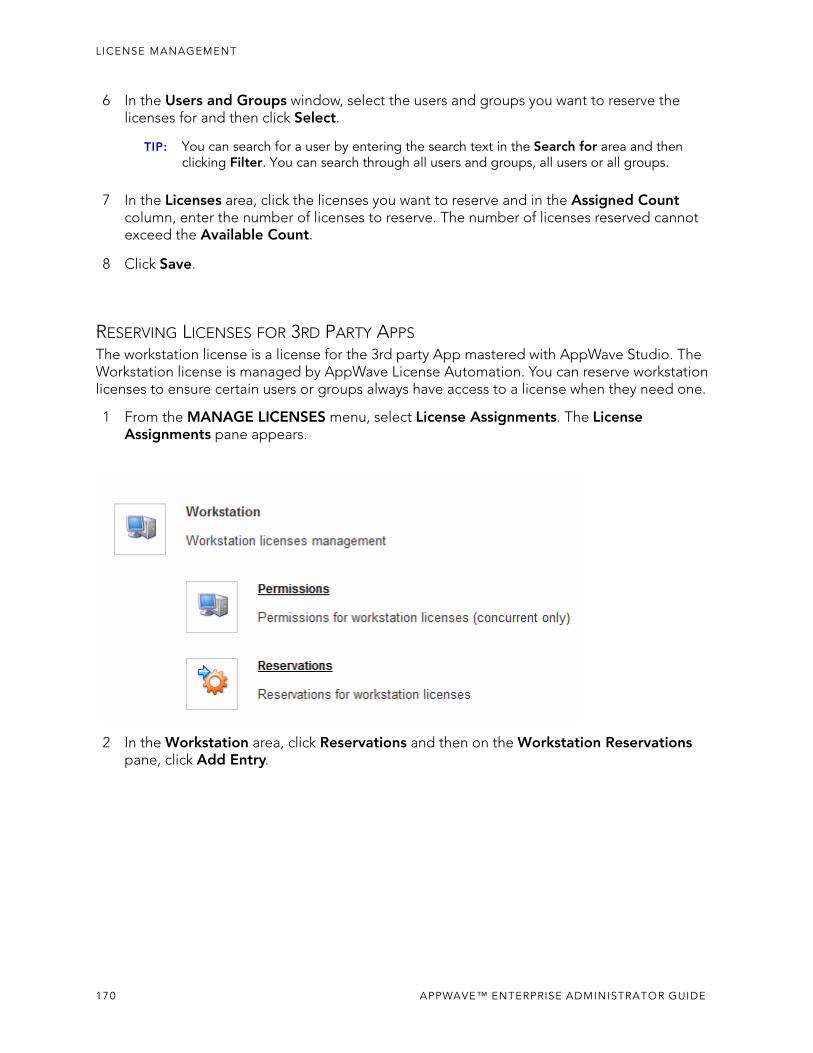
LICENSE MANAGEMENT
6 In the Users and Groups window, select the users and groups you want to reserve the licenses for and then click Select.
TIP: You can search for a user by entering the search text in the Search for area and then clicking Filter. You can search through all users and groups, all users or all groups.
7 In the Licenses area, click the licenses you want to reserve and in the Assigned Count column, enter the number of licenses to reserve. The number of licenses reserved cannot exceed the Available Count.
8 Click Save.
RESERVING LICENSES FOR 3RD PARTY APPSThe workstation license is a license for the 3rd party App mastered with AppWave Studio. The Workstation license is managed by AppWave License Automation. You can reserve workstation licenses to ensure certain users or groups always have access to a license when they need one.
1 From the MANAGE LICENSES menu, select License Assignments. The License Assignments pane appears.
2 In the Workstation area, click Reservations and then on the Workstation Reservations pane, click Add Entry.
170 APPWAVE™ ENTERPRISE ADMINISTRATOR GUIDE
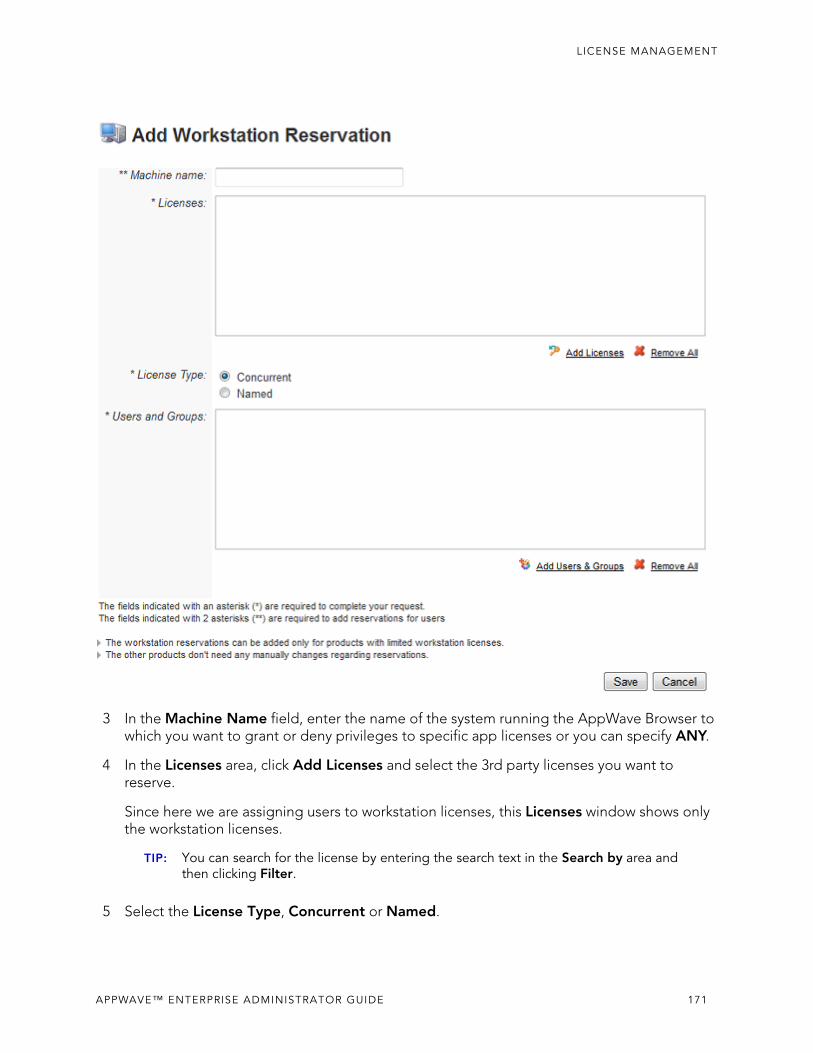
LICENSE MANAGEMENT
3 In the Machine Name field, enter the name of the system running the AppWave Browser to which you want to grant or deny privileges to specific app licenses or you can specify ANY.
4 In the Licenses area, click Add Licenses and select the 3rd party licenses you want to reserve.
Since here we are assigning users to workstation licenses, this Licenses window shows only the workstation licenses.
TIP: You can search for the license by entering the search text in the Search by area and then clicking Filter.
5 Select the License Type, Concurrent or Named.
APPWAVE™ ENTERPRISE ADMINISTRATOR GUIDE 171
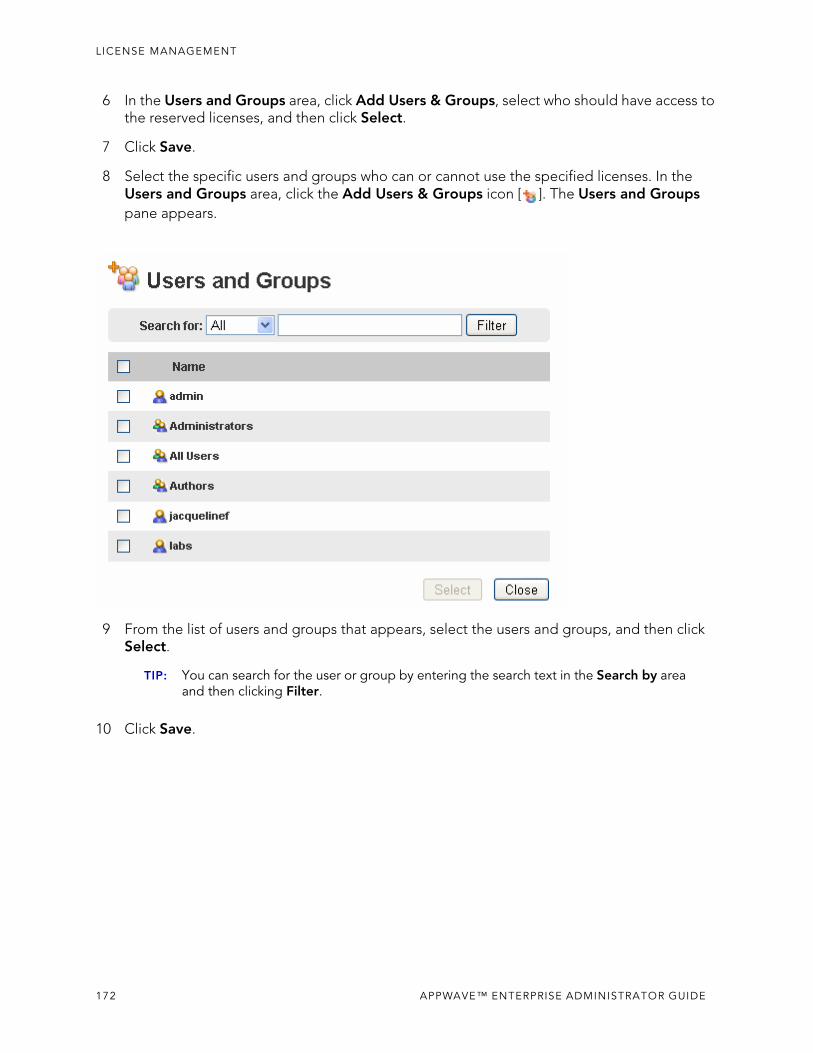
LICENSE MANAGEMENT
6 In the Users and Groups area, click Add Users & Groups, select who should have access to the reserved licenses, and then click Select.
7 Click Save.
8 Select the specific users and groups who can or cannot use the specified licenses. In the Users and Groups area, click the Add Users & Groups icon [ ]. The Users and Groups pane appears.
9 From the list of users and groups that appears, select the users and groups, and then click Select.
TIP: You can search for the user or group by entering the search text in the Search by area and then clicking Filter.
10 Click Save.
172 APPWAVE™ ENTERPRISE ADMINISTRATOR GUIDE
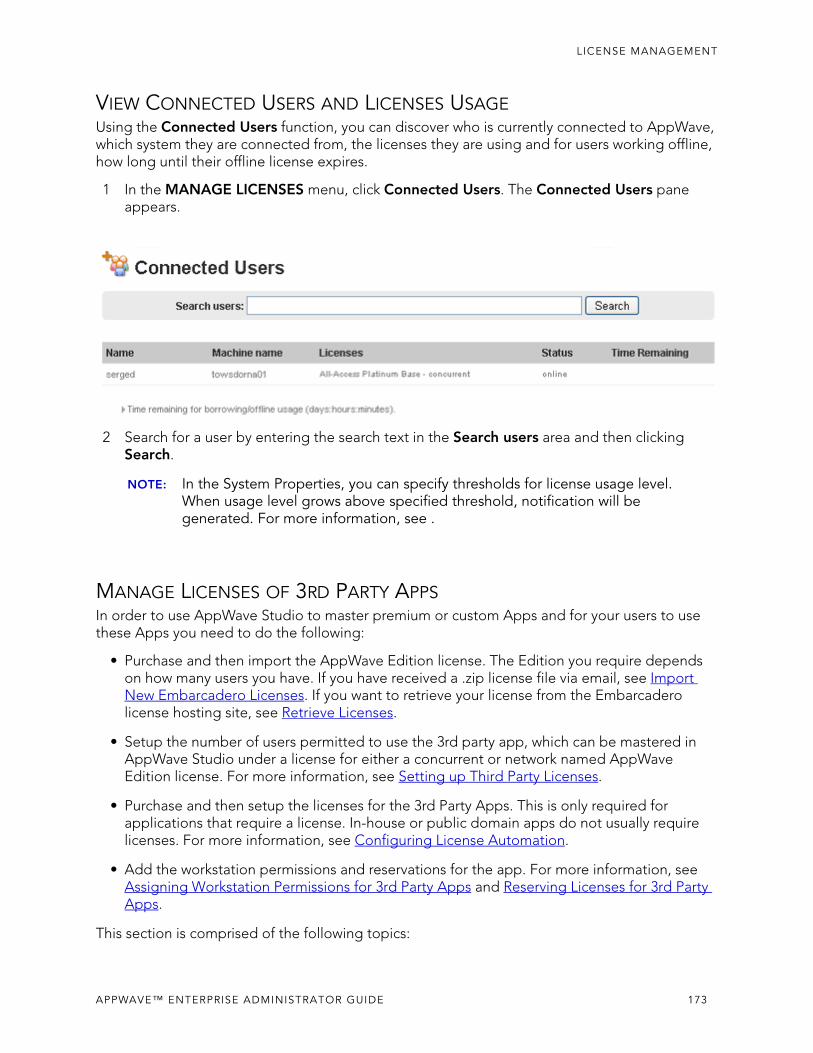
LICENSE MANAGEMENT
VIEW CONNECTED USERS AND LICENSES USAGEUsing the Connected Users function, you can discover who is currently connected to AppWave, which system they are connected from, the licenses they are using and for users working offline, how long until their offline license expires.
1 In the MANAGE LICENSES menu, click Connected Users. The Connected Users pane appears.
2 Search for a user by entering the search text in the Search users area and then clicking Search.
NOTE: In the System Properties, you can specify thresholds for license usage level. When usage level grows above specified threshold, notification will be generated. For more information, see .
MANAGE LICENSES OF 3RD PARTY APPSIn order to use AppWave Studio to master premium or custom Apps and for your users to use these Apps you need to do the following:
• Purchase and then import the AppWave Edition license. The Edition you require depends on how many users you have. If you have received a .zip license file via email, see Import New Embarcadero Licenses. If you want to retrieve your license from the Embarcadero license hosting site, see Retrieve Licenses.
• Setup the number of users permitted to use the 3rd party app, which can be mastered in AppWave Studio under a license for either a concurrent or network named AppWave Edition license. For more information, see Setting up Third Party Licenses.
• Purchase and then setup the licenses for the 3rd Party Apps. This is only required for applications that require a license. In-house or public domain apps do not usually require licenses. For more information, see Configuring License Automation.
• Add the workstation permissions and reservations for the app. For more information, see Assigning Workstation Permissions for 3rd Party Apps and Reserving Licenses for 3rd Party Apps.
This section is comprised of the following topics:
APPWAVE™ ENTERPRISE ADMINISTRATOR GUIDE 173
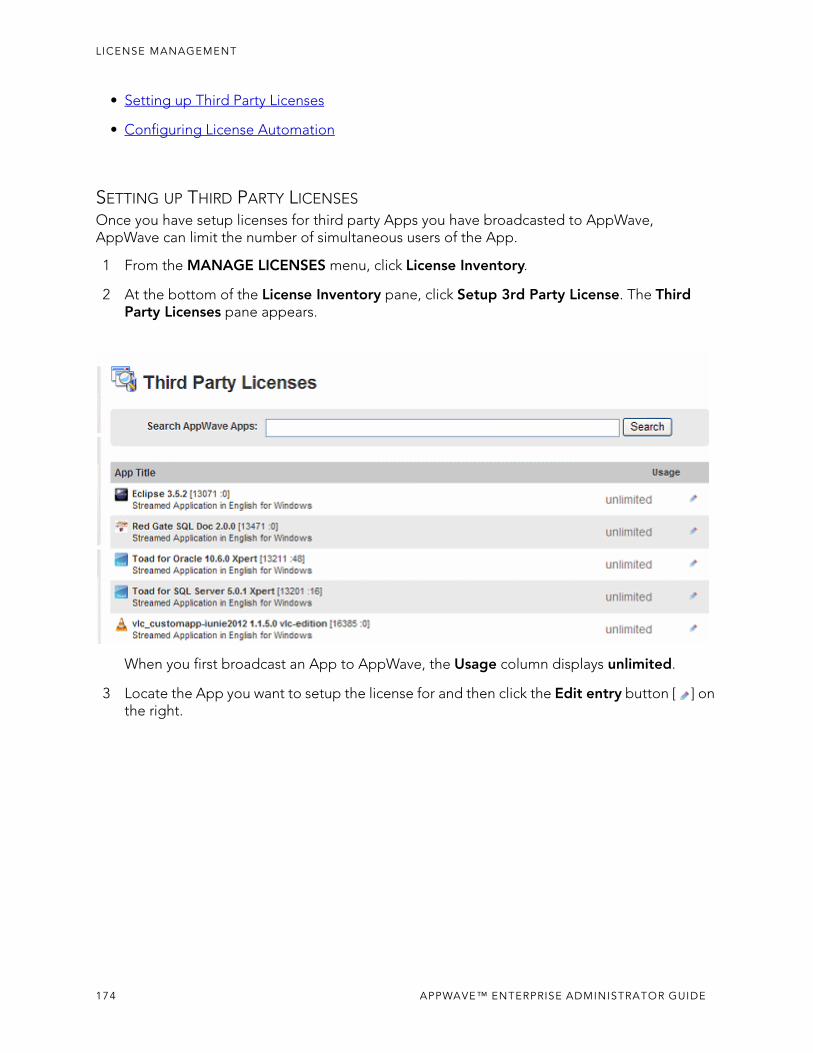
LICENSE MANAGEMENT
• Setting up Third Party Licenses
• Configuring License Automation
SETTING UP THIRD PARTY LICENSESOnce you have setup licenses for third party Apps you have broadcasted to AppWave, AppWave can limit the number of simultaneous users of the App.
1 From the MANAGE LICENSES menu, click License Inventory.
2 At the bottom of the License Inventory pane, click Setup 3rd Party License. The Third Party Licenses pane appears.
When you first broadcast an App to AppWave, the Usage column displays unlimited.
3 Locate the App you want to setup the license for and then click the Edit entry button [ ] on the right.
174 APPWAVE™ ENTERPRISE ADMINISTRATOR GUIDE
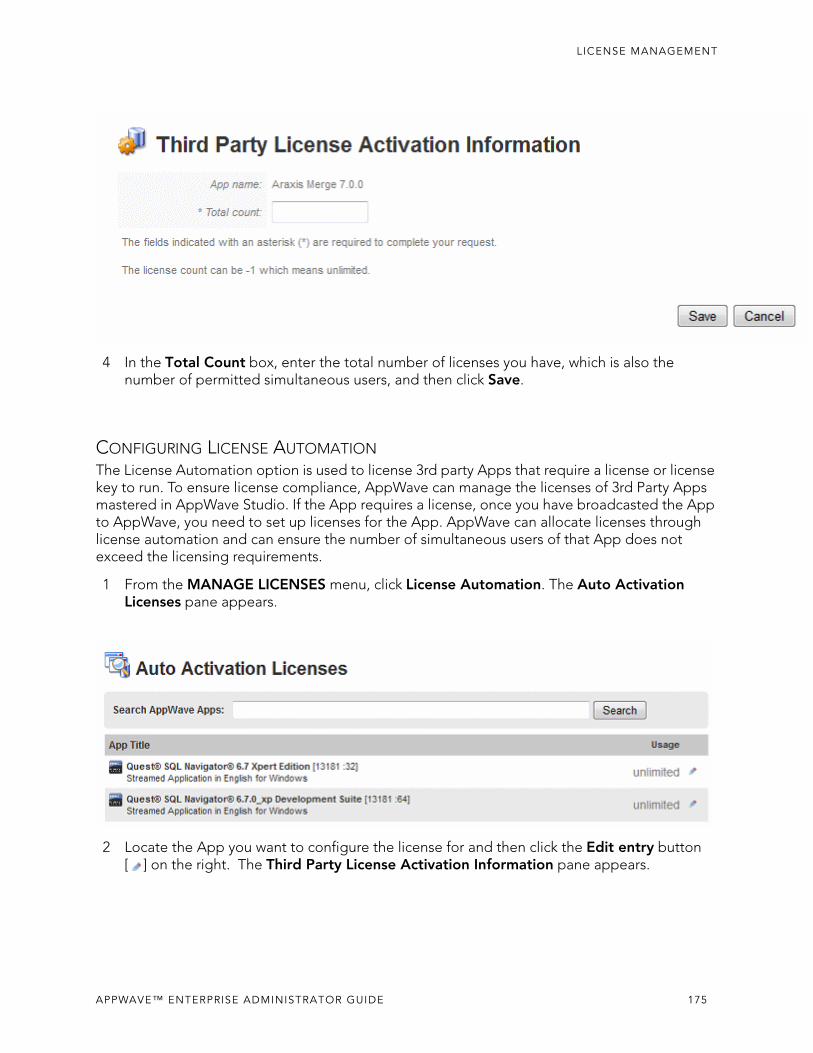
LICENSE MANAGEMENT
4 In the Total Count box, enter the total number of licenses you have, which is also the number of permitted simultaneous users, and then click Save.
CONFIGURING LICENSE AUTOMATIONThe License Automation option is used to license 3rd party Apps that require a license or license key to run. To ensure license compliance, AppWave can manage the licenses of 3rd Party Apps mastered in AppWave Studio. If the App requires a license, once you have broadcasted the App to AppWave, you need to set up licenses for the App. AppWave can allocate licenses through license automation and can ensure the number of simultaneous users of that App does not exceed the licensing requirements.
1 From the MANAGE LICENSES menu, click License Automation. The Auto Activation Licenses pane appears.
2 Locate the App you want to configure the license for and then click the Edit entry button [ ] on the right. The Third Party License Activation Information pane appears.
APPWAVE™ ENTERPRISE ADMINISTRATOR GUIDE 175
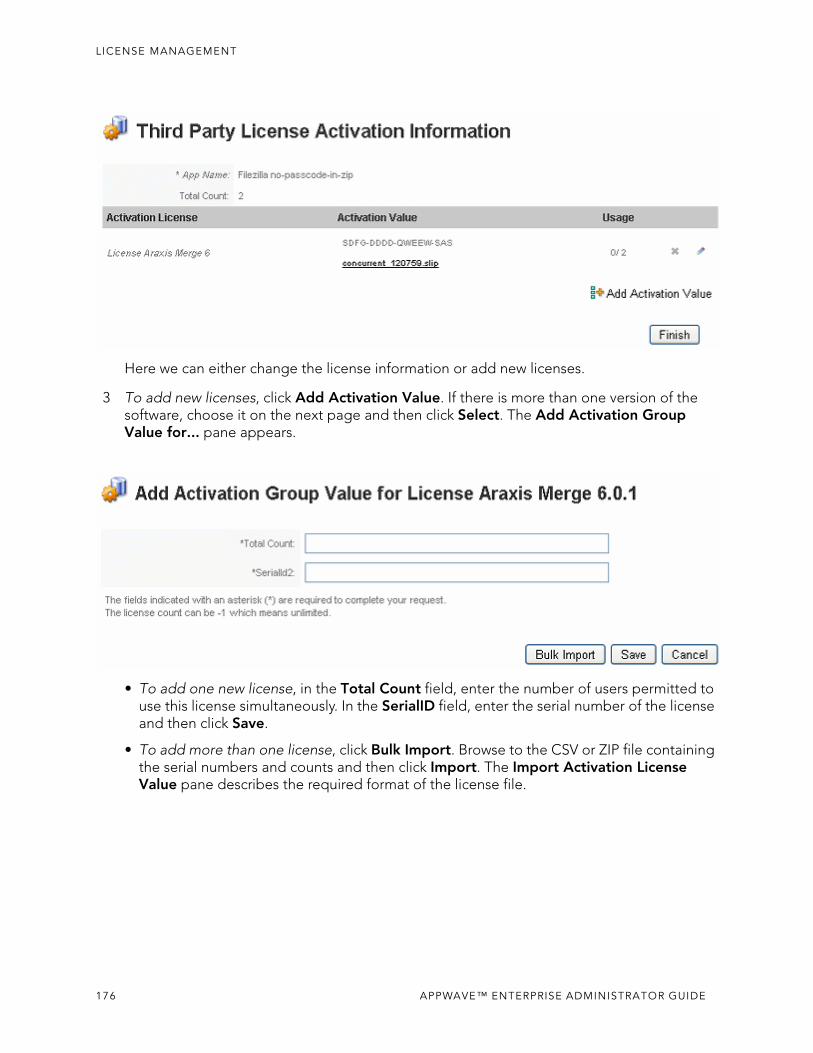
LICENSE MANAGEMENT
Here we can either change the license information or add new licenses.
3 To add new licenses, click Add Activation Value. If there is more than one version of the software, choose it on the next page and then click Select. The Add Activation Group Value for... pane appears.
• To add one new license, in the Total Count field, enter the number of users permitted to use this license simultaneously. In the SerialID field, enter the serial number of the license and then click Save.
• To add more than one license, click Bulk Import. Browse to the CSV or ZIP file containing the serial numbers and counts and then click Import. The Import Activation License Value pane describes the required format of the license file.
176 APPWAVE™ ENTERPRISE ADMINISTRATOR GUIDE
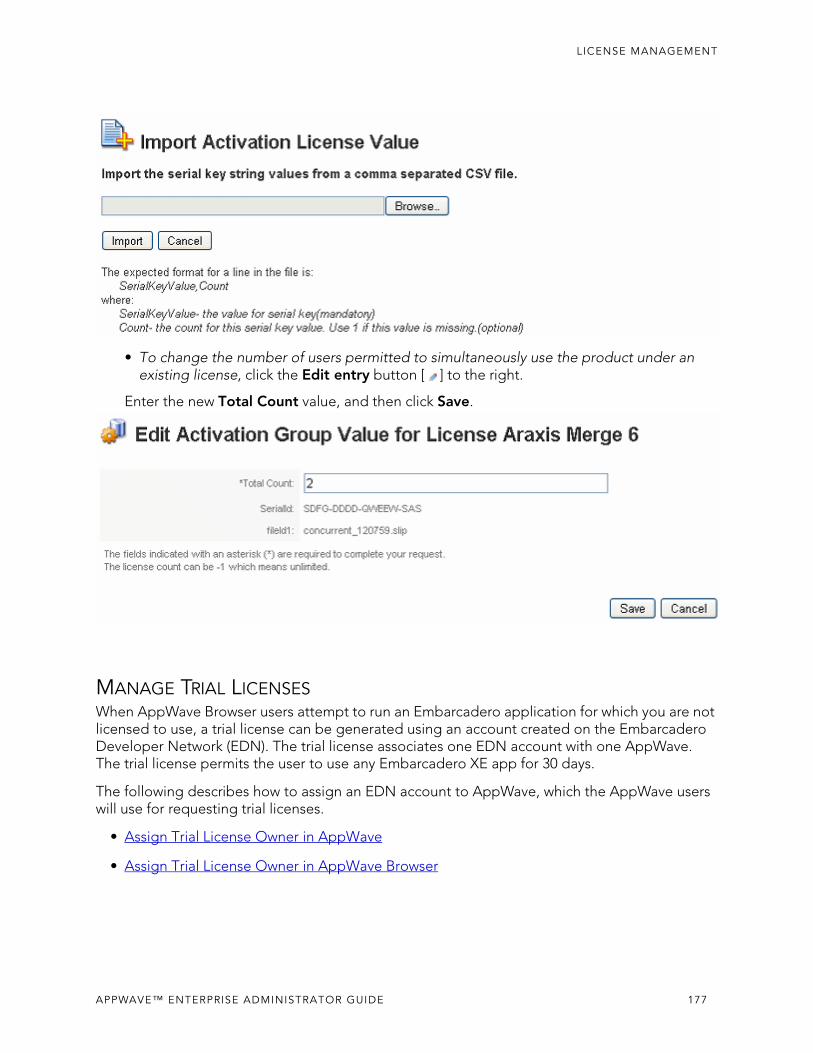
LICENSE MANAGEMENT
• To change the number of users permitted to simultaneously use the product under an existing license, click the Edit entry button [ ] to the right.
Enter the new Total Count value, and then click Save.
MANAGE TRIAL LICENSESWhen AppWave Browser users attempt to run an Embarcadero application for which you are not licensed to use, a trial license can be generated using an account created on the Embarcadero Developer Network (EDN). The trial license associates one EDN account with one AppWave. The trial license permits the user to use any Embarcadero XE app for 30 days.
The following describes how to assign an EDN account to AppWave, which the AppWave users will use for requesting trial licenses.
• Assign Trial License Owner in AppWave
• Assign Trial License Owner in AppWave Browser
APPWAVE™ ENTERPRISE ADMINISTRATOR GUIDE 177
LICENSE MANAGEMENT
ASSIGN TRIAL LICENSE OWNER IN APPWAVE1 From the Dashboard, click Set up licenses.
2 On the Set Up Licenses pane, click Set Trial Owner.
3 If you have an EDN account, enter your EDN credentials and then click Save.
If you do not have an EDN account, click Create EDN account, create an account, and then enter your EDN credentials and click Save.
ASSIGN TRIAL LICENSE OWNER IN APPWAVE BROWSER1 Start AppWave Browser using an account with administrator privileges.
2 At the top of AppWave Browser Apps tab, click the Tools and Options icon [ ] and then select Licensing > Change Trial Owner.
3 If you have an EDN account, enter your EDN credentials and then click OK.
4 If you do not have an EDN account, click Create new EDN account, create an account, and then enter your EDN credentials and click OK.
PROVIDE LICENSES TO APPWAVE BROWSER USERS
By default the Embarcadero applications are available to all users. However, if you want tighter control over who uses your AppWave, you need to configure Folders, Groups, and Users. These are the steps involved in providing a new user access to AppWave.
• Create an individual user or Import users and groups from an LDAP server
• Create a group of users that share application requirements
• Assign users to a group that shares application requirements
• Create a folder authorizing users and groups to use specific products
• Assign groups and users to folders
178 APPWAVE™ ENTERPRISE ADMINISTRATOR GUIDE
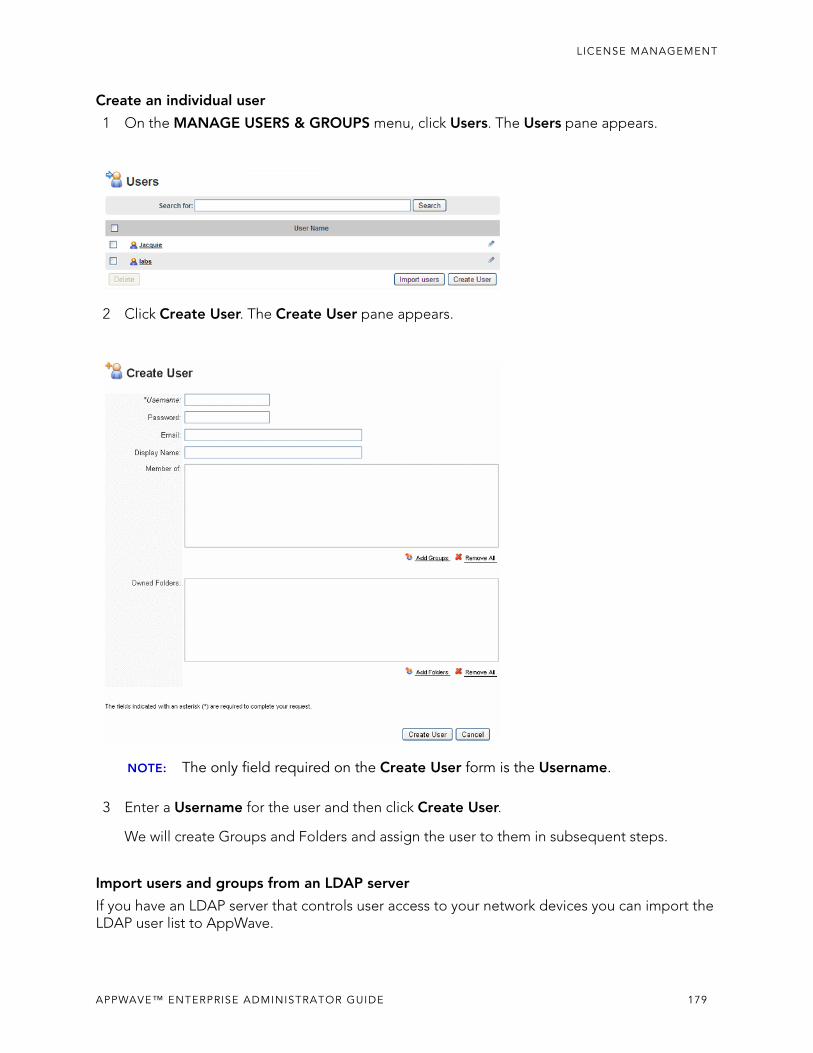
LICENSE MANAGEMENT
Create an individual user
1 On the MANAGE USERS & GROUPS menu, click Users. The Users pane appears.
2 Click Create User. The Create User pane appears.
NOTE: The only field required on the Create User form is the Username.
3 Enter a Username for the user and then click Create User.
We will create Groups and Folders and assign the user to them in subsequent steps.
Import users and groups from an LDAP server
If you have an LDAP server that controls user access to your network devices you can import the LDAP user list to AppWave.
APPWAVE™ ENTERPRISE ADMINISTRATOR GUIDE 179
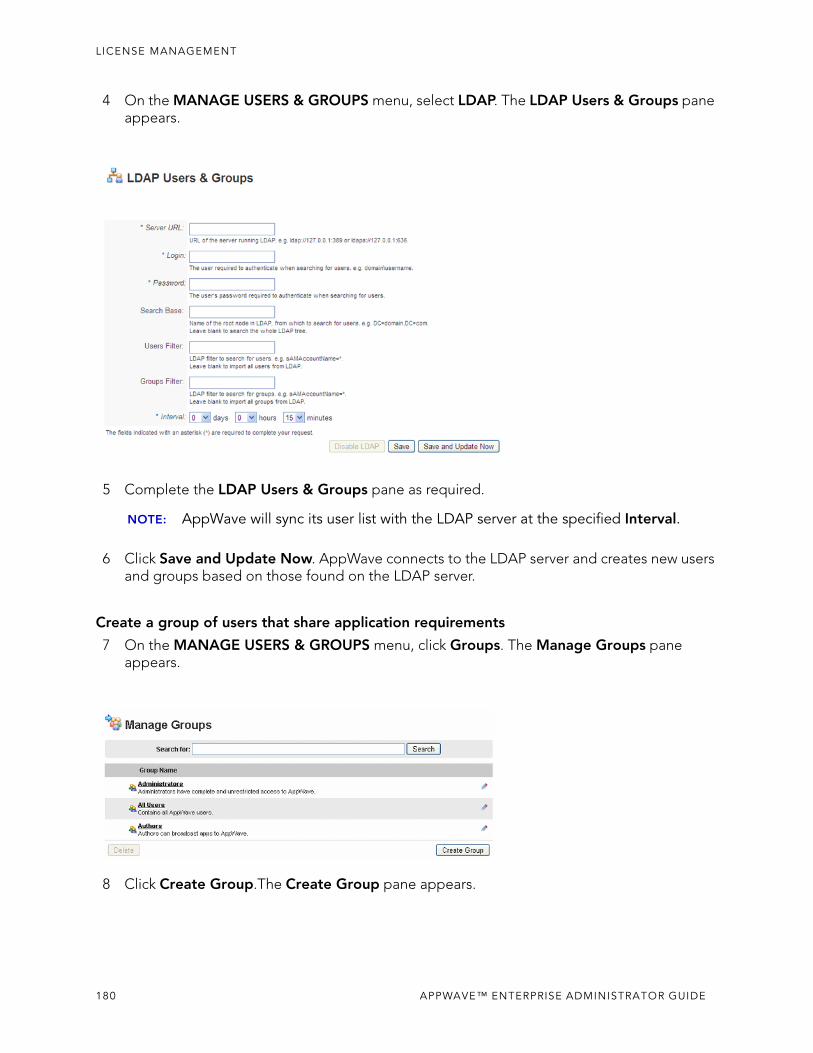
LICENSE MANAGEMENT
4 On the MANAGE USERS & GROUPS menu, select LDAP. The LDAP Users & Groups pane appears.
5 Complete the LDAP Users & Groups pane as required.
NOTE: AppWave will sync its user list with the LDAP server at the specified Interval.
6 Click Save and Update Now. AppWave connects to the LDAP server and creates new users and groups based on those found on the LDAP server.
Create a group of users that share application requirements
7 On the MANAGE USERS & GROUPS menu, click Groups. The Manage Groups pane appears.
8 Click Create Group.The Create Group pane appears.
180 APPWAVE™ ENTERPRISE ADMINISTRATOR GUIDE
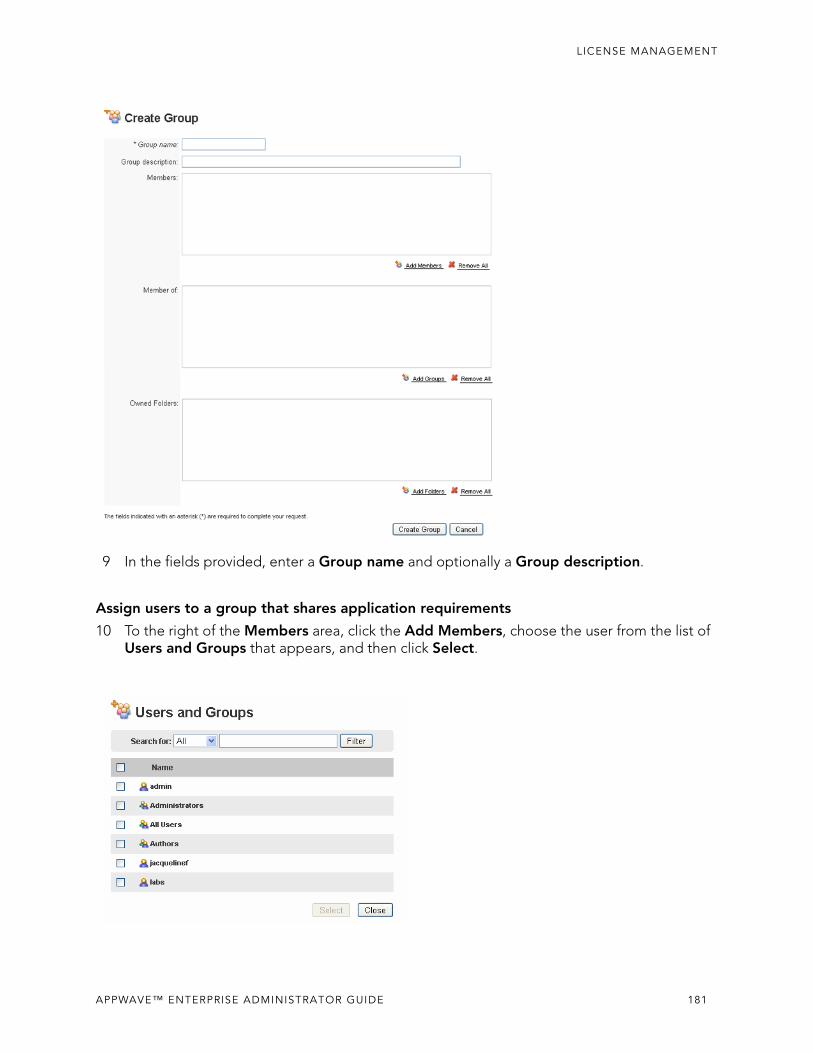
LICENSE MANAGEMENT
9 In the fields provided, enter a Group name and optionally a Group description.
Assign users to a group that shares application requirements
10 To the right of the Members area, click the Add Members, choose the user from the list of Users and Groups that appears, and then click Select.
APPWAVE™ ENTERPRISE ADMINISTRATOR GUIDE 181

LICENSE MANAGEMENT
11 The Create Group dialog reappears with the selected user added to the Members area.
12 Click Create Group.
Create a folder authorizing users and groups to use specific products
13 On the MANAGE FOLDERS menu, click App Folders.
14 Click Create Folder. The Create Folder pane appears.
182 APPWAVE™ ENTERPRISE ADMINISTRATOR GUIDE
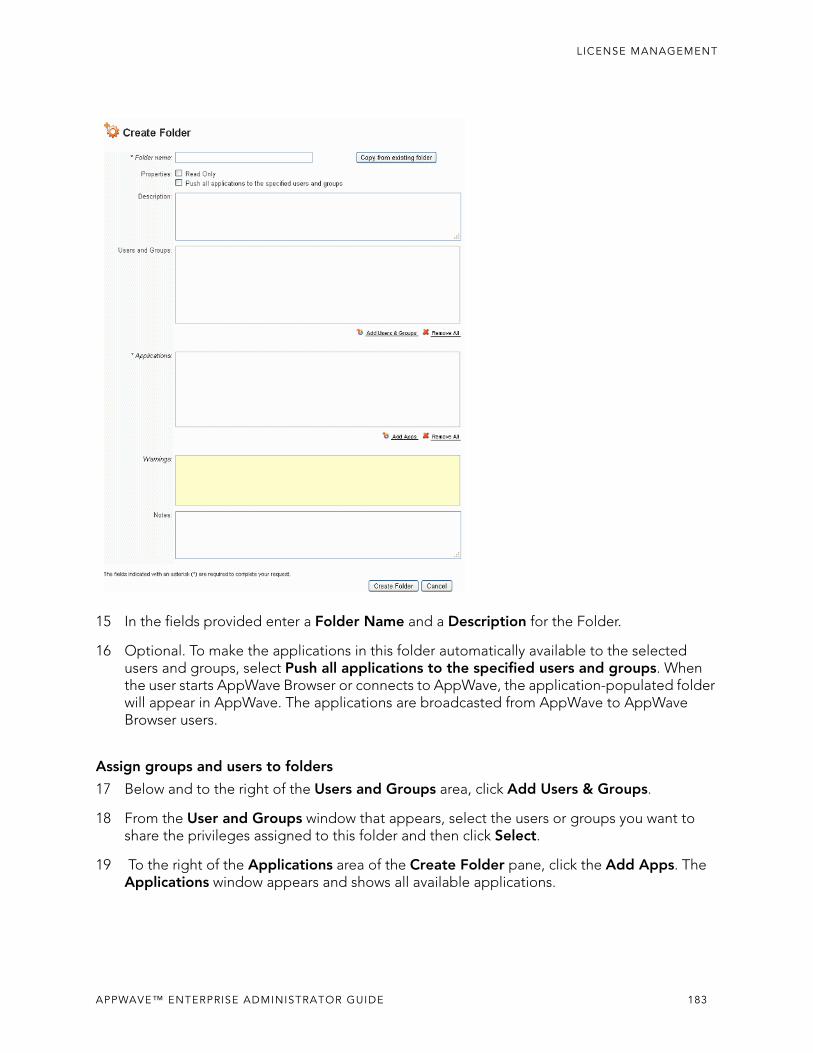
LICENSE MANAGEMENT
15 In the fields provided enter a Folder Name and a Description for the Folder.
16 Optional. To make the applications in this folder automatically available to the selected users and groups, select Push all applications to the specified users and groups. When the user starts AppWave Browser or connects to AppWave, the application-populated folder will appear in AppWave. The applications are broadcasted from AppWave to AppWave Browser users.
Assign groups and users to folders
17 Below and to the right of the Users and Groups area, click Add Users & Groups.
18 From the User and Groups window that appears, select the users or groups you want to share the privileges assigned to this folder and then click Select.
19 To the right of the Applications area of the Create Folder pane, click the Add Apps. The Applications window appears and shows all available applications.
APPWAVE™ ENTERPRISE ADMINISTRATOR GUIDE 183
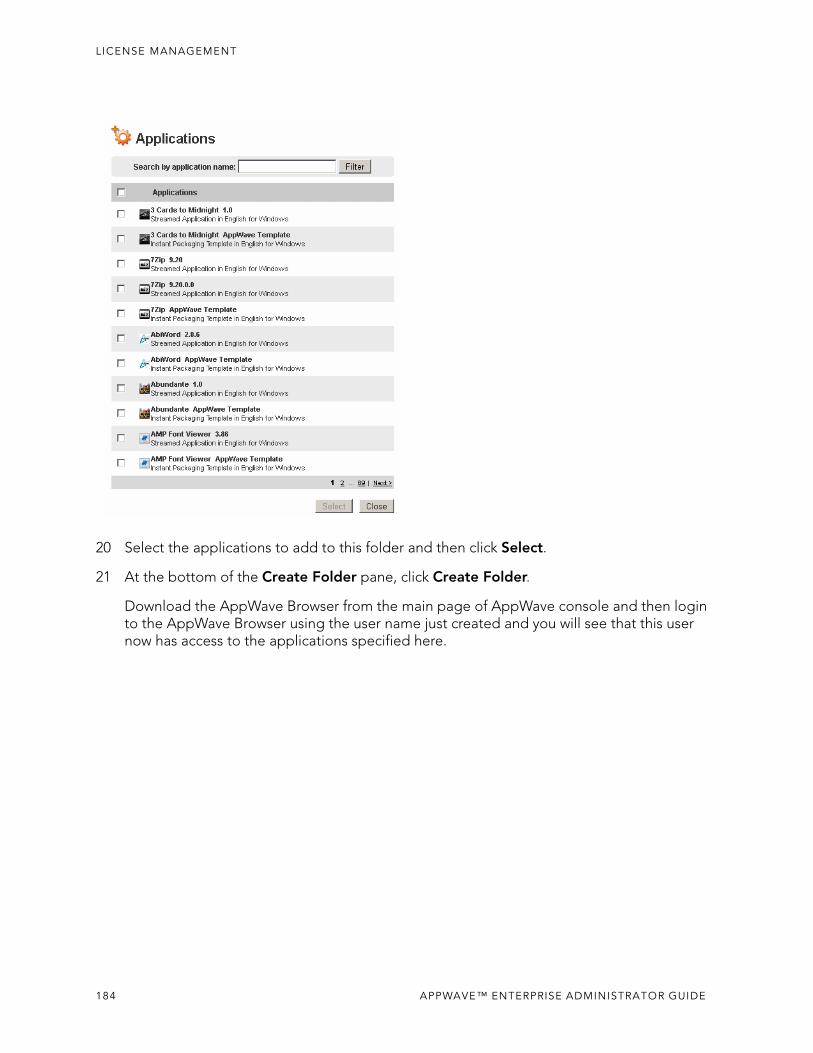
LICENSE MANAGEMENT
20 Select the applications to add to this folder and then click Select.
21 At the bottom of the Create Folder pane, click Create Folder.
Download the AppWave Browser from the main page of AppWave console and then login to the AppWave Browser using the user name just created and you will see that this user now has access to the applications specified here.
184 APPWAVE™ ENTERPRISE ADMINISTRATOR GUIDE
FOLDER, USER, AND GROUP MANAGEMENT
Folders allow you to restrict users and groups to a certain set of products and licenses available on AppWave™ Enterprise Store (AppWave).
Grouping users enables you to grant or deny access to applications to the whole group at once, making the user administration more efficient in an environment where there are many users.
If local users are permitted in the System Properties, users running AppWave Browser for the first time without an account will automatically have individual accounts created for them. This is related to the System Properties > Allow client to register user option. The AppWave administrator can also add users individually or in a batch using the AppWave MANAGE USERS & GROUPS, Users pane. Users can also be added dynamically through the LDAP facility.
This section describes folders, user, and group administration and contains these topics:
• Managing Folders
• Managing Users
• Managing Groups
NOTE: Users will not see changes made to their user permissions, groups or folders until they restart AppWave Browser.
MANAGING FOLDERS
Creating and assigning folders allows you to restrict users and groups to a certain set of products and licenses available on AppWave. By default, AppWave is configured with the following folders:
• All Apps: Provides access to specified applications to all AppWave Browser users. The All Apps folder can be edited to provide access to only specific applications, but this folder cannot be deleted. Attributes of the folder such as users, group, properties, applications and notes can be changed.
• All-Access: Provides access to all Embarcadero applications to all AppWave Browser users. The properties of this folder are fully editable and it can be deleted.
• Popular, Productivity, Utility, Database Tools, IDEs, and Developer Tools are also available at install and are subsets of the All Apps folder. The properties of these folders are fully editable and they can be deleted.
• Licensed Apps: 3rd party apps broadcasted to AppWave or imported manually to AppWave are automatically added to this folder. The level of AppWave Edition license you have purchased determines how many 3rd apps this folder and your AppWave catalog can contain.
Folders you create appear in the MANAGE FOLDERS menu.
This section covers the following topics:
APPWAVE™ ENTERPRISE ADMINISTRATOR GUIDE 185

FOLDER, USER, AND GROUP MANAGEMENT
• Create Folders
• Use Existing Folders to Create a New Folder
• Edit Folders
• Delete Folders
CREATE FOLDERS1 From the MANAGE FOLDERS menu, click App Folders.
2 At the bottom of the App Folders pane, click Create Folder. The Create Folder pane appears.
3 In the Folder name field, enter a folder name of up to 20 characters.
186 APPWAVE™ ENTERPRISE ADMINISTRATOR GUIDE
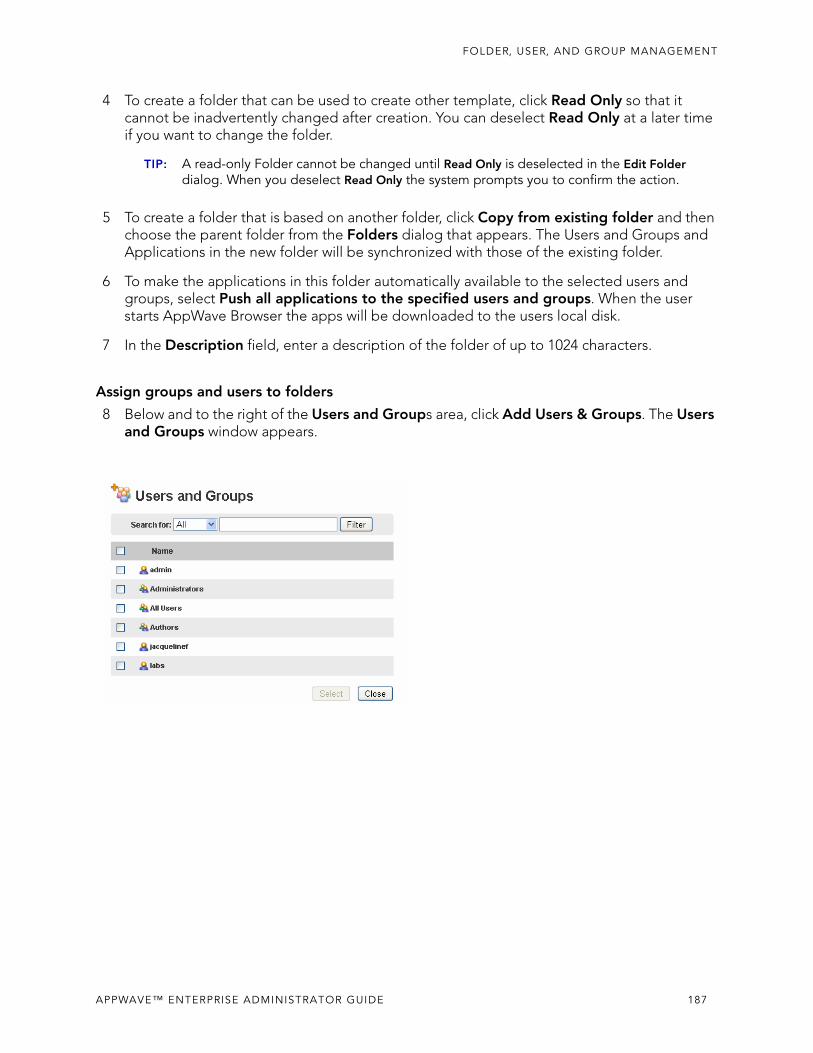
FOLDER, USER, AND GROUP MANAGEMENT
4 To create a folder that can be used to create other template, click Read Only so that it cannot be inadvertently changed after creation. You can deselect Read Only at a later time if you want to change the folder.
TIP: A read-only Folder cannot be changed until Read Only is deselected in the Edit Folder dialog. When you deselect Read Only the system prompts you to confirm the action.
5 To create a folder that is based on another folder, click Copy from existing folder and then choose the parent folder from the Folders dialog that appears. The Users and Groups and Applications in the new folder will be synchronized with those of the existing folder.
6 To make the applications in this folder automatically available to the selected users and groups, select Push all applications to the specified users and groups. When the user starts AppWave Browser the apps will be downloaded to the users local disk.
7 In the Description field, enter a description of the folder of up to 1024 characters.
Assign groups and users to folders
8 Below and to the right of the Users and Groups area, click Add Users & Groups. The Users and Groups window appears.
APPWAVE™ ENTERPRISE ADMINISTRATOR GUIDE 187
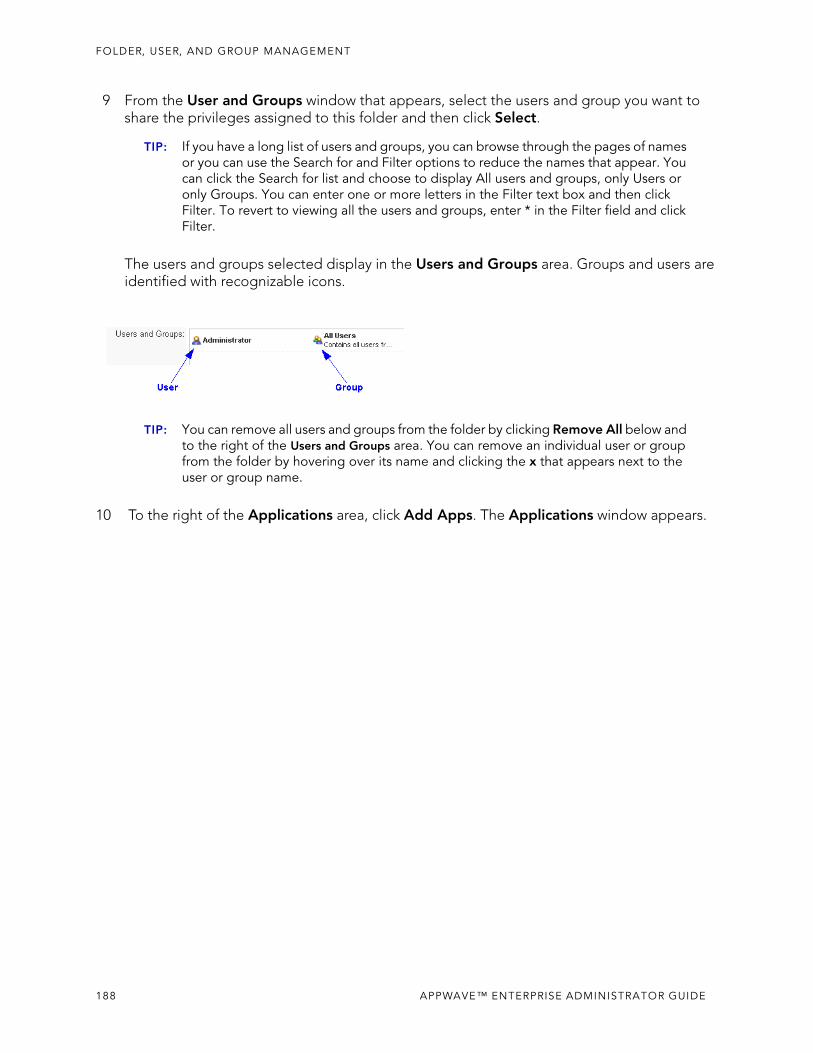
FOLDER, USER, AND GROUP MANAGEMENT
9 From the User and Groups window that appears, select the users and group you want to share the privileges assigned to this folder and then click Select.
TIP: If you have a long list of users and groups, you can browse through the pages of names or you can use the Search for and Filter options to reduce the names that appear. You can click the Search for list and choose to display All users and groups, only Users or only Groups. You can enter one or more letters in the Filter text box and then click Filter. To revert to viewing all the users and groups, enter * in the Filter field and click Filter.
The users and groups selected display in the Users and Groups area. Groups and users are identified with recognizable icons.
TIP: You can remove all users and groups from the folder by clicking Remove All below and to the right of the Users and Groups area. You can remove an individual user or group from the folder by hovering over its name and clicking the x that appears next to the user or group name.
10 To the right of the Applications area, click Add Apps. The Applications window appears.
188 APPWAVE™ ENTERPRISE ADMINISTRATOR GUIDE
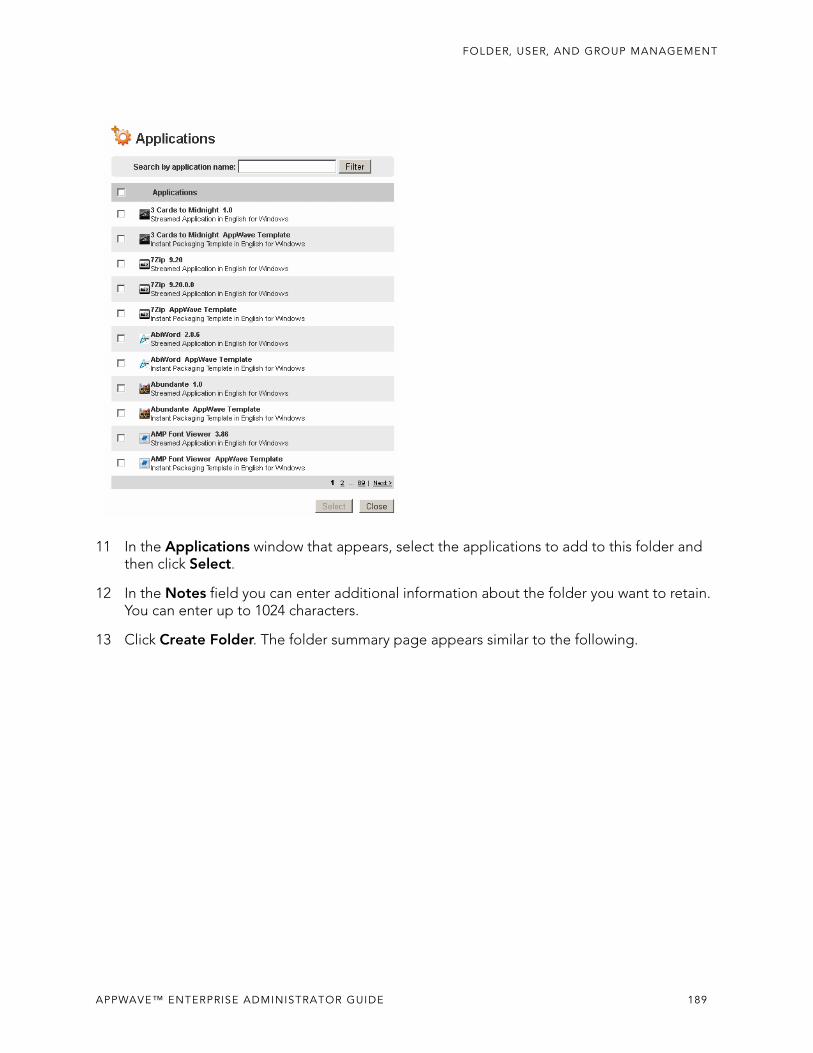
FOLDER, USER, AND GROUP MANAGEMENT
11 In the Applications window that appears, select the applications to add to this folder and then click Select.
12 In the Notes field you can enter additional information about the folder you want to retain. You can enter up to 1024 characters.
13 Click Create Folder. The folder summary page appears similar to the following.
APPWAVE™ ENTERPRISE ADMINISTRATOR GUIDE 189
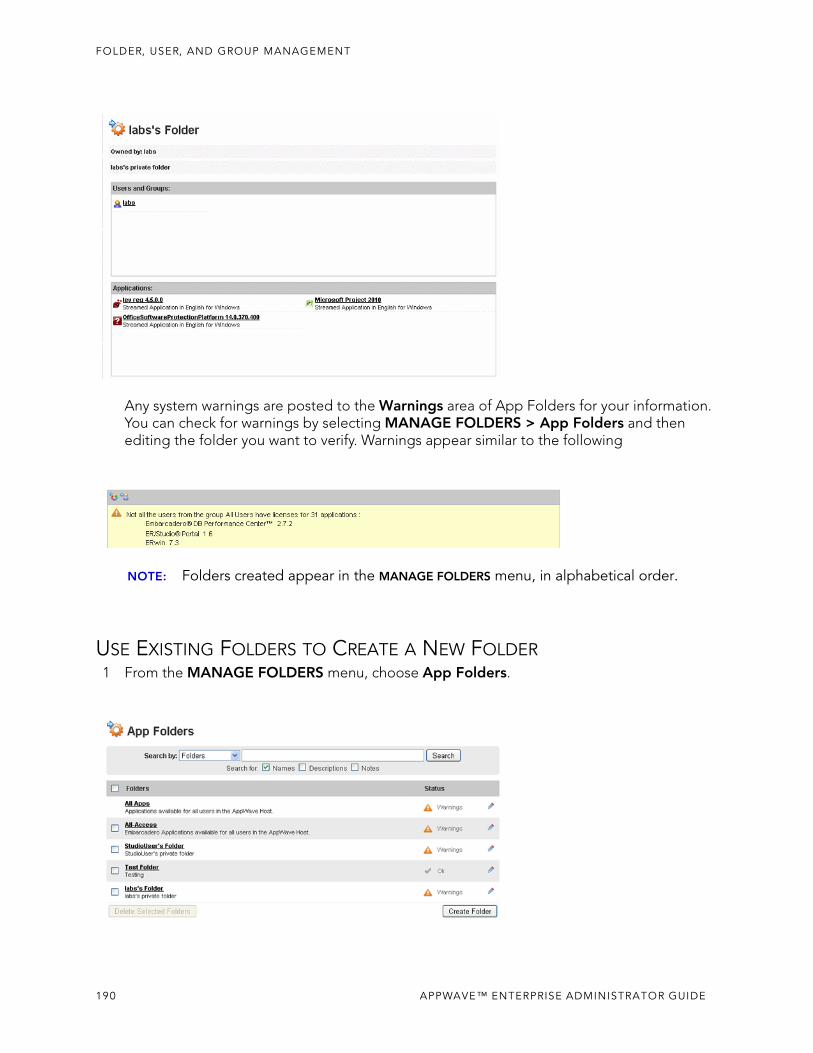
FOLDER, USER, AND GROUP MANAGEMENT
Any system warnings are posted to the Warnings area of App Folders for your information. You can check for warnings by selecting MANAGE FOLDERS > App Folders and then editing the folder you want to verify. Warnings appear similar to the following
NOTE: Folders created appear in the MANAGE FOLDERS menu, in alphabetical order.
USE EXISTING FOLDERS TO CREATE A NEW FOLDER1 From the MANAGE FOLDERS menu, choose App Folders.
190 APPWAVE™ ENTERPRISE ADMINISTRATOR GUIDE

FOLDER, USER, AND GROUP MANAGEMENT
2 Click Create Folder. The Create Folder pane appears.
3 Click Copy from existing folder and then from the Folders window, choose a folder and then click Select.
The Users and Groups and the Applications areas of the new folder are populated with all the users and groups, and all the applications of the folder selected.
4 Complete defining the folder as described in Create Folders.
NOTE: Folders created appear in the MANAGE FOLDERS menu, in alphabetical order.
APPWAVE™ ENTERPRISE ADMINISTRATOR GUIDE 191
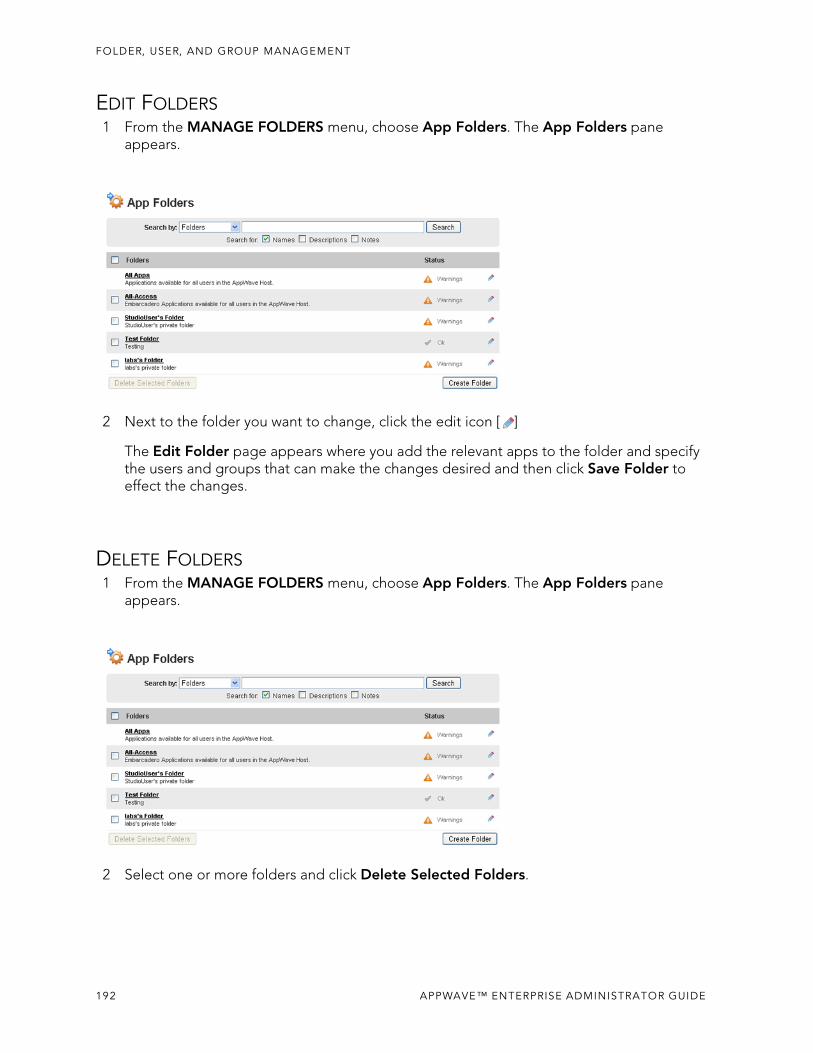
FOLDER, USER, AND GROUP MANAGEMENT
EDIT FOLDERS1 From the MANAGE FOLDERS menu, choose App Folders. The App Folders pane
appears.
2 Next to the folder you want to change, click the edit icon [ ]
The Edit Folder page appears where you add the relevant apps to the folder and specify the users and groups that can make the changes desired and then click Save Folder to effect the changes.
DELETE FOLDERS1 From the MANAGE FOLDERS menu, choose App Folders. The App Folders pane
appears.
2 Select one or more folders and click Delete Selected Folders.
192 APPWAVE™ ENTERPRISE ADMINISTRATOR GUIDE
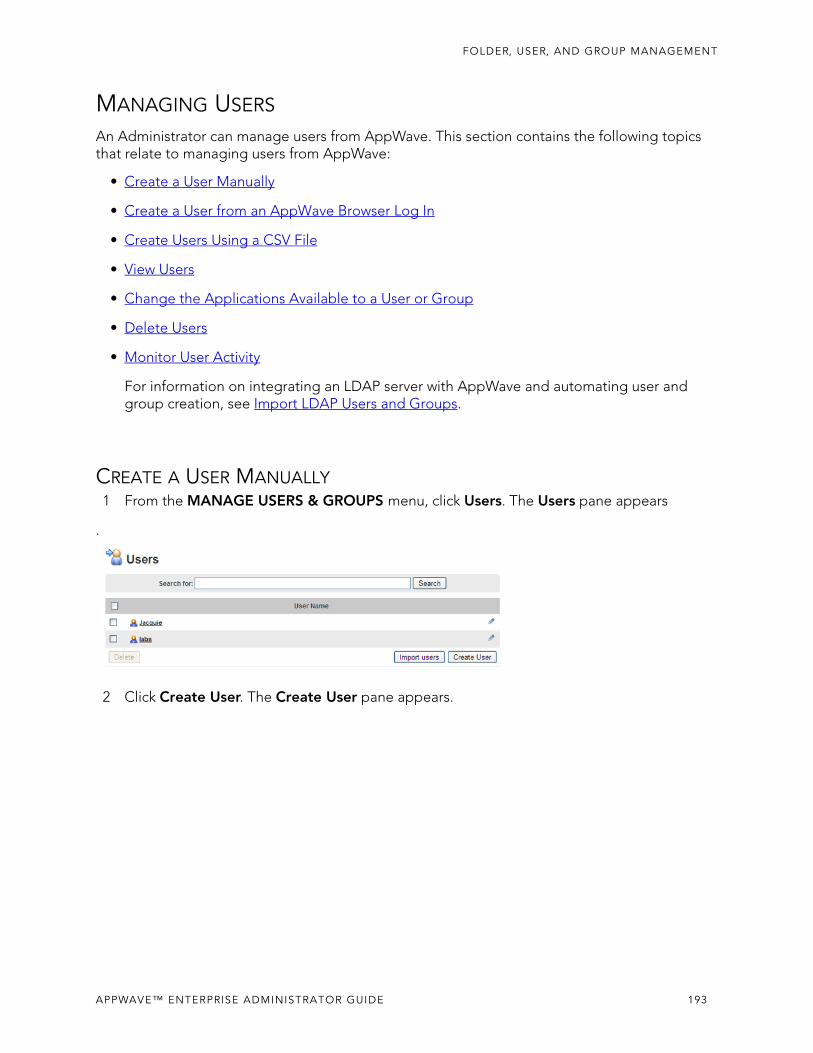
FOLDER, USER, AND GROUP MANAGEMENT
MANAGING USERS
An Administrator can manage users from AppWave. This section contains the following topics that relate to managing users from AppWave:
• Create a User Manually
• Create a User from an AppWave Browser Log In
• Create Users Using a CSV File
• View Users
• Change the Applications Available to a User or Group
• Delete Users
• Monitor User Activity
For information on integrating an LDAP server with AppWave and automating user and group creation, see Import LDAP Users and Groups.
CREATE A USER MANUALLY1 From the MANAGE USERS & GROUPS menu, click Users. The Users pane appears
.
2 Click Create User. The Create User pane appears.
APPWAVE™ ENTERPRISE ADMINISTRATOR GUIDE 193
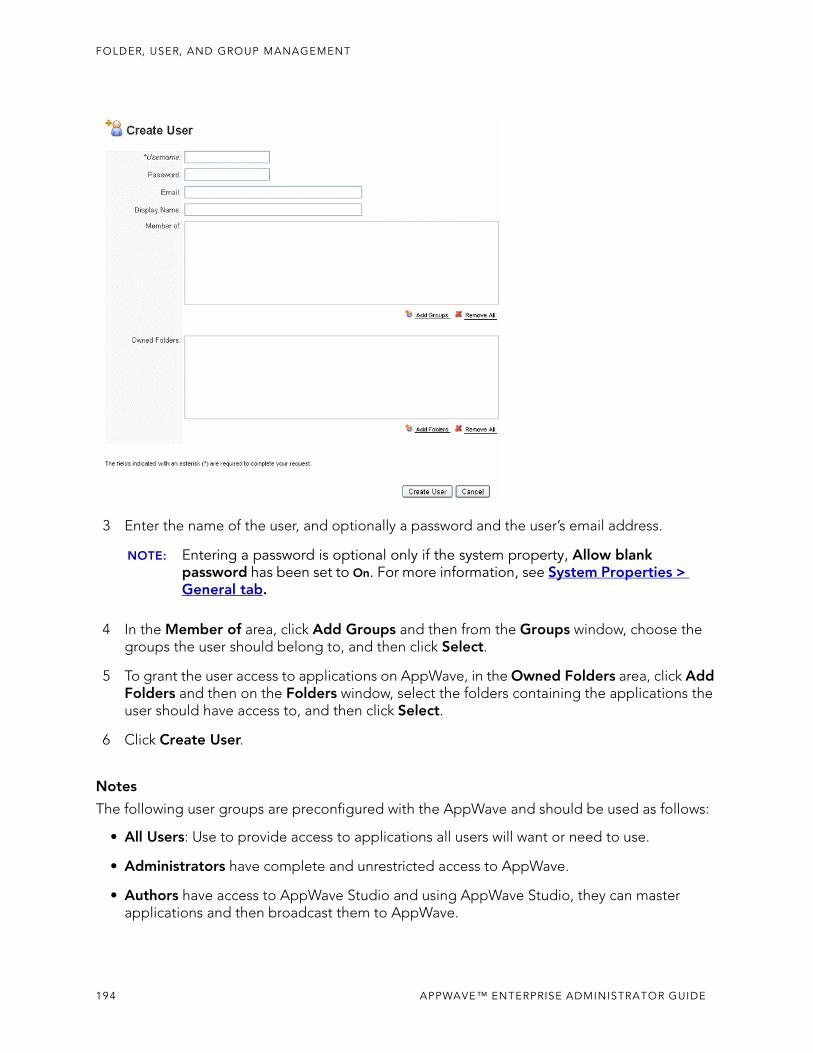
FOLDER, USER, AND GROUP MANAGEMENT
3 Enter the name of the user, and optionally a password and the user’s email address.
NOTE: Entering a password is optional only if the system property, Allow blank password has been set to On. For more information, see System Properties > General tab.
4 In the Member of area, click Add Groups and then from the Groups window, choose the groups the user should belong to, and then click Select.
5 To grant the user access to applications on AppWave, in the Owned Folders area, click Add Folders and then on the Folders window, select the folders containing the applications the user should have access to, and then click Select.
6 Click Create User.
Notes
The following user groups are preconfigured with the AppWave and should be used as follows:
• All Users: Use to provide access to applications all users will want or need to use.
• Administrators have complete and unrestricted access to AppWave.
• Authors have access to AppWave Studio and using AppWave Studio, they can master applications and then broadcast them to AppWave.
194 APPWAVE™ ENTERPRISE ADMINISTRATOR GUIDE
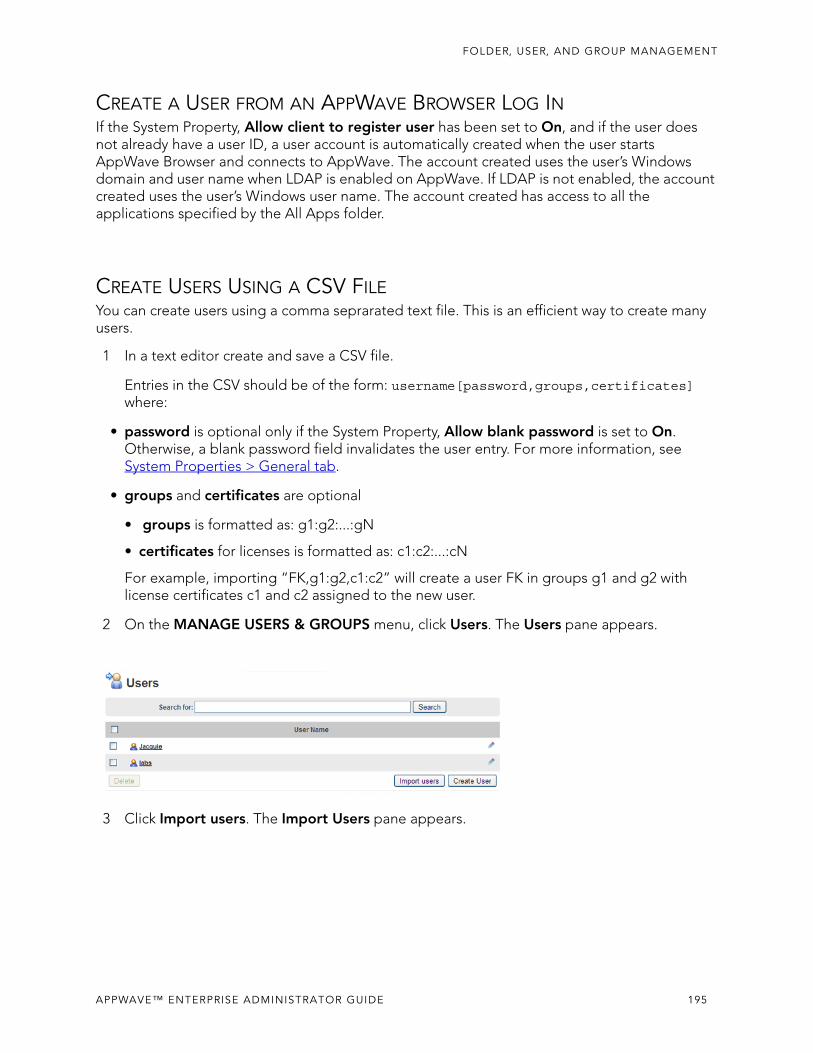
FOLDER, USER, AND GROUP MANAGEMENT
CREATE A USER FROM AN APPWAVE BROWSER LOG INIf the System Property, Allow client to register user has been set to On, and if the user does not already have a user ID, a user account is automatically created when the user starts AppWave Browser and connects to AppWave. The account created uses the user’s Windows domain and user name when LDAP is enabled on AppWave. If LDAP is not enabled, the account created uses the user’s Windows user name. The account created has access to all the applications specified by the All Apps folder.
CREATE USERS USING A CSV FILEYou can create users using a comma seprarated text file. This is an efficient way to create many users.
1 In a text editor create and save a CSV file.
Entries in the CSV should be of the form: username[password,groups,certificates] where:
• password is optional only if the System Property, Allow blank password is set to On. Otherwise, a blank password field invalidates the user entry. For more information, see System Properties > General tab.
• groups and certificates are optional
• groups is formatted as: g1:g2:...:gN
• certificates for licenses is formatted as: c1:c2:...:cN
For example, importing “FK,g1:g2,c1:c2” will create a user FK in groups g1 and g2 with license certificates c1 and c2 assigned to the new user.
2 On the MANAGE USERS & GROUPS menu, click Users. The Users pane appears.
3 Click Import users. The Import Users pane appears.
APPWAVE™ ENTERPRISE ADMINISTRATOR GUIDE 195
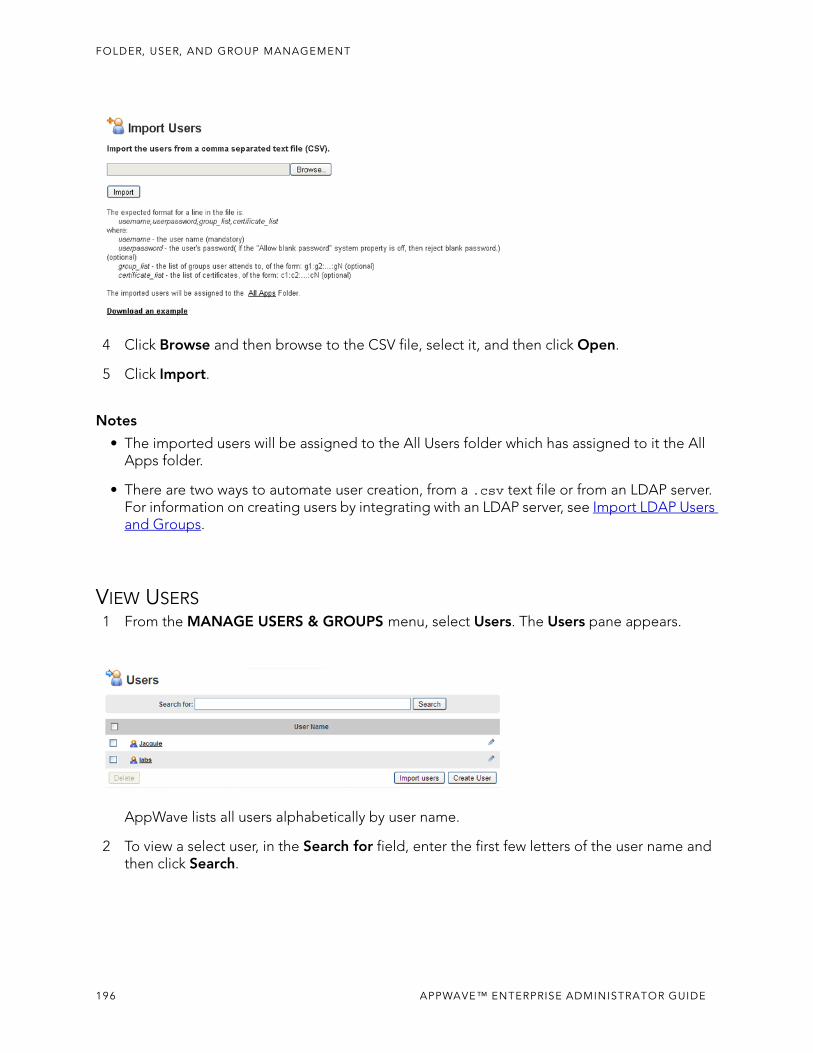
FOLDER, USER, AND GROUP MANAGEMENT
4 Click Browse and then browse to the CSV file, select it, and then click Open.
5 Click Import.
Notes
• The imported users will be assigned to the All Users folder which has assigned to it the All Apps folder.
• There are two ways to automate user creation, from a .csv text file or from an LDAP server. For information on creating users by integrating with an LDAP server, see Import LDAP Users and Groups.
VIEW USERS1 From the MANAGE USERS & GROUPS menu, select Users. The Users pane appears.
AppWave lists all users alphabetically by user name.
2 To view a select user, in the Search for field, enter the first few letters of the user name and then click Search.
196 APPWAVE™ ENTERPRISE ADMINISTRATOR GUIDE
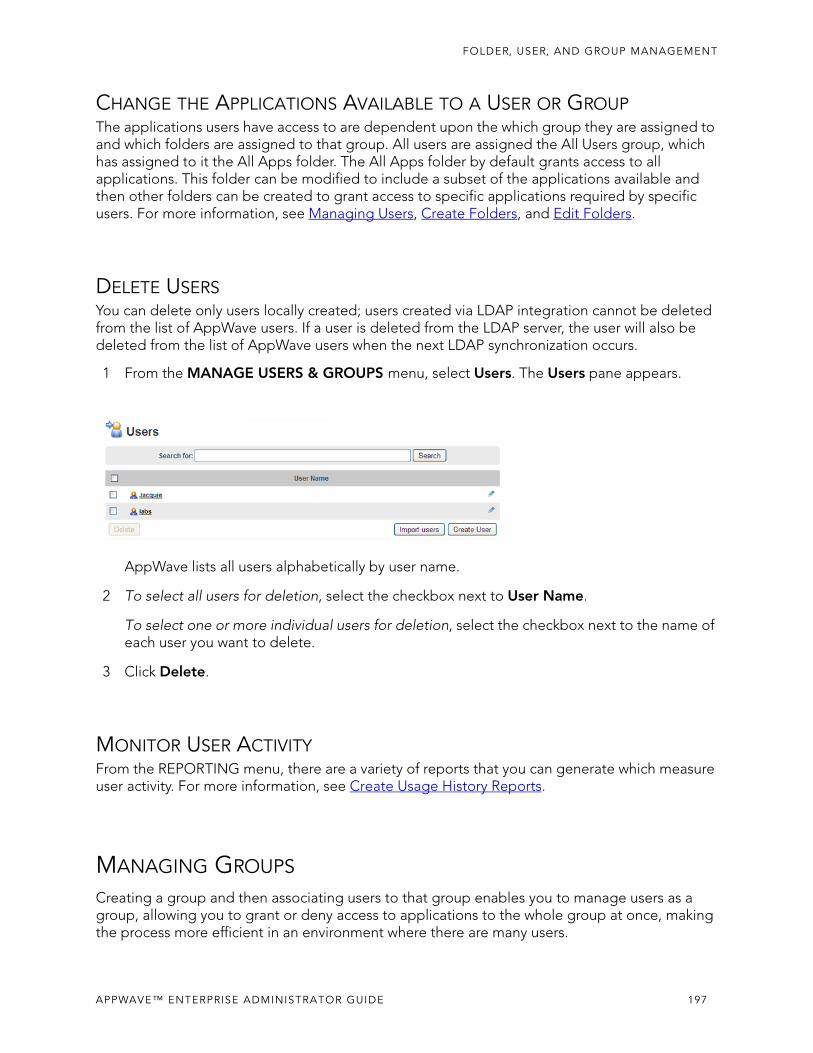
FOLDER, USER, AND GROUP MANAGEMENT
CHANGE THE APPLICATIONS AVAILABLE TO A USER OR GROUPThe applications users have access to are dependent upon the which group they are assigned to and which folders are assigned to that group. All users are assigned the All Users group, which has assigned to it the All Apps folder. The All Apps folder by default grants access to all applications. This folder can be modified to include a subset of the applications available and then other folders can be created to grant access to specific applications required by specific users. For more information, see Managing Users, Create Folders, and Edit Folders.
DELETE USERSYou can delete only users locally created; users created via LDAP integration cannot be deleted from the list of AppWave users. If a user is deleted from the LDAP server, the user will also be deleted from the list of AppWave users when the next LDAP synchronization occurs.
1 From the MANAGE USERS & GROUPS menu, select Users. The Users pane appears.
AppWave lists all users alphabetically by user name.
2 To select all users for deletion, select the checkbox next to User Name.
To select one or more individual users for deletion, select the checkbox next to the name of each user you want to delete.
3 Click Delete.
MONITOR USER ACTIVITYFrom the REPORTING menu, there are a variety of reports that you can generate which measure user activity. For more information, see Create Usage History Reports.
MANAGING GROUPS
Creating a group and then associating users to that group enables you to manage users as a group, allowing you to grant or deny access to applications to the whole group at once, making the process more efficient in an environment where there are many users.
APPWAVE™ ENTERPRISE ADMINISTRATOR GUIDE 197
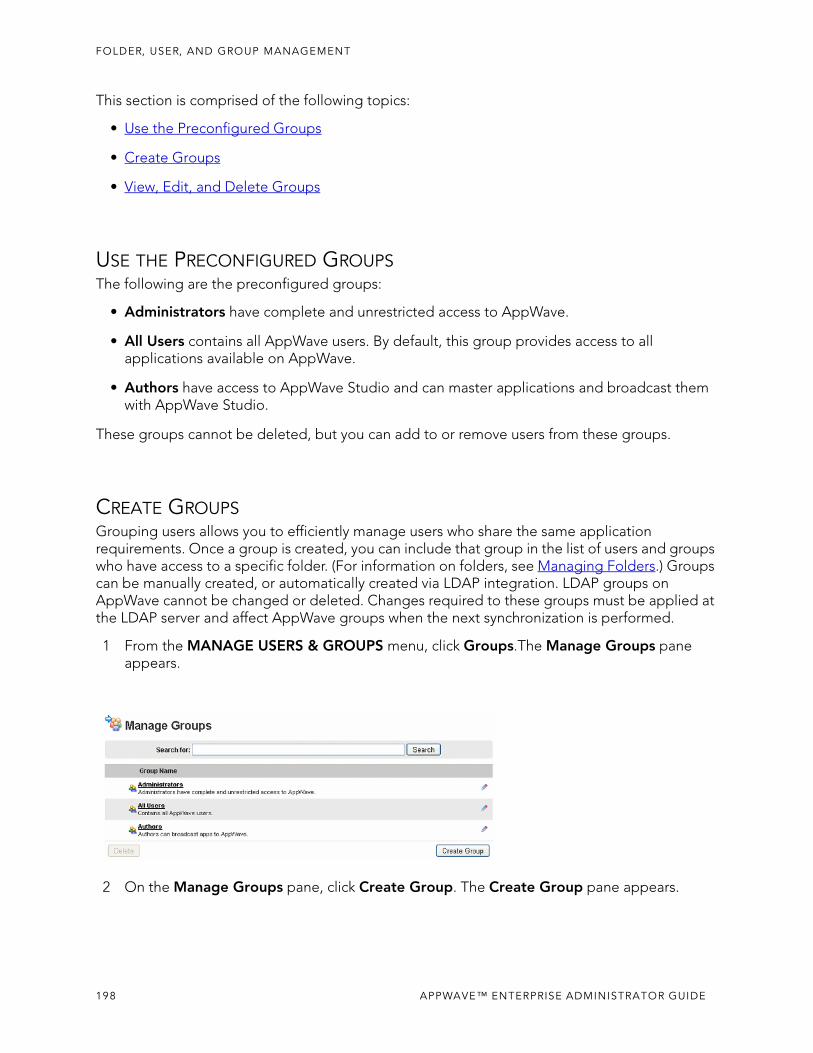
FOLDER, USER, AND GROUP MANAGEMENT
This section is comprised of the following topics:
• Use the Preconfigured Groups
• Create Groups
• View, Edit, and Delete Groups
USE THE PRECONFIGURED GROUPSThe following are the preconfigured groups:
• Administrators have complete and unrestricted access to AppWave.
• All Users contains all AppWave users. By default, this group provides access to all applications available on AppWave.
• Authors have access to AppWave Studio and can master applications and broadcast them with AppWave Studio.
These groups cannot be deleted, but you can add to or remove users from these groups.
CREATE GROUPSGrouping users allows you to efficiently manage users who share the same application requirements. Once a group is created, you can include that group in the list of users and groups who have access to a specific folder. (For information on folders, see Managing Folders.) Groups can be manually created, or automatically created via LDAP integration. LDAP groups on AppWave cannot be changed or deleted. Changes required to these groups must be applied at the LDAP server and affect AppWave groups when the next synchronization is performed.
1 From the MANAGE USERS & GROUPS menu, click Groups.The Manage Groups pane appears.
2 On the Manage Groups pane, click Create Group. The Create Group pane appears.
198 APPWAVE™ ENTERPRISE ADMINISTRATOR GUIDE
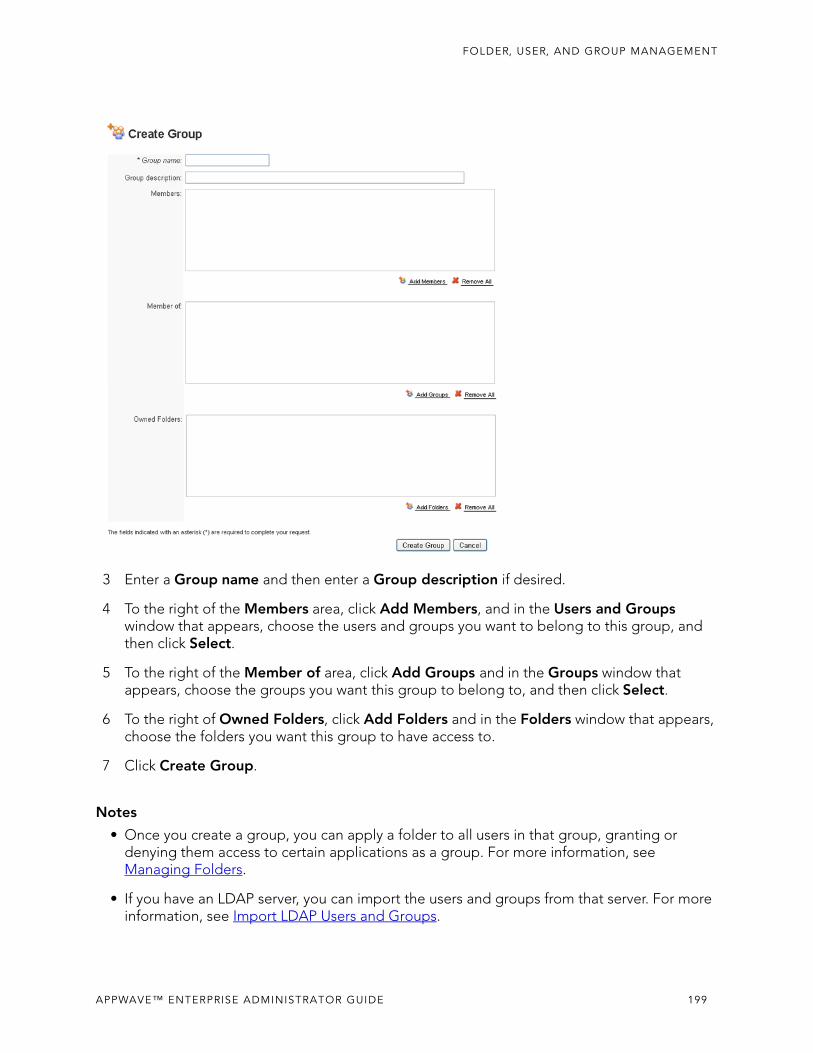
FOLDER, USER, AND GROUP MANAGEMENT
3 Enter a Group name and then enter a Group description if desired.
4 To the right of the Members area, click Add Members, and in the Users and Groups window that appears, choose the users and groups you want to belong to this group, and then click Select.
5 To the right of the Member of area, click Add Groups and in the Groups window that appears, choose the groups you want this group to belong to, and then click Select.
6 To the right of Owned Folders, click Add Folders and in the Folders window that appears, choose the folders you want this group to have access to.
7 Click Create Group.
Notes
• Once you create a group, you can apply a folder to all users in that group, granting or denying them access to certain applications as a group. For more information, see Managing Folders.
• If you have an LDAP server, you can import the users and groups from that server. For more information, see Import LDAP Users and Groups.
APPWAVE™ ENTERPRISE ADMINISTRATOR GUIDE 199
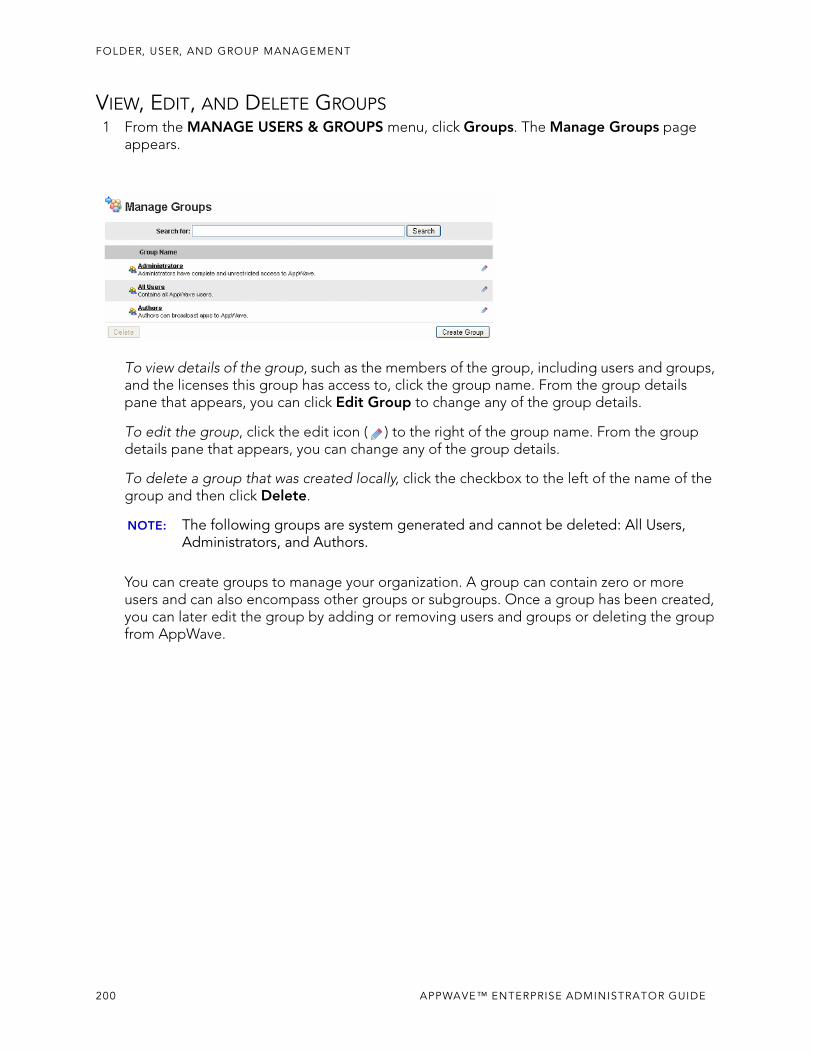
FOLDER, USER, AND GROUP MANAGEMENT
VIEW, EDIT, AND DELETE GROUPS1 From the MANAGE USERS & GROUPS menu, click Groups. The Manage Groups page
appears.
To view details of the group, such as the members of the group, including users and groups, and the licenses this group has access to, click the group name. From the group details pane that appears, you can click Edit Group to change any of the group details.
To edit the group, click the edit icon ( ) to the right of the group name. From the group details pane that appears, you can change any of the group details.
To delete a group that was created locally, click the checkbox to the left of the name of the group and then click Delete.
NOTE: The following groups are system generated and cannot be deleted: All Users, Administrators, and Authors.
You can create groups to manage your organization. A group can contain zero or more users and can also encompass other groups or subgroups. Once a group has been created, you can later edit the group by adding or removing users and groups or deleting the group from AppWave.
200 APPWAVE™ ENTERPRISE ADMINISTRATOR GUIDE
APPLICATION MANAGEMENT This section includes these topics:
• Understanding AppWave Apps
• Caching Apps on AppWave
• Monitoring Download Progress
• Importing Applications to the Product Repository
• Obtaining Embarcadero XE Apps Manually
• Understanding App Inventory
• Browsing the App Catalog
• Automatically Updating the Application Catalog
• Manually Updating the Application Catalog
• Moderating Product Reviews
• Managing Catalog Banners
• Downloading Applications to Users
UNDERSTANDING APPWAVE APPS
In addition to standard installation executable for all Embarcadero products, Embarcadero also provides AppWave App versions for many of our products.
AppWave App executables (Apps) provide click-and-run functionality for each product, to simplify deployment and enable side-by-side versioning of products. Apps are also ideal in locked-down desktop environments because they do not affect system files or system registry settings.
AppWave Apps run within their own space without sharing DLLs or system-wide settings that could conflict with other applications. Application data, including configuration and license information, is stored locally on the hard disk, separate from the executable itself.
AppWave Apps run on the local machine and are launched from either the local hard drive or over the network using AppWave Browser.
Apps are provisioned and licensed by AppWave and then accessed using AppWave Browser. In this scenario, AppWave obtains software updates from Embarcadero servers and makes them available to the AppWave Browser user.
Using AppWave Apps on a shared server avoids the need to keep multiple machines updated with new versions. By keeping the AppWave version up to date, you will automatically gain access to the latest versions of the products.
APPWAVE™ ENTERPRISE ADMINISTRATOR GUIDE 201
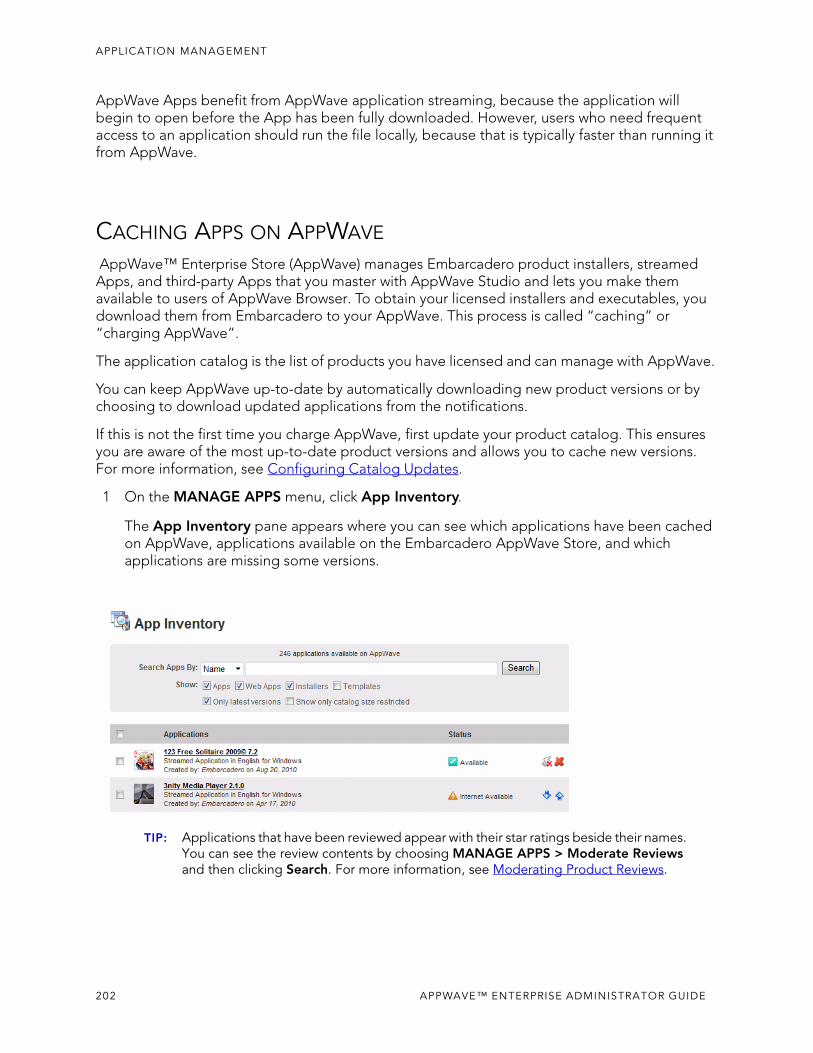
APPLICATION MANAGEMENT
AppWave Apps benefit from AppWave application streaming, because the application will begin to open before the App has been fully downloaded. However, users who need frequent access to an application should run the file locally, because that is typically faster than running it from AppWave.
CACHING APPS ON APPWAVE
AppWave™ Enterprise Store (AppWave) manages Embarcadero product installers, streamed Apps, and third-party Apps that you master with AppWave Studio and lets you make them available to users of AppWave Browser. To obtain your licensed installers and executables, you download them from Embarcadero to your AppWave. This process is called “caching” or “charging AppWave”.
The application catalog is the list of products you have licensed and can manage with AppWave.
You can keep AppWave up-to-date by automatically downloading new product versions or by choosing to download updated applications from the notifications.
If this is not the first time you charge AppWave, first update your product catalog. This ensures you are aware of the most up-to-date product versions and allows you to cache new versions. For more information, see Configuring Catalog Updates.
1 On the MANAGE APPS menu, click App Inventory.
The App Inventory pane appears where you can see which applications have been cached on AppWave, applications available on the Embarcadero AppWave Store, and which applications are missing some versions.
TIP: Applications that have been reviewed appear with their star ratings beside their names. You can see the review contents by choosing MANAGE APPS > Moderate Reviews and then clicking Search. For more information, see Moderating Product Reviews.
202 APPWAVE™ ENTERPRISE ADMINISTRATOR GUIDE
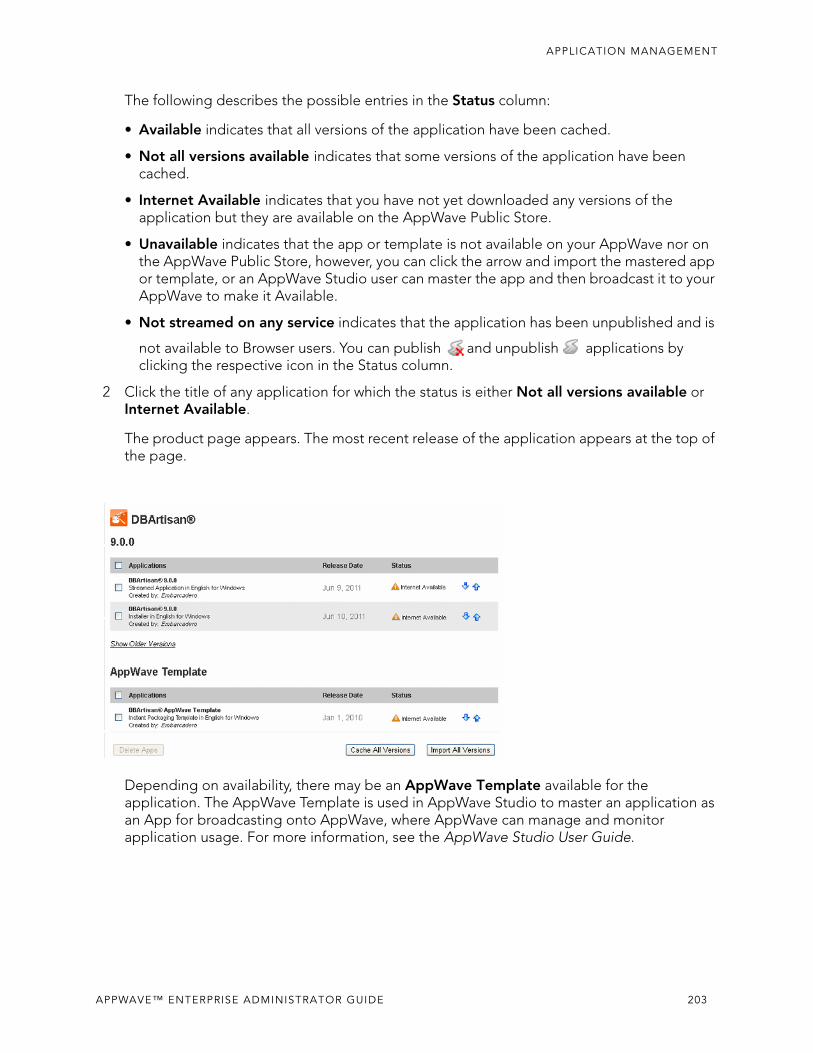
APPLICATION MANAGEMENT
The following describes the possible entries in the Status column:
• Available indicates that all versions of the application have been cached.
• Not all versions available indicates that some versions of the application have been cached.
• Internet Available indicates that you have not yet downloaded any versions of the application but they are available on the AppWave Public Store.
• Unavailable indicates that the app or template is not available on your AppWave nor on the AppWave Public Store, however, you can click the arrow and import the mastered app or template, or an AppWave Studio user can master the app and then broadcast it to your AppWave to make it Available.
• Not streamed on any service indicates that the application has been unpublished and is
not available to Browser users. You can publish and unpublish applications by clicking the respective icon in the Status column.
2 Click the title of any application for which the status is either Not all versions available or Internet Available.
The product page appears. The most recent release of the application appears at the top of the page.
Depending on availability, there may be an AppWave Template available for the application. The AppWave Template is used in AppWave Studio to master an application as an App for broadcasting onto AppWave, where AppWave can manage and monitor application usage. For more information, see the AppWave Studio User Guide.
APPWAVE™ ENTERPRISE ADMINISTRATOR GUIDE 203
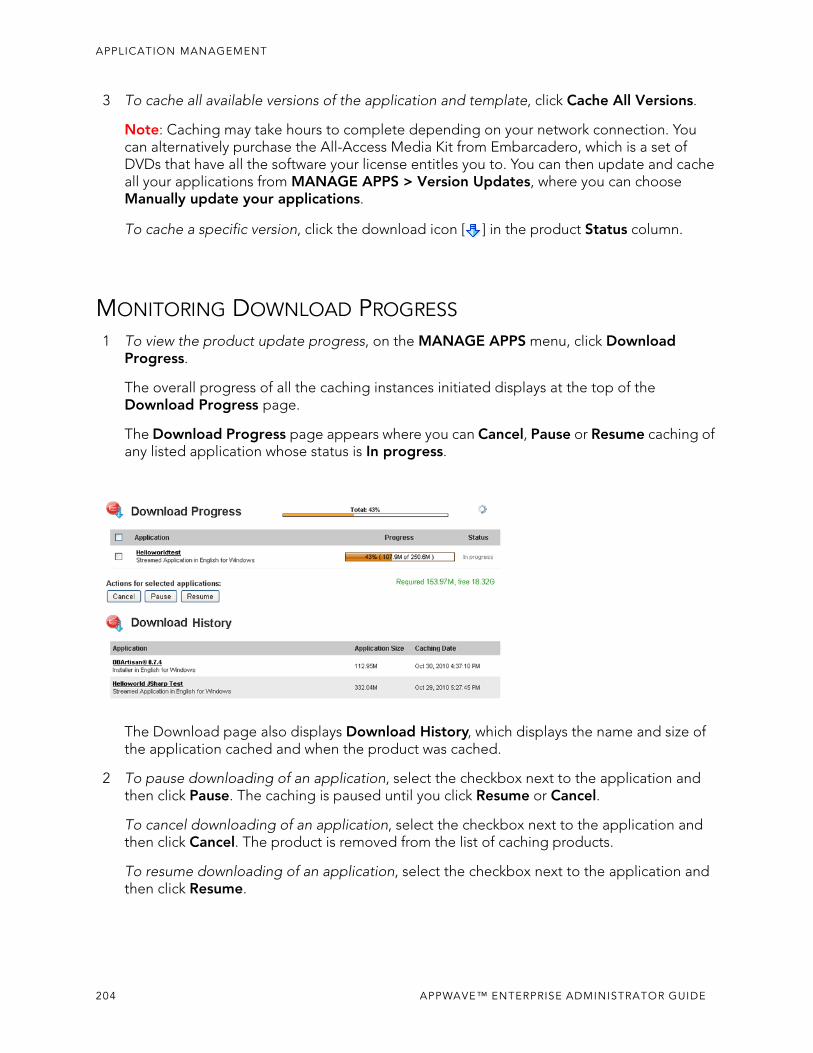
APPLICATION MANAGEMENT
3 To cache all available versions of the application and template, click Cache All Versions.
Note: Caching may take hours to complete depending on your network connection. You can alternatively purchase the All-Access Media Kit from Embarcadero, which is a set of DVDs that have all the software your license entitles you to. You can then update and cache all your applications from MANAGE APPS > Version Updates, where you can choose Manually update your applications.
To cache a specific version, click the download icon [ ] in the product Status column.
MONITORING DOWNLOAD PROGRESS
1 To view the product update progress, on the MANAGE APPS menu, click Download Progress.
The overall progress of all the caching instances initiated displays at the top of the Download Progress page.
The Download Progress page appears where you can Cancel, Pause or Resume caching of any listed application whose status is In progress.
The Download page also displays Download History, which displays the name and size of the application cached and when the product was cached.
2 To pause downloading of an application, select the checkbox next to the application and then click Pause. The caching is paused until you click Resume or Cancel.
To cancel downloading of an application, select the checkbox next to the application and then click Cancel. The product is removed from the list of caching products.
To resume downloading of an application, select the checkbox next to the application and then click Resume.
204 APPWAVE™ ENTERPRISE ADMINISTRATOR GUIDE
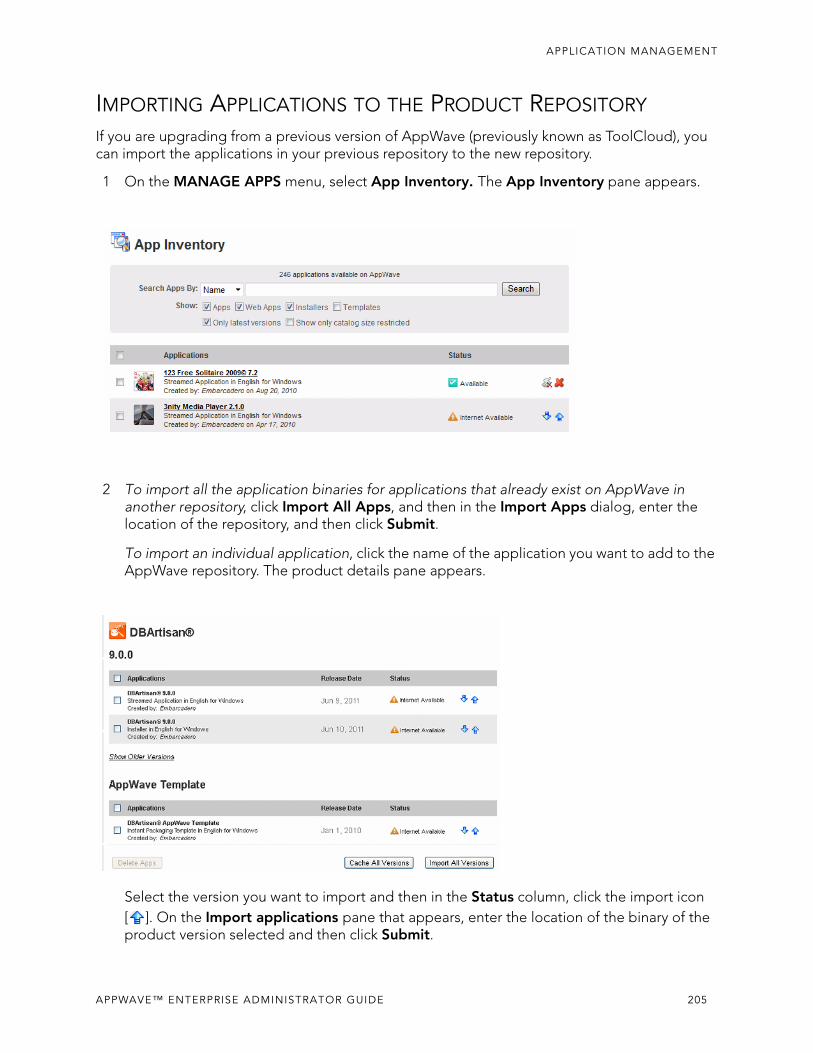
APPLICATION MANAGEMENT
IMPORTING APPLICATIONS TO THE PRODUCT REPOSITORY
If you are upgrading from a previous version of AppWave (previously known as ToolCloud), you can import the applications in your previous repository to the new repository.
1 On the MANAGE APPS menu, select App Inventory. The App Inventory pane appears.
2 To import all the application binaries for applications that already exist on AppWave in another repository, click Import All Apps, and then in the Import Apps dialog, enter the location of the repository, and then click Submit.
To import an individual application, click the name of the application you want to add to the AppWave repository. The product details pane appears.
Select the version you want to import and then in the Status column, click the import icon [ ]. On the Import applications pane that appears, enter the location of the binary of the product version selected and then click Submit.
APPWAVE™ ENTERPRISE ADMINISTRATOR GUIDE 205
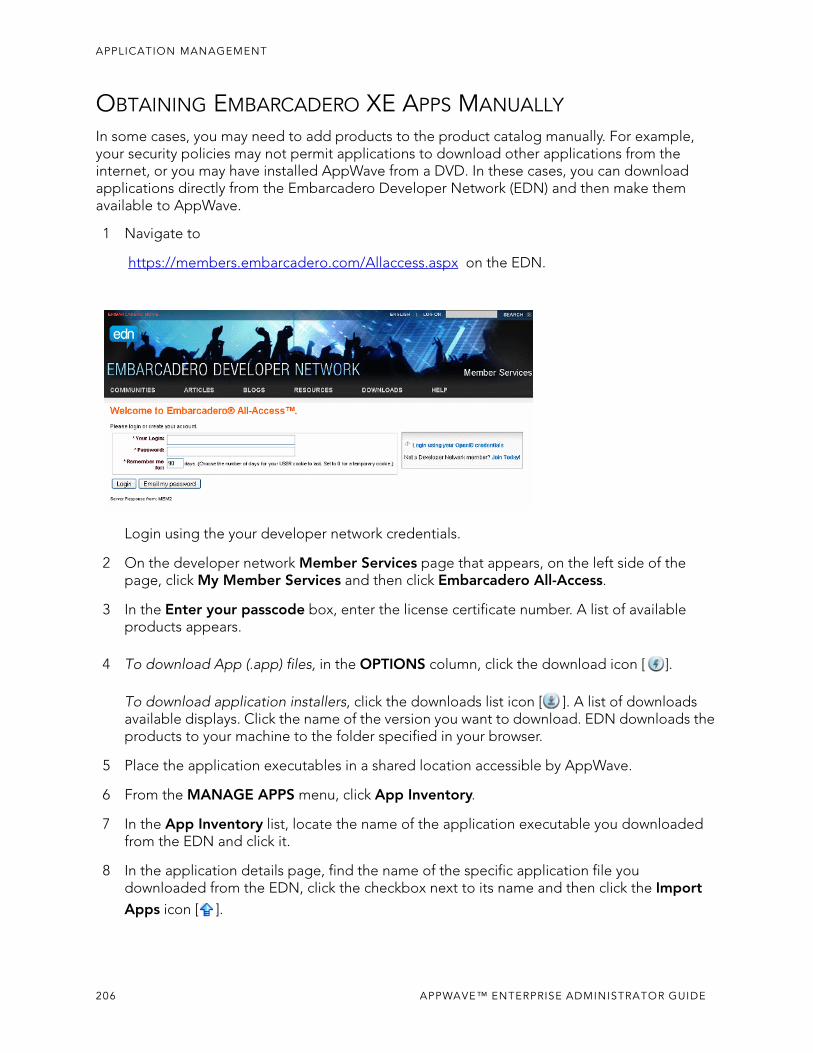
APPLICATION MANAGEMENT
OBTAINING EMBARCADERO XE APPS MANUALLY
In some cases, you may need to add products to the product catalog manually. For example, your security policies may not permit applications to download other applications from the internet, or you may have installed AppWave from a DVD. In these cases, you can download applications directly from the Embarcadero Developer Network (EDN) and then make them available to AppWave.
1 Navigate to
https://members.embarcadero.com/Allaccess.aspx on the EDN.
Login using the your developer network credentials.
2 On the developer network Member Services page that appears, on the left side of the page, click My Member Services and then click Embarcadero All-Access.
3 In the Enter your passcode box, enter the license certificate number. A list of available products appears.
4 To download App (.app) files, in the OPTIONS column, click the download icon [ ].
To download application installers, click the downloads list icon [ ]. A list of downloads available displays. Click the name of the version you want to download. EDN downloads the products to your machine to the folder specified in your browser.
5 Place the application executables in a shared location accessible by AppWave.
6 From the MANAGE APPS menu, click App Inventory.
7 In the App Inventory list, locate the name of the application executable you downloaded from the EDN and click it.
8 In the application details page, find the name of the specific application file you downloaded from the EDN, click the checkbox next to its name and then click the Import Apps icon [ ].
206 APPWAVE™ ENTERPRISE ADMINISTRATOR GUIDE
APPLICATION MANAGEMENT
9 Enter the location of the application executable downloaded from the EDN and then click Submit.
The application executable is imported into AppWave and will show as available as soon as the caching has completed.
OBTAINING EMBARCADERO XE APPS VIA THE APPWAVE MEDIA KIT
The AppWave Media Kit is used to install AppWave when you do not have access to the Internet from the machine designated to be the AppWave server or when you want to install the Apps Embarcadero provides, without having to download them from the AppWave Store. This section helps you install AppWave Apps.
NOTE: For information on upgrading an existing ToolCloud 1.x installation using the AppWave Media Kit, see the upgrade instructions in ReadMe.htm.
1 Log in to the AppWave console using admin credentials.
2 From the MANAGE APPS menu, click Version Updates.
3 At the bottom of the page, click Manually update your applications.
4 If you have purchased AppWave for Custom Apps licenses and want to be able to use the templates you must perform steps 5 and 6 in order. Otherwise, proceed to step 7.
5 Import PADE Plug-ins as follows:
In the Media Kit location field, enter the location of the directory on the setup disk containing the PADE Plug-ins, such as E:\PADE.
Click Submit.
Once the list is populated, at the bottom of the page, click Import.
CAUTION: Import PADE Plug-ins first, Template configuration requires that the PADE plug-ins be already present.
6 Import Templates
At the bottom of the Version Updates page, click Manually update your applications.
In the Media Kit location field, enter the location of the directory on the setup disk containing the Templates, such as E:\Templates.
Click Submit.
Once the list is populated, at the bottom of the page, click Import.
APPWAVE™ ENTERPRISE ADMINISTRATOR GUIDE 207
APPLICATION MANAGEMENT
7 Import Apps
At the bottom of the Version Updates page, click Manually update your applications.
In the Media Kit location field, enter the location of the directory on the setup disk containing the Apps, such as E:\Apps.
Click Submit.
Once the list is populated, at the bottom of the page, click Import.
This will update the App Inventory with Apps that once cached on AppWave can be broadcasted to AppWave Browser users.
8 Import Installers
There are two ways to import installers. Choose one of the following methods:
• Import Installers Individually
• Import All Installers at Once
IMPORT INSTALLERS INDIVIDUALLY1 From the MANAGE APPS menu, click App Inventory.
2 On the App Inventory page, locate the App with an installer and click the App Title entry.
3 On the App page that appears, locate the installer and at the far right of the page, click the Import Apps icon [ ].
4 On the Import Apps... page, in the Import location field, enter the location of the directory on the product disk containing the installer file, such as E:\Install_Files.
5 Click Submit.
This will update the App Inventory with application installers that an AppWave Browser user can download and then install on their system and run the application locally.
IMPORT ALL INSTALLERS AT ONCE1 At the bottom of the Version Updates page, click Manually update your applications.
2 In the Media Kit location field, enter the location of the directory on the setup disk containing the all_products.tc file, such as E:\.
3 Click Submit.
Once the list is populated, at the bottom of the page, click Import.
208 APPWAVE™ ENTERPRISE ADMINISTRATOR GUIDE
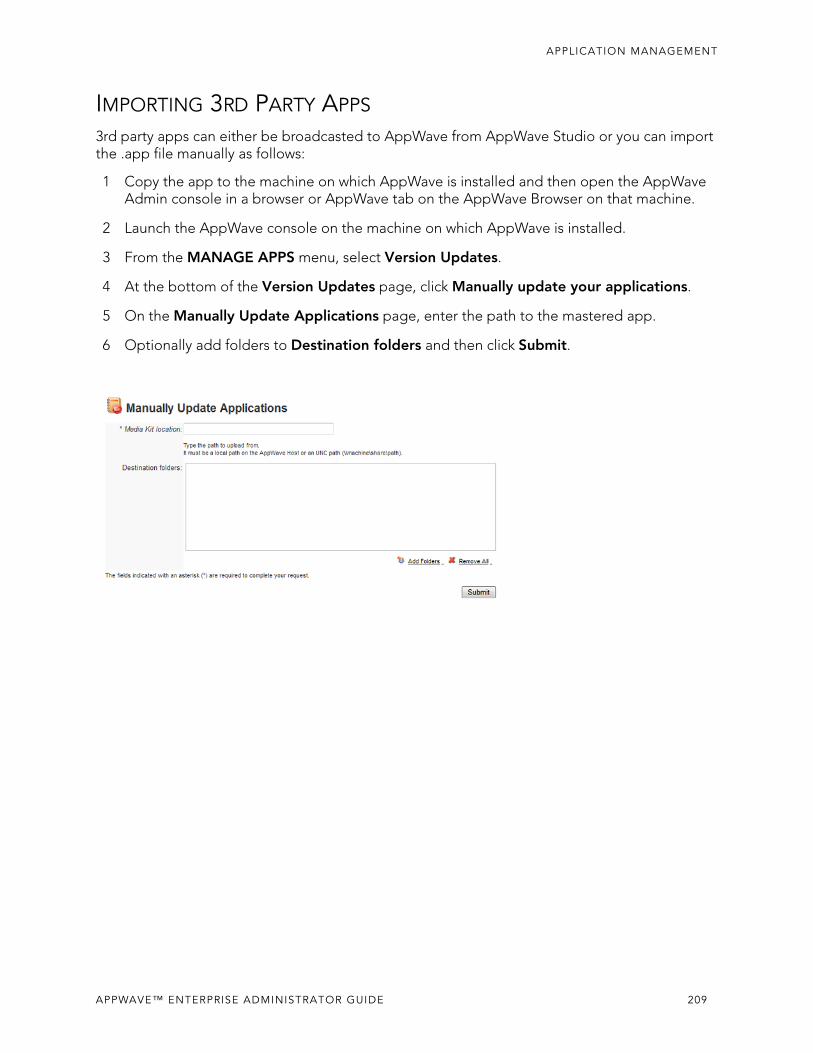
APPLICATION MANAGEMENT
IMPORTING 3RD PARTY APPS
3rd party apps can either be broadcasted to AppWave from AppWave Studio or you can import the .app file manually as follows:
1 Copy the app to the machine on which AppWave is installed and then open the AppWave Admin console in a browser or AppWave tab on the AppWave Browser on that machine.
2 Launch the AppWave console on the machine on which AppWave is installed.
3 From the MANAGE APPS menu, select Version Updates.
4 At the bottom of the Version Updates page, click Manually update your applications.
5 On the Manually Update Applications page, enter the path to the mastered app.
6 Optionally add folders to Destination folders and then click Submit.
APPWAVE™ ENTERPRISE ADMINISTRATOR GUIDE 209
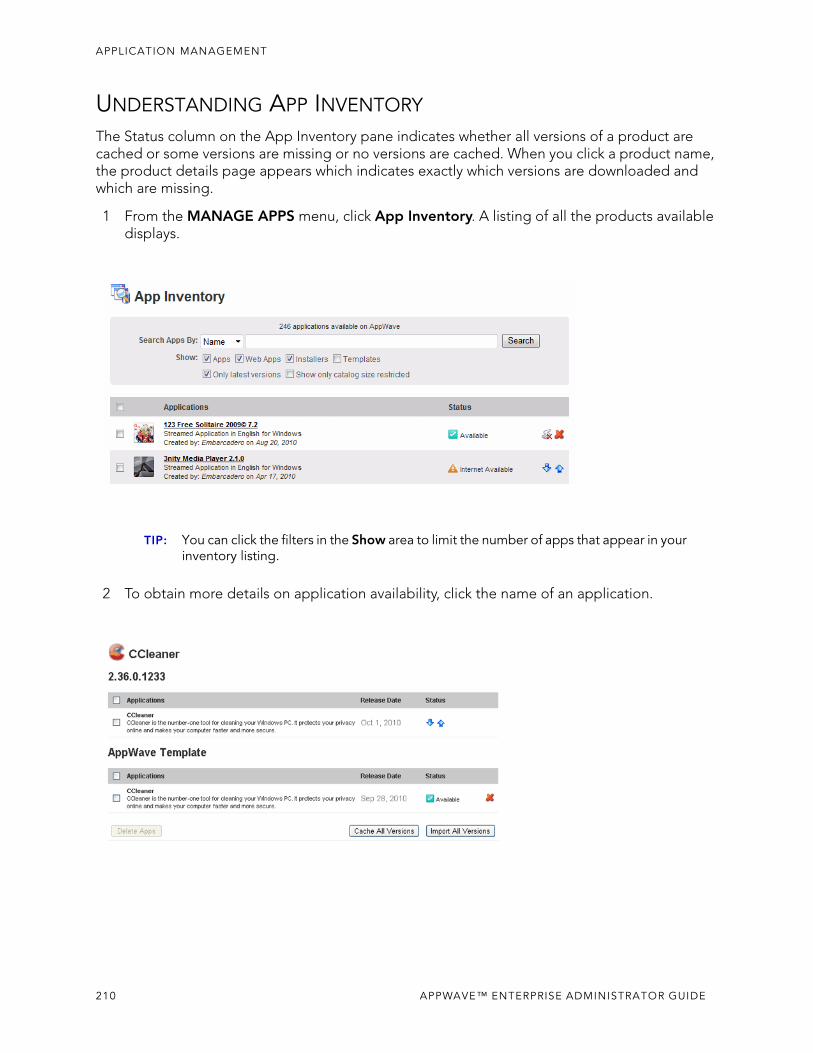
APPLICATION MANAGEMENT
UNDERSTANDING APP INVENTORY
The Status column on the App Inventory pane indicates whether all versions of a product are cached or some versions are missing or no versions are cached. When you click a product name, the product details page appears which indicates exactly which versions are downloaded and which are missing.
1 From the MANAGE APPS menu, click App Inventory. A listing of all the products available displays.
TIP: You can click the filters in the Show area to limit the number of apps that appear in your inventory listing.
2 To obtain more details on application availability, click the name of an application.
210 APPWAVE™ ENTERPRISE ADMINISTRATOR GUIDE
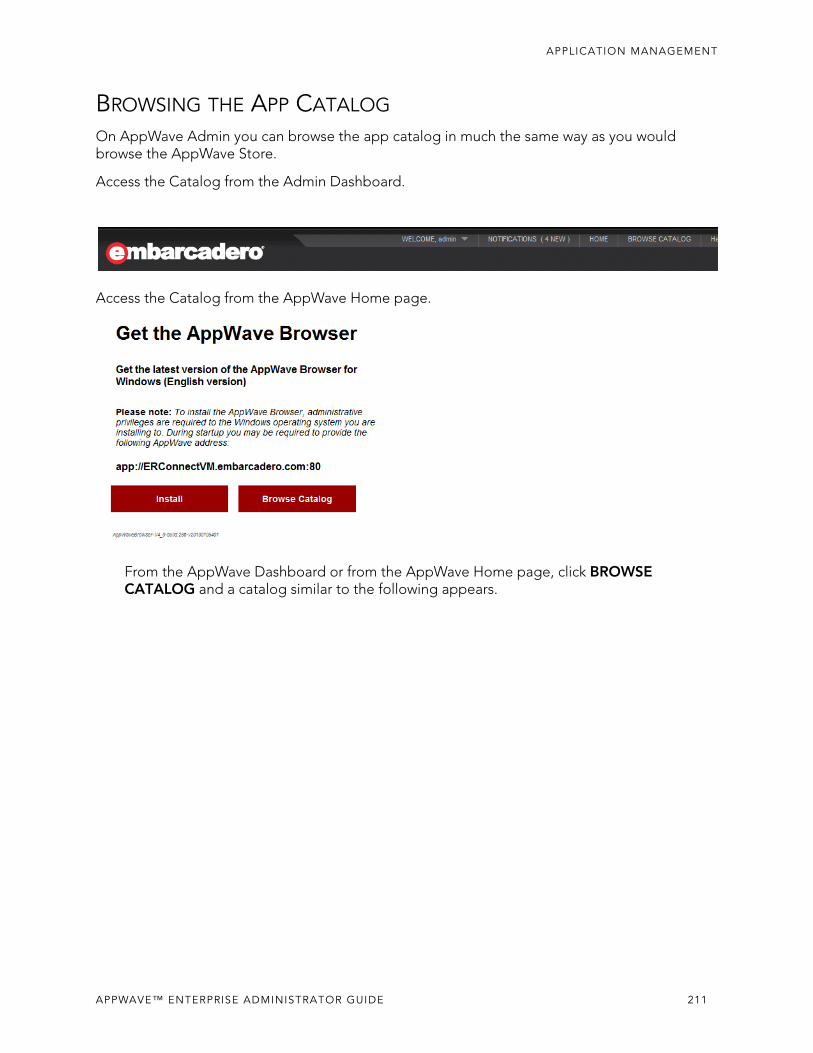
APPLICATION MANAGEMENT
BROWSING THE APP CATALOG
On AppWave Admin you can browse the app catalog in much the same way as you would browse the AppWave Store.
Access the Catalog from the Admin Dashboard.
Access the Catalog from the AppWave Home page.
From the AppWave Dashboard or from the AppWave Home page, click BROWSE CATALOG and a catalog similar to the following appears.
APPWAVE™ ENTERPRISE ADMINISTRATOR GUIDE 211
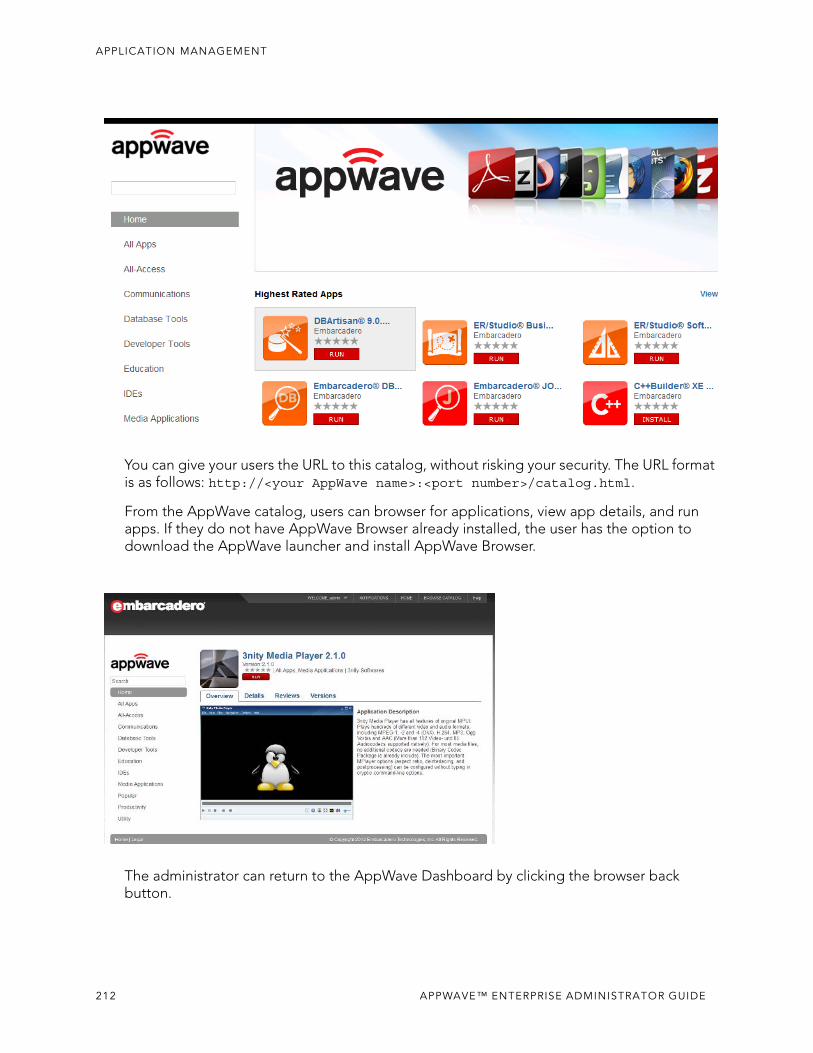
APPLICATION MANAGEMENT
You can give your users the URL to this catalog, without risking your security. The URL format is as follows: http://<your AppWave name>:<port number>/catalog.html.
From the AppWave catalog, users can browser for applications, view app details, and run apps. If they do not have AppWave Browser already installed, the user has the option to download the AppWave launcher and install AppWave Browser.
The administrator can return to the AppWave Dashboard by clicking the browser back button.
212 APPWAVE™ ENTERPRISE ADMINISTRATOR GUIDE
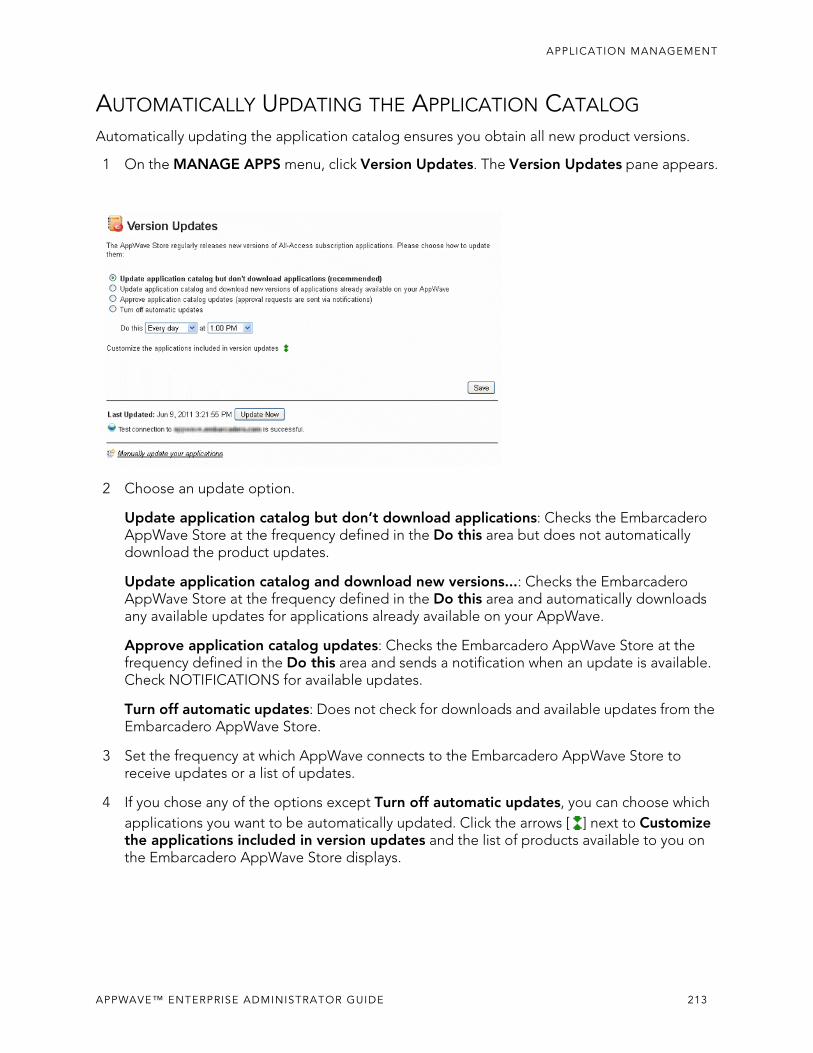
APPLICATION MANAGEMENT
AUTOMATICALLY UPDATING THE APPLICATION CATALOG
Automatically updating the application catalog ensures you obtain all new product versions.
1 On the MANAGE APPS menu, click Version Updates. The Version Updates pane appears.
2 Choose an update option.
Update application catalog but don’t download applications: Checks the Embarcadero AppWave Store at the frequency defined in the Do this area but does not automatically download the product updates.
Update application catalog and download new versions...: Checks the Embarcadero AppWave Store at the frequency defined in the Do this area and automatically downloads any available updates for applications already available on your AppWave.
Approve application catalog updates: Checks the Embarcadero AppWave Store at the frequency defined in the Do this area and sends a notification when an update is available. Check NOTIFICATIONS for available updates.
Turn off automatic updates: Does not check for downloads and available updates from the Embarcadero AppWave Store.
3 Set the frequency at which AppWave connects to the Embarcadero AppWave Store to receive updates or a list of updates.
4 If you chose any of the options except Turn off automatic updates, you can choose which applications you want to be automatically updated. Click the arrows [ ] next to Customize the applications included in version updates and the list of products available to you on the Embarcadero AppWave Store displays.
APPWAVE™ ENTERPRISE ADMINISTRATOR GUIDE 213
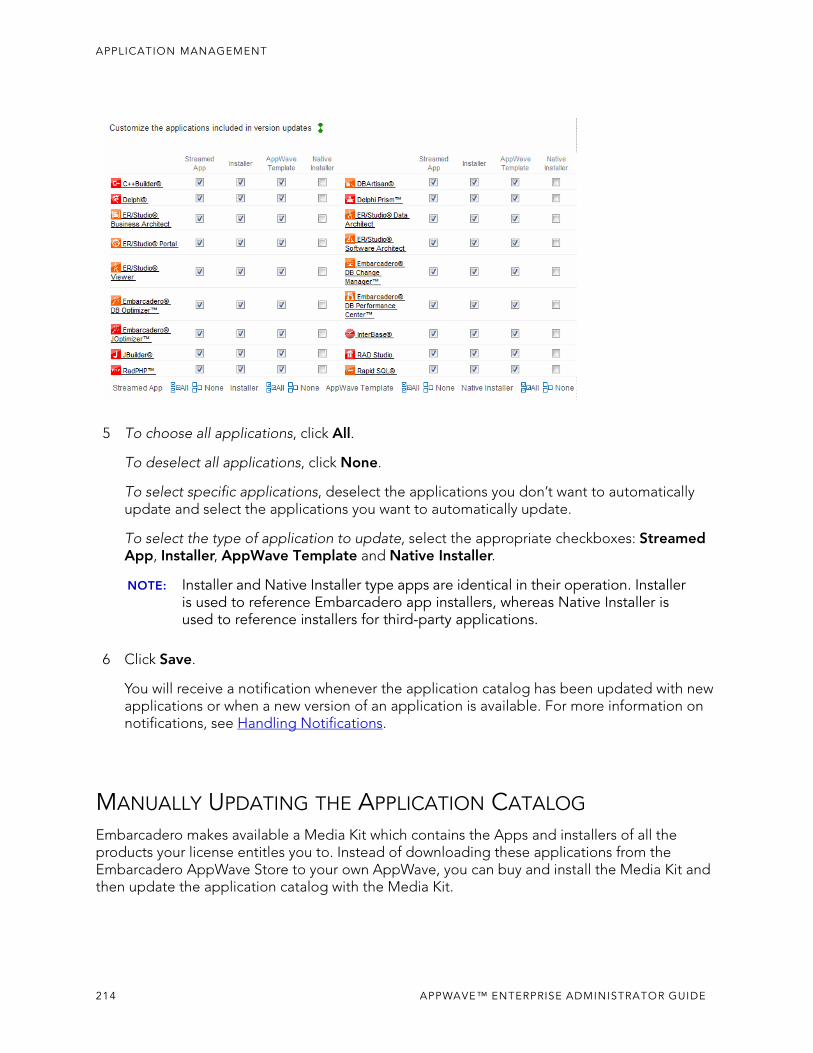
APPLICATION MANAGEMENT
5 To choose all applications, click All.
To deselect all applications, click None.
To select specific applications, deselect the applications you don’t want to automatically update and select the applications you want to automatically update.
To select the type of application to update, select the appropriate checkboxes: Streamed App, Installer, AppWave Template and Native Installer.
NOTE: Installer and Native Installer type apps are identical in their operation. Installer is used to reference Embarcadero app installers, whereas Native Installer is used to reference installers for third-party applications.
6 Click Save.
You will receive a notification whenever the application catalog has been updated with new applications or when a new version of an application is available. For more information on notifications, see Handling Notifications.
MANUALLY UPDATING THE APPLICATION CATALOG Embarcadero makes available a Media Kit which contains the Apps and installers of all the products your license entitles you to. Instead of downloading these applications from the Embarcadero AppWave Store to your own AppWave, you can buy and install the Media Kit and then update the application catalog with the Media Kit.
214 APPWAVE™ ENTERPRISE ADMINISTRATOR GUIDE
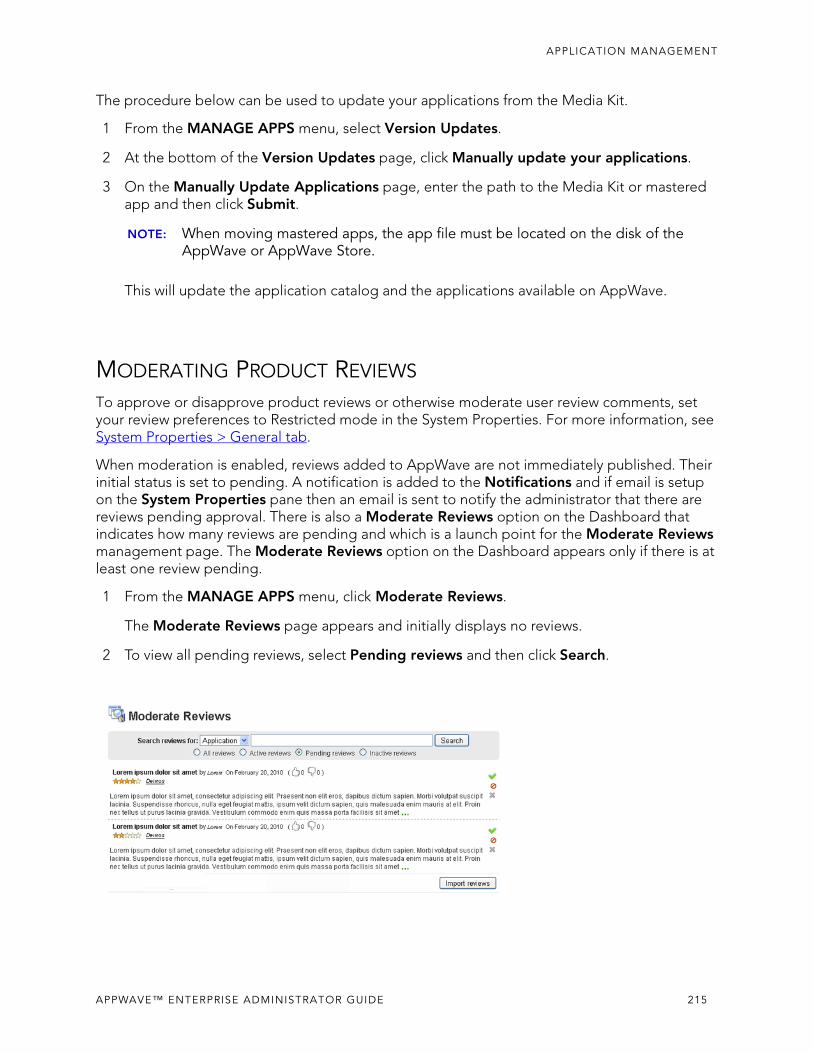
APPLICATION MANAGEMENT
The procedure below can be used to update your applications from the Media Kit.
1 From the MANAGE APPS menu, select Version Updates.
2 At the bottom of the Version Updates page, click Manually update your applications.
3 On the Manually Update Applications page, enter the path to the Media Kit or mastered app and then click Submit.
NOTE: When moving mastered apps, the app file must be located on the disk of the AppWave or AppWave Store.
This will update the application catalog and the applications available on AppWave.
MODERATING PRODUCT REVIEWS
To approve or disapprove product reviews or otherwise moderate user review comments, set your review preferences to Restricted mode in the System Properties. For more information, see System Properties > General tab.
When moderation is enabled, reviews added to AppWave are not immediately published. Their initial status is set to pending. A notification is added to the Notifications and if email is setup on the System Properties pane then an email is sent to notify the administrator that there are reviews pending approval. There is also a Moderate Reviews option on the Dashboard that indicates how many reviews are pending and which is a launch point for the Moderate Reviews management page. The Moderate Reviews option on the Dashboard appears only if there is at least one review pending.
1 From the MANAGE APPS menu, click Moderate Reviews.
The Moderate Reviews page appears and initially displays no reviews.
2 To view all pending reviews, select Pending reviews and then click Search.
APPWAVE™ ENTERPRISE ADMINISTRATOR GUIDE 215
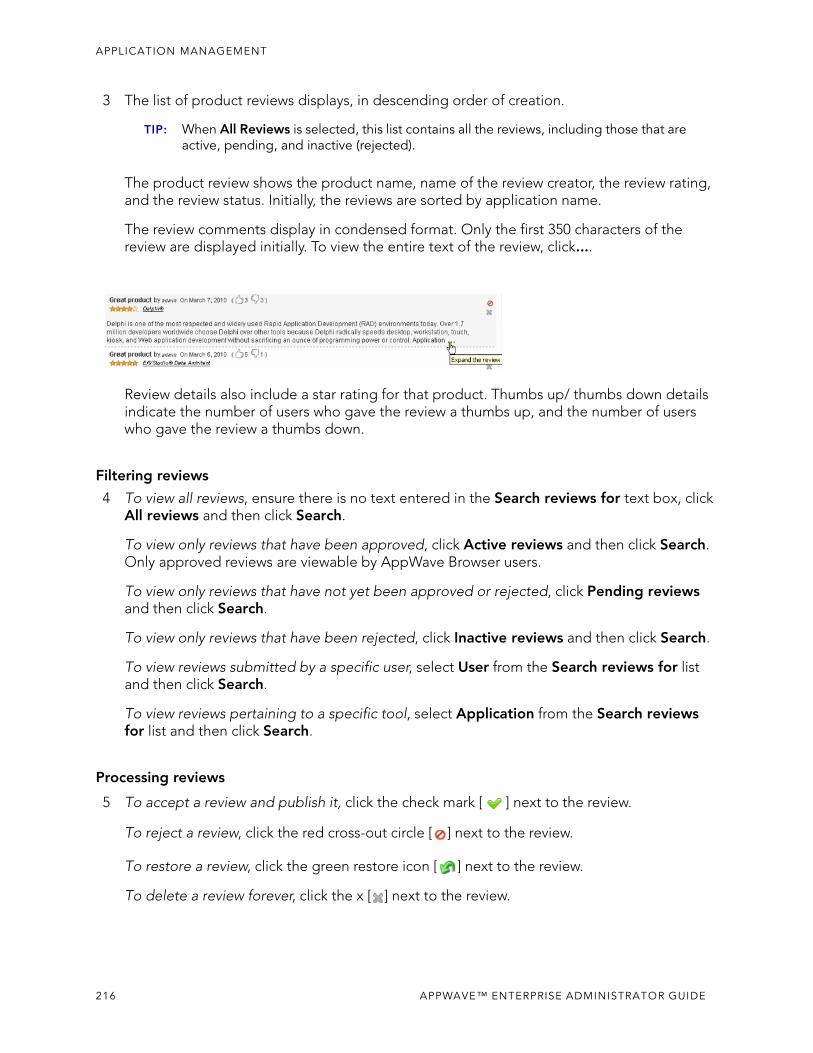
APPLICATION MANAGEMENT
3 The list of product reviews displays, in descending order of creation.
TIP: When All Reviews is selected, this list contains all the reviews, including those that are active, pending, and inactive (rejected).
The product review shows the product name, name of the review creator, the review rating, and the review status. Initially, the reviews are sorted by application name.
The review comments display in condensed format. Only the first 350 characters of the review are displayed initially. To view the entire text of the review, click....
Review details also include a star rating for that product. Thumbs up/ thumbs down details indicate the number of users who gave the review a thumbs up, and the number of users who gave the review a thumbs down.
Filtering reviews
4 To view all reviews, ensure there is no text entered in the Search reviews for text box, click All reviews and then click Search.
To view only reviews that have been approved, click Active reviews and then click Search. Only approved reviews are viewable by AppWave Browser users.
To view only reviews that have not yet been approved or rejected, click Pending reviews and then click Search.
To view only reviews that have been rejected, click Inactive reviews and then click Search.
To view reviews submitted by a specific user, select User from the Search reviews for list and then click Search.
To view reviews pertaining to a specific tool, select Application from the Search reviews for list and then click Search.
Processing reviews
5 To accept a review and publish it, click the check mark [ ] next to the review.
To reject a review, click the red cross-out circle [ ] next to the review.
To restore a review, click the green restore icon [ ] next to the review.
To delete a review forever, click the x [ ] next to the review.
216 APPWAVE™ ENTERPRISE ADMINISTRATOR GUIDE
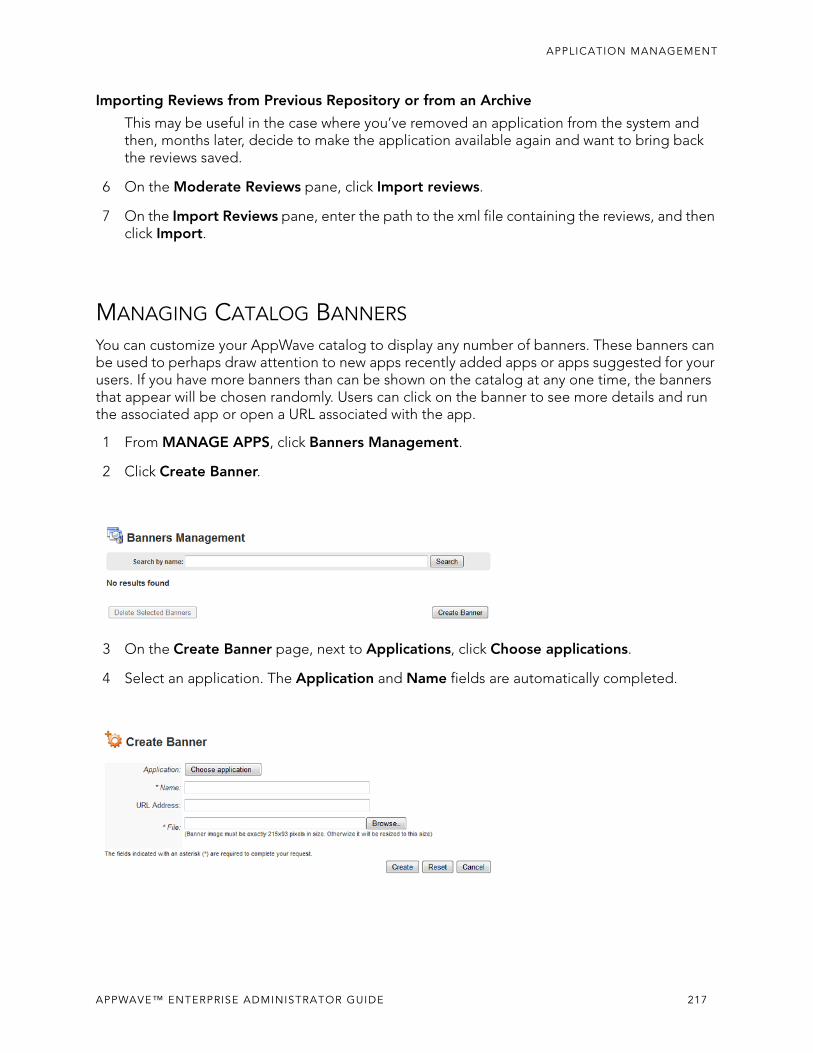
APPLICATION MANAGEMENT
Importing Reviews from Previous Repository or from an Archive
This may be useful in the case where you’ve removed an application from the system and then, months later, decide to make the application available again and want to bring back the reviews saved.
6 On the Moderate Reviews pane, click Import reviews.
7 On the Import Reviews pane, enter the path to the xml file containing the reviews, and then click Import.
MANAGING CATALOG BANNERS
You can customize your AppWave catalog to display any number of banners. These banners can be used to perhaps draw attention to new apps recently added apps or apps suggested for your users. If you have more banners than can be shown on the catalog at any one time, the banners that appear will be chosen randomly. Users can click on the banner to see more details and run the associated app or open a URL associated with the app.
1 From MANAGE APPS, click Banners Management.
2 Click Create Banner.
3 On the Create Banner page, next to Applications, click Choose applications.
4 Select an application. The Application and Name fields are automatically completed.
APPWAVE™ ENTERPRISE ADMINISTRATOR GUIDE 217
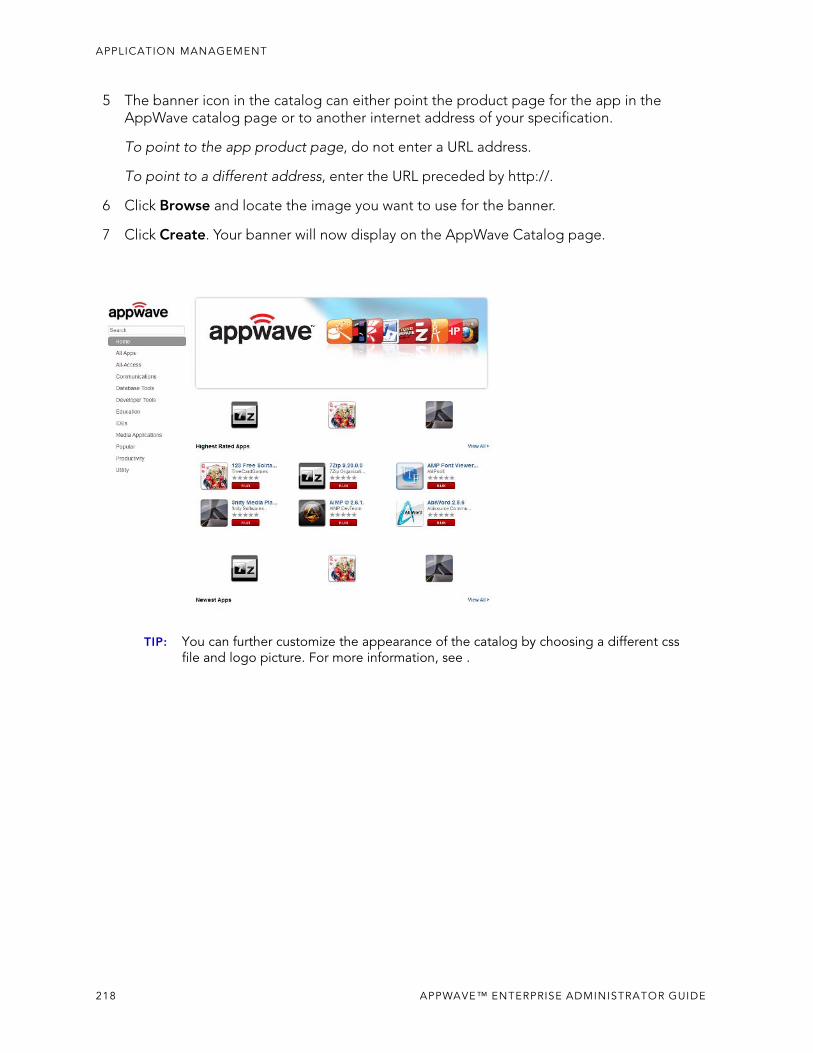
APPLICATION MANAGEMENT
5 The banner icon in the catalog can either point the product page for the app in the AppWave catalog page or to another internet address of your specification.
To point to the app product page, do not enter a URL address.
To point to a different address, enter the URL preceded by http://.
6 Click Browse and locate the image you want to use for the banner.
7 Click Create. Your banner will now display on the AppWave Catalog page.
TIP: You can further customize the appearance of the catalog by choosing a different css file and logo picture. For more information, see .
218 APPWAVE™ ENTERPRISE ADMINISTRATOR GUIDE
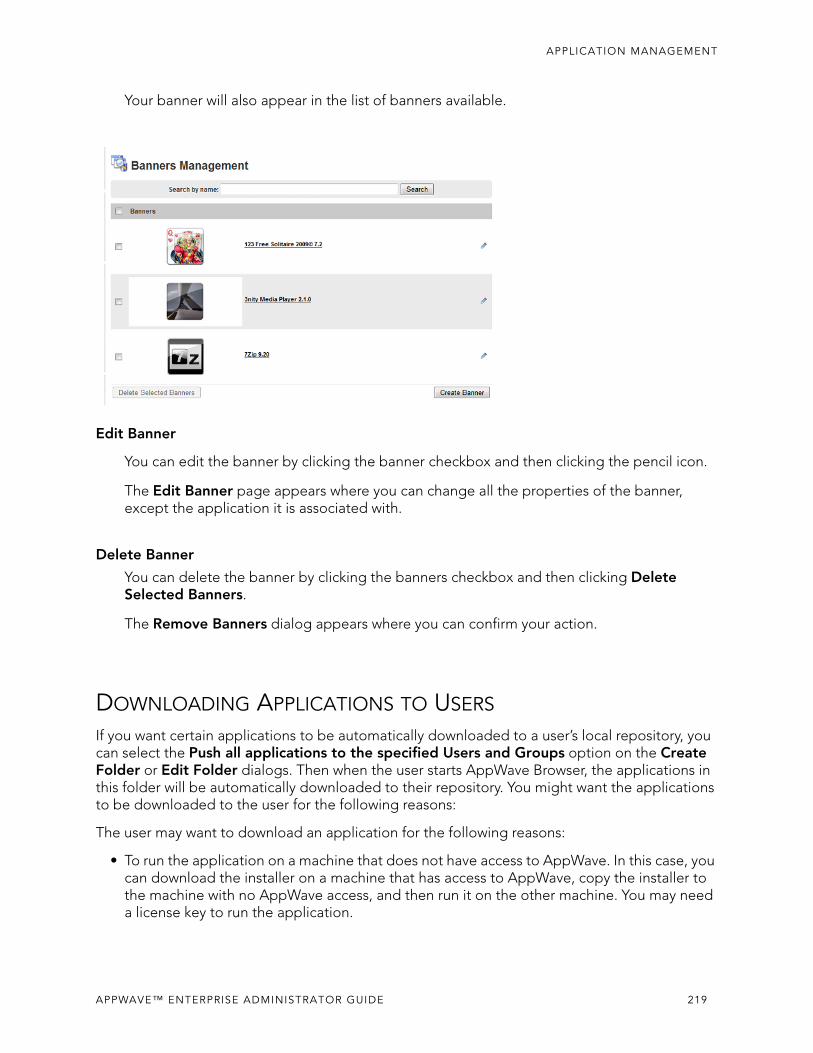
APPLICATION MANAGEMENT
Your banner will also appear in the list of banners available.
Edit Banner
You can edit the banner by clicking the banner checkbox and then clicking the pencil icon.
The Edit Banner page appears where you can change all the properties of the banner, except the application it is associated with.
Delete Banner
You can delete the banner by clicking the banners checkbox and then clicking Delete Selected Banners.
The Remove Banners dialog appears where you can confirm your action.
DOWNLOADING APPLICATIONS TO USERS
If you want certain applications to be automatically downloaded to a user’s local repository, you can select the Push all applications to the specified Users and Groups option on the Create Folder or Edit Folder dialogs. Then when the user starts AppWave Browser, the applications in this folder will be automatically downloaded to their repository. You might want the applications to be downloaded to the user for the following reasons:
The user may want to download an application for the following reasons:
• To run the application on a machine that does not have access to AppWave. In this case, you can download the installer on a machine that has access to AppWave, copy the installer to the machine with no AppWave access, and then run it on the other machine. You may need a license key to run the application.
APPWAVE™ ENTERPRISE ADMINISTRATOR GUIDE 219
APPLICATION MANAGEMENT
• To install the application at another time. In this case you can download the installer and then run it later. For large applications, the installation will be much faster if the installer is first copied locally.
• Your environment includes a backup AppWave license server and the user wants to be able to run your applications when AppWave is unavailable but can access the backup license server.
• To enable the user to use a workstation or network named application license when not connected to AppWave, i.e offline license usage. For more information, see Configuring Licenses for Offline Usage and Assigning Licenses to Network Named Users.
For more information, see Managing Folders.
220 APPWAVE™ ENTERPRISE ADMINISTRATOR GUIDE
APPWAVE ENTERPRISE UI CUSTOMIZATION
Using the User Interface Theme option on the AppWave menu of the AppWave Administration page, you can customize existing themes to change the fonts and background colors of the interface. You can also package your own theme, consisting of a styles.css file and a directory of images that when implemented can replace the existing AppWave theme. You can customize the following features of the private AppWave user interface:
• Body
• Header Logo
• Navigation menu
• Menu contents
• Dashboard header, logo, contents, and descriptions, and icons
• View of users
• All icons
APPWAVE™ ENTERPRISE ADMINISTRATOR GUIDE 221

CUSTOMIZING THE APPWAVE USER INTERFACE THEME
1 From the AppWave menu, select User Interface Theme.
2 The text that displays in the orange box above is the .css file for the User Interface Theme select. In the case above, it’s the Default user interface theme.
3 If you do not have access to the AppWave host file system to add a theme to the correct place in the AppWave installation directory, you can edit the .css file above to customize the user interface and then click Save.
If you want to modify the active theme and then upload it later from the host, you can click the Download Theme button and download the .zip file containing the theme.css file and the images folder.
APPWAVE™ ENTERPRISE ADMINISTRATOR GUIDE 222

APPWAVE ENTERPRISE UI CUSTOMIZATION > CUSTOMIZING THE FORMAT OF THE USER INTERFACE
If you have access to the AppWave host file system and want to add a new theme,
a Create two new directories for the customized files, Images and Styles.
b Change any of the images described in Replacing the Images in the AppWave Admin User Interface, and place the replacement images in the Images directory.
c Cope the text from the Default theme as shown above and edit it as required. The various .css elements of the Default theme are described in Customizing the Format of the User Interface Theme. You can name the new .css file anything you like. Place the new theme.css file into the Styles directory.
d Create a .zip file containing the Images and Styles directories. You can name the .zip file anything you like.
e Click Add Theme and locate the .zip file you just created that contains your new theme files. The new theme appears in the User Interface Theme list.
f From the User Interface Theme list, select your new theme and then click Apply Theme.
4 Press F5 to apply the changes to the user interface and refresh the page you are viewing.
NOTE: If you have a custom theme selected, you can revert to the Default theme by clicking Remove Theme at the bottom of the User interface Customization page. However, if you change the default theme you cannot revert to it automatically in this fashion. You would need to undo the changes you previously made to the default theme.
CUSTOMIZING THE FORMAT OF THE USER INTERFACE THEME
The following describes the elements of the .css file that you can customize. These descriptions are presented in the following format:
Body
Image: N/A
Description: The Body style is the parent of all elements and also describes the background image.
CSS classes: .body
Brief Identifier
Image: A visual representation of the format of the element
Description: A description of the element.
CSS classes: The classes that define this element in the .css file.
APPWAVE™ ENTERPRISE ADMINISTRATOR GUIDE 223
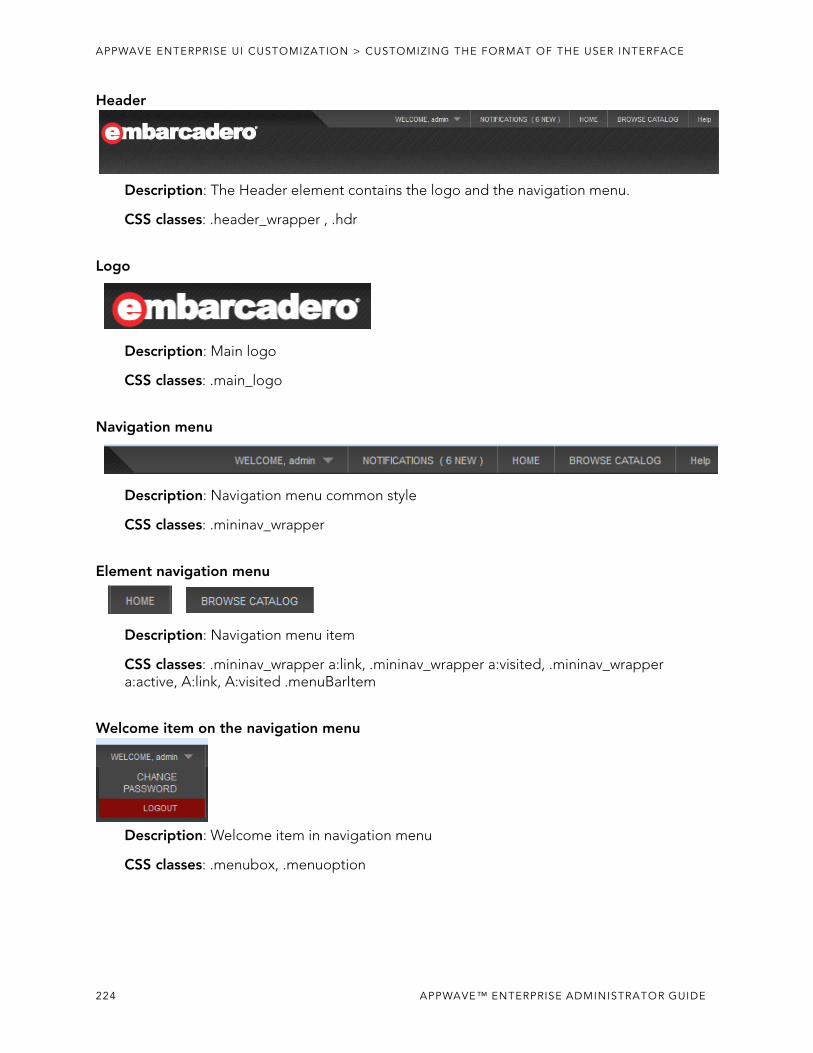
APPWAVE ENTERPRISE UI CUSTOMIZATION > CUSTOMIZING THE FORMAT OF THE USER INTERFACE
Header
Description: The Header element contains the logo and the navigation menu.
CSS classes: .header_wrapper , .hdr
Logo
Description: Main logo
CSS classes: .main_logo
Navigation menu
Description: Navigation menu common style
CSS classes: .mininav_wrapper
Element navigation menu
Description: Navigation menu item
CSS classes: .mininav_wrapper a:link, .mininav_wrapper a:visited, .mininav_wrapper a:active, A:link, A:visited .menuBarItem
Welcome item on the navigation menu
Description: Welcome item in navigation menu
CSS classes: .menubox, .menuoption
224 APPWAVE™ ENTERPRISE ADMINISTRATOR GUIDE
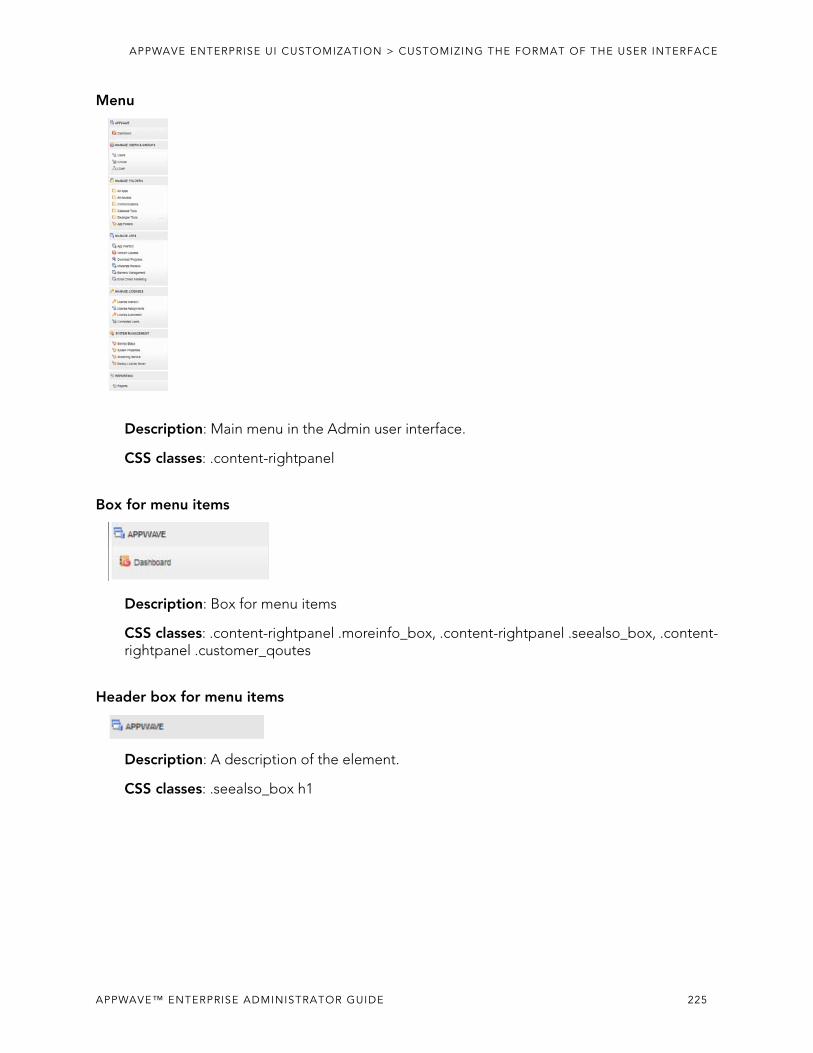
APPWAVE ENTERPRISE UI CUSTOMIZATION > CUSTOMIZING THE FORMAT OF THE USER INTERFACE
Menu
Description: Main menu in the Admin user interface.
CSS classes: .content-rightpanel
Box for menu items
Description: Box for menu items
CSS classes: .content-rightpanel .moreinfo_box, .content-rightpanel .seealso_box, .content-rightpanel .customer_qoutes
Header box for menu items
Description: A description of the element.
CSS classes: .seealso_box h1
APPWAVE™ ENTERPRISE ADMINISTRATOR GUIDE 225
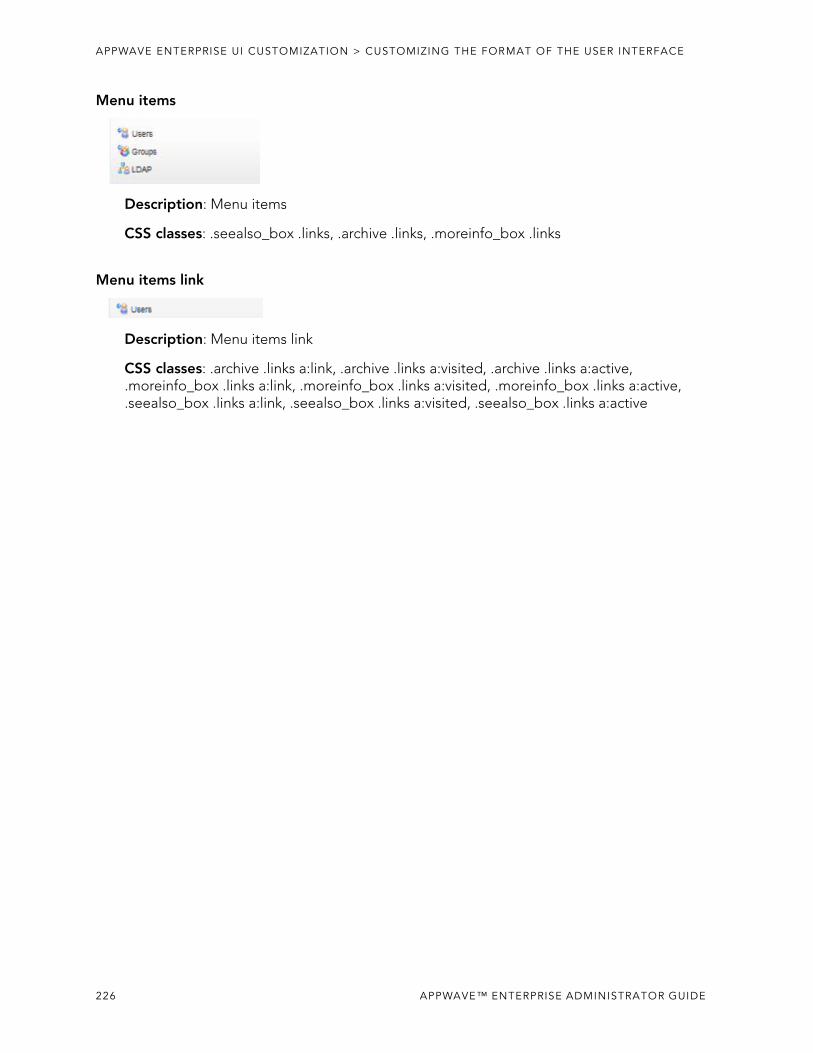
APPWAVE ENTERPRISE UI CUSTOMIZATION > CUSTOMIZING THE FORMAT OF THE USER INTERFACE
Menu items
Description: Menu items
CSS classes: .seealso_box .links, .archive .links, .moreinfo_box .links
Menu items link
Description: Menu items link
CSS classes: .archive .links a:link, .archive .links a:visited, .archive .links a:active, .moreinfo_box .links a:link, .moreinfo_box .links a:visited, .moreinfo_box .links a:active, .seealso_box .links a:link, .seealso_box .links a:visited, .seealso_box .links a:active
226 APPWAVE™ ENTERPRISE ADMINISTRATOR GUIDE
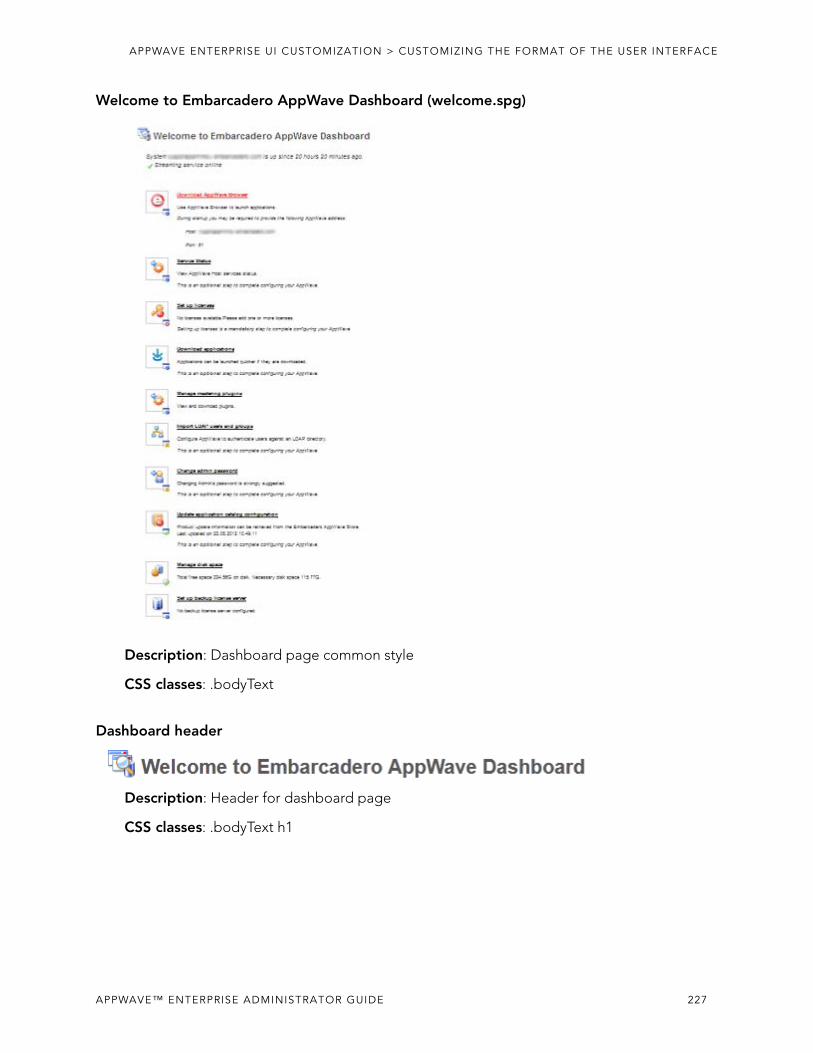
APPWAVE ENTERPRISE UI CUSTOMIZATION > CUSTOMIZING THE FORMAT OF THE USER INTERFACE
Welcome to Embarcadero AppWave Dashboard (welcome.spg)
Description: Dashboard page common style
CSS classes: .bodyText
Dashboard header
Description: Header for dashboard page
CSS classes: .bodyText h1
APPWAVE™ ENTERPRISE ADMINISTRATOR GUIDE 227
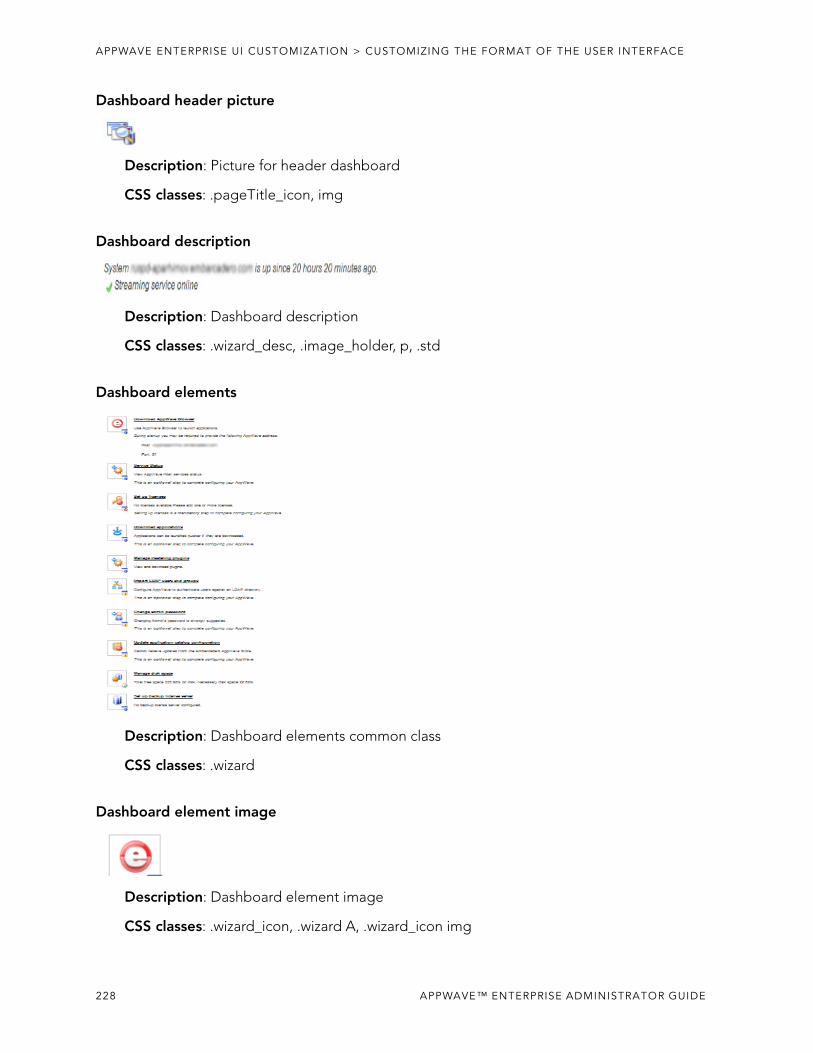
APPWAVE ENTERPRISE UI CUSTOMIZATION > CUSTOMIZING THE FORMAT OF THE USER INTERFACE
Dashboard header picture
Description: Picture for header dashboard
CSS classes: .pageTitle_icon, img
Dashboard description
Description: Dashboard description
CSS classes: .wizard_desc, .image_holder, p, .std
Dashboard elements
Description: Dashboard elements common class
CSS classes: .wizard
Dashboard element image
Description: Dashboard element image
CSS classes: .wizard_icon, .wizard A, .wizard_icon img
228 APPWAVE™ ENTERPRISE ADMINISTRATOR GUIDE

APPWAVE ENTERPRISE UI CUSTOMIZATION > CUSTOMIZING THE FORMAT OF THE USER INTERFACE
Dashboard element header
Description: Dashboard element header
CSS classes: .wizard A, A:link, A:visited
Dashboard element description
Description: Dashboard element description
CSS classes: .image_holder, p, .std, .wizard span
Dashboard element description image
Description: Image for dashboard element description
CSS classes: .wizard_top_icon, img
Dashboard element tips
Description: Dashboard element tips
CSS classes: .wizard_tips
Dashboard element tips item
Description: Dashboard element tips item
CSS classes: .wizard_item
APPWAVE™ ENTERPRISE ADMINISTRATOR GUIDE 229
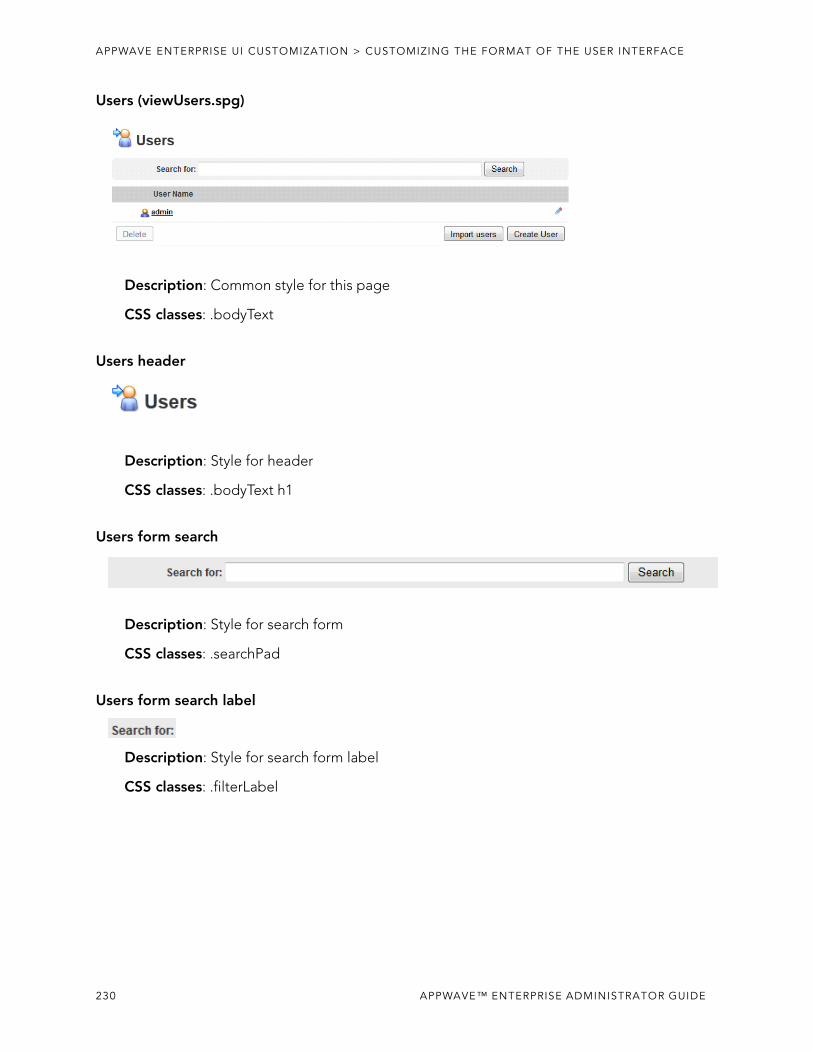
APPWAVE ENTERPRISE UI CUSTOMIZATION > CUSTOMIZING THE FORMAT OF THE USER INTERFACE
Users (viewUsers.spg)
Description: Common style for this page
CSS classes: .bodyText
Users header
Description: Style for header
CSS classes: .bodyText h1
Users form search
Description: Style for search form
CSS classes: .searchPad
Users form search label
Description: Style for search form label
CSS classes: .filterLabel
230 APPWAVE™ ENTERPRISE ADMINISTRATOR GUIDE
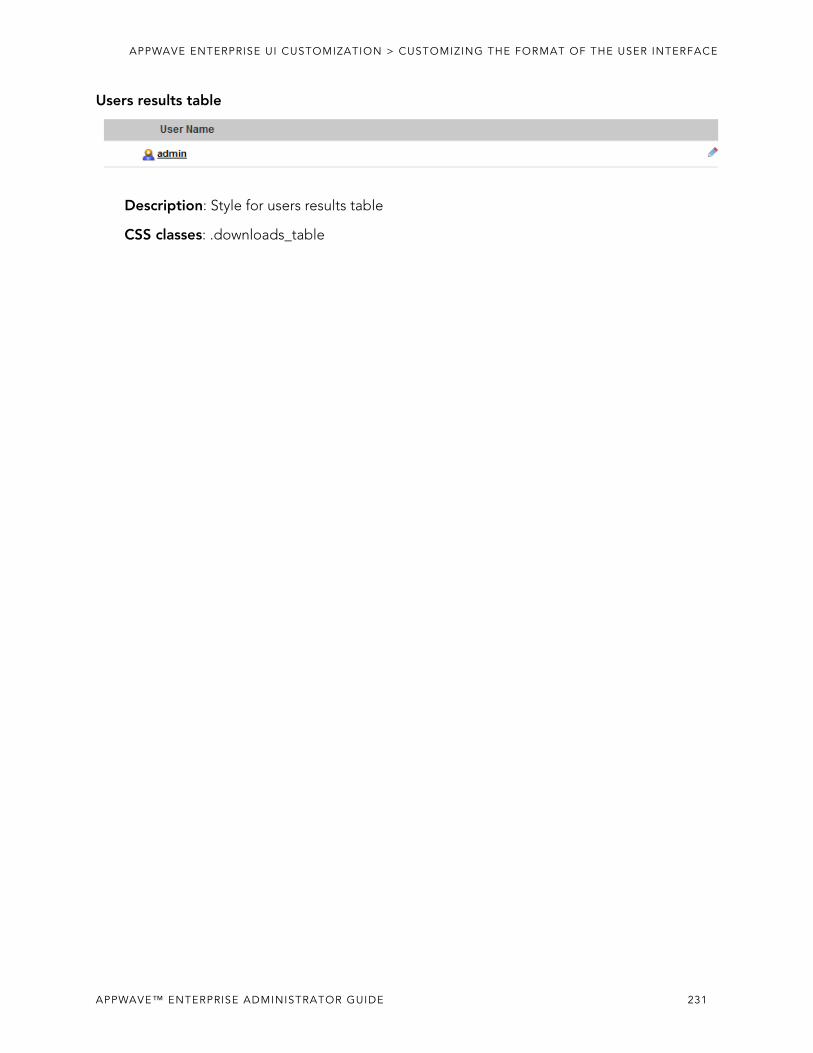
APPWAVE ENTERPRISE UI CUSTOMIZATION > CUSTOMIZING THE FORMAT OF THE USER INTERFACE
Users results table
Description: Style for users results table
CSS classes: .downloads_table
APPWAVE™ ENTERPRISE ADMINISTRATOR GUIDE 231
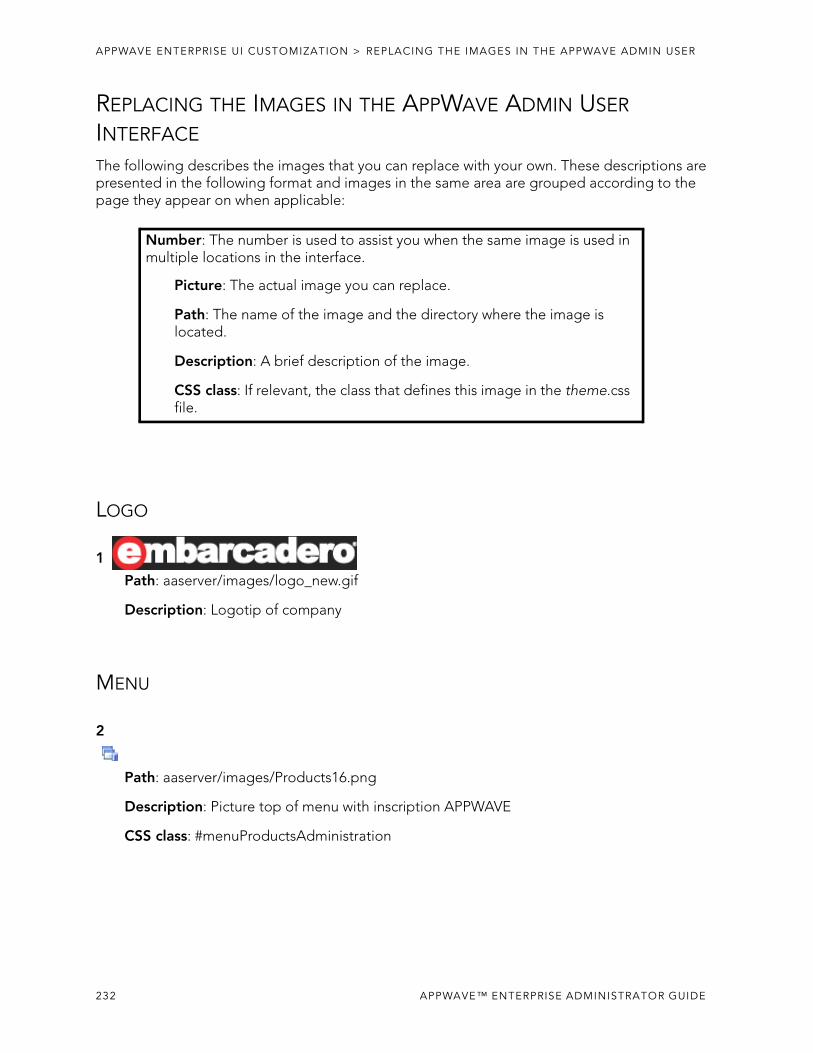
APPWAVE ENTERPRISE UI CUSTOMIZATION > REPLACING THE IMAGES IN THE APPWAVE ADMIN USER
REPLACING THE IMAGES IN THE APPWAVE ADMIN USER INTERFACE
The following describes the images that you can replace with your own. These descriptions are presented in the following format and images in the same area are grouped according to the page they appear on when applicable:
LOGO
1
Path: aaserver/images/logo_new.gif
Description: Logotip of company
MENU
2
Path: aaserver/images/Products16.png
Description: Picture top of menu with inscription APPWAVE
CSS class: #menuProductsAdministration
Number: The number is used to assist you when the same image is used in multiple locations in the interface.
Picture: The actual image you can replace.
Path: The name of the image and the directory where the image is located.
Description: A brief description of the image.
CSS class: If relevant, the class that defines this image in the theme.css file.
232 APPWAVE™ ENTERPRISE ADMINISTRATOR GUIDE
APPWAVE ENTERPRISE UI CUSTOMIZATION > REPLACING THE IMAGES IN THE APPWAVE ADMIN USER
3
Path: aaserver/images/UpdateProductCatalog16.png
Description: Dashboard
CSS class: #menuUpdateProductCatalog
4
Path: aaserver/images/UsersGroups16.png
Description: MANAGE USERS & GROUPS
CSS class: #menuUsersAdministration
5
Path: aaserver/images/EditRemoveUsers16.png
Description: Users
CSS class: #menuViewEditUsers
6
Path:aaserver/images/EditRemoveGroups16.png
Description: Groups
CSS class: #menuEditRemoveGroups
7
Path: aaserver/images/LDAP16.png
Description: LDAP
CSS class: #menuEditRemoveGroups
8
Path: aaserver/images/Folders.gif
Description: MANAGE FOLDERS
CSS class: #menuFoldersAdministration
APPWAVE™ ENTERPRISE ADMINISTRATOR GUIDE 233
APPWAVE ENTERPRISE UI CUSTOMIZATION > REPLACING THE IMAGES IN THE APPWAVE ADMIN USER
9
Path: aaserver/images/folder.gif
Description: All Apps, All Access, Communications, Database Tools, and Developer Tools
CSS class: #menuFolderView
10
Path: aaserver/images/ViewRemoveConfigurations16.png
Description: App Folders
CSS class: #menuFoldersView
11
Path: aaserver/images/Products16.png, same as 2
Description: MANAGE APPS
CSS class: #menuProductsAdministration
12
Path: aaserver/images/ViewProducts16.png
Description: App Inventory
CSS class: #menuViewProducts
13
Path: aaserver/images/UpdateProductCatalog16.png, same as 3
Description: Version Updates
CSS class: #menuUpdateProductCatalog
14
Path: aaserver/images/CachingProgress16.png
Description: Download Progress
CSS class: #menuUpdateProductCatalog
234 APPWAVE™ ENTERPRISE ADMINISTRATOR GUIDE
APPWAVE ENTERPRISE UI CUSTOMIZATION > REPLACING THE IMAGES IN THE APPWAVE ADMIN USER
15
Path: aaserver/images/ViewProducts16.png, same as 12
Description: App Inventory
Description: Moderate Reviews
CSS class: #menuProductReviews
16
Path: aaserver/images/ViewProducts16.png, same as 12
Description: App Inventory
Description: Banners Management
CSS class: #bannersManagement
17
Path: aaserver/images/ViewProducts16.png, same as 12
Description: App Inventory
Description: Email Direct Marketing
CSS class: #edmConfig
18
Path: aaserver/images/Licenses16.png
Description: MANAGE LICENSES
CSS class: #menuMainLicenses
19
Path: aaserver/images/CurrentLicenses16.png
Description: License Inventory
CSS class: #menuLicenses
APPWAVE™ ENTERPRISE ADMINISTRATOR GUIDE 235
APPWAVE ENTERPRISE UI CUSTOMIZATION > REPLACING THE IMAGES IN THE APPWAVE ADMIN USER
20
Path: aaserver/images/EditRemoveUsers16.png, same as 5
Description: License Assignments
CSS class: #menuLicenseAssignments
21
Path: aaserver/images/CurrentLicenses16.png, same as 19
Description: License Automation
CSS class: #menuLicenseAutomation
22
Path:aaserver/images/EditRemoveGroups16.png, same as 6
Description: Connected Users
CSS class: #menuConnectedUsers
23
Path: aaserver/images/ConfigurationManagement16.png
Description: SYSTEM MANAGEMENT
CSS class: #menuMainSysParam
24
Path: aaserver/images/ViewRemoveConfigurations16.png
Description: Service Status
CSS class: #menuParamSystem
25
Path: aaserver/images/ViewRemoveConfigurations16.png, same as 24
Description: System Properties
CSS class: #menuParamSystem
236 APPWAVE™ ENTERPRISE ADMINISTRATOR GUIDE
APPWAVE ENTERPRISE UI CUSTOMIZATION > REPLACING THE IMAGES IN THE APPWAVE ADMIN USER
26
Path: aaserver/images/ViewRemoveConfigurations16.png, same as 24
Description: Streaming Service
CSS class: #menuParamStreaming
27
Path: aaserver/images/ViewRemoveConfigurations16.png, same as 24
Description: Backup License Server
CSS class: #menuParamSystem
28
Path: aaserver/images/Reports16.gif
Description: REPORTING
CSS class: #menuReporting
29
Path: aaserver/images/Reports16.gif, same as 28
Description: Reports
CSS class: #menuParamStatistics
WELCOME TO EMBARCADERO APPWAVE DASHBOARDwelcome.spg
30
Path: aaserver/images/Overlay-ok.gif
Description: service online
APPWAVE™ ENTERPRISE ADMINISTRATOR GUIDE 237
APPWAVE ENTERPRISE UI CUSTOMIZATION > REPLACING THE IMAGES IN THE APPWAVE ADMIN USER
31
Path: aaserver/images/Overlay-block.gif
Description: Service block
32
Path: aaserver/images/Overlay-Warning.gif
Description: Service warning
33
Path: aaserver/icons/Icon_AllAccess_32.png
Description: Download AppWave Browser
34
Path: aaserver/images/App-info.gif
Description: Section is available
35
Path: aaserver/images/ViewRemoveConfigurations.png
Description: Service Status
36
Path: aaserver/images/EmbarcaderoLicense.png
Description: Set up licenses
37
Path: aaserver/images/App-block.gif
Description: Section is not available
238 APPWAVE™ ENTERPRISE ADMINISTRATOR GUIDE
APPWAVE ENTERPRISE UI CUSTOMIZATION > REPLACING THE IMAGES IN THE APPWAVE ADMIN USER
38
Path: aaserver/images/download1.gif
Description: Download applications
39
Path: aaserver/images/ViewRemoveConfigurations.png, same as 35
Description: Manage mastering plugins
40
Path: aaserver/images/LDAP.png
Description: Import LDAP users and groups
41
Path: aaserver/images/App-warn.gif
Description: Warning section
42
Path: aaserver/images/EditRemoveUsers.png
Description: Change admin password
43
Path: aaserver/images/UpdateProductCatalog.png
Description: Update application catalog configuration
44
Path: aaserver/images/App-ok.gif
Description: Configured sucessful
APPWAVE™ ENTERPRISE ADMINISTRATOR GUIDE 239
APPWAVE ENTERPRISE UI CUSTOMIZATION > REPLACING THE IMAGES IN THE APPWAVE ADMIN USER
45
Path: aaserver/images/Computer.gif
Description: Manage disk space
46
Path: aaserver/images/Disc-Ok.gif
Description: Show Disk Space Ok
47
Path: aaserver/images/Disc-Warn.gif
Description: Show Disk Space warning
48
Path: aaserver/images/Disc-Info.gif
Description: Show Disk Space Info
49
Path: aaserver/images/backupServer.gif
Description: Set up backup license server
50
Path: aaserver/images/ViewProducts.png
Description: Main picture for Welcome to Embarcadero AppWave Dashboard
USERviewUsers.spg
240 APPWAVE™ ENTERPRISE ADMINISTRATOR GUIDE

APPWAVE ENTERPRISE UI CUSTOMIZATION > REPLACING THE IMAGES IN THE APPWAVE ADMIN USER
51
Path: aaserver/images/EditRemoveUsers.png, same as 42
Description: Main picture for Users Section
52
Path: aaserver/images/user.png
Description: User in list
53
Path: aaserver/images/edit.gif
Description: Edit user
VIEW USERviewUser.spg?id=<userID>)
54
Path: aaserver/images/EditRemoveUsers.png, same as 42
Description: Main picture for Users Section
55
Path: aaserver/images/group.png
Description: Member of group picture
56
Path: aaserver/images/ConfigurationManagement16.png, same as 23
Description: Folders owner picture
APPWAVE™ ENTERPRISE ADMINISTRATOR GUIDE 241
APPWAVE ENTERPRISE UI CUSTOMIZATION > REPLACING THE IMAGES IN THE APPWAVE ADMIN USER
57
Path: aaserver/images/CurrentLicenses16.png, same as 19
Description: Licenses
EDIT USEReditUser.spg?embtUsrId=<userID>)
58
Path: aaserver/images/CreateGroups16.png
Description: Add Groups, Add Folders
59
Path: aaserver/images/destroy.gif
Description: Remove All
ADD CONCURRENT USERSaddLicenseUsers.spg?licenseType=Concurrent&targetId=<userID>&targetType=USER
60
Path: aaserver/images/CreateGroups.png
Description: Add Concurrent Users main Picture
61
Path: aaserver/images/cancel.gif
Description: Permissions Deny
62
Path: aaserver/images/action_check.gif
Description: Permissions Allow
242 APPWAVE™ ENTERPRISE ADMINISTRATOR GUIDE

APPWAVE ENTERPRISE UI CUSTOMIZATION > REPLACING THE IMAGES IN THE APPWAVE ADMIN USER
63
Path: aaserver/images/RetrieveLicense16.png
Description: Add Licenses
ADD NAMED USERSaddLicenseUsers.spg?licenseType=Named&targetId=<userID>&targetType=USER
64
Path: aaserver/images/CreateUsers.png
Description: Add Named Users main Picture
IMPORT USERSuserImport.spg
65
Path: aaserver/images/CreateUsers.png, same as 64
Description: Main picture for Import Users Section
CREATE USEReditUser.spg
66
Path: aaserver/images/CreateUsers.png, same as 64
Description: Main picture for Create User Section
MANAGE GROUPSviewUserGroups.spg
APPWAVE™ ENTERPRISE ADMINISTRATOR GUIDE 243
APPWAVE ENTERPRISE UI CUSTOMIZATION > REPLACING THE IMAGES IN THE APPWAVE ADMIN USER
67
Path: aaserver/images/EditRemoveGroups.png
Description: Main picture for Manage Groups
CREATE GROUPeditUserGroup.spg
68
Path: aaserver/images/CreateGroups.png, same as 60
Description: Main picture for Create Group
LDAP USERS & GROUPSldapImport.spg
69
Path: aaserver/images/LDAP.png, same as 40
Description: Main picture for LDAP Users & Groups
VIEW FOLDERviewFolder.spg?id=<folderID>)
70
Path: aaserver/images/ViewRemoveConfigurations.png, same as 35
Description: Main picture for View Folder
244 APPWAVE™ ENTERPRISE ADMINISTRATOR GUIDE
APPWAVE ENTERPRISE UI CUSTOMIZATION > REPLACING THE IMAGES IN THE APPWAVE ADMIN USER
71
Path: aaserver/images/EditRemoveGroups16.png, same as 6
Description: Assignment concurrent users
72
Path: aaserver/images/EditRemoveUsers16.png, same as 5
Description: Assignment named users
73
Path: aaserver/images/warning20.png
Description: Warning message
CSS class: .warningMessages li
74
Path: aaserver/images/expand_text.png
Description: View all aplication
75
Path: aaserver/images/collapse_text.png
Description: Close the detail applications
EDIT FOLDEReditFolder.spg?id=<folderID>)
76
Path: aaserver/images/ViewRemoveConfigurations.png, same as 35
Description: Main picture for Edit Folder
APPWAVE™ ENTERPRISE ADMINISTRATOR GUIDE 245
APPWAVE ENTERPRISE UI CUSTOMIZATION > REPLACING THE IMAGES IN THE APPWAVE ADMIN USER
APP FOLDERSviewAllFolders.spg
77
Path: aaserver/images/ViewRemoveConfigurations.png, same as 35
Description: Main picture for App Folders
78
Path: aaserver/images/warning20.png, same as 73
Description: Folder Status Warning
79
Path: aaserver/images/check20.gif
Description: Folder status OK
APP INVENTORYtools.spg
80
Path: aaserver/images/ViewProducts.png, same as 50
Description: Main picture for App Inventory
81
Path: aaserver/images/warning20.png, same as 73
Description: App internet available
82
Path: aaserver/images/check.png
Description: App available
246 APPWAVE™ ENTERPRISE ADMINISTRATOR GUIDE
APPWAVE ENTERPRISE UI CUSTOMIZATION > REPLACING THE IMAGES IN THE APPWAVE ADMIN USER
83
Path: aaserver/images/wrench.gif
Description: Build configure
84
Path: aaserver/images/error20.png
Description: Not streamed on any service
85
Path: aaserver/images/stream.png
Description: Start streaming
86
Path: aaserver/images/unstream.png
Description: Stop streaming
87
Path: aaserver/images/info20.png
Description: Inprogress publish/unpublish
88
Path: aaserver/images/download_start.gif
Description: Resume download
89
Path: aaserver/images/download_pause.gif
Description: Pause download
APPWAVE™ ENTERPRISE ADMINISTRATOR GUIDE 247
APPWAVE ENTERPRISE UI CUSTOMIZATION > REPLACING THE IMAGES IN THE APPWAVE ADMIN USER
90
Path: aaserver/images/download_stop.gif
Description: Stop download
91
Path: aaserver/images/download.png
Description: Download App
92
Path: aaserver/images/upload.png
Description: Upload App
93
Path: aaserver/images/action_check.gif, same as 62
Description: Inactive state
94
Path: aaserver/images/download_disabled.png
Description: Download disable
95
Path: aaserver/images/destroy.gif, same as 59
Description: Delete binaries
248 APPWAVE™ ENTERPRISE ADMINISTRATOR GUIDE
APPWAVE ENTERPRISE UI CUSTOMIZATION > REPLACING THE IMAGES IN THE APPWAVE ADMIN USER
VERSION UPDATESupdateProductCatalog.spg
96
Path: aaserver/images/UpdateProductCatalog.png, same as 46
Description: Main picture for Version Updates
97
Path: aaserver/images/icon_expand_all.gif
Description: Expand list app for customizing
98
Path: aaserver/images/icon_collapse_all.gif
Description: Collapse list app for customizing
99
Path: aaserver/images/img_select_all.gif
Description: Select all
100
Path: aaserver/images/img_select_none.gif
Description: Select none
101
Path: aaserver/images/Web-ok.png
Description: Test connection to appwave.embarcadero.com is successful
102
Path: aaserver/images/Web-block.png
Description: Cannot establish connection
APPWAVE™ ENTERPRISE ADMINISTRATOR GUIDE 249

APPWAVE ENTERPRISE UI CUSTOMIZATION > REPLACING THE IMAGES IN THE APPWAVE ADMIN USER
DOWNLOAD HISTORYdownloadApplications.spg
103
Path: aaserver/images/CachingProgress.png
Description: Main picture for Download History
MODERATE REVIEWSsearchReviews.spg
104
Path: aaserver/images/ViewProducts.png, same as 53
Description: Main picture for Moderate Reviews
105
Path: aaserver/images/thumb_up.gif
Description: Like review
106
Path: aaserver/images/thumb_down.gif
Description: Dislike review
107
Path: aaserver/images/cancel.gif, same as 61
Description: Reject review
108
Path: aaserver/images/action_delete.gif
Description: Delete forever
250 APPWAVE™ ENTERPRISE ADMINISTRATOR GUIDE
APPWAVE ENTERPRISE UI CUSTOMIZATION > REPLACING THE IMAGES IN THE APPWAVE ADMIN USER
109
Path: aaserver/images/stars1.gif
Description: Rating 1 star
110
Path: aaserver/images/stars2.gif
Description: Rating 2 stars
111
Path: aaserver/images/stars3.gif
Description: Rating 3 stars
112
Path: aaserver/images/stars4.gif
Description: Rating 4 stars
113
Path: aaserver/images/stars5.gif
Description: Rating 5 stars
BANNERS MANAGEMENTbannersManagement.spg
114
Path: aaserver/images/ViewProducts.png, same as 50
Description: Main picture for Banners Management
115
Path: aaserver/images/edit.gif, same as 53
Description: Edit Banner
APPWAVE™ ENTERPRISE ADMINISTRATOR GUIDE 251
APPWAVE ENTERPRISE UI CUSTOMIZATION > REPLACING THE IMAGES IN THE APPWAVE ADMIN USER
EMAIL DIRECT MARKETINGedmConfig.spg
116
Path: aaserver/images/ViewProducts.png, same as 50
Description: Main picture for Email Direct Marketing
LICENSE INVENTORYlicenses.spg
117
Path: aaserver/images/CurrentLicenses.png
Description: Main picture for License Inventory
LICENSE FILESviewLicenses.spg
118
Path: aaserver/images/CurrentLicenses.png, same as 117
Description: Main picture for License Files
119
Path: aaserver/images/download.png, same as 91
Description: Update this license
120
Path: aaserver/images/destroy.gif, same as 59
Description: Delete this license
252 APPWAVE™ ENTERPRISE ADMINISTRATOR GUIDE
APPWAVE ENTERPRISE UI CUSTOMIZATION > REPLACING THE IMAGES IN THE APPWAVE ADMIN USER
RETRIEVE LICENSErequestLicense.spg
121
Path: aaserver/images/RetrieveLicense.png
Description: Main picture for Retrieve License
122
Path: aaserver/images/warning20.png, same as 73
Description: No backup license server configured.
SET TRIAL OWNERrequestTrialLicense.spg
123
Path: aaserver/images/RetrieveLicense.png, same as 121
Description: Main picture for Set trial owner
THIRD PARTY LICENSES3rdPartyLics.spg
124
Path: aaserver/images/ViewProducts.png, same as 50
Description: Main picture for Third Party Licenses
125
Path: aaserver/images/edit.gif, same as 53
Description: Edit entry
APPWAVE™ ENTERPRISE ADMINISTRATOR GUIDE 253
APPWAVE ENTERPRISE UI CUSTOMIZATION > REPLACING THE IMAGES IN THE APPWAVE ADMIN USER
LICENSE ASSIGNMENTSlicenseAssignments.spg
126
Path: aaserver/images/EditRemoveUsers.png, same as 42
Description: Main picture for License Assignments
127
Path: aaserver/images/EditRemoveGroups.png, same as 67
Description: Concurrent licenses management
128
Path: aaserver/images/EditRemoveGroups.png, same as 67
Description: Permissions for concurrent licenses
129
Path: aaserver/images/CurrentLicenses.png, same as 117
Description: Valid IPs for concurrent licenses
130
Path: aaserver/images/ViewRemoveConfigurations.png, same as 35
Description: Reservations for concurrent licenses
131
Path: aaserver/images/EditRemoveUsers.png, same as 42
Description: Named licenses management
254 APPWAVE™ ENTERPRISE ADMINISTRATOR GUIDE
APPWAVE ENTERPRISE UI CUSTOMIZATION > REPLACING THE IMAGES IN THE APPWAVE ADMIN USER
132
Path: aaserver/images/workstation.png
Description: Workstation licenses management
133
Path: aaserver/images/workstation.png, same as 132
Description: Permissions for workstation licenses (concurrent only)
134
Path: aaserver/images/ViewRemoveConfigurations.png, same as 35
Description: Reservations for workstation licenses
CONCURENT USERS, NAMED USERS, AND WORKSTATION PERMISSIONSconcurrentUsers.spg, namedUsers.spg, workstationPermissions.spg
135
Path: aaserver/images/CreateGroups.png, same as 60
Description: Main picture for Concurent Users
136
Path: aaserver/images/user.png, same as 55
Description: User icon
137
Path: aaserver/images/action_check.gif, same as 62
Description: Permissions allow
APPWAVE™ ENTERPRISE ADMINISTRATOR GUIDE 255
APPWAVE ENTERPRISE UI CUSTOMIZATION > REPLACING THE IMAGES IN THE APPWAVE ADMIN USER
138
Path: aaserver/images/cancel.gif, same as 61
Description: Permissions deny
139
Path: aaserver/images/edit.gif, same as 56
Description: Edit entry
140
Path: aaserver/images/destroy.gif, same as 59
Description: Delete entry
VALID IPSiplist.spg
141
Path: aaserver/images/CurrentLicenses.png, same as 117
Description: Main picture for Valid IPs
142
Path: aaserver/images/img_select_all.gif. same as 99
Description: Select all
143
Path: aaserver/images/img_select_none.gif, same as 100
Description: Select none
256 APPWAVE™ ENTERPRISE ADMINISTRATOR GUIDE
APPWAVE ENTERPRISE UI CUSTOMIZATION > REPLACING THE IMAGES IN THE APPWAVE ADMIN USER
144
Path: aaserver/images/action_add.gif
Description: Add new IP
RESERVATIONS AND WORKSTATION RESERVATIONSreservations.spg and workstationReservations.spg
145
Path: aaserver/images/ViewRemoveConfigurations.png, same as 35
Description: Main picture for Reservations
146
Path: aaserver/images/edit.gif, same as 53
Description: Edit entry
147
Path: aaserver/images/destroy.gif, same as 59
Description: Delete entry
AUTO ACTIVATION LICENSES3rdPartyLics.spg?scope=autoActivation
148
Path: aaserver/images/ViewProducts.png, same as 50
Description: Main picture for Auto Activation Licenses
APPWAVE™ ENTERPRISE ADMINISTRATOR GUIDE 257
APPWAVE ENTERPRISE UI CUSTOMIZATION > REPLACING THE IMAGES IN THE APPWAVE ADMIN USER
149
Path: aaserver/images/edit.gif, same as 53
Description: Edit entry
CONNECTED USERSconnectedUsers.spg
150
Path: aaserver/images/CreateGroups.png, same as 60
Description: Main picture for Connected Users
151
Path: aaserver/images/user.png, same as 52
Description: User
152
Path: aaserver/images/EmbarcaderoLicense16.png
Description: Embarcadero licemse
SERVICE STATUSserverStatus.spg
153
Path: aaserver/images/ViewProducts.png, same as 50
Description: Main picture for Service Status
258 APPWAVE™ ENTERPRISE ADMINISTRATOR GUIDE
APPWAVE ENTERPRISE UI CUSTOMIZATION > REPLACING THE IMAGES IN THE APPWAVE ADMIN USER
154
Path: aaserver/images/Overlay-ok.gif, same as 30
Description: Service status OK
155
Path: aaserver/images/Overlay-block.gif, same as 31
Description: Service status not available
156
Path: aaserver/images/Overlay-Warning.gif, same as 32
Description: Service status warning
SET UP LICENSESwelcome.spg?license=1
157
Path: aaserver/images/CurrentLicenses.png, same as 117
Description: Main picture for Set Up License
158
Path: aaserver/images/RetrieveLicense.png, same as 121
Description: Retrieve licenses
159
Path: aaserver/images/RetrieveLicense.png, same as 121
Description: Set trial owner
APPWAVE™ ENTERPRISE ADMINISTRATOR GUIDE 259
APPWAVE ENTERPRISE UI CUSTOMIZATION > REPLACING THE IMAGES IN THE APPWAVE ADMIN USER
160
Path: aaserver/images/ImportLicensesNew.png
Description: Manual import licenses
SYSTEM PROPERTIES EMAILsmtp.spg
161
Path: aaserver/images/ViewRemoveConfigurations.png, same as 35
Description: Main picture for System Properties
162
Path: aaserver/images/emailAdding.gif
Description: Add new email
163
Path: aaserver/images/action_add.gif, same as 144
Description: Add
STREAMING SERVICEstreamingDashboard.spg
164
Path: aaserver/images/UpdateProductCatalog.png, same as 43
Description: Main picture for Streaming Service
260 APPWAVE™ ENTERPRISE ADMINISTRATOR GUIDE
APPWAVE ENTERPRISE UI CUSTOMIZATION > REPLACING THE IMAGES IN THE APPWAVE ADMIN USER
165
Path: aaserver/images/start_green_rnd.png
Description: Start streaming
166
Path: aaserver/images/stop_red_rnd.png
Description: Stop streaming
PUBLISHING PROGRESSpublishingProgress.spg
167
Path: aaserver/images/CachingProgress.png, same as 103
Description: Main picture for Publishing Progress
APPWAVE BACKUP SETUPwelcome.spg?backupServerSetup=1
168
Path: aaserver/images/backupServer.gif, same as 49
Description: Main picture for AppWave Backup Setup
169
Path: aaserver/images/backupServer.gif, same as 49
Description: Configure the backup license server
APPWAVE™ ENTERPRISE ADMINISTRATOR GUIDE 261
APPWAVE ENTERPRISE UI CUSTOMIZATION > REPLACING THE IMAGES IN THE APPWAVE ADMIN USER
170
Path: aaserver/images/backupServer.gif, same as 49
Description: Set AppWave as backup license server
171
Path: aaserver/images/App-ok.gif, same as 44
Description: Server is configured
172
Path: aaserver/images/App-info.gif, same as 34
Description: Server is not configured
REPORTSstatisticsMain.spg
173
Path: aaserver/images/Reports.gif
Description: Main picture for Reports
174
Path: aaserver/images/Reports.gif, same as 173
Description: License app report
175
Path: aaserver/images/EditRemoveUsers.png, same as 42
Description: Streamed app report
262 APPWAVE™ ENTERPRISE ADMINISTRATOR GUIDE
APPWAVE ENTERPRISE UI CUSTOMIZATION > REPLACING THE IMAGES IN THE APPWAVE ADMIN USER
NOTIFICATIONSnotifications.spg
176
Path: aaserver/images/Notifications.png
Description: Main picture for Notification
177
Path: aaserver/images/double_check.gif
Description: Mark all as read
178
Path: aaserver/images/double_X.gif
Description: Delete all
179
Path: aaserver/images/gtk-delete.png
Description: View deleted
180
Path: aaserver/images/StartWatching.gif
Description: Mark as read
181
Path: aaserver/images/action_delete.gif, same as 108
Description: Delete notification
APPWAVE™ ENTERPRISE ADMINISTRATOR GUIDE 263
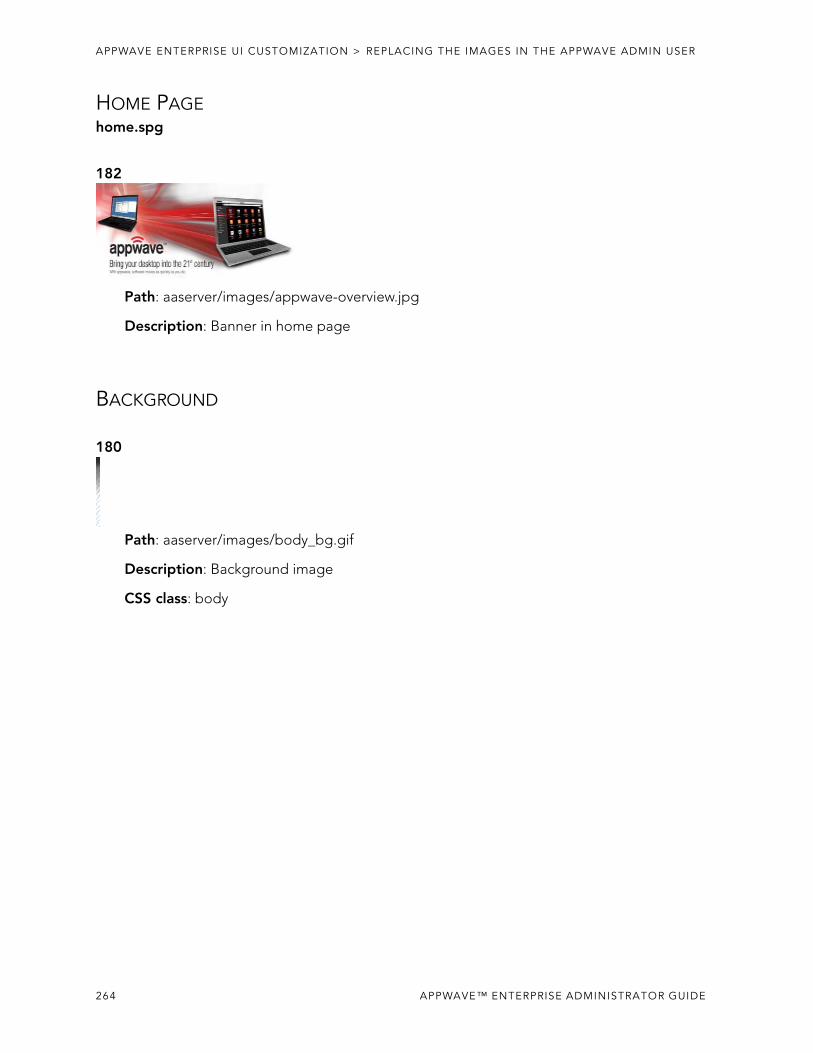
APPWAVE ENTERPRISE UI CUSTOMIZATION > REPLACING THE IMAGES IN THE APPWAVE ADMIN USER
HOME PAGEhome.spg
182
Path: aaserver/images/appwave-overview.jpg
Description: Banner in home page
BACKGROUND
180
Path: aaserver/images/body_bg.gif
Description: Background image
CSS class: body
264 APPWAVE™ ENTERPRISE ADMINISTRATOR GUIDE
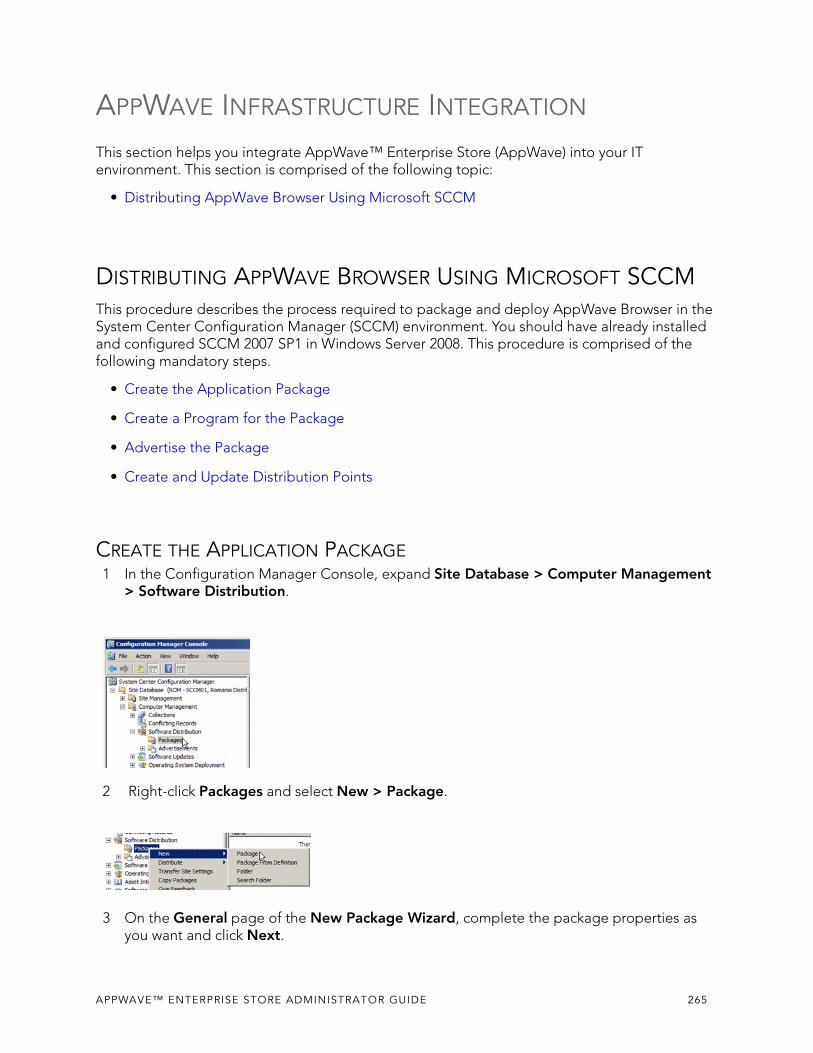
APPWAVE INFRASTRUCTURE INTEGRATION
This section helps you integrate AppWave™ Enterprise Store (AppWave) into your IT environment. This section is comprised of the following topic:
• Distributing AppWave Browser Using Microsoft SCCM
DISTRIBUTING APPWAVE BROWSER USING MICROSOFT SCCMThis procedure describes the process required to package and deploy AppWave Browser in the System Center Configuration Manager (SCCM) environment. You should have already installed and configured SCCM 2007 SP1 in Windows Server 2008. This procedure is comprised of the following mandatory steps.
• Create the Application Package
• Create a Program for the Package
• Advertise the Package
• Create and Update Distribution Points
CREATE THE APPLICATION PACKAGE1 In the Configuration Manager Console, expand Site Database > Computer Management
> Software Distribution.
2 Right-click Packages and select New > Package.
3 On the General page of the New Package Wizard, complete the package properties as you want and click Next.
APPWAVE™ ENTERPRISE STORE ADMINISTRATOR GUIDE 265

APPWAVE INFRASTRUCTURE INTEGRATION
4 On the Data Source page, select This package contains source files.
5 In the Source Version area, click Set and specify the directory where the AppWave Browser installer is located and then click OK.
NOTE: This directory containing the AppWave Browser installer must be shared over the network.
6 Ensure Always obtain files from the source directory is selected. Then click Next.
7 On the Data Access page, set the options as you want. Then click Next.
8 On the Distribution Settings page, click the Sending priority list and select High.Then click Next.
266 APPWAVE™ ENTERPRISE STORE ADMINISTRATOR GUIDE
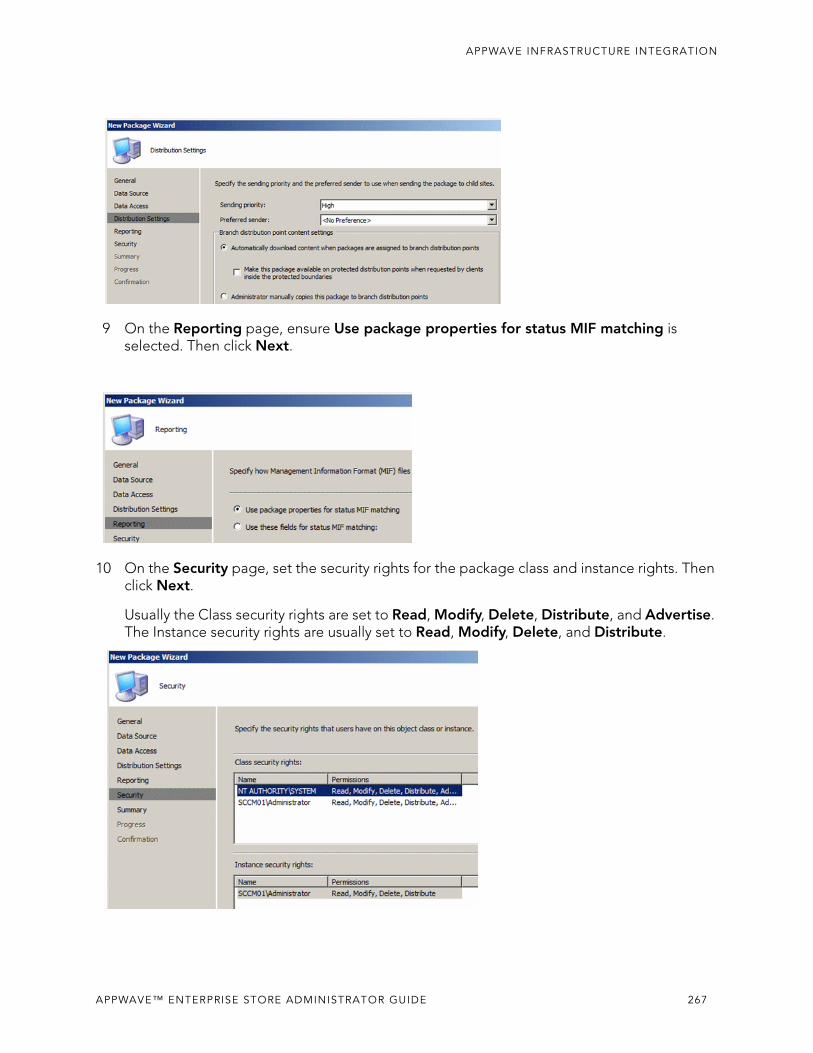
APPWAVE INFRASTRUCTURE INTEGRATION
9 On the Reporting page, ensure Use package properties for status MIF matching is selected. Then click Next.
10 On the Security page, set the security rights for the package class and instance rights. Then click Next.
Usually the Class security rights are set to Read, Modify, Delete, Distribute, and Advertise. The Instance security rights are usually set to Read, Modify, Delete, and Distribute.
APPWAVE™ ENTERPRISE STORE ADMINISTRATOR GUIDE 267
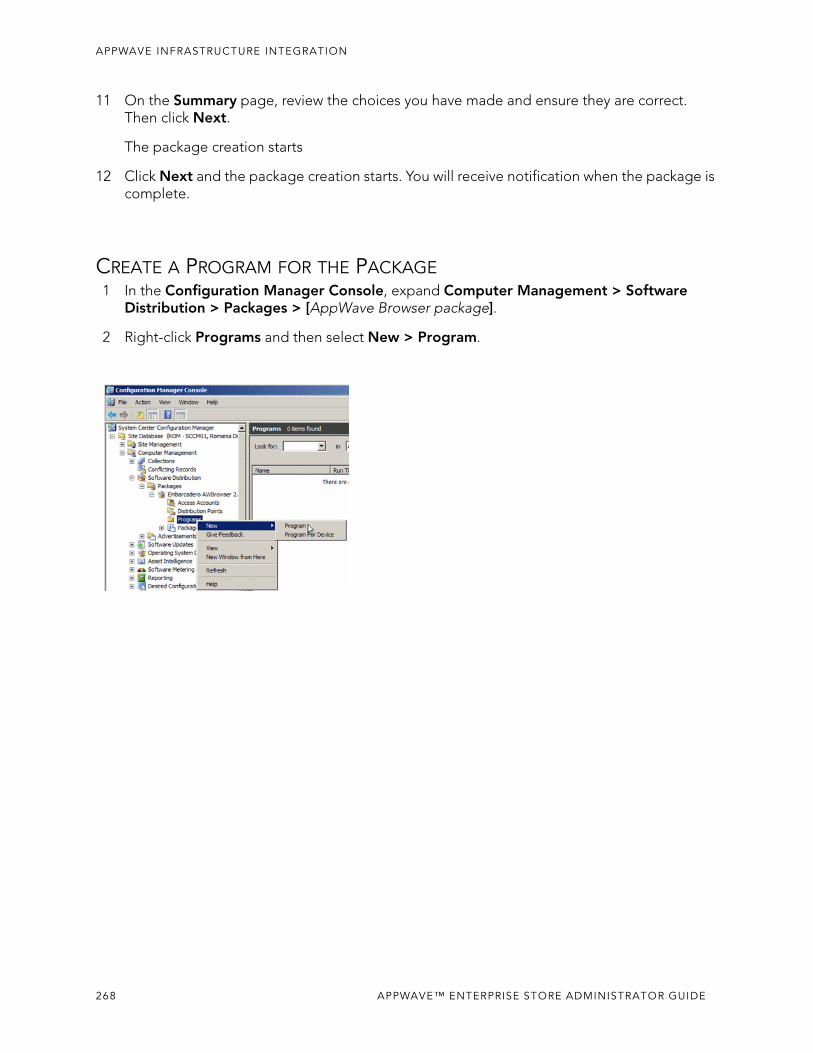
APPWAVE INFRASTRUCTURE INTEGRATION
11 On the Summary page, review the choices you have made and ensure they are correct. Then click Next.
The package creation starts
12 Click Next and the package creation starts. You will receive notification when the package is complete.
CREATE A PROGRAM FOR THE PACKAGE1 In the Configuration Manager Console, expand Computer Management > Software
Distribution > Packages > [AppWave Browser package].
2 Right-click Programs and then select New > Program.
268 APPWAVE™ ENTERPRISE STORE ADMINISTRATOR GUIDE
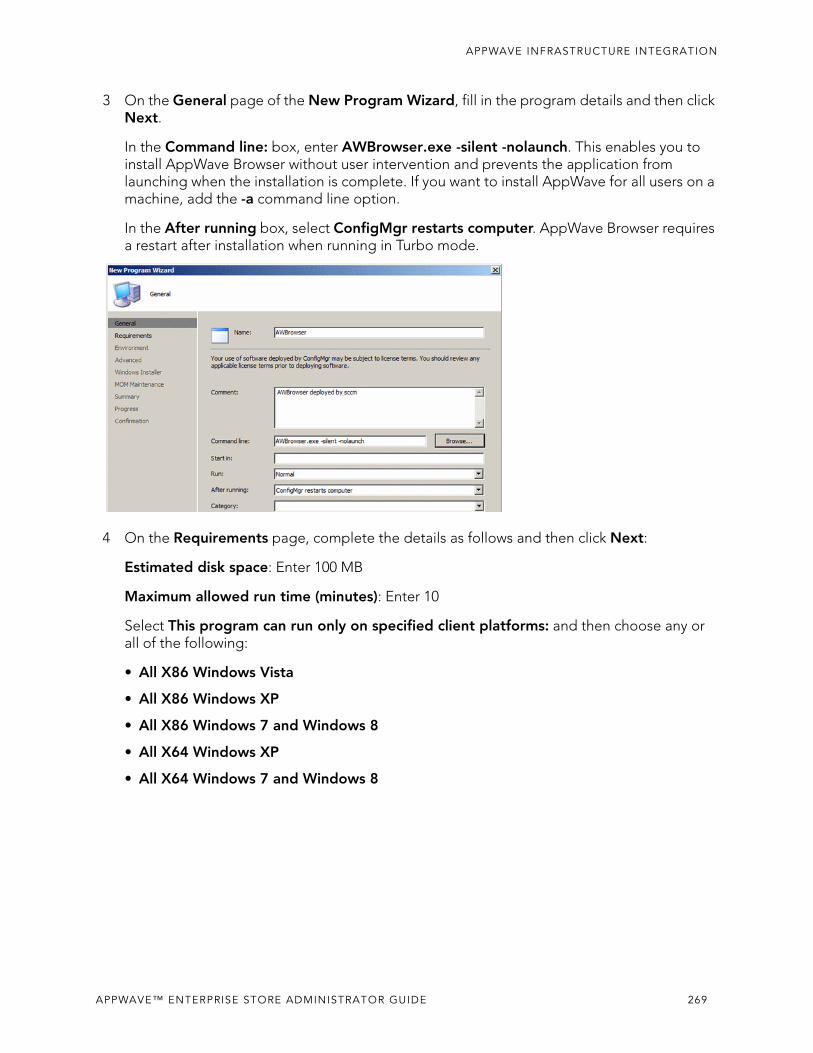
APPWAVE INFRASTRUCTURE INTEGRATION
3 On the General page of the New Program Wizard, fill in the program details and then click Next.
In the Command line: box, enter AWBrowser.exe -silent -nolaunch. This enables you to install AppWave Browser without user intervention and prevents the application from launching when the installation is complete. If you want to install AppWave for all users on a machine, add the -a command line option.
In the After running box, select ConfigMgr restarts computer. AppWave Browser requires a restart after installation when running in Turbo mode.
4 On the Requirements page, complete the details as follows and then click Next:
Estimated disk space: Enter 100 MB
Maximum allowed run time (minutes): Enter 10
Select This program can run only on specified client platforms: and then choose any or all of the following:
• All X86 Windows Vista
• All X86 Windows XP
• All X86 Windows 7 and Windows 8
• All X64 Windows XP
• All X64 Windows 7 and Windows 8
APPWAVE™ ENTERPRISE STORE ADMINISTRATOR GUIDE 269
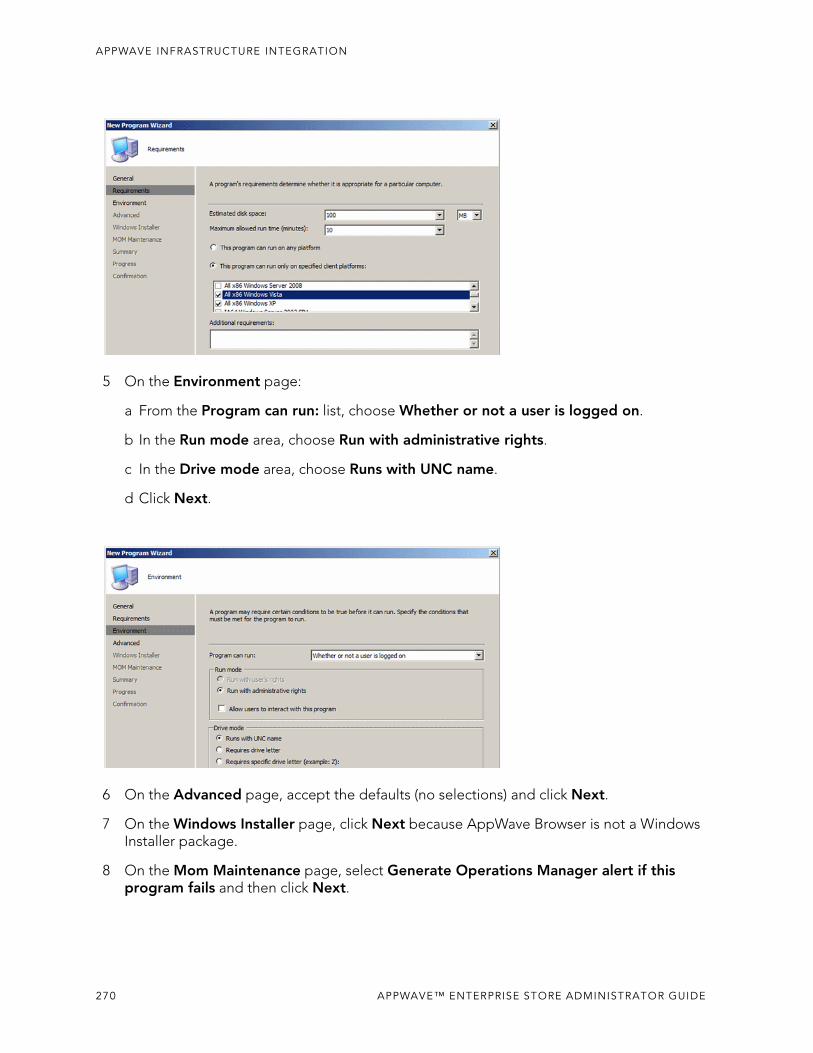
APPWAVE INFRASTRUCTURE INTEGRATION
5 On the Environment page:
a From the Program can run: list, choose Whether or not a user is logged on.
b In the Run mode area, choose Run with administrative rights.
c In the Drive mode area, choose Runs with UNC name.
d Click Next.
6 On the Advanced page, accept the defaults (no selections) and click Next.
7 On the Windows Installer page, click Next because AppWave Browser is not a Windows Installer package.
8 On the Mom Maintenance page, select Generate Operations Manager alert if this program fails and then click Next.
270 APPWAVE™ ENTERPRISE STORE ADMINISTRATOR GUIDE
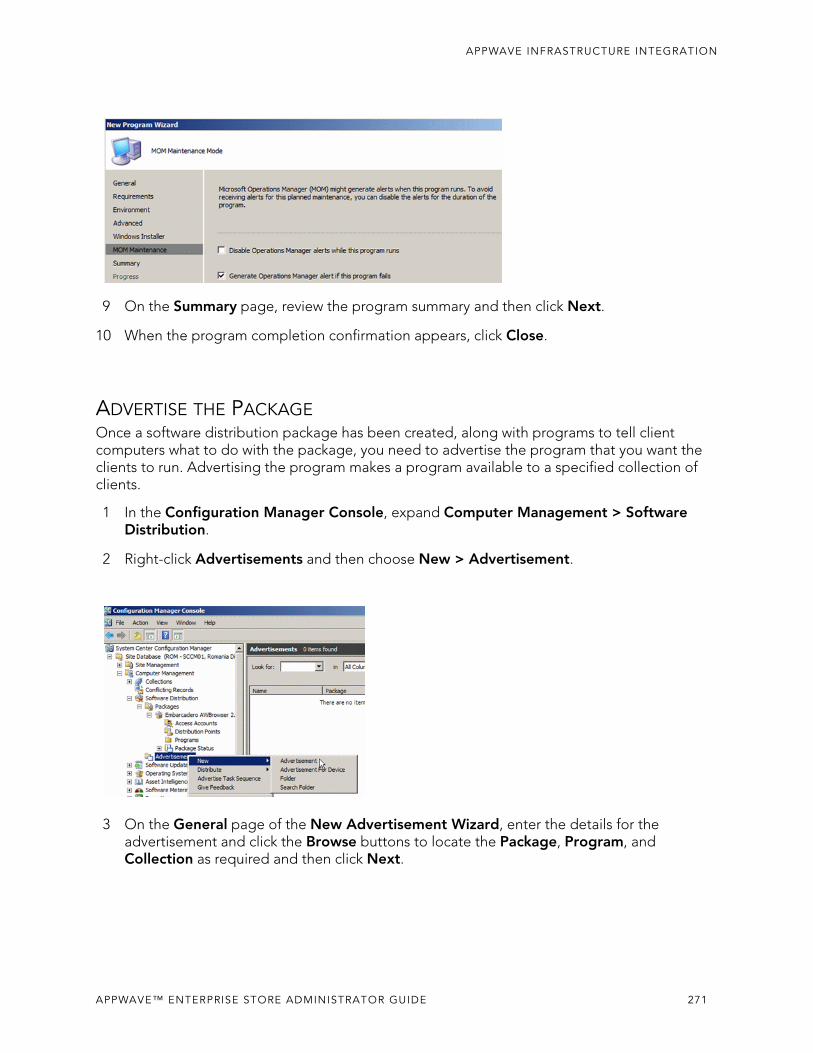
APPWAVE INFRASTRUCTURE INTEGRATION
9 On the Summary page, review the program summary and then click Next.
10 When the program completion confirmation appears, click Close.
ADVERTISE THE PACKAGEOnce a software distribution package has been created, along with programs to tell client computers what to do with the package, you need to advertise the program that you want the clients to run. Advertising the program makes a program available to a specified collection of clients.
1 In the Configuration Manager Console, expand Computer Management > Software Distribution.
2 Right-click Advertisements and then choose New > Advertisement.
3 On the General page of the New Advertisement Wizard, enter the details for the advertisement and click the Browse buttons to locate the Package, Program, and Collection as required and then click Next.
APPWAVE™ ENTERPRISE STORE ADMINISTRATOR GUIDE 271
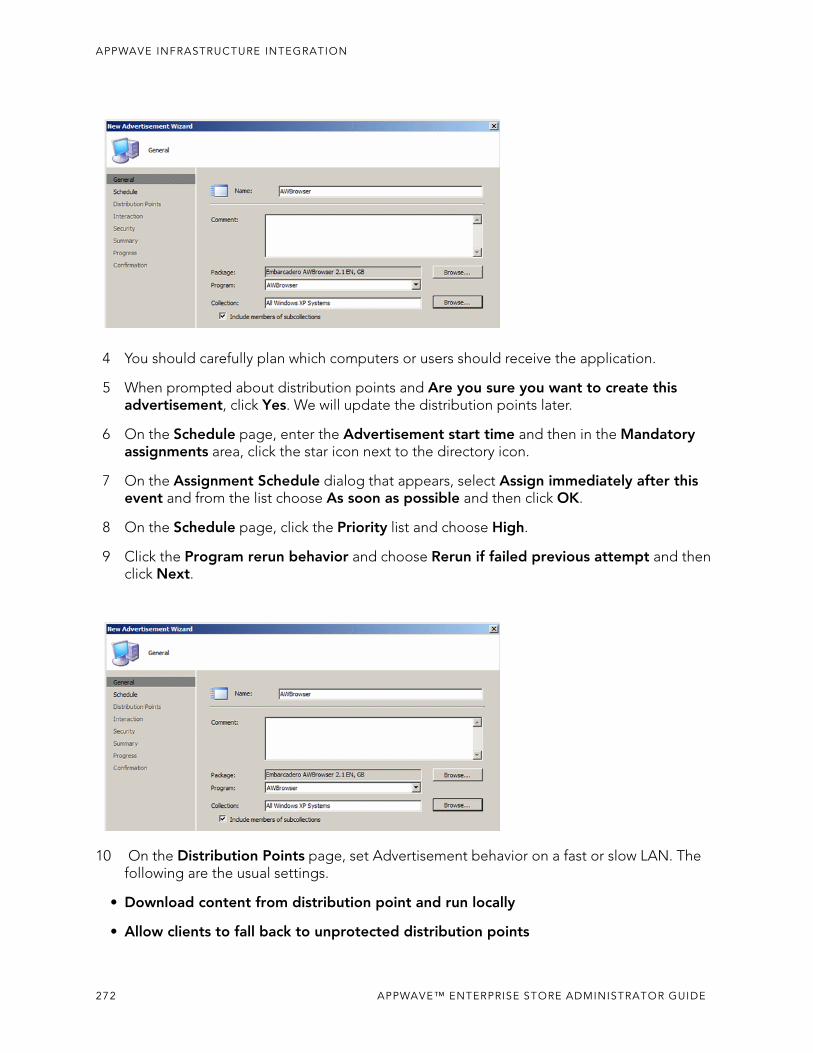
APPWAVE INFRASTRUCTURE INTEGRATION
4 You should carefully plan which computers or users should receive the application.
5 When prompted about distribution points and Are you sure you want to create this advertisement, click Yes. We will update the distribution points later.
6 On the Schedule page, enter the Advertisement start time and then in the Mandatory assignments area, click the star icon next to the directory icon.
7 On the Assignment Schedule dialog that appears, select Assign immediately after this event and from the list choose As soon as possible and then click OK.
8 On the Schedule page, click the Priority list and choose High.
9 Click the Program rerun behavior and choose Rerun if failed previous attempt and then click Next.
10 On the Distribution Points page, set Advertisement behavior on a fast or slow LAN. The following are the usual settings.
• Download content from distribution point and run locally
• Allow clients to fall back to unprotected distribution points
272 APPWAVE™ ENTERPRISE STORE ADMINISTRATOR GUIDE
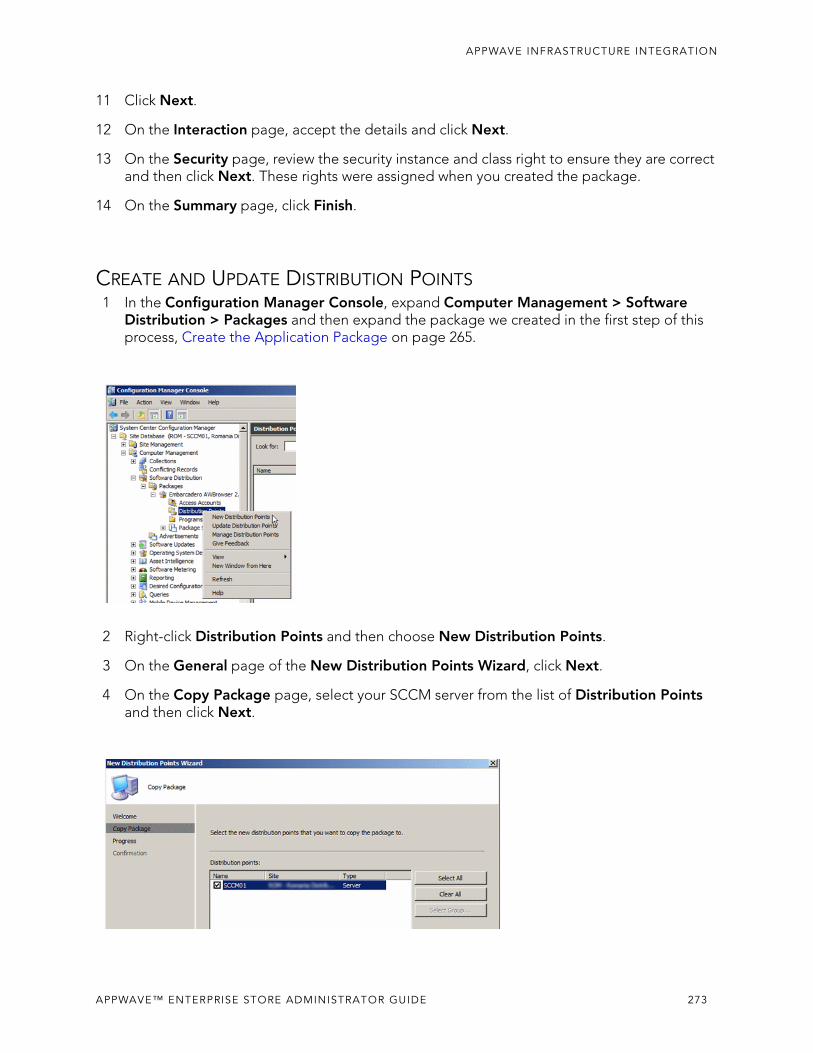
APPWAVE INFRASTRUCTURE INTEGRATION
11 Click Next.
12 On the Interaction page, accept the details and click Next.
13 On the Security page, review the security instance and class right to ensure they are correct and then click Next. These rights were assigned when you created the package.
14 On the Summary page, click Finish.
CREATE AND UPDATE DISTRIBUTION POINTS1 In the Configuration Manager Console, expand Computer Management > Software
Distribution > Packages and then expand the package we created in the first step of this process, Create the Application Package on page 265.
2 Right-click Distribution Points and then choose New Distribution Points.
3 On the General page of the New Distribution Points Wizard, click Next.
4 On the Copy Package page, select your SCCM server from the list of Distribution Points and then click Next.
APPWAVE™ ENTERPRISE STORE ADMINISTRATOR GUIDE 273
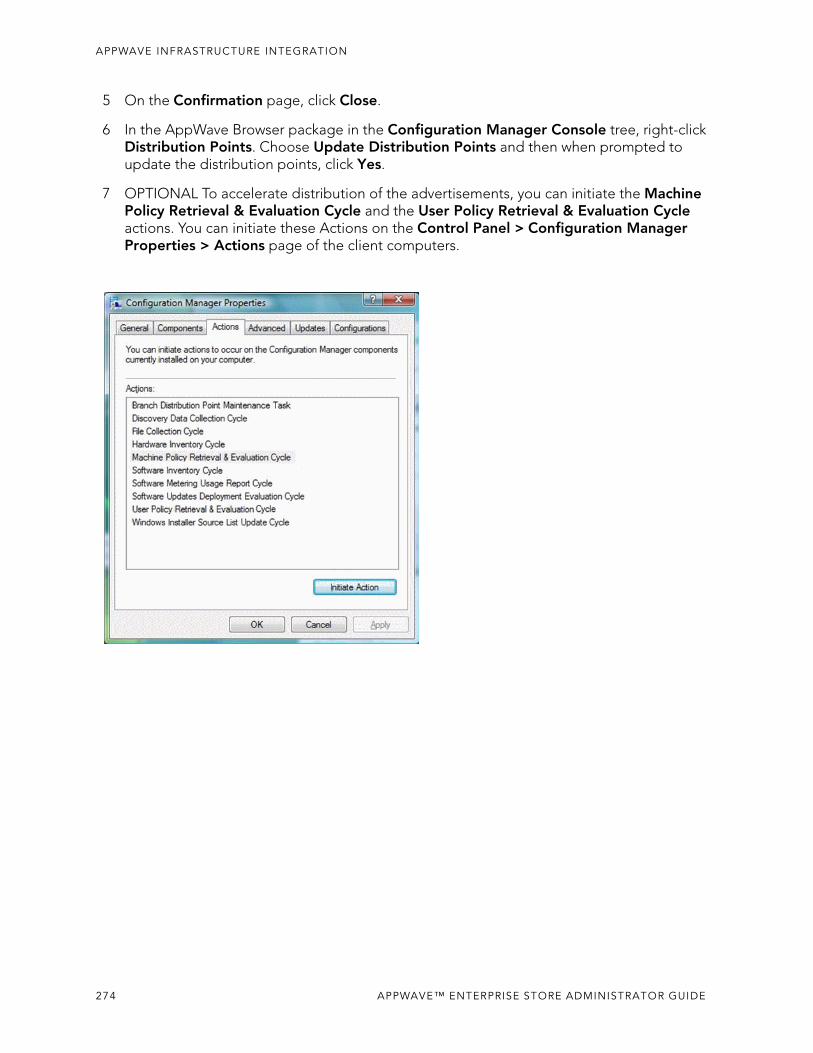
APPWAVE INFRASTRUCTURE INTEGRATION
5 On the Confirmation page, click Close.
6 In the AppWave Browser package in the Configuration Manager Console tree, right-click Distribution Points. Choose Update Distribution Points and then when prompted to update the distribution points, click Yes.
7 OPTIONAL To accelerate distribution of the advertisements, you can initiate the Machine Policy Retrieval & Evaluation Cycle and the User Policy Retrieval & Evaluation Cycle actions. You can initiate these Actions on the Control Panel > Configuration Manager Properties > Actions page of the client computers.
274 APPWAVE™ ENTERPRISE STORE ADMINISTRATOR GUIDE
APPWAVE GLOSSARY
This glossary includes terms from AppWave™ Enterprise Store, AppWave Public Store, AppWave Browser, AppWave Studio, and All-Access.
A
.aib
This file contains all registry keys and values and also the file structure for the app.
.app
This is the filename extension for an AppWave-enabled application file. So once you have managed [Product] in AppWave Studio it is saved in the file [Product].app. This file contains all files necessaries to run it: .tca, metadata.xml, .stc, .toc, .aib, and .pref. It also contains EULA files, icons, and screen shots.
.aw
An .aw file is a template that stores information about an application. This information includes: Product Name, Display Name, Version, Long Description, etc. The included files are: .tca, metadata.xml, templateversions.dat, EULA, icons, and screen shots.
Acceptance Criteria
In order for an app to be mastered it must meet required specifications. For example, no beta versions can be mastered, an original installer must be used, and Apps must be mastered using the prefetch option.
Administrators
This is the group of AppWave users that have access to the administrative functions in AppWave. They can access this functionality either through a web browser or through the Admin tab in the AppWave Browser. By default, the Administrators group is a member of the Authors group.
All-Access
Embarcadero All-Access licenses that are managed by AppWave provide you with industry-leading database tools, including DBArtisan®, Rapid SQL®, ER/Studio® family of products, and many more. They also provide powerful application development tools, including Delphi®, JBuilder®, C++Builder®, the InterBase® SMP database, and more.
All-Access Pass
This is a license key that unlocks all applications for a given All-Access level.
APPWAVE™ ENTERPRISE STORE ADMINISTRATOR GUIDE 275
APPWAVE GLOSSARY
All Apps Folder
When installation is complete, the All Apps folder will not contain the All Users group. AppWave Browser users have access only to applications corresponding to the license level assigned on 1.x through the migration folder after an upgrade. Apps appear in Pending only when they are removed from All Apps folder; in this case the folder is not assigned to All Users group, but it contains all apps.
All Users
This is the group that contains all AppWave users. Members of this group have access to the Apps tab in the AppWave Browser. When a user connects to AppWave for the first time, they are automatically added to the All Users group.
App
Once an application is mastered, it is referred to as an App. Apps are the applications that are mastered into a single file that runs without installation. The application runs on the desktop, locally and under ‘full power’ but does not change OS or registry. Apps run within their own space, with no shared DLLs or other system-wide settings that could conflict with other applications. Application data, including settings and licenses are stored locally on the hard drive separate from the executable.
App Cache Size
This is the amount of memory set aside as cache for use with streamed applications.
App Channel
A channel is a landing page inside the AppWave Browser including an app description, reviews, and an app/version selector. Each product has a channel.
Application Repository
AppWave distributes Embarcadero products through a local or shared repository. When you specify the repository location, you then have to specify the access rights for that directory. The AppWave Browser gets the streamed apps through the streaming server and others (installers) have to be cached locally.
Application Service Provider (ASP)
A provider of streamable applications, which could be a user’s company IT group, a software vendor, or an online gaming company. An ASP packages software applications into a format that can be streamed to clients over the Internet or a company internet.
276 APPWAVE™ ENTERPRISE STORE ADMINISTRATOR GUIDE
APPWAVE GLOSSARY
AppWave
AppWave is where you centrally provision, manage, and update your All-Access software and licenses inside your own firewall. You control what product versions are available to end users. With network licensing, you can use the server to centrally control the list of authorized users, and what licenses they have access to.
AppWave (formerly known as ‘host’)
The machine where AppWave is installed that the AppWave Browser connects to in order to browse and download applications.
AppWave App
This is an application that was mastered with AppWave. These apps have instant access to your products without installation. It is a ready-to-run app launched from the AppWave Store.
AppWave Browser
This is the client software that the AppWave user installs allowing a user to launch AppWave applications. It provides a primary entry point to the various products used with All-Access. You can launch, install, update, and select product versions, all from a single user interface. It can be configured to run standalone, to receive products from Embarcadero, or to run with AppWave on your own network.
AppWave Channel
A channel is a landing page inside the AppWave Browser including an app description, reviews, and an app/version selector. Each product has a channel.
AppWave for Custom Apps
The product name for the license to package a customer's internal applications for use with AppWave.
AppWave Enterprise
The AppWave Enterprise describes the AppWave as an installed product catalog of apps within an organization typically used to broadcast commercial and custom apps relevant to that organization and accessed by employees of the same organization. AppWave Enterprise is typically behind the company firewall and in many cases without direct access to the internet.
AppWave for [Product]
The product name for a license to use [Product] when it has been mastered and is available on AppWave.
APPWAVE™ ENTERPRISE STORE ADMINISTRATOR GUIDE 277

APPWAVE GLOSSARY
AppWave Name
The AppWave name is set by the Administrator in the System Management -> System Properties page. You can set the name in General Properties in the AppWave name field. This is the name of the AppWave, not the name of the machine that holds the Host. This AppWave name appears as a folder in the Apps portion of the AppWave Browser.
AppWave Network Mode
When using AppWave to manage applications, it operates in network mode. Users connect to AppWave from a Web browser and download the AppWave Browser from the repository. Licensing is automatically handled by AppWave.
AppWave Public Store
The AppWave Public Store describes the AppWave accessible to the public containing free and commercial vendor apps for purchase. The AppWave Public Store can be accessed by anyone with access to the internet. This store is hosted and managed by Embarcadero.
AppWave Store
The AppWave that Embarcadero maintains for all of the Embarcadero-provided applications and templates and the e-commerce web site that allows customers to purchase applications they can use in AppWave. In the AppWave Store the user can purchase applications that they can use in AppWave. This includes Embarcadero-provided applications, templates, and e-commerce web sites.
AppWave Studio
The application (within the AppWave Browser) that a user can use to master applications for AppWave. You are walked through a series of steps where you master and then broadcast the App file for your selected application. This can then be run on the local machine and be launched from either the local hard drive or the network using AppWave Browser.
Authors
This is the group of AppWave users who are able to master applications for use in AppWave. Members of this group have access to the Studio tab in the AppWave Browser. Authoring permission is granted by the Administrator.
Autogrow
When streaming, if the cache cannot accommodate the size of the full app, the cache can automatically grow to accommodate the new size. The Autogrow default setting is “On”, and the command is available in the AppWave Browser under Menu->Options. If the Autogrow setting is not selected you will be asked, via the browser, to increase the size of the cache to meet the size requirements.
278 APPWAVE™ ENTERPRISE STORE ADMINISTRATOR GUIDE
APPWAVE GLOSSARY
Auto Load
You have the option to always launch the AppWave Browser. This means that it automatically loads when the operating system is started. Then any previously run apps that have been downloaded are “auto loaded” as well as the catalog. Once an App is run, it automatically loads each time.
B
B2B
Business to Business. B2B transactions are through purchase orders through our sales offices.
B2C
Business to Consumer. B2C transactions are processed with Cleverbridge as the payment processor.
Brand
This is one of the steps of mastering an application in the AppWave Studio. An application is identified or “branded”. The branding information includes product name, display name, version, publisher, web site, icons, product description, licensing information, etc. This information then appears in the Studio and/or AppWave Browser.
Broadcast
This is one of the steps of mastering an application in the AppWave Studio. Once you have broadcast a product to AppWave, that product is streamed or made available to users via AppWave.
Browser
See AppWave Browser
C
Cache Folder
This is where you will store your download. This is your Product Repository.
Caching
Cashing occurs when you obtain your licensed installers and executables, and download them from Embarcadero to your AppWave.
APPWAVE™ ENTERPRISE STORE ADMINISTRATOR GUIDE 279
APPWAVE GLOSSARY
Channel
Channels, or groupings, can be created for any purpose, by an administrator. For example, you could create the “New Hire Channel” to see all the applications needed to get started with your work. A channel is a landing page inside the AppWave Browser including an app description, reviews, and an app/version selector. Each product has a channel.
Client-Centered Environment
Also known as a client workstation mode, the AppWave Browser user downloaded products from Embarcadero which you then license using the Embarcadero Developer Network (EDN).
Client Network Mode
This is server-centered environment where app executables are provisioned and licensed by AppWave and then accessed using the AppWave Browser.
Common Gateway Interface
The CGI is a standard protocol that defines how web server software can delegate the generation of web pages to a console application. Such applications are known as CGI scripts; they can be written in any programming language, although scripting languages are often used.
Custom Scripts
The AppWave Studio Custom Script Support gives the user the ability to define a custom action called an AppEvent, at key points: (1) before or after an App is added to a machine; (2) before or after the App is launched; and (3) before or after the App is running.
D
Disposition Layers
The layers used to configure individual system resources, such as a file, folder, registry key, or registry value. The layer determines whether the system resource can be seen by the local system, and whether it is permanent or can be removed.
• Layer 1: Installed-permanent - Copies assets (files, folder, registry keys, and registry values) permanently onto the local system, and can be seen by the entire local system.
• Layer 2: Installed-temporary - Installs assets during the activation process, and uninstalls assets during the deactivation process. The original asset is backed up before the new asset is installed, and when the new asset is uninstalled the original asset is restored.
• Layer 3: Virtual-integrated - (default setting) Assets that can be seen both by the streamed application and the local system, but are not physically installed on the local system.
• Layer 4: Virtual-Isolated - Assets that can only be seen by the streamed application, and are not physically installed on the local system.
280 APPWAVE™ ENTERPRISE STORE ADMINISTRATOR GUIDE

APPWAVE GLOSSARY
Dynamic Cache
The dynamic cache is created with launching an application in the AppWave Studio. This cache is cleared when using the Remove Application option.
For Windows XP, the cache location is: C:\Documents and Settings\<your_user>\Local Settings\Application Data\Embarcadero\Product Repository\StreamingCore\Profiles\<your_user>\Sessions\<session_id>\Applications.
For Windows 7, Windows 8, and Vista the cache location is: C:\ProgramData\Embarcadero\Product Repository\StreamingCore\Profiles\<your_user>\Sessions\<session_id>\Applications; C:\Users\<your_user>\AppData\Roaming\Embarcadero\Product Repository\StreamingCore\<session_id>.
E
Embarcadero Development Network
The EDN provides support, updates, upgrades, new products, and access to premium content on the Embarcadero Developer Network and is a way to provide a cost-effective way to license products and tools. You can also create your own EDN accounts
Embarcadero License Center
The ELC is integrated with AppWave and installs automatically when you install AppWave. If you are upgrading your Embarcadero License Center installation, you will set up licenses, users and groups. You do not have to cache products on AppWave if AppWave will only be managing your site licenses and you do not have an All-Access license.
exclusions.dat
This file contains information for autodetecting exclusions applications.
F
File Association
With file association, you have the ability to launch AppWave applications using the file format typically associated with that application. You can also access the functionality typically made available within the right-click menu of a file type. It also covers the proximity and visual presence of the AppWave Browser when launching an app directly via file association, license checking, etc.
Free AppWave Store Apps
This refers to free apps available from Vendors through the AppWave Store. End users will need to be connected to the internet in order to register and use free apps from the AppWave Store.
APPWAVE™ ENTERPRISE STORE ADMINISTRATOR GUIDE 281
APPWAVE GLOSSARY
Fully Streamed
The streaming activity is initiated when a user selects to “Run" an app using the AppWave Browser. AppWave streams the app into the client cache and loads the app onto a user's screen before it's fully streamed. The app is said to be "fully streamed" when 100% of the app has been streamed into client cache - which is also a pre-requisite for the offline use case. This improves performance and enables offline usage.
H
Harvesting
Harvesting refers to mastering an app from an application that is already installed on the app author’s PC. With this feature the app author does not have to master the app using the application’s installer.
Heartbeat Period
Number of minutes between “keep alive” pings to the streaming server. The heartbeat maintains streaming server connectivity and alerts AppWave when the streaming server does not respond.
Heartbeat Grace Period
The number of minutes to wait for the streaming server to respond to a heartbeat. If the streaming server does not respond within this period, the streaming server is considered to be offline and a notification is generated.
Hosted AppWave
An AppWave host that is located on the Amazon EC2 cloud or elsewhere outside of the customer's site and is managed by Embarcadero.
I
Integrated-Complex Apps
With AppWave you can master complex applications (for example, Microsoft Office, Visual Studio, Autodesk Design Suites, Adobe CS5, etc.). Suites, or larger product "bundles", require a deeper level of integration with the operating environment. Once mastered, common components are exposed within the Windows UI as a collection of executables, right-click menu extensions, and file associations.
ISV
An Independent Software Vendor would create, edit, and broadcast applications using the Studio’s Create an AppWave from Install function.
Item
Anything that has a SKU (Stock-keeping Unit) associated with it.
282 APPWAVE™ ENTERPRISE STORE ADMINISTRATOR GUIDE
APPWAVE GLOSSARY
L
Launch at Startup
You have the option to always launch the AppWave Browser. This means that it automatically loads when the operating system is started. Then any previously run apps are “auto loaded” as well as the catalog. Once an App is run it automatically loads each time.
License, AppWave Browser User
This license is required for each AppWave Browser user. This license entitles the user to connect to AppWave and run Embarcadero applications as permitted by the administrator.
License, AppWave for Premium Product
This license is required in order for an AppWave Studio user to master and deploy a premium application to AppWave. This license is purchased separately for each application and gives the AppWave Studio author access to an Embarcadero-created template that guides the Studio user easily through the mastering process of premium applications.
License, AppWave for Products License
These licenses are purchased by organizations from Embarcadero so they can master and run complicated commercial applications and run them in their own AppWave environment.
License, AppWave for Custom Apps
This license is required in order to use AppWave Studio to master and deploy applications, such as in-house applications, for which Embarcadero is not currently providing premium support.
License, Concurrent
Floating license. Can be assigned to a group or an individual user. A concurrent license can be borrowed from the license pool and when the user quits the application, the license is returned to the shared pool and made available for another user to use.
License, MyApps
This license is required for the AppWave Browser user who will be connecting to AppWave in order to launch and run custom or premium Apps mastered in your company.
License, Network Named
A network named license is a license assigned to a specified user for their use anywhere on the network, from any IP address.
APPWAVE™ ENTERPRISE STORE ADMINISTRATOR GUIDE 283
APPWAVE GLOSSARY
Licenses, Premium or Custom App Product
Through License Automation, AppWave can manage the licenses of custom 3rd party Apps you have mastered. This provides the license key and displays information on how to use the license when the AppWave Browser user launches a 3rd party App. Depending on the App, in the AppWave License Automation pages, you need to provide the license as either a serial key or as a .csv file containing multiple serial keys.
License Automation
The License Automation feature enables AppWave to automatically provision licensing information for 3rd party Apps. An AppWave admin must set up licenses for license automated supported Apps in the Admin console. The number and types of licenses can be customized by the admin. AppWave will then allocate licenses through license automation and ensure the number of simultaneous users of that app does not exceed the specified settings.
Lightweight Directory Access Protocol
LDAP is an application protocol for querying and modifying directory services running over TCP/IP.
M
MD5
Message-Digest algorithm 5 (MD5) is used to check the integrity of files. The .aw and the .app files must come together with the associated md5 message digest file. Each time one of the two files needs to be changed, the .md5 file must be changed too.
Managed Apps
Contains shortcuts to apps that you have downloaded. Helps you easily find your apps. You can change the title of this menu item to something like Denny’s Apps, in the AppWave options dialog accessed on the Tools and Options ( ) menu.
Master
When you package or wrap an application so it can be used in AppWave.
Mastering Template
This is a plug-in that allows the user to master a given application with default settings.
Metadata.xml
This is the information used by Appwave host to add the new app or template to the server catalog.
284 APPWAVE™ ENTERPRISE STORE ADMINISTRATOR GUIDE
APPWAVE GLOSSARY
MSI Installer
MSI files are database files, used by Windows Installer. They contain information about an application which is divided into features and components, and every component may hold files, registry data, shortcuts etc. The MSI file also contains the UI that is to be used for installing, and various other data such as any prerequisites to look for, custom actions to execute, the order of the installation procedure, whether to support Administrative installations, etc. MSI files are the current recommended way of doing installations on Windows. The .msi files provided must have the ability to run in Unattended mode.
Membership
Provides support, updates, upgrades, new products, and access to premium content on the Embarcadero Developer Network (EDN), plus Embarcadero® AppWave for one-step access to your tools without installation.
Multiple Entry Points
There are products which include several applications. So when the applications are being mastered, the installer installs several applications which could be launched with different command lines. It could be a different executable or the same executable but with different command line parameters. With Multiple Entry Points, you do not have to produce several Apps with different command line arguments. This eliminates the need for extra disk space on the server (in the repository and in the streaming cache folder and client local cache). In addition you do not have to master additional Apps.
My AppWave Name
Managed Apps is the Default setting in the AppWave Browser. However, you can change the title of this menu item to something like Denny’s Apps, in the My AppWave Name field in the AppWave options dialog accessed on the Tools and Options ( ) menu.
My Documents
The My Documents folder is your own personal folder in which you can store your documents, graphics, and other personal files. When there is more than one person using the computer, Windows creates a My Documents folder for each user on the computer. By default, the target or actual location of the My Documents folder is C:\Documents and Settings\user name\My Documents, where C is the drive in which Windows is installed, and user name is the currently logged-on user. However, companies can change this folder to a network location instead of their local machines.
My Tools License (Enterprise Client)
A concurrent license that is consumed by the AppWave Browser, that governs whether a user can run Apps that were mastered by a customer. Only one license is required per user and machine. All Apps requiring a MyApp license share the same MyApps license. This is to simulate "machine" license.
N
APPWAVE™ ENTERPRISE STORE ADMINISTRATOR GUIDE 285
APPWAVE GLOSSARY
Notifications
These messages come from AppWave. The AppWave administrator configures what types of messages are sent out as notifications. Notification messages can include new product or version availability, downloads complete, and download errors. You can also subscribe to an RSS news feed of notifications from the AppWave Home page of the AppWave console application.
O
On-Demand
Tools can be delivered on demand to users as they need them from the AppWave Browser. Applications they have licenses for automatically show up in their Browser. You can see what previous versions are available and can run versions side-by-side without conflicts and without uninstalling and reinstalling versions.
One-click Mastering
The AppWave Studio has third party commercial and OSS applications that have already been mastered previously by Embarcadero and have auto-fix capabilities. If you master one of those apps, then a plug-in has been created to help you fix all potential problems.
Open Mode
In unrestricted or open mode, broadcast Apps are published to the All Apps folder which is assigned to the All Users group. The administrator can fine-tune the members of the All Users groups and the Apps available in the All Apps folder to restrict application usage. In open mode, all users can access all reviews on AppWave as soon as they are submitted.
P
PADE
The purpose of a Packaging Analyst & Design Engine (PADE) is to help correct problems frequently encountered when preparing an application for an APP. PADE allows for plug-ins to analyze the content of the application and recommend changes and potentially make changes.A single plug-in can support multiple resolutions.
Parsing
Parsing takes a TCA profile and maps the file location to where they are going to appear when you are either running or have the app mounted on your machine. It mounts the app as part of your profile.
.pref
This file contains information to improve the timing of when an application is launched, and is recorded in the Test page of the AppWave Studio after mastering the app.
286 APPWAVE™ ENTERPRISE STORE ADMINISTRATOR GUIDE
APPWAVE GLOSSARY
Prefetch
Prefetching is the process of streaming application blocks prior to their being explicitly requested by AppWave Browser, in anticipation of being needed by the application. Be advised that only some key blocks of application data from AppWave are necessary for the application to launch and perform basic functions.
Premium Application
A premium application is an application for which Embarcadero provides a mastering template. This template contains licensing information which allows for License Automation. Once a premium application has been mastered the licenses for the application can be managed by AppWave.
Premium or Custom App Product Licenses
Through License Automation, AppWave can manage the licenses of custom 3rd party Apps you have mastered. This provides the license key and displays information on how to use the license when the AppWave Browser user launches a 3rd party App. Depending on the App, in the AppWave License Automation pages, you need to provide the license as either a serial key or as a .csv file containing multiple serial keys.
Private Server
A Private Server means those operated by AppWave Enterprise licensed owners, in their own network. Private servers can be configured to authenticate via several means (local, LDAP, etc). When a user starts AppWave Browser or connects to AppWave, the application-populated folder appears in the Private AppWave. The apps are broadcast from AppWave to AppWave Browser user.
Product Channel
A channel is a landing page inside the AppWave Browser including a description, reviews, and an app/version selector. Each product has a channel.
Product Name
When creating an app for an Embarcadero product, choose the Product Name from the drop-down list of available names. This is done during the Branding step of the creation process. You must select the correct name or the concurrent licensing will not be managed by AppWave.
Public Server
Public servers are operated by Embarcadero.
R
APPWAVE™ ENTERPRISE STORE ADMINISTRATOR GUIDE 287
APPWAVE GLOSSARY
Repository Cache
This is the directory where the applications that will be streamed are saved on the AppWave Browser user’s local machine. The primary purpose for the cache is to allow partial downloading of an application before showing the application to the user. This is especially important when working with large applications because caching the application allows the user to begin using the application sooner, before the entire application has been cached.
Restricted Mode
You can operate AppWave in either Restricted Mode or Open Mode. In restricted mode, the admin must approve any new reviews or broadcast Apps before they are made available to AppWave Browser users. In unrestricted or open mode, broadcast Apps are published to the All Apps folder which is assigned to the All Users group. The administrator can fine-tune the members of the All Users groups and the Apps available in the All Apps folder to restrict application usage.
Runtime
This refers to execution runtimes that some products need like the .NET framework which RADStudio needs. Runtimes are provided for authors to include when creating their apps. They can pick and choose what to include.
S
.stc
The file contains the code and other configuration information that comprises most of the app. It is a package containing all files of the app. This contains the block database for the app (all the binary).
.stp
The .stp file is an appset file. It is encrypted and stores the files, folders, and registry settings needed to reproduce the application being mastered on the end users machine. This file is the result of mastering a project in Test page. It's a zip file containing necessary files (.stc, .toc, and .aib) for running an application. It can also contain EULA information files, icons, and screen shots.
SDK
Software Development Kit is typically a set of development tools that allows for the creation of applications for certain software, software framework, hardware platform, computer system.
Search
The search function in both the AppWave Browser and AppWave Store searches all fields with the exception of product reviews written by the user.
288 APPWAVE™ ENTERPRISE STORE ADMINISTRATOR GUIDE

APPWAVE GLOSSARY
Staff
In the AppWave Store, the Staff is all the personnel who have access to the Vendor’s account. The information for each staff person is displayed on the Staff tab and includes ID number, name, e-mail address, and status.
Stage
In the AppWave Store, once you create and manage your application you submit it to Embarcadero for staging. This is where your submission is reviewed. You can then review the feedback on the review.
Start
In the AppWave Studio, this is the first step in creating your App. You select a source and begin to build your App. This step currently allows you to select the launch command (the application's executable), view and edit files, view and edit registry entries, and manage environment variables.
Static Cache
You can view the size of the Static Cache (also referred to as the App Cache) in the AppWave Browser Options. Click Options and then click Clear.
For Windows XP, the cache location is: Repository\StreamingCore\Profiles\<your_user>\Sessions\<session_id>\Cache.
For Windows 7, Windows 8, and Vista the cache location is: C:\ProgramData\Embarcadero\Product Repository\StreamingCore\Profiles\<your_user>\Sessions\<session_id>\Cache.
Streaming
An application is constantly received by and presented to an end-user while being delivered by a streaming provider.
Subject Channel
Channels can be created for any purpose, for example a “DBA Channel”. Channels can include both Product and Subject Channels. So a subject channel would contain apps pertaining to a specific type.
Subscribing
You can also ensure you always have the latest version of your applications by subscribing to AppWave notifications and by checking the Notifications folder in AppWave Browser, so you will always know when a new version is available.
APPWAVE™ ENTERPRISE STORE ADMINISTRATOR GUIDE 289
APPWAVE GLOSSARY
Suite Product
Suite Products are complex applications such as Microsoft Office, Visual Studio, Adobe CS5, etc., that have multiple entry points. The Suite contains multiple applications. For example Microsoft Office includes Excel, Word, PowerPoint, etc.
T
.tca file
The .tca file contains the registry and folder and files structure captured during a software installation along with resources, launch points, and registry settings required to run a product. It also contains information about the product such as the version, name, and editions. Every time a user needs to master an App, a .tca file is created.
templateversions.dat
This file contains information about harvesting. Some templates will contain several versions of an application, and this file indicates which tca file will be used for which version.
Test
In this step you master all the elements needed to build the app and then test the results.
Threshold
Default or user-defined values that mark performance boundaries. Thresholds are the point that must be exceeded to begin producing a user-defined effect or result or to elicit a response.
Ticket
When a customer encounters a problem and reports it in the AppWave Store, a ticket is generated and submitted to the vendor for correction, additional information, etc. The Ticketing site is where you manage all aspects of your tickets.
.toc
This is the token file, containing the information used by the player to run the app. It includes the launch command, environment variables, all the custom settings, and app events for the app.
Turbo Option
This is a performance option that allows the AppWave Browser to run in a more resource-efficient and feature-rich fashion. This is the default option. If the user does not have administrator rights at the time of install, the AppWave Browser installs without the turbo option. The executing code has complete and unrestricted access to the underlying hardware. It can execute any CPU instruction and reference any memory address. The Turbo mode is generally reserved for the lowest-level, most trusted functions of the operating system.
U
290 APPWAVE™ ENTERPRISE STORE ADMINISTRATOR GUIDE
APPWAVE GLOSSARY
User Mode Streaming
In User mode, the executing code has no ability to directly access hardware or reference memory. Code running in user mode must delegate to system APIs to access hardware or memory. Due to the protection afforded by this sort of isolation, crashes in user mode are always recoverable. Most of the code running on your computer will execute in user mode.
W
Web Caching
Web Caching configures a transparent proxy set up between AppWave and AppWave Browser. If this proxy is configured, AppWave would add special headers to streaming data sent to the AppWave Browser. This allows the streamed data to be cached on the proxy server so that the next time an AppWave Browser user asks for the relevant application, the streamed data is sent directly to the AppWave Browser from the proxy. This ability may be useful when the communication channel between AppWave and AppWave Browser is poor.
Windows Authentication
Automatically authenticates connections between Microsoft Internet Information Services, Internet Explorer, and other Active Directory aware applications.
Windows Services Registration
AppWave is automatically registered as a Windows service, therefore it starts when your machine starts. By default, the service is named Embarcadero AppWave. If you do not want AppWave to start as a Windows service, you can reset or otherwise change the service by selecting Start > Embarcadero AppWave X.X > Configure AppWave. In the Embarcadero AppWave Properties dialog, select the General tab and change the service parameters.
Working Folder
The user can pick a directory in the working file directory. However, you can’t enter your own path, the folder has to exist already. When the launch command manages it, it is converted to what is needed.
Workstation License
A workstation license is a license assigned to a specific workstation for its use by specified users associated with that workstation. Permissions allow you to define who can and cannot use the workstation license and under what circumstances, offline or online only.
APPWAVE™ ENTERPRISE STORE ADMINISTRATOR GUIDE 291

APPWAVE GLOSSARY
292 APPWAVE™ ENTERPRISE STORE ADMINISTRATOR GUIDE

Index
AAdditional resources 13Administrator
Using preconfigured groups 198All Apps folder 35, 185Allow Public Store to be visible 69Application catalog
Caching 202Configuring updates 59Manually updating 206Notifications 60
Application repository 74Application usage over time report 96Apps 201
Caching 202Downloading 219Importing 205Importing without internet access 219Managing 25Moving 215Publishing 62Pushing to users and groups 183, 219Reviewing 202Running standalone 220Viewing publishing progress 84
AppWaveBackup license server 220Configuring AppWave services 57Optimization 57Optimizing 79Running applications 220
AppWave accountsAllowing creation from AppWave Browser 69
AppWave BrowserAllowing client to register 69
AppWave Browser tools and optionsAssigning trial license owner 178
AppWave host name 68AppWave performance optimization 79AppWave service 52AppWave Windows Service 50Authorizing concurrent licenses 153, 161Auto assign country group 69Auto deploy applications 69Auto stream applications 69Automatic updates 59
BBackup Database 77, 104Backup license server
Creating 88Banners Management 217
CCaching 202
Caching updates 60Catalog updates 70Charging the server 202Checkout period 154, 162Collect Logs 79Concurrent licenses
Allow 153, 161Assigning 152Deny 153, 161License type 110
Concurrent users 152Configure system properties 66Connected users 173connectionTimeout 77, 79Create group 198Create user as author 69CSV file 195Cumulative reports
Licensed apps 89Streamed apps 99
DDATABASE_CACHE_PAGES 78–79Default password 58Denying concurrent licenses 153, 161Discussion Groups 13Documentation 13
EEDM 64Email 64Email Direct Marketing (EDM) 64Email notifications
Setting properties 70Embarcadero License Center (ELC) 19, 88Errors 60
FFAQs 13Folders
Creating and managing 185Preconfigured 185
Forums 13
GGroups
Creating 198Encompassing subgroups 200Managing 198Preconfigured 198, 200
HHeartBeat grace period 81HeartBeat period 81High watermark report 97Http Host 69Http Port 69
EMBARAPPWAVE™ ENTERPRISE STORE ADMINISTRATOR GUIDE 293
INDEX
Http Resolve 68
IInitial memory pool 76, 79InitialSize 78
JJava Runtime Environment (JRE) 51JRE configuration 54
KkeepAliveTimeout 77Knowledge Base 13
LLDAP server
Importing users 179Importing Users and Groups 34Synchronizing 180Syntax examples 37
License NotificationsConfiguring 70
LicensesAssigning trial license owner 178Backup server 88Creating backup server 88File details 146Importing 115Offline usage 162Reloading 146Reporting on denials 92Retrieving 119, 126, 144Thresholds for pool notifications 70Updating 140Usage notifications 72Viewing usage 173
Log4j level 79Log4j rolling 78Logging
Configuring 52Logging in to AppWave 58
MmaxActive 78–79Maximum file size 78Maximum memory pool 76, 79Maximum number of rolled files 79maxKeepAliveRequests 77maxThreads 77, 79
NNative Installer. 142, 214Network Named User (NNU) License 110Notification messages
Managing 61Setting properties 60Subscribing to 60Viewing 60Viewing licensing problems 60
OOffline usage 162
PPassword
Allowing blank user password 69Changing 41Default 58
Plug-insManaging 33
Preconfigured Groups 198Processing reviews 216Product repository
Importing apps 205Product review moderation 215Proxies 72Proxy server 73, 79
RReload licenses 146Reporting data
Exporting 101Reports
Creating 88Repository cache 81Restore Database 78Restricted mode 69Reviews
Allowing updates 69Importing 217
SServer
Shutting down 56Starting 55
Star ratings 202Streaming services
Managing 82Setting properties 80Stopping and starting 84
System Center Configuration Manager (SCCM) 21, 265System properties
Setting 25
TTime series reports 95Trial license 111
UUsage history reports
Creating 88User-initiated caching 69Users
Allowing client to register 69Creating 179, 193Managing 25, 193
VVersion updates
Configuring 140, 213
294 APPWAVE™ ENTERPRISE STORE ADMINISTRATOR GUIDE

INDEX
WWindows services
Configuring 51Configuring AppWave 19Stopping and starting AppWave 52
APPWAVE™ ENTERPRISE STORE ADMINISTRATOR GUIDE 295