ar1200 basic config guide
TRANSCRIPT

Huawei AR1200-S Series Enterprise RoutersV200R001C01
Configuration Guide - BasicConfiguration
Issue 02
Date 2011-10-15
HUAWEI TECHNOLOGIES CO., LTD.
Copyright © Huawei Technologies Co., Ltd. 2011. All rights reserved.No part of this document may be reproduced or transmitted in any form or by any means without prior writtenconsent of Huawei Technologies Co., Ltd. Trademarks and Permissions
and other Huawei trademarks are trademarks of Huawei Technologies Co., Ltd.All other trademarks and trade names mentioned in this document are the property of their respective holders. NoticeThe purchased products, services and features are stipulated by the contract made between Huawei and thecustomer. All or part of the products, services and features described in this document may not be within thepurchase scope or the usage scope. Unless otherwise specified in the contract, all statements, information,and recommendations in this document are provided "AS IS" without warranties, guarantees or representationsof any kind, either express or implied.
The information in this document is subject to change without notice. Every effort has been made in thepreparation of this document to ensure accuracy of the contents, but all statements, information, andrecommendations in this document do not constitute the warranty of any kind, express or implied.
Huawei Technologies Co., Ltd.Address: Huawei Industrial Base
Bantian, LonggangShenzhen 518129People's Republic of China
Website: http://www.huawei.com
Email: [email protected]
Issue 02 (2011-10-15) Huawei Proprietary and ConfidentialCopyright © Huawei Technologies Co., Ltd.
i

About This Document
Intended AudienceThis document provides the basic concepts, configuration procedures, and configurationexamples in different application scenarios of the Basic configuration supported by the AR1200-S device.
This document describes how to configure the Basic configuration.
This document is intended for:
l Data configuration engineers
l Commissioning engineers
l Network monitoring engineers
l System maintenance engineers
Symbol ConventionsThe symbols that may be found in this document are defined as follows.
Symbol Description
DANGERIndicates a hazard with a high level of risk, which if notavoided, will result in death or serious injury.
WARNINGIndicates a hazard with a medium or low level of risk, whichif not avoided, could result in minor or moderate injury.
CAUTIONIndicates a potentially hazardous situation, which if notavoided, could result in equipment damage, data loss,performance degradation, or unexpected results.
TIP Indicates a tip that may help you solve a problem or savetime.
NOTE Provides additional information to emphasize or supplementimportant points of the main text.
Huawei AR1200-S Series Enterprise RoutersConfiguration Guide - Basic Configuration About This Document
Issue 02 (2011-10-15) Huawei Proprietary and ConfidentialCopyright © Huawei Technologies Co., Ltd.
ii

Command ConventionsThe command conventions that may be found in this document are defined as follows.
Convention Description
Boldface The keywords of a command line are in boldface.
Italic Command arguments are in italics.
[ ] Items (keywords or arguments) in brackets [ ] are optional.
{ x | y | ... } Optional items are grouped in braces and separated by verticalbars. One item is selected.
[ x | y | ... ] Optional items are grouped in brackets and separated by verticalbars. One item is selected or no item is selected.
{ x | y | ... }* Optional items are grouped in braces and separated by verticalbars. A minimum of one item or a maximum of all items can beselected.
[ x | y | ... ]* Optional items are grouped in brackets and separated by verticalbars. Several items or no item can be selected.
&<1-n> The parameter before the & sign can be repeated 1 to n times.
# A line starting with the # sign is comments.
Interface Numbering ConventionsInterface numbers used in this manual are examples. In device configuration, use the existinginterface numbers on devices.
Change HistoryChanges between document issues are cumulative. Therefore, the latest document versioncontains all updates made to previous versions.
Changes in Issue 02 (2011-10-15)Based on issue 01 (2011-08-15), the document is updated as follows:
The following information is modified:l 8.8.4 Example for Connecting the SFTP Client to the SSH Serverl 9.3.3 Downloading Resource Files
Changes in Issue 01 (2011-08-15)Initial commercial release.
Huawei AR1200-S Series Enterprise RoutersConfiguration Guide - Basic Configuration About This Document
Issue 02 (2011-10-15) Huawei Proprietary and ConfidentialCopyright © Huawei Technologies Co., Ltd.
iii
Contents
About This Document.....................................................................................................................ii
1 Logging In to the System for the First Time............................................................................11.1 Introduction........................................................................................................................................................21.2 Logging In to the Device Through the Console Port or Mini USB Port............................................................2
1.2.1 Establishing the Configuration Task.........................................................................................................21.2.2 Establishing the Physical Connection........................................................................................................31.2.3 Logging in to the router.............................................................................................................................3
2 CLI Overview.................................................................................................................................62.1 CLI Introduction.................................................................................................................................................7
2.1.1 Command Line Interface...........................................................................................................................72.1.2 Command Levels.......................................................................................................................................72.1.3 Command Line Views.............................................................................................................................10
2.2 Online Help.......................................................................................................................................................112.2.1 Full Help..................................................................................................................................................112.2.2 Partial Help..............................................................................................................................................122.2.3 Error Messages of the Command Line Interface.....................................................................................12
2.3 CLI Features.....................................................................................................................................................132.3.1 Editing.....................................................................................................................................................132.3.2 Displaying................................................................................................................................................142.3.3 Regular Expressions................................................................................................................................142.3.4 Previously-Used Commands...................................................................................................................17
2.4 Shortcut Keys...................................................................................................................................................182.4.1 Classifying Shortcut Keys.......................................................................................................................182.4.2 Defining Shortcut Keys...........................................................................................................................192.4.3 Use of Shortcut Keys...............................................................................................................................20
2.5 Configuration Examples...................................................................................................................................202.5.1 Example for Using Tab............................................................................................................................212.5.2 Example for Using Shortcut Keys...........................................................................................................22
3 Basic Configuration.....................................................................................................................233.1 Configuring the Basic System Environment....................................................................................................24
3.1.1 Establishing the Configuration Task.......................................................................................................243.1.2 Configuring the Equipment Name...........................................................................................................24
Huawei AR1200-S Series Enterprise RoutersConfiguration Guide - Basic Configuration Contents
Issue 02 (2011-10-15) Huawei Proprietary and ConfidentialCopyright © Huawei Technologies Co., Ltd.
iv

3.1.3 Setting the System Clock.........................................................................................................................253.1.4 Configuring a Header..............................................................................................................................263.1.5 Configuring the Undo Command to Match in the Previous View Automatically..................................27
3.2 Displaying System Status Messages.................................................................................................................273.2.1 Displaying System Configuration...........................................................................................................283.2.2 Displaying System Status........................................................................................................................283.2.3 Collecting System Diagnostic Information.............................................................................................29
4 Configuring User Interface........................................................................................................304.1 User Interface Overview...................................................................................................................................314.2 Configuring the Console User Interface...........................................................................................................33
4.2.1 Establishing the Configuration Task.......................................................................................................334.2.2 Setting Physical Attributes of Console User Interface............................................................................344.2.3 Setting Terminal Attributes of Console User Interface...........................................................................354.2.4 Configuring User Priority of Console User Interface..............................................................................364.2.5 Configuring the User Authentication Mode of the Console User Interface............................................364.2.6 Checking the Configuration.....................................................................................................................38
4.3 Configuring VTY User Interface......................................................................................................................384.3.1 Establishing the Configuration Task.......................................................................................................394.3.2 Configuring Maximum VTY User Interfaces.........................................................................................394.3.3 (Optional)Setting Limit on Incoming and Outgoing Calls of VTY User Interfaces...............................404.3.4 Setting Terminal Attributes of the VTY User Interface..........................................................................414.3.5 Setting User Priority of VTY User Interface...........................................................................................424.3.6 Setting User Authentication Mode of the VTY User Interface...............................................................434.3.7 Checking the Configuration.....................................................................................................................44
4.4 Configuring a TTY User Interface...................................................................................................................454.4.1 Establishing the Configuration Task.......................................................................................................454.4.2 Setting Physical Attributes of a TTY User Interface...............................................................................464.4.3 Setting Terminal Attributes of TTY User Interface................................................................................474.4.4 Configuring User Priority of TTY User Interface...................................................................................484.4.5 Configuring the Authentication Mode on a TTY User Interface............................................................494.4.6 Checking the Configuration.....................................................................................................................50
4.5 Configuration Examples...................................................................................................................................514.5.1 Example for Configuring Console User Interface...................................................................................514.5.2 Example for Configuring VTY User Interface........................................................................................534.5.3 Example for Configuring TTY User Interface........................................................................................54
5 Configuring User Login.............................................................................................................575.1 Overview of User Login...................................................................................................................................585.2 Logging in to the Devices Through the Console Port......................................................................................58
5.2.1 Establishing the Configuration Task.......................................................................................................585.2.2 Configuring Console User Interface........................................................................................................595.2.3 Logging in to the router Through a Console Port....................................................................................595.2.4 Checking the Configuration.....................................................................................................................60
Huawei AR1200-S Series Enterprise RoutersConfiguration Guide - Basic Configuration Contents
Issue 02 (2011-10-15) Huawei Proprietary and ConfidentialCopyright © Huawei Technologies Co., Ltd.
v

5.3 Logging in to the Devices by Using Telnet......................................................................................................605.3.1 Establishing the Configuration Task.......................................................................................................615.3.2 Configuring VTY User Interface.............................................................................................................615.3.3 (Optional) Configuring Local Telnet Users.............................................................................................625.3.4 Enabling the Telnet Service.....................................................................................................................625.3.5 Logging in to the router by Using Telnet................................................................................................635.3.6 Checking the Configuration.....................................................................................................................64
5.4 Logging in to the Devices by Using STelnet....................................................................................................655.4.1 Establishing the Configuration Task.......................................................................................................655.4.2 Configuring VTY User Interface.............................................................................................................665.4.3 Configuring SSH for the VTY User Interface.........................................................................................665.4.4 Configuring an SSH User and Specifying STelnet as One of Service Types.........................................675.4.5 Enabling the STelnet Server Function.....................................................................................................695.4.6 (Optional) Configuring the STelnet Server Parameters...........................................................................705.4.7 Logging in to the router by Using STelnet..............................................................................................715.4.8 Checking the Configuration.....................................................................................................................72
5.5 Common Operations After Login.....................................................................................................................735.5.1 Establishing the Configuration Task.......................................................................................................735.5.2 Switching User Levels.............................................................................................................................745.5.3 Locking User Interfaces...........................................................................................................................755.5.4 Sending Messages to Other User Interfaces............................................................................................755.5.5 Displaying Logged-in Users....................................................................................................................76
5.6 Configuration Examples...................................................................................................................................765.6.1 Example for Configuring User Login Through a Console Port..............................................................765.6.2 Example for Logging In by Telnet..........................................................................................................795.6.3 Example for Configuring User Login by Using STelnet.........................................................................80
6 Managing File System................................................................................................................836.1 File System Overview......................................................................................................................................84
6.1.1 File System..............................................................................................................................................846.1.2 Methods of File Management..................................................................................................................84
6.2 Performing File Operations by Means of the File System...............................................................................856.2.1 Establishing the Configuration Task.......................................................................................................856.2.2 Managing Storage Devices......................................................................................................................866.2.3 Managing the Directory...........................................................................................................................866.2.4 Managing Files........................................................................................................................................87
6.3 Performing File Operations by Means of FTP.................................................................................................896.3.1 Establishing the Configuration Task.......................................................................................................896.3.2 Configuring a Local FTP User................................................................................................................906.3.3 (Optional) Specifying a Port Number for the FTP Server.......................................................................916.3.4 Enabling the FTP Server..........................................................................................................................926.3.5 (Optional) Configuring the FTP Server Parameters................................................................................926.3.6 (Optional) Configuring an FTP ACL......................................................................................................93
Huawei AR1200-S Series Enterprise RoutersConfiguration Guide - Basic Configuration Contents
Issue 02 (2011-10-15) Huawei Proprietary and ConfidentialCopyright © Huawei Technologies Co., Ltd.
vi

6.3.7 Accessing the System by Using FTP.......................................................................................................946.3.8 Performing File Operations by Using FTP Commands...........................................................................946.3.9 Checking the Configuration.....................................................................................................................96
6.4 Performing File Operations by Means of SFTP...............................................................................................976.4.1 Establishing the Configuration Task.......................................................................................................976.4.2 Configuring VTY User Interface.............................................................................................................986.4.3 Configuring SSH for the VTY User Interface.........................................................................................986.4.4 Configuring an SSH User and Specifying SFTP as One of Service Types.............................................996.4.5 Enabling the SFTP Service....................................................................................................................1016.4.6 Accessing the System by Using SFTP..................................................................................................1026.4.7 Performing File Operations by Using SFTP..........................................................................................1036.4.8 Checking the Configuration...................................................................................................................104
6.5 Configuration Examples.................................................................................................................................1056.5.1 Example for Performing File Operations by Means of the File System...............................................1056.5.2 Example for Performing File Operations by Means of FTP.................................................................1076.5.3 Example for Performing File Operations by Means of SFTP...............................................................109
7 Configuring System Startup....................................................................................................1127.1 System Startup Overview...............................................................................................................................113
7.1.1 System Software....................................................................................................................................1137.1.2 Configuration Files and Current Configurations...................................................................................113
7.2 Managing Configuration Files........................................................................................................................1137.2.1 Establishing the Configuration Task.....................................................................................................1147.2.2 Saving Configuration Files....................................................................................................................1147.2.3 Clearing a Configuration File................................................................................................................1157.2.4 Comparing Configuration Files.............................................................................................................1167.2.5 Checking the Configuration...................................................................................................................116
7.3 Specifying a File for System Startup..............................................................................................................1177.3.1 Establishing the Configuration Task.....................................................................................................1177.3.2 Configuring System Software for a router to Load for the Next Startup..............................................1187.3.3 Configuring the Configuration File for Router to Load for the Next Startup.......................................1187.3.4 Checking the Configuration...................................................................................................................119
7.4 Configuration Examples.................................................................................................................................1197.4.1 Example for Configuring System Startup.............................................................................................120
8 Accessing Another Device.......................................................................................................1228.1 Accessing Another Device Overview.............................................................................................................123
8.1.1 Telnet Method........................................................................................................................................1238.1.2 FTP Method...........................................................................................................................................1258.1.3 TFTP Method........................................................................................................................................1258.1.4 SSH Method..........................................................................................................................................126
8.2 Logging in to Other Devices by Using Telnet................................................................................................1278.2.1 Establishing the Configuration Task.....................................................................................................1278.2.2 (Optional) Configuring a Source IP Address for an Telnet Client........................................................128
Huawei AR1200-S Series Enterprise RoutersConfiguration Guide - Basic Configuration Contents
Issue 02 (2011-10-15) Huawei Proprietary and ConfidentialCopyright © Huawei Technologies Co., Ltd.
vii

8.2.3 Logging in to Another Device by Using Telnet....................................................................................1288.2.4 Checking the Configuration...................................................................................................................129
8.3 Using the Redirection Function to Connect to a Remote Device...................................................................1298.3.1 Establishing the Configuration Task.....................................................................................................1298.3.2 Configuring the Redirection Function...................................................................................................1328.3.3 Checking the Configuration...................................................................................................................133
8.4 Logging in to other Device by Using STelnet................................................................................................1348.4.1 Establishing the Configuration Task.....................................................................................................1348.4.2 Configuring the First Successful Login to Another Device (Enabling the First-Time Authentication onthe SSH Client)...............................................................................................................................................1348.4.3 Configuring the First Successful Login to Another Device (Allocating an RSA Public Key to the SSHServer)............................................................................................................................................................1358.4.4 Logging in to Another Device by Using STelnet..................................................................................1368.4.5 Checking the configuration...................................................................................................................137
8.5 Accessing Files on Another Device by Using TFTP......................................................................................1378.5.1 Establishing the Configuration Task.....................................................................................................1378.5.2 (Optional) Configuring a Source IP Address for a TFTP Client...........................................................1388.5.3 (Optional) Configuring TFTP Access Authority...................................................................................1398.5.4 Downloading Files by Using TFTP.......................................................................................................1398.5.5 Uploading Files by Using TFTP............................................................................................................1408.5.6 Checking the Configuration...................................................................................................................140
8.6 Accessing Files on Another Device by Using FTP........................................................................................1418.6.1 Establishing the Configuration Task.....................................................................................................1418.6.2 (Optional) Configuring Source IP Address and Interface of the FTP Client........................................1418.6.3 Connecting to Other Devices by Using FTP Commands......................................................................1428.6.4 Operating Files by Using FTP Commands............................................................................................1438.6.5 Changing Login Users...........................................................................................................................1458.6.6 Disconnecting from the FTP Server......................................................................................................1458.6.7 Checking the Configuration...................................................................................................................146
8.7 Accessing Files on Another Device by Using SFTP......................................................................................1468.7.1 Establishing the Configuration Task.....................................................................................................1468.7.2 (Optional) Configuring a Source IP Address for an SFTP Client.........................................................1478.7.3 Configuring the First Successful Login to Another Device (Enabling the First-Time Authentication onthe SSH Client)...............................................................................................................................................1488.7.4 Configuring the First Successful Login to Another Device (Allocating an RSA Public Key to the SSHServer)............................................................................................................................................................1498.7.5 Connecting to Other Devices by Using SFTP.......................................................................................1508.7.6 Operating Files by Using SFTP Commands..........................................................................................1508.7.7 Checking the Configuration...................................................................................................................152
8.8 Configuration Examples.................................................................................................................................1528.8.1 Example for Configuring Telnet Services.............................................................................................1528.8.2 Example for Configuring the Device as the STelnet Client to Connect to the SSH Server..................1558.8.3 Example for Configuring TFTP............................................................................................................159
Huawei AR1200-S Series Enterprise RoutersConfiguration Guide - Basic Configuration Contents
Issue 02 (2011-10-15) Huawei Proprietary and ConfidentialCopyright © Huawei Technologies Co., Ltd.
viii

8.8.4 Example for Connecting the SFTP Client to the SSH Server...............................................................1618.8.5 Example for Authenticating SSH Through RADIUS............................................................................166
9 Upgrade and Maintenance.......................................................................................................1719.1 Upgrade and Maintenance Overview.............................................................................................................172
9.1.1 License Authorization............................................................................................................................1729.1.2 Software Upgrade..................................................................................................................................1729.1.3 Patch Management................................................................................................................................1729.1.4 CPU and Memory Usage Thresholds....................................................................................................1739.1.5 Device Restart........................................................................................................................................173
9.2 Activating a GTL License File.......................................................................................................................1739.2.1 Establishing the Configuration Task.....................................................................................................1749.2.2 Uploading a GTL License File..............................................................................................................1759.2.3 Activating the GTL License File...........................................................................................................1759.2.4 (Optional) Enabling the Emergency State of the GTL License Module...............................................1769.2.5 Checking the Configuration...................................................................................................................177
9.3 Upgrading System Software...........................................................................................................................1779.3.1 Establishing the Configuration Task.....................................................................................................1779.3.2 Checking the System Before the Upgrade.............................................................................................1789.3.3 Downloading Resource Files.................................................................................................................1799.3.4 Specifying the System Software to Be Used at the Next Startup..........................................................1819.3.5 Configuring a Backup Startup File........................................................................................................1829.3.6 (Optional) Upgrading the BootROM of the LPU..................................................................................1829.3.7 Restarting a Device................................................................................................................................1839.3.8 (Optional) Activating a GTL License File............................................................................................1839.3.9 Checking the Configuration...................................................................................................................184
9.4 Managing Patches...........................................................................................................................................1859.4.1 Establishing the Configuration Task.....................................................................................................1859.4.2 Installing a Patch...................................................................................................................................1859.4.3 Specifying a Patch File to Be Used at the Next Startup........................................................................1869.4.4 Uninstalling a Patch...............................................................................................................................1879.4.5 Checking the Configuration...................................................................................................................187
9.5 Monitoring CPU and Memory Usage.............................................................................................................1879.5.1 Establishing the Configuration Task.....................................................................................................1889.5.2 Setting CPU Usage Thresholds.............................................................................................................1889.5.3 Setting a Memory Usage Threshold......................................................................................................1899.5.4 Checking the Configuration...................................................................................................................189
9.6 Restarting the Device......................................................................................................................................1909.6.1 Establishing the Configuration Task.....................................................................................................1909.6.2 Restarting the Device Immediately.......................................................................................................1919.6.3 Configuring the Device to Restart as Scheduled...................................................................................1919.6.4 Checking the Configuration...................................................................................................................192
9.7 Configuration Examples.................................................................................................................................192
Huawei AR1200-S Series Enterprise RoutersConfiguration Guide - Basic Configuration Contents
Issue 02 (2011-10-15) Huawei Proprietary and ConfidentialCopyright © Huawei Technologies Co., Ltd.
ix
9.7.1 Example for Upgrading System Software.............................................................................................1929.7.2 Example for Installing a Patch File.......................................................................................................196
Huawei AR1200-S Series Enterprise RoutersConfiguration Guide - Basic Configuration Contents
Issue 02 (2011-10-15) Huawei Proprietary and ConfidentialCopyright © Huawei Technologies Co., Ltd.
x

1 Logging In to the System for the First Time
About This Chapter
You can log in to a new router through the console port or mini USB port to configure therouter.
1.1 IntroductionYou can log in to the device that is powered on for the first time through the console port or miniUSB port to configure the device.
1.2 Logging In to the Device Through the Console Port or Mini USB PortThis section describes how to connect a terminal to a router through the console port or miniUSB port to establish the configuration environment.
Huawei AR1200-S Series Enterprise RoutersConfiguration Guide - Basic Configuration 1 Logging In to the System for the First Time
Issue 02 (2011-10-15) Huawei Proprietary and ConfidentialCopyright © Huawei Technologies Co., Ltd.
1
1.1 IntroductionYou can log in to the device that is powered on for the first time through the console port or miniUSB port to configure the device.
A main control board provides a console port and a mini USB port. To configure a device,connect the serial port of your terminal to the console port of the device or connect the USB portof the user terminal to the mini USB port of the device.
NOTE
l If a device is powered on for the first time, you must log in to it through the console port or mini USBport before logging in to the device using other login modes. For example, before configuring an IPaddress to log in to a device using Telnet, log in to the device through the console port or mini USBport.
l Before logging in to a device through the mini USB port, install the drive application of the mini USBport on the user terminal.
l The mini USB port and console port cannot be used together.
1.2 Logging In to the Device Through the Console Port orMini USB Port
This section describes how to connect a terminal to a router through the console port or miniUSB port to establish the configuration environment.
1.2.1 Establishing the Configuration TaskBefore logging in to the router through the console port or mini USB port, familiarize yourselfwith the applicable environment, complete the pre-configuration tasks, and obtain the requireddata. This will help you complete the configuration task quickly and accurately.
Applicable EnvironmentWhen the router is powered on for the first time, you need to use the console port or mini USBport to log in to the router to configure and manage the router.
Pre-configuration TasksBefore logging in to the router through the console port or mini USB port, complete the followingtasks:
l Installing terminal emulation program on the PC (such as Windows XP HyperTerminal)l Preparing serial interface cables or mini USB interface cables.
NOTE
To log in to the device through the mini USB interface, install the drive program on the user terminal.
Data PreparationTo log in to the router through the console port or mini USB port, you need the following data.
Huawei AR1200-S Series Enterprise RoutersConfiguration Guide - Basic Configuration 1 Logging In to the System for the First Time
Issue 02 (2011-10-15) Huawei Proprietary and ConfidentialCopyright © Huawei Technologies Co., Ltd.
2

No. Data
1 Terminal communication parametersl Baud ratel Data bitl Parityl Stop bitl Flow-control mode
NOTEWhen the router is logged in for the first time, the system automatically uses default parameter values.
1.2.2 Establishing the Physical ConnectionYou can connect the console port of the router to the COM port of a terminal, or connect themini USB port of the router to the USB port of the terminal through cables.
Procedure
Step 1 Power on all devices to perform a self-check.
Step 2 Connect the console port of the router to the COM port of a PC, or connect the mini USB portof the router to the USB port of the PC through cables.
NOTE
The mini USB port and console port cannot be used together.
----End
1.2.3 Logging in to the routerYou can log in to the router through the console portor mini USB port to configure and managethe router that is powered on for the first time.
ContextYou need to configure terminal attributes for the PC according to the attributes configured forthe console port, including the transmission rate, data bit, parity bit, stop bit, and flow controlmode. As the router is logged in for the first time, every terminal attribute uses the default valueof the router.
Procedure
Step 1 Start a terminal emulator on the PC, and create a new connection, as shown in Figure 1-1.
Huawei AR1200-S Series Enterprise RoutersConfiguration Guide - Basic Configuration 1 Logging In to the System for the First Time
Issue 02 (2011-10-15) Huawei Proprietary and ConfidentialCopyright © Huawei Technologies Co., Ltd.
3

Figure 1-1 Connection creation
Step 2 Set interface,as shown in Figure 1-2.
Figure 1-2 Interface setting
Step 3 Set communication parameter, same as the default of router,as shown in Figure 1-3.
Huawei AR1200-S Series Enterprise RoutersConfiguration Guide - Basic Configuration 1 Logging In to the System for the First Time
Issue 02 (2011-10-15) Huawei Proprietary and ConfidentialCopyright © Huawei Technologies Co., Ltd.
4
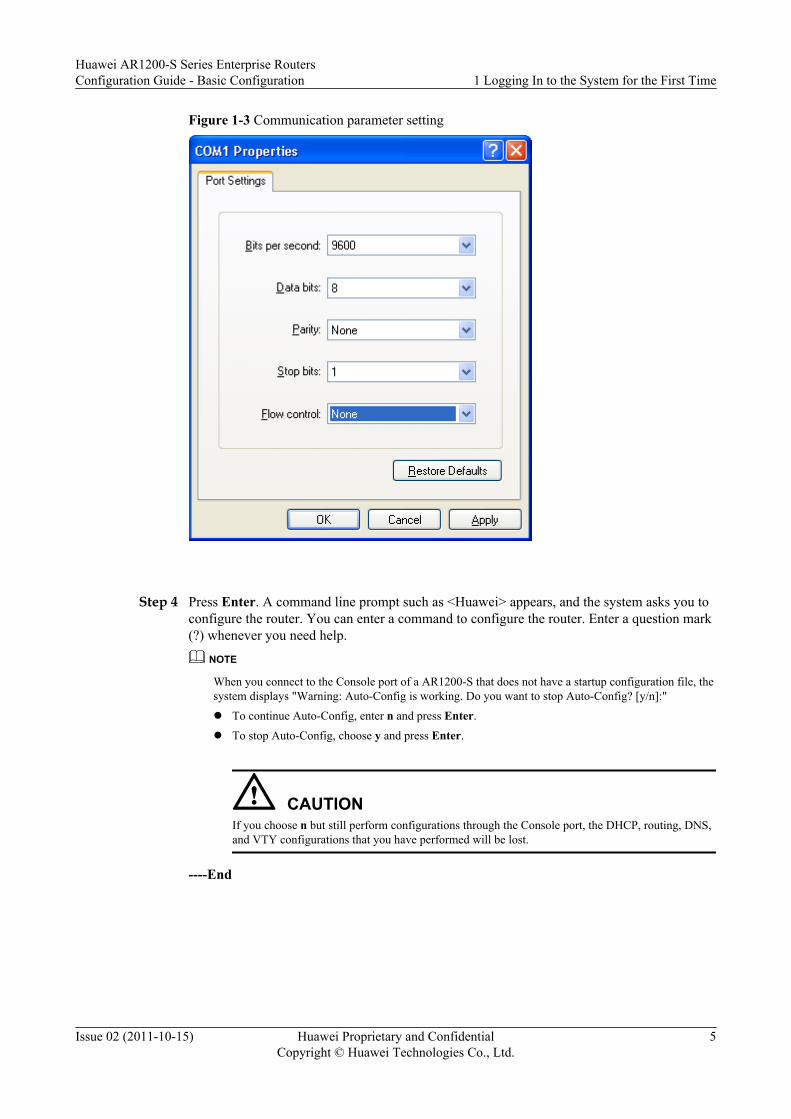
Figure 1-3 Communication parameter setting
Step 4 Press Enter. A command line prompt such as <Huawei> appears, and the system asks you toconfigure the router. You can enter a command to configure the router. Enter a question mark(?) whenever you need help.
NOTE
When you connect to the Console port of a AR1200-S that does not have a startup configuration file, thesystem displays "Warning: Auto-Config is working. Do you want to stop Auto-Config? [y/n]:"
l To continue Auto-Config, enter n and press Enter.
l To stop Auto-Config, choose y and press Enter.
CAUTIONIf you choose n but still perform configurations through the Console port, the DHCP, routing, DNS,and VTY configurations that you have performed will be lost.
----End
Huawei AR1200-S Series Enterprise RoutersConfiguration Guide - Basic Configuration 1 Logging In to the System for the First Time
Issue 02 (2011-10-15) Huawei Proprietary and ConfidentialCopyright © Huawei Technologies Co., Ltd.
5
2 CLI Overview
About This Chapter
The command line interface (CLI) is used to configure and maintain devices.
2.1 CLI IntroductionAfter you log in to the router, a prompt is displayed, indicating that you enter the command lineinterface (CLI). The CLI is used by users to interact with the router.
2.2 Online HelpWhen inputting command lines or configuring services, you can use the online help function toobtain real-time help.
2.3 CLI FeaturesThe CLI provides the following features to help users flexibly use it.
2.4 Shortcut KeysUsing the system or user-defined shortcut keys makes it easier to enter commands.
2.5 Configuration ExamplesThis section provides several examples for using command lines.
Huawei AR1200-S Series Enterprise RoutersConfiguration Guide - Basic Configuration 2 CLI Overview
Issue 02 (2011-10-15) Huawei Proprietary and ConfidentialCopyright © Huawei Technologies Co., Ltd.
6
2.1 CLI IntroductionAfter you log in to the router, a prompt is displayed, indicating that you enter the command lineinterface (CLI). The CLI is used by users to interact with the router.
2.1.1 Command Line InterfaceYou can configure and manage the router by using the CLI commands.
The characteristics of CLI are as follows:
l Local configuration through console port.
l Local or remote configuration through Telnet or Secure Shell (SSH).
l The telnet command for directly logging in to and managing other routers.
l FTP service for file uploading and downloading.
l A user interface view for specific configuration management.
l Hierarchical command protection for users of different levels, that is, running thecommands of the corresponding levels.
l Three authentication modes are supported, namely, none-authentication, passwordauthentication, and Authentication, Authorization, and Accounting (AAA) authentication.Password and AAA authentication prohibit unauthorized users from logging in to therouter, guaranteeing system security.
l Entering "?" for online help at any time.
l A command line interpreter provides intelligent command resolution methods such as keyword fuzzy match and context conjunction. These methods make it easy for users to entertheir commands.
l Network testing commands such as tracert and ping for rapidly diagnosing a network.
l Abundant debugging information to help in diagnosing the network.
l Running a command used previously on the device, like DosKey.
NOTE
l The system supports the command with a maximum of 512 characters. The command can beincomplete. You can enter one or more initial characters of the command to match the whole command.The incomplete command, however, must be unique in the system. For example, to use the displaycurrent-configuration command, enter d cu, di cu, or dis cu. You cannot enter d c or dis c becausethey are not unique in the system.
l The system saves the incomplete command to the configuration files in complete form; therefore, thecommand may have more than 512 characters. When the system is restarted, however, the incompletecommand cannot be restored. Therefore, pay attention to the length of the incomplete command.
2.1.2 Command LevelsThe system manages commands in hierarchy for security. The administrator can set user levelscorresponding to command levels to implement user-specific access control.
The default command levels are as follows:
Huawei AR1200-S Series Enterprise RoutersConfiguration Guide - Basic Configuration 2 CLI Overview
Issue 02 (2011-10-15) Huawei Proprietary and ConfidentialCopyright © Huawei Technologies Co., Ltd.
7

Table 2-1 Command line levels
Level Name Description
0 Visit level Commands of this level include commands of networkdiagnosis tool (such as ping and tracert) and commands thatstart from the local device and visit external device (suchas Telnet client side).
1 Monitoring level Commands of this level, including the display commands,are used for system maintenance and fault diagnosis.
2 Configurationlevel
Commands of this level are service configurationcommands that provide direct network service to the user,including routing and network layer commands.
3 Management level Commands of this level are commands that influence thebasic operation of the system and provide support to theservice. They include file system commands, FTPcommands, TFTP commands, configuration file switchingcommands, power supply control commands, backup boardcontrol commands, user management commands, levelsetting commands, system internal parameter settingcommands, and debugging commands that are used forfault diagnosis.
NOTE
l The default command level may be higher than the command level defined according to the commandrules in application.
l The level of the command that a user can run is determined by the level of this user.
l Login users have the same 16 levels as the command levels. The login users can use only the commandof the levels that are equal to or lower than their own levels. The user privilege level level commandsets the user level.
Searching Commands Based on Command LevelsYou can search for all commands of a specific level simultaneously. The procedure is as follows:
1. Open the command reference (.chm.) file.2. Click the "Search" tab. The search window will be displayed as shown in Figure 2-1.
Huawei AR1200-S Series Enterprise RoutersConfiguration Guide - Basic Configuration 2 CLI Overview
Issue 02 (2011-10-15) Huawei Proprietary and ConfidentialCopyright © Huawei Technologies Co., Ltd.
8

Figure 2-1 Entering the search window
3. Enter a desired command level in the "Type in the word(s) to search for" textbox and click"List Topics". All commands of the specified level will be displayed as shown in Figure2-2.
Huawei AR1200-S Series Enterprise RoutersConfiguration Guide - Basic Configuration 2 CLI Overview
Issue 02 (2011-10-15) Huawei Proprietary and ConfidentialCopyright © Huawei Technologies Co., Ltd.
9

Figure 2-2 Searching commands based on a specific level
2.1.3 Command Line ViewsThe command line interface has different command views. All the commands are registered inone or more command views. You can run a command only when you enter the correspondingcommand view.
The following part uses the user, system, and aaa views as an example:
# Establish connection to the router. If the router adopts the default configuration, you can enterthe user view with the prompt of <Huawei>.
<Huawei>
# Run the system-view command to enter the system view.
<Huawei> system-view[Huawei]
# Run the aaa command in the system view to enter the AAA view.
[Huawei] aaa[Huawei-aaa]
Huawei AR1200-S Series Enterprise RoutersConfiguration Guide - Basic Configuration 2 CLI Overview
Issue 02 (2011-10-15) Huawei Proprietary and ConfidentialCopyright © Huawei Technologies Co., Ltd.
10

NOTE
l The command prompt "Huawei" is the default host name.l The prompt indicates a specific view. For example, "<HUAWEI>" indicates the user view, and
"[HUAWEI-ui-console0]" indicates the console user interface view.
Some commands can be used in both system and other views, but have different effects.
2.2 Online HelpWhen inputting command lines or configuring services, you can use the online help function toobtain real-time help.
2.2.1 Full HelpWhen inputting a command, you can use the full help function to obtain all keywords orparameters of this command.
Procedurel You can obtain the full help of a command line in the following manners.
– Enter a question mark (?) in any command line view to display all the commands andtheir simple descriptions.<Huawei> ?User view commands: arp-ping ARP-ping autosave <Group> autosave command group backup Backup information cd Change current directory clock Specify the system clock cls Clear screen ......
– Enter a command and a question mark (?) separated by a space. If the key word is atthis position, all key words and their simple descriptions are displayed. For example:[Huawei] interface ?Bridge-if Bridge-if interface Cellular Cellular interface ......Bridge-if and Cellular are keywords; Bridge-if interface and Cellular interfacedescribe the keywords respectively.
– Enter a command and a question mark (?) separated by a space, and if a parameter is atthis position, the related parameter names and parameter descriptions are displayed. Forexample:[Huawei] ftp timeout ? INTEGER<1-35791> The value of FTP timeout (in minutes)[Huawei] ftp timeout 35 ?<cr> Please press ENTER to execute command [Huawei] ftp timeout 35In the preceding display, INTEGER<1-35791> describes the parameter value; Thevalue of FTP timeout (in minutes) is a simple description of the parameter usage;
Huawei AR1200-S Series Enterprise RoutersConfiguration Guide - Basic Configuration 2 CLI Overview
Issue 02 (2011-10-15) Huawei Proprietary and ConfidentialCopyright © Huawei Technologies Co., Ltd.
11

<cr> indicates that no parameter is at this position. The command is repeated in the nextcommand line. You can press Enter to run the command.
----End
2.2.2 Partial HelpIf you enter only the first one or a few characters of a command, you can use the partial helpfunction to obtain all keywords following the character or character string.
Procedurel You can obtain the partial help of a command line in the following manners.
– Enter a character string with a question mark (?) closely following it to display allcommands that begin with this character string.<Huawei> d?debugging <Group> debugging command group delete Delete a file dialer Dialer dir List files on a filesystem display Display information
– Enter a command and a character string with a question mark (?) closely following itto display all the key words that begin with this character string.<Huawei> display b? bfd Specify BFD(Bidirectional Forwarding Detection ) configuration information bgp BGP information bootp Bootstrap Protocol bridge <Group> bridge command group
– Enter the first several letters of a key word in the command and then press Tab to displaythe complete key word on the condition that the letters uniquely identify the key word.Otherwise, if you continue to press Tab, different key words are displayed. You canselect the needed key word.
----End
2.2.3 Error Messages of the Command Line InterfaceIf an entered command passes the syntax check, the system executes it. Otherwise, the systemprompts an error message.
All the commands entered by the user are run correctly, if the grammar check has been passed.Otherwise, error messages are reported to the user. See Table 2-2 for the common errormessages.
Huawei AR1200-S Series Enterprise RoutersConfiguration Guide - Basic Configuration 2 CLI Overview
Issue 02 (2011-10-15) Huawei Proprietary and ConfidentialCopyright © Huawei Technologies Co., Ltd.
12
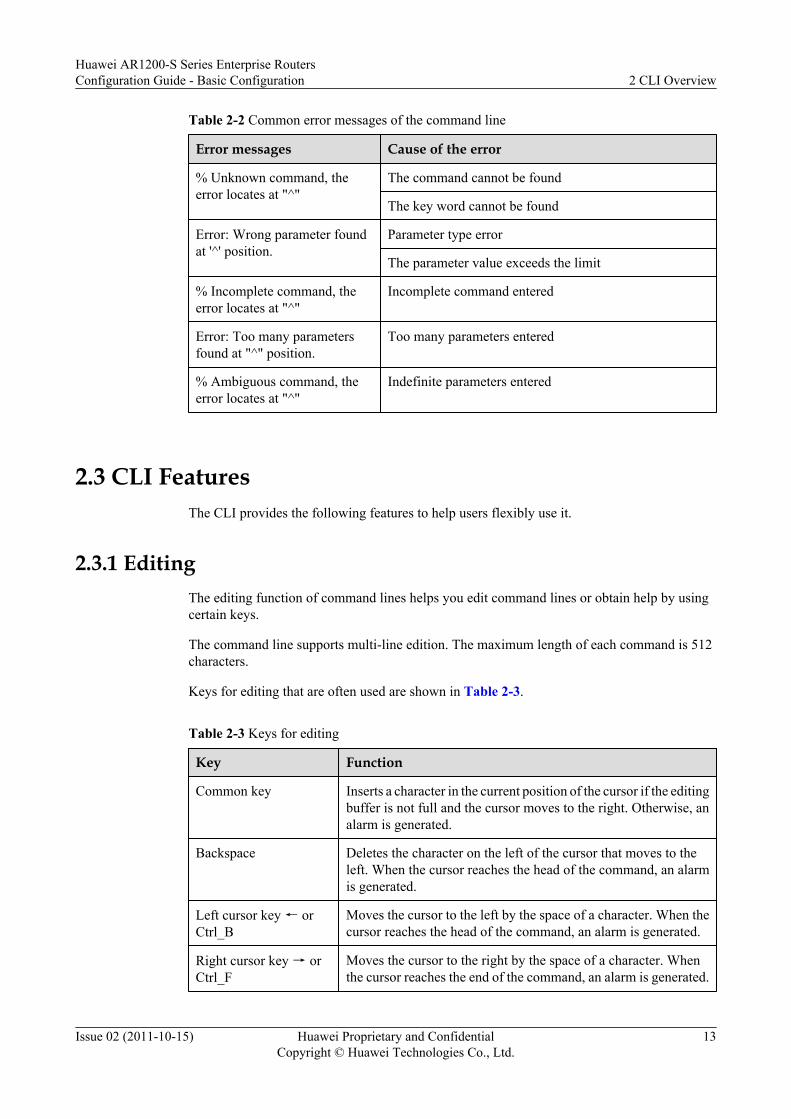
Table 2-2 Common error messages of the command line
Error messages Cause of the error
% Unknown command, theerror locates at "^"
The command cannot be found
The key word cannot be found
Error: Wrong parameter foundat '^' position.
Parameter type error
The parameter value exceeds the limit
% Incomplete command, theerror locates at "^"
Incomplete command entered
Error: Too many parametersfound at "^" position.
Too many parameters entered
% Ambiguous command, theerror locates at "^"
Indefinite parameters entered
2.3 CLI FeaturesThe CLI provides the following features to help users flexibly use it.
2.3.1 EditingThe editing function of command lines helps you edit command lines or obtain help by usingcertain keys.
The command line supports multi-line edition. The maximum length of each command is 512characters.
Keys for editing that are often used are shown in Table 2-3.
Table 2-3 Keys for editing
Key Function
Common key Inserts a character in the current position of the cursor if the editingbuffer is not full and the cursor moves to the right. Otherwise, analarm is generated.
Backspace Deletes the character on the left of the cursor that moves to theleft. When the cursor reaches the head of the command, an alarmis generated.
Left cursor key ← orCtrl_B
Moves the cursor to the left by the space of a character. When thecursor reaches the head of the command, an alarm is generated.
Right cursor key → orCtrl_F
Moves the cursor to the right by the space of a character. Whenthe cursor reaches the end of the command, an alarm is generated.
Huawei AR1200-S Series Enterprise RoutersConfiguration Guide - Basic Configuration 2 CLI Overview
Issue 02 (2011-10-15) Huawei Proprietary and ConfidentialCopyright © Huawei Technologies Co., Ltd.
13

Key Function
Tab Press Tab after typing the incomplete key word and the systemruns the partial help:l If the matching key word is unique, the system replaces the
typed one with the complete key word and displays it in a newline with the cursor a space behind.
l If there are several matches or no match at all, the systemdisplays the prefix first. Then you can press Tab to view thematching key word one by one. In this case, the cursor closelyfollows the end of the word and you can type a space to enterthe next word.
l If a wrong key word is entered, press Tab and the word isdisplayed in a new line.
2.3.2 DisplayingAll command lines have the same displaying feature. You can construct the displaying mode asrequired.
You can control the display of information on the CLI as follows:
l If output information cannot be displayed on a full screen, you have three options to viewthe information, as shown in Table 2-4.
Table 2-4 Keys for displaying
Key Function
Ctrl_C Stops the display and running of the command.
Space Allows information to be displayed on the next screen.
Enter Allows information to be displayed on the next line.
2.3.3 Regular ExpressionsThe regular expression is an expression that describes a set of strings. It consists of commoncharacters (such as letters from "a" to "z") and particular characters (also named metacharacters).The regular expression is a template according to which you can search for the required string.Users can use regular expressions to filter output information to rapidly locate desiredinformation.
A regular expression can provide the following functions:
l Searching for and obtaining a sub-string that matches a rule in the string.
l Substituting a string according to a certain matching rule.
Huawei AR1200-S Series Enterprise RoutersConfiguration Guide - Basic Configuration 2 CLI Overview
Issue 02 (2011-10-15) Huawei Proprietary and ConfidentialCopyright © Huawei Technologies Co., Ltd.
14
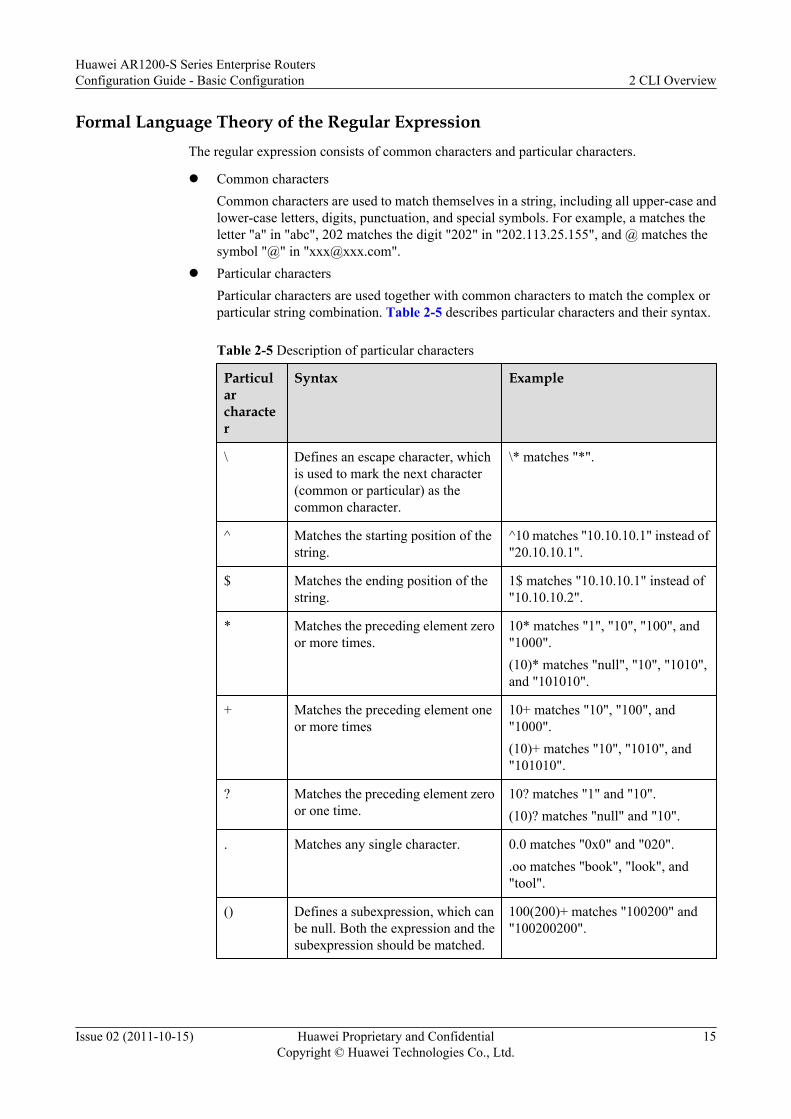
Formal Language Theory of the Regular ExpressionThe regular expression consists of common characters and particular characters.
l Common charactersCommon characters are used to match themselves in a string, including all upper-case andlower-case letters, digits, punctuation, and special symbols. For example, a matches theletter "a" in "abc", 202 matches the digit "202" in "202.113.25.155", and @ matches thesymbol "@" in "[email protected]".
l Particular charactersParticular characters are used together with common characters to match the complex orparticular string combination. Table 2-5 describes particular characters and their syntax.
Table 2-5 Description of particular characters
Particularcharacter
Syntax Example
\ Defines an escape character, whichis used to mark the next character(common or particular) as thecommon character.
\* matches "*".
^ Matches the starting position of thestring.
^10 matches "10.10.10.1" instead of"20.10.10.1".
$ Matches the ending position of thestring.
1$ matches "10.10.10.1" instead of"10.10.10.2".
* Matches the preceding element zeroor more times.
10* matches "1", "10", "100", and"1000".(10)* matches "null", "10", "1010",and "101010".
+ Matches the preceding element oneor more times
10+ matches "10", "100", and"1000".(10)+ matches "10", "1010", and"101010".
? Matches the preceding element zeroor one time.
10? matches "1" and "10".(10)? matches "null" and "10".
. Matches any single character. 0.0 matches "0x0" and "020"..oo matches "book", "look", and"tool".
() Defines a subexpression, which canbe null. Both the expression and thesubexpression should be matched.
100(200)+ matches "100200" and"100200200".
Huawei AR1200-S Series Enterprise RoutersConfiguration Guide - Basic Configuration 2 CLI Overview
Issue 02 (2011-10-15) Huawei Proprietary and ConfidentialCopyright © Huawei Technologies Co., Ltd.
15

Particularcharacter
Syntax Example
x|y Matches x or y. 100|200 matches "100" or "200".1(2|3)4 matches "124" or "134",instead of "1234", "14", "1224", and"1334".
[xyz] Matches any single character in theregular expression.
[123] matches the character 2 in"255".
[^xyz] Matches any character that is notcontained within the brackets.
[^123] matches any character exceptfor "1", "2", and "3".
[a-z] Matches any character within thespecified range.
[0-9] matches any character rangingfrom 0 to 9.
[^a-z] Matches any character beyond thespecified range.
[^0-9] matches all non-numericcharacters.
_ Matches a comma "," left brace "{",right brace "}", left parenthesis "(",and right parenthesis ")".Matches the starting position of theinput string.Matches the ending position of theinput string.Matches a space.
_2008_ matches "2008", "space2008 space", "space 2008", "2008space", ",2008,", "{2008}","(2008)", "{2008)", and "(2008}".
NOTE
Unless otherwise specified, all characters in the preceding table are displayed on the screen.
l Degeneration of particular charactersCertain particular characters, when being placed at the following positions in the regularexpression, degenerate to common characters.– The particular characters following "\" is transferred to match particular characters
themselves.– The particular characters "*", "+", and "?" placed at the starting position of the regular
expression. For example, +45 matches "+45" and abc(*def) matches "abc*def".– The particular character "^" placed at any position except for the start of the regular
expression. For example, abc^ matches "abc^".– The particular character "$" placed at any position except for the end of the regular
expression. For example, 12$2 matches "12$2".– The right bracket such as ")" or "]" being not paired with its corresponding left bracket
"(" or "[". For example, abc) matches "abc)" and 0-9] matches "0-9]".
Huawei AR1200-S Series Enterprise RoutersConfiguration Guide - Basic Configuration 2 CLI Overview
Issue 02 (2011-10-15) Huawei Proprietary and ConfidentialCopyright © Huawei Technologies Co., Ltd.
16

NOTE
Unless otherwise specified, degeneration rules are applicable when preceding regular expressionsserve as subexpressions within parentheses.
l Combination of common and particular charactersIn actual application, a regular expression combines multiple common and particularcharacters to match certain strings.
Specifying a Filtering Mode in Command
CAUTIONThe Huawei AR1200-S Series uses a regular expression to implement the filtering function ofthe pipe character. A display command supports the pipe character only when there is excessiveoutput information.When the output information is queried according to the filtering conditions, the first line of thecommand output starts with the information containing the regular expression.
The command can carry the parameter | count to display the number of matching entries. Theparameter | count can be used together with other parameters.
For the commands supporting regular expressions, the three filtering methods are as follows:
l | begin regular-expression: displays the information that begins with the line that matchesregular expression.
l | exclude regular-expression: displays the information that excludes the lines that matchregular expression.
l | include regular-expression: displays the information that includes the lines that matchregular expression.
NOTE
The value of regular-expression is a string of 1 to 255 characters.
2.3.4 Previously-Used CommandsThe CLI provides a function similar to DosKey to automatically save commands used previouslyon the device. If you need to run a command that has been executed, you can call the commandfrom those have been used previously on the device. This facilitates user operation.
By default, the system saves a maximum of 10 previously-used commands for each user. Youcan run the history-command max-size size-value command in the user view to set the numberof previously-used commands saved in the system. A maximum of 256 previously-usedcommands can be saved in the system.
NOTESetting the number of saved previously-used commands to a proper value is recommended. If a largenumber of previously-used commands are saved, it will take a long time to locate a needed previously-used command, affecting efficiency.
The operations are shown in Table 2-6
Huawei AR1200-S Series Enterprise RoutersConfiguration Guide - Basic Configuration 2 CLI Overview
Issue 02 (2011-10-15) Huawei Proprietary and ConfidentialCopyright © Huawei Technologies Co., Ltd.
17

Table 2-6 Access the previously-used commands
Action Key or Command Result
Displaypreviously-usedcommands.
display history-command
Display previously-used commands entered byusers.
Access the lastpreviously-usedcommand.
Up cursor key (↑) orCtrl_P
Display the last previously-used command if thereis an earlier previously-used command. Otherwise,an alarm is generated.
Access the nextpreviously-usedcommand.
Down cursor key(↓) or Ctrl_N
Display the next previously-used command if thereis a later previously-used command. Otherwise, thecommand is cleared and an alarm is generated.
NOTE
On the HyperTerminal of Windows 9X, cursor key ↑ is invalid as the HyperTerminals of Windows 9Xdefine the keys differently. In this case, you can replace the cursor key ↑ with Ctrl_P.
When you use previously-used commands, note the following points:
l The saved previously-used commands are the same as that those entered by users. Forexample, if the user enters an incomplete command, the saved command also is incomplete.
l If the user runs the same command several times, the earliest command is saved. If thecommand is entered in different forms, they are considered as different commands.For example, if the display ip routing-table command is run several times, only onepreviously-used command is saved. If the display current-configuration command andthe display ip routing-table command are run, two previously-used commands are saved.
2.4 Shortcut KeysUsing the system or user-defined shortcut keys makes it easier to enter commands.
2.4.1 Classifying Shortcut KeysThere are two types of shortcut keys, namely, system shortcut keys and user-defined shortcutkeys. Familiarize yourself with shortcut keys so as to use them accurately.
The shortcut keys in the system are classified into the following types:
l User-defined shortcut keys: CTRL_G, CTRL_L, CTRL_O, and CTRL_U. The user cancorrelate these shortcut keys with any commands. When the shortcut keys are pressed, thesystem automatically runs the corresponding command. For details of defining the shortcutkeys, see 2.4.2 Defining Shortcut Keys.
l System-defined shortcut keys: These shortcut keys with fixed functions are defined by thesystem. Table 2-7 lists the system-defined shortcut keys.
Huawei AR1200-S Series Enterprise RoutersConfiguration Guide - Basic Configuration 2 CLI Overview
Issue 02 (2011-10-15) Huawei Proprietary and ConfidentialCopyright © Huawei Technologies Co., Ltd.
18

NOTE
Different terminal software defines these keys differently. Therefore, the shortcut keys on the terminal maybe different from those listed in this section.
Table 2-7 System-defined shortcut keys
Key Function
CTRL_A The cursor moves to the beginning of the current line.
CTRL_B The cursor moves to the left by the space of a character.
CTRL_C Terminates the running function.
CTRL_D Deletes the character where the cursor lies.
CTRL_E The cursor moves to the end of the current line.
CTRL_F The cursor moves to the right by the space of a character.
CTRL_H Deletes one character on the left of the cursor.
CTRL_N Displays the next command in the previously-used commandbuffer.
CTRL_P Displays the previous command in the previously-usedcommand buffer.
CTRL_W Deletes a character string or character on the left of the cursor.
CTRL_X Deletes all the characters on the left of the cursor.
CTRL_Y Deletes all the characters on the place of the cursor and the rightof the cursor.
CTRL_Z Returns to the user view.
CTRL_] Terminates the inbound or redirection connections.
ESC_B The cursor moves to the left by the space of a word.
ESC_D Deletes a word on the right of the cursor.
ESC_F The cursor moves to the right to the end of next word.
2.4.2 Defining Shortcut KeysIf one or multiple commands are frequently used, you can correlate these commands withshortcut keys. This facilitates user operation and improves efficiency. Only management-levelusers have the rights to define shortcut keys.
Configure as follows in the system view.
Huawei AR1200-S Series Enterprise RoutersConfiguration Guide - Basic Configuration 2 CLI Overview
Issue 02 (2011-10-15) Huawei Proprietary and ConfidentialCopyright © Huawei Technologies Co., Ltd.
19

Action Command
Define shortcut keys hotkey { CTRL_G | CTRL_L | CTRL_O | CTRL_U }command-text
NOTE
When defining the shortcut keys, use double quotation marks to define the command if this commandcontains several commands words, that is, if spaces exist in the command.
By default, CTRL_G, CTRL_L and CTRL_O correspond to the following commandsrespectively:
l CTRL_G: display current-configurationl CTRL_L: undo idle-timeoutl CTRL_O: undo debugging all
By default, CTRL_U is not correlated with any command.
NOTE
Using the undo hotkey command, you can restore the default.
2.4.3 Use of Shortcut KeysYou can use the shortcut key at any position that allows a command to be entered. The systemexecutes an entered shortcut key and displays the corresponding command on the screen in thesame way as you enter a complete command.
l If you have typed part of a command and have not pressed Enter, you can press the shortcutkeys to clear the entered command and display the full corresponding command. Thisoperation has the same effect as that of deleting all commands and then re-entering thecomplete command.
l The shortcut keys are run as the commands, the syntax is recorded to the command bufferand log for fault location and querying.
NOTE
The terminal in use may affect the functions of the shortcut keys. For example, if the customized shortcutkeys of the terminal conflict with those of the router, the input shortcut keys are captured by the terminalprogram and hence the shortcut keys do not function.
Run the following command in any view to display the use of shortcut keys.
Action Command
Check the usage of shortcut keys. display hotkey
2.5 Configuration ExamplesThis section provides several examples for using command lines.
Huawei AR1200-S Series Enterprise RoutersConfiguration Guide - Basic Configuration 2 CLI Overview
Issue 02 (2011-10-15) Huawei Proprietary and ConfidentialCopyright © Huawei Technologies Co., Ltd.
20

2.5.1 Example for Using TabThis example shows how to use the Tab key. After inputting an incomplete keyword, you canpress Tab and obtain all related keywords or verify the correctness of the input keyword.
Context
Usually, you do not need to input complete keywords. Instead, you can just input one or a fewbeginning characters of a keyword and press Tab to complete the keyword. The Tab key helpssearch for and use commands.
Procedurel Tab can be used in three ways as shown in the following example.
– The matching key word is unique after the incomplete key word is input.
1. Input the incomplete key word.[Huawei] info-
2. Press Tab.
The system replaces the input one with the complete key word and displays it in anew line with the cursor leaving a space behind.[Huawei] info-center
– There are several matches or no match after the incomplete key word is input.
# The keyword info-center can be followed by the following prefixes beginning withlog.[Huawei] info-center log?logbuffer Setting of log buffer configurationlogfile <Group> logfile command group loghost Setting of logging host configuration
1. Input the incomplete key word.[Huawei] info-center log
2. Press Tab.
The system first displays the prefix log.[Huawei] info-center logbuffer
Press Tab repeatedly to select a keyword. The cursor is closely following the endof the keyword.[Huawei] info-center logfile[Huawei] info-center loghost
Stop pressing Tab after the keyword logfile that you need is displayed.
3. Input a space to enter the next word path.[Huawei] info-center logfile path
– Input an incorrect keyword and press Tab to check the correctness of the keyword.
1. Input a wrong keyword loglog.[Huawei] info-center loglog
2. Press Tab.[Huawei] info-center loglog
Huawei AR1200-S Series Enterprise RoutersConfiguration Guide - Basic Configuration 2 CLI Overview
Issue 02 (2011-10-15) Huawei Proprietary and ConfidentialCopyright © Huawei Technologies Co., Ltd.
21
The system displays information in a new line, but the keyword loglog remainsunchanged and there is no space between the cursor and the keyword, indicatingthat this keyword is inexistent.
----End
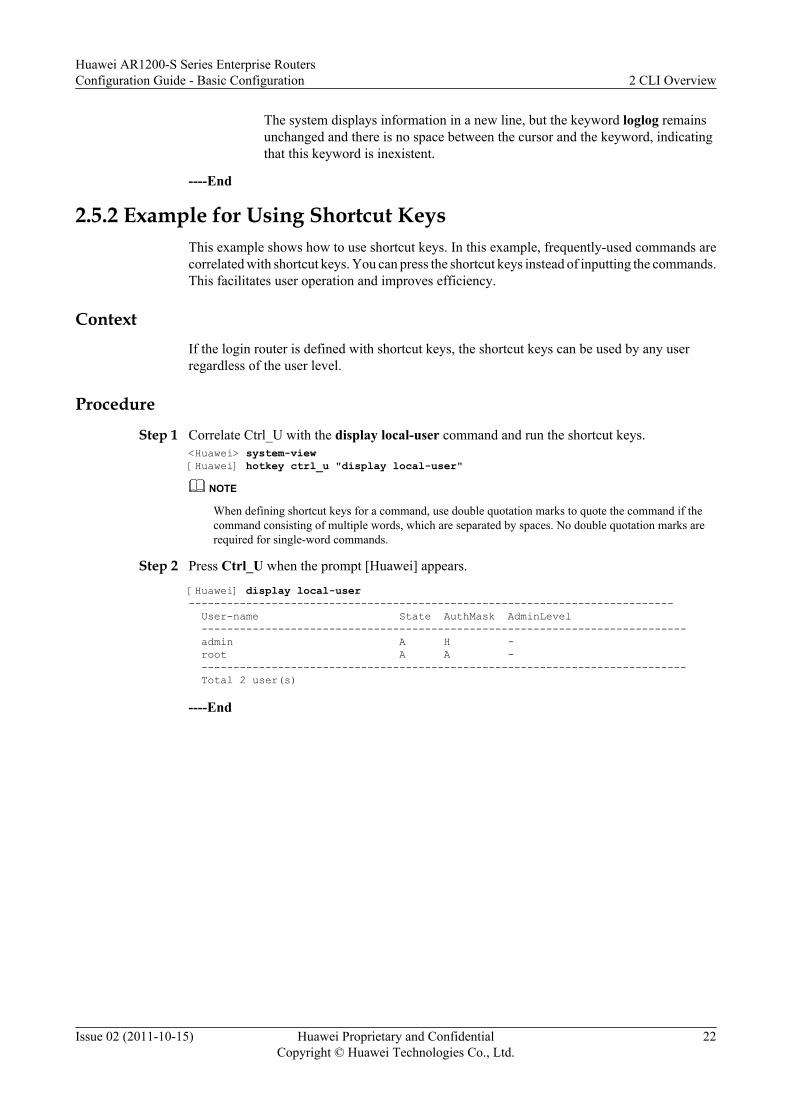
2.5.2 Example for Using Shortcut KeysThis example shows how to use shortcut keys. In this example, frequently-used commands arecorrelated with shortcut keys. You can press the shortcut keys instead of inputting the commands.This facilitates user operation and improves efficiency.
ContextIf the login router is defined with shortcut keys, the shortcut keys can be used by any userregardless of the user level.
Procedure
Step 1 Correlate Ctrl_U with the display local-user command and run the shortcut keys.<Huawei> system-view[Huawei] hotkey ctrl_u "display local-user"
NOTE
When defining shortcut keys for a command, use double quotation marks to quote the command if thecommand consisting of multiple words, which are separated by spaces. No double quotation marks arerequired for single-word commands.
Step 2 Press Ctrl_U when the prompt [Huawei] appears.
[Huawei] display local-user---------------------------------------------------------------------------- User-name State AuthMask AdminLevel ---------------------------------------------------------------------------- admin A H - root A A - ---------------------------------------------------------------------------- Total 2 user(s)
----End
Huawei AR1200-S Series Enterprise RoutersConfiguration Guide - Basic Configuration 2 CLI Overview
Issue 02 (2011-10-15) Huawei Proprietary and ConfidentialCopyright © Huawei Technologies Co., Ltd.
22

3 Basic Configuration
About This Chapter
This chapter describes how to configure the router to follow your using habits and the actualenvironment requirements after logging in to the router.
3.1 Configuring the Basic System EnvironmentThis section describes how to configure the basic system environment.
3.2 Displaying System Status MessagesThis section describes how to use display commands to check basic configurations of the currentsystem.
Huawei AR1200-S Series Enterprise RoutersConfiguration Guide - Basic Configuration 3 Basic Configuration
Issue 02 (2011-10-15) Huawei Proprietary and ConfidentialCopyright © Huawei Technologies Co., Ltd.
23

3.1 Configuring the Basic System EnvironmentThis section describes how to configure the basic system environment.
3.1.1 Establishing the Configuration TaskBefore configuring the basic system environment, familiarize yourself with the applicableenvironment, complete the pre-configuration tasks, and obtain the required data. This can helpyou complete the configuration task quickly and accurately.
Applicable Environment
Before configuring services, you need to configure the basic system environment (such as timeand device name) to meet the environment requirement.
Pre-configuration Tasks
Before configuring the basic system environment, complete the following task:
l Powering on the router
Data Preparation
To configure the basic system environment, you need the following data.
No. Data
1 System time
2 Host name
3 Login information
4 Command level
3.1.2 Configuring the Equipment NameWhen multiple devices on the network need to be managed, you can identify them by setting anequipment name for each device.
Context
The new equipment name takes effect immediately.
Procedure
Step 1 Run:system-view
Huawei AR1200-S Series Enterprise RoutersConfiguration Guide - Basic Configuration 3 Basic Configuration
Issue 02 (2011-10-15) Huawei Proprietary and ConfidentialCopyright © Huawei Technologies Co., Ltd.
24

The system view is displayed.
Step 2 Run:sysname host-name
The equipment name is set.
By default, the equipment name of the router is Huawei.
You can change the name of the router that appears in the command prompt.
----End
3.1.3 Setting the System ClockYou need to set the system time properly to ensure the cooperation between the AR1200-S andother devices.
Context
The system clock displays the current time and date of the system, time zone to which the systembelongs, and daylight saving time. The AR1200-S supports the configurations of the time zoneand the daylight saving time.
Do as follows in the user view:
Procedure
Step 1 Run:clock datetime HH:MM:SS YYYY-MM-DD
The current date and time is set.
Step 2 Run:clock timezone time-zone-name { add | minus } offset
The time zone is set.
l If add is configured, the current time is the UTC time plus the time offset. That is, the defaultUTC time plus offset is equal to the time of time-zone-name.
l If minus is configured, the current time is the UTC time minus the time offset. That is, thedefault UTC time minus offset is equal to the time of time-zone-name.
Step 3 Run:clock daylight-saving-time time-zone-name one-year start-time start-date end-time end-date offset
or
clock daylight-saving-time time-zone-name repeating start-time { { first | second | third | fourth | last } weekday month | start-date } end-time { { first | second | third | fourth | last } weekday month | end-date } offset [ start-year [ end-year ] ]
The daylight saving time is set.
By default, the daylight saving time is not set.
Huawei AR1200-S Series Enterprise RoutersConfiguration Guide - Basic Configuration 3 Basic Configuration
Issue 02 (2011-10-15) Huawei Proprietary and ConfidentialCopyright © Huawei Technologies Co., Ltd.
25

During the configuration of the daylight saving time, you can configure the starting time andending time in one of the following modes: date+date, week+week, date+week, and week+date.For details, see clock daylight-saving-time.
NOTEWhen the daylight saving time is used, the clock timezone time-zone-name { add | minus } offset commandcan be executed to set the time zone name. The display clock command displays the daylight saving timename. After the daylight saving time is complete, the original time zone name is displayed.
----End
3.1.4 Configuring a HeaderIf you need to provide information for users logging in, you can configure a header that thesystem displays during or after login.
ContextA header text is a message displayed by the system when and after a user is logging in to therouter.
If you need to provide information for login users, you can configure a header that the systemdisplays during login or after login.
Procedure
Step 1 Run:system-view
The system view is displayed.
Step 2 Run:header login { information text | file file-name }
The header displayed during login is set.
Step 3 Run:header shell { information text | file file-name }
The header displayed after login is set.
To display the header when the terminal connection has been activated but the user is not beingauthenticated, configure the parameter login.
To display the header after the user logs in successfully, configure the parameter shell.
If the user can log in to the router without authentication, the system directly displays the headerafter the login.
Huawei AR1200-S Series Enterprise RoutersConfiguration Guide - Basic Configuration 3 Basic Configuration
Issue 02 (2011-10-15) Huawei Proprietary and ConfidentialCopyright © Huawei Technologies Co., Ltd.
26

CAUTIONl The header text starts and ends with the same character. After a character is input and
Enter is pressed, an interactive interface is displayed. You can input the required informationended with the first character. The system then exits from the interactive interface.
l If file is specified, save the file containing the header in the root directory of the defaultstorage medium. If the file is saved in another directory, specify the full path in the file name;otherwise, the configuration fails.
l If a user logs in to the router by using SSH1.X, the login header is not displayed during login,but the shell header is displayed after login.
l If a user logs in to the router by using SSH2.0, both login and shell headers are displayed.
----End
3.1.5 Configuring the Undo Command to Match in the PreviousView Automatically
You can run the undo command in the current view and thus the system automatically matchesthe previous view.
ContextIf the user allows the undo command to automatically match the previous view and the userruns the undo command that is not registered in the current view, the system searches theundo command in the previous view.
Procedure
Step 1 Run:system-view
The system view is displayed.
Step 2 Run:matched upper-view
The undo command is configured to match the upper level view.
By default, the undo command does not match the previous view automatically.
NOTE
l The matched upper-view command is valid for current login users who run this command.l It is not recommended that you configure the undo command to automatically match the upper level
view, unless necessary.
----End
3.2 Displaying System Status MessagesThis section describes how to use display commands to check basic configurations of the currentsystem.
Huawei AR1200-S Series Enterprise RoutersConfiguration Guide - Basic Configuration 3 Basic Configuration
Issue 02 (2011-10-15) Huawei Proprietary and ConfidentialCopyright © Huawei Technologies Co., Ltd.
27

ContextYou can use the display commands to collect information about the system status. The displaycommands are classified according to the following functions:
l Displays system configurations.l Displays the running status of the system.l Displays the diagnostic information about a system.
See the related sections for display commands for protocols and interfaces. The following partonly shows the system-level display commands.
Run the following commands in any view.
3.2.1 Displaying System ConfigurationThis section describes how to check the system version, system time, original configuration, andcurrent configuration by using command lines.
PrerequisiteBasic configuration are complete.
Procedurel Run the display version command to display the system version.l Run the display clock command to display the system time.l Run the display saved-configuration command to display the original configuration.l Run the display current-configuration command to display the current configuration.
NOTE
l The display version command can be used to display the software version of the system, thechassis type, and the information about the main control board and interface board.
When a user runs the display current-configuration command to display configurationinformation, other users cannot run the same command until all the command output is displayed.
l The original configuration refers to information about configuration files used by the device whenthe device has been powered on and is being initialized. The current configuration refers to theconfiguration files taking effect during the device operation. For details, see the chapter"Configuring System Startup" in the AR1200-S Basic-Configuration.
----End
3.2.2 Displaying System StatusThis section describes how to check the system operating status (the configuration of the currentview) by using command lines.
PrerequisiteBasic configurations are complete.
Procedurel Run the display this command to display the configuration of the current view.
Huawei AR1200-S Series Enterprise RoutersConfiguration Guide - Basic Configuration 3 Basic Configuration
Issue 02 (2011-10-15) Huawei Proprietary and ConfidentialCopyright © Huawei Technologies Co., Ltd.
28

NOTE
When a user runs the display this command to display system status information, other users cannotrun the same command until all the command output is displayed.
----End
3.2.3 Collecting System Diagnostic InformationThis section describes how to collect information about all modules in the system.
ContextWhen the system fails to perform routine maintenance, you need to collect a lot of informationto locate faults. Then, you have to run different display commands to collect all information. Inthis case, you can use the display diagnostic-information command to collect all informationabout the current running modules in the system.
Procedurel Run:
display diagnostic-information
The system diagnosis information is displayed.
The display diagnostic-information command collects all information collected byrunning the following commands, including display clock, display version, and so on.
----End
Huawei AR1200-S Series Enterprise RoutersConfiguration Guide - Basic Configuration 3 Basic Configuration
Issue 02 (2011-10-15) Huawei Proprietary and ConfidentialCopyright © Huawei Technologies Co., Ltd.
29

4 Configuring User Interface
About This Chapter
When a user logs in to the router by using the console port, the TTY port, Telnet, or SSH, thesystem manages the session between the user and the router on the corresponding user interface.
4.1 User Interface OverviewThe system supports console, and VTY user interfaces.
4.2 Configuring the Console User InterfaceWhen a user logs in to the router by using a console port for local maintenance, you can configureattributes for the corresponding console user interface are needed.
4.3 Configuring VTY User InterfaceIf you need to log in to the router for local or remote maintenance by using Telnet or SSH, youcan configure the corresponding VTY user interface as needed.
4.4 Configuring a TTY User InterfaceThe True Type Terminal (TTY) user interface view is a command line view and is used toconfigure and manage physical interfaces working in asynchronous and interactive mode.
4.5 Configuration ExamplesThis section provides examples for configuring console, TTY user interfaces, and VTY userinterfaces. These configuration examples explain networking requirements, configurationroadmap, and configuration notes.
Huawei AR1200-S Series Enterprise RoutersConfiguration Guide - Basic Configuration 4 Configuring User Interface
Issue 02 (2011-10-15) Huawei Proprietary and ConfidentialCopyright © Huawei Technologies Co., Ltd.
30

4.1 User Interface OverviewThe system supports console, and VTY user interfaces.
Each user interface has a corresponding user interface view. A user interface view is a commandline view provided by the system. It is used to configure and manage all the physical and logicalinterfaces in asynchronous mode.
User Interfaces Supported by the Systeml Console port (CON)
The console port is a serial port provided by the main control board of the router.The main control board provides one EIA/TIA-232 DCE console port for localconfiguration by directly connecting a terminal to a router.
l Virtual type terminal (VTY)It is a logical terminal line. A VTY connection is set up when a router connects to a terminalby means of Telnet. It is used for local or remote access to a router. A maximum of 16 userscan log in to the router by using the VTY user interface.
l TTYThe TTY is used to manage and monitor login users.The TTY mode is the login mode by using the asynchronous serial port.
Numbering of a User InterfaceAfter a user logs in to the router, the system assigns an idle user interface of the smallest numberto the user according to the user's login mode. You can number a user interface in the followingmanners:
l Relative numberingThe relative numbering is in the format of user interface type + number.The relative numbering is available for interfaces of a specific type. It is used only to specifyone or a group of user interfaces of a specified type. Relative numbering must comply withthe following rules:– Number of the console port: CON 0– Number of the TTY: TTY 0 for the first line, TTY 1 for the second line, and so on– Number of the VTY: VTY 0 for the first line, VTY 1 for the second line, and so on
l Absolute numberingThe absolute numbering is used to uniquely specify a user interface or a group of userinterfaces.The number starts with 0. The ports are numbered in the sequence of CON → TTY →VTY. There is only one console port and 0-20 VTY interfaces (VTY interfaces 0 to 14 areprovided for Telnet/SSH users and VTY interfaces 16 to 20 are provided for networkmanagement users). You can use the user-interface maximum-vty command to set themaximum number of user interfaces. The default number is five.By default, the system supports three types of user interfaces: CON, TTY, and VTY.Table 4-1 shows the absolute numbers of the user interfaces in this system.
Huawei AR1200-S Series Enterprise RoutersConfiguration Guide - Basic Configuration 4 Configuring User Interface
Issue 02 (2011-10-15) Huawei Proprietary and ConfidentialCopyright © Huawei Technologies Co., Ltd.
31

Table 4-1 Example for the absolute numbering
Absolute number User-interface
0 CON0
1 First TTY user interface (TTY0)
2 Second TTY user interface (TTY1)
3 Third TTY user interface (TTY2)
4 Fourth TTY user interface (TTY3)
5 Fifth TTY user interface (TTY4)
129 First virtual interface (VTY0)
130 Second virtual interface (VTY1)
131 Third virtual interface (VTY2)
132 Fourth virtual interface (VTY3)
133 Fifth virtual interface (VTY4)
NOTE
The absolute numbers allocated for TTY and VTY interfaces are device-specific.
The numbers from 1 to 32 are reserved for the TTY user interfaces.
Run the display user-interface command to view the absolute number of user interfaces.
Authentication of a User Interface
After a user is configured, the system authenticates the user during user login.
There are three user authentication modes: non-authentication, password authentication, andAAA.
l Non-authentication: In this mode, users can log in to the router without entering usernamesor passwords. For security, this mode is not recommended.
l Password authentication: In this mode, users need to enter passwords, not usernames,during the login process.
l AAA authentication: In this mode, users need to enter passwords and usernames during thelogin process. Telnet users are usually authenticated in this mode.
Priority of a User Interface
Users that log in to the router are managed according to their levels.
Similar to command levels, users are classified into 16 levels numbered 0 to 15. The greater thenumber, the higher the user level.
The level of the command that a user can run is determined by the level of this user.
Huawei AR1200-S Series Enterprise RoutersConfiguration Guide - Basic Configuration 4 Configuring User Interface
Issue 02 (2011-10-15) Huawei Proprietary and ConfidentialCopyright © Huawei Technologies Co., Ltd.
32

l In the case of non-authentication or password authentication, the level of the command thatthe user can run is determined by the level of the user interface.
l In the case of AAA authentication, the command that the user can run is determined by thelevel of the local user specified in the AAA configuration.
4.2 Configuring the Console User InterfaceWhen a user logs in to the router by using a console port for local maintenance, you can configureattributes for the corresponding console user interface are needed.
4.2.1 Establishing the Configuration TaskBefore configuring the console user interface, familiarize yourself with the applicableenvironment, complete the pre-configuration tasks, and obtain the required data. This can helpyou complete the configuration task quickly and accurately.
Applicable Environment
If you need to log in to the router for local maintenance by using a console port, you can configurethe corresponding console user interface, including the physical attributes, terminal attributes,user priority, and user authentication mode. The preceding parameters have default values onthe router and additional configuration is not needed. You can configure these parameters asneeded.
Pre-configuration Tasks
Before configuring a console user interface, complete the following tasks:
l Logging in to the router by using a terminal
Data Preparation
To configure a console user interface, you need the following data.
No. Data
1 Baud rate, flow-control mode, parity, stop bit, and data bit
2 Idle timeout period, number of lines displayed in a terminal screen, and the size ofhistory command buffer
3 User priority
4 User authentication method, user name, and password
NOTE
All the default values (excluding the password and username) are stored on the router and do not needadditional configuration.
Huawei AR1200-S Series Enterprise RoutersConfiguration Guide - Basic Configuration 4 Configuring User Interface
Issue 02 (2011-10-15) Huawei Proprietary and ConfidentialCopyright © Huawei Technologies Co., Ltd.
33
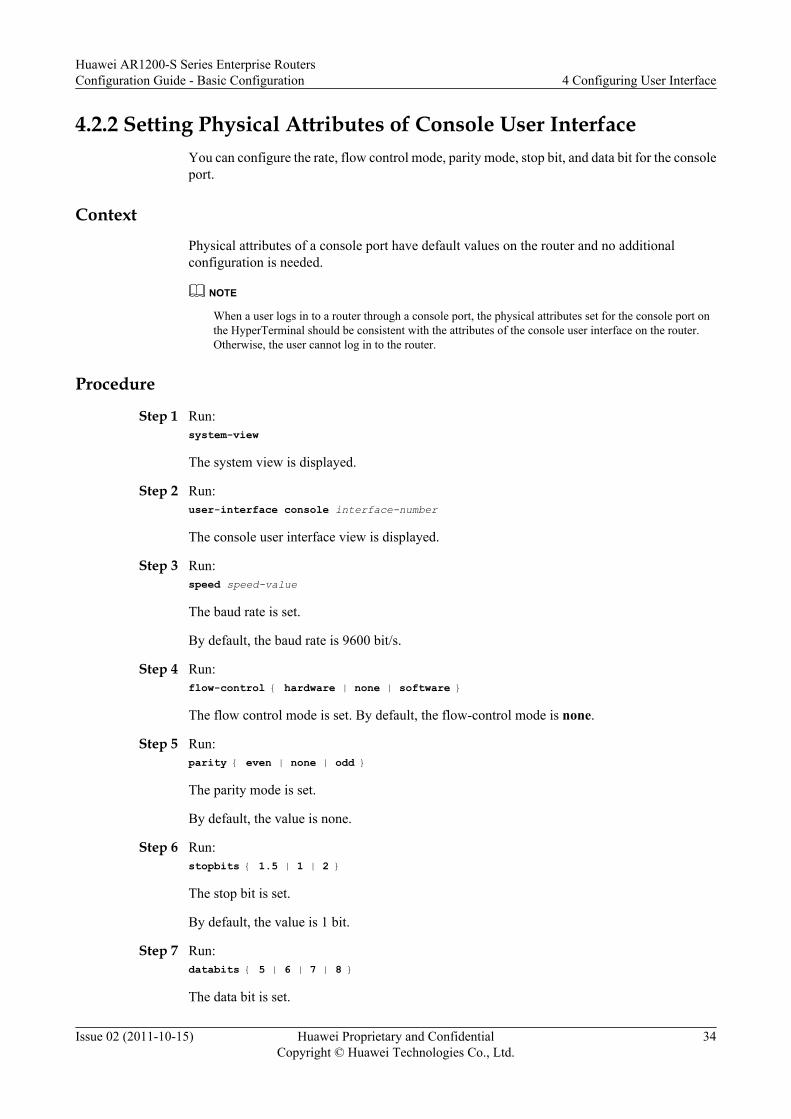
4.2.2 Setting Physical Attributes of Console User InterfaceYou can configure the rate, flow control mode, parity mode, stop bit, and data bit for the consoleport.
Context
Physical attributes of a console port have default values on the router and no additionalconfiguration is needed.
NOTE
When a user logs in to a router through a console port, the physical attributes set for the console port onthe HyperTerminal should be consistent with the attributes of the console user interface on the router.Otherwise, the user cannot log in to the router.
Procedure
Step 1 Run:system-view
The system view is displayed.
Step 2 Run:user-interface console interface-number
The console user interface view is displayed.
Step 3 Run:speed speed-value
The baud rate is set.
By default, the baud rate is 9600 bit/s.
Step 4 Run:flow-control { hardware | none | software }
The flow control mode is set. By default, the flow-control mode is none.
Step 5 Run:parity { even | none | odd }
The parity mode is set.
By default, the value is none.
Step 6 Run:stopbits { 1.5 | 1 | 2 }
The stop bit is set.
By default, the value is 1 bit.
Step 7 Run:databits { 5 | 6 | 7 | 8 }
The data bit is set.
Huawei AR1200-S Series Enterprise RoutersConfiguration Guide - Basic Configuration 4 Configuring User Interface
Issue 02 (2011-10-15) Huawei Proprietary and ConfidentialCopyright © Huawei Technologies Co., Ltd.
34

By default, the data bit is 8.
----End
4.2.3 Setting Terminal Attributes of Console User InterfaceThis section describes how to set terminal attributes of the console user interface, including theuser timeout disconnection function, number of lines displayed in a terminal screen, and size ofthe history command buffer.
ContextTerminal attributes of the console user interface have default values on the router and you canset them as needed.
Procedure
Step 1 Run:system-view
The system view is displayed.
Step 2 Run:user-interface console interface-number
The console user interface view is displayed.
Step 3 Run:shell
The terminal service is started.
Step 4 Run:idle-timeout minutes [ seconds ]
The idle timeout period is set.
If the connection keeps idle within the timeout period, the system automatically terminates theconnection.
By default, the idle timeout period on the user interface is 10 minutes.
Step 5 Run:screen-length screen-length [temporary]
The length of a terminal screen is set.
The parameter temporary is used to display the number of lines to be temporarily displayed ona terminal screen.
By default, the length of a terminal screen is 24 lines.
Step 6 Run:history-command max-size size-value
The history command buffer is set.
By default, the size of history command buffer on a user interface is 10 entries.
----End
Huawei AR1200-S Series Enterprise RoutersConfiguration Guide - Basic Configuration 4 Configuring User Interface
Issue 02 (2011-10-15) Huawei Proprietary and ConfidentialCopyright © Huawei Technologies Co., Ltd.
35

4.2.4 Configuring User Priority of Console User InterfaceThis section describes how to control users' authority of logging in to the router and improvethe security of managing the router by configuring the user priority.
Contextl Similar to command levels, users are classified into 16 levels numbered 0 to 15. The greater
the number, the higher the user level.l This process is to set the priority for a user who logs in through the console port. A user
can only use the commands with the level corresponding to the user level.For details about command levels, see "Command Level" in the chapter "CLI Overview" ofthe Configuration Guide - Basic Configuration.
Procedure
Step 1 Run:system-view
The system view is displayed.
Step 2 Run:user-interface console interface-number
The console user interface view is displayed.
Step 3 Run:user privilege level level
The priority of the user is set.
NOTE
l By default, users logging in through the console user interface can use commands at level 15, and userslogging in through other user interfaces can use commands at level 0.
l If the command level is inconsistent with the user level, the user level takes precedence.
----End
4.2.5 Configuring the User Authentication Mode of the ConsoleUser Interface
The system provides three authentication modes: AAA, password authentication, and non-authentication. Configuring the user authentication mode can improve the security of therouter.
ContextBy default, the user authentication mode of the console user interface is non-authentication.
Procedurel Configuring AAA Authentication
1. Run:system-view
Huawei AR1200-S Series Enterprise RoutersConfiguration Guide - Basic Configuration 4 Configuring User Interface
Issue 02 (2011-10-15) Huawei Proprietary and ConfidentialCopyright © Huawei Technologies Co., Ltd.
36
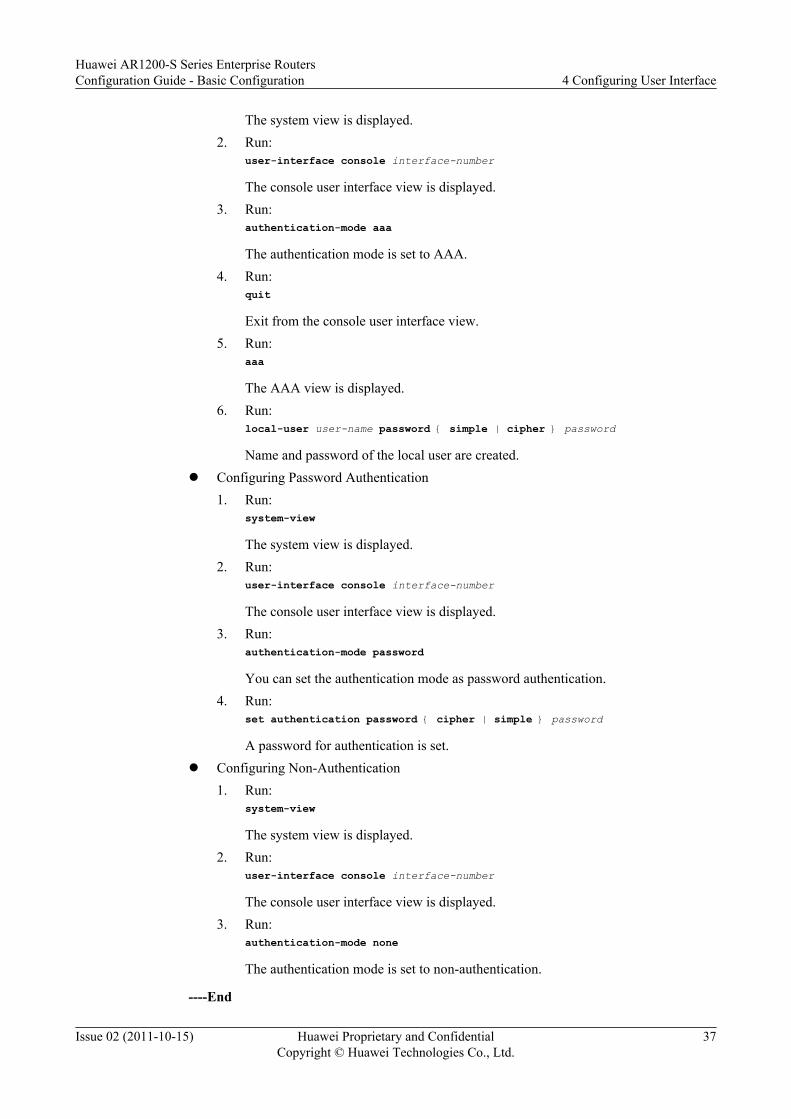
The system view is displayed.2. Run:
user-interface console interface-number
The console user interface view is displayed.3. Run:
authentication-mode aaa
The authentication mode is set to AAA.4. Run:
quit
Exit from the console user interface view.5. Run:
aaa
The AAA view is displayed.6. Run:
local-user user-name password { simple | cipher } password
Name and password of the local user are created.l Configuring Password Authentication
1. Run:system-view
The system view is displayed.2. Run:
user-interface console interface-number
The console user interface view is displayed.3. Run:
authentication-mode password
You can set the authentication mode as password authentication.4. Run:
set authentication password { cipher | simple } password
A password for authentication is set.l Configuring Non-Authentication
1. Run:system-view
The system view is displayed.2. Run:
user-interface console interface-number
The console user interface view is displayed.3. Run:
authentication-mode none
The authentication mode is set to non-authentication.
----End
Huawei AR1200-S Series Enterprise RoutersConfiguration Guide - Basic Configuration 4 Configuring User Interface
Issue 02 (2011-10-15) Huawei Proprietary and ConfidentialCopyright © Huawei Technologies Co., Ltd.
37

4.2.6 Checking the ConfigurationAfter configuring the console user interface, you can view information about the user interface,physical attributes and configurations of the user interface, local user list, and online users.
PrerequisiteThe configurations of the user management function are complete.
Procedurel Run the display users [ all ] command to check information about the user interface.l Run the display user-interface console ui-number1 [ summary ] command to check
physical attributes and configurations of the user interface.l Run the display local-user command to check the local user list.
----End
ExampleRun the display users command, and you can view information about the current user interface.
<Huawei> display users User-Intf Delay Type Network Address AuthenStatus AuthorcmdFlag 0 CON 0 00:00:44 pass noUsername : Unspecified
Run the display user-interface console ui-number1 [ summary ] command, and you can viewthe physical attributes and configurations of the user interface.
<Huawei> display user-interface console 0 Idx Type Tx/Rx Modem Privi ActualPrivi Auth Int 0 CON 0 9600 - 3 - N - + : Current UI is active. F : Current UI is active and work in async mode. Idx : Absolute index of UIs. Type : Type and relative index of UIs. Privi: The privilege of UIs. ActualPrivi: The actual privilege of user-interface. Auth : The authentication mode of UIs. A: Authenticate use AAA. N: Current UI need not authentication. P: Authenticate use current UI's password. Int : The physical location of UIs.
Run the display local-user command, and you can view the local user list.
<Huawei> display local-user ---------------------------------------------------------------------------- User-name State AuthMask AdminLevel ---------------------------------------------------------------------------- admin A H - ftp A F - guest A A 15 ---------------------------------------------------------------------------- Total 3 user(s)
4.3 Configuring VTY User InterfaceIf you need to log in to the router for local or remote maintenance by using Telnet or SSH, youcan configure the corresponding VTY user interface as needed.
Huawei AR1200-S Series Enterprise RoutersConfiguration Guide - Basic Configuration 4 Configuring User Interface
Issue 02 (2011-10-15) Huawei Proprietary and ConfidentialCopyright © Huawei Technologies Co., Ltd.
38
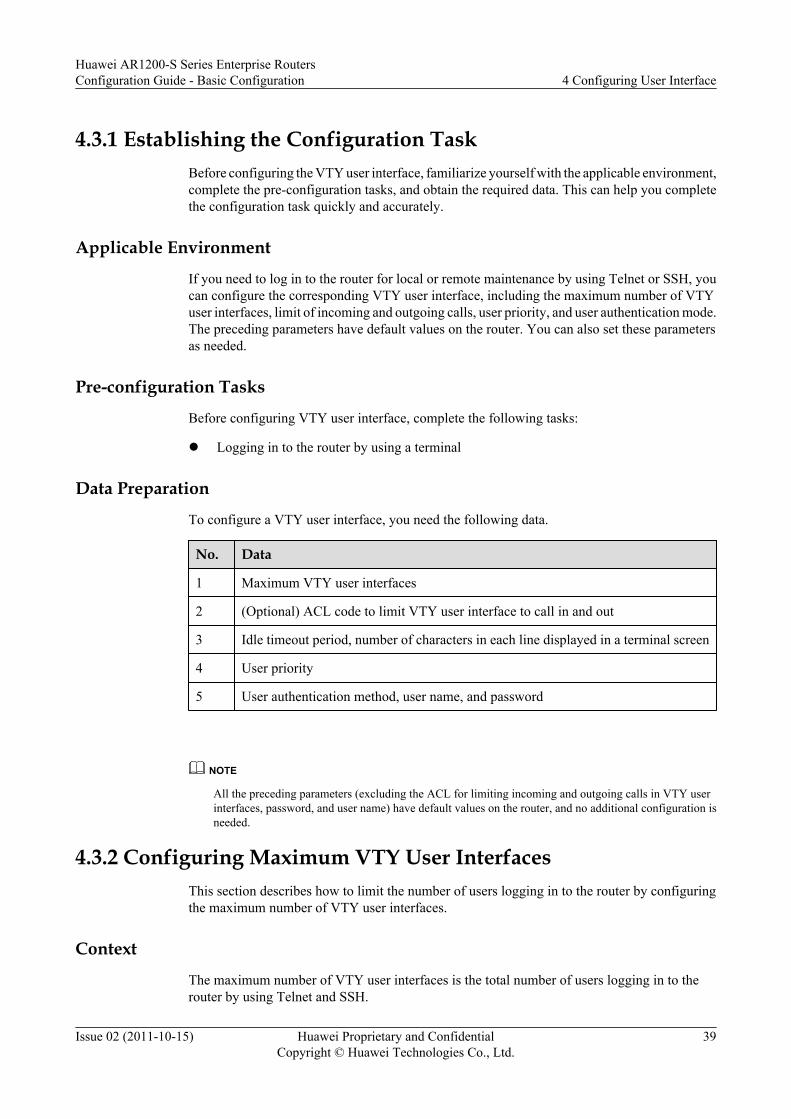
4.3.1 Establishing the Configuration TaskBefore configuring the VTY user interface, familiarize yourself with the applicable environment,complete the pre-configuration tasks, and obtain the required data. This can help you completethe configuration task quickly and accurately.
Applicable Environment
If you need to log in to the router for local or remote maintenance by using Telnet or SSH, youcan configure the corresponding VTY user interface, including the maximum number of VTYuser interfaces, limit of incoming and outgoing calls, user priority, and user authentication mode.The preceding parameters have default values on the router. You can also set these parametersas needed.
Pre-configuration Tasks
Before configuring VTY user interface, complete the following tasks:
l Logging in to the router by using a terminal
Data Preparation
To configure a VTY user interface, you need the following data.
No. Data
1 Maximum VTY user interfaces
2 (Optional) ACL code to limit VTY user interface to call in and out
3 Idle timeout period, number of characters in each line displayed in a terminal screen
4 User priority
5 User authentication method, user name, and password
NOTE
All the preceding parameters (excluding the ACL for limiting incoming and outgoing calls in VTY userinterfaces, password, and user name) have default values on the router, and no additional configuration isneeded.
4.3.2 Configuring Maximum VTY User InterfacesThis section describes how to limit the number of users logging in to the router by configuringthe maximum number of VTY user interfaces.
Context
The maximum number of VTY user interfaces is the total number of users logging in to therouter by using Telnet and SSH.
Huawei AR1200-S Series Enterprise RoutersConfiguration Guide - Basic Configuration 4 Configuring User Interface
Issue 02 (2011-10-15) Huawei Proprietary and ConfidentialCopyright © Huawei Technologies Co., Ltd.
39

Procedure
Step 1 Run:system-view
The system view is displayed.
Step 2 Run:user-interface maximum-vty number
The maximum VTY user interfaces that can log in to the router is set. By default, the maximumnumber of VTY users is 5.
NOTE
When the maximum number of VTY user interfaces is set to zero, any user (including the NMS user) cannotlog in to the router by using a VTY user interface.
If the maximum number of VTY user interfaces to be configured is smaller than the maximumnumber of current interfaces, current online users will not be affected and no additionconfiguration is needed.
If the maximum number of VTY user interfaces to be configured is larger than the maximumnumber of current interfaces, the authentication mode and password need to be configured fornewly added user interfaces.
For newly added user interfaces, the system defaults to password authentication.
For example, a maximum of five users are allowed online. To allow 15 VTY users online at thesame time, you need to run the authentication-mode command and the set authenticationpassword command to configure authentication modes and passwords for user interfaces fromVTY 5 to VTY 14. The command is run as follows:
<Huawei> system-view[Huawei] user-interface maximum-vty 15[Huawei] user-interface vty 5 14[Huawei-ui-vty5-14] authentication-mode password[Huawei-ui-vty5-14] set authentication password cipher huawei
----End
4.3.3 (Optional)Setting Limit on Incoming and Outgoing Calls ofVTY User Interfaces
This section describes how to configure an ACL to limit incoming and outgoing calls of theVTY user interface.
ContextBefore setting the limit on incoming and outgoing calls of the VTY user interface, run the aclcommand in the system view to create an ACL and enter the ACL view. Then, run the rulecommand to add rules to the ACL.
NOTE
l The user interface supports the basic ACL ranging from 2000 to 2999 and the advanced ACL rangingfrom 3000 to 3999.
l For details of ACL configuration, refer to the Huawei AR1200-S Series Enterprise RoutersConfiguration Guide - Security.
Huawei AR1200-S Series Enterprise RoutersConfiguration Guide - Basic Configuration 4 Configuring User Interface
Issue 02 (2011-10-15) Huawei Proprietary and ConfidentialCopyright © Huawei Technologies Co., Ltd.
40
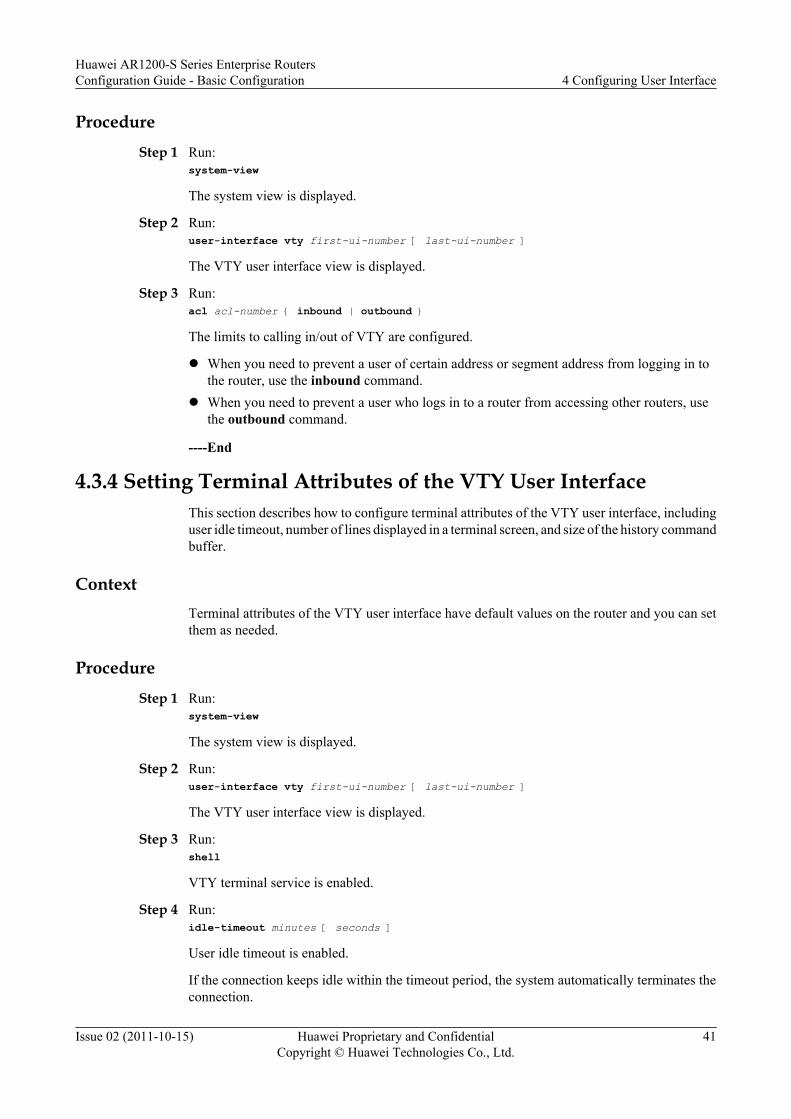
ProcedureStep 1 Run:
system-view
The system view is displayed.
Step 2 Run:user-interface vty first-ui-number [ last-ui-number ]
The VTY user interface view is displayed.
Step 3 Run:acl acl-number { inbound | outbound }
The limits to calling in/out of VTY are configured.
l When you need to prevent a user of certain address or segment address from logging in tothe router, use the inbound command.
l When you need to prevent a user who logs in to a router from accessing other routers, usethe outbound command.
----End
4.3.4 Setting Terminal Attributes of the VTY User InterfaceThis section describes how to configure terminal attributes of the VTY user interface, includinguser idle timeout, number of lines displayed in a terminal screen, and size of the history commandbuffer.
ContextTerminal attributes of the VTY user interface have default values on the router and you can setthem as needed.
ProcedureStep 1 Run:
system-view
The system view is displayed.
Step 2 Run:user-interface vty first-ui-number [ last-ui-number ]
The VTY user interface view is displayed.
Step 3 Run:shell
VTY terminal service is enabled.
Step 4 Run:idle-timeout minutes [ seconds ]
User idle timeout is enabled.
If the connection keeps idle within the timeout period, the system automatically terminates theconnection.
Huawei AR1200-S Series Enterprise RoutersConfiguration Guide - Basic Configuration 4 Configuring User Interface
Issue 02 (2011-10-15) Huawei Proprietary and ConfidentialCopyright © Huawei Technologies Co., Ltd.
41
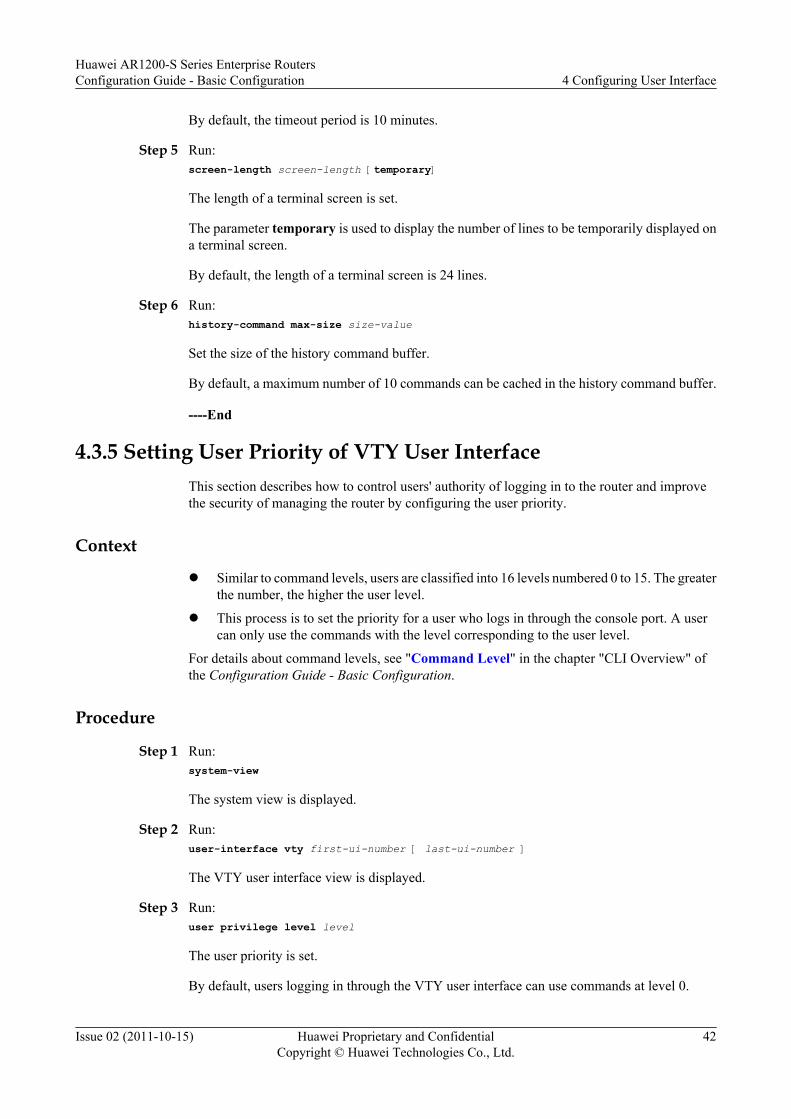
By default, the timeout period is 10 minutes.
Step 5 Run:screen-length screen-length [temporary]
The length of a terminal screen is set.
The parameter temporary is used to display the number of lines to be temporarily displayed ona terminal screen.
By default, the length of a terminal screen is 24 lines.
Step 6 Run:history-command max-size size-value
Set the size of the history command buffer.
By default, a maximum number of 10 commands can be cached in the history command buffer.
----End
4.3.5 Setting User Priority of VTY User InterfaceThis section describes how to control users' authority of logging in to the router and improvethe security of managing the router by configuring the user priority.
Context
l Similar to command levels, users are classified into 16 levels numbered 0 to 15. The greaterthe number, the higher the user level.
l This process is to set the priority for a user who logs in through the console port. A usercan only use the commands with the level corresponding to the user level.
For details about command levels, see "Command Level" in the chapter "CLI Overview" ofthe Configuration Guide - Basic Configuration.
Procedure
Step 1 Run:system-view
The system view is displayed.
Step 2 Run:user-interface vty first-ui-number [ last-ui-number ]
The VTY user interface view is displayed.
Step 3 Run:user privilege level level
The user priority is set.
By default, users logging in through the VTY user interface can use commands at level 0.
Huawei AR1200-S Series Enterprise RoutersConfiguration Guide - Basic Configuration 4 Configuring User Interface
Issue 02 (2011-10-15) Huawei Proprietary and ConfidentialCopyright © Huawei Technologies Co., Ltd.
42

NOTE
If the command level configured in the VTY user interface view is inconsistent with the user priority, theuser priority takes effect.
----End
4.3.6 Setting User Authentication Mode of the VTY User InterfaceThe system provides three authentication modes: AAA, password authentication, and non-authentication. Configuring the user authentication mode can improve the security of therouter.
ContextBy default, the user authentication mode of the VTY user interface is password authentication.
Procedurel Configuring AAA Authentication
1. Run:system-view
The system view is displayed.2. Run:
user-interface vty first-ui-number [ last-ui-number ]
The VTY user interface view is displayed.3. Run:
authentication-mode aaa
The authentication mode is set to AAA.4. Run:
quit
Exit from the VTY user interface view.5. Run:
aaa
The AAA view is displayed.6. Run:
local-user user-name password { simple | cipher } password
Name and password of the local user are created.l Configuring Password Authentication
1. Run:system-view
The system view is displayed.2. Run:
user-interface vty first-ui-number [ last-ui-number ]
The VTY user interface view is displayed.3. Run:
Huawei AR1200-S Series Enterprise RoutersConfiguration Guide - Basic Configuration 4 Configuring User Interface
Issue 02 (2011-10-15) Huawei Proprietary and ConfidentialCopyright © Huawei Technologies Co., Ltd.
43

authentication-mode password
Set the authentication mode as password.4. Run:
set authentication password { cipher | simple } password
A password for this authentication mode is set.l Configuring Non-Authentication
1. Do as follows on the router, run:system-view
The system view is displayed.2. Run:
user-interface vty first-ui-number [ last-ui-number ]
The VTY user interface view is displayed.3. Run:
authentication-mode none
The authentication mode is set to none.
----End
4.3.7 Checking the ConfigurationAfter configuring the VTY user interface, you can view information about user interfaces, themaximum number of VTY user interfaces, and physical attributes and configurations of userinterfaces.
PrerequisiteThe configurations of the VTY user interface are complete.
Procedurel Run the display users [ all ] command to check information about user interfaces.l Run the display user-interface maximum-vty command to check the maximum number
of VTY user interfaces.l Run the display user-interface [ [ ui-type ] ui-number1 | ui-number ] [ summary ]
command to check the physical attributes and configurations of user interfaces.l Run the display local-user command to check the local user list.l Run the display vty mode command to check the VTY mode.
----End
ExampleRun the display users command, and you can view information about the current user interfaces.
<Huawei> display users User-Intf Delay Type Network Address AuthenStatus AuthorcmdFlag 34 VTY 0 00:00:12 TEL 10.138.77.38 no Username : Unspecified+ 35 VTY 1 00:00:00 TEL 10.138.77.57 no Username : Unspecified
Huawei AR1200-S Series Enterprise RoutersConfiguration Guide - Basic Configuration 4 Configuring User Interface
Issue 02 (2011-10-15) Huawei Proprietary and ConfidentialCopyright © Huawei Technologies Co., Ltd.
44
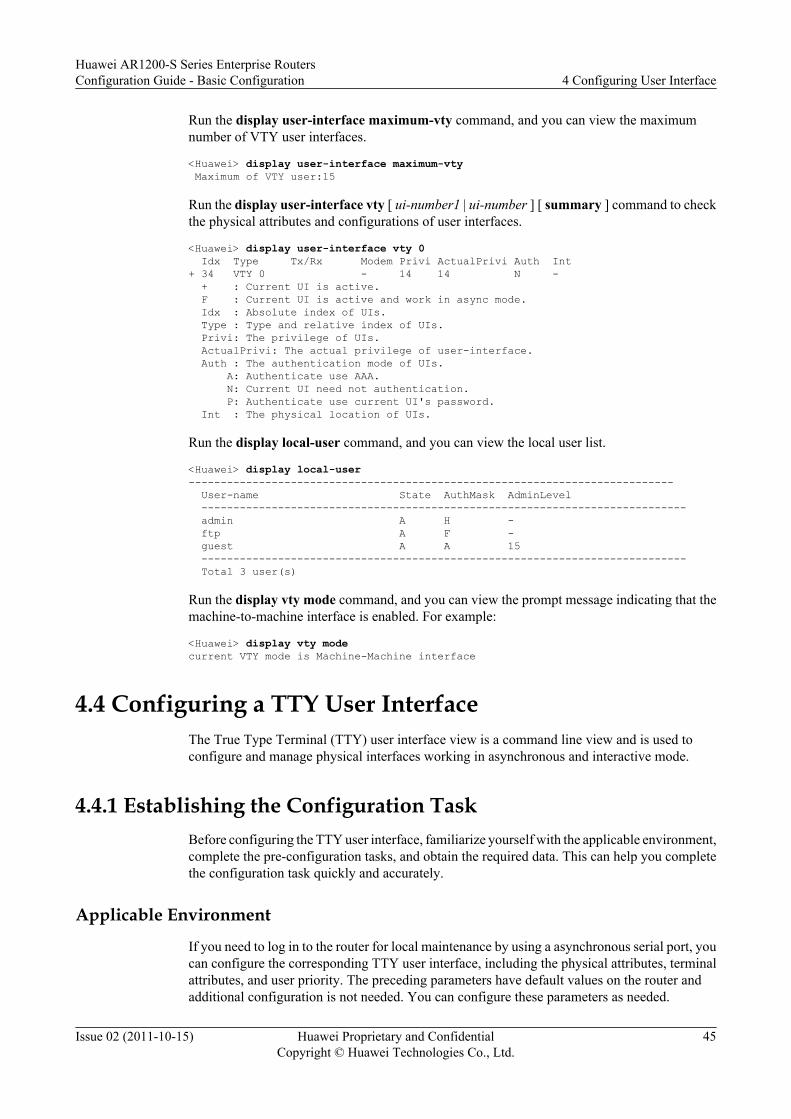
Run the display user-interface maximum-vty command, and you can view the maximumnumber of VTY user interfaces.
<Huawei> display user-interface maximum-vty Maximum of VTY user:15
Run the display user-interface vty [ ui-number1 | ui-number ] [ summary ] command to checkthe physical attributes and configurations of user interfaces.
<Huawei> display user-interface vty 0 Idx Type Tx/Rx Modem Privi ActualPrivi Auth Int+ 34 VTY 0 - 14 14 N - + : Current UI is active. F : Current UI is active and work in async mode. Idx : Absolute index of UIs. Type : Type and relative index of UIs. Privi: The privilege of UIs. ActualPrivi: The actual privilege of user-interface. Auth : The authentication mode of UIs. A: Authenticate use AAA. N: Current UI need not authentication. P: Authenticate use current UI's password. Int : The physical location of UIs.
Run the display local-user command, and you can view the local user list.
<Huawei> display local-user ---------------------------------------------------------------------------- User-name State AuthMask AdminLevel ---------------------------------------------------------------------------- admin A H - ftp A F - guest A A 15 ---------------------------------------------------------------------------- Total 3 user(s)
Run the display vty mode command, and you can view the prompt message indicating that themachine-to-machine interface is enabled. For example:
<Huawei> display vty modecurrent VTY mode is Machine-Machine interface
4.4 Configuring a TTY User InterfaceThe True Type Terminal (TTY) user interface view is a command line view and is used toconfigure and manage physical interfaces working in asynchronous and interactive mode.
4.4.1 Establishing the Configuration TaskBefore configuring the TTY user interface, familiarize yourself with the applicable environment,complete the pre-configuration tasks, and obtain the required data. This can help you completethe configuration task quickly and accurately.
Applicable Environment
If you need to log in to the router for local maintenance by using a asynchronous serial port, youcan configure the corresponding TTY user interface, including the physical attributes, terminalattributes, and user priority. The preceding parameters have default values on the router andadditional configuration is not needed. You can configure these parameters as needed.
Huawei AR1200-S Series Enterprise RoutersConfiguration Guide - Basic Configuration 4 Configuring User Interface
Issue 02 (2011-10-15) Huawei Proprietary and ConfidentialCopyright © Huawei Technologies Co., Ltd.
45

Pre-configuration Tasks
Before configuring a TTY user interface, complete the following tasks:
l Logging in to the router by using a terminal
Data Preparation
To configure a TTY user interface, you need the following data.
No. Data
1 Baud rate, flow-control mode, parity, stop bit, and data bit
2 Idle timeout period, number of lines displayed in a terminal screen, and the size ofhistory command buffer
3 User priority
NOTE
All the default values (excluding the password and username) are stored on the router and do not needadditional configuration.
4.4.2 Setting Physical Attributes of a TTY User InterfaceYou can configure the rate, flow control mode, parity mode, stop bit, and data bit for anasynchronous serial port.
Context
Physical attributes of an asynchronous serial port have default values on a router and noadditional configuration is needed.
NOTE
l If you need to log in to a router through an asynchronous serial port, install an SA or SA board on therouter. If an SA board installed, set the interface working mode to asynchronous mode on the SA board.
l The Hyper Terminal and router must use the same physical attributes, including the baud rate, flowcontrol mode, parity mode, stop bit, and data bit. If values of any attributes are different, you cannotlog in to the router.
Procedure
Step 1 Run:system-view
The system view is displayed.
Step 2 Run:user-interface TTY interface-number
The TTY user interface view is displayed.
Huawei AR1200-S Series Enterprise RoutersConfiguration Guide - Basic Configuration 4 Configuring User Interface
Issue 02 (2011-10-15) Huawei Proprietary and ConfidentialCopyright © Huawei Technologies Co., Ltd.
46

After a board registers successfully and a serial port on the board is configured to work inasynchronous mode, the router generates a random TTY number for the asynchronous serialport. To view the TTY number, run the display user-interface command.
Step 3 Run:speed speed-value
The baud rate is set.
By default, the baud rate is 9600 bit/s.
Step 4 Run:flow-control { hardware | none | software }
The flow control mode is set. By default, the flow-control mode is none.
Step 5 Run:parity { even | none | odd }
The parity mode is set.
By default, the value is none.
Step 6 Run:stopbits { 1.5 | 1 | 2 }
The stop bit is set.
By default, the value is 1 bit.
Step 7 Run:databits { 5 | 6 | 7 | 8 }
The data bit is set.
By default, the data bit is 8.
----End
4.4.3 Setting Terminal Attributes of TTY User InterfaceThis section describes how to set terminal attributes of the TTY user interface, including theuser timeout disconnection function, number of lines displayed in a terminal screen, and size ofthe history command buffer.
ContextTerminal attributes of the TTY user interface have default values on the router and you can setthem as needed.
Procedure
Step 1 Run:system-view
The system view is displayed.
Step 2 Run:user-interface tty interface-number
Huawei AR1200-S Series Enterprise RoutersConfiguration Guide - Basic Configuration 4 Configuring User Interface
Issue 02 (2011-10-15) Huawei Proprietary and ConfidentialCopyright © Huawei Technologies Co., Ltd.
47

The TTY user interface view is displayed.
Step 3 Run:shell
The terminal service is started.
Step 4 Run:idle-timeout minutes [ seconds ]
The idle timeout period is set.
If the connection keeps idle within the timeout period, the system automatically terminates theconnection.
By default, the idle timeout period on the user interface is 10 minutes.
Step 5 Run:screen-length screen-length [temporary]
The length of a terminal screen is set.
The parameter temporary is used to display the number of lines to be temporarily displayed ona terminal screen.
By default, the length of a terminal screen is 24 lines.
Step 6 Run:history-command max-size size-value
The history command buffer is set.
By default, the size of history command buffer on a user interface is 10 entries.
----End
4.4.4 Configuring User Priority of TTY User InterfaceThis section describes how to control users' authority of logging in to the router and improvethe security of managing the router by configuring the user priority.
Contextl Similar to command levels, users are classified into 16 levels numbered 0 to 15. The greater
the number, the higher the user level.l This process is to set the priority for a user who logs in through the asynchronous serial
port. A user can only use the commands with the level corresponding to the user level.For details about command levels, see "Command Level" in the chapter "CLI Overview" ofthe Configuration Guide - Basic Configuration.
Procedure
Step 1 Run:system-view
The system view is displayed.
Step 2 Run:
Huawei AR1200-S Series Enterprise RoutersConfiguration Guide - Basic Configuration 4 Configuring User Interface
Issue 02 (2011-10-15) Huawei Proprietary and ConfidentialCopyright © Huawei Technologies Co., Ltd.
48
user-interface tty interface-number
The TTY user interface view is displayed.
Step 3 Run:user privilege level level
The priority of the user is set.
NOTE
l By default, users logging in through the TTY user interface can use commands at level 3, and userslogging in through other user interfaces can use commands at level 0.
l If the command level is inconsistent with the user level, the user level takes precedence.
----End
4.4.5 Configuring the Authentication Mode on a TTY User Interface
ContextBy default, users are not authenticated on a TTY user interface.
Procedurel Configuring AAA authentication
1. Run:system-view
The system view is displayed.2. Run:
user-interface tty first-ui-number [ last-ui-number ]
The TTY user interface view is displayed.3. Run:
authentication-mode aaa
The authentication mode is set to AAA authentication.4. Run:
quit
Exit the TTY user interface view.5. Run:
aaa
The AAA view is displayed.6. Run:
local-user user-name password { simple | cipher } password
The local user name and password are configured.l Configuring password authentication
1. Run:system-view
The system view is displayed.
Huawei AR1200-S Series Enterprise RoutersConfiguration Guide - Basic Configuration 4 Configuring User Interface
Issue 02 (2011-10-15) Huawei Proprietary and ConfidentialCopyright © Huawei Technologies Co., Ltd.
49
2. Run:user-interface tty first-ui-number [ last-ui-number ]
The TTY user interface view is displayed.3. Run:
authentication-mode password
The authentication mode is set to password authentication.4. Run:
set authentication password { cipher | simple } password
The authentication password is configured.l Configuring non-authentication
1. Run:system-view
The system view is displayed.2. Run:
user-interface tty first-ui-number [ last-ui-number ]
The TTY user interface view is displayed.3. Run:
authentication-mode none
The authentication mode is set to none.
----End
4.4.6 Checking the ConfigurationAfter configuring the TTY user interface, you can view information about the user interface,physical attributes and configurations of the user interface, local user list, and online users.
PrerequisiteThe configurations of the user management function are complete.
Procedurel Run the display users [ all ] command to check information about the user interface.l Run the display user-interface tty ui-number1 [ summary ] command to check physical
attributes and configurations of the user interface.
----End
ExampleRun the display users command, and you can view information about the current user interface.
<Huawei> display users User-Intf Delay Type Network Address AuthenStatus AuthorcmdFlag 0 TTY 0 00:00:44 Username : Unspecified
Run the display user-interface tty ui-number1 [ summary ] command, and you can view thephysical attributes and configurations of the user interface.
Huawei AR1200-S Series Enterprise RoutersConfiguration Guide - Basic Configuration 4 Configuring User Interface
Issue 02 (2011-10-15) Huawei Proprietary and ConfidentialCopyright © Huawei Technologies Co., Ltd.
50
<Huawei> display user-interface tty 17Idx Type Tx/Rx Modem Privi ActualPrivi Auth Int 17 TTY 17 9600 - 0 - N 2/0/0 + : Current UI is active. F : Current UI is active and work in async mode. Idx : Absolute index of UIs. Type : Type and relative index of UIs. Privi: The privilege of UIs. ActualPrivi: The actual privilege of user-interface. Auth : The authentication mode of UIs. A: Authenticate use AAA. N: Current UI need not authentication. P: Authenticate use current UI's password. Int : The physical location of UIs.
4.5 Configuration ExamplesThis section provides examples for configuring console, TTY user interfaces, and VTY userinterfaces. These configuration examples explain networking requirements, configurationroadmap, and configuration notes.
4.5.1 Example for Configuring Console User InterfaceThis part provides an example describing how to configure the console user interface. In thisconfiguration example, to allow a user in password authentication mode to log in to the routerby using a console user interface, multiple attributes of the console user interface are set,including physical attributes, terminal attributes, user priority, user authentication mode, andpassword.
Networking RequirementsTo initialize configurations of the router or locally maintain the router, a user can log in to therouter through a console user interface. To allow the user to log in, you can set attributes of theconsole user interface as needed (for security reasons, for example).
In the console user interface view, the password authentication mode is set (the password ishuawei).
After a user logs in, if the user takes no action on the router for more than 30 minutes, theconnection between the user and the router is torn down.
Configuration RoadmapThe configuration roadmap is as follows:
1. Enter the interface view and set physical attributes of the console user interface.2. Set terminal attributes of the console user interface.3. Set the user priority of the console user interface.4. Set the user authentication mode and password of the console user interface.
By default, the terminal service is enabled on all the user interfaces. If the terminal service isdisabled, run the shell command to enable the terminal service.
Data PreparationTo complete the configuration, you need the following data:
Huawei AR1200-S Series Enterprise RoutersConfiguration Guide - Basic Configuration 4 Configuring User Interface
Issue 02 (2011-10-15) Huawei Proprietary and ConfidentialCopyright © Huawei Technologies Co., Ltd.
51
l Transmission rate of the console user interface: 4800 bit/s
l Flow control mode of the console user interface: None
l Parity of the console user interface: even
l Stop bit of the console user interface: 2
l Data bit of the console user interface: 8
l Timeout period for disconnecting from the console user interface: 30 minutes
l Number of lines that a terminal screen displays: 30
l Size of the history command buffer: 20
l User authentication mode: password (password: huawei)
Procedure
Step 1 Set physical attributes of the console user interface.<Huawei> system-view[Huawei] user-interface console 0[Huawei-ui-console0] speed 4800[Huawei-ui-console0] flow-control none[Huawei-ui-console0] parity even[Huawei-ui-console0] stopbits 2[Huawei-ui-console0] databits 8
Step 2 Set terminal attributes of the console user interface.[Huawei-ui-console0] shell[Huawei-ui-console0] idle-timeout 30[Huawei-ui-console0] screen-length 30[Huawei-ui-console0] history-command max-size 20
Step 3 Set the user authentication mode in the console user interface to password.[Huawei-ui-console0] authentication-mode password[Huawei-ui-console0] set authentication password simple huawei[Huawei-ui-console0] quit
After the console user interface is configured, a user in password authentication mode can login to the router through a console port, implementing local maintenance of the router. For detailson how a user logs in to the router, see the 5 Configuring User Login.
----End
Configuration Files# sysname Huawei#user-interface con 0 authentication-mode password user privilege level 15 set authentication password simple huawei history-command max-size 20 idle-timeout 30 0 screen-length 30 databits 8 parity even stopbits 2 speed 4800 screen-length 30#return
Huawei AR1200-S Series Enterprise RoutersConfiguration Guide - Basic Configuration 4 Configuring User Interface
Issue 02 (2011-10-15) Huawei Proprietary and ConfidentialCopyright © Huawei Technologies Co., Ltd.
52
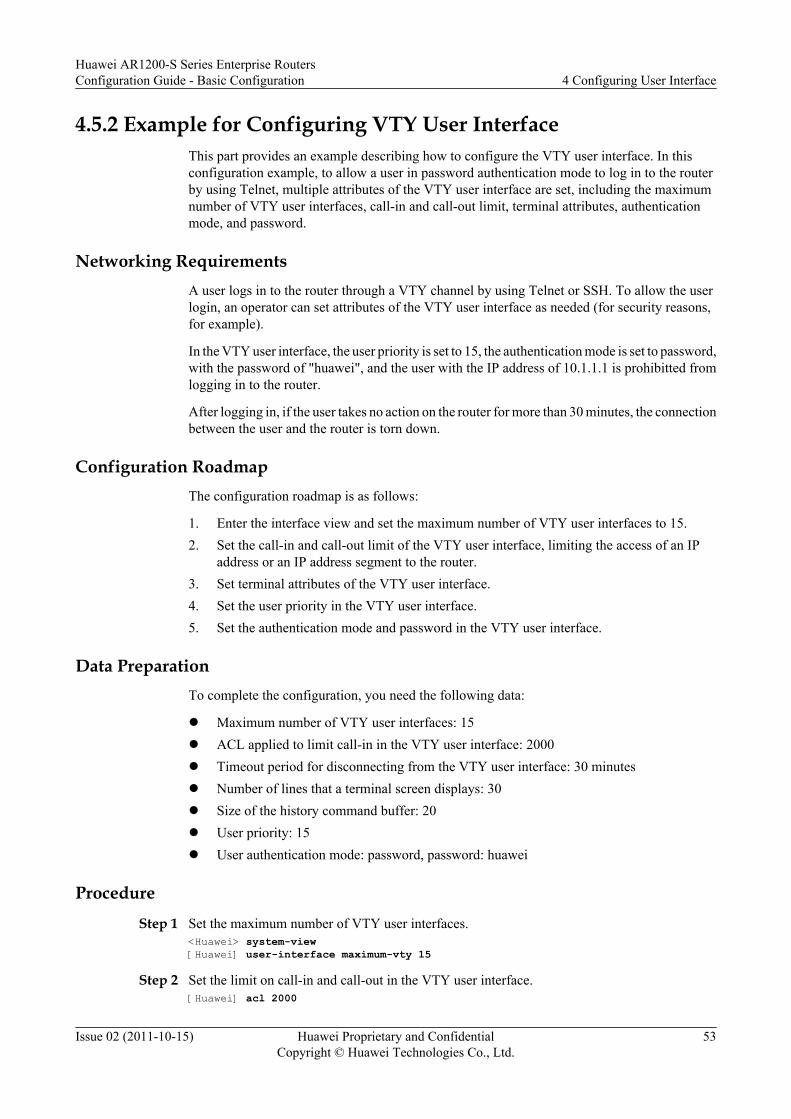
4.5.2 Example for Configuring VTY User InterfaceThis part provides an example describing how to configure the VTY user interface. In thisconfiguration example, to allow a user in password authentication mode to log in to the routerby using Telnet, multiple attributes of the VTY user interface are set, including the maximumnumber of VTY user interfaces, call-in and call-out limit, terminal attributes, authenticationmode, and password.
Networking RequirementsA user logs in to the router through a VTY channel by using Telnet or SSH. To allow the userlogin, an operator can set attributes of the VTY user interface as needed (for security reasons,for example).
In the VTY user interface, the user priority is set to 15, the authentication mode is set to password,with the password of "huawei", and the user with the IP address of 10.1.1.1 is prohibitted fromlogging in to the router.
After logging in, if the user takes no action on the router for more than 30 minutes, the connectionbetween the user and the router is torn down.
Configuration RoadmapThe configuration roadmap is as follows:
1. Enter the interface view and set the maximum number of VTY user interfaces to 15.2. Set the call-in and call-out limit of the VTY user interface, limiting the access of an IP
address or an IP address segment to the router.3. Set terminal attributes of the VTY user interface.4. Set the user priority in the VTY user interface.5. Set the authentication mode and password in the VTY user interface.
Data PreparationTo complete the configuration, you need the following data:
l Maximum number of VTY user interfaces: 15l ACL applied to limit call-in in the VTY user interface: 2000l Timeout period for disconnecting from the VTY user interface: 30 minutesl Number of lines that a terminal screen displays: 30l Size of the history command buffer: 20l User priority: 15l User authentication mode: password, password: huawei
Procedure
Step 1 Set the maximum number of VTY user interfaces.<Huawei> system-view[Huawei] user-interface maximum-vty 15
Step 2 Set the limit on call-in and call-out in the VTY user interface.[Huawei] acl 2000
Huawei AR1200-S Series Enterprise RoutersConfiguration Guide - Basic Configuration 4 Configuring User Interface
Issue 02 (2011-10-15) Huawei Proprietary and ConfidentialCopyright © Huawei Technologies Co., Ltd.
53

[Huawei-acl-basic-2000] rule deny source 10.1.1.1 0[Huawei-acl-basic-2000] rule permit source any[Huawei-acl-basic-2000] quit[Huawei] user-interface vty 0 14[Huawei-ui-vty0-14] acl 2000 inbound
Step 3 Set terminal attributes of the VTY user interface.[Huawei-ui-vty0-14] shell[Huawei-ui-vty0-14] idle-timeout 30[Huawei-ui-vty0-14] screen-length 30[Huawei-ui-vty0-14] history-command max-size 20
Step 4 Set the user priority in the VTY user interface.[Huawei-ui-vty0-14] user privilege level 15
Step 5 Set the authentication mode and password in the VTY user interface.[Huawei-ui-vty0-14] authentication-mode password[Huawei-ui-vty0-14] set authentication password simple huawei[Huawei-ui-vty0-14] quit
After the VTY user interface is configured, a user authenticated in password mode can log in tothe router by using Telnet or SSH (Stelnet), implementing local or remote maintenance of therouter. For details on how a user logs in to the router, see the 5 Configuring User Login.
----End
Configuration Files# sysname Huawei#acl number 2000 rule 5 deny source 10.1.1.1 0#user-interface maximum-vty 15user-interface vty 0 14 acl 2000 inbound user privilege level 15 set authentication password simple huawei history-command max-size 20 idle-timeout 30 0 screen-length 30#return
4.5.3 Example for Configuring TTY User InterfaceThis document describes the configurations of the TTY user interface, including physicalattributes, terminal attributes, and user priorities.
Networking RequirementsTo initialize configurations of the router or locally maintain the router, a user can log in to therouter through a TTY user interface. To allow the user to log in, you can set attributes of theTTY user interface.
After a user logs in, if the user takes no action on the router for more than 30 minutes, theconnection between the user and the router is torn down.
Configuration RoadmapThe configuration roadmap is as follows:
Huawei AR1200-S Series Enterprise RoutersConfiguration Guide - Basic Configuration 4 Configuring User Interface
Issue 02 (2011-10-15) Huawei Proprietary and ConfidentialCopyright © Huawei Technologies Co., Ltd.
54
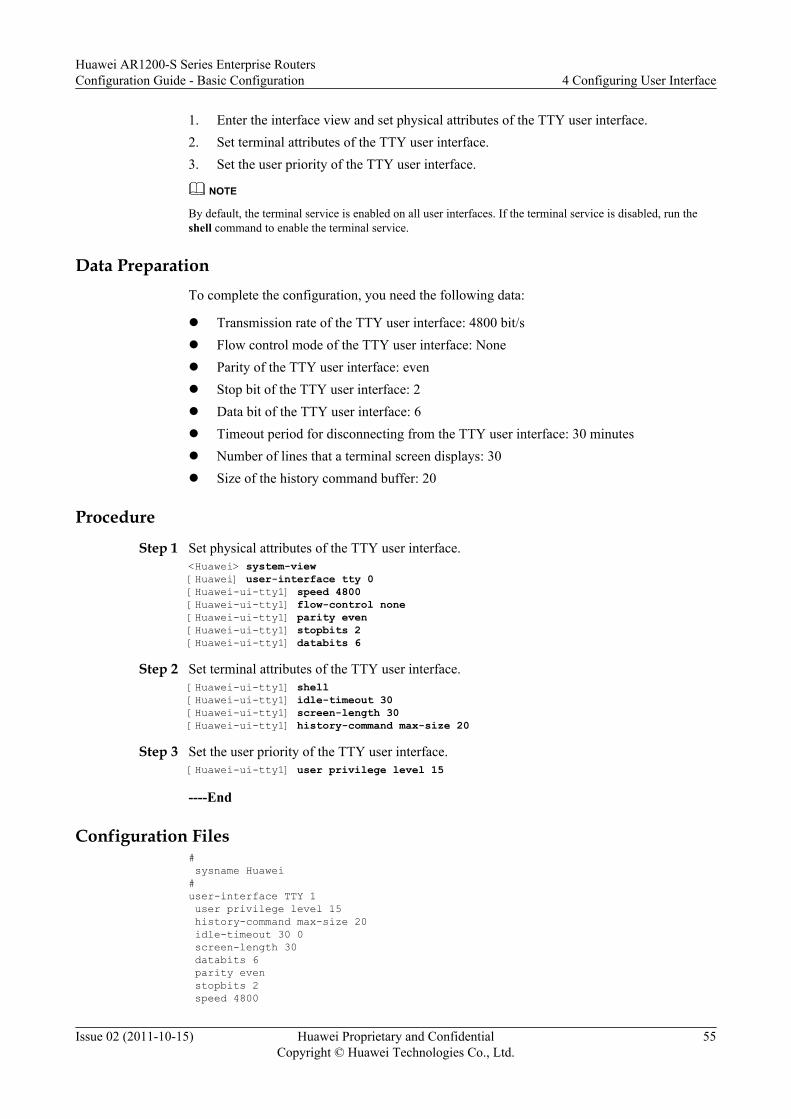
1. Enter the interface view and set physical attributes of the TTY user interface.2. Set terminal attributes of the TTY user interface.3. Set the user priority of the TTY user interface.
NOTE
By default, the terminal service is enabled on all user interfaces. If the terminal service is disabled, run theshell command to enable the terminal service.
Data PreparationTo complete the configuration, you need the following data:
l Transmission rate of the TTY user interface: 4800 bit/sl Flow control mode of the TTY user interface: Nonel Parity of the TTY user interface: evenl Stop bit of the TTY user interface: 2l Data bit of the TTY user interface: 6l Timeout period for disconnecting from the TTY user interface: 30 minutesl Number of lines that a terminal screen displays: 30l Size of the history command buffer: 20
Procedure
Step 1 Set physical attributes of the TTY user interface.<Huawei> system-view[Huawei] user-interface tty 0[Huawei-ui-tty1] speed 4800[Huawei-ui-tty1] flow-control none[Huawei-ui-tty1] parity even[Huawei-ui-tty1] stopbits 2[Huawei-ui-tty1] databits 6
Step 2 Set terminal attributes of the TTY user interface.[Huawei-ui-tty1] shell[Huawei-ui-tty1] idle-timeout 30[Huawei-ui-tty1] screen-length 30[Huawei-ui-tty1] history-command max-size 20
Step 3 Set the user priority of the TTY user interface.[Huawei-ui-tty1] user privilege level 15
----End
Configuration Files# sysname Huawei#user-interface TTY 1 user privilege level 15 history-command max-size 20 idle-timeout 30 0 screen-length 30 databits 6 parity even stopbits 2 speed 4800
Huawei AR1200-S Series Enterprise RoutersConfiguration Guide - Basic Configuration 4 Configuring User Interface
Issue 02 (2011-10-15) Huawei Proprietary and ConfidentialCopyright © Huawei Technologies Co., Ltd.
55

screen-length 30#return
Huawei AR1200-S Series Enterprise RoutersConfiguration Guide - Basic Configuration 4 Configuring User Interface
Issue 02 (2011-10-15) Huawei Proprietary and ConfidentialCopyright © Huawei Technologies Co., Ltd.
56

5 Configuring User Login
About This Chapter
A user can log in to the router through a console port, or by using Telnet or SSH (STelnet). Afterthe login, the user can maintain the router locally or remotely.
5.1 Overview of User LoginUsers can manage and maintain the router only after logging in to the router. Users can log into the router by using the console port, Telnet, or STelnet (SSH Telnet).
5.2 Logging in to the Devices Through the Console PortWhen a user needs to configure the router that is powered on for the first time or locally maintainthe router, the user can log in to the router through a console port.
5.3 Logging in to the Devices by Using TelnetIf multiple routers need to be configured and managed, you do not need to connect the routersand maintain them locally one by one. Instead, you can log in to the routers from a terminal byusing Telnet. This implements remote maintenance of the router and greatly facilitates devicemanagement.
5.4 Logging in to the Devices by Using STelnetSTelnet provides secured remote access over an insecure network. After the client/servernegotiation is complete and a secured connection is established, a user can log in to the routerin a similar way as Telnet.
5.5 Common Operations After LoginAfter logging in to the router, you can perform following operations as needed, such as userpriority switching and terminal window locking.
5.6 Configuration ExamplesThis section provides several examples describing how to configure user login by using a consoleport, Telnet, or STelnet. You can understand the configuration procedures by referring to theconfiguration flowchart. The configuration examples provide information about the networkingrequirements, configuration notes, and configuration roadmap.
Huawei AR1200-S Series Enterprise RoutersConfiguration Guide - Basic Configuration 5 Configuring User Login
Issue 02 (2011-10-15) Huawei Proprietary and ConfidentialCopyright © Huawei Technologies Co., Ltd.
57

5.1 Overview of User LoginUsers can manage and maintain the router only after logging in to the router. Users can log into the router by using the console port, Telnet, or STelnet (SSH Telnet).
To configure, monitor, and maintain the local or remote network devices running AR1200-S,you need to configure the user interface, the user management, and the terminal service.
The user interface provides a login plane. The user management guarantees the login securityand the terminal service provides related processes of login protocol.
The AR1200-S supports the following login methods:
l Login through the console port
l Local or remote login through Telnet or STelnet
Table 5-1 User login modes
Login Mode Application
Console port Users log in to the router through the console port to configure the routerlocally. Login through the console port is required when the router ispowered on for the first time.
Telnet Users log in to the router by using Telnet for local and remote maintenance.Telnet helps users maintain remote devices but brings security threats.
SSH (STelnet) SSH (STelnet) provides security protection for users logging in to therouter to maintain the router locally or remotely.
NOTE
Logins by using Telnet bring security risks because no secure authentication mechanism is available anddata is transmitted by using TCP in plain text mode. Unlike Telnet, SSH guarantees secure data transmissionon a conventional insecure network by authenticating the client and encrypting data in both directions. SSHsupports security Telnet (STelnet).
For detailed information about SSH, see the AR1200-S Feature Description - Basic Configurations.
5.2 Logging in to the Devices Through the Console PortWhen a user needs to configure the router that is powered on for the first time or locally maintainthe router, the user can log in to the router through a console port.
5.2.1 Establishing the Configuration TaskBefore configuring user login through a console port, familiarize yourself with the applicableenvironment, complete the pre-configuration tasks, and obtain the required data. This will helpyou complete the configuration task quickly and accurately.
Huawei AR1200-S Series Enterprise RoutersConfiguration Guide - Basic Configuration 5 Configuring User Login
Issue 02 (2011-10-15) Huawei Proprietary and ConfidentialCopyright © Huawei Technologies Co., Ltd.
58

Applicable EnvironmentA user can log in to the router locally through a console port. If the router is powered on for thefirst time, the user has to log in through a console port.
Pre-configuration TasksBefore configuring user login through a console port, complete the following tasks:
l Configuring the PC/terminal (including the serial port and RS-232 cable)l Installing the terminal emulator (such as HyperTerminal of Windows XP) to the PC
Data PreparationTo configure user login through a console port, you need the following data.
No. Data
1 l Transmission rate, flow control mode, parity mode, stop bit, data bitl Number of lines displayed in a terminal screen, size of the history command bufferl User priorityl User authentication mode, user name, and password
5.2.2 Configuring Console User InterfaceTo allow users to log in to the router through a console port, configure attributes of the consoleuser interface.
ContextAttributes of an console user interface have default values on the router, and generally need noadditional settings. To meet specific application requirements or ensure network security, youcan set attributes of the console user interface, such as terminal attributes and user authenticationmode.
For detailed settings, see Configuring Console User Interface.
5.2.3 Logging in to the router Through a Console PortA user can log in to the router by connecting a terminal with the router through a console port.
ContextFor details, see Login Through the Console Portrouter.
NOTE
l Communication parameters of the user terminal must be consistent with the physical attributeparameters of the console user interface on the router.
l If a user authentication mode is specified in the console user interface, a user can log in to the routeronly after passing the authentication. This enhances network security.
Huawei AR1200-S Series Enterprise RoutersConfiguration Guide - Basic Configuration 5 Configuring User Login
Issue 02 (2011-10-15) Huawei Proprietary and ConfidentialCopyright © Huawei Technologies Co., Ltd.
59
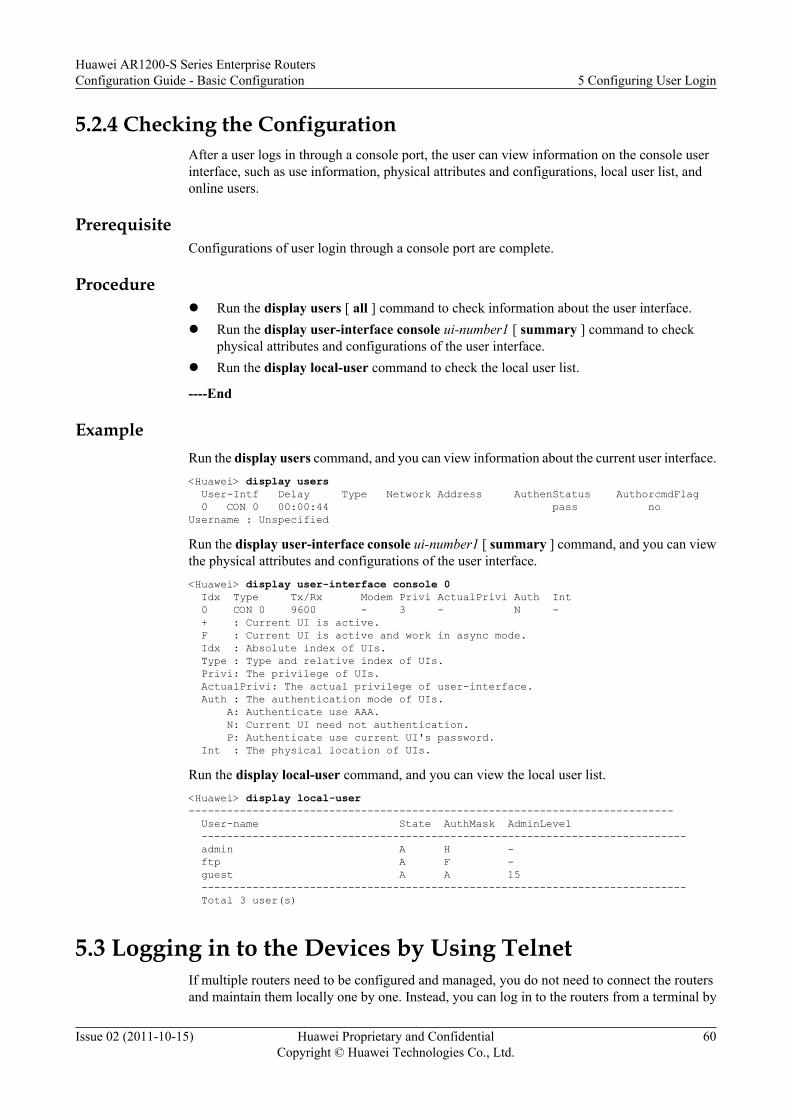
5.2.4 Checking the ConfigurationAfter a user logs in through a console port, the user can view information on the console userinterface, such as use information, physical attributes and configurations, local user list, andonline users.
PrerequisiteConfigurations of user login through a console port are complete.
Procedurel Run the display users [ all ] command to check information about the user interface.l Run the display user-interface console ui-number1 [ summary ] command to check
physical attributes and configurations of the user interface.l Run the display local-user command to check the local user list.
----End
ExampleRun the display users command, and you can view information about the current user interface.<Huawei> display users User-Intf Delay Type Network Address AuthenStatus AuthorcmdFlag 0 CON 0 00:00:44 pass noUsername : Unspecified
Run the display user-interface console ui-number1 [ summary ] command, and you can viewthe physical attributes and configurations of the user interface.<Huawei> display user-interface console 0 Idx Type Tx/Rx Modem Privi ActualPrivi Auth Int 0 CON 0 9600 - 3 - N - + : Current UI is active. F : Current UI is active and work in async mode. Idx : Absolute index of UIs. Type : Type and relative index of UIs. Privi: The privilege of UIs. ActualPrivi: The actual privilege of user-interface. Auth : The authentication mode of UIs. A: Authenticate use AAA. N: Current UI need not authentication. P: Authenticate use current UI's password. Int : The physical location of UIs.
Run the display local-user command, and you can view the local user list.<Huawei> display local-user ---------------------------------------------------------------------------- User-name State AuthMask AdminLevel ---------------------------------------------------------------------------- admin A H - ftp A F - guest A A 15 ---------------------------------------------------------------------------- Total 3 user(s)
5.3 Logging in to the Devices by Using TelnetIf multiple routers need to be configured and managed, you do not need to connect the routersand maintain them locally one by one. Instead, you can log in to the routers from a terminal by
Huawei AR1200-S Series Enterprise RoutersConfiguration Guide - Basic Configuration 5 Configuring User Login
Issue 02 (2011-10-15) Huawei Proprietary and ConfidentialCopyright © Huawei Technologies Co., Ltd.
60

using Telnet. This implements remote maintenance of the router and greatly facilitates devicemanagement.
5.3.1 Establishing the Configuration TaskBefore configuring user login by using Telnet, familiarize yourself with the applicableenvironment, complete the pre-configuration tasks, and obtain the required data. This will helpyou complete the configuration task quickly and accurately.
Applicable Environment
If you have known the IP address of the router to be accessed, you can log in to the router froma terminal by using Telnet, and remotely maintain the device. This allows you to maintainmultiple routers on the same terminal, greatly facilitating device management.
Note that IP addresses of the routers need to be preset through console ports.
Pre-configuration Tasks
Before configuring user login in Telnet mode, complete the following tasks:
l Configuring reachable routes between the terminal and the device
Data Preparation
Before configuring user login in Telnet mode, you need the following data.
No. Data
1 l Maximum number of VTY user interfacesl (Optional) ACL for limiting call-in and call-out in VTY user interfacesl Connection timeout period of terminal users, number of lines displayed in a
terminal screen, size of the history command bufferl User priorityl User authentication mode, user name, password
2 TCP port number for the remote router to provide Telnet services, VPN instance name
3 IPv4 address or host name of the router
5.3.2 Configuring VTY User InterfaceTo log in to the router by using Telnet, configure attributes of the VTY user interface.
Context
By default, the user authentication mode in the VTY user interface is password. Therefore, beforea user logs in to the router by using Telnet, the user authentication mode in the VTY user interfacemust be set. Otherwise, the user cannot log in to the router.
Huawei AR1200-S Series Enterprise RoutersConfiguration Guide - Basic Configuration 5 Configuring User Login
Issue 02 (2011-10-15) Huawei Proprietary and ConfidentialCopyright © Huawei Technologies Co., Ltd.
61
You can log in to the router through a console port to set the user authentication mode in theVTY user interface.
Other attributes of the VTY user interface in the router, such as terminal attributes and userpriorities, can also be set as needed. These attributes, however, generally do not need to be setbecause they have default values.
For detailed settings, see Configuring VTY User Interface.
5.3.3 (Optional) Configuring Local Telnet UsersIf the user authentication mode is AAA in the VTY user interface, the access type of local usersneeds to be specified. Local users with the access type of Telnet are Telnet users.
Context
If the user authentication mode of the VTY user interface is non-authentication or passwordauthentication, the following configurations are not needed.
By default, a local user can apply for any access type. You can specify an access type to allowonly users configured with the specified access type to log in to the router.
Do as follows on the router that functions as a Telnet server:
Procedure
Step 1 Run:system-view
The system view is displayed.
Step 2 Run:aaa
The AAA view is displayed.
Step 3 Run:local-user user-name password { simple | cipher } password
The local user name and password are set.
----End
5.3.4 Enabling the Telnet ServiceBefore a terminal establishes a Telnet connection with the router, enable the Telnet serverfunction on the router.
Context
By default, the function of the Telnet server is enabled.
Do as follows on the router that serves as an Telnet server.
Huawei AR1200-S Series Enterprise RoutersConfiguration Guide - Basic Configuration 5 Configuring User Login
Issue 02 (2011-10-15) Huawei Proprietary and ConfidentialCopyright © Huawei Technologies Co., Ltd.
62
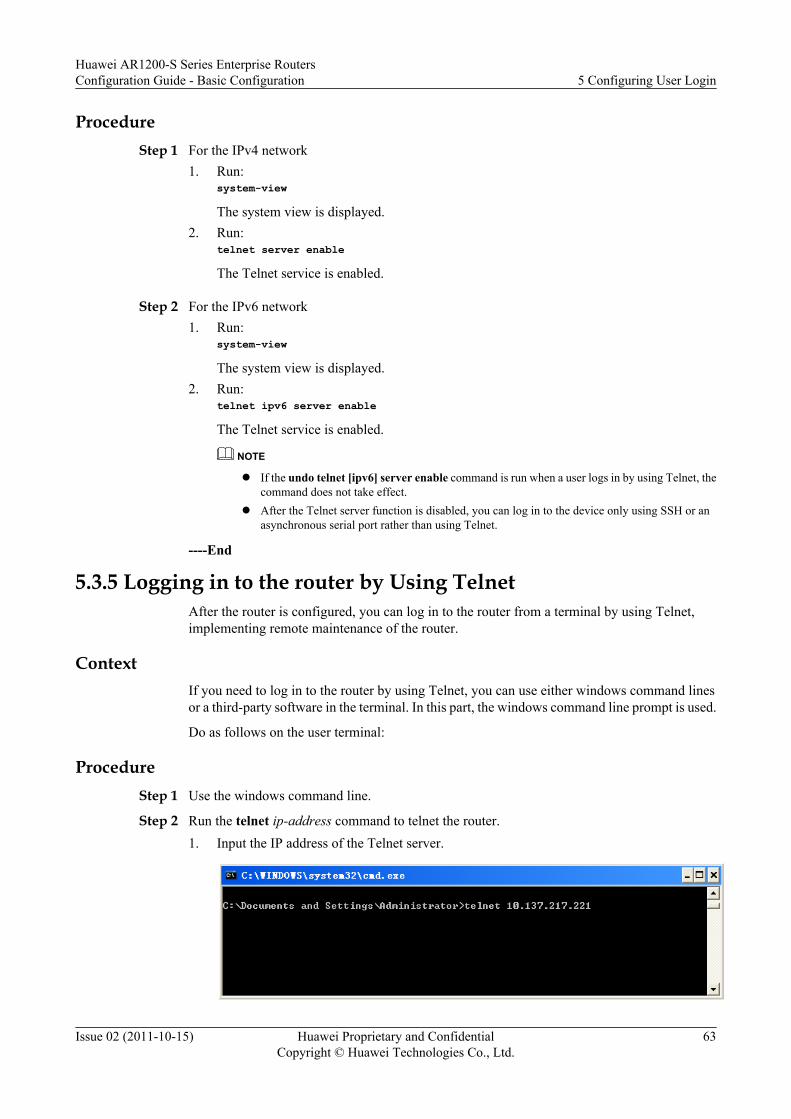
ProcedureStep 1 For the IPv4 network
1. Run:system-view
The system view is displayed.2. Run:
telnet server enable
The Telnet service is enabled.
Step 2 For the IPv6 network1. Run:
system-view
The system view is displayed.2. Run:
telnet ipv6 server enable
The Telnet service is enabled.
NOTE
l If the undo telnet [ipv6] server enable command is run when a user logs in by using Telnet, thecommand does not take effect.
l After the Telnet server function is disabled, you can log in to the device only using SSH or anasynchronous serial port rather than using Telnet.
----End
5.3.5 Logging in to the router by Using TelnetAfter the router is configured, you can log in to the router from a terminal by using Telnet,implementing remote maintenance of the router.
ContextIf you need to log in to the router by using Telnet, you can use either windows command linesor a third-party software in the terminal. In this part, the windows command line prompt is used.
Do as follows on the user terminal:
ProcedureStep 1 Use the windows command line.
Step 2 Run the telnet ip-address command to telnet the router.1. Input the IP address of the Telnet server.
Huawei AR1200-S Series Enterprise RoutersConfiguration Guide - Basic Configuration 5 Configuring User Login
Issue 02 (2011-10-15) Huawei Proprietary and ConfidentialCopyright © Huawei Technologies Co., Ltd.
63
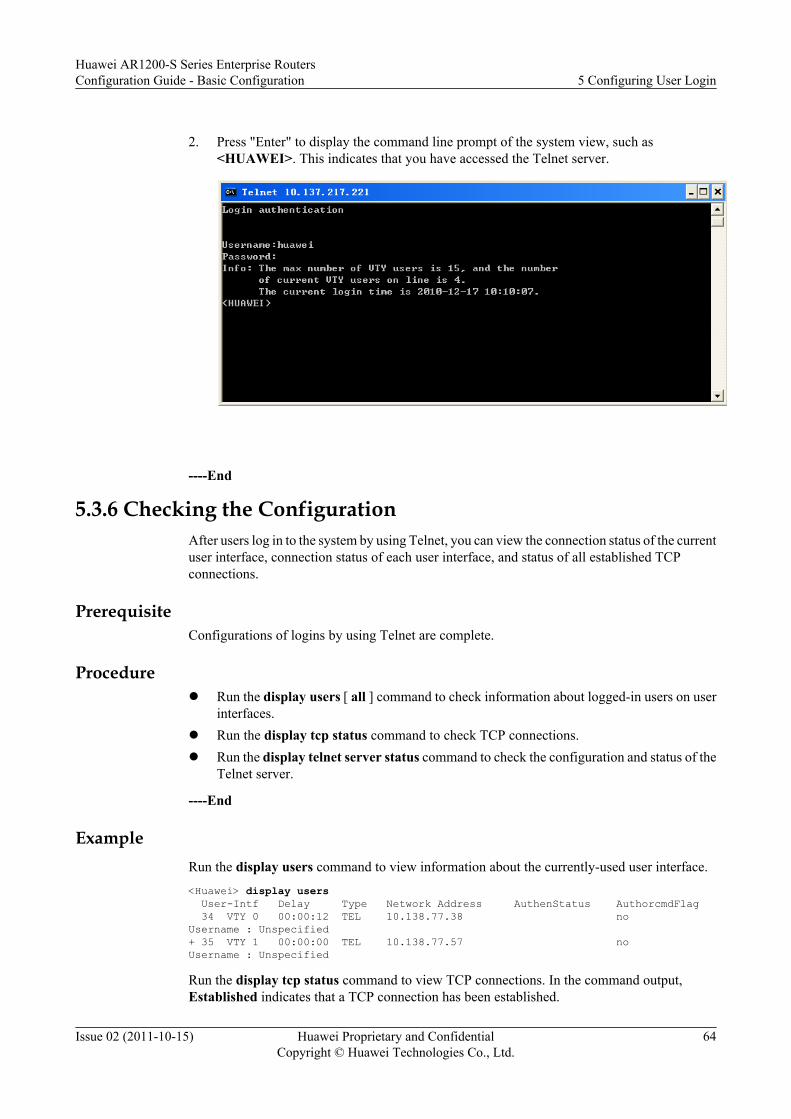
2. Press "Enter" to display the command line prompt of the system view, such as
<HUAWEI>. This indicates that you have accessed the Telnet server.
----End
5.3.6 Checking the ConfigurationAfter users log in to the system by using Telnet, you can view the connection status of the currentuser interface, connection status of each user interface, and status of all established TCPconnections.
PrerequisiteConfigurations of logins by using Telnet are complete.
Procedurel Run the display users [ all ] command to check information about logged-in users on user
interfaces.l Run the display tcp status command to check TCP connections.l Run the display telnet server status command to check the configuration and status of the
Telnet server.
----End
ExampleRun the display users command to view information about the currently-used user interface.<Huawei> display users User-Intf Delay Type Network Address AuthenStatus AuthorcmdFlag 34 VTY 0 00:00:12 TEL 10.138.77.38 noUsername : Unspecified+ 35 VTY 1 00:00:00 TEL 10.138.77.57 noUsername : Unspecified
Run the display tcp status command to view TCP connections. In the command output,Established indicates that a TCP connection has been established.
Huawei AR1200-S Series Enterprise RoutersConfiguration Guide - Basic Configuration 5 Configuring User Login
Issue 02 (2011-10-15) Huawei Proprietary and ConfidentialCopyright © Huawei Technologies Co., Ltd.
64
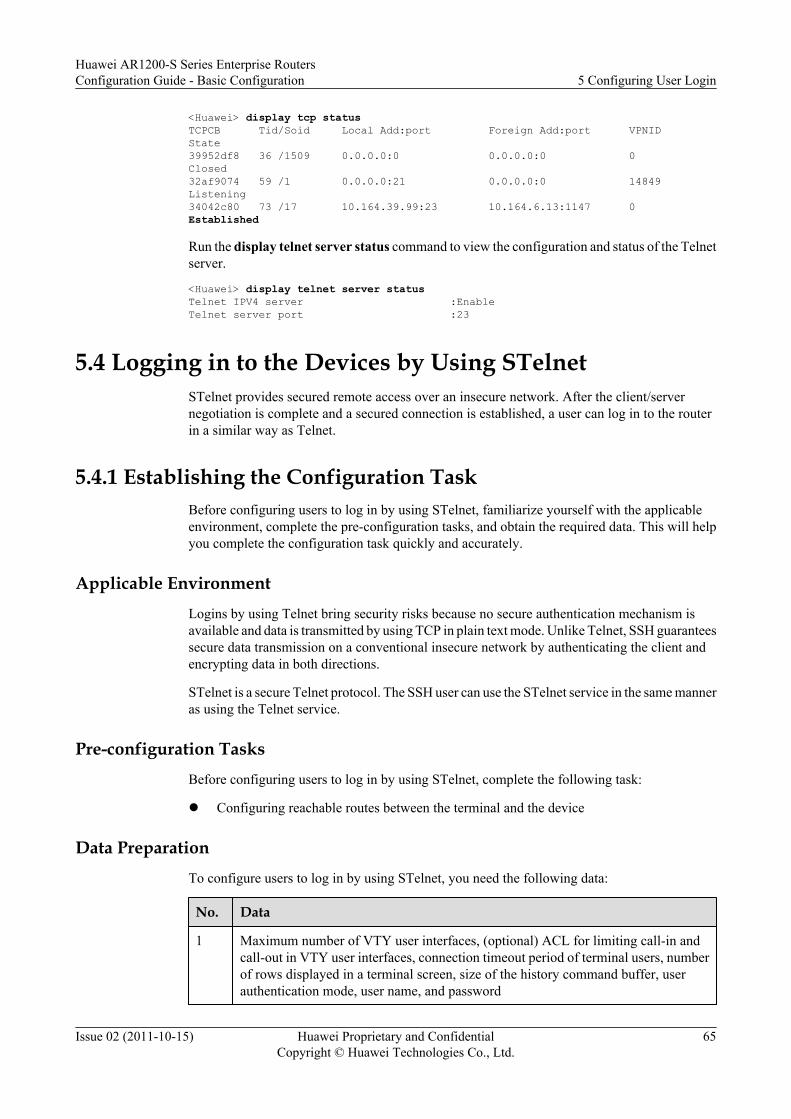
<Huawei> display tcp statusTCPCB Tid/Soid Local Add:port Foreign Add:port VPNID State39952df8 36 /1509 0.0.0.0:0 0.0.0.0:0 0 Closed32af9074 59 /1 0.0.0.0:21 0.0.0.0:0 14849 Listening34042c80 73 /17 10.164.39.99:23 10.164.6.13:1147 0 Established
Run the display telnet server status command to view the configuration and status of the Telnetserver.
<Huawei> display telnet server statusTelnet IPV4 server :EnableTelnet server port :23
5.4 Logging in to the Devices by Using STelnetSTelnet provides secured remote access over an insecure network. After the client/servernegotiation is complete and a secured connection is established, a user can log in to the routerin a similar way as Telnet.
5.4.1 Establishing the Configuration TaskBefore configuring users to log in by using STelnet, familiarize yourself with the applicableenvironment, complete the pre-configuration tasks, and obtain the required data. This will helpyou complete the configuration task quickly and accurately.
Applicable EnvironmentLogins by using Telnet bring security risks because no secure authentication mechanism isavailable and data is transmitted by using TCP in plain text mode. Unlike Telnet, SSH guaranteessecure data transmission on a conventional insecure network by authenticating the client andencrypting data in both directions.
STelnet is a secure Telnet protocol. The SSH user can use the STelnet service in the same manneras using the Telnet service.
Pre-configuration TasksBefore configuring users to log in by using STelnet, complete the following task:
l Configuring reachable routes between the terminal and the device
Data PreparationTo configure users to log in by using STelnet, you need the following data:
No. Data
1 Maximum number of VTY user interfaces, (optional) ACL for limiting call-in andcall-out in VTY user interfaces, connection timeout period of terminal users, numberof rows displayed in a terminal screen, size of the history command buffer, userauthentication mode, user name, and password
Huawei AR1200-S Series Enterprise RoutersConfiguration Guide - Basic Configuration 5 Configuring User Login
Issue 02 (2011-10-15) Huawei Proprietary and ConfidentialCopyright © Huawei Technologies Co., Ltd.
65

No. Data
2 User name, password, authentication mode, and service type of an SSH user andremote public RSA key pair allocated to the SSH user
3 (Optional) Name of an SSH server, number of the port monitored by the SSH server,preferred encryption algorithm from the STelnet client to the SSH server, preferredencrypted algorithm from the SSH server to the STelnet client, preferred HMACalgorithm from the STelnet client to the SSH server, preferred HMAC algorithm fromthe SSH server to the STelnet client, preferred algorithm of key exchange, name ofthe outgoing interface, and source address
5.4.2 Configuring VTY User InterfaceTo allow a user to log in to the router by using STelnet, configure attributes of the VTY userinterface.
ContextBy default, the user authentication mode in the VTY user interface is password. Therefore, beforea user logs in to the router by using STelnet, the user authentication mode in the VTY userinterface must be set. Otherwise, the user cannot log in to the router.
You can log in to the router through a console port to set the user authentication mode in theVTY user interface.
Other attributes of the VTY user interface in the router, such as terminal attributes and userpriorities, can also be set as needed. These attributes, however, generally do not need to be setbecause they have default values.
For detailed settings, see Configuring VTY User Interface.
5.4.3 Configuring SSH for the VTY User InterfaceTo allow users to log in to the router by using STelnet, you need to configure VTY user interfacesto support SSH.
ContextBy default, user interfaces support Telnet. If no user interface is configured to support SSH,users cannot log in to the router by using STelnet.
Do as follows on the router that serves as an SSH server:
Procedure
Step 1 Run:system-view
The system view is displayed.
Step 2 Run:user-interface [ vty ] first-ui-number [ last-ui-number ]
Huawei AR1200-S Series Enterprise RoutersConfiguration Guide - Basic Configuration 5 Configuring User Login
Issue 02 (2011-10-15) Huawei Proprietary and ConfidentialCopyright © Huawei Technologies Co., Ltd.
66

The VTY user interface is displayed.
Step 3 Run:authentication-mode aaa
The AAA authentication mode is configured.
Step 4 Run:protocol inbound ssh
The VTY user interface is configured to support SSH.
NOTE
If a VTY user interface is configured to support SSH, the VTY user interface must be configured withAAA authentication. Otherwise, the protocol inbound ssh command cannot be configured.
----End
5.4.4 Configuring an SSH User and Specifying STelnet as One ofService Types
To allow a user to log in to the router by using STelnet, you must configure an SSH user,configure the router to generate a local RSA key pair, configure a user authentication mode, andspecify a service type for the SSH user.
Contextl SSH users can be authenticated in four modes: RSA, password, password-rsa, and all. You
must create a local user with the specified user name in the AAA view.l Configuring the router to generate a local RSA key pair is a key step for SSH login. If an
SSH user logs in to an SSH server in password authentication mode, configure the serverto generate a local RSA key pair. If an SSH user logs in to an SSH server in RSAauthentication mode, configure both the server and the client to generate local RSA keypairs.
NOTE
Password-rsa authentication requires success of both password authentication and RSA authentication. Theall authentication mode requires success of either password authentication or RSA authentication.
Do as follows on the router that functions as an SSH server:
Procedure
Step 1 Run:system-view
The system view is displayed.
Step 2 Run:aaa
The AAA view is displayed.
Step 3 Run:local-user user-name password { simple | cipher } password
Huawei AR1200-S Series Enterprise RoutersConfiguration Guide - Basic Configuration 5 Configuring User Login
Issue 02 (2011-10-15) Huawei Proprietary and ConfidentialCopyright © Huawei Technologies Co., Ltd.
67

Name and password of the local user are created.
Step 4 Run:quit
Quit the AAA view.
Step 5 Run:rsa local-key-pair create
A local RSA key pair is generated.
NOTE
l Before performing the other SSH configurations, you must configure the rsa local-key-pair createcommand to generate a local key pair.
l After generating the local key pair,you can perform the display rsa local-key-pair public commandto view the public key in the local key pair.
Step 6 Run:ssh user user-name authentication-type { password | rsa | password-rsa | all }
The authentication mode for SSH users is configured.
Perform the following as required:
l Authenticate the SSH user through the password.– Run:
ssh user user-name authentication-type passwordThe password authentication is configured for the SSH user.
l Authenticate the SSH user through RSA.1. Run:
ssh user user-name authentication-type rsa
The RSA authentication is configured for the SSH user.2. Run:
rsa peer-public-key key-name
The public key view is displayed.3. Run:
public-key-code begin
The public key editing view is displayed.4. Run:
hex-data
The public key is edited.
NOTE
l In the public key view, only hexadecimal strings complying with the public key format can betyped in. Each string is randomly generated on an SSH client. For detailed operations, see manualsfor SSH client software.
l After the public key editing view is displayed, the RSA public key generated on the client canbe sent to the server. Copy the RSA public key to the router that serves as the SSH server.
5. Run:public-key-code end
Huawei AR1200-S Series Enterprise RoutersConfiguration Guide - Basic Configuration 5 Configuring User Login
Issue 02 (2011-10-15) Huawei Proprietary and ConfidentialCopyright © Huawei Technologies Co., Ltd.
68

Quit the public key editing view.
l If the specified hex-data is invalid, the public key cannot be generated after the peer-public-key end command is run.
l If the specified key-name is deleted in other views, the system prompts that the key doesnot exist after the peer-public-key end command is run and the system view isdisplayed.
6. Run:peer-public-key end
Return to the system view from the public key view.7. Run:
ssh user user-name assign rsa-key key-name
The public key is assigned to the SSH user.
Step 7 (Optional) Configuring the Basic Authentication Information for SSH Users1. Run:
ssh server rekey-interval interval
The interval for updating the server key pair is configured.
By default, the interval for updating the key pair of the SSH server is 0 that indicates noupdating.
2. Run:ssh server auth-timeout timeout_interval
The timeout period of the SSH authentication is set.
By default, the timeout period is 60 seconds.3. Run:
ssh server authentication-retries auth-times
The number of retry times of the SSH authentication is set.
By default, the retry times is 3.
----End
5.4.5 Enabling the STelnet Server FunctionTo allow users to log in to the router by using STelnet, you must enable the STelnet serverfunction on the router.
ContextBy default, no router is enabled with the STelnet server function. Users can establish connectionsto the router by using STelnet only after the router is enabled with the STelnet server function.
Do as follows on the router that serves as an SSH server:
Procedure
Step 1 Run:system-view
Huawei AR1200-S Series Enterprise RoutersConfiguration Guide - Basic Configuration 5 Configuring User Login
Issue 02 (2011-10-15) Huawei Proprietary and ConfidentialCopyright © Huawei Technologies Co., Ltd.
69
The system view is displayed.
Step 2 Run:stelnet server enable
The STelnet server function is enabled.
By default, the STelnet server function is disabled.
----End
5.4.6 (Optional) Configuring the STelnet Server ParametersYou can configure a device to be compatible with the SSH protocol of earlier versions, configureor change the listening port number of an SSH server, set an interval at which the key pair ofthe SSH server is updated, and specify the source interface.
ContextTable 5-2 lists server parameters.
Table 5-2 Server parameters
ServerParameter
Description
Earlier SSHversioncompatibility
SSH has two versions: SSH1.X (earlier than SSH2.0) and SSH2.0. Comparedwith SSH1.X, SSH2.0 is extended in structure and supports moreauthentication modes and key exchange methods. SSH2.0 also supports moreadvanced services such as SFTP. The Huawei AR1200-S Series supportsSSH versions ranging from 1.3 to 2.0.
Interval atwhich the keypair of theSSH server isupdated
After the interval is set, the key pair of the SSH server is updated periodicallyto improve security.
Do as follows on the router that serves as an SSH server:
Procedure
Step 1 Run:system-view
The system view is displayed.
Step 2 Perform one or more operations shown in Table 5-3 as needed.
Huawei AR1200-S Series Enterprise RoutersConfiguration Guide - Basic Configuration 5 Configuring User Login
Issue 02 (2011-10-15) Huawei Proprietary and ConfidentialCopyright © Huawei Technologies Co., Ltd.
70
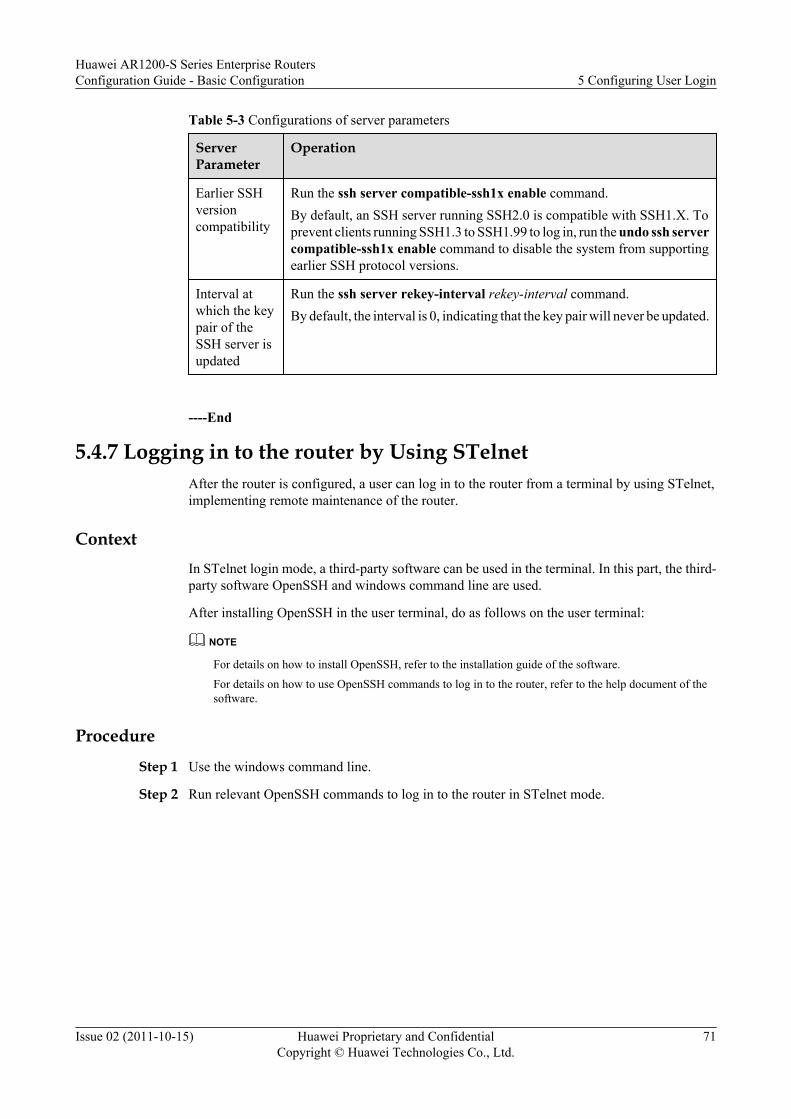
Table 5-3 Configurations of server parameters
ServerParameter
Operation
Earlier SSHversioncompatibility
Run the ssh server compatible-ssh1x enable command.By default, an SSH server running SSH2.0 is compatible with SSH1.X. Toprevent clients running SSH1.3 to SSH1.99 to log in, run the undo ssh servercompatible-ssh1x enable command to disable the system from supportingearlier SSH protocol versions.
Interval atwhich the keypair of theSSH server isupdated
Run the ssh server rekey-interval rekey-interval command.By default, the interval is 0, indicating that the key pair will never be updated.
----End
5.4.7 Logging in to the router by Using STelnetAfter the router is configured, a user can log in to the router from a terminal by using STelnet,implementing remote maintenance of the router.
ContextIn STelnet login mode, a third-party software can be used in the terminal. In this part, the third-party software OpenSSH and windows command line are used.
After installing OpenSSH in the user terminal, do as follows on the user terminal:
NOTE
For details on how to install OpenSSH, refer to the installation guide of the software.
For details on how to use OpenSSH commands to log in to the router, refer to the help document of thesoftware.
Procedure
Step 1 Use the windows command line.
Step 2 Run relevant OpenSSH commands to log in to the router in STelnet mode.
Huawei AR1200-S Series Enterprise RoutersConfiguration Guide - Basic Configuration 5 Configuring User Login
Issue 02 (2011-10-15) Huawei Proprietary and ConfidentialCopyright © Huawei Technologies Co., Ltd.
71

----End
5.4.8 Checking the ConfigurationAfter configuring users to log in by using STelnet, you can view the SSH server configuration.
PrerequisiteConfigurations of logins by using STelnet are complete.
Procedurel Run the display ssh user-information username command on the SSH server to check
information about SSH users.l Run the display ssh server status command on the SSH server to check its configurations.l Run the display ssh server session command on the SSH server to check sessions for SSH
users.
----End
ExampleRun the display ssh user-information username command to view information about aspecified SSH user.
<Huawei> display ssh user-information client001
Huawei AR1200-S Series Enterprise RoutersConfiguration Guide - Basic Configuration 5 Configuring User Login
Issue 02 (2011-10-15) Huawei Proprietary and ConfidentialCopyright © Huawei Technologies Co., Ltd.
72
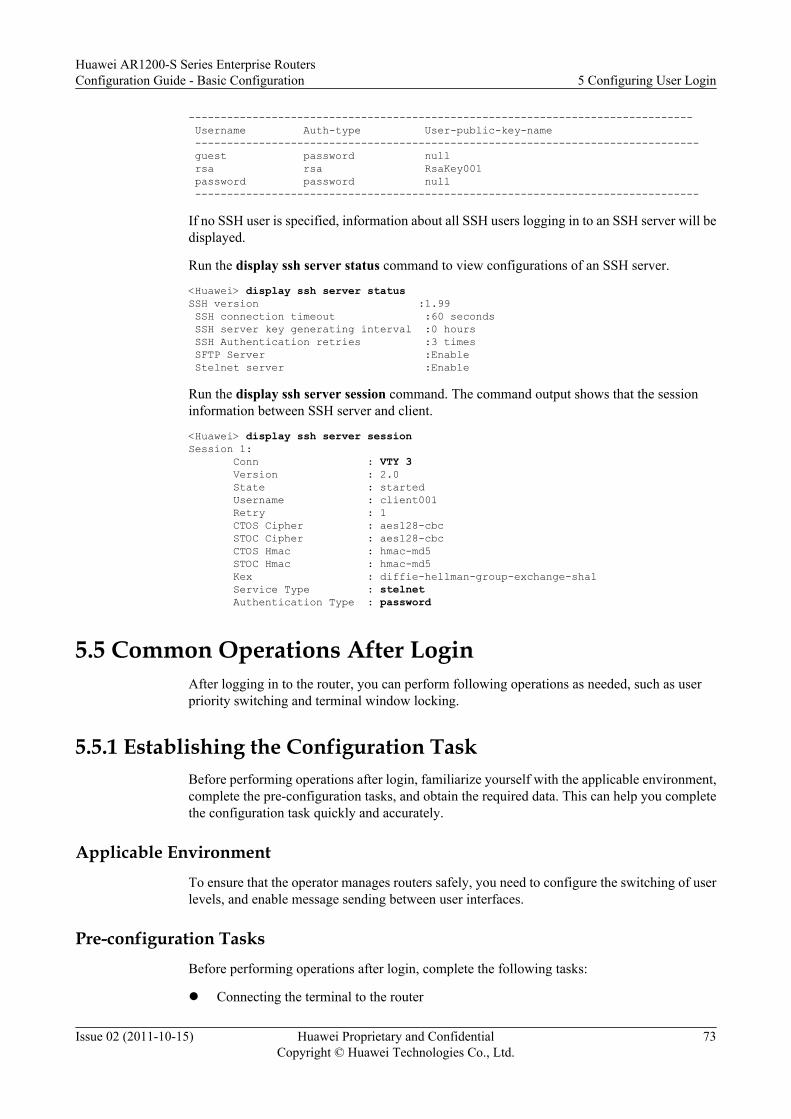
------------------------------------------------------------------------------- Username Auth-type User-public-key-name ------------------------------------------------------------------------------- guest password null rsa rsa RsaKey001 password password null -------------------------------------------------------------------------------
If no SSH user is specified, information about all SSH users logging in to an SSH server will bedisplayed.
Run the display ssh server status command to view configurations of an SSH server.
<Huawei> display ssh server statusSSH version :1.99 SSH connection timeout :60 seconds SSH server key generating interval :0 hours SSH Authentication retries :3 times SFTP Server :Enable Stelnet server :Enable
Run the display ssh server session command. The command output shows that the sessioninformation between SSH server and client.
<Huawei> display ssh server sessionSession 1: Conn : VTY 3 Version : 2.0 State : started Username : client001 Retry : 1 CTOS Cipher : aes128-cbc STOC Cipher : aes128-cbc CTOS Hmac : hmac-md5 STOC Hmac : hmac-md5 Kex : diffie-hellman-group-exchange-sha1 Service Type : stelnet Authentication Type : password
5.5 Common Operations After LoginAfter logging in to the router, you can perform following operations as needed, such as userpriority switching and terminal window locking.
5.5.1 Establishing the Configuration TaskBefore performing operations after login, familiarize yourself with the applicable environment,complete the pre-configuration tasks, and obtain the required data. This can help you completethe configuration task quickly and accurately.
Applicable EnvironmentTo ensure that the operator manages routers safely, you need to configure the switching of userlevels, and enable message sending between user interfaces.
Pre-configuration TasksBefore performing operations after login, complete the following tasks:
l Connecting the terminal to the router
Huawei AR1200-S Series Enterprise RoutersConfiguration Guide - Basic Configuration 5 Configuring User Login
Issue 02 (2011-10-15) Huawei Proprietary and ConfidentialCopyright © Huawei Technologies Co., Ltd.
73

Data PreparationsBefore performing operations after login, you need the following data:
No. Data
1 Password used for switching user levels
2 Type and number of the user interface
3 Contents of the message to be sent
5.5.2 Switching User LevelsIf a user wants to upgrade from a lower level to a higher level after logging in to the router, apassword is required. The password needs to be configured in advance.
ContextTo prevent an unauthorized user from using high-level commands, a password is required toincrease the user level.
Procedure
Step 1 Run:system-view
The system view is displayed.
Step 2 Run:super password [ level user-level ] { simple | cipher } password
The password for switching user levels is configured.
By default, the password for the user is set to Level 3.
CAUTIONIf simple is configured, the password is saved in the configuration file in plain text. This meansthat low-level login users can easily obtain and change the password by checking theconfiguration file, compromising the network security. Therefore, selecting cipher to save thepassword in the cipher text is recommended.If cipher is used to set the password, the password cannot be obtained from the system. Savethe password to avoid oblivion or missing.
Step 3 Run:quit
Return to the user view.
Step 4 Run:
Huawei AR1200-S Series Enterprise RoutersConfiguration Guide - Basic Configuration 5 Configuring User Login
Issue 02 (2011-10-15) Huawei Proprietary and ConfidentialCopyright © Huawei Technologies Co., Ltd.
74

super [ level ]
User levels are switched.
By default, the level is 3.
Step 5 Follow the prompt and enter a password.
If the password entered is correct, the user can switch to a higher level. If the user enters apassword incorrectly for three consecutive times, the user remains at the current login level andreturns to the user view.
NOTE
When the login user of lower level is switched to the user of higher level through the super command, thesystem automatically sends trap messages and records the switchover in a log. When the switched levelis lower than that of the current level, the system only records the switchover in a log.
----End
5.5.3 Locking User InterfacesWhen you leave the operation terminals for a moment, you can lock the user interface to preventunauthorized users from operating the interface.
Context
The user interface can be classified into the Console user interface and VTY user interface.
Procedure
Step 1 Run:lock
The user interface is locked.
Step 2 Follow the system prompt and input an unlock password, and then confirm the input.<Huawei> lockEnter Password:Confirm Password:
If the locking is successful, the system prompts that the user interface is locked.
You must enter a correct password to unlock the user interface.
----End
5.5.4 Sending Messages to Other User InterfacesMessages can be exchanged between the current user interface and other user interfaces.
Context
Users logging in to the router can send messages from the current user interface to users in otheruser interfaces as needed.
Huawei AR1200-S Series Enterprise RoutersConfiguration Guide - Basic Configuration 5 Configuring User Login
Issue 02 (2011-10-15) Huawei Proprietary and ConfidentialCopyright © Huawei Technologies Co., Ltd.
75

ProcedureStep 1 Run:
send { all | ui-type ui-number | ui-number1 }
You can enable message sending between user interfaces.
Step 2 Following the prompt, you can view the message to be sent. You can press Ctrl_Z or Enter toend the display, and press Ctrl_C to abort the display.
Step 3 At the system prompt, enter Y to send the message or enter N to cancel message sending.
----End
5.5.5 Displaying Logged-in UsersAfter users log in, you can query information about logged-in users.
ContextUser information includes the user name, address, and authentication and authorizationinformation.
Procedurel Run the display users [ all ] command to view information about logged-in users.
If all is configured, information about logged-in users on all user interfaces is displayed.
----End
5.6 Configuration ExamplesThis section provides several examples describing how to configure user login by using a consoleport, Telnet, or STelnet. You can understand the configuration procedures by referring to theconfiguration flowchart. The configuration examples provide information about the networkingrequirements, configuration notes, and configuration roadmap.
5.6.1 Example for Configuring User Login Through a Console PortThis part provides an configuration example describing how to configure user login through aconsole port. In this configuration example, certain login settings are performed on the PC,enabling the access to the router through a console port.
Networking RequirementsIf a user modifies default values of certain parameters in the console user interface, the userneeds to reset corresponding parameters in the PC when logging in to the router through theconsole port next time.
Figure 5-1 Networking diagram of user login through a console port
RouterPC
Huawei AR1200-S Series Enterprise RoutersConfiguration Guide - Basic Configuration 5 Configuring User Login
Issue 02 (2011-10-15) Huawei Proprietary and ConfidentialCopyright © Huawei Technologies Co., Ltd.
76
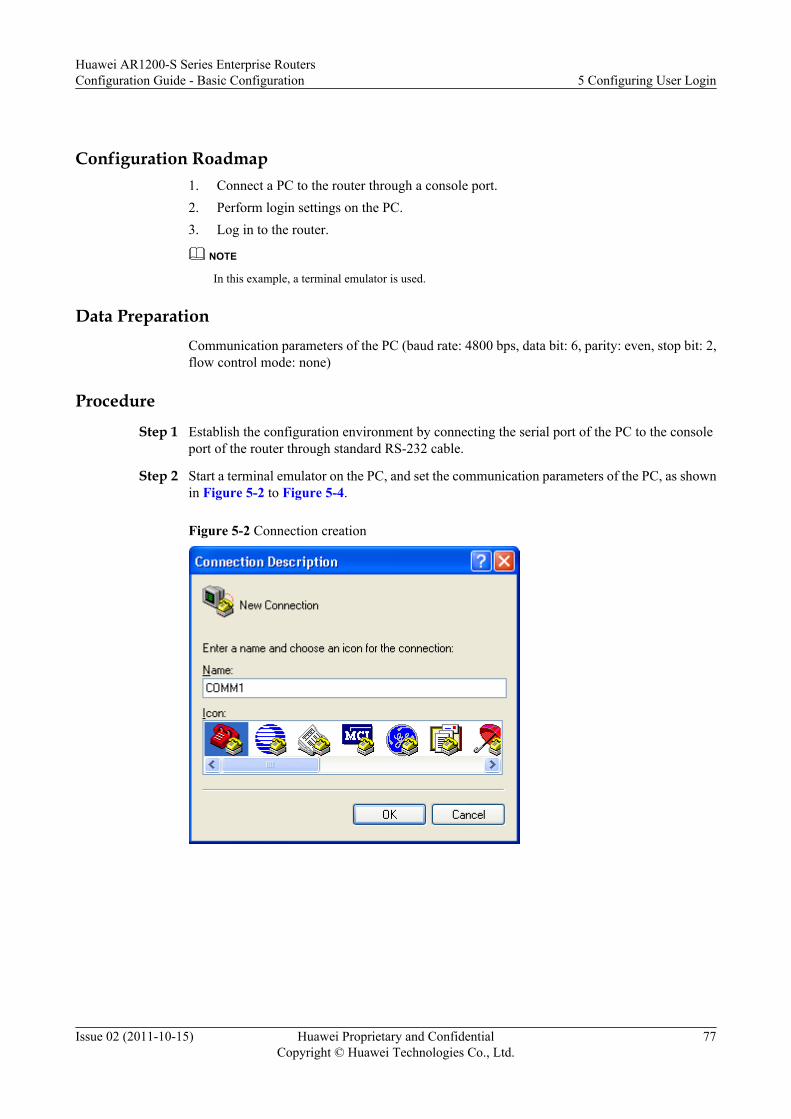
Configuration Roadmap1. Connect a PC to the router through a console port.2. Perform login settings on the PC.3. Log in to the router.
NOTE
In this example, a terminal emulator is used.
Data PreparationCommunication parameters of the PC (baud rate: 4800 bps, data bit: 6, parity: even, stop bit: 2,flow control mode: none)
Procedure
Step 1 Establish the configuration environment by connecting the serial port of the PC to the consoleport of the router through standard RS-232 cable.
Step 2 Start a terminal emulator on the PC, and set the communication parameters of the PC, as shownin Figure 5-2 to Figure 5-4.
Figure 5-2 Connection creation
Huawei AR1200-S Series Enterprise RoutersConfiguration Guide - Basic Configuration 5 Configuring User Login
Issue 02 (2011-10-15) Huawei Proprietary and ConfidentialCopyright © Huawei Technologies Co., Ltd.
77

Figure 5-3 Interface setting
Figure 5-4 Communication parameter setting
Step 3 Power on the router and wait for the completion of the self-check. After the router starts normallyand finishes the self-check, the system prompts you to press Enter.
Huawei AR1200-S Series Enterprise RoutersConfiguration Guide - Basic Configuration 5 Configuring User Login
Issue 02 (2011-10-15) Huawei Proprietary and ConfidentialCopyright © Huawei Technologies Co., Ltd.
78
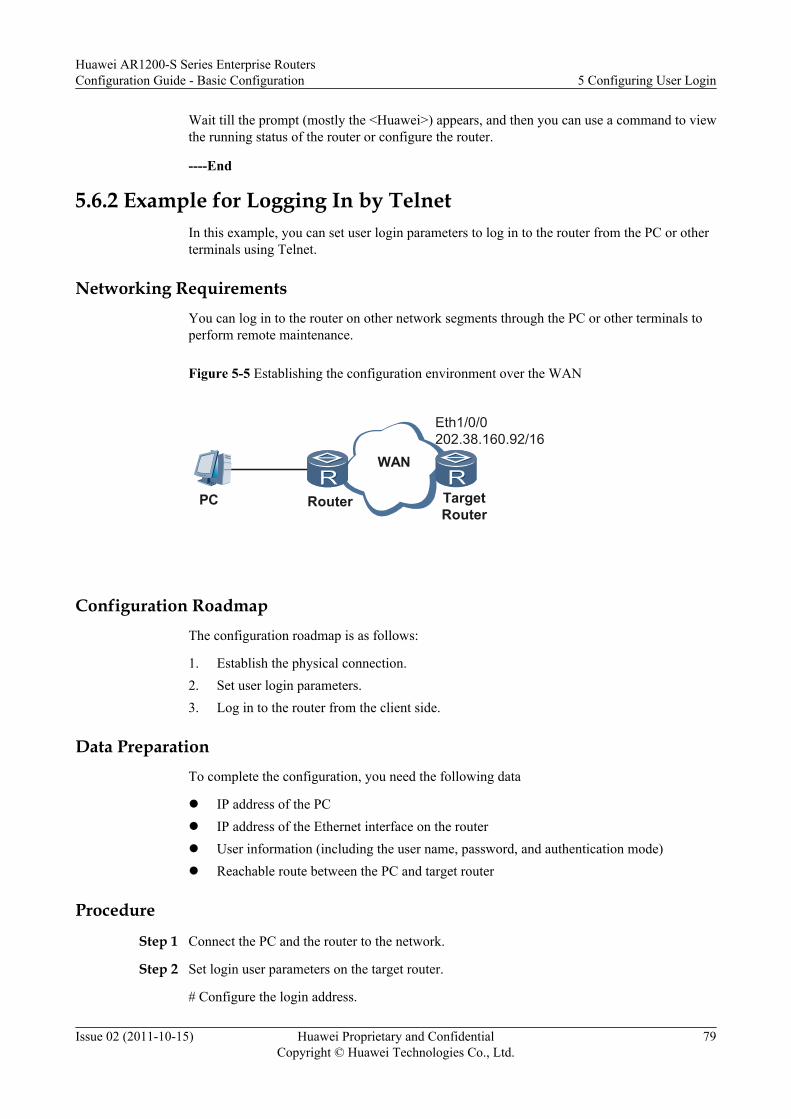
Wait till the prompt (mostly the <Huawei>) appears, and then you can use a command to viewthe running status of the router or configure the router.
----End
5.6.2 Example for Logging In by TelnetIn this example, you can set user login parameters to log in to the router from the PC or otherterminals using Telnet.
Networking RequirementsYou can log in to the router on other network segments through the PC or other terminals toperform remote maintenance.
Figure 5-5 Establishing the configuration environment over the WAN
WAN
Router TargetRouter
PC
Eth1/0/0202.38.160.92/16
Configuration RoadmapThe configuration roadmap is as follows:
1. Establish the physical connection.2. Set user login parameters.3. Log in to the router from the client side.
Data PreparationTo complete the configuration, you need the following data
l IP address of the PCl IP address of the Ethernet interface on the routerl User information (including the user name, password, and authentication mode)l Reachable route between the PC and target router
Procedure
Step 1 Connect the PC and the router to the network.
Step 2 Set login user parameters on the target router.
# Configure the login address.
Huawei AR1200-S Series Enterprise RoutersConfiguration Guide - Basic Configuration 5 Configuring User Login
Issue 02 (2011-10-15) Huawei Proprietary and ConfidentialCopyright © Huawei Technologies Co., Ltd.
79

<Huawei> system-view[Huawei] interface gigabitethernet 1/0/0[Huawei-GigabitEthernet1/0/0] ip address 202.38.160.92 255.255.0.0[Huawei-GigabitEthernet1/0/0] quit
# Configure the login authentication mode
[Huawei] aaa[Huawei-aaa] local-user huawei password cipher hello[Huawei-aaa] local-user huawei service-type telnet[Huawei-aaa] local-user huawei privilege level 3[Huawei-aaa] quit[Huawei] user-interface vty 0 4[Huawei-ui-vty0-14] authentication-mode aaa
Step 3 Configure the client login.
Run the Telnet on the PC, as shown in Figure 5-6.
Figure 5-6 Running the Telnet program on the PC
Click OK.
Enter the user name and password in the login window. After authentication, a command lineprompt such as <Huawei> appears. Enter the configuration environment in the user view.
----End
5.6.3 Example for Configuring User Login by Using STelnetThis part provides an example describing how to configure user login by using STelnet.. In thisexample, after generating the local key pair on the SSH server, configuring the name andpassword of the SSH user on the SSH server, and enabling the STelnet service on the SSH server,you can connect the Stelnet client to the SSH server.
Networking Requirements
As shown in Figure 5-7, after the STelnet service is enabled on the SSH server, the STelnetclient can log in to the SSH server with the password, RSA, password-rsa, or all authenticationmode.
In this configuration example, the password authentication mode is used.
Huawei AR1200-S Series Enterprise RoutersConfiguration Guide - Basic Configuration 5 Configuring User Login
Issue 02 (2011-10-15) Huawei Proprietary and ConfidentialCopyright © Huawei Technologies Co., Ltd.
80

Figure 5-7 Networking diagram of configuring user login by using STelnet
PC
N etw ork
SSH Server
G E1/0/010.137.217.223/16
Configuration RoadmapThe configuration roadmap is as follows:
1. Configure a local key pair on the SSH server for secure data exchange between the STelnetclient and the SSH server.
2. Configure the VTY user interface on the SSH server.3. Configure an SSH client, which involves the setting of the user authentication mode, user
name, and password.4. Enable the STelnet server function on the SSH server and configure a user service type.
Data PreparationTo complete the configuration, you need the following data:
l SSH user authentication mode: password, user name: client001, password: huaweil User level of client001: 3l IP address of the SSH server: 10.137.217.223
Procedure
Step 1 Generate a local key pair on the server.<Huawei> system-view[Huawei] sysname SSH Server[SSH Server] rsa local-key-pair createThe key name will be: Huawei_HostThe range of public key size is (512 ~ 2048).NOTES: If the key modulus is greater than 512, It will take a few minutes.Input the bits in the modulus[default = 512]: 768Generating keys..........++++++++++++..........++++++++++++...................................++++++++......++++++++
Step 2 Configure the VTY user interface.[SSH Server] user-interface vty 0 4[SSH Server-ui-vty0-4] authentication-mode aaa[SSH Server-ui-vty0-4] protocol inbound ssh[SSH Server-ui-vty0-4] quit
NOTE
If SSH is configured as the login protocol, the AR1200-S automatically disables Telnet.
Step 3 Configure the password of the SSH user Client001 to huawei.[SSH Server] aaa
Huawei AR1200-S Series Enterprise RoutersConfiguration Guide - Basic Configuration 5 Configuring User Login
Issue 02 (2011-10-15) Huawei Proprietary and ConfidentialCopyright © Huawei Technologies Co., Ltd.
81

[SSH Server-aaa] local-user client001 password cipher huawei[SSH Server-aaa] local-user client001 privilege level 3[SSH Server-aaa] local-user client001 service-type ssh[SSH Server-aaa] quit
Step 4 Verify the configuration.
# Log in the SSH server by using OpenSSH.
----End
Configuration Filesl Configuration file of the SSH server
# sysname SSH Server#aaa local-user client001 password cipher huawei local-user client001 privilege level 3 local-user client001 service-type ssh#interface GigabitEthernet1/0/0 ip address 10.137.217.223 255.255.0.0# ssh user client001 authentication-type password#user-interface vty 0 4 authentication-mode aaa protocol inbound ssh#return
Huawei AR1200-S Series Enterprise RoutersConfiguration Guide - Basic Configuration 5 Configuring User Login
Issue 02 (2011-10-15) Huawei Proprietary and ConfidentialCopyright © Huawei Technologies Co., Ltd.
82

6 Managing File System
About This Chapter
The file system manages the files and directories in the storage devices on the router. It can moveand delete a file or directory and display the contents of the file.
6.1 File System OverviewThe router effectively manages all files by means of the file system.
6.2 Performing File Operations by Means of the File SystemUsers can perform file operations by means of the file system, including managing storagedevices, directories, and files.
6.3 Performing File Operations by Means of FTPFTP can transmit files between local and remote hosts, and is widely used for version upgrade,log downloading, file transmission, and configuration saving.
6.4 Performing File Operations by Means of SFTPSFTP enables users to log in to the router securely from the remote device to manage files. Thisimproves the security of data transmission for the remote end to update its system.
6.5 Configuration ExamplesThis section provides an example for performing files by accessing the system and using FTPor SFTP.These configuration examples explain networking requirements, configurationroadmap, and configuration notes.
Huawei AR1200-S Series Enterprise RoutersConfiguration Guide - Basic Configuration 6 Managing File System
Issue 02 (2011-10-15) Huawei Proprietary and ConfidentialCopyright © Huawei Technologies Co., Ltd.
83

6.1 File System OverviewThe router effectively manages all files by means of the file system.
6.1.1 File SystemThe file system manages the files and directories in the storage devices. It can create, delete,modify, and rename a file or directory and display the contents of the file.
The file system has two functions: managing the storage devices and managing the files that arestored in those storage devices.
Performing File Operations by Means of the File SystemAfter logging in to the router by using the console port, Telnet, or STelnet, you can managestorage devices, directories, and files.
l Storage DevicesStorage devices are hardware devices for storing messages.At present, the router supports the storage devices such as flash memory and USB disk.
l FilesThe file is a mechanism with which the system stores and manages messages.
l DirectoriesThe directory is a mechanism with which the system integrates and organizes the file,serving as a logical container of the file.
6.1.2 Methods of File ManagementYou can manage files by means of the file system, FTP or SFTP.
Performing File Operations by Means of FTPYou can configure the router as the FTP server, and log in to the router from the user terminalto transmit files and manage directories on the FTP server.
Performing File Operations by Means of SFTPSSH supports Secure File Transfer Protocol (SFTP), which enables users to remotely andsecurely log in to the router to manage files. SSH guarantees secure data transmission on aconventional insecure network by authenticating the client and encrypting data in bothdirections.
Table 6-1 File management methods
File Management Method Implementation
Logging in to the system You can log in to the system through theConsole or by using Telnet or STelnet tomanage files.
Huawei AR1200-S Series Enterprise RoutersConfiguration Guide - Basic Configuration 6 Managing File System
Issue 02 (2011-10-15) Huawei Proprietary and ConfidentialCopyright © Huawei Technologies Co., Ltd.
84

File Management Method Implementation
FTP The router needs to be enabled with FTP.Most terminals support the FTP clientfunction.
SFTP l SFTP provides secure file transferservices based on SSH, irrelevant to thestandard FTP protocol.
l The router needs to be enabled with SFTP.Terminals need to be installed with theSFTP client software.
6.2 Performing File Operations by Means of the File SystemUsers can perform file operations by means of the file system, including managing storagedevices, directories, and files.
6.2.1 Establishing the Configuration TaskBefore performing file operations by means of the file system, familiarize yourself with theapplicable environment, complete the pre-configuration tasks, and obtain the required data. Thiscan help you complete the configuration tasks quickly and accurately.
Applicable Environment
When the router fails to save or obtain data, you can log in to the file system to repair the faultystorage devices or manage files or directories on the router. You can especially manage storagedevices by logging in to the file system.
Pre-configuration Tasks
Before performing file operations by logging in to the file system, complete the following tasks:
l Connecting the client with the server correctly
Data Preparation
To perform file operations by logging in to the file system, you need the following data:
No. Data
1 Storage device name
2 Directory name
3 File name
Huawei AR1200-S Series Enterprise RoutersConfiguration Guide - Basic Configuration 6 Managing File System
Issue 02 (2011-10-15) Huawei Proprietary and ConfidentialCopyright © Huawei Technologies Co., Ltd.
85
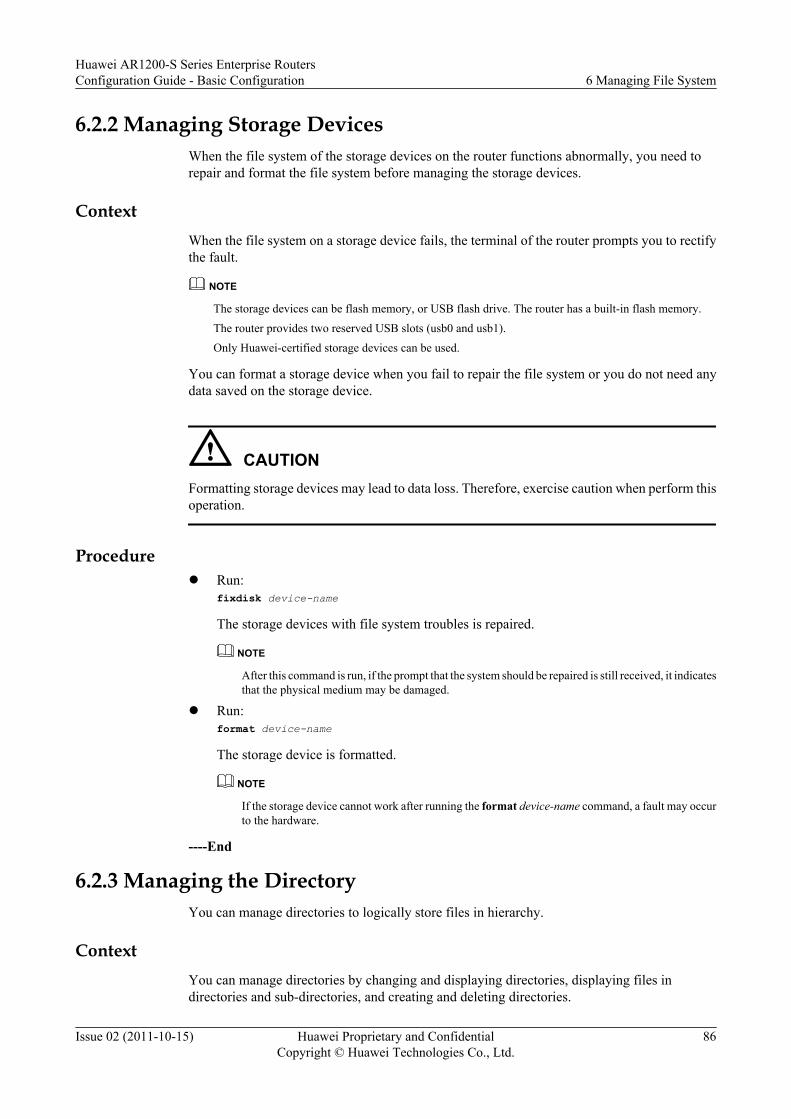
6.2.2 Managing Storage DevicesWhen the file system of the storage devices on the router functions abnormally, you need torepair and format the file system before managing the storage devices.
ContextWhen the file system on a storage device fails, the terminal of the router prompts you to rectifythe fault.
NOTE
The storage devices can be flash memory, or USB flash drive. The router has a built-in flash memory.The router provides two reserved USB slots (usb0 and usb1).Only Huawei-certified storage devices can be used.
You can format a storage device when you fail to repair the file system or you do not need anydata saved on the storage device.
CAUTIONFormatting storage devices may lead to data loss. Therefore, exercise caution when perform thisoperation.
Procedurel Run:
fixdisk device-name
The storage devices with file system troubles is repaired.
NOTE
After this command is run, if the prompt that the system should be repaired is still received, it indicatesthat the physical medium may be damaged.
l Run:format device-name
The storage device is formatted.
NOTE
If the storage device cannot work after running the format device-name command, a fault may occurto the hardware.
----End
6.2.3 Managing the DirectoryYou can manage directories to logically store files in hierarchy.
ContextYou can manage directories by changing and displaying directories, displaying files indirectories and sub-directories, and creating and deleting directories.
Huawei AR1200-S Series Enterprise RoutersConfiguration Guide - Basic Configuration 6 Managing File System
Issue 02 (2011-10-15) Huawei Proprietary and ConfidentialCopyright © Huawei Technologies Co., Ltd.
86
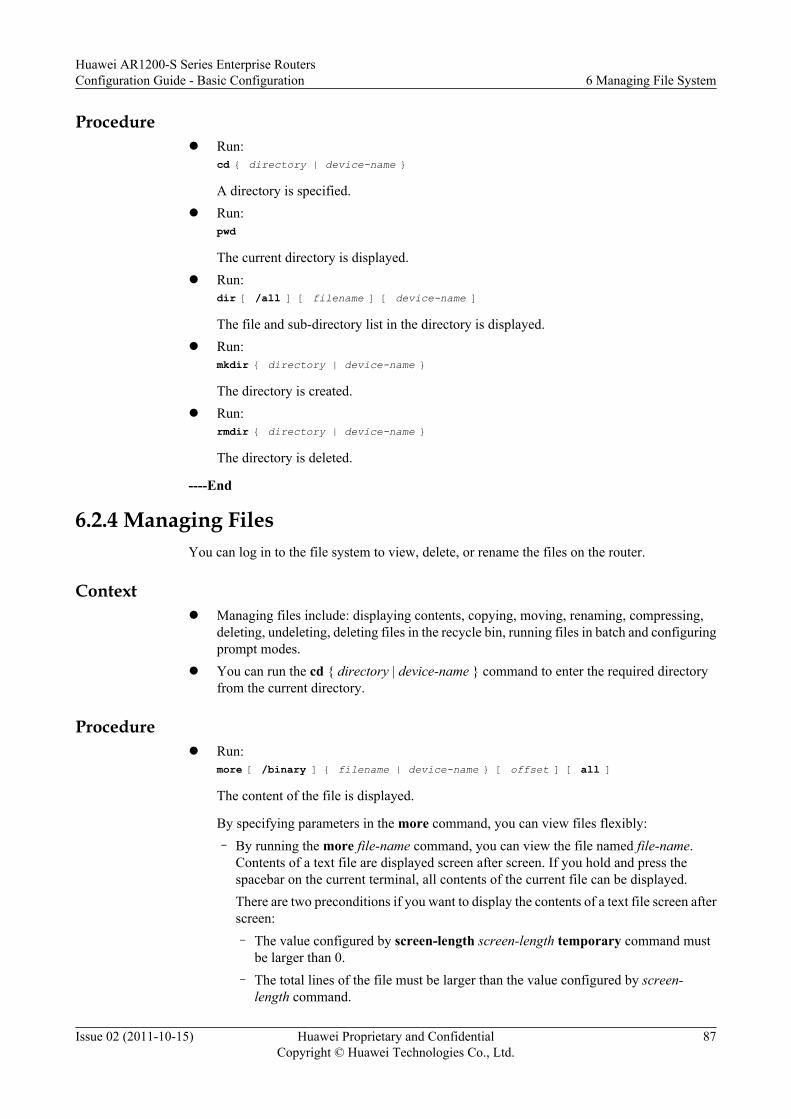
Procedurel Run:
cd { directory | device-name }
A directory is specified.l Run:
pwd
The current directory is displayed.l Run:
dir [ /all ] [ filename ] [ device-name ]
The file and sub-directory list in the directory is displayed.l Run:
mkdir { directory | device-name }
The directory is created.l Run:
rmdir { directory | device-name }
The directory is deleted.
----End
6.2.4 Managing FilesYou can log in to the file system to view, delete, or rename the files on the router.
Contextl Managing files include: displaying contents, copying, moving, renaming, compressing,
deleting, undeleting, deleting files in the recycle bin, running files in batch and configuringprompt modes.
l You can run the cd { directory | device-name } command to enter the required directoryfrom the current directory.
Procedurel Run:
more [ /binary ] { filename | device-name } [ offset ] [ all ]
The content of the file is displayed.
By specifying parameters in the more command, you can view files flexibly:– By running the more file-name command, you can view the file named file-name.
Contents of a text file are displayed screen after screen. If you hold and press thespacebar on the current terminal, all contents of the current file can be displayed.There are two preconditions if you want to display the contents of a text file screen afterscreen:– The value configured by screen-length screen-length temporary command must
be larger than 0.– The total lines of the file must be larger than the value configured by screen-
length command.
Huawei AR1200-S Series Enterprise RoutersConfiguration Guide - Basic Configuration 6 Managing File System
Issue 02 (2011-10-15) Huawei Proprietary and ConfidentialCopyright © Huawei Technologies Co., Ltd.
87

– By running the more file-name offset command, you can view the file named file-name. Contents of a text file are displayed from the line specified by offset screen afterscreen. If you hold and press the spacebar on the current terminal, all contents of thecurrent file can be displayed.There are two preconditions if you want to display the contents of a text file screen afterscreen:– The value configured by screen-length screen-length command must be larger than
0.– The result of the number of file characters subtracted by the value of offset must be
larger than the value configured by screen-length command.– By running the more file-name all command, you can view the file named file-name.
Contents of a text file are completely displayed without pausing after each screenful ofinformation.
l Run:copy source-filename destination-filename
The file is copied.
NOTE
The file to be copied must be larger than 0 bytes. Otherwise, the operation fails.
l Run:move source-filename destination-filename
The file is moved.l Run:
rename source-filename destination-filename
The file is renamed.l Run:
zip source-filename destination-filename
The file is compressed.l Run:
delete [ /unreserved ] [ /force ] { filename | device-name } [ all ]
The file is deleted.
If you use the parameter [ /unreserved ] in the delete command, the file cannot be restoredafter being deleted.
l Run:undelete filename
The deleted file is recovered.
NOTE
If the current directory is not the parent directory, you must operate the file by using the absolutepath.
l Run:reset recycle-bin [ filename ]
The file is deleted.
You can permanently delete files in the recycle bin.
Huawei AR1200-S Series Enterprise RoutersConfiguration Guide - Basic Configuration 6 Managing File System
Issue 02 (2011-10-15) Huawei Proprietary and ConfidentialCopyright © Huawei Technologies Co., Ltd.
88

l Running Files in Batch
You can upload the files and then process the files in batches. The edited batch files needto be saved in the storage devices on the router.
When the batch file is created, you can run the batch file to implement routine tasksautomatically.
1. Run:system-view
The system view is displayed.
2. Run:execute filename
The batched file is executed.
l Configuring Prompt Modes
The system displays prompts or warning messages when you operate the device (especiallythe operations leading to data loss). If you need to change the prompt mode for fileoperations, you can configure the prompt mode of the file system.
1. Run:system-view
The system view is displayed.
2. Run:file prompt { alert | quiet }
The prompt mode of the file system is configured.
By default, the prompt mode is alert.
CAUTIONIf the prompt is in the quiet mode, no prompt appears for data lossdue to maloperation.
----End
6.3 Performing File Operations by Means of FTPFTP can transmit files between local and remote hosts, and is widely used for version upgrade,log downloading, file transmission, and configuration saving.
6.3.1 Establishing the Configuration TaskBefore performing file operations by means of FTP, familiarize yourself with the applicableenvironment, complete the pre-configuration tasks, and obtain the required data. This can helpyou complete the configuration task quickly and accurately.
Huawei AR1200-S Series Enterprise RoutersConfiguration Guide - Basic Configuration 6 Managing File System
Issue 02 (2011-10-15) Huawei Proprietary and ConfidentialCopyright © Huawei Technologies Co., Ltd.
89
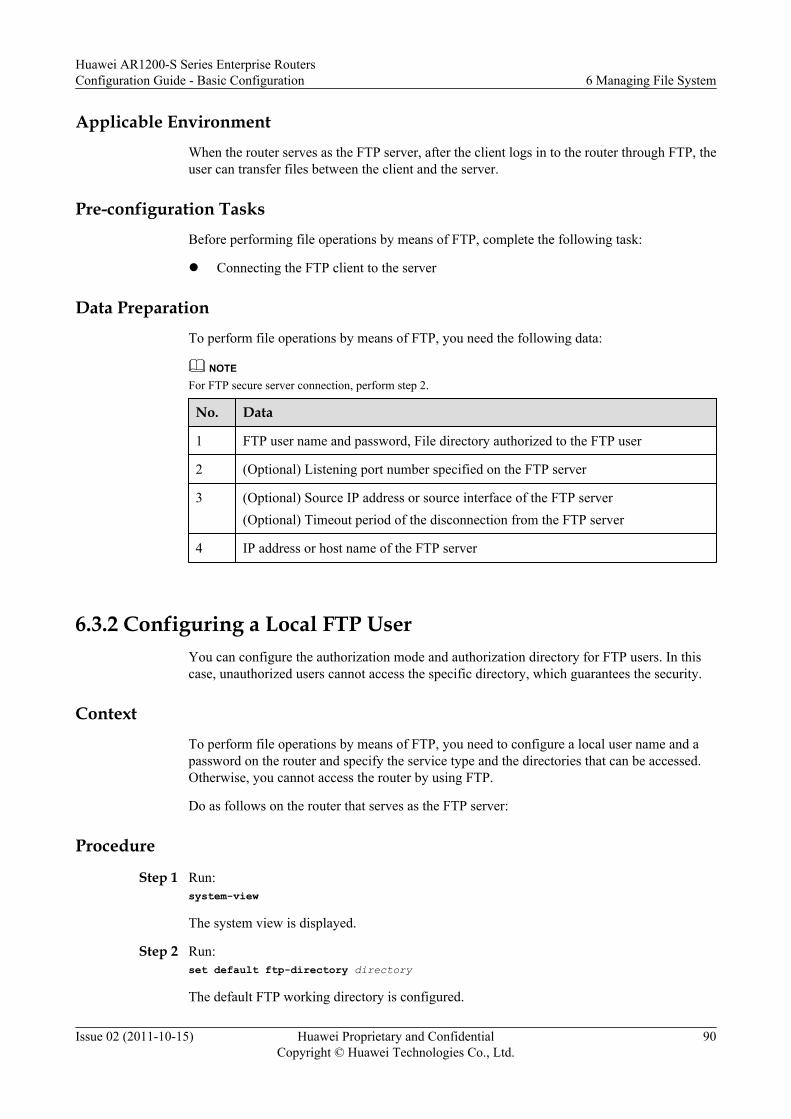
Applicable EnvironmentWhen the router serves as the FTP server, after the client logs in to the router through FTP, theuser can transfer files between the client and the server.
Pre-configuration TasksBefore performing file operations by means of FTP, complete the following task:
l Connecting the FTP client to the server
Data PreparationTo perform file operations by means of FTP, you need the following data:
NOTEFor FTP secure server connection, perform step 2.
No. Data
1 FTP user name and password, File directory authorized to the FTP user
2 (Optional) Listening port number specified on the FTP server
3 (Optional) Source IP address or source interface of the FTP server(Optional) Timeout period of the disconnection from the FTP server
4 IP address or host name of the FTP server
6.3.2 Configuring a Local FTP UserYou can configure the authorization mode and authorization directory for FTP users. In thiscase, unauthorized users cannot access the specific directory, which guarantees the security.
ContextTo perform file operations by means of FTP, you need to configure a local user name and apassword on the router and specify the service type and the directories that can be accessed.Otherwise, you cannot access the router by using FTP.
Do as follows on the router that serves as the FTP server:
Procedure
Step 1 Run:system-view
The system view is displayed.
Step 2 Run:set default ftp-directory directory
The default FTP working directory is configured.
Huawei AR1200-S Series Enterprise RoutersConfiguration Guide - Basic Configuration 6 Managing File System
Issue 02 (2011-10-15) Huawei Proprietary and ConfidentialCopyright © Huawei Technologies Co., Ltd.
90
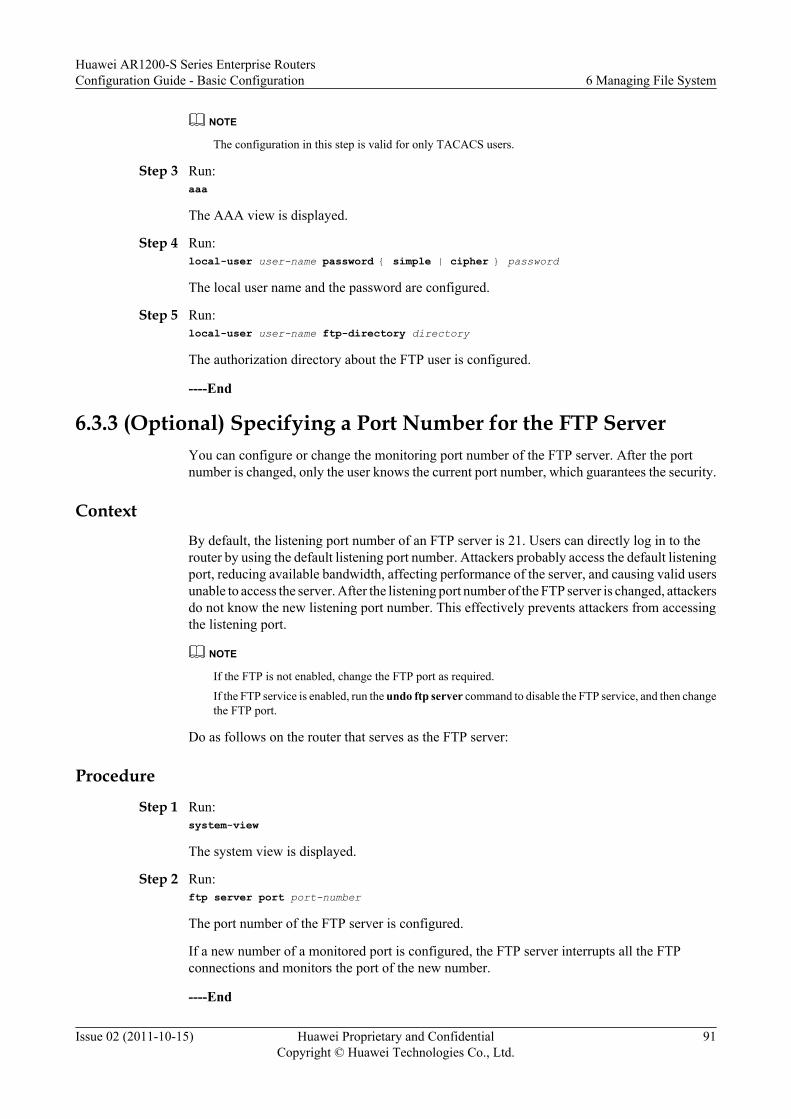
NOTE
The configuration in this step is valid for only TACACS users.
Step 3 Run:aaa
The AAA view is displayed.
Step 4 Run:local-user user-name password { simple | cipher } password
The local user name and the password are configured.
Step 5 Run:local-user user-name ftp-directory directory
The authorization directory about the FTP user is configured.
----End
6.3.3 (Optional) Specifying a Port Number for the FTP ServerYou can configure or change the monitoring port number of the FTP server. After the portnumber is changed, only the user knows the current port number, which guarantees the security.
ContextBy default, the listening port number of an FTP server is 21. Users can directly log in to therouter by using the default listening port number. Attackers probably access the default listeningport, reducing available bandwidth, affecting performance of the server, and causing valid usersunable to access the server. After the listening port number of the FTP server is changed, attackersdo not know the new listening port number. This effectively prevents attackers from accessingthe listening port.
NOTE
If the FTP is not enabled, change the FTP port as required.
If the FTP service is enabled, run the undo ftp server command to disable the FTP service, and then changethe FTP port.
Do as follows on the router that serves as the FTP server:
Procedure
Step 1 Run:system-view
The system view is displayed.
Step 2 Run:ftp server port port-number
The port number of the FTP server is configured.
If a new number of a monitored port is configured, the FTP server interrupts all the FTPconnections and monitors the port of the new number.
----End
Huawei AR1200-S Series Enterprise RoutersConfiguration Guide - Basic Configuration 6 Managing File System
Issue 02 (2011-10-15) Huawei Proprietary and ConfidentialCopyright © Huawei Technologies Co., Ltd.
91
6.3.4 Enabling the FTP ServerBefore using FTP to perform file operations, you need to enable the FTP sever on the router.
ContextBy default, the FTP server is disabled on the router. Therefore, you must enable the FTP serverbefore using FTP.
Do as follows on the router that serves as the FTP server:
Procedure
Step 1 Run:system-view
The system view is displayed.
Step 2 Run:ftp server enable
The FTP server is enabled.
NOTE
When the file operation between clients and the router ends, run the undo ftp server command to disablethe FTP server function. This ensures the security of the router.
----End
6.3.5 (Optional) Configuring the FTP Server ParametersThe FTP server parameters include the source address of the FTP server and the timeout periodfor FTP connection.
Contextl You can configure a source IP address for the FTP server. This limits the destination address
that the client can access and therefore guarantee the security.l You can configure the timeout period for FTP connections on the FTP server. When the
timeout period of an FTP connection expires, the system breaks the connection to releaseresources.
Do as follows on the router that serves as the FTP server:
Procedure
Step 1 Run:system-view
The system view is displayed.
Step 2 Run:ftp server-source { -a ip-address | -iinterface-type interface-number }
The source IP address and source interface of an FTP server is configured.
Huawei AR1200-S Series Enterprise RoutersConfiguration Guide - Basic Configuration 6 Managing File System
Issue 02 (2011-10-15) Huawei Proprietary and ConfidentialCopyright © Huawei Technologies Co., Ltd.
92

To log in to the FTP server, you must specify the same source IP address in the ftp command.Otherwise, you cannot log in to the FTP server.
Step 3 Run:ftp timeout minutes
The timeout period of the FTP server is configured.
If the client is idle for the configured time, the connection is removed from the FTP server.
By default, the timeout value is 30 minutes.
----End
6.3.6 (Optional) Configuring an FTP ACLAfter an FTP ACL is configured, only the specified clients can access the devicerouter.
Context
When the routerdevice functions as an FTP server, you can configure an ACL to allow the clientsthat meet the matching rules to access the FTP server.
Do as follows on the router that serves as the FTP server:
Procedure
Step 1 Run:system-view
The system view is displayed.
Step 2 Run:acl acl-number
The ACL view is displayed.
Step 3 Run:rule [ rule-id ] { deny | permit } [ { fragment | none-first-fragment } | source { source-address source-wildcard | any } | time-range time-name ] *
The ACL rule is configured.
NOTE
FTP supports only the basic ACL.
Step 4 Run:quit
Return the system view.
Step 5 Run:ftp acl acl-number
The basic FTP ACL is configured.
----End
Huawei AR1200-S Series Enterprise RoutersConfiguration Guide - Basic Configuration 6 Managing File System
Issue 02 (2011-10-15) Huawei Proprietary and ConfidentialCopyright © Huawei Technologies Co., Ltd.
93

6.3.7 Accessing the System by Using FTPAfter the FTP server is configured, you can access the router from the PC by using FTP to managethe files on the router.
ContextIf you need to log in to the router by using FTP, you can use either windows command lineprompt or a third-party software. Here uses the windows command line prompt as an example.
Do as follows on the PC:
Procedure
Step 1 Use the windows command line.
Step 2 Run the ftp ip-address command to log in to the router by using FTP.
Enter the user name and password at the prompt, and press Enter. When the windows commandline prompts are displayed in the FTP client view, such as ftp>, you have entered the workingdirectory of the FTP server.
----End
6.3.8 Performing File Operations by Using FTP CommandsAfter logging in to the router that functions as an FTP server by using FTP, you can upload filesto or download files from the router, and manage the directories on the router.
ContextAfter logging in to the FTP server, you can perform the following operations:
l Configuring data type for the filel Uploading or downloading filesl Creating directories on or deleting directories from the FTP server
Huawei AR1200-S Series Enterprise RoutersConfiguration Guide - Basic Configuration 6 Managing File System
Issue 02 (2011-10-15) Huawei Proprietary and ConfidentialCopyright © Huawei Technologies Co., Ltd.
94

l Displaying information about a specified remote directory or a file of the FTP server, ordeleting a specified file from the FTP server
After logging in to the FTP server and entering the FTP client view, you can perform thefollowing one or more operations:
Procedurel Configuring data type and transmission mode for the file.
– Run:ascii or binary
The data type of the file to be transmitted is ascii or binary mode.
NOTE
FTP supports the ASCII type and the binary type. Their differences are as follows:
l In ASCII transmission mode, ASCII characters are used to separate carriage returned fromline feeds.
l In binary transmission mode, characters can be transferred without format conversion orformatting.
The selection of the FTP transmission mode is client-customized. The system defaults to theASCII transmission mode. The client can use a mode switch command to switch between theASCII mode and the binary mode. The ASCII mode is used to transmit .txt files and the binarymode is used to transmit binary files.
l Upload or download files.– Upload or download a file.
– Run:put local-filename [ remote-filename ]
The local file is uploaded to the remote FTP server.– Run:
get remote-filename [ local-filename ]
The FTP file is downloaded from the FTP server and saved to the local file.l Run one or more commands in the following order to manage directories.
– Run:cd pathname
The working path of the remote FTP server is specified.– Run:
pwd
The specified directory of the FTP server is displayed.– Run:
lcd [ local-directory ]
The directory of the FTP client is displayed or changed.– Run:
mkdir remote-directory
A directory is created on the FTP server.– Run:
rmdir remote-directory
A directory is removed from the FTP server.
Huawei AR1200-S Series Enterprise RoutersConfiguration Guide - Basic Configuration 6 Managing File System
Issue 02 (2011-10-15) Huawei Proprietary and ConfidentialCopyright © Huawei Technologies Co., Ltd.
95

l Run one or more commands in the following to manage files.– Run:
ls [ remote-filename ] [ local-filename ]The specified directory or file on the remote FTP server is displayed.If the directory name is not specified when a specific remote file is selected, the systemsearches the working directory for the specific file.
– Run:dir [ remote-filename ] [ local-filename ]The specified directory or file on the local FTP server is displayed.If the directory name is not specified when a specific remote file is selected, the systemsearches the working directory for the specific file.
– Run:delete remote-filenameThe specified file on the FTP server is deleted.If the directory name is not specified when a specific remote file is selected, the systemsearches the working directory for the specific file.
When local-filename is set, related information about the file can be downloaded locally.
NOTE
If you need other FTP operations,you can perform the help [ command ] command to get help in theWindows command line.
----End
6.3.9 Checking the ConfigurationAfter configuring a router to be the FTP server, you can view the configuration and status of theFTP server as well as information about login FTP users.
PrerequisiteThe configuration of the Router to be the FTP Server are complete.
Procedurel Run the display ftp-server the configuration and running information about the FTP server.l Run the display ftp-users command to check the login FTP user.
----End
ExampleAfter configuring the FTP server, run the display ftp-server command. You can view that theFTP server is working.
<Huawei> display ftp-server FTP server is running Max user number 5 User count 0 Timeout value(in minute) 30 Listening Port 21 Acl number 0 FTP server's source address 1.1.1.1
Huawei AR1200-S Series Enterprise RoutersConfiguration Guide - Basic Configuration 6 Managing File System
Issue 02 (2011-10-15) Huawei Proprietary and ConfidentialCopyright © Huawei Technologies Co., Ltd.
96

Run the display ftp-users command to view the user name, port number, authorization directoryof the FTP user configured presently.
<Huawei> display ftp-users username host port idle topdir zll 100.2.150.226 1383 3 flash:
6.4 Performing File Operations by Means of SFTPSFTP enables users to log in to the router securely from the remote device to manage files. Thisimproves the security of data transmission for the remote end to update its system.
6.4.1 Establishing the Configuration TaskBefore performing file operations by using SFTP, familiarize yourself with the applicableenvironment, complete the pre-configuration tasks, and obtain the required data. This can helpyou complete the configuration task quickly and accurately.
Applicable EnvironmentSSH guarantees secure data transmission on a conventional insecure network by authenticatingthe client and encrypting data in both directions. SSH supports SFTP.
SFTP is a secure FTP service and enables users to log in to the FTP server for data transmission.
Pre-configuration TasksBefore performing file operations by using SFTP, complete the following task:
l Configuring reachable routes between the terminal and the device
Data PreparationBefore performing file operations by using SFTP, you need the following data.
No. Data
1 Maximum number of VTY user interfaces, (optional) ACL for limiting call-in andcall-out in VTY user interfaces, connection timeout period of terminal users, numberof rows displayed in a terminal screen, size of the history command buffer, userauthentication mode, user name, and password
2 User name, password, authentication mode, and service type of an SSH user andremote public RSA key pair allocated to the SSH user, SFTP working directory ofthe SSH user
3 (Option) Number of the port monitored by the SSH server(Option) The interval for updating the key pair on the SSH server
Huawei AR1200-S Series Enterprise RoutersConfiguration Guide - Basic Configuration 6 Managing File System
Issue 02 (2011-10-15) Huawei Proprietary and ConfidentialCopyright © Huawei Technologies Co., Ltd.
97

No. Data
4 Name of the SSH server,Number of the port monitored by the SSH server,Preferredencrypted algorithm from the SFTP client to the SSH server,Preferred encryptedalgorithm from the SSH server to the SFTP client,Preferred HMAC algorithm fromthe SFTP client to the SSH server,Preferred HMAC algorithm from the SSH serverto the SFTP client,Preferred algorithm of key exchange,Name of the outgoinginterface,Source address
5 Directory name and File name
6.4.2 Configuring VTY User InterfaceTo allow a user to log in to the router by using SFTP, you need to configure attributes of theVTY user interface.
Context
By default, the user authentication mode in the VTY user interface is password. Therefore, beforea user logs in to the router by using SFTP, the user authentication mode in the VTY user interfacemust be set. Otherwise, the user cannot log in to the router.
Other attributes of the VTY user interface in the router, such as terminal attributes and userpriorities, can also be set as needed. These attributes, however, generally do not need to be setbecause they have default values.
For detailed settings, see Configuring VTY User Interface.
6.4.3 Configuring SSH for the VTY User InterfaceTo allow users to log in to the router by using SFTP, you need to configure VTY user interfacesto support SSH.
Context
By default, user interfaces support Telnet. If no user interface is configured to support SSH,users cannot log in to the router by using SFTP.
Procedure
Step 1 Run:system-view
The system view is displayed.
Step 2 Run:user-interface [ vty ] first-ui-number [ last-ui-number ]
The VTY user interface is displayed.
Step 3 Run:authentication-mode aaa
Huawei AR1200-S Series Enterprise RoutersConfiguration Guide - Basic Configuration 6 Managing File System
Issue 02 (2011-10-15) Huawei Proprietary and ConfidentialCopyright © Huawei Technologies Co., Ltd.
98

The AAA authentication mode is configured.
Step 4 Run:protocol inbound ssh
The VTY user interface is configured to support SSH.
NOTE
If a VTY user interface is configured to support SSH, the VTY user interface must be configured withAAA authentication. Otherwise, the protocol inbound ssh command cannot be configured.
----End
6.4.4 Configuring an SSH User and Specifying SFTP as One ofService Types
To allow a user to log in to the router by using SFTP, you must configure an SSH user, configurethe router to generate a local RSA key pair, configure a user authentication mode, specify aservice type and authorized directory for the SSH user.
Contextl SSH users can be authenticated in four modes: RSA, password, password-rsa, and all. You
must create a local user with the specified user name in the AAA view.l Configuring the router to generate a local RSA key pair is a key step for SSH login. If an
SSH user logs in to an SSH server in password authentication mode, configure the serverto generate a local RSA key pair. If an SSH user logs in to an SSH server in RSAauthentication mode, configure both the server and the client to generate local RSA keypairs.
NOTE
Password-rsa authentication requires success of both password authentication and RSA authentication. Theall authentication mode requires success of either password authentication or RSA authentication.
Do as follows on the router that functions as an SSH server:
Procedure
Step 1 Run:system-view
The system view is displayed.
Step 2 Run:aaa
The AAA view is displayed.
Step 3 Run:local-user user-name password { simple | cipher } password
Name and password of the local user are created.
Step 4 Run:rsa local-key-pair create
A local RSA key pair is generated.
Huawei AR1200-S Series Enterprise RoutersConfiguration Guide - Basic Configuration 6 Managing File System
Issue 02 (2011-10-15) Huawei Proprietary and ConfidentialCopyright © Huawei Technologies Co., Ltd.
99

NOTE
l Before performing the other SSH configurations, you must configure the rsa local-key-pair createcommand to generate a local key pair.
l After generating the local key pair,you can perform the display rsa local-key-pair public commandto view the public key in the local key pair.
Step 5 Run:ssh user user-name authentication-type { password | rsa | password-rsa | all }
The authentication mode for SSH users is configured.
Perform the following as required:
l Authenticate the SSH user through the password.– Run:
ssh user user-name authentication-type password
The password authentication is configured for the SSH user.l Authenticate the SSH user through RSA.1. Run:
ssh user user-name authentication-type rsa
The RSA authentication is configured for the SSH user.2. Run:
rsa peer-public-key key-name
The public key view is displayed.3. Run:
public-key-code begin
The public key editing view is displayed.4. Run:
hex-data
The public key is edited.
NOTE
l In the public key view, only hexadecimal strings complying with the public key format can betyped in. Each string is randomly generated on an SSH client. For detailed operations, see manualsfor SSH client software.
l After the public key editing view is displayed, the RSA public key generated on the client canbe sent to the server. Copy the RSA public key to the router that serves as the SSH server.
5. Run:public-key-code end
Quit the public key editing view.
l If the specified hex-data is invalid, the public key cannot be generated after the peer-public-key end command is run.
l If the specified key-name is deleted in other views, the system prompts that the key doesnot exist after the peer-public-key end command is run and the system view isdisplayed.
6. Run:peer-public-key end
Huawei AR1200-S Series Enterprise RoutersConfiguration Guide - Basic Configuration 6 Managing File System
Issue 02 (2011-10-15) Huawei Proprietary and ConfidentialCopyright © Huawei Technologies Co., Ltd.
100

Return to the system view from the public key view.7. Run:
ssh user user-name assign rsa-key key-name
The public key is assigned to the SSH user.
Step 6 (Optional) Configuring the Basic Authentication Information for SSH Users1. Run:
ssh server rekey-interval interval
The interval for updating the server key pair is configured.
By default, the interval for updating the key pair of the SSH server is 0 that indicates noupdating.
2. Run:ssh server auth-timeout timeout_interval
The timeout period of the SSH authentication is set.
By default, the timeout period is 60 seconds.3. Run:
ssh server authentication-retries auth-times
The number of retry times of the SSH authentication is set.
By default, the retry times is 3.
----End
6.4.5 Enabling the SFTP ServiceBefore enjoying the STelnet service, you need to enable it.
ContextBy default, the router is not enabled with the SFTP server function. Users can establishconnections with the router by using SFTP only after the router is enabled with the SFTP serverfunction.
Do as follows on the router that serves as an SSH server:
Procedure
Step 1 Run:system-view
The system view is displayed.
Step 2 Run:sftp server enable
The SFTP service is enabled.
By default, the SFTP service is disabled.
----End
Huawei AR1200-S Series Enterprise RoutersConfiguration Guide - Basic Configuration 6 Managing File System
Issue 02 (2011-10-15) Huawei Proprietary and ConfidentialCopyright © Huawei Technologies Co., Ltd.
101

6.4.6 Accessing the System by Using SFTPAfter the configuration is complete, users can log in to the router from the user terminal by usingSFTP to manage files on the router.
ContextThe third-party software can be used to access the router from the user terminal by using SFTP.Here uses the third-party software OpenSSH and windows command line as an example.
After installing OpenSSH on the user terminal, do as follows on the user terminal:
NOTE
For details on how to install OpenSSH, see the installation guide of the software.
For details on how to use OpenSSH commands to log in to the router, see the help document of the software.
Procedure
Step 1 Use the windows command line.
Step 2 Run relevant OpenSSH commands to log in to the router in SFTP mode.
When the command line prompt is displayed in the SFTP client view, such as sftp>, users haveentered the working directory of the SFTP server.
----End
Huawei AR1200-S Series Enterprise RoutersConfiguration Guide - Basic Configuration 6 Managing File System
Issue 02 (2011-10-15) Huawei Proprietary and ConfidentialCopyright © Huawei Technologies Co., Ltd.
102

6.4.7 Performing File Operations by Using SFTPOn the SFTP client, you can log in to the SSH server to create or delete directories on the SSHserver.
ContextAfter logging in to the SFTP server, you can perform the following operations:
l Displaying the SFTP client command helpl Managing the directory on the SFTP serverl Managing the directory on the SFTP server
After logging in to the SFTP server and entering the SFTP client view, you can perform thefollowing one or more operations.
Procedurel Run:
help [ all | command-name ]
The SFTP client command help is displayed.l You can perform one or multiple of the following operations as required.
– Run:cd [ remote-directory ]
The current operating directory of users is changed.– Run:
pwd
The current operating directory of users is displayed.– Run:
dir [ -l -a ] [ path ]
The file list in the specified directory is displayed.– Run:
rmdir remote-directory &<1-10>
– The directory on the server is deleted.– Run:
mkdir remote-directory
A directory is created on the server.l You can perform one or multiple of the following operations as required.
– Run:rename old-name new-name
The name of the specified file on the server is changed.– Run:
get remote-filename [ local-filename ]
The file on the remote server is downloaded.– Run:
put local-filename [ remote-filename ]
Huawei AR1200-S Series Enterprise RoutersConfiguration Guide - Basic Configuration 6 Managing File System
Issue 02 (2011-10-15) Huawei Proprietary and ConfidentialCopyright © Huawei Technologies Co., Ltd.
103
The local file is uploaded to the remote server.– Run:
rmdir remote-directory &<1-10>The file on the server is removed.
----End
6.4.8 Checking the ConfigurationAfter performing file operations by using SFTP, you can view SSH user information and globalconfigurations of the SSH server.
PrerequisiteThe configuration of SSH Users are complete.
Procedurel Run the display ssh user-information username command to check the information about
the SSH client on the SSH server.l Run the display ssh server status command on the SSH server to check its global
configurations.l Run the display ssh server session command on the SSH server to check information about
connection sessions with SSH clients.
----End
ExampleRun the display ssh user-information username command. It shows that the SSH user namedclinet001 is authenticated by password, and its service type is sftp.[Huawei] display ssh user-information client001------------------------------------------------------------------------------- Username Auth-type User-public-key-name ------------------------------------------------------------------------------- client001 password null -------------------------------------------------------------------------------
If no SSH user is specified, information about all SSH users logging in to an SSH server will bedisplayed.
Run the display ssh server status command to view configurations of an SSH server.<Huawei> display ssh server status SSH version : 1.99 SSH connection timeout : 60 seconds SSH server key generating interval : 2 hours SSH Authentication retries : 5 times
SFTP Server : Enable
NOTE
If the default interception port is in use, information about the current interception port is not displayed.
Run the display ssh server session command. The command output shows that the sessioninformation between SSH server and client.
Huawei AR1200-S Series Enterprise RoutersConfiguration Guide - Basic Configuration 6 Managing File System
Issue 02 (2011-10-15) Huawei Proprietary and ConfidentialCopyright © Huawei Technologies Co., Ltd.
104
<Huawei> display ssh server sessionSession 2: Conn : VTY 4 Version : 2.0 State : started Username : client002 Retry : 1 CTOS Cipher : aes128-cbc STOC Cipher : aes128-cbc CTOS Hmac : hmac-md5 STOC Hmac : hmac-md5 Kex : diffie-hellman-group-exchange-sha1
Authentication Type : password
6.5 Configuration ExamplesThis section provides an example for performing files by accessing the system and using FTPor SFTP.These configuration examples explain networking requirements, configurationroadmap, and configuration notes.
6.5.1 Example for Performing File Operations by Means of the FileSystem
This section describes how to perform file operations by means of the file system. In thisexample, you can log in to the router to view and copy directories.
Networking RequirementsYou can log in to the router through the Console interface, Telnet, or STelnet to perform fileoperations on the router.
The file path in the storage device must be correct. If the user does not specify a target file name,the source file name is the name of the target file by default.
Configuration RoadmapThe configuration roadmap is as follows:
1. Check the files under a certain directory.2. Copy a file to this directory.3. Check this directory and view that the file is copied successfully to the specified directory.
Data PreparationTo complete the configuration, you need the following data:
l Source file name and target file namel Source file path and target file path
Procedure
Step 1 Display the file information in the current directory, flash:/ is the flash memory identifier.<Huawei> dir
Huawei AR1200-S Series Enterprise RoutersConfiguration Guide - Basic Configuration 6 Managing File System
Issue 02 (2011-10-15) Huawei Proprietary and ConfidentialCopyright © Huawei Technologies Co., Ltd.
105
Directory of flash:/ Idx Attr Size(Byte) Date Time(LMT) FileName 0 -rw- 47,584,256 Sep 17 2107 14:54:23 ar1201_23316_1220.cc 1 -rw- 4 Jun 30 2010 01:01:16 voip_feature.efs 2 -rw- 4 Jul 27 2005 11:02:05 voip_protocol.efs 3 -rw- 45,794,304 Sep 03 2107 12:38:38 ar1117_20921_1220.cc 4 -rw- 1,751,678 Jan 26 2008 16:24:13 web.zip 5 -rw- 3,856 Jan 28 2008 00:00:09 iascfg.zip 6 -rw- 396 Jan 11 2008 18:09:53 rsa_host_key.efs 7 -rw- 6 Dec 01 2007 15:35:31 1.txt 8 -rw- 3,315 Dec 07 2007 12:54:45 ma5600_license.dat 9 -rw- 6,656 Dec 07 2007 12:55:14 patch_lic.pat 10 -rw- 7,533 Dec 07 2007 12:55:50 pdt_keyfile.txt 11 -rw- 6,656 Dec 07 2007 13:13:39 patch_lic2.pat 12 -rw- 526,003 Jan 27 2008 00:00:36 private-data.txt 13 -rw- 540 Jan 11 2008 18:10:07 rsa_server_key.efs 14 -rw- 16 Jan 12 2008 14:53:53 dulei.tbl 15 -rw- 0 Dec 27 2007 15:27:49 dictionary.xml 16 -rw- 2,016,467 Dec 28 2007 17:58:26 arweb.zip 17 -rw- 477 Jan 10 2008 14:46:12 elabel.fls 18 -rw- 2,810 Jan 15 2008 13:57:02 aa.txt 19 -rw- 68,750,848 Jan 26 2008 15:40:15 ar0312_34479_1220.cc 20 -rw- 0 Jan 28 2008 14:47:29 ar.txt 217,168 KB total (4,320 KB free)
Step 2 Copy files from usb0:/sample.txt to flash:/sample.txt<Huawei> copy usb0:/sample.txt flash:/sample1.txtCopy usb0:/sample.txt to flash:/sample1.txt?[Y/N]:y100% completeInfo:Copied file usb0:/sample.txt to flash:/sample1.txt...Done
Step 3 Display the file information about the current directory, and you can view that the file is copiedto the specified directory.<Huawei> dirDirectory of flash:/ Idx Attr Size(Byte) Date Time(LMT) FileName 0 -rw- 47,584,256 Sep 17 2107 14:54:23 ar1201_23316_1220.cc 1 -rw- 4 Jun 30 2010 01:01:16 voip_feature.efs 2 -rw- 4 Jul 27 2005 11:02:05 voip_protocol.efs 3 -rw- 45,794,304 Sep 03 2107 12:38:38 ar1117_20921_1220.cc 4 -rw- 1,751,678 Jan 26 2008 16:24:13 web.zip 5 -rw- 3,856 Jan 28 2008 00:00:09 iascfg.zip 6 -rw- 396 Jan 11 2008 18:09:53 rsa_host_key.efs 7 -rw- 6 Dec 01 2007 15:35:31 1.txt 8 -rw- 3,315 Dec 07 2007 12:54:45 ma5600_license.dat 9 -rw- 6,656 Dec 07 2007 12:55:14 patch_lic.pat 10 -rw- 7,533 Dec 07 2007 12:55:50 pdt_keyfile.txt 11 -rw- 6,656 Dec 07 2007 13:13:39 patch_lic2.pat 12 -rw- 526,003 Jan 27 2008 00:00:36 private-data.txt 13 -rw- 540 Jan 11 2008 18:10:07 rsa_server_key.efs 14 -rw- 16 Jan 12 2008 14:53:53 dulei.tbl 15 -rw- 0 Dec 27 2007 15:27:49 dictionary.xml 16 -rw- 2,016,467 Dec 28 2007 17:58:26 arweb.zip 17 -rw- 477 Jan 10 2008 14:46:12 elabel.fls 18 -rw- 2,810 Jan 15 2008 13:57:02 aa.txt 19 -rw- 68,750,848 Jan 26 2008 15:40:15 ar0312_34479_1220.cc 20 -rw- 0 Jan 28 2008 14:47:29 ar.txt 21 -rw- 1,605 Oct 24 2009 11:14:39 sample1.txt
217,169 KB total (4,319 KB free)
----End
Huawei AR1200-S Series Enterprise RoutersConfiguration Guide - Basic Configuration 6 Managing File System
Issue 02 (2011-10-15) Huawei Proprietary and ConfidentialCopyright © Huawei Technologies Co., Ltd.
106

6.5.2 Example for Performing File Operations by Means of FTPThis section provides an example for operating files by means of FTP. In this example, a PCconnected to the router logs in to the FTP server by entering the correct user name and passwordusing FTP, and then downloads files to the memory of the FTP client.
Networking Requirements
As shown in Figure 6-1, after the FTP server is enabled on the router, you can log in to the FTPserver from the HyperTerminal to upload or download files.
Figure 6-1 Networking for performing file operations by using FTP
PC
Network
FTP Server
GE1/0/010.137.217.221/16
Configuration Roadmap
The configuration roadmap is as follows:
1. Configure the IP address of the FTP server.2. Enable the FTP server.3. Configure the authentication information, authorization mode, and directories to be
accessed for an FTP user.4. Log in to the FTP server by using the correct user name and password.5. Upload files to or download files from the FTP server.
NOTEEnsure that the PC can communicate with the FTP server.
Data Preparation
To complete the configuration, you need the following data:
l IP address of the FTP server, that is, 10.137.217.221l Timeout period for the FTP connection, that is, 20 minutesl FTP username as huawei and password as huawei on the serverl Destination file name and its position in the FTP client
Procedure
Step 1 Configure the IP address of the FTP server.[server] interface gigabitethernet1/0/0[server-GigabitEthernet1/0/0] ip address 10.137.217.221 255.255.0.0[server-GigabitEthernet1/0/0] quit
Huawei AR1200-S Series Enterprise RoutersConfiguration Guide - Basic Configuration 6 Managing File System
Issue 02 (2011-10-15) Huawei Proprietary and ConfidentialCopyright © Huawei Technologies Co., Ltd.
107
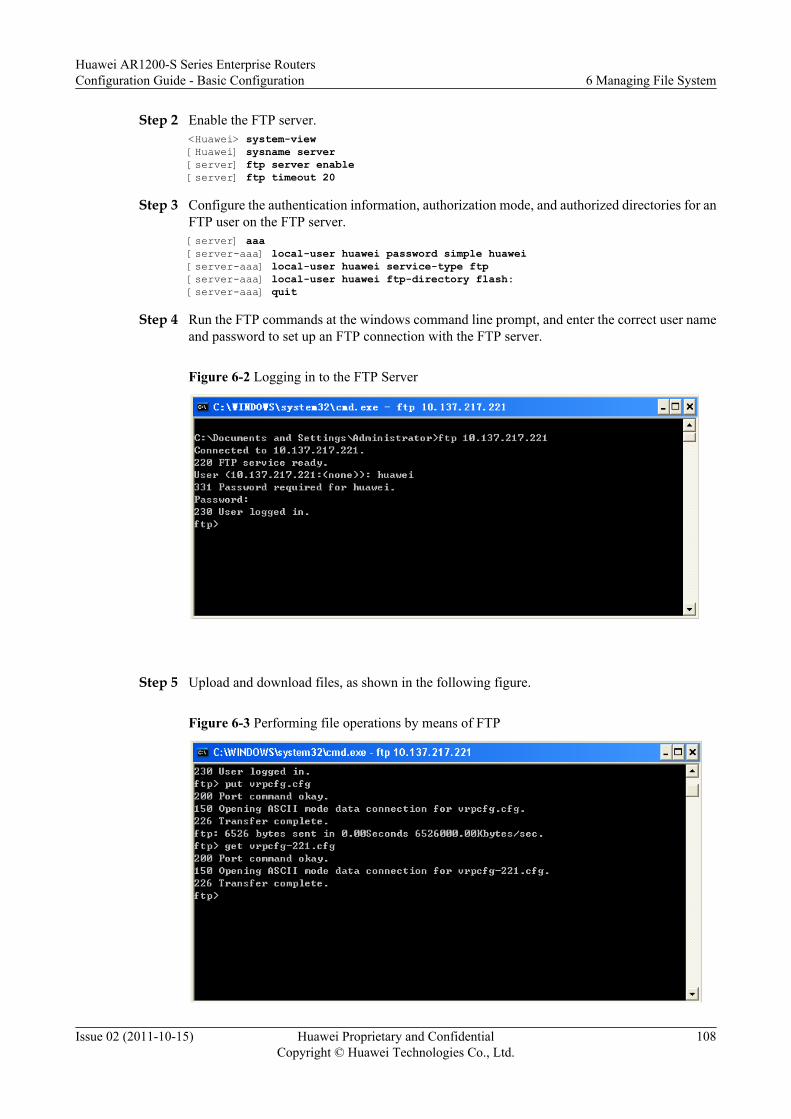
Step 2 Enable the FTP server.<Huawei> system-view[Huawei] sysname server[server] ftp server enable[server] ftp timeout 20
Step 3 Configure the authentication information, authorization mode, and authorized directories for anFTP user on the FTP server.[server] aaa[server-aaa] local-user huawei password simple huawei[server-aaa] local-user huawei service-type ftp[server-aaa] local-user huawei ftp-directory flash:[server-aaa] quit
Step 4 Run the FTP commands at the windows command line prompt, and enter the correct user nameand password to set up an FTP connection with the FTP server.
Figure 6-2 Logging in to the FTP Server
Step 5 Upload and download files, as shown in the following figure.
Figure 6-3 Performing file operations by means of FTP
Huawei AR1200-S Series Enterprise RoutersConfiguration Guide - Basic Configuration 6 Managing File System
Issue 02 (2011-10-15) Huawei Proprietary and ConfidentialCopyright © Huawei Technologies Co., Ltd.
108
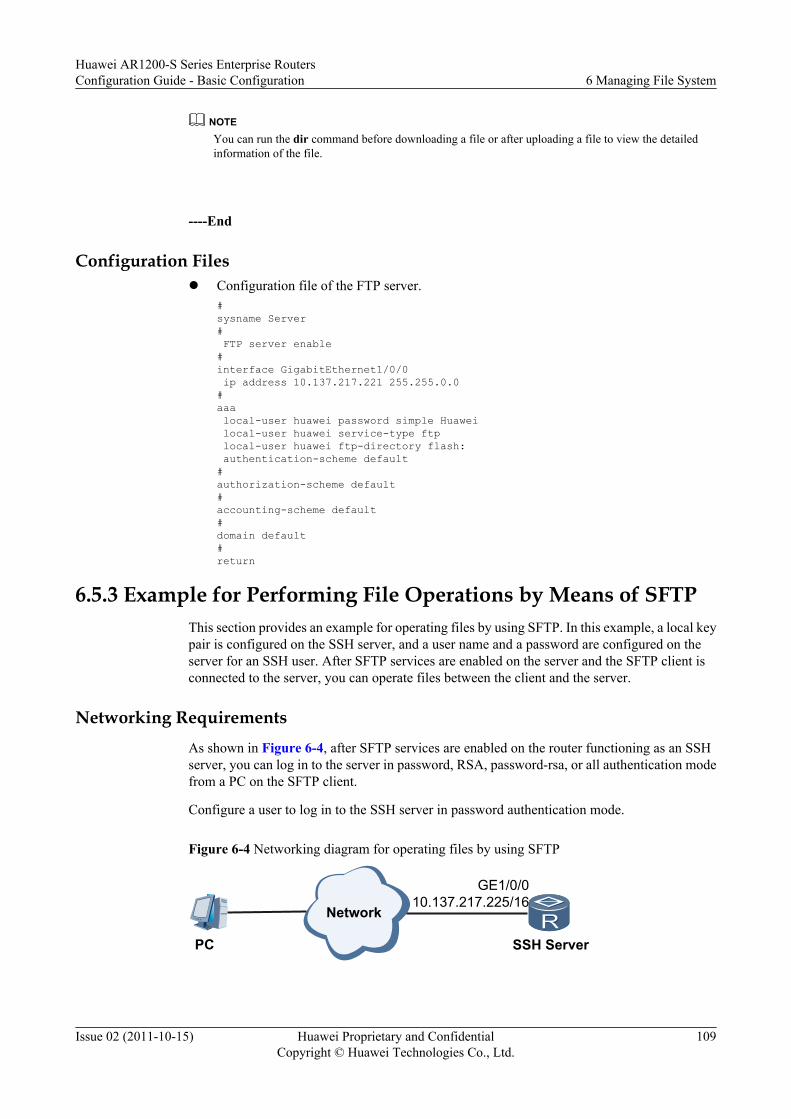
NOTEYou can run the dir command before downloading a file or after uploading a file to view the detailedinformation of the file.
----End
Configuration Filesl Configuration file of the FTP server.
#sysname Server# FTP server enable#interface GigabitEthernet1/0/0 ip address 10.137.217.221 255.255.0.0 #aaa local-user huawei password simple Huawei local-user huawei service-type ftp local-user huawei ftp-directory flash: authentication-scheme default#authorization-scheme default#accounting-scheme default#domain default#return
6.5.3 Example for Performing File Operations by Means of SFTPThis section provides an example for operating files by using SFTP. In this example, a local keypair is configured on the SSH server, and a user name and a password are configured on theserver for an SSH user. After SFTP services are enabled on the server and the SFTP client isconnected to the server, you can operate files between the client and the server.
Networking RequirementsAs shown in Figure 6-4, after SFTP services are enabled on the router functioning as an SSHserver, you can log in to the server in password, RSA, password-rsa, or all authentication modefrom a PC on the SFTP client.
Configure a user to log in to the SSH server in password authentication mode.
Figure 6-4 Networking diagram for operating files by using SFTP
PC
Network
SSH Server
GE1/0/010.137.217.225/16
Huawei AR1200-S Series Enterprise RoutersConfiguration Guide - Basic Configuration 6 Managing File System
Issue 02 (2011-10-15) Huawei Proprietary and ConfidentialCopyright © Huawei Technologies Co., Ltd.
109

Configuration Roadmap
The configuration roadmap is as follows:
1. Configure a local key pair on the SSH server to securely exchange data between the SFTPclient and the SSH server.
2. Configure VTY user interfaces on the SSH server.
3. Configure an SSH user, including user name and password.
4. Enable SFTP services on the SSH server and configure a user service type.
Data Preparation
To complete the configuration, you need the following data:
l SSH user authentication mode: password, user name: client001, password: huawei
l User level of client001: 3
l IP address of the SSH server: 10.137.217.225
Procedure
Step 1 Configure a local key pair on the SSH server.<Huawei> system-view[Huawei] sysname SSH Server[SSH Server] rsa local-key-pair createThe key name will be: HostThe range of public key size is (512 ~ 2048).NOTES: If the key modulus is greater than 512, It will take a few minutes.Input the bits in the modulus[default = 512]: 768Generating keys..........++++++++++++..........++++++++++++...................................++++++++......++++++++
Step 2 Configure VTY user interfaces on the SSH server.[SSH Server] user-interface vty 0 4[SSH Server-ui-vty0-4] authentication-mode aaa[SSH Server-ui-vty0-4] protocol inbound ssh[SSH Server-ui-vty0-4] quit
Step 3 Configure the SSH user name and password on the SSH server.[SSH Server] aaa[SSH Server-aaa] local-user client001 password cipher huawei[SSH Server-aaa] local-user client001 privilege level 3[SSH Server-aaa] local-user client001 service-type ssh[SSH Server-aaa] local-user client001 ftp-directory flash:[SSH Server-aaa] quit
Step 4 Enable SFTP.[SSH Server] sftp server enable
Step 5 Verify the configurations.
# Access the SFTP server by using the OpenSSH software.
Huawei AR1200-S Series Enterprise RoutersConfiguration Guide - Basic Configuration 6 Managing File System
Issue 02 (2011-10-15) Huawei Proprietary and ConfidentialCopyright © Huawei Technologies Co., Ltd.
110
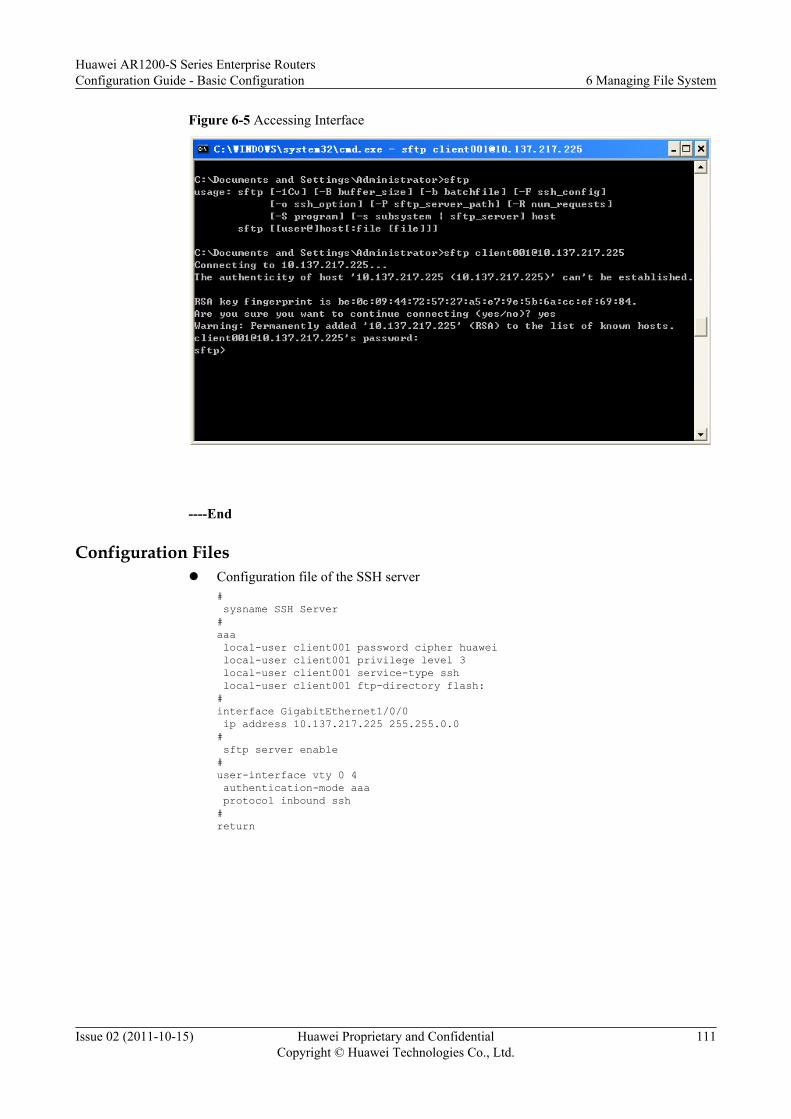
Figure 6-5 Accessing Interface
----End
Configuration Filesl Configuration file of the SSH server
# sysname SSH Server#aaa local-user client001 password cipher huawei local-user client001 privilege level 3 local-user client001 service-type ssh local-user client001 ftp-directory flash:#interface GigabitEthernet1/0/0 ip address 10.137.217.225 255.255.0.0# sftp server enable#user-interface vty 0 4 authentication-mode aaa protocol inbound ssh#return
Huawei AR1200-S Series Enterprise RoutersConfiguration Guide - Basic Configuration 6 Managing File System
Issue 02 (2011-10-15) Huawei Proprietary and ConfidentialCopyright © Huawei Technologies Co., Ltd.
111
7 Configuring System Startup
About This Chapter
When the router starts, system software is started and configuration files are loaded. To ensuresmooth running of the router, you need to efficiently manage system software and configurationfiles.
7.1 System Startup OverviewWhen the router starts, system software is started and configuration files are loaded.
7.2 Managing Configuration FilesYou can manage the configuration files for the current and next startup operations on therouter.
7.3 Specifying a File for System StartupYou can specify a file for system startup by specifying the system software and configurationfile for the next startup of the router.
7.4 Configuration ExamplesThis section provides an example for configuring system startup.These configuration examplesexplain networking requirements, configuration roadmap, and configuration notes.
Huawei AR1200-S Series Enterprise RoutersConfiguration Guide - Basic Configuration 7 Configuring System Startup
Issue 02 (2011-10-15) Huawei Proprietary and ConfidentialCopyright © Huawei Technologies Co., Ltd.
112
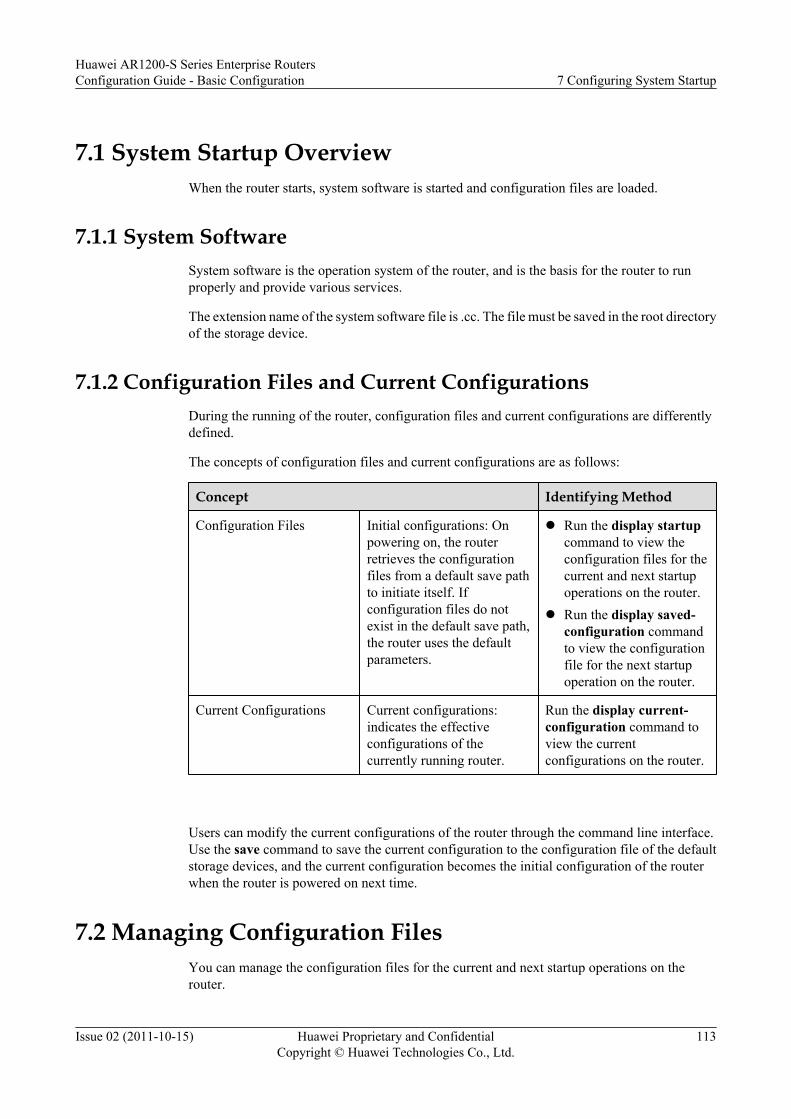
7.1 System Startup OverviewWhen the router starts, system software is started and configuration files are loaded.
7.1.1 System SoftwareSystem software is the operation system of the router, and is the basis for the router to runproperly and provide various services.
The extension name of the system software file is .cc. The file must be saved in the root directoryof the storage device.
7.1.2 Configuration Files and Current ConfigurationsDuring the running of the router, configuration files and current configurations are differentlydefined.
The concepts of configuration files and current configurations are as follows:
Concept Identifying Method
Configuration Files Initial configurations: Onpowering on, the routerretrieves the configurationfiles from a default save pathto initiate itself. Ifconfiguration files do notexist in the default save path,the router uses the defaultparameters.
l Run the display startupcommand to view theconfiguration files for thecurrent and next startupoperations on the router.
l Run the display saved-configuration commandto view the configurationfile for the next startupoperation on the router.
Current Configurations Current configurations:indicates the effectiveconfigurations of thecurrently running router.
Run the display current-configuration command toview the currentconfigurations on the router.
Users can modify the current configurations of the router through the command line interface.Use the save command to save the current configuration to the configuration file of the defaultstorage devices, and the current configuration becomes the initial configuration of the routerwhen the router is powered on next time.
7.2 Managing Configuration FilesYou can manage the configuration files for the current and next startup operations on therouter.
Huawei AR1200-S Series Enterprise RoutersConfiguration Guide - Basic Configuration 7 Configuring System Startup
Issue 02 (2011-10-15) Huawei Proprietary and ConfidentialCopyright © Huawei Technologies Co., Ltd.
113
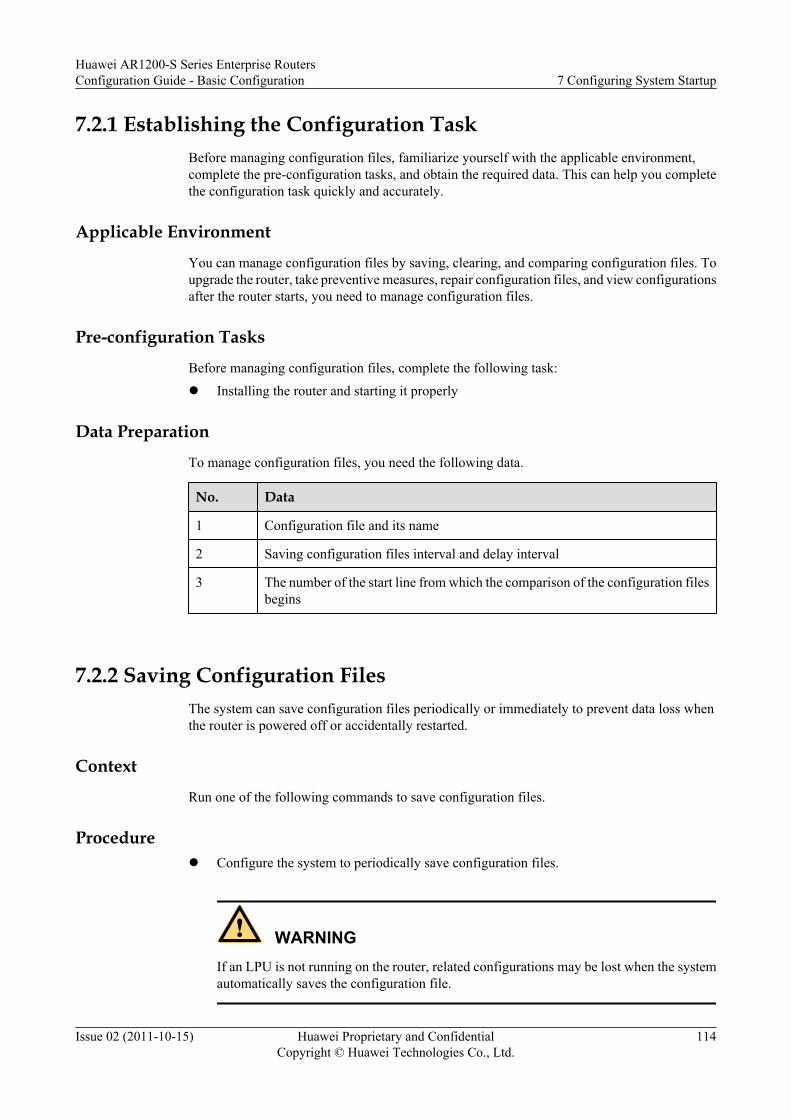
7.2.1 Establishing the Configuration TaskBefore managing configuration files, familiarize yourself with the applicable environment,complete the pre-configuration tasks, and obtain the required data. This can help you completethe configuration task quickly and accurately.
Applicable Environment
You can manage configuration files by saving, clearing, and comparing configuration files. Toupgrade the router, take preventive measures, repair configuration files, and view configurationsafter the router starts, you need to manage configuration files.
Pre-configuration Tasks
Before managing configuration files, complete the following task:l Installing the router and starting it properly
Data Preparation
To manage configuration files, you need the following data.
No. Data
1 Configuration file and its name
2 Saving configuration files interval and delay interval
3 The number of the start line from which the comparison of the configuration filesbegins
7.2.2 Saving Configuration FilesThe system can save configuration files periodically or immediately to prevent data loss whenthe router is powered off or accidentally restarted.
Context
Run one of the following commands to save configuration files.
Procedurel Configure the system to periodically save configuration files.
WARNINGIf an LPU is not running on the router, related configurations may be lost when the systemautomatically saves the configuration file.
Huawei AR1200-S Series Enterprise RoutersConfiguration Guide - Basic Configuration 7 Configuring System Startup
Issue 02 (2011-10-15) Huawei Proprietary and ConfidentialCopyright © Huawei Technologies Co., Ltd.
114

1. Run:autosave interval { time } | { value } | { configuration time }The system is configured to save the configuration file periodically.If interval time is specified, the system saves the configuration file at the specifiedinterval regardless of whether the configuration is changed.– By default, the interval at which the system saves the configuration file is 0
seconds, indicating that the system does not save the configuration fileautomatically.
– After automatic configuration saving is enabled, the default interval is 30 minutesif time is not specified.
l Save the current configuration immediately.– Run:
save [ all ] [ configuration-file ]The current configuration is saved.The configuration file name extension must be .cfg or .zip, and the system startupconfiguration file must be saved in the root directory of the storage device.If you modify the current configuration and want to use the modified configuration asthe next startup configuration, run the save command to save the new configuration tothe storage device.The save all command saves all the current configurations to the default directory,including the configurations of the boards that are not running on the router.
----End
7.2.3 Clearing a Configuration FileYou can clear the configuration file that has been loaded to a device.
ContextThe configuration file needs to be cleared in the following cases:
l The system software does not match the configuration file after the router has beenupgraded.
l The configuration file is destroyed or an incorrect configuration file has been loaded.
Procedurel Run the reset saved-configuration command to clear the currently loaded configuration
file.– If the configuration file of the router used for the current startup is the same as that used
for the next startup, running the reset saved-configuration command will clear boththe configuration files. The router will uses the default configuration file for the nextstartup.
– If the configuration file of the router used for the current startup is different from thatused at the next startup, running the reset saved-configuration command will clear theconfiguration file used for the current startup.
– If the configuration file of the router used for the current startup is empty, the systemwill prompt you that the configuration file does not exist after you run the reset saved-configuration command.
Huawei AR1200-S Series Enterprise RoutersConfiguration Guide - Basic Configuration 7 Configuring System Startup
Issue 02 (2011-10-15) Huawei Proprietary and ConfidentialCopyright © Huawei Technologies Co., Ltd.
115
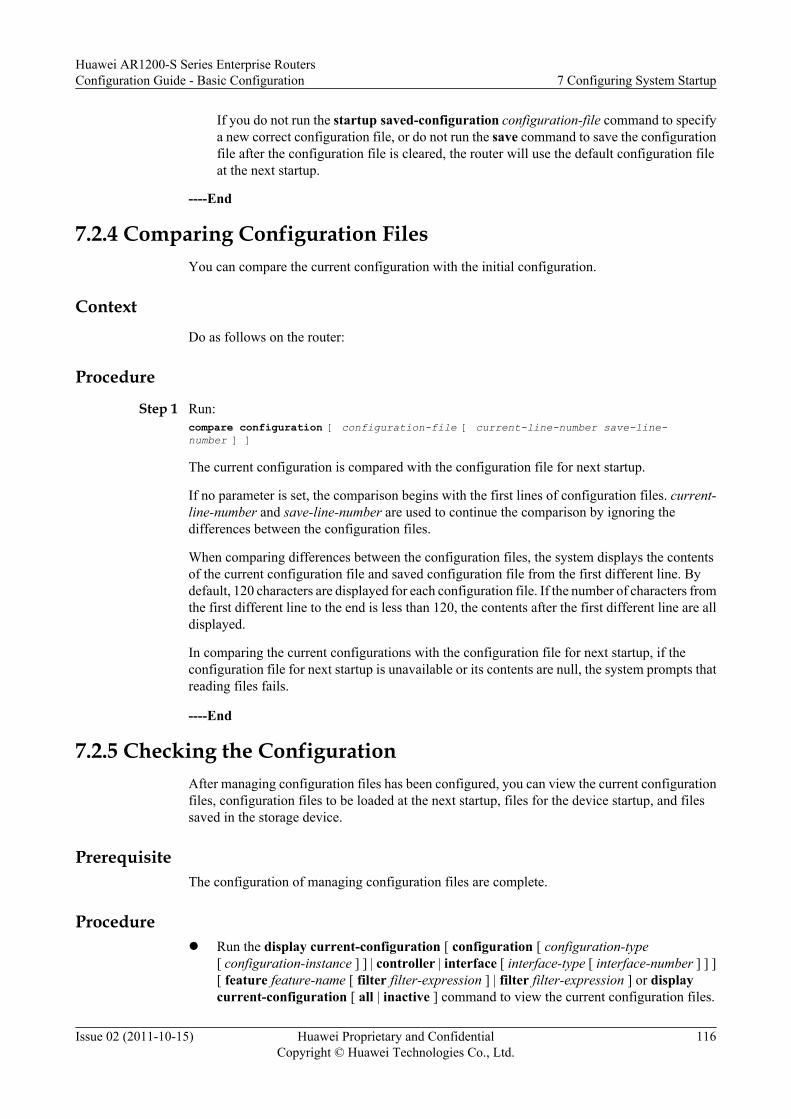
If you do not run the startup saved-configuration configuration-file command to specifya new correct configuration file, or do not run the save command to save the configurationfile after the configuration file is cleared, the router will use the default configuration fileat the next startup.
----End
7.2.4 Comparing Configuration FilesYou can compare the current configuration with the initial configuration.
ContextDo as follows on the router:
Procedure
Step 1 Run:compare configuration [ configuration-file [ current-line-number save-line-number ] ]
The current configuration is compared with the configuration file for next startup.
If no parameter is set, the comparison begins with the first lines of configuration files. current-line-number and save-line-number are used to continue the comparison by ignoring thedifferences between the configuration files.
When comparing differences between the configuration files, the system displays the contentsof the current configuration file and saved configuration file from the first different line. Bydefault, 120 characters are displayed for each configuration file. If the number of characters fromthe first different line to the end is less than 120, the contents after the first different line are alldisplayed.
In comparing the current configurations with the configuration file for next startup, if theconfiguration file for next startup is unavailable or its contents are null, the system prompts thatreading files fails.
----End
7.2.5 Checking the ConfigurationAfter managing configuration files has been configured, you can view the current configurationfiles, configuration files to be loaded at the next startup, files for the device startup, and filessaved in the storage device.
PrerequisiteThe configuration of managing configuration files are complete.
Procedurel Run the display current-configuration [ configuration [ configuration-type
[ configuration-instance ] ] | controller | interface [ interface-type [ interface-number ] ] ][ feature feature-name [ filter filter-expression ] | filter filter-expression ] or displaycurrent-configuration [ all | inactive ] command to view the current configuration files.
Huawei AR1200-S Series Enterprise RoutersConfiguration Guide - Basic Configuration 7 Configuring System Startup
Issue 02 (2011-10-15) Huawei Proprietary and ConfidentialCopyright © Huawei Technologies Co., Ltd.
116
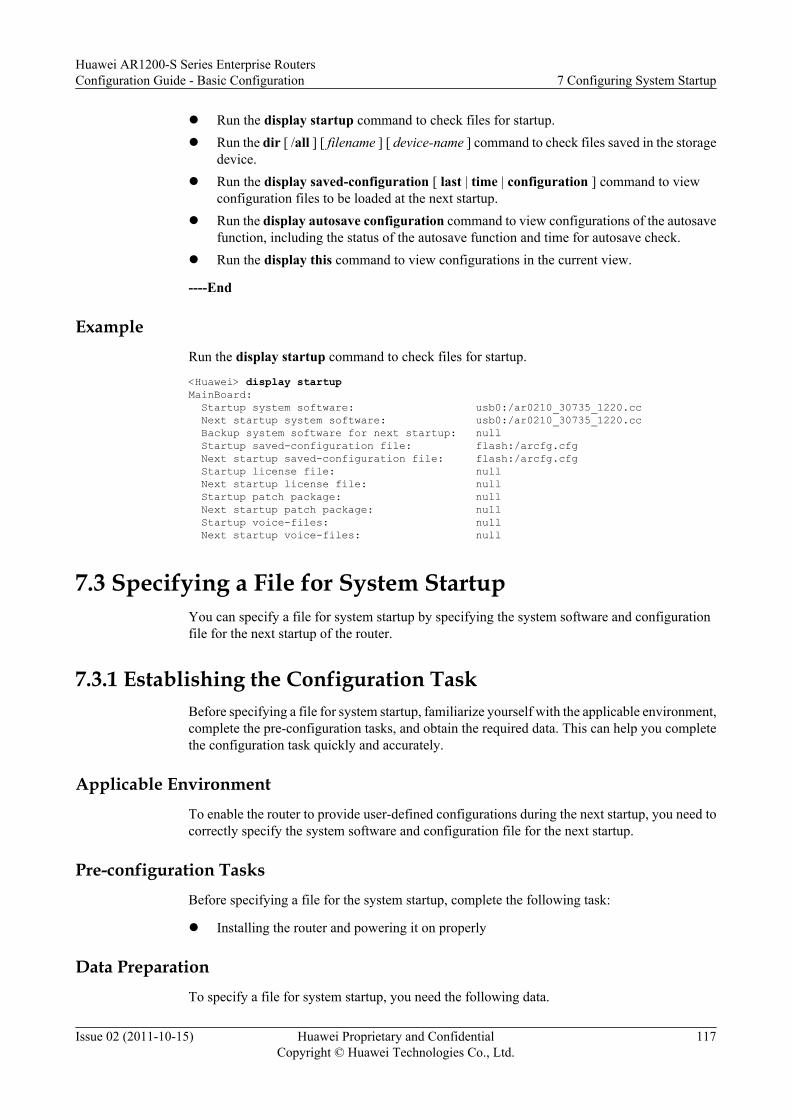
l Run the display startup command to check files for startup.l Run the dir [ /all ] [ filename ] [ device-name ] command to check files saved in the storage
device.l Run the display saved-configuration [ last | time | configuration ] command to view
configuration files to be loaded at the next startup.l Run the display autosave configuration command to view configurations of the autosave
function, including the status of the autosave function and time for autosave check.l Run the display this command to view configurations in the current view.
----End
ExampleRun the display startup command to check files for startup.
<Huawei> display startupMainBoard: Startup system software: usb0:/ar0210_30735_1220.cc Next startup system software: usb0:/ar0210_30735_1220.cc Backup system software for next startup: null Startup saved-configuration file: flash:/arcfg.cfg Next startup saved-configuration file: flash:/arcfg.cfg Startup license file: null Next startup license file: null Startup patch package: null Next startup patch package: null Startup voice-files: null Next startup voice-files: null
7.3 Specifying a File for System StartupYou can specify a file for system startup by specifying the system software and configurationfile for the next startup of the router.
7.3.1 Establishing the Configuration TaskBefore specifying a file for system startup, familiarize yourself with the applicable environment,complete the pre-configuration tasks, and obtain the required data. This can help you completethe configuration task quickly and accurately.
Applicable EnvironmentTo enable the router to provide user-defined configurations during the next startup, you need tocorrectly specify the system software and configuration file for the next startup.
Pre-configuration TasksBefore specifying a file for the system startup, complete the following task:
l Installing the router and powering it on properly
Data PreparationTo specify a file for system startup, you need the following data.
Huawei AR1200-S Series Enterprise RoutersConfiguration Guide - Basic Configuration 7 Configuring System Startup
Issue 02 (2011-10-15) Huawei Proprietary and ConfidentialCopyright © Huawei Technologies Co., Ltd.
117
No. Data
1 System software and its file name on the AR1200-S
2 Configuration file and its file name on the AR1200-S
7.3.2 Configuring System Software for a router to Load for the NextStartup
To upgrade the system software of a router, you can specify the AR1200-S system software tobe loaded for the next startup.
Context
If no system software is specified for the next startup operation of the router, the system softwareloaded this time will be started during the next startup operation. To change system software forthe next startup operation, you need to specify the required one.
The filename extension of the system software must be .cc and must be stored in the root directoryof a storage device.
Procedure
Step 1 Run:startup system-software filename
The AR1200-S system software for the router to load next time when it starts is configured.
----End
7.3.3 Configuring the Configuration File for Router to Load for theNext Startup
Before restarting a router, you can specify the configuration files that are loaded for the nextstartup.
Context
You can run the display startup command on the router to check whether the configuration fileto be loaded during the next startup operation is specified. If no configuration file is specified,the default configuration file is loaded during the next startup operation.
The filename extension of the configuration file must be .cfg or .zip, and must be stored in theroot directory of a storage device.
When the router turns on, it initiates by reading the configuration file from the flash memory bydefault. Thus, the configuration in this configuration file is called initial configuration. If noconfiguration file is saved in the flash, the router initiates with default parameters.
Huawei AR1200-S Series Enterprise RoutersConfiguration Guide - Basic Configuration 7 Configuring System Startup
Issue 02 (2011-10-15) Huawei Proprietary and ConfidentialCopyright © Huawei Technologies Co., Ltd.
118

Procedurel Run:
startup saved-configuration configuration-file
Configuration file is saved for the router to load next time on startup.
----End
7.3.4 Checking the ConfigurationAfter specifying a file for system startup, you can check the contents of the configuration file tobe loaded and the information about the file to be used during the next startup on the router.
PrerequisiteThe file has been specified for system startup.
Procedurel Run the display current-configuration [ configuration [ configuration-type
[ configuration-instance ] ] | controller | interface [ interface-type [ interface-number ] ] ][ feature feature-name [ filterfilter-expression ] | filterfilter-expression ] command tocheck current configurations.
l Run the display saved-configuration [ last | time ] command to check the contents of theconfiguration file to be loaded during the next startup.
l Run the display startup command to check information about the files to be used duringthe next startup.
----End
Example
Run the display startup command to check information about the files to be used during thenext startup.
<Huawei> display startupMainBoard: Startup system software: usb0:/ar0210_30735_1220.cc Next startup system software: usb0:/ar0210_30735_1220.cc Backup system software for next startup: null Startup saved-configuration file: flash:/arcfg.zip Next startup saved-configuration file: flash:/arcfg.zip Startup license file: null Next startup license file: null Startup patch package: null Next startup patch package: null Startup voice-files: null Next startup voice-files: null
7.4 Configuration ExamplesThis section provides an example for configuring system startup.These configuration examplesexplain networking requirements, configuration roadmap, and configuration notes.
Huawei AR1200-S Series Enterprise RoutersConfiguration Guide - Basic Configuration 7 Configuring System Startup
Issue 02 (2011-10-15) Huawei Proprietary and ConfidentialCopyright © Huawei Technologies Co., Ltd.
119
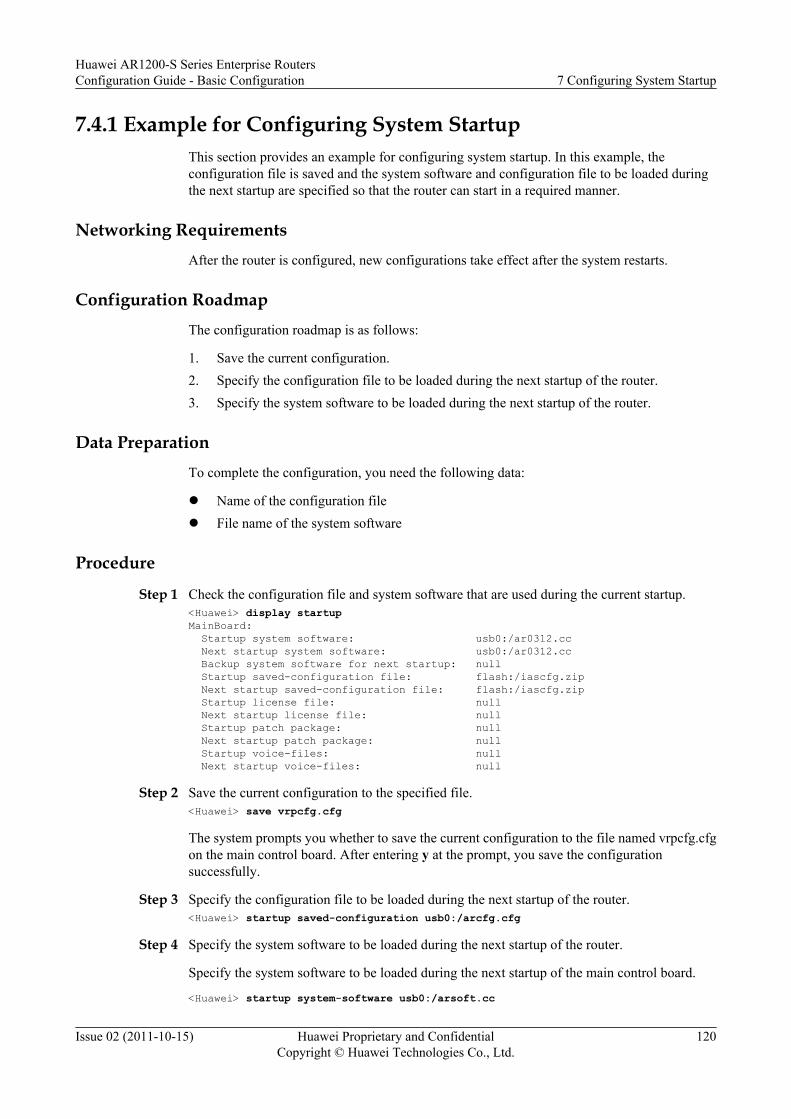
7.4.1 Example for Configuring System StartupThis section provides an example for configuring system startup. In this example, theconfiguration file is saved and the system software and configuration file to be loaded duringthe next startup are specified so that the router can start in a required manner.
Networking RequirementsAfter the router is configured, new configurations take effect after the system restarts.
Configuration RoadmapThe configuration roadmap is as follows:
1. Save the current configuration.2. Specify the configuration file to be loaded during the next startup of the router.3. Specify the system software to be loaded during the next startup of the router.
Data PreparationTo complete the configuration, you need the following data:
l Name of the configuration filel File name of the system software
Procedure
Step 1 Check the configuration file and system software that are used during the current startup.<Huawei> display startupMainBoard: Startup system software: usb0:/ar0312.cc Next startup system software: usb0:/ar0312.cc Backup system software for next startup: null Startup saved-configuration file: flash:/iascfg.zip Next startup saved-configuration file: flash:/iascfg.zip Startup license file: null Next startup license file: null Startup patch package: null Next startup patch package: null Startup voice-files: null Next startup voice-files: null
Step 2 Save the current configuration to the specified file.<Huawei> save vrpcfg.cfg
The system prompts you whether to save the current configuration to the file named vrpcfg.cfgon the main control board. After entering y at the prompt, you save the configurationsuccessfully.
Step 3 Specify the configuration file to be loaded during the next startup of the router.<Huawei> startup saved-configuration usb0:/arcfg.cfg
Step 4 Specify the system software to be loaded during the next startup of the router.
Specify the system software to be loaded during the next startup of the main control board.
<Huawei> startup system-software usb0:/arsoft.cc
Huawei AR1200-S Series Enterprise RoutersConfiguration Guide - Basic Configuration 7 Configuring System Startup
Issue 02 (2011-10-15) Huawei Proprietary and ConfidentialCopyright © Huawei Technologies Co., Ltd.
120
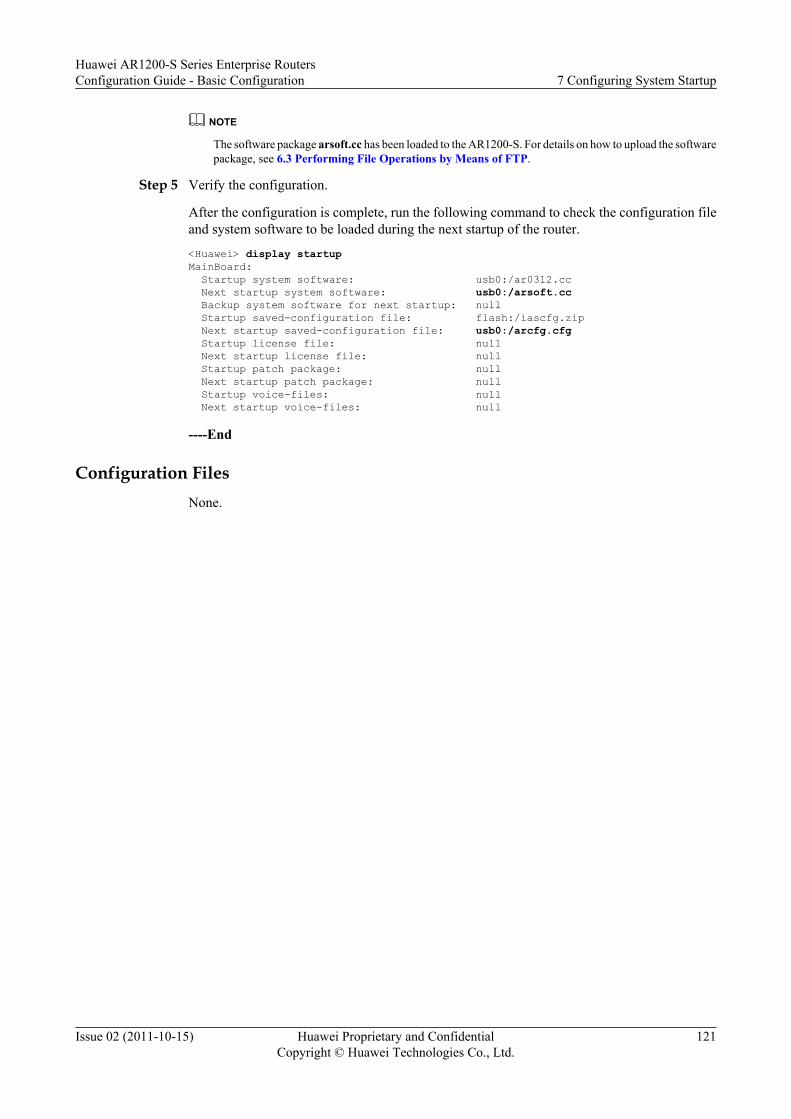
NOTE
The software package arsoft.cc has been loaded to the AR1200-S. For details on how to upload the softwarepackage, see 6.3 Performing File Operations by Means of FTP.
Step 5 Verify the configuration.
After the configuration is complete, run the following command to check the configuration fileand system software to be loaded during the next startup of the router.
<Huawei> display startupMainBoard: Startup system software: usb0:/ar0312.cc Next startup system software: usb0:/arsoft.cc Backup system software for next startup: null Startup saved-configuration file: flash:/iascfg.zip Next startup saved-configuration file: usb0:/arcfg.cfg Startup license file: null Next startup license file: null Startup patch package: null Next startup patch package: null Startup voice-files: null Next startup voice-files: null
----End
Configuration FilesNone.
Huawei AR1200-S Series Enterprise RoutersConfiguration Guide - Basic Configuration 7 Configuring System Startup
Issue 02 (2011-10-15) Huawei Proprietary and ConfidentialCopyright © Huawei Technologies Co., Ltd.
121
8 Accessing Another Device
About This Chapter
To manage configurations or operate files of another device, you can access the device by usingTelnet, STelnet, TFTP, FTP, or SFTP from the device that you have logged in to.
8.1 Accessing Another Device OverviewThis section describes how to access another device on the network by using Telnet, FTP, TFTP,or SSH.
8.2 Logging in to Other Devices by Using TelnetOn the network, a large number of routers need to be managed and maintained. Not all routers,however, can be connected to terminal PCs. In addition, there are not reachable routes betweensome routers and terminal PCs. To manage and maintain routers remotely, you can log in tothem by using Telnet from a device that you have logged in to.
8.3 Using the Redirection Function to Connect to a Remote DeviceTo manage a remote device that can transmit data only through a serial interface, configure theredirection function on the AR1200-S.
8.4 Logging in to other Device by Using STelnetSTelnet ensures secure Telnet services. You can log in to another router from the router that youhave logged in to by using STelnet, and thus to manage the device remotely.
8.5 Accessing Files on Another Device by Using TFTPYou can configure the router as a TFTP client, and log in to the TFTP server to upload anddownload files.
8.6 Accessing Files on Another Device by Using FTPThis section describes how to configure the router as an FTP client to log in to the FTP server,and to upload files to or download files from the server.
8.7 Accessing Files on Another Device by Using SFTPSFTP is a secure FTP service. After the router is configured as an SFTP client. The SFTP serverauthenticates the client and encrypts data in both directions to provide secure data transmission.
8.8 Configuration ExamplesThis section describes examples for access another device. The examples explain networkingrequirements, configuration notes, and configuration roadmap.
Huawei AR1200-S Series Enterprise RoutersConfiguration Guide - Basic Configuration 8 Accessing Another Device
Issue 02 (2011-10-15) Huawei Proprietary and ConfidentialCopyright © Huawei Technologies Co., Ltd.
122
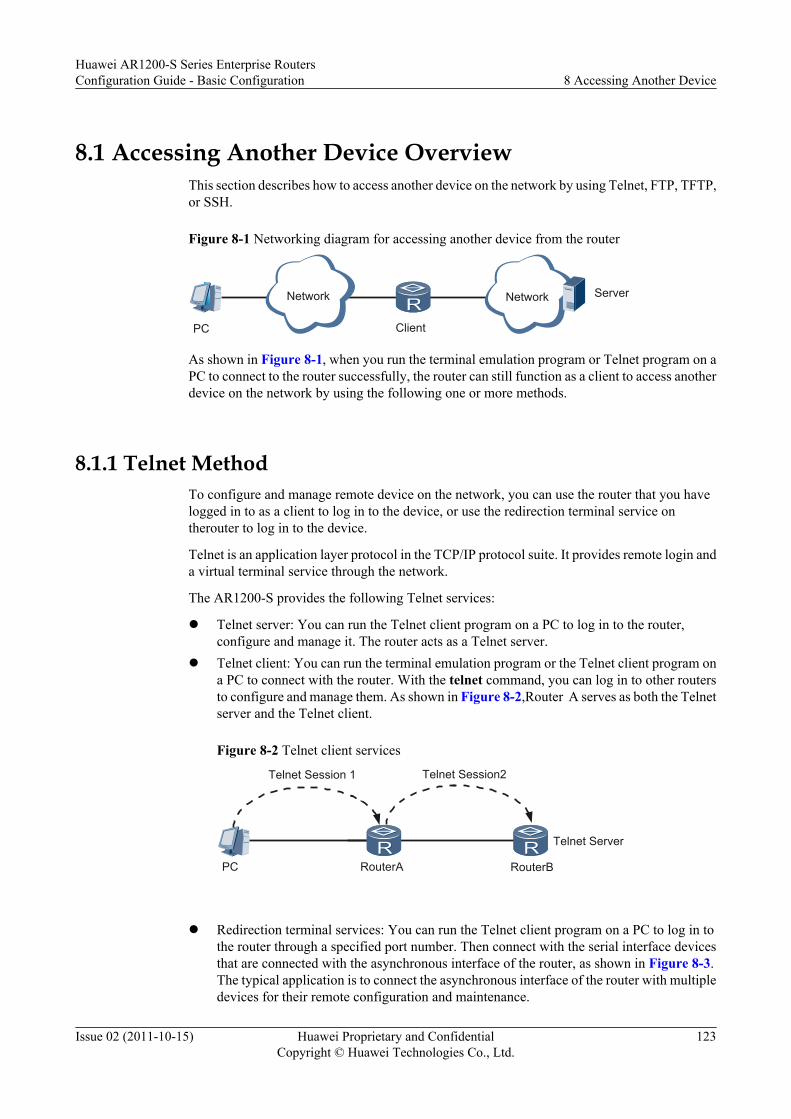
8.1 Accessing Another Device OverviewThis section describes how to access another device on the network by using Telnet, FTP, TFTP,or SSH.
Figure 8-1 Networking diagram for accessing another device from the router
Network Network
PC Client
Server
As shown in Figure 8-1, when you run the terminal emulation program or Telnet program on aPC to connect to the router successfully, the router can still function as a client to access anotherdevice on the network by using the following one or more methods.
8.1.1 Telnet MethodTo configure and manage remote device on the network, you can use the router that you havelogged in to as a client to log in to the device, or use the redirection terminal service ontherouter to log in to the device.
Telnet is an application layer protocol in the TCP/IP protocol suite. It provides remote login anda virtual terminal service through the network.
The AR1200-S provides the following Telnet services:
l Telnet server: You can run the Telnet client program on a PC to log in to the router,configure and manage it. The router acts as a Telnet server.
l Telnet client: You can run the terminal emulation program or the Telnet client program ona PC to connect with the router. With the telnet command, you can log in to other routersto configure and manage them. As shown in Figure 8-2,Router A serves as both the Telnetserver and the Telnet client.
Figure 8-2 Telnet client services
RouterAPC RouterB
Telnet Session 1 Telnet Session2
Telnet Server
l Redirection terminal services: You can run the Telnet client program on a PC to log in to
the router through a specified port number. Then connect with the serial interface devicesthat are connected with the asynchronous interface of the router, as shown in Figure 8-3.The typical application is to connect the asynchronous interface of the router with multipledevices for their remote configuration and maintenance.
Huawei AR1200-S Series Enterprise RoutersConfiguration Guide - Basic Configuration 8 Accessing Another Device
Issue 02 (2011-10-15) Huawei Proprietary and ConfidentialCopyright © Huawei Technologies Co., Ltd.
123

Figure 8-3 Telnet redirection services
Ethernet
PC
Router
Router2ModemSwitchRouter1
Async0
Async1 Async2
Async3
NOTE
Only the devices that provide the asynchronous interface support the Telnet redirection service.
l Interruption of Telnet servicesIn Telnet connection, you can use two types of shortcut keys to interrupt the connection.As shown in Figure 8-4, Router A logs in to Router B through Telnet, and Router B logsin to Router C through Telnet. Thus, a cascade network is formed. In this case, Router Ais the client of Router B and Router B is the client of Router C. Figure 8-4 illustrates theusage of the two types of shortcut keys.
Figure 8-4 Usage of Telnet shortcut keys
RouterB RouterC
Telnet Session 1 Telnet Session2
TelnetServer
RouterA
TelnetClient
<Ctrl_]>: The server interrupts the connection.If the network connection is normal, when you press Ctrl_], the Telnet server interruptsthe current Telnet connection actively. For example:<RouterC>
Press <Ctrl_]> to return to the prompt of Router B.Configuration console exit, please retry to log onThe connection was closed by the remote host<RouterB>
Press <Ctrl_]> to return to the prompt of Router A.Configuration console exit, please retry to log onThe connection was closed by the remote host<RouterA>
Huawei AR1200-S Series Enterprise RoutersConfiguration Guide - Basic Configuration 8 Accessing Another Device
Issue 02 (2011-10-15) Huawei Proprietary and ConfidentialCopyright © Huawei Technologies Co., Ltd.
124
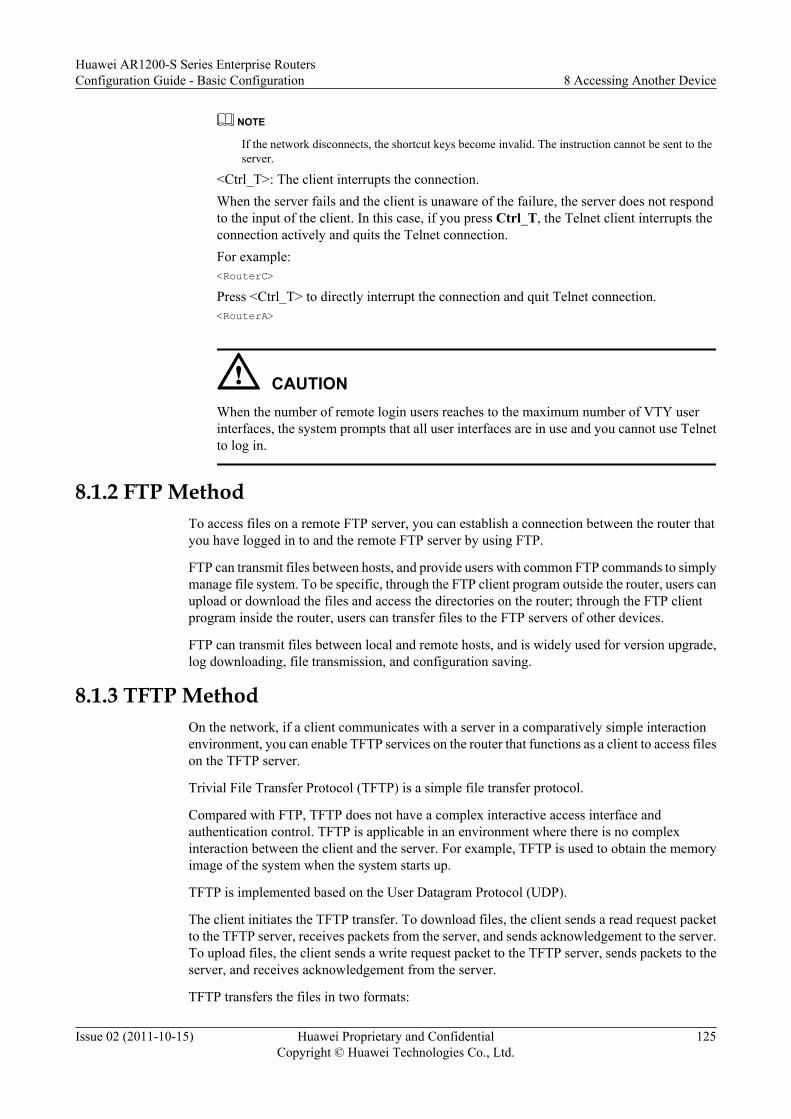
NOTE
If the network disconnects, the shortcut keys become invalid. The instruction cannot be sent to theserver.
<Ctrl_T>: The client interrupts the connection.When the server fails and the client is unaware of the failure, the server does not respondto the input of the client. In this case, if you press Ctrl_T, the Telnet client interrupts theconnection actively and quits the Telnet connection.For example:<RouterC>Press <Ctrl_T> to directly interrupt the connection and quit Telnet connection.<RouterA>
CAUTIONWhen the number of remote login users reaches to the maximum number of VTY userinterfaces, the system prompts that all user interfaces are in use and you cannot use Telnetto log in.
8.1.2 FTP MethodTo access files on a remote FTP server, you can establish a connection between the router thatyou have logged in to and the remote FTP server by using FTP.
FTP can transmit files between hosts, and provide users with common FTP commands to simplymanage file system. To be specific, through the FTP client program outside the router, users canupload or download the files and access the directories on the router; through the FTP clientprogram inside the router, users can transfer files to the FTP servers of other devices.
FTP can transmit files between local and remote hosts, and is widely used for version upgrade,log downloading, file transmission, and configuration saving.
8.1.3 TFTP MethodOn the network, if a client communicates with a server in a comparatively simple interactionenvironment, you can enable TFTP services on the router that functions as a client to access fileson the TFTP server.
Trivial File Transfer Protocol (TFTP) is a simple file transfer protocol.
Compared with FTP, TFTP does not have a complex interactive access interface andauthentication control. TFTP is applicable in an environment where there is no complexinteraction between the client and the server. For example, TFTP is used to obtain the memoryimage of the system when the system starts up.
TFTP is implemented based on the User Datagram Protocol (UDP).
The client initiates the TFTP transfer. To download files, the client sends a read request packetto the TFTP server, receives packets from the server, and sends acknowledgement to the server.To upload files, the client sends a write request packet to the TFTP server, sends packets to theserver, and receives acknowledgement from the server.
TFTP transfers the files in two formats:
Huawei AR1200-S Series Enterprise RoutersConfiguration Guide - Basic Configuration 8 Accessing Another Device
Issue 02 (2011-10-15) Huawei Proprietary and ConfidentialCopyright © Huawei Technologies Co., Ltd.
125

l The binary format: transfers program files.l The ASCII format: transfers text files.
At present, the AR1200-S serves only as the TFTP client and transfers files in the binary format.
8.1.4 SSH MethodTo securely access another device on the network, you can log in to it by using SSH (includingSTelnet,SFTP) from the router that you have logged in to.
SSH OverviewWhen users on an insecure network log in to the router through Telnet, the Secure Shell (SSH)feature ensures information security and authentication. It protects the router from attacks suchas IP address spoofing and interception of plain text password.
The SSH client function allows users to establish SSH connections with router serving as SSHserver or with UNIX hosts.
SSH Client FunctionThe AR1200-S supports the STelnet client function ,the SFTP client function.
l STelnet clientThe Telnet protocol does not provide secure authentication. The TCP transmits data in plaintext. This leads to security problems. The system also faces serious threats from DOS(Denial of Service) attacks, the host IP address spoofing, and routing spoofing. Telnetservices are prone to network attacks.SSH implements secure remote access on insecure networks and it has the followingadvantages compared with Telnet:– SSH supports Remote Subscriber Access (RSA) authentication. In RSA authentication,
SSH generates and exchanges public and private keys compliant with asymmetricencipherment system to ensure the session security.
– SSH supports Data Encryption Standard (DES), 3DES, and AES authentications.– The user name and the password are both encrypted in the communication between the
SSH client and the SSH server. This prevents password interception.– SSH encrypts the transmitted data.When the STelnet server or the connection to the client is faulty, the client must detect thefault in time and release the connection voluntarily. To implement this, when logging in tothe server through Stelnet, the client must be configured with the interval for sending thekeepalive packet and the number of times for no reply restriction on the server if no packetis received by the client. If a client does not receive any packet within specified period, theclient sends a keepalive packet to the server. If the number of times of no reply restrictionexceeds the specified number, the client releases the connection voluntarily.
l SFTP clientSFTP is short for Secure FTP. You can log in to a device from the secure remote end tomanage files. This improves the security of data transmission when the remote system isupdated. Meanwhile, the client function enables you to log in to the remote device throughSFTP for secure file transmission.When the SFTP server or the connection between it and the client is faulty, the client mustdetect the fault in time and releases the connection voluntarily. To implement this, when
Huawei AR1200-S Series Enterprise RoutersConfiguration Guide - Basic Configuration 8 Accessing Another Device
Issue 02 (2011-10-15) Huawei Proprietary and ConfidentialCopyright © Huawei Technologies Co., Ltd.
126

logging in to the server through SFTP, the client must be configured with the period ofsending the keepalive packet and the number of times for no reply restriction on the serverif no packet is received by the client. If a client does not receive any packet within specifiedperiod, the client sends a keepalive packet to the server. If the number of times of no replyrestriction exceeds the specified number, the client takes the initiative to release theconnection.
8.2 Logging in to Other Devices by Using TelnetOn the network, a large number of routers need to be managed and maintained. Not all routers,however, can be connected to terminal PCs. In addition, there are not reachable routes betweensome routers and terminal PCs. To manage and maintain routers remotely, you can log in tothem by using Telnet from a device that you have logged in to.
8.2.1 Establishing the Configuration TaskBefore establishing the configuration task of logging in to another router from the router thatyou have logged in to, familiarize yourself with the applicable environment, complete the pre-configuration tasks, and obtain the required data. This can help you complete the configurationtask quickly and accurately.
Applicable Environment
Figure 8-5 Networking diagram for accessing another device from the router that you havelogged in to
Network Network
PC RouterA RouterB
As shown in Figure 8-5, you can log in to Router A from a PC by using Telnet, but cannotmanage Router B remotely. This is because there is no reachable route between the PC andRouter B. To manage Router B remotely, you can log in to it from Router A by using Telnet.
In this situation, Router A functions as a Telnet client, and Router B that you attempt to log into functions as a server.
Pre-configuration Tasks
Before logging in to another device on the network by using Telnet, complete the followingtasks:
l Ensuring that the router that you attempt to log in to works properly, and enabling Telnetservices on the device
l Ensuring that there is a reachable route between the router that you have logged into andthe router that you attempt to log in to
Huawei AR1200-S Series Enterprise RoutersConfiguration Guide - Basic Configuration 8 Accessing Another Device
Issue 02 (2011-10-15) Huawei Proprietary and ConfidentialCopyright © Huawei Technologies Co., Ltd.
127

Data PreparationTo log in to another device by using Telnet, you need the following data:
No. Data
1 IP address or host name of RouterB
2 Number of the TCP port used by the RouterB to provide Telnet services
8.2.2 (Optional) Configuring a Source IP Address for an TelnetClient
You can configure a source IP address for an Telnet client. Then, you can set up an Telnetconnection from the Telnet client to the server through a specific route by using this source IPaddress.
ContextAn IP address is configured for an interface on the router and functions as the source IP addressof an telnet connection. In this manner, security checks can be implemented.
The source address of a client can be configured as a source interface or a source IP address.
Do as follows on a router that functions as an Telnet client.
Procedure
Step 1 Run:system-view
The system view is displayed.
Step 2 Run:telnet client-source { -a source-ip-address | -i interface-type interface-number }
A source IP address of an Telnet client is configured.
After the configuration, the source IP address of the Telnet client displayed on the Telnet servermust be the same as the configured one.
----End
8.2.3 Logging in to Another Device by Using TelnetYou can log in to another router and manage it by using Telnet.
ContextTelnet provides an interactive CLI for users to log in to a remote server. Users can log in to ahost, and then remotely log in to another host by using Telnet to configure and manage the remotehost. In this manner, not each host is required to connect to a hardware terminal.
Do as follows on the router that serves as a Telnet client:
Huawei AR1200-S Series Enterprise RoutersConfiguration Guide - Basic Configuration 8 Accessing Another Device
Issue 02 (2011-10-15) Huawei Proprietary and ConfidentialCopyright © Huawei Technologies Co., Ltd.
128
Procedurel Run:
telnet [-a source-ip-address ] host-name [ port-number ]
Log in to the router and manage other routers.
----End
8.2.4 Checking the ConfigurationWhen you log in to another router successfully from the router that you have logged in to, youcan check information about the established TCP connection.
PrerequisiteAll configurations for logging in to another device are complete.
Procedurel Run the display tcp status command to check the status of all TCP connections.
----End
Example
Run the display tcp status command to view the status of TCP connections. The Establishedstatus indicates that a TCP connection has been established.
<Huawei> display tcp statusTCPCB Tid/Soid Local Add:port Foreign Add:port VPNID State39952df8 36 /1509 0.0.0.0:0 0.0.0.0:0 0 Closed32af9074 59 /1 0.0.0.0:21 0.0.0.0:0 14849 Listening34042c80 73 /17 10.164.39.99:23 10.164.6.13:1147 0 Established
8.3 Using the Redirection Function to Connect to a RemoteDevice
To manage a remote device that can transmit data only through a serial interface, configure theredirection function on the AR1200-S.
8.3.1 Establishing the Configuration TaskBefore configuring the redirection function, familiarize yourself with the applicableenvironment, complete the pre-configuration tasks, and obtain the data required for theconfiguration. This will help you complete the configuration task quickly and accurately.
Applicable Environment
To manage a remote device that can transmit data only through a serial interface, configure theredirection function on the AR1200-S.
Huawei AR1200-S Series Enterprise RoutersConfiguration Guide - Basic Configuration 8 Accessing Another Device
Issue 02 (2011-10-15) Huawei Proprietary and ConfidentialCopyright © Huawei Technologies Co., Ltd.
129

A remote device can be a router, a switch, an electricity terminal, a finance terminal, or otherterminals that use serial interfaces to transmit data.
l Managing remote routers and switches
Figure 8-6 Using redirection to connect to remote routers and switches
Ethernet
PC
Router
Router2Switch2Switch1Router1
Async0
Async1 Async2
Async3
As shown in Figure 8-6, there are two routers and two switches connected to the Router(an AR1200-S). To manage these devices through their serial interfaces, connectasynchronous serial interfaces of the Router to serial interfaces of the devices, and configurethe redirection function on the Router. After the configuration is complete, you can use anoperation terminal to manage and maintain these devices remotely.
l Managing terminals such intelligent electricity meters, intelligent water meters, andautomatic teller machines
Huawei AR1200-S Series Enterprise RoutersConfiguration Guide - Basic Configuration 8 Accessing Another Device
Issue 02 (2011-10-15) Huawei Proprietary and ConfidentialCopyright © Huawei Technologies Co., Ltd.
130

Figure 8-7 Using redirection to connect to remote intelligent terminals
Router
Async0
Async1 Async2
Async3
Nework
Intelligent Electricity Meters 1
Monitor Device
Intelligent Electricity Meters 2
Intelligent Electricity Meters 3
Intelligent Electricity Meters 4
As shown in Figure 8-7, the redirection function is enabled on the Router. The Routerlistens to the specified TCP port number and receives data flows from the terminals throughasynchronous serial interfaces. After receiving data packets, the Router encapsulates thepackets into Ethernet frames so that they can be transmitted over an Ethernet network. Inthis way, the intelligent terminals can be managed by a remote operation terminal.
Pre-configuration TasksBefore configuring the redirection function, complete the following tasks:
l Starting the remote devicesl Directly connecting the remote devices to the 8AS board of the router through asynchronous
serial cables and ensuring that the 8AS board has registered successfully and theasynchronous serial interfaces are in Up state
Data PreparationTo configure the redirection function, you need the following data.
No. Data
1 IP address of the router
2 (Optional) Port number of the redirection function
Huawei AR1200-S Series Enterprise RoutersConfiguration Guide - Basic Configuration 8 Accessing Another Device
Issue 02 (2011-10-15) Huawei Proprietary and ConfidentialCopyright © Huawei Technologies Co., Ltd.
131

8.3.2 Configuring the Redirection FunctionAfter configuring the redirection function on a router, you can use an operation terminal tomanage remote serial interface devices.
PrerequisiteThe 8AS board on the router has registered successfully and the asynchronous serial interfacesare in Up state.
ContextDo as follows on the router.
Procedure
Step 1 Run:system-view
The system view is displayed.
Step 2 Run:interface async interface-number
The asynchronous serial interface view is displayed.
Step 3 Run:async mode flow
The asynchronous serial interface is configured to work in flow mode.
By default, an asynchronous serial interface works in protocol mode.
Step 4 Run:quit
Exit from the asynchronous serial interface view.
Step 5 Run:user-interface tty tty-number
The TTY user interface view is displayed.
After the 8AS board registers successfully, the router generates random numbers for TTY userinterfaces. Run the display user-interface command to view the TTY number mapping anasynchronous serial interface.
Step 6 Run:redirect enable
The redirection function is enabled.
Step 7 Run:undo shell
The terminal service is disabled.
Step 8 (Optional) Run:redirect binding vpn-instance vpn-instance-name
Huawei AR1200-S Series Enterprise RoutersConfiguration Guide - Basic Configuration 8 Accessing Another Device
Issue 02 (2011-10-15) Huawei Proprietary and ConfidentialCopyright © Huawei Technologies Co., Ltd.
132

The redirection function is associated with a VPN instance.
By default, the redirection function is not associated with any VPN instance, and all users onpublic and private networks can use the redirection function to log in to remote devices.
Step 9 (Optional) Run:redirect listen-port port-num
The port number is set for the redirection function.
The default port number is 2000 plus tty-number. When the default port number is used byanother service, perform this step to set a new port number.
NOTE
l The terminal attributes of a TTY user interface must be the same as the physical attributes of the terminalconnected to the corresponding asynchronous serial interface. For details on how to configure terminalattributes of a TTY user interface, see 4.4.3 Setting Terminal Attributes of TTY User Interface.
l If the modem function is enabled on a TTY user interface, the redirection function does not take effect.
----End
Follow-up Procedure
Run the telnet host-name port-number command to log in to a remote device. In the command,host-name is the IP address or host name of the router with the redirection function enabled, andport-number is the default port number or the port number configured by running the redirectlisten-port command.
8.3.3 Checking the ConfigurationAfter completing the configuration of the redirection function, check the TCP connection statusto verify the configuration.
PrerequisiteAll configurations of the redirection function are complete.
Contextl Run the display tcp status command to check the status of the current TCP connection.
Example
Run the display tcp status to check the TCP connection status.
<Huawei> display tcp statusTCPCB Tid/Soid Local Add:port Foreign Add:port VPNID State 1973f250 9 /2 0.0.0.0:22 0.0.0.0:0 23553 Listening 1973f0ec 9 /1 0.0.0.0:23 0.0.0.0:0 23553 Listening 1973ef88 109/1 0.0.0.0:80 0.0.0.0:0 23553 Listening 1a16a204 9 /14 0.0.0.0:2046 0.0.0.0:0 23553 Listening 1973e9f8 7 /1 0.0.0.0:7547 0.0.0.0:0 0 Listening 1a169c74 9 /15 10.137.217.211:23 10.138.77.61:2120 0 Established
Huawei AR1200-S Series Enterprise RoutersConfiguration Guide - Basic Configuration 8 Accessing Another Device
Issue 02 (2011-10-15) Huawei Proprietary and ConfidentialCopyright © Huawei Technologies Co., Ltd.
133
8.4 Logging in to other Device by Using STelnetSTelnet ensures secure Telnet services. You can log in to another router from the router that youhave logged in to by using STelnet, and thus to manage the device remotely.
8.4.1 Establishing the Configuration TaskBefore establishing the configuration task of logging in to another device by using Stelnet,familiarize yourself with the applicable environment, complete the pre-configuration tasks, andobtain the required data. This can help you complete the configuration task quickly andaccurately.
Applicable EnvironmentLogins by using Telnet bring security risks because no secure authentication mechanism isavailable and data is transmitted by using TCP in plain text mode.
STelnet is short for SSH Telnet that is a secure Telnet protocol. STelnet is on the basis of SSH.SSH users can use STelnet services as Telnet services.
In this configuration, the Router that you have logged in to functions as a Telnet client, andtheRouter that you attempt to log in to functions as an SSH server.
Pre-configuration TasksBefore logging in to another device by using STelnet, complete the following tasks:
l Configuring a reachable route between the client and SSH server
Data PreparationTo log in to another device by using STelnet, you need the following data:
No. Data
1 Name of the SSH server,Public key that is assigned by the client to the SSH server
2 IPv4 address or host name of the SSH server,Number of the port monitored by theSSH server,Preferred encrypted algorithm from the SFTP client to the SSHserver,Preferred encrypted algorithm from the SSH server to the SFTPclient,Preferred HMAC algorithm from the SFTP client to the SSH server,PreferredHMAC algorithm from the SSH server to the SFTP client,Preferred algorithm of keyexchangeThe user information for logging in to the SSH server
8.4.2 Configuring the First Successful Login to Another Device(Enabling the First-Time Authentication on the SSH Client)
After the first-time authentication on the SSH client is enabled, the STelnet client does not checkthe validity of the RSA public key when logging in to the SSH server for the first time.
Huawei AR1200-S Series Enterprise RoutersConfiguration Guide - Basic Configuration 8 Accessing Another Device
Issue 02 (2011-10-15) Huawei Proprietary and ConfidentialCopyright © Huawei Technologies Co., Ltd.
134

Context
If the first-time authentication on the SSH client is enabled, the STelnet client does not checkthe validity of the RSA public key when logging in to the SSH server for the first time. Afterthe login, the system automatically allocates the RSA public key and saves it for authenticationin next login.
Do as follows on the router that serves as an SSH client:
Procedure
Step 1 Run:system-view
The system view is displayed.
Step 2 Run:ssh client first-time enable
The first-time authentication on the SSH client is enabled.
By default, the first-time authentication on the SSH client is disabled.
NOTE
l The purpose of enabling the first-time authentication on the SSH client is to skip checking the validityof the RSA public key of the SSH server when the STelnet client logs in to the SSH server for the firsttime. The check is skipped because the STelnet server has not saved the RSA public key of the SSHserver.
l If the first-time authentication is not enabled on the SSH client, when the STelnet client logs in to theSSH server for the first time, the STelnet client fails to pass the check on the RSA public key validityand cannot log in to the server.
TIP
To ensure that the STelnet client can log in to the SSH server at the first attempt, you can assign the RSApublic key in advance to the SSH server on the SSH client in addition to enabling the first-timeauthentication on the SSH client.
----End
8.4.3 Configuring the First Successful Login to Another Device(Allocating an RSA Public Key to the SSH Server)
To configure the first successful login to another device on the SSH client, you need to allocatean RSA public key to the SSH server before the login.
Context
If the first-time authentication is not enabled on the SSH client, when the STelnet client logs into the SSH server for the first time, the STelnet client fails to pass the check on the RSA publickey validity and cannot log in to the server.So you need to allocate an RSA public key to theSSH server before the STelnet client logs in to the SSH server.
Do as follows on the router that serves as an SSH client:
Huawei AR1200-S Series Enterprise RoutersConfiguration Guide - Basic Configuration 8 Accessing Another Device
Issue 02 (2011-10-15) Huawei Proprietary and ConfidentialCopyright © Huawei Technologies Co., Ltd.
135

Procedure
Step 1 Run:system-view
The system view is displayed.
Step 2 Run:rsa peer-public-key key-name
The public key view is displayed.
Step 3 Run:public-key-code begin
The public key editing view is displayed.
Step 4 Run:hex-data
The public key is edited.
The public key must be a string of hexadecimal alphanumeric characters. It is automaticallygenerated by an SSH client. You can run the display rsa local-key-pair public command toview a generated public key.
NOTE
Before being assigned to the SSH server, the assigned peer RSA public key must be obtained from the SSHserver and must be configured on the SSH client. Then, the STelnet client client can successfully undergothe validity check on the RSA public key of the SSH server.
Step 5 Run:public-key-code end
Quit the public key editing view.
l If the specified hex-data is invalid, the public key cannot be generated after the peer-public-key end command is run.
l If the specified key-name is deleted in other views, the system prompts that the key does notexist after the peer-public-key end command is run and the system view is displayed.
Step 6 Run:peer-public-key end
Return to the system view from the public key view.
----End
8.4.4 Logging in to Another Device by Using STelnetYou can log in to the SSH server from the SSH client by using STelnet.
ContextWhen accessing an SSH server, the STelnet client can carry the source address and choose thekey exchange algorithm, encryption algorithm, or HMAC algorithm, and configure the keepalivefunction.
Huawei AR1200-S Series Enterprise RoutersConfiguration Guide - Basic Configuration 8 Accessing Another Device
Issue 02 (2011-10-15) Huawei Proprietary and ConfidentialCopyright © Huawei Technologies Co., Ltd.
136

Do as follows on the router that serves as an SSH client:
Procedure
Step 1 Run:system-view
The system view is displayed.
Step 2 Run the stelnet [ -a source-address ] host-ipv4 [ port ] [ [ -vpn-instance vpn-instance-name ] |[ prefer_kex { dh_group1 | dh_exchange_group } ] | [ prefer_ctos_cipher { des | 3des |aes128 } ] | [ prefer_stoc_cipher { des | 3des | aes128 } ] | [ prefer_ctos_hmac { sha1 |sha1_96 | md5 | md5_96 } ] | [ prefer_stoc_hmac { sha1 | sha1_96 | md5 | md5_96 } ] ] * [ -ki aliveinterval [ -kc alivecountmax ] ] command. You can log in to the SSH server throughSTelnet.
----End
8.4.5 Checking the configurationAfter the configuration task of logging in to another device by using STelnet is established, youcan check the global configurations of the SSH servers and the sessions between the SSH serversand the STelnet client.
PrerequisiteThe configurations for logging in to another device by using STelnet are complete.
Procedurel Run the display ssh server status command to view the status of the SSH server.
----End
ExampleRun the display ssh server status to view the status of the SSH server.
<Huawei> display ssh server status SSH version :1.99 SSH connection timeout :60 seconds SSH server key generating interval :0 hours SSH Authentication retries :3 times SFTP Server :Enable
8.5 Accessing Files on Another Device by Using TFTPYou can configure the router as a TFTP client, and log in to the TFTP server to upload anddownload files.
8.5.1 Establishing the Configuration TaskBefore accessing another device by using TFTP, familiarize yourself with the applicableenvironment, complete the pre-configuration tasks, and obtain the required data. This can helpyou complete the configuration task quickly and accurately.
Huawei AR1200-S Series Enterprise RoutersConfiguration Guide - Basic Configuration 8 Accessing Another Device
Issue 02 (2011-10-15) Huawei Proprietary and ConfidentialCopyright © Huawei Technologies Co., Ltd.
137

Applicable Environment
You can transfer files through TFTP between the server and the client in a simple interactionenvironment.
The current Router functions as a TFTP client, and theRouter to be accessed functions as a TFTPserver.
Pre-configuration Tasks
Before accessing another device by using TFTP, complete the following tasks:
l Configuring a reachable route between the client and TFTP server
Data Preparation
To access another device by using TFTP, you need the following data.
No. Data
1 (Optional) Source address or source interface of the router that functions as a TFTPclient
2 IP address or host name of the TFTP server
3 Name of the specific file in the TFTP server and the file directory
8.5.2 (Optional) Configuring a Source IP Address for a TFTP ClientYou can configure a source IP address for a TFTP client. Then, you can set up a TFTP connectionfrom the TFTP client to the server through a specific route by using this source IP address.
Context
An IP address is configured for an interface on the router and functions as the source IP addressof a TFTP connection. In this manner, security checks can be implemented.
The source address of a client can be configured as a source interface or a source IP address.
Do as follows on a router that functions as a TFTP client.
Procedure
Step 1 Run:system-view
The system view is displayed.
Step 2 Run:tftp client-source { -a source-ip-address | -i interface-type interface-number }
A source IP address of a TFTP client is configured.
Huawei AR1200-S Series Enterprise RoutersConfiguration Guide - Basic Configuration 8 Accessing Another Device
Issue 02 (2011-10-15) Huawei Proprietary and ConfidentialCopyright © Huawei Technologies Co., Ltd.
138
After the configuration, the source IP address of the TFTP client displayed on the TFTP servermust be the same as the configured one.
----End
8.5.3 (Optional) Configuring TFTP Access AuthorityThis section describes how to use an ACL rule to authorize the users to specify the TFTP serversthat can be accessed by using TFTP from the router that you have logged in to.
ContextAn Access Control List (ACL) is a set of sequential rules. These rules are described based onthe source address, destination address, and port number of a packet. Routers use the ACL rulesto filter packets. With the rule applied to the interface on a router, the router permits or deniesthe packets.
Each ACL can define multiple rules. ACL rules are classified into the interface ACL, basic ACL,and advanced ACL based on the functions of ACL rules.
NOTE
TFTP supports only the basic ACL (whose number ranges from 2000 to 2999).
Do as follows on the router that serves as the TFTP client:
Procedure
Step 1 Run:system-view
The system view is displayed.
Step 2 Run:acl acl-number
The ACL view is displayed.
Step 3 Run:rule [ rule-id ] { deny | permit } [ { fragment | none-first-fragment } | source { source-address source-wildcard | any } | time-range time-name ] *
The ACL rule is configured.
Step 4 Run:quit
The system view is displayed.
Step 5 Run the tftp-server acl acl-number command. You can use the ACL to limit the access to theTFTP server.
----End
8.5.4 Downloading Files by Using TFTPYou can download files from the TFTP server to the TFTP client.
Do as follows on the router that serves as the TFTP client:
Huawei AR1200-S Series Enterprise RoutersConfiguration Guide - Basic Configuration 8 Accessing Another Device
Issue 02 (2011-10-15) Huawei Proprietary and ConfidentialCopyright © Huawei Technologies Co., Ltd.
139
Procedurel Run:
tftp [ -a source-ip-address | -i interface-type interface-number ] tftp-server get source-filename [ destination-filename ]
The router is configured to download files through TFTP.
----End
8.5.5 Uploading Files by Using TFTPYou can upload files from the TFTP client to the TFTP server.
Do as follows on the router that serves as the TFTP client:
Procedurel Run:
tftp [ -a source-ip-address | -i interface-type interface-number ] tftp-server put source-filename [ destination-filename ]
The router is configured to upload files through TFTP.
----End
8.5.6 Checking the ConfigurationWhen a device is configured to be a TFTP client, you can check the source address of the clientand the configured ACl rule.
PrerequisiteConfigurations of using the device as a TFTP client are complete.
Procedurel Run the display tftp-client command to check the device address that is set to the source
address of the TFTP client.l Run the display acl { name acl-name | acl-number | all } command to check the ACL rule
that is configured on the TFTP client.
----End
ExampleRun the display tftp-client command to view the source address of the TFTP client.
<Huawei> display tftp-clientInfo: The source address of TFTP client is 1.1.1.1.
Run the display acl{ name acl-name | acl-number | all } to view the ACL rule that is configuredon the TFTP client.
<Huawei> display acl 2001Basic acl 2001, 2 rules,Acl's step is 5 rule 5 permit rule 10 permit source 1.1.1.1 0
Huawei AR1200-S Series Enterprise RoutersConfiguration Guide - Basic Configuration 8 Accessing Another Device
Issue 02 (2011-10-15) Huawei Proprietary and ConfidentialCopyright © Huawei Technologies Co., Ltd.
140

8.6 Accessing Files on Another Device by Using FTPThis section describes how to configure the router as an FTP client to log in to the FTP server,and to upload files to or download files from the server.
8.6.1 Establishing the Configuration TaskBefore establishing the configuration task of accessing files on another device by using FTP,familiarize yourself with the applicable environment, complete the pre-configuration tasks, andobtain the required data. This can help you complete the configuration task quickly andaccurately.
Applicable Environment
Before transmitting files between a client and a remote FTP server, or managing directories ofthe server, you can configure the router that you have logged in to as an FTP client. Then, youcan access the FTP server by using FTP for file transmission or directory management.
Pre-configuration Tasks
Before establishing the configuration task of accessing files on another device by using FTP,complete the following tasks:
l Configuring a reachable route between the router and the FTP server
Data Preparation
To establish the configuration task of accessing files on another device by using FTP, you needthe following data:
No. Data
1 (Optional) Source IP address or source interface of the router functioning as an FTPclient
2 Host name or IP address of the FTP server, port number of connecting FTP, loginusername and password
3 Local file name and file name on the remote FTP server,working directory name ofthe remote FTP server, local working directory of the FTP client, or directory nameof the remote FTP server
8.6.2 (Optional) Configuring Source IP Address and Interface of theFTP Client
This section describes how to configure the source IP address and interface of FTP client toestablish the connection with FTP server.
Huawei AR1200-S Series Enterprise RoutersConfiguration Guide - Basic Configuration 8 Accessing Another Device
Issue 02 (2011-10-15) Huawei Proprietary and ConfidentialCopyright © Huawei Technologies Co., Ltd.
141
PrerequisiteAn IP address is configured for an interface on the router and functions as the source IP addressof an FTP connection. In this manner, security checks can be implemented.
The source address of a client can be configured as a source interface or a source IP address.
The interface configuration is possible, only if the system has a loopback interface.
Procedure
Step 1 Run:system-view
The system view is displayed.
Step 2 Run:ftp client-source { -a ip-address }
The source IP address of the FTP client is configured.
or
ftp client-source { -i interface-type interface-number }
The loopback addresses of the FTP client is configured.
NOTE
Then, run the display ftp-client command on the router to view the current configuration of the FTP client.
----End
8.6.3 Connecting to Other Devices by Using FTP CommandsYou can run FTP commands to log in to other devices from the router that functions as the FTPclient.
ContextYou can log in to the FTP server in the user view or the FTP view.
Do as follows on the router that serves as the client:
Procedurel In the user view, establish a connection to the FTP server.
Run:
ftp [ -a source-ip-address | -i interface-type interface-number ] host [ port-number ] [ public-net | vpn-instance vpn-instace-name ]
The router is connected to the FTP server.l In the FTP view, establish a connection to the FTP server.
1. In the user view, Run:ftp
The FTP view is displayed.
Huawei AR1200-S Series Enterprise RoutersConfiguration Guide - Basic Configuration 8 Accessing Another Device
Issue 02 (2011-10-15) Huawei Proprietary and ConfidentialCopyright © Huawei Technologies Co., Ltd.
142

2. Run:open [ -a source-ip-address | -i interface-type interface-number ] host [ port-number ] [ vpn-instance vpn-instance-name ]
The router is connected to the FTP server.
----End
8.6.4 Operating Files by Using FTP CommandsAfter logging in to a FTP server, you can operate files by using FTP commands. File operationsinclude configuring a file transmission method, checking online help about FTP commands,uploading or downloading files, and managing directories and files.
ContextAfter logging in to the FTP server, you can perform the following operations:
l Configure a data type for transmission files and a file transmission method.l Check the online help about FTP commands in the FTP client view.l Upload local files to the remote FTP server, or download files from the FTP server and
save them locally.l Create directories on or delete directories from the FTP server.l Display information about a specified remote directory or a file of the FTP server, or delete
a specified file from the FTP server.
After logging in to the router that functions as a client and entering the FTP client view, you canperform the following steps:
Procedurel Configuring data type and transmission mode for the file.
– Run:ascii | binary
The data type of the file to be transmitted is ascii or binary mode.
NOTE
FTP supports the ASCII type and the binary type. Their differences are as follows:
l In ASCII transmission mode, ASCII characters are used to separate carriage returned fromline feeds.
l In binary transmission mode, characters can be transferred without format conversion orformatting.
The selection of the FTP transmission mode is client-customized. The system defaults to theASCII transmission mode. The client can use a mode switch command to switch between theASCII mode and the binary mode. The ASCII mode is used to transmit .txt files and the binarymode is used to transmit binary files.
– Run:passive
The passive file transfer mode is configured.– Run:
verbose
The verbose mode for FTP is enabled.
Huawei AR1200-S Series Enterprise RoutersConfiguration Guide - Basic Configuration 8 Accessing Another Device
Issue 02 (2011-10-15) Huawei Proprietary and ConfidentialCopyright © Huawei Technologies Co., Ltd.
143

When verbose is enabled, all FTP responses are displayed. After file transmission, thestatistics about transmission efficiency will be displayed.
l Viewing online help of the FTP command.remotehelp [ command ]
The online help of the FTP command is displayed.l Upload or download files.
– Upload or download a file.– Run:
put local-filename [ remote-filename ]The local file is uploaded to the remote FTP server.
– Run:get remote-filename [ local-filename ]The FTP file is downloaded from the FTP server and saved to the local file.
l Run one or more commands in the following order to manage directories.– Run:
cd pathnameThe working path of the remote FTP server is specified.
– Run:cdupThe working path of the FTP server is switched to the upper-level directory.
– Run:pwdThe specified directory of the FTP server is displayed.
– Run:lcd [ local-directory ]The directory of the FTP client is displayed or changed.
– Run:mkdir remote-directoryA directory is created on the FTP server.
– Run:rmdir remote-directoryA directory is removed from the FTP server.
NOTE
l The directory to be created can comprise letters and digits, but not special characters such as<, >, ?, \ and :.
l When running the mkdir /abc command, you create a sub-directory named "abc".
l Run one or more commands in the following to manage files.– Run:
ls [ remote-filename ] [ local-filename ]The specified directory or file on the remote FTP server is displayed.If the directory name is not specified when a specific remote file is selected, the systemsearches the working directory for the specific file.
– Run:
Huawei AR1200-S Series Enterprise RoutersConfiguration Guide - Basic Configuration 8 Accessing Another Device
Issue 02 (2011-10-15) Huawei Proprietary and ConfidentialCopyright © Huawei Technologies Co., Ltd.
144

dir [ remote-filename ] [ local-filename ]
The specified directory or file on the local FTP server is displayed.If the directory name is not specified when a specific remote file is selected, the systemsearches the working directory for the specific file.
– Run:delete remote-filename
The specified file on the FTP server is deleted.If the directory name is not specified when a specific remote file is selected, the systemsearches the working directory for the specific file.
When local-filename is set, related information about the file can be downloaded locally.
----End
8.6.5 Changing Login UsersAfter logging in to an FTP server, you can change the username on the client and re-log in tothe server with the new username.
ContextFrom the AR1200-S (an FTP client) that you have logged in to, you can log in to the FTP serverby using another username without logging out of the FTP client view. The established FTPconnection is identical with that established by running the ftp command.
Perform the following steps on the router that functions as a client:
Procedurel Run:
user user-name [ password ]
The user that have logged in to the FTP server is changed and the new user logs in to theserver.
When the username that is used to log in to the FTP server is changed, the originalconnection between the user and the FTP server is interrupted.
----End
8.6.6 Disconnecting from the FTP ServerYou can terminate the connection with the FTP server and return to the user view or FTP view.
ContextYou can select different commands to terminate the connection with the FTP server in the FTPclient view.
Do as follows on the router that serves as the client.
Procedurel Run the following commands according to different configurations.
Huawei AR1200-S Series Enterprise RoutersConfiguration Guide - Basic Configuration 8 Accessing Another Device
Issue 02 (2011-10-15) Huawei Proprietary and ConfidentialCopyright © Huawei Technologies Co., Ltd.
145
– Run:bye
Or,quit
The client router is disconnected from the FTP server.
Return to the user view.
– Run:close
Or,disconnect
The client router is disconnected from the FTP server.
Return to the FTP view.
----End
8.6.7 Checking the ConfigurationAfter the configurations of accessing other devices by using FTP are complete, you can viewthe source parameters configured on the FTP client.
Prerequisite
The configurations of accessing other devices by using FTP are complete.
Procedurel Run the display ftp-client command to view the source parameters of the FTP client.
----End
Example
Run the display ftp-client command to view the source parameters of the FTP client.
<Huawei> display ftp-clientInfo: The source address of FTP client is 1.1.1.1.
8.7 Accessing Files on Another Device by Using SFTPSFTP is a secure FTP service. After the router is configured as an SFTP client. The SFTP serverauthenticates the client and encrypts data in both directions to provide secure data transmission.
8.7.1 Establishing the Configuration TaskBefore establishing the configuration task of accessing files on another device by using SFTP,familiarize yourself with the applicable environment, complete the pre-configuration tasks, andobtain the required data. This can help you complete the configuration task quickly andaccurately.
Huawei AR1200-S Series Enterprise RoutersConfiguration Guide - Basic Configuration 8 Accessing Another Device
Issue 02 (2011-10-15) Huawei Proprietary and ConfidentialCopyright © Huawei Technologies Co., Ltd.
146

Applicable Environment
SFTP is short for SSH FTP that is a secure FTP protocol. SFTP is on the basis of SSH. It ensuresthat users can log in to a remote device securely for file management and transmission, andenhances the security in data transmission. In addition, you can log in to a remote SSH serverfrom the router that functions as an SFTP client.
Pre-configuration Tasks
Before establishing the configuration task of accessing files on another device by using SFTP,complete the following tasks:
l Configuring a reachable route between the client and SSH server
Data Preparation
To access files on another device by using SFTP, you need the following data:
No. Data
1 (Optional) Source address of the device that functions as the SFTP client
2 (Optional) Name of the SSH server
3 (Optional) Public key that is assigned by the client to the SSH server
4 IPv4 address or host name of the SSH server
5 Number of the port monitored by the SSH server,Preferred encrypted algorithm fromthe SFTP client to the SSH server,Preferred encrypted algorithm from the SSH serverto the SFTP client,Preferred HMAC algorithm from the SFTP client to the SSHserver,Preferred HMAC algorithm from the SSH server to the SFTP client,Preferredalgorithm of key exchange,Name of the outgoing interface,Source addressThe user information for logging in to the SSH server
6 Name and directory of a specified file on the SSH server
8.7.2 (Optional) Configuring a Source IP Address for an SFTP ClientYou can configure a source IP address for an SFTP client. Then, you can set up an SFTPconnection from the SFTP client to the server through a specific route by using this source IPaddress.
Context
An IP address is configured for an interface on the router and functions as the source IP addressof an FTP connection. In this manner, security checks can be implemented.
The source address of a client can be configured as a source interface or a source IP address.
Do as follows on a router that functions as an SFTP client.
Huawei AR1200-S Series Enterprise RoutersConfiguration Guide - Basic Configuration 8 Accessing Another Device
Issue 02 (2011-10-15) Huawei Proprietary and ConfidentialCopyright © Huawei Technologies Co., Ltd.
147
Procedure
Step 1 Run:system-view
The system view is displayed.
Step 2 Run:sftp client-source { -a source-ip-address | -i interface-type interface-number }
A source IP address is configured for an SFTP client.
----End
8.7.3 Configuring the First Successful Login to Another Device(Enabling the First-Time Authentication on the SSH Client)
After the first-time authentication on the SSH client is enabled, the SFTP client does not checkthe validity of the RSA public key when logging in to the SSH server for the first time.
ContextIf the first-time authentication on the SSH client is enabled, the SFTP client does not check thevalidity of the RSA public key when logging in to the SSH server for the first time. After thelogin, the system automatically allocates the RSA public key and saves it for authentication innext login.
Do as follows on the router that serves as an SSH client:
Procedure
Step 1 Run:system-view
The system view is displayed.
Step 2 Run:ssh client first-time enable
The first-time authentication on the SSH client is enabled.
By default, the first-time authentication on the SSH client is disabled.
NOTE
l The purpose of enabling the first-time authentication on the SSH client is to skip checking the validityof the RSA public key of the SSH server when the STelnet client logs in to the SSH server for the firsttime. The check is skipped because the STelnet server has not saved the RSA public key of the SSHserver.
l If the first-time authentication is not enabled on the SSH client, when the STelnet client logs in to theSSH server for the first time, the STelnet client fails to pass the check on the RSA public key validityand cannot log in to the server.
TIP
To ensure that the STelnet client can log in to the SSH server at the first attempt, you can assign the RSApublic key in advance to the SSH server on the SSH client in addition to enabling the first-timeauthentication on the SSH client.
----End
Huawei AR1200-S Series Enterprise RoutersConfiguration Guide - Basic Configuration 8 Accessing Another Device
Issue 02 (2011-10-15) Huawei Proprietary and ConfidentialCopyright © Huawei Technologies Co., Ltd.
148
8.7.4 Configuring the First Successful Login to Another Device(Allocating an RSA Public Key to the SSH Server)
To configure the first successful login to another device on the SSH client, you need to allocatean RSA public key to the SSH server before the login.
ContextIf the first-time authentication is not enabled on the SSH client, when the SFTP client logs in tothe SSH server for the first time, the SFTP client fails to pass the check on the RSA public keyvalidity and cannot log in to the server.
Do as follows on the router functioning as an SSH client:
Procedure
Step 1 Run:system-view
The system view is displayed.
Step 2 Run:rsa peer-public-key key-name
The public key view is displayed.
Step 3 Run:public-key-code begin
The public key editing view is displayed.
Step 4 Run:hex-data
The public key is edited.
The public key must be a string of hexadecimal alphanumeric characters. It is automaticallygenerated by an SSH client. You can run the display rsa local-key-pair public command toview a generated public key.
NOTE
Before being assigned to the SSH server, the assigned peer RSA public key must be obtained from the SSHserver and must be configured on the SSH client. Then, the STelnet client client can successfully undergothe validity check on the RSA public key of the SSH server.
Step 5 Run:public-key-code end
Quit the public key editing view.
l If the specified hex-data is invalid, the public key cannot be generated after the peer-public-key end command is run.
l If the specified key-name is deleted in other views, the system prompts that the key does notexist after the peer-public-key end command is run and the system view is displayed.
Step 6 Run:
Huawei AR1200-S Series Enterprise RoutersConfiguration Guide - Basic Configuration 8 Accessing Another Device
Issue 02 (2011-10-15) Huawei Proprietary and ConfidentialCopyright © Huawei Technologies Co., Ltd.
149

peer-public-key end
Return to the system view from the public key view.
----End
8.7.5 Connecting to Other Devices by Using SFTPYou can log in to the SSH server from the SSH client through SFTP.
Context
The command of enabling the SFTP client is similar to that of the STelnet. When accessing theSSH server, the SFTP can carry the source address and the name of the VPN instance and choosethe key exchange algorithm, encrypted algorithm and HMAC algorithm, and configure thekeepalive function.
Do as follows on the router that serves as an SSH client.
Procedure
Step 1 Run:system-view
The system view is displayed.
Step 2 Run:sftp [ -a source-address | -i interface-type interface-number ] host-ipv4 [ port ] [ [ public-net | -vpn-instance vpn-instance-name ] | [ prefer_kex { dh_group1 | dh_exchange_group } ] | [ prefer_ctos_cipher { des | 3des | aes128 } ] | [ prefer_stoc_cipher { des | 3des | aes128 } ] | [ prefer_ctos_hmac { sha1 | sha1_96 | md5 | md5_96 } ] | [ prefer_stoc_hmac { sha1 | sha1_96 | md5 | md5_96 } ] ] * [ -ki aliveinterval [ -kc alivecountmax ] ]
You can log in to the SSH server through SFTP.
----End
8.7.6 Operating Files by Using SFTP CommandsYou can manage directories and files on the SSH server from the SFTP client, and check thecommand help on the SFTP client.
Context
After logging in to the SSH server from the SFTP client, you can perform the followingoperations on the SFTP client:
l Create or delete a directory on the SSH server, and display the current working directory,the specified directory and information about the file in the specified directory.
l Change a file name, delete a file, display a file list, and upload or download a file.l Displaying the SFTP client command help.
After logging in to the router that functions as an SSH client and entering the SFTP client view,you can perform the following steps:
Huawei AR1200-S Series Enterprise RoutersConfiguration Guide - Basic Configuration 8 Accessing Another Device
Issue 02 (2011-10-15) Huawei Proprietary and ConfidentialCopyright © Huawei Technologies Co., Ltd.
150

Procedurel Managing the directory
Perform the following as required:
– Run:cd [ remote-directory ]
The current operating directory of users is changed.
– Run:cdup
The operating directory of users is switched to the upper-level directory.
– Run:pwd
The current operating directory of users is displayed.
– Run:dir [ -l -a ] [ path ]
The file list in the specified directory is displayed.
– Run:rmdir remote-directory & <1-10>
– The directory on the server is deleted.
– Run:mkdir remote-directory
A directory is created on the server.
l Managing the file
Perform the following as required:
– Run:rename old-name new-name
The name of the specified file on the server is changed.
– Run:get remote-filename [local-filename]
The file on the remote server is downloaded.
– Run:put local-filename [remote-filename]
The local file is uploaded to the remote server.
– Run:remove remote-filename
The file on the server is removed.
l Displaying the SFTP client command helphelp [all | command-name ]
The SFTP client command help is displayed.
----End
Huawei AR1200-S Series Enterprise RoutersConfiguration Guide - Basic Configuration 8 Accessing Another Device
Issue 02 (2011-10-15) Huawei Proprietary and ConfidentialCopyright © Huawei Technologies Co., Ltd.
151

8.7.7 Checking the ConfigurationAfter logging in to another device by using SFTP, you can view the source address of the SSHclient, the mappings between all SSH servers and the RSA public keys on the client, the globalconfigurations of the SSH servers, and the sessions between the SSH servers and the client.
PrerequisiteThe configuration of accessing files on another device by using SFTP is complete.
Procedurel Run the display sftp-client command to check the source IP address of the SFTP client on
the SSH client.
----End
ExampleRun the display sftp-client command on the client to view the source parameters of the devicefunctioning as an SFTP client.
<Huawei> display sftp-clientInfo: The source address of SFTP client is 1.1.1.1
8.8 Configuration ExamplesThis section describes examples for access another device. The examples explain networkingrequirements, configuration notes, and configuration roadmap.
8.8.1 Example for Configuring Telnet ServicesIn this example, the authentication mode and password are configured for users to log in usingTelnet.
Networking RequirementsAs shown in Figure 8-8, Router A and Router B can ping each other successfully. A user logsin to Router B from Router A using Telnet.
Figure 8-8 Networking diagram for configuring Telnet services
RouterA RouterB
GE1/0/01.1.1.1/24
GE1/0/01.1.1.2/24
Configuration RoadmapThe configuration roadmap is as follows:
Huawei AR1200-S Series Enterprise RoutersConfiguration Guide - Basic Configuration 8 Accessing Another Device
Issue 02 (2011-10-15) Huawei Proprietary and ConfidentialCopyright © Huawei Technologies Co., Ltd.
152
1. On Router B, configure the authentication mode and password for VTY0 to VTY4.2. Configure users to use passwords to log in to Router B from Router A using Telnet.3. Configure a Telnet server port number on Router B to ensure that users log in through this
port only.
Data PreparationTo complete the configuration, you need the following data:
l Host address of Router Bl Authentication mode and passwordl Telnet server port numberl User level 15
Procedure
Step 1 Configure IP addresses.
# Configure Router A.
<Huawei> system-view[Huawei] sysname RouterA[RouterA] interface gigabitethernet1/0/0[RouterA-GigabitEthernet1/0/0] ip address 1.1.1.1 24[RouterA-GigabitEthernet1/0/0] quit[RouterA] quit
# Configure Router B.
<Huawei> system-view[Huawei] sysname RouterB[RouterB] interface gigabitethernet1/0/0[RouterB-GigabitEthernet1/0/0] ip address 1.1.1.2 24[RouterB-GigabitEthernet1/0/0] quit
Step 2 Configure the authentication mode and password for Telnet services on Router B.[RouterB] user-interface vty 0 4[RouterB-ui-vty0-4] authentication-mode password[RouterB-ui-vty0-4] set authentication password simple hello[RouterB-ui-vty0-4] quit
To configure an ACL for Telnet services, run the following commands on Router B.
[RouterB] acl 2000[RouterB-acl-basic-2000] rule permit source 1.1.1.1 0[RouterB-acl-basic-2000] quit[RouterB] user-interface vty 0 4[RouterB-ui-vty0-4] acl 2000 inbound
NOTE
You can choose to configure an ACL for Telnet services.
Step 3 Log in to Router B from Router A using Telnet.<RouterA> telnet 1.1.1.2Press CTRL_] to quit telnet mode Trying 1.1.1.2 ... Connected to 1.1.1.2 ... User Access Verification
Huawei AR1200-S Series Enterprise RoutersConfiguration Guide - Basic Configuration 8 Accessing Another Device
Issue 02 (2011-10-15) Huawei Proprietary and ConfidentialCopyright © Huawei Technologies Co., Ltd.
153

>>User password: Huawei Integrated Access SoftwareAR. Copyright(C) Huawei Technologies Co., Ltd. 2010-2011. All rights reserved. <RouterB>
Step 4 Configure a Telnet server port number on Router B.<RouterB> system-view[RouterB]sysman service telnet port 1028 After the command is executed, logging in to the port through telnet fails, all the telnet users exit, and a new port is created. If you need to set the port through telnet again, wait for at least two minutes and then set the port again. Are you sure to continue?(y/n)[n]: y
Step 5 Use the port number 1028 to log in to Router B from Router A using Telnet.<RouterA> telnet 1.1.1.2 1028Press CTRL_] to quit telnet mode Trying 1.1.1.2 ... Connected to 1.1.1.2 ... User Access Verification >>User password: Huawei Integrated Access SoftwareAR. Copyright(C) Huawei Technologies Co., Ltd. 2010-2011. All rights reserved. <RouterB>
----End
Configuration Filesl Configuration file of Router A
# sysname RouterA#interface GigabitEthernet1/0/0 ip address 1.1.1.1 255.255.255.0#return
l Configuration file of Router B# sysname RouterB#acl number 2000 rule 5 permit source 1.1.1.1 0#interface GigabitEthernet1/0/0 ip address 1.1.1.2 255.255.255.0#user-interface con 0user-interface vty 0 4 acl 2000 inbound set authentication password simple hello#return
Huawei AR1200-S Series Enterprise RoutersConfiguration Guide - Basic Configuration 8 Accessing Another Device
Issue 02 (2011-10-15) Huawei Proprietary and ConfidentialCopyright © Huawei Technologies Co., Ltd.
154

8.8.2 Example for Configuring the Device as the STelnet Client toConnect to the SSH Server
In this example, the local key pairs are generated on the STelnet client and the SSH server; thepublic RSA key is generated on the SSH server and then bound to the STelnet client. In thismanner, the STelnet client can connect to the SSH server.
Networking RequirementsAs shown in Figure 8-9, after the STelnet service is enabled on the SSH server, the STelnetclient can log in to the SSH server with the password, RSA, password-rsa, or all authenticationmode.
Configure two login clients:
l Configure Client001 with the password as huawei and adopt the password authentication.l Configure Client002, adopt the RSA authentication and assign the public key RsaKey001
to Client002.
The user interface supports only SSH.
Figure 8-9 Networking diagram of configuring the device as the STelnet client to connect tothe SSH server
Client002
GE1/0/010.164.39.221/24
SSH ServerGE1/0/010.164.39.222/24
Client001
GE1/0/010.164.39.220/24
Configuration RoadmapThe configuration roadmap is as follows:
1. Configure Client001 and Client002 on the SSH server.2. Generate the local key pairs on the STelnet client and the SSH server respectively.3. Generate the RSA public key on SSH server and bind the RSA public key of SSH client to
Client002.4. Enable STelnet service on the SSH server.5. Users Client001 and Client002 log in to the SSH server through STelnet.
Data PreparationTo complete the configuration, you need the following data:
Huawei AR1200-S Series Enterprise RoutersConfiguration Guide - Basic Configuration 8 Accessing Another Device
Issue 02 (2011-10-15) Huawei Proprietary and ConfidentialCopyright © Huawei Technologies Co., Ltd.
155
l Name and the authentication mode of the SSH userl Password or the RSA public key of the SSH userl Name of the SSH server
Procedure
Step 1 Generate a local key pair on the SSH server.<Huawei> system-view[Huawei] sysname SSH Server[SSH Server] rsa local-key-pair createThe key name will be: HostThe range of public key size is (512 ~ 2048).NOTES: If the key modulus is greater than 512, It will take a few minutes.Input the bits in the modulus[default = 512]: 768Generating keys..........++++++++++++..........++++++++++++...................................++++++++......++++++++
Step 2 Create SSH users on the server.
# Configure a VTY user interface.
[SSH Server] user-interface vty 0 4[SSH Server-ui-vty0-4] authentication-mode aaa[SSH Server-ui-vty0-4] protocol inbound ssh[SSH Server-ui-vty0-4] quitl Create an SSH user named Client001.
# Create an SSH user named Client001, configure password authentication for the user, andset the password to huawei.[SSH Server] aaa[SSH Server-aaa] local-user client001 password cipher huawei[SSH Server-aaa] local-user client001 service-type ssh[SSH Server-aaa] quit
l Create an SSH user named Client002.# Create an SSH user named Client002, set the password to huawei, and configure RSAauthentication for the user.[SSH Server] aaa[SSH Server-aaa] local-user client002 password cipher huawei[SSH Server-aaa] local-user client002 service-type ssh[SSH Server-aaa] quit[SSH Server] ssh user client002 authentication-type rsa
Step 3 Configure the RSA public key on the server.
# Generate a local key pair for Client002.
<Huawei> system-view[Huawei] sysname client002[client002] rsa local-key-pair create
# Check the RSA public key of the client.
[client002] display rsa local-key-pair public=====================================================Time of Key pair created: 2007-12-29 16:19:59+08:00Key name: HostKey type: RSA encryption Key=====================================================Key code:
Huawei AR1200-S Series Enterprise RoutersConfiguration Guide - Basic Configuration 8 Accessing Another Device
Issue 02 (2011-10-15) Huawei Proprietary and ConfidentialCopyright © Huawei Technologies Co., Ltd.
156

3047 0240 BFF35E4B C61BD786 F907B5DE 7D6770C3 E5FD17AB 203C8FCB BBC8FDF2 F7CB674E 519E8419 0F6B97A8 EA91FC4B B9E18836 5E74BFD5 4C687767 A89C6B43 1D7E3E1B 0203 010001=====================================================Time of Key pair created: 2007-12-29 16:20:05+08:00Key name: ServerKey type: RSA encryption Key=====================================================Key code:3067 0260 BCFAC085 49A2E70E 1284F901 937D7B63 D7A077AB D2797280 4BCA86C0 4CD18B70 5DFAC9D3 9A3F3E74 9B2AF4CB 69FA6483 E87DA590 7B47721A 16391E27 1C76ABAB 743C568B 1B35EC7A 8572A096 BCA9DF0E BC89D3DB 5A83698C 9063DB39 A279DD89 0203 010001[client002]
# Send the RSA public key of the client to the server.
[SSH Server] rsa peer-public-key RsaKey001Enter "RSA public key" view, return system view with "peer-public-key end".NOTE: The number of the bits of public key must be between 769 and 2048.[SSH Server-rsa-public-key] public-key-code beginEnter "RSA key code" view, return last view with "public-key-code end".[SSH Server-rsa-key-code] 3047[SSH Server-rsa-key-code] 0240[SSH Server-rsa-key-code] BFF35E4B C61BD786 F907B5DE 7D6770C3 E5FD17AB [SSH Server-rsa-key-code] 203C8FCB BBC8FDF2 F7CB674E 519E8419 0F6B97A8[SSH Server-rsa-key-code] EA91FC4B B9E18836 5E74BFD5 4C687767 A89C6B43[SSH Server-rsa-key-code] 1D7E3E1B[SSH Server-rsa-key-code] 0203[SSH Server-rsa-key-code] 010001[SSH Server-rsa-key-code] public-key-code end[SSH Server-rsa-public-key] peer-public-key end
Step 4 Bind the RSA public key of the SSH client to Client002.[SSH Server] ssh user client002 assign rsa-key RsaKey001
Step 5 Connect to the SSH server.
# Enable initial authentication on the SSH client if it logs in for the first time.
<Huawei> system-view[Huawei] sysname client001[client001] ssh client first-time enable<Huawei> system-view[Huawei] sysname client002[client002] ssh client first-time enable
# Log in to the SSH server from Client001 in password authentication mode by entering the username and password.
<client001> system-view[client001] stelnet 10.164.39.222 Please input the username:client001Trying 10.164.39.222 ...Press CTRL+K to abortConnected to 10.164.39.222 ...Enter password:
Enter the password huawei. The following information indicates that the login succeeds.
Huawei AR1200-S Series Enterprise RoutersConfiguration Guide - Basic Configuration 8 Accessing Another Device
Issue 02 (2011-10-15) Huawei Proprietary and ConfidentialCopyright © Huawei Technologies Co., Ltd.
157

Info: The max number of VTY users is 20, and the number of current VTY users on line is 6. The current login time is 2010-09-06 11:42:42.<SSH Server>
# Log in to the SSH server from Client002 in RSA authentication mode.
<client002> system-view[client002] stelnet 10.164.39.222Please input the username: client002Trying 10.164.39.222 ...Press CTRL+K to abortConnected to 10.164.39.222 ... The server is not authenticated. Do you continue to access it?(Y/N):ySave the server's public key? [Y/N] :yThe server's public key will be saved with the name: 10.164.39.222. Please wait... Info: The max number of VTY users is 20, and the number of current VTY users on line is 6. The current login time is 2010-09-06 11:42:42.<SSH Server>
Step 6 Verify the configuration.
After the configuration is complete, run the display ssh server status and display ssh serversession commands. You can see that the STelnet clients have logged in to the server successfully.
# Check the status of the SSH server.
[SSH Server] display ssh server status SSH version : 1.99 SSH connection timeout : 60 seconds SSH server key generating interval : 0 hours SSH Authentication retries : 3 times SFTP Server : Enable
# Check the SSH session status.
[SSH Server] display ssh server session-------------------------------------------------------------------- Conn Ver Encry State Auth-type Username -------------------------------------------------------------------- VTY 3 2.0 AES run password client001 VTY 4 2.0 AES run rsa client002 --------------------------------------------------------------------
# Check information about the SSH users.
[SSH Server] display ssh user-information ------------------------------------------------------------------------------- Username Auth-type User-public-key-name ------------------------------------------------------------------------------- client001 password null client002 rsa RsaKey001 -------------------------------------------------------------------------------
----End
Configuration Filesl Configuration file of the SSH server
# sysname SSH Server# rsa peer-public-key rsakey001 public-key-code begin 3047 0240
Huawei AR1200-S Series Enterprise RoutersConfiguration Guide - Basic Configuration 8 Accessing Another Device
Issue 02 (2011-10-15) Huawei Proprietary and ConfidentialCopyright © Huawei Technologies Co., Ltd.
158
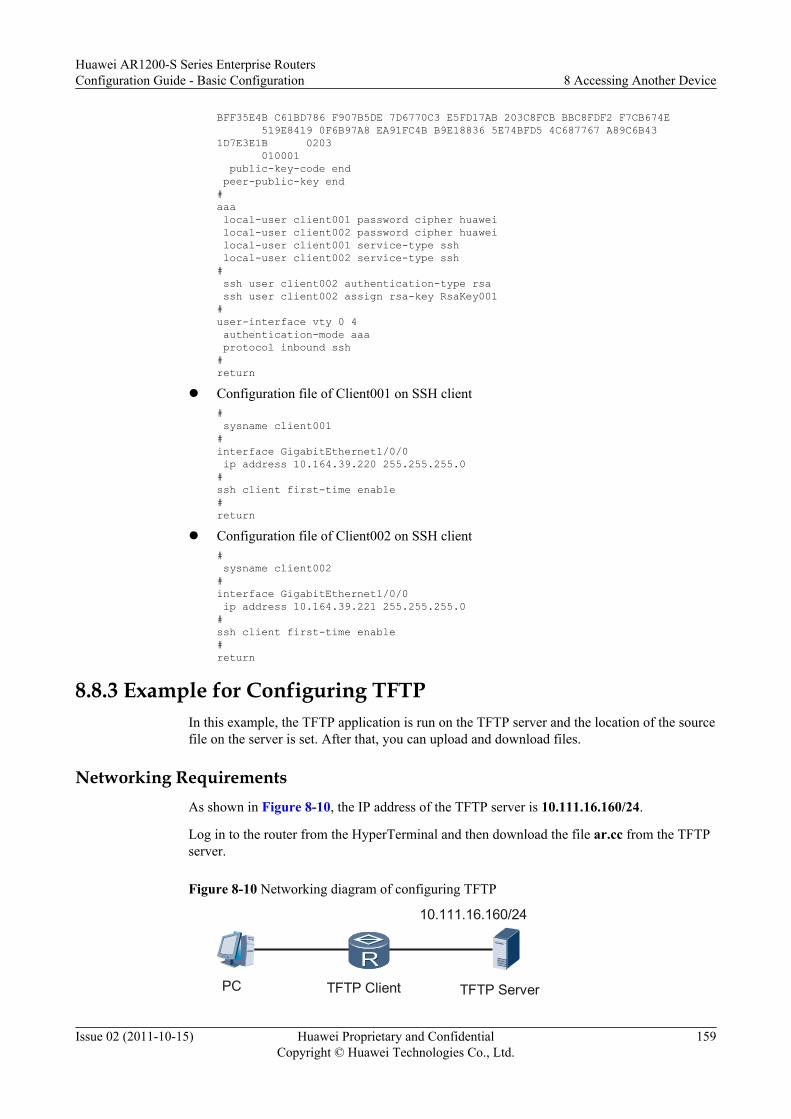
BFF35E4B C61BD786 F907B5DE 7D6770C3 E5FD17AB 203C8FCB BBC8FDF2 F7CB674E 519E8419 0F6B97A8 EA91FC4B B9E18836 5E74BFD5 4C687767 A89C6B43 1D7E3E1B 0203 010001 public-key-code end peer-public-key end#aaa local-user client001 password cipher huawei local-user client002 password cipher huawei local-user client001 service-type ssh local-user client002 service-type ssh# ssh user client002 authentication-type rsa ssh user client002 assign rsa-key RsaKey001#user-interface vty 0 4 authentication-mode aaa protocol inbound ssh#return
l Configuration file of Client001 on SSH client# sysname client001#interface GigabitEthernet1/0/0 ip address 10.164.39.220 255.255.255.0#ssh client first-time enable#return
l Configuration file of Client002 on SSH client# sysname client002#interface GigabitEthernet1/0/0 ip address 10.164.39.221 255.255.255.0#ssh client first-time enable#return
8.8.3 Example for Configuring TFTPIn this example, the TFTP application is run on the TFTP server and the location of the sourcefile on the server is set. After that, you can upload and download files.
Networking RequirementsAs shown in Figure 8-10, the IP address of the TFTP server is 10.111.16.160/24.
Log in to the router from the HyperTerminal and then download the file ar.cc from the TFTPserver.
Figure 8-10 Networking diagram of configuring TFTP
TFTP Client TFTP ServerPC
10.111.16.160/24
Huawei AR1200-S Series Enterprise RoutersConfiguration Guide - Basic Configuration 8 Accessing Another Device
Issue 02 (2011-10-15) Huawei Proprietary and ConfidentialCopyright © Huawei Technologies Co., Ltd.
159

Configuration RoadmapThe configuration roadmap is as follows:
1. Run the TFTP application on the TFTP server, and set the location of the file on the server.2. Use the TFTP command on the router to download the file.3. Use the TFTP command on the router to upload the file.
Data PreparationTo complete the configuration, you need the following data:
l The TFTP application installed on the TFTP serverl The path of the file on the TFTP serverl The destination file name and its path on the router
Procedure
Step 1 Start the TFTP server, and set its Current Directory as the directory where the ar.cc file resides.Figure 8-11shows the interface.
Figure 8-11 Setting the Base Directory of the TFTP server
NOTE
The display may be different depending on different TFTP server applications run in the computer.
Step 2 Log in to the router from the computer HyperTerminal and enter the following command todownload the file.<Huawei> tftp 10.111.16.160 get ar.cc flash:/
Huawei AR1200-S Series Enterprise RoutersConfiguration Guide - Basic Configuration 8 Accessing Another Device
Issue 02 (2011-10-15) Huawei Proprietary and ConfidentialCopyright © Huawei Technologies Co., Ltd.
160
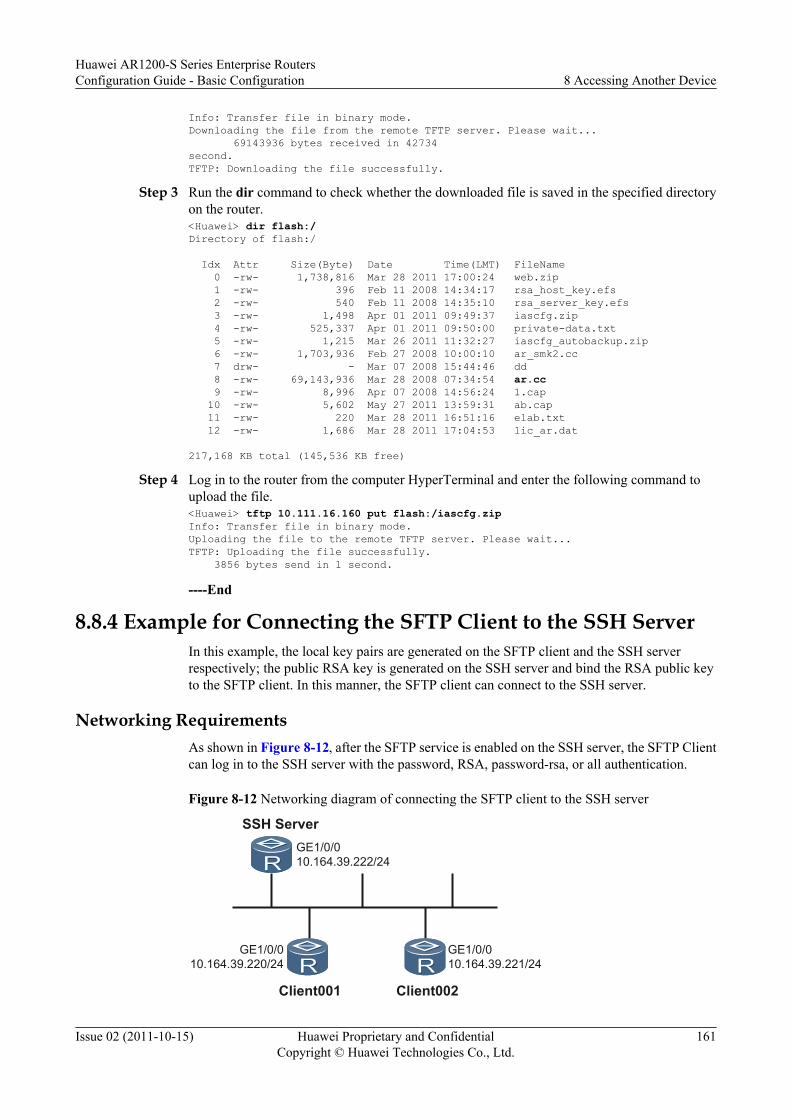
Info: Transfer file in binary mode. Downloading the file from the remote TFTP server. Please wait... 69143936 bytes received in 42734 second. TFTP: Downloading the file successfully.
Step 3 Run the dir command to check whether the downloaded file is saved in the specified directoryon the router.<Huawei> dir flash:/Directory of flash:/ Idx Attr Size(Byte) Date Time(LMT) FileName 0 -rw- 1,738,816 Mar 28 2011 17:00:24 web.zip 1 -rw- 396 Feb 11 2008 14:34:17 rsa_host_key.efs 2 -rw- 540 Feb 11 2008 14:35:10 rsa_server_key.efs 3 -rw- 1,498 Apr 01 2011 09:49:37 iascfg.zip 4 -rw- 525,337 Apr 01 2011 09:50:00 private-data.txt 5 -rw- 1,215 Mar 26 2011 11:32:27 iascfg_autobackup.zip 6 -rw- 1,703,936 Feb 27 2008 10:00:10 ar_smk2.cc 7 drw- - Mar 07 2008 15:44:46 dd 8 -rw- 69,143,936 Mar 28 2008 07:34:54 ar.cc 9 -rw- 8,996 Apr 07 2008 14:56:24 1.cap 10 -rw- 5,602 May 27 2011 13:59:31 ab.cap 11 -rw- 220 Mar 28 2011 16:51:16 elab.txt 12 -rw- 1,686 Mar 28 2011 17:04:53 lic_ar.dat 217,168 KB total (145,536 KB free)
Step 4 Log in to the router from the computer HyperTerminal and enter the following command toupload the file.<Huawei> tftp 10.111.16.160 put flash:/iascfg.zipInfo: Transfer file in binary mode. Uploading the file to the remote TFTP server. Please wait... TFTP: Uploading the file successfully. 3856 bytes send in 1 second.
----End
8.8.4 Example for Connecting the SFTP Client to the SSH ServerIn this example, the local key pairs are generated on the SFTP client and the SSH serverrespectively; the public RSA key is generated on the SSH server and bind the RSA public keyto the SFTP client. In this manner, the SFTP client can connect to the SSH server.
Networking RequirementsAs shown in Figure 8-12, after the SFTP service is enabled on the SSH server, the SFTP Clientcan log in to the SSH server with the password, RSA, password-rsa, or all authentication.
Figure 8-12 Networking diagram of connecting the SFTP client to the SSH server
Client002
GE1/0/010.164.39.221/24
SSH ServerGE1/0/010.164.39.222/24
Client001
GE1/0/010.164.39.220/24
Huawei AR1200-S Series Enterprise RoutersConfiguration Guide - Basic Configuration 8 Accessing Another Device
Issue 02 (2011-10-15) Huawei Proprietary and ConfidentialCopyright © Huawei Technologies Co., Ltd.
161

Configuration RoadmapThe configuration roadmap is as follows:
1. Configure Client001 and Client002 on the SSH server.2. Generate the local key pairs on the SFTP client and SSH server .3. Generate the RSA public key on the SSH server and bind the RSA public key of SSH client
to Client002.4. Enable the SFTP service on the SSH server.5. Configure the service mode and authorization directory for the SSH user.6. Client001 and Client002 log in to the SSH server through SFTP.
Data PreparationTo complete the configuration, you need the following data:
l Name and the authentication mode of the SSH userl Password or the RSA public key of the SSH userl Name of the SSH server
Procedure
Step 1 Generate a local key pair on the SSH server.<Huawei> system-view[Huawei] sysname SSH Server[SSH Server] rsa local-key-pair createThe key name will be: HostThe range of public key size is (512 ~ 2048).NOTES: If the key modulus is greater than 512, It will take a few minutes.Input the bits in the modulus[default = 512]: 768Generating keys............++++++++......................++++++++......................+++++++++.....+++++++++
Step 2 Create SSH users on the server.
# Configure a VTY user interface.
[SSH Server] user-interface vty 0 4[SSH Server-ui-vty0-4] authentication-mode aaa[SSH Server-ui-vty0-4] protocol inbound ssh[SSH Server-ui-vty0-4] quit
l Create an SSH user named Client001.# Create an SSH user named Client001, configure password authentication for the user, andset the password to huawei.[SSH Server] aaa[SSH Server-aaa] local-user client001 password cipher huawei[SSH Server-aaa] local-user client001 service-type ssh[SSH Server-aaa] local-user client001 ftp-directory flash:[SSH Server-aaa] quit
l Create an SSH user named Client002.
Huawei AR1200-S Series Enterprise RoutersConfiguration Guide - Basic Configuration 8 Accessing Another Device
Issue 02 (2011-10-15) Huawei Proprietary and ConfidentialCopyright © Huawei Technologies Co., Ltd.
162

# Create an SSH user named Client002, set the password to huawei, and configure RSAauthentication for the user.[SSH Server] aaa[SSH Server-aaa] local-user client002 password cipher huawei[SSH Server-aaa] local-user client002 service-type ssh[SSH Server-aaa] local-user client002 ftp-directory flash:[SSH Server-aaa] quit[SSH Server] ssh user client002 authentication-type rsa
Step 3 Configure the RSA public key on the server.
# Generate a local key pair for Client002.
<Huawei> system-view[Huawei] sysname client002[client002] rsa local-key-pair create
# Check the RSA public key of the client.
[client002] display rsa local-key-pair public=====================================================Time of Key pair created: 2007-12-29 16:19:59+08:00Key name: HostKey type: RSA encryption Key=====================================================Key code:3047 0240 BFF35E4B C61BD786 F907B5DE 7D6770C3 E5FD17AB 203C8FCB BBC8FDF2 F7CB674E 519E8419 0F6B97A8 EA91FC4B B9E18836 5E74BFD5 4C687767 A89C6B43 1D7E3E1B 0203 010001=====================================================Time of Key pair created: 2007-12-29 16:20:05+08:00Key name: ServerKey type: RSA encryption Key=====================================================Key code:3067 0260 BCFAC085 49A2E70E 1284F901 937D7B63 D7A077AB D2797280 4BCA86C0 4CD18B70 5DFAC9D3 9A3F3E74 9B2AF4CB 69FA6483 E87DA590 7B47721A 16391E27 1C76ABAB 743C568B 1B35EC7A 8572A096 BCA9DF0E BC89D3DB 5A83698C 9063DB39 A279DD89 0203 010001[client002]
# Send the RSA public key of the client to the server.
[SSH Server] rsa peer-public-key RsaKey001Enter "RSA public key" view, return system view with "peer-public-key end".NOTE: The number of the bits of public key must be between 769 and 2048.[SSH Server-rsa-public-key] public-key-code beginEnter "RSA key code" view, return last view with "public-key-code end".[SSH Server-rsa-key-code] 3047[SSH Server-rsa-key-code] 0240[SSH Server-rsa-key-code] BFF35E4B C61BD786 F907B5DE 7D6770C3 E5FD17AB [SSH Server-rsa-key-code] 203C8FCB BBC8FDF2 F7CB674E 519E8419 0F6B97A8[SSH Server-rsa-key-code] EA91FC4B B9E18836 5E74BFD5 4C687767 A89C6B43[SSH Server-rsa-key-code] 1D7E3E1B[SSH Server-rsa-key-code] 0203[SSH Server-rsa-key-code] 010001[SSH Server-rsa-key-code] public-key-code end[SSH Server-rsa-public-key] peer-public-key end
Huawei AR1200-S Series Enterprise RoutersConfiguration Guide - Basic Configuration 8 Accessing Another Device
Issue 02 (2011-10-15) Huawei Proprietary and ConfidentialCopyright © Huawei Technologies Co., Ltd.
163
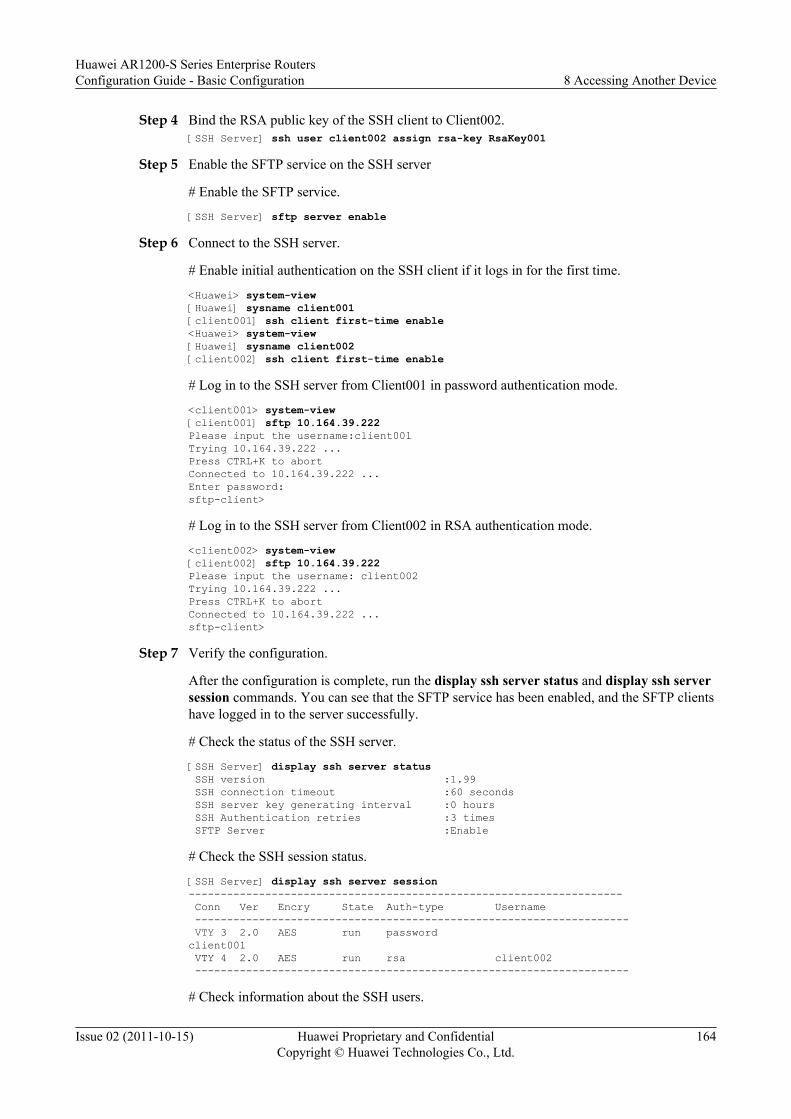
Step 4 Bind the RSA public key of the SSH client to Client002.[SSH Server] ssh user client002 assign rsa-key RsaKey001
Step 5 Enable the SFTP service on the SSH server
# Enable the SFTP service.
[SSH Server] sftp server enable
Step 6 Connect to the SSH server.
# Enable initial authentication on the SSH client if it logs in for the first time.
<Huawei> system-view[Huawei] sysname client001[client001] ssh client first-time enable<Huawei> system-view[Huawei] sysname client002[client002] ssh client first-time enable
# Log in to the SSH server from Client001 in password authentication mode.
<client001> system-view[client001] sftp 10.164.39.222Please input the username:client001Trying 10.164.39.222 ...Press CTRL+K to abortConnected to 10.164.39.222 ...Enter password: sftp-client>
# Log in to the SSH server from Client002 in RSA authentication mode.
<client002> system-view[client002] sftp 10.164.39.222Please input the username: client002Trying 10.164.39.222 ...Press CTRL+K to abortConnected to 10.164.39.222 ...sftp-client>
Step 7 Verify the configuration.
After the configuration is complete, run the display ssh server status and display ssh serversession commands. You can see that the SFTP service has been enabled, and the SFTP clientshave logged in to the server successfully.
# Check the status of the SSH server.
[SSH Server] display ssh server status SSH version :1.99 SSH connection timeout :60 seconds SSH server key generating interval :0 hours SSH Authentication retries :3 times SFTP Server :Enable
# Check the SSH session status.
[SSH Server] display ssh server session-------------------------------------------------------------------- Conn Ver Encry State Auth-type Username -------------------------------------------------------------------- VTY 3 2.0 AES run password client001 VTY 4 2.0 AES run rsa client002 --------------------------------------------------------------------
# Check information about the SSH users.
Huawei AR1200-S Series Enterprise RoutersConfiguration Guide - Basic Configuration 8 Accessing Another Device
Issue 02 (2011-10-15) Huawei Proprietary and ConfidentialCopyright © Huawei Technologies Co., Ltd.
164

[SSH Server] display ssh user-information ------------------------------------------------------------------------------- Username Auth-type User-public-key-name ------------------------------------------------------------------------------- client001 password null client002 rsa RsaKey001 -------------------------------------------------------------------------------
----End
Configuration Filesl Configuration file of the SSH server.
# sysname SSH Server# rsa peer-public-key rsakey001 public-key-code begin 3047 0240 C4989BF0 416DA8F2 2675910D 7F2997E8 5573A35D 0163FD4A FAC39A6E 0F45F325 A4E3AA1D 54692B04 C6A28D3D C58DE2E8 E0D58D65 7A25CF92 A74D21F9 E917182B 0203 010001 public-key-code end peer-public-key end#aaa local-user client001 password simple huawei local-user client001 service-type ssh local-user client001 ftp-directory flash: local-user client002 ftp-directory flash:# sftp server enable ssh user client002 authentication-type rsa ssh user client002 assign rsa-key RsaKey001 #user-interface vty 0 4 authentication-mode aaa protocol inbound ssh#Return
l Configuration file of Client001 on the SSH client# sysname client001#interface GigabitEthernet1/0/0 ip address 10.164.39.220 255.255.255.0# ssh client first-time enable#return
l Configuration file of Client002 on the SSH client# sysname client002#interface GigabitEthernet1/0/0 ip address 10.164.39.221 255.255.255.0# ssh client first-time enable#return
Huawei AR1200-S Series Enterprise RoutersConfiguration Guide - Basic Configuration 8 Accessing Another Device
Issue 02 (2011-10-15) Huawei Proprietary and ConfidentialCopyright © Huawei Technologies Co., Ltd.
165

8.8.5 Example for Authenticating SSH Through RADIUSIn this example, a user that attempts to access the SSH server is authenticated by the RADIUSserver, and the SSH server determines whether to set up a connection with the user accordingto the authentication result.
Networking RequirementsWhen an RADIUS user is connected to an SSH server, the SSH server sends the user name andpassword of the SSH client to the RADIUS server (compatible with the TACACS server) forauthentication.
The RADIUS server authenticates the user and sends the result (passed or failed) back to theSSH server. If the authentication is successful, the user level is sent along with the result. TheSSH server determines whether the SSH client is allowed to set up a connection according tothe authentication result.
Figure 8-13 shows the networking diagram.
Figure 8-13 Networking diagram of authenticating the SSH through RADIUS
SSH Client SSH Server Radius Server
GE1/0/010.164.39.222/24
GE1/0/010.164.39.221/24 10.164.6.49/24
Configuration RoadmapThe configuration roadmap is as follows:
1. Configure the RADIUS template on the SSH server.2. Configure a domain on the SSH server.3. Create a user on the RADIUS server.4. Generate the local key pair on STelnet client and SSH server respectively.5. Generate the local key pair on the client and SSH server .6. Generate the RSA public key on SSH server and bind the RSA public key of the SSH client
to [email protected]. Enable the STelnet and SFTP services on the SSH server.8. Configure the service mode and authorization directory of the SSH user.9. Users [email protected] and [email protected] log in to the SSH server through STelnet and
SFTP respectively.
Data PreparationTo complete the configuration, you need the following data:
l Configure the password authentication for the two SSH users .
Huawei AR1200-S Series Enterprise RoutersConfiguration Guide - Basic Configuration 8 Accessing Another Device
Issue 02 (2011-10-15) Huawei Proprietary and ConfidentialCopyright © Huawei Technologies Co., Ltd.
166

l RADIUS authenticationl Name of the RADIUS templatel Name of the RADIUS domainl Name and password of the RADIUS user
ProcedureStep 1 Generate a local key pair on the SSH server.
<Huawei> system-view[Huawei] rsa local-key-pair createThe key name will be: HostThe range of public key size is (512 ~ 2048).NOTES: If the key modulus is greater than 512, It will take a few minutes.Input the bits in the modulus[default = 512]: 768Generating keys..........++++++++++++..........++++++++++++...................................++++++++......++++++++
Step 2 Configure the RSA public key on the server.
# Generate a local key pair on the client.
<Huawei> system-view[Huawei] sysname client[client] rsa local-key-pair create
# Check the RSA public key of the client.
[client] display rsa local-key-pair public=====================================================Time of Key pair created: 16:38:51 2007/5/25Key name: HostKey type: RSA encryption Key=====================================================Key code:3047 0240 BFF35E4B C61BD786 F907B5DE 7D6770C3 E5FD17AB 203C8FCB BBC8FDF2 F7CB674E 519E8419 0F6B97A8 EA91FC4B B9E18836 5E74BFD5 4C687767 A89C6B43 1D7E3E1B 0203 010001=====================================================Time of Key pair created: 16:38:51 2007/5/25Key name: ServerKey type: RSA encryption Key=====================================================Key code:3067 0260 BCFAC085 49A2E70E 1284F901 937D7B63 D7A077AB D2797280 4BCA86C0 4CD18B70 5DFAC9D3 9A3F3E74 9B2AF4CB 69FA6483 E87DA590 7B47721A 16391E27 1C76ABAB 743C568B 1B35EC7A 8572A096 BCA9DF0E BC89D3DB 5A83698C 9063DB39 A279DD89 0203 010001[client]
# Send the RSA public key of the client to the server.
[Huawei] rsa peer-public-key RsaKey001
Huawei AR1200-S Series Enterprise RoutersConfiguration Guide - Basic Configuration 8 Accessing Another Device
Issue 02 (2011-10-15) Huawei Proprietary and ConfidentialCopyright © Huawei Technologies Co., Ltd.
167
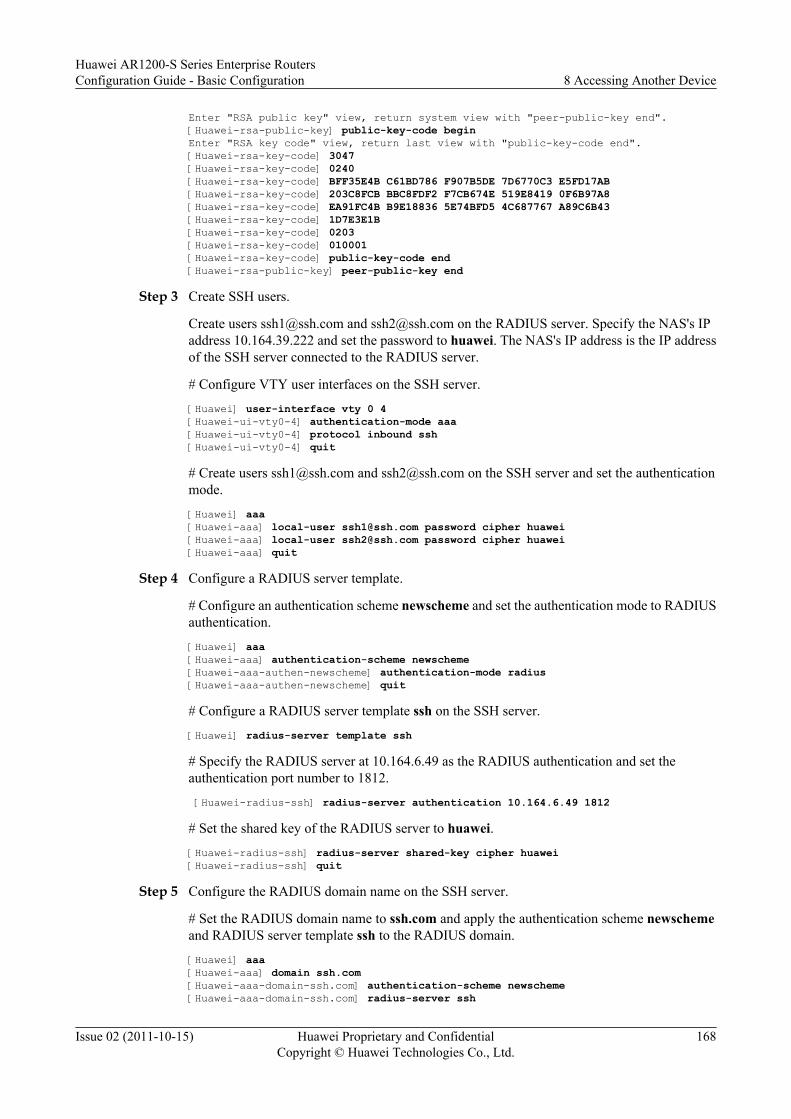
Enter "RSA public key" view, return system view with "peer-public-key end".[Huawei-rsa-public-key] public-key-code beginEnter "RSA key code" view, return last view with "public-key-code end".[Huawei-rsa-key-code] 3047[Huawei-rsa-key-code] 0240[Huawei-rsa-key-code] BFF35E4B C61BD786 F907B5DE 7D6770C3 E5FD17AB[Huawei-rsa-key-code] 203C8FCB BBC8FDF2 F7CB674E 519E8419 0F6B97A8[Huawei-rsa-key-code] EA91FC4B B9E18836 5E74BFD5 4C687767 A89C6B43[Huawei-rsa-key-code] 1D7E3E1B[Huawei-rsa-key-code] 0203[Huawei-rsa-key-code] 010001[Huawei-rsa-key-code] public-key-code end[Huawei-rsa-public-key] peer-public-key end
Step 3 Create SSH users.
Create users [email protected] and [email protected] on the RADIUS server. Specify the NAS's IPaddress 10.164.39.222 and set the password to huawei. The NAS's IP address is the IP addressof the SSH server connected to the RADIUS server.
# Configure VTY user interfaces on the SSH server.
[Huawei] user-interface vty 0 4[Huawei-ui-vty0-4] authentication-mode aaa[Huawei-ui-vty0-4] protocol inbound ssh[Huawei-ui-vty0-4] quit
# Create users [email protected] and [email protected] on the SSH server and set the authenticationmode.
[Huawei] aaa[Huawei-aaa] local-user [email protected] password cipher huawei[Huawei-aaa] local-user [email protected] password cipher huawei[Huawei-aaa] quit
Step 4 Configure a RADIUS server template.
# Configure an authentication scheme newscheme and set the authentication mode to RADIUSauthentication.
[Huawei] aaa[Huawei-aaa] authentication-scheme newscheme[Huawei-aaa-authen-newscheme] authentication-mode radius[Huawei-aaa-authen-newscheme] quit
# Configure a RADIUS server template ssh on the SSH server.
[Huawei] radius-server template ssh
# Specify the RADIUS server at 10.164.6.49 as the RADIUS authentication and set theauthentication port number to 1812.
[Huawei-radius-ssh] radius-server authentication 10.164.6.49 1812
# Set the shared key of the RADIUS server to huawei.
[Huawei-radius-ssh] radius-server shared-key cipher huawei[Huawei-radius-ssh] quit
Step 5 Configure the RADIUS domain name on the SSH server.
# Set the RADIUS domain name to ssh.com and apply the authentication scheme newschemeand RADIUS server template ssh to the RADIUS domain.
[Huawei] aaa[Huawei-aaa] domain ssh.com[Huawei-aaa-domain-ssh.com] authentication-scheme newscheme[Huawei-aaa-domain-ssh.com] radius-server ssh
Huawei AR1200-S Series Enterprise RoutersConfiguration Guide - Basic Configuration 8 Accessing Another Device
Issue 02 (2011-10-15) Huawei Proprietary and ConfidentialCopyright © Huawei Technologies Co., Ltd.
168

[Huawei-aaa-domain-ssh.com] quit[Huawei-aaa] quit
Step 6 Connect the SSH client to the SSH server.
# Enable the SFTP service on the SSH server.
[Huawei] sftp server enable
# Enable initial authentication on the SSH client if it logs in for the first time.
[client] ssh client first-time enable[client] quit
# Log in to the SSH server from the STelnet client in RADIUS authentication mode.
<client> system-view[client] stelnet 10.164.39.222Please input the username: [email protected] 10.164.39.222 ...Press CTRL+K to abortConnected to 10.164.39.222 ...The server is not authenticated. Do you continue to access it?(Y/N):ySave the server's public key? [Y/N] :yThe server's public key will be saved with the name: 10.164.39.222. Please wait...Enter password:
Enter the password huawei. The following information indicates that the login succeeds.
Info: The max number of VTY users is 10, and the current number of VTY users on line is 2. <Huawei>
# Log in to the SSH server from the SFTP client in RADIUS authentication mode.
<client> system-view[client] sftp 10.164.39.222 Please input the username: [email protected] 10.164.39.222 ...Press CTRL+K to abortConnected to 10.164.39.222 ...Enter password: sftp-client>
Step 7 Verify the configuration.
After the preceding configuration is complete, run the display radius-server configuration anddisplay ssh server session commands on the SSH server to view the RADIUS serverconfiguration and the SSH session status. You can see that the STelnet and SFTP clients havelogged in to the SSH server.
# View the configuration of the RADIUS server.
[Huawei-aaa] display radius-server configuration------------------------------------------------------------------- Server-template-name : ssh Protocol-version : standard Traffic-unit : B Shared-secret-key : N`C55QK<`=/Q=^Q`MAF4<1!! Timeout-interval(in second) : 5 Primary-authentication-server : 10.164.6.49 :1812 LoopBack:NULL Primary-accounting-server : 0.0.0.0 :0 LoopBack:NULL Secondary-authentication-server : 0.0.0.0 :0 LoopBack:NULL Secondary-accounting-server : 0.0.0.0 :0 LoopBack:NULL Retransmission : 3 Domain-included : YES -------------------------------------------------------------------
# Check the SSH session status.
Huawei AR1200-S Series Enterprise RoutersConfiguration Guide - Basic Configuration 8 Accessing Another Device
Issue 02 (2011-10-15) Huawei Proprietary and ConfidentialCopyright © Huawei Technologies Co., Ltd.
169
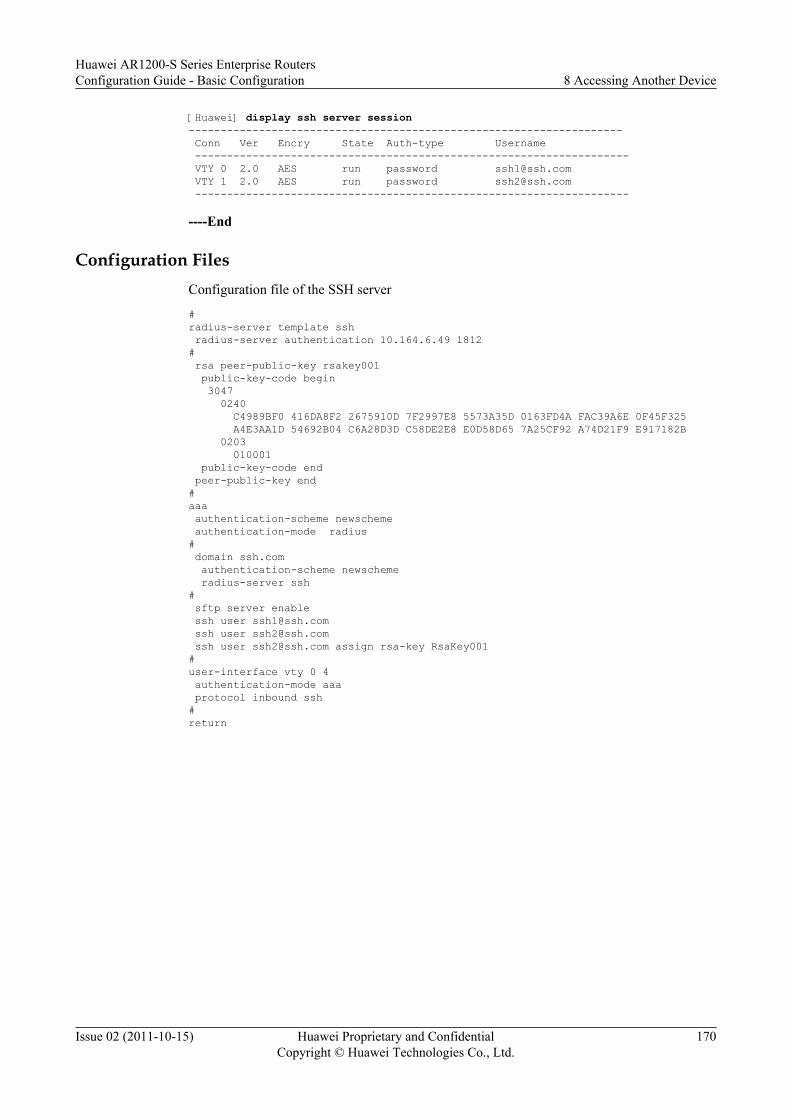
[Huawei] display ssh server session-------------------------------------------------------------------- Conn Ver Encry State Auth-type Username -------------------------------------------------------------------- VTY 0 2.0 AES run password [email protected] VTY 1 2.0 AES run password [email protected] --------------------------------------------------------------------
----End
Configuration FilesConfiguration file of the SSH server
#radius-server template ssh radius-server authentication 10.164.6.49 1812# rsa peer-public-key rsakey001 public-key-code begin 3047 0240 C4989BF0 416DA8F2 2675910D 7F2997E8 5573A35D 0163FD4A FAC39A6E 0F45F325 A4E3AA1D 54692B04 C6A28D3D C58DE2E8 E0D58D65 7A25CF92 A74D21F9 E917182B 0203 010001 public-key-code end peer-public-key end#aaa authentication-scheme newscheme authentication-mode radius# domain ssh.com authentication-scheme newscheme radius-server ssh# sftp server enable ssh user [email protected] ssh user [email protected] ssh user [email protected] assign rsa-key RsaKey001#user-interface vty 0 4 authentication-mode aaa protocol inbound ssh#return
Huawei AR1200-S Series Enterprise RoutersConfiguration Guide - Basic Configuration 8 Accessing Another Device
Issue 02 (2011-10-15) Huawei Proprietary and ConfidentialCopyright © Huawei Technologies Co., Ltd.
170

9 Upgrade and Maintenance
About This Chapter
Upgrade and maintenance of the router can optimize device performance, monitor deviceoperation status, simplify operation and maintenance, and reduce carriers' OperationExpenditure (OPEX).
9.1 Upgrade and Maintenance OverviewDevices can be upgraded and maintained by activating GTL license files, upgrading systemsoftware, managing patches, monitoring CPU and memory usage, or restarting devices.
9.2 Activating a GTL License FileA GTL license file is an authorization file that controls the capacity and functions of a device.
9.3 Upgrading System SoftwareSoftware upgrade can optimize device performance, add new features, and update the currentsoftware version.
9.4 Managing PatchesThis section describes several operations that can be performed on patches. You can installpatches to upgrade the system without interrupting services, specify the patch file to be usedafter the next startup, uninstall patches to deactivate the patches that do not meet systemrequirements, or delete the unwanted patches to release the memory of the patch area on theMPU.
9.5 Monitoring CPU and Memory UsageConfiguring CPU and memory usage thresholds allows CPU and memory usage to be monitoredand system performance to be known in time.
9.6 Restarting the DeviceAfter the system software of the router is upgraded, the router must be restarted to make theconfiguration take effect. To prevent the system from breaking down due to a large number oftemporary files, the router also must be restarted.
9.7 Configuration ExamplesThis section provides configuration examples for upgrade and maintenance, includingnetworking requirements, precautions, and configuration roadmap. The configuration flowchartwill help you understand the configuration procedures.
Huawei AR1200-S Series Enterprise RoutersConfiguration Guide - Basic Configuration 9 Upgrade and Maintenance
Issue 02 (2011-10-15) Huawei Proprietary and ConfidentialCopyright © Huawei Technologies Co., Ltd.
171

9.1 Upgrade and Maintenance OverviewDevices can be upgraded and maintained by activating GTL license files, upgrading systemsoftware, managing patches, monitoring CPU and memory usage, or restarting devices.
9.1.1 License AuthorizationThe AR1200-S provides a management platform of license authorization. You can apply for,upgrade, and activate license files to obtain corresponding rights.
If new devices are deployed, you can purchase new licenses as needed to enable license-controlled features and functions on the devices. This reduces purchase costs. If the capacitiesof the existing devices are expanded, you can update the licenses used on the devices to enablemore license-controlled features and functions.
9.1.2 Software UpgradeSoftware upgrade meets users' requirements for new functions by upgrading the patch file,system software, configuration file, PAF file, and license file.
Software upgrade involves software downloading and software loading. Software downloadingincludes:l Remote downloadingl Local downloading
9.1.3 Patch ManagementLoading a patch onto the system software allows the system software to be upgraded in servicewithout interrupting services on the device. This also improves Quality of Service (QoS).
During device operation, the system software may need to be modified due to system bugs ornew function requirements. The traditional way is to upgrade the system software after poweringoff the device. This, however, interrupts services and affects QoS.
By means of patch management, the system software can be upgraded in service withoutinterrupting services.
Table 9-1 provides details on patch status.
Table 9-1 Description of patch status
Patch Status Description Patch Status Transition
None A patch file is saved to the storagemedium but has not been loaded tothe patch area in memory.
The patch file will be in the runningstate after being loaded from thestorage medium to the patch area inmemory.
Huawei AR1200-S Series Enterprise RoutersConfiguration Guide - Basic Configuration 9 Upgrade and Maintenance
Issue 02 (2011-10-15) Huawei Proprietary and ConfidentialCopyright © Huawei Technologies Co., Ltd.
172

Patch Status Description Patch Status Transition
Running A patch file is in the running statewhen it is stored in the patch areaand run permanently. If a board isreset, the patch files in the runningstate on the board remain in therunning state.
A patch file in the running state canbe deleted from the patch area inmemory.
Figure 9-1 shows patch status transition.
Figure 9-1 Patch status transition
Upload and Run patch
Delete patch
Patch Status:Patch Status:none running
9.1.4 CPU and Memory Usage ThresholdsConfiguring CPU and memory usage thresholds allows CPU and memory usage and systemperformance to be monitored.
l A log is recorded when CPU usage exceeds the configured threshold.If CPU usage exceeds the threshold, an alarm will be generated and logged. You can querythe log to know CPU usage.
l A log is recorded when memory usage exceeds the configured threshold.If memory usage exceeds the threshold, an alarm will be generated and logged. Users canquery the log to know memory usage.
9.1.5 Device RestartA device can be restarted immediately or as scheduled.
In some special cases, for example, during system upgrade, the router must be restarted to makethe configuration take effect.
In addition to powering off a device, the AR1200-S supports the following methods of restartingthe router:
l Immediate restartl Scheduled restart
9.2 Activating a GTL License FileA GTL license file is an authorization file that controls the capacity and functions of a device.
Huawei AR1200-S Series Enterprise RoutersConfiguration Guide - Basic Configuration 9 Upgrade and Maintenance
Issue 02 (2011-10-15) Huawei Proprietary and ConfidentialCopyright © Huawei Technologies Co., Ltd.
173

9.2.1 Establishing the Configuration TaskA GTL license file must be activated if license-controlled features need to be used on a newlypurchased device, or the activated GTL license file on the existing device has expired.
Applicable Environmentl Activating a new GTL license for the first time
If you have purchased a new device, you need to apply for and purchase a GTL license fileto obtain the authorization of related service modules. After the GTL license file isactivated, the license-controlled service modules can be used.
l Activating an updated GTL license file
If a device has an activated GTL license file but the GTL license file has expired, you needto apply for a new GTL license file, update it, and then activate it. Otherwise, the GTLlicense file will become invalid upon expiration. As a result, function modules will bedisabled and services will be interrupted.
Before updating a GTL license file, check whether a new GTL license needs to be appliedfor. If the authorization value of the new GTL license file is smaller than that of the currentGTL license file, an interactive message is displayed to prompt you whether to activate thenew GTL license file.
– If you enter Y, the system informs you of a GTL license file update success.
– If you enter N, the system informs you of a GTL license update failure, and displaysthe status of the current GTL license file.
Before activating a GTL license file, check that the GTL license file is suffixed with .dat. Afterobtaining a GTL license file, use a notepad program to check whether the ESN on the MPU isthe same as that in the GTL license file.
NOTE
The GTL license file is suffixed with .dat.
A GTL license file has two versions, namely, Demo and Comm.
Version Period of Validity Reservation Period
COMM As defined in a contract Usually 90 days and at most180 days
DEMO Usually 60 days, whichvaries according to products
Usually 60 days, whichvaries according to productsYou can run the displaylicense state command toview how long a license in theDemo version will expire.
The reservation period refers to the number of days for which you can continue to use a functionafter the relevant license expires. The system prompts you with a message in the reservationperiod. If you intend to continue to use the GTL license file, apply for a new GTL license.
Huawei AR1200-S Series Enterprise RoutersConfiguration Guide - Basic Configuration 9 Upgrade and Maintenance
Issue 02 (2011-10-15) Huawei Proprietary and ConfidentialCopyright © Huawei Technologies Co., Ltd.
174

Pre-configuration TasksBefore activating a GTL license file, complete the following tasks:
l Applying for a GTL license filel Installing the GTL license file
Data PreparationTo activate a GTL license file, you need the following data.
No. Data
1 GTL license file name
9.2.2 Uploading a GTL License FileThe GTL license file that has been applied for can be activated only after the file has beenuploaded to the storage medium on a device.
ContextBefore uploading a GTL license file, run the dir command to check the remaining space of thestorage media on the device. Make sure that there is enough space in the storage media to storethe GTL license file.
Procedure
Step 1 Run:dir device-name
Check whether the GTL license file is existed.
The license file is in the .dat format and can be stored in the flash memory or USB flash drive.
NOTE
l A user who uses the GTL license for the first time must buy the GTL license from Huawei, and thenload the GTL license file to the main control board.
l A user who wants to upgrade the GTL license needs to run the license revoke command to obtain aninvalidation code, and then apply to Huawei for a new GTL license by using the invalidation code. Theuser also needs to load the new GTL license file to the main control board.
----End
9.2.3 Activating the GTL License FileAfter activating the GTL license, you are allowed to operate the corresponding service modules.
ContextBefore activating the GTL license, run the dir *.dat command to verify that the license file hasbeen loaded to the USB flash drive, or flash memory..
Huawei AR1200-S Series Enterprise RoutersConfiguration Guide - Basic Configuration 9 Upgrade and Maintenance
Issue 02 (2011-10-15) Huawei Proprietary and ConfidentialCopyright © Huawei Technologies Co., Ltd.
175
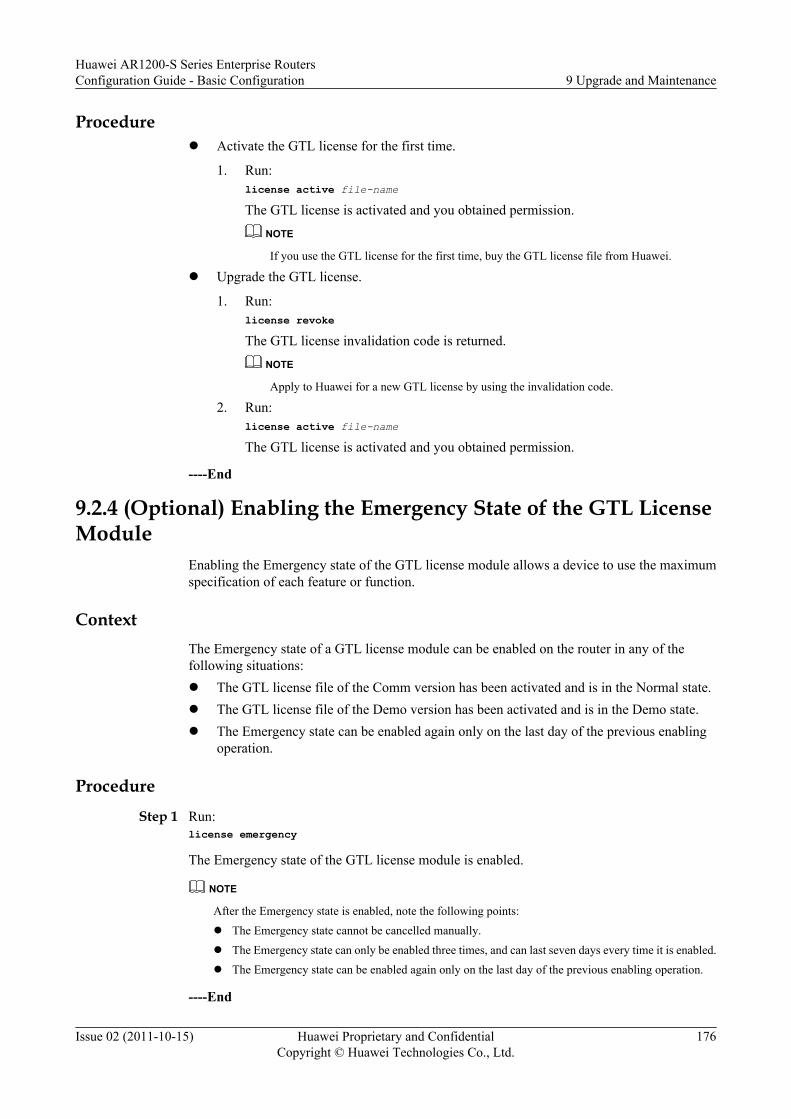
Procedurel Activate the GTL license for the first time.
1. Run:license active file-nameThe GTL license is activated and you obtained permission.
NOTE
If you use the GTL license for the first time, buy the GTL license file from Huawei.
l Upgrade the GTL license.
1. Run:license revokeThe GTL license invalidation code is returned.
NOTE
Apply to Huawei for a new GTL license by using the invalidation code.
2. Run:license active file-nameThe GTL license is activated and you obtained permission.
----End
9.2.4 (Optional) Enabling the Emergency State of the GTL LicenseModule
Enabling the Emergency state of the GTL license module allows a device to use the maximumspecification of each feature or function.
ContextThe Emergency state of a GTL license module can be enabled on the router in any of thefollowing situations:l The GTL license file of the Comm version has been activated and is in the Normal state.l The GTL license file of the Demo version has been activated and is in the Demo state.l The Emergency state can be enabled again only on the last day of the previous enabling
operation.
ProcedureStep 1 Run:
license emergency
The Emergency state of the GTL license module is enabled.
NOTE
After the Emergency state is enabled, note the following points:l The Emergency state cannot be cancelled manually.l The Emergency state can only be enabled three times, and can last seven days every time it is enabled.l The Emergency state can be enabled again only on the last day of the previous enabling operation.
----End
Huawei AR1200-S Series Enterprise RoutersConfiguration Guide - Basic Configuration 9 Upgrade and Maintenance
Issue 02 (2011-10-15) Huawei Proprietary and ConfidentialCopyright © Huawei Technologies Co., Ltd.
176
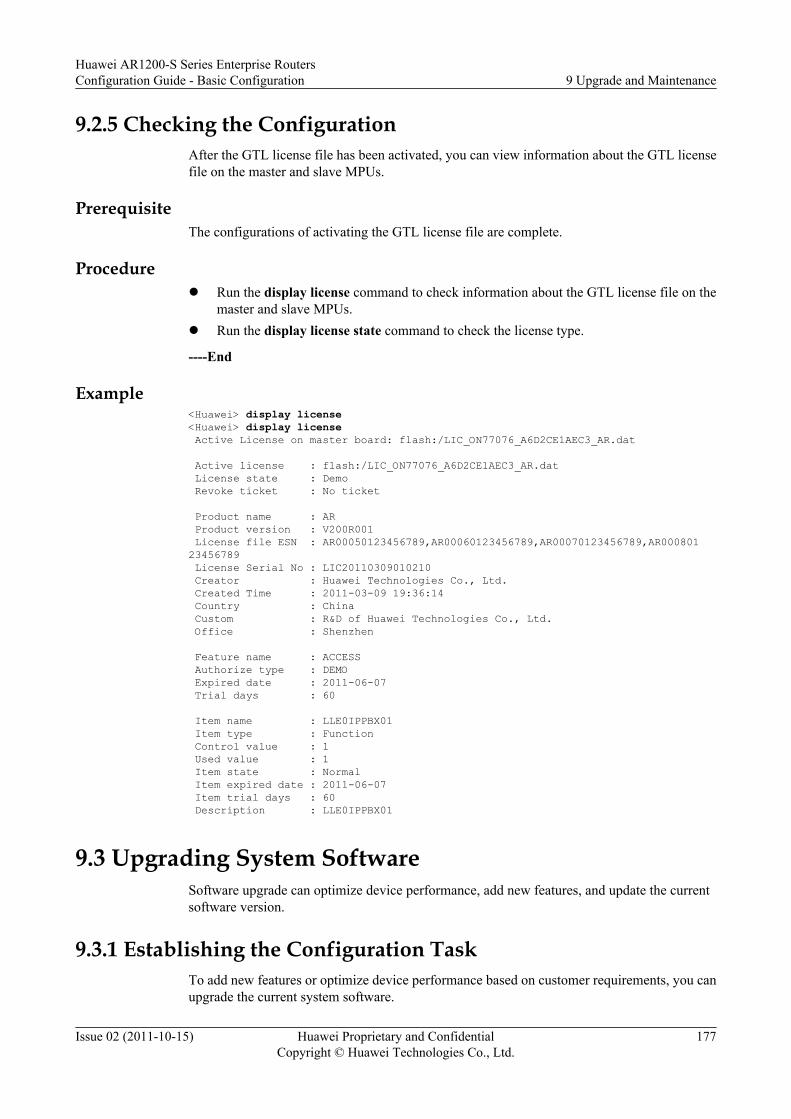
9.2.5 Checking the ConfigurationAfter the GTL license file has been activated, you can view information about the GTL licensefile on the master and slave MPUs.
PrerequisiteThe configurations of activating the GTL license file are complete.
Procedurel Run the display license command to check information about the GTL license file on the
master and slave MPUs.l Run the display license state command to check the license type.
----End
Example<Huawei> display license<Huawei> display license Active License on master board: flash:/LIC_ON77076_A6D2CE1AEC3_AR.dat Active license : flash:/LIC_ON77076_A6D2CE1AEC3_AR.dat License state : Demo Revoke ticket : No ticket Product name : AR Product version : V200R001 License file ESN : AR00050123456789,AR00060123456789,AR00070123456789,AR00080123456789 License Serial No : LIC20110309010210 Creator : Huawei Technologies Co., Ltd. Created Time : 2011-03-09 19:36:14 Country : China Custom : R&D of Huawei Technologies Co., Ltd. Office : Shenzhen Feature name : ACCESS Authorize type : DEMO Expired date : 2011-06-07 Trial days : 60 Item name : LLE0IPPBX01 Item type : Function Control value : 1 Used value : 1 Item state : Normal Item expired date : 2011-06-07 Item trial days : 60 Description : LLE0IPPBX01
9.3 Upgrading System SoftwareSoftware upgrade can optimize device performance, add new features, and update the currentsoftware version.
9.3.1 Establishing the Configuration TaskTo add new features or optimize device performance based on customer requirements, you canupgrade the current system software.
Huawei AR1200-S Series Enterprise RoutersConfiguration Guide - Basic Configuration 9 Upgrade and Maintenance
Issue 02 (2011-10-15) Huawei Proprietary and ConfidentialCopyright © Huawei Technologies Co., Ltd.
177
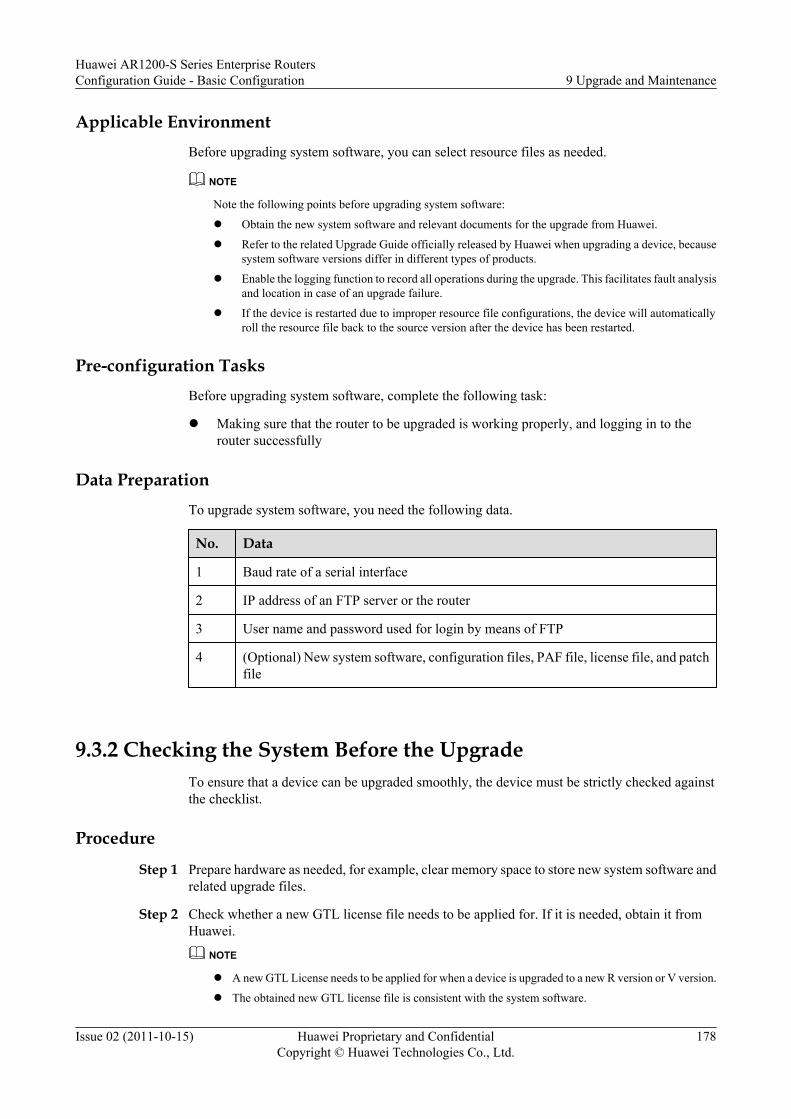
Applicable EnvironmentBefore upgrading system software, you can select resource files as needed.
NOTE
Note the following points before upgrading system software:
l Obtain the new system software and relevant documents for the upgrade from Huawei.
l Refer to the related Upgrade Guide officially released by Huawei when upgrading a device, becausesystem software versions differ in different types of products.
l Enable the logging function to record all operations during the upgrade. This facilitates fault analysisand location in case of an upgrade failure.
l If the device is restarted due to improper resource file configurations, the device will automaticallyroll the resource file back to the source version after the device has been restarted.
Pre-configuration TasksBefore upgrading system software, complete the following task:
l Making sure that the router to be upgraded is working properly, and logging in to therouter successfully
Data PreparationTo upgrade system software, you need the following data.
No. Data
1 Baud rate of a serial interface
2 IP address of an FTP server or the router
3 User name and password used for login by means of FTP
4 (Optional) New system software, configuration files, PAF file, license file, and patchfile
9.3.2 Checking the System Before the UpgradeTo ensure that a device can be upgraded smoothly, the device must be strictly checked againstthe checklist.
Procedure
Step 1 Prepare hardware as needed, for example, clear memory space to store new system software andrelated upgrade files.
Step 2 Check whether a new GTL license file needs to be applied for. If it is needed, obtain it fromHuawei.
NOTE
l A new GTL License needs to be applied for when a device is upgraded to a new R version or V version.
l The obtained new GTL license file is consistent with the system software.
Huawei AR1200-S Series Enterprise RoutersConfiguration Guide - Basic Configuration 9 Upgrade and Maintenance
Issue 02 (2011-10-15) Huawei Proprietary and ConfidentialCopyright © Huawei Technologies Co., Ltd.
178

To view GTL license-controlled features, use the Text Editor to open the GTL license file. Thecontents in the Resource and Function fields are the resource and function items controlled bythe GTL license file.
Step 3 Obtain software required for the upgrade. The new system software (.cc file) and relevantdocuments for the upgrade must be obtained from Huawei.
Step 4 In the user view, run the display version command to view the current system software. If thecurrent system software is the same as or later than new system software, the software upgradedis not needed.
Step 5 Run the following commands to check the device operation status:
Run the display memory-usage command in the user view to check the memory usage of MPUsto ensure that the MPUs are working properly.
Run the display health command in the user view and record the command output. If you cannotlocate faults that have occurred during the upgrade, provide the information to Huawei technicalpersonnel for troubleshooting.
Step 6 Set up an environment where software upgrade can be performed by means of TFTP or FTP.This helps to back up the original resource files before the upgrade and upload the new resourcefiles required for the upgrade.
When the system software is upgraded by means of FTP:
l If the device to be upgraded functions as a client and a PC functions as a server, you need toinstall the FTP server software on the PC. You need to purchase and install the FTP serversoftware yourself, because the device is not installed with such software by default.
l If the device to be upgraded functions as a server and a PC functions as a client, you do notneed to install the FTP server software on the PC. By default, the FTP server function on thedevice to be upgraded is disabled. To enable the function, run the ftp server enablecommand.
When the system software is upgraded by means of TFTP, the device to be upgraded can onlyfunction as a client and does not provide the TFTP server function. In this case, you must installthe TFTP server software on the PC.
Step 7 Back up the important data stored in the storage media on the device to be upgraded.
Step 8 Check the remaining space of the storage media to make sure that there is enough space to storethe new system software and related upgrade files.
----End
9.3.3 Downloading Resource FilesBefore upgrading the system software, download the required resource files from the server toyour local computer and configure a local FTP server.
Context
You can download resource files to the router by using the serial port of a computer or theEthernet port of the router.
This section describes how to download resource files to the router using the serial port.
Huawei AR1200-S Series Enterprise RoutersConfiguration Guide - Basic Configuration 9 Upgrade and Maintenance
Issue 02 (2011-10-15) Huawei Proprietary and ConfidentialCopyright © Huawei Technologies Co., Ltd.
179

Procedure
Step 1 Log in to the router from the console port. For details, see 1.2 Logging In to the Device Throughthe Console Port or Mini USB Port.
Step 2 Restart the router. Press Ctrl+B to enter the BootROM menu when the following informationis displayed.Sep 16 2011,17:14:28Copying Data : DoneUncompressing : DoneInitializing SMI Bus:OKInit flash, please wait......Base Address: 0xfffffffffc000000Size is: 0x20000000OKflash drv init.Initializing FlashPiece Module:FlashPiece start offset at: 0x300000FlashPiece size is: 0x100000Initializing FlashDynamic Module:FlashDynamic start offset at: 0x400000FlashDynamic size is: 0x200000Initializing I2C Bus:OKUSB2 Host Stack Initialized.USB Hub Driver InitializedUSBD Wind River Systems, IncEHCI Controller found.Waiting to attach to USBD...0xbfffdf0 (tRootTask): usb1_base = 0xbff22000Done.0xbfffdf0 (tRootTask): usbBulkDevInit() returned OK
Press Ctrl+B to break auto startup ... Attached TCP/IP interface to teth1.
NOTE
l If a password is configured, you must enter the password after pressing Ctrl+B to display the BootROMmenu (the default password is huawei ).
l You can change the password under the BootROM menu. Make a note of your password and keep itin a safe place. The password cannot be restored if it is lost.
Step 3 Select choice 3 to enter the network menu.Enter Password:
Main Menu
1. Default Startup 2. Serial Menu 3. Network Menu 4. Startup Select 5. File Manager 6. Reboot
Enter your choice(1-6):3
Step 4 Select choice 2 to modify the parameter.NetWork Menu
1. Display parameter 2. Modify parameter 3. Save parameter 4. Download file 0. ReturnEnter your choice(1-10): 2
Set the FTP type, resource file name, management interface address, FTP server address, andFTP user name and password.
Huawei AR1200-S Series Enterprise RoutersConfiguration Guide - Basic Configuration 9 Upgrade and Maintenance
Issue 02 (2011-10-15) Huawei Proprietary and ConfidentialCopyright © Huawei Technologies Co., Ltd.
180
NOTE
l FTP types include FTP and TFTP.
l Management interface refers to gigabitethernet 0/0/0 on the MPU.
Step 5 After the system returns to the network menu, select choice 4 to download the specified resourcefile from the local FTP server.NetWork Menu
1. Display parameter 2. Modify parameter 3. Save parameter 4. Download file 0. ReturnEnter your choice(1-10): 4
Step 6 Select the location for storing the resource file.Download file to: [ 1:flash 2:usb0 ]:
Enter the corresponding numeral to select the storage media.
NOTE
The device uses the flash as default setting. The other storage medium such as USB flash drive will bedisplayed only after they are installed.
Step 7 After the resource file is downloaded, restart the router.
----End
9.3.4 Specifying the System Software to Be Used at the Next StartupAfter the system software to be used by the router at the next startup is specified, the patch statusfile to be used at the next startup must be reset.
ContextBefore specifying the system software to be used at the next startup, perform the followingoperations:
Upload the system software to the master and slave MPUs. For details, see the contents ofuploading and downloading files in Performing File Operations by Using FTP Commands.
Make sure that the storage media on the MPUs have sufficient space to store the system software.
NOTE
Verify the system software to be uploaded by checking its size and date.
Do as follows on the router to be upgraded:
Procedure
Step 1 In the user view, run:startup system-software system-file
The system software to be used at the next startup is specified for the MPU.
Step 2 (Optional) If the upgraded system software needs a corresponding patch file, perform thefollowing operations:
Huawei AR1200-S Series Enterprise RoutersConfiguration Guide - Basic Configuration 9 Upgrade and Maintenance
Issue 02 (2011-10-15) Huawei Proprietary and ConfidentialCopyright © Huawei Technologies Co., Ltd.
181

l Run:startup patch file-name
A patch file to be used at the next startup is specified for the MPU.
Step 3 (Optional) Run:startup saved-configuration configuration-file
The configuration file to be used at the next startup is specified for the MPUs.
Step 4 (Optional) Run:startup license file-name
The license file to be used at the next startup is specified for the MPU.
----End
9.3.5 Configuring a Backup Startup FileAfter a backup startup software package is configured, the system can restart properly if a faultoccurs.
Context
If the storage device where the startup software package is stored is damaged, you can use thebackup software package to make the system start.
NOTE
l The file name extension of the system software package must be .cc and the package must be storedin the root directory.
l The backup startup software package can be the same as or different from the current startup softwarepackage, but it can be used to make the system start.
Procedure
Step 1 Run:startup system-software filename backupThe backup startup software package isspecified.
----End
9.3.6 (Optional) Upgrading the BootROM of the LPUAfter the system software is upgraded successfully, you need to manually upgrade the BootROMof the 2FE and 1GEC.
Context
After the system software is upgraded successfully, you need to manually upgrade the BootROMof the 2FE and 1GEC.
NOTE
Run the display device command to check whether the device is configured with the successfully registered2FE or 1GEC.
Huawei AR1200-S Series Enterprise RoutersConfiguration Guide - Basic Configuration 9 Upgrade and Maintenance
Issue 02 (2011-10-15) Huawei Proprietary and ConfidentialCopyright © Huawei Technologies Co., Ltd.
182

Procedure
Step 1 Run:upgrade slot slot-id startup bootrom
The BootROM is upgraded.
Step 2 Run:reset slot slot-id
The LPU is reset.
After the LPU is reset, run the display version slot slot-id command to check whether theBootROM is upgraded successfully.
----End
9.3.7 Restarting a DeviceThe specified system software to be used at the next startup will take effect only after the deviceis restarted.
Context
During the upgrade, the device must be restarted in the following situations:
l The system software and configuration file to be used at the next startup have been specified.
CAUTIONBefore restarting the router, run the save command to save the current configuration file.
The router restarts with the specified startup files. If the specified startup files are damaged, therouter restarts with the backup startup files. If the router fails to restart with the backup startupfiles, it searches valid startup files on the storage devices in the sequence "Flash memory-> USBflash drive." When the router finds valid system software packages and configuration files onthe storage device, it selects a rollback version within 24 minutes and restarts with the selectedversion. If the router does not find valid system software and configuration file, it stops at theBootROM menu.
Procedurel In the user view, run:
reboot [ fast | save diagnostic-information ]
The router is restarted.
----End
9.3.8 (Optional) Activating a GTL License FileActivating a GTL license file allows the GTL license-controlled features to be used on a device.
Huawei AR1200-S Series Enterprise RoutersConfiguration Guide - Basic Configuration 9 Upgrade and Maintenance
Issue 02 (2011-10-15) Huawei Proprietary and ConfidentialCopyright © Huawei Technologies Co., Ltd.
183
Context
Before activating the GTL license, run the dir command to verify that the license file has beenloaded to the storage device (Flash memory or USB flash drive).
Procedurel Run:
license active file-name
The GTL license file is activated, and the license-controlled features on the device can beused.
----End
9.3.9 Checking the ConfigurationAfter the system software is upgraded, you can check information about interface parametersand version consistency between resource files.
PrerequisiteThe configurations of upgrading system software are complete.
Procedurel Run the display patch-information command to check information about all patches.
l Run the display startup command to check that the values of the "Startup system software"and "Startup saved-configuration file" fields in the command output are the needed ones.
----End
Example
After the patch is installed, run the display patch-information command. You can view thepatch status on each board.
<Huawei> display patch-informationPatch version : ARV200R001C00SPH100 Patch packet name: flash:/patch_lic2.pat
Run the display startup command. You can view the names of the system software and theconfiguration file used at the startup. For example:
<Huawei> display startupMainBoard: Startup system software: flash:/ar0215_31345_1220.cc Next startup system software: flash:/ar0215_31345_1220.cc Backup system software for next startup: null Startup saved-configuration file: flash:/iascfg.zip Next startup saved-configuration file: flash:/iascfg.zip Startup license file: null Next startup license file: null Startup patch package: null Next startup patch package: null Startup voice-files: null Next startup voice-files: null
Huawei AR1200-S Series Enterprise RoutersConfiguration Guide - Basic Configuration 9 Upgrade and Maintenance
Issue 02 (2011-10-15) Huawei Proprietary and ConfidentialCopyright © Huawei Technologies Co., Ltd.
184

9.4 Managing PatchesThis section describes several operations that can be performed on patches. You can installpatches to upgrade the system without interrupting services, specify the patch file to be usedafter the next startup, uninstall patches to deactivate the patches that do not meet systemrequirements, or delete the unwanted patches to release the memory of the patch area on theMPU.
9.4.1 Establishing the Configuration TaskTo rectify system vulnerabilities or defects, you can install patches in the system. Installingpatches allows the system to be upgraded without interrupting services.
Applicable EnvironmentDuring patch installation, the patch is installed onto the MPU and all LPUs.
You can use either of the following methods to install patches:l Installing a patch file immediately: The patch file takes effect after a command is used to
run the patch file, without having to restart the device. For details, see Installing aPatch.
l Specifying a patch file to be used at the next startup: The patch file takes effect after thedevice is restarted.
Pre-configuration TasksBefore managing patches, complete the following tasks:
l Making sure that the router is working properlyl Storing patches in the storage medium on the router
Data PreparationTo manage patches, you need the following data.
No. Data
1 Patch file
9.4.2 Installing a PatchYou can load and run a patch in the user view. This allows the device performance to beoptimized.
ContextOnly one patch file can be run in the system at a time. Therefore, display patch-informationrun the command before patch installation to check information about all patches, including the
Huawei AR1200-S Series Enterprise RoutersConfiguration Guide - Basic Configuration 9 Upgrade and Maintenance
Issue 02 (2011-10-15) Huawei Proprietary and ConfidentialCopyright © Huawei Technologies Co., Ltd.
185

running patches. If the command output shows that there is a running patch file in the system,delete the running patch file.
In addition, perform the following operations before patch installation:l Upload a patch file to the master MPU. For details, see the contents of uploading and
downloading files in Performing File Operations by Using FTP Commands.
Procedure
Step 1 Enter the user view.
Step 2 Run:patch load patchname all run
The patch is activated.
NOTE
l The patch load patchname all run command can activate only one patch file each time.
l Each patch is developed incrementally based on the earlier version. If the incremental patchpatchB.pat is activated when the system is running the earlier version patchA.pat, patchB.pat takeseffect. To run patchA.pat again, run the patch delete all command to delete patches in the system,and load and activate patchA.pat. Alternatively, run the startup patch command to specifypatchA.pat as the next startup patch, and then restart the device to make patchA.pat effective.
----End
9.4.3 Specifying a Patch File to Be Used at the Next StartupIf you do not want the patch file that has been uploaded to the storage media to take effect, youcan specify a patch file to be used at the next startup. In this manner, the patch file will takeeffect after the device is restarted.
Context
Before specifying a patch file to be used at the next startup, the following tasks must becompleted:l Upload the specified patch file to the storage medium on the master MPU. For details, see
the contents of uploading and downloading files in Performing File Operations by UsingFTP Commands.
Procedure
Step 1 In the use view, run:startup patch file-name
The patch file (*.pat) to be used at the next startup is specified for the master and slave MPUs.
----End
Follow-up Procedure
After the patch file to be used at the next startup has been specified, run the display startupcommand to view the value of the "Next startup patch package" field on the MPUs.
Huawei AR1200-S Series Enterprise RoutersConfiguration Guide - Basic Configuration 9 Upgrade and Maintenance
Issue 02 (2011-10-15) Huawei Proprietary and ConfidentialCopyright © Huawei Technologies Co., Ltd.
186

9.4.4 Uninstalling a PatchIf an installed patch does not meet system requirements, or more storage space of the patch areais needed, you can uninstall the patch by running a command in the user view.
ContextOnly one patch file can be run in the system during patch installation. Therefore, delete therunning patch file from the patch area before loading and running a new patch file.
ProcedureStep 1 Enter the user view.
Step 2 Run:patch delete all
All patches in the system are deleted.
----End
Follow-up ProcedureAfter patch files have been deleted, run the following command to verify the configuration.
l Run the display patch-information command to check the patch status.<Huawei> display patch-information Info: No patch in the system
9.4.5 Checking the ConfigurationAfter patch installation is complete, you can view patch information, such as the patch status.
PrerequisiteThe configurations of patch installation are complete.
Procedurel Run the display patch-information command to check information about all patches.
----End
ExampleAfter a patch has been installed, run the display patch-information command. You can viewthe patch status on each board.<Huawei> display patch-informationPatch version : ARV200R001C00SPH100 Patch packet name: flash:/patch_lic2.pat
9.5 Monitoring CPU and Memory UsageConfiguring CPU and memory usage thresholds allows CPU and memory usage to be monitoredand system performance to be known in time.
Huawei AR1200-S Series Enterprise RoutersConfiguration Guide - Basic Configuration 9 Upgrade and Maintenance
Issue 02 (2011-10-15) Huawei Proprietary and ConfidentialCopyright © Huawei Technologies Co., Ltd.
187

9.5.1 Establishing the Configuration TaskBefore setting CPU and memory usage thresholds, familiarize yourself with the applicableenvironment, complete the pre-configuration tasks, and obtain the data required for theconfiguration. This will help you complete the configuration task quickly and accurately.
Applicable Environment
The CPU and memory are a key part of a device. A lot of routing information or fast routealgorithms in the system will consume a large number of CPU resources, affecting systemperformance. As a result, the device is unable to process data in time, a lot of packets may belost, or the system may break down. All these will bring an incalculable loss to customers.
If alarms of high CPU and memory usage can be generated during data processing on therouter, the CPU and memory usage can be effectively monitored, and the system performancecan be optimized. This also allows the system to work properly.
Pre-configuration Tasks
Before setting CPU and memory usage thresholds, complete the following task:l Making sure that the router is working properly
Data Preparation
To set CPU and memory usage thresholds, you need the following data.
No. Data
1 CPU usage thresholds, including an alarm threshold and a clear alarm threshold
2 Memory usage threshold
9.5.2 Setting CPU Usage ThresholdsSetting CPU usage thresholds allows CPU usage to be monitored.
Context
Two CPU usage thresholds are set:l Alarm threshold: indicates that the system generates an alarm when the CPU usage reaches
the alarm threshold.l Clear alarm threshold: indicates that the alarm is cleared when the CPU usage falls below
the clear alarm threshold.
Procedure
Step 1 Run:system-view
Huawei AR1200-S Series Enterprise RoutersConfiguration Guide - Basic Configuration 9 Upgrade and Maintenance
Issue 02 (2011-10-15) Huawei Proprietary and ConfidentialCopyright © Huawei Technologies Co., Ltd.
188
The system view is displayed.
Step 2 Run:set cpu-usage threshold threshold-value [ restore restore-threshold-value ] [ slot slot-id ]
An alarm threshold and a clear alarm threshold are set for the CPU usage on an MPU or an LPUin a specified slot.
NOTEBy default, the alarm threshold of CPU usage is 80%, and the clear alarm threshold of CPU usage is 75%.
----End
9.5.3 Setting a Memory Usage ThresholdSetting a memory usage threshold allows memory usage to be monitored.
ContextAlarm threshold of memory usage: indicates that the system generates an alarm when thememory usage reaches the alarm threshold.
Procedure
Step 1 Run:system-view
The system view is displayed.
Step 2 Run:set memory-usage threshold threshold-value
An alarm threshold is set for memory usage.
Default settings are as follows:
l If the memory of an LPU is smaller than 128 MB, the alarm threshold of memory usage is80%.
l If the memory of an LPU ranges from 128 MB to 256 MB, the alarm threshold of memoryusage is 85%.
l If the memory of an LPU ranges from 256 MB to 512 MB, the alarm threshold of memoryusage is 90%.
l If the memory of an LPU is larger than 512 MB, the alarm threshold of memory usage is95%.
----End
9.5.4 Checking the ConfigurationAfter CPU and memory usage thresholds are set, you can view information about the CPU usageand memory usage.
PrerequisiteThe configurations of CPU and memory usage are complete.
Huawei AR1200-S Series Enterprise RoutersConfiguration Guide - Basic Configuration 9 Upgrade and Maintenance
Issue 02 (2011-10-15) Huawei Proprietary and ConfidentialCopyright © Huawei Technologies Co., Ltd.
189
Procedurel Run the display cpu-usage command to check CPU usage.
l Run the display cpu-usage [ configuration ] [ slot slot-id ] command to check CPU usage.
l Run the display memory-usage thresholdcommand to check memory usage.
----End
9.6 Restarting the DeviceAfter the system software of the router is upgraded, the router must be restarted to make theconfiguration take effect. To prevent the system from breaking down due to a large number oftemporary files, the router also must be restarted.
9.6.1 Establishing the Configuration TaskBefore restarting the router, familiarize yourself with the applicable environment, complete thepre-configuration tasks, and obtain the data required for the configuration. This will help youcomplete the configuration task quickly and accurately.
Applicable Environment
After the system software of the router is upgraded, the router must be restarted to make theconfiguration take effect. To prevent the system from breaking down due to a large number oftemporary files, the router also must be restarted.
The AR1200-S provides two methods of restarting the router:
l Immediate restart
l Scheduled restart
Pre-configuration Tasks
Before restarting the router, complete the following tasks:
l Making sure that the router is working properly
l Making sure that the local and remote connections are working properly
Data Preparation
To restart the router, you need the following data.
No. Data
1 Time to restart the router
2 Wait time before restarting the router
Huawei AR1200-S Series Enterprise RoutersConfiguration Guide - Basic Configuration 9 Upgrade and Maintenance
Issue 02 (2011-10-15) Huawei Proprietary and ConfidentialCopyright © Huawei Technologies Co., Ltd.
190
9.6.2 Restarting the Device ImmediatelyBefore restarting the router, you must choose whether to save the current configuration file ofthe router.
Context
CAUTIONRunning the reboot command is not recommended, because this will interrupt network servicesin a short period. Before restarting the router, choose whether to save the configuration file ofthe router.
Procedurel Run:
reboot [ fast ]
The router is restarted immediately.
----End
9.6.3 Configuring the Device to Restart as ScheduledYou can configure the router to restart as scheduled by setting the restart time or the wait timebefore the restart.
Context
Do as follows on the router that needs to restart as scheduled:
Procedure
Step 1 Run:schedule reboot at exact-time
The router is configured to restart as scheduled, and the restart time is set.
Step 2 Run:schedule reboot delay interval
The router is configured to restart as scheduled, and the wait time before the restart is set.
You can choose either Step 1 or Step 2 to configure the router to restart as scheduled. If youneed to perform other operations before the device restart, perform Step 2 to set the wait timebefore the restart.
By default, the function of configuring a device to restart as scheduled is disabled.
----End
Huawei AR1200-S Series Enterprise RoutersConfiguration Guide - Basic Configuration 9 Upgrade and Maintenance
Issue 02 (2011-10-15) Huawei Proprietary and ConfidentialCopyright © Huawei Technologies Co., Ltd.
191

9.6.4 Checking the ConfigurationAfter the router has been configured to restart as scheduled, you can view parameters set for thescheduled restart.
PrerequisiteThe configurations of restarting the router as scheduled are complete.
Procedurel Run the display schedule reboot command to check the parameters set for the scheduled
restart of the router.
----End
Example# View the configuration of the router restart, with the restart time at 00:00.<Huawei> display schedule rebootInfo:System will reboot at 00:00:00 2009/07/01 (in 12 hours and 33 minutes).
# View the configuration of the router restart, with the wait time of 12 hours before the restart.<Huawei> display schedule rebootInfo:System will reboot at 23:27:14 2009/06/30 (in 11 hours and 59 minutes).
9.7 Configuration ExamplesThis section provides configuration examples for upgrade and maintenance, includingnetworking requirements, precautions, and configuration roadmap. The configuration flowchartwill help you understand the configuration procedures.
9.7.1 Example for Upgrading System SoftwareThis section provides detailed procedures for upgrading system software. This will help you tocomplete the upgrade task quickly and accurately.
Networking RequirementsThe current system software needs to be upgraded if it cannot provide additional features orlarger specifications required by customers.
As shown in Figure 9-2, the system software of the cannot meet customer's requirements andneeds to be upgraded. Huawei has provided related upgrade files for the customer to performsoftware upgrade on the.
Figure 9-2 Networking diagram for upgrading system software
MPLS CorePE
FTP ServerPC
10.1.1.2/24
GE2/0/010.1.1.1/24
Huawei AR1200-S Series Enterprise RoutersConfiguration Guide - Basic Configuration 9 Upgrade and Maintenance
Issue 02 (2011-10-15) Huawei Proprietary and ConfidentialCopyright © Huawei Technologies Co., Ltd.
192
Precautionsl The key data in the storage medium on the device must be backed up to the PC.l The remaining space of the storage media must be checked to make sure that there is enough
space to store new system software.
Configuration RoadmapThe configuration roadmap is as follows:
1. Specify FTP as the mode of uploading the system software, the device as the FTP server,user 1 as the user name, and huawei as the user password.
2. Specify the system software and configuration file to be used at the next startup.3. Save the configuration file and restart the device.4. Verify the configuration.
Data PreparationTo complete the configuration, you need the following data:
l System software version before the upgrade, which is V200R001C00_ch.cc in this examplel New system software version, which is V200R001C00_ch.cc in this examplel Backup startup software version, which is V200R001C00_backup.ccl Size of the remaining space of the storage media
Procedure
Step 1 Upload the new system software.
# Configure the device as an FTP server.<Huawei> system-view[Huawei] sysname HuaWei[HuaWei] ftp server enableInfo: Succeeded in starting the FTP server. [HuaWei] aaa[HuaWei-aaa] local-user user1 password simple huaweiinfo: A new user added[HuaWei-aaa] local-user user1 service-type ftp[HuaWei-aaa] local-user user1 ftp-directory flash:/[HuaWei-aaa] quit[HuaWei] quit
After the preceding configurations are complete, run the display local-user command to checkinformation about the user.<HuaWei> display local-user---------------------------------------------------------------------------- User-name State AuthMask AdminLevel ---------------------------------------------------------------------------- user1 A H - user2 A A - ---------------------------------------------------------------------------- Total 2 user(s)
# On the PC, specify the binary format as the file transfer mode, and c:\temp as the workingdirectory.
Huawei AR1200-S Series Enterprise RoutersConfiguration Guide - Basic Configuration 9 Upgrade and Maintenance
Issue 02 (2011-10-15) Huawei Proprietary and ConfidentialCopyright © Huawei Technologies Co., Ltd.
193

NOTE
The Windows XP operating system is used as an example.
Store the uploaded file in the specified directory (C:\temp in this example). Choose Start >Run and enter cmd. Then, press Enter. Enter FTP 10.1.1.1. At the prompt of "user", enter theuser name. At the prompt of "password", enter the password. The following configurations aredisplayed:C:\Documents and Settings\Administrator> ftp 10.1.1.1Connect to 10.1.1.1.220 FTP server ready.User <10.1.1.1:<none>>:user1331 Please specify the password.Password:230 User logged in.
Specify a directory and a file transfer mode on the FTP client to store the uploaded file.ftp> binary200 Type set to I.ftp> lcd c:\tempLocal directory now c:\temp.
# On the PC, upload the new system software (*.cc) to the device.ftp> put V200R001C00_ch.cc200 Port command okay.226 Transfer complete.
Step 2 Specify the system software and configuration file to be used at the next startup.
# Specify the system software to be used at the next startup.
<HuaWei> startup system-software flash:/V200R001C00_ch.ccThis operation will take several minutes, please wait..........Info: Succeeded in setting the file for booting system
# Specify the configuration file to be used at the next startup.
<HuaWei> startup saved-configuration aa.cfgThis operation will take several minutes, please wait...Info: Succeeded in setting the file for booting system
# View the system software and configuration file to be used at the next startup, and check thatthe system software is the specified one.
<HuaWei> display startupMainBoard : Startup system software : flash:/V200R001C00_ch.cc Next startup system software : flash:/V200R001C00_ch.cc Backup system software for next startup: null Startup saved-configuration file: flash:/iascfg.zip Next startup saved-configuration file : flash:/aa.cfg Startup license file: null Next startup license file: null Startup patch package: null Next startup patch package: null Startup voice-files: null Next startup voice-files: null
Step 3 Specify the backup startup software.
# After a backup startup software package is configured, the system can restart properly if a faultoccurs.
<HuaWei> startup system-software V200R001C00_backup.cc backupThis operation will take several minutes, please wait...Info: Succeeded in setting the backup file for booting system
Huawei AR1200-S Series Enterprise RoutersConfiguration Guide - Basic Configuration 9 Upgrade and Maintenance
Issue 02 (2011-10-15) Huawei Proprietary and ConfidentialCopyright © Huawei Technologies Co., Ltd.
194
Step 4 Save the configuration file and restart the device.
# Save the configuration file.
<HuaWei> saveThe current configuration will be written to the device.Are you sure to continue? [Y/N]:yIt will take several minutes to save configuration file, please wait...Configuration file had been saved successfullyNote: The configuration file will take effect after being activated
# Restart the device.
<HuaWei> rebootInfo: The system is comparing the configuration, please wait. Warning: All the configuration will be saved to the next startup configuration.Continue ? [y/n]:y It will take several minutes to save configuration file, please wait........ Configuration file had been saved successfully Note: The configuration file will take effect after being activatedSystem will reboot! Continue ? [y/n]:y Info: system is rebooting ,please wait...
Step 5 Verify the configuration.
After the device has been restarted, run the display version command. You can view that thecurrent system software is a new version. It means that the system software upgrade is successful.
<Huawei> system-view[Huawei] sysname HuaWei[HuaWei] display versionHuawei Versatile Routing Platform SoftwareVRP (R) software, Version 5.90 (AR1220-S V200R001C00)Copyright (C) 2000-2010 Huawei Technologies Co., LTDHuawei AR1220-S Router uptime is 0 week, 0 day, 3 hours, 59 minutes BKP 0 version information: 1. PCB Version : AR01BAK1A VER.C 2. If Supporting PoE : Yes 3. Board Type : AR1220-S 4. MPU Slot Quantity : 1 5. LPU Slot Quantity : 2 MPU 0(Master) : uptime is 0 week, 0 day, 3 hours, 59 minutes SDRAM Memory Size : 512 M bytes Flash Memory Size : 256 M bytesNVRAM Memory Size : 512 K bytes MPU version information : 1. PCB Version : AR01SRU1A VER.A 2. MAB Version : 0 3. Board Type : AR1220-S 4. CPLD1 Version : 100 5. BootROM Version : - LPU 1 : uptime is 0 week, 0 day, 3 hours, 53 minutes SDRAM Memory Size : 256 M bytes Flash Memory Size : 64 M bytes LPU version information : 1. PCB Version : AR01SDCE2A VER.A 2. MAB Version : 0 3. Board Type : 2T1-M 4. CPLD1 Version : 0 5. CPLD2 Version : 0 6. BootROM Version : 906 LPU 2 : uptime is 0 week, 0 day, 3 hours, 53 minutes SDRAM Memory Size : 256 M bytes Flash Memory Size : 64 M bytes LPU version information : 1. PCB Version : AR01SDSA2A VER.A
Huawei AR1200-S Series Enterprise RoutersConfiguration Guide - Basic Configuration 9 Upgrade and Maintenance
Issue 02 (2011-10-15) Huawei Proprietary and ConfidentialCopyright © Huawei Technologies Co., Ltd.
195
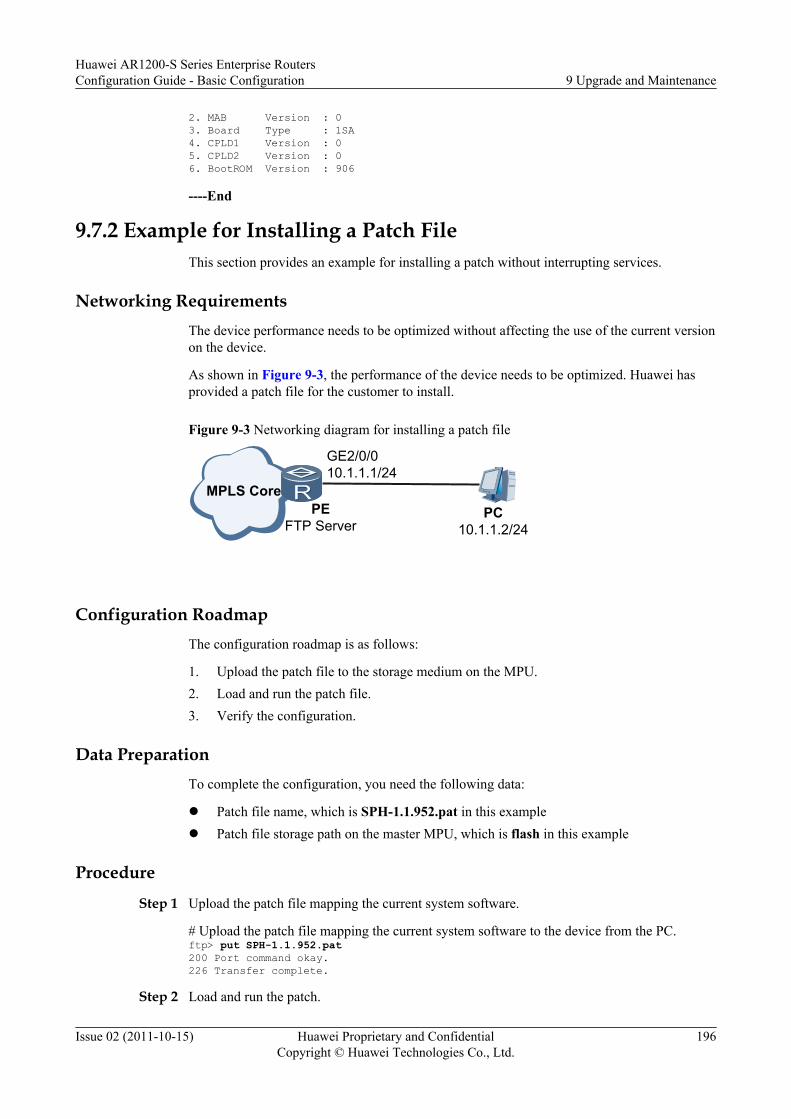
2. MAB Version : 0 3. Board Type : 1SA 4. CPLD1 Version : 0 5. CPLD2 Version : 0 6. BootROM Version : 906
----End
9.7.2 Example for Installing a Patch FileThis section provides an example for installing a patch without interrupting services.
Networking RequirementsThe device performance needs to be optimized without affecting the use of the current versionon the device.
As shown in Figure 9-3, the performance of the device needs to be optimized. Huawei hasprovided a patch file for the customer to install.
Figure 9-3 Networking diagram for installing a patch file
MPLS CorePE
FTP ServerPC
10.1.1.2/24
GE2/0/010.1.1.1/24
Configuration RoadmapThe configuration roadmap is as follows:
1. Upload the patch file to the storage medium on the MPU.2. Load and run the patch file.3. Verify the configuration.
Data PreparationTo complete the configuration, you need the following data:
l Patch file name, which is SPH-1.1.952.pat in this examplel Patch file storage path on the master MPU, which is flash in this example
Procedure
Step 1 Upload the patch file mapping the current system software.
# Upload the patch file mapping the current system software to the device from the PC.ftp> put SPH-1.1.952.pat200 Port command okay.226 Transfer complete.
Step 2 Load and run the patch.
Huawei AR1200-S Series Enterprise RoutersConfiguration Guide - Basic Configuration 9 Upgrade and Maintenance
Issue 02 (2011-10-15) Huawei Proprietary and ConfidentialCopyright © Huawei Technologies Co., Ltd.
196

<HuaWei> patch load SPH-1.1.952.pat all runPatch operation succeeded
Step 3 Verify the configuration.
After the configuration is complete, run the display patch-information command to viewinformation about the running patch.
<HuaWei> display patch-informationPatch version : ARV200R001C00SPH100 Patch packet name: flash:/SPH-1.1.952.pat
----End
Huawei AR1200-S Series Enterprise RoutersConfiguration Guide - Basic Configuration 9 Upgrade and Maintenance
Issue 02 (2011-10-15) Huawei Proprietary and ConfidentialCopyright © Huawei Technologies Co., Ltd.
197