ar15 semi—automatic instruction/ safety … semi—automatic instruction/ safety manual page 1 use...
TRANSCRIPT

AR15 SEMI—AUTOMATICINSTRUCTION/ SAFETY MANUAL
Page 1
USE ONLY CLEAN, DRY, ORIGINAL, HIGH QUALITY COMMERCIALLY MANUFACTURED AMMUNITION IN GOOD CONDITON which is appropriate to the caliber of your firearm. We do not recommend the use of remanufactured or hand loaded ammunition because it may cause severe damage to yourself and/ or your rifle.
CAUTION:

Page 2
READ AND UNDERSTAND ALL THE FOLLOWING PRECAUTIONS BEFORE REMOVING THIS FIREARM FROM ITS PACKAGE.
SECTION 1 PRECAUTIONS
! WARNING: IF THIS FIREARM IS CARELESSLY OR IMPROPERLY HANDLED, UNINTENTIONAL DISCHARGE COULD RESULT AND COULD CAUSE INJURY, DEATH, OR DAMAGE TO PROPERTY.
CAUTION:
PRIOR TO LOADING AND FIRING, CAREFULLY READ THIS INSTRUCTION MANUAL WHICH GIVES BASIC ADVICE ON THE PROPER HANDLING AND FUNCTIONING OF THIS RADICAL FIREARMS SYSTEM. However, your safety and the safety of others (including your family) depends on your mature compliance with that advice, and your adoption, development and constant employment of safe practices. If unfamiliar with firearms, seek further advice through safe handling courses run by your local gun clubs, NRA approved instructor, or similar qualified organizations.
Page 3
NOTICE:
Radical Firearms shall not be responsible for injury, death, or damage to property resulting from either intentional or accidental discharge of this firearm, or from its function when used for purposes or subjected to treatment for which it was not designed. Radical Firearms will not honor claims involving this firearm which result from careless or improper handling, unauthorized adjustment or parts replacement, corrosion, neglect, or the use of wrong caliber ammunition, or the use of ammunition other than original high quality commercially manufactured ammunition in good condition, or any combination thereof. Radical Firearms will not honor claims involving this firearm for any reason or cause when such claims are made by the second or subsequent owner.
IMPORTANT:
Before this firearm left the factory it was tested, carefully inspected, and packaged. Radical Firearms cannot control product handling after it leaves the factory; therefore, please examine this firearm carefully at the time of purchase to insure that it is unloaded and undamaged. The dealer will be pleased to assist you in making this examination and endeavor to answer any further questions.
NOTICE:
End user is responsible for knowledge of Local and Federal Laws, and for adhering to all regulations. Radical Firearms is not responsible for misuse of any products.
Page 4
This instruction manual should always accompany this firearm. When you lend, give or sell this firearm, be sure this manual goes with it.
Page 5
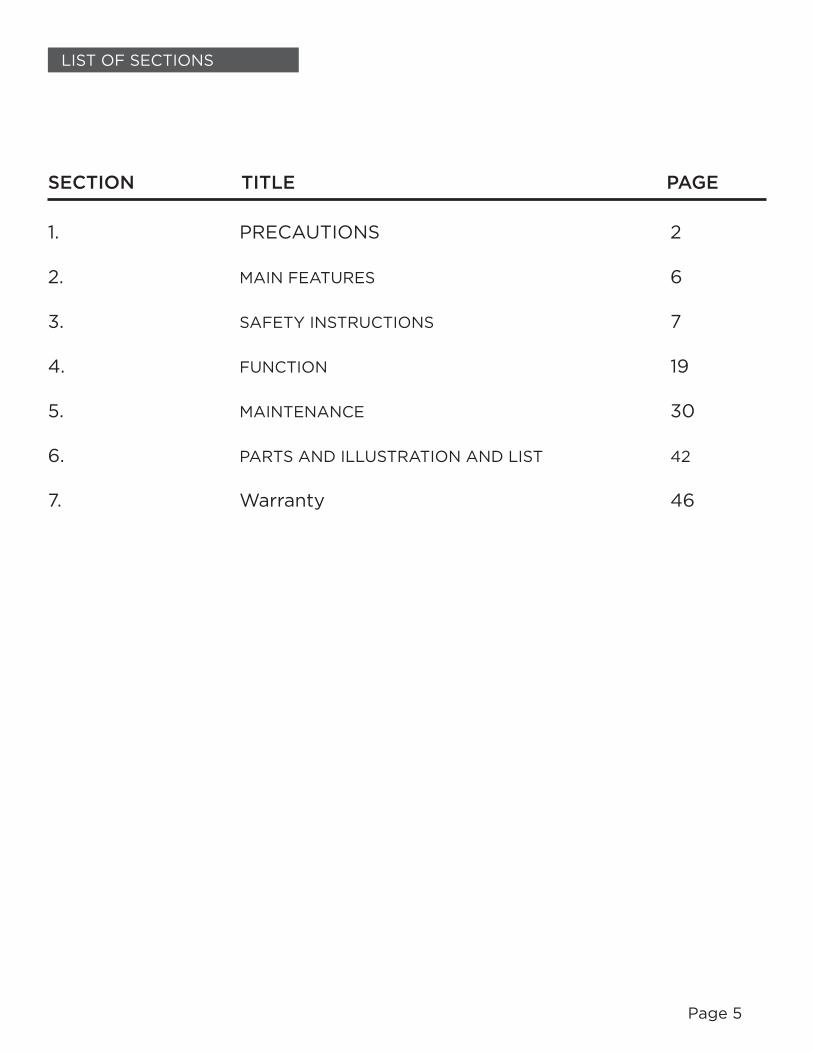
1. PRECAUTIONS 2
2. MAIN FEATURES 6
3. SAFETY INSTRUCTIONS 7
4. FUNCTION 19
5. MAINTENANCE 30
6. PARTS AND ILLUSTRATION AND LIST 42
7. Warranty 46
LIST OF SECTIONS
TITLE PAGE SECTION

Page 6
The Radical Firearms AR15 Rifle/ Pistol is a lightweight, semi—automatic firearm. Features include a free float rail system, forged upper and lower receiver. All actions are gas operated with the bolt closed.
SECTION 2 MAIN FEATURES
16” 5.56 M4 1:7 COMPLETE RIFLE WITH 12” FGS ROUND RAIL
7.5” 1:7 5.56 AR PISTOL WITH 7” FGS RAIL
* The AR Pistol Functions and breaks down the same as the AR Rifle but features a shorter barrel and a fixed length pistol buffer tube.
Page 7
You may be an experienced, safe shooter already familiar with the procedures in this instruction manual, or you may have never handled a firearm before. Either way, we urge you to read this entire instruction manual carefully. YOU MUST FOLLOW THE SAFETY INSTRUCTIONS FOR YOUR SAFETY AND THE SAFETY OF OTHERS.
! WARNING: When you squeeze the trigger, you must expect the firearm to fire, and you must take full responsibility for firing it. Your care can avoid accidental discharge, and you will thereby avoid accidental injury and death.
! WARNING: THIS FIREARM MAY DISCHARGE ACCIDENTALLY WHEN A ROUND IS FED INTO THE CHAMBER, IF IT IS DROPPED OR RECEIVES A BLOW TO THE MUZZLE OR FRONT OF THE FIREARM. (This can occur regardless of the position of the hammer or any of the various safety devices.) Therefore, extra care and strict adherence to these instructions by the firearm user is mandatory for minimizing the risk of accidents.
SECTION 3 SAFETY INSTRUCTIONS
Page 8
CAUTIONS:
1. ALWAYS HANDLE YOUR FIREARM AS IF IT WERE LOADED so that you never fire it accidentally when you think it is unloaded.
2. NEVER POINT YOUR FIREARM AT ANYTHING YOU DO NOT INTEND TO SHOOT so that if it fires accidentally, injury, death, or damage to property will be prevented.
3. NEVER TAKE ANYONE'S WORD THAT A FIREARM IS UNLOADED; check for yourself with fingers off the trigger and firearm pointed in a safe direction, so that you never fire the firearm accidentally when you think it is unloaded.
4. ALWAYS MAKE SURE YOUR FIREARM IS NOT LOADED AND BOLT IS LATCHED OPEN BEFORE LAYING IT DOWN, OR HANDING IT TO ANOTHER PERSON, so that it cannot be fired when it is unsafe to do so. Do not let anyone stick their fingers in the ejection port during inspection or operation.
5. ALWAYS KEEP AND CARRY YOUR FIREARM EMPTY, WITH THE HAMMER FORWARD except when you intend to shoot, so that your firearm cannot be fired when you do not intend to fire it.
Firearm and ammunition manufacturers design their products within exacting engineering safety limits. Handloads and remanufactured ammunition are sometimes outside those limits and can be so unsafe as to blow up the chamber, damage the receiver and magazine, and cause injury, death, or damage to property with costly repairs to your firearm.
! GENERAL HANDLING CAUTIONS
Page 9
6. ALWAYS BE AWARE OF POSSIBLE RISK FROM DROPPING YOUR FIREARM. Some parts of the mechanism could be damaged. You may not see the damage, but if it is severe, the firearm may discharge and cause injury, death, or damage to property. If your firearm has been dropped, have it examined by a competent gunsmith before using it again.
7. NEVER LEAVE A FIREARM CHARGED AND READY TO FIRE as this condition is extremely dangerous, and the firearm could easily be accidentally discharged, causing injury, death, or damage to property.
8. NEVER LEAVE A LOADED FIREARM UNATIENDED. Someone, especially a child, may fire it and cause injury, death, or damage to property.
9. ALWAYS INSTRUCT CHILDREN AND OTHERS IN YOUR HOUSEHOLD TO RESPECT FIREARMS. If you teach your children to shoot, teach them or get them trained by a qualified instructor to treat and use a firearm properly, and always supervise them closely. Always stress safety so that your children will not discharge a firearm when it is unsafe to do so.

Page 10
! RANGE CAUTIONS
10. ALWAYS BE SURE YOUR BACKSTOP IS ADEQUATE to stop and contain bullets before beginning target practice so that you do not hit anything outside the range shooting area.
11. ALWAYS PUT A KNOWLEDGABLE AND RESPONSIBLE PERSON IN CHARGE TO MAINTAIN SAFETY CONTROL WHEN A GROUP IS FIRING ON A RANGE. Obey their commands so that discipline is maintained to reduce the likelihood of accidents.
12. ALWAYS CARRY YOUR FIREARM EMPTY WITH THE BOLT LOCKED OPEN WHILE ON A RANGE until preparing to fire. Keep it pointed towards the backstop when loading, firing and unloading, to eliminate the risk of injury, death, or damage to property from premature discharge.
! LOADING CAUTIONS
13. ALWAYS BE SURE BARREL BORE, CHAMBER AND ACTION ARE CLEAN AND CLEAR OF OBSTRUCTIONS. Clean a wet or fouled firearm immediately so that it will function correctly and safely.
14. ALWAYS USE CLEAN, DRY, ORIGINAL, HIGH QUALITY COMMERCIALY MANUFACTURED AMMUNITION IN GOOD CONDITION WHICH IS APPROPRIATE TO THE CALIBER OF YOUR FIREARM.
Page 11
15. ALWAYS CHECK THAT AMMUNITION IS CLEAN AND UNDAMAGED BEFORE USING THE FORWARD ASSIST. Forcing damaged ammunition into the chamber could damage your firearm and could result in injury, death, or damage to property.
! SHOOTING CAUTIONS
16. NEVER CONSUME ALCOHOLIC BEVERAGES OR TAKE DRUGS BEFORE OR DURING SHOOTING, as your vision, coordination, and judgment could be seriously impaired, making your firearm handling unsafe.
17. ALWAYS SEEK A DOCTOR'S ADVICE IF YOU ARE TAKING MEDICATION, to be sure you are fit to shoot and handle your firearm safely.
18. ALWAYS WEAR AND ENCOURAGE OTHERS TO WEAR EAR PROTECTION WHEN SHOOTING, especially on a range. Without ear protection, the noise from your firearm and other firearms close to you, could leave a "ringing" in the ears for some time after firing, while the cumulative, long-term effect could result in permanent hearing loss.
Page 12
19. ALWAYS WEAR AND ENCOURAGE OTHERS TO WEAR PROTECTIVE SHOOTING GLASSES. Flying particles could damage eyes and cause blindness; but protective shooting glasses should prevent such injury. 20. ALWAYS KEEP THE SAFETY SELECTOR LEVER SET TO SAFE WHEN YOUR FIREARM IS LOADED AND COCKED until you are aiming at a target and intend to fire. This will minimize the risk of an accidental discharge.
21. ALWAYS KEEP CLEAR AND KEEP OTHERS CLEAR OF THE EJECTION PORT. Spent cartridges are ejected with enough force to cause injury, and the ejection port must be unobstructed by your hand to ensure safe ejection of spent rounds. Never place fingers in ejection port; they could be burned by hot metal or injured by the bolt moving forward.
22. NEVER SQUEEZE THE TRIGGER OR PUT YOUR FINGER IN THE TRIGGER GUARD UNTIL YOU ARE AIMING AT A TARGET YOU ARE READY AND INTEND TO SHOOT. This will prevent you from firing the firearm when it is pointing in an unsafe direction.
23. ALWAYS BE ABSOLUTELY SURE OF YOUR TARGET AND THE AREA BEHIND AND BEYOND IT BEFORE YOU SQUEEZE THE TRIGGER. A bullet can travel through or past your target up to 3 miles. If you are at all in doubt about what is behind or beyond your target, do not shoot.
Page 13
24. NEVER ATEMPT TO FIRE IF WATER IS IN THE BARREL. Water can accumulate if your firearm is exposed to heavy rain or fog. Open the bolt and allow water to drain before firing. Clean a wet firearm as soon as possible.
25. NEVER SHOOT AT A HARD SURFACE SUCH AS ROCK, OR A LIQUID SURFACE SUCH AS WATER. A bullet may ricochet and travel in any direction to strike you, others around you, or even an object you cannot see, causing injury, death, or damage to property.
26. NEVER DISCHARGE A FIREARM NEAR FLAMMABLE MATERIAL. Flame and sparks erupt from the firearm when discharged. They can start a fire or cause flammable liquids and gases to explode.
27. NEVER FIRE YOUR FIREARM NEAR AN ANIMAL unless it is trained to accept the noise; an animal's startled reaction could injure it or cause an accident.
28. NEVER INDULGE IN “HORSEPLAY" WHILE HOLDING YOUR FIREARM as it may be accidentally discharged.
29. NEVER WALK, CLIMB, OR FOLLOW ANOTHER PERSON WHEN YOUR FIREARM IS COCKED AND READY TO FIRE to eliminate risk of accidental discharge. Hold your firearm so that you can always control the direction of the muzzle and keep the safety selector lever set to “SAFE."

Page 14
! MALFUNCTION CAUTIONS
30. IF YOU EXPERIENCE A FAILURE TO FIRE, ALWAYS HOLD THE FIREARM, POINTING TOWARDS THE TARGET OR SAFE OPEN AREA AND WAIT 30 SECONDS. If a hangfire (slow ignition) has occurred, the round will fire within 30 seconds. If round does not fire, cycle the bolt, eject the round and examine the primer. If the firing pin indent on the primer is light, off center, or nonexistent, have your firearm examined by a competent gunsmith before continuing to fire. If firing pin indent on primer appears normal (in comparison with similar previously fired rounds), assume faulty ammunition; segregate the misfired round from all other live ammunition and empty cases, reload and continue firing.
NOTE 1: It is normal for a light firing pin indent to appear on the primer of cartridges which have been fed into the chamber but not fired.
NOTE 2: Dispose of any misfired rounds in accordance with the ammunition manufacturer's instructions.
31. NEVER USE YOUR FIREARM IF IT FAILS TO FUNCTION PROPERLY, AND NEVER FORCE A JAMMED ACTION, as a round may explode causing serious injury, possible death, or severe damage to your firearm.
Page 15
! CLEANING AND STORAGE CAUTIONS
32. ALWAYS MAKE SURE YOUR FIREARM IS NOT LOADED BEFORE CLEANING AND STORING so that it cannot be fired when it is unsafe to do so.
33. ALWAYS KEEP AND STORE YOUR FIREARM AND AMMUNITION IN A SEPARATE LOCKED RECEPTACLE OUT OF REACH AND SIGHT OF CHILDREN AND UNTRAINED PEOPLE, to minimize the risk of firearm and ammunition being easily available for loading and firing.
! FIREARM ABUSE
34. NEVER ABUSE YOUR FIREARM by using it for any purpose other than shooting. 35. NEVER DRY FIRE WHEN THE RECEIVERS ARE OPEN as the level of safety could be reduced.
36. NEVER ALTER PARTS as the level of safety could be reduced.
NOTE: Please note that we have chosen to use the word "SQUEEZE" in this instruction manual instead of "PULL" or "PRESS" when trigger movement is described; this is simply to remind you of the need for a gentle squeezing action to achieve the best possible accuracy.
Page 16
SAFETY FEATURES
• Trigger Guard The Trigger Guard is a metal strip below the trigger to protect it from damage and to help prevent accidental discharge. The Trigger Guard should always be in position. The Trigger Guard on the AR15 features radiused and beveled edges to accommodate shooters wearing gloves.
• Safety Selector Lever The Safety Selector Lever is located on the left side of the lower receiver and has two positions, “FIRE" and “SAFE." When set to “FIRE," the firearm will fire a single shot each time the trigger is squeezed without manually reloading. When set to “SAFE," a cam bears upon the rear portion of the trigger, blocking the sear surface of the trigger and preventing the hammer from being released.
NOTE: The safety featured on the Radical Firearms AR15 is a mechanical safeguard. As with all mechanical systems, failures within this system are possible and may not be visible to the operator. ACTIVATING THE SAFETY SELECTOR LEVER TO THE "SAFE" POSITION DOES NOT MEAN THE FIREARM IS INCAPABLE OF FIRING IF MISHANDLED OR DROPPED.

Page 17
Bolt Locking Safety Features
This firearm can fire only when the bolt is fully locked to the barrel and the firing pin is free to move forward. The firing pin is prevented from reaching the cartridge by the bolt carrier. Only when the bolt carrier moves forward over the bolt, rotating it to the fully locked position, can the firing pin move forward enough to fire the rifle. This design feature makes sure that the rifle will not fire before the cartridge is fully chambered and the bolt is fully rotated (locked) to the barrel.
Even with the bolt locked, if you do not use the proper ammunition, your rifle could blow up or blow down through the magazine. See inside front cover and elsewhere in the manual where we clearly emphasize that you should use only clean, dry, original, high quality, commercially manufactured ammunition in good condition. Keep the bore of the barrel clear at all times.
Disconnect
The Disconnect, which is part of the firing mechanism, prevents the firearm from firing fully automatic. As the T hammer is cocked after each shot by the rearward movement of the bolt carrier, the Disconnect engages the hammer to hold it rearward until the trigger is released. When the trigger is released, retention of the hammer passes from the Disconnect to the sear surface of the trigger ready for the next shot.
Page 18
Fail Safe Firing Mechanism
In case of any failure of the firing mechanism, the top of the hammer and the underside of the carrier are machined in such a way that if the hammer was not held rearward by the disconnect or trigger sear surface, then the hammer would ride under the carrier and drop into engagement with the back of the firing pin to stop or prevent firing.
Separation of Upper and Lower Receivers
In the event of functional problems, the lower receiver can be separated from the upper receiver by pivoting it downwards after pushing out the rear take down pin. This provides access to the mechanism and separates the firing mechanism from other components so that the cocked hammer can not strike the firing pin.
NOTE: The Bolt Carrier Group must be in the full forward position in order to separate the Upper Receiver from the Lower Receiver.
Page 19
The AR15 has a semi-automatic action. With the action cocked, chamber loaded, and selector lever set to if FIRE" the firearm may be fired by squeezing the trigger. The trigger rotates, disengaging the trigger sear surface from the hammer. The hammer spring drives the hammer forward to strike the firing pin, which in turn strikes the primer in the base of the cartridge, igniting the primer composition which ignites the main powder charge. High pressure gases push the bullet down the barrel where rifling grooves impart a stabilizing spin to the bullet. As a bullet passes the gas port (a small hole in the barrel below the front sight) gas is tapped off, flows through the gas tube, into the bolt carrier chamber driving the bolt carrier group rearward. As the bolt carrier moves to the rear the firing pin is withdrawn into the bolt while the cam track in the bolt carrier acts upon the bolt cam pin, causing the bolt to rotate until its locking lugs are no longer in engagement with the lugs of the barrel extension.
The bolt is now unlocked and is carried rearward by the bolt carrier.
The extractor extracts the spent case and holds it against the face or bolt until the ejector throws the spent case through the ejection port.
SECTION 4 FUNCTION

Page 20
The bolt carrier group continues rearward, compressing the action spring and returning the hammer to its cocked position, until the buffer assembly strikes the bottom of the receiver extension and stops. The action spring then forces the bolt carrier group forward so that the face of the bolt strips the next round of ammunition from the magazine and thrusts it into the chamber. Simultaneously the extractor snaps into the groove of a cartridge case and the bolt locks into the barrel.
The hammer is now held rearward by the disconnect. When trigger is released, the disconnect is rotated back releasing the hammer. However, before the disconnect hook actually releases the hammer, the trigger sear surface has rotated in front of the hammer notch so that hammer is held on the trigger sear surface making the firearm ready for another shot.
THIS IS A SEMI—AUTOMATIC FIREARM AND IS IMMEDIATELY LOADED AND IS READY TO FIRE AGAIN AFTER EACH SHOT UNTIL MAGAZINE IS EMPTY. TO UNLOAD THE RIFLE, THE MAGAZINE MUST BE REMOVED, AND THE BOLT CARRIER GROUP MUST BE PULLED TO THE REAR WITH THE CHARGING HANDLE, EXTRACTING ANY ROUND IN THE CHAMBER.

Page 21
AMMUNITION SELECTION
Radical Firearms systems are designed to function with a variety of brands and types of factory manufactured ammunition in the appropriate caliber. NOT ALL AMMUNITION WILL PRODUCE THE SAME RESULTS. Radical Firearms recommends that after you read and understand this manual, you go to the range and fire different ammunition which is appropriate to the caliber of your firearm. Once you find the ammunition which functions best - keep using it. To protect you and others from danger, and your firearm from being severely damaged, Radical Firearms does not recommend the use of any handloaded or remanufactured ammunition.
FORWARD ASSIST
The forward assist allows you to help the bolt to lock into the barrel, but it will only be useful on rare occasions when the bolt fails to lock automatically. When you must use the forward assist, it is usually time for you to clean your firearm paying particular attention to the cleanliness of the chamber and bolt.
ADJUSTABLE BUTTSTOCK (where applicable on rifle)
The adjustable buttstock a 6-position collapsible buttstock.
To extend or collapse the buttstock, press the rear end of the release lever up against the buttstock and slide the buttstock to forward or backward and release the release lever to lock the buttstock at the desired position
Non-Adjustable SB15 Arm Brace (where applicable on pistol)
The Stabilizing Brace is a non-adjustable shooter’s aid that is designed to improve the single-handed shooting performance of buffer tube equipped pistols. The Pistol Stabilizing Brace uses the operator’s forearm to provide stable support, thereby minimizing accuracy-robbing spin and shift.
Page 22
LOADNG:
! CAUTION:
ALWAYS CHECK THAT AMMUNITION IS CLEAN AND UNDAMAGED BEFORE USING THE FORWARD ASSIST. Forcing damaged ammunition into the chamber can damage your firearm and can result in injury, death, or damage to property.
TO LOAD A MAGAZINE:
! CAUTION:
READ SAFETY INSTURCTIONS (SECTION 3).
1. Use only ammunition recommended inside the front cover of this instruction manual as suitable for your firearm. Examine the ammunition, particularly on and around the primer. Look for dents, scratches, and other signs of damage. Do not load damaged ammunition.
2. With short end of the magazine facing forward, place a round between the lips of the magazine with the bullet forward. Press the round down until it is held by the magazine lips. Place next round on top of previous round and repeat until desired number is loaded. CAUTION:
TO MINIMIZE RISK OF UNINTENTIONAL DAMAGE, LOAD LIVE AMMUNITION INTO YOUR FIREARM ONLY WHEN YOU ARE ABOUT TO SHOOT.
Page 23
TO LOAD THE FIREARM:
CAUTION:
READ SAFETY INSTURCTIONS (Section 3) - KEEP YOUR FIREARM POINTING IN A SAFE DIRECTION AND DO NOT TOUCH THE TRIGGER.
1. Remove empty magazine: depress magazine catch which is located on the right side of the lower receiver, and extract magazine from the magazine well.
2. Press in on bottom of thumb piece of bolt catch while grasping and pulling back on the charging handle, to cock the hammer and leave bolt and carrier latched open to the rear.
CAUTION:
THE BOLT CARRIER GROUP BEING LATCHED OPEN IS NOT A SAFE CONDITION WHEN A LOADED MAGAZINE IS INSTALLED.
3. Return charging handle fully forward until it locks and remove finger from bolt catch.
4. Set selector lever (located on left of lower receiver) to “SAFE", this will lock the trigger.
5. With bullet points forward, insert the loaded magazine into the magazine well and push it home until it stops and is locked by the magazine catch. When the magazine is inserted, pull down on the magazine to ensure it is fully seated in the magazine well.
Page 24
6. Keeping fingers away from the ejection port and muzzle pointing in a safe direction, press in on the top of the thumb piece of the bolt catch. This will release the bolt carrier group to move forward and feed a round from the magazine into the chamber. THE FIREARM IS NOW LOADED WITH A ROUND IN THE CHAMBER AND THE HAMMER IS COCKED.
7. You may now close the ejection port dust cover if you wish; it is located on the right hand side of the upper receiver and will open automatically when the first round is fired.
! CAUTION:
NEVER LEAVE YOUR FIREARM COCKED AND LOCKED, READY TO FIRE WITHOUT SELECTOR LEVER BEING SET TO SAFE, as this is the Fire Condition and is extremely dangerous. Firearms can easily be accidentally discharged, causing injury, death or damage to property.
! WARNING: THIS FIREARM MAY DISCHARGE ACCIDENTALLY WHEN A ROUND IS FED INTO THE CHAMBER, IF IT IS DROPPED OR RECEIVES A BLOW TO THE MUZZLE OR FRONT OF THE FIREARM. (This can occur regardless of the position of the hammer or any of the various safety devices.) Therefore, extra care and strict adherence to these instructions by the firearm's user is mandatory for minimizing the risk of accidents.
Page 25
UNLOADING
! CAUTION:
ALWAYS UNLOAD YOUR FIREARM IMMEDIATELY AFTER USE AND PRIOR TO CLEANING AND STORAGE TO MINIMIZE THE RISK OF ACCIDENTAL DISCHARGE.
To Unload: CAUTIONS:
READ SAFETY INSTRUCTIONS. (Section 3 Page 8)
KEEP YOUR FIREARM POINTING IN A SAFE DIRECTION. DO NOT TOUCH THE TRIGGER AND KEEP HANDS AWAY FROM THE EJECTION PORT.
1. Set the safety selector lever to "SAFE". NOTE: The hammer must be cocked to place this firearm on "SAFE". 2. Press the magazine catch and remove the magazine.
3. Pull the charging handle to rear and push in lower portion of bolt catch. If a round had been in the chamber it should have been ejected. If the last round had been fired, the bolt carrier group should already be held to the rear provided a magazine was in place.
4. LOOK INTO THE CHAMBER THROUGH THE EJECTION PORT TO MAKE SURE THE CHAMBER IS EMPTY.
Page 26
5. When the magazine is removed and the chamber is empty, push the top portion of the bolt catch to allow the bolt carrier group to return forward.
6. Remove remaining live rounds by sliding them forward out of the magazine.
7. Collect live ammunition for safe storage and spent cartridge cases for disposal.
FIRING
Before firing, practice your stance, aim, rhythm and breathing for steady aim with your firearm UNLOADED. Practice firing on a range before using your firearm for any other type of shooting.
! CAUTIONS:
1. ALWAYS WEAR AND ENCOURAGE OTHERS TO WEAR EAR PROTECTON WHEN SHOOTING, especially on a range. Without ear protection, the noise from your firearm and other firearms close to you, could leave a "ringing" in your ears for some time after firing, while the cumulative long term effect could be permanent hearing loss.
2. ALWAYS WEAR AND ENCOURAGE OTHERS TO WEAR PROTECTIVE SHOOTING GLASSES. Flying particles could damage eyes and cause blindness; but protective shooting glasses should prevent such injury
Page 27
To Fire:
CAUTIONS:
READ SAFETY INSTRUCTIONS IN SECTION 3. KEEP YOUR FIREARM POINTING IN A SAFE DIRECTION. DO NOT TOUCH THE TRIGGER AND KEEP HANDS AWAY FROM THE EJECTION PORT.
1. Load the firearm as previously described.
2. Grasp firearm with one hand on handguard and other hand on pistol grip with index finger resting along outside of trigger guard. Raise firearm and pull buttstock firmly into shoulder ... extend buttstock as necessary.
3. Aim by aligning target with front and rear sights.
4. Move safety selector lever to "FIRE."
5. Keeping steady aim, place index finger on trigger and squeeze gently until trigger releases hammer. Don't jerk the trigger as you will disturb your aim and ruin your accuracy. To fire the second and subsequent rounds, all that is necessary is to release the trigger and squeeze it again after every shot until you have completed firing or emptied the magazine.
6. THIS IS A SEMAUTOMATIC FIREARM AND IS IMMEDIATELY LOADED AND READY TO FIRE AGAIN AFTER EACH SHOT UNTIL THE MAGAZINE IS EMPTY.
Page 28
NOTE: This firearm can also be fired without a magazine in place.
7. Release trigger, remove finger from trigger, and set selector lever to "SAFE." If you have fired the last round from the magazine, the bolt will be held to the rear so that the firearm can quickly be reloaded by replacing the magazine, or the chamber can be inspected to make sure it is empty.
! CAUTION:
WHILE FIRING, IF YOU NOTICE A DIFFERENCE IN SOUND OR RECOIL, STOP FIRING. A bullet could be stuck in the barrel. If you fire again before clearing the blockage, the barrel may bulge or burst and cause injury.
If this occurs, retract the bolt slowly to remove and identify the fired cartridge case. Clear the firearm and make sure the bore is clear. Any unburned propellant or obstruction in the bore must be removed before firing again to prevent risk of damage and injury.
! CAUTION:
IF YOUR FIREARM FAILS TO FIRE, HOLD IT, KEEPING IT POINTED TOWARDS THE TARGET AND WAIT 30 SECONDS. If a hangfire (slow ignition) has occurred, the round will fire within 30 seconds. If the round does not fire, remove themagazine, eject the round and examine the primer. If the firing pin indent on the primer is light, misaligned or nonexistent, have your firearm examined by a competent gunsmith.

Page 29
If the firing pin indent on the primer appears normal (in comparison with previously fired rounds) assume faulty ammunition; segregate the misfired round from other live ammunition and empty cases; reload and carryon firing.
Note: 1: On the AR15, it is normal for a light firing pin indent to appear on cartridges which have been fed into the chamber, but not fired.
Note: 2: Dispose of misfired rounds in accordance with ammunition manufacturer's instructions.
CAUTION:
KEEP YOUR FIREARM POINTING IN A SAFE DIRECTION. UNLOAD as previously described.
IMPORTANT: If you load your firearm but do not fire it, Keep the safety selector lever set to “SAFE” until you are ready to fire.
CAUTION:
NEVER LEAVE YOUR FIREARM COCKED READY TO FIRE WITHOUT SELECTOR LEVER SET TO “SAFE" as this is the fire condition and is extremely dangerous. Your firearm can easily be accidentally discharged, causing injury, death, or damage to property.
Page 30
SECTION 5 MAINTENANCE
Your Radical Firearms system will perform better, last longer and remain safer when it is properly maintained. Follow the instructions in this section to keep your firearm in good condition.
CAUTION:
1. MAKE SURE THAT THE MAGAZINE IS REMOVED AND THAT THE FIREARM IS UNLOADED SO THAT IT CANNOT BE FIRED.
2. WEAR SAFETY GLASSES IN CASE YOU LOSE CONTROL OF ANY SPRING LOADED COMPONENTS WHICH COULD INJURE YOUR EYES.
STRIPPING FOR CLEANING
IMPORTANT: To prevent loss of small components during stripping and cleaning, lay them out in an orderly fashion.
1. Read safety instructions in Section 3 and previous CAUTIONS.
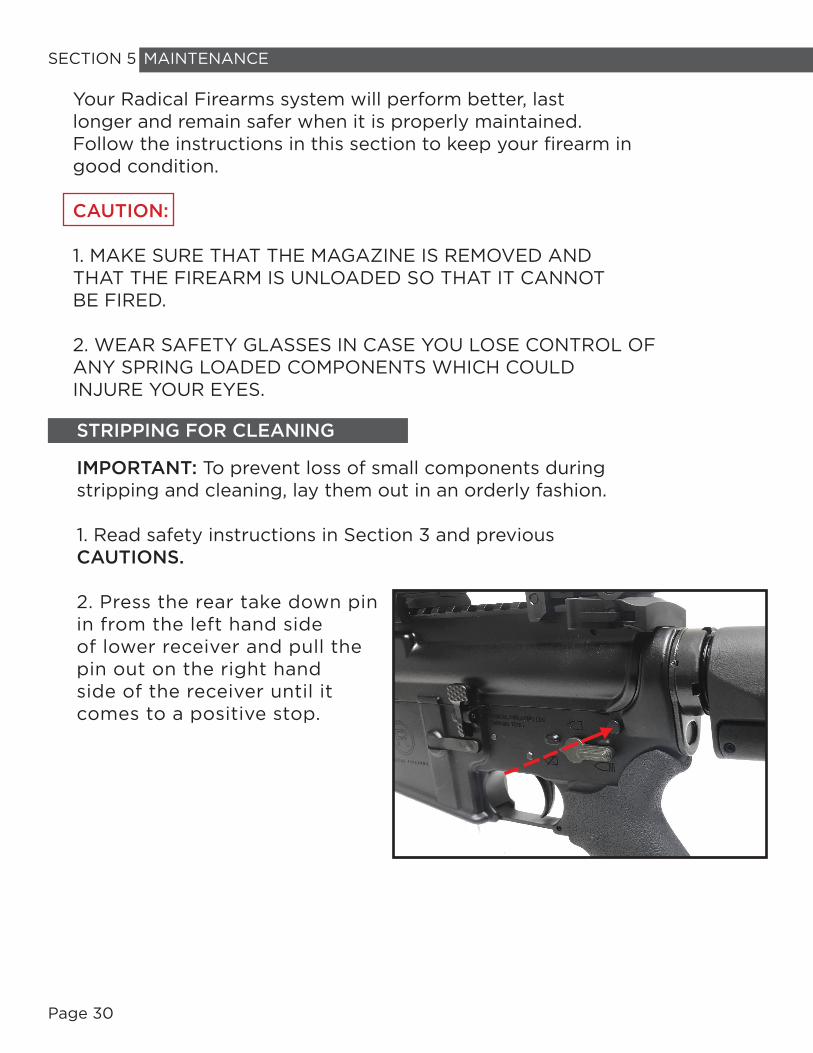
2. Press the rear take down pin in from the left hand side of lower receiver and pull the pin out on the right hand side of the receiver until it comes to a positive stop.
Page 31
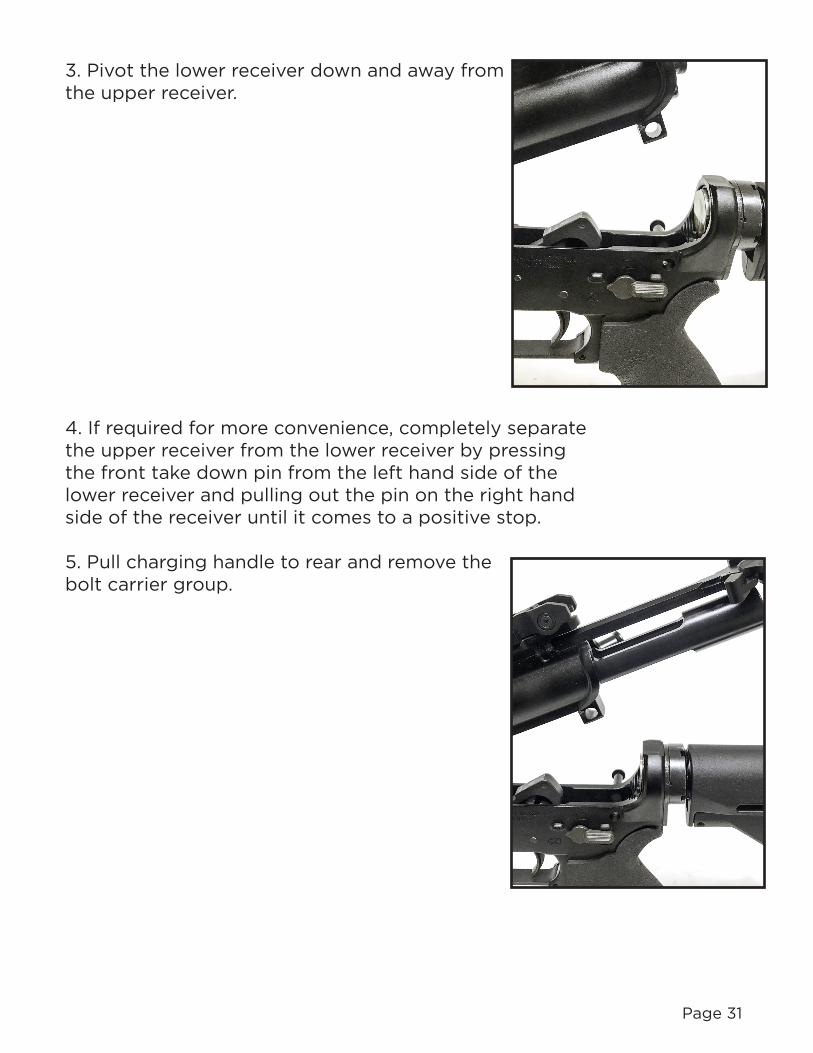
3. Pivot the lower receiver down and away from the upper receiver.
4. If required for more convenience, completely separate the upper receiver from the lower receiver by pressing the front take down pin from the left hand side of the lower receiver and pulling out the pin on the right hand side of the receiver until it comes to a positive stop.
5. Pull charging handle to rear and remove the bolt carrier group.

Page 32
6. Remove the charging handle by pulling it backwards to keyway and then down and out of the upper receiver.
7. Push in the firing pin retaining pin from right to left of the bolt carrier group and remove the pin by pulling it out to the left.
8. Tilt the bolt face up and remove the firing pin.

Page 33
9. Push the bolt in towards the carrier until bolt rotattes and comes to a stop, then turn the bolt cam pin through 90 (i.e., at right angles to its normal position.
10. Remove the cam pin by lifting it out and away from the bolt and bolt carrier.
11. Pull the bolt forward and remove it from the bolt carrier.

Page 34
12. Depress the buffer, maintaining pressure as the buffer is under spring tension, to prevent it from being ejected when the buffer retainer pin is depressed.
13. Depress the buffer retainer pin to permit the buffer and the action spring to move forward. Depress the hammer to allow the action spring and the buffer assembly to continue moving forward and be completely removed from the receiver extension.
Handguard Removal
1. Remove the 8 hex head screws that secure the rail to the barrel nut.
2. With the screws out, remove the rail system by pulling forward towards the end of the barrel.
Note: Removal not necessary unless replacing gas block/ gas tube combo
Page 35
IMPORTANT: Do not strip your firearm further than previously described. If additional maintenance is required, see "Service and Repair" later in this instruction manual. Reassemble your firearm by reversing the stripping procedure already described, and make sure that the cam pin is properly installed.
! CAUTION:
IF YOU ATTEMPT TO FIRE WITHOUT THE BOLT CAM PIN INSTALLED, DAMAGE OR INJURY MAY RESULT.
WHEN TO CLEAN
Before firing, make sure that the barrel and the chamber are clean and dry.
After firing, clean your firearm as soon as possible so that the job will be easier and there will be less opportunity for corrosion to start. Periodically, when your firearm has not been fired, we suggest you clean it when necessary and at least once or twice a year in a temperate climate, or as often as once a week in a tropical climate. If you carry a loaded firearm UNLOAD it and clean it when necessary and at least once a month. If you get your firearm wet, clean it as soon as possible.

Page 36
HOW TO CLEAN
The following cleaning procedure may be used both periodically and after firing; however, those items marked with a “*" are unnecessary for periodic cleaning.
Materials: Cleaning rod, cleaning patches (cut to fit snugly into the bore), a small nylon brush, good quality light gun oil, *gun cleaning solution, * a brass wire bristle bore cleaning brush, and a chamber cleaning brush.
Procedure:
CAUTION:
ENSURE THAT THE FIREARM IS NOT LOADED.
1. Strip for cleaning as previously described.
Note: Avoid contact between the cleaning rod and the muzzle as resultant wear will greatly reduce accuracy.
2. Attach a cotton flannel patch to end of the cleaning rod, insert it in the chamber and pass the rod and patch down through the barrel. Repeat, changing patches with each pass through the barrel, until the last patch comes out clean.
Page 37
3. Visually inspect the barrel; if it is clean, proceed directly with step 8, but if it remains dirty, continue with step 5.
4. *(Note: Items 5 & 6 should be applicable only after firing.) Attach brass wire bristle bore cleaning brush to cleaning rod and dip brush in firearm cleaning solution. Thoroughly scrub out barrel, passing the brush all the way through before reversing the movement. If you try to change direction with the brush in barrel, the brush will stick.
5. Attach the larger, chamber cleaning brush to the cleaning rod, dip the brush in bore cleaning solution, and clean the chamber. Use a minimum of five plunge strokes and three 360 clockwise, rotational strokes.
6. Repeat steps 3 and 4 above.
7. Use bore cleaning brush, still wet with firearm cleaning solution, and clean all carbon and powder residue from around the gas tube in the upper receiver, bolt locking lugs, bolt rings, firing pin, bolt cam pin, lip of the extractor, and inside the bolt carrier group. If any of these conditions are discovered, have them corrected before firing again. (See Servicing and Repair later on in this section.)
IMPORTANT: Do not use a wire brush on aluminum surfaces such as the upper and lower receivers and the handguards.If cleaning is necessary, avoid scratches and wear by using a small nylon brush or flannel patch.
8. Wipe all components clean and dry and inspect them for excessive wear, corrosion or mechanical damage. If any of these conditions are discovered, have them corrected before firing again. (See Servicing and Repair later on in this section.)
Page 38
9. Lightly dampen a flannel patch with gun oil and pass it once through the barrel, leaving a thin film of oil on the inside surface. Leave this film of oil on the surface if firearm is to be stored. If it is not be stored, or if it is being removed from storage for use, pass the dry patch through the barrel and chamber to remove as much oil as possible.
lO. Check that flannel or brush bristles have not become lodged in any part of firearm, then lightly lubricate the following parts:
a. ejection port cover latch b. ejection port cover spring c. action springs and pins d. charging handle catch e. charging handle catch spring f. inside rear or bolt g. mouth of bolt key h. bolt carrier exhaust ports i. forward assist
11. Reassemble the firearm as previously described.
l2. Remove any gun cleaning solution, oil, and finger prints from the outside surfaces of the firearm. (Finger moisture, if left, could start a corrosion process.)
Page 39
STORAGE
! CAUTION:
ALWAYS UNLOAD YOUR FIREARM FOR STORAGE AND STORE AMMUNITION SEPARATELY.
Store your firearm and ammunition securely locked in separate locations out of reach and sight of children. (Children are naturally curious and do not always believe or understand the real danger and responsibilities of firearms.)
Note: Do not store your firearm in an air tight container, and do not seal or attempt to seal the barrel to exclude dust, as internal steel surface is more likely to corrode.
Servicing and Repair
Should your firearm require adjustment or repair, contact Radical Firearms and you will receive shipping instructions. For spare parts, seek advice from the dealer who should have up-to-date information on how to best obtain genuine parts.

Page 40
An illustration and list of part names are included in the next section of this instruction manual to help you identify the parts you need. Parts should be installed by Radical Firearms or by a competent gunsmith. When ordering parts, please provide the part name as it is given on the Parts List along with the serial number of the firearm.
IMPORTANT: If you make unauthorized adjustments or use unauthorized parts, Radical Firearms will not assume responsibility for the functioning of this rifle and your warranty may become void.
NOTE: THIS FIREARM IS MANUFACTURED TO PERFORM PROPERLY WITH THE ORIGINAL PARTS AS DESIGNED. IT IS YOUR DUTY TO MAKE SURE ANY PARTS YOU BUY ARE INSTALLED CORRECTLY AND THAT NEITHER REPLACEMENTS NOR ORIGINALS ARE ALTERED OR CHANGED. YOUR FIREARM IS A COMPLEX TOOL WITH MANY PARTS THAT MUST RELATE CORRECTLY TO OTHER PARTS. PUTING A FIREARM TOGETHER INCORRECTLY OR WITH MODIFIED PARTS CAN RESULT IN A DAMAGED FIREARM, AND DANGER, INJURY, OR DEATH TO YOU AND OTHERS THROUGH MALFUNCTION. ALWAYS LET A QUALIFIED GUNSMITH WORK ON YOUR FIREARM AND CHECK ANY WORK YOU THINK WAS NOT PERFORMED BY A GUNSMITH. We at Radical Firearms think this is a small price to pay for firearms safety.
Page 41
WARRANTY/ SERVICE
NOTE: Various Federal and State laws and local ordinances govern the transfer and transportation of firearms. Take the advice of the Dealer in your state on how to send your firearm to: Radical Firearms Before shipping your firearm, take note of some important points to remember:
! CAUTION:
MAKE SURE THE MAGAZINE IS EMPTY AND THE FIREARM IS NOT LOADED.
1. Write an e-mail to [email protected] the problem and your requirements in as much detail as possible. Include the model name and serial number of your firearm.
2. You will receive shipping information and an RMA form from customer service once it is deemed covered under warranty/serviceable.
Shipping suggestions: 1. Do not send presentation boxes, accessories, or explosive components.
2. Do not indicate the contents, or include "Radical Firearms" in the address on the pack, so that an inquisitive thief is not attracted to it by such information.
3. Make sure that the package contents are insured against loss or theft.

Page 42
SECTION 6 PARTS ILLUSTRATION AND LISTB
olt
Carr
ier
Gro
up
Fir
ing
Pin
Bo
lt C
arr
ier
Fir
ing
Pin
Reta
inin
g P
in
Cam
Pin
Bo
lt A
ssem
bly
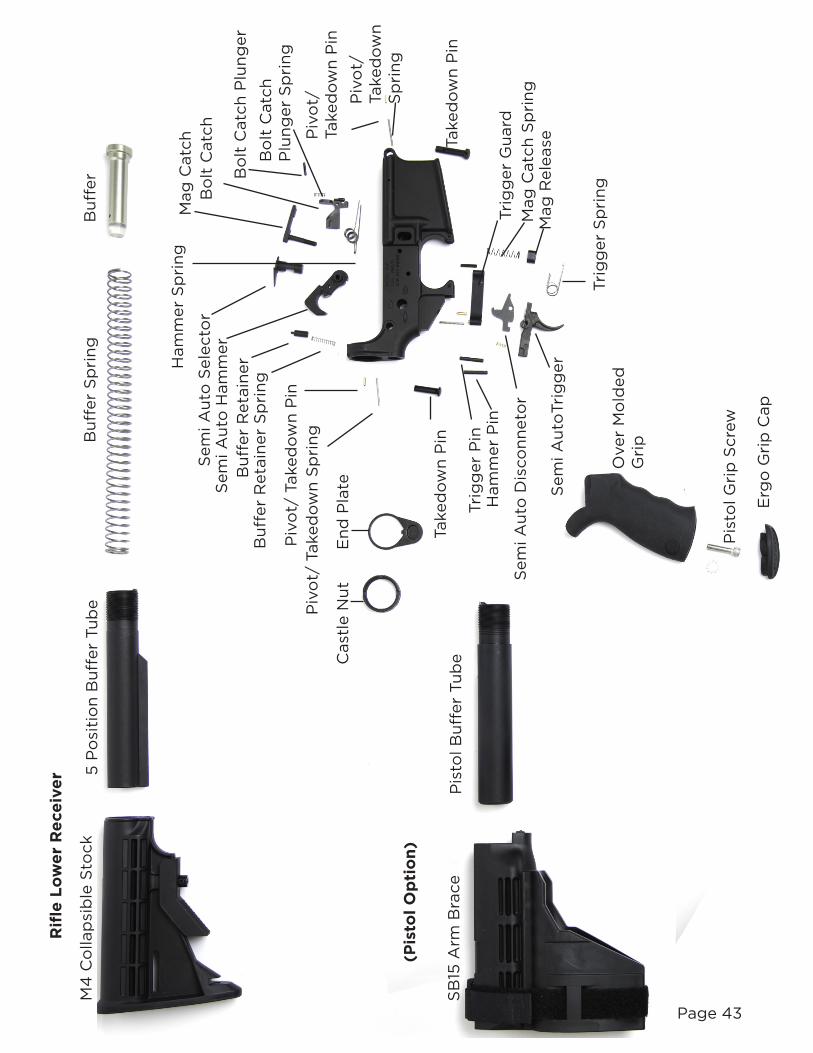
Page 43
Rif
le L
ow
er
Re
ce
ive
r
Pis
tol B
uff
er
Tu
be
SB
15 A
rm B
race
En
d P
late
Cast
le N
ut
Over
Mo
lded
G
rip
Pis
tol G
rip
Scre
w
Sem
i A
uto
Dis
co
nn
eto
r
Ham
mer
Pin
Tri
gg
er
Pin
Taked
ow
n P
in
Piv
ot/
Taked
ow
n P
inP
ivo
t/ T
aked
ow
n S
pri
ng
Sem
i A
uto
Tri
gg
er
Tri
gg
er
Sp
rin
g
Mag
Rele
ase
Mag
Catc
h S
pri
ng
Tri
gg
er
Gu
ard
Taked
ow
n P
in
Piv
ot/
Ta
ked
ow
n P
in
Piv
ot/
Ta
ked
ow
n
Sp
rin
g
5 P
osi
tio
n B
uff
er
Tu
be
M4
Co
llap
sib
le S
tock
Bu
ffer
Bu
ffer
Sp
rin
g
Erg
o G
rip
Cap
Bu
ffer
Reta
iner
Sp
rin
gB
uff
er
Reta
iner
Sem
i A
uto
Ham
mer
Sem
i A
uto
Sele
cto
rM
ag
Catc
hB
olt
Catc
h
Ham
mer
Sp
rin
g
Bo
lt C
atc
h P
lun
ger
Bo
lt C
atc
h
Plu
ng
er
Sp
rin
g
(Pis
tol
Op
tio
n)
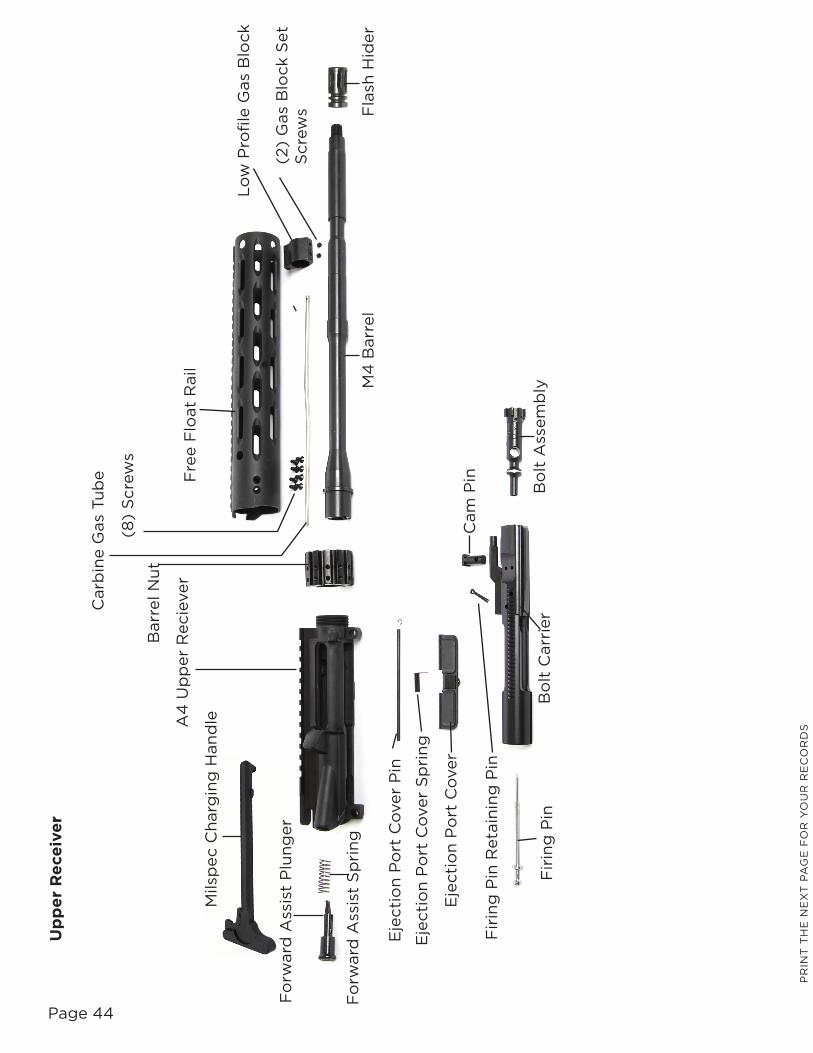
Page 44
Up
pe
r R
ece
ive
r
Fir
ing
Pin
Bo
lt C
arr
ier
Fir
ing
Pin
Reta
inin
g P
in
Cam
Pin
Bo
lt A
ssem
bly
Mils
pec C
harg
ing
Han
dle
Fre
e F
loat
Rail
Lo
w P
rofi
le G
as
Blo
ck
Fla
sh H
ider
Barr
el N
ut
M4
Barr
el
Eje
cti
on
Po
rt C
over
Eje
cti
on
Po
rt C
over
Sp
rin
g
Eje
cti
on
Po
rt C
over
Pin
Fo
rward
Ass
ist
Plu
ng
er
Fo
rward
Ass
ist
Sp
rin
g
A4
Up
per
Recie
ver
(8)
Scre
ws
Carb
ine G
as
Tu
be
(2)
Gas
Blo
ck S
et
Scre
ws
PR
INT
TH
E N
EX
T P
AG
E F
OR
YO
UR
RE
CO
RD
S
Page 45
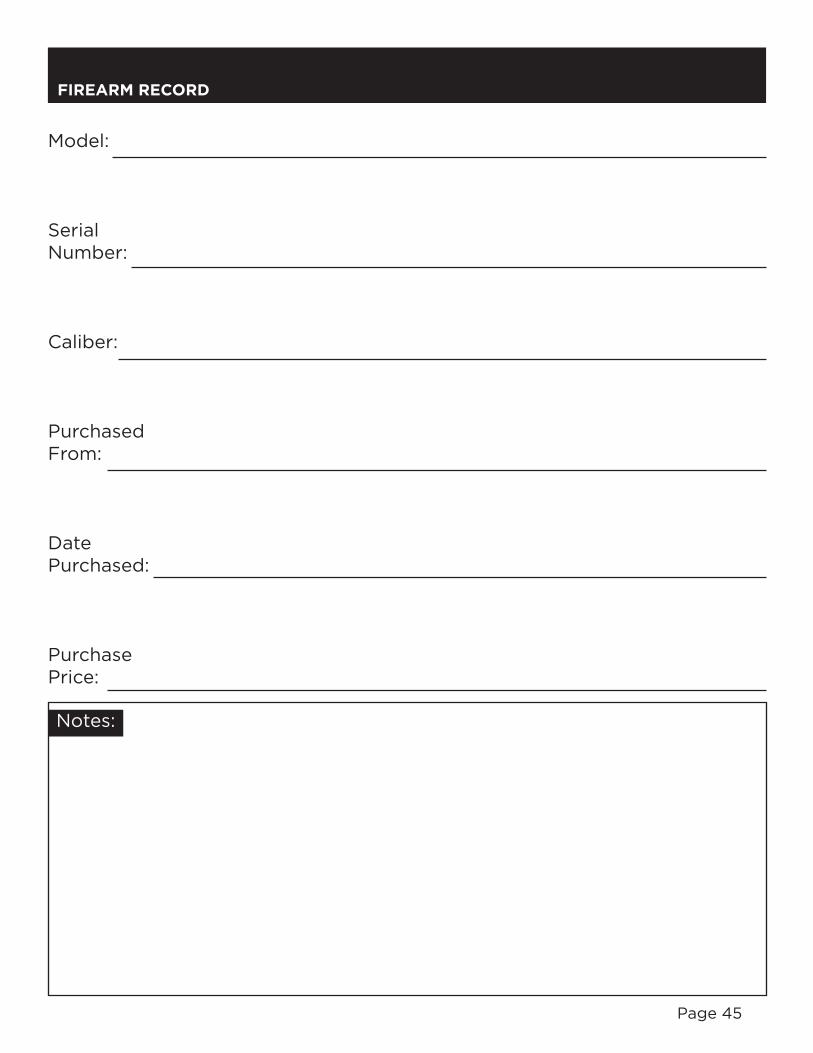
Model:
Serial Number:
Caliber:
Purchased From:
Date Purchased:
Purchase Price:
FIREARM RECORD
Notes:
Page 46
Radical Firearms manufactured or branded products come with a limited lifetime warranty granted to the original owner of the product. This warranty is non-transferable. Radical Firearms products are warranted to be free of manufacture and workmanship defects. Under this warranty Radical Firearms upon inspection will repair or replace a product due to any defects found in material or workmanship.
Radical Firearms warranty will not cover any of the following: Unauthorized alterations to a firearm or upper. Changing of a product any way from the factory condition. Careless or negligent handling resulting in accidental damage of a product. Barrel obstructions due to ammunition or improper maintenance. Ordinary wear and tear of a product including cosmetic damage. Unauthorized repairs not made by Radical Firearms. Damage caused by not conducting routine maintenance resulting in rust or corrosion.
The use of the following types of ammunition will void the warranty: hand-loaded, factory remanufactured, or factory loaded ammunition not loaded to C.I.P. or SAAMI specifications.
Any repairs that are conducted on a voided warranty will be at the expense of the customer. In order for warranty work to be conducted a RMA number must be on the product being repaired either on the shipping label or written on the package. If there is no RMA number present on the shipping label or written on the package, then the product will be returned to the courier used. Repair requests will be made through the Customer Service Department and at the time an RMA number will be issued. If the item was purchased directly from Radical Firearms please have your order number and e-mail ready before contacting a Customer Service Representative. If a product was not ordered from Radical Firearms please provide an invoice from the dealer from which the product was purchased from and send the invoice to Customer Service through e-mail. When sending products for repair the contents of the package must be adequately secure to protect from damage that may occur during the shipping process. Radical Firearms is not responsible for damage of a product caused by shipping.
SECTION 7 WARRANTY STATEMENT
Page 47
! HEALTH AND ENVIRONMENTAL WARNING
Discharging firearms in poorly ventilated areas, cleaning firearms, or handling ammunition may result in exposure to lead and other substances known to cause birth defects, reproductive harm, cancer, and other serious physical injury. Have adequate ventilation at all times. Wash hands thoroughly after exposure.
If your instruction manual becomes lost or destroyed, obtain a replacement by writing to
Radical Firearms LLC 4413 Bluebonnet, Ste 8 Stafford TX 77477
or send an e-mail to: [email protected]
Make a note of the address. When requesting a manual, include the information, which is on the left side of your firearm together with its serial number.
This instruction manual should always accompany this firearm. When you lend, give or sell this firearm, be sure that this manual goes with it.
THIS MANUAL WAS DIGITALLY PRINTED IN THE U.S.A.
END OF WORK PACKET

AMERICAN MADE TEXAS PROUD