arcgis 10: the installation and authorization process · 1 arcgis 10.1: the installation and...
TRANSCRIPT

1
ArcGIS 10.1: The Installation and Authorization User Guide
This document outlines the steps needed to download, install, and authorize ArcGIS 10.1 as well as
to transfer/upgrade existing ArcGIS 10.0/9.x licenses to the ArcGIS 10.1 release.
Getting Started:
Creating an Esri Global Account
Validating your Tokens and Downloading ArcGIS 10.1
ArcGIS 10.1 Installation:
Removing previous versions of ArcGIS using the Uninstall Utility
Installing ArcGIS 10.1
ArcGIS 10.1 License Authorization:
Authorizing ArcMap 10.1 Single Use Using an Authorization Number
Authorizing ArcGIS 10.1 Single Use with a Provisioning File
Authorizing ArcGIS 10.1 Concurrent Use with an Authorization Number
Authorizing ArcMap 10.1 Concurrent Use with a Provisioning File
ArcGIS 10.0 License Transfer and/or Upgrade:
Transferring ArcGIS 10.0 Concurrent Use licenses to ArcGIS License Manager 10.1
Upgrading ArcGIS 10.0 Concurrent Use License to ArcGIS 10.1 release
Performing an Offline Upgrade of ArcGIS 10.0 Concurrent Use License to ArcGIS 10.1
Upgrading ArcGIS 10.0 Single Use License to ArcGIS 10.1 release
Authorizing ArcGIS 9.x Floating licenses to ArcGIS License Manager 10.1
Authorizing Legacy ArcGIS Products/Extensions on ArcGIS License Manager 10.1
Authorizing ArcScan, Maplex Extensions;
Authorizing ARC/INFO Workstation;
Authorizing ArcGIS Survey Analyst for ArcGIS 9.x clients;
Authorizing VBA Extension;
ArcGIS License Manager 10.1 Installation and Configuration:
Setting up the ArcGIS License Manager 10.1
Additional Resources

2
Getting Started
Creating an Esri Global Account
1. The first step in the process of installing and registering ArcGIS 10.1 is to ensure that you have an Esri
Global Account. An Esri Global Account is required to download your software. If you do not already have
an account, you can create one on the Esri Customer Care site.
2. Fill in your contact information as required.

3
3. Upon clicking the Create Account button you will be advised on a successful Esri Global Account creation
and prompted to login. Use the same password entered in the previous step. Esri Customer Care gathers
your organization and personal information from our various systems and online services into one online
location.

4
Validating your Tokens and Downloading ArcGIS 10.1 product(s)
To activate your license management permissions on the Customer Service site, or to gain organization
access to the Esri Customer Care Portal, we need to link your Global Account to your Esri customer number.
Please use the token supplied to you by Esri Customer Service. You will only need to perform this action once.
The Token is a 12 character string and may already be filled in for you.
1. Once your Esri Global Account has been setup, you can go to http://service.esri.com/validate to enter in
your token, and click ‘Link My Account’. After clicking Link My Account, you will see a confirmation screen
with the customer number(s) you have access to. If not, you should be able to find your token in the
correspondence you have received from Esri Canada. If you cannot find this information, please contact
Esri Canada Customer Care.

5
2. After your token information is verified, you can move onto the Esri Customer Care site where you can
download your software, view your authorization numbers, as well as creating provisioning files. The
options you have available on the Esri Customer Care Portal are dependent on the type of user account
and permissions you are entitled to.
Provisioning File: Combines a set of authorization numbers into a single file that is sent to the user and can be
uploaded directly into the Software Authorization Wizard. This can be created by the Administrator of the
Enterprise Activation Server or via the Customer Care Web site.
Authorization Number: A three-letter, 9-digit number (ABC123456789) used by Esri to create an authorization
file to enable your software. Every Concurrent Use, Single Use and server product, including their extensions or
options, has a unique authorization number. Authorization numbers are entered into the Software Authorization
Wizard (along with your name, address, etc.) to authorize your software for use. Concurrent use authorization
numbers begin with EFL, Single Use - ESU, Single Use enterprise - EEA, and server - ECP.
3. Next, you can proceed to the Software Download where you will be able to download the products that
are available to you. The available downloadable products that are displayed are determined by the
authorization numbers issued to your customer number. For example, if you have an ArcGIS for Desktop
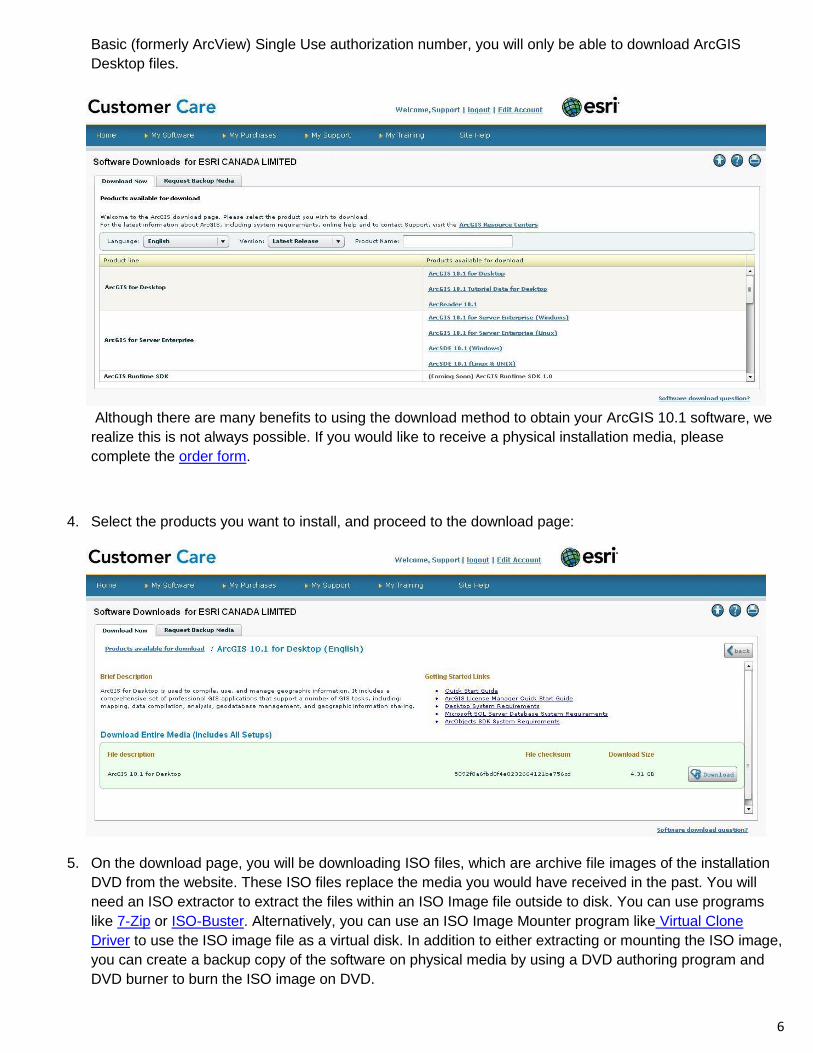
6
Basic (formerly ArcView) Single Use authorization number, you will only be able to download ArcGIS
Desktop files.
Although there are many benefits to using the download method to obtain your ArcGIS 10.1 software, we
realize this is not always possible. If you would like to receive a physical installation media, please
complete the order form.
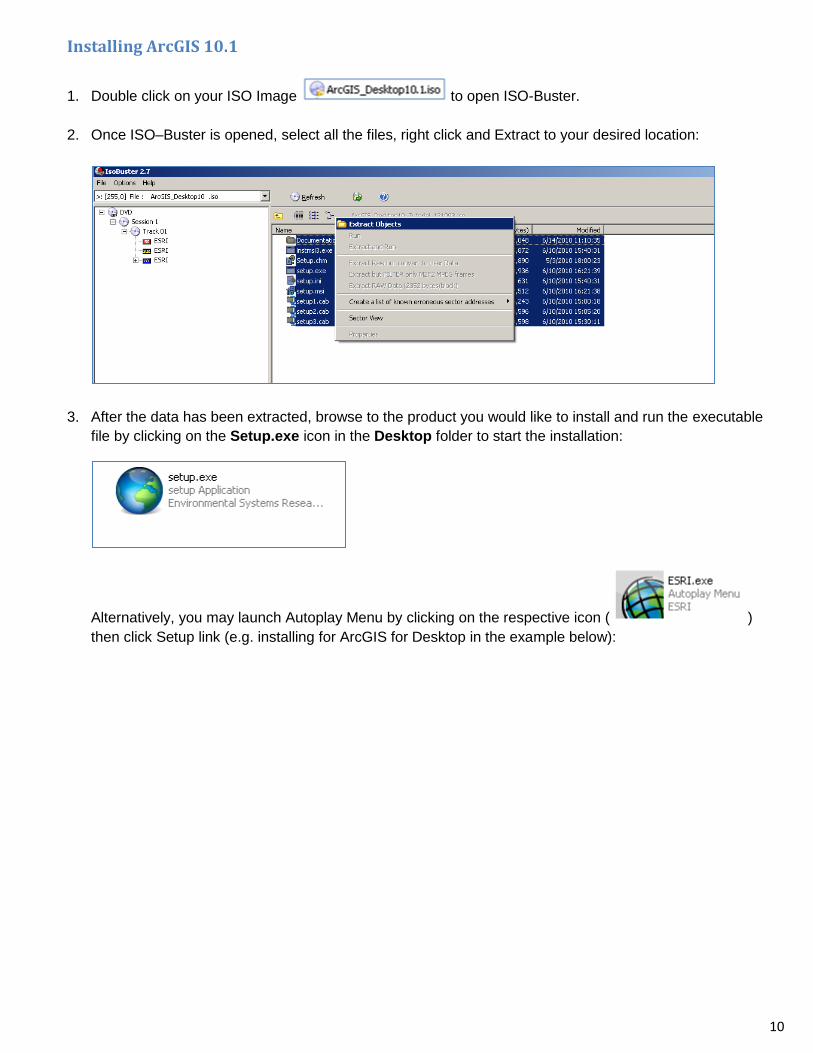
4. Select the products you want to install, and proceed to the download page:
5. On the download page, you will be downloading ISO files, which are archive file images of the installation
DVD from the website. These ISO files replace the media you would have received in the past. You will
need an ISO extractor to extract the files within an ISO Image file outside to disk. You can use programs
like 7-Zip or ISO-Buster. Alternatively, you can use an ISO Image Mounter program like Virtual Clone
Driver to use the ISO image file as a virtual disk. In addition to either extracting or mounting the ISO image,
you can create a backup copy of the software on physical media by using a DVD authoring program and
DVD burner to burn the ISO image on DVD.

7
Additional resources:
HowTo: Download ArcGIS software from the Esri Customer Care Portal
HowTo: Run ArcGIS software setup from a downloaded .iso file
6. Also a number of Individual Setups are available from the Software Downloads page including but not
limited to ArcGIS 10.1 Uninstall Utility, ArcGIS License Manager 10.1, Microsoft .Net Framework 3.5 SP1
(click the plus sign on the right-hand side of each category to expand the list, the selection may vary
depending on the core product chosen in Step 4):
7. Once you click on Download button, Esri Download Manager will be opened in a new browser window
pop-up. Click on the Click To Download Your File Now button to start downloading your product(s).

8
ArcGIS 10.1 Installation
Once you have successfully downloaded your desired ArcGIS 10.1 products, you can unpack and install the
software.
Removing previous versions of ArcGIS using the Uninstall Utility
If you have any previous versions of ArcGIS software installed, you must run the ArcGIS 10.1 Uninstall
Utility, available for download from the Software Download > Download Individual Setups section on your
Esri Customer Care Portal. This utility is intended for Windows only. It will locate and automatically remove
ArcGIS products previous to ArcGIS 10.1 that are installed on your machine:
- Product versions prior to 9.X are not detected. Manually uninstall these products (using the Operating
System Add/Remove Programs).
- For ArcGIS 9.0-9.3.1 clients, the Uninstall Utility will remove all the software components, except for
Beta versions, ArcSDE, ArcGIS License Manager 9.x, and certain extensions.
- For ArcGIS 9.4(Beta 1)-10.1(Beta 1) clients, the Uninstall Utility will remove all the software
components (including respective License Manager release) except ArcSDE and certain extensions.
- For ArcGIS 10.1 (Beta 2) and 10.1 Pre-Release clients, the Uninstall Utility will remove all the software
components (including respective License Manager release) except ArcSDE, ArcGIS Runtime, and
certain extensions.
- The ArcGIS 10.1 Uninstall Utility will not detect third party extensions or plug-ins. Manually uninstall
these products through Add/Remove Programs (Windows XP) or Programs & Features (Windows 7)
BEFORE removing any ArcGIS products.
NOTE: All ArcGIS applications, processes, and ArcGIS Server services must be shutdown before using the
Uninstall Utility. Applications, processes, and services include, but are not limited to, Server Object Manager
(SOM), Server Object Container (SOC), ArcMap, ArcCatalog, and ArcReader. If any applications, processes,
or services are running, the ArcGIS 10.1 Uninstall Utility may not successfully remove all products.
To use the ArcGIS 10.1 Uninstall Utility:
1. Download the utility from the Esri Customer Care Portal;
2. Unpack the utility by double-clicking on the executable you have downloaded in previous step
and specifying the destination of your choice for the Uninstall Utility files to be extracted to:

9
3. Upon extraction completion, click the Close button. If the Launch The Setup Program checkbox was
checked ON, the ArcGIS 10.1 Uninstall Utility will start automatically:
Alternatively, if that doesn’t happen, you may open Windows Explorer, go to the folder which you have
extracted the files to in Step 2, and double-click ‘101UninstallUtility.exe’. Please note, that the Uninstall
Utility User Guide - ‘101UninstallUtilityGuide.html’ – is also located in the same directory. Take time to read
that document prior to using the Uninstall Utility.
4. Conflicting products will be displayed. Click Uninstall to remove all displayed products.
5. After all displayed products have been removed, click exit to dismiss the utility.
6. ArcGIS 10.1 can now be installed.
Next, using the ISO-buster (version 2.7 was used in this example) we will go through the process of unpacking
and installing ArcGIS 10.1. To follow along the ISO-Buster or a similar program must already be installed.
10
Installing ArcGIS 10.1
1. Double click on your ISO Image to open ISO-Buster.
2. Once ISO–Buster is opened, select all the files, right click and Extract to your desired location:
3. After the data has been extracted, browse to the product you would like to install and run the executable
file by clicking on the Setup.exe icon in the Desktop folder to start the installation:
Alternatively, you may launch Autoplay Menu by clicking on the respective icon ( )
then click Setup link (e.g. installing for ArcGIS for Desktop in the example below):

11
NOTE: If you have any previous versions of ArcGIS products installed, you must uninstall them manually or
using the ArcGIS 10.1 Uninstall Utility, prior to running the 10.1 installation. If you do not do that a
notification will be displayed:
Now that the software has been installed, we can move onto authorizing it for use. At this time it is
important to note that there are two different types of licenses: Single Use and Concurrent Use.
Single Use licenses are licensed on one computer and use is restricted to this one machine.
Concurrent, or Floating use licenses allow users to access the software from any computer on the
network on which the software is installed.

12
ArcGIS 10.1 License Authorization
Authorizing ArcMap 10.1 Single Use Using an Authorization Number
It is important to note that there are two methods available for authorizing your Single Use Software:
1. Using an Authorization number;
2. Creating a provisioning file on the Esri Customer Care site:
Creating a provisioning file allows you to authorize a number of Single Use licenses at once.
Provisioning files are especially useful for an organization that has a large number of licenses and
removes the need to duplicate the authorization process for each single use installation. A provisioning
file is a text file that can be pre-populated with user information and authorization numbers for the
authorization process. For more information on Provisioning files, please read the following articles:
o Esri Customer Care – Authorization & Provisioning Help
o Provisioning files
First, we will look at authorizing ArcMap Single Use using an authorization number. This process simply
involves the use of an authorization number and the ArcGIS Administrator.
1. First, open your ArcGIS Administrator (Start > Programs > ArcGIS > ArcGIS Administrator)
2. Click on the Desktop folder on the left-hand side to select it. Then choose a desired ArcGIS Single Use
license level by selecting a respective radio button:
3. Click the Authorize Now button.

13
4. Select the I have installed my software and need to authorize it option and click Next>
5. Select Authorize with Esri now using the Internet and click Next>
6. Fill in your client information as required and click Next>.

14
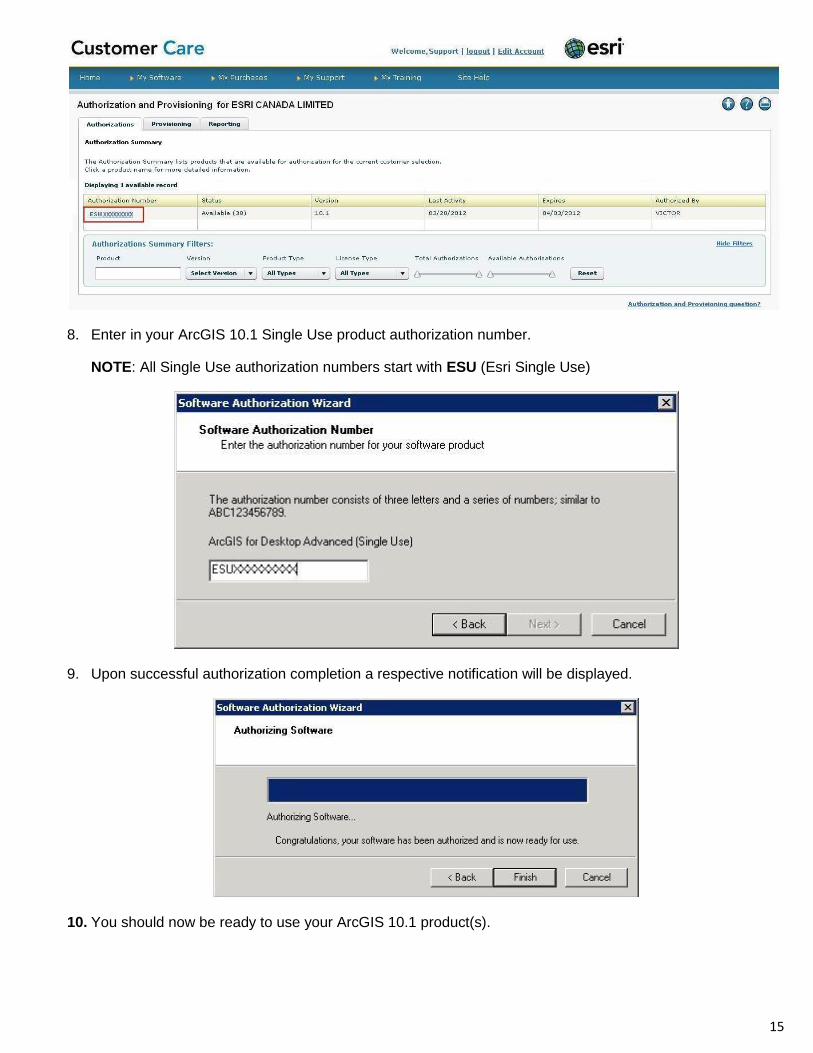
7. You can obtain your ArcGIS 10.1 Single Use product authorization number(s) from the Esri Customer Care
Portal, under the Authorization & Provisioning section. Use your Esri Global Account to login. If you
cannot find this information, please contact Esri Canada Customer Care.
15
8. Enter in your ArcGIS 10.1 Single Use product authorization number.
NOTE: All Single Use authorization numbers start with ESU (Esri Single Use)
9. Upon successful authorization completion a respective notification will be displayed.
10. You should now be ready to use your ArcGIS 10.1 product(s).
16
Authorizing ArcGIS 10.1 Single Use with a Provisioning File
It is important to note that there are two methods available for authorizing your Single Use Software:
1. Using an Authorization number;
2. Creating a provisioning file on the Esri Customer Care site:
Creating a provisioning file allows you to authorize a number of Single Use licenses at once.
Provisioning files are especially useful for an organization that has a large number of licenses and
removes the need to duplicate the authorization process for each single use installation. A provisioning
file is a text file that can be pre-populated with user information and authorization numbers for the
authorization process. For more information on Provisioning files, please read the following articles:
o Esri Customer Care – Authorization & Provisioning Help
o Provisioning files
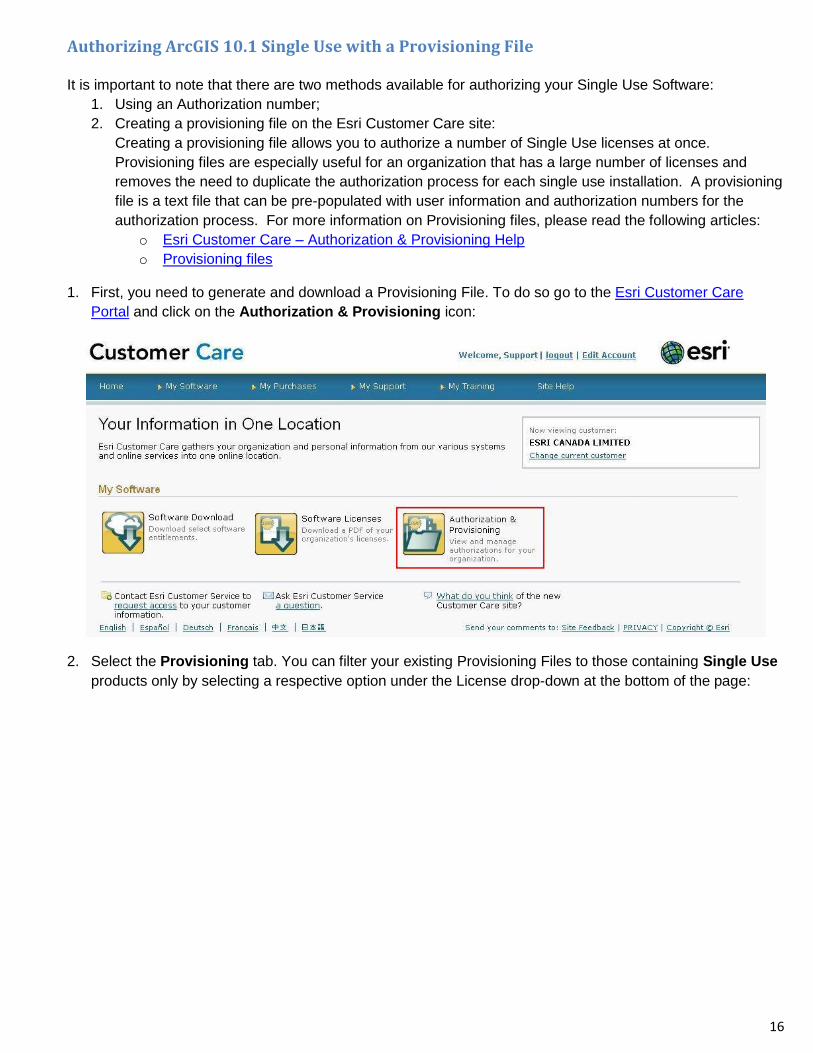
1. First, you need to generate and download a Provisioning File. To do so go to the Esri Customer Care
Portal and click on the Authorization & Provisioning icon:
2. Select the Provisioning tab. You can filter your existing Provisioning Files to those containing Single Use
products only by selecting a respective option under the License drop-down at the bottom of the page:

17
3. If you want to download an existing Provisioning File, simply click on the desired number under the
Provisioning ID column, and click on the Download This Provision link at the top right of the page:
Alternatively, if you want to create a new Provisioning File, click on the New Provisioning File button at
the top right of the Authorization & Provisioning page:

18
4. Select desired product version (e.g. 10.1) and the license type (i.e. Single Use) from the respective drop-
down lists at the top right of the page. Select a Core Product and any Extensions (if applicable) that you
would like to include in the Provisioning File you are about to create. In the example below, we selected
ArcGIS for Desktop Advanced 10.1 (formerly ArcInfo) Single Use and a few extensions. You can also
choose to either download the provisioning file or have it e-mailed to you. Once you are satisfied with the
selection, click on the Create Provisioning File button.
19
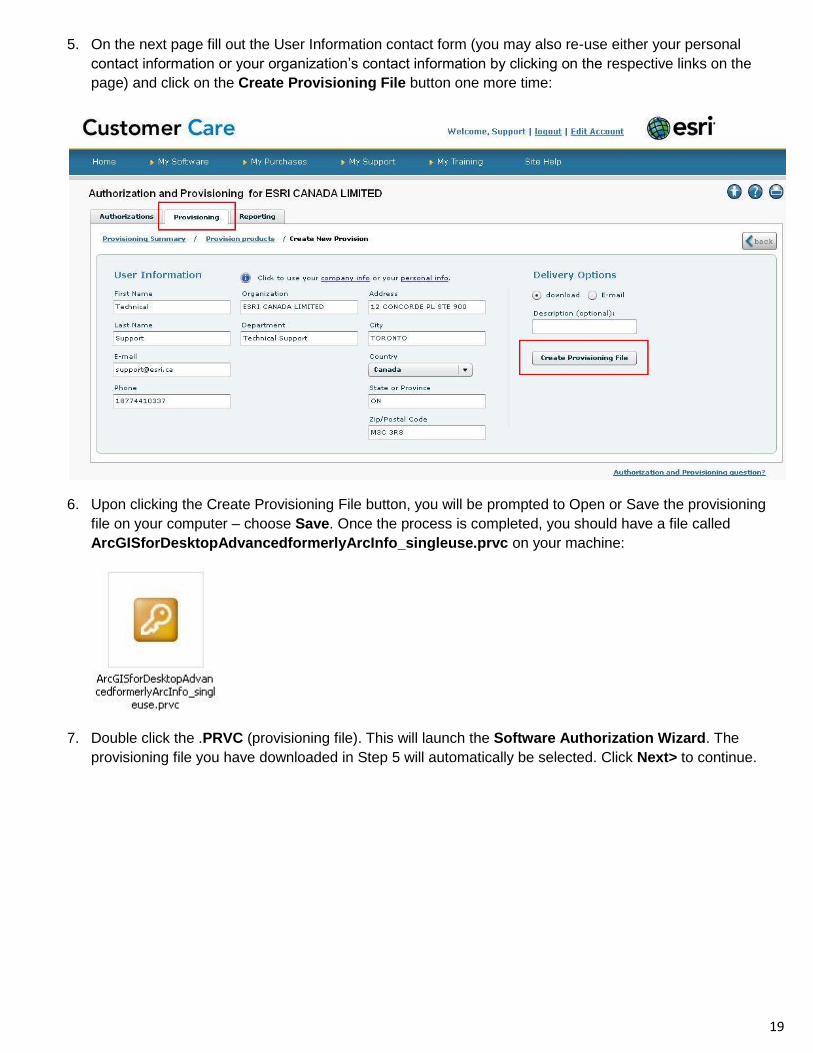
5. On the next page fill out the User Information contact form (you may also re-use either your personal
contact information or your organization’s contact information by clicking on the respective links on the
page) and click on the Create Provisioning File button one more time:
6. Upon clicking the Create Provisioning File button, you will be prompted to Open or Save the provisioning
file on your computer – choose Save. Once the process is completed, you should have a file called
ArcGISforDesktopAdvancedformerlyArcInfo_singleuse.prvc on your machine:
7. Double click the .PRVC (provisioning file). This will launch the Software Authorization Wizard. The
provisioning file you have downloaded in Step 5 will automatically be selected. Click Next> to continue.

20
8. Select Authorize with Esri now using the Internet and click Next > to continue.
9. You don’t have to fill in your client information as it should be already populated for you based on your Esri
Global Account:

21
Click Next> to complete entering your information.
10. On the following screen your product authorization number(s) should be already populated as well:
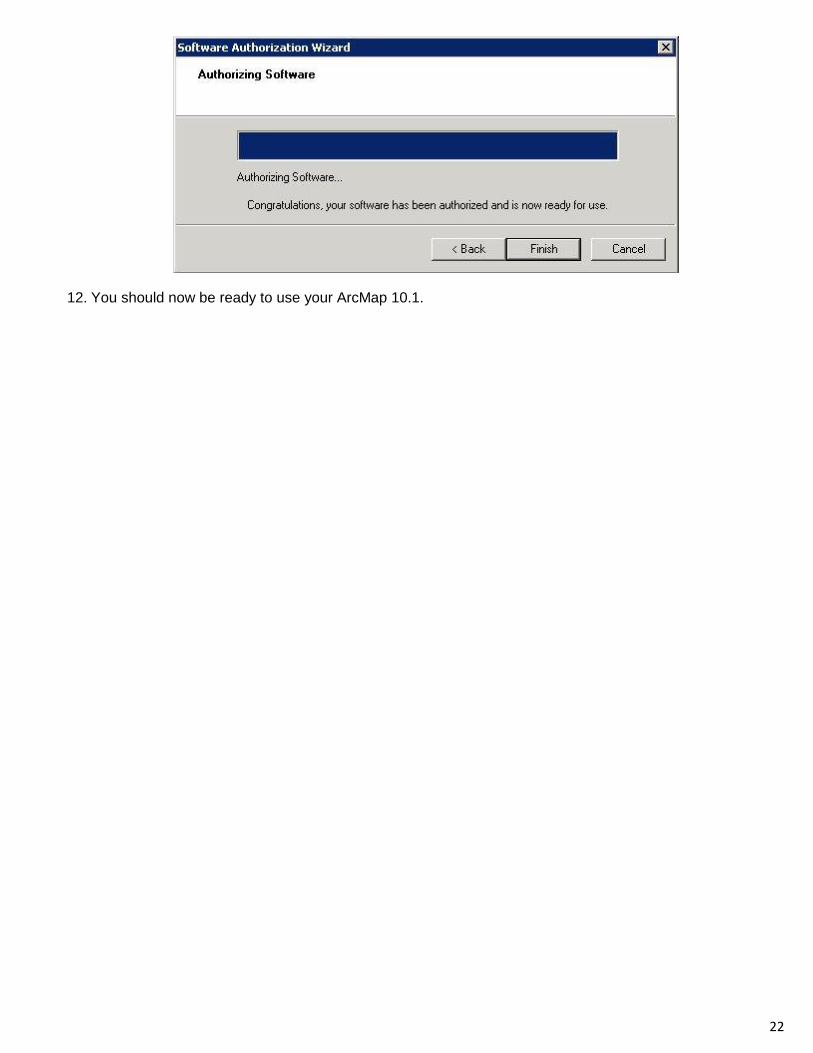
11. Click Next> on the screen shown above, then click Finish to complete the authorization process:
22
12. You should now be ready to use your ArcMap 10.1.

23
Authorizing ArcGIS 10.1 Concurrent Use with an Authorization Number
It is important to note that there are two methods available for authorizing your Concurrent Use Software:
1. Using an Authorization number
2. Creating a provisioning file on the Esri Customer Care site:
Creating a provisioning file allows you to authorize a number of Concurrent Use licenses at once. A
provisioning file is a text file that can be pre-populated with user information and authorization numbers for
the authorization process. For more information on Provisioning files, please read the following articles:
o Esri Customer Care – Authorization & Provisioning Help
o Provisioning files
After purchasing Esri Concurrent Use software products, you will receive an e-mail (similar to the one shown
below) from Esri Canada Customer Service containing the authorization information for your purchased
products:
You will need this information to authorize licenses on your license server. You first need to run the License
Manager installer and use ArcGIS License Server Administrator to authorize licenses before starting the
license service. Please refer to the section Setting up the ArcGIS License Manager 10.1 section of this
document for detailed instructions on License Manager installation and configuration.
Here, we are going to discuss ArcGIS 10.1 Concurrent Use license authorization process using an
Authorization number assuming that you have already installed ArcGIS License Manager 10.1 on your license
server.
1. ArcGIS Concurrent Use products need to be authorized in the License Server Administrator. You can
access the License Server Administrator from Start > Programs > ArcGIS > License Manager > License
Server Administrator. On UNIX/Linux, you can run License Server Administrator from the installation
location using the following command: <installation_path>/arcgis/license10.1/LSAdmin.
2. Click on the Authorization folder on the left-hand side to get it selected, make sure that the 10.1/CE 2012
version is selected from the drop down list, and click the Authorize Now button to launch Software
Authorization Wizard:

24
3. Select I need to authorize licenses on my license server and select ArcGIS Desktop under Product to
be Authorized and hit Next>.

25
4. Select Authorize with Esri now using the Internet:
5. Fill in your contact information as required and hit Next>.

26
6. Enter in your Esri Authorization number(s). You can find this information by logging into the Esri Customer
Care Portal with your Esri Global Account account. If you cannot find this information, please contact Esri
Canada Customer Care.
NOTE: All Concurrent Use authorization numbers start with EFL (Esri Floating Use)
7. Select any extensions that you would like to register and hit Next>. Once the authorization is completed
successfully click Finish:

27
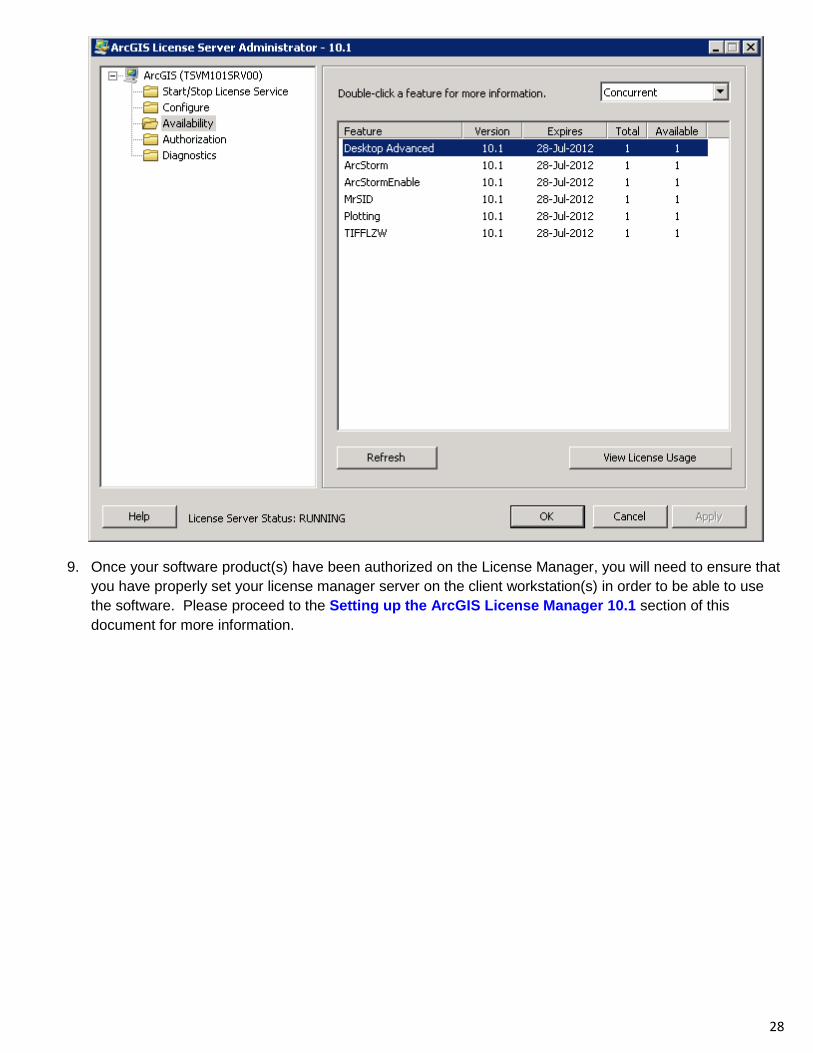
8. Upon completion the Authorized Concurrent Use Product(s) will appear under Availability folder on the
ArcGIS License Server Administrator:
28
9. Once your software product(s) have been authorized on the License Manager, you will need to ensure that
you have properly set your license manager server on the client workstation(s) in order to be able to use
the software. Please proceed to the Setting up the ArcGIS License Manager 10.1 section of this
document for more information.

29
Authorizing ArcMap 10.1 Concurrent Use with a Provisioning File
It is important to note that there are two methods available for authorizing your Concurrent Use Software:
1. Using an Authorization number
2. Creating a provisioning file on the Esri Customer Care site:
Creating a provisioning file allows you to authorize a number of Concurrent Use licenses at once. A
provisioning file is a text file that can be pre-populated with user information and authorization numbers for the
authorization process. For more information on Provisioning files, please read the following articles:
o Esri Customer Care – Authorization & Provisioning Help
o Provisioning files
First, you need to run the License Manager installer and use ArcGIS License Server Administrator to authorize
licenses before starting the license service. Please refer to the section Setting up the ArcGIS License
Manager 10.1 section of this document for detailed instructions on the License Manager installation and
configuration.
Here, we are going to discuss ArcGIS 10.1 Concurrent Use license authorization process with a Provisioning
File assuming that you have already installed ArcGIS License Manager 10.1 on your license server.
1. First, you need to generate and download a Provisioning File. To do so go to the Esri Customer Care
Portal and click on the Authorization & Provisioning icon:
2. Select the Provisioning tab. You can filter your existing Provisioning Files to those containing Concurrent
Use products only by selecting a respective option under the License drop-down at the bottom of the
page:.

30
3. If you want to download an existing Provisioning File, simply click on the desired number under the
Provisioning ID column, and click on the Download This Provision link at the top right of the page:
Alternatively, if you want to create a new Provisioning File, click on the New Provisioning File button at
the top right of the Authorization & Provisioning page:

31
4. Select desired product version (e.g. 10.1) and the license type (i.e. Concurrent Use) from the respective
drop-down lists at the top right of the page. Specify the number of the Core Product and Extension (if
applicable) licenses in the Allocate column that will be included in the Provisioning File you are about to
create. In the example below, we selected 1 license for ArcGIS for Desktop Advanced 10.1 (formerly
ArcInfo) Concurrent Use and a few extensions. You can also choose to either download the provisioning
file or have it e-mailed to you. Once you are satisfied with the selection, click on the Create Provisioning
File button.

32
5. On the next page fill out the User Information contact form (you may also re-use either your personal
contact information or your organization’s contact information by clicking on the respective links on the
page) and click on the Create Provisioning File button one more time:
6. Upon clicking the Create Provisioning File button, you will be prompted to Open or Save the provisioning
file on your computer – choose Save. Once the process is completed, you should have a file called
ArcGISforDesktopAdvancedformerlyArcInfo_concurrentuse.prvc.
7. Double click the .PRVC (provisioning file). This will launch the Software Authorization Wizard. The
provisioning file you have downloaded in Step 5 will automatically be selected. Click Next> to continue..
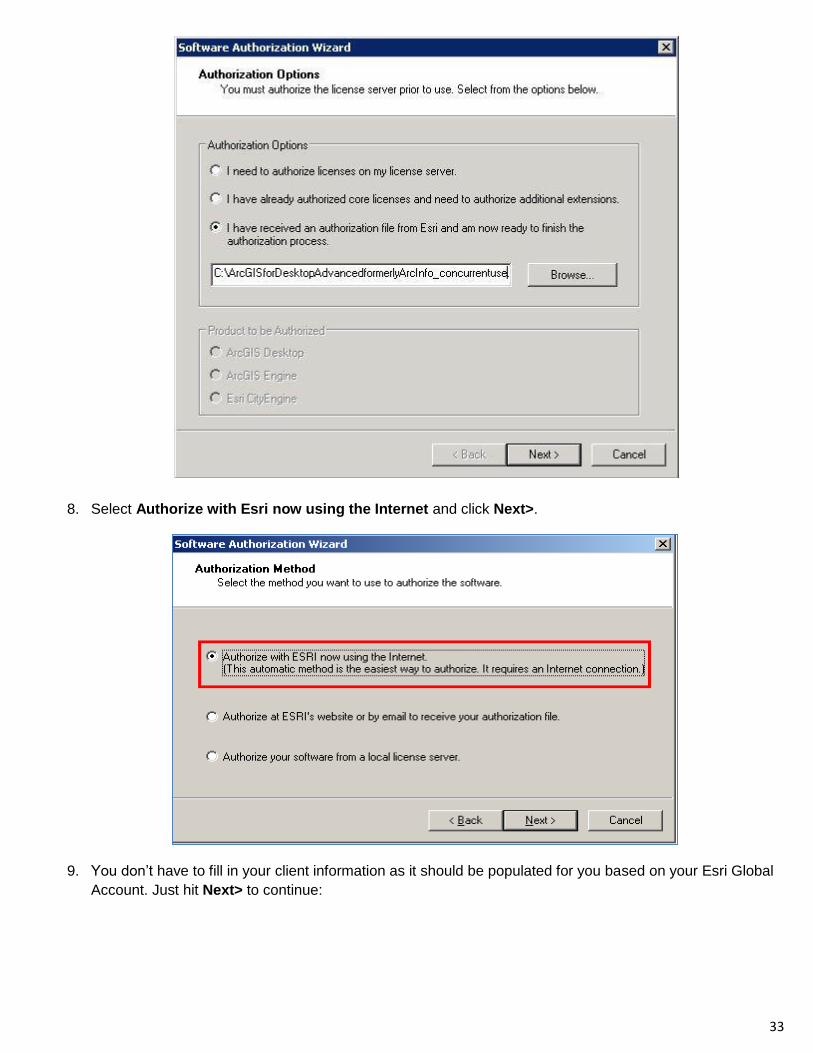
33
8. Select Authorize with Esri now using the Internet and click Next>.
9. You don’t have to fill in your client information as it should be populated for you based on your Esri Global
Account. Just hit Next> to continue:

34
Hit Next> again to fill in the rest of the information.
10. When presented with a prompt for an Authorization Version, make sure you select proper software
version that you are licensed for and are about to authorize:
11. On the following screen your product authorization number(s) should be already populated. Click Next> to
continue:

35
12. Once your software product(s) have been authorized on the License Manager, you will need to ensure that
you have properly set your license manager server on the client workstation(s) in order to be able to use
the software. Please proceed to the Setting up the ArcGIS License Manager 10.1 section of this
document for more information.

36
ArcGIS 10.0 License Transfer and/or Upgrade:
With the ArcGIS 10.1 release Esri has made License transfer and upgrade process easier than ever before. As
an example we are going to review a scenario where you might have one or more ArcGIS 10.0 products
currently authorized on the license server running ArcGIS License Manager 10.0:
Transferring ArcGIS 10.0 Concurrent Use licenses to ArcGIS License Manager 10.1
With ArcGIS 10.1 you no longer need to Deauthorize your existing ArcGIS product licenses prior to
transferring them over to ArcGIS License Manager 10.1 if you are installing it on the same license server,
where your current license manager is setup. All that has to be done in this case in order to ensure that your
existing 9.x and/or 10.0 client continue working with the new ArcGIS License Manager 10.1 is to get it installed
on the current license server where your licenses are presently authorized. Please refer to the Setting up the
ArcGIS License Manager 10.1 section of this document for detailed instructions on the License Manager
setup.
Once installed, the ArcGIS License Manager 10.1 will automatically recognise any existing ArcGIS 9.x and/or
ArcGIS 10.0 licenses present on that license server prior to the installation.

37
Your existing ArcGIS 9.x and/or ArcGIS 10.0 clients should be able to continue consuming software licenses
from the ArcGIS License Manager 10.1.
Upgrading ArcGIS 10.0 Concurrent Use License to ArcGIS 10.1 release
NOTE: Any Borrowed licenses must be returned back to the license pool before they can be upgraded.
Nevertheless, this can be done at a later time and will not prevent you from upgrading other licenses currently
available within your License Manager. Current license status can be monitored in the ArcGIS License Server
Administrator 10.1 > Availability > View License Usage. Any borrowed, transferred or checked out licenses
are displayed there. In addition, if there were any orphan licenses checked out by a client workstation and
never returned back to the pool for any reason (e.g. application hang, system crash, etc.), those can be pulled
back by using Force Checkin button under the View License Usage > Checked Out tab:
Now that you have successfully installed ArcGIS License Manager 10.1 and transferred your existing ArcGIS
10.0 licenses to it (done automatically), being an existing Esri customer current on maintenance, you may be
eligible for a license upgrade from ArcGIS 10.0 to ArcGIS 10.1. To confirm your eligibility for upgrade, please
contact Esri Canada Customer Care.
Below are the steps required in order to upgrade your ArcGIS 10.0 licenses to ArcGIS 10.1 release:
1. Open ArcGIS License Server Administrator 10.1 and click on the Authorize folder on the left-hand side
to select it.
2. Click on the Upgrade Now… button:

38
3. Select Upgrade with Esri now using the Internet option and hit Next>:

39
Alternatively, if you do not have a ready access to the Internet from the workstation where your License
Manager is installed, you may opt out to use the ‘Upgrade at Esri’s website or by email to receive your
upgrade response file’ option, also referred to as an Offline Upgrade. Please refer to the ‘Performing an
Offline Upgrade of ArcGIS 10.0 Concurrent Use License to ArcGIS 10.1’ section of this document for
further details.
4. The Upgrade Engine will gather information about licenses presently authorized on the ArcGIS License
Manager 10.1 that are eligible for an upgrade to 10.1 release and display them in the list:
5. You can control which products to upgrade by selecting/de-selecting checkbox under Upgrade? column.
Furthermore, if you have more than one license present for some product(s), but do not want to upgrade all
of them, you can modify the number of licenses to be upgraded by double-clicking on the number listed
under No. of Licenses for each product and typing in a desired number:

40
6. Once you are satisfied with the selection and the number of licenses to be upgraded for each ArcGIS
product, click Next>. A progress bar will be displayed.
7. Upon successful upgrade completion a respective notification will appear. Click Finish to close the
window.

41
8. License Manager will re-read the licenses, and the newly upgraded licenses will show up under Availability
folder in the ArcGIS License Server Administrator 10.1.
Performing an Offline Upgrade of ArcGIS 10.0 Concurrent Use License to ArcGIS 10.1
Below are the steps required in order to upgrade your ArcGIS 10.0 Concurrent Use licenses to ArcGIS 10.1
release in an offline mode:
1. Open ArcGIS License Server Administrator 10.1 and click on the Authorize folder on the left-hand side
to select it.
2. Click on the Upgrade Now… button:

42
3. Select Upgrade at Esri’s website of by email to receive your upgrade response file option and hit
Next>:
4. The Upgrade Engine will gather information about licenses presently authorized on the ArcGIS License
Manager 10.1 that are eligible for an upgrade to 10.1 release and display them in the list:
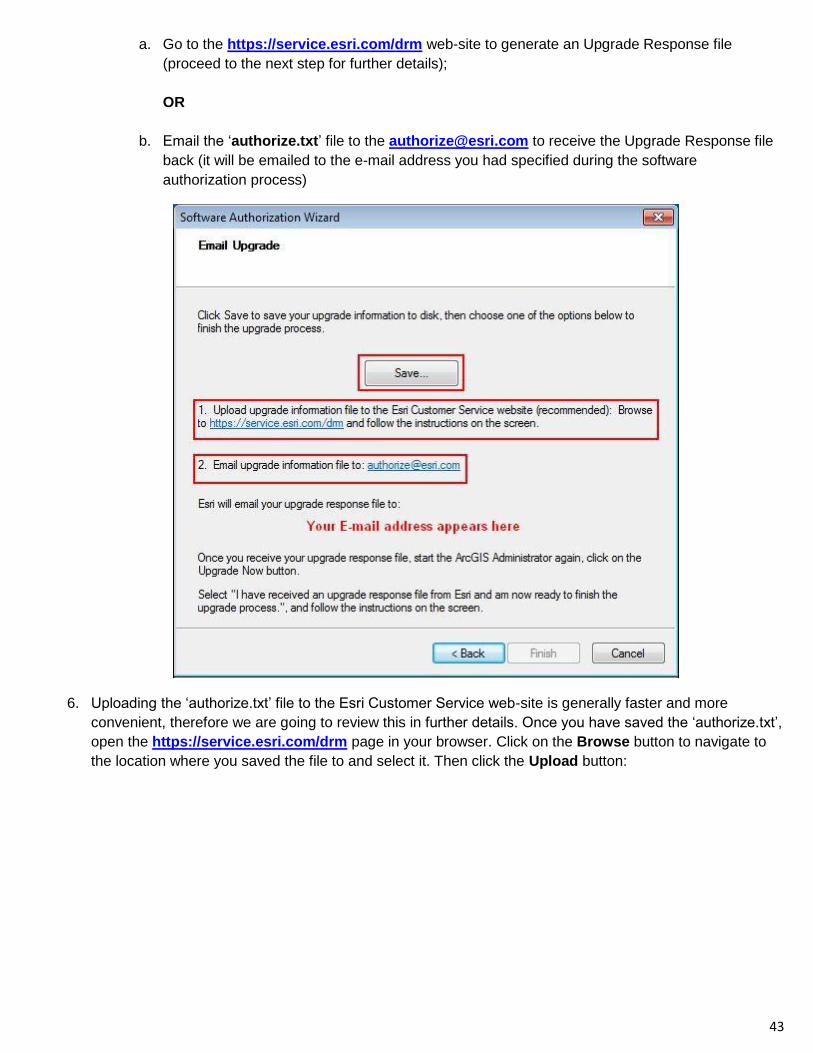
5. Click Next> to generate an ‘authorize.txt’ file containing all the information required for Esri Response file
generation needed to complete the Upgrade process. Once the generation is complete, click on the Save...
button to save the ‘authorize.txt’ file on your computer. Then follow the instructions:
43
a. Go to the https://service.esri.com/drm web-site to generate an Upgrade Response file
(proceed to the next step for further details);
OR
b. Email the ‘authorize.txt’ file to the [email protected] to receive the Upgrade Response file
back (it will be emailed to the e-mail address you had specified during the software
authorization process)
6. Uploading the ‘authorize.txt’ file to the Esri Customer Service web-site is generally faster and more
convenient, therefore we are going to review this in further details. Once you have saved the ‘authorize.txt’,
open the https://service.esri.com/drm page in your browser. Click on the Browse button to navigate to
the location where you saved the file to and select it. Then click the Upload button:

44
7. Once the file has been uploaded successfully, you will see a prompt allowing you to either open the file or
save it. Click on the Save button (a view in Windows 7 is shown on the screenshot below).
8. Once the ‘Authorization.resps’ has been saved, go to the directory where you saved it to and double-click
on the file. This will launch the Software Authorization Wizard. Make sure that the I have received an
authorization file from Esri... option is selected and the correct path to the RESPS file is present. Click
Next> button to proceed:

45
9. The Upgrade Engine will complete the upgrade process based on the information in the RESPS file, and
you will be advised on the successful authorization process completion. Click Finish to exit the
Authorization Wizard.
10. License Manager will re-read the licenses, and the newly upgraded licenses will show up under Availability
folder in the ArcGIS License Server Administrator 10.1.
46
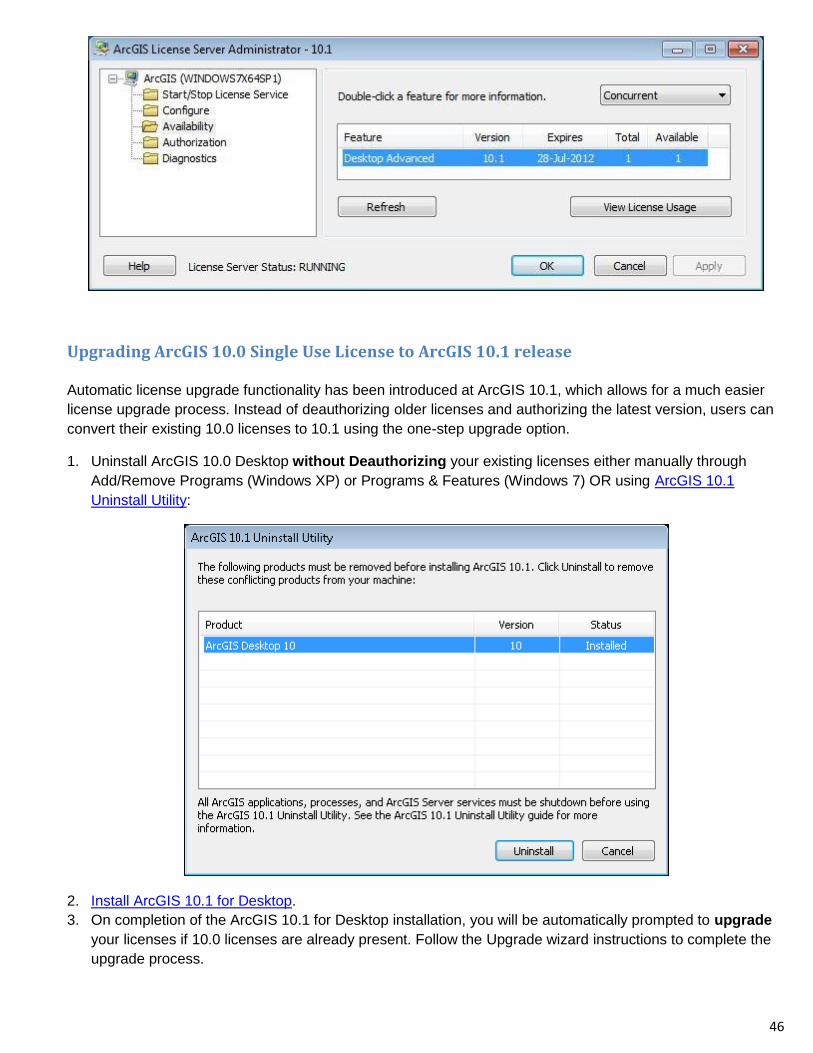
Upgrading ArcGIS 10.0 Single Use License to ArcGIS 10.1 release
Automatic license upgrade functionality has been introduced at ArcGIS 10.1, which allows for a much easier
license upgrade process. Instead of deauthorizing older licenses and authorizing the latest version, users can
convert their existing 10.0 licenses to 10.1 using the one-step upgrade option.
1. Uninstall ArcGIS 10.0 Desktop without Deauthorizing your existing licenses either manually through
Add/Remove Programs (Windows XP) or Programs & Features (Windows 7) OR using ArcGIS 10.1
Uninstall Utility:
2. Install ArcGIS 10.1 for Desktop.
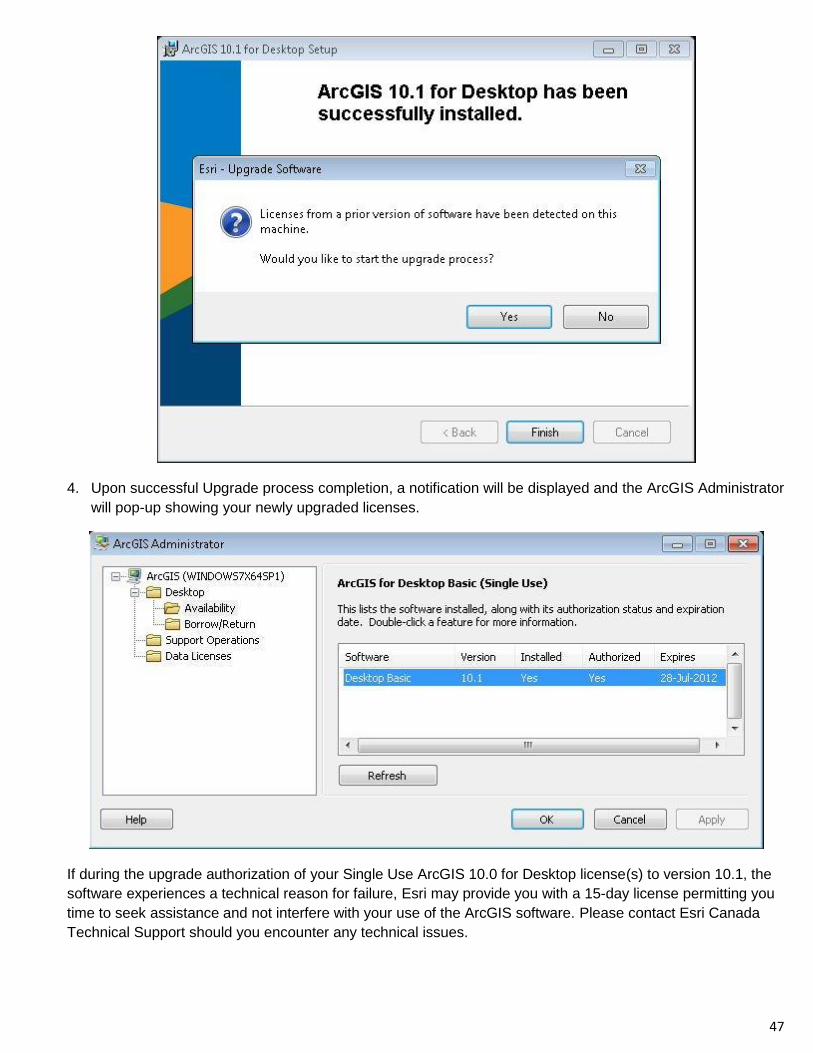
3. On completion of the ArcGIS 10.1 for Desktop installation, you will be automatically prompted to upgrade
your licenses if 10.0 licenses are already present. Follow the Upgrade wizard instructions to complete the
upgrade process.
47
4. Upon successful Upgrade process completion, a notification will be displayed and the ArcGIS Administrator
will pop-up showing your newly upgraded licenses.
If during the upgrade authorization of your Single Use ArcGIS 10.0 for Desktop license(s) to version 10.1, the
software experiences a technical reason for failure, Esri may provide you with a 15-day license permitting you
time to seek assistance and not interfere with your use of the ArcGIS software. Please contact Esri Canada
Technical Support should you encounter any technical issues.

48
Authorizing ArcGIS 9.x Floating licenses to ArcGIS License Manager 10.1
With the ArcGIS Desktop 10.0 release Esri adopted FLEXERA FlexNet Publisher (FNP) Trusted Storage
encrypted license activation and fulfillment token exchange. All the ArcGIS Desktop 10 products (except the
legacy Workstation) are FNP Trusted Storage enabled. "Legacy" ArcGIS 9.x products make no use of the
Trusted Storage token exchanges and will simply continue to consume license authorizations from the new
ArcGIS 10.1 License Manager as in prior version. Consequently, if you need to continue supporting your 9.x
clients along with ArcGIS 10.0 and/or 10.1 clients upon upgrading to ArcGIS License Manager 10.1, you have
two options:
1) Continue to maintain a stand-alone ArcGIS License Manager 9.x instance on a separate server
(ArcGIS License Manager 10.0/10.1 and ArcGIS License Manager 9.x cannot reside on the same
workstation);
2) Authorize available 10.1 licenses on your ArcGIS License Manager 10.1, and point your ArcGIS 9.x
clients to the new license server. The 10.1 licenses should be made available on the Esri Customer
Care Portal based on the 9.x license count that are current on maintenance, which will determine their
eligibility for ArcGIS 10.1 upgrade. If you don’t see the 10.1 licenses corresponding to your 9.x seats on
the Esri Customer Care Portal, please contact Esri Canada Customer Care for further assistance.
NOTE: The ArcGIS 9.x clients will not be able to borrow licenses from the ArcGIS license Manager
10.1.
In this section, we are going to review ArcGIS 9.x license authorization process on ArcGIS License Manager
10.1. Prior to installing ArcGIS License Manager 10.1 (if performing a License Manager upgrade on the current
license server), previous version of ArcGIS License Manager must be removed manually through Add/Remove
Programs (Windows XP) or Programs & Features (Windows 7).
To ensure proper uninstall process completion, it is recommended that you choose the Custom uninstall
option:

49
Then, as you go through the following screens by clicking Next> button, use the Select All button to select all
the components:
Once the old license manager has been uninstalled successfully, go ahead and install the ArcGIS License
Manager 10.1. Unlike transitioning from ArcGIS License Manager 10.0 to ArcGIS License Manager 10.1, the
process of transferring ArcGIS 9.x licenses will require manual authorization using the ArcGIS License Server
Administrator 10.1. To do so:
1) Contact Esri Canada Customer Care to request version 10.1 authorization numbers based on your
current 9.x license eligibility;
2) Open ArcGIS License Server Administrator 10.1 from Start > Programs > ArcGIS > License
Manager;

50
3) Click on the Authorization folder on the left-hand side to select it and select 10.1/CE 2012 from the
Version drop-down list (do not get confused with the 9.x option in the drop-down list which is primarily
used to authorize 9.x extensions that had been depreciated in ArcGIS 10.0, as we will discuss in the
following section) on the right pane and click the Authorize Now button:
4) Follow through the wizard in the same manner as it has been discussed in previous sections;
5) Once the authorization is complete double-check the ArcGIS Desktop Administrator on the client
workstation to make sure that it is pointing to the proper license server under the License Manager
section:

51
NOTE: Once the ArcGIS Desktop Administrator 9.x has been been updated to point to the ArcGIS
License Manager 10.1 server as outlined above, you can go under Availability section to check for
available licenses. ArcGIS 9.x clients up until version 9.3 (inclusive) will not be able to read the license
availability count from the ArcGIS 10.1 License Manager, and therefore will show zeros under Licenses
and Available fields (as shown on the graphic below). Despite that, as long as the ArcGIS License
Manager 10.1 has been properly configured, has licenses available, and all the necessary exceptions
have been made to allow flawless communication through Windows Firewall, ArcGIS 9.x client
application should be able to successfully consume a license from the ArcGIS License Manager 10.1.
The way to double-check is to launch ArcMap 9.x and make sure that it starts up without any errors.
The ArcGIS 9.3.1 will show proper license availability count under the Availability section in the ArcGIS
Desktop Administrator once pointed to ArcGIS License Manager 10.1 server:

52
6) Your 9.x client application should now be able to seamlessly consume ArcGIS licenses from the new
ArcGIS License Manager 10.1. If you run into any problems, please contact Esri Canada Technical
Support.

53
Authorizing Legacy ArcGIS Products/Extensions on ArcGIS License Manager 10.1
Since ArcGIS 10.0 release there were several ArcGIS Extensions that have been either depreciated or
integrated into core ArcGIS package. Selected products that are being incorporated or retired will not be
upgraded to 10.1:
ArcScan for ArcGIS (included in ArcGIS for Desktop Basic, Standard and Advanced at ArcGIS 10.1);
Maplex for ArcGIS (included in ArcGIS for Desktop Basic, Standard and Advanced at ArcGIS 10.1);
ArcGIS Schematics (included with ArcGIS 10.1 for Server Standard and Advanced);
The licenses for retired products (Image Server, ArcIMS, COGO, and ArcInfo Workstation) will continue
to work under the 10.0 license at 10.1;
ArcGIS Survey Analyst (Extension is no longer available as of ArcGIS 10.0);
NOTE: Visual Studio 2008, SQL Server 2005, and VBA ArcObjects SDK are no longer supported at 10.1.
Next, we are going to review some of the common authorization scenarios. Since the extension authorization
process is similar to the core software license authorization discussed in previous sections with just a few
slight changes, here we are going to review the process of Extension Authorization using Concurrent Use
License authorization number as an example.
Authorizing ArcScan and/or Maplex Extensions for ArcGIS 9.x/10.0 Clients on ArcGIS License Manager 10.1
Since both 9.x and 10.0 clients can consume ArcGIS 10.0 licenses (including extensions, except for ArcGIS
Survey Analyst that will be discussed separately in the following section), you may use 10.0 authorization
numbers to authorize the ArcScan and/or Maplex extensions on ArcGIS License Manager 10.1 to be served to
the aforementioned clients. To perform the extension authorization in ArcGIS License Manager 10.1, follow the
steps below:
1) ArcGIS Concurrent Use products need to be authorized in the License Server Administrator. You
can access the License Server Administrator from Start > Programs > ArcGIS > License Manager >
License Server Administrator. On UNIX/Linux, you can run License Server Administrator from the
installation location using the following command: <installation_path>/arcgis/license10.1/LSAdmin.
2) Click on the Authorization folder on the left-hand side to get it selected, choose the 10.0 version from
the drop down list, and click the Authorize Now button to launch Software Authorization Wizard:

54
3) Select the I have already authorized core licenses and need to authorize additional extensions
under the Authorization Options section, select ArcGIS Desktop under the Product to be
Authorized section, and hit Next>:

55
4) Select Authorize with Esri now using the Internet:
5) Fill in your contact information as required and hit Next>.

56
6) At this point you will be presented with a list of optional extensions to be authorized. If you would like to
authorize any of those, you see in the list, enter in your Esri Authorization number(s) along with the
quantity of licenses to be authorized for each extension. You can find the authorization number (s) by
logging into your Esri Customer Care Portal with your Esri Global Account account. If you cannot find
this information, please contact Esri Canada Customer Care. In order to authorize ArcScan and/or
Maplex extensions in addition to the extensions already present in the list, manually type in the
extension name(s) and supply respective authorization number and license quantity for each. Then
click Next>:

57
7) Upon successful authorization completion a respective notification will be displayed.
8) Your 9.x and 10.0 clients should now be ready to consume licenses for the ArcScan and/or Maplex
extensions.
Authorizing ARC/INFO Workstation on ArcGIS License Manager 10.1
NOTE: Please refer to the Esri KB 40394 “FAQ: Can ARC/INFO Workstation operate with Concurrent
Use licenses on an ArcGIS 10.1 License Manager?” for further details.

58
Windows ARC/INFO Workstation 9.3 and above can be operated with 10.1 Concurrent Use licenses. For each
seat of Windows ARC/INFO Workstation 9.2 and older to be maintained, an ArcGIS for Desktop Advanced
(formerly ArcInfo) 10.0 Concurrent Use license must remain on the ArcGIS 10.1 License Manager.
Alternatively, a separate License Manager with 10.0 licenses can be set up for operating Windows ARC/INFO
Workstation 9.2 and older. With the above said, if you are planning upgrade your existing ArcGIS for Desktop
Advanced (formerly ArcInfo) 10.0 licenses to version 10.1, you should evaluate your ARC/INFO Workstation
9.2 and older license requirements and leave an ample number of ArcGIS for Desktop Advanced (formerly
ArcInfo) 10.0 licenses as-is prior to performing the license upgrade. If you have any additional questions
regarding licensing policies, please contact Esri Canada Customer Care.
NOTE: There is a known bug# NIM081843 "Not able to use ArcInfo Single Use V 10.1 license with ArcInfo
Workstation v10".
Authorizing ArcGIS Survey Analyst for ArcGIS 9.x clients on ArcGIS License Manager 10.1
ArcGIS Survey Analyst Extension is no longer available as of ArcGIS 10.0. Nonetheless, existing ArcGIS 9.x
clients may still have to access the aforementioned extension. You can authorize the ArcGIS Survey Analyst
license on your ArcGIS License Manager 10.1 and serve it to the ArcGIS 9.x clients. To authorize the
extension using a Concurrent Use authorization number:
1) Contact Esri Canada Customer Care to request authorization number(s) for the ArcGIS Survey Analyst
Extension based on your current 9.x license eligibility;
2) Open ArcGIS License Server Administrator 10.1 from Start > Programs > ArcGIS > License
Manager;
3) Click on the Authorization folder on the left-hand side to select it and select 9.x from the Version
drop-down list on the right pane and click the Authorize Now button:
4) Follow through the wizard in the same manner as it has been discussed in previous section;

59
5) Upon successful authorization completion your ArcGIS 9.x clients should be able to seamlessly
consume ArcGIS Survey Analyst Extension license(s) from the new ArcGIS License Manager 10.1. If
you run into any problems, please contact Esri Canada Technical Support.
Authorizing VBA Extension on ArcGIS License Manager 10.1
ArcObjects VBA SDK or new VBA development are not supported in ArcGIS for Desktop 10.1. With that being
said, there is an optional separate setup for legacy VBA support in the ArcGIS applications available on the
ArcGIS Desktop 10.1 installation media under VBACompatibility directory. This will require an additional
license authorization similar to ArcGIS 10.0. Contact Esri Canada Customer Care to obtain your ArcGIS 10.1
VBA authorization number(s) and authorize the VBA extension in a similar manner as discussed in the
previous section.

60
ArcGIS License Manager 10.1 Installation and Configuration
Setting up the ArcGIS License Manager 10.1
NOTE: ArcGIS 10.1 License Manager Quick Start Guide is available from Esri Resource Center.
In order to be able to authorize any ArcGIS Concurrent Use licenses you have to install and configure ArcGIS
License Manager 10.1. You only need one ArcGIS license server per network to manage all your concurrent
use ArcGIS 10.x and 9.x software products. Please note that the license files at version 9.x or earlier will not
work with this new version of the ArcGIS License Manager 10.1. If you are currently using a License Manager
released prior to ArcGIS 10.x, you will need to first uninstall it, setup the ArcGIS 10.1 License Manager, and
then authorize licenses on the upgraded license server using the new authorization information sent via e-mail
by Esri Customer Service before starting the license service. If you are using ArcGIS License Manager 9.4
(Beta 1) or 10.x, you may use the ArcGIS 10.1 Uninstall Utility to get rid of the previous License Manager
release automatically. However, if you have any other ArcGIS products installed on your license manager
server, they will be removed as well should you opt out to use the Uninstall Utility. Thus, if you need to
uninstall the License Manager only do it manually through Control Panel > Add/Remove Programs
(Windows XP) OR Programs & Features (Windows 7) prior to proceeding with the installation of the ArcGIS
License Manager 10.1:
Once you have uninstalled any previous releases of ArcGIS License Manager, you are ready to proceed with
the ArcGIS License Manager 10.1 setup. In order to do so:
1. Run the License Manager setup from your ArcGIS 10.1 installation media OR Download the ArcGIS
License Manager 10.1 from the Esri Customer Care Portal > Software Downloads > Individual Setups
section, unpack the installation files by double-clicking on the executable, go to the location where you
have extracted the files, and double-click on Setup.exe.
NOTE: Make sure you have write access to your download directory location as well as your ArcGIS
installation directory location, and that no one is accessing it.

61
2. Follow the instructions to install the license manager to the desired location. At the end of the installation,
the ArcGIS License Server Administrator appears.

62
3. Proceed with the ArcGIS 10.1 Concurrent Use product authorization process as outlined in the
aforementioned sections of this document. If you choose to do this step at a later time, on Windows, you
can access the ArcGIS License Server Administrator from Start > Programs > ArcGIS > License
Manager > License Server Administrator. On UNIX/Linux, you can run License Server Administrator
from the installation location using the following command:
<installation_path>/arcgis/license10.1/LSAdmin
4. Click Finish to close the wizard and return to License Server Administrator.
Once you have authorized your ArcGIS 10.1 Concurrent Use product(s) using the ArcGIS License Server
Administrator, it is important to ensure that your client workstations have been configured properly to
communicate with the license server and are able to consume software license(s).
On the client workstation (i.e. any computer with ArcGIS core products installed):
1. Open your ArcGIS Administrator from Start > Programs > ArcGIS > ArcGIS Administrator.
2. Click on the Desktop folder on the left-hand side to select it.
3. Select an ArcGIS 10.1 Concurrent Use product previously authorized on your license server that you are
intended to use on this particular workstation.
4. If you are setting configuring your ArcGIS client for the first time, the License Manager will be set to
Not_Set by default:
63
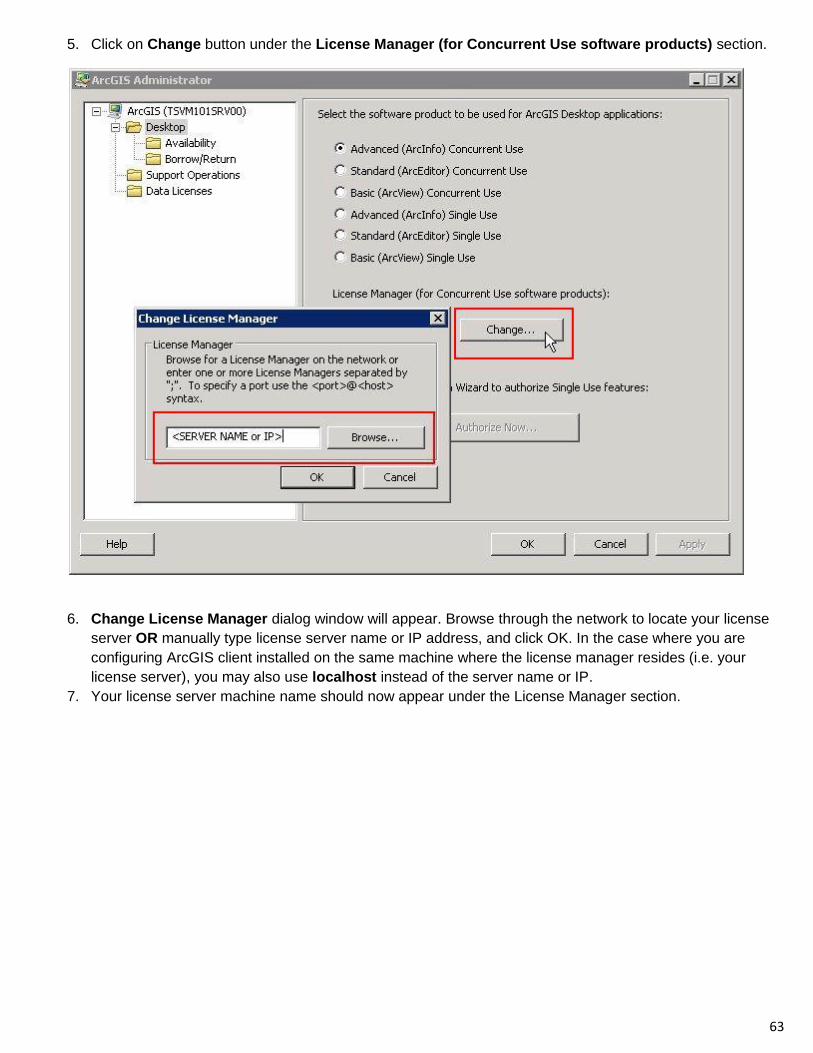
5. Click on Change button under the License Manager (for Concurrent Use software products) section.
6. Change License Manager dialog window will appear. Browse through the network to locate your license
server OR manually type license server name or IP address, and click OK. In the case where you are
configuring ArcGIS client installed on the same machine where the license manager resides (i.e. your
license server), you may also use localhost instead of the server name or IP.
7. Your license server machine name should now appear under the License Manager section.
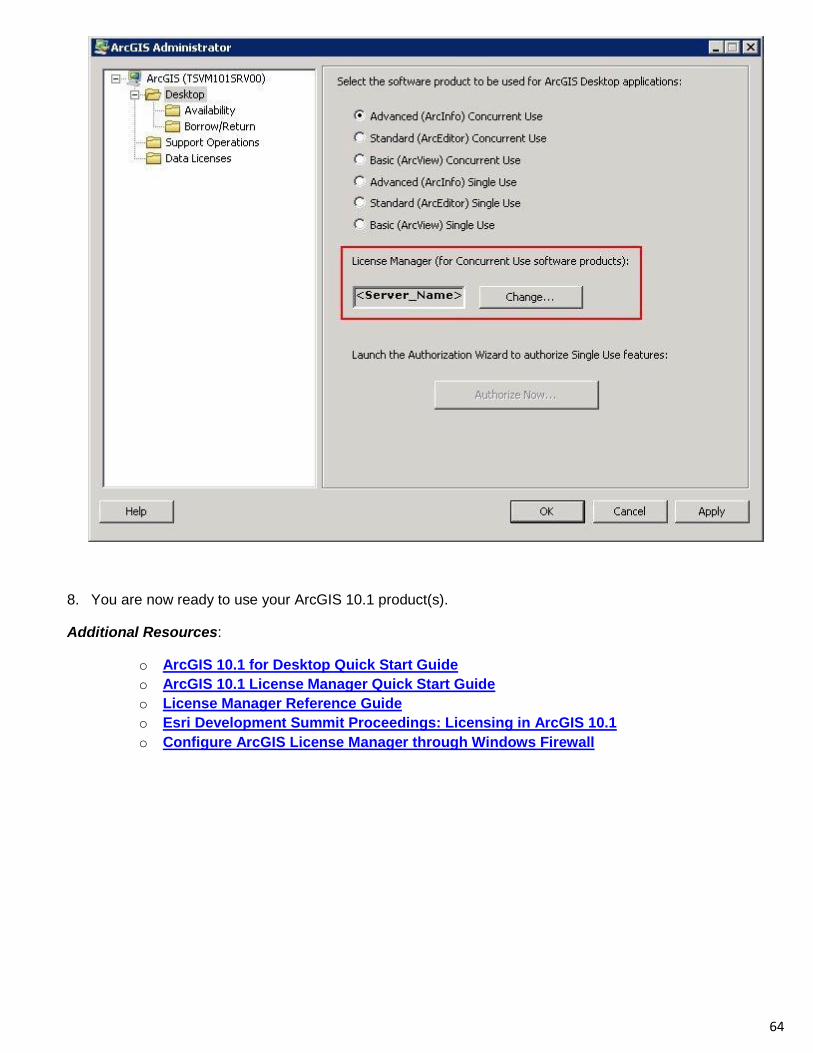
64
8. You are now ready to use your ArcGIS 10.1 product(s).
Additional Resources:
o ArcGIS 10.1 for Desktop Quick Start Guide
o ArcGIS 10.1 License Manager Quick Start Guide
o License Manager Reference Guide
o Esri Development Summit Proceedings: Licensing in ArcGIS 10.1
o Configure ArcGIS License Manager through Windows Firewall