arn ats lok or mini quilt · pdf filepage 1 /5 arn ats lok or mini quilt this is a tutorial...
TRANSCRIPT

Pag
e1/5
BARN BATS BLOCK OR MINI QUILT
This is a tutorial for the block I used to make the Halloween mini quilt shown above. For that quilt, I was definitely trying to make the piecing look like bats, but I think that, absent the orange and black color scheme (and vampire teeth embroidery), it can read more like a graphic zigzag/herringbone variation.
I drafted the pattern for this block from a picture in this Nancy Cabot Block Index. The index is basically a collection of hand-drawn images of blocks from Nancy Cabot's circa 1933-1948 column in the Chicago Tribune. According to the index, Barn Bats was published in Nancy Cabot's column on October 19, 1935. It's not a block that I had seen before and I haven't been able to find any examples of it elsewhere. It's a great design though, and I hope you enjoy it.
BARN BATS BLOCK 18" x 18" FINISHED All seams are sewn with a ¼ seam allowance and pressed open.
Fabric Requirements This block is made with two groups of fabrics, Group A and Group B. You can use any combination of prints and solids. You just want the fabrics in each group to coordinate with one another and contrast with the fabrics in the other group. For example, in my Halloween version, Group A is black/gray and Group B is orange/gold. In the version you'll see in the tutorial photos, Group A is all multicolor prints from Jay McCarroll's Center City collection and Group B is all bright solids (plus one text print with a bright solid background). Within each group, you can repeat fabrics as many or few times as you like. Each bat is made from a pair of fabric strips, as follows:
Group A = 15 pairs of fabric strips, each 2-1/2" x 7-1/2" Group B = 12 pairs of fabric strips, each 2-1/2" x 7-1/2"
Note: Each pair of fabric strips should be made up of two pieces of the same fabric.

Pag
e2/5
Step 1 Stack the 2 strips of fabric that make up each pair and arrange the stacks in three columns with nine rows. Rows 1, 3, 5, 7, and 9 should include stacks from Group A. Rows 2, 4, 6, and 8 should include stacks from Group B.
Step 2 Separate the pairs of fabric strips in the first column into two identical columns. Sew together the 9 strips in one of the columns, sewing each subsequent strip 1" from the left side of the previous one to create a strip set that tilts to the right (as shown on the left in the above photo). Sew together the 9 strips in the other column, sewing each subsequent strip 1" from the right side of the previous one to create a strip set that tilts to the left (as shown on the right in the above photo).
Step 3 Use the 60° marking on your 6" x 24" ruler to create a straight edge along one side of the right-leaning strip set.

Pag
e3/5
Step 4 Measure from the straight edge to cut 1 pieced strip 2-1/2" wide and 1 pieced strip 1-1/2" wide.
Step 5 Repeat Steps 3 and 4 with the left-leaning strip set. You should now have two mirror-image pieced strips 1-1/2" wide and two
mirror-image pieced strips 2-1/2" wide. The 1-1/2" pieced strips will become the bats' faces. The 2-1/2" pieced strips will become the bats' wings. Take care not to stretch the bias-cut edges of these strips.
Step 6 Sew the two 1-1/2" strips together, matching seams, to create a column of bat faces with "chins" pointing toward the bottom and "ears" pointing toward the top of the block.
Before moving on to Step 7, take a look at the above photo of the column of bat faces with a 2-1/2" pieced "wing" strip sewn to the right side. Notice how the seams above the bats' right wings line up with the seams above the same bats' left ears. In Step 7, you'll mark the points where the wings will be attached.

Pag
e4/5
Step 7 Place a ruler on top of the column of bat faces, lining its edge up with the seam above one of the bat's left ears. Use a fabric marker or chalk liner to mark the point where the ruler meets the right side of the bat's face. (This is the point indicated by the arrow in the above photo, or the point the seam would end up if it continued in a straight line across the right side of the bat's face.)
Mark the same point on the right side of each bat face, then line your ruler up with the seams above the bats' right ears to mark points on the left side of each bat face. When you're finished, the column of bat faces should look something like the left photo. You'll probably find that some fabrics are easier than others to mark. As long as you can see the majority of the marks, you should be fine.
Step 8 Keeping right (finished) sides together, pin the left side of the right-leaning strip of bat wings to the right side of the column of bat faces. The wings will sit below the faces so, in relation to the alignment of the finished block, the seams between the wings should be lower than the seams between the faces. (In the above photo, we're looking at the pieced strips sideways, so the right side of the photo is the bottom of the block.) As you pin, match the outside edges of the wing seam allowances (not the center of the seams) to the marked points on each corresponding bat face, keeping identical fabrics together. For example, the outside corner of the gray seam allowance (indicated by an arrow in the above photo) should be lined up with the point where the mark on the gray bat face meets the raw edge (also indicated by an arrow in the above photo). Take a quick peek at the right sides to make sure everything is where it should be, then sew the pieces together.
Use the same process to match and sew the right side of the left-leaning strip of bat wings to the left side of the column of bat faces, completing the first column of bats.
Pag
e5/5
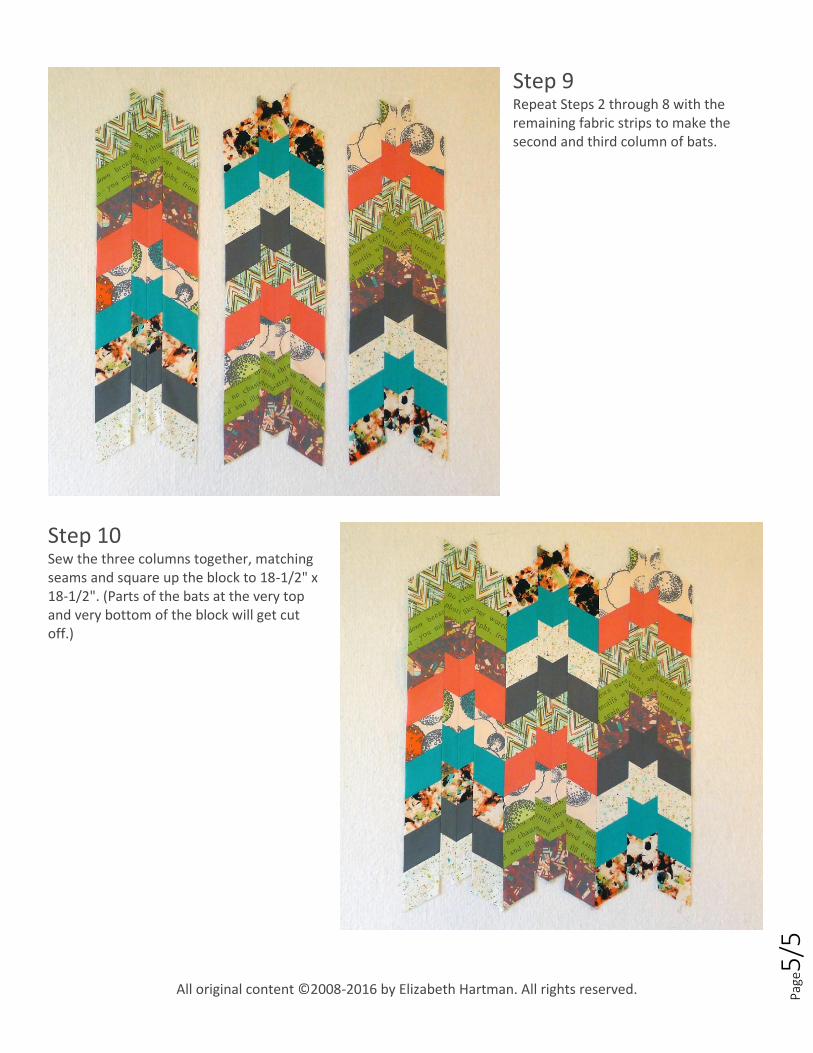
Step 9 Repeat Steps 2 through 8 with the remaining fabric strips to make the second and third column of bats.
Step 10 Sew the three columns together, matching seams and square up the block to 18-1/2" x 18-1/2". (Parts of the bats at the very top and very bottom of the block will get cut off.)
All original content ©2008-2016 by Elizabeth Hartman. All rights reserved.