art of jazz improvisation
TRANSCRIPT
The Art of ImprovisationVersion 1.0 – 8/22/2000
… Creating real-time music through jazz improvisation …
*Introduction*
by Bob TaylorAuthor of Sightreading Jazz, Sightreading Chord Progressions
©2000 Taylor-James Publications
About This Book i
About This BookAbout This BookAbout This BookAbout This Book
Welcome to The Art of Improvisation ! This section is about:
• Why I Wrote The Art of Improvisation
• Highlights of The Art of Improvisation
• Acknowledgements and BRIDJJ
• Listening to Jazz
Why I Wrote The Art of Improvisation
So how do they do it?
How do the great improvisers create musical tales of suspense and wonder? Can weimprovise like they do by copying what they play? I used to think so, but now I’mconvinced it’s better to visualize and understand their ideas, not just copy them. Greatplayers know and use seven elements of improvisation; I wrote The Art of Improvisation to helpyou learn and use these elements like they do. It’s not a wizard’s apprenticeship; it’s areal process you can learn a step at a time.
You can include the principles in The Art of Improvisation in your daily practice to greatlyspeed up your progress in improvisation. You’ll recognize these principles when youlisten to the solos of great jazz improvisers.
What This Book What This Book What This Book What This Book Is Is Is Is andandandand Isn’t Isn’t Isn’t Isn’t About ... About ... About ... About ...In this book you’ll use the “Yes” concepts below, not the typical “No” methods.
� Yes: Learn a variety of flexible scales that help you create musical ideas.
X No: Start with the blues scale, stay with the blues scale, and eventually becometrapped by the blues scale.
� Yes: Create, develop, and express your own musical ideas and phrases.
X No: Memorize jazz patterns and try to turn them into improvisation.
� Yes: Learn to create and develop melodies first, then use changing chords.
X No: Study chord progressions first (get on the freeway, then learn to drive).
� Yes: Create melodies that sometimes fit, sometimes transcend the chords.
X No: Play arpeggios so much that your listener is sure what chord you’re playingagainst, but not sure if you know much else about improvising.
About the AuthorAbout the AuthorAbout the AuthorAbout the AuthorMy early music background was classical; I started playing jazz as a freshman in college.At first I learned to improvise by copying patterns and by transcribing solos. But afterextensive listening, I discovered solid principles in the solos of great improvisers. I usedthem, adapted them, and shared them with students. This book gathers what I learnedin years of playing, teaching, and research.

ii About This Book
Some of my credits:
• Master’s Degree in Music Education, California State Univ., Los Angeles
• Jazz faculty member at Cal. State L.A., Pasadena City College, and BYU
• Member of BYU Faculty Jazz Quintet and BRIDJJ jazz/fusion group
• Author of Sightreading Jazz and Sightreading Chord Progressions
Highlights of The Art of Improvisation
The Art of Improvisation is a two-volume set that includes the features listed below, andmore, to help you learn and master jazz improvisation:
• Easy-to-read explanations of 7 elements of improvisation, in 5 skill levels.• Over 350 concise musical examples to illustrate what you’re learning.• Over 200 exercises to help you try out what you’ve learned. Most exercises have
three levels of difficulty: Basic, Medium, and Challenge.• Chords for 130 standard jazz tunes in a clear, easy-to-read format.• Transcribed jazz solos from the BRIDJJ CD “Beat the Rats.”• Ideas for teaching with The Art of Improvisation.
Other Books I’ve WrittenOther Books I’ve WrittenOther Books I’ve WrittenOther Books I’ve WrittenSightreading Jazz, a complete method for reading pitches, rhythms, and melodies, for allinstruments in treble or bass clef. Exercises can be recycled and varied, creatingthousands of new sightreading examples. Also available are transposed exercises (Bband Eb) for ensemble practice along with the concert key exercises.
Acknowledgments and BRIDJJ
I’d like to especially thank those who have helped to bring this book to light:
• My wife, Jennifer, for her constant support and writing insights.
• My daughters, Jamie, Jessica, and Johanna, for sharing me with the computer.
• My parents, Harold and Jean, for the musical legacy they left me.
• John, for his love of jazz and art.
• Mick, for his love of engineering, and Rosie, for her love of the classics.
• Jay Lawrence, for his research and insights into latin and fusion rhythms.
• Rich Dixon, for his ideas on the art of playing “outside.”
• Members of BRIDJJ (Rich Dixon, Dan Waldis, Jim Stout, and Jay Lawrence).
• Steve Richins, Lars Yorgason, and Newell Dayley for their ideas and support.
• All the musicians who tested this book and provided valuable feedback.
About This Book iii
Listening to Jazz
As you study from The Art of Improvisation and practice its exercises, it’s essential that youkeep listening to recordings of great jazz artists. As you listen, you should constantly tryto:
1) Find the form of the tune so you can clearly identify the start and end of each solochorus.
2) Switch your focus back and forth between the improvised solos and the rhythmsection accompaniment, noticing how the players interact and support each other.
3) Identify interesting ideas and match them with concepts from the Art ofImprovisation, so you can adapt them in your own improvisation.
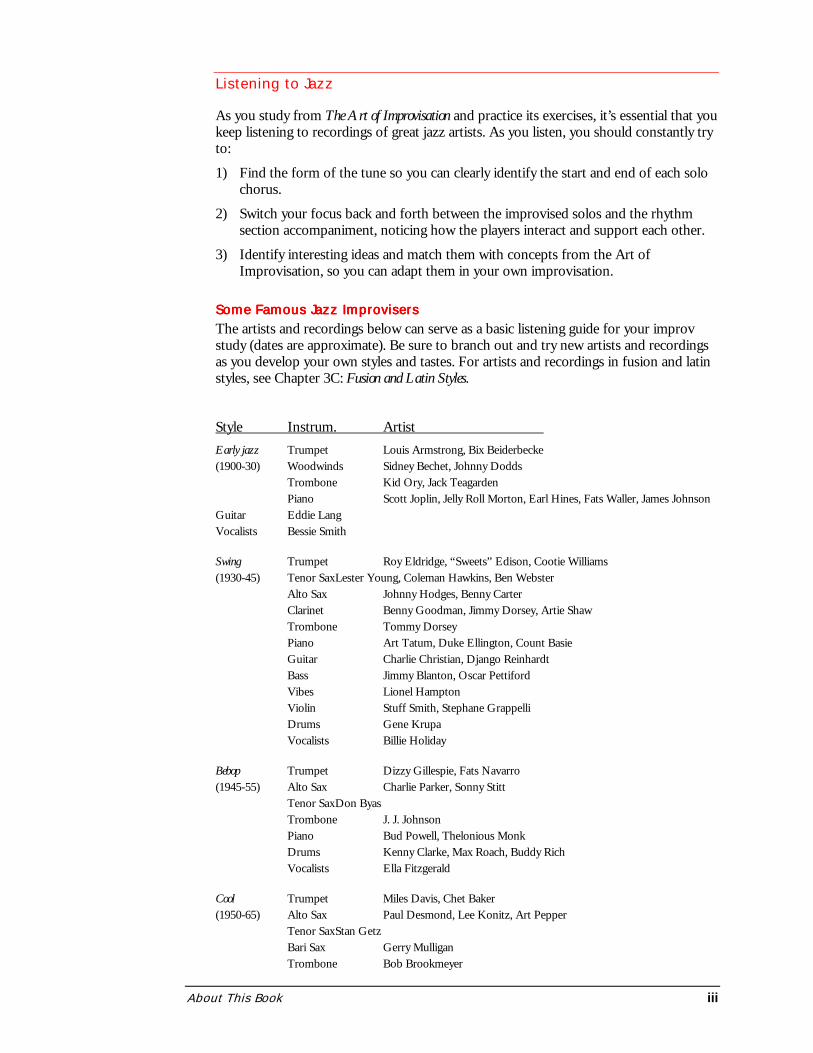
Some Famous Jazz ImprovisersSome Famous Jazz ImprovisersSome Famous Jazz ImprovisersSome Famous Jazz ImprovisersThe artists and recordings below can serve as a basic listening guide for your improvstudy (dates are approximate). Be sure to branch out and try new artists and recordingsas you develop your own styles and tastes. For artists and recordings in fusion and latinstyles, see Chapter 3C: Fusion and Latin Styles.
Style Instrum. Artist Early jazz Trumpet Louis Armstrong, Bix Beiderbecke(1900-30) Woodwinds Sidney Bechet, Johnny Dodds
Trombone Kid Ory, Jack TeagardenPiano Scott Joplin, Jelly Roll Morton, Earl Hines, Fats Waller, James Johnson
Guitar Eddie LangVocalists Bessie Smith
Swing Trumpet Roy Eldridge, “Sweets” Edison, Cootie Williams(1930-45) Tenor SaxLester Young, Coleman Hawkins, Ben Webster
Alto Sax Johnny Hodges, Benny CarterClarinet Benny Goodman, Jimmy Dorsey, Artie ShawTrombone Tommy DorseyPiano Art Tatum, Duke Ellington, Count BasieGuitar Charlie Christian, Django ReinhardtBass Jimmy Blanton, Oscar PettifordVibes Lionel HamptonViolin Stuff Smith, Stephane GrappelliDrums Gene KrupaVocalists Billie Holiday
Bebop Trumpet Dizzy Gillespie, Fats Navarro(1945-55) Alto Sax Charlie Parker, Sonny Stitt
Tenor SaxDon ByasTrombone J. J. JohnsonPiano Bud Powell, Thelonious MonkDrums Kenny Clarke, Max Roach, Buddy RichVocalists Ella Fitzgerald
Cool Trumpet Miles Davis, Chet Baker(1950-65) Alto Sax Paul Desmond, Lee Konitz, Art Pepper
Tenor SaxStan GetzBari Sax Gerry MulliganTrombone Bob Brookmeyer
iv About This Book
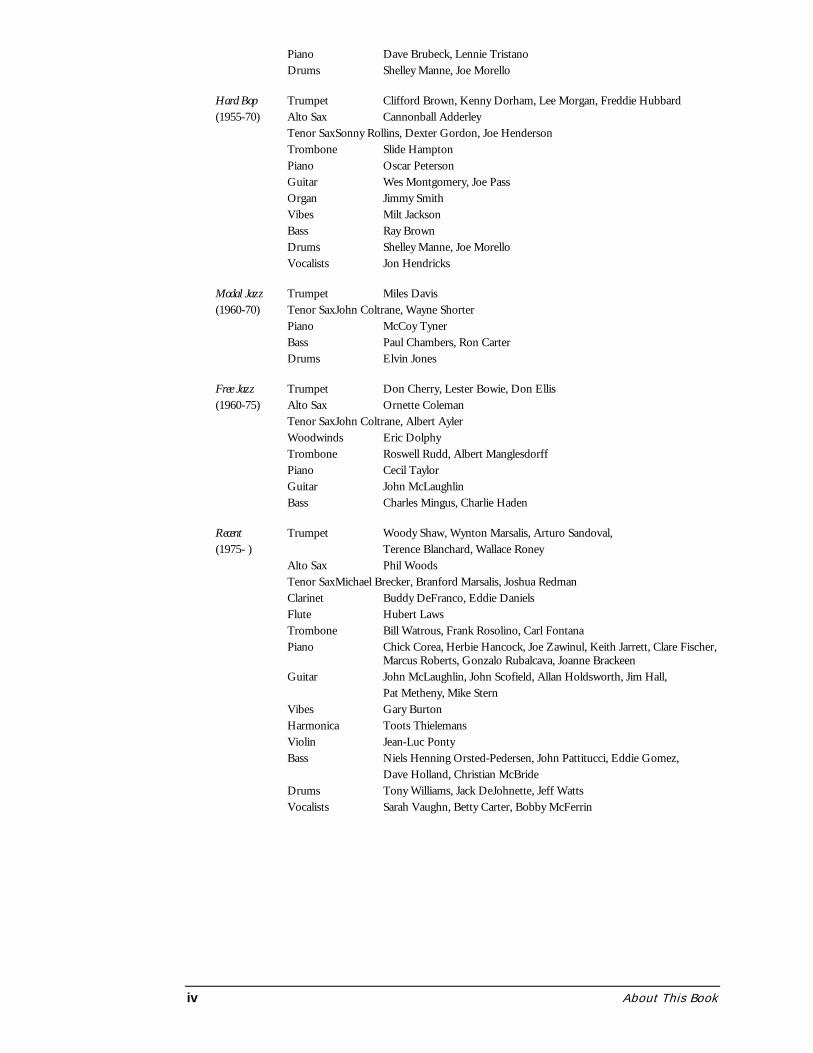
Piano Dave Brubeck, Lennie TristanoDrums Shelley Manne, Joe Morello
Hard Bop Trumpet Clifford Brown, Kenny Dorham, Lee Morgan, Freddie Hubbard(1955-70) Alto Sax Cannonball Adderley
Tenor SaxSonny Rollins, Dexter Gordon, Joe HendersonTrombone Slide HamptonPiano Oscar PetersonGuitar Wes Montgomery, Joe PassOrgan Jimmy SmithVibes Milt JacksonBass Ray BrownDrums Shelley Manne, Joe MorelloVocalists Jon Hendricks
Modal Jazz Trumpet Miles Davis(1960-70) Tenor SaxJohn Coltrane, Wayne Shorter
Piano McCoy TynerBass Paul Chambers, Ron CarterDrums Elvin Jones
Free Jazz Trumpet Don Cherry, Lester Bowie, Don Ellis(1960-75) Alto Sax Ornette Coleman
Tenor SaxJohn Coltrane, Albert AylerWoodwinds Eric DolphyTrombone Roswell Rudd, Albert ManglesdorffPiano Cecil TaylorGuitar John McLaughlinBass Charles Mingus, Charlie Haden
Recent Trumpet Woody Shaw, Wynton Marsalis, Arturo Sandoval,(1975- ) Terence Blanchard, Wallace Roney
Alto Sax Phil WoodsTenor SaxMichael Brecker, Branford Marsalis, Joshua RedmanClarinet Buddy DeFranco, Eddie DanielsFlute Hubert LawsTrombone Bill Watrous, Frank Rosolino, Carl FontanaPiano Chick Corea, Herbie Hancock, Joe Zawinul, Keith Jarrett, Clare Fischer,
Marcus Roberts, Gonzalo Rubalcava, Joanne BrackeenGuitar John McLaughlin, John Scofield, Allan Holdsworth, Jim Hall,
Pat Metheny, Mike SternVibes Gary BurtonHarmonica Toots ThielemansViolin Jean-Luc PontyBass Niels Henning Orsted-Pedersen, John Pattitucci, Eddie Gomez,
Dave Holland, Christian McBrideDrums Tony Williams, Jack DeJohnette, Jeff WattsVocalists Sarah Vaughn, Betty Carter, Bobby McFerrin
Table of ContentsTable of ContentsTable of ContentsTable of Contents
IntroductionIntroductionIntroductionIntroduction
About This Book iWhy I Wrote The Art of Improvisation i
What This Book Is and Isn’t About ... i
About the Author i
Highlights of The Art of Improvisation ii
Other Books I’ve Written ii
Acknowledgments and BRIDJJ ii
Listening to Jazz iii
Some Famous Jazz Improvisers iii
Improvisation Levels and Elements 1About the Five Levels 1
Starting at the Beginning 1
“Sneaking Ahead” 1
Exercises 2
The Seven Elements of Improvisation 2
Making the Seven Elements Work for You 2
Skills You Need 2
Jazz Improvisation Myths 3
Myth #1: You’re Born With It 3
Myth #2: You Need Perfect Pitch 3
Myth #3: You Can’t Practice Without YourInstrument 3
Myth #4: Classical and Jazz Don’t Mix 3
Definitions of Improvisation 4
Q1: How Do You Make It Up? 5
Q2: What Makes It Good or Bad? 5
Bad Habits of Improvisation 5
Q3: What Are Notes? 5
Q4: What about Wrong Notes? 5
Q5: Who Communicates? 6
Q6: What Do You Communicate and How? 6
Jazz Improvisation and Other Arts 6
Painting and Jazz Improvisation 6
Classical Composition and Improvisation 7
Language and Improvisation 7
Standup Comedy and Improvisation 7
Chapter Review 8
Why Learn to Improvise? 9
Self-Expression 9
Creativity 9
Teamwork 9
Values 10
Learning Values through Improvisation 10
#1: Discernment and Wisdom 10
#2: Integrity 10
#3: Leadership 10
#4: Informed Risks 10
#5: Diversity 11
About Creativity 11
The Creative Process 11
Steps in the Creative Process 11
Five Barriers to Creativity 12
Barrier 1: Only One Way to Solve a Problem12
Barrier 2: Our Creation Must Be All “New” 12
Barrier 3: We Don’t Know Materials/Tools 12
Barrier 4: We Don’t Plan or Visualize 13
Barrier 5: We Let Fear and Ego Defeat Us 13
Creative Improvisation 13
Can Improvisation Be Pre-Determined? 13
Improvisation and the Creative Process 14
Chapter Review 14
About the Exercises 11Using the Exercises 15
Variety in Exercises 16
Reviewing Exercises 16
Level 1 - StartingLevel 1 - StartingLevel 1 - StartingLevel 1 - Starting
1A: Using the Virtual Practice Method 191.1 Steps for Virtual Practice 19
Practicing with the Circle of Fourths 20
1.2 Practicing Major Scales 20
Using Flexible Scales 20
1.3 Using Flexible Major Scales 20
1.4 Using Thirds in Flexible Scales 21
More Practice 21
SHAPE: See, Hear, And Play Expressively 21
Using SHAPE 21
Avoiding PHASE 22
Improvising with a Background 22
Chapter Review 22
1B: Chords and Scales 23Understanding Chord Symbols 23
Basic Elements of Chord Symbols 23
Building Major Chords 23
1.5 Spelling the 12 Major Chords 23
1.6 Practicing Major 7 Arpeggios 24
Building Lydian Scales 24
1.7 Spelling The 12 Lydian Scales 24
1.8 Practicing Flexible Lydian Scales 24
Building Dominant Chords and Scales 25
1.9 Spelling the 12 Dominant 7 Chords 25
1.10 Practicing Dominant 7 Chords 25
1.11 Spelling the 12 Mixolydian Scales 25
1.12 Practicing Flexible Mixolydian Scales 25
Building Minor Chords and Scales 26
1.13 Spelling the 12 Minor 7 Chords 26
1.14 Practicing Minor 7 Chords 26
1.15 Spelling the 12 Dorian Scales 26
1.16 Practicing Flexible Dorian Scales 26
More Practice with Flexible Scales and Arpeggios27
1.17 Flexible Scales with Wide Intervals 27
1.18 Flexible Scales with Alternate Rhythms 27
1.19 Flexible Scales: Wider Intervals, AlternateRhythms 28
Chapter Review 28
1C: Melodic Color 19Color Tones 29
1.20 Naming the Color Tones 29
1.21 Emphasizing Color Tones 29
1.22 Using Color Intervals 30
Handling the Fourth Degree 30
1.23 Handling the 4th in Major & Dominant30
Suspended Chords 31
Handling the 4th Degree in Minor 31
Finding Color Tones in Written Music 32
1.24 Color Tones in Transcribed Solos 32
Soloing with Color Tones 32
Soloing with Color Tones & Flexible Scales 32
Chapter Review 32
1D: Rhythmic Variety 33Latin, Fusion, and Swing Styles 33
Latin Style 33
Fusion Style 33
Swing Style 33
Using Offbeats 33
1.25 Emphasizing Offbeats 34
Mixing Offbeats and Downbeats 34
1.26 Consecutive Offbeats: Half-Notes 34
1.27 Consecutive Offbeats: Quarter-Notes 35
1.28 Shifting: Downbeats and Offbeats 35
Playing Interesting Rhythms 36
1.29 Shorter and Longer Values 36
1.30 Using Triplets 36
1.31 Using Triplets with Ties and Rests 37
Using Rhythmic Combinations 37
Virtual Practice Method for Rhythms 38
1.33 Visualizing Rhythms 38
Rhythmic Precision: Thinking Like a Drummer
39
Chapter Review 39
1E: Using Expression 40The Role of Expression 40
Sound and Technique 40
Playing with Expression 40
#1: Subtle and Occasional 40
#2: Varied 41
#3: Well-Timed 41
Using SHAPE for Expression 41
Using Dynamics 41
1.34 Dynamic Variety 41
Varying Accents and Articulations 41
1.35 Using Accents 42
1.36 Using Articulations 42
Chapter Review 42
1F: Developing with Motifs and Phrases 43About Development 43
The Classical Connection 43
Excuses for Not Developing 44
Creating a Motif 44
1.37 Motif Examples 44
Motifs from Tune Melodies 45
Varying a Motif 45
Degrees of Variation 45
1.38 Varying Motifs 45
1.39 Developing Earlier Motifs 46
Creating Phrases 46
1.40 Phrase Types 46
1.41 Connecting Motifs 47
How to End Phrases 48
Economizing 48
Dealing with Silence 48
Eliminating Phrase Barriers 49
1.43 Phrase Barriers 49
Development Exercises, Level 1 49
Chapter Review 50
1G: Chords, Keys, and Progressions 51Chords in Major Keys 51
1.44 Using Roman Numerals in a Key 51
Recognizing Keys in Chord Progressions 52
1.45 Tips for Recognizing Keys 52
The Basic Blues 52
1.46 Blues Structure 52
Using Blues Scales 53
1.47 Spelling the 12 Blues Scales 53
1.48 Practicing Flexible Blues Scales 53
Avoiding Common Blues Scale Problems 54
ii-V-I Progressions 54
1.49 Building a ii-V-I Progression 54
1.50 Prefacing a ii-V-I 54
Simplifying Chord Progressions 54
1.51 Practice for Simplifying Chords 55
Disadvantages of Simplifying 55
Chapter Review 55
1H: The Jazz Group 56Group Performance Skills 56
Time 56
Balance and Dynamics 56
Chord Reading 57
Styles and Rhythmic Ideas 57
Interaction and Teamwork 57
Rhythm Section Roles 57
The Chords 57
The Bass 57
The Drums 58
The Tune Melody 58
Tune Melodies on the BRIDJJ CD 58
Chapter Review 58
1J: Analyzing Solos 59Evaluating Your Own Solos 59
Creating, Then Criticizing 59
Four Goals for Improving Your Solos 59
1.52 Practicing for Melody 60
1.53 Practicing for Rhythm 60
1.54 Practicing for Expression 60
About Sound and Technique 61
1.55 Practicing for Development 61
Analyzing Other Artists’ Solos 61
Chapter Review 62
Rhythm Section Techniques 63Chord Techniques 63
Chord Inversions 63
Chord Voicings for Left Hand 63
Chord Voicings for Two Hands 64
Keyboard and Guitar Styles on BRIDJJ CD 64
Bass Techniques 65
Building a Walking Bass Line 65
Bass Styles on the BRIDJJ CD 65
Drumset Techniques 66
Basic Drum Styles 66
Drum Styles on the BRIDJJ CD 67
Variety and Interaction 68
Individual Variety 68
Group Variety 68
Interaction: Rhythm Section and Soloist 68
Vocal Improvisation Skills – Part 1 69An Approach to Vocal Improvisation 69
Thinking More Instrumentally 69
10 Bad Habits and 10 Better Habits: 69
Virtual Practice for Vocalists 70
Reviewing SHAPE 71
Virtual Rhythm Practice 71
Virtual Pitch Practice 71
Basic Vowels and Consonants 72
Examples 72
Priorities 72
Exercises for Level 1 73Melody: Virtual Practice 73
Melody: Chords and Scales 74
Melody: Melodic Color 77
Rhythm: Rhythmic Variety 78
Expression: Using Expression 80
Development: with Motifs and Phrases 81
Chord Progressions: Chords and Keys 83
Analysis: Analyzing Your Own Solos 85
Table of ContentsTable of ContentsTable of ContentsTable of Contents
Level 2 - ApprenticeLevel 2 - ApprenticeLevel 2 - ApprenticeLevel 2 - Apprentice2A: More Scales 89
Pentatonic Scales 89
2.1 Spelling The 12 Pentatonic Scales 89
2.2 Practicing Flexible Pentatonic Scales 89
Expanded Blues Scales 89
2.3 Spelling the 12 Expanded Blues Scales 89
2.4 Flexible Expanded Blues Scales 90
Lydian Dominant Scales 90
2.5 Spelling Lydian Dominant Scales 90
2.6 Flexible Lydian Dominant Scales 91
Minor Pentatonic Scales 91
2.7 Spelling The Minor Pentatonic Scales 91
2.8 Flexible Minor Pentatonic Scales 91
Melodic Minor Ascending Scales 91
2.10 Flexible Melodic Minor Asc. Scales 92
2.11 Handling the 7th in Minor 92
Chapter Review 92
2B: Melodic Shapes 93Naming Intervals 93
2.12 Interval Types 93
C Major Intervals 93
C Minor Intervals 94
Hearing and Playing Intervals 94
2.13 Stepping Between Intervals 94
2.14 Building Interval Skills 94
2.15 Transposing Tunes 95
Range and Neighborhoods 95
Visualizing Range 95
2.16 Seeing Neighborhoods 95
2.17 Switching Ranges 96
Variety in Contours 96
2.18 Contour Guidelines 96
Up and Down: Tension and Release 96
2.19 Flattening Contours 97
2.20 The Outer Ranges 97
2.21 Offset Contours 98
Using Fills 98
2.22 Partial and Complete Fills 98
2.23 Delayed Fills 98
2.24 Winding Fills 99
Chapter Review 99
2C: Swing Rhythms 100Learning the Swing Style 100
Listening: The Traditional Approach 100
Teaching by Rote: The Limited Approach 100
Swing Rhythm and Articulation Guidelines 100
2.25 Quarter-Notes and Quarter-Rests 100
2.26 Eighth-Notes and Eighth-Rests 101
2.27 Eighth-Note Articulations 102
2.28 Dotted Quarters and Longer Notes 103
2.29 Written Triplets 104
Swing Accent Guidelines 104
2.30 Accent Guidelines 104
Variations in Swing 105
Using Even Eighth-Notes in Swing 105
2.32 Laying Back on the Tempo 105
Swing Exceptions 106
Chapter Review 106
Sample Answers: Triplets and Articulations 106
2D: Three and Four 1083-Against-4 108
2.33 Playing 3/4 Rhythms in 4/4 Tunes 108
2.34 3-Note or 6-Note Contours 109
Triplet Contours 110
2.35 Playing Triplet Contours of 2 110
2.36 Playing Triplet Contours of 4 110
4-Against-3 111
2.37 Playing 4/4 Rhythms in a 3/4 Tune 111
2.38 4-note Contours in a 3/4 Tune 111
2.39 4-note Brackets in a 3/4 Tune 111
Chapter Review 112
2E: Embellishments 113Trills 113
2.40 Using Trills 113
2.41 Wider Trills 113
Grace Notes 114
2.42 Using Grace Notes 114
Turns 114
2.43 Using Turns 114
Neighbor Tones 114
More About Expression 115
“I Remember You” - Marcus Roberts 115
“The Seductress” - Wynton Marsalis 115
“J.C. on the Set” - James Carter 115
“Spain” - Bobby McFerrin 115
Chapter Review 116
2F: Melodic Development 117Expanding Intervals 117
2.45 Types of Expanding Intervals 117
Raising the Top Note 117
Lowering the Bottom Note 118
Raising the Top and Lowering the Bottom 118
Raising Both or Lowering Both 118
Shrinking Intervals 119
2.46 Ways to Shrink Intervals 119
Omitting Ending Notes 120
2.47 Ways to Omit Ending Notes 120
Adding Notes 120
2.48 Ways to Add Notes to a Motif 120
Inverting Contours 121
2.49 Ways to Invert a Contour 121
Retrograde 122
Chapter Review 122
Development Exercises: Level 2 1232G: Tune Forms 126
Learning the Form of the Tune 126
2.51 Seeing the Tune Form 126
Common Tune Forms 127
AABA Form 127
2.52 Recognizing AABA Tunes 127
2.53 Recognizing “I Got Rhythm” Tunes 128
Other Common Tune Forms 128
A B (or A A’) - “Summer Dime” 129
ABC - “Sole R” 129
ABAC - “Some Day My Prints Will Come” 129
Chapter Review 129
2H: Preparing Concert Material 130Handling the Tune Melody 130
2.55 One Player on Melody 130
Melody Plus Background Line 130
Two or More Players on Melody 130
2.56 Ending the Tune 131
Building Effective Tune Sets 131
Set Length 132
Balance 132
Order of Tunes 132
More Variety in Tune Sets 133
Deciding Solo Order 133
What Is There to Say? 133
Chapter Review 134
2J: Analyzing Written Solos 135Analysis Levels 135
Steps for Analysis 135
1: Selecting a Written Solo 135
2: Finding the Form and Phrases 136
3: Finding Motifs and Developments 136
4: Finding Other Interesting Spots 136
Sample Solos to Analyze 136
Chapter Review 136
Exercises for LEVEL 2 139Melody: More Scales 139
Melody: Melodic Shapes 141
Rhythm: Swing Rhythms 143
Rhythm: Three and Four 144
Expression: Embellishments 145
Development: Melodic Development 145
Chord Progressions: Tune Forms 146
Performance: Preparing Concert Material 147
Level 3 - IntermediateLevel 3 - IntermediateLevel 3 - IntermediateLevel 3 - Intermediate3A: More Melodic Color 151
Using Non-Harmonic Tones 151
3.1 Resolving Non-Harmonic Tones 151
3.2 Non-Harmonic Tones On/Off Beat 151
3.3 Using the Chromatic Scale 152
3.4 Non-Harmonic Tones in Minor 152
3.5 Non-Harmonic Tone in Dominant 153
Harmonic Minor and Natural Minor Scales 153
3.6 Learning the Harmonic Minor Scales 153
3.7 Natural Minor Scales 153
3.8 Handling the Flat 6th in Minor 154
Chapter Review 154
3B: Melodic Connections 155Consecutive Chords of One Type 155
About Melodic Resolution 155
Melodic Resolution Intervals 155
Problems Solved by Melodic Resolution 156
How to Use Melodic Resolution 156
3.9 Steps for Melodic Resolution 156
Basic Practice Method (Whole Notes) 157
3.10 Variation #1: Least Movement 158
3.11 Variation #2: Moving Up 158
3.12 Variation #3: Moving Down 158
3.13 Melodic Resolution w/Other Rhythms158
Chord Anticipation 159
3.14 Anticipating Chords 159
Chord Delay 159
3.16 Avoiding Chords (Pedal) 160
Chapter Review 160
3C: Fusion and Latin Styles 161About Jazz Fusion 161
Jazz/Rock Fusion 161
Latin Jazz 162
Characteristics of Jazz Fusion 162
Jazz Fusion Artists 162
Jazz Fusion Pioneers 163
Recent Fusion Artists 163
Some Interesting Possibilities 164
Styles Around the World 164
Latin Rhythms and Clave 164
3.18 Rhythms Over Clave 165
Rhythms Over the Son Clave 166
Rhythms Over the Brazilian Clave 166
3.19 Building Your Own Combinations 167
Montunos and Guajeos 167
Chapter Review 168
3D: Melodic Patterns 169About Patterns 169
Weak Approach: Patterns as a Crutch 169
Better: Patterns for Development 169
Using Sequences 169
3.21 Diatonic Sequences 170
3.22 Transposed Sequences 170
3.23 Semi-Sequences 171
Creating Patterns 171
3.24 Creating Your Own Patterns 171
3.25 Linking Sequences 172
Melodic Variety in Patterns 173
3.26 Using Longer Motifs and Sequences 173
3.27 “Pulling” Patterns 173
3.28 Non-Harmonic Tones in Sequences 174
Rhythmic Variety in Patterns 174
3.29 Using Other Rhythms 175
3.30 Offset Patterns 175
Short Patterns 176
2-Note Sequences and Patterns 176
3-Note Sequences and Patterns 176
Chapter Review 177
3E: Rhythmic Development 178Augmenting Rhythms 178
3.33 Augmenting by Other Amounts 178
Compressing Rhythms 179
3.35 Compressing by Other Amounts 180
Fragmenting Motifs 180
Displacing Motifs 181
Chapter Review 182
3F: Dominant Alterations 186Altered Dominant Chords 186
3.38 Dominant Alterations 186
3.39 Humming Dominant Alterations 187
Adding Alterations 187
3.41 Other Altered Tones 187
Whole-Tone Scales 188
3.42 Learning Whole-Tone Scales 188
Minor Chord Progressions 188
3.43 Minor ii-V-I’s & Harmonic Minor Scales188
3.44 Minor Blues 189
3.45 Substitute i Chords in Minor 189
Diminished Chords and Scales 190
3.47 Learning the Diminished-1 Scales 190
3.48 Diminished Whole-Tone Scales 190
3.49 Substituting Dominant for Diminished191
Chapter Review 191
3G: Learning Standard Tunes 192Learning the Tune Melody 192
Steps for Memorizing Progressions 192
Using Bass Cheater Notes 193
Singing the Bass Line 194
3.52 Memorizing the Chord Symbols 195
Adding Other Tones 195
3.53 Adding Arpeggio Tones 195
3.54 Adding Color Tones 195
3.55 Adding Flexible Scale Notes 196
Improvising on Your Own 196
Unaccompanied Improvisation 197
Chapter Review 197
3H: Soloing Live 198The Psychology of Performance 198
Relaxed Concentration 198
Performance Proverbs 198
About the Audience 198
How the Audience Views Us 199
How We View the Audience 199
Performance Tips 200
1: Develop a Good Stage Presence 200
2: Hear and See What You Need 200
3: Play Under Control 200
4: Play Rhythms Securely 201
5: Play Pitches Securely 201
6: Play Solo Breaks Cleanly 201
7: Don’t Be Fooled by Audience Reactions 201
Chapter Review 202
3J: Analyzing Solos – Level 3 203More Vocal Improv Skills 207
Review of Vocal Improv Skills in Level 1 207
Additional Vocal Skills 208
Good Sound Quality 208
Extended Range 208
Flexibility 208
Vowels and Consonants 208
Vowel Sounds 208
Consonant Sounds 209
Language Sounds 209
Vocal Effects 210
Words and Phrases 210
Words and Natural Rhythms 211
Instrumental Sounds 211
Horn Sounds 211
Guitar Sounds, Bass Sounds 211
Drum Sounds, Other Sounds 212
Exercises for LEVEL 3 213Melody: More Melodic Color 213
Melody: Melodic Resolution 214
Rhythm: Fusion and Latin Styles 216
Development: Melodic Patterns 217
Development: Rhythmic Development 220
Chord Progressions: Dominant Alterations 221
Performance: Learning Standard Tunes 224
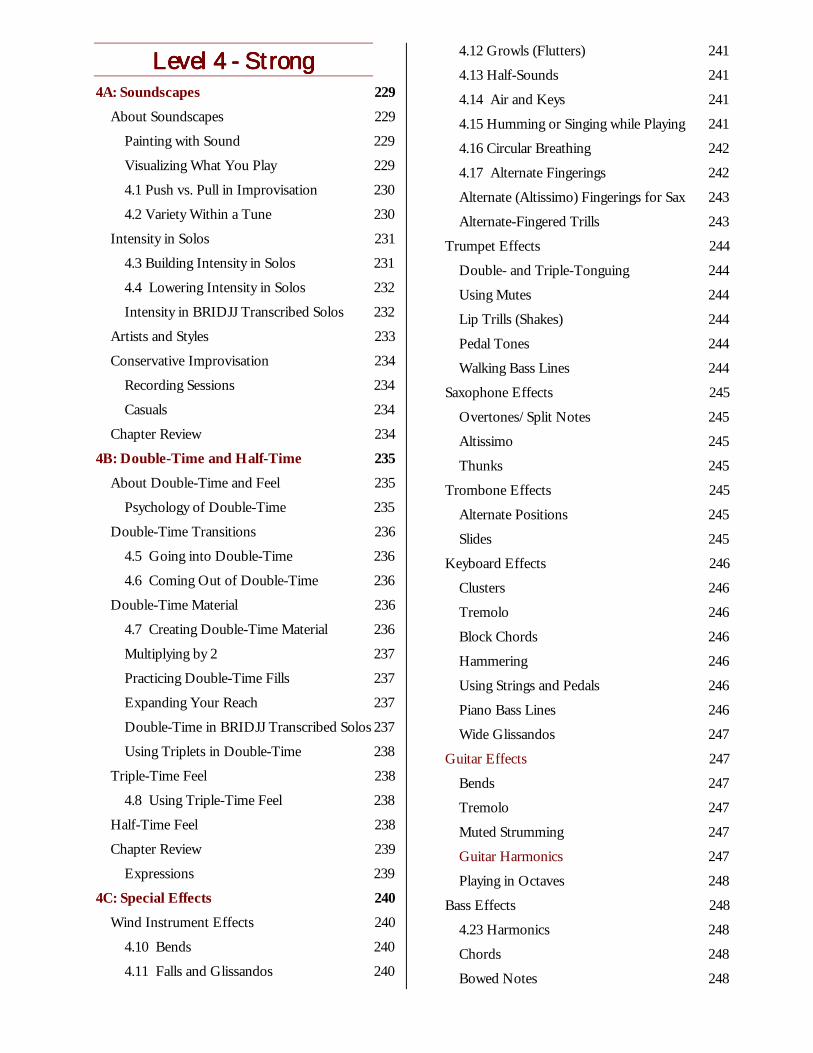
Level 4 - StrongLevel 4 - StrongLevel 4 - StrongLevel 4 - Strong4A: Soundscapes 229
About Soundscapes 229
Painting with Sound 229
Visualizing What You Play 229
4.1 Push vs. Pull in Improvisation 230
4.2 Variety Within a Tune 230
Intensity in Solos 231
4.3 Building Intensity in Solos 231
4.4 Lowering Intensity in Solos 232
Intensity in BRIDJJ Transcribed Solos 232
Artists and Styles 233
Conservative Improvisation 234
Recording Sessions 234
Casuals 234
Chapter Review 234
4B: Double-Time and Half-Time 235About Double-Time and Feel 235
Psychology of Double-Time 235
Double-Time Transitions 236
4.5 Going into Double-Time 236
4.6 Coming Out of Double-Time 236
Double-Time Material 236
4.7 Creating Double-Time Material 236
Multiplying by 2 237
Practicing Double-Time Fills 237
Expanding Your Reach 237
Double-Time in BRIDJJ Transcribed Solos 237
Using Triplets in Double-Time 238
Triple-Time Feel 238
4.8 Using Triple-Time Feel 238
Half-Time Feel 238
Chapter Review 239
Expressions 239
4C: Special Effects 240Wind Instrument Effects 240
4.10 Bends 240
4.11 Falls and Glissandos 240
4.12 Growls (Flutters) 241
4.13 Half-Sounds 241
4.14 Air and Keys 241
4.15 Humming or Singing while Playing 241
4.16 Circular Breathing 242
4.17 Alternate Fingerings 242
Alternate (Altissimo) Fingerings for Sax 243
Alternate-Fingered Trills 243
Trumpet Effects 244
Double- and Triple-Tonguing 244
Using Mutes 244
Lip Trills (Shakes) 244
Pedal Tones 244
Walking Bass Lines 244
Saxophone Effects 245
Overtones/Split Notes 245
Altissimo 245
Thunks 245
Trombone Effects 245
Alternate Positions 245
Slides 245
Keyboard Effects 246
Clusters 246
Tremolo 246
Block Chords 246
Hammering 246
Using Strings and Pedals 246
Piano Bass Lines 246
Wide Glissandos 247
Guitar Effects 247
Bends 247
Tremolo 247
Muted Strumming 247
Guitar Harmonics 247
Playing in Octaves 248
Bass Effects 248
4.23 Harmonics 248
Chords 248
Bowed Notes 248
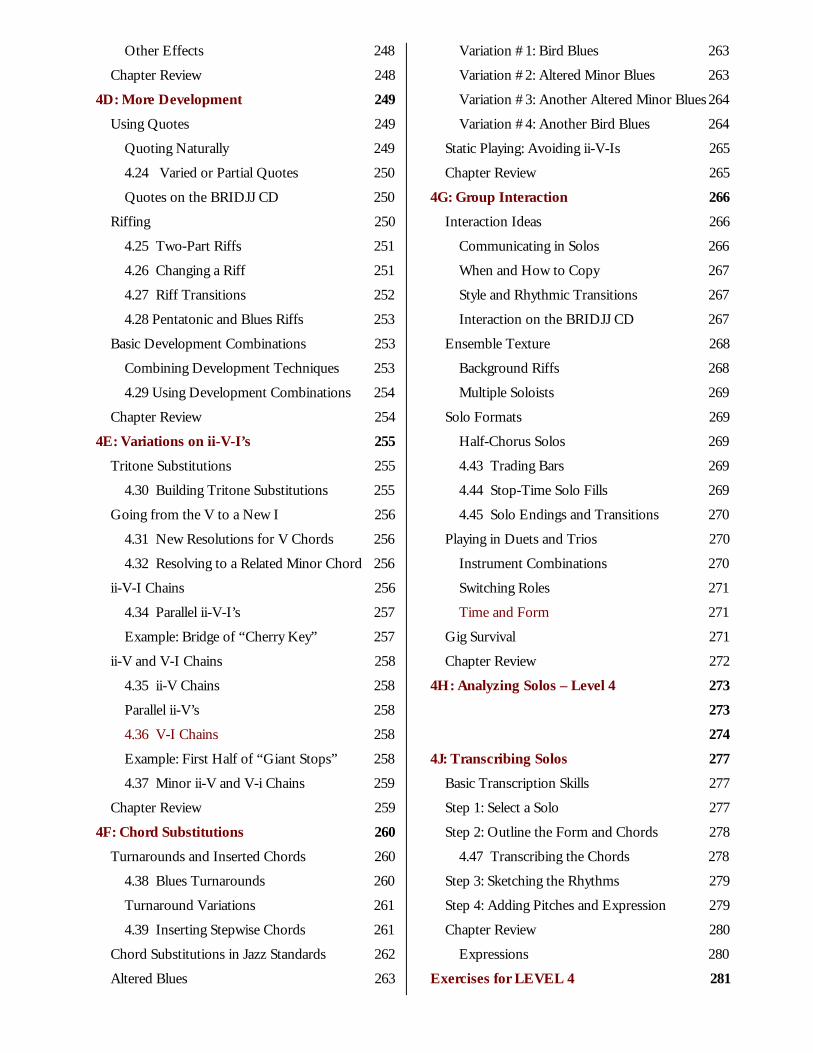
Other Effects 248
Chapter Review 248
4D: More Development 249Using Quotes 249
Quoting Naturally 249
4.24 Varied or Partial Quotes 250
Quotes on the BRIDJJ CD 250
Riffing 250
4.25 Two-Part Riffs 251
4.26 Changing a Riff 251
4.27 Riff Transitions 252
4.28 Pentatonic and Blues Riffs 253
Basic Development Combinations 253
Combining Development Techniques 253
4.29 Using Development Combinations 254
Chapter Review 254
4E: Variations on ii-V-I’s 255Tritone Substitutions 255
4.30 Building Tritone Substitutions 255
Going from the V to a New I 256
4.31 New Resolutions for V Chords 256
4.32 Resolving to a Related Minor Chord 256
ii-V-I Chains 256
4.34 Parallel ii-V-I’s 257
Example: Bridge of “Cherry Key” 257
ii-V and V-I Chains 258
4.35 ii-V Chains 258
Parallel ii-V’s 258
4.36 V-I Chains 258
Example: First Half of “Giant Stops” 258
4.37 Minor ii-V and V-i Chains 259
Chapter Review 259
4F: Chord Substitutions 260Turnarounds and Inserted Chords 260
4.38 Blues Turnarounds 260
Turnaround Variations 261
4.39 Inserting Stepwise Chords 261
Chord Substitutions in Jazz Standards 262
Altered Blues 263
Variation #1: Bird Blues 263
Variation #2: Altered Minor Blues 263
Variation #3: Another Altered Minor Blues 264
Variation #4: Another Bird Blues 264
Static Playing: Avoiding ii-V-Is 265
Chapter Review 265
4G: Group Interaction 266Interaction Ideas 266
Communicating in Solos 266
When and How to Copy 267
Style and Rhythmic Transitions 267
Interaction on the BRIDJJ CD 267
Ensemble Texture 268
Background Riffs 268
Multiple Soloists 269
Solo Formats 269
Half-Chorus Solos 269
4.43 Trading Bars 269
4.44 Stop-Time Solo Fills 269
4.45 Solo Endings and Transitions 270
Playing in Duets and Trios 270
Instrument Combinations 270
Switching Roles 271
Time and Form 271
Gig Survival 271
Chapter Review 272
4H: Analyzing Solos – Level 4 273273274
4J: Transcribing Solos 277Basic Transcription Skills 277
Step 1: Select a Solo 277
Step 2: Outline the Form and Chords 278
4.47 Transcribing the Chords 278
Step 3: Sketching the Rhythms 279
Step 4: Adding Pitches and Expression 279
Chapter Review 280
Expressions 280
Exercises for LEVEL 4 281

Melody: Soundscapes 281
Rhythm: Double-Time and Half-Time 282
Expression: Special Effects 283
Development: More Melodic Development 285
Chord Progressions: Variations on ii-V-I’s 287
4 Performance: Group Interaction 290
Analysis: Transcribing Solos 290
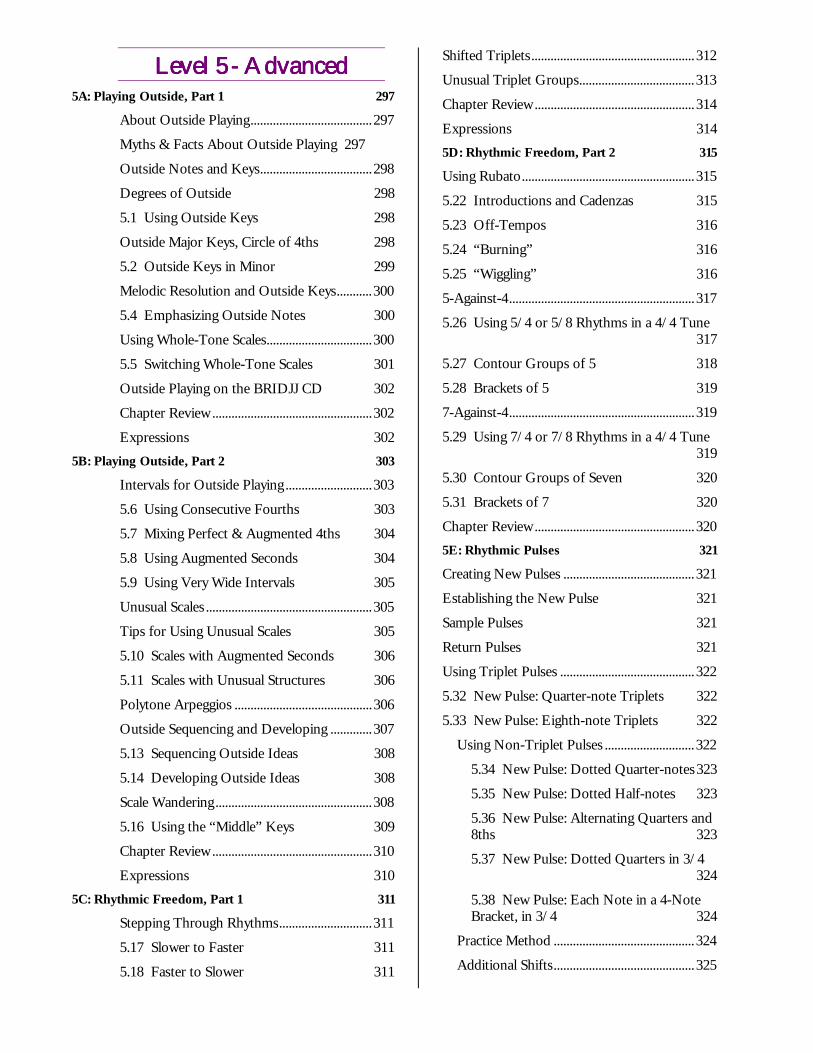
Level 5 - AdvancedLevel 5 - AdvancedLevel 5 - AdvancedLevel 5 - Advanced5A: Playing Outside, Part 1 297
About Outside Playing...................................... 297
Myths & Facts About Outside Playing 297
Outside Notes and Keys................................... 298
Degrees of Outside 298
5.1 Using Outside Keys 298
Outside Major Keys, Circle of 4ths 298
5.2 Outside Keys in Minor 299
Melodic Resolution and Outside Keys........... 300
5.4 Emphasizing Outside Notes 300
Using Whole-Tone Scales................................. 300
5.5 Switching Whole-Tone Scales 301
Outside Playing on the BRIDJJ CD 302
Chapter Review .................................................. 302
Expressions 3025B: Playing Outside, Part 2 303
Intervals for Outside Playing ........................... 303
5.6 Using Consecutive Fourths 303
5.7 Mixing Perfect & Augmented 4ths 304
5.8 Using Augmented Seconds 304
5.9 Using Very Wide Intervals 305
Unusual Scales .................................................... 305
Tips for Using Unusual Scales 305
5.10 Scales with Augmented Seconds 306
5.11 Scales with Unusual Structures 306
Polytone Arpeggios ........................................... 306
Outside Sequencing and Developing ............. 307
5.13 Sequencing Outside Ideas 308
5.14 Developing Outside Ideas 308
Scale Wandering................................................. 308
5.16 Using the “Middle” Keys 309
Chapter Review .................................................. 310
Expressions 3105C: Rhythmic Freedom, Part 1 311
Stepping Through Rhythms............................. 311
5.17 Slower to Faster 311
5.18 Faster to Slower 311
Shifted Triplets................................................... 312
Unusual Triplet Groups.................................... 313
Chapter Review.................................................. 314
Expressions 3145D: Rhythmic Freedom, Part 2 315
Using Rubato...................................................... 315
5.22 Introductions and Cadenzas 315
5.23 Off-Tempos 316
5.24 “Burning” 316
5.25 “Wiggling” 316
5-Against-4.......................................................... 317
5.26 Using 5/4 or 5/8 Rhythms in a 4/4 Tune317
5.27 Contour Groups of 5 318
5.28 Brackets of 5 319
7-Against-4.......................................................... 319
5.29 Using 7/4 or 7/8 Rhythms in a 4/4 Tune319
5.30 Contour Groups of Seven 320
5.31 Brackets of 7 320
Chapter Review.................................................. 3205E: Rhythmic Pulses 321
Creating New Pulses ......................................... 321
Establishing the New Pulse 321
Sample Pulses 321
Return Pulses 321
Using Triplet Pulses .......................................... 322
5.32 New Pulse: Quarter-note Triplets 322
5.33 New Pulse: Eighth-note Triplets 322
Using Non-Triplet Pulses ............................ 322
5.34 New Pulse: Dotted Quarter-notes323
5.35 New Pulse: Dotted Half-notes 323
5.36 New Pulse: Alternating Quarters and8ths 323
5.37 New Pulse: Dotted Quarters in 3/4324
5.38 New Pulse: Each Note in a 4-NoteBracket, in 3/4 324
Practice Method ............................................ 324
Additional Shifts............................................ 325

Group Shifts .................................................. 325
Chapter Review ............................................. 326
Expressions 3265F: More Development Combinations 327
Sources for Motifs ........................................ 327
Variations........................................................ 328
Combinations and Examples ...................... 3295G: Free Improvisation 331
About Free Improvisation........................... 331
Degrees of “Free” ......................................... 331
5.42 Using Themes 331
Group Interaction 332
Free Melody and Harmony ......................... 332
Playing Free Melodies 332
5.39 Playing Free Harmonies 332
Free Rhythm .................................................. 333
Free Jazz ......................................................... 333
Chapter Review ............................................. 333
Expressions 333Exercises for LEVEL 5 334
Melody: Playing Outside.......................... 334
Rhythm: Rhythmic Freedom.................. 338
5 Rhythm: Rhythmic Pulses.................... 342
Louis Armstrong Bix Beiderbecke Sidney BechetJohnny Dodds Kid Ory Jack Teagarden Scott Joplin
Jelly Roll Morton Earl Hines Fats Waller James Johnson Eddie Lang BessieSmith Roy Eldridge “Sweets” Edison
IntroductionIntroductionIntroductionIntroduction• Improvisation Levels and Elements •
• Values and Creativity •
• About the Exercises •
Cootie Williams Lester Young Coleman HawkinsBen Webster Johnny Hodges Benny Carter Benny Goodman Jimmy Dorsey
Artie Shaw Tommy Dorsey Art TatumDuke Ellington Count Basie Charlie Christian
(Introduction) Improvisation Levels and Elements • 1111
Improvisation Levels and ElementsImprovisation Levels and ElementsImprovisation Levels and ElementsImprovisation Levels and Elements
The topics for this chapter are:
• About the Five Levels• The Seven Elements of Improvisation• Skills You Need• Jazz Improvisation Myths• Definitions of Improvisation• Jazz Improvisation and Other Arts
About the Five Levels
his book is based on Five Levels of improvisation skills, from starting to advanced. Thesections in this book guide you through these levels.
• Level 1 - Starting. This is where it all begins. You’ll learn basic keys, scales and chords,and how to create and develop imaginative improv ideas.
• Level 2 - Apprentice. In this level, you’ll learn the tools for improvising in basic jazz tunes,including swing rhythms and melodic shapes.
• Level 3 - Intermediate. Here you’ll deepen your skills of development, patterns, andrhythmic variety to create more solid improvisations.
• Level 4 - Strong. In this level you’ll use musical tools with confidence and ingenuity tobuild fine solos. You learn to interact strongly, execute cleanly, and develop creatively,from subtle ideas to flights of fancy.
• Level 5 - Advanced. As an advanced improviser you’ll master more difficult approaches,including rhythmic freedom and outside playing, and integrate them successfully in yoursolos.
The chapters and topics for the five levels are listed in the Table of Contents.
Starting at the BeginningStarting at the BeginningStarting at the BeginningStarting at the BeginningLooking at the Five Levels, you probably have a feeling for which level applies to you. Butregardless of your current level, there are definite advantages to reading this book from thebeginning. For example, few improvisers at any level are familiar with the Virtual PracticeMethod, and that’s explained in Level 1. So by starting at the beginning, you can pick upnew ideas and skills and skip over material you already know.
“Sneaking Ahead”“Sneaking Ahead”“Sneaking Ahead”“Sneaking Ahead”If you skip on to later topics in the book, remember:
• Most topics in higher levels assume you’ve learned the topics and skills from previouslevels.
• Although you can read through this book quickly enough, it takes time and practice toreally master the concepts and use them in your solos.
T
2222 • Improvisation Levels and Elements (Introduction)
ExercisesExercisesExercisesExercisesThe Exercises section at the end of each volume is a complete, practical study guide forimprovisation. You can use the exercises to track your own progress, or you can share themwith your improv students as a lesson plan to follow. For study convenience, each exerciseis numbered to match a corresponding spot in the book. For example:
���Exercise 1.1 Virtual Practice for the C Major Scale
For instructions on how to use the exercises, see About the Exercises at the end of thisIntroduction and read the Exercises section at the end of each Level.
The Seven Elements of Improvisation
The Seven Elements of jazz improvisation have initials that conveniently spell out “MR. ED,CPA:”
1) M elody2) R hythm3) E xpression4) D evelopment5) C hord progressions6) P erformance7) A nalysis
These initials should be pretty easy to remember. As you work on the seven elements inyour daily practice, you’ll create exciting, artistic solos. These Seven Elements are the foundation ofeach of the Five Levels of improvisation.
Making the Seven Elements Work for YouMaking the Seven Elements Work for YouMaking the Seven Elements Work for YouMaking the Seven Elements Work for YouJust skimming through this book won’t help you progress to new levels. You must also usethe 3 “E’s”:
1) Explanations: Carefully read and understand the paragraphs that explain each conceptand skill.
2) Examples: Study and try the musical examples in each chapter and transpose them toother keys.
3) Exercises: Try each exercise. There are usually three versions of each exercise: Basic,Medium, and Challenge. Do all three versions, then vary them.
Skills You Need
This book is for improvisers of all skill levels, beginning to advanced. To get the most fromthis book, you should start by having or developing these skills:
• Music reading – Read music in one or more clefs, including pitches and basic rhythms.From a pitch, accurately sing up or down a whole- or half-step.
• Scales and arpeggios – Have a basic mastery of them, at least the major scales andarpeggios in the easier keys.
• Sound and technique – Work on your sound and technique so your improv ideas can flow.• Intervals – Recognize, hear, sing, and play intervals, at least major and minor seconds.
(Introduction) Improvisation Levels and Elements • 3333
• Desire – Have the desire to understand and create better improvisation, with new toolsand ideas.
Now we’ll discuss what jazz improvisation is and what it isn’t. It’s no mystery, but it’smagically fun.
Jazz Improvisation Myths
Let’s begin by discussing what jazz improvisation isn’t. Here are four common myths aboutjazz improv:
1) “Jazz improv is something you’re born with, not something you learn.”2) “Jazz improv requires perfect pitch.”3) “You can’t practice without an instrument.”4) “Classical and jazz have little in common.”
Myth #1: You’re Born With ItMyth #1: You’re Born With ItMyth #1: You’re Born With ItMyth #1: You’re Born With ItAlthough jazz improv is a universal language, we’re not born with it. But almost anyone canlearn basic improv skills (listening, ear training, theory, instrumental or voice techniques);some people learn faster than others.
Some very good improvisers start later in life, but all good improvisers pay their dues bystudying the works of the great jazz soloists. You need to constantly develop your listeningskills, your sound and technique, and your desire to create better solos, or your progress willbe blocked from time to time.
Myth #2: You Need Perfect PitchMyth #2: You Need Perfect PitchMyth #2: You Need Perfect PitchMyth #2: You Need Perfect PitchYou don’t need perfect pitch (although it usually doesn’t hurt). But you do need good relativepitch, to recognize and remember intervals you hear. Accurately hearing intervals is one ofthe keys to improvisation; it’s a skill you can gain and develop. It can be as simple asmatching pitches with a keyboard or recording, or as involved as a full-fledged ear-trainingcourse. Unfortunately, many improvisers don’t spend adequate time developing relativepitch, so they hit roadblocks in hearing and creating ideas. The Art of Improvisation givesyou plenty of material for developing good relative pitch.
Myth #3: You Can’t Practice Without Your InstrumentMyth #3: You Can’t Practice Without Your InstrumentMyth #3: You Can’t Practice Without Your InstrumentMyth #3: You Can’t Practice Without Your InstrumentSo what’s your instrument? The most neglected but perhaps most powerful jazz instrumentis the human voice. Jazz instrumentalists who know how to practice vocally can practicelonger hours (such as in the car, in the shower, etc.) and can try new melodies and rhythmsthat are difficult at first on an instrument. Vocal practice can include humming, whistling, orjust mentally hearing the notes you want to improvise.
It’s important to know how to practice improv vocally, even if you’re a “bad” singer. (Youmay even improve your voice in the process.) Singing or humming improv lines lets youconcentrate on capturing pitches and rhythms without fighting an instrument; then you cantransfer the vocal ideas to your instrument later. This book shows you how to use theVirtual Practice Method to help you practice improvisation vocally and instrumentally.
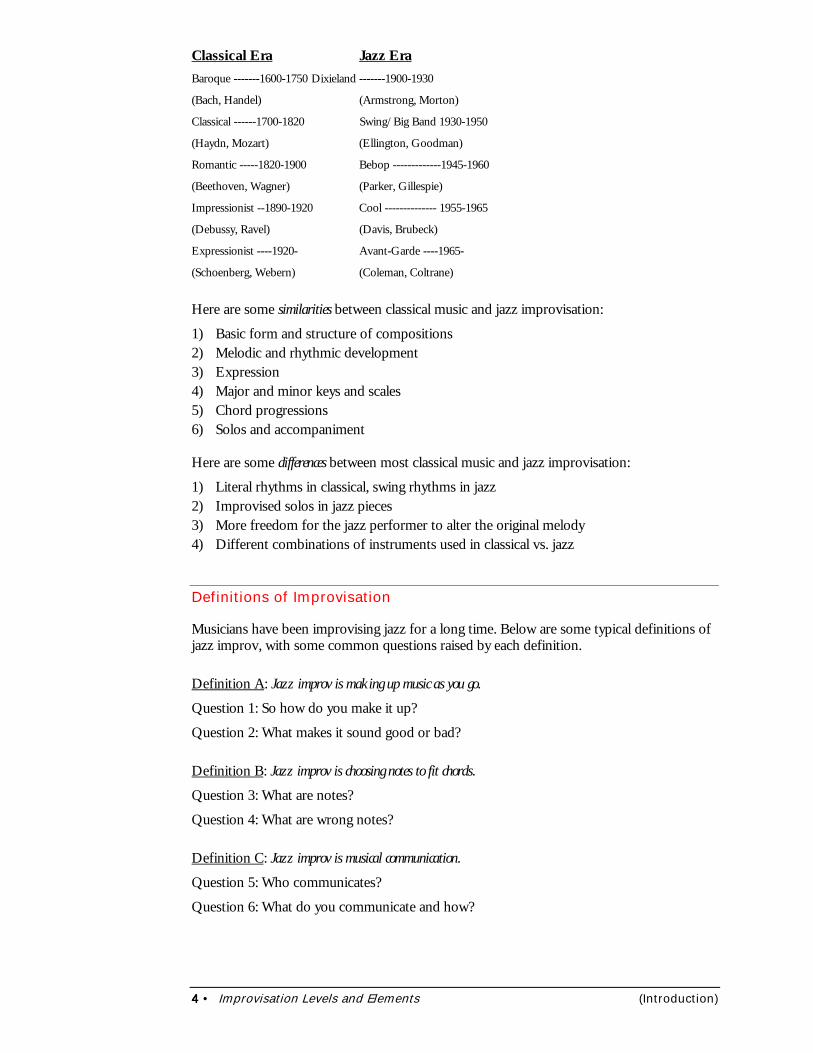
Myth #4: Classical and Jazz Don’t MixMyth #4: Classical and Jazz Don’t MixMyth #4: Classical and Jazz Don’t MixMyth #4: Classical and Jazz Don’t MixActually, they do mix; jazz and classical music have some similar elements. There are somevery interesting parallels in the histories of classical and jazz musics. Understanding theseparallels enriches your improv skills, helps you play the right styles for the right tunes, andhelps you appreciate music of great jazz improvisers. This is a strong hint for the importance ofstudying jazz history. Here are the historical parallels, with times and composers:
4444 • Improvisation Levels and Elements (Introduction)
Classical Era Jazz EraBaroque -------1600-1750 Dixieland -------1900-1930
(Bach, Handel) (Armstrong, Morton)
Classical ------1700-1820 Swing/Big Band 1930-1950
(Haydn, Mozart) (Ellington, Goodman)
Romantic -----1820-1900 Bebop -------------1945-1960
(Beethoven, Wagner) (Parker, Gillespie)
Impressionist --1890-1920 Cool -------------- 1955-1965
(Debussy, Ravel) (Davis, Brubeck)
Expressionist ----1920- Avant-Garde ----1965-
(Schoenberg, Webern) (Coleman, Coltrane)
Here are some similarities between classical music and jazz improvisation:
1) Basic form and structure of compositions2) Melodic and rhythmic development3) Expression4) Major and minor keys and scales5) Chord progressions6) Solos and accompaniment
Here are some differences between most classical music and jazz improvisation:
1) Literal rhythms in classical, swing rhythms in jazz2) Improvised solos in jazz pieces3) More freedom for the jazz performer to alter the original melody4) Different combinations of instruments used in classical vs. jazz
Definitions of Improvisation
Musicians have been improvising jazz for a long time. Below are some typical definitions ofjazz improv, with some common questions raised by each definition.
Definition A: Jazz improv is making up music as you go.
Question 1: So how do you make it up?
Question 2: What makes it sound good or bad?
Definition B: Jazz improv is choosing notes to fit chords.
Question 3: What are notes?
Question 4: What are wrong notes?
Definition C: Jazz improv is musical communication.
Question 5: Who communicates?
Question 6: What do you communicate and how?
(Introduction) Improvisation Levels and Elements • 5555
Q1: How Do You Make It Up?Q1: How Do You Make It Up?Q1: How Do You Make It Up?Q1: How Do You Make It Up?Improvising is creating music on the spot, but you don’t improvise out of thin air. With the12 chromatic pitches (C, C#, D, Eb, etc.) you can get unlimited combinations by changing:
• The order of the pitches• The range of the pitches (higher or lower octaves)• The rhythms and expressions used• The way pitches are repeated or variedRemember: creativity is more a matter of organization and expression than finding “newness.”This is discussed in more detail in the Values and Creativity chapter.
Q2: What Makes It Good or Bad?Q2: What Makes It Good or Bad?Q2: What Makes It Good or Bad?Q2: What Makes It Good or Bad?Your definition of bad, good, or great solos will change and mature as you learn more aboutthe art of improvisation. When you discover how and why musical ideas fit together, solosthat at first sound too simple may reveal their hidden beauty, while solos that seem toocomplicated may actually be a wonderful collection of smaller ideas. On the other hand,solos that sound impressive at first may be long on technique and short on creative ideas.
When you recognize the Seven Elements of improvisation in your own solos and inrecordings, you can make significant progress in your improvisation.
Bad Habits of ImprovisationBad Habits of ImprovisationBad Habits of ImprovisationBad Habits of ImprovisationYou should avoid common bad habits of weak improvisation:
• Continually trying to play higher, faster, and louder, leading down a dead-end street.• Playing too many new ideas instead of building on some of the musical ideas you have
already played.• Getting locked into the same ideas, same pitches, same rhythms, and same expression
(or lack of it).
Q3: What Are Notes?Q3: What Are Notes?Q3: What Are Notes?Q3: What Are Notes?Dumb question. Or is it? A note is more than just a pitch: it also has rhythmic placement andmusical expression. A note can be played many different ways, and a group of notes can havecountless variations. Sadly, many improvisers get wrapped up in finding the next “goldenpitch,” thinking little about the rhythms, expression, and development that would turnthose pitches into artistic improvisation.
Q4: What about Wrong Notes?Q4: What about Wrong Notes?Q4: What about Wrong Notes?Q4: What about Wrong Notes?Is a wrong note one you didn’t intend to play? Often you can build a musical idea around anunintended note so it sounds intended. If that doesn’t work, at least you can go on with therest of your idea (instead of moaning after a “wrong” note).
Is a wrong note one that doesn’t fit the current chord symbol? Actually, any of the 12pitches can be played against any chord; each pitch is either a chord tone (consonant), achord extension (somewhat dissonant), or a non-harmonic tone (dissonant). The real issueis handling those notes so they sound like they belong. That way, there aren’t right andwrong pitches, just better or worse ones for the current chord and idea.
A “wrong” note could simply be a boring one. This book help you choose pitches, rhythms,expressions, and musical ideas to make your solos more interesting.
6666 • Improvisation Levels and Elements (Introduction)
Q5: Who Communicates?Q5: Who Communicates?Q5: Who Communicates?Q5: Who Communicates?As you improvise, you first communicate with yourself. You hear chords, select and playnotes, and decide whether to build upon what you just played or try something new. Thistakes practice, concentration, and quick reflexes so your solo can be what you want and howyou want it, without slowing the music down.
Next, you communicate with the other members of your group. Your improv decisions areaffected by what they play, and vice versa. This book contains many helpful ideas on howyou can establish good communication in your jazz group (Chapter 4G: Group Interaction).
Finally, you communicate with your listener. Usually, this works well if you’recommunicating with yourself and with your group members. But don’t try to guess whatyour audience wants to hear. Tell them your own story from your heart and mind. (Formore about live performance psychology, see Chapter 3H: Soloing Live.)
Q6: What Do You Communicate and How?Q6: What Do You Communicate and How?Q6: What Do You Communicate and How?Q6: What Do You Communicate and How?You communicate by how you play and develop your musical ideas. Just like conversation,you have to balance what you say with how much you say and when you say it, so you cancommunicate something truly interesting. Remember: quantity doesn’t equal quality. Theeconomy of your melodies and the context of your musical ideas make a huge difference inyour improvisation.
Jazz Improvisation and Other Arts
Jazz improvisation is like other art forms, such as painting, classical composition, language,and standup comedy.
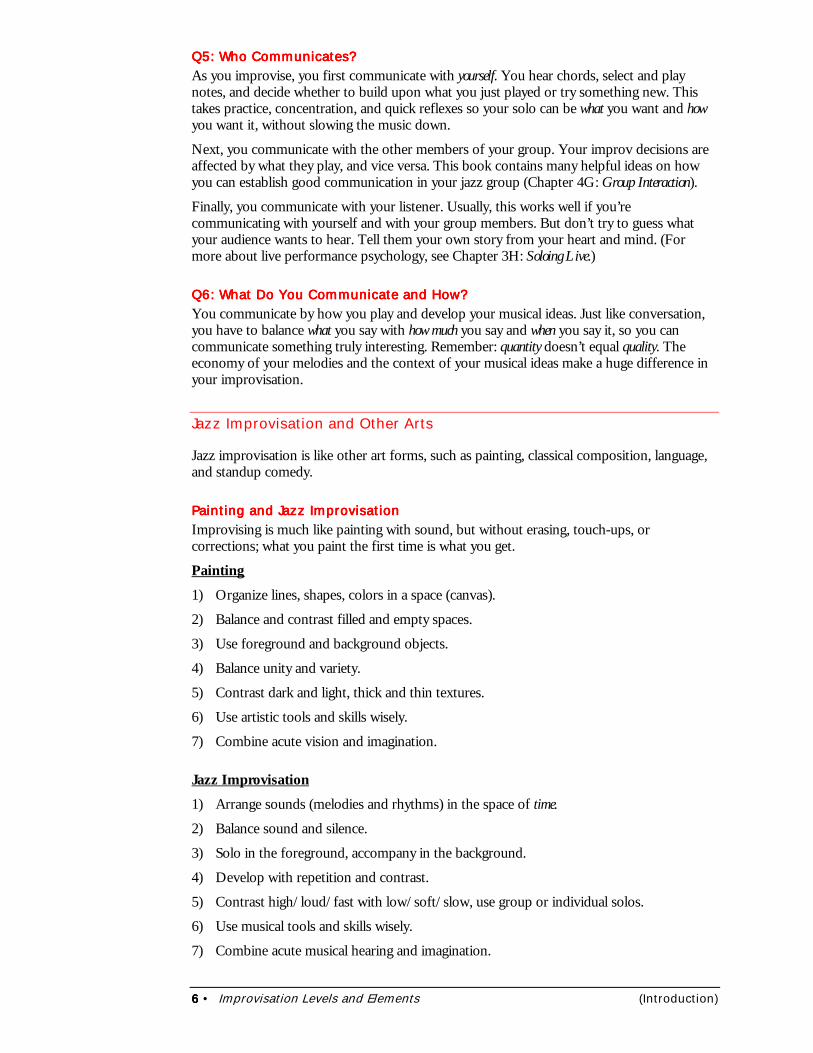
Painting and Jazz ImprovisationPainting and Jazz ImprovisationPainting and Jazz ImprovisationPainting and Jazz ImprovisationImprovising is much like painting with sound, but without erasing, touch-ups, orcorrections; what you paint the first time is what you get.
Painting1) Organize lines, shapes, colors in a space (canvas).
2) Balance and contrast filled and empty spaces.
3) Use foreground and background objects.
4) Balance unity and variety.
5) Contrast dark and light, thick and thin textures.
6) Use artistic tools and skills wisely.
7) Combine acute vision and imagination.
Jazz Improvisation1) Arrange sounds (melodies and rhythms) in the space of time.
2) Balance sound and silence.
3) Solo in the foreground, accompany in the background.
4) Develop with repetition and contrast.
5) Contrast high/loud/fast with low/soft/slow, use group or individual solos.
6) Use musical tools and skills wisely.
7) Combine acute musical hearing and imagination.
(Introduction) Improvisation Levels and Elements • 7777
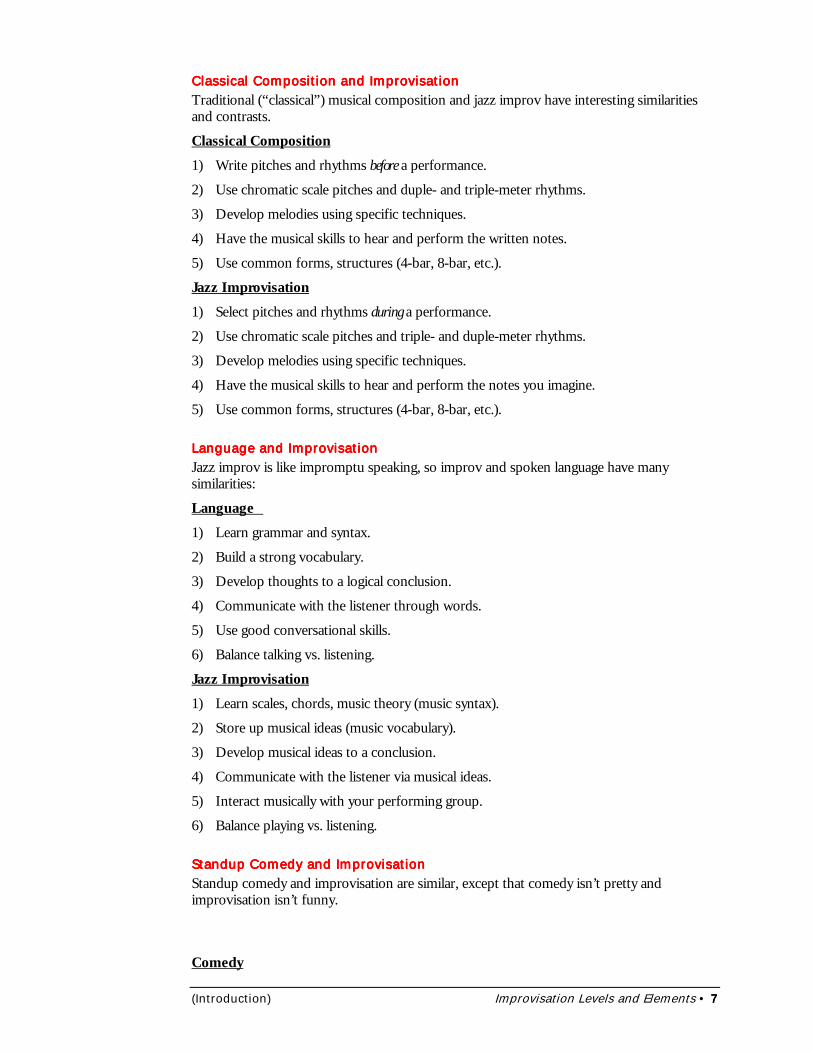
Classical Composition and ImprovisationClassical Composition and ImprovisationClassical Composition and ImprovisationClassical Composition and ImprovisationTraditional (“classical”) musical composition and jazz improv have interesting similaritiesand contrasts.
Classical Composition1) Write pitches and rhythms before a performance.
2) Use chromatic scale pitches and duple- and triple-meter rhythms.
3) Develop melodies using specific techniques.
4) Have the musical skills to hear and perform the written notes.
5) Use common forms, structures (4-bar, 8-bar, etc.).
Jazz Improvisation1) Select pitches and rhythms during a performance.
2) Use chromatic scale pitches and triple- and duple-meter rhythms.
3) Develop melodies using specific techniques.
4) Have the musical skills to hear and perform the notes you imagine.
5) Use common forms, structures (4-bar, 8-bar, etc.).
Language and ImprovisationLanguage and ImprovisationLanguage and ImprovisationLanguage and ImprovisationJazz improv is like impromptu speaking, so improv and spoken language have manysimilarities:
Language 1) Learn grammar and syntax.
2) Build a strong vocabulary.
3) Develop thoughts to a logical conclusion.
4) Communicate with the listener through words.
5) Use good conversational skills.
6) Balance talking vs. listening.
Jazz Improvisation1) Learn scales, chords, music theory (music syntax).
2) Store up musical ideas (music vocabulary).
3) Develop musical ideas to a conclusion.
4) Communicate with the listener via musical ideas.
5) Interact musically with your performing group.
6) Balance playing vs. listening.
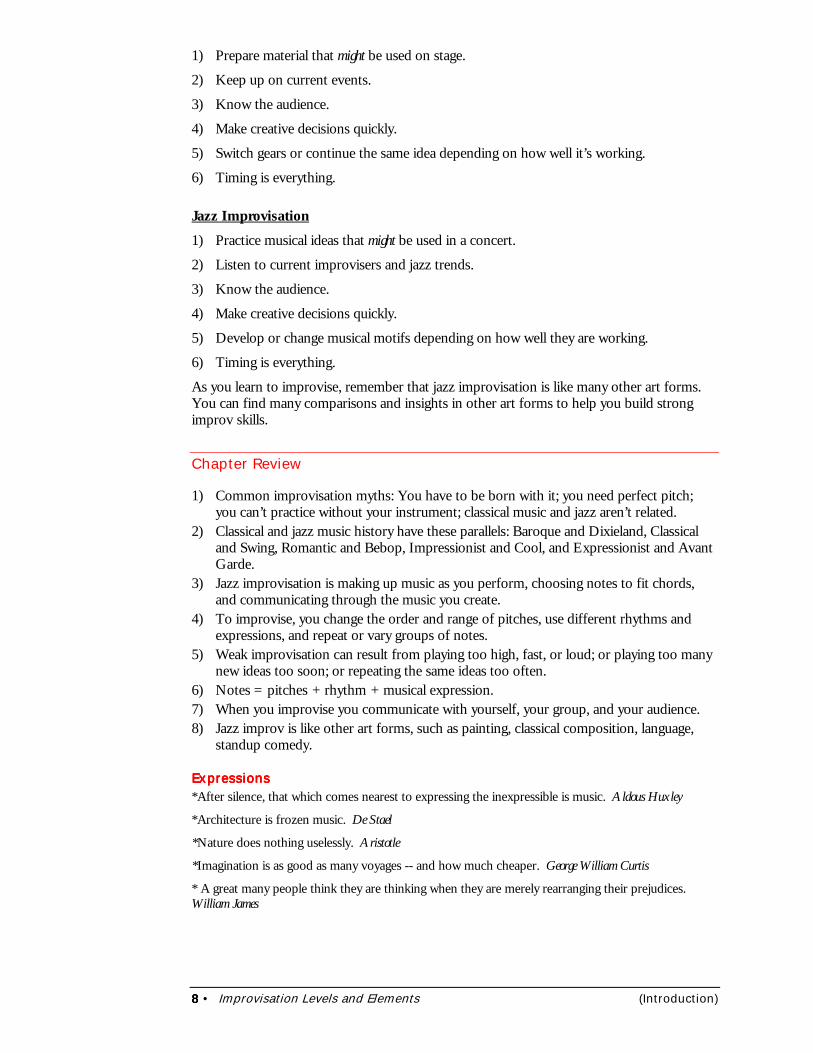
Standup Comedy and ImprovisationStandup Comedy and ImprovisationStandup Comedy and ImprovisationStandup Comedy and ImprovisationStandup comedy and improvisation are similar, except that comedy isn’t pretty andimprovisation isn’t funny.
Comedy
8888 • Improvisation Levels and Elements (Introduction)
1) Prepare material that might be used on stage.
2) Keep up on current events.
3) Know the audience.
4) Make creative decisions quickly.
5) Switch gears or continue the same idea depending on how well it’s working.
6) Timing is everything.
Jazz Improvisation1) Practice musical ideas that might be used in a concert.
2) Listen to current improvisers and jazz trends.
3) Know the audience.
4) Make creative decisions quickly.
5) Develop or change musical motifs depending on how well they are working.
6) Timing is everything.
As you learn to improvise, remember that jazz improvisation is like many other art forms.You can find many comparisons and insights in other art forms to help you build strongimprov skills.
Chapter Review
1) Common improvisation myths: You have to be born with it; you need perfect pitch;you can’t practice without your instrument; classical music and jazz aren’t related.
2) Classical and jazz music history have these parallels: Baroque and Dixieland, Classicaland Swing, Romantic and Bebop, Impressionist and Cool, and Expressionist and AvantGarde.
3) Jazz improvisation is making up music as you perform, choosing notes to fit chords,and communicating through the music you create.
4) To improvise, you change the order and range of pitches, use different rhythms andexpressions, and repeat or vary groups of notes.
5) Weak improvisation can result from playing too high, fast, or loud; or playing too manynew ideas too soon; or repeating the same ideas too often.
6) Notes = pitches + rhythm + musical expression.7) When you improvise you communicate with yourself, your group, and your audience.8) Jazz improv is like other art forms, such as painting, classical composition, language,
standup comedy.
ExpressionsExpressionsExpressionsExpressions*After silence, that which comes nearest to expressing the inexpressible is music. Aldous Huxley
*Architecture is frozen music. De Stael
*Nature does nothing uselessly. Aristotle
*Imagination is as good as many voyages -- and how much cheaper. George William Curtis
* A great many people think they are thinking when they are merely rearranging their prejudices.William James
(Introduction) Values and Creativity • 9999
Values and CreativityValues and CreativityValues and CreativityValues and Creativity
In this chapter you’ll learn about:
• Why Learn to Improvise?• Learning Values through Improvisation• About Creativity• The Creative Process• Five Barriers to Creativity• Creative Improvisation
mprovisation is not only an art form, it’s also a great way to discover values andcreativity in yourself and others. This chapter explores the “inner side” of jazzimprovisation.
Why Learn to Improvise?
This book discusses how to improvise, but some people may also wonder why to improvise.Here are several good reasons for learning how to improvise jazz:
• It allows self-expression.• It develops your creativity.• It promotes teamwork with other musicians.• It helps you learn and strengthen positive values.
Self-ExpressionSelf-ExpressionSelf-ExpressionSelf-ExpressionImprovisation helps you express your thoughts and insights through music. It also teachesyou about your strengths and weaknesses, and it helps you develop a “musical personality”as well. This is like an audible pathway to your inner self.
When you practice alone, you express your ideas to yourself; when you play in a concert,your ideas may be heard by handfuls or hundreds; when you record, your ideas might spreadto thousands of listeners. That places a lot of responsibility on treating your art form andyour audience with care and respect. This is discussed in more detail in #2: Integrity inLearning Values through Improvisation below.
CreativityCreativityCreativityCreativityImprovisation is a great vehicle for learning and using the creative process – you get to hearyour ideas unfold before you in real time. Creativity is one of life’s best pursuits. For moreon creativity, see the following sections in this chapter:
• About Creativity• The Creative Process• Five Barriers to Creativity• Creative Improvisation
TeamworkTeamworkTeamworkTeamworkPlaying in a jazz group is a great way to learn teamwork. Leader and follower rolesconstantly change, and there are many split-second decisions to make about unity and
I

10101010 • Values and Creativity (Introduction)
variety in the music. The music of a strong jazz team is magical in its interaction andadventure; the whole result is much greater than the individual parts.
VaVaVaValuesuesuesuesAs we learn to improvise, we can discover some important values in life. There’s also a darkside to the jazz scene, one of selfishness, ego, and abuse that some players unfortunately fallinto. But choosing the positive elements of jazz can enrich the lives of jazz improvisers andlisteners alike. Let’s explore how values and improvisation relate in life.
Learning Values through Improvisation
Learning to improvise and interact musically can build rich experiences and positive valuesin your daily life. Here are five of life’s values that the art of improvisation can strengthen:
1) Discernment and wisdom2) Integrity3) Leadership4) Informed risks5) Diversity
#1: Discernment and Wisdom#1: Discernment and Wisdom#1: Discernment and Wisdom#1: Discernment and WisdomImprovising opens up a potential floodgate of notes and ideas. Exploring and controllingthese musical ideas requires discernment and wisdom. First, you use discernment to recognizechords, rhythms, melodic shapes, and other elements as they emerge in the music. Then youdevelop wisdom as you learn:
• When to speak up musically and when to be silent• When and how to copy, change, or support the ideas of other players• How to fully develop musical ideas to interesting conclusions
#2: Integrity#2: Integrity#2: Integrity#2: IntegrityAs you learn to improvise, you’re faced with issues of musical integrity such as these:
• Do I pursue musical excellence and new territories, or do I stay in a comfortable rut?• Do I keep my ego in perspective, or do I inflate my self-importance or get paralyzed in
self-criticism?• Do I treat others with honesty and compassion, or do I walk on them to get to the top?Music and the music business often seem at odds with each other, but they’re both greatplaces to practice musical and personal integrity.
#3: Leadership#3: Leadership#3: Leadership#3: LeadershipIn improvisation you sometimes lead with musical ideas, and you sometimes follow bysupporting the ideas of other players. In accomplished groups, this interplay of teamworkcan be astonishingly good. In basketball you feed the hot shooter on the team, whoever it is;in a company, you promote good ideas from any employee; in jazz you let good ideas roll.
To lead, you need to connect the past and the present. In the immediate past, you need to analyzewhat’s been going on in a tune and how it shapes present and future ideas. Farther back, therecordings of jazz greats can provide you with new insights in your own playing.
#4: Informed Risks#4: Informed Risks#4: Informed Risks#4: Informed RisksIn the high-wire act of improvisation there are sometimes spills, but there are alsobreathtaking moments of adventure. Improvisation helps you weigh issues of courage vs.safety and risk vs. restraint. When you come to a workable balance, the rewards are high!

(Introduction) Values and Creativity • 11111111
The key to success is taking informed, not blind risks. The Virtual Practice Method (Chapter1A) helps you see, hear, and play musical ideas more effectively.
#5: Diversity#5: Diversity#5: Diversity#5: DiversityAs you improvise in a jazz group, you learn:
• How to appreciate and value others’ viewpoints• When to specialize or diversify your skills• How to learn from others’ strengths and mistakes.A boring world is one where everyone thinks as we do. We can learn something fromeveryone, even if it’s just what not to do in music or life. Each new player we perform with isan opportunity to appreciate diversity.
About Creativity
The principles of creativity and improvisation can be understood, learned, and applied. Somepeople think you’re either born creative or you’re not, and that you can’t really developcreativity. I firmly believe otherwise: if you want to develop creativity and you learn thecreative process, you can definitely be more creative. The issue isn’t whether you’ll become acreative genius, but how well you’ll develop your own creative gift. As you read this chapter,think of how the creative process can apply to your own jazz improvisation.
The Creative Process
Creativity is the art of organizing things or ideas in a useful or unusual way. You can use thecreative process to do the following things, for example:
• Make one or more objects from available materials, such as a musical phrase fromindividual notes.
• Enhance or improve an object or situation, such as doing an extra take on a recordedsolo.
• Solve a problem, such as finding notes to play with a given chord.Notice that these tasks involve making something out of something. It’s not a question of pullinga creation out of “thin air;” it’s a question of organizing and combining existing materials tocreate what you want.
Steps in the Creative ProcessSteps in the Creative ProcessSteps in the Creative ProcessSteps in the Creative ProcessWhether you build something practical, artistic, or both, you can follow these steps in thecreative process:
1) Visualize what you want to create.2) Plan and design your creation.3) Understand what your building materials and tools are and how to use them.4) Solve problems that arise in the planning, designing, and building steps.5) Analyze what you create to find improvements.
Depending on the art form or project, you may execute these steps slowly or quickly, butyou should use them in the above order to get the best results.
12121212 • Values and Creativity (Introduction)
Five Barriers to Creativity
Sometimes we stifle our creativity by limiting the way we think. Here are five commonbarriers to creativity:
1) “There’s just one way to solve a problem.”2) “I need a new and unique solution, not one that’s borrowed or adapted.”3) “I don’t really understand the tools and materials.”4) “I just build, without planning or visualizing.”5) “My fears or ego interfere with creativity.”Below are some ways to overcome these five barriers.
Barrier 1: Only One Way to Solve a ProblemBarrier 1: Only One Way to Solve a ProblemBarrier 1: Only One Way to Solve a ProblemBarrier 1: Only One Way to Solve a ProblemWhen we try to solve a problem, sometimes our solution clicks and sometimes it doesn’t.When it doesn’t work, we should ask ourselves:
• Are we trying to solving the right problem? We often try to solve the first problem we see orthe easiest first.
• Are we solving this problem in the right order compared with other problems? Often the rightsolution out of sequence is just bad as the wrong solution.
• Are we using the correct tools? If not, the solution may take much longer, or it may not besmooth or effective. You might use another tool in an unusual way to solve a problem.
Barrier 2: Our Creation Must Be All “New”Barrier 2: Our Creation Must Be All “New”Barrier 2: Our Creation Must Be All “New”Barrier 2: Our Creation Must Be All “New”We often think our creation must be totally new. Granted, we shouldn’t violate copyrightsor patents, but our work can have small pieces or qualities that have been used many timesin many other works. For example, artists use and reuse the same colors and media;musicians use and reuse the same 12 notes of the chromatic scale. So, much of the creativeessence lies in how elements are combined, not in finding completely “new” elements.
In each art form there are countless ways to combine elements and materials. Somecombinations make no sense, some are very obvious, and some fit somewhere in between,with a wide range of meanings and beauty. Our task is to find the “beautiful” combinationsto build our creation.
Barrier 3: We Don’t Know Materials/ToolsBarrier 3: We Don’t Know Materials/ToolsBarrier 3: We Don’t Know Materials/ToolsBarrier 3: We Don’t Know Materials/ToolsIf we don’t know how to use our materials or tools, we can’t be creative in the art form. (Wecan still appreciate how someone else uses materials and tools. I appreciate painting, but Idon’t paint well.) But using tools and materials doesn’t make us creative. It openspossibilities and removes barriers, but we’re still responsible to use tools and materialswisely, with imagination. Our knowledge unlocks creativity; our wisdom unleashes it.
In every art form, some artists have limited technical skills, while others have great technicalmastery. There are also art works that are:
• Not technically sound and not creative. This is the weakest kind of art.
• Technically sound but not creative. This kind of art is usually produced with much attentionto detail but not enough attention to vision. The artist needs to see and try othercombinations and possibilities, perhaps outside the traditional boundaries.
• Creative but not technically sound. This is typical of younger artists who see possibilities buthaven’t mastered materials and tools yet. I would rather be in this situation than in the“technically sound but not creative” one.
• Creative and technically sound. This is what we strive for, remembering that techniqueserves creativity, not the other way around.
(Introduction) Values and Creativity • 13131313
As artists, we strive to reach the level where we produce creative and technically sound art.
Barrier 4: We Don’t Plan or VisualizeBarrier 4: We Don’t Plan or VisualizeBarrier 4: We Don’t Plan or VisualizeBarrier 4: We Don’t Plan or VisualizeSome think creativity is blocking out all conscious thinking and “letting it fly.” On thecontrary, logical thinking is an important part in creativity. The trick is to get your brain’slogical (left) side and creative (right) side to cooperate in the creative process. When the rightside says “What if we try this?” the left side can say “Here’s some stuff to help you do that...” or maybe “I don’t think our ship can handle Warp 9, Captain.”
Before you start creating, it’s important to:
• Get a basic idea of what you are creating.• Know your audience’s expectations and your own.• Know space/time limitations on your creation.The amount of planning may depend on how complex the creation is and what the art formis. Usually, static art forms such as painting and sculpture need more specific planning, whereyou visualize details before you begin. A real-time art form such as jazz improv orimpromptu speaking requires more general planning. This means you collect details aboutwhat you can do, but you make most creative decisions as you are create.
Barrier 5: We Let Fear and Ego Defeat UsBarrier 5: We Let Fear and Ego Defeat UsBarrier 5: We Let Fear and Ego Defeat UsBarrier 5: We Let Fear and Ego Defeat UsWe often fear these things when we try to create:
• New or unexplored territory. Remember: new areas bring new adventure. If you’re prepared,new is good; if you’re not, new can be intimidating.
• Thoughts of failure. Small mistakes don’t cancel out the rest of our creation. Most finishedworks still have small imperfections; many have even suffered through corrections ofmajor mistakes. If we err, it should be in technique, not in the ideas we convey.
• Criticism from our audience. What will the audience think? Actually, you must be solidly intouch with art, without an audience; then be ready for positive or negative feedback.Some of what they say may be wrong; some may be true but harsh; and some may betrue and helpful. Screen and use audience feedback to improve your creations.
Our own egos can also block creativity. Competing for awards can focus us on arbitraryopinions instead of art. Or we can get into safe ruts, where we feel accepted and competentbut where there’s no room for growth. Where art is a team effort, as in a musical group, theego of one artist can cancel out contributions of others. To me, the truly great artist is theone who also realizes how much more could be done, then improves the creation next time.
Creative Improvisation
Improvisation is the art of creating something quickly, with limited time to plan and withlimited materials. To improvise, you need to make quick decisions and see relationshipsquickly, while you’re creating.
Can Improvisation Be Pre-Determined?Can Improvisation Be Pre-Determined?Can Improvisation Be Pre-Determined?Can Improvisation Be Pre-Determined?By definition, improvisation is not pre-determined. For example, if you plan out all the notesof a solo and then play them, it’s a composition, not an improvisation. (In some cases that maybe OK, such as for very short solos or recordings where a specific result is needed.) Here’swhat you should study and plan ahead of time:
• The elements of the song to improvise to (chords, scales, rhythmic style, etc.)• The basic mood and feeling of the song
14141414 • Values and Creativity (Introduction)
• Song organization and chords (where the chords repeat or change)Here’s a common improvisation question: “Why can’t I plan ahead to use my best stuff?”The answer comes back as another question: “Am I trying to impress someone, or am Ireally trying to create musical ideas that capture each moment?” Focusing on “your beststuff” limits your vision so it’s harder to see ideas that may work better than your best stuff.
Improvisation and the Creative ProcessImprovisation and the Creative ProcessImprovisation and the Creative ProcessImprovisation and the Creative ProcessImprovisation follows the steps of the basic creative process. However, you greatly speed upthe creative steps and execute them in seconds or split-seconds. This is really the fun andscary foundation of improvisation; you make important decisions in each second of time, sothe creation evolves and takes shape before your eyes. The Art of Improvisation helps youmake your own improvisation decisions, quickly and successfully.
Here’s how the 5 creative steps are handled in improv:
Creative Step Jazz Improv Approach1. Visualize what you want to create. Picture the chord symbol; see a melodic shape.
2. Plan & design it. Choose the starting pitch for the melody; add rhythm.
3. Understand your tools & materials. Pay attention to how the melody takes shape on yourinstrument; watch for technical challenges infingering, air, positions, etc.
4. Solve problems that arise. Work your way around technical/creative obstacles;use mistakes as new ideas when possible.
5. Analyze and improve the creation Picture and remember what you just played so youcan develop it or go on to something else.
Chapter Review
1) Improvisation can strengthen the values of discernment, wisdom, integrity, leadership,informed risk-taking, and diversity.
2) Improvisation promotes self-expression, creativity, teamwork, and values in life.3) Principles of creativity and improvisation can be understood, learned, and applied.4) Creativity is the art of organizing things or ideas in a useful or unusual way.5) Five steps in the creative process are:
A) Visualize what you want to create.B) Plan and design it.C) Understand what your building materials and tools are and how to use them.D) Solve problems (planning, designing, building).E) Analyze what you create to find improvements.
6) Five barriers to creativity include:A) We think there’s one way to solve a problem.B) We think our solution must be new and unique, not borrowed or adapted.C) We don’t know our materials or tools.D) We build without planning or visualizing.E) Fear and ego interfere in the creative process.
7) Improvisation is creating something quickly, with limited planning and materials.8) Improvisation greatly speeds up the creative steps so they are executed in seconds or split-
seconds, as opposed to minutes or hours.
(Introduction) About the Exercises • 15151515
About the ExercisesAbout the ExercisesAbout the ExercisesAbout the Exercises
In this chapter you’ll learn about:
• Using the Exercises• Variety in Exercises• Reviewing Exercises
he exercises in The Art of Improvisation help you learn the vital skills you need forimprovisation. Be sure to make them a part of your regular improvisation practice,and remember that you can do most of these exercises away from your instrument,
wherever you are. The exercises are grouped by skill level (1 through 3) and by element (MRED, CPA). Each exercises has a Basic difficulty version; most also have Medium andChallenge levels of difficulty. Some exercises skip numbers to match the numbered topics inthe books.
Remember: These exercises provide you with ongoing practice material. Don’t hurrythrough them just to move on to the next level; use them, vary them and review them tostrengthen your improv skills.
The sections below explain how to use, vary, and review exercises; the actual exercises arethe end of each volume of The Art of Improvisation.
Using the Exercises
Here are some suggestions for getting the most from the exercises in your practice sessions:
1) Photocopy the exercise pages for your personal use (non-commercial only). That wayyou can quickly refer to them as you practice or as you look up text in The Art ofImprovisation.
2) Establish your current skill level (1 through 3).
3) If you are past Level 1, first take some time to review the exercises for previous levels.Mark all exercises in previous levels that you need to spend time with.
4) For each exercise, select the Basic, Medium, or Challenge version, depending on yourcurrent abilities for that exercise. For some exercises you may already be at theChallenge version, while for others you should start at Basic.
5) When you master an exercise version, check its box with a pencil. You can also write inthe date you completed the exercise version.
6) Try to keep a balance between the seven elements as you work on exercises. Forexample, work on the first exercise in Level 1 Melody (1.6), then the first one in Level 1Rhythm (1.23), etc., until you cover one exercise for each of the seven elements at yourlevel.
7) For humming exercises, occasionally check your pitch against a keyboard or otherinstrument. For exercises that can be hummed or played, try to alternate practicebetween humming (singing) and playing.
T
16161616 • About the Exercises (Introduction)
8) Some exercises have time goals, such as naming the pitches for all major 7 arpeggios in60 seconds or less. At first, you may want to ignore the time goal until the skill issomewhat comfortable; then you can try for your best time in the exercise.
9) Above each exercise fill in the date (__/__/__) you worked on each exercise version,and give yourself a score ( ) for each version. Score ideas (highest is best): 1 to 3, 1 to 5,or 1 to 10. You can also use grades of A B C D and E.
If you already have the skills mentioned in the Challenge version of the exercise, skip on tothe next exercise or find new ways to practice that exercise. Try to keep your practiceflexible, challenging, and enjoyable.
Variety in Exercises
By using a variety of approaches, you can recycle and customize each exercise for yourcontinued use. Here are some suggestions for getting variety in the exercises:
1) Wherever possible, practice the exercise in all 12 major or minor keys.
2) Use alternate rhythms instead of only eighth-notes.
3) Use a different metronome marking for each exercise, without going too fast.
4) For scale practice use alternate contours, such as two octaves per scale or descendingscales.
5) Practice with a recorded rhythm section.
6) Practice with one or more friends.
7) Make up your own variations of the exercises.
Reviewing Exercises
Here are some suggestions for reviewing exercises you’ve already mastered:
1) As you master an exercise, mark the date next to it. At a later date, go back and reviewexercises you marked over a month ago, or over two or three months ago.
2) Decide how much benefit you’ll get from reviewing an exercise. Then do one of thefollowing things: a) practice it just as you did before; b) practice it with variety so itbecomes new to you; or c) skip over the exercise and go on to the next one.
As you review exercises, you’ll not only strengthen your skills but you’ll also see new ways toapply things you’re learning in later exercises. Enjoy!
ExpressionsExpressionsExpressionsExpressions* Compared to what we ought to be, we are only half awake. We are making use of only a small partof our physical and mental resources. Stating the thing broadly, the human individual thus lives farwithin his limits. He possesses power of various sorts which he habitually fails to use. William James* If any man wishes to write a clear style, let him first be clear in his thoughts. Johann W. von Goethe* They talk most who have the least to say. Matthew Prior*We put up with being surpassed more easily than with being equalled. A. Vinet
The Art of Improvisation The Art of Improvisation The Art of Improvisation The Art of Improvisation
… Creating real-time music through jazz improvisation …
*Level 1: Starting**Level 1: Starting**Level 1: Starting**Level 1: Starting*
by Bob TaylorAuthor of Sightreading Jazz, Sightreading Chord Progressions
©2000 Taylor-James Publications
Django Reinhardt Jimmy Blanton Oscar PettifordLionel Hampton Stuff Smith Stephane Grappelli Gene Krupa Billie Holiday
Dizzy Gillespie Fats Navarro Charlie Parker
*Level 1 — Starting*Level 1 — Starting*Level 1 — Starting*Level 1 — Starting*
As a Starting Improviser, you may be new to improvisation, or your solos might be“trapped” in blues scales or rote playing. What you learn in Level 1 isn’tcomplicated, but it is essential. Here you get a basic foundation in improvisationthat will help you create instead of react. Even players who have been improvisingfor years can take advantage of skills taught in Level 1. Enjoy the journey! Andremember to be patient with your progress ... you’re laying the foundation forsome great work ahead.
Sonny Stitt Don Byas J. J. Johnson Bud PowellThelonious Monk Kenny Clarke Max Roach Buddy RichElla Fitzgerald Miles Davis Chet Baker Paul Desmond
(Level 1 - Starting) 1A: The Virtual Practice Method • 19191919
1A: The Virtual Practice Method1A: The Virtual Practice Method1A: The Virtual Practice Method1A: The Virtual Practice Method
In this chapter you’ll learn about:
• Using the Virtual Practice Method• Using Flexible Scales• SHAPE: See, Hear, And Play Expressively• Improvising with a Background
t all starts here – finding out what to practice and how to practice so you can improvisewell. But you don’t have to lock yourself in a practice room all day to learn chords andscales in all keys. Instead, you can use the Virtual Practice Method (described below) to:
1. Learn how to practice away from your instrument, so you can learn scales and chordsalmost anywhere you go, while avoiding “instrument fatigue.”
2. Practice each scale and chord in many different ways, so they come alive withimprovisation possibilities.
You can use the Virtual Practice Method on almost any exercise in this book. Eventually (inLevel Three) you’ll use the Virtual Practice Method to memorize chord progressions andactually hear a rhythm section playing in your head while you hum or sing your solos.Sounds amazing? I’ve done it; it works, and it’s fun!
Using the Virtual Practice Method
The Virtual Practice Method for melody works like this:
*Hum (or whistle or sing) each note you hear while moving your fingers or handsjust as if you were playing the notes on your instrument.While humming notes, trumpeters can wiggle three fingers onto the thumb for fingerings;saxophonists can move fingers on a pencil for fingerings; trombonists can move the wrist toeach slide position; guitarists or bassists can finger imaginary frets; vocalists can picturenotes on a staff; and pianists can touch imaginary keys. The important thing is to accuratelyhum each note as you finger it cleanly, just as if you were playing it or singing it.
1.1 Steps for Virtual Practice1.1 Steps for Virtual Practice1.1 Steps for Virtual Practice1.1 Steps for Virtual PracticeTo use the Virtual Practice Method,
1 Choose the scale or arpeggio you want to practice, such as a C Major scale.
2 Choose a comfortable tempo for eighth-notes. Use a metronome if you like.
3 Hum any medium-low starting pitch and think of it as the starting note, such as C. (Ifyou have perfect pitch or have an instrument near, you can find the actual C.)
4 Hum each new pitch in the scale, going up to the octave and back down to the startingpitch. As you hum each pitch, “finger” the notes for your instrument (without yourinstrument, of course). Keep the tempo as steady as possible. If a scale or arpeggio isdifficult, slow it down until the pitches and fingerings lock in well.
Now turn to Exercise 1.1 at the end of this book to try virtual practice with a C Major scale.(Note: In the electronic version, click the check mark to jump to the exercise.)
���Exercise 1.1 Virtual Practice for the C Major Scale
I
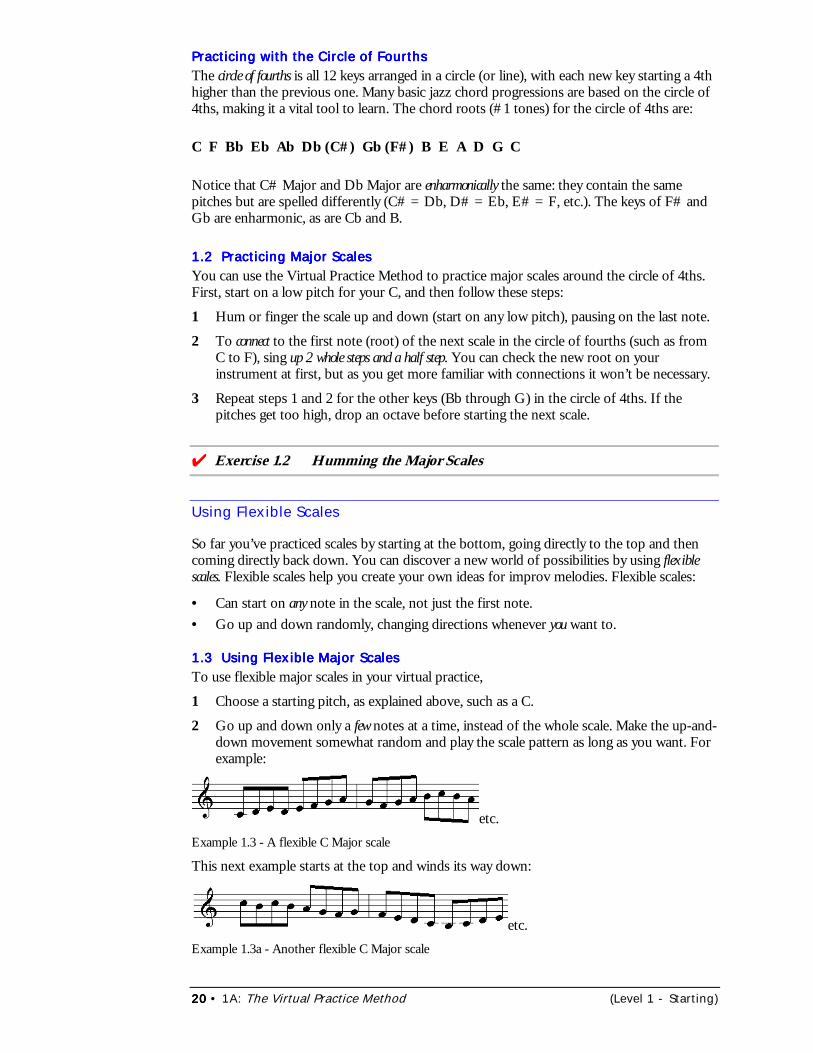
20202020 • 1A: The Virtual Practice Method (Level 1 - Starting)
Practicing with the Circle of FourthsPracticing with the Circle of FourthsPracticing with the Circle of FourthsPracticing with the Circle of FourthsThe circle of fourths is all 12 keys arranged in a circle (or line), with each new key starting a 4thhigher than the previous one. Many basic jazz chord progressions are based on the circle of4ths, making it a vital tool to learn. The chord roots (#1 tones) for the circle of 4ths are:
C F Bb Eb Ab Db (C#) Gb (F#) B E A D G C
Notice that C# Major and Db Major are enharmonically the same: they contain the samepitches but are spelled differently (C# = Db, D# = Eb, E# = F, etc.). The keys of F# andGb are enharmonic, as are Cb and B.
1.2 Practicing Major Scales1.2 Practicing Major Scales1.2 Practicing Major Scales1.2 Practicing Major ScalesYou can use the Virtual Practice Method to practice major scales around the circle of 4ths.First, start on a low pitch for your C, and then follow these steps:
1 Hum or finger the scale up and down (start on any low pitch), pausing on the last note.
2 To connect to the first note (root) of the next scale in the circle of fourths (such as fromC to F), sing up 2 whole steps and a half step. You can check the new root on yourinstrument at first, but as you get more familiar with connections it won’t be necessary.
3 Repeat steps 1 and 2 for the other keys (Bb through G) in the circle of 4ths. If thepitches get too high, drop an octave before starting the next scale.
���Exercise 1.2 Humming the Major Scales
Using Flexible Scales
So far you’ve practiced scales by starting at the bottom, going directly to the top and thencoming directly back down. You can discover a new world of possibilities by using flexiblescales. Flexible scales help you create your own ideas for improv melodies. Flexible scales:
• Can start on any note in the scale, not just the first note.• Go up and down randomly, changing directions whenever you want to.
1.3 Using Flexible Major Scales1.3 Using Flexible Major Scales1.3 Using Flexible Major Scales1.3 Using Flexible Major ScalesTo use flexible major scales in your virtual practice,
1 Choose a starting pitch, as explained above, such as a C.
2 Go up and down only a few notes at a time, instead of the whole scale. Make the up-and-down movement somewhat random and play the scale pattern as long as you want. Forexample:
etc.Example 1.3 - A flexible C Major scale
This next example starts at the top and winds its way down:
etc.Example 1.3a - Another flexible C Major scale
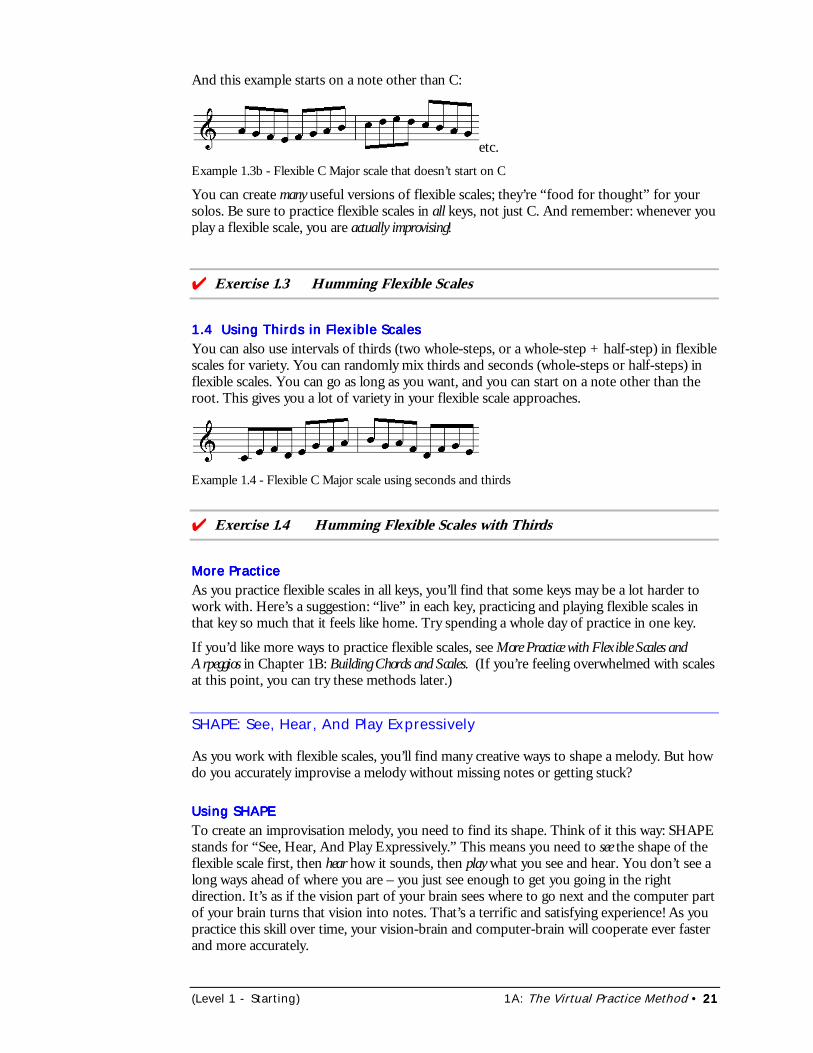
(Level 1 - Starting) 1A: The Virtual Practice Method • 21212121
And this example starts on a note other than C:
etc.Example 1.3b - Flexible C Major scale that doesn’t start on C
You can create many useful versions of flexible scales; they’re “food for thought” for yoursolos. Be sure to practice flexible scales in all keys, not just C. And remember: whenever youplay a flexible scale, you are actually improvising!
���Exercise 1.3 Humming Flexible Scales
1.4 Using Thirds in Flexible Scales1.4 Using Thirds in Flexible Scales1.4 Using Thirds in Flexible Scales1.4 Using Thirds in Flexible ScalesYou can also use intervals of thirds (two whole-steps, or a whole-step + half-step) in flexiblescales for variety. You can randomly mix thirds and seconds (whole-steps or half-steps) inflexible scales. You can go as long as you want, and you can start on a note other than theroot. This gives you a lot of variety in your flexible scale approaches.
Example 1.4 - Flexible C Major scale using seconds and thirds
���Exercise 1.4 Humming Flexible Scales with Thirds
More PracticeMore PracticeMore PracticeMore PracticeAs you practice flexible scales in all keys, you’ll find that some keys may be a lot harder towork with. Here’s a suggestion: “live” in each key, practicing and playing flexible scales inthat key so much that it feels like home. Try spending a whole day of practice in one key.
If you’d like more ways to practice flexible scales, see More Practice with Flexible Scales andArpeggios in Chapter 1B: Building Chords and Scales. (If you’re feeling overwhelmed with scalesat this point, you can try these methods later.)
SHAPE: See, Hear, And Play Expressively
As you work with flexible scales, you’ll find many creative ways to shape a melody. But howdo you accurately improvise a melody without missing notes or getting stuck?
Using SHAPEUsing SHAPEUsing SHAPEUsing SHAPETo create an improvisation melody, you need to find its shape. Think of it this way: SHAPEstands for “See, Hear, And Play Expressively.” This means you need to see the shape of theflexible scale first, then hear how it sounds, then play what you see and hear. You don’t see along ways ahead of where you are – you just see enough to get you going in the rightdirection. It’s as if the vision part of your brain sees where to go next and the computer partof your brain turns that vision into notes. That’s a terrific and satisfying experience! As youpractice this skill over time, your vision-brain and computer-brain will cooperate ever fasterand more accurately.

22222222 • 1A: The Virtual Practice Method (Level 1 - Starting)
When you “see” a musical idea first, it becomes easier to hear it correctly, because you cansense (see) the right notes to attack. And when you hear a note in your mind, it’s a lot easierto play it accurately. Then when you play the note, especially if you hold on to it a while, youcan add some interesting and personal expression to it. A melody based on SHAPE can bepowerful or subtle; it works because it’s secure without being pre-memorized. The more youwork on SHAPE, the better your ideas will flow and the better you’ll play the melodies yousee and hear.
Avoiding PHASEAvoiding PHASEAvoiding PHASEAvoiding PHASEThe wrong approach is to use SHAPE backwards, which is PHASE – “Play, Hear, And SeeErrors.” Improvisers who use PHASE will play something, hear it after they play it, andthen see (focus on) their errors. This is approach is very limiting – it almost guarantees thatthe soloist will fall back on familiar or memorized material to avoid mistakes. You canalmost always tell whether a soloist is using SHAPE or PHASE. Always use SHAPE for allyour improvisations. SHAPE helps your creativity soar and expand. In time, you’ll truly see it,hear it, and play it.
Improvising with a Background
Now that you’ve learned how to use flexible scales, you can start improvising with a rhythmsection background. Start with a background tune that has a single chord for at least eightbars. Here are several ways to use a background:
• Practice with a live rhythm section.• Use a play-along CD or tape, such as Aebersold’s Vol. 24: Major and Minor or Vol. 1: A
New Approach to Improvisation. These CDs have several tunes that stay in one key at a timeso you can work on flexible scales.
• Have a friend record a piano or guitar background for your accompaniment.As you improvise with a background, remember to use SHAPE, and always keep your ideassteadily in tempo so they fit the background.
Chapter Review
1) The Virtual Practice Method helps you practice away from your instrument.2) You can use the circle of 4ths (C F Bb Eb Ab Db F# B E A D G C) to practice scales.3) Flexible scales can start on any scale note and go up and down at will.4) You can mix intervals of 3rds and seconds in flexible scales.5) Use SHAPE - “See, Hear, And Play Expressively.”6) Don’t use PHASE – “Play, Hear, and See Errors.”7) “Living in a key” means practicing and playing in that key so much that it feels like
home to you.8) You can practice flexible scales with a live rhythm section or with play-along recordings.
ExpressionsExpressionsExpressionsExpressions*Imagination is more important than knowledge, for knowledge is limited to all we now know andunderstand, while imagination embraces the entire world, and all there ever will be to know andunderstand. Albert Einstein
*See some good picture -- in nature; if possible; or on canvas hear a page of the best music; or read agreat poem every day. You will always find a free half hour for one or the other; and at the end of theyear your mind will shine with such an accumulation of jewels as will astonish even yourself. HenryWadsworth Longfellow
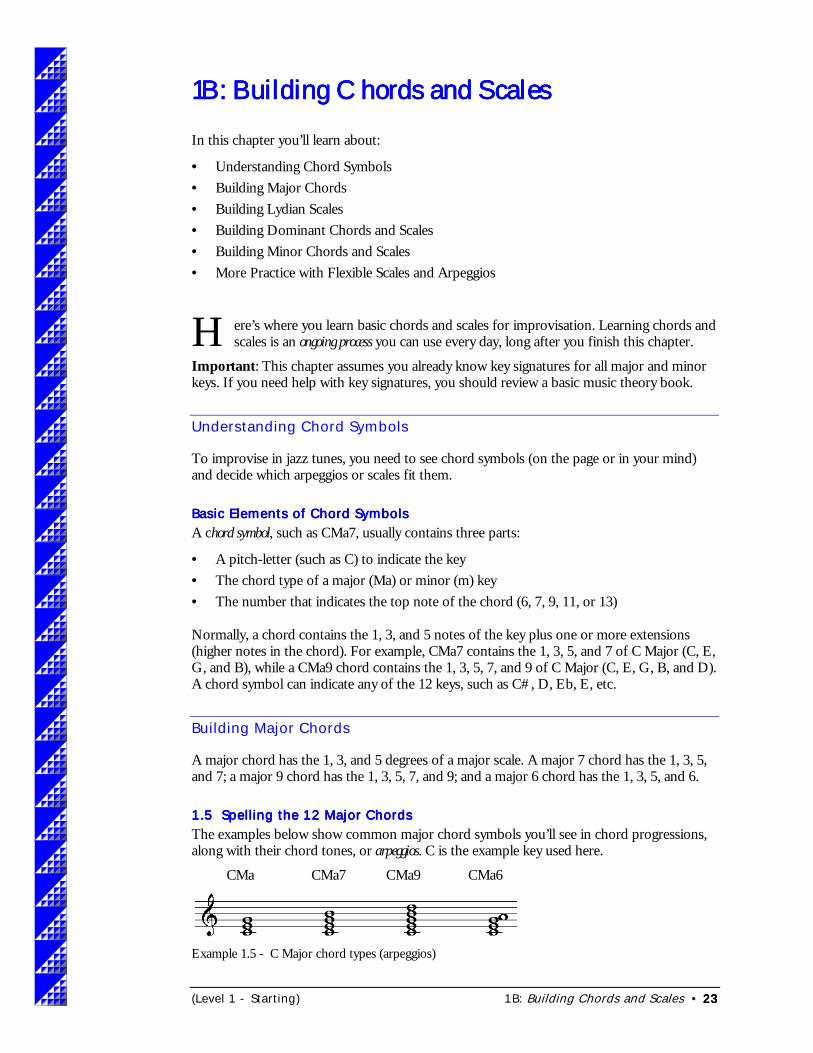
(Level 1 - Starting) 1B: Building Chords and Scales • 23232323
1B: Building Chords and Scales1B: Building Chords and Scales1B: Building Chords and Scales1B: Building Chords and Scales
In this chapter you’ll learn about:
• Understanding Chord Symbols• Building Major Chords• Building Lydian Scales• Building Dominant Chords and Scales• Building Minor Chords and Scales• More Practice with Flexible Scales and Arpeggios
ere’s where you learn basic chords and scales for improvisation. Learning chords andscales is an ongoing process you can use every day, long after you finish this chapter.
Important: This chapter assumes you already know key signatures for all major and minorkeys. If you need help with key signatures, you should review a basic music theory book.
Understanding Chord Symbols
To improvise in jazz tunes, you need to see chord symbols (on the page or in your mind)and decide which arpeggios or scales fit them.
Basic Elements of Chord SymbolsBasic Elements of Chord SymbolsBasic Elements of Chord SymbolsBasic Elements of Chord SymbolsA chord symbol, such as CMa7, usually contains three parts:
• A pitch-letter (such as C) to indicate the key• The chord type of a major (Ma) or minor (m) key• The number that indicates the top note of the chord (6, 7, 9, 11, or 13)
Normally, a chord contains the 1, 3, and 5 notes of the key plus one or more extensions(higher notes in the chord). For example, CMa7 contains the 1, 3, 5, and 7 of C Major (C, E,G, and B), while a CMa9 chord contains the 1, 3, 5, 7, and 9 of C Major (C, E, G, B, and D).A chord symbol can indicate any of the 12 keys, such as C#, D, Eb, E, etc.
Building Major Chords
A major chord has the 1, 3, and 5 degrees of a major scale. A major 7 chord has the 1, 3, 5,and 7; a major 9 chord has the 1, 3, 5, 7, and 9; and a major 6 chord has the 1, 3, 5, and 6.
1.5 Spelling the 12 Major Chords1.5 Spelling the 12 Major Chords1.5 Spelling the 12 Major Chords1.5 Spelling the 12 Major ChordsThe examples below show common major chord symbols you’ll see in chord progressions,along with their chord tones, or arpeggios. C is the example key used here.
CMa CMa7 CMa9 CMa6
Example 1.5 - C Major chord types (arpeggios)
H
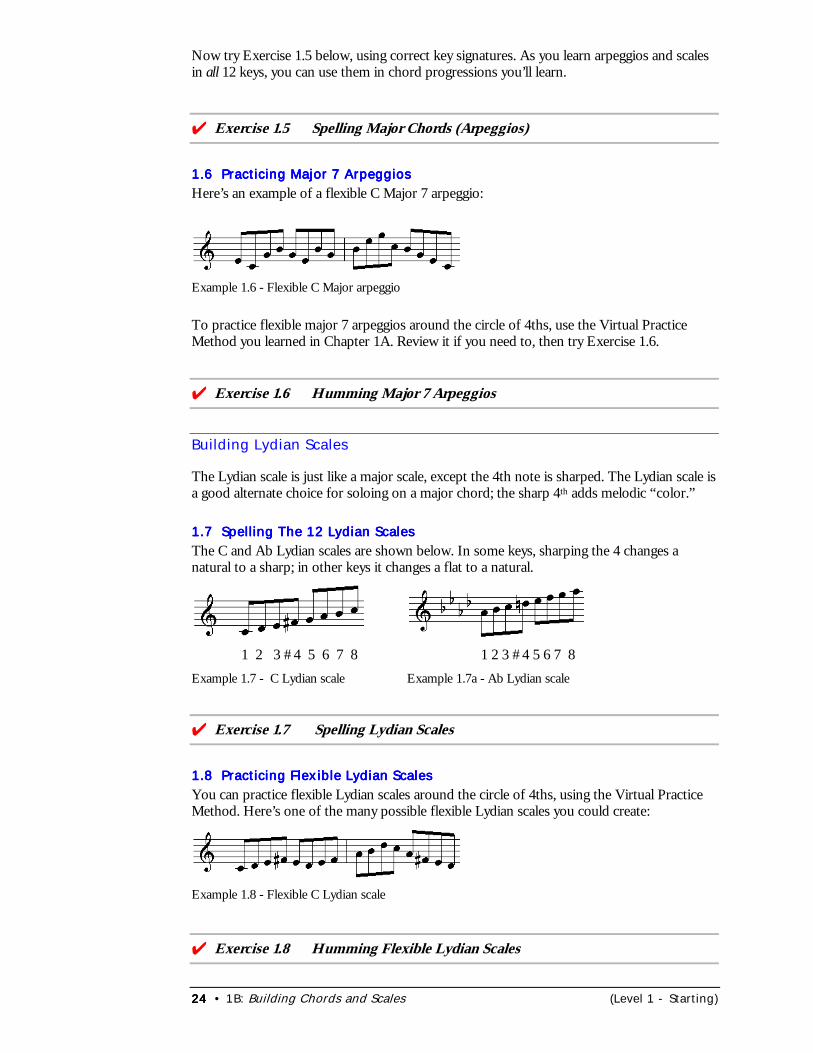
24242424 • 1B: Building Chords and Scales (Level 1 - Starting)
Now try Exercise 1.5 below, using correct key signatures. As you learn arpeggios and scalesin all 12 keys, you can use them in chord progressions you’ll learn.
���Exercise 1.5 Spelling Major Chords (Arpeggios)
1.6 Practicing Major 7 Arpeggios1.6 Practicing Major 7 Arpeggios1.6 Practicing Major 7 Arpeggios1.6 Practicing Major 7 ArpeggiosHere’s an example of a flexible C Major 7 arpeggio:
Example 1.6 - Flexible C Major arpeggio
To practice flexible major 7 arpeggios around the circle of 4ths, use the Virtual PracticeMethod you learned in Chapter 1A. Review it if you need to, then try Exercise 1.6.
���Exercise 1.6 Humming Major 7 Arpeggios
Building Lydian Scales
The Lydian scale is just like a major scale, except the 4th note is sharped. The Lydian scale isa good alternate choice for soloing on a major chord; the sharp 4th adds melodic “color.”
1.7 Spelling The 12 Lydian Scales1.7 Spelling The 12 Lydian Scales1.7 Spelling The 12 Lydian Scales1.7 Spelling The 12 Lydian ScalesThe C and Ab Lydian scales are shown below. In some keys, sharping the 4 changes anatural to a sharp; in other keys it changes a flat to a natural.
1 2 3 #4 5 6 7 8 1 2 3 #4 5 6 7 8Example 1.7 - C Lydian scale Example 1.7a - Ab Lydian scale
���Exercise 1.7 Spelling Lydian Scales
1.8 Practicing Flexible Lydian Scales1.8 Practicing Flexible Lydian Scales1.8 Practicing Flexible Lydian Scales1.8 Practicing Flexible Lydian ScalesYou can practice flexible Lydian scales around the circle of 4ths, using the Virtual PracticeMethod. Here’s one of the many possible flexible Lydian scales you could create:
Example 1.8 - Flexible C Lydian scale
���Exercise 1.8 Humming Flexible Lydian Scales
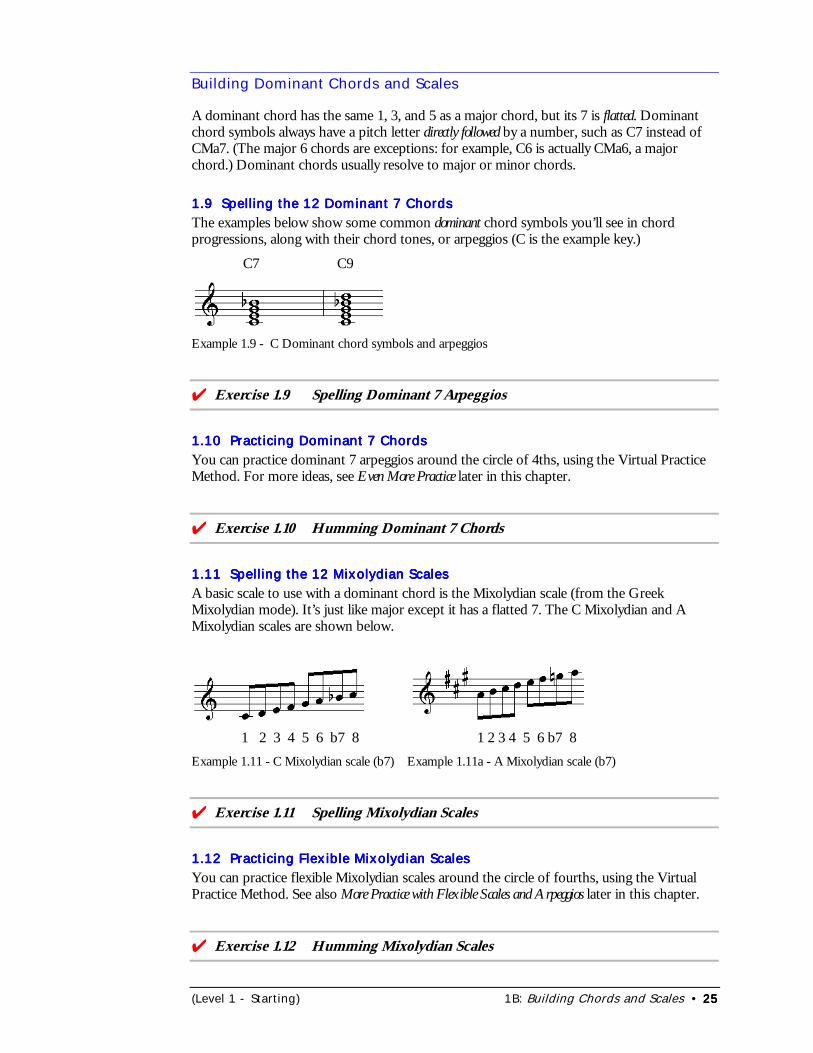
(Level 1 - Starting) 1B: Building Chords and Scales • 25252525
Building Dominant Chords and Scales
A dominant chord has the same 1, 3, and 5 as a major chord, but its 7 is flatted. Dominantchord symbols always have a pitch letter directly followed by a number, such as C7 instead ofCMa7. (The major 6 chords are exceptions: for example, C6 is actually CMa6, a majorchord.) Dominant chords usually resolve to major or minor chords.
1.9 Spelling the 12 Dominant 7 Chords1.9 Spelling the 12 Dominant 7 Chords1.9 Spelling the 12 Dominant 7 Chords1.9 Spelling the 12 Dominant 7 ChordsThe examples below show some common dominant chord symbols you’ll see in chordprogressions, along with their chord tones, or arpeggios (C is the example key.)
C7 C9
Example 1.9 - C Dominant chord symbols and arpeggios
���Exercise 1.9 Spelling Dominant 7 Arpeggios
1.10 Practicing Dominant 7 Chords1.10 Practicing Dominant 7 Chords1.10 Practicing Dominant 7 Chords1.10 Practicing Dominant 7 ChordsYou can practice dominant 7 arpeggios around the circle of 4ths, using the Virtual PracticeMethod. For more ideas, see Even More Practice later in this chapter.
���Exercise 1.10 Humming Dominant 7 Chords
1.11 Spelling the 12 Mixolydian Scales1.11 Spelling the 12 Mixolydian Scales1.11 Spelling the 12 Mixolydian Scales1.11 Spelling the 12 Mixolydian ScalesA basic scale to use with a dominant chord is the Mixolydian scale (from the GreekMixolydian mode). It’s just like major except it has a flatted 7. The C Mixolydian and AMixolydian scales are shown below.
1 2 3 4 5 6 b7 8 1 2 3 4 5 6 b7 8
Example 1.11 - C Mixolydian scale (b7) Example 1.11a - A Mixolydian scale (b7)
���Exercise 1.11 Spelling Mixolydian Scales
1.12 Practicing Flexible Mixolydian Scales1.12 Practicing Flexible Mixolydian Scales1.12 Practicing Flexible Mixolydian Scales1.12 Practicing Flexible Mixolydian ScalesYou can practice flexible Mixolydian scales around the circle of fourths, using the VirtualPractice Method. See also More Practice with Flexible Scales and Arpeggios later in this chapter.
���Exercise 1.12 Humming Mixolydian Scales

26262626 • 1B: Building Chords and Scales (Level 1 - Starting)
Building Minor Chords and Scales
A minor chord is like a major chord but with a flatted third. In minor chords that contain a7, the 7 is also usually flatted. A minor chord can use “min” or “mi” or “m” or even a minussign; in this book we use “m” (such as Cm7).
1.13 Spelling the 12 Minor 7 Chords1.13 Spelling the 12 Minor 7 Chords1.13 Spelling the 12 Minor 7 Chords1.13 Spelling the 12 Minor 7 ChordsThe examples below show common minor chord symbols you’ll see in chord progressions,along with their chord tones (C is the example key).
Cm7 Cm9 Cm6 CmN7
Example 1.13 - Minor chords and arpeggios
In Exercise 1.13 below, be sure to flat both the 3 and 7 in each minor arpeggio.
���Exercise 1.13 Spelling Minor 7 Arpeggios
1.14 Practicing Minor 7 Chords1.14 Practicing Minor 7 Chords1.14 Practicing Minor 7 Chords1.14 Practicing Minor 7 ChordsYou can practice minor 7 chords with the circle of 4ths, using the Virtual Practice Method.For additional ideas, see More Practice with Flexible Scales and Arpeggios later in this chapter.
���Exercise 1.14 Humming Minor 7 Chords
1.15 Spelling the 12 Dorian Scales1.15 Spelling the 12 Dorian Scales1.15 Spelling the 12 Dorian Scales1.15 Spelling the 12 Dorian ScalesThe Dorian scale is a basic minor scale. It comes from the Greek Dorian mode. Its pitchesare the same as major, except for a b3 and a b7.
1 2 b3 4 5 6 b7 8 1 2 b3 4 5 6 b7 8Example 1.15 - C Dorian scale Example 1.15a - E Dorian scale
���Exercise 1.15 Spelling Dorian Scales
1.16 Practicing Flexible Dorian Scales1.16 Practicing Flexible Dorian Scales1.16 Practicing Flexible Dorian Scales1.16 Practicing Flexible Dorian ScalesYou can practice flexible Dorian scales around the circle of 4ths, using the Virtual PracticeMethod. For more ideas, see More Practice with Flexible Scales and Arpeggios below.
���Exercise 1.16 Humming Dorian Scales
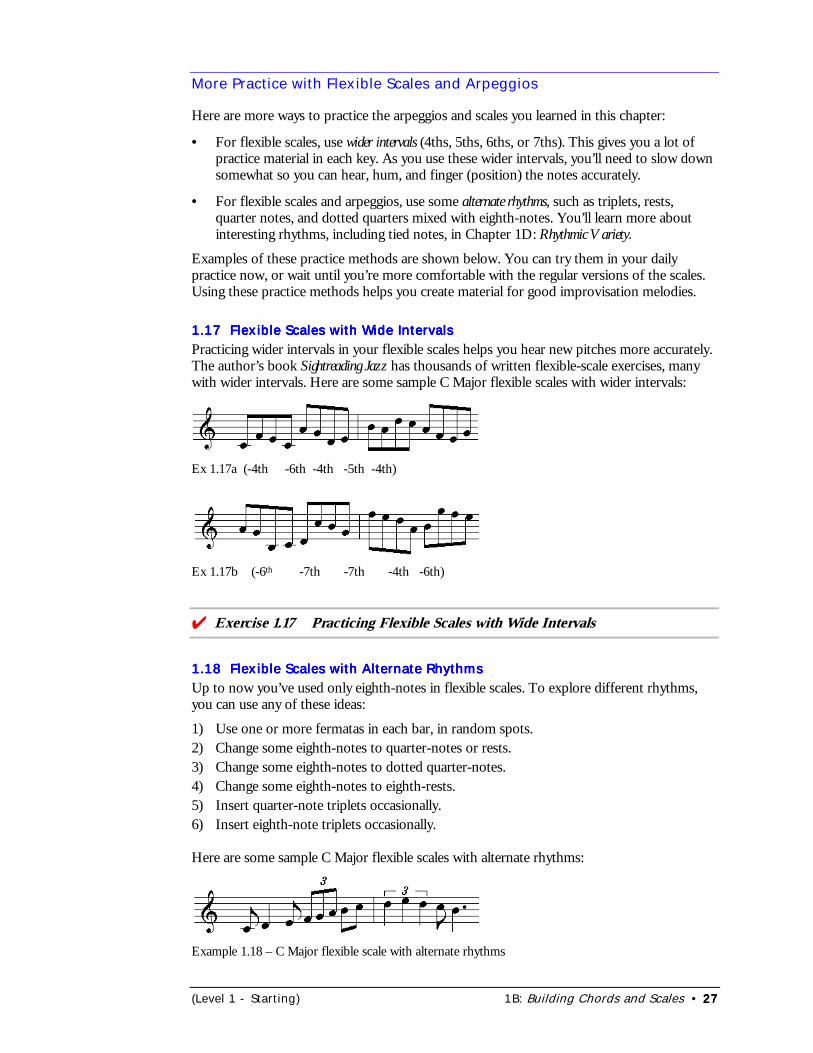
(Level 1 - Starting) 1B: Building Chords and Scales • 27272727
More Practice with Flexible Scales and Arpeggios
Here are more ways to practice the arpeggios and scales you learned in this chapter:
• For flexible scales, use wider intervals (4ths, 5ths, 6ths, or 7ths). This gives you a lot ofpractice material in each key. As you use these wider intervals, you’ll need to slow downsomewhat so you can hear, hum, and finger (position) the notes accurately.
• For flexible scales and arpeggios, use some alternate rhythms, such as triplets, rests,quarter notes, and dotted quarters mixed with eighth-notes. You’ll learn more aboutinteresting rhythms, including tied notes, in Chapter 1D: Rhythmic Variety.
Examples of these practice methods are shown below. You can try them in your dailypractice now, or wait until you’re more comfortable with the regular versions of the scales.Using these practice methods helps you create material for good improvisation melodies.
1.17 Flexible Scales with Wide Intervals1.17 Flexible Scales with Wide Intervals1.17 Flexible Scales with Wide Intervals1.17 Flexible Scales with Wide IntervalsPracticing wider intervals in your flexible scales helps you hear new pitches more accurately.The author’s book Sightreading Jazz has thousands of written flexible-scale exercises, manywith wider intervals. Here are some sample C Major flexible scales with wider intervals:
Ex 1.17a (-4th -6th -4th -5th -4th)
Ex 1.17b (-6th -7th -7th -4th -6th)
���Exercise 1.17 Practicing Flexible Scales with Wide Intervals
1.18 Flexible Scales with Alternate Rhythms1.18 Flexible Scales with Alternate Rhythms1.18 Flexible Scales with Alternate Rhythms1.18 Flexible Scales with Alternate RhythmsUp to now you’ve used only eighth-notes in flexible scales. To explore different rhythms,you can use any of these ideas:
1) Use one or more fermatas in each bar, in random spots.2) Change some eighth-notes to quarter-notes or rests.3) Change some eighth-notes to dotted quarter-notes.4) Change some eighth-notes to eighth-rests.5) Insert quarter-note triplets occasionally.6) Insert eighth-note triplets occasionally.
Here are some sample C Major flexible scales with alternate rhythms:
Example 1.18 – C Major flexible scale with alternate rhythms
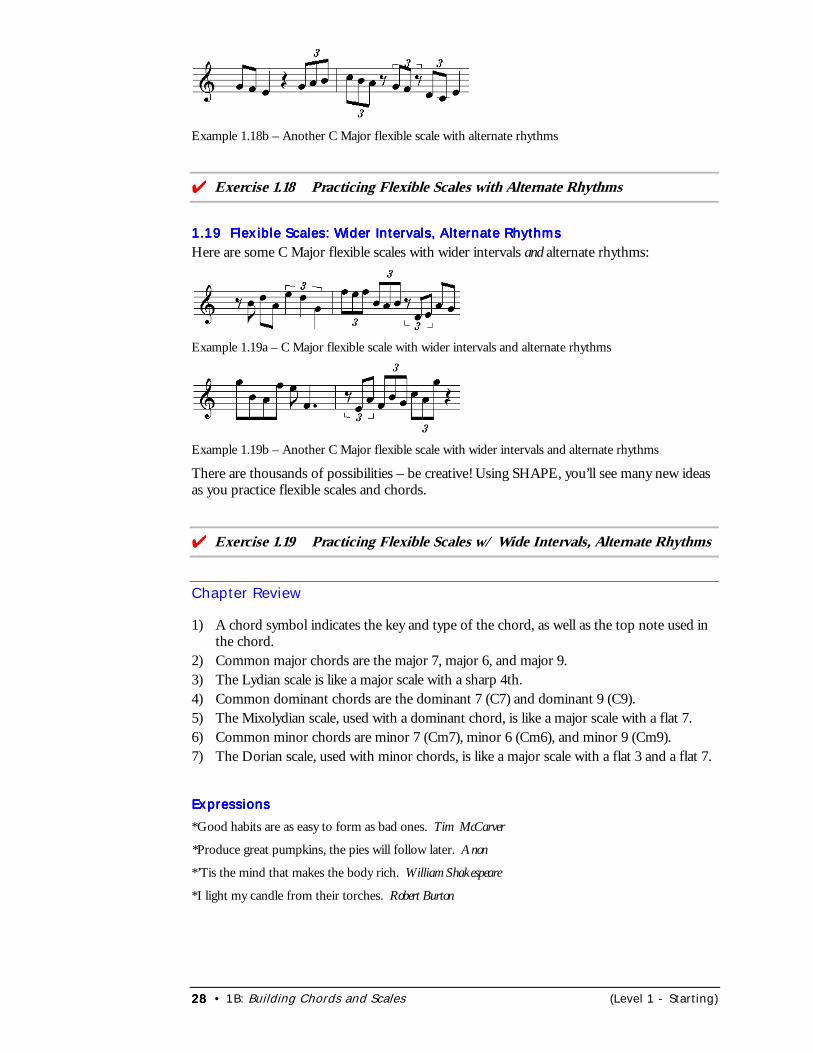
28282828 • 1B: Building Chords and Scales (Level 1 - Starting)
Example 1.18b – Another C Major flexible scale with alternate rhythms
���Exercise 1.18 Practicing Flexible Scales with Alternate Rhythms
1.19 Flexible Scales: Wider Intervals, Alternate Rhythms1.19 Flexible Scales: Wider Intervals, Alternate Rhythms1.19 Flexible Scales: Wider Intervals, Alternate Rhythms1.19 Flexible Scales: Wider Intervals, Alternate RhythmsHere are some C Major flexible scales with wider intervals and alternate rhythms:
Example 1.19a – C Major flexible scale with wider intervals and alternate rhythms
Example 1.19b – Another C Major flexible scale with wider intervals and alternate rhythms
There are thousands of possibilities – be creative! Using SHAPE, you’ll see many new ideasas you practice flexible scales and chords.
���Exercise 1.19 Practicing Flexible Scales w/ Wide Intervals, Alternate Rhythms
Chapter Review
1) A chord symbol indicates the key and type of the chord, as well as the top note used inthe chord.
2) Common major chords are the major 7, major 6, and major 9.3) The Lydian scale is like a major scale with a sharp 4th.4) Common dominant chords are the dominant 7 (C7) and dominant 9 (C9).5) The Mixolydian scale, used with a dominant chord, is like a major scale with a flat 7.6) Common minor chords are minor 7 (Cm7), minor 6 (Cm6), and minor 9 (Cm9).7) The Dorian scale, used with minor chords, is like a major scale with a flat 3 and a flat 7.
ExpressionsExpressionsExpressionsExpressions*Good habits are as easy to form as bad ones. Tim McCarver
*Produce great pumpkins, the pies will follow later. Anon
*’Tis the mind that makes the body rich. William Shakespeare
*I light my candle from their torches. Robert Burton
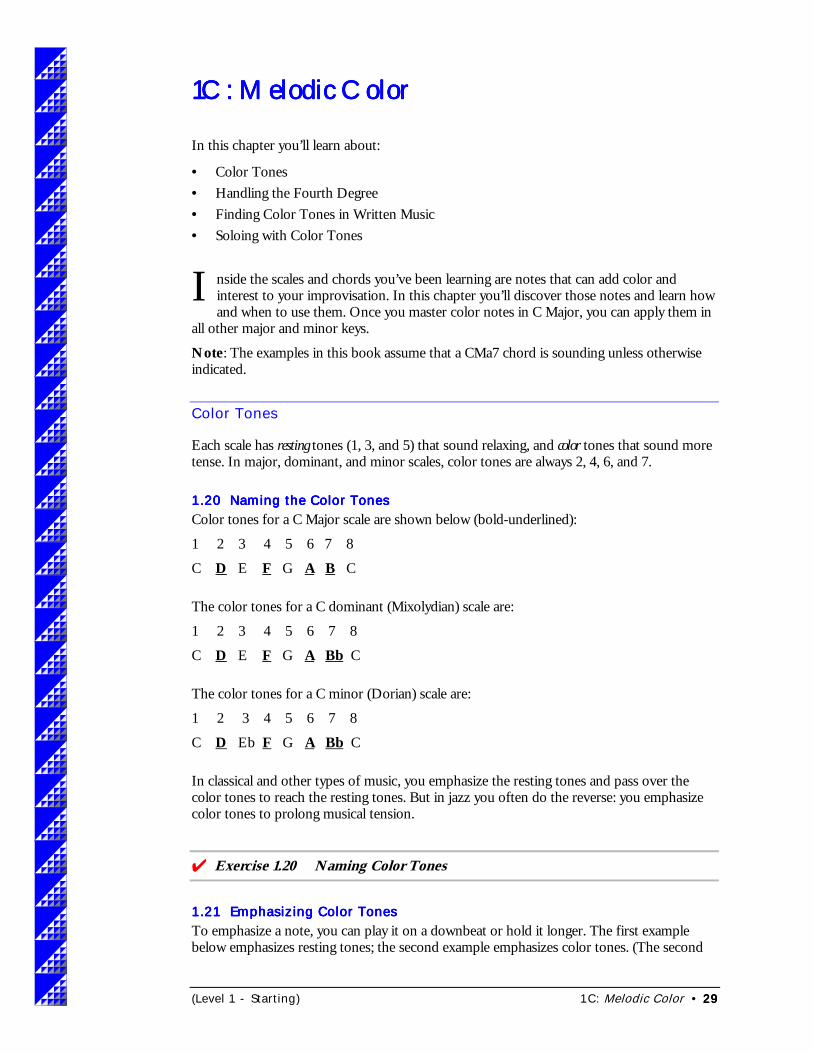
(Level 1 - Starting) 1C: Melodic Color • 29292929
1C: Melodic Color1C: Melodic Color1C: Melodic Color1C: Melodic Color
In this chapter you’ll learn about:
• Color Tones• Handling the Fourth Degree• Finding Color Tones in Written Music• Soloing with Color Tones
nside the scales and chords you’ve been learning are notes that can add color andinterest to your improvisation. In this chapter you’ll discover those notes and learn howand when to use them. Once you master color notes in C Major, you can apply them in
all other major and minor keys.
Note: The examples in this book assume that a CMa7 chord is sounding unless otherwiseindicated.
Color Tones
Each scale has resting tones (1, 3, and 5) that sound relaxing, and color tones that sound moretense. In major, dominant, and minor scales, color tones are always 2, 4, 6, and 7.
1.20 Naming the Color Tones1.20 Naming the Color Tones1.20 Naming the Color Tones1.20 Naming the Color TonesColor tones for a C Major scale are shown below (bold-underlined):
1 2 3 4 5 6 7 8
C D E F G A B C
The color tones for a C dominant (Mixolydian) scale are:
1 2 3 4 5 6 7 8
C D E F G A Bb C
The color tones for a C minor (Dorian) scale are:
1 2 3 4 5 6 7 8
C D Eb F G A Bb C
In classical and other types of music, you emphasize the resting tones and pass over thecolor tones to reach the resting tones. But in jazz you often do the reverse: you emphasizecolor tones to prolong musical tension.
���Exercise 1.20 Naming Color Tones
1.21 Emphasizing Color Tones1.21 Emphasizing Color Tones1.21 Emphasizing Color Tones1.21 Emphasizing Color TonesTo emphasize a note, you can play it on a downbeat or hold it longer. The first examplebelow emphasizes resting tones; the second example emphasizes color tones. (The second
I
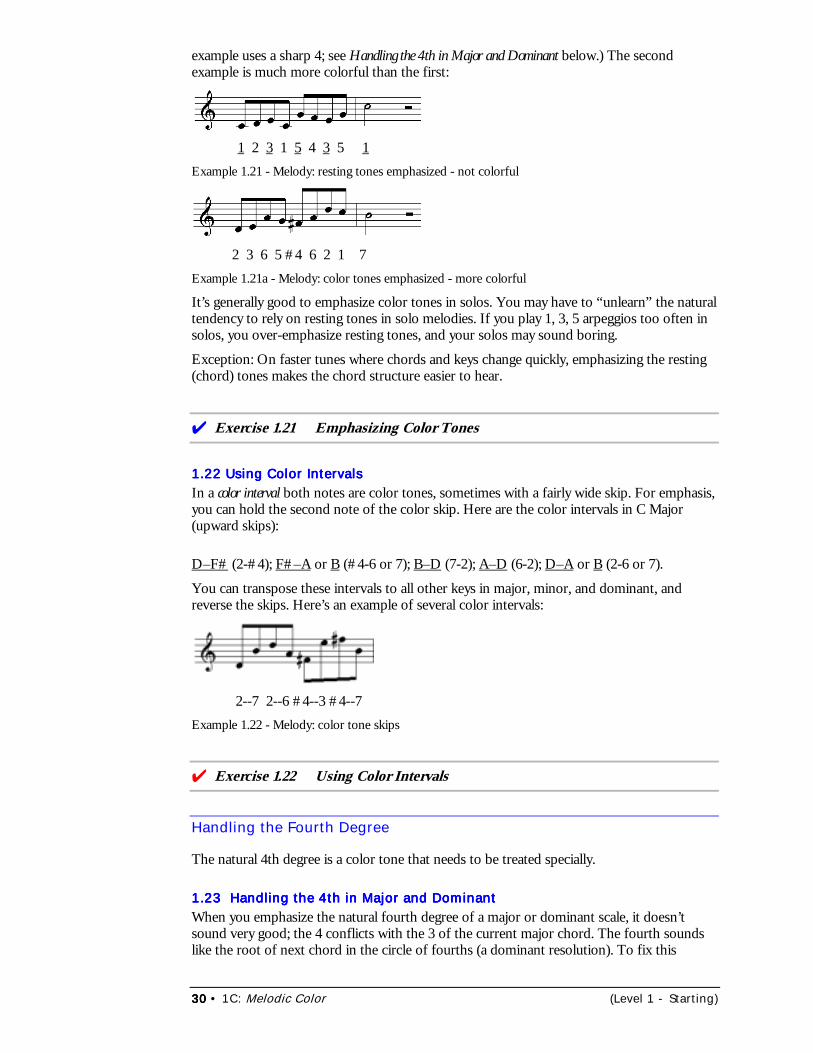
30303030 • 1C: Melodic Color (Level 1 - Starting)
example uses a sharp 4; see Handling the 4th in Major and Dominant below.) The secondexample is much more colorful than the first:
1 2 3 1 5 4 3 5 1Example 1.21 - Melody: resting tones emphasized - not colorful
2 3 6 5 #4 6 2 1 7Example 1.21a - Melody: color tones emphasized - more colorful
It’s generally good to emphasize color tones in solos. You may have to “unlearn” the naturaltendency to rely on resting tones in solo melodies. If you play 1, 3, 5 arpeggios too often insolos, you over-emphasize resting tones, and your solos may sound boring.
Exception: On faster tunes where chords and keys change quickly, emphasizing the resting(chord) tones makes the chord structure easier to hear.
���Exercise 1.21 Emphasizing Color Tones
1.22 Using Color Intervals1.22 Using Color Intervals1.22 Using Color Intervals1.22 Using Color IntervalsIn a color interval both notes are color tones, sometimes with a fairly wide skip. For emphasis,you can hold the second note of the color skip. Here are the color intervals in C Major(upward skips):
D–F# (2-#4); F#–A or B (#4-6 or 7); B–D (7-2); A–D (6-2); D–A or B (2-6 or 7).
You can transpose these intervals to all other keys in major, minor, and dominant, andreverse the skips. Here’s an example of several color intervals:
2--7 2--6 #4--3 #4--7Example 1.22 - Melody: color tone skips
���Exercise 1.22 Using Color Intervals
Handling the Fourth Degree
The natural 4th degree is a color tone that needs to be treated specially.
1.23 Handling the 4th in Major and Dominant1.23 Handling the 4th in Major and Dominant1.23 Handling the 4th in Major and Dominant1.23 Handling the 4th in Major and DominantWhen you emphasize the natural fourth degree of a major or dominant scale, it doesn’tsound very good; the 4 conflicts with the 3 of the current major chord. The fourth soundslike the root of next chord in the circle of fourths (a dominant resolution). To fix this
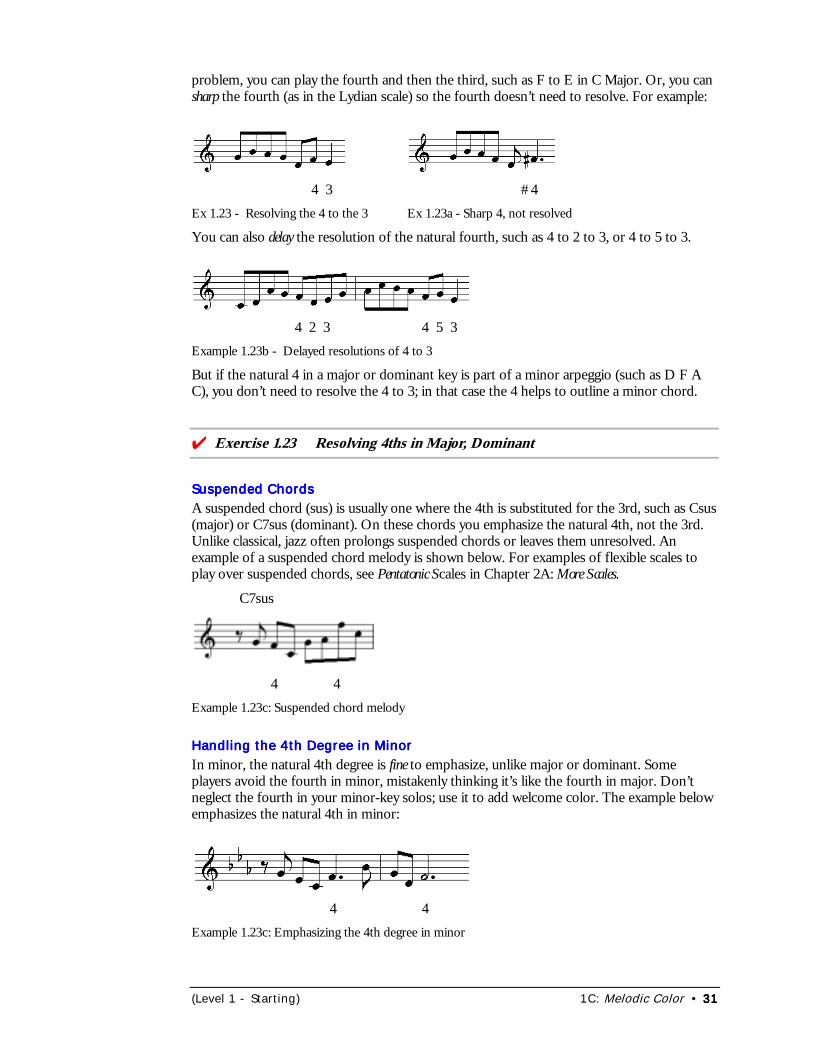
(Level 1 - Starting) 1C: Melodic Color • 31313131
problem, you can play the fourth and then the third, such as F to E in C Major. Or, you cansharp the fourth (as in the Lydian scale) so the fourth doesn’t need to resolve. For example:
4 3 #4Ex 1.23 - Resolving the 4 to the 3 Ex 1.23a - Sharp 4, not resolved
You can also delay the resolution of the natural fourth, such as 4 to 2 to 3, or 4 to 5 to 3.
4 2 3 4 5 3Example 1.23b - Delayed resolutions of 4 to 3
But if the natural 4 in a major or dominant key is part of a minor arpeggio (such as D F AC), you don’t need to resolve the 4 to 3; in that case the 4 helps to outline a minor chord.
���Exercise 1.23 Resolving 4ths in Major, Dominant
Suspended ChordsSuspended ChordsSuspended ChordsSuspended ChordsA suspended chord (sus) is usually one where the 4th is substituted for the 3rd, such as Csus(major) or C7sus (dominant). On these chords you emphasize the natural 4th, not the 3rd.Unlike classical, jazz often prolongs suspended chords or leaves them unresolved. Anexample of a suspended chord melody is shown below. For examples of flexible scales toplay over suspended chords, see Pentatonic Scales in Chapter 2A: More Scales.
C7sus
4 4Example 1.23c: Suspended chord melody
Handling the 4th Degree in MinorHandling the 4th Degree in MinorHandling the 4th Degree in MinorHandling the 4th Degree in MinorIn minor, the natural 4th degree is fine to emphasize, unlike major or dominant. Someplayers avoid the fourth in minor, mistakenly thinking it’s like the fourth in major. Don’tneglect the fourth in your minor-key solos; use it to add welcome color. The example belowemphasizes the natural 4th in minor:
4 4Example 1.23c: Emphasizing the 4th degree in minor
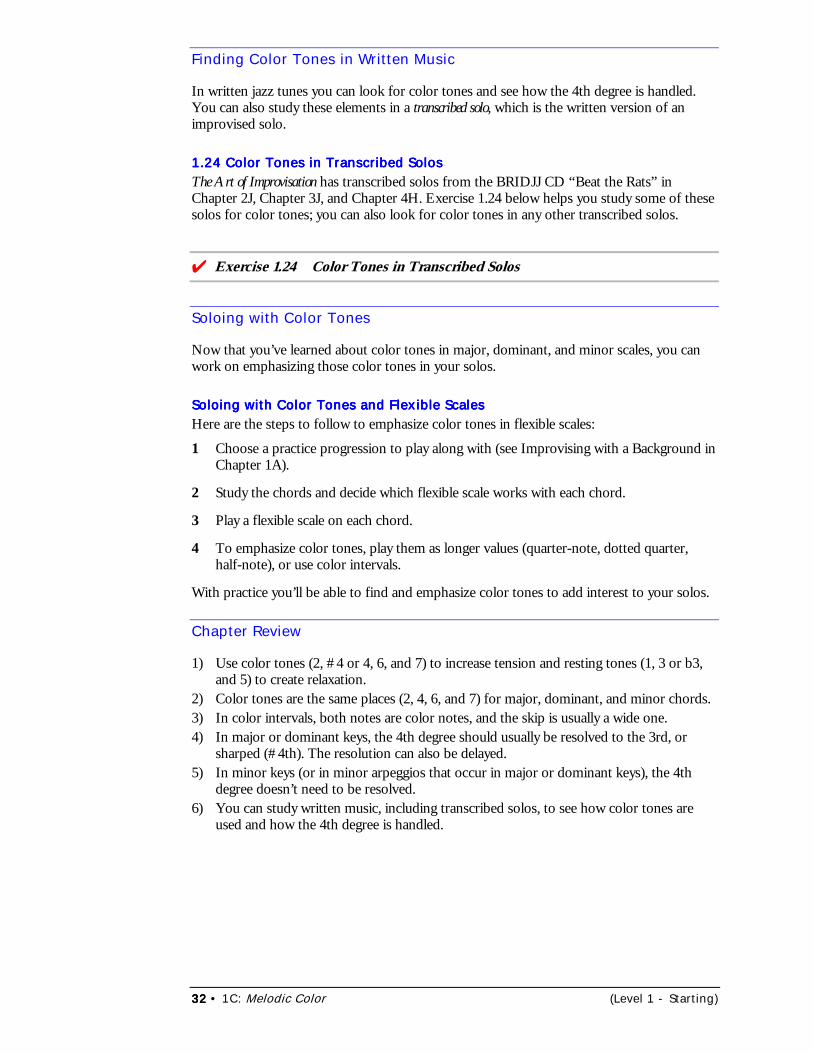
32323232 • 1C: Melodic Color (Level 1 - Starting)
Finding Color Tones in Written Music
In written jazz tunes you can look for color tones and see how the 4th degree is handled.You can also study these elements in a transcribed solo, which is the written version of animprovised solo.
1.24 Color Tones in Transcribed Solos1.24 Color Tones in Transcribed Solos1.24 Color Tones in Transcribed Solos1.24 Color Tones in Transcribed SolosThe Art of Improvisation has transcribed solos from the BRIDJJ CD “Beat the Rats” inChapter 2J, Chapter 3J, and Chapter 4H. Exercise 1.24 below helps you study some of thesesolos for color tones; you can also look for color tones in any other transcribed solos.
���Exercise 1.24 Color Tones in Transcribed Solos
Soloing with Color Tones
Now that you’ve learned about color tones in major, dominant, and minor scales, you canwork on emphasizing those color tones in your solos.
Soloing with Color Tones and Flexible ScalesSoloing with Color Tones and Flexible ScalesSoloing with Color Tones and Flexible ScalesSoloing with Color Tones and Flexible ScalesHere are the steps to follow to emphasize color tones in flexible scales:
1 Choose a practice progression to play along with (see Improvising with a Background inChapter 1A).
2 Study the chords and decide which flexible scale works with each chord.
3 Play a flexible scale on each chord.
4 To emphasize color tones, play them as longer values (quarter-note, dotted quarter,half-note), or use color intervals.
With practice you’ll be able to find and emphasize color tones to add interest to your solos.
Chapter Review
1) Use color tones (2, #4 or 4, 6, and 7) to increase tension and resting tones (1, 3 or b3,and 5) to create relaxation.
2) Color tones are the same places (2, 4, 6, and 7) for major, dominant, and minor chords.3) In color intervals, both notes are color notes, and the skip is usually a wide one.4) In major or dominant keys, the 4th degree should usually be resolved to the 3rd, or
sharped (#4th). The resolution can also be delayed.5) In minor keys (or in minor arpeggios that occur in major or dominant keys), the 4th
degree doesn’t need to be resolved.6) You can study written music, including transcribed solos, to see how color tones are
used and how the 4th degree is handled.
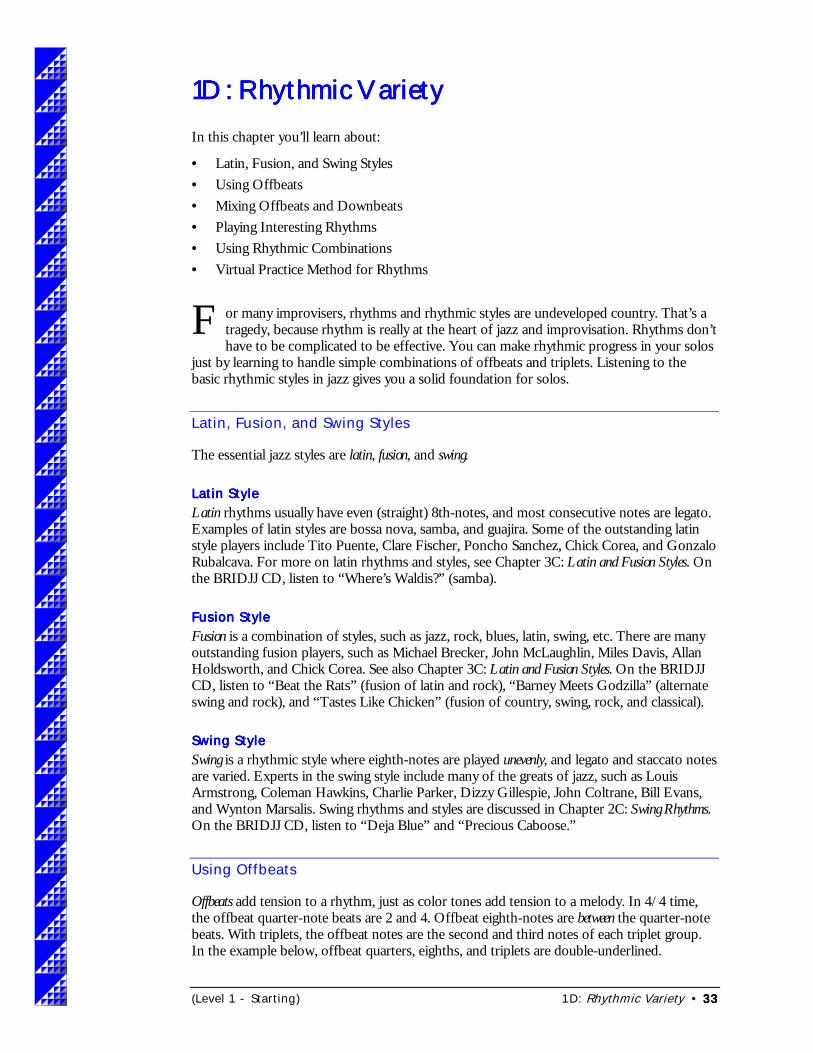
(Level 1 - Starting) 1D: Rhythmic Variety • 33333333
1D: Rhythmic Variety1D: Rhythmic Variety1D: Rhythmic Variety1D: Rhythmic Variety
In this chapter you’ll learn about:
• Latin, Fusion, and Swing Styles• Using Offbeats• Mixing Offbeats and Downbeats• Playing Interesting Rhythms• Using Rhythmic Combinations• Virtual Practice Method for Rhythms
or many improvisers, rhythms and rhythmic styles are undeveloped country. That’s atragedy, because rhythm is really at the heart of jazz and improvisation. Rhythms don’thave to be complicated to be effective. You can make rhythmic progress in your solos
just by learning to handle simple combinations of offbeats and triplets. Listening to thebasic rhythmic styles in jazz gives you a solid foundation for solos.
Latin, Fusion, and Swing Styles
The essential jazz styles are latin, fusion, and swing.
Latin StyleLatin StyleLatin StyleLatin StyleLatin rhythms usually have even (straight) 8th-notes, and most consecutive notes are legato.Examples of latin styles are bossa nova, samba, and guajira. Some of the outstanding latinstyle players include Tito Puente, Clare Fischer, Poncho Sanchez, Chick Corea, and GonzaloRubalcava. For more on latin rhythms and styles, see Chapter 3C: Latin and Fusion Styles. Onthe BRIDJJ CD, listen to “Where’s Waldis?” (samba).
Fusion StyleFusion StyleFusion StyleFusion StyleFusion is a combination of styles, such as jazz, rock, blues, latin, swing, etc. There are manyoutstanding fusion players, such as Michael Brecker, John McLaughlin, Miles Davis, AllanHoldsworth, and Chick Corea. See also Chapter 3C: Latin and Fusion Styles. On the BRIDJJCD, listen to “Beat the Rats” (fusion of latin and rock), “Barney Meets Godzilla” (alternateswing and rock), and “Tastes Like Chicken” (fusion of country, swing, rock, and classical).
Swing StyleSwing StyleSwing StyleSwing StyleSwing is a rhythmic style where eighth-notes are played unevenly, and legato and staccato notesare varied. Experts in the swing style include many of the greats of jazz, such as LouisArmstrong, Coleman Hawkins, Charlie Parker, Dizzy Gillespie, John Coltrane, Bill Evans,and Wynton Marsalis. Swing rhythms and styles are discussed in Chapter 2C: Swing Rhythms.On the BRIDJJ CD, listen to “Deja Blue” and “Precious Caboose.”
Using Offbeats
Offbeats add tension to a rhythm, just as color tones add tension to a melody. In 4/4 time,the offbeat quarter-note beats are 2 and 4. Offbeat eighth-notes are between the quarter-notebeats. With triplets, the offbeat notes are the second and third notes of each triplet group.In the example below, offbeat quarters, eighths, and triplets are double-underlined.
F
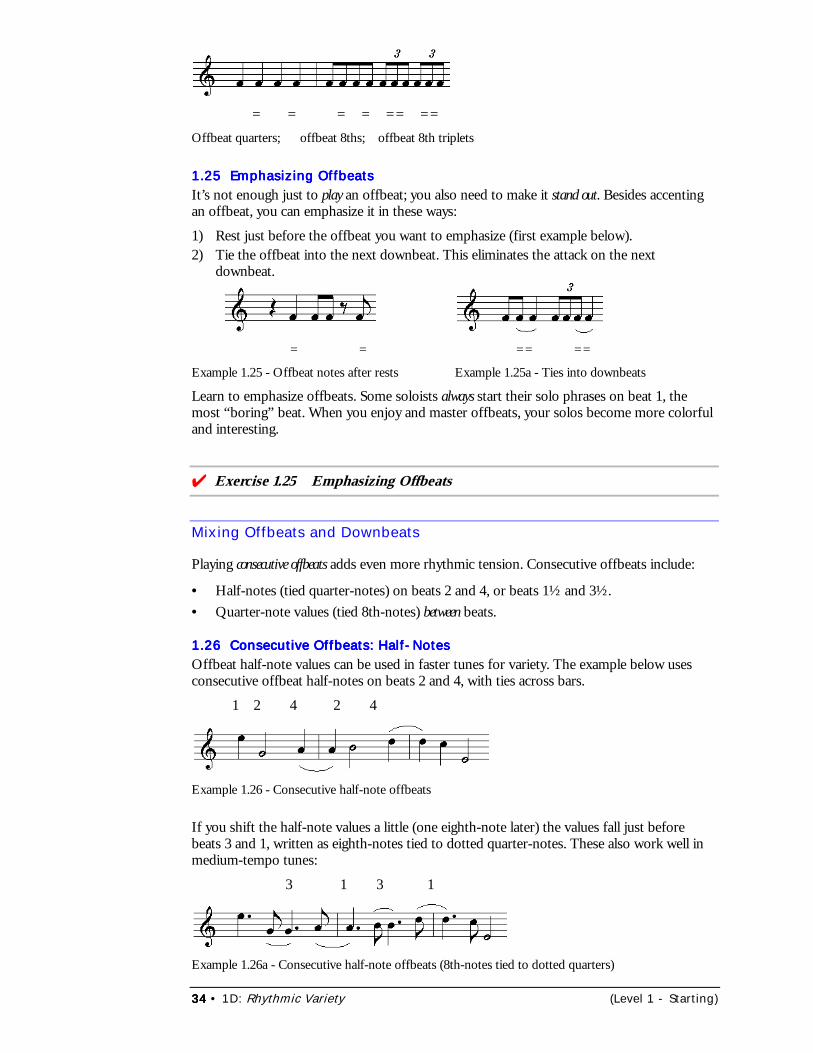
34343434 • 1D: Rhythmic Variety (Level 1 - Starting)
= = = = == == Offbeat quarters; offbeat 8ths; offbeat 8th triplets
1.25 Emphasizing Offbeats1.25 Emphasizing Offbeats1.25 Emphasizing Offbeats1.25 Emphasizing OffbeatsIt’s not enough just to play an offbeat; you also need to make it stand out. Besides accentingan offbeat, you can emphasize it in these ways:
1) Rest just before the offbeat you want to emphasize (first example below).2) Tie the offbeat into the next downbeat. This eliminates the attack on the next
downbeat.
= = == ==
Example 1.25 - Offbeat notes after rests Example 1.25a - Ties into downbeats
Learn to emphasize offbeats. Some soloists always start their solo phrases on beat 1, themost “boring” beat. When you enjoy and master offbeats, your solos become more colorfuland interesting.
���Exercise 1.25 Emphasizing Offbeats
Mixing Offbeats and Downbeats
Playing consecutive offbeats adds even more rhythmic tension. Consecutive offbeats include:
• Half-notes (tied quarter-notes) on beats 2 and 4, or beats 1½ and 3½.• Quarter-note values (tied 8th-notes) between beats.
1.26 Consecutive Offbeats: Half-Notes1.26 Consecutive Offbeats: Half-Notes1.26 Consecutive Offbeats: Half-Notes1.26 Consecutive Offbeats: Half-NotesOffbeat half-note values can be used in faster tunes for variety. The example below usesconsecutive offbeat half-notes on beats 2 and 4, with ties across bars.
1 2 4 2 4
Example 1.26 - Consecutive half-note offbeats
If you shift the half-note values a little (one eighth-note later) the values fall just beforebeats 3 and 1, written as eighth-notes tied to dotted quarter-notes. These also work well inmedium-tempo tunes:
3 1 3 1
Example 1.26a - Consecutive half-note offbeats (8th-notes tied to dotted quarters)
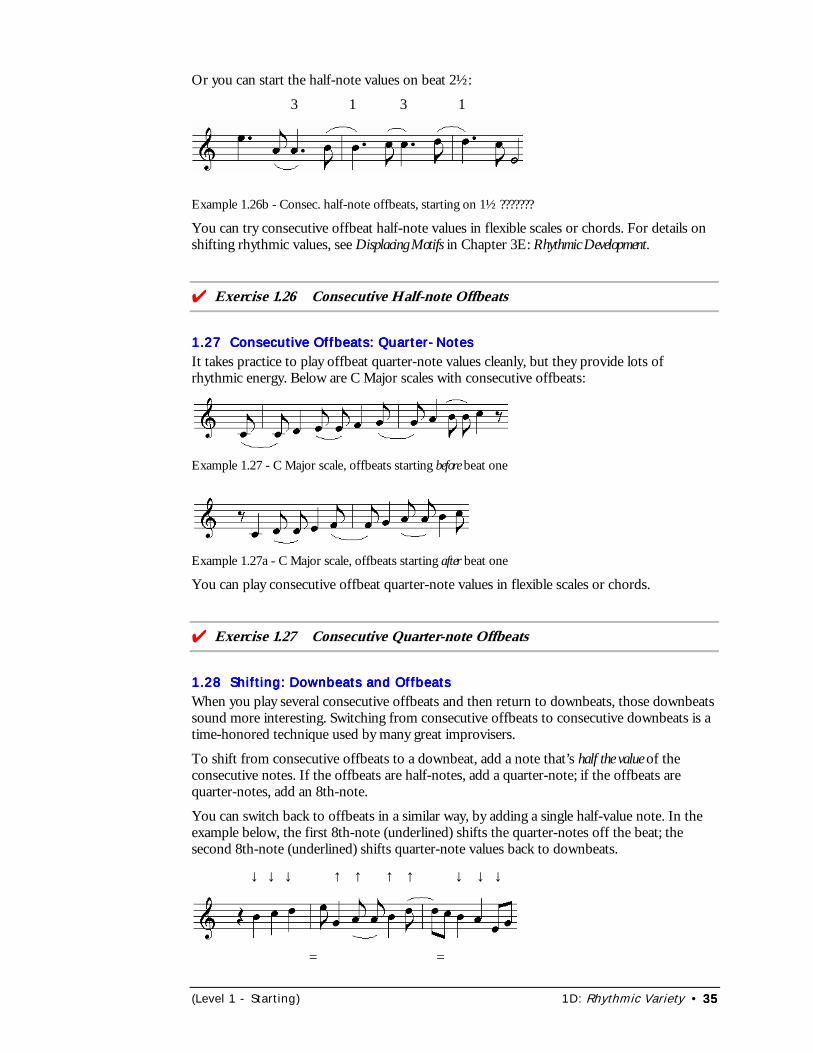
(Level 1 - Starting) 1D: Rhythmic Variety • 35353535
Or you can start the half-note values on beat 2½:
3 1 3 1
Example 1.26b - Consec. half-note offbeats, starting on 1½ ???????
You can try consecutive offbeat half-note values in flexible scales or chords. For details onshifting rhythmic values, see Displacing Motifs in Chapter 3E: Rhythmic Development.
���Exercise 1.26 Consecutive Half-note Offbeats
1.27 Consecutive Offbeats: Quarter-Notes1.27 Consecutive Offbeats: Quarter-Notes1.27 Consecutive Offbeats: Quarter-Notes1.27 Consecutive Offbeats: Quarter-NotesIt takes practice to play offbeat quarter-note values cleanly, but they provide lots ofrhythmic energy. Below are C Major scales with consecutive offbeats:
Example 1.27 - C Major scale, offbeats starting before beat one
Example 1.27a - C Major scale, offbeats starting after beat one
You can play consecutive offbeat quarter-note values in flexible scales or chords.
���Exercise 1.27 Consecutive Quarter-note Offbeats
1.28 Shifting: Downbeats and Offbeats1.28 Shifting: Downbeats and Offbeats1.28 Shifting: Downbeats and Offbeats1.28 Shifting: Downbeats and OffbeatsWhen you play several consecutive offbeats and then return to downbeats, those downbeatssound more interesting. Switching from consecutive offbeats to consecutive downbeats is atime-honored technique used by many great improvisers.
To shift from consecutive offbeats to a downbeat, add a note that’s half the value of theconsecutive notes. If the offbeats are half-notes, add a quarter-note; if the offbeats arequarter-notes, add an 8th-note.
You can switch back to offbeats in a similar way, by adding a single half-value note. In theexample below, the first 8th-note (underlined) shifts the quarter-notes off the beat; thesecond 8th-note (underlined) shifts quarter-note values back to downbeats.
↓ ↓ ↓ ↑ ↑ ↑ ↑ ↓ ↓ ↓
= =
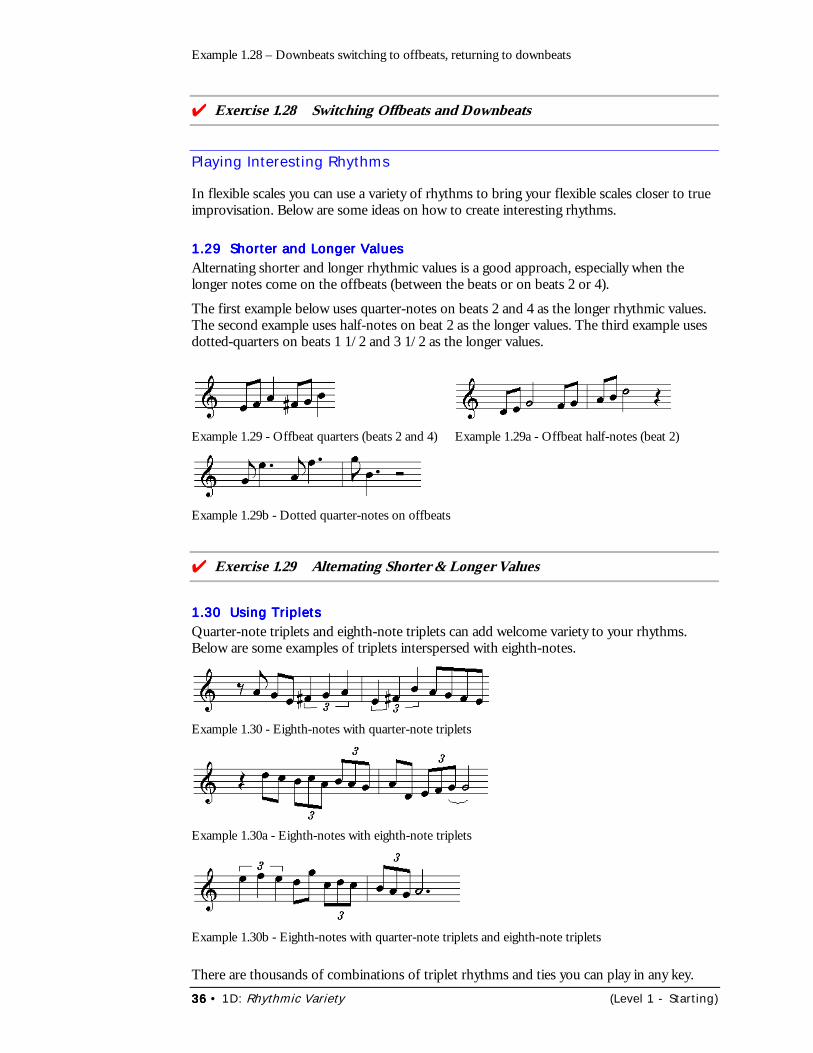
36363636 • 1D: Rhythmic Variety (Level 1 - Starting)
Example 1.28 – Downbeats switching to offbeats, returning to downbeats
���Exercise 1.28 Switching Offbeats and Downbeats
Playing Interesting Rhythms
In flexible scales you can use a variety of rhythms to bring your flexible scales closer to trueimprovisation. Below are some ideas on how to create interesting rhythms.
1.29 Shorter and Longer Values1.29 Shorter and Longer Values1.29 Shorter and Longer Values1.29 Shorter and Longer ValuesAlternating shorter and longer rhythmic values is a good approach, especially when thelonger notes come on the offbeats (between the beats or on beats 2 or 4).
The first example below uses quarter-notes on beats 2 and 4 as the longer rhythmic values.The second example uses half-notes on beat 2 as the longer values. The third example usesdotted-quarters on beats 1 1/2 and 3 1/2 as the longer values.
Example 1.29 - Offbeat quarters (beats 2 and 4) Example 1.29a - Offbeat half-notes (beat 2)
Example 1.29b - Dotted quarter-notes on offbeats
���Exercise 1.29 Alternating Shorter & Longer Values
1.30 Using Triplets1.30 Using Triplets1.30 Using Triplets1.30 Using TripletsQuarter-note triplets and eighth-note triplets can add welcome variety to your rhythms.Below are some examples of triplets interspersed with eighth-notes.
Example 1.30 - Eighth-notes with quarter-note triplets
Example 1.30a - Eighth-notes with eighth-note triplets
Example 1.30b - Eighth-notes with quarter-note triplets and eighth-note triplets
There are thousands of combinations of triplet rhythms and ties you can play in any key.
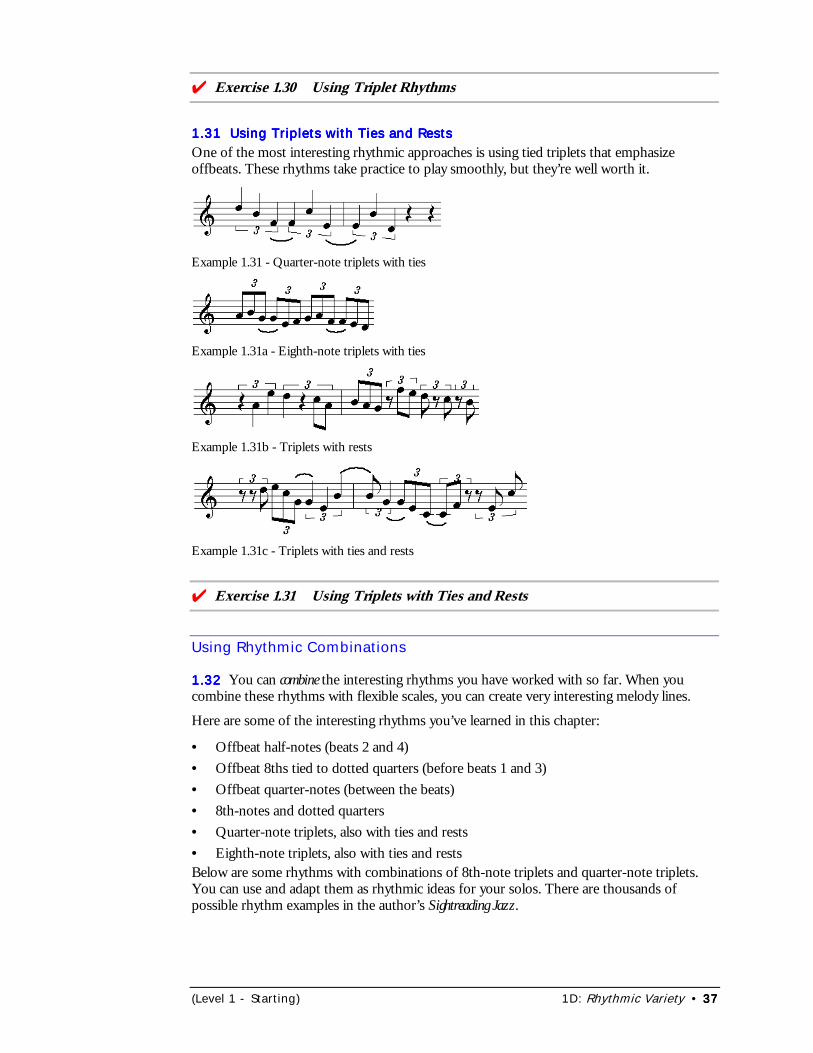
(Level 1 - Starting) 1D: Rhythmic Variety • 37373737
���Exercise 1.30 Using Triplet Rhythms
1.31 Using Triplets with Ties and Rests1.31 Using Triplets with Ties and Rests1.31 Using Triplets with Ties and Rests1.31 Using Triplets with Ties and RestsOne of the most interesting rhythmic approaches is using tied triplets that emphasizeoffbeats. These rhythms take practice to play smoothly, but they’re well worth it.
Example 1.31 - Quarter-note triplets with ties
Example 1.31a - Eighth-note triplets with ties
Example 1.31b - Triplets with rests
Example 1.31c - Triplets with ties and rests
���Exercise 1.31 Using Triplets with Ties and Rests
Using Rhythmic Combinations
1.321.321.321.32 You can combine the interesting rhythms you have worked with so far. When youcombine these rhythms with flexible scales, you can create very interesting melody lines.
Here are some of the interesting rhythms you’ve learned in this chapter:
• Offbeat half-notes (beats 2 and 4)• Offbeat 8ths tied to dotted quarters (before beats 1 and 3)• Offbeat quarter-notes (between the beats)• 8th-notes and dotted quarters• Quarter-note triplets, also with ties and rests• Eighth-note triplets, also with ties and restsBelow are some rhythms with combinations of 8th-note triplets and quarter-note triplets.You can use and adapt them as rhythmic ideas for your solos. There are thousands ofpossible rhythm examples in the author’s Sightreading Jazz.
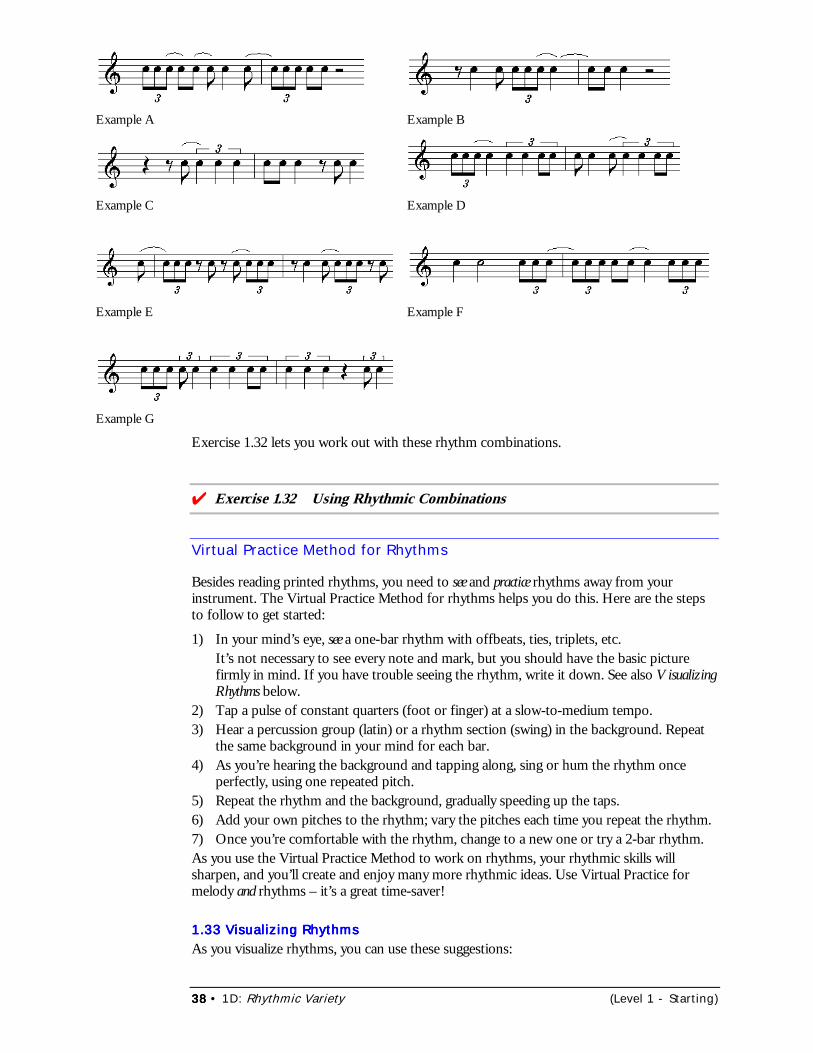
38383838 • 1D: Rhythmic Variety (Level 1 - Starting)
Example A Example B
Example C Example D
Example E Example F
Example G
Exercise 1.32 lets you work out with these rhythm combinations.
���Exercise 1.32 Using Rhythmic Combinations
Virtual Practice Method for Rhythms
Besides reading printed rhythms, you need to see and practice rhythms away from yourinstrument. The Virtual Practice Method for rhythms helps you do this. Here are the stepsto follow to get started:
1) In your mind’s eye, see a one-bar rhythm with offbeats, ties, triplets, etc.It’s not necessary to see every note and mark, but you should have the basic picturefirmly in mind. If you have trouble seeing the rhythm, write it down. See also VisualizingRhythms below.
2) Tap a pulse of constant quarters (foot or finger) at a slow-to-medium tempo.3) Hear a percussion group (latin) or a rhythm section (swing) in the background. Repeat
the same background in your mind for each bar.4) As you’re hearing the background and tapping along, sing or hum the rhythm once
perfectly, using one repeated pitch.5) Repeat the rhythm and the background, gradually speeding up the taps.6) Add your own pitches to the rhythm; vary the pitches each time you repeat the rhythm.7) Once you’re comfortable with the rhythm, change to a new one or try a 2-bar rhythm.As you use the Virtual Practice Method to work on rhythms, your rhythmic skills willsharpen, and you’ll create and enjoy many more rhythmic ideas. Use Virtual Practice formelody and rhythms – it’s a great time-saver!
1.33 Visualizing Rhythms1.33 Visualizing Rhythms1.33 Visualizing Rhythms1.33 Visualizing RhythmsAs you visualize rhythms, you can use these suggestions:
(Level 1 - Starting) 1D: Rhythmic Variety • 39393939
1) See the start of each measure as a solid vertical bar line (every 4 beats in 4/4) and knowwhere it fits in your rhythm.
2) See beats 2, 3, and 4 as thin, light vertical lines in each measure.
3) Assign each note in the rhythm its proper role as a downbeat (a thin line through it) oroffbeat or internal triplet (between the lines).
Even though you may not see exactly where beats 2, 3, and 4 are in your rhythm, youmust always be able to sense which notes are downbeats and which are offbeats.
4) Long values feel more “inflated” and full; short values have bursts of energy.
Rhythmic Precision: Thinking Like a DrummerRhythmic Precision: Thinking Like a DrummerRhythmic Precision: Thinking Like a DrummerRhythmic Precision: Thinking Like a DrummerMost jazz soloists need to think more like good jazz drummers in order to be more preciseand creative with rhythms. I was fortunate to grow up with a brother who incessantlypracticed independent coordination exercises for drum set in the next room in our house. Idiscovered there is a world of rhythmic possibilities, if I could just combine rhythmicimagination and precision. I also discovered that most improvisers give far less attention torhythmic detail than drummers do, but great improvisers are very solid rhythmically.
So I began to approach improvisation more rhythmically. I found that rhythmic imaginationand precision unlocked the door to rhythmic development in my solos, where I could takemusical ideas and vary them both rhythmically and melodically. (See also Chapter 3E:Rhythmic Development.) Once I entered the land of rhythmic development, there was no goingback; I found it was far superior to the land of endless eighth-notes and scale-running.
���Exercise 1.33 Using Virtual Practice for Rhythms
Chapter Review
1) Essential jazz styles are latin, fusion, and swing.2) To emphasize an offbeat, you can accent it, or rest just before the offbeat you want to
emphasize, or tie the offbeat into the next downbeat.3) To switch between downbeats and offbeats, insert a note half the value of the
consecutive notes.4) Interesting rhythms include short/long note combinations and triplet values.5) In triplet groups you can use rests and ties.6) You can use the Virtual Practice Method to strengthen your rhythmic skills and ideas.
ExpressionsExpressionsExpressionsExpressions*Words differently arranged have a different meaning, and meanings differently arranged have adifferent effect. Pascal
*The most important thing in communication is to hear what isn't being said. Peter F. Drucker
*No man can do anything well who does not esteem his work to be important. Ralph Waldo Emerson
*A little learning is a dangerous thing; Drink deep, or taste not the Pierian spring. Alexander Pope
*Is not life a hundred times too short for us to bore ourselves? Friedrich Nietzsche
*The greatest pleasure in life is doing what people say you cannot do. Walter Bagehot
40404040 • 1E: Using Expression (Level 1 - Starting)
1E: Using Expression1E: Using Expression1E: Using Expression1E: Using Expression
In this chapter you’ll learn about:
• The Role of Expression• Playing with Expression• Using Dynamics• Varying Accents and Articulations
xpression is the art of how you play notes in your solos, using dynamics, accents,articulations, etc. The “E” in SHAPE is “expressively” – the right expression in yourmelodies can make a big difference in your solos. This chapter deals specifically with
dynamics, accents, and articulations. Special effects, another type of expression, arediscussed in Chapter 4C: Special Effects.
The Role of Expression
Emotion is the subjective fire that triggers expression; expression is how you translate theemotion into musical elements. Even though musical expression might seem very subjective,you can treat the basic elements of expression objectively. For example, you can identifydynamics, accents, and articulations in solos. Still, there so many different ways to use andcombine these basic elements that your expression does become more personal. What’simportant is to recognize and use expression well to enhance your solos.
Most improvisers get so caught up searching for the next pitches that they don’t express thepitches they’re playing. Don’t fall into that trap – slow your ideas down enough so you cansee them well and express them well.
Sound and TechniqueSound and TechniqueSound and TechniqueSound and TechniqueYour personal expression depends on your control over your own sound and technique. Anyweaknesses you have in these areas can limit the kinds of expression you use. With bettercontrol of your instrument, the pitches and rhythms come easier so you can focus more onadding expression effectively. For more ideas on sound and technique in solos, see Chapter1J: Analyzing Your Solos.
Playing with Expression
When you use expression, consider these points:
1) How dramatic or frequent is the expression? Expression should be subtle, not overdone.
2) How wide should the variation be? You can get many degrees of expression without going toextremes, but occasionally extremes are called for.
3) When does expression work best? Expression needs to stand out. It’s usually more effectivewhen it’s unexpected, but it can sometimes be effective when it’s expected.
#1: Subtle and Occasional#1: Subtle and Occasional#1: Subtle and Occasional#1: Subtle and OccasionalWe can compare expression to spices in meals. With the right spices in the right amounts,the meal can taste much better. In a solo, expression shouldn’t be overdone or it will lose itsflavor. Slower tunes allow more subtle and more frequent expression, while faster tunesneed more dramatic but less frequent expression. Silence helps expression stand out more.
E
(Level 1 - Starting) 1E: Using Expression • 41414141
#2: Varied#2: Varied#2: Varied#2: VariedYou need a wide variety of dynamics, articulations, and accents. You should:
• Use a wider range of accents and articulations, from gentle to strong.• Watch the overall dynamics in your band. You can help the others get louder or softer
by the solo ideas you play. When you allow softer dynamics you open a wider range ofexpression; with louder dynamics, the subtler effects are lost.
#3: Well-Timed#3: Well-Timed#3: Well-Timed#3: Well-TimedWhen you use expression is almost as important as the kind of expression you use. There aremany timing possibilities; your task is to select the right kind of expression at just the rightmoment. Listening to jazz recordings can give you helpful ideas in this area.
Sometimes you can add expression to a note or two that are isolated before and after bylonger rests. This makes the expression you use really stand out. Be sure you havesomething effective to say, and don’t overuse this approach.
Using SHAPE for ExpressionUsing SHAPE for ExpressionUsing SHAPE for ExpressionUsing SHAPE for ExpressionAs you see, hear, and play notes, you can add expression to some of them. Expression canmake the notes prettier, rougher, stronger, fainter, or unusual in some way. In a visual way,adding expression is something like this:
• Prettier = vibrato, trills, (see Chapter 2E: Embellishments), color notes held longer• Rougher = harsher attacks, flatter or sharper pitch• Stronger or fainter = louder or softer (or half-sounds)• Unusual = special effects (see Chapter 4C: Special Effects)So you can polish and paint notes, or scratch them up, or hammer or squish them –whatever comes to mind that makes the idea better, as long as it’s not overdone.
Using Dynamics
Some players use little or no range in their dynamics – it’s all “medium loud.” Instead, tryfrequent but slight dynamic variations in melodies to open a world of dynamic possibilities.
1.34 Dynamic Variety1.34 Dynamic Variety1.34 Dynamic Variety1.34 Dynamic VarietyBy habit, we play louder as we go higher, and softer as we go lower. Here are somesuggestions for making dynamics more varied and less predictable:
• Reverse the normal dynamics: crescendo going down, decrescendo going up.• Crescendo or decrescendo as you hold a pitch or repeat a pitch several times.• Play whisper-soft. Balance with the rhythm section and pause before the soft passage.• Insert occasional louder, accented notes in the middle of a softer passage.• Use “terraced” dynamics: play a musical idea softly, then repeat it louder.
���Exercise 1.34 Using Dynamics
Varying Accents and Articulations
Accents and articulations are often neglected or poorly handled in expression. If your soloshave little variety in accents or articulation, you’re probably just searching for “newer and
42424242 • 1E: Using Expression (Level 1 - Starting)
better” pitches to play. Here are some common problems with accents and articulations,along with solutions:
Problem 1: It’s hard enough choosing pitches without worrying about accents & articulations.
Solution: Choose fewer pitches and express them better so the listener enjoys themmore.
Problem 2: I can’t use accents or articulations when pitches and rhythms aren’t locking in.
Solution: Practice scales and intervals in all keys; practice offbeat rhythms in all styles.
Problem 3: At medium or fast speeds, notes crack when I use articulations or accents.
Solution: Improve your sound production, technique, and articulation ability on yourinstrument. Also, work on your ear training so you can accurately hear and singthe notes you’re trying to play.
1.35 Using Accents1.35 Using Accents1.35 Using Accents1.35 Using AccentsBelow are some suggestions for using accents effectively. (See also Swing Accent Guidelines inChapter 2C: Swing Rhythms.)
• Practice a wide variety of accents, from ghosted notes to very strong accents.
• Randomly accent a repeated pitch for several bars.
• While repeating a group of notes, accent one or two notes strongly, or vary which notesare accented.
There are many ways to effectively use accents in your melodies; try your own variations.
���Exercise 1.35 Using Accents
1.36 Using Articulations1.36 Using Articulations1.36 Using Articulations1.36 Using ArticulationsIn jazz the basic approach is to play notes legato (full value). To use expression inarticulations, try any of the following ideas:
• Play occasional notes staccato. Chapter 2C: Swing Rhythms explains more aboutarticulations in the swing style.
• Adjust the length of any staccato note, from very short to almost full value. Thesevariations are subtle but important.
• Vary between slurs (smooth) and attacks.
���Exercise 1.36 Using Articulations
Chapter Review
1) Expression is how you translate emotion into musical elements.2) The basic elements of expression can be described and learned.3) Your ability to use expression depends on your control of sound and technique.4) Effective expression is usually subtle and occasional, varied and well-timed.5) Common tools of expression are dynamics, accents, and articulations.
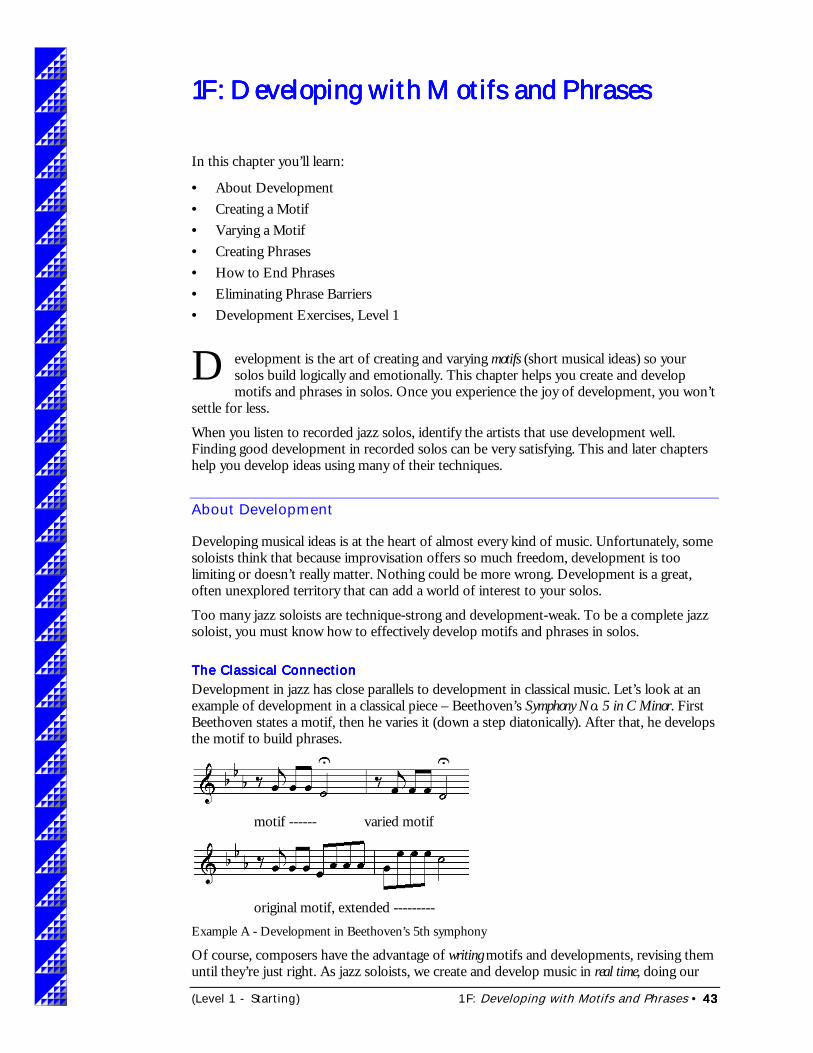
(Level 1 - Starting) 1F: Developing with Motifs and Phrases • 43434343
1F: Developing with Motifs and Phrases1F: Developing with Motifs and Phrases1F: Developing with Motifs and Phrases1F: Developing with Motifs and Phrases
In this chapter you’ll learn:
• About Development• Creating a Motif• Varying a Motif• Creating Phrases• How to End Phrases• Eliminating Phrase Barriers• Development Exercises, Level 1
evelopment is the art of creating and varying motifs (short musical ideas) so yoursolos build logically and emotionally. This chapter helps you create and developmotifs and phrases in solos. Once you experience the joy of development, you won’t
settle for less.
When you listen to recorded jazz solos, identify the artists that use development well.Finding good development in recorded solos can be very satisfying. This and later chaptershelp you develop ideas using many of their techniques.
About Development
Developing musical ideas is at the heart of almost every kind of music. Unfortunately, somesoloists think that because improvisation offers so much freedom, development is toolimiting or doesn’t really matter. Nothing could be more wrong. Development is a great,often unexplored territory that can add a world of interest to your solos.
Too many jazz soloists are technique-strong and development-weak. To be a complete jazzsoloist, you must know how to effectively develop motifs and phrases in solos.
The Classical ConnectionThe Classical ConnectionThe Classical ConnectionThe Classical ConnectionDevelopment in jazz has close parallels to development in classical music. Let’s look at anexample of development in a classical piece – Beethoven’s Symphony No. 5 in C Minor. FirstBeethoven states a motif, then he varies it (down a step diatonically). After that, he developsthe motif to build phrases.
motif ------ varied motif
original motif, extended ---------Example A - Development in Beethoven’s 5th symphony
Of course, composers have the advantage of writing motifs and developments, revising themuntil they’re just right. As jazz soloists, we create and develop music in real time, doing our
D
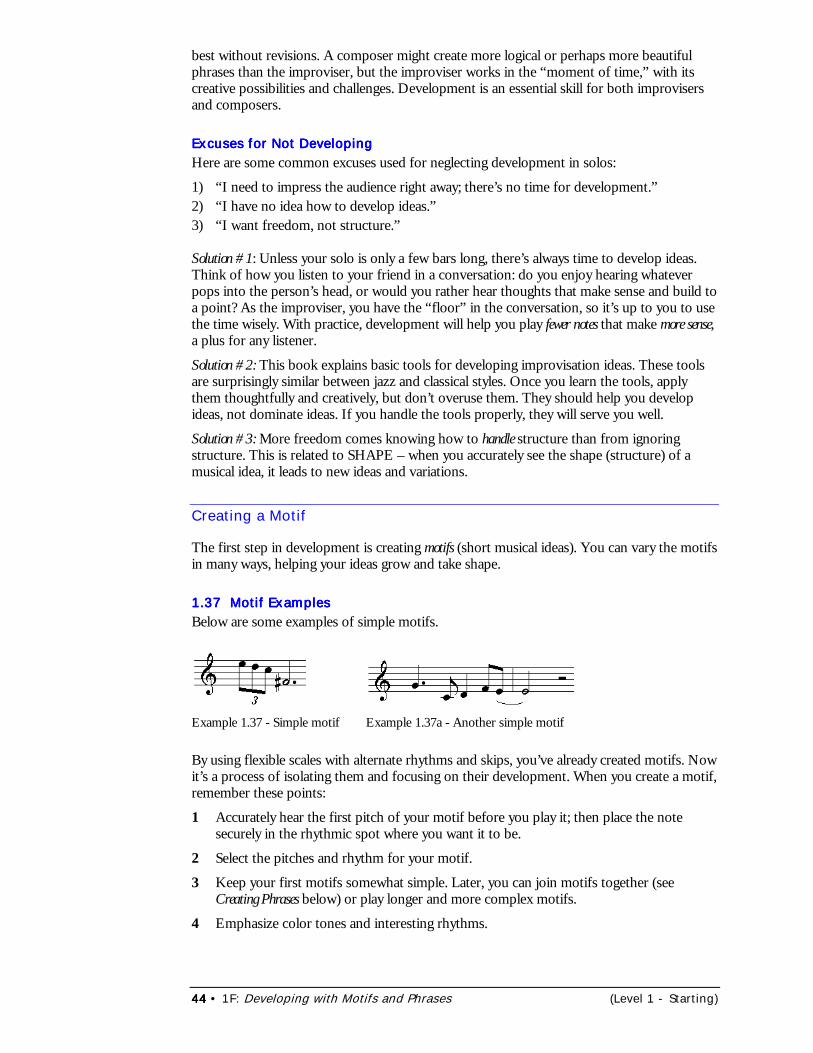
44444444 • 1F: Developing with Motifs and Phrases (Level 1 - Starting)
best without revisions. A composer might create more logical or perhaps more beautifulphrases than the improviser, but the improviser works in the “moment of time,” with itscreative possibilities and challenges. Development is an essential skill for both improvisersand composers.
Excuses for Not DevelopingExcuses for Not DevelopingExcuses for Not DevelopingExcuses for Not DevelopingHere are some common excuses used for neglecting development in solos:
1) “I need to impress the audience right away; there’s no time for development.”2) “I have no idea how to develop ideas.”3) “I want freedom, not structure.”
Solution #1: Unless your solo is only a few bars long, there’s always time to develop ideas.Think of how you listen to your friend in a conversation: do you enjoy hearing whateverpops into the person’s head, or would you rather hear thoughts that make sense and build toa point? As the improviser, you have the “floor” in the conversation, so it’s up to you to usethe time wisely. With practice, development will help you play fewer notes that make more sense,a plus for any listener.
Solution #2: This book explains basic tools for developing improvisation ideas. These toolsare surprisingly similar between jazz and classical styles. Once you learn the tools, applythem thoughtfully and creatively, but don’t overuse them. They should help you developideas, not dominate ideas. If you handle the tools properly, they will serve you well.
Solution #3: More freedom comes knowing how to handle structure than from ignoringstructure. This is related to SHAPE – when you accurately see the shape (structure) of amusical idea, it leads to new ideas and variations.
Creating a Motif
The first step in development is creating motifs (short musical ideas). You can vary the motifsin many ways, helping your ideas grow and take shape.
1.37 Motif Examples1.37 Motif Examples1.37 Motif Examples1.37 Motif ExamplesBelow are some examples of simple motifs.
Example 1.37 - Simple motif Example 1.37a - Another simple motif
By using flexible scales with alternate rhythms and skips, you’ve already created motifs. Nowit’s a process of isolating them and focusing on their development. When you create a motif,remember these points:
1 Accurately hear the first pitch of your motif before you play it; then place the notesecurely in the rhythmic spot where you want it to be.
2 Select the pitches and rhythm for your motif.
3 Keep your first motifs somewhat simple. Later, you can join motifs together (seeCreating Phrases below) or play longer and more complex motifs.
4 Emphasize color tones and interesting rhythms.
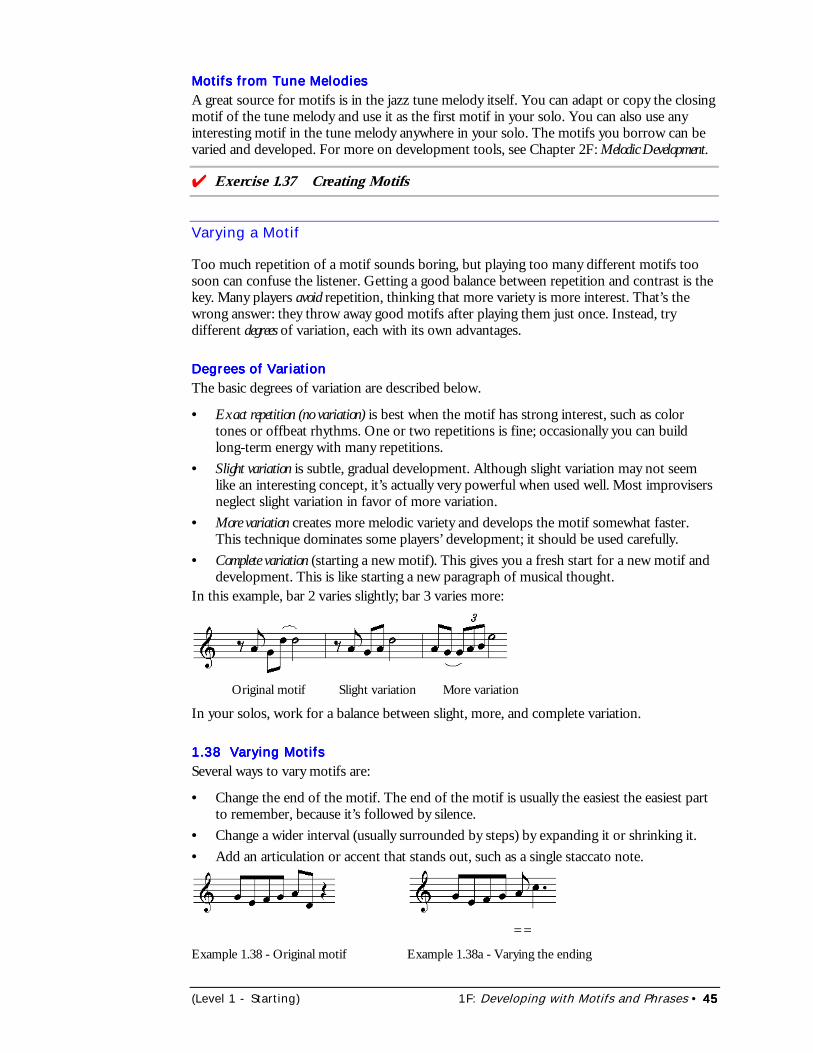
(Level 1 - Starting) 1F: Developing with Motifs and Phrases • 45454545
Motifs from Tune MelodiesMotifs from Tune MelodiesMotifs from Tune MelodiesMotifs from Tune MelodiesA great source for motifs is in the jazz tune melody itself. You can adapt or copy the closingmotif of the tune melody and use it as the first motif in your solo. You can also use anyinteresting motif in the tune melody anywhere in your solo. The motifs you borrow can bevaried and developed. For more on development tools, see Chapter 2F: Melodic Development.
���Exercise 1.37 Creating Motifs
Varying a Motif
Too much repetition of a motif sounds boring, but playing too many different motifs toosoon can confuse the listener. Getting a good balance between repetition and contrast is thekey. Many players avoid repetition, thinking that more variety is more interest. That’s thewrong answer: they throw away good motifs after playing them just once. Instead, trydifferent degrees of variation, each with its own advantages.
Degrees of VariationDegrees of VariationDegrees of VariationDegrees of VariationThe basic degrees of variation are described below.
• Exact repetition (no variation) is best when the motif has strong interest, such as colortones or offbeat rhythms. One or two repetitions is fine; occasionally you can buildlong-term energy with many repetitions.
• Slight variation is subtle, gradual development. Although slight variation may not seemlike an interesting concept, it’s actually very powerful when used well. Most improvisersneglect slight variation in favor of more variation.
• More variation creates more melodic variety and develops the motif somewhat faster.This technique dominates some players’ development; it should be used carefully.
• Complete variation (starting a new motif). This gives you a fresh start for a new motif anddevelopment. This is like starting a new paragraph of musical thought.
In this example, bar 2 varies slightly; bar 3 varies more:
Original motif Slight variation More variation
In your solos, work for a balance between slight, more, and complete variation.
1.38 Varying Motifs1.38 Varying Motifs1.38 Varying Motifs1.38 Varying MotifsSeveral ways to vary motifs are:
• Change the end of the motif. The end of the motif is usually the easiest the easiest partto remember, because it’s followed by silence.
• Change a wider interval (usually surrounded by steps) by expanding it or shrinking it.• Add an articulation or accent that stands out, such as a single staccato note.
==Example 1.38 - Original motif Example 1.38a - Varying the ending
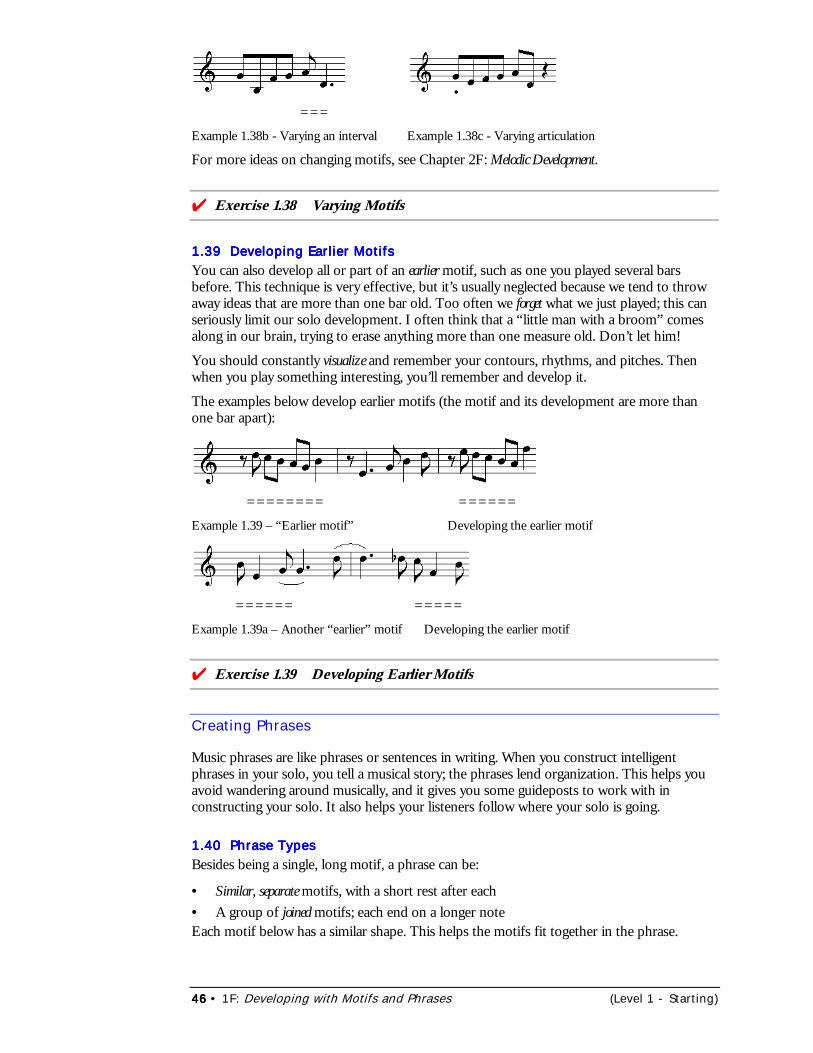
46464646 • 1F: Developing with Motifs and Phrases (Level 1 - Starting)
===Example 1.38b - Varying an interval Example 1.38c - Varying articulation
For more ideas on changing motifs, see Chapter 2F: Melodic Development.
���Exercise 1.38 Varying Motifs
1.39 Developing Earlier Motifs1.39 Developing Earlier Motifs1.39 Developing Earlier Motifs1.39 Developing Earlier MotifsYou can also develop all or part of an earlier motif, such as one you played several barsbefore. This technique is very effective, but it’s usually neglected because we tend to throwaway ideas that are more than one bar old. Too often we forget what we just played; this canseriously limit our solo development. I often think that a “little man with a broom” comesalong in our brain, trying to erase anything more than one measure old. Don’t let him!
You should constantly visualize and remember your contours, rhythms, and pitches. Thenwhen you play something interesting, you’ll remember and develop it.
The examples below develop earlier motifs (the motif and its development are more thanone bar apart):
======== ======Example 1.39 – “Earlier motif” Developing the earlier motif
====== =====Example 1.39a – Another “earlier” motif Developing the earlier motif
���Exercise 1.39 Developing Earlier Motifs
Creating Phrases
Music phrases are like phrases or sentences in writing. When you construct intelligentphrases in your solo, you tell a musical story; the phrases lend organization. This helps youavoid wandering around musically, and it gives you some guideposts to work with inconstructing your solo. It also helps your listeners follow where your solo is going.
1.40 Phrase Types1.40 Phrase Types1.40 Phrase Types1.40 Phrase TypesBesides being a single, long motif, a phrase can be:
• Similar, separate motifs, with a short rest after each• A group of joined motifs; each end on a longer noteEach motif below has a similar shape. This helps the motifs fit together in the phrase.
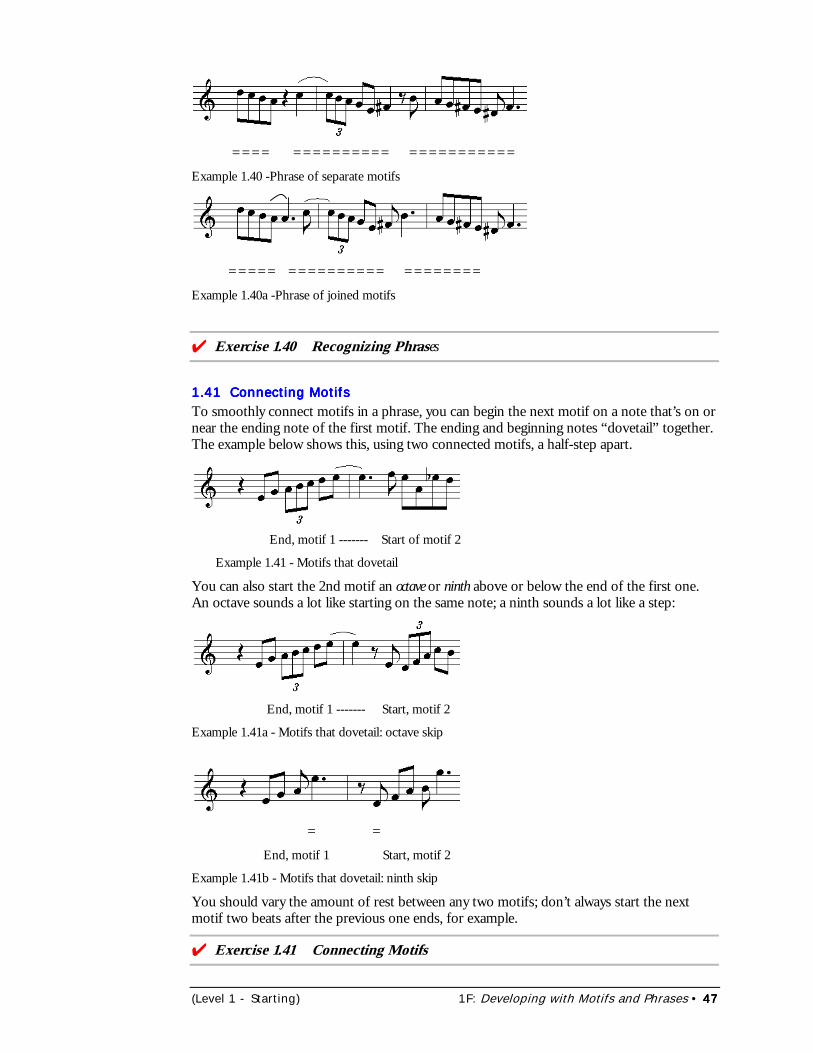
(Level 1 - Starting) 1F: Developing with Motifs and Phrases • 47474747
==== ========== ===========Example 1.40 -Phrase of separate motifs
===== ========== ========Example 1.40a -Phrase of joined motifs
���Exercise 1.40 Recognizing Phrases
1.41 Connecting Motifs1.41 Connecting Motifs1.41 Connecting Motifs1.41 Connecting MotifsTo smoothly connect motifs in a phrase, you can begin the next motif on a note that’s on ornear the ending note of the first motif. The ending and beginning notes “dovetail” together.The example below shows this, using two connected motifs, a half-step apart.
End, motif 1 ------- Start of motif 2
Example 1.41 - Motifs that dovetail
You can also start the 2nd motif an octave or ninth above or below the end of the first one.An octave sounds a lot like starting on the same note; a ninth sounds a lot like a step:
End, motif 1 ------- Start, motif 2
Example 1.41a - Motifs that dovetail: octave skip
= =End, motif 1 Start, motif 2
Example 1.41b - Motifs that dovetail: ninth skip
You should vary the amount of rest between any two motifs; don’t always start the nextmotif two beats after the previous one ends, for example.
���Exercise 1.41 Connecting Motifs
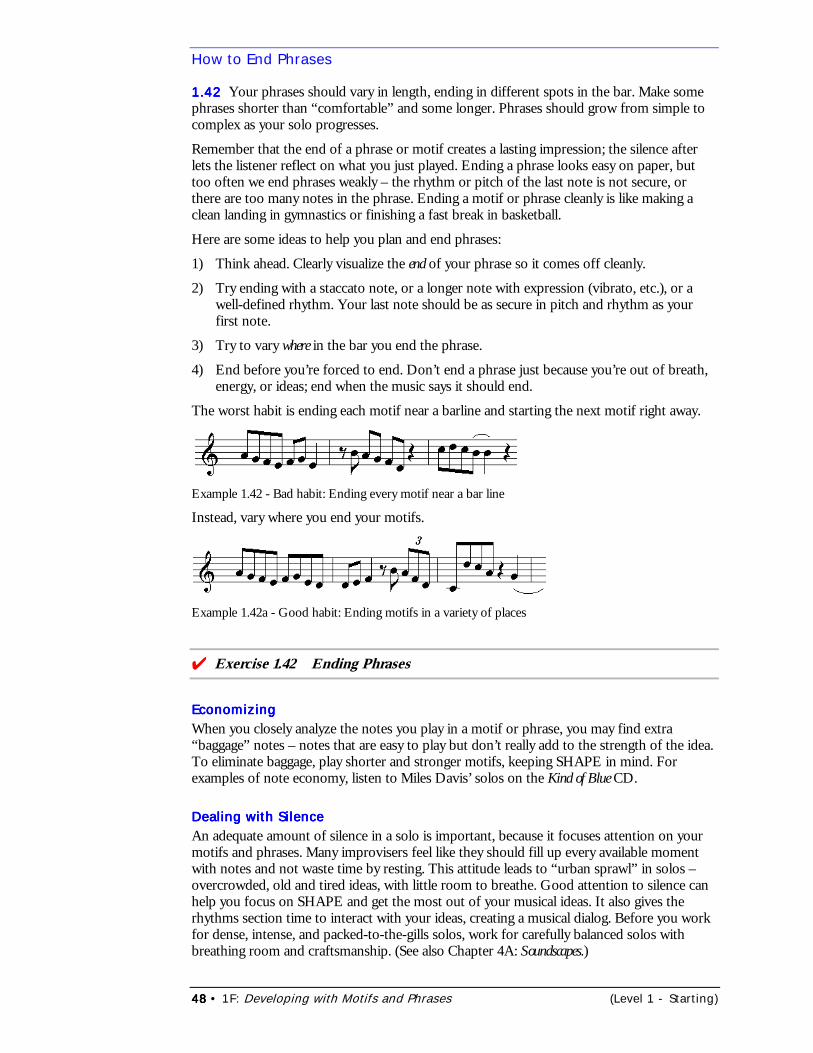
48484848 • 1F: Developing with Motifs and Phrases (Level 1 - Starting)
How to End Phrases
1.421.421.421.42 Your phrases should vary in length, ending in different spots in the bar. Make somephrases shorter than “comfortable” and some longer. Phrases should grow from simple tocomplex as your solo progresses.
Remember that the end of a phrase or motif creates a lasting impression; the silence afterlets the listener reflect on what you just played. Ending a phrase looks easy on paper, buttoo often we end phrases weakly – the rhythm or pitch of the last note is not secure, orthere are too many notes in the phrase. Ending a motif or phrase cleanly is like making aclean landing in gymnastics or finishing a fast break in basketball.
Here are some ideas to help you plan and end phrases:
1) Think ahead. Clearly visualize the end of your phrase so it comes off cleanly.
2) Try ending with a staccato note, or a longer note with expression (vibrato, etc.), or awell-defined rhythm. Your last note should be as secure in pitch and rhythm as yourfirst note.
3) Try to vary where in the bar you end the phrase.
4) End before you’re forced to end. Don’t end a phrase just because you’re out of breath,energy, or ideas; end when the music says it should end.
The worst habit is ending each motif near a barline and starting the next motif right away.
Example 1.42 - Bad habit: Ending every motif near a bar line
Instead, vary where you end your motifs.
Example 1.42a - Good habit: Ending motifs in a variety of places
���Exercise 1.42 Ending Phrases
EconomizingEconomizingEconomizingEconomizingWhen you closely analyze the notes you play in a motif or phrase, you may find extra“baggage” notes – notes that are easy to play but don’t really add to the strength of the idea.To eliminate baggage, play shorter and stronger motifs, keeping SHAPE in mind. Forexamples of note economy, listen to Miles Davis’ solos on the Kind of Blue CD.
Dealing with SilenceDealing with SilenceDealing with SilenceDealing with SilenceAn adequate amount of silence in a solo is important, because it focuses attention on yourmotifs and phrases. Many improvisers feel like they should fill up every available momentwith notes and not waste time by resting. This attitude leads to “urban sprawl” in solos –overcrowded, old and tired ideas, with little room to breathe. Good attention to silence canhelp you focus on SHAPE and get the most out of your musical ideas. It also gives therhythms section time to interact with your ideas, creating a musical dialog. Before you workfor dense, intense, and packed-to-the-gills solos, work for carefully balanced solos withbreathing room and craftsmanship. (See also Chapter 4A: Soundscapes.)
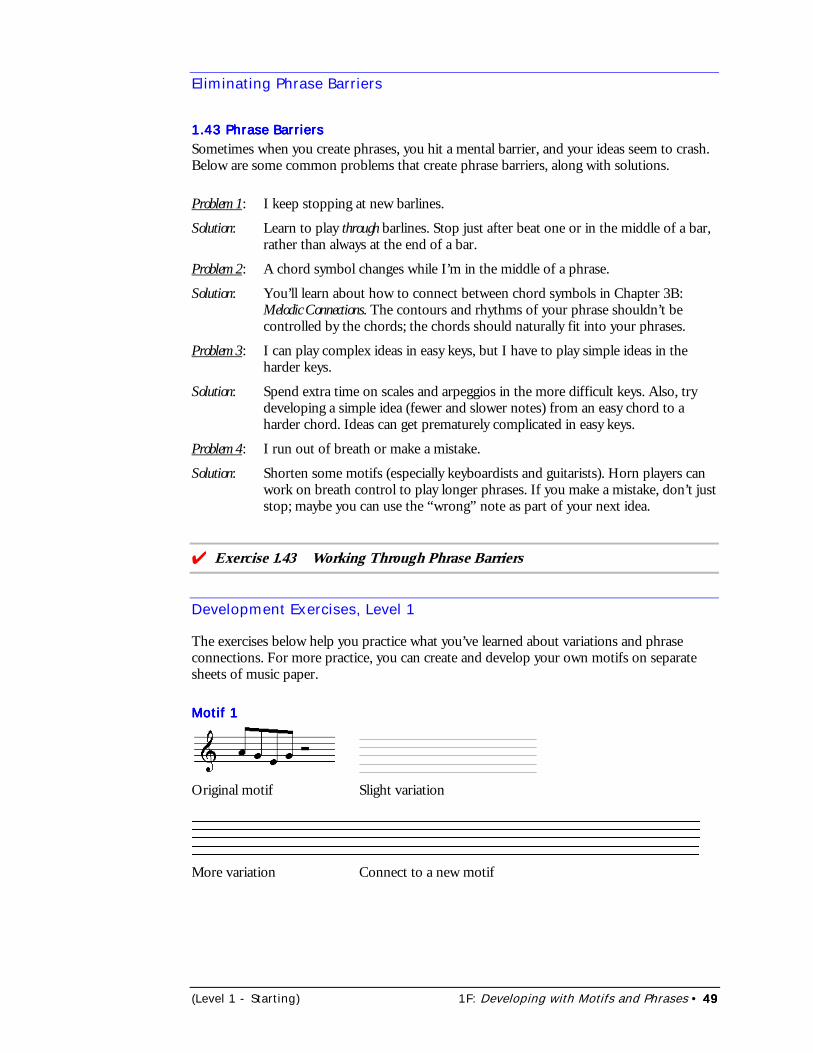
(Level 1 - Starting) 1F: Developing with Motifs and Phrases • 49494949
Eliminating Phrase Barriers
1.43 Phrase Barriers1.43 Phrase Barriers1.43 Phrase Barriers1.43 Phrase BarriersSometimes when you create phrases, you hit a mental barrier, and your ideas seem to crash.Below are some common problems that create phrase barriers, along with solutions.
Problem 1: I keep stopping at new barlines.
Solution: Learn to play through barlines. Stop just after beat one or in the middle of a bar,rather than always at the end of a bar.
Problem 2: A chord symbol changes while I’m in the middle of a phrase.
Solution: You’ll learn about how to connect between chord symbols in Chapter 3B:Melodic Connections. The contours and rhythms of your phrase shouldn’t becontrolled by the chords; the chords should naturally fit into your phrases.
Problem 3: I can play complex ideas in easy keys, but I have to play simple ideas in theharder keys.
Solution: Spend extra time on scales and arpeggios in the more difficult keys. Also, trydeveloping a simple idea (fewer and slower notes) from an easy chord to aharder chord. Ideas can get prematurely complicated in easy keys.
Problem 4: I run out of breath or make a mistake.
Solution: Shorten some motifs (especially keyboardists and guitarists). Horn players canwork on breath control to play longer phrases. If you make a mistake, don’t juststop; maybe you can use the “wrong” note as part of your next idea.
���Exercise 1.43 Working Through Phrase Barriers
Development Exercises, Level 1
The exercises below help you practice what you’ve learned about variations and phraseconnections. For more practice, you can create and develop your own motifs on separatesheets of music paper.
Motif 1Motif 1Motif 1Motif 1
Original motif Slight variation
More variation Connect to a new motif
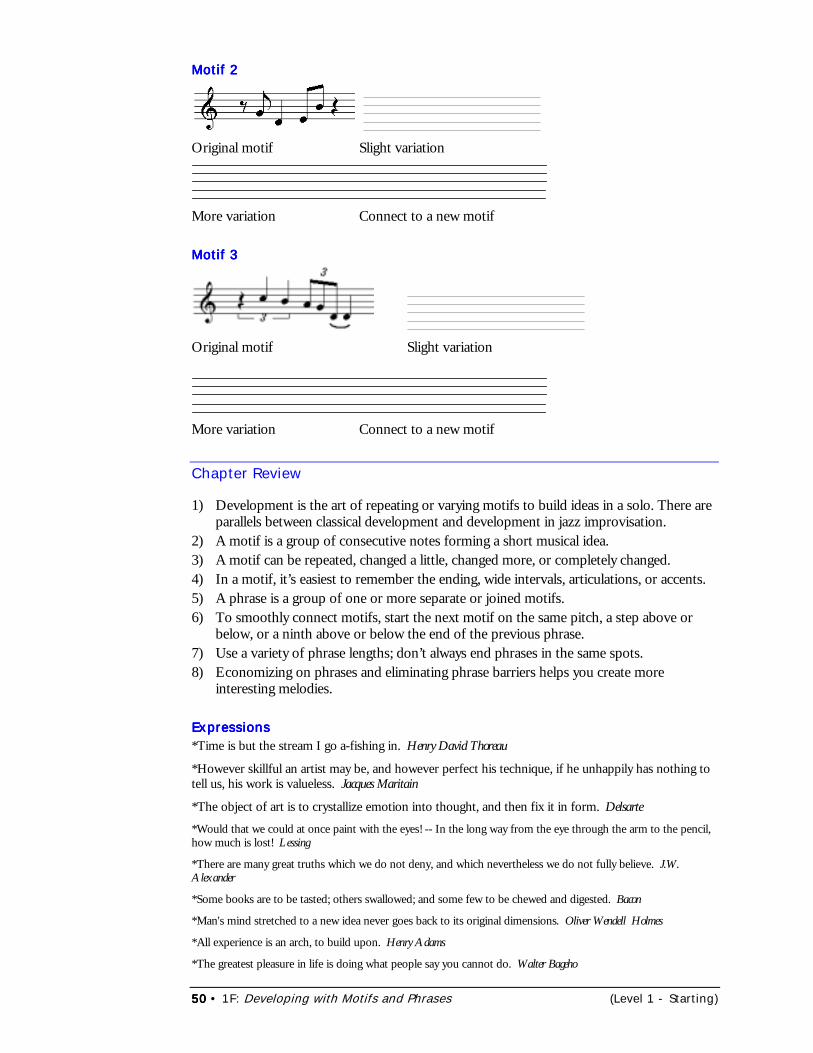
50505050 • 1F: Developing with Motifs and Phrases (Level 1 - Starting)
Motif 2Motif 2Motif 2Motif 2
Original motif Slight variation
More variation Connect to a new motif
Motif 3Motif 3Motif 3Motif 3
Original motif Slight variation
More variation Connect to a new motif
Chapter Review
1) Development is the art of repeating or varying motifs to build ideas in a solo. There areparallels between classical development and development in jazz improvisation.
2) A motif is a group of consecutive notes forming a short musical idea.3) A motif can be repeated, changed a little, changed more, or completely changed.4) In a motif, it’s easiest to remember the ending, wide intervals, articulations, or accents.5) A phrase is a group of one or more separate or joined motifs.6) To smoothly connect motifs, start the next motif on the same pitch, a step above or
below, or a ninth above or below the end of the previous phrase.7) Use a variety of phrase lengths; don’t always end phrases in the same spots.8) Economizing on phrases and eliminating phrase barriers helps you create more
interesting melodies.
ExpressionsExpressionsExpressionsExpressions*Time is but the stream I go a-fishing in. Henry David Thoreau
*However skillful an artist may be, and however perfect his technique, if he unhappily has nothing totell us, his work is valueless. Jacques Maritain
*The object of art is to crystallize emotion into thought, and then fix it in form. Delsarte
*Would that we could at once paint with the eyes! -- In the long way from the eye through the arm to the pencil,how much is lost! Lessing
*There are many great truths which we do not deny, and which nevertheless we do not fully believe. J.W.Alexander
*Some books are to be tasted; others swallowed; and some few to be chewed and digested. Bacon
*Man's mind stretched to a new idea never goes back to its original dimensions. Oliver Wendell Holmes
*All experience is an arch, to build upon. Henry Adams
*The greatest pleasure in life is doing what people say you cannot do. Walter Bageho
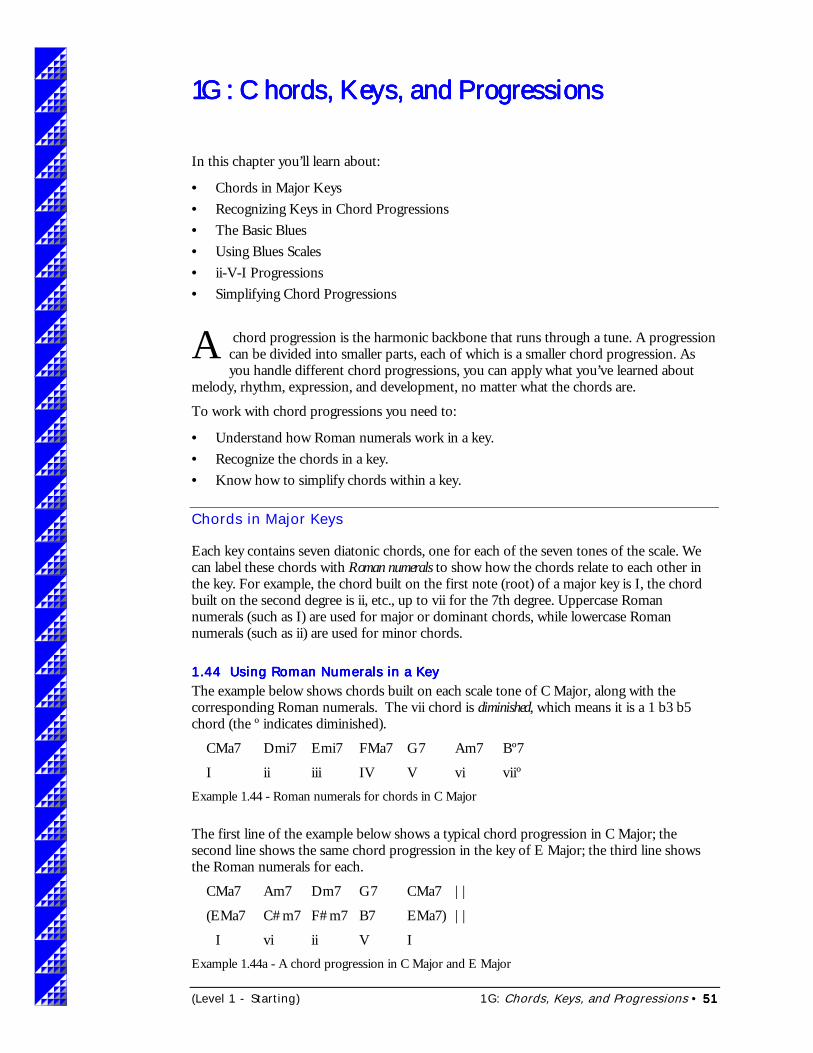
(Level 1 - Starting) 1G: Chords, Keys, and Progressions • 51515151
1G: Chords, Keys, and Progressions1G: Chords, Keys, and Progressions1G: Chords, Keys, and Progressions1G: Chords, Keys, and Progressions
In this chapter you’ll learn about:
• Chords in Major Keys• Recognizing Keys in Chord Progressions• The Basic Blues• Using Blues Scales• ii-V-I Progressions• Simplifying Chord Progressions
chord progression is the harmonic backbone that runs through a tune. A progressioncan be divided into smaller parts, each of which is a smaller chord progression. Asyou handle different chord progressions, you can apply what you’ve learned about
melody, rhythm, expression, and development, no matter what the chords are.
To work with chord progressions you need to:
• Understand how Roman numerals work in a key.• Recognize the chords in a key.• Know how to simplify chords within a key.
Chords in Major Keys
Each key contains seven diatonic chords, one for each of the seven tones of the scale. Wecan label these chords with Roman numerals to show how the chords relate to each other inthe key. For example, the chord built on the first note (root) of a major key is I, the chordbuilt on the second degree is ii, etc., up to vii for the 7th degree. Uppercase Romannumerals (such as I) are used for major or dominant chords, while lowercase Romannumerals (such as ii) are used for minor chords.
1.44 Using Roman Numerals in a Key1.44 Using Roman Numerals in a Key1.44 Using Roman Numerals in a Key1.44 Using Roman Numerals in a KeyThe example below shows chords built on each scale tone of C Major, along with thecorresponding Roman numerals. The vii chord is diminished, which means it is a 1 b3 b5chord (the º indicates diminished).
CMa7 Dmi7 Emi7 FMa7 G7 Am7 Bº7
I ii iii IV V vi viiºExample 1.44 - Roman numerals for chords in C Major
The first line of the example below shows a typical chord progression in C Major; thesecond line shows the same chord progression in the key of E Major; the third line showsthe Roman numerals for each.
CMa7 Am7 Dm7 G7 CMa7 ||
(EMa7 C#m7 F#m7 B7 EMa7) ||
I vi ii V IExample 1.44a - A chord progression in C Major and E Major
A
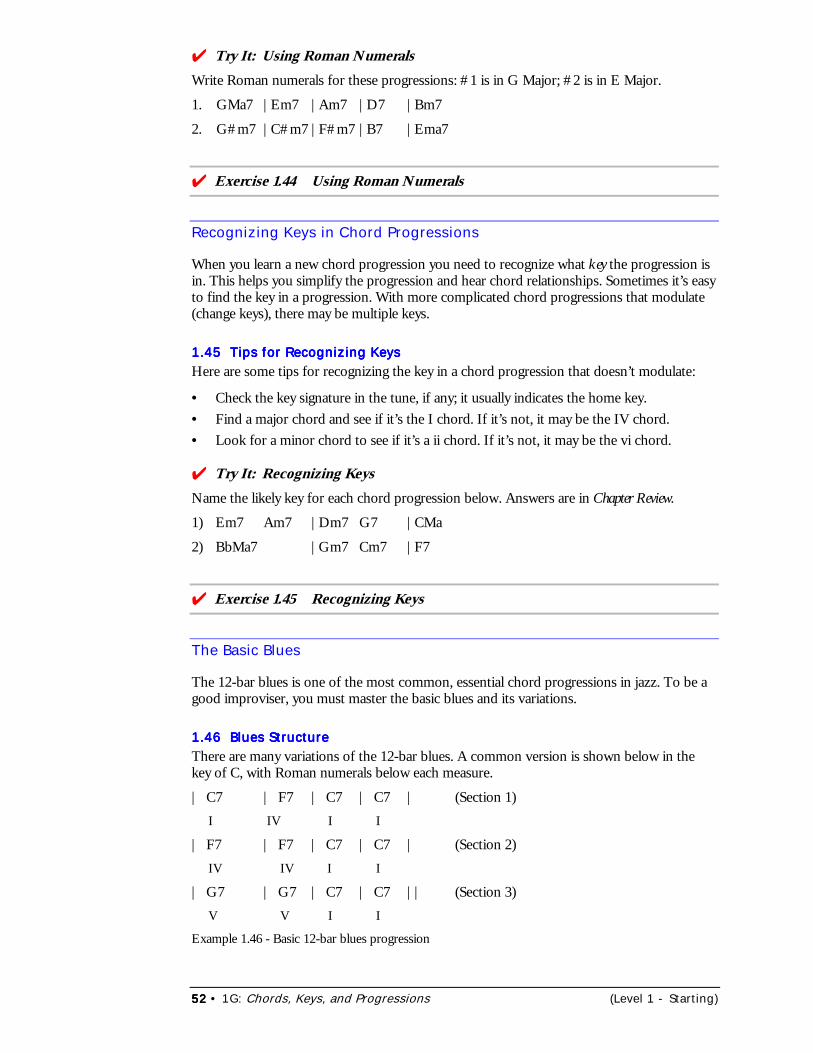
52525252 • 1G: Chords, Keys, and Progressions (Level 1 - Starting)
���Try It: Using Roman NumeralsWrite Roman numerals for these progressions: #1 is in G Major; #2 is in E Major.
1. GMa7 |Em7 |Am7 |D7 |Bm7
2. G#m7 |C#m7 |F#m7 |B7 |Ema7
���Exercise 1.44 Using Roman Numerals
Recognizing Keys in Chord Progressions
When you learn a new chord progression you need to recognize what key the progression isin. This helps you simplify the progression and hear chord relationships. Sometimes it’s easyto find the key in a progression. With more complicated chord progressions that modulate(change keys), there may be multiple keys.
1.45 Tips for Recognizing Keys1.45 Tips for Recognizing Keys1.45 Tips for Recognizing Keys1.45 Tips for Recognizing KeysHere are some tips for recognizing the key in a chord progression that doesn’t modulate:
• Check the key signature in the tune, if any; it usually indicates the home key.• Find a major chord and see if it’s the I chord. If it’s not, it may be the IV chord.• Look for a minor chord to see if it’s a ii chord. If it’s not, it may be the vi chord.
���Try It: Recognizing KeysName the likely key for each chord progression below. Answers are in Chapter Review.
1) Em7 Am7 |Dm7 G7 |CMa
2) BbMa7 |Gm7 Cm7 |F7
���Exercise 1.45 Recognizing Keys
The Basic Blues
The 12-bar blues is one of the most common, essential chord progressions in jazz. To be agood improviser, you must master the basic blues and its variations.
1.46 Blues Structure1.46 Blues Structure1.46 Blues Structure1.46 Blues StructureThere are many variations of the 12-bar blues. A common version is shown below in thekey of C, with Roman numerals below each measure.
| C7 | F7 | C7 | C7 | (Section 1) I IV I I
| F7 | F7 | C7 | C7 | (Section 2) IV IV I I
| G7 | G7 | C7 | C7 || (Section 3) V V I I
Example 1.46 - Basic 12-bar blues progression
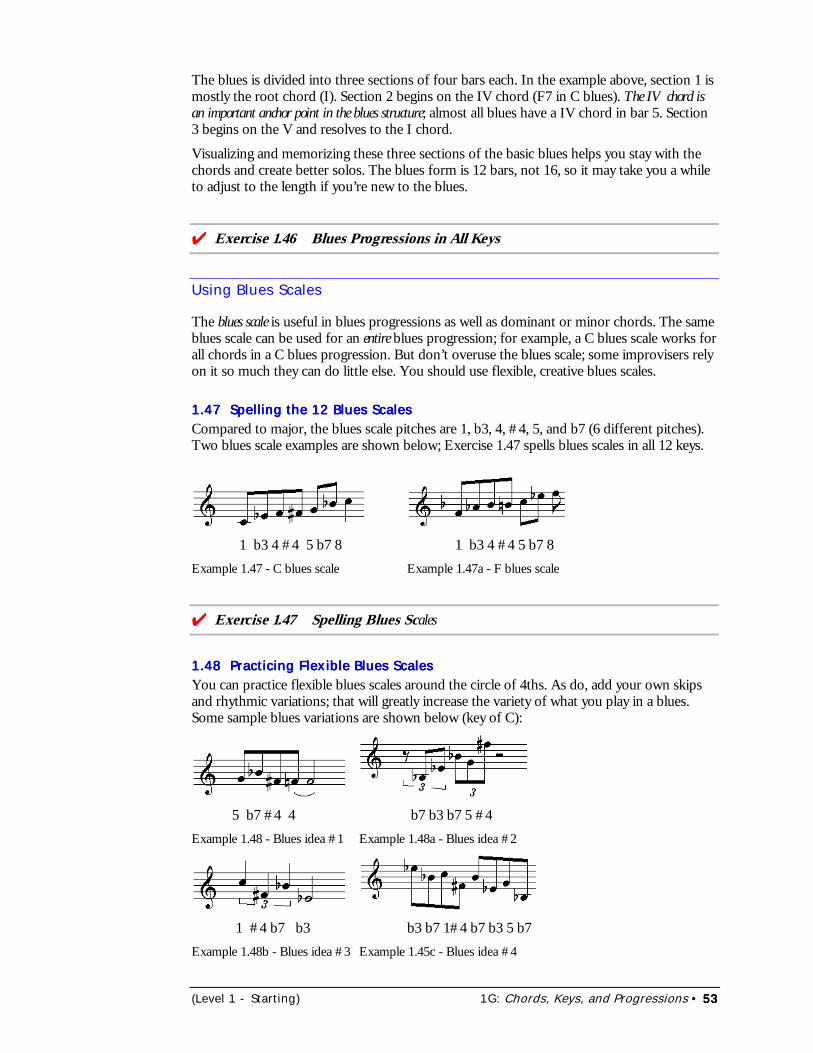
(Level 1 - Starting) 1G: Chords, Keys, and Progressions • 53535353
The blues is divided into three sections of four bars each. In the example above, section 1 ismostly the root chord (I). Section 2 begins on the IV chord (F7 in C blues). The IV chord isan important anchor point in the blues structure; almost all blues have a IV chord in bar 5. Section3 begins on the V and resolves to the I chord.
Visualizing and memorizing these three sections of the basic blues helps you stay with thechords and create better solos. The blues form is 12 bars, not 16, so it may take you a whileto adjust to the length if you’re new to the blues.
���Exercise 1.46 Blues Progressions in All Keys
Using Blues Scales
The blues scale is useful in blues progressions as well as dominant or minor chords. The sameblues scale can be used for an entire blues progression; for example, a C blues scale works forall chords in a C blues progression. But don’t overuse the blues scale; some improvisers relyon it so much they can do little else. You should use flexible, creative blues scales.
1.471.471.471.47 Spelling the 12 Blues ScalesSpelling the 12 Blues ScalesSpelling the 12 Blues ScalesSpelling the 12 Blues ScalesCompared to major, the blues scale pitches are 1, b3, 4, #4, 5, and b7 (6 different pitches).Two blues scale examples are shown below; Exercise 1.47 spells blues scales in all 12 keys.
1 b3 4 #4 5 b7 8 1 b3 4 #4 5 b7 8Example 1.47 - C blues scale Example 1.47a - F blues scale
���Exercise 1.47 Spelling Blues Scales
1.48 Practicing Flexible Blues Scales1.48 Practicing Flexible Blues Scales1.48 Practicing Flexible Blues Scales1.48 Practicing Flexible Blues ScalesYou can practice flexible blues scales around the circle of 4ths. As do, add your own skipsand rhythmic variations; that will greatly increase the variety of what you play in a blues.Some sample blues variations are shown below (key of C):
5 b7 #4 4 b7 b3 b7 5 #4Example 1.48 - Blues idea #1 Example 1.48a - Blues idea #2
1 #4 b7 b3 b3 b7 1#4 b7 b3 5 b7Example 1.48b - Blues idea #3 Example 1.45c - Blues idea #4
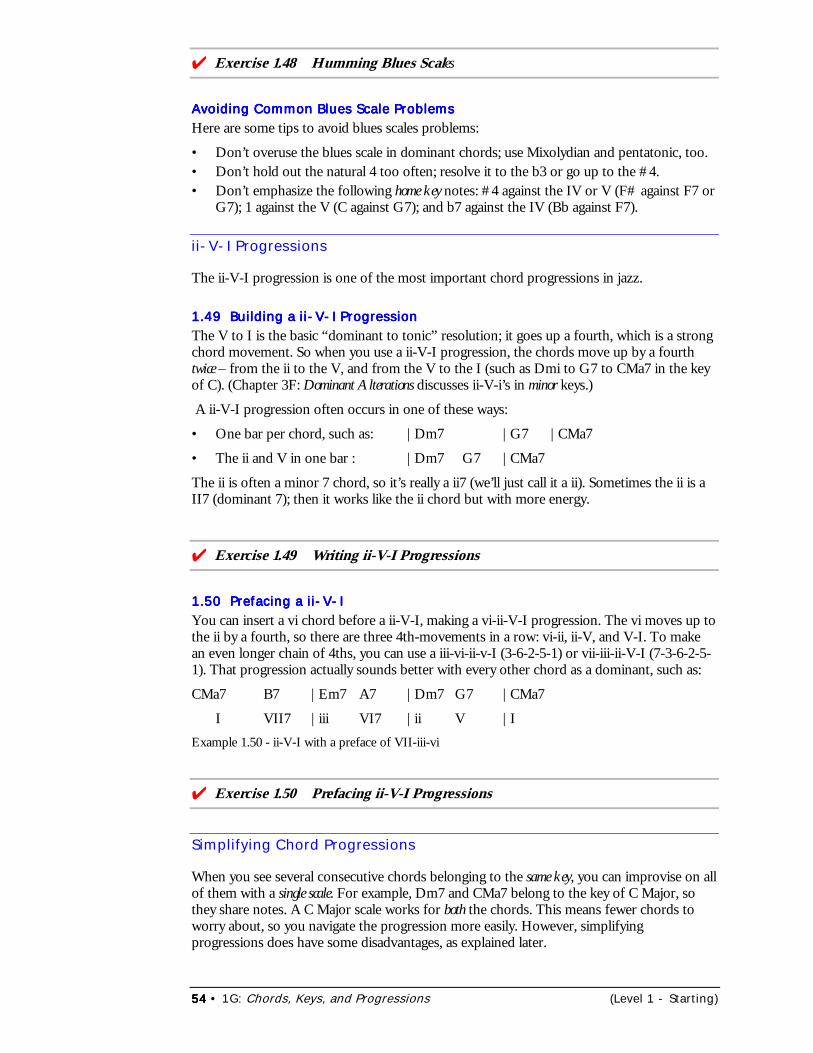
54545454 • 1G: Chords, Keys, and Progressions (Level 1 - Starting)
���Exercise 1.48 Humming Blues Scales
Avoiding Common Blues Scale ProblemsAvoiding Common Blues Scale ProblemsAvoiding Common Blues Scale ProblemsAvoiding Common Blues Scale ProblemsHere are some tips to avoid blues scales problems:
• Don’t overuse the blues scale in dominant chords; use Mixolydian and pentatonic, too.• Don’t hold out the natural 4 too often; resolve it to the b3 or go up to the #4.• Don’t emphasize the following home key notes: #4 against the IV or V (F# against F7 or
G7); 1 against the V (C against G7); and b7 against the IV (Bb against F7).
ii-V-I Progressions
The ii-V-I progression is one of the most important chord progressions in jazz.
1.49 Building a ii-V-I Progression1.49 Building a ii-V-I Progression1.49 Building a ii-V-I Progression1.49 Building a ii-V-I ProgressionThe V to I is the basic “dominant to tonic” resolution; it goes up a fourth, which is a strongchord movement. So when you use a ii-V-I progression, the chords move up by a fourthtwice – from the ii to the V, and from the V to the I (such as Dmi to G7 to CMa7 in the keyof C). (Chapter 3F: Dominant Alterations discusses ii-V-i’s in minor keys.)
A ii-V-I progression often occurs in one of these ways:
• One bar per chord, such as: |Dm7 |G7 |CMa7
• The ii and V in one bar : |Dm7 G7 |CMa7
The ii is often a minor 7 chord, so it’s really a ii7 (we’ll just call it a ii). Sometimes the ii is aII7 (dominant 7); then it works like the ii chord but with more energy.
���Exercise 1.49 Writing ii-V-I Progressions
1.50 Prefacing a ii-V-I1.50 Prefacing a ii-V-I1.50 Prefacing a ii-V-I1.50 Prefacing a ii-V-IYou can insert a vi chord before a ii-V-I, making a vi-ii-V-I progression. The vi moves up tothe ii by a fourth, so there are three 4th-movements in a row: vi-ii, ii-V, and V-I. To makean even longer chain of 4ths, you can use a iii-vi-ii-v-I (3-6-2-5-1) or vii-iii-ii-V-I (7-3-6-2-5-1). That progression actually sounds better with every other chord as a dominant, such as:
CMa7 B7 |Em7 A7 |Dm7 G7 |CMa7
I VII7 |iii VI7 |ii V |IExample 1.50 - ii-V-I with a preface of VII-iii-vi
���Exercise 1.50 Prefacing ii-V-I Progressions
Simplifying Chord Progressions
When you see several consecutive chords belonging to the same key, you can improvise on allof them with a single scale. For example, Dm7 and CMa7 belong to the key of C Major, sothey share notes. A C Major scale works for both the chords. This means fewer chords toworry about, so you navigate the progression more easily. However, simplifyingprogressions does have some disadvantages, as explained later.
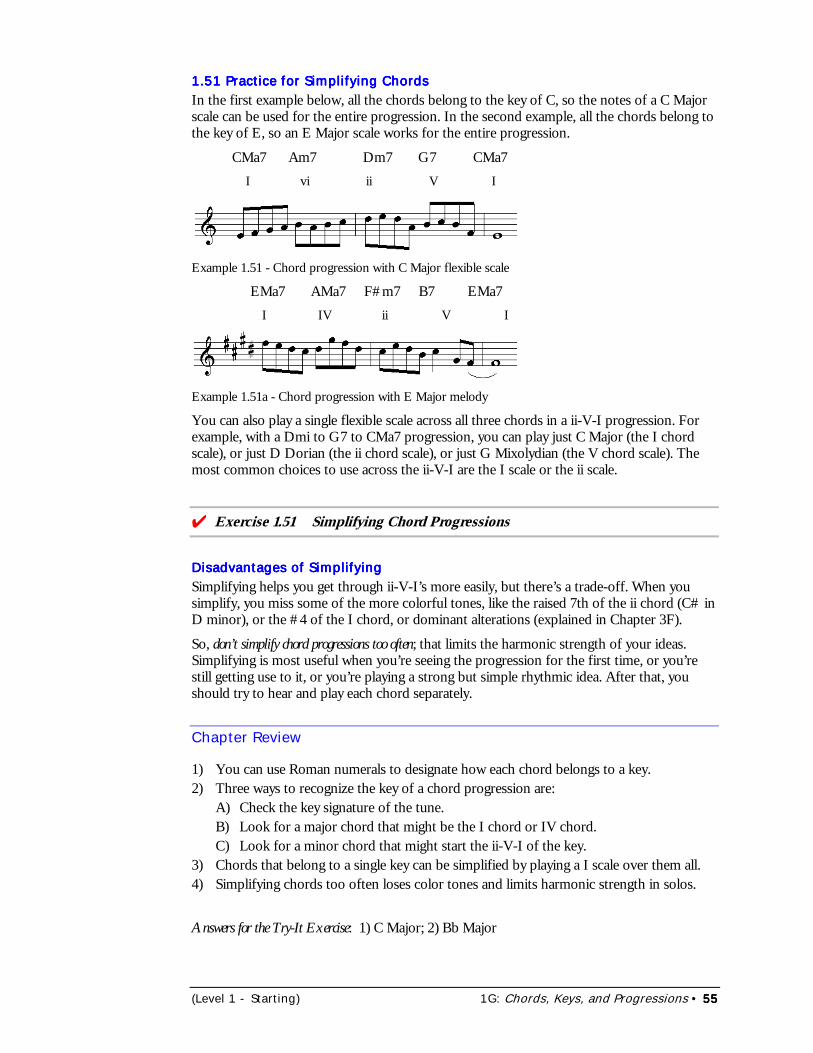
(Level 1 - Starting) 1G: Chords, Keys, and Progressions • 55555555
1.51 Practice for Simplifying Chords1.51 Practice for Simplifying Chords1.51 Practice for Simplifying Chords1.51 Practice for Simplifying ChordsIn the first example below, all the chords belong to the key of C, so the notes of a C Majorscale can be used for the entire progression. In the second example, all the chords belong tothe key of E, so an E Major scale works for the entire progression.
CMa7 Am7 Dm7 G7 CMa7 I vi ii V I
Example 1.51 - Chord progression with C Major flexible scale
EMa7 AMa7 F#m7 B7 EMa7 I IV ii V I
Example 1.51a - Chord progression with E Major melody
You can also play a single flexible scale across all three chords in a ii-V-I progression. Forexample, with a Dmi to G7 to CMa7 progression, you can play just C Major (the I chordscale), or just D Dorian (the ii chord scale), or just G Mixolydian (the V chord scale). Themost common choices to use across the ii-V-I are the I scale or the ii scale.
���Exercise 1.51 Simplifying Chord Progressions
Disadvantages of SimplifyingDisadvantages of SimplifyingDisadvantages of SimplifyingDisadvantages of SimplifyingSimplifying helps you get through ii-V-I’s more easily, but there’s a trade-off. When yousimplify, you miss some of the more colorful tones, like the raised 7th of the ii chord (C# inD minor), or the #4 of the I chord, or dominant alterations (explained in Chapter 3F).
So, don’t simplify chord progressions too often; that limits the harmonic strength of your ideas.Simplifying is most useful when you’re seeing the progression for the first time, or you’restill getting use to it, or you’re playing a strong but simple rhythmic idea. After that, youshould try to hear and play each chord separately.
Chapter Review
1) You can use Roman numerals to designate how each chord belongs to a key.2) Three ways to recognize the key of a chord progression are:
A) Check the key signature of the tune.B) Look for a major chord that might be the I chord or IV chord.C) Look for a minor chord that might start the ii-V-I of the key.
3) Chords that belong to a single key can be simplified by playing a I scale over them all.4) Simplifying chords too often loses color tones and limits harmonic strength in solos.
Answers for the Try-It Exercise: 1) C Major; 2) Bb Major
56565656 • 1H: The Jazz Group (Level 1 - Starting)
1H: The Jazz Group1H: The Jazz Group1H: The Jazz Group1H: The Jazz Group
In this chapter you’ll learn about:
• Group Performance Skills• Rhythm Section Roles• The Tune Melody
Note: This chapter discusses basic skills and roles necessary in an improvising jazz group.For more details on skills and techniques, see the Rhythm Section Techniques chapter.
egardless of what instrument you play, you should understand the basic role of eachtype of instrument in a jazz group. This helps you support each member in the groupand solve musical problems that arise.
This chapter assumes a basic group of a horn, a chord instrument (keyboards or guitar), abass, and drums. Many other combinations are possible; each places different demands onthe players. For more on playing in different group sizes, see Chapter 4G: Group Interaction.
Group Performance Skills
The musical success of your jazz group depends on how well the players:
• Play solidly in time • Use balance and dynamics• Read and interpret chords• Work with styles and rhythmic ideas• Interact and use teamwork
Each individual in the group has his own responsibility (see Rhythm Section Roles below).
TimeTimeTimeTimeAlthough most people think it’s the drummer’s job to keep time in the group, it’s reallyeveryone’s job. From the opening count-off to the end of the tune, the time should remainstable in the group. To improve the overall sense of time in your group, try these exercises:
1) One person counts off a tempo (with or without a silent metronome). Everyone silentlycounts an agreed-upon number of bars and comes in together on the downbeat, withno visual cues. This helps the group get a common sense of tempo.
2) While you play a tune together, be suddenly silent for a few pre-determined bars, thenre-enter together in tempo. Hear your part and the time during the silence.
3) Have a soloist play a 2-bar or 4-bar solo break, with the rhythm section entering in timeafter the break.
Balance and DynamicsBalance and DynamicsBalance and DynamicsBalance and DynamicsProblems with group dynamics and balance can be annoying, but they’re usually easy to fix.
• Get a good sound check before each rehearsal and performance. A poorly balancedgroup seldom plays good dynamics in tunes..
• Always be aware of your own volume as you play.
R
(Level 1 - Starting) 1H: The Jazz Group • 57575757
• Vary your dynamics to create expression.
• Don’t overplay, and don’t fill every available space. Part of the beauty of jazz ischanging musical textures.
Chord ReadingChord ReadingChord ReadingChord ReadingEveryone in the group should be comfortable reading and playing the chord symbols in thetune. So far we’ve discussed major, dominant, and minor chords; in later chapters you’lllearn about other chord types such as diminished and altered dominants. Your group shouldbe able to act on the chords rather than reacting to them. Keyboard and guitar players playingtogether should coordinate chord playing to avoid conflicts in rhythms and voicings.
Styles and Rhythmic IdeasStyles and Rhythmic IdeasStyles and Rhythmic IdeasStyles and Rhythmic IdeasEach player should master the basic styles of swing and latin, as well as ballad, rock, andfusion. Listening to recordings of these styles is essential (see Chapter 2C: Swing Rhythms andChapter 3C: Fusion and Latin Styles).
Your group should also be alive with rhythmic ideas that feed group interaction andteamwork. For more details on doing this, see Chapter 1D: Rhythmic Variety, Chapter 2D:Three and Four, and Chapter 3E: Rhythmic Development.
Interaction and TeamworkInteraction and TeamworkInteraction and TeamworkInteraction and TeamworkAs your group creates motifs and rhythms, each player should listen carefully to how theseideas influence the music being played. You can copy, change, or just hear any interestingidea played in the group. Don’t overdo imitation – keep it subtle and flexible.
With practice, your group can become much more than just a group of people playing thesame tune. Teamwork in a jazz group teaches communication, leadership, and a balance ofrisk and safety. For more on interacting musically, see Chapter 4F: Group Interaction.
Rhythm Section Roles
Each individual should understand his or her role very well and the other roles in the groupreasonably well. Individual roles in a rhythm section are the chords, the bass, and the drums.
The ChordsThe ChordsThe ChordsThe ChordsHere are some basic issues chord players in a group should consider:
• Voicings usually leave out the root (the bass usually plays it).• Chord comping should use interesting rhythms (see Chapter 1D: Rhythmic Variety).• Fills should be simple, complementing the soloist’s ideas.• Sound and silence should be well-balanced.
The BassThe BassThe BassThe BassIn the swing style, bass lines use a “walking” pattern of mostly quarter-notes. The root isplayed on the downbeat of each chord, and the other beats are usually chord arpeggios. Thelast beat before a new chord can be a whole-step or half-step away from the root of thatchord. (For ideas on connecting chords, see Chapter 3B: Melodic Connections.)
Swing bass lines can grow to be quite artful, including offbeats, color tones, triplets, wideintervals, 3 against 4, etc. They can also revolve around half-notes (half-time) or eighth-notes (double-time), or even use a wide range of rhythms (“running bass”).
58585858 • 1H: The Jazz Group (Level 1 - Starting)
In fusion, latin, and ballads, the bass plays rhythmic figures that revolve around the root ofthe chord. For more ideas, see Chapter 3C: Fusion and Latin Styles.
The DrumsThe DrumsThe DrumsThe DrumsOnce the group has a solid sense of time, the drummer should be free to play offbeats,triplets, and other rhythmic figures to energize the music. The drummer should also use arange of sound colors, mixing drum and cymbal sounds. When the group trades solos, orafter a drum solo, the time and the entrances should be solid.
The Tune Melody
The horn player, if there is one, typically plays the tune melody, but rhythm section players(chords or bass) may join in or occasionally may take over the melody. If you’re the melodyplayer, keep these points in mind:
• Balance: Make sure your melody can be heard just above the rest of the group.
• Memorization: Whenever possible, memorize the melody so you can play it freely; youcan still keep a copy of the music handy for reference. Memorizing the tune lets youfocus on the group sound, as well as changing a few pitches in your melody for variety.
• Rhythms: Your rhythms should be solid and accurate. If the tune has easier rhythms, youcan take a few liberties with them (see Chapter 1D: Rhythmic Variety for ideas).
• Expression: A few well-timed changes in dynamics, articulations, and accents can boostthe expression level in the melody, especially in slower tunes.
The tune melody can give you some development ideas for your improvised solo later on.(See also Handling the Tune Melody in Chapter 2H: Preparing Concert Material.)
Tune Melodies on the BRIDJJ CDTune Melodies on the BRIDJJ CDTune Melodies on the BRIDJJ CDTune Melodies on the BRIDJJ CDThe tune melodies on the BRIDJJ CD “Beat the Rats” were played anywhere from note-for-note to fairly loose, compared to the original sheet music:
• Note-for-note: The complex melodies in “Deja Blue” and “Tastes Like Chicken” areplayed as written.
• Slight variations: “Beat the Rats” has a few trills added; “Precious Caboose” has a fewgrace notes; and “Where’s Waldis” has almost three bars of the second-time melodyreplaced by a long trumpet glissando. “Barney Meets Godzilla” and Three and Me” aremostly note for note, except that both tunes have improv fills embedded in the melody.
• More variations: “I Think I’ll Keep Her” is a ballad with grace notes, flexible rhythms, andsome improvised pitches not on the original lead sheet.
Chapter Review
1) Important skills in a jazz group are time, balance and dynamics, chord reading, stylesand rhythmic ideas, and interaction and teamwork.
2) The basic rhythm section roles are chords, bass, and drums.3) The tune melody player should get a good dynamic balance with the other players and
demonstrate imagination in pitches, rhythms, and expression when playing the melody.

(Level 1 - Starting) 1J: Analyzing Solos • 59595959
1J: Analyzing Solos1J: Analyzing Solos1J: Analyzing Solos1J: Analyzing Solos
In this chapter you’ll learn about:
• Evaluating Your Own Solos• Four Goals for Improving Your Solos• Analyzing Other Artists’ Solos
t’s tough to solo in a “vacuum” – you need accurate feedback about your solos on aregular basis. It’s nice to have a teacher or friend listen to you and offer advice, butusually you’re on your own for improvements. This chapter helps you analyze and
improve your own solos.
Note: Chapter 2J: Analyzing Written Solos offers tips on analyzing written (transcribed)solos. Chapter 4A: Soundscapes discusses ways to analyze your solos for intensity, texture,density, etc.
Evaluating Your Own Solos
To effectively analyze your own solos, you need to record them on tape while youpractice or perform. Even thinking about recording yourself can be uncomfortable atfirst, but a recorded solo gives you a better picture of how well you’re soloing.
Creating, Then CriticizingCreating, Then CriticizingCreating, Then CriticizingCreating, Then CriticizingThere are two separate processes you need to follow: first, you need to freely create asyou improvise; then you need to constructively criticize what you hear on the recording.These processes must be separated in your mind; don’t be critical as you create, and bespecific and helpful with the criticisms. Was the problem seeing the shape or playing it?Why something was strong or weak? Four Goals for Improving Your Solos shows you how todo this.
Four Goals for Improving Your Solos
To improve your solos, set your own objectives in one or more of the areas below, orreview the Exercises for Level 1 section for ideas:
• Melody: Choose pitches that fit the current chord or scale and include color tones.• Rhythm: Combine downbeats and offbeats into interesting rhythms. Keep the time
secure.• Expression: Combine dynamics, accents, and articulations occasionally and
effectively.• Development: Create and vary short motifs.You can also use any of the concepts you’ve learned in the text or Exercises section ofthis book. It’s best to focus on just a few objectives at a time.
Important: As you retry a solo for improvements, don’t memorize and play the samesolo again. Instead, see new motifs or phrases, carefully noting problems and yoursolutions. Then find new ways to use what you learned in your next solo.
I
60606060 • 1J: Analyzing Solos (Level 1 - Starting)
1.52 Practicing for Melody1.52 Practicing for Melody1.52 Practicing for Melody1.52 Practicing for Melody1 Choose a basic chord progression to solo against.
2 Concentrate on melody. Play one solo chorus and record it. Choose pitches that fitthe chords and scales, use SHAPE, and emphasize color tones from time to time.
3 Listen carefully to the recorded solo and give yourself a score from 1 to 10 in eachof these areas:
• Sound quality• Playing in tune• Accuracy of attacks on pitches• Notes that fit the chords• Use of color tones
���Exercise 1.52 Practicing for Melody
Important: As you learn melodic techniques in later chapters (scales, fills, patterns,connections, outside playing, etc.) include them in your melody analysis.
1.53 Practicing for Rhythm1.53 Practicing for Rhythm1.53 Practicing for Rhythm1.53 Practicing for RhythmUse the steps in Practicing for Melody above, concentrating on rhythm. Choose rhythmsthat:
• Are secure and accurate• Mix downbeats and offbeats effectively• Get a balance between longer and shorter values.
Identify any weak rhythmic spots in your recording and play over them again toimprove the solo. Remember: the idea isn’t to memorize a perfect solution, but to seehow to improve this particular solo.
As you practice with a recording or live group, always be aware of how well you’restaying with the tempo. Avoid slowing down or speeding up in your rhythms.
Also remember what you learned while practicing for melody. When you practice forrhythm, your rhythms will depend on good melodic note choices.
���Exercise 1.53 Practicing for Rhythm
Important: As you learn rhythmic techniques in later chapters (swing, 3 against 4,rhythmic development, etc.) include them in your rhythmic analysis.
1.54 Practicing for Expression1.54 Practicing for Expression1.54 Practicing for Expression1.54 Practicing for ExpressionTo concentrate on expression, pay close attention to:
• Dynamic range and changing dynamics• Accents• Articulations
(Level 1 - Starting) 1J: Analyzing Solos • 61616161
• Control of sound and techniqueIdentify any spots in your recording where the notes or phrases sound somewhat stiffor dull; these might be good spots to add a little expression. Remember: the idea isn’t tomemorize a perfect solution, but to improve this solo. Also, remember and apply whatyou learned while practicing for rhythm and melody.
About Sound and TechniqueAbout Sound and TechniqueAbout Sound and TechniqueAbout Sound and TechniqueAn important part of expression is your control over sound and technique. Here are someareas to consider:
• Clear tone. Your tone doesn’t have to be classically beautiful, but it should be secureand in tune.
• Clear attacks. Each attack should be coordinated with air (for wind players) andfingers/hands. The attacks can range from smooth slurs to hard accents.
• Flexibility and strength. You need enough flexibility of air, fingers, etc. to make themusic flow easily, and enough strength to support higher, faster, or louder passages.
A good classical foundation in sound and technique can be very helpful. However,remember that jazz uses different vibrato, more exaggerated expression, and a looserrhythmic feel compared to classical music.
Your choice of instrument and equipment (reeds, mouthpiece, strings, amps, etc) canalso make a big difference in your overall sound. Find the combination that gives youthe best quality and ease of sound.
���Exercise 1.54 Practicing for Expression
1.55 Practicing for Development1.55 Practicing for Development1.55 Practicing for Development1.55 Practicing for DevelopmentTo practice development, follow these steps:
• Control the start, end, and length of each motif.• Move from slight contrast to more contrast.• Connect some motifs into phrases.• Vary where phrases end in the bar.Identify any weak development spots in your recording and improve them. Alsoremember what you learned while practicing for melody and rhythm. The developmentsyou use will depend on good melodic and rhythmic note choices.
���Exercise 1.55 Practicing for Development
Important: As you learn development techniques in later chapters (phrases, expandingand shrinking intervals, rhythmic development, etc.) include them in your analysis whenyou practice for development.
Analyzing Other Artists’ Solos
You can use the concepts in this chapter to analyze solos of other jazz improvisers,whether live, on audio, or on video. As you listen to their solos, ask yourself:
62626262 • 1J: Analyzing Solos (Level 1 - Starting)
1) Why did they play what they did? Does it make good sense in the context of the solo?Are they developing ideas, or are they just wandering through the music?
2) What motifs and phrases were particularly interesting and why? Check out their use of colortones, contours, small or large variations, etc.
3) Are chords and flexible scales used well? Does the performer know where he/she is inthe progression?
4) Is the solo rhythmically alive? Are rhythms secure and interesting? Is there rhythmicaction in the group?
5) How would you play it differently? Often you can identify a phrase or idea that doesn’tcome off cleanly or effectively. Try to sing, hum, or visualize the notes that youwould use to improve it.
Chapter Review
1) You can improve your solos in melody, rhythm, expression, and development.2) Record your solos and listen to them to find strengths and weaknesses.3) Your melodies should fit the chords, using color tones when appropriate.4) Your rhythms should be secure, should mix downbeats and offbeats, and should
use variety.5) Your expression should use dynamics, accents, and articulations with imagination
and taste, with a secure foundation in sound and technique.6) Your developments should use secure motifs that move from slight contrast to
more contrast.7) When you listen to other artists’ solos, analyze their overall use of musical elements.
ExpressionsExpressionsExpressionsExpressions*Time is but the stream I go a-fishing in. Henry David Thoreau
*Be not afraid of greatness: some are born great, some achieve greatness and some havegreatness thrust upon 'em. Shakespeare
*It takes two to speak the truth -- one to speak, and another to hear. Henry David Thoreau
*Many can argue; not many converse. Bronson Alcott
*It is better to have less thunder in the mouth and more lightning in the hand. Cheyenne Chief
*Grasp the subject, the words will follow. Cato
*A man that has a taste of music, painting, or architecture, is like one that has another sense,when compared with such as have no relish of those arts. Joseph Addison
*It is no great thing to be humble when you are brought low, but to be humble when you arepraised is a great attainment. St. Bernard
*You would be surprised at the number of years it took me to see clearly what some of theproblems were which had to be solved ... looking back, I think it was more difficult to see whatthe problems were than to solve them. Charles Darwin
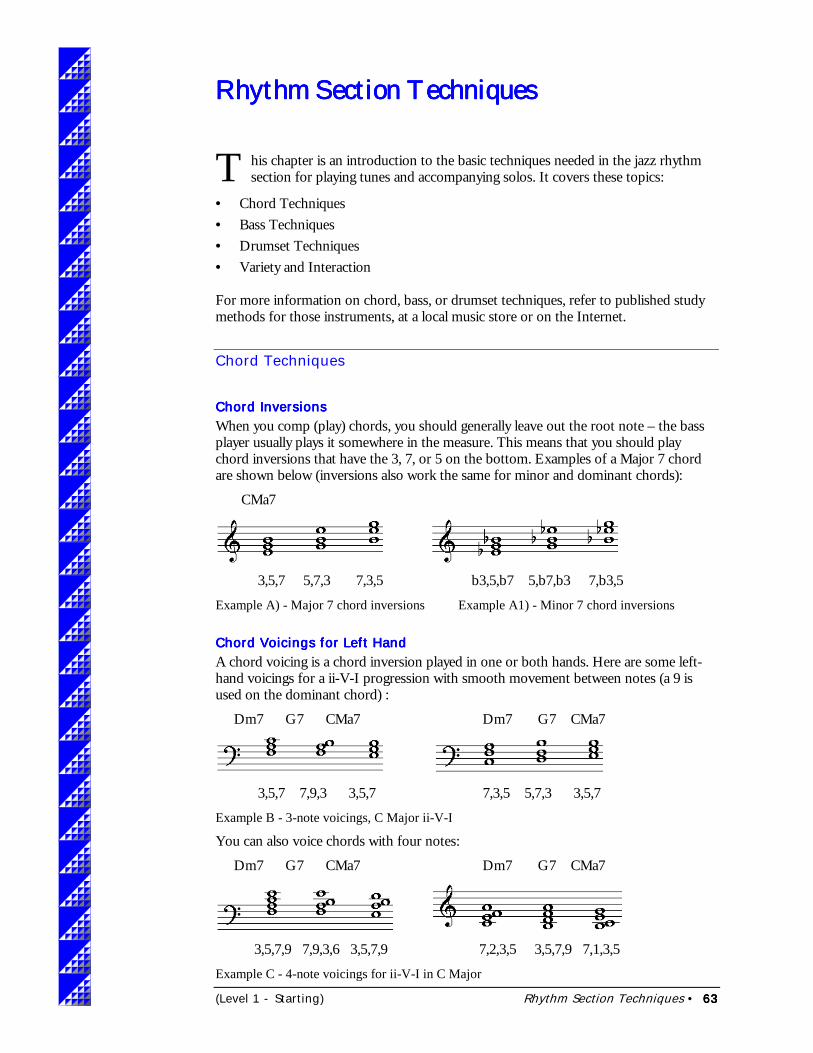
(Level 1 - Starting) Rhythm Section Techniques • 63636363
Rhythm Section TechniquesRhythm Section TechniquesRhythm Section TechniquesRhythm Section Techniques
his chapter is an introduction to the basic techniques needed in the jazz rhythmsection for playing tunes and accompanying solos. It covers these topics:
• Chord Techniques• Bass Techniques• Drumset Techniques• Variety and Interaction
For more information on chord, bass, or drumset techniques, refer to published studymethods for those instruments, at a local music store or on the Internet.
Chord Techniques
Chord InversionsChord InversionsChord InversionsChord InversionsWhen you comp (play) chords, you should generally leave out the root note – the bassplayer usually plays it somewhere in the measure. This means that you should playchord inversions that have the 3, 7, or 5 on the bottom. Examples of a Major 7 chordare shown below (inversions also work the same for minor and dominant chords):
CMa7
3,5,7 5,7,3 7,3,5 b3,5,b7 5,b7,b3 7,b3,5
Example A) - Major 7 chord inversions Example A1) - Minor 7 chord inversions
Chord Voicings for Left HandChord Voicings for Left HandChord Voicings for Left HandChord Voicings for Left HandA chord voicing is a chord inversion played in one or both hands. Here are some left-hand voicings for a ii-V-I progression with smooth movement between notes (a 9 isused on the dominant chord) :
Dm7 G7 CMa7 Dm7 G7 CMa7
3,5,7 7,9,3 3,5,7 7,3,5 5,7,3 3,5,7
Example B - 3-note voicings, C Major ii-V-I
You can also voice chords with four notes:
Dm7 G7 CMa7 Dm7 G7 CMa7
3,5,7,9 7,9,3,6 3,5,7,9 7,2,3,5 3,5,7,9 7,1,3,5
Example C - 4-note voicings for ii-V-I in C Major
T
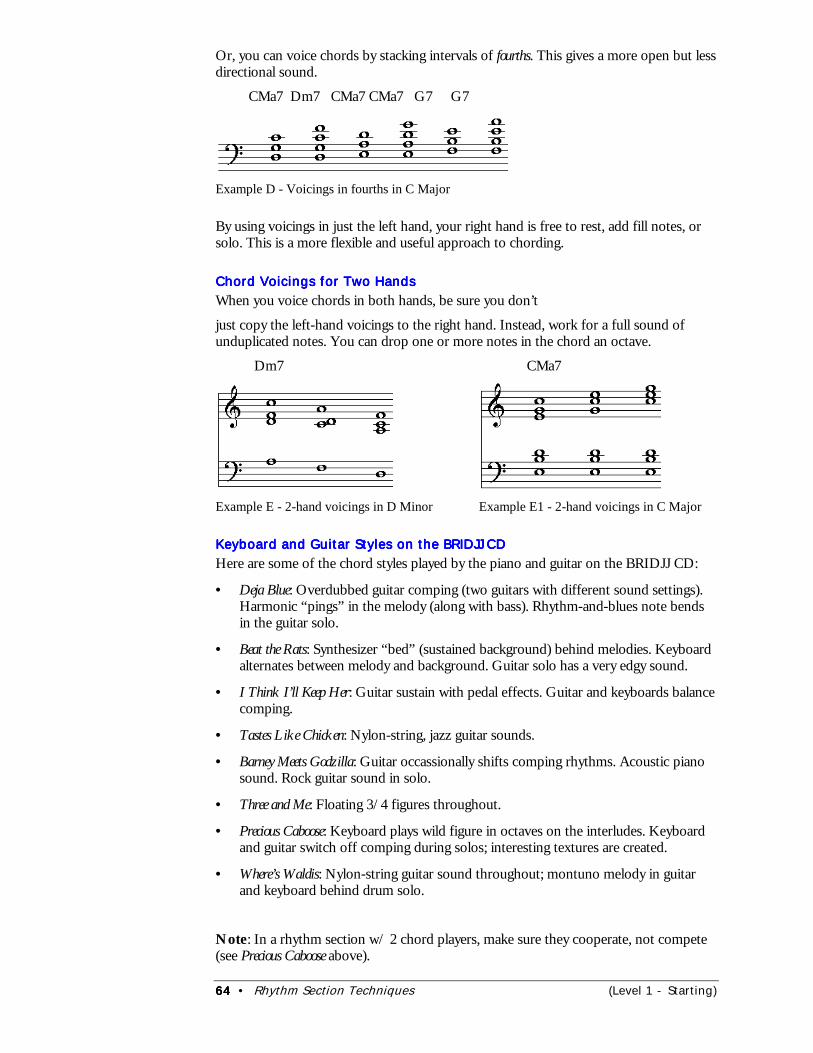
64646464 • Rhythm Section Techniques (Level 1 - Starting)
Or, you can voice chords by stacking intervals of fourths. This gives a more open but lessdirectional sound.
CMa7 Dm7 CMa7 CMa7 G7 G7
Example D - Voicings in fourths in C Major
By using voicings in just the left hand, your right hand is free to rest, add fill notes, orsolo. This is a more flexible and useful approach to chording.
Chord Voicings for Two HandsChord Voicings for Two HandsChord Voicings for Two HandsChord Voicings for Two HandsWhen you voice chords in both hands, be sure you don’t
just copy the left-hand voicings to the right hand. Instead, work for a full sound ofunduplicated notes. You can drop one or more notes in the chord an octave.
Dm7 CMa7
Example E - 2-hand voicings in D Minor Example E1 - 2-hand voicings in C Major
Keyboard and Guitar Styles on the BRIDJJ CDKeyboard and Guitar Styles on the BRIDJJ CDKeyboard and Guitar Styles on the BRIDJJ CDKeyboard and Guitar Styles on the BRIDJJ CDHere are some of the chord styles played by the piano and guitar on the BRIDJJ CD:
• Deja Blue: Overdubbed guitar comping (two guitars with different sound settings).Harmonic “pings” in the melody (along with bass). Rhythm-and-blues note bendsin the guitar solo.
• Beat the Rats: Synthesizer “bed” (sustained background) behind melodies. Keyboardalternates between melody and background. Guitar solo has a very edgy sound.
• I Think I’ll Keep Her: Guitar sustain with pedal effects. Guitar and keyboards balancecomping.
• Tastes Like Chicken: Nylon-string, jazz guitar sounds.
• Barney Meets Godzilla: Guitar occassionally shifts comping rhythms. Acoustic pianosound. Rock guitar sound in solo.
• Three and Me: Floating 3/4 figures throughout.
• Precious Caboose: Keyboard plays wild figure in octaves on the interludes. Keyboardand guitar switch off comping during solos; interesting textures are created.
• Where’s Waldis: Nylon-string guitar sound throughout; montuno melody in guitarand keyboard behind drum solo.
Note: In a rhythm section w/ 2 chord players, make sure they cooperate, not compete(see Precious Caboose above).
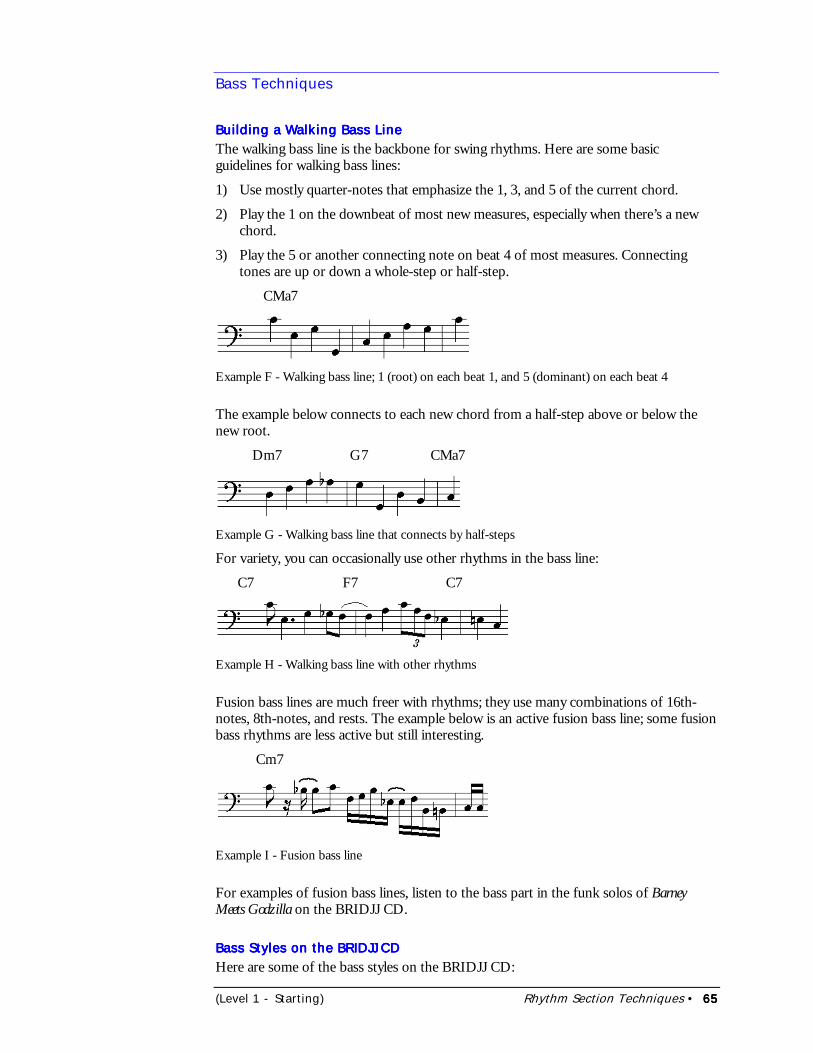
(Level 1 - Starting) Rhythm Section Techniques • 65656565
Bass Techniques
Building a Walking Bass LineBuilding a Walking Bass LineBuilding a Walking Bass LineBuilding a Walking Bass LineThe walking bass line is the backbone for swing rhythms. Here are some basicguidelines for walking bass lines:
1) Use mostly quarter-notes that emphasize the 1, 3, and 5 of the current chord.
2) Play the 1 on the downbeat of most new measures, especially when there’s a newchord.
3) Play the 5 or another connecting note on beat 4 of most measures. Connectingtones are up or down a whole-step or half-step.
CMa7
Example F - Walking bass line; 1 (root) on each beat 1, and 5 (dominant) on each beat 4
The example below connects to each new chord from a half-step above or below thenew root.
Dm7 G7 CMa7
Example G - Walking bass line that connects by half-steps
For variety, you can occasionally use other rhythms in the bass line:
C7 F7 C7
Example H - Walking bass line with other rhythms
Fusion bass lines are much freer with rhythms; they use many combinations of 16th-notes, 8th-notes, and rests. The example below is an active fusion bass line; some fusionbass rhythms are less active but still interesting.
Cm7
Example I - Fusion bass line
For examples of fusion bass lines, listen to the bass part in the funk solos of BarneyMeets Godzilla on the BRIDJJ CD.
Bass Styles on the BRIDJJ CDBass Styles on the BRIDJJ CDBass Styles on the BRIDJJ CDBass Styles on the BRIDJJ CDHere are some of the bass styles on the BRIDJJ CD:
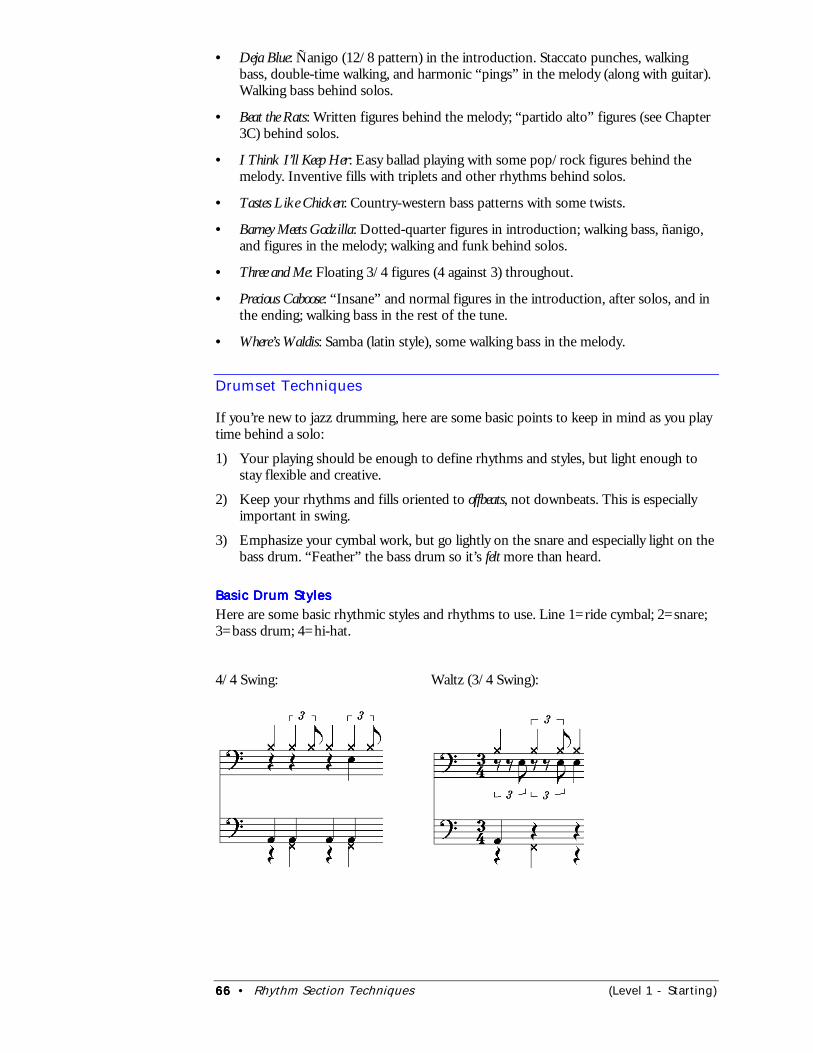
66666666 • Rhythm Section Techniques (Level 1 - Starting)
• Deja Blue: Ñanigo (12/8 pattern) in the introduction. Staccato punches, walkingbass, double-time walking, and harmonic “pings” in the melody (along with guitar).Walking bass behind solos.
• Beat the Rats: Written figures behind the melody; “partido alto” figures (see Chapter3C) behind solos.
• I Think I’ll Keep Her: Easy ballad playing with some pop/rock figures behind themelody. Inventive fills with triplets and other rhythms behind solos.
• Tastes Like Chicken: Country-western bass patterns with some twists.
• Barney Meets Godzilla: Dotted-quarter figures in introduction; walking bass, ñanigo,and figures in the melody; walking and funk behind solos.
• Three and Me: Floating 3/4 figures (4 against 3) throughout.
• Precious Caboose: “Insane” and normal figures in the introduction, after solos, and inthe ending; walking bass in the rest of the tune.
• Where’s Waldis: Samba (latin style), some walking bass in the melody.
Drumset Techniques
If you’re new to jazz drumming, here are some basic points to keep in mind as you playtime behind a solo:
1) Your playing should be enough to define rhythms and styles, but light enough tostay flexible and creative.
2) Keep your rhythms and fills oriented to offbeats, not downbeats. This is especiallyimportant in swing.
3) Emphasize your cymbal work, but go lightly on the snare and especially light on thebass drum. “Feather” the bass drum so it’s felt more than heard.
Basic Drum StylesBasic Drum StylesBasic Drum StylesBasic Drum StylesHere are some basic rhythmic styles and rhythms to use. Line 1=ride cymbal; 2=snare;3=bass drum; 4=hi-hat.
4/4 Swing: Waltz (3/4 Swing):
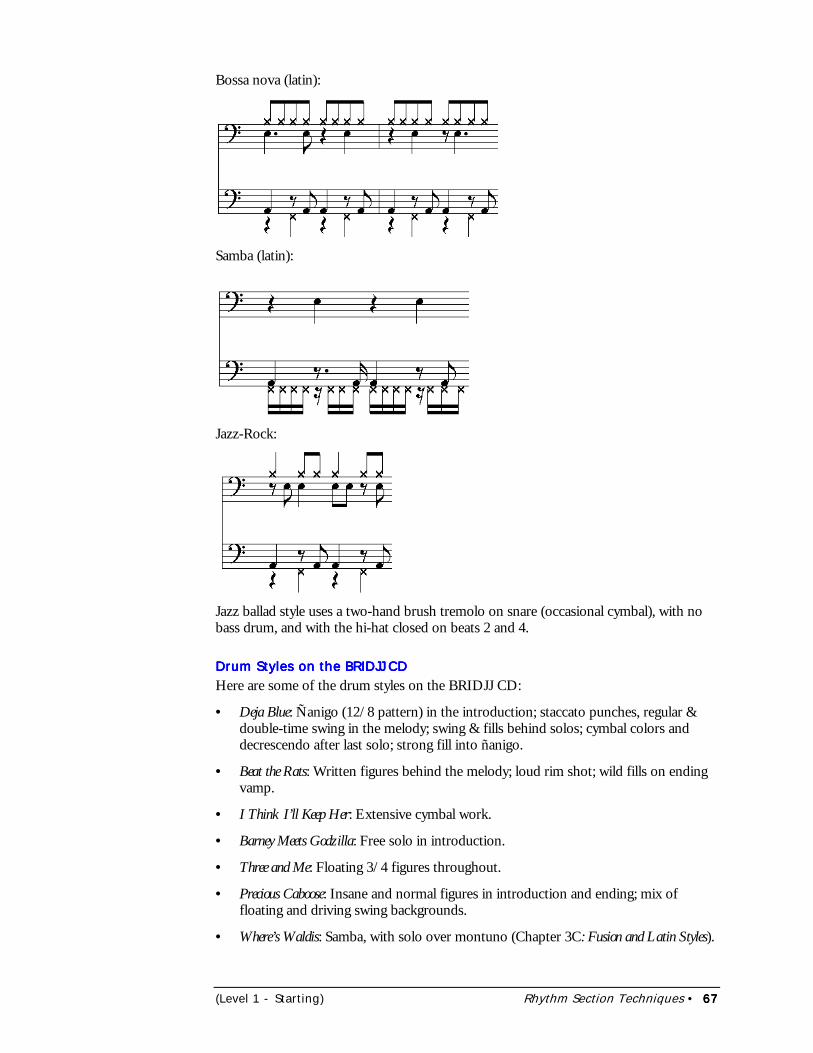
(Level 1 - Starting) Rhythm Section Techniques • 67676767
Bossa nova (latin):
Samba (latin):
Jazz-Rock:
Jazz ballad style uses a two-hand brush tremolo on snare (occasional cymbal), with nobass drum, and with the hi-hat closed on beats 2 and 4.
Drum Styles on the BRIDJJ CDDrum Styles on the BRIDJJ CDDrum Styles on the BRIDJJ CDDrum Styles on the BRIDJJ CDHere are some of the drum styles on the BRIDJJ CD:
• Deja Blue: Ñanigo (12/8 pattern) in the introduction; staccato punches, regular &double-time swing in the melody; swing & fills behind solos; cymbal colors anddecrescendo after last solo; strong fill into ñanigo.
• Beat the Rats: Written figures behind the melody; loud rim shot; wild fills on endingvamp.
• I Think I’ll Keep Her: Extensive cymbal work.
• Barney Meets Godzilla: Free solo in introduction.
• Three and Me: Floating 3/4 figures throughout.
• Precious Caboose: Insane and normal figures in introduction and ending; mix offloating and driving swing backgrounds.
• Where’s Waldis: Samba, with solo over montuno (Chapter 3C: Fusion and Latin Styles).
68686868 • Rhythm Section Techniques (Level 1 - Starting)
Variety and Interaction
Once your group masters the basic jazz styles, the next challenge is to use variety andinteraction to create a conversational background behind the soloist.
Individual VarietyIndividual VarietyIndividual VarietyIndividual VarietyEach individual player should become an expert at using variety to keep his/her partinteresting. Below are some methods to try (see also Chapter 4C: Special Effects).
• Bass: Repeat a rhythmic figure every bar or two bars; use “pedal” ( repeat the samepitch for several bars); play fills at the ends of phrases; try offbeat attacks and tiesacross barlines; use effects such as slides, twangs, and chords.
• Chords: Use any of the bass methods above, with piano effects such as tremolo,block chords, and clusters; use rhythmic variety in chord comping; play single-notemotifs; alternate quickly between hands.
• Drums: Use cymbal variety; try “long” notes (rolls); use fills and unusual patterns;alternate sticks, brushes, hands; hit different parts of the drum set.
Group VarietyGroup VarietyGroup VarietyGroup VarietySome effective ways to get variety as a group are:
• Switching textures (amount of people playing and how heavily they play). This is probably thebiggest area to explore. Use any combination of all, some, or no players behindsolos. Use dynamic contrast well in your group, and switch between lighter andheavier techniques.
• Using vamps (repeating a short set of chords). These are most effective in intros orendings, but they can also be played on modal tunes (few chord changes).
• Using unified rhythms. When one player starts an interesting rhythm pattern, the otherplayers can imitate it for a short while (don’t overuse this).
Interaction: Rhythm Section and SoloistInteraction: Rhythm Section and SoloistInteraction: Rhythm Section and SoloistInteraction: Rhythm Section and SoloistRhythm section players can generate some good ideas behind a soloist, coming fromrhythms, pitches, or both. The basic goals are:
1) Exchange ideas within the rhythm section2) Exchange ideas between the rhythm section and the soloist,3) Support but not overpower the soloist.
The basic interaction methods are:
• Copy a short idea that someone else played.
• Adapt (change) the idea.
• Support the idea (repeat a different idea that complements the original idea).
The key to this is finding and using the interesting parts of the idea you hear. Those partscan be a single note (F#) or a rhythmic placement (the “and” of 4), or a few notes ofthe idea, or the whole idea. Then you can use melodic and rhythmic development tocarry the idea further. As you interact, keep it under control and interesting so thesoloist is always motivated.
For more ideas on group variety, see Chapter 4F: Group Interaction and Chapter 5D:Rhythmic Pulses.
(Level 1 - Starting) Vocal Improvisation Skills – Part 1 • 69696969
Vocal Improvisation Skills – Part 1Vocal Improvisation Skills – Part 1Vocal Improvisation Skills – Part 1Vocal Improvisation Skills – Part 1
his chapter is an introduction to improvisation for vocalists. It covers thesetopics:
• An Approach to Vocal Improvisation• Virtual Practice for Vocalists• Basic Vowels and Consonants
You don’t need a highly trained voice to do vocal improvisation. In fact, a classicalmindset sometimes gets in the way of the freedoms you need for jazz styles. Still, a goodfoundation in voice techniques can give you added range, flexibility, and strength ofsound for vocal improv. If you’re an instrumentalist who wants to try vocal improv, payspecial attention as you use the vocal parts of the Virtual Practice Method.
For more on vocal improvisation skills, see Vocal Improvisation Skills, Part 2 in Level 4.
An Approach to Vocal Improvisation
Many vocalists use a somewhat limited approach to improvisation. Compared to otherinstruments, the human voice can create a much wider range of expression. But becauseit has no buttons or keys, the voice relies completely on the brain’s sense of pitch. Thisleads to these basic problems in vocal improvisation:
• Problem #1: Dependence on easy-to-hear intervals and scales• Problem #2: Underdeveloped melodic lines and rhythms• Problem #3: Exaggerated expression
Thinking More InstrumentallyThinking More InstrumentallyThinking More InstrumentallyThinking More InstrumentallyTo overcome these problems, most vocalists need to think more like an instrumentalist (andinstrumentalists need to think more vocally, too). This doesn’t mean just imitating aninstrument’s sound; it means developing a strong control over pitches, rhythms, anddevelopment to create more “instrumental” ideas. As you listen to great instrumentalsolos, think of how you can adapt them in your own vocal improvisations. Many greatjazz solos have been transcribed and set to words by vocalists such as Jon Hendricksand Eddie Jefferson, and groups such as Manhattan Transfer and New York Voices.
You can also use a virtual framework based on a musical instrument, to keep yourpitches and rhythms strong (see Virtual Practice for Vocalists below).
10 Bad Habits and 10 Better Habits:10 Bad Habits and 10 Better Habits:10 Bad Habits and 10 Better Habits:10 Bad Habits and 10 Better Habits:Below are 10 things that vocalists commonly do that cause weaker solos, along with 10ideas for improvement. The chapters in The Art of Improvisation that deal with the betterhabits are noted. Notice that most of these habits are also typical for instrumentalistswho improvise. As you practice vocal improvisation, keep working to turn these badhabits into better habits.
Bad Habit #1: Emphasizing roots of chords, then the arpeggios.
Solution: Emphasize some color tones; use color skips (1C: Melodic Color).
T
70707070 • Vocal Improvisation Skills – Part 1 (Level 1 - Starting)
Bad Habit #2: Emphasizing downbeats of measures.
Solution: Sing offbeats, consecutive offbeats, and interesting rhythms (1D:Rhythmic Variety).
Bad Habit #3: Relying too much on blues scales.
Solution: Use Lydian, pentatonic, melodic minor ascending, and others (1B:Building Chords and Scales; 2A More Scales; 3A: More Melodic Color).
Bad Habit #4: Using too much vibrato and too many vocal effects.
Solution: Keep expression subtle, with occasional effects that fit the solowell (1E: Using Expression; 2E: Embellishments; 4C: Special Effects).
Bad Habit #5: Changing ideas without developing them.
Solution: Use principles of melodic and rhythmic development in solos (1F:Developing with Motifs and Phrases; 2F: Melodic Development; 3E:Rhythmic Development).
Bad Habit #6: Relying on phrases with predictable, similar lengths (based on acomfortable breath) and similar contours.
Solution: Vary phrase lengths and melodic contours (Chapters 1F, 2B).
Bad Habit #7: Using a limited range and no wider intervals.
Solution: Try wider skips and a variety of filled intervals (Chapter 2B).
Bad Habit #8: Not interpreting swing rhythms and articulations accurately.
Solution: Use the guidelines in Chapter 2C.
Bad Habit #9: Singing ideas that are harmonically limited.
Solution: Outline ii-V-I’s and chord variations (Chapters 1G and 3F).
Bad Habit #10: Avoiding non-harmonic tones.
Solution: Sing and resolve non-harmonic tones (Chapter 3A).
The exercises in this book (see the Exercises section) are also designed to help youapproach vocal improvisation more instrumentally.
Virtual Practice for Vocalists
The voice can sing pitches as accurately as an instrument can, but too often it doesn’t. Ifyou could sing pitches as accurately as an instrument plays them, but also have theimmense flexibility and range of vocal sounds, you’d be in great shape for some finevocal solos. (Some classically trained vocalists can sing incredibly difficult intervals,especially in 20th-century music.) As a jazz vocalist, you can use the Virtual PracticeMethod in interesting ways to build your confidence in rhythms and pitches.
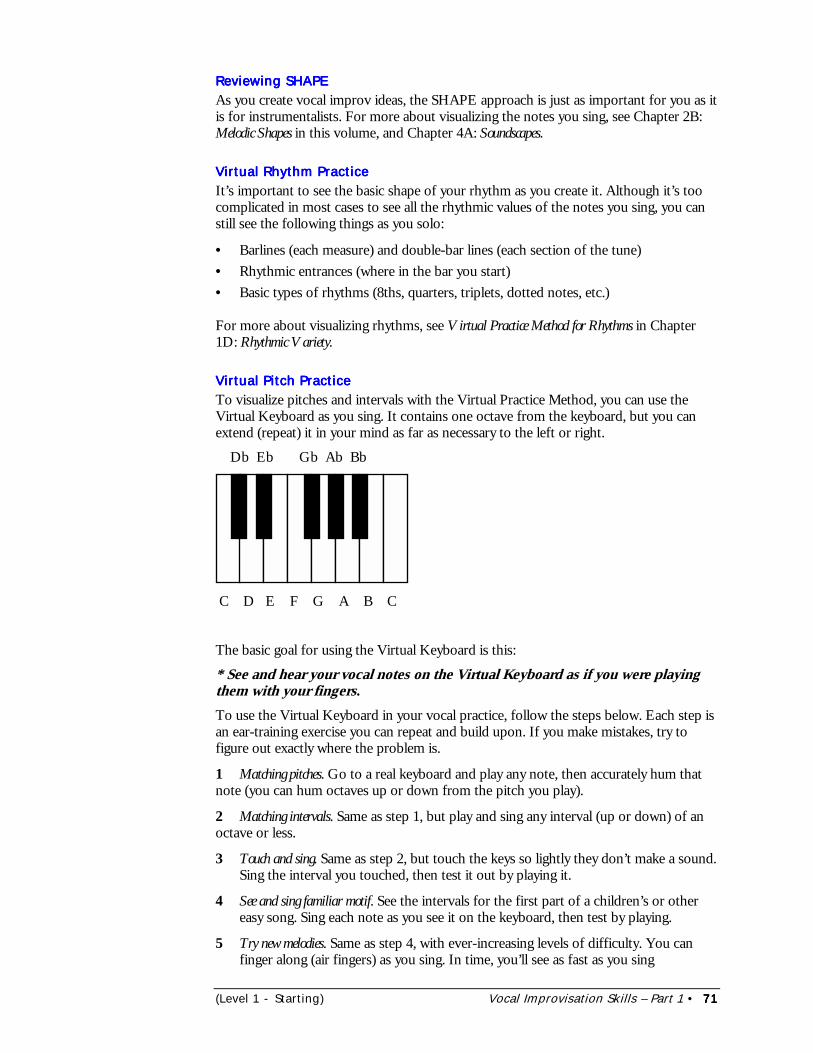
(Level 1 - Starting) Vocal Improvisation Skills – Part 1 • 71717171
Reviewing SHAPEReviewing SHAPEReviewing SHAPEReviewing SHAPEAs you create vocal improv ideas, the SHAPE approach is just as important for you as itis for instrumentalists. For more about visualizing the notes you sing, see Chapter 2B:Melodic Shapes in this volume, and Chapter 4A: Soundscapes.
Virtual Rhythm PracticeVirtual Rhythm PracticeVirtual Rhythm PracticeVirtual Rhythm PracticeIt’s important to see the basic shape of your rhythm as you create it. Although it’s toocomplicated in most cases to see all the rhythmic values of the notes you sing, you canstill see the following things as you solo:
• Barlines (each measure) and double-bar lines (each section of the tune)• Rhythmic entrances (where in the bar you start)• Basic types of rhythms (8ths, quarters, triplets, dotted notes, etc.)
For more about visualizing rhythms, see Virtual Practice Method for Rhythms in Chapter1D: Rhythmic Variety.
Virtual Pitch PracticeVirtual Pitch PracticeVirtual Pitch PracticeVirtual Pitch PracticeTo visualize pitches and intervals with the Virtual Practice Method, you can use theVirtual Keyboard as you sing. It contains one octave from the keyboard, but you canextend (repeat) it in your mind as far as necessary to the left or right.
Db Eb Gb Ab Bb
C D E F G A B C
The basic goal for using the Virtual Keyboard is this:
* See and hear your vocal notes on the Virtual Keyboard as if you were playingthem with your fingers.To use the Virtual Keyboard in your vocal practice, follow the steps below. Each step isan ear-training exercise you can repeat and build upon. If you make mistakes, try tofigure out exactly where the problem is.
1 Matching pitches. Go to a real keyboard and play any note, then accurately hum thatnote (you can hum octaves up or down from the pitch you play).
2 Matching intervals. Same as step 1, but play and sing any interval (up or down) of anoctave or less.
3 Touch and sing. Same as step 2, but touch the keys so lightly they don’t make a sound.Sing the interval you touched, then test it out by playing it.
4 See and sing familiar motif. See the intervals for the first part of a children’s or othereasy song. Sing each note as you see it on the keyboard, then test by playing.
5 Try new melodies. Same as step 4, with ever-increasing levels of difficulty. You canfinger along (air fingers) as you sing. In time, you’ll see as fast as you sing
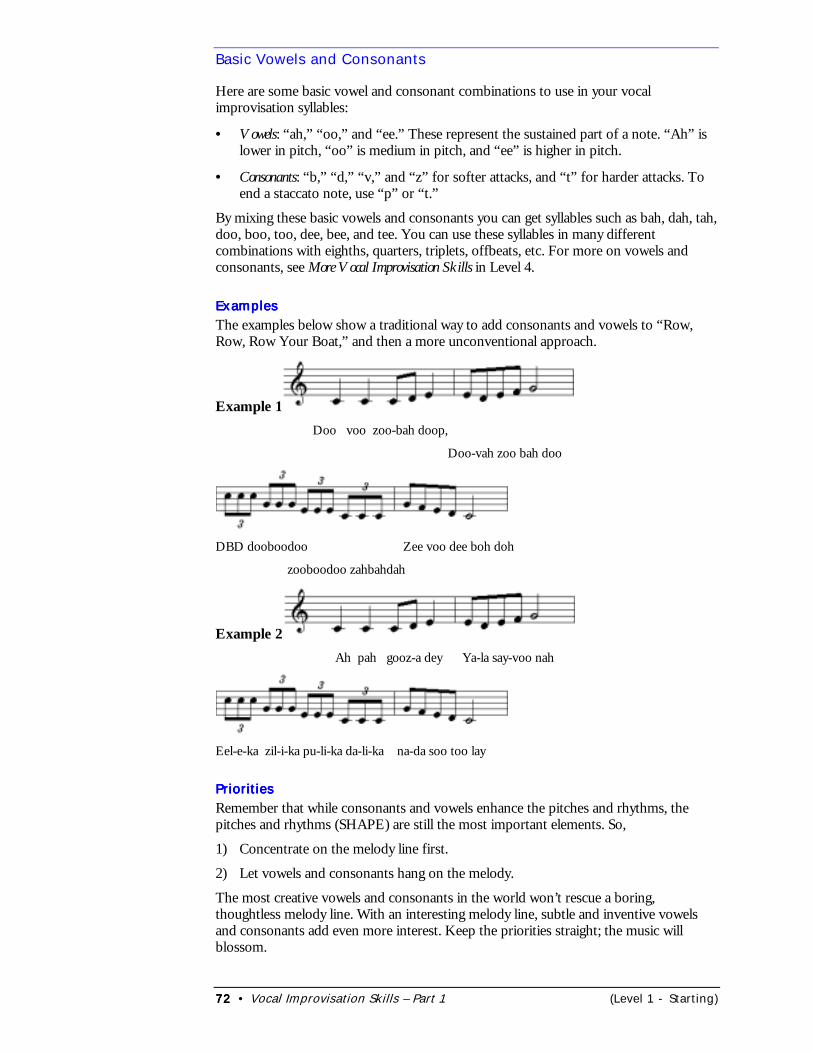
72727272 • Vocal Improvisation Skills – Part 1 (Level 1 - Starting)
Basic Vowels and Consonants
Here are some basic vowel and consonant combinations to use in your vocalimprovisation syllables:
• Vowels: “ah,” “oo,” and “ee.” These represent the sustained part of a note. “Ah” islower in pitch, “oo” is medium in pitch, and “ee” is higher in pitch.
• Consonants: “b,” “d,” “v,” and “z” for softer attacks, and “t” for harder attacks. Toend a staccato note, use “p” or “t.”
By mixing these basic vowels and consonants you can get syllables such as bah, dah, tah,doo, boo, too, dee, bee, and tee. You can use these syllables in many differentcombinations with eighths, quarters, triplets, offbeats, etc. For more on vowels andconsonants, see More Vocal Improvisation Skills in Level 4.
ExamplesExamplesExamplesExamplesThe examples below show a traditional way to add consonants and vowels to “Row,Row, Row Your Boat,” and then a more unconventional approach.
Example 1 Doo voo zoo-bah doop,
Doo-vah zoo bah doo
DBD dooboodoo Zee voo dee boh doh
zooboodoo zahbahdah
Example 2Ah pah gooz-a dey Ya-la say-voo nah
Eel-e-ka zil-i-ka pu-li-ka da-li-ka na-da soo too lay
PrioritiesPrioritiesPrioritiesPrioritiesRemember that while consonants and vowels enhance the pitches and rhythms, thepitches and rhythms (SHAPE) are still the most important elements. So,
1) Concentrate on the melody line first.
2) Let vowels and consonants hang on the melody.
The most creative vowels and consonants in the world won’t rescue a boring,thoughtless melody line. With an interesting melody line, subtle and inventive vowelsand consonants add even more interest. Keep the priorities straight; the music willblossom.
(Introduction) Exercises for Level 1 • 73737373
Exercises for Level 1Exercises for Level 1Exercises for Level 1Exercises for Level 1
Melody: Virtual Practice
Exercise 1.1 ���� Virtual Practice for the C Major ScaleBasic __/__/__ ( )Medium __/__/__ ( ) Challenge __/__/__ ( ) More __/__/__ ( )
❏ *Basic: Hum and finger eighth-notes for the C Major scale, at quarter-note = 100. Be sure eachattack is accurate in pitch and played in solid rhythm.
❏ **Medium: Same as Basic; quarter-note = 144.
❏ ***Challenge: Same as Basic; quarter-note = 180.
❏ >More: Same as Basic; A) play the scale descending; B) play the scale in 2 octaves; C) both Aand B.
Exercise 1.2 ���� Humming the Major ScalesBasic __/__/__ ( )Medium __/__/__ ( ) Challenge __/__/__ ( ) More __/__/__ ( )
❏ *Basic: Around the circle of 4ths, accurately hum and finger eighth-notes for all 12 majorscales, up and down, quarter-note = 100. Test the notes against your instrument.
❏ **Medium: Same as Basic; quarter-note = 144.
❏ ***Challenge: Same as Basic; quarter-note = 180.
❏ >More: Same as Basic; A) reverse the contour; B) play 2 octaves; C) both A and B.
❏ ��Play-Along: Aebersold Vol. 1: side 2, track 3. One quarter-note scale per chord or 2 of 8th-notes.
Exercise 1.3 � Humming Flexible ScalesBasic __/__/__ ( )Medium __/__/__ ( ) Challenge __/__/__ ( ) More __/__/__ ( )
❏ *Basic: Hum and finger each flexible major scale in the circle of 4ths; quarter-note = 100. Playeach note in the scale at least once; pause before each new key.
❏ **Medium: Same as Basic; quarter-note = 144.
❏ ***Challenge: Same as Basic; quarter-note = 180.
❏ >More: Same as Basic; A) don't pause between keys - connect to the next root and proceed; B)play 2 octaves on each key; C) both A and B
❏ ��Play-Along: Aebersold Vol. 1: side 2, track 3. One quarter-note scale per chord or 2 of 8th-notes.
Exercise 1.4 � Humming Flexible Scales with ThirdsBasic __/__/__ ( )Medium __/__/__ ( ) Challenge __/__/__ ( ) More __/__/__ ( )
❏ *Basic: Hum and finger each flexible major scale in the circle of 4ths, using some thirds;quarter-note = 100. Use thirds based on each scale tone.
❏ **Medium: Same as Basic; quarter-note = 144.
❏ ***Challenge: Same as Basic; quarter-note = 180.
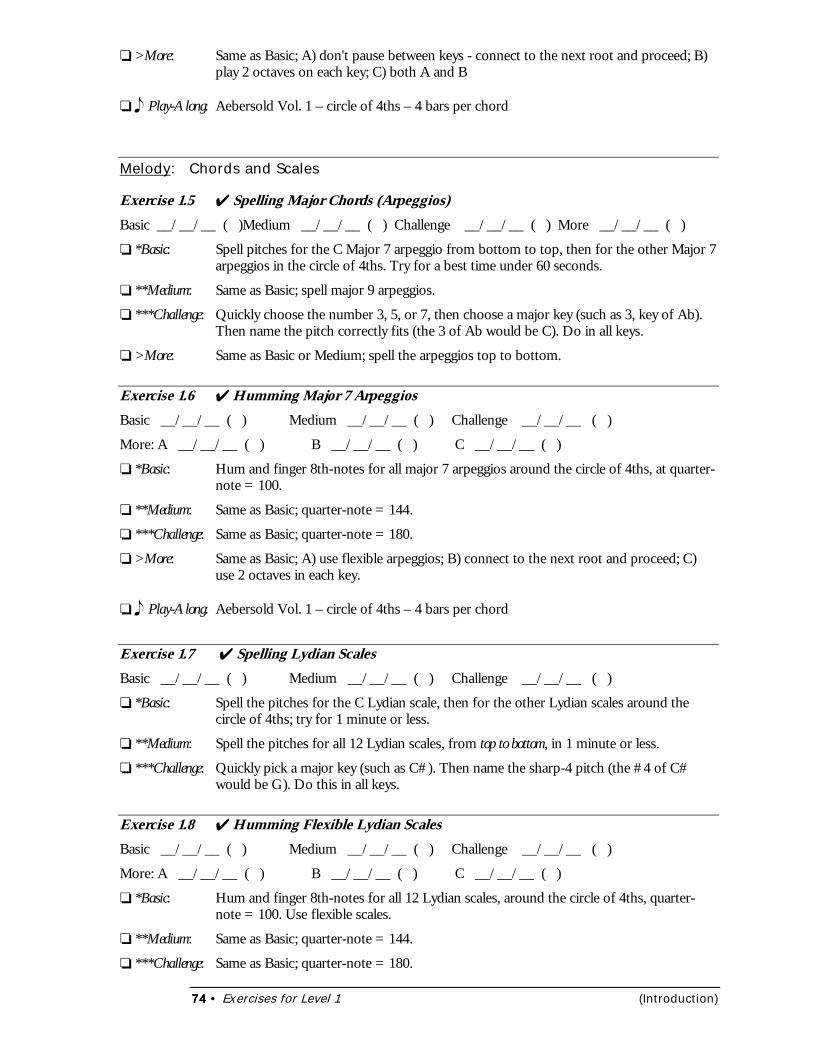
74747474 • Exercises for Level 1 (Introduction)
❏ >More: Same as Basic; A) don't pause between keys - connect to the next root and proceed; B)play 2 octaves on each key; C) both A and B
❏ ��Play-Along: Aebersold Vol. 1 – circle of 4ths – 4 bars per chord
Melody: Chords and Scales
Exercise 1.5 � Spelling Major Chords (Arpeggios)Basic __/__/__ ( )Medium __/__/__ ( ) Challenge __/__/__ ( ) More __/__/__ ( )
❏ *Basic: Spell pitches for the C Major 7 arpeggio from bottom to top, then for the other Major 7arpeggios in the circle of 4ths. Try for a best time under 60 seconds.
❏ **Medium: Same as Basic; spell major 9 arpeggios.
❏ ***Challenge: Quickly choose the number 3, 5, or 7, then choose a major key (such as 3, key of Ab).Then name the pitch correctly fits (the 3 of Ab would be C). Do in all keys.
❏ >More: Same as Basic or Medium; spell the arpeggios top to bottom.
Exercise 1.6 � Humming Major 7 ArpeggiosBasic __/__/__ ( ) Medium __/__/__ ( ) Challenge __/__/__ ( )
More: A __/__/__ ( ) B __/__/__ ( ) C __/__/__ ( )
❏ *Basic: Hum and finger 8th-notes for all major 7 arpeggios around the circle of 4ths, at quarter-note = 100.
❏ **Medium: Same as Basic; quarter-note = 144.
❏ ***Challenge: Same as Basic; quarter-note = 180.
❏ >More: Same as Basic; A) use flexible arpeggios; B) connect to the next root and proceed; C)use 2 octaves in each key.
❏ ��Play-Along: Aebersold Vol. 1 – circle of 4ths – 4 bars per chord
Exercise 1.7 � Spelling Lydian ScalesBasic __/__/__ ( ) Medium __/__/__ ( ) Challenge __/__/__ ( )
❏ *Basic: Spell the pitches for the C Lydian scale, then for the other Lydian scales around thecircle of 4ths; try for 1 minute or less.
❏ **Medium: Spell the pitches for all 12 Lydian scales, from top to bottom, in 1 minute or less.
❏ ***Challenge: Quickly pick a major key (such as C#). Then name the sharp-4 pitch (the #4 of C#would be G). Do this in all keys.
Exercise 1.8 � Humming Flexible Lydian ScalesBasic __/__/__ ( ) Medium __/__/__ ( ) Challenge __/__/__ ( )
More: A __/__/__ ( ) B __/__/__ ( ) C __/__/__ ( )
❏ *Basic: Hum and finger 8th-notes for all 12 Lydian scales, around the circle of 4ths, quarter-note = 100. Use flexible scales.
❏ **Medium: Same as Basic; quarter-note = 144.
❏ ***Challenge: Same as Basic; quarter-note = 180.
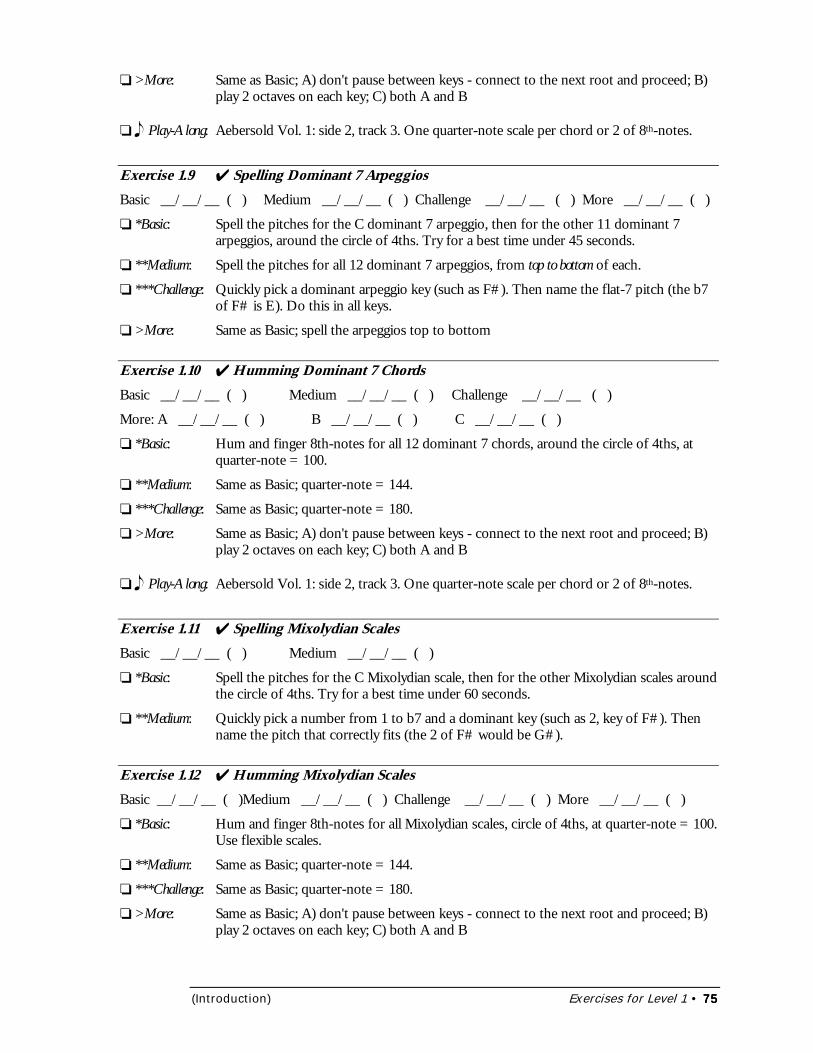
(Introduction) Exercises for Level 1 • 75757575
❏ >More: Same as Basic; A) don't pause between keys - connect to the next root and proceed; B)play 2 octaves on each key; C) both A and B
❏ ��Play-Along: Aebersold Vol. 1: side 2, track 3. One quarter-note scale per chord or 2 of 8th-notes.
Exercise 1.9 � Spelling Dominant 7 ArpeggiosBasic __/__/__ ( ) Medium __/__/__ ( ) Challenge __/__/__ ( ) More __/__/__ ( )
❏ *Basic: Spell the pitches for the C dominant 7 arpeggio, then for the other 11 dominant 7arpeggios, around the circle of 4ths. Try for a best time under 45 seconds.
❏ **Medium: Spell the pitches for all 12 dominant 7 arpeggios, from top to bottom of each.
❏ ***Challenge: Quickly pick a dominant arpeggio key (such as F#). Then name the flat-7 pitch (the b7of F# is E). Do this in all keys.
❏ >More: Same as Basic; spell the arpeggios top to bottom
Exercise 1.10 � Humming Dominant 7 ChordsBasic __/__/__ ( ) Medium __/__/__ ( ) Challenge __/__/__ ( )
More: A __/__/__ ( ) B __/__/__ ( ) C __/__/__ ( )
❏ *Basic: Hum and finger 8th-notes for all 12 dominant 7 chords, around the circle of 4ths, atquarter-note = 100.
❏ **Medium: Same as Basic; quarter-note = 144.
❏ ***Challenge: Same as Basic; quarter-note = 180.
❏ >More: Same as Basic; A) don't pause between keys - connect to the next root and proceed; B)play 2 octaves on each key; C) both A and B
❏ ��Play-Along: Aebersold Vol. 1: side 2, track 3. One quarter-note scale per chord or 2 of 8th-notes.
Exercise 1.11 � Spelling Mixolydian ScalesBasic __/__/__ ( ) Medium __/__/__ ( )
❏ *Basic: Spell the pitches for the C Mixolydian scale, then for the other Mixolydian scales aroundthe circle of 4ths. Try for a best time under 60 seconds.
❏ **Medium: Quickly pick a number from 1 to b7 and a dominant key (such as 2, key of F#). Thenname the pitch that correctly fits (the 2 of F# would be G#).
Exercise 1.12 � Humming Mixolydian ScalesBasic __/__/__ ( )Medium __/__/__ ( ) Challenge __/__/__ ( ) More __/__/__ ( )
❏ *Basic: Hum and finger 8th-notes for all Mixolydian scales, circle of 4ths, at quarter-note = 100.Use flexible scales.
❏ **Medium: Same as Basic; quarter-note = 144.
❏ ***Challenge: Same as Basic; quarter-note = 180.
❏ >More: Same as Basic; A) don't pause between keys - connect to the next root and proceed; B)play 2 octaves on each key; C) both A and B
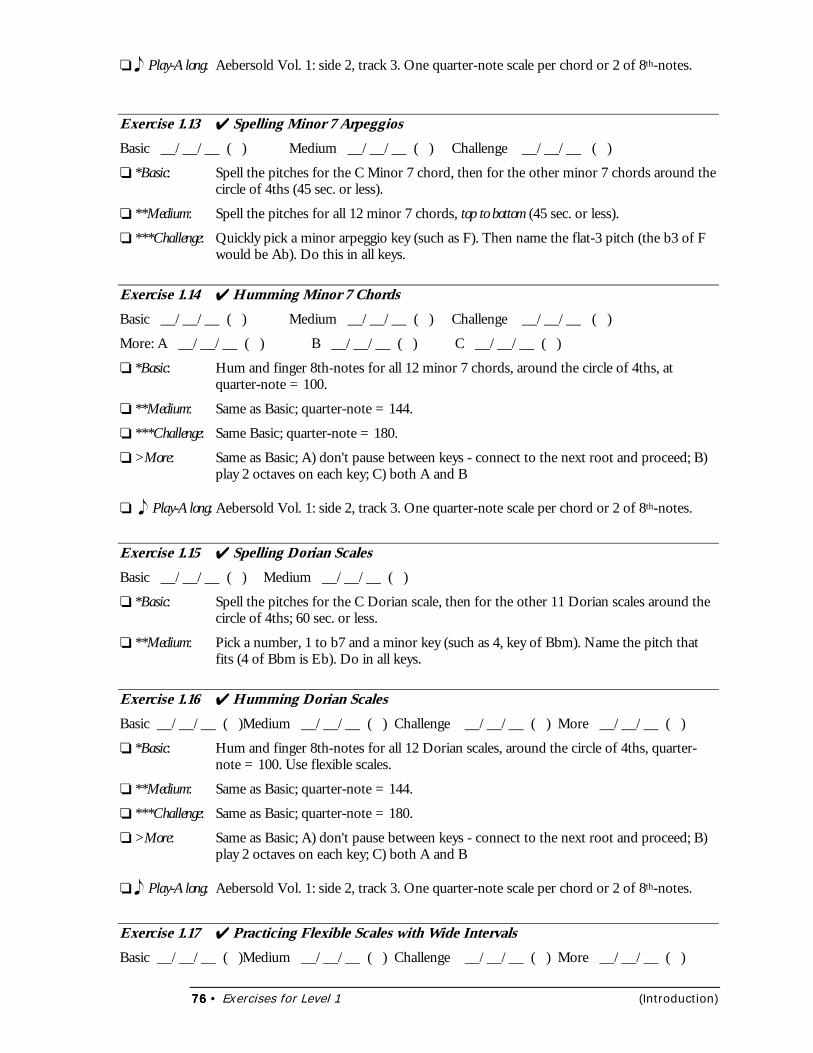
76767676 • Exercises for Level 1 (Introduction)
❏ ��Play-Along: Aebersold Vol. 1: side 2, track 3. One quarter-note scale per chord or 2 of 8th-notes.
Exercise 1.13 � Spelling Minor 7 ArpeggiosBasic __/__/__ ( ) Medium __/__/__ ( ) Challenge __/__/__ ( )
❏ *Basic: Spell the pitches for the C Minor 7 chord, then for the other minor 7 chords around thecircle of 4ths (45 sec. or less).
❏ **Medium: Spell the pitches for all 12 minor 7 chords, top to bottom (45 sec. or less).
❏ ***Challenge: Quickly pick a minor arpeggio key (such as F). Then name the flat-3 pitch (the b3 of Fwould be Ab). Do this in all keys.
Exercise 1.14 � Humming Minor 7 ChordsBasic __/__/__ ( ) Medium __/__/__ ( ) Challenge __/__/__ ( )
More: A __/__/__ ( ) B __/__/__ ( ) C __/__/__ ( )
❏ *Basic: Hum and finger 8th-notes for all 12 minor 7 chords, around the circle of 4ths, atquarter-note = 100.
❏ **Medium: Same as Basic; quarter-note = 144.
❏ ***Challenge: Same Basic; quarter-note = 180.
❏ >More: Same as Basic; A) don't pause between keys - connect to the next root and proceed; B)play 2 octaves on each key; C) both A and B
❏ ��Play-Along: Aebersold Vol. 1: side 2, track 3. One quarter-note scale per chord or 2 of 8th-notes.
Exercise 1.15 � Spelling Dorian ScalesBasic __/__/__ ( ) Medium __/__/__ ( )
❏ *Basic: Spell the pitches for the C Dorian scale, then for the other 11 Dorian scales around thecircle of 4ths; 60 sec. or less.
❏ **Medium: Pick a number, 1 to b7 and a minor key (such as 4, key of Bbm). Name the pitch thatfits (4 of Bbm is Eb). Do in all keys.
Exercise 1.16 � Humming Dorian ScalesBasic __/__/__ ( )Medium __/__/__ ( ) Challenge __/__/__ ( ) More __/__/__ ( )
❏ *Basic: Hum and finger 8th-notes for all 12 Dorian scales, around the circle of 4ths, quarter-note = 100. Use flexible scales.
❏ **Medium: Same as Basic; quarter-note = 144.
❏ ***Challenge: Same as Basic; quarter-note = 180.
❏ >More: Same as Basic; A) don't pause between keys - connect to the next root and proceed; B)play 2 octaves on each key; C) both A and B
❏ ��Play-Along: Aebersold Vol. 1: side 2, track 3. One quarter-note scale per chord or 2 of 8th-notes.
Exercise 1.17 � Practicing Flexible Scales with Wide IntervalsBasic __/__/__ ( )Medium __/__/__ ( ) Challenge __/__/__ ( ) More __/__/__ ( )
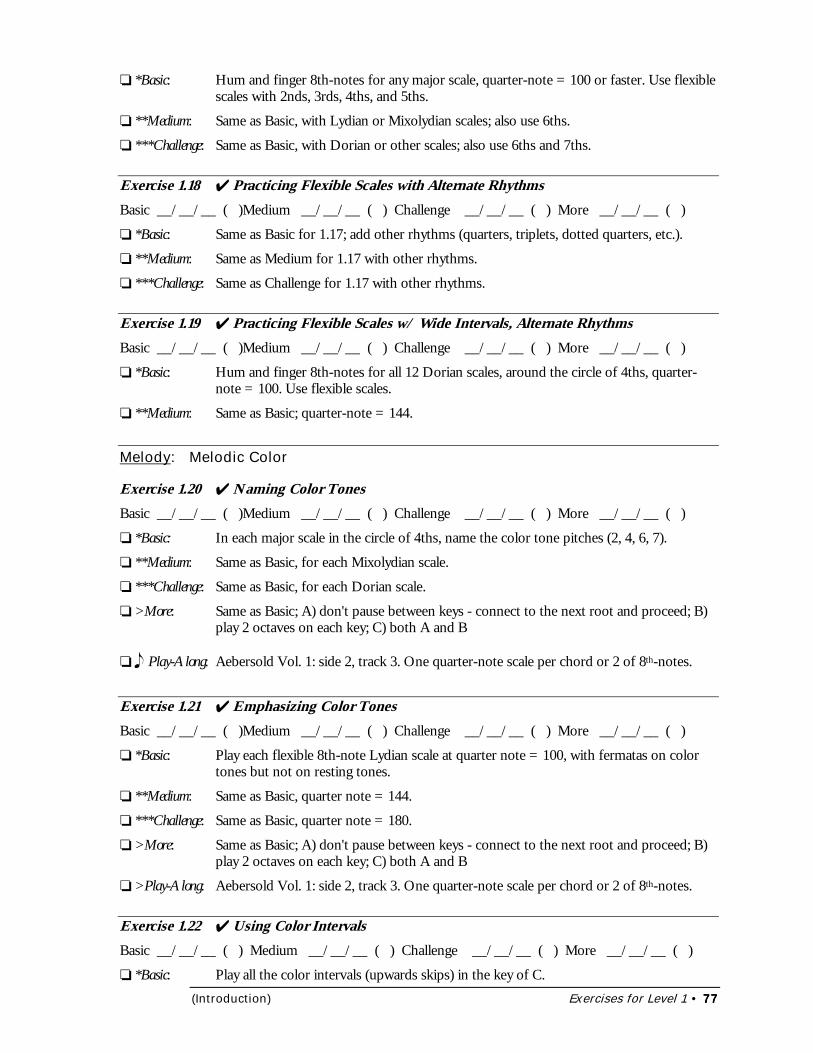
(Introduction) Exercises for Level 1 • 77777777
❏ *Basic: Hum and finger 8th-notes for any major scale, quarter-note = 100 or faster. Use flexiblescales with 2nds, 3rds, 4ths, and 5ths.
❏ **Medium: Same as Basic, with Lydian or Mixolydian scales; also use 6ths.
❏ ***Challenge: Same as Basic, with Dorian or other scales; also use 6ths and 7ths.
Exercise 1.18 � Practicing Flexible Scales with Alternate RhythmsBasic __/__/__ ( )Medium __/__/__ ( ) Challenge __/__/__ ( ) More __/__/__ ( )
❏ *Basic: Same as Basic for 1.17; add other rhythms (quarters, triplets, dotted quarters, etc.).
❏ **Medium: Same as Medium for 1.17 with other rhythms.
❏ ***Challenge: Same as Challenge for 1.17 with other rhythms.
Exercise 1.19 � Practicing Flexible Scales w/ Wide Intervals, Alternate RhythmsBasic __/__/__ ( )Medium __/__/__ ( ) Challenge __/__/__ ( ) More __/__/__ ( )
❏ *Basic: Hum and finger 8th-notes for all 12 Dorian scales, around the circle of 4ths, quarter-note = 100. Use flexible scales.
❏ **Medium: Same as Basic; quarter-note = 144.
Melody: Melodic Color
Exercise 1.20 � Naming Color TonesBasic __/__/__ ( )Medium __/__/__ ( ) Challenge __/__/__ ( ) More __/__/__ ( )
❏ *Basic: In each major scale in the circle of 4ths, name the color tone pitches (2, 4, 6, 7).
❏ **Medium: Same as Basic, for each Mixolydian scale.
❏ ***Challenge: Same as Basic, for each Dorian scale.
❏ >More: Same as Basic; A) don't pause between keys - connect to the next root and proceed; B)play 2 octaves on each key; C) both A and B
❏ ��Play-Along: Aebersold Vol. 1: side 2, track 3. One quarter-note scale per chord or 2 of 8th-notes.
Exercise 1.21 � Emphasizing Color TonesBasic __/__/__ ( )Medium __/__/__ ( ) Challenge __/__/__ ( ) More __/__/__ ( )
❏ *Basic: Play each flexible 8th-note Lydian scale at quarter note = 100, with fermatas on colortones but not on resting tones.
❏ **Medium: Same as Basic, quarter note = 144.
❏ ***Challenge: Same as Basic, quarter note = 180.
❏ >More: Same as Basic; A) don't pause between keys - connect to the next root and proceed; B)play 2 octaves on each key; C) both A and B
❏ >Play-Along: Aebersold Vol. 1: side 2, track 3. One quarter-note scale per chord or 2 of 8th-notes.
Exercise 1.22 � Using Color IntervalsBasic __/__/__ ( ) Medium __/__/__ ( ) Challenge __/__/__ ( ) More __/__/__ ( )
❏ *Basic: Play all the color intervals (upwards skips) in the key of C.
78787878 • Exercises for Level 1 (Introduction)
❏ **Medium: Same as Basic; reverse the skips.
❏ ***Challenge: Same as Basic; all keys, circle of 4ths (upwards skips).
❏ >More: Same as Challenge; skip downwards
❏ >Play-Along: Aebersold Vol. 1: side 2, track 3. One quarter-note scale per chord or 2 of 8th-notes.
Exercise 1.23 � Resolving 4ths in Major & DominantBasic __/__/__ ( ) Medium __/__/__ ( ) Challenge __/__/__ ( ) More __/__/__ ( )
❏ *Basic: In each major scale around the circle of 4ths, name the fourth degree and two differentways to resolve each fourth. For example, in C Major, F is the fourth; it can resolve toE, or first to D then to E.
❏ **Medium: Play each flexible major scale, with a fermata on each 3 you resolve from a 4.
❏ ***Challenge: Same as Medium, but use 4-2-3 and 4-5-3 resolutions.
❏ >More: Same as Basic; A) don't pause between keys - connect to the next root and proceed; B)play 2 octaves on each key; C) both A and B
❏ >Play-Along: Aebersold Vol. 1: side 2, track 3. One quarter-note scale per chord or 2 of 8th-notes.
Exercise 1.24 � Color Tones in Transcribed SolosBasic __/__/__ ( ) Medium __/__/__ ( ) Challenge __/__/__ ( )
❏ *Basic: In the guitar solo for “Where’s Waldis” (Chapter 3J), find all color tones (2, #4, 6, 7)that are emphasized (held notes, starting notes, or ending notes).
❏ **Medium: Same as Basic; use the trumpet solo for “Where’s Waldis.” Also note all 4 to 3resolutions.
❏ ***Challenge: Same as Medium; select any other solo in Chapter 2J or Chapter 3J.
❏ >Play-Along: Aebersold Vol. 1: side 2, track 3. One quarter-note scale per chord or 2 of 8th-notes.
Rhythm: Rhythmic Variety
Exercise 1.25 ✔ Emphasizing OffbeatsBasic __/__/__ ( )Medium __/__/__ ( ) Challenge __/__/__ ( ) More __/__/__ ( )
❏ *Basic: Write or play a two-measure melody with quarter-rests on beat 1 or 3 in each bar. Doagain with 8th-rests on 1, 2, 3, or 4.
❏ **Medium: Same as Basic; hide beat 1 or 3 using tied quarter-notes from 4 to 1 or from 2 to 3.Repeat the exercise with tied eighth-notes from “4-and” into 1, “1-and” into 2, “2-and”into 3, or “3-and” into 4.
❏ ***Challenge: Combine quarter-note offbeats after rests with eighth-note offbeat after rests. Repeatwith ties to downbeats not rests.
❏ >More: Same as Basic; A) don't pause between keys - connect to the next root and proceed; B)play 2 octaves on each key; C) both A and B
❏ >Play-Along: Aebersold Vol. 1: side 2, track 3. One quarter-note scale per chord or 2 of 8th-notes.
Exercise 1.26 � Consecutive Half-note OffbeatsBasic __/__/__ ( )Medium __/__/__ ( ) Challenge __/__/__ ( ) More __/__/__ ( )
(Introduction) Exercises for Level 1 • 79797979
❏ *Basic: On a flexible major scale, at quarter-note = 120, play one quarter-note, then playconsecutive half-note values. Repeat in all 12 keys.
❏ **Medium: Same as Basic; use flexible Mixolydian scales at quarter-note = 144.
❏ ***Challenge: On a flexible major scale, quarter-note = 180, play a dotted quarter-note, then playconsecutive half-note values (eighths tied to dotted-quarters). Do in all keys.
❏ >More: Same as Basic; A) don't pause between keys - connect to the next root and proceed; B)play 2 octaves on each key; C) both A and B
❏ >Play-Along: Aebersold Vol. 1: side 2, track 3. One quarter-note scale per chord or 2 of 8th-notes.
Exercise 1.27 � Consecutive Quarter-note OffbeatsBasic __/__/__ ( )Medium __/__/__ ( ) Challenge __/__/__ ( ) More __/__/__ ( )
❏ *Basic: On a flexible major scale, at quarter-note = 120, play one downbeat eighth-note, thenplay consecutive offbeat quarters. Repeat in all 12 keys.
❏ **Medium: Same as Basic; use flexible Lydian scales, at quarter-note = 144.
❏ ***Challenge: Same as Basic; use flexible Mixolydian scales, at quarter-note = 180.
❏ >More: Same as Basic; A) don't pause between keys - connect to the next root and proceed; B)play 2 octaves on each key; C) both A and B
❏ >Play-Along: Aebersold Vol. 1: side 2, track 3. One quarter-note scale per chord or 2 of 8th-notes.
Exercise 1.28 � Shifting Offbeats & DownbeatsBasic __/__/__ ( )Medium __/__/__ ( ) Challenge __/__/__ ( ) More __/__/__ ( )
❏ *Basic: On any flexible major scale, at quarter-note = 120, play a downbeat quarter, then mixoffbeats and downbeats.
❏ **Medium: Same as Basic, quarter-note = 144.
❏ ***Challenge: Same as Basic, quarter-note = 180.
❏ >More: Same as Basic; A) don't pause between keys - connect to the next root and proceed; B)play 2 octaves on each key; C) both A and B
❏ >Play-Along: Aebersold Vol. 1: side 2, track 3. One quarter-note scale per chord or 2 of 8th-notes.
Exercise 1.29 � Alternating Shorter & Longer ValuesBasic __/__/__ ( ) Medium __/__/__ ( ) Challenge __/__/__ ( ) More __/__/__ ( )
❏ *Basic: Repeat rhythm of two 8ths and a quarter in a flexible scale; quarter-note = 120.
❏ **Medium: Repeat rhythm of two 8ths and a half-note, flexible scale; quarter-note = 144.
❏ ***Challenge: Repeat rhythm of 8th-note / dotted quarter-note in flexible scales, at quarter-note =180.
❏ >More: Same as Basic; A) don't pause between keys - connect to the next root and proceed; B)play 2 octaves on each key; C) both A and B
❏ >Play-Along: Aebersold Vol. 1: side 2, track 3. One quarter-note scale per chord or 2 of 8th-notes.
Exercise 1.30 � Using Triplet RhythmsBasic __/__/__ ( )Medium __/__/__ ( ) Challenge __/__/__ ( ) More __/__/__ ( )
❏ *Basic: Mix 8th-notes and quarter-note triplets in flexible scales, at quarter-note = 120.
80808080 • Exercises for Level 1 (Introduction)
❏ **Medium: Mix eighth-notes with 8th-note triplets in flexible scales, at quarter-note = 144.
❏ ***Challenge: Mix eighth-notes, quarter-note triplets, and eighth-note triplets in flexible scales;quarter-note = 144.
❏ >More: Same as Basic; A) don't pause between keys - connect to the next root and proceed; B)play 2 octaves on each key; C) both A and B
❏ >Play-Along: Aebersold Vol. 1: side 2, track 3. One quarter-note scale per chord or 2 of 8th-notes.
Exercise 1.31 � Using Triplets with Ties and RestsBasic __/__/__ ( )Medium __/__/__ ( ) Challenge __/__/__ ( ) More __/__/__ ( )
❏ *Basic: Same as Basic 1.27; add a few ties to triplets and a few triplet rests.
❏ **Medium: Same as Medium 1.27; add a few ties to triplets and a few triplet rests.
❏ ***Challenge: Same as Challenge 1.27; add a few ties to triplets and a few triplet rests.
❏ >More: Same as Basic; A) don't pause between keys - connect to the next root and proceed; B)play 2 octaves on each key; C) both A and B
❏ >Play-Along: Aebersold Vol. 1: side 2, track 3. One quarter-note scale per chord or 2 of 8th-notes.
Exercise 1.32 � Using Rhythmic CombinationsBasic __/__/__ ( )Medium __/__/__ ( ) Challenge __/__/__ ( ) More __/__/__ ( )
❏ *Basic: Write several examples of combining any of these: offbeat half-notes, offbeat quarters,offbeat eighths tied to dotted quarters, mixed eighths and dotted quarters, or triplets.Use one pitch for all rhythms; make each example 4 bars.
❏ **Medium: Play the Basic examples you wrote, adding your own pitches from a flexible major scale;quarter-note = 144:
❏ ***Challenge: Same as Medium, at quarter-note = 180.
❏ >More: Same as Basic; A) don't pause between keys - connect to the next root and proceed; B)play 2 octaves on each key; C) both A and B
❏ >Play-Along: Aebersold Vol. 1: side 2, track 3. One quarter-note scale per chord or 2 of 8th-notes.
Exercise 1.33 � Using Virtual Practice for RhythmsBasic __/__/__ ( )Medium __/__/__ ( ) Challenge __/__/__ ( ) More __/__/__ ( )
❏ *Basic: Use the Virtual Practice Method for Rhythms on several rhythms with quarter-notes,8th-notes and 8th-rests.
❏ **Medium: Same as Basic: add quarter-note triplets.
❏ ***Challenge: Same as Basic, 8th-note triplets & rests.
❏ >More: Same as Basic; A) don't pause between keys - connect to the next root and proceed; B)play 2 octaves on each key; C) both A and B
❏ >Play-Along: Aebersold Vol. 1: side 2, track 3. One quarter-note scale per chord or 2 of 8th-notes.
Expression: Using Expression
Exercise 1.34 � Using DynamicsBasic __/__/__ ( )Medium __/__/__ ( ) Challenge __/__/__ ( ) More __/__/__ ( )
❏ *Basic: On a flexible scale, crescendo as you go down and decrescendo as you go up.
(Introduction) Exercises for Level 1 • 81818181
❏ **Medium: Same as Basic; crescendo or decrescendo as you hold or repeat a pitch in the scale.
❏ ***Challenge: On a flexible scale, play suddenly softer; or insert a few louder, accented notes in asofter passage.
❏ >More: Same as Basic; A) don't pause between keys - connect to the next root and proceed; B)play 2 octaves on each key; C) both A and B
❏ >Play-Along: Aebersold Vol. 1: side 2, track 3. One quarter-note scale per chord or 2 of 8th-notes.
Exercise 1.35 � Using AccentsBasic __/__/__ ( )Medium __/__/__ ( ) Challenge __/__/__ ( ) More __/__/__ ( )
❏ *Basic: On a flexible scale, “ghost” some notes.
❏ **Medium: Randomly accent notes in a flexible scale.
❏ ***Challenge: Combine the Basic & Medium exercises.
❏ >More: Same as Basic; A) don't pause between keys - connect to the next root and proceed; B)play 2 octaves on each key; C) both A and B
❏ >Play-Along: Aebersold Vol. 1: side 2, track 3. One quarter-note scale per chord or 2 of 8th-notes.
Exercise 1.36 � Using ArticulationsBasic __/__/__ ( ) More __/__/__ ( )
❏ *Basic: On a flexible scale, see how many ways you can articulate the notes.
❏ >More: Same as Basic; A) don't pause between keys - connect to the next root and proceed; B)play 2 octaves on each key; C) both A and B
❏ >Play-Along: Aebersold Vol. 1: side 2, track 3. One quarter-note scale per chord or 2 of 8th-notes.
Development: with Motifs and Phrases
Exercise 1.37 � Creating MotifsBasic __/__/__ ( )Medium __/__/__ ( ) Challenge __/__/__ ( ) More __/__/__ ( )
❏ *Basic: Write down a simple motif and play it. Find a motif in printed music and play it.
❏ **Medium: Play a simple motif, then write it down.
❏ ***Challenge: Hear a motif in a recorded piece, then write it and play it.
❏ >More: Same as Basic; A) don't pause between keys - connect to the next root and proceed; B)play 2 octaves on each key; C) both A and B
❏ >Play-Along: Aebersold Vol. 1: side 2, track 3. One quarter-note scale per chord or 2 of 8th-notes.
Exercise 1.38 � Varying MotifsBasic __/__/__ ( )Medium __/__/__ ( ) Challenge __/__/__ ( ) More __/__/__ ( )
❏ *Basic: Play a 1-bar motif, then vary it slightly.
❏ **Medium: Same as Basic; vary with more contrast.
❏ ***Challenge: Play a 2-bar motif and vary it twice, each time differently, with slight contrast.
❏ >More: Same as Basic; A) don't pause between keys - connect to the next root and proceed; B)play 2 octaves on each key; C) both A and B
82828282 • Exercises for Level 1 (Introduction)
❏ >Play-Along: Aebersold Vol. 1: side 2, track 3. One quarter-note scale per chord or 2 of 8th-notes.
Exercise 1.39 � Developing Earlier MotifsBasic __/__/__ ( )Medium __/__/__ ( ) Challenge __/__/__ ( ) More __/__/__ ( )
❏ *Basic: Write 2 motifs, then vary the first one.
❏ **Medium: Play 2 motifs, then vary the first one.
❏ ***Challenge: Play 3 motifs, then vary the first one.
❏ >More: Same as Basic; A) don't pause between keys - connect to the next root and proceed; B)play 2 octaves on each key; C) both A and B
❏ >Play-Along: Aebersold Vol. 1: side 2, track 3. One quarter-note scale per chord or 2 of 8th-notes.
Exercise 1.40 � Recognizing PhrasesBasic __/__/__ ( )Medium __/__/__ ( ) Challenge __/__/__ ( ) More __/__/__ ( )
❏ *Basic: In any printed solo in Chapter 2J or Chapter 3J, find these 3 phrase types: long motifs;similar but separate motifs; and a group of joined motifs.
❏ **Medium: In any printed solo in Chapter 2J or Chapter 3J, mark the phrase types for the entiresolo.
❏ >More: Same as Basic; A) don't pause between keys - connect to the next root and proceed; B)play 2 octaves on each key; C) both A and B
❏ >Play-Along: Aebersold Vol. 1: side 2, track 3. One quarter-note scale per chord or 2 of 8th-notes.
Exercise 1.41 � Connecting MotifsBasic __/__/__ ( )Medium __/__/__ ( ) Challenge __/__/__ ( ) More __/__/__ ( )
❏ *Basic: Write two motifs that connect by half- or whole-step, up or down.
❏ **Medium: Same as Basic; connect by an octave.
❏ ***Challenge: Same as Basic; connect by a ninth.
❏ >More: Same as Basic; A) don't pause between keys - connect to the next root and proceed; B)play 2 octaves on each key; C) both A and B
❏ >Play-Along: Aebersold Vol. 1: side 2, track 3. One quarter-note scale per chord or 2 of 8th-notes.
Exercise 1.42 � Ending PhrasesBasic __/__/__ ( )Medium __/__/__ ( ) Challenge __/__/__ ( ) More __/__/__ ( )
❏ *Basic: Choose a beat or offbeat in an upcoming bar; play a motif that ends at that spot.
❏ **Medium: Choose a beat or offbeat within the second bar of two measures and play a motif thatends at that spot.
❏ ***Challenge: Write and play simple motifs, varying where in the bar you end each motif.
❏ >More: Same as Basic; A) don't pause between keys - connect to the next root and proceed; B)play 2 octaves on each key; C) both A and B
❏ >Play-Along: Aebersold Vol. 1: side 2, track 3. One quarter-note scale per chord or 2 of 8th-notes.
(Introduction) Exercises for Level 1 • 83838383
Exercise 1.43 � Working Through Phrase BarriersBasic __/__/__ ( ) More __/__/__ ( )
❏ *Basic: Write a solo of 3 phrases using: Fmi7 Bb7 AMa7 C7 BMa7 (two bars per chord).End each phrase in a different spot in the bar.
❏ >More: Same as Basic; A) don't pause between keys - connect to the next root and proceed; B)play 2 octaves on each key; C) both A and B
❏ ��Play-Along: Aebersold Vol. 1: side 2, track 3. One quarter-note scale per chord or 2 of 8th-notes.
Chord Progressions: Chords and Keys
Exercise 1.44 � Using Roman NumeralsBasic __/__/__ ( ) Medium __/__/__ ( ) More __/__/__ ( )
❏ **Basic: Choose any short tune from 200 Standard Tunes; write Roman numerals for the chords.
❏ ***Medium: Same as Basic; choose a longer tune.
❏ >More: Same as Basic; A) don't pause between keys - connect to the next root and proceed; B)play 2 octaves on each key; C) both A and B
❏ ��Play-Along: Aebersold Vol. 1: side 2, track 3. One quarter-note scale per chord or 2 of 8th-notes.
Exercise 1.45 � Recognizing KeysBasic __/__/__ ( ) Medium __/__/__ ( ) More __/__/__ ( )
❏ **Basic: Choose any short tune from 200 Standard Tunes; name the tune’s likely key.
❏ ***Medium: Same as Basic; choose a longer tune.
❏ >More: Same as Basic; A) don't pause between keys - connect to the next root and proceed; B)play 2 octaves on each key; C) both A and B
❏ ��Play-Along: Aebersold Vol. 1: side 2, track 3. One quarter-note scale per chord or 2 of 8th-notes.
Exercise 1.46 � Blues Progressions in All KeysBasic __/__/__ ( ) Medium __/__/__ ( ) Challenge __/__/__ ( ) More __/__/__ ( )
❏ *Basic: Write chord progressions for blues in each of these keys: Eb, Bb, F, C, and G.
❏ **Medium: Same as Basic; in keys of D, A, E, B,
❏ ***Challenge: Same as Basic; in F#, C#, Ab.
❏ >More: Same as Basic; A) don't pause between keys - connect to the next root and proceed; B)play 2 octaves on each key; C) both A and B
❏ ��Play-Along: Aebersold Vol. 1: side 2, track 3. One quarter-note scale per chord or 2 of 8th-notes.
Exercise 1.47 � Spelling Blues ScalesBasic __/__/__ ( ) Medium __/__/__ ( ) More __/__/__ ( )
84848484 • Exercises for Level 1 (Introduction)
❏ *Basic: Spell the pitches for the C Blues scale, then for the other blues scales around the circleof fourths.
❏ **Medium: Spell the pitches for all 12 blues scales, from top to bottom of each scale.
❏ >More: Same as Basic; A) don't pause between keys - connect to the next root and proceed; B)play 2 octaves on each key; C) both A and B
❏ ��Play-Along: Aebersold Vol. 1: side 2, track 3. One quarter-note scale per chord or 2 of 8th-notes.
Exercise 1.48 � Humming Blues ScalesBasic __/__/__ ( )Medium __/__/__ ( ) Challenge __/__/__ ( ) More __/__/__ ( )
❏ *Basic: Hum and finger eighth-notes for all 12 blues scales, around the circle of 4ths, at quarter-note = 100.
❏ **Medium: Same as Basic; quarter-note = 150.
❏ ***Challenge: Same as Basic; quarter-note = 180.
❏ >More: Same as Basic; A) don't pause between keys - connect to the next root and proceed; B)play 2 octaves on each key; C) both A and B
❏ ��Play-Along: Aebersold Vol. 1: side 2, track 3. One quarter-note scale per chord or 2 of 8th-notes.
Exercise 1.49 � Writing ii-V-I ProgressionsBasic __/__/__ ( ) Medium __/__/__ ( ) More __/__/__ ( )
❏ *Basic: Going around the circle of 4ths, write a ii-V-I progression for each major key.
❏ **Medium: Going up the chromatic scale, write the ii-V-I progression for each major key.
❏ >More: Same as Basic; A) don't pause between keys - connect to the next root and proceed; B)play 2 octaves on each key; C) both A and B
❏ ��Play-Along: Aebersold Vol. 1: side 2, track 3. One quarter-note scale per chord or 2 of 8th-notes.
Exercise 1.50 � Prefacing ii-V-I ProgressionsBasic __/__/__ ( )Medium __/__/__ ( ) Challenge __/__/__ ( ) More __/__/__ ( )
❏ *Basic: Treating each key in the circle of 4ths as a root key, build a preface of vi-ii-V.
❏ **Medium: Same as Basic; preface of iii-vi-ii-V.
❏ ***Challenge: Same as Basic; preface of vii-iii-vi-ii-V.
❏ >More: Same as Basic; A) don't pause between keys - connect to the next root and proceed; B)play 2 octaves on each key; C) both A and B
❏ ��Play-Along: Aebersold Vol. 1: side 2, track 3. One quarter-note scale per chord or 2 of 8th-notes.
Exercise 1.51 � Simplifying Chord ProgressionsBasic __/__/__ ( )Medium __/__/__ ( ) Challenge __/__/__ ( ) More __/__/__ ( )
❏ *Basic: Find one scale that fits all these chords: CMa7 Dm7 G7 CMa7
❏ **Medium: Same as Basic; use AMa7, Bm7, C#m7, F#m7
❏ ***Challenge: Choose one of the 30 Standard Tunes; simplify 2 or more of the progressions.

(Introduction) Exercises for Level 1 • 85858585
❏ >More: Same as Basic; A) don't pause between keys - connect to the next root and proceed; B)play 2 octaves on each key; C) both A and B
❏ ��Play-Along: Aebersold Vol. 1: side 2, track 3. One quarter-note scale per chord or 2 of 8th-notes.
Analysis: Analyzing Your Own Solos
Exercise 1.52 � Practicing for MelodyBasic __/__/__ ( )Medium __/__/__ ( ) Challenge __/__/__ ( ) More __/__/__ ( )
❏ *Basic: Solo to one of the first few tracks of Aebersold’s Vol. 24: Major/Minor; fit the chordsand scales and use color tones.
❏ **Medium: Same as Basic, but use a harder key.
❏ ***Challenge: Same as Medium, but use a progression that changes chords.
Exercise 1.53 � Practicing for RhythmBasic __/__/__ ( )Medium __/__/__ ( ) Challenge __/__/__ ( ) More __/__/__ ( )
❏ *Basic: Same as 1.52 Basic. Use secure,accurate rhythms; mix downbeats and offbeats; balancelonger/shorter note values.
❏ **Medium: Same as Basic, but use a harder key.
❏ ***Challenge: Same as Medium, but use a progression that changes chords.
Exercise 1.54 � Practicing for ExpressionBasic __/__/__ ( )Medium __/__/__ ( ) Challenge __/__/__ ( ) More __/__/__ ( )
❏ *Basic: Same as 1.52 Basic. Vary dynamics, accents, and articulations in the solo.
❏ **Medium: Same as Basic, but use a harder key.
❏ ***Challenge: Same as Medium, but use a progression that changes chords.
Exercise 1.55 � Practicing for DevelopmentBasic __/__/__ ( )Medium __/__/__ ( ) Challenge __/__/__ ( ) More __/__/__ ( )
❏ *Basic: Same as 1.52 Basic. Control the start, end, and length of each motif; move from slightcontrast to more contrast; connect some motifs into phrases; and vary where phrasesend in the bar.
❏ **Medium: Same as Basic, but use a harder key.
❏ ***Challenge: Same as Medium, but use a progression that changes chords.
The Art of ImprovisationVersion 1.0 – 8/22/2000
… Creating real-time music through jazz improvisation …
*Level 2: Apprentice*
by Bob TaylorAuthor of Sightreading Jazz, Sightreading Chord Progressions
©2000 Taylor-James Publications
Django Reinhardt Jimmy Blanton Oscar PettifordLionel Hampton Stuff Smith Stephane Grappelli Gene Krupa Billie Holiday
Dizzy Gillespie Fats Navarro Charlie Parker
*Level 2 — Apprentice*Level 2 — Apprentice*Level 2 — Apprentice*Level 2 — Apprentice*
As an Apprentice Improviser, you learn more about the beauty of creating melodic phrases. Youlearn the guidelines of swing so you can understand and play authentic swing rhythms in yoursolos. You also learn about the basic chord progressions used in jazz tunes, more aboutinteresting rhythms, and about useful tools for melodic development. At Level 2, you’re gainingconfidence in playing solos with control and creativity, while building your skills from Level 1.Go for it!
From time to time, you should review the Exercises and concepts you worked onin Level One. You can also review the Values and Creativity chapter for more ideas.
Sonny Stitt Don Byas J. J. Johnson Bud PowellThelonious Monk Kenny Clarke Max Roach Buddy RichElla Fitzgerald Miles Davis Chet Baker Paul Desmond

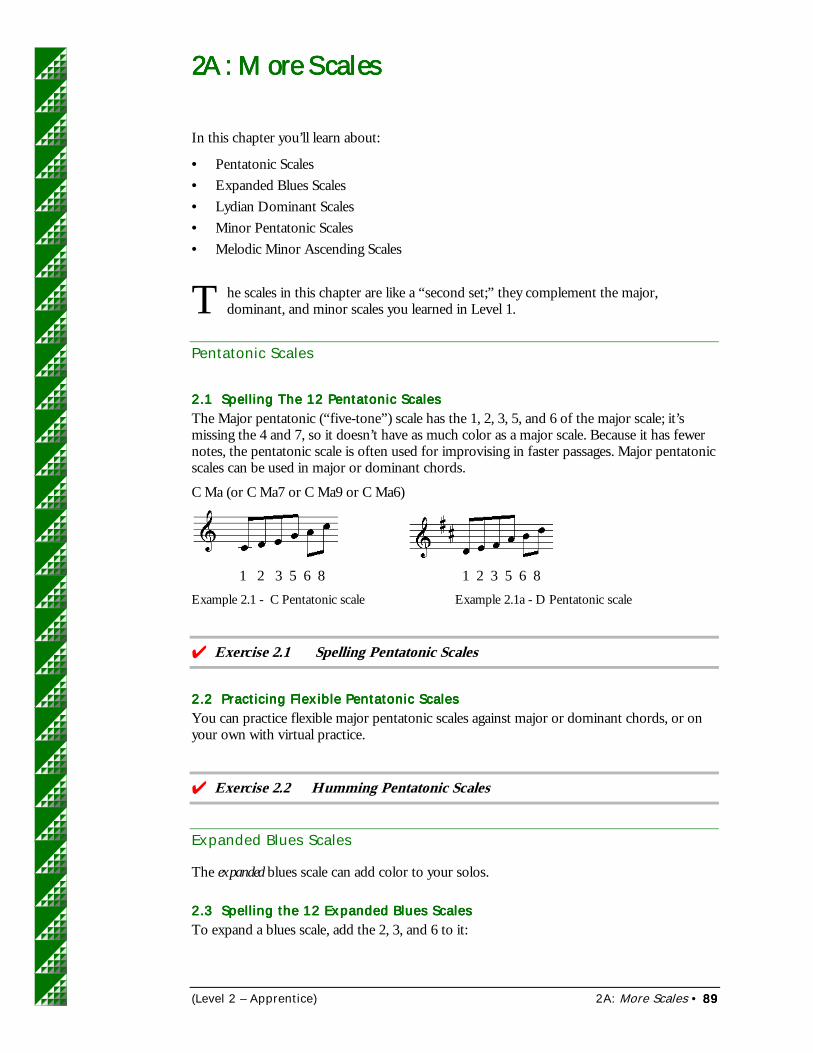
(Level 2 – Apprentice) 2A: More Scales • 89898989
2A: More Scales2A: More Scales2A: More Scales2A: More Scales
In this chapter you’ll learn about:
• Pentatonic Scales• Expanded Blues Scales• Lydian Dominant Scales• Minor Pentatonic Scales• Melodic Minor Ascending Scales
he scales in this chapter are like a “second set;” they complement the major,dominant, and minor scales you learned in Level 1.
Pentatonic Scales
2.1 Spelling The 12 Pentatonic Scales2.1 Spelling The 12 Pentatonic Scales2.1 Spelling The 12 Pentatonic Scales2.1 Spelling The 12 Pentatonic ScalesThe Major pentatonic (“five-tone”) scale has the 1, 2, 3, 5, and 6 of the major scale; it’smissing the 4 and 7, so it doesn’t have as much color as a major scale. Because it has fewernotes, the pentatonic scale is often used for improvising in faster passages. Major pentatonicscales can be used in major or dominant chords.
C Ma (or C Ma7 or C Ma9 or C Ma6)
1 2 3 5 6 8 1 2 3 5 6 8Example 2.1 - C Pentatonic scale Example 2.1a - D Pentatonic scale
���Exercise 2.1 Spelling Pentatonic Scales
2.2 Practicing Flexible Pentatonic Scales2.2 Practicing Flexible Pentatonic Scales2.2 Practicing Flexible Pentatonic Scales2.2 Practicing Flexible Pentatonic ScalesYou can practice flexible major pentatonic scales against major or dominant chords, or onyour own with virtual practice.
���Exercise 2.2 Humming Pentatonic Scales
Expanded Blues Scales
The expanded blues scale can add color to your solos.
2.3 Spelling the 12 Expanded Blues Scales2.3 Spelling the 12 Expanded Blues Scales2.3 Spelling the 12 Expanded Blues Scales2.3 Spelling the 12 Expanded Blues ScalesTo expand a blues scale, add the 2, 3, and 6 to it:
T
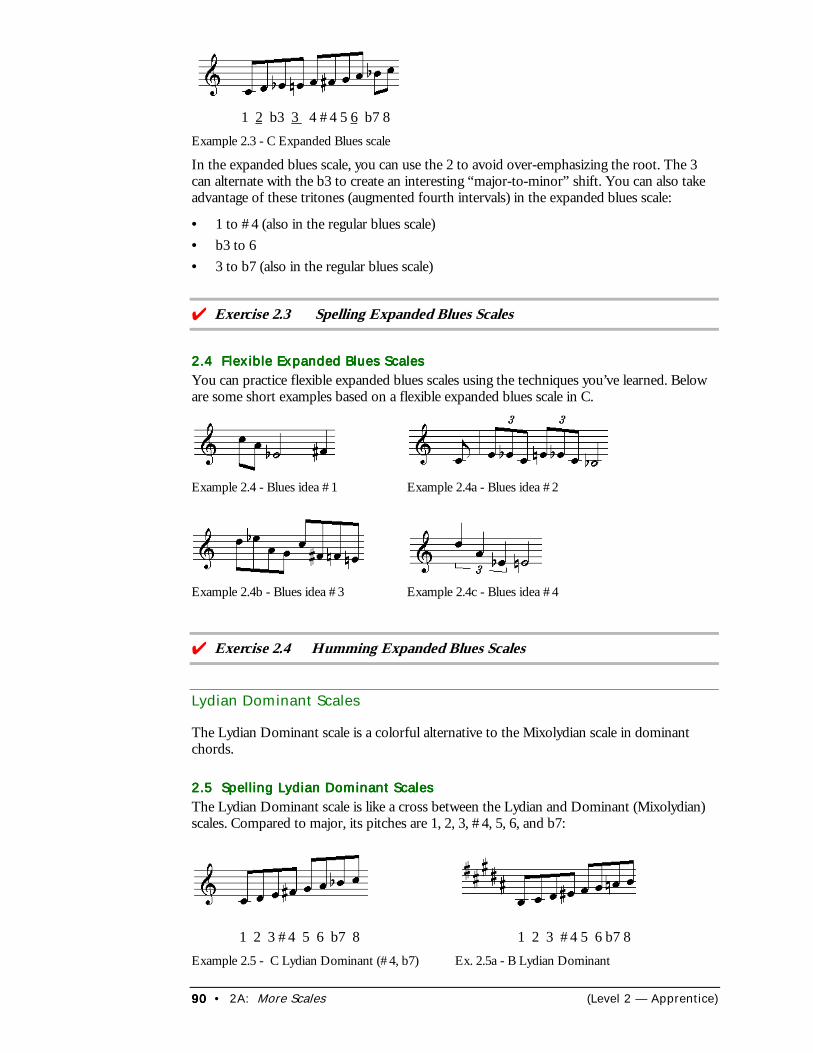
90909090 • 2A: More Scales (Level 2 — Apprentice)
1 2 b3 3 4 #4 5 6 b7 8Example 2.3 - C Expanded Blues scale
In the expanded blues scale, you can use the 2 to avoid over-emphasizing the root. The 3can alternate with the b3 to create an interesting “major-to-minor” shift. You can also takeadvantage of these tritones (augmented fourth intervals) in the expanded blues scale:
• 1 to #4 (also in the regular blues scale)• b3 to 6• 3 to b7 (also in the regular blues scale)
���Exercise 2.3 Spelling Expanded Blues Scales
2.4 Flexible Expanded Blues Scales2.4 Flexible Expanded Blues Scales2.4 Flexible Expanded Blues Scales2.4 Flexible Expanded Blues ScalesYou can practice flexible expanded blues scales using the techniques you’ve learned. Beloware some short examples based on a flexible expanded blues scale in C.
Example 2.4 - Blues idea #1 Example 2.4a - Blues idea #2
Example 2.4b - Blues idea #3 Example 2.4c - Blues idea #4
���Exercise 2.4 Humming Expanded Blues Scales
Lydian Dominant Scales
The Lydian Dominant scale is a colorful alternative to the Mixolydian scale in dominantchords.
2.52.52.52.5 Spelling Lydian Dominant ScalesSpelling Lydian Dominant ScalesSpelling Lydian Dominant ScalesSpelling Lydian Dominant ScalesThe Lydian Dominant scale is like a cross between the Lydian and Dominant (Mixolydian)scales. Compared to major, its pitches are 1, 2, 3, #4, 5, 6, and b7:
1 2 3 #4 5 6 b7 8 1 2 3 #4 5 6 b7 8Example 2.5 - C Lydian Dominant (#4, b7) Ex. 2.5a - B Lydian Dominant
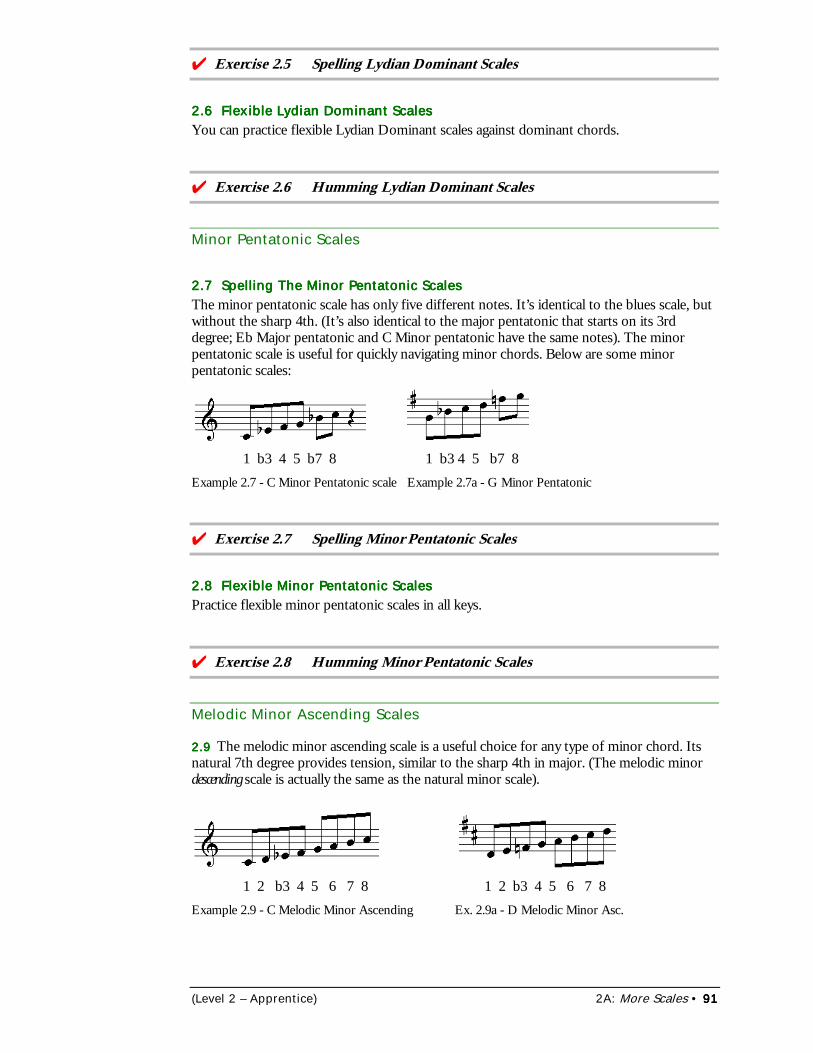
(Level 2 – Apprentice) 2A: More Scales • 91919191
���Exercise 2.5 Spelling Lydian Dominant Scales
2.6 Flexible Lydian Dominant Scales2.6 Flexible Lydian Dominant Scales2.6 Flexible Lydian Dominant Scales2.6 Flexible Lydian Dominant ScalesYou can practice flexible Lydian Dominant scales against dominant chords.
���Exercise 2.6 Humming Lydian Dominant Scales
Minor Pentatonic Scales
2.7 Spelling The Minor Pentatonic Scales2.7 Spelling The Minor Pentatonic Scales2.7 Spelling The Minor Pentatonic Scales2.7 Spelling The Minor Pentatonic ScalesThe minor pentatonic scale has only five different notes. It’s identical to the blues scale, butwithout the sharp 4th. (It’s also identical to the major pentatonic that starts on its 3rddegree; Eb Major pentatonic and C Minor pentatonic have the same notes). The minorpentatonic scale is useful for quickly navigating minor chords. Below are some minorpentatonic scales:
1 b3 4 5 b7 8 1 b3 4 5 b7 8Example 2.7 - C Minor Pentatonic scale Example 2.7a - G Minor Pentatonic
���Exercise 2.7 Spelling Minor Pentatonic Scales
2.8 Flexible Minor Pentatonic Scales2.8 Flexible Minor Pentatonic Scales2.8 Flexible Minor Pentatonic Scales2.8 Flexible Minor Pentatonic ScalesPractice flexible minor pentatonic scales in all keys.
���Exercise 2.8 Humming Minor Pentatonic Scales
Melodic Minor Ascending Scales
2.92.92.92.9 The melodic minor ascending scale is a useful choice for any type of minor chord. Itsnatural 7th degree provides tension, similar to the sharp 4th in major. (The melodic minordescending scale is actually the same as the natural minor scale).
1 2 b3 4 5 6 7 8 1 2 b3 4 5 6 7 8Example 2.9 - C Melodic Minor Ascending Ex. 2.9a - D Melodic Minor Asc.

92929292 • 2A: More Scales (Level 2 — Apprentice)
���Exercise 2.9 Spelling Melodic Minor Scales
2.10 Flexible Melodic Minor Asc. Scales2.10 Flexible Melodic Minor Asc. Scales2.10 Flexible Melodic Minor Asc. Scales2.10 Flexible Melodic Minor Asc. ScalesYou can practice flexible melodic minor ascending scales in all keys.
���Exercise 2.10 Humming Melodic Minor Asc. Scales
2.11 Handling the 7th in Minor2.11 Handling the 7th in Minor2.11 Handling the 7th in Minor2.11 Handling the 7th in MinorThe flat 7th degree is used in most minor scales and is fine to emphasize. You can also usethe natural 7th degree in minor. For example:
• Emphasize the natural 7.• Resolve it to the natural 6th, flat 7th, or root.• Delay the resolution, such as 7 to 2 to 1.• Play the natural 7th degree even if the chord symbol indicates a flat 7th (such as Cmi7).• For variety, alternate between the natural and flat 7th over a minor 7 chord.
In the example below, the natural 7 (n7) is first resolved to the flat 7. Then it’s resolved tothe natural 6 (n6) using a delayed resolution (7 to 2 to 1).
n7 b7 n7 2 1 n6Example 2.11 - Handling the natural 7th degree in minor
���Exercise 2.11 Handling the 7th in Minor
Chapter Review
1) More scales include pentatonic, blues, Lydian Dominant, minor pentatonic, melodicminor ascending.
2) The pentatonic scale has the 1, 2, 3, 5, and 6 of major scale.3) The blues scale has the 1, b3, 4, #4, 5, and b7 of a major key.4) The Lydian Dominant scale has the 1, 2, 3, #4, 5, 6, and b7 of a major key.5) The minor pentatonic scale has the 1, b3, 4, 5, and b7 of a major key.6) The melodic minor ascending scale has the 1, 2, b3, 4, 5, 6, and 7 of a major key.7) To handle the natural 7 in minor you can:
A) Emphasize it.B) Resolve it to the natural 6th, flat 7th, or root.C) Delay the resolution, such as 7 to 2 to 1.D) Play the natural 7th degree even if the chord symbol shows a flat 7th (such as Cm7).E) Alternate between the natural and flat 7th over a minor 7 chord.
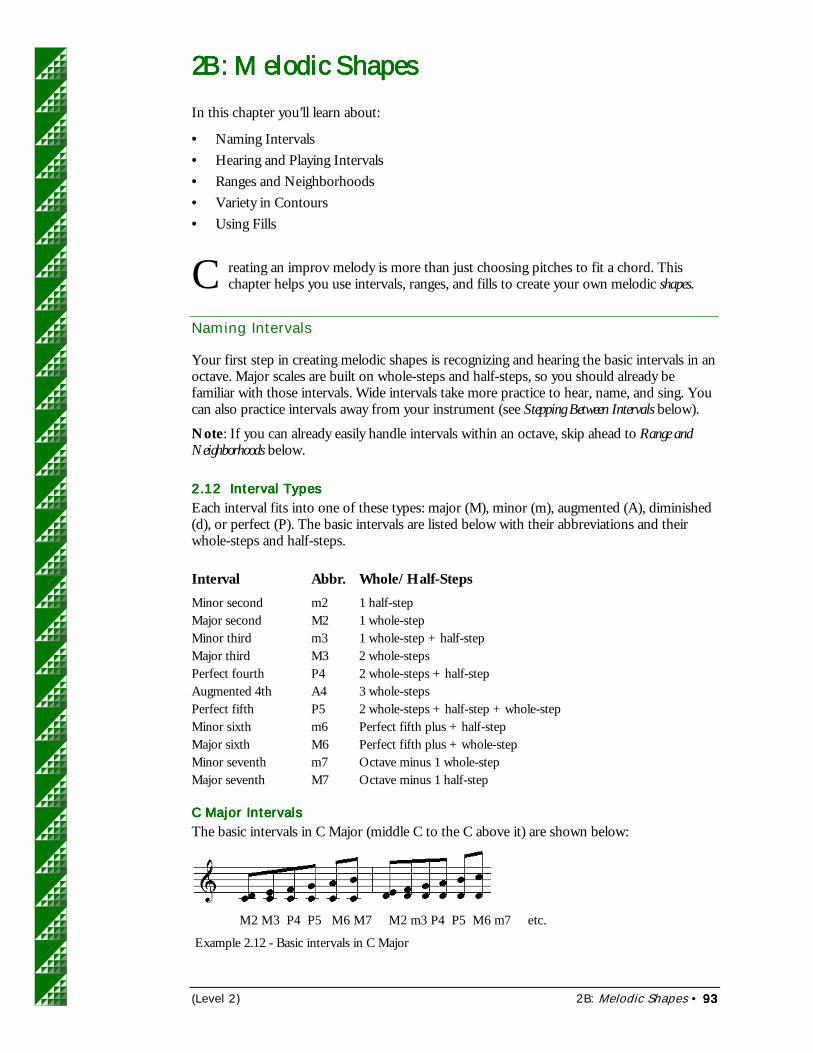
(Level 2) 2B: Melodic Shapes • 93939393
2B: Melodic Shapes2B: Melodic Shapes2B: Melodic Shapes2B: Melodic Shapes
In this chapter you’ll learn about:
• Naming Intervals• Hearing and Playing Intervals• Ranges and Neighborhoods• Variety in Contours• Using Fills
reating an improv melody is more than just choosing pitches to fit a chord. Thischapter helps you use intervals, ranges, and fills to create your own melodic shapes.
Naming Intervals
Your first step in creating melodic shapes is recognizing and hearing the basic intervals in anoctave. Major scales are built on whole-steps and half-steps, so you should already befamiliar with those intervals. Wide intervals take more practice to hear, name, and sing. Youcan also practice intervals away from your instrument (see Stepping Between Intervals below).
Note: If you can already easily handle intervals within an octave, skip ahead to Range andNeighborhoods below.
2.12 Interval Types2.12 Interval Types2.12 Interval Types2.12 Interval TypesEach interval fits into one of these types: major (M), minor (m), augmented (A), diminished(d), or perfect (P). The basic intervals are listed below with their abbreviations and theirwhole-steps and half-steps.
Interval Abbr. Whole/Half-StepsMinor second m2 1 half-stepMajor second M2 1 whole-stepMinor third m3 1 whole-step + half-stepMajor third M3 2 whole-stepsPerfect fourth P4 2 whole-steps + half-stepAugmented 4th A4 3 whole-stepsPerfect fifth P5 2 whole-steps + half-step + whole-stepMinor sixth m6 Perfect fifth plus + half-stepMajor sixth M6 Perfect fifth plus + whole-stepMinor seventh m7 Octave minus 1 whole-stepMajor seventh M7 Octave minus 1 half-step
C Major IntervalsC Major IntervalsC Major IntervalsC Major IntervalsThe basic intervals in C Major (middle C to the C above it) are shown below:
M2 M3 P4 P5 M6 M7 M2 m3 P4 P5 M6 m7 etc.
Example 2.12 - Basic intervals in C Major
C
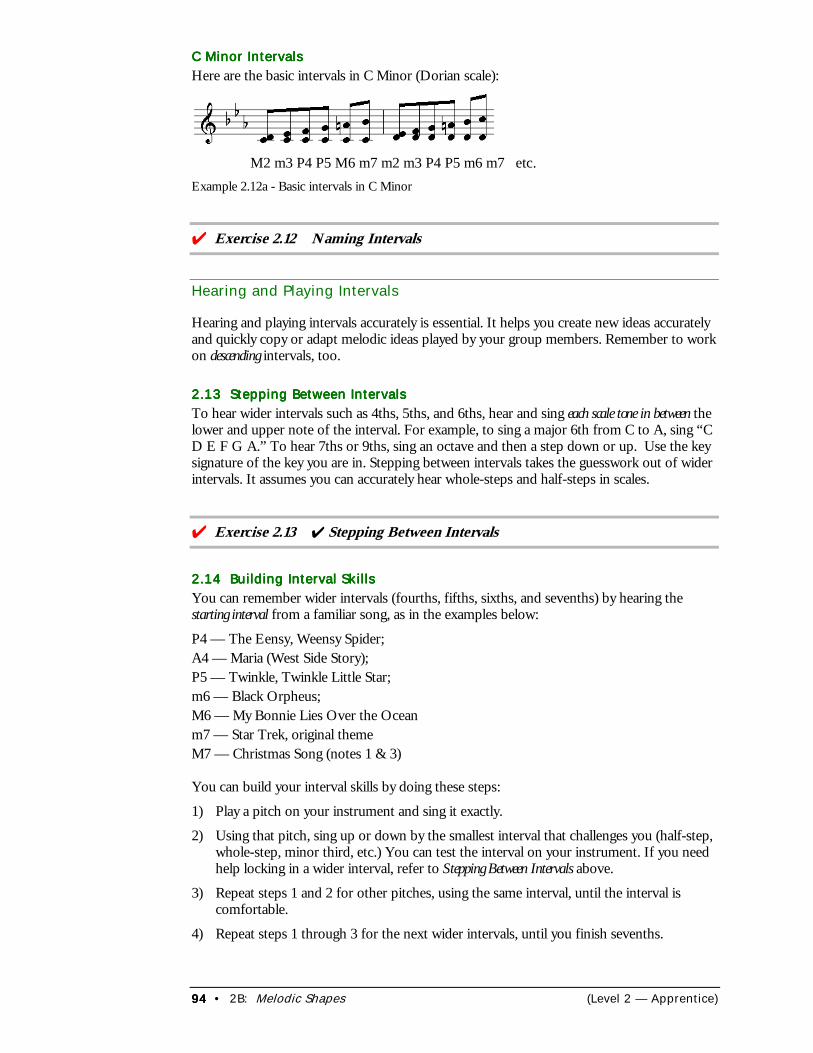
94949494 • 2B: Melodic Shapes (Level 2 — Apprentice)
C Minor IntervalsC Minor IntervalsC Minor IntervalsC Minor IntervalsHere are the basic intervals in C Minor (Dorian scale):
M2 m3 P4 P5 M6 m7 m2 m3 P4 P5 m6 m7 etc.Example 2.12a - Basic intervals in C Minor
���Exercise 2.12 Naming Intervals
Hearing and Playing Intervals
Hearing and playing intervals accurately is essential. It helps you create new ideas accuratelyand quickly copy or adapt melodic ideas played by your group members. Remember to workon descending intervals, too.
2.13 Stepping Between Intervals2.13 Stepping Between Intervals2.13 Stepping Between Intervals2.13 Stepping Between IntervalsTo hear wider intervals such as 4ths, 5ths, and 6ths, hear and sing each scale tone in between thelower and upper note of the interval. For example, to sing a major 6th from C to A, sing “CD E F G A.” To hear 7ths or 9ths, sing an octave and then a step down or up. Use the keysignature of the key you are in. Stepping between intervals takes the guesswork out of widerintervals. It assumes you can accurately hear whole-steps and half-steps in scales.
���Exercise 2.13 ✔ Stepping Between Intervals
2.14 Building Interval Skills2.14 Building Interval Skills2.14 Building Interval Skills2.14 Building Interval SkillsYou can remember wider intervals (fourths, fifths, sixths, and sevenths) by hearing thestarting interval from a familiar song, as in the examples below:
P4 — The Eensy, Weensy Spider; A4 — Maria (West Side Story);P5 — Twinkle, Twinkle Little Star;m6 — Black Orpheus;M6 — My Bonnie Lies Over the Ocean m7 — Star Trek, original themeM7 — Christmas Song (notes 1 & 3)
You can build your interval skills by doing these steps:
1) Play a pitch on your instrument and sing it exactly.
2) Using that pitch, sing up or down by the smallest interval that challenges you (half-step,whole-step, minor third, etc.) You can test the interval on your instrument. If you needhelp locking in a wider interval, refer to Stepping Between Intervals above.
3) Repeat steps 1 and 2 for other pitches, using the same interval, until the interval iscomfortable.
4) Repeat steps 1 through 3 for the next wider intervals, until you finish sevenths.
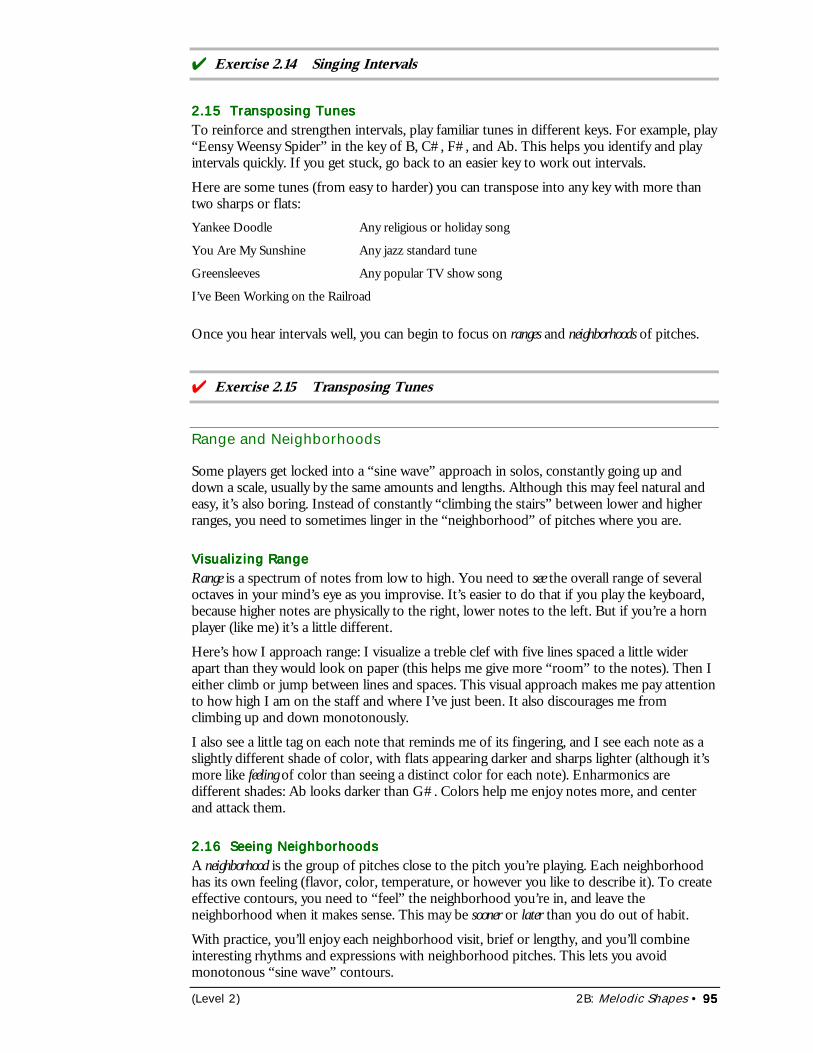
(Level 2) 2B: Melodic Shapes • 95959595
���Exercise 2.14 Singing Intervals
2.15 Transposing Tunes2.15 Transposing Tunes2.15 Transposing Tunes2.15 Transposing TunesTo reinforce and strengthen intervals, play familiar tunes in different keys. For example, play“Eensy Weensy Spider” in the key of B, C#, F#, and Ab. This helps you identify and playintervals quickly. If you get stuck, go back to an easier key to work out intervals.
Here are some tunes (from easy to harder) you can transpose into any key with more thantwo sharps or flats:Yankee Doodle Any religious or holiday song
You Are My Sunshine Any jazz standard tune
Greensleeves Any popular TV show song
I’ve Been Working on the Railroad
Once you hear intervals well, you can begin to focus on ranges and neighborhoods of pitches.
���Exercise 2.15 Transposing Tunes
Range and Neighborhoods
Some players get locked into a “sine wave” approach in solos, constantly going up anddown a scale, usually by the same amounts and lengths. Although this may feel natural andeasy, it’s also boring. Instead of constantly “climbing the stairs” between lower and higherranges, you need to sometimes linger in the “neighborhood” of pitches where you are.
Visualizing RangeVisualizing RangeVisualizing RangeVisualizing RangeRange is a spectrum of notes from low to high. You need to see the overall range of severaloctaves in your mind’s eye as you improvise. It’s easier to do that if you play the keyboard,because higher notes are physically to the right, lower notes to the left. But if you’re a hornplayer (like me) it’s a little different.
Here’s how I approach range: I visualize a treble clef with five lines spaced a little widerapart than they would look on paper (this helps me give more “room” to the notes). Then Ieither climb or jump between lines and spaces. This visual approach makes me pay attentionto how high I am on the staff and where I’ve just been. It also discourages me fromclimbing up and down monotonously.
I also see a little tag on each note that reminds me of its fingering, and I see each note as aslightly different shade of color, with flats appearing darker and sharps lighter (although it’smore like feeling of color than seeing a distinct color for each note). Enharmonics aredifferent shades: Ab looks darker than G#. Colors help me enjoy notes more, and centerand attack them.
2.16 Seeing Neighborhoods2.16 Seeing Neighborhoods2.16 Seeing Neighborhoods2.16 Seeing NeighborhoodsA neighborhood is the group of pitches close to the pitch you’re playing. Each neighborhoodhas its own feeling (flavor, color, temperature, or however you like to describe it). To createeffective contours, you need to “feel” the neighborhood you’re in, and leave theneighborhood when it makes sense. This may be sooner or later than you do out of habit.
With practice, you’ll enjoy each neighborhood visit, brief or lengthy, and you’ll combineinteresting rhythms and expressions with neighborhood pitches. This lets you avoidmonotonous “sine wave” contours.
96969696 • 2B: Melodic Shapes (Level 2 — Apprentice)
���Exercise 2.16 Seeing Neighborhoods
2.17 Switching Ranges2.17 Switching Ranges2.17 Switching Ranges2.17 Switching RangesWhen you suddenly switch ranges, it can add energy to your solo and break monotony. Toswitch effectively,
• Use flattened (narrower) contours in each range to set them apart (see Flattening Contoursbelow).
• Use motifs that flow (more eighth-notes).• Put a wide distance between ranges (5th thru 9th).• Make a quick switch; don’t pause between ranges.
In the example below, the first range is only two whole-steps wide. It jumps down by aseventh (G to A) to the second range, which also covers two whole-steps (dim. 4th).
Range1 ===========|-------------------Range2-Example 2.17 - Switching ranges, from high to low
���Exercise 2.17 Switching Ranges
Variety in Contours
Seeing ranges and neighborhoods helps you get good variety in melodic contours. A contouris the shape of the melody (ascending, descending, or mixed) as it goes up or down in pitch.In a strong melody, there’s usually a highest note and a lowest note per phrase.
2.18 Contour Guidelines2.18 Contour Guidelines2.18 Contour Guidelines2.18 Contour GuidelinesHere are some guidelines for variety in contours:
1) Vary ascending, descending, and mixed contours.2) Make ascending contours go higher to build tension.3) Reverse a contour sooner than you would.4) Make a contour steeper by playing wider intervals.5) Take a contour farther up or down than you normally would.
These guidelines can make a world of difference in your solo melodies – the differencebetween being pulled along by habit, or exploring new, creative areas.
As you vary contours, try to fool your listeners (and maybe yourself) about 50% of the timeas to which way your contour will go. This keeps interest in your solo; the listener canpredict your direction sometimes, but not always.
Up and Down: Tension and ReleaseUp and Down: Tension and ReleaseUp and Down: Tension and ReleaseUp and Down: Tension and ReleaseMoving up in pitch generally adds energy to your solo, while moving down releases thatenergy. Moving up by a half-step, whole-step, or third makes the energy increase gradually;moving up by an interval of a fourth or more makes the energy increase more quickly. Thesame applies in reverse to downward skips. You can control the pitch energy in your solosby choosing when and how far to skip up or down in pitch.
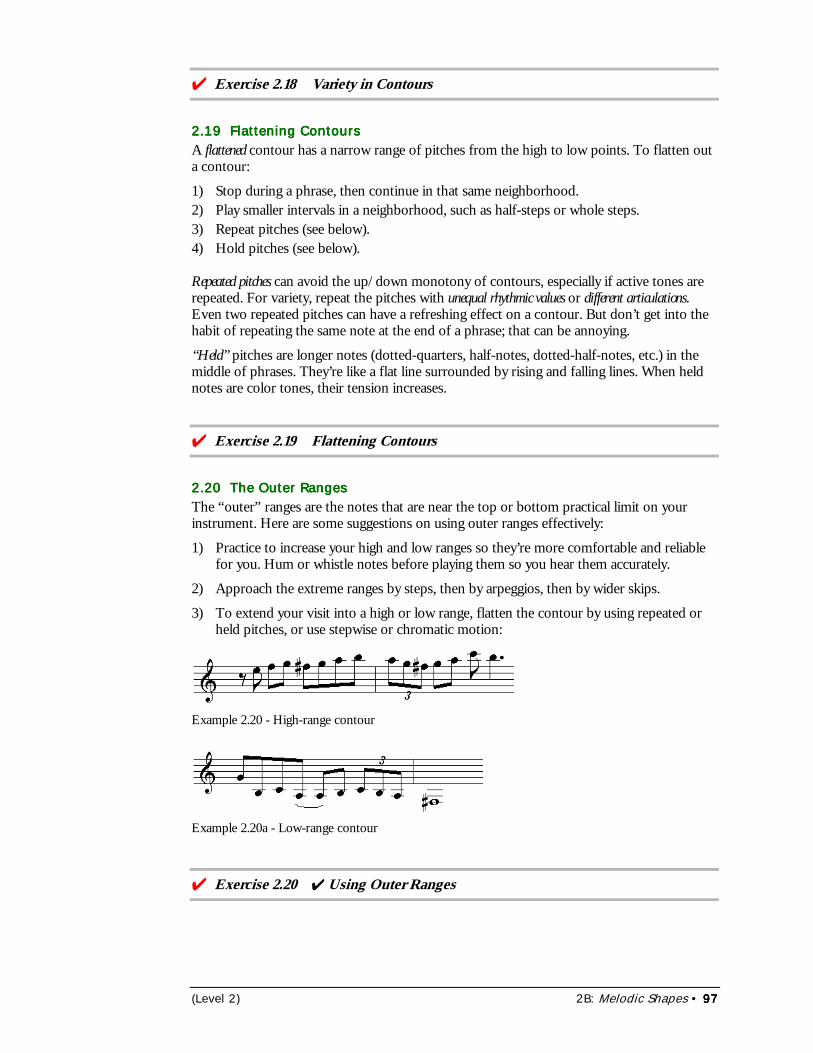
(Level 2) 2B: Melodic Shapes • 97979797
���Exercise 2.18 Variety in Contours
2.19 Flattening Contours2.19 Flattening Contours2.19 Flattening Contours2.19 Flattening ContoursA flattened contour has a narrow range of pitches from the high to low points. To flatten outa contour:
1) Stop during a phrase, then continue in that same neighborhood.2) Play smaller intervals in a neighborhood, such as half-steps or whole steps.3) Repeat pitches (see below).4) Hold pitches (see below).
Repeated pitches can avoid the up/down monotony of contours, especially if active tones arerepeated. For variety, repeat the pitches with unequal rhythmic values or different articulations.Even two repeated pitches can have a refreshing effect on a contour. But don’t get into thehabit of repeating the same note at the end of a phrase; that can be annoying.
“Held” pitches are longer notes (dotted-quarters, half-notes, dotted-half-notes, etc.) in themiddle of phrases. They’re like a flat line surrounded by rising and falling lines. When heldnotes are color tones, their tension increases.
���Exercise 2.19 Flattening Contours
2.20 The Outer Ranges2.20 The Outer Ranges2.20 The Outer Ranges2.20 The Outer RangesThe “outer” ranges are the notes that are near the top or bottom practical limit on yourinstrument. Here are some suggestions on using outer ranges effectively:
1) Practice to increase your high and low ranges so they’re more comfortable and reliablefor you. Hum or whistle notes before playing them so you hear them accurately.
2) Approach the extreme ranges by steps, then by arpeggios, then by wider skips.
3) To extend your visit into a high or low range, flatten the contour by using repeated orheld pitches, or use stepwise or chromatic motion:
Example 2.20 - High-range contour
Example 2.20a - Low-range contour
���Exercise 2.20 ✔ Using Outer Ranges
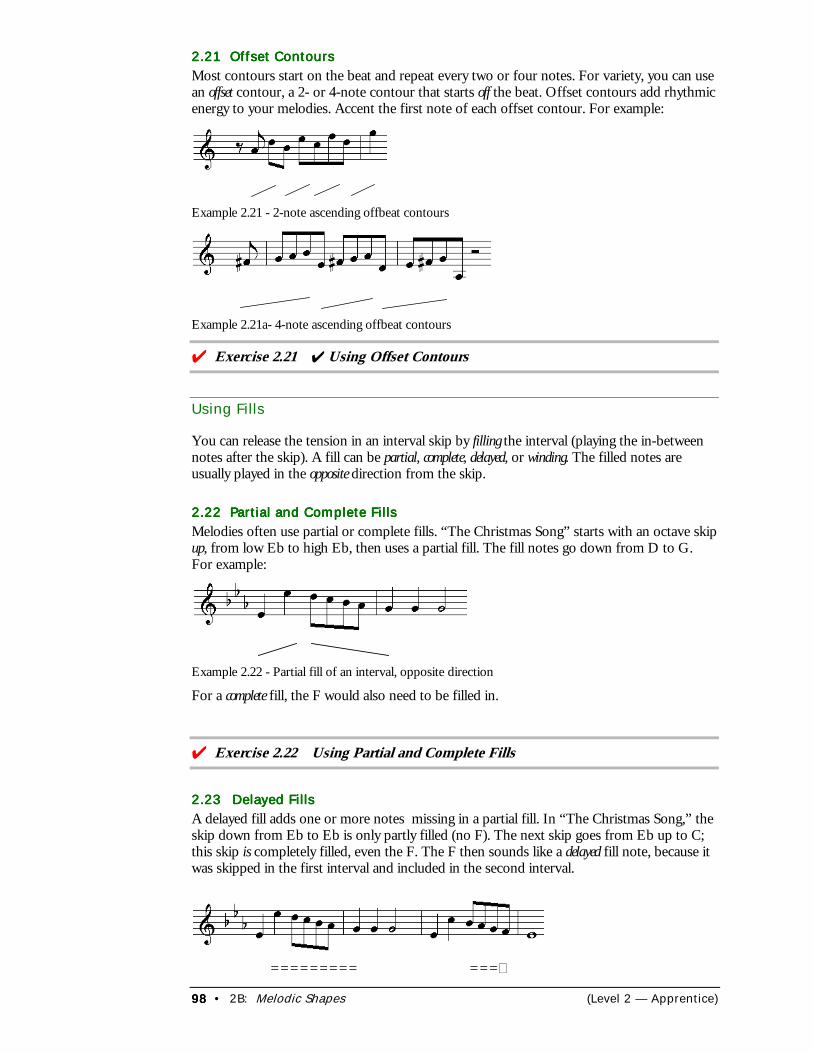
98989898 • 2B: Melodic Shapes (Level 2 — Apprentice)
2.21 Offset Contours2.21 Offset Contours2.21 Offset Contours2.21 Offset ContoursMost contours start on the beat and repeat every two or four notes. For variety, you can usean offset contour, a 2- or 4-note contour that starts off the beat. Offset contours add rhythmicenergy to your melodies. Accent the first note of each offset contour. For example:
Example 2.21 - 2-note ascending offbeat contours
Example 2.21a- 4-note ascending offbeat contours
���Exercise 2.21 ✔ Using Offset Contours
Using Fills
You can release the tension in an interval skip by filling the interval (playing the in-betweennotes after the skip). A fill can be partial, complete, delayed, or winding. The filled notes areusually played in the opposite direction from the skip.
2.22 Partial and Complete Fills2.22 Partial and Complete Fills2.22 Partial and Complete Fills2.22 Partial and Complete FillsMelodies often use partial or complete fills. “The Christmas Song” starts with an octave skipup, from low Eb to high Eb, then uses a partial fill. The fill notes go down from D to G.For example:
Example 2.22 - Partial fill of an interval, opposite direction
For a complete fill, the F would also need to be filled in.
���Exercise 2.22 Using Partial and Complete Fills
2.23 2.23 2.23 2.23 Delayed FillsDelayed FillsDelayed FillsDelayed FillsA delayed fill adds one or more notes missing in a partial fill. In “The Christmas Song,” theskip down from Eb to Eb is only partly filled (no F). The next skip goes from Eb up to C;this skip is completely filled, even the F. The F then sounds like a delayed fill note, because itwas skipped in the first interval and included in the second interval.
========= ===�
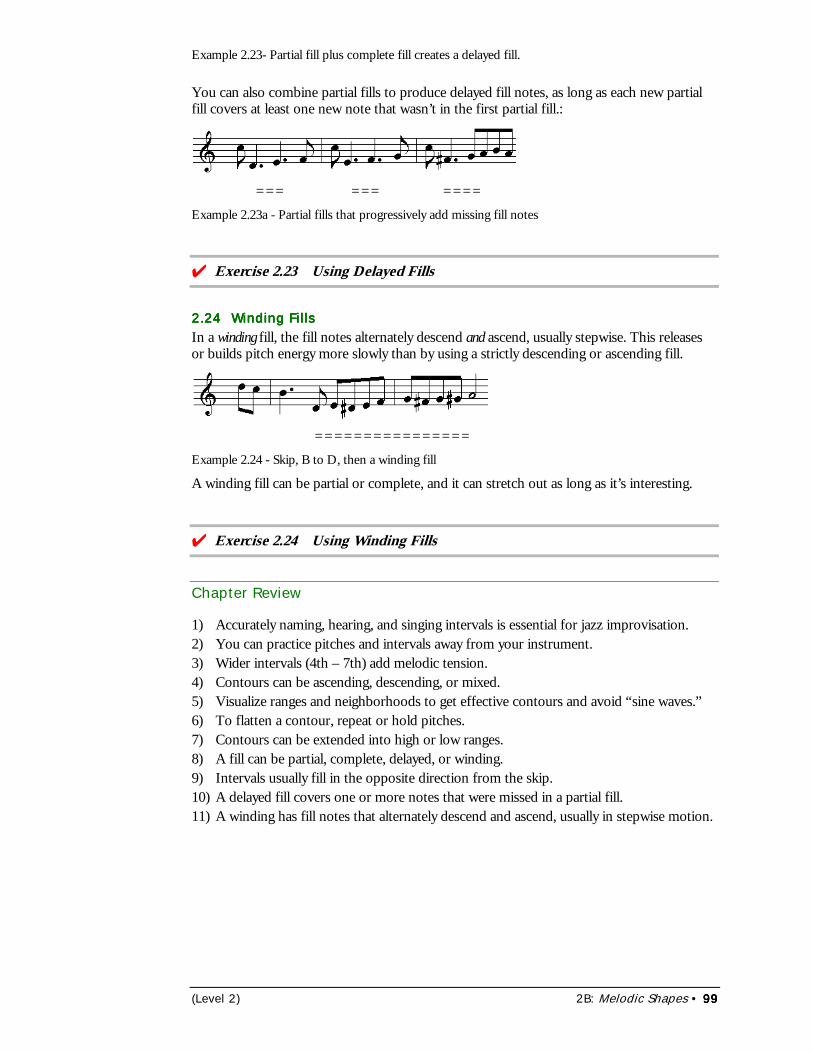
(Level 2) 2B: Melodic Shapes • 99999999
Example 2.23- Partial fill plus complete fill creates a delayed fill.
You can also combine partial fills to produce delayed fill notes, as long as each new partialfill covers at least one new note that wasn’t in the first partial fill.:
=== === ====Example 2.23a - Partial fills that progressively add missing fill notes
���Exercise 2.23 Using Delayed Fills
2.242.242.242.24 Winding FillsWinding FillsWinding FillsWinding FillsIn a winding fill, the fill notes alternately descend and ascend, usually stepwise. This releasesor builds pitch energy more slowly than by using a strictly descending or ascending fill.
================Example 2.24 - Skip, B to D, then a winding fill
A winding fill can be partial or complete, and it can stretch out as long as it’s interesting.
���Exercise 2.24 Using Winding Fills
Chapter Review
1) Accurately naming, hearing, and singing intervals is essential for jazz improvisation.2) You can practice pitches and intervals away from your instrument.3) Wider intervals (4th – 7th) add melodic tension.4) Contours can be ascending, descending, or mixed.5) Visualize ranges and neighborhoods to get effective contours and avoid “sine waves.”6) To flatten a contour, repeat or hold pitches.7) Contours can be extended into high or low ranges.8) A fill can be partial, complete, delayed, or winding.9) Intervals usually fill in the opposite direction from the skip.10) A delayed fill covers one or more notes that were missed in a partial fill.11) A winding has fill notes that alternately descend and ascend, usually in stepwise motion.
100100100100 • 2C: Swing Rhythms (Level 2 — Apprentice)
2C: Swing Rhythms2C: Swing Rhythms2C: Swing Rhythms2C: Swing Rhythms
In this chapter you’ll learn about:
• Learning the Swing Style• Swing Rhythm and Articulation Guidelines• Swing Accent Guidelines• Variations in Swing
he swing style is pervasive in jazz, even finding its way into some of the popular fusionstyles. This lesson shows you how to learn and analyze swing rhythms so you cancreate or sight-read them faster and more accurately. Even if you’ve never played
swing style before, these guidelines combined with listening to recorded examples can getyou on your way to swinging with the best of them.
Note: The guidelines on swing rhythms, articulations, and accents are taken from theauthor’s book Sightreading Jazz.
Learning the Swing Style
Many jazz tunes use swing rhythms that combine a rhythmic feeling of three against a meterbased in two. To successfully improvise on swing tunes, you need to understand how swingrhythms and phrasing work. Swing rhythms often look different on music paper from howthey should sound; this causes “optical illusions” when you read and play them. Forexample, two consecutive swing 8th-notes are not equal in length – one is twice as long asthe other. This chapter teaches you how to handle these rhythmic illusions.
Listening: The Traditional ApproachListening: The Traditional ApproachListening: The Traditional ApproachListening: The Traditional ApproachA popular myth is that the only way to learn to swing is by listening to jazz recordings andconcerts. True, this is how jazz players typically learn swing. However, most of the qualitiesof swing can be explained on paper with simple guidelines. You can then apply theseguidelines when you read swing music or improvise on swing tunes. Of course, you stillneed to listen to soloists who swing so you can pick up on the subtleties of the style. Butunderstanding the guidelines of swing can help you learn swing rhythms faster and easier.
Teaching by Rote: The Limited ApproachTeaching by Rote: The Limited ApproachTeaching by Rote: The Limited ApproachTeaching by Rote: The Limited ApproachMusic teachers often teach swing rhythms by singing the rhythms to students. This is OK inthe short run, but the danger is that students then depend on the teacher for figuring outthe rhythms. When the students understand the principles of swing rhythms, includingarticulations and accents, they can correct their own rhythmic mistakes. Then the teachercan concentrate on other areas of improvisation and performance.
Swing Rhythm and Articulation Guidelines
Remember: These are guidelines, not hard-and-fast rules. Still, it’s best to learn them first soyou’ll understand how to make exceptions later.
2.25 Quarter-Notes and Quarter-Rests2.25 Quarter-Notes and Quarter-Rests2.25 Quarter-Notes and Quarter-Rests2.25 Quarter-Notes and Quarter-Rests*1 Mentally divide each quarter-note into three eighth-note triplets. Swing quarter-notesare usually played staccato, so they are about one triplet of sound and two triplets of silence.
T
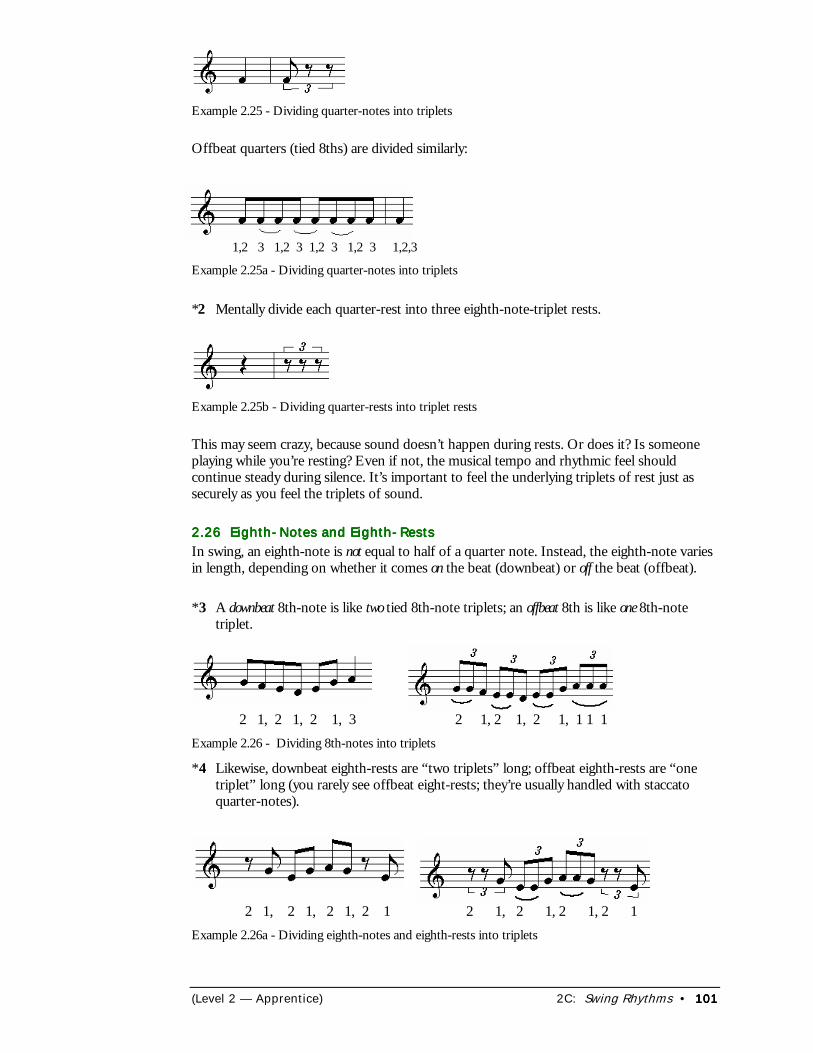
(Level 2 — Apprentice) 2C: Swing Rhythms • 101101101101
Example 2.25 - Dividing quarter-notes into triplets
Offbeat quarters (tied 8ths) are divided similarly:
1,2 3 1,2 3 1,2 3 1,2 3 1,2,3
Example 2.25a - Dividing quarter-notes into triplets
*2 Mentally divide each quarter-rest into three eighth-note-triplet rests.
Example 2.25b - Dividing quarter-rests into triplet rests
This may seem crazy, because sound doesn’t happen during rests. Or does it? Is someoneplaying while you’re resting? Even if not, the musical tempo and rhythmic feel shouldcontinue steady during silence. It’s important to feel the underlying triplets of rest just assecurely as you feel the triplets of sound.
2.26 Eighth-Notes and Eighth-Rests2.26 Eighth-Notes and Eighth-Rests2.26 Eighth-Notes and Eighth-Rests2.26 Eighth-Notes and Eighth-RestsIn swing, an eighth-note is not equal to half of a quarter note. Instead, the eighth-note variesin length, depending on whether it comes on the beat (downbeat) or off the beat (offbeat).
*3 A downbeat 8th-note is like two tied 8th-note triplets; an offbeat 8th is like one 8th-notetriplet.
2 1, 2 1, 2 1, 3 2 1, 2 1, 2 1, 1 1 1Example 2.26 - Dividing 8th-notes into triplets
*4 Likewise, downbeat eighth-rests are “two triplets” long; offbeat eighth-rests are “onetriplet” long (you rarely see offbeat eight-rests; they’re usually handled with staccatoquarter-notes).
2 1, 2 1, 2 1, 2 1 2 1, 2 1, 2 1, 2 1Example 2.26a - Dividing eighth-notes and eighth-rests into triplets
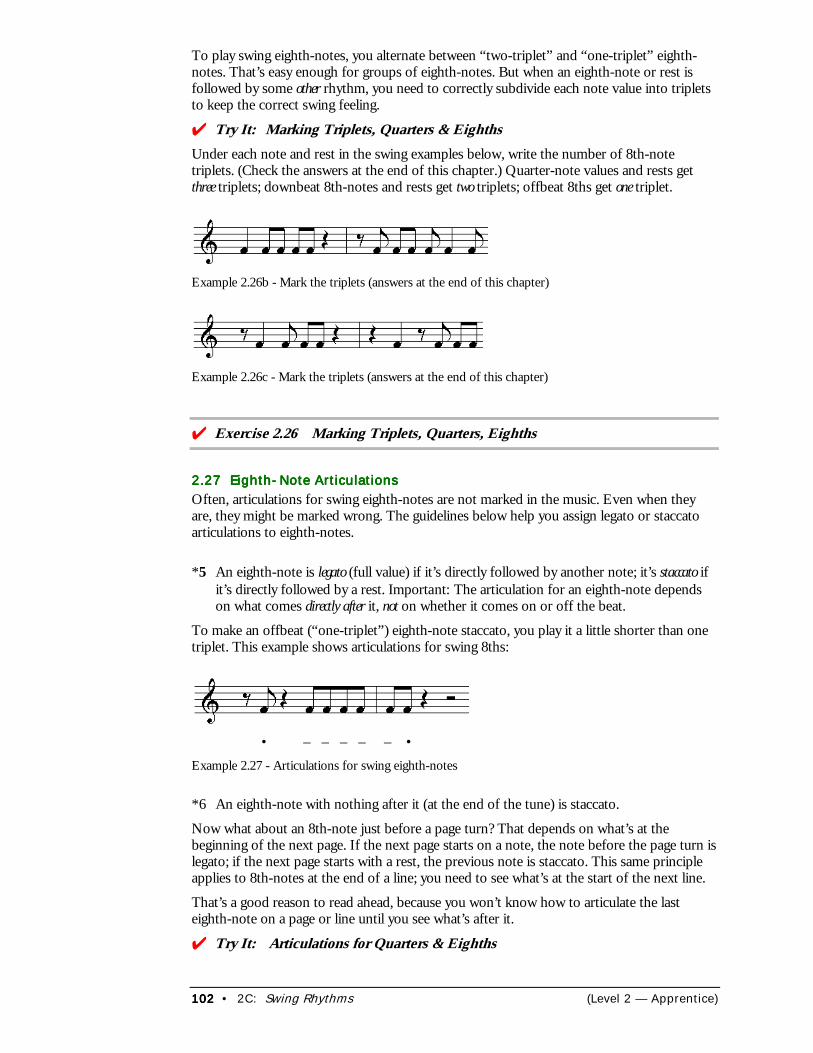
102102102102 • 2C: Swing Rhythms (Level 2 — Apprentice)
To play swing eighth-notes, you alternate between “two-triplet” and “one-triplet” eighth-notes. That’s easy enough for groups of eighth-notes. But when an eighth-note or rest isfollowed by some other rhythm, you need to correctly subdivide each note value into tripletsto keep the correct swing feeling.
���Try It: Marking Triplets, Quarters & EighthsUnder each note and rest in the swing examples below, write the number of 8th-notetriplets. (Check the answers at the end of this chapter.) Quarter-note values and rests getthree triplets; downbeat 8th-notes and rests get two triplets; offbeat 8ths get one triplet.
Example 2.26b - Mark the triplets (answers at the end of this chapter)
Example 2.26c - Mark the triplets (answers at the end of this chapter)
���Exercise 2.26 Marking Triplets, Quarters, Eighths
2.27 Eighth-Note Articulations2.27 Eighth-Note Articulations2.27 Eighth-Note Articulations2.27 Eighth-Note ArticulationsOften, articulations for swing eighth-notes are not marked in the music. Even when theyare, they might be marked wrong. The guidelines below help you assign legato or staccatoarticulations to eighth-notes.
*5 An eighth-note is legato (full value) if it’s directly followed by another note; it’s staccato ifit’s directly followed by a rest. Important: The articulation for an eighth-note dependson what comes directly after it, not on whether it comes on or off the beat.
To make an offbeat (“one-triplet”) eighth-note staccato, you play it a little shorter than onetriplet. This example shows articulations for swing 8ths:
• – – – – – •Example 2.27 - Articulations for swing eighth-notes
*6 An eighth-note with nothing after it (at the end of the tune) is staccato.
Now what about an 8th-note just before a page turn? That depends on what’s at thebeginning of the next page. If the next page starts on a note, the note before the page turn islegato; if the next page starts with a rest, the previous note is staccato. This same principleapplies to 8th-notes at the end of a line; you need to see what’s at the start of the next line.
That’s a good reason to read ahead, because you won’t know how to articulate the lasteighth-note on a page or line until you see what’s after it.
���Try It: Articulations for Quarters & Eighths
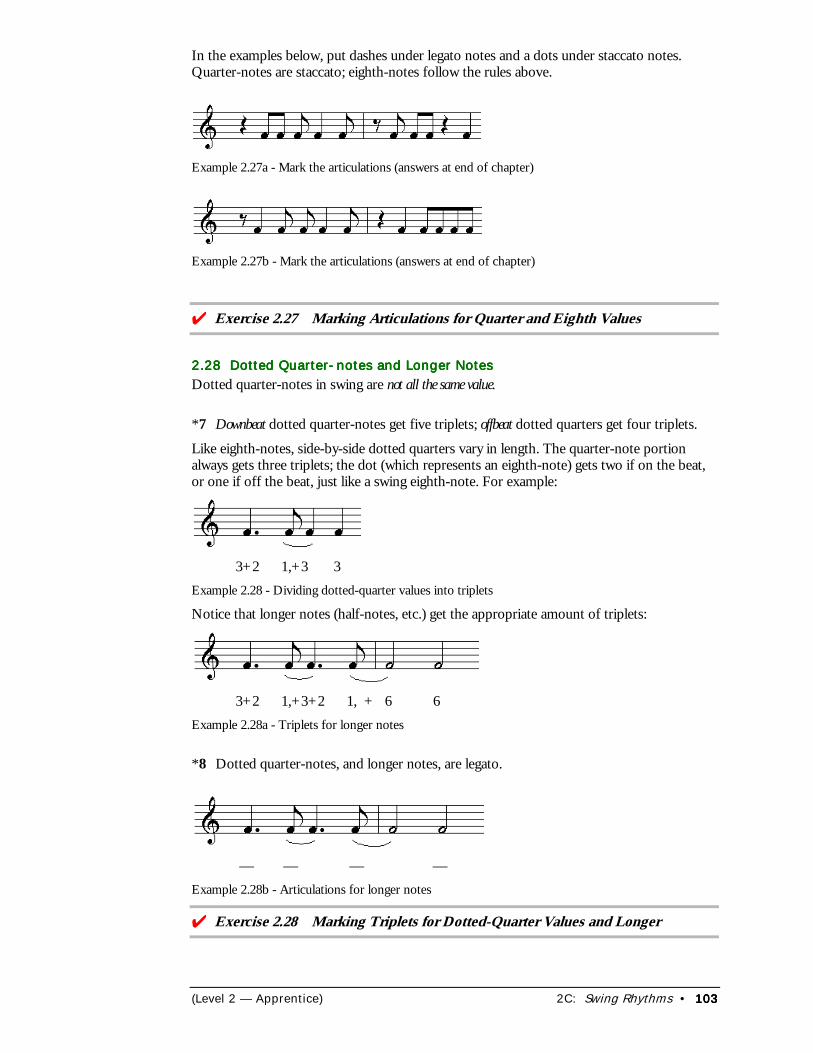
(Level 2 — Apprentice) 2C: Swing Rhythms • 103103103103
In the examples below, put dashes under legato notes and a dots under staccato notes.Quarter-notes are staccato; eighth-notes follow the rules above.
Example 2.27a - Mark the articulations (answers at end of chapter)
Example 2.27b - Mark the articulations (answers at end of chapter)
���Exercise 2.27 Marking Articulations for Quarter and Eighth Values
2.28 Dotted Quarter-notes and Longer Notes2.28 Dotted Quarter-notes and Longer Notes2.28 Dotted Quarter-notes and Longer Notes2.28 Dotted Quarter-notes and Longer NotesDotted quarter-notes in swing are not all the same value.
*7 Downbeat dotted quarter-notes get five triplets; offbeat dotted quarters get four triplets.
Like eighth-notes, side-by-side dotted quarters vary in length. The quarter-note portionalways gets three triplets; the dot (which represents an eighth-note) gets two if on the beat,or one if off the beat, just like a swing eighth-note. For example:
3+2 1,+3 3Example 2.28 - Dividing dotted-quarter values into triplets
Notice that longer notes (half-notes, etc.) get the appropriate amount of triplets:
3+2 1,+3+2 1, + 6 6Example 2.28a - Triplets for longer notes
*8 Dotted quarter-notes, and longer notes, are legato.
— — — —Example 2.28b - Articulations for longer notes
���Exercise 2.28 Marking Triplets for Dotted-Quarter Values and Longer
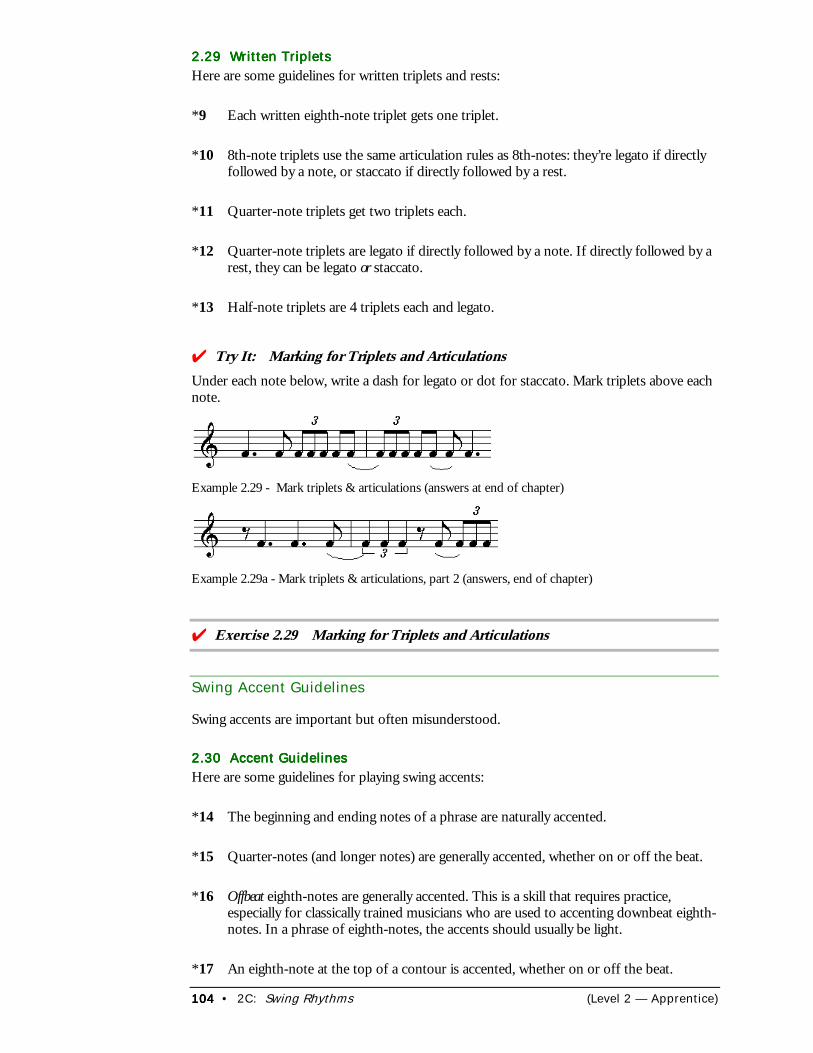
104104104104 • 2C: Swing Rhythms (Level 2 — Apprentice)
2.29 Written Triplets2.29 Written Triplets2.29 Written Triplets2.29 Written TripletsHere are some guidelines for written triplets and rests:
*9 Each written eighth-note triplet gets one triplet.
*10 8th-note triplets use the same articulation rules as 8th-notes: they’re legato if directlyfollowed by a note, or staccato if directly followed by a rest.
*11 Quarter-note triplets get two triplets each.
*12 Quarter-note triplets are legato if directly followed by a note. If directly followed by arest, they can be legato or staccato.
*13 Half-note triplets are 4 triplets each and legato.
���Try It: Marking for Triplets and ArticulationsUnder each note below, write a dash for legato or dot for staccato. Mark triplets above eachnote.
Example 2.29 - Mark triplets & articulations (answers at end of chapter)
Example 2.29a - Mark triplets & articulations, part 2 (answers, end of chapter)
���Exercise 2.29 Marking for Triplets and Articulations
Swing Accent Guidelines
Swing accents are important but often misunderstood.
2.30 Accent Guidelines2.30 Accent Guidelines2.30 Accent Guidelines2.30 Accent GuidelinesHere are some guidelines for playing swing accents:
*14 The beginning and ending notes of a phrase are naturally accented.
*15 Quarter-notes (and longer notes) are generally accented, whether on or off the beat.
*16 Offbeat eighth-notes are generally accented. This is a skill that requires practice,especially for classically trained musicians who are used to accenting downbeat eighth-notes. In a phrase of eighth-notes, the accents should usually be light.
*17 An eighth-note at the top of a contour is accented, whether on or off the beat.
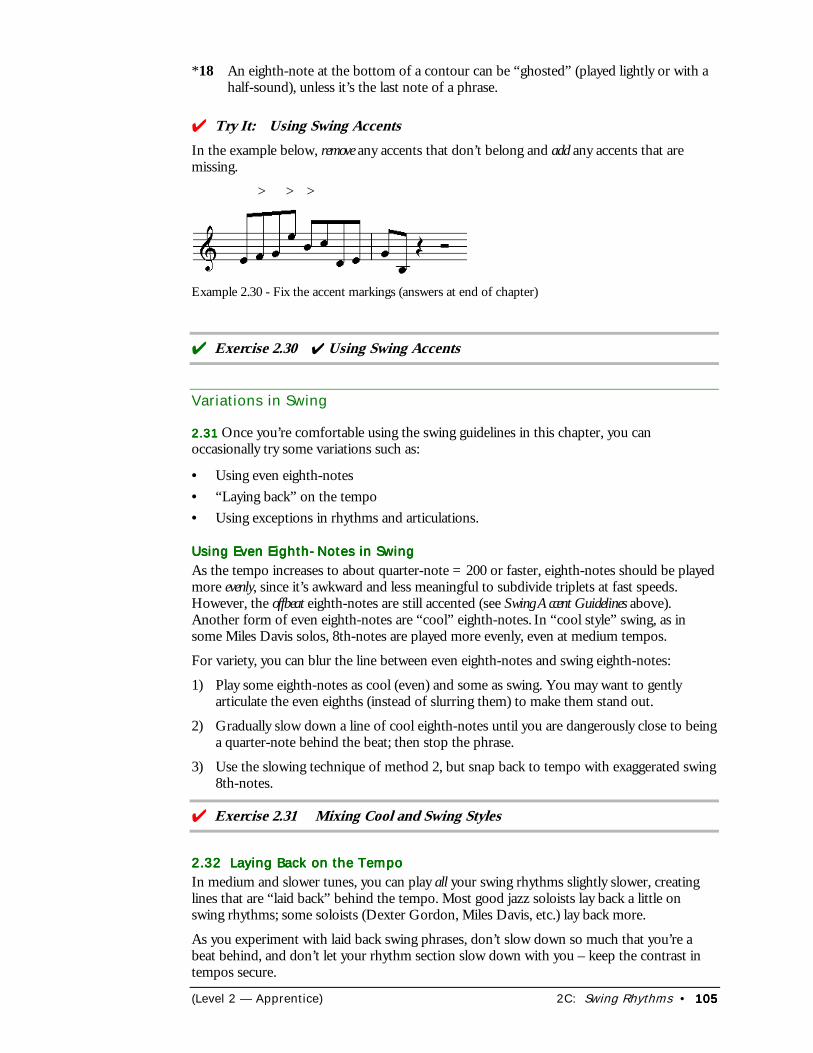
(Level 2 — Apprentice) 2C: Swing Rhythms • 105105105105
*18 An eighth-note at the bottom of a contour can be “ghosted” (played lightly or with ahalf-sound), unless it’s the last note of a phrase.
���Try It: Using Swing AccentsIn the example below, remove any accents that don’t belong and add any accents that aremissing.
> > >
Example 2.30 - Fix the accent markings (answers at end of chapter)
���Exercise 2.30 ✔ Using Swing Accents
Variations in Swing
2.312.312.312.31 Once you’re comfortable using the swing guidelines in this chapter, you canoccasionally try some variations such as:
• Using even eighth-notes• “Laying back” on the tempo• Using exceptions in rhythms and articulations.
Using Even Eighth-Notes in SwingUsing Even Eighth-Notes in SwingUsing Even Eighth-Notes in SwingUsing Even Eighth-Notes in SwingAs the tempo increases to about quarter-note = 200 or faster, eighth-notes should be playedmore evenly, since it’s awkward and less meaningful to subdivide triplets at fast speeds.However, the offbeat eighth-notes are still accented (see Swing Accent Guidelines above).Another form of even eighth-notes are “cool” eighth-notes. In “cool style” swing, as insome Miles Davis solos, 8th-notes are played more evenly, even at medium tempos.
For variety, you can blur the line between even eighth-notes and swing eighth-notes:
1) Play some eighth-notes as cool (even) and some as swing. You may want to gentlyarticulate the even eighths (instead of slurring them) to make them stand out.
2) Gradually slow down a line of cool eighth-notes until you are dangerously close to beinga quarter-note behind the beat; then stop the phrase.
3) Use the slowing technique of method 2, but snap back to tempo with exaggerated swing8th-notes.
���Exercise 2.31 Mixing Cool and Swing Styles
2.32 Laying Back on the Tempo2.32 Laying Back on the Tempo2.32 Laying Back on the Tempo2.32 Laying Back on the TempoIn medium and slower tunes, you can play all your swing rhythms slightly slower, creatinglines that are “laid back” behind the tempo. Most good jazz soloists lay back a little onswing rhythms; some soloists (Dexter Gordon, Miles Davis, etc.) lay back more.
As you experiment with laid back swing phrases, don’t slow down so much that you’re abeat behind, and don’t let your rhythm section slow down with you – keep the contrast intempos secure.
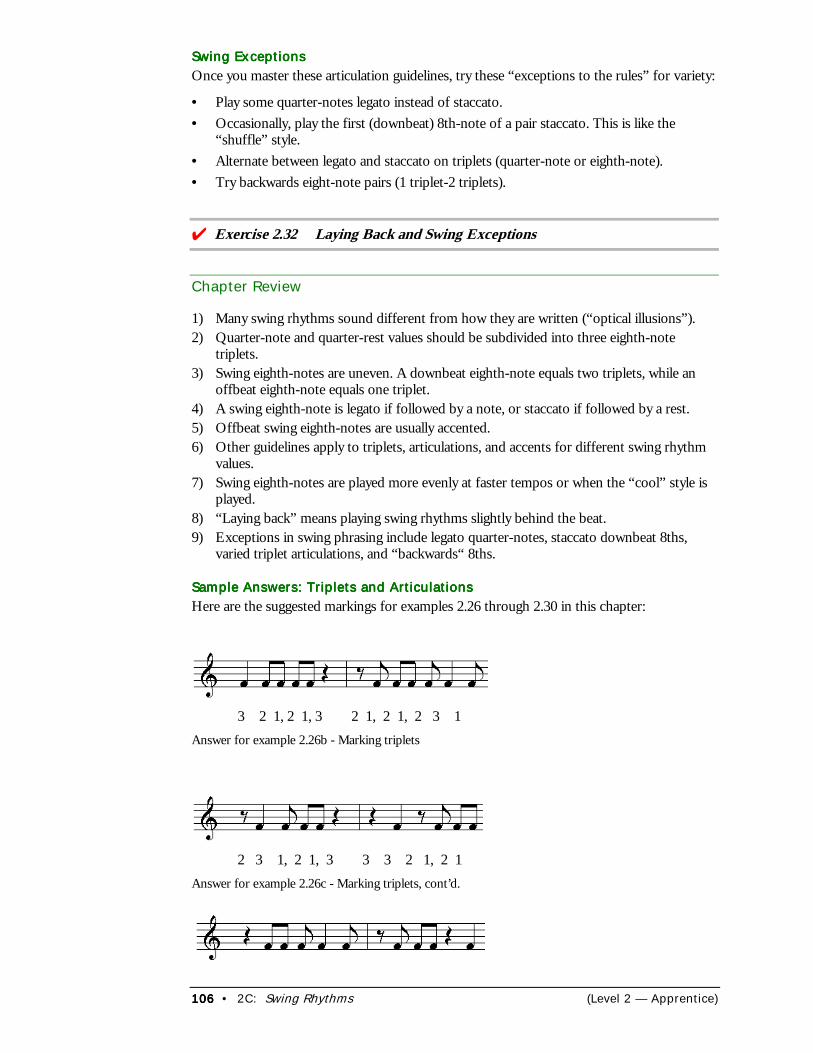
106106106106 • 2C: Swing Rhythms (Level 2 — Apprentice)
Swing ExceptionsSwing ExceptionsSwing ExceptionsSwing ExceptionsOnce you master these articulation guidelines, try these “exceptions to the rules” for variety:
• Play some quarter-notes legato instead of staccato.• Occasionally, play the first (downbeat) 8th-note of a pair staccato. This is like the
“shuffle” style.• Alternate between legato and staccato on triplets (quarter-note or eighth-note).• Try backwards eight-note pairs (1 triplet-2 triplets).
���Exercise 2.32 Laying Back and Swing Exceptions
Chapter Review
1) Many swing rhythms sound different from how they are written (“optical illusions”).2) Quarter-note and quarter-rest values should be subdivided into three eighth-note
triplets.3) Swing eighth-notes are uneven. A downbeat eighth-note equals two triplets, while an
offbeat eighth-note equals one triplet.4) A swing eighth-note is legato if followed by a note, or staccato if followed by a rest.5) Offbeat swing eighth-notes are usually accented.6) Other guidelines apply to triplets, articulations, and accents for different swing rhythm
values.7) Swing eighth-notes are played more evenly at faster tempos or when the “cool” style is
played.8) “Laying back” means playing swing rhythms slightly behind the beat.9) Exceptions in swing phrasing include legato quarter-notes, staccato downbeat 8ths,
varied triplet articulations, and “backwards“ 8ths.
Sample Answers: Triplets and ArticulationsSample Answers: Triplets and ArticulationsSample Answers: Triplets and ArticulationsSample Answers: Triplets and ArticulationsHere are the suggested markings for examples 2.26 through 2.30 in this chapter:
3 2 1, 2 1, 3 2 1, 2 1, 2 3 1Answer for example 2.26b - Marking triplets
2 3 1, 2 1, 3 3 3 2 1, 2 1Answer for example 2.26c - Marking triplets, cont’d.
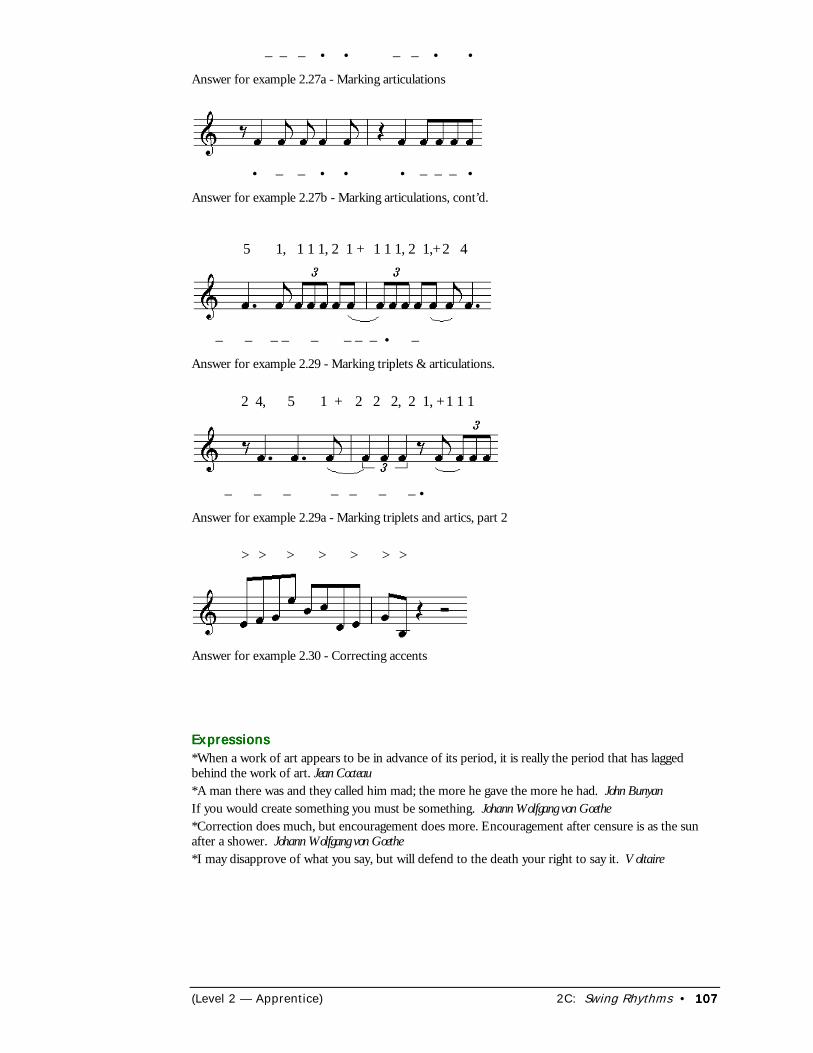
(Level 2 — Apprentice) 2C: Swing Rhythms • 107107107107
– – – • • – – • •Answer for example 2.27a - Marking articulations
• – – • • • – – – •Answer for example 2.27b - Marking articulations, cont’d.
5 1, 1 1 1, 2 1 + 1 1 1, 2 1,+2 4
– – – – – – – – • – Answer for example 2.29 - Marking triplets & articulations.
2 4, 5 1 + 2 2 2, 2 1, +1 1 1
– – – – – – – •Answer for example 2.29a - Marking triplets and artics, part 2
> > > > > > >
Answer for example 2.30 - Correcting accents
ExpressionsExpressionsExpressionsExpressions*When a work of art appears to be in advance of its period, it is really the period that has laggedbehind the work of art. Jean Cocteau*A man there was and they called him mad; the more he gave the more he had. John BunyanIf you would create something you must be something. Johann Wolfgang von Goethe*Correction does much, but encouragement does more. Encouragement after censure is as the sunafter a shower. Johann Wolfgang von Goethe*I may disapprove of what you say, but will defend to the death your right to say it. Voltaire
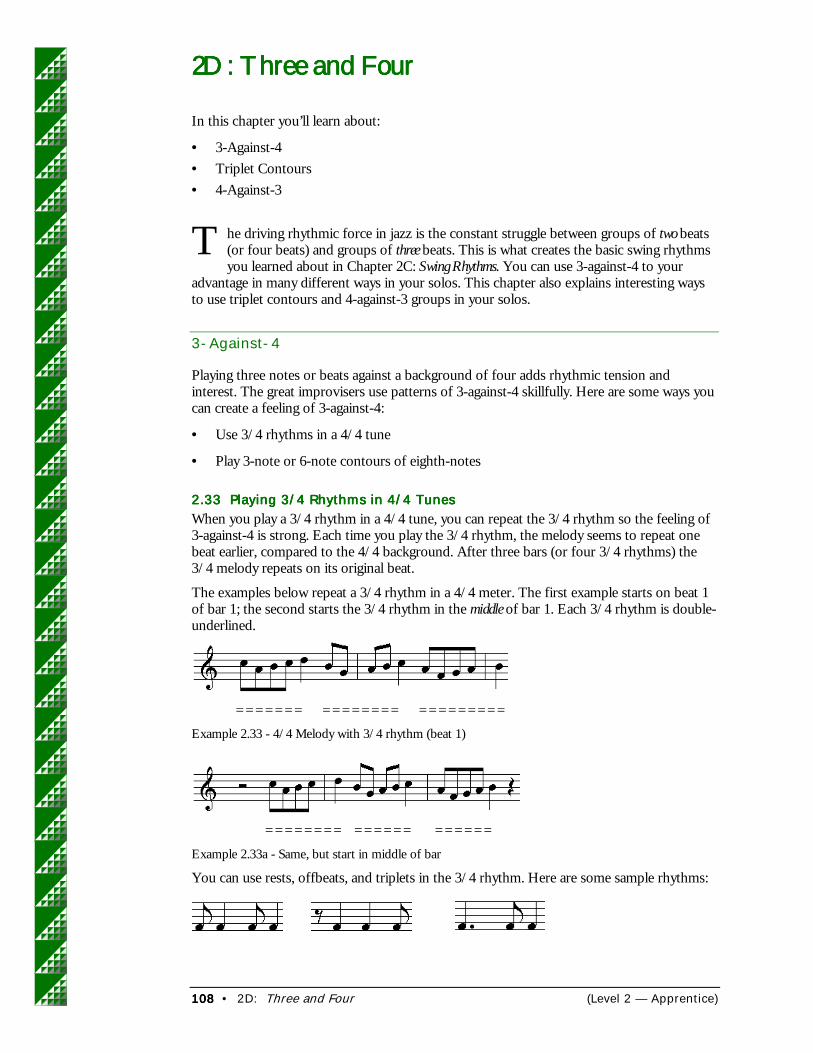
108108108108 • 2D: Three and Four (Level 2 — Apprentice)
2D: Three and Four2D: Three and Four2D: Three and Four2D: Three and Four
In this chapter you’ll learn about:
• 3-Against-4• Triplet Contours• 4-Against-3
he driving rhythmic force in jazz is the constant struggle between groups of two beats(or four beats) and groups of three beats. This is what creates the basic swing rhythmsyou learned about in Chapter 2C: Swing Rhythms. You can use 3-against-4 to your
advantage in many different ways in your solos. This chapter also explains interesting waysto use triplet contours and 4-against-3 groups in your solos.
3-Against-4
Playing three notes or beats against a background of four adds rhythmic tension andinterest. The great improvisers use patterns of 3-against-4 skillfully. Here are some ways youcan create a feeling of 3-against-4:
• Use 3/4 rhythms in a 4/4 tune
• Play 3-note or 6-note contours of eighth-notes
2.33 Playing 3/4 Rhythms in 4/4 Tunes2.33 Playing 3/4 Rhythms in 4/4 Tunes2.33 Playing 3/4 Rhythms in 4/4 Tunes2.33 Playing 3/4 Rhythms in 4/4 TunesWhen you play a 3/4 rhythm in a 4/4 tune, you can repeat the 3/4 rhythm so the feeling of3-against-4 is strong. Each time you play the 3/4 rhythm, the melody seems to repeat onebeat earlier, compared to the 4/4 background. After three bars (or four 3/4 rhythms) the3/4 melody repeats on its original beat.
The examples below repeat a 3/4 rhythm in a 4/4 meter. The first example starts on beat 1of bar 1; the second starts the 3/4 rhythm in the middle of bar 1. Each 3/4 rhythm is double-underlined.
======= ======== =========Example 2.33 - 4/4 Melody with 3/4 rhythm (beat 1)
======== ====== ======Example 2.33a - Same, but start in middle of bar
You can use rests, offbeats, and triplets in the 3/4 rhythm. Here are some sample rhythms:
T
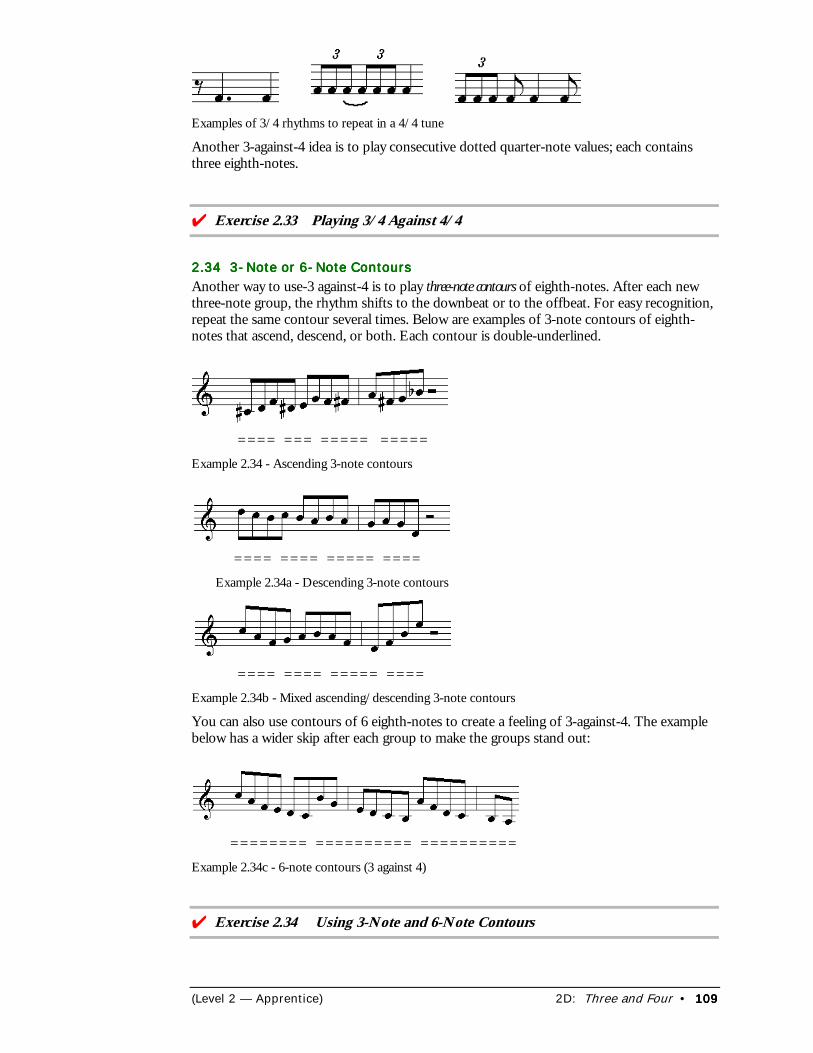
(Level 2 — Apprentice) 2D: Three and Four • 109109109109
Examples of 3/4 rhythms to repeat in a 4/4 tune
Another 3-against-4 idea is to play consecutive dotted quarter-note values; each containsthree eighth-notes.
���Exercise 2.33 Playing 3/4 Against 4/4
2.34 3-Note or 6-Note Contours2.34 3-Note or 6-Note Contours2.34 3-Note or 6-Note Contours2.34 3-Note or 6-Note ContoursAnother way to use-3 against-4 is to play three-note contours of eighth-notes. After each newthree-note group, the rhythm shifts to the downbeat or to the offbeat. For easy recognition,repeat the same contour several times. Below are examples of 3-note contours of eighth-notes that ascend, descend, or both. Each contour is double-underlined.
==== === ===== =====Example 2.34 - Ascending 3-note contours
==== ==== ===== ====Example 2.34a - Descending 3-note contours
==== ==== ===== ====Example 2.34b - Mixed ascending/descending 3-note contours
You can also use contours of 6 eighth-notes to create a feeling of 3-against-4. The examplebelow has a wider skip after each group to make the groups stand out:
======== ========== ==========Example 2.34c - 6-note contours (3 against 4)
���Exercise 2.34 Using 3-Note and 6-Note Contours
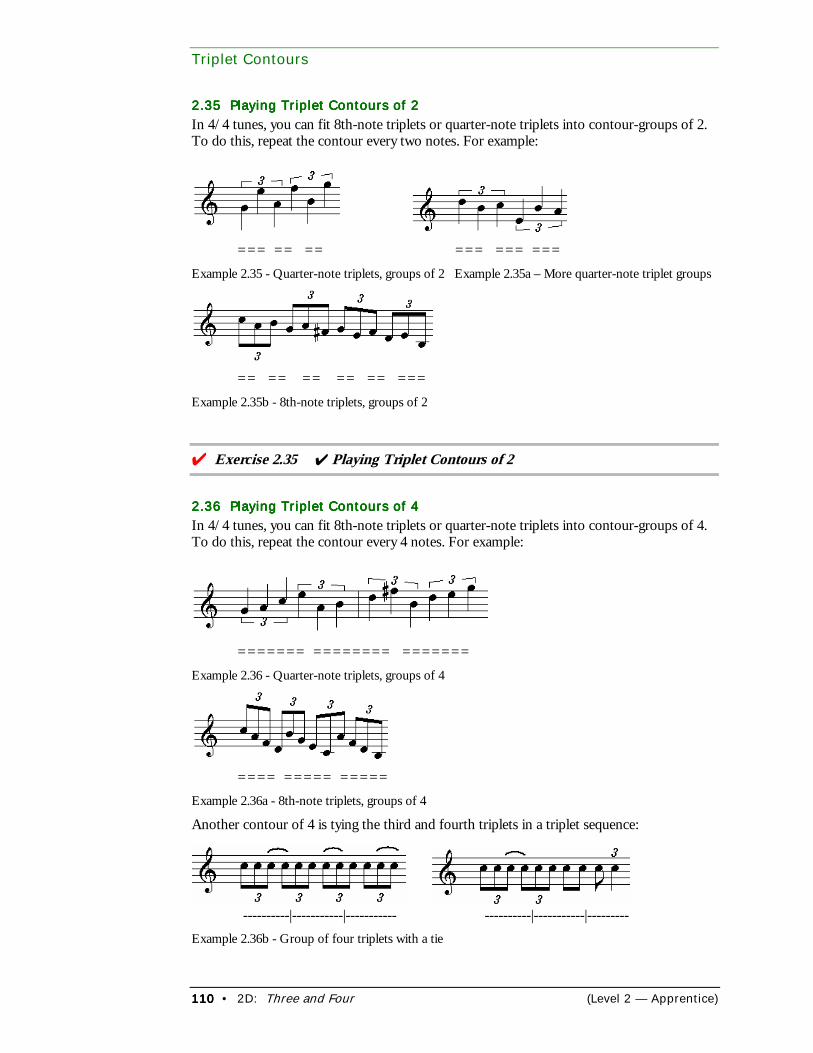
110110110110 • 2D: Three and Four (Level 2 — Apprentice)
Triplet Contours
2.35 Playing Triplet Contours of 22.35 Playing Triplet Contours of 22.35 Playing Triplet Contours of 22.35 Playing Triplet Contours of 2In 4/4 tunes, you can fit 8th-note triplets or quarter-note triplets into contour-groups of 2.To do this, repeat the contour every two notes. For example:
=== == == === === ===
Example 2.35 - Quarter-note triplets, groups of 2 Example 2.35a – More quarter-note triplet groups
== == == == == ===Example 2.35b - 8th-note triplets, groups of 2
���Exercise 2.35 ✔ Playing Triplet Contours of 2
2.36 Playing Triplet Contours of 42.36 Playing Triplet Contours of 42.36 Playing Triplet Contours of 42.36 Playing Triplet Contours of 4In 4/4 tunes, you can fit 8th-note triplets or quarter-note triplets into contour-groups of 4.To do this, repeat the contour every 4 notes. For example:
======= ======== =======Example 2.36 - Quarter-note triplets, groups of 4
==== ===== =====Example 2.36a - 8th-note triplets, groups of 4
Another contour of 4 is tying the third and fourth triplets in a triplet sequence:
----------|-----------|----------- ----------|-----------|---------Example 2.36b - Group of four triplets with a tie
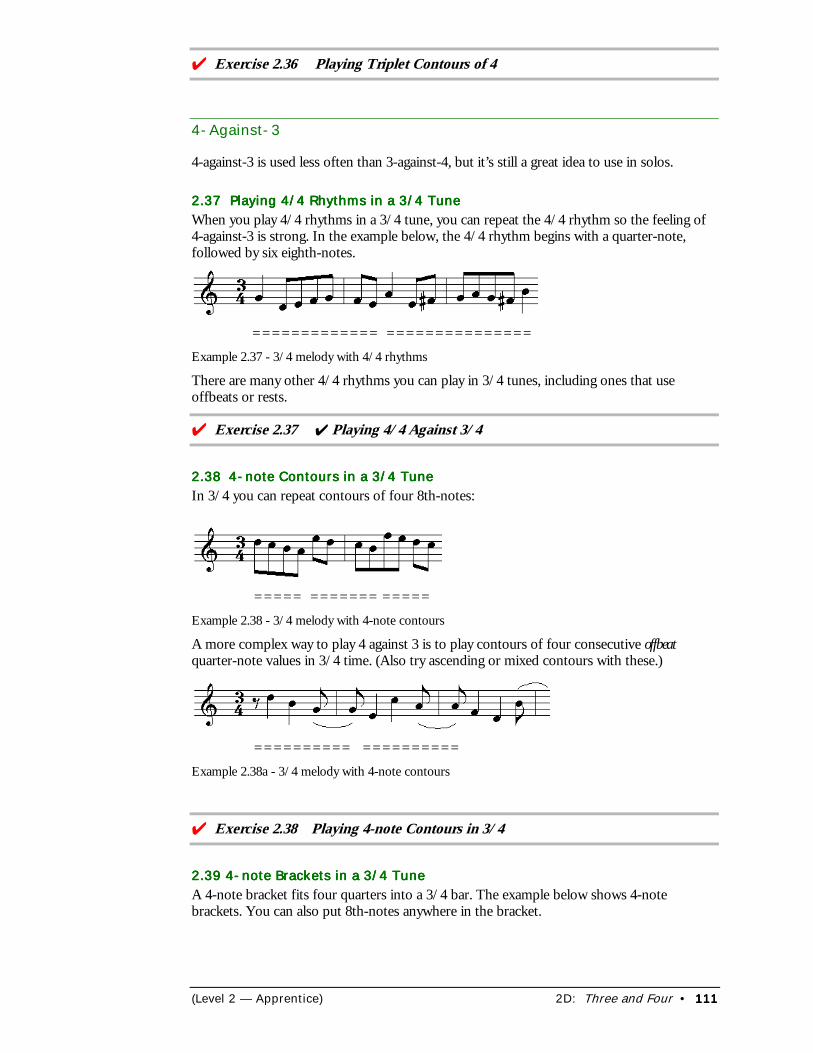
(Level 2 — Apprentice) 2D: Three and Four • 111111111111
���Exercise 2.36 Playing Triplet Contours of 4
4-Against-3
4-against-3 is used less often than 3-against-4, but it’s still a great idea to use in solos.
2.37 Playing 4/4 Rhythms in a 3/4 Tune2.37 Playing 4/4 Rhythms in a 3/4 Tune2.37 Playing 4/4 Rhythms in a 3/4 Tune2.37 Playing 4/4 Rhythms in a 3/4 TuneWhen you play 4/4 rhythms in a 3/4 tune, you can repeat the 4/4 rhythm so the feeling of4-against-3 is strong. In the example below, the 4/4 rhythm begins with a quarter-note,followed by six eighth-notes.
============= ===============Example 2.37 - 3/4 melody with 4/4 rhythms
There are many other 4/4 rhythms you can play in 3/4 tunes, including ones that useoffbeats or rests.
���Exercise 2.37 ✔ Playing 4/4 Against 3/4
2.382.382.382.38 4-note Contours in a 3/4 Tune 4-note Contours in a 3/4 Tune 4-note Contours in a 3/4 Tune 4-note Contours in a 3/4 TuneIn 3/4 you can repeat contours of four 8th-notes:
===== ======= =====Example 2.38 - 3/4 melody with 4-note contours
A more complex way to play 4 against 3 is to play contours of four consecutive offbeatquarter-note values in 3/4 time. (Also try ascending or mixed contours with these.)
========== ==========Example 2.38a - 3/4 melody with 4-note contours
���Exercise 2.38 Playing 4-note Contours in 3/4
2.39 4-note Brackets in a 3/4 Tune2.39 4-note Brackets in a 3/4 Tune2.39 4-note Brackets in a 3/4 Tune2.39 4-note Brackets in a 3/4 TuneA 4-note bracket fits four quarters into a 3/4 bar. The example below shows 4-notebrackets. You can also put 8th-notes anywhere in the bracket.
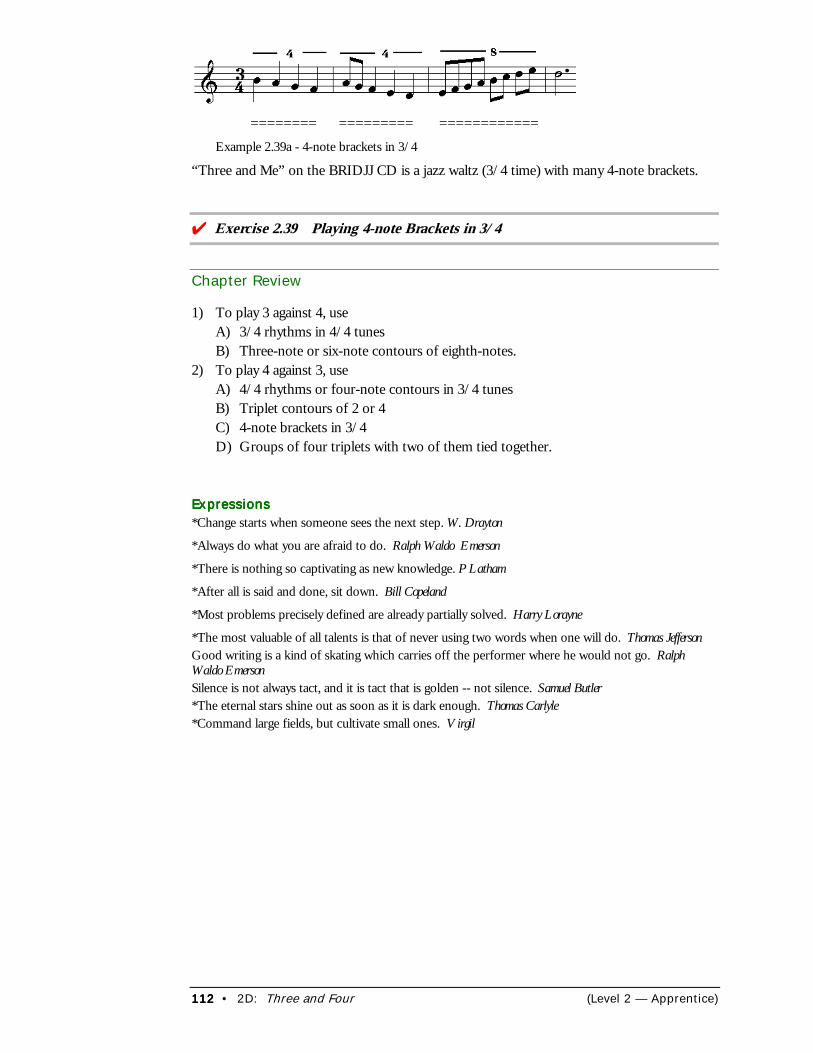
112112112112 • 2D: Three and Four (Level 2 — Apprentice)
======== ========= ============Example 2.39a - 4-note brackets in 3/4
“Three and Me” on the BRIDJJ CD is a jazz waltz (3/4 time) with many 4-note brackets.
���Exercise 2.39 Playing 4-note Brackets in 3/4
Chapter Review
1) To play 3 against 4, useA) 3/4 rhythms in 4/4 tunesB) Three-note or six-note contours of eighth-notes.
2) To play 4 against 3, useA) 4/4 rhythms or four-note contours in 3/4 tunesB) Triplet contours of 2 or 4C) 4-note brackets in 3/4D) Groups of four triplets with two of them tied together.
ExpressionsExpressionsExpressionsExpressions*Change starts when someone sees the next step. W. Drayton
*Always do what you are afraid to do. Ralph Waldo Emerson
*There is nothing so captivating as new knowledge. P Latham
*After all is said and done, sit down. Bill Copeland
*Most problems precisely defined are already partially solved. Harry Lorayne
*The most valuable of all talents is that of never using two words when one will do. Thomas JeffersonGood writing is a kind of skating which carries off the performer where he would not go. RalphWaldo EmersonSilence is not always tact, and it is tact that is golden -- not silence. Samuel Butler*The eternal stars shine out as soon as it is dark enough. Thomas Carlyle*Command large fields, but cultivate small ones. Virgil
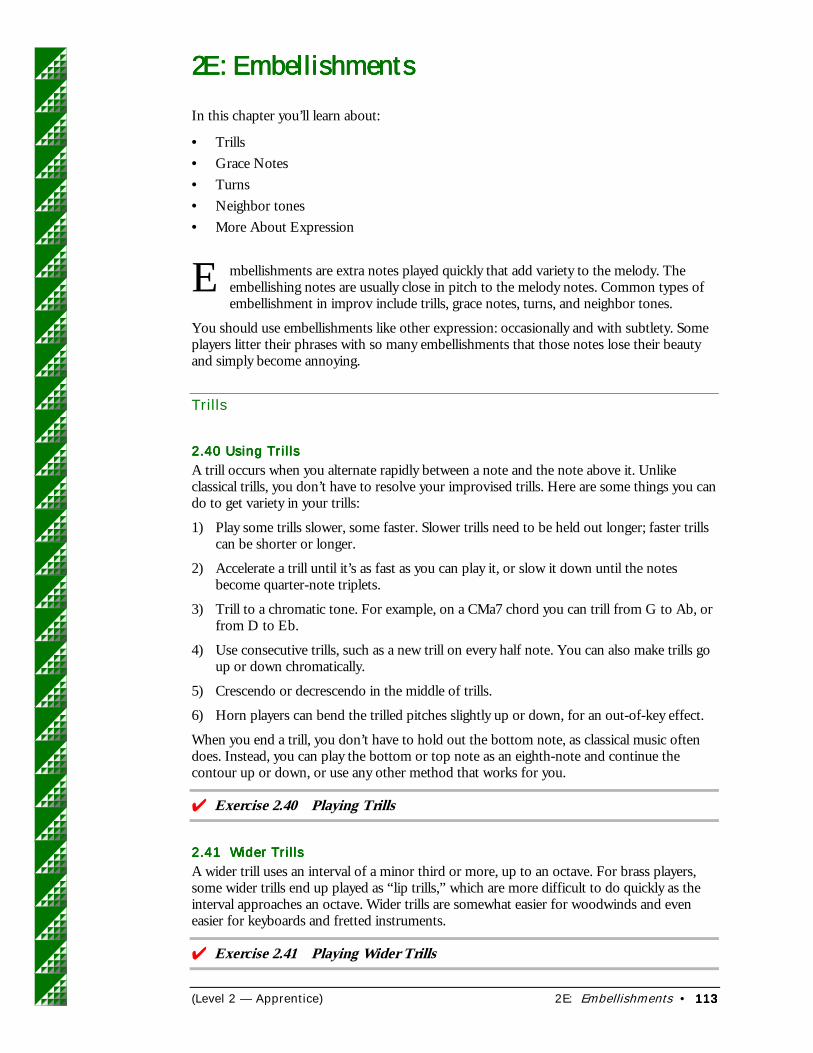
(Level 2 — Apprentice) 2E: Embellishments • 113113113113
2E: Embellishments2E: Embellishments2E: Embellishments2E: Embellishments
In this chapter you’ll learn about:
• Trills• Grace Notes• Turns• Neighbor tones• More About Expression
mbellishments are extra notes played quickly that add variety to the melody. Theembellishing notes are usually close in pitch to the melody notes. Common types ofembellishment in improv include trills, grace notes, turns, and neighbor tones.
You should use embellishments like other expression: occasionally and with subtlety. Someplayers litter their phrases with so many embellishments that those notes lose their beautyand simply become annoying.
Trills
2.40 Using Trills2.40 Using Trills2.40 Using Trills2.40 Using TrillsA trill occurs when you alternate rapidly between a note and the note above it. Unlikeclassical trills, you don’t have to resolve your improvised trills. Here are some things you cando to get variety in your trills:
1) Play some trills slower, some faster. Slower trills need to be held out longer; faster trillscan be shorter or longer.
2) Accelerate a trill until it’s as fast as you can play it, or slow it down until the notesbecome quarter-note triplets.
3) Trill to a chromatic tone. For example, on a CMa7 chord you can trill from G to Ab, orfrom D to Eb.
4) Use consecutive trills, such as a new trill on every half note. You can also make trills goup or down chromatically.
5) Crescendo or decrescendo in the middle of trills.
6) Horn players can bend the trilled pitches slightly up or down, for an out-of-key effect.
When you end a trill, you don’t have to hold out the bottom note, as classical music oftendoes. Instead, you can play the bottom or top note as an eighth-note and continue thecontour up or down, or use any other method that works for you.
���Exercise 2.40 Playing Trills
2.41 Wider Trills2.41 Wider Trills2.41 Wider Trills2.41 Wider TrillsA wider trill uses an interval of a minor third or more, up to an octave. For brass players,some wider trills end up played as “lip trills,” which are more difficult to do quickly as theinterval approaches an octave. Wider trills are somewhat easier for woodwinds and eveneasier for keyboards and fretted instruments.
���Exercise 2.41 Playing Wider Trills
E
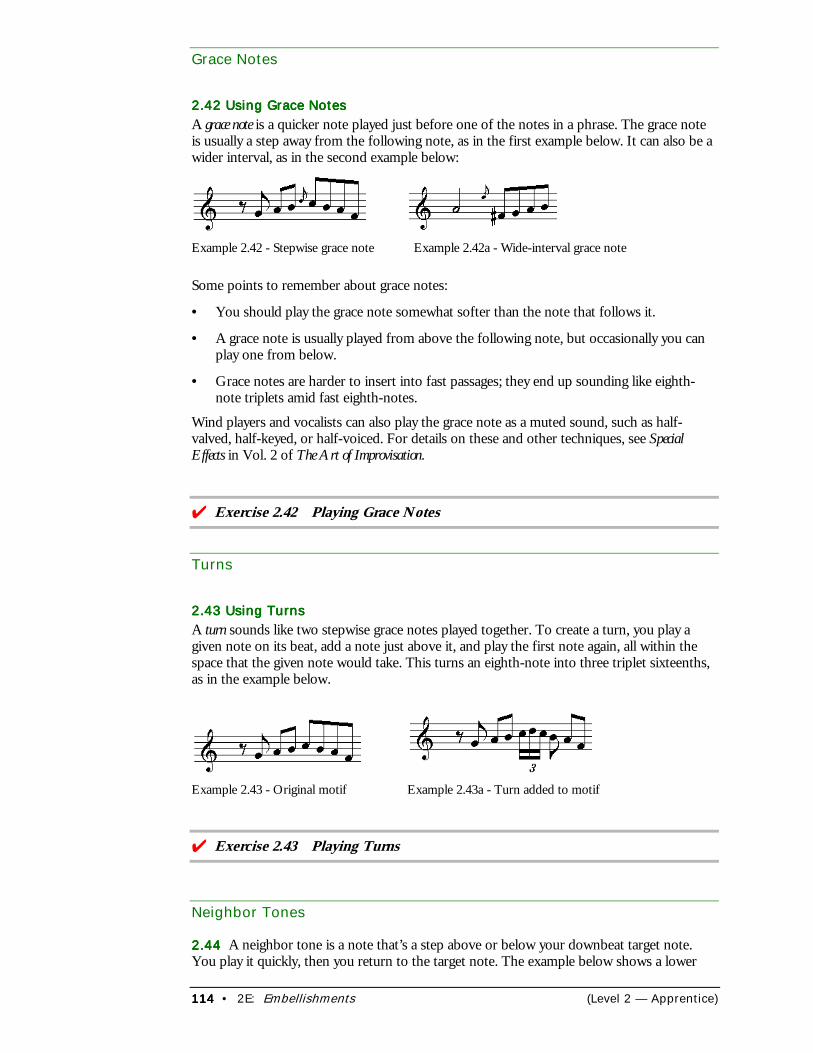
114114114114 • 2E: Embellishments (Level 2 — Apprentice)
Grace Notes
2.42 Using Grace Notes2.42 Using Grace Notes2.42 Using Grace Notes2.42 Using Grace NotesA grace note is a quicker note played just before one of the notes in a phrase. The grace noteis usually a step away from the following note, as in the first example below. It can also be awider interval, as in the second example below:
Example 2.42 - Stepwise grace note Example 2.42a - Wide-interval grace note
Some points to remember about grace notes:
• You should play the grace note somewhat softer than the note that follows it.
• A grace note is usually played from above the following note, but occasionally you canplay one from below.
• Grace notes are harder to insert into fast passages; they end up sounding like eighth-note triplets amid fast eighth-notes.
Wind players and vocalists can also play the grace note as a muted sound, such as half-valved, half-keyed, or half-voiced. For details on these and other techniques, see SpecialEffects in Vol. 2 of The Art of Improvisation.
���Exercise 2.42 Playing Grace Notes
Turns
2.43 Using Turns2.43 Using Turns2.43 Using Turns2.43 Using TurnsA turn sounds like two stepwise grace notes played together. To create a turn, you play agiven note on its beat, add a note just above it, and play the first note again, all within thespace that the given note would take. This turns an eighth-note into three triplet sixteenths,as in the example below.
Example 2.43 - Original motif Example 2.43a - Turn added to motif
���Exercise 2.43 Playing Turns
Neighbor Tones
2.442.442.442.44 A neighbor tone is a note that’s a step above or below your downbeat target note.You play it quickly, then you return to the target note. The example below shows a lower
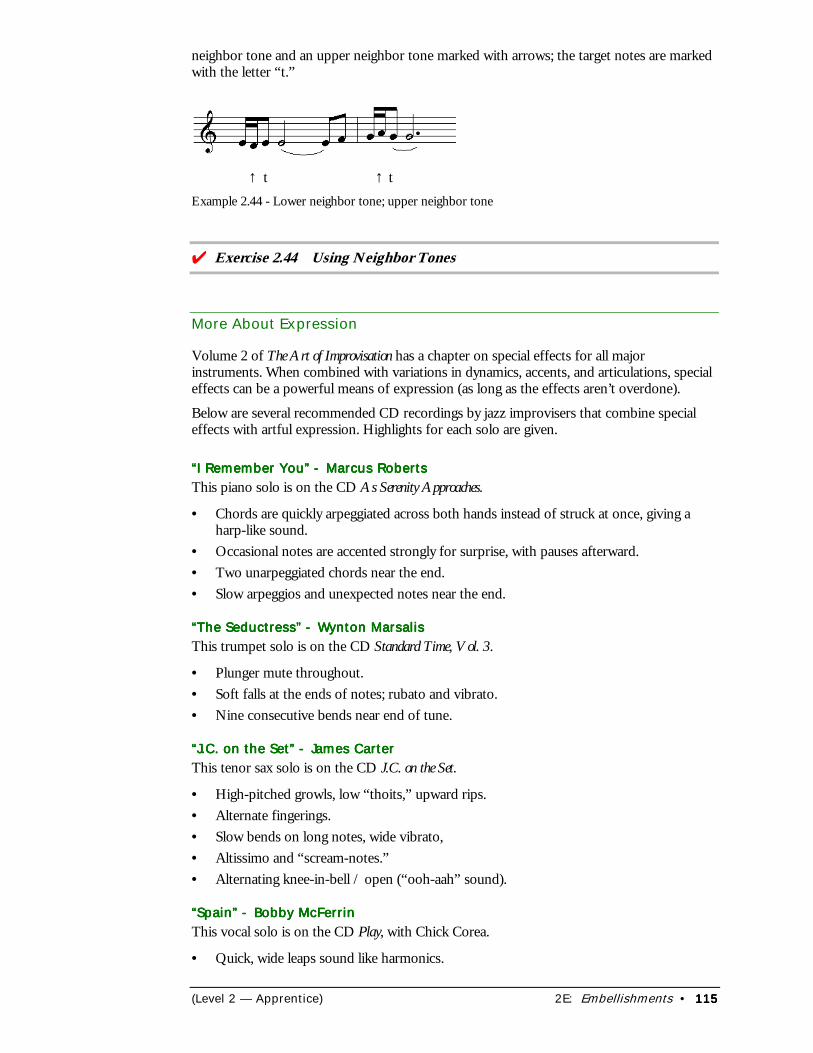
(Level 2 — Apprentice) 2E: Embellishments • 115115115115
neighbor tone and an upper neighbor tone marked with arrows; the target notes are markedwith the letter “t.”
↑ t ↑ tExample 2.44 - Lower neighbor tone; upper neighbor tone
���Exercise 2.44 Using Neighbor Tones
More About Expression
Volume 2 of The Art of Improvisation has a chapter on special effects for all majorinstruments. When combined with variations in dynamics, accents, and articulations, specialeffects can be a powerful means of expression (as long as the effects aren’t overdone).
Below are several recommended CD recordings by jazz improvisers that combine specialeffects with artful expression. Highlights for each solo are given.
“I Remember You” - Marcus Roberts“I Remember You” - Marcus Roberts“I Remember You” - Marcus Roberts“I Remember You” - Marcus RobertsThis piano solo is on the CD As Serenity Approaches.
• Chords are quickly arpeggiated across both hands instead of struck at once, giving aharp-like sound.
• Occasional notes are accented strongly for surprise, with pauses afterward.• Two unarpeggiated chords near the end.• Slow arpeggios and unexpected notes near the end.
“The Seductress” - Wynton Marsalis“The Seductress” - Wynton Marsalis“The Seductress” - Wynton Marsalis“The Seductress” - Wynton MarsalisThis trumpet solo is on the CD Standard Time, Vol. 3.
• Plunger mute throughout.• Soft falls at the ends of notes; rubato and vibrato.• Nine consecutive bends near end of tune.
“J.C. on the Set” - James Carter“J.C. on the Set” - James Carter“J.C. on the Set” - James Carter“J.C. on the Set” - James CarterThis tenor sax solo is on the CD J.C. on the Set.
• High-pitched growls, low “thoits,” upward rips.• Alternate fingerings.• Slow bends on long notes, wide vibrato,• Altissimo and “scream-notes.”• Alternating knee-in-bell / open (“ooh-aah” sound).
“Spain” - Bobby McFerrin“Spain” - Bobby McFerrin“Spain” - Bobby McFerrin“Spain” - Bobby McFerrinThis vocal solo is on the CD Play, with Chick Corea.
• Quick, wide leaps sound like harmonics.
116116116116 • 2E: Embellishments (Level 2 — Apprentice)
• Occasional gargling sounds.• “Ee” to “ooh” vocal sounds on melody.• Percussion sound with tongue.• Bassline with chest thumps during piano solo.• Mix of percussive and muted attacks.• Bends and growl in voice on last note.
Chapter Review
1) Common embellishments include trills, grace notes, turns, and neighbor tones.2) A trill occurs when you alternate rapidly between a note and the note above it.3) A wider trill is one that spans a minor third or more, up to an octave.4) A grace note is a quicker note played just before one of the notes in a phrase.5) A turn is like two stepwise grace notes together.6) A neighbor tone is a note that’s a half-step above or below your downbeat target note. It’s
played quickly, then you return to the target note.
ExpressionsExpressionsExpressionsExpressions*Carelessness does more harm than a want of knowledge. Benjamin Franklin
*The best effect of any book is that it excites the reader to self activity. Thomas Carlyle
*The risk of a wrong decision is preferable to the terror of indecision. Maimonides
*Criticism comes easier than craftsmanship. Zeuxis
*Guard your spare moments. They are like uncut diamonds. Discard them and their value will neverbe known. Improve them and they will become the brightest gems in a useful life. Ralph WaldoEmerson
*The woods are lovely, dark and deep, but I have promises to keep and miles to go before I sleep.Robert Frost
*I'm always fascinated by the way memory diffuses fact. Diane Sawyer
*A ship in harbor is safe, but that is not what ships are built for. John A. Shedd
*Genius means little more than the faculty of perceiving in an unhabitual way. William James
*For more than forty years I have been speaking prose without knowing it. Moliere

(Level 2 — Apprentice) 2F: Melodic Development • 117117117117
2F: Melodic Development2F: Melodic Development2F: Melodic Development2F: Melodic Development
In this chapter you’ll learn about:
• Expanding Intervals• Shrinking Intervals• Omitting Ending Notes• Adding Notes• Inverting Contours• Retrograde
his chapter explains tools you can use to develop your solo ideas. As with any musicaltool, melodic development should help you create ideas,but not be an end in itself.
Expanding Intervals
Expanding intervals are ones that widen as they repeat. The skips don’t need to be filled in;they can stand as they are. The original interval should usually be a fourth or smaller so theinterval will have enough room to expand. You can also vary rhythms of the intervals.
2.45 Types of Expanding Intervals2.45 Types of Expanding Intervals2.45 Types of Expanding Intervals2.45 Types of Expanding IntervalsThere are several basic ways to expand an interval:
1) Raise the top note.2) Lower the bottom note.3) Raise the top note and lower the bottom note.4) For an upward skip, raise both notes: the bottom note goes up a step, the top note goes
up more.5) For a downward skip, lower both notes: the top note goes down a step, the bottom
note goes down more.
Raising the Top NoteRaising the Top NoteRaising the Top NoteRaising the Top NoteThe example below expands an interval by raising the top note. The rhythms in this examplerepeat exactly, but you can also change them for variety.
Example 2.45 - Expanding an interval: top note goes up
The expanding interval can be at the end of a motif:
=== ===Example 2.45a - Expanding an interval at the end of a motif
or in the middle of a motif:
T
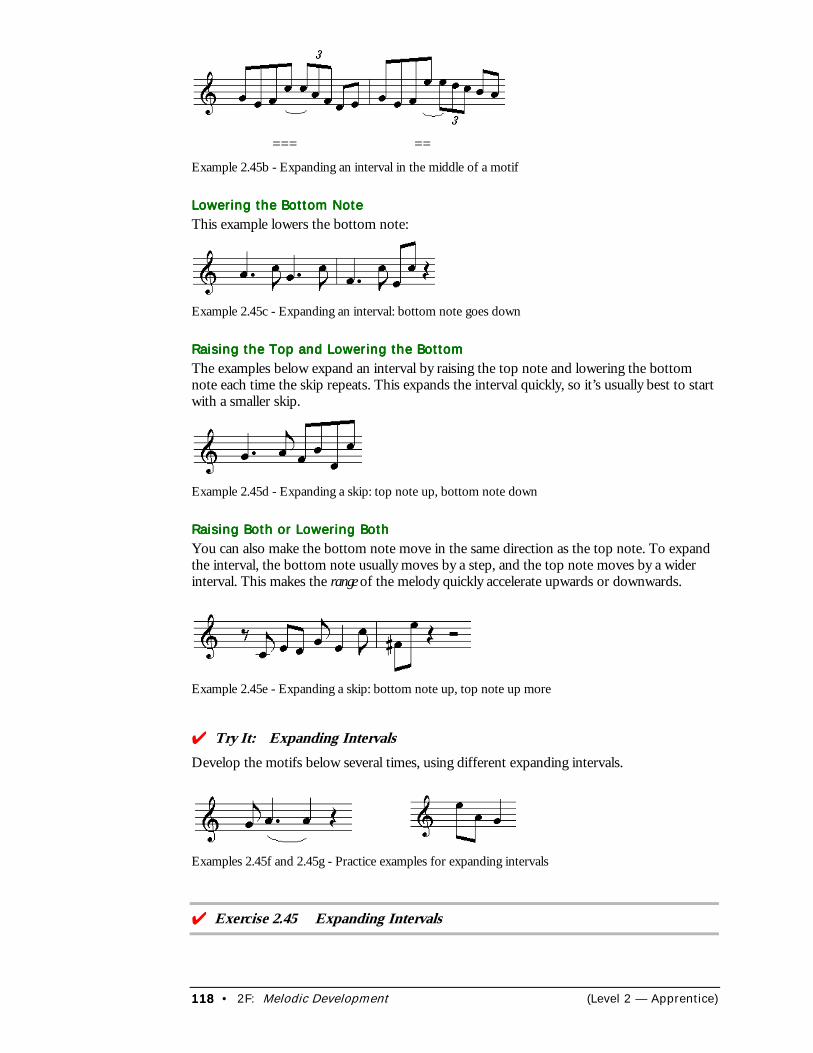
118118118118 • 2F: Melodic Development (Level 2 — Apprentice)
=== ==Example 2.45b - Expanding an interval in the middle of a motif
Lowering the Bottom NoteLowering the Bottom NoteLowering the Bottom NoteLowering the Bottom NoteThis example lowers the bottom note:
Example 2.45c - Expanding an interval: bottom note goes down
Raising the Top and Lowering the BottomRaising the Top and Lowering the BottomRaising the Top and Lowering the BottomRaising the Top and Lowering the BottomThe examples below expand an interval by raising the top note and lowering the bottomnote each time the skip repeats. This expands the interval quickly, so it’s usually best to startwith a smaller skip.
Example 2.45d - Expanding a skip: top note up, bottom note down
Raising Both or Lowering BothRaising Both or Lowering BothRaising Both or Lowering BothRaising Both or Lowering BothYou can also make the bottom note move in the same direction as the top note. To expandthe interval, the bottom note usually moves by a step, and the top note moves by a widerinterval. This makes the range of the melody quickly accelerate upwards or downwards.
Example 2.45e - Expanding a skip: bottom note up, top note up more
���Try It: Expanding IntervalsDevelop the motifs below several times, using different expanding intervals.
Examples 2.45f and 2.45g - Practice examples for expanding intervals
���Exercise 2.45 Expanding Intervals
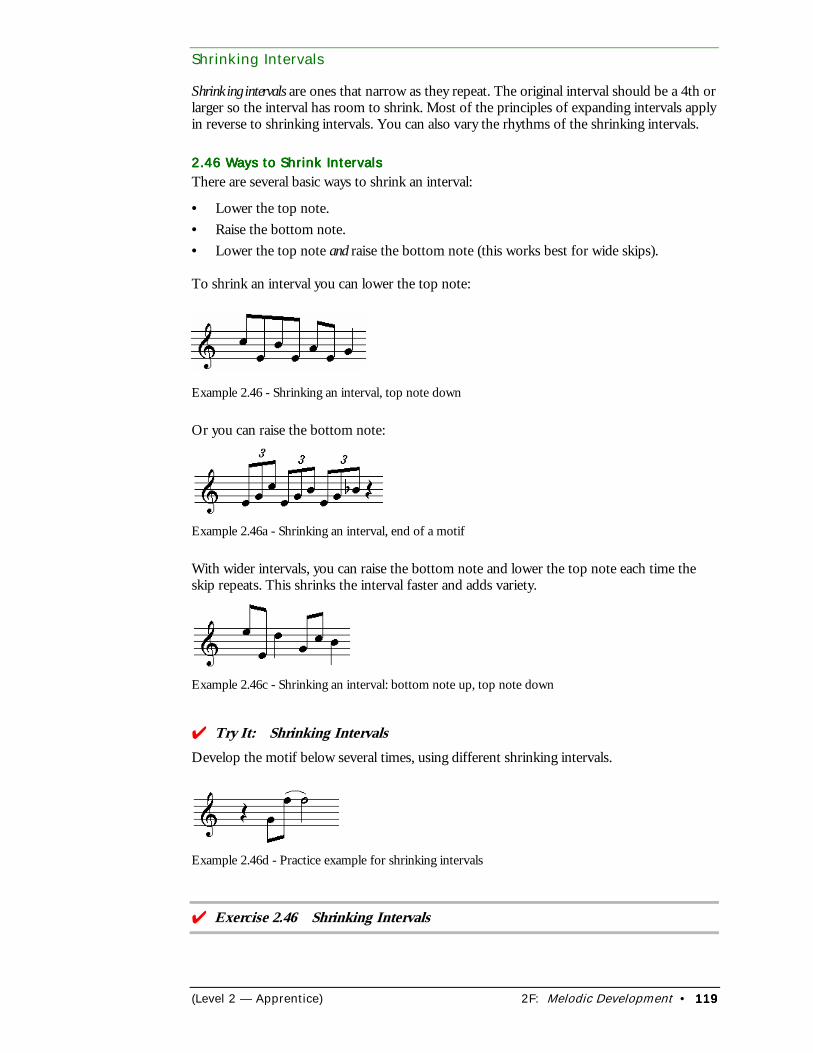
(Level 2 — Apprentice) 2F: Melodic Development • 119119119119
Shrinking Intervals
Shrinking intervals are ones that narrow as they repeat. The original interval should be a 4th orlarger so the interval has room to shrink. Most of the principles of expanding intervals applyin reverse to shrinking intervals. You can also vary the rhythms of the shrinking intervals.
2.46 Ways to Shrink Intervals2.46 Ways to Shrink Intervals2.46 Ways to Shrink Intervals2.46 Ways to Shrink IntervalsThere are several basic ways to shrink an interval:
• Lower the top note.• Raise the bottom note.• Lower the top note and raise the bottom note (this works best for wide skips).
To shrink an interval you can lower the top note:
Example 2.46 - Shrinking an interval, top note down
Or you can raise the bottom note:
Example 2.46a - Shrinking an interval, end of a motif
With wider intervals, you can raise the bottom note and lower the top note each time theskip repeats. This shrinks the interval faster and adds variety.
Example 2.46c - Shrinking an interval: bottom note up, top note down
���Try It: Shrinking IntervalsDevelop the motif below several times, using different shrinking intervals.
Example 2.46d - Practice example for shrinking intervals
���Exercise 2.46 Shrinking Intervals
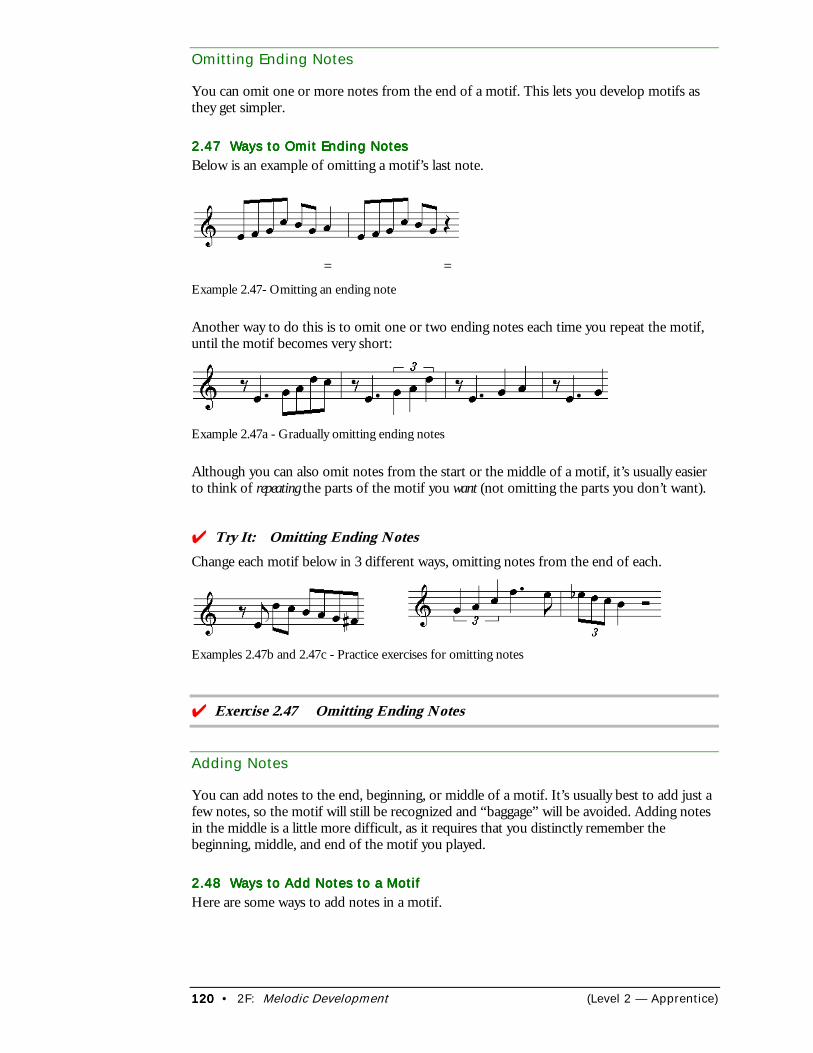
120120120120 • 2F: Melodic Development (Level 2 — Apprentice)
Omitting Ending Notes
You can omit one or more notes from the end of a motif. This lets you develop motifs asthey get simpler.
2.47 Ways to Omit Ending Notes2.47 Ways to Omit Ending Notes2.47 Ways to Omit Ending Notes2.47 Ways to Omit Ending NotesBelow is an example of omitting a motif’s last note.
= =Example 2.47- Omitting an ending note
Another way to do this is to omit one or two ending notes each time you repeat the motif,until the motif becomes very short:
Example 2.47a - Gradually omitting ending notes
Although you can also omit notes from the start or the middle of a motif, it’s usually easierto think of repeating the parts of the motif you want (not omitting the parts you don’t want).
���Try It: Omitting Ending NotesChange each motif below in 3 different ways, omitting notes from the end of each.
Examples 2.47b and 2.47c - Practice exercises for omitting notes
���Exercise 2.47 Omitting Ending Notes
Adding Notes
You can add notes to the end, beginning, or middle of a motif. It’s usually best to add just afew notes, so the motif will still be recognized and “baggage” will be avoided. Adding notesin the middle is a little more difficult, as it requires that you distinctly remember thebeginning, middle, and end of the motif you played.
2.48 Ways to Add Notes to a Motif2.48 Ways to Add Notes to a Motif2.48 Ways to Add Notes to a Motif2.48 Ways to Add Notes to a MotifHere are some ways to add notes in a motif.
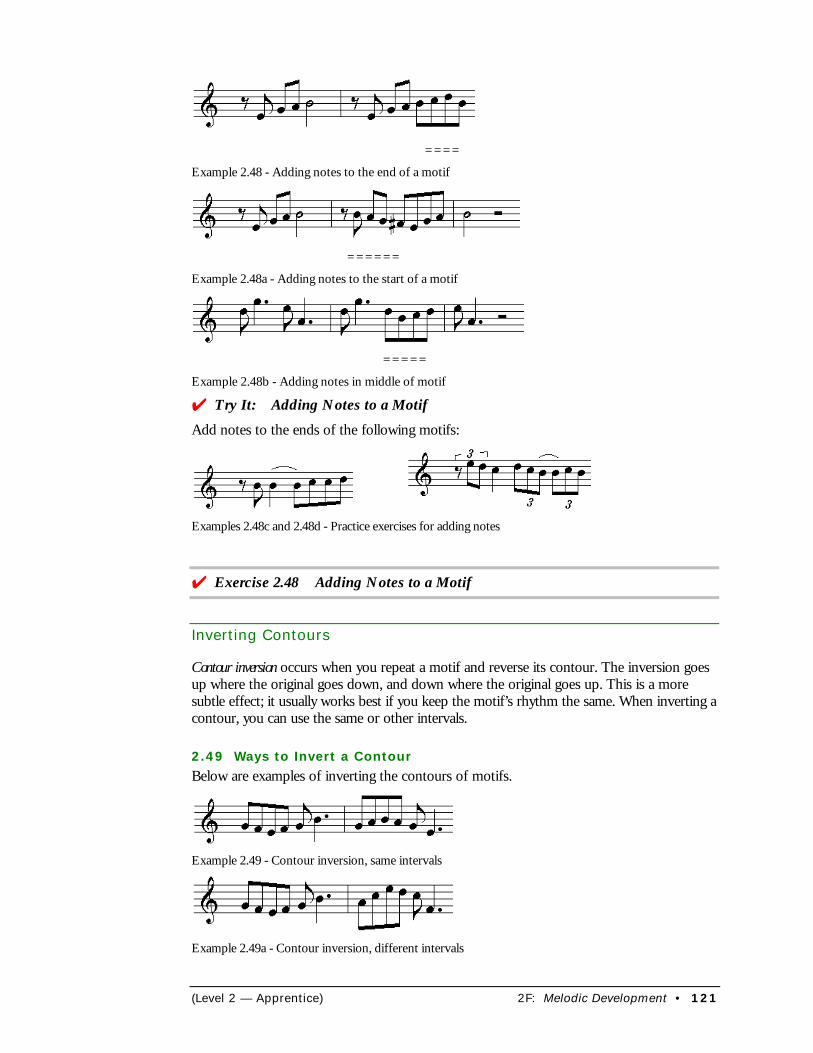
(Level 2 — Apprentice) 2F: Melodic Development • 121
====
Example 2.48 - Adding notes to the end of a motif
======
Example 2.48a - Adding notes to the start of a motif
=====
Example 2.48b - Adding notes in middle of motif
4 Try It: Adding Notes to a Motif
Add notes to the ends of the following motifs:
Examples 2.48c and 2.48d - Practice exercises for adding notes
4 Exercise 2.48 Adding Notes to a Motif
Inverting Contours
Contour inversion occurs when you repeat a motif and reverse its contour. The inversion goesup where the original goes down, and down where the original goes up. This is a moresubtle effect; it usually works best if you keep the motif’s rhythm the same. When inverting acontour, you can use the same or other intervals.
2.49 Ways to Invert a ContourBelow are examples of inverting the contours of motifs.
Example 2.49 - Contour inversion, same intervals
Example 2.49a - Contour inversion, different intervals
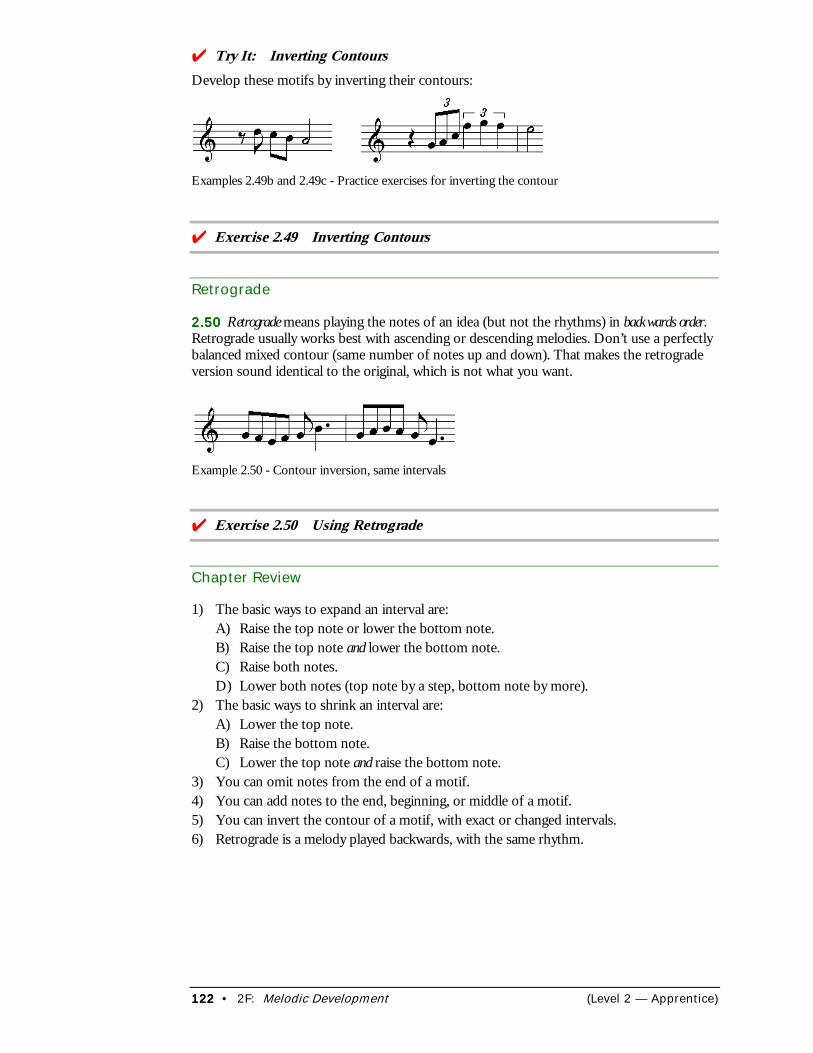
122122122122 • 2F: Melodic Development (Level 2 — Apprentice)
���Try It: Inverting ContoursDevelop these motifs by inverting their contours:
Examples 2.49b and 2.49c - Practice exercises for inverting the contour
���Exercise 2.49 Inverting Contours
Retrograde
2.502.502.502.50 Retrograde means playing the notes of an idea (but not the rhythms) in backwards order.Retrograde usually works best with ascending or descending melodies. Don’t use a perfectlybalanced mixed contour (same number of notes up and down). That makes the retrogradeversion sound identical to the original, which is not what you want.
Example 2.50 - Contour inversion, same intervals
���Exercise 2.50 Using Retrograde
Chapter Review
1) The basic ways to expand an interval are:A) Raise the top note or lower the bottom note.B) Raise the top note and lower the bottom note.C) Raise both notes.D) Lower both notes (top note by a step, bottom note by more).
2) The basic ways to shrink an interval are:A) Lower the top note.B) Raise the bottom note.C) Lower the top note and raise the bottom note.
3) You can omit notes from the end of a motif.4) You can add notes to the end, beginning, or middle of a motif.5) You can invert the contour of a motif, with exact or changed intervals.6) Retrograde is a melody played backwards, with the same rhythm.
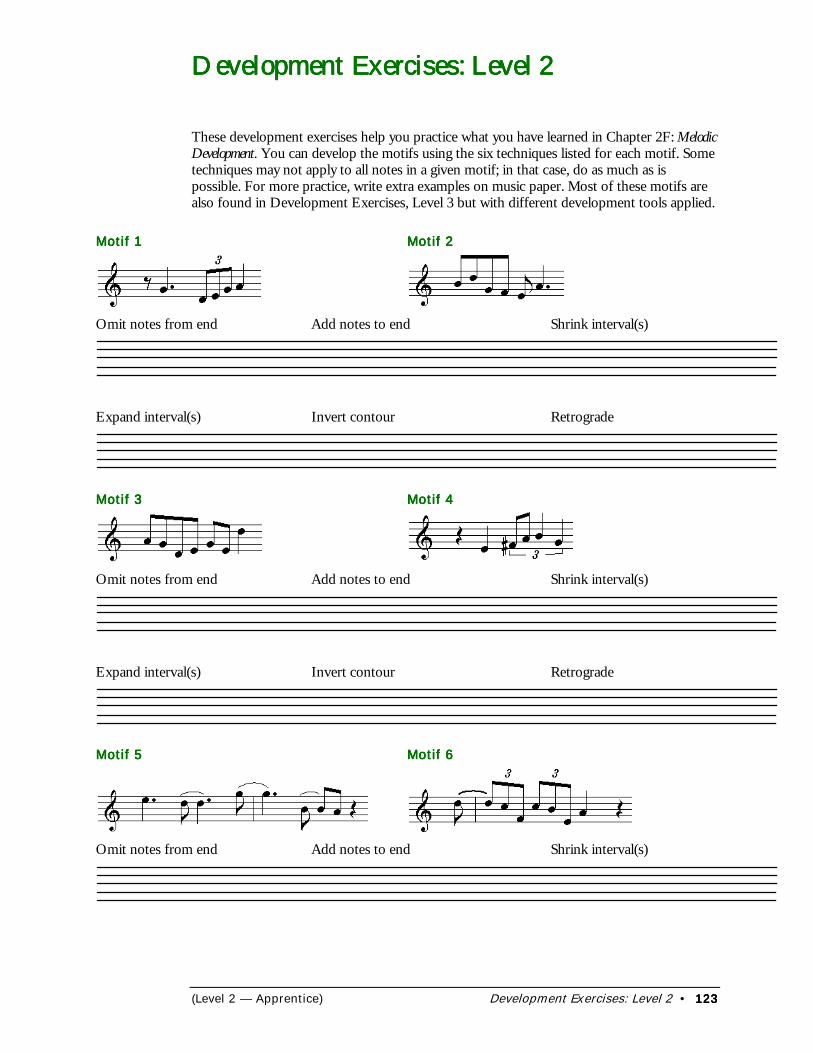
(Level 2 — Apprentice) Development Exercises: Level 2 • 123123123123
Development Exercises: Level 2Development Exercises: Level 2Development Exercises: Level 2Development Exercises: Level 2
These development exercises help you practice what you have learned in Chapter 2F: MelodicDevelopment. You can develop the motifs using the six techniques listed for each motif. Sometechniques may not apply to all notes in a given motif; in that case, do as much as ispossible. For more practice, write extra examples on music paper. Most of these motifs arealso found in Development Exercises, Level 3 but with different development tools applied.
Motif 1Motif 1Motif 1Motif 1 Motif 2Motif 2Motif 2Motif 2
Omit notes from end Add notes to end Shrink interval(s)
Expand interval(s) Invert contour Retrograde
Motif 3Motif 3Motif 3Motif 3 Motif 4Motif 4Motif 4Motif 4
Omit notes from end Add notes to end Shrink interval(s)
Expand interval(s) Invert contour Retrograde
Motif 5Motif 5Motif 5Motif 5 Motif 6Motif 6Motif 6Motif 6
Omit notes from end Add notes to end Shrink interval(s)
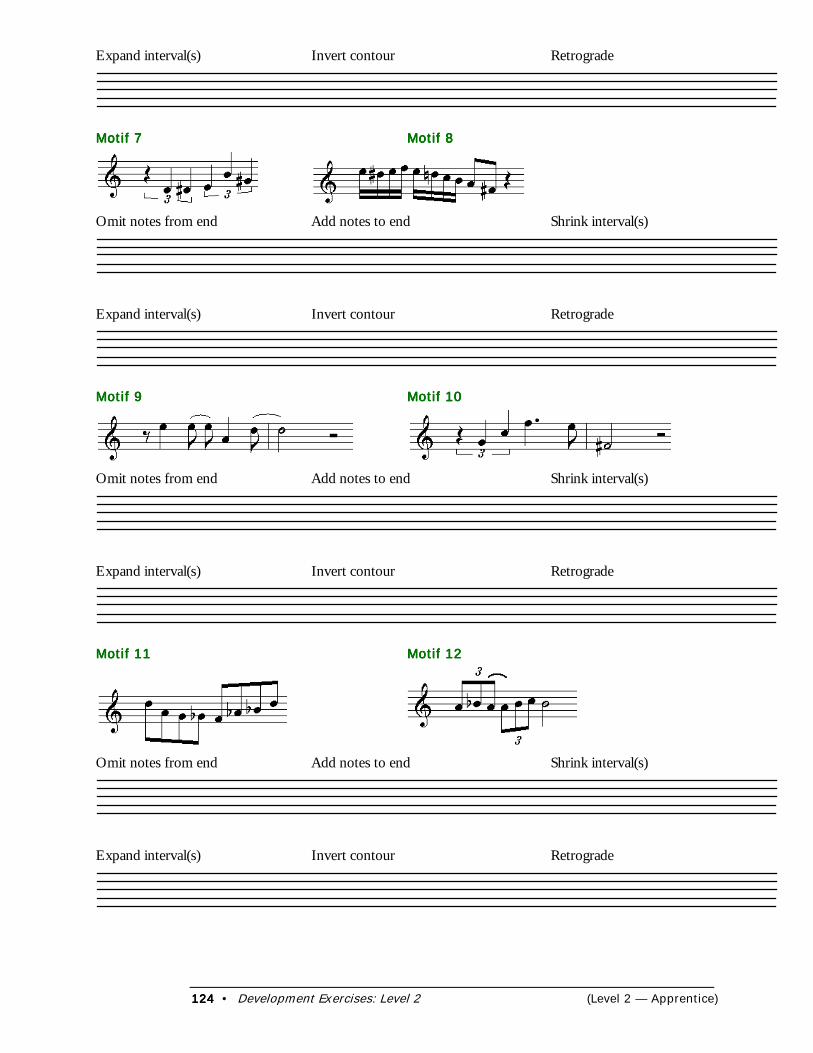
124124124124 • Development Exercises: Level 2 (Level 2 — Apprentice)
Expand interval(s) Invert contour Retrograde
Motif 7Motif 7Motif 7Motif 7 Motif 8Motif 8Motif 8Motif 8
Omit notes from end Add notes to end Shrink interval(s)
Expand interval(s) Invert contour Retrograde
Motif 9Motif 9Motif 9Motif 9 Motif 10Motif 10Motif 10Motif 10
Omit notes from end Add notes to end Shrink interval(s)
Expand interval(s) Invert contour Retrograde
Motif 11Motif 11Motif 11Motif 11 Motif 12Motif 12Motif 12Motif 12
Omit notes from end Add notes to end Shrink interval(s)
Expand interval(s) Invert contour Retrograde
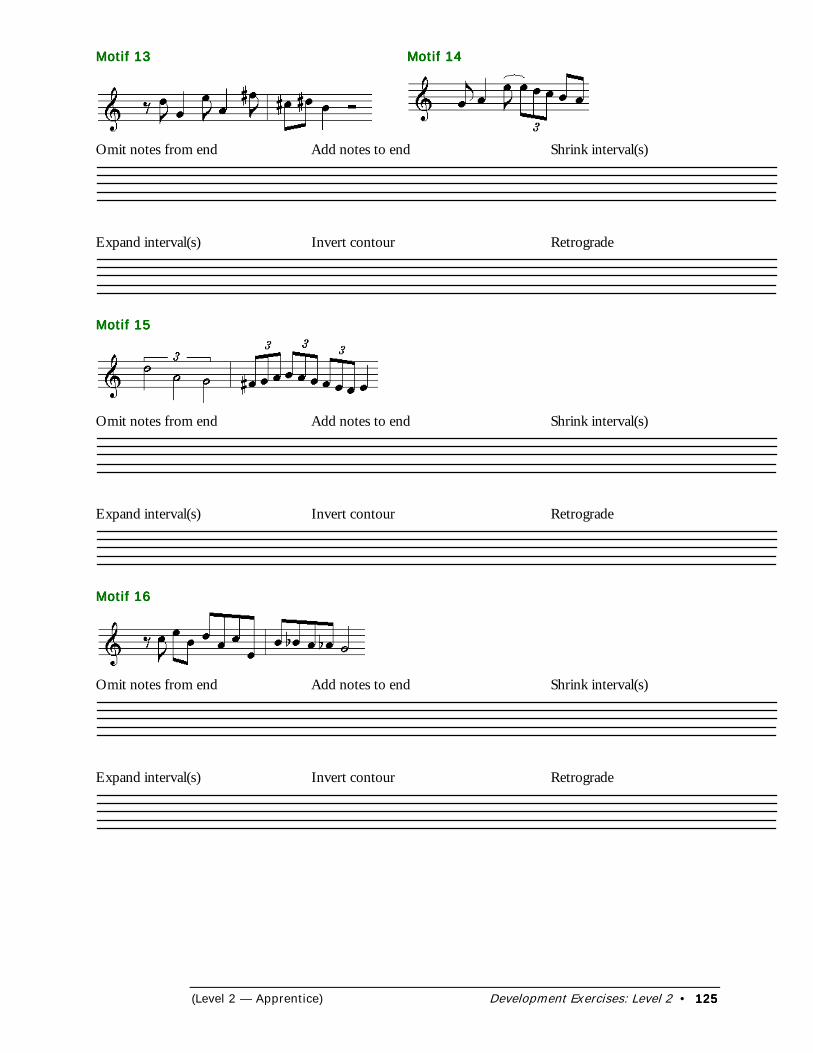
(Level 2 — Apprentice) Development Exercises: Level 2 • 125125125125
Motif 13Motif 13Motif 13Motif 13 Motif Motif Motif Motif 14141414
Omit notes from end Add notes to end Shrink interval(s)
Expand interval(s) Invert contour Retrograde
Motif 15Motif 15Motif 15Motif 15
Omit notes from end Add notes to end Shrink interval(s)
Expand interval(s) Invert contour Retrograde
Motif 16Motif 16Motif 16Motif 16
Omit notes from end Add notes to end Shrink interval(s)
Expand interval(s) Invert contour Retrograde

126126126126 • 2G: Tune Forms (Level 2 — Apprentice)
2G: Tune Forms2G: Tune Forms2G: Tune Forms2G: Tune Forms
In this chapter you’ll learn about:
• Learning the Form of the Tune• AABA Form• Other Common Tune Forms
ecognizing the basic form of a tune helps you learn jazz standards more quickly andreliably. It also helps you keep your place in a solo, following the chords accuratelywithout getting lost in the tune.
Learning the Form of the Tune
Almost every jazz tune has the following elements, in one way or another:
• Introduction (not part of the main progression)• Main melody (A section)• Contrasting melody or bridge (B section)• Solos that repeat the A and B sections with improvisation instead of the original melody• Ending (return of main melody, sometimes a coda).
To improvise successfully, you must always know where you are in the form of the tune atany moment. This helps you play the correct chord changes and prepares you for newsections in the tune. While another player is soloing, you can hum the original melody of thetune to arrive at each new tune section at the correct bar (especially helpful in drum solos).
2.51 Seeing the Tune Form2.51 Seeing the Tune Form2.51 Seeing the Tune Form2.51 Seeing the Tune FormA lead sheet contains the melody and chords for the tune you’re playing. As you examine alead sheet, you can usually find the form of the tune by looking for common “road signs”(such as double barlines, repeats, D.C., and D.S. al Coda) that define the sections.
In the sample tune below, the form is A A B C. Each new section follows a double bar.
Cm7 | F7 | BbMa7 | EbMa7 |
Am7b5 | D7 | Gm7 | •/• : ||
Am7b5 | D7 | Gm7 | •/• |
Cm7 | F7 | BbMa7 | •/• ||
Am7b5 | D7 | Gm7 Gb7 | Fm7 E7 |
Eb7 | D7b9 | Gm | •/• ||
Example 2.51 - “Autumn Leaflets” tune with A A B C form
R
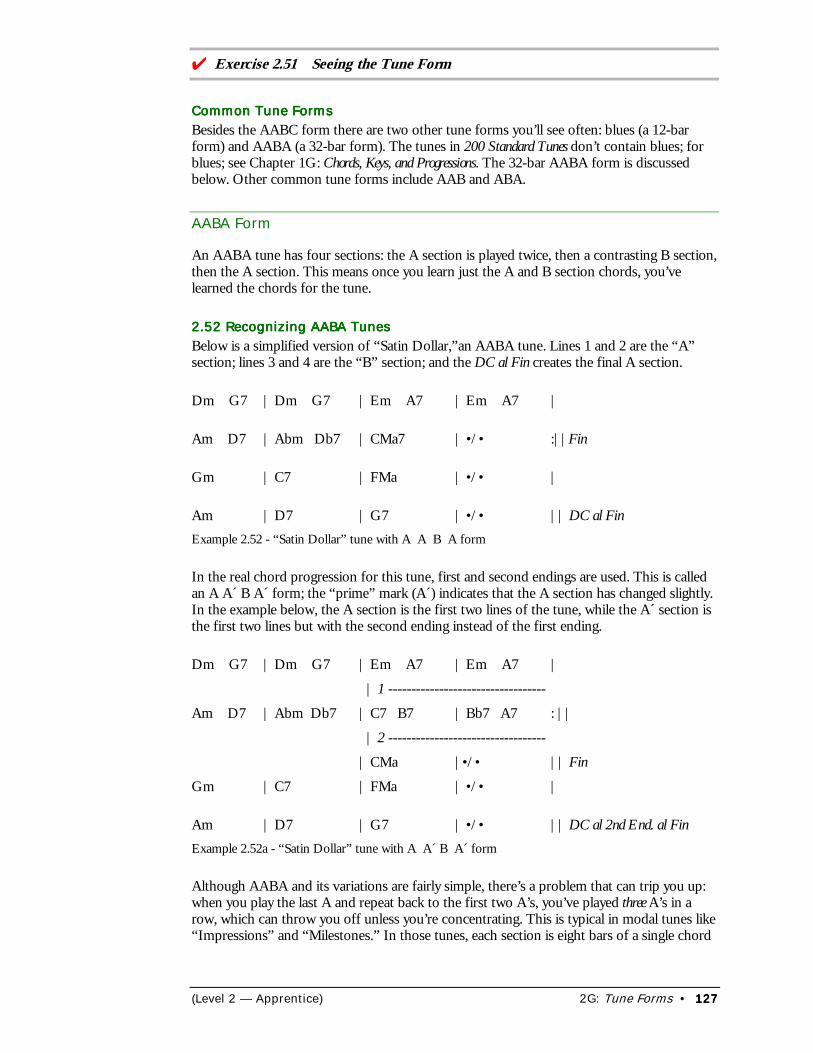
(Level 2 — Apprentice) 2G: Tune Forms • 127127127127
���Exercise 2.51 Seeing the Tune Form
Common Tune FormsCommon Tune FormsCommon Tune FormsCommon Tune FormsBesides the AABC form there are two other tune forms you’ll see often: blues (a 12-barform) and AABA (a 32-bar form). The tunes in 200 Standard Tunes don’t contain blues; forblues; see Chapter 1G: Chords, Keys, and Progressions. The 32-bar AABA form is discussedbelow. Other common tune forms include AAB and ABA.
AABA Form
An AABA tune has four sections: the A section is played twice, then a contrasting B section,then the A section. This means once you learn just the A and B section chords, you’velearned the chords for the tune.
2.52 Recognizing AABA Tunes2.52 Recognizing AABA Tunes2.52 Recognizing AABA Tunes2.52 Recognizing AABA TunesBelow is a simplified version of “Satin Dollar,”an AABA tune. Lines 1 and 2 are the “A”section; lines 3 and 4 are the “B” section; and the DC al Fin creates the final A section.
Dm G7 | Dm G7 | Em A7 | Em A7 |
Am D7 | Abm Db7 | CMa7 | •/• :||Fin
Gm | C7 | FMa | •/• |
Am | D7 | G7 | •/• || DC al FinExample 2.52 - “Satin Dollar” tune with A A B A form
In the real chord progression for this tune, first and second endings are used. This is calledan A A´ B A´ form; the “prime” mark (A´) indicates that the A section has changed slightly.In the example below, the A section is the first two lines of the tune, while the A´ section isthe first two lines but with the second ending instead of the first ending.
Dm G7 | Dm G7 | Em A7 | Em A7 |
| 1 ----------------------------------
Am D7 | Abm Db7 | C7 B7 | Bb7 A7 : ||
| 2 ----------------------------------
| CMa |•/• || Fin
Gm | C7 | FMa | •/• |
Am | D7 | G7 | •/• || DC al 2nd End. al FinExample 2.52a - “Satin Dollar” tune with A A´ B A´ form
Although AABA and its variations are fairly simple, there’s a problem that can trip you up:when you play the last A and repeat back to the first two A’s, you’ve played three A’s in arow, which can throw you off unless you’re concentrating. This is typical in modal tunes like“Impressions” and “Milestones.” In those tunes, each section is eight bars of a single chord
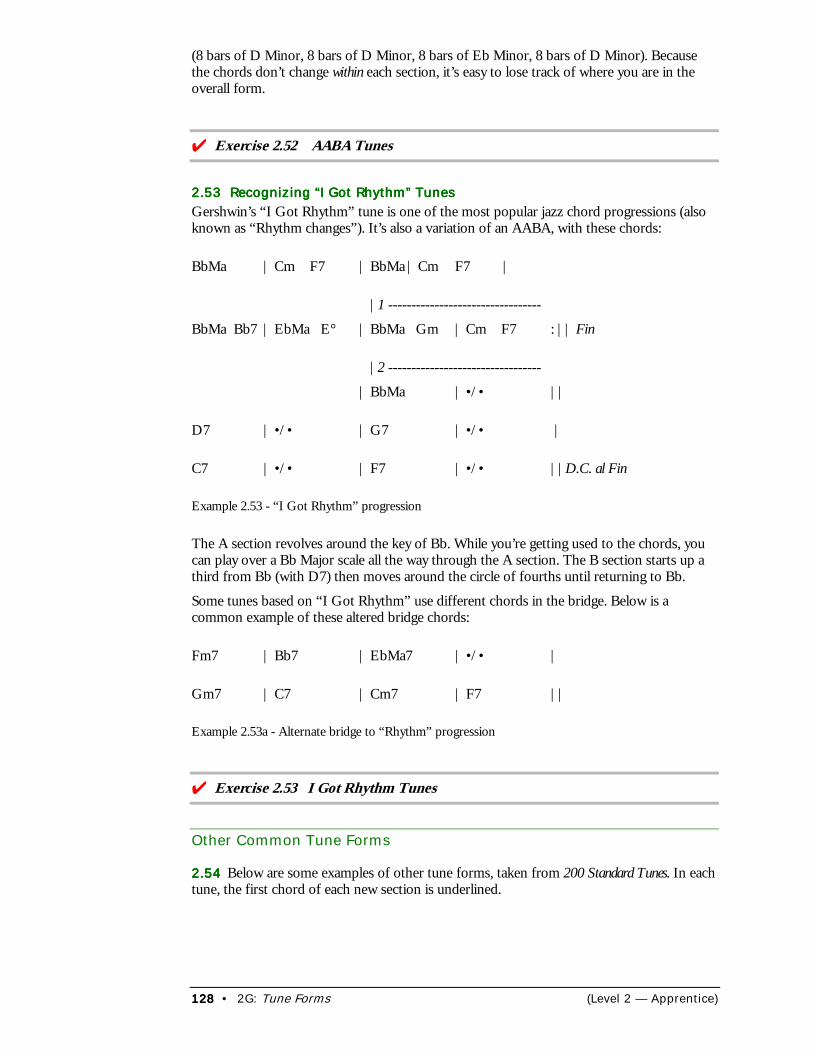
128128128128 • 2G: Tune Forms (Level 2 — Apprentice)
(8 bars of D Minor, 8 bars of D Minor, 8 bars of Eb Minor, 8 bars of D Minor). Becausethe chords don’t change within each section, it’s easy to lose track of where you are in theoverall form.
���Exercise 2.52 AABA Tunes
2.53 Recognizing “I Got Rhythm” Tunes2.53 Recognizing “I Got Rhythm” Tunes2.53 Recognizing “I Got Rhythm” Tunes2.53 Recognizing “I Got Rhythm” TunesGershwin’s “I Got Rhythm” tune is one of the most popular jazz chord progressions (alsoknown as “Rhythm changes”). It’s also a variation of an AABA, with these chords:
BbMa | Cm F7 | BbMa | Cm F7 |
|1 ---------------------------------
BbMa Bb7 | EbMa E° | BbMa Gm | Cm F7 : || Fin
|2 ---------------------------------
| BbMa | •/• ||
D7 | •/• | G7 | •/• |
C7 | •/• | F7 | •/• ||D.C. al Fin
Example 2.53 - “I Got Rhythm” progression
The A section revolves around the key of Bb. While you’re getting used to the chords, youcan play over a Bb Major scale all the way through the A section. The B section starts up athird from Bb (with D7) then moves around the circle of fourths until returning to Bb.
Some tunes based on “I Got Rhythm” use different chords in the bridge. Below is acommon example of these altered bridge chords:
Fm7 | Bb7 | EbMa7 | •/• |
Gm7 | C7 | Cm7 | F7 ||
Example 2.53a - Alternate bridge to “Rhythm” progression
���Exercise 2.53 I Got Rhythm Tunes
Other Common Tune Forms
2.542.542.542.54 Below are some examples of other tune forms, taken from 200 Standard Tunes. In eachtune, the first chord of each new section is underlined.
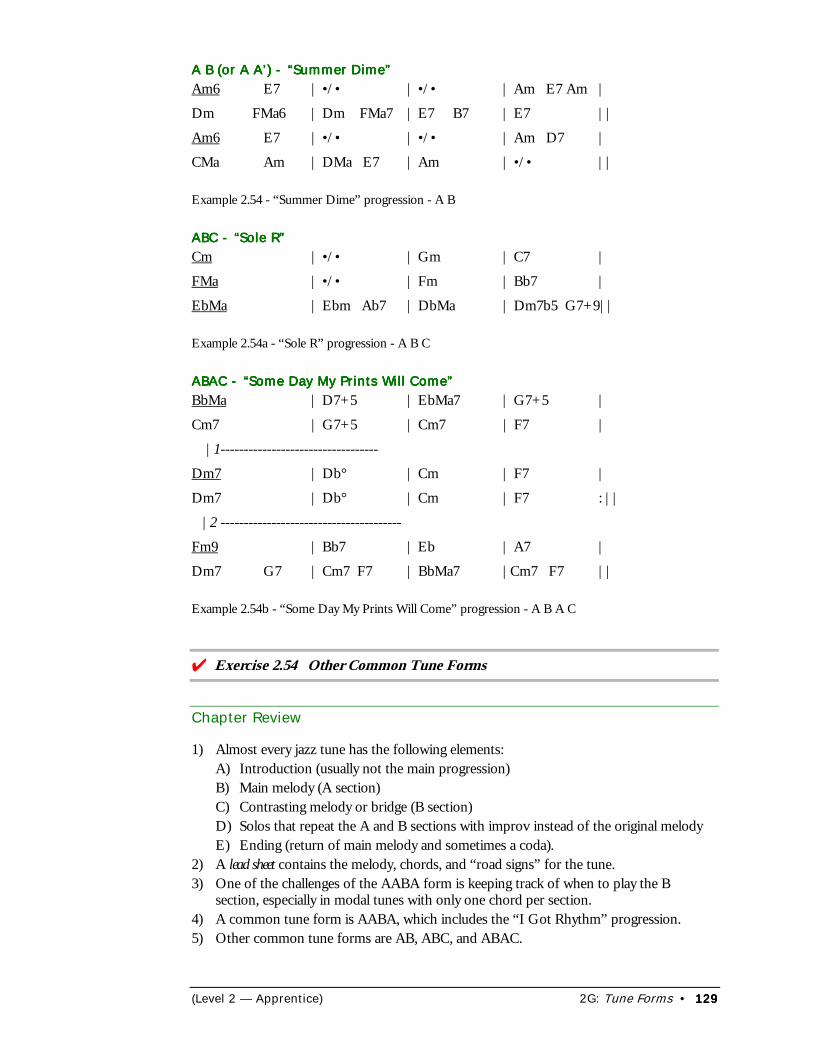
(Level 2 — Apprentice) 2G: Tune Forms • 129129129129
A B (or A A’) - “Summer Dime”A B (or A A’) - “Summer Dime”A B (or A A’) - “Summer Dime”A B (or A A’) - “Summer Dime”Am6 E7 | •/• | •/• | Am E7 Am |
Dm FMa6 | Dm FMa7 | E7 B7 | E7 ||
Am6 E7 | •/• | •/• | Am D7 |
CMa Am | DMa E7 | Am | •/• ||
Example 2.54 - “Summer Dime” progression - A B
ABC - “Sole R”ABC - “Sole R”ABC - “Sole R”ABC - “Sole R”Cm | •/• | Gm | C7 |
FMa | •/• | Fm | Bb7 |
EbMa | Ebm Ab7 | DbMa | Dm7b5 G7+9||
Example 2.54a - “Sole R” progression - A B C
ABAC - “Some Day My Prints Will Come”ABAC - “Some Day My Prints Will Come”ABAC - “Some Day My Prints Will Come”ABAC - “Some Day My Prints Will Come”BbMa | D7+5 | EbMa7 | G7+5 |
Cm7 | G7+5 | Cm7 | F7 |
|1----------------------------------
Dm7 | Db° | Cm | F7 |
Dm7 | Db° | Cm | F7 : ||
|2 ---------------------------------------
Fm9 | Bb7 | Eb | A7 |
Dm7 G7 | Cm7 F7 | BbMa7 |Cm7 F7 ||
Example 2.54b - “Some Day My Prints Will Come” progression - A B A C
���Exercise 2.54 Other Common Tune Forms
Chapter Review
1) Almost every jazz tune has the following elements:A) Introduction (usually not the main progression)B) Main melody (A section)C) Contrasting melody or bridge (B section)D) Solos that repeat the A and B sections with improv instead of the original melodyE) Ending (return of main melody and sometimes a coda).
2) A lead sheet contains the melody, chords, and “road signs” for the tune.3) One of the challenges of the AABA form is keeping track of when to play the B
section, especially in modal tunes with only one chord per section.4) A common tune form is AABA, which includes the “I Got Rhythm” progression.5) Other common tune forms are AB, ABC, and ABAC.
130130130130 • 2H: Preparing Concert Material (Level 2 — Apprentice)
2H: Preparing Concert Material2H: Preparing Concert Material2H: Preparing Concert Material2H: Preparing Concert Material
In this chapter you’ll learn about:
• Handling the Tune Melody• Building Effective Tune Sets• More Variety in Tune Sets• What Is There to Say?
egardless of how well you improvise, your audience will enjoy variety in these areas:
• Tune melodies and arrangements,• The order and length of each tune set,• Your conversations with the audience.
This chapter explains some effective ways to provide that interest, without getting intospecifics of arranging and composing tunes. Listeners who are new to jazz especiallyappreciate an enjoyable framework to your concert material; it makes it that much easier forthem to dig into appreciating your solos.
Handling the Tune Melody
You can add interest to a tune by handling the original melody in a number of ways.
2.55 One Player on Melody2.55 One Player on Melody2.55 One Player on Melody2.55 One Player on MelodyThe most common approach is where one person, usually a horn player, plays the tunemelody. For variety, a rhythm section player can play the melody while a horn plays a softerbackground part (see Melody Plus Background Line below). Or, musicians can take turnsplaying parts of the melody, such as a horn on the A section, piano on the B section, etc.
With slower or medium tunes, the melody player usually has space to add expression to themelody or change a few of the rhythms and pitches. Most often, the changes should besubtle so the original melody stands out.
Melody Plus Background LineMelody Plus Background LineMelody Plus Background LineMelody Plus Background LineAnother player can improvise a background part behind the melody by:
• Playing longer notes that harmonize with the melody. The harmony notes should besofter than the melody and usually in a lower range. You can get started on backgroundlines by using melodic resolution with whole notes (see Chapter 3B: Melodic Connections).
• Playing fills when the melody has long notes or rests. The melody player may also want tofill in some of these places, so be ready to go back to longer notes.
• As a drummer, tuning some drums to key pitches (like 1, 3, and 5 of the home key) fora background.
Two or More Players on MelodyTwo or More Players on MelodyTwo or More Players on MelodyTwo or More Players on MelodyIf two or more players play the melody, they should use the same phrasing and rhythms.
1) For slower tunes with more room for expression, use one melody player.
R
(Level 2 — Apprentice) 2H: Preparing Concert Material • 131131131131
2) For medium-tempo tunes, one player or a melody plus background is best. If the tune isrhythmically complex, use two or more melody players.
3) Fast melodies have less room for expression but can be more technically challenging, sotwo or more melody players can be very effective. Consider having the bass andkeyboard/guitar also double the melody instead of outlining chords.
Also consider using two- or three-part harmonies, or two or more players in unison for someof the melody.
���Exercise 2.55 Handling the Tune Melody
2.56 Ending the Tune2.56 Ending the Tune2.56 Ending the Tune2.56 Ending the TuneThe ending of a tune can be exciting but also risky. You could write out an exact ending,which might be better for more complex endings or for recording situations. Or, your groupcould agree on a basic format for the ending (lower risk, but maybe less creative), or you can“discover” the ending as it comes (higher risk, but often pleasantly surprising). You shouldbalance risk with creativity in endings.
Here are some ways to end your tunes (but don’t overuse any one method):
• Fermatas: Hold the last chord and have one or more players fill. For variety, use fermatason the last 2, 3, or 4 notes, with fills alternating between soloists.
• 1-2-3- Go: Repeat the last few bars of the tune two more times, with a fermata after thethird time.
• Vamp and Fade: Keep repeating the last few bars or several “made-up” bars witharbitrary chords. Fade by getting softer, by playing fewer notes, or by going from stricttempo to a looser tempo.
• Extension: Don’t hold the last chord together, but have one or more soloists fill at theend of the written tune, out of tempo. The fills should be brief and conversational, withan eye towards “feeling” when the tune should end.
• Cadenza: Stop and let one player solo freely, then bring in the last chord on cue. In acadenza, you can vary between rubato and rhythmic playing. (See Cadenzas in Chapter4C: Rhythmic Freedom.)
You can also use segues between tunes, where you go directly from the final notes of onetune to the first notes of the next tune.
���Exercise 2.56 Ending the Tune
Building Effective Tune Sets
2.572.572.572.57 To build an effective set of tunes for a jazz combo performance, follow these steps:
1 Decide the best length for each tune set (such as 45 minutes). See Set Length below.
2 Decide the average length per tune (for example, 6 minutes). This may depend on thestyles of tunes or the number of solos in each tune.
3 Figure the average amount of time between tunes (perhaps 1 minute), and add that tothe average tune length (now 7 minutes per tune).
132132132132 • 2H: Preparing Concert Material (Level 2 — Apprentice)
4 Figure the number of tunes in the set. In this example there’s time for six tunes (7 x 6 =42, which just about hits the 45-minute limit).
5 Select the tunes, balancing different styles and considering the audience’s backgroundand tastes.
6 Put the tunes in order (see Order of Tunes below).
7 Mark one or two tunes as lower priority so they can be skipped if the set is taking toolong (this happens quite frequently). Have one or two backup tunes ready if a certaintune doesn’t seem right to play, or if the set is running ahead of schedule.
8 When appropriate, decide solo order and length.
Set LengthSet LengthSet LengthSet LengthWhen you plan the length of a set, remember:
• The more solos, the longer the tunes will be.• Soloists may decide to stretch out and lengthen solos if things are going well.• You may need to allow time for talk between tunes, such as describing the next tune,
introducing group members, announcing upcoming gigs, etc.• In multiple sets, make each new set a little shorter if necessary to avoid fatigue.
Often, sets tend to be too long, with too many tunes. Your audience is working hard toappreciate your improvisations, so don’t overload their ears. It’s a good idea to prioritizetunes beforehand and keep an eye on the clock during the set. If time is running short,lower-priority tunes can be canceled, or some solos can be dropped from tunes to speedthings up. But if a tune is stretching out and really getting exciting, let it stretch; it’s better tocut a later tune than to stop the excitement when it’s happening.
BalanceBalanceBalanceBalanceUnless your group is emphasizing a certain style, each set should contain a balance of jazzstyles, such as swing, latin, ballads, fusion, etc. (You should lean towards the styles yourgroup plays best or towards styles your audience might be expecting.) Each set should alsocontain a variety of tempos, with a slower tune in each set, a few fast tunes, and the rest ofthe tunes in at medium tempos.
Within a given tune, you can arrange to switch styles one or more times (such as from swingto latin to reggae, etc.). These switches can be pre-planned or spur-of-the-moment.Switching styles can add variety and be very exciting (especially when it’s spontaneous), butavoid forcing a switch or switching too often. For ideas on style switching, see Chapter 4F:Group Interaction.
Order of TunesOrder of TunesOrder of TunesOrder of TunesChoosing a good order for tunes in the set is very important. To do that,
1) Choose strong opening and closing tunes for the set. The first tune should help thegroup get into a good groove, and the closing tune should be energetic or unique insome way.
2) Choose the order for middle tunes:
• Alternate styles between tunes. If two tunes in a row are the same style, alternatetheir tempos.
• Alternate tempos between tunes. If two tunes in a row of the same tempo, alternatetheir styles.
• If a piece is very demanding on a certain player, put that tune earlier in the set.
(Level 2 — Apprentice) 2H: Preparing Concert Material • 133133133133
• If a soloist does several feature pieces, spread them out through the set (or sets).
• If two tunes have similar intros or endings, spread the tunes apart in the lineup.
Choosing tune order can be subjective and sometimes tricky. Be open to the input of thegroup members for the order of tunes. You may decide to scrap or swap tunes in order toget better balance or length to the set.
���Exercise 2.57 Building a Tune Set
More Variety in Tune Sets
These suggestions can add variety to your tune sets:
• Play a mini-tune as a closer after the last tune of the first set. A group member can talkto the audience during the first part of it. The tempo can be fast to pick things up, ormedium to ease down.
• Use a solo introduction or cadenza before the tune.
• Use interludes or segues between some tunes. In an interlude between tunes, one or moreplayers play softly while another player talks to the audience.
• Change the style of an entire tune. For example, play a swing tune as latin or vice versa.
For more ideas on effective tune sets, attend quality live concerts. Take notes on the styles,order, and tempos of tunes in each set; see what makes a good set.
Deciding Solo OrderDeciding Solo OrderDeciding Solo OrderDeciding Solo OrderAvoid these common soloing problems in your group:
• Problem 1: Everyone solos on every tune. This is predictable; it leads to longer tunes orshorter solos (unless your group is a duet or trio).
• Solution 1: Decide beforehand who will solo on each tune. Unless one player is clearlythe improvisation leader, try to get a balance in how much each soloist is heard. For aperformance, make sure the soloist feels comfortable with soloing on a tune. You canalso use “feature” tunes, where only one or two players stretch out.
• Problem 2: The soloists always go in the same order, (horns, then chords, bass, drums).
• Solution 2: For a recording, decide the order of solos beforehand. For a liveperformance, use one of these visual cues to signal you’re taking the next solo:
• Raise your instrument or lean forward a bit.
• Make eye contact with other group members.
If two players want the next solo, work it out quickly. If a player doesn’t want the next solo,he or she should signal that before the solo starts.
What Is There to Say?
Another concert element is what you say about what you play. If it’s a more formal concert,you probably won’t be saying much at all; you might just introduce tunes. In less formal
134134134134 • 2H: Preparing Concert Material (Level 2 — Apprentice)
concerts or even clinics, what you say may be almost as important as what you play. Here aresome suggestions for things you can talk about during informal and interactive concerts.
Informal concerts:
• Announce upcoming gigs.
• Briefly describe tunes before or after they’re played.
• Briefly introduce band members
Interactive concerts or clinics:
• Answer questions from the audience.
• Describe your instruments.
• Talk about the history of your tunes or composers.
• Tell about the group.
Keep the interactions brief and focused so they don’t detract from your concert music.
Chapter Review
1) To build an effective set of tunes for a jazz combo performance, follow these steps:A: Decide the best length for each tune set.
B: Decide the average length for each tune. This depends on the styles of tunes you’ll playor the number of solos in each tune.
C: Figure the average time between tunes and add that to the average tune length.D: Figure the number of tunes in the set. E: Select tunes with a balance of different styles.F: Put the tunes in a balanced performance order.
G: Mark one or two tunes as lower priority so they can be skipped if the set is takinglonger than planned. Have a tune or two ready as backups.
2) Use mini-tunes, cadenzas, segues, interludes, and good solo orders in tune sets.3) Use variety in the number of solos per tune, the order of solos, and the length of solos.4) When appropriate, talk with the audience, especially in informal or interactive concerts.
ExpressionsExpressionsExpressionsExpressions*When a work of art appears to be in advance of its period, it is really the period that has laggedbehind the work of art. Jean Cocteau
*Strange how much you've got to know before you know how little you know. Dr. Samuel Johnson
*These things are good in little measure and evil in large; yeast, salt, and hesitation. The Talmud
*Every man is a volume if you know how to read him. Channing
(Level 2 — Apprentice) 2J: Analyzing Written Solos • 135135135135
2J: Analyzing Written Solos2J: Analyzing Written Solos2J: Analyzing Written Solos2J: Analyzing Written Solos
In this chapter you’ll learn about:
• Analysis Levels• Steps for Analysis• Sample Solos to Analyze
o how do you spot the techniques and ideas of strong improvisers in action? One wayis to analyze transcribed solos (solos written down from recordings). In written solosyou may find gems of development and artistry, or you may find examples of what not
to do.
Note: For a discussion of how to transcribe (write down) recorded solos, see Chapter 4J:Transcribing Solos.
Analysis Levels
With practice, you can learn to translate interesting contours, rhythms, and ideas fromwritten solos into your own ideas. As you analyze, balance the high-level information and low-level information in the solo.
To get the high-level picture of the solo, look at the soloist’s phrases, use of ranges, contourtypes, etc. The idea of high-level is to see the bigger picture of how the musical pieces fittogether. For more information on high-level elements in solos, see Chapter 4A: Soundscapes.
For “low-level” information, look for interesting rhythms, melodic color, expression,chord/scale matching, etc. Be sure that there’s enough evidence in the low-level informationso it’s meaningful.
Steps for Analysis
Here are the steps for analyzing written solos:
1 Select an appropriate written solo.
2 Find the overall tune form and mark the tune sections.
3 Find and mark the tune’s motifs and developments.
4 Mark other interesting spots in the tune that use rhythmic tools, expression, etc.
1: Selecting a Written Solo1: Selecting a Written Solo1: Selecting a Written Solo1: Selecting a Written SoloWhen you select a written solo, look for one that:
• Has something to teach you. There is no sense in studying an unimportant solo; checkthe recording if possible to see how interesting the solo is.
• Is somewhat neat and organized, ideally with clean notation, chord symbols, andmeasure numbers.
• Corresponds to a recording you have. You can check the transcription against therecording and listen as you analyze.
S
136136136136 • 2J: Analyzing Written Solos (Level 2 —- Apprentice)
2: Finding the Form and Phrases2: Finding the Form and Phrases2: Finding the Form and Phrases2: Finding the Form and PhrasesTo map out the form and phrases in the solo, first divide the solo into choruses. Look fordouble-bar lines every eight or 16 measures (or 12 if the tune is a blues). If there are nodouble-bar lines, add them. Then go through the solo and mark where each phrase ends –this helps you find the solo’s motifs.
3: Finding Motifs and Developments3: Finding Motifs and Developments3: Finding Motifs and Developments3: Finding Motifs and DevelopmentsWithin each phrase look for motifs that are repeated with slight contrast or more contrast.Remember that motifs may be joined (no space between). Then compare each original motifand its variation to see if a development took place. Mark any development spots.
4: Finding Other Interesting Spots4: Finding Other Interesting Spots4: Finding Other Interesting Spots4: Finding Other Interesting SpotsLook for interesting rhythms and use of color tones or non-harmonic tones. If you have therecording, check for places where interesting expression is used.
Sample Solos to Analyze
On the next few pages are two written solos from the BRIDJJ CD “Beat the Rats.” Eachsolo is divided across two pages with comments that match measure numbers, as well as CDtimings. To analyze these solos,
1) Cover or hide the comments at the bottoms of pages.
2) Follow the four steps above as you analyze solos.
2) Check your findings against the comments (Note: Some comments refer to laterchapters in The Art of Improvisation).
Chapter Review
1) You can examine high-level and low-level information in written solos.2) To analyze a written solo:
A) Select an appropriate written solo.B) Find the overall form to the tune and mark the tune’s sections.C) Find and mark the motifs and developments.D) Mark other interesting spots in the tune that use rhythmic tools, expression, etc.
ExpressionsExpressionsExpressionsExpressions*Fear always springs from ignorance. Ralph Waldo Emerson
*Man's greatness lies in his power of thought. Bronson Alcott
*You don't have to blow out the other fellow's light to let your own shine. Bernard Baruch
*For in becoming all things to all people, one eventually becomes nothing to everybody, including,and particularly to oneself. Stephen R. Covey
*The best of a book is not the thought which it contains, but the thought which it suggests; just as thecharm of music dwells not in the tones but in the echoes of our hearts. O.W. Holmes
*When one has no design but to speak plain truth, he may say a great deal in a very narrow compass.Steele
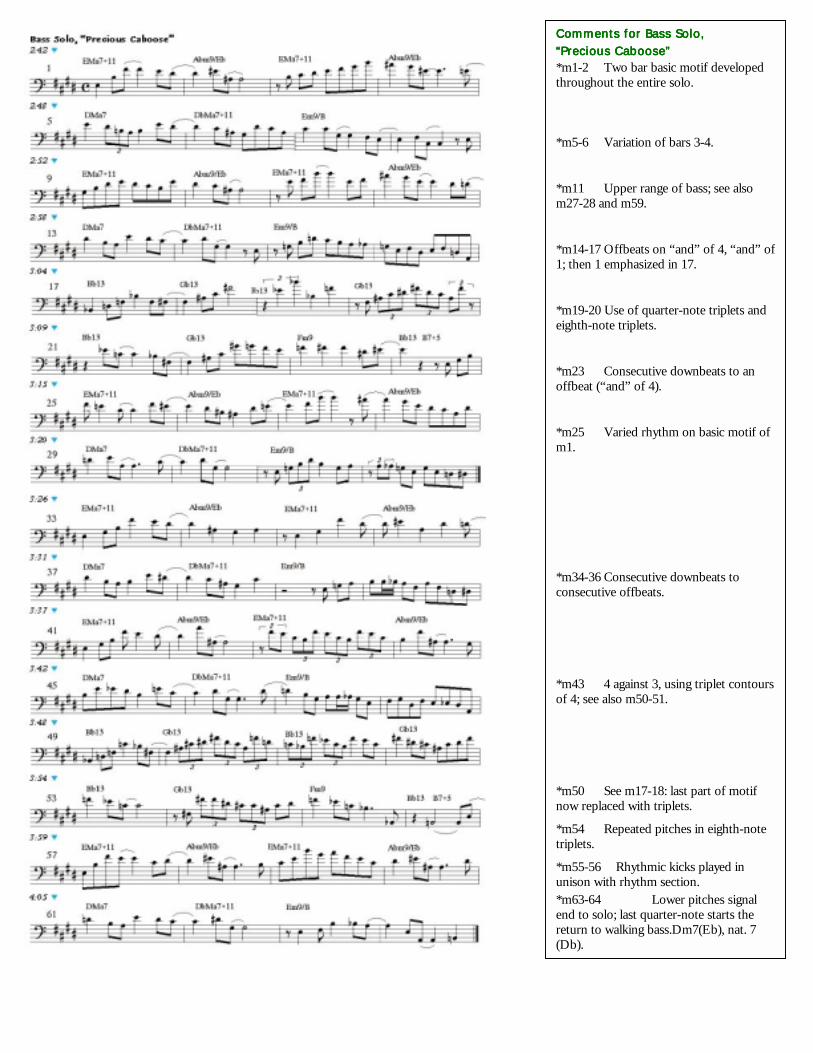
Comments for Bass Solo,Comments for Bass Solo,Comments for Bass Solo,Comments for Bass Solo,“Precious Caboose”“Precious Caboose”“Precious Caboose”“Precious Caboose”*m1-2 Two bar basic motif developedthroughout the entire solo.
*m5-6 Variation of bars 3-4.
*m11 Upper range of bass; see alsom27-28 and m59.
*m14-17 Offbeats on “and” of 4, “and” of1; then 1 emphasized in 17.
*m19-20 Use of quarter-note triplets andeighth-note triplets.
*m23 Consecutive downbeats to anoffbeat (“and” of 4).
*m25 Varied rhythm on basic motif ofm1.
*m34-36 Consecutive downbeats toconsecutive offbeats.
*m43 4 against 3, using triplet contoursof 4; see also m50-51.
*m50 See m17-18: last part of motifnow replaced with triplets.
*m54 Repeated pitches in eighth-notetriplets.
*m55-56 Rhythmic kicks played inunison with rhythm section.*m63-64 Lower pitches signalend to solo; last quarter-note starts thereturn to walking bass.Dm7(Eb), nat. 7(Db).
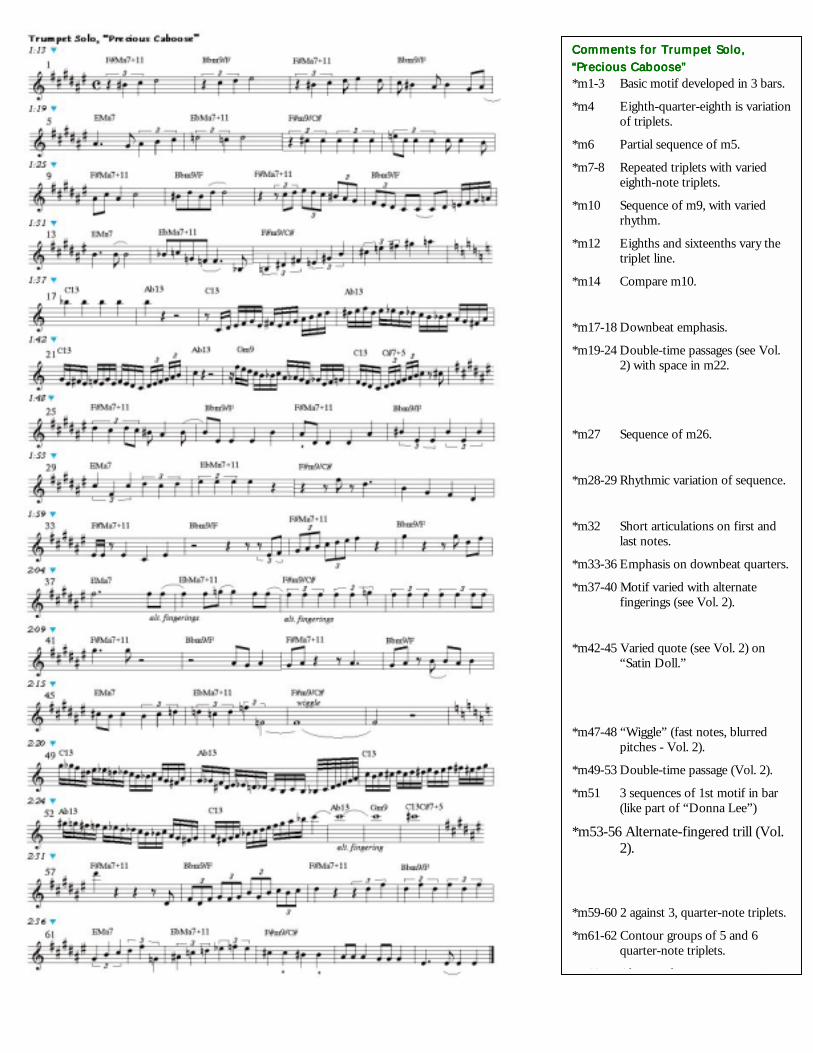
Comments for Trumpet Solo,Comments for Trumpet Solo,Comments for Trumpet Solo,Comments for Trumpet Solo,“Precious Caboose”“Precious Caboose”“Precious Caboose”“Precious Caboose”*m1-3 Basic motif developed in 3 bars.
*m4 Eighth-quarter-eighth is variationof triplets.
*m6 Partial sequence of m5.
*m7-8 Repeated triplets with variedeighth-note triplets.
*m10 Sequence of m9, with variedrhythm.
*m12 Eighths and sixteenths vary thetriplet line.
*m14 Compare m10.
*m17-18 Downbeat emphasis.
*m19-24 Double-time passages (see Vol.2) with space in m22.
*m27 Sequence of m26.
*m28-29 Rhythmic variation of sequence.
*m32 Short articulations on first andlast notes.
*m33-36 Emphasis on downbeat quarters.
*m37-40 Motif varied with alternatefingerings (see Vol. 2).
*m42-45 Varied quote (see Vol. 2) on“Satin Doll.”
*m47-48 “Wiggle” (fast notes, blurredpitches - Vol. 2).
*m49-53 Double-time passage (Vol. 2).
*m51 3 sequences of 1st motif in bar(like part of “Donna Lee”)
*m53-56 Alternate-fingered trill (Vol.2).
*m59-60 2 against 3, quarter-note triplets.
*m61-62 Contour groups of 5 and 6quarter-note triplets.
* 63 Al l i
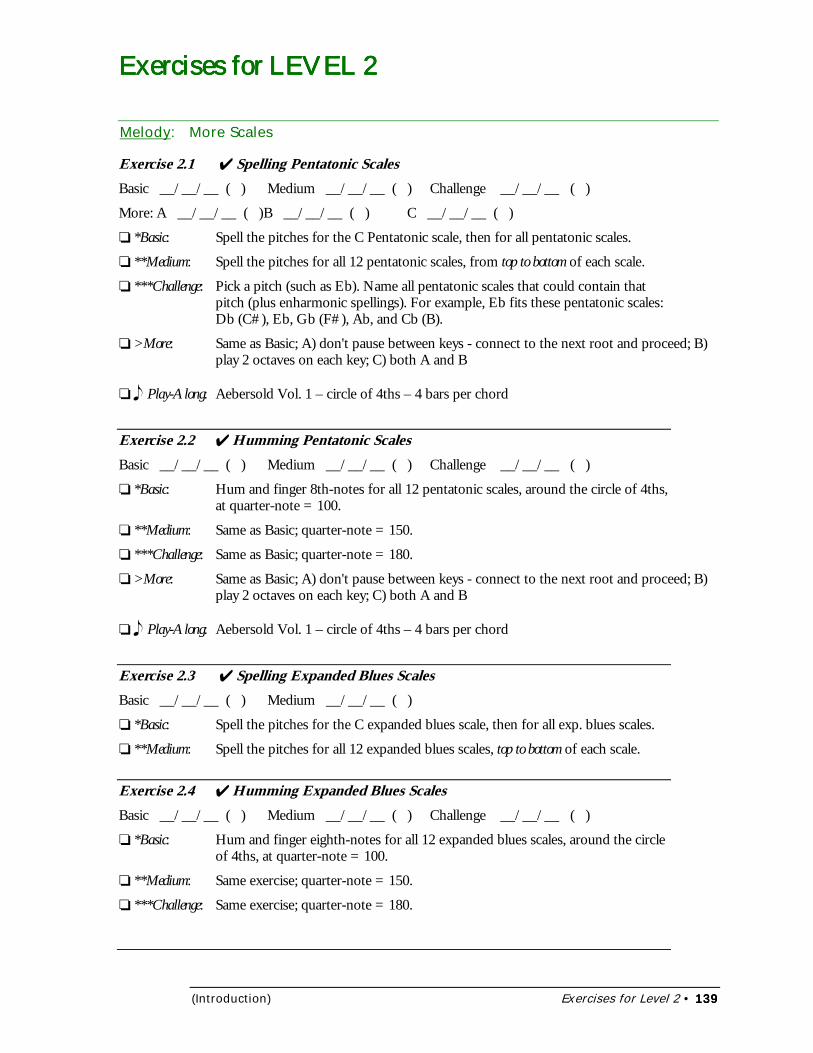
(Introduction) Exercises for Level 2 • 139139139139
Exercises for LEVEL 2Exercises for LEVEL 2Exercises for LEVEL 2Exercises for LEVEL 2
Melody: More Scales
Exercise 2.1 � Spelling Pentatonic ScalesBasic __/__/__ ( ) Medium __/__/__ ( ) Challenge __/__/__ ( )
More: A __/__/__ ( )B __/__/__ ( ) C __/__/__ ( )
❏ *Basic: Spell the pitches for the C Pentatonic scale, then for all pentatonic scales.
❏ **Medium: Spell the pitches for all 12 pentatonic scales, from top to bottom of each scale.
❏ ***Challenge: Pick a pitch (such as Eb). Name all pentatonic scales that could contain thatpitch (plus enharmonic spellings). For example, Eb fits these pentatonic scales:Db (C#), Eb, Gb (F#), Ab, and Cb (B).
❏ >More: Same as Basic; A) don't pause between keys - connect to the next root and proceed; B)play 2 octaves on each key; C) both A and B
❏ ��Play-Along: Aebersold Vol. 1 – circle of 4ths – 4 bars per chord
Exercise 2.2 � Humming Pentatonic ScalesBasic __/__/__ ( ) Medium __/__/__ ( ) Challenge __/__/__ ( )
❏ *Basic: Hum and finger 8th-notes for all 12 pentatonic scales, around the circle of 4ths,at quarter-note = 100.
❏ **Medium: Same as Basic; quarter-note = 150.
❏ ***Challenge: Same as Basic; quarter-note = 180.
❏ >More: Same as Basic; A) don't pause between keys - connect to the next root and proceed; B)play 2 octaves on each key; C) both A and B
❏ ��Play-Along: Aebersold Vol. 1 – circle of 4ths – 4 bars per chord
Exercise 2.3 � Spelling Expanded Blues ScalesBasic __/__/__ ( ) Medium __/__/__ ( )
❏ *Basic: Spell the pitches for the C expanded blues scale, then for all exp. blues scales.
❏ **Medium: Spell the pitches for all 12 expanded blues scales, top to bottom of each scale.
Exercise 2.4 � Humming Expanded Blues ScalesBasic __/__/__ ( ) Medium __/__/__ ( ) Challenge __/__/__ ( )
❏ *Basic: Hum and finger eighth-notes for all 12 expanded blues scales, around the circleof 4ths, at quarter-note = 100.
❏ **Medium: Same exercise; quarter-note = 150.
❏ ***Challenge: Same exercise; quarter-note = 180.
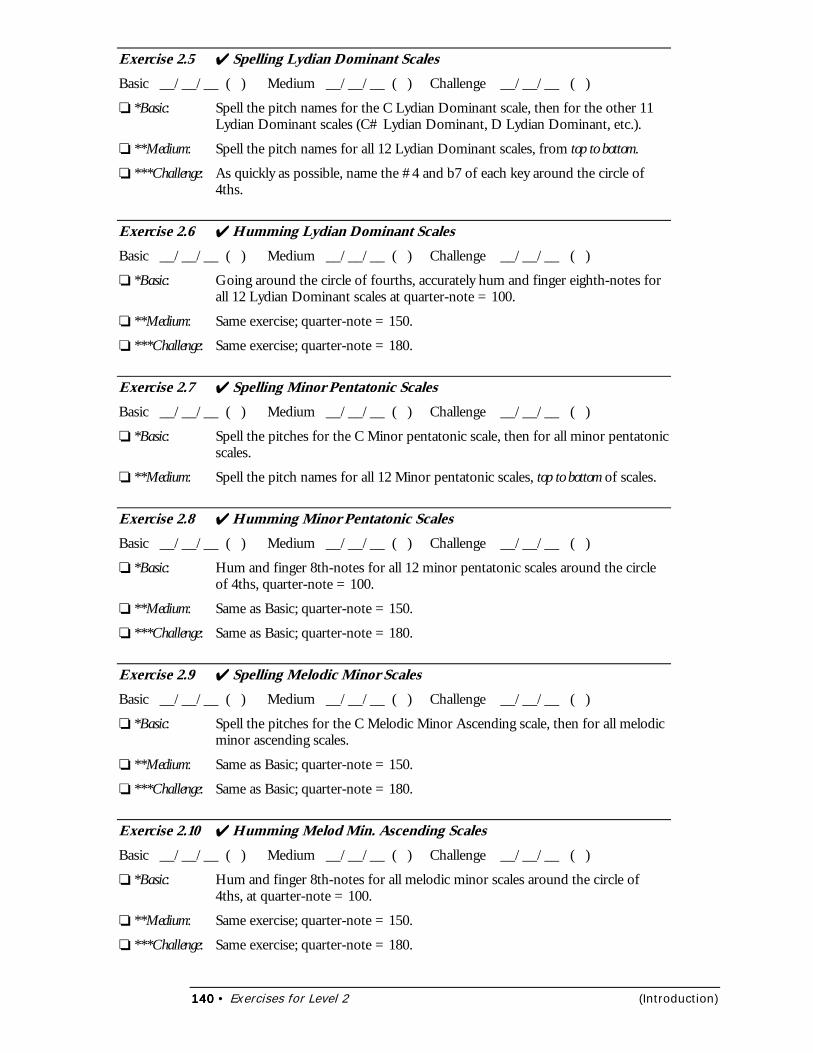
140140140140 • Exercises for Level 2 (Introduction)
Exercise 2.5 � Spelling Lydian Dominant ScalesBasic __/__/__ ( ) Medium __/__/__ ( ) Challenge __/__/__ ( )
❏ *Basic: Spell the pitch names for the C Lydian Dominant scale, then for the other 11Lydian Dominant scales (C# Lydian Dominant, D Lydian Dominant, etc.).
❏ **Medium: Spell the pitch names for all 12 Lydian Dominant scales, from top to bottom.
❏ ***Challenge: As quickly as possible, name the #4 and b7 of each key around the circle of4ths.
Exercise 2.6 � Humming Lydian Dominant ScalesBasic __/__/__ ( ) Medium __/__/__ ( ) Challenge __/__/__ ( )
❏ *Basic: Going around the circle of fourths, accurately hum and finger eighth-notes forall 12 Lydian Dominant scales at quarter-note = 100.
❏ **Medium: Same exercise; quarter-note = 150.
❏ ***Challenge: Same exercise; quarter-note = 180.
Exercise 2.7 � Spelling Minor Pentatonic ScalesBasic __/__/__ ( ) Medium __/__/__ ( ) Challenge __/__/__ ( )
❏ *Basic: Spell the pitches for the C Minor pentatonic scale, then for all minor pentatonicscales.
❏ **Medium: Spell the pitch names for all 12 Minor pentatonic scales, top to bottom of scales.
Exercise 2.8 � Humming Minor Pentatonic ScalesBasic __/__/__ ( ) Medium __/__/__ ( ) Challenge __/__/__ ( )
❏ *Basic: Hum and finger 8th-notes for all 12 minor pentatonic scales around the circleof 4ths, quarter-note = 100.
❏ **Medium: Same as Basic; quarter-note = 150.
❏ ***Challenge: Same as Basic; quarter-note = 180.
Exercise 2.9 � Spelling Melodic Minor ScalesBasic __/__/__ ( ) Medium __/__/__ ( ) Challenge __/__/__ ( )
❏ *Basic: Spell the pitches for the C Melodic Minor Ascending scale, then for all melodicminor ascending scales.
❏ **Medium: Same as Basic; quarter-note = 150.
❏ ***Challenge: Same as Basic; quarter-note = 180.
Exercise 2.10 � Humming Melod Min. Ascending ScalesBasic __/__/__ ( ) Medium __/__/__ ( ) Challenge __/__/__ ( )
❏ *Basic: Hum and finger 8th-notes for all melodic minor scales around the circle of4ths, at quarter-note = 100.
❏ **Medium: Same exercise; quarter-note = 150.
❏ ***Challenge: Same exercise; quarter-note = 180.
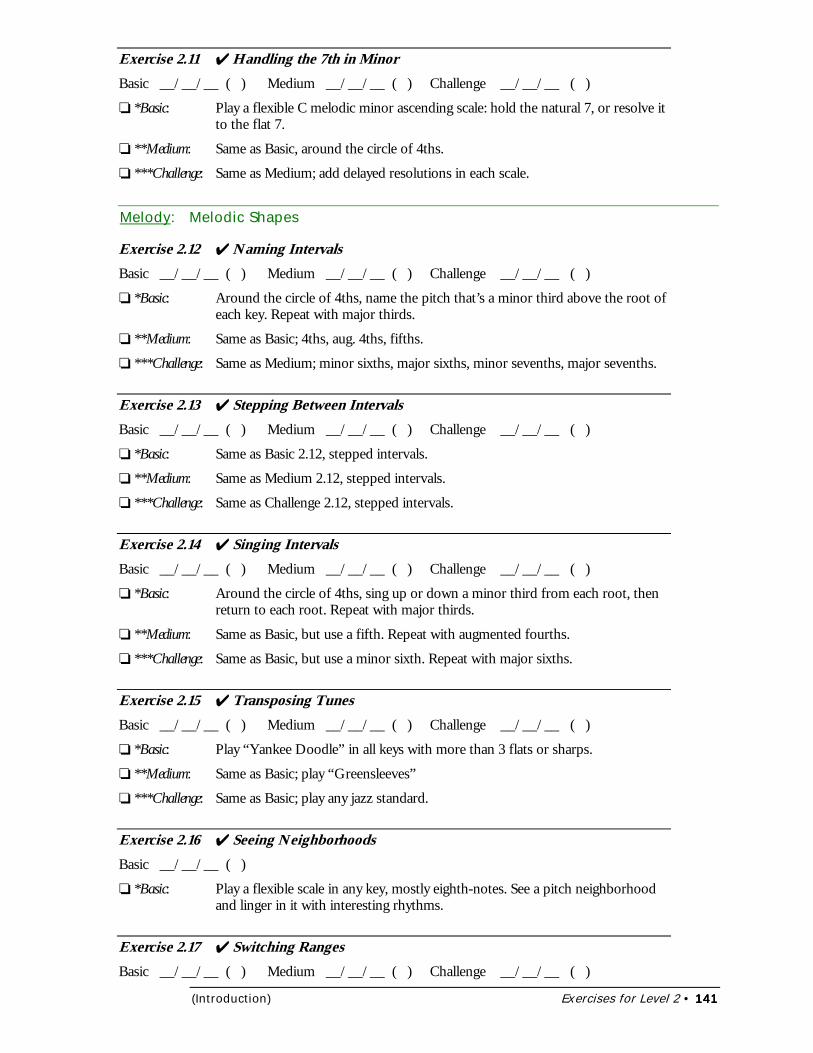
(Introduction) Exercises for Level 2 • 141141141141
Exercise 2.11 � Handling the 7th in MinorBasic __/__/__ ( ) Medium __/__/__ ( ) Challenge __/__/__ ( )
❏ *Basic: Play a flexible C melodic minor ascending scale: hold the natural 7, or resolve itto the flat 7.
❏ **Medium: Same as Basic, around the circle of 4ths.
❏ ***Challenge: Same as Medium; add delayed resolutions in each scale.
Melody: Melodic Shapes
Exercise 2.12 � Naming IntervalsBasic __/__/__ ( ) Medium __/__/__ ( ) Challenge __/__/__ ( )
❏ *Basic: Around the circle of 4ths, name the pitch that’s a minor third above the root ofeach key. Repeat with major thirds.
❏ **Medium: Same as Basic; 4ths, aug. 4ths, fifths.
❏ ***Challenge: Same as Medium; minor sixths, major sixths, minor sevenths, major sevenths.
Exercise 2.13 � Stepping Between IntervalsBasic __/__/__ ( ) Medium __/__/__ ( ) Challenge __/__/__ ( )
❏ *Basic: Same as Basic 2.12, stepped intervals.
❏ **Medium: Same as Medium 2.12, stepped intervals.
❏ ***Challenge: Same as Challenge 2.12, stepped intervals.
Exercise 2.14 � Singing IntervalsBasic __/__/__ ( ) Medium __/__/__ ( ) Challenge __/__/__ ( )
❏ *Basic: Around the circle of 4ths, sing up or down a minor third from each root, thenreturn to each root. Repeat with major thirds.
❏ **Medium: Same as Basic, but use a fifth. Repeat with augmented fourths.
❏ ***Challenge: Same as Basic, but use a minor sixth. Repeat with major sixths.
Exercise 2.15 � Transposing TunesBasic __/__/__ ( ) Medium __/__/__ ( ) Challenge __/__/__ ( )
❏ *Basic: Play “Yankee Doodle” in all keys with more than 3 flats or sharps.
❏ **Medium: Same as Basic; play “Greensleeves”
❏ ***Challenge: Same as Basic; play any jazz standard.
Exercise 2.16 � Seeing NeighborhoodsBasic __/__/__ ( )
❏ *Basic: Play a flexible scale in any key, mostly eighth-notes. See a pitch neighborhoodand linger in it with interesting rhythms.
Exercise 2.17 � Switching RangesBasic __/__/__ ( ) Medium __/__/__ ( ) Challenge __/__/__ ( )
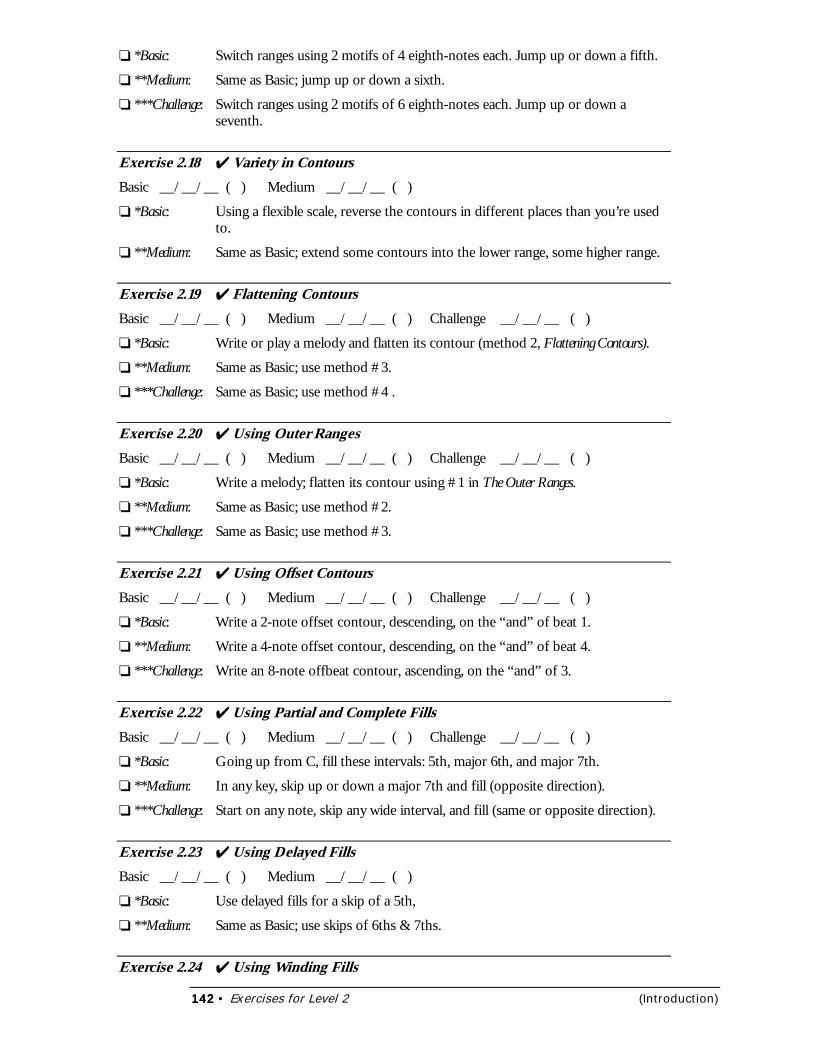
142142142142 • Exercises for Level 2 (Introduction)
❏ *Basic: Switch ranges using 2 motifs of 4 eighth-notes each. Jump up or down a fifth.
❏ **Medium: Same as Basic; jump up or down a sixth.
❏ ***Challenge: Switch ranges using 2 motifs of 6 eighth-notes each. Jump up or down aseventh.
Exercise 2.18 � Variety in ContoursBasic __/__/__ ( ) Medium __/__/__ ( )
❏ *Basic: Using a flexible scale, reverse the contours in different places than you’re usedto.
❏ **Medium: Same as Basic; extend some contours into the lower range, some higher range.
Exercise 2.19 � Flattening ContoursBasic __/__/__ ( ) Medium __/__/__ ( ) Challenge __/__/__ ( )
❏ *Basic: Write or play a melody and flatten its contour (method 2, Flattening Contours).
❏ **Medium: Same as Basic; use method #3.
❏ ***Challenge: Same as Basic; use method #4 .
Exercise 2.20 � Using Outer RangesBasic __/__/__ ( ) Medium __/__/__ ( ) Challenge __/__/__ ( )
❏ *Basic: Write a melody; flatten its contour using #1 in The Outer Ranges.
❏ **Medium: Same as Basic; use method #2.
❏ ***Challenge: Same as Basic; use method #3.
Exercise 2.21 � Using Offset ContoursBasic __/__/__ ( ) Medium __/__/__ ( ) Challenge __/__/__ ( )
❏ *Basic: Write a 2-note offset contour, descending, on the “and” of beat 1.
❏ **Medium: Write a 4-note offset contour, descending, on the “and” of beat 4.
❏ ***Challenge: Write an 8-note offbeat contour, ascending, on the “and” of 3.
Exercise 2.22 � Using Partial and Complete FillsBasic __/__/__ ( ) Medium __/__/__ ( ) Challenge __/__/__ ( )
❏ *Basic: Going up from C, fill these intervals: 5th, major 6th, and major 7th.
❏ **Medium: In any key, skip up or down a major 7th and fill (opposite direction).
❏ ***Challenge: Start on any note, skip any wide interval, and fill (same or opposite direction).
Exercise 2.23 � Using Delayed FillsBasic __/__/__ ( ) Medium __/__/__ ( )
❏ *Basic: Use delayed fills for a skip of a 5th,
❏ **Medium: Same as Basic; use skips of 6ths & 7ths.
Exercise 2.24 � Using Winding Fills

(Introduction) Exercises for Level 2 • 143143143143
Basic __/__/__ ( )
❏ *Basic: Choose any wide interval in a key, then use a winding fill in opposite direction.
Rhythm: Swing Rhythms
Exercise 2.26 � Marking Triplets, Quarters & EighthsBasic __/__/__ ( )
❏ *Basic: Locate the bass solo for “Precious Caboose” in Chapter 2J. In pencil, lightly arktriplets for quarter-notes and rests and eighth-notes and rests.
Exercise 2.27 � Marking Artics for Quarter and 8thsBasic __/__/__ ( )
❏ *Basic: In Basic 2.26, mark articulations for quarter-note and eighth-note values.
Exercise 2.28 � Marking Triplets for Dotted-Quarter Values and LongerBasic __/__/__ ( )
❏ *Basic: Locate the guitar solo for “Where’s Waldis?” in Chapter 3J. Mark triplets fordotted-quarter-note values and longer.
Exercise 2.29 � Marking for Triplet ValuesBasic __/__/__ ( )
❏ *Basic: Locate the trumpet solo for “Deja Blue” in Chapter 3J. Mark triplet values forall 8th-note triplets & quarter-note triplets.
Exercise 2.30 � Using Swing AccentsBasic __/__/__ ( ) Medium __/__/__ ( )
❏ *Basic: Go up and down a one-octave scale of eighth-notes, accenting only the offbeateighth-notes (especially down the scale).
❏ **Medium: Locate the bass solo for “Deja Blue” in Chapter 3J. Mark the accents.
Exercise 2.31 4 Mixing Cool and Swing StylesBasic __/__/__ ( ) Medium __/__/__ ( )
❏ *Basic: With a metronome at quarter-note = 120, improvise eighth-notes up and downany scale, mixing cool and swing styles.
❏ **Medium: Same as Basic; quarter-note = 150.
Exercise 2.32 4 Laying Back and Swing ExceptionsBasic __/__/__ ( ) Medium __/__/__ ( )
❏ *Basic: Play a long flexible scale of 8th-notes, laying back on them slightly.
❏ **Medium: Try a few of these: legato quarter-notes, staccato downbeat 8ths, mixed legato/staccato on triplets, or backwards 8ths.
144144144144 • Exercises for Level 2 (Introduction)
Rhythm: Three and Four
Exercise 2.33 � Playing 3/4 Against 4/4Basic __/__/__ ( ) Medium __/__/__ ( ) Challenge __/__/__ ( )
❏ *Basic: In a 4/4 meter, play a melody that repeats a 3/4 rhythm twice.
❏ **Medium: Same as Basic; start on beat 2 of bar 1.
❏ ***Challenge: Same as Basic; start on an offbeat eighth-note in the first bar.
Exercise 2.34 � Using 3-Note and 6-Note ContoursBasic __/__/__ ( ) Medium __/__/__ ( ) Challenge __/__/__ ( )
❏ *Basic: Repeat an ascending three-note contour consisting of all eighth-notes.
❏ **Medium: Same as Basic; all dotted quarter-notes.
❏ ***Challenge: Same as Medium; use contours of six 8th-notes.
Exercise 2.35 4 Playing Triplet Contours of 2Basic __/__/__ ( ) Medium __/__/__ ( ) Challenge __/__/__ ( )
❏ *Basic: Play a melody with quarter-note-triplets in contour groups of 2.
❏ **Medium: Play a melody with eighth-note-triplets in contour groups of 2.
❏ **Challenge: Combine Basic and Medium in a melody.
Exercise 2.36 � Playing Triplet Contours of 4Basic __/__/__ ( ) Medium __/__/__ ( ) Challenge __/__/__ ( )
❏ *Basic: Play a melody with quarter-note-triplets in contour groups of 4..
❏ **Medium: Play a melody with eighth-note-triplets in contour groups of 4.
❏ **Challenge: Combine Basic and Medium in a melody.
Exercise 2.37 � Playing 4/4 Against 3/4Basic __/__/__ ( ) Medium __/__/__ ( )
❏ *Basic: Repeat a 4/4 rhythm in a 3/4 meter.
❏ **Medium: Same as Basic; use one or more offbeats.
Exercise 2.38 � Playing 4-note Contours in 3/4Basic __/__/__ ( ) Medium __/__/__ ( )
❏ *Basic: Repeat a 4-note contour in a 3/4 meter, using eighth-notes.
❏ **Medium: Same as Basic; offbeat quarter-values.
Exercise 2.39 � Playing 4-note Brackets in 3/4Basic __/__/__ ( ) Medium __/__/__ ( )
❏ *Basic: Repeat a 4-note bracket in a 3/4 meter, using quarter-notes.
(Introduction) Exercises for Level 2 • 145145145145
❏ **Medium: Same as Basic; use a few 8th-notes in each bracket.
Expression: Embellishments
Exercise 2.40 4 Playing TrillsBasic __/__/__ ( ) Medium __/__/__ ( ) Challenge __/__/__ ( )
❏ *Basic: Play a line of 8th-notes; hold a trill on the last note. Accelerate the trill, thendecelerate to quarter-note triplets. Repeat this in new keys and ranges.
❏ **Medium: Same as Basic; to non-harmonic tone.
❏ ***Challenge: Same as Basic or Medium; trill several consecutive half-notes at the end.
Exercise 2.41 � Playing Wider TrillsBasic __/__/__ ( ) Medium __/__/__ ( ) Challenge __/__/__ ( )
❏ *Basic: Same as Basic 2.38; use a wider trill.
❏ **Medium: Same as Medium 2.38; use a wider trill.
❏ ***Challenge: Same as Challenge 2.38; use wider trill.
Exercise 2.42 � Playing Grace NotesBasic __/__/__ ( ) Medium __/__/__ ( )
❏ *Basic: Write a phrase, then add a few stepwise grace notes to it in different spots.
❏ **Medium: Same as Basic; use wider grace notes.
Exercise 2.43 � Playing TurnsBasic __/__/__ ( )
❏ *Basic: Create and write a phrase, then add a few turns in different spots.
Exercise 2.44 � Using Neighbor TonesBasic __/__/__ ( )
❏ *Basic: Create and write a phrase, then add upper and lower neighbor tones.
Development: Melodic Development
Exercise 2.45 � Expanding IntervalsBasic __/__/__ ( ) Medium __/__/__ ( )
❏ *Basic: Create a simple motif and vary it several times, with different expandingintervals.
❏ **Medium: Same as Basic; a more complicated motif.
Exercise 2.46 � Shrinking IntervalsBasic __/__/__ ( ) Medium __/__/__ ( )
❏ *Basic: Create a simple motif and vary it several times, using different shrinkingintervals.
146146146146 • Exercises for Level 2 (Introduction)
❏ **Medium: Same as Basic; a more complicated motif.
Exercise 2.47 � Omitting Ending NotesBasic __/__/__ ( ) Medium __/__/__ ( )
❏ *Basic: Create a simple motif and vary it several times, omitting notes differently.
❏ **Medium: Same as Basic; a more complicated motif.
Exercise 2.48 � Adding Notes to a MotifBasic __/__/__ ( ) Medium __/__/__ ( )
❏ *Basic: Create a simple motif and vary it several times, adding notes differently.
❏ **Medium: Same as Basic; a more complicated motif.
Exercise 2.49 � Inverting ContoursBasic __/__/__ ( ) Medium __/__/__ ( )
❏ *Basic: Create a simple motif and vary it several times by inverting the contour.
❏ **Medium: Same as Basic; a more complicated motif.
Exercise 2.50 � Using RetrogradeBasic __/__/__ ( ) Medium __/__/__ ( )
❏ *Basic: Create a simple motif and vary it several times by playing the contourbackwards.
❏ **Medium: Same as Basic; a more complicated motif.
Chord Progressions: Tune Forms
Exercise 2.51 � Seeing the Tune FormBasic __/__/__ ( ) Medium __/__/__ ( )
❏ *Basic: In 200 Standard Tunes, select a short tune and identify where the differentsections begin and end in the tune.
❏ **Medium: Same as Basic; mark the sections for two other longer tunes.
Exercise 2.52 � AABA TunesBasic __/__/__ ( ) Medium __/__/__ ( )
❏ *Basic: In 200 Standard Tunes, identify all the tunes that are in AABA form. Thencompare and contrast each tune in section lengths and types of progressions.
❏ **Medium: Same as Basic, with tunes in a fake book.
Exercise 2.53 � I Got Rhythm TunesBasic __/__/__ ( ) Medium __/__/__ ( )
❏ *Basic: Write out the chords to I Got Rhythm in a key other than concert Bb.
❏ **Medium: Same as Basic; choose a different key and use an altered bridge section.
(Introduction) Exercises for Level 2 • 147147147147
Exercise 2.54 � Other Common Tune FormsBasic __/__/__ ( ) Medium __/__/__ ( )
❏ *Basic: In 200 Standard Tunes, identify all the tunes that are AB, ABC, or ABAC.
❏ **Medium: Same as Basic, with tunes in a fake book.
Performance: Preparing Concert Material
Exercise 2.55 � Handling the Tune MelodyBasic __/__/__ ( ) Medium __/__/__ ( ) Challenge __/__/__ ( )
❏ *Basic: Select a familiar tune and play long notes that harmonize with the melody.
❏ **Medium: Play fills around the rests of a melody.
❏ ***Challenge: Try two players on melody; switch between unison and backgrounds.
Exercise 2.56 � Ending the TuneBasic __/__/__ ( ) Medium __/__/__ ( ) Challenge __/__/__ ( )
❏ *Basic: Choose one of the 30 Standard Tunes for which you have a lead sheet. TryFermata and 1-2-3-Go methods to end the tune.
❏ **Medium: Same as Basic; try the Vamp and Fade.
❏ ***Challenge: Same as Basic; try the Extension and Cadenza.
Exercise 2.57 � Building a Tune SetBasic __/__/__ ( ) Medium __/__/__ ( ) Challenge __/__/__ ( )
❏ *Basic: Build an effective 30-min. set of tunes.
❏ **Medium: Same as Basic; build a 60-minute set.
❏ ***Challenge: Same as Basic; build two 45-minute sets.
The Art of ImprovisationVersion 1.0 – 8/22/2000
… Creating real-time music through jazz improvisation …
*Level 3: Intermediate*
by Bob TaylorAuthor of Sightreading Jazz, Sightreading Chord Progressions
©2000 Taylor-James Publications
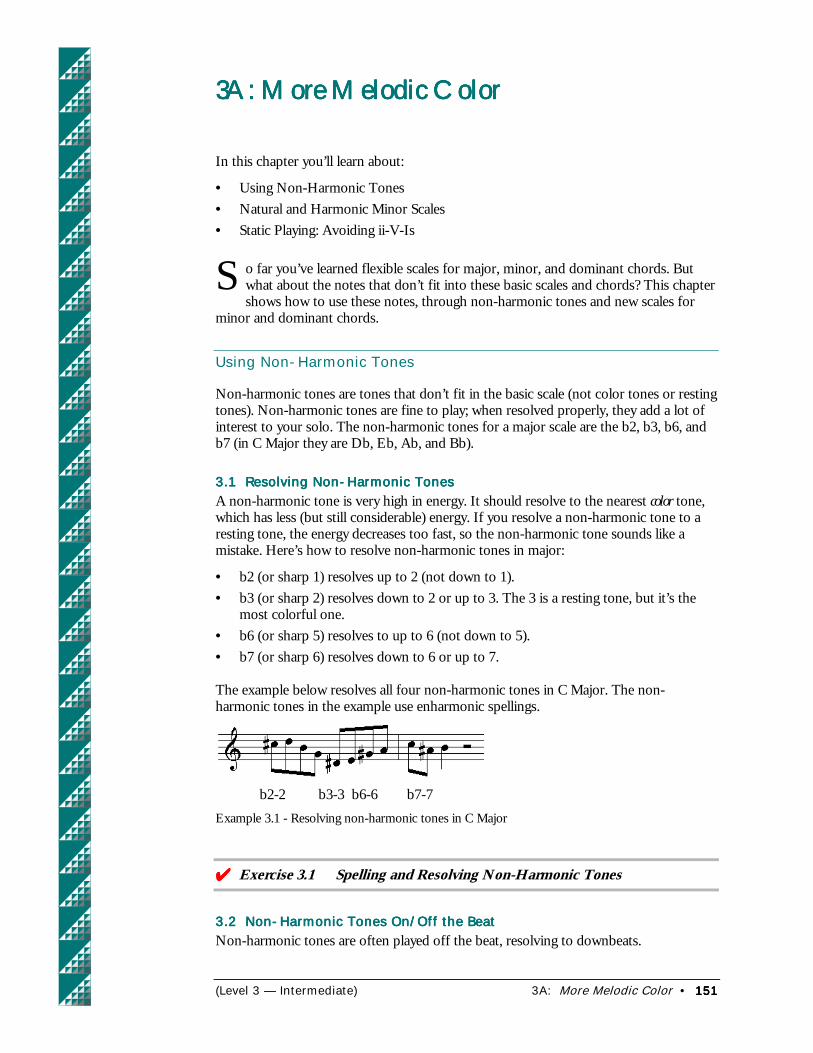
(Level 3 — Intermediate) 3A: More Melodic Color • 151151151151
3A: More Melodic Color3A: More Melodic Color3A: More Melodic Color3A: More Melodic Color
In this chapter you’ll learn about:
• Using Non-Harmonic Tones• Natural and Harmonic Minor Scales• Static Playing: Avoiding ii-V-Is
o far you’ve learned flexible scales for major, minor, and dominant chords. Butwhat about the notes that don’t fit into these basic scales and chords? This chaptershows how to use these notes, through non-harmonic tones and new scales for
minor and dominant chords.
Using Non-Harmonic Tones
Non-harmonic tones are tones that don’t fit in the basic scale (not color tones or restingtones). Non-harmonic tones are fine to play; when resolved properly, they add a lot ofinterest to your solo. The non-harmonic tones for a major scale are the b2, b3, b6, andb7 (in C Major they are Db, Eb, Ab, and Bb).
3.1 Resolving Non-Harmonic Tones3.1 Resolving Non-Harmonic Tones3.1 Resolving Non-Harmonic Tones3.1 Resolving Non-Harmonic TonesA non-harmonic tone is very high in energy. It should resolve to the nearest color tone,which has less (but still considerable) energy. If you resolve a non-harmonic tone to aresting tone, the energy decreases too fast, so the non-harmonic tone sounds like amistake. Here’s how to resolve non-harmonic tones in major:
• b2 (or sharp 1) resolves up to 2 (not down to 1).• b3 (or sharp 2) resolves down to 2 or up to 3. The 3 is a resting tone, but it’s the
most colorful one.• b6 (or sharp 5) resolves to up to 6 (not down to 5).• b7 (or sharp 6) resolves down to 6 or up to 7.
The example below resolves all four non-harmonic tones in C Major. The non-harmonic tones in the example use enharmonic spellings.
b2-2 b3-3 b6-6 b7-7Example 3.1 - Resolving non-harmonic tones in C Major
������
����
��Exercise 3.1 Spelling and Resolving Non-Harmonic Tones
3.2 Non-Harmonic Tones On/Off the Beat3.2 Non-Harmonic Tones On/Off the Beat3.2 Non-Harmonic Tones On/Off the Beat3.2 Non-Harmonic Tones On/Off the BeatNon-harmonic tones are often played off the beat, resolving to downbeats.
S
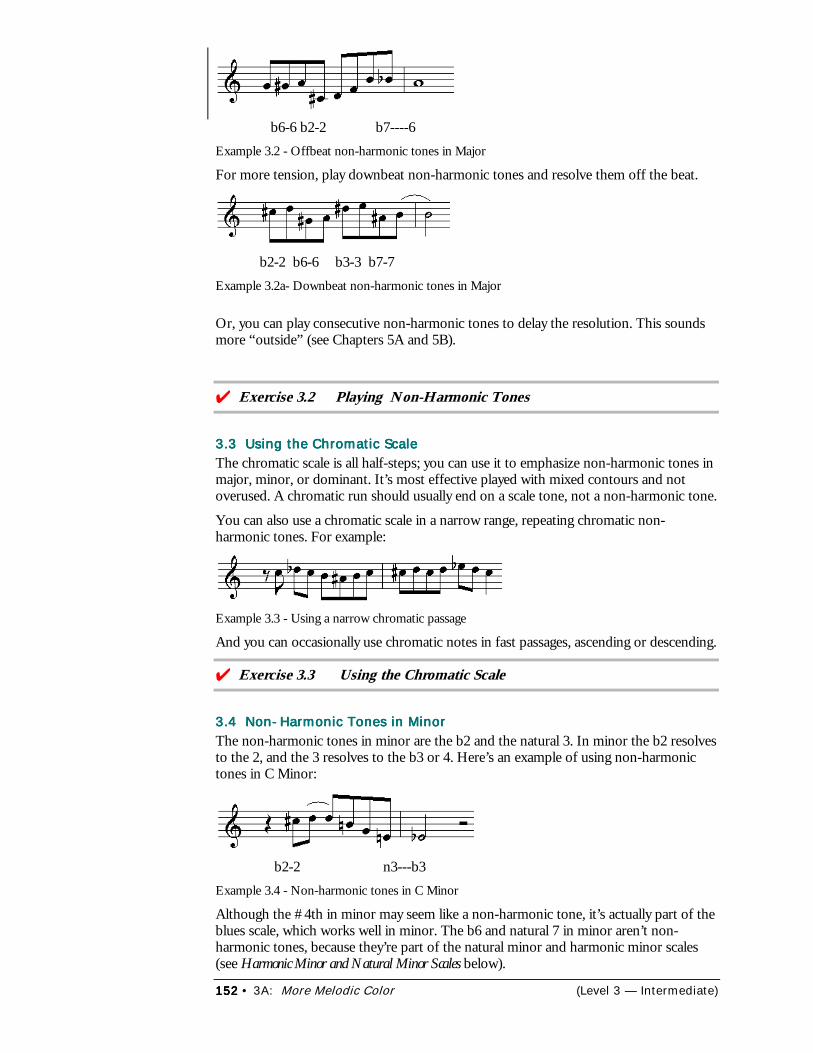
152152152152 • 3A: More Melodic Color (Level 3 — Intermediate)
b6-6 b2-2 b7----6Example 3.2 - Offbeat non-harmonic tones in Major
For more tension, play downbeat non-harmonic tones and resolve them off the beat.
b2-2 b6-6 b3-3 b7-7Example 3.2a- Downbeat non-harmonic tones in Major
Or, you can play consecutive non-harmonic tones to delay the resolution. This soundsmore “outside” (see Chapters 5A and 5B).
�����
�Exercise 3.2 Playing Non-Harmonic Tones
3.3 Using the Chromatic Scale3.3 Using the Chromatic Scale3.3 Using the Chromatic Scale3.3 Using the Chromatic ScaleThe chromatic scale is all half-steps; you can use it to emphasize non-harmonic tones inmajor, minor, or dominant. It’s most effective played with mixed contours and notoverused. A chromatic run should usually end on a scale tone, not a non-harmonic tone.
You can also use a chromatic scale in a narrow range, repeating chromatic non-harmonic tones. For example:
Example 3.3 - Using a narrow chromatic passage
And you can occasionally use chromatic notes in fast passages, ascending or descending.
���Exercise 3.3 Using the Chromatic Scale
3.4 Non-Harmonic Tones in Minor3.4 Non-Harmonic Tones in Minor3.4 Non-Harmonic Tones in Minor3.4 Non-Harmonic Tones in MinorThe non-harmonic tones in minor are the b2 and the natural 3. In minor the b2 resolvesto the 2, and the 3 resolves to the b3 or 4. Here’s an example of using non-harmonictones in C Minor:
b2-2 n3---b3Example 3.4 - Non-harmonic tones in C Minor
Although the #4th in minor may seem like a non-harmonic tone, it’s actually part of theblues scale, which works well in minor. The b6 and natural 7 in minor aren’t non-harmonic tones, because they’re part of the natural minor and harmonic minor scales(see Harmonic Minor and Natural Minor Scales below).
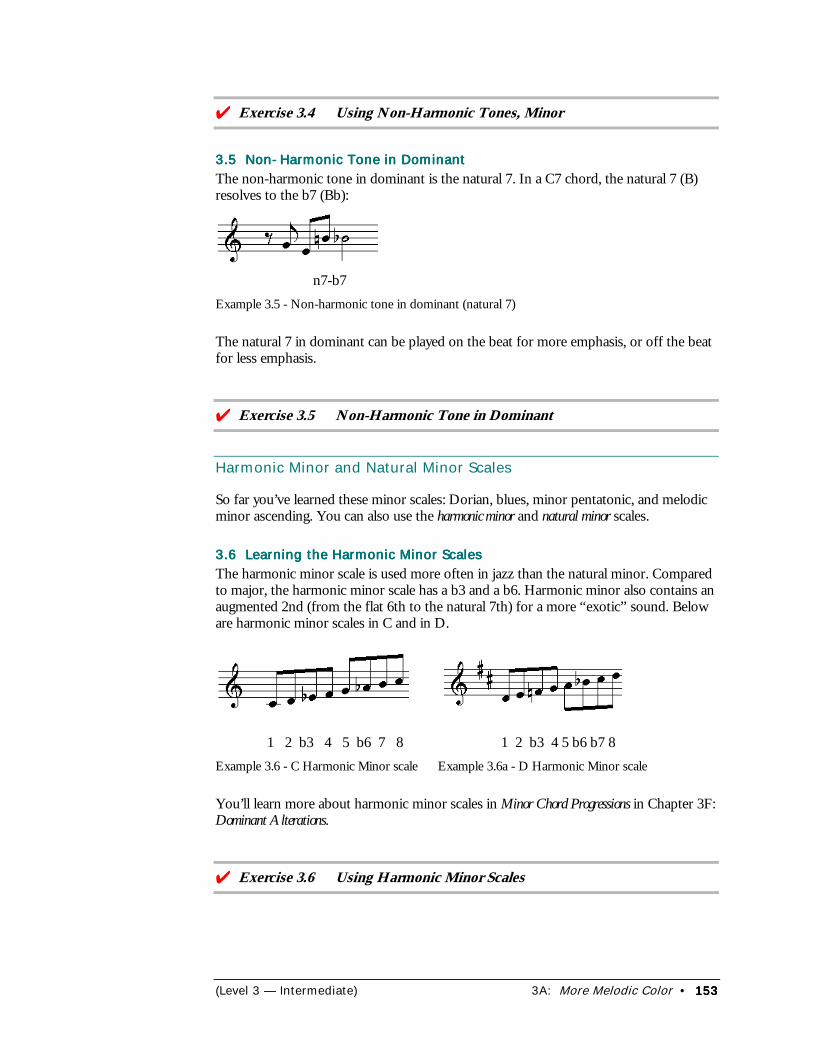
(Level 3 — Intermediate) 3A: More Melodic Color • 153153153153
���Exercise 3.4 Using Non-Harmonic Tones, Minor
3.5 Non-Harmonic Tone in Dominant3.5 Non-Harmonic Tone in Dominant3.5 Non-Harmonic Tone in Dominant3.5 Non-Harmonic Tone in DominantThe non-harmonic tone in dominant is the natural 7. In a C7 chord, the natural 7 (B)resolves to the b7 (Bb):
n7-b7Example 3.5 - Non-harmonic tone in dominant (natural 7)
The natural 7 in dominant can be played on the beat for more emphasis, or off the beatfor less emphasis.
���Exercise 3.5 Non-Harmonic Tone in Dominant
Harmonic Minor and Natural Minor Scales
So far you’ve learned these minor scales: Dorian, blues, minor pentatonic, and melodicminor ascending. You can also use the harmonic minor and natural minor scales.
3.6 Learning the Harmonic Minor Scales3.6 Learning the Harmonic Minor Scales3.6 Learning the Harmonic Minor Scales3.6 Learning the Harmonic Minor ScalesThe harmonic minor scale is used more often in jazz than the natural minor. Comparedto major, the harmonic minor scale has a b3 and a b6. Harmonic minor also contains anaugmented 2nd (from the flat 6th to the natural 7th) for a more “exotic” sound. Beloware harmonic minor scales in C and in D.
1 2 b3 4 5 b6 7 8 1 2 b3 4 5 b6 b7 8Example 3.6 - C Harmonic Minor scale Example 3.6a - D Harmonic Minor scale
You’ll learn more about harmonic minor scales in Minor Chord Progressions in Chapter 3F:Dominant Alterations.
���Exercise 3.6 Using Harmonic Minor Scales
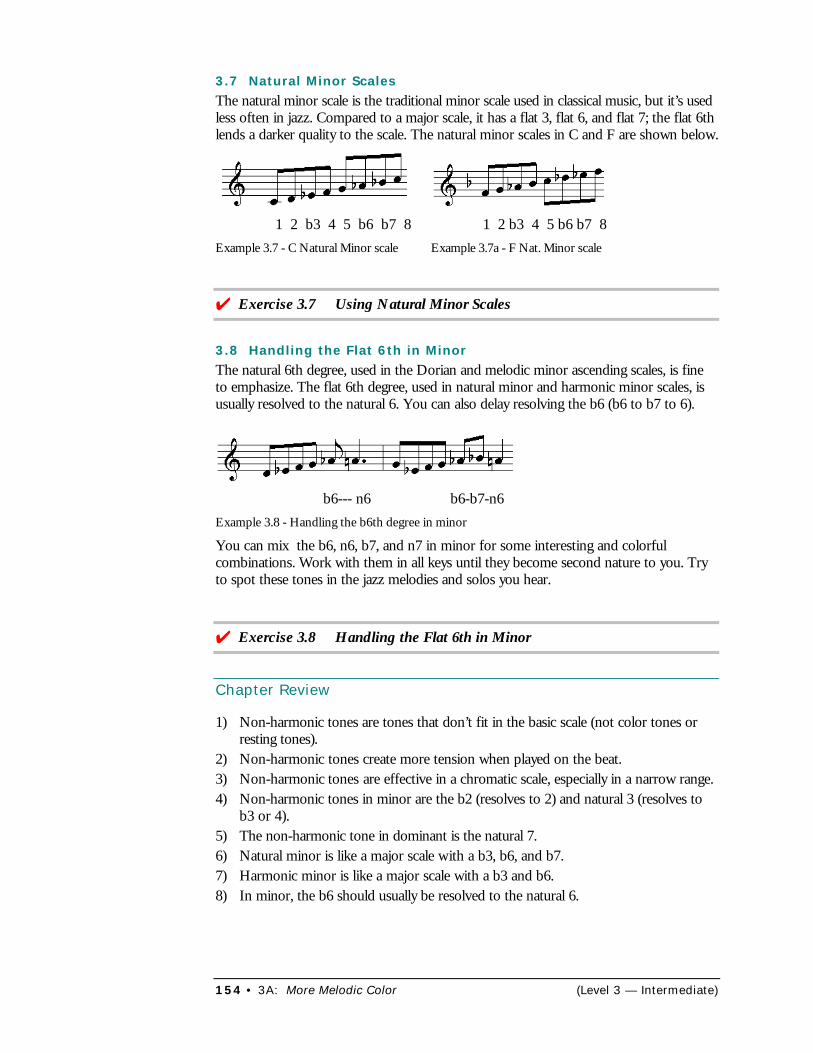
154 • 3A: More Melodic Color (Level 3 — Intermediate)
3.7 Natural Minor ScalesThe natural minor scale is the traditional minor scale used in classical music, but it’s usedless often in jazz. Compared to a major scale, it has a flat 3, flat 6, and flat 7; the flat 6thlends a darker quality to the scale. The natural minor scales in C and F are shown below.
1 2 b3 4 5 b6 b7 8 1 2 b3 4 5 b6 b7 8Example 3.7 - C Natural Minor scale Example 3.7a - F Nat. Minor scale
4 Exercise 3.7 Using Natural Minor Scales
3.8 Handling the Flat 6th in MinorThe natural 6th degree, used in the Dorian and melodic minor ascending scales, is fineto emphasize. The flat 6th degree, used in natural minor and harmonic minor scales, isusually resolved to the natural 6. You can also delay resolving the b6 (b6 to b7 to 6).
b6--- n6 b6-b7-n6Example 3.8 - Handling the b6th degree in minor
You can mix the b6, n6, b7, and n7 in minor for some interesting and colorfulcombinations. Work with them in all keys until they become second nature to you. Tryto spot these tones in the jazz melodies and solos you hear.
4 Exercise 3.8 Handling the Flat 6th in Minor
Chapter Review
1) Non-harmonic tones are tones that don’t fit in the basic scale (not color tones orresting tones).
2) Non-harmonic tones create more tension when played on the beat.3) Non-harmonic tones are effective in a chromatic scale, especially in a narrow range.4) Non-harmonic tones in minor are the b2 (resolves to 2) and natural 3 (resolves to
b3 or 4).5) The non-harmonic tone in dominant is the natural 7.6) Natural minor is like a major scale with a b3, b6, and b7.7) Harmonic minor is like a major scale with a b3 and b6.8) In minor, the b6 should usually be resolved to the natural 6.
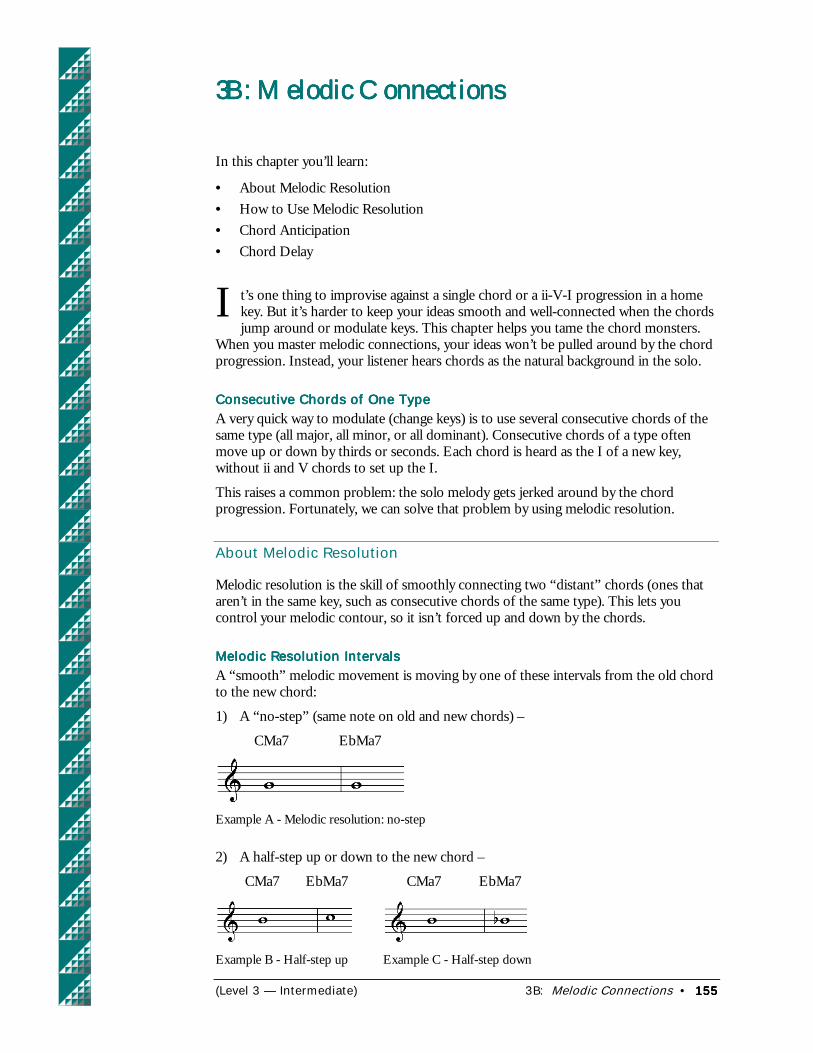
(Level 3 — Intermediate) 3B: Melodic Connections • 155155155155
3B: Melodic Connections3B: Melodic Connections3B: Melodic Connections3B: Melodic Connections
In this chapter you’ll learn:
• About Melodic Resolution• How to Use Melodic Resolution• Chord Anticipation• Chord Delay
t’s one thing to improvise against a single chord or a ii-V-I progression in a homekey. But it’s harder to keep your ideas smooth and well-connected when the chordsjump around or modulate keys. This chapter helps you tame the chord monsters.
When you master melodic connections, your ideas won’t be pulled around by the chordprogression. Instead, your listener hears chords as the natural background in the solo.
Consecutive Chords of One TypeConsecutive Chords of One TypeConsecutive Chords of One TypeConsecutive Chords of One TypeA very quick way to modulate (change keys) is to use several consecutive chords of thesame type (all major, all minor, or all dominant). Consecutive chords of a type oftenmove up or down by thirds or seconds. Each chord is heard as the I of a new key,without ii and V chords to set up the I.
This raises a common problem: the solo melody gets jerked around by the chordprogression. Fortunately, we can solve that problem by using melodic resolution.
About Melodic Resolution
Melodic resolution is the skill of smoothly connecting two “distant” chords (ones thataren’t in the same key, such as consecutive chords of the same type). This lets youcontrol your melodic contour, so it isn’t forced up and down by the chords.
Melodic Resolution IntervalsMelodic Resolution IntervalsMelodic Resolution IntervalsMelodic Resolution IntervalsA “smooth” melodic movement is moving by one of these intervals from the old chordto the new chord:
1) A “no-step” (same note on old and new chords) –
CMa7 EbMa7
Example A - Melodic resolution: no-step
2) A half-step up or down to the new chord –
CMa7 EbMa7 CMa7 EbMa7
Example B - Half-step up Example C - Half-step down
I
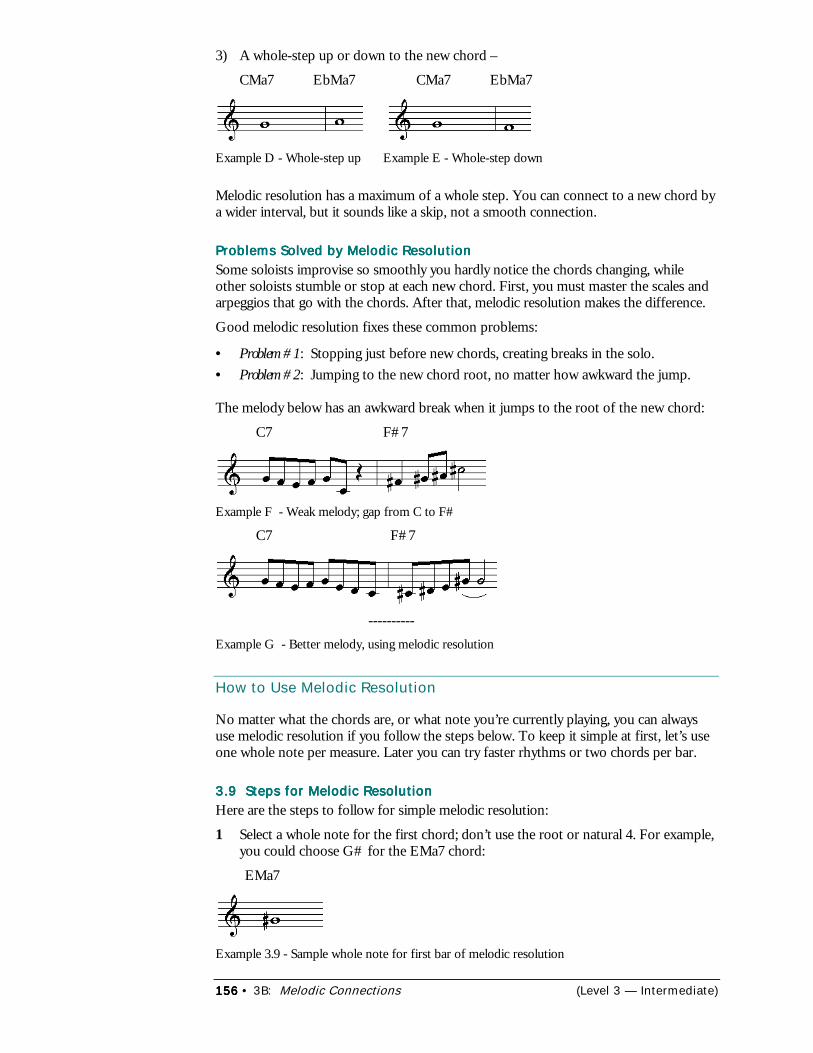
156156156156 • 3B: Melodic Connections (Level 3 — Intermediate)
3) A whole-step up or down to the new chord –
CMa7 EbMa7 CMa7 EbMa7
Example D - Whole-step up Example E - Whole-step down
Melodic resolution has a maximum of a whole step. You can connect to a new chord bya wider interval, but it sounds like a skip, not a smooth connection.
Problems Solved by Melodic ResolutionProblems Solved by Melodic ResolutionProblems Solved by Melodic ResolutionProblems Solved by Melodic ResolutionSome soloists improvise so smoothly you hardly notice the chords changing, whileother soloists stumble or stop at each new chord. First, you must master the scales andarpeggios that go with the chords. After that, melodic resolution makes the difference.
Good melodic resolution fixes these common problems:
• Problem #1: Stopping just before new chords, creating breaks in the solo.• Problem #2: Jumping to the new chord root, no matter how awkward the jump.
The melody below has an awkward break when it jumps to the root of the new chord:
C7 F#7
Example F - Weak melody; gap from C to F#
C7 F#7
----------Example G - Better melody, using melodic resolution
How to Use Melodic Resolution
No matter what the chords are, or what note you’re currently playing, you can alwaysuse melodic resolution if you follow the steps below. To keep it simple at first, let’s useone whole note per measure. Later you can try faster rhythms or two chords per bar.
3.9 Steps for Melodic Resolution3.9 Steps for Melodic Resolution3.9 Steps for Melodic Resolution3.9 Steps for Melodic ResolutionHere are the steps to follow for simple melodic resolution:
1 Select a whole note for the first chord; don’t use the root or natural 4. For example,you could choose G# for the EMa7 chord:
EMa7
Example 3.9 - Sample whole note for first bar of melodic resolution
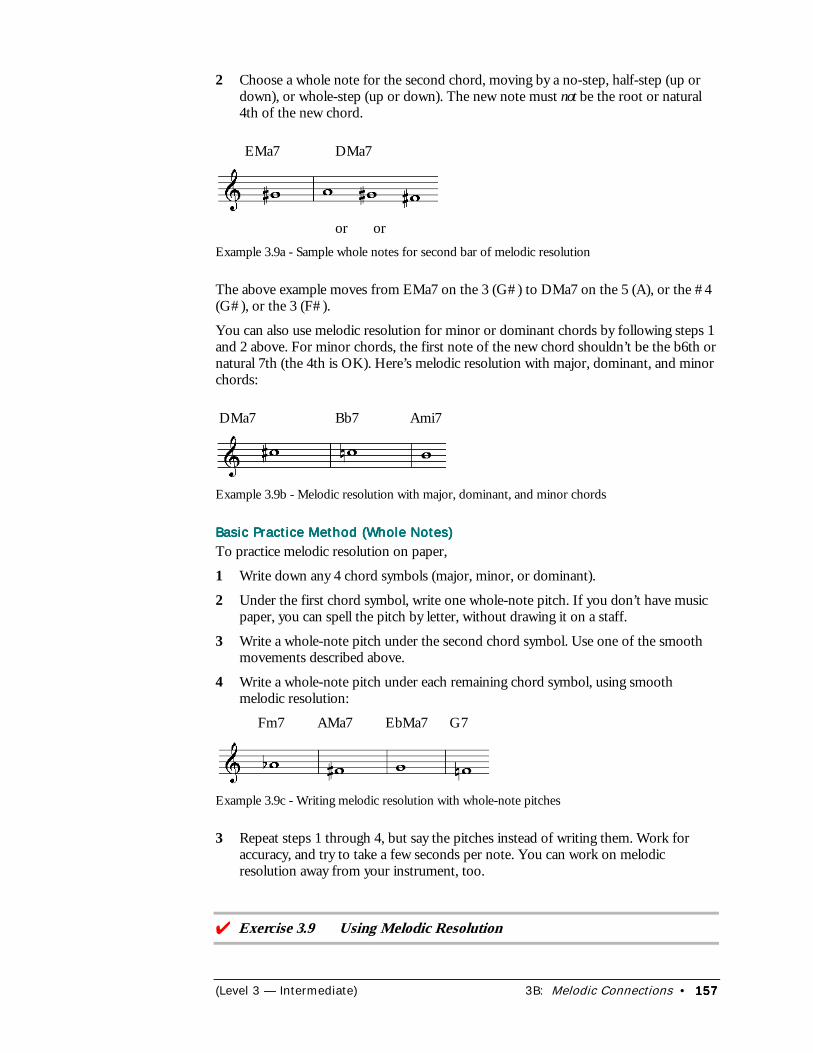
(Level 3 — Intermediate) 3B: Melodic Connections • 157157157157
2 Choose a whole note for the second chord, moving by a no-step, half-step (up ordown), or whole-step (up or down). The new note must not be the root or natural4th of the new chord.
EMa7 DMa7
or orExample 3.9a - Sample whole notes for second bar of melodic resolution
The above example moves from EMa7 on the 3 (G#) to DMa7 on the 5 (A), or the #4(G#), or the 3 (F#).
You can also use melodic resolution for minor or dominant chords by following steps 1and 2 above. For minor chords, the first note of the new chord shouldn’t be the b6th ornatural 7th (the 4th is OK). Here’s melodic resolution with major, dominant, and minorchords:
DMa7 Bb7 Ami7
Example 3.9b - Melodic resolution with major, dominant, and minor chords
Basic Practice Method (Whole Notes)Basic Practice Method (Whole Notes)Basic Practice Method (Whole Notes)Basic Practice Method (Whole Notes)To practice melodic resolution on paper,
1 Write down any 4 chord symbols (major, minor, or dominant).
2 Under the first chord symbol, write one whole-note pitch. If you don’t have musicpaper, you can spell the pitch by letter, without drawing it on a staff.
3 Write a whole-note pitch under the second chord symbol. Use one of the smoothmovements described above.
4 Write a whole-note pitch under each remaining chord symbol, using smoothmelodic resolution:
Fm7 AMa7 EbMa7 G7
Example 3.9c - Writing melodic resolution with whole-note pitches
3 Repeat steps 1 through 4, but say the pitches instead of writing them. Work foraccuracy, and try to take a few seconds per note. You can work on melodicresolution away from your instrument, too.
���Exercise 3.9 Using Melodic Resolution
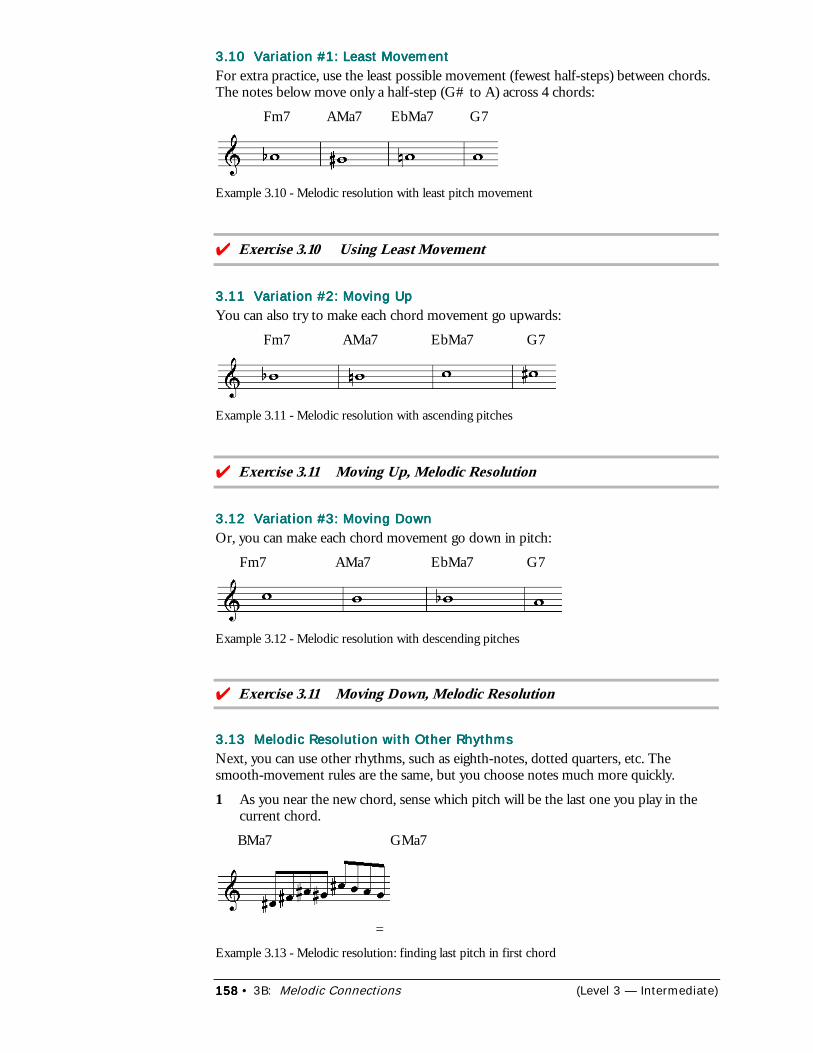
158158158158 • 3B: Melodic Connections (Level 3 — Intermediate)
3.10 Variation #1: Least Movement3.10 Variation #1: Least Movement3.10 Variation #1: Least Movement3.10 Variation #1: Least MovementFor extra practice, use the least possible movement (fewest half-steps) between chords.The notes below move only a half-step (G# to A) across 4 chords:
Fm7 AMa7 EbMa7 G7
Example 3.10 - Melodic resolution with least pitch movement
���Exercise 3.10 Using Least Movement
3.11 Variation #2: Moving Up3.11 Variation #2: Moving Up3.11 Variation #2: Moving Up3.11 Variation #2: Moving UpYou can also try to make each chord movement go upwards:
Fm7 AMa7 EbMa7 G7
Example 3.11 - Melodic resolution with ascending pitches
���Exercise 3.11 Moving Up, Melodic Resolution
3.12 Variation #3: Moving Down3.12 Variation #3: Moving Down3.12 Variation #3: Moving Down3.12 Variation #3: Moving DownOr, you can make each chord movement go down in pitch:
Fm7 AMa7 EbMa7 G7
Example 3.12 - Melodic resolution with descending pitches
���Exercise 3.11 Moving Down, Melodic Resolution
3.13 Melodic Resolution with Other Rhythms3.13 Melodic Resolution with Other Rhythms3.13 Melodic Resolution with Other Rhythms3.13 Melodic Resolution with Other RhythmsNext, you can use other rhythms, such as eighth-notes, dotted quarters, etc. Thesmooth-movement rules are the same, but you choose notes much more quickly.
1 As you near the new chord, sense which pitch will be the last one you play in thecurrent chord.
BMa7 GMa7
=Example 3.13 - Melodic resolution: finding last pitch in first chord
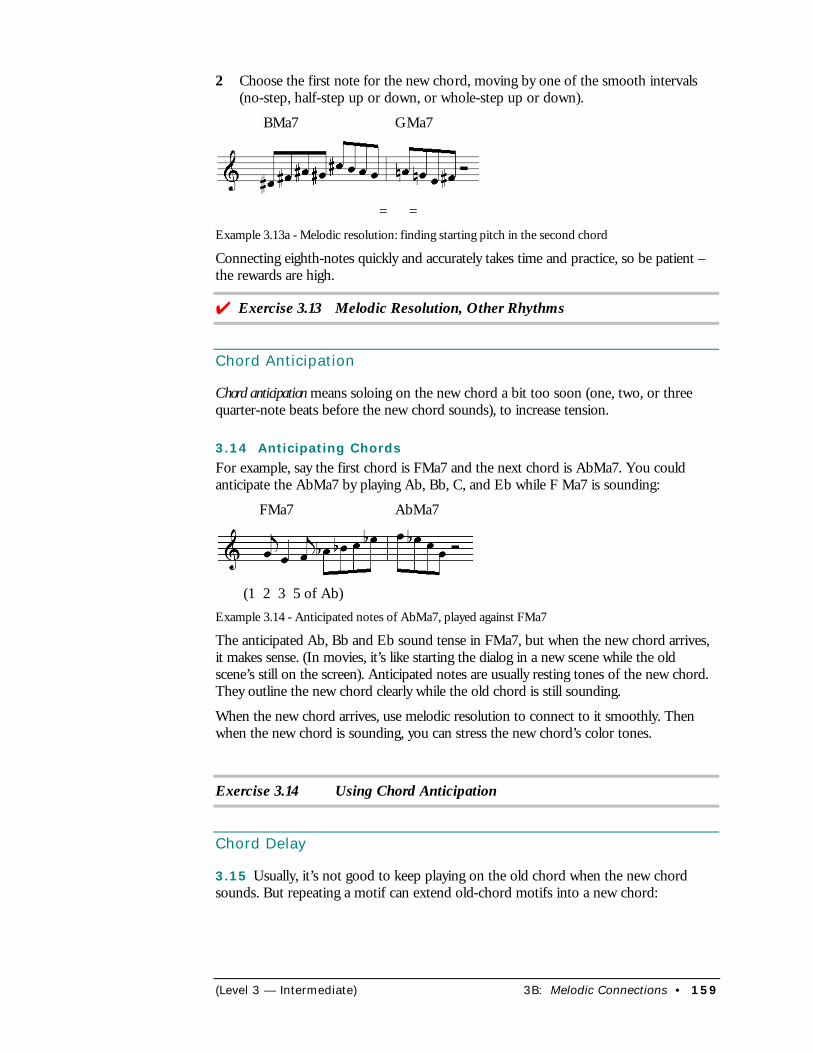
(Level 3 — Intermediate) 3B: Melodic Connections • 159
2 Choose the first note for the new chord, moving by one of the smooth intervals(no-step, half-step up or down, or whole-step up or down).
BMa7 GMa7
= =Example 3.13a - Melodic resolution: finding starting pitch in the second chord
Connecting eighth-notes quickly and accurately takes time and practice, so be patient –the rewards are high.
4 Exercise 3.13 Melodic Resolution, Other Rhythms
Chord Anticipation
Chord anticipation means soloing on the new chord a bit too soon (one, two, or threequarter-note beats before the new chord sounds), to increase tension.
3.14 Anticipating ChordsFor example, say the first chord is FMa7 and the next chord is AbMa7. You couldanticipate the AbMa7 by playing Ab, Bb, C, and Eb while F Ma7 is sounding:
FMa7 AbMa7
(1 2 3 5 of Ab)Example 3.14 - Anticipated notes of AbMa7, played against FMa7
The anticipated Ab, Bb and Eb sound tense in FMa7, but when the new chord arrives,it makes sense. (In movies, it’s like starting the dialog in a new scene while the oldscene’s still on the screen). Anticipated notes are usually resting tones of the new chord.They outline the new chord clearly while the old chord is still sounding.
When the new chord arrives, use melodic resolution to connect to it smoothly. Thenwhen the new chord is sounding, you can stress the new chord’s color tones.
Exercise 3.14 Using Chord Anticipation
Chord Delay
3.15 Usually, it’s not good to keep playing on the old chord when the new chordsounds. But repeating a motif can extend old-chord motifs into a new chord:
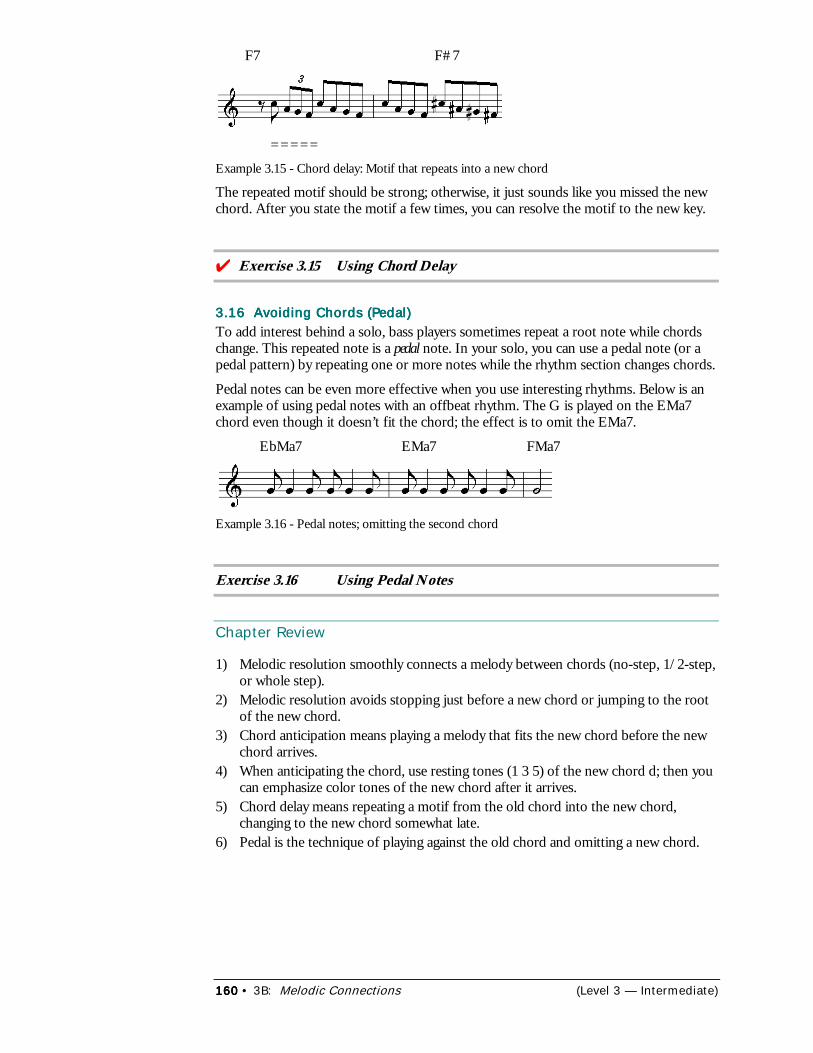
160160160160 • 3B: Melodic Connections (Level 3 — Intermediate)
F7 F#7
=====Example 3.15 - Chord delay: Motif that repeats into a new chord
The repeated motif should be strong; otherwise, it just sounds like you missed the newchord. After you state the motif a few times, you can resolve the motif to the new key.
���Exercise 3.15 Using Chord Delay
3.16 Avoiding Chords (Pedal)3.16 Avoiding Chords (Pedal)3.16 Avoiding Chords (Pedal)3.16 Avoiding Chords (Pedal)To add interest behind a solo, bass players sometimes repeat a root note while chordschange. This repeated note is a pedal note. In your solo, you can use a pedal note (or apedal pattern) by repeating one or more notes while the rhythm section changes chords.
Pedal notes can be even more effective when you use interesting rhythms. Below is anexample of using pedal notes with an offbeat rhythm. The G is played on the EMa7chord even though it doesn’t fit the chord; the effect is to omit the EMa7.
EbMa7 EMa7 FMa7
Example 3.16 - Pedal notes; omitting the second chord
Exercise 3.16 Using Pedal Notes
Chapter Review
1) Melodic resolution smoothly connects a melody between chords (no-step, 1/2-step,or whole step).
2) Melodic resolution avoids stopping just before a new chord or jumping to the rootof the new chord.
3) Chord anticipation means playing a melody that fits the new chord before the newchord arrives.
4) When anticipating the chord, use resting tones (1 3 5) of the new chord d; then youcan emphasize color tones of the new chord after it arrives.
5) Chord delay means repeating a motif from the old chord into the new chord,changing to the new chord somewhat late.
6) Pedal is the technique of playing against the old chord and omitting a new chord.
(Level 3 — Intermediate) 3C: Fusion and Latin Styles • 161161161161
3C: Fusion and Latin Styles3C: Fusion and Latin Styles3C: Fusion and Latin Styles3C: Fusion and Latin Styles
In this chapter you’ll learn about:
• About Jazz Fusion• Jazz Fusion Artists• Styles Around the World• Latin Rhythms and Clave• Montunos and Guajeos
Note: Special thanks to Jay Lawrence, percussionist for BRIDJJ, for his contributionsto this chapter. For more on latin rhythms and styles, see other books such as “TheSalsa Guidebook” by Rebeca Mauleón.
oday it’s becoming increasingly popular to mix musical styles within a tune or aconcert. For example, top recording artists are typically proficient in manydifferent styles, such as jazz, classical, latin, and rock. While it’s outside the scope
of this book to discuss each style in detail, this chapter deals with mixtures of styles,important fusion and Latin artists, and rhythmic examples.
About Jazz Fusion
The basic dictionary definition of fusion is: “... a merging of diverse elements into aunified whole.” We could argue that jazz itself is a fusion of old-world (classical) andAfro-American musics, or that the swing style is a fusion of duple and triple meters andrhythms. But the term “fusion” usually refers to the merging of mainstream jazz andsome other musical style, such as rock, blues, classical, etc.
Jazz/Rock FusionJazz/Rock FusionJazz/Rock FusionJazz/Rock FusionThe late 1960’s and early 70’s saw the blending of jazz and rock into a new kind offusion. A groundbreaking recording for jazz/rock fusion was Miles Davis’ “BitchesBrew.” The band for this recording included other players who would go on to becomepioneers in jazz fusion: Chick Corea and Joe Zawinul on electric keyboards; WayneShorter on sax; John McLaughlin on guitar; Larry Young on organ; and Jack deJohnetteand Lenny White on drums.
A more commercially successful brand of jazz/rock fusion was developed by Blood,Sweat and Tears and by Chicago, two groups that added vocals and horns to a rhythmsection.
Some landmark recordings of jazz/rock fusion:
• “Inner Mounting Flame” (Mahavishnu Orchestra, with John McLaughlin)• “Spectrum” (Billy Cobham, percussion)• “Brecker Brothers” (Michael & Randy Brecker)• “Heavy Weather” (Weather Report, with Joe Zawinul and Wayne Shorter)• “Light as a Feather” (Chick Corea’s latin/jazz band)• “Headhunters” (Herbie Hancock’s band)
T
162162162162 • 3C: Fusion and Latin Styles (Level 3 — Intermediate)
• “Lifetime” (Tony Williams)
Latin JazzLatin JazzLatin JazzLatin JazzIn the late 1940’s, Dizzy Gillespie, one of the founders of the bebop style, combinedforces with Cuban musicians Mario Bauza and Chano Pozo. They formed a big bandthat pioneered “Cubop,” a fusion of latin and jazz. In the late-1950’s, Brazilianapartment dwellers experimented by mixing subtler and quieter forms of the sambastyle with jazz harmonies – the result was the bossa nova, which became quite popularthroughout the Western Hemisphere. Antonio Carlos Jobim was the most famouscomposer of bossa nova tunes, and guitarist Joao Gilberto and tenor saxophonist StanGetz were leading proponents.
Some leading artists in the history of latin jazz:
• Machito • Airto• Antonio Carlos Jobim • Stan Getz• Joao Gilberto • Fort Apache Band• Charlie Byrd • Cal Tjader• Sergio Mendes • Tito Puente• Lalo Schifrin
On the BRIDJJ CD, listen to the introduction to “Deja Blue” (latin Ñanigo) and“Where’s Waldis” (samba) for examples of latin styles.
Characteristics of Jazz FusionCharacteristics of Jazz FusionCharacteristics of Jazz FusionCharacteristics of Jazz FusionRather than remaining a curious musical hybrid, jazz fusion developed into a style all itsown, with characteristics such as these:
1) Aggressive melodies and rhythms.2) Electric instrumentation, such as synthesizers, amplified horns, and electric bass.3) Odd meters.4) Be-bop and double-time passages over rock styles.5) Contrast of modal vamps and advanced harmonies.6) “Outside” improvisation.7) Repeated rhythm section patterns.
The basic rhythmic style for jazz fusion is usually rock-based (straight eighth-notes, with16th-note patterns), or swing combined with rock. For example, the Brecker Brother’s“Some Skunk Funk” contains many eighth- and sixteenth-note rhythm combinations.On the other hand, Weather Report’s “Rockin’ in Rhythm” is an adaptation of theDuke Ellington original, with swing rhythms intact but new electronic instrumentation.
On the BRIDJJ CD, listen to “Beat the Rats” (rock and latin), “Tastes Like Chicken”(country, rock, classical), and “Barney Meets Godzilla” (swing and rock).
Jazz Fusion Artists
The lists below show jazz fusion artists in these categories: 1) pioneers who developeddifferent types of fusion and who have had a lasting effect on jazz history and on otherjazz musicians; and 2) more recent fusion artists with outstanding ideas and techniques.

(Level 3 — Intermediate) 3C: Fusion and Latin Styles • 163163163163
Jazz Fusion PioneersJazz Fusion PioneersJazz Fusion PioneersJazz Fusion PioneersArtist Instrument Jazz Fused With:Blood, Sweat & Tears Band Rock, classicalBolling, Claude Piano ClassicalBrecker, Michael Sax Rock, latin, hip-hopBrown, James Vocals Rhythm and bluesBurton, Gary Vibes RockCharles, Ray Voc/piano BluesChicago Band Rock, popClarke, Stanley Bass Rock, latinCobham, Billy Drums RockCorea, Chick Piano Latin, rockCoryell, Larry Guitar Latin, rockDavis, Miles Trumpet RockDiMeola, Al Guitar Classical, rock, flamencoDreams Band RockEarth, Wind, & Fire Band Soul, rockEllis, Don Tpt, band Rock, East. Europe, Indian, odd metersFerguson, Maynard Tpt, band RockHammer, Jan Piano RockHancock, Herbie Big band Rock, popJones, Quincey Big band Pop, rock, latin, rapLorber, Jeff Band RockMcLaughlin, John Guitar Rock, Indian, blues,Modern Jazz Qt. Band ClassicalPastorius, Jaco Bass Funk, latinPuente, Tito Perc/ band LatinSantana Band Latin, rockSchuller, Gunther Arranger ClassicalShakti Band IndianSpyro Gyra Band Rock. popSteps Ahead Band Rock, latinSting Band Rock, ska, reggaeTower of Power Band Funk, R&BWeather Report Band Rock, folk, latin
Recent Fusion ArtistsRecent Fusion ArtistsRecent Fusion ArtistsRecent Fusion ArtistsArtist Instrument Jazz Fused With:d’Rivera, Paquito Woodwinds LatinFischer, Clare Piano, arr. LatinHoldsworth, Allan Guitar Rock, outsideSanchez, Poncho Perc. LatinStern, Mike Guitar RockTribal Tech Band Rock, rhythm & blues

164 • 3C: Fusion and Latin Styles (Level 3 — Intermediate)
Some Interesting PossibilitiesWhen you think about all the different combinations of musical styles, there is astaggering number of possibilities; some are ridiculous, some very intriguing. Here aresome interesting combinations:
Gregorian Chant Reggae Big Band RancheroHip-hop Taiko Bulgarian BebopBlues Bolero Flamenco FunkOperatic Zydeco Gospel MariachiBluegrass Viennese Waltz Baroque PolkaPunk Tango Avant-Garde PolynesianMetal Raga Romantic Oompah
Maybe your band will start the next fusion trend.
Styles Around the World
Here is a partial list of different rhythmic styles found in musics around the world – sortof a “geographical rhythm chart.” These styles have found their way into numerous jazztunes and recordings.
Location Artists (Rhythmic Styles)Africa King Sunny Ade (Ju Ju, High Life)Argentina Astor Piazzola (Tango)Brazil Ivan Lins, Sergio Mendes, Airto, Joao Gilberto (Samba, Bossa
Nova, Marcha)(Maracatu, Freva, Partido Alto, Baion)
Colombia Joe Arroyo (Cumbia)Cuba Los Papines, Los Muñequitos, Los Van Van (Son, Danson,
Rumba, Cha Cha, Bata, Mozambique, Conga de Comparsa,Bembe, Iyesa, Arara, Bolere, Mambo Songo, Salsa)
Domin. Rep. Milly y Los Vecinos, Wilfredo Vargas (Merengue, Jaleo, Pambiche)Haiti (Compas)India Allah Rakha, Zakir Hussain (Rupak Tal, Jhapak Tal)Jamaica Bob Marley, Jimmy Cliff, Peter Tosh, Black Uhuru (Reggae, Ska,
Bluebeat, Mento, Rubadub)Louisiana Dr. John, Dirty Dozen Brass Band (Zydeco, Second-line)Martinique (Beguine, Zouk)Puerto Rico Cortijo & Kako (Bomba, Plena, Jibaro)Trinidad (Calypso, Soka)Venezuela (Joropo)
Latin Rhythms and Clave
3.17 This section illustrates some of the more popular Latin rhythms that are used in aclave. A clave (claw´-vay or“keystone”) is a repeated rhythmic pattern that serves as therhythmic framework for a tune. There are many versions of clave; examples are shownbelow. (It’s assumed that each pattern is repeated indefinitely.)
Remember: Don’t swing latin rhythms; play them with even 8th-notes.
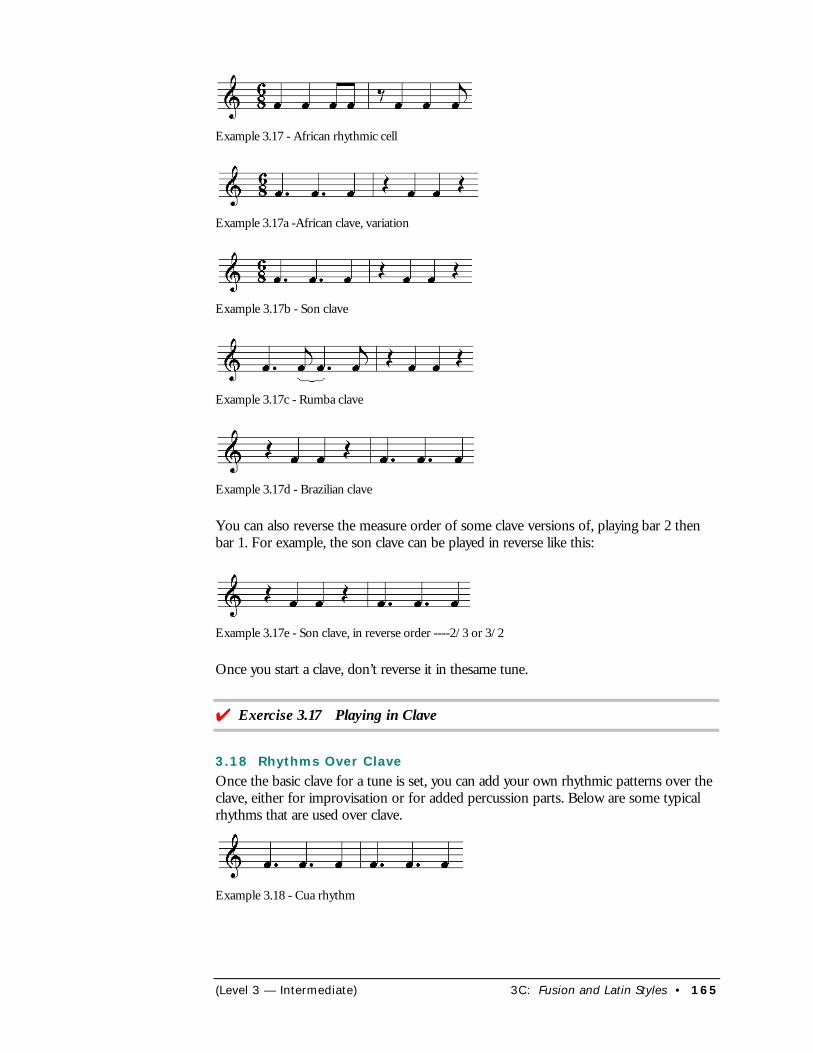
(Level 3 — Intermediate) 3C: Fusion and Latin Styles • 165
Example 3.17 - African rhythmic cell
Example 3.17a -African clave, variation
Example 3.17b - Son clave
Example 3.17c - Rumba clave
Example 3.17d - Brazilian clave
You can also reverse the measure order of some clave versions of, playing bar 2 thenbar 1. For example, the son clave can be played in reverse like this:
Example 3.17e - Son clave, in reverse order ----2/3 or 3/2
Once you start a clave, don’t reverse it in thesame tune.
4 Exercise 3.17 Playing in Clave
3.18 Rhythms Over ClaveOnce the basic clave for a tune is set, you can add your own rhythmic patterns over theclave, either for improvisation or for added percussion parts. Below are some typicalrhythms that are used over clave.
Example 3.18 - Cua rhythm
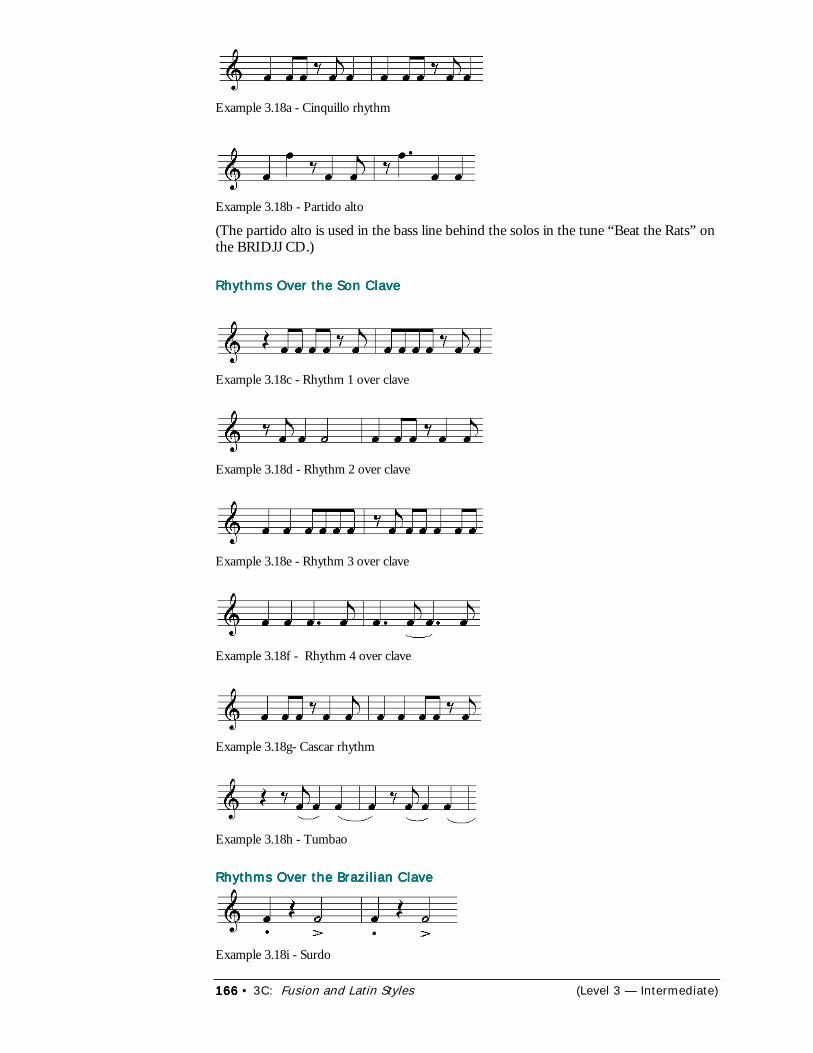
166166166166 • 3C: Fusion and Latin Styles (Level 3 — Intermediate)
Example 3.18a - Cinquillo rhythm
Example 3.18b - Partido alto
(The partido alto is used in the bass line behind the solos in the tune “Beat the Rats” onthe BRIDJJ CD.)
Rhythms Over the Son ClaveRhythms Over the Son ClaveRhythms Over the Son ClaveRhythms Over the Son Clave
Example 3.18c - Rhythm 1 over clave
Example 3.18d - Rhythm 2 over clave
Example 3.18e - Rhythm 3 over clave
Example 3.18f - Rhythm 4 over clave
Example 3.18g- Cascar rhythm
Example 3.18h - Tumbao
Rhythms Over the Brazilian ClaveRhythms Over the Brazilian ClaveRhythms Over the Brazilian ClaveRhythms Over the Brazilian Clave
Example 3.18i - Surdo
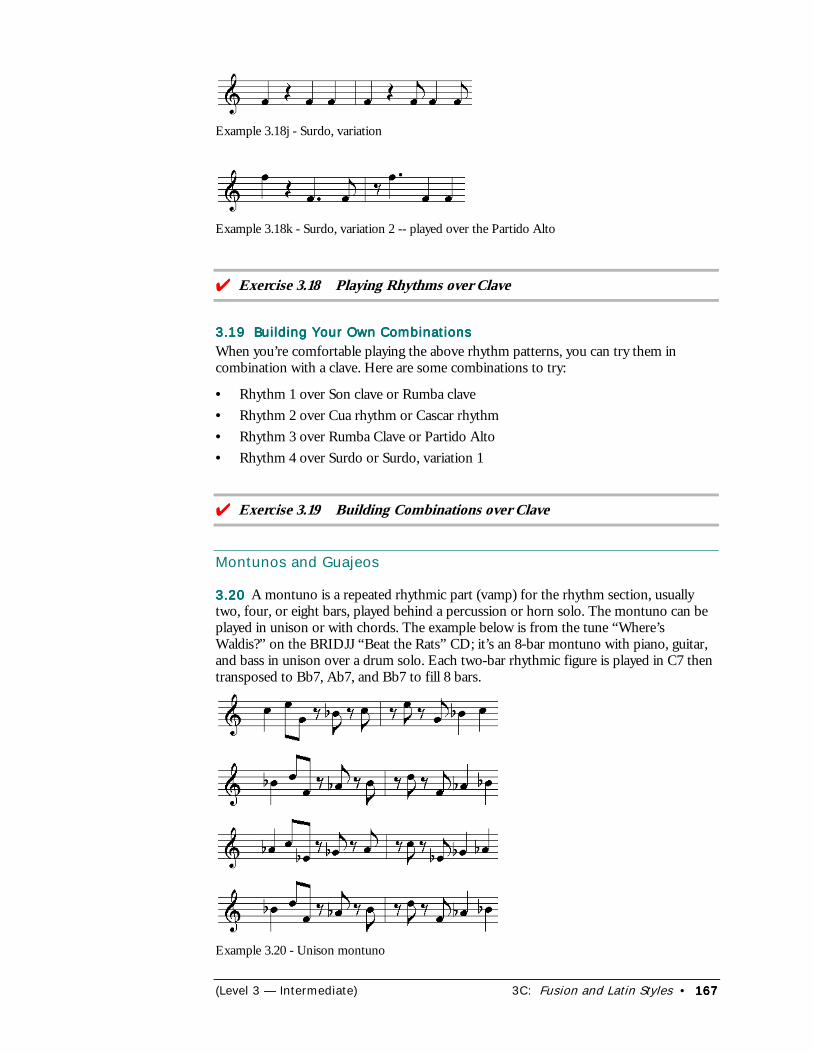
(Level 3 — Intermediate) 3C: Fusion and Latin Styles • 167167167167
Example 3.18j - Surdo, variation
Example 3.18k - Surdo, variation 2 -- played over the Partido Alto
���Exercise 3.18 Playing Rhythms over Clave
3.19 Building Your Own Combinations3.19 Building Your Own Combinations3.19 Building Your Own Combinations3.19 Building Your Own CombinationsWhen you’re comfortable playing the above rhythm patterns, you can try them incombination with a clave. Here are some combinations to try:
• Rhythm 1 over Son clave or Rumba clave• Rhythm 2 over Cua rhythm or Cascar rhythm• Rhythm 3 over Rumba Clave or Partido Alto• Rhythm 4 over Surdo or Surdo, variation 1
���Exercise 3.19 Building Combinations over Clave
Montunos and Guajeos
3.203.203.203.20 A montuno is a repeated rhythmic part (vamp) for the rhythm section, usuallytwo, four, or eight bars, played behind a percussion or horn solo. The montuno can beplayed in unison or with chords. The example below is from the tune “Where’sWaldis?” on the BRIDJJ “Beat the Rats” CD; it’s an 8-bar montuno with piano, guitar,and bass in unison over a drum solo. Each two-bar rhythmic figure is played in C7 thentransposed to Bb7, Ab7, and Bb7 to fill 8 bars.
Example 3.20 - Unison montuno
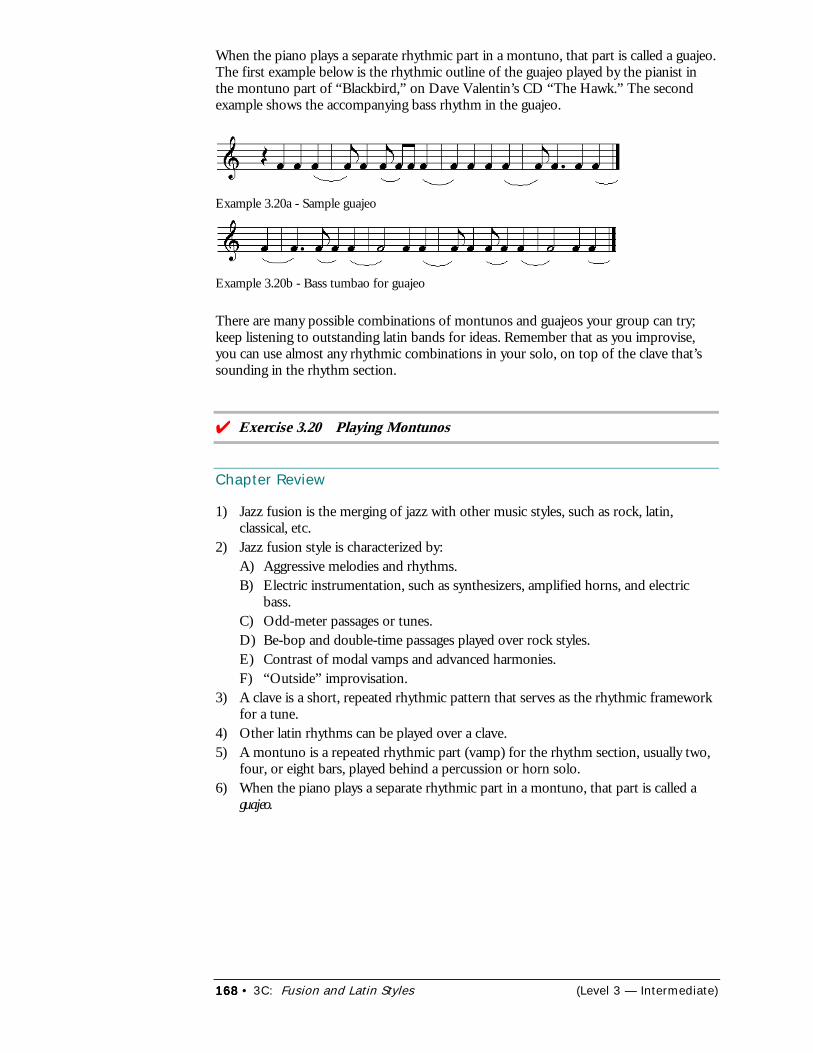
168168168168 • 3C: Fusion and Latin Styles (Level 3 — Intermediate)
When the piano plays a separate rhythmic part in a montuno, that part is called a guajeo.The first example below is the rhythmic outline of the guajeo played by the pianist inthe montuno part of “Blackbird,” on Dave Valentin’s CD “The Hawk.” The secondexample shows the accompanying bass rhythm in the guajeo.
Example 3.20a - Sample guajeo
Example 3.20b - Bass tumbao for guajeo
There are many possible combinations of montunos and guajeos your group can try;keep listening to outstanding latin bands for ideas. Remember that as you improvise,you can use almost any rhythmic combinations in your solo, on top of the clave that’ssounding in the rhythm section.
���Exercise 3.20 Playing Montunos
Chapter Review
1) Jazz fusion is the merging of jazz with other music styles, such as rock, latin,classical, etc.
2) Jazz fusion style is characterized by:A) Aggressive melodies and rhythms.B) Electric instrumentation, such as synthesizers, amplified horns, and electric
bass.C) Odd-meter passages or tunes.D) Be-bop and double-time passages played over rock styles.E) Contrast of modal vamps and advanced harmonies.F) “Outside” improvisation.
3) A clave is a short, repeated rhythmic pattern that serves as the rhythmic frameworkfor a tune.
4) Other latin rhythms can be played over a clave.5) A montuno is a repeated rhythmic part (vamp) for the rhythm section, usually two,
four, or eight bars, played behind a percussion or horn solo.6) When the piano plays a separate rhythmic part in a montuno, that part is called a
guajeo.
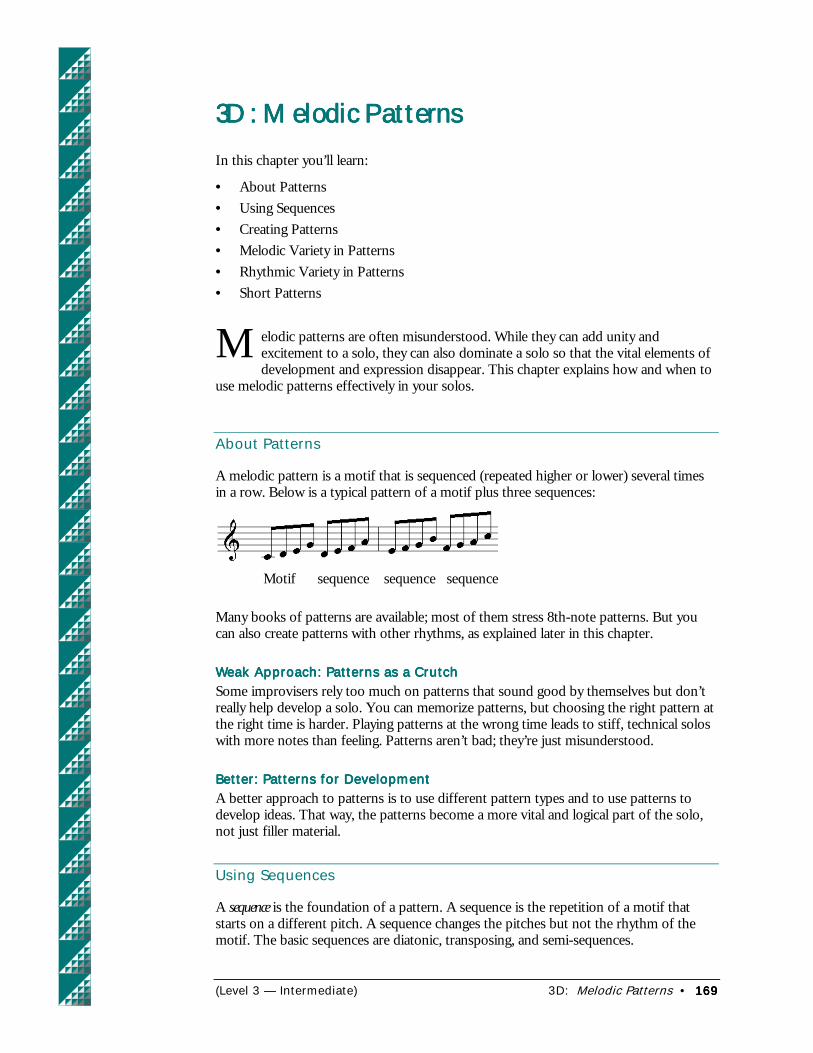
(Level 3 — Intermediate) 3D: Melodic Patterns • 169169169169
3D: Melodic Patterns3D: Melodic Patterns3D: Melodic Patterns3D: Melodic Patterns
In this chapter you’ll learn:
• About Patterns• Using Sequences• Creating Patterns• Melodic Variety in Patterns• Rhythmic Variety in Patterns• Short Patterns
elodic patterns are often misunderstood. While they can add unity andexcitement to a solo, they can also dominate a solo so that the vital elements ofdevelopment and expression disappear. This chapter explains how and when to
use melodic patterns effectively in your solos.
About Patterns
A melodic pattern is a motif that is sequenced (repeated higher or lower) several timesin a row. Below is a typical pattern of a motif plus three sequences:
Motif sequence sequence sequence
Many books of patterns are available; most of them stress 8th-note patterns. But youcan also create patterns with other rhythms, as explained later in this chapter.
Weak Approach: Patterns as a CrutchWeak Approach: Patterns as a CrutchWeak Approach: Patterns as a CrutchWeak Approach: Patterns as a CrutchSome improvisers rely too much on patterns that sound good by themselves but don’treally help develop a solo. You can memorize patterns, but choosing the right pattern atthe right time is harder. Playing patterns at the wrong time leads to stiff, technical soloswith more notes than feeling. Patterns aren’t bad; they’re just misunderstood.
Better: Patterns for DevelopmentBetter: Patterns for DevelopmentBetter: Patterns for DevelopmentBetter: Patterns for DevelopmentA better approach to patterns is to use different pattern types and to use patterns todevelop ideas. That way, the patterns become a more vital and logical part of the solo,not just filler material.
Using Sequences
A sequence is the foundation of a pattern. A sequence is the repetition of a motif thatstarts on a different pitch. A sequence changes the pitches but not the rhythm of themotif. The basic sequences are diatonic, transposing, and semi-sequences.
M
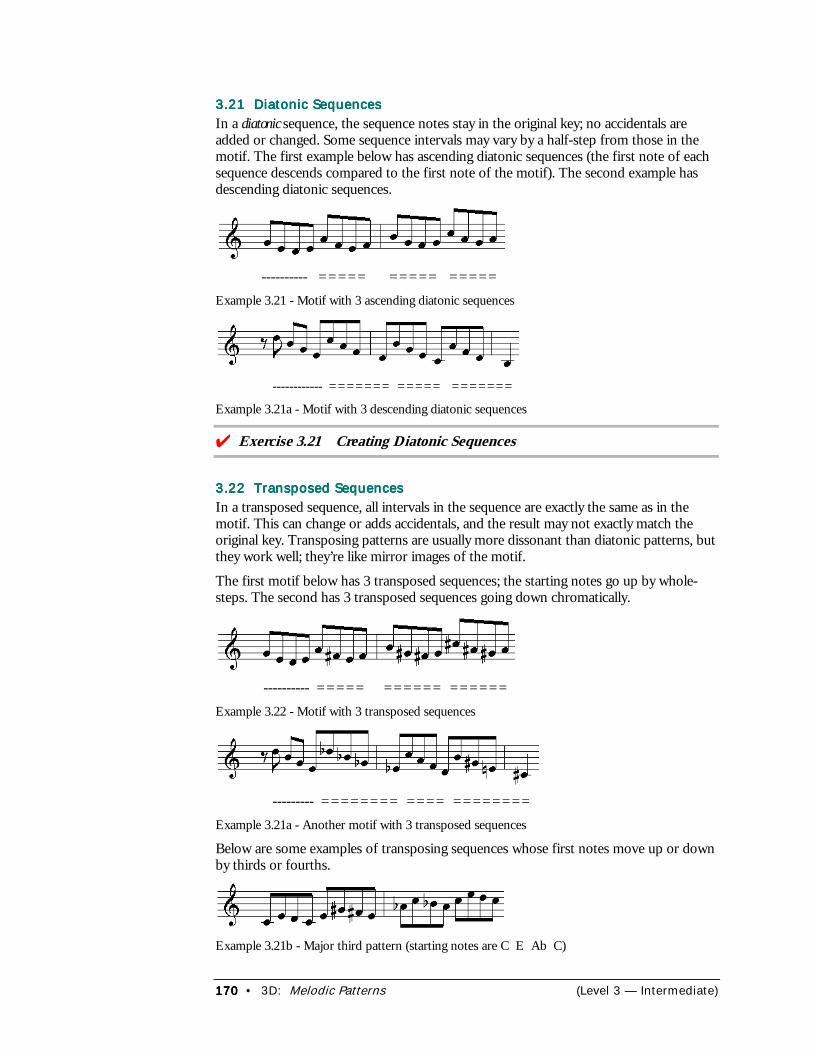
170170170170 • 3D: Melodic Patterns (Level 3 — Intermediate)
3.21 Diatonic Sequences3.21 Diatonic Sequences3.21 Diatonic Sequences3.21 Diatonic SequencesIn a diatonic sequence, the sequence notes stay in the original key; no accidentals areadded or changed. Some sequence intervals may vary by a half-step from those in themotif. The first example below has ascending diatonic sequences (the first note of eachsequence descends compared to the first note of the motif). The second example hasdescending diatonic sequences.
---------- ===== ===== =====Example 3.21 - Motif with 3 ascending diatonic sequences
------------ ======= ===== =======
Example 3.21a - Motif with 3 descending diatonic sequences
���Exercise 3.21 Creating Diatonic Sequences
3.22 Transposed Sequences3.22 Transposed Sequences3.22 Transposed Sequences3.22 Transposed SequencesIn a transposed sequence, all intervals in the sequence are exactly the same as in themotif. This can change or adds accidentals, and the result may not exactly match theoriginal key. Transposing patterns are usually more dissonant than diatonic patterns, butthey work well; they’re like mirror images of the motif.
The first motif below has 3 transposed sequences; the starting notes go up by whole-steps. The second has 3 transposed sequences going down chromatically.
---------- ===== ====== ======Example 3.22 - Motif with 3 transposed sequences
--------- ======== ==== ========Example 3.21a - Another motif with 3 transposed sequences
Below are some examples of transposing sequences whose first notes move up or downby thirds or fourths.
Example 3.21b - Major third pattern (starting notes are C E Ab C)
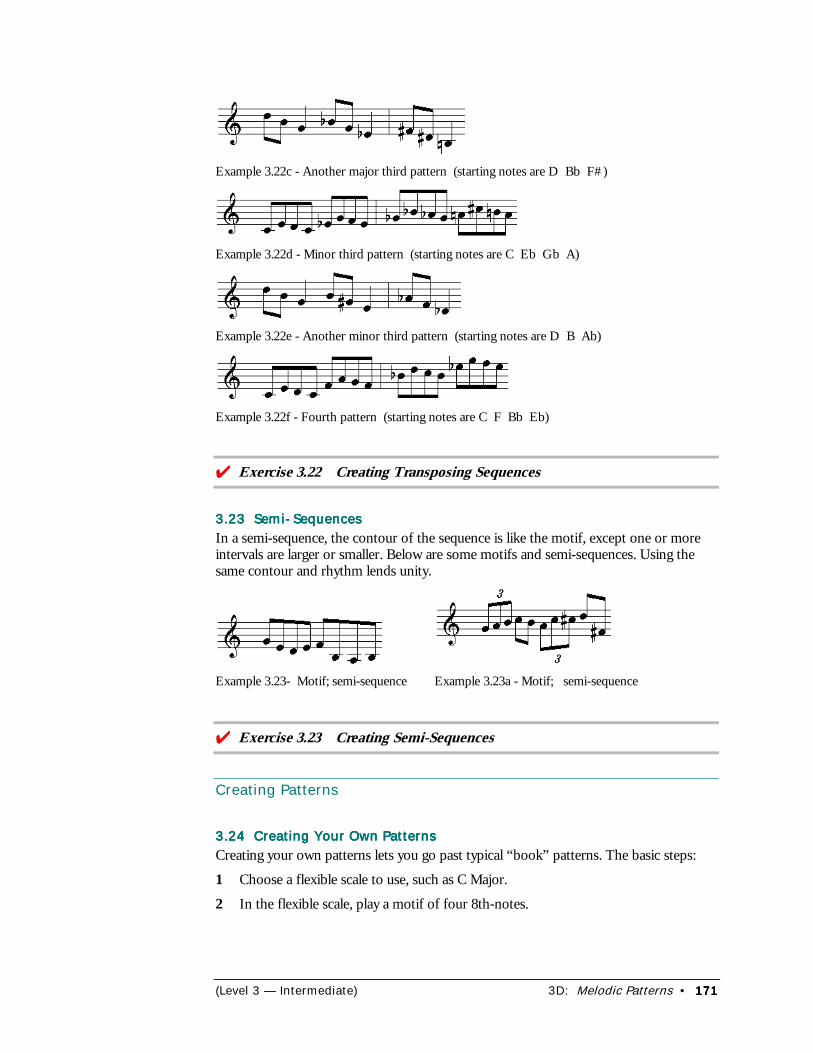
(Level 3 — Intermediate) 3D: Melodic Patterns • 171171171171
Example 3.22c - Another major third pattern (starting notes are D Bb F#)
Example 3.22d - Minor third pattern (starting notes are C Eb Gb A)
Example 3.22e - Another minor third pattern (starting notes are D B Ab)
Example 3.22f - Fourth pattern (starting notes are C F Bb Eb)
���Exercise 3.22 Creating Transposing Sequences
3.23 Semi-Sequences3.23 Semi-Sequences3.23 Semi-Sequences3.23 Semi-SequencesIn a semi-sequence, the contour of the sequence is like the motif, except one or moreintervals are larger or smaller. Below are some motifs and semi-sequences. Using thesame contour and rhythm lends unity.
Example 3.23- Motif; semi-sequence Example 3.23a - Motif; semi-sequence
���Exercise 3.23 Creating Semi-Sequences
Creating Patterns
3.24 Creating Your Own Patterns3.24 Creating Your Own Patterns3.24 Creating Your Own Patterns3.24 Creating Your Own PatternsCreating your own patterns lets you go past typical “book” patterns. The basic steps:
1 Choose a flexible scale to use, such as C Major.
2 In the flexible scale, play a motif of four 8th-notes.
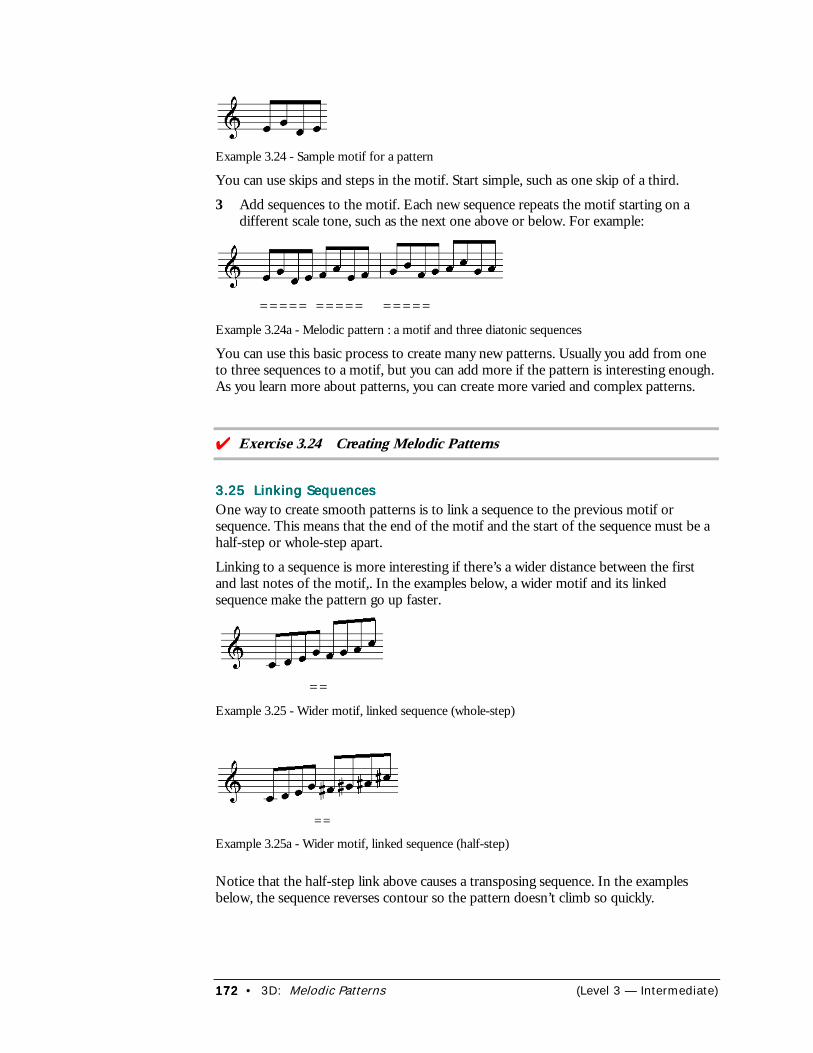
172172172172 • 3D: Melodic Patterns (Level 3 — Intermediate)
Example 3.24 - Sample motif for a pattern
You can use skips and steps in the motif. Start simple, such as one skip of a third.
3 Add sequences to the motif. Each new sequence repeats the motif starting on adifferent scale tone, such as the next one above or below. For example:
===== ===== =====Example 3.24a - Melodic pattern : a motif and three diatonic sequences
You can use this basic process to create many new patterns. Usually you add from oneto three sequences to a motif, but you can add more if the pattern is interesting enough.As you learn more about patterns, you can create more varied and complex patterns.
���Exercise 3.24 Creating Melodic Patterns
3.25 Linking Sequences3.25 Linking Sequences3.25 Linking Sequences3.25 Linking SequencesOne way to create smooth patterns is to link a sequence to the previous motif orsequence. This means that the end of the motif and the start of the sequence must be ahalf-step or whole-step apart.
Linking to a sequence is more interesting if there’s a wider distance between the firstand last notes of the motif,. In the examples below, a wider motif and its linkedsequence make the pattern go up faster.
==Example 3.25 - Wider motif, linked sequence (whole-step)
==
Example 3.25a - Wider motif, linked sequence (half-step)
Notice that the half-step link above causes a transposing sequence. In the examplesbelow, the sequence reverses contour so the pattern doesn’t climb so quickly.
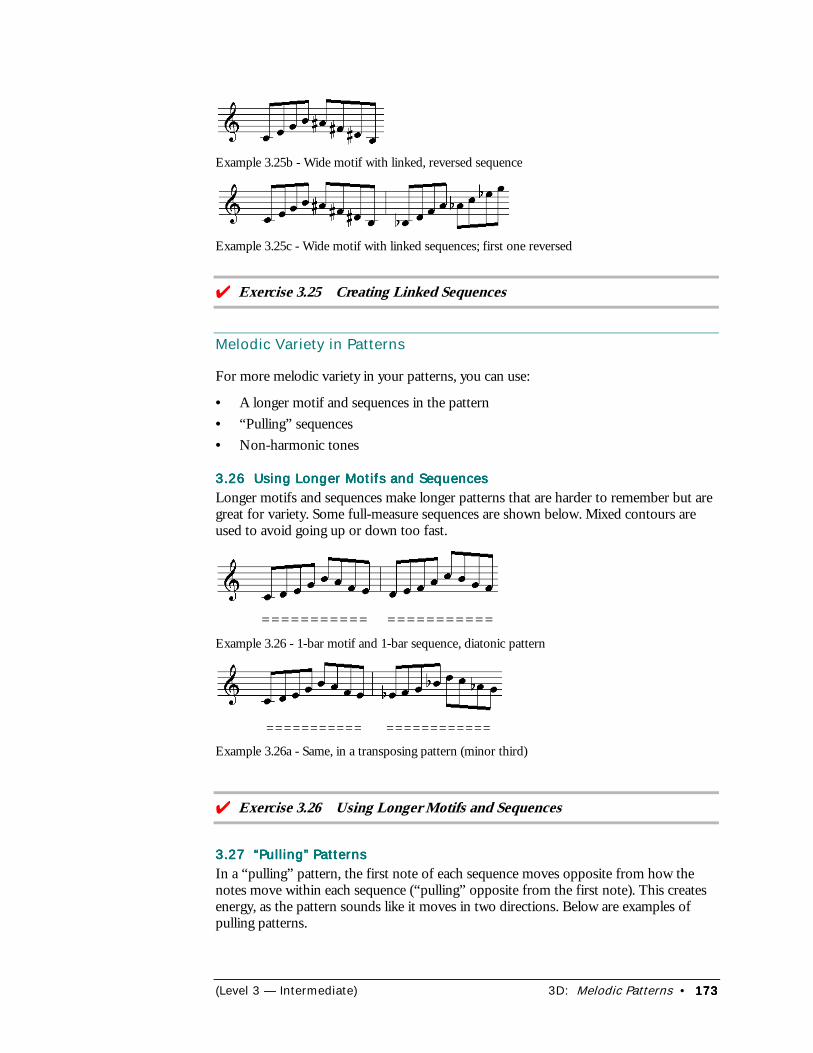
(Level 3 — Intermediate) 3D: Melodic Patterns • 173173173173
Example 3.25b - Wide motif with linked, reversed sequence
Example 3.25c - Wide motif with linked sequences; first one reversed
���Exercise 3.25 Creating Linked Sequences
Melodic Variety in Patterns
For more melodic variety in your patterns, you can use:
• A longer motif and sequences in the pattern• “Pulling” sequences• Non-harmonic tones
3.26 Using Longer Motifs and Sequences3.26 Using Longer Motifs and Sequences3.26 Using Longer Motifs and Sequences3.26 Using Longer Motifs and SequencesLonger motifs and sequences make longer patterns that are harder to remember but aregreat for variety. Some full-measure sequences are shown below. Mixed contours areused to avoid going up or down too fast.
=========== ===========Example 3.26 - 1-bar motif and 1-bar sequence, diatonic pattern
=========== ============
Example 3.26a - Same, in a transposing pattern (minor third)
���Exercise 3.26 Using Longer Motifs and Sequences
3.27 “Pulling” Patterns3.27 “Pulling” Patterns3.27 “Pulling” Patterns3.27 “Pulling” PatternsIn a “pulling” pattern, the first note of each sequence moves opposite from how thenotes move within each sequence (“pulling” opposite from the first note). This createsenergy, as the pattern sounds like it moves in two directions. Below are examples ofpulling patterns.
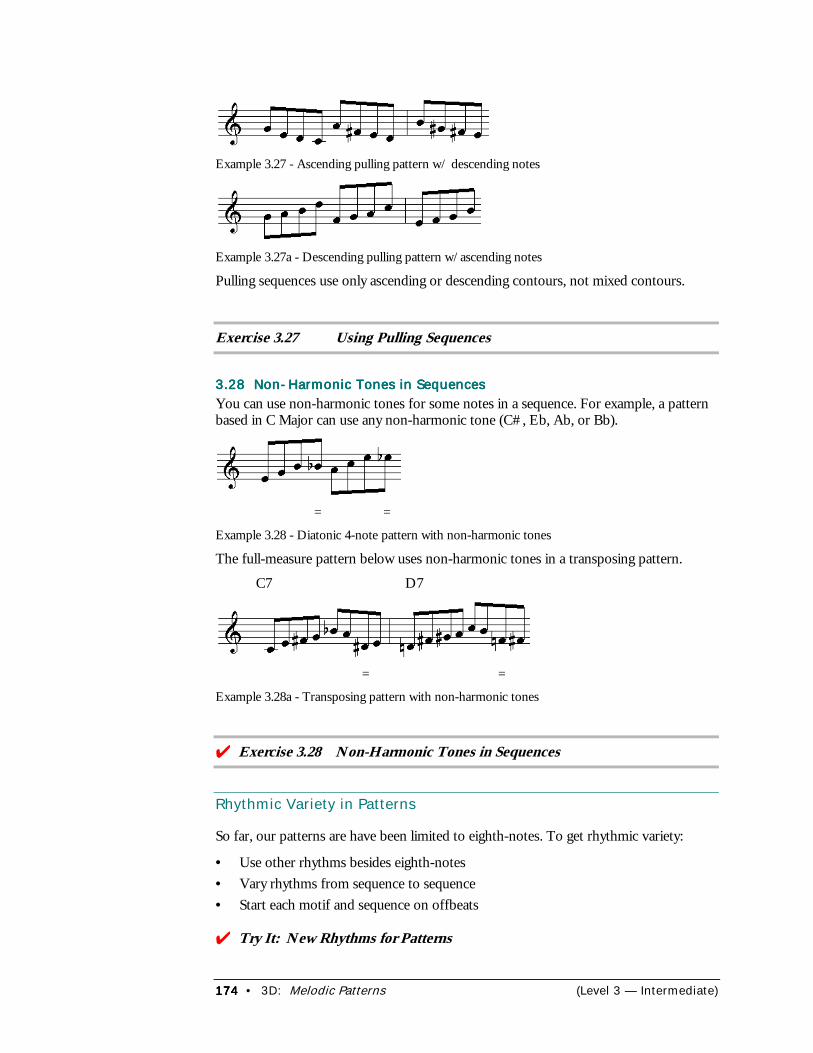
174174174174 • 3D: Melodic Patterns (Level 3 — Intermediate)
Example 3.27 - Ascending pulling pattern w/ descending notes
Example 3.27a - Descending pulling pattern w/ascending notes
Pulling sequences use only ascending or descending contours, not mixed contours.
Exercise 3.27 Using Pulling Sequences
3.28 Non-Harmonic Tones in Sequences3.28 Non-Harmonic Tones in Sequences3.28 Non-Harmonic Tones in Sequences3.28 Non-Harmonic Tones in SequencesYou can use non-harmonic tones for some notes in a sequence. For example, a patternbased in C Major can use any non-harmonic tone (C#, Eb, Ab, or Bb).
= =
Example 3.28 - Diatonic 4-note pattern with non-harmonic tones
The full-measure pattern below uses non-harmonic tones in a transposing pattern.
C7 D7
= =
Example 3.28a - Transposing pattern with non-harmonic tones
���Exercise 3.28 Non-Harmonic Tones in Sequences
Rhythmic Variety in Patterns
So far, our patterns are have been limited to eighth-notes. To get rhythmic variety:
• Use other rhythms besides eighth-notes• Vary rhythms from sequence to sequence• Start each motif and sequence on offbeats
���Try It: New Rhythms for Patterns
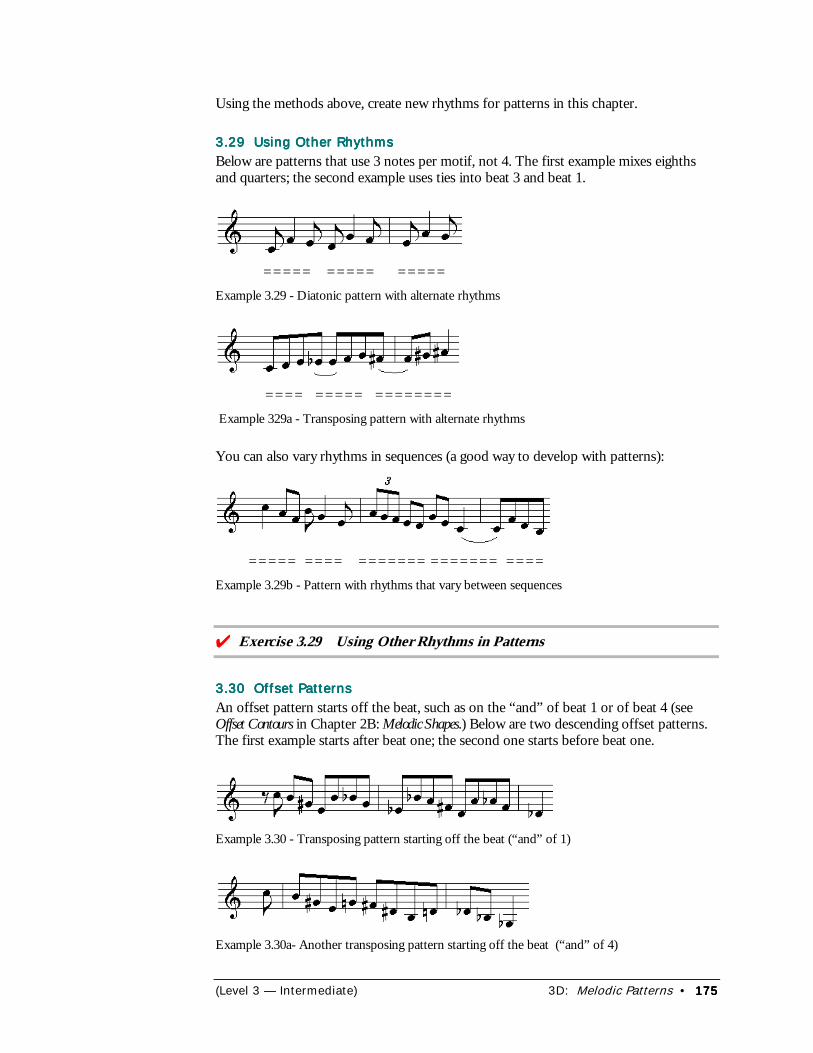
(Level 3 — Intermediate) 3D: Melodic Patterns • 175175175175
Using the methods above, create new rhythms for patterns in this chapter.
3.29 Using Other Rhythms3.29 Using Other Rhythms3.29 Using Other Rhythms3.29 Using Other RhythmsBelow are patterns that use 3 notes per motif, not 4. The first example mixes eighthsand quarters; the second example uses ties into beat 3 and beat 1.
===== ===== =====Example 3.29 - Diatonic pattern with alternate rhythms
==== ===== ======== Example 329a - Transposing pattern with alternate rhythms
You can also vary rhythms in sequences (a good way to develop with patterns):
===== ==== ======= ======= ====Example 3.29b - Pattern with rhythms that vary between sequences
���Exercise 3.29 Using Other Rhythms in Patterns
3.30 Offset Patterns3.30 Offset Patterns3.30 Offset Patterns3.30 Offset PatternsAn offset pattern starts off the beat, such as on the “and” of beat 1 or of beat 4 (seeOffset Contours in Chapter 2B: Melodic Shapes.) Below are two descending offset patterns.The first example starts after beat one; the second one starts before beat one.
Example 3.30 - Transposing pattern starting off the beat (“and” of 1)
Example 3.30a- Another transposing pattern starting off the beat (“and” of 4)
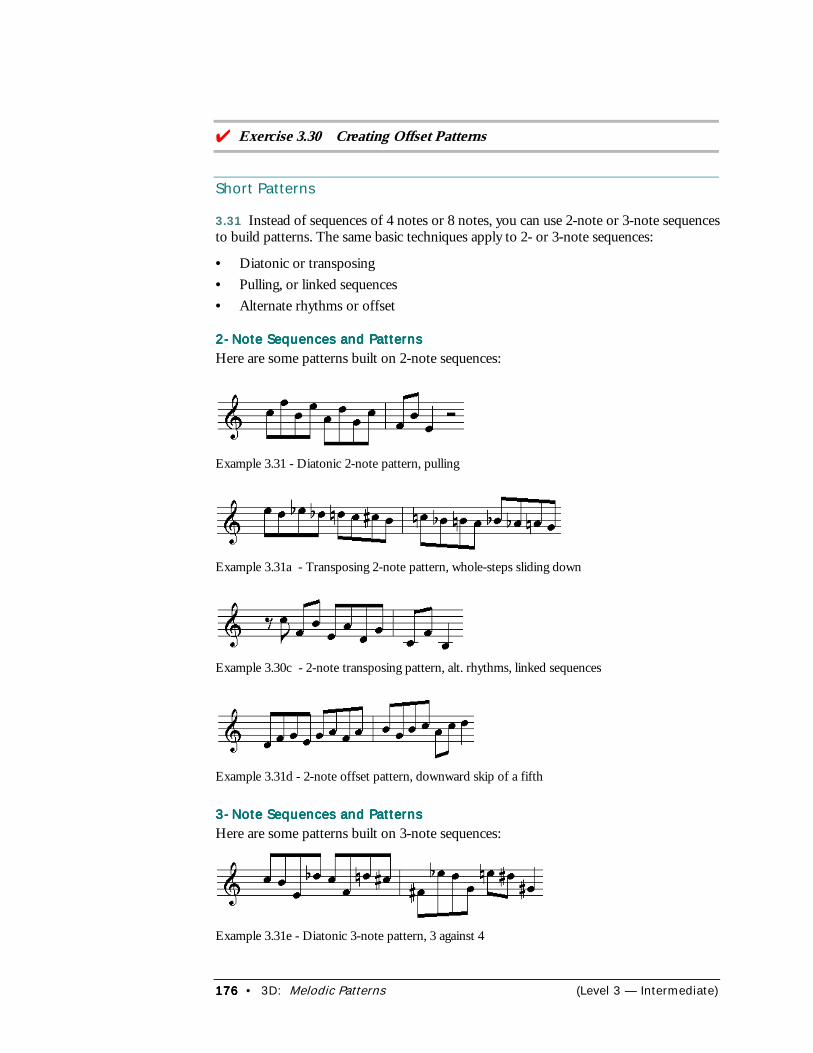
176176176176 • 3D: Melodic Patterns (Level 3 — Intermediate)
���Exercise 3.30 Creating Offset Patterns
Short Patterns
3.31 Instead of sequences of 4 notes or 8 notes, you can use 2-note or 3-note sequencesto build patterns. The same basic techniques apply to 2- or 3-note sequences:
• Diatonic or transposing• Pulling, or linked sequences• Alternate rhythms or offset
2-Note Sequences and Patterns2-Note Sequences and Patterns2-Note Sequences and Patterns2-Note Sequences and PatternsHere are some patterns built on 2-note sequences:
Example 3.31 - Diatonic 2-note pattern, pulling
Example 3.31a - Transposing 2-note pattern, whole-steps sliding down
Example 3.30c - 2-note transposing pattern, alt. rhythms, linked sequences
Example 3.31d - 2-note offset pattern, downward skip of a fifth
3-Note Sequences and Patterns3-Note Sequences and Patterns3-Note Sequences and Patterns3-Note Sequences and PatternsHere are some patterns built on 3-note sequences:
Example 3.31e - Diatonic 3-note pattern, 3 against 4
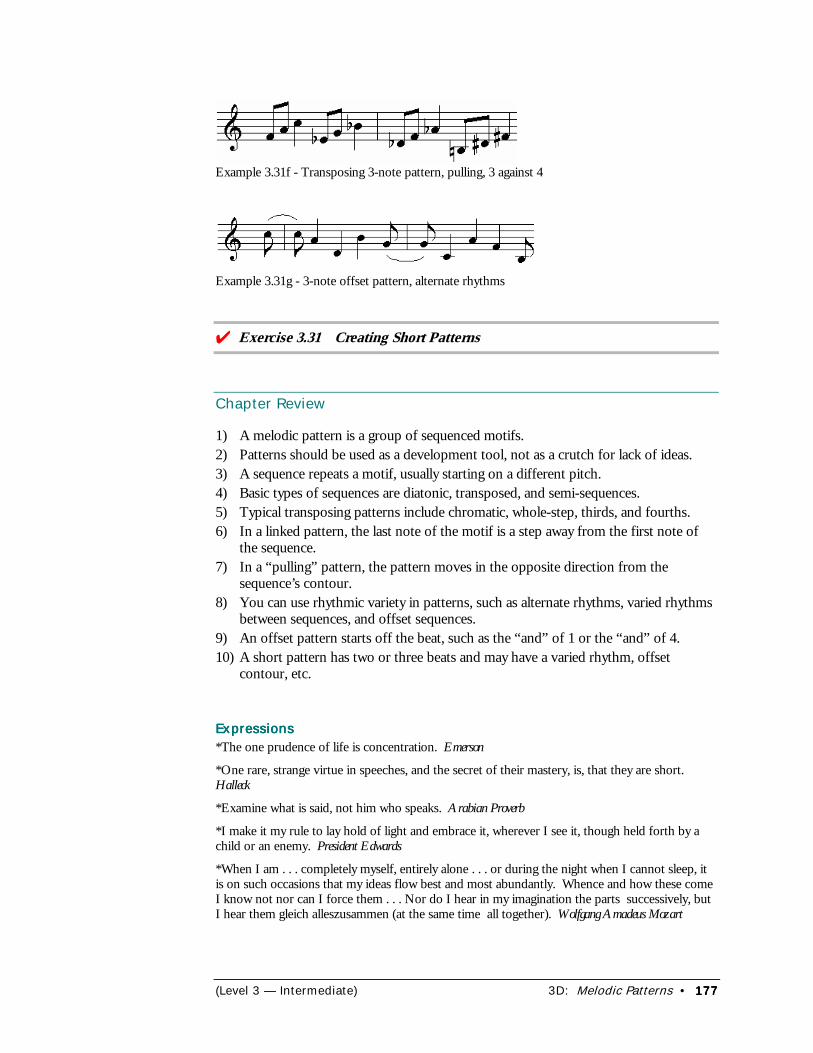
(Level 3 — Intermediate) 3D: Melodic Patterns • 177177177177
Example 3.31f - Transposing 3-note pattern, pulling, 3 against 4
Example 3.31g - 3-note offset pattern, alternate rhythms
���Exercise 3.31 Creating Short Patterns
Chapter Review
1) A melodic pattern is a group of sequenced motifs.2) Patterns should be used as a development tool, not as a crutch for lack of ideas.3) A sequence repeats a motif, usually starting on a different pitch.4) Basic types of sequences are diatonic, transposed, and semi-sequences.5) Typical transposing patterns include chromatic, whole-step, thirds, and fourths.6) In a linked pattern, the last note of the motif is a step away from the first note of
the sequence.7) In a “pulling” pattern, the pattern moves in the opposite direction from the
sequence’s contour.8) You can use rhythmic variety in patterns, such as alternate rhythms, varied rhythms
between sequences, and offset sequences.9) An offset pattern starts off the beat, such as the “and” of 1 or the “and” of 4.10) A short pattern has two or three beats and may have a varied rhythm, offset
contour, etc.
ExpressionsExpressionsExpressionsExpressions*The one prudence of life is concentration. Emerson
*One rare, strange virtue in speeches, and the secret of their mastery, is, that they are short.Halleck
*Examine what is said, not him who speaks. Arabian Proverb
*I make it my rule to lay hold of light and embrace it, wherever I see it, though held forth by achild or an enemy. President Edwards
*When I am . . . completely myself, entirely alone . . . or during the night when I cannot sleep, itis on such occasions that my ideas flow best and most abundantly. Whence and how these comeI know not nor can I force them . . . Nor do I hear in my imagination the parts successively, butI hear them gleich alleszusammen (at the same time all together). Wolfgang Amadeus Mozart
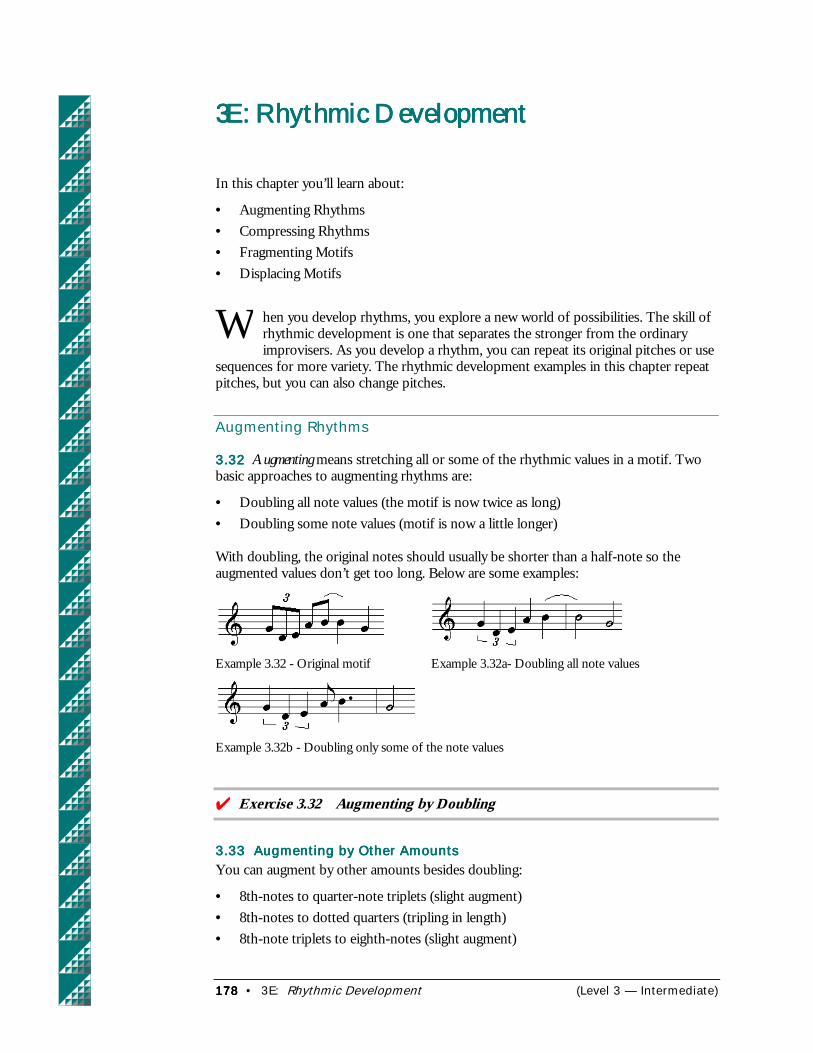
178178178178 • 3E: Rhythmic Development (Level 3 — Intermediate)
3E: Rhythmic Development3E: Rhythmic Development3E: Rhythmic Development3E: Rhythmic Development
In this chapter you’ll learn about:
• Augmenting Rhythms• Compressing Rhythms• Fragmenting Motifs• Displacing Motifs
hen you develop rhythms, you explore a new world of possibilities. The skill ofrhythmic development is one that separates the stronger from the ordinaryimprovisers. As you develop a rhythm, you can repeat its original pitches or use
sequences for more variety. The rhythmic development examples in this chapter repeatpitches, but you can also change pitches.
Augmenting Rhythms
3.323.323.323.32 Augmenting means stretching all or some of the rhythmic values in a motif. Twobasic approaches to augmenting rhythms are:
• Doubling all note values (the motif is now twice as long)• Doubling some note values (motif is now a little longer)
With doubling, the original notes should usually be shorter than a half-note so theaugmented values don’t get too long. Below are some examples:
Example 3.32 - Original motif Example 3.32a- Doubling all note values
Example 3.32b - Doubling only some of the note values
���Exercise 3.32 Augmenting by Doubling
3.33 Augmenting by Other Amounts3.33 Augmenting by Other Amounts3.33 Augmenting by Other Amounts3.33 Augmenting by Other AmountsYou can augment by other amounts besides doubling:
• 8th-notes to quarter-note triplets (slight augment)• 8th-notes to dotted quarters (tripling in length)• 8th-note triplets to eighth-notes (slight augment)
W
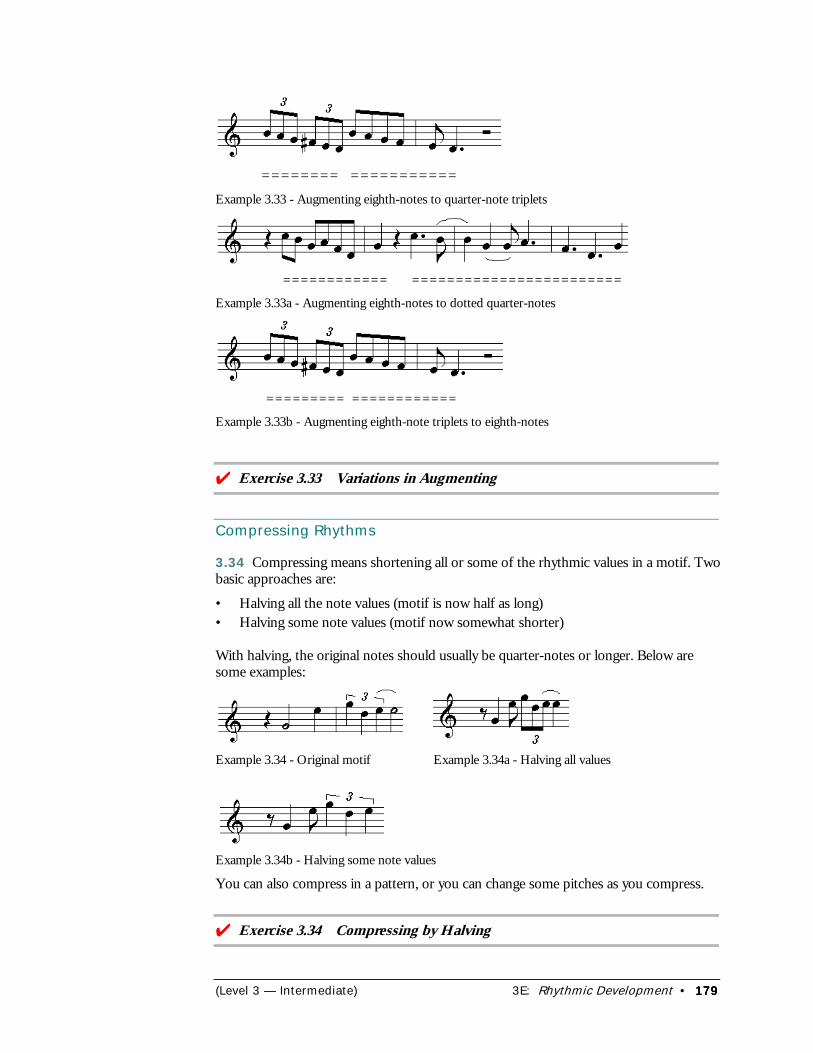
(Level 3 — Intermediate) 3E: Rhythmic Development • 179179179179
======== ===========Example 3.33 - Augmenting eighth-notes to quarter-note triplets
============ ========================
Example 3.33a - Augmenting eighth-notes to dotted quarter-notes
========= ============
Example 3.33b - Augmenting eighth-note triplets to eighth-notes
���Exercise 3.33 Variations in Augmenting
Compressing Rhythms
3.34 Compressing means shortening all or some of the rhythmic values in a motif. Twobasic approaches are:
• Halving all the note values (motif is now half as long)• Halving some note values (motif now somewhat shorter)
With halving, the original notes should usually be quarter-notes or longer. Below aresome examples:
Example 3.34 - Original motif Example 3.34a - Halving all values
Example 3.34b - Halving some note values
You can also compress in a pattern, or you can change some pitches as you compress.
���Exercise 3.34 Compressing by Halving
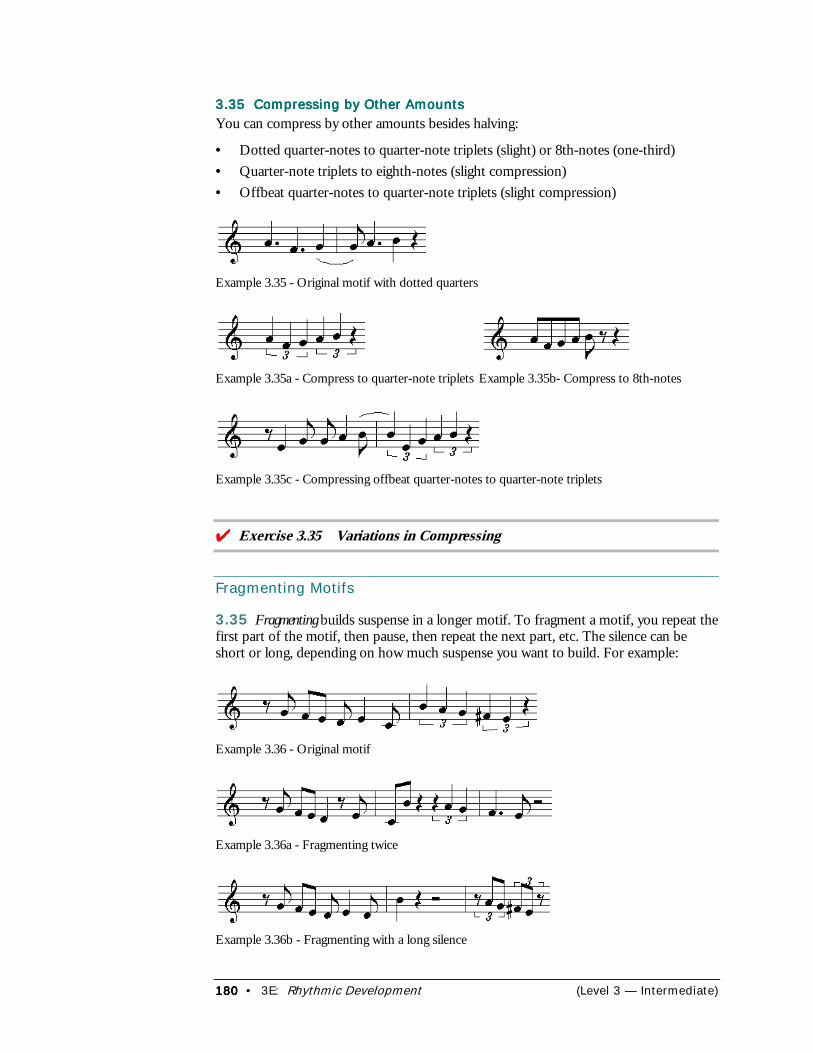
180180180180 • 3E: Rhythmic Development (Level 3 — Intermediate)
3.35 Compressing by Other Amounts3.35 Compressing by Other Amounts3.35 Compressing by Other Amounts3.35 Compressing by Other AmountsYou can compress by other amounts besides halving:
• Dotted quarter-notes to quarter-note triplets (slight) or 8th-notes (one-third)• Quarter-note triplets to eighth-notes (slight compression)• Offbeat quarter-notes to quarter-note triplets (slight compression)
Example 3.35 - Original motif with dotted quarters
Example 3.35a - Compress to quarter-note triplets Example 3.35b- Compress to 8th-notes
Example 3.35c - Compressing offbeat quarter-notes to quarter-note triplets
���Exercise 3.35 Variations in Compressing
Fragmenting Motifs
3.35 Fragmenting builds suspense in a longer motif. To fragment a motif, you repeat thefirst part of the motif, then pause, then repeat the next part, etc. The silence can beshort or long, depending on how much suspense you want to build. For example:
Example 3.36 - Original motif
Example 3.36a - Fragmenting twice
Example 3.36b - Fragmenting with a long silence

(Level 3 — Intermediate) 3E: Rhythmic Development • 181181181181
Example 3.36c - Fragmenting with a long held note (like augmenting one note)
You can also change some pitches in the fragmentation or use fragmented pieces as partof a pattern. When you fragment, make the first part of the motif (before your rest)sound “unfinished.” For example, you could insert the rest after a color tone, before askip, or in the middle of a faster run of notes.
���Exercise 3.36 Fragmenting
Displacing Motifs
3.37 Displacing is repeating a motif in a different spot from the original motif. Forexample, if a motif starts on beat two, you can displace the repetition to start on beatthree or beat one of a later bar. When you displace a motif, leave space after it so therepetition starts clearly. In the example below, the motif is displaced one beat because itstarts one bar and one beat later.
============= ======Example 3.37 - Displacing: One bar plus one beat later
Here are common ways to displace a motif in 4/4:
A) One bar plus a quarter note (the example above).
B) One bar minus a quarter-note (like 3 against 4).
C) One bar plus an eighth-note (4 1/2 beats).
D) One bar minus an eighth-note (3 1/2 beats).
======== ========Example 3.37a- Displacing: three beats later (3 against 4)
============== =======
Example 3.37b - Displacing: 4 1/2 beats later
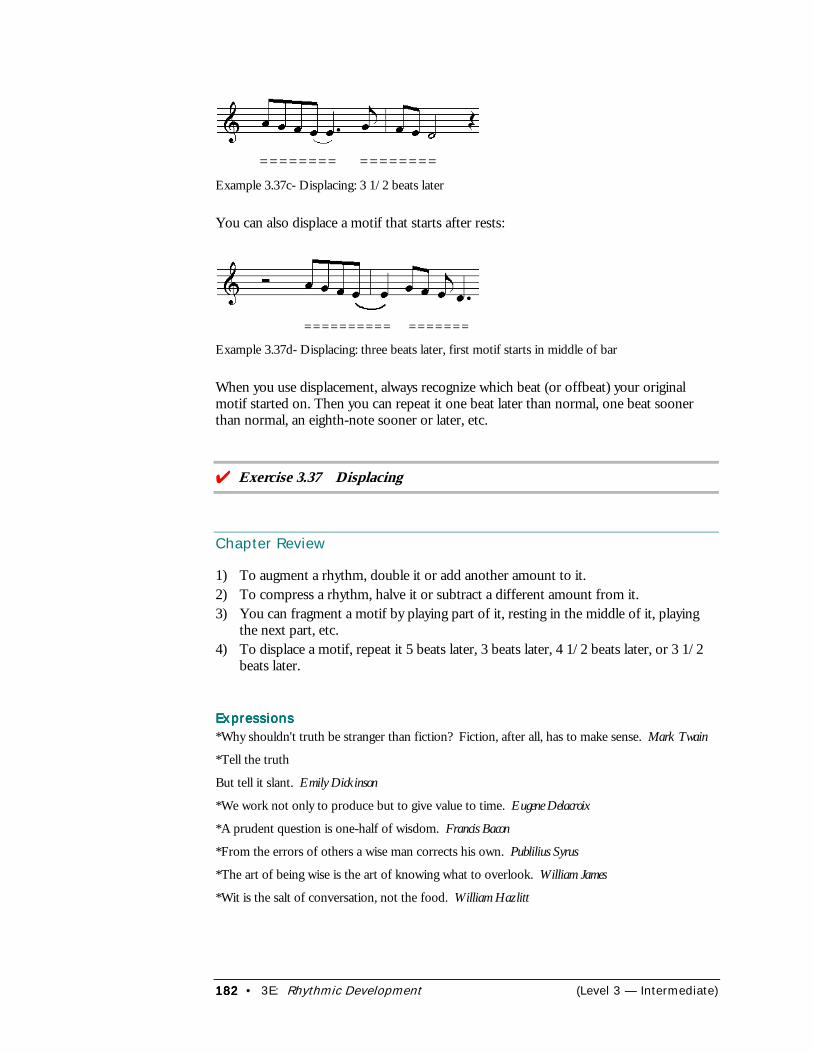
182182182182 • 3E: Rhythmic Development (Level 3 — Intermediate)
======== ========Example 3.37c- Displacing: 3 1/2 beats later
You can also displace a motif that starts after rests:
========== =======
Example 3.37d- Displacing: three beats later, first motif starts in middle of bar
When you use displacement, always recognize which beat (or offbeat) your originalmotif started on. Then you can repeat it one beat later than normal, one beat soonerthan normal, an eighth-note sooner or later, etc.
���Exercise 3.37 Displacing
Chapter Review
1) To augment a rhythm, double it or add another amount to it.2) To compress a rhythm, halve it or subtract a different amount from it.3) You can fragment a motif by playing part of it, resting in the middle of it, playing
the next part, etc.4) To displace a motif, repeat it 5 beats later, 3 beats later, 4 1/2 beats later, or 3 1/2
beats later.
ExpressionsExpressionsExpressionsExpressions*Why shouldn't truth be stranger than fiction? Fiction, after all, has to make sense. Mark Twain
*Tell the truth
But tell it slant. Emily Dickinson
*We work not only to produce but to give value to time. Eugene Delacroix
*A prudent question is one-half of wisdom. Francis Bacon
*From the errors of others a wise man corrects his own. Publilius Syrus
*The art of being wise is the art of knowing what to overlook. William James
*Wit is the salt of conversation, not the food. William Hazlitt
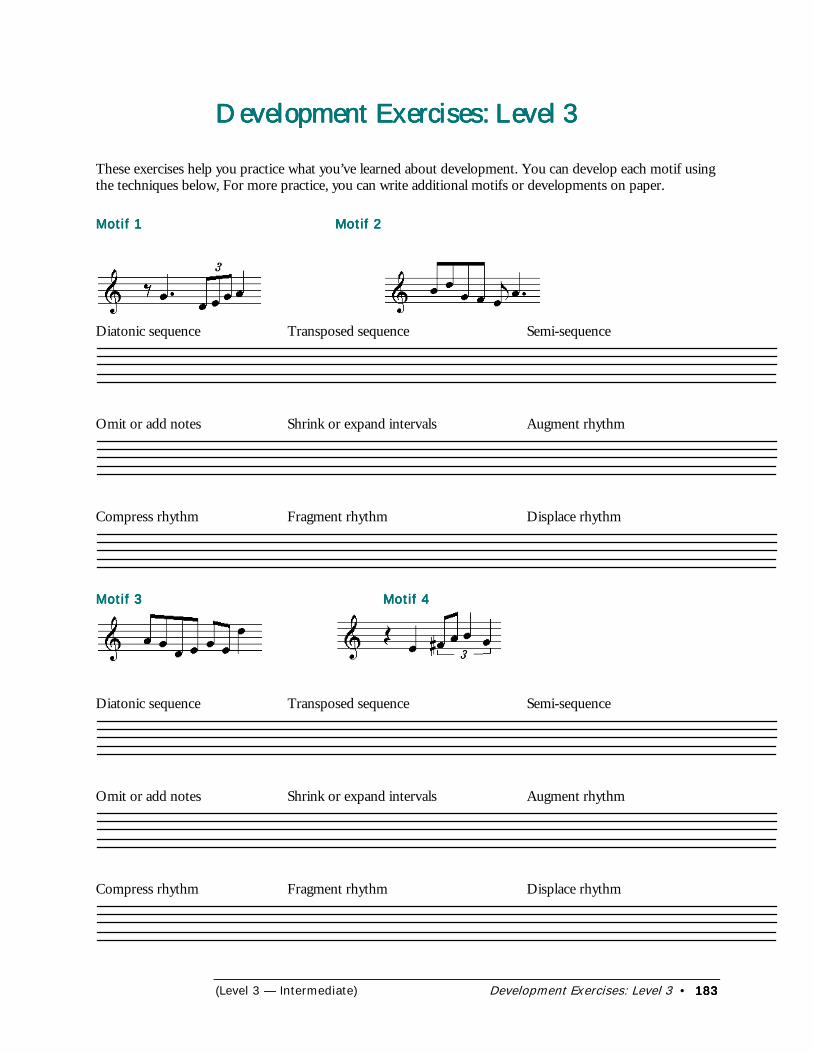
(Level 3 — Intermediate) Development Exercises: Level 3 • 183183183183
Development Exercises: Level 3Development Exercises: Level 3Development Exercises: Level 3Development Exercises: Level 3
These exercises help you practice what you’ve learned about development. You can develop each motif usingthe techniques below, For more practice, you can write additional motifs or developments on paper.
Motif 1Motif 1Motif 1Motif 1 Motif 2Motif 2Motif 2Motif 2
Diatonic sequence Transposed sequence Semi-sequence
Omit or add notes Shrink or expand intervals Augment rhythm
Compress rhythm Fragment rhythm Displace rhythm
Motif 3Motif 3Motif 3Motif 3 Motif 4Motif 4Motif 4Motif 4
Diatonic sequence Transposed sequence Semi-sequence
Omit or add notes Shrink or expand intervals Augment rhythm
Compress rhythm Fragment rhythm Displace rhythm
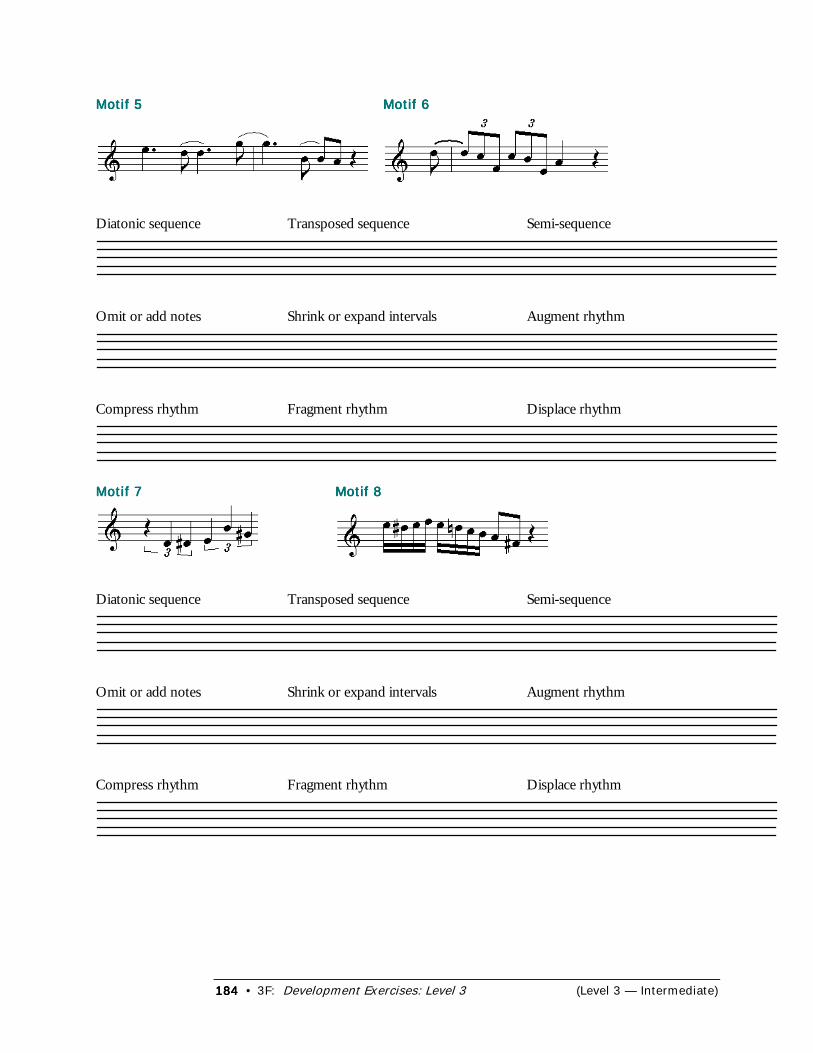
184184184184 • 3F: Development Exercises: Level 3 (Level 3 — Intermediate)
Motif 5Motif 5Motif 5Motif 5 Motif 6Motif 6Motif 6Motif 6
Diatonic sequence Transposed sequence Semi-sequence
Omit or add notes Shrink or expand intervals Augment rhythm
Compress rhythm Fragment rhythm Displace rhythm
Motif 7Motif 7Motif 7Motif 7 Motif 8Motif 8Motif 8Motif 8
Diatonic sequence Transposed sequence Semi-sequence
Omit or add notes Shrink or expand intervals Augment rhythm
Compress rhythm Fragment rhythm Displace rhythm
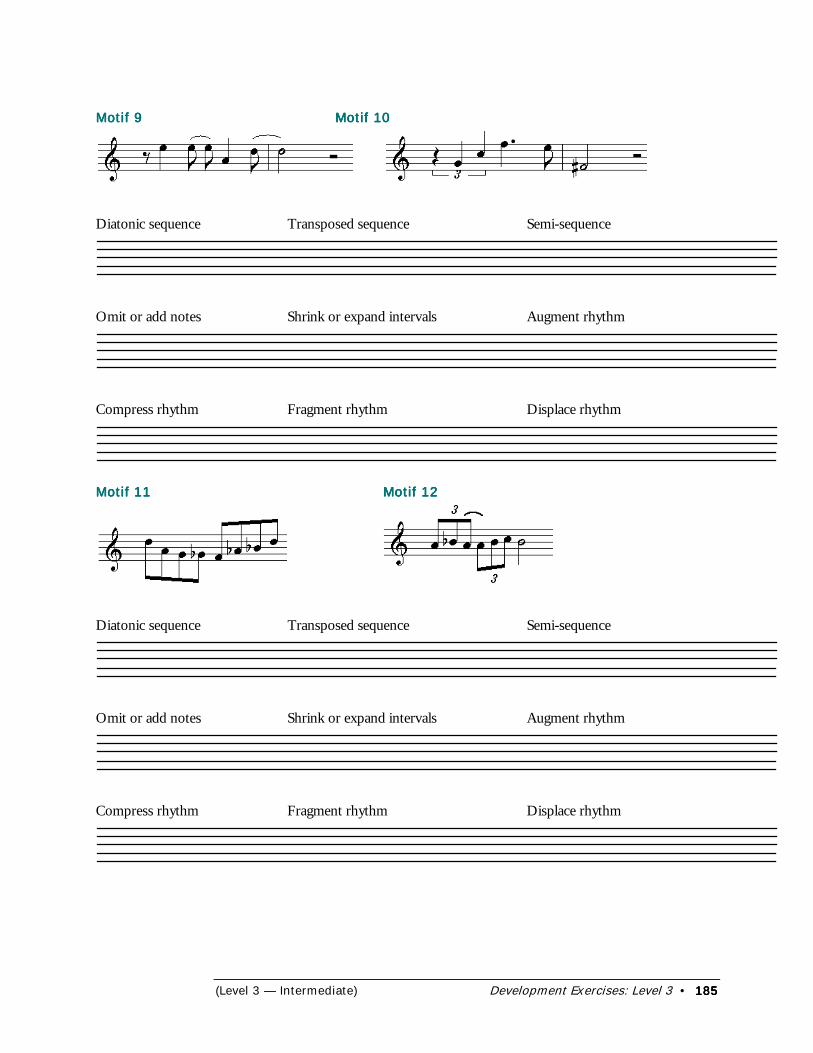
(Level 3 — Intermediate) Development Exercises: Level 3 • 185185185185
Motif 9Motif 9Motif 9Motif 9 Motif 10Motif 10Motif 10Motif 10
Diatonic sequence Transposed sequence Semi-sequence
Omit or add notes Shrink or expand intervals Augment rhythm
Compress rhythm Fragment rhythm Displace rhythm
Motif 11Motif 11Motif 11Motif 11 Motif 12Motif 12Motif 12Motif 12
Diatonic sequence Transposed sequence Semi-sequence
Omit or add notes Shrink or expand intervals Augment rhythm
Compress rhythm Fragment rhythm Displace rhythm
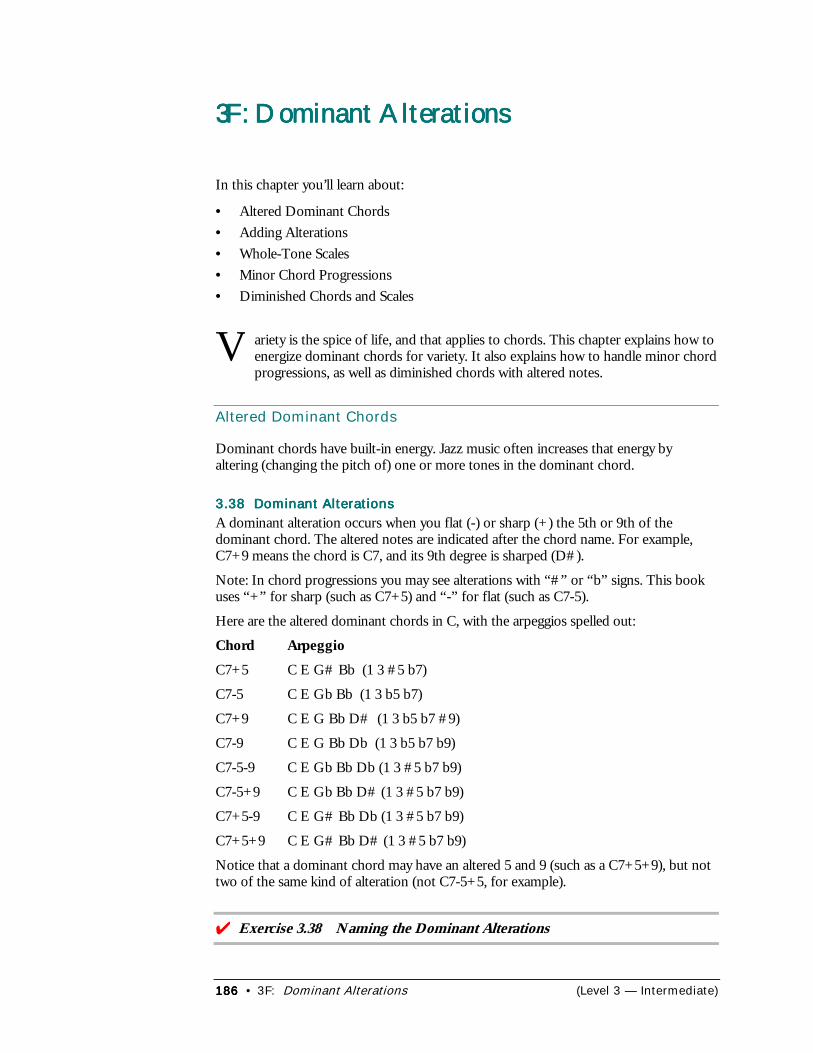
186186186186 • 3F: Dominant Alterations (Level 3 — Intermediate)
3F: Dominant Alterations3F: Dominant Alterations3F: Dominant Alterations3F: Dominant Alterations
In this chapter you’ll learn about:
• Altered Dominant Chords• Adding Alterations• Whole-Tone Scales• Minor Chord Progressions• Diminished Chords and Scales
ariety is the spice of life, and that applies to chords. This chapter explains how toenergize dominant chords for variety. It also explains how to handle minor chordprogressions, as well as diminished chords with altered notes.
Altered Dominant Chords
Dominant chords have built-in energy. Jazz music often increases that energy byaltering (changing the pitch of) one or more tones in the dominant chord.
3.38 Dominant Alterations3.38 Dominant Alterations3.38 Dominant Alterations3.38 Dominant AlterationsA dominant alteration occurs when you flat (-) or sharp (+) the 5th or 9th of thedominant chord. The altered notes are indicated after the chord name. For example,C7+9 means the chord is C7, and its 9th degree is sharped (D#).
Note: In chord progressions you may see alterations with “#” or “b” signs. This bookuses “+” for sharp (such as C7+5) and “-” for flat (such as C7-5).
Here are the altered dominant chords in C, with the arpeggios spelled out:
Chord ArpeggioC7+5 C E G# Bb (1 3 #5 b7)
C7-5 C E Gb Bb (1 3 b5 b7)
C7+9 C E G Bb D# (1 3 b5 b7 #9)
C7-9 C E G Bb Db (1 3 b5 b7 b9)
C7-5-9 C E Gb Bb Db (1 3 #5 b7 b9)
C7-5+9 C E Gb Bb D# (1 3 #5 b7 b9)
C7+5-9 C E G# Bb Db (1 3 #5 b7 b9)
C7+5+9 C E G# Bb D# (1 3 #5 b7 b9)
Notice that a dominant chord may have an altered 5 and 9 (such as a C7+5+9), but nottwo of the same kind of alteration (not C7-5+5, for example).
���Exercise 3.38 Naming the Dominant Alterations
V
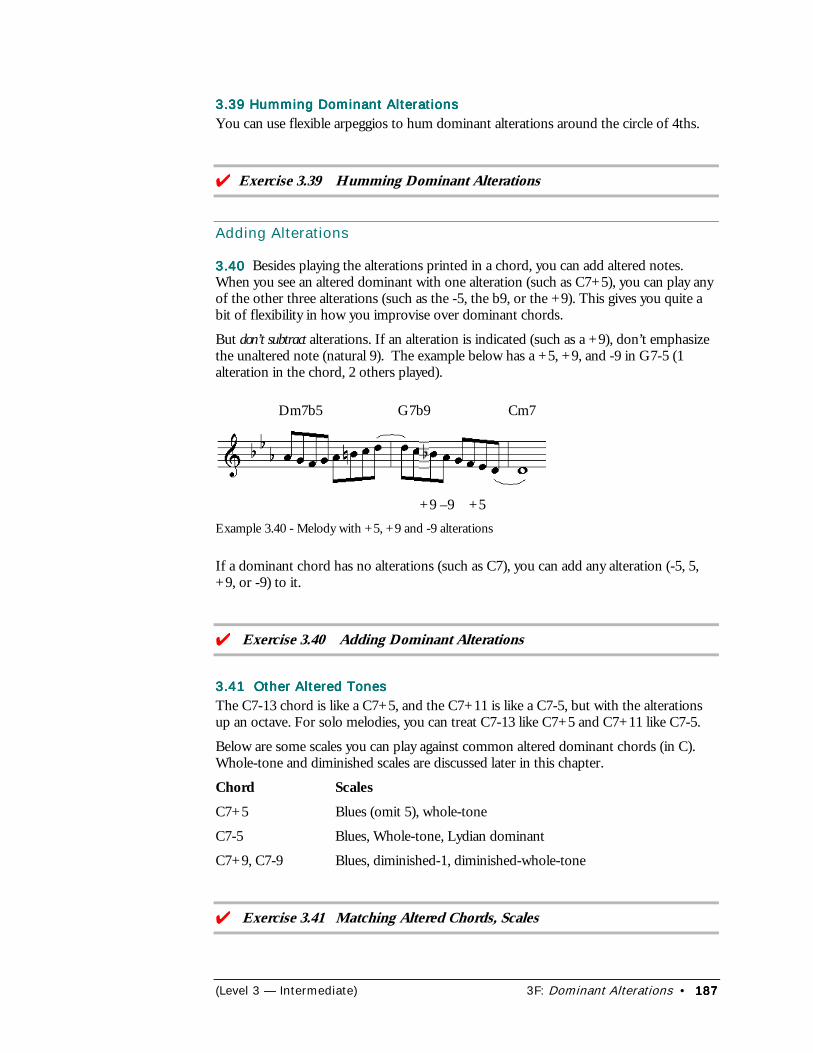
(Level 3 — Intermediate) 3F: Dominant Alterations • 187187187187
3.39 Humming Dominant Alterations3.39 Humming Dominant Alterations3.39 Humming Dominant Alterations3.39 Humming Dominant AlterationsYou can use flexible arpeggios to hum dominant alterations around the circle of 4ths.
���Exercise 3.39 Humming Dominant Alterations
Adding Alterations
3.403.403.403.40 Besides playing the alterations printed in a chord, you can add altered notes.When you see an altered dominant with one alteration (such as C7+5), you can play anyof the other three alterations (such as the -5, the b9, or the +9). This gives you quite abit of flexibility in how you improvise over dominant chords.
But don’t subtract alterations. If an alteration is indicated (such as a +9), don’t emphasizethe unaltered note (natural 9). The example below has a +5, +9, and -9 in G7-5 (1alteration in the chord, 2 others played).
Dm7b5 G7b9 Cm7
+9 –9 +5Example 3.40 - Melody with +5, +9 and -9 alterations
If a dominant chord has no alterations (such as C7), you can add any alteration (-5, 5,+9, or -9) to it.
��� Exercise 3.40 Adding Dominant Alterations
3.41 Other Altered Tones3.41 Other Altered Tones3.41 Other Altered Tones3.41 Other Altered TonesThe C7-13 chord is like a C7+5, and the C7+11 is like a C7-5, but with the alterationsup an octave. For solo melodies, you can treat C7-13 like C7+5 and C7+11 like C7-5.
Below are some scales you can play against common altered dominant chords (in C).Whole-tone and diminished scales are discussed later in this chapter.
Chord ScalesC7+5 Blues (omit 5), whole-tone
C7-5 Blues, Whole-tone, Lydian dominant
C7+9, C7-9 Blues, diminished-1, diminished-whole-tone
��� Exercise 3.41 Matching Altered Chords, Scales
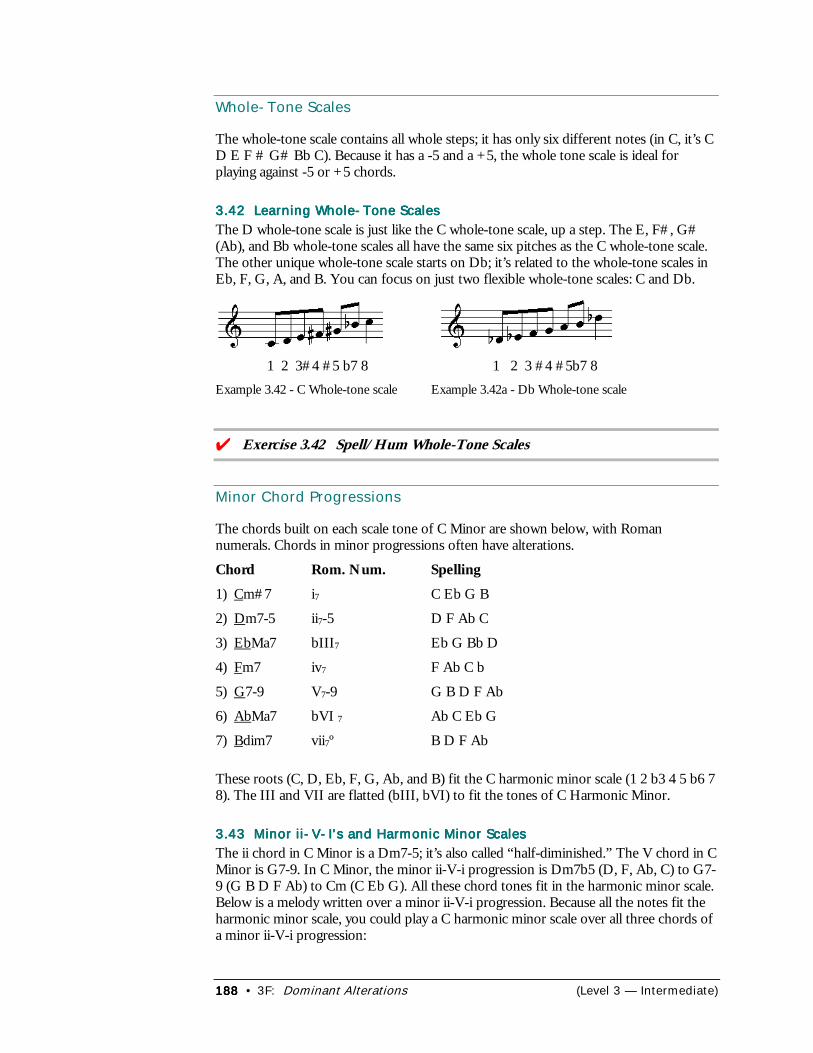
188188188188 • 3F: Dominant Alterations (Level 3 — Intermediate)
Whole-Tone Scales
The whole-tone scale contains all whole steps; it has only six different notes (in C, it’s CD E F # G# Bb C). Because it has a -5 and a +5, the whole tone scale is ideal forplaying against -5 or +5 chords.
3.42 Learning Whole-Tone Scales3.42 Learning Whole-Tone Scales3.42 Learning Whole-Tone Scales3.42 Learning Whole-Tone ScalesThe D whole-tone scale is just like the C whole-tone scale, up a step. The E, F#, G#(Ab), and Bb whole-tone scales all have the same six pitches as the C whole-tone scale.The other unique whole-tone scale starts on Db; it’s related to the whole-tone scales inEb, F, G, A, and B. You can focus on just two flexible whole-tone scales: C and Db.
1 2 3#4 #5 b7 8 1 2 3 #4 #5b7 8Example 3.42 - C Whole-tone scale Example 3.42a - Db Whole-tone scale
��� Exercise 3.42 Spell/Hum Whole-Tone Scales
Minor Chord Progressions
The chords built on each scale tone of C Minor are shown below, with Romannumerals. Chords in minor progressions often have alterations.
Chord Rom. Num. Spelling1) Cm#7 i7 C Eb G B
2) Dm7-5 ii7-5 D F Ab C
3) EbMa7 bIII7 Eb G Bb D
4) Fm7 iv7 F Ab C b
5) G7-9 V7-9 G B D F Ab
6) AbMa7 bVI 7 Ab C Eb G
7) Bdim7 vii7º B D F Ab
These roots (C, D, Eb, F, G, Ab, and B) fit the C harmonic minor scale (1 2 b3 4 5 b6 78). The III and VII are flatted (bIII, bVI) to fit the tones of C Harmonic Minor.
3.43 Minor ii-V-I’s and Harmonic Minor Scales3.43 Minor ii-V-I’s and Harmonic Minor Scales3.43 Minor ii-V-I’s and Harmonic Minor Scales3.43 Minor ii-V-I’s and Harmonic Minor ScalesThe ii chord in C Minor is a Dm7-5; it’s also called “half-diminished.” The V chord in CMinor is G7-9. In C Minor, the minor ii-V-i progression is Dm7b5 (D, F, Ab, C) to G7-9 (G B D F Ab) to Cm (C Eb G). All these chord tones fit in the harmonic minor scale.Below is a melody written over a minor ii-V-i progression. Because all the notes fit theharmonic minor scale, you could play a C harmonic minor scale over all three chords ofa minor ii-V-i progression:
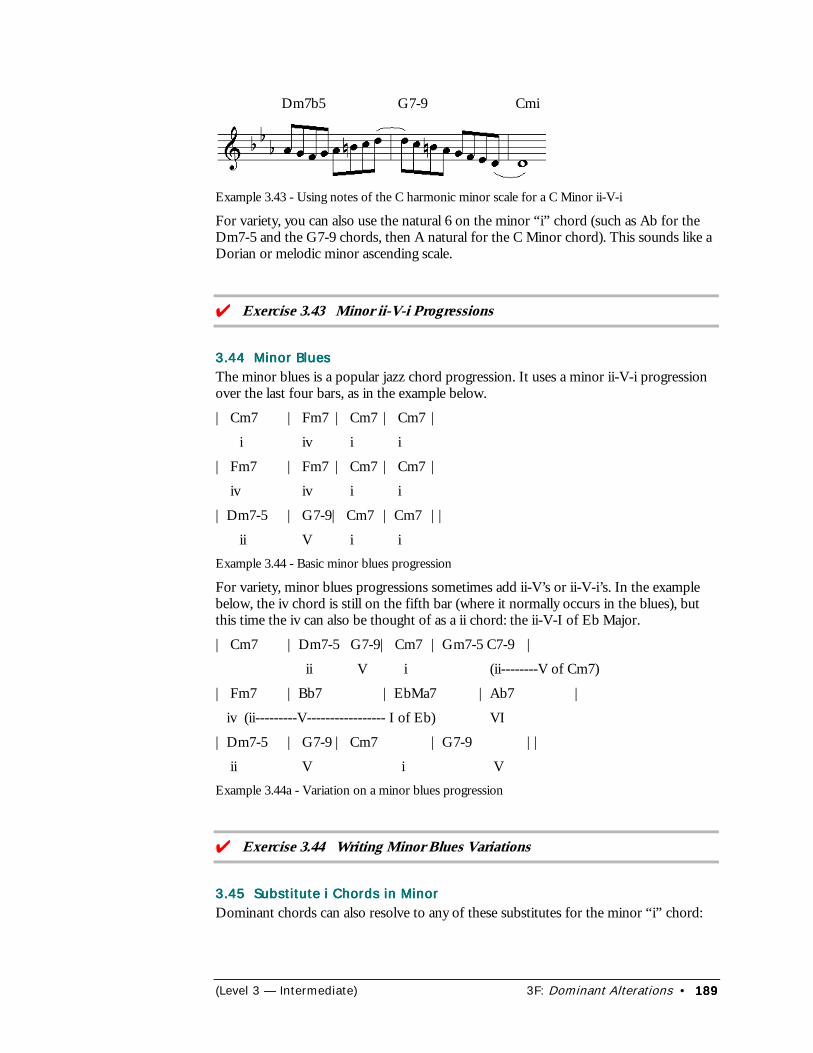
(Level 3 — Intermediate) 3F: Dominant Alterations • 189189189189
Dm7b5 G7-9 Cmi
Example 3.43 - Using notes of the C harmonic minor scale for a C Minor ii-V-i
For variety, you can also use the natural 6 on the minor “i” chord (such as Ab for theDm7-5 and the G7-9 chords, then A natural for the C Minor chord). This sounds like aDorian or melodic minor ascending scale.
��� Exercise 3.43 Minor ii-V-i Progressions
3.44 Minor Blues3.44 Minor Blues3.44 Minor Blues3.44 Minor BluesThe minor blues is a popular jazz chord progression. It uses a minor ii-V-i progressionover the last four bars, as in the example below.
| Cm7 | Fm7 | Cm7 | Cm7 |
i iv i i
| Fm7 | Fm7 | Cm7 | Cm7 |
iv iv i i
| Dm7-5 | G7-9| Cm7 | Cm7 ||
ii V i iExample 3.44 - Basic minor blues progression
For variety, minor blues progressions sometimes add ii-V’s or ii-V-i’s. In the examplebelow, the iv chord is still on the fifth bar (where it normally occurs in the blues), butthis time the iv can also be thought of as a ii chord: the ii-V-I of Eb Major.
| Cm7 | Dm7-5 G7-9| Cm7 | Gm7-5 C7-9 |
ii V i (ii--------V of Cm7)
| Fm7 | Bb7 | EbMa7 | Ab7 |
iv (ii---------V----------------- I of Eb) VI
| Dm7-5 | G7-9 | Cm7 | G7-9 ||
ii V i VExample 3.44a - Variation on a minor blues progression
��� Exercise 3.44 Writing Minor Blues Variations
3.45 Substitute i Chords in Minor3.45 Substitute i Chords in Minor3.45 Substitute i Chords in Minor3.45 Substitute i Chords in MinorDominant chords can also resolve to any of these substitutes for the minor “i” chord:
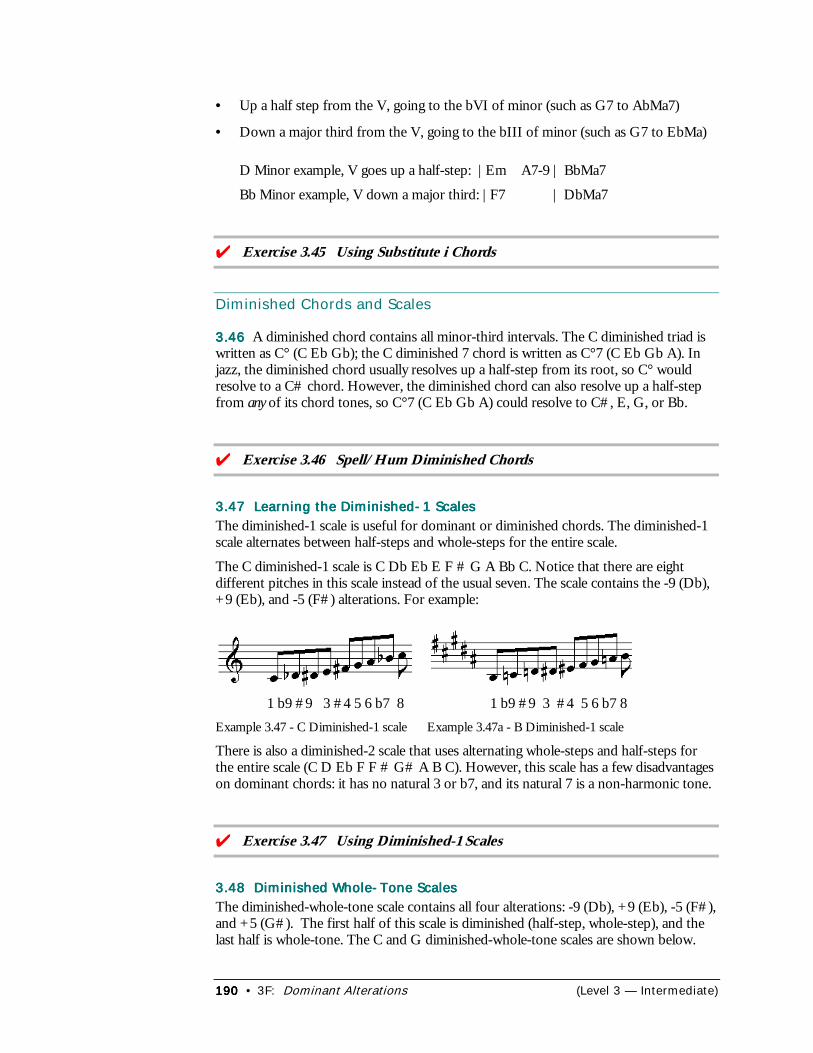
190190190190 • 3F: Dominant Alterations (Level 3 — Intermediate)
• Up a half step from the V, going to the bVI of minor (such as G7 to AbMa7)
• Down a major third from the V, going to the bIII of minor (such as G7 to EbMa)
D Minor example, V goes up a half-step: |Em A7-9 | BbMa7
Bb Minor example, V down a major third: |F7 | DbMa7
��� Exercise 3.45 Using Substitute i Chords
Diminished Chords and Scales
3.463.463.463.46 A diminished chord contains all minor-third intervals. The C diminished triad iswritten as C° (C Eb Gb); the C diminished 7 chord is written as C°7 (C Eb Gb A). Injazz, the diminished chord usually resolves up a half-step from its root, so C° wouldresolve to a C# chord. However, the diminished chord can also resolve up a half-stepfrom any of its chord tones, so C°7 (C Eb Gb A) could resolve to C#, E, G, or Bb.
��� Exercise 3.46 Spell/Hum Diminished Chords
3.47 Learning the Diminished-1 Scales3.47 Learning the Diminished-1 Scales3.47 Learning the Diminished-1 Scales3.47 Learning the Diminished-1 ScalesThe diminished-1 scale is useful for dominant or diminished chords. The diminished-1scale alternates between half-steps and whole-steps for the entire scale.
The C diminished-1 scale is C Db Eb E F # G A Bb C. Notice that there are eightdifferent pitches in this scale instead of the usual seven. The scale contains the -9 (Db),+9 (Eb), and -5 (F#) alterations. For example:
1 b9 #9 3 #4 5 6 b7 8 1 b9 #9 3 #4 5 6 b7 8Example 3.47 - C Diminished-1 scale Example 3.47a - B Diminished-1 scale
There is also a diminished-2 scale that uses alternating whole-steps and half-steps forthe entire scale (C D Eb F F # G# A B C). However, this scale has a few disadvantageson dominant chords: it has no natural 3 or b7, and its natural 7 is a non-harmonic tone.
��� Exercise 3.47 Using Diminished-1 Scales
3.48 Diminished Whole-Tone Scales3.48 Diminished Whole-Tone Scales3.48 Diminished Whole-Tone Scales3.48 Diminished Whole-Tone ScalesThe diminished-whole-tone scale contains all four alterations: -9 (Db), +9 (Eb), -5 (F#),and +5 (G#). The first half of this scale is diminished (half-step, whole-step), and thelast half is whole-tone. The C and G diminished-whole-tone scales are shown below.
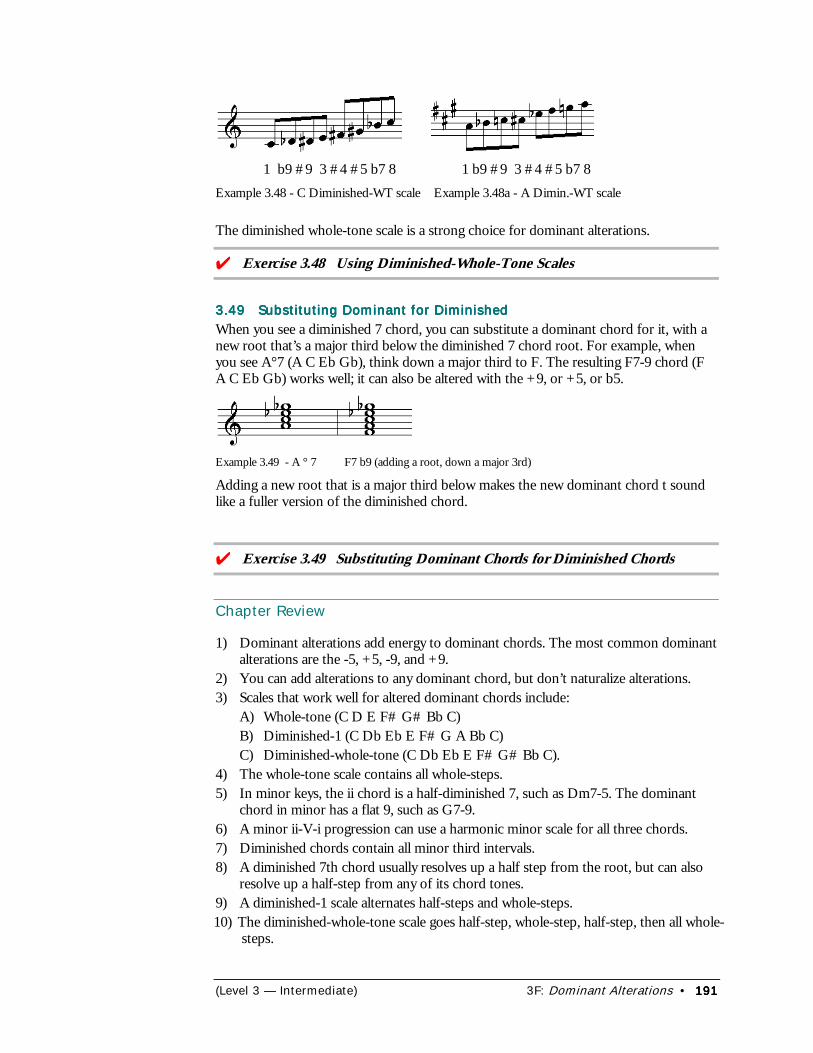
(Level 3 — Intermediate) 3F: Dominant Alterations • 191191191191
1 b9 #9 3 #4 #5 b7 8 1 b9 #9 3 #4 #5 b7 8Example 3.48 - C Diminished-WT scale Example 3.48a - A Dimin.-WT scale
The diminished whole-tone scale is a strong choice for dominant alterations.
��� Exercise 3.48 Using Diminished-Whole-Tone Scales
3.49 Substituting Dominant for Diminished3.49 Substituting Dominant for Diminished3.49 Substituting Dominant for Diminished3.49 Substituting Dominant for DiminishedWhen you see a diminished 7 chord, you can substitute a dominant chord for it, with anew root that’s a major third below the diminished 7 chord root. For example, whenyou see A°7 (A C Eb Gb), think down a major third to F. The resulting F7-9 chord (FA C Eb Gb) works well; it can also be altered with the +9, or +5, or b5.
Example 3.49 - A ° 7 F7 b9 (adding a root, down a major 3rd)
Adding a new root that is a major third below makes the new dominant chord t soundlike a fuller version of the diminished chord.
��� Exercise 3.49 Substituting Dominant Chords for Diminished Chords
Chapter Review
1) Dominant alterations add energy to dominant chords. The most common dominantalterations are the -5, +5, -9, and +9.
2) You can add alterations to any dominant chord, but don’t naturalize alterations.3) Scales that work well for altered dominant chords include:
A) Whole-tone (C D E F# G# Bb C)B) Diminished-1 (C Db Eb E F# G A Bb C)C) Diminished-whole-tone (C Db Eb E F# G# Bb C).
4) The whole-tone scale contains all whole-steps.5) In minor keys, the ii chord is a half-diminished 7, such as Dm7-5. The dominant
chord in minor has a flat 9, such as G7-9.6) A minor ii-V-i progression can use a harmonic minor scale for all three chords.7) Diminished chords contain all minor third intervals.8) A diminished 7th chord usually resolves up a half step from the root, but can also
resolve up a half-step from any of its chord tones.9) A diminished-1 scale alternates half-steps and whole-steps.
10) The diminished-whole-tone scale goes half-step, whole-step, half-step, then all whole- steps.
192192192192 • 3G: Learning Standard Tunes (Level 3 — Intermediate)
3G: Learning Standard Tunes3G: Learning Standard Tunes3G: Learning Standard Tunes3G: Learning Standard Tunes
In this chapter you’ll learn about:
• Steps for Memorizing Progressions• Using Bass Cheater Notes• Singing the Bass Line• Adding Other Tones
here are hundreds of standard tunes, with almost as many different chordprogressions. When you memorize the chord progression for standard tunes,you can solo on them with confidence. But you don’t have to memorize chord
progressions with your instrument; you can actually memorize them using the VirtualPractice Method. That way, you can practice the progressions whenever and whereveryou want.
Learning the Tune MelodyLearning the Tune MelodyLearning the Tune MelodyLearning the Tune MelodyBefore you memorize a tune’s chord progression, you should learn the melody for thetune. These steps will help you memorize a tune melody:
1 Get a recording of the tune by one of your favorite artists. Or, use the sheet musicfor the tune, or have a friend play or record it for you.
2 Sing or play through the tune. Make a mental note of the tune’s phrases, activetones, and interesting rhythms: they may remind you of tunes you know.
3 Sing or play through the tune several times again.
4 Looking away from the music, sing or play the tune, one section at a time until youmemorize it.
Try these steps on any tune you’re learning. In time you’ll be able to practice the tunesanywhere, anytime you want, without looking at the music.
Steps for Memorizing Progressions
To memorize a chord progression, you need to actually hear the progression in yourmind instead of just remembering chord letters and numbers. Here are the steps:
1 Write the bass “cheater” notes between each chord, as explained in Using BassCheater Notes below. This gives you a reliable way to hear each new chord withoutgetting lost harmonically.
2 Sing or hum a bass line with the chord roots and bass cheater notes for the entiretune. End on the same pitch where you began.
These first steps should be fairly simple, but steps 3 and 4 require more practice.
3 Repeat step 2, adding arpeggios (like 1 3 5 3 1) to the root tones, so you begin tohear the chords along with the bass line.
4 When step 3 is comfortable, mix the arpeggios (like 1 5 3 1), then add active tonesfor variety.
W
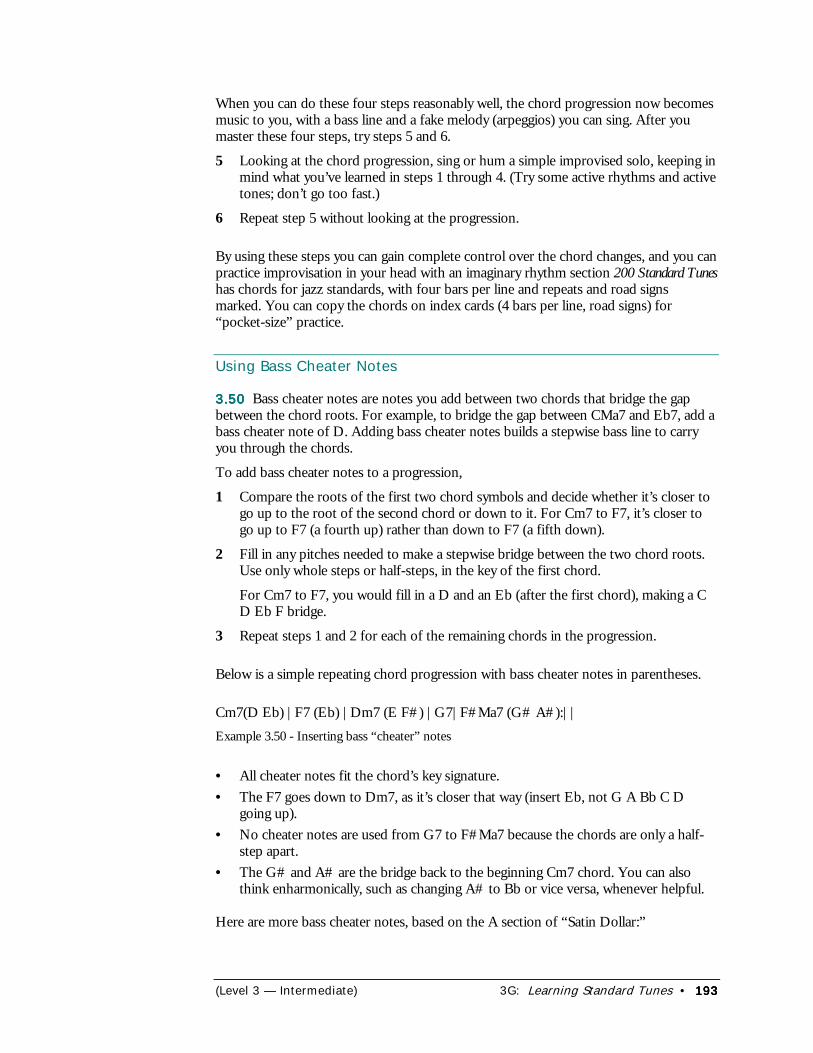
(Level 3 — Intermediate) 3G: Learning Standard Tunes • 193193193193
When you can do these four steps reasonably well, the chord progression now becomesmusic to you, with a bass line and a fake melody (arpeggios) you can sing. After youmaster these four steps, try steps 5 and 6.
5 Looking at the chord progression, sing or hum a simple improvised solo, keeping inmind what you’ve learned in steps 1 through 4. (Try some active rhythms and activetones; don’t go too fast.)
6 Repeat step 5 without looking at the progression.
By using these steps you can gain complete control over the chord changes, and you canpractice improvisation in your head with an imaginary rhythm section 200 Standard Tuneshas chords for jazz standards, with four bars per line and repeats and road signsmarked. You can copy the chords on index cards (4 bars per line, road signs) for“pocket-size” practice.
Using Bass Cheater Notes
3.503.503.503.50 Bass cheater notes are notes you add between two chords that bridge the gapbetween the chord roots. For example, to bridge the gap between CMa7 and Eb7, add abass cheater note of D. Adding bass cheater notes builds a stepwise bass line to carryyou through the chords.
To add bass cheater notes to a progression,
1 Compare the roots of the first two chord symbols and decide whether it’s closer togo up to the root of the second chord or down to it. For Cm7 to F7, it’s closer togo up to F7 (a fourth up) rather than down to F7 (a fifth down).
2 Fill in any pitches needed to make a stepwise bridge between the two chord roots.Use only whole steps or half-steps, in the key of the first chord.
For Cm7 to F7, you would fill in a D and an Eb (after the first chord), making a CD Eb F bridge.
3 Repeat steps 1 and 2 for each of the remaining chords in the progression.
Below is a simple repeating chord progression with bass cheater notes in parentheses.
Cm7(D Eb) |F7 (Eb) |Dm7 (E F#) |G7|F#Ma7 (G# A#):||Example 3.50 - Inserting bass “cheater” notes
• All cheater notes fit the chord’s key signature.• The F7 goes down to Dm7, as it’s closer that way (insert Eb, not G A Bb C D
going up).• No cheater notes are used from G7 to F#Ma7 because the chords are only a half-
step apart.• The G# and A# are the bridge back to the beginning Cm7 chord. You can also
think enharmonically, such as changing A# to Bb or vice versa, whenever helpful.
Here are more bass cheater notes, based on the A section of “Satin Dollar:”
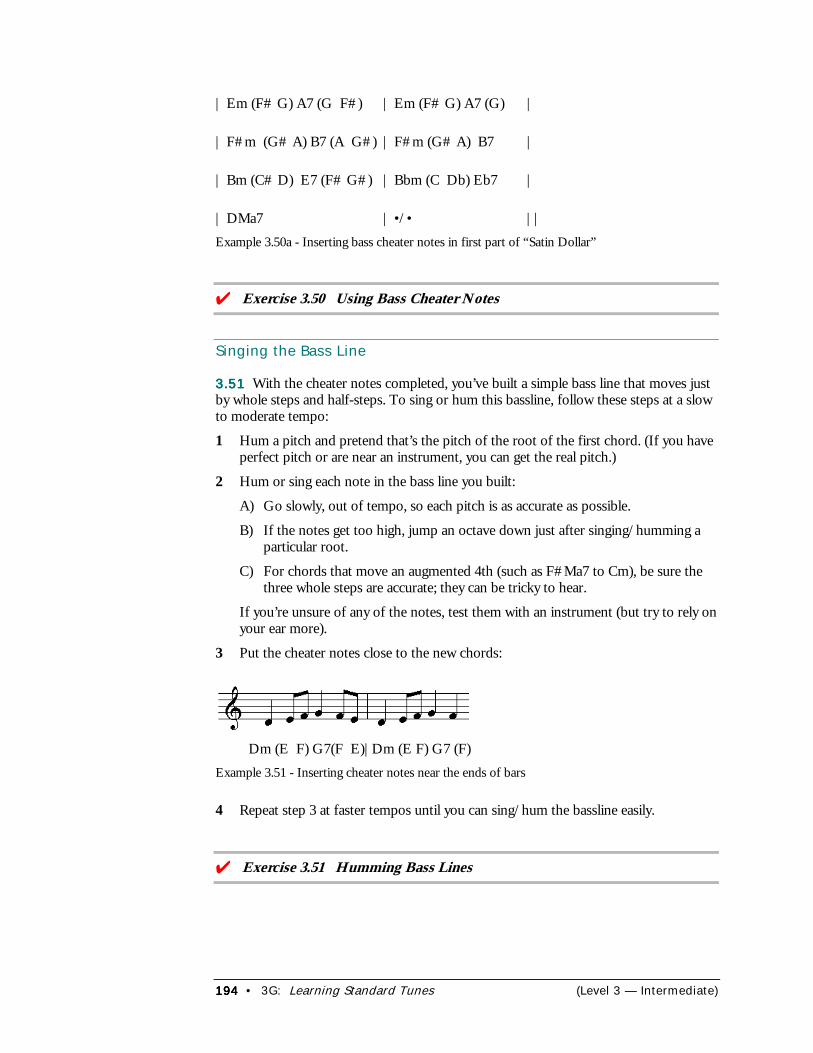
194194194194 • 3G: Learning Standard Tunes (Level 3 — Intermediate)
| Em (F# G) A7 (G F#) | Em (F# G) A7 (G) |
| F#m (G# A) B7 (A G#) | F#m (G# A) B7 |
| Bm (C# D) E7 (F# G#) | Bbm (C Db) Eb7 |
| DMa7 | •/• ||Example 3.50a - Inserting bass cheater notes in first part of “Satin Dollar”
��� Exercise 3.50 Using Bass Cheater Notes
Singing the Bass Line
3.513.513.513.51 With the cheater notes completed, you’ve built a simple bass line that moves justby whole steps and half-steps. To sing or hum this bassline, follow these steps at a slowto moderate tempo:
1 Hum a pitch and pretend that’s the pitch of the root of the first chord. (If you haveperfect pitch or are near an instrument, you can get the real pitch.)
2 Hum or sing each note in the bass line you built:
A) Go slowly, out of tempo, so each pitch is as accurate as possible.
B) If the notes get too high, jump an octave down just after singing/humming aparticular root.
C) For chords that move an augmented 4th (such as F#Ma7 to Cm), be sure thethree whole steps are accurate; they can be tricky to hear.
If you’re unsure of any of the notes, test them with an instrument (but try to rely onyour ear more).
3 Put the cheater notes close to the new chords:
Dm (E F) G7(F E)|Dm (E F) G7 (F)Example 3.51 - Inserting cheater notes near the ends of bars
4 Repeat step 3 at faster tempos until you can sing/hum the bassline easily.
��� Exercise 3.51 Humming Bass Lines
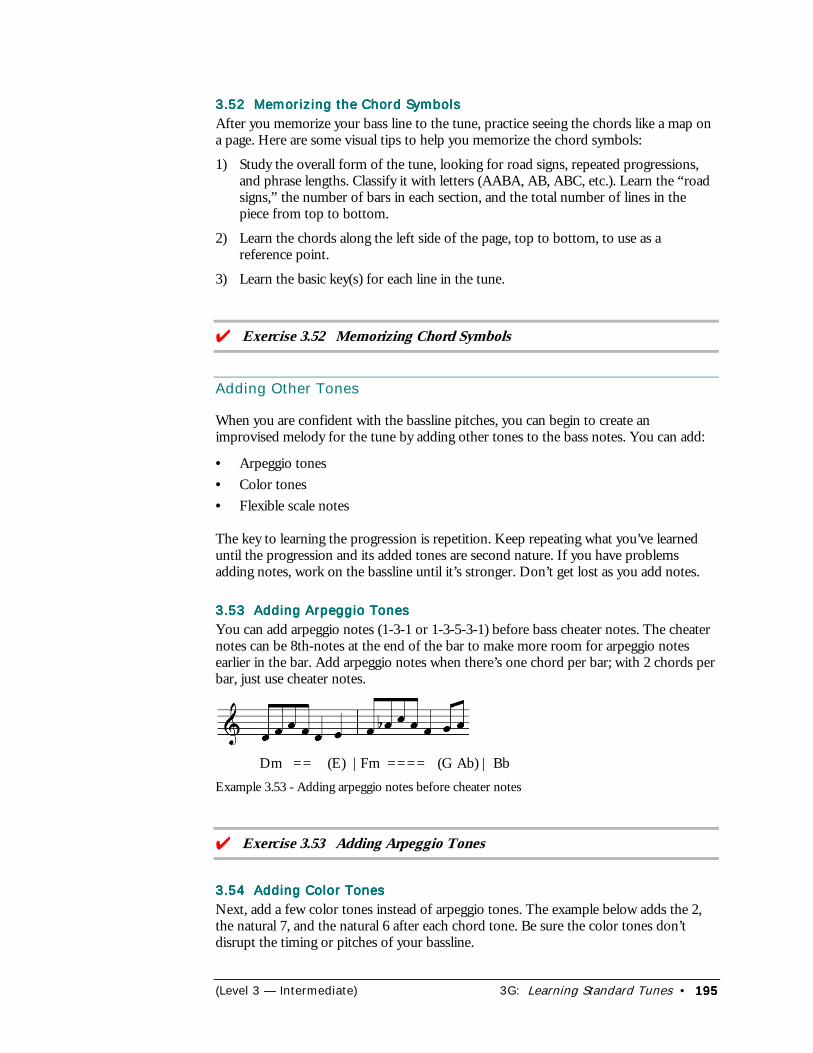
(Level 3 — Intermediate) 3G: Learning Standard Tunes • 195195195195
3.52 Memorizing the Chord Symbols3.52 Memorizing the Chord Symbols3.52 Memorizing the Chord Symbols3.52 Memorizing the Chord SymbolsAfter you memorize your bass line to the tune, practice seeing the chords like a map ona page. Here are some visual tips to help you memorize the chord symbols:
1) Study the overall form of the tune, looking for road signs, repeated progressions,and phrase lengths. Classify it with letters (AABA, AB, ABC, etc.). Learn the “roadsigns,” the number of bars in each section, and the total number of lines in thepiece from top to bottom.
2) Learn the chords along the left side of the page, top to bottom, to use as areference point.
3) Learn the basic key(s) for each line in the tune.
��� Exercise 3.52 Memorizing Chord Symbols
Adding Other Tones
When you are confident with the bassline pitches, you can begin to create animprovised melody for the tune by adding other tones to the bass notes. You can add:
• Arpeggio tones• Color tones• Flexible scale notes
The key to learning the progression is repetition. Keep repeating what you’ve learneduntil the progression and its added tones are second nature. If you have problemsadding notes, work on the bassline until it’s stronger. Don’t get lost as you add notes.
3.53 Adding Arpeggio Tones3.53 Adding Arpeggio Tones3.53 Adding Arpeggio Tones3.53 Adding Arpeggio TonesYou can add arpeggio notes (1-3-1 or 1-3-5-3-1) before bass cheater notes. The cheaternotes can be 8th-notes at the end of the bar to make more room for arpeggio notesearlier in the bar. Add arpeggio notes when there’s one chord per bar; with 2 chords perbar, just use cheater notes.
Dm == (E) |Fm ==== (G Ab) | BbExample 3.53 - Adding arpeggio notes before cheater notes
��� Exercise 3.53 Adding Arpeggio Tones
3.54 Adding Color Tones3.54 Adding Color Tones3.54 Adding Color Tones3.54 Adding Color TonesNext, add a few color tones instead of arpeggio tones. The example below adds the 2,the natural 7, and the natural 6 after each chord tone. Be sure the color tones don’tdisrupt the timing or pitches of your bassline.
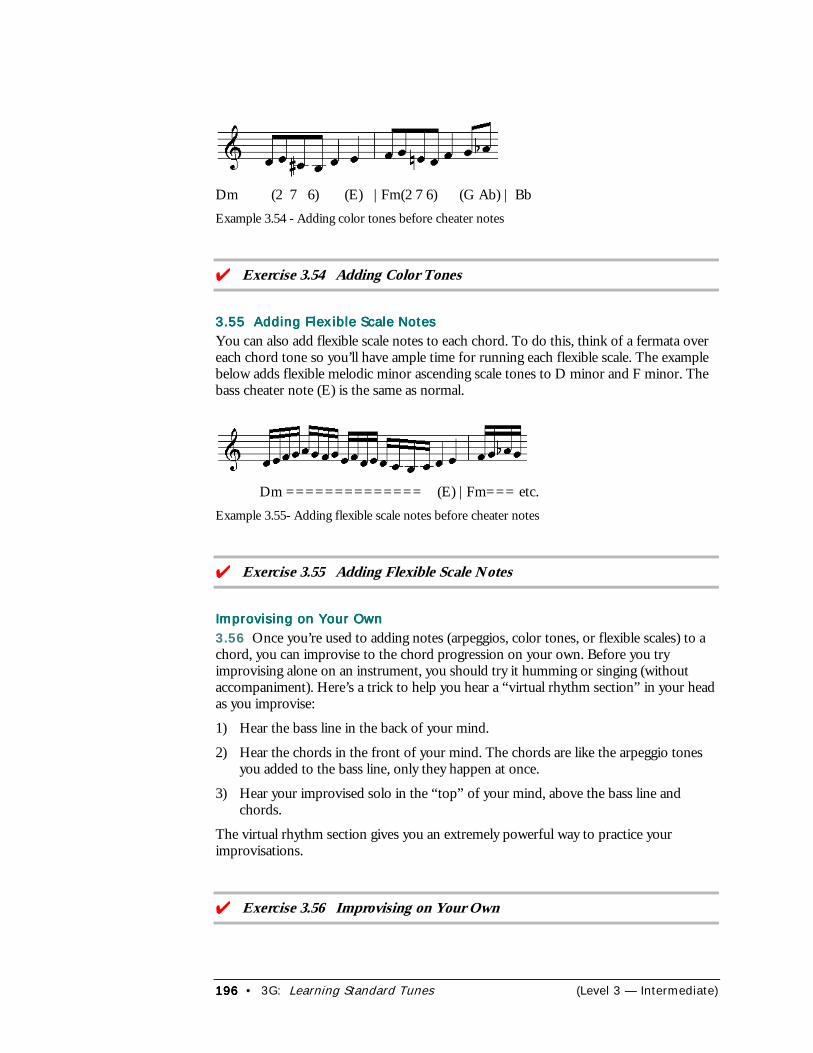
196196196196 • 3G: Learning Standard Tunes (Level 3 — Intermediate)
Dm (2 7 6) (E) |Fm(2 7 6) (G Ab) | BbExample 3.54 - Adding color tones before cheater notes
��� Exercise 3.54 Adding Color Tones
3.55 Adding Flexible Scale Notes3.55 Adding Flexible Scale Notes3.55 Adding Flexible Scale Notes3.55 Adding Flexible Scale NotesYou can also add flexible scale notes to each chord. To do this, think of a fermata overeach chord tone so you’ll have ample time for running each flexible scale. The examplebelow adds flexible melodic minor ascending scale tones to D minor and F minor. Thebass cheater note (E) is the same as normal.
Dm ============== (E) |Fm=== etc.Example 3.55- Adding flexible scale notes before cheater notes
��� Exercise 3.55 Adding Flexible Scale Notes
Improvising on Your OwnImprovising on Your OwnImprovising on Your OwnImprovising on Your Own3.56 Once you’re used to adding notes (arpeggios, color tones, or flexible scales) to achord, you can improvise to the chord progression on your own. Before you tryimprovising alone on an instrument, you should try it humming or singing (withoutaccompaniment). Here’s a trick to help you hear a “virtual rhythm section” in your headas you improvise:
1) Hear the bass line in the back of your mind.
2) Hear the chords in the front of your mind. The chords are like the arpeggio tonesyou added to the bass line, only they happen at once.
3) Hear your improvised solo in the “top” of your mind, above the bass line andchords.
The virtual rhythm section gives you an extremely powerful way to practice yourimprovisations.
��� Exercise 3.56 Improvising on Your Own
(Level 3 — Intermediate) 3G: Learning Standard Tunes • 197197197197
Unaccompanied ImprovisationUnaccompanied ImprovisationUnaccompanied ImprovisationUnaccompanied ImprovisationImprovising without accompaniment is great musical adventure that too few soloistsexplore. Besides being great for practice and memorizing chord, improvising alone canbe a great performance skill.
Below are some tips to help when you improvise to a tune by yourself. These tips referto playing a structured tune rather than free improvisation.
1) Choose a tempo you can handle; stick with it.2) Be very familiar with the form and chords so you always know where you are in the
tune.3) Use the suggestions from Improvising on Your Own to “see” and hear the music you
play.4) Resist the temptation to overplay. You don’t need to fill every available moment,
you just need to keep the interest level high.5) Use rhythms, development, and expression wisely to help the solo build.
See these chapters for more ideas:
• Chapter 4A: Soundscapes• Cadenzas in Chapter 5D: Rhythmic Freedom, Part 2• Chapter 5G: Free Improvisation
Chapter Review
1) You can memorize tune melodies and chord progressions away from yourinstrument.
2) To memorize chord progressions, use these steps:A: Add bass “cheater” notes between each chord.B: Starting on a given pitch, sing or hum the roots and bass cheater notes from
start to finish of the tune. End on the same pitch as at first.C: Add arpeggios (1 3 5 3 1) to the root tones, so you hear the chords along with
the bass.D: Mix arpeggios (such as 1 5 3 1), then add some color tones or flexible scale
notes for variety.E: Looking at the chord progression, sing or hum a simple improvised solo,
keeping in mind what you’ve learned in the previous steps.F: Improvise through the tune without looking at the chord progression.
3) You can build a virtual rhythm section in your mind to help you improvise awayfrom your instrument or recordings.
4) Unaccompanied improv is a musical adventure that depends on hearing a virtualrhythm section in your head, and playing wisely and under control.

198198198198 • 3H: Soloing Live (Level 3 — Intermediate)
3H: Soloing Live3H: Soloing Live3H: Soloing Live3H: Soloing Live
In this chapter you’ll lean about:
• The Psychology of Performance• About the Audience• Performance Tips
his chapter helps you plan and carry out effective performances of your jazz tunes.When you use the techniques in this chapter, your audience will tend to pay moreattention and enjoy your concert more.
The Psychology of Performance
When we perform live or for a recording, we often get tense or flustered, or we try too hard.We don’t execute ideas as well as we hear them, or we fall back on familiar “no-risk” ideasand give up on creativity. That’s too bad, because live performances can offer some of themost exciting improvisation moments.
Relaxed ConcentrationRelaxed ConcentrationRelaxed ConcentrationRelaxed ConcentrationA key to building a creative atmosphere is learning the skill of relaxed concentration. That maysound like a paradox, but we practice it in everyday life. For example, when we watch aninteresting TV show or movie, we relax and concentrate on the plot, action, and scenes asthey unfold. We lose track of the clock or what’s happening nearby, but we enter a world ofnew connections and associations.
Relaxing and concentrating on your tunes opens your “musical eyes” in improvisation. Youlearn to tune out distractions and tune in creative possibilities. Relaxed concentration caneven become a bridge to self-hypnosis, where your visualizations and imagination surroundyou and become your creative sphere.
Performance ProverbsPerformance ProverbsPerformance ProverbsPerformance ProverbsThere’s wisdom in applying some old proverbs to your performances. Here are someproverbs and some new ways to see them from the jazz performance angle.
1) Haste makes waste. Be quick, but don’t hurry solos.2) Too many cooks spoil the broth. Too many jammers spoil the jam session.3) A rolling stone gathers no moss. Let your ideas gather some “moss” before you roll on.4) Don’t cry over spilt milk. Don’t let mistakes derail your train of thought.5) Time flies. Stretching out on solos eats more clock time than you’d think.6) If it ain’t broke, don’t fix it. Sometimes “mistakes” turn out to be good ideas.7) All that glitters is not gold. Higher, faster, louder doesn’t necessarily sound better.8) Life is like a box of chocolates ... you never know what your improv notes will be, but you
can make ‘em tasty.
About the Audience
“Will they like the concert? Will they like me? What if I embarrass myself in a solo?” Theseare the “haunting” questions about live performances. The first thing to do is build your
T
(Level 3 - Intermediate) 3H: Soloing Live • 199199199199
improvisation skills so you can perform confidently. Then you need to understand who theaudience is.
How the Audience Views UsHow the Audience Views UsHow the Audience Views UsHow the Audience Views UsIn most audiences, there are these kinds of listeners:
1) Those who really don’t care. They may not really like jazz, they may be there out ofobligation, or they may be preoccupied with other thoughts.
2) Critics or competitors who secretly hope you mess up so they will look better.3) The “rah-rah” listeners who think you can do no wrong. They usually don’t know much
about improvisation but seem to enjoy it.4) Those who are supportive and wish you the best. They may be new to jazz or
improvisation and want to learn more, or they may be seasoned listeners.
We should accept the fact that most concerts we play will have these types of listeners. Thatway we’ll handle their comments and criticisms a little better, whether spoken to us or in thenewspaper. Remember: The music we play should stand on its own merit.
How We View the AudienceHow We View the AudienceHow We View the AudienceHow We View the AudienceWe tend to think of our audience in one of four ways, depending on our own musicalmaturity:
• Stage 1: The audience is the enemy.• Stage 2: The audience doesn’t exist.• Stage 3: I’ll impress them.• Stage 4: They share in the musical experience.
At stage 1, listeners seem ready to pounce on every mistake, so you don’t take risks orinteract musically in the group. While some criticize your mistakes, others criticize your lackof mistakes (too little risk-taking or adventure).
At stage 2, you’re aware there are critics in the audience, so you try to ignore all listeners.While this approach might help you focus on the music and eliminate some stress andnervousness, it can also make you self-absorbed. You may end up playing solos and tunesthat are too long or too abstract for the audience.
At stage 3, you care about the audience’s listening experience, but not in a fully mature way.At this level you go for dazzling patterns or techniques, and favor extremes (higher, faster,louder) over subtleties. This approach may impress the “rah-rah” listeners, but it doesn’tgive the audience much food for thought. It may also limit your group interaction.Remember that even listeners who are new to jazz can hear and appreciate well-crafteddevelopment.
At stage 4, you have developed a love of improvisation that you want to share with theaudience. They are partners in your musical journey. In this approach, you concentrate ondevelopment and interaction, with a better balance between restraint and abandon. Thoughsome listeners won’t follow where you go, you share a rich experience with those who do.Getting to stage 4 takes time and effort but it’s definitely worth it. When you watch jazzvideos of great performers, you can feel their love of the music and respect for theiraudience.
200200200200 • 3H: Soloing Live (Level 3 — Intermediate)
Performance Tips
This section offers tips on how to do your best in performance situations:
1) Develop a good stage presence.2) Hear and see what you need in order to improvise and play well.3) Play under control – manage your adrenaline.4) Play rhythms securely.5) Play pitches securely.6) Play solo breaks cleanly.7) Don’t be fooled by audience reactions.
1: Develop a Good Stage Presence1: Develop a Good Stage Presence1: Develop a Good Stage Presence1: Develop a Good Stage PresenceThe main reason for a jazz concert is the jazz. Still, the audience will consider your wordsand actions on stage as part of their concert experience. A warm and professionalinteraction with the audience can make a good concert better (but it won’t rescue weakmusicianship). To create positive audience appeal:
• Start on time and end on time. Get to the concert in plenty of time to set up equipment,talk over tunes, rehearse, and relax before you begin. Between tunes, keep an eye on theclock so you can stretch out or cut tunes as needed.
• Speak well or hold your peace. Do introduce your band, its members, and the tunes.Don’t get wrapped up in speeches or jokes, although a little situational humor can befun. (See What Is There to Say? in Chapter 2H: Preparing Concert Material.)
• Move the concert along. Know the tune lineup in advance; avoid having to vote ontunes during the concert. Vary the amount and length of solos in tunes and avoid longpauses between tunes.
2: Hear and See What You Need2: Hear and See What You Need2: Hear and See What You Need2: Hear and See What You NeedBefore you begin improvising, make sure you can see and hear the other members of yourgroup clearly and that the sound balance is good. When others are soloing, listen for ideasand lend your support. If you improvise by visualizing scales or notes, or just by staring atyour fingers, don’t change your routine just because an audience is there. You need to “see”notes just as well as you do when you practice privately (see Range and Neighborhoods inChapter 2B: Melodic Shapes).
3: Play Under Control3: Play Under Control3: Play Under Control3: Play Under ControlRemember that improvising involves balancing risks: too little risk bores the listener, andtoo much risk frustrates the listener’s expectations. Here are some guidelines that will helpyou succeed in creative risks:
• Don’t fall back on familiar or easy musical ideas instead of using development.• Don’t overdo repetition or contrast – instead, develop your ideas smoothly.• Don’t overdo “maximum effect” by often playing high, fast, dense, or loud.• Don’t forget to use expression because you’re too busy looking for new notes.
Try to “lose yourself,” getting completely involved in the creative process during your solos.Be patient and attentive to details while you develop your ideas. Much of the fun and magiclies in seeing where an idea will go, not just in arriving at the final product.
(Level 3 - Intermediate) 3H: Soloing Live • 201201201201
4: Play Rhythms Securely4: Play Rhythms Securely4: Play Rhythms Securely4: Play Rhythms SecurelyWhen the adrenaline of live performing kicks in, one of the first things that starts wobblingis rhythm. Weak rhythms really stand out in live performances. Because you make uprhythms as you go, concentrate on where to place each note, especially in swing tunes.
A good technique for rhythms is to attack each note “only when it’s time for it.” To do this,you may need to simplify your ideas somewhat, but clean phrases are definitely worth it.However, don’t sacrifice expression; you can still shape and caress the notes while you playaccurately. In time you’ll develop relaxed self-control with your rhythms and expression.People will notice.
5: Play Pitches Securely5: Play Pitches Securely5: Play Pitches Securely5: Play Pitches SecurelyThere is a definite beauty in playing secure pitches that fit a melody and lend themselves toexpression, especially in ballads. Here are ideas for secure pitches:
• Know the chord progression and current key.• Sing the melody inside yourself as you play it on your instrument.• When you play non-harmonic tones or outside notes, hear them and mean them. They
carry more weight when they’re played and resolved securely.• Horn players should play each pitch in its “center.”
6: Play Solo Breaks Cleanly6: Play Solo Breaks Cleanly6: Play Solo Breaks Cleanly6: Play Solo Breaks CleanlySome tunes have solo breaks, where you play a short, unaccompanied solo (2 or 4 bars)before your main solo starts. Few things are as embarrassing as completely messing up asolo break. Here are some ideas for playing solo breaks cleanly:
• Before you start, get oriented to the chord before the break. Be sure your first pitchattack is secure.
• Keep the tempo steady and your rhythms secure; don’t rush ahead.• While dazzling solo breaks can be exciting, trying to produce them can be a trap. You
should usually avoid pre-planning solo breaks.• Where possible, develop the material in your solo break into the main solo.
Remember that the notes in your solo break are “under the microscope;” each one is openand exposed. Playing a simple idea with a rhythmic or expressive twist can be very effective.
7: Don’t Be Fooled by Audience Reactions7: Don’t Be Fooled by Audience Reactions7: Don’t Be Fooled by Audience Reactions7: Don’t Be Fooled by Audience ReactionsHere are some common audience reactions that are sometimes misunderstood:
• Some people get up and leave. In outdoor concerts some people may haveappointments or other business. Near the end of a long set or concert, some may bemusically fatigued; this may be a sign you need to shorten sets or tunes, or play lesscomplicated material. And some people may have the wrong expectations; they’ll leavewhen they don’t hear a country-western tune.
• There’s silence or near-silence after a solo. Sometimes people may not realize that it’sOK to clap after a solo; you can let them know between tunes. Other times, the solomay be more thought provoking than blood pumping; there’s certainly nothing wrongwith that. The level of applause isn’t always a good indicator of the quality of solos.
• There’s yelling and applause during a solo. Remember that some people just want tohear high, fast, and loud, and they’ll start yelling whenever you play it. If your solo haslegitimately developed intensity, the applause may be well-earned. But don’t go fishing
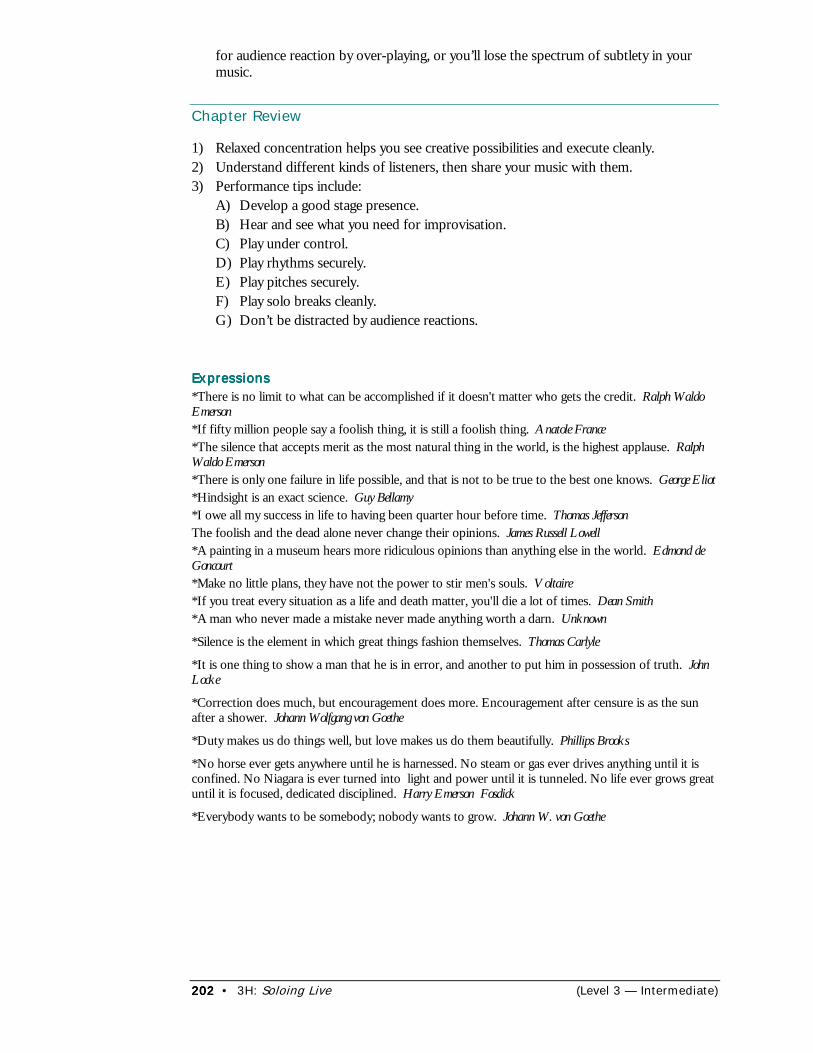
202202202202 • 3H: Soloing Live (Level 3 — Intermediate)
for audience reaction by over-playing, or you’ll lose the spectrum of subtlety in yourmusic.
Chapter Review
1) Relaxed concentration helps you see creative possibilities and execute cleanly.2) Understand different kinds of listeners, then share your music with them.3) Performance tips include:
A) Develop a good stage presence.B) Hear and see what you need for improvisation.C) Play under control.D) Play rhythms securely.E) Play pitches securely.F) Play solo breaks cleanly.G) Don’t be distracted by audience reactions.
ExpressionsExpressionsExpressionsExpressions*There is no limit to what can be accomplished if it doesn't matter who gets the credit. Ralph WaldoEmerson*If fifty million people say a foolish thing, it is still a foolish thing. Anatole France*The silence that accepts merit as the most natural thing in the world, is the highest applause. RalphWaldo Emerson*There is only one failure in life possible, and that is not to be true to the best one knows. George Eliot*Hindsight is an exact science. Guy Bellamy*I owe all my success in life to having been quarter hour before time. Thomas JeffersonThe foolish and the dead alone never change their opinions. James Russell Lowell*A painting in a museum hears more ridiculous opinions than anything else in the world. Edmond deGoncourt*Make no little plans, they have not the power to stir men's souls. Voltaire*If you treat every situation as a life and death matter, you'll die a lot of times. Dean Smith*A man who never made a mistake never made anything worth a darn. Unknown
*Silence is the element in which great things fashion themselves. Thomas Carlyle
*It is one thing to show a man that he is in error, and another to put him in possession of truth. JohnLocke
*Correction does much, but encouragement does more. Encouragement after censure is as the sunafter a shower. Johann Wolfgang von Goethe
*Duty makes us do things well, but love makes us do them beautifully. Phillips Brooks
*No horse ever gets anywhere until he is harnessed. No steam or gas ever drives anything until it isconfined. No Niagara is ever turned into light and power until it is tunneled. No life ever grows greatuntil it is focused, dedicated disciplined. Harry Emerson Fosdick
*Everybody wants to be somebody; nobody wants to grow. Johann W. von Goethe
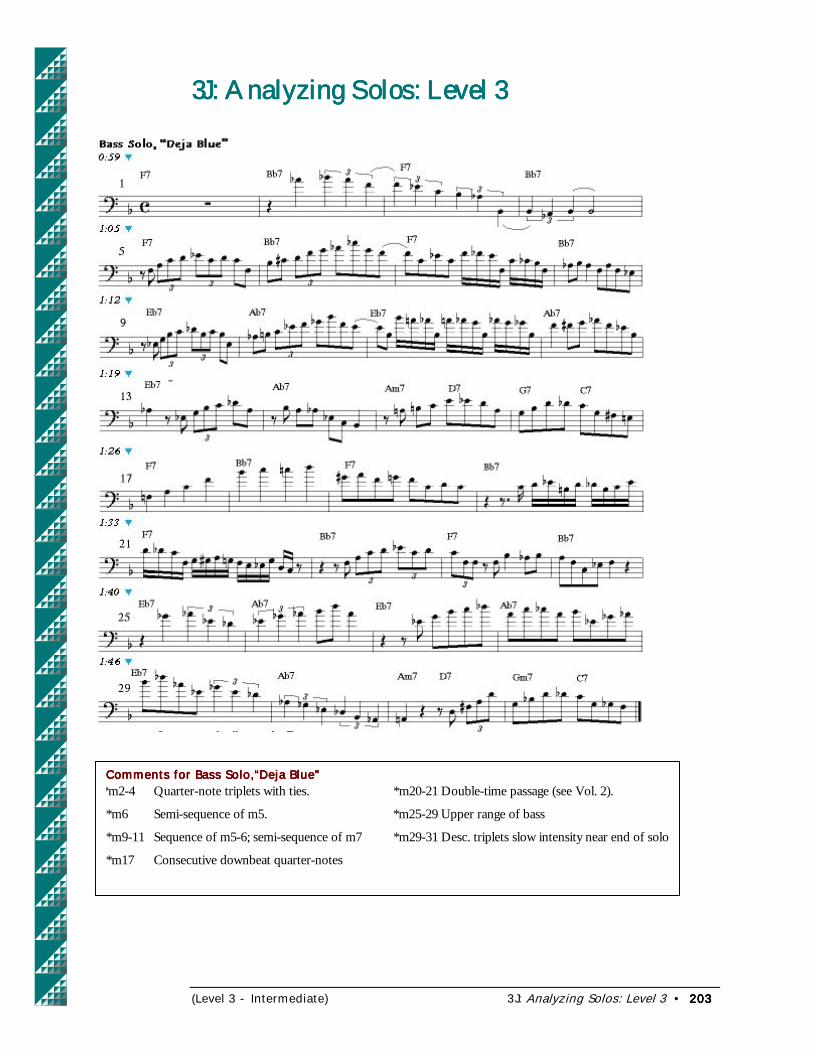
(Level 3 - Intermediate) 3J: Analyzing Solos: Level 3 • 203203203203
3J: Analyzing Solos: Level 33J: Analyzing Solos: Level 33J: Analyzing Solos: Level 33J: Analyzing Solos: Level 3
Comments for Bass Solo,“Deja Blue”Comments for Bass Solo,“Deja Blue”Comments for Bass Solo,“Deja Blue”Comments for Bass Solo,“Deja Blue”*m2-4 Quarter-note triplets with ties. *m20-21 Double-time passage (see Vol. 2).
*m6 Semi-sequence of m5. *m25-29 Upper range of bass
*m9-11 Sequence of m5-6; semi-sequence of m7 *m29-31 Desc. triplets slow intensity near end of solo
*m17 Consecutive downbeat quarter-notes
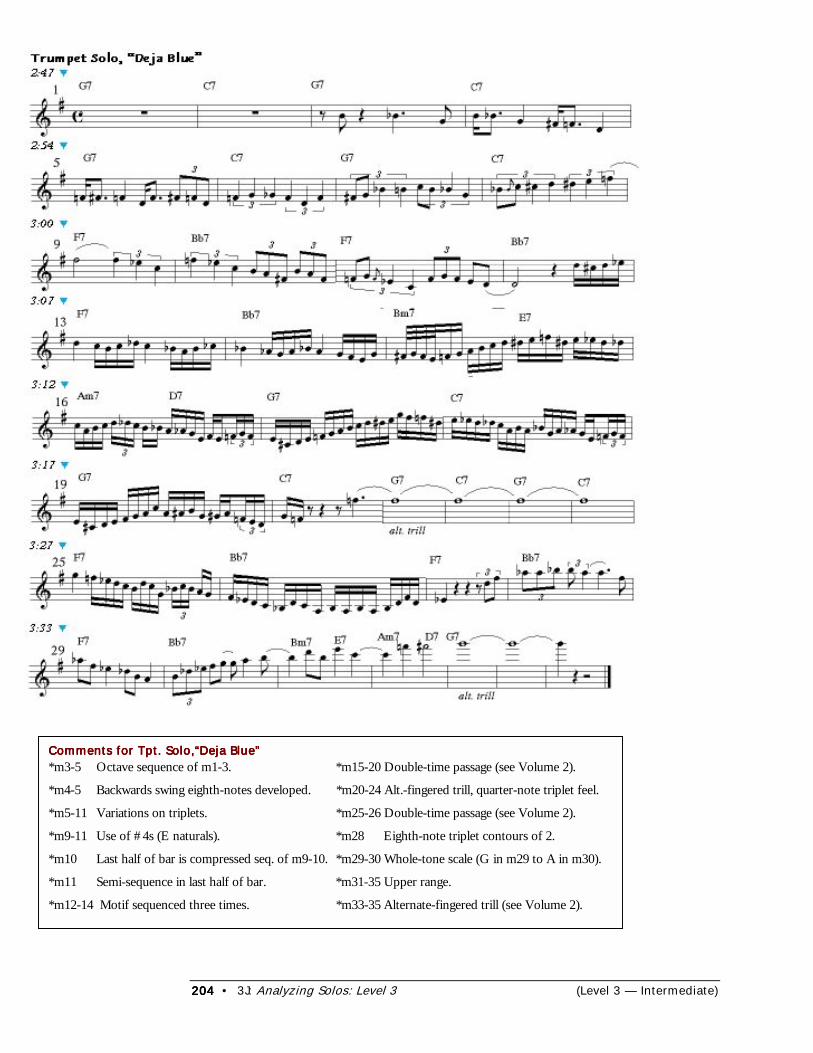
204204204204 • 3J: Analyzing Solos: Level 3 (Level 3 — Intermediate)
Comments for Tpt. Solo,“Deja Blue”Comments for Tpt. Solo,“Deja Blue”Comments for Tpt. Solo,“Deja Blue”Comments for Tpt. Solo,“Deja Blue”*m3-5 Octave sequence of m1-3. *m15-20 Double-time passage (see Volume 2).
*m4-5 Backwards swing eighth-notes developed. *m20-24 Alt.-fingered trill, quarter-note triplet feel.
*m5-11 Variations on triplets. *m25-26 Double-time passage (see Volume 2).
*m9-11 Use of #4s (E naturals). *m28 Eighth-note triplet contours of 2.
*m10 Last half of bar is compressed seq. of m9-10. *m29-30 Whole-tone scale (G in m29 to A in m30).
*m11 Semi-sequence in last half of bar. *m31-35 Upper range.
*m12-14 Motif sequenced three times. *m33-35 Alternate-fingered trill (see Volume 2).
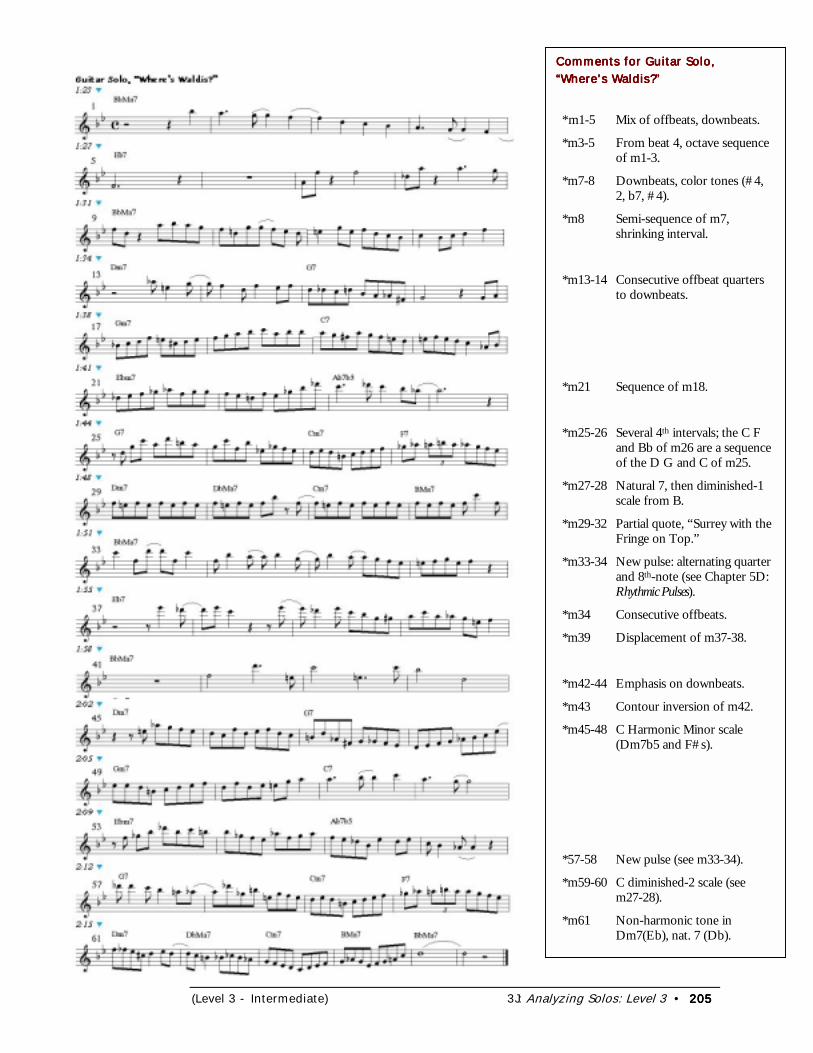
(Level 3 - Intermediate) 3J: Analyzing Solos: Level 3 • 205205205205
Comments for Guitar Solo,Comments for Guitar Solo,Comments for Guitar Solo,Comments for Guitar Solo,“Where’s Waldis?”“Where’s Waldis?”“Where’s Waldis?”“Where’s Waldis?”
*m1-5 Mix of offbeats, downbeats.
*m3-5 From beat 4, octave sequenceof m1-3.
*m7-8 Downbeats, color tones (#4,2, b7, #4).
*m8 Semi-sequence of m7,shrinking interval.
*m13-14 Consecutive offbeat quartersto downbeats.
*m21 Sequence of m18.
*m25-26 Several 4th intervals; the C Fand Bb of m26 are a sequenceof the D G and C of m25.
*m27-28 Natural 7, then diminished-1scale from B.
*m29-32 Partial quote, “Surrey with theFringe on Top.”
*m33-34 New pulse: alternating quarterand 8th-note (see Chapter 5D:Rhythmic Pulses).
*m34 Consecutive offbeats.
*m39 Displacement of m37-38.
*m42-44 Emphasis on downbeats.
*m43 Contour inversion of m42.
*m45-48 C Harmonic Minor scale(Dm7b5 and F#s).
*57-58 New pulse (see m33-34).
*m59-60 C diminished-2 scale (seem27-28).
*m61 Non-harmonic tone inDm7(Eb), nat. 7 (Db).
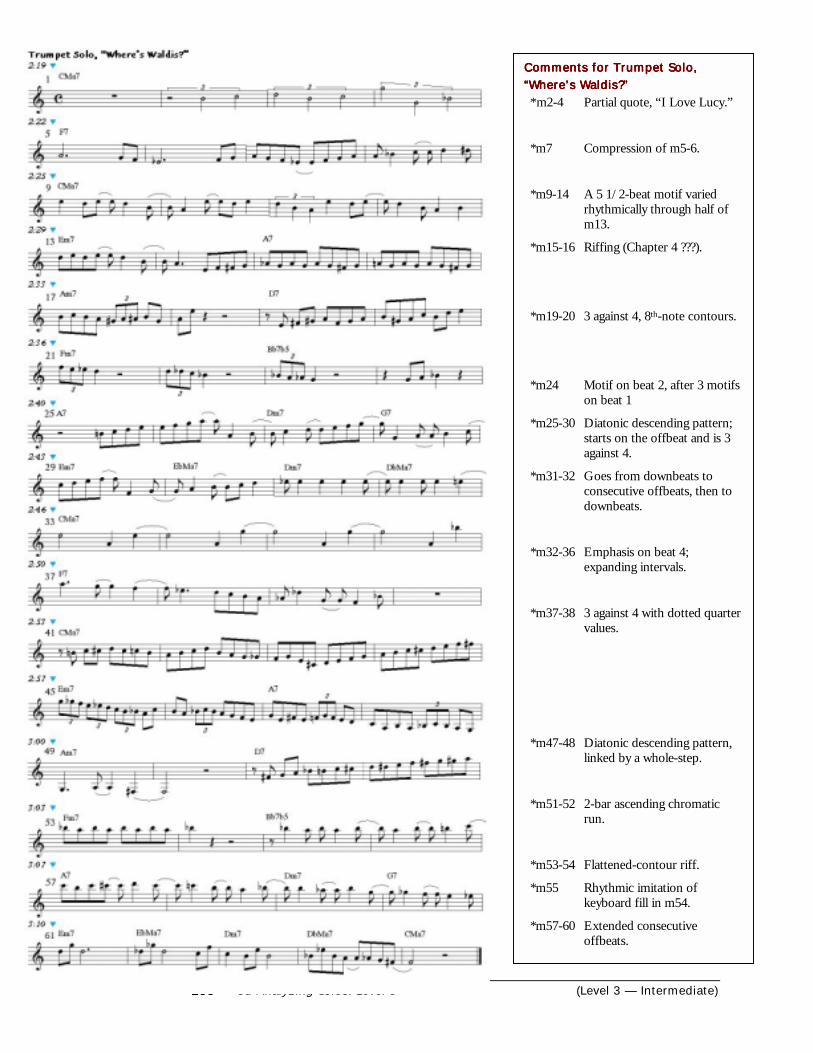
206206206206 • 3J: Analyzing Solos: Level 3
(Level 3 — Intermediate)Comments for Trumpet Solo,Comments for Trumpet Solo,Comments for Trumpet Solo,Comments for Trumpet Solo,“Where’s Waldis?”“Where’s Waldis?”“Where’s Waldis?”“Where’s Waldis?”*m2-4 Partial quote, “I Love Lucy.”
*m7 Compression of m5-6.
*m9-14 A 5 1/2-beat motif variedrhythmically through half ofm13.
*m15-16 Riffing (Chapter 4 ???).
*m19-20 3 against 4, 8th-note contours.
*m24 Motif on beat 2, after 3 motifson beat 1
*m25-30 Diatonic descending pattern;starts on the offbeat and is 3against 4.
*m31-32 Goes from downbeats toconsecutive offbeats, then todownbeats.
*m32-36 Emphasis on beat 4;expanding intervals.
*m37-38 3 against 4 with dotted quartervalues.
*m47-48 Diatonic descending pattern,linked by a whole-step.
*m51-52 2-bar ascending chromaticrun.
*m53-54 Flattened-contour riff.
*m55 Rhythmic imitation ofkeyboard fill in m54.
*m57-60 Extended consecutiveoffbeats.
(Level 3 - Intermediate) More Vocal Improv Skills • 207207207207
More Vocal Improv SkillsMore Vocal Improv SkillsMore Vocal Improv SkillsMore Vocal Improv Skills
This section contains the following topics:
• Review of Vocal Improv Skills in Level 1• Additional Vocal Skills• Vowels and Consonants• Vocal Effects• Instrumental Sounds
nce you’ve mastered the basics of vocal improvisation and increased your vocalskills, you can continue on by experimenting with vowels and consonants and withvocal effects.
Review of Vocal Improv Skills in Level 1
Below are some of the goals for vocal improvisation described in Level 1.
A) Overcome three basic problems:
• Dependence on easy intervals and scales
• Underdeveloped melodic lines and rhythms
• Exaggerated expression
B) Think more like an instrumentalist in using secure pitches and rhythms.
C) Use the following 10 Better Habits of Vocal Improv:
1) Emphasize some color tones, use color skips (Chapter 1C: Melodic Color).
2) Sing offbeats, consecutive offbeats, and more interesting rhythms (Chapter 1D:Rhythmic Variety).
3) Use Lydian, pentatonic, melodic minor ascending, and other scales (1B: BuildingChords and Scales; Chapter 2A More Scales; and Chapter 3A: More Melodic Color).
4) Keep expression subtle, with occasional effects that fit the solo well (Chapter 1E:Using Expression; Chapter 2E: Embellishments; and Chapter 4C: Special Effects).
5) Use principles of melodic and rhythmic development in solos (Chapter 1F:Developing with Motifs and Phrases; Chapter 2F: Melodic Development; Chapter 3E:Rhythmic Development).
6) Vary phrase lengths and types of melodic contours (Chapter 1F, 2B).
7) Try wider skips and a variety of filled intervals (Chapter 2B).
8) Use the swing rhythm guidelines (Chapter 2C).
9) Outline ii-V-I’s and chord variations (Chapters 1G and 3F).
10) Sing and resolve non-harmonic tones (Chapter 3A).
O
208208208208 • More Vocal Improv Skills (Level 3 — Intermediate)
Remember to use the techniques in Chapter 3G: Learning Standard Tunes (Vol. 1) so you canpractice your vocal improv without a rhythm section, wherever you are.
Additional Vocal Skills
Improving on the skills mentioned below can also help your vocal improv.
Good Sound QualityGood Sound QualityGood Sound QualityGood Sound QualityGetting a good sound quality doesn’t mean you need to be a virtuoso singer, but you shoulddevelop a vocal sound that sounds free and clear, without extra tension or harshness.Concentrate on moving the air from the lungs and letting the sound resonate in the head.
Vibrato should not be an automatic part of each sound. Instead, reserve it for longer notesand vary its use.
Extended RangeExtended RangeExtended RangeExtended RangeWork to increase your high and low ranges so you can add usable, clear notes to your vocalsolos. The high and low notes don’t need to be overpowering; they just need to be reliableto hit and well in tune. For the higher notes, work on a dependable falsetto sound (“headvoice”); keep it soft at first.
As you increase your overall range, work out the rough spots or breaks between high,medium, and low notes. Practice long flexible scales from low to high so you can cover allthe notes smoothly, with reliable control.
FlexibilityFlexibilityFlexibilityFlexibilityWork to improve these aspects of your vocal flexibility:
• Wider intervals. Work on 5ths, 6ths, 7ths, 9ths, etc., to cover more territory.
• Quick passages. Work on double-time passages and faster rhythmic values, such as eighth-note triplets.
• Sudden switches from high to low range or vice-versa.
Bobby McFerrin is an example of a singer who is a master of sound, extended range, andflexibility.
Vowels and Consonants
Level 1 of The Art of Improvisation describes the basic vowel and consonant sounds for vocalimprov syllables. Below is a more extensive listing of vowel and consonant descriptions. Trythem in different combinations in your vocal improv practice and solos.
Vowel SoundsVowel SoundsVowel SoundsVowel SoundsVowels are usually the sustained part of the note and consonants are the attacks, but youcan also start a sound with a vowel. Note which vowels you neglect or avoid, andexperiment with them. You can also try switching low and high vowel sounds.
• Low vowels: oh, aw, a (short), a (long), ooh• High vowels: e (short), i (short), y• Diphthongs (vowel combinations): i (long), ow, eu, oi
(Level 3 - Intermediate) More Vocal Improv Skills • 209209209209
Consonant SoundsConsonant SoundsConsonant SoundsConsonant SoundsEspecially note which consonants you neglect or avoid, and experiment with them.Consonants are divided into two types: hard and soft. The hard consonants sound morepercussive, while soft consonants sound smoother.
Hard consonants:
• k (or hard “c” or “q;” this is the hardest sound)
• t (the next-hardest sound
• p (somewhat between hard and soft)
Soft consonants:
• b - basic articulation attack
• d - basic articulation attack
• f - less used, attack or ending
• g - less used attack
• h - very soft attack
• j - less used attack
• l - usually in “la” but shouldn’t be overused
• m - humming attack or soft ending
• n - like “m” but less used
• r - usually trilled, as in drum roll
• s - softer attack
• v - softer attack
• w - usually an ending
• z - attack or ending, like “s”
Consonant combinations:
• br, tr - usually for percussion
• fr, gr - humorous
• ch, sh, th - percussive attacks, cymbals
• bl, cl, fl, gl, pl - less often used
Language SoundsLanguage SoundsLanguage SoundsLanguage SoundsSome types of tunes lend themselves to non-English syllables and sounds. For these tunesyou can sometimes sing syllables that sound like a certain language but aren’t real words. Afew tune types and corresponding languages are listed below. A little language imitation isfine, but if you want to do extended passages, you should speak the language or listen to itfrequently.
• Bossa nova and samba - Portuguese. Stress these consonants: zh, j, d, p, m, and v. Stressthese vowel sounds: o, ah, ooh, ee.
• Salsa and samba - Spanish. Stress these consonants: k, s, r, t. Stress the same vowel soundsas in Portuguese.
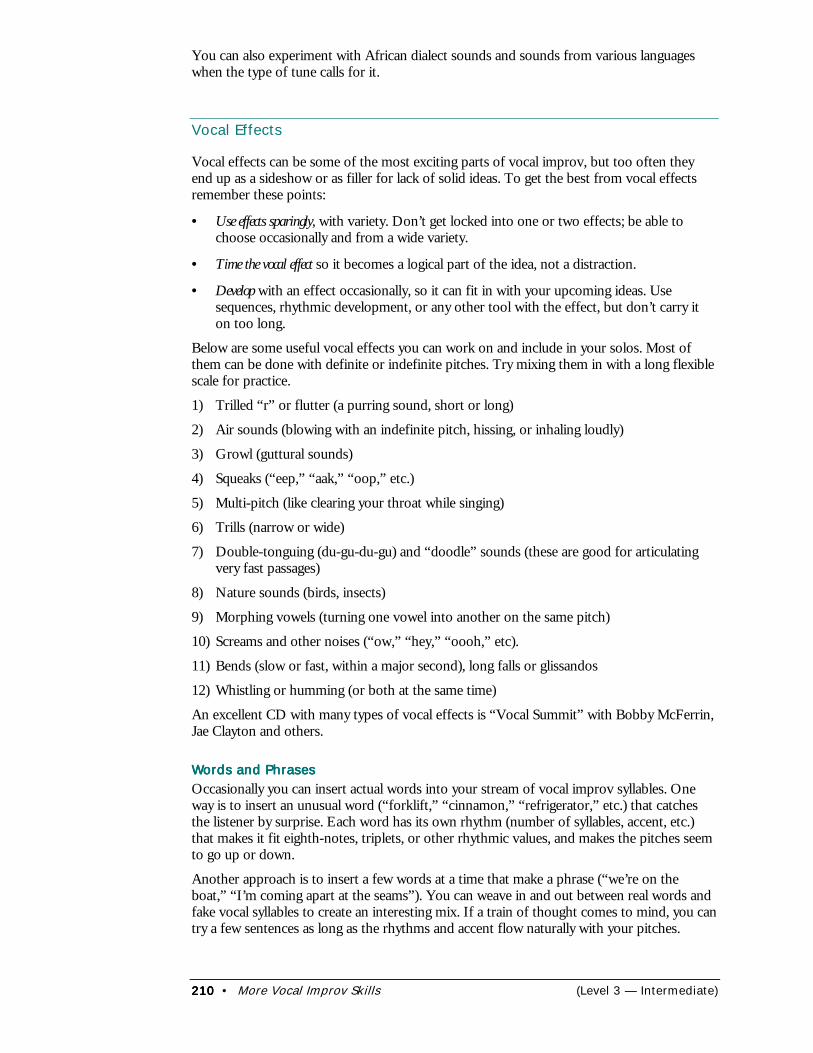
210210210210 • More Vocal Improv Skills (Level 3 — Intermediate)
You can also experiment with African dialect sounds and sounds from various languageswhen the type of tune calls for it.
Vocal Effects
Vocal effects can be some of the most exciting parts of vocal improv, but too often theyend up as a sideshow or as filler for lack of solid ideas. To get the best from vocal effectsremember these points:
• Use effects sparingly, with variety. Don’t get locked into one or two effects; be able tochoose occasionally and from a wide variety.
• Time the vocal effect so it becomes a logical part of the idea, not a distraction.
• Develop with an effect occasionally, so it can fit in with your upcoming ideas. Usesequences, rhythmic development, or any other tool with the effect, but don’t carry iton too long.
Below are some useful vocal effects you can work on and include in your solos. Most ofthem can be done with definite or indefinite pitches. Try mixing them in with a long flexiblescale for practice.
1) Trilled “r” or flutter (a purring sound, short or long)
2) Air sounds (blowing with an indefinite pitch, hissing, or inhaling loudly)
3) Growl (guttural sounds)
4) Squeaks (“eep,” “aak,” “oop,” etc.)
5) Multi-pitch (like clearing your throat while singing)
6) Trills (narrow or wide)
7) Double-tonguing (du-gu-du-gu) and “doodle” sounds (these are good for articulatingvery fast passages)
8) Nature sounds (birds, insects)
9) Morphing vowels (turning one vowel into another on the same pitch)
10) Screams and other noises (“ow,” “hey,” “oooh,” etc).
11) Bends (slow or fast, within a major second), long falls or glissandos
12) Whistling or humming (or both at the same time)
An excellent CD with many types of vocal effects is “Vocal Summit” with Bobby McFerrin,Jae Clayton and others.
Words and PhrasesWords and PhrasesWords and PhrasesWords and PhrasesOccasionally you can insert actual words into your stream of vocal improv syllables. Oneway is to insert an unusual word (“forklift,” “cinnamon,” “refrigerator,” etc.) that catchesthe listener by surprise. Each word has its own rhythm (number of syllables, accent, etc.)that makes it fit eighth-notes, triplets, or other rhythmic values, and makes the pitches seemto go up or down.
Another approach is to insert a few words at a time that make a phrase (“we’re on theboat,” “I’m coming apart at the seams”). You can weave in and out between real words andfake vocal syllables to create an interesting mix. If a train of thought comes to mind, you cantry a few sentences as long as the rhythms and accent flow naturally with your pitches.
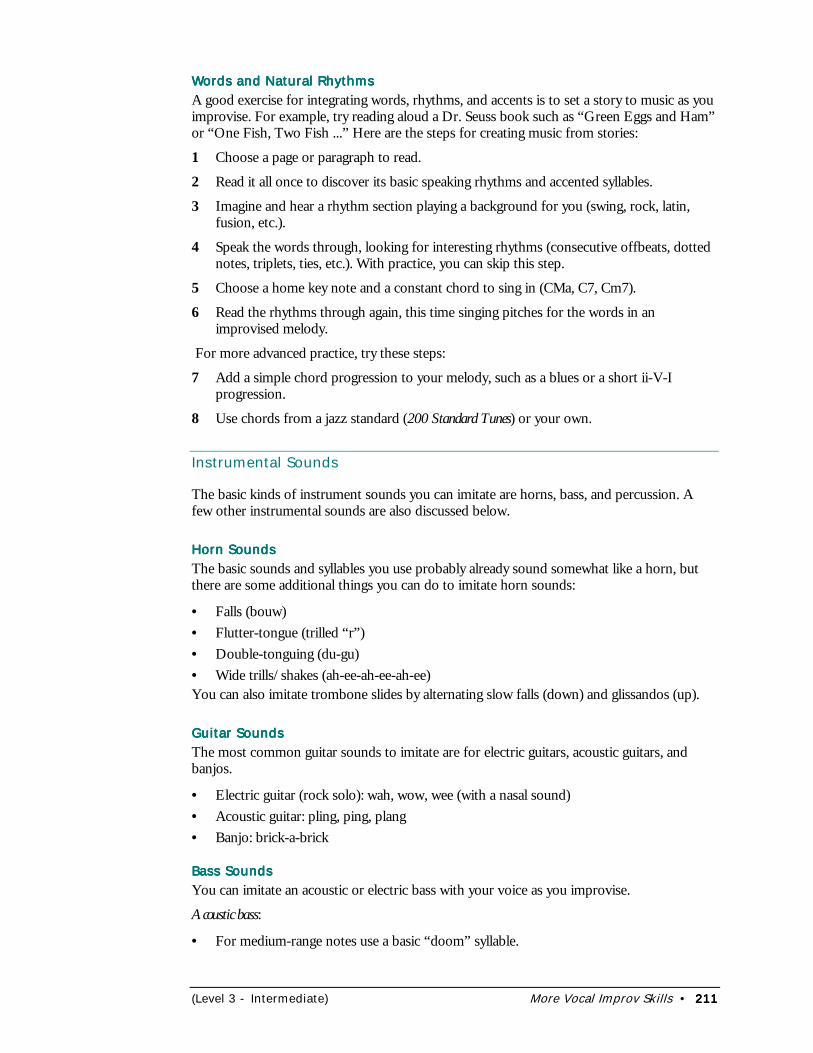
(Level 3 - Intermediate) More Vocal Improv Skills • 211211211211
Words and Natural RhythmsWords and Natural RhythmsWords and Natural RhythmsWords and Natural RhythmsA good exercise for integrating words, rhythms, and accents is to set a story to music as youimprovise. For example, try reading aloud a Dr. Seuss book such as “Green Eggs and Ham”or “One Fish, Two Fish ...” Here are the steps for creating music from stories:
1 Choose a page or paragraph to read.
2 Read it all once to discover its basic speaking rhythms and accented syllables.
3 Imagine and hear a rhythm section playing a background for you (swing, rock, latin,fusion, etc.).
4 Speak the words through, looking for interesting rhythms (consecutive offbeats, dottednotes, triplets, ties, etc.). With practice, you can skip this step.
5 Choose a home key note and a constant chord to sing in (CMa, C7, Cm7).
6 Read the rhythms through again, this time singing pitches for the words in animprovised melody.
For more advanced practice, try these steps:
7 Add a simple chord progression to your melody, such as a blues or a short ii-V-Iprogression.
8 Use chords from a jazz standard (200 Standard Tunes) or your own.
Instrumental Sounds
The basic kinds of instrument sounds you can imitate are horns, bass, and percussion. Afew other instrumental sounds are also discussed below.
Horn SoundsHorn SoundsHorn SoundsHorn SoundsThe basic sounds and syllables you use probably already sound somewhat like a horn, butthere are some additional things you can do to imitate horn sounds:
• Falls (bouw)• Flutter-tongue (trilled “r”)• Double-tonguing (du-gu)• Wide trills/shakes (ah-ee-ah-ee-ah-ee)You can also imitate trombone slides by alternating slow falls (down) and glissandos (up).
Guitar SoundsGuitar SoundsGuitar SoundsGuitar SoundsThe most common guitar sounds to imitate are for electric guitars, acoustic guitars, andbanjos.
• Electric guitar (rock solo): wah, wow, wee (with a nasal sound)• Acoustic guitar: pling, ping, plang• Banjo: brick-a-brick
Bass SoundsBass SoundsBass SoundsBass SoundsYou can imitate an acoustic or electric bass with your voice as you improvise.
Acoustic bass:
• For medium-range notes use a basic “doom” syllable.
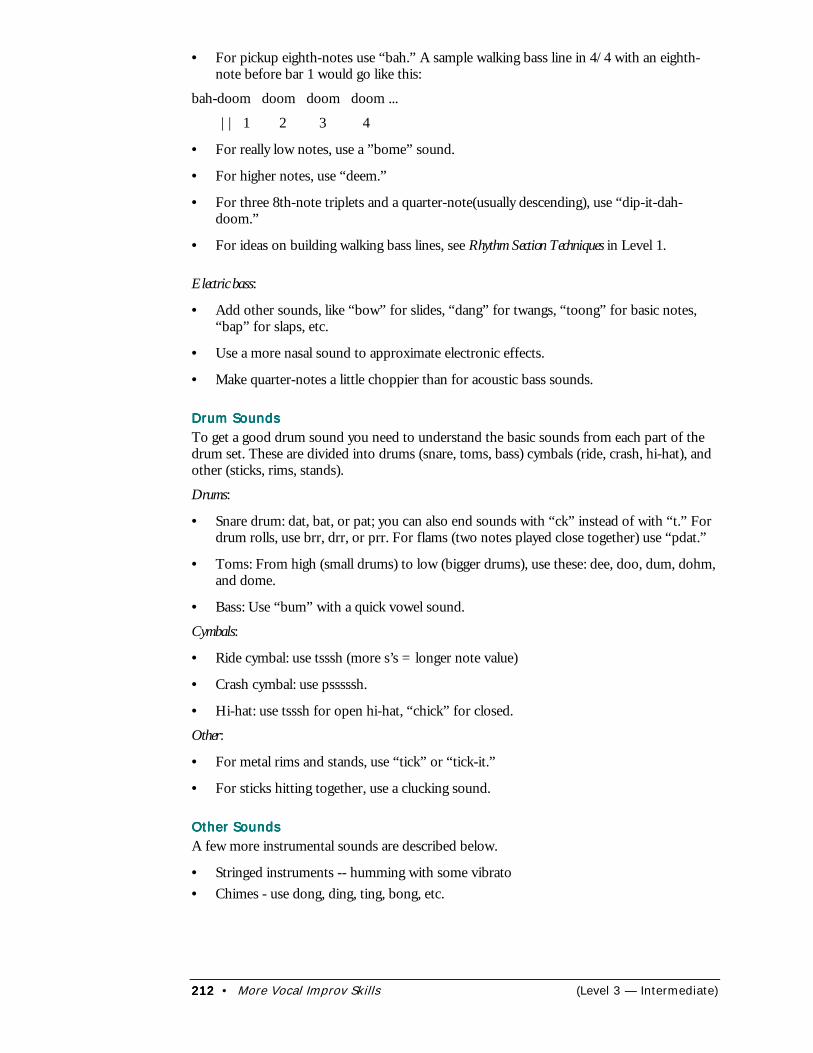
212212212212 • More Vocal Improv Skills (Level 3 — Intermediate)
• For pickup eighth-notes use “bah.” A sample walking bass line in 4/4 with an eighth-note before bar 1 would go like this:
bah-doom doom doom doom ...
|| 1 2 3 4
• For really low notes, use a ”bome” sound.
• For higher notes, use “deem.”
• For three 8th-note triplets and a quarter-note(usually descending), use “dip-it-dah-doom.”
• For ideas on building walking bass lines, see Rhythm Section Techniques in Level 1.
Electric bass:
• Add other sounds, like “bow” for slides, “dang” for twangs, “toong” for basic notes,“bap” for slaps, etc.
• Use a more nasal sound to approximate electronic effects.
• Make quarter-notes a little choppier than for acoustic bass sounds.
Drum SoundsDrum SoundsDrum SoundsDrum SoundsTo get a good drum sound you need to understand the basic sounds from each part of thedrum set. These are divided into drums (snare, toms, bass) cymbals (ride, crash, hi-hat), andother (sticks, rims, stands).
Drums:
• Snare drum: dat, bat, or pat; you can also end sounds with “ck” instead of with “t.” Fordrum rolls, use brr, drr, or prr. For flams (two notes played close together) use “pdat.”
• Toms: From high (small drums) to low (bigger drums), use these: dee, doo, dum, dohm,and dome.
• Bass: Use “bum” with a quick vowel sound.
Cymbals:
• Ride cymbal: use tsssh (more s’s = longer note value)
• Crash cymbal: use psssssh.
• Hi-hat: use tsssh for open hi-hat, “chick” for closed.
Other:
• For metal rims and stands, use “tick” or “tick-it.”
• For sticks hitting together, use a clucking sound.
Other SoundsOther SoundsOther SoundsOther SoundsA few more instrumental sounds are described below.
• Stringed instruments -- humming with some vibrato• Chimes - use dong, ding, ting, bong, etc.
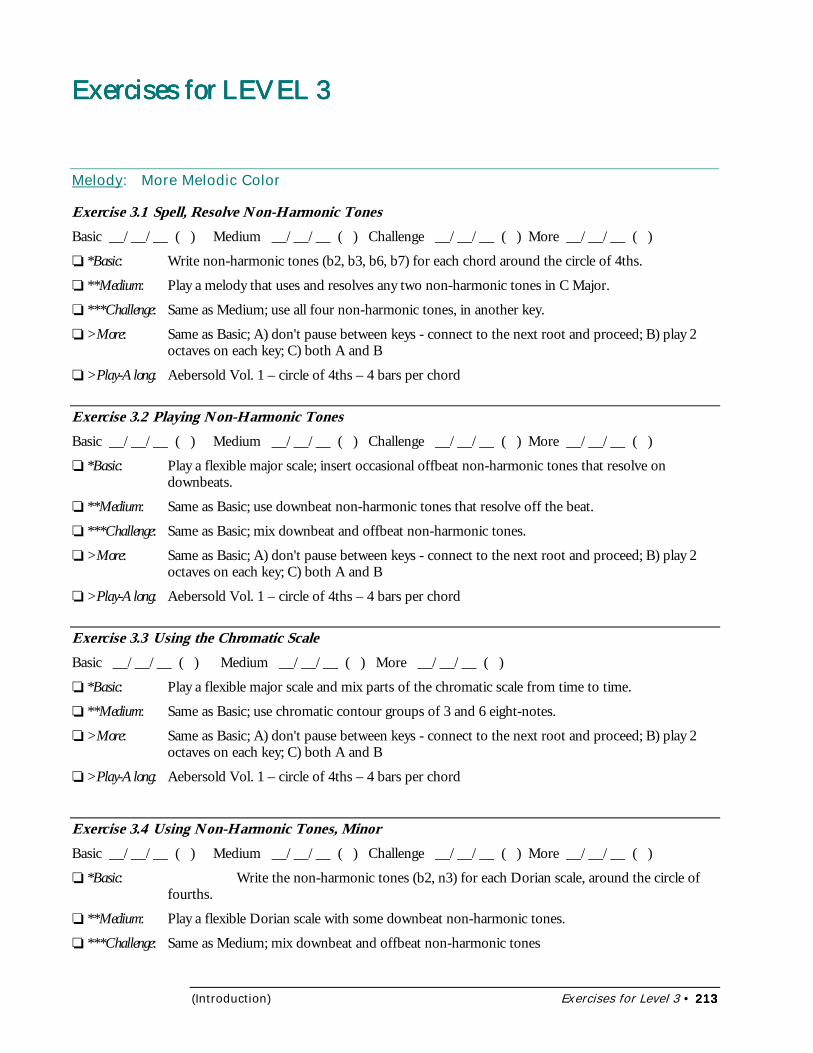
(Introduction) Exercises for Level 3 • 213213213213
Exercises for LEVEL 3Exercises for LEVEL 3Exercises for LEVEL 3Exercises for LEVEL 3
Melody: More Melodic Color
Exercise 3.1 Spell, Resolve Non-Harmonic TonesBasic __/__/__ ( ) Medium __/__/__ ( ) Challenge __/__/__ ( ) More __/__/__ ( )
❏ *Basic: Write non-harmonic tones (b2, b3, b6, b7) for each chord around the circle of 4ths.
❏ **Medium: Play a melody that uses and resolves any two non-harmonic tones in C Major.
❏ ***Challenge: Same as Medium; use all four non-harmonic tones, in another key.
❏ >More: Same as Basic; A) don't pause between keys - connect to the next root and proceed; B) play 2octaves on each key; C) both A and B
❏ >Play-Along: Aebersold Vol. 1 – circle of 4ths – 4 bars per chord
Exercise 3.2 Playing Non-Harmonic TonesBasic __/__/__ ( ) Medium __/__/__ ( ) Challenge __/__/__ ( ) More __/__/__ ( )
❏ *Basic: Play a flexible major scale; insert occasional offbeat non-harmonic tones that resolve ondownbeats.
❏ **Medium: Same as Basic; use downbeat non-harmonic tones that resolve off the beat.
❏ ***Challenge: Same as Basic; mix downbeat and offbeat non-harmonic tones.
❏ >More: Same as Basic; A) don't pause between keys - connect to the next root and proceed; B) play 2octaves on each key; C) both A and B
❏ >Play-Along: Aebersold Vol. 1 – circle of 4ths – 4 bars per chord
Exercise 3.3 Using the Chromatic ScaleBasic __/__/__ ( ) Medium __/__/__ ( ) More __/__/__ ( )
❏ *Basic: Play a flexible major scale and mix parts of the chromatic scale from time to time.
❏ **Medium: Same as Basic; use chromatic contour groups of 3 and 6 eight-notes.
❏ >More: Same as Basic; A) don't pause between keys - connect to the next root and proceed; B) play 2octaves on each key; C) both A and B
❏ >Play-Along: Aebersold Vol. 1 – circle of 4ths – 4 bars per chord
Exercise 3.4 Using Non-Harmonic Tones, MinorBasic __/__/__ ( ) Medium __/__/__ ( ) Challenge __/__/__ ( ) More __/__/__ ( )
❏ *Basic: Write the non-harmonic tones (b2, n3) for each Dorian scale, around the circle offourths.
❏ **Medium: Play a flexible Dorian scale with some downbeat non-harmonic tones.
❏ ***Challenge: Same as Medium; mix downbeat and offbeat non-harmonic tones
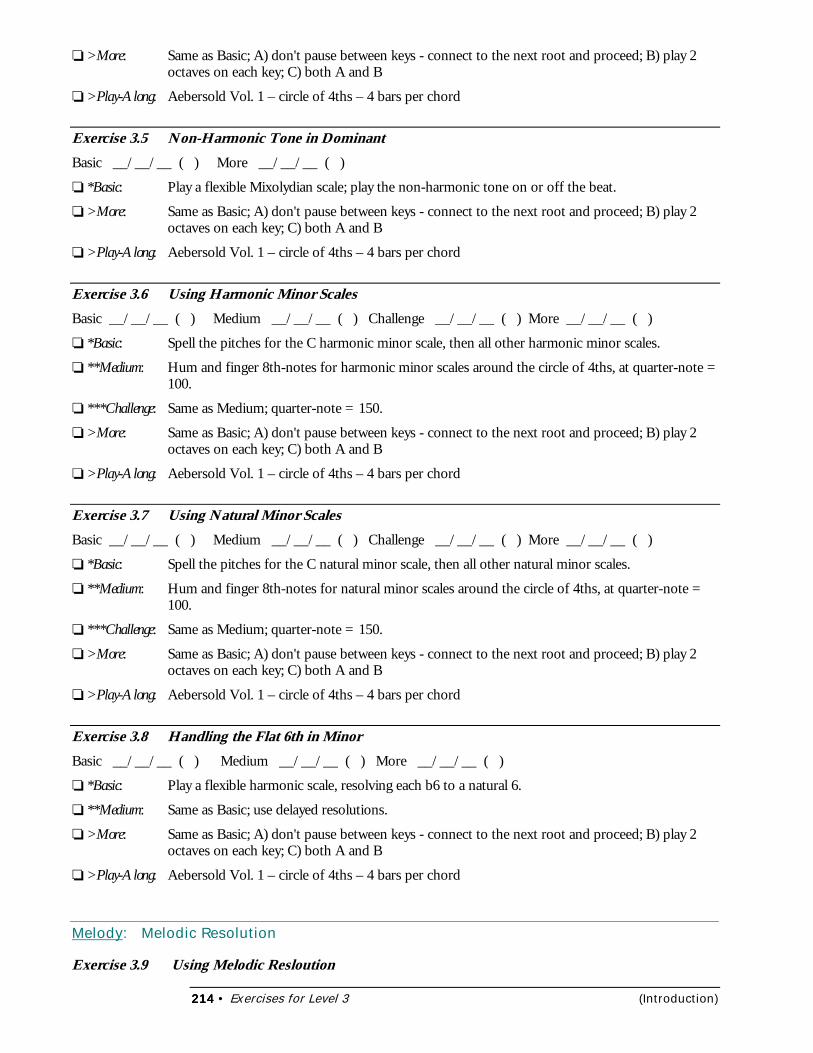
214214214214 • Exercises for Level 3 (Introduction)
❏ >More: Same as Basic; A) don't pause between keys - connect to the next root and proceed; B) play 2octaves on each key; C) both A and B
❏ >Play-Along: Aebersold Vol. 1 – circle of 4ths – 4 bars per chord
Exercise 3.5 Non-Harmonic Tone in DominantBasic __/__/__ ( ) More __/__/__ ( )
❏ *Basic: Play a flexible Mixolydian scale; play the non-harmonic tone on or off the beat.
❏ >More: Same as Basic; A) don't pause between keys - connect to the next root and proceed; B) play 2octaves on each key; C) both A and B
❏ >Play-Along: Aebersold Vol. 1 – circle of 4ths – 4 bars per chord
Exercise 3.6 Using Harmonic Minor ScalesBasic __/__/__ ( ) Medium __/__/__ ( ) Challenge __/__/__ ( ) More __/__/__ ( )
❏ *Basic: Spell the pitches for the C harmonic minor scale, then all other harmonic minor scales.
❏ **Medium: Hum and finger 8th-notes for harmonic minor scales around the circle of 4ths, at quarter-note =100.
❏ ***Challenge: Same as Medium; quarter-note = 150.
❏ >More: Same as Basic; A) don't pause between keys - connect to the next root and proceed; B) play 2octaves on each key; C) both A and B
❏ >Play-Along: Aebersold Vol. 1 – circle of 4ths – 4 bars per chord
Exercise 3.7 Using Natural Minor ScalesBasic __/__/__ ( ) Medium __/__/__ ( ) Challenge __/__/__ ( ) More __/__/__ ( )
❏ *Basic: Spell the pitches for the C natural minor scale, then all other natural minor scales.
❏ **Medium: Hum and finger 8th-notes for natural minor scales around the circle of 4ths, at quarter-note =100.
❏ ***Challenge: Same as Medium; quarter-note = 150.
❏ >More: Same as Basic; A) don't pause between keys - connect to the next root and proceed; B) play 2octaves on each key; C) both A and B
❏ >Play-Along: Aebersold Vol. 1 – circle of 4ths – 4 bars per chord
Exercise 3.8 Handling the Flat 6th in MinorBasic __/__/__ ( ) Medium __/__/__ ( ) More __/__/__ ( )
❏ *Basic: Play a flexible harmonic scale, resolving each b6 to a natural 6.
❏ **Medium: Same as Basic; use delayed resolutions.
❏ >More: Same as Basic; A) don't pause between keys - connect to the next root and proceed; B) play 2octaves on each key; C) both A and B
❏ >Play-Along: Aebersold Vol. 1 – circle of 4ths – 4 bars per chord
Melody: Melodic Resolution
Exercise 3.9 Using Melodic Resloution
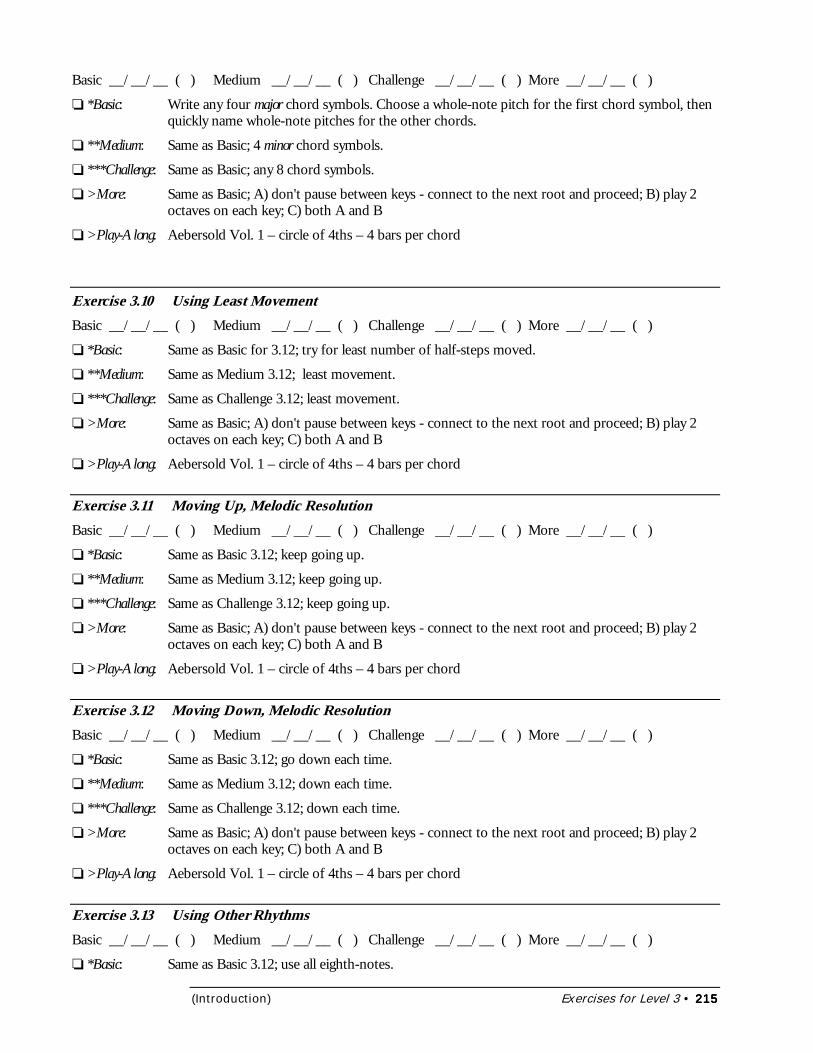
(Introduction) Exercises for Level 3 • 215215215215
Basic __/__/__ ( ) Medium __/__/__ ( ) Challenge __/__/__ ( ) More __/__/__ ( )
❏ *Basic: Write any four major chord symbols. Choose a whole-note pitch for the first chord symbol, thenquickly name whole-note pitches for the other chords.
❏ **Medium: Same as Basic; 4 minor chord symbols.
❏ ***Challenge: Same as Basic; any 8 chord symbols.
❏ >More: Same as Basic; A) don't pause between keys - connect to the next root and proceed; B) play 2octaves on each key; C) both A and B
❏ >Play-Along: Aebersold Vol. 1 – circle of 4ths – 4 bars per chord
Exercise 3.10 Using Least MovementBasic __/__/__ ( ) Medium __/__/__ ( ) Challenge __/__/__ ( ) More __/__/__ ( )
❏ *Basic: Same as Basic for 3.12; try for least number of half-steps moved.
❏ **Medium: Same as Medium 3.12; least movement.
❏ ***Challenge: Same as Challenge 3.12; least movement.
❏ >More: Same as Basic; A) don't pause between keys - connect to the next root and proceed; B) play 2octaves on each key; C) both A and B
❏ >Play-Along: Aebersold Vol. 1 – circle of 4ths – 4 bars per chord
Exercise 3.11 Moving Up, Melodic ResolutionBasic __/__/__ ( ) Medium __/__/__ ( ) Challenge __/__/__ ( ) More __/__/__ ( )
❏ *Basic: Same as Basic 3.12; keep going up.
❏ **Medium: Same as Medium 3.12; keep going up.
❏ ***Challenge: Same as Challenge 3.12; keep going up.
❏ >More: Same as Basic; A) don't pause between keys - connect to the next root and proceed; B) play 2octaves on each key; C) both A and B
❏ >Play-Along: Aebersold Vol. 1 – circle of 4ths – 4 bars per chord
Exercise 3.12 Moving Down, Melodic ResolutionBasic __/__/__ ( ) Medium __/__/__ ( ) Challenge __/__/__ ( ) More __/__/__ ( )
❏ *Basic: Same as Basic 3.12; go down each time.
❏ **Medium: Same as Medium 3.12; down each time.
❏ ***Challenge: Same as Challenge 3.12; down each time.
❏ >More: Same as Basic; A) don't pause between keys - connect to the next root and proceed; B) play 2octaves on each key; C) both A and B
❏ >Play-Along: Aebersold Vol. 1 – circle of 4ths – 4 bars per chord
Exercise 3.13 Using Other RhythmsBasic __/__/__ ( ) Medium __/__/__ ( ) Challenge __/__/__ ( ) More __/__/__ ( )
❏ *Basic: Same as Basic 3.12; use all eighth-notes.
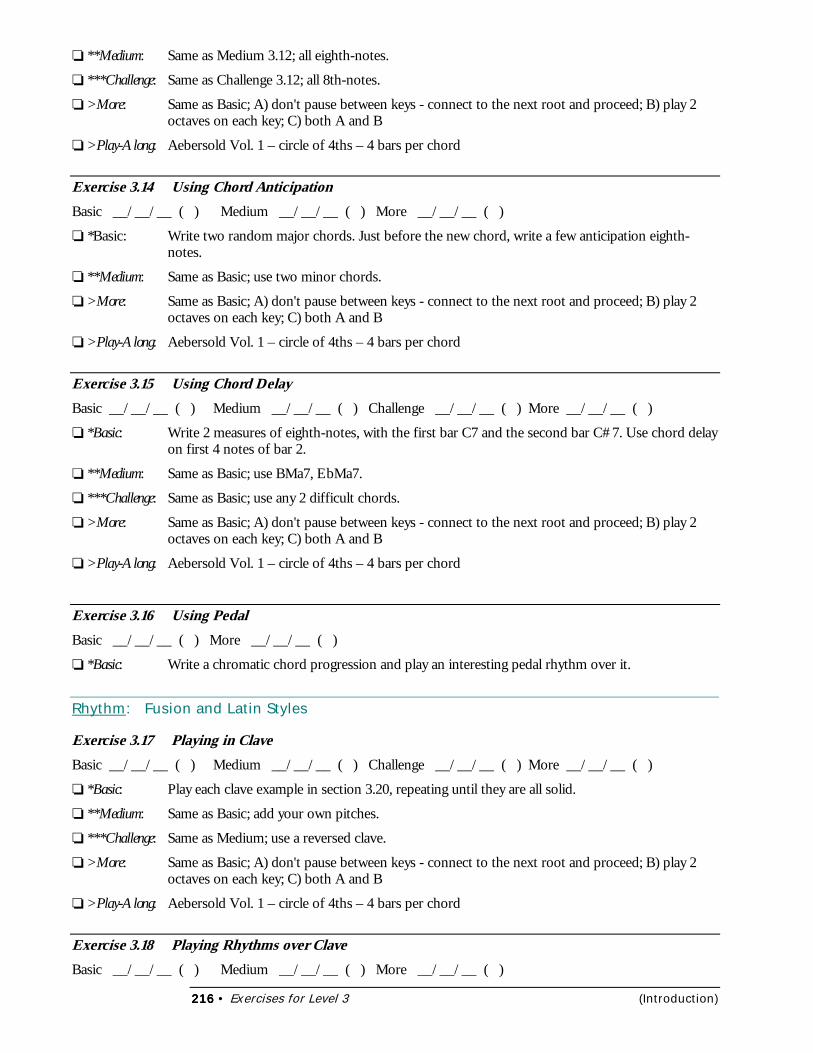
216216216216 • Exercises for Level 3 (Introduction)
❏ **Medium: Same as Medium 3.12; all eighth-notes.
❏ ***Challenge: Same as Challenge 3.12; all 8th-notes.
❏ >More: Same as Basic; A) don't pause between keys - connect to the next root and proceed; B) play 2octaves on each key; C) both A and B
❏ >Play-Along: Aebersold Vol. 1 – circle of 4ths – 4 bars per chord
Exercise 3.14 Using Chord AnticipationBasic __/__/__ ( ) Medium __/__/__ ( ) More __/__/__ ( )
❏ *Basic: Write two random major chords. Just before the new chord, write a few anticipation eighth-notes.
❏ **Medium: Same as Basic; use two minor chords.
❏ >More: Same as Basic; A) don't pause between keys - connect to the next root and proceed; B) play 2octaves on each key; C) both A and B
❏ >Play-Along: Aebersold Vol. 1 – circle of 4ths – 4 bars per chord
Exercise 3.15 Using Chord DelayBasic __/__/__ ( ) Medium __/__/__ ( ) Challenge __/__/__ ( ) More __/__/__ ( )
❏ *Basic: Write 2 measures of eighth-notes, with the first bar C7 and the second bar C#7. Use chord delayon first 4 notes of bar 2.
❏ **Medium: Same as Basic; use BMa7, EbMa7.
❏ ***Challenge: Same as Basic; use any 2 difficult chords.
❏ >More: Same as Basic; A) don't pause between keys - connect to the next root and proceed; B) play 2octaves on each key; C) both A and B
❏ >Play-Along: Aebersold Vol. 1 – circle of 4ths – 4 bars per chord
Exercise 3.16 Using PedalBasic __/__/__ ( ) More __/__/__ ( )
❏ *Basic: Write a chromatic chord progression and play an interesting pedal rhythm over it.
Rhythm: Fusion and Latin Styles
Exercise 3.17 Playing in ClaveBasic __/__/__ ( ) Medium __/__/__ ( ) Challenge __/__/__ ( ) More __/__/__ ( )
❏ *Basic: Play each clave example in section 3.20, repeating until they are all solid.
❏ **Medium: Same as Basic; add your own pitches.
❏ ***Challenge: Same as Medium; use a reversed clave.
❏ >More: Same as Basic; A) don't pause between keys - connect to the next root and proceed; B) play 2octaves on each key; C) both A and B
❏ >Play-Along: Aebersold Vol. 1 – circle of 4ths – 4 bars per chord
Exercise 3.18 Playing Rhythms over ClaveBasic __/__/__ ( ) Medium __/__/__ ( ) More __/__/__ ( )
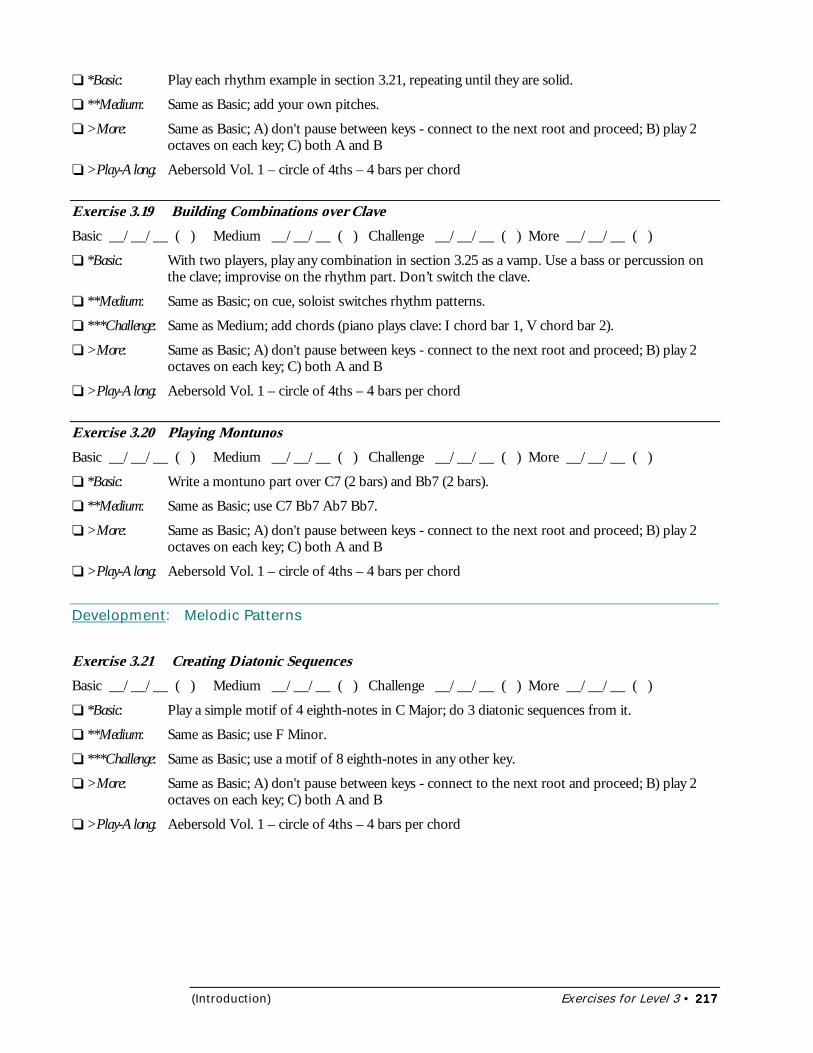
(Introduction) Exercises for Level 3 • 217217217217
❏ *Basic: Play each rhythm example in section 3.21, repeating until they are solid.
❏ **Medium: Same as Basic; add your own pitches.
❏ >More: Same as Basic; A) don't pause between keys - connect to the next root and proceed; B) play 2octaves on each key; C) both A and B
❏ >Play-Along: Aebersold Vol. 1 – circle of 4ths – 4 bars per chord
Exercise 3.19 Building Combinations over ClaveBasic __/__/__ ( ) Medium __/__/__ ( ) Challenge __/__/__ ( ) More __/__/__ ( )
❏ *Basic: With two players, play any combination in section 3.25 as a vamp. Use a bass or percussion onthe clave; improvise on the rhythm part. Don’t switch the clave.
❏ **Medium: Same as Basic; on cue, soloist switches rhythm patterns.
❏ ***Challenge: Same as Medium; add chords (piano plays clave: I chord bar 1, V chord bar 2).
❏ >More: Same as Basic; A) don't pause between keys - connect to the next root and proceed; B) play 2octaves on each key; C) both A and B
❏ >Play-Along: Aebersold Vol. 1 – circle of 4ths – 4 bars per chord
Exercise 3.20 Playing MontunosBasic __/__/__ ( ) Medium __/__/__ ( ) Challenge __/__/__ ( ) More __/__/__ ( )
❏ *Basic: Write a montuno part over C7 (2 bars) and Bb7 (2 bars).
❏ **Medium: Same as Basic; use C7 Bb7 Ab7 Bb7.
❏ >More: Same as Basic; A) don't pause between keys - connect to the next root and proceed; B) play 2octaves on each key; C) both A and B
❏ >Play-Along: Aebersold Vol. 1 – circle of 4ths – 4 bars per chord
Development: Melodic Patterns
Exercise 3.21 Creating Diatonic SequencesBasic __/__/__ ( ) Medium __/__/__ ( ) Challenge __/__/__ ( ) More __/__/__ ( )
❏ *Basic: Play a simple motif of 4 eighth-notes in C Major; do 3 diatonic sequences from it.
❏ **Medium: Same as Basic; use F Minor.
❏ ***Challenge: Same as Basic; use a motif of 8 eighth-notes in any other key.
❏ >More: Same as Basic; A) don't pause between keys - connect to the next root and proceed; B) play 2octaves on each key; C) both A and B
❏ >Play-Along: Aebersold Vol. 1 – circle of 4ths – 4 bars per chord
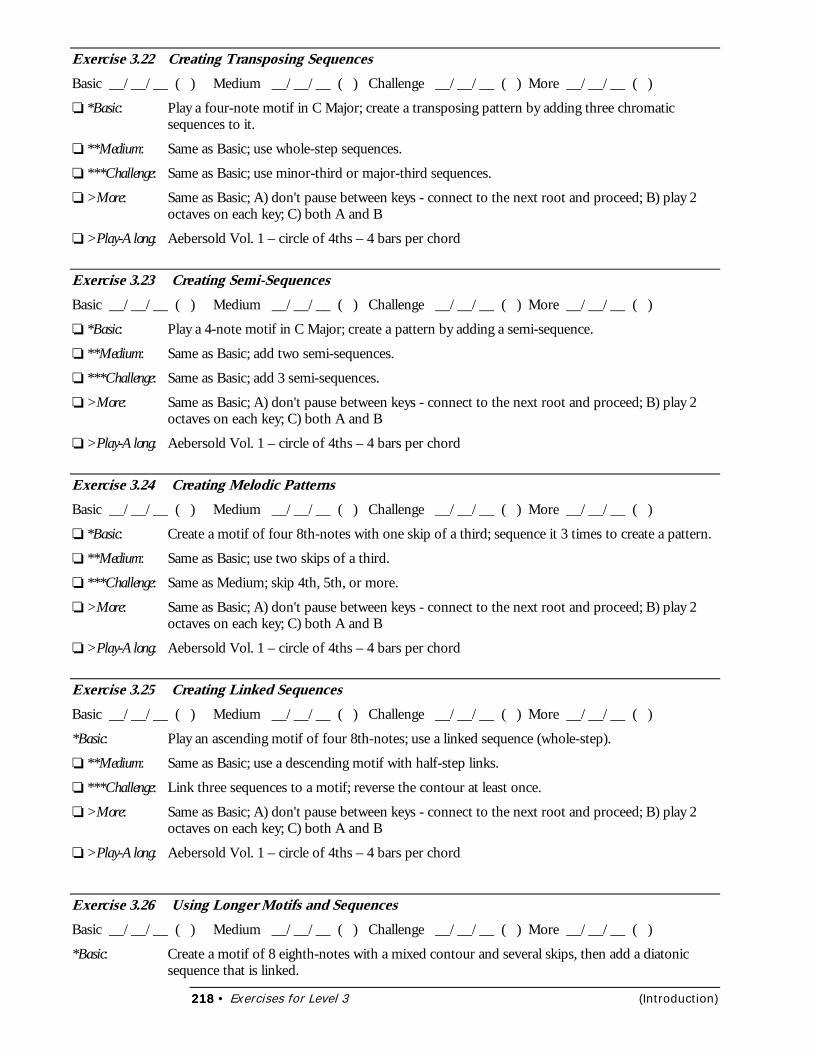
218218218218 • Exercises for Level 3 (Introduction)
Exercise 3.22 Creating Transposing SequencesBasic __/__/__ ( ) Medium __/__/__ ( ) Challenge __/__/__ ( ) More __/__/__ ( )
❏ *Basic: Play a four-note motif in C Major; create a transposing pattern by adding three chromaticsequences to it.
❏ **Medium: Same as Basic; use whole-step sequences.
❏ ***Challenge: Same as Basic; use minor-third or major-third sequences.
❏ >More: Same as Basic; A) don't pause between keys - connect to the next root and proceed; B) play 2octaves on each key; C) both A and B
❏ >Play-Along: Aebersold Vol. 1 – circle of 4ths – 4 bars per chord
Exercise 3.23 Creating Semi-SequencesBasic __/__/__ ( ) Medium __/__/__ ( ) Challenge __/__/__ ( ) More __/__/__ ( )
❏ *Basic: Play a 4-note motif in C Major; create a pattern by adding a semi-sequence.
❏ **Medium: Same as Basic; add two semi-sequences.
❏ ***Challenge: Same as Basic; add 3 semi-sequences.
❏ >More: Same as Basic; A) don't pause between keys - connect to the next root and proceed; B) play 2octaves on each key; C) both A and B
❏ >Play-Along: Aebersold Vol. 1 – circle of 4ths – 4 bars per chord
Exercise 3.24 Creating Melodic PatternsBasic __/__/__ ( ) Medium __/__/__ ( ) Challenge __/__/__ ( ) More __/__/__ ( )
❏ *Basic: Create a motif of four 8th-notes with one skip of a third; sequence it 3 times to create a pattern.
❏ **Medium: Same as Basic; use two skips of a third.
❏ ***Challenge: Same as Medium; skip 4th, 5th, or more.
❏ >More: Same as Basic; A) don't pause between keys - connect to the next root and proceed; B) play 2octaves on each key; C) both A and B
❏ >Play-Along: Aebersold Vol. 1 – circle of 4ths – 4 bars per chord
Exercise 3.25 Creating Linked SequencesBasic __/__/__ ( ) Medium __/__/__ ( ) Challenge __/__/__ ( ) More __/__/__ ( )
*Basic: Play an ascending motif of four 8th-notes; use a linked sequence (whole-step).
❏ **Medium: Same as Basic; use a descending motif with half-step links.
❏ ***Challenge: Link three sequences to a motif; reverse the contour at least once.
❏ >More: Same as Basic; A) don't pause between keys - connect to the next root and proceed; B) play 2octaves on each key; C) both A and B
❏ >Play-Along: Aebersold Vol. 1 – circle of 4ths – 4 bars per chord
Exercise 3.26 Using Longer Motifs and SequencesBasic __/__/__ ( ) Medium __/__/__ ( ) Challenge __/__/__ ( ) More __/__/__ ( )
*Basic: Create a motif of 8 eighth-notes with a mixed contour and several skips, then add a diatonicsequence that is linked.

(Introduction) Exercises for Level 3 • 219219219219
❏ **Medium: Same as Basic; add a transposing sequence that is linked.
❏ ***Challenge: Same as Medium; add a transposing sequence that is not linked.
❏ >More: Same as Basic; A) don't pause between keys - connect to the next root and proceed; B) play 2octaves on each key; C) both A and B
❏ >Play-Along: Aebersold Vol. 1 – circle of 4ths – 4 bars per chord
Exercise 3.27 Using Pulling SequencesBasic __/__/__ ( ) Medium __/__/__ ( ) Challenge __/__/__ ( ) More __/__/__ ( )
❏ *Basic: Create an asc. pulling pattern, diatonic.
❏ **Medium: Create a desc. pulling pattern, transposing.
❏ ***Challenge: Same as Medium; use an 8-note motif.
❏ >More: Same as Basic; A) don't pause between keys - connect to the next root and proceed; B) play 2octaves on each key; C) both A and B
❏ >Play-Along: Aebersold Vol. 1 – circle of 4ths – 4 bars per chord
Exercise 3.28 Non-Harmonic Tones in SequencesBasic __/__/__ ( ) Medium __/__/__ ( ) Challenge __/__/__ ( ) More __/__/__ ( )
❏ *Basic: Create a 4-note asc. diatonic pattern with one non-harmonic tone in the motif.
❏ **Medium: Same as Basic; 4-note descending transposing pattern.
❏ ***Challenge: Same as Basic; use an 8-note transposing pattern with two non-harmonic tones.
❏ >More: Same as Basic; A) don't pause between keys - connect to the next root and proceed; B) play 2octaves on each key; C) both A and B
❏ >Play-Along: Aebersold Vol. 1 – circle of 4ths – 4 bars per chord
Exercise 3.29 Using Other Rhythms in PatternsBasic __/__/__ ( ) Medium __/__/__ ( ) Challenge __/__/__ ( ) More __/__/__ ( )
❏ *Basic: Create a pattern using two eighth-notes and a quarter- note.
❏ **Medium: Create a pattern with a different rhythm (not all eighth-notes).
❏ ***Challenge: Create a four-beat pattern that uses a different rhythm (not all eighth-notes)
❏ >More: Same as Basic; A) don't pause between keys - connect to the next root and proceed; B) play 2octaves on each key; C) both A and B
❏ >Play-Along: Aebersold Vol. 1 – circle of 4ths – 4 bars per chord
Exercise 3.30 Creating Offset PatternsBasic __/__/__ ( ) Medium __/__/__ ( ) Challenge __/__/__ ( ) More __/__/__ ( )
❏ *Basic: Create a pattern with sequences of four eighth-notes; start on the “and” of 1.
❏ **Medium: Same as Basic; start on the “and” of 4.
❏ ***Challenge: Same as Basic; “and” of 1 or “and” of 4.
❏ >More: Same as Basic; A) don't pause between keys - connect to the next root and proceed; B) play 2octaves on each key; C) both A and B
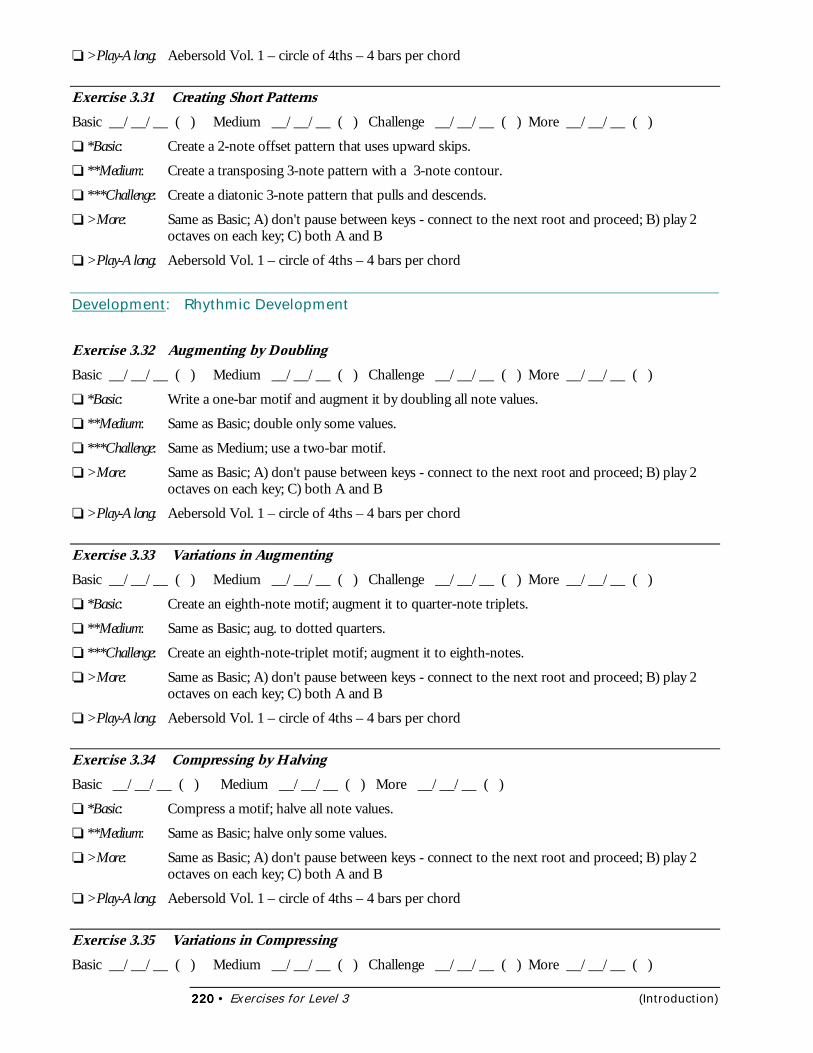
220220220220 • Exercises for Level 3 (Introduction)
❏ >Play-Along: Aebersold Vol. 1 – circle of 4ths – 4 bars per chord
Exercise 3.31 Creating Short PatternsBasic __/__/__ ( ) Medium __/__/__ ( ) Challenge __/__/__ ( ) More __/__/__ ( )
❏ *Basic: Create a 2-note offset pattern that uses upward skips.
❏ **Medium: Create a transposing 3-note pattern with a 3-note contour.
❏ ***Challenge: Create a diatonic 3-note pattern that pulls and descends.
❏ >More: Same as Basic; A) don't pause between keys - connect to the next root and proceed; B) play 2octaves on each key; C) both A and B
❏ >Play-Along: Aebersold Vol. 1 – circle of 4ths – 4 bars per chord
Development: Rhythmic Development
Exercise 3.32 Augmenting by DoublingBasic __/__/__ ( ) Medium __/__/__ ( ) Challenge __/__/__ ( ) More __/__/__ ( )
❏ *Basic: Write a one-bar motif and augment it by doubling all note values.
❏ **Medium: Same as Basic; double only some values.
❏ ***Challenge: Same as Medium; use a two-bar motif.
❏ >More: Same as Basic; A) don't pause between keys - connect to the next root and proceed; B) play 2octaves on each key; C) both A and B
❏ >Play-Along: Aebersold Vol. 1 – circle of 4ths – 4 bars per chord
Exercise 3.33 Variations in AugmentingBasic __/__/__ ( ) Medium __/__/__ ( ) Challenge __/__/__ ( ) More __/__/__ ( )
❏ *Basic: Create an eighth-note motif; augment it to quarter-note triplets.
❏ **Medium: Same as Basic; aug. to dotted quarters.
❏ ***Challenge: Create an eighth-note-triplet motif; augment it to eighth-notes.
❏ >More: Same as Basic; A) don't pause between keys - connect to the next root and proceed; B) play 2octaves on each key; C) both A and B
❏ >Play-Along: Aebersold Vol. 1 – circle of 4ths – 4 bars per chord
Exercise 3.34 Compressing by HalvingBasic __/__/__ ( ) Medium __/__/__ ( ) More __/__/__ ( )
❏ *Basic: Compress a motif; halve all note values.
❏ **Medium: Same as Basic; halve only some values.
❏ >More: Same as Basic; A) don't pause between keys - connect to the next root and proceed; B) play 2octaves on each key; C) both A and B
❏ >Play-Along: Aebersold Vol. 1 – circle of 4ths – 4 bars per chord
Exercise 3.35 Variations in CompressingBasic __/__/__ ( ) Medium __/__/__ ( ) Challenge __/__/__ ( ) More __/__/__ ( )
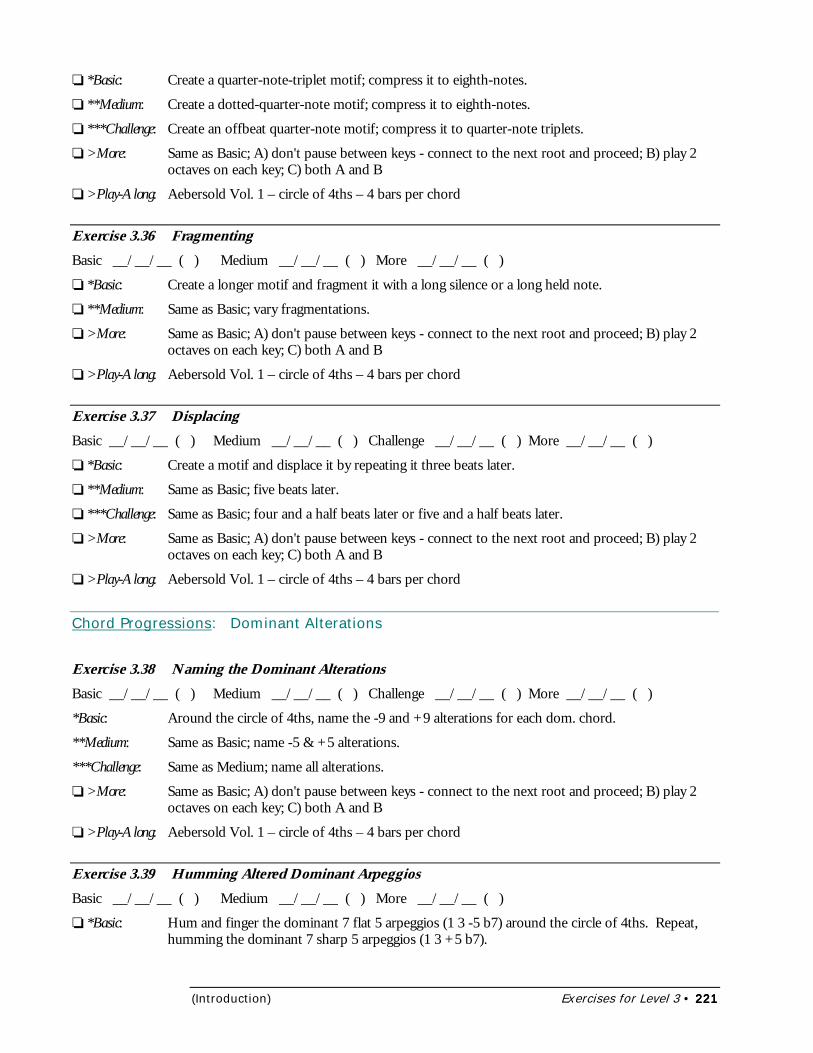
(Introduction) Exercises for Level 3 • 221221221221
❏ *Basic: Create a quarter-note-triplet motif; compress it to eighth-notes.
❏ **Medium: Create a dotted-quarter-note motif; compress it to eighth-notes.
❏ ***Challenge: Create an offbeat quarter-note motif; compress it to quarter-note triplets.
❏ >More: Same as Basic; A) don't pause between keys - connect to the next root and proceed; B) play 2octaves on each key; C) both A and B
❏ >Play-Along: Aebersold Vol. 1 – circle of 4ths – 4 bars per chord
Exercise 3.36 FragmentingBasic __/__/__ ( ) Medium __/__/__ ( ) More __/__/__ ( )
❏ *Basic: Create a longer motif and fragment it with a long silence or a long held note.
❏ **Medium: Same as Basic; vary fragmentations.
❏ >More: Same as Basic; A) don't pause between keys - connect to the next root and proceed; B) play 2octaves on each key; C) both A and B
❏ >Play-Along: Aebersold Vol. 1 – circle of 4ths – 4 bars per chord
Exercise 3.37 DisplacingBasic __/__/__ ( ) Medium __/__/__ ( ) Challenge __/__/__ ( ) More __/__/__ ( )
❏ *Basic: Create a motif and displace it by repeating it three beats later.
❏ **Medium: Same as Basic; five beats later.
❏ ***Challenge: Same as Basic; four and a half beats later or five and a half beats later.
❏ >More: Same as Basic; A) don't pause between keys - connect to the next root and proceed; B) play 2octaves on each key; C) both A and B
❏ >Play-Along: Aebersold Vol. 1 – circle of 4ths – 4 bars per chord
Chord Progressions: Dominant Alterations
Exercise 3.38 Naming the Dominant AlterationsBasic __/__/__ ( ) Medium __/__/__ ( ) Challenge __/__/__ ( ) More __/__/__ ( )
*Basic: Around the circle of 4ths, name the -9 and +9 alterations for each dom. chord.
**Medium: Same as Basic; name -5 & +5 alterations.
***Challenge: Same as Medium; name all alterations.
❏ >More: Same as Basic; A) don't pause between keys - connect to the next root and proceed; B) play 2octaves on each key; C) both A and B
❏ >Play-Along: Aebersold Vol. 1 – circle of 4ths – 4 bars per chord
Exercise 3.39 Humming Altered Dominant ArpeggiosBasic __/__/__ ( ) Medium __/__/__ ( ) More __/__/__ ( )
❏ *Basic: Hum and finger the dominant 7 flat 5 arpeggios (1 3 -5 b7) around the circle of 4ths. Repeat,humming the dominant 7 sharp 5 arpeggios (1 3 +5 b7).

222222222222 • Exercises for Level 3 (Introduction)
❏ **Medium: Same as Basic; use dominant 7 flat 9 arpeggios (1 3 5 b7 -9), then dominant 7 sharp 9 arpeggios(1 3 5 b7 +9).
❏ >More: Same as Basic; A) don't pause between keys - connect to the next root and proceed; B) play 2octaves on each key; C) both A and B
❏ >Play-Along: Aebersold Vol. 1 – circle of 4ths – 4 bars per chord
Exercise 3.40 Adding Dominant AlterationsBasic __/__/__ ( ) Medium __/__/__ ( ) More __/__/__ ( )
❏ *Basic: Around the circle of 4ths, choose a +5 or b5 chord, then add all other alterations.
❏ **Medium: Same as Basic; use b9 or +9 chords.
❏ >More: Same as Basic; A) don't pause between keys - connect to the next root and proceed; B) play 2octaves on each key; C) both A and B
❏ >Play-Along: Aebersold Vol. 1 – circle of 4ths – 4 bars per chord
Exercise 3.41 Matching Altered Chords and ScalesBasic __/__/__ ( ) More __/__/__ ( )
❏ *Basic: While a friend or recording holds out an altered chord, play one of the flexible scales mentionedin section 3.43.
❏ >More: Same as Basic; A) don't pause between keys - connect to the next root and proceed; B) play 2octaves on each key; C) both A and B
❏ >Play-Along: Aebersold Vol. 1 – circle of 4ths – 4 bars per chord
Exercise 3.42 Spelling/Humming Whole-Tone ScalesBasic __/__/__ ( ) Medium __/__/__ ( ) Challenge __/__/__ ( ) More __/__/__ ( )
❏ *Basic: Spell the pitches for the C whole-tone scale, then for the D whole-tone scale.
❏ **Medium: Accurately hum & finger 8th-notes for both whole-tone scales, quarter = 100.
❏ ***Challenge: Same as Medium; quarter-note = 150.
❏ >More: Same as Basic; A) don't pause between keys - connect to the next root and proceed; B) play 2octaves on each key; C) both A and B
❏ >Play-Along: Aebersold Vol. 1 – circle of 4ths – 4 bars per chord
Exercise 3.43 Minor ii-V-i ProgressionsBasic __/__/__ ( ) Medium __/__/__ ( ) Challenge __/__/__ ( ) More __/__/__ ( )
❏ *Basic: Around the circle of 4ths, write the ii-V-i progression for each minor key.
❏ **Medium: Name the b5 degree for each chord around the circle of 4ths.
❏ ***Challenge: Play a flexible harmonic minor scale for each minor ii-V-I in the circle of 4ths.
❏ >More: Same as Basic; A) don't pause between keys - connect to the next root and proceed; B) play 2octaves on each key; C) both A and B
❏ >Play-Along: Aebersold Vol. 1 – circle of 4ths – 4 bars per chord
Exercise 3.44 Writing a Minor Blues VariationBasic __/__/__ ( ) Medium __/__/__ ( ) Challenge __/__/__ ( ) More __/__/__ ( )

(Introduction) Exercises for Level 3 • 223223223223
❏ *Basic: Write the basic minor blues, all 12 keys.
❏ **Medium: Write a minor blues variation, Ab minor.
❏ ***Challenge: Create your own variation of a minor blues in any key besides C.
❏ >More: Same as Basic; A) don't pause between keys - connect to the next root and proceed; B) play 2octaves on each key; C) both A and B
❏ >Play-Along: Aebersold Vol. 1 – circle of 4ths – 4 bars per chord
Exercise 3.45 Using Substitute i ChordsBasic __/__/__ ( ) Medium __/__/__ ( ) More __/__/__ ( )
❏ *Basic: Write ii-V-bVI progressions around the circle of 4ths.
❏ **Medium: Write ii-V-bIII progressions around the circle of 4ths.
❏ >More: Same as Basic; A) don't pause between keys - connect to the next root and proceed; B) play 2octaves on each key; C) both A and B
❏ >Play-Along: Aebersold Vol. 1 – circle of 4ths – 4 bars per chord
Exercise 3.46 Using Diminished ChordsBasic __/__/__ ( ) Medium __/__/__ ( ) Challenge __/__/__ ( ) More __/__/__ ( )
❏ *Basic: Going around the circle of 4ths, spell all the diminished 7 chords.
❏ **Medium: Same as Basic; hum all dim. 7 chords.
❏ ***Challenge: Name three ways to resolve each diminished 7 chord.
❏ >More: Same as Basic; A) don't pause between keys - connect to the next root and proceed; B) play 2octaves on each key; C) both A and B
❏ >Play-Along: Aebersold Vol. 1 – circle of 4ths – 4 bars per chord
Exercise 3.47 Using Diminished-1 ScalesBasic __/__/__ ( ) Medium __/__/__ ( ) Challenge __/__/__ ( ) More __/__/__ ( )
*Basic: Spell the pitches for the C diminished-1 scale, then for all diminished-1 scales.
❏ **Medium: Hum & finger 8th-notes for all diminished-1 scales around circle of 4ths, quarter-note = 100.
❏ ***Challenge: Same as Medium; quarter-note = 150.
❏ >More: Same as Basic; A) don't pause between keys - connect to the next root and proceed; B) play 2octaves on each key; C) both A and B
❏ >Play-Along: Aebersold Vol. 1 – circle of 4ths – 4 bars per chord
Exercise 3.48 Diminished-Whole-Tone ScalesBasic __/__/__ ( ) Medium __/__/__ ( ) Challenge __/__/__ ( ) More __/__/__ ( )
❏ *Basic: Spell the pitches for the C diminished-whole-tone scale, then for the other 11.
❏ **Medium: Hum and finger eighth-notes for all diminished-whole-tone scales around the circle of 4ths, atquarter-note = 100.
❏ ***Challenge: Same as Medium; quarter-note = 150.
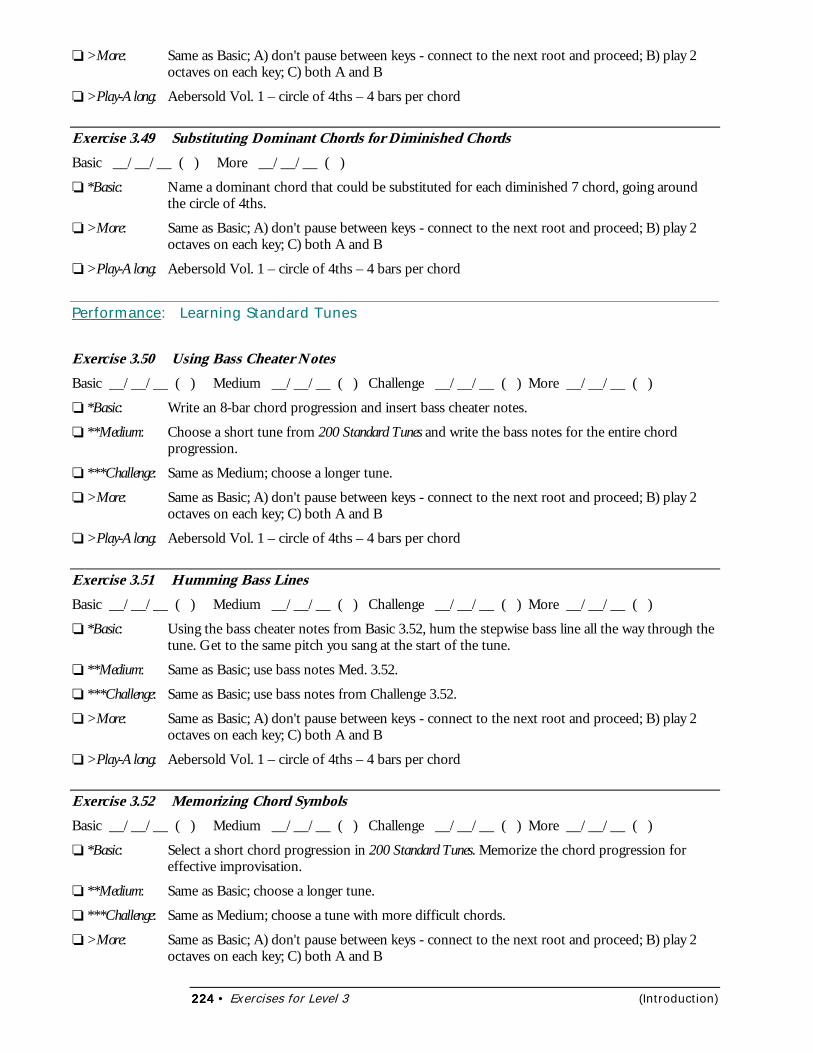
224224224224 • Exercises for Level 3 (Introduction)
❏ >More: Same as Basic; A) don't pause between keys - connect to the next root and proceed; B) play 2octaves on each key; C) both A and B
❏ >Play-Along: Aebersold Vol. 1 – circle of 4ths – 4 bars per chord
Exercise 3.49 Substituting Dominant Chords for Diminished ChordsBasic __/__/__ ( ) More __/__/__ ( )
❏ *Basic: Name a dominant chord that could be substituted for each diminished 7 chord, going aroundthe circle of 4ths.
❏ >More: Same as Basic; A) don't pause between keys - connect to the next root and proceed; B) play 2octaves on each key; C) both A and B
❏ >Play-Along: Aebersold Vol. 1 – circle of 4ths – 4 bars per chord
Performance: Learning Standard Tunes
Exercise 3.50 Using Bass Cheater NotesBasic __/__/__ ( ) Medium __/__/__ ( ) Challenge __/__/__ ( ) More __/__/__ ( )
❏ *Basic: Write an 8-bar chord progression and insert bass cheater notes.
❏ **Medium: Choose a short tune from 200 Standard Tunes and write the bass notes for the entire chordprogression.
❏ ***Challenge: Same as Medium; choose a longer tune.
❏ >More: Same as Basic; A) don't pause between keys - connect to the next root and proceed; B) play 2octaves on each key; C) both A and B
❏ >Play-Along: Aebersold Vol. 1 – circle of 4ths – 4 bars per chord
Exercise 3.51 Humming Bass LinesBasic __/__/__ ( ) Medium __/__/__ ( ) Challenge __/__/__ ( ) More __/__/__ ( )
❏ *Basic: Using the bass cheater notes from Basic 3.52, hum the stepwise bass line all the way through thetune. Get to the same pitch you sang at the start of the tune.
❏ **Medium: Same as Basic; use bass notes Med. 3.52.
❏ ***Challenge: Same as Basic; use bass notes from Challenge 3.52.
❏ >More: Same as Basic; A) don't pause between keys - connect to the next root and proceed; B) play 2octaves on each key; C) both A and B
❏ >Play-Along: Aebersold Vol. 1 – circle of 4ths – 4 bars per chord
Exercise 3.52 Memorizing Chord SymbolsBasic __/__/__ ( ) Medium __/__/__ ( ) Challenge __/__/__ ( ) More __/__/__ ( )
❏ *Basic: Select a short chord progression in 200 Standard Tunes. Memorize the chord progression foreffective improvisation.
❏ **Medium: Same as Basic; choose a longer tune.
❏ ***Challenge: Same as Medium; choose a tune with more difficult chords.
❏ >More: Same as Basic; A) don't pause between keys - connect to the next root and proceed; B) play 2octaves on each key; C) both A and B
(Introduction) Exercises for Level 3 • 225225225225
❏ >Play-Along: Aebersold Vol. 1 – circle of 4ths – 4 bars per chord
Exercise 3.53 Adding Arpeggio TonesBasic __/__/__ ( ) Medium __/__/__ ( ) Challenge __/__/__ ( ) More __/__/__ ( )
❏ *Basic: Add arpeggio tones to the progression from Basic 3.52 or another tune.
❏ **Medium: Same as Basic; add 1 5 3 1 tones.
❏ >More: Same as Basic; A) don't pause between keys - connect to the next root and proceed; B) play 2octaves on each key; C) both A and B
❏ >Play-Along: Aebersold Vol. 1 – circle of 4ths – 4 bars per chord
Exercise 3.54 Adding Color TonesBasic __/__/__ ( ) Medium __/__/__ ( ) Challenge __/__/__ ( ) More __/__/__ ( )
❏ *Basic: Add color tones to the progression from Basic 3.52 or another tune.
❏ >More: Same as Basic; A) don't pause between keys - connect to the next root and proceed; B) play 2octaves on each key; C) both A and B
❏ >Play-Along: Aebersold Vol. 1 – circle of 4ths – 4 bars per chord
Exercise 3.55 Adding Flexible Scale TonesBasic __/__/__ ( ) Medium __/__/__ ( ) Challenge __/__/__ ( ) More __/__/__ ( )
❏ *Basic: Add flexible scale tones to the prog. from Basic 3.52 or another tune.
❏ >More: Same as Basic; A) don't pause between keys - connect to the next root and proceed; B) play 2octaves on each key; C) both A and B
❏ >Play-Along: Aebersold Vol. 1 – circle of 4ths – 4 bars per chord
Exercise 3.56 Improvising on Your OwnBasic __/__/__ ( ) Medium __/__/__ ( ) Challenge __/__/__ ( ) More __/__/__ ( )
❏ *Basic: Improvise to a short progression in 200 Standard Tunes, alone.
❏ **Medium: Same as Basic; choose a longer tune.
❏ ***Challenge: Same as Medium; choose a tune with more difficult chords.
❏ >More: Same as Basic; A) don't pause between keys - connect to the next root and proceed; B) play 2octaves on each key; C) both A and B
❏ >Play-Along: Aebersold Vol. 1 – circle of 4ths – 4 bars per chord.
(Level 3 - Intermediate) Exercises for Level 3 • 1
The Art of ImprovisationVersion 1.0 – 8/22/2000
… Creating real-time music through jazz improvisation …
*Level 4: Strong*
by Bob TaylorAuthor of Sightreading Jazz, Sightreading Chord Progressions
©2000 Taylor-James Publications
(Level 4 — Strong) 4A: Soundscapes • 229229229229
4A: Soundscapes4A: Soundscapes4A: Soundscapes4A: Soundscapes
In this chapter you’ll learn:
• About Soundscapes• Intensity in Solos• Artists and Styles• Conservative Improvisation
“soundscape” is like a visual map or landscape of your music. When you balancehigh and low, fast and slow, heavy and light, and rough and smooth in yourmusic, you can create patterns of sound that are much more than just notes
filling space. Your sound patterns can flow together to create a vivid musical landscape.
About Soundscapes
Painting with SoundPainting with SoundPainting with SoundPainting with SoundArtists pick up brushes or other tools and create with them. As an improviser youchoose melodic and rhythmic tools and essentially “paint with sound.” With this sound-painting approach, you can concentrate on beauty, variety and meaningful direction inyour solo, so it adds up to a work of art.
So, what makes an interesting landscape? In painting or photography a beautifullandscape is easy to appreciate. In music, a soundscape can be beautiful but hard todescribe in words. Here are some common elements in landscapes and soundscapes:
Landscapes (Art) Soundscapes (Music)
Angular lines, contours Intervals and contours
Smooth & rough surfaces Smooth/rough expression; legato/staccato articulations
Hard vs. soft objectsLoud and soft dynamics
Dense or empty texture More notes or fewer notes
As you use your musical tools of improvisation, work to create beautiful soundscapes.That raises the goal from simply surviving chord changes to creating a work of art.
Visualizing What You PlayVisualizing What You PlayVisualizing What You PlayVisualizing What You PlayCreating soundscapes depends on how well you can see musical shapes and objects (seealso Ranges and Neighborhoods in Chapter 2B: Melodic Shapes. Here are the basic steps:
1 See the starting note and the first part of the shape you want to play.
2 Hear the starting note and shape.
3 Play the starting note and shape.
This is SHAPE (See, Hear, And Play Expressively).
A
230230230230 • 4A: Soundscapes (Level 4 — Strong)
4.1 Push vs. Pull in Improvisation4.1 Push vs. Pull in Improvisation4.1 Push vs. Pull in Improvisation4.1 Push vs. Pull in ImprovisationWhen we improvise we instinctively think of pushing out a stream of notes to fill up themusical space, until something interesting emerges. But this pushing approach hasnatural weaknesses – it seems like you’re at the “back of the train,” pushing thingsalong. When you use a pulling approach to improvisation, interesting things start tohappen – it’s like being at the “engine” of the train, with a clear view of what’s ahead.Some of the differences between pushing and pulling are described below.
Pushing (weak):
• It’s hard to see where you’re headed.• You change directions too often.• You’re not sure when a motif, phrase, or solo is really completed.• You get higher density but lower creativity.
Pulling (strong):
• You see musical shapes and objects.• You do more with the notes at hand, instead of just pushing ahead for “new” notes.• You see where and how to end ideas and phrases.• You use silence more effectively: more often, longer, and in a variety of places.• Expression becomes a vital part of your playing instead of an afterthought.
To “pull” ideas,1 Visualize the first part of the idea.
2 Get a secure start on the pitch and rhythm of the idea.
3 Work through the idea, visualizing as you go.
4 Pull towards a clean and interesting ending.
Remember the shapes you create so you can develop them later. With practice, you’llfind that the pulling approach can open new creative possibilities for you.
���Exercise 4.1 Pulling Improvisation Ideas
4.2 Variety Within a Tune4.2 Variety Within a Tune4.2 Variety Within a Tune4.2 Variety Within a TuneOne of the keys to beauty in improvisation is a healthy amount of variety (see Chapter1D: Rhythmic Variety and Chapter 1F: Developing with Motifs and Phrases.
One aspect of variety is how you handle the type of tune you’re playing. For example,the typical way to improvise in a fast swing tune is to play a lot of eighth-notes. Whileyou can still play interesting solos that way (John Coltrane’s Giant Steps solo workedwell), you might miss the wealth of variety in other approaches. Below are commontune styles and the most common approaches players take in soloing on those tunes.Also described are some unusual approaches that can add variety to your solos.
Ballads Common: Slow quarters and 8ths, long notes, mostly soft
Unusual: Double-time & triple-time (see Chapter 4B), triplet ties,rough expression, intensity
(Level 4 — Strong) 4A: Soundscapes • 231231231231
Latin Common: Legato quarters, even 8ths
Unusual: Triplets, offbeat ties, groups of 5 or 7 (Chapter 5C)
Slow swing Common: 8ths, many downbeat accents
Unusual: Double-time and triple-time, rhythmic variations (seeChapters 5C and 5D)
Med. swing Common: 8ths w/ simple syncopations
Unusual: Double-time, triplet variations
Up swing Common: Lots of eighth-notes
Unusual: Quarter-notes, offbeat ties, consec. dotted quarters
���Exercise 4.2 Variety in Rhythmic Styles
Intensity in Solos
Intensity is the process of turning up the heat in a solo to build to a high point. Here aresome guidelines on understanding and using intensity effectively:
• Don’t confuse intensity with interest. Suspense, subtlety, and economy can buildinterest in a solo even without typical intensity. The main goal is interest, not justintensity.
• Be careful with higher, faster, and louder. These elements can build intensity in asolo but can also kill the interest in a solo if you overdo them.
• Be ready to pounce on intensity when the time is right. It’s frustrating for thelistener when a great opportunity presents itself and you leave it hanging withoutbuilding some intensity.
4.3 Building Intensity in Solos4.3 Building Intensity in Solos4.3 Building Intensity in Solos4.3 Building Intensity in SolosWhile intensity should often rise and fall by small amounts in your solo, occasionallyyou’ll want to build the intensity to a higher level. This can be triggered by your ownsolo ideas or by something the group plays. Remember: When the time is right to build,you’ll sense it, and you must be ready to play your ideas quickly and effectively.Otherwise, it’s an opportunity missed.
Below are some basic ways to build intensity in solos. You can also combine them foreven more intensity.
• Repetition. If a motif is interesting enough, repeat it several (or many) times.• Development. Vary a motif slightly over repetitions.• Louder dynamics. Go suddenly loud, or crescendo.• Riffs. Use short, repeated patterns that are dense & quick (see Riffing in Chapter 4D:
More Development).• High range. Gradually develop an idea and make it climb in range. Or, sustain an
idea in a high range.• Held note. You can hold out a high note for intensity; you can also add expression,
alternate fingerings, or a trill to it.• Accelerating. You can move from slower to faster rhythms (see Stepping Through
Rhythms in Chapter 5C: Rhythmic Freedom).• Burning and wiggling (see Using Rubato in Chapter 5C: Rhythmic Freedom).
232232232232 • 4A: Soundscapes (Level 4 — Strong)
• Special effects (see Chapter 4C: Special Effects).• Harmonic intensity -- outside (Chapters 5A and 5B).
���Exercise 4.3 Building Intensity
4.4 Lowering Intensity in Solos4.4 Lowering Intensity in Solos4.4 Lowering Intensity in Solos4.4 Lowering Intensity in SolosAfter reaching high intensity in your solo, you usually lower the intensity gradually. Butyou can also lower intensity suddenly, or occasionally lower the intensity where therewas no high intensity before, as long as your group lowers the intensity with you.
Below are some basic ways to lower the intensity in solos. You can also combine themfor less intensity.
• Longer rests – use unpredictable entrances• Less density – use care with selecting each note• Lower range – keep the melody line flowing• Slower rhythms – keep them interesting• Softer dynamics – balance with the group• Longer notes with expression
���Exercise 4.4 Lowering Intensity
Intensity in BRIDJJ Transcribed SolosIntensity in BRIDJJ Transcribed SolosIntensity in BRIDJJ Transcribed SolosIntensity in BRIDJJ Transcribed SolosBelow are selected places in BRIDJJ transcribed solos where intensity is built orlowered. The solos are in Chapters 2J, 3J, and 4J.
1) Bass solo, “Precious Caboose” (Chapter 2J)
• Motif in m57-58 is developed in m59-60; upper range of bass is used.• m61-64 lowers the intensity: the range gradually goes down, and the density
decreases.2) Trumpet solo, “Precious Caboose” (Ch. 2J)
• m1-14 is mellow to match the delicate background.
• m15-18 builds range; at the high point the rhythm repeats downbeats.
• m18-24 transfers energy to the low range; double-time 16th-note passages aredivided by longer rests.
• m37-41 repeats F# and G for 4 bars, with rhythmic variations and alt.fingerings, then resolves to G#.
• m47 wiggle starts energy; m48 rest stops the energy; m49 jump-starts withdouble-time.
• m53-57 builds range, then holds a high note with alternate fingerings beforeending on highest note.
3) Trumpet solo, “Deja Blue” (Ch. 3J)
• m1-9 gradually increases density; m6-9 gradually increases range.
• m9-12 lowers range and intensity.
(Level 4 — Strong) 4A: Soundscapes • 233233233233
• m30-35 builds intensity (similar to m53-57 in “Precious Caboose” solo).
4) Trumpet solo, “Where’s Waldis?” (Ch. 3J)
• m45-50 lowers range to the bottom limit of the trumpet.• m51-52 buildsrange after a rest; m53-56 repeats Bb and A many times.
• m57-64 gradually lowers intensity.5) Flugelhorn solo, “I Think I’ll Keep Her” (Ch. 4J)
• m5-6 has low intensity with long, low notes.• m31 lowers intensity with a dotted half-note.• m57-61 builds intensity with long, high notes.
6) Guitar solo, “Beat the Rats” (Ch. 4J)
• m1-26 is lower in density but uses high range and varied rhythms for interest.• m27 to the end increases the density.• m45 uses consecutive offbeats to add energy.• m51-54 accelerates rhythms in a riff, more intense.• m71-72 uses rough expression.• Overall: many color tones, non-harmonic tones, and “outside” passages.
Artists and Styles
As you listen to jazz recordings it’s good to recognize different approaches tosoundscapes. The artists listed below don’t play exclusively in the styles listed, but thereare many recordings available on which they do.
Density: HeavyPiano - Art Tatum, McCoy Tyner, Gonzalo RubalcabaSax - John Coltrane, Michael Brecker, James CarterTrumpet - Woody Shaw, Wynton Marsalis, Wallace RoneyGuitar - Allan Holdsworth, John McLaughlinBass - Jaco Pastorius, John PattitucciDensity: LightPiano - Bill Evans, Count BasieSax - Paul Desmond, Stan GetzTrumpet - Miles Davis, Chet Baker, Wynton Marsalis
Range ExtremesPiano - Lennie Tristano (lower)Sax - John Coltrane, Michael Brecker, James CarterTrumpet - Arturo Sandoval, Wynton MarsalisBass - Jaco Pastorius (harmonics)Strong ExpressionPiano - Lennie Tristano (lower range), Chick Corea
Sax - Michael Brecker, James Carter, Joshua RedmanTrumpet - Wynton Marsalis, Clark TerryGuitar - Allan Holdsworth, John McLaughlinBass - Jaco Pastorius, John Pattitucci, Christian McBride
234234234234 • 4A: Soundscapes (Level 4 — Strong)
Conservative Improvisation
Some situations, such as casuals or recording sessions for light jazz, call for moreconservative improvisation. Here are some soundscape elements to focus on:
• Light density• Lower intensity• Careful and subtle expression• Restraint with non-harmonic tones or complicated rhythms
Recording SessionsRecording SessionsRecording SessionsRecording SessionsIn recording sessions with light improv, you may want to plan out where the solo peaks,and where give and take is necessary with other instruments. In some cases, accuracy isas important (or more important) than coming up with fresh ideas. And once in a while,you might as well just write something out instead of improvising. But when you needto improvise something meaningful in a limited space, SHAPE becomes moreimportant than ever.
CasualsCasualsCasualsCasualsIn a casual gig, improv can range from light to occasionally full-bore. Here are somepoints to consider about jazz casuals and improvisation:
• Keep solos short, such as two choruses for faster tunes, one or two for mediumtunes, and one or one-half for ballads.
• Keep most tunes short – not everyone needs to solo on every tune. Exception –when the crowd is dancing and really getting into a high-energy tune, go ahead andstretch things out.
• Keep the mood of the piece intact. Your solo shouldn’t draw attention to itself;instead, it should flow with the rest of the song.
• Develop solo ideas simply and carefully. There may be a lot of jazz newcomers atthe gig who might be annoyed at complicated solos, but who would be intrigued bythoughtful solo development.
• Concentrate on group textures and interactions during each song (see Chapter 4F:Group Interactions).
Chapter Review
1) A soundscape is like a musical landscape that you paint with sound.2) You can get variety in a tune by emphasizing unusual rhythmic styles.3) You can build intensity in a solo through repetition, development, louder dynamics,
riffs, high range, held high notes, accelerated rhythms, burning and wiggling, specialeffects, and outside playing.
4) You can lower intensity in a solo through longer rests, less density, lower range,slower rhythms, softer dynamics, and longer notes with expression.
5) Conservative improvisation can be valuable in situations that call for light orcontrolled jazz, such as recording sessions or casuals.
(Level 4 — Strong) 4B: Double-Time and Half-Time • 235235235235
4B: Double-Time and Half-Time4B: Double-Time and Half-Time4B: Double-Time and Half-Time4B: Double-Time and Half-Time
In this chapter you’ll learn:
• About Double-Time and Feel• Double-Time Transitions• Double-Time Material• Triple-Time Feel• Half-Time Feel
laying double-time passages can add excitement and intensity to your solomelodies, while half-time can be a creative switch from the normal rhythmic flow.This chapter explains how to use double-time, half-time, and triple-time.
About Double-Time and Feel
Technically, double-time and double-time feel are two different things. Double-time feel iswhen you start playing twice-as-fast rhythms, as if the tempo were going twice as fast,even though the measures and chords go by at the same speed. In contrast, true double-time makes the chord progression go by twice as fast, but this shrinks the actual form ofthe tune. To avoid changing the form, double-time feel is used more often than truedouble-time in jazz improvisation.
Important: When this chapter discusses “double time,” it means double-time feel, nottrue double-time. Also, triple-time is used for triple-time feel, and half-time is used forhalf-time feel.
Psychology of Double-TimePsychology of Double-TimePsychology of Double-TimePsychology of Double-TimePerhaps no other jazz improv technique can be as exciting or disappointing as double-time. On the positive side, double-time has many possibilities and challenges. A gooddouble-time passage at the right time can energize and lift a solo, and leave the audiencewanting more. On the other hand, bad double-time can pretty much ruin a solo.
Here are some common double-time pitfalls to avoid:
• Jumping headlong into and out of double-time, without graceful transitions
• Using predictable and uninteresting contours
• Repeating the same double-time material in each solo
• Playing double-time passages with a shaky rhythmic feel or stiff articulations
• Ending double-time passages awkwardly or abruptly
The topics in this chapter help you gain control of double-time and explore some of itsmany possibilities.
P
236236236236 • 4B: Double-Time and Half-Time (Level 4 — Strong)
Double-Time Transitions
4.5 Going into Double-Time4.5 Going into Double-Time4.5 Going into Double-Time4.5 Going into Double-TimeTo go smoothly from the original tempo into double-time, follow these steps:
1 Make sure you feel the quarter-note pulses in the original tempo securely. (Youdon’t have to play quarter-notes, but you must be able to find them.)
2 Quickly imagine straight eighth-notes at the same tempo. In a swing tune, it takessome practice to imagine straight eighth-notes.
3 These straight eighth-notes become the quarter-notes of the new double-time.
4 In the new double-time, work for active rhythms. Many players try only eighth-notes in the new tempo, missing a lot of rhythmic possibilities.
Steps 2 and 3 help you solidify the transition into double-time. With practice, you’ll getthe double-time feel quickly without worrying about the steps. You can drift in and outof double-time during a solo, as long as it’s smooth and not overused.
���Exercise 4.5 Going Into Double-Time
4.6 Coming Out of Double-Time4.6 Coming Out of Double-Time4.6 Coming Out of Double-Time4.6 Coming Out of Double-TimeTo return from double-time to the original tempo, follow these steps.
1 Quickly imagine your current double-time quarter-notes as 8th-notes of the originaltempo. If the style is swing, stretch out the eighth-notes so they become swing 8ths.
2 In the new tempo, work for active rhythms to re-establish the original feel. If thetune is swing, be sure to play accurate swing rhythms with the correct tripletsubdivisions.
With practice, you can move in and out of double-time whenever it feels right.
���Exercise 4.6 In and Out of Double-Time
Double-Time Material
4.74.74.74.7 Creating Double-Time Material Creating Double-Time Material Creating Double-Time Material Creating Double-Time MaterialHere are some good ways to create interesting material for double-time feel:
1) Use the suggestions in Using Flexible Scales in Chapter 1A: The Virtual Practice Methodto generate double-time ideas.
2) Avoid predictable scale contours and repetitive ideas.
3) Begin on (or emphasize) active rhythms or tones.
4) Use contour patterns of 3 eighth-notes in 4/4 time.
5) Mix some chromatic notes with the scale tones to slow down the contours.
6) Mix in one or more riffs (see Chapter 4D).
(Level 4 — Strong) 4B: Double-Time and Half-Time • 237237237237
Multiplying by 2Multiplying by 2Multiplying by 2Multiplying by 2You can get started with double-time practice by creating an interesting one- or two-baridea at an easy tempo. For example, try a flexible scale with a few skips and maybe aslight rhythm variation. Then play the same idea exactly twice as fast to turn it intodouble-time. Once that idea is comfortable, transpose it to other keys – first at theoriginal tempo and then at the double-time tempo. As you progress through new ideas,gradually introduce wider skips, non-harmonic tones, and different rhythms to add spiceto your double-time ideas.
Practicing Double-Time FillsPracticing Double-Time FillsPracticing Double-Time FillsPracticing Double-Time FillsOne way to begin working with double-time is to play a short double-time fill during aone- or two-bar rest. For example, start at a slower tempo, rest for two beats, and playeight 16th-notes (two beats) and a downbeat note. At first, you should work on shortphrases of 8th-notes with smaller contours. After you’re comfortable with basic fills, trythese ideas:
• Rest a bar and play a bar of 16th-notes• Rest two bars and play two bars of 16ths.• Vary the rhythms, mixing eighths and 16ths.
Work for pitch and rhythm accuracy as you go; then gradually boost the tempo eachtime until you can handle reasonably fast double-time passages.
Expanding Your ReachExpanding Your ReachExpanding Your ReachExpanding Your ReachWhen you can play phrases accurately and confidently at faster tempos, expand thelength and contour of each double-time phrase. You can also transcribe and playdouble-time material from CDs, but don’t rely too much on imitation. You’ll be amazedat how much mileage you can get just from flexible scales and chromatic notes. Here aresome additional points to keep in mind with double-time playing:
• You’ll need split-second timing and quick reflexes.
• Be securely locked into the tempo. The rhythm section must play steady time, andyou must be able to hear them clearly and work with them.
• Use melodic and rhythmic development in your double-time material andremember SHAPE.
• Use sequences and patterns in your double-time material.
As you play long double-time passages, the soundscape becomes very detailed and low-level, something like flying a spacecraft at high speeds along a planet’s surface. Youbecome very involved in the shapes, contours, colors, and changes of direction as youcreate fast double-time material.
���Exercise 4.7 Using Double Time Material
Double-Time in BRIDJJ Transcribed SolosDouble-Time in BRIDJJ Transcribed SolosDouble-Time in BRIDJJ Transcribed SolosDouble-Time in BRIDJJ Transcribed SolosBelow are some double-time passages in the transcribed BRIDJJ solos in Chapter 4G:Analyzing Solos, Level 4. If you have the BRIDJJ CD, you can check the CD timings andfollow along with the recording.
238238238238 • 4B: Double-Time and Half-Time (Level 4 — Strong)
Measure #s Tunem17-22,61-63 I Think I’ll Keep Her (piano)
m6-14, 19-24, I Think I’ll Keep Her (flugelhorn)
29-30, 37-42, 50-56
m11-16, 29-32, 43-48 Three and Me (flugelhorn)
Using Triplets in Double-TimeUsing Triplets in Double-TimeUsing Triplets in Double-TimeUsing Triplets in Double-TimeInstead of simply converting quarter-notes to eighth-notes for double-time, you canemphasize eighth-note triplets in the double-time. This sounds like the basic pulse isgoing three times as fast (four quarter-notes to 12 eighth-note triplets). You can mixeighth-notes and eight-note triplets in the double-time passages for variety.
Triple-Time Feel
4.84.84.84.8 Using Triple-Time Feel Using Triple-Time Feel Using Triple-Time Feel Using Triple-Time FeelTriple-time feel is not three times as fast as the original feel; it’s twice as fast as double-time, which makes it four times as fast as the original feel. If the original tempo is 60,double-time is 120, and triple-time is 240. Triple-time works best in ballads or slowblues, after you’re into double-time. If the tempo of the triple-time is very fast, playeasier ideas and consider patterns, sequences, and riffs.
Once you establish triple-time, you can switch among triple-, double-, and single-timefeels as you like. The switching process is similar to going in and out of double-time, asdescribed earlier in this chapter.
Another way to give the feeling of triple-time is to repeat eighth-note triplets and thenestablish a new pulse of quarter-notes based on the speed of those triplets. For detailson how to do this, see Using Triplet Pulses in Chapter 5E: Rhythmic Pulses.
���Exercise 4.8 Using Triple Time
Half-Time Feel
4.9 Half-time feel is less common than double-time, but it can be very effective. Youcan go in and out of half-time, and your group can follow you or stay in the old tempo.In half-time feel, the chords go by at the same rate, but it feels like half as many bars areplayed. Half-time feel is also used quite often in the rhythm section to introduce a tuneor at the start of a solo.
To go into half-time, follow these steps:
1 Concentrate on half-notes in the original tempo.
2 Imagine them as quarter-notes of the new tempo.
3 In the new tempo, play varied rhythms to get the new half-time feel. In swing tunes,play accurate swing rhythms with correct triplet subdivisions.
To return from half-time back to the original faster tempo, follow these steps:
1 Concentrate on 8th-notes in half-time tempo.
(Level 4 — Strong) 4B: Double-Time and Half-Time • 239239239239
2 Imagine those 8th-notes as the new quarter-notes of the original fast tempo.
3 In the new tempo, use active rhythms to re-establish the original feel. In a swingtune, be sure to play accurate swing rhythms with the correct triplet subdivisions.
���Exercise 4.9 In and Out of Half-Time
Chapter Review
1) Double-time feel (or double-time) means playing twice as fast but leaving thechords in their original locations.
2) To switch to a double-time feel,A) Feel secure quarter-note pulses (orig. tempo).B) Imagine straight 8th-notes (same tempo).C) Think of straight 8th-notes as the quarter-notes of the new double-time tempo.D In the new tempo, use active rhythms to establish the new double-time.
3) To return to single-time, reverse the process.4) Get double-time material from the suggestions in Using Flexible Scales in Chapter 1A:
The Virtual Practice Method. Mix in chromatic notes and slow down the contours.You can also get double-time ideas from recorded solos.
5) Multiplying short ideas by two and practicing short fills helps you build double-timeskills and ideas.
6) Triple-time feel is four times as fast as the original feel (twice as fast as double-timefeel).
7) To shift to half-time feel,A) Think of half-notes in the original tempo.B) Imagine the half-notes as the quarter-notes of the new slower tempo.C) In the new tempo, work for varied rhythms to establish the new half-time feel.
ExpressionsExpressionsExpressionsExpressions*See some good picture -- in nature; if possible; or on canvas hear a page of the best music; orread a great poem every day. You will always find a free half hour for one or the other; and at theend of the year your mind will shine with such an accumulation of jewels as will astonish evenyourself. Henry Wadsworth Longfellow
*Thinking is the hardest work there is, which is the probable reason so few engage in it. HenryFord
*It isn't what you know that counts, it's what you think of in time. Benjamin Franklin
*The only thing worse than being talked about is not being talked about. Oscar Wilde
*Strange how much you've got to know before you know how little you know. Dr. Samuel Johnson
240240240240 • 4C: Special Effects (Level 4 — Strong)
4C: Special Effects4C: Special Effects4C: Special Effects4C: Special Effects
In this chapter you’ll learn about:
• Wind Instrument Effects• Trumpet Effects• Saxophone Effects• Trombone Effects• Keyboard Effects• Guitar Effects• Bass Effects
pecial effects are unusual sounds you play that add an extra dimension to yourplaying. Sometimes you can get great results by adding an effect to just one or twonotes, or by repeating the same special effect as you develop a motif. You can also
combine special effects in many ways; be sure to experiment on your instrument.
Note: Although there are many possible electronic effects, this chapter deals just withacoustic effects.
Wind Instrument Effects
This section discusses special effects common to the sax, trumpet, and trombone.
4.10 Bends4.10 Bends4.10 Bends4.10 BendsA bend is moving a pitch down (or sometimes up), usually by less than a half-step.Sometimes it helps to press one or more valves or keys as you bend, to get a morecontrolled sound. Practice bends in these ways:
• Play a note, bend it fast or slow, and return to it.• Play a note and bend it, but don’t return to the note.• Play a note, then use multiple bends up or down.• Bend all the way to the next regular note.
For an example of bends on the BRIDJJ CD, listen to timings 6:11-6:16 (flugelhornsolo) of “Three and Me.”
���Exercise 4.10 Using Bends
4.11 Falls and Glissandos4.11 Falls and Glissandos4.11 Falls and Glissandos4.11 Falls and GlissandosA fall is moving a pitch downward so the actual pitches are vague. Practice falls in theseways:
• Play a short or a long fall.• Fall after holding a note, or just after the attack.• Continue the phrase after falling to the low note.• Attach a glissando (see below) to the end of a fall.
S
(Level 4 — Strong) 4C: Special Effects • 241241241241
A glissando is like a fall that goes up instead of down. Practice glissandos in these ways:
• Play a short or long glissando.• Gliss after holding a note, or just after the attack.• Continue the phrase after glissing to the low note.• Attach a fall to the end of a glissando.
For a glissando on the BRIDJJ CD, listen to timings 5:41-5:42 (flugelhorn solo) of“Three and Me.”
���Exercise 4.11 Using Falls and Glissandos
4.12 Growls (Flutters)4.12 Growls (Flutters)4.12 Growls (Flutters)4.12 Growls (Flutters)To “growl” a note, you use a flutter-tongue technique. You can practice this bybreathing out “hoooo” and forcing the tongue against the roof of the mouth. Practicegrowls in these ways:
• Start the growl on the attack of a note.• Hold a note, then begin the growl.• Growl on a held note, then play the note normally.• Combine a growl with a bend or fall.
4.13 Half-Sounds4.13 Half-Sounds4.13 Half-Sounds4.13 Half-SoundsThe pitch of a “half-sound” is usually somewhat vague. It can be a surprising effectwhen it’s used well. To produce a half-sound you press valves or keys halfway down. Toemphasize a half-sound, play it as a longer note or the highest note in a phrase.
You can also play multiple half-sounds in a row, repeating or varying the pitch. Withpractice, you can even tune up multiple half-sounds so they sound something like arecognizable tune. This is most effective in softer passages. And you can go from half-sound to full-sound to create a kind of sliding effect.
With practice, you can play half-sounds that are actually quarter-tone pitches, in-between the half steps. Quarter-tones expand the chromatic scale, up or down.
4.14 Air and Keys4.14 Air and Keys4.14 Air and Keys4.14 Air and KeysOccasionally in a softer passage you can simply blow air through the instrument withoutplaying a note. As you do this, you can vary dynamics, wiggle keys or valves, move theslide, or change the basic pitch of the air-stream.
This creates a sense of mystery or surprise, and it’s usually done in a ballad or free jazzpiece, or at the end of a tune. But it can lose its appeal if it’s done too often.
4.15 Humming or Singing while Playing4.15 Humming or Singing while Playing4.15 Humming or Singing while Playing4.15 Humming or Singing while PlayingWhen you hum or sing at the same time you play a note, the note takes on an unusualsound. For best effect, the sound should be under control, with half the emphasis on agood vocal pitch and half on the played pitch. To practice the basic concept away fromyour instrument, try whistling and singing at the same time. You can hum/play on anentire phrase or just a few exposed notes.
Here are some variations on humming while playing:
• Hum the same pitch that you play.

242242242242 • 4C: Special Effects (Level 4 — Strong)
• Hum a different pitch than the one you play, such as a major third or a fourth away.You can practice this by accurately whistling and singing the interval together, awayfrom your instrument.
• Play a regular note, then hum it as you hold it.• Change the hummed pitch as you hold the played pitch, or change the played pitch
as you hold the hummed pitch.
���Exercise 4.15 Growling, Half-Sounds, Air/Keys, and Humming
4.16 Circular Breathing4.16 Circular Breathing4.16 Circular Breathing4.16 Circular BreathingCircular breathing is the process where you keep a sound going while you sneak abreath. To do this, you puff out the cheeks to get an extra reservoir of air, then quicklybreathe in through the nose as you expel the air from the cheeks. It usually takes quite abit of practice to get the sound to stay smooth during the breath. Circular breathing isusually used on a long note or to hook two long phrases together. It can also be usedfor riffing (see Chapter 4D: More Development).
But don’t use circular breathing just because you can do it, or just to get an audiencereaction. Use it only when your improv ideas really call for it.
4.17 Alternate Fingerings4.17 Alternate Fingerings4.17 Alternate Fingerings4.17 Alternate FingeringsAn alternate fingering produces the same basic note as the regular fingering, but thealtered note is slightly out of tune (less than a quarter-tone away from the regular-fingered pitch). This out-of-tune sound is what gives the alternate fingering its spice.
An alternate note is usually played directly after a regular note, for maximum contrast. Ifyou play an alternate note instead of a regular note, the listener usually just hears it asbeing slightly out of tune. When you tongue the altered note it stands out more; whenyou just finger it, it’s more subtle. You can try out your own combinations oftongued/not-tongued.
You can include alternate fingerings for several different notes in a phrase. Withpractice, you can insert altered notes wherever you need to, at a moment’s notice. Theexample below shows several alternate-fingered notes (underlined) in a phrase.
= =Example 4.17 - Phrase with regular and alternate-fingered notes
For examples of trumpet alternate-fingerings on the BRIDJJ CD, listen to timings 2:05-2:08 of “Precious Caboose” and 2:44-2:45 of “Where’s Waldis?”
Alternate fingerings for trumpet are shown in the table below. The pitches in the tablebelow start with the F# on the first space of the treble clef and extend to the G abovehigh C. In some cases, there may be multiple alternates for higher pitches; the morevalves pressed, the stronger the trill sounds. (Read columns downward.)
Pitch Reg. Alt. Pitch Reg. Alt.
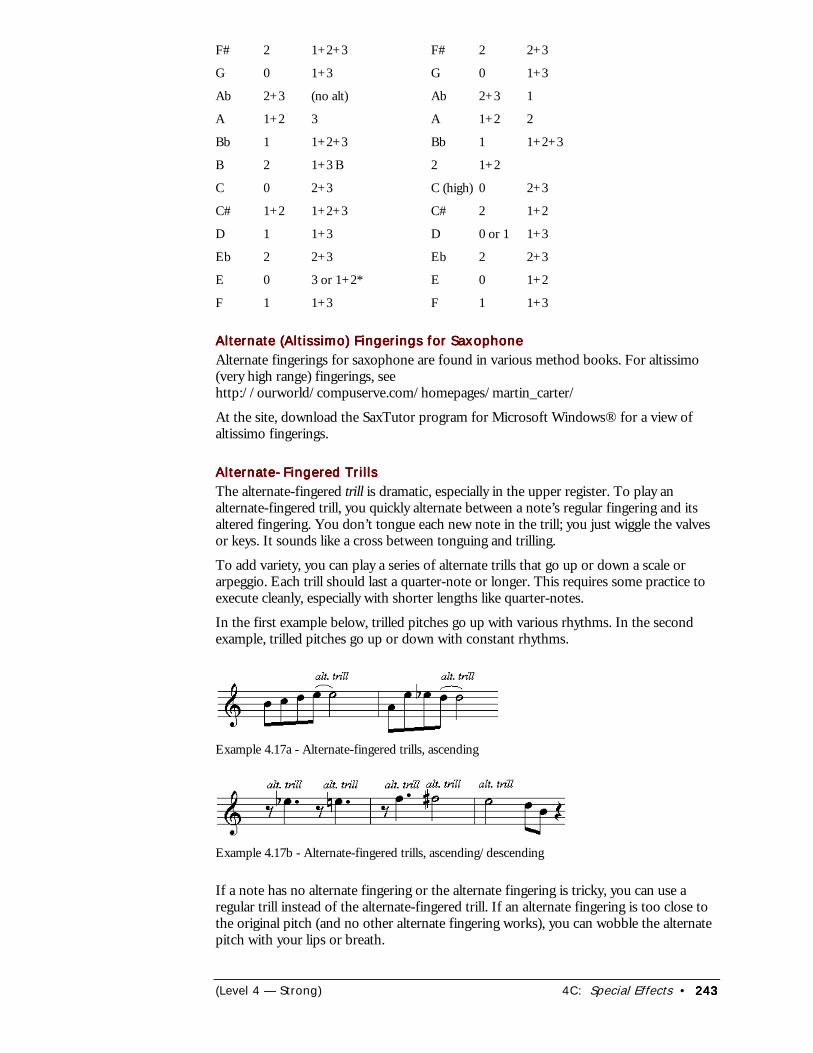
(Level 4 — Strong) 4C: Special Effects • 243243243243
F# 2 1+2+3 F# 2 2+3
G 0 1+3 G 0 1+3
Ab 2+3 (no alt) Ab 2+3 1
A 1+2 3 A 1+2 2
Bb 1 1+2+3 Bb 1 1+2+3
B 2 1+3 B 2 1+2
C 0 2+3 C (high) 0 2+3
C# 1+2 1+2+3 C# 2 1+2
D 1 1+3 D 0 or 1 1+3
Eb 2 2+3 Eb 2 2+3
E 0 3 or 1+2* E 0 1+2
F 1 1+3 F 1 1+3
Alternate (Altissimo) Fingerings for SaxophoneAlternate (Altissimo) Fingerings for SaxophoneAlternate (Altissimo) Fingerings for SaxophoneAlternate (Altissimo) Fingerings for SaxophoneAlternate fingerings for saxophone are found in various method books. For altissimo(very high range) fingerings, see
http://ourworld/compuserve.com/homepages/martin_carter/
At the site, download the SaxTutor program for Microsoft Windows® for a view ofaltissimo fingerings.
Alternate-Fingered TrillsAlternate-Fingered TrillsAlternate-Fingered TrillsAlternate-Fingered TrillsThe alternate-fingered trill is dramatic, especially in the upper register. To play analternate-fingered trill, you quickly alternate between a note’s regular fingering and itsaltered fingering. You don’t tongue each new note in the trill; you just wiggle the valvesor keys. It sounds like a cross between tonguing and trilling.
To add variety, you can play a series of alternate trills that go up or down a scale orarpeggio. Each trill should last a quarter-note or longer. This requires some practice toexecute cleanly, especially with shorter lengths like quarter-notes.
In the first example below, trilled pitches go up with various rhythms. In the secondexample, trilled pitches go up or down with constant rhythms.
Example 4.17a - Alternate-fingered trills, ascending
Example 4.17b - Alternate-fingered trills, ascending/descending
If a note has no alternate fingering or the alternate fingering is tricky, you can use aregular trill instead of the alternate-fingered trill. If an alternate fingering is too close tothe original pitch (and no other alternate fingering works), you can wobble the alternatepitch with your lips or breath.
244244244244 • 4C: Special Effects (Level 4 — Strong)
For an example of alternate-fingered trills on the BRIDJJ CD, listen to timings 1:44 to1:55 (trumpet solo) of “Beat the Rats.”
���Exercise 4.17 Alternate Fingerings
Trumpet Effects
4.184.184.184.18 This section covers:
• Double- and triple-tonguing• Using mutes• Lip trills (shakes)• Pedal tones• Walking bass lines
Double- and Triple-TonguingDouble- and Triple-TonguingDouble- and Triple-TonguingDouble- and Triple-TonguingDouble-tonguing and triple-tonguing are much more common in classical music than injazz. Still, you can occasionally use these tonguing methods when the accompaniment issparse, or in free improvisation, or in interaction with another soloist. Lester Bowie usesthese effects wisely in his playing.
Double-tonguing can also be used for articulating very fast passages, as an alternative tothe “doo-dul” tonguing of 8th-notes. Wallace Roney does this well.
Using MutesUsing MutesUsing MutesUsing MutesThe most commonly used mutes are the cup, plunger, and harmon. Each mute lends acharacteristic sound that colors the mood of your improvisation. You can also use othereffects, such as growls, bends, and half-sounds with a mute. When using a mute, youneed to be miked well, or have the rhythm section play quieter.
The harmon mute can be used without the stem for cool jazz, or with the stem for“wah-wah” sounds (hand covering and uncovering the stem).
Lip Trills (Shakes)Lip Trills (Shakes)Lip Trills (Shakes)Lip Trills (Shakes)To play a lip trill, alternate two notes of the same fingering, using air and lip tension.The trill can be slow or fast, wide or narrow. Low range uses wide trills; higher rangeuses wide or narrow trills.
Pedal TonesPedal TonesPedal TonesPedal TonesA pedal tone is one that is below the bottom range of the horn. You can use regular orhalf-valve fingerings for pedal tones, depending on what works best.
Common places for pedal tones are the ending of a tune, softer passages, or cadenzas.As much as possible, play each pedal tone in tune and with a good tone. You can alsouse pedal tones in walking bass lines.
Walking Bass LinesWalking Bass LinesWalking Bass LinesWalking Bass LinesIf you haven’t played a walking bass line on the trumpet, you’re missing an unusualexperience. You can accompany the bass player’s walking notes during or outside yoursolo. For basics on creating walking bass lines, see Rhythm Section Techniques in Level 1.
In trumpet bass lines, you can play regular pitches (from low F# to about middle G) orpedal tones (below low F#) or both kinds. If you switch between regular and pedalnotes, make the transitions smooth.
(Level 4 — Strong) 4C: Special Effects • 245245245245
���Exercise 4.18 Trumpet Effects
Saxophone Effects
4.194.194.194.19 This section covers overtones/split notes, altissimo playing, and “thunks.”
Overtones/Split NotesOvertones/Split NotesOvertones/Split NotesOvertones/Split NotesYou can play two notes at once (a main note and an overtone above it) by loosening theembouchure just enough. This can be done for one note or a phrase. Be sure to get abalanced sound between the two notes.
AltissimoAltissimoAltissimoAltissimoAltissimo is the extreme upper range of the sax, above the regular fingerings (seeAlternate Fingerings). To use altissimo effectively,
• Play the notes in tune with a good sound.• Use dynamics, including soft altissimo notes.• Don’t just climb up the scale to altissimo and then climb down; use other
approaches as well, such as starting in altissimo or skipping up to it.
ThunksThunksThunksThunksA thunk is made when you blow air and finger a low, staccato note with a looseembouchure. You can switch from high range to low thunks; or play chromatic thunks.James Carter and Joshua Redman use this effect well in solos.
���Exercise 4.19 Saxophone Effects
Trombone Effects
4.204.204.204.20 This section covers alternate positions and slides (glissandos).
Alternate PositionsAlternate PositionsAlternate PositionsAlternate PositionsAlternate positions are like alternate fingerings for trumpet, except that the positions arebetter in tune on trombone. Using alternate positions helps you play faster and moreeasily in the upper register. You can also play a note slightly out of position for effect.
SlidesSlidesSlidesSlidesThe trombone plays the smoothest glissandos or slides of any wind instrument. Longslides are common, but small slides are often under-used. When you slide up or down ahalf-step or less, you can mix quarter-tones with chromatic notes. You can alsocombine slides with growls, double-tonguing, or triple-tonguing for effect.
���Exercise 4.20 Trombone Effects
246246246246 • 4C: Special Effects (Level 4 — Strong)
Keyboard Effects
4.214.214.214.21 This section covers:
• Clusters• Tremolo• Block chords• Hammering• Using strings and pedals• Piano bass lines• Wide glissandos
ClustersClustersClustersClustersClusters are groups of notes that are half-steps (or sometimes whole-steps) apart. Theycan be used to spice up chords or melody lines, such as in the Thelonious Monk style.They can also be used as percussive effects, especially with many notes at once.
Experiment with one-hand or two-hand clusters. For gentler clusters, play them in theupper range or include only white keys or only black keys. For more intense clusters,mix white and black keys, or play more notes (use a horizontal hand or forearm).
TremoloTremoloTremoloTremoloTremolo is like a wide trill; it builds intensity or suspense. The most common tremolointerval is the octave; you can also play tremolos with smaller intervals or with chords.As you work with tremolos, pay close attention to dynamic subtleties.
Block ChordsBlock ChordsBlock ChordsBlock ChordsBlock chords (or locked chords) are played in both hands at once, with the same orsimilar voicings for each new chord. Each chord follows a right-hand melody. Thislends a traditional swing feeling to the solo. Masters of block chords include RedGarland, Erroll Garner, Wynton Kelly, and George Shearing
HammeringHammeringHammeringHammeringHammering is the technique of rapidly attacking one key with two index fingers (it canalso be done by rotating between the thumb and fingers one and two). The idea is to getthe maximum speed of clean attacks. With hammering, you can start and stop on onekey, or extend it by going up or down chromatically or by wider intervals. Hammering isalso effective in the middle of a full passage, instead of isolated by rests.
Using Strings and PedalsUsing Strings and PedalsUsing Strings and PedalsUsing Strings and PedalsAlthough you can actually play melody lines on the strings by touching them with yourfingertips, strings are usually played to set up a rhythmic accompaniment vamp (as doneby Chick Corea). In this case, you rapidly alternate between plucking and touching oneor two strings to set up the vamp. Make sure the texture is light enough so the stringscan be heard, such as in a duet or trio. The sustain and soft pedals are effective in solopassages or where the accompaniment is light.
Piano Bass LinesPiano Bass LinesPiano Bass LinesPiano Bass LinesPlaying bass lines on the piano is most effective in a solo or duet situation, or wheneveryone drops out during a piano solo. Some highly unusual and effective bass linescan be created, especially with different rhythms (triplets, accelerating / decelerating
(Level 4 — Strong) 4C: Special Effects • 247247247247
notes, 3 against 4, etc.). For basic ideas on creating walking bass lines, see Rhythm SectionTechniques in Level 1.
Wide GlissandosWide GlissandosWide GlissandosWide GlissandosWide glissandos have been overused so much by some players that they can tend tosound stale to the rest of us. To make a wide glissando more effective:
• Play it up more often than down.• Use it in the middle of a solo, not at the finish.• Follow it with a continuous idea.• Use it rarely.
Gonzalo Rubalcaba uses wide glissandos effectively.
���Exercise 4.21 Keyboard Effects
Guitar Effects
4.224.224.224.22 This section covers:
• Bends• Tremolo• Muted strumming• Guitar harmonics• Playing in octaves
BendsBendsBendsBendsBends can be slow or fast (fast bends are like a wide vibrato), or repeated several timesfrom the same pitch. After a bend you can continue with a note that’s near the pitchwhere the bend finished.
TremoloTremoloTremoloTremoloNotes in a tremolo chord can gradually change as you continue the tremolo; this buildsintensity. Related to tremolo is quick strumming, where you play chords with 16th-notepatterns, somewhat in a flamenco style. See also Tremolo in Piano Effects above.
Muted StrummingMuted StrummingMuted StrummingMuted StrummingMuted (soft) strumming is an interesting technique for quieter passages oraccompanying solos (especially bass players) in duets or trios. Jim Hall uses this effectquite well.
Guitar HarmonicsGuitar HarmonicsGuitar HarmonicsGuitar HarmonicsHarmonic notes are played by pressing a string halfway down. These usually work bestin a soft setting, at the end of a phrase or solo. You can play a single harmonic, or tryoctaves or triads. More difficult but effective is playing a melody line with harmonicnotes. In a melodic line you can ascend from high regular tones into harmonics; theresult dramatically extends the range of the melody.
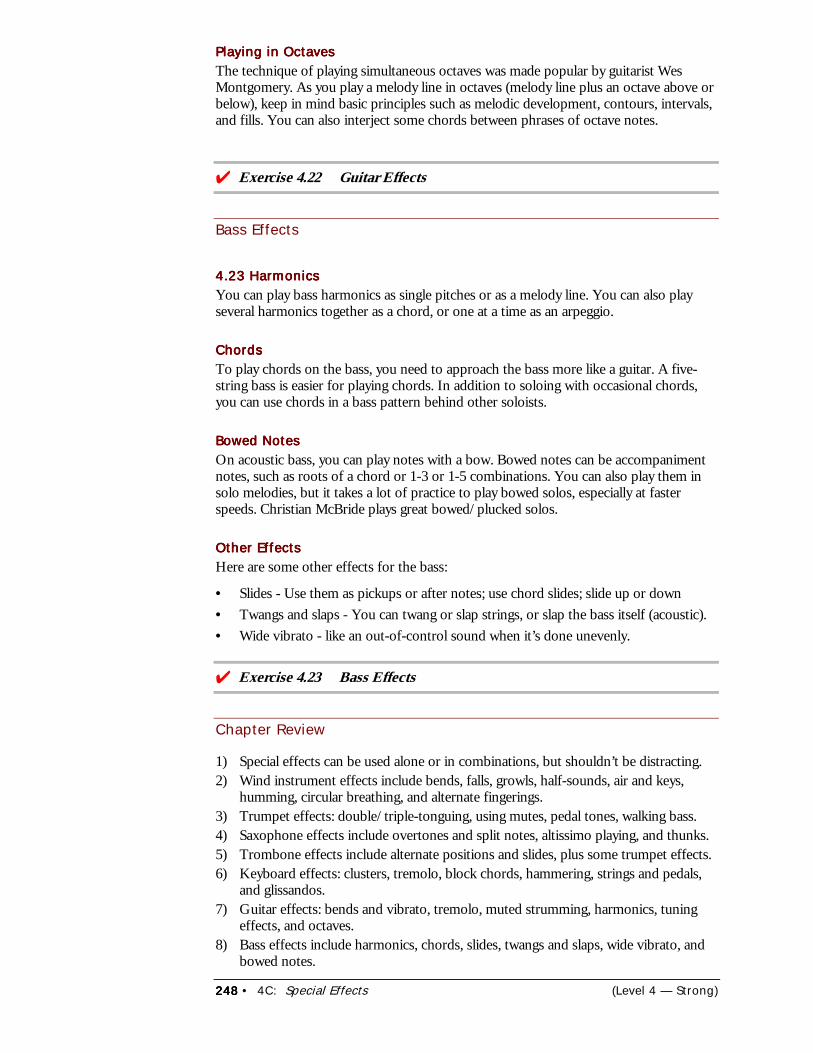
248248248248 • 4C: Special Effects (Level 4 — Strong)
Playing in OctavesPlaying in OctavesPlaying in OctavesPlaying in OctavesThe technique of playing simultaneous octaves was made popular by guitarist WesMontgomery. As you play a melody line in octaves (melody line plus an octave above orbelow), keep in mind basic principles such as melodic development, contours, intervals,and fills. You can also interject some chords between phrases of octave notes.
���Exercise 4.22 Guitar Effects
Bass Effects
4.23 Harmonics4.23 Harmonics4.23 Harmonics4.23 HarmonicsYou can play bass harmonics as single pitches or as a melody line. You can also playseveral harmonics together as a chord, or one at a time as an arpeggio.
ChordsChordsChordsChordsTo play chords on the bass, you need to approach the bass more like a guitar. A five-string bass is easier for playing chords. In addition to soloing with occasional chords,you can use chords in a bass pattern behind other soloists.
Bowed NotesBowed NotesBowed NotesBowed NotesOn acoustic bass, you can play notes with a bow. Bowed notes can be accompanimentnotes, such as roots of a chord or 1-3 or 1-5 combinations. You can also play them insolo melodies, but it takes a lot of practice to play bowed solos, especially at fasterspeeds. Christian McBride plays great bowed/plucked solos.
Other EffectsOther EffectsOther EffectsOther EffectsHere are some other effects for the bass:
• Slides - Use them as pickups or after notes; use chord slides; slide up or down• Twangs and slaps - You can twang or slap strings, or slap the bass itself (acoustic).• Wide vibrato - like an out-of-control sound when it’s done unevenly.
���Exercise 4.23 Bass Effects
Chapter Review
1) Special effects can be used alone or in combinations, but shouldn’t be distracting.2) Wind instrument effects include bends, falls, growls, half-sounds, air and keys,
humming, circular breathing, and alternate fingerings.3) Trumpet effects: double/triple-tonguing, using mutes, pedal tones, walking bass.4) Saxophone effects include overtones and split notes, altissimo playing, and thunks.5) Trombone effects include alternate positions and slides, plus some trumpet effects.6) Keyboard effects: clusters, tremolo, block chords, hammering, strings and pedals,
and glissandos.7) Guitar effects: bends and vibrato, tremolo, muted strumming, harmonics, tuning
effects, and octaves.8) Bass effects include harmonics, chords, slides, twangs and slaps, wide vibrato, and
bowed notes.

(Level 4 — Strong) 4D: More Development • 249249249249
4D: More Development4D: More Development4D: More Development4D: More Development
In this chapter you’ll learn about:
• Using Quotes• Riffing• Basic Development Combinations
his chapter covers some interesting melodic development techniques, such asusing quotes from other tunes and developing with up-tempo riffs. It alsoexplains development combinations that can add variety to your solos.
Using Quotes
A quote happens when you play all or part of the melody of a well-known song in yoursolo. The quote can be as silly as “Three Blind Mice” or as hip as a quotation from agreat artist’s solo, or anything in between. It can also be transposed to fit any key.
Quotes can be fresh, entertaining material if you handle them well; otherwise, theysound predictable or forced. The idea is to pleasantly surprise the listener. The quoteshould spring naturally out of a idea in your solo (see Quoting Naturally below).
The following guidelines can help you with quotes:
1) Keep the quote short. The listener should say, “Hey, wasn’t that ...?” not “OK,that’s enough!”
2) Know the quote well (intervals, pitches, rhythms).
3) Don’t repeat the same quote in the same tune (but you can vary the quote).
4) Draw from many types of music (folk, pop, rock, children’s, classical, etc.).
5) Generally, you should play quotes sparingly.
6) The easiest tunes for using quotes are ones with simple progressions, such as blues,modal tunes, and tunes that don’t modulate. On simple tunes you can sometimesplay some rather long quotes.
Quoting NaturallyQuoting NaturallyQuoting NaturallyQuoting NaturallyProbably the worst quoting mistake is having a favorite quote you must play in a tune.When you do play it, chances are it will sound stiff or predictable because it doesn’trelate well to what you played just before. Instead, use quotes that grow out of yourown melodic ideas. That way, you play the quote because it fits, not because you’reforcing it to belong.
To prepare for using quotes in your solos, you should:
• Memorize the melodies to many different tunes, from many different styles.• Practice the tunes with slightly different rhythms.• Be able to play the tunes in just about any key.If you pay close attention to the intervals and rhythms you play (or someone else plays)during your solo, something may remind you of a well-known song you can quote.Then when you play the quote, it sounds like it fits with what you’re playing.
T
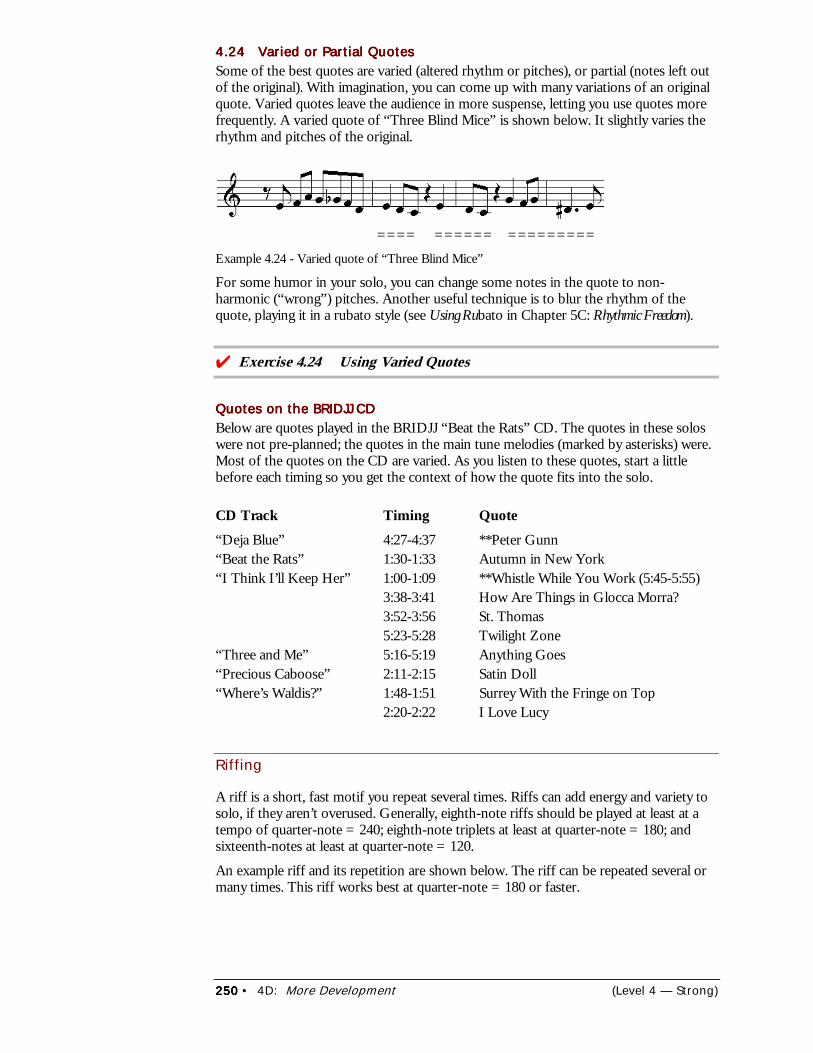
250250250250 • 4D: More Development (Level 4 — Strong)
4.24 Varied or Partial Quotes4.24 Varied or Partial Quotes4.24 Varied or Partial Quotes4.24 Varied or Partial QuotesSome of the best quotes are varied (altered rhythm or pitches), or partial (notes left outof the original). With imagination, you can come up with many variations of an originalquote. Varied quotes leave the audience in more suspense, letting you use quotes morefrequently. A varied quote of “Three Blind Mice” is shown below. It slightly varies therhythm and pitches of the original.
==== ====== =========Example 4.24 - Varied quote of “Three Blind Mice”
For some humor in your solo, you can change some notes in the quote to non-harmonic (“wrong”) pitches. Another useful technique is to blur the rhythm of thequote, playing it in a rubato style (see Using Rubato in Chapter 5C: Rhythmic Freedom).
���Exercise 4.24 Using Varied Quotes
Quotes on the BRIDJJ CDQuotes on the BRIDJJ CDQuotes on the BRIDJJ CDQuotes on the BRIDJJ CDBelow are quotes played in the BRIDJJ “Beat the Rats” CD. The quotes in these soloswere not pre-planned; the quotes in the main tune melodies (marked by asterisks) were.Most of the quotes on the CD are varied. As you listen to these quotes, start a littlebefore each timing so you get the context of how the quote fits into the solo.
CD Track Timing Quote“Deja Blue” 4:27-4:37 **Peter Gunn“Beat the Rats” 1:30-1:33 Autumn in New York“I Think I’ll Keep Her” 1:00-1:09 **Whistle While You Work (5:45-5:55)
3:38-3:41 How Are Things in Glocca Morra?3:52-3:56 St. Thomas5:23-5:28 Twilight Zone
“Three and Me” 5:16-5:19 Anything Goes“Precious Caboose” 2:11-2:15 Satin Doll“Where’s Waldis?” 1:48-1:51 Surrey With the Fringe on Top
2:20-2:22 I Love Lucy
Riffing
A riff is a short, fast motif you repeat several times. Riffs can add energy and variety tosolo, if they aren’t overused. Generally, eighth-note riffs should be played at least at atempo of quarter-note = 240; eighth-note triplets at least at quarter-note = 180; andsixteenth-notes at least at quarter-note = 120.
An example riff and its repetition are shown below. The riff can be repeated several ormany times. This riff works best at quarter-note = 180 or faster.
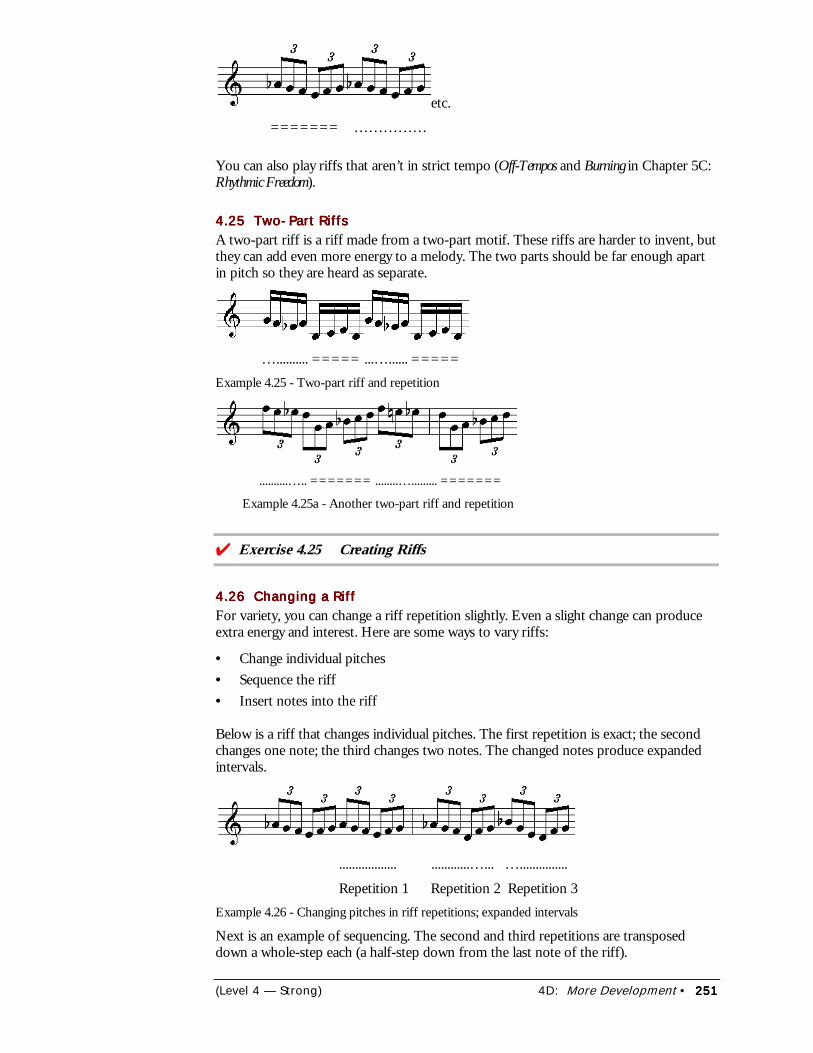
(Level 4 — Strong) 4D: More Development • 251251251251
etc.
======= ……………
You can also play riffs that aren’t in strict tempo (Off-Tempos and Burning in Chapter 5C:Rhythmic Freedom).
4.25 Two-Part Riffs4.25 Two-Part Riffs4.25 Two-Part Riffs4.25 Two-Part RiffsA two-part riff is a riff made from a two-part motif. These riffs are harder to invent, butthey can add even more energy to a melody. The two parts should be far enough apartin pitch so they are heard as separate.
….......... ===== ...…...... =====Example 4.25 - Two-part riff and repetition
..........….. ======= ........…......... =======
Example 4.25a - Another two-part riff and repetition
���Exercise 4.25 Creating Riffs
4.26 Changing a Riff4.26 Changing a Riff4.26 Changing a Riff4.26 Changing a RiffFor variety, you can change a riff repetition slightly. Even a slight change can produceextra energy and interest. Here are some ways to vary riffs:
• Change individual pitches• Sequence the riff• Insert notes into the riff
Below is a riff that changes individual pitches. The first repetition is exact; the secondchanges one note; the third changes two notes. The changed notes produce expandedintervals.
.................. ............…... …...............
Repetition 1 Repetition 2 Repetition 3Example 4.26 - Changing pitches in riff repetitions; expanded intervals
Next is an example of sequencing. The second and third repetitions are transposeddown a whole-step each (a half-step down from the last note of the riff).
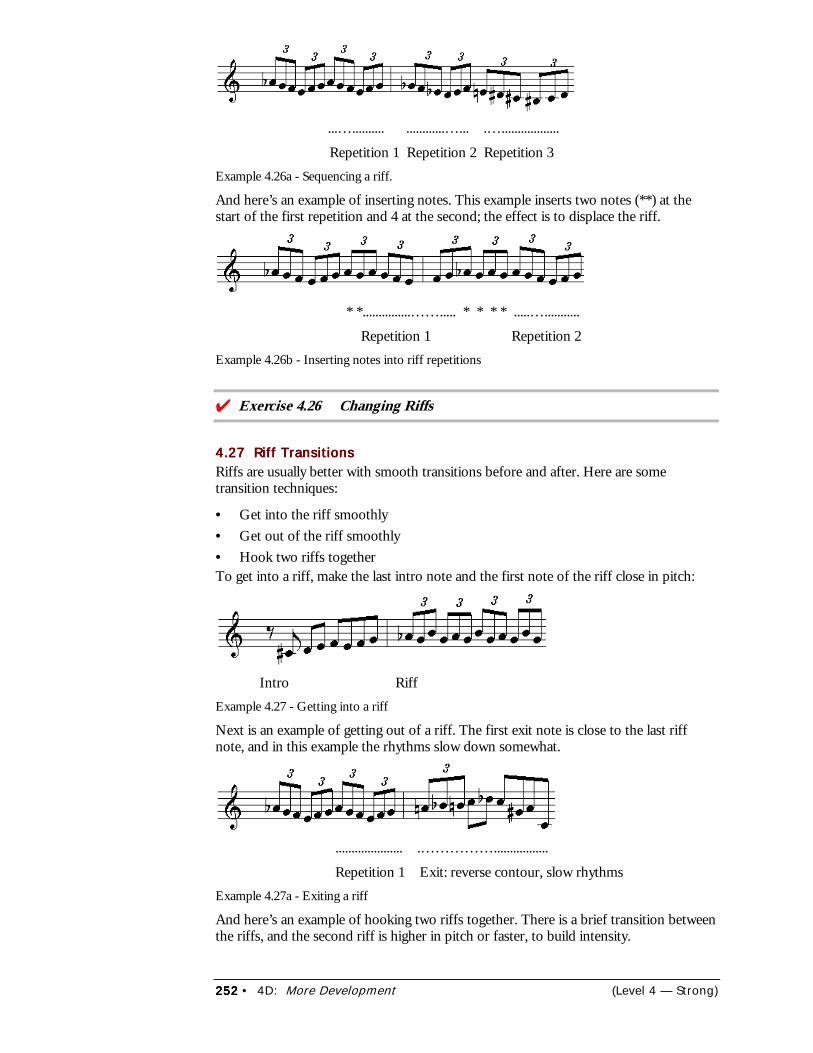
252252252252 • 4D: More Development (Level 4 — Strong)
...….......... ............…... .…..................
Repetition 1 Repetition 2 Repetition 3Example 4.26a - Sequencing a riff.
And here’s an example of inserting notes. This example inserts two notes (**) at thestart of the first repetition and 4 at the second; the effect is to displace the riff.
* *...............……..... * * * * .....…...........
Repetition 1 Repetition 2Example 4.26b - Inserting notes into riff repetitions
���Exercise 4.26 Changing Riffs
4.27 Riff Transitions4.27 Riff Transitions4.27 Riff Transitions4.27 Riff TransitionsRiffs are usually better with smooth transitions before and after. Here are sometransition techniques:
• Get into the riff smoothly• Get out of the riff smoothly• Hook two riffs togetherTo get into a riff, make the last intro note and the first note of the riff close in pitch:
Intro RiffExample 4.27 - Getting into a riff
Next is an example of getting out of a riff. The first exit note is close to the last riffnote, and in this example the rhythms slow down somewhat.
..................... .…………….................
Repetition 1 Exit: reverse contour, slow rhythmsExample 4.27a - Exiting a riff
And here’s an example of hooking two riffs together. There is a brief transition betweenthe riffs, and the second riff is higher in pitch or faster, to build intensity.
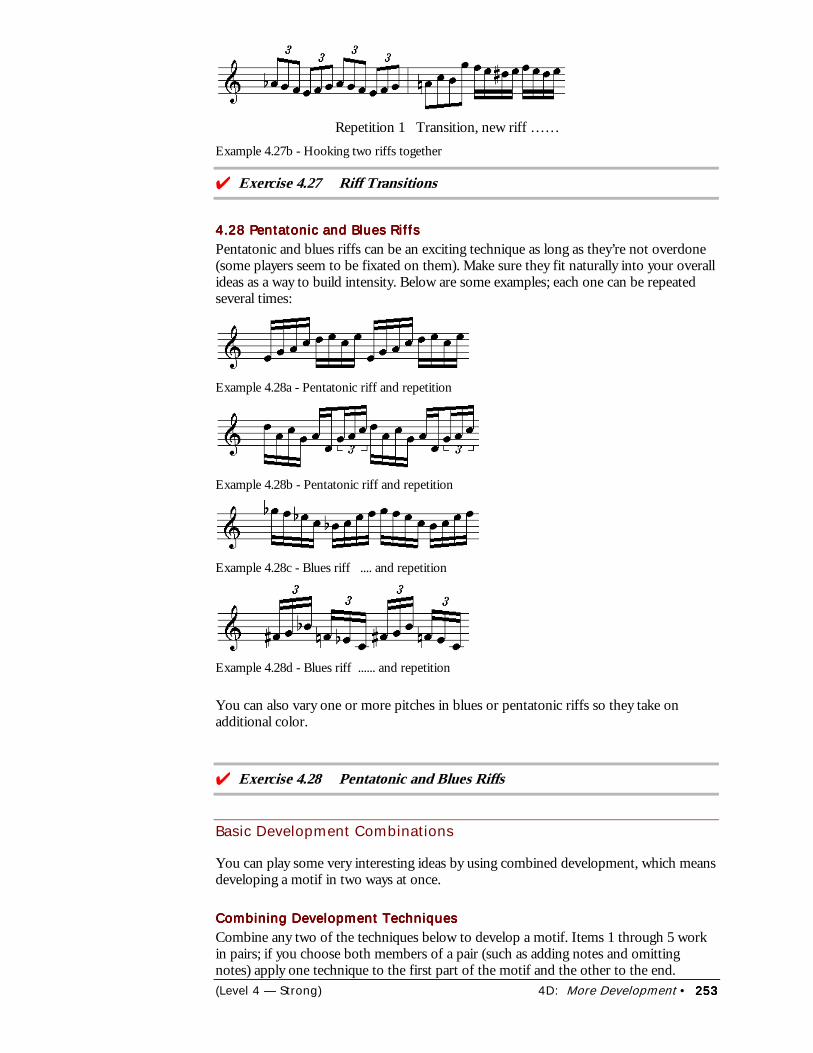
(Level 4 — Strong) 4D: More Development • 253253253253
Repetition 1 Transition, new riff ……Example 4.27b - Hooking two riffs together
���Exercise 4.27 Riff Transitions
4.28 Pentatonic and Blues Riffs4.28 Pentatonic and Blues Riffs4.28 Pentatonic and Blues Riffs4.28 Pentatonic and Blues RiffsPentatonic and blues riffs can be an exciting technique as long as they’re not overdone(some players seem to be fixated on them). Make sure they fit naturally into your overallideas as a way to build intensity. Below are some examples; each one can be repeatedseveral times:
Example 4.28a - Pentatonic riff and repetition
Example 4.28b - Pentatonic riff and repetition
Example 4.28c - Blues riff .... and repetition
Example 4.28d - Blues riff ...... and repetition
You can also vary one or more pitches in blues or pentatonic riffs so they take onadditional color.
���Exercise 4.28 Pentatonic and Blues Riffs
Basic Development Combinations
You can play some very interesting ideas by using combined development, which meansdeveloping a motif in two ways at once.
Combining Development TechniquesCombining Development TechniquesCombining Development TechniquesCombining Development TechniquesCombine any two of the techniques below to develop a motif. Items 1 through 5 workin pairs; if you choose both members of a pair (such as adding notes and omittingnotes) apply one technique to the first part of the motif and the other to the end.
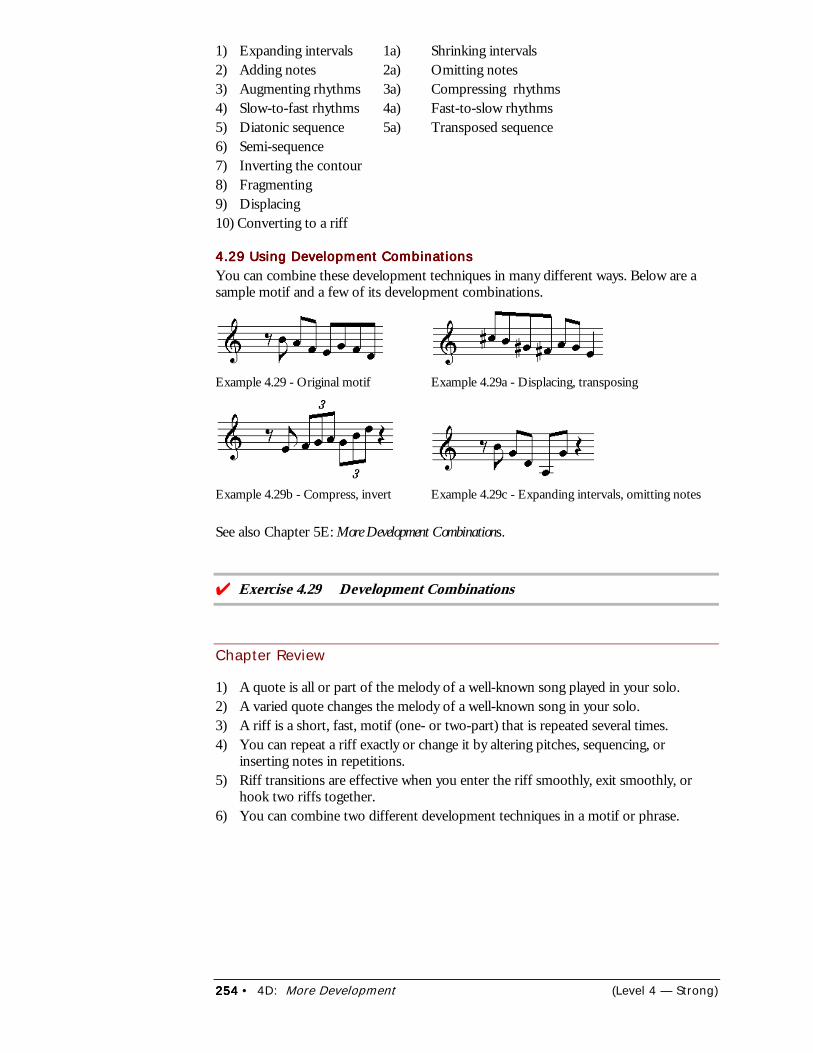
254254254254 • 4D: More Development (Level 4 — Strong)
1) Expanding intervals 1a) Shrinking intervals2) Adding notes 2a) Omitting notes3) Augmenting rhythms 3a) Compressing rhythms4) Slow-to-fast rhythms 4a) Fast-to-slow rhythms5) Diatonic sequence 5a) Transposed sequence6) Semi-sequence7) Inverting the contour8) Fragmenting9) Displacing10) Converting to a riff
4.29 Using Development Combinations4.29 Using Development Combinations4.29 Using Development Combinations4.29 Using Development CombinationsYou can combine these development techniques in many different ways. Below are asample motif and a few of its development combinations.
Example 4.29 - Original motif Example 4.29a - Displacing, transposing
Example 4.29b - Compress, invert Example 4.29c - Expanding intervals, omitting notes
See also Chapter 5E: More Development Combinations.
���Exercise 4.29 Development Combinations
Chapter Review
1) A quote is all or part of the melody of a well-known song played in your solo.2) A varied quote changes the melody of a well-known song in your solo.3) A riff is a short, fast, motif (one- or two-part) that is repeated several times.4) You can repeat a riff exactly or change it by altering pitches, sequencing, or
inserting notes in repetitions.5) Riff transitions are effective when you enter the riff smoothly, exit smoothly, or
hook two riffs together.6) You can combine two different development techniques in a motif or phrase.

(Level 4 — Strong) 4E: Variations on ii-V-I’s • 255255255255
4E: Variations on ii-V-I’s4E: Variations on ii-V-I’s4E: Variations on ii-V-I’s4E: Variations on ii-V-I’s
In this chapter you’ll learn about:
• Tritone Substitutions• Going from the V to a New I• ii-V-I Chains• ii-V and V-I Chains• ii-V-I Variations in Jazz Standards
any jazz tunes have chord progressions that modulate (change keys) or use ii-V-I’s in different ways. This chapter discusses common modulations and ii-V-Ivariations so you can recognize them in chord progressions and use them in
your solos.
Tritone Substitutions
Just as you can simplify ii-V-I’s, you can also spice them up with tritone (augmented4th) substitutions.
4.30 Building Tritone Substitutions4.30 Building Tritone Substitutions4.30 Building Tritone Substitutions4.30 Building Tritone SubstitutionsA tritone substitution occurs when you use a bII chord instead of a V, creating a ii-bII-Iprogression. For example, in the key of C the ii-bII-I progression would be Dm to Db7to CMa7. These chords move down by half-steps – a strong chord movement. Becausethe substitute bII is a tritone away from the V, using the bII is called a tritonesubstitution. You can substitute a ii-bII-I wherever you see a written II-V-I.
Tritone substitution favors dominant alterations (b5, +5, b9, +9). For example::
Dm7 G7 (play a Db7) CMa7
b9 +5 b5Example 4.30 - Tritone substitution: ii-bII-I (Dm7-Db7-CMa7) over ii-V-I
You can also use “opposite” tritone substitution: when the actual chords are ii-bII-I,you can use II-V-I instead, as in the example below.
Dm7 Db7 (play a G7) CMa7
Example 4.30a - Opposite tritone substitution:. ii-V-I (Dm7-G7-CMa7) over ii-bII-I
���Exercise 4.30 Using Tritone Substitutions
M
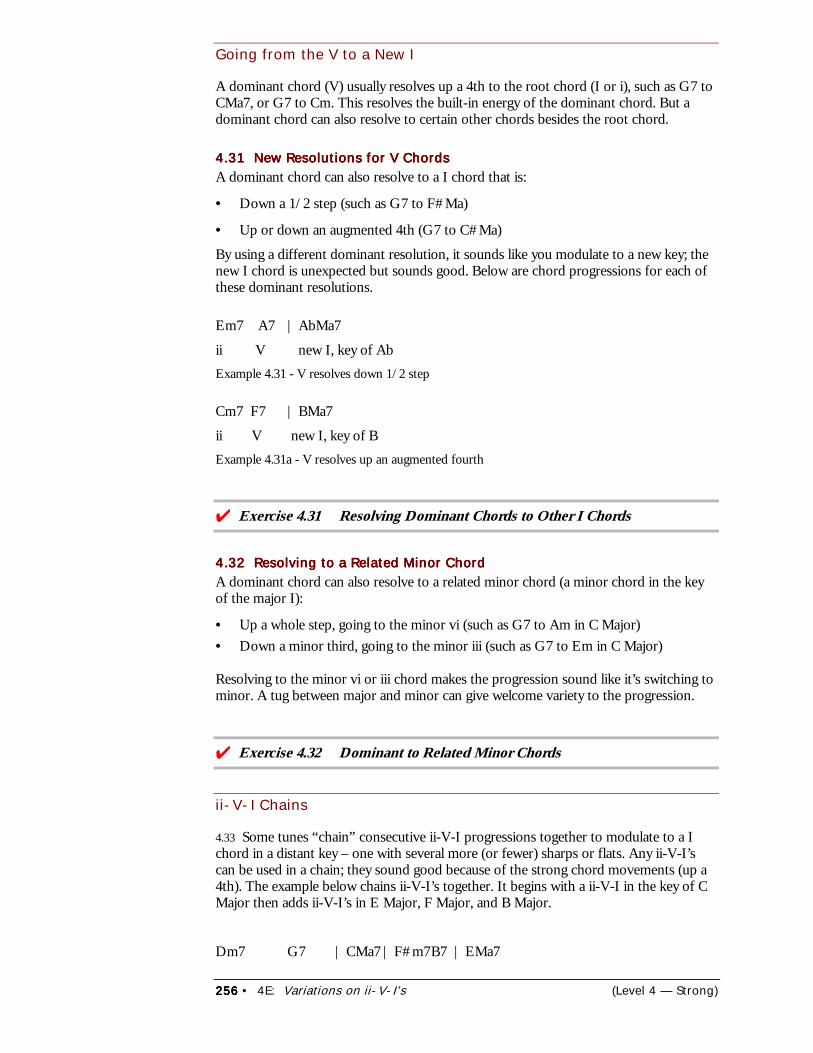
256256256256 • 4E: Variations on ii-V-I’s (Level 4 — Strong)
Going from the V to a New I
A dominant chord (V) usually resolves up a 4th to the root chord (I or i), such as G7 toCMa7, or G7 to Cm. This resolves the built-in energy of the dominant chord. But adominant chord can also resolve to certain other chords besides the root chord.
4.31 New Resolutions for V Chords4.31 New Resolutions for V Chords4.31 New Resolutions for V Chords4.31 New Resolutions for V ChordsA dominant chord can also resolve to a I chord that is:
• Down a 1/2 step (such as G7 to F#Ma)
• Up or down an augmented 4th (G7 to C#Ma)
By using a different dominant resolution, it sounds like you modulate to a new key; thenew I chord is unexpected but sounds good. Below are chord progressions for each ofthese dominant resolutions.
Em7 A7 | AbMa7
ii V new I, key of AbExample 4.31 - V resolves down 1/2 step
Cm7 F7 | BMa7
ii V new I, key of BExample 4.31a - V resolves up an augmented fourth
���Exercise 4.31 Resolving Dominant Chords to Other I Chords
4.32 Resolving to a Related Minor Chord4.32 Resolving to a Related Minor Chord4.32 Resolving to a Related Minor Chord4.32 Resolving to a Related Minor ChordA dominant chord can also resolve to a related minor chord (a minor chord in the keyof the major I):
• Up a whole step, going to the minor vi (such as G7 to Am in C Major)• Down a minor third, going to the minor iii (such as G7 to Em in C Major)
Resolving to the minor vi or iii chord makes the progression sound like it’s switching tominor. A tug between major and minor can give welcome variety to the progression.
���Exercise 4.32 Dominant to Related Minor Chords
ii-V-I Chains
4.33 Some tunes “chain” consecutive ii-V-I progressions together to modulate to a Ichord in a distant key – one with several more (or fewer) sharps or flats. Any ii-V-I’scan be used in a chain; they sound good because of the strong chord movements (up a4th). The example below chains ii-V-I’s together. It begins with a ii-V-I in the key of CMajor then adds ii-V-I’s in E Major, F Major, and B Major.
Dm7 G7 | CMa7 | F#m7B7 | EMa7
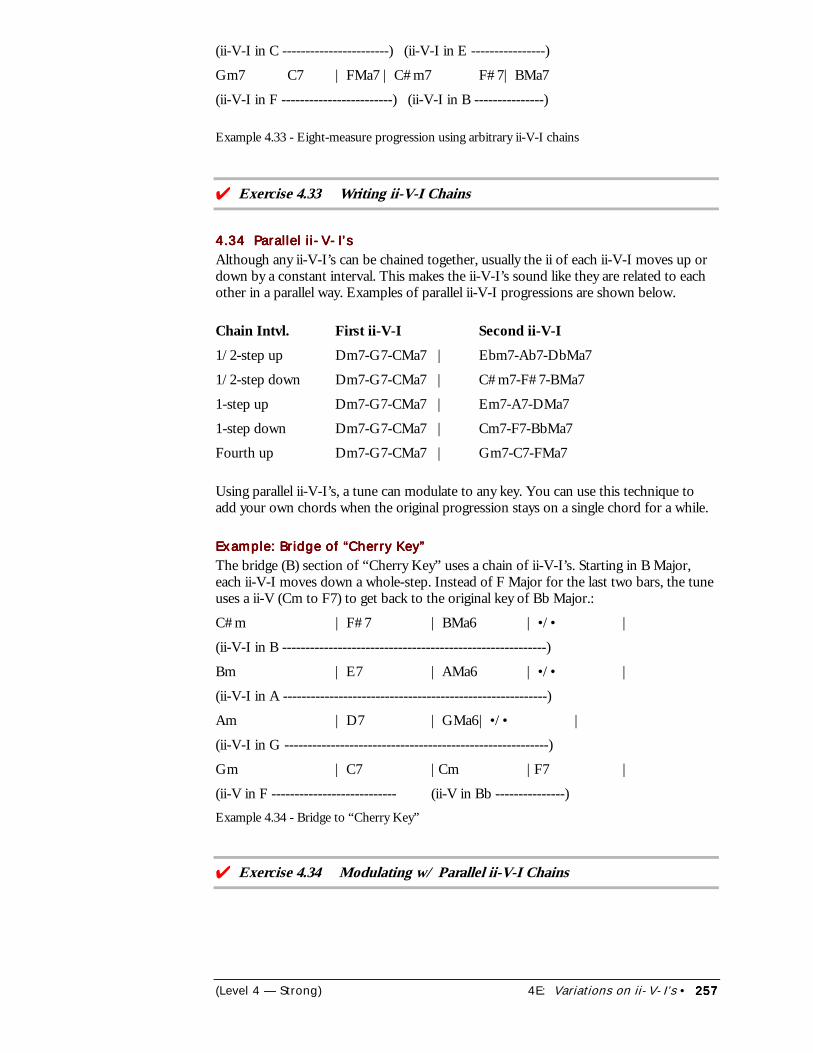
(Level 4 — Strong) 4E: Variations on ii-V-I’s • 257257257257
(ii-V-I in C -----------------------) (ii-V-I in E ----------------)
Gm7 C7 | FMa7 | C#m7 F#7| BMa7
(ii-V-I in F ------------------------) (ii-V-I in B ---------------)
Example 4.33 - Eight-measure progression using arbitrary ii-V-I chains
���Exercise 4.33 Writing ii-V-I Chains
4.34 Parallel ii-V-I’s4.34 Parallel ii-V-I’s4.34 Parallel ii-V-I’s4.34 Parallel ii-V-I’sAlthough any ii-V-I’s can be chained together, usually the ii of each ii-V-I moves up ordown by a constant interval. This makes the ii-V-I’s sound like they are related to eachother in a parallel way. Examples of parallel ii-V-I progressions are shown below.
Chain Intvl. First ii-V-I Second ii-V-I1/2-step up Dm7-G7-CMa7 | Ebm7-Ab7-DbMa7
1/2-step down Dm7-G7-CMa7 | C#m7-F#7-BMa7
1-step up Dm7-G7-CMa7 | Em7-A7-DMa7
1-step down Dm7-G7-CMa7 | Cm7-F7-BbMa7
Fourth up Dm7-G7-CMa7 | Gm7-C7-FMa7
Using parallel ii-V-I’s, a tune can modulate to any key. You can use this technique toadd your own chords when the original progression stays on a single chord for a while.
Example: Bridge of “Cherry Key”Example: Bridge of “Cherry Key”Example: Bridge of “Cherry Key”Example: Bridge of “Cherry Key”The bridge (B) section of “Cherry Key” uses a chain of ii-V-I’s. Starting in B Major,each ii-V-I moves down a whole-step. Instead of F Major for the last two bars, the tuneuses a ii-V (Cm to F7) to get back to the original key of Bb Major.:
C#m | F#7 | BMa6 | •/• |
(ii-V-I in B ---------------------------------------------------------)
Bm | E7 | AMa6 | •/• |
(ii-V-I in A ---------------------------------------------------------)
Am | D7 | GMa6| •/• |
(ii-V-I in G ---------------------------------------------------------)
Gm | C7 |Cm |F7 |
(ii-V in F --------------------------- (ii-V in Bb ---------------)Example 4.34 - Bridge to “Cherry Key”
���Exercise 4.34 Modulating w/ Parallel ii-V-I Chains
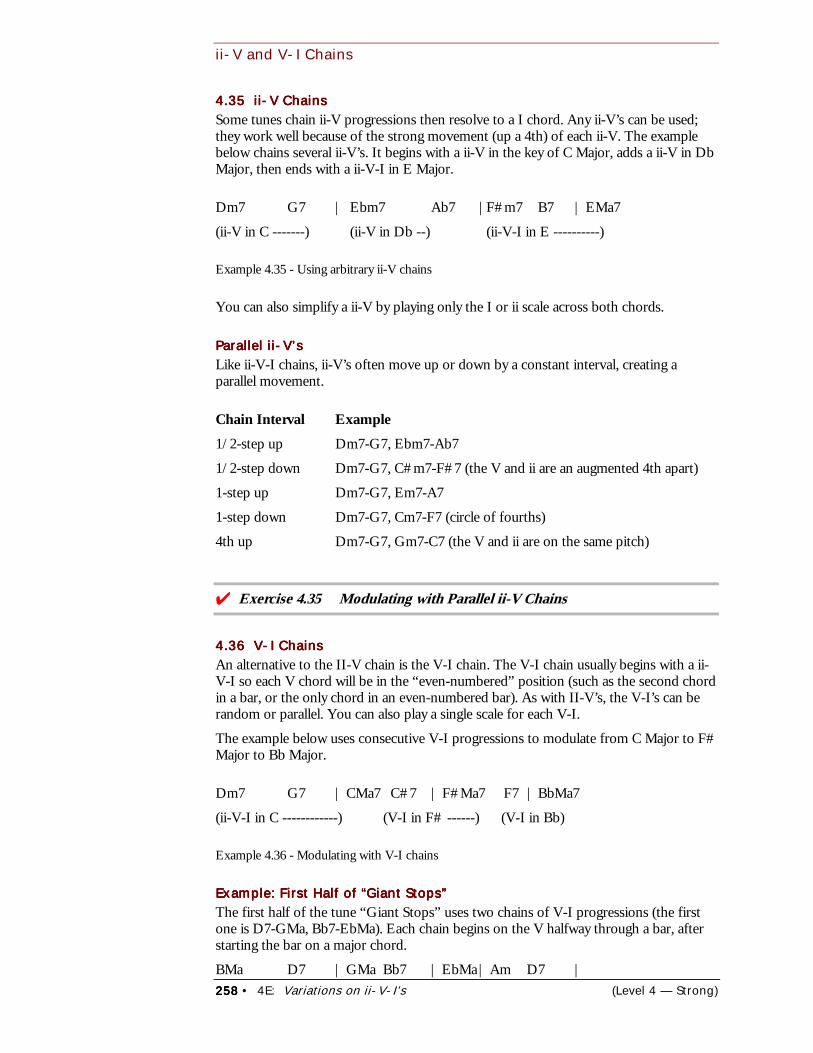
258258258258 • 4E: Variations on ii-V-I’s (Level 4 — Strong)
ii-V and V-I Chains
4.35 ii-V Chains4.35 ii-V Chains4.35 ii-V Chains4.35 ii-V ChainsSome tunes chain ii-V progressions then resolve to a I chord. Any ii-V’s can be used;they work well because of the strong movement (up a 4th) of each ii-V. The examplebelow chains several ii-V’s. It begins with a ii-V in the key of C Major, adds a ii-V in DbMajor, then ends with a ii-V-I in E Major.
Dm7 G7 | Ebm7 Ab7 |F#m7 B7 | EMa7
(ii-V in C -------) (ii-V in Db --) (ii-V-I in E ----------)
Example 4.35 - Using arbitrary ii-V chains
You can also simplify a ii-V by playing only the I or ii scale across both chords.
Parallel ii-V’sParallel ii-V’sParallel ii-V’sParallel ii-V’sLike ii-V-I chains, ii-V’s often move up or down by a constant interval, creating aparallel movement.
Chain Interval Example1/2-step up Dm7-G7, Ebm7-Ab7
1/2-step down Dm7-G7, C#m7-F#7 (the V and ii are an augmented 4th apart)
1-step up Dm7-G7, Em7-A7
1-step down Dm7-G7, Cm7-F7 (circle of fourths)
4th up Dm7-G7, Gm7-C7 (the V and ii are on the same pitch)
���Exercise 4.35 Modulating with Parallel ii-V Chains
4.36 V-I Chains4.36 V-I Chains4.36 V-I Chains4.36 V-I ChainsAn alternative to the II-V chain is the V-I chain. The V-I chain usually begins with a ii-V-I so each V chord will be in the “even-numbered” position (such as the second chordin a bar, or the only chord in an even-numbered bar). As with II-V’s, the V-I’s can berandom or parallel. You can also play a single scale for each V-I.
The example below uses consecutive V-I progressions to modulate from C Major to F#Major to Bb Major.
Dm7 G7 | CMa7 C#7 | F#Ma7 F7 | BbMa7
(ii-V-I in C ------------) (V-I in F# ------) (V-I in Bb)
Example 4.36 - Modulating with V-I chains
Example: First Half of “Giant Stops”Example: First Half of “Giant Stops”Example: First Half of “Giant Stops”Example: First Half of “Giant Stops”The first half of the tune “Giant Stops” uses two chains of V-I progressions (the firstone is D7-GMa, Bb7-EbMa). Each chain begins on the V halfway through a bar, afterstarting the bar on a major chord.
BMa D7 | GMa Bb7 | EbMa| Am D7 |
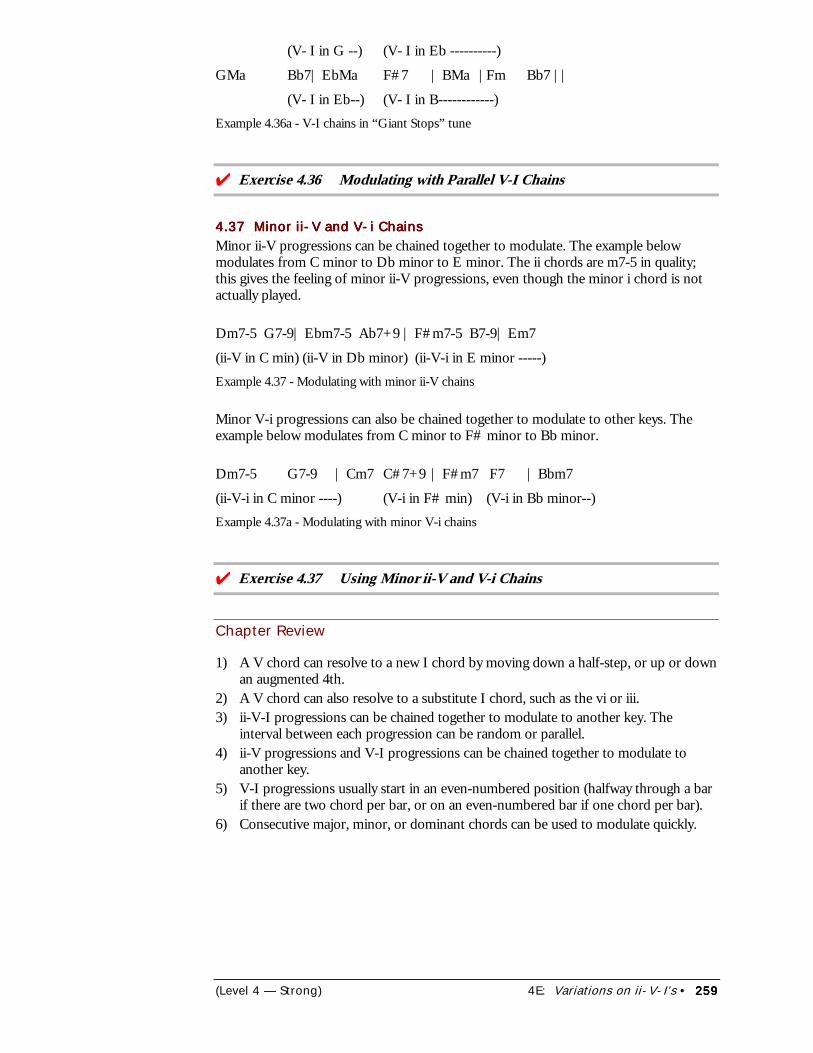
(Level 4 — Strong) 4E: Variations on ii-V-I’s • 259259259259
(V- I in G --) (V- I in Eb ----------)
GMa Bb7| EbMa F#7 | BMa |Fm Bb7 ||
(V- I in Eb--) (V- I in B------------)Example 4.36a - V-I chains in “Giant Stops” tune
���Exercise 4.36 Modulating with Parallel V-I Chains
4.37 Minor ii-V and V-i Chains4.37 Minor ii-V and V-i Chains4.37 Minor ii-V and V-i Chains4.37 Minor ii-V and V-i ChainsMinor ii-V progressions can be chained together to modulate. The example belowmodulates from C minor to Db minor to E minor. The ii chords are m7-5 in quality;this gives the feeling of minor ii-V progressions, even though the minor i chord is notactually played.
Dm7-5 G7-9| Ebm7-5 Ab7+9 | F#m7-5 B7-9| Em7
(ii-V in C min) (ii-V in Db minor) (ii-V-i in E minor -----)Example 4.37 - Modulating with minor ii-V chains
Minor V-i progressions can also be chained together to modulate to other keys. Theexample below modulates from C minor to F# minor to Bb minor.
Dm7-5 G7-9 | Cm7 C#7+9 | F#m7 F7 | Bbm7
(ii-V-i in C minor ----) (V-i in F# min) (V-i in Bb minor--)Example 4.37a - Modulating with minor V-i chains
���Exercise 4.37 Using Minor ii-V and V-i Chains
Chapter Review
1) A V chord can resolve to a new I chord by moving down a half-step, or up or downan augmented 4th.
2) A V chord can also resolve to a substitute I chord, such as the vi or iii.3) ii-V-I progressions can be chained together to modulate to another key. The
interval between each progression can be random or parallel.4) ii-V progressions and V-I progressions can be chained together to modulate to
another key.5) V-I progressions usually start in an even-numbered position (halfway through a bar
if there are two chord per bar, or on an even-numbered bar if one chord per bar).6) Consecutive major, minor, or dominant chords can be used to modulate quickly.
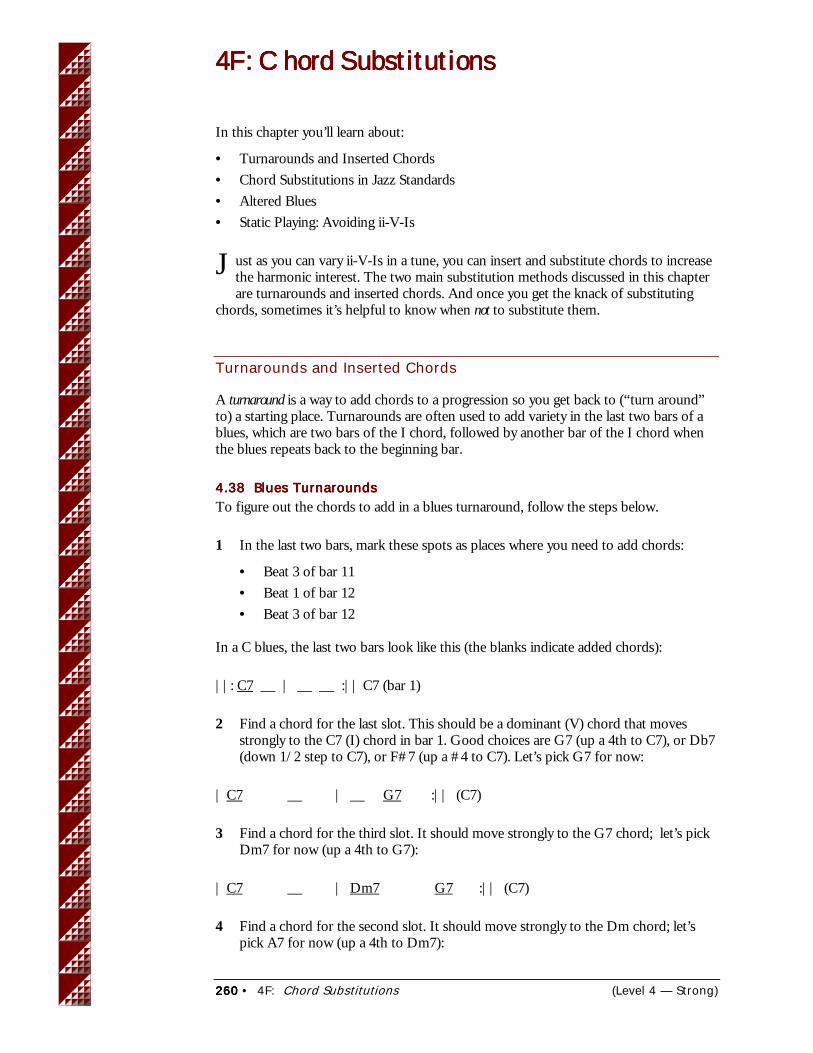
260260260260 • 4F: Chord Substitutions (Level 4 — Strong)
4F: Chord Substitutions4F: Chord Substitutions4F: Chord Substitutions4F: Chord Substitutions
In this chapter you’ll learn about:
• Turnarounds and Inserted Chords• Chord Substitutions in Jazz Standards• Altered Blues• Static Playing: Avoiding ii-V-Is
ust as you can vary ii-V-Is in a tune, you can insert and substitute chords to increasethe harmonic interest. The two main substitution methods discussed in this chapterare turnarounds and inserted chords. And once you get the knack of substituting
chords, sometimes it’s helpful to know when not to substitute them.
Turnarounds and Inserted Chords
A turnaround is a way to add chords to a progression so you get back to (“turn around”to) a starting place. Turnarounds are often used to add variety in the last two bars of ablues, which are two bars of the I chord, followed by another bar of the I chord whenthe blues repeats back to the beginning bar.
4.38 Blues Turnarounds4.38 Blues Turnarounds4.38 Blues Turnarounds4.38 Blues TurnaroundsTo figure out the chords to add in a blues turnaround, follow the steps below.
1 In the last two bars, mark these spots as places where you need to add chords:
• Beat 3 of bar 11• Beat 1 of bar 12• Beat 3 of bar 12
In a C blues, the last two bars look like this (the blanks indicate added chords):
||: C7 __ | __ __ :|| C7 (bar 1)
2 Find a chord for the last slot. This should be a dominant (V) chord that movesstrongly to the C7 (I) chord in bar 1. Good choices are G7 (up a 4th to C7), or Db7(down 1/2 step to C7), or F#7 (up a #4 to C7). Let’s pick G7 for now:
| C7 __ | __ G7 :|| (C7)
3 Find a chord for the third slot. It should move strongly to the G7 chord; let’s pickDm7 for now (up a 4th to G7):
| C7 __ | Dm7 G7 :|| (C7)
4 Find a chord for the second slot. It should move strongly to the Dm chord; let’spick A7 for now (up a 4th to Dm7):
J
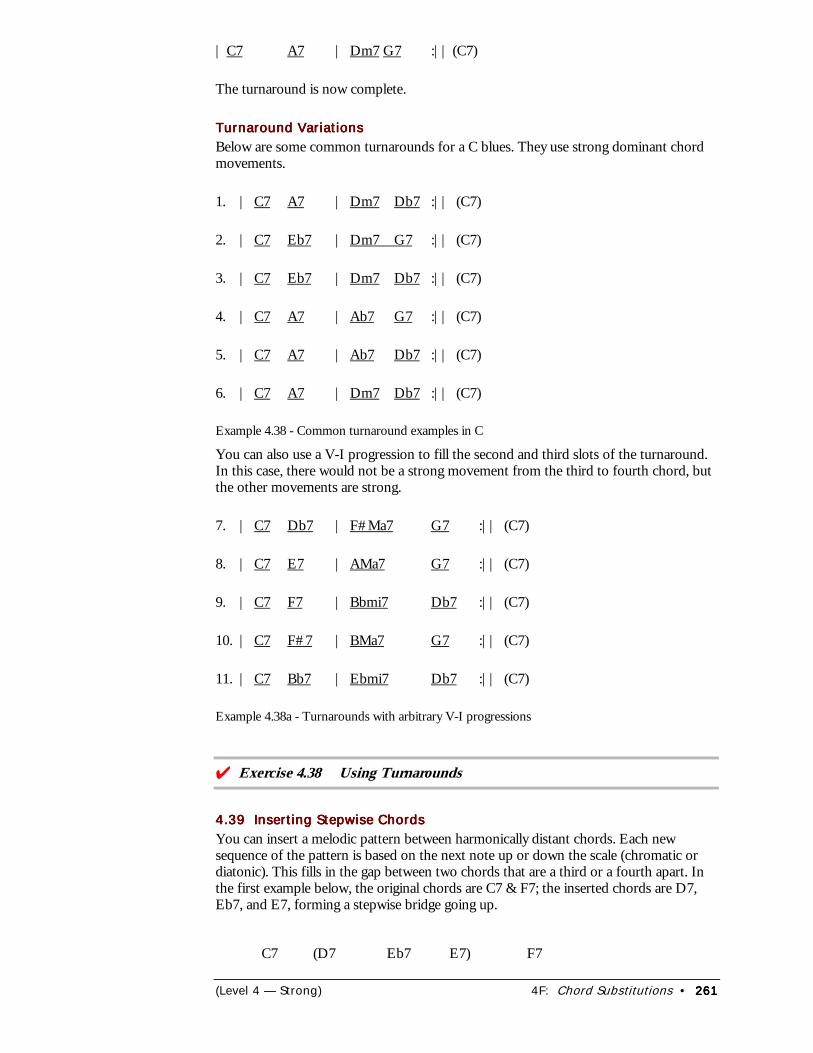
(Level 4 — Strong) 4F: Chord Substitutions • 261261261261
| C7 A7 | Dm7 G7 :|| (C7)
The turnaround is now complete.
Turnaround VariationsTurnaround VariationsTurnaround VariationsTurnaround VariationsBelow are some common turnarounds for a C blues. They use strong dominant chordmovements.
1. | C7 A7 | Dm7 Db7 :|| (C7)
2. | C7 Eb7 | Dm7 G7 :|| (C7)
3. | C7 Eb7 | Dm7 Db7 :|| (C7)
4. | C7 A7 | Ab7 G7 :|| (C7)
5. | C7 A7 | Ab7 Db7 :|| (C7)
6. | C7 A7 | Dm7 Db7 :|| (C7)
Example 4.38 - Common turnaround examples in C
You can also use a V-I progression to fill the second and third slots of the turnaround.In this case, there would not be a strong movement from the third to fourth chord, butthe other movements are strong.
7. | C7 Db7 | F#Ma7 G7 :|| (C7)
8. | C7 E7 | AMa7 G7 :|| (C7)
9. | C7 F7 | Bbmi7 Db7 :|| (C7)
10. | C7 F#7 | BMa7 G7 :|| (C7)
11. | C7 Bb7 | Ebmi7 Db7 :|| (C7)
Example 4.38a - Turnarounds with arbitrary V-I progressions
���Exercise 4.38 Using Turnarounds
4.39 Inserting Stepwise Chords4.39 Inserting Stepwise Chords4.39 Inserting Stepwise Chords4.39 Inserting Stepwise ChordsYou can insert a melodic pattern between harmonically distant chords. Each newsequence of the pattern is based on the next note up or down the scale (chromatic ordiatonic). This fills in the gap between two chords that are a third or a fourth apart. Inthe first example below, the original chords are C7 & F7; the inserted chords are D7,Eb7, and E7, forming a stepwise bridge going up.
C7 (D7 Eb7 E7) F7
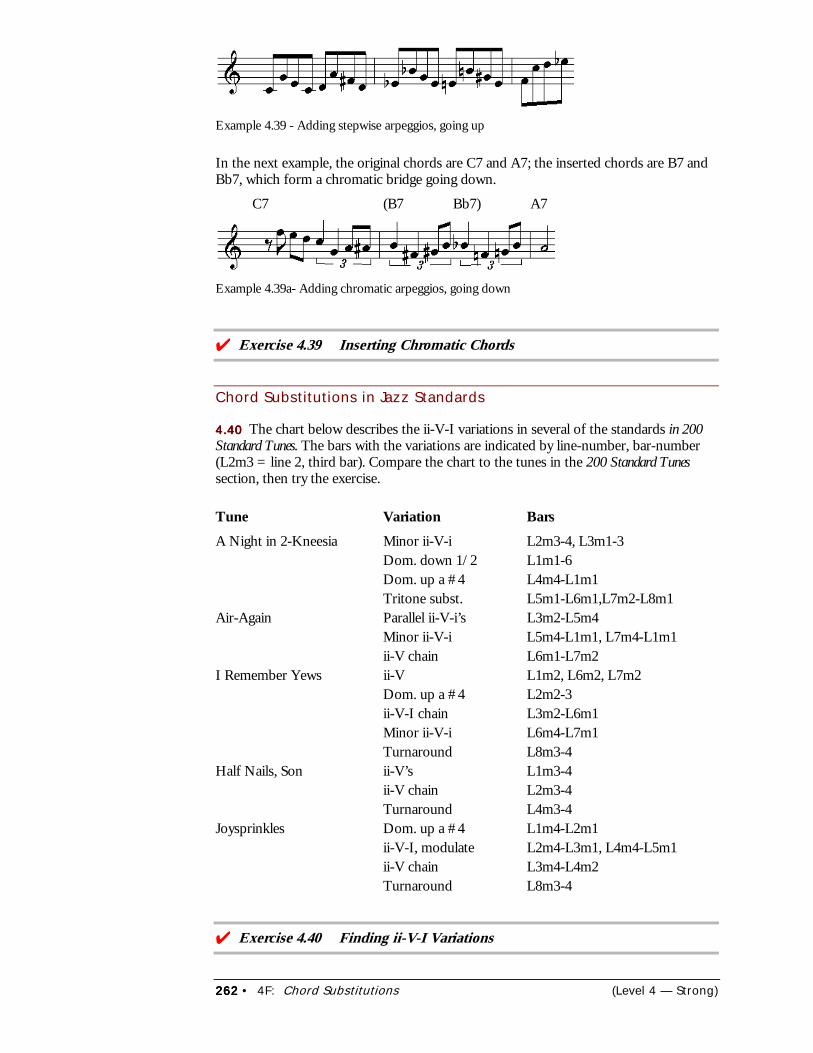
262262262262 • 4F: Chord Substitutions (Level 4 — Strong)
Example 4.39 - Adding stepwise arpeggios, going up
In the next example, the original chords are C7 and A7; the inserted chords are B7 andBb7, which form a chromatic bridge going down.
C7 (B7 Bb7) A7
Example 4.39a- Adding chromatic arpeggios, going down
���Exercise 4.39 Inserting Chromatic Chords
Chord Substitutions in Jazz Standards
4.404.404.404.40 The chart below describes the ii-V-I variations in several of the standards in 200Standard Tunes. The bars with the variations are indicated by line-number, bar-number(L2m3 = line 2, third bar). Compare the chart to the tunes in the 200 Standard Tunessection, then try the exercise.
Tune Variation BarsA Night in 2-Kneesia Minor ii-V-i L2m3-4, L3m1-3
Dom. down 1/2 L1m1-6Dom. up a #4 L4m4-L1m1Tritone subst. L5m1-L6m1,L7m2-L8m1
Air-Again Parallel ii-V-i’s L3m2-L5m4Minor ii-V-i L5m4-L1m1, L7m4-L1m1ii-V chain L6m1-L7m2
I Remember Yews ii-V L1m2, L6m2, L7m2Dom. up a #4 L2m2-3ii-V-I chain L3m2-L6m1Minor ii-V-i L6m4-L7m1Turnaround L8m3-4
Half Nails, Son ii-V’s L1m3-4ii-V chain L2m3-4Turnaround L4m3-4
Joysprinkles Dom. up a #4 L1m4-L2m1ii-V-I, modulate L2m4-L3m1, L4m4-L5m1ii-V chain L3m4-L4m2Turnaround L8m3-4
���Exercise 4.40 Finding ii-V-I Variations
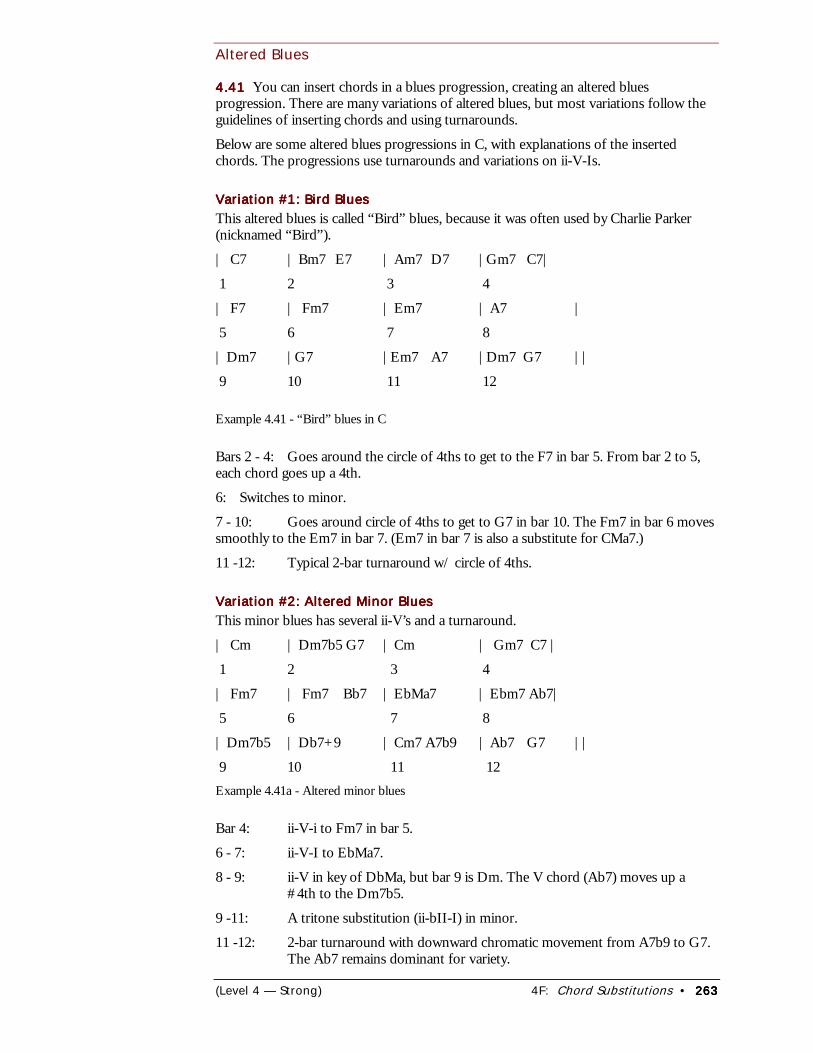
(Level 4 — Strong) 4F: Chord Substitutions • 263263263263
Altered Blues
4.414.414.414.41 You can insert chords in a blues progression, creating an altered bluesprogression. There are many variations of altered blues, but most variations follow theguidelines of inserting chords and using turnarounds.
Below are some altered blues progressions in C, with explanations of the insertedchords. The progressions use turnarounds and variations on ii-V-Is.
Variation #1: Bird BluesVariation #1: Bird BluesVariation #1: Bird BluesVariation #1: Bird BluesThis altered blues is called “Bird” blues, because it was often used by Charlie Parker(nicknamed “Bird”).
| C7 | Bm7 E7 | Am7 D7 |Gm7 C7|
1 2 3 4
| F7 | Fm7 | Em7 | A7 |
5 6 7 8
| Dm7 |G7 |Em7 A7 |Dm7 G7 ||
9 10 11 12
Example 4.41 - “Bird” blues in C
Bars 2 - 4: Goes around the circle of 4ths to get to the F7 in bar 5. From bar 2 to 5,each chord goes up a 4th.
6: Switches to minor.
7 - 10: Goes around circle of 4ths to get to G7 in bar 10. The Fm7 in bar 6 movessmoothly to the Em7 in bar 7. (Em7 in bar 7 is also a substitute for CMa7.)
11 -12: Typical 2-bar turnaround w/ circle of 4ths.
Variation #2: Altered Minor BluesVariation #2: Altered Minor BluesVariation #2: Altered Minor BluesVariation #2: Altered Minor BluesThis minor blues has several ii-V’s and a turnaround.
| Cm | Dm7b5 G7 | Cm | Gm7 C7 |
1 2 3 4
| Fm7 | Fm7 Bb7 | EbMa7 | Ebm7 Ab7|
5 6 7 8
| Dm7b5 | Db7+9 | Cm7 A7b9 | Ab7 G7 ||
9 10 11 12Example 4.41a - Altered minor blues
Bar 4: ii-V-i to Fm7 in bar 5.
6 - 7: ii-V-I to EbMa7.
8 - 9: ii-V in key of DbMa, but bar 9 is Dm. The V chord (Ab7) moves up a#4th to the Dm7b5.
9 -11: A tritone substitution (ii-bII-I) in minor.
11 -12: 2-bar turnaround with downward chromatic movement from A7b9 to G7.The Ab7 remains dominant for variety.
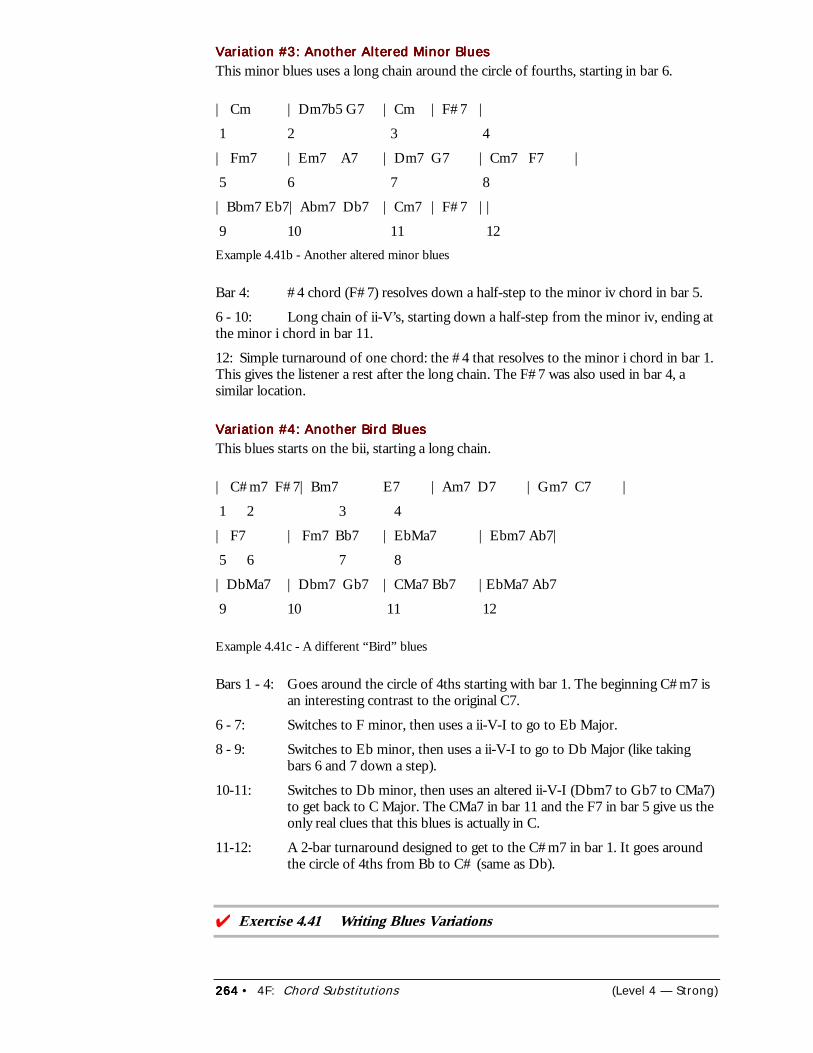
264264264264 • 4F: Chord Substitutions (Level 4 — Strong)
Variation #3: Another Altered Minor BluesVariation #3: Another Altered Minor BluesVariation #3: Another Altered Minor BluesVariation #3: Another Altered Minor BluesThis minor blues uses a long chain around the circle of fourths, starting in bar 6.
| Cm | Dm7b5 G7 | Cm | F#7 |
1 2 3 4
| Fm7 | Em7 A7 | Dm7 G7 | Cm7 F7 |
5 6 7 8
| Bbm7 Eb7| Abm7 Db7 | Cm7 | F#7 ||
9 10 11 12Example 4.41b - Another altered minor blues
Bar 4: #4 chord (F#7) resolves down a half-step to the minor iv chord in bar 5.
6 - 10: Long chain of ii-V’s, starting down a half-step from the minor iv, ending atthe minor i chord in bar 11.
12: Simple turnaround of one chord: the #4 that resolves to the minor i chord in bar 1.This gives the listener a rest after the long chain. The F#7 was also used in bar 4, asimilar location.
Variation #4: Another Bird BluesVariation #4: Another Bird BluesVariation #4: Another Bird BluesVariation #4: Another Bird BluesThis blues starts on the bii, starting a long chain.
| C#m7 F#7| Bm7 E7 | Am7 D7 | Gm7 C7 |
1 2 3 4
| F7 | Fm7 Bb7 | EbMa7 | Ebm7 Ab7|
5 6 7 8
| DbMa7 | Dbm7 Gb7 | CMa7 Bb7 |EbMa7 Ab7
9 10 11 12
Example 4.41c - A different “Bird” blues
Bars 1 - 4: Goes around the circle of 4ths starting with bar 1. The beginning C#m7 isan interesting contrast to the original C7.
6 - 7: Switches to F minor, then uses a ii-V-I to go to Eb Major.
8 - 9: Switches to Eb minor, then uses a ii-V-I to go to Db Major (like takingbars 6 and 7 down a step).
10-11: Switches to Db minor, then uses an altered ii-V-I (Dbm7 to Gb7 to CMa7)to get back to C Major. The CMa7 in bar 11 and the F7 in bar 5 give us theonly real clues that this blues is actually in C.
11-12: A 2-bar turnaround designed to get to the C#m7 in bar 1. It goes aroundthe circle of 4ths from Bb to C# (same as Db).
���Exercise 4.41 Writing Blues Variations
(Level 4 — Strong) 4F: Chord Substitutions • 265265265265
Static Playing: Avoiding ii-V-Is
4.42 4.42 4.42 4.42 Some tunes or solos suggest an open feeling – perhaps a single chord vamp or ablues. That’s when static playing can be valuable. In static playing, you avoid outlining ii-V-Is in your solo to reduce the harmonic energy.
Using ii-V-Is is somewhat like creating harmonic “tides” of push and pull in the music.When you eliminate the ii-V-I’s, the focus shifts towards your rhythms, expression, anddevelopment. In static playing you can still use a few non-harmonic tones and even playoutside a little, as long as you don’t imply ii-V-Is. Staying away from ii-V-Is eliminatesthat “tidal pull” of harmony.
Here are some examples of note patterns to avoid in static playing (in C Major):
D-F-A-B-G (ii-V); D-B-G-C (V-I); F-E (4 to 3, like G7 to C)
���Exercise 4.42 Static Playing
Chapter Review
1) A turnaround is a special way to add chords to a progression so that you get back to(“turn around” to) a certain starting place.
2) To fill in a turnaround progression, work backward from the final resolution chord.3) Two common ways to add chords to a progression are chromatically and around
the circle of 4ths.4) You can create altered blues progressions by substituting ii-V’s, V-I’s, and
turnarounds.5) Static playing (avoiding ii-V-Is) can be helpful to draw attention away from
harmony and towards the basic key, style, rhythms, and expression in a solo.
266266266266 • 4G: Group Interaction (Level 4 — Strong)
4G: Group Interaction4G: Group Interaction4G: Group Interaction4G: Group Interaction
In this chapter you’ll learn about:
• Interaction Ideas• Ensemble Texture• Solo Formats• Playing in Duets and Trios• Gig Survival
uestion: When is a jazz group greater than the sum of its parts? Answer: When thegroup interacts musically. As you learn to interact with your group, your solos cantake on new dimensions.
Interaction Ideas
One of the most enjoyable challenges for the soloist is learning to interact musicallywith the members of the group. Good interaction can take a solo beyond its borders,making it an exciting group experience.
Communicating in SolosCommunicating in SolosCommunicating in SolosCommunicating in SolosContrary to what some players think, the soloist is not the only one who is playingimportant ideas. The other members can greatly inspire the soloist, or in some cases caneven join in as multiple soloists.
A successful solo is like a conversation among the group members. The soloist leads thediscussion, and the group members are like the supporting actors who feed the leaderideas. When members of the group hear interesting ideas from the soloist (or from theother members), they can react in any of these ways:
1) Let the idea go by. This by helps the idea stand out, but does not necessarily buildcommunication. Even when you let it go by, someone else may be communicatingwith it, so you’ll get your turn soon. Remember: the soloist may be in the middle ofhis or her own development and may play something even more interesting in a fewseconds.
2) Play against the idea. For example, if the idea uses offbeats, play against it withdownbeats, or vice versa; if the idea is ascending, play descending, etc.
3) Play under the idea, such as repeated tones, pedal notes, drum rolls, etc. Thissimplifies the rhythm or chords and draws attention to the soloist and can enhancea solo that’s building intensity.
4) Copy the idea (explained below).
5) Alter or develop the idea (explained below).
Important: The group can use any or all of the above methods at the same time. It’snot necessary for all members to copy or play against at the same time; variety makes aneffective engine behind the soloist.
Q
(Level Four — Strong) 4G: Group Interaction • 267267267267
When and How to CopyWhen and How to CopyWhen and How to CopyWhen and How to CopyWhether and how to copy a soloist’s idea are ongoing decisions made with split-secondtiming. Here are the basic choices for imitation:
1) Copy the whole idea. This works best with shorter ideas. But don’t overdo it;conversing with a soloist is not an imitating contest, it’s communication.
2) Copy part of the idea (the most intriguing part, or the part you can manage to hearand play accurately). Remember: you can copy one or more pitches, but don’t forgetabout copying part of the rhythm (such as a triplet group or offbeat).
3) Alter or develop the idea. This is the most subtle way to communicate - you take afew notes of the idea, alter them and play them back. This leaves the door open formore twists and turns and tends to pull the audience into the conversation. You canplay a sequence or semi-sequence on the original idea, or augment the rhythm.
The more the soloist and group members respond, the farther the communication goes.This can be exciting when it occurs naturally and isn’t forced. But too many groups getin the habit of conversing too long on a single idea (like talking too long on a limitedsubject). Unless the idea is developing well, it’s usually better to create a short (or veryshort) conversation and be ready to develop the next exciting idea. Remember: the nextidea could be something the group just played; the soloist isn’t always the originator.
Style and Rhythmic TransitionsStyle and Rhythmic TransitionsStyle and Rhythmic TransitionsStyle and Rhythmic TransitionsOne of the most exciting events in a tune is when the entire rhythmic style changesunexpectedly for one or more bars. For example the feel could change from bossa tosamba, from ballad to double-time swing, from swing to funk, etc. You can trigger thiswith a rhythmic idea, or someone else can trigger it.
However, too often the style shifts feel forced, predictable, or unsteady. Here are twocommon misconceptions about style shifts:
Misconception #1: The whole group needs to shift styles.
Fact #1: It’s OK to have one or more players not join in the shift sometimes (unlessthe shift is a radical one). For example, half the group could shift to double-time whilethe other half stays is single-time.
Misconception #2: The shift needs to happen as quickly as possible, preferably all atonce.
Fact #2: The style shift can build gradually, with one player joining at a time so theintensity builds. (And yes, sometimes it is cool when everyone shifts styles at once.) Forways to create rhythmic shifts, see Chapter 5D: Rhythm Pulses.
Interaction on the BRIDJJ CDInteraction on the BRIDJJ CDInteraction on the BRIDJJ CDInteraction on the BRIDJJ CDThis section describes some of the locations in solos on the BRIDJJ CD “Beat theRats” where obvious musical interaction occurs, between soloist and band, or amongthe band members. The interactions happened on the spot during the recording; theywere not pre-planned.
Deja Blue1:26-1:33 Bass plays consecutive downbeat quarter-notes in solo; guitar then comps
with quarter-notes; drums then play accented roll, on beat 4.
2:26 Drums and bass kick into quarter-note triplets; guitar solo imitates andshifts to eighth-note triplets with contours of 2.
268268268268 • 4G: Group Interaction (Level 4 — Strong)
Beat the Rats3:03 Guitar distorts at end of solo, drums follow with a strong kick.
I Think I’ll Keep Her2:35-2:44 Bass fills with eighth-note triplets with contours of 2; piano solo follows at
2:37; drums follow at 2:44.
5:45-5:57 Keyboards and drums fill behind long, held high notes in trumpet.
Barney Meets Godzilla:47-:48 Trumpet fill notes at :47 answered by piano at :48.
2:25-2:28 Dotted quarters in trumpet solo are picked up by the drums at 2:27, thenthe guitar at 2:28.
2:40-2:47 While trumpet holds alternate-fingered trill in high register, guitar fills witha repeated rhythmic pattern.
4:10-4:12 Guitar figure of 8th-note triplets picked up by drums at 4:12.
7:27-7:29 Trumpet wiggle answered by percussive piano chord at 7:29.
Precious Caboose1:52-1:55 Trumpet quarter-note triplets answered by drums, from 1:54-1:55.
2:27-2:29 Trumpet trill answered by drum roll.
2:32-2:33 Trumpet and bass simultaneously play eighth-note triplets.
3:29-3:34 Bass solo plays offbeat quarters from 3:29-3:31; guitar answers from 3:31-3:34.
Overall During trumpet and bass solos, smooth switching between guitar compingand piano comping. This creates a light and interesting background.
Where’s Waldis?2:36-2:38 Trumpet plays sparse chromatic fills; drums imitate rhythm.
3:03-3:05 Trumpet repeats high notes several times, piano adds strong fill.
6:02-6:52 Guitar and piano trade and vary 2-bar rhythmic pattern
Ensemble Texture
Background RiffsBackground RiffsBackground RiffsBackground RiffsBackground riffs can sometimes add excitement behind solos, but they must notinterfere with the solo. The riffs can be pre-planned, or they can develop out ofsomething that happens during a solo. Below are some ideas of how to use backgroundriffs:
1) During a rhythm section solo, the horn(s) can play a simple repeated backgroundriff.
2) During latin or fusion drum solos, the bass can play a repeated pattern over one ortwo chords.
3) The keyboard or guitar can intersperse motifs in a bass solo and sometimes duringa drum solo.
(Level Four — Strong) 4G: Group Interaction • 269269269269
Multiple SoloistsMultiple SoloistsMultiple SoloistsMultiple SoloistsOccasionally, two or more soloists can play at once. Trading bars is a safer alternative,but simultaneous soloing can be effective if the players use space, timing, anddevelopment wisely. Here are some tips:
1) Have the second soloist wait for a bar or so after the first soloist starts. Try to keepan active musical conversation going.
2) For shorter durations, have two soloists play together. Make sure the rhythms aresolid.
3) Keep listening for where to build and end the solo.
You can get into multiple soloing by practicing jazz duets and learning how to give andtake with ideas.
Solo Formats
Usually, a soloist improvises uninterrupted for several choruses. But there are manyother solo formats to use; for variety, try any of the techniques below.
Half-Chorus SolosHalf-Chorus SolosHalf-Chorus SolosHalf-Chorus SolosIn ballads or tunes with longer solo choruses, it’s often a good idea for one soloist totake the first half of the chorus and another soloist the second half. This also lendscontrast to a feature piece; a secondary soloist can take half a solo, allowing one and ahalf (or more) choruses for the featured soloist.
4.43 Trading Bars4.43 Trading Bars4.43 Trading Bars4.43 Trading BarsTrading bars is where two or more soloists divide up the chord progression and playshort solos. Usually, each player takes four bars (called “trading 4’s”). Other commontrading lengths are eight bars, two bars, or 12 bars if the tune is a blues. Trading isusually done with the drums (horn, drums, guitar, drums, bass, drums, etc.) or aroundthe group (piano, horn, bass, drums, etc.). The trading continues for several choruses assoloists repeat the order until trading is finished.
Here are some guidelines for successfully trading bars:
1) Clearly signal when trading is to start. Specify the kind of trading (with drums, oraround the group) and how many bars to trade. Anyone who wants to be left out ofthe trading should signal that.
2) Be ready for your turn; don’t be unprepared.
3) Try to develop on the ideas the previous soloist just played, when appropriate.
4) Clearly signal when it’s time to end trading and return to the tune melody. Don’t letthe trading go on too long.
Sometimes, brief quotes from other tunes can be effective during trading (see UsingQuotes in Chapter 4D: More Development).
���Exercise 4.43 Trading Bars in Solos
4.44 Stop-Time Solo Fills4.44 Stop-Time Solo Fills4.44 Stop-Time Solo Fills4.44 Stop-Time Solo FillsYou can build solo fills into the structure of the tune melody. These are most effectiveas stop-time fills, where everyone drops out during the fill except the soloist. This builds
270270270270 • 4G: Group Interaction (Level 4 — Strong)
suspense well, but it requires clean and imaginative playing on each fill. Here are somesuggestions for playing stop-time fills:
• Use double-time frequently (see Practicing Double-Time Fills in Chapter 4B: Double-Time and Half-Time).
• Use interesting rhythms.• Develop ideas from previous fills.
A good example of playing many stop-time fills is Wynton Marsalis’ solo on Buggy Rideon the CD “Joe Cool’s Blues.”
���Exercise 4.44 Playing Stop-Time Solo Fills
4.45 Solo Endings and Transitions4.45 Solo Endings and Transitions4.45 Solo Endings and Transitions4.45 Solo Endings and TransitionsThe end of your solo leaves a lasting impression on the audience. Some do’s and don’tsfor ending solos:
• Don’t end your solo in the middle of the progression, unless you’re intentionally(and clearly) doing a half solo.
• Don’t commit to another solo chorus unless you can feel momentum or new ideasspurring you on. Likewise, if some good intensity is building, don’t bail out on thesolo too soon.
• For variety, try extending your solo a few bars into the next soloist’s progression.• At the start of your solo, try to pick up on the last idea of the previous solo for a
smooth transition.
The group should always know which is the last solo, and someone should signal theimmediate return to the melody to avoid annoying delays. During solos, you can lookaround and see who else wants to solo later or who wants to skip a solo.
���Exercise 4.45 Using Solo Endings and Transitions
Playing in Duets and Trios
When you play in duets or trios, there’s a new set of challenges and opportunities. Thebasic jazz functions are now handled by two or three people instead of four or more. Induets and trios, the priorities are:
1) Melody (horn, vocalist, or chord instrument)2) Chords (piano, guitar, vibes, etc.)3) Bass (acoustic or electric bass, or chord instrument)4) Drums
Notice that chord instruments can play melody, chords, and bass. Duets almost alwaysinclude chord instruments, but usually don’t include drums.
Instrument CombinationsInstrument CombinationsInstrument CombinationsInstrument CombinationsSome typical instrument combinations for duets and trios are listed below.
Duets:
(Level Four — Strong) 4G: Group Interaction • 271271271271
• Chords and bass
• Horn and chords
• Vocalist and chords
• Two chords. This is usually piano and guitar, piano and vibes, or two pianos. Thepiano can occasionally fill in the bass line.
Trios:
• Chords, bass, and drums.
• Horn, chords, and bass.
• Two chords and bass.
• Horn, bass, and drums (for advanced players. In this combination, the horn playerhas a more chordal responsibility.
Switching RolesSwitching RolesSwitching RolesSwitching RolesOne of the best ways to keep a duet or trio sounding fresh and interesting is for theplayers to occasionally switch roles in the music. Here are some examples:
• Running bass. Instead of walking with quarter-notes, the bass “runs” with fasterrhythms. This is like a double melody (see below).
• Horn held notes and trills. A horn player can hold out harmony background notes,or trill on the held notes. The held notes shouldn’t compete or conflict with themelody player or soloist.
• Bass chords. These can be played behind the tune melody or behind solos.
• Bass lines in other instruments. The chord instrument can sometimes fill in with awalking bass line. (See also Trumpet Effects in Chapter 4C: Special Effects).
• Percussive effects. One or two players can play staccato notes behind the soloist, orall players can play staccato notes or patterns together. In the latter case, it’s vital tokeep a solid sense of time.
• Double melodies (counterpoint). Two melodies can be played during the tunemelody or during solos.
Time and FormTime and FormTime and FormTime and FormBecause many duets and trios don’t have drums, it’s very important for each player tobe accurate with the tempo and confident with rhythms. You can still take rhythmicchances, but every “liberty” should be compared against a solid framework of rhythmand form. This is especially true when players switch roles for a while (see Switching Rolesabove). Players should always know exactly where they are in the tune form.
Gig Survival
There are many kinds of jazz gigs, from free jazz to stiff casuals. No matter what thegig, it’s a good idea to fit in well with the band (especially if you’ve never met them) andthe audience. Here are some survival tips:
1) Prepare for the gig, physically and mentally. Get all the details straight (time,location, dress, method and timing of payment, etc.).

272272272272 • 4G: Group Interaction (Level 4 — Strong)
2) Be sure you understand the kinds of music you’ll be playing; listen to examplesbeforehand.
3) Treat the gig professionally. You can always turn down a loser gig the next time, butpeople form opinions of your playing and professionalism on each gig.
4) Listen closely to the styles the other soloists use. Your solo and background ideasshould fit in smoothly.
5) Resist the temptation to go overboard or grab too much spotlight. Focus on thegroup sound and direction, not just your own ideas. On casuals, generally avoidharmonically “outside” playing.
6) Play solid rhythms and strong motifs. In short or conservative solos, you don’t havetime for a lot of notes, but you do have time for a lot of meaning.
7) Know tunes, know styles, know chord progressions. You can never be tooprepared.
8) Be on top of solo entrance, dynamics, and expression. These elements tend to setyou apart from other players, especially when solo space is limited on the gig.
9) Play intelligent backgrounds. When the time is right, playing a subtle and effectivebackground behind another soloist can expand your role in the group.
10) Watch and listen for road signs and endings. Be ready for shortened solos, cuts,segues, special endings, etc. The last thing you want is to be the only player to “missthe train.”
Chapter Review
1) Group interaction depends on everyone accurately hearing the musical ideas.2) Basic ways to communicate in solos are:
A) Play something against (contrary to) the idea.B) Play under the idea (background).C) Copy the idea.D) Alter part of the idea.
3) For variety in solo formats, try half solos, trading bars, background riffs, multiplesoloists, solo fills, and effective solo endings and transitions.
4) Style shifts by one or more players can increase the variety in the tune.5) Common duet combinations: a) chords and bass, b) horn or vocalist and chords,
and c) two chords.6) Common trio combinations: a) chords, bass, and drums, b) horn (or vocalist),
chords, and bass, c) two chords and bass, and d) horn, bass, and drums.7) In duets or trios, players can sometimes switch basic roles.8) Accurate time and form are essential in duets and trios, especially with no drums.9) Professionalism and musical sensitivity on a gig increases your demand as a soloist.
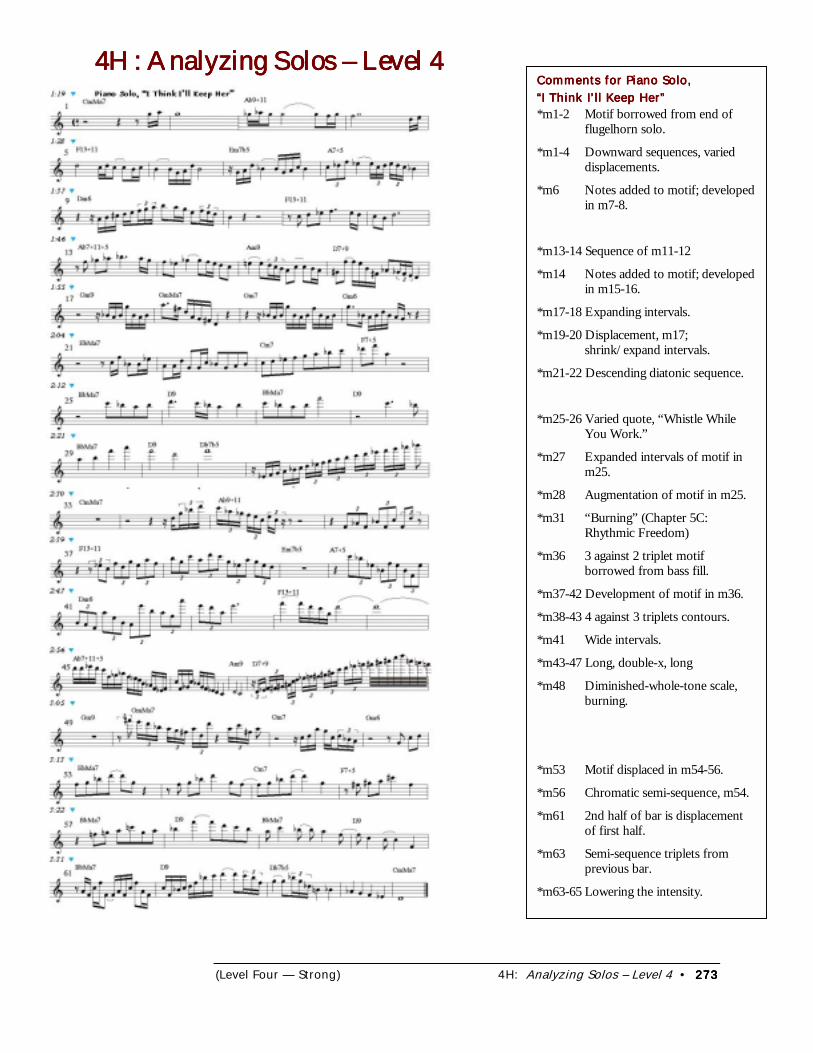
(Level Four — Strong) 4H: Analyzing Solos – Level 4 • 273273273273
4H: Analyzing Solos – Level 44H: Analyzing Solos – Level 44H: Analyzing Solos – Level 44H: Analyzing Solos – Level 4Comments for Piano Solo,Comments for Piano Solo,Comments for Piano Solo,Comments for Piano Solo,“I Think I’ll Keep Her”“I Think I’ll Keep Her”“I Think I’ll Keep Her”“I Think I’ll Keep Her”*m1-2 Motif borrowed from end of
flugelhorn solo.
*m1-4 Downward sequences, varieddisplacements.
*m6 Notes added to motif; developedin m7-8.
*m13-14 Sequence of m11-12
*m14 Notes added to motif; developedin m15-16.
*m17-18 Expanding intervals.
*m19-20 Displacement, m17;shrink/expand intervals.
*m21-22 Descending diatonic sequence.
*m25-26 Varied quote, “Whistle WhileYou Work.”
*m27 Expanded intervals of motif inm25.
*m28 Augmentation of motif in m25.
*m31 “Burning” (Chapter 5C:Rhythmic Freedom)
*m36 3 against 2 triplet motifborrowed from bass fill.
*m37-42 Development of motif in m36.
*m38-43 4 against 3 triplets contours.
*m41 Wide intervals.
*m43-47 Long, double-x, long
*m48 Diminished-whole-tone scale,burning.
*m53 Motif displaced in m54-56.
*m56 Chromatic semi-sequence, m54.
*m61 2nd half of bar is displacementof first half.
*m63 Semi-sequence triplets fromprevious bar.
*m63-65 Lowering the intensity.
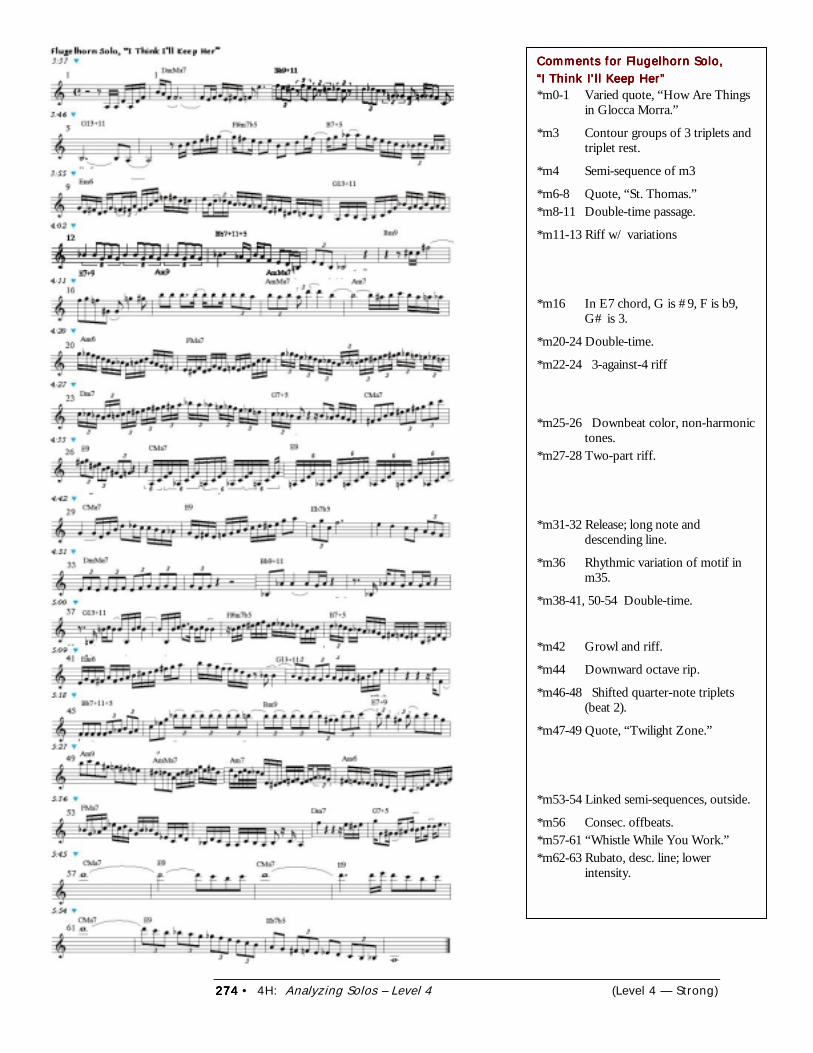
274274274274 • 4H: Analyzing Solos – Level 4 (Level 4 — Strong)
Comments for Flugelhorn Solo,Comments for Flugelhorn Solo,Comments for Flugelhorn Solo,Comments for Flugelhorn Solo,“I Think I’ll Keep Her”“I Think I’ll Keep Her”“I Think I’ll Keep Her”“I Think I’ll Keep Her”*m0-1 Varied quote, “How Are Things
in Glocca Morra.”
*m3 Contour groups of 3 triplets andtriplet rest.
*m4 Semi-sequence of m3
*m6-8 Quote, “St. Thomas.”*m8-11 Double-time passage.
*m11-13 Riff w/ variations
*m16 In E7 chord, G is #9, F is b9,G# is 3.
*m20-24 Double-time.
*m22-24 3-against-4 riff
*m25-26 Downbeat color, non-harmonictones.
*m27-28 Two-part riff.
*m31-32 Release; long note anddescending line.
*m36 Rhythmic variation of motif inm35.
*m38-41, 50-54 Double-time.
*m42 Growl and riff.
*m44 Downward octave rip.
*m46-48 Shifted quarter-note triplets(beat 2).
*m47-49 Quote, “Twilight Zone.”
*m53-54 Linked semi-sequences, outside.
*m56 Consec. offbeats.*m57-61 “Whistle While You Work.”*m62-63 Rubato, desc. line; lower
intensity.
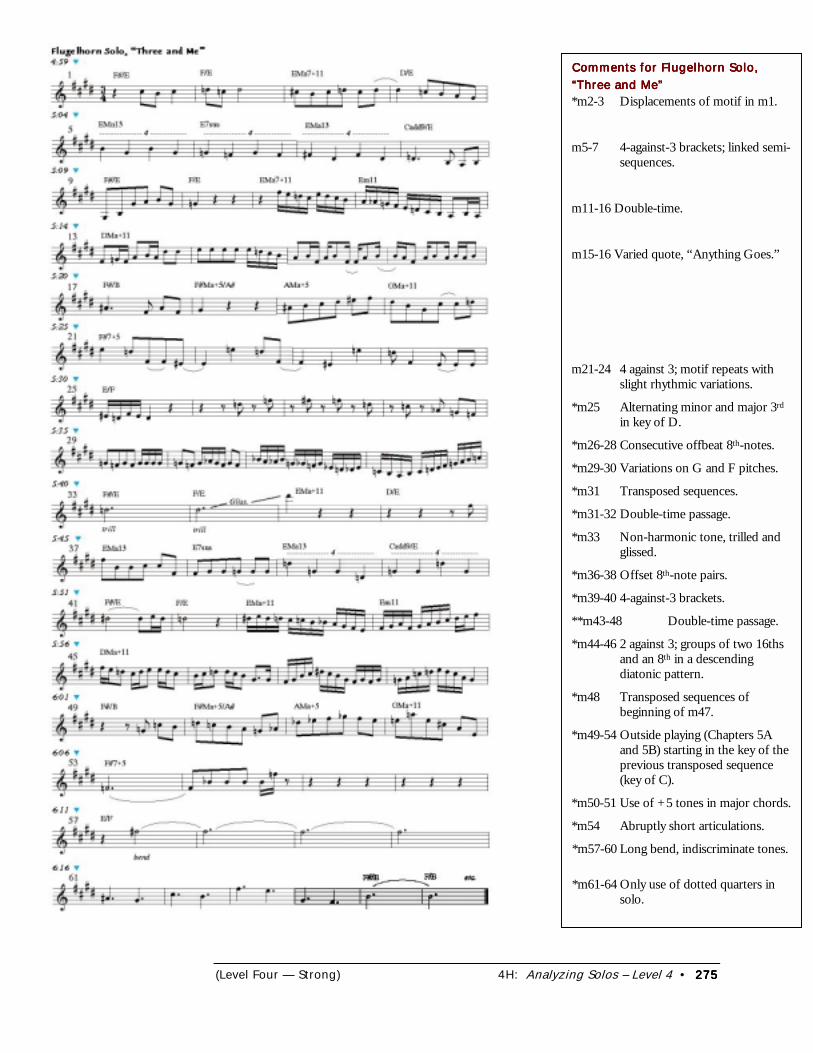
(Level Four — Strong) 4H: Analyzing Solos – Level 4 • 275275275275
Comments for Flugelhorn Solo,Comments for Flugelhorn Solo,Comments for Flugelhorn Solo,Comments for Flugelhorn Solo,“Three and Me”“Three and Me”“Three and Me”“Three and Me”*m2-3 Displacements of motif in m1.
m5-7 4-against-3 brackets; linked semi-sequences.
m11-16 Double-time.
m15-16 Varied quote, “Anything Goes.”
m21-24 4 against 3; motif repeats withslight rhythmic variations.
*m25 Alternating minor and major 3rd
in key of D.
*m26-28 Consecutive offbeat 8th-notes.
*m29-30 Variations on G and F pitches.
*m31 Transposed sequences.
*m31-32 Double-time passage.
*m33 Non-harmonic tone, trilled andglissed.
*m36-38 Offset 8th-note pairs.
*m39-40 4-against-3 brackets.
**m43-48 Double-time passage.
*m44-46 2 against 3; groups of two 16thsand an 8th in a descendingdiatonic pattern.
*m48 Transposed sequences ofbeginning of m47.
*m49-54 Outside playing (Chapters 5Aand 5B) starting in the key of theprevious transposed sequence(key of C).
*m50-51 Use of +5 tones in major chords.
*m54 Abruptly short articulations.
*m57-60 Long bend, indiscriminate tones.
*m61-64 Only use of dotted quarters insolo.
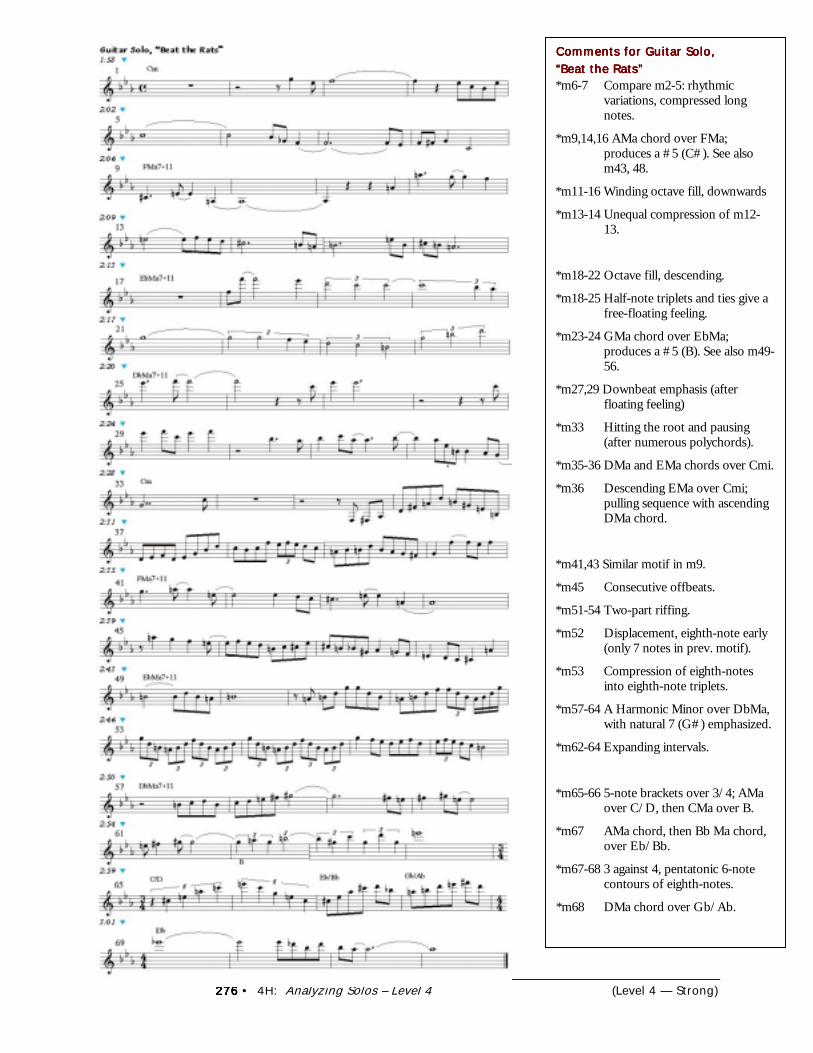
276276276276 • 4H: Analyzing Solos – Level 4 (Level 4 — Strong)
Comments for Guitar Solo,Comments for Guitar Solo,Comments for Guitar Solo,Comments for Guitar Solo,“Beat the Rats”“Beat the Rats”“Beat the Rats”“Beat the Rats”*m6-7 Compare m2-5: rhythmic
variations, compressed longnotes.
*m9,14,16 AMa chord over FMa;produces a #5 (C#). See alsom43, 48.
*m11-16 Winding octave fill, downwards
*m13-14 Unequal compression of m12-13.
*m18-22 Octave fill, descending.
*m18-25 Half-note triplets and ties give afree-floating feeling.
*m23-24 GMa chord over EbMa;produces a #5 (B). See also m49-56.
*m27,29 Downbeat emphasis (afterfloating feeling)
*m33 Hitting the root and pausing(after numerous polychords).
*m35-36 DMa and EMa chords over Cmi.
*m36 Descending EMa over Cmi;pulling sequence with ascendingDMa chord.
*m41,43 Similar motif in m9.
*m45 Consecutive offbeats.
*m51-54 Two-part riffing.
*m52 Displacement, eighth-note early(only 7 notes in prev. motif).
*m53 Compression of eighth-notesinto eighth-note triplets.
*m57-64 A Harmonic Minor over DbMa,with natural 7 (G#) emphasized.
*m62-64 Expanding intervals.
*m65-66 5-note brackets over 3/4; AMaover C/D, then CMa over B.
*m67 AMa chord, then Bb Ma chord,over Eb/Bb.
*m67-68 3 against 4, pentatonic 6-notecontours of eighth-notes.
*m68 DMa chord over Gb/Ab.
(Level Four — Strong) 4J: Transcribing Solos • 277277277277
4J: Transcribing Solos4J: Transcribing Solos4J: Transcribing Solos4J: Transcribing Solos
In this chapter you’ll learn about:
• Basic Transcription Skills• Step 1: Select a Solo• Step 2: Outline the Form and Chords• Step 3: Sketch the Rhythm• Step 4: Add Pitches and Expression
ranscribing (writing down) a recorded solo should be a great exercise for your ear, notjust an exercise in frustration. This chapter shows how to transcribe solos without“banging your ear against the wall.”
Here are the basic steps to follow in order to transcribe a recorded solo (single-line melody):
1 Outline the form of the solo and divide it into choruses and bars on your music paper.
2 If you have the chords to the solo, write them in above the empty bars on your paper.If you don’t have the chords, transcribe them from the recording.
3 Sketch the rhythms in the solo accurately.
4 Add the pitches and expression (articulations, accents, effects, rubato) to the rhythmicsketch.
If you’re already skilled in writing rhythms and melodies, go to Step 2: Outlining the Form andChords below. Otherwise, read Basic Transcription Skills below.
Basic Transcription Skills
Transcription requires the musical skills listed below. If you are currently weak in any ofthese skills, you may want to improve them before you start transcribing solos.
• Dividing and organizing music into choruses.
• Recognizing chords (if no lead sheet). You should be able to identify the chord root(usually in the bass) and type (major, minor, or dominant).
• Recognizing pitches and intervals. Perfect pitch is not required, but good relative pitchis essential.
• Notating rhythms correctly. To practice rhythmic notation, you can sing or play afamiliar tune, such as Twinkle, Twinkle, Little Star, into a tape recorder with your own“jazzed-up” rhythms. Then play back the tape and write down the exact rhythms forwhat you recorded. Play the rhythms you wrote and see if they match the recording.
Step 1: Select a Solo
4.464.464.464.46 Here are ideas for selecting a solo to transcribe:
• It should fit your current transcription skills.
• It should be interesting and pose challenges to you.
• If the recording is a tape, it should be clear enough so you can hear the notes you willtranscribe.
T
278278278278 • 4J: Transcribing Solos (Level 4 — Strong)
• If you have a lead sheet (melody and chords) of the tune being improvised on, this cansave you time in finding out the chord progression for the solo.
Start simple. For example, the Miles Davis trumpet solo on “So What” from the “Kind ofBlue” CD is simple melodically and rhythmically but is quite interesting. Also, the recordedsolo should be on cassette tape or CD; phonograph recordings are difficult to work with.
Another approach is to transcribe a solo for which you already have a written transcriptionin a book. Look back at the book version only when you get stuck.
���Exercise 4.46 Selecting a Solo
Step 2: Outline the Form and Chords
Outlining the form of the solo in advance helps you get the right number of bars in yourtranscription. If you have a lead sheet of the tune, copy the chords above empty bars onyour music paper, making sure you include repeats and road signs.
If you don’t have a lead sheet, listen to the solo once all the way through. If it’s too long,decide how much of it you want to transcribe. Then follow these steps:
1 Find the meter (4/4, 3/4, etc.). This is usually the same as the original tune’s meter.
2 Determine how many bars are in each complete chorus of the solo. Write four emptybars on each staff of music paper, with a double bar at the end of each section. Mosttunes will use eight-bar sections; blues tunes use 12-bar sections.
4.47 Transcribing the Chords4.47 Transcribing the Chords4.47 Transcribing the Chords4.47 Transcribing the ChordsSo why do you need to transcribe the chords to the solo if you’re just trying to copy the solomelody? Transcribing the chords helps in these ways:
• The chords can help you better determine some of the more difficult pitches in the sololater on.
• When the solo is finished, you can better appreciate how the soloist’s melody worksagainst the chord progression of the tune.
• It’s good ear training.
To transcribe the chords of a tune, follow these steps:
1 Transcribe the bass line for the first solo chorus as well as possible. (The bass line maybe more clear in the melody section than in the solos). These bass notes will usuallyindicate the roots of the chords you’re trying to transcribe. Find strong dominantmovements, such as up a 4th, down a half-step, etc.
2 Determine the quality (major, minor, dominant) of each chord in the chorus. Use akeyboard for this.
3 Find any b5, +5, b9, or +9 dominant alterations.
4 When you finish the chords for an entire chorus (including the bridge, if any), copythese chords to the remaining choruses in the solo. Occasionally the chords may changefrom chorus to chorus, but at least you’ll have basic chords at your disposal.
(Level Four — Strong) 4J: Transcribing Solos • 279279279279
���Exercise 4.47 Outlining the Form and Chords
Step 3: Sketching the Rhythms
4.484.484.484.48 After you have the chord progression ready, you need to write a rhythmic sketch ofthe solo, chorus by chorus. In some places, the rhythms and pitches in the solo may beobvious enough that you can go ahead and write the actual notes down. However, there willlikely be many spots where a rhythmic sketch will definitely speed up the transcriptionprocess.
The steps below show how to create rhythmic sketches.
1 Find and mark the exact beat or offbeat where the soloist’s phrase starts. Write anynecessary rests before the start of the phrase.
2 Find and mark the exact beat or offbeat where the soloist’s phrase ends (followed by asilence or longer note).
3 Listen to the rhythm in the phrase until you can hum it accurately.
4 In light pencil, write down the rhythm you hear. Use diamonds for longer notes (whole-notes or half notes) and slash marks for faster notes. Write each sketch note so itmatches the contour (not exact pitch) of the melody.
5 Repeat steps 1 through 4 for each phrase in the solo. When you finish, go back andcheck your sketch so it accurately fits the rhythms you hear.
6 If a phrase seems to have a strange rhythm, the soloist may have been using rubato (ormade a mistake). In this case, mark where the phrase begins and ends, count thenumber of pitches you hear, and write “rubato” over the phrase.
���Exercise 4.48 Sketching the Rhythms
Step 4: Adding Pitches and Expression
4.494.494.494.49 Once your rhythmic sketch is complete, you will have heard the solo enough to befamiliar with its pitches. To add the pitches for the solo,
1 Change rhythm notes in your sketch to actual pitches. Use a keyboard or otherinstrument if necessary. Contours in the rhythm sketch will help.
With pitches that are difficult to hear, try these steps:
2 Find the top and bottom pitches of the contour first, as these are often easier to hear.Next, find the pitches that occur on beats 1 and 3, if possible.
3 See if the missing notes fit with the current chord symbol in the tune. If not, they maybe part of an added or outside chord.
4 If you have a variable-speed tape recorder, tape the recording at half-speed to help youhear the notes better. Half-speed notes sound an octave lower than normal speed.
280280280280 • 4J: Transcribing Solos (Level 4 — Strong)
When you have finished adding the pitches for the transcription, mark the following typesof expression in the solo:
• Strong or unusual accents• Unusual articulations• Dynamics and effects
���Exercise 4.49 Adding Pitches and Expression
Chapter Review
1) The basic transcription skills you need are:A) Organize the solo into bars and choruses.B) Recognize the chords, if necessary.C) Recognize pitches and intervals.D) Notate rhythms correctly.
2) The steps in transcribing a recorded solo are:A) Select a recorded solo on CD or cassette.B) Outline the form and chords of the solo.C) Sketch the rhythm figures in the solo.D) Add the pitches and indicate any significant expression or effects in the solo.
ExpressionsExpressionsExpressionsExpressions*The more intellectual people are, the more originality they see in other men. To commonplacepeople all men are much alike. Blaise Pascal
*It is not sufficient to know what one ought to say, but one must also know how to say it. Aristotle
*There is nothing so easy but that it becomes difficult when you do it with reluctance. Terence HeautonTimorumenos
*To know how to hide one's ability is great skill. Rochefoucauld
*The winds and waves are always on the side of the ablest navigators. Gibbon
*Nothing ever happens but once in this world. What I do now I do once for all. It is over and gone,with all its eternity of solemn meaning. Carlyle
*Don't talk to me about a man's being able to talk sense; everyone can talk sense -- can he talknonsense?
William Pitt the Elder
(Introduction) Exercises for Level 4 • 281281281281
Exercises for LEVEL 4Exercises for LEVEL 4Exercises for LEVEL 4Exercises for LEVEL 4
Melody: Soundscapes
Exercise 4.1 Pulling Improvisation IdeasBasic __/__/__ ( ) Medium __/__/__ ( ) Challenge __/__/__ ( )
❏ *Basic: Choose a major or minor key and “pull” a two-bar phrase. Start and end securely; use aninteresting shape.
❏ **Medium: Same as Basic; use a 4-bar phrase.
❏ ***Challenge: Same as Basic; use a 6- or 8-bar phrase.
❏ >More: Same as Basic; A) don't pause between keys - connect to the next root and proceed; B) play 2octaves on each key; C) both A and B
❏ ��Play-Along: Aebersold Vol. 1 – circle of 4ths – 4 bars per chord
Exercise 4.2 � Variety in Rhythmic StylesBasic __/__/__ ( ) Medium __/__/__ ( ) Challenge __/__/__ ( )
❏ *Basic: Choose a ballad play-along recording. Use the table in 4.2 for ideas in rhythmic variety.
❏ **Medium: Same as Basic; choose a latin, slow swing, or medium swing tune.
❏ ***Challenge: Same as Basic; choose an up-tempo latin or swing tune.
❏ >More: Same as Basic; A) don't pause between keys - connect to the next root and proceed; B) play 2octaves on each key; C) both A and B
❏ ��Play-Along: Aebersold Vol. 1 – circle of 4ths – 4 bars per chord
Exercise 4.3 � Building IntensityBasic __/__/__ ( ) Medium __/__/__ ( ) Challenge __/__/__ ( )
❏ *Basic: Repeat an interesting idea several times; vary it slightly after several repetitions.
❏ **Medium: Build intensity by gradually developing an idea; make it louder, higher, or both.
❏ ***Challenge: Experiment with techniques in Part 5: accelerating, burning, wiggling, special effects, or outside.
❏ >More: Same as Basic; A) don't pause between keys - connect to the next root and proceed; B) play 2octaves on each key; C) both A and B
❏ ��Play-Along: Aebersold Vol. 1 – circle of 4ths – 4 bars per chord
Exercise 4.4 � Lowering IntensityBasic __/__/__ ( ) Medium __/__/__ ( ) Challenge __/__/__ ( )
❏ *Basic: Play a dense idea for two bars, then develop it by inserting longer rests or playing fewer notes.
❏ **Medium: Same as Basic; use a lower range and softer dynamics.
❏ ***Challenge: Same as Basic; use slower rhythms and long notes with expression.
282282282282 • Exercises for Level 4 (Introduction)
❏ >More: Same as Basic; A) don't pause between keys - connect to the next root and proceed; B) play 2octaves on each key; C) both A and B
❏ ��Play-Along: Aebersold Vol. 1 – circle of 4ths – 4 bars per chord
Rhythm: Double-Time and Half-Time
Exercise 4.5 � Going Into Double-TimeBasic __/__/__ ( ) Medium __/__/__ ( ) Challenge __/__/__ ( )
❏ *Basic: Using a metronome setting of quarter-note = 100, play swing eighth-notes for 4 bars, then shiftto double-time feel for 4 bars. Use any scale notes; ascending, descending, or mixed contours.
❏ **Medium: Same as Basic; quarter-note = 120.
❏ ***Challenge: Same as Basic; quarter-note = 140.
❏ >More: Same as Basic; A) don't pause between keys - connect to the next root and proceed; B) play 2octaves on each key; C) both A and B
❏ ��Play-Along: Aebersold Vol. 1 – circle of 4ths – 4 bars per chord
Exercise 4.6 � In and Out of Double-TimeBasic __/__/__ ( ) Medium __/__/__ ( ) Challenge __/__/__ ( )
❏ *Basic: Using a metronome setting of quarter-note = 100, play swing eighth-notes for two bars. Shift todouble-time feel for two bars, then shift back to single-time for the next two bars.
❏ **Medium: Same as Basic; quarter-note = 120.
❏ ***Challenge: Same as Basic; quarter-note = 140.
❏ >More: Same as Basic; A) don't pause between keys - connect to the next root and proceed; B) play 2octaves on each key; C) both A and B
❏ ��Play-Along: Aebersold Vol. 1 – circle of 4ths – 4 bars per chord
Exercise 4.7 � Using Double Time MaterialBasic __/__/__ ( ) Medium __/__/__ ( ) Challenge __/__/__ ( )
❏ *Basic: Create four bars of steady double-time eighth-notes (two bars in the original, slower tempo).
❏ **Medium: Same as Basic; create eight bars of double-time eighth-notes.
❏ ***Challenge: Play the longest stream of eighth-notes at the fastest tempo you’re OK with; go as far you canwith no breaks or errors.
❏ >More: Same as Basic; A) don't pause between keys - connect to the next root and proceed; B) play 2octaves on each key; C) both A and B
❏ ��Play-Along: Aebersold Vol. 1 – circle of 4ths – 4 bars per chord
(Introduction) Exercises for Level 4 • 283283283283
Exercise 4.8 � Using Triple TimeBasic __/__/__ ( ) Medium __/__/__ ( )
❏ *Basic: Write several simple motifs and convert them to triple-time.
❏ **Medium: Play a two-bar motif in slow single-time (quarter-note about 60); convert it to double-time (onebar), then triple-time (half a bar).
❏ >More: Same as Basic; A) don't pause between keys - connect to the next root and proceed; B) play 2octaves on each key; C) both A and B
❏ ��Play-Along: Aebersold Vol. 1 – circle of 4ths – 4 bars per chord
Exercise 4.9 � In and Out of Half-TimeBasic __/__/__ ( ) Medium __/__/__ ( )
❏ *Basic: At quarter-note = 200, play swing eighth-notes for two bars. Then go to half-time feel for onelong bar (two original bars) and back to single-time for the next two bars.
❏ **Medium: Same as Basic; use quarter-note = 240.
❏ >More: Same as Basic; A) don't pause between keys - connect to the next root and proceed; B) play 2octaves on each key; C) both A and B
❏ ��Play-Along: Aebersold Vol. 1 – circle of 4ths – 4 bars per chord
Expression: Special Effects
Exercise 4.10 � Using BendsBasic __/__/__ ( ) Medium __/__/__ ( ) Challenge __/__/__ ( )
❏ *Basic: Play long, slow bends on random chromatic notes; work for control and intonation.
❏ **Medium: Play quick bends on notes in a flexible scale; some bends go up, some down.
❏ ***Challenge: Add bends to notes in standard jazz tunes or other familiar tune melodies .
❏ >More: Same as Basic; A) don't pause between keys - connect to the next root and proceed; B) play 2octaves on each key; C) both A and B
❏ ��Play-Along: Aebersold Vol. 1 – circle of 4ths – 4 bars per chord
Exercise 4.11 � Using Falls and GlissandosBasic __/__/__ ( ) Medium __/__/__ ( ) Challenge __/__/__ ( )
❏ *Basic: Playing a flexible scale, occasionally using falls to skip down.
❏ **Medium: Same as Basic; use glisses to skip up.
❏ ***Challenge: Add falls and glisses to standard tunes or other familiar melodies.
❏ >More: Same as Basic; A) don't pause between keys - connect to the next root and proceed; B) play 2octaves on each key; C) both A and B
❏ ��Play-Along: Aebersold Vol. 1 – circle of 4ths – 4 bars per chord
Exercise 4.15 � Growling, Humming, Air/Keys, and Half-Sounds
284284284284 • Exercises for Level 4 (Introduction)
Basic __/__/__ ( ) Medium __/__/__ ( ) Challenge __/__/__ ( )
❏ *Basic: Play a flexible scale; growl some notes.
❏ **Medium: Same as Basic; hum some notes.
❏ ***Challenge: Combine growling, humming, air, and key sounds in a longer passage.
❏ >More: Same as Basic; A) don't pause between keys - connect to the next root and proceed; B) play 2octaves on each key; C) both A and B
❏ ��Play-Along: Aebersold Vol. 1 – circle of 4ths – 4 bars per chord
Exercise 4.17 � Alternate FingeringsBasic __/__/__ ( ) Medium __/__/__ ( ) Challenge __/__/__ ( )
o *Basic: Memorize and play all alternate fingerings on your instrument.
o **Medium: Play all alternate-fingered trills on your instrument, from slow to fast.
o ***Challenge: Play a flexible scale; use alternate fingerings on repeated pitches, then add alternate-fingered trillson some pitches.
❏ >More: Same as Basic; A) don't pause between keys - connect to the next root and proceed; B) play 2octaves on each key; C) both A and B
❏ ��Play-Along: Aebersold Vol. 1 – circle of 4ths – 4 bars per chord
Exercise 4.18 � Trumpet EffectsBasic __/__/__ ( ) Medium __/__/__ ( ) Challenge __/__/__ ( )
❏ *Basic: On a flexible scale, use occasional double-tonguing or triple-tonguing on repeated or newpitches.
❏ **Medium: Play an octave’s worth of pedal tones (below low F#) with good sound and intonation. Use realor fake fingerings.
❏ ***Challenge: On a C blues progression, play a walking bassline.
❏ >More: Same as Basic; A) don't pause between keys - connect to the next root and proceed; B) play 2octaves on each key; C) both A and B
❏ ��Play-Along: Aebersold Vol. 1 – circle of 4ths – 4 bars per chord
Exercise 4.19 � Saxophone EffectsBasic __/__/__ ( ) Medium __/__/__ ( ) Challenge __/__/__ ( )
❏ *Basic: Slowly play all the split notes in a chromatic scale, then play a familiar melody adding a few splitnotes.
❏ **Medium: Experiment with thunk notes, then use some in a flexible scale or melody.
❏ ***Challenge: Learn as many altissimo notes as you can, then create melodies that switch between altissimoand regular range.
❏ >More: Same as Basic; A) don't pause between keys - connect to the next root and proceed; B) play 2octaves on each key; C) both A and B
❏ ��Play-Along: Aebersold Vol. 1 – circle of 4ths – 4 bars per chord

(Introduction) Exercises for Level 4 • 285285285285
Exercise 4.20 � Trombone EffectsBasic __/__/__ ( ) Medium __/__/__ ( )
❏ *Basic: Learn and play alternate positions for all notes that have them.
❏ **Medium: Play a flexible scale and add slides that go up, down, and both.
❏ >More: Same as Basic; A) don't pause between keys - connect to the next root and proceed; B) play 2octaves on each key; C) both A and B
❏ ��Play-Along: Aebersold Vol. 1 – circle of 4ths – 4 bars per chord
Exercise 4.21 � Keyboard EffectsBasic __/__/__ ( ) Medium __/__/__ ( ) Challenge __/__/__ ( )
❏ *Basic: Experiment with any of these effects: clusters, tremolo, hammering, strings and pedals, wideglissandos.
❏ **Medium: Create smooth piano bass lines for blues and other progressions.
❏ ***Challenge: Fill a familiar melody with block chords.
❏ >More: Same as Basic; A) don't pause between keys - connect to the next root and proceed; B) play 2octaves on each key; C) both A and B
❏ ��Play-Along: Aebersold Vol. 1 – circle of 4ths – 4 bars per chord
Exercise 4.22 � Guitar EffectsBasic __/__/__ ( ) Medium __/__/__ ( )
❏ *Basic: Experiment with any of these effects: bends, tremolo, muted strumming.
❏ **Medium: Experiment with guitar harmonics and playing melodies in octaves.
❏ >More: Same as Basic; A) don't pause between keys - connect to the next root and proceed; B) play 2octaves on each key; C) both A and B
❏ ��Play-Along: Aebersold Vol. 1 – circle of 4ths – 4 bars per chord
Exercise 4.23 � Bass EffectsBasic __/__/__ ( ) Medium __/__/__ ( )
❏ *Basic: Experiment with any of these effects: slides, twangs, slaps, wide vibrato.
❏ **Medium: Experiment with bass chords and bass harmonics.
❏ >More: Same as Basic; A) don't pause between keys - connect to the next root and proceed; B) play 2octaves on each key; C) both A and B
❏ ��Play-Along: Aebersold Vol. 1 – circle of 4ths – 4 bars per chord
Development: More Melodic Development
Exercise 4.24 � Using Varied Quotes
286286286286 • Exercises for Level 4 (Introduction)
Basic __/__/__ ( ) Medium __/__/__ ( )
❏ *Basic: Choose an easy tune and play it as several varied quotes.
❏ **Medium: Choose a jazz standard you know and play the first part of it as a varied quote.
❏ >More: Same as Basic; A) don't pause between keys - connect to the next root and proceed; B) play 2octaves on each key; C) both A and B
❏ ��Play-Along: Aebersold Vol. 1 – circle of 4ths – 4 bars per chord
Exercise 4.25 � Creating RiffsBasic __/__/__ ( ) Medium __/__/__ ( ) Challenge __/__/__ ( )
❏ *Basic: Play a simple riff; repeat it a few times.
❏ **Medium: Create a two-part riff and repeat it several times.
❏ ***Challenge: Create and repeat another simple riff and another two-part riff.
❏ >More: Same as Basic; A) don't pause between keys - connect to the next root and proceed; B) play 2octaves on each key; C) both A and B
❏ ��Play-Along: Aebersold Vol. 1 – circle of 4ths – 4 bars per chord
Exercise 4.26 � Changing RiffsBasic __/__/__ ( ) Medium __/__/__ ( ) Challenge __/__/__ ( )
❏ *Basic: Create a riff and change a few notes on the riff repetitions.
❏ **Medium: Create a riff and sequence two riff repetitions.
❏ ***Challenge: Create a riff and insert notes into the riff repetitions.
❏ >More: Same as Basic; A) don't pause between keys - connect to the next root and proceed; B) play 2octaves on each key; C) both A and B
❏ ��Play-Along: Aebersold Vol. 1 – circle of 4ths – 4 bars per chord
Exercise 4.27 � Riff TransitionsBasic __/__/__ ( ) Medium __/__/__ ( ) Challenge __/__/__ ( )
❏ *Basic: Play a simple melody line and create a riff from the end of the line.
❏ **Medium: Play a riff and transition into a melody.
❏ ***Challenge: Play a riff, add transition material, and hook into a second riff.
❏ >More: Same as Basic; A) don't pause between keys - connect to the next root and proceed; B) play 2octaves on each key; C) both A and B
❏ ��Play-Along: Aebersold Vol. 1 – circle of 4ths – 4 bars per chord
Exercise 4.28 � Using Pentatonic and Blues RiffsBasic __/__/__ ( ) Medium __/__/__ ( ) Challenge __/__/__ ( )
❏ *Basic: Create a pentatonic riff (minor or major) and transpose it into 12 keys.
❏ **Medium: Same as Basic; create a blues riff.
(Introduction) Exercises for Level 4 • 287287287287
❏ ***Challenge: Combine a pentatonic and blues riff into a longer riff; try in several keys.
❏ >More: Same as Basic; A) don't pause between keys - connect to the next root and proceed; B) play 2octaves on each key; C) both A and B
❏ ��Play-Along: Aebersold Vol. 1 – circle of 4ths – 4 bars per chord
Exercise 4.29 � Development CombinationsBasic __/__/__ ( ) Medium __/__/__ ( )
❏ *Basic: Create a motif and use the development combinations above.
❏ **Medium: Same as Basic; use three other development combinations.
❏ >More: Same as Basic; A) don't pause between keys - connect to the next root and proceed; B) play 2octaves on each key; C) both A and B
❏ ��Play-Along: Aebersold Vol. 1 – circle of 4ths – 4 bars per chord
Chord Progressions: Variations on ii-V-I’s
Exercise 4.30 � Using Tritone SubstitutionsBasic __/__/__ ( ) Medium __/__/__ ( )
❏ *Basic: Write the ii-bII-I progression for each key.in the circle of 4ths.
❏ **Medium: Write a chromatic progression down from C (C, B, Bb, A, etc.). Think of every other chord as abII, then do an “opposite” tritone substitution for each bII chord.
❏ >More: Same as Basic; A) don't pause between keys - connect to the next root and proceed; B) play 2octaves on each key; C) both A and B
❏ ��Play-Along: Aebersold Vol. 1 – circle of 4ths – 4 bars per chord
Exercise 4.31 � Resolving Dominant Chords to Other I ChordsBasic __/__/__ ( ) Medium __/__/__ ( )
❏ *Basic: Resolve each dominant chord around the circle of fourths to two major chords (not up afourth).
❏ **Medium: Think of each chord in the circle of 4ths as a dominant chord. Name the two related minorchords that each dominant chord could resolve to.
❏ >More: Same as Basic; A) don't pause between keys - connect to the next root and proceed; B) play 2octaves on each key; C) both A and B
❏ ��Play-Along: Aebersold Vol. 1 – circle of 4ths – 4 bars per chord
Exercise 4.32 � Dominant to Related Minor ChordsBasic __/__/__ ( ) Medium __/__/__ ( )
❏ *Basic: Around the circle of 4ths, create ii-v’s that resolve to the minor vi chord.
❏ **Medium: Same as Basic; resolve to minor iii.
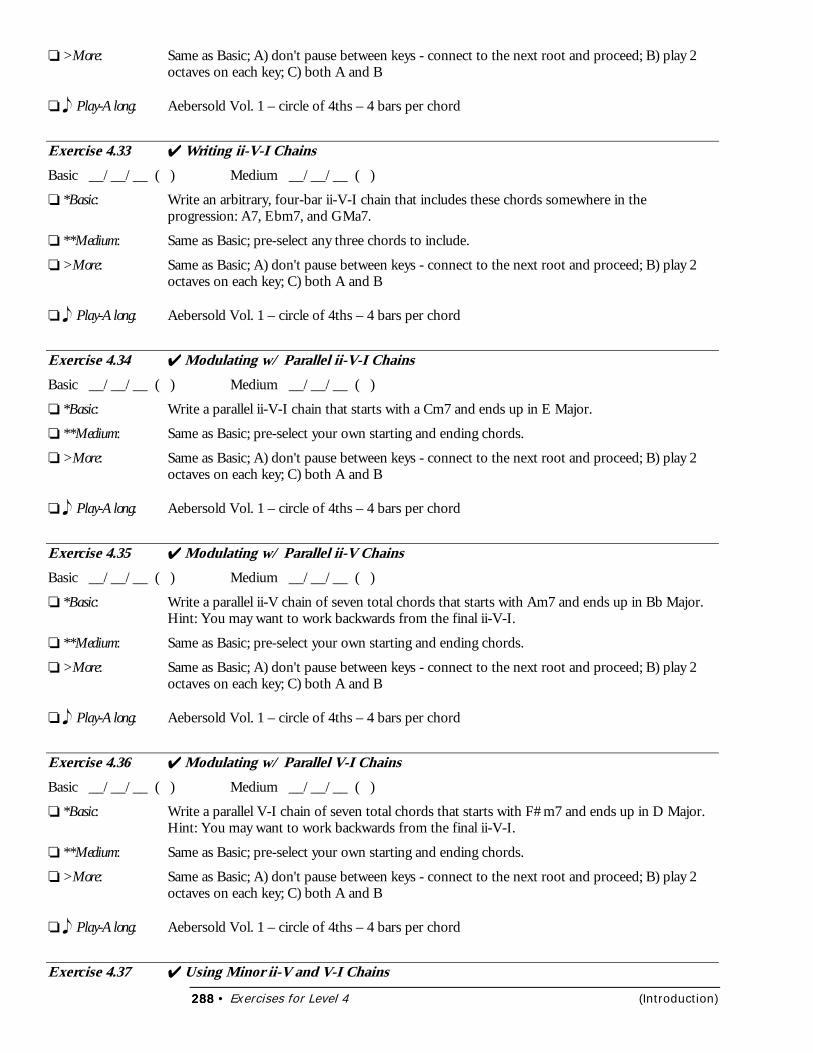
288288288288 • Exercises for Level 4 (Introduction)
❏ >More: Same as Basic; A) don't pause between keys - connect to the next root and proceed; B) play 2octaves on each key; C) both A and B
❏ ��Play-Along: Aebersold Vol. 1 – circle of 4ths – 4 bars per chord
Exercise 4.33 � Writing ii-V-I ChainsBasic __/__/__ ( ) Medium __/__/__ ( )
❏ *Basic: Write an arbitrary, four-bar ii-V-I chain that includes these chords somewhere in theprogression: A7, Ebm7, and GMa7.
❏ **Medium: Same as Basic; pre-select any three chords to include.
❏ >More: Same as Basic; A) don't pause between keys - connect to the next root and proceed; B) play 2octaves on each key; C) both A and B
❏ ��Play-Along: Aebersold Vol. 1 – circle of 4ths – 4 bars per chord
Exercise 4.34 � Modulating w/ Parallel ii-V-I ChainsBasic __/__/__ ( ) Medium __/__/__ ( )
❏ *Basic: Write a parallel ii-V-I chain that starts with a Cm7 and ends up in E Major.
❏ **Medium: Same as Basic; pre-select your own starting and ending chords.
❏ >More: Same as Basic; A) don't pause between keys - connect to the next root and proceed; B) play 2octaves on each key; C) both A and B
❏ ��Play-Along: Aebersold Vol. 1 – circle of 4ths – 4 bars per chord
Exercise 4.35 � Modulating w/ Parallel ii-V ChainsBasic __/__/__ ( ) Medium __/__/__ ( )
❏ *Basic: Write a parallel ii-V chain of seven total chords that starts with Am7 and ends up in Bb Major.Hint: You may want to work backwards from the final ii-V-I.
❏ **Medium: Same as Basic; pre-select your own starting and ending chords.
❏ >More: Same as Basic; A) don't pause between keys - connect to the next root and proceed; B) play 2octaves on each key; C) both A and B
❏ ��Play-Along: Aebersold Vol. 1 – circle of 4ths – 4 bars per chord
Exercise 4.36 � Modulating w/ Parallel V-I ChainsBasic __/__/__ ( ) Medium __/__/__ ( )
❏ *Basic: Write a parallel V-I chain of seven total chords that starts with F#m7 and ends up in D Major.Hint: You may want to work backwards from the final ii-V-I.
❏ **Medium: Same as Basic; pre-select your own starting and ending chords.
❏ >More: Same as Basic; A) don't pause between keys - connect to the next root and proceed; B) play 2octaves on each key; C) both A and B
❏ ��Play-Along: Aebersold Vol. 1 – circle of 4ths – 4 bars per chord
Exercise 4.37 � Using Minor ii-V and V-I Chains
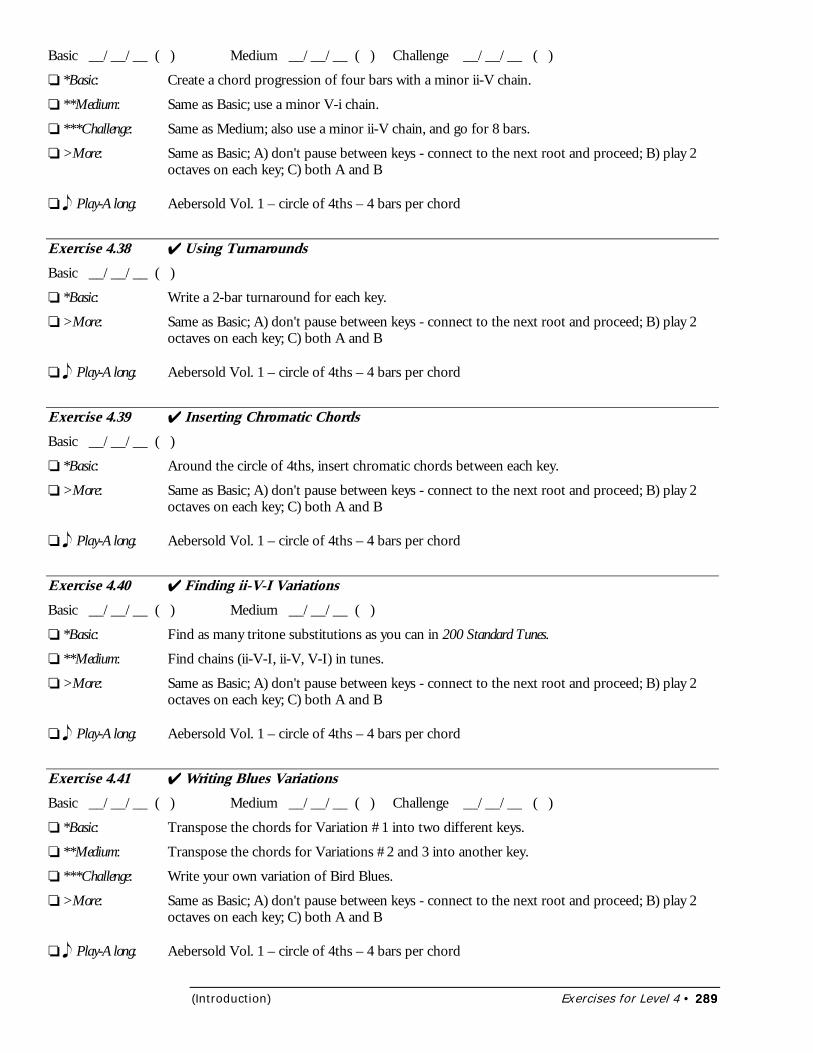
(Introduction) Exercises for Level 4 • 289289289289
Basic __/__/__ ( ) Medium __/__/__ ( ) Challenge __/__/__ ( )
❏ *Basic: Create a chord progression of four bars with a minor ii-V chain.
❏ **Medium: Same as Basic; use a minor V-i chain.
❏ ***Challenge: Same as Medium; also use a minor ii-V chain, and go for 8 bars.
❏ >More: Same as Basic; A) don't pause between keys - connect to the next root and proceed; B) play 2octaves on each key; C) both A and B
❏ ��Play-Along: Aebersold Vol. 1 – circle of 4ths – 4 bars per chord
Exercise 4.38 � Using TurnaroundsBasic __/__/__ ( )
❏ *Basic: Write a 2-bar turnaround for each key.
❏ >More: Same as Basic; A) don't pause between keys - connect to the next root and proceed; B) play 2octaves on each key; C) both A and B
❏ ��Play-Along: Aebersold Vol. 1 – circle of 4ths – 4 bars per chord
Exercise 4.39 � Inserting Chromatic ChordsBasic __/__/__ ( )
❏ *Basic: Around the circle of 4ths, insert chromatic chords between each key.
❏ >More: Same as Basic; A) don't pause between keys - connect to the next root and proceed; B) play 2octaves on each key; C) both A and B
❏ ��Play-Along: Aebersold Vol. 1 – circle of 4ths – 4 bars per chord
Exercise 4.40 � Finding ii-V-I VariationsBasic __/__/__ ( ) Medium __/__/__ ( )
❏ *Basic: Find as many tritone substitutions as you can in 200 Standard Tunes.
❏ **Medium: Find chains (ii-V-I, ii-V, V-I) in tunes.
❏ >More: Same as Basic; A) don't pause between keys - connect to the next root and proceed; B) play 2octaves on each key; C) both A and B
❏ ��Play-Along: Aebersold Vol. 1 – circle of 4ths – 4 bars per chord
Exercise 4.41 � Writing Blues VariationsBasic __/__/__ ( ) Medium __/__/__ ( ) Challenge __/__/__ ( )
❏ *Basic: Transpose the chords for Variation #1 into two different keys.
❏ **Medium: Transpose the chords for Variations #2 and 3 into another key.
❏ ***Challenge: Write your own variation of Bird Blues.
❏ >More: Same as Basic; A) don't pause between keys - connect to the next root and proceed; B) play 2octaves on each key; C) both A and B
❏ ��Play-Along: Aebersold Vol. 1 – circle of 4ths – 4 bars per chord
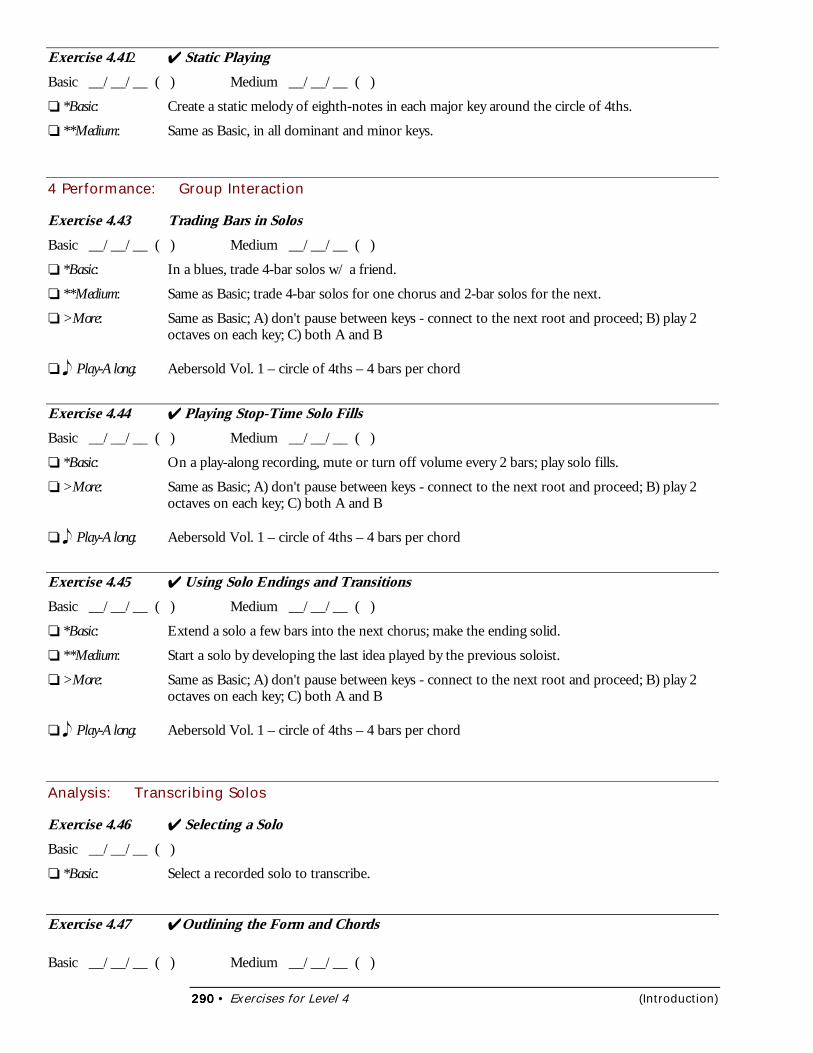
290290290290 • Exercises for Level 4 (Introduction)
Exercise 4.412 � Static PlayingBasic __/__/__ ( ) Medium __/__/__ ( )
❏ *Basic: Create a static melody of eighth-notes in each major key around the circle of 4ths.
❏ **Medium: Same as Basic, in all dominant and minor keys.
4 Performance: Group Interaction
Exercise 4.43 Trading Bars in SolosBasic __/__/__ ( ) Medium __/__/__ ( )
❏ *Basic: In a blues, trade 4-bar solos w/ a friend.
❏ **Medium: Same as Basic; trade 4-bar solos for one chorus and 2-bar solos for the next.
❏ >More: Same as Basic; A) don't pause between keys - connect to the next root and proceed; B) play 2octaves on each key; C) both A and B
❏ ��Play-Along: Aebersold Vol. 1 – circle of 4ths – 4 bars per chord
Exercise 4.44 � Playing Stop-Time Solo FillsBasic __/__/__ ( ) Medium __/__/__ ( )
❏ *Basic: On a play-along recording, mute or turn off volume every 2 bars; play solo fills.
❏ >More: Same as Basic; A) don't pause between keys - connect to the next root and proceed; B) play 2octaves on each key; C) both A and B
❏ ��Play-Along: Aebersold Vol. 1 – circle of 4ths – 4 bars per chord
Exercise 4.45 � Using Solo Endings and TransitionsBasic __/__/__ ( ) Medium __/__/__ ( )
❏ *Basic: Extend a solo a few bars into the next chorus; make the ending solid.
❏ **Medium: Start a solo by developing the last idea played by the previous soloist.
❏ >More: Same as Basic; A) don't pause between keys - connect to the next root and proceed; B) play 2octaves on each key; C) both A and B
❏ ��Play-Along: Aebersold Vol. 1 – circle of 4ths – 4 bars per chord
Analysis: Transcribing Solos
Exercise 4.46 � Selecting a SoloBasic __/__/__ ( )
❏ *Basic: Select a recorded solo to transcribe.
Exercise 4.47 �Outlining the Form and Chords
Basic __/__/__ ( ) Medium __/__/__ ( )

(Introduction) Exercises for Level 4 • 291291291291
❏ *Basic: Outline the form for the tune.
❏ **Medium: Same as Basic; transcribe the chords.
Exercise 4.48 � Sketching the RhythmsBasic __/__/__ ( )
❏ *Basic: Sketch the rhythms for the tune.
Exercise 4.49 � Adding Pitches and ExpressionBasic __/__/__ ( ) Medium __/__/__ ( )
❏ *Basic: Using the guidelines in section 4.41, add the pitches for the tune.
❏ **Medium: Same as Basic; add expressions.
Django Reinhardt Jimmy Blanton Oscar PettifordLionel Hampton Stuff Smith Stephane Grappelli Gene Krupa Billie
Holiday Dizzy Gillespie Fats Navarro Charlie Parker
*Level 5 — Advanced*Level 5 — Advanced*Level 5 — Advanced*Level 5 — Advanced*
As an Advanced Improviser, your improvisation skills are strong enoughthat you can explore new areas of creativity in melody and rhythm. Theseareas enhance but don’t replace your basic improv techniques. You’ll seemany ways to combine the techniques you’ve learned so far to produceinteresting new melodies and ideas. Free improvisation becomes a newopportunity for creativity. It’s just the beginning of what lies ahead ...
Sonny Stitt Don Byas J. J. Johnson Bud PowellThelonious Monk Kenny Clarke Max Roach Buddy RichElla Fitzgerald Miles Davis Chet Baker Paul Desmond
(Level 5 — Advanced) 5A: Playing Outside, Part 1 • 297297297297
5A: Playing Outside, Part 15A: Playing Outside, Part 15A: Playing Outside, Part 15A: Playing Outside, Part 1
In this chapter you’ll learn about:
• About Outside Playing• Outside Notes and Keys• Melodic Resolution and Outside Keys• Using Whole-Tone Scales
Note: Special thanks to Rich Dixon, guitarist for BRIDJJ, for his contributions to Chapters5a and 5b.
n simple terms, “inside” means playing notes that fit with the key, and “outside” meansplaying notes that don’t, such as non-harmonic tones. But this view is a limited one;there’s much more to know about playing outside.
About Outside Playing
Playing outside notes can add new dimensions to your solos. Artists such as OrnetteColeman, Allan Holdsworth and Dave Liebman have taken outside playing to great heights.When you play outside, you create groups of outside notes. Playing a single outside noteusually sounds more like a mistake (such as holding C# in C Major). Playing meaningfulgroups of outside notes highlights the difference between inside and outside.
When you play outside, consider these issues:
1) How closely do the notes fit with the current key? The more the notes diverge from the key, themore outside it is likely to sound.
2) How closely do the notes relate to each other? Augmented intervals and wide intervals withnon-harmonic tones tend to sound more outside.
3) How do the notes sound in context, compared to what’s before and after? Polychords and rapidlychanging keys sound more outside.
Myths & Facts About Outside PlayingMyths & Facts About Outside PlayingMyths & Facts About Outside PlayingMyths & Facts About Outside PlayingThere are plenty of misconceptions about outside playing. Here are some common mythsand facts:
Myth #1: Outside notes are chosen at random.
Fact #1: There are definite approaches to playing outside you can learn and depend on.
Myth #2: Inside is inside, outside is outside, and the two are a long way apart.
Fact #2: There are degrees of inside and outside, and you can go back and forthsmoothly between inside and outside.
Myth #3: You should only play outside on weird, avant-garde tunes.
Fact #3: You can play at least a small amount of outside in many types of solos; it justdepends on how well you play outside.
Myth #4: Playing outside is just a matter of choosing unusual pitches.
I

298298298298 • 5A: Playing Outside, Part 1 (Level 5 — Advanced)
Fact #4: The other elements of improvisation, such as rhythm, development, andexpression, are still important.
Outside Notes and Keys
The “inside” key is the current key. The most inside notes are the ones that fit the key’sbasic scale (such as the notes in the C Major scale). The most “outside” notes are ones thatdon’t relate to the current key, such as non-harmonic tones. But outside playing also usesother tones besides non-harmonic tones, in relative “degrees” of outside.
Degrees of OutsideDegrees of OutsideDegrees of OutsideDegrees of OutsideTo switch between inside and outside, you should know how outside any given note sounds,compared to the current key. The relative degrees of outside are:
• Most outside: Non-harmonic tones
• Somewhat outside: Active tones (2, 4, #4, 6, and 7). In major and dominant, the 4 and #4are more outside; in minor, the #4 and 7 are more outside.
• Least outside: Chord tones (1, 3, 5)
5.1 Using Outside Keys5.1 Using Outside Keys5.1 Using Outside Keys5.1 Using Outside KeysOne way to play outside is to play in a different key from the current key (also known aspolytonal playing). To do this, you can play the pentatonic scale in the new key. You need toknow how outside (or inside) the new pentatonic notes are. You can assign degrees of outsideto each note in the new pentatonic scale, as compared to the current key, to help you see thetotal outside effect of the new key.
For example, let’s superimpose F# Pentatonic over C Major. Four of the F# pentatonicnotes are non-harmonic tones in C Major (G#, A#, C#, and D#), while F# is an activetone. If we score 3 for each non-harmonic tone (most outside), 2 for each active tone (F#),and 1 for each chord tone (none in this case), we get a total outside score of 14 (veryoutside) for F# Pentatonic over C Major. The outside score of C Pentatonic over C Majoris only 7, so it’s very inside.
Against C Major, the other keys (pentatonic scales) are ranked below from most outside tomost inside.
Outside of C Major -------------------- In-between ----------------------- Inside C MajorF# Db B Ab E Eb A Bb D F G C
14 14 13 12 11 10 10 9 9 8 8 7
#4 b2 7 b6 3 b3 6 b7 2 4 5 1Example 5.1 - From C (inside) to F# (outside)
So over a CMa7 chord, you can switch between other pentatonic scales to create outside orinside sounds. This is easier to do when the chord lasts longer. When you are familiar withthe chart above, transpose it to the other major keys.
Outside Major Keys, Circle of 4thsOutside Major Keys, Circle of 4thsOutside Major Keys, Circle of 4thsOutside Major Keys, Circle of 4thsOne way to visualize outside keys is to use a diagram of the circle of fourths. On the circle,the farther a key is from the current key (or on the opposite side of the circle), the moreoutside it sounds. The diagram for C Major is shown below. The most outside keys are at ornear the bottom of each circle; the most inside keys are at or near the top of the circle.
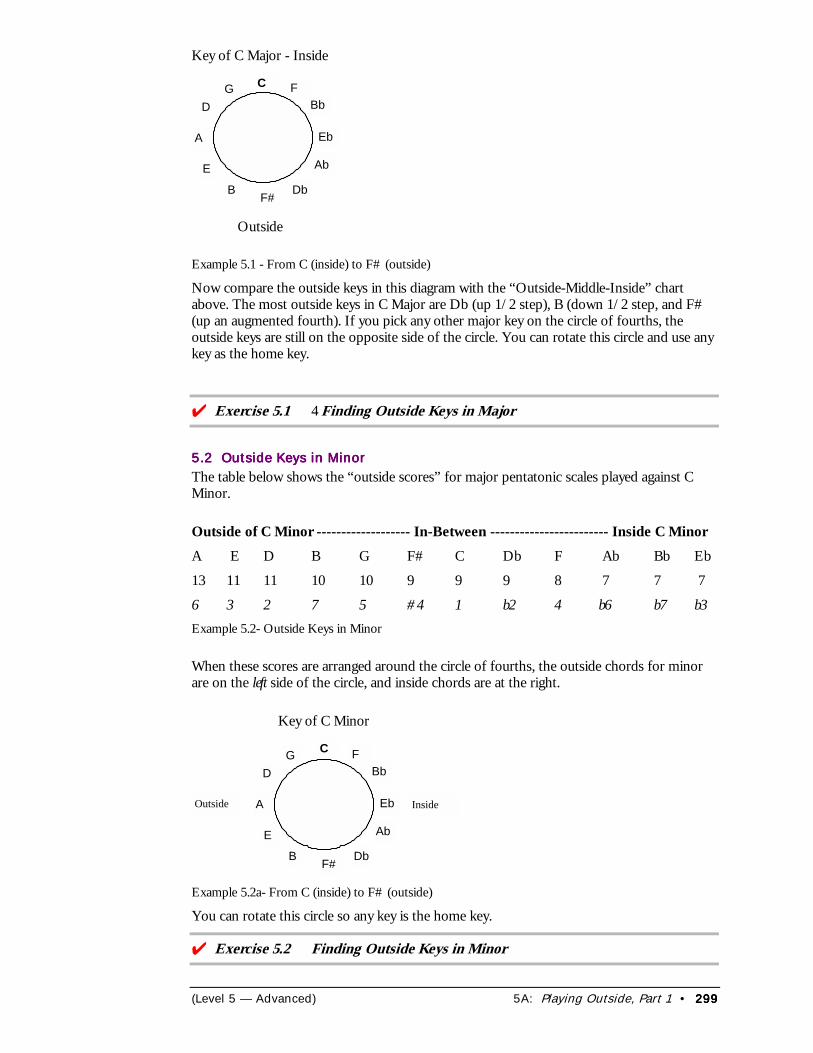
(Level 5 — Advanced) 5A: Playing Outside, Part 1 • 299299299299
Key of C Major - Inside
C FBb
Eb
Ab
DbF#B
E
A
DG
Outside
Example 5.1 - From C (inside) to F# (outside)
Now compare the outside keys in this diagram with the “Outside-Middle-Inside” chartabove. The most outside keys in C Major are Db (up 1/2 step), B (down 1/2 step, and F#(up an augmented fourth). If you pick any other major key on the circle of fourths, theoutside keys are still on the opposite side of the circle. You can rotate this circle and use anykey as the home key.
���Exercise 5.1 4 Finding Outside Keys in Major
5.2 Outside Keys in Minor5.2 Outside Keys in Minor5.2 Outside Keys in Minor5.2 Outside Keys in MinorThe table below shows the “outside scores” for major pentatonic scales played against CMinor.
Outside of C Minor ------------------- In-Between ------------------------ Inside C MinorA E D B G F# C Db F Ab Bb Eb
13 11 11 10 10 9 9 9 8 7 7 7
6 3 2 7 5 #4 1 b2 4 b6 b7 b3Example 5.2- Outside Keys in Minor
When these scores are arranged around the circle of fourths, the outside chords for minorare on the left side of the circle, and inside chords are at the right.
Key of C Minor
C FBb
Eb
Ab
DbF#B
E
A
DG
Outside Inside
Example 5.2a- From C (inside) to F# (outside)
You can rotate this circle so any key is the home key.
���Exercise 5.2 Finding Outside Keys in Minor
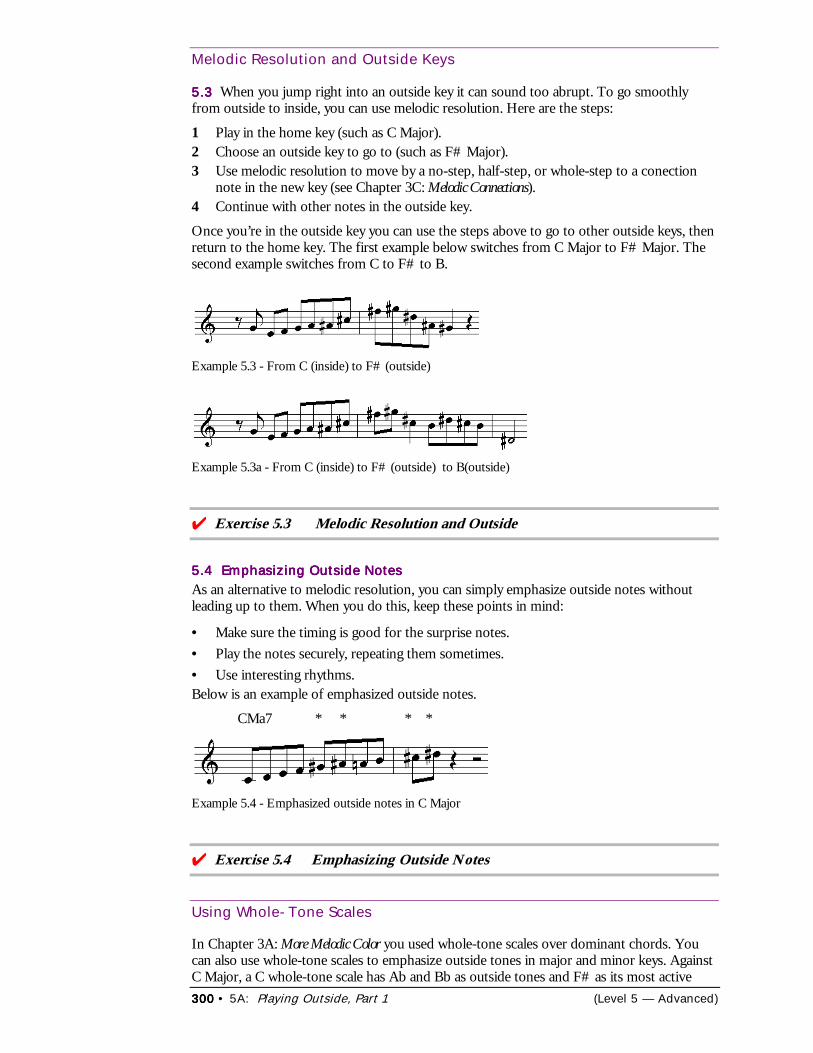
300300300300 • 5A: Playing Outside, Part 1 (Level 5 — Advanced)
Melodic Resolution and Outside Keys
5.35.35.35.3 When you jump right into an outside key it can sound too abrupt. To go smoothlyfrom outside to inside, you can use melodic resolution. Here are the steps:
1 Play in the home key (such as C Major).2 Choose an outside key to go to (such as F# Major).3 Use melodic resolution to move by a no-step, half-step, or whole-step to a conection
note in the new key (see Chapter 3C: Melodic Connections).4 Continue with other notes in the outside key.
Once you’re in the outside key you can use the steps above to go to other outside keys, thenreturn to the home key. The first example below switches from C Major to F# Major. Thesecond example switches from C to F# to B.
Example 5.3 - From C (inside) to F# (outside)
Example 5.3a - From C (inside) to F# (outside) to B(outside)
���Exercise 5.3 Melodic Resolution and Outside
5.4 Emphasizing Outside Notes5.4 Emphasizing Outside Notes5.4 Emphasizing Outside Notes5.4 Emphasizing Outside NotesAs an alternative to melodic resolution, you can simply emphasize outside notes withoutleading up to them. When you do this, keep these points in mind:
• Make sure the timing is good for the surprise notes.• Play the notes securely, repeating them sometimes.• Use interesting rhythms.Below is an example of emphasized outside notes.
CMa7 * * * *
Example 5.4 - Emphasized outside notes in C Major
���Exercise 5.4 Emphasizing Outside Notes
Using Whole-Tone Scales
In Chapter 3A: More Melodic Color you used whole-tone scales over dominant chords. Youcan also use whole-tone scales to emphasize outside tones in major and minor keys. AgainstC Major, a C whole-tone scale has Ab and Bb as outside tones and F# as its most active
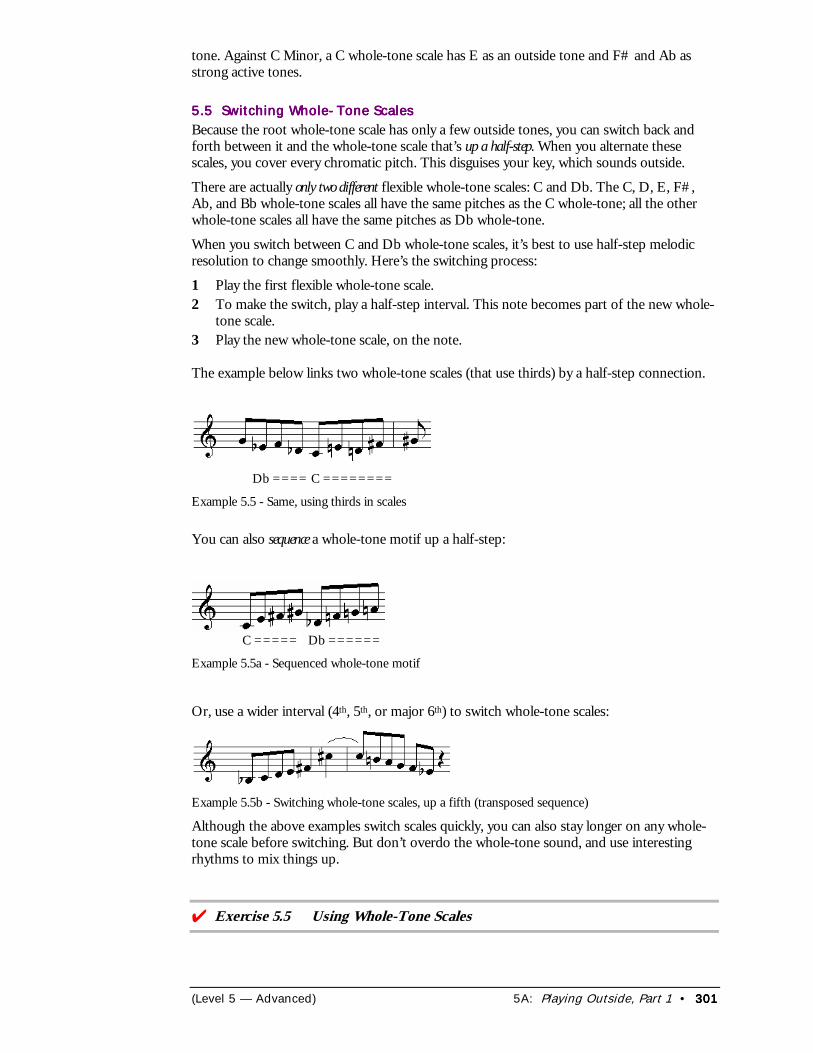
(Level 5 — Advanced) 5A: Playing Outside, Part 1 • 301301301301
tone. Against C Minor, a C whole-tone scale has E as an outside tone and F# and Ab asstrong active tones.
5.5 Switching Whole-Tone Scales5.5 Switching Whole-Tone Scales5.5 Switching Whole-Tone Scales5.5 Switching Whole-Tone ScalesBecause the root whole-tone scale has only a few outside tones, you can switch back andforth between it and the whole-tone scale that’s up a half-step. When you alternate thesescales, you cover every chromatic pitch. This disguises your key, which sounds outside.
There are actually only two different flexible whole-tone scales: C and Db. The C, D, E, F#,Ab, and Bb whole-tone scales all have the same pitches as the C whole-tone; all the otherwhole-tone scales all have the same pitches as Db whole-tone.
When you switch between C and Db whole-tone scales, it’s best to use half-step melodicresolution to change smoothly. Here’s the switching process:
1 Play the first flexible whole-tone scale.2 To make the switch, play a half-step interval. This note becomes part of the new whole-
tone scale.3 Play the new whole-tone scale, on the note.
The example below links two whole-tone scales (that use thirds) by a half-step connection.
Db ==== C ========
Example 5.5 - Same, using thirds in scales
You can also sequence a whole-tone motif up a half-step:
C ===== Db ======
Example 5.5a - Sequenced whole-tone motif
Or, use a wider interval (4th, 5th, or major 6th) to switch whole-tone scales:
Example 5.5b - Switching whole-tone scales, up a fifth (transposed sequence)
Although the above examples switch scales quickly, you can also stay longer on any whole-tone scale before switching. But don’t overdo the whole-tone sound, and use interestingrhythms to mix things up.
���Exercise 5.5 Using Whole-Tone Scales
302302302302 • 5A: Playing Outside, Part 1 (Level 5 — Advanced)
Outside Playing on the BRIDJJ CDOutside Playing on the BRIDJJ CDOutside Playing on the BRIDJJ CDOutside Playing on the BRIDJJ CDBelow are some locations on the BRIDJJ CD “Beat the Rats” where outside playing occurs.Some of these outside techniques are explained in the next chapter.
Timing Tune / Description5:35-5:40 “I Think I’ll Keep Her,” flugelhorn solo; linked sequences using 4ths and half-
steps.5:48-5:49 “Three and Me,” flugelhorn solo; G Major arpeggio against E Major.6:01-6:08 “Three and Me,” flugelhorn solo; melodic resolution to outside.2:29-2:30 “Beat the Rats,” guitar solo; outside arpeggios.2:51-2:55 “Beat the Rats;” whole-tone over major.2:59-3:01 “Beat the Rats;” polytone arpeggios (see Chapter 5B: Playing Outside, Part 2).
Chapter Review
1) Outside notes are ones that don’t fit in the home key.2) Non-harmonic tones are most outside; active tones are somewhat outside; chord tones
are inside.3) In major, the outside keys are across the circle of fourths from the current key; in
minor, the outside keys are to the left on the circle of fourths.4) You can use melodic resolution to switch from an inside key to an outside key.5) You can switch between whole-tone scales to play outside (2 flexible scales linked by a
half-step).
ExpressionsExpressionsExpressionsExpressions*Imagination is more important than knowledge, for knowledge is limited to all we now know and*If a man write a better book, preach a better sermon, or make a better mouse-trap, than his neighbor,tho' he build his house in the woods, the world will make a beaten path to his door. Ralph WaldoEmerson
*It is hard for an empty sack to stand upright. Ralph Waldo Emerson
*Even if you are on the right track, you will get run over if you just stand there. Arthur Godfrey
*Every artist was first an amateur. Ralph Waldo Emerson*No man is free who is not master of himself. Epictetus*Sometimes I've believed as many as six impossible things before breakfast. Lewis Carroll*The mind is a wonderful thing. It starts to work the minute you are born, and never stops until youget up to speak in public. John Mason Brown*Ah, but a man's reach should exceed his grasp, or what's a heaven for? Robert Browning*I light my candle from their torches. Robert Burton*I am a great believer in luck. The harder I work the more of it I seem to have. Coleman Cox*I have a friend who's a weather forecaster. He bases his forecasts on reports cabled him by experts inall parts of the world. And he's a rotten forecaster -- because he never looks out the window. Dr.Harvey Cushing
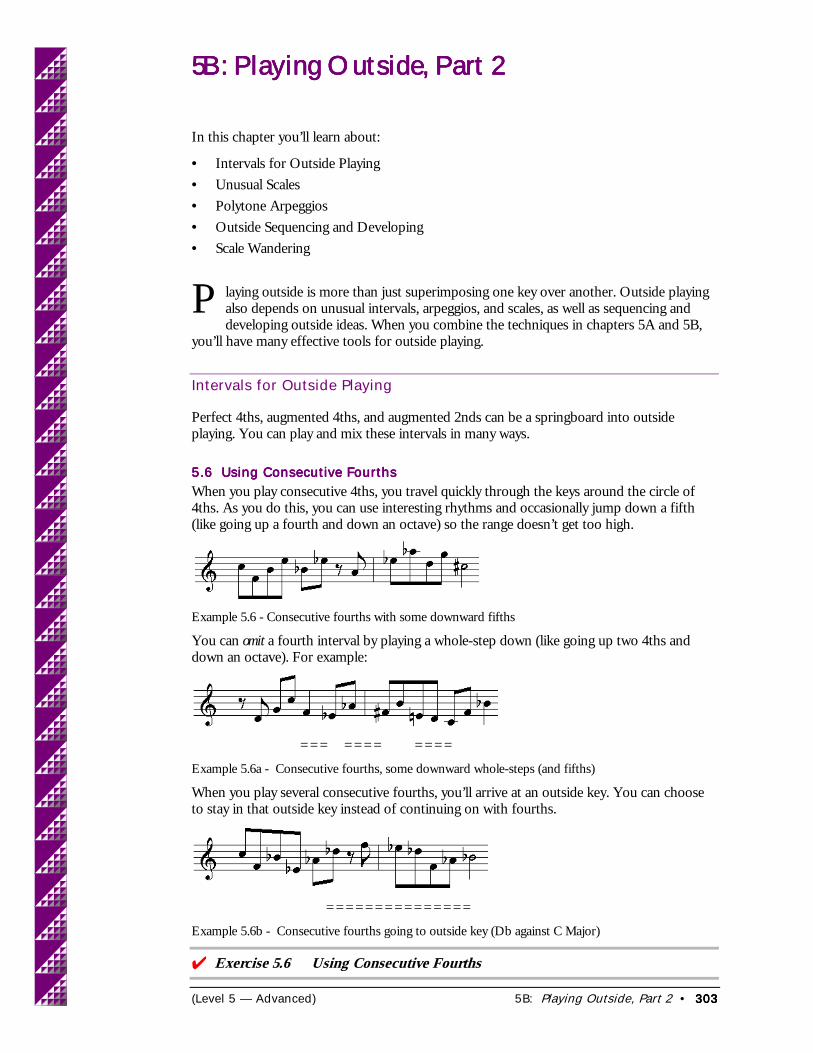
(Level 5 — Advanced) 5B: Playing Outside, Part 2 • 303303303303
5B: Playing Outside, Part 25B: Playing Outside, Part 25B: Playing Outside, Part 25B: Playing Outside, Part 2
In this chapter you’ll learn about:
• Intervals for Outside Playing• Unusual Scales• Polytone Arpeggios• Outside Sequencing and Developing• Scale Wandering
laying outside is more than just superimposing one key over another. Outside playingalso depends on unusual intervals, arpeggios, and scales, as well as sequencing anddeveloping outside ideas. When you combine the techniques in chapters 5A and 5B,
you’ll have many effective tools for outside playing.
Intervals for Outside Playing
Perfect 4ths, augmented 4ths, and augmented 2nds can be a springboard into outsideplaying. You can play and mix these intervals in many ways.
5.6 Using Consecutive Fourths5.6 Using Consecutive Fourths5.6 Using Consecutive Fourths5.6 Using Consecutive FourthsWhen you play consecutive 4ths, you travel quickly through the keys around the circle of4ths. As you do this, you can use interesting rhythms and occasionally jump down a fifth(like going up a fourth and down an octave) so the range doesn’t get too high.
Example 5.6 - Consecutive fourths with some downward fifths
You can omit a fourth interval by playing a whole-step down (like going up two 4ths anddown an octave). For example:
=== ==== ====Example 5.6a - Consecutive fourths, some downward whole-steps (and fifths)
When you play several consecutive fourths, you’ll arrive at an outside key. You can chooseto stay in that outside key instead of continuing on with fourths.
===============Example 5.6b - Consecutive fourths going to outside key (Db against C Major)
���Exercise 5.6 Using Consecutive Fourths
P
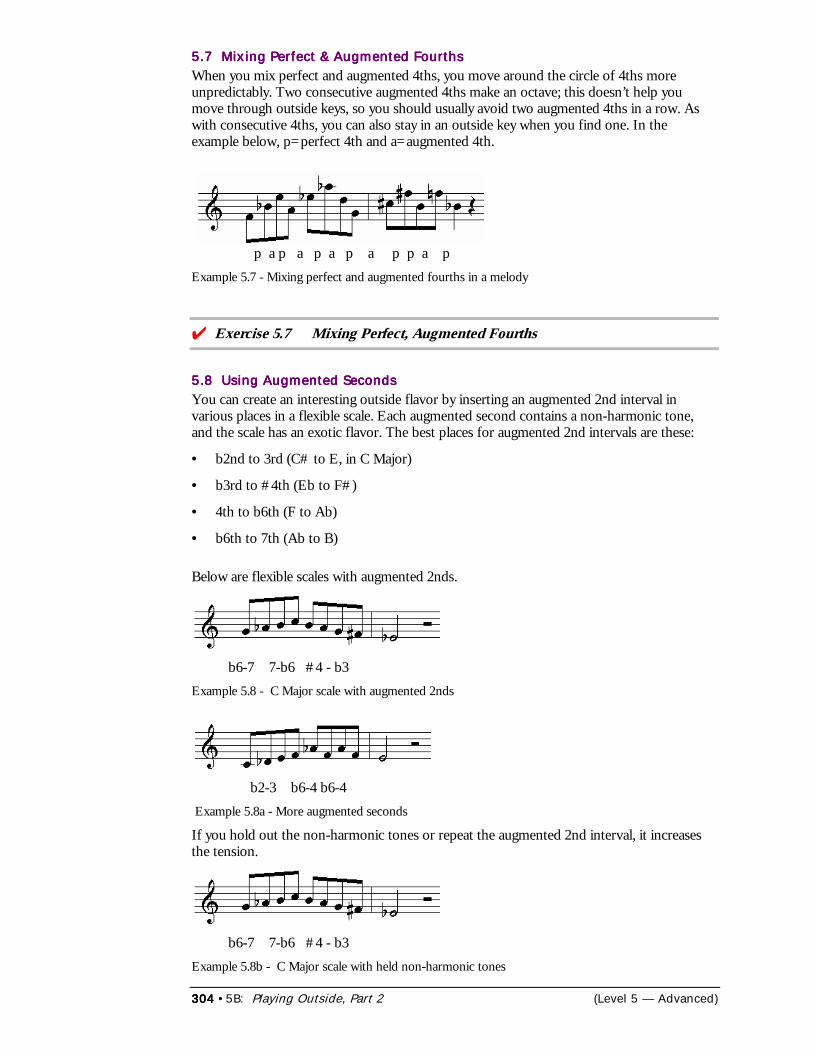
304304304304 •5B: Playing Outside, Part 2 (Level 5 — Advanced)
5.7 Mixing Perfect & Augmented Fourths5.7 Mixing Perfect & Augmented Fourths5.7 Mixing Perfect & Augmented Fourths5.7 Mixing Perfect & Augmented FourthsWhen you mix perfect and augmented 4ths, you move around the circle of 4ths moreunpredictably. Two consecutive augmented 4ths make an octave; this doesn’t help youmove through outside keys, so you should usually avoid two augmented 4ths in a row. Aswith consecutive 4ths, you can also stay in an outside key when you find one. In theexample below, p=perfect 4th and a=augmented 4th.
p a p a p a p a p p a pExample 5.7 - Mixing perfect and augmented fourths in a melody
���Exercise 5.7 Mixing Perfect, Augmented Fourths
5.8 Using Augmented Seconds5.8 Using Augmented Seconds5.8 Using Augmented Seconds5.8 Using Augmented SecondsYou can create an interesting outside flavor by inserting an augmented 2nd interval invarious places in a flexible scale. Each augmented second contains a non-harmonic tone,and the scale has an exotic flavor. The best places for augmented 2nd intervals are these:
• b2nd to 3rd (C# to E, in C Major)
• b3rd to #4th (Eb to F#)
• 4th to b6th (F to Ab)
• b6th to 7th (Ab to B)
Below are flexible scales with augmented 2nds.
b6-7 7-b6 #4 - b3Example 5.8 - C Major scale with augmented 2nds
b2-3 b6-4 b6-4 Example 5.8a - More augmented seconds
If you hold out the non-harmonic tones or repeat the augmented 2nd interval, it increasesthe tension.
b6-7 7-b6 #4 - b3Example 5.8b - C Major scale with held non-harmonic tones
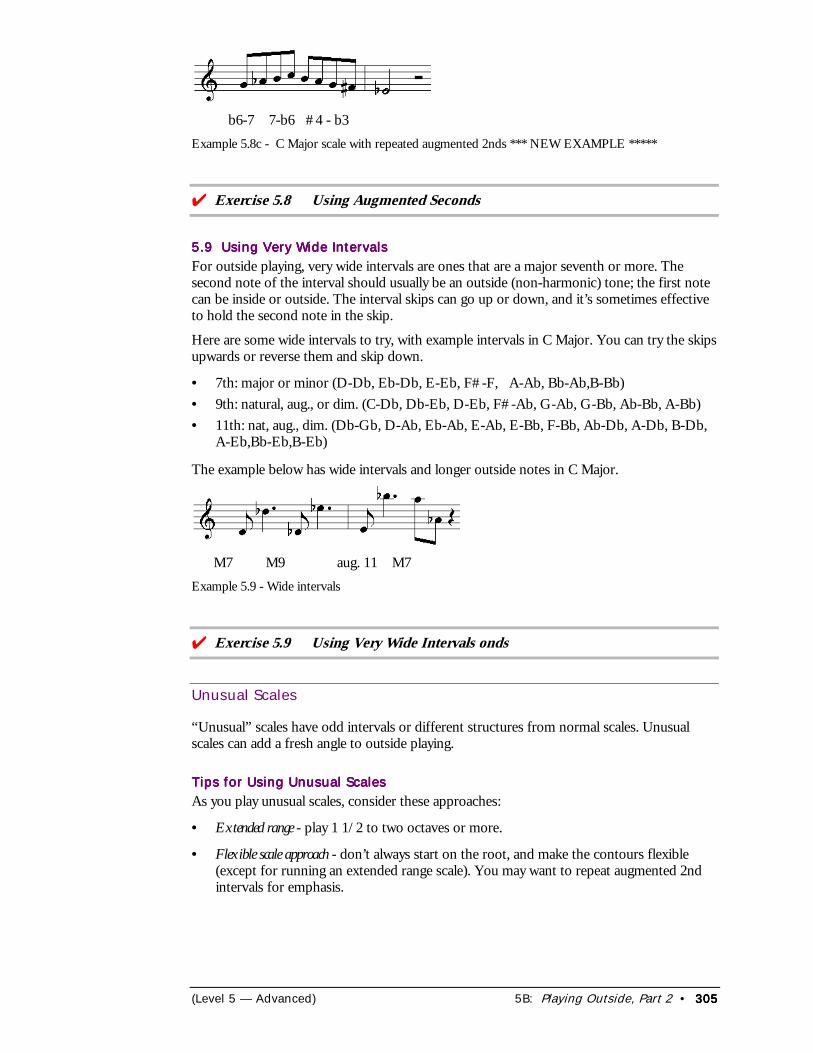
(Level 5 — Advanced) 5B: Playing Outside, Part 2 • 305305305305
b6-7 7-b6 #4 - b3Example 5.8c - C Major scale with repeated augmented 2nds *** NEW EXAMPLE *****
���Exercise 5.8 Using Augmented Seconds
5.9 Using Very Wide Intervals5.9 Using Very Wide Intervals5.9 Using Very Wide Intervals5.9 Using Very Wide IntervalsFor outside playing, very wide intervals are ones that are a major seventh or more. Thesecond note of the interval should usually be an outside (non-harmonic) tone; the first notecan be inside or outside. The interval skips can go up or down, and it’s sometimes effectiveto hold the second note in the skip.
Here are some wide intervals to try, with example intervals in C Major. You can try the skipsupwards or reverse them and skip down.
• 7th: major or minor (D-Db, Eb-Db, E-Eb, F#-F, A-Ab, Bb-Ab,B-Bb)• 9th: natural, aug., or dim. (C-Db, Db-Eb, D-Eb, F#-Ab, G-Ab, G-Bb, Ab-Bb, A-Bb)• 11th: nat, aug., dim. (Db-Gb, D-Ab, Eb-Ab, E-Ab, E-Bb, F-Bb, Ab-Db, A-Db, B-Db,
A-Eb,Bb-Eb,B-Eb)
The example below has wide intervals and longer outside notes in C Major.
M7 M9 aug. 11 M7Example 5.9 - Wide intervals
���Exercise 5.9 Using Very Wide Intervals onds
Unusual Scales
“Unusual” scales have odd intervals or different structures from normal scales. Unusualscales can add a fresh angle to outside playing.
Tips for Using Unusual ScalesTips for Using Unusual ScalesTips for Using Unusual ScalesTips for Using Unusual ScalesAs you play unusual scales, consider these approaches:
• Extended range - play 1 1/2 to two octaves or more.
• Flexible scale approach - don’t always start on the root, and make the contours flexible(except for running an extended range scale). You may want to repeat augmented 2ndintervals for emphasis.
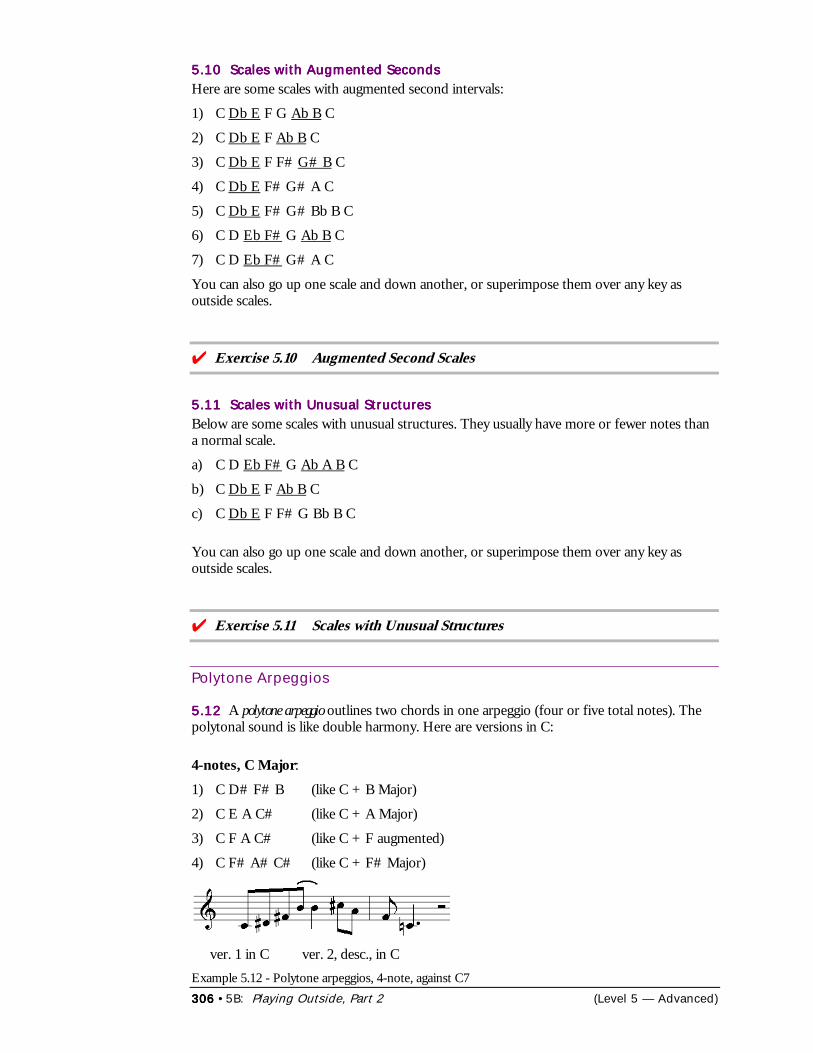
306306306306 •5B: Playing Outside, Part 2 (Level 5 — Advanced)
5.10 Scales with Augmented Seconds5.10 Scales with Augmented Seconds5.10 Scales with Augmented Seconds5.10 Scales with Augmented SecondsHere are some scales with augmented second intervals:
1) C Db E F G Ab B C
2) C Db E F Ab B C
3) C Db E F F# G# B C
4) C Db E F# G# A C
5) C Db E F# G# Bb B C
6) C D Eb F# G Ab B C
7) C D Eb F# G# A C
You can also go up one scale and down another, or superimpose them over any key asoutside scales.
���Exercise 5.10 Augmented Second Scales
5.11 Scales with Unusual Structures5.11 Scales with Unusual Structures5.11 Scales with Unusual Structures5.11 Scales with Unusual StructuresBelow are some scales with unusual structures. They usually have more or fewer notes thana normal scale.
a) C D Eb F# G Ab A B C
b) C Db E F Ab B C
c) C Db E F F# G Bb B C
You can also go up one scale and down another, or superimpose them over any key asoutside scales.
���Exercise 5.11 Scales with Unusual Structures
Polytone Arpeggios
5.125.125.125.12 A polytone arpeggio outlines two chords in one arpeggio (four or five total notes). Thepolytonal sound is like double harmony. Here are versions in C:
4-notes, C Major:1) C D# F# B (like C + B Major)
2) C E A C# (like C + A Major)
3) C F A C# (like C + F augmented)
4) C F# A# C# (like C + F# Major)
ver. 1 in C ver. 2, desc., in CExample 5.12 - Polytone arpeggios, 4-note, against C7
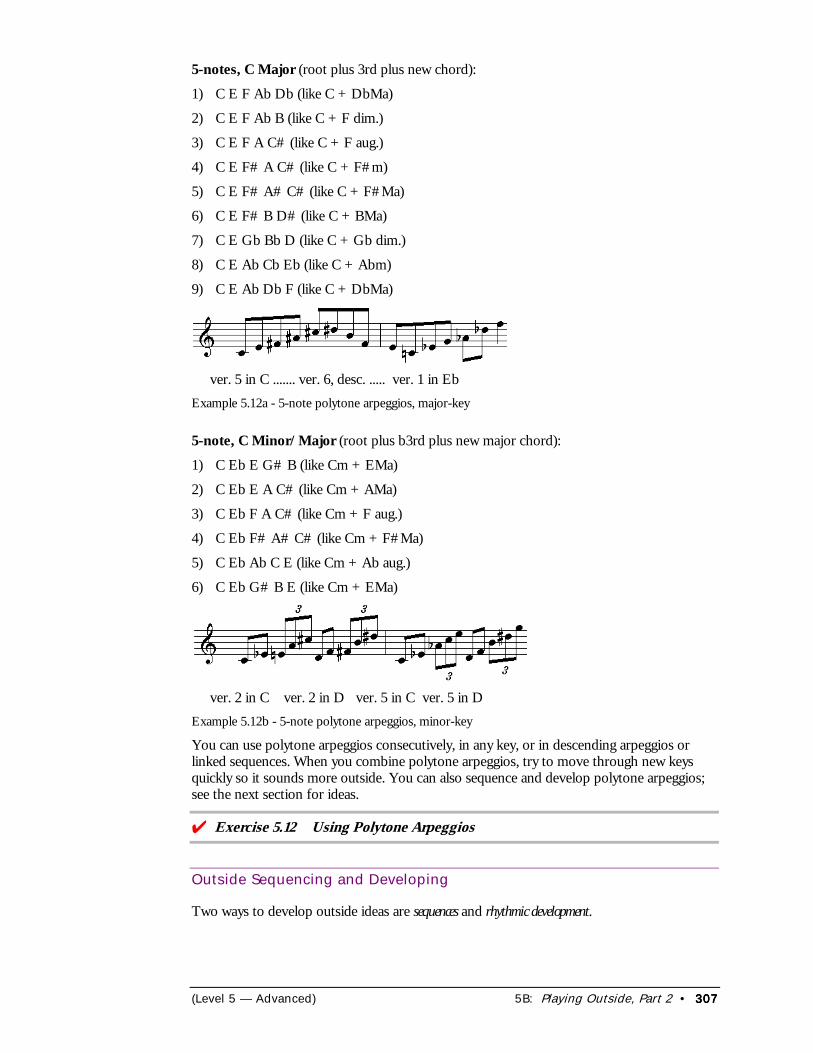
(Level 5 — Advanced) 5B: Playing Outside, Part 2 • 307307307307
5-notes, C Major (root plus 3rd plus new chord):
1) C E F Ab Db (like C + DbMa)
2) C E F Ab B (like C + F dim.)
3) C E F A C# (like C + F aug.)
4) C E F# A C# (like C + F#m)
5) C E F# A# C# (like C + F#Ma)
6) C E F# B D# (like C + BMa)
7) C E Gb Bb D (like C + Gb dim.)
8) C E Ab Cb Eb (like C + Abm)
9) C E Ab Db F (like C + DbMa)
ver. 5 in C ....... ver. 6, desc. ..... ver. 1 in EbExample 5.12a - 5-note polytone arpeggios, major-key
5-note, C Minor/Major (root plus b3rd plus new major chord):
1) C Eb E G# B (like Cm + EMa)
2) C Eb E A C# (like Cm + AMa)
3) C Eb F A C# (like Cm + F aug.)
4) C Eb F# A# C# (like Cm + F#Ma)
5) C Eb Ab C E (like Cm + Ab aug.)
6) C Eb G# B E (like Cm + EMa)
ver. 2 in C ver. 2 in D ver. 5 in C ver. 5 in DExample 5.12b - 5-note polytone arpeggios, minor-key
You can use polytone arpeggios consecutively, in any key, or in descending arpeggios orlinked sequences. When you combine polytone arpeggios, try to move through new keysquickly so it sounds more outside. You can also sequence and develop polytone arpeggios;see the next section for ideas.
���Exercise 5.12 Using Polytone Arpeggios
Outside Sequencing and Developing
Two ways to develop outside ideas are sequences and rhythmic development.
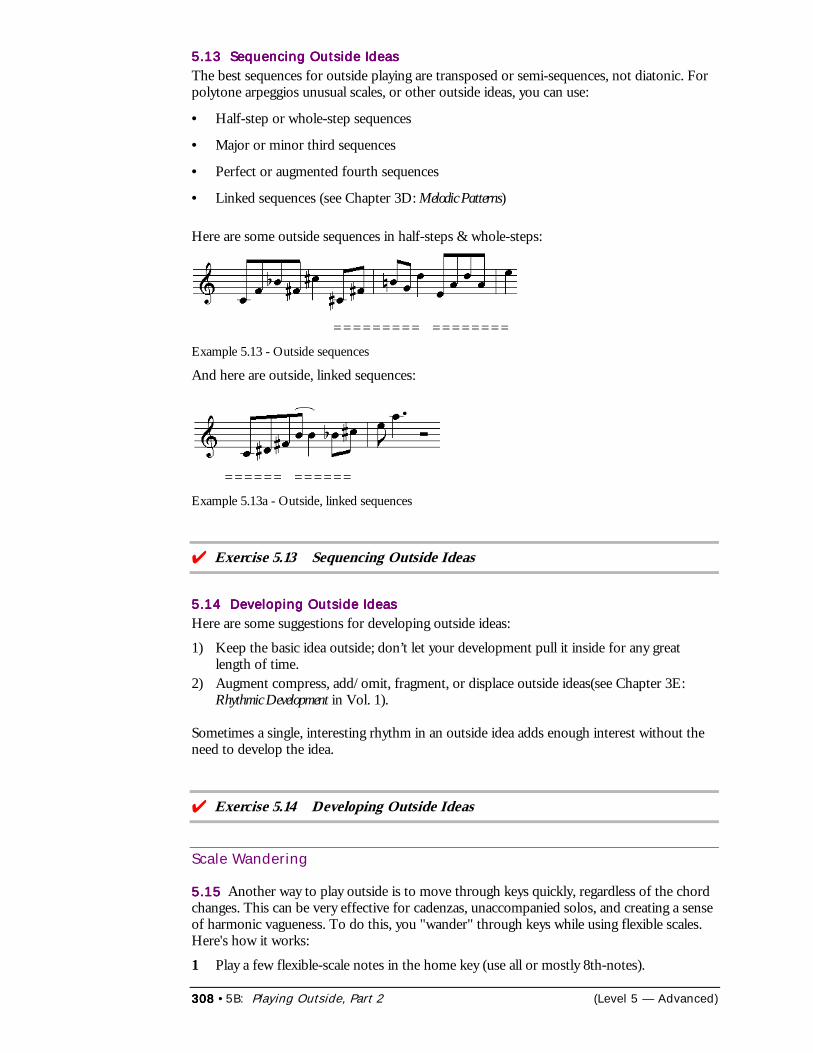
308308308308 •5B: Playing Outside, Part 2 (Level 5 — Advanced)
5.13 Sequencing Outside Ideas5.13 Sequencing Outside Ideas5.13 Sequencing Outside Ideas5.13 Sequencing Outside IdeasThe best sequences for outside playing are transposed or semi-sequences, not diatonic. Forpolytone arpeggios unusual scales, or other outside ideas, you can use:
• Half-step or whole-step sequences
• Major or minor third sequences
• Perfect or augmented fourth sequences
• Linked sequences (see Chapter 3D: Melodic Patterns)
Here are some outside sequences in half-steps & whole-steps:
========= ========Example 5.13 - Outside sequences
And here are outside, linked sequences:
====== ======Example 5.13a - Outside, linked sequences
���Exercise 5.13 Sequencing Outside Ideas
5.14 Developing Outside Ideas5.14 Developing Outside Ideas5.14 Developing Outside Ideas5.14 Developing Outside IdeasHere are some suggestions for developing outside ideas:
1) Keep the basic idea outside; don’t let your development pull it inside for any greatlength of time.
2) Augment compress, add/omit, fragment, or displace outside ideas(see Chapter 3E:Rhythmic Development in Vol. 1).
Sometimes a single, interesting rhythm in an outside idea adds enough interest without theneed to develop the idea.
���Exercise 5.14 Developing Outside Ideas
Scale Wandering
5.155.155.155.15 Another way to play outside is to move through keys quickly, regardless of the chordchanges. This can be very effective for cadenzas, unaccompanied solos, and creating a senseof harmonic vagueness. To do this, you "wander" through keys while using flexible scales.Here's how it works:
1 Play a few flexible-scale notes in the home key (use all or mostly 8th-notes).
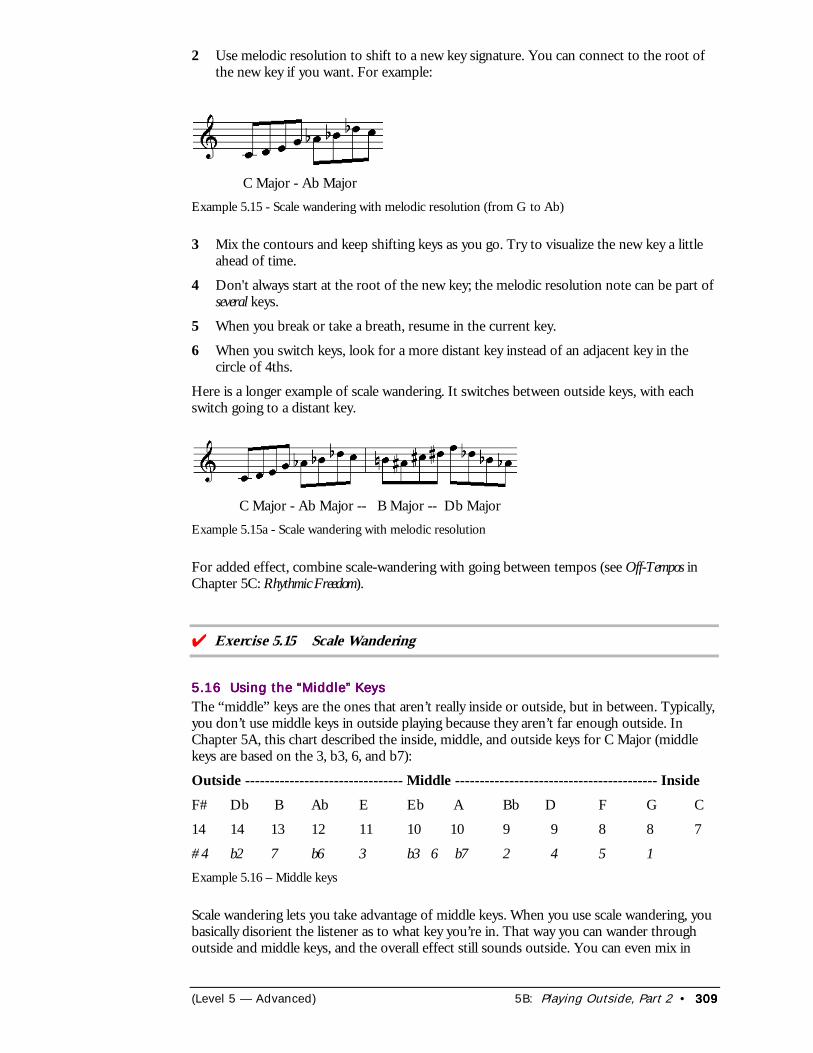
(Level 5 — Advanced) 5B: Playing Outside, Part 2 • 309309309309
2 Use melodic resolution to shift to a new key signature. You can connect to the root ofthe new key if you want. For example:
C Major - Ab MajorExample 5.15 - Scale wandering with melodic resolution (from G to Ab)
3 Mix the contours and keep shifting keys as you go. Try to visualize the new key a littleahead of time.
4 Don't always start at the root of the new key; the melodic resolution note can be part ofseveral keys.
5 When you break or take a breath, resume in the current key.
6 When you switch keys, look for a more distant key instead of an adjacent key in thecircle of 4ths.
Here is a longer example of scale wandering. It switches between outside keys, with eachswitch going to a distant key.
C Major - Ab Major -- B Major -- Db MajorExample 5.15a - Scale wandering with melodic resolution
For added effect, combine scale-wandering with going between tempos (see Off-Tempos inChapter 5C: Rhythmic Freedom).
���Exercise 5.15 Scale Wandering
5.16 Using the “Middle” Keys5.16 Using the “Middle” Keys5.16 Using the “Middle” Keys5.16 Using the “Middle” KeysThe “middle” keys are the ones that aren’t really inside or outside, but in between. Typically,you don’t use middle keys in outside playing because they aren’t far enough outside. InChapter 5A, this chart described the inside, middle, and outside keys for C Major (middlekeys are based on the 3, b3, 6, and b7):
Outside -------------------------------- Middle ----------------------------------------- InsideF# Db B Ab E Eb A Bb D F G C
14 14 13 12 11 10 10 9 9 8 8 7
#4 b2 7 b6 3 b3 6 b7 2 4 5 1Example 5.16 – Middle keys
Scale wandering lets you take advantage of middle keys. When you use scale wandering, youbasically disorient the listener as to what key you’re in. That way you can wander throughoutside and middle keys, and the overall effect still sounds outside. You can even mix in
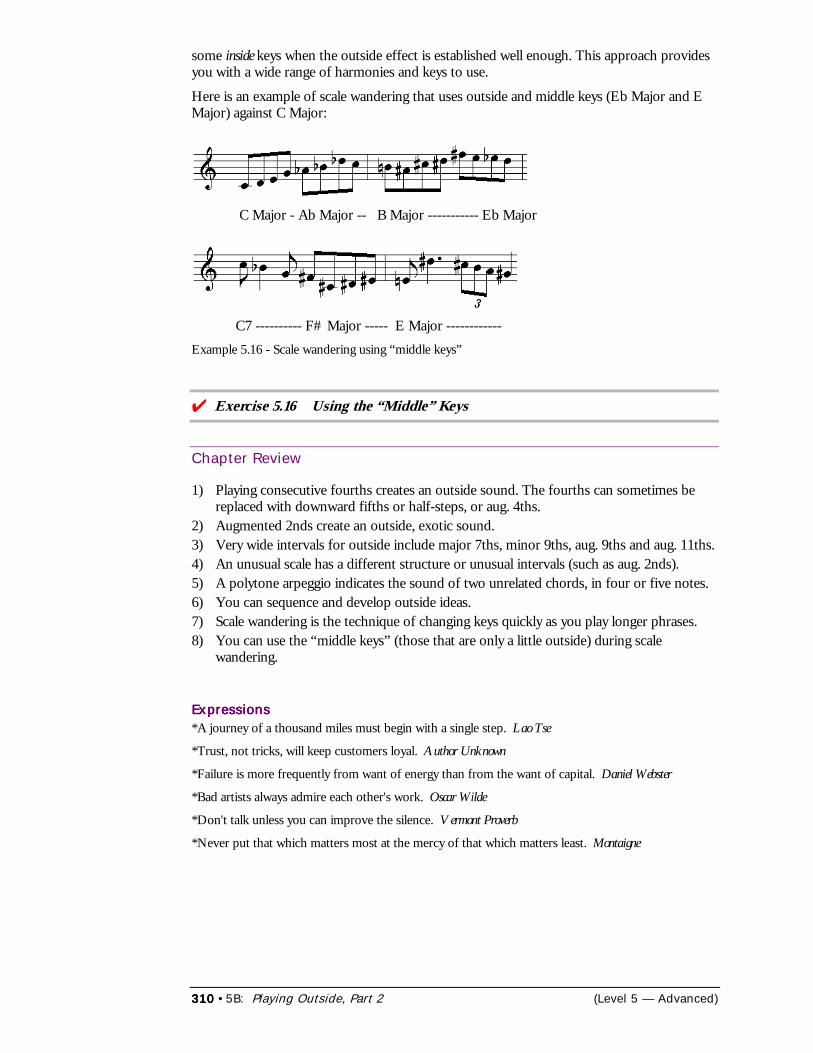
310310310310 •5B: Playing Outside, Part 2 (Level 5 — Advanced)
some inside keys when the outside effect is established well enough. This approach providesyou with a wide range of harmonies and keys to use.
Here is an example of scale wandering that uses outside and middle keys (Eb Major and EMajor) against C Major:
C Major - Ab Major -- B Major ----------- Eb Major
C7 ---------- F# Major ----- E Major ------------Example 5.16 - Scale wandering using “middle keys”
���Exercise 5.16 Using the “Middle” Keys
Chapter Review
1) Playing consecutive fourths creates an outside sound. The fourths can sometimes bereplaced with downward fifths or half-steps, or aug. 4ths.
2) Augmented 2nds create an outside, exotic sound.3) Very wide intervals for outside include major 7ths, minor 9ths, aug. 9ths and aug. 11ths.4) An unusual scale has a different structure or unusual intervals (such as aug. 2nds).5) A polytone arpeggio indicates the sound of two unrelated chords, in four or five notes.6) You can sequence and develop outside ideas.7) Scale wandering is the technique of changing keys quickly as you play longer phrases.8) You can use the “middle keys” (those that are only a little outside) during scale
wandering.
ExpressionsExpressionsExpressionsExpressions*A journey of a thousand miles must begin with a single step. Lao Tse
*Trust, not tricks, will keep customers loyal. Author Unknown
*Failure is more frequently from want of energy than from the want of capital. Daniel Webster
*Bad artists always admire each other's work. Oscar Wilde
*Don't talk unless you can improve the silence. Vermont Proverb
*Never put that which matters most at the mercy of that which matters least. Montaigne
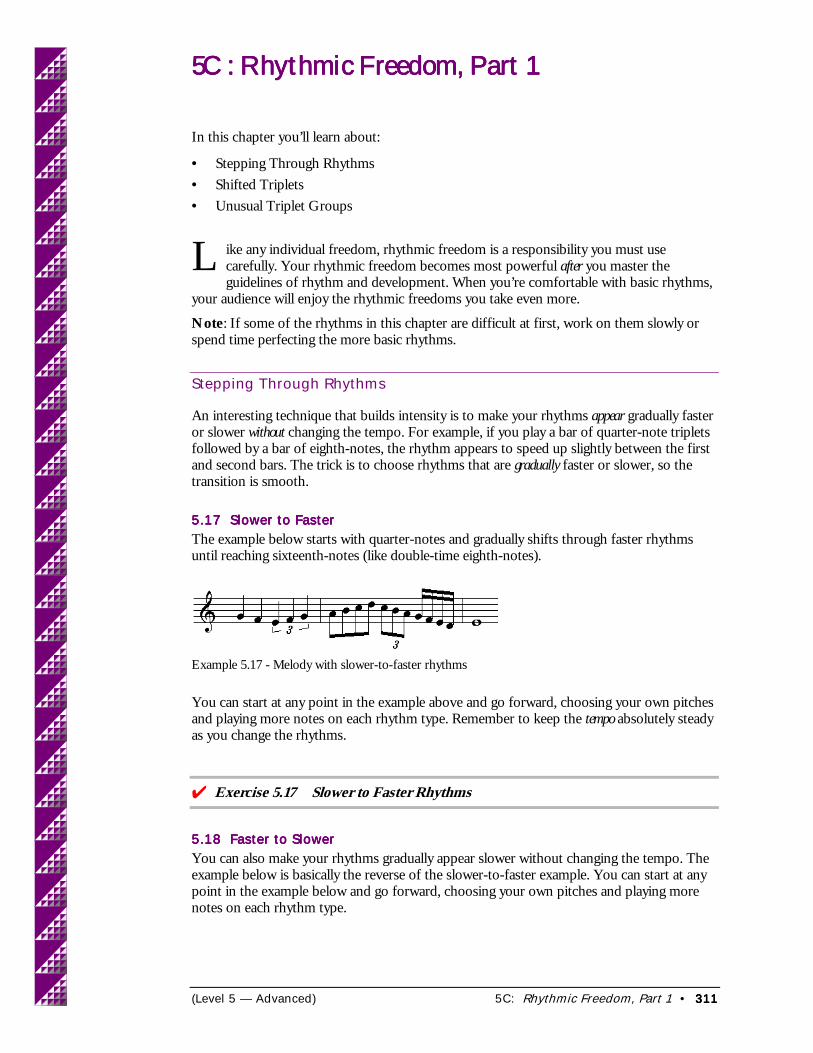
(Level 5 — Advanced) 5C: Rhythmic Freedom, Part 1 • 311311311311
5C: Rhythmic Freedom, Part 15C: Rhythmic Freedom, Part 15C: Rhythmic Freedom, Part 15C: Rhythmic Freedom, Part 1
In this chapter you’ll learn about:
• Stepping Through Rhythms• Shifted Triplets• Unusual Triplet Groups
ike any individual freedom, rhythmic freedom is a responsibility you must usecarefully. Your rhythmic freedom becomes most powerful after you master theguidelines of rhythm and development. When you’re comfortable with basic rhythms,
your audience will enjoy the rhythmic freedoms you take even more.
Note: If some of the rhythms in this chapter are difficult at first, work on them slowly orspend time perfecting the more basic rhythms.
Stepping Through Rhythms
An interesting technique that builds intensity is to make your rhythms appear gradually fasteror slower without changing the tempo. For example, if you play a bar of quarter-note tripletsfollowed by a bar of eighth-notes, the rhythm appears to speed up slightly between the firstand second bars. The trick is to choose rhythms that are gradually faster or slower, so thetransition is smooth.
5.17 Slower to Faster5.17 Slower to Faster5.17 Slower to Faster5.17 Slower to FasterThe example below starts with quarter-notes and gradually shifts through faster rhythmsuntil reaching sixteenth-notes (like double-time eighth-notes).
Example 5.17 - Melody with slower-to-faster rhythms
You can start at any point in the example above and go forward, choosing your own pitchesand playing more notes on each rhythm type. Remember to keep the tempo absolutely steadyas you change the rhythms.
���Exercise 5.17 Slower to Faster Rhythms
5.18 Faster to Slower5.18 Faster to Slower5.18 Faster to Slower5.18 Faster to SlowerYou can also make your rhythms gradually appear slower without changing the tempo. Theexample below is basically the reverse of the slower-to-faster example. You can start at anypoint in the example below and go forward, choosing your own pitches and playing morenotes on each rhythm type.
L
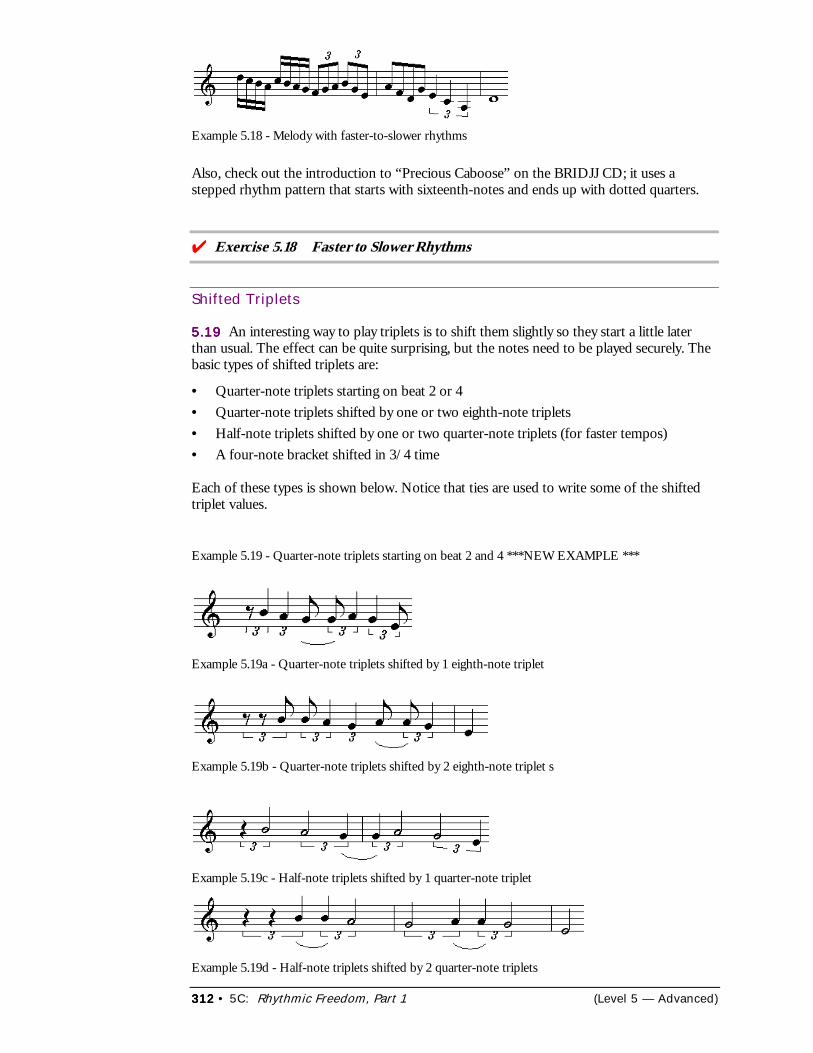
312312312312 • 5C: Rhythmic Freedom, Part 1 (Level 5 — Advanced)
Example 5.18 - Melody with faster-to-slower rhythms
Also, check out the introduction to “Precious Caboose” on the BRIDJJ CD; it uses astepped rhythm pattern that starts with sixteenth-notes and ends up with dotted quarters.
���Exercise 5.18 Faster to Slower Rhythms
Shifted Triplets
5.195.195.195.19 An interesting way to play triplets is to shift them slightly so they start a little laterthan usual. The effect can be quite surprising, but the notes need to be played securely. Thebasic types of shifted triplets are:
• Quarter-note triplets starting on beat 2 or 4• Quarter-note triplets shifted by one or two eighth-note triplets• Half-note triplets shifted by one or two quarter-note triplets (for faster tempos)• A four-note bracket shifted in 3/4 time
Each of these types is shown below. Notice that ties are used to write some of the shiftedtriplet values.
Example 5.19 - Quarter-note triplets starting on beat 2 and 4 ***NEW EXAMPLE ***
Example 5.19a - Quarter-note triplets shifted by 1 eighth-note triplet
Example 5.19b - Quarter-note triplets shifted by 2 eighth-note triplet s
Example 5.19c - Half-note triplets shifted by 1 quarter-note triplet
Example 5.19d - Half-note triplets shifted by 2 quarter-note triplets
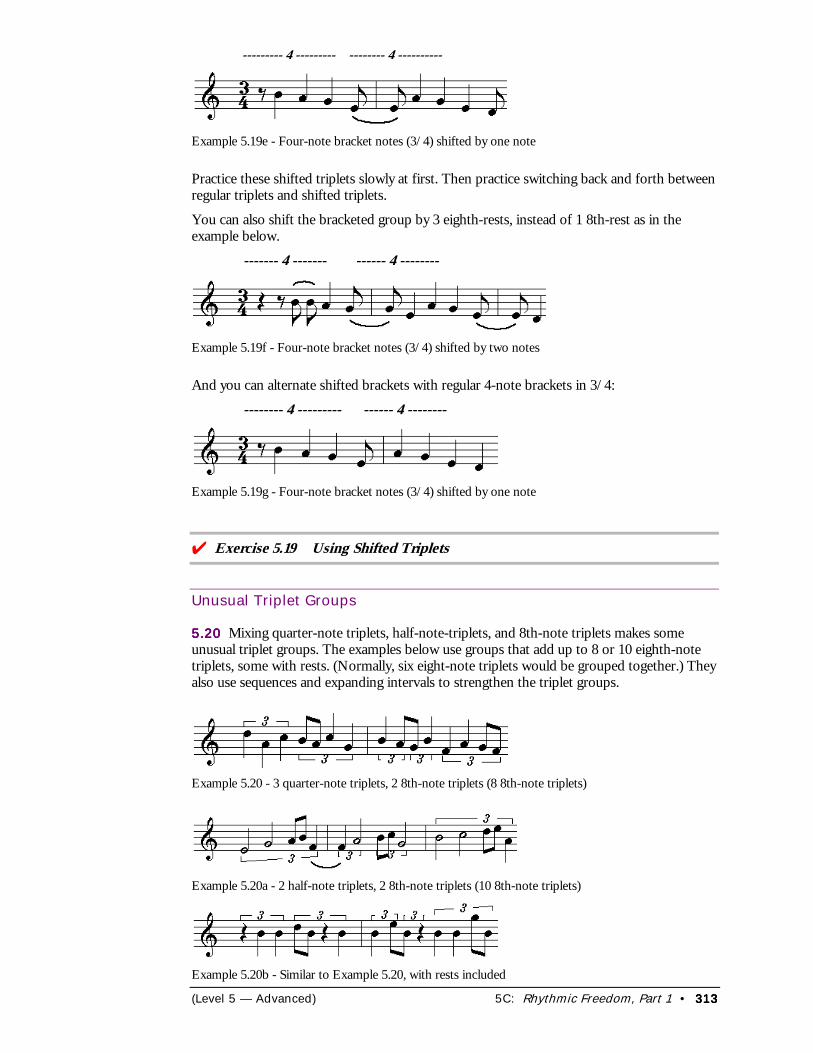
(Level 5 — Advanced) 5C: Rhythmic Freedom, Part 1 • 313313313313
--------- 4 --------- -------- 4 ----------
Example 5.19e - Four-note bracket notes (3/4) shifted by one note
Practice these shifted triplets slowly at first. Then practice switching back and forth betweenregular triplets and shifted triplets.
You can also shift the bracketed group by 3 eighth-rests, instead of 1 8th-rest as in theexample below.
------- 4 ------- ------ 4 --------
Example 5.19f - Four-note bracket notes (3/4) shifted by two notes
And you can alternate shifted brackets with regular 4-note brackets in 3/4:
-------- 4 --------- ------ 4 --------
Example 5.19g - Four-note bracket notes (3/4) shifted by one note
���Exercise 5.19 Using Shifted Triplets
Unusual Triplet Groups
5.205.205.205.20 Mixing quarter-note triplets, half-note-triplets, and 8th-note triplets makes someunusual triplet groups. The examples below use groups that add up to 8 or 10 eighth-notetriplets, some with rests. (Normally, six eight-note triplets would be grouped together.) Theyalso use sequences and expanding intervals to strengthen the triplet groups.
Example 5.20 - 3 quarter-note triplets, 2 8th-note triplets (8 8th-note triplets)
Example 5.20a - 2 half-note triplets, 2 8th-note triplets (10 8th-note triplets)
Example 5.20b - Similar to Example 5.20, with rests included
314314314314 • 5C: Rhythmic Freedom, Part 1 (Level 5 — Advanced)
There are many other combinations of triplets and rests in groups of 8 or 10 eighth-notetriplets; experiment with them and find ones that interest you. In Chapter 5D: RhythmicFreedom, Part 2 you’ll work with groups of 5 and 7 triplets.
���Exercise 5.20 Playing Unusual Triplet Groups
Chapter Review
1) You can step through rhythm values to make the rhythmic feel appear to speed up or toslow down.
2) The basic types of shifted triplets are:A) Quarter-note triplets on beat 2 or beat 4.B) Quarter-note triplets shifted by one or two eighth-note tripletsC) Half-note triplets shifted by one or two quarter-note triplets (for faster tempos)D) A four-note bracket shifted in 3/4 time
3) Unusual triplet groups mix half-note triplets, quarter-note triplets, and 8th-note triplets,usually in groups of 8 or 10 eighth-note triplets.
ExpressionsExpressionsExpressionsExpressions* Solitude is as needful to the imagination as society is wholesome for the character. James RussellLowell
* Only a mediocre person is always at his best. W. Somerset Maugham
* Ever building to the clouds, and never reflecting that the poor narrow basis cannot sustain thegiddy, tottering column. Schiller
* Chance is always powerful. -- Let your hook be always cast; in the pool where you least expect it,there will be a fish. Ovid
* Talents are best nurtured in solitude; character is best formed in the stormy billows of the world.Goethe
* You cannot dream yourself into a character; you must hammer and forge one for yourself. Froude
*It is by attempting to reach the top at a single leap, that so much misery is caused in the world.Cobbett*Ambition is like love, impatient both of delays and rivals. Denham*Applause is the spur of noble minds; the end and aim of weak ones. Colton*A little learning is a dangerous thing; Drink deep, or taste not the Picerian spring; There shallowdraughts intoxicate the brain, And drinking largely sobers us again. Alexander Pope
*A peacock has too little in its head and too much in its tail. Swedish Proverb
(Level 5 — Advanced) 5D: Rhythmic Freedom, Part 2 • 315315315315
5D: Rhythmic Freedom, Part 25D: Rhythmic Freedom, Part 25D: Rhythmic Freedom, Part 25D: Rhythmic Freedom, Part 2
In this chapter you’ll learn about:
• Using Rubato• 5-Against-4• 7-Against-4
ubato, 5-against-4, and 7-against 4 give you powerful tools of rhythmic freedom.
Using Rubato
5.215.215.215.21 Rubato means slowing down or speeding up somewhat in your musical idea. This isdone frequently in ballads and slower-tempo tunes. Rubato lets you explore many subtledimensions in rhythm. As you use it, keep it as an occasional contrast to strict rhythms sothe listener hears an enjoyable variety.
Here are some ideas for using rubato in your solos:
• Slow down slightly towards the end of a phrase, keeping the pitch selection strong. Or,hold a non-harmonic tone or alteration and resolve it a bit late at the end of a solo.
• Slow down in the middle of a phrase, then speed up to the original tempo. This is likemusically stretching a rubber band.
• Speed up considerably (not just a little) towards the end of a phrase. This is like using anoff-tempo (see Off-Tempos below).
• Play randomly placed staccato notes, to erase the tempo of your melody.
For other ways to use rubato, see Introductions and Cadenzas, Off-Tempos, Burning, and Wiggling.
���Exercise 5.21 Using Rubato
5.22 Introductions and Cadenzas5.22 Introductions and Cadenzas5.22 Introductions and Cadenzas5.22 Introductions and CadenzasAn introduction is an unaccompanied solo you play before the main tune begins. The purposeis to set up the tune, so as you play an introduction keep these points in mind:
• Remember the tune melody and its mood.• Play secure rhythms and pitches as you play alone.• Use expression well (dynamics, accents, and effects).
A cadenza is an unaccompanied (or sparsely accompanied) solo. It can be an effective way toopen or close a tune. The cadenza puts a lot of responsibility on the soloist to effectively setthe stage for the tune or finish it strongly. For effective cadenzas:
1) See your melodic shapes in advance; use relaxed concentration.2) Use good development techniques to keep your ideas strong.3) Don’t overplay or underplay it, or develop ideas too fast.4) You can use riffing to build intensity (see Riffing in Chapter 4D: More Development).5) Don’t ramble on (better to play a short, effective cadenza than a tiresome one).
R
316316316316 •5D: Rhythmic Freedom, Part 2 (Level 5 — Advanced)
6) When you’re finished, give a clear signal to the group so they can join you.
���Exercise 5.22 Playing Cadenzas
5.23 Off-Tempos5.23 Off-Tempos5.23 Off-Tempos5.23 Off-TemposYou can rush or drag rhythms so they are in between their current value and the next“stepped” value. (see Stepping through Rhythms earlier in this chapter.) The effect is hazy, butit’s quite effective with strong melodic ideas. For example, you can drag quarter-note tripletsslightly, or push eighth-notes slightly off-tempo. Be sure to play and maintain the off-tempowhile the rhythm section remains steady in the original tempo.
Here are some guidelines for going off-tempo:
1) Keep the dragging/rushing ideas simple and strong so they are easily distinguished.
2) After the off-tempo, re-enter the old tempo securely.
3) It’s usually best if the other players don’t try to change tempos with you. The originaltempo provides a good contrast against your rubato.
4) Use distinct melodic patterns. Developing with sequences or semi-sequences in off-tempo creates an interesting tension against the melody.
���Exercise 5.23 Using Off-Tempo Ideas
5.24 “Burning”5.24 “Burning”5.24 “Burning”5.24 “Burning”Burning is where you play a very fast passage that’s at or near the limit of your speedtechnique, regardless of what the current tempo is. Burning is like a faster extension ofdouble-time feel. As long as the passage is clean, in tune, and interesting, the “burn” passagedoesn’t really need to relate to the original tempo. But don’t overuse this technique, as it caneventually weaken the rhythmic strength of your solo.
To exit “burning mode,” slow down until you lock into double-time, eighth-note triplets, orregular eighth-notes. A clean transition makes it very effective.
���Exercise 5.24 Burning
5.25 “Wiggling”5.25 “Wiggling”5.25 “Wiggling”5.25 “Wiggling”Once in a while you can turn burning into “wiggling” (your fingers), where you play randomnotes as fast as you can. Keep this brief and well-timed so it doesn’t lose its surprise.
Here are some wiggling tips:
• Wiggle briefly in any register.• Wiggle into the high register and back down.• Wiggle after “burning.”For an example of wiggling, listen to timings 2:18-2:19 of the trumpet solo in PreciousCaboose (Chapter 2J: Analyzing Written Solos).
���Exercise 5.25 Wiggling
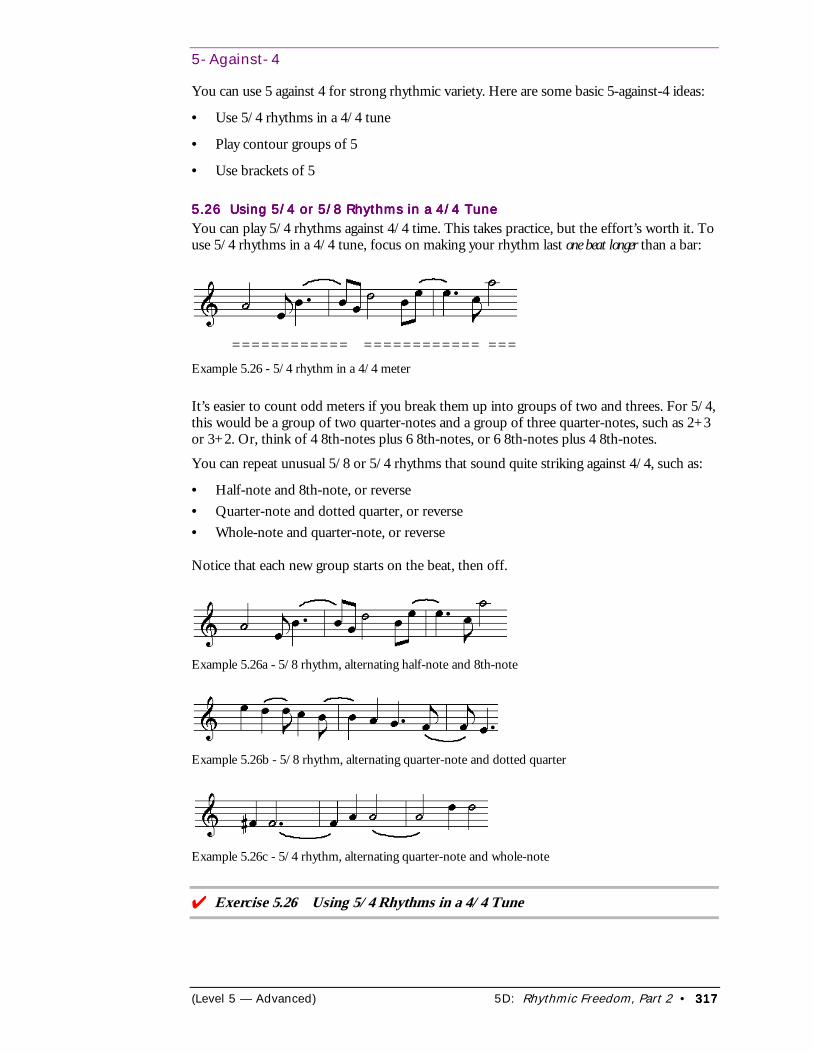
(Level 5 — Advanced) 5D: Rhythmic Freedom, Part 2 • 317317317317
5-Against-4
You can use 5 against 4 for strong rhythmic variety. Here are some basic 5-against-4 ideas:
• Use 5/4 rhythms in a 4/4 tune
• Play contour groups of 5
• Use brackets of 5
5.26 Using 5/4 or 5/8 Rhythms in a 4/4 Tune5.26 Using 5/4 or 5/8 Rhythms in a 4/4 Tune5.26 Using 5/4 or 5/8 Rhythms in a 4/4 Tune5.26 Using 5/4 or 5/8 Rhythms in a 4/4 TuneYou can play 5/4 rhythms against 4/4 time. This takes practice, but the effort’s worth it. Touse 5/4 rhythms in a 4/4 tune, focus on making your rhythm last one beat longer than a bar:
============ ============ ===Example 5.26 - 5/4 rhythm in a 4/4 meter
It’s easier to count odd meters if you break them up into groups of two and threes. For 5/4,this would be a group of two quarter-notes and a group of three quarter-notes, such as 2+3or 3+2. Or, think of 4 8th-notes plus 6 8th-notes, or 6 8th-notes plus 4 8th-notes.
You can repeat unusual 5/8 or 5/4 rhythms that sound quite striking against 4/4, such as:
• Half-note and 8th-note, or reverse• Quarter-note and dotted quarter, or reverse• Whole-note and quarter-note, or reverse
Notice that each new group starts on the beat, then off.
Example 5.26a - 5/8 rhythm, alternating half-note and 8th-note
Example 5.26b - 5/8 rhythm, alternating quarter-note and dotted quarter
Example 5.26c - 5/4 rhythm, alternating quarter-note and whole-note
���Exercise 5.26 Using 5/4 Rhythms in a 4/4 Tune
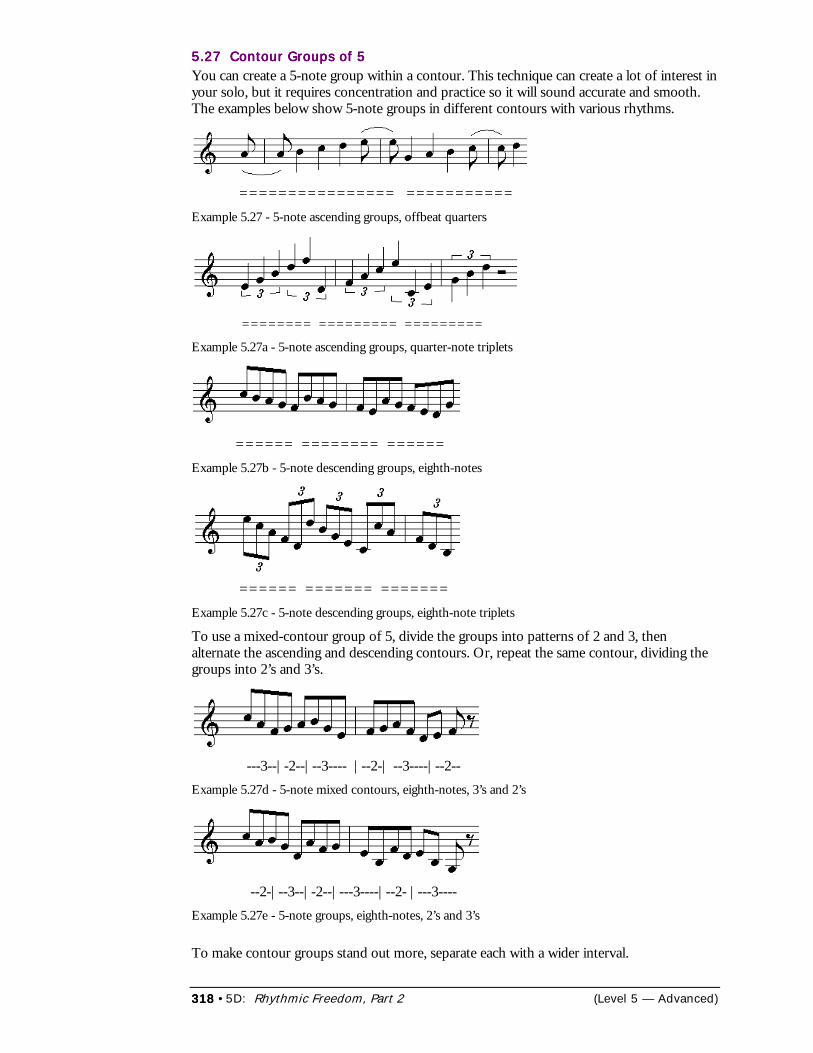
318318318318 •5D: Rhythmic Freedom, Part 2 (Level 5 — Advanced)
5.27 Contour Groups of 55.27 Contour Groups of 55.27 Contour Groups of 55.27 Contour Groups of 5You can create a 5-note group within a contour. This technique can create a lot of interest inyour solo, but it requires concentration and practice so it will sound accurate and smooth.The examples below show 5-note groups in different contours with various rhythms.
================ ===========Example 5.27 - 5-note ascending groups, offbeat quarters
======== ========= =========
Example 5.27a - 5-note ascending groups, quarter-note triplets
====== ======== ======Example 5.27b - 5-note descending groups, eighth-notes
====== ======= =======Example 5.27c - 5-note descending groups, eighth-note triplets
To use a mixed-contour group of 5, divide the groups into patterns of 2 and 3, thenalternate the ascending and descending contours. Or, repeat the same contour, dividing thegroups into 2’s and 3’s.
---3--|-2--|--3---- |--2-| --3----|--2--Example 5.27d - 5-note mixed contours, eighth-notes, 3’s and 2’s
--2-|--3--|-2--|---3----|--2- |---3----Example 5.27e - 5-note groups, eighth-notes, 2’s and 3’s
To make contour groups stand out more, separate each with a wider interval.
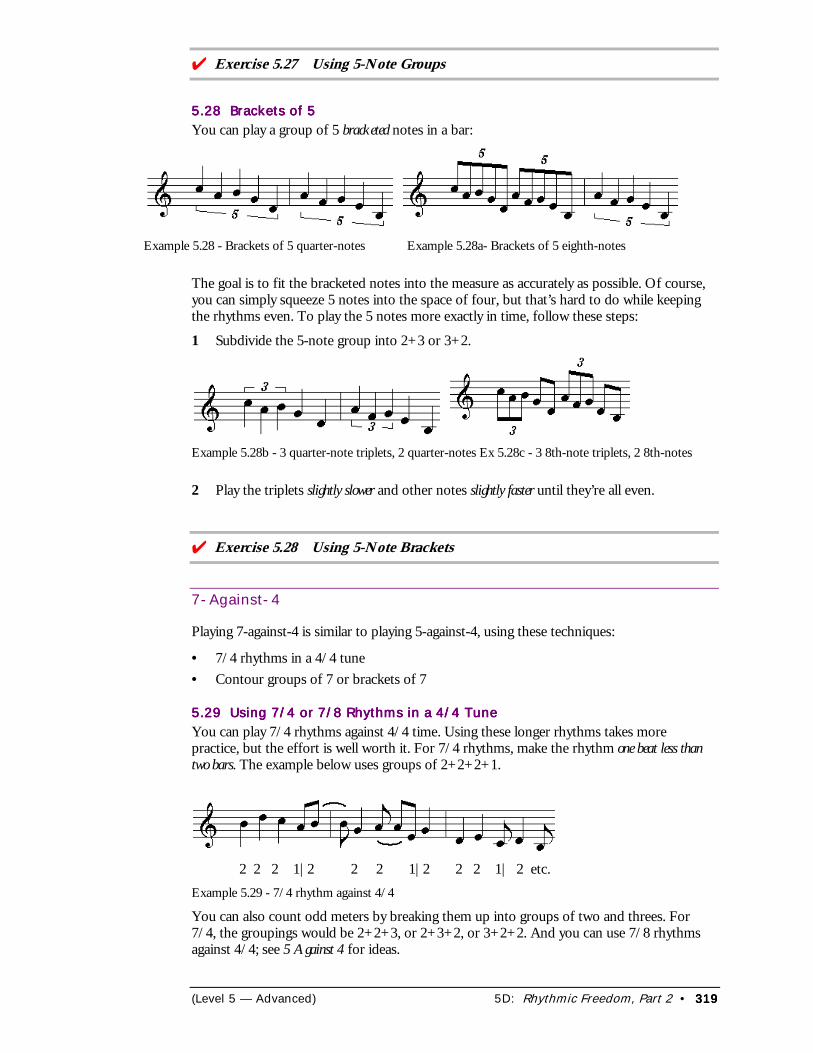
(Level 5 — Advanced) 5D: Rhythmic Freedom, Part 2 • 319319319319
���Exercise 5.27 Using 5-Note Groups
5.28 Brackets of 55.28 Brackets of 55.28 Brackets of 55.28 Brackets of 5You can play a group of 5 bracketed notes in a bar:
Example 5.28 - Brackets of 5 quarter-notes Example 5.28a- Brackets of 5 eighth-notes
The goal is to fit the bracketed notes into the measure as accurately as possible. Of course,you can simply squeeze 5 notes into the space of four, but that’s hard to do while keepingthe rhythms even. To play the 5 notes more exactly in time, follow these steps:
1 Subdivide the 5-note group into 2+3 or 3+2.
Example 5.28b - 3 quarter-note triplets, 2 quarter-notes Ex 5.28c - 3 8th-note triplets, 2 8th-notes
2 Play the triplets slightly slower and other notes slightly faster until they’re all even.
���Exercise 5.28 Using 5-Note Brackets
7-Against-4
Playing 7-against-4 is similar to playing 5-against-4, using these techniques:
• 7/4 rhythms in a 4/4 tune• Contour groups of 7 or brackets of 7
5.29 Using 7/4 or 7/8 Rhythms in a 4/4 Tune5.29 Using 7/4 or 7/8 Rhythms in a 4/4 Tune5.29 Using 7/4 or 7/8 Rhythms in a 4/4 Tune5.29 Using 7/4 or 7/8 Rhythms in a 4/4 TuneYou can play 7/4 rhythms against 4/4 time. Using these longer rhythms takes morepractice, but the effort is well worth it. For 7/4 rhythms, make the rhythm one beat less thantwo bars. The example below uses groups of 2+2+2+1.
2 2 2 1|2 2 2 1|2 2 2 1| 2 etc.Example 5.29 - 7/4 rhythm against 4/4
You can also count odd meters by breaking them up into groups of two and threes. For7/4, the groupings would be 2+2+3, or 2+3+2, or 3+2+2. And you can use 7/8 rhythmsagainst 4/4; see 5 Against 4 for ideas.
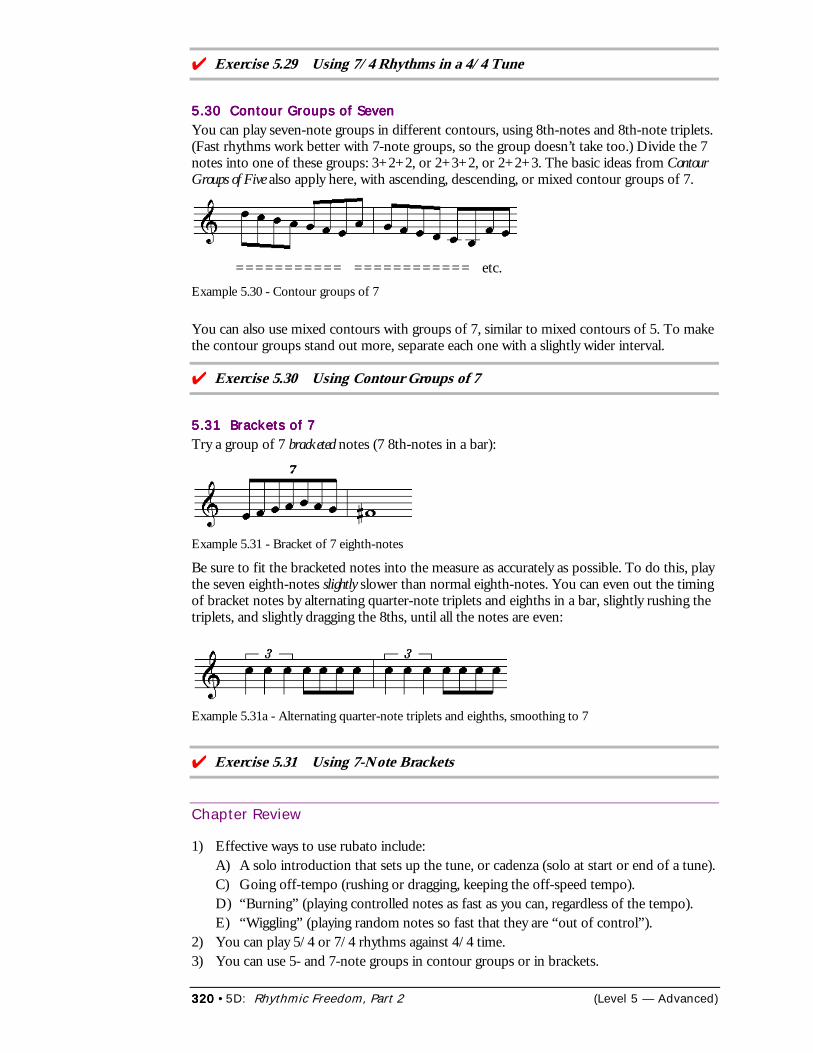
320320320320 •5D: Rhythmic Freedom, Part 2 (Level 5 — Advanced)
���Exercise 5.29 Using 7/4 Rhythms in a 4/4 Tune
5.30 Contour Groups of Seven5.30 Contour Groups of Seven5.30 Contour Groups of Seven5.30 Contour Groups of SevenYou can play seven-note groups in different contours, using 8th-notes and 8th-note triplets.(Fast rhythms work better with 7-note groups, so the group doesn’t take too.) Divide the 7notes into one of these groups: 3+2+2, or 2+3+2, or 2+2+3. The basic ideas from ContourGroups of Five also apply here, with ascending, descending, or mixed contour groups of 7.
=========== ============ etc.Example 5.30 - Contour groups of 7
You can also use mixed contours with groups of 7, similar to mixed contours of 5. To makethe contour groups stand out more, separate each one with a slightly wider interval.
���Exercise 5.30 Using Contour Groups of 7
5.31 Brackets of 75.31 Brackets of 75.31 Brackets of 75.31 Brackets of 7Try a group of 7 bracketed notes (7 8th-notes in a bar):
Example 5.31 - Bracket of 7 eighth-notes
Be sure to fit the bracketed notes into the measure as accurately as possible. To do this, playthe seven eighth-notes slightly slower than normal eighth-notes. You can even out the timingof bracket notes by alternating quarter-note triplets and eighths in a bar, slightly rushing thetriplets, and slightly dragging the 8ths, until all the notes are even:
Example 5.31a - Alternating quarter-note triplets and eighths, smoothing to 7
���Exercise 5.31 Using 7-Note Brackets
Chapter Review
1) Effective ways to use rubato include:A) A solo introduction that sets up the tune, or cadenza (solo at start or end of a tune).C) Going off-tempo (rushing or dragging, keeping the off-speed tempo).D) “Burning” (playing controlled notes as fast as you can, regardless of the tempo).E) “Wiggling” (playing random notes so fast that they are “out of control”).
2) You can play 5/4 or 7/4 rhythms against 4/4 time.3) You can use 5- and 7-note groups in contour groups or in brackets.
(Level 5 — Advanced) 5E: Rhythmic Pulses • 321321321321
5E: Rhythmic Pulses5E: Rhythmic Pulses5E: Rhythmic Pulses5E: Rhythmic Pulses
In this chapter you’ll learn about:
• Creating New Pulses• Using Triplet Pulses• Using Non-Triplet Pulses• Practice Method• Additional Shifts• Group Shifts
rhythmic pulse is the basic, underlying beat in the tune, usually the quarter-note. Sofar, you’ve used double-time, half-time, and triple-time to change the rhythmic pulseof the tune.
You can also create other new pulses that increase by other amounts instead of by doublingor halving. These unusual pulses can create some very interesting rhythmic shifts in a tune.
Creating New Pulses
Establishing the New PulseEstablishing the New PulseEstablishing the New PulseEstablishing the New PulseTo establish a new pulse,
1 Repeat the rhythm of the new pulse enough until it feels like a new quarter-note pulse.
For example, suppose you keep repeating dotted quarter-notes in 4/4 time. Now there aretwo pulses: the original quarter-note pulse the band is playing and your new, slightly slowerpulse made of dotted quarters. This new pulse can then be imagined as your new quarter-note pulse.
(See Example 5.34 for an illustration of how this works.)
2 Subdivide the new pulse into eighth-notes (swing or straight) and play other rhythmsbased on the new pulse. This causes a strikingly different metric feel.
Sample PulsesSample PulsesSample PulsesSample PulsesHere are some ways to create new quarter-note pulses, along with descriptions of whetherthe new pulse feels faster or slower than the original quarter-note pulse:
New Quarter-note Pulse Faster/SlowerQuarter-note triplets (2/3) Faster (3/2)
8th-note triplets (1/3) Much faster (3)
Dotted quarter-notes (3/2) Slower (2/3)
Alternate quarters, 8ths (3/2) Slower (2/3)
4-note bracket, 3/4 time (3/4) Faster (4/3)
Return PulsesReturn PulsesReturn PulsesReturn PulsesTo return from a new pulse back to the old pulse, you need to use a rhythm that’s the inversefraction of the new pulse. For example, suppose you switch to a new pulse of quarter-notetriplets. They are 2/3 the value of the original quarter-notes. So, your return pulse should be
A
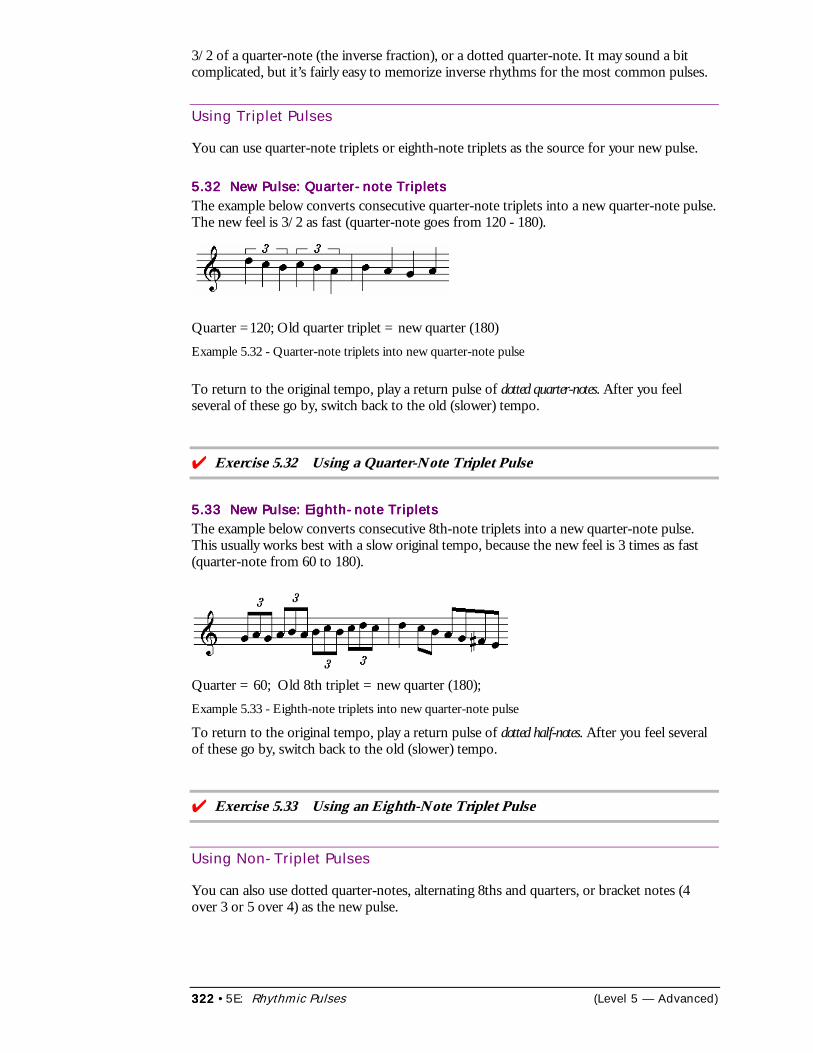
322322322322 •5E: Rhythmic Pulses (Level 5 — Advanced)
3/2 of a quarter-note (the inverse fraction), or a dotted quarter-note. It may sound a bitcomplicated, but it’s fairly easy to memorize inverse rhythms for the most common pulses.
Using Triplet Pulses
You can use quarter-note triplets or eighth-note triplets as the source for your new pulse.
5.32 New Pulse: Quarter-note Triplets5.32 New Pulse: Quarter-note Triplets5.32 New Pulse: Quarter-note Triplets5.32 New Pulse: Quarter-note TripletsThe example below converts consecutive quarter-note triplets into a new quarter-note pulse.The new feel is 3/2 as fast (quarter-note goes from 120 - 180).
Quarter =120; Old quarter triplet = new quarter (180)Example 5.32 - Quarter-note triplets into new quarter-note pulse
To return to the original tempo, play a return pulse of dotted quarter-notes. After you feelseveral of these go by, switch back to the old (slower) tempo.
���Exercise 5.32 Using a Quarter-Note Triplet Pulse
5.33 New Pulse: Eighth-note Triplets5.33 New Pulse: Eighth-note Triplets5.33 New Pulse: Eighth-note Triplets5.33 New Pulse: Eighth-note TripletsThe example below converts consecutive 8th-note triplets into a new quarter-note pulse.This usually works best with a slow original tempo, because the new feel is 3 times as fast(quarter-note from 60 to 180).
Quarter = 60; Old 8th triplet = new quarter (180);Example 5.33 - Eighth-note triplets into new quarter-note pulse
To return to the original tempo, play a return pulse of dotted half-notes. After you feel severalof these go by, switch back to the old (slower) tempo.
���Exercise 5.33 Using an Eighth-Note Triplet Pulse
Using Non-Triplet Pulses
You can also use dotted quarter-notes, alternating 8ths and quarters, or bracket notes (4over 3 or 5 over 4) as the new pulse.
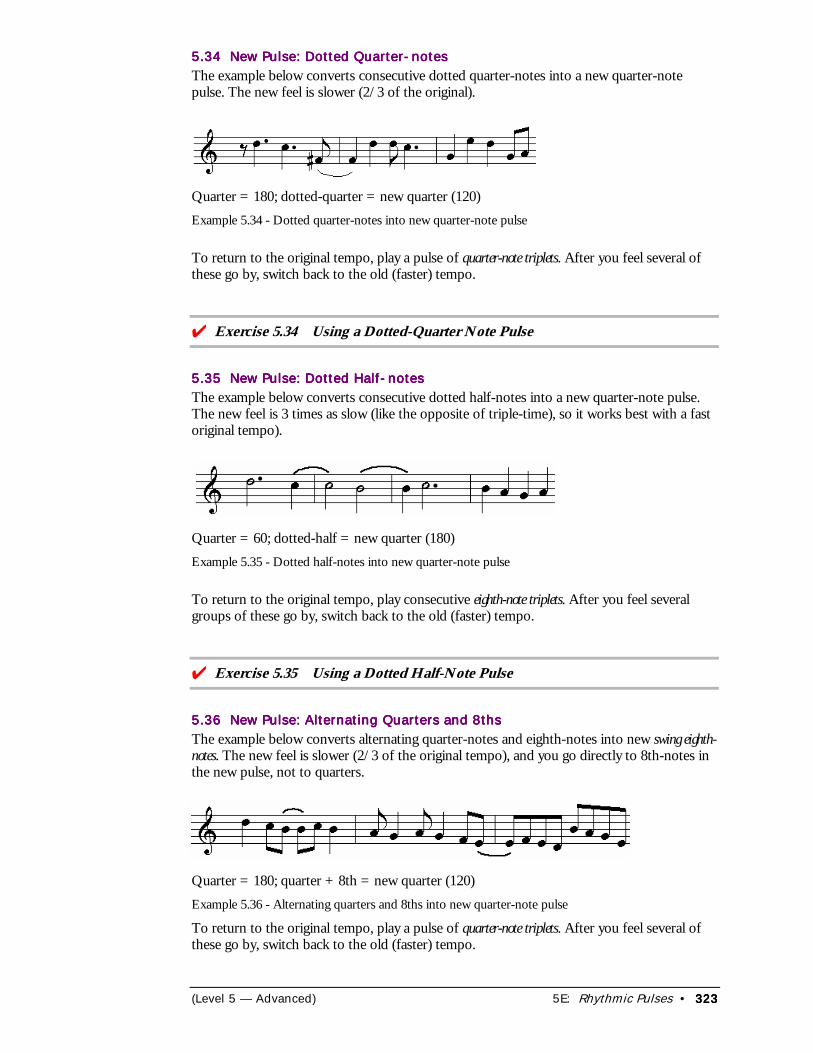
(Level 5 — Advanced) 5E: Rhythmic Pulses • 323323323323
5.34 New Pulse: Dotted Quarter-notes5.34 New Pulse: Dotted Quarter-notes5.34 New Pulse: Dotted Quarter-notes5.34 New Pulse: Dotted Quarter-notesThe example below converts consecutive dotted quarter-notes into a new quarter-notepulse. The new feel is slower (2/3 of the original).
Quarter = 180; dotted-quarter = new quarter (120)Example 5.34 - Dotted quarter-notes into new quarter-note pulse
To return to the original tempo, play a pulse of quarter-note triplets. After you feel several ofthese go by, switch back to the old (faster) tempo.
���Exercise 5.34 Using a Dotted-Quarter Note Pulse
5.35 New Pulse: Dotted Half-notes5.35 New Pulse: Dotted Half-notes5.35 New Pulse: Dotted Half-notes5.35 New Pulse: Dotted Half-notesThe example below converts consecutive dotted half-notes into a new quarter-note pulse.The new feel is 3 times as slow (like the opposite of triple-time), so it works best with a fastoriginal tempo).
Quarter = 60; dotted-half = new quarter (180)Example 5.35 - Dotted half-notes into new quarter-note pulse
To return to the original tempo, play consecutive eighth-note triplets. After you feel severalgroups of these go by, switch back to the old (faster) tempo.
���Exercise 5.35 Using a Dotted Half-Note Pulse
5.36 New Pulse: Alternating Quarters and 8ths5.36 New Pulse: Alternating Quarters and 8ths5.36 New Pulse: Alternating Quarters and 8ths5.36 New Pulse: Alternating Quarters and 8thsThe example below converts alternating quarter-notes and eighth-notes into new swing eighth-notes. The new feel is slower (2/3 of the original tempo), and you go directly to 8th-notes inthe new pulse, not to quarters.
Quarter = 180; quarter + 8th = new quarter (120)Example 5.36 - Alternating quarters and 8ths into new quarter-note pulse
To return to the original tempo, play a pulse of quarter-note triplets. After you feel several ofthese go by, switch back to the old (faster) tempo.
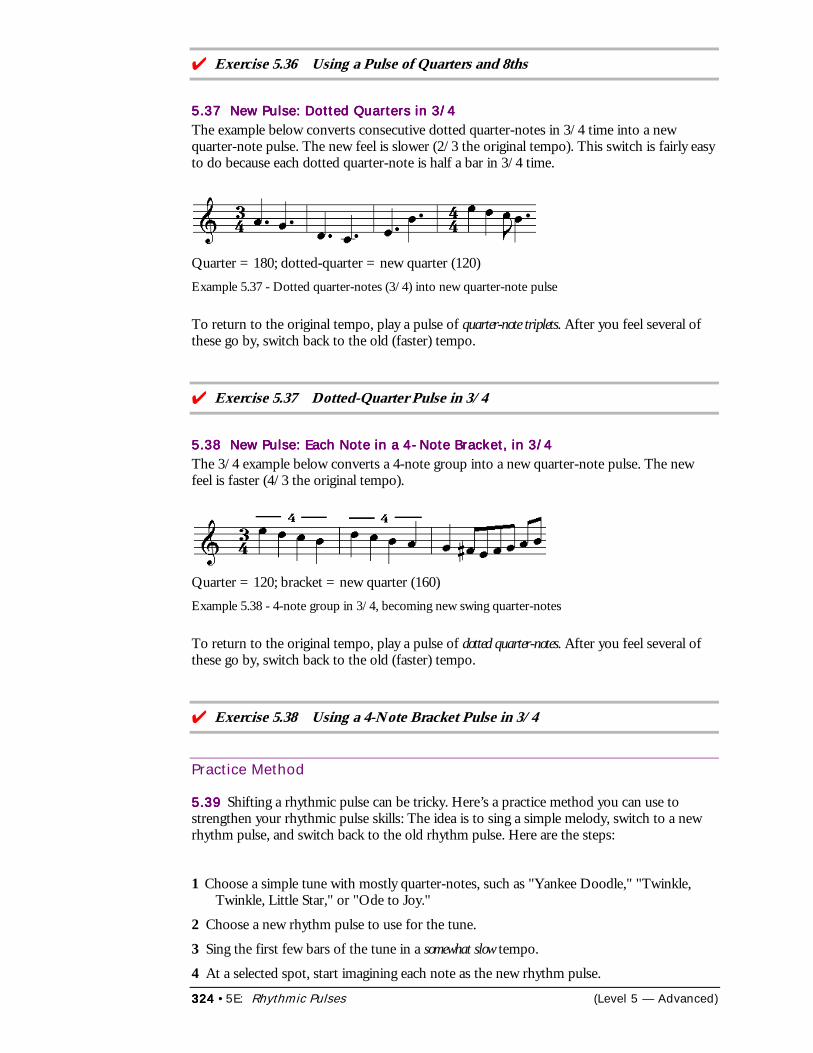
324324324324 •5E: Rhythmic Pulses (Level 5 — Advanced)
���Exercise 5.36 Using a Pulse of Quarters and 8ths
5.37 New Pulse: Dotted Quarters in 3/45.37 New Pulse: Dotted Quarters in 3/45.37 New Pulse: Dotted Quarters in 3/45.37 New Pulse: Dotted Quarters in 3/4The example below converts consecutive dotted quarter-notes in 3/4 time into a newquarter-note pulse. The new feel is slower (2/3 the original tempo). This switch is fairly easyto do because each dotted quarter-note is half a bar in 3/4 time.
Quarter = 180; dotted-quarter = new quarter (120)Example 5.37 - Dotted quarter-notes (3/4) into new quarter-note pulse
To return to the original tempo, play a pulse of quarter-note triplets. After you feel several ofthese go by, switch back to the old (faster) tempo.
���Exercise 5.37 Dotted-Quarter Pulse in 3/4
5.38 New Pulse: Each Note in a 4-Note Bracket, in 3/45.38 New Pulse: Each Note in a 4-Note Bracket, in 3/45.38 New Pulse: Each Note in a 4-Note Bracket, in 3/45.38 New Pulse: Each Note in a 4-Note Bracket, in 3/4The 3/4 example below converts a 4-note group into a new quarter-note pulse. The newfeel is faster (4/3 the original tempo).
Quarter = 120; bracket = new quarter (160)Example 5.38 - 4-note group in 3/4, becoming new swing quarter-notes
To return to the original tempo, play a pulse of dotted quarter-notes. After you feel several ofthese go by, switch back to the old (faster) tempo.
���Exercise 5.38 Using a 4-Note Bracket Pulse in 3/4
Practice Method
5.395.395.395.39 Shifting a rhythmic pulse can be tricky. Here’s a practice method you can use tostrengthen your rhythmic pulse skills: The idea is to sing a simple melody, switch to a newrhythm pulse, and switch back to the old rhythm pulse. Here are the steps:
1 Choose a simple tune with mostly quarter-notes, such as "Yankee Doodle," "Twinkle,Twinkle, Little Star," or "Ode to Joy."
2 Choose a new rhythm pulse to use for the tune.
3 Sing the first few bars of the tune in a somewhat slow tempo.
4 At a selected spot, start imagining each note as the new rhythm pulse.
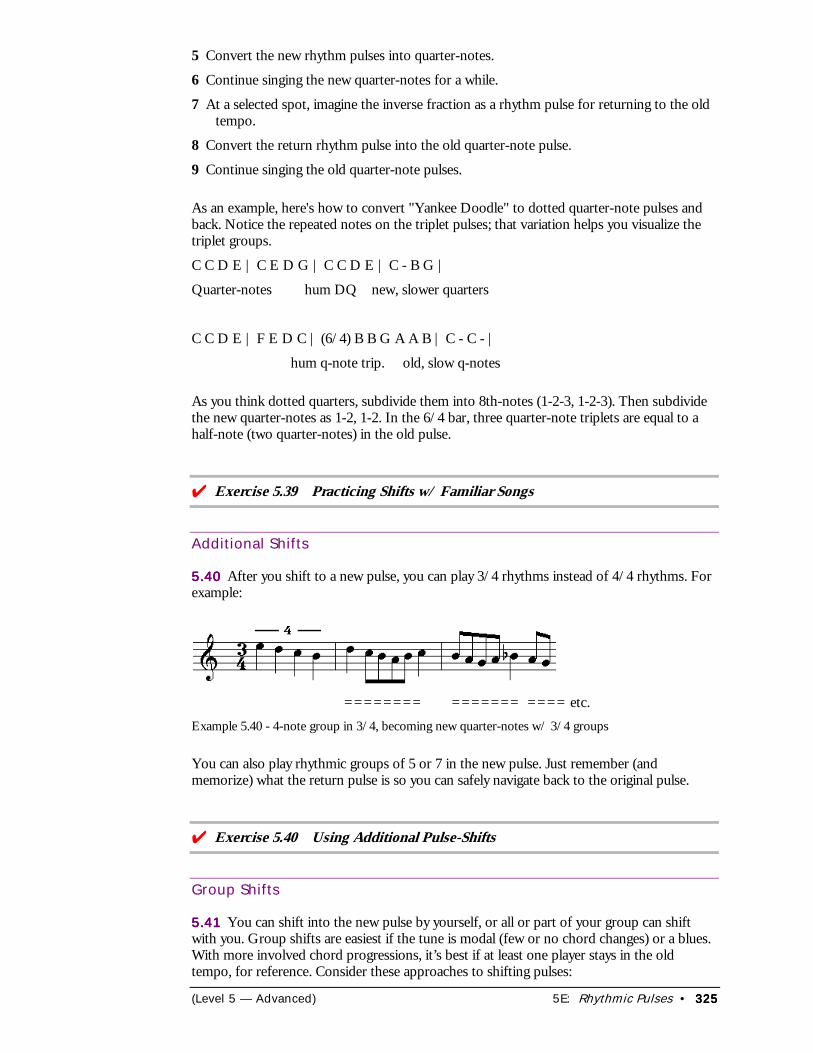
(Level 5 — Advanced) 5E: Rhythmic Pulses • 325325325325
5 Convert the new rhythm pulses into quarter-notes.
6 Continue singing the new quarter-notes for a while.
7 At a selected spot, imagine the inverse fraction as a rhythm pulse for returning to the oldtempo.
8 Convert the return rhythm pulse into the old quarter-note pulse.
9 Continue singing the old quarter-note pulses.
As an example, here's how to convert "Yankee Doodle" to dotted quarter-note pulses andback. Notice the repeated notes on the triplet pulses; that variation helps you visualize thetriplet groups.
C C D E | C E D G | C C D E | C - B G |
Quarter-notes hum DQ new, slower quarters
C C D E | F E D C | (6/4) B B G A A B | C - C - |
hum q-note trip. old, slow q-notes
As you think dotted quarters, subdivide them into 8th-notes (1-2-3, 1-2-3). Then subdividethe new quarter-notes as 1-2, 1-2. In the 6/4 bar, three quarter-note triplets are equal to ahalf-note (two quarter-notes) in the old pulse.
���Exercise 5.39 Practicing Shifts w/ Familiar Songs
Additional Shifts
5.405.405.405.40 After you shift to a new pulse, you can play 3/4 rhythms instead of 4/4 rhythms. Forexample:
======== ======= ==== etc.Example 5.40 - 4-note group in 3/4, becoming new quarter-notes w/ 3/4 groups
You can also play rhythmic groups of 5 or 7 in the new pulse. Just remember (andmemorize) what the return pulse is so you can safely navigate back to the original pulse.
���Exercise 5.40 Using Additional Pulse-Shifts
Group Shifts
5.415.415.415.41 You can shift into the new pulse by yourself, or all or part of your group can shiftwith you. Group shifts are easiest if the tune is modal (few or no chord changes) or a blues.With more involved chord progressions, it’s best if at least one player stays in the oldtempo, for reference. Consider these approaches to shifting pulses:
326326326326 •5E: Rhythmic Pulses (Level 5 — Advanced)
• Only the soloist switches; the rest of the group follows the regular tempo and chords.
• Two people switch: soloist plus chords, soloist plus drums, or soloist plus bass. Theother players keep a steady rhythm in the old pulse.
• Three people switch. Usually the bass will stay on the old pulse as a reference.
• Everyone changes. In this case, play the chords to fit the new pulse, then everyonereturns at the end of a chorus.
If the whole group does the shift, be sure everyone knows how to get back to the originalmeter. Shifting smoothly to and from rhythmic feels requires concentration and practice butis definitely worth it.
���Exercise 5.41 Using Group Shifts
Chapter Review
1) To establish a new pulse, repeat the new rhythm pulse enough times until it feels like anew quarter-note pulse. Then subdivide the new pulse into eighth-notes and play offthose rhythms.
2) Common examples of new pulses are:A) Quarter-note triplets in 4/4 (faster)B) Eighth-note triplets in 4/4 (much faster)C) Dotted quarter-notes in 4/4 (slower)D) Dotted half-notes(slower)E) 4-note brackets in 3/4 (faster)
3) To return to the original pulse, use a return rhythm that’s the inverse fraction of thenew pulse.
4) After shifting the pulse you can play rhythms in 3/4, 5/4, or 7/4.5) The most common group shifts are soloist, soloist and one other, or two or three
players. The bass player usually stays in the old pulse for reference.
ExpressionsExpressionsExpressionsExpressions* Neither human applause nor human censure is to be taken as the test of truth; but either should setus upon testing ourselves. Whately*He has occasional flashes of silence that made his conversation perfectly delightful. Sydney Smith ofMacaulay*His imagination resembles the wings of an ostrich. Thomas Babington Macaulay of Dryden
(Level 5 — Advanced) 5F: More Development Combinations • 327327327327
5F: More Development Combinations5F: More Development Combinations5F: More Development Combinations5F: More Development Combinations
In this chapter you’ll learn about:
• Sources for Motifs• Variations• Combinations and Examples
s an advanced improviser, you need to draw on many sources for ideas and then varyand combine those sources. This chapter gives you a fresh look at doing that. Motifsand variations can be played in any key, usually with any chord and in any style. You
can also add expression and use melodic resolution between chords. If your playing is in arut, spend time working on the concepts in this chapter and you’ll see many newpossibilities.
Sources for Motifs
Below are some ideas for creating motifs. They are listed with chapter numbers so you canspend time reviewing them before trying them. The faster you can identify and play them,the faster you can use them in your solos. And as you play one of these ideas, you shouldbriefly be aware of its name so you can control and develop the technique you’re using.
Melodic Source ChapterFlexible scales 1AEmphasizing color tones 1COuter ranges 2BFlattened contours / chromaticism 2B, 3AOffset contours 2BPartial, complete, and delayed fills 2BEmbellishments (trills, grace notes, turns) 2ENon-harmonic tones (on or offbeat) 3AChord anticipation 3BChord delay 3BDominant alterations 3FQuotes (partial, full, or varied) 4DRiffs (single, two-part, or combined) 4DTritone substitutions 4EOutside keys 5AConsecutive fourths 5AAugmented seconds 5AOutside arpeggios 5A
A

328328328328 •5F: More Development Combinations (Level 5 — Advanced)
Rhythmic Source ChapterConsecutive offbeats, with returns 1DTriplets (quarter or eighth) 1DRhythmic combinations 1D3/4 rhythms in 4/4 2D3-note or 6-note contours 2DTriplet contours of 2 or 4 2D4/4 rhythms in 3/4 2D4-note contours in 3/4 2D4-note brackets in 3/4 2DDouble-time 4BHalf-time 4BTriple-time 4BShifted triplets 5BBurning 5BWiggling 5B5/4 rhythms in a 4/4 tune 5BContour groups of 5 5BBrackets of 5 5B7/4 rhythms in a 4/4 tune 5BContour groups of 7 5BBrackets of 7 5B
Variations
Below are some ways to vary motifs.
Melodic Variation ChapterExpand intervals 2FShrink intervals 2FAdding notes 2FOmitting notes 2FInverting the contour 2FRetrograde 2FDiatonic sequences 3DTransposed sequence 3DSemi-sequences 3DLinking sequences 3DPulling patterns 3DOffset patterns 3DSpecial effects (wind players) 4CSpecial effects (rhythm players) 4Cii-V, V-I, and ii-V-I chains 4E
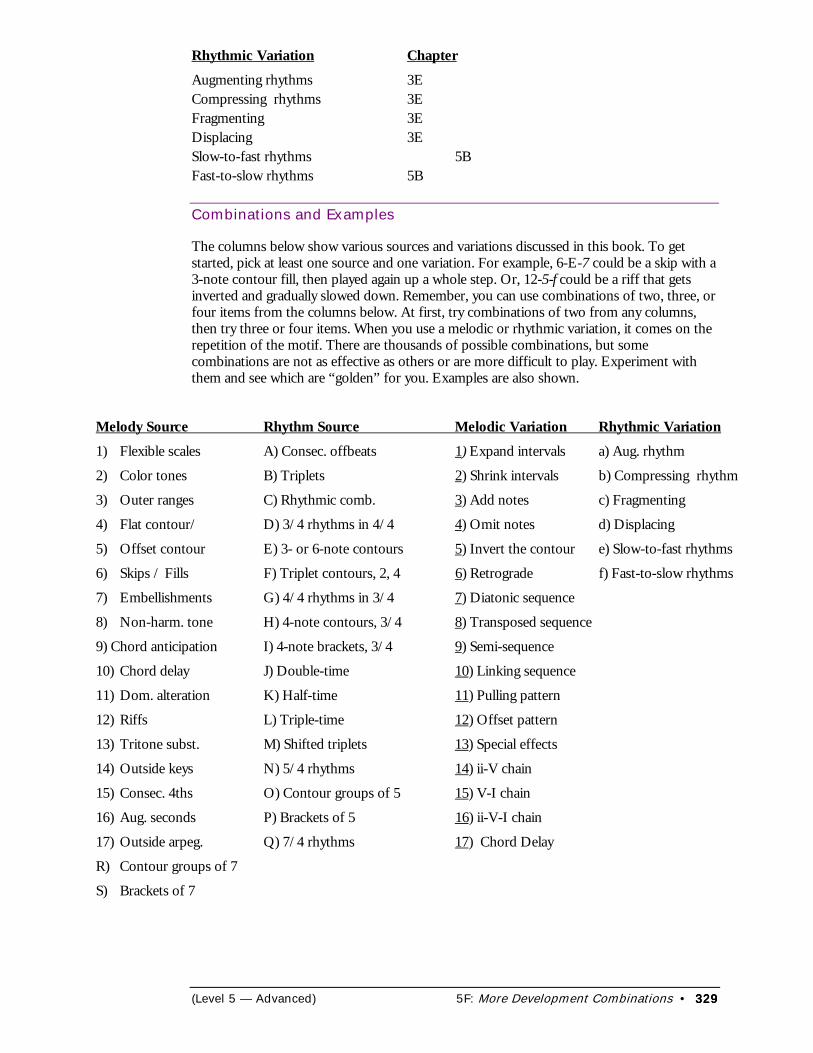
(Level 5 — Advanced) 5F: More Development Combinations • 329329329329
Rhythmic Variation ChapterAugmenting rhythms 3ECompressing rhythms 3EFragmenting 3EDisplacing 3ESlow-to-fast rhythms 5BFast-to-slow rhythms 5B
Combinations and Examples
The columns below show various sources and variations discussed in this book. To getstarted, pick at least one source and one variation. For example, 6-E-7 could be a skip with a3-note contour fill, then played again up a whole step. Or, 12-5-f could be a riff that getsinverted and gradually slowed down. Remember, you can use combinations of two, three, orfour items from the columns below. At first, try combinations of two from any columns,then try three or four items. When you use a melodic or rhythmic variation, it comes on therepetition of the motif. There are thousands of possible combinations, but somecombinations are not as effective as others or are more difficult to play. Experiment withthem and see which are “golden” for you. Examples are also shown.
Melody Source Rhythm Source Melodic Variation Rhythmic Variation1) Flexible scales A) Consec. offbeats 1) Expand intervals a) Aug. rhythm
2) Color tones B) Triplets 2) Shrink intervals b) Compressing rhythm
3) Outer ranges C) Rhythmic comb. 3) Add notes c) Fragmenting
4) Flat contour/ D) 3/4 rhythms in 4/4 4) Omit notes d) Displacing
5) Offset contour E) 3- or 6-note contours 5) Invert the contour e) Slow-to-fast rhythms
6) Skips / Fills F) Triplet contours, 2, 4 6) Retrograde f) Fast-to-slow rhythms
7) Embellishments G) 4/4 rhythms in 3/4 7) Diatonic sequence
8) Non-harm. tone H) 4-note contours, 3/4 8) Transposed sequence
9) Chord anticipation I) 4-note brackets, 3/4 9) Semi-sequence
10) Chord delay J) Double-time 10) Linking sequence
11) Dom. alteration K) Half-time 11) Pulling pattern
12) Riffs L) Triple-time 12) Offset pattern
13) Tritone subst. M) Shifted triplets 13) Special effects
14) Outside keys N) 5/4 rhythms 14) ii-V chain
15) Consec. 4ths O) Contour groups of 5 15) V-I chain
16) Aug. seconds P) Brackets of 5 16) ii-V-I chain
17) Outside arpeg. Q) 7/4 rhythms 17) Chord Delay
R) Contour groups of 7
S) Brackets of 7
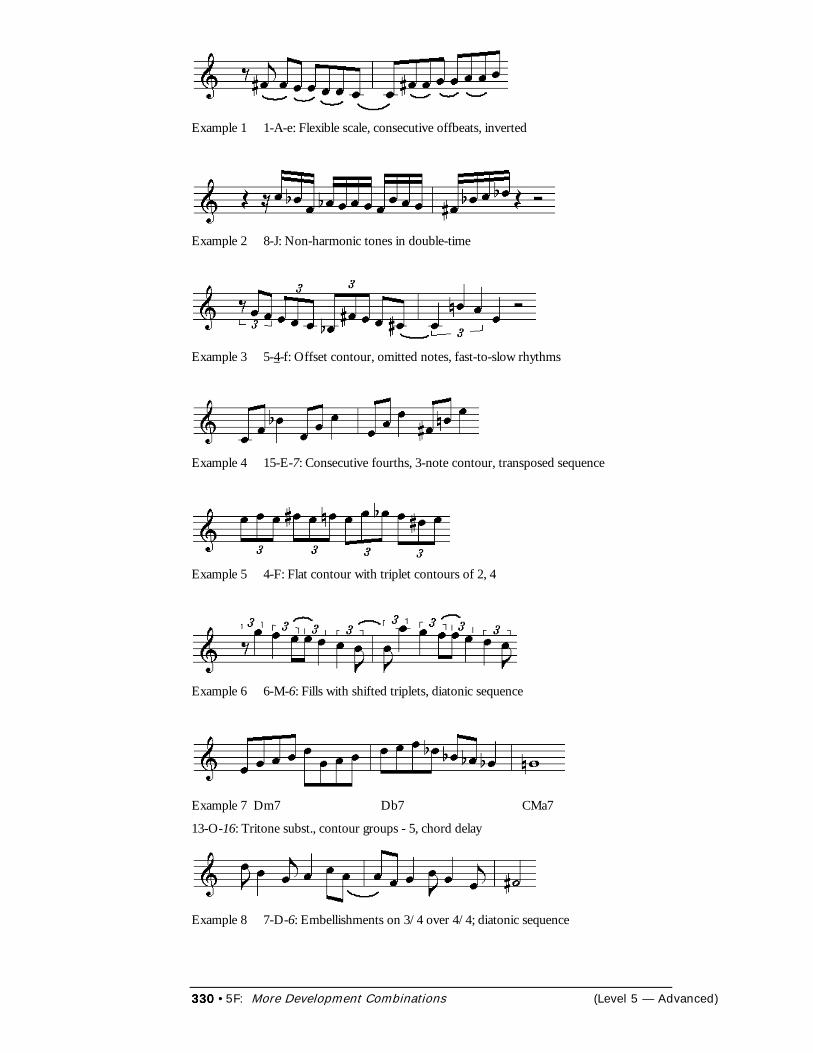
330330330330 •5F: More Development Combinations (Level 5 — Advanced)
Example 1 1-A-e: Flexible scale, consecutive offbeats, inverted
Example 2 8-J: Non-harmonic tones in double-time
Example 3 5-4-f: Offset contour, omitted notes, fast-to-slow rhythms
Example 4 15-E-7: Consecutive fourths, 3-note contour, transposed sequence
Example 5 4-F: Flat contour with triplet contours of 2, 4
Example 6 6-M-6: Fills with shifted triplets, diatonic sequence
Example 7 Dm7 Db7 CMa7
13-O-16: Tritone subst., contour groups - 5, chord delay
Example 8 7-D-6: Embellishments on 3/4 over 4/4; diatonic sequence
(Level 5 — Advanced) 5G: Free Improvisation • 331331331331
5G: Free Improvisation5G: Free Improvisation5G: Free Improvisation5G: Free Improvisation
In this chapter you’ll learn about:
• About Free Improvisation• Degrees of “Free”• Free Melody and Harmony• Free Rhythm• Free Jazz
ree improvisation is an interesting paradox. It sounds like you play whatever you want,but there’s actually some rhyme and reason to it, as this chapter explains. Famous freejazz soloists include Ornette Coleman, Cecil Taylor, John Coltrane, and Dave
Liebman.
About Free Improvisation
Wherever there’s freedom there’s also responsibility. Free jazz is a challenging experiencefor both the player and the listener. Instead of familiar keys, chord progressions, melodies,and rhythm backgrounds, there’s a new focus to the music: it goes in different directionswith many new possibilities.
Two important principles in approaching free improvisation are these:
• Freedom can be used in many degrees, in your solos and in your group (see Degrees ofFreedom below).
• Freedom doesn’t mean getting rid of musical elements like melody, chords, and rhythm;it means approaching them in a less structured or less traditional way.
Degrees of “Free”
Free improvisation isn’t necessarily all “free”; there are many degrees of freedom within asolo or in the way a group handles a tune. Here are some possibilities:
• The soloist improvises freely while the rhythm section stays traditional.
• One or more rhythm section players drift into free accompaniment behind a solo.
• The entire group goes free for a short while. This can be done at the beginning or endof a tune, or in response to a free-sounding solo (usually followed by a transition backinto the regular tune).
• All the group plays free for all or most of a tune.
You can mingle these degrees of freedom in your tunes to loosen things up a bit. Be sure touse the concepts in Chapter 4A: Soundscapes to give your free improv a sense of direction andintensity.
5.42 Using Themes5.42 Using Themes5.42 Using Themes5.42 Using ThemesTo begin experimenting with free improvisation, you can select themes to improvise on.Themes help you start and focus your improvisation, but they are better as a practicetechnique than as a performance means (unless you’re doing a music workshop).
F
332332332332 • 5G: Free Improvisation (Level 5 — Advanced)
Examples of themes include emotions (joy, anger, worry, etc.) or visual pictures (places,people, things, etc.). To practice themes,
1 Select a theme to use in free improv.
2 Have everyone in the group concentrate on the theme for a few seconds before playing.(Focus on the mood or picture of the theme, not on the specific notes you’re going toplay.)
3 Begin playing, and listen carefully to how the music evolves. There may or may not be acommon key.
As you practice themes, make it an exercise in creative teamwork. Don’t control the musictoo tightly; keep the interplay and communication flowing.
���Exercise 5.42 Using Themes in Free Improv
Group InteractionGroup InteractionGroup InteractionGroup InteractionFree improvisation often blurs the harmonic and rhythmic structure of music, but it alsohighlights interaction and development. Your group needs to handle interaction situationsquickly and effectively, including choices of when and how much to imitate or support mainideas. The better your group handles these situations, the better your free improvisation islikely to be. For more ideas on interaction, see Chapter 4F: Group Interaction.
Free Melody and Harmony
So how do you keep a free melody interesting, instead of sounding like it’s going nowherefast? Although a free melody doesn’t cling to a key, it still uses strong melodic elements asdiscussed below.
Playing Free MelodiesPlaying Free MelodiesPlaying Free MelodiesPlaying Free MelodiesA tune has a free-sounding melodies when you
• Play outside (see Chapters 5A and 5B), including angular lines.• Use rhythmic freedom in the melody (Chapter 5C).• Use wide, unfilled intervals in melody lines.• In most cases, avoid outlining traditional chords and progressions (see Playing Free
Harmonies below).• Use expression.• Use unusual sounds and special effects (Chapter 4C).• Use principles of melodic development (see Review of Volume 1 earlier in this book).
Playing Free HarmoniesPlaying Free HarmoniesPlaying Free HarmoniesPlaying Free HarmoniesA tune has free-sounding harmonies when you
• Avoid traditional chord progressions (such as ii-V-I’s) and home keys.• Use multiple keys at once (polytonal chords)
A useful technique for free harmonies is to have a pedal (usually a bass pedal or left hand inthe keyboard) behind the changing chords. As you play free-sounding melodies andharmony, the bass and drums can keep steady time, or they can use free rhythms asexplained below.
(Level 5 — Advanced) 5G: Free Improvisation • 333333333333
Free Rhythm
The simplest free rhythm is “no rhythm,” such as a long rest, or a long or randomlyrepeated note or chord. In addition to that, here are some suggestions for playing freerhythms:
• Use techniques of rhythmic freedom (see Chapter 5C: Rhythmic Freedom).• Don’t emphasize downbeats, time, or tempo.• Start with simple rhythms placed unexpectedly.• Mix percussive attacks with longer notes.• Use principles of rhythmic development (see Review of Volume 1 earlier in this book).
Near the end of the tune “Beat the Rats” on the BRIDJJ CD, the drums play free fills whilethe rest of rhythm section keeps playing structured time (4/4 + 5/4).
Free Jazz
When you combine free melody, free harmony, and free rhythm, you get free jazz.Remember that free jazz can be very demanding for listeners, so be sure your audience isready for the experience. And in free jazz, group interaction is still very important, so listencarefully to how ideas are evolving in your group.
At college, I used to practice free improvisation with a quintet. We would close our eyes andplay whatever we heard. Often we would spontaneously line up harmonies and developcounterpoint on the fly. It was a great exercise in listening and real-time composing.
By the way ... be careful about advertising a “free jazz” concert; some people may show upexpecting to get in for free.
Chapter Review
1) Free jazz is built on the traditional elements of improvisation, such as melody, rhythm,expression, development, and chords.
2) There are many degrees of freedom in free jazz, from slight to extreme.
3) Group interaction is important in free jazz, but the interaction is usually looser andmore varied.
4) In free jazz you need to know what to avoid (traditional chord movements, restingpitches and rhythms, etc.) as well as what to emphasize (non-harmonic tones, rhythmicfreedom, outside playing, strong effects, etc.).
ExpressionsExpressionsExpressionsExpressions*Nothing is more terrible than activity without insight. Thomas Carlyle*All poetry [is] putting the infinite within the finite. Robert Browning*In great attempts it is glorious even to fail.
(Level 5 — Advanced) Exercises for Level 5 • 334334334334
Exercises for LEVEL 5Exercises for LEVEL 5Exercises for LEVEL 5Exercises for LEVEL 5
Melody: Playing Outside
Exercise 5.1 � Finding Outside Keys in MajorBasic __/__/__ ( )
*Basic: For each major key around the circle of fourths, find the three most outside pentatonicscales.
Exercise 1.45 � Humming Blues ScalesBasic __/__/__ ( ) Medium __/__/__ ( ) Challenge __/__/__ ( )
More __/__/__ ( )
❏ *Basic: Hum and finger eighth-notes for all 12 blues scales, around the circle of 4ths, at quarter-note = 100.
❏ **Medium: Same as Basic; quarter-note = 150.
❏ ***Challenge: Same as Basic; quarter-note = 180.
❏ >More: Same as Basic; A) don't pause between keys - connect to the next root and proceed; B)play 2 octaves on each key; C) both A and B
❏ ��Play-Along: Aebersold Vol. 1 – circle of 4ths – 4 bars per chord
Exercise 5.2 � Finding Outside Keys in MinorBasic __/__/__ ( )
*Basic: For each minor key around the circle of 4ths, find the 3 most outside major pentatonicscales.
Exercise 5.3 � Melodic Resolution and OutsideBasic __/__/__ ( ) Medium __/__/__ ( ) Challenge __/__/__ ( )
*Basic: In a major key, play inside and resolve to an outside key.
**Medium: Same as Basic; return to the home key.
***Challenge: Same as Medium; go to two outside keys before returning.
❏ >More: Same as Basic; A) don't pause between keys - connect to the next root and proceed; B)play 2 octaves on each key; C) both A and B
❏ ��Play-Along: Aebersold Vol. 1 – circle of 4ths – 4 bars per chord
Level 5 — Advanced) Exercises for Level 5 • 335335335335
Exercise 5.4 � Emphasizing Outside NotesBasic __/__/__ ( ) Medium __/__/__ ( )
*Basic: Play a two-bar idea with 2 emphasized outside notes.
**Medium: Play a long idea with 4 or more emphasized outside notes.
❏ >More: Same as Basic; A) don't pause between keys - connect to the next root and proceed; B)play 2 octaves on each key; C) both A and B
❏ ��Play-Along: Aebersold Vol. 1 – circle of 4ths – 4 bars per chord
Exercise 5.5 � Using Whole-Tone ScalesBasic __/__/__ ( ) Medium __/__/__ ( ) Challenge __/__/__ ( )
*Basic: Play a C whole-tone scale; switch to a Db whole-tone scale w/ a half-step link.
**Medium: Same as Basic; switch between the two scales several times.
***Challenge: Same as Medium; switch with half-steps and wider intervals.
❏ >More: Same as Basic; A) don't pause between keys - connect to the next root and proceed; B)play 2 octaves on each key; C) both A and B
❏ ��Play-Along: Aebersold Vol. 1 – circle of 4ths – 4 bars per chord
Exercise 5.6 � Using Consecutive FourthsBasic __/__/__ ( ) Medium __/__/__ ( ) Challenge __/__/__ ( )
*Basic: Play a line of consecutive fourths, dropping a fifth occasionally.
**Medium: Same as Basic; include some downward whole-steps.
***Challenge: Same as Medium; when you reach an outside key, stay in it.
❏ >More: Same as Basic; A) don't pause between keys - connect to the next root and proceed; B)play 2 octaves on each key; C) both A and B
❏ ��Play-Along: Aebersold Vol. 1 – circle of 4ths – 4 bars per chord
Exercise 5.7 � Mixing Perfect & Augmented 4thsBasic __/__/__ ( ) Medium __/__/__ ( ) Challenge __/__/__ ( )
*Basic: Play a line of mostly consecutive 4ths with a few augmented 4ths.
**Medium: Same as Basic; include some downward whole-steps.
***Challenge: Same as Medium; when you reach an outside key, stay in it.
❏ >More: Same as Basic; A) don't pause between keys - connect to the next root and proceed; B)play 2 octaves on each key; C) both A and B
❏ ��Play-Along: Aebersold Vol. 1 – circle of 4ths – 4 bars per chord
Exercise 5.8 � Using Augmented Seconds

(Level 5 — Advanced) Exercises for Level 5 • 336336336336
Basic __/__/__ ( )
*Basic: Play a long line with all four augmented 2nds.
❏ >More: Same as Basic; A) don't pause between keys - connect to the next root and proceed; B)play 2 octaves on each key; C) both A and B
❏ ��Play-Along: Aebersold Vol. 1 – circle of 4ths – 4 bars per chord
Exercise 5.9 � Using Very Wide IntervalsBasic __/__/__ ( ) Medium __/__/__ ( )
*Basic: Play a long line with skips (major 7 or minor 7) to non-harmonic tones.
**Medium: Same as Basic; use 11ths.
❏ >More: Same as Basic; A) don't pause between keys - connect to the next root and proceed; B)play 2 octaves on each key; C) both A and B
❏ ��Play-Along: Aebersold Vol. 1 – circle of 4ths – 4 bars per chord
Exercise 5.10 � Playing Augmented Second ScalesBasic __/__/__ ( ) Medium __/__/__ ( ) Challenge __/__/__ ( )
*Basic: Play a flexible version of scale #1, then transpose it to the other 11 keys.
**Medium: Same as Basic; use scales 2 and 3.
***Challenge: Same as Basic; use any 3 scales (4 to 7).
❏ >More: Same as Basic; A) don't pause between keys - connect to the next root and proceed; B)play 2 octaves on each key; C) both A and B
❏ ��Play-Along: Aebersold Vol. 1 – circle of 4ths – 4 bars per chord
Exercise 5.11 � Playing Scales w/ Unusual StructuresBasic __/__/__ ( ) Medium __/__/__ ( )
*Basic: Play a flexible version of scale #a, then transpose it to the other 11 keys.
**Medium: Same as Basic; use scales #b and #c.
❏ >More: Same as Basic; A) don't pause between keys - connect to the next root and proceed; B)play 2 octaves on each key; C) both A and B
❏ ��Play-Along: Aebersold Vol. 1 – circle of 4ths – 4 bars per chord
Exercise 5.12 � Using Polytone ArpeggiosBasic __/__/__ ( ) Medium __/__/__ ( ) Challenge __/__/__ ( )
*Basic: Play a 4-note polytone arpeggio in C; transpose it around the circle of 4ths.
**Medium: Same as Basic; use a 5-note polytone arpeggio in major or minor.
Level 5 — Advanced) Exercises for Level 5 • 337337337337
***Challenge: Combine several different kinds of polytone arpeggios into one long idea.
❏ >More: Same as Basic; A) don't pause between keys - connect to the next root and proceed; B)play 2 octaves on each key; C) both A and B
❏ ��Play-Along: Aebersold Vol. 1 – circle of 4ths – 4 bars per chord
Exercise 5.13 � Sequencing Outside IdeasBasic __/__/__ ( ) Medium __/__/__ ( ) Challenge __/__/__ ( )
*Basic: Play an outside idea and sequence it by half-steps or whole-steps.
**Medium: Same as Basic; use min. or major thirds.
***Challenge: Same as Basic; use the circle of 4ths..
❏ >More: Same as Basic; A) don't pause between keys - connect to the next root and proceed; B)play 2 octaves on each key; C) both A and B
❏ ��Play-Along: Aebersold Vol. 1 – circle of 4ths – 4 bars per chord
Exercise 5.14 � Developing Outside IdeasBasic __/__/__ ( )
*Basic: Play an outside idea; then augment it, compress it, add or omit notes, fragment it, ordisplace it .
❏ >More: Same as Basic; A) don't pause between keys - connect to the next root and proceed; B)play 2 octaves on each key; C) both A and B
❏ ��Play-Along: Aebersold Vol. 1 – circle of 4ths – 4 bars per chord
Exercise 5.15 � Scale WanderingBasic __/__/__ ( ) Medium __/__/__ ( ) Challenge __/__/__ ( )
*Basic: Choose two keys and wander through them, back and forth.
**Medium: Same as Basic; use three or four keys.
***Challenge: Same as Basic; use any key.
❏ >More: Same as Basic; A) don't pause between keys - connect to the next root and proceed; B)play 2 octaves on each key; C) both A and B
❏ ��Play-Along: Aebersold Vol. 1 – circle of 4ths – 4 bars per chord
Exercise 5.16 � Using “Middle” KeysBasic __/__/__ ( ) Medium __/__/__ ( )
*Basic: Play a longer outside idea in any major key; travel through 2 middle keys.
**Medium: Same as Basic, in a minor key.
(Level 5 — Advanced) Exercises for Level 5 • 338338338338
❏ >More: Same as Basic; A) don't pause between keys - connect to the next root and proceed; B)play 2 octaves on each key; C) both A and B
❏ ��Play-Along: Aebersold Vol. 1 – circle of 4ths – 4 bars per chord
Rhythm: Rhythmic Freedom
Exercise 5.17 � Slower to Faster Rhythms
Basic __/__/__ ( ) Medium __/__/__ ( )
*Basic: Write a 2-bar melody; start with quarter-note triplets, end with 16ths.
**Medium: Write a 4-bar melody; start with half-notes, end with sixteenth-notes.
❏ >More: Same as Basic; A) don't pause between keys - connect to the next root and proceed; B)play 2 octaves on each key; C) both A and B
❏ ��Play-Along: Aebersold Vol. 1 – circle of 4ths – 4 bars per chord
Exercise 5.18 � Faster to Slower RhythmsBasic __/__/__ ( ) Medium __/__/__ ( )
*Basic: Write a 2-bar melody; start with 16th-notes, end with quarter-note triplets.
**Medium: Write a 4-bar melody; start with sixteenth-notes, end with half-notes.
❏ >More: Same as Basic; A) don't pause between keys - connect to the next root and proceed; B)play 2 octaves on each key; C) both A and B
❏ ��Play-Along: Aebersold Vol. 1 – circle of 4ths – 4 bars per chord
Exercise 5.19 � Using Shifted TripletsBasic __/__/__ ( ) Medium __/__/__ ( ) Challenge __/__/__ ( )
*Basic: Play six regular quarter-note triplets, then six shifted ones.
**Medium: Same as Basic; use half-note triplets.
***Challenge: Same as Basic; use four-note bracket notes in 3/4.
❏ >More: Same as Basic; A) don't pause between keys - connect to the next root and proceed; B)play 2 octaves on each key; C) both A and B
❏ ��Play-Along: Aebersold Vol. 1 – circle of 4ths – 4 bars per chord
Level 5 — Advanced) Exercises for Level 5 • 339339339339
Exercise 5.20 � Playing Unusual Triplet GroupsBasic __/__/__ ( ) Medium __/__/__ ( ) Challenge __/__/__ ( )
*Basic: Create several groups of 8 eighth-note triplets.
**Medium: Same as Basic, with groups of 10.
❏ >More: Same as Basic; A) don't pause between keys - connect to the next root and proceed; B)play 2 octaves on each key; C) both A and B
❏ ��Play-Along: Aebersold Vol. 1 – circle of 4ths – 4 bars per chord
Exercise 5.21 � Using RubatoBasic __/__/__ ( ) Medium __/__/__ ( ) Challenge __/__/__ ( )
*Basic: Play six regular quarter-note triplets, then six shifted ones.
**Medium: Same as Basic; use half-note triplets.
***Challenge: Same as Basic; use four-note bracket notes in 3/4.
❏ >More: Same as Basic; A) don't pause between keys - connect to the next root and proceed; B)play 2 octaves on each key; C) both A and B
❏ ��Play-Along: Aebersold Vol. 1 – circle of 4ths – 4 bars per chord
Exercise 5.22 � Playing CadenzasBasic __/__/__ ( ) Medium __/__/__ ( ) Challenge __/__/__ ( )
*Basic: Play a brief introduction before a play-along recording.
**Medium: Play a brief cadenza just before the end of a play-along recording (pause it).
***Challenge: Same as Basic or Medium; play longer.
❏ >More: Same as Basic; A) don't pause between keys - connect to the next root and proceed; B)play 2 octaves on each key; C) both A and B
❏ ��Play-Along: Aebersold Vol. 1 – circle of 4ths – 4 bars per chord
Exercise 5.23 � Using Off-TemposBasic __/__/__ ( ) Medium __/__/__ ( ) Challenge __/__/__ ( )
*Basic: Using a metronome, speed up quarter-note triplets; slightly then slow them back tonormal, or slow them slightly, then speed them back to normal.
**Medium: Same as Basic; use eighth-notes.
***Challenge: Same as Basic; use eighth-note triplets.
❏ >More: Same as Basic; A) don't pause between keys - connect to the next root and proceed; B)play 2 octaves on each key; C) both A and B
❏ ��Play-Along: Aebersold Vol. 1 – circle of 4ths – 4 bars per chord
Exercise 5.24 � Burning
(Level 5 — Advanced) Exercises for Level 5 • 340340340340
Basic __/__/__ ( ) Medium __/__/__ ( )
*Basic: Play a line of eighth-notes and add a short “burning” passage to it.
**Medium: Move between 8th-notes and burning.
❏ >More: Same as Basic; A) don't pause between keys - connect to the next root and proceed; B)play 2 octaves on each key; C) both A and B
❏ ��Play-Along: Aebersold Vol. 1 – circle of 4ths – 4 bars per chord
Exercise 5.25 �WigglingBasic __/__/__ ( ) Medium __/__/__ ( )
*Basic: Play a line of eighth-notes and add a short “wiggling” passage to it.
**Medium: Move back and forth between eighth-notes and wiggling.
❏ >More: Same as Basic; A) don't pause between keys - connect to the next root and proceed; B)play 2 octaves on each key; C) both A and B
❏ ��Play-Along: Aebersold Vol. 1 – circle of 4ths – 4 bars per chord
Exercise 5.26 � Playing 5/4 Rhythms in a 4/4 TuneBasic __/__/__ ( ) Medium __/__/__ ( )
*Basic: Repeat motif with a 5/4 rhythm in a 4/4 tune .
**Medium: Write a longer melody with 7-note groups.
❏ >More: Same as Basic; A) don't pause between keys - connect to the next root and proceed; B)play 2 octaves on each key; C) both A and B
❏ ��Play-Along: Aebersold Vol. 1 – circle of 4ths – 4 bars per chord
Exercise 5.27 � Using 5-Note GroupsBasic __/__/__ ( ) Medium __/__/__ ( )
*Basic: Write your own 5-note groups.
**Medium: Write a longer melody with 5-note groups.
❏ >More: Same as Basic; A) don't pause between keys - connect to the next root and proceed; B)play 2 octaves on each key; C) both A and B
❏ ��Play-Along: Aebersold Vol. 1 – circle of 4ths – 4 bars per chord
Level 5 — Advanced) Exercises for Level 5 • 341341341341
Exercise 5.28 � Using 5-Note Brackets
Basic __/__/__ ( ) Medium __/__/__ ( )
*Basic: On a flexible scale, play four quarter-notes in bar 1, a bracket of five quarter-notes inbar 2, etc.; switch between 4 and 5, one bar to the next.
**Medium: Same as Basic; brackets of 5 8th-notes.
❏ >More: Same as Basic; A) don't pause between keys - connect to the next root and proceed; B)play 2 octaves on each key; C) both A and B
❏ ��Play-Along: Aebersold Vol. 1 – circle of 4ths – 4 bars per chord
Exercise 5.29 � Playing 7/4 Rhythms in a 4/4 TuneBasic __/__/__ ( ) Medium __/__/__ ( )
*Basic: Write your own 7-note groups.
**Medium: Write a longer melody with 7-note groups.
❏ >More: Same as Basic; A) don't pause between keys - connect to the next root and proceed; B)play 2 octaves on each key; C) both A and B
❏ ��Play-Along: Aebersold Vol. 1 – circle of 4ths – 4 bars per chord
Exercise 5.30 � Using Contour Groups of 7Basic __/__/__ ( ) Medium __/__/__ ( )
*Basic: Write your own 7-note groups.
**Medium: Write a longer melody with 7-note groups.
❏ >More: Same as Basic; A) don't pause between keys - connect to the next root and proceed; B)play 2 octaves on each key; C) both A and B
❏ ��Play-Along: Aebersold Vol. 1 – circle of 4ths – 4 bars per chord
Exercise 5.31 � Using 7-Note BracketsBasic __/__/__ ( )
*Basic: Improvise on a flexible scale. Play eight 8th-notes in bar 1, a bracket of seven 8th-notesin the bar 2, etc., alternating between 8 and 7 every other bar.
(Level 5 — Advanced) Exercises for Level 5 • 342342342342
5 Rhythm: Rhythmic Pulses
Exercise 5.32 � Using a Quarter-Note Triplet PulseBasic __/__/__ ( ) Medium __/__/__ ( )
*Basic: Play original quarter-notes at a comfortable speed. Then repeat quarter-note triplets toset up the new pulse. Once you feel the new pulse, subdivide it into swing rhythms,then return to the original quarter-note pulse.
**Medium: Same as Basic; return to the original quarter-note pulse
❏ >More: Same as Basic; A) don't pause between keys - connect to the next root and proceed; B)play 2 octaves on each key; C) both A and B
❏ ��Play-Along: Aebersold Vol. 1 – circle of 4ths – 4 bars per chord
Exercise 5.33 � Using an Eighth-Note Triplet PulseBasic __/__/__ ( )
*Basic: Same as Basic 5.32; use 8th-note triplets. Then return to original pulse.
❏ >More: Same as Basic; A) don't pause between keys - connect to the next root and proceed; B)play 2 octaves on each key; C) both A and B
❏ ��Play-Along: Aebersold Vol. 1 – circle of 4ths – 4 bars per chord
Exercise 5.34 � Using a Dotted Quarter-Note PulseBasic __/__/__ ( )
*Basic: Same as Basic 5.32; use dotted quarter-notes. Then return to original pulse.
❏ >More: Same as Basic; A) don't pause between keys - connect to the next root and proceed; B)play 2 octaves on each key; C) both A and B
❏ ��Play-Along: Aebersold Vol. 1 – circle of 4ths – 4 bars per chord
Exercise 5.35 � Using a Dotted Half-Note PulseBasic __/__/__ ( )
*Basic: Same as Basic 5.32; use dotted half-notes. Then return to original pulse.
❏ >More: Same as Basic; A) don't pause between keys - connect to the next root and proceed; B)play 2 octaves on each key; C) both A and B
❏ ��Play-Along: Aebersold Vol. 1 – circle of 4ths – 4 bars per chord
Level 5 — Advanced) Exercises for Level 5 • 343343343343
Exercise 5.36 � Using a Pulse of Quarters & EighthsBasic __/__/__ ( )
*Basic: Same as Basic 5.32; use alternating quarter-notes and eighth-notes. Then return tooriginal pulse.
❏ >More: Same as Basic; A) don't pause between keys - connect to the next root and proceed; B)play 2 octaves on each key; C) both A and B
❏ ��Play-Along: Aebersold Vol. 1 – circle of 4ths – 4 bars per chord
Exercise 5.37 � Using Dotted-Quarter Pulses in 3/4Basic __/__/__ ( )
*Basic: Same as Basic 5.32; use alternating quarter-notes and eighth-notes. Then return tooriginal pulse.
❏ >More: Same as Basic; A) don't pause between keys - connect to the next root and proceed; B)play 2 octaves on each key; C) both A and B
❏ ��Play-Along: Aebersold Vol. 1 – circle of 4ths – 4 bars per chord
Exercise 5.38 � Using a 4-Note Bracket Pulse in 3/4Basic __/__/__ ( )
*Basic: Same as Basic 5.32; use 4-note brackets in 3/4. Then return to original pulse.
❏ >More: Same as Basic; A) don't pause between keys - connect to the next root and proceed; B)play 2 octaves on each key; C) both A and B
❏ ��Play-Along: Aebersold Vol. 1 – circle of 4ths – 4 bars per chord
Exercise 5.39 � Practicing Shifts with Familiar SongsBasic __/__/__ ( )
*Basic: Same as Basic 5.32; use 4-note brackets in 3/4. Then return to original pulse.
❏ >More: Same as Basic; A) don't pause between keys - connect to the next root and proceed; B)play 2 octaves on each key; C) both A and B
❏ ��Play-Along: Aebersold Vol. 1 – circle of 4ths – 4 bars per chord
Exercise 5.40 � Using Group ShiftsBasic __/__/__ ( )
*Basic: Same as Basic 5.32; use 4-note brackets in 3/4. Then return to original pulse.
❏ >More: Same as Basic; A) don't pause between keys - connect to the next root and proceed; B)play 2 octaves on each key; C) both A and B
❏ ��Play-Along: Aebersold Vol. 1 – circle of 4ths – 4 bars per chord.

344344344344 • About the Exercises (Introduction)