artist mix user guide.pdf - euphonix
TRANSCRIPT

Artist Mix User Guide
EuControl v3.0
Legal Notices© 2013 Avid Technology, Inc., (“Avid”), all rights reserved. This guide may not be duplicated in whole or in part without the written consent of Avid.
003, 192 Digital I/O, 192 I/O, 96 I/O, 96i I/O, Adrenaline, AirSpeed, ALEX, Alienbrain, AME, AniMatte, Archive, Archive II, Assistant Station, AudioPages, AudioStation, AutoLoop, AutoSync, Avid, Avid Active, Avid Advanced Response, Avid DNA, Avid DNxcel, Avid DNxHD, Avid DS Assist Station, Avid Ignite, Avid Liquid, Avid Media Engine, Avid Media Processor, Avid MEDIArray, Avid Mojo, Avid Remote Response, Avid Unity, Avid Unity ISIS, Avid VideoRAID, AvidRAID, AvidShare, AVIDstripe, AVX, Beat Detective, Beauty Without The Bandwidth, Beyond Reality, BF Essentials, Bomb Factory, Bruno, C|24, CaptureManager, ChromaCurve, ChromaWheel, Cineractive Engine, Cineractive Player, Cineractive Viewer, Color Conductor, Command|8, Control|24, Cosmonaut Voice, CountDown, d2, d3, DAE, D-Command, D-Control, Deko, DekoCast, D-Fi, D-fx, Digi 002, Digi 003, DigiBase, Digidesign, Digidesign Audio Engine, Digidesign Development Partners, Digidesign Intelligent Noise Reduction, Digidesign TDM Bus, DigiLink, DigiMeter, DigiPanner, DigiProNet, DigiRack, DigiSerial, DigiSnake, DigiSystem, Digital Choreography, Digital Nonlinear Accelerator, DigiTest, DigiTranslator, DigiWear, DINR, DNxchange, Do More, DPP-1, D-Show, DSP Manager, DS-StorageCalc, DV Toolkit, DVD Complete, D-Verb, Eleven, EM, Euphonix, EUCON, EveryPhase, Expander, ExpertRender, Fairchild, FastBreak, Fast Track, Film Cutter, FilmScribe, Flexevent, FluidMotion, Frame Chase, FXDeko, HD Core, HD Process, HDpack, Home-to-Hollywood, HyperSPACE, HyperSPACE HDCAM, iKnowledge, Impact, Improv, iNEWS, iNEWS Assign, iNEWS ControlAir, InGame, Instantwrite, Instinct, Intelligent Content Management, Intelligent Digital Actor Technology, IntelliRender, Intelli-Sat, Intelli-Sat Broadcasting Recording Manager, InterFX, Interplay, inTONE, Intraframe, iS Expander, iS9, iS18, iS23, iS36, ISIS, IsoSync, LaunchPad, LeaderPlus, LFX, Lightning, Link & Sync, ListSync, LKT-200, Lo-Fi, MachineControl, Magic Mask, Make Anything Hollywood, make manage move|media, Marquee, MassivePack, MassivePack Pro, Maxim, Mbox, Media Composer, MediaFlow, MediaLog, MediaMix, Media Reader, Media Recorder, MEDIArray, MediaServer, MediaShare, MetaFuze, MetaSync, MIDI I/O, Mix Rack, Moviestar, MultiShell, NaturalMatch, NewsCutter, NewsView, NewsVision, Nitris, NL3D, NLP, NSDOS, NSWIN, OMF, OMF Interchange, OMM, OnDVD, Open Media Framework, Open Media Management, Painterly Effects, Palladium, Personal Q, PET, Podcast Factory, PowerSwap, PRE, ProControl, ProEncode, Profiler, Pro Tools, Pro Tools|HD, Pro Tools LE, Pro Tools M-Powered, Pro Transfer, QuickPunch, QuietDrive, Realtime Motion Synthesis, Recti-Fi, Reel Tape Delay, Reel Tape Flanger, Reel Tape Saturation, Reprise, Res Rocket Surfer, Reso, RetroLoop, Reverb One, ReVibe, Revolution, rS9, rS18, RTAS, Salesview, Sci-Fi, Scorch, ScriptSync, SecureProductionEnvironment, Shape-to-Shape, ShuttleCase, Sibelius, SimulPlay, SimulRecord, Slightly Rude Compressor, Smack!, Soft SampleCell, Soft-Clip Limiter, SoundReplacer, SPACE, SPACEShift, SpectraGraph, SpectraMatte, SteadyGlide, Streamfactory, Streamgenie, StreamRAID, SubCap, Sundance, Sundance Digital, SurroundScope, Symphony, SYNC HD, SYNC I/O, Synchronic, SynchroScope, Syntax, TDM FlexCable, TechFlix, Tel-Ray, Thunder, TimeLiner, Titansync, Titan, TL Aggro, TL AutoPan, TL Drum Rehab, TL Everyphase, TL Fauxlder, TL In Tune, TL MasterMeter, TL Metro, TL Space, TL Utilities, tools for storytellers, Transit, TransJammer, Trillium Lane Labs, TruTouch, UnityRAID, Vari-Fi, Video the Web Way, VideoRAID, VideoSPACE, VTEM, Work-N-Play, Xdeck, X-Form, and XMON are either registered trademarks or trademarks of Avid Technology, Inc. in the United States and/or other countries.
Bonjour, the Bonjour logo, and the Bonjour symbol are trademarks of Apple Computer, Inc.
Thunderbolt and the Thunderbolt logo are trademarks of Intel Corporation in the U.S. and/or other countries.
This product may be protected by one or more U.S. and non-U.S. patents. Details are available at www.avid.com/patents.
Product features, specifications, system requirements, and availability are subject to change without notice.
Guide Part Number 9329-65301-00 REV A 05/13

Chapter 1. Introduction . . . . . . . . . . . . . . . . . . . . . . . . . . . . . . . . . . . . . . . . . . . . . . . . . . . . . . . . . . . . . . . . . . . . . . . . . . 1What’s Included . . . . . . . . . . . . . . . . . . . . . . . . . . . . . . . . . . . . . . . . . . . . . . . . . . . . . . . . . . . . . . . . . . . . . . . . . . . 1System Requirements and Compatibility . . . . . . . . . . . . . . . . . . . . . . . . . . . . . . . . . . . . . . . . . . . . . . . . . . . . . . . . . 2Registration . . . . . . . . . . . . . . . . . . . . . . . . . . . . . . . . . . . . . . . . . . . . . . . . . . . . . . . . . . . . . . . . . . . . . . . . . . . . . . 2About This Guide . . . . . . . . . . . . . . . . . . . . . . . . . . . . . . . . . . . . . . . . . . . . . . . . . . . . . . . . . . . . . . . . . . . . . . . . . . 2About www.avid.com . . . . . . . . . . . . . . . . . . . . . . . . . . . . . . . . . . . . . . . . . . . . . . . . . . . . . . . . . . . . . . . . . . . . . . . 3
Chapter 2. Setup and Installation . . . . . . . . . . . . . . . . . . . . . . . . . . . . . . . . . . . . . . . . . . . . . . . . . . . . . . . . . . . . . . . . . . 5Unpacking and Elevating the Artist Mix . . . . . . . . . . . . . . . . . . . . . . . . . . . . . . . . . . . . . . . . . . . . . . . . . . . . . . . . . . 5Attaching an Artist Mix to Additional Units . . . . . . . . . . . . . . . . . . . . . . . . . . . . . . . . . . . . . . . . . . . . . . . . . . . . . . . . 6Installing Software and Hardware . . . . . . . . . . . . . . . . . . . . . . . . . . . . . . . . . . . . . . . . . . . . . . . . . . . . . . . . . . . . . . 8
Chapter 3. Common Tasks . . . . . . . . . . . . . . . . . . . . . . . . . . . . . . . . . . . . . . . . . . . . . . . . . . . . . . . . . . . . . . . . . . . . . . 13Fader Strip. . . . . . . . . . . . . . . . . . . . . . . . . . . . . . . . . . . . . . . . . . . . . . . . . . . . . . . . . . . . . . . . . . . . . . . . . . . . . . 13Inserts . . . . . . . . . . . . . . . . . . . . . . . . . . . . . . . . . . . . . . . . . . . . . . . . . . . . . . . . . . . . . . . . . . . . . . . . . . . . . . . . . 14
Chapter 4. Surface Controls . . . . . . . . . . . . . . . . . . . . . . . . . . . . . . . . . . . . . . . . . . . . . . . . . . . . . . . . . . . . . . . . . . . . . 17Power Switch . . . . . . . . . . . . . . . . . . . . . . . . . . . . . . . . . . . . . . . . . . . . . . . . . . . . . . . . . . . . . . . . . . . . . . . . . . . . 18SHIFT . . . . . . . . . . . . . . . . . . . . . . . . . . . . . . . . . . . . . . . . . . . . . . . . . . . . . . . . . . . . . . . . . . . . . . . . . . . . . . . . . 18Fader Strips . . . . . . . . . . . . . . . . . . . . . . . . . . . . . . . . . . . . . . . . . . . . . . . . . . . . . . . . . . . . . . . . . . . . . . . . . . . . . 19Fader Navigation Controls . . . . . . . . . . . . . . . . . . . . . . . . . . . . . . . . . . . . . . . . . . . . . . . . . . . . . . . . . . . . . . . . . . 22Knobs . . . . . . . . . . . . . . . . . . . . . . . . . . . . . . . . . . . . . . . . . . . . . . . . . . . . . . . . . . . . . . . . . . . . . . . . . . . . . . . . . 23APPLICATION . . . . . . . . . . . . . . . . . . . . . . . . . . . . . . . . . . . . . . . . . . . . . . . . . . . . . . . . . . . . . . . . . . . . . . . . . . . 26WORKSTATION . . . . . . . . . . . . . . . . . . . . . . . . . . . . . . . . . . . . . . . . . . . . . . . . . . . . . . . . . . . . . . . . . . . . . . . . . 26
Chapter 5. EuControl . . . . . . . . . . . . . . . . . . . . . . . . . . . . . . . . . . . . . . . . . . . . . . . . . . . . . . . . . . . . . . . . . . . . . . . . . . . 27Surfaces . . . . . . . . . . . . . . . . . . . . . . . . . . . . . . . . . . . . . . . . . . . . . . . . . . . . . . . . . . . . . . . . . . . . . . . . . . . . . . . 27Workstations . . . . . . . . . . . . . . . . . . . . . . . . . . . . . . . . . . . . . . . . . . . . . . . . . . . . . . . . . . . . . . . . . . . . . . . . . . . . 29General . . . . . . . . . . . . . . . . . . . . . . . . . . . . . . . . . . . . . . . . . . . . . . . . . . . . . . . . . . . . . . . . . . . . . . . . . . . . . . . . 30Preferences . . . . . . . . . . . . . . . . . . . . . . . . . . . . . . . . . . . . . . . . . . . . . . . . . . . . . . . . . . . . . . . . . . . . . . . . . . . . . 32Assign . . . . . . . . . . . . . . . . . . . . . . . . . . . . . . . . . . . . . . . . . . . . . . . . . . . . . . . . . . . . . . . . . . . . . . . . . . . . . . . . . 33Layouts . . . . . . . . . . . . . . . . . . . . . . . . . . . . . . . . . . . . . . . . . . . . . . . . . . . . . . . . . . . . . . . . . . . . . . . . . . . . . . . . 34Soft Keys . . . . . . . . . . . . . . . . . . . . . . . . . . . . . . . . . . . . . . . . . . . . . . . . . . . . . . . . . . . . . . . . . . . . . . . . . . . . . . . 34
Chapter 6. Setting IP Addresses . . . . . . . . . . . . . . . . . . . . . . . . . . . . . . . . . . . . . . . . . . . . . . . . . . . . . . . . . . . . . . . . . . 35
Appendix A. Compliance Information. . . . . . . . . . . . . . . . . . . . . . . . . . . . . . . . . . . . . . . . . . . . . . . . . . . . . . . . . . . . . . 37Environmental Compliance . . . . . . . . . . . . . . . . . . . . . . . . . . . . . . . . . . . . . . . . . . . . . . . . . . . . . . . . . . . . . . . . . . 37EMC (Electromagnetic Compliance) . . . . . . . . . . . . . . . . . . . . . . . . . . . . . . . . . . . . . . . . . . . . . . . . . . . . . . . . . . . 38Safety Compliance . . . . . . . . . . . . . . . . . . . . . . . . . . . . . . . . . . . . . . . . . . . . . . . . . . . . . . . . . . . . . . . . . . . . . . . . 39
Contents
Contents iii

Artist Mix User Guideiv

Chapter 1: Introduction
The Artist Control, Artist Mix, Artist Transport and Artist Color comprise the Artist Series family of media controllers. They use a 100 Mbs Ethernet EUCON™ connection to control audio and video applications running on a workstation computer. EUCON is a high-speed communication protocol and enables control of virtually every application feature.
Each Artist Series media controller can run as a standalone device. Up to four Artist Mix units can be used with an optional Artist Control and/or Artist Transport to create a larger control surface. Artist Series media controllers borrow many features from the MC Pro and System 5-MC.
The Artist Mix supports two types of applications:• EUCON-aware applications (such as Pro Tools™ 9.0 and higher, Media Composer™, Cubase, Logic Pro, and Nuendo) di-
rectly support the EUCON protocol. They provide the highest level of integration, high-resolution controls, and high-speed connectivity.
• Non-EUCON-aware applications that support Mackie Control or HUI (such as Pro Tools 8.x and lower, Live, and Reason) can use many functions but are less integrated than EUCON-aware applications.
EuControl SoftwareThe EuControl software application is responsible for finding, linking, and communicating with all Artist Series controllers on the network. EuControl must be installed on the computer that runs the applications you want to control before using Artist Series con-trollers.
What’s Included• Artist Mix, with riser brackets• EuControl software installer disc• 1 Ethernet Crossover cable• Power supply• Artist Mix Quick Setup • Registration Information Card
Chapter 1: Introduction 1

System Requirements and CompatibilityAvid can only assure compatibility and provide support for hardware and software it has tested and approved.
For downloads and other Artist Series resources, visit: www.avid.com/artistsupport
RegistrationReview the enclosed Registration Information Card and follow the instructions on it to quickly register your purchase online. By registering, you become eligible to receive the following:
• Technical support information• Software update and upgrade notices• Hardware warranty information
About This Guide
Conventions Used in This GuideAll of our guides use the following conventions to indicate menu choices and key commands::
The names of Commands, Options, and Settings that appear on-screen are in a different font. The names of keys on Artist Series hardware are in bold (such as SEL). The SHIFT key on Artist Series hardware is indicated by bold text, in all-caps (SHIFT) to dis-tinguish it from references to the Shift key on your QWERTY keyboard.
The following symbols are used to highlight important information:
Convention Action
File > Save Choose Save from the File menu
Control+N Hold down the Control key and press the N key
Control-click Hold down the Control key and click the mouse button
Right-click Click with the right mouse button
User Tips are helpful hints for getting the most from your system.
Important Notices include information that could affect your data or the performance of your system.
Shortcuts show you useful keyboard or mouse shortcuts.
Cross References point to related sections in this guide and other Avid guides.
Artist Mix User Guide2

About www.avid.comThe Avid website (www.avid.com) is your best online source for information to help you get the most out of your system. The following are just a few of the services and features available.
Product Registration Register your purchase online.
Support and Downloads Contact Avid Customer Success (technical support); download software updates and the latest online manuals; browse the Compatibility documents for system requirements; search the online Knowledge Base or join the worldwide Pro Tools community on the User Conference.
Training and Education Study on your own using courses available online or find out how you can learn in a classroom setting at a certified Pro Tools training center.
Products and Developers Learn about Avid products; download demo software or learn about our Development Partners and their plug-ins, applications, and hardware.
News and Events Get the latest news from Avid or sign up for a Pro Tools demo.
Chapter 1: Introduction 3

Artist Mix User Guide4
Chapter 2: Setup and Installation
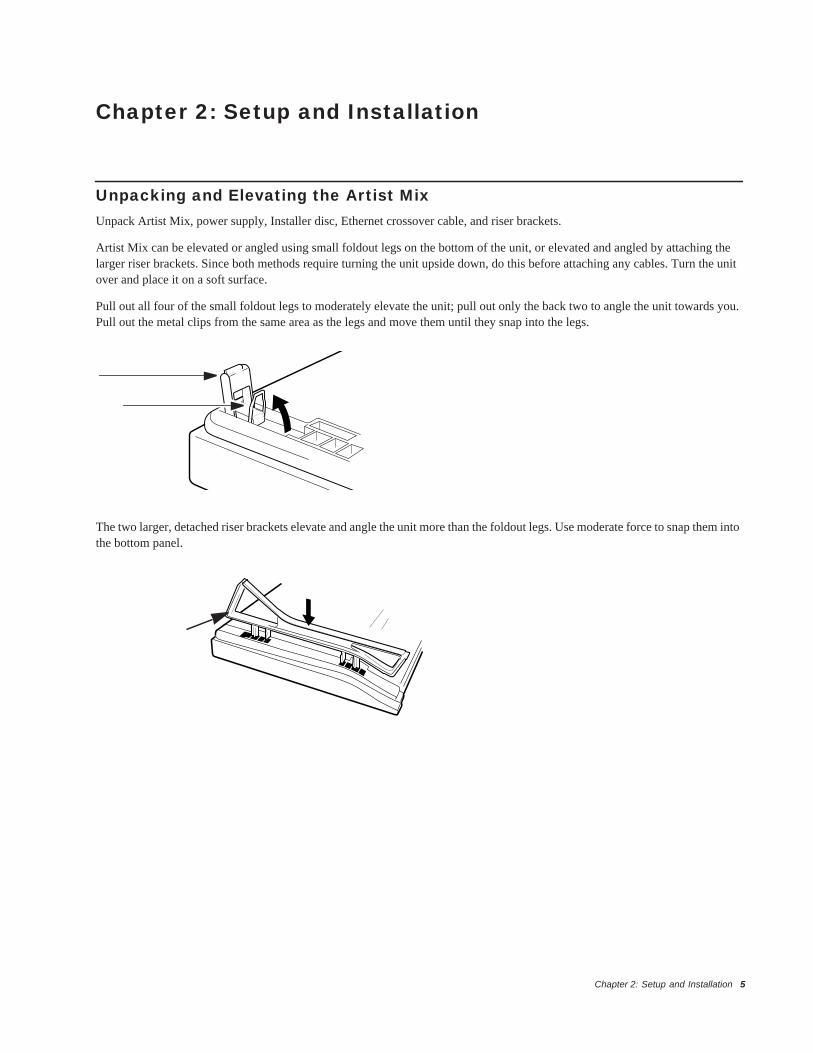
Unpacking and Elevating the Artist MixUnpack Artist Mix, power supply, Installer disc, Ethernet crossover cable, and riser brackets.
Artist Mix can be elevated or angled using small foldout legs on the bottom of the unit, or elevated and angled by attaching the larger riser brackets. Since both methods require turning the unit upside down, do this before attaching any cables. Turn the unit over and place it on a soft surface.
Pull out all four of the small foldout legs to moderately elevate the unit; pull out only the back two to angle the unit towards you. Pull out the metal clips from the same area as the legs and move them until they snap into the legs.
The two larger, detached riser brackets elevate and angle the unit more than the foldout legs. Use moderate force to snap them into the bottom panel.
Chapter 2: Setup and Installation 5

Removing the Riser Brackets
To remove the riser brackets from Artist Mix:
1 Slide the side panel towards the front of the unit, then pull it away).
2 Press the tabs to release the riser bracket and lift it out of the side panel.
Attaching an Artist Mix to Additional UnitsUp to four Artist Mixes can be physically attached to each other to form a larger and more stable control surface. An Artist Control and Artist Transport can also be joined to Artist Mix.
To join two Artist Mixes (or other Artist Series unit):
1 On one of the Artist Mixes, use a #2 Phillips screwdriver to remove the two silver screws. The screws may be tight, so you may have to use some force.
Removing side panel from Artist Mix
Tabs to release the riser bracket from the side panel
If you are using multiple units, see “Surfaces” on page 27 to use EuControl to link the units in the desired order.
Removing screws from the bottom panel
Artist Mix User Guide6

2 Lift the black plastic connecting part and side panel up and out of the Artist Mix.
3 On the second Artist Mix, remove the side panel on the end where it will attach to the first Artist Mix.
4 Slide the connecting part of the second Artist Mix into the first Artist Mix to attach them together.
Removing connecting part and side panel
Artist Mixes attached by connecting at side panel
Chapter 2: Setup and Installation 7

Installing Software and HardwareEuControl software must be installed before using any Artist Series media controller.
To install EuControl software for Artist Series media controllers:
1 Do one of the following:• Download the EuControl installer for your computer platform from www.avid.com/artistsupport. After downloading, make
sure the installer is uncompressed (.dmg on Mac or .ZIP on Windows).– or –• Insert the Installer disc into your computer.
2 Double-click the EuControl installer application.
3 Follow the on-screen instructions to complete the installation.
4 When installation is complete, click Quit (Mac) or Finish (Windows). EuControl will launch automatically and is running when its icon appears as follows:
• On Mac, the icon is shown in your menu bar. • On Windows, the icon appears in the System tray (or alongside other Hidden Icons in the lower tool bar if you do not have
your system configured to always show icons in the System tray).
5 Shut down your computer.
6 Plug one end of the AC power cord into the power adapter and the other into a power outlet. Make sure the AC power cord is pushed all the way into the adapter.
7 Connect the DC output cable from the power adapter to the DC In jack on the left side of the rear panel.
If prompted to download the most current version of EuControl, follow the onscreen instructions.
EuControl icon in Menu bar (Mac)
Connecting the DC power output cable to the DC In jack
DC In 15 V
FOOTSWITCH
Artist Mix User Guide8

8 Plug one end of the Ethernet crossover cable into the Ethernet jack on the back panel of the Artist Mix.
9 Plug the other end of the Ethernet crossover cable into an open Ethernet jack on your computer, router, or Ethernet switch. Note that connecting directly to the computer may require removing your Internet cable.
If you have a Mac with two Ethernet ports, it is recommended to use Ethernet 1 rather than Ethernet 2. However, if you want to use Ethernet 2 do the following:
• Go to System Preferences > EUCON. • Change the Network Interface to Ethernet 2. • Restart the computer.
An Ethernet router or switch is required to connect multiple Artist Series units such as an Artist Control with one or more Artist Mix controllers, or to connect units to a local area network.
10 Turn on your router (if applicable), then turn on your computer and wait until it finishes starting up.
Ethernet cable and rear panel jack
Eucon
SOLOSOLO ON ON SOLOSOLO ON ON SOLOSOLO ON ON SOLOSOLO ON ON
Chapter 2: Setup and Installation 9

11 Press and release the POWER switch on Artist Mix. Do the following, as appropriate for your operating system:
Mac Wait up to 60 seconds. A lit EuControl icon in the menu bar indicates correct installation.
Windows Wait up to 60 seconds. A lit EuControl icon appears in the System tray (or, in Hidden Icons if your system is not con-figured to show all icons in the System tray).
12 If you did not see the lit EuControl icon, do the following: • See “Surfaces” on page 27 and add Artist Mix manually.• Shut down Artist Mix and your computer, then turn them on (computer first, then Artist Mix).• If your Mac is pre-2002 and you are using an Ethernet router or switch, you need to purchase a normal straight-through Ether-
net cable (instead of the crossover Ethernet cable supplied) from a computer store. • See www.avid.com/artist/support for the most current troubleshooting information.
13 If you downloaded the latest software from the web, you may need to update the firmware on your Artist Series controllers. See “Update Firmware” on page 28 for instructions.
14 Launch your application and open a session or project (such as Pro Tools, Logic Pro, Cubase, or Digital Performer).
15 To set up your application to work with the Artist Mix, see the EuCon Application Setup Guide that you downloaded at the be-ginning of this section.
Controlling a Second WorkstationThe Artist Mix can control applications running on a second computer, referred to in this guide as a workstation. If EuControl is running on the same workstation as all your audio/video applications you can skip these instructions.
To be able to control a second workstation:
1 Do one of the following:• Download the EuControl installer from www.avid.com/artistsupport onto the second computer. After downloading, make
sure the installer is uncompressed (.dmg on Mac or .ZIP on Windows).– or –• Insert the Installer disc into the second computer.
2 In the Extras folder, double-click the Install EuCon Workstation installer.
3 Follow the instructions to install the EuCon software.
EuControl icon on Mac
EuControl icon on Windows
Artist Mix User Guide10

Connecting a FootswitchThe Artist Mix has a ¼-inch FOOTSWITCH input on the back panel. The footswitch can be used to punch in and out of recording. Plug the footswitch in before powering on the Artist Mix. See “Footswitch” on page 32 for more information.
FOOTSWITCH input on rear panel
DC In 15 V
FOOTSWITCH
Chapter 2: Setup and Installation 11

Artist Mix User Guide12

Chapter 3: Common Tasks
If you completed the installation steps in Chapter 2, “Setup and Installation”, you are ready to start learning more about Artist Mix. The following examples demonstrate several common tasks.
Fader StripTo select tracks, adjust volume and pan, and bank tracks to the faders:
4 Press the Artist Mix strip 1 fader SEL key. The corresponding track is selected in your application.
5 Move the Artist Mix strip 1 fader up and down. You are now controlling the level of your application’s first track with Artist Mix. The display at the top of strip 1 shows track information.
6 When the Artist Mix is first powered up, the PAN key is lit by default. If it is not press the PAN key. Each strip’s Soft Knob now controls pan for its corresponding track.
Strip 1 fader SEL key
PAN key
ON
INSERTSINPUT
CHANFLIP
EQDYN
AUXGROUP
PANMIX
BACKTOP
CFG
PAGE
CFG
PAGE
AUTOREC N
ASSIGNSEL Y
12
6
0
5
10
20
30
SOLO ON
INSERTSINPUT
CHANFLIP
EQDYN
AUXGROUP
PANMIX
AUTOREC N
ASSIGNSEL Y
12
6
0
5
10
20
30
Chapter 3: Common Tasks 13

7 Press the NUDGE> key to move all eight tracks over one strip. If tracks 1–8 were assigned to strips 1–8, tracks 2–9 are now as-signed to strips 1–8.
8 Press the HOME key to restore tracks 1–8 to strips 1–8.
The SHIFT key is used in conjunction with other keys to access secondary functions labeled in blue above the primary function. In this case, the HOME function is accessed by pressing SHIFT + <BANK.
Two SHIFT keys are located at bottom-left and -right of Artist Mix.
9 Press the BANK> key to shift tracks over eight at a time. If tracks 1–8 were assigned to strips 1–8, tracks 9–16 are now assigned to strips 1–8.
The <NUDGE and <BANK keys perform the same operations in the opposite direction.
InsertsTo access and edit plug-ins:
1 Add a plug-in on track 1 of your application.
2 If tracks 1–8 are not assigned to strips 1–8, press the HOME key to restore tracks 1–8 to strips 1–8.
3 Press the Artist Mix strip 1 fader SEL key.
4 Press the CHAN key to enter channel mode.
5 Press the INSERTS key.
NUDGE and BANK keys
SHIFT keys
RECPLAY
END
BANK
HOME
BANK
CLOSE
NUDGE
MIXER
NUDGE
SEL
ON
SOLO ON
MC MIX60
40
0
5
10
20
30
8
60
40
0
5
10
20
30
8
60
40
0
5
10
20
30
8
60
40
0
5
10
20
30
8
60
40
0
5
10
20
308
60
40
0
5
10
20
30
8
60
40
0
5
10
20
30
8
60
40
0
5
10
20
30
8
Artist Mix User Guide14

The names of the plug-ins on that track spill across the display screens.
6 Press the Soft Knob below the desired plug-in name to select it. The parameters of that plug-in spill across the display screens.
7 Turn the Soft Knob below the desired parameter to adjust its value. The Soft Knobs can be turned like a conventional knob and pressed like a switch to access an additional function.
8 Press the <PAGE> keys to access more parameters.
9 Press the BACK key to exit that plug-in.
10 Press the CHAN key to exit channel mode.
INSERTS key
BACK and PAGE keys
INSERTSINPUT
CHANFLIP
EQDYN
AUXGROUP
PANMIX
CFG
PAGE
CFG
PAGE
AUTOREC N
ASSIGNSEL Y
12
6
0
5
10
20
30
SOLO ON
SEL
ONBACKTOP
CFG
PAGE
CFG
PAGE
SOLO ON
Chapter 3: Common Tasks 15

Artist Mix User Guide16

Chapter 4: Surface Controls
1 Soft Key navigation
2 Display screens
3 Power
4 Fader Navigation
5 SHIFT keys
6 Knob Set selectors
7 Fader strips
Artist Mix surface controls
SOLOSOLO ON ON SOLOSOLO ON ON SOLOSOLO ON ON SOLOSOLO ON ON
1 43
5 7 56
2
Chapter 4: Surface Controls 17

Power SwitchPress and release the POWER switch to turn the Artist Mix on or off.
ResetYou can reset the surface name and (any) IP Address assigned to the unit by doing the following.
To reset the Artist Mix Surface Name and IP Address:
1 Make sure the unit is powered off.
2 Press and hold BACK while pressing the POWER switch.
Test ModeYou can enable Test mode to check faders and switches (also known as “Vegas mode”).
Test Mode for Faders and Switches
To access Test mode for Faders and Switches:
1 Make sure the unit is powered off.
2 Hold <BANK+BANK>+NUDGE> while pressing POWER to power the unit on. While in Test mode, do any of the following:
Faders Move any fader. The adjacent fader (to the right) should move also, following the moves of the one you are touching.
ON Switch Touch a Fader Cap. The corresponding ON switch should turn off.
Knobs Touching a knobs displays Touch on the corresponding display. Turning knobs displays the value on the display. Pressing a knob-top displays Switch on the corresponding display.
Switches and LEDs In Test Mode, all switch LEDs light. (All switches have LEDs except <NUDGE>, <BANK>, POWER, and BACK). Press any switch to display its name on the display.
3 To exit Test mode, power the unit off.
SHIFT The SHIFT key is used in conjunction with other keys to access secondary functions labeled in blue above the primary function. Two SHIFT keys are located at the lower-left and -right of Artist Mix.
The SHIFT key can be locked on like caps lock on a computer keyboard by pressing both SHIFT keys simultaneously. This is useful if you plan to access several SHIFT functions consecutively. Press either SHIFT key to unlock.
Artist Mix User Guide18
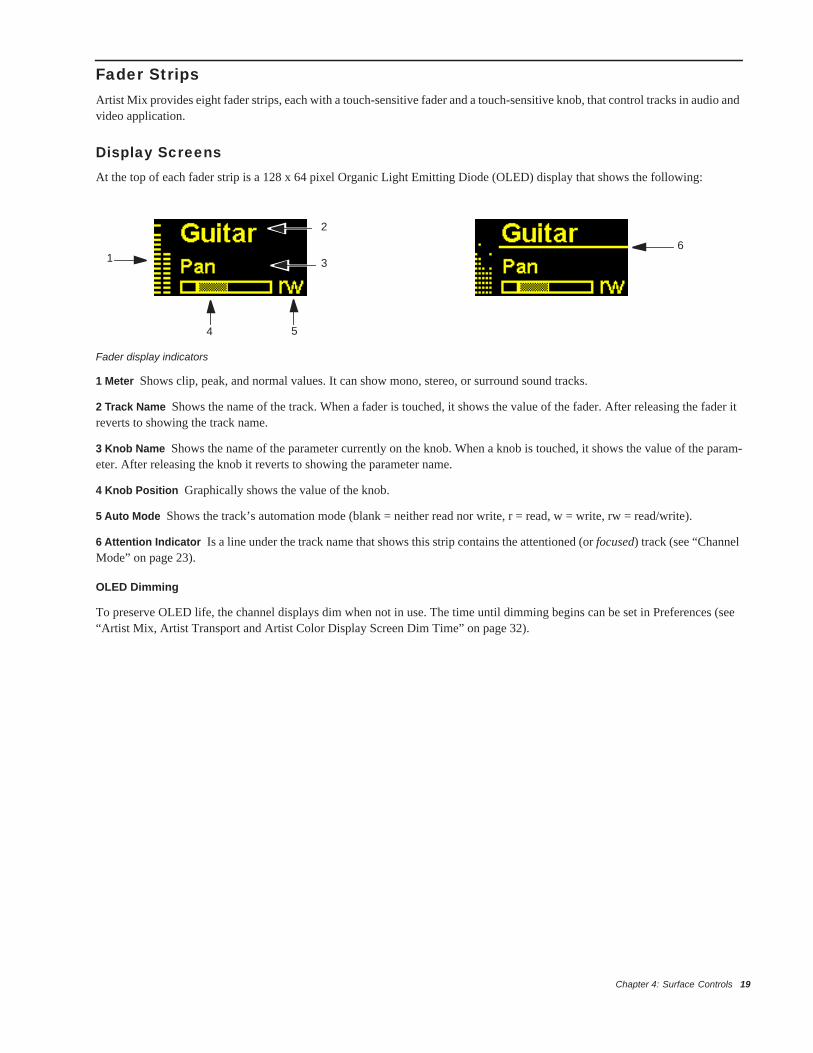
Fader StripsArtist Mix provides eight fader strips, each with a touch-sensitive fader and a touch-sensitive knob, that control tracks in audio and video application.
Display ScreensAt the top of each fader strip is a 128 x 64 pixel Organic Light Emitting Diode (OLED) display that shows the following:
1 Meter Shows clip, peak, and normal values. It can show mono, stereo, or surround sound tracks.
2 Track Name Shows the name of the track. When a fader is touched, it shows the value of the fader. After releasing the fader it reverts to showing the track name.
3 Knob Name Shows the name of the parameter currently on the knob. When a knob is touched, it shows the value of the param-eter. After releasing the knob it reverts to showing the parameter name.
4 Knob Position Graphically shows the value of the knob.
5 Auto Mode Shows the track’s automation mode (blank = neither read nor write, r = read, w = write, rw = read/write).
6 Attention Indicator Is a line under the track name that shows this strip contains the attentioned (or focused) track (see “Channel Mode” on page 23).
OLED Dimming
To preserve OLED life, the channel displays dim when not in use. The time until dimming begins can be set in Preferences (see “Artist Mix, Artist Transport and Artist Color Display Screen Dim Time” on page 32).
Fader display indicators
1
4
2
3
5
6
Chapter 4: Surface Controls 19

FaderThe fader controls the track assigned to this strip. It is motorized so it reflects changes made in the application, such as automation. It is also touch sensitive, which some applications use for automation.
When the Select by Touch General preference is selected, touching a fader selects that track in the application and attentions it on that strip. This is the same as pressing the fader SEL key. Holding down the SHIFT key and touching a fader sets it to unity gain.
Suspending Faders
You can turn the faders off so they do not move or follow existing automation. Automation continues to play back and affect vol-ume or other parameters, the faders are merely ‘suspended’ from following automation data.
To turn faders off:
Hold SHIFT and press SOLO on fader strip 1. Repeat to turn faders back on.
ONThe track is on (unmuted) when the strip ON switch is lit and off (muted) it is not lit.
SOLOThe SOLO switch lights red when that track is soloed.
Fader strip
SEL
ON
INSERTSINPUT
CHANFLIP
EQDYN
AUXGROUP
PANMIX
BACKTOP
CFG
PAGE
CFG
PAGE
AUTOREC N
ASSIGNSEL Y
12
60
40
6
0
5
10
20
30
8
SOLO ON
Artist Mix User Guide20

Transport ControlsArtist Mix provides Transport controls on strips 5–8, using the SHIFT layer for the track SOLO and ON switches:
RTZ (Return To Zero) Press RTZ (SHIFT + strip 5 SOLO) to move to the beginning of the session or project.
PREV (Previous) Press PREV to move to the previous marker. Not all applications support markers.
NEXT Press NEXT to move to the next marker. Not all applications support markers.
REW (Rewind) Press REW to rewind. This function varies with the application. Common functions include:• Rewind until STOP or another key is pressed.• Rewind a fixed amount.• Rewind until the REW key is released.
FF (Fast Forward) Press FF to fast forward. This function varies with the application. Common functions include:• Fast forward until STOP or another key is pressed.• Fast forward a fixed amount.• Fast forward until the FF key is released.
STOP Press STOP to stop all other functions.
PLAY Press PLAY to play the project from the current location.
REC Press REC begin recording at the current location. All tracks armed for recording are punched into record.
SELPressing a fader SEL key selects that track in the application and focusses it on Artist Mix. .
ASSIGNPress the ASSIGN key to display the Assign tab in the EuControl Settings dialog (see “Assign” on page 33).
RECPress the REC key to enable recording on a track. The REC key lights red to indicate that track is enabled (armed) for recording. Press the REC key to cancel a track enabled for recording. Some applications blink the REC LED when armed but not recording and light solid when recording.
AUTOTo change track automation mode, press the AUTO key until the desired automation mode appears in the channel display.
Transport Controls in fader strips 5–8
Some applications allow selecting multiple tracks if the Shift key on the QWERTY keyboard is held down while selecting tracks. In this case, the focussed (attentioned) track is the last one selected.
RECPLAYNEXT FF STOPPREVRTZ REW
SOLO ONSOLO ON SOLO ON SOLO ON
Chapter 4: Surface Controls 21

Fader Navigation ControlsScroll through tracks using the BANK and NUDGE keys. HOME and END are shortcuts to the first and last banks, respectively.
BANK and NUDGEThe BANK and NUDGE keys change which tracks are assigned to the strips. The eight strips can be thought of as a window that moves in the direction indicated by the arrow over the application’s tracks.
<NUDGE
Moves the window one track to the left. If strips 1–8 are assigned to tracks 9–16, they are now assigned to tracks 8–15.
NUDGE>
Moves the window one track to the right. If strips 1–8 are assigned to tracks 9–16, they are now assigned to tracks 10–17.
<BANK
Moves the window one bank (eight tracks) to the left. If strips 1–8 were assigned to the bank starting at track 9, they are now as-signed to the bank starting with track 1. Pressing <BANK again does nothing because the first bank is already shown.
BANK>
Moves the window one bank (eight tracks) to the right. If strips 1–8 had the bank starting at track 9, they now have the bank starting with track 17.
MIXER and CLOSENot all applications support these keys.
MIXER Opens and closes the application’s mixer window.
CLOSE Closes any open window or dialog box on the application.
HOME and ENDHOME Moves to the first bank with tracks 1–8 assigned to strips 1–8.
END Moves to the last bank.
Navigating Among Multiple Artist MixesMultiple Artist Mixes act as one big control surface with a bank size of eight tracks. For example, three linked Artist Mixes can show 24 contiguous tracks. The BANK and NUDGE keys perform the identical actions on the combined set of tracks.
Fader navigation controls
Strips window moves over application tracks
RECPLAY
END
BANK
HOME
BANK
CLOSE
NUDGE
MIXER
NUDGE
SEL
ON
SOLO ON
Artist Mix User Guide22

KnobsEach fader strip has one touch-sensitive knob along with two knob switches (SEL and ON).
1 Knob Each fader strip has one touch-sensitive, continuously rotating knob that adjusts parameters such as pan and aux send lev-els. Each knob can also be pressed from the top. This is called the Knob Top key and is typically used to access sub-menus but also to turn parameters on and off.
2 The SEL key changes the knob function or toggles a secondary function’s value, such as an aux send pre/post fader.
3 The ON key toggles two-state parameters, such as EQ Band 1 on/off.
Basic Knob UseWhen the Artist Mix is first powered on, the knobs are in normal mode (see Knob Modes on page 34). Each knob controls pan for its track on the strip.
The knob selector keys can quickly access common parameters in normal mode:• Press AUX to assign each track’s first aux send to each knob. Press PAGE> to assign the next aux send to the knob. Pressing
<PAGE returns to the previous aux send.• Press PAN to assign the track’s pan control to each knob.
It is also possible to edit plug-ins, EQ, dynamics, and other functions on the knobs.
Knob ModesThe eight knobs can be in normal or channel modes.
Normal Mode
Each knob controls the same parameter for every track on the strips.
Channel Mode
Channel mode is useful for editing EQs and plug-ins that have many parameters. The eight knobs control up to eight different pa-rameters on a single focussed track. Press a fader SEL key to focus that track. Channel mode is denoted in the display by a grid of small yellow dots around each parameter name and knob position indicator. The focussed track is further distinguished by these dots around its entire area including the track name.
Knob controls
Normal mode
Channel mode
SEL
ONBACKTOP
1
2
3
Chapter 4: Surface Controls 23

CHAN
The CHAN key toggles between normal mode (CHAN key unlit) and channel mode (CHAN key lit). In normal mode, the focussed track name is underlined to show which track’s parameters will be expanded in channel mode.
FLIP
The FLIP key toggles what is currently assigned to the knobs (such as plug-in or send parameters) to the faders. A vertical double arrow appears in the OLED display when the faders and knobs are flipped. Press the FLIP key again to toggle the faders and knobs back to normal. Flip mode is a great way to be able to adjust plug-in parameters as an alternative to using the knobs.
Knob Set Selector KeysA knob set is an array of knobs used by EuControl-compatible applications to control plug-ins, EQs, dynamics, aux sends, and sim-ilar. One of the eight Knob Set Selector keys is always selected and lit and displays its knob set until another Knob Set Selector key is pressed. When the Artist Mix first starts, the PAN knob set is selected by default.
The Knob Set Selector keys enter the Artist Mix menu system. Some of these knob sets can display another knob set called a sub-menu. For example, the Inserts knob set shows the names of every plug-in inserted on the track, one plug-in name per knob (in Channel mode). Pressing a plug-in’s Knob Top key displays its parameters on the knobs for editing. This new knob set is a sub-menu of the Inserts knob set. Press the BACK key to return to the top of the Inserts knob set.
Sub-menus are not directly supported in normal mode. When a sub-menu is entered in normal mode, Artist Mix automatically changes to Channel mode and that track is focussed and selected. When the top of that knob set is displayed again, normal mode resumes. Since sub-menus can be more than one level deep, this can be accomplished by pressing the TOP key once or the BACK key repeatedly. However, you can simply press another Knob Selector key to navigate directly to another knob set.
INSERTS
Pressing the INSERTS key displays the inserts knob set for editing plug-ins. In normal mode, the first plug-in is displayed on the knob. Pressing one of these Knob Tops in normal mode toggles Artist Mix into channel mode and displays the first eight plug-in parameters for editing. Pressing a plug-in’s Knob Top displays its parameters for editing.
EQ
Press the EQ key to display the EQ knob set to configure equalization controls and filters. This automatically toggles Artist Mix into channel mode and shows four EQ bands on eight knobs.
AUX
Press the AUX key to display the Aux knob set to control auxiliary sends. In normal mode, the first aux send is displayed. In normal mode, press the PAGE> key to advance to the second aux send. In channel mode, up to eight aux sends can be shown at once.
Flip indicator in OLED display
Knob Selector keys
INSERTSINPUT
EQDYN
AUXGROUP
PANMIX
A
Artist Mix User Guide24

PAN
Press the PAN key to display the Pan knob set to configure stereo or surround panning. In normal mode, the stereo pan control is typically displayed. In channel mode, the first page of eight pan knobs is shown.
INPUT
Press the INPUT key to display the Input knob set to configure input routing, mic gains, phantom power, and other application-spe-cific parameters.
DYN
Press the DYN key to display the Dynamics knob set to configure compressors, limiters, expanders, and gates.
GROUP
Press the GROUP key (SHIFT+AUX/GROUP) to display the Group knob set to configure group bus routing or control group (VCA) membership.
MIX
Press the MIX key to display the Mix knob set to configure output routing.
Dual-Function Knobs
Some knobs have two functions that are toggled by pressing the knob SEL key (such as EQ Frequency and Q). The knob name changes in the display to show the current function. Dual-function knobs are supported in normal mode.
Knob Set Navigation Since a knob set may have more parameters than knobs, use the two <PAG > keys to scroll among them.
<PAGE
Press the <PAGE key to scroll to the previous page. When on the first page, pressing <PAGE key does nothing. The <PAGE key lights yellow when there is a previous page to go to.
PAGE>
Press the PAGE> key to scroll to the next page. When on the last page, pressing the PAGE> key does nothing. The PAGE> key lights yellow when there is a next page to go to.
Configuration Pages (CFG)
Many knob sets have a configuration page to set up that knob set. The configuration page for the Inserts knob set, for example, is used to assign plug-ins to a track. The configuration page for the Aux knob set assigns aux sends to a track. Some applications can configure presets for plug-ins and EQs.
Knob Set navigation keys
SEL
ONBACKTOP
CFG
PAGE
CFG
PAGE
SOLO ON
Chapter 4: Surface Controls 25

Press the <PAGE> keys simultaneously to display a knob set’s configuration page, if it has one. When on the configuration page, both the <PAGE> keys light.
BACK
Press the BACK key once to return to the previous knob set. Press the BACK key repeatedly to back out of all sub-menus and dis-play the top of the current knob set.
TOP
Press the TOP key to immediately back out of all sub-menus and display the top of the current knob set. This is equivalent to press-ing the BACK key repeatedly.
Knob Sets and Multiple Artist MixesUp to four Artist Mixes can be linked to form one large surface. See “Surfaces” on page 27 to learn how to arrange the order of My Surfaces to determine the layout of tracks across the units.
Press the CHAN key on any Artist Mix to toggle all surfaces between normal and channel mode.
In channel mode, a knob set is displayed across all linked surfaces. For example, with two linked surfaces, a knob set is displayed on 16 knobs instead of eight. If the knob set has more knobs than the linked surfaces can display, navigate among them with the PAGE keys.
Press a Knob Set Selector key on any Artist Mix to select that knob set on all Artist Mixes.
APPLICATIONPress the APPLICATION key to toggle between the two most recently used open applications. Hold down the APPLICATION key and press BANK> to toggle between all open applications in a circle. Hold down the APPLICATION key and press <BANK to cycle through applications in the opposite direction.
WORKSTATIONArtist Mix can control applications running on a second computer, referred to in this guide as a workstation. Press the WORKSTA-TION key (SHIFT + Application/Workstation) to attach the Artist Mix to another workstation. You must first use EuControl to cre-ate a list of workstations that this key switches between (see “Workstations” on page 29).
While attached to a second workstation, your computer keyboard and mouse can be configured to control that workstation and not your primary computer (see “Redirect Keyboard and Mouse Control to Attached External Workstation” on page 30).
Configuration pages work only in Channel mode.
Artist Mix User Guide26

Chapter 5: EuControl
EuControl is launched automatically upon starting your computer and runs in the background. EuControl is responsible for finding, linking, and communicating with all Artist media controllers on the network.
Accessing EuControl Settings
To open the EuControl Settings window:
Do one of the following: • On Mac, click the EuControl icon on the taskbar and select EuControl Settings.• On Windows, click the EuControl icon in the Task or System tray (Windows) and select EuControl Settings. Unused icons
will be shown in the Hidden icons view.
Only one instance (installation, or copy) of EuControl can run on a workstation. However, multiple workstations on a single net-work can each run EuControl. Each EuControl-equipped workstation can connect one Artist Transport, one Artist Control, and up to four Artist Mixes on the network. These multiple devices act together as a single control surface. Once connected, Artist Series media controllers are not available to EuControl on other systems until relinquished.
SurfacesThe Surfaces tab shows all Artist media controllers on your network and those connected to your instance of EuControl.
Artist Control Banks Independently
This option is only available when an Artist Control is selected in the My Surfaces list. Multiple Artist Mix units always bank as a single unit.
Some EuControl features pertain only to Artist Mix and Artist Control, not Artist Transport. These are called out at the beginning ofeach of the following sections.
Surfaces tab
Chapter 5: EuControl 27

All Surfaces
All Surfaces shows all Artist media controllers on the network. A device shown in light gray is already connected either to your own or another instance of EuControl running on a different workstation. In both cases, it is not selectable. Y
My Surfaces
My Surfaces shows the Artist media controllers connected to your instance of EuControl. There can be one Artist Control, one Artist Transport, and up to four Artist Mixes in the My Surfaces list, linked together as a single large surface.
The top-to-bottom order corresponds to the left-to-right order of the surfaces, respectively. The left-most surface is assigned to fader strip 1. Use the + and – buttons to reorder the list.
Each Artist media controller can be renamed by double-clicking the existing name and typing a new name.
Add
Click Add to add the selected All Surfaces entry to My Surfaces. This connects the selected Artist media controller to your instance of EuControl. You can also click and drag an Artist media controller from All Surfaces to My Surfaces.
Add is disabled if all Artist media controllers in All Surfaces are connected to any instance of EuControl.
Remove
Click Remove to remove the selected surface from My Surfaces and make it available to other instances of EuControl.Remove is disabled if no surface is selected.
Automatically Add
The Automatically Add menu has two settings that control what happens to stored Surfaces between shutdown and startup.
All Surfaces (Default) This setting is best used when you are the only person running EuControl in your home or studio. It provides an easy plug-and-play experience by automatically adding your All Surfaces list to your My Surfaces list so you never have to man-ually edit the My Surfaces list.
My Surfaces Only This setting is useful in facilities where other EuControl users are on your network. When EuControl starts, only the surfaces from your My Surfaces list are added. Because a surface can only be claimed by one user at a time, this avoids claiming another user’s surfaces.
Update Firmware
Each time a new version of EuControl is installed, it checks each Artist Transport, Artist Control, and Artist Mix in your system to determine if any firmware updates are required. The firmware is embedded in EuControl so an Internet connection is not re-quired.
Select each Artist media controller in the My Surfaces list (Shift-click to select multiple devices). Click Update Firmware to update their firmware. If a dialog displays a message that the firmware is up to date, no further action is necessary.
Follow the instructions in the EuControl dialog box.• The Artist Series controllers must be plugged into a working power source.• Do not power off any Artist Series controllers during the update or attempt to interrupt the update.• The status for each Artist Series controller being updated is displayed on that device as well as in the EuControl dialog.
Show Info
Select an Artist Series controller and click Show Info to display the name of the unit, and hardware and software information.
Artist Mix User Guide28

WorkstationsAn Artist Series controller can control applications running on a second computer, referred to in this guide as a workstation. The Workstations tab establishes the list of workstations that the WORKSTATION key cycles through. Any workstation running EuControl software can be in this list, including those controlled by the System 5-MC, MC Pro, and Artist Control.
All Workstations
All Workstations lists all EUCON-enabled workstations on the network. If the workstation is already in the My Workstations list, it is shown in gray and cannot be selected.
My Workstations
My Workstations lists the workstations that can be attached to by pressing the WORKSTATION key.
It is possible to put a workstation in the My Workstations list that is already attached to another instance of EuControl running on another computer. It cannot be attached here until it is unattached from the other instance of EuControl. This was done to allow multiple users to share workstations without having to frequently edit their My Workstation list.
Add
Click Add to add the selected workstation from the All Workstations list to the My Workstations list. If the workstation is already in the My Workstations list, it is grayed out and cannot be selected.
Remove
Click Remove to remove the selected workstation from the My Workstations list.
Attach/Detach
Select a workstation in the My Workstations list and click Attach. A check mark appears in the Attach column next to that work-station. This workstation is now communicating with the Artist media controller(s) connected to your instance of EuControl.
If the selected workstation is already attached, the button displays Detach. Click it to detach the workstation.
Workstations tab
Chapter 5: EuControl 29
Redirect Keyboard and Mouse Control to Attached External Workstation
Your computer keyboard and mouse can control a second external workstation, if desired. Select this option before adding a work-station to the My Workstations list to redirect keyboard and mouse control to the attached workstation. Note that the keyboard and mouse will no longer control your primary workstation. If this option is not selected (default setting), your keyboard and mouse control your primary computer.
You can manually toggle control back and forth between your primary workstation and the attached external workstation by press-ing Control+Option+\ (Mac) or Control+Alt+\ (Windows).
The Redirect Keyboard and Mouse Control to Attached External Workstation option must be checked before adding the workstation to the My Workstations list. If it is toggled ON after adding the workstation it will have no affect. Only workstations added with the option checked will respond.
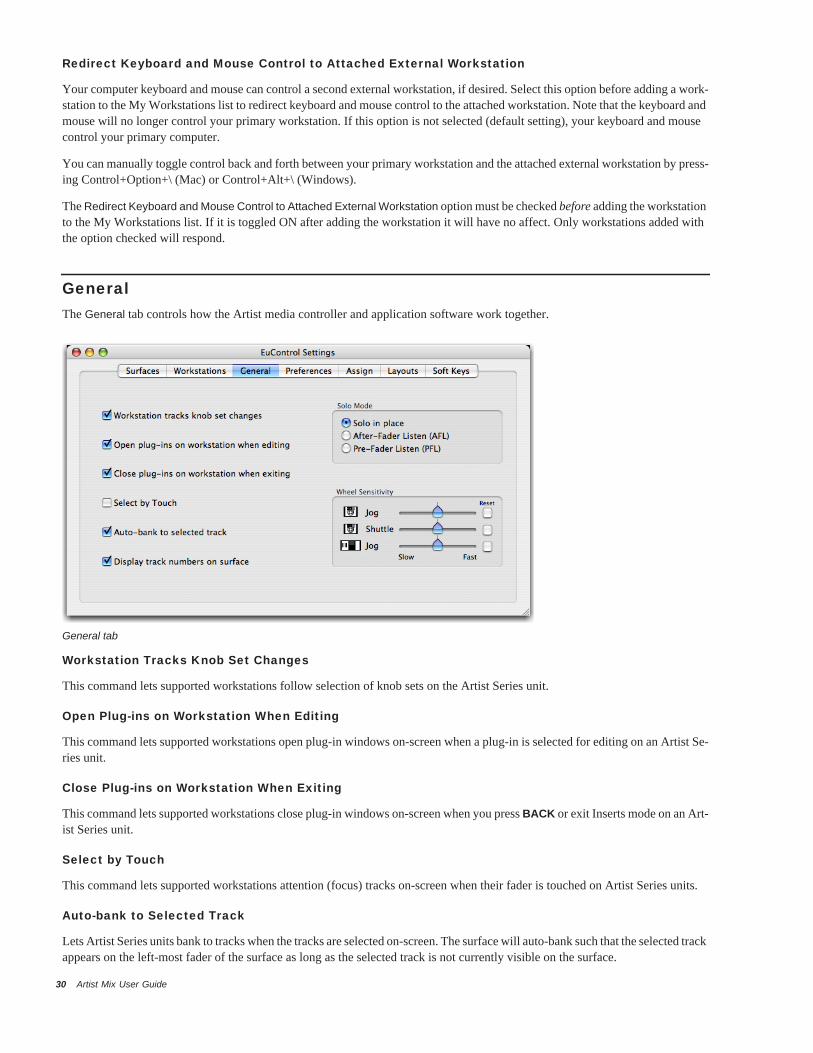
GeneralThe General tab controls how the Artist media controller and application software work together.
Workstation Tracks Knob Set Changes
This command lets supported workstations follow selection of knob sets on the Artist Series unit.
Open Plug-ins on Workstation When Editing
This command lets supported workstations open plug-in windows on-screen when a plug-in is selected for editing on an Artist Se-ries unit.
Close Plug-ins on Workstation When Exiting
This command lets supported workstations close plug-in windows on-screen when you press BACK or exit Inserts mode on an Art-ist Series unit.
Select by Touch
This command lets supported workstations attention (focus) tracks on-screen when their fader is touched on Artist Series units.
Auto-bank to Selected Track
Lets Artist Series units bank to tracks when the tracks are selected on-screen. The surface will auto-bank such that the selected track appears on the left-most fader of the surface as long as the selected track is not currently visible on the surface.
General tab
Artist Mix User Guide30

Display Track Numbers on Surface
Lets Artist Series units show track numbers as assigned by the current workstation (if supported).
Solo Mode
Lets you configure Artist Series units for the following Solo modes as (if) available in the current workstation: • Solo-in-Place• After-Fader Listen (AFL)• Pre-Fader Listen (PFL)
See the documentation for your specific workstation for details on Solo modes.
Wheel Sensitivity Sliders(Artist Transport and Artist Control Only)
The sensitivity of the Jog Wheel and Shuttle Ring can be precisely adjusted using the Wheel Sensitivity sliders. The top two sliders pertain to the Artist Transport, the bottom is the Jog Wheel for the Artist Control.
The center position is the default for each control. Click and drag a slider to move it right for faster response or left for a slower, more controlled movement. Click the Reset button to restore the center position.
The name of the currently focussed application is shown above the sliders (the application that will be affected by adjusting Wheel Sensitivity). If the controls have been locked to a specific application, the display will list it and identify it as the application being adjusted.
Global or Application Specific
Click to enable the Global option to maintain a single set of your Wheel Sensitivity settings to be available regardless of the current application.
Click to enable the Application Specific option to be able to have unique Wheel Sensitivity settings in each application you use. To store settings, switch to your other application, open EuControl Settings > General, and adjust the Wheel Sensitivity sliders for that environment.
Chapter 5: EuControl 31

Preferences
FootswitchArtist Mix lets you connect a footswitch for hands-free punch in/out. Connect a footswtich to the 1/4-inch FOOTSWITCH input on the back panel.
To configure the Footswitch in EuControl:
In the Footswitch section of the Preferences tab, click to select the desired Punch In and Punch Out assignments:
Record | Record When the application is rolling, pressing the footswitch once punches into recording on record enabled tracks. Pressing the footswitch again takes the track(s) out of record but does not stop the transport.
Record | Play Pressing the footswitch once punches into recording on record enabled tracks. Pressing the footswitch again stops the record pass (your DAW may or may not automatically take the track out of record on stop; see the documentation for your appli-cation).
Status Shows whether the footswitch state is currently on or off.
Shift + Fader Sets Level to 0dB When enabled, holding SHIFT and touching a fader sets the fader to 0dB. SHIFT-lock does not apply (SHIFT must be pressed).
Artist Control DisplayThis feature only applies to Artist Control. See the Artist Control User Guide.
Artist Mix, Artist Transport and Artist Color Display Screen Dim TimeDrag the slider to set the amount of inactive time before the display screens of any Artist Mix(es), Artist Transport, or Artist Color in your system dims to half intensity.
Preferences tab
Artist Mix User Guide32

AssignThe Assign tab manages how tracks are assigned to strips on the Artist Mix and Artist Control. By default, tracks are automatically assigned in banks of four.
Display Application’s Track Numbers Enabling this option lets EuControl display track numbers as assigned by the currently selected (in focus) application (if that ap-plication supports track numbers).
Clear All AssignmentsClears all currently displayed assignments.
Lock to ApplicationThis feature lets the transport controls or the entire surface to stay locked to the application listed at the top-left of the dialog even when that application is not top-most.
Entire Surface Select this checkbox to lock the entire surface, including those of all linked Artist media controllers, to the listed ap-plication.
Transport Select this checkbox to lock the transport controls (Artist Mix and Artist Control, only) to the listed application.
Monitor and Control Room See the Artist Control User Guide.
Assign tab
Chapter 5: EuControl 33

LayoutsThe Layouts tab pertains to Artist Mix and Artist Control only. Use the Layouts tab to store and recall assignments. For example, you can use the Assign tab to “lock” (or “bank safe”) important tracks to specific faders, so they ignore banking. You can save that assignments as part of a Layout, so that you can easily switch between your “bank safed” layout and default banking, or other as-signments.
Soft KeysThe Soft Keys tab provides Soft Key options for Artist Transport, Artist Control, and Artist Color, only.
Layouts tab
Layouts are created and temporarily stored in EuControl as long as the current session or project is open. To be able to recall your layouts, be sure to save your session or project in your workstation application.
Soft Keys tab
Artist Mix User Guide34

Chapter 6: Setting IP Addresses
Most Artist Mix users will never have to set a static Internet Protocol (IP) address but in the rare cases that require it, Artist Mix does allow for it.
Normally Artist Mix uses Dynamic Host Configuration Protocol (DHCP) to obtain its IP address, typically from a router. Artist Mix reverts to link-local addressing to generate an IP address if a DHCP server is not found on the network, such as when an Artist Mix is connected directly to a computer with an Ethernet cable. Both of these methods of obtaining IP addresses can be over-ridden by supplying a static IP address, which Artist Mix uses in all cases when powered on.
To set a static IP address:
1 While holding down both <PAGE> keys (<PAGE and PAGE>) simultaneously, press and release the POWER switch. Continue to hold the Soft Keys down until the display lights.
2 Press the left-most SEL and ON keys simultaneously (or press the left-most PAN knob).
3 Press both <PAGE> keys simultaneously to move the cursor to the next screen, in this case the first field of the IP Address screen. Press the <PAGE or PAGE> keys to cycle the cursor back to a previous field or screen to change a parameter to a dif-ferent value. To change the value for the Subnet Mask or IP Address, place the cursor under the current value and press the left-most SEL and ON keys (or press the left-most PAN knob).
4 Press <PAGE or PAGE> to scroll through the fields of the IP Address.
5 Press the left-most SEL and ON keys (or press the left-most PAN knob) to set the second field of the IP address.
6 To change the value for the Subnet Mask or IP Address, place the cursor under the current value and press the left-most SEL and ON keys (or press the left-most PAN knob).
7 Repeat the previous steps to set the remaining IP Address fields.
Attempt this only if you have prior experience configuring a network.
Use DHCP yes (left); Use DHCP no (right)
IP Address displays
Chapter 6: Setting IP Addresses 35

8 After setting the last IP Address field, press both <PAGE> keys to move the cursor to the first field of the Subnet Mask screen.
9 Use the techniques described to set the Subnet Mask.
10 Press both PAGE keys (<PAGE and PAGE>) simultaneously to save this static IP address. Power Artist Mix off and on to use the new IP address. To cancel any changes made to the IP address at any time, power off the Artist Mix before pressing the two left-most SEL and ON keys simultaneously.
Subnet Mask display
Artist Mix User Guide36

Appendix A: Compliance Information
Environmental Compliance
Disposal of Waste Equipment by Users in the European Union
This symbol on the product or its packaging indicates that this product must not be disposed of with other waste. Instead, it is your responsibility to dispose ofyour waste equipment by handing it over to a designated collection point for the recycling of waste electrical and electronic equipment. The separate collectionand recycling of your waste equipment at the time of disposal will help conserve natural resources and ensure that it is recycled in a manner that protects humanhealth and the environment. For more information about where you can drop off your waste equipment for recycling, please contact your local city recycling officeor the dealer from whom you purchased the product.
Proposition 65 Warning
Perchlorate NoticeThis product may contain a lithium coin battery. The State of California requires the following disclosure statement: “Perchlorate Material – special handling mayapply, See www.dtsc.ca.gov/hazardouswaste/perchlorate.”
Recycling Notice
This product contains chemicals, including lead, known to the State of California to cause cancer and birth defects or other reproductive harm. Wash hands after handling.
Appendix A: Compliance Information 37

EMC (Electromagnetic Compliance)This model Artist Mix complies with the following standards regulating interference and EMC:• FCC Part 15 Class B• EN 55022 Class B• EN 55024 Class B• AS/NZS CISPR 22 Class B• CISPR 22 Class B
FCC Compliance for United States
Australian Compliance
Canadian ComplianceThis Class B digital apparatus meets all requirements of the Canadian Interference-Causing Equipment Regulations.
Cet appareil numérique de la classe B respecte toutes les exigences du Règlement sur le matériel brouilleur du Canada.
CE Compliance(EMC and Safety)
Avid is authorized to apply the CE (Conformité Europénne) mark on this compliant equipment thereby declaring conformity to EMC Directive 2004/108/EC andLow Voltage Directive 2006/95/EC.
Communication StatementNOTE: This equipment has been tested and found to complywith the limits for a Class B digital device, pursuant to Part15 of the FCC Rules. These limits are designed to providereasonable protection against harmful interference in aresidential installation. This equipment generates, uses,and can radiate radio frequency energy and, if not installedand used in accordance with the instructions, may causeharmful interference to radio communications. However,there is no guarantee that interference will not occur in aparticular installation. If this equipment does cause harmfulinterference to radio or television reception, which can bedetermined by turning the equipment off and on, the user isencouraged to try and correct the interference by one ormore of the following measures:• Reorient or relocate the receiving antenna.• Increase the separation between the equipment and
receiver.• Connect the equipment into an outlet on a circuit
different from that to which the receiver is connected.• Consult the dealer or an experienced radio/TV technician
for help.Any modifications to the unit, unless expressly approved byAvid, could void the user's authority to operate theequipment.
N1709
Artist Mix User Guide38

Safety ComplianceThis equipment has been tested to comply with USA and Canadian safety certifications in accordance with the specifications of UL Standards: UL60950-1:2007,2nd Edition and canadian CAN/CSA C22.2 60950-1-07, 2nd Edition. Avid Inc. has been authorized to apply the appropriate UL and CUL mark on its compliantequipment.
Warning
Important Safety Instructions
1) Read these instructions.
2) Keep these instructions.
3) Heed all warnings.
4) Follow all instructions.
5) Do not use this equipment near water.
6) Clean only with dry cloth.
7) Do not block any ventilation openings. Install in accordance with the manufacturer’s instructions.
8) Do not install near any heat sources such as radiators, heat registers, stoves, or other equipment (including amplifiers) that produce heat.
9) Do not defeat the safety purpose of the polarized or grounding-type plug. A polarized plug has two blades with one wider than the other. A grounding type plughas two blades and a third grounding prong. The wide blade or the third prong are provided for your safety. If the provided plug does not fit into your outlet, consultan electrician for replacement of the obsolete outlet.
10) Protect power cords from being walked on or pinched particularly at plugs, convenience receptacles, and the point where they exit from the equipment.
11) Only use attachments/accessories specified by the manufacturer.
12) For products that are not rack-mountable: Use only with a cart, stand, tripod, bracket, or table specified by the manufacturer, or sold with the equipment.When a cart is used, use caution when moving the cart/equipment combination to avoid injury from tip-over.
13) Unplug this equipment during lightning storms or when unused for long periods of time.
14) Refer all servicing to qualified service personnel. Servicing is required when the equipment has been damaged in any way, such as power-supply cord or plugis damaged, liquid has been spilled or objects have fallen into the equipment, the equipment has been exposed to rain or moisture, does not operate normally,or has been dropped.
15) For products that are a Mains powered device:The equipment shall not be exposed to dripping or splashing and no objects filled with liquids (such as vases) shall be placed on the equipment.
Warning! To reduce the risk of fire or electric shock, do not expose this equipment to rain or moisture.
16) For products containing a lithium battery:CAUTION! Danger of explosion if battery is incorrectly replaced. Replace only with the same or equivalent type.
17) For products with a power switch:The main power switch is located on the top panel of Artist Mix. It should remain accessible after installation.
18) The equipment shall be used at a maximum ambient temperature of 40° C.
Korean EMC Compliance
이 기기는 업무용 (A급 ) 전자파적합기기로서 판매자 또는 사용자는 이 점을 주의하시기 바라며 , 가정외의 지역에서 사용하는 것을 목적으로합니다 .
Appendix A: Compliance Information 39

Artist Mix User Guide40


Avid2001 Junipero Serra Boulevard Daly City, CA 94014-3886 USA
Technical Support (USA)Visit the Online Support Center at www.avid.com/support
Product InformationFor company and product information, visit us on the web at www.avid.com