assembling the phoenix hand - amazon web services · assembling the phoenix hand note that these...
TRANSCRIPT

Assembling the Phoenix hand Note that these instructions assume the use of the enhanced gripper box
components and a thermoformed gauntlet with a regular dovetail.
John Diamond 30th March 2016
This work is licensed under the Creative Commons Attribution-NonCommercial-ShareAlike 4.0 International License. To view a copy of this license, visithttp://creativecommons.org/licenses/by-nc-sa/4.0/ or send a letter to Creative
Commons, PO Box 1866, Mountain View, CA 94042, USA.

Obtaining the STL files Archive of Phoenix files described in this guide
– http://www.thingiverse.com/thing:1453190
Original archive of Phoenix files by Jason Bryant – https://www.dropbox.com/sh/crnrp4tzsrwnfqb/AAAOYpwae0W8O1h3dBxCibwZa?dl=0
Further details about the enhanced component designs used in this guide • Palm with easy to remove support structure http://www.thingiverse.com/thing:1322595
• Enhanced gripper box components http://www.thingiverse.com/thing:1298894
• Thermoformed gauntlet with a regular dovetail http://www.thingiverse.com/thing:1391441
• Video demonstrating how to thermoform a gauntlet https://www.youtube.com/watch?v=BihhKHjguZY
• Wrist pin for use with a thermoformed gauntlet (print 2 pins) http://www.thingiverse.com/thing:890794
• Thermoformed palm mesh http://www.thingiverse.com/thing:1298907
• Finger/thumb assembly jig http://www.thingiverse.com/thing:1429004

Items required to build a Phoenix hand
Scale 100% 130% 145% 160%
Pan head sheet metal screws #4 x 5/8” #6 x ¾” #6 x 1” #6 x 1 ¼”
Countersink head wood screws #4 x 3/8” #6 x ½” #8 x 5/8” #8 x ¾”
Dental bands ¼” 5/16” 5/16” 5/16”
Fishing line 65” 85” 95” 104”
The following items are required in addition to the 3D printed parts. Imperial/US measurements are quoted but metric equivalents should be substituted where appropriate. : • 3x pan head Phillips sheet metal screws (see sizing table) • 13x countersink head Phillips wood screws (see sizing table) • 80-100 lbs strength braided fishing line (see sizing table) • 10x non-latex heavy grade dental bands (see sizing table) • 3/8” thick self-adhesive firm foam (use foam cutting templates to determine total length) • Thick CA glue such as Superglue for sealing the knots in the fishing line
• 5x #3 Lee Tippi gel finger tips • 2x Velcro straps, 12” long, 1” wide, non-elastic (often sold as cable straps) Note: The size of the screw holes in the 3D printed parts varies between printers so it’s advisable to double check the required screw thickness against your actual printed components to ensure that they are neither too loose nor so tight that they crack the plastic.
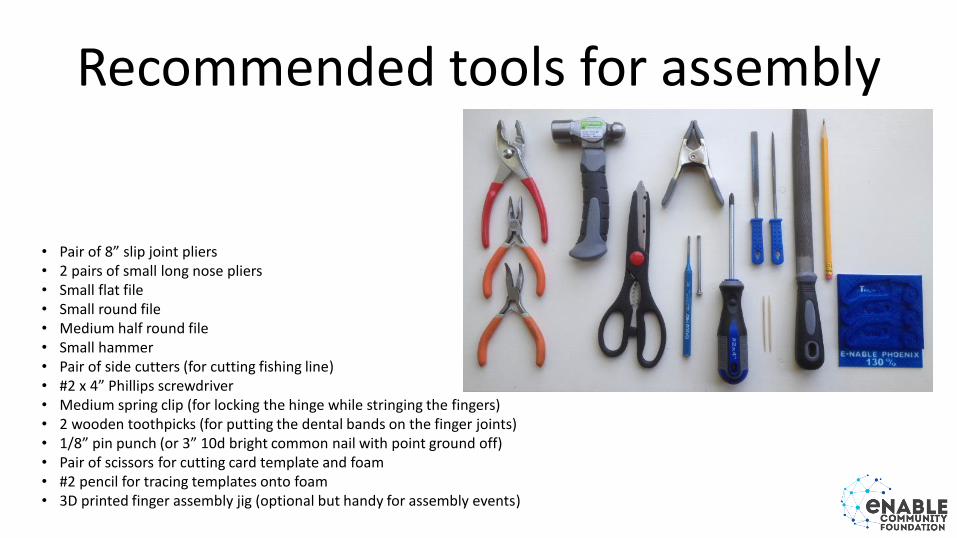
Recommended tools for assembly
• Pair of 8” slip joint pliers • 2 pairs of small long nose pliers • Small flat file • Small round file • Medium half round file • Small hammer • Pair of side cutters (for cutting fishing line) • #2 x 4” Phillips screwdriver • Medium spring clip (for locking the hinge while stringing the fingers) • 2 wooden toothpicks (for putting the dental bands on the finger joints) • 1/8” pin punch (or 3” 10d bright common nail with point ground off) • Pair of scissors for cutting card template and foam • #2 pencil for tracing templates onto foam • 3D printed finger assembly jig (optional but handy for assembly events)

Identify your snap pins
Thumb tip (1)
Fingertip (4)
Thumb knuckle (1)
Short knuckle (2)
Long knuckle (1)
Wrist (2)

Identify the fingers and thumb
Long fingertip Short fingertip
Thumb tip
Thumb proximal phalanges
Finger proximal phalanges

Assemble the thumb Thumb tip
Thumb proximal phalanges
Thumb tip pin
Rectangular hole
With the rectangular hole on the top align the holes in the thumb tip and thumb proximal phalanges (the wide one). Hold the thumb tip pin tightly using pliers and push into the hole. Work the joint to and fro till it moves freely.

Assemble the fingers
All the finger proximal phalanges are identical. If the pin is difficult to insert try using a small round file to clean out the round hole at the bottom of the rectangular hole. Work the joint to and fro till it moves freely.

100% scale foam cutting template for gauntlet and palm
100% scale gauntlet foam
cutting template
100% scale palm foam cutting template
Use this side for right palm
and reverse side for left palm
Remove this page from the sleeve and carefully cut around the lines Trace onto the foam side (not the wax paper side) of the self adhesive foam sheet using a pencil

105% scale gauntlet foam
cutting template
105% scale palm foam cutting template
Use this side for right palm
and reverse side for left palm
Remove this page from the sleeve and carefully cut around the lines Trace onto the foam side (not the wax paper side) of the self adhesive foam sheet using a pencil
105% scale foam cutting template for gauntlet and palm

110% scale gauntlet foam
cutting template
110% scale palm foam cutting template
Use this side for right palm
and reverse side for left palm
Remove this page from the sleeve and carefully cut around the lines Trace onto the foam side (not the wax paper side) of the self adhesive foam sheet using a pencil
110% scale foam cutting template for gauntlet and palm
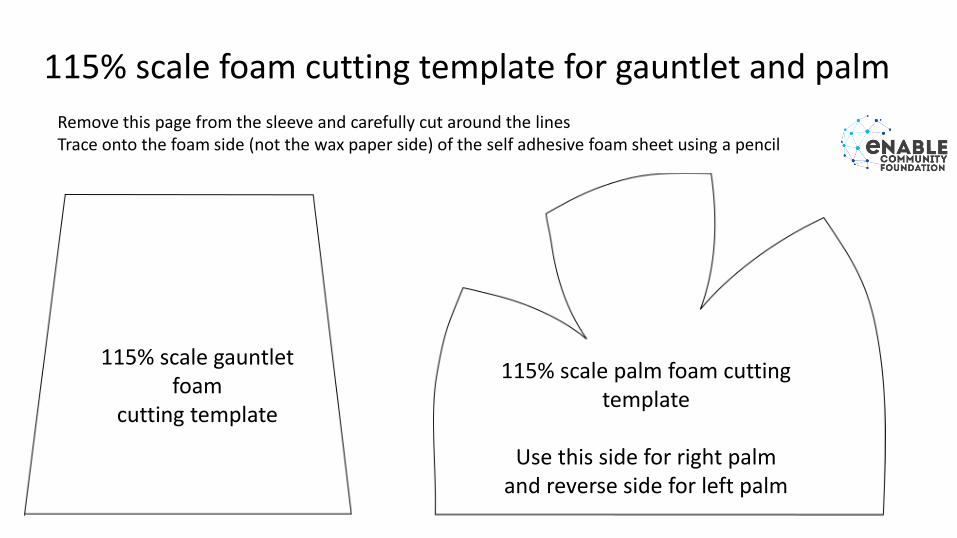
115% scale gauntlet foam
cutting template
115% scale palm foam cutting template
Use this side for right palm
and reverse side for left palm
Remove this page from the sleeve and carefully cut around the lines Trace onto the foam side (not the wax paper side) of the self adhesive foam sheet using a pencil
115% scale foam cutting template for gauntlet and palm

120% scale gauntlet foam
cutting template
120% scale palm foam cutting template
Use this side for right palm
and reverse side for left palm
Remove this page from the sleeve and carefully cut around the lines Trace onto the foam side (not the wax paper side) of the self adhesive foam sheet using a pencil
120% scale foam cutting template for gauntlet and palm

125% scale gauntlet foam
cutting template
125% scale palm foam cutting template
Use this side for right palm
and reverse side for left palm
Remove this page from the sleeve and carefully cut around the lines Trace onto the foam side (not the wax paper side) of the self adhesive foam sheet using a pencil
125% scale foam cutting template for gauntlet and palm

130% scale gauntlet foam cutting template
130% scale palm foam cutting template
Use this side for right palm and reverse side for left palm
Remove this page from the sleeve and carefully cut around the lines Trace onto the foam side (not the wax paper side) of the self adhesive foam sheet using a pencil
130% scale foam cutting template for gauntlet and palm

Apply the self adhesive foam to the palm Cut out the palm foam template and place it on the foam side of the self-adhesive foam sheet with the text showing for a right palm and on the underside for a left palm. The straight edge should align with the straight edge of the foam. Carefully mark the foam around the template using a soft pencil. Cut around the pencil marks using scissors. Remove the backing paper from the foam and press into the palm with the straight edge aligned with the back of the roof of the palm centered left/right. Using the curved side of a half round file cut the foam to the edge of the palm base.

Apply the self adhesive foam to the gauntlet Cut out the gauntlet foam template and place it on the foam side of the self-adhesive foam sheet. Carefully mark the foam around the template using a soft pencil. Cut around the pencil marks using scissors. Remove the backing paper from the foam and press into the gauntlet with the smallest straight edge aligned with the ends of the small curved end near the hinges. Make sure it is centered left/right. The left and right straight edges should align with the edges of the Velcro slots. You can lift and unstick the foam from the gauntlet as many times as is necessary to get the alignment correct … you’re lucky if you get it right first time! Using the curved side of a half round file cut the foam to the front and back edges of the gauntlet.

Identify the locations of the short and long fingers
Index - short
Middle - long
Ring - long
Pinkie - short

Attach index finger Attach index (short) finger using long knuckle pin. Before inserting the pin ensure that its rectangular head will fit in the rectangular hole in the palm. If necessary file or sand the pin head to fit. Using pliers firmly grip the rectangular end of the long knuckle pin. Push pin through till it almost appears in the joint slot for the middle finger. Alternatively, hold the pin with long nose pliers and gently tap the head of the pin using a hammer.
If you can’t insert the pin try filing a 45o chamfer on the tip of the pin then try again.
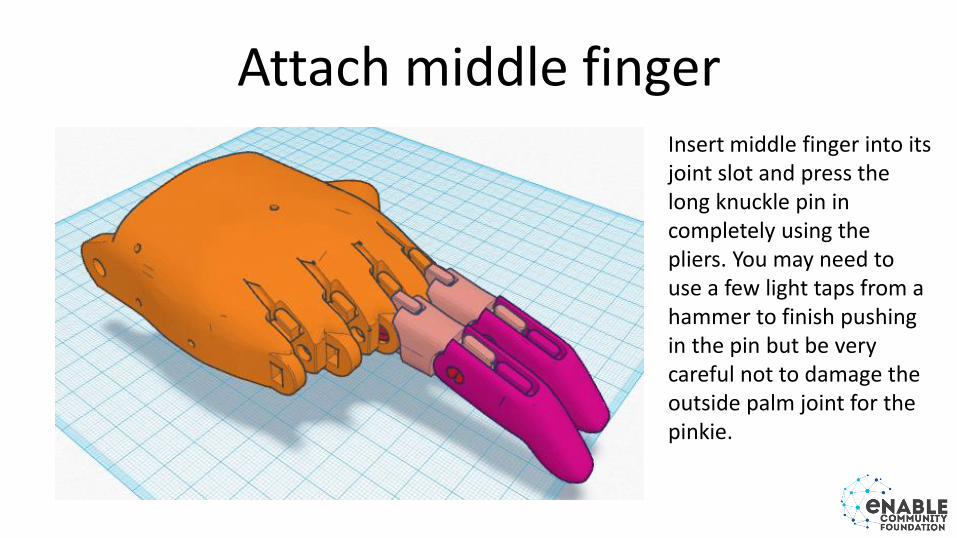
Attach middle finger Insert middle finger into its joint slot and press the long knuckle pin in completely using the pliers. You may need to use a few light taps from a hammer to finish pushing in the pin but be very careful not to damage the outside palm joint for the pinkie.

Attach ring finger Before inserting one of the short knuckle pins ensure that its rectangular head will fit in the rectangular ring finger hole in the palm. If necessary file or sand the pin head to fit. Press the pin into the rectangular hole for the ring ringer using the pliers. Once the tip of the pin is in place insert the ring finger (long) into its joint slot then push the pin in fully. You may need to use a nail punch and hammer to complete this step.

Attach the pinkie finger Before inserting the other short knuckle pin ensure that its rectangular head will fit in the rectangular pinkie finger hole in the palm. If necessary file or sand the pin head to fit. Press the pin into the rectangular hole for the pinkie finger using the pliers. Once the tip of the pin is in place insert the pinkie finger (short) into its joint slot then push the pin in fully. You may need to use a hammer to finish this step.

Attach the thumb
insert the thumb into its joint slot then push the thumb knuckle pin in fully. This can usually be done using just the pliers. Make sure the thumb moves freely in the knuckle joint. If it can’t be made to swing freely by working is to and fro you’ll need to remove the thumb, file the curved surface of the pin using a small flat file then reattach.
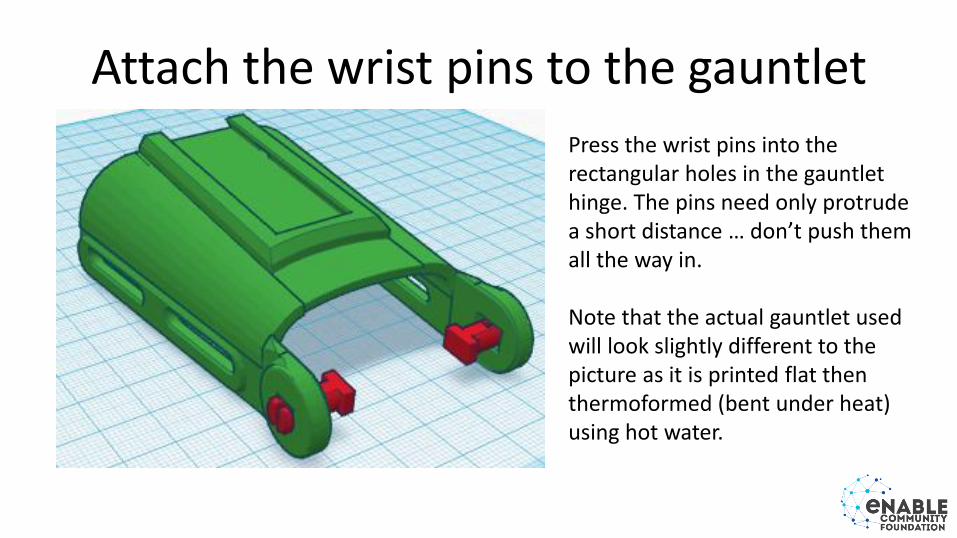
Attach the wrist pins to the gauntlet
Press the wrist pins into the rectangular holes in the gauntlet hinge. The pins need only protrude a short distance … don’t push them all the way in. Note that the actual gauntlet used will look slightly different to the picture as it is printed flat then thermoformed (bent under heat) using hot water.

Attach the gauntlet to the palm
Slightly squeeze the gauntlet hinges together and locate the wrist pins in the corresponding holes in the palm. Press the wrist pins into place. You may need to use the pliers for this step.
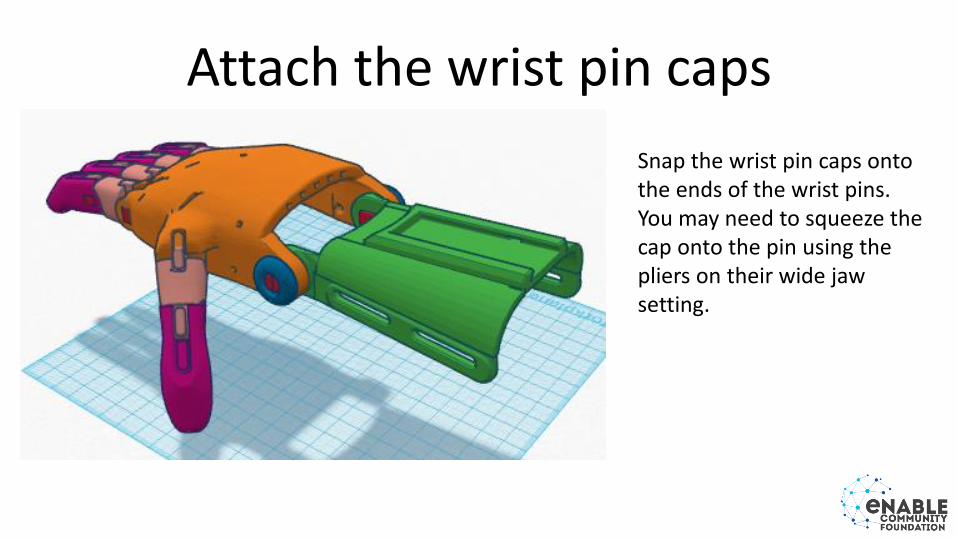
Attach the wrist pin caps
Snap the wrist pin caps onto the ends of the wrist pins. You may need to squeeze the cap onto the pin using the pliers on their wide jaw setting.
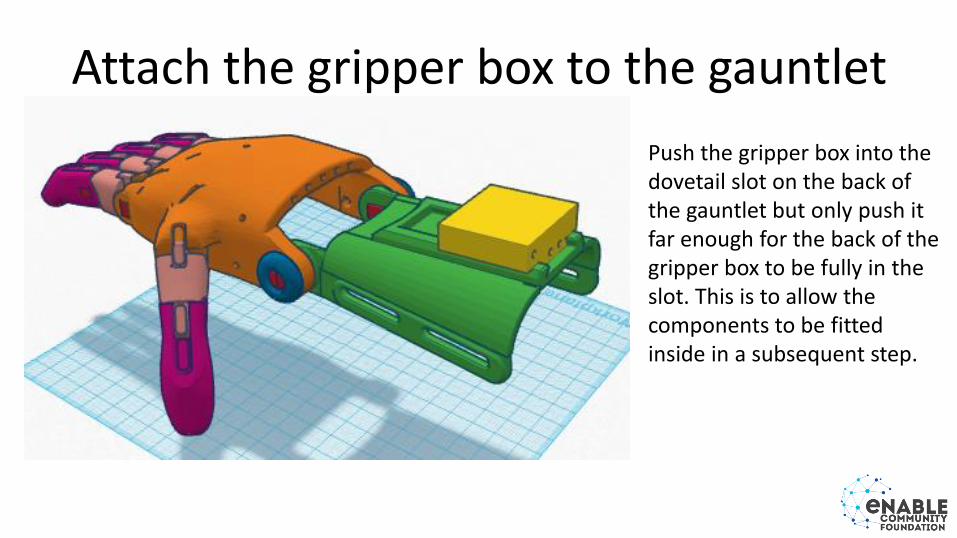
Attach the gripper box to the gauntlet
Push the gripper box into the dovetail slot on the back of the gauntlet but only push it far enough for the back of the gripper box to be fully in the slot. This is to allow the components to be fitted inside in a subsequent step.

Attach the dental bands
Using a thin pointed tool such as a toothpick attach dental bands to each of the the ten finger and thumb joints. The bands will pull the fingers and thumb into their straight unclenched position.
Dental bands

Stringing the fingers
Cut a length of fishing line that is three times the length of the hand. Thread it through the fourth hole from the thumb side on the back of the palm till it comes out the top of the palm near the ring finger knuckle. Thread it down the back of the knuckle joint so that it appears through the hole behind the joint on the bottom of the palm. Thread it through the tunnel in the bottom of the proximal phalanges then under the bar across the bottom of the fingertip. Tie it tightly around the bar using a triple knot. Use two pairs of small long nose plier to ensure the knot is tight. Cut off the remaining thread from the knot leaving about an inch remaining.
Hole behind the joint One inch of thread
Tunnel Bar
Back of the palm

Stringing the fingers – part 2
Cut another similar length of thread and repeat the operation using the middle hole in the back of the palm. Tie a knot on the bar under the middle finger.

Stringing the whippletree
Place the whippletree on the back of the gripper box with the four holes facing the palm and the smoothest surface touching the gripper box. You’ll need to hold it there while stringing the remaining fingers. Pass the thread from the ring finger through hole 3 on the whippletree and back out though hole 4. Now thread it into the fifth hole from the thumb side on the back of the palm and down through the pinkie fingertip as you did with the other fingers. Don’t tie a knot at the end yet!
Hole 1
Hole 2
Hole 3 Hole 4

Stringing the whippletree – part 2 Repeat the stringing procedure but this time passing the thread from the middle finger through hole 2 in the whippletree and back out of hole 1. Then thread it through the second hole from the thumb side on the back of the palm down to the index fingertip but don’t tie it to the bar on the fingertip yet!

Attaching the whippletree
Insert the swivel pin under the whippletree in front of the gripper box. Then slide the gripper box forward as far as it can go. The whippletree will now be entirely enclosed within the gripper box.

Attaching the whippletree – part 2
Insert and tighten two of the pan head sheet metal screws so that they attach the swivel pin. The screw heads should both be flush with the back of the gripper box but the swivel pin should still be as far forward in its slot as possible. Slide the retention clip into the back of the dovetail slot on the top of the gauntlet.

Attach the thumb tensioner pin
Cut a length of thread twice as long as the hand and tie it using a triple knot through the small hole at on end of the thumb tensioner pin. Pull the knot tight using two pairs of small long nose pliers. Cut the excess thread to about an inch long. Thread the long end of the thread through the remaining hole in the back of the palm and down to the end of the thumb tip as you did with the fingers. Don’t tie it to the end of the thumb tip yet! Use another sheet metal screw to attach the pin and tighten till the front of the pin is level with the front of the gripper box.
Thumb tensioner pin

Securing the final knots
Raise the gauntlet so that it has an approximately 30o angle to the palm. Turn the hand upside down and place it at the edge of a table with the fingers overhanging.
30o

Securing the final knots – part 2 If possible, lock the hinge between the gauntlet and palm using one or two spring clamps to maintain the 30o angle. Gently pull both the pinkie and index finger threads till tight and balance them so that the front of the whippletree is in alignment with the front of the gripper box. Tie the threads around the bars on the index and pinkie fingers using one knot on each. Pull the two finger threads till the whippletree is level with the gripper box front again. Tie one more knot on the index finger and tighten using two pairs of small long nose pliers. At this point the index finger side of the whippletree should be slightly protruding from the gripper box … if not then pull on the thread ends using pliers till it is. The thread should slide slightly within the knots.

Securing the final knots – part 3 Tie a second knot on the pinkie finger and tighten using two pairs of pliers. This time the front of the whippletree should be in alignment with the front of the gripper box. Again, pull on the thread ends using pliers if an adjustment is necessary. Now put the final knots on both the index and pinkie fingers and tighten using pliers. Perform a final check that the front of the whippletree is still in alignment with the front of the gripper box. Now for the thumb. Pull the thumb thread tight around the bar in the thumb tip and make one knot. Pull on the end of the thread to ensure that it is tight then make two more knots. Tighten the knots on the thumb using two pairs of small long nose pliers. Remove the spring clamps and flex the gauntlet/palm hinge to check that all the fingers and thumb are closing properly.

Attach the thermoformable palm mesh
Screw the palm mesh to the palm using 13 countersunk wood screws.

Sealing the knots
Seal the six knots including the thumb tensioner pin in the gripper box using a small drop of thick CA glue (eg. Super Glue). Wait for the glue to set hard then snip off the excess thread paying careful attention not to cut into the knots or the wrong thread.

Attaching the Velcro straps Feed a Velcro strap through a slot on the thumb side of the gauntlet from the outside with the fuzzy side upwards
Feed the strap through the buckle
Feed the strap back through the gauntlet slot

Attaching the Velcro straps – part 2
Twist the buckle upwards and feed the strap through the gauntlet slot but not the buckle this time
Pull the strap tight then attach a second strap using the same technique to the other slot on the same side of the gauntlet

Making the fingers grip Lee Tippi gel fingertips can be stretched over each finger and thumb tip to provide a grippy surface to pick objects up with
WARNING Don’t fit the Lee Tippi gel fingertips until the CA glue on the knots is thoroughly set as wet CA will melt the gel material
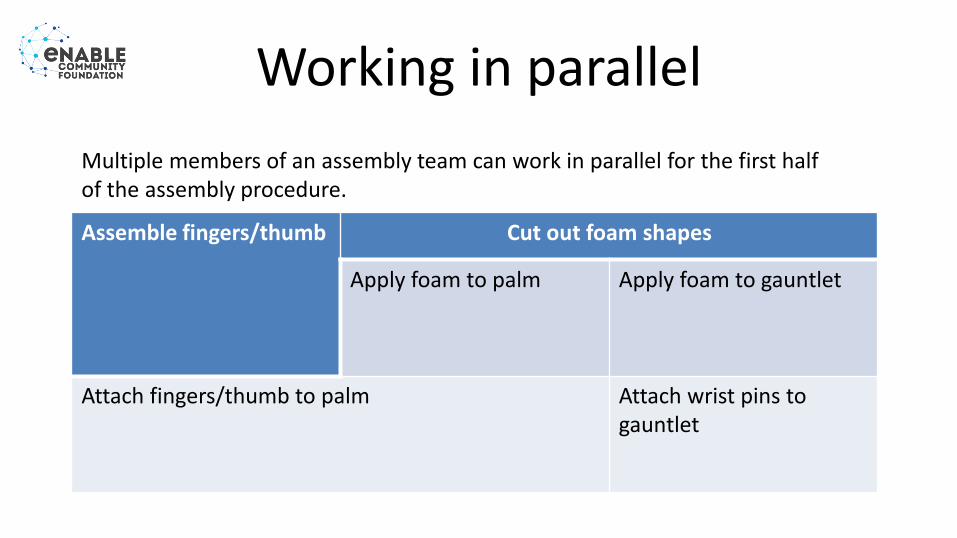
Working in parallel
Assemble fingers/thumb Cut out foam shapes
Apply foam to palm
Apply foam to gauntlet
Attach fingers/thumb to palm Attach wrist pins to gauntlet
Multiple members of an assembly team can work in parallel for the first half of the assembly procedure.