assemblyinstructionsfor -...
TRANSCRIPT
Call Free 1.800.848.1633 or 1.888.HCL.INTL • Fax Free 1.800.447.2923Web Site: www.HealthCareLogistics.com • E-mail: [email protected]
© Health Care Logistics, Inc. 2008 • Printed in the U.S.A.
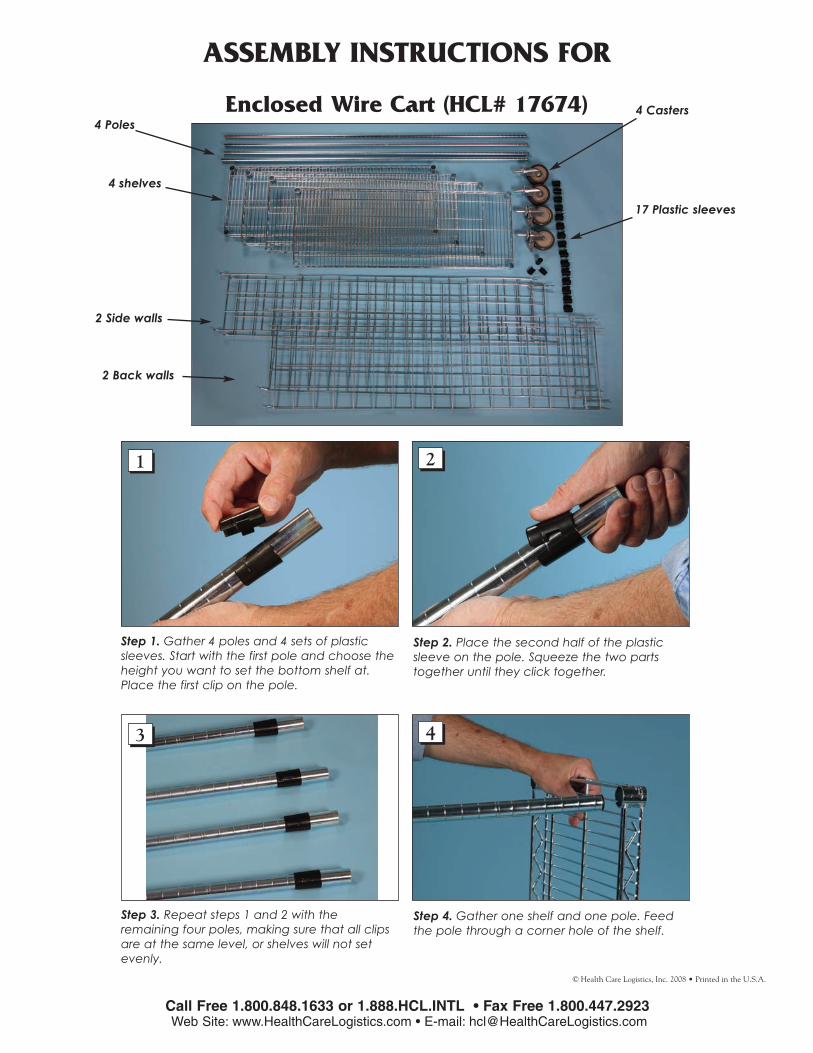
ASSEMBLY INSTRUCTIONS FOR
Enclosed Wire Cart (HCL# 17674)
4 shelves
17 Plastic sleeves
2 Side walls
4 Casters
1
Step 1. Gather 4 poles and 4 sets of plasticsleeves. Start with the first pole and choose theheight you want to set the bottom shelf at.Place the first clip on the pole.
Step 2. Place the second half of the plasticsleeve on the pole. Squeeze the two partstogether until they click together.
2
3
Step 3. Repeat steps 1 and 2 with theremaining four poles, making sure that all clipsare at the same level, or shelves will not setevenly.
Step 4. Gather one shelf and one pole. Feedthe pole through a corner hole of the shelf.
4
4 Poles
2 Back walls

Call Free 1.800.848.1633 or 1.888.HCL.INTL • Fax Free 1.800.447.2923Web Site: www.HealthCareLogistics.com • E-mail: [email protected]
© Health Care Logistics, Inc. 2008 • Printed in the U.S.A.
Step 5. Lay the side of the shelf with the polethrough it on the floor.
5
7
Step 7. Repeat steps 4 through 6 on theremaining 3 poles.
Step 9. Choose the level for the next shelf andplace plastic sleeves on the poles the sameway as done in steps 1 through 2.
9
Step 10. Make sure that all plastic sleeves areat the same level or the shelf will not sit level.
10
Step 6. Tap into place with a rubber mallet.
6
8
Step 8. Set the entire unit upright.

11 12
Call Free 1.800.848.1633 or 1.888.HCL.INTL • Fax Free 1.800.447.2923Web Site: www.HealthCareLogistics.com • E-mail: [email protected]
© Health Care Logistics, Inc. 2008 • Printed in the U.S.A.
Step 11. Gather another shelf and slide itover the top of the unit.
Step 13. Tap into place with a rubbermallet.
Step 12. Press it firmly onto the plasticsleeves.
Step 14. Repeat steps 9 through 13 withthe remaining two shelves.
1413

Call Free 1.800.848.1633 or 1.888.HCL.INTL • Fax Free 1.800.447.2923Web Site: www.HealthCareLogistics.com • E-mail: [email protected]
© Health Care Logistics, Inc. 2008 • Printed in the U.S.A.
Step 15. Lay the unit down on its side.
Step 17. Repeat step 8 on remaining 3casters, making sure that the two casterswith breaks go on the same end of thecart.
Step 16. Tap a caster into the bottom ofthe cart with a rubber mallet.
Step 18. Turn the unit upright.
1615
1817

Call Free 1.800.848.1633 or 1.888.HCL.INTL • Fax Free 1.800.447.2923Web Site: www.HealthCareLogistics.com • E-mail: [email protected]
© Health Care Logistics, Inc. 2008 • Printed in the U.S.A.
Step 19. Depress the brake. Step 20. Gather 1 back wall.
Step 21. Place the 4 prongs on the bottom ofthe back wall on the inside edge of the shelf.Be sure to have the shelf as far to the side ofthe cart as possible.
Step 22. Loop the hooks on the top of the backwall on the inside of the top shelf.
2019
21 22

Call Free 1.800.848.1633 or 1.888.HCL.INTL • Fax Free 1.800.447.2923Web Site: www.HealthCareLogistics.com • E-mail: [email protected]
© Health Care Logistics, Inc. 2008 • Printed in the U.S.A.
Step 23. Attach the sides the same wayas indicated in steps 20 through 22 for theback walls.
23